

Page 1

Commercial Dryer
C
E
R
T
I
F
I
E
D
D
E
S
I
G
N
Operating Instructions
CDE3379WD/CDG3389WD
CDE3379WN/CDG3389WN
Please read this manual carefully. It provides instructions on
safe installation, use, and maintenance.
Retain it for future reference.
Record the model and serial numbers of your machine and
report this information to your dealer if your machine
requires service.
Not for residential use.
Page 2

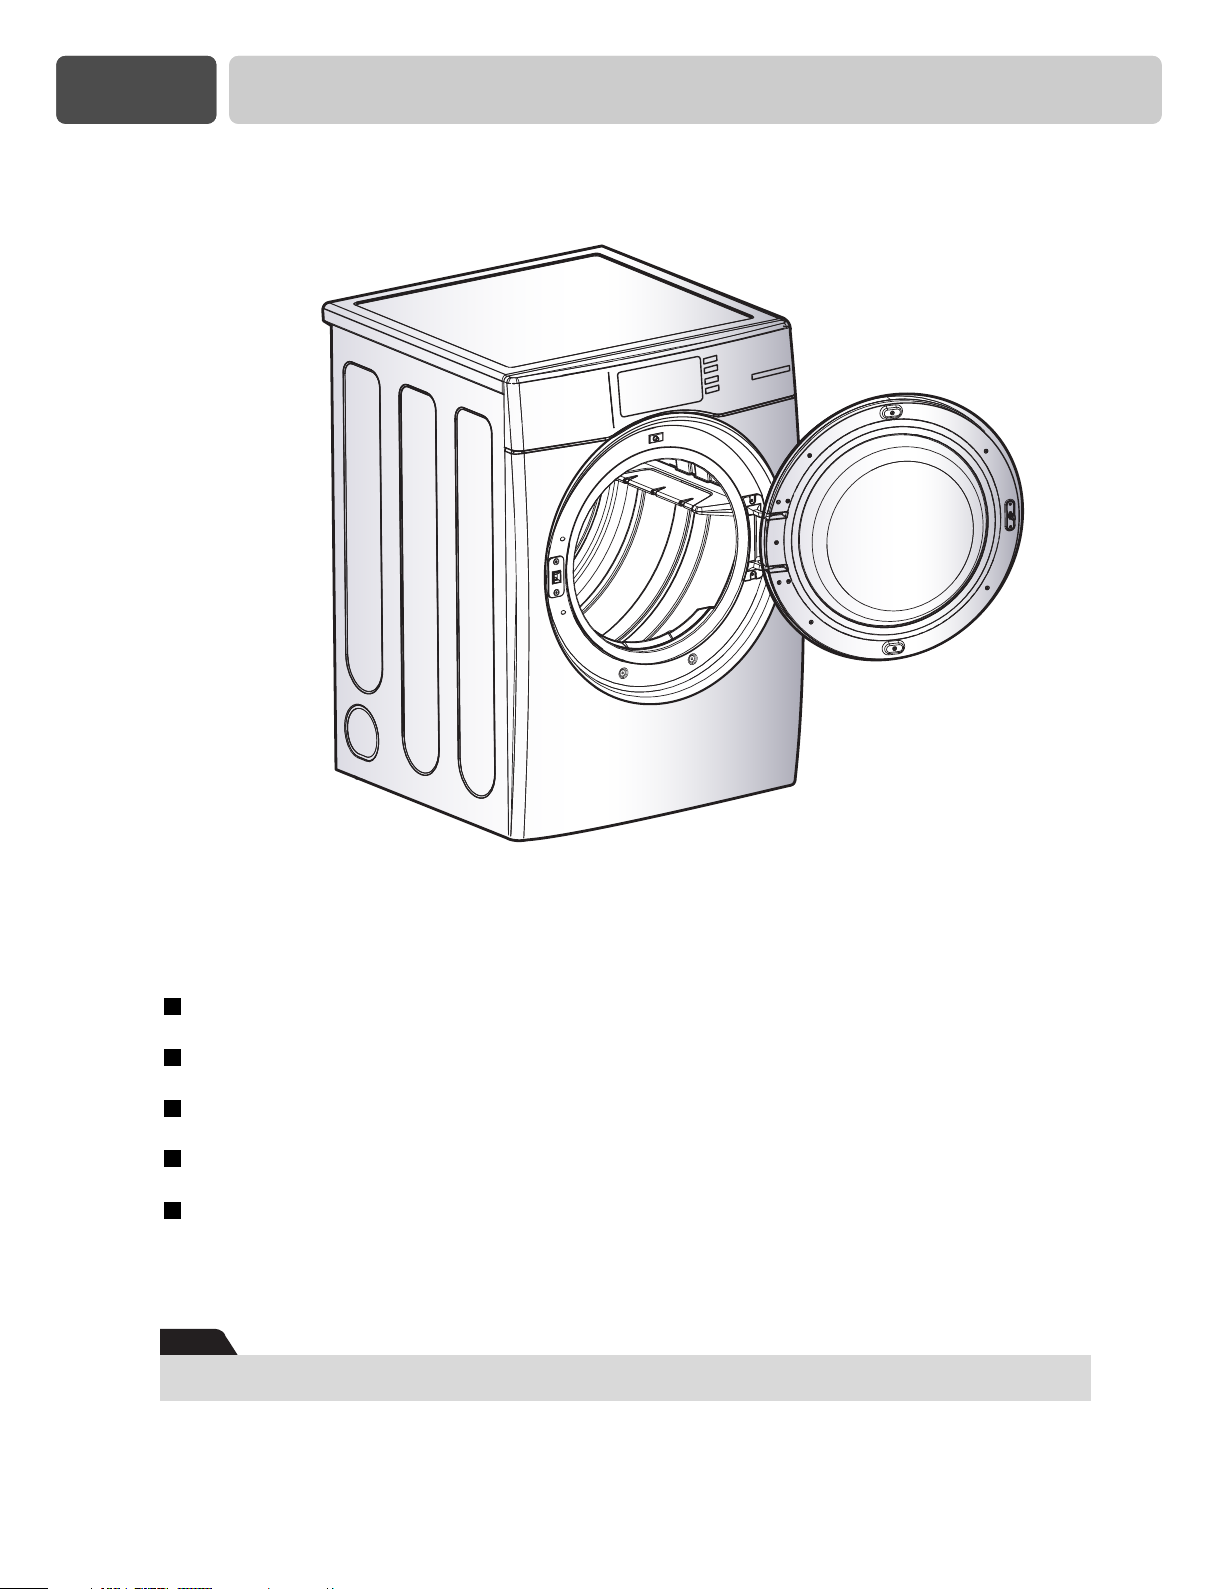
PRODUCT FEATURES
OUTSTANDING PERFORMANCE
The dryer features the largest capacity, quick drying times, quiet operation, and an
energy-saving system.
STAINLESS STEEL DRUM
Stainless steel drum doesn’t rust.
ARTISTIC DESIGN
Modern front panel look and big clear glass door make your dryer look stylish
EASY OF USE
An entire selection of user-friendly functions makes operating the dryer easy.
ULTRA CAPACITY
The larger drum enables better tumbling and less tangling and wrinkling of the laundry.
CONTENTS
PART 1. IMPORTANT SAFETY INSTRUCTIONS ................................................................................................. 3
PART 2. SPECIFCATIONS .................................................................................................................................... 8
PART 3. IDENTIFICATION ..................................................................................................................................... 9
PART 4. OPERATING YOUR DRYER ................................................................................................................. 11
PART 5. PROGRAMMING MODE ....................................................................................................................... 12
PART 6. ERROR MODE ...................................................................................................................................... 37
PART 7. POWER FAILURE RECOVERY ............................................................................................................ 37
PART 8. DEFAULT DRYER SETTINGS .............................................................................................................. 37
PART 9. WARRANTY .......................................................................................................................................... 38
2
Page 3

Part 1 IMPORTANT SAFETY INFORMATION
READ ALL INSTRUCTIONS BEFORE USE
WARNING
of fire or explosion, electric shock, or to prevent property damage, personal injury, or loss of life.
For your safety, the information in this manual must be followed to minimize the risk
Your Safety and the safety of others is very important.
We have provided many important safety messages in this manual and on your appliance.
Always read and obey all safety messages.
This is the safety alert symbol.
This symbol alerts you to potential hazards that can kill or hurt you and others.
All safety messages will follow the safety alert symbol and either the word DANGER or WARNING.
These words mean:
DANGER:
WARNING:
All safety messages will tell you what the potential hazard is, tell you how to reduce the
chance of injury, and tell you what can happen if the instructions are not followed.
You can be killed or seriously injured if you don’t immediately follow instructions.
You can be killed or seriously injured if you don’t follow instructions.
BASIC SAFETY PRECAUTIONS
WARNING:
this appliance, follow basic precautions, including the following:
To reduce the risk of fire, electric shock, or injury to persons when using
• Read all instructions before using the dryer.
• Before use, the dryer must be properly installed as
described in this manual.
• Do not place items exposed to cooking oils in your
dryer. Items contaminated with cooking oils may
contribute to a chemical reaction that could cause
a load to catch fire.
• Do not dry articles that have been previously
cleaned in, washed in, soaked in, or spotted with
gasoline, dry-cleaning solvents, or other
flammable or explosive substances as they give
off vapors that could ignite or explode.
• Do not reach into the dryer if the drum or any other
part is moving.
• Do not repair or replace any part of the dryer or
attempt any servicing unless specifically
recommended in this Use and Care Guide or in
published user-repair instructions that you
understand and have the skills to carry out.
• Do not tamper with controls.
• Before the dryer is removed from service or
• Do not allow children to play on or in the dryer.
• Do not use fabric softeners or products to
• Do not use heat to dry articles containing foam
• Keep area around the exhaust opening and
• The interior of the dryer and exhaust vent should
• Do not install or store the dryer where it will be
• Always check the inside of the dryer for foreign
• Clean lint screen before or after each load.
discarded, remove the door to the drying
compartment.
Close supervision of children is necessary when
the dryer is used near children.
eliminate static unless recommended by the
manufacturer of the fabric softener or product.
rubber or similarly textured rubber-like materials.
adjacent surrounding areas free from the
accumulation of lint, dust, and dirt.
be cleaned periodically by qualified service
personnel.
exposed to the weather.
objects.
3
Page 4

Part 1 IMPORTANT SAFETY INFORMATION
READ ALL INSTRUCTIONS BEFORE USE
WARNING
fire or explosion, electric shock, or to prevent property damage, personal injury, or loss of life.
• Do not store or use gasoline or other flammable
vapors and liquids in the vicinity of this appliance or
any other appliances.
For your safety, the information in this manual must be followed to minimize the risk of
• Installation and service must be performed by a
qualified installer, service agency, or the gas
supplier.
WHAT TO DO IF YOU SMELL GAS:
1. Do not try to light a match or cigarette, or turn on
any gas or electrical appliance.
2. Do not touch any electrical switches. Do not use
any phone in your building.
3. Clear the room, building, or area of all occupants.
CALIFORNIA SAFE DRINkING WATER AND TOXIC ENFORCEMENT ACT
This act requires the governor of California to publish a list of substances known to the state to
cause cancer, birth defects, or other reproductive harm and requires businesses to warn customers
of potential exposure to such substances.
4. Immediately call your gas supplier from a
neighbor’s phone. Follow the gas supplier’s
instructions carefully.
5. If you cannot reach your gas supplier, call the fire
department.
Gas appliances can cause minor exposure to four of these substances, namely benzene, carbon
monoxide, formaldehyde, and soot, caused primarily by the incomplete combustion of natural gas or
LP fuels.
Properly adjusted dryers will minimize incomplete combustion. Exposure to these substances can
be minimized further by properly venting the dryer to the outdoors.
4
Page 5

Part 1 IMPORTANT SAFETY INFORMATION
READ ALL INSTRUCTIONS BEFORE USE
WARNING
of fire or explosion, electric shock, or to prevent property damage, personal injury, or loss of life.
For your safety, the information in this manual must be followed to minimize the risk
GROUNDING INSTRUCTIONS
This appliance must be grounded. In the event of
malfunction or breakdown, grounding will reduce the
risk of electric shock by providing a path of least
resistance for electric current. This appliance must
be equipped with a cord having an equipmentgrounding conductor and a grounding plug. The plug
must be plugged into an appropriate outlet that is
properly installed and grounded in accordance with
all local codes and ordinances.
WARNING
the equipment-grounding conductor can result in a
risk of electric shock. Check with a qualified
electrician or service
— Improper connection of
person if you are in doubt as to whether the
appliance is properly grounded.
Do not modify the plug provided with the appliance.
If it will not fit the outlet, have a proper outlet
installed by a qualified electrician.
This appliance must be connected to a grounded
metal, permanent wiring system or an equipmentgrounding conductor must be run with the circuit
conductors and connected to the equipmentgrounding terminal or lead on the appliance.
Electrical shock can result if the dryer is not properly
grounded.
SAFETY INSTRUCTIONS FOR INSTALLATION
WARNING
appliance, follow basic precautions, including the following:
• Properly ground dryer to conform with all
governing codes and ordinances. Follow details
in the installation instructions. Electrical shock can
result if the dryer is not properly grounded.
• Before use, the dryer must be properly
installed as described in this manual.
Electrical shock can result if the dryer is not
properly grounded.
• Install and store the dryer where it will not be
exposed to temperatures below freezing or
exposed to the weather.
• All repairs and servicing must be performed by
an authorized servicer unless specifically
recommended in this Owner’s Guide. Use only
authorized factory parts. Failure to follow this
warning can cause serious injury, fire, electrical
shock, or death.
To reduce the risk of fire, electric shock, or injury to persons when using this
• To reduce the risk of electric shock, do not
install the dryer in humid spaces. Failure to
follow this warning can cause serious injury, fire,
electrical shock, or death.
• Connect to a properly rated, protected, and
sized power circuit to avoid electrical overload.
Improper power circuit can melt, creating electrical
shock and/or fire hazard.
• Remove all packing items and dispose of all
shipping materials properly. Failure to do so can
result in death, explosion, fire, or burns.
• Place dryer at least 18 in. above the floor for a
garage installation. Failure to do so can result in
death, explosion, fire, or burns.
• Keep all packaging from children. Packaging
material can be dangerous for children. There is a
risk of suffocation.
5
Page 6

Part 1 IMPORTANT SAFETY INFORMATION
READ ALL INSTRUCTIONS BEFORE USE
WARNING
of fire or explosion, electric shock, or to prevent property damage, personal injury, or loss of life.
For your safety, the information in this manual must be followed to minimize the risk
SAFETY INSTRUCTIONS FOR INSTALLATION
Exhaust/Ducting:
• Gas dryers MUST be exhausted to the outside.
Failure to follow these instructions can result in fire
or death.
• The dryer exhaust system must be exhausted
to the outside of the dwelling. If the dryer is
not exhausted outdoors, some fine lint and
large amounts of moisture will be expelled into
the laundry area. An accumulation of lint in any
area of the home can create a health and fire
hazard.
• Use only rigid metal or flexible metal 4-in.
diameter ductwork inside the dryer cabinet or
for exhausting to the outside. Use of plastic or
other combustible ductwork can cause a fire.
Punctured ductwork can cause a fire if it collapses
or becomes otherwise restricted in use or during
installation.
• Ductwork is not provided with the dryer, and
you should obtain the necessary ductwork
locally. The end cap should have hinged
dampers to prevent backdraft when the dryer
is not in use. Failure to follow these instructions
can result in fire or death.
• The exhaust duct must be 4 in. (10 cm) in
diameter with no obstructions. The exhaust
duct should be kept as short as possible. Make
sure to clean any old ducts before installing
your new dryer. Failure to follow these
instructions can result in fire or death.
• Rigid or semi rigid metal ducting is
recommended for use between the dryer and
the wall. In special installations when it is
impossible to make a connection with the
above recommendations, a UL-listed flexible
metal transition duct may be used between the
dryer and wall connection only. The use of this
ducting will affect drying time. Failure to follow
these instructions can result in fire or death.
• DO NOT use sheet metal screws or other
fasteners which extend into the duct that could
catch lint and reduce the efficiency of the
exhaust system. Secure all joints with duct tape.
For complete details, follow the Installation
Instructions. Failure to follow these instructions
can result in fire or death.
SAFETY INSTRUCTIONS FOR STEAM FUNCTIONS
WARNING:
appliance, follow basic precautions, including the following:
• Do not open the dryer door during steam
cycles. Failure to follow these instructions can
result in a burn hazard.
• Do not dry articles that have been previously
cleaned in, washed in, soaked in, or spotted
with gasoline, dry-cleaning solvents, or other
flammable or explosive substances as they
give off vapors that could ignite or explode.
Failure to follow these instructions can result in fire
or death.
6
To reduce the risk of fire, electric shock, or injury to persons when using this
• Do not fill the steam feeder with gasoline, dry-
cleaning solvents, or other flammable or
explosive substances. Failure to follow these
instructions can result in fire or death.
• Do not touch the steam nozzle in the drum
during or after the steam cycle. Failure to follow
these instructions can result in a burn hazard.
• Do not fill the steam feeder with hot water
(over 86° F / 30° C). Failure to follow these
instructions can result in a burn hazard.
Page 7

Part 1 IMPORTANT SAFETY INFORMATION
READ ALL INSTRUCTIONS BEFORE USE
WARNING
of fire or explosion, electric shock, or to prevent property damage, personal injury, or loss of life.
For your safety, the information in this manual must be followed to minimize the risk
SAFETY INSTRUCTIONS FOR CONNECTING ELECTRICITY
WARNING:
appliance, follow basic precautions, including the following:
• Do not, under any circumstances, cut or
remove the ground prong from the power cord.
To prevent personal injury or damage to the dryer,
the electrical power cord must be plugged into a
properly grounded outlet.
• For personal safety, this dryer must be
properly grounded. Failure to do so can result in
electrical shock or injury.
• Refer to the installation instructions in this
manual for specific electrical requirements for
your model. Failure to follow these instructions
can create an electrical shock hazard and/or a fire
hazard.
• This dryer must be plugged into a properly
grounded outlet. Electrical shock can result if
the dryer is not properly grounded. Have the
wall outlet and circuit checked by a qualified
electrician to make sure the outlet is properly
grounded. Failure to follow these instructions can
create an electrical shock hazard and/or a fire
hazard.
To reduce the risk of fire, electric shock, or injury to persons when using this
• Never unplug your dryer by pulling on the
power cord. Always grip plug firmly and pull
straight out from the outlet. The power cord can
be damaged, resulting in a risk of fire and
electrical shock.
• Repair or replace immediately all power cords
that have become frayed or otherwise
damaged. Do not use a cord that shows cracks
or abrasion damage along its length or at
either end. The power cord can melt, creating
electrical shock and/or fire hazard.
• When installing or moving the dryer, be careful
not to pinch, crush, or damage the power cord.
This will prevent injury and prevent damage to the
dryer from fire and electrical shock.
• The dryer should always be plugged into its
own individual electrical outlet which has a
voltage rating that matches the rating plate.
This provides the best performance and also
prevents overloading house wiring circuits which
could cause a fire hazard from overheated wires.
SAVE THESE INSTRUCTIONS
7
Page 8
Part 2 SPECIFICATIONS
Type: Electric or Gas Dryer
Rating: Please refer to the rating label regarding detailed information.
Size: 27 x 29.9 x 38.7 (inch)
Capacity: IEC 7.3 cu. ft. (22.5 lbs.)
Weight: 126 Ibs (57.2 kg)
Note
Specifications subject to change by manufacturer.
8
Page 9
IDENTIFICATIONPart 3
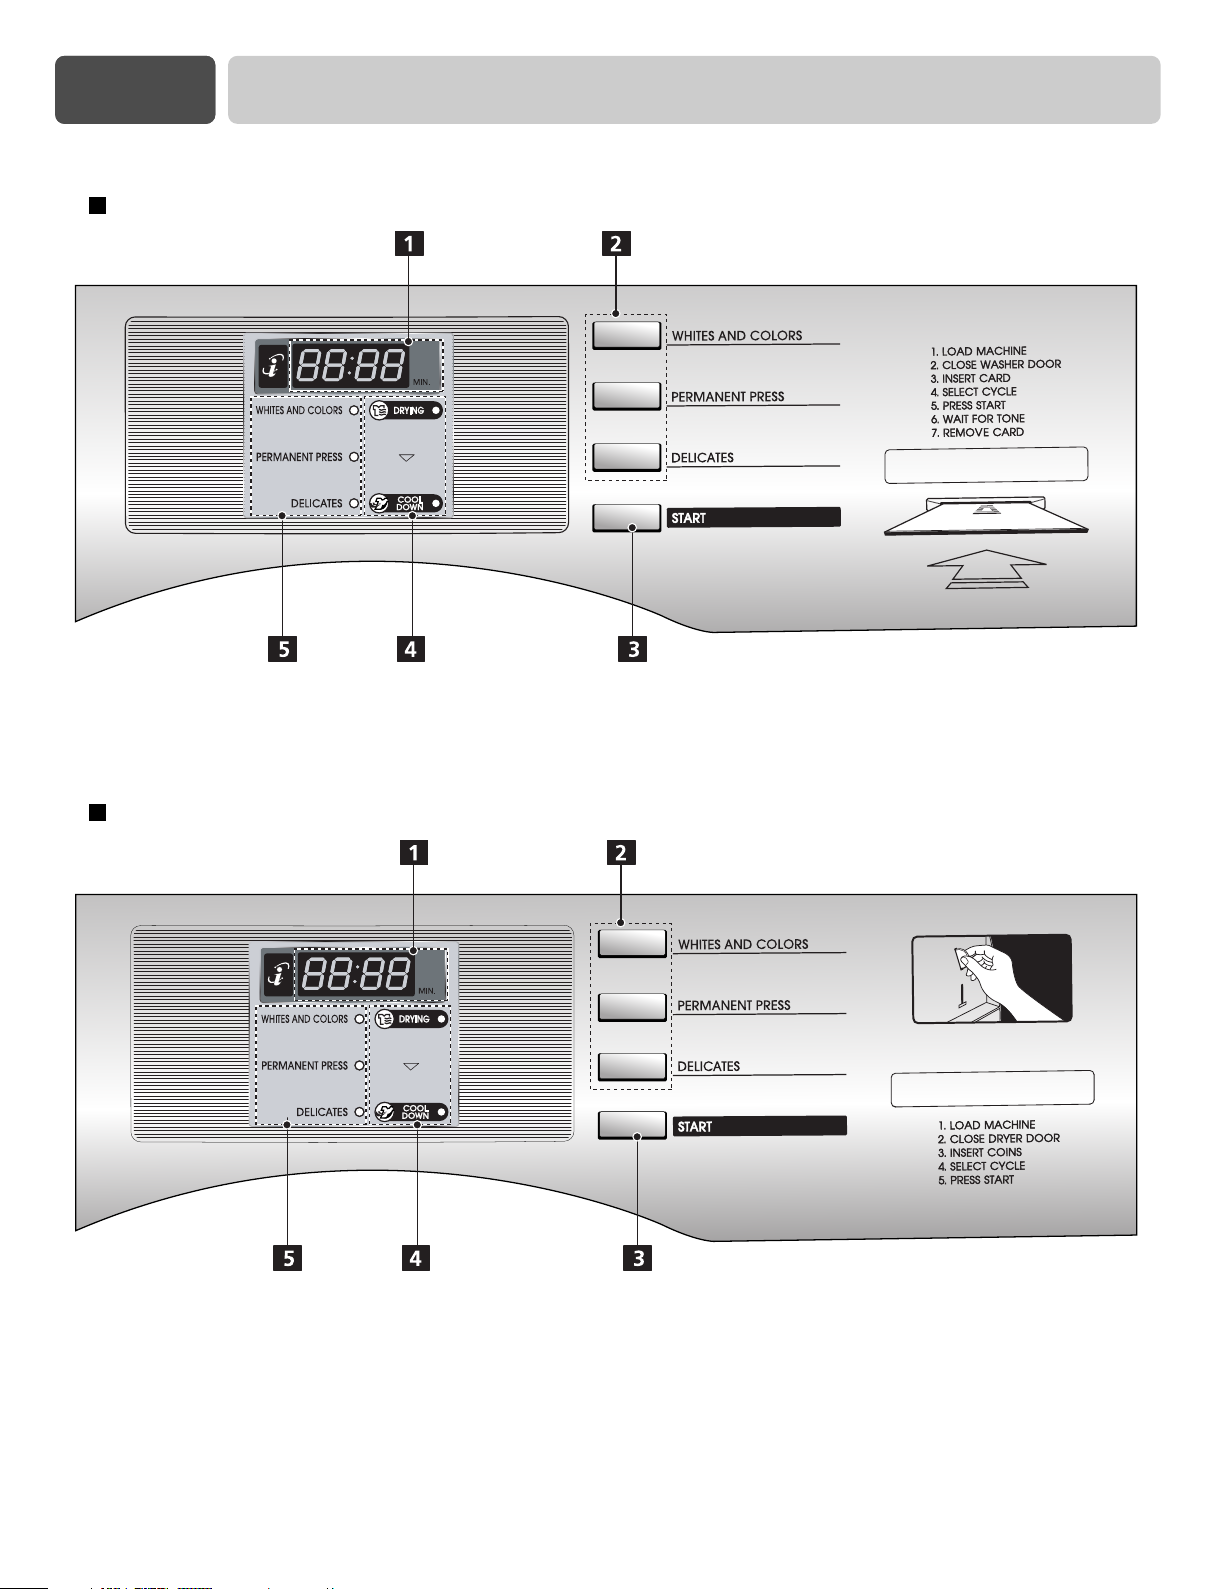
CARD TYPE (CDE3379WD/CDG3389WD)
COIN TYPE (CDE3379WN/CDG3389WN)
1. DISPLAY LED
2. CYCLE BUTTON
3. START BUTTON
4. STATUS LED
5. CYCLE LED
9
Page 10
Part 3 IDENTIFICATION
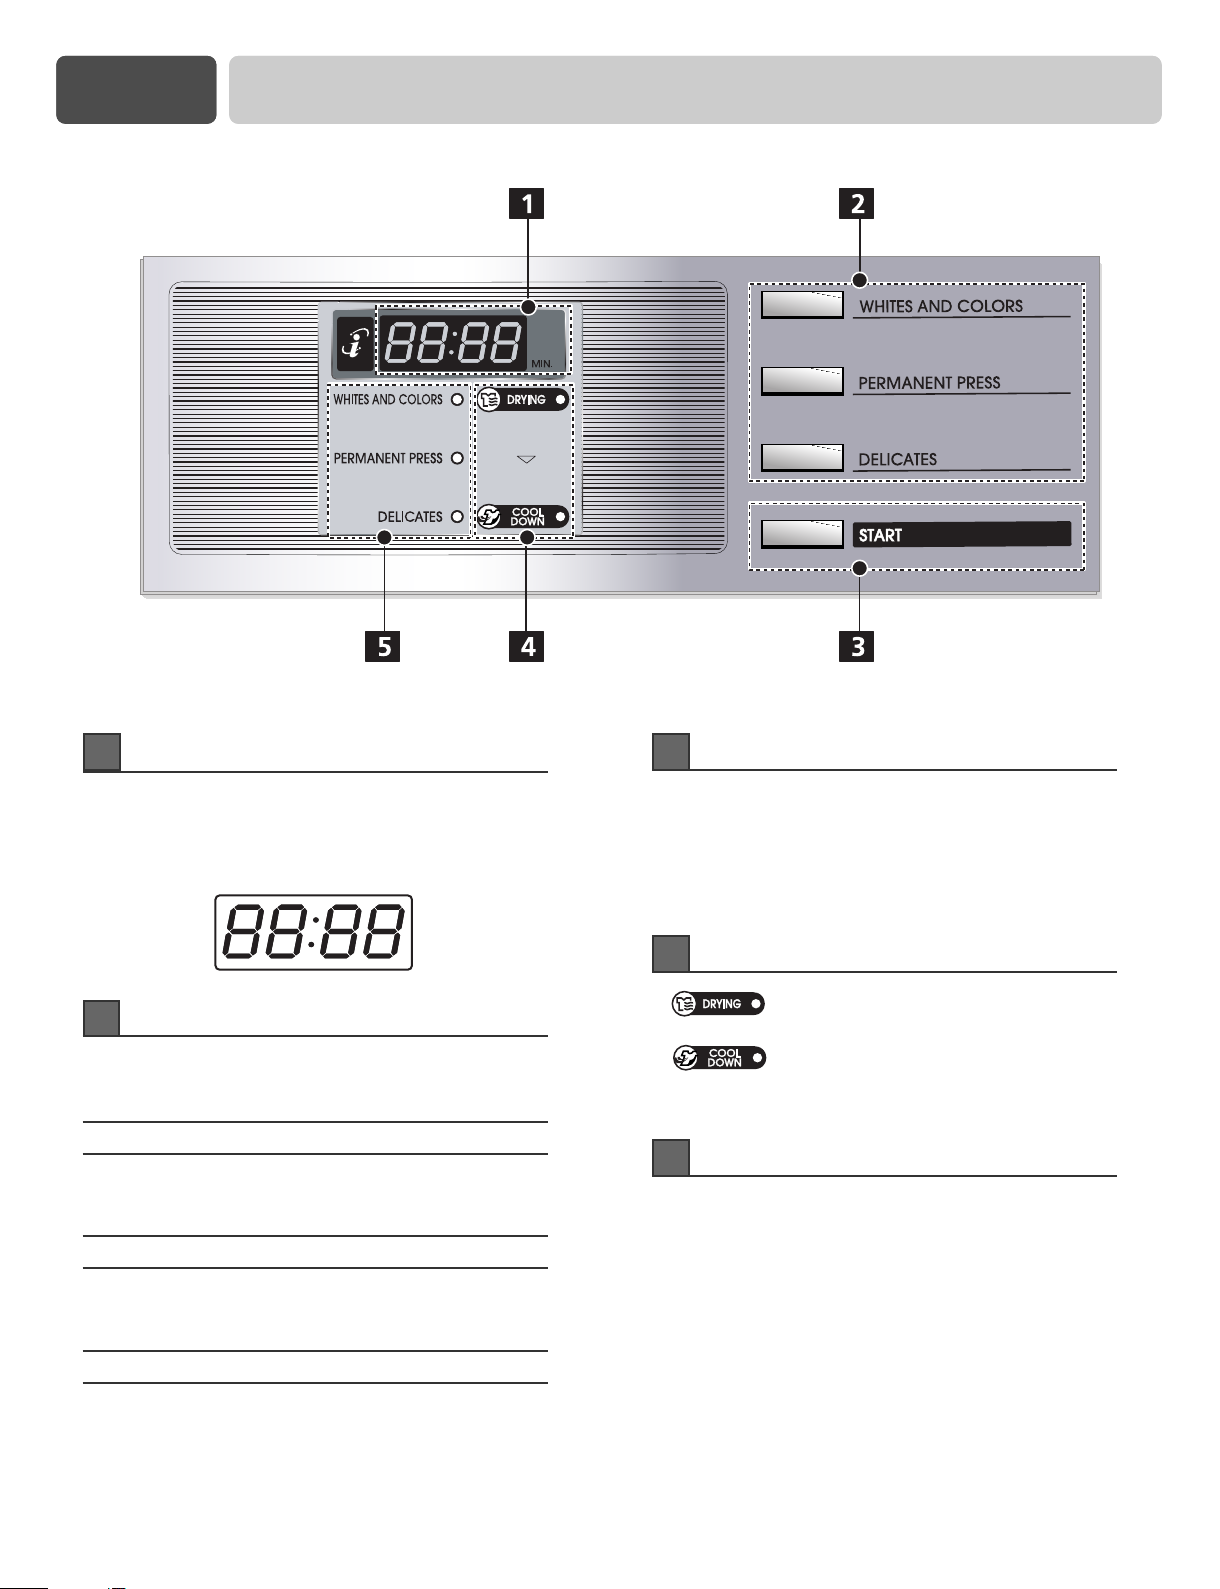
DISPLAY LED CYCLE BUTTON
CYCLE LED STATUS LED START BUTTON
11
DISPLAY LED
The Display shows the vend price, remaining time,
and programming options.
Error codes are also displayed here.
22
CYCLE BUTTON
Press the cycle button to Select the desired cycle
based on laundry types and conditions.
WHITES AND COLORS
Use this cycle to get high heat for heavy fabrics,
such as jeans corduroys or work clothes (High heat).
PERMANENT PRESS
Use for drying sturdy fabrics such as work casual
clothes (Medium heat).
33
START BUTTON
The START LED flashes when the full vend price
has been satisfied then the cycle has been chosen or
the machine is paused.
The START LED flashes when a card is inserted to
add time to the current cycle.
44
STATUS LED
• LED flashes whenever the heating
cycle is in operation.
• LED flashes whenever the cool down
cycle is in operation.
55
CYCLE LED
WHITES AND COLORS, PERMANENT PRESS,
or DELICATES LED is lit to indicate that heated
portion of a cycle is in operation.
DELICATES
Use for drying synthetic fabrics,washable knit
fabrics and no-iron finishes (Low heat).
10
Page 11

Part 4 OPERATING YOUR DRYER
11
Ready mode
44
Top off (To add more time)
The display LED shows each cycle price and cycle
LED toggle.
22
Insert card/coin
Insert a cash card that has a sufficient balance.
The card balance should be more than the
programmed vend price for a selected cycle.
Note
When the card balance is not enough, machine
displays the balance for 5 seconds and then
displays message repetitively
Insert a sufficient amount of change that is a more
than the programmed vend price for a selected
cycle.
Note
When the coin amount is not enough, the
machine will not start.
After a debit card is inserted, the operating
time can be increased to 15 minutes/25¢
(default), when the START button or the
chosen course button has been pressed.
(The card should have enough balance to
satisfy increasing time.)
The operating time can be increased to 15
minutes/25¢ (default) by adding more coins.
Note
Owner can control the additional time and
money setting (top off price).
When the COOL DOWN has been working, if
time is added, it goes back to the DRYING.
Time can be added up 99 minutes.
55
Change cycle
You cannot change the cycle while the machine is
running.
But if the door is opened, the machine stops
temporarily and the cycle can be changed.
33
Select the cycle
Press the desired cycle and the start button. The
display LED will show the remaining time and the
selected cycle starts.
Note
The last 2 minutes of the remaining time are
always for the cool down portion.
66
Cycle finish
After the COOL DOWN of cycle, the machine
stops and LED display shows End.
If you press any key or open the door, the dryer
defaults to the ready mode.
11
Page 12
Part 5 PROGRAMMING MODE
11
Programming mode
You can check machine information or change setting on Program setup or Diagnostic test.
There are two methods that you can enter programming mode.
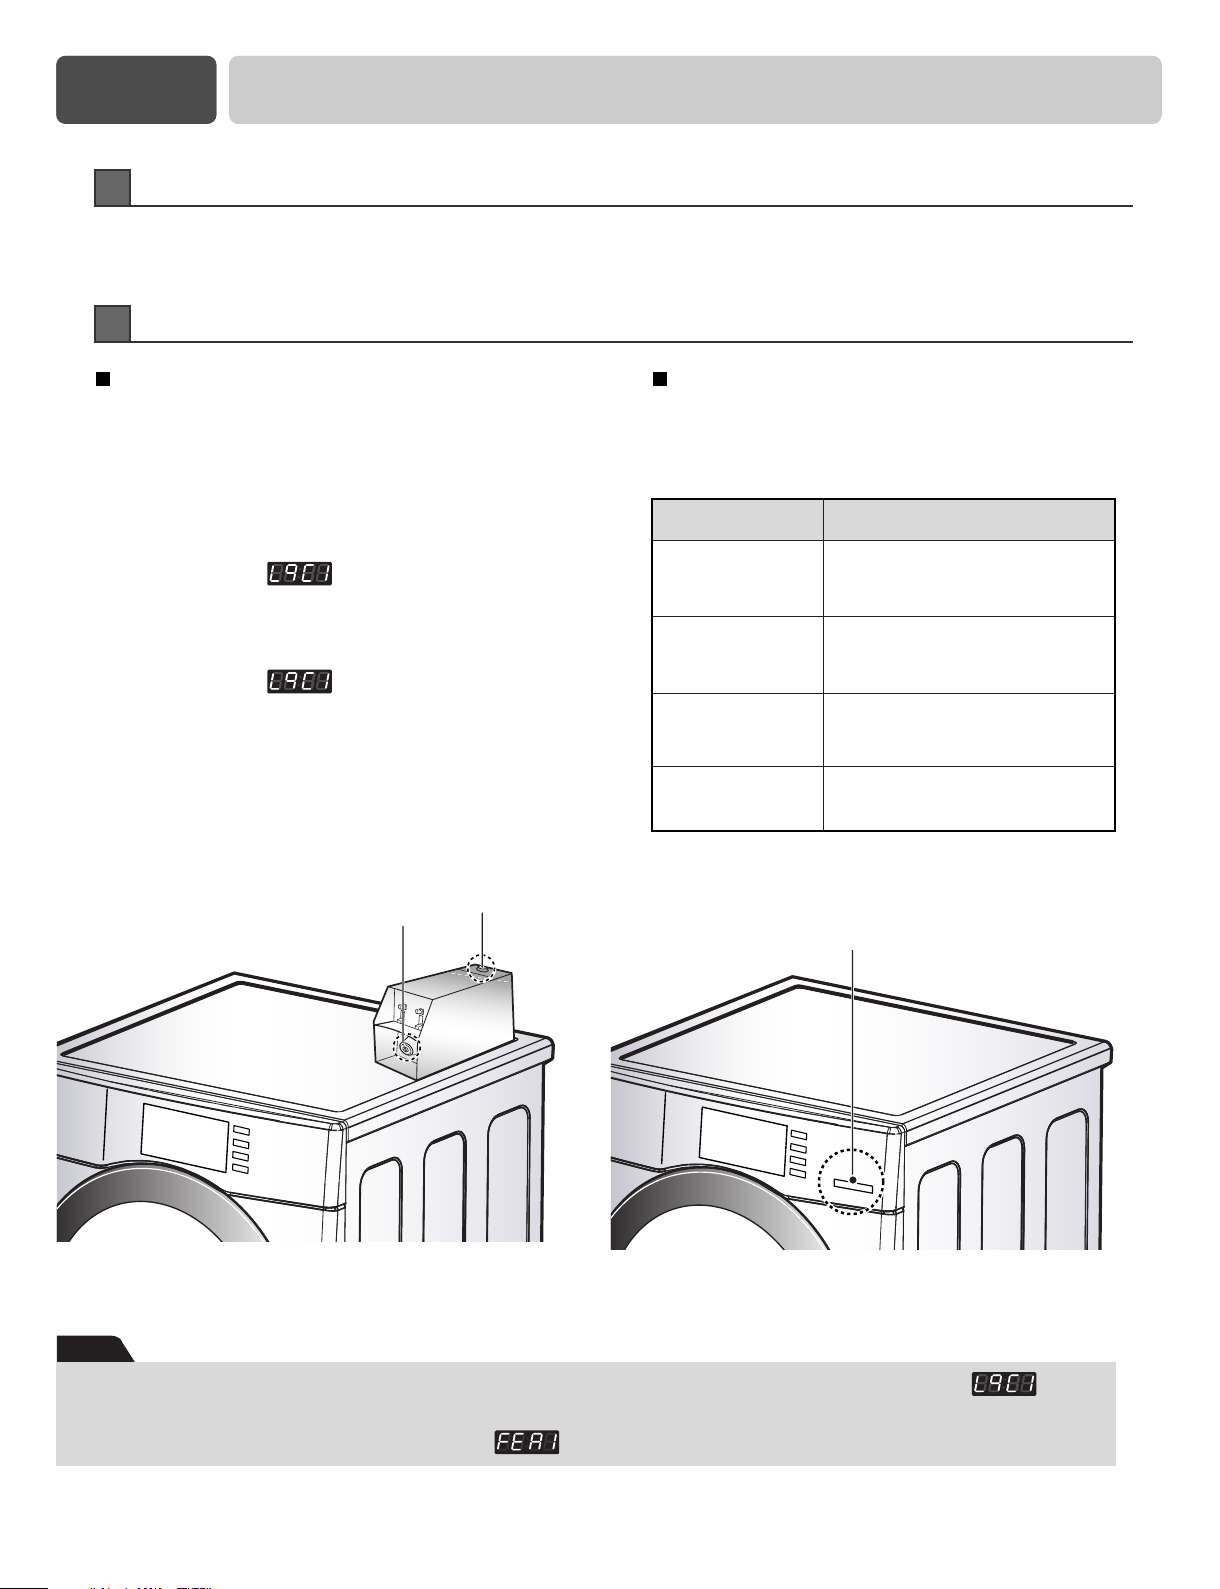
22
Check the programming mode by button
How to enter "Programming mode"
You can enter programming mode
only for Idle state and pause state.
- Card Type
1) Insert service card.
2) Display will show
- Coin Type
1) Open the Service door.
2) Display will show
How to use button
You can change Dryer vend price, cycle time and
Cycle parameters, etc.
Press button
WHITES AND
COLORS
PERMANENT
PRESS
DELICATES
START
Service doorCoin Vault
Insert debit card
Move to the modes in the
Description
Move to upper level
Move to the mode in the
same level (+)
same level (-)
Enter the selected mode
COIN TYPE CARD TYPE
Note
• If you turn on the power without connecting the meter case for the first time, the machine will display .
• When the machine comes from the factory, it is set in the coin type. You can change Card/Coin type by button.
(For more information refer to SETUP mode’s .)
12
Page 13

Part 5 PROGRAMMING MODE
Algorithm Flow Chart shows how to control programming mode.
Before program set, check the structure of programming mode.
1. Open the service door or Insert the service card to entering set up mode.
2. Press WHITES AND COLORS button to move the upper level.
3. Press PERM PRESS(+) or DELICATES(-) button if you want to be at the same level.
4. Press START button to enter the details of Set up, Diagnostic Tests mode.
is to set price value, time value and vend type etc.
consists of line test, reset, free cycle and kill cycle.
Is to collect the usage data.
STRUCTURE OF PROGRAMMING MODE
Note
• Do not use , .
• It is only used in inspecting the machine.
13
Page 14

Part 5 PROGRAMMING MODE -
Setup Mode
Setup Mode : (display)
You can change dryer vend price, cycle time, and cycle parameters, etc.
Entering set up mode
• Coin type-Open the service door.
• Card type-Insert the service card.
• Then, dryer displays .
11
How to change regular price.
Button Display
Entering set up mode.
You will see LqC1
Press the WHITES AND COLORS button.
Press the PERMANENT PRESS or the DELICATES
button until appears in the display.
Press the START button.
Press the START button.
Display previous regular price.
Press PERMANENT PRESS(+) or DELICATES(-) button to
set regular price.
(The vend price can be set from 0 to $9.95 in 5¢ increments.)
Press the START button.
The machine sets up the regular price, then advances to the
next process automatically.
1. Continue to set up the next price.
2. Stop the change of setup value and go back to ready mode.
• Coin type - Close the service door.
• Card type - Pull the service card.
Note
• rgCP (regular cold price) is not available in dryer.
• rgrP (regular warm price) is not available in dryer.
• rgHP (regular hot price) is not available in dryer.
14
Page 15

Part 5 PROGRAMMING MODE -
22
How to change special price
Button Display
Entering set up mode.
You will see LqC1
Press the WHITES AND COLORS button.
Press the PERMANENT PRESS or the DELICATES
button until appears in the display.
Press the START button.
Press the PERMANENT PRESS or the DELICATES
button until appears in the display.
Setup Mode
Press the START button.
Display previous special price.
Press PERMANENT PRESS(+) or DELICATES(-) button to
set special price.
(The vend price can be set from 0 to $9.95 in 5¢ increments.)
Press the START button.
The machine sets up the regular price, then advances to the
next process automatically.
1. Continue to set up the next price.
2. Stop the change of setup value and go back to ready mode.
• Coin type - Close the service door.
• Card type - Pull the service card.
Note
• SPCP (special cold price) is not available in dryer.
• SPrP (special warm price) is not available in dryer.
• SPHP (special hot price) is not available in dryer.
• SCPA (add super cycle price) is not available in dryer.
• SPCt (add super wash type) is not available in dryer.
15
Page 16

Part 5 PROGRAMMING MODE -
33
How to enter the
Button Display
Entering set up mode.
You will see LqC1
Press the WHITES AND COLORS button.
Press the PERMANENT PRESS or the DELICATES
button until appears in the display.
Press the START button.
Press the PERMANENT PRESS or the DELICATES
button until appears in the display.
Setup Mode
Structure of
Content of
• Special price days apply or not
• Clear escrow enable or not (coin type only)
• Add super wash apply or not
• Select vend type
• Sense dry apply or not (only for dryer)
• Pre-wash apply or not
• Top off apply or not (only for dryer)
• Disable
• Enable
16
Page 17

Part 5 PROGRAMMING MODE -
33--11
Special price day setup
Button Display
Entering set up mode.
You will see LqC1
Press the WHITES AND COLORS button.
Press the PERMANENT PRESS or the DELICATES
button until appears in the display.
Press the START button.
Press the PERMANENT PRESS or the DELICATES
button until appears in the display.
Setup Mode
Press the START button.
Display
Press the START button.
Press PERMANENT PRESS or DELICATES button and then
select or
Press the START button.
The machine sets up the special price, then advances to the
next process automatically.
1. Continue to set up the next mode.
2. Stop the change of setup value and go back to ready mode.
• Coin type - Close the service door.
• Card type - Pull the service card.
.
.
Disable
Enable
One or the other will
display.
Note
• CLEE (clear escrow enable or not) is not available in dryer.
• SUUE (add super wash apply or not) is not available in dryer.
17
Page 18

Part 5 PROGRAMMING MODE -
33--22
Vend type setup - card type or coin type setup
Button Display
Entering set up mode.
You will see LqC1
Press the WHITES AND COLORS button.
Press the PERMANENT PRESS or the DELICATES
button until appears in the display.
Press the START button.
Press the PERMANENT PRESS or the DELICATES
button until appears in the display.
Press the START button.
Display
.
Setup Mode
Press the PERMANENT PRESS or the DELICATES button
until appears in the display.
Press the START button.
Press PERMANENT PRESS or DELICATES button and then
select or
Coin type
Card type
Press the START button.
The machine sets up the vend type, then go to the idle mode
automatically.
Note
• SEdE (sensor dry apply or not) is not available in dryer.
• PrSH (Pre-wash apply or not) is not available in dryer.
One or the other will
display.
.
18
Page 19

Part 5 PROGRAMMING MODE -
33--33
Top off apply or not setup
Button Display
Entering set up mode.
You will see LqC1
Press the WHITES AND COLORS button.
Press the PERMANENT PRESS or the DELICATES
button until appears in the display.
Press the START button.
Press the PERMANENT PRESS or the DELICATES
button until appears in the display.
Setup Mode
Press the START button.
Display
Press the PERMANENT PRESS or the DELICATES
button until appears in the display.
Press the START button.
Press PERMANENT PRESS or DELICATES button and then
select or
Press the START button.
The machine sets up the Vend type, then advances to the
next process automatically.
.
.
Disable
Enable
One or the other will
display.
1. Continue to set up the next mode.
2. Stop the change of setup value and go back to ready mode.
• Coin type - Close the service door.
• Card type - Pull the service card.
19
Page 20

Part 5 PROGRAMMING MODE -
44
How to enter the special price day setup
Button Display
Entering set up mode.
You will see LqC1
Press the WHITES AND COLORS button.
Press the PERMANENT PRESS or the DELICATES
button until appears in the display.
Press the START button.
Press the PERMANENT PRESS or the DELICATES
button until appears in the display.
Press the START button.
Display
.
Setup Mode
Structure of
20
Page 21

Part 5 PROGRAMMING MODE -
44--11
How to change sunday
Button Display
Entering set up mode.
You will see LqC1
Press the WHITES AND COLORS button.
Press the PERMANENT PRESS or the DELICATES
button until appears in the display.
Press the START button.
Press the PERMANENT PRESS or the DELICATES
button until appears in the display.
Setup Mode
Press the START button.
Display
Press the START button.
Press PERMANENT PRESS or DELICATES button and then
select or
Press the START button.
The machine sets up the special price day (Sunday), then
advances to the next process automatically.
1. Continue to set up the next mode.
2. Stop the change of setup value and go back to ready mode.
• Coin type - Close the service door.
• Card type - Pull the service card.
.
.
Disable
Enable
One or the other will
display.
Note
As explained on the previous page, other days can be set up by the same method.
21
Page 22

Part 5 PROGRAMMING MODE -
55
Special price beginning time setup
Button Display
Entering set up mode.
You will see LqC1
Press the WHITES AND COLORS button.
Press the PERMANENT PRESS or the DELICATES
button until appears in the display.
Press the START button.
Press the PERMANENT PRESS or the DELICATES
button until appears in the display.
Setup Mode
Press the START button.
Display previous special price beginning time.
Press PERMANENT PRESS(+) or DELICATES(-) button to
select time between 0 and 23.
Press the START button.
The machine sets up the special price beginning time, then
advances to the next process automatically.
1. Continue to set up the next mode.
2. Stop the change of setup value and go back to ready mode.
• Coin type - Close the service door.
• Card type - Pull the service card.
22
Page 23

Part 5 PROGRAMMING MODE -
66
Special price ending time setup
Button Display
Entering set up mode.
You will see LqC1
Press the WHITES AND COLORS button.
Press the PERMANENT PRESS or the DELICATES
button until appears in the display.
Press the START button.
Press the PERMANENT PRESS or the DELICATES
button until appears in the display.
Setup Mode
Press the START button.
Display previous special price ending time.
Press PERMANENT PRESS(+) or DELICATES(-) button to
select time between 0 and 23.
Press the START button.
The machine sets up the special price ending time, then
advances to the next process automatically.
1. Continue to set up the next mode.
2. Stop the change of setup value and go back to ready mode.
• Coin type - Close the service door.
• Card type - Pull the service card.
Note
When setting up a special price period, the ending time must be later than the beginning time.
23
Page 24

Part 5 PROGRAMMING MODE -
77
Regular priced dryer cycle time
Button Display
Entering set up mode.
You will see LqC1
Press the WHITES AND COLORS button.
Press the PERMANENT PRESS or the DELICATES
button until appears in the display.
Press the START button.
Press the PERMANENT PRESS or the DELICATES
button until appears in the display.
Setup Mode
Press the START button.
Display previous regular priced dryer cycle time.
Press PERMANENT PRESS(+) or DELICATES(-) button to
select time between 10 and 99.
Press the START button.
The machine sets up the regular priced dryer cycle time, then
advances to the next process automatically.
1. Continue to set up the next mode.
2. Stop the change of setup value and go back to ready mode.
• Coin type - Close the service door.
• Card type - Pull the service card.
24
Page 25

Part 5 PROGRAMMING MODE -
88
Special priced dryer cycle time
Button Display
Entering set up mode.
You will see LqC1
Press the WHITES AND COLORS button.
Press the PERMANENT PRESS or the DELICATES
button until appears in the display.
Press the START button.
Press the PERMANENT PRESS or the DELICATES
button until appears in the display.
Setup Mode
Press the START button.
Display previous special priced dryer cycle time.
Press PERMANENT PRESS(+) or DELICATES(-) button to
select time between 10 and 99.
Press the START button.
The machine sets up the special priced dryer cycle time, then
advances to the next process automatically.
1. Continue to set up the next mode.
2. Stop the change of setup value and go back to ready mode.
• Coin type - Close the service door.
• Card type - Pull the service card.
Note
• CCCC (washing time) is not available in dryer.
• nrPC (rinsing times per cycle) is not available in dryer.
• rt (rinsing time setup) is not available in dryer.
• tSSd (top spin speed) is not available in dryer.
25
Page 26

Part 5 PROGRAMMING MODE -
99
Value of coin 1
Button Display
Entering set up mode.
You will see LqC1
Press the WHITES AND COLORS button.
Press the PERMANENT PRESS or the DELICATES
button until appears in the display.
Press the START button.
Press the PERMANENT PRESS or the DELICATES
button until appears in the display.
Setup Mode
Press the START button.
Display previous coin 1 value.
Press PERMANENT PRESS(+) or DELICATES(-) button to
select value of coin 1 (The value can be set fronm 0 to 9.95 in
5¢ increments.)
Press the START button.
The machine sets up the value of coin 1, then advances to the
next process automatically.
1. Continue to set up the next mode.
2. Stop the change of setup value and go back to ready mode.
• Coin type - Close the service door.
• Card type - Pull the service card.
26
Page 27

Part 5 PROGRAMMING MODE -
1100
Value of coin 2 (Set up for top off price and e-suds coin pulse)
Setup Mode
Button Display
Entering set up mode.
You will see LqC1
Press the WHITES AND COLORS button.
Press the PERMANENT PRESS or the DELICATES
button until appears in the display.
Press the START button.
Press the PERMANENT PRESS or the DELICATES
button until appears in the display.
Press the START button.
Display previous coin 2 value.
Press PERMANENT PRESS(+) or DELICATES(-) button to
select value of coin 2 (The value can be set fronm 0 to 9.95 in
5¢ increments.)
Press the START button.
The machine sets up the value of coin 2, then advances to the
next process automatically.
1. Continue to set up the next mode.
2. Stop the change of setup value and go back to ready mode.
• Coin type - Close the service door.
• Card type - Pull the service card.
Note
• Coin type : Value of coin 2 is same function as setting for the e-Suds coin pulse.
• Card type : Value of coin 2 is same function as the top off price.
(As changing the value of coin 2, you can change the top off price and e-Suds coin pulse.)
27
Page 28

Part 5 PROGRAMMING MODE -
1111
Penny increment pricing offset
Setup Mode
This represents the cent increment price offset used when debit card is setup.
Button Display
Entering set up mode.
You will see LqC1
Press the WHITES AND COLORS button.
Press the PERMANENT PRESS or the DELICATES
button until appears in the display.
Press the START button.
Press the PERMANENT PRESS or the DELICATES
button until appears in the display.
Press the START button.
Display previous penny increment pricing offset.
Press PERMANENT PRESS(+) or DELICATES(-) button to
select value of PIPo. (0~4)
Press the START button.
The machine sets up the PIPo, then advances to the next
process automatically.
1. Continue to set up the next mode.
2. Stop the change of setup value and go back to ready mode.
• Coin type - Close the service door.
• Card type - Pull the service card.
Note
• Penny increment pricing offset is available only in card type.
(It hasn’t affected on the coin type’s price setting.)
28
Page 29

Part 5 PROGRAMMING MODE -
1122
Top off time
Button Display
Entering set up mode.
You will see LqC1
Press the WHITES AND COLORS button
Press the PERMANENT PRESS or the DELICATES
button until appears in the display.
Press the START button.
Press the PERMANENT PRESS or the DELICATES
button until appears in the display.
Setup Mode
Press the START button.
Display previous top off time.
Press PERMANENT PRESS(+) or DELICATES(-) button to
select time between 1 and 30.
Press the START button.
The machine sets up the top off time, then advances to the
next process automatically.
1. Continue to set up the next mode.
2. Stop the change of setup value and go back to ready mode.
• Coin type - Close the service door.
• Card type - Pull the service card.
29
Page 30

Part 5 PROGRAMMING MODE -
Test Mode
Diagnostic tests : (display)
This program has been added for testing the dryer and detecting errors.
Entering the test mode
Data Name
Entering
the test mode
1. Entering programming mode
2. WHITES AND COLORS
3. START
Button Display Description
11
Pressing the START button cycles to the next test function.
Number of times the START
button is pressed
None
1 time
2 times
3 times
Check the version and code of machine.
■ ELECTRIC TYPE : US:OE
■ GAS TYPE : US:Og
Motor runs.
■ ELECTRIC TYPE: Heater runs.
Motor + Heater 1 (2700W)
■ GAS TYPE: GAS valve runs.
Motor + Valve
Checking point
Insert service card (card type), open the service door (coin type).
Press the WHITES AND COLORS button.
Then appears in the display.
Enter the diagnostic test mode.
Display
LqC 1
Version and code of machine (All LED on)
Display US:OE or US:Og and EU:XX
alternately. XX is the version number.
Measured moisture value (70~239)
Current temperature (5~70)
(Displays the temperature inside the drum in
° Celsius.)
4 times
5 times
6 times
During check, if the door is open.
During check, if the door is closed
■ ELECTRIC TYPE: Heater runs.
Motor + Heater 1 +Heater 2 (5400W)
■ GAS TYPE: GAS valve runs.
Motor+Valve
LED & KEY CHECK
Press WHITES AND COLORS button.
Press PERMANENT PRESS button.
Press DELICATES button.
Test ends.
Door switch
(Motor & Heater Off, Buzzer beeps seven
times)
Test goes back at step 2.
(Motor on & Heater Off)
Current temperature (5~70)
(Displays the temperature inside the drum in
° Celsius.)
Version and code of machine
LqC1
dE
(The door is open. Please close the door
completely)
Measured moisture value (70~239)
Note
During LqC1 test, if no buttons are pressed for 4 minutes, machine will be turned off automatically.
Do not use .
30
Page 31

Part 5 PROGRAMMING MODE -
22
Factory reset - EEPt
After a factory reset, all values are reset to the default values.
Button Display
Entering set up mode.
You will see LqC1
Press the PERMANENT PRESS or the DELICATES
Button until appears in the display.
Press the START button.
Press the PERMANENT PRESS button until
appears in the display.
Press the START button, then factory reset is done.
is displayed.
Test Mode
Note
• Dryer default value
- Drying time 45 Minute
- Top off time 15 Minute
1. Continue to set up the next mode.
2. Stop the change of setup value and go back to ready mode.
• Coin type - Close the service door.
• Card type - Pull the service card.
31
Page 32

Part 5 PROGRAMMING MODE -
33
Time Set Up
Button Display
Entering set up mode.
You will see LqC1
Press the PERMANENT PRESS or the DELICATES button
until appears in the display.
Press the START button.
The display cycles through 2000 --> 0101 --> Sat --> 0000.
Press the START button.
Press PERMANENT PRESS (+) or DELICATES(-) button to
select year between 2000 and 2099.
Press the START button.
The machine sets up the year, then advances to the next
process automatically.
Test Mode
Press PERMANENT PRESS (+) or DELICATES(-) button to
select month between 01 and 12.
Press the START button.
The machine sets up the month, then advances to the next
process automatically.
Press PERMANENT PRESS (+) or DELICATES(-) button to
select day between 01 and 31.
Press the START button.
The machine sets up the day, then advances to the next
process automatically.
Press PERMANENT PRESS (+) or DELICATES(-) button to
select hour between 00 and 23.
Press the START button.
The machine sets up the hour, then advances to the next
process automatically.
Press PERMANENT PRESS (+) or DELICATES(-) button to
select minute between 00 and 59.
32
Press the START button.
The machine sets up the minute.
1. Continue to set up the next mode.
2. Stop the change of setup value and go back to ready mode.
• Coin type - Close the service door.
• Card type - Pull the service card.
Page 33

Part 5 PROGRAMMING MODE -
44
Courtesy cycle
Courtesy cycle is like a complimentary cycle given to the customer when the dryer goes out of order when the
customer has made the payment to dry one’s clothes.
Test Mode
Button Display
Entering set up mode.
You will see LqC1
Press the PERMANENT PRESS or the DELICATES
Button until appears in the display.
Press the START button.
Press the PERMANENT PRESS button until
appears in the display.
Press the START button.
Display will show
.
Select the course you desire.
Note
• In case of dryer card type, it has to insert the cash card
after removing the service card. Then press the cycle
course and the start button. (It is only applicable to the
dryer’s card type specially and there is no subtraction in
card balance at the Courtesy cycle.)
Press the START button.
Display will show the remaining time and start.
33
Page 34

Part 5 PROGRAMMING MODE -
55
Cycle Kill
Coin type
Button Display
Opening
the service door.
You will see LqC1
Press the PERMANENT PRESS or the DELICATES
Button until appears in the display.
Press the START button.
Press the PERMANENT PRESS button until
appears in the display.
Press the START button.
Test Mode
Card type
Insert
cycle kill card.
Display with beeping.
Display with beeping.
Go back to ready mode.
Descriptions Display
Display the current time and .
Display with beeping.
Go back to ready mode.
34
Page 35

Part 5 PROGRAMMING MODE -
Collect Mode
Collect Information Data : CLCt (display)
The dryer collects the usage data so that the owner can check various information like number of various cycles used,
how many times card or coins used, etc.
Entering the collect mode
Data Name Step (Button) LED Display Description
Entering
the collect
mode
1. Entering the programming mode.
2. WHITES AND COLORS
3. DELICATES
4. START
5. PERMANENT PRESS or
DELICATES
6. START
Insert service card(card type), open the service door(coin type).
Press the WHITES AND COLORS button until "tESt" appears in
the display.
Press the PERMANENT PRESS or DELICATES button until
"CLCt" appears in the display.
Enter the Collect information data.
Move to each data list that you want to check by pressing with
PERMANENT PRESS or DELICATES button.
Display the value of selected data list
Check the collect information reference to the follow lists. The Lists are displayed by abbreviations.
Collect Mode Data lists
No.
1
2
3
4
5
6
7
8
9
10
11
12
13
14
15
16
17
18
19
20
Abbreviation
rgPr Regular Price
rgCP
rgrP
rgHP
dELC
ItrC
ItCC
ItAC
ItHC
ItSC
IttF
ItUC
ItFC
ACrC
ACCC
ACAC
ACHC
ACSC
ACtF
ACUC
Regular Cold Price
Regular Warm Price
Regular Hot Price
Dryer Moisture Sense
Interval Regular Cycles
Interval Regular Cold Cycles
Interval Regular Warm Cycles
Interval Regular Hot Cycles
Interval Super Cycles
Interval Topoff Cycles (Dryer Only)
Interval Service Cycles
Interval Token Cycles
Accumulated Regular Cycles
Accumulated Regular Cold Cycles
Accumulated Regular Warm Cycles
Accumulated Regular Hot Cycles
Accumulated Super Cycles (Washer Only)
Accumulated Topoff Cycles (Dryer Only)
Accumulated Service Cycles
Meaning
0~199 nickels ($.00~$9.95)
rgCP is not available in dryer. (It can't enter.)
rgrP is not available in dryer. (It can't enter.)
rgHP is not available in dryer. (It can't enter.)
dELC is not available in dryer. (It can't enter.)
Number of Regular cycles ( 0~65535 )
ItCC is not available in dryer. (It can't enter.)
ItAC is not available in dryer. (It can't enter.)
ItHC is not available in dryer. (It can't enter.)
ItSC is not available in dryer. (It can't enter.)
Number of Topoff cycles ( 0~65535 )
Number of Service cycles (0~65535)
Number of Token cycles (0~65535)
Number of Regular cycles ( 0~65535 )
ACCC is not available in dryer. (It can't enter.)
ACAC is not available in dryer. (It can't enter.)
ACHC is not available in dryer. (It can't enter.)
ACSC is not available in dryer. (It can't enter.)
Number of Topoff cycles ( 0~65535 )
Number of Service cycles ( 0~65535 )
Description
Interval Cycles('Interval' means 'Since last data collecting')
Accumulated Cycles('Accumulated'means 'Total cycles in washer/dryer's life time not include service cycles or trouble cycles')
35
Page 36

Part 5 PROGRAMMING MODE -
Collect Mode Data lists
Collect Mode
No.
Abbreviation
21 ACFC
22 ACrt
23
24
25
26
27
28
29
30
31
32
33
34
35
Itnr
Ittb
ItPd
Itdd
ItAd
ItUC
ItAC Interval Authorized Coin Vault Openings
tLdo Time of Last Service Door Opening
tLCo Time of Last Coin Vault Opening
tPdo Time of Previous Service Door Opening
tPCo Time of Previous Coin Vault Opening
SCPr Super Cycle Price
toPr Top Off Price
Meaning
Accumulated Token Cycles Number of Token cycles (0~65535)
Accumulated Run Time Number of Running minutes ( 0~65535 )
Interval No Runs
Interval Trouble Cycles
Interval Power Downs
Interval Unauthorized Service Door Openings
Interval Authorized Service Door Openings
Interval Unauthorized Coin Vault Openings
Itnr is not available in dryer.
Ittb is not available in dryer.
Number of power down
Number of Unauthorized Service Door Openings ( 0~ 255)
Number of Unauthorized Service Door Openings ( 0~ 255)
Number of Authorized Service Door Openings ( 0~ 255)
Number of Authorized Service Door Openings ( 0~ 255)
tLdo is not available in dryer.(It can't enter.)
tLCo is not available in dryer.(It can't enter.)
tPdo is not available in dryer.(It can't enter.)
tPCo is not available in dryer.(It can't enter.)
Scpr is not available in dryer. (It can't enter.)
0~199 nickels ($.00~$9.95)
Description
Authorized: Service Door Openings with PDA Communication
(Open Service door Within 30 minutes After communicating with PDA)
Unauthorized: Service Door Openings without PDA Communication
These items (No.30~33) are not applied this program.
36
Page 37

Part 6 ERROR MODE
Meaning of Error Codes that LED displays during occurrence or problem.
Dryer error code
PROBLEM POSSIBLE CAUSE SOLUTION
It is displayed when thermistor is open.
It is displayed when thermistor is shorted.
Disconnection of card reader wire.
Thermistor should be replaced.
Thermistor should be replaced.
Check the card reader wire.
Part 7 POWER FAIL RECOVERY
In case of power failure the machine stops running but the time display remains on, showing the time just before
power failure.
Press the START button after the power is restored, then the machine will restart.
Part 8 DEFAULT DRYER SETTINGS
Default Settings
Cycle Time (Minutes)
Cool Down Time Cycle
High Temperature
Medium Temperature
Low Temperature
Top Off Time (Minutes per coin)
Coin #1 Value
Coin #2 Value
Minutes/Minutes and seconds
Fahrenheit/Celsius
Error Mode
Default
45 Minutes
2 Minutes
154.4° F (68° C)
140° F (60° C)
125.6° F (52.5° C)
15 Minutes
25¢
25¢
Minutes
Fahrenheit
On
37
Page 38

Part 9 WARRANTY
LG ELECTRONICS, INC.
LG COMMERCIAL DRYER LIMITED WARRANTY - USA
Should any part in your LG Commercial Dryer fail due to a defect in material or workmanship under normal use, during the warranty period set forth
below, LG will provide a replacement part. This limited warranty is valid only to the original purchaser of the product and applies only when used
within the United States, excluding U.S. Territories. Proof of original purchase is required to obtain a replacement part under this limited warranty.
WARRANTY PERIOD (Please see OPL* below): PARTS ONLY, does NOT include Labor and/or shipping.
Note: If the original date of purchase can not be verified, the warranty will begin 60 days from the date of
manufacture.
TWO (2) YEARS from the date of original purchase
THREE (3) YEARS from the date of original purchase
All parts. Electronic controls: Main control board and user
interface board.
Motor, electric element and stainless steel drum.
In addition, the following cabinet parts are warranted
against rust through: top plate, cabinet, base and door.
* OPL (On Premise Laundry), defined as non-vended commercial products used in locations such as hotels, hospitals, health clubs,
businesses, etc. will have one (1) full year parts only warranty. Labor and shipping are NOT included.
Replacement Units and Repair Parts may be new or remanufactured.
Replacement Units and Repair Parts are warranted for the remaining portion of the original warranty period.
THIS WARRANTY IS IN LIEU OF ANY OTHER WARRANTY, EXPRESS OR IMPLIED, INCLUDING WITHOUT LIMITATION, ANY WARRANTY OF
MERCHANTABILITY OR FITNESS FOR A PARTICULAR PURPOSE. TO THE EXTENT ANY IMPLIED WARRANTY IS REQUIRED BY LAW, IT IS
LIMITED IN DURATION TO THE EXPRESS WARRANTY PERIOD ABOVE. NEITHER THE MANUFACTURER NOR ITS U.S. DISTRIBUTOR SHALL
BE LIABLE FOR ANY INCIDENTAL, CONSEQUENTIAL, INDIRECT, SPECIAL, OR PUNITIVE DAMAGES OF ANY NATURE, INCLUDING WITHOUT
LIMITATION, LOST REVENUES OR PROFITS, OR ANY OTHER DAMAGE WHETHER BASED IN CONTRACT, TORT, OR OTHERWISE. Some
states do not allow the exclusion or limitation of incidental or consequential damages or limitations on how long an implied warranty lasts, so the above
exclusion or limitation may not apply to you. This warranty gives you specific legal rights and you may also have other rights that vary from state to state.
THIS LIMITED WARRANTY DOES NOT APPLY TO:
1. Service trips to deliver, pick up, install, or repair the product.
2. Failure of product to perform during power failures and interruptions or inadequate electrical service.
3. Damage caused by leaky or broken water pipes, frozen water pipes, restricted drain lines, inadequate or interrupted water supply or inadequate supply of air.
4. Damage resulting from running the product in a corrosive atmosphere or contrary to the instructions outlined in the product owner's manual.
5. Damage to the product caused by accidents, pest and vermin, lightning, wind, fire, floods, or acts of God.
6. Damage resulting from misuse, abuse, improper installation, repair, or maintenance. Improper repair include use of parts not approved or specified by LG.
7. Damage or failure caused by unauthorized modification or alteration, or if it is used for other than intended purpose.
8. Damage or failure caused by incorrect electrical current ,voltage or plumbing codes, or use of accessories, components or consumable cleaning products that
are not approved by LG.
9. Damage caused by transportation and handling, including scratches, dents, chips, and/or other damage to the finish of your product, unless such damage
results from defects in materials or workmanship and is reported within one (1) week of delivery.
10. Damage to any display, open box, discounted, or refurbished product.
11. Products with original serial numbers that have been removed, altered or can not be readily determined.
12. Increases in utility costs and additional utility expenses.
13. Replacement of light bulbs, filters or any consumable parts.
The cost of repair or replacement under these excluded circumstances shall be borne by the consumer.
For complete warranty details or any questions,
please call or write: Product Registration Information
LG Commercial Product Support: Model:
P. O. Box 240007 Serial Number:
201 James Record Road
Huntsville, Alabama 35813 Date of Purchase:
Call: 1-888-865 -3026 and select the appropriate option
from the menu.
Please be prepared to provide proof of purchase, model and serial number.
38
Page 39

Page 40

P / No. :3828EL3003R
 Loading...