

Page 1

User Guide
Some of the contents in this manual may differ from your phone depending
on the software of the phone or your service provider. AT&T marks contained
herein are trademarks of AT&T Intellectual Property and/or AT&T affiliated
companies. © 2010 AT&T Intellectual Property. All rights reserved.
Actual color of the phone may vary.
Page 2

Your phone is designed to make it easy for you to access a wide variety of content. For your protection, we want
you to be aware that some applications that you enable may involve the location of your phone being shared.
For applications available through AT&T, we offer privacy controls that let you decide how an application may
use the location of your phone and other phones on your account. However, the AT&T privacy tools do not apply
to applications available outside of AT&T. Please review the terms and conditions and the associated privacy
policy for each location-based service to learn how location information will be used and protected. In addition,
your AT&T phone may be used to access the Internet and to download, and/or purchase goods, applications, and
services from AT&T or elsewhere from third parties. AT&T provides tools for you to control access to the Internet
and certain Internet content. These controls may not be available for certain devices which bypass AT&T controls.
Page 3

LIMITED WARRANTY STATEMENT
1. WHAT THIS WARRANTY COVERS :
LG offers you a limited warranty that the enclosed
subscriber unit and its enclosed accessories will
be free from defects in material and workmanship,
according to the following terms and conditions:
1. The limited warranty for the product extends for
TWELVE (12) MONTHS beginning on the date
of purchase of the product with valid proof of
purchase, or absent valid proof of purchase,
FIFTEEN (15) MONTHS from date of manufacture
as determined by the unit’s manufacture date code.
2. The limited warranty extends only to the original
purchaser of the product and is not assignable or
transferable to any subsequent purchaser/end user.
3. This warranty is good only to the original purchaser
of the product during the warranty period as long
as it is in the U.S, including Alaska, Hawaii, U.S.
Territories and Canada.
4. The external housing and cosmetic parts shall
be free of defects at the time of shipment and,
therefore, shall not be covered under these limited
warranty terms.
5. Upon request from LG, the consumer must provide
information to reasonably prove the date of
purchase.
6. The customer shall bear the cost of shipping the
product to the Customer Service Department of LG.
LG shall bear the cost of shipping the product back
to the consumer after the completion of service
under this limited warranty.
2. WHAT THIS WARRANTY DOES
NOT COVER :
1. Defects or damages resulting from use of the
product in other than its normal and customary
manner.
2. Defects or damages from abnormal use, abnormal
conditions, improper storage, exposure to moisture
or dampness, unauthorized modifications,
unauthorized connections, unauthorized repair,
misuse, neglect, abuse, accident, alteration,
improper installation, or other acts which are
not the fault of LG, including damage caused by
shipping, blown fuses, spills of food or liquid.
3. Breakage or damage to antennas unless caused
directly by defects in material or workmanship.
4. That the Customer Service Department at LG was
not notified by consumer of the alleged defect or
malfunction of the product during the applicable
limited warranty period.
5. Products which have had the serial number
removed or made illegible.
6. This limited warranty is in lieu of all other
warranties, express or implied either in fact or
by operations of law, statutory or otherwise,
including, but not limited to any implied warranty
of marketability or fitness for a particular use.
7. Damage resulting from use of non-LG approved
accessories.
8. All plastic surfaces and all other externally exposed
parts that are scratched or damaged due to normal
customer use.
Page 4

9. Products operated outside published maximum
ratings.
10. Products used or obtained in a rental program.
11. Consumables (such as fuses).
3. WHAT LG WILL DO:
LG will, at its sole option, either repair, replace or
refund the purchase price of any unit that does
not conform to this limited warranty. LG may
choose at its option to use functionally equivalent
reconditioned, refurbished or new units or parts
or any units. In addition, LG will not re-install or
back-up any data, applications or software that
you have added to your phone. It is therefore
recommended that you back-up any such data or
information prior to sending the unit to LG to avoid
the permanent loss of such information.
4. STATE LAW RIGHTS :
No other express warranty is applicable to
this product. THE DURATION OF ANY IMPLIED
WARRANTIES, INCLUDING THE IMPLIED
WARRANTY OF MARKETABILITY, IS LIMITED TO
THE DURATION OF THE EXPRESS WARRANTY
HEREIN. LG INFOCOMM INC. SHALL NOT BE
LIABLE FOR THE LOSS OF THE USE OF THE
PRODUCT, INCONVENIENCE, LOSS OR ANY
OTHER DAMAGES, DIRECT OR CONSEQUENTIAL,
ARISING OUT OF THE USE OF, OR INABILITY
TO USE, THIS PRODUCT OR FOR ANY BREACH
OF ANY EXPRESS OR IMPLIED WARRANTY,
INCLUDING THE IMPLIED WARRANTY OF
MARKETABILITY APPLICABLE TO THIS PRODUCT.
Some states do not allow the exclusive of
limitation of incidental or consequential damages
or limitations on how long an implied warranty
lasts; so these limitations or exclusions may not
apply to you. This warranty gives you specific legal
rights and you may also have other rights which
vary from state to state.
5. HOW TO GET WARRANTY
SERVICE :
To obtain warranty service, please call or fax to
the following telephone numbers from anywhere
in the continental United States:
Tel. 1-800-793-8896 or Fax. 1-800-448-4026
Or visit www.lg.com.
Correspondence may also be mailed to:
LG Electronics MobileComm U.S.A., Inc.
201 James Record Road Huntsville, AL 35824
DO NOT RETURN YOUR PRODUCT TO THE ABOVE
ADDRESS.
Please call or write for the location of the LG
authorized service center nearest you and for the
procedures for obtaining warranty claims.
Page 5

User Guide
Page 6

Table of Contents
The Basics . . . . . . . . . . . . . . . . . . . . . . . . . . . . . 4
Getting to know your phone . . . . . . . . . . . . . . . . . . . . . . . . 4
Open view . . . . . . . . . . . . . . . . . . . . . . . . . . . . . . . . . . . . . . 5
QWERTY Keyboard . . . . . . . . . . . . . . . . . . . . . . . . . . . . . . . 6
Installing the SIM card and battery . . . . . . . . . . . . . . . . . . 7
Getting started . . . . . . . . . . . . . . . . . . . . . . . . . 10
Step 1. Sign in with a Windows Live ID . . . . . . . . . . . . . 10
Step 2. Import your contacts . . . . . . . . . . . . . . . . . . . . . . 11
Step 3. Stay in Sync . . . . . . . . . . . . . . . . . . . . . . . . . . . . . 11
Navigating Windows Phoneß . . . . . . . . . . . 12
Using your Touch screen . . . . . . . . . . . . . . . . . . . . . . . . . 12
Getting to know your Start screen . . . . . . . . . . . . . . . . . . 13
Knowing and navigating the Start . . . . . . . . . . . . . . . . . . 14
Customizing Start Screen . . . . . . . . . . . . . . . . . . . . . . . . . 17
Viewing the status bar . . . . . . . . . . . . . . . . . . . . . . . . . . . 18
Navigating and Setting Applications . . . . . . . . . . . . . . . . 22
Customizing your Windows Phone . . . . . . . . . . . . . . . . . 25
Enter text . . . . . . . . . . . . . . . . . . . . . . . . . . . . . . . . . . . . . . 27
Download applications from Marketplace . . . . . . . . . . . 29
Communicating . . . . . . . . . . . . . . . . . . . . . . . . 30
Phone . . . . . . . . . . . . . . . . . . . . . . . . . . . . . . . . . . . . . . . . 30
Airplane mode (to disable wireless communication) . . . 30
Messaging . . . . . . . . . . . . . . . . . . . . . . . . . . . . . . . . . . . . 32
Email . . . . . . . . . . . . . . . . . . . . . . . . . . . . . . . . . . . . . . . . . 34
Facebook . . . . . . . . . . . . . . . . . . . . . . . . . . . . . . . . . . . . . . 38
2
Entertainment . . . . . . . . . . . . . . . . . . . . . . . . . . 39
Camera . . . . . . . . . . . . . . . . . . . . . . . . . . . . . . . . . . . . . . . 39
Pictures . . . . . . . . . . . . . . . . . . . . . . . . . . . . . . . . . . . . . . . 43
Music + Videos . . . . . . . . . . . . . . . . . . . . . . . . . . . . . . . . . 46
Games . . . . . . . . . . . . . . . . . . . . . . . . . . . . . . . . . . . . . . . . 50
FM Radio . . . . . . . . . . . . . . . . . . . . . . . . . . . . . . . . . . . . . . 51
Personal Information . . . . . . . . . . . . . . . . . . . 53
Facebook . . . . . . . . . . . . . . . . . . . . . . . . . . . . . . . . . . . . . . 53
People Hub . . . . . . . . . . . . . . . . . . . . . . . . . . . . . . . . . . . . 53
Me card . . . . . . . . . . . . . . . . . . . . . . . . . . . . . . . . . . . . . . . 55
Calendar . . . . . . . . . . . . . . . . . . . . . . . . . . . . . . . . . . . . . . 56
Office . . . . . . . . . . . . . . . . . . . . . . . . . . . . . . . . . . . . . . . . . 57
The Web . . . . . . . . . . . . . . . . . . . . . . . . . . . . . . 62
Internet . . . . . . . . . . . . . . . . . . . . . . . . . . . . . . . . . . . . . . . 62
Map . . . . . . . . . . . . . . . . . . . . . . . . . . . . . . . . . . . . . . . . . . 64
Marketplace . . . . . . . . . . . . . . . . . . . . . . . . . . . . . . . . . . . 66
Connectivity . . . . . . . . . . . . . . . . . . . . . . . . . . . 67
Bluetooth . . . . . . . . . . . . . . . . . . . . . . . . . . . . . . . . . . . . . 67
Wi-Fi . . . . . . . . . . . . . . . . . . . . . . . . . . . . . . . . . . . . . . . . . 68
Play To . . . . . . . . . . . . . . . . . . . . . . . . . . . . . . . . . . . . . . . . 70
Utilities . . . . . . . . . . . . . . . . . . . . . . . . . . . . . . . 71
Setting your alarm . . . . . . . . . . . . . . . . . . . . . . . . . . . . . . 71
Using your calculator . . . . . . . . . . . . . . . . . . . . . . . . . . . . 71
Search . . . . . . . . . . . . . . . . . . . . . . . . . . . . . . . . . . . . . . . . 71
Page 7

Applications . . . . . . . . . . . . . . . . . . . . . . . . . . . 73
AT&T FamilyMap . . . . . . . . . . . . . . . . . . . . . . . . . . . . . . . 73
My Wireless . . . . . . . . . . . . . . . . . . . . . . . . . . . . . . . . . . . 73
AT&T Navigator . . . . . . . . . . . . . . . . . . . . . . . . . . . . . . . . 73
AT&T Radio . . . . . . . . . . . . . . . . . . . . . . . . . . . . . . . . . . . . 74
U-verse . . . . . . . . . . . . . . . . . . . . . . . . . . . . . . . . . . . . . . . 74
Settings . . . . . . . . . . . . . . . . . . . . . . . . . . . . . . . 75
System Settings . . . . . . . . . . . . . . . . . . . . . . . . . . . . . . . . 75
Applications Settings . . . . . . . . . . . . . . . . . . . . . . . . . . . . 77
Software update . . . . . . . . . . . . . . . . . . . . . . . 79
Phone Software update . . . . . . . . . . . . . . . . . . . . . . . . . . 79
FAQ . . . . . . . . . . . . . . . . . . . . . . . . . . . . . . . . . . . 80
Accessories . . . . . . . . . . . . . . . . . . . . . . . . . . . 88
For Your Safety . . . . . . . . . . . . . . . . . . . . . . . . . 89
Safety Guidelines . . . . . . . . . . . . . . . . . . . . . . 94
3
Page 8
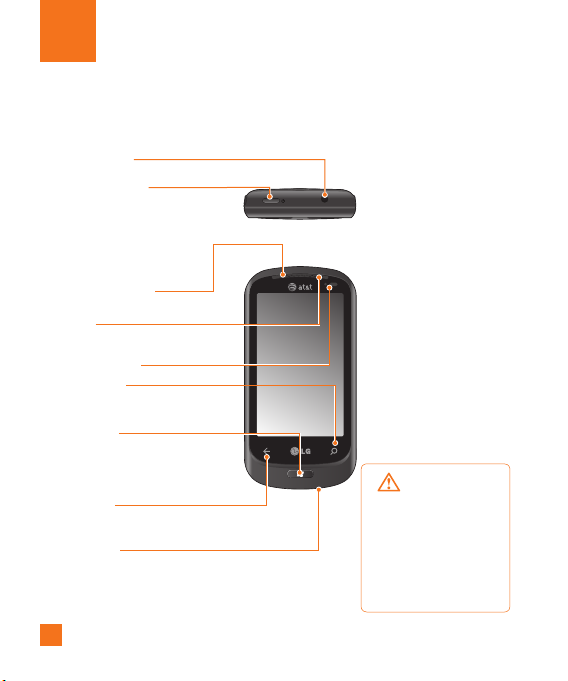
Assembling
Getting to know your phone
Headset Jack
Power/Lock button
• Long press (5 secs) for Power ON
/ OFF.
• Short press to turn the screen on
or off.
Speakerphone Mic
Earpiece
Lets you hear the caller and prompts.
Proximity sensor
Search Button
Open Quick Search.
Start Button
Return to the Home screen; Start the
Voice Recognition function (press and
hold).
Back Button
Returns to the previous screen.
Mouth Piece
Allows other callers to hear you during
a call and allows you to record audio or
say Voice Commands.
4
n
Notes
All screen shots in this guide
are simulated. Actual displays
may vary.
Instructions to perform tasks
in this guide are based on
the default phone settings
and may change depending
on the software version on
your phone.
WARNING: Putting
a heavy object on the
phone or sitting on it can
damage its LCD and touch
screen functionality. Do
not cover with protective
films as this may cause
the sensor to malfunction.
Page 9
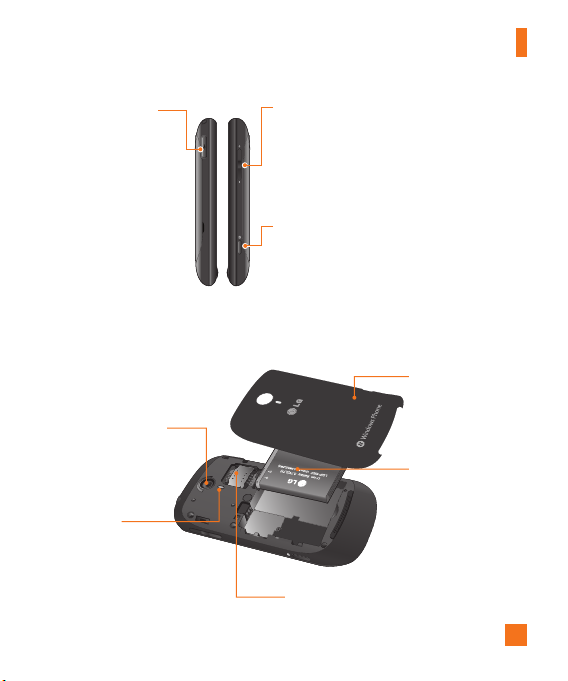
The Basics
Charger/USB Port
TIP: Before connecting
the USB cable, wait
until the phone has
powered up and has
registered on the
network.
Open view
External camera
lens
Camera
Flash
Volume keys
• When the screen is idle: adjusts the system
tone & ring tone volume.
• During a call: adjusts the earpiece volume.
• When playing a track: controls track volume.
Camera key
• Press and hold to launch the camera
Battery cover
Battery
SIM Card Slot
5
Page 10
The Basics
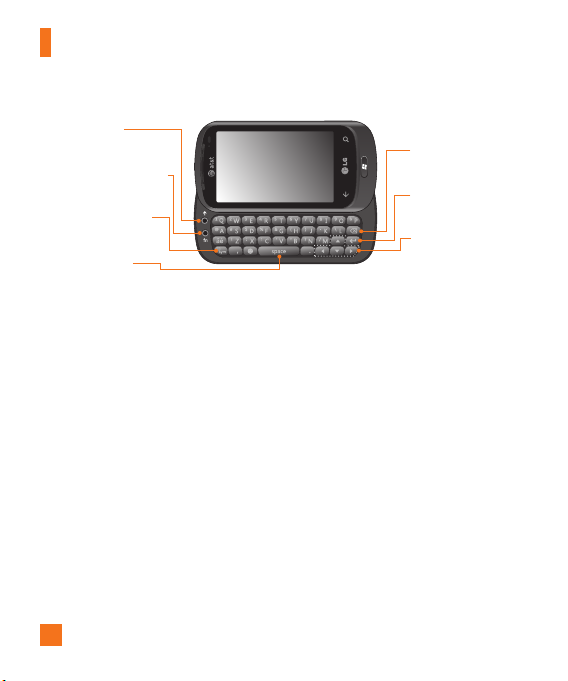
QWERTY Keyboard
1. Caps Button
2. fn (Function) Button
3. Language/Symbol
Button
4. Space Button
1. Caps Button lets you enter capital letters.
2. fn (Function) Button lets you enter
alternate characters such as @ (using the A
button). To lock the fn button, press the fn
button. To unlock the button, press it again.
3. Language/Symbol Button let you change
the language, or enter symbols.
4. Space Button enters spaces when in a
text entry field.
5. Delete Button
6. Enter Button
7. Directional
Buttons
5. Delete Button deletes a single space or
character with each press. Press and hold
to delete text more quickly.
6. Enter Button moves the cursor to the next
field or text line.
7. Directional Buttons Moves the cursor in
text input mode.
6
Page 11
The Basics
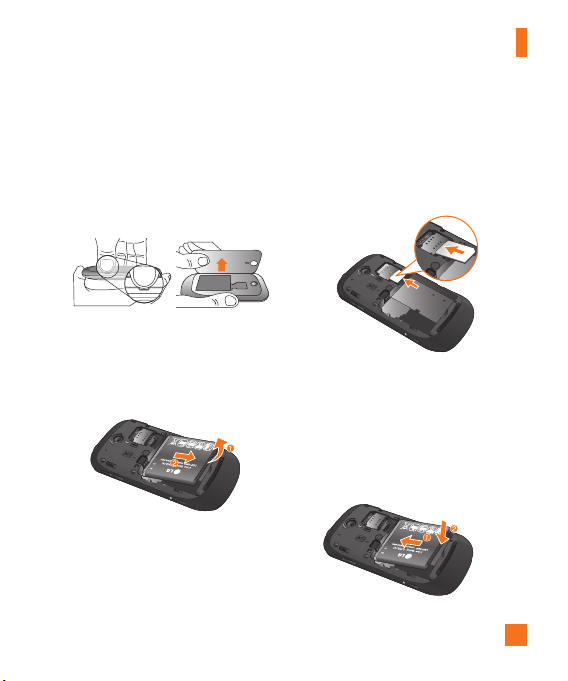
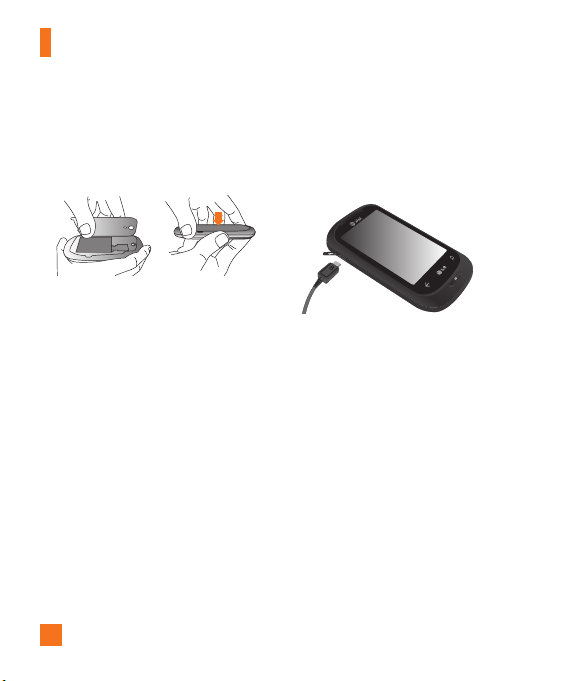
Installing the SIM card and
battery
1 Remove the battery cover
Place your thumbnail in the cover opening.
Open the cover as pictured below.
2 Remove the battery
Using the cut-out at the bottom, lift it from
the battery compartment.
n
WARNING
Do not remove the battery when the phone is
switched on, as this may damage the phone.
3 Install the SIM card
The SIM card should be inserted with the
gold-colored contacts downwards towards the
phone, and the notch in the SIM card pointing
to the bottom of the phone.
4 Install the battery
First, insert the top of the battery into the top
edge of the battery compartment. Ensure that
the battery contacts align with the phone’s
terminals. Press the bottom of the battery
down until it clips into place.
7
Page 12
The Basics
5 Close the battery cover
Align the cover hook to the latch as pictured
below. Close the cover in the direction of
the arrow.
8
Charging your phone
Open the charger port cover on the side of
your LG-Quantum. Insert the charger and plug
it into a power outlet.
When the battery is fully discharged,
you can not power on the phone. It takes
approximately 4-5 minutes to reach a charge
state sufficient for booting.
It takes 14-15 minutes more for charging by
USB connection.
If the battery is critically low, the phone
display will notify the user to charge the
phone.
n
NOTE
The battery must be fully charged initially to
improve battery lifetime.
Page 13

n
WARNING
• Do not connect the charger to the phone without
the battery. You must check if the battery is
inserted before charging.
• Do not remove your battery or SIM card while
charging.
• There is a risk of explosion if the battery is
replaced by an incorrect type. Dispose of
used batteries in accordance with the maker’s
instructions.
• Unplug the charger from the power socket during
lightning storms to avoid electric shock or fire due
to power surges.
• Make sure that no sharp items come into contact
with the battery. This could pose a fire risk.
The Basics
9
Page 14

Getting started
When you turn on your phone for the first time, you will be guided through essential settings.
Please follow the instructions on the screen to activate your device.
Please note that during the “WINDOWS PHONE SETTINGS” step, recommended settings
includes activating sending feedback to Microsoft. This feature will consume data and may
incur data charges. To avoid this select custom and uncheck “Send information to help improve
Windows Phones”. If you want to disable this later, open the application list and select
settings > system > feedback and turn off the Send feedback option.
You are guided through the following activation screens: Choose A Language > Windows
Phone Settings > Choose Time Zone > Sign in with a Windows Live ID.
Step 1. Sign in with a Windows Live ID
To download applications, play Xbox LIVE games, use a Zune Pass,
synchronise Windows Live information to the web and more, you will need
to sign in with a Windows LIVE ID.
A Windows Live ID is the email address you use to sign in to services
like Xbox LIVE®, Zune®, Hotmail®, and so on. If you can’t remember the
email address you use:
For Xbox LIVE: On your Xbox 360® console, sign in with your gamer tag,
then press the Guide button on your controller (the one in the middle that
looks like the Xbox logo). In Settings, click Account Management >
email & accounts.
For Zune: Install the Zune Software in advance. Sign in to the Zune software on your PC.
Right-click your profile picture and click Switch user to see your Windows Live ID. To reset your
password or get a reminder, go to http://account live.com/ResetPassword.aspx.
If you haven't yet signed in with a Windows Live ID, there are a few things you won't be able to
do on your phone for the moment (for example, get applications or play Xbox LIVE games).
10
Page 15
Step 2. Import your contacts
When you set up your email or Facebook account, your contacts are
imported automatically into your People hub. And when you add Facebook,
your friends’ feeds appear in your People hub, their photos show up in your
Pictures hub, and your own feeds pop up in your Me tile.
To set up a Facebook (or any kind of email) account:
1. Tap the arrow or swipe from right to left on Start screen to go to
your App list.
2. Tap Settings > email & accounts.
Getting your contacts from your SIM card is easy. Go to Settings, flick to
applications, tap People, then tap Import SIM contacts.
Step 3. Stay in Sync
To sync your music, videos, pictures, and updates from your computer to
your phone (or vice versa), you’ll need the Zune software.
1. Connect your phone to your computer using the USB cable.
2. Go to windowsphone.com to install the Zune software.
3. Open the Zune software, then follow the instructions to get your music,
videos, pictures, and so on into your collection.
4. Click collection, then drag everything you want to sync to the phone icon
in the lower left.
Getting started
11
Page 16
Navigating Windows Phone
Using your Touch screen
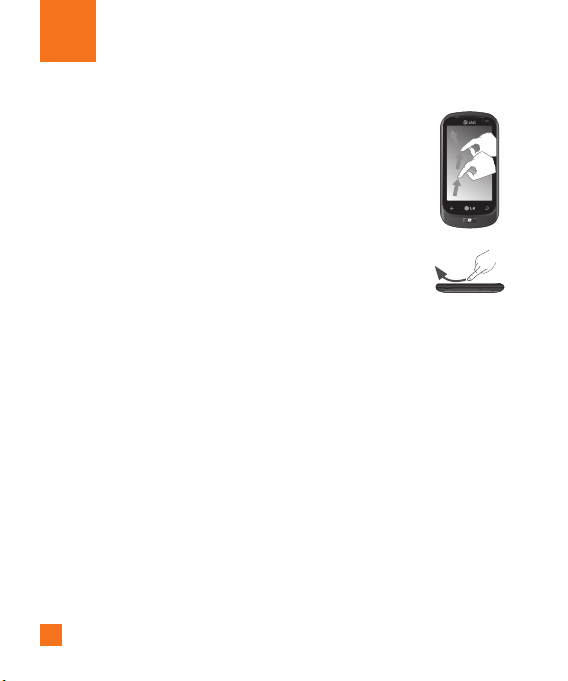
Touch screen tips
Your device’s touch screen lets you easily
select items or perform functions. Learn basic
actions to use the touch screen.
n
NOTES
• To avoid scratching the touch screen, do not use
sharp tools.
• Do not allow the touch screen to come into
contact with other electrical devices. Electrostatic
discharges can cause the touch screen to
malfunction.
• Do not allow the touch screen to come into
contact with water. The touch screen may
malfunction in humid conditions or when exposed
to water.
• For optimal use of the touch screen, remove the
screen protection film before using your device.
• Your touch screen has a layer that detects small
electrical charges emitted by the human body.
n
NOTES
• Your device screen turns off when idle for a
specified period of time. To turn it back on, simply
press the Power/Lock button.
• You can also adjust the backlight time or
change wallpaper. In the Start screen, go to the
application list and select Settings > lock &
wallpaper.
12
Flick
A flick is a single finger
moved rapidly in any
direction and ends with
the finger up in the air.
A flick can follow a pan
gesture.
Page 17
Navigating Windows Phone
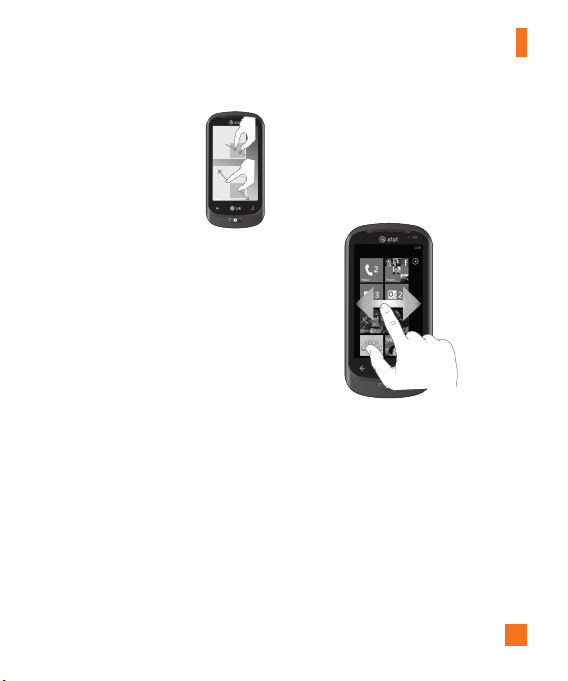
Pinch and Stretch
Pinch and stretch are
opposites of each
other. These gestures
are used often with
maps when zooming in
and out.
Pinching is achieved
by bringing two fingers
together. For stretching,
the fingers are moved
away from each other
to zoom out on an
image.
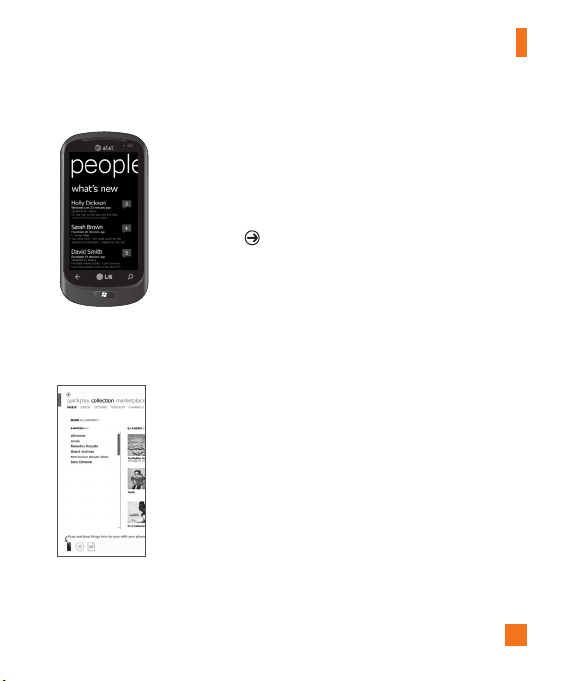
Getting to know your Start
screen
From this screen you can access menu
options, make a call, view the status of your
phone and much more.
13
Page 18

Navigating Windows Phone
Knowing and navigating the
Start screen
The Start screen is the beginning of the
Windows Phone 7 experience for users
after they power on their phone. The Start
screen displays application tiles that users
have pinned and placed in a position of their
choosing for quick launch. Pressing the Start
Button on the phone always returns a
user to the Start screen, no matter what
application is running.
1 Simply swipe your finger up or down to
view applications on the Start screen.
You can also customize tiles on the Start
screen, which are shortcuts to your favorite
menus and applications.
n
NOTES
When you are in a standby display after
unlocking the phone, swipe your finger upward,
then you can see the application tiles on the
Start screen.
14
Page 19
Navigating Windows Phone
Tiles on Start screen
A tile is an easily recognizable visual shortcut for an application or its content that users can set
in an arbitrary location on the phone’s Start screen.
Tiles that use the tile notification feature can update the tile graphic or title text, or increment
a counter, enabling users to create a personalized, “glanceable” Start screen. Examples include
displaying if it is their turn in a game, the weather, or how many email messages they have
received.
The Start screen is always presented in Portrait view.
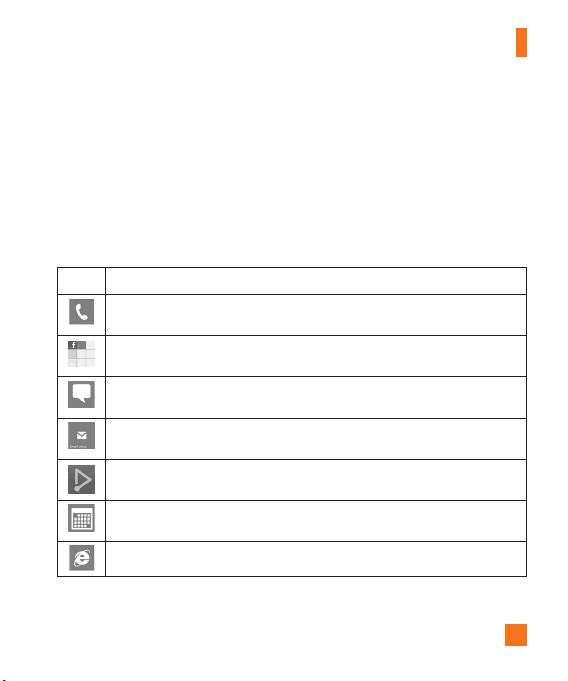
Icon Description
Allows you to make calls using the dial pad. You can also access recent calls, your
contact list, and voicemail.
Touch to access People hub, the integrated communication application for emails,
messages, contacts and other information.
Send and receive SMS and MMS messages. The messages are displayed as
conversations for easy viewing.
Windows Phone supports many of the most popular email services, such as Microsoft
Exchange, Hotmail, and others.
Touch to stream videos, music and pictures from your phone to a Digital Living
Network Alliance(DLNA) compatible playback device.
Windows Phone allows you to sync your calendars and set alerts to remind you about
important events.
Touch to access the Internet Explorer and navigate the web.
15
Page 20
Navigating Windows Phone
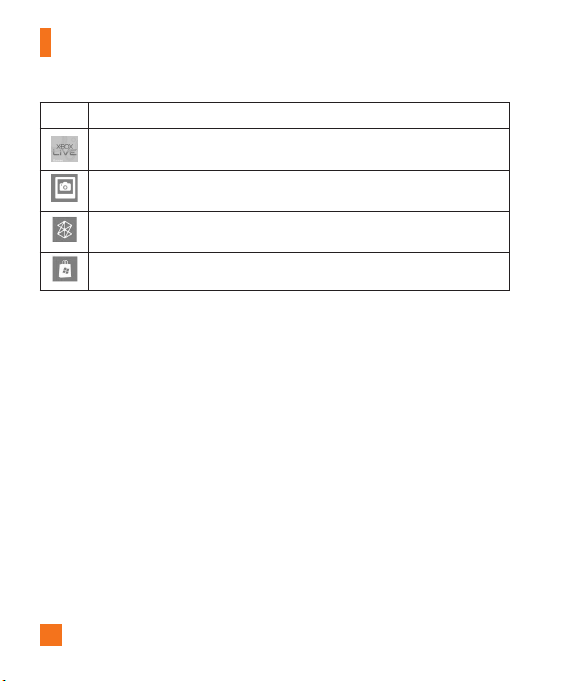
Icon Description
Access to Xbox Live to play a game and invite a friend to play it with you. You can
also download new games to your phone.
View photos and videos you’ve taken with your new Windows Phone, received in
Email or MMS messages, or synced from your computer’s Zune Software.
Play musics, videos and podcasts stored in the device by connecting to your PC to
synchronize your stuff.
Search and download applications to your Windows Phone.
n
NOTES
ScanSearch and PanoramaShot are downloadable through MarketPlace.
After downloading, these applications are displayed on Camera Settings.
16
Page 21
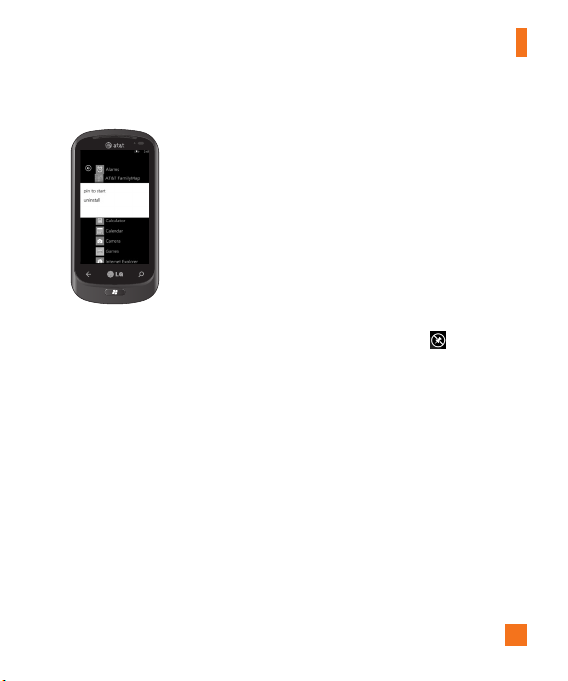
Customizing Start Screen
You can customize the layout of Tiles on the Start screen.
You can pin all sorts of things to the Start screen, including apps,
websites, map locations, and even contacts. When you pin a contact
to the Start screen, you’ll get all of that person’s feed updates—right
from that tile.
To pin most things to the Start screen, touch and hold the item until the
menu appears.
l
If you’d like to move a tile somewhere else on the Start screen, touch
and hold the tile, and move it wherever you’d like it.
l
To remove a tile, touch and hold it, then tap unpin .
Navigating Windows Phone
17
Page 22

Navigating Windows Phone
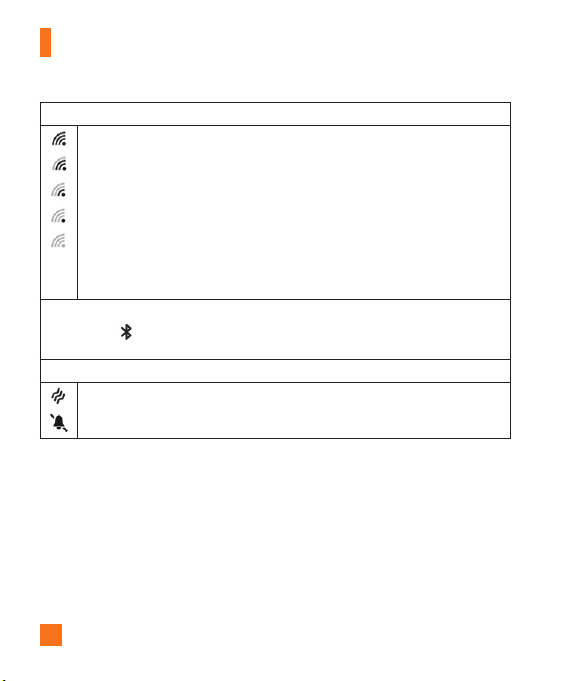
Viewing the status bar
The status bar uses different icons to display phone information, such as signal strength, new
messages, battery life, and active Bluetooth and data connections.
Below is a table explaining the meaning of icons you’re likely to see in the status bar.
[Status bar]
1 2 3 4 5 6 7 8 9
1. Cellular signal strength
2. Cellular data connection
3. Call forwarding
4. Wi-Fi connection
18
5. Bluetooth device
6. Phone profile
7. Input language and method
8. Battery
9. Clock
Page 23
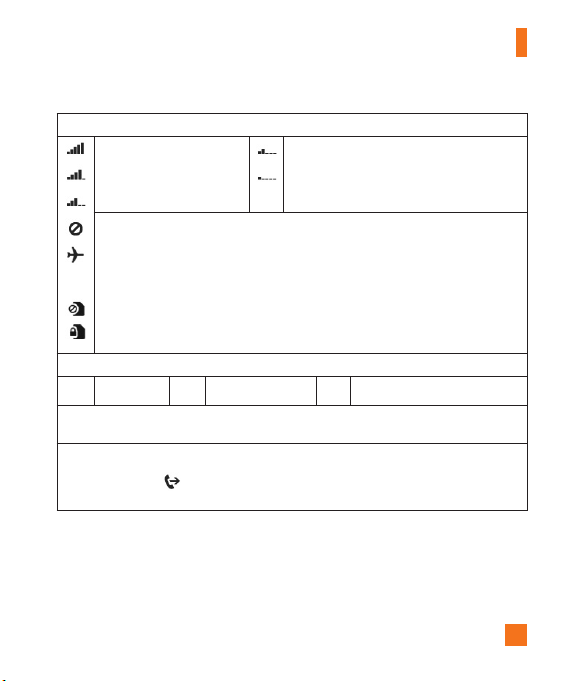
Navigating Windows Phone
1. Cellular signal strength
Very high signal strength
High signal strength
Medium signal strength
No signal because your phone isn't connected to a cellular network.
Your phone is in Airplane mode. Cellular, Wi-Fi, and Bluetooth connections are all
turned off simultaneously when you turn on Airplane mode. (However, you can still turn
Wi-Fi and Bluetooth on separately.) See What's Airplane mode? for more information.
SIM card is missing.
SIM card is locked. For more information, see Use a PIN to lock my SIM card.
2. Cellular data connection
GPRS
G
Note: The cellular data connection icons might look different on your phone and can vary by mobile
operator.
3. Call forwarding
The Call forwarding icon appears when the call forwarding is turned on. To learn how to
forward calls, see Make and receive phone calls.
EDGE
E
Low signal strength
Very low signal strength
3G
3G
19
Page 24
Navigating Windows Phone
4. Wi-Fi connection
Connected to a Wi-Fi network with a very high signal strength.
Connected to a Wi-Fi network with a high signal strength.
Connected to a Wi-Fi network with a medium signal strength.
Connected to a Wi-Fi network with a low signal strength.
Wi-Fi is turned on, but your phone isn't connected to a Wi-Fi network.
For more information about setting up a Wi-Fi connection on your phone, see Connect
to a Wi-Fi network.
5. Bluetooth device
The Bluetooth icon indicates that a Bluetooth device is connected to your phone. To learn
more, see Pair my phone with a Bluetooth accessory.
6. Phone profile
The phone is in Vibrate mode.
The phone is in Silent mode.
20
Page 25
7. Input language and method
Shift is on.
Shift Lock is on.
German (DE) is the current input language.
DE
English (EN) is the current input language.
EN
Spanish (ES) is the current input language.
ES
French (FR) is the current input language.
FR
Italian (IT) is the current input language.
IT
8. Battery
Battery is charging.
Phone is plugged in and
battery is fully charged.
Full battery power
High battery power
Medium battery power
9. Clock
The clock displays the current time.
Navigating Windows Phone
Fn is on.
Fn Lock is on.
Low battery power
Critically low battery power and needs to be
charged.
Battery power or state of the battery isn’t
known at the current time.
21
Page 26
Navigating Windows Phone
Navigating and Setting
Applications
Access applications
To access your Windows Phone’s applications,
1 On the Start screen, tap the arrow
or swipe from right to left to access the
application list.
2 Pan down to the tile if it isn’t already
visible.
3 Select an application.
4 Press the Back button to return to the
previous screen; Press the Start button
to return to the Start screen.
n
NOTES
• Your Windows Phone has a built-in motion sensor
that detects its orientation. If you rotate the
device while using some features, the interface
will automatically switch between landscape
and portrait view. This does not occur for every
application.
22
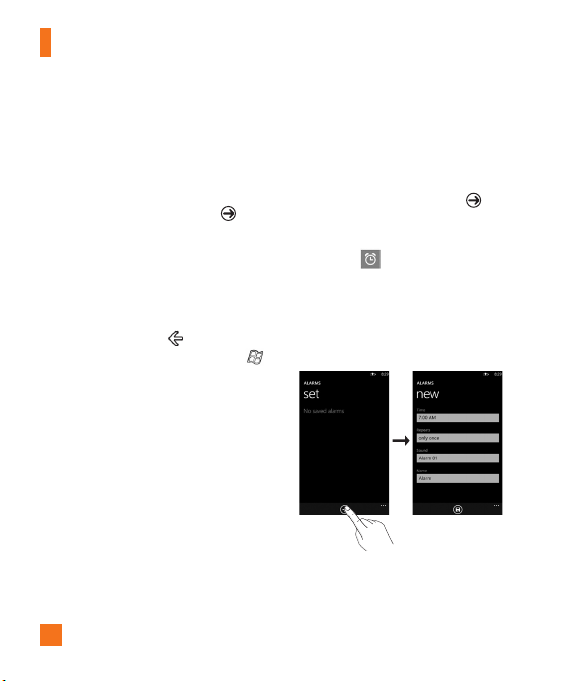
Getting to know application bar
To set the application, you can use the
application bar and application bar menu.
For example, to set the Alarms
1 On the Start screen, tap the arrow
or swipe from right to left to access the
application list.
2 Tap Alarms .
3 Tap the ... to expand the application menu
and see the text labels for the icons in the
application bar.
4 Select the icon button or menu which you
want to use.
Page 27

Application Bar and Menu
The Application Bar provides a view that
displays icon buttons with text hints and an
optional context menu when a user taps the
visual indicator of sequential dots or flicks
up the Application Bar. This view can be
dismissed by tapping outside of the menu
area or on the dots, using the back button, or
selecting a menu item or Application Bar Icon.
n
NOTES
• If no menu items are displayed, only the icon text
hints are displayed.
• The Application Bar Menu will remain on the
screen until the user performs an action.
Navigating Windows Phone
23
Page 28
Navigating Windows Phone
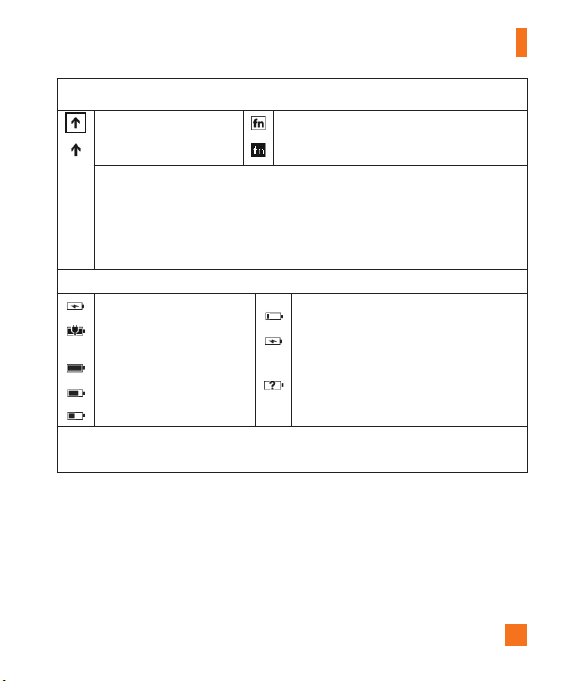
Application Bar icons
The following are some of the icons for the application setting that are frequently used.
NEW ADD
CLOSE CANCEL SYNC REFRESH
QUESTION MARK EXCLAMATION BACK NEXT
SEARCH DELETE SAVE FOLDER
VIDEO
FAVORITES
SHARE
PLAY
CAMERA
ADD TO FAVORITES
EDIT
PAUSE
REMOVE/MINUS
DOWNLOAD
EXPAND MENU
PREVIOUS/REWIND
24
E-MAIL
CONFIRM
SETTINGS
UPLOAD
NEXT/FASTFORWARD
Page 29

Navigating Windows Phone
Customizing your Windows
Phone
Get more from your device by customizing it
to match your preferences.
Set the current time and date
1 In Idle mode, open the application list and
select Settings " Date and time.
2 Tap the Set automatically bar and change
the date and time and other options.
Turn ringtones and sounds on
or off
You can adjust the sounds for ringtones and
other notifications.
1 On Start screen, tap the arrow or swipe
from right to left to go to application.
2 Tap Settings > System > ringtones &
sounds.
Switch to silent mode
You can switch to silent mode by pressing
the volume up or down keys, and tapping the
bell icon.
Adjust ringtone volume
Press the Volume Key up or down to adjust
the ringtone volume.
Select a lock screen wallpaper
1 On Start screen, tap the arrow or swipe
from right to left to go to application.
2 Tap Settings > System > lock &
wallpaper > change wallpaper.
3 Select an image and save.
You can also change the Screen time-out
and set a password.
25
Page 30

Navigating Windows Phone
Adjust display brightness
To adjust the brightness in the setting menu,
1 On Start screen, tap the arrow or swipe
from right to left to go to application.
2 Tap Settings > System > brightness.
3 Drag the Automatically Adjust slider to
get the desired brightness level.
NOTE: The brightness level of the display will
affect how quickly the device consumes battery
power.
26
Lock your SIM card
You can lock your device by activating the PIN
supplied with your SIM card.
1 On Start screen, tap the arrow or swipe
from right to left to go to application.
2 Tap Settings and scroll to the right to
select application > phone.
3 Drag the SIM security Slider to On.
4 Enter your PIN and select enter.
n
NOTES
• Once the PIN lock is enabled, you must enter the
PIN each time you turn on the device.
• If you enter an incorrect PIN too many times,
your SIM card will be blocked. You must enter a
PIN Unlock Key (PUK) to unblock the SIM card.
If you enter the incorrect PUK too many times,
your SIM will be permanently locked and require
replacement.
Page 31

Enter text
This section outlines how to select the
desired text input mode when entering
characters into your phone. This section also
describes how to use the on-screen keyboard
to ease the text entry method.
Here are some tips for using the on-screen
keyboard and text suggestions.
Keyboard overview
1
2 3 4
1 shift and caps lock
2 numbers and symbols
3 emoticons
4 enter
5 delete
To find numbers and symbols
When you tap the Numbers and symbols key
, you'll see: 0-9 , common punctuation and
common symbols.
5
Navigating Windows Phone
n
NOTES
• In Messaging, if you tap the Numbers key from
the To: line, you'll get a dial pad so you can easily
type a phone number.
To find more symbols
Tap More from the numbers keyboard
to show more symbols, including foreign
currency symbols, mathematical symbols, and
a few other useful ones.
To find still more symbols
Some of the symbol keys can bring up yet
more symbols. Tap and hold to see more
options. For example, if you tap and hold the
left parentheses key (, you'll see left angle
bracket <, left brace {, and left square bracket
[, too.
To use emoticons (smiley faces)
When you're typing an email or SMS
message, your keyboard offers two full pages
of smiley faces. Tap the Happy face to see
the first screen, then tap More to see
the rest.
27
Page 32

Navigating Windows Phone
To turn on Caps Lock
Tap and hold or double-tap the Shift key .
Tap it again to turn it off.
To quickly add a period
Tap Space twice to add a period.
To add accents to letters
• Automatically: For many words, your phone
will realize when a word requires an accent
and add it for you.
• Tap and hold: Tap and hold any letter
that can include an accent, and all of the
possible accents for that letter appear. Tap
the one you want to add.
To place your cursor where you
want it
If you want to place your cursor in the middle
of some text you've already written, tap and
hold the screen near the text you want to
change until a cursor appears, then drag your
finger to move the cursor exactly where you
want it.
28
If you want to select an entire word, tap
the word.
To use text suggestions and automatic
corrections
When you start typing, you'll notice that
your phone suggests words based on the
letters you've typed so far. You can tap the
suggestion to add it to your message, or keep
typing until you see the one you want. If a
suggested word is bold, your phone will use
it to replace the typed word automatically.
It'll also automatically add apostrophes to
contractions (for example, "dont" will be
replaced with "don't") and accents where
appropriate.
If it's not bold, you can tap the suggested
word to replace the one you've typed. Flick
left to see more options.
If you realize later that you mistyped
something, it's not too late. Tap that word and
your phone will bring back some suggestions
for you.
Page 33

Navigating Windows Phone
To change the settings for text
suggestions
You can choose whether to allow text
suggestions, correct misspelled words, insert
a space after selecting a suggestion, reset
text suggestions, and more.
1 On the Start screen, tap the arrow and
flick to go to the Apps list.
2 Tap Settings > Keyboard.
3 Do one of the following:
• Selectorclearanyofthecheckboxesfor
thesettingsyouwanttochange.
• Toremoveallthewordsyou'veadded
toyoursuggestionlist,ickupandtap
Resettextsuggestions.
Download applications from
Marketplace
Marketplace enables users to easily find &
acquire music and applications (including
games) to enhance their Windows Phone.
Individual category pages have been added to
the site for apps and games, and music.
• On the Start screen, tap the arrow or
swipe right to left to go to your App list and
tap Marketplace .
Or, tap Marketplace tile from the Start
screen.
• Press the Search button to search for
apps.
• Type in the desired text and tap " and
the results will be displayed below on the
same page.
• Tap an item in the list of search results to
open that Marketplace item.
• While browsing or searching for an app, a
user can tap on an application or game and
the Details page for the app will appear.
• Select the item you want to buy and tap
install.
n
NOTES
• Pictures, podcasts, and videos are not available on
the Marketplace.
• This feature may be unavailable depending on
your region.
29
Page 34

Communicating
Phone
Making phone calls
1 Touch .
2 Tap .
3 Enter the number on the keypad.
To delete a digit, touch .
4 Touch
5 To end a call, touch
You can also place calls using the Phone Tile
on the Start screen.
n
TIP
To enter “+” to make international calls, touch
and hold down [0+] .
Calling your contacts
1 Touch People to open your contacts.
2 Scroll through the contact list or enter the
first letter(s) of the contact you want to call
by touching .
3 In the list, touch the contact you want to
call, then select the number to use if there
is more than one for that contact.
30
to make a call.
call
end call
.
Answering and rejecting a call
When your phone rings, tap the answer
button to accept the call. If your screen is
locked you will need to flick up to unlock and
access the answer button.
Tap ignore tab to reject an incoming call.
n
TIP
When the phone rings, press the lower volume
key on the right if you want to switch to silent
ringer mode.
Airplane mode (to disable
wireless communication)
Some locations may require you to turn off
your phone’s wireless connections by placing
your phone in Airplane mode.
Tap Settings > system> airplane mode.
This features toggles your phone’s mobile,
Wi-Fi, and Bluetooth radios simultaneously.
Adjusting call volume
To adjust the volume during a call, use up &
down volume keys on the right side of the
phone.
Page 35

Making a second call
> Undo.
1 During your initial call, touch the then
tap .
2 Call the number, or search your
contacts using the or .
3 Touch the call icon to connect the call.
4 Both calls will be displayed on the
call screen.
Your initial call will be locked and put on hold.
5 Touch PRESS TO SWAP on the top of
the screen to toggle between calls.
6 To end active calls, touch end call.
If there is no active call, it will end the held
call.
n
NOTES
You will be charged seperately for each
additional outbound call. I.e. if you have one
outbound call active and one outbound call on
hold, you will be charged for both the active call
and the held call.
Viewing your call history
On the Start screen, press the to view
Call log.
View a complete list of all dialed, received,
and missed voice calls.
Communicating
n
TIP
Touch any single call log entry to view the date,
and time of the call.
n
TIP
Tap the
button then touch delete all to
delete all the recorded items.
Call settings
You can configure phone call settings, such
as call forwarding, and other special features
offered by your carrier.
1 On the Start screen, touch .
2 Tap the
3 Choose the options that you want to adjust.
Voicemail number - Edits the Voicemail
number
Show my caller ID to - Choose whether to
display your number on an outgoing call.
international assist- It will help
automatically correct some common mistakes
while dialing internationally or dialing while
abroad.
button at the bottom of the call
history screen and open the Call Settings
menu.
31
Page 36

Communicating
Searching for a contact
There are two ways to search for a contact:
On the Start screen
1 On the home screen, touch the People Hub
Tile to open your contacts.
2 Touch and enter the contact name
using the keypad.
n
TIP
To search by contact first initial, tap any of
the letters. e.g. tap the “a” shown above the
contacts starting with “a” and a list of initials
will be displayed to select.
From the application menu
1 On the Start screen, touch to go to the
application lists.
2 Touch the People and select the desired
profile.
32
Messaging
To send a text message
1 On the Start screen, tap Messaging
> New .
2 Do one of the following:
• Begin typing a person's name in the To: box, and
then tap a matching contact name in the list.
Repeat to add more recipients, and their names
will be added automatically in the To: box.
• Enter the person's mobile phone number or their
email address in the To: box. To enter additional
recipients, tap Enter after each one.
• Tap Add , flick to a contact, and then tap it.
Repeat to add more recipients, and their names
will be added automatically in the To: box.
3 Tap the message box, type your
message, and then tap Send .
Page 37

Communicating
To reply to a text message
1 On the Start screen, tap Messaging , and
then tap the conversation that has the text
message you received.
2 Tap the message box, type your response,
and then tap Send .
To forward a text message
1 On the Start screen, tap Messaging ,
and then tap the conversation that has the
text message you want to forward.
2 Touch and hold a message, and then tap
Forward.
3 Type the person's name, mobile phone
number, or email address in the To: box.
4 Tap the message box, type a message if
you'd like, and then tap Send .
n
NOTES
• Text messages are also called SMS (Short
Message Service) messages and can be up to 160
characters long.
• If your text message is longer than 160 characters,
it will be sent in one or more additional messages.
• Sometimes mobile operators will send a text
message that you can't reply to or forward, and
the message box says Read-only message.
Save a picture from a text
message
1 On the Start screen, tap Messaging .
2 Tap a conversation that has a picture, and
then tap the picture.
3 Touch and hold the opened picture, and
then tap Save to phone.
The picture is saved in the Saved Pictures
album on your phone.
n
NOTES
• Text messages that have a picture attached are
also called MMS (Multimedia Message Service)
messages.
• Some pictures you receive might be protected
using digital rights management and can't be
saved to your phone.
33
Page 38

Communicating
Email
Setting up an email account
Whether it's personal or work-related email,
you can get to it from your Windows Phone by
setting up different types of email accounts.
Depending on the email account you set up
on your phone, other items from your account
(such as contacts, calendar, and more) can
appear on your phone as well.
n
NOTES
• To set up an email account on your phone,
you must have a working mobile data or
Wi-Fi connection. For more information about
connecting to a Wi-Fi network, see Connect to a
Wi-Fi network.
34
Setting up a Windows Live
account
When you're first setting up your phone,
you're asked to sign in with your Windows
Live ID. If you didn't sign in with it at that
time or if you have more than one Windows
Live ID, you can use the steps below to set up
your primary Windows Live ID or additional
Windows Live IDs.
On the Start screen, press the arrow button to
the Apps list, tap Settings, and then tap
Email & accounts.
1 Tap Add an account > Windows Live
and follow the instruction on the screen.
n
NOTES
• The first Windows Live account that you set up
can't be deleted from your phone.
• If you set up additional Windows Live IDs on your
phone, photos in those additional accounts won't
be synced to your phone.
• You can create a Hotmail account here and
retrieve new email messages from Hotmail to your
Inbox. When you access this Hotmail application,
the total number of new emails displays on the
email tile.
Page 39

Communicating
Setting up a Microsoft Exchange
email account
You can use the following steps to set up
an email account that is on a Microsoft
Exchange Server. (For example, your email
account at work might be on a Microsoft
Exchange Server.) You can also use the
steps in the following procedure to set up
other email accounts that use Exchange
ActiveSync—including a hosted Microsoft
Exchange email account or an Outlook Web
App account.
1 On the Start screen, flick left to the Apps
list, tap Settings, and then tap Email
& accounts.
2 Tap Add an account > Outlook.
Setting up an email account
from an Internet Service
Provider (ISP)
When you set up an email account, your
phone will try to automatically find correct
settings for your email account. The email
account might be one that's through your
Internet Service Provider (ISP), or it might
be another IMAP or POP email account from
another provider.
1 On the Start screen, flick left to the Apps
list, tap Settings, and then tap Email
& accounts.
2 Tap Add an account > Other
account.
The following is a list of settings that you'll
need to know beforehand when the correct
email account settings can't be found
automatically. Generally, you can find this
information on the provider's website.
• The email account type (POP or IMAP)
• The incoming email server address
• The outgoing (SMTP) email server address
• Server authentication settings
• SSL requirements for incoming email
• SSL requirements for outgoing email
35
Page 40

Communicating
Sending an email message
After you set up an email account on your
phone, you can send or delete emails from
that account.
1 On the Start screen, tap the email account
that you want to access (for example,
Outlook, Google, or Windows Live).
2 Tap New .
3 Do one of the following:
• In the To: text box, tap Add , and then
choose a contact.
• Tap in the To: text box, and then start typing
an email address. Your phone will offer
suggestions as you type.
• To remove a recipient, tap their name or
email address, and then tap Remove.
4 Tap in the Subject: text box and type
a subject.
5 Tap below the Subject: text box, type
your message, and then tap Send .
n
NOTES
• You can attach files stored on your phone (such
as pictures and documents) to an email before
sending it.
Viewing email messages
1 On the Start screen, tap the email account
that you want to access (for example,
Outlook, Google, or Windows Live).
2 Select an email message.
From the message view, use the
following options:
• To reply to or forward an email, tap
Respond .
• To delete one email, tap on the email to
open it, and then tap Delete .
• To delete multiple emails, tap on the far
left of an email you want to delete. A check
box will appear. Tap the check box next to
each email you want to delete, and then
tap Delete.
36
Page 41

Communicating
Retrieving your email
You can automatically or manually check your
account for new email.
To check manually:
1 Tap on the Start screen to go to your
App list and tap the desired Account Name.
Or, you can also tap the Email tile on Start
screen, and which is the account you want
to use, like Hotmail, gmail, and so on.
2 Choose synchronise and your
Windows phone will then connect to
your email account and retrieve your
new messages.
Changing your email account’s
settings
You can set up additional accounts based on
your own preferences.
1 Tap on the Start screen to go to your
App list and tap the desired Account Name.
Or, you can also tap the Email tile on the
Start screen.
2 Touch the Application bar at the
bottom of the screen to open the
options menu, and tap add email
account.
3 Choose the email you want to
change to . There are options such as
Windows Live, Outlook, Yahoo! Mail,
Google and other account.
4 Enter your email address and
password, then it will automatically
synchronise with your new email
account.
37
Page 42

Communicating
You can change settings based on your own
preferences.
1 Touch the Application bar at the bottom of
the screen to open the options menu, and
tap settings.
2 You can change detail sync options by
tapping "sync settings" or checking/
dischecking "Always bcc myself" and
"Use an email signature".
n
NOTES
• In "sync settings" you can change the settings
below download new content : the period of
retrieving contents download email from content
to sync(email, contacts, calendar) : enable/disable
the contents and other detailed account
information.
Deleting your email account
1 Tap on the Start screen to go to your
App list.
2 Tap Settings and go to email &
accounts.
3 Touch and hold the account you want
to delete and tap delete.
38
Facebook
Set up a Facebook account
When you set up your Facebook account
on your phone, Facebook info is available
throughout your phone. You can then access
Facebook info in the People hub, Pictures hub,
and the Me card.
1 On the Start screen, flick left to the Apps
list, tap Settings > Email & accounts.
2 Tap Add an account > Facebook.
n
NOTES
• To set up your Facebook account on your phone,
you must have a working mobile data or Wi-Fi
connection.
• You can only have one Facebook account set up
on your phone at a time. At the same time you can
log in to other accounts such as Windows Live,
Facebook or Gmail.
Page 43

Entertainment
Camera
Before using the camera, you will be asked
whether you want to allow the camera to use
your location. Allowing this option will add
location info to your pictures so you can see
where your pictures were taken.
To take a picture
1 On the Start screen, flick left to the Apps
list.
2 Tap the Camera icon.
Or press and hold the Camera button
to start the camera.
3 Make sure the camera mode is
selected.
Hold the phone steady, either vertically or
horizontally. You can zoom in or out to
get closer or further away from your subject.
n
TIP
Want to play with camera settings? Tap to
adjust various settings, including flash.
4 Press the Camera button
on the right bottom of phone to take
a picture.
on the right bottom of phone
5 The picture is automatically saved in the
Camera Roll album on your phone.
You can also choose to upload pictures to
the web, including automatically sharing
your pictures to SkyDrive or Facebook.
Once you’ve taken the photo
1 After you take a picture, flick right to see it
in the picture viewer.
n
TIP
Want to see your pictures and videos in
filmstrip view? Go to the camera, tap a picture
or video, pinch it as if to shrink it, and then flick
left or right to see the filmstrip. The filmstrip
works best when you turn your phone sideways
and view your pictures in landscape view.
2 Touch and hold the picture to view
picture options such as adding it
as a favorite, deleting it, using it as
wallpaper, or uploading it to SkyDrive
or Facebook.
To record a video
1 On the Start screen, flick left to the Apps
list.
2 Tap the Camera icon.
39
Page 44

Entertainment
3 Make sure the video mode is selected.
Hold the phone steady, either vertically or
horizontally.
4 Press the Camera button to start or
stop recording.
The video is automatically saved in the
Camera Roll album on your phone.
After shooting a video
1 After you record a video, flick right, then tap
it to play it in the video viewer.
A still image representing your video will
appear on the screen and the duration will be
shown on the bottom of the screen.
NOTE: You can record and play HD video
(1280x720 high-def resolution). If you connect
your phone to your computer and copy the video
to it, you can play HD video in its full 1280x720
resolution.
n
TIP
• If you want to watch videos on your phone that
you downloaded from a website, connect your
phone to the PC and sync them to your phone. You
can't automatically upload videos to your phone.
• To find a video you captured from your phone
that you synced to your computer, open the Zune
software, click Collection > Videos.
• If you have a lot of pictures or videos that you
40
want to delete, or if you want to save them to
your computer, you can save time by connecting
the phone to your computer and using the Zune
software to do the heavy lifting for you.
Add location info to my pictures
When you include location (GPS) information
in the pictures you take, the information can
be seen by others after you upload and share
them. Once you do, you and your friends can
have fun viewing these pictures on a map
using Bing and Windows Live Photo Gallery,
and even searching the web for other pictures
just like it because the location is embedded
in your picture behind the scenes.
1 On the Start screen, flick left to the Apps
list, and tap Settings > Applications >
Pictures + Camera.
2 Turn on Include location (GPS) info in
pictures you take.
NOTE: If you want this information to stay
with your pictures when you upload them to
Facebook or SkyDrive, turn on Keep location info
on upload pictures.
Page 45

Entertainment
Getting to know the Camera mode
Camera/Video Record mode - Tap this icon to switch to Camera/Video Record mode
Zoom - Zoom in or zoom out.
Settings - Touch this icon to open the settings menu. See Using the advanced settings. Allows
you to set up Intelligent Shot, Beauty shot, ScanSearch, Photo Resolution and more.
Using the advanced Camera settings
From the viewfinder, touch to open all advanced settings options.
After selecting the appropriate option, tap and set the related setting.
Setting Options Function
Intelligent Shot
Your new Windows Phone automatically sets the shutter speed and
aperture according to the subject and brightness for optimum recording.
Beauty shot
Photo resolution
Brightness
White Balance
Your new Windows Phone automatically sets the focus and color balance
to express the natural skin tone.
The more pixels, the larger the file, which means the files take up more
memory space. If you want to store more pictures on your phone, you can
alter the number of megapixels to make the files smaller.
Brightness enables you to set the recording brightness according the
lighting condition.
It automatically adjusts the color of the subject. You can record in natural
colors depending on the subject and lighting conditions.
41
Page 46

Entertainment
Setting Options Function
Color effect
Select the desired setting options on the menu: off, sepia, mono,
negative, solarize
TIP! You can change a picture taken in color to black and white or sepia
after it is taken, but you cannot change a picture taken in mono or sepia
back to color.
Quality
Choose between Super fine, Fine and Normal. The finer the quality,
the sharper the photo. However, the file size will increase as a result,
which means you’ll be able to store fewer photos in the phone’s memory.
Anti-shake
Flash
Reduce blur caused by the device's vibration or movement.
Using the Flash function, you can set the built-in flash to fire under low
light conditions.
Video
Resolution
The more pixels, the larger the file size, which means the files take up
more memory space. If you want to store more videos on your phone, you
can alter their resolution to make the files smaller.
Restore to
Reset menus and shooting options to the default values.
default
n
NOTE
Before taking a photo, you cans go and tap Setting > Application > pictures + camera to access
the following settings: GPS, SkyDrive.
n
NOTE
ScanSearch and PanoramaShot are downloadable through MarketPlace.
After downloading, these applications are displayed on Camera Settings.
42
Page 47

Entertainment
Pictures
Learn to view photos and play videos saved in
your device's memory.
Pictures hub
The Pictures hub is Windows Phone's digital
version of those pictures in your wallet. Show
off all the pictures you took with the camera
on your phone, saved from an email, text
message, or off of the web, or downloaded
from your PC.
• Times Square wall. A showcase of local
pictures from your All view. The mosaic of
picture-perfect moments changes every 5th
time you turn on your phone. If you sync
your phone using the Zune software before
you visit the Pictures hub, you'll see your
pictures here when you arrive.
• What's New. These are the latest pictures
your friends and family uploaded to
Windows Live or Facebook.
• Picture collection. You can view your
pictures and videos by album, date, or
favorites. When you add a picture as a
favorite as part of your Favorites album,
you can then pin that album to the Start
screen.
• Hub background. Tap anywhere in the
hub to change the background or let us do
it for you using any of your pictures. Either
way, changing the background will also
change the Pictures tile on the Start screen.
• Zune software. Sync files with my phone
to move pictures from your PC into albums
on your phone and vice versa.
n
NOTE
When you go to the Pictures hub for the first
time, you'll see 8 pictures from the 7 folder in
the Times Square wall. To see a mosaic of your
own pictures here, you need to tap and hold the
7 folder to delete it. The Times Square wall will
now randomly pull in pictures from your Camera
Roll as well as albums you sync from your PC or
your social networking sites.
• Some file formats are not supported
depending on the software of the phone.
43
Page 48

Entertainment
• If the file size exceeds the available
memory, an error can occur when you
open files.
Picture Albums
Picture albums are a big part of how you
organize your pictures and videos—on your
phone, on your computer, and on the web.
Knowing where albums can be added to and
deleted from will help keep everything in
working order.
The Zune software puts pictures from your
phone albums—Camera Roll, Saved Pictures,
Received Pictures—into the Pictures library
on your computer.
n
NOTE
With the exception of viewing and deleting
albums, all other album tasks must be
completed using the Zune software on your
computer.
To view albums
1 Do one of the following:
• On your computer, click Phone > Pictures.
• On your phone, in the Pictures gallery,
tap All.
• On your phone, in the Pictures hub, flick
to What's new.
44
Viewing a picture
1 On the Start screen, tap the arrow or
swipe right to left to go to your App list and
tap Pictures.
Or, tap Pictures tile from the Start screen
if it’s pinned as your favorite Tile on Start.
2 In Pictures, pan and go to picture albums
(all, date, favorite) and tap a photo tile to
open and view.
While viewing a photo, use the following
options:
• To view more photos, scroll left or right.
• To zoom in or out, you can tap the screen
with two fingers and spread them apart
(move your fingers closer together to
zoom out).
Playing a video
1 In Pictures, pan and go to picture albums
(all, date, favorite) and tap a video tile to
open and view.
2 Tap a video tile to view.
3 Rotate the device counter-clockwise to
landscape view.
4 Control playback with the virtual keys.
Page 49

n
NOTE
Only recorded videos with your Windows Phone
can be played.
Share pictures
1 On the Start screen, tap Pictures.
2 Find a picture you want to share. Pictures
from online albums can't be uploaded.
3 Touch and hold the picture, then tap Share.
4 Choose a method to share your picture via
message or upload to the web.
n
NOTE
SkyDrive is part of Windows Live, a passwordprotected service on the web (photos.live.com),
where you can store and share your documents
and pictures up to 25 GB for free. Sign in with
your Windows Live ID and you're all set.
n
TIP
After you upload your pictures to SkyDrive from
your phone, you can find and edit them within
Windows Live Photo Gallery on your computer
without having to connect to the web. You must
have a computer running Windows Vista or
Windows 7. To see if you have Windows Live
Photo Gallery installed, from your computer,
click the Start button . In the search box,
type photo gallery, and in the list of results, click
Windows Live Photo Gallery.
Entertainment
Favorites in the Pictures gallery
Using the Favorites album on your Pictures
hub has the advantage of putting your most
interesting pictures in one place for easy
viewing. Pictures in Favorites are also the only
ones you can pin to the Start screen (if you
have certain pictures that make you happy
every time you see them).
1 On the Start screen, tap Pictures and find
a picture and tap to open it.
2 In the picture viewer, touch and hold
the picture, and then tap Add to
Favorites.
n
TIP
Want to add a picture from an online album
as a favorite? Open a picture, tap it, then tap
Save to phone. The picture will be added to the
Saved Pictures folder (In the Pictures hub, go
to All > Saved Pictures). Find the picture, then
follow Step 3 above to add a saved picture as
a favorite.
45
Page 50

Entertainment
Add or delete a caption from a
picture
To add a caption
You can add captions to pictures that you
upload to Facebook or Windows Live.
1 Tap and hold the picture, and then tap
Share.
2 Choose an account to upload your picture.
3 Tap the text box to type a caption.
You have 4 seconds to start typing or the picture
will be uploaded without a caption.
4 Tap Upload.
To delete a caption
You must be on your computer to delete a
caption, and you can only delete a caption
from a picture that you've uploaded.
1 Find your picture.
2 Sign in and follow the steps provided by
Facebook or Windows Live to delete a
caption.
Add location info to my pictures
When you include location (GPS) information
in the pictures you take, the information can
be seen by others after you upload and share
46
them. Once you do, you and your friends can
have fun viewing these pictures on a map
using Bing and Windows Live Photo Gallery,
and even searching the web for other pictures
just like it because the location is embedded
in your picture behind the scenes.
1 On the Start screen, flick left to the Apps
list, and tap Settings > Applications >
Pictures + Camera.
2 Turn on Include location (GPS) info in
pictures you take.
n
NOTE
If you want this information to stay with your
pictures when you upload them to Facebook or
SkyDrive, turn on Keep location info on upload
pictures.
Music + Videos
Sync files with my phone to move musics
and videos from your PC into albums on your
phone and vice versa.
Get music, videos, and podcasts
from Marketplace
Zune Marketplace is your one-stop shop
for great music, podcasts, movies, videos,
Page 51

Entertainment
TV shows, and more. Some stuff is free to
play, download, or sample. Other items are
available to buy or rent.
There are two ways to access Zune
Marketplace:
To download or stream music directly to
your phone
1 On the Start screen, tap Music & Videos.
2 Flick to Zune, and then tap Marketplace.
3 Find a song, album, artist, or playlist by
doing one of the following:
• Flick left or right, browse through the
available categories, and then tap the
desired item.
• Press the Search button , enter a song title,
album title, or artist name, and then tap the
desired item.
4. Follow the instructions to get your music,
videos, pictures, and so on into your
collection.
To sync music, videos, pictures, and
podcasts to your phone
There are several ways to copy or sync files to
and from your phone. To sync multimedia files
between your phone and your PC, you must
install a free program called Zune software
on your computer. The Zune software helps
you organize your multimedia collection,
choose what to sync to your phone, and even
download new stuff from Zune Marketplace.
1 Connect your phone to your PC using the
USB cable that came with your phone.
If the Zune software is installed on
your computer, the program will start
automatically. If it isn't installed on your
computer, see Install the Zune software.
If this is the first time you've connected
your phone to your PC, follow the
instructions in the Zune software to name
your phone and perform other setup tasks.
2 In the Zune software, click Collection.
3 Find the item you want to sync by
doing one of the following:
Click a category (Music, Videos, Pictures,
or Podcasts), and browse until you find the
item you want to sync to your phone (such
as a song, album, artist, playlist, genre,
and so on).
In the Search box, enter what you're
looking for (for example, a song title or
artist name). In the search results, click the
desired item.
47
Page 52

Entertainment
4 Drag the item to the phone icon in the
lower-left corner of the Zune software.
n
NOTE
Not all items are available for purchase, rental,
download, or streaming. Zune Marketplace
is not available in all locations or languages.
Zune Marketplace content varies by market. To
learn more about using Zune Marketplace, go
to Zune.net.
Play music, videos, and
podcasts
Your Windows Phone isn't just a phone. It's
also a great Zune music and video player.
Listen to music while you surf the web or
check your email, catch up on your favorite
podcasts on your commute, or enjoy a movie
on your next flight. There's no need carry
another device with you. Windows Phone has
all your entertainment needs covered.
To play music, videos, and podcasts
1 On the Start screen, tap Music + Videos.
2 Flick to Zune, and then tap Music,
Videos, or Podcasts.
3 Find the item you want to play by doing one
of the following:
48
• Flick left or right, tap a category (such as Artists,
Albums, or Songs), and flick up or down as
necessary.
• To search Zune Marketplace, press the Search
button, and then enter a song title, album title,
or artist name. (Zune Marketplace may not be
available in some countries or regions.)
4 Tap the item that you want to play.
If you need to adjust the volume, press the
Volume Up or Volume Down keys on the side
of your phone.
The table below lists the files supported by
this device.
Type Format Sync from Zune
SW
Audio Extension:
mp3, mp4,
m4a, wma
Codec: MP3,
AAC, WMA
Video Extension:
3gp, 3g2,
mp4, m4v,
wmv
Codec:
MPEG4,
H263, H264,
VC-1
Extension: mp3,
mp4, m4a, wma
Codec: MP3,
AAC, WMA
Extention: mp4,
m4v, wmv
Codec: MPEG4,
H.264, VC-1
Page 53

Entertainment
n
TIP
• There's a quick way to play all your music in
random order. Flick to Zune, and then tap Play .
This icon is next to Music.
• If you have a lot of items in a category (such as
Songs or Albums), there's a quick way to jump
to a particular point in the list without a lot of
scrolling. For example, let's say you're at the top
of the Songs list (in the "a" section) and you want
to play a song that starts with the letter "s." Tap
the colored box with the letter "a" in it. In the grid
of letters that appears, tap S.
n
TIP
• When playing songs or audio podcasts, you can
also skip to the next and previous items in the
playlist by flicking right or left.
• When playing videos, tap the screen to display the
playback controls. Press the Back button to return
to Music + Videos.
• Press the Volume Up or Volume Down buttons to
show the mini playback controls. This works even
when the screen is locked.
To show the current playlist
When you're playing music, the next few
items in the playlist are displayed beneath the
album image. To see all items in the playlist,
do the following:
1 Tap the name of the current song (beneath
the album image).
2 To hide the playlist, wait a few seconds or
press the Back button.
n
TIP
To play a different song in the playlist, flick up
or down as necessary, and then tap the name of
the item you want to play.
To show what's playing now
1 Do one of the following:
• Press the Volume Up or Volume Down
buttons. The name of the current song is
shown above the mini playback controls.
This works even if your phone is locked.
• In Music + Videos, flick to History.
To show related info about a song
1 In Music + Videos, when playing a song,
tap the artist name.
2 Flick left or right to see information
(when available), such as other albums
by this artist, album reviews, and artist
biographies.
49
Page 54

Entertainment
Games
Games hub
From the Games hub, you can play games not
just on the phone, you can also connect to
and extend your gaming experience to your
computer and your Xbox console.
• Spotlight. Read up on Xbox LIVE game
news, tips, and trends from the Xbox LIVE
team.
• Xbox LIVE Gamer Profile. Look at your
profile to view recently played games,
see your gamercard, change account
information, and even personalize your
avatar.
• Requests. View invitations to quickly
jump into game play, keep up with turn
notifications in a turn-based game, or
accept a nudge from your buddy to make
the next move.
• Collection. View all Xbox LIVE and other
games that you have on your phone in
one place.
50
To play a game
Xbox LIVE might not be available in your
area. If it is available and you want to play
games, use an existing Xbox LIVE account or
set up an Xbox LIVE account. You'll need to
install the game on your phone before you
can play it.
1 On the Start screen, tap Games.
2 Tap to open a game you've already
purchased.
If you want to play an Xbox LIVE game,
you'll need to sign in to (or join) Xbox LIVE.
3 If you want to see whether you have a
game invitation or a turn notification, flick
left to Requests.
If you want to play a game with a friend,
but don't have any games on your phone
that allow more than one player, flick to the
bottom of your collection, then tap Get more
games to see what you can try or buy from
Marketplace.
n
NOTE
Xbox LIVE may not be available in your country
or region.
Page 55

FM Radio
Learn to listen to music and news on the FM
radio. To listen to the FM radio, you must
connect the supplied headset, which serves
as the radio antenna.
To listen to a station
1 Plug the supplied headset into the
device. The headset is used by the FM
Radio as the antenna.
2 On the Start screen, tap Music + Videos.
3 Flick to Zune, and then tap Radio.
4 To choose a station, do one of the
following:
• Swipe left or right to go up or down the
dial. (If you flick instead of swipe, the radio
will auto-tune to the next station.
• Tap Favorites to show your favorite
stations.
n
TIPS
• Tap Play or Pause to start or stop
playback.
• When the screen is locked, press the Volume
Up or Volume Down buttons to show the mini
playback controls. You can use the controls to
pause or resume the radio or to skip to the next or
previous station.
Entertainment
n
NOTE
As you switch channels, you might see info
about each station, such as its genre and what
song or program is currently playing. It's up to
each station to choose what they broadcast, so
you might not see info for every station.
To add or remove a favorite station
To tune into stations more quickly, try adding
a few as favorites.
1 Tune in to a station.
2 Do one of the following:
• To add the station as a favorite, tap Add
Favorite .
• To remove the station as a favorite, tap
Remove Favorite .
n
TIPS
To show your favorite stations, tap Favorites.
You can also pin your favorite station to the
Start screen by pressing and holding the station
number.
51
Page 56

Entertainment
To switch between speaker and headset
modes
1 While playing a station, touch and hold the
station number.
2 Tap Radio mode: headset or Radio
mode: speaker to switch between the
two options.
To switch radio regions
If you travel internationally, you might need to
switch the radio region setting to listen to FM
radio when you're abroad. If you do change
this setting, don't forget to switch it back to
the original setting when you get home.
1 While playing a station, touch and hold the
station number.
2 Tap Settings.
3 On the Radio screen, tap the Region box,
and then tap the name that corresponds to
your desired radio region.
52
Page 57

Personal Information
Facebook
Set up a Facebook account
When you set up your Facebook account
on your phone, Facebook info is available
throughout your phone. You can then access
Facebook info in the People hub, Pictures hub,
and the Me card.
1 On the Start screen, flick left to the Apps
list, tap Settings > Email & accounts.
2 Tap Add an account > Facebook.
n
NOTES
• To set up your Facebook account on your phone,
you must have a working mobile data or Wi-Fi
connection.
• You can only have one Facebook account set up
on your phone at a time. At the same time you can
log in to other accounts such as Windows Live,
Facebook or Gmail.
People Hub
The first time you start up Windows Phone
7, the Start screen will be fairly bare. In the
People Hub, in particular, most of the nine
squares in the hub will be empty. After you
import your contacts, you can add photos to
your contacts, and the People tile squares will
show small thumbnails of your contacts. For
first time use, tap the People Hub to go to it.
Accessing the People Hub
When you open a contact, you’ll have all the
information you need to connect with your
friend in just a few taps.
Tap the method you want to use to connect
with your contact. It could be by phone, text
messaging, email, or Facebook.
For first time use, tap the People hub.
On the Start screen, tap People, and then do
one of the following:
• Flick left or right to What’s new to see
recent posts from your friends.
• Flick left or right to All to see all your
contacts from Facebook and other social
networks and email accounts.
About the contacts
Each contact has the name of the person at
the top of the screen. Underneath are the
ways to reach him (text mobile, call home,
send email, etc.), as well as any personal
information you want to enter.
53
Page 58

Personal Information
Importing contacts
One of the first things you’ll do with your
new phone is to create contacts. You start by
importing your existing contacts. Contacts can
be imported by your SIM card and through
email. They are automatically brought into
the People Hub.
1 On the Start screen, tap the arrow
or swipe right to left to go to your App
list and tap Settings > applications >
people.
2 Tap import SIM contacts to start the
process.
You can also import contacts from your
email accounts. Your MSN, Hotmail, and
Live.com accounts are all part of Windows
Live services and easily downloaded to
your phone.
Tap Windows Live to import your contacts
and calendar info from these accounts.
54
Adding a new contact
Now, let’s add a contact manually.
1 On the Start screen, go and tap People, and
tap the plus icon on the People Hub.
2 To add information, tap the plus sign icon
for each field you want to work with.
3 Tap the text field. Add the information
using the virtual keypad.
4 Tap the Done icon at the bottom of the
screen when you’re done with that field.
To link a person’s contact to another:
• Tap the link icon (circled chain link) at the
bottom of the screen and choose a contact.
To edit a contact
You can add or change information for a
contact, then choose which account you want
to store the changes in.
• Flick to All, find and tap the contact you
want to edit, and then tap Edit .
Page 59

Personal Information
To delete a contact
While you can't delete a Facebook contact
on your phone, you can delete contacts from
other services. When you do this, the contact
will be deleted both from your phone and
from the online service where it is stored.
Find a contact
Contacts on your phone can come from
Facebook, services like Windows Live or
Google, email accounts, or ones you’ve
created from scratch. If you find that your
contacts list is getting rather long, don’t
fret—here are some tips to make life a little
easier.
To jump to a letter of the alphabet
You can jump to a letter of the alphabet
rather than scroll through your entire contacts
list.
1 On the Start screen, tap People .
2 Flick to All, tap any letter of the alphabet,
and then tap the desired letter to jump to
that point in your contacts list.
To search your contacts list
If your contacts list is especially long, search
is probably the best way to find something.
1 On the Start screen, tap People .
2 Tap Search , and then start typing
someone’s name.
The list will filter as you type.
Me card
The Me card is your profile on your phone. It's
also where you go to see your most recent
Facebook and Windows Live posts, and to
post something new.
• On the Start screen, tap People , flick
to All, and then tap your profile picture.
• Or on the Start screen, tap Me.
Here are some things you can do on the
Me card:
• Post a new message to Facebook or
Windows Live.
• See and comment on posts to your
Facebook Wall. All posts to your Facebook
Wall appear on the Me card, including
posts by your friends.
55
Page 60

Personal Information
• Update your profile picture on your social
networks. You can update your profile
picture on your phone, Windows Live, and
Facebook all at once.
Post to Facebook and Windows
Live
You can post messages and pictures to
Facebook and Windows Live from your phone,
or comment on other people's posts. When
you write a new message, you can choose
whether you want to post it to Facebook,
Windows Live, or both.
1 On the Start screen, tap Me, and then tap
your most recent message (to the right of
your profile picture).
2 Type the message you want to post.
If you have more than one social network
account set up on your phone, tap the check
box next to each account to choose
which ones you want to post to.
3 Tap Post .
56
Calendar
Learn to create and manage daily, weekly
or monthly events, and set alarms to remind
yourself of important events.
Create an event
1 On the Start screen, tap the arrow or
swipe right to left to go to your App list and
tap Calendar .
2 Tap month to select the desired date,
then touch the new icon .
3 Enter the details of the event as required
and tap save icon.
View events
To change the calendar view,
1 On the Start screen, tap the arrow or
swipe right to left to go to your App list and
tap Calendar .
2 Simply swipe your finger left/right to
view the today's event as agenda or
day view.
To view events of a specific date,
1 On the Start screen, tap the arrow or
swipe right to left to go to your App list and
tap Calendar .
Page 61

Personal Information
2 Tap the month icon to select a date on the
calendar.
3 Tap an event to view its details.
Office
Get started with Microsoft
Office Mobile
Microsoft Office Mobile 2010 includes mobile
versions of Microsoft Office applications that
are made for your Windows Phone 7. You
don't need to download or install anything
else either. Just go to the Office hub on your
phone to open and work on your Microsoft
Office documents.
The Office hub is the place to get started with
Office Mobile 2010. Through the Office hub,
you can start using the different Office Mobile
applications on your phone—including:
• Microsoft Word Mobile 2010
• Microsoft Excel Mobile 2010
• Microsoft PowerPoint Mobile 2010
• Microsoft OneNote Mobile 2010
• Microsoft SharePoint Workspace Mobile
2010
To get to the Office hub, on the Start screen,
flick left to go to the Apps list, and then tap
Office . (If you think you'll use Office Mobile
2010 a lot, pin it to Start.)
Use Microsoft Word Mobile
With Microsoft Word Mobile 2010, you can
create new Microsoft Word documents or
read and revise existing ones on your phone.
Because it’s part of Office Mobile 2010 and
already on your Windows Phone 7 in the
Office hub, you don’t need to download
anything else to get started.
n
NOTE
Word Mobile doesn’t support all the features
that are found in Microsoft Word 2010. If a
document has content that’s not supported in
Word Mobile, you can still open the document
on your phone, but the unsupported content
won’t be displayed.
To create a new document
1 On the Start screen, press the arrow button
to the Apps list, and then tap Office .
2 Flick to Documents, tap New document
> Word document.
57
Page 62

Personal Information
, and then do one or more of the
To edit a document
1 On the Start screen, press the arrow button
to the Apps list, and then tap Office .
2 Flick to Documents, and then tap the
Word document you’d like to edit.
3 Tap Edit .
4 To format the text, tap Format
5 Type text you want to add.
6 To stop formatting the text, tap Format
and then tap an icon for the formatting
that’s currently being used to turn it off.
n
TIPS
• You can use more than one formatting option at
a time. To do this, tap Format , and then choose
the first formatting option. After that, tap Format
again and choose the next formatting option you
want to use, and then type your text.
• You can also format text by selecting it first, and
then applying the formatting that you want to use.
Use Microsoft Excel Mobile
Microsoft Excel Mobile 2010 allows you to
create or edit Microsoft Excel workbooks
right on your phone. Because it’s part of
Microsoft Office Mobile 2010 and already
on your Windows Phone 7, you don’t need
to download or install anything else to get
started.
58
n
NOTE
Excel Mobile doesn’t support all the features
and functions that are found in Microsoft Excel
2010. If a workbook has content that’s not
supported, you can still open the workbook on
your phone, but the unsupported content won’t
be displayed. If a function isn’t supported, the
.
calculated value still appears in the cell but
won’t be recalculated if the data changes. Some
data and formatting might be lost when you
save it on your phone.
,
To create a new Excel workbook
1 On the Start screen, flick left to the Apps
list, and then tap Office .
2 Flick to Documents, tap New document
> Excel workbook.
Use Microsoft PowerPoint
Mobile
With Microsoft PowerPoint Mobile 2010, you
can open and view Microsoft PowerPoint
presentations, make small changes, and add
notes if you want. You can even watch a
presentation that’s broadcast online. Because
PowerPoint Mobile is part of Office Mobile
2010 and already on your Windows Phone 7
in the Office hub, you don’t need to download
or install anything else to get started.
Page 63

Personal Information
n
NOTE
PowerPoint Mobile doesn’t support all the
features that are found in Microsoft PowerPoint
2010. If a presentation has content that’s not
supported, you can still open the presentation
on your phone, but the unsupported content
won’t be displayed or will be displayed
differently.
To open an existing PowerPoint
presentation
1 On the Start screen, flick left to the Apps
list, and then tap Office .
2 Flick to Documents, and then tap a
PowerPoint presentation.
Use Microsoft OneNote Mobile
Microsoft OneNote Mobile 2010 lets you
take new notes and view existing Microsoft
OneNote notebooks on your Windows Phone
7. You can use your notes as an extension
of your mental memory, helping you remember
everything from what happened in that
meeting at work to what you need to pick
up at the grocery store on the way home.
Because OneNote Mobile is part of Microsoft
Office Mobile 2010 and already on your
Windows Phone 7 in the Office hub, you don’t
need to download or install anything else to
get started.
In addition to storing notes on your phone, you
can also add notes to a OneNote notebook
that’s created for you and synced to Windows
Live SkyDrive.
This way, you can view and edit your notes
on your phone using OneNote Mobile, on your
computer using Microsoft OneNote 2010, or
online using Microsoft OneNote Web App in
a web browser.
n
NOTE
OneNote Mobile doesn’t support all the features
that are found in Microsoft OneNote 2010 or
Microsoft OneNote Web App. If a notebook has
content that’s not supported in OneNote Mobile,
you can still open the notebook and view it on
your phone, but the unsupported content won’t
be displayed in OneNote Mobile
To create a new note in OneNote Mobile
1 On the Start screen, flick left to the Apps
list, and then tap Office .
2 Flick to OneNote, and then tap New
note .
3 If you want to include a title, tap Enter title,
and then type a title.
59
Page 64

Personal Information
> Undo.
> Undo.
4 Tap below the title, and then type your
notes.
5 To undo the last change you made, tap
More
> Undo.
6 To redo the last change you undid, tap
More
> Redo.
n
NOTES
• These notes are stored on your phone. Like
Microsoft OneNote on your computer, your
changes are saved automatically when you leave
OneNote Mobile, such as when you press the
Back or Start button on your phone.
• If you don’t type a title, the first line of text in your
note will be used as the title.
To sync a notebook on Windows Live
SkyDrive for the first time
1 On the Start screen, flick left to the Apps
list, and then tap Office .
2 Flick to OneNote, and then tap All
3 Tap Refresh
.
4 Tap Yes in the Sync with SkyDrive message
box. Wait while you’re signed in with your
Windows Live ID.
Afterwards, a personal notebook named
Personal (Web) will be created in your
My Documents folder on Windows Live
SkyDrive and synced on your phone.
60
5 Type your notes.
n
NOTES
• To ensure that this notebook syncs properly to
Windows Live SkyDrive, do not change the default
notebook name from Personal (Web), and don’t
change the name of the Unfiled Notes section in
the notebook.
• Before you can create and sync your default
OneNote notebook, a Windows Live ID must be
set up on your phone, and you must accept the
End User License Agreement for Windows Live
SkyDrive.
Use Microsoft SharePoint
Workspace Mobile
With Microsoft SharePoint Workspace Mobile
2010, you can open, edit, and save Microsoft
Office documents that are on a SharePoint
2010 site (a website that lets you and others
share and collaborate on documents, projects,
.
schedules, and ideas). You don’t need to
download or install anything to start using
SharePoint and Microsoft Office documents
on your phone. SharePoint Workspace Mobile
is part of Microsoft Office Mobile 2010 and is
already there in the Office hub on your phone.
Page 65

Personal Information
> Undo.
n
NOTES
• To access a SharePoint site using SharePoint
Workspace Mobile from inside your organization,
you’ll need to set up a Wi-Fi connection that lets
you access a SharePoint site on your company’s
network.
• If you’d like to learn more about SharePoint, visit
the Microsoft SharePoint 2010 website.
To open a SharePoint site for the first
time using SharePoint Workspace
Mobile
1 On the Start screen, flick left to the Apps
list, and then tap Office .
2 Flick to SharePoint, and then tap Open
URL
.
3 Next to http://, type the address for a
SharePoint site, document library, list, or
folder, and then tap Go
If you’re at your computer, it might help to
open the SharePoint site on it, so you can
see the SharePoint address that you’ll need
to type on your phone.
4 If the Signing in screen displays, do the
following, and then tap Done:
If you have an Exchange email account set
up on your phone, SharePoint will try to use
that user name and password information
to sign in to the SharePoint site. If it’s
successful, you won’t need to enter your
user name and password and this screen
won’t appear.
5 Tap More
> Bookmark this link > OK
in the Link added screen to bookmark the
link for later.
To browse a SharePoint site
1 After you’ve opened a SharePoint site
in SharePoint Workspace Mobile, go to
SharePoint in the Office hub, and then
tap All
.
2 At the top, tap Links, and then tap the
.
SharePoint site, document library, list, or
folder that you want to browse.
3 Tap Up
to go up one level in the
SharePoint site.
4 To open the SharePoint site in your phone’s
web browser, tap More
> Open in
browser.
61
Page 66

The Web
Internet
Open webpages
Internet Explorer Mobile makes it easier to
surf the web on the go. It includes handy
features such as tabs, which let you open
multiple webpages at once.
1. refresh page
2. address bar
3. add a favorite
website
4. see favorites or
browsing history
5. show tabs
6. more menu options
31425 6
To open a webpage
1 On the Start screen, tap Internet Explorer
, then tap the address bar.
2 Type the web address.
As you type, Internet Explorer Mobile will
suggest possible matches. If you see the site
you're looking for, tap it.
3 Otherwise, tap Go .
n
TIPS
• Need to search the web? Press the Search button
. Or type your search term into the address
bar in Internet Explorer Mobile.
• Don't see a list of suggestions when you enter an
address? On the Start screen, flick left to the Apps
list, tap Settings > Internet Explorer, and
then select Let Bing suggest sites as I type.
n
NOTES
You'll need a mobile data or Wi-Fi connection to
browse the web in Internet Explorer Mobile.
To cancel a webpage
1 To stop a webpage from loading, tap Cancel
in the address bar.
To open a new tab
You can open six separate browser windows
(called "tabs" in Internet Explorer Mobile)
simultaneously. Tabs provide a handy way to
jump around to multiple websites.
1 On the Start screen, tap Internet Explorer
, then tap Tabs .
2 Tap New to open a blank tab.
n
TIPS
The Tabs icon shows you the number of
tabs you have open.
62
Page 67

The Web
To switch between tabs
1 In Internet Explorer, tap Tabs .
2 Tap the thumbnail of the tab you want
to see full screen.
Navigate webpages
Once you learn the tricks, surfing on your
phone with Internet Explorer Mobile is almost
as easy as surfing on your PC.
To scroll and zoom
1 Do one of the following:
• Flick your finger across the screen in any direction
to move the webpage. The faster you flick, the
faster the page scrolls.
• Spread your thumb and forefinger apart to zoom
in on a webpage. Pinch your fingers together to
zoom out.
• Double-tap your finger on a webpage to
automatically center and zoom in on that spot.
Double-tap again to zoom out.
To open a link
1 Touch an underlined link to open it in
Internet Explorer Mobile.
n
TIPS
If you see a phone number or street address
on a website, you can often tap it to dial the
number or map the address directly.
To navigate between webpages
It's easy to go back and forth between
webpages or sites you've previously seen.
1 Do one of the following:
• To go back, press the Back button on your
phone.
• To skip ahead, tap More , then tap Forward.
n
TIPS
Use your saved browsing history to quickly
return to older sites you've visited. Tap
Favorites, flick to History, and then tap the
site you want to see again.
To find text on a webpage
1 In Internet Explorer Mobile, tap More
, then tap Find on page.
2 Type the word or phrase you want to
find, then tap Go .
Change privacy and other browser
settings
Internet Explorer Mobile makes it easy to
change privacy settings on your phone and
control your browsing experience.
1 On the Start screen, flick left to the Apps
list, and then tap Settings .
63
Page 68

The Web
2 Flick to Applications, then tap Internet
Explorer.
To delete cookies, history, and saved
passwords
1 Tap Delete history to erase browser
history, saved cookies and passwords, and
temporary Internet files from your phone.
To turn cookies on or off
Cookies are small files on your phone that
websites use to remember things like your
password or preferences, so you don't have
to retype information each time you visit. You
can easily prevent cookies from being stored
on your phone.
1 Select or clear Allow cookies on my phone
to permit or block cookies from being saved
on your phone.
To turn address autosuggestion on
or off
Bing Search can suggest websites as you
type into the address bar—potentially a big
time saver.
1 Select or clear Let Bing suggest sites as
I type.
64
To set your website preferences
Many websites today offer a slimmed-down
version of their full desktop site that's
customized for the smaller screens and slower
Internet connections commonly found on
mobile phones. Some people prefer these
mobile sites, others don't. Internet Explorer
Mobile can help show you the version you
prefer.
1 Under Website preference, select either
Mobile version or Desktop version.
n
NOTES
You'll need a mobile data or Wi-Fi connection
to browse the web in Internet Explorer Mobile
Maps
Use Maps to find a place
The Maps app in Windows Phone 7 can
show you where you are, where you'll find an
address, and provide turn-by-turn directions
straight there. It can also show you what
stores or restaurants are in your vicinity and
what other people are saying about them.
Page 69

The Web
1. get directions
2. show your location
3. find address of
place
4. more menu options
1 23 4
To move around the map
1 On the Start screen, flick left to go to the
Apps list, then tap Maps .
n
TIPS
If this is your first time accessing Maps, when
you see Allow Maps to access and use your
location? tap Allow.
2 Do any of the following:
• Flickyourngeracrossthescreeninany
directiontomovethemap.Thefaster
youick,thefasterthemapscrolls.
• Tozoomin,spreadyourthumband
forengerapartonthemap.Tozoom
out,pinchyourngerstogether.
• Double-tapthemaptoautomatically
centerandzoominonaspot.Doubletapagaintogetevencloser.
n
NOTE
At maximum zoom, the map will automatically
change to satellite view.
To find your current location
Tap Me .
n
NOTE
Certain features of Maps may not be available
in your country or region.
You'll need a mobile data or Wi-Fi connection
to use Maps.
To find an address or place
1 On the Start screen, flick to the Apps list,
then tap Maps .
2 Tap Search .
3 In the search box, type any of the
following:
• Anaddress(1MicrosoftWay,Redmond,
WA)
• AZIPCode(90052)
• Acity(Seattle,WA)
• Abusinessnameortype(coeeshop)
• Anintersection(1st&Main)
• Apointofinterest(SpaceNeedle)
4 Tap Go .
65
Page 70

The Web
n
TIPS
• To get directions to a spot and see what's nearby,
tap a pushpin. Pushpins for a store or restaurant
also might include a street address, phone
number, web address, and customer reviews.
• To see all the pushpins as a list, tap More
> Results list. To remove pins from the map, tap
More > Clear map.
• Pin a map location to the Start screen for quicker
access. Just tap a pushpin, and then tap Pin .
To get directions to an address or
place
Windows Phone can guide you to your
destination with written turn-by-turn
directions. It also shows the total distance
and estimated travel time.
1 On the Start screen, flick to the Apps list,
then tap Maps .
2 Tap Directions .
3 Type one of the following:
• Anaddress
• Arestaurant,store,orotherbusiness
name
2 Tap Go .
3 Tap Walking or Driving ,
depending on how you plan to travel.
66
n
TIPS
• Tap a direction to see it highlighted on the map.
• Maps assumes you always want to start from your
current location. To start from someplace else, tap
My Location and type another starting point.
• Instead of an address, type a business name into
the destination box and Maps will automatically
route you there.
• Tap Start or End to reverse the starting or ending
points for your trip.
Marketplace
Marketplace lets you download useful
applications and musics and games. If you
install them from Marketplace, they appear
in App list.
1 Tap on the Start screen to go to your
App list and tap Marketplace application
or you can also tap Marketplace tile on
the Start screen.
2 Marketplace has three categories
- apps, games, music. Select one you
need to install or download.
Page 71

Connectivity
Bluetooth
Bluetooth is a short-range wireless
communications technology capable of
exchanging information over a distance of
about 10 meters without requiring a physical
connection.
You do not need to line up the devices to
beam information with Bluetooth. If the
devices are within range of one another, you
can exchange information between them even
if they are located in different rooms.
n
NOTES
• LG is not responsible for the loss, interception, or
misuse of data sent or received via the Bluetooth
wireless feature.
• Always ensure that you share and receive
data with devices that are trusted and properly
secured. If there are obstacles between the
devices, the operating distance may be reduced.
Turn on the Bluetooth wireless
feature
1 On the Start screen, tap the arrow or
swipe right to left to go to your App list.
2 Tap Settings > System > Bluetooth.
3 To turn on Bluetooth, drag the Status
slider to On.
4 Starts to search the Bluetooth enabled
headset.
5 Tap a device which you want to pair.
67
Page 72

Connectivity
To connect to a Bluetooth
headset
Once paired, you can connect to a Bluetooth
device as needed.
• If Bluetooth is off, touch Bluetooth to turn
it on. In the list of Bluetooth devices, touch
the name for the paired device on the list.
n
NOTES
• Later, when you want to turn off your Bluetooth,
go to Settings, then tap Bluetooth and slide the
toggle left to the Off position.
• Once the Bluetooth has been set up, the Windows
Phone 7 recognizes it when it is turned on.
• When the Bluetooth settings menu is displayed,
your Windows Phone is visible to other devices,
otherwise, your device is hidden.
68
Wi-Fi
Learn to use your device’s wireless
networking capabilities to activate and
connect to any wireless local area network
(WLAN) compatible with the IEEE 802.11 b/g/
n standards. You can connect to the internet
or other network devices anywhere an access
point or wireless hotspot is available.
Page 73

Connect to a Wi-Fi network
You can use your Windows Phone to connect
to an available Wi-Fi network in your location,
in addition to connecting to a mobile network.
Wi-Fi connections are typically faster than
your mobile data connection. This can save on
costs if you're not on an unlimited data plan,
or if you can't connect to your mobile network
for some reason. Some Wi-Fi networks are
secured and may require a password before
you can connect to the network.
1 On the Start screen, tap the arrow or
swipe right to left to go to your App list.
2 Tap Settings > System > Wi-Fi to connect
to a wireless network.
3 Move the slider to On to turn on wireless
connections. In most cases you’ll see both
secure and unsecured networks.
4 Now tap the network you want to connect
to.
5 On the next screen, tap the text fields. Then
type your user name or password.
6 Tap done to finish.
Connectivity
n
TIPS!
• Your phone will notify you periodically if there are
available Wi-Fi networks in your area, and you
can tap the notification to connect to the network,
or to turn off notifications. If you don't want to be
notified when a Wi-Fi network is available, return
to Settings > Wi-Fi and clear the Notify me
when new networks are found check box. When
notifications are turned off, you can still check for
Wi-Fi networks by returning to this screen.
• If you want to connect to a secure network, you
might have to enter a user name and a password. If
so, tap Done when you're finished.
• To disconnect from a network, tap and hold it, and
then tap Delete.
• Your device uses non-harmonised frequency and
is intended for use in all European countries.
The WLAN can be operated in the EU without
restriction indoors, but cannot be operated outdoors
in France.
n
NOTES
• To turn off Wi-Fi, go back to the Settings screen,
and set Wi-Fi to Off.
• When you turn Wi-Fi back on, your phone will
remember the network settings and automatically
connect.
69
Page 74

Connectivity
Play To
Learn to use Play To compatible with the
Digital Living Network Alliance(DLNA) service
that enables you to have contents in your
phone play with DLNA DMR-enabled devices
in your home over a Wi-Fi network.
Before you start!: You must first activate
the Wi-Fi feature and add a Wi-Fi network
connection profile.
Customise DLNA settings for
Streaming media files
To allow other DLNA-enabled devices to
receive media files from your device, you must
activate Play To(media sharing).
1 On the Start screen, tap the arrow or
swipe right to left to go to your App list and
select Play To.
2 Tap Device icon on the notification bar.
3 Adjust the following settings to
customise the DLNA feature:
- Settings > System > Wi-Fi to On.
- you need to be connected to the Wi-Fi
network before you choose the target
device for Play To.
n
NOTES
• Some files may not play on the DLNA DMRenabled devices.
• Playback may not be instantaneous, but instead
buffered, depending on the network connection
and the connected DLNA DMR-enabled devices.
• You will need a DLNA-certified device that
supports DMR (Digital Media Render) service
for use with Play To. Go to http://www.dlna.org/
products/ to check if your device is compatible.
Play your files on another DLNA
DMR-enabled devices
1 On the Start screen, tap the arrow or
swipe right to left to go to your App list and
select Play To.
2 Tap Device icon on the notification bar and
choose target. Your device automatically
searches for DLNA DMR-enabled devices.
3 Select a media category > a file.
4 Playback begins at the selected player.
5 Control playback using icons of your device.
n
NOTES
• Playback may be buffered, depending on the
network connection and the connected server.
• You can search DLNA DMR-enabled devices only
if they are turned on.
70
Page 75

Utilities
Setting your alarm
1 Tap on the Start screen to go to your
App list and tap Alarms application.
2 If you want to add a new alarm, tap on
the bottom option menu bar.
3 Touch Time to set the time you want the
alarm to sound.
4 Set the repeat.
The icons indicate the weekday you select.
5 Choose the sound would like and enter a
name for the alarm. When you are finished,
touch at the bottom of the page to save
your alarm.
n
NOTE!
• To delete an alarm item, tap on the alarm item to
open it, and then tap Delete.
Using your calculator
1 Tap on the Start screen to go to
your App list and tap Calculator
application.
2 Touch the number buttons to enter
numbers.
3 For simple calculations, touch the function
you want (+, –, x, or ÷), followed by =.
4 For more complex calculations, change the
display mode to landscape, then choose
sin, cos, tan, log, and so on.
Search
Search for stuff
The Search button is your one-push avenue to
fast answers, both on and off your phone. In
addition to web searches, you can also press
Search to find email, calls, contacts, or new
apps to buy. It all depends on the app you're
using when you press it.
To find something on the web
1 Press the Search button .
(If you press Search within call history,
email, Marketplace, or People, you'll
need to press it again to search the web.
Otherwise you'll be searching just those
apps.)
2 Tap the Search box, then type a word
or phrase.
3 Tap Go .
71
Page 76

Utilities
n
TIPS!
• You can narrow or broaden your search results by
flicking to Web, Local, or News.
n
NOTES
• Certain features of Bing, such as local search, may
not be available in your country or region.
• You'll need a cellular data or Wi-Fi connection to
search the web, Maps, or Marketplace.
72
Page 77

Applications
AT&T FamilyMap
Locate your family members with AT&T
FamilyMap! Get peace of mind by being able
to conveniently locate a family member’s
wireless phone on a map from your mobile
phone or PC. Want to verify that your child
arrives home from school each day? Set up a
Schedule Check to automatically get location
information sent to you via text message or
email. Locate any phone indoors or outdoors
on the AT&T Network!
For more information, click here.
My Wireless
Gives access to your bill, usage details, and
your devices’ current and available features.
You can even break it down by phone number
if you have an account with multiple lines.
Hit the jump for details and link to mobile
download.
For more information, click here.
AT&T Navigator
Find Your Way Safely with GPS Navigation:
Get where you’re going with turn-by-turn
voice and onscreen driving directions and
automatic rerouting if you miss a turn. Save
Time On Your Daily Commute with Proactive
Traffic Alerts: Real-time traffic monitoring
along your route to alert you of slowdowns
and incidents so you can reroute to avoid
them. Find the Closest ATM, Restaurants, Gas
Station, Wi-Fi Hotspots and More: Locate
and navigate restaurants, Wi-Fi hotspots
and more. Search and rate over 10 million
business listings.
For more information, click here.
73
Page 78

Applications
AT&T Radio
Lets you bring 400+ stations anywhere you
go. Get the best in radio with iheartradio
including local stations from across the nation
or access a limitless selection of music by
creating personal radio stations inside Last.
fm. Enjoy all the best in music, from Hip-Hop
and R&B to Rock, Pop, Latin and more, PLUS
the best in talk radio such as Fox Sports,
AccuWeather, ABC News, and The Onion.
For more information, click here.
U-verse
U-verse Mobile gives U-verse TV customers
one-app access to download and watch
TV shows and schedule their home DVR
recordings directly on their smartphone.
With AT&T U-verse, we’re delivering a better
television experience than cable — from
unmatched features and quadruple-play
integration, to value and customer service.
And our customers agree.
By utilizing the power of our 100-percent
Internet Protocol (IP) network, we’re
enhancing the customer experience to bring a
74
competitive TV choice and integrated TV, high
speed Internet, home phone, and wireless
services to you.
For more information, click here.
Page 79

Settings
In this menu, you can personalise the setting
of your phone. Touch on the Start screen
to go to app list and tap settings.
System Settings
ringtones & sounds
You can adjust the sounds for Ringtone, New
text message, New voicemail, New email and
other options.
Set to play a sound for Appointment
reminders, Key press, Lock and unlock, All
other notifications.
theme
Change your phone’s background and accent
color to match your mood today, this week,
or all month.
airplane mode
Toggle your phone’s mobile, Wi-Fi, and
Bluetooth radios simultaneously. You’ll still be
able to toggle Wi-Fi and Bluetooth separately.
Wi-Fi
Turn on Wi-Fi to connect to available Wi-Fi
networks.
Wi-Fi settings – Set network notification, or
add a Wi-Fi network
Bluetooth
Search and connect to Bluetooth devices.
email & accounts
Set up email, contacts, Facebook and others.
lock & wallpaper
Set to change wallpaper and screen time-out.
Toggle to set password and create a 4-digit
password.
location
Applications for which you’ve previously
enabled location services can now access
your current location.
75
Page 80

Settings
cellular
Set Data connection and Data roaming.
date & time
Set date, time, and time zone
brightness
Adjust the brightness of the screen.
keyboard
Set Keyboard languages. You can check to
Suggest text and highlight misspelt words,
Correct misspelt words, Insert a space after
selecting a suggestion, Insert a full-stop after
double-clicking the SPACEBAR, Capitalise the
first letter of a sentence.
region & language
Set Display language, Region format, Short
date, Long date, First day of week, System
locale and Browser & search language.
ease of access
Set TTY/TDD mode
76
speech
Set to Play audio confirmations and Use
Speech when the phone is locked.
find my phone
Map, ring, lock or erase your phone at
windowsphone.live.com
When you’ve lost your phone, it will help you
find your phone. Go to windowsphone.live.
com and sign in your Windowslive ID and
password.
phone update
Notify you when new updates are found.
Use your mobile data connection to check
for updates.
about
View legal information, and check phone
status and software version.
feedback
Send feedback to help improve Windows
Phone
Page 81

Settings
Applications Settings
games
Connect to Xbox LIVE On/Off.
Internet Explorer
Check whether you allow cookies on your
phone or not. Also you can set if you let Bing
suggest sites as you type.
Choose website preference.
Mobile version or Desktop version
delete history
Delete all temporary files, history, cookies and
saved passwords from Internet Explorer.
maps
Toggle Use my location On/Off.
It uses your location to provide you with
better local search results.
delete history
Delete previous map searches, pins and
image data from your phone.
messaging
This is used to send and receive messages.
music & videos
Connect with Zune On/Off.
Turn on to automatically download
information that enhances your Zune
experience.
Office
username
Enter your user information to identify yourself
in comments and to help with collaboration
and document tracking.
SharePoint
• data store
You can create space on your phone by
clearing the SharePoint cache. This will
delete all temporary SharePoint files and
history.
• conflicts
SharePoint lets you choose how to manage
conflicts between files on your phone and
the server. You can choose the way you
want to resolve conflicts.
- Notify me and I’ll resolve the conflict
manually.
- Automatically replace item on the phone.
• startup option Check to always open
SharePoint links.
• reset Restore default settings.
77
Page 82

Settings
OneNote
Toggle Automatic synchronization On/Off.
Turn on to automatically synchronise notes
when you open a page, save a page or open
a section.
people
Import SIM contacts will be synced with your
online Windows Live contact list.
- Sort list by First name / Last name.
- Display names by First Last / Last, First.
phone
Set Voicemail number.
Show my caller ID to everyone / no one / my
contacts
Call forwarding On/Off
International assist On/Off
SIM security On/Off
pictures & camera
Set options below.
Allow the camera button to wake up the
phone On/Off.
Include location (GPS) information in pictures
you take On/Off.
78
Auto upload to SkyDrive On/Off.
Keep location information on uploaded
pictures On/Off.
radio
Set regional options.
North America / World / Japan
search
Toggle Use my location On/Off.
It uses your location to provide you with
better local search results.
Check to get suggestions from Bing as you
type.
delete history
Delete previously entered search terms from
your phone.
Page 83

Software update
Phone Software update
Windows Phone Update enables you to
update the firmware of your phone to the
latest version. Your phone are alerted to
Windows Phone Updates automatically by
the Windows Phone Update service, and the
updates are installed on the phone by using
the Zune software running on the user's
personal computer. Please go to 'PHONE'
menu of settings from the Zune software and
click 'UPDATE' to check for updates available.
79
Page 84

FAQ
Please check to see if any problems you have encountered with the phone are described in this
section before taking the phone in for a service or calling a service engineer.
Category Sub-Category Question Answer
* Check you do not have headphones connected
to the phone.
• Ensure that your device is connected to the
Stereo headset.
• Ensure that the music format you are trying to
listen to is supported by the headset.
• Ensure that the distance between the headset
and device is not more than 10 metres and
that they are not separated by walls or other
obstacles.
Bluetooth Bluetooth Headset
You cannot listen to music on a remote
Bluetooth headset
Bluetooth Bluetooth Headset
Bluetooth supported
Bluetooth
Profile
80
You cannot listen to video sound on a
remote Bluetooth headset
Which profiles are supported for
Windows Phone 7?
It's not supported. If you want to listen to
video sound, please use the ear-jack instead of
Bluetooth headset.
HFP (HandsFreeProfile)
HSP (HeadSet Profile)
A2DP(Advanced Audio Distribution Profile)
AVRCP(A/V Remote Control Profile)
- Music : only support Play/Pause/Previous
Song/Next Song
PBAP(Phone Book Access Profile)
Page 85

Category Sub-Category Question Answer
FAQ
Bluetooth
Bluetooth
Connection
Bluetooth
Bluetooth
Connection
Bluetooth Contact transmission
Bluetooth Print
Data Backup
Data Synchronization
Data Synchronization
Data Web-Upgrade
What are the functions available via
Bluetooth?
Is it possible to use internet when
synchronising between phone and pc?
(In such case, where pc is connected
with wired LAN).
Is there any way to transfer the contacts
data to other phone thru bluetooth?
Ex) Contacts of other phone move to
phone via BT.
Can you print MS office document
(MS word, excel, PDF, etc.) using BT
or wireless?
How do you import contacts from your
old phone to your Window Phone 7?
What are some limitations, when data
synchronising between windows phone
7 and pc?
How do you synchronise between phone
and pc under Windows Vista & Win7?
Is it possible to backup the user data
automatically when upgrading thru Web.
Connecting to Stereo/Mono Headset, Car Kit
is possible.
It's not supported.
It's not supported.
It's not supported.
• Put your old SIM card into your new phone,
then go to Settings. Flick to applications,
tap people > import SIM contacts.
• You cannot do this through Zune.
In Window Phone 7, "Zune" application is used
instead of "Activesync".
The limitation of Zune is, while syncronizing,
(music, video and picture) files can not be played
on the phone.
By using microsoft application "Zune" which can
be downloaded from MS website.
Zune supports whole flash backup, but does not
support backup of user data seperately.
81
Page 86

FAQ
Category Sub-Category Question Answer
Misc. Call Time
Misc. E-Mail
Misc. Active X Is the Activie X supported like PC? No, it’s not supported.
Phone
Battery
Function
Phone
W&P option
Function
Phone
Office Mobile
Function
Phone
Ring Tone Setting How do I set the Ring Tone?
Function
Is the Calling time calculated differently
according to the model(Ex. 2G/3G,
CDMA ...)
Where do you get POP3 & SMTP Server
settings?
How do you check if battery is fully
charged?
Is it possible to use W(Wait) & P(Pause)
option, when saving phone number
to contacts?
Is it possible to edit files in office
applications of mobile?
CDMA Model : Calling time is calculated from
when you press "call" after dialling the number.
2G/3G Model : Calling time is calculated from
when the call is connected.
Please consult email system administrator for
assistance.
Battery charge status is displayed on top of
the screen.
Yes, it’s possible. But it's supported using the
hardware keyboard only. it's not supported for
the on-screen keyboard.
It's only possible to read.
• Please note that Microsoft Office Mobile doesn't
support all the features that are found in
Microsoft Office 2010.
If a document has content that's not supported
in Office Mobile, you can still open the
document on your phone, but the unsupported
content won't be displayed.
Go to Application list and tap Settings>
ringtone & sounds to set up the Ring Tone.
there are different kinds of alerts and different
ringtones you can asign to different people.
On the Start screen, tap People > the contact
you want to change > Edit > Rigntone.
82
Page 87

Category Sub-Category Question Answer
Marketplace enables users to easily find &
acquire your favorite ringtone
Phone
Ring Tone Setting
Function
Phone
Supported Language Is it possible to change the language?
Function
Phone
Sound Settings
Function
Phone
Time Setting How do you set the time on the phone?
Function
Phone
Youtube
Function
Phone
Battery Life Time What is the talk time of this phone?
Function
How can I use my favorite music as
a ringtone?
How to setup the system sound and
Ring sound?
Is it possible to view video clips from
Youtube?
Go to Application list and tap Marketplace >
Music. And browse and choose your favorite
ringtone.
Please note that Marketplace may not be
available in your countr y or region.
Your Windows Phone 7 supports 6 different
languages (Deutsch, English (United Kingdom/
United States), Español, Français, Italiano).
If you want to change the settings, go to tap
Settings> region & language > Display
language.
You can adjust the music, rigntone and system
sound with volume keys.
• Go to "Settings > ringtone & sounds
Applications list > Settings > date & time >
Set automatically slider to Off > Set the Time
This is possible via use of Marketplace YouTube
player.
Please note that Marketplace YouTube player may
not be available in your country or region.
Calling : 360 min. (based on 3G)
Standby time : 350 hours
FAQ
83
Page 88

FAQ
Category Sub-Category Question Answer
Picture is saved automatically.
Phone
camera
Function
Phone
E-mail Is it possible to set e-mail filtering?
Function
Phone
E-mail
Function
Phone
browser settings
Function
Phone
Proximity Sensor
Function
Phone
SIM Lock
Function
Phone
SIM Lock
Function
Is there any option to save or erase a
picture, right after it's taken?
Is it possible to set the alert sound when
receiving e-mail?
How can I change privacy and other
browser settings?
How do you keep the LCD screen on,
during phone conversation?
Is it possible to use SIM Card that's
provided by different operator?
My Windows Phone has a SIM lock, can
LG help me in this case?
Navigate to Picture Viewer by flicking to the right.
Touch and hold the picture taken. View available
options.
(eg. Adding to favorites, deleting etc).
E-Mail filtering is possible via use of "Search"
button.
[Steps]
Settings > ringtones & sounds >
New email > Choose an item
Go to Settings > applications > Internet
Explorer to delete cookies.
Also, you can turn off sharing your location using
Settings > system > location.
Proximity sensor on the phone is designed to
switch the LCD off by default whilst on a call.
Please contact the store that sold you the phone
to check if a SIM lock is active or not.
If there is no SIM Lock, certain features or
services might not be available due to phone or
network settings.
SIM lock depends on the network operator that
sold you the Windows Phone. Please contact the
network operator or the store that sold you the
Windows Phone.
84
Page 89

Category Sub-Category Question Answer
Phone
Function
Phone
Function
Phone Spec Band
Phone Spec Phone Spec Is it possilbe to use external GPS device?
Recovery
Password missing
Solution
Is Adobe Flash supported (similar to
PC browser)?
Is Streaming service supported.
Is GSM technology Quadra band, tri band
or dual band? (For example: 1900Mhz,
900, 1800, 850)
What do you do, when you've forgotten
your password?
How do you obtain your password, if
forgotten?
It’s not supported.
Some streaming protocols are not supported
(e.g. RTSP). HTTP-Progressive and IIS
SmoothStreaming is supported depending on
the website you are visiting and the application
you are using.
Quad band is supported.
No. There is a built-in GPS unit in your Windows
Phone 7 device.
Contact your service provider.
FAQ
85
Page 90

FAQ
Category Sub-Category Question Answer
1. Factory Reset.
Go to tap Applications list > Settings > about
> reset your phone.
Resetting your phone will erase all your
personal content, including applications that you
purchased and downloaded, and wil restore the
factory settings.
2. Try to update latest SW version via Web.Your
phone are alerted to Windows Phone Updates
automatically by the Windows Phone Update
service, and the updates are installed on the
phone by using the Zune software running on
your personal computer, when you connect your
phone with it.
If you didn't install the Zune software yet, go to
www.windowsphone.com to install.
Warning!
By performing "Factory Reset", all user data
will be ERASED.
Customer MUST backup PRIOR to running factory
reset & Web update.
You can connect to the internet or other network
devices anywhere an access point or wireless
hotspot is available.
Factory Rest
Recovery
Solution
Web update
Wi-Fi Wi-Fi Simple Inquiry
I want to reset my phone to improve
performance, how do I do this?
I want to update the software running
on my phone to improve performance,
how do I do this?
What can I do with Wi-Fi (wireless
networking)?
86
Page 91

Category Sub-Category Question Answer
1. Factory Reset.
Go to tap Applications list > Settings
> about > reset your phone.
Resetting your phone will erase all
your personal content, including
applications that you purchased and
downloaded, and wil restore the
factory settings.
2. Try to update latest SW version
via Web.Your phone are alerted
to Windows Phone Updates
Recovery
Solution
Factory Rest
How to do when the
performance is much lower
than before?
automatically by the Windows Phone
Update service, and the updates
are installed on the phone by using
the Zune software running on your
personal computer, when you connect
your phone with it.
If you didn't install the Zune software
yet, go to www.windowsphone.com
to install.
*Attention
In case of Factory Reset and Web
update, all user data will be erased.
hence, customer should have to back
up them before.
FAQ
87
Page 92

Accessories
There are a variety of accessories available for your mobile phone, some of which may be
sold separately. You can select these options according to your personal communication
requirements. Consult your local dealer for availability.
Travel Adapter
This adapter allows you to charge the battery. It supports
standard US 120 Volt 60Hz outlets. Output /Sortie: 4.8V/ 1.0A
Battery
Standard battery is available.
n
Note
• Always use genuine LG accessories. Failure to do this may invalidate your warranty.
• Accessories may be different in different regions; please check with our regional service company
or agent for further enquiries.
88
Page 93

For Your Safety
Important Information
This user guide contains important
information on the use and operation of
this phone. Please read all the information
carefully for optimal performance and to
prevent any damage to or misuse of the
phone. Any changes or modifications not
expressly approved in this user guide could
void your warranty for this equipment. Any
changes or modifications not expressly
approved by the manufacturer could void the
user’s authority to operate the equipment.
Before You Start
Safety Instructions
WARNING! To reduce the possibility of
electric shock, do not expose your phone to
high humidity areas, such as the bathroom,
swimming pool, etc.
Always store your phone away from
heat. Never store your phone in settings that
may expose it to temperatures less than 32°F
or greater than 104°F, such as outside during
extreme weather conditions or in your car on
a hot day. Exposure to excessive cold or heat
will result in malfunction, damage and/or
catastrophic failure.
Be careful when using your phone near
other electronic devices. RF emissions
from your mobile phone may affect nearby
in adequately shielded electronic equipment.
You should consult with manufacturers of any
personal medical devices such as pacemakers
and hearing aides to determine if they are
susceptible to interference from your mobile
phone. Turn off your phone in a medical
facility or at a gas station. Never place your
phone in a microwave oven as this will cause
the battery to explode.
IMPORTANT! Please read the TIA SAFETY
INFORMATION on page 94 before using your
phone.
Safety Information
Read these simple guidelines. Breaking the
rules may be dangerous or illegal. Further
detailed information is given in this user
guide.
] Do not disassemble this unit. Take it to a
qualified service technician when repair
work is required.
] Keep away from electrical appliances such
as TVs, radios, and personal computers.
89
Page 94

For Your Safety
] The unit should be kept away from heat
sources such as radiators or cookers.
] Do not drop.
] Do not subject this unit to mechanical
vibration or shock.
] The coating of the phone may be damaged
if covered with wrap or vinyl wrapper.
] Use dry cloth to clean the exterior of the
unit. (Do not use solvent such as benzene,
thinner or alcohol.)
] Do not subject this unit to excessive smoke
or dust.
] Do not keep the phone next to credit
cards or transport tickets; it can affect the
information on the magnetic strips.
] Do not tap the screen with a sharp object;
otherwise, it may damage the phone.
] Do not expose the phone to liquid or
moisture.
] Use the accessories like an earphone
cautiously. Do not touch the antenna
unnecessarily.
90
Memory card information and
care
] The memory card cannot be used for
recording copyright- protected data.
] Keep the memory card out of the small
children's reach.
] Do not leave the memory card in extremely
hot location.
] Do not disassemble or modify the memory
card.
FCC RF Exposure Information
WARNING! Read this information before
operating the phone.
In August 1996, the Federal Communications
Commission (FCC) of the United States, with
its action in Report and Order FCC 96-326,
adopted an updated safety standard for
human exposure to radio frequency (RF)
electromagnetic energy emitted by FCC
regulated transmitters. Those guidelines are
consistent with the safety standard previously
set by both U.S. and international standards
bodies.
Page 95

For Your Safety
The design of this phone complies with
the FCC guidelines and these international
standards.
CAUTION
Use only the supplied and approved antenna.
Use of unauthorized antennas or modifications
could impair call quality, damage the phone,
void your warranty and/or result in violation
of FCC regulations. Do not use the phone with
a damaged antenna. If a damaged antenna
comes into contact with skin, a minor burn
may result. Contact your local dealer for a
replacement antenna.
Body-worn Operation
This device was tested for typical body-worn
operations with the back of the phone kept
0.79 inches (2cm) between the user’s body
and the back of the phone. To comply with
FCC RF exposure requirements, a minimum
separation distance of 0.79 inches (2cm) must
be maintained between the user’s body and
the back of the phone. Third-party belt-clips,
holsters, and similar accessories containing
metallic components should not be used.
Body-worn accessories that cannot maintain
0.79 inches (2cm) separation distance
between the user's body and the back of the
phone, and have not been tested for typical
body-worn operations may not comply with
FCC RF exposure limits and should be avoided.
FCC Part 15 Class B Compliance
This device and its accessories comply with
part 15 of FCC rules. Operation is subject
to the following two conditions: (1) This
device and its accessories may not cause
harmful interference, and (2) this device and
its accessories must accept any interference
received, including interference that may
cause undesired operation.
Part 15.105 statement
This equipment has been tested and found
to comply with the limits for a class B
digital device, pursuant to Part 15 of the FCC
Rules. These limits are designed to provide
reasonable protection against harmful
interference in a residential installation.
This equipment generates uses and can
radiate radio frequency energy and, if not
installed and used in accordance with the
instructions, may cause harmful interference
to radio communications. However, there is no
guarantee that interference will not occur in a
particular installation.
91
Page 96

For Your Safety
If this equipment does cause harmful
interference or television reception, which
can be determined by turning the equipment
off and on, the user is encouraged to try to
correct the interference by one or more of the
following measures:
] Reorient or relocate the receiving antenna.
] Increase the separation between the
equipment and receiver.
] Connect the equipment into an outlet on
a circuit different from that to which the
receiver is connected.
] Consult the dealer or an experienced radio/
TV technician for help.
Cautions for Battery
] Do not disassemble or open crush, bend or
deform, puncture or shred.
] Do not modify or remanufacture, attempt
to insert foreign objects into the battery,
immerse or expose to water or other
liquids, expose to fire, explosion or other
hazard.
92
] Only use the battery for the system for
which it is specified.
] Only use the battery with a charging
system that has been qualified with
the system per this standard. Use of an
unqualified battery or charger may present
a risk of fire, explosion, leakage, or other
hazard.
] Do not short circuit a battery or allow
metallic conductive objects to contact
battery terminals.
] Replace the battery only with another
battery that has been qualified with the
system per this standard, IEEE-Std-1725200x. Use of an unqualified battery may
present a risk of fire, explosion, leakage or
other hazard.
] Promptly dispose of used batteries in
accordance with local regulations.
] Battery usage by children should be
supervised.
Page 97

For Your Safety
] Avoid dropping the phone or battery. If the
phone or battery is dropped, especially
on a hard surface, and the user suspects
damage, take it to a service center for
inspection.
] Improper battery use may result in a fire,
explosion or other hazard.
] For those host devices that utilize a USB
port as a charging source, the host device’s
user manual shall include a statement
that the phone shall only be connected to
products that bear the USB-IF logo or have
completed the USB-IF compliance program.
Adapter (Charger) Cautions
] Using the wrong battery charger could
damage your phone and void your
warranty.
] The adapter or battery charger is intended
for indoor use only.
Do not expose the adapter or battery charger
to direct sunlight or use it in places with high
humidity, such as the bathroom.
Avoid damage to your hearing
] Damage to your hearing can occur if you
are exposed to loud sound for long periods
of time. We therefore recommend that you
do not turn on or off the handset close to
your ear. We also recommend that music
and call volumes are set to a reasonable
level.
] If you are listening to music while out and
about, please ensure that the volume is at
a reasonable level so that you are aware
of your surroundings. This is particularly
imperative when attempting to cross the
street.
93
Page 98

Safety Guidelines
TIA Safety Information
Provided herein is the complete TIA Safety
Information for Wireless Handheld phones.
Inclusion of the text covering Pacemakers,
Hearing Aids, and Other Medical Devices
is required in the owner’s manual for CTIA
Certification. Use of the remaining TIA
language is encouraged when appropriate.
Exposure to Radio Frequency
Signal
Your wireless handheld portable telephone
is a lowpower radio transmitter and receiver.
When it is ON, it receives and also sends out
radio frequency (RF) signals.
In August, 1996, the Federal Communications
Commissions (FCC) adopted RF exposure
guidelines with safety levels for handheld
wireless phones. Those guidelines are
consistent with the safety standards
previously set by both U.S. and international
standards bodies:
ANSI C95.1 (1992) *
NCRP Report 86 (1986)
ICNIRP (1996)
94
Those standards were based on
comprehensive and periodic evaluations of the
relevant scientific literature. For example, over
120 scientists, engineers, and physicians from
universities, government health agencies,
and industry reviewed the available body
of research to develop the ANSI Standard
(C95.1).
* American National Standards Institute;
National Council on Radiation Protection
and Measurements; International
Commission on Non-Ionizing Radiation
Protection
The design of your phone complies with the
FCC guidelines (and those standards).
Antenna Care
Use only the supplied or an approved
replacement antenna. Unauthorized antennas,
modifications, or attachments could damage
the phone and may violate FCC regulations.
Phone Operation
NORMAL POSITION: Hold the phone as you
would any other telephone with the antenna
pointed up and over your shoulder.
Page 99

Safety Guidelines
Tips on Efficient Operation
For your phone to operate most efficiently:
] Do not touch the antenna unnecessarily
when the phone is in use. Contact with the
antenna affects call quality and may cause
the phone to operate at a higher power
level than otherwise needed.
Driving
Check the laws and regulations on the use of
wireless phones in the areas where you drive.
Always obey them. Also, if using your phone
while driving, please:
] Give full attention to driving - driving safely
is your first responsibility;
] Use hands-free operation, if available;
] Pull off the road and park before making
or answering a call if driving conditions
so require.
Electronic Devices
Most modern electronic equipment is shielded
from RF signals. However, certain electronic
equipment may not be shielded against the RF
signals from your wireless phone.
Pacemakers
The Health Industry Manufacturers Association
recommends that a minimum separation of six
(6’) inches be maintained between a handheld
wireless phone and a pacemaker to avoid
potential interference with the pacemaker.
These recommendations are consistent with the
independent research by and recommendations
of Wireless Technology Research.
Persons with pacemakers:
] Should ALWAYS keep the phone more than
six inches from their pacemaker when the
phone is turned ON;
] Should not carry the phone in a breast
pocket.
] Should use the ear opposite the pacemaker
to minimize the potential for interference.
] If you have any reason to suspect that
interference is taking place, turn your
phone OFF immediately.
Hearing Aids
Some digital wireless phones may interfere
with some hearing aids. In the event of such
interference, you may want to consult AT&T.
95
Page 100

Safety Guidelines
Other Medical Devices
If you use any other personal medical device,
consult the manufacturer of your device to
determine if they are adequately shielded
from external RF energy. Your physician
may be able to assist you in obtaining this
information.
Health Care Facilities
Turn your phone OFF in health care facilities
when any regulations posted in these areas
instruct you to do so. Hospitals or health care
facilities may use equipment that could be
sensitive to external RF energy.
Vehicles
RF signals may affect improperly installed or
inadequately shielded electronic systems in
motor vehicles. Check with the manufacturer
or its representative regarding your vehicle.
You should also consult the manufacturer of
any equipment that has been added to your
vehicle.
96
Posted Facilities
Turn your phone OFF in any facility where
posted notices so require.
Aircraft
FCC regulations prohibit using your phone
while in the air. Turn your phone OFF before
boarding an aircraft.
Blasting Areas
To avoid interfering with blasting operations,
turn your phone OFF when in a ‘blasting areas
or in areas posted: ‘Turn off two-way radio’.
Obey all signs and instructions.
Potentially Explosive
Atmosphere
Turn your phone OFF when in any area with a
potentially explosive atmosphere and obey all
signs and instructions. Sparks in such areas
could cause an explosion or fire resulting in
bodily injury or even death.
 Loading...