

Page 1

C570 User Guide ELECTRONICS INC.
LG-C570/C570g/C570g User Manual
Page 2

Part 15.21 statement
This device is not intended for sale in the USA.
" Change or Modifications that are not expressly approved by the manufacturer could void
the user's authority to operate the equipment. “
Part 15.105 statement
This equipment has been tested and found to comply with the limits for a class B digital
device, pursuant to Part 15 of the FCC Rules.
These limits are designed to provide reasonable protection against harmful interference in
a residential installation. This equipment generates uses and can radiate radio frequency
energy and, if not installed and used in accordance with the instructions, may cause harmful
interference to radio communications. However, there is no guarantee that interference will
not occur in a particular installation. If this equipment does cause harmful interference or
television reception, which can be determined by turning the equipment off and on, the user
is encouraged to try to correct the interference by one or more of the following measures:
- Reorient or relocate the receiving antenna.
- Increase the separation between the equipment and receiver.
- Connect the equipment into an outlet on a circuit different from that to
which the receiver is connected.
- Consult the dealer or an experienced radio/TV technician for help.
Page 3

Part 15 Class B Compliance
This device and its accessories comply with part15 of FCC rules.
Operation is subject to the following two conditions:
(1) This device & its accessories may not cause harmful interference.
(2) This device & its accessories must accept any interference received,
including interference that may cause undesired operation.
Body-worn Operation
This device has been tested for typical body-worn operations
with the distance of 0.79inches (2.0cm) from the user’s body.
To comply with FCC RF exposure requirements, a minimum separation distance
of 0.79inches(2.0cm) must be maintained from the user's body.
Additionally, Belt clips, holsters & other body-worn accessories may not contain
metallic components.
Page 4

Introduction
Congratulations on your purchase of this LG C570 Windows Mobile Smartphone.
This user guide contains information on the use and operation of this phone. Please read all
the information carefully for optimal performance and to prevent damage or misuse of the
phone. Any changes or modifications not expressly approved in this user guide could void
your warranty for this equipment.
6
Page 5

Phone Components
1. Earphone jack
2. Display screen
3. Home key
C570 Features
10. Earpiece/Speakers
11. Camera
4. Left soft key
5. Call key
6. Optical joystick
7. Function key
8 Microphone
9. SIM Card slot
12. Right soft key
13. Power/End key
14. Back key
15. Enter key
16. My Social key
17. Smart Contacts key
18. Smart Applications
key
19. microSD Card slot
20. Camera
21. Battery
Compartment
7
Page 6

C570 Features
Keys and Parts Functions
1. Earphone jack: Plug the headset for
handsfree conversation or listening to
music.
2. Display screen
3. Home key:
screen.
4. Left soft key:
function indicated by the text on the
display above it.
5. Send key:
incoming calls. In standby mode, press
to access the dialer and view the most
recent incoming, outgoing and missed
calls.
6. Optical joystick: Use as directional keys
to move up, down, left, or right. Press to
confirm a selection.
7. Function key:
number/symbol and letter input.
8. Microphone
9. SIM Card slot
10. Earpiece/Speakers
11. Camera: Use for video calls.
12. Right soft key:
Press to return to the Today
Press to perform the
Press to place or answer
Press to toggle between
Press to perform the
function indicated by the text on the
display above it.
13. Power/End key
b Long press to turn the phone on or off.
b
During a call, press to end or reject
a call.
14. Back key:
previous screen or back out of menus
one level at a time. When entering text,
press to delete single characters; press
and hold to delete entire words.
15. Enter key
16. My Social key:
Email and SN. Good Email and SN is a
shortcut application to send and receive
e-mails.
17. Smart Contacts key:
Smart Contacts. Smart Contacts allows
you to add your favorite contacts or
phone numbers to the Smart Contacts
list.
18. Smart Applications key:
access Smart Applications. Smart
Application allows you to add your
favorite applications to the Smart
Applications list for easy access.
19. microSD Card slot
20. Camera: Use to take photos or videos.
21. Battery Compartment
Press to go back to the
Press to access Good
Press to access
Press to
8
Page 7

C570 Features
USB Connector
Use to connect the
charger, earphone, or USB
cable to synchronize with
a computer.
micro SD
microSD slot
Remove the cover and
insert the memory card.
Multi key
Press to switch multi
world clock with single
clock, Task Manager.
Volume Keys
bWhen the screen
is idle, press to adjust
system volume.
Camera Key
Press to activate the
camera and take photos
or videos.
bDuring a call, press to
adjust the in-call volume.
How to hold your phone
In order to allow better RF antenna sensitivity, LG suggests that you hold
the handset as depicted in the figure below.
Please do not cover the RF antenna area with your hand during a call and
using a bluetooth connection. It may degrade speech quality.
9
Page 8

Getting Started
Installing the SIM card and
Battery
Always turn off your phone and disconnect
it from the charger and other accessories
before installing or replacing the SIM card,
microSD card, and battery.
To remove the back cover
1. Place three fingers on the back cover and
your thumb on the front panel.
2. Push the front panel with your thumb and
slide the back cover off with the three
fingers.
Battery
Your phone comes with a rechargeable Li-ion
battery.
To remove the battery
1. Turn the phone off.
2. Remove the back cover.
3. Insert your finger in the battery’s finger
grip, then gently push down the battery
towards the direction of the arrow to
release and remove the battery.
10
Page 9

Getting Started
SIM Card
Your SIM card contains your phone number,
subscription details, and contacts and must
be inserted into your handset.
To install the SIM card
Insert the SIM card with the metal contacts
facing down and the cut-off corner on the
top-right side.
To remove the SIM card
1. Remove the battery if it is installed.
2. Slide the SIM card out the slot.
Note
The SIM card and its contacts can be
easily damaged by scratching and bending
the card. Be careful when installing and
removing the card. Refer to the instructions
supplied with the SIM card.
To install the battery
1. Remove the back cover.
2. Insert the battery. Align the contacts of the
battery with the corresponding connectors
on the battery compartment and insert in
the direction of the arrow (A) then push
the battery into place (B).
3. Replace the back cover.
11
Page 10

Getting Started
To replace the back cover
1. Align the back cover (A).
2. Push the back cover to lock into place (B).
Charging the Battery
1. Make sure the battery is installed inside
the battery compartment.
2. Plug the power adaptor into a wall outlet.
3. Flip open the USB connector’s cover of
the phone.
4. Connect the power adaptor into the USB
connector of your phone.
Battery Indicators
When the phone is tur
b The
b When the battery is fully charged, the
When the phone is turned off...
b A charging animation is displayed on the
b When the battery is fully charged, the
icon indicates that the battery
is charging.
icon is displayed.
screen.
animation stops and the screen turns
blank.
Note
When you charge a fully discharged battery,
it may take over a minute for the display
to respond. It is not a malfunction but
completely normal.
ned on...
12
Page 11

Getting Started
CAUTION!
b Do not remove the battery or the SIM
card while charging.
b There is a risk of explosion if battery
is replaced by an incorrect type.
Replace only with batteries approved
by the manufacturer.
b Dispose of used batteries according
to the local regulations in your area.
b Do not force the mini USB connector
as this may damage the phone or
the cable.
WARNING!
• Unplug the charger from the mains and
phone during lightning storms to avoid
electric shock or fire.
• Make sure that no sharp-edged items,
such as nails, come into contact with the
battery. There is a risk of causing fire.
microSD Card
For additional storage space for your photos,
videos, music and files, install a microSD
card into your phone.
To install the microSD card
1. Flip open the microSD card slot’s cover of
the phone.
2. Insert the microSD card down up and push
until it clicks into the slot. If you insert
the card in the wrong direction, it may
damage your phone or your card.
13
Page 12

Getting Started
To remove the microSD card
1. Turn the phone off.
2. Flip open the microSD card slot’s cover of
the phone.
3. Push the card in to release the exposed
edge of the microSD card to eject it.
4. Remove the microSD card from the slot
and replace the cover.
Info!
The microSD card is an optional
accessory and is not included in your
package. Contact your retailer to
purchase one.
b Avoid using the microSD card when the
battery is low.
b The card is designed to fit easily into
the slot.
b Do not bend the card or force it into
the slot.
b Do not insert any memory cards other
than microSD.
14
Page 13

Getting Started
Turn the Device On and Off
To turn on the device, press and hold the
Power button.
To turn off the device, press and hold the
Power button.
Lock the Keyboard
To lock the keyboard, press and hold the U
key for 2 ~ 3 seconds.
To unlock the keyboard, press the left soft
key
.
Muting the Microphone
To mute the microphone during a call, press
and hold the J key for 2 ~ 3 seconds.
When the handset is muted, the caller cannot
hear you, but you can still hear the caller.
Getting Started
Getting Started gives you step-by-step
instructions on how to set up the basic
functions of your device. From the Today
screen, do either of the following to access
Getting Started:
b Scroll down to select the Getting Started
shortcut menu, then scroll left or right and
select a specific topic.
b Select Start > All Programs > Getting
Started, then select the topic to view.
Adjust Volume
Your device has two types of volume:
b System Volume: Adjust the system
volume to change the volume level of
system sounds and notifications like
alarm, ringer, keypad, audio and video
playback.
To adjust the system volume:
•
When the device is in idle mode, press
the volume keys up or down to increase
or decrease volume.
b In-Call Volume: Adjusts the volume level
of the phone conversation.
To adjust the in-call volume:
During a call, press the volume keys
•
up or down to increase or decrease
volume.
15
Page 14

Screen Information
The Today Screen
From the home screen, you can quickly check your schedule, and see at a glance any missed
calls or new messages.
Default Today Screen
Status Indicators
Service Provider’s Name
Wi-Fi Status
Shortcut menu
Scroll down to view more
shortcut menu. Highlight
a menu to expand to more
shortcuts.
Start menu
(Left soft key function)
b Press the left soft key
to access menu.
Contacts
(Right soft key function)
b Press the right soft key
to access Contacts.
To Customize the Today Screen
You can change the layout, background image, color scheme and the time out of the Today
screen.
b To customize settings of the Today screen, go to Start > Settings > Dual Home Screen.
Date and Time
16
Page 15
Screen Information
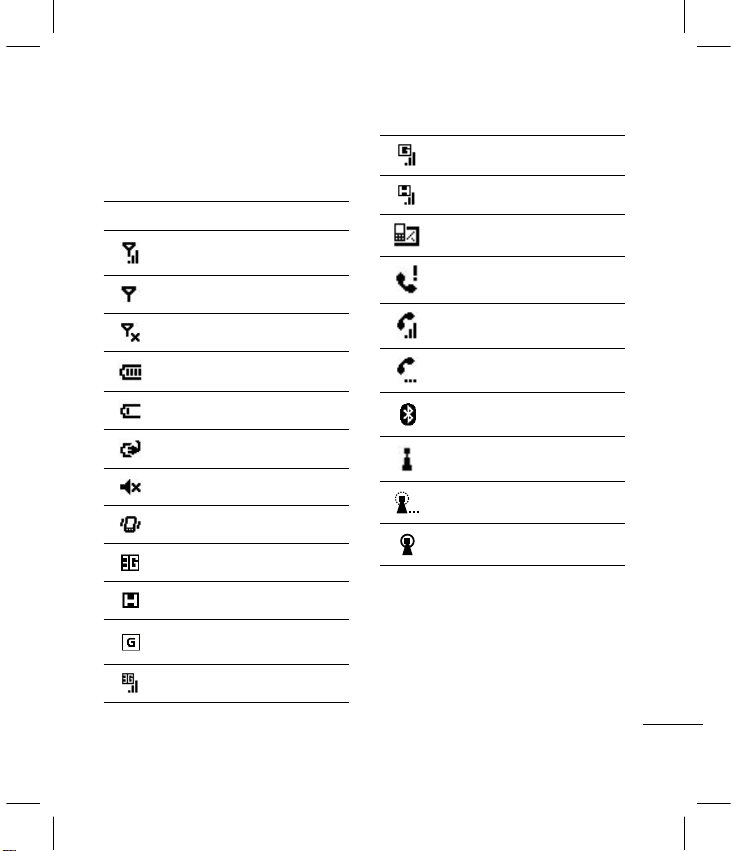
Status Indicators
The following are some of the status icons
that you may see on your device.
Icon Description
Indicates maximum signal
strength
Searching for signal
No phone service
Indicates battery level
Battery low
Battery charging
Silent mode enabled
Vibrate mode enabled
WCDMA (3G) available
HSDPA available
GPRS (General Packet Radio
Services) available
3G network in use
GPRS network in use
HSDPA network in use
New message received
Missed call or rejected call
Call in progress
Call on hold
Bluetooth active
Wireless network available
Wireless network connecting
Wireless network connected
17
Page 16

Screen Information
Shortcut Menu
The shortcut menu displays notifications or other information of each menu item.
By default the following applications are displayed:
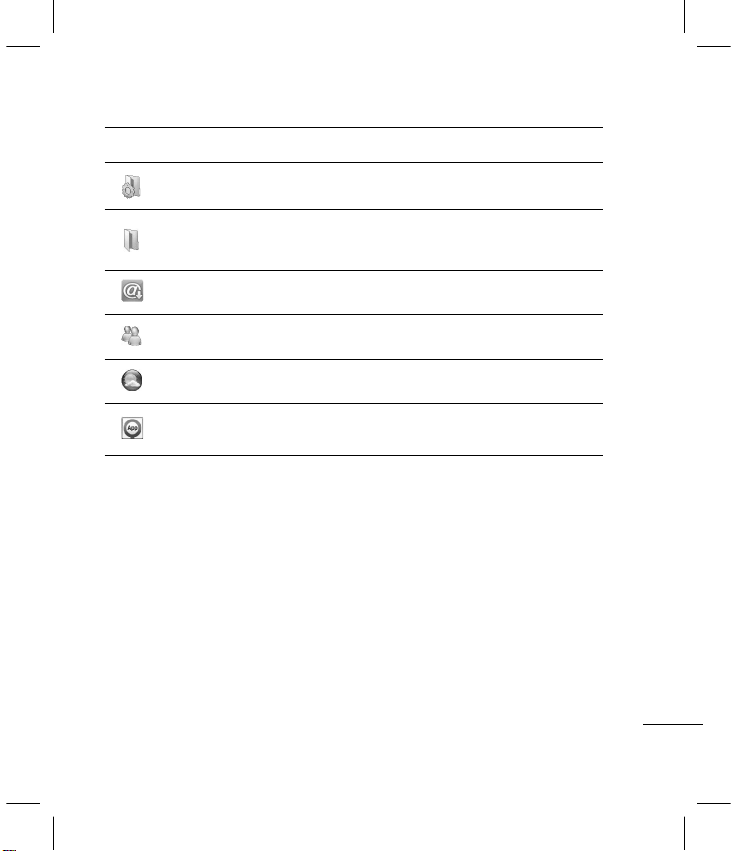
Menu Description
Calls and Messages
Notification
World Clock Displays time information for major cities worldwide.
Appointments Displays upcoming schedules and allows you to set appointments.
Getting Started Select an item to view its help information.
Favorites
Settings Displays and allows you to easily adjust basic device settings.
b To access a shortcut menu, use the Optical joystick to select the desired menu, then press
the Enter key.
b To add shortcuts of media applications, go to Start > Settings > My Screen.
18
Displays notifications about recent voice and video calls,
voicemail, and other messages. To access a submenu, use the
Optical joystick to scroll, then press the Enter key.
Displays and allows you to add your favorite web pages for easy
access.
Page 17
Screen Information
Start Menu
The Start menu contains all the programs
installed on your device.
Accessing the Start menu
b From the Home screen, press the left soft
key Start to access the Start menu.
b By default, the Recent Programs screen is
displayed. To view other programs, press
the left soft key All Programs.
b To go to the next screen display, press the
left soft key More.
b To go back to the previous screen, press
the Back key
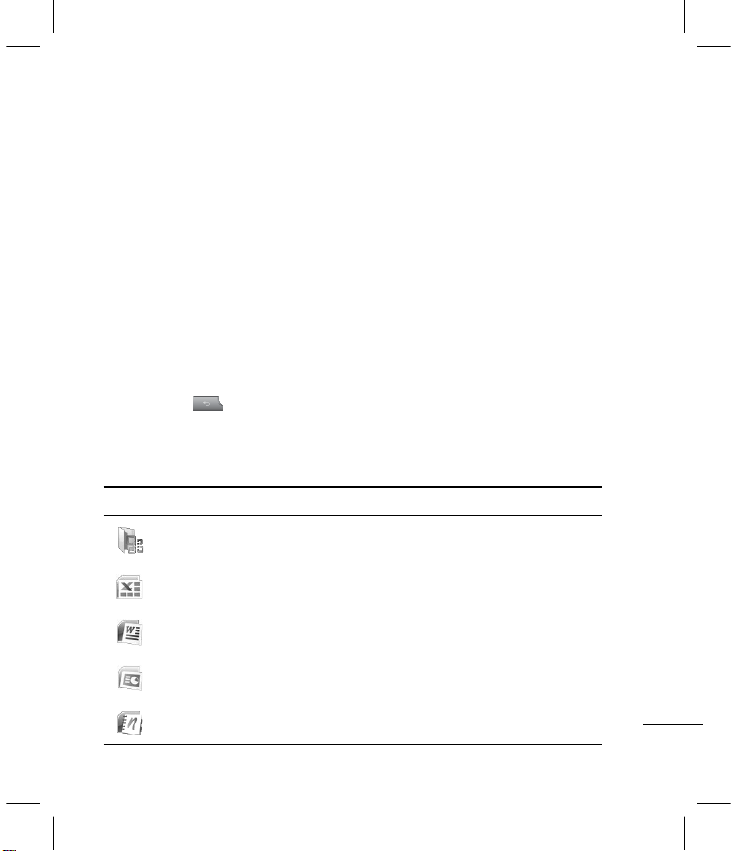
Programs
The following programs are installed on your device.
Icon Program Description
.
Office Mobile
Excel Mobile View and edit Excel workbooks.
Word Mobile View and edit Word documents.
PowerPoint
Mobile
View slide shows.
b To access a menu, use the
Optical joystick to highlight the
item, then press the Enter key.
OneNote Mobile Create notes with pictures and recordings.
19
Page 18

Screen Information
Icon Program Description
ActiveSync
Call History Displays the list of missed, received or placed calls.
Synchronizes information between your device and a
computer.
Games
Voice Notes Record voice notes.
Pictures & Videos
Getting Started Learn the basics on how to operate your device.
Internet Sharing Use your device as an Internet sharing device.
File Explorer
Marketplace Purchase and download applications on the web.
Microsoft My
Phone
Adobe Reader LE View *.pdf files on your device.
AGPS Setting Enable Assisted Global Positioning System.
Brightness
20
Play pre-installed games on your device: Bubble Breaker
and Solitaire.
Collects, organizes, and sorts photo files in the My
Picture folder of your device or the storage card.
Browse files and folders saved on your device or the
storage card.
Synchronizes information on your device with your My
Phone account at http://myphone.microsoft.com.
Control the level of brightness when using the battery or
external power.
Page 19
Screen Information
Icon Program Description
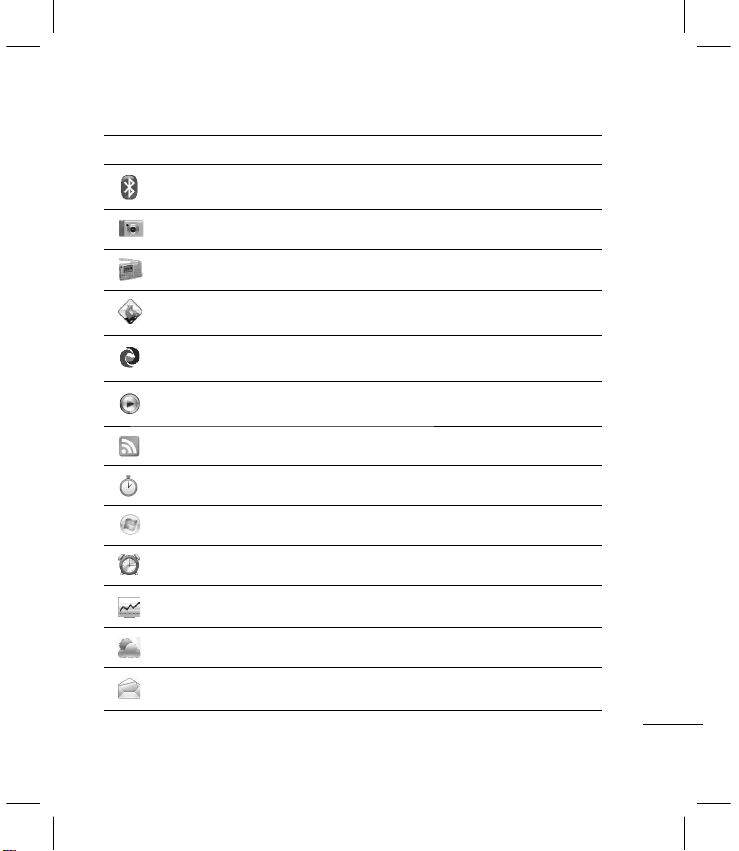
Bluetooth
Camera Capture photos and record videos.
FM Connect the earphones and tune in to the FM radio.
GPS Extra Download GPS data.
Java Install Java applications on your device.
Connect with other Bluetooth devices and create a
network.
Windows Media
RSS Viewer View RSS or RDF-compatible newsfeeds.
Stopwatch Functions as a timer.
Windows Live Mobile version of Windows Live™.
Clock & Alarm Allows you to set the date and time and set alarms.
MSN Money Access MSN Money to view stocks.
MSN Weather View the weather forecast via MSN Weather.
Messaging Send and receive e-mail and text messages.
Mobile version of Windows Media Player. Tune in and
watch your favorite music videos.
21
Page 20
Screen Information
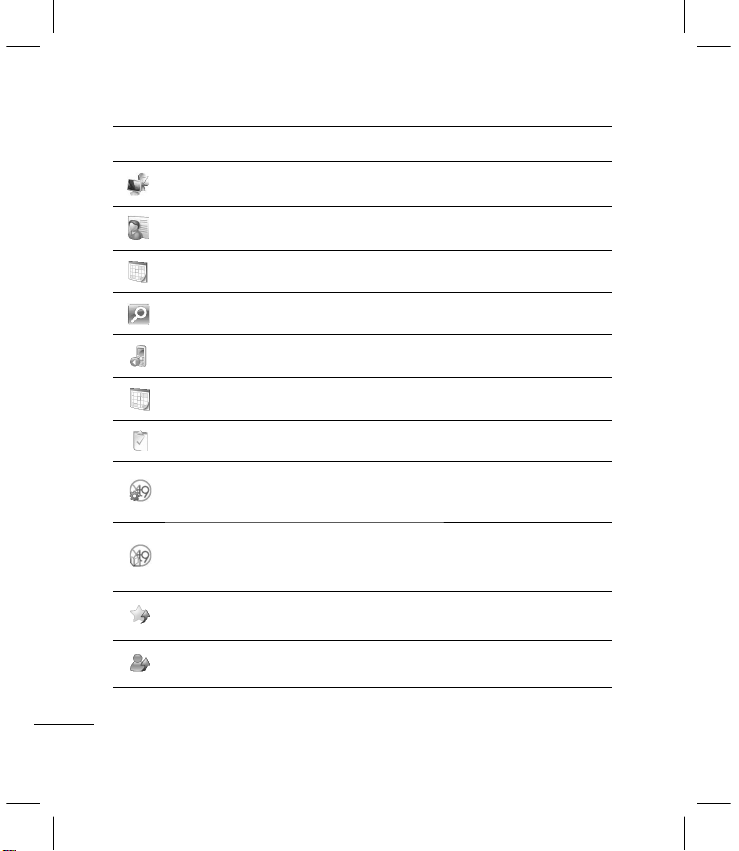
Icon Program Description
Remote Desktop
Contacts
Calendar Schedule appointments and set alarm notifications.
Search Widget Provides access to Live Search.
Speed Dial Allows you to add phone numbers for speed dial.
Calendar Schedule appointments and set alarm notifications.
Tasks Keeps track of your tasks.
Set up and connect to your computer to access files and
programs from your device.
Lets you store names, phone numbers, e-mail and other
information.
XT9 Settings
XT9 Dictionaries
Smart
Applications
Smart Contacts
22
Allows you to set the language of the dictionary and
enable functions such as word completion, next word
prediction and others.
Allows you to view, add or edit the words in the My
Words XT9 dictionary. It also allows you to configure
automatic substitution.
Allows you to register the desired applications that you
frequently use in the Smart Applications.
Allows you to register the Contacts that you frequently
use in the Smart Contacts.
Page 21
Icon Program Description
Settings
Accessories
Good Email
and SN
Messenger
Weather
LG Mobile
Application
Allows you to configure phone settings, wireless settings
and call settings of your phone.
Allows you to access extra applications that have been
pre-installed on your device (such as Calculator and Task
Manager).
Allows you to send and receives online emails, and
connects to your social networking sites.
Allows you to sign in with your MSN Messenger account
and chat with friends.
Allows you to view the current weather on the selected
city.
Allows you to access various mobile internet services
using your phone browser.
Screen Information
23
Page 22
Entering Information
Using the Keyboard
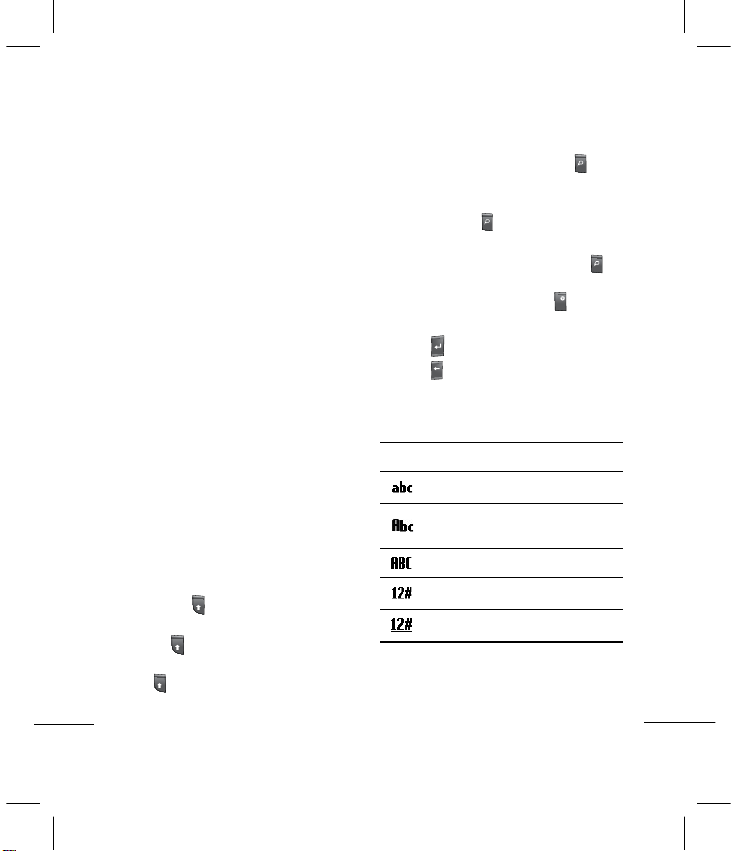
QWER
TY Keyboard
Numeric Keypad
Your device comes with a full keyboard
for text entry and other shortcut button
functions.
QWERTY Keyboard
QWERTY keyboard is activated whenever
an alphanumeric text entry is required. This
functions just like a standard computer
keyboard.
b To switch between the different letter
cases, press
To type all in upper case letters, press
and hold
keys. To switch back to lower case entry,
press
CAPS
.
CAPS
then press the corresponding
CAPS
again.
b To enter a single symbol or number
printed at the top of keys, press
press the corresponding key.
To enter various symbols or numbers,
press and hold
corresponding keys.
To switch back to text mode, press
again. To enter the symbols that are not
shown on the keypad, press
then press the
Sym
then
select the desired symbol.
b Press
b Press
to go to the next line.
to erase a character.
DEL
The following icons are displayed on the
status indicator area:
Icon Description
Enter text in lower case letter
Enter one character in upper
case and the rest in lower case
Enter all text in upper case letter
Enter a number or symbol
Enter all numbers or symbols
then
24
Page 23
Entering Information
XT9 Mode
XT9 predicts words and suggests spellings
as you type the first few characters, so you
can just select the word you want.
To activate XT9 mode, press
and select XT9 English.
To enter text using XT9
1. Type the first few characters of the word.
2. As you type, the dictionary displays
predicted words below the word you are
typing.
3. Scroll left or right to highlight the word
then press the Enter key to select.
The following icons are displayed on the
status indicator area:
Icon Description
Enter the first character in
upper case and the rest in
lower case
Enter text in lower case letter
+ spacebar
Numeric Keypad
The numeric keypad functions just like a
standard phone keypad. It is automatically
activated whenever numeric entries are
required, such as in setting the time.
Recording a Note
You can create a stand-alone recording
(voice note).
To create a voice note
1. Select Start > Voice Notes.
2. Hold your device’s microphone near your
mouth or other sound sources.
3. Select Record to start recording.
4. Select Stop to stop recording.
25
Page 24
Contacts
Contacts
Contacts is your address book and
information storage for the people you
communicate with. You can store phone
numbers, e-mail addresses, home
addresses, and other information that relates
to a contact. You can also add a picture or
assign a ringtone to a contact.
Your device supports three types of
contacts: Outlook Contact, E-mail Group and
Messaging Group.
Outlook Contact
Contacts are stored in the device memory
or the SIM card memory. If you use Outlook
on your PC, you can synchronize contacts
between your device and the PC.
SIM Contact
Contacts are stored in the SIM card memory.
You can only store a name and a phone
number per entry.
E-mail Group
You can add several contacts into an e-mail
group.
Messaging Group
You can add several contacts into a
messaging group.
26
To Create a Contact
1. From the Today screen, select Contacts.
2. Select New.
3. Select
Outlook Contact, then enter the
contact details.
4. When finished, select Done.
TIP!
b You can create a contact from Call
History list, select Menu > Save to
Contacts.
b To add the sender of a message
to Contacts, select the received
message and the number, then press
the Enter key.
To Find a Contact
There are several ways to find a contact
when your contact list is long.
1. From the Today screen, select Contacts.
2. If you are not in Name view, tap
View By > Name.
3. Do one of the following:
b Enter the first character of a name. Scroll
down to select the desired name from
the the list. The next character you enter
continues to narrow the search.
b Filter the list by category. In the contact
Menu >
Page 25

Contacts
list, select Menu > Filter. Then, select
a category you’ve assigned to a contact.
To show all contacts again, select No
Categories.
To Work with the Contact List
There are several ways to use and
synchronise the contact list. Here are a
few tips:
1. From the Today screen, select Contacts.
2. In the contact list, do any of the following:
b In Name view, you can search for a
contact by entering a name or by using
the alphabetical index. To switch to Name
view, select Menu > View By > Name.
b To see a summary of information about
a contact, select the contact. From there
you can also make a call or send a
message.
b To see a list of contacts employed by
a specific company, select Menu >
View By > Company. Then, select the
company name.
To Change Contact Information
1. From the Today screen, select Contacts.
2. Select the contact.
3. Select
Menu > Edit and enter the
changes.
4. When finished, select Done.
To Delete a Contact
1. From the Today screen, select Contacts.
2. Select the contact.
3. Select Menu > Delete.
4. Select Yes to confirm delete.
To Copy Contacts
To copy saved Contacts from SIM card to
your device or from your device to SIM card:
1. From the Today screen, select Contacts.
2. Select
Menu > Select Contacts >
Several or All.
3. Select
Menu > Copy Contacts > To
Contacts or To SIM.
27
Page 26

Call
Making a Voice Call
Calling is easy with the smart dial feature.
If you press a number on the keypad, the
screen displays the phone numbers in your
Call History, starting with the number you
enter.
You can then select the number you want
to call.
Make a Call from Phone
To make a call, enter the phone number you
wish to call, including the area code, and
press the Call key
For international calls, press and hold “0”
to add the + character that replaces the
international access code.
To end the call, press the End key
.
.
Note
If you enter the wrong number, press
to delete a number. To delete all
the numbers, press and hold
.
Make a Call from Contacts
1. From the Today screen, select Contacts.
2. Select the desired contact.
3. Press the Call key
to place the call.
Make a Call from Call History
1. From the Today screen, press the Call key
to view your call history.
2. Select the desired number or name from
the list.
3. Press the Call key
to place the call.
Speed Dial
Use speed dial to call a number by pressing
and holding a number key when in the home
screen. Before you can create a speed dial
entry, the number must already exists in
Contacts list.
28
Page 27

Call
To Create a Speed Dial Entry
1. From the Today screen, press the Call key
to view your call history.
2. Select
Menu > Open Contact.
3. Select the desired number or name from
the list.
2. Select
Menu > Add to Speed Dial.
4. In the
Keypad Assignment box, select the
desired number.
5. Select Done to save.
Note
b Key 1 is generally assigned to your
voice mail, and Speed Dial will
designate the next available key
by default. If you want to save a
number to a key that has already
been assigned, the new number will
replace the current one.
b To delete a Speed Dial entry, in the
Speed Dial list, select the desired
entry then select Menu > Delete.
Receiving a Call
When you receive an incoming call, a
message will appear and the device will ring
if the ring volume is turned on.
To Answer or Reject a Call
b To answer the call, select Answer or
press the Call key
b To reject the call, press the End key
b To reject the call and send a text
message, select Menu > Respond with
text message.
.
.
To End a Call
b To end an incoming or outgoing call, press
the End key
.
In-call Options
To Put a Call on Hold
b Select Menu > Hold.
b To unhold a call, select Menu > Unhold.
To Set Up a Conference Call
1. Either put the current call on hold, and dial
a second number; or accept an incoming
call when you are already having a call
conversation.
2. Select Menu > Conference.
29
Page 28

Call
Note
Not all service providers support
conference call. Contact your service
provider for details.
To Turn the Speakerphone On or Off
The speakerphone allows users to talk
hands-free or allows other people to listen to
the conversation.
b During a conversation, select Menu >
Speakerphone On. The speakerphone
icon
appear on the status indicators
area.
b To turn off the speakerphone, select Menu
> Speakerphone Off.
WARNING!
To avoid damage to your ear, do
not hold out your device when the
speakerphone is turned Off.
To Mute a Call
You can turn off the microphone during a
call. When the phone is muted, you can hear
the caller but the caller cannot hear you
b During a conversation, select Menu
> Mute. The microphone off
appears on the screen.
b To turn on the microphone, select
Unmute.
icon
Video Calls
You can see a real-time, two-way video
between you and the caller who has a
compatible mobile phone.
Note
A 3G network coverage is required
to enabled Video Call functions. You
can send or start to receive video
from a caller whose phone has Video
Call capabilities. Contact your service
provider for details.
Make a Video Call
To Make a Video Call From Phone
1. Enter the phone number or select the
name from Contacts or Call History.
2. Select
Menu > Video Call from Contacts
to place the call.
30
Page 29

Call
To End a Video Call
b To end an incoming or outgoing video call,
press the End key
.
Notes
1. Video call service is only available in 3G
coverage areas.
2. The video call will be terminated in the
following cases:
When you accept a 3rd party, Conference
Call, or a 2nd incoming call.
When the voice call is placed on hold.
When the voice call is disconnected.
When moving out of a 3G service area.
When the network connection is in poor
state.
Using Call History
From the Today screen, do either of the
following to open the Call History screen:
b Highlight Calls and Messages Notification
shortcut, then select View.
b Select Start > Call History.
You can view the recently missed, received,
and dialed calls.
You can make a call, send a text or
multimedia message, and save a number
to Contacts.
You can delete a selected number or select
and delete all at one time.
Find Contact
If the number is saved in your Contacts, you
can view the contact details by selecting
Menu > Find Contact.
Send Text Message
1. Select the number you want from the list.
2. Select
Menu > Send Text Message to
send a text message.
E-mail
If the selected number has an e-mail
address saved in your Contacts, you can
send an email by selecting Menu > E-mail.
View Timers
To view the approximate duration of all calls
made on your device, select Menu > View
Timers.
b To reset timer, select Menu > Reset
Timers.
Delete
1. Select the desired number.
2. Select Menu > Delete.
3. Select Yes to confirm.
31
Page 30

Call
Delete List
To empty the call history list, select Menu >
Delete List.
Filter
b No Filter: Allows you to view missed,
received, and dialed call records.
b Missed Calls: Allows you to view the
calls which you have not answered.
b Incoming Calls: Allows you to view the
calls that you have answered.
b Outgoing Calls: Allows you to view the
calls that you have dialed.
Video Call
1. Select the number to make a video call
from the list.
2. Select Menu > Video Call.
32
Page 31

Messaging
Messaging
To Open the Messaging screen
b From the Today screen, select Start >
Messaging.
You can send and receive text messages,
multimedia messages, audio messages, and
email messagse.
Text Message
You can write, edit, and view the text
messages.
To create an SMS message
1. From the Messaging screen, select Text
Message.
2. Select Menu > New > SMS.
3. On the To field, enter the recipient’s
phone number or add a recipient from
Contacts.
TIP!
b To add a recipient from Contacts,
select Menu > Add Recipient. Then
select the name.
b Repeat the same procedure to add
more recipients.
4. Compose your message.
TIP!
b To use a template, select Menu >
My Text, the text and Insert.
5. When finished, select Send.
33
Page 32

Messaging
To create an MMS message
1. From the Messaging screen, select Text
Message.
2. Select Menu > New > MMS.
3. On the To field, enter the recipient’s
phone number.
4. Enter the Subject for the message.
5. Select Insert Text to enter the text of the
message, and select Insert Picture/
Video or Insert Audio to add media
objects. To capture a new image or record
a new sound clip for the message, select
Menu > Capture.
6. To preview a multimedia message before
sending it, select Menu > Preview
Message.
7. When finished, select Send.
To reply or forward a text message
Highlight the message then select Reply or
Menu > Reply/Forward > Reply, Reply all
or Forward.
E-mail
You can send and receive Outlook and
Internet e-mail through an Internet Service
Provider (ISP). You can access e-mail from
work using VPN connection.
Your device can send and receive e-mails
just as you do with a PC. You can set up the
following e-mail accounts:
Outlook E-mail
This e-mail account can be synchronized
with your computer through Microsoft
Outlook® or Exchange Server®.
Internet E-mail
This is an e-mail account provided by an
Internet Service Provider (ISP) or a web-based
e-mail such as Hotmail, Yahoo!Mail, etc.
34
Page 33

Messaging
To Set up an E-mail Account
1. From the Today screen, select Start >
Messaging.
2. Select Setup E-mail.
3. Enter your
then select Next.
4.
5. Enter
E-mail address and Password
Note
Select the Save Password box to allow
the phone to remember your password
so you do not have to enter it again.
Auto setup attempts to download
necessary e-mail server settings so that
you do not have to set them manually.
Once finished, select Next.
Your Name (name to display when
you send e-mail), Account display name
(name for this account on your device),
then select Next.
Note
b Auto setup is successful, the
Account display name and the
address of the incoming and outgoing
e-mail servers are populated.
b Auto setup is unsuccessful or you
have an account that you access
using VPN server connection, contact
your ISP or network administrator for
the required information.
6. Select Automatic Send/Receive option.
7. Select Finish to complete setup.
35
Page 34

Messaging
To create and send a new e-mail
1. From the Messaging screen, select the
e-mail account.
2. Select Menu > New.
3. On
To, enter the recipient’s e-mail
address.
TIP!
b To add Bcc and Cc recipients, use
the navigation key up to view and
scroll the screen’s the top page.
4. Enter the Subject.
5. Compose your message.
6. When finished, select Send.
To reply or forward an e-mail
1. Highlight the message then select Menu
> Reply/Forward > Reply, Reply all or
Forward.
2. Compose your response.
b To quickly add common messages, select
Menu > My Text and select a desired
message.
b To add an attachment, select Menu >
Insert > Picture, Voice Note or File.
3. When finished, select Send.
Note
b You will be alerted when you have
received messages.
b Received messages are stored in
the Inbox.
b If the device shows “No space for SIM
message”, delete some messages
from the Inbox.
b If the device shows “No space for
messages”, make space of each
repository by deleting messages,
media, and applications.
36
Page 35

Messaging
Receiving Messages
The manner in which you receive messages
depends on the type of the account you
have:
• To send and receive e-mail for an Outlook
E-mail account, begin synchronization with
Exchange Server through ActiveSync.
• To send and receive an Internet e-mail
account, download messages through a
remote e-mail server.
• Text messages are automatically received
when your phone is turned on. When your
phone is off, your service provider holds
the messages until the next time your
phone is turned on.
Managing Messages
On the Messaging screen, select the
message account to open. By default, when
you open the account, its Inbox is displayed.
To view and manage account folders, select
Menu > Folders.
b Deleted Items: View deleted items.
b Drafts: View saved messages. Select a
message to edit message.
b Inbox: View received messages. Select a
message to view message.
TIP!
Windows Mobile 6.5 Standard manages
your Inbox messages by address. You
can check the conversation history with
the address that you sent a message
to or view the message by selecting
the threaded message. Create a
new message on the text message
composer which is on the bottom of the
conversation history screen. You can
send the new message by selecting
Send.
b Outbox: The outbox is a temporary
storage for messages waiting to be sent.
Failed messages are also placed in the
Outbox.
b Sent Items: View the messages you sent.
37
Page 36

Multimedia
Camera
Taking a Photo
1. Select Start > Camera or press the
Camera key to activate the camera
capture mode.
Zoom Remaining
White Balance
Photo Mode
2. Press the Enter key or the Camera key to
capture an image.
The captured image is displayed on the
3.
screen. Do either of the following:
b To capture more images, select New.
b To view the images in the folder, select
Menu > View.
b To send the image via MMS or e-mail,
38
shots
Memory
Resolution
select Menu > Send.
b To delete the image, select Menu >
Delete.
4. The captured image is automatically
saved in the My Pictures folder. To
view images in the folder, select Start >
Pictures & Videos.
5. To close the camera, select Menu > Exit.
Recording a Video
1. Select Start > Camera or press the
Camera key to activate the camera
capture mode.
2. Select Options > Video and press the
Enter key.
3. Select Back to activate the camera video
mode.
4. Press the Enter key or the
Camera key to start recording;
press again to stop recording.
Page 37

Multimedia
5. Do either of the following:
b To capture more videos, select Back.
b To play the video, select Menu > Play.
b To send the video via MMS, select Menu
> Send.
b To delete the video, select Menu >
Delete.
6. The recorded video is automatically saved
in the My Videos folder. To play videos in
the folder, select Start > File Explorer >
My Videos, then select the desired video
file to play. Videos are played using the
Windows Media Player application.
7. To close the camera, select Menu > Exit.
Camera Settings
Before taking a photo or recording video, you
can change the camera settings by selecting
Menu > Settings. Available settings are
as follows:
b Timer: Allows you to select the delay time
(5 sec., 10 sec.)
b Burst: Set the number of shots to take
when burst mode is enabled. (3 pics,
5 pics)
b Storage: Select the memory to save your
pictures and videos.
b Shutter Sound: Enable or disable shutter
sound when the Camera or Enter key is
pressd.
b Video For
b Video Voice: Enable or disable audio
b Flicker: Allows you to select flicker
b Time Stamp: Enable or disable time
b Photo Quality: Allows you to select the
b Panorama: Allows you to select the
mat: Allows you to select the
video file format.
during video recording.
setting. (Auto, 50Hz, 60Hz)
stamp on captured images.
photo quality. (Normal, Fine, Super Fine)
panoramic view. (Horizontal, Vertical)
39
Page 38

Multimedia
Capture Mode Settings
On the capture screen, select Options to
view and adjust capture mode settings.
Choosing Capture Mode Type
Scroll up and down with the Optical joystick
then Enter key to select a capture mode type:
b Photo: Select to capture still images. This
is the default capture mode.
b Timer: Select to enable timer mode.
b Burst: Select to capture three or five
continuous shots.
b Frame: Select to choose from the
predefined frames and add it to your
images.
b PMK: Select to capture image in vivid
colors.
b Smile: When capturing an image in this
mode, the focus is set on the smiling
subject.
b Video: Select to record a standard video.
b MMS Video: Select to capture video
suitable to send via MMS.
Scroll left and right with the Optical joystick
then Enter to adjust other capture settings
such as:
b Brightness: Adjusts brightness.
b White Balance: Auto / Incandescent /
Fluorescent / Daylight / Cloudy
b Effect: Normal / Black & White / Negative
/ Sepia
b Resolution: Available options depend on
the selected capture mode type.
40
Page 39

Multimedia
Pictures & Videos
The Pictures & Videos application collects,
organizes, and sorts images and video clips
on your device or the storage card.
You can view the pictures as a slide show,
beam or send them via e-mail, edit them, or
set them as the background on the Today
screen.
To Copy a Picture or Video Clip to Your
Device
You can copy pictures from your PC and view
them on your device.
b Copy the pictures from your PC or a
storage card to the My Pictures folder on
your device.
Note
b You can also copy pictures to your
PC from your device using a memory
card. Insert the memory card into
the memory card slot on your device,
then copy the pictures from your
device to the folder you created on
the memory card.
To View Pictures
1. From the Today screen, select Start >
Pictures & Videos. The images in the
My Pictures folder appear as thumbnails
by default.
TIP!
b If you are not in the My Pictures
folder, select Menu > Folders > My
Pictures.
b To go to other folders, select Menu
> Folders > My Device, then select
your desired folder.
2. Highlight a picture and select View.
3. To zoom the image, select Menu > Zoom,
then select zoom options (Zoom In / Zoom
Out / Fit to Screen /
Actual Size).
41
Page 40

Multimedia
To View Slide Show
b From the My Pictures folder screen or
while viewing a picture, select Menu >
Play Slide Show.
b To stop slide show, press the back key
.
To Play Videos with Audio
1. Select Menu > Folders > My Device >
My Documents > My Videos to open
the default folder for videos. By default,
the video files appear as thumbnails with
a media icon.
2. Highlight the video and select Play to play
it with the built-in
Windows Media Player.
To Delete a Picture or Video Clip
1. From the Today screen, select Start >
Pictures & Videos.
2. Highlight a picture or video clip then
select Menu > Delete.
3. Select Yes to confirm the deletion.
To Edit a Picture
You can rotate, crop, and adjust the
brightness and color contrast of your
pictures.
1. From the Today screen, select Start >
Pictures & Videos.
2. Select the picture you want to edit.
3. Select Menu > Edit. The Edit screen
appears.
4. Select Menu, then any of the following:
b Rotate: To rotate the picture 90º
clockwise.
b Crop: To crop the picture. Use the
navigation and Enter keys to select the
position of the first and second corners.
Select Done to complete cropping.
42
Page 41

bAuto Correct: To adjust the brightness
and contrast levels of the picture.
Note
b To undo an edit, select Menu >
Undo.
b To cancel all unsaved edits you made
to the picture, press
Yes to confirm.
5. When finished, select Done.
then select
Multimedia
To Set a Picture as the Today Screen
Background
You can use a picture as the background on
the Today screen.
1. From the Today screen, select Start >
Pictures & Videos.
2. Select the picture you want to set as
background.
3. Select Menu > Use as Home Screen.
4. Select the display area, and adjust
the transparency level, select a higher
percentage for a more transparent
picture, or a lower percentage for a more
opaque picture.
5. Select Finish to complete.
43
Page 42

Multimedia
To Send Pictures and Video Clips via
E-mail or MMS
You can send pictures and video clips to
other devices via e-mail.
1. First, set up Messaging to send and
receive e-mail messages.
2. From the Today screen, select
Pictures & Videos.
3. Highlight the picture or video clip you
want to send.
4. Select
Menu > Send, then select the
messaging account (such as Outlook
E-mail or MMS) to send the attached item.
5. A new message is created with the item
attached.
6. Enter the recipient name and subject, then
select Send. The message will be sent the
next time you synchronize your device.
Note
b Pictures and video clips are saved
automatically before they are sent.
Start >
To Assign Pictures to Contacts
You can assign a picture to a contact so that
you can easily identify the contact at any
point of time.
1. From the Today screen, select
Pictures & Videos.
2. Highlight a picture then select
Save to Contact.
3. Select the desired contact from the
Contacts list then Select to confirm.
Start >
Menu >
To Save a Picture as Another File
1. From the Today screen, select Start >
Pictures & Videos.
2. Select the picture you want to save as
another file.
3. Select
Menu > Save > Save As.
4. Enter the new filename, then select
Done.
44
Page 43

Multimedia
To Use Advance Options
1. From the Today screen, select Start >
Pictures & Videos.
2. Select the picture for which you want to
configure settings.
3. Select
Menu > Options > General or
Slide Show. The Options screen appears,
allow you to:
b Resize a picture so that you can send it
faster via e-mail.
b Configure the rotation setting.
b Configure the view settings during slide
shows.
Windows Media
Use Microsoft Windows Media Player 10
Mobile for Pocket PC to play digital audio
and video files that are stored on your device
or on a network, such as on a web site. The
following file formats are supported by this
application: WAV, WMA, WMV, MP3, MIDI,
SP-MIDI, SMAF, AAC, AMR, 3GP, MP4, etc.
To Open Windows Media
Access Windows Media by any of the
following options:
b From the Today screen, select Start >
Windows Media to open the application.
b Open an audio or video file from File
Explorer or Pictures & Videos.
Windows Media Player has three primary
screens: Playback, Now Playing and Library.
From the Playback screen, select Now
Playing or Menu > Library to switch to Now
Playing or Library screen.
45
Page 44

Multimedia
Playback Screen
This is the default screen that displays the
playback controls, the album art window,
and the video window. You can change the
appearance of this screen by choosing a
different skin.
When you are viewing the Playback screen,
the following commands appear on the
Menu.
ary: Displays the Library screen so
b Libr
you can choose a file to play.
b Play/Pause: Starts or pauses playback.
b Stop: Stops playback.
b Shuffle/Repeat: Plays the items in the
Now Playing playlist randomly/repeatedly.
b Full Screen: When a video is playing,
displays it by using the entire screen.
b Options: Lets you adjust various Windows
Media Player options, including network,
skin, and hardware button options.
b Properties: Displays information about
the currently playing file.
b About: Displays information about the
Windows Media Player, such as the
version number.
Playback Controls
During playback, use the following keys to
play, pause, skip titles/tracks, and adjust
the volume.
b To start or pause playback, press the
Enter key.
b To go to the previous title/track, use the
Optical joystick scroll left.
b To go to the next title/track, use the
Optical joystick to scroll right.
b To increase or decrease the volume, use
the Optical joystick to scroll up or down.
46
Page 45

Multimedia
Now Playing Screen
The screen that displays the Now Playing
playlist. This special playlist indicates the
currently playing file and any files that are
“queued up” to play next.
When you are viewing the Now Playing
screen, the following commands appear on
the Menu.
ary: Displays the Library screen so
b Libr
you can choose a file to play.
b Move Up/ Down: Moves the selected
item up/down in the playlist order.
b Remove from Playlist: Deletes the
selected item from the playlist.
b Shuffle/Repeat: Plays the items in the
Now Playing playlist randomly/repeatedly.
b Save Playlist: Saves the current playlist.
b Clear Now Playing: Deletes all items
from the Now Playing playlist.
b Error Details: Displays error information
about the selected item (an exclamation
mark appears before the item name if
error details are available).
b Properties: Displays information about
the selected file.
Library Screen
The Library screen lets you quickly find
your audio files, video files, and playlists. It
contains categories such as My Music, My
Videos, My TV, My Playlists and Now Playing.
47
Page 46

Multimedia
When you are viewing the Library screen, the
following commands appear on the Menu.
b Queue Up: Adds the selected item to the
end of the current Now Playing playlist.
b Delete from Library: Deletes the selected
item from the library.
b Now Playing: Displays the Now Playing
screen.
b Library: Displays the Library screen so
you can choose a file to play.
b Update Library: Adds new items to
the library by searching your device or
storage card.
b Open File: Lets you find and play files
that are stored on your device or storage
card but that are not in the library.
b Open URL: Lets you play a file on a
network, such as the Internet.
b Properties: Displays information about
the selected file.
b Player: Open the Window media player.
FM Radio
You can search for your favorite radio
stations and enjoy listening to the radio.
Note
b You must connect the supplied
earphones or use Bluetooth
headsets to use the FM Radio.
1. From the Today screen, select Start > FM.
Use the Optical joystick to scroll left and
2.
right to select the radio station to listen to.
TIP!
Press the Optical joystick to scroll up
and down to find stations.
48
Page 47

3. Select Menu > Presets, highlight a
channel and select Go to tune in to a
preset station.
b When no preset channel is available,
Menu > Preset Scan. The FM radio
will scan for channels. Select Stop to
stop scan.
4. To close radio, select Done.
To Use Radio Options
From the FM Radio screen, select Menu and
choose any of the following options:
b Scan: Allows you to scan all channels.
b Mute: Allows you to turn off the volume.
b Speaker: Allows you to listen to the radio
via Speaker.
b Preset Scan: Allows you to erase existing
presets before scanning new stations.
b Save preset: Allows you to change the
frequency and preset name, and add a
shortcut key for the selected channel.
b Presets: Allows you to add, edit, and
delete the preset channels.
b Alarm: Allows you to set radio alarm.
b Options: Allows you to enable or disable
RDS and alternate frequency switching.
Multimedia
49
Page 48

Applications
Internet Explorer
With Internet Explorer you can view web sites
and surf the Internet on your device just like
you do on a computer.
From the Today screen, select Start >
Internet Explorer.
In the address bar, enter the web address
you want to visit or choose from previously
entered addresses from Favorites or History.
Press the left or right soft key to display the
function bar.
You can do the following by selecting Menu.
vorites: You can view and select from
b Fa
the list of your favorite web sites.
b Add to Favorites: Select to add the
currently displayed web site to your
Favorites.
50
b Go to Web Address: Select to place
cursor on the address bar and enter
the web address that you want to visit
manually.
b Home Page: Select to visit the home
page.
b History: Select to view the history list of
recently visited web pages.
b Forward: Select to go to the next page.
b Refresh: Select to refresh the current
web page.
b View: Select the view options.
• Text Size: Select the font size for the
page you are viewing.
• Enable ActiveX Controls: Select this
option to enable ActiveX Controls.
• Mobile: Select this option to view the
page in mobile format.
• Desktop: Select this option to view the
page in desktop format.
• Automatic: Select this option to allows
the system automatically set the view
format.
b Tools: Select to change browser options
such as Send Link, Properties, Add to
RSSViewer and other options.
b Copy/Paste: Allows you to use copy and
Page 49

Applications
paste functions.
b Exit: Select to exit the browser.
To zoom the page
b Select Zoom then use the jog bar to zoom
in or out the web page.
Note
b Browsing the internet may incur
additional charges. Charges vary
depending on the type of connection
(i.e. GPRS, ActiveSync, or WiFi).
Please contact your network operator
for further information.
Windows Live™
With the pre-installed Windows Live™ on
your device, you can access Hotmail, search
the web and synchronize your Contacts.
To Set Up Windows Live™
1. From the Today screen, select Start >
Windows Live.
2. Select Sign in to Windows Live.
3. Read the license agreement then select
Accept.
TIP!
b To avoid typing your name and
password each time you log in, select
the Save Password box.
4. Enter your e-mail address and password
then select Next.
5. Select what you want to sync on your
device then select Next.
6. When finished, select Done.
Using Hotmail
1. From the Today screen, select Start >
Windows Live.
2. Select Hotmail.
3. To synchronize e-mail, select
Send/Receive.
Menu >
51
Page 50

Applications
Windows Live™ Contacts
After setting up Windows Live™, you can
synchronize Contacts to your device.
To add Windows Live™ contacts
1. From the Today screen, select Contacts
> New.
2. Select Windows Live.
3. Enter the contact information, in the Email field, enter the e-mail address.
4. When finished, select Done.
Using Windows Live™ Search
1. From the Today screen, select Start >
Windows Live.
2. Enter the word(s) to search on the search
bar, then press the Enter key.
3. Internet Browser opens and displays the
search results.
ActiveSync
ActiveSync synchronizes information on your
device with information on your PC, such
as Outlook content. ActiveSync can also
synchronize over a cellular network with
Microsoft Exchange Server, if your company
or service provider is running Microsoft
Exchange Server with Exchange ActiveSync.
When you synchronize, ActiveSync compares
the information on your device with the
information on your PC and/or Exchange
Server and updates all locations with the
most recent information.
With ActiveSync, you can:
b Synchronize information, such as Outlook
E-mail, Contacts, Calendar, or Tasks
information on your device with your PC,
as well as pictures, video, and music.
b Synchronize Outlook E-mail, Contacts,
Calendar appointments, and Tasks on your
device directly with Exchange Server so
that you can stay up to date even when
your PC is turned off.
b Exchange files between your device and
your PC without synchronizing.
52
Page 51

Applications
b Select which types of information are
synchronized and specify how much
information is synchronized. For example,
you can choose how many weeks of past
Calendar appointments to synchronize.
Install ActiveSync on your PC. Once
ActiveSync is installed, you can synchronize
your device with the PC. You can download
ActiveSync from the Microsoft’s website
(http://www.microsoft.com) and install it on
your PC. Once you have installed ActiveSync
and set up a synchronization relationship,
ActiveSync on the PC recognizes your device
when you connect it, and automatically
transfers the synchronization settings you
specified on your device.
You may be able to synchronize your device
with Exchange Server through your company
or wireless service provider. If you plan to do
so, obtain e-mail address, Exchange Server
address, user name, password, and domain
name from your administrator before starting
the Sync Setup Wizard.
Setting up Windows Vista™
Instead of ActiveSync, Windows Vista™ uses
the Microsoft Windows Mobile™ Device
Center.
Note
b Some versions of Windows Vista
come with Windows Mobile Device
Center already installed. If Windows
Mobile Device center is not available
on your Windows Vista, you can
download it from Microsoft’s website
(http://www.microsoft.com) and
install it on your PC.
Set up synchronization in Windows
Mobile Device Center
When you connect your device to your PC
and start Windows Mobile Device Center
for the first time, you are asked to create
a Windows Mobile partnership with your
device. Follow the steps below to create a
partnership.
b Connect your device to your PC. Windows
Mobile Device Center configures itself and
then opens.
b On the license agreement screen, click
Accept.
b On the Windows Mobile Device Center’s
Home screen, click Set up your device.
53
Page 52

Applications
Note
b Choose Connect without setting
up your device if you only want
to transfer media files, check for
updates, and explore your device but
not sync Outlook information.
b Select the items you want to synchronize,
then click Next.
b Enter a device name and click Set
Up. When you finish the setup wizard,
Windows Mobile Device Center
synchronizes your device automatically.
Notice that Outlook e-mails and other
information will appear on your device
after synchronization.
Use Windows Mobile Device Center
To open Windows Mobile Device Center, click
Start > All Programs > Windows Mobile
Device Center on your Windows Vista
computer. On Windows Mobile Device Center,
you can do the following:
b Click Mobile Device Settings to change
synchronization settings.
54
b When you click Pictures, Music and
Video > ___ new pictures/video clips
are available for import, a wizard guides
you to tag and transfer photos from
your device to the Photo Gallery on your
Windows Vista PC.
b Click Pictures, Music and Video > Add
media to your device from Windows
Media Player to synchronize music and
video files using Windows Media™ Player.
b Click File Management > Browse
the contents of your device to view
documents and files from your device.
Setting up Windows XP
If you are using Windows XP, download
ActiveSync from Microsoft’s website
(http://www.microsoft.com) then follow the
steps below to install and set up ActiveSync
on your PC.
b Follow the on-screen instructions to install
ActiveSync.
b After installation is completed, connect
your device to your PC using the sync
cable.
- Connect the smaller end of the USB
cable to your LG C570 device.
- Connect the larger end of the USB cable
to the USB port on your computer.
Page 53

Applications
b The Synchronization Setup Wizard
automatically starts and guides you to
create a synchronization relationship. Click
Next to proceed.
b To synchronize your device with your
computer, clear the Synchronize directly
with a server running Microsoft Exchange
Server check box, and then click Next.
b Select the information types that you want
to synchronize, and then click Next.
b Click Finish.
When you finish the wizard, ActiveSync
synchronizes your device automatically.
Synchronizing Information
When you connect your device to the PC
using a USB or a Bluetooth connection,
ActiveSync will immediately synchronize.
While the device is connected, ActiveSync
synchronizes every time you make a change
on either the PC or the device.
Synchronizing Outlook information
If you have set up a synchronization
relationship between your device and the PC,
synchronization keeps Outlook information
up-to-date on both computers.
ActiveSync synchronizes a limited amount
of information by default to save storage
space on your device. You can change the
amount of information synchronized for a
given information type in Settings for the
information type.
You can set up your device to synchronize
with more than one PC or with a combination
of one or more PCs and Exchange Server.
When synchronizing with multiple computers,
the items that you synchronize will appear
on all of the computers with which they are
synchronized.
For example, if you have set up
synchronization with two PCs (PC1 and
PC2), which have different items, and you
synchronize Contacts and Calendar on the
device with both computers, the result is
as follows:
55
Page 54

Applications
Location New state
PC1 All Outlook contacts and
calendar appointments that
were on PC2 are now also
on PC1.
PC2 All Outlook contacts and
calendar appointments that
were on PC1 are now also
on PC2.
Device All Outlook contacts and
calendar appointments
from both PC1 and PC2
are on the device.
To start and stop synchronization
b To synchronize Outlook information
and other local information on the PC,
including media files, connect your device
to the PC using Bluetooth or a cable.
b If you are synchronizing directly with the
Exchange Server, you can use the PC
connection to the network that is “Desktop
Pass-through”, or you can synchronize
without connecting to the PC over a
cellular network.
b In ActiveSync, select Sync. To end
synchronization before it completes,
select Stop.
56
b To change which information is
synchronized
1. In ActiveSync on the device, select
Menu > Options.
2. Do one or both of the following:
b Select the check box for any items
you want to synchronize. If you cannot
select a check box, you might have
to clear the check box for the same
information type elsewhere in the list.
b Clear the check box for any items you
want to stop synchronizing.
3. To stop synchronizing with one PC
completely, select the PC and select
Delete.
Note
b Outlook e-mail can be synchronized
with only one computer. To change
available synchronization settings,
select the type of information and
select Settings.
Page 55

Applications
To synchronize directly with Exchange
Server
You can set up synchronization with
Exchange Server on your device, if it is
available to you through your company or
wireless service provider. However, you
should first ask your administrator for the
following information and then carry on
with the steps: e-mail address, Exchange
Server address, user name, password, and
domain name.
1. In ActiveSync on the device, select
> Configure Server. If you have not yet
set up synchronization with Exchange
Server, this will say Add Server Source.
2. Enter e-mail address, and select
3. In the Server address, enter the address
of the running Exchange Server, check the
box if this Server requires an encrypted
(SSL) connection, and select Next.
4. Enter your user name, password, and
domain, then select Next. To change
the rules for resolving synchronization
conflicts, select Menu > Advanced.
5. Select the check boxes for the types of
items that you want to synchronize with
the Exchange Server.
Menu
Next.
6. To change available synchronization
settings, select the settings desired and
select Menu > Settings.
7. Select Finish.
Synchronizing via Bluetooth
You can connect your device to the PC to
synchronize using Bluetooth.
To synchronize with a PC via Bluetooth
1. First, check “Allow connections to one
of the following” of the ActiveSync
connection Settings menu on your PC.
Select the proper COM port.
If there is not an available connection,
then you should make a Bluetooth pairing.
2. Select the
Menu > Connect via
Bluetooth.
57
Page 56

Applications
Synchronizing Musics, Videos, and
Pictures
If you want to carry your music or other
digital media with you along while you travel,
ActiveSync works with Windows Media
Player to synchronize music, video, and
pictures.
Other than selecting the Media information
type in ActiveSync to be synchronized, all
media synchronization settings must be set
in Windows Media Player. Before media can
be synchronized, you must do the following:
b Install Windows Media Player Version 10
on the PC.
b Connect your device to the PC with a
USB cable. If the device is currently
connected using Bluetooth, you must
end that connection before media can be
synchronized.
b Insert a storage card into your device
(32MB or larger is recommended).
b Set up a sync partnership between the
storage card and Windows Media Player.
Change Media synchronization
settings
Once you select the Media information type
in ActiveSync to be synchronized, any of
your favorite music, video, and picture files
in Windows Media Player playlists can be
synchronised. All you have to do is set up
synchronization in Windows Media Player for
those media files.
To set up a sync relationship with a storage
card:
1. Open Windows Media Player.
2. Click the Sync tab.
3. Select the storage card.
4. Click Set up Sync.
58
Page 57

Applications
Internet Sharing
You can set up your PC to connect to the
Internet using the Internet connection on
your device.
Note
b ActiveSync software version 4.5 or
higher is required.
1. Connect the USB cable to the PC.
2.
From the Today screen, select Start >
Internet Sharing.
3. Set PC Connection to USB or Bluetooth
PAN.
4. Set the Network Connection to a proper
APN.
5. Select Connect.
6. A data connection indicator (
/ ) is displayed when PDP activation is
performed successfully.
Note
b The operating system of your PC
must be Windows XP, Service Pack
2 or higher.
/
Bluetooth Manager
Bluetooth enables compatible mobile
devices, peripherals and computers that are
in close proximity to communicate directly
with each other without wires. Your device
supports built-in Bluetooth connectivity,
which makes it possible to connect it with
compatible Bluetooth headsets, computer
applications and so on.
To Set the Bluetooth Configuration
1. From the Today screen, select Start >
Bluetooth.
2. Select Yes to turn on Bluetooth. The
Bluetooth Manager Settings page is
displayed.
59
Page 58

Applications
Note
b If you use a PC Sync via Bluetooth,
you can exchange data within
Contacts.
b When you receive data from another
Bluetooth device, the device requests
a confirmation. After confirming the
transfer, the file will be copied to
your device.
b You can set the shared folder in
Settings > Advanced... > File
Transfer.
To Make Your Device Discoverable
1. From the Settings page, highlight Not
Discoverable then press the Enter key.
2. Select visibility option (Always Visible,
Visible for 60 seconds, Not Visible).
3. Select Done.
Bluetooth Partnership
A Bluetooth partnership is a relationship
that you create between your device
and another Bluetooth-enabled device in
order to exchange information in a secure
manner. Creating a partnership between two
devices involves entering the same personal
identification number (PIN) or Passkey
on both devices. Creating a partnership
between two devices is a one-time process.
Once a partnership is created, the devices
can recognize the partnership and exchange
information without entering a PIN again.
Make sure the two devices are within a
range of 10 meters from one another, and
Bluetooth is turned on and in discoverable
mode.
60
Page 59

Applications
To create a Bluetooth Partnership
1. From the Settings page, select Add a
device.
2. To limit the search, select the type of
device you want to establish connection
with.
Note
b Make sure the other device and its
Bluetooth function is turned on and
discoverable.
3. Select
Continue. Your device searches for
the other device.
4. Highlight the device, then select Select.
5. Enter a passkey, then select OK.
Note
b The passkey you enter must also be
the same passkey to be entered on
the other device.
b The passkey must be 1 to 16
characters.
To Accept a Bluetooth Partnership
1. Ensure that the Bluetooth is turned on.
2. When prompted, enter a passkey (the
same passkey that is entered on the
device requesting the partnership) to
establish a secure connection.
3. Select OK.
Services
After establishing connection with a
Bluetooth device, you can activate and set
the configuration of each Bluetooth profile.
Select Menu > Update. A list of services
is shown.
b Serial Port: Connect to a wireless serial
port on the device.
b Synchronization: Synchronize contacts
and other PIM items.
b Bluetooth Networking: Share
information or connect to the Internet.
61
Page 60

Applications
Settings Page
From the Settings page, the following
options are available:
b Add a Device: Select to set up a new
Bluetooth partnership.
b Disable Bluetooth: Turns Bluetooth off.
b LG-C570: The default device name as
seen by other Bluetooth devices. Select
this option to change the name.
b Not Discoverable/Discoverable: Select
this option to set visibility status of your
device.
b Advanced:
Allows you to configure hands-
• Audio:
free related settings.
• Beam Data Exchange:
configure Beam settings.
• File Transfer:
file transfer settings.
• Serial Ports:
serial ports.
Allows you to
Allows you to configure
Select to view Bluetooth
Accessories Page
The following options are available:
b Networking Manager: Allows you to
network with other Bluetooth devices
(Create a Private Network, Share Internet
Connection, Access Internet through
remote device).
b Business Card Exchange: Allows you
to send and receive business cards from
other devices.
b BT Send Object: Allows you to send
an object, such as an item or items in
Contacts, Outlook E-mail, Calendar Items,
Audio, Ring Tones, Images, Voice Notes,
Tasks, and Videos.
My Devices Page
This page lists all Bluetooth devices that you
have established partnership with.
b To add more devices, select Menu >
Add Device.
b To delete a selected device, select Menu
> Delete.
b To update services, select Menu >
Update.
62
Page 61

Applications
Office Mobile
Excel Mobile
Excel Mobile makes it easy for you to open
and edit Excel workbooks and templates
created on your PC.
To open an Excel file
1. From the Today screen, select Start >
Office Mobile > Excel Mobile.
2. Locate the Excel file, then select
To change view options, select View.
For other functions, select Menu.
b Close File: Select to close the file and
exit Excel Mobile.
b Edit: Select this option to edit the opened
file.
b File: Allows you to save the file (Save As),
or send the file via e-mail.
b Go to: Allows you to go to a particular cell
or reference name.
b Find: Allows you to find matching word(s)
in the file.
b About: View software version.
Select.
Unsupported features in Excel Mobile
Excel Mobile does not fully support
some features such as formulas and cell
comments. Some data and formatting may
be lost when you save the workbook on
your device. Note the following Excel Mobile
formatting considerations:
b Alignment. Horizontal, vertical, and
wrap-text attributes remain the same, but
vertical text appears horizontal.
b Borders. Appear as a single line.
b Cell patterns. Patterns applied to cells
are removed.
b Fonts and font sizes. Fonts not supported
by your device are mapped to the closest
font available. The original font is listed
on your device. When the workbook is
opened in Excel on your PC again, the
data is displayed in the original font.
b Number formats. Numbers formatted
using the Microsoft Excel 2007 Version
6.1 conditional formatting feature are
displayed in Number format.
63
Page 62

Applications
b Formulas and functions. If an Excel file
contains a function that is not supported
by Excel Mobile, the function is removed,
and only the returned value of the
function appears. The following formulas
are also converted to values: formulas
entered as an array or containing an array
argument, for example, =SUM({1;2;3;4});
formulas containing external link
references or an intersection range
reference; and formulas containing
references past row 16384 are replaced
with #REF!
b Protection settings. Most worksheet and
workbook protection features are disabled
but not removed. However, support for
password protection has been removed.
Workbooks that are password-protected
or workbooks in which one or more
worksheets are password-protected
cannot be opened. You must remove the
password protection in Excel on the PC
and then synchronise to open the file on
the device.
b Zoom settings. Are not retained. Excel
supports a per worksheet zoom setting,
while the Excel Mobile zoom setting is
applied to the entire workbook.
b Worksheet names. Names that reference
worksheets within the same workbook are
64
displayed accurately, but names that refer
to other workbooks, arrays, for example,
={1;2;3;4}, array formulas, or intersection
ranges are removed from the name list. If
a name is removed from the list, it is left
in formulas and functions, causing those
formulas to be resolved as “#NAME?”. All
hidden names are not hidden.
b AutoFilter settings. Are removed. However,
you can use the AutoFilter command in
Excel Mobile to perform similar functions.
If you have an AutoFilter applied to a
worksheet that causes rows to be hidden,
the rows remain hidden when the file is
opened in Excel Mobile. Use the Unhide
command to display the hidden rows.
b Chart formatting. All charts will be
saved the way they are shown in Excel
Mobile. Unsupported chart types are
changed to one of these supported types:
Column, Bar, Line, Pie, Scatter, and
Area. Background colors, gridlines, data
labels, trend lines, shadows, 3D effects,
secondary axes, and logarithmic scales
are turned off.
b Worksheet features. The following
features are not supported in Excel Mobile
and are removed or modified when a
workbook is opened on the device: hidden
sheets are not hidden; VBA modules,
Page 63

macro sheets, and dialog sheets are
removed and replaced with a place
holder sheet; text boxes, drawing objects,
pictures, lists, conditional formats, and
controls are removed; pivot table data is
converted to values.
OneNote Mobile
OneNote Mobile allows you to create notes
with added pictures and recordings.
To create a new note
1. From the Today screen, select Start >
Office Mobile > OneNote Mobile.
2. Select New.
3. Compose your note.
4. When finished, select Done.
For other functions, select Menu.
b Format: Select font style.
b List: Allows you to add or clear bullets
and numbers.
b Take Picture: Select this option to
capture an image and insert to note.
b Insert Picture: Allows you to add a
picture that is saved on your device.
b Insert Recording: Allows you to record
a voice note.
Applications
PowerPoint Mobile
With PowerPoint Mobile, you can open
and view slide show presentations created
on your PC in *.ppt and *.pps format with
PowerPoint ‘97 and later.
Many presentation elements built into the
slide shows such as slide transitions and
animations will play back on the device.
If the presentation is set up as a timed
slide show, one slide will advance to the
next automatically. Links to URLs are also
supported.
PowerPoint features not supported on the
device include:
b Notes. Notes written for slides will not
be visible.
b Rearranging or editing slides. PowerPoint
Mobile is a viewer only.
b File formats. Files created in *.ppt format
earlier than PowerPoint ‘97 and HTML
files in *.htm and *.mht formats are not
supported.
65
Page 64

Applications
To start a slide show presentation
1. From the Today screen, select Start >
Office Mobile > PowerPoint Mobile.
2. Locate the the slide show you want to
view, then select Select.
If the presentation is set up as a timed slide
show, slides will advance automatically.
To stop a slide show
• In a PowerPoint Mobile presentation,
select End.
To navigate between slides
You can advance to the next slide if a
presentation is not set up as a timed slide
show, return to the previous slide, or go to
any slide out of sequence.
1. From the Today screen, select
Office Mobile > PowerPoint Mobile.
2. Open the desired presentation.
3. Select
Menu > Next or Previous, or Go
to Slide then select the desired slide.
TIP!
b Simply press the left or right
navigation keys to advance to the
next slide or return to the previous
slide.
66
Start >
To zoom the slide show
1. From the Today screen, select Start >
Office Mobile > PowerPoint Mobile.
2. Open the presentation.
3. Select
Menu > Zoom In or Zoom Out.
Word Mobile
Word Mobile is a streamlined version of
Microsoft Word. Word documents created on
your PC can be opened and edited on your
device and save them as *.doc, *.rtf, *.txt,
and *.dot files.
You can have only one document open at a
time. To open another document, you have to
close the first one.
When you close a document, the device
will automatically prompt you to save the
document. If you selected to save, you can
rename the document with your preferred
name and move it to another folder or a
storage card.
Word Mobile does not fully support some
features of Microsoft Word such as revision
marks and password protection. Some data
and formatting may be lost when you save
the document on your device.
The following features are not supported in
Word Mobile.
Page 65

Applications
• Backgrounds
• Shapes and text boxes
• Artistic page borders
• Smart tags
• Metafiles
b Bi-directional text. While Word
Mobile will open documents containing
bi-directional text, the indentations and
alignment may be displayed and saved
incorrectly.
b Password-protected files. Word Mobile
does not support opening passwordprotected documents. You must first
remove the password protection in
Word on the PC if you want to view the
document on the device.
b Document protection. Word Mobile does
not support displaying files that have been
protected in Word on the PC.
The following features are partially supported
in Word Mobile.
b Picture bullets
b Revision marks. When you open a
document that has revision marks in
Word Mobile, the document appears as if
all revision marks were accepted. When
you save the document in Word Mobile,
revision marks are lost.
b Table styles. When you save a document
in Word Mobile, some or all the formatting
that is defined in the table style is lost.
b Underline styles. Underline styles not
supported by Word Mobile are mapped to
one of the four supported styles: regular,
dotted, wavy, or thick/bold/wide.
b Legacy Pocket Word files. You can open
*.psw files in Word Mobile; however, if you
edit a file, you will need to save it in *.doc,
*.rtf, *.txt, or *.dot format.
The following features are not supported on
the device; however, they are retained in the
file so that when a file is opened on the PC
again, they appear as expected.
b Footnotes, endnotes, headers, footers.
b Page breaks: Word Mobile does not
display breaks between pages. However,
all page breaks except for breaks at the
end of a document are retained in the
document.
b Lists: When you open the document on
the computer again, indented lists are
displayed in the original form.
b Fonts and font sizes. Fonts not supported
by the device are mapped to the closest
font available, although the original font
will be listed on the device.
67
Page 66

Applications
Adobe Reader LE
Adobe Reader® LE is an application for
viewing PDF (Portable Document Format)
files on your device.
To open a PDF file
1. From the Today screen, select Start >
Adobe Reader LE.
2. Browse for the PDF file you want to open,
then select Open.
3. To zoom the file, select Tools > Zoom.
4. To close the application, select Menu
> Exit.
Task Manager
In most cases, programs automatically close
to free up needed memory, however, you
can close programs manually using Task
Manager.
1. From the Today screen, select Start >
Accessories > Task Manager.
2. You can check the list of running
programs, memory and CPU information.
3. You can end the programs manually by
highlighting a program and selecting
End Task.
4. To close all running programs, select
Menu > End All Tasks.
68
5. You can change the way programs are
viewed or ordered by selecting Menu >
View or Sort by.
6. To close Task Manager, select Menu
> Exit.
MSN Money
MSN Money allows you have quick access
to MSN Money and view the latest stocks
exchange information on your device.
b From the Today screen, select Start >
MSN Money.
Note
b Before accessing MSN Money, make
sure your device has a GPRS SIM
card installed.
b Additional costs may be incurred
when using this service.
MSN Weather
MSN Weather allows you to connect to the
Internet and view the latest weather forecast
from MSN Weather.
b From the Today screen, select Start >
MSN Weather.
Page 67

Applications
Note
b Before accessing MSN Weather,
make sure your device has a GPRS
SIM card installed.
b Additional costs may be incurred
when using this service.
GPS Extra
GPS Extra allows you to download GPS data
and to enhance GPS performance.
b From the Today screen, select Start >
GPS Extra.
Note
b Before accessing GPS Accelerator,
make sure your device has a GPRS
SIM card installed.
b Additional costs may be incurred
when using this service.
AGPS Setting
GPS Setting allow you to use AGPS to
shorten the time a GPS module used to
determine its location.
b From the Today screen, select Start >
AGPS Setting.
Java
Your device supports Java and hence you
can easily download java games and other
java applications from the internet.
b From the Today screen, select Start >
Java.
Note
b Additional costs may be incurred
when using this service.
Marketplace
Windows® Marketplace for mobile is a new
marketplace that will provide direct-to-phone
mobile applications and can be accessed
from both the phone and the Web.
b From the Today screen, select Start >
Marketplace.
Note
b Before accessing Marketplace, make
sure your device has a GPRS SIM
card installed.
b Additional costs may be incurred
when using this service.
69
Page 68

Applications
Microsoft My Phone
Microsoft® My Phone synchronizes your
phone’s contacts, calendar, tasks, text
messages, music, photos, videos, and other
documents with your My Phone account at
http://myphone.microsoft.com.
To Configure My Phone
1. From the Today screen, select Start >
Microsoft My Phone.
2. Select
Next.
3. Read the license, then select
4. Sign in your Windows Live ID, then select
Sign In.
5. Select synchronization method:
Automatic, then select Next.
6. Select
Finish to start synchronization.
Note
b Before accessing Microsoft My
Phone, make sure your device has a
GPRS SIM card installed.
Accept.
Manual or
Remote Desktop
Remote Desktop provides remote access
to the desktop of your computer running
Windows XP Professional, from your device.
Using Remote Desktop you can, for example,
connect to your office computer from home
and access all your applications, files, and
network resources as though you were in
front of your computer at the office.
b From the Today screen, select Start >
Remote Desktop.
RSS Viewer
RSS Viewer is an application that allows you
to subscribe to RSS feeds and view them on
your device.
To Subscribe to RSS Feeds
1. From the Today screen, select Start >
RSS Viewer.
2. Select
Menu > Channel > New Channel.
3. Enter the URL and Channel name and set
folder location, select Done.
70
Page 69

Applications
To Update RSS Feeds
1. Highlight the folder or channel then press
the Enter key.
2. Select Menu > Update to start updating.
To View RSS Feeds
1. Highlight the channel then press the
Enter key.
2. Highlight the news feed you want to view
from the list.
3. Press the Enter key to view the rest of
the story.
4. You can view the next or previous news
feed on the list by selecting Menu > Next
or Previous.
5. If you wish to view the news feed with
Internet Explorer, select Menu > Open
with IE.
6. To refresh page, select Menu > ReLoad.
7. To return to list view, select List View.
Note
b Additional costs may be incurred
when using this service.
Live Search Widget
Live Search Widget allows you to search the
Internet using Live Search. With just a click
of a button, you can launch Live Search in a
standalone window.
b From the Today screen, select Start >
Search Widget.
Note
b Before accessing Live Search Widget,
make sure your device has a GPRS
SIM card installed.
b Additional costs may be incurred
when using this service.
File Explorer
The File Explorer application allows you to
open an explorer window similar to a desktop
Windows based system. The explorer window
allows you to navigate through your phone to
locate desired folders and files.
You can also quickly manage, delete, copy,
or edit any files and folders on your phone
and create new folders.
To access File Explorer, from the Today
screen, select Start > File Explorer.
71
Page 70

Applications
b If you want to see the files or folders in
the My device or Storage Card folder,
select either of the two.
b To view the files or folders in the phone’s
memory, highlight the files or folders
that you want to view, then press the
Enter key.
b Select the folder category (labelled My
Documents by default) and then the folder
that you want to view.
Voice Notes
Voice Notes allows you to record your voice
notes.
To create a new voice note
1. From the Today screen, select Start >
Voice Notes.
2. Select Record to start recording.
3. Select
Stop to stop recording. The
recording is automatically saved with a
default file name.
4. To close voice notes, press
To listen to the voice note
1. From the Today screen, select Start >
Voice Notes.
2. Select
Menu > Play to playback
recording.
72
To rename the file
1. From the Today screen, select Start >
Voice Notes.
2. Highlight the recording from the list.
3. Select
Menu > Rename to rename
the file.
4. Enter the new name, then select Done.
To delete recording
1. From the Today screen, select Start >
Voice Notes.
2. Highlight the recording that you want to
delete from the list.
3. Select
Menu > Delete.
Calendar
To Add an Event to your Calendar
1. From the Today screen, select Start >
Calendar.
2. Select the desired date.
3. Select
.
Menu > New Appointment.
4. Type in the subject and location of the
event and check the date and enter time
you would like your event to begin.
5. Check other information below.
6. When finished writing your note, select
Done.
Page 71

Applications
To Change your Default Calendar View
1. From the Today screen, select Start >
Calendar.
2. Select
Menu > Day View / Week View /
Month View / Agenda View.
Tasks
Use Tasks to keep track of things you need
to do. A task can occur once or repeatedly
(recurring). You can set reminders for your
tasks and you can organize them using
categories.
Your tasks are displayed in a task list.
Overdue tasks are displayed in red.
To Create a Task
1. From the Today screen, select Start >
Tasks.
2. Select Menu > New Task.
3. Enter a subject for the task, and fill in
information such as start and due dates,
priority, and so on.
4. When finished, select Done.
Note
b You can easily create a short, to-do-
type task. Simply enter the text on the
Enter new task here bar.
To Change the Priority of a Task
Before you can sort tasks by priority, you
need to specify a priority level for each task.
1. From the Today screen, select
Tasks.
2. Select the desired task, then select
3. In the Priority box, select a priority level.
4. Select
Done to return to the task list.
Note
b All new tasks are assigned with
Normal priority by default.
Start >
Edit.
To Set a Default reminder for all New
Tasks
You can have a reminder automatically
turned on for all new tasks you create.
1. From the Today screen, select
Tasks.
2. Select
Menu > Options.
3. Check the
4. Select Done to return to the task list.
Set reminders for new
items box.
Note
b The new tasks must have due dates
set in order for the reminder to take
effect.
Start >
73
Page 72

Applications
To Show Start and Due Dates in the
Task List
1. From the Today screen, select Start >
Tasks.
2. Select Menu > Options.
3. Check the
4. Select Done to return to the task list.
Show start and due dates
box.
To Locate a Task
When your list of tasks is long, you can sort
the list to quickly find a specific task.
1. From the Today screen, select
Tasks.
2. In the task list, do one of the following:
b Sort the list. Select Menu > Sort by,
then select the sort option.
b Filter the list by category. Select Menu
> Filter, then select the category you
want displayed.
Note
b To filter your tasks further, select
Menu > Filter > Active Tasks or
Completed Tasks.
Start >
Calculator
The calculator function allows you to add,
subtract, multiply and divide. You can input
numbers using the number keys, and input
operators using button keys.
b From the Today screen, select Start >
Accessories > Calculator.
Stopwatch
StopWatch allows you to start and stop time
for exact timing.
1. From the Today screen, select
Stopwatch.
2. To start timing, select
time is displayed as HH.MM.SS.hh
(hours, minutes, seconds, hundredths of
a second).
3. During the timing, you can record an
individual lap time by selecting Lap. The
lap times are listed on screen. Up to 99
lap times can be recorded.
4. To stop timer, select
5. You can either resume or reset the
stopwatch by selecting Resume or Reset.
Start >
Start. The running
Stop.
74
Page 73

Applications
Games
In the Games submenu, Windows games
like Bubble Breaker and Solitaire, have been
already been pre-installed on your device.
b From the Today screen, select Start >
Games, then select the desired game.
XT9 Dictionaries
The XT9 Dictionaries allows you to add your
own words into the My Words XT9 dictionary.
It also allows you to configure automatic
substitution.
To add a word in XT9
1. From the Today screen, select Start >
XT9 Dictionaries.
2. Select
My Words XT9, then press the
Enter key.
3. Select Add.
4. Type the word to add in the dictionary,
then select Done.
5. To close My Words function, select
> Exit.
Menu
To edit a word in XT9
1. From the Today screen, select Start >
XT9 Dictionaries.
2. Select
My Words XT9, then press the
Enter key.
3. Highlight the word you want to edit, then
select Menu > Edit.
4. Type the word to add in the dictionary,
then select Done.
To delete a word in XT9
1. From the Today screen, select Start >
XT9 Dictionaries.
2. Select
My Words XT9, then press the
Enter key.
3. Highlight the word you want to delete,
then select Menu > Delete.
4. To delete all the words in the My Words
list, select Menu > Delete All. Select Ye s
to confirm.
75
Page 74

Applications
To add auto-substitution shortcut
1. From the Today screen, select Start >
XT9 Dictionaries.
2. Select
Auto-Substitution XT9, then press
the Enter key.
3. To add a shortcut, select
4. Type the shortcut word and the word to
substitute, then select Done.
Add.
To edit auto-substitution shortcut
1. From the Today screen, select Start >
XT9 Dictionaries.
2. Select
Auto-Substitution XT9, then press
the Enter key.
3. Highlight the word to edit, then select
Menu > Edit.
4. Type the shortcut word and the word to
substitute, then select Done.
To delete auto-substitution shortcut
1. From the Today screen, select Start >
XT9 Dictionaries.
2. Select
Auto-Substitution XT9, then press
the Enter key.
3. Highlight the word to delete, select
> Delete.
Menu
XT9 Settings
Use XT9 Settings to select the dictionary
language and other word prediction settings.
1. From the Today screen, select
XT9 Settings.
2. In the Language list, select the desired
language. Options are: English,
Portuguese, Spanish, French, Italian, and
German.
3. In the Word Completion Point list, select
how many typed letters do you want the
dictionary to start word completion.
4. To enable other options, check their
corresponding boxes.
5. When finished, select
Start >
Done.
Smart Applications
Smart Applications consists of a set of
applications offered by your phone.
The selected applications appear in the
Smart Applications.
1. From the Today screen, select
Applications > Register.
2. Select the desired applications and press
the Enter key.
3. When finished, select
> Smart
Done.
76
Page 75

Applications
Smart Contacts
You can register the contact you frequently
use in Smart Contacts. Using the registered
contact, you can easily make a call or send
a message.
1. From the Today screen, select
Applications > Register.
2. Select the desired applications and press
the Enter key.
3. When finished, select
> Smart
Done.
Good Email and SN
Good Email and SN connects you to your
online world while on the go with your
phone.
Once you choose “Setup Now”, My
e-mail will prompt you for your username
and password to your favorite Internet
destinations. You have the option to choose
one or more sites either now or in the future,
and My e-mail will automatically deliver new
information form those sites to your phone.
b From the Today screen, select Start >
Good Email and SN.
Messenger
Messenger allows you to sign in with your
MSN Messenger account and chat with
friends.
b From the Today screen, select Start >
Messenger.
Weather
Weather allows you to view the current
weather on the selected city.
b From the Today screen, select Start >
Weather.
Brightness
Brightness allows you to control the level of
brightness when using the battery or external
power.
b From the Today screen, select Start >
Brightness.
LG Mobile Application
LG Mobile Application allows you to access
various internet services using your phone
browser.
b From the Today screen, select Start > LG
Mobile Application.
77
Page 76

Settings
To configure the settings on your device,
from the Today screen, select Start >
Settings, then select the settings category.
Phone
You can edit the general settings related to
making and receiving calls.
Auto Answer
Set how quickly calls are automatically
answered during hands-free operation. This
setting does not apply when the ring type
is Silent.
BandSwitch
You can change the settings related to
Network.
Call Barring
You can set restrictions for the following
calls:
b Block incoming calls: All calls/When
roaming/Off.
b Block outgoing calls: All calls/
International/International except to home
country/Off.
To edit mobile call barring settings, you need
a password. You obtain the barring password
from your service provider upon subscription
to this network service.
78
Call barring affects all voice and data calls,
except emergency calls.
Call Forwarding
Allows you to forward your incoming calls to
another phone number.
Call Options
You can configure the following options:
b Any key answer: Check the box to
answer a call by pressing any key.
b Show SIM contacts: Check the box to
display your contacts saved in the SIM
card.
b Voice mail number: Call the voice mail
number to listen to your voice messages.
Voice mail number is automatically
configured upon receiving network service
from your service provider.
b Text messages service center: Service
center number for all text messages. The
service center number is automatically
configured upon receiving network service
from your service provider.
b Country code: Enter the country code in
your location.
b Area code: Enter the area code in your
location.
Page 77

Settings
Call Waiting
To be notified of incoming calls while you
have a call in progress, check Provide call
waiting notifications, then select Done.
Caller ID
To display your phone number to the person
you are calling, select Everyone. Select No
one to hide it.
Channels
Allows you to receive cell broadcast
messages.
Fixed Dialing
Allows you to limit outgoing calls in certain
formats.
Networks
Displays the current network and allows you
to select the manner of selecting networks.
Current network
The current network displays in the Current
network field.
Network selection
Define how to choose between different
available networks when travelling, for
example.
b Manual: You can select the network
yourself.
b Automatic: To have the network selected
automatically.
Preferred network
To select other networks, from the Networks
page, select Menu > Preferred Networks
(retrieving settings may take a few minutes).
Select a network and re-order the priorities
for network usage by selecting Menu >
Move Up or Move Down.
Pre-Defined Text Messages
Your device has pre-defined text messages
that you can send a caller when you cannot
answer a call.
To edit pre-defined text message
1. Highlight the pre-defined text message,
then select Select.
2. Edit the message.
3. When finished, select
Save.
Ringer Output
Allows you to select how your phone plays
the ringtone when using headset.
Sounds
b Ring tone: You can select the ringtone for
incoming voice calls.
b Reminders: You can select the alert tone
for reminder.
79
Page 78

Settings
b New e-mail: You can select the alert
tone that sounds when a new e-mail is
received.
b New text message: You can select the
alert tone that sounds when a new text
message is received.
b New voice message: You can select the
alert tone that sounds when a new voice
message is received.
b New instant message: You can select
the alert tone that sounds when a new
instant message is received.
b New channel message: You can select
the alert tone that sounds when a new
channel message is received.
b SIM toolkit messages: You can select
the alert tone that sounds when SIM
toolkit messages are received.
b Exclamation: You can select the alert
tone that sounds when the device pops up
information.
b Question: You can select the alert tone
that sounds when the device prompts the
user with a question.
b Warnings: You can select the alert tone
that sounds when the device displays a
warning message.
b Keypad control: You can set the key tone
when keys are pressed.
80
Profiles
Your device comes with five pre-set profiles.
You can adjust and customise the ringing
tones, alert tones, and other device tones
for different events, environments, or caller
groups.
To edit the profile
1. Highlight the profile.
2. Select Menu > Edit.
3. Enter the name and select your desired
ringer and alert settings.
4. When finished, select Done.
To change the active profile
Highlight the profile and press the Enter key.
The checked profile name indicates the
current profile in use.
Dual Home Screen
Your device comes with two pre-set home
screens. You can change how you want the
Today screen to look. The Today screen can
show your upcoming appointments, active
tasks, and information about calls and
messages.
To change the active home screen
Select Menu > Switch Mode and press the
Page 79

Settings
Enter key.
The checked home screen name indicates
the current home screen in use.
To Select Information Shown On
Screen
1. From the Today screen, select Start >
Settings > Dual Home Screen.
2. Select your home screen.
3. On Home screen layout, select your
desired layout option:
4. To display the recently opened programs
when Start is selected, check Show
Recent Programs.
5. When finished, select Done.
To select color for your screen
You can select color scheme for your screen.
1. From the Today screen, select
Settings > Dual Home Screen.
2. Select your home screen.
3. In the
Color scheme box, select the a
color to use.
4. When finished, select Done.
Start >
To Add Own Background Image
You can use one of your own pictures as the
background image on the Today screen.
1. From the Today screen, select
Settings > Dual Home Screen.
2. Select your home screen.
3. In the
Background image box, select an
image to use as background.
4. When finished, select Done.
Start >
To Set Screen Timeout
To define how long the backlight remains on:
1. From the Today screen, select
Settings > Home Screen.
2. Select your home screen.
3. In the
Time out box, select a time out
option.
4. When finished, select Done.
Note
User are able to set mp3 files in
storage card root directory or storage
card\my ringtones or my documents\my
ringtones as ringtone.
If users want to set background image
or any sound from storage card, only
image or sound files in storage card root
directory can be set.
WBMP images cannot be set as
homescreen, WBMP images can only be
viewed in the picture and video.
Start >
81
Page 80

Settings
My Screen
You can select programs to be displayed on
your home screen.
1. From the Today screen, select
Settings > My Screen.
2. Highlight the desired programs, then press
the Enter key.
3. When finished, select
Start >
Done.
Clock & Alarm
Clock & Alarm can accessed by either of the
following:
b From the Today screen, select Start >
Clock & Alarm.
b From the Today screen, select Start >
Settings > Clock & Alarm.
Date and Time
You can view the time, day of the week
and date.
1. From the Clock & Alarm screen, highlight
Date and Time, then press the Enter key.
2. Select the Time zone, date and time.
3. To update the time, date, and time zone
information automatically, check Use GSM
Network Time.
4. When finished, select
82
Done.
World Clock
1. From the Clock & Alarm screen, highlight
World Clock, then press the Enter key.
2. Highlight the country selection.
3. Select Menu > Set and press the Enter
key.
4. When finished, select
Done.
Alarm
1. From the Clock & Alarm screen, highlight
Alarm 1 or 2, then press the Enter key.
2. Set the alarm time, frequency, sound, type,
and volume.
3. When finished, select
Done.
Connections
The Connections menu allows you to setup
various types of connections such as Wi-Fi,
Bluetooth, Dial-Up, GPRS, and others.
Wireless Manager
Wireless Manager provides shortcuts
to access Wi-Fi, Bluetooth, and Phone
connection settings.
Page 81

Settings
Note
b The charge between using a data
plan to access the internet and using
Wi-Fi is different. Please contact
your network operator for further
information.
Wi-Fi
1. From the Today screen, select Start >
Settings > Connections > Wireless
Manager.
2. To turn on, highlight the
press the Enter key.
3. Select
Menu > Wi-Fi Settings and press
the Enter key.
4. If Wi-Fi connection is established, you can
see the connection name (SSID) in the
Wireless Manager.
4. Select the desired SSID.
5. When finished, select Connect.
6. To turn off Wi-Fi, select
Wireless Manager again.
Wi-Fi bar, then
Wi-Fi in the
Note
b If your Wi-Fi service provider or
network administrator sets WEP
encryption for network security, you
should fill in WEP key in the pop-up
window. If WEP encryption is not set,
this pop-up window is not shown.If
you don’t know the key, you need to
ask it to your Wi-Fi service provider or
network administrator.
Configuring Wi-Fi Connection Settings
Note
b Before you set the WLAN
configuration, you need to ask your
WLAN service provider or your
network administrator for the IP
settings.
83
Page 82

Settings
WARNING!
This device uses non-harmonised
frequency and is intended for use in all
European countries.
The WLAN can be operated in the EU
without restriction indoors, but cannot
be operated outdoors in France.
1. From the Today screen, select Start >
Settings > Connections > Wireless
Manager.
2. Select
Menu > Wi-Fi Settings > Menu
> Advanced.
3. Enter the necessary network information
and connection preferences.
4. When finished, select Done.
To check WLAN status
1. From the Today screen, select Start >
Settings > Connections > Wireless
Manager.
2. Select
Menu > Wi-Fi Settings. The list
of available Wi-Fi connections and their
status are displayed.
b To add a new Wi-Fi connection, select
Menu > Add.
b To edit a Wi-Fi connection configuration,
select Menu > Edit.
84
Bluetooth
1. From the Today screen, select Start >
Settings > Connections > Wireless
Manager.
2. To turn on/off, highlight the
then press the Enter key.
3. To configure settings, select
Bluetooth Settings. The Bluetooth
Manager program launches, see
“Bluetooth Manager” on page 59.
Bluetooth bar,
Menu >
Phone
1. From the Today screen, select Start >
Settings > Connections > Wireless
Manager.
2. To turn on/off, highlight the
then press the Enter key.
3. To configure phone settings, select
> Phone Settings.
Phone bar,
Menu
Streaming Setting
The Streaming Setting menu allows you to
set up various types of streaming settings
such as The Internet, Work, WAP Network,
and Secure WAP Network.
b From the Today screen, select Start >
Settings > More > Streaming Setting.
Page 83

Settings
Security
Device Lock
You can keep your data more secure by
requiring a password every time the device
is turned on or when waking up from idle
mode.
1. From the Today screen, select
Settings > More > Security > Device
Lock.
2. Check the
box, then select the idle time.
3. Set the password type and enter your
desired password.
4. Re-enter the password to confirm.
5. When finished, select
Prompt if phone unused for
Note
b When the device locks, you will be
prompted to enter the password to
unlock.
Start >
Done.
To Protect your Phone with a PIN
You can protect your phone from
unauthorized use by assigning a type of
password called a PIN (personal identification
number). Obtain the PIN from your wireless
service provider; you can change the PIN at
a later time.
b From the Today screen, select Start >
Settings > More > Security > Enable
SIM PIN.
To Change your Password
b From the Today screen, select Start >
Settings > More > Security > Change
PIN2.
To Enter Owner Information
Saving your contact information on your
device allows for easy identification of the
device in case it is lost.
b From the Today screen, select Start
> Settings > More > More > Owner
Information.
Remove Programs
To free up space on your device’s memory,
remove unnecessary programs which are not
pre-installed on your device.
b From the Today screen, select Start >
85
Page 84

Settings
Settings > More > Remove Programs.
Power Management
Use Power Management to see current
battery status and configure battery usage to
save on power.
1. From the Today screen, select
Settings > More > Power Management.
2. Set the backlight and display time out.
3. When finished, select
Start >
Done.
Accessibility
Use Accessibility to select the system font
size and configure time out options and
volume.
1. From the Today screen, select
Settings > More > Accessibility.
2. Highlight an option:
b System font size: Select the system font
size from the list.
b Multipress time out: Select the time out
when multiple keys have been pressed
at one time.
b Confirmation time out: Select the
time out after a confirmation has been
executed.
b In-call alert volume: Select the alert
volume level of incoming calls.
86
Start >
3. When finished, select Done.
Regional Settings
You can set the regional configuration and
style in which numbers, currency, dates and
time are displayed on your device.
1. From the Today screen, select
Settings > More >Regional Settings.
2. Highlight an option to change settings:
b Language: Set the language.
b Locale: Select the region where you are.
b Short date style: Select how you want
the numeric date format to appear on
screen.
b Long date style: Select how you want
the alphanumeric date format to appear
on screen.
b Time format: Select how you want the
time format to appear on screen.
b Positive and Negative number: Set
the decimal symbol, number of decimal
places, digit grouping symbol, and
negative number format.
b Positive and Negative currency: Set the
currency symbol, symbol position, decimal
symbol, number of decimal places, digit
grouping symbol, and negative number
format.
Start >
Page 85

Settings
3. When finished, select Done.
Device Name
You can set a name for this device. Your
device uses this information to identify itself
to other computers or devices.
b From the Today screen, select Start
> Settings > More > More > Device
Name.
Optical joystick Setting
Use Optical joystick Setting to change the
speed of the Optical joystick movement.
b From the Today screen, select Start >
Settings > More > More > More >
Optical joystick Setting.
Setup E-mail
You can setup an e-mail account by either of
the following.
b From the Today screen, select Start
> Settings > More > More > Setup
E-mail.
bSee ‘To Set Up an E-mail Account’ for
more details.
Managed Programs
Use Managed Programs to view a list of
programs that has been installed on your
device.
b From the Today screen, select Start >
Settings > More > More > More >
Managed Programs.
Error Reporting
This feature allows your device can
automatically collect information on software
operation for reporting in the event of a
serious error.
b From the Today screen, select Start
> Settings > More > More > Error
Reporting.
Master Clear
This feature allows you to perform factory
reset.
b From the Today screen, select Start >
Settings > More > More > More >
Master Clear.
87
 Loading...