


C1300
User Guide

Unpacking 8
For Your Safety
9
Your Phone
14
Phone Components 14
Your Phone’s Features
15
Display Information
17
Getting Started 18
Using the Battery,
Charger and SIM Card
18
Installing and
Removing the Battery
18
Installing the Battery
18
Removing the Battery
19
Charging the Battery
19
Disconnecting the Charger
20
Installing the SIM Card
21
Turning Your
Phone On and Off 22
Turning Your Phone On
22
Turning Your Phone Off
22
Access Codes
22
Security code
22
Barring Password
22
General Functions 23
Making and
Answering Calls
23
Making a Call 23
Making a Call by Send Key
23
Making International Calls
23
Ending a Call
23
Making a Call
From the Phonebook
24
Adjusting the Volume
24
Answering a Call
24
Manner Mode (Quick)
25
Signal Strength
25
Entering Text
25
Phonebook
29
In-Call Menu
30
During a Call
30
Making a Second Call
30
Swapping
Between Two Calls
30
Answering an Incoming Call
30
Rejecting an Incoming Call
31
Muting the Microphone
31
Switching DTMF
Tones on During a Call
31
Multiparty or
Conference Calls 32
Making a Second Call
32
Setting up a
Conference Call
33
Activate the
Conference Call on Hold
32
5
4
Adding Calls to the
Conference Call
33
Displaying Callers in a
Conference Call
33
Private Call in a
Conference Call
33
Ending a Conference Call
33
Menu Tree 34
Selecting
Functions and Options
37
Messages
38
Text Messages 38
Write Message
38
Inbox
39
Outbox
40
Draft
40
Settings
41
Delete All
41
Multimedia Messages
42
Write
42
Inbox
43
Outbox
44
Draft
45
Settings
46
Instant Message
47
Login
47
History
47
Settings
48
Set parameter 48
Voice Mall
49
Listen to Voice Messages
49
Voice Mailbox Number
49
Download messages
50
Inbox
50
Receive
50
Info Service
51
Receive
51
Inbox
51
Topics
51
Alert
51
Auto Display
51
Languages
52
Templates
52
Text
52
Multimedia
52
Name Card
53
Check Memory
53
Recent Calls 56
Missed Calls 56
Received Calls
56
Dialed Calls
57
Delete Recent Calls
57
Call Durations
57
Table of Contents

7
6
Last Call 57
Received Calls
57
Dialed Calls
57
All Calls
57
Call Costs
58
Last Call’s Cost
58
All Calls’ Cost
58
Cost Settings
58
Call Cost’s Limit
58
Set Tariff
59
Auto Display
59
Data Information
59
WAP Information
59
External Device
59
Total Data
59
Sounds 60
Shop Ringtones 60
My Ringtones
60
Volume
60
Message Alert
60
Tones
61
Key tones
61
Games & Apps 62
Shop Games 62
My Games and Apps
62
Bookmark
62
View Information 63
Memory status
63
Java version
63
Settings 64
Display 64
My Wallpaper
64
Backlight
64
Languages
64
LED indicator
64
Date & Time
65
Set date
65
Date format
65
Set time
65
Time format
65
Auto update
65
Call Settings
66
Call Divert
66
Answer Mode
67
Send My Number
67
Call Waiting
67
Minute Minder
67
Auto Redial
67
Closed User Group
68
TTY
68
Security Settings
69
PIN Code Request
69
Call Barring Service
69
Fixed Dial Number (FDN) 70
Change Codes
70
Connection Settings
71
Network Selection
71
Access Point
71
Attach
71
External Device
71
Reset Settings
73
Web Access 74
Home 76
Bookmarks
76
Profiles
78
Go to URL
79
Cache Settings
79
Clear Cache
79
Cache Check
79
Security Certificates
79
WAP Information
79
Tools 80
My Folder 80
Picture
80
Animation
80
Sound
81
Alarm Clock
82
Calendar 83
Calculator
84
Memo
85
World Time
86
Unit Converter
86
Phonebook 87
Contact list 87
Add New
88
Speed Dials
89
Caller Groups
89
Copy All
90
Delete All
90
Settings
91
Information
91
Q & A 92
Accessories
95
Safety Guidelines
97
Glossary
111
Index
114
9
8
Important Information
This user guide contains important information on the use and
operation of this phone. Please read all the information carefully for
optimal performance and to prevent any damage to, or misuse of,
the phone. Any changes or modifications not expressly approved in
this user guide could void your warranty for this equipment.
Before You Start
Safety Instructions
WARNING! To reduce the possibility of electric shock, do not
expose your phone to high humidity areas, such as the bathroom,
swimming pool, etc.
Always store your phone away from heat. Never store
your phone in settings that may expose it to temperatures less than
32°F or greater than 104°F, such as outside during a snowstorm or
in your car on a hot day. Exposure to excessive cold or heat will
result in malfunction, damage and/or catastrophic failure.
Be careful when using your phone near other
electronic devices. RF emissions from your mobile phone may
affect nearby inadequately shielded electronic equipment. You
should consult with manufacturers of any personal medical devices
such as pacemakers and hearing aides to determine if they are
susceptible to interference from your mobile phone. Turn off your
phone in a medical facility or at a gas station.
Never place your phone in a microwave oven as this will cause the
battery to explode.
IMPORTANT! Please read the TIA SAFETY INFORMATION on
page 103 before using your phone.
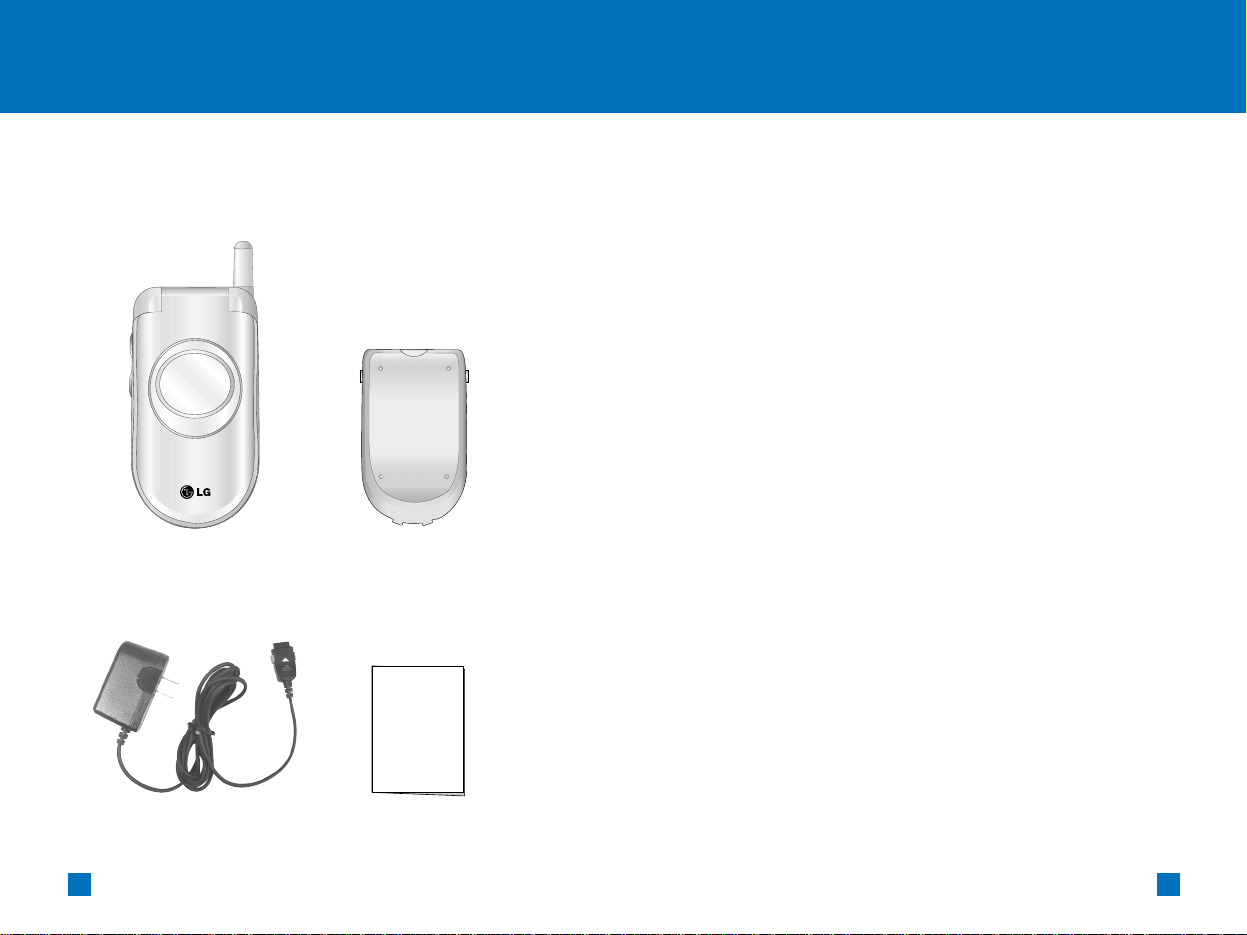
Check to make sure that you have all the parts shown below.
Unpacking For Your Safety
Handset Standard
Battery
User GuideTravel Adapter

11
10
Safety Information
Please read and observe the following information for the safe and
proper use of your phone and to prevent any unanticipated
damage. Also, keep the user’s manual in an accessible place at all
times after reading it.
]
Unplug the power cord and charger during a lightning storm to
avoid electric shock or fire.
]
Do not use your phone in high explosive areas as the phone may
generate sparks.
]
Do not put your phone in a place subject to excessive dust, and
keep the minimum required distance between the power cord
and heat sources.
]
Do not damage the power cord by bending, twisting, pulling, or
subjecting it to heat. Do not use the plug if it is loose as it may
cause fire or electric shock.
]
Hold the power cord plug firmly to plug and unplug the power
cord. Ensure the plug is firmly connected. If it is not firmly
connected, it may cause excessive heat or fire.
]
Do not place a heavy item on the power cord. Do not allow the
power cord to be crimped as it may cause fire or electric shock.
]
Be careful not to let the battery contact metal conductors such
as a necklace or coins. When shorted, it may cause an
explosion.
]
Do not disassemble or impact the battery as it may cause
electric shock, short-circuit, and fire. Store the battery in a place
out of reach of children.
]
Using a damaged battery or placing a battery in your mouth may
cause serious injury.
]
Do not place items containing magnetic components such as a
credit card, phone card, bank book or a subway ticket, near
your phone. The magnetic strip can be damaged by the phone.
]
Do not hold or let the antenna come in contact with your body
during a call.
]
Talking on your phone for a long period of time may reduce the
call quality due to heat generated during the use of the phone.
]
Do not allow excessive vibration or impact to the phone.
]
When you do not plan to use the phone for a long period of time,
store it in a safe area with the power cord unplugged.
FCC RF Exposure Information
WARNING! Read this information before operating the phone.
In August 1996, the Federal Communications (FCC) of the United
States, with its action in Report and Order FCC 96-326, adopted an
updated safety standard for human exposure to radio frequency
(RF) electromagnetic energy emitted by FCC regulated
transmitters. Those guidelines are consistent with the safety
standard previously set by both U.S. and international standards
bodies.
The design of this phone complies with the FCC guidelines and
these international standards.
For Your SafetyFor Your Safety

13
12
CAUTION
Use only the supplied and approved antenna. Use of unauthorized
antennas or modifications could impair call quality, damage the
phone, void your warranty and/or result in violation of FCC
regulations.
Do not use the phone with a damaged antenna. If a damaged
antenna comes into contact with skin, a minor burn may result.
Contact your local dealer for a replacement antenna.
Body-worn Operation
This device was tested for typical body-worn operations with the
back of the phone kept 10mm between the use's body and the
back of the phone. To comply with FCC RF exposure requirements,
a minimum separation distance of 10mm must be maintained
between the user’s body and the back of the phone. Third-party
belt-clips, holsters, and similar accessories containing metallic
components should not be used. Body-worn accessories that
cannot maintain 3/4 inch (2 cm) separation distance between the
user’s body and the back of the phone, and have not been tested
for typical body-worn operations may not comply with FCC RF
exposure limits and should be avoided.
Vehicle Mounted External Antenna (optional,
if available)
A minimum separation distance of 8 inches (20 cm) must be
maintained between the user/bystander and the vehicle mounted
external antenna to satisfy FCC RF exposure requirements.
For more information about RF exposure, visit the FCC website at
www.fcc.gov
FCC Part 15 Class B Compliance
This device and its accessories comply with part 15 of FCC rules.
Operation is subject to the following two conditions: (1) This device
and its accessories may not cause harmful interference, and (2)
this device and its accessories must accept any interference
received, including interference that may cause undesired
operation.
Cautions for Battery
]
Do not disassemble.
]
Do not short-circuit.
]
Do not expose to high temperature: 60°C (140°F).
]
Do not incinerate.
Battery Disposal
]
Please dispose of your battery properly or bring to your local
wireless carrier for recycling.
]
Do not dispose in fire or with hazardous or flammable materials.
Adapter (Charger) Cautions
]
Using the wrong battery charger could damage your phone and
void your warranty.
]
The adapter or battery charger is intended for indoor use only.
Do not expose the adapter or battery charger to direct sunlight or
use it in places with high humidity, such as the bathroom.
For Your SafetyFor Your Safety
15
14
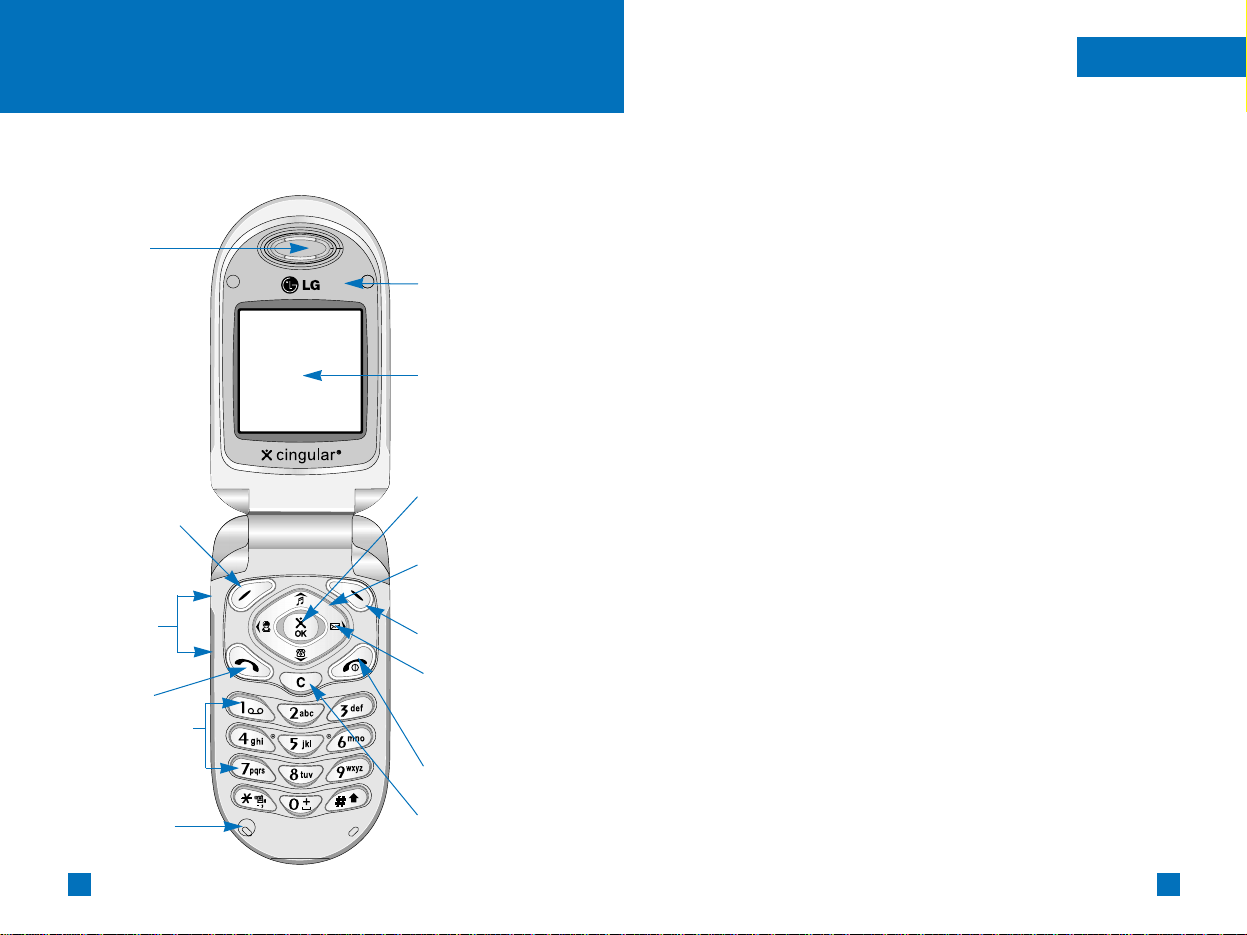
Your Phone
Your Phone
1. Earpiece
7. Active flip
8. Display screen
10. Navigation key
2. Left soft key
3. Side keys
4. Send key
9. Confirmation
key
11. Right soft key
12. Message key
14. Clear key
13. End / Power key
6. Microphone
5. Alpha numeric
keys
Your Phone’s Features
1. Earpiece
2,11. Left soft key / Right soft key: Each of these keys
perform the functions indicated by the text on the display
immediately above them.
3. Side keys: These keys are used to control the volume of key
tone in standby mode and speaker volume during a call.
4. Send key: You can dial a phone number and answer incoming
calls. Press this key in standby mode to quickly access the most
recent incoming, outgoing and missed calls.
5. Alphanumeric keys: These keys are used to dial a number in
standby mode and to enter number or characters in edit mode.
6. Microphone: Can be muted during a call for privacy.
7. Active flip: Open the flip to answer an incoming call and close
to end the call.
8. Display screen: Displays phone status icons, menu items,
Web information, pictures and more in full color.
9. Confirmation key: Long press will launch the WAP browser.
Allows you to select and confirm menu options.
10. Navigation key: Use for quick access to phone functions.
12. Message key: Use to retrieve or send voice and text
messages.
13. End/Power key: Allows you to power the phone on or off,
end calls, or return to Standby Mode.
14. Clear key: Allows you to delete the characters entered or
return you to the previous screen.
Phone Components

17
Icon Description
Indicates the strength of the network signal.
Indicates a call is in progress.
Indicates that you are roaming off the network.
Indicates that GPRS service is available.
Indicates the alarm has been set and is on.
Indicates the status of the battery charge.
Indicates the receipt of a text message.
Indicates the receipt of a MMS message.
Indicates the receipt of a voice message.
Indicates that the vibration ringer has been set.
Indicates the receipt of an e-mail message.
Indicates the Loud menu in Profiles.
Indicates the Quiet menu in Profiles.
Indicates the Headset menu in Profiles.
Indicates the Car menu in Profiles.
Indicates the General menu in Profiles.
Indicates that you can use the push message service.
Indicates the Schedule function.
16
SIM Card
Socket
Battery Lock
Antenna
Cable Connector/
Battery Charging Connector
Handstrap Hole
Battery
Battery
Terminals
Display Information
The table below describes various display indicators or icons that
appear on the phone’s display screen.
On-Screen Icons
Your Phone Your Phone
19
18
Using the Battery, Charger and SIM
Card
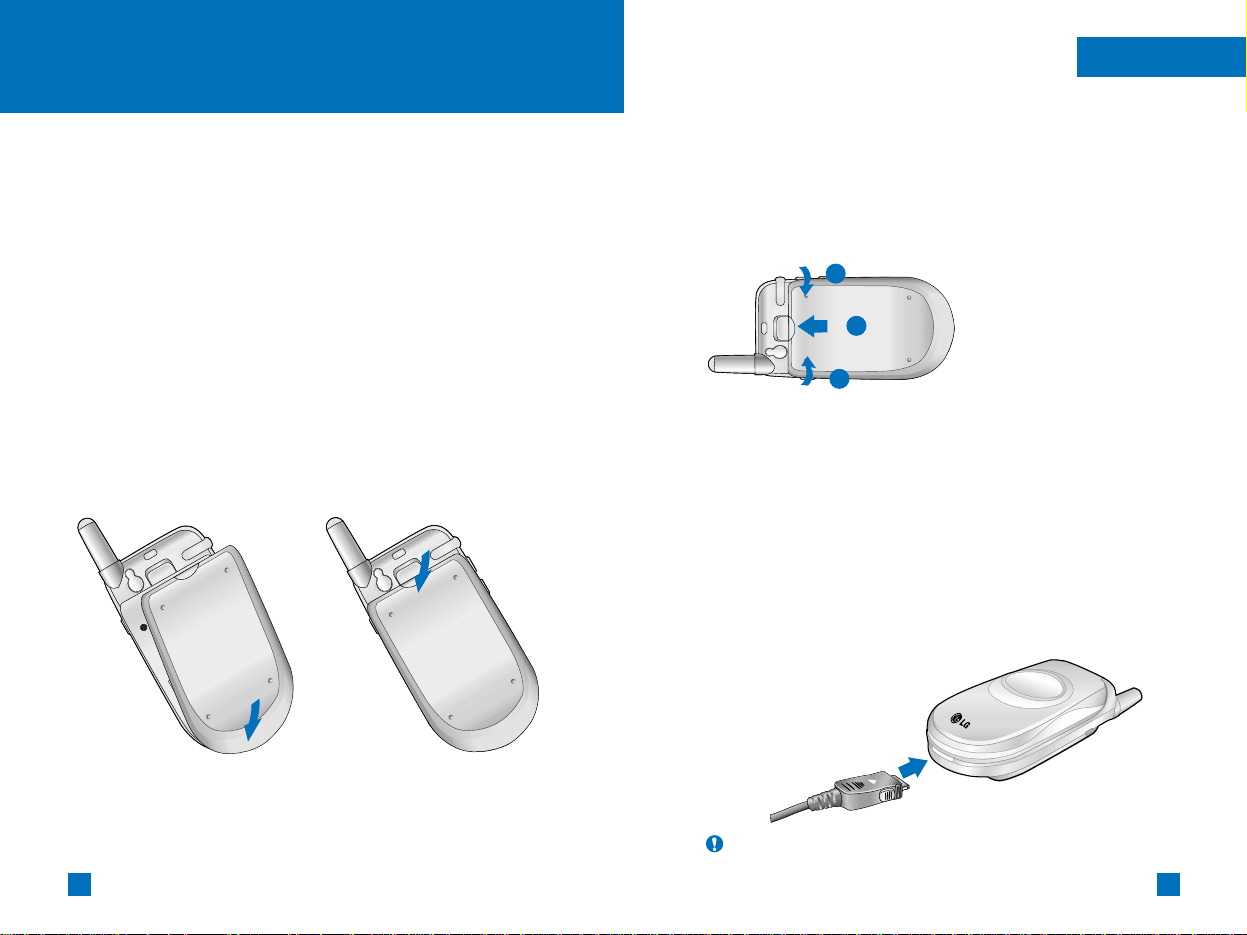
Installing and Removing the Battery
]
To install, insert the battery into the opening on the back of the
phone and gently press down until the latch snaps into place.
]
To remove, first make sure the power is off. Press the battery
release latch up and remove the battery from the phone at a 45degree angle.
Installing the Battery
To install the battery, insert the bottom of the battery into the
opening on the back of the phone. Then push the battery down
until the latch clicks.
Removing the Battery
Turn the power off. (If power is left on, there is a chance you could
lose the stored telephone numbers and messages.)
Pressing the release latch upwards will detach the battery from the
phone.
1
2
2
Getting Started
Getting Started
Charging the Battery
Use of unauthorized accessories could damage your phone and
invalidate your warranty.
To use the travel adapter provided with your phone:
1. With the battery in position on the phone, connect the lead from
the travel adapter to the bottom of the phone. Check that the
arrow on the lead connector is facing towards the front of the
phone.
2. Connect the adapter to a standard AC wall outlet. Only use the
travel adapter that comes included with the package.
Warning Do not force the connector as this may damage the phone
and/or the travel adapter.
21
20
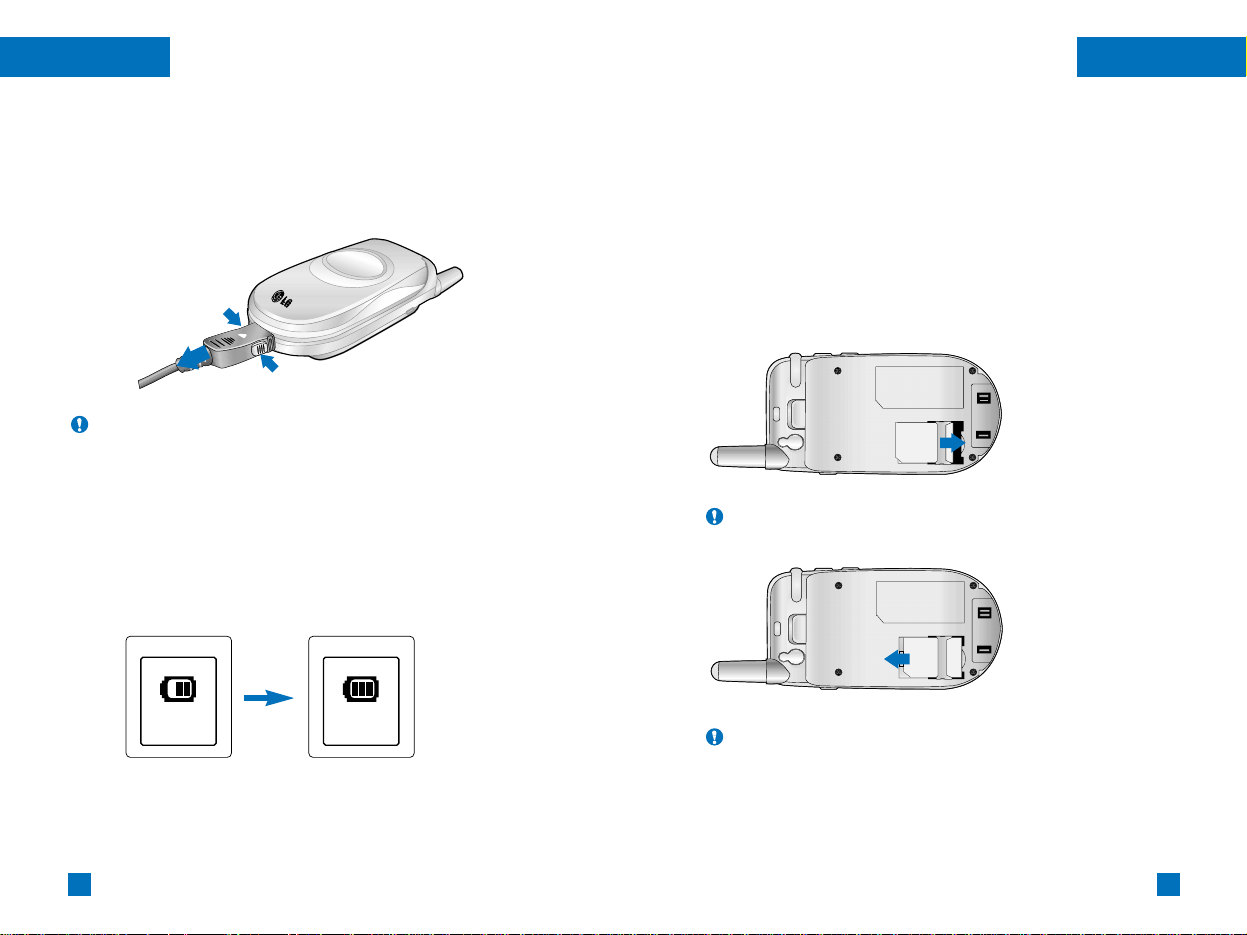
Disconnecting the Charger
When charging is finished, disconnect the adapter from the power
outlet and from the phone by pressing on the gray tabs on both
sides of the connector while pulling the connector out.
Notice
]
The battery delivered with your phone has to be fully charged
before using it.
]
Do not remove the battery or the SIM card while charging.
]
If your phone is powered on while charging, you’ll see the bars in
the battery indicator icon cycle.
When the battery is fully charged, the bars in the battery indicator
icon will flash on and off
]
If your phone is powered off, the display will show the charging
status. ‘Charging’ or ‘Full’ will be displayed.
If the battery fails to charge completely:
]
After turning the phone on and off, please attempt to recharge the
battery.
]
After detaching and reattaching the battery, please attempt to
recharge the battery.
Getting StartedGetting Started
Notice When you need to remove the SIM card, slide it towards the
top of the phone and take it out of the holder.
Notice
]
Before installing always make sure that the phone is switched off
and remove the battery.
]
The metal contact of the SIM card can be easily damaged by
scratches. Pay special attention to the SIM card while handling and
installing. Follow the instructions supplied with the SIM card.
SIM
SIM
Installing the SIM Card
When you subscribe to a cellular network, you are provided with a
plug-in SIM card loaded with your subscription details (PIN,
optional services available and so on).
Locate the SIM card socket in the back of the phone. Follow the
steps below to install the SIM card.
1. Remove the battery if attached.
2. Slide the SIM card into the SIM card holder so that the holder
locks the card in position.
Full
Charging

23
22
Turning Your Phone On and Off
Turning Your Phone On
1. Install a charged battery pack or connect the phone to an
external power source such as the vehicle power adapter or car
kit.
2. Press for more than five seconds.
3. Depending on the status of the PIN Code Request setting you
may or may not need to enter it.
Turning Your Phone Off
1. Press for a few seconds.
Notice Like any other radio device, avoid any unnecessary contact
with the antenna while your phone is on.
Getting Started
Access Codes
You can use the access codes described in this section to avoid
unauthorized use of your phone. The access codes can be
changed by using the Change Codes feature [Menu 6.4.4].
Security code (4 to 8 digits)
The security code protects the unauthorized use of your phone.
The default security code is set to ‘0000’ and the security code is
required to delete all phone entries and to activate the Restore
Factory Settings menu. The security code default setting can be
modified from the Security Settings menu.
Barring Password
The barring password is required when you use the Call Barring
function. The password is obtained from the service provider when
you subscribe to this function. See page 65 for further details.
General Functions
Making and Answering Calls
Making a Call
1. Make sure your phone is powered on.
2. Enter a phone number including the area code. To edit a
number on the display screen, press the right/left navigation
keys to move the cursor to desired position or simply press
to erase one digit at a time.
]
Press and hold to erase the entire number.
3. Press to call the number.
4. When finished, press .
Making a Call by Send Key
1. Press , and the most recent incoming, outgoing and missed
phone numbers will be displayed.
2. Select the desired number by using the navigation key.
3. Press .
Making International Calls
1. Press and hold the key for the international prefix. The ‘+’
character can be replaced with the international access code.
2. Enter the country code, area code, and the phone number.
3. Press .
Ending a Call
When you have finished a call, press the key.

25
24
Making a Call From the Phonebook
You can store names and phone numbers dialed frequently in the
SIM card as well as the phone memory known as the Phonebook.
You can dial a number by simply looking up a name in the
phonebook. For more details on the Phonebook feature, please
refer to page 73.
Adjusting the Volume
During a call, if you want to adjust the earpiece volume, use the
side keys of the phone.
In idle mode with the flip cover open, you can adjust the key
volume using the side keys.
Answering a Call
When you receive a call, the phone rings and the flashing phone
icon appears on the screen. If the caller can be identified, the
caller’s phone number(or name if stored in your phonebook) is
displayed.
1. Open the flip and press the key or the left soft key to answer
an incoming call. If the Any key menu option(Menu 6.3.2) has
been set to , any key press will answer a call except for the
key or the right soft key.
2. End the call by closing the phone or pressing the key.
General Functions
Notice You can answer a call while using the phonebook or other
menu features.
Notice
]
To reject an incoming call, press and hold the side keys on the left
side of the phone without opening the flip.
]
If the Flip open menu option(Menu 6.3.2) is set to , you do not
need to press any key. You can answer the call simply by opening
the flip.
General Functions
Manner Mode (Quick)
When the flip is closed, Manner Mode can be activated by
pressing and holding down side keys.
Signal Strength
Since the antenna is fixed, it does not extend. If you are inside a
building, being near a window may give you better reception. You
can see the strength of your signal by the signal indicator ( )
on your phone’s display screen.
Entering Text
You can enter alphanumeric characters by using the phone’s
keypad. For example, storing names in the phonebook, writing a
message, creating a personal greeting or scheduling events in the
calendar all require entering text.
Following text input methods are available in the phone.
T9 Mode
This mode allows you to enter words with only one keystroke per
letter. Each key on the keypad has more than one letter. The T9
mode automatically compares your keystrokes with an internal
linguistic dictionary to determine the correct word, thus requiring
far fewer keystrokes than the traditional ABC mode.
ABC Mode
This mode allows you to enter letters by pressing the key labeled
with the required letter once, twice, three or four times until the
letter is displayed.
123 Mode(Numbers Mode)
Type numbers using one keystroke per number. To change to 123
mode in a text entry field, press key until 123 mode is
displayed.
27
26
General FunctionsGeneral Functions
Symbolic Mode
This mode allows you to enter special characters.
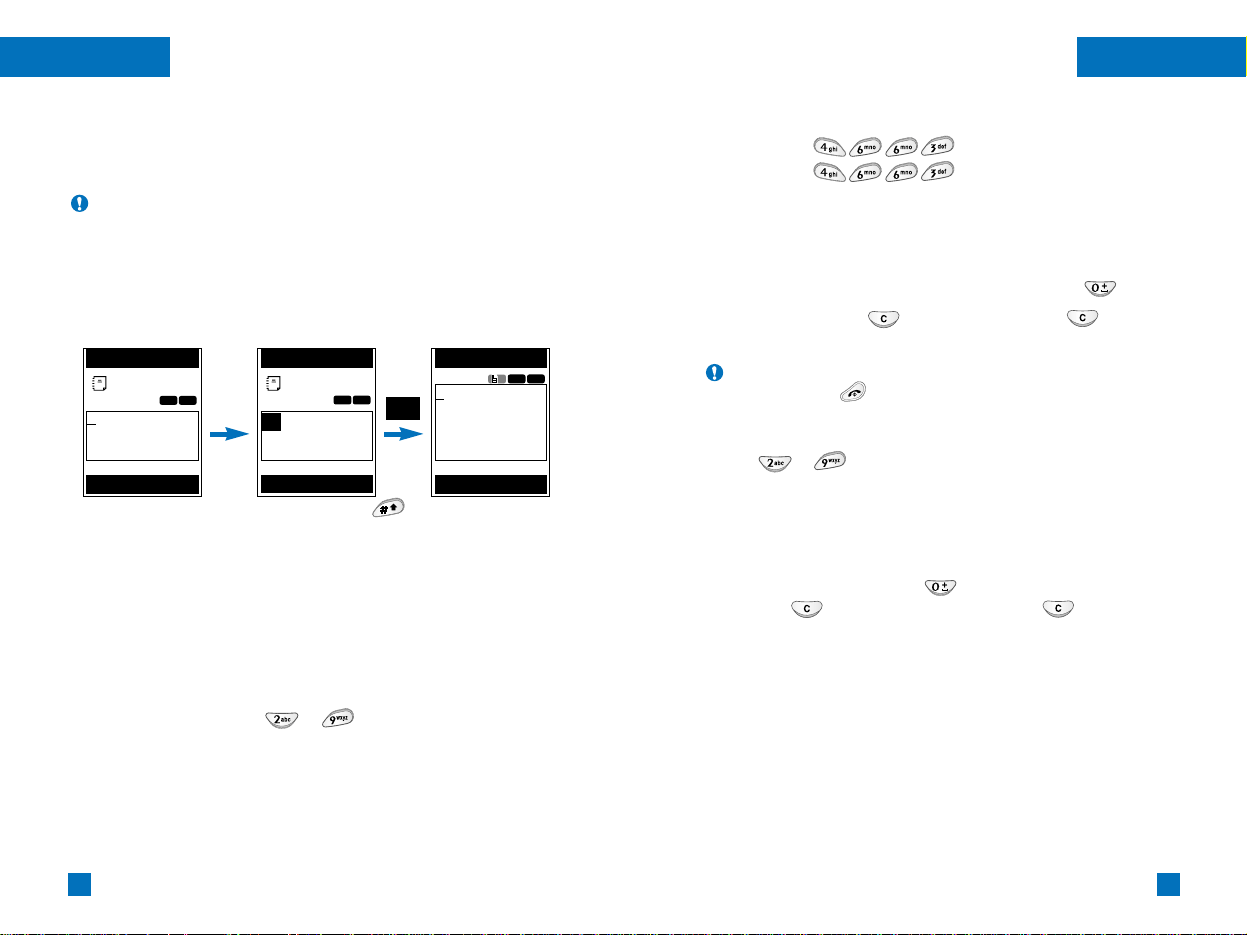
Changing the Text Input Mode
1. When you are in a field that allows characters to be entered, you
will notice the text input mode indicator in the upper right corner
of the display.
2. If you want to change modes, press the key. The available
modes are displayed.
Using the T9 Mode
The T9 predictive text input mode allows you to enter words easily
with a minimum number of key presses. As you press each key, the
phone begins to display the characters that it thinks you are typing
based on a built-in dictionary. As new letters are added, the word
changes to reflect the most likely candidate from the dictionary.
1. When you are in the T9 predictive text input mode, start entering
a word by pressing keys to . Press one key per letter.
]
The word changes as letters are typed - ignore what’s on the
screen until the word is typed completely.
]
If the word is still incorrect after typing completely, press the
down navigation key once or more to cycle through the other
word options.
Notice You can select a different T9 language from the menu option.
The default setting on the phone is T9 enabled mode.
To turn it off, select the T9 Off option from the menu.
Write message
OK Back
Subject
En T9
Write message
914
Options Attach
1
en T9
OK
]
If the desired word is missing from the word choices list, add it
by using the ABC mode.
2. Enter the whole word before editing or deleting any keystrokes.
3. Complete each word with a space by pressing the key.
To delete letters, press . Press and hold down to erase
entire words.
Using the ABC Mode
Use the to keys to enter your text.
1. Press the key labeled with the required letter:
]
Once for the first letter
]
Twice for the second letter
]
And so on
2. To insert a space, press the key once. To delete letters,
press the key. Press and hold down the key to clear
the display.
Notice To exit the text input mode without saving your input,
press .The phone returns to the previous menu level.
Example: Press to type Good
Press [down navigation key] to type
Home
Write message
Subject
en T9
Hi
OK Back
29
28
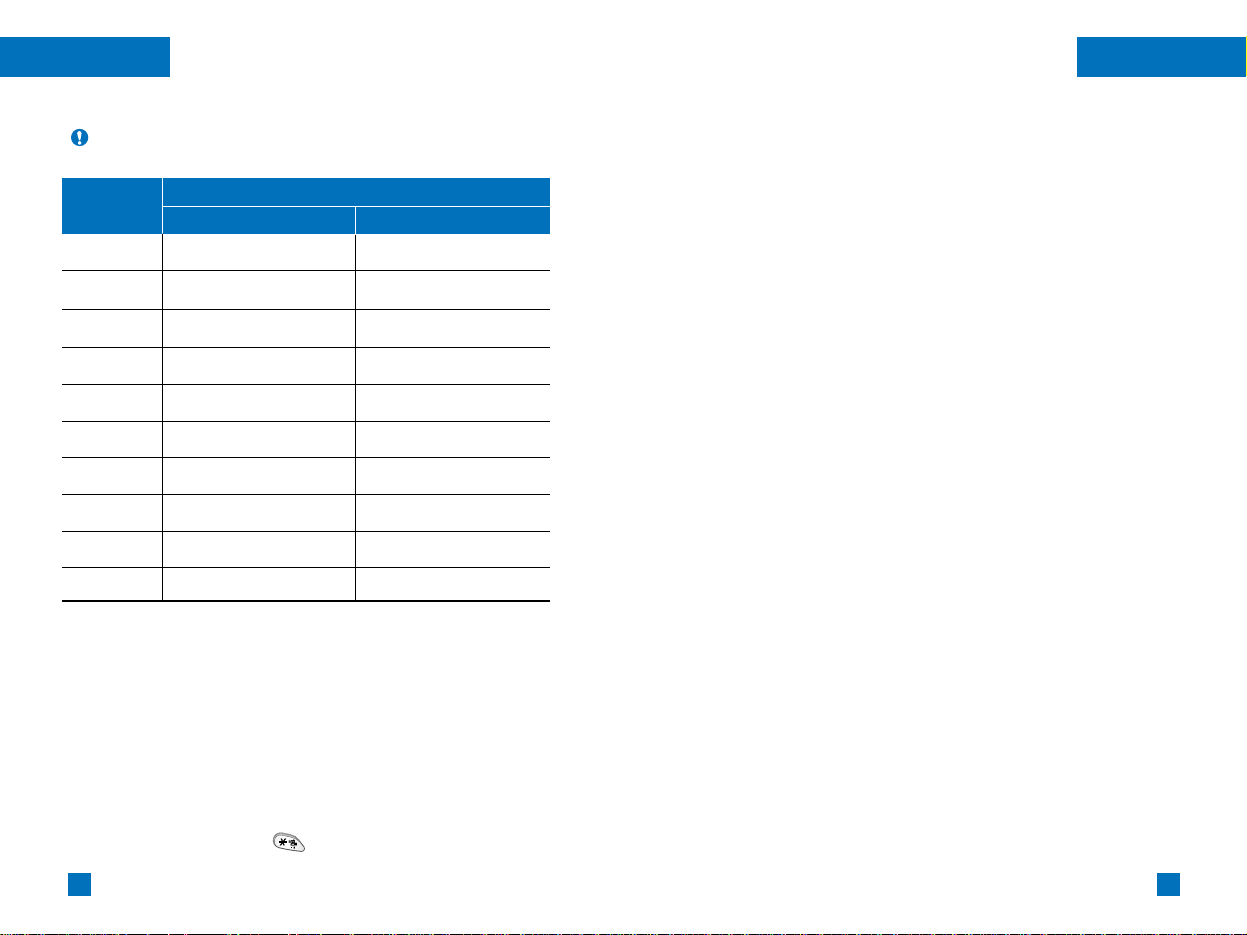
Characters in the Order Display
Upper Case Lower Case
. , - ¿? ¡ ! @1 . , - ¿? ¡ ! @1
A B C Á Ã Ç 2 a b c á ã ç 2
D E F É 3 d e f é 3
G H I Í 4 g h i í 4
J K L 5 j k l 5
M N O Ó Ñ 6 m n o ó ñ 6
P Q R S 7 p q r s 7
T U V Ú Ü 8 t u v ú ü 8
W X Y Z 9 w x y z 9
Space Key Space Key
General FunctionsGeneral Functions
Notice Refer to the table below for more information on the
characters available using the keys.
Using the 123 (Numbers) Mode
The 123 Mode enables you to enter numbers in a text message
(a telephone number, for example).
Press the keys corresponding to the required digits before
manually switching back to the appropriate text entry mode.
Using the Symbol Mode
The Symbol Mode enables you to enter various symbols or special
characters.
To enter a symbol, press the key. Use the navigation keys to
select the desired symbol and press the [OK] key.
1
2
3
4
5
6
7
8
9
0
Key
Phonebook
You can store phone numbers and their corresponding names in
the memory of your SIM card.
In addition, you can store up to 255 numbers and names in the
phone memory.
The SIM card and phone memory, although physically separate,
are utilized like a single entity known as the Phonebook. (See page
73 for details)

31
30
General FunctionsGeneral Functions
In-Call Menu
Your phone provides a number of control functions that you can
use during a call. To access these functions during a call, press
the left soft key [Options].
During a Call
The menu displayed on the handset screen during a call is different
than the default main menu displayed when in idle screen, and the
options are described below.
Making a Second Call
You can get a number you wish to dial from the phonebook to
make a second call. Press the right soft key then select Search. To
save the dialed number into the phonebook during a call, press the
right soft key then select Add New.
Swapping Between Two Calls
To switch between two calls, press the left soft key, and then select
Swap.
Answering an Incoming Call
To answer an incoming call when the handset is ringing, simply
press the key. The handset is also able to warn you of an
incoming call while you are already on a call. A tone sounds in the
earpiece, and the display will show that a second call is waiting.
This feature, known as Call Waiting, is only available if your
network supports it. For details of how to activate and deactivate it
see Call Waiting [Menu 6.3.4].
If Call Waiting is on, you can put the first call on hold and answer
the second, by pressing or by pressing the left soft key, and
then selecting the Hold & Answer. You can end the current call and
answer the waiting call by pressing the left soft key and then
selecting Active call menu of End call.
Rejecting an Incoming Call
You can reject an incoming call without answering by simply
pressing the key.
During a call, you can reject an incoming call by pressing the left
soft key, which is the [Menu] key and selecting the
Conference/Reject or by pressing the key.
Muting the Microphone
You can mute the microphone during a call by pressing the
[Menu] key then selecting Mute on. The handset can be
unmuted by pressing the Mute off menu. When the handset is
muted, the caller cannot hear you, but you can still hear them.
Switching DTMF Tones on During a Call
To turn DTMF tones on during a call, press the left soft key, and
then select DTMF on. DTMF tones can be turned off the same
way. DTMF tones allow your phone to make use of an automated
switchboard.

33
32
Adding Calls to the Conference Call
To add a call to an existing conference call, press the left soft key,
and then select the Join menu of Conference call.
Displaying Callers in a Conference Call
To scroll through the numbers of the callers who make up a
conference call on the handset screen, press the up/down
navigation keys.
Private Call in a Conference Call
To have a private call with one caller from a conference call,
display the number of the caller you wish to talk to on the screen,
then press the left soft key. Select the Private menu of Conference
call to put all the other callers on hold.
Ending a Conference Call
Currently displayed caller from a conference call can be
disconnected by pressing the key.
Multiparty or Conference Calls
The multiparty or conference service provides you with the ability to
have a simultaneous conversation with more than one caller, if your
network service provider supports this feature. A multiparty call can
only be set up when you have one active call and one call on hold,
both calls having been answered. Once a multiparty call is set up,
calls may be added, disconnected or separated (that is, removed
from the multiparty call but still connected to you) by the person
who set up the multiparty call. These options are all available from
the In-Call menu. The maximum callers in a multiparty call are five.
Once started, you are in control of the multiparty call, and only you
can add calls to the multiparty call.
Making a Second Call
You can make a second call while currently on a call. Enter the
second number and press the . When the second call is
connected, the first call is automatically placed on hold. You can
swap between calls, by selecting the left soft key and then
selecting Swap.
Setting Up a Conference Call
To set up a conference call, place one call on hold and while the
active call is on, press the left soft key and then select the Join
menu of Conference call.
Activate the Conference Call on Hold
To activate a conference call on hold, press the left soft key, and
then select the Join menu of Conference call.
General FunctionsGeneral Functions
35
34
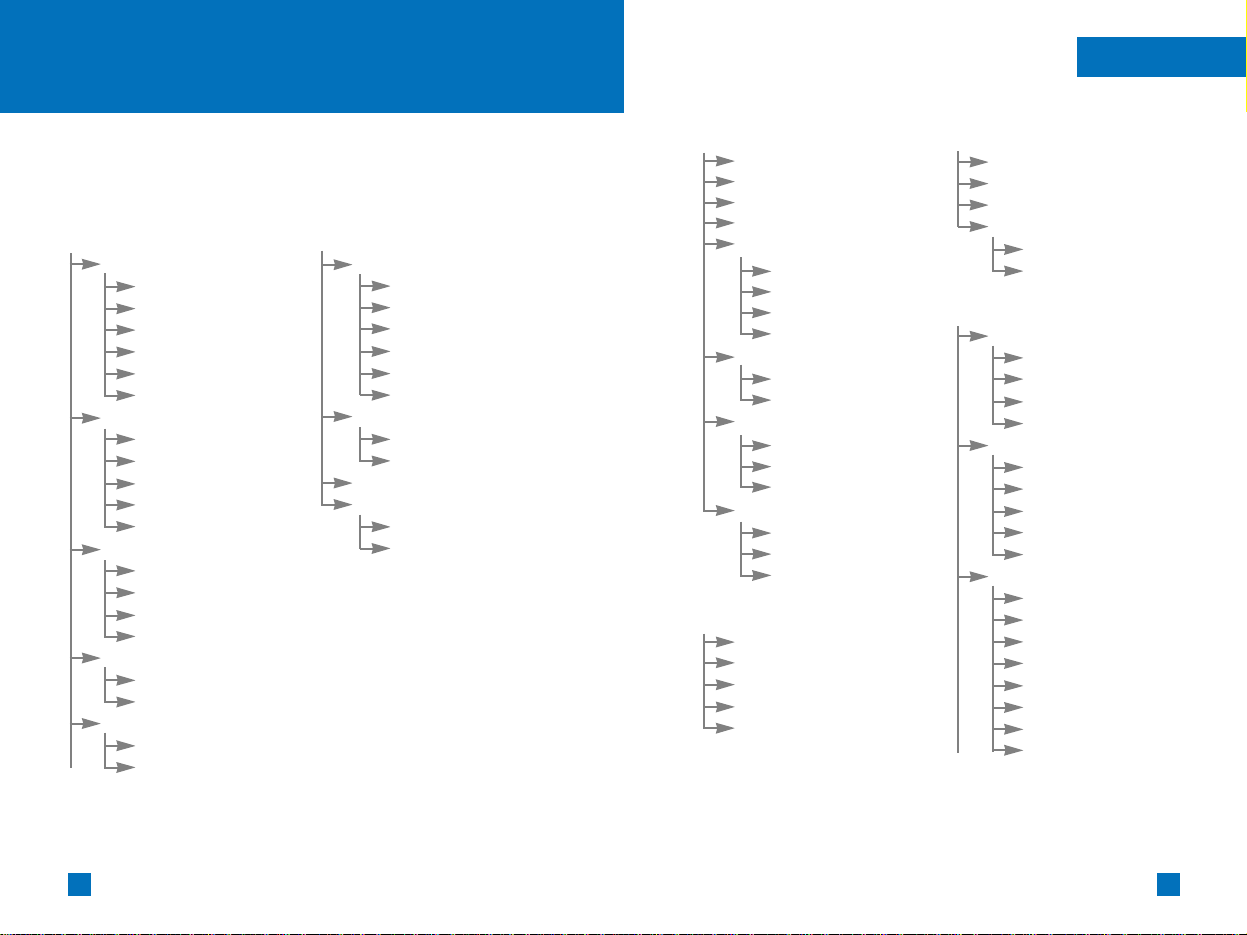
Menu Tree
The following illustration shows the available menu structure and
indicates the:
]
Number assigned to each menu option.
]
Page where you can find the feature description.
1. Messages (see page 39)
1.1 Text messages
1.1.1 Write message
1.1.2 Inbox
1.1.3 Outbox
1.1.4 Draft
1.1.5 Settings
1.1.6 Delete all
1.2 Multimedia messages
1.2.1 Write
1.2.2 Inbox
1.2.3 Outbox
1.2.4 Draft
1.2.5 Settings
1.3 Instant message
1.3.1 Login
1.3.2 History
1.3.3 Settings
1.3.4 Set Parameter
1.4 Voice Mail
1.4.1 Listen to voice messages
1.4.2 Voice mailbox number
1.5 Download messages
1.5.1 Inbox
1.5.2 Receive
1. Messages (continued)
1.6 Info service
1.6.1 Receive
1.6.2 Inbox
1.6.3 Topics
1.6.4 Alert
1.6.5 Auto display
1.6.6 Languages
1.7 Templates
1.7.1 Text
1.7.2 Multimedia
1.8 Name card
1.9 Check memory
1.9.1 Text
1.9.2 Multimedia
*
:
Shown only if supported by CPHS(Common PCS Handset Specification)
*
*
Menu Tree
4. Games & Apps. (see page 62)
4.1 Shop Games
4.2 My Games and Apps
4.3 Bookmark
4.4 View information
4.4.1 Memory status
4.4.2 Java version
5. Settings (see page 64)
5.1 Display
5.1.1 My Wallpaper
5.1.2 Backlight
5.1.3 Languages
5.1.4 LED indicator
5.2 Date & Time
5.2.1 Set Date
5.2.2 Date Format
5.2.3 Set Time
5.2.4 Time Format
5.2.5 Auto Update
5.3 Call settings
5.3.1 Call Divert
5.3.2 Answer Mode
5.3.3 Send My Number
5.3.4 Call Waiting
5.3.5 Minute Minder
5.3.6 Auto Redial
5.3.7 Closed User Group
5.3.8 TTY
*
*
*
*
*
2. Recent Calls (see page 56)
2.1 Missed calls
2.2 Received calls
2.3 Dialed calls
2.4 Delete recent calls
2.5 Call durations
2.5.1 Last call
2.5.2 Received calls
2.5.3 Dialed calls
2.5.4 All calls
2.6 Call costs
2.6.1 Last call’s cost
2.6.2 All calls’ cost
2.7 Cost settings
2.7.1 Call cost’s limit
2.7.2 Set tariff
2.7.3 Auto display
2.8 Data Information
2.8.1 WAP information
2.8.2 External information
2.8.3 Total data
3. Sounds (see page 60)
3.1 Shop Ringtones
3.2 My Ringtones
3.3 Volume
3.4 Message Alert Tones
3.5 Key Tones
*
*
*
*
:
Shown only if supported by CPHS(Common PCS Handset Specification)

7. Tools (see page 80)
7.1 My folder
7.1.1 Picture
7.1.2 Animation
7.1.3 Sound
7.2 Alarm Clock
7.3 Calendar
7.4 Calculator
7.5 Memo
7.6 World time
7.7 Unit converter
8. Phonebook(see page 86)
8.1 Contact list
8.2 Add new
8.3 Speed dials
8.4 Caller groups
8.5 Copy all
8.6 Delete all
8.7 Settings
8.8 Information
37
36
5. Settings (continued)
5.4 Security settings
5.4.1 PIN Code Request
5.4.2 Call Barring Service
5.4.3 Fixed Dial Number
5.4.4 Change Codes
5.5 Connection settings
5.5.1 Network Selection
5.5.2 Access Point
5.5.3 Attach
5.5.4 External Device
5.6 Reset Setting
6. Web Access (see page 74)
6.1 Home
6.2 Bookmarks
Inbox
Home
Tone Download
Graphic Downld
Delete all
6.3 Profiles
6.4 Go to URL
6.5 Cache settings
6.5.1 Clear cache
6.5.2 Cache check
6.6 Security certificates
6.7 WAP information
Menu Tree
*
Selecting Functions and Options
Your phone offers a set of functions that allow you to customize the
phone. These functions are arranged in menus and sub-menus,
accessed via the two soft keys marked and . Each menu
and sub-menu allows you to view and alter the settings of a
particular function.
The roles of the soft keys vary according to the current context; the
label on the bottom line of the display just above each key
indicates its current role.
Press the left soft key
to access the
available menu.
Press the right soft
key to access the
available names.
*
:
Shown only if supported by CPHS(Common PCS Handset Specification)
 Loading...