

Page 1
Some of the contents in this
manual may differ from your phone
depending on the software of the
phone or your service provider.
This handset is not recommended for
blind disability person due to touch
screen keypad.
BL40 User Guide
Page 2

Congratulations on your purchase of the
advanced and compact BL40 phone by LG,
designed to operate with the latest digital mobile
communication technology.
Page 3

Contents
Guidelines for safe and
ecient use .................................8
Getting to know your
phone .........................................19
Open view .................................21
Installing the USIM and
battery ........................................22
Charging your phone ............ 24
Memory card ............................ 25
Installing a memory card ................. 25
Formatting the memory card ......... 26
Transferring your contacts .............. 26
Menu map ................................. 27
Your home screen .................. 28
Touch screen tips ................................ 28
Customising the home screen ....... 29
Quick keys .............................................31
Touch screen ........................................ 32
Viewing the status bar ...................... 33
Using the Multi-tasking function .. 35
Calls ............................................. 36
Making a call or a video call ............ 36
Calling your contacts ......................... 36
Answering and rejecting a call ......36
In-call options ......................................37
Adjusting call volume ....................... 38
Speed dialling ..................................... 38
Making a second call ......................... 38
Turning o DTMF ................................ 39
Viewing your call logs ....................... 39
Using call divert ................................... 40
Using call barring ................................ 40
Changing the common call
setting .....................................................41
Changing your video call
settings ................................................... 42
Contacts ..................................... 43
Searching for a contact.....................43
Adding a new contact ....................... 43
Creating a group ................................. 44
Changing your contact settings .... 44
Viewing information .......................... 45
3
Page 4

Contents
Messaging ................................. 46
Messaging ............................................. 46
Sending a message ............................ 46
Entering text .........................................47
T9 predictive ......................................... 47
Abc manual ........................................... 47
Setting up your email........................48
Retrieving your email ........................ 49
Sending an email using your new
account ................................................... 49
Changing your email settings ........ 50
Message folders ..................................51
Using templates .................................. 51
Using emoticons ................................. 52
Changing your text message
settings ................................................... 52
Changing your multimedia
message settings ................................ 53
Changing your other settings ........ 54
Camera ....................................... 55
Taking a quick photo ........................ 55
Once you’ve taken the photo ......... 56
Getting to know the viewnder .... 57
Using the ash ..................................... 58
Choosing a shot type ........................58
Taking a continuous shot ................59
4 LG BL40 | User Guide
Using the advanced settings .......... 59
Changing the image size .................62
Choosing a colour eect .................. 62
Using the secondary camera .......... 63
Viewing your saved photos ............63
Video camera ........................... 64
Shooting a quick video ..................... 64
After taking a video ...........................65
Getting to know the viewnder .... 66
Using the advanced settings .......... 67
Changing the video image size ..... 68
Choosing a colour tone .................... 68
Using the secondary video
camera .................................................... 69
Watching your saved videos ...........69
Watching your videos on TV ........... 70
Your photos and videos ....... 71
Viewing your photos and videos .. 71
Using zoom when viewing a video
or photo ................................................. 71
Adjusting the volume when
viewing a video ...................................71
Setting a photo as wallpaper .........72
Editing your photos ........................... 72
Adding text to a photo ..................... 74
Page 5

Adding an eect to a photo ...........74
Cropping a photo .............................. 74
Adding a colour accent to a
photo ......................................................75
Swapping colours in a photo .........75
Fog Drawing ......................................... 76
Rain Drop ............................................... 76
MotionBlur ............................................ 77
Artistic Eect ........................................77
Editing your videos ............................ 77
Trimming the length of the video 77
Merging two videos ........................... 78
Merging a photo with a video .......78
Adding text to a video ...................... 79
Overlaying a photo ............................79
Adding a soundtrack to your
video........................................................80
Adding live sound to your video ... 80
Adding a dimming eect ................. 81
Multimedia ............................... 82
Pictures .................................................. 82
Images options menu ....................... 82
Sending a photo .................................82
Using an image .................................... 83
Printing an image ............................... 83
Moving or copying an image ......... 84
Creating a slide show ........................ 84
Geo-tagging ........................................84
Sounds .................................................... 85
Using a sound ......................................85
Videos ....................................................85
Sending a video clip ..........................86
Games and Applications ................. 86
Playing a game .................................... 86
Using the options menu .................86
Installing a Java game and
application ........................................... 87
Use the M-Toy menu .......................... 87
Flash contents ...................................... 87
Viewing an SWF/ SVG le ................. 87
Documents ...........................................87
Viewing a le ........................................ 87
Transferring a le to your phone...88
Others .....................................................88
Creating a movie ................................. 88
Music ....................................................... 89
Transferring music onto your
phone ...................................................... 90
Playing a song ...................................... 90
Creating a playlist ............................... 91
Deleting a playlist ............................... 91
Using the radio .................................... 91
Searching for stations ....................... 92
5
Page 6

Contents
Listening to the radio ........................ 93
Using the FM transmitter to play
music ....................................................... 93
Organiser ................................... 94
Adding an event to your
calendar .................................................94
Changing your default calendar
view .........................................................94
Adding an item to your To Do list .95
Using the date nder.........................95
Setting your alarm .............................. 96
Adding a memo ..................................96
Voice recorder ...................................... 96
Recording a sound or voice ............ 97
Sending the voice recording .......... 97
Using your calculator ........................97
Converting a unit ................................ 98
Using the stopwatch .........................98
Adding a city to your world clock . 98
PC Suite ...................................... 99
Installing the LG PC Suite on your
computer ............................................... 99
Connecting your phone and PC .... 99
Backing up and restoring your
phone’s information ........................100
6 LG BL40 | User Guide
Viewing phone les on your PC ..100
Synchronising your contacts ........101
Synchronising the messages ........101
Music Sync...........................................101
Transferring music using Windows
Media Player .......................................102
DivX Converter ..................................103
The web ...................................104
Vodafone live! ....................................104
Accessing the web ...........................104
Adding and accessing
bookmarks ..........................................104
Using the RSS reader .......................105
Accessing a saved page ..................105
Viewing your browser history ......105
Changing web browser settings .106
Using your phone as a modem ...106
Settings ....................................108
Changing your screen settings ....108
Personalising your proles ............108
Changing your phone settings ....109
Changing your touch settings ....109
Changing your connectivity
settings .................................................110
Using memory manager ................112
Page 7

Using ight mode .............................112
Sending and receiving les using
Bluetooth .............................................112
Changing your Bluetooth
settings .................................................114
Pairing with another Bluetooth
device ....................................................114
Using a Bluetooth headset ............115
Wi-Fi ...........................................116
Phone Software update .....118
Accessories .............................119
Network service ....................120
Technical data ........................120
Trouble shooting ..................122
7
Page 8

Guidelines for safe and ecient use
Please read these simple guidelines.
Not following these guidelines may
be dangerous or illegal.
Exposure to radio frequency
energy
THIS DEVICE MEETS INTERNATIONAL
GUIDELINES FOR EXPOSURE TO
RADIO WAVES
Your mobile device is a radio
transmitter and receiver. It is
designed and manufactured not to
exceed the limits for exposure to
radio frequency (RF) recommended
by international guidelines
(ICNIRP). These limits are part of
comprehensive guidelines and
establish permitted levels of RF
energy for the general population.
The guidelines were developed by
independent scientific organisations
through periodic and thorough
evaluation of scientific studies. The
guidelines include a substantial
safety margin designed to assure
8 LG BL40 | User Guide
the safety of all persons, regardless
of age and health.
The exposure standard for
mobile devices employs a unit of
measurement known as the Specific
Absorption Rate, or SAR. The SAR
limit stated in the international
guidelines is 2.0 W/kg*. Tests for
SAR are conducted using standard
operating positions with the device
transmitting at its highest certified
power level in all tested frequency
bands. Although the SAR is
determined at the highest certified
power level, the actual SAR of the
device while operating can be well
below the maximum value. This is
because the device is designed to
operate at multiple power levels so
as to use only the power required
to reach the network. In general,
the closer you are to a base station,
the lower the power output of
the device. Before a phone model
is available for sale to the public,
Page 9

compliance with the European
R&TTE directive must be shown. This
directive includes as one essential
requirement the protection of the
health and the safety for the user
and any other person.
The highest SAR value for this
device when tested for use at the
ear is 0.564 W/kg.
This device meets RF exposure
guidelines when used either in the
normal use position against the ear
or when positioned at least 1.5 cm
away from the body. When a carry
case, belt clip or holder is used for
body-worn operation, it should
not contain metal and should
position the product at least 1.5
cm away from your body. In order
to transmit data files or messages,
this device requires a quality
connection to the network. In some
cases, transmission of data files or
messages may be delayed until such
a connection is available. Ensure
the above separation distance
instructions are followed until the
transmission is completed. The
highest SAR value for this device
when tested for use at the body is
0.935 W/kg.
* The SAR limit for mobile devices
used by the public is 2.0 watts/
kilogram (W/kg) averaged over ten
grams of body tissue. The guidelines
incorporate a substantial margin of
safety to give additional protection
for the public and to account for
any variations in measurements.
SAR values may vary depending on
national reporting requirements
and the network band.
For SAR information in other
regions please look under product
information at www. lgmobile.com.
9
Page 10

Guidelines for safe and ecient use
FCC SAR information
Your mobile device is also designed
to meet the requirements for
exposure to radio waves established
by the Federal Communications
Commission (USA) and Industry
Canada.
These requirements set a SAR limit
of 1.6 W/kg averaged over 1 gram
of tissue. The highest SAR value
reported under this standard during
product certifi cation for use at the
ear is 0.216 W/kg and when properly
worn on the body is 0.628 W/kg.
Additionally, this device was tested
for typical body-worn operations
with the back of the phone kept
0.79 inches (2cm) between the users
body and the back of the phone.
To comply with FCC RF exposure
requirements, a minimum
separation distance of 0.79
inches(2cm) must be maintained
between the user’s body and the
back of the phone.
10 LG BL40 | User Guide
* FCC Notice & Caution
Notice!
This device complies with part 15 of
the FCC Rules. Operation is subject
to the following two conditions:
(1) This device may not cause
harmful interference, and
(2) this device must accept any
interference received, including
interference that may cause
undesired operation.
Caution!
Change or Modifications that are
not specifically approved by the
manufacturer could void the user’s
authority to operate the equipment
Page 11
Product care and maintenance
WARNING
Only use batteries, chargers
and accessories approved for
use with this particular phone
model. The use of any other types
may invalidate any approval or
warranty applying to the phone,
and may be dangerous.
Do not disassemble this unit. Take
•
it to a qualified service technician
when repair work is required.
Keep away from electrical
•
appliances such as TVs, radios,
and personal computers.
The unit should be kept away
•
from heat sources such as
radiators or cookers.
Do not drop.
•
Do not subject this unit to
•
mechanical vibration or shock.
Switch off the phone in any area
•
where you are required by special
regulations. For example, do not
use your phone in hospitals as
it may affect sensitive medical
equipment.
Do not handle the phone with
•
wet hands while it is being
charged. It may cause an electric
shock and can seriously damage
your phone.
Do not charge a handset near
•
flammable material as the
handset can become hot and
create a fire hazard.
•
Use a dry cloth to clean the
exterior of the unit (do not use
solvents such as benzene, thinner
or alcohol).
•
Do not charge the phone when it
is on soft furnishings.
•
The phone should be charged in
a well ventilated area.
11
Page 12

Guidelines for safe and ecient use
Do not subject this unit to
•
excessive smoke or dust.
Do not keep the phone next to
•
credit cards or transport tickets; it
can affect the information on the
magnetic strips.
Do not tap the screen with a
•
sharp object as it may damage
the phone.
Do not expose the phone to
•
liquid, moisture or humidity.
Use the accessories like
•
earphones cautiously. Do not
touch the antenna unnecessarily.
Do not use the phone or
•
accessories in places with
high humidity such as pools,
greenhouses, solariums or
tropical environments, it may
cause damage to the phone and
invalidation of warranty.
12 LG BL40 | User Guide
Efficient phone operation
Electronic and medical devices
All mobile phones may get
interference, which could affect
performance.
Do not use your mobile phone
near medical equipment without
requesting permission. Please
consult your doctor to determine
if operation of your phone may
interfere with the operation of your
medical device.
Some hearing aids might be
disturbed by mobile phones.
Minor interference may affect TVs,
radios, PCs, etc.
Page 13

Pacemakers
Pacemaker manufacturers
recommend that a minimum
separation of 15cm be maintained
between a mobile phone and
a pacemaker to avoid potential
interference with the pacemaker. To
achieve this use the phone on the
opposite ear to your pacemaker and
do not carry it in a breast pocket.
Hospitals
Switch off your wireless device
when requested to do so in
hospitals, clinics or health care
facilities. These requests are
designed to prevent possible
interference with sensitive medical
equipment.
Road safety
Check the laws and regulations on
the use of mobile phones in the
area when you drive.
Do not use a hand-held phone
•
while driving.
Give full attention to driving.
•
Use a hands-free kit, if available.
•
Pull off the road and park before
•
making or answering a call if
driving conditions so require.
RF energy may affect some
•
electronic systems in your vehicle
such as car stereos and safety
equipment.
When your vehicle is equipped
•
with an air bag, do not obstruct
with installed or portable wireless
equipment. It can cause the air
bag to fail or cause serious injury
due to improper performance.
13
Page 14

Guidelines for safe and ecient use
If you are listening to music
•
while out and about, please
ensure that the volume is at a
reasonable level so that you are
aware of your surroundings. This
is particularly imperative when
near roads.
Avoid damage to your hearing
Damage to your hearing can occur
if you are exposed to loud sound for
long periods of time. We therefore
recommend that you do not turn on
or off the handset close to your ear.
We also recommend that music and
call volumes are set to a reasonable
level.
14 LG BL40 | User Guide
Glass Parts
Some parts of your mobile device
are made of glass. This glass
could break if your mobile device
is dropped on a hard surface or
receives a substantial impact. If
the glass breaks, do not touch or
attempt to remove. Stop using your
mobile device until the glass is
replaced by an authorized service
provider.
Blasting area
Do not use the phone where
blasting is in progress. Observe
restrictions, and follow any
regulations or rules.
Page 15

Potentially explosive
atmospheres
Do not use the phone at a
•
refueling point.
Do not use near fuel or chemicals.
•
Do not transport or store
•
flammable gas, liquid, or
explosives in the same
compartment of your vehicle
as your mobile phone and
accessories.
In aircraft
Wireless devices can cause
interference in aircraft.
Turn your mobile phone off
•
before boarding any aircraft.
Do not use it on the ground
•
without permission from the
crew.
Children
Keep the phone in a safe place
out of the reach of small children.
It includes small parts which may
cause a choking hazard if detached.
Emergency calls
Emergency calls may not be
available under all mobile networks.
Therefore, you should never depend
solely on the phone for emergency
calls. Check with your local service
provider.
15
Page 16

Guidelines for safe and ecient use
Do not expose the battery
Battery information and care
•
You do not need to completely
discharge the battery before
recharging. Unlike other battery
systems, there is no memory
effect that could compromise the
battery’s performance.
Use only LG batteries and
•
chargers. LG chargers are
designed to maximize the battery
life.
Do not disassemble or short-
•
circuit the battery pack.
Keep the metal contacts of the
•
battery pack clean.
Replace the battery when it
•
no longer provides acceptable
performance. The battery pack
maybe recharged hundreds of
times until it needs replacing.
Recharge the battery if it has
•
not been used for a long time to
maximize usability.
16 LG BL40 | User Guide
•
charger to direct sunlight or use
it in high humidity, such as in the
bathroom.
•
Do not leave the battery in hot or
cold places, this may deteriorate
the battery performance.
There is risk of explosion if
•
the battery is replaced by an
incorrect type.
Dispose of used batteries
•
according to the manufacturer’s
instructions. Please recycle when
possible. Do not dispose as
household waste.
If you need to replace the battery,
•
take it to the nearest authorized
LG Electronics service point or
dealer for assistance.
Always unplug the charger from
•
the wall socket after the phone is
fully charged to save unnecessary
power consumption of the
charger.
Page 17

Actual battery life will depend on
•
network configuration, product
settings, usage patterns, battery
and environmental conditions.
Driver Safety Tips
Your wireless telephone gives you
the powerful ability to communicate
by voice - almost anywhere,
anytime. But an important
responsibility accompanies the
benefits of wireless phones, one
that every user must uphold.
When driving a car, driving is your
first responsibility. When using your
wireless phone behind the wheel of
a car, practice good common sense
and remember the following tips:
Use a hands free device. If
•
possible, add an additional layer
of convenience and safety to
your wireless phone with one of
the many hands free accessories
available today.
Let the person you are speaking
•
with know you are driving; if
necessary, suspend the call in
heavy traffic or hazardous weather
conditions. Rain, sleet, snow, ice
and even heavy traffic can be
hazardous.
]
Use your wireless phone to call
emergency services for yourself
or others.
In the case of fire, traffic accident
or medical emergencies;
• Australia: Dial 0-0-0,
• New Zealand: Dial 1-1-1,
• International: Dial 1-1-2,
• other local emergency number.
Remember, it is a free call on your
wireless phone for emergency
services.
17
Page 18

Guidelines for safe and ecient use
]
Use your wireless phone to help
others in emergencies, if you see
an auto accident crime in progress
or other serious emergency
where lives are in danger, call the
emergency number, as you would
want others to do for you.
Do not take notes or look up
•
phone numbers while driving.
Jotting down a “to do” list or
flipping through your address
book takes attention away from
your primary responsibility, driving
safely.
If possible, place calls when you
•
are not moving or before pulling
into traffic. Try to plan calls when
you will not be driving.
18 LG BL40 | User Guide
Do not engage in stressful or
•
emotional conversations that may
be distracting. Make people you
are talking with aware you are
driving and suspend conversations
that have the potential to divert
your attention from the road.
Page 19
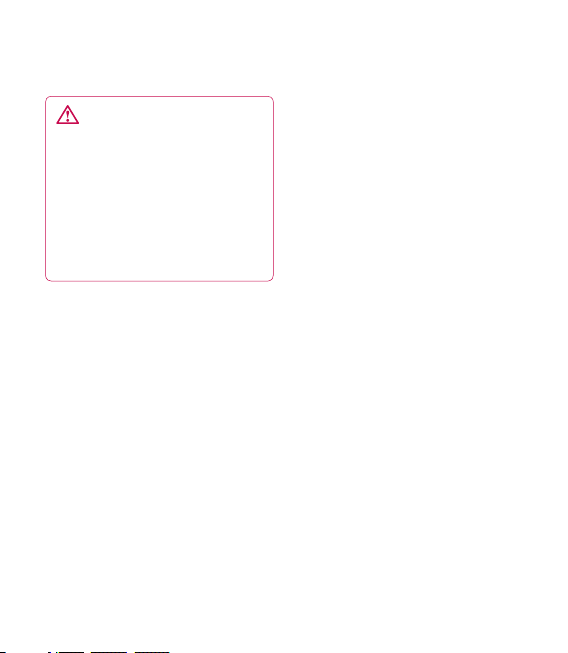
Getting to know your phone
Handsfree or Stereo earphone connector
Power key
Turns the phone on/off.
Earpiece
Inner camera
Proximity Sensor
WARNING: Putting a heavy
object on the phone or sitting on
it can damage its LCD and touch
screen functionality. Do not cover the
protection lm on proximity sensor of
LCD. It can cause malfunction of sensor.
19
Page 20
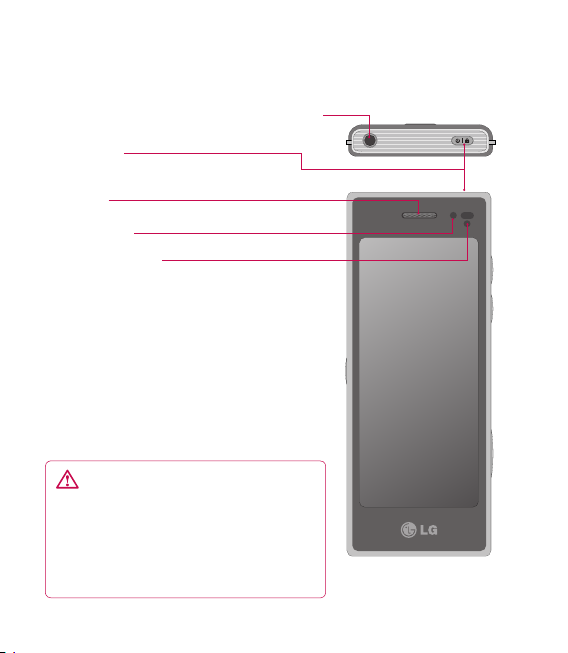
Getting to know your phone
Charger, Data cable
(USB cable)
TIP: Before
connecting the
USB cable, wait
until the phone has
powered up and
has registered on
the network.
Music key
20 LG BL40 | User Guide
Volume keys
• When the screen is idle:
key tone or ring tone
volume.
• During a call:
volume.
• When playing a track:
controls the volume
continuously.
Camera key
•
Go to camera menu
directly by pressing and
holding the key.
earpiece
Page 21
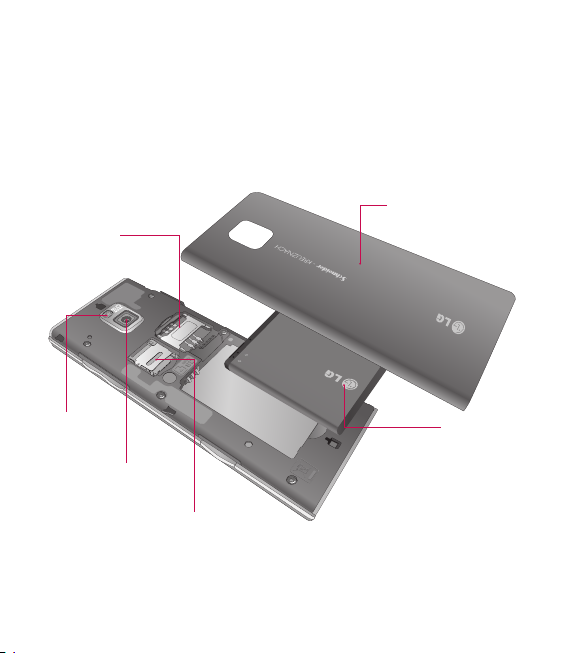
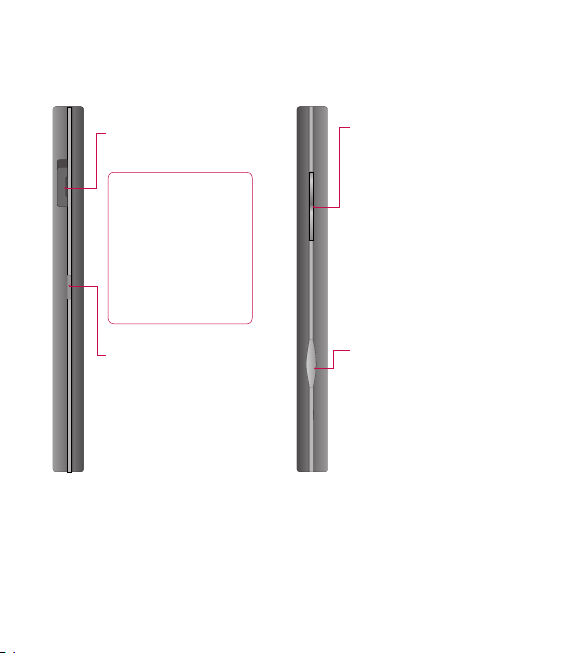
Open view
USIM card
socket
Battery cover
Flash light
Camera lens
Battery
Memory card
socket
21
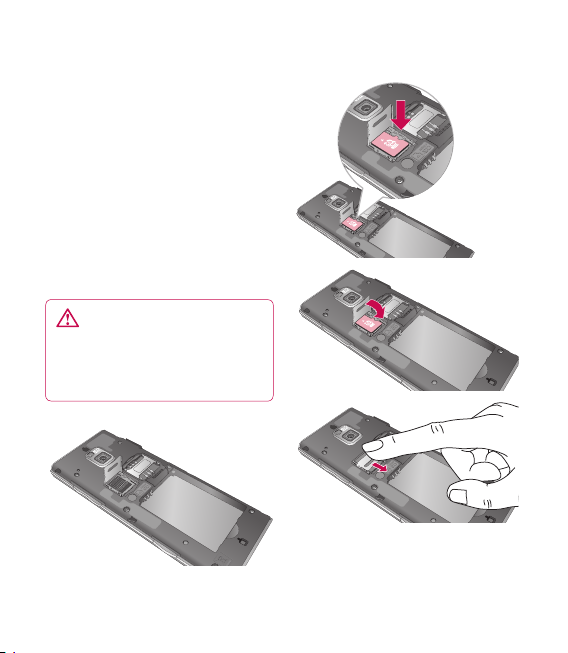
Page 22
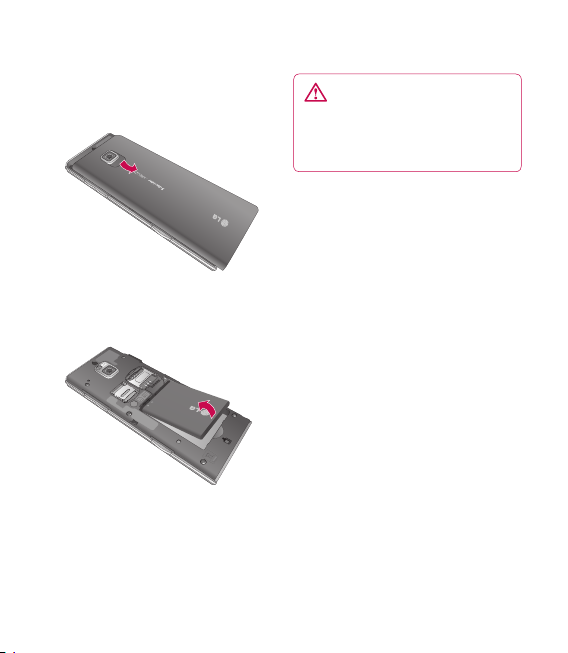
Installing the USIM and battery
1 Remove the battery cover
Slide down the battery cover.
2 Remove the battery
Pull out the battery.
22 LG BL40 | User Guide
WARNING: Do not remove
the battery when the phone
is switched on, as this may
damage the phone.
Page 23
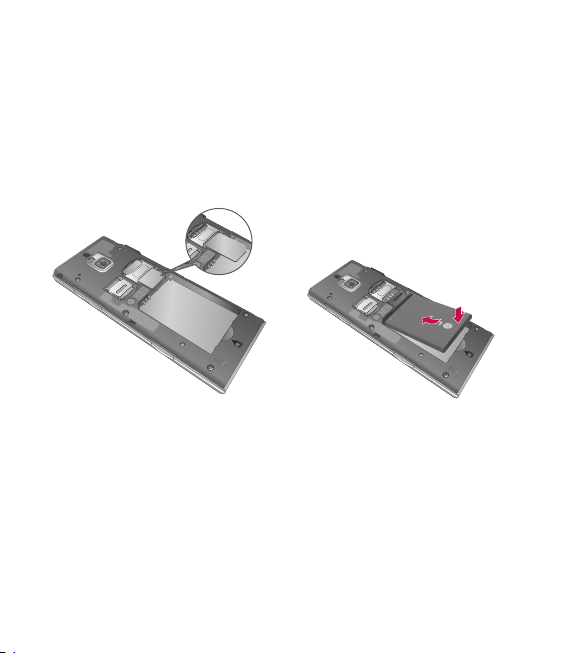
3 Install the USIM card
Slide the USIM card into the USIM
card holder. Make sure the gold
contact area on the card is facing
downwards. To remove the USIM
card, gently pull it outwards.
4 Install the battery
Insert the top of the battery
into the top edge of the battery
compartment first. Ensure that
the battery contacts align with
the phone’s terminals. Press the
bottom of the battery down until
it clips into place.
23
Page 24
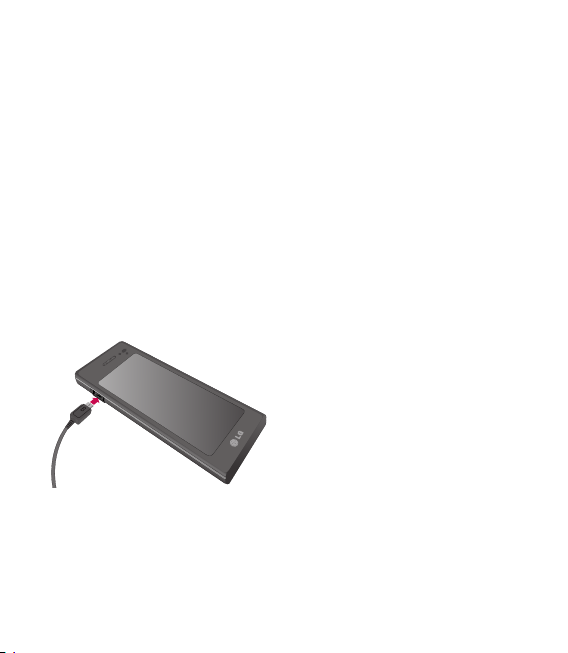
Charging your phone
Open the cover of the charger
connector on the side of your BL40.
Insert the charger and plug it into a
mains electricity socket. Your BL40
must be charged until the “Battery
full” message appears on the screen.
NOTE: The battery must be fully
charged initially to improve battery
lifetime. Disregard the first “Battery
full” message and keep the phone
on charge overnight (or for up to
14 hours).
24 LG BL40 | User Guide
Page 25
Memory card
Installing a memory card
You can expand the available
memory space on your phone by
using a memory card (microSD).
NOTE: A memory card is an optional
accessory.
Slide the memory card into the slot
at the top, until it clicks into place.
Make sure the gold contact area is
facing downwards.
WARNING: Slide the
memory card into the slot,
otherwise the card may be
damaged.
25
Page 26

Memory card
Formatting the memory card
Your memory card may already be
formatted. If it isn’t, you will need
to format it before you can start to
use it.
NOTE: All files get deleted while
formatting.
From the home screen select
1
and select Phone settings from
the Settings tab.
Scroll and touch Memory info
2
then scroll and touch External
memory.
Touch Format and then confirm
3
your choice.
Enter the password, if one has
4
been set. The card will then be
formatted and ready to use.
NOTE: If there is existing content
on your memory card, the folder
structure may be different after
formatting since all files will have
been deleted.
26 LG BL40 | User Guide
Transferring your contacts
To transfer your contacts from your
USIM to your phone:
From the Communication
1
tab, scroll through Contacts
and choose then Change
location.
Touch Copy to Handset.
2
Choose Mark all or select names
3
one by one and touch Copy to
Handset.
Page 27
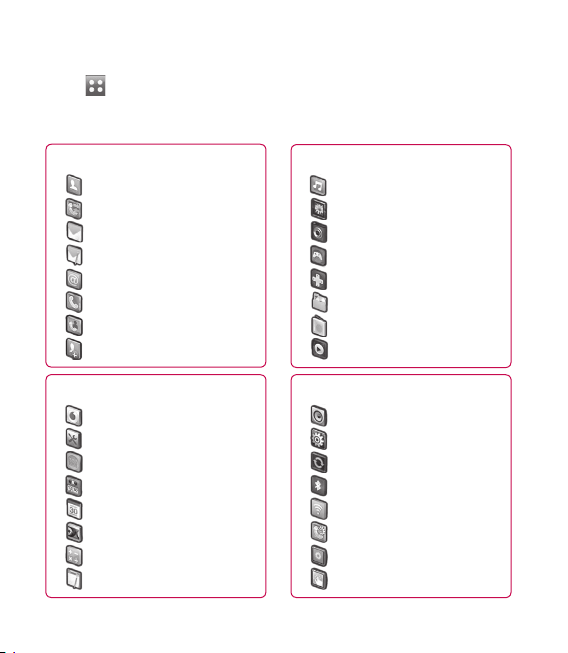
Menu map
Touch in the home screen to open a Top menu. From here you can access
further menus by scrolling through the icons: Communication, Entertainment,
Utilities and Settings.
Communication
Contacts
Recent history
Messaging
Write message
Email
Dialling
Video call
New contact
Utilities
Vodafone live!
Tools
Applications
Alarms
Organiser
Voice recorder
Calculator
Memo
Entertainment
Music
Gallery
Camera
Games
Fun stuff
My Files
FM radio
Movie maker
Settings
Profiles
Phone settings
Connectivity
Bluetooth
Wi-Fi
Call settings
Display settings
Touch settings
27
Page 28

Your home screen
From this screen you can access
menu options, make a call, view
the status of your phone and much
more.
Touch screen tips
The home screen is also a great
place to get used to using the touch
screen.
To select an item, touch the centre
of the icon.
Do not to press too hard; the
•
touchscreen is sensitive enough
to pick up on a light, firm touch.
•
Use the tip of your finger to
touch the option you require. Be
careful not to touch any other
keys.
•
When the screen light is off, press
the power key to return to the
home screen.
28 LG BL40 | User Guide
Whenever your BL40 is not in use,
•
it will return to the lock screen.
Page 29
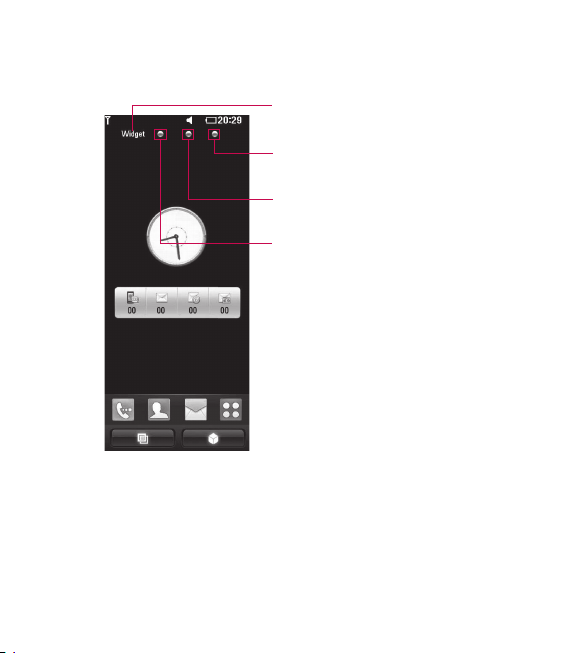
Customising the home screen
Widget home screen (active)
Shortcut home screen
Browser home screen
Contact home screen
29
Page 30
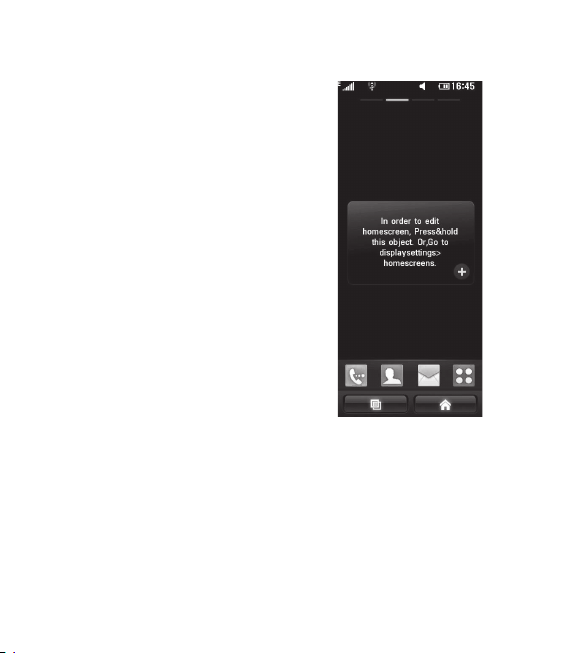
Your home screen
Get in touch with your BL40 -
•
The User Interface is based on four
types of Homescreens. To swap
between the home screens just
wipe quickly over the display from
left to right or from right to left.
Home screen customisation -
•
For each type of home screen
you are able to add and remove
objects by pressing & holding your
finger on the screen, or if already
added touching and holding one
of the objects.
30 LG BL40 | User Guide
Page 31

Quick keys
The quick keys on your home screen provide easy, one-touch access to the
functions you use most.
Touch to bring up the touch
dialling pad, which lets
you make a call. Enter the
number as you would with
a normal key pad and touch
Voice call.
To place a video call to this
number, touch Video Call
after entering the number.
Touch to open your contacts.
To search for the number you
want to call: Click the search
icon to enter the name of the
contact using the touchpad.
You can also create new
contacts and edit existing
ones.
Touch to access the
Messaging menu. From here
you can create a new SMS.
Touch to open the full top
menu which is divided into
four sub-menus.
31
Page 32

Your home screen
Touch screen
The controls on the BL40 touch
screen change dynamically,
depending on the task you are
carrying out.
Opening Applications
To open any Application simply
touch its icon.
Scrolling
Drag from side to side to scroll. On
some screens, such as web pages,
you can also scroll up or down.
32 LG BL40 | User Guide
Page 33

Zooming In or Out
When viewing photos, web pages,
emails, or maps, you can zoom in
and out. Pinch your fingers together
or slide them apart.
Viewing the status bar
The status bar uses various icons
to show different conditions such
as signal strength, new messages
and battery life as well as telling
you whether Bluetooth or GPRS are
active.
Below is a table which explains the
meaning of icons you’re likely to see
in the status bar.
Icon Description
No Service
2G
3G
EDGE
HSDPA
Wi-fi is on
Bluetooth Message
Bluetooth Mono hands free
headset
Bluetooth Mono Stereo
headset
33
Page 34

Your home screen
Icon Description
Bluetooth Stereo headset
Bluetooth Mono headset
Bluetooth on
Printer by Bluetooth
Bluetooth Transfer
Bluetooth Visibility
Bluetooth Music
Downloading
Downloading complete
Downloading cancelled
In-call option
Internet
Searching
Call divert
Call reject
Security
Headset
HomeZone
Roaming
34 LG BL40 | User Guide
Icon Description
Alarm
Schedule (Calendar)
Multi-tasking
Music paused
Music playing
Music playing with FM
broadcasting
FM radio playing
FM broadcasting
Email being sent
Email received
MMS sending has failed
MMS sending
MMS receiving
MMS New message
SMS sending
SMS receiving
New voicemail
New message
Page 35

Icon Description
SMS sending has failed
New email
Push message
Flight mode
Normal
Outdoor
Silent
Customised profile 1-10 or
Customised 1-10
External memory
Battery status
Microsoft Exchange
Using the Multi-tasking
function
Touch the multitasking key
to open the Multitasking menu.
From here you can view some
applications that are running and
access them with one touch.
Multitasking
End all
35
Page 36

Calls
TIP! Press the power key
briey to lock the touchscreen
and prevent calls being made
by mistake.
Making a call or a video call
1 Touch to open the keypad.
2 Type in the number on the
keypad. To delete a digit, press
the clear key.
3 Touch the Voice call or Video call
to place the call.
4 To end the call, touch the End
call.
TIP! To enter + for making
international calls, touch
twice or press and hold down
.
TIP! You can Save number,
Send message, Search
contacts by tapping .
36 LG BL40 | User Guide
Calling your contacts
From the home screen touch
1
to open your Contacts.
Scroll through the contact list
2
or enter the first letter(s) of the
contact you want to call by
touching .
From the list, touch the contact
3
you want to call and select
the number to use, if there is
more than one number for that
contact.
Touch Voice call or Video call.
4
Answering and rejecting a
call
When your phone rings, touch the
Accept button to answer the call.
Touch the button to reject an
incoming call.
Page 37

In-call options
End call
Hold - Touch to put a call on hold.
Mute - Touch to turn the microphone off so
the person you are talking to cannot hear you.
Speaker - Touch to turn the speaker phone
on.
Options - Choose from a list of further in-call
options, including creating new memo and going
to messages, so you can check your messages
and add contacts during a call. You can also end
the call from here by touching End call.
- Touch to open a numerical keypad for typing
in numbers, e.g. when dialling call centres or other
automated telephone services.
- Add a memo during a call.
- Search your contacts during a call.
37
Page 38

Calls
Adjusting call volume
To adjust the volume during a call,
use the up and down button on the
right side of the phone.
Speed dialling
You can assign a frequently-called
contact to a speed dial number.
From the home screen touch
1
to open your Contacts.
2
Touch and select Speed
dials.
Your voicemail is already set to
3
speed dial 1. You cannot change
this. Touch any other number to
assign it to a speed dial contact.
Your contacts list will open. Select
4
the contact you want to assign
to that number by touching the
phone number once.
To call a speed dial number, touch
on the home screen then press
and hold the assigned number until
the contact appears on the screen.
38 LG BL40 | User Guide
The call will initiate automatically,
without having to touch Voice call.
Making a second call
During your initial call, touch
1
and select the number you want
to call.
Call the number (unable to
2
search for contacts).
Touch Voice call to connect the
3
call.
4
Both calls will be displayed on
the call screen. Your initial call will
be locked and put on hold.
Touch the swap icon to
5
toggle between calls.
Touch the + symbol to open the
6
in-call menu and select “Join calls”
to make a conference call.
To end one or both calls press
7
.
End
NOTE: You will be charged for each
call you make.
Page 39

Turning off DTMF
DTMF lets you use numerical
commands to navigate within
automated calls. DTMF default is
set to on.
To turn it off during a call (e.g. to
make a note of a number) touch
and select Disable DTMF.
Viewing your call logs
From the home screen, touch ,
then touch Recent history in the
Communication tab.
Choose from the following:
All history - View a complete list
of all dialled, received and missed
calls, voice calls, video calls and
messages.
Missed calls - View a list of all calls
you have missed.
Calls only - View a list of all calls
you have made and missed.
Messages only - View a list of all
numbers that have received or sent
texts and multimedia messages.
VT only- View a list of all video calls.
TIP! From any call log,
touch and Delete all to
delete all recorded items.
TIP! Touch any single call
log entry to view the date, time
and duration of the call.
39
Page 40

Calls
Using call divert
Touch and choose Call
1
settings in the Settings tab.
Touch Call divert and choose
2
Voice calls and/or Video calls.
Choose whether to divert all calls,
3
when the line is busy, when there
is no answer, or when you cannot
be contacted.
Enter the number to divert to.
4
Touch Activate to activate.
5
Enter the number to divert to.
6
NOTE: Diverting calls will incur
charges. Please contact your
network operator for details.
TIP! To turn o all call
diverts, select Deactivate all
from the Call divert menu.
40 LG BL40 | User Guide
Using call barring
1
Touch and choose Call
settings in the Settings tab.
2
Touch Call barring and choose
Voice calls and/or Video calls.
Choose any or all of the five
3
options:
All outgoing
Outgoing international
Outgoing international calls
except home country
All incoming
Incoming when abroad
Enter the call barring password.
4
Please check with your network
operator about this service.
Page 41

TIP! Select Fixed dial
numbers to turn on and
compile a list of numbers that
can be called from your phone.
You’ll need your PIN2 code,
available from your operator.
Only numbers within the xed
dial list can be called from your
phone.
Changing the common call
setting
Touch and choose Call
1
settings in the Settings tab.
Touch Common settings. This
2
lets you amend the following
settings:
Call reject - Slide the switch left
for ON. You can touch the Reject
list to choose all calls, specific
contacts or groups or calls from
unregistered numbers (i.e. not in
your contacts).
Send my number - Choose
whether to display your number
on an outgoing call.
Auto redial - Slide the switch left
for ON or right for OFF.
Minute minder - Slide the switch
left to ON to hear a tone every
minute during a call.
BT answer mode - Select
Hands-free to be able to answer
a call automatically while using
a Bluetooth headset, or select
Handset to press a handset key
to answer a call.
Save new number - Select ON or
OFF to save a new number.
Voice clarity - Select ON or
OFF to clear noises around. This
feature makes your voice louder
and clearer.
41
Page 42

Calls
Changing your video call
settings
From the home screen, touch
1
and scroll to Call settings in the
Settings tab.
Touch Video call settings and
2
select the settings for your video
calls. Decide whether to use still
image, then select one and/or
switch on the mirror to see
yourself on screen when making
a video call.
42 LG BL40 | User Guide
Page 43

Contacts
Searching for a contact
There are two ways to search for a
contact:
From the home screen
From the home screen touch
1
to open your Contacts. Touch
and enter the contact name
using the key pad.
Touch Video call or Voice call to
2
place the call.
TIP! You can search by group by
touching the Contacts tab on the
top of the screen and selecting
Groups. This will bring up a list
of all your groups.
From the main menu
Touch , touch Contacts on
1
the Communication tab.
Adding a new contact
From the home screen touch
1
then touch New contact.
Choose whether to save the
2
contact to Handset or USIM.
If you want to add a picture to
3
each contact, touch Add picture.
Enter the first and last name of
4
your new contact. You do not
have to enter both, but you must
enter at least one.
Enter up to five different numbers
5
and assign a type to each of
them, choosing between Mobile,
Home, Office, Pager, Fax, VT
and General.
Add an email address.
6
Assign the contact to one or
7
more groups, choosing between
No group, Family, Friends,
Colleagues, School or VIP.
43
Page 44

Contacts
You can also add a Ringtone,
8
Vibration, Homepage, Home
address, Company name,
Job title, Company address,
Birthday, Anniversary and
Memo.
9
Touch to save the contact.
TIP! You can create
customised groups for your
contacts. See Creating a group.
NOTE: If you delete a group, the
contacts assigned to that group will
not be lost. They will remain in your
contacts.
TIP! You can edit an existing
group by touching the selected
group once. Choose View
members, Edit the group, Send
message, Send business card or
Delete group.
Creating a group
From the home screen, touch
1
and then touch Contacts in the
Communication tab.
2
Touch Contacts on the top of the
screen, then touch Groups and
select New group.
3
Enter a name for the new group.
And set the group picture, group
name, group ringtone and group
vibration.
Touch to save the group.
4
44 LG BL40 | User Guide
Changing your contact
settings
You can adapt your contact settings
to suit your own preferences.
Touch Contacts from the
1
Communication tab, select
and scroll through Contact
settings.
From here, you can adjust the
2
following settings:
Display name - Choose whether
to display the first or last name of
a contact first.
Page 45

Copy - Copy your contacts from
your USIM to your handset, or
vice versa. You can do this one
contact at a time, or all at once.
Move - This works in the same
way as Copy, but the contact will
only remain in the new location.
Therefore, once a contact is
moved from the USIM to the
handset it will be deleted from
the USIM memory.
Clear contacts - Delete all your
contacts. Touch Yes if you are
sure you want to delete all your
contacts.
Memory info. - View memory
capacity information.
Synchronise contacts - Connect
to your server to synchronise your
contacts.
Send all contacts via Bluetooth
- Send all of your contacts to
another device using Bluetooth.
You will be prompted to turn on
Bluetooth if you select this option.
Viewing information
Touch Contacts from the
1
Communication tab select
and scroll to Information.
From here you can view your
2
Service dial numbers, Own
numbers and Memory info.
(memory space remaining).
TIP! To add your own business
card, select My business card
and enter your details as you
would for any contact. Touch
to nish.
45
Page 46

Messaging
Messaging
Your BL40 combines SMS and MMS
into one intuitive, easy to use menu.
There are two ways of entering the
messaging centre:
From the home screen, touch
1
, or touch then scroll
through Messaging from the
Communication tab.
Sending a message
Touch then Write message
1
to open a blank message.
Touch To to enter the recipient’s
2
number, or open your contacts or
favourites. You can add multiple
contacts. When you are finished,
touch the message box below
to start composing the message
text.
After entering the text, you
3
can send the SMS by touching
the send button on top of the
message.
46 LG BL40 | User Guide
TIP! You will be charged
for a 160 character text message
for every person you send the
message to.
Touch Insert to add an
4
Image, Video, Sound, SMS
template, MMS template,
emoticon, name & number, new
slide, subject or signature and
More (Business card/Schedule/
Memo/Tasks).
WARNING: The 160character limit may vary from
country to country depending
on how the SMS is coded.
WARNING: If an image,
video or audio le is added to
an SMS, it will automatically be
converted to an MMS, and you
will be charged accordingly.
Page 47

Entering text
Touch to turn on T9
predictive texting.
Tap to change between the
number, symbol and text keypads.
Use to toggle between the
different keyboards in each text
entry mode (e.g., capital or lower
case letters).
To enter a space, touch .
T9 predictive
In T9 mode, you will see ,
coloured circle in orange.
T9 uses a built-in dictionary to
recognise your words based on the
key sequences you touch. Simply
touch the number key associated
with the letter you want to enter,
and the dictionary will predict the
word you want to use.
For example, press 8, 3, 5, 3, 7, 4, 6, 6
and 3 to write ‘telephone’.
Abc manual
In Abc mode you have to touch the
key repeatedly to enter a letter. For
example, to write ‘hello’, touch 4
twice, 3 twice, 5 three times, 5 three
more times, then 6 three times.
47
Page 48

Messaging
Setting up your email
You can keep in touch on the move
using your BL40 to email. It’s quick
and simple to set up a POP3 or
IMAP4.
Touch from the home
1
screen, and scroll to Email on the
Communication tab.
Touch Write email. If the email
2
account is not set up, start the
email set up wizard.
TIP! If an email account is
already set up, the wizard is not
activated automatically.
You can also edit specific
account settings by navigating to
Communication > Email > >
New email account. Email
provider appears: Vodafone
E-M@il, Others.
48 LG BL40 | User Guide
Vodafone E-M@ail
Email address - Enter the
account email address.
Password - Enter the account
password.
User name - Enter the account
username.
Others
Email address
Password
User name
Mailbox type - Select mailbox
type POP3 or IMAP4.
Incoming server - Enter the
incoming email server address.
Outgoing server - Enter the
outgoing email server address.
SMTP authentication - Choose
the security settings for the
outgoing mail server.
SMTP Username - Enter the
SMTP username.
Page 49

SMTP Password - Enter the SMTP
password.
Account name - Enter a name for
this account.
Once the account is set up, it will
appear in the accounts list in your
Email folder.
Retrieving your email
You can automatically or manually
check your account for new emails.
To check manually:
Touch from the home screen,
1
and scroll through Email from
the Communication tab.
Select Email.
2
Touch the account you want to
3
use then .
Choose Retrieve/Message
4
synchronisation and your BL40
will connect to your email
account and retrieve your new
messages.
Sending an email using your
new account
1
Touch from the home
screen, and scroll to Email on the
Communication tab and touch
Write email to open a new blank
message.
Enter the recipient’s address and
2
write your message. You can also
attach images, videos, audio files
and other file types.
Touch Send email to send your
3
email.
TIP! During an active Wi-Fi
connection, emails are sent and
received via Wi-Fi.
49
Page 50

Messaging
Changing your email settings
You can change your email settings
based on your own preferences.
1
Touch from the home screen,
and scroll through Email from
the Communication tab.
Select and scroll to Email
2
settings.
You can alter the following
3
settings:
Email accounts - Manage your
email accounts.
Allow reply email - Choose
whether to allow read
confirmation messages to be sent.
Request reply email - Choose
whether to request read
confirmation messages.
Retrieve interval - Select how
often your BL40 checks for new
email messages.
Retrieve amount - Select how
many your BL40 checks for new
email messages.
50 LG BL40 | User Guide
Include message in fwd & reply
- Select whether to include the
original message in your reply.
Include attachment - Select
whether to include the original
attachment in any reply.
Auto retrieval in roaming -
Choose whether to retrieve
messages automatically when
abroad (roaming).
New email notification - Choose
whether to be alerted about a
new email without a pop-up
message.
Signature - Create an email
signature and switch this feature
on.
Priority - Choose the priority level
of your email messages.
Mail sending size - Choose the
size of email you send.
Page 51

Message folders
You will recognise the folder
structure in your BL40, which is fairly
self-explanatory. If you set up an
email account, you can have folders
for each account.
Inbox - All messages you receive are
stored in your inbox. From here you
can view them and delete them,
amongst other functions.
Outbox - This is a temporary
storage folder while messages are
being sent.
Sent items - Messages you send are
stored in this folder.
Drafts - If you don’t finish writing a
message you can save what you’ve
done in this folder.
Threaded box - Messages
(SMS, MMS) exchanged with
another party can be displayed in
chronological order so that you
conveniently can see an overview of
your conversation.
My folders - Create folders to store
your messages.
Using templates
Create templates for the SMS and
MMS messages you send most
often. There are already some
templates on the phone, which you
can edit.
When writing a new message,
1
you can enter Templates from
Insert in option menu.
Choose SMS Template or MMS
2
Template. You can then touch
to New template, Delete or
Delete all templates. To edit a
message just select it, make your
changes and touch Save.
51
Page 52

Messaging
Using emoticons
Liven up your messages using
emoticons. There are some
commonly used emoticons already
on your phone.
When writing a new message,
1
you can enter Emoticon from
Insert in the options menu.
You can add a new emoticon by
2
touching New emoticon.
Changing your text message
settings
Your BL40 message settings are predefined, so you can send messages
immediately. These settings can be
changed based on your preferences.
Scroll through Messaging from
the Communication tab. Touch
then choose Message settings and
Text message. You can change the
following:
Text message centre - Enter the
details of your message centre.
52 LG BL40 | User Guide
Delivery report - Slide the switch
left to receive confirmation that
your messages have been delivered.
Validity period - Choose how long
your messages are stored at the
message centre.
Message types - Convert your text
into Voice, Fax, X.400 or Email.
Character encoding - Choose
how your characters are encoded.
This impacts on the size of your
messages and therefore on your
data charges.
Send long text as - Choose to send
long messages as Multiple SMS or
MMS.
Signature - Select to add signature
in the text message.
Page 53

Changing your multimedia
message settings
Your BL40 message settings are predefined, so you can send messages
immediately. These settings can be
changed based on your preferences.
Scroll through Messaging from
the Communication tab. Touch
then choose Message settings
and Multimedia message. You can
make change the following:
Retrieval mode - Select Home
network or Roaming network. If
you then select Manual you will only
receive notifications about MMS
messages. You can then decide
whether to download them in full.
Delivery report - Choose whether
to allow and/or request a delivery
report.
Read reply - Choose whether to
allow and/or send a read reply.
Priority - Choose the priority level
of your MMS.
Validity period - Choose how
long your message is stored at the
message centre.
Slide duration - Choose how long
slides appear on screen.
Creation mode - Choose the mode
between restricted/Warning/Free.
WARNING: You can
select to restrict or attach
unsupported type files to MMS
via confirmation popup.
Free - It can attach the unsupported
type file to MMS up to the available
size.
Delivery time - Choose how long to
wait before a message is delivered.
Multimedia message centre - Enter
the details of your message centre.
53
Page 54

Messaging
Changing your other settings
Scroll through Message settings
from the Settings tab then:
Service message - Choose
whether to receive or block service
messages. You can also set message
security levels by creating trusted
and not trusted sender lists.
Save sent message - Choose
whether to save or not save for sent
message.
Info. service - Select your reception
status, language and other settings.
54 LG BL40 | User Guide
Page 55

Camera
Taking a quick photo
Press and hold down the Camera
1
key on the right side of the
phone.
Holding the phone horizontally,
2
point the lens towards the
subject you want to take a
picture of.
Press the capture button lightly
3
and a focus box will appear in the
centre of the viewfinder screen.
Position the phone so you can
4
see the photo subject in the
focus box.
When the focus box turns green,
5
the camera has focused on your
subject.
Press the capture button and
6
hold it down.
55
Page 56

Camera
Once you’ve taken the photo
Your captured photo will appear on the screen. The image name is shown
with eight options on the sides.
Send
Use as
Rename
Edit
Send
Touch to send the photo
as a Message, Email, Bluetooth or
Postcard.
NOTE: Additional cost may occur
when MMS are sent while roaming.
Use as
Touch to use the image as
Homescreen, Lock screen, contact
picture or start-up screen.
Rename
Touch to edit the name of
the selected picture.
Edit
Touch to edit the image
using various tools.
56 LG BL40 | User Guide
IMG006.jpg
Touch to return to the previous
menu.
Delete
Touch to delete the image.
New picture
photo immediately. Your current
photo will be saved.
Touch to view a gallery of your
saved photos.
Delete
New
picture
Touch to take another
Page 57

Getting to know the viewfinder
Zoom - Touch to zoom in or to zoom out.
Alternatively you can use the side volume keys.
Image size
Brightness - See Adjusting the Brightness.
Saving to handset memory/
external memory
Touch to take a picture
Touch to access Scene mode.
Flash status - Set or turn off
the flash.
Macro - Switch on take close
up shot.
Quality (Normal/Fine/Super fine)
Settings - Touch this icon to
open the settings menu. See
Using the advanced settings.
Back - Touch here to return to the
home screen.
Camera mode
1. Camera mode is selected.
2. Touch to take picture
3. Drag down to switch to video
camera
Video
Gallery
57
Page 58

Camera
Using the flash
The default flash setting is auto, but
there are other options.
Select from the left side of
1
the viewfinder to enter the flash
sub-menu.
There are three flash options:
2
Auto - Your camera will assess the
light available for a good picture
and use the flash as necessary.
Red -eye reduction - The camera
will flash twice in order to remove
red eye.
Always off - The camera will
never flash. This is useful if you
want to save battery power.
Always on - The camera will
always flash.
When you touch the option
3
you want, the flash menu will
automatically close, allowing you
to take a picture immediately.
58 LG BL40 | User Guide
The flash status icon in the
4
viewfinder will change based on
the new flash mode.
Choosing a shot type
Touch and select Shot mode
1
to open the available shot types
Choose from eight options:
2
Normal shot -This is the default
shot type, the photo will be taken
in the normal way, as outlined in
taking a quick photo.
Continuous shot - This enables
you to take six shots automatically
in very quick succession.
Stitch shot - This enables you to
stitch photos side by side after
continuous shot. Six to eight
pictures can be merged together
in a panoramic image, allowing
you to enjoy the full size of your
BL40’s screen.
Page 59

Smile shot - This shot type
is great for taking a photo of
people.
Beauty shot - This enables you
to take a photo of person’s face
clearly and brightly. Especially
useful when you are close up.
Art shot - Choose different
picture effects. (Original,
Black&White, Warm, Cold.)
Frame shot - Choose from one
of the fun frames to transform
your friend or just decorate their
surroundings.
Panorama - This shot type is
great for taking a photo of a large
group of people or for capturing a
panoramic view.
Out focusing shot - This shot
type means selective focusing.
You can focus on the center of
image.
Taking a continuous shot
Touch and select Shot mode
1
to open the available shot types
and select Continuous shot.
Position the subject in the
2
viewfinder and press the capture
button as if taking a normal
photo.
The camera will take shots in
3
quick succession.
Using the advanced settings
From the viewfinder, touch to
open all advanced settings options.
You can change the camera setting
by scrolling the wheel. After
selecting the option, touch the
button.
TIP! You can view the help
menu about the functions of
the camera by touching
59
Page 60

Camera
Swap cam - For self portraits, switch
to the LG BL40‘s inner camera. You
can also switch between camera
mode and video camera mode.
Size - Change the size of the photo
to save on memory space or to take
an appropriately sized picture for a
contact. See Changing the image
size.
Scene mode - Set the camera to
adjust to the environment. Choose
from Auto, Portrait, Landscape,
Sport and Night.
Colour Effect - Choose a colour
tone to use on your new photo. See
Choosing a colour effect.
White balance - Choose between
Auto, Incandescent, Sunny,
Fluorescent and Cloudy.
Self-timer - The self-timer allows
you to set a delay after the shutter
is pressed. Select Off, 3 seconds,
5 seconds or 10 seconds. This is
60 LG BL40 | User Guide
ideal if you want to be included in
a photo.
Shot mode - Choose the shot
mode.
ISO - The ISO rating determines
the sensitivity of the camera’s light
sensor. The higher the ISO, the more
sensitive the camera will be. This is
useful in darker conditions when
you can’t use the flash. Select the
ISO value from Auto, 100, 200, 400,
or 800.
Quality - Choose between Super
fine, Fine and Normal. The finer
the quality the sharper the photo.
However, the file size will increase
as a result, which means you’ll be
able to store fewer photos in your
memory.
Memory - Choose whether to
save your photos to the Handset
memory or the External memory.
Page 61

Image stabilization - Enables you
to take a picture without the camera
wobbling or shaking.
Focus Mode - Select the way the
camera will focus. Choose between
Spot, Manual focus and Face
tracking.
Shutter sound - Select one of the 3
shutter sounds.
Grid screen - Choose between Off,
Simple cross or Trisection.
Geo-Tagging - Choose to switch on
the EXIF information for the photo
to write GPS information.
Reset settings - Restore all camera
settings.
TIP! When you exit the camera,
all settings will return to their
defaults except image size and
image quality. Any non-default
settings will need to be reset,
such as colour tone and ISO.
Check these before you take
your next photo.
TIP! The settings menu
is superimposed over the
viewnder, so when you change
elements of the image colour or
quality you will see a preview of
the image change behind the
settings menu.
61
Page 62

Camera
Changing the image size
The more pixels, the larger the file,
which means the files take up more
memory space. If you want to store
more pictures on your phone, you
can alter the number of pixels to
make the files smaller.
Using the viewfinder, touch
1
in the left corner.
Select Size from the Preview
2
menu.
3
Select a pixel value from the
options (5M(2560x1920),
3M(2048x1536),
2M(1600x1200),
1M(1280x960), VGA(640x480),
QVGA(320x240), Contacts) or
choose the predefined wallpaper
size.
62 LG BL40 | User Guide
Choosing a colour effect
Using the viewfinder, touch
1
in the left corner.
Select Colour Effect from the
2
Preview menu.
There are colour tone options.
3
When you’ve made your selection
4
the colour tone menu can be
closed by selecting the , ready
for you to take your picture.
TIP! You can change a
picture taken in colour to black
and white or sepia, but you
cannot change a picture taken
in black and white or sepia to
colour.
Page 63

Using the secondary camera
Your LG BL40 has an inner 640x480
camera for both video calls and
taking photos.
1
To switch to the secondary
camera touch then select
Use main camera from the Swap
cam menu.
After a few seconds you’ll see
2
yourself in the viewfinder. To
capture the image, press the side
button as normal.
TIP! The secondary camera has
fewer settings as it has no ash
nor ISO. You can still alter the
image size, colour eect, image
quality, white balance and set
the self-timer by touching in
the same way as when using the
main camera.
After you’ve taken the photo
3
you’ll be offered all the same
options as for an image taken
with the main camera.
4
To return to the main camera
touch and then select Use
secondary camera from the
Swap cam menu.
Viewing your saved photos
You can access your saved photos
1
from within camera mode. Just
touch and your gallery will
appear onscreen.
63
Page 64

Video camera
Shooting a quick video
Press and hold the camera key on
1
the right side of the phone.
Alternatively, draw down in
2
the view finder in camera mode
to switch to video mode.
The video camera’s viewfinder
3
will appear on screen.
Holding the phone horizontally,
4
point the lens towards the
subject of the video.
Press the capture button once or
5
touch in the view finder to
start recording.
REC will appear at the bottom
6
of the viewfinder with a timer
showing the length of the video.
To pause the video, touch and
7
resume recording by selecting
.
Touch on the screen to stop
8
recording.
64 LG BL40 | User Guide
WARNING: The great
editing software on your LG BL40
is compatible with all video types
except 640x480. Don’t record in
this format if you plan to edit the
video.
Page 65

After taking a video
A still image representing your captured video will appear on the screen.
The name of the video will be shown on the bottom of the screen, along
with nine options on the sides.
Play
Send
Use as
Rename
Edit
Play
Touch to play the video.
Send
Touch to send the photo as
MOV007.3gp
a Message, Email or Bluetooth. See
Sending a message, and Sending and
receiving your files using Bluetooth.
Use as
Touch to use the video as a
ringtone.
Rename
Touch to edit the name of
the selected picture.
Edit
Touch to edit the image
using various tools.
Touch to return to the previous
menu.
Delete
Touch to delete the video
you have just made, and confirm by
touching Yes. The viewfinder will
reappear.
New video
video immediately. Your current
video will be saved.
Touch to view the saved
videos and pictures gallery.
Delete
New
video
Touch to shoot another
65
Page 66

Video camera
Getting to know the viewfinder
Zoom - Touch to zoom in or to zoom out.
Alternatively you can use the side volume keys.
Video Size
Touch to access Scene mode.
Flash status - Set or turn off the flash.
Duration - Set a duration limit for your video. Choose between Normal
and MMS to limit the maximum size to send the video as an MMS.
Quality - Choose between Super fine, Fine and Normal. The finer the
quality, the sharper the video will be. The file size will increase as a result,
meaning you’ll be able to store fewer videos in the phone’s memory.
Settings - Touch this icon to open the settings menu. See Using the
advanced settings.
66 LG BL40 | User Guide
Saving to handset memory/
external memory
Brightness - See Adjusting the Brightness.
Touch to recording a video
Page 67

Back - Touch here to return to the
home screen.
Camera
Video camera mode
1. Video camera mode is selected.
2. Touch to start recording
3. Drag up to swith to camera
Gallery
Using the advanced settings
Using the viewfinder, touch
to open all the advanced settings
options.
Swap cam - Switch to your LG
BL40’s inner camera to record
yourself on video.
Video size - Change the size of the
video to save memory space. See
Changing the video image size.
Scene mode - Choose between
Auto or Night.
Colour Effect - Choose a colour
tone to use on your new view. See
Choosing a colour tone.
White balance - The white balance
ensures any white in your video is
realistic. To enable your camera to
adjust the white balance correctly,
you may need to determine the
light conditions. Choose between
Auto, Incandescent, Sunny,
Fluorescent or Cloudy.
TIP! If you choose MMS duration,
choosing a lower image quality
will enable you to shoot a longer
video.
Memory - Choose whether to save
your videos to the Handset memory
or the External memory.
Voice - Choose from Mute to record
a video without sound, or unmute
to include the sound.
Reset settings - Reset all the video
camera settings.
67
Page 68

Video camera
Changing the video image
size
The more pixels, the larger the file
size, which means the files take up
more memory space. If you want to
store more videos on your phone,
you can alter the number of pixels
to make the files smaller.
Using the viewfinder, touch
1
in the left corner.
Select Video size.
2
Select a pixel value from the four
3
options:
VGA(640x480) - Standard sized
VGA.
QVGA(320x240) - Smaller image
size, and therefore a smaller
file size. This is ideal for saving
memory space.
QCIF(176x144) - Smallest image
size and therefore the smallest
file size.
68 LG BL40 | User Guide
Touch to return to the
4
viewfinder.
WARNING: The great
editing software on your LG
BL40 is compatible with all video
types except 640x480. Don’t
record in this format if you plan
to edit the video.
TIP! For video format conversion
software, see the CD that came
with your BL40.
Choosing a colour tone
Using the viewfinder, in the
1
left corner.
Select Colour Effect.
2
There are five colour
3
tone options, Off, Sepia,
Monochrome, Negative or
Sketch.
Touch the colour tone you want
4
to use.
Page 69

TIP! You can change a video shot
in colour to black and white or
sepia, but you cannot change a
video shot in black and white or
sepia to colour.
Using the secondary video
camera
Your LG BL40 has an inner 320x240
camera for both video calls and
recording videos.
To switch to the inner camera,
1
touch then select Use
secondary camera from the
Swap cam menu.
After a few seconds you’ll see
2
yourself in the viewfinder. To start
recording the image press the
capture button as normal, and
press it again to stop recording.
After you’ve shot the video,
3
you’ll be offered all the options
available for a video shot using
the main camera.
4
To return to the main camera
touch and then Use main
camera.
TIP! You can still alter the
image size, colour eect, white
balance and quality by touching
Settings in the same way as
when using the main camera.
Watching your saved videos
1
In the viewfinder, touch .
Your gallery will appear on the
2
screen.
Touch the video you want to view
3
once to bring it to the front of the
gallery. Touch for it to play.
69
Page 70

Video camera
Watching your videos on TV
Connect your BL40 to TV using the
TV output cable.
NOTE: The TV output cable is
available for purchase separately.
WARNING: All formats
except 320x240 and 176x144
are compatible with playing the
video through a TV.
70 LG BL40 | User Guide
Page 71

Your photos and videos
Viewing your photos and
videos
Touch on the camera
1
preview screen.
Your gallery will appear on the
2
screen.
Touch the video or photo to open
3
it fully.
TIP! Flick left or right to
view other photos or videos.
TIP! To delete a photo or
video, open it and select .
Touch Yes to conrm.
Using zoom when viewing a
video or photo
When viewing photos or videos, you
can zoom in and out by pinching
your fingers together or spreading
them apart.
Adjusting the volume when
viewing a video
To adjust the volume of a video
while it is playing, touch the volume
button on the bottom right corner
of the screen (or the bar on the left
side of the screen if the phone is tilt
in landscape mode). Alternatively,
use the volume keys on the side of
the phone.
71
Page 72

Your photos and videos
Setting a photo as wallpaper
Touch the photo you want to set
1
as wallpaper to open it.
Touch the to open the
2
options menu
Touch Use as.
3
Editing your photos
You can do lots of great things to
your photos to change them, add to
them or liven them up.
Open the photo you want to edit,
1
and touch the options icon to
select Edit.
Touch the icons to alter your
2
photo:
72 LG BL40 | User Guide
Select Area
I. Rectangle
Select a rectangular area and
perform the following operation.
1. Crop / Save
Crop area and move your
finger across the screen to
select the area.
2. Filter
Selected area will be applied.
II. Ellipse / Circular
Select a circular area and
perform the following operation.
1. Filter
Selected area will be applied.
III. Photo ID
Photo Id feature helps you to
create your 3x4, 3.5x4.5, 5x7,
Contact Image size photo for
printing.
Page 73

Draw something on your
photo, freehand. Select the line
thickness from the four options,
then the colour you want to use.
Adding writing on a picture.
See Adding text to a photo.
Decorate your photo with
stamps. Choose from the different
stamps and touch your photo
where you want to place them.
Erase the editing you have
done to the picture. You can
choose the size of eraser you use.
Undo
Erase the editing you have
done to the photo.
Image
Touch to open further
effect options including Rotate.
There are also more advanced
editing options. See Adding a
colour accent and Swapping the
colours in a photo.
Filter
Touch to apply the effect
options to a photo.
Adjustment
This helps to adjust
a picture taken using automatic
colour, brightness etc.
Touch to return to the
gallery.
Save
Save the changes you
made to the photo. Select to
save the changes as an Update
existing, or a New file. If you
select New file enter a file name.
Save
Undo
Image
Filter
Adjustment
73
Page 74

Your photos and videos
Adding text to a photo
1From the editing screen, touch .
Select Signature Text or Bubble
1
Text.
Type the text using the keypad
2
and touch the Save icon.
Set the text to the desired
3
location on the picture by sliding
it.
Touch the text, keypad will be
enabled for reedit.
Text
Signature
74 LG BL40 | User Guide
Save
Undo
Image
Filter
Adjustment
Adding an effect to a photo
From the editing screen, touch
1
Filter
.
You can apply any of the various
2
options to the photo
To undo an effect simply touch
3
Undo
.
Cropping a photo
From the editing screen, touch
1
.
Choose the shape you want to
2
use to crop the picture.
Drag the box over the area you
3
want to crop.
When you are happy with your
4
selection, touch
Save
.
Page 75

Adding a colour accent to a
photo
From the editing screen, touch
1
Image
.
Choose Colour Accent.
2
Select part of the photo. A traced
3
line will appear around everything
in that area which is the same or
a similar colour, for example, a
person’s hair or jumper.
Alter the intensity of the
4
accenting by touching
and touch ‘+’ or ‘-’ button.
Touch OK.
5
All colour will be removed
6
from the photo, apart from in
the section marked for colour
accenting.
Save
7
Select
to save the changes.
Intensity
Swapping colours in a photo
From the editing screen, touch
1
Image
.
Choose Colour Swapping.
2
Select part of the photo. A
3
traced line will appear around
everything in that area which is
the same or a similar colour,
for example, a person’s hair or
jumper.
Select a colour.
4
Press OK.
5
The part of the photo selected for
6
colour accenting will change to
the selected colour.
Save
7
Select
to save the changes.
75
Page 76

Your photos and videos
Fog Drawing
Tasks Fog drawing on your
1
picture, touch Image.
Choose Fog Drawing.
2
Puff into the mic to put fog on
3
the picture and draw with your
finger over it.
After the fog is applied on the
4
picture, you can change color
and intensity of the fog and erase
width.
76 LG BL40 | User Guide
Rain Drop
For adding rain drops on your
1
picture, select Image menu.
Choose Rain Drop.
2
The bubbles appears over the
3
image.
You can set the intensity/scale
4
of droplets by adjusting the
intensity/scale menu bar
respectively.
Also the direction of droplets can
5
be adjusted with the cell phone
rotation.
Page 77

MotionBlur
For applying Motion Blur, touch
1
Image
.
Select MotionBlur.
2
Select the location you want to
3
enter MotionBlur by drawing an
outline. Touch Ok, and then Rub
in the direction you want.
Intensity of the blur can be set
4
using the intensity adjust bar.
Artistic Effect
From the editing screen, touch
1
Filter
.
choose Artistic Effect.
2
Select the Artistic Effect effect
3
and you can watch the painting.
The painting will be created and
4
automatically saved. Touch cancel
to stop in between.
Editing your videos
The video editing features are
available for MPEG4 types.
Trimming the length of the
video
1
Play the video you want to edit,
touch option key.
2
3
4
5
Edit
Select
and choose Trim/
Multi-trim.
Touch and set the new start
and end points using
Preview
Touch
to confirm you are
Trim
.
happy with the new cut.
Save
Touch
or, alternatively,
touch to return to the
gallery and discard the changes.
Save
Undo
Trim
Preview
77
Page 78

Your photos and videos
Merging two videos
Play the video you want to edit,
1
touch option key.
Edit
Select
2
merge.
The My videos folder will open.
3
Choose the video you want to
merge.
Touch and slide the photo
4
to move it to the end or the
beginning of the video.
Touch Preview to choose how to
5
merge the videos together.
Press Save then Yes to save the
6
new merged video. Replace the
existing file or save as a new file.
Repeat these steps to merge
7
more videos.
78 LG BL40 | User Guide
and choose Video
Merging a photo with a video
Play the video you want to edit,
1
touch option key.
Edit
Select
2
merge.
The Images folder will open.
3
Choose the photo you want to
merge into your video and touch
Select.
Touch and slide the photo
4
to move it to the end or the
beginning of the video.
Touch Preview to choose how
5
the photo and video merge
together.
Press Save then choose to replace
6
the existing file or save as a new
file.
Repeat these steps to merge
7
more photos.
and choose Image
Page 79

Adding text to a video
Open the video you want to edit,
1
touch option key.
Edit
Select
2
overlay.
Touch and pause playback
3
for setting the start point for text
appearance.
Touch Start and choose the text
4
styles. Enter your text using the
keypad and select OK.
Touch the area of the screen
5
you want the text to appear and
touch OK.
Touch Save. Replace the existing
6
file or save as a new file.
Repeat these steps to add more
7
text.
and select Text
Overlaying a photo
Open the video you want to edit,
1
touch option key.
Edit
Select
2
overlay.
The Images folder will open.
3
Choose the photo you want to
overlay on your video.
Touch and pause when you
4
want the picture to appear, then
select Opacity after touching the
Start button.
Touch OK and then press End
5
when the photo overlay shall be
stopped.
Touch the area of the screen
6
where you want the text to
appear. If the photo is too big it
will overlay the whole screen, not
just the selected area.
Touch Save. Replace the existing
7
file or save as a new file.
Repeat these steps to add more
8
photos.
and choose Image
79
Page 80

Your photos and videos
Adding a soundtrack to your
video
Open the video you want to edit,
1
touch option key.
Edit
Select
2
dubbing.
The My sounds folder will open.
3
Choose the track you want to add
to your video.
The original audio track on your
4
video will be erased.
If the audio track is shorter than
5
the video choose whether to play
it Once or to Repeat it.
Replace the existing file or save
6
as a new file.
80 LG BL40 | User Guide
and choose Audio
Adding live sound to your
video
Open the video you want to edit,
1
touch option key.
Edit
Select
2
dubbing.
Set the audio mixing ratio
3
between the original sound and
the recording sound.
and choose Live
Reset
Audio mixing ratio
Original sound
Recording sound
Save
Undo
Preview
Page 81

Adding a dimming effect
Open the video you want to edit,
1
touch option key.
Edit
Select
2
Dimming Effect.
Your video will now fade in at the
3
start and fade out at the end.
Replace the original file or save as
4
a new file.
and choose
81
Page 82

Multimedia
You can store multimedia files in
your phone’s memory so you have
easy access to all your pictures,
sounds, videos and games. You can
also save your files to a memory
card. Using a memory card allows
you to free up space in your phone’s
memory.
To access the Entertainment menu,
touch select My Files from the
Entertainment Tab. You can open a
list of the folders that store all your
multimedia files.
TIP! To delete any les in My
Files, touch then Delete.
Pictures
Images contains a list of pictures
including default images pre-loaded
onto your phone, images you have
downloaded and those taken with
your phone’s camera.
82 LG BL40 | User Guide
Images options menu
The options available to you in
Images depend on the image
type you have selected. All of the
options will be available for pictures
you have taken with the phone’s
camera, but only the Set favorites,
Sort by and Slide show options are
available for default images.
Sending a photo
To send a photo just select the
1
picture you want.
Touch Send. Choose between
2
Message, Email, Bluetooth or
Upload to web.
3
If you choose Message or Email,
your photo will be attached to a
message and you can write and
send the message as usual. If you
choose Bluetooth, your phone
will search for a device to send
the picture to.
Page 83

Using an image
You can choose images to use as
wallpapers and screensavers, or
even to identify a caller.
Touch then select My Files
1
from the Entertainment tab.
Touch Images.
2
Select an image and touch .
3
Touch Use as and choose
4
between:
Homescreens Lock screen - Set a wallpaper for
the key lock screen.
Contacts image - Allocate
an image to a person in your
contacts list, so the picture is
displayed when they call you.
Start up image - Set an image
to appear when you switch the
phone on.
Shut down image - Set an image
to appear when you switch the
phone off.
Outgoing call image - Set an
image to appear during outgoing
calls.
Incoming call image - Set an
image to appear during incoming
calls.
Printing an image
Touch then select My Files
1
from the Entertainment tab.
Touch Images.
2
Select an image and touch .
3
Touch Print via Bluetooth.
4
83
Page 84

Multimedia
Moving or copying an image
An image can be moved or copied
between the phone memory and
the memory card. You may want to
do this to clear some space in one of
the memories, or to safeguard your
images against being lost.
Touch then select My Files
1
from the Entertainment tab.
Touch Images.
2
Touch .
3
Select Move or Copy.
4
84 LG BL40 | User Guide
Creating a slide show
If you want to view all the images
on your phone, you can create a
slide show to save you having to
open and close each individual
image.
Touch then select My Files
1
from the Entertainment tab.
Touch Images.
2
Touch then Slide show.
3
Geo-tagging
Turn on the camera and enjoy the
capabilities of your phone’s locationbased services.
Take pictures wherever you are and
tag them with the location.
If you upload tagged pictures to a
blog that supports Geo-tagging,
you can see the pictures displayed
on a map.
Page 85

Sounds
The Sounds folder contains
Downloaded sounds, Default
sounds and Voice recordings.
From here you can manage or send
sounds or set them as ringtones.
Using a sound
Touch then select My Files
1
from the Entertainment tab.
Touch Sounds.
2
3
Select Default sounds or
Download sound.
Select a sound and eventually
4
touch the play icon. It will start
to play.
You can use the sound as a
5
various tone by selecting Use as
menu.
Choose between Ringtone,
6
Video ringtone and Message
tone.
Videos
The Videos folder shows a list of
videos you have downloaded or
recorded on your phone.
Watching a video
Touch then select My Files
1
from the Entertainment tab.
Touch Videos.
2
Select a video to play.
3
TIP! BL40 supports both DivX
& Xvid video format playback
to ensure greater content
availability.
NOTE: The TV output cable is
available for purchase separately.
85
Page 86

Multimedia
Sending a video clip
Select a video and touch .
1
Touch Send and choose between
2
Message, Email and Bluetooth.
If you choose Message or Email,
3
your video clip will be attached
to the message, which you can
write and send as normal. If you
choose Bluetooth, your phone
will search for a device to send
the video to.
Games and Applications
You can download new games and
applications to your phone to keep
you entertained in your free time.
86 LG BL40 | User Guide
Playing a game
Touch then select the
1
Games or the My Files from the
Entertainment tab.
Touch Games or Applications
2
menu.
Touch Launch button to launch a
3
game or an application.
Using the options menu
Within Games and Application
folders, the following options are
available:
Sort by: Sort the games and
applications by Date, Size or Name.
Original size and Fit to width : The
Original size allows an application
to be executed in its original
resolution. The Fit to width allows
an application to be executed in
a format fitting the whole screen
width.
Page 87

Installing a Java game and
application
Touch then select My Files
1
from Entertainment tab.
Touch the All Memory item that
2
is upper side menu.
Select All memory or Phone
3
Memory. If you insert new
memory card, touch External
Memory menu.
Use the M-Toy menu
M-Toy contains preloaded flash
games which are using the
integrated motion sensor.
Flash contents
The Flash contents folder contains
all downloaded SWF and SVG files.
Viewing an SWF/ SVG file
1
Touch then select My Files
from the Entertainment tab.
2
Touch Flash contents.
Select the file you want to view.
3
Documents
This is possible with your Excel,
PowerPoint, Word, Text and pdf files.
Viewing a file
Touch then select My Files
1
from the Entertainment tab.
Touch Documents.
2
Select a document and touch
3
View.
87
Page 88

Multimedia
Transferring a file to your
phone
Bluetooth is probably the easiest
way of transferring a file from your
computer to your phone. You can
also use the LG PC Suite via your
sync cable.
To transfer files (e.g. music) using
Bluetooth:
Make sure your phone and
1
computer have Bluetooth
switched on and are connected
to each other.
Use your computer to send the
2
file via Bluetooth.
3
When the file is sent, accept it on
your phone by touching Yes.
4
The file should appear in your
Documents or Others folder.
88 LG BL40 | User Guide
Others
The Others folder is used to store
files that are not pictures, audio
files, videos, games or applications.
It is used in the same way as the
Documents folder. You may find
that when you transfer files from
your computer to your phone that
they appear in the Others folder.
If this happens, you can move them.
Creating a movie
Touch then select Movie
1
maker from the Entertainment
tab.
2
Touch Insert to add an image.
Touch the style to choose a
3
movie style.
4
Touch the Sound on the screen
to change the sound, e.g. for a
voice recording.
Touch the Preview button to see
5
the results.
Page 89

Touch the Play Order on the
6
screen to change the order.
Touch the Storage tab on the
7
screen to choose where to save
the movie, and touch the Usage
to choose between normal file
size and MMS.
8
To save your movie, touch Save
movie.
Music
Your LG BL40 has a built-in music
player that lets you play all your
favourite tracks. To access the
music player, touch menu key
then select Music from the
Entertainment Tab. From here, you
can access a number of folders:
All tracks - Contains all the tracks
you have on your phone.
Favorites - Contains the tracks you
have saved as favourites.
Artists - Browse your music
collection by artists.
Albums - Browse your music
collection by albums.
Genres - Browse your music
collection by genres.
Playlists
TIP! BL40 is the rst worldwide
handset to apply Dolby Mobile
for music, Providing trademark
Dolby sound quality to your
mobile phone.
89
Page 90

Multimedia
Transferring music onto your
phone
The easiest way to transfer music
onto your phone is via Bluetooth or
the sync cable.
You can also use the LG PC Suite. To
transfer music using Bluetooth:
Make sure both devices have
1
Bluetooth switched on and are
connected to each other.
Select the music file on the other
2
device and select to send it via
Bluetooth.
When the file is sent, accept it on
3
your phone by touching Yes.
The file should appear in Music >
4
All tracks.
90 LG BL40 | User Guide
Playing a song
Touch then select Music
1
from the Entertainment tab.
Touch All tracks.
2
Select the track you want to play
3
then touch .
Touch to pause the track.
4
Touch to skip to the next
5
track.
Touch to go back to the
6
previous track.
Touch to return to the
7
Music menu.
TIP! To change the volume
while listening to music, touch
.
Page 91

Creating a playlist
You can create your own playlists by
choosing a selection of songs from
the All tracks folder.
Touch then select Music
1
from the Entertainment tab.
Access the folder Playlists.
2
Touch New playlist, enter the
3
playlist name and touch .
The All tracks folder will be
4
displayed. Touch all the songs
that you would like to include in
your playlist; a tick will appear
next to these track names.
Touch Add songs.
5
To play a playlist, select it and touch
one of the tracks it contains.
NOTE: To add a second playlist,
touch then New playlist.
Deleting a playlist
Touch then select Music
1
from the Entertainment tab.
Access the folder Playlists and
2
touch the option icon.
Touch Delete or Delete all to
3
delete all of the playlists.
Using the radio
Your LG BL40 has a built-in FM radio
tuner so you can listen to your
favourite stations on the move.
NOTE: You will need to attach your
earphones to listen to the radio.
Insert them into the earphones
socket.
91
Page 92

Multimedia
FM Radio
Set as
Listen via
Channel
92 LG BL40 | User Guide
Volume
Searching for stations
You can tune your phone to radio
stations by searching for them
manually or automatically. They will
then be saved to specific channel
numbers, so you don’t have to keep
re-tuning. You can store up to 48
channels on your phone.
Automatic tuning:
Touch then select FM radio
1
from the Entertainment tab.
Touch .
2
Touch Autoscan. The stations
3
found will be allocated to
channel numbers in your phone.
NOTE: You can also manually
tune to a station by using the
wheel displayed next to the radio
frequency.
Page 93

Listening to the radio
Touch then select FM radio
1
from the Entertainment tab.
Touch the channel number of the
2
station you would like to listen to.
TIP! To improve radio
reception, extend the headset
cord, which functions as the
radio aerial.
WARNING: If you connect
the headset not specically
made for the phone, this may
cause interference with radio
reception.
Using the FM transmitter to
play music
The BL40 allows you with its builtin FM transmitter to listen to your
music via any FM tuner in range of
the phone, e.g. at home or in your
car.
Touch then Tools from
1
the Utilities tab. Select FM
Transmitter.
Select a frequency at which your
2
phone shall tranmit an FM signal
of your music.
Touch Transmit.
3
FM transmitter
Save Current
Transmit
93
Page 94

Organiser
Adding an event to your
calendar
From the home screen select
1
then touch Organiser from the
Utilities tab.
Select the date to which you
2
want to add an event.
Touch then New schedule.
3
Touch Category then choose
4
between Appointment,
Anniversary or Birthday. Check
the date and enter the time you
want your event to begin.
For appointments and
5
anniversaries, enter the time and
date the event finishes in the
lower time and date boxes.
If you would like to add a
6
subject or note to your event,
touch Subject and location (for
appointments) type in the details.
Select Alarm to set an alert for the
7
event. If you want to repeat the
alarm, select Repeat.
94 LG BL40 | User Guide
Touch to save the event in
8
the calendar. A coloured square
cursor will mark all days that have
saved events, and an alarm will
sound at the event start time, to
help you stay organised.
TIP! You can enter holidays
in your calendar. Individually
touch each day of the holiday,
then touch and select
Set holiday. Each day will be
marked in red text.
Changing your default
calendar view
From the home screen select
1
then scroll through Organiser
in Utilities tab. Select Settings
in .
Touch Default view and choose
2
Month, Week, Timetable, List or
All tasks.
Page 95

Adding an item to your To
Do list
From the home screen select
1
then scroll through Organiser in
Utilities tab.
Select New task in and touch
2
Notes.
Set the date for the task, add
3
notes, then select its priority
level: High, Medium or Low.
Save the task by selecting .
4
TIP! You can back up and
synchronise your calendar with
your computer by using the PC
Suite.
Using the date finder
Date finder is a handy tool to help
you calculate what the date will be
once a certain number of days have
passed. For example, 60 days from
10.10.2009 will be 09.12.2009.
This helps you keep track of
deadlines.
From the home screen select
1
then scroll through Organiser in
Utilities tab.
Select Date finder from the
2
option menu.
In the From tab set the required
3
date.
In the After tab set the number
4
of days.
The Target date will be shown.
5
95
Page 96

Organiser
Setting your alarm
From the home screen select
1
then scroll through Alarms in
Utilities tab.
If you want to add a new alarm,
2
touch New alarm. If you want
to set the alarm to sound again
within one hour, touch Quick
alarm.
Set the time you would like the
3
alarm to sound.
Choose whether you want the
4
alarm to repeat and set the
repeat type.
The icons indicate the weekday
you select.
Select Sound/ Vibration to select
5
the type of alarm you want.
Touch Alarm bell then select
6
bell. To listen to sounds, touch
the sound, followed by .
Touch More to set other options.
7
Touch to save.
8
96 LG BL40 | User Guide
TIP! Touch On icon or set to
start the alarm.
Adding a memo
From the home screen select
1
then scroll through Memo in
Utilities tab.
Touch New memo.
2
Touch the screen then the
3
keypad appeared. Type your
memo, and then touch .
TIP! You can edit an existing
memo. Select the one to be
edited, touch Edit and type in
your changes.
Voice recorder
Use your voice recorder to record
voice memos or other audio files.
Page 97

Recording a sound or voice
From the home screen select
1
then scroll to Voice recorder in
the Utilities tab.
Rec.
Touch
2
Touch
3
If you touch
4
automatically restart the voice
recording after saving the
previous one.
to begin recording.
Stop
to end recording.
Voice recorder
Recording mode
Rec.
New
General
, it will
Sending the voice recording
Once you have finished
1
recording, touch Send.
Choose Message, Email or
2
Bluetooth. If you choose
Message or Email, the recorded
track will be attached to the
message and sent as MMS. If you
choose Bluetooth, your phone
will search for a device to send
the voice recording to.
Using your calculator
From the home screen select ,
1
then scroll to Calculator in the
Utilities tab.
Touch the number keys to enter
2
numbers.
For simple calculations, touch the
3
function you require (+, –, x or ÷),
followed by =.
For more complex calculations,
4
touch and choose from sin,
cos, tan, deg, log etc..
97
Page 98

Organiser
Converting a unit
From the home screen select
1
, then scroll to Tools in the
Utilities tab.
Select Unit converter.
2
Choose whether you want to
3
convert Currency, Area, Length,
Weight, Temperature, Volume
or Velocity.
Then select the unit, and enter
4
the value you would like to
convert from.
The corresponding value for all
5
units will appear on the screen.
98 LG BL40 | User Guide
Using the stopwatch
From the home screen select ,
1
then scroll to Tools and select
Stopwatch in the Utilities tab.
Touch Start to begin the timing.
2
Touch Lap if you want to record
3
a lap time.
Touch Stop to end the
4
stopwatch.
Touch Resume to restart the
5
stopwatch from the point you
stopped it, or touch Reset to start
the stopwatch again.
Adding a city to your world
clock
From the home screen select .
1
Scroll to Tools and select World
2
clock in the Utilities tab.
Touch the icon, followed by
3
Add city.
Page 99

PC Suite
You can synchronise your PC with
your phone. This will ensure all your
important details and dates match,
and also act as a back up to help put
your mind at ease.
TIP! You will need to install the
application PC Suite provided
on the CD-ROM or available as
a download from http://update.
lgmobile. com. (From www.
lgmobile.com PRODUCTS
> Manual & Software > Go
to Manual & S/W Download
Section)
Installing the LG PC Suite on
your computer
From the home screen, touch
1
and then click Connectivity.
Select USB connection and click
2
PC Suite.
Connect handset and PC via USB
3
cable and wait for a while.
Installation guide message will
4
be displayed.
Caution! If installation guide
message is not displayed in your
PC, please check your CD-ROM
setting on Windows.
Insert the supplied CD-ROM or
5
the click the download button
to directly download the LG PC
Suite program from the internet.
Click on the LG PC Suite Installer
6
which will appear on your screen.
Connecting your phone and
PC
Select PC Suite mode in
1
Connectivity menu and then
connect the USB cable to your
phone and your PC.
LG PC Suite will be automatically
2
activated on your PC.
Your phone and PC are now
3
connected.
99
Page 100

PC Suite
Backing up and restoring
your phone’s information
Connect your phone to your PC
1
as outlined above.
Click on the Backup icon, and
2
select Backup or Restore.
Choose whether to back
3
up Contents Data and/or
Phonebook/Schedule/Todo/
Memo Data. Select the location
you want to back up the
information to, or restore it from.
Click OK.
Your information will be backed
4
up.
100 LG BL40 | User Guide
Viewing phone files on your
PC
Connect your phone to your PC
1
as outlined above.
Click on the Manage Photos,
2
Videos or music icon.
Images, audio files and videos
3
you have saved on your phone
will be displayed on the screen in
the LG Phone folder.
TIP! Viewing the contents of
your phone on your PC helps
you to arrange les you no
longer need.
 Loading...