

LG BE320 User Manual

Owner's Manual
BE320-SD
DLP Projector
P/N: SAC30190915 Rev. A
www.lg.com

Table of Contents
Table of Contents
Usage Notice
Safety Instructions .................................................2
Introduction
Product Features ...................................................5
Package Overview .................................................6
Product Overview ..................................................7
Connection Ports ................................................ 8
Control Panel ...................................................... 9
Remote Control Battery Installation .................. 10
Remote Control ................................................. 11
Remote Control Operating Range .................... 13
Installation
Connecting the Projector .....................................14
Connect to Computer/Notebook ....................... 14
Connect to Video .............................................. 15
Powering On/Off the Projector ............................. 16
Powering On the Projector ................................16
Powering Off the Projector ................................17
Adjusting the Projected Image .............................18
Adjusting the Height of Projector Image ........... 18
Adjusting the Projector’s Zoom and Focus ....... 19
Adjusting Projection Image Size ....................... 19
Appendices
Troubleshooting ................................................... 37
Replacing the lamp .............................................. 42
Compatibility Mode ..............................................44
Computer Compatibility (Analog, PC) ............... 44
RGB to RCA adapter ........................................ 44
Congurations of Terminals ................................. 45
Terminal: RS232 Pin Assignments ...................45
RS232 Protocol Function List ........................... 46
Dimensions .......................................................... 49
Specications.......................................................50
Regulation & Safety Notices ................................ 51
User Controls
On Screen Display ...............................................21
How to operate .................................................21
IMAGE .............................................................. 22
IMAGE | Advanced ...........................................24
IMAGE | Advanced | Color ................................ 25
IMAGE | Advanced | Input ................................25
SCREEN ........................................................... 26
SETTING .......................................................... 28
SETTING | Signal .............................................30
SETTING | Advanced .......................................31
OPTIONS ..........................................................32
OPTIONS | Lamp Settings ................................33
OPTIONS | Information .....................................34
OPTIONS | Advanced .......................................35
1
English
English

Usage Notice
Safety Instructions
Please take note of the safety instructions to prevent any poten
tial accident or misuse of the projector.
Safety Instructions are given in two forms as detailed below.
WARNING : The violation of this instruction may cause serious injuries and even death.
NOTES : The violation of this instruction may cause injuries or damage to the projector.
After reading this manual, keep it in the place that you can access easily.
-
Indoor Installation
Do not place the Projector in direct
sunlight or near heat sources such
as radiators, res, stove etc.
This may cause a re hazard !
Do not block the vents of the pro-
jector or restrict air-ow in any way.
This would cause the internal tem-
perature to increase and could cause
a re hazard or damage to the unit!
Do not use the projector in a damp
place such as a bathroom where it
is likely to get wet.
This may cause a re or an electric
shock hazard!
Indoor Installation
When installing the projector on a
table, be careful not to place it near
the edge.
The projector could fall causing injury
and damage to the projector.
Only use a suitable stand.
Power
Earth wire should be connected.
Ensure that you connect the earth ground wire
to prevent possible electric shock (i.e.a Projector
with a three-prong grounded AC plug must be
connected to a three-prong gronded AC outlet.
If grounding methods are not possible, have
a qualied electrician install a separate circuit
breaker.
Do not try to ground the unit by connecting it to
telephone wires, lightening rods, or gas pipes.
WARNING
Do not place ammable materials
in, on or near the projector
This may cause a re hazard!
Do not place the projector close to
sources of steam or oil such as a
humidier.
This may create a re hazard or an
electric shock hazard !
Do not place the projector directly
on a carpet, rug or place where
ventilation is restricted.
This would cause its internal tempera-
ture to increase and might create a re
hazard or damage the unit.
NOTES
Disconnect from the power supply
and remove all connections before
moving, or cleaning.
WARNING
The power cord should be inserted
fully into the power outlet to avoid
a re hazard!
This may cause a re hazard or dam-
age the unit.
Do not hang on the installed
projector.
It may cause the projector to fall,
causing injury or death.
Do not place the projector where it
might be exposed to dust.
This may cause a re hazard or dam-
age to the unit!
Ensure good ventilation around the
projector. The distance between
the projector and the wall should be
more than 30cm/12 inches.
An excessive increase in its internal
temperature may cause a re hazard
or damage to the unit!
Only use the projector on a level
and stable surface.
It may fall and cause injury and/or
damage to the unit.
Do not place heavy objects on the
power cord.
This may cause a re or an electric
shock hazard !
2
English

Usage Notice
Power
Never touch the power plug with a
wet hand
This may cause an electric shock-
hazard!
Power
Hold the plug rmly when unplug-
ging. If you pull the cord, it may be
damaged.
This may cause a re hazard !
Place the projector where people
will not trip or tread on the power
cord.
This may cause a re or an electric-
shock hazard or damage to the unit!
Using
Do not place anything containing
liquid on top of the projector such
as owerpot, cup, cosmetics or
candle.
This may cause a re hazard or dam-
age to the unit!
If water is spilt into the projector
unplug it from the power supply
immediately and consult your
Service Agent.
This may cause an electric shock
hazard or damage to the unit!
WARNING
Do not plug-in too many items into
one power outlet.
It may result in overheating of the
outlet and create a re hazard!
Prevent dust from collecting on the
power plug pins or outlet.
This may cause a re hazard!
NOTES
Do not use if the power cord or the
plug is damaged or any part of the
power outlet is loose.
This may cause a re or an electric-
shock hazard or damage to the unit!
Do not turn the projector On/Off by plugging-in or unplugging the power
plug to the wall outlet.
(Allow the unit to cool before removing power.)
It may cause mechanical failure or could cause an electric shock.
Ensure the power cord does not
come into contact with sharp or
hot objects.
This may cause a re or an electric-
shock hazard or damage to the unit!
WARNING
In case of impact shock or damage
to the projector switch it off and
unplug it from the power outlet
and contact an authorized service
center.
This may cause a re or an electric
shock hazard or damage to the unit!
Dispose of used batteries carefully and safely.
In the case of a battery being swallowed by a child please consult a doctor
immediately.
Do not allow any objects to fall into
the projector.
This may cause an electric shock
hazard or damage to the unit!
Do not remove any covers.
High risk of Electric Shock!
CAUTION concerning the Power Cord
It is recommend that most appliances be placed on a dedicated circuit; that is,a single outlet circuit which powers
only that appliance and has no additional outlets or branch circuits. Check the specication page of this owner’s
manual to be certain.
Do not overload wall outlets. Overloaded wall outlets, loose or damaged wall outlets, extension cords, frayed power
cords, or damaged or cracked wire insulation are dangerous. Any of these conditions could result in electric shock
or re. Periodically examine the cord of your appliance, and if its appearance indicates damage or deterioration,
unplug it, discontinue use of the appliance, and have the cord replaced with an exact replacement part by an
authorized service personnel.
Protect the power cord from physical or mechanical abuse, such as being twisted, kinked, pinched, closed in a
door, or walked upon. Pay particular attention to plugs, wall outlets, and the point where the cord exits the appli-
ance.
Don’t look directly into the lens
when the projector is in use. Eye
damage may occur!
Do not touch metal parts during
or soon after operation since the
vents will remain very hot!
3
English
English
Usage Notice
Using
If the projector is in a room that
experiences a gas leak, do not
touch the projector.
It can cause a re or a burn by a
spark.
Using
Do not place heavy objects on top
of projector.
This may cause mechanical failure
orpersonal injury!
Do not use any sharp tools on the
projector as this will damage the
casing.
Cleaning
Do not use water while cleaning
the projector.
This may cause damage to the projec-
tor or an electric shock hazard.
WARNING
Don’t look at laser beam directly as
it can cause eye damage!
NOTES
Take care not to impact the lens
particularly when moving the
projector.
In the event that an image does
not appear on the screen please
switch it off and unplug it from
the power outlet and contact your
Service Agent.
This may cause a re or an electric
shock hazard or damage to the unit!
WARNING
In the unlikely event of smoke or
a strange smell from the projector,
switch it off , unplug it from the wall
outlet and contact your dealer or
service centre.
This may cause a re or an electric
shock hazard or damage to the unit!
Always open the lens door or
remove the lens cap when the
projector lamp is on.
Do not touch the lens of the
projector. It is delicate and easily
damaged.
Do not drop the projector or allow
impact shock.
This may cause mechanical failure or
personal injury!
Use an air spray or soft cloth that
is moist with a neutral detergent
and water for removing dust or
stains on the projection lens.
4
English
Cleaning
Contact the Service
Center once a year to
clean the internal parts of
the projector.
Accumulated dust can
cause mechanical failure.
When cleaning the plastic parts such as projector case, unplug the power and wipe it
with a soft cloth. Do not use cleanser, spray water or wipe with a wet cloth. Especially,
never use cleanser (glass cleaner), automobile or industrial shiner, abrasive or wax,
benzene, alcohol etc., which can damage the product.
Use an air spray or soft cloth that is moist with a neutral detergent and water for
removing dust or stains on the projection lens.
It can cause re, electric shock or product damage (deformation, corrosion and damage).
Others
Do not attempt to service the projector yourself. Contact your dealer or service center.
This may cause damage to the projector and could give an electric Shock as well as invalidating the warranty!
Others
Be sure to unplug if the projector is not to be used for
a long period.
Accumulated dust may cause a re hazard or damage to
the unit!
NOTES
WARNING
NOTES
Only use the specied type of battery.
This could cause damage to the remote control.

Introduction
Product Features
■ SVGA (800x600) Native resolution
■ RGB monitor Loop Thru
(works on standby mode > 0.5 W)
■ BrilliantColorTM Technology
■ RS232C control
■ Rapid shutdown
This device meets the EMC requirements ments for
home applicaces (Class B) and is intended for home
usage. This device can be used in all regions.
5
English
English
6
English
Introduction
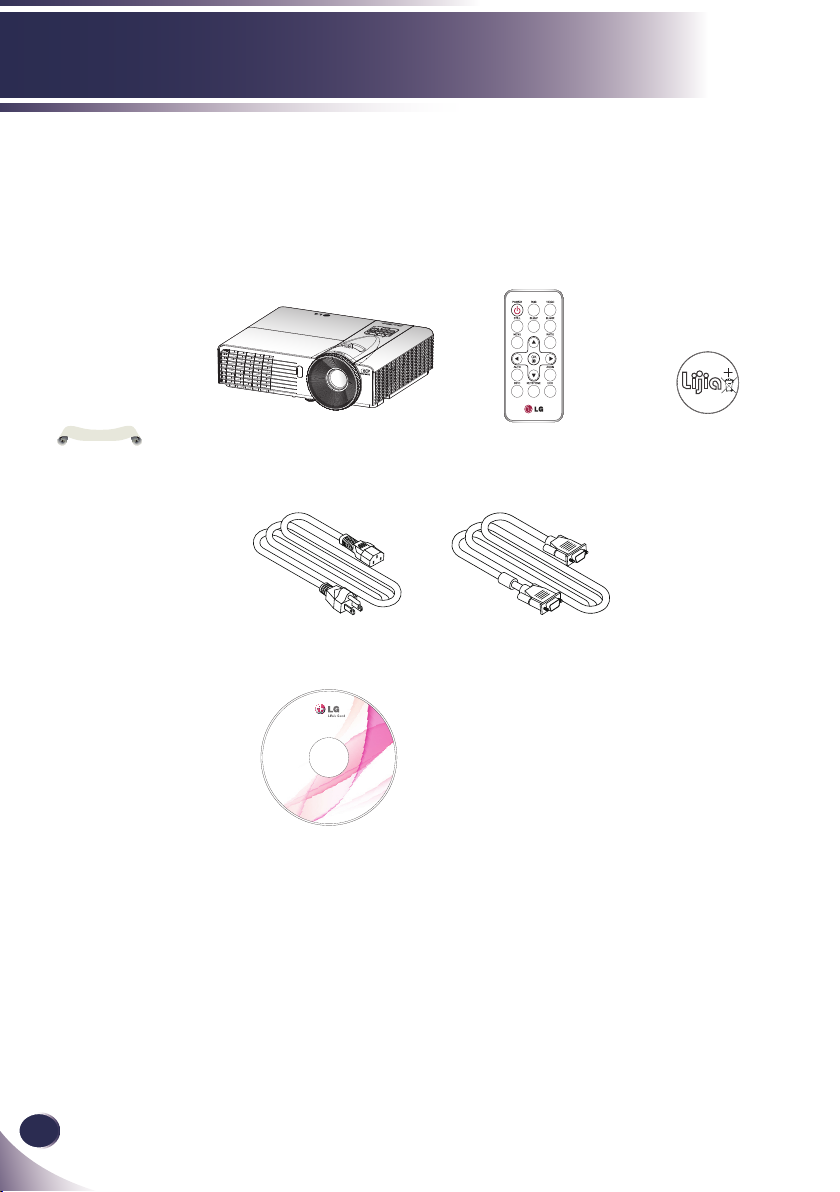
Power Cable RGB Cable
Wireless Remote ControlProjector
Package Overview
This projector comes with all the items shown below.
Check to make sure your unit is complete. Contact your
dealer immediately if anything is missing.
Due to the differ-
ence in applications
for each country, some
regions may have different accessories.
Battery is included
inside the remote control.
N
o
t
e
Battery
C
R
2
0
2
5
Lithium Cell
3V
OWNER’S MANUAL
PROJECTOR
BE320-SD
http://www.lg.com
Copyright© 2012 LGE,
All Rights Reserved.
P/N 36.8PC01G001-A
User’s Manual
English
7
English
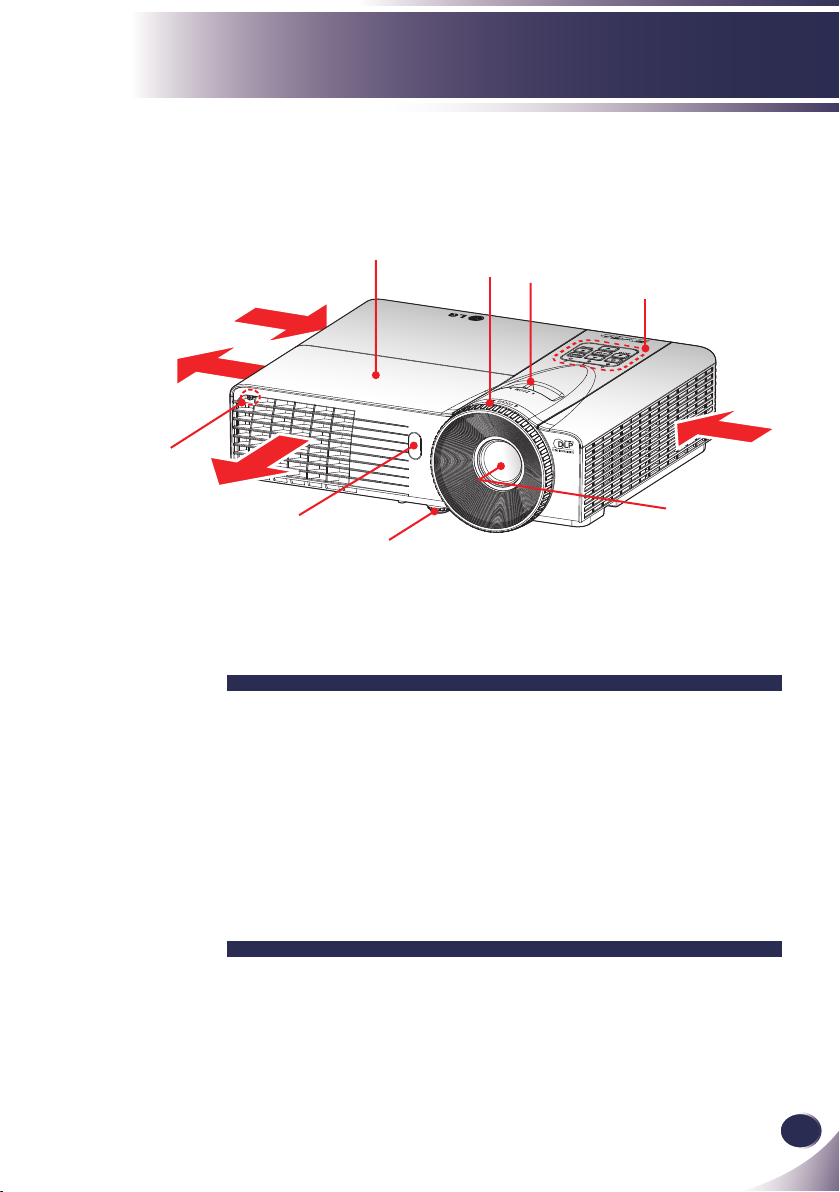
Introduction
1. Control Panel
2. Zoom Lever
3. Focus Ring
4. Lamp Cover
5. Lamp Cove Screw
6. Remote Sensor
7. Tilt-Adjustable Feet
8. Lens
9. Ventilation (inlet)
10. Ventilation (outlet)
Product Overview
Air Flow
1
2
8
9
7
6
9
10
10
5
3
4

8
English
Introduction
Connection Ports
1. VIDEO Connector
2. RGB OUT Connector
3. RGB IN Connector
4. RS232C Control Port
5. AC IN
6. KensingtonTM Lock
1 2
5
3
This projector has a Kensington Security System Connector on the back panel. Connect the
Kensington Security System cable as below.
Kensington Security System
4
6
For the detailed installation and use of
the Kensington Security System, refer
to the user’s guide included with the
Kensington Security System set. And
for further information, contact
http://www.kensington.com, the
internet homepage of the Kensington
company that deals with expensive
electronic equipment such as notebook
PCs or projectors.
The Kensington Security System is an
optional item.

English
9
English
Introduction
Control Panel
1
POWER
Refer to the “Power On/Off the Projector” section on pages 16~17.
2 AUTO Automatically synchronize the
projector to the VGA(RGB) and Video
signal input sources.
3 OK Con rm your item selection.
4 MENU Press “MENU” to launch the on-
screen display (OSD) menu. To exit
OSD, press “MENU” again.
5 SOURCE Press “SOURCE” to select an input
signal.
6 Four Direction-
al Select Keys
Use or or or to select items
or make adjustments to your selection.
7 POWER LED Indicate the projector’s status.
8 TEMP LED Indicate the projector’s temperature
status.
9 LAMP LED Indicate the projector’s lamp status.
4
52
1
6
7 8
9
2
3
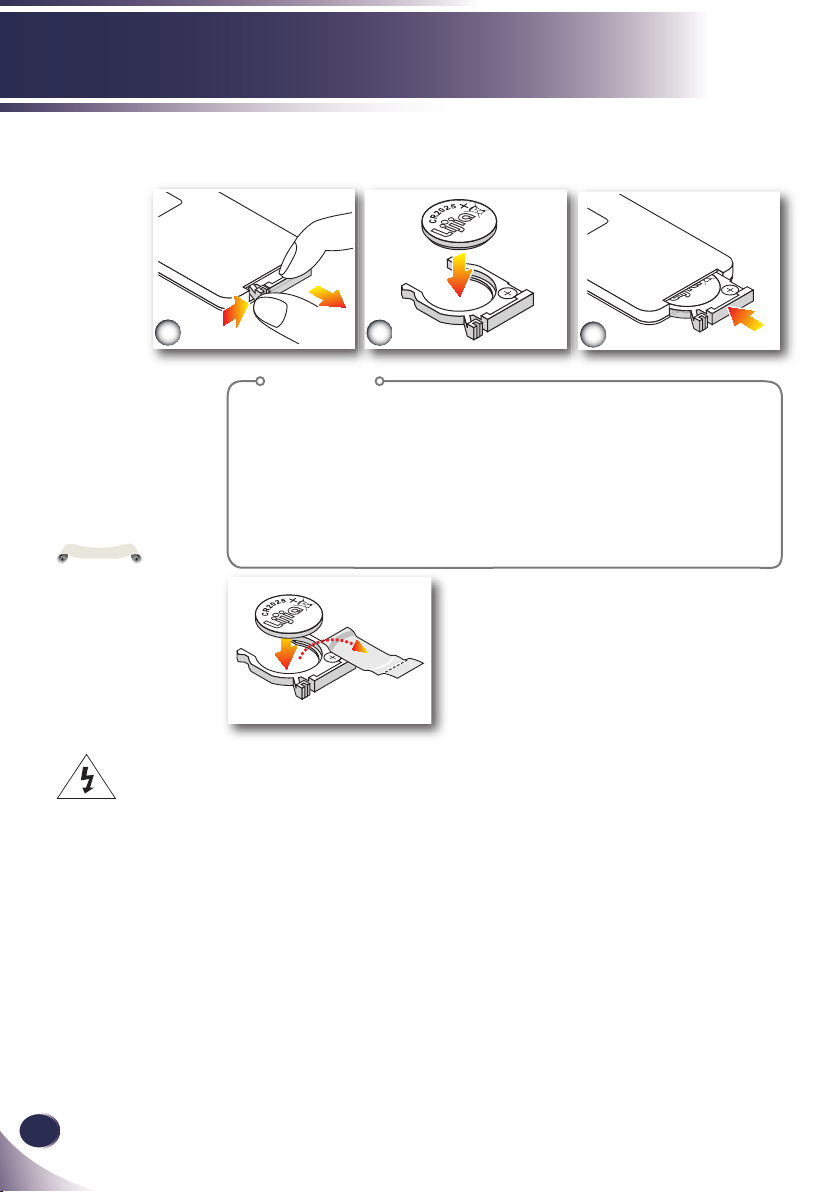
Procedure
1. Remove the battery holder by holding down the side
release rmly and pulling out the battery holder.
2. Insert a CR2025 coin cell battery and align the polarity
correctly according to the marking in the battery holder.
Ensure that the side with a “+” is facing up.
3. Replace the battery holder.
Lithium Cell
3V
10
English
Introduction
Remote Control Battery Installation
Warning: To ensure safe operation, please observe the following precautions :
■ Use CR2025 type battery.
■ Avoid contact with water or liquid.
■ Do not expose the remote control to moisture or heat.
■ Do not drop the remote control.
■ If the battery has leaked in the remote control, carefully wipe the case clean and install new battery.
■ Risk of an explosion if battery is replaced by an incorrect type.
■ Dispose of used battery according to the instructions.
Lithium Cell
3V
M
Lithium Cell
3V
3
2
1
When you use the
remote control for
the rst time, there
is a plastic sheet
between the battery
and its contact.
Remove the sheet
before use.
N
o
t
e
Remote Control
N
o
t
e
2
3
Introduction
1
4
5
You can only turn
the projector on/off
with POWER button on
the projector.
You can operate all
of the functions of the
projector via the remote
control. Make sure
not to lose the remote
control.
6
8
7
9
10
11
12
14
13
15
16
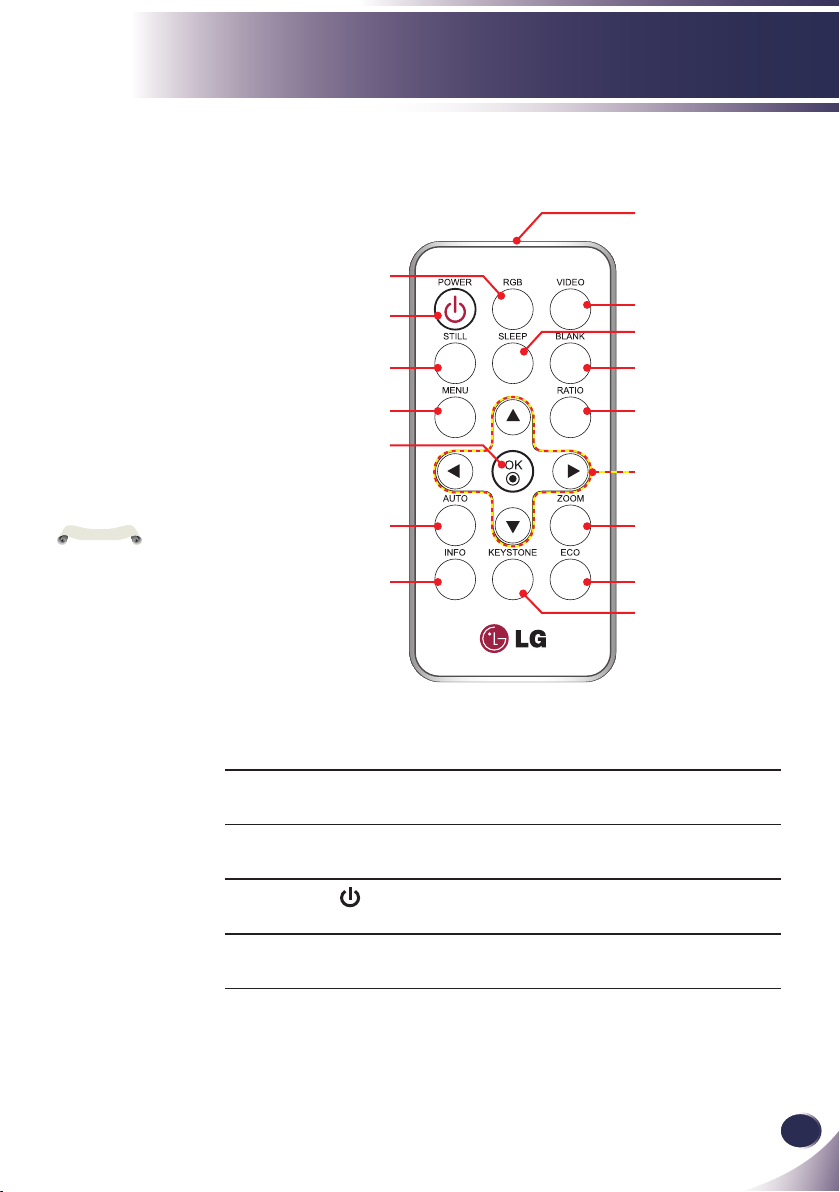
1 Infrared trans-
Sends signals to the projector.
mitter
2 RGB Press “RGB” to choose RGB connec-
tor.
3
Power
Refer to the “Power On/Off the Projector” section. (refer to pages 16~17)
4 Video Press “Video” to choose VIDEO con-
nector.
11
English
English

Introduction
5 Sleep Press “Sleep” to set the countdown
6 Still Pause the screen image. Press again to
7 Blank Use this function to choose blank
8 Menu Press “Menu” to launch the Onscreen
9 Ratio Use this function to choose your
10 OK Conrm your section of items in sub
11 Four
Directional
Select Keys
12 Auto Automatically synchronize the
13 Zoom Zoom out or zoom in the projector
14 Info To display the projector information for
15 Eco When Eco mode is activated, the
16 Keystone Press to adjust image distortion
timer interval. The projector will automatically power off when the count-
down has nished. (in minutes)
resume the screen image.
color.
display (OSD), back to the top level of
OSD for the OSD main menu operation
desired aspect ratio.
menu operation.
Use or or or to select items
or make adjustments to your selection.
projector to the VGA(RGB) and Video
signal input sources.
display.
“Source”, “Resolution or Video”, “ECO
Mode” and “Sleep Countdown” on the
screen. (refer to page 34)
brightness detected to signicantly reduced lamp power consumption (up
to 70%) during periods of inactivity.
caused by tilting the projector.
12
English

English
13
English
Introduction
Remote Control Operating Range
Point the remote control toward the projector (Infrared Remote Receiver) when pressing any button. Maximum operating range for the remote control is about 23.0’ (7m) and 30° in
front of the projector.
23.0’ (7m)
Approx.15°
Installation
N
o
t
e
E62405SP
R
N
o
t
e
Due to the differ-
ence in applications
for each country, some
regions may have different accessories.
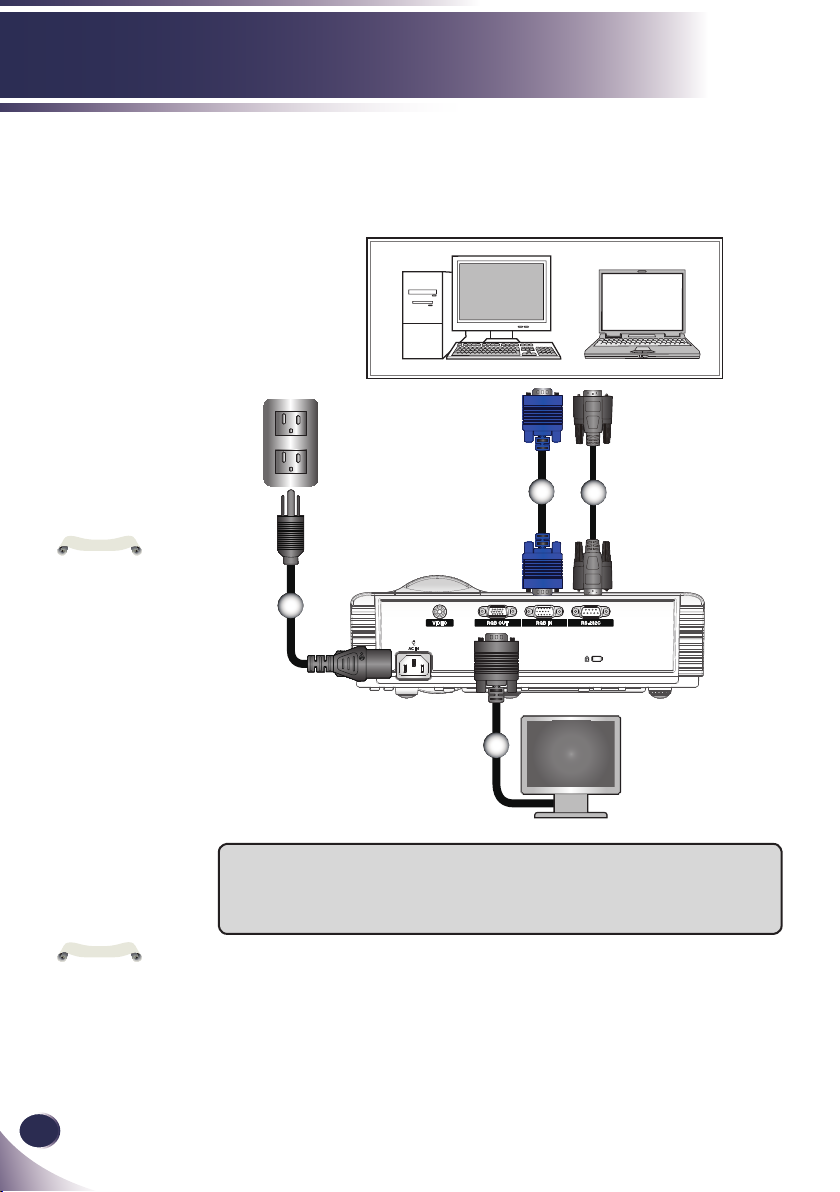
Connecting the Projector
Connect to Computer/Notebook
3
1
4
Optional Extras
To purchase optional extras, visit an electronics store or online shopping site or contact the retail
store where you purchased the product.
Without prior notice, optional extras are subject to change in order to improve the performance of
the product, and new accessories may be added.
14
English
2
1...............................................................................................................Power cable
2...................................................................................Monitor out cable (optional)
3.................................................................................................................. RGB cable
4.......................................................................................... RS232C cable (optional)

English
15
English
Installation
Due to the differ-
ence in applications
for each country, some
regions may have different accessories.
N
o
t
e
1...............................................................................................................Power cable
2..........................................................................Composite video cable (optional)
3..................................................................... (*) RGB to RCA adaptor (optional)
4........................................................................3 RCA component cable (optional)
Connect to Video
E62405SP
R
1
3
2
Video Output
4
DVD player, Set-top Box
HDTV receiver
(*) If you want
to connect the HDTV,
it is recommended to
buy the “RGB to RCA
adaptor”.
Optional Extras
To purchase optional extras, visit an electronics store or online shopping site or contact the retail
store where you purchased the product.
Without prior notice, optional extras are subject to change in order to improve the performance of
the product, and new accessories may be added.
N
o
t
e
 Loading...