

LG BA850 Owner’s Manual
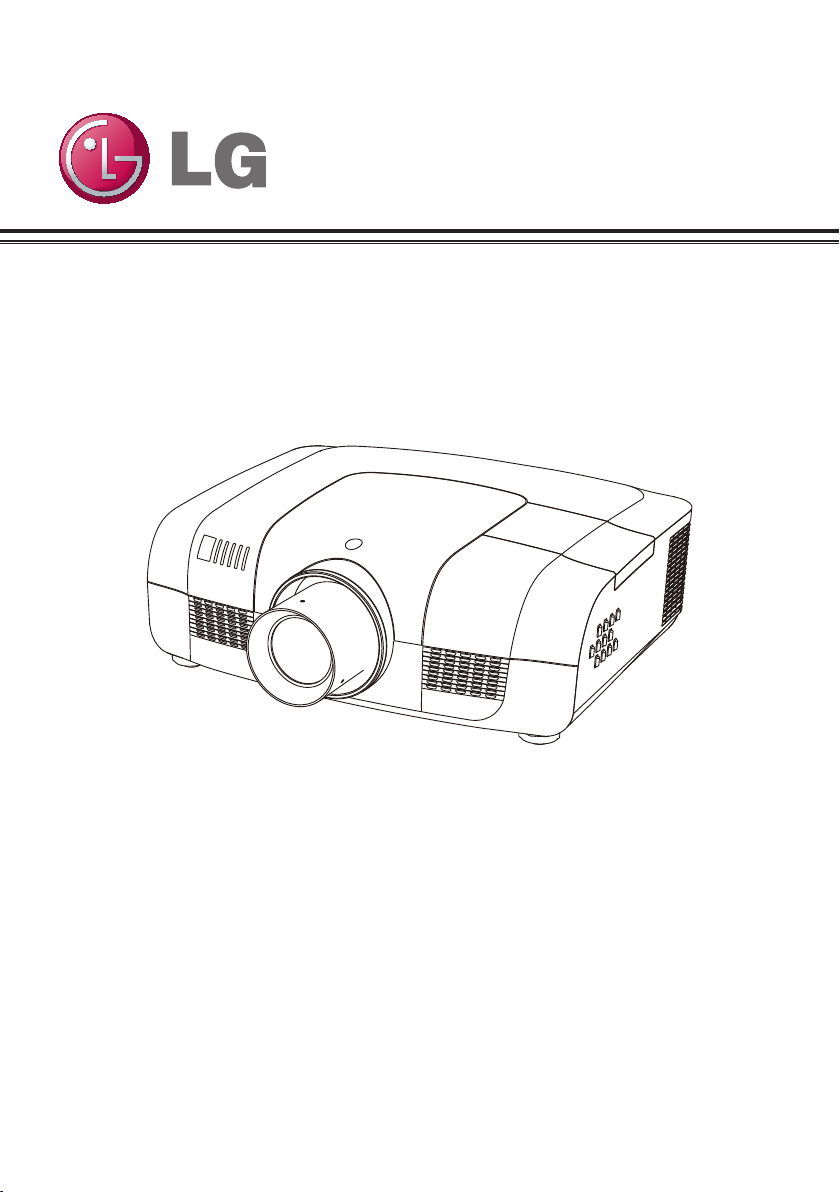
LCD Projector
Model
BA850
Owner's Manual
P/N: 4100376500 Rev. A www.lg.com
Safety Instructions
Please take note of the safety instructions to prevent any potential accident or misuse
of the projector.
WARNING/CAUTION
AVERTISSEMENGT
Warning:The lightning ash
with arrowhead symbol, within
an equilateral triangle,is intended
to alert the user to the presence of
uninsulated “dangerous voltage” within
the product’s enclosure that may be
of sufcient magnitude to constitute a
risk of electric shock to persons.
Caution: The exclamation point
within an equilateral triangle is
intended to alert the user to the
presence of important operating and
maintenance (servicing) instructions
in the literature accompanying the
appliance.
WARNING/CAUTION
- TO REDUCE THE RISK OF FIRE
AND ELECTRIC SHOCK, DO NOT
EXPOSE THIS PRODUCT TO
RAIN OR MOISTURE.
WARNING: This product contains
chemicals known to the State of California
to cause cancer and birth defects or other
reproductive harm.
Wash hands after handling.
Read these instructions.
Keep these instructions.
Heed all warnings.
Follow all instructions.
Indoor Installation
WARNING
• Do not place the projector in direct
sunlight or near heat sources such as
radiators, res, stoves, etc.
- This may cause a re.
• Do not place ammable materials such
as aerosols near the projector.
- This may cause a re.
• Do not allow your children to cling to or
climb up to the projector.
- The projector may fall down and cause
personal injury or death.
• Do not place the projector directly on a
carpet, rug or place where ventilation is
restricted such as a book shelf or closet.
- This may cause the projector's internal
temperature to rise and cause a re.
• Do not place the projector close
to sources of steam or oil such as a
humidier or kitchen counter.
- This may cause a re hazard or an
electric shock
• Do not place the projector where it might
be exposed to excessive dust.
- This may cause a re.
• Do not use the projector in a damp place
such as a bathroom where it is likely to
get wet.
- This may cause a re or an electric
shock.
2

• Do not allow a tablecloth or curtain to
block the vents.
- This may cause the internal temperature
of the projector to rise and cause a re.
• The distance between the projector and
the wall should be more than 30 cm for
ventilation purposes.
- Otherwise, this may cause the internal
temperature of the projector to rise and
cause a re.
CAUTION
• When installing the projector on a table,
be careful not to place it near the edge.
- The projector may fall causing injury to
persons or damage to the projector.
Make sure that you use a stand suitable
for the size of projector.
• Turn off the projector, disconnect the
power supply and remove all
connec tions before moving the
projector.
- A damaged cord may cause a re or an
electric shock.
• Do not install the projector on an
unstable or vibrating surface such as a
vibrating shelf or tilted surface.
- It may fall and cause injury.
• Be careful not to tip the projector over
when connecting external devices to the
projector.
- This may cause injury to persons or
damage to the projector
Safety Instructions
POWER
WARNING
• The earth wire should be connected.
- Inappropriate earth grounding may
cause damage to the projector or an
electric shock when there is an electrical
surge.If the projector must be installed
at a place where earth grounding is not
possible, purchase a circuit breaker and
connect the projector to its wall outlet.Do
not ground the projector to the gas pipe,
water pipe, lightning rod, or telephone
line, etc.
• The power plug should be fully inserted
into the wall outlet.
- Unstable connection may cause a re.
• Do not place heavy objects on the
power cord or place the cord underneath
the projector.- This may cause a re or
an electric shock.
• Never touch the power plug with a wet
hand.
- This may cause an electric shock.
• Do not connect too many devices to the
same power extension.
- Overheating may cause a re.
• Remove dust or contaminants around
power plug pins or wall outlets.
- This may cause a re.
• To turn off the main power, remove the
power plug, which should be positioned
so it is easy to access for operation.
3

Safety Instructions
CAUTION
• Hold the plug rmly when unplugging.
- A broken wire in the cord may cause a
re.
• Ensure the power cord or plug is not
damaged, modied, severely bent,
twisted, pulled, sandwiched or heated.
Do not use a loose wall outlet.
- This may cause a re or an electric
shock.
• Keep the power cord away from any
heating devices.
- The cord coating may melt and cause
an electric shock.
• Place the projector where people will
not trip over or tread on the power cord
or plug to protect the power cord and
plug from any damage.
- This may cause a re hazard or an
electric shock.
• Do not turn the projector on or off by
plugging in the power plug or unplugging
it from the wall outlet.
(Do not use the power plug as a switch.)
- This may cause an electric shock or
damage to the projector.
• Do not insert a conductor into the other
side of the wall outlet while the power
plug is inserted into the wall outlet. In
addition, do not touch the power plug
immediately after it is disconnected from
the wall outlet.
- This may cause an electric shock.
• Use only the ofcial power cord which
is provided by LG Electronics, Inc. Do
not use other power cords.
- This may cause a re or an electric
shock.
USING
WARNING
• Do not place anything containing liquid,
such as a vase, owerpot, cup,
cosmetics, chemicals, decorations or
candles, etc., on top of the projector.
- Possible re, electric shock, or falling
may cause physical injury.
• In the event that there is a big impact to
the projector or the cabinet is damaged,
switch it off, unplug it from the wall outlet
and contact an authorized service
center.
- Otherwise, this may cause a re or an
electric shock.
• Do not insert pieces of metal such
as coins, hairpins or metal debris, nor
ammable materials such as paper or
matches into the projector.
- This may cause a re or an electric
shock.
• In the event that liquid or a foreign
object falls into the projector, please
switch it off and unplug it from the wall
outlet and contact an LG Electronics
Service Center.
- Otherwise, this may cause a re or an
electric shock.
• When replacing a battery of the remote
control, make sure a child does not
swallow the battery. Keep the battery out
of reach of children.
- In the case of a battery being swallowed
by a child, please consult a doctor
immediately.
• Do not remove any covers except for
the lens cap. There is a high risk of
electric shock.
• Do not look directly into the lens when
the projector is in use.
4

Safety Instructions
• When the lamp is on or has just been
turned off, avoid touching the air vent or
lamp because these will be very hot.
• If there is a gas leak, do not touch
the wall outlet. Open the window for
ventilation.
- A spark may cause a re or burn.
• Always open the lens door and remove
the lens cap when the projector lamp is
on.
• Never touch the projector or power cord
during thunder or lightning.
- This may cause an electric shock.
• Do not use the projector near an
electronic device which generates a
strong magnetic eld.
• Store the vinyl envelope used to pack
the projector in a safe place away from
children.
- It could cause suffocation if used
improperly.
• Do not keep your hand on the projector
for a long time when it is running.
• When you play a game by connecting
a game console to a projector, it is
recommended that you maintain a
distance of more than four times the
diagonal length of the screen.
• Make sure that the length of connecting
cable is long enough. Otherwise, the
product may fall causing personal injury
or damage to the product.
CAUTION
• Do not place a heavy object on the
projector.
- It may fall down and cause physical
injury.
• Be careful to prevent the lens from
heavy impact during transportation.
• Do not touch the lens. The lens may be
damaged.
• Do not use any sharp tools on the
projector such as a knife or hammer,
because this may damage the casing.
• In the event that no image appears
on the screen, switch the projector off,
unplug it from the wall outlet and contact
an authorized service center.
- Otherwise, this may cause a re or an
electric shock.
• Do not drop an object onto the projector
or apply heavy pressure to it.
- This may cause injury to persons or
damage to the projector.
• The distance between your eyes and
the screen must be around 5 - 7 times
the diagonal length of the screen.
- If you watch the screen at a close
distance for a long time, your eye sight
may become worse.
5

Safety Instructions
Cleaning Others
WARNING WARNING
• Do not spray the projector with water
when cleaning. Do not allow water to go
into the projector or do not allow it to
get wet.
- This may cause a re or an electric
shock.
• When there is smoke or a strange smell
coming out from the projector or a
foreign object falls into the projector,
please switch it off and unplug it from
the power outlet and contact an LG
Electronics Service Center.
- If not, this may cause a re or an electric
shock.
• Use an air spray or soft cloth or cotton
swab moistened with a lens cleaning
chemical or alcohol to remove dust or
stains on the front projection lens.
CAUTION
• Contact your seller or the Service
Center once a year to clean the internal
parts of the projector.
- If you do not clean the contaminated
interior of the projector for a long time,
there may be a re or damage to the
projector.
• When cleaning plastic parts such as
the projector case, unplug the power
rst and wipe with a soft cloth. Do not
spray with water or wipe with a wet
cloth.
When cleaning the plastic parts,
such as the projector case, do not use
cleanser, automobile or industrial shiner,
abrasive or wax, benzene, alcohol, etc.,
which can damage the product.
- This can cause re, electric shock or
product damage (deformation, corrosion
and damage).
• Only a qualied technician can
disassemble or modify the projector.
For inspection, adjustment, or repair,
contact your seller or the Service
Center.
- Otherwise, this may cause a re or an
electric shock.
• Dispose of the used battery properly.
- Otherwise, this may result in explosion
or re.
• The correct method of disposal may
vary depending on your country or
region. Dispose of the battery pack
according to the appropriate instructions.
• Do not throw or disassemble the battery.
- Otherwise, this may result in re or
explosion due to damage to the battery.
• Always use batteries approved and
certied by LG Electronics.
- Otherwise, this may result in re or
explosion.
• Store the battery away from metallic
objects, such as keys and paper clips.
• Excess current may cause a rapid
increase in temperature, resulting in re
or burns.
• Do not store the battery near any heat
source, such as a heater.
- This may result in re or damage the
product.
• Do not store it at temperatures higher
than 60°C or in high humidity.
6

Safety Instructions
• Keep the battery out of reach of
children.
- This may result in personal injury or
damage to the product.
• Make sure that the battery is installed
correctly.
• Incorrect battery replacement may
cause re.
CAUTION
• Do not mix new batteries with old
batteries.
- This may cause a re or an electric
shock caused by overheating and
leakage.
• Unplug the power cord if the projector
is not used for a long period.
- Accumulated dust may cause
overheating, an electric shock from
corroded insulation and a re from an
electrical surge.
• Only use the specied type of battery.
- Otherwise, this may cause an electric
shock caused by overheating and
leakage.
FCC NOTICE
• Warning - Class B
(b) For a Class B Digital device or
peripheral, the instructions furnished
the user shall include the following or
similar statement, placed in a prominent
location in the text of the manual:
NOTE: This equipment has been tested
and found to comply with the limits for
a Class B digital device, pursuant to
part 15 of the FCC Rules. These limits
are designed to provide reasonable
protection against harmful interference
in a residential installation. This
equipment generates, uses and can
radiate radio frequency energy and,
if not installed and used in accordance
with the instructions, may cause harmful
interference to radio communications.
However, there is no guarantee that
interference will not occur in a particular
installation. If this equipment does
cause harmful interference to radio or
television reception, which can be
determined by turning the equipment off
and on, the user is encouraged to try to
correct the interference by one or more
of the following measures:
- Reorient or relocate the receiving
antenna.
- Increase the separation between the
equipment and receiver.
- Connect the equipment into an outlet
on a circuit different from that to which
the receiver is connected.
- Consult the dealer or an experienced
radio/TV technician for help.
7

Safety Instructions
Disposal of your old appliance
1. When this crossed-out wheeled bin
symbol is attached to a product it
means the product is covered by the
European Directive 2002/96/EC.
2. All electrical and electronic products
should be disposed of separately from
the municipal waste stream through
designated collection facilities
appointed by your government or your
local authorities.
3. The correct disposal of your old
appliance will help prevent potential
negative consequences for the
environment and human health.
4. For more detailed information about
disposal of your old appliance, please
contact your city ofce, waste disposal
service or the shop where you
purchased the product.
Disposal of waste
batteries/accumulators
1. When this crossed-out wheeled
bin symbol is attached to batteries/
accumulators of Your product it means
they are covered by European Directive
2006/66/EC.
2. This symbol may be combined with
chemical symbols for mercury(Hg),
cadmium(Cd) or lead(Pb) if the battery
Contains more that 0.0005% of mercury,
0.002% of cadmium or 0.004% of lead.
3. All batteries/accumulators should be
disposed separately from the municipal
waste stream via designated collection
facilities appointed by the government
or the local authorities.
4. The correct disposal of Your old
batteries/accumulators will help to
prevent potential negative
consequences for the environment,
animal and human health.
5. For more detailed information about
disposal of Your old batteries/
accumulators, please contact Your city
ofce, waste disposal service or the
shop where You purchased the product.
8

Licenses
Supported licenses may differ by model. For more information about licenses, visit
www.lg.com.
HDMI, the HDMI logo and High-Denition Multimedia
Interface are trademarks or registered trademarks of HDMI
Licensing LLC.
NOTE
• Image shown may differ from your projector.
• Your projector’s OSD (On Screen Display) may differ slightly from that
shown in this manual.
9

Table of Contents
Safety Instructions 2
Licenses 9
Table of Contents 10
Statement 11
Part names and functions 12
Front 12
Back 12
Bottom 12
Rear terminal 13
Side control and indicators 14
Remote control 15
Remote control battery installation 17
Operation range 17
Adjustable feet 17
Installation 18
Positioning the projector 18
Lens shift adjustment 18
Connecting to computer 19
(Digital and analog RGB)
Connecting to video equipment 20
(Video, S-Video,Component, HDMI)
Connecting to the AC power cord 21
Lens installation 22
Basic operation 23
Turning on the projector 23
Turning off the projector 24
How to operate the on screen menu 25
Menu bar 26
Auto setup function 27
Lens shift control panel 27
Zoom adjustment 28
Focus adjustment 28
Keystone 28
Remote control operation 29
Computer input 31
Input source select (RGB1) 31
Input source select(RGB 2 or RGBHV)
32
Computer system select 33
Auto PC adjustment 34
Manual adjustment via PC 35
Image select 36
Image adjust 37
Screen size adjust 38
Video Input 39
Selecting input source 39
(HDMI/Component/S-Video/Video)
Video system select 40
Image select 41
Image adjust 42
Screen size adjust 43
Option 44
Option 44
Information 52
Maintenance 53
WARNING TEMP indicator 53
Cleaning the lter 54
Covering the lens properly 55
Cleaning the lens 55
Cleaning the projector’s cabinet 55
Replacing the lamp 56
Appendix 58
Troubleshooting 58
Indicator and projector state 60
Compatible signal 61
Conguration of terminals 62
Technical Specications 63
Dimensions 65
Content of hazardous substances and
elements 66
PIN code memorandum 66
RS232 Control Method 67
LAN control 75
10

Statement
Note:
• The screen menu and pictures in the manual may slightly differ from the real product.
• The manual is subject to change without prior notice.
11
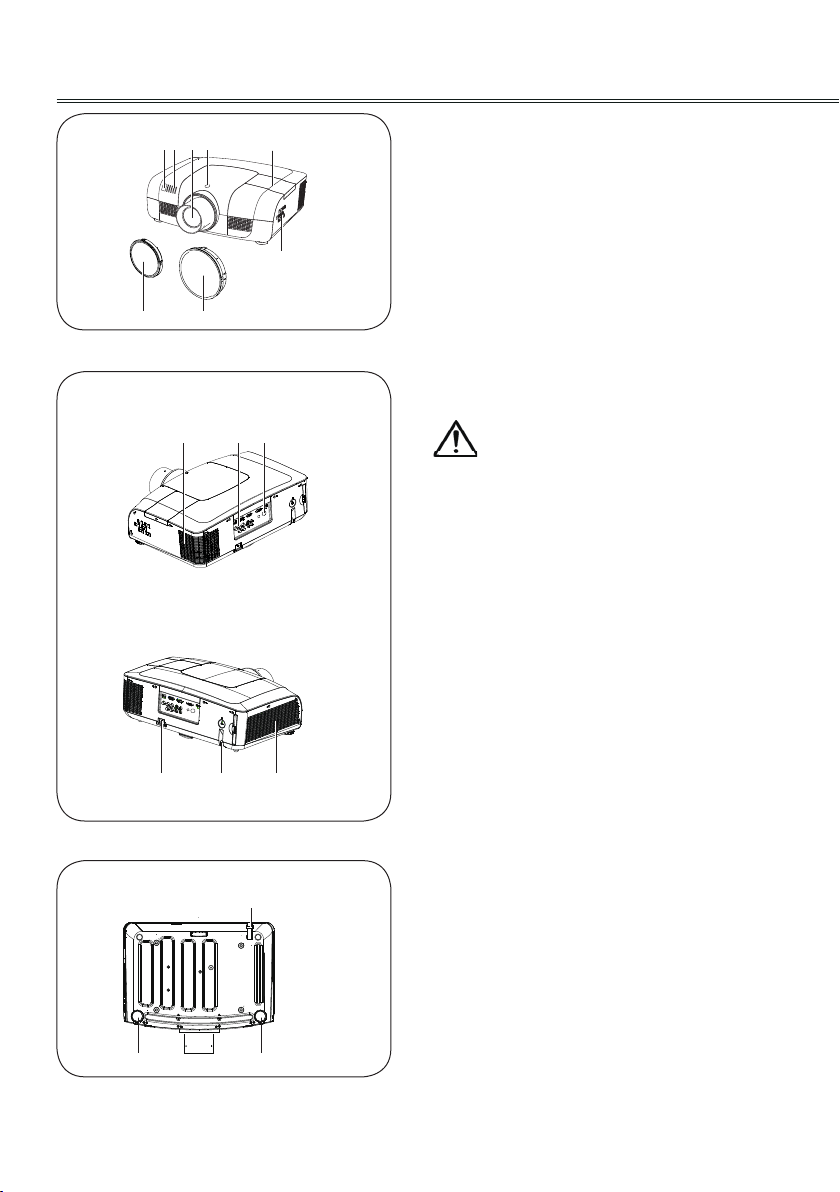
Part names and functions
Front
Back
② ①⑤ ③
⑦
④
⑥
⑨ ⑩⑪
Lens release button
①
Indicator
②
Lamp cover
③
Lens cap
④
Projector lens
⑤
Decorative cover
⑧
⑥
Remote receiver (Front & top)
⑦
Side control panel
⑧
Exhaust vent
⑨
Caution
Hot air is exhausted from the exhaust vent. Do
not put heat-sensitive objects near this side.
Remote receiver (Back)
⑩
Terminals and connectors
⑪
Air lter and air-intake vent
⑫
Power cord connector
⑬
Bottom
12
⑬
⑮ ⑮
⑭
⑭
⑫
Safety lock
⑭
Adjustable feet
⑮
Rear terminal
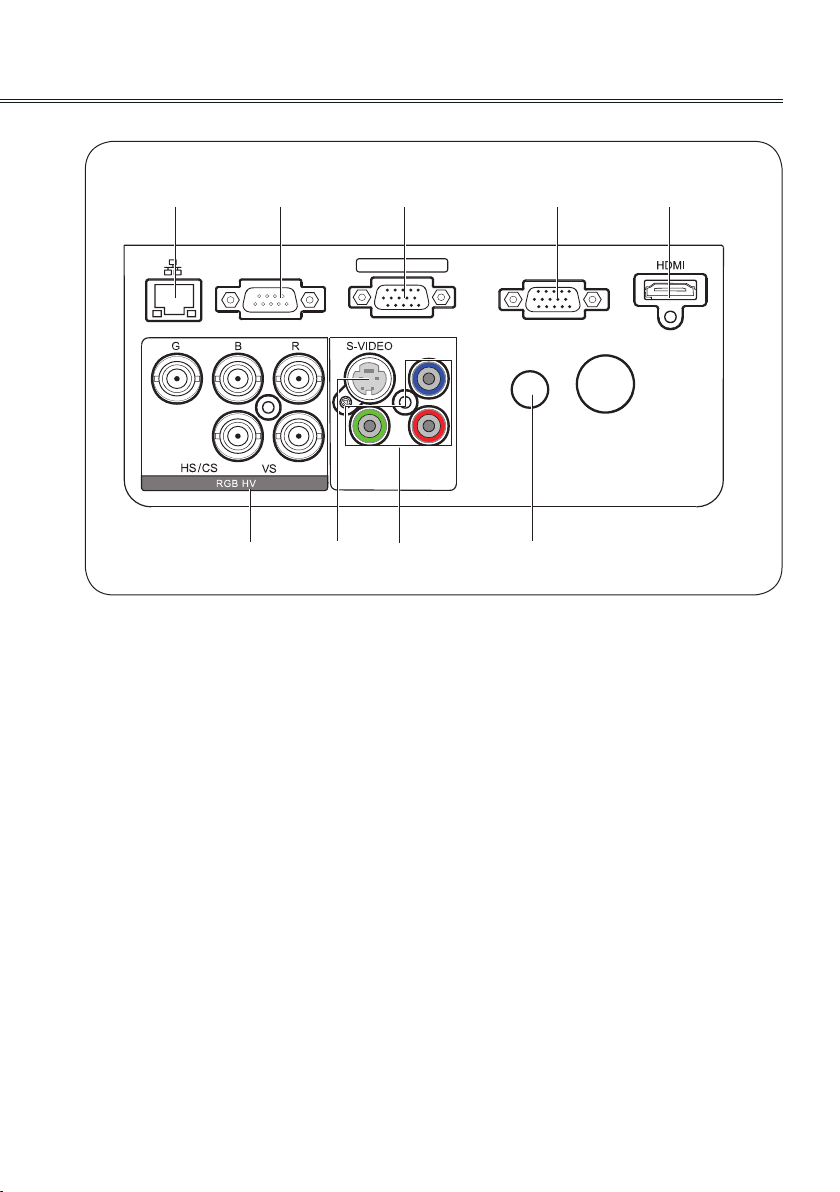
Part names and functions
① ② ③ ④
RGB OUT
RGB IN 2
VIDEO/Y
⑦
Network port
①
RS-232C
⑥ ⑧
Used to connect the network cable.
RS-232C
②
When using RS-232C to control the projector,
please connect the serial control line to this
terminal.
RGB IN 2/RGB OUT
③
- Used to connect the computer output.
- Used to output the analog signals from
(RGB IN 1) or ⑥(RGB HV) to the other
④
monitor.
RGB IN 1
④
Used to connect a computer output.
HDMI
⑤
Used to connect the HDMI digital output.
⑤
Pb/Cb
Pr/Cr
RGB IN 1
Wir ed R/C
⑨
RGB HV
⑥
- Connect the composite video output from video
equipment to RGB HV terminal.
- Connect the RGB HV format (5 line system)
signal to G, B, R, HS/CS and Vs jacks.
S-VIDEO
⑦
Used to connect the S-video output of video
equipment.
VIDEO/Y, Pb/Cb, Pr/Cr input jacks
⑧
- Connect the component signals to these jacks.
- Connect the composite signals to the VIDEO/ Y
jack.
Wired R/C jack
⑨
Connect wired remote control cable to this jack
while using wired remote control.
Wireless remote control is disable while using
wired remote control via wired R/C jack.
13
Part names and functions
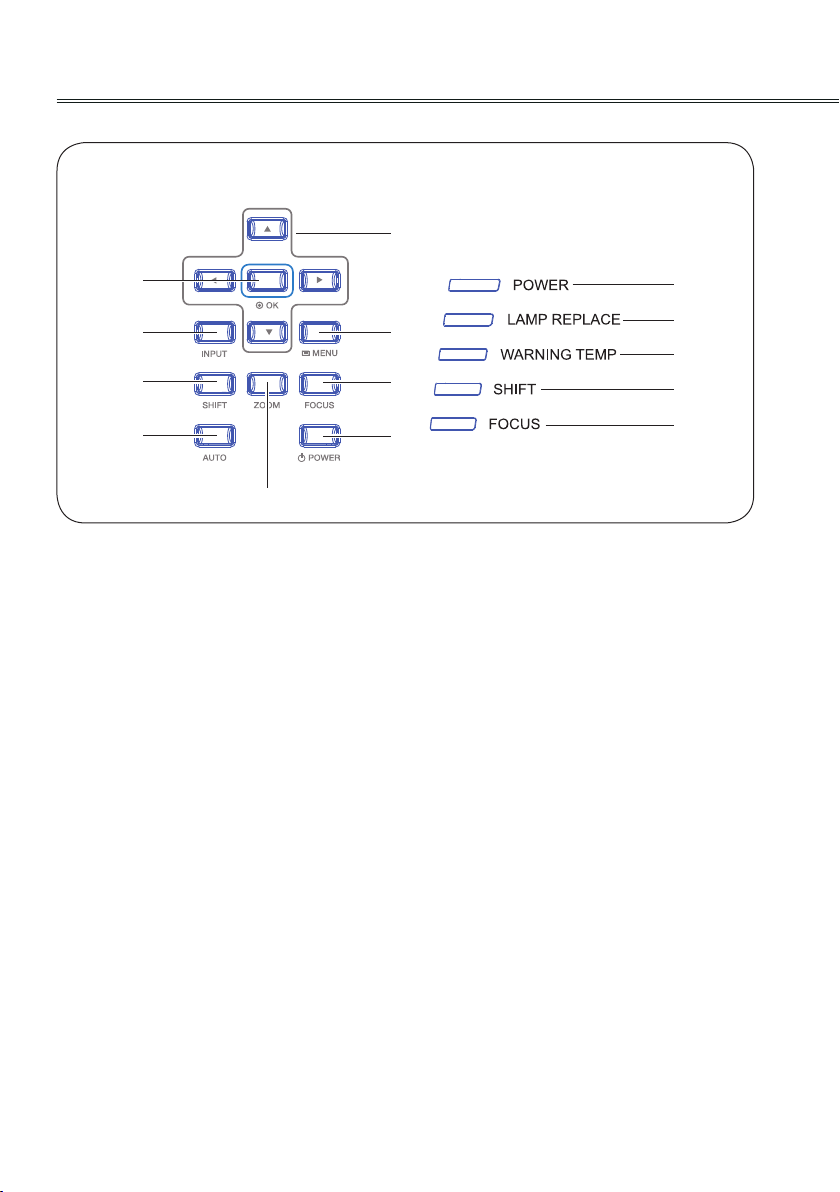
Side control and indicators
Side control Indicator (Top panel)
⑨
①
②
③
④
⑤
OK button
①
- Enter menu.
- Execute the selected item.
- Expand or compress the image in Digital
Zoom Mode.
INPUT button
②
To select an input source.
SHIFT button
③
To enter the lens shift mode.
AUTO button
④
To perform various settings congured
automatically, including the input source
search function and auto PC adjust function.
ZOOM button
⑤
To zoom in/out images.
⑥
⑦
⑧
Navigation ▲▼◄► buttons
⑨
– Select an item or adjust the value in the
On-Screen Menu.
– Move the image in the DZOOM +/- mode.
POWER indicator
⑩
– Lights red when the projector is in stand-
by mode.
– Lights green during operations.
– Flashes green in the Power management
mode.
LAMP REPLACE indicator
⑪
It turns orange when the life of the
projection lamp draws to an end.
WARNING TEMP indicator
⑫
It ashes red when the internal projector
temperature is too high.
⑩
⑪
⑫
⑬
⑭
MENU button
⑥
To open or close the screen menu.
FOCUS button
⑦
To adjust the focus.
POWER button
⑧
To turn on/off the projector.
14
SHIFT indicator
⑬
It lights blue when the projector lens is
moving.
It lights blue when the projector lens is
moving to the end.
FOCUS indicator
⑭
It lights green when adjusting the focus.
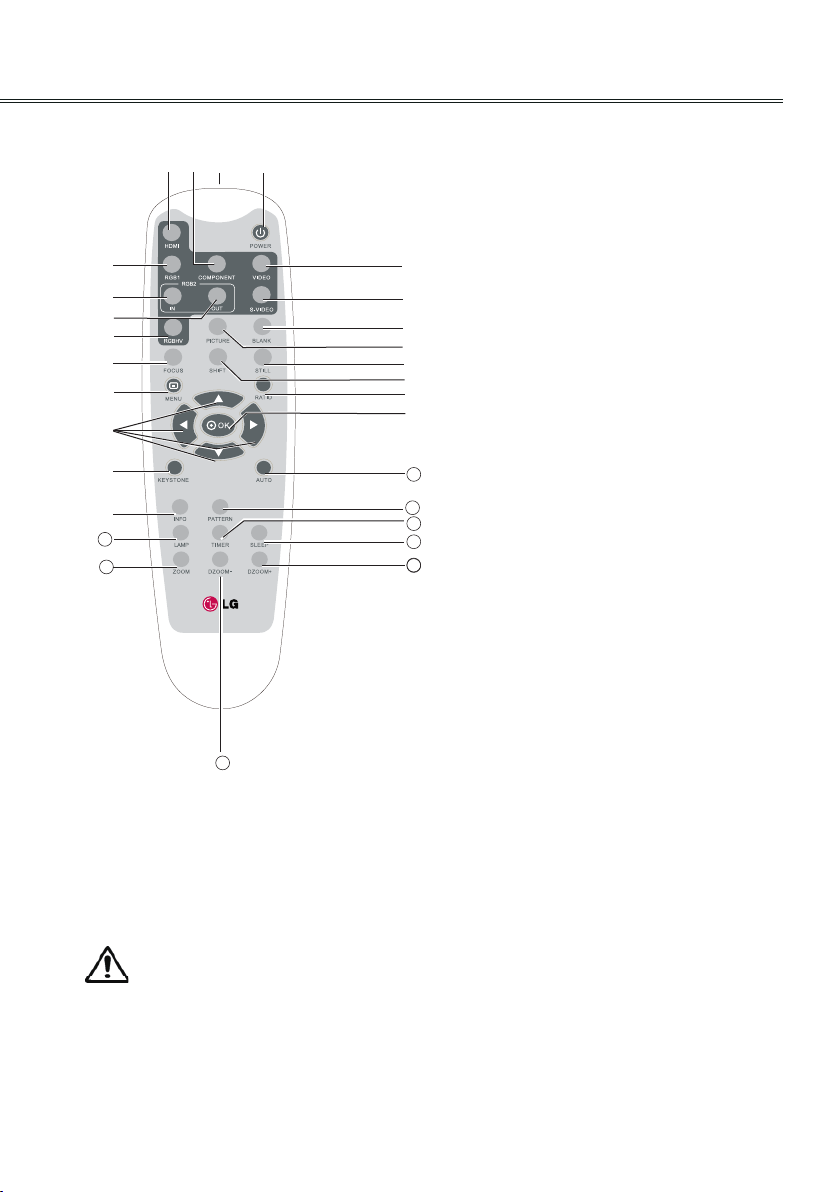
Remote control
①
*
③
②
④
⑥ ⑦
⑧
⑩
⑫
⑭
⑯
⑱
⑳
22
24
Part names and functions
POWER button
①
Turn the projector on or off.
COMPONENT button
②
Select the component input source.
HDMI button
③
⑤
Select HDMI input source.
RGB1 button
④
⑨
Select RGB1 input source.
⑪
⑬
⑮
⑰
⑲
VIDEO button
⑤
Select VIDEO input source.
RGB2 IN button
⑥
Select RGB2 as RGB input.
21
S-VIDEO button
⑦
23
Select S-Video input source.
25
26
RGB2 OUT button
⑧
27
27
Enable RGB2 as moniter out.
BLANK button
⑨
Hide the on screen menu.
RGBHV button
⑩
Select RGBHV input source.
28
*
IR remote control is compulsory but Wired
remote control is optional.
To ensure safe operation, observe the
following precautions:
– Do not bend, drop or expose the remote
control to moisture or heat.
– For cleaning, use a soft dry cloth. Do not
apply benzene, thinner, splay or any
other chemicals.
PICTURE button
⑪
Select picture mode.
FOCUS button
⑫
Adjust the focus.
STILL button
⑬
Still the projected image.
MENU button
⑭
Open or close the on screen menu.
SHIFT button
⑮
Select the lens shift mode.
▲▼◄► button
⑯
– Select an item or adjust the value in the
on screen menu.
– Move the image in Digital zoom + mode.
Please refer to the next page for other buttons.
15
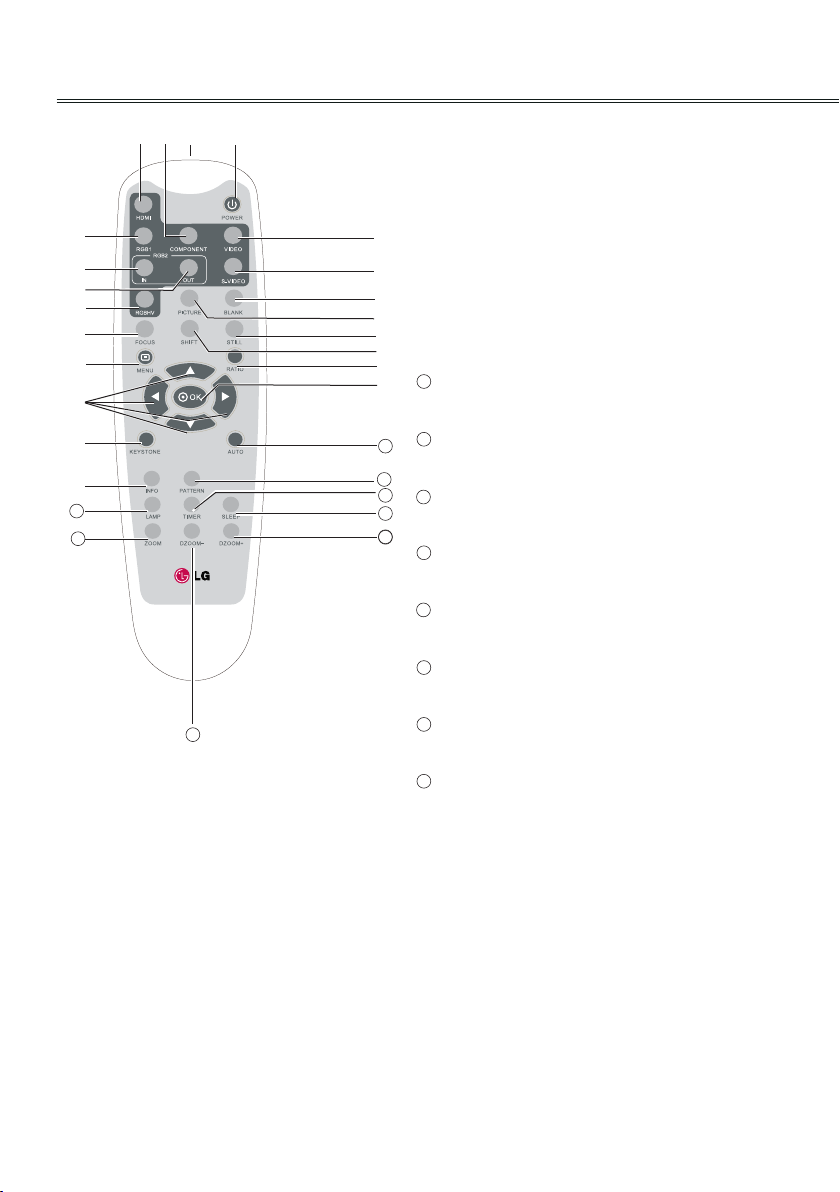
Part names and functions
①
*
③
②
④
⑥ ⑦
⑧
⑩
⑫
⑭
⑯
⑱
⑳
22
24
28
RATIO button
⑰
Select a screen display mode.
KEYSTONE button
⑱
Calibrate keystone distortion.
⑤
OK button
⑲
Access the menu or select an item in the
menu.
⑨
⑪
INFO button
⑳
⑬
Operate the information function.
⑮
⑰
21
AUTO button
⑲
Enter the AUTO setup mode.
22
LAMP button
21
Select the lamp mode.
23
25
23
PATTERN button
26
Select a test pattern picture.
27
27
24
ZOOM button
Zoom in/out images.
25
TIMER button
Enable the timer function.
26
SLEEP button
Turn off the projector at the specied time.
27
DZOOM+ button
Select the digital zoom + mode.
16
28
DZOOM- button
Select the digital zoom - mode.

Part names and functions
7m
7m
Remote control battery installation
1. Open the battery
compartment lid.
To ensure safe operation, please observe the following precautions:
● Use two (2) AAA or LR03 type alkaline batteries.
● Always replace batteries in sets.
● Do not use a new battery with a used battery.
● Avoid contacting with water or liquid matter.
● Do not expose the remote control to moisture or heat.
● Do not drop the remote control.
● If the battery has leaked on the remote control, carefully wipe the case clean and
install new batteries.
● Risk of explosion if a battery is replaced by an incorrect type.
● Dispose of used batteries according to the instructions.
Operation range
Point the remote control toward the projector when
pressing any button. The maximum operating
range for the remote control is about 7 meters and
60 degrees.
2. Install new batteries into
the compartment.
For correct polarity
( + and – ) , be sure
battery terminals are in
contact with pins in the
compartment.
3. Re-cover the compartment
lid.
Adjustable feet
Projection angle can be adjusted up to 5.0
degree with the adjustable feet.
Rotate the adjustable feet to lift the projector to
a certain height. During lifting, rotate the two feet
clockwise.
To lower or retract the adjustable feet, rotate
the feet counterclockwise.
Keystone distortion of the projected image can be
corrected by menu operation.
Adjustable feet
17
Installation
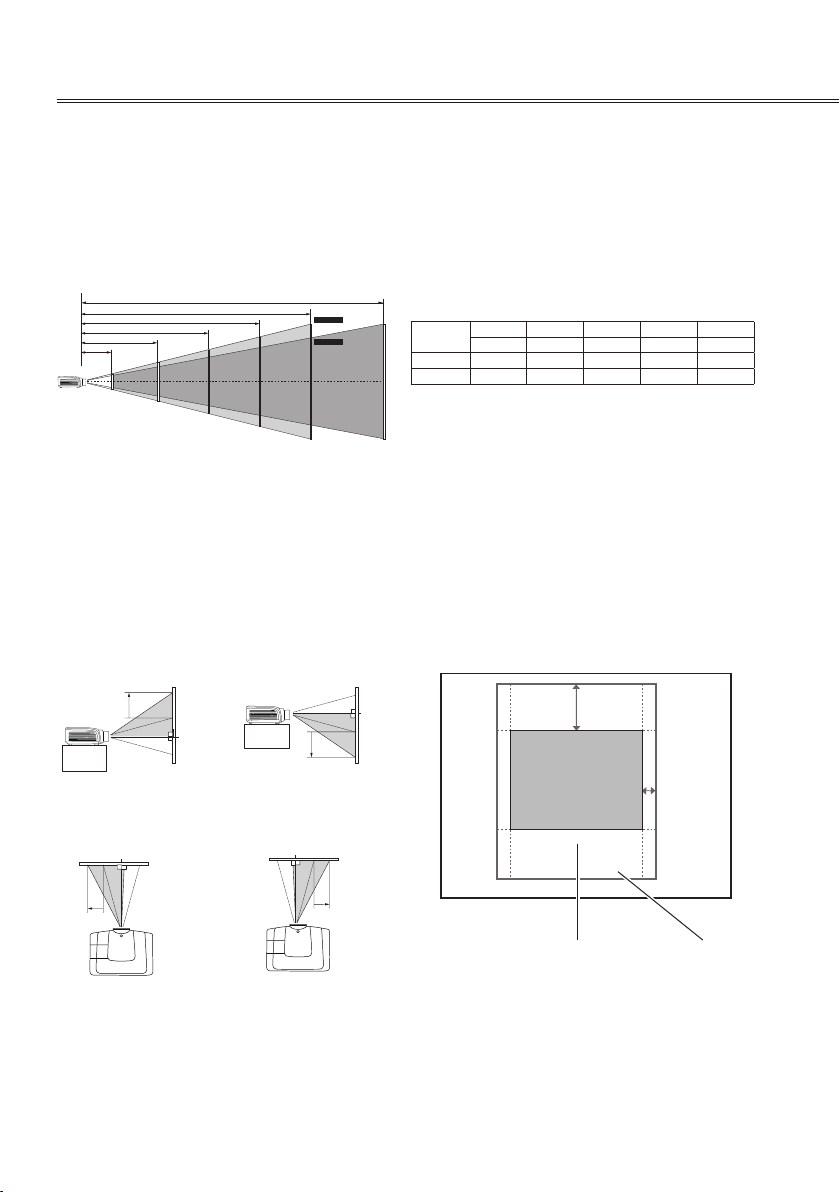
Positioning the projector
For projector positioning, see the figures below. The projector should be set
perpendicularly to the plane of the screen.
√ Note:
● The brightness in the room has a great inuence on picture quality. It is recommended to limit the
ambient lighting in order to get the best image.
● All measurements are approximate and may vary from the actual sizes.
17.335 m
10.793m
8.083 m
5.374 m
2.664 m
1.039 m
Lens shift adjustment
Projection lens can be moved from side to side
and up to down.
This function makes the positioning of images
easy on the screen.
The display position can be
shifted upward up to 50%
elevation of the display.
When the lens is shifted to top.
The display position can be
shifted to the left up to 10%
width of the display.
The display position can be
shifted downward up to 50%
elevation of the display.
When the lens is shifted to bottom.
The display position can
be shifted to the right up
to 10% width of the display.
Max. frame
Min. frame
( )
Diagonal
400”
Screen size
(WxH)mm
4:3 aspect ratio
Maximum 1.039m 2.664m 5.374m 8.083m 10.793m
Minimum 1.604m 4.297m 8.643m 12.969m 17.335m
40" 100" 200" 300" 400"
813x610 2032x1524 4064x3048 6096x4572 8128x6096
Adjusting range
50%
10%
When the lens is shifted to leftmost.
18
When the lens is shifted to rightmost.
When the lens is
shifted to the center.
Shifting range
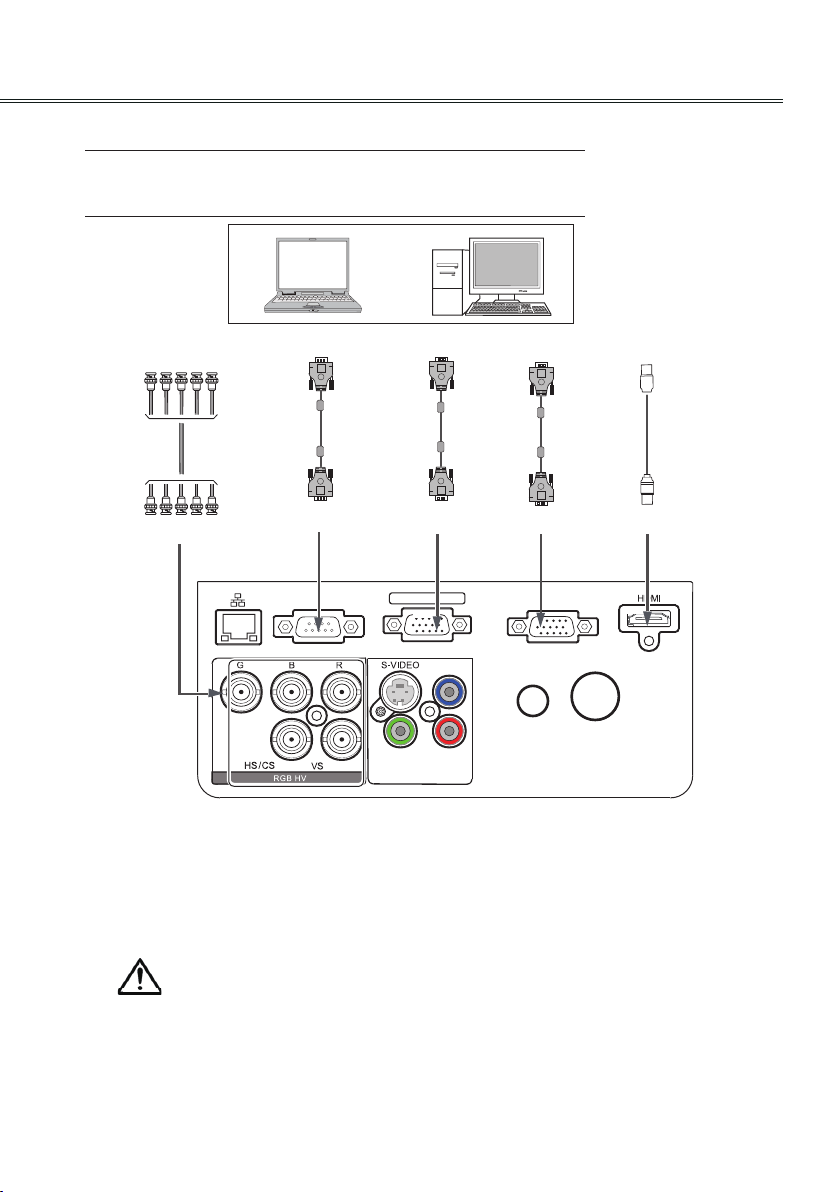
Connecting to computer (Digital and analog RGB)
RGB IN 1
RGB IN 2
RGB OUT
VIDEO/Y
Pb/Cb
Pr/Cr
RS-232C
Wir ed R/C
G B R H V
Cables used for connection ( *Cables are not supplied with the projector.)
RGB cable (1) Serial cable*
BNC cable * (BNC*5) HDMI cable*
Installation
RGB output
BNC cable
Serial cable
RGB cable
RGB OUT
RGB cable
RGB outputRGB:Monitor intputSerial port
HDMI output
HDMI cable
RGB1 inputControl port
HDMI
Unplug the power cords of both the projector and external
equipment from the AC outlet before connecting the cables.
19
Installation
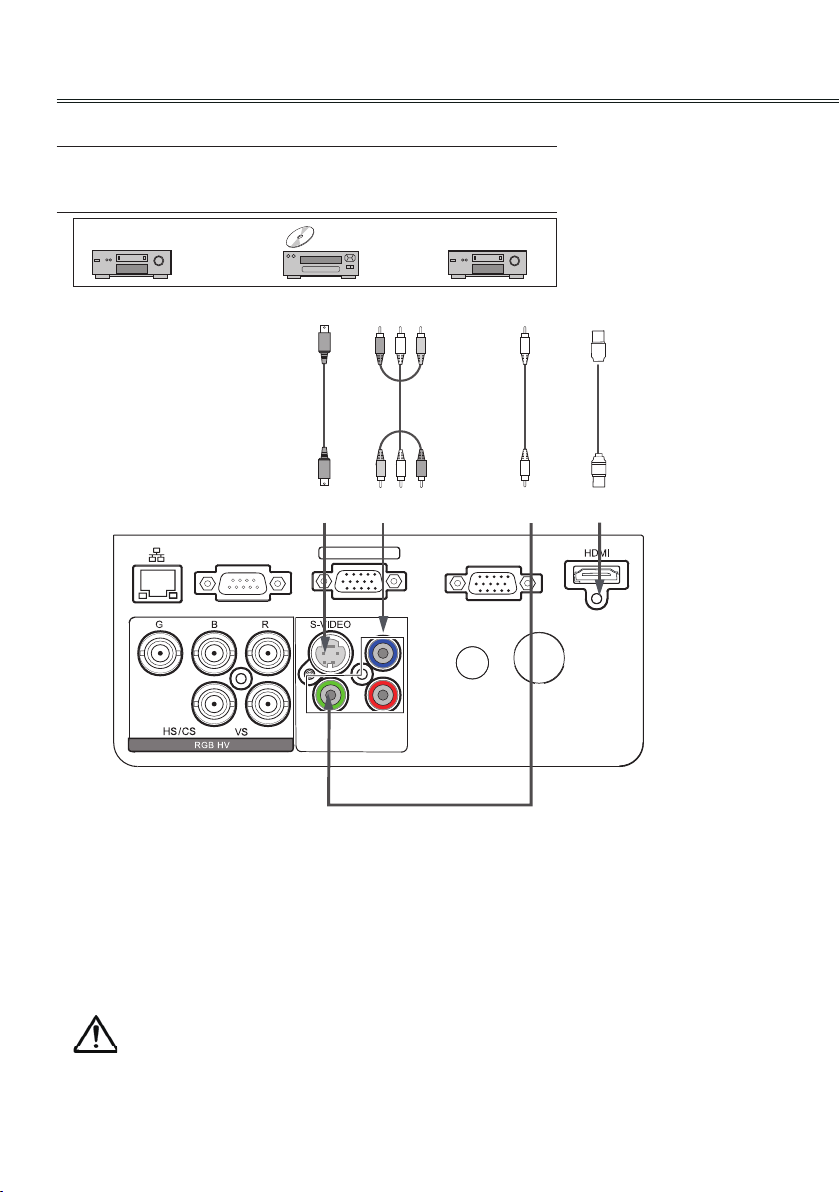
Connecting to video equipment (Video, S-Video,Component, HDMI)
Cables used for connection (*Cables are not supplied with the projector.)
Video cable (RCA*1) * Component cable (RCA*3) *
S-Video cable * HDMI cable *
RS-232C
S-video
output
S-video
cable
S-video
VIDEO/Y
RCA
cable
RGB OUT
RGB IN 2
Pb/Cb
Pr/Cr
Component
Video output
RGB IN 1
Wir ed R/C
RCA
cable
Video
output
VideoY-Pb/Cb Pr/Cr
HDMI output
HDMI cable
HDMI
20
Unplug the power cords of both the projector and external
equipment from the AC outlet before connecting the cables.
Installation
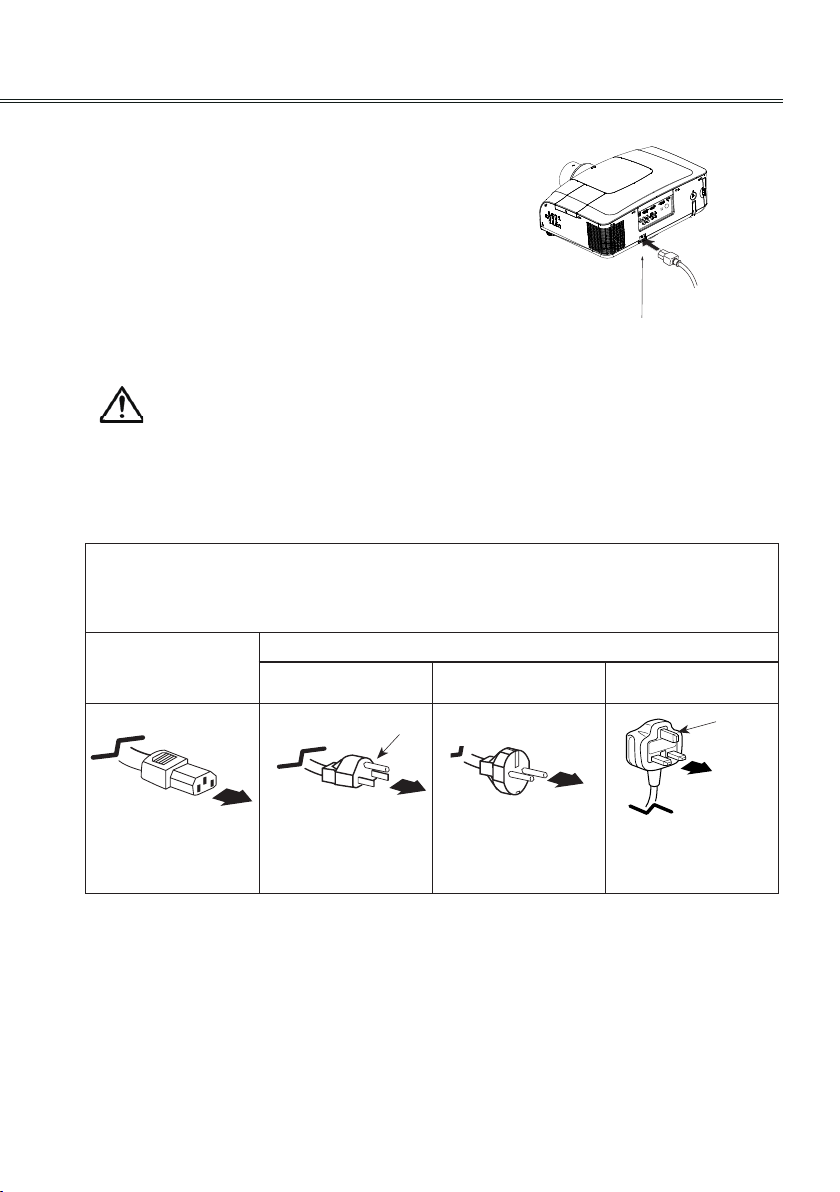
Connecting to the AC power cord
This projector uses nominal input voltages of
100–240 V AC and it automatically selects the
correct input voltage. It is designed to work with
a single-phase power system having a grounded
neutral conductor. To reduce the risk of electrical
shock, do not plug into any other type of power
system. If you are not sure of the type of power
being supplied, consult your authorized dealer
or service station. Connect the projector with all
peripheral equipment before turning it on.
The AC outlet should be near this equipment and must be easily accessible.
√ Note:
Unplug the AC power cord when the projector is not in use. When the projector is connected to an outlet
with AC power cord, it is in stand-by mode and consumes a little electric power.
Note on the power cord
AC power cord must meet the requirements of the country where you use the projector. Conrm the AC
plug type with the chart below and proper AC power cord must be used.
AC outlet side
Projector side
For the U.S.A. and
For Continental
Canada
Ground
Connect the AC power cord
(supplied) to the projector.
Europe
For the U.K.
Ground
To power cord
connector on your
projector.
√ Note:
● Using incorrect power cord may inuence the product performance, or even cause hazards like an
electric shock or re. To ensure the product performance and security, please apply the cable of the
same model with the original one.
● Common connecting cables include the AC power cord, various RGB cables, video cable,and serial
control cable.
To the AC outlet.
(110 V AC)
To the AC outlet.
(200 - 240 V AC)
To the AC outlet.
(200 - 240 V AC)
21
Installation
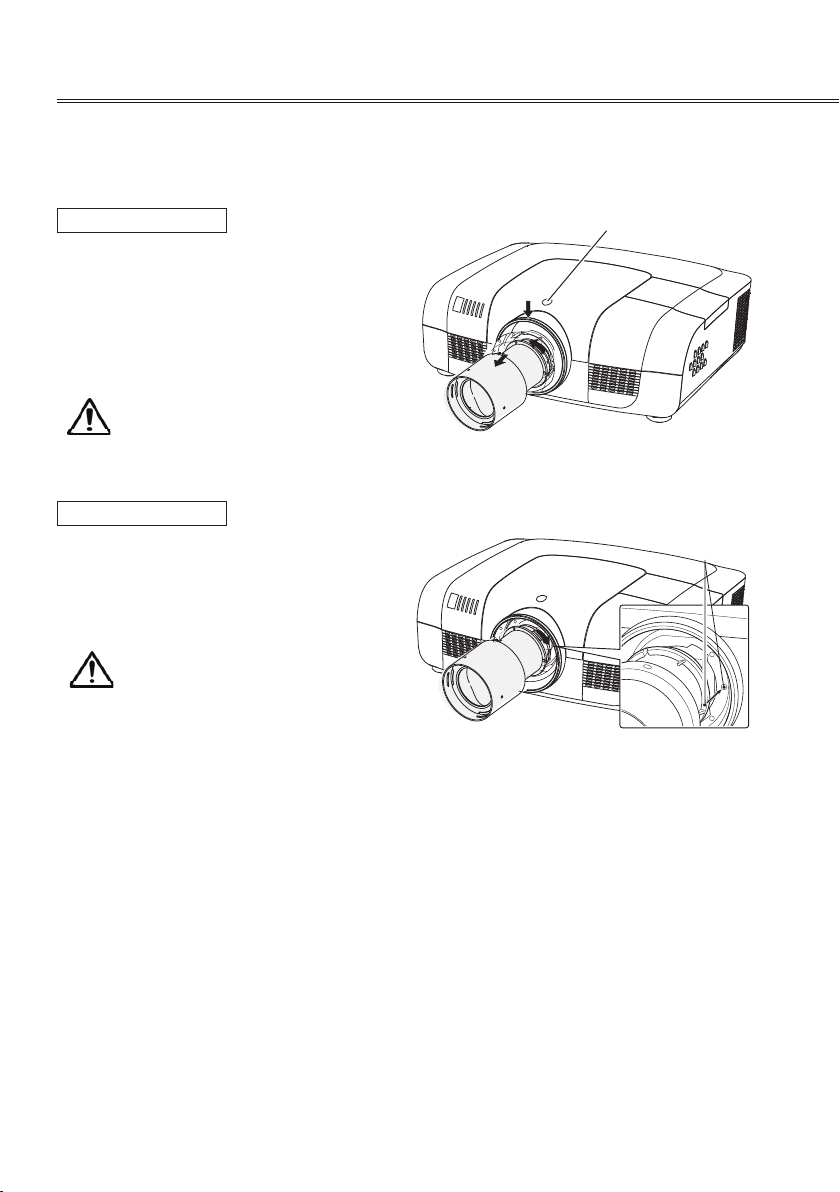
Lens installation
Follow the instructions below to install the lens upon replacing or using the provided lens. For the
specication of projector lens, contact your dealer.
Removing the lens
1 Shift the lens to the center with the lens shift
function.
2 Turn off the projector, and unplug the AC power
cord.
3 Press and hold the lens release button on the
top counterclockwise until the lens cannot be
rotated. Draw it out slowly from the projector.
Caution
Do not drop the lens when handling.
Installing the lens
1 Remove the lens decorator.
2 Align the red point on the lens with that on the
projector to install the lens.
3 Rotate the lens clockwise slowly until it
clicks.Make sure that the lens is the projector.
Caution
While installing the lens, do not hold the
release button.
Lens release button
Red point
● Do not touch or remove any part except lens and its relative part. This may cause a malfunction,
electric shock, re or other hazards.
● Make sure the mode of the lens is compatible with your projector before installing or replacing the lens.
● For information about the lens and its installation, contact the local dealer.
Notes on lens installation
22
Basic operation
PIN Code
Set
----
Adjust
Move -----
Clear
*
1
PIN Code
Set
----
-----
Move Select
Clear
*
*
*
Turning on the projector
1 Complete peripheral connections (with a
computer, VCR, etc.) before turning on the
projector.
2 Connect the projector’s AC power cord into
an AC outlet. The POWER indicator turns red.
Open the lens cap.
3 Press the Power button on the side control
or on the remote control. The POWER indicator
becomes green and the cooling fans start to
operate. The preparation display appears on
the screen and the count down starts.
4 If the projector is locked with a PIN code, a PIN
code Input Dialog Box appears. Enter the PIN
code as instructed below.
√ Note:
● When the logo option is set to be "Off” ,
the logo will not be displayed on the screen.
● When the display option is set to be "Off,”
the logo and countdown will not be displayed
on the screen.
● During the countdown period, all operations
are invalid except shutdown.
Enter a PIN code
Select a number by pressing the ▲▼ buttons,
and then press the ► button to x the number
and move the cursor. The number changes to "*".
If you xed an incorrect number, move the cursor
to the number you want to correct by pressing the
◄ button, and then select the correct number by
pressing the ▲▼ buttons.
Repeat this step to complete entering a three-digit
number.
After entering the three-digit number, move the
cursor to "Set", then you can start to operate the
projector.
If you entered an incorrect PIN code, the "PIN
code" and the number (***) turn red. Enter
the correct PIN code all over again.
Move the cursor to Set, and press OK.
√ Note:
The projector will automatically power off within
3 minutes while you input an incorrect PIN code
or there is no any operation after turning on the
projector.
What is PIN code?
PIN (Personal Identification Number) code is a
security code that allows the person who knows
it to operate the projector. Setting the PIN code
prevents unauthorized use of the projector.
A PIN code consists of a three-digit number. Refer
to the PIN code lock function in the Setting Menu
on page 50 for locking operation of the projector
with your PIN code.
Caution on handling the PIN code
If you forget your PIN code, the projector can no
longer be started. Take a special care in setting
a new PIN code; write down the number in a
column on page 66 of this manual and keep it
at hand. Should the PIN code be missing or
forgotten, consult your dealer or service center.
23

Basic operation
Turning off the projector
1 Press the POWER button on the side control or
on the remote control, and “Power off? Please
press Power key again” appears on the screen.
2 Press the POWER button again to turn off
the projector. The POWER indicator starts to
ash red, and the cooling fans keep running.
(You can select the level of the fans’
quietness and running speed.) At this time you
can unplug the AC power cord even if the fans
are still running.
3 When the projector has cooled down enough to
be turned on again, the POWER indicator stops
ashing.
To maintain the lamp life, once you turn
the projector on, wait at least 5 minutes
before turning it off.
Do not operate the projector continuously
without reset. Continuous use may result
in shortening the lamp life. Turn off the
projector and let it stand for about one hour
in every 24 hours.
Power off?
Please press Power key again
“Power off? Please press Power key again”
disappears after 4 seconds.
√ Note:
● When the Auto Power function is “On” , this projector is turned on automatically by connecting the AC
power cord to an AC outlet.(Page 48)
● The running speed of cooling fans is changed according to the temperature inside the projector.
● Do not put the projector in a case before the projector is cooled enough.
● If the WARNING indicator ashes or emits a red light, see “Warning Indicator”.(Page 53)
● While the POWER indicator is ashing, the lamp is being cooled down and the projector cannot be
turned on. Wait until the POWER indicator turns red to turn on the projector again.
● The fan rotation will terminate directly if the AC power cord is unplugged immediately after the
projector is turned off.
● The projector can be turned on after the POWER indicator turns red. The waiting time to restart will be
shortened when the normal power-off processing for fan cooling is completed, comparing with the
time the AC power cord is immediately unplugged after the power-off.
24
 Loading...