

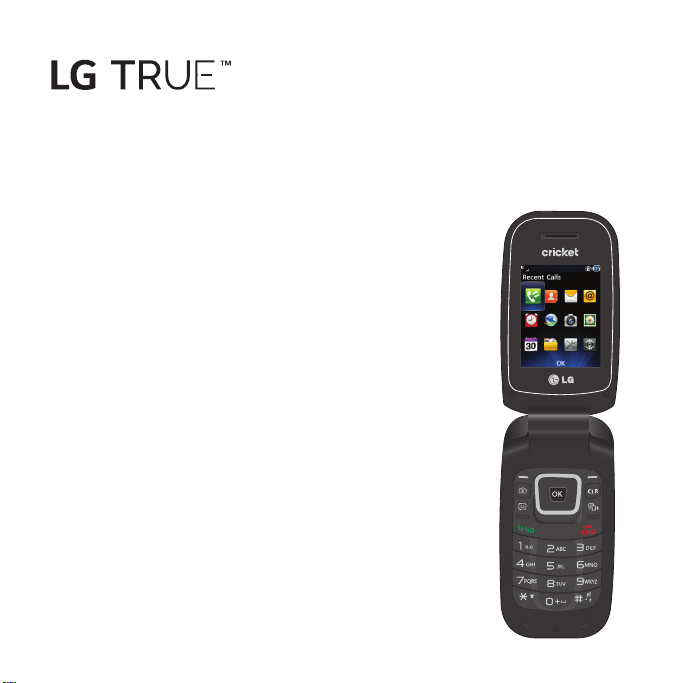
Page 1

MFL68488201 (1.0) Printed in China
User Guide
Guía del usario
Page 2

Your phone is designed to make it easy for you to access a wide variety of content. For
your protection, we want you to be aware that some applications that you enable may
involve the location of your phone being shared. For applications available through
Cricket, we offer privacy controls that let you decide how an application may use the
location of your phone and other phones on your account. However, the Cricket privacy
tools do not apply to applications available outside of Cricket. Please review the terms and
conditions and the associated privacy policy for each location-based service to learn how
location information will be used and protected. In addition, your Cricket phone may be
used to access the Internet and to download, and/or purchase goods, applications, and
services from Cricket or elsewhere from third parties. Cricket provides tools for you to control
access to the Internet and certain Internet content. These controls may not be available for
certain devices which bypass Cricket controls.
Portions ©2014 Cricket Wireless LLC. All rights reserved. Cricket is a trademark of Cricket
Wireless LLC. Other marks are the property of their respective owners.
registrada de Cricket Wireless LLC. Otras marcas son propiedad de sus respectivos titulares.
Portions ©2014 Cricket Wireless LLC. Todos los derechos reservados. Cricket es una marca
estar disponibles para ciertos dispositivos que evitan los controles de Cricket.
controlar el acceso a Internet y cierto contenido de Internet. Estos controles pueden no
de Cricket o de otro lugar, de terceros. Cricket ofrece herramientas para que pueda
utilizar para acceder a Internet y descargar y/o comprar artículos, aplicaciones y servicios
utilizará y protegerá la información de ubicación. Además, su teléfono Cricket se puede
privacidad asociada para cada servicio basado en la ubicación para saber cómo se
disponibles fuera de Cricket. Por favor revise los términos y condiciones y la política de
Sin embargo, las herramientas de privacidad de Cricket no aplican a las aplicaciones
aplicación puede usar la ubicación de su teléfono y de otros teléfonos en su cuenta.
través de Cricket, ofrecemos controles de privacidad que le permiten decidir cómo una
que habilite podrían compartir la ubicación del teléfono. Para aplicaciones disponibles a
Para su protección, queremos que usted tenga en cuenta que algunas aplicaciones
Su teléfono está diseñado para facilitarle el acceso a una amplia variedad de contenido.
Page 3
User Guide
t
Screen displays and illustrations may differ
from those you see on the actual phone.
t
Some of the contents of this manual may
not apply to your phone depending on your
phone’s software or your service provider. All
information in this document is subject to
change without notice.
t
Copyright ©2014 LG Electronics, Inc. All rights
reserved. LG and the LG logo are registered
trademarks of LG Group and its related
entities. All other trademarks are the property
of their respective owners.
Page 4

LIMITED WARRANTY STATEMENT
1. WHAT THIS WARRANTY COVERS :
LG offers you a limited warranty that the enclosed
subscriber unit and its enclosed accessories will
be free from defects in material and workmanship,
according to the following terms and conditions:
1. The limited warranty for the product extends for
TWELVE (12) MONTHS beginning on the date
of purchase of the product with valid proof of
purchase, or absent valid proof of purchase,
FIFTEEN (15) MONTHS from date of manufacture
as determined by the unit’s manufacture date
code.
2. The limited warranty extends only to the original
purchaser of the product and is not assignable
or transferable to any subsequent purchaser/end
user.
3. This warranty is good only to the original
purchaser of the product during the warranty
period as long as it is in the U.S, including Alaska,
Hawaii, U.S. Territories and Canada.
4. The external housing and cosmetic parts shall
be free of defects at the time of shipment and,
therefore, shall not be covered under these limited
warranty terms.
5. Upon request from LG, the consumer must
provide information to reasonably prove the date
of purchase.
6. The customer shall bear the cost of shipping the
product to the Customer Service Department of
LG. LG shall bear the cost of shipping the product
back to the consumer after the completion of
service under this limited warranty.
2. WHAT THIS WARRANTY DOES NOT COVER :
1. Defects or damages resulting from use of the
product in other than its normal and customary
manner.
2. Defects or damages from abnormal use, abnormal
conditions, improper storage, exposure to moisture
or dampness, unauthorized modifications,
unauthorized connections, unauthorized repair,
misuse, neglect, abuse, accident, alteration,
improper installation, or other acts which are not
the fault of LG, including damage caused by
shipping, blown fuses, spills of food or liquid.
3. Breakage or damage to antennas unless caused
directly by defects in material or workmanship.
4. That the Customer Service Department at LG was
not notified by consumer of the alleged defect or
malfunction of the product during the applicable
limited warranty period.
5. Products which have had the serial number
removed or made illegible.
6. This limited warranty is in lieu of all other warranties,
express or implied either in fact or by operations of
law, statutory or otherwise, including, but not limited
to any implied warranty of marketability or fitness for
a particular use.
7. Damage resulting from use of non-LG approved
accessories.
8. All plastic surfaces and all other externally exposed
parts that are scratched or damaged due to
normal customer use.
Page 5

9. Products operated outside published maximum
ratings.
10. Products used or obtained in a rental program.
11. Consumables (such as fuses).
3. WHAT LG WILL DO:
LG will, at its sole option, either repair, replace or
refund the purchase price of any unit that does
not conform to this limited warranty. LG may
choose at its option to use functionally equivalent
reconditioned, refurbished or new units or parts or
any units. In addition, LG will not re-install or back-up
any data, applications or software that you have
added to your phone. It is therefore recommended
that you back-up any such data or information prior
to sending the unit to LG to avoid the permanent
loss of such information.
4. STATE LAW RIGHTS :
No other express warranty is applicable to this
product. THE DURATION OF ANY IMPLIED WARRANTIES,
INCLUDING THE IMPLIED WARRANTY OF MARKETABILITY,
IS LIMITED TO THE DURATION OF THE EXPRESS
WARRANTY HEREIN. LG INFOCOMM INC. SHALL NOT
BE LIABLE FOR THE LOSS OF THE USE OF THE PRODUCT,
INCONVENIENCE, LOSS OR ANY OTHER DAMAGES,
DIRECT OR CONSEQUENTIAL, ARISING OUT OF THE
USE OF, OR INABILITY TO USE, THIS PRODUCT OR FOR
ANY BREACH OF ANY EXPRESS OR IMPLIED WARRANTY,
INCLUDING THE IMPLIED WARRANTY OF MARKETABILITY
APPLICABLE TO THIS PRODUCT.
Some states do not allow the exclusive of limitation
of incidental or consequential damages or
limitations on how long an implied warranty lasts; so
these limitations or exclusions may not apply to you.
This warranty gives you specific legal rights and you
may also have other rights which vary from state to
state.
5. HOW TO GET WARRANTY SERVICE :
To obtain warranty service, please call or fax to the
following telephone numbers from anywhere in the
continental United States:
Tel. 1-800-793-8896 or Fax. 1-800-448-4026
Or visit www.lg.com.
Correspondence may also be mailed to:
LG Electronics MobileComm U.S.A., Inc.
201 James Record Road Huntsville, AL 35824
DO NOT RETURN YOUR PRODUCT TO THE ABOVE
ADDRESS.
Please call or write for the location of the LG
authorized service center nearest you and for the
procedures for obtaining warranty claims.
Page 6

Contents
Your Phone ....................7
Phone Components ................7
Rear view .........................9
Getting Started ................10
Installing the SIM card and battery . . . 10
Charging your phone ..............11
On-Screen Icons .....................12
General Functions .............13
Before you begin ..................13
Making a Call ....................13
Making a Call with the Send Key .......13
Making International Calls ............. 13
Ending a Call .......................13
Making a Call from the Contacts .......14
Answering a Call ..................14
Adjusting the Volume ..............14
Vibrating Mode (Quick) ............... 14
Signal Strength ......................14
Entering Text. . . . . . . . . . . . . . . . . . . . . . 15
Changing the Text Input Mode ......... 15
123 Mode (Numbers Mode) ...........15
Using the 123 (Numbers) Mode ........ 15
Symbol Mode .......................15
ABC Mode .......................... 15
Using the ABC Mode ................. 15
4
In-Call Menu ..................17
During a Call .....................17
Making a Second Call ................ 17
Swapping Between Two Calls .......... 17
Answering an Incoming Call ...........17
Rejecting an Incoming Call ............ 17
Muting the Microphone ...............17
Using the Speakerphone ..............18
Recent Calls ..................19
Contacts .....................20
Contact List ......................20
New Contact .....................20
Groups ..........................20
Speed Dial .......................20
SIM Management .................21
Own Number .....................21
My Business Card .................21
Messages ....................22
Create Message ..................22
Inbox ...........................24
Drafts ...........................25
Outbox ..........................25
Message Settings .................26
Message Alert .......................26
Page 7

Save To .............................26
Signature ...........................26
Text Message ........................ 26
Multimedia Message ................. 27
Voicemail ...........................28
Email ........................29
Sending an email .................... 29
Retrieving your email .................29
Message folders .....................29
Changing your email settings .......... 29
Alarm Clock ..................31
Edit Alarm ..........................31
Browser ......................32
Using the Browser ....................32
Menus for the Browser ................33
Using the Navigation Keys .............33
Camera ......................34
Take Photo .......................34
Record Video .....................35
Camera Album ................36
Calendar .....................37
My Folder ....................38
Audio ...........................38
Music ...........................38
Playing Music .......................38
Adding Music To Your Phone ........... 39
Pictures .........................39
Video ...........................39
Other Files .......................40
File Manager .....................40
Tools ........................41
Voice Command ..................41
Alarm Clock .....................43
Games & Apps ...................43
Notepad ........................43
Calculator .......................43
Tasks ...........................43
Stopwatch .......................44
Tip Calculator ....................44
Unit Converter ....................45
Voice Recorder ...................45
Settings ......................46
Audio & Ringtones ................46
Ringtone ...........................46
Message Tone .......................46
Alert Tone ........................... 46
Keypad Tone ........................ 46
Multimedia .........................47
Call ................................47
5
Page 8

Phone Settings. . . . . . . . . . . . . . . . . . . . 47
Date & Time .........................47
Languages .........................47
Set Hotkeys .........................47
Flight Mode .........................48
Security ............................48
Reset Settings ....................... 49
Display ..........................49
Wallpapers ..........................49
Fonts ...............................49
Clocks & Calendar ................... 49
Brightness ..........................50
Backlight Timer ...................... 50
Menu Styles .........................50
Call ............................50
Call Forwarding ...................... 50
Send My Number .................... 50
Auto Redial ......................... 50
Answer Mode .......................51
Senior Mode ........................51
Minute Minder ......................51
Call Waiting ......................... 51
Call Reject .......................... 51
Send DTMF Tones .................... 51
Accessibility ......................... 52
Accessibility .....................52
Menu Readout ......................52
Keypad Tone ........................ 52
Large Text ...........................52
Invert Color .........................52
6
Mono Sound ........................52
Senior Mode ........................52
TTY ................................52
Hearing Aid ......................... 52
Voice Command ....................53
Connectivity .....................53
Bluetooth ...........................53
Connection ......................54
Internet Profiles ......................55
Access Points .......................55
Network Selection .................... 55
Memory .........................55
Used Space ......................... 55
Applications .....................55
Messages ..........................56
Browser ............................. 56
Software Update ..................58
Phone Information ................58
Accessories. . . . . . . . . . . . . . . . . . . 59
For Your Safety ................60
Safety Guidelines ..............65
Page 9
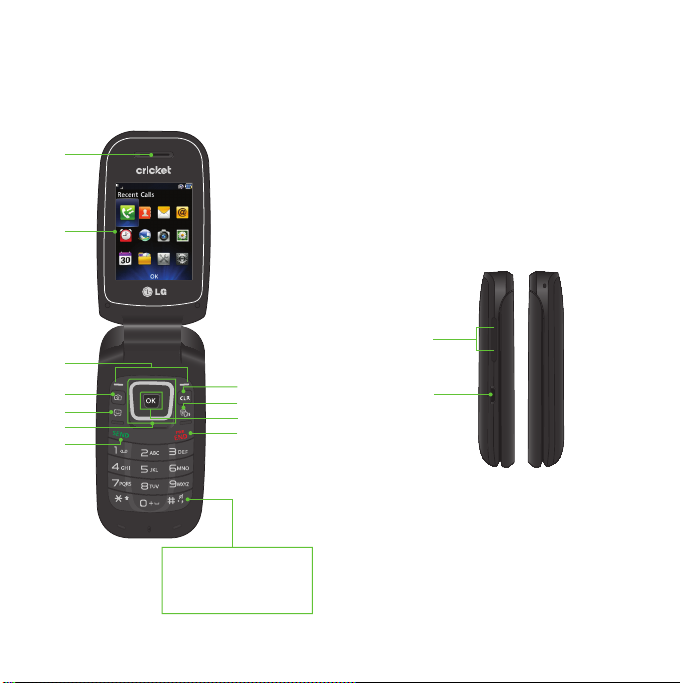
Your Phone
Phone Components
1
2
3
4
5
6
7
Press and hold to
activate/deactivate
Vibrating Mode.
8
9
10
11
12
13
7
Page 10

1. Earpiece: Lets you hear the caller during
a call.
2. Main LCD: Displays phone status icons,
menu items, web items, web information,
pictures and more, in full color.
3. Left Soft Key/Right Soft Key: Each
of these keys perform the functions
indicated by the text on the display
immediately above them.
4. Camera Key: Lets you activate the
Camera and take pictures.
5. Message Key: Allows you to create a
new message immediately.
6. Navigation Keys
Home screen functions:
Messages
Contacts
Email
Calendar
- In a menu: Navigates between menus.
7. Send Key: Press this key in standby mode
to quickly access the most recent missed,
dialed, and received calls. Also dials a
call when you enter a number.
8
8. Clear/Back Key: Allows you to return to
the previous screen. Press and hold to
activate the Voice Command function.
9. TTS Mode Key: Lets you turn the Text-To-
Speech mode on/off.
10. OK Key: Select options and menus.
11. End/Power Key: Allows you to power
the phone on or off, end calls, or return
to standby mode.
12. Volume Keys: Allows you to control the
Master Volume while in standby mode
and the earpiece volume during a call.
13. Charger/USB Port: Allows you to
connect a charger or other supported
accessories.
Page 11
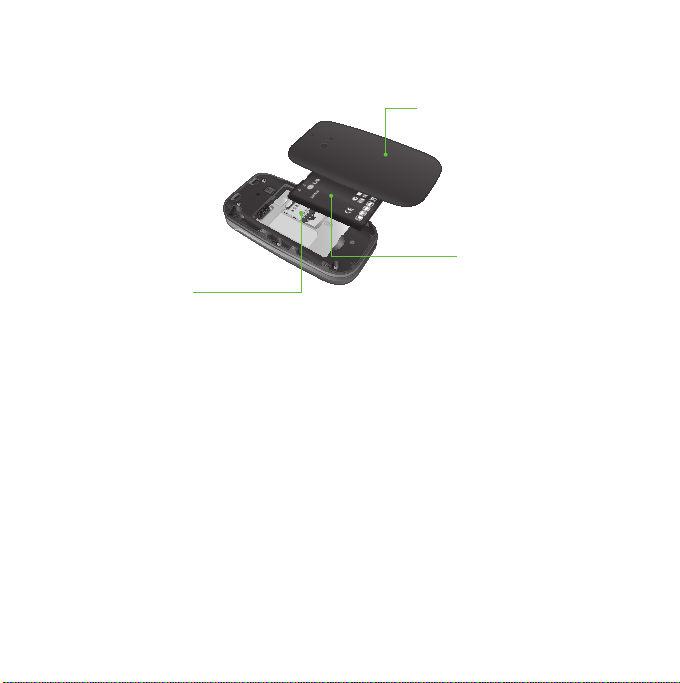
Rear view
SIM Card Slot
Back Cover
Battery
9
Page 12
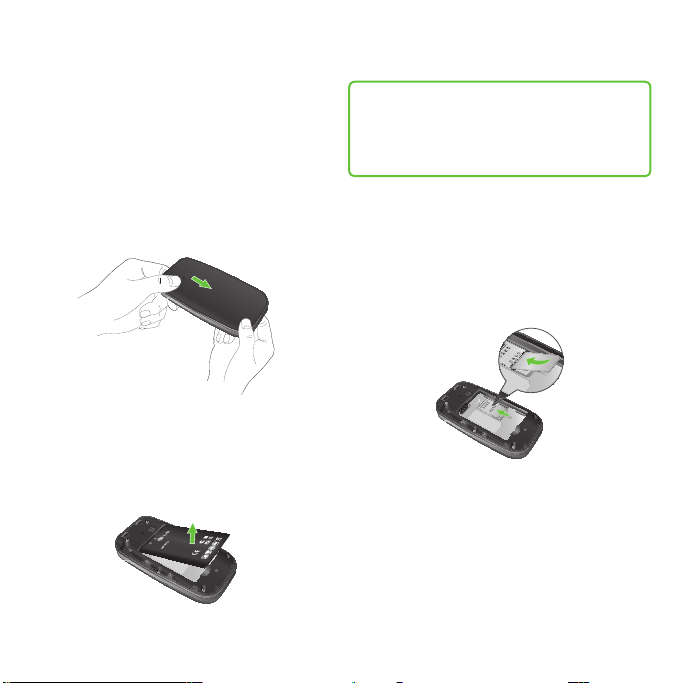
Getting Started
Installing the SIM card and battery
1. Remove the back cover
Place your thumb at the top part of the
back cover and slide it downwards to
remove it.
2. Remove the battery
Hold the top edge of the phone and use
the fingernail cutout near the bottom
of the battery to lift the battery from the
phone.
10
Warning
Do not remove the battery when the
phone is turned on; this can damage
the phone.
3. Install the SIM card
Slide the SIM card into the SIM card slot
(as shown below). Make sure that the
gold contact area on the card is facing
downwards. To remove the SIM card, slide
it gently in the opposite direction.
Page 13
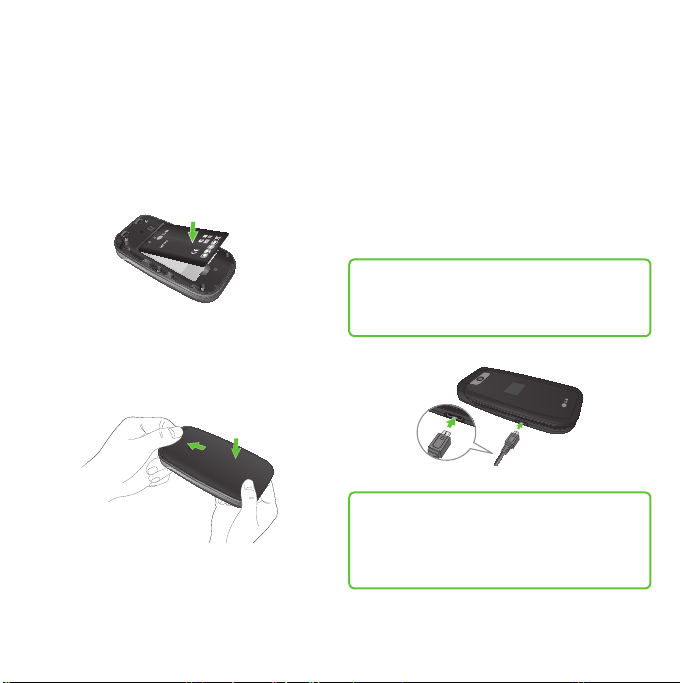
4. Install the battery
Insert the top of the battery first into the
top edge of the battery compartment.
Ensure that the battery contacts align
with the terminals on the phone. Press the
bottom of the battery down until it snaps
into place.
5. Install the back cover
Align the back cover on the battery
compartment and slide it upwards until it
locks into place.
Charging your phone
Locate the Charger/USB Port on the left
side of your phone. Insert the charger
connector to the phone (the ‘B’ side of
the connector has to be facing up when
connecting to the phone) and then plug
the other end into the wall socket. Your
phone will need to be charged until the Full
Battery message appears on the screen.
Important!
You must insert the battery before
charging.
Warning
Use of unauthorized accessories could
damage your phone and void your
warranty.
11
Page 14
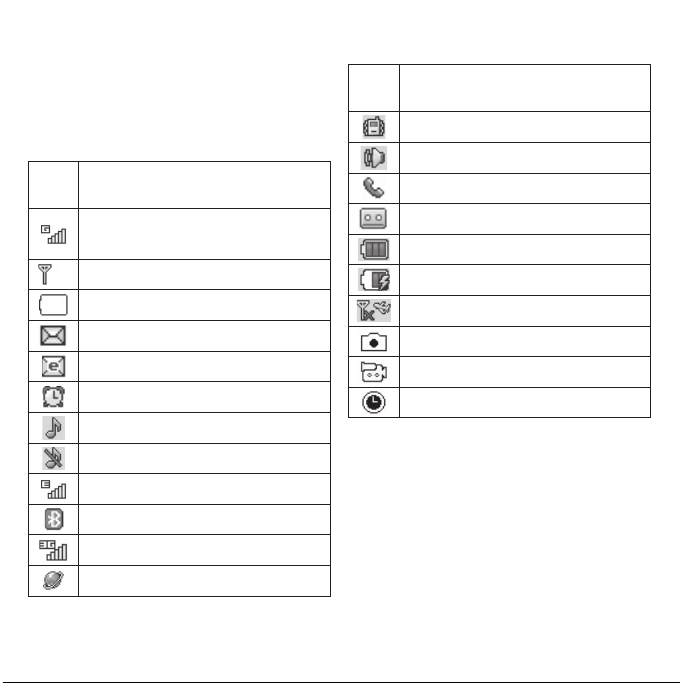
On-Screen Icons
The table below describes various display
indicators or icons that appear on the
phone’s display screen.
ICON/
DESCRIPTION
INDICATOR
Network signal strength (number
of bars will vary)
No network signal
Low Battery
New text message
New email
An alarm is set
Ring profile in use
Silent All profile in use
EDGE network available
Bluetooth is active
3G network available
The browser is active
12
ICON/
DESCRIPTION
INDICATOR
Vibrating Mode On
Speakerphone
Call in Progress
Voicemail
Battery Full
Battery Charging
Flight Mode On
Camera in use
Camcorder in use
Camcorder timer
Page 15

General Functions
Before you begin
Remember that you can select the menu
icons from the Menu screen using the
number keys if you set the Menu Styles
option as List. If you set the Menu Styles
option as Icon, you can only use the
Navigation Keys to select the menu icons.
Making a Call
1
Make sure your phone is powered on.
2
Enter a phone number including the
area code. To edit a number on the
display screen, simply press the Clear/
Back Key
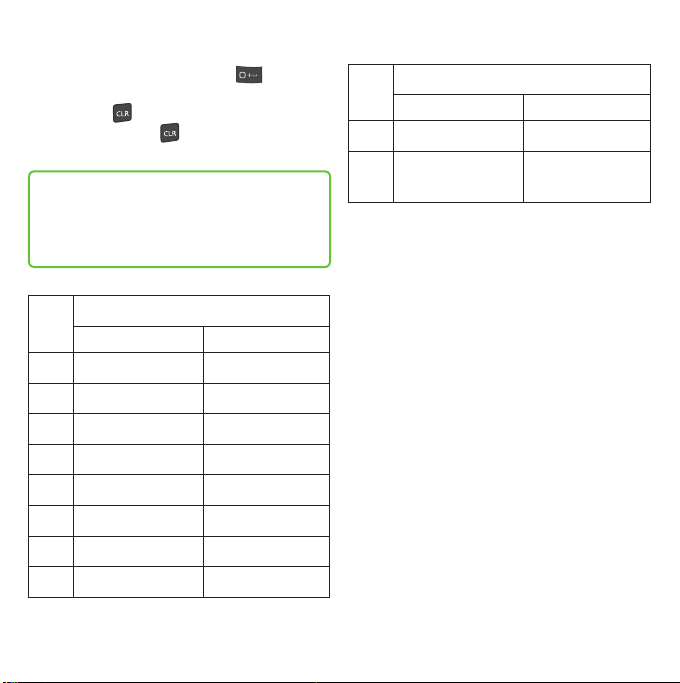
d Press and hold the Clear/Back Key
to erase the entire number.
3
Press the Send Key to call the
number.
4
To end the call, press the End/Power Key
.
to erase one digit at a time.
Making a Call with the Send Key
Press the Send Key to display the
1
most recent missed, dialed and received
calls will be displayed.
Highlight the desired number by using
2
the Navigation Keys.
Press the Send Key .
3
Making International Calls
Press and hold the key and the
1
international access character ‘+’ will
appear.
Enter the country code, area code, and
2
the phone number.
Press the Send Key to call the
3
number.
Ending a Call
To end a call, press the End/Power Key
.
13
Page 16

Making a Call from the Contacts
You can store frequently called names and
phone numbers in the SIM card as well as
in your Contacts List.
You can dial a number by simply
highlighting a name in the Contacts List
and pressing the Send Key
Press the Down Navigation Key to
1
access the Contact List.
Highlight the Contact and press the Send
2
Key
.
.
Answering a Call
When you receive a call, the phone
displays a notification on the screen and
rings and/or vibrates. If the caller can
be identified, the caller’s phone number
(or name, if stored in your Contacts) is
displayed.
1
Press the Send Key or the Left Soft
Accept to answer an incoming
Key
call.
If the Answer Mode has been set as Any
Key (
Call >
14
Menu > Settings >
Answer Mode), any key press
will answer a call, except for the End/
Power Key
2
End the call by pressing the End/Power
Key
Note
You can answer a call while using other
functions or features.
, or the Right Soft Key .
.
Adjusting the Volume
Use the Volume Keys during a call to
adjust the earpiece volume.
While in standby mode, you can adjust the
Master Volume using the Volume Keys.
Vibrating Mode (Quick)
Vibrating Mode can be activated by
pressing and holding down the
Signal Strength
If you are inside a building, being near a
window may give you better reception. You
can see the strength of your signal by the
signal indicator on your phone’s display
screen.
key.
Page 17

Entering Text
You can enter alphanumeric characters
by using the phone’s keypad. For example,
storing names in the Contacts, writing
a message, or scheduling events in the
calendar all require text to be entered.
Changing the Text Input Mode
Change the text input mode by pressing
when in a text entry field.
You can check the current text input mode
in the upper right corner of the screen.
The following text input modes are
available on the phone.
123 Mode (Numbers Mode)
Type numbers using one keystroke per
number. To change to 123 mode in a
text entry field, press the key until
123 mode is displayed in the upper right
corner.
Using the 123 (Numbers) Mode
The 123 Mode enables you to enter
numbers in a text message (a telephone
number, for example) more quickly. Press
the keys corresponding to the required
digits before manually switching back to
the appropriate text entry mode.
Symbol Mode
The Symbol Mode enables you to enter
various symbols or special characters.
To enter a symbol, press the
Use the Navigation Keys to highlight the
desired symbol and press the OK Key
key.
.
ABC Mode
This mode allows you to enter letters by
pressing the key labeled with the required
letter.
Using the ABC Mode
Use the alphanumeric keypad to enter your
text.
Press the key labeled with the required
1
letter.
15
Page 18
To insert a space, press the key
2
once. To delete letters, press the Clear/
Back Key
Clear/Back Key
entered text.
Note
Refer to the table below for more
information on the characters available
using the keys.
Key
1
2
3
4
5
6
7
8
16
. Press and hold down the
to erase all of the
Characters in the Order Displayed
Upper Case Lower Case
. , ’ @ ? ! - : / 1 . , ’ @ ? ! - : / 1
A B C 2 a b c 2
D E F 3 d e f 3
G H I 4 g h i 4
J K L 5 j k l 5
M N O 6 m n o 6
P Q R S 7 p q r s 7
T U V 8 t u v 8
Characters in the Order Displayed
Key
Upper Case Lower Case
9
0
W X Y Z 9 w x y z 9
Space Key,
0 (Long press)
0 (Long press)
Space Key,
Page 19

In-Call Menu
During a Call
Your phone provides a number of control
functions that you can use during a call.
To access these functions during a call,
press the Left Soft Key
Making a Second Call
You can select a number you wish to dial
from the Contacts to make a second call.
1
Press the Left Soft Key Options, then
select Contacts.
2
Highlight the contact, then press the
Send Key to make a second call.
Swapping Between Two Calls
Once the second call has been dialed (or
answered), you can switch between the
calls by using one of the following three
methods:
d Press the Send Key .
d Press the Left Soft Key Options and
then select Swap Calls.
d Press the up or down Navigation Keys.
Options.
Answering an Incoming Call
To answer an incoming call when the
phone is ringing, simply press the Send Key
. The phone is also able to warn you of
an incoming call while you are already on
a call. A tone sounds in the earpiece and
the display will show that a second call is
waiting. This feature, known as Call Waiting,
is only available if your network supports it.
If Call Waiting is turned on, you can put the
first call on hold and answer the second
call by pressing the Send Key
.
Rejecting an Incoming Call
You can reject an incoming call without
answering by simply pressing the End/
Power Key
.
Muting the Microphone
You can mute the microphone during a
call by pressing the Right Soft Key
Mute. The phone can be unmuted by
pressing the Right Soft Key
When the phone is muted, the caller
cannot hear you, but you can still hear the
caller.
Unmute.
17
Page 20
Using the Speakerphone
You can use the integrated Speakerphone
during a call by pressing the OK Key
Spk. On. The loudspeaker is automatically
deactivated when you end the call.
Warning
Due to increased volume levels, do not
place the phone near your ear while the
speakerphone is enabled.
18
Page 21

Recent Calls
This menu allows you to see the list of
recent calls. To access Recent Calls, from
the standby screen, press the Left Soft Key
Menu and select Recent Calls .
You can access the following menus:
All Calls, Missed Calls, Dialed Calls, and
Received Calls.
19
Page 22

Contacts
Contact List
This menu allows you to save and manage
contact address information. The Contact
List allows you to add a new address or
search saved contact addresses by name.
To access Contact List, from the standby
screen, press the Left Soft Key
Contacts
and Contact List.
Menu,
New Contact
This menu allows you to add a new
contact to the Contact List. You can enter
contact address information including
name, phone numbers, email addresses,
group information items, memos, ring tones,
and a contact Picture ID.
To access New Contact, from the standby
screen, press the Left Soft Key
Contacts
20
and New Contact.
Menu,
Groups
This menu allows you to manage group
information. You can also configure a
ring tone for a group so that the group
ring tone sounds when a call from a
specific contact address within that group
is received and there is no ring tone
configured for the specific contact address.
To access Groups, from the standby screen,
press the Left Soft Key
and Groups.
Menu, Contacts
Speed Dial
This menu allows you to assign a
frequently-called contact to the Speed Dial
List. You can select a number from 2 to 9 as
a speed dial.
To access Speed Dial List, from the standby
screen, press the Left Soft Key
Contacts
and Speed Dial.
Menu,
Page 23

SIM Management
This menu allows you to copy information
from your SIM card to your phone and
vice versa. If a name is duplicated during
the copying operation, the information
is also duplicated. You can also delete
information from the SIM card.
To access SIM Management, from the
standby screen, press the Left Soft Key
Menu, Contacts and SIM
Management.
Own Number
This displays your personal phone number.
To access Own Number, from the standby
screen, press the Left Soft Key
Contacts
and Own Number.
Menu,
My Business Card
This displays your business card stored in
the phone. You can also edit it.
To access My Business Card, from the
standby screen, press the Left Soft Key
Menu, Contacts
Card.
and My Business
21
Page 24
Messages
This menu includes functions related to SMS
(Short Message Service), MMS (Multimedia
Message Service), Voicemail as well as the
network’s service messages.
Create Message
1
From the standby screen, press the Left
Soft Key Menu.
Select Messages.
2
Press Create Message .
3
OR
You can simply press the Message Key
from the standby screen.
Note
If you insert a picture, audio, or video
file while writing a multimedia message,
the file loading time will take about
5 seconds. You will not be able to
activate any key during the file loading
time. When the file loading is complete,
you will be able to continue writing your
multimedia message.
22
Editing a message
The following options are available when
editing a message.
Using Insert
While entering text, press the Right Soft
Insert. The following options are
Key
available.
d Symbol: You can insert various symbols
into your message. Pressing the Left Soft
Key and Right Soft Key scrolls
through the pages.
d Picture: You can select a picture to insert
by using the Navigation Keys. You can
preview the selected picture by pressing
the Right Soft Key
d Audio: You can insert an audio file from
your saved audio files.
d Video: You can insert a video clip from
your saved video clips.
d Take New Picture: You can take and
insert a picture in your message.
View.
Page 25
d Record New Audio: You can record a
new audio clip by pressing the OK Key
Record. Press the Left Soft Key
Options before you begin recording to
set the options (below). After recording
a new audio clip, you can delete it by
pressing the Left Soft Key
s Quality: Set the audio’s quality to Fine,
Discard.
Normal, or Economy.
d Record New Video: You can record a
new video by pressing the OK Key
Rec. When finished recording, press the
OK Key
d Slide: Allows you to insert another slide
Insert.
before or after the current slide.
d Template
s Text: Allows you to easily insert
frequently used sentences in the text
message.
s Multimedia: Preset multimedia
templates can be created (
Menu > Messages
> Message
Settings > Multimedia Message
Multimedia Templates >
>
New).
s Signature: Allows you to insert your
own created signature.
d More: Allows you to insert vCard,
vCalendar, vNote, vTask or Contact.
Note
vCard, vCalendar, vNote and vTask are
created by the Contacts, Calendar,
Notepad, and Tasks functions,
respectively.
Using Options
While entering text, press the Left Soft Key
Options.
s Text Entry Mode: Sets the text input
mode. For more details, refer to Entering
Text (page 15).
s Text Entry Settings
- Text Entry Language: Allows you to set
the text entry language to English or
Spanish.
- T9 Word Candidate List: Displays the
word candidates as you type.
- T9 Next Word Prediction: Allows the
phone to predict the next word when
typing in T9 mode.
- T9 Dictionary: Allows you to add, delete,
reset, and modify words.
23
Page 26

Save to Drafts: Saves the message to
Drafts.
Cancel Message: Allows you to exit the text
input mode without saving your message.
Sending a Message
After completing a message, press the OK
Key
Send To to select a recipient.
s Enter the recipient(s). For more options,
press the Left Soft Key
this menu, you can choose from the
following options:
- Enter Number: Allows you to enter the
phone number using the keypad.
- Enter Email: Allows you to enter an
email address instead of a phone
number.
- Insert Symbol: Allows you to enter
symbols.
- Caller Groups: Displays Contacts
Groups.
- Recent Messages: Choose a
Contact from Recent Messages.
- Recent Calls: Choose a Contact
from Recent Calls.
- Delivery Options: Allows you to set
the options for Add Cc and Add Bcc.
24
Options. In
- Save to Drafts: Saves the selected
message to Drafts.
- Text Entry Mode: Allows you to
change the text entry mode.
- Text Entry Settings: Allows you to
set the options for Language, T9
Word Candidate List, T9 Next Word
Prediction, and T9 Dictionary.
- Cancel Message: Allows you to
cancel the message.
Inbox
You will be alerted when you receive a
message. New messages are stored in the
Inbox. In the Inbox, you can identify each
message by icons. If you are notified that
you have received a multimedia message,
you can download the whole multimedia
message by selecting it in the Inbox menu.
To reach the Inbox, from the standby
screen, press the Left Soft Key
Messages
When you press the Right Soft Key
Reply, you can reply to the sender of the
message.
While viewing the Inbox, press the Left Soft
Key
> Inbox.
Options for the following options:
Menu >
Page 27

d Add to Contact: You can save the
sender’s phone number in the Contact
List.
d Delete: You can delete the selected
message.
d Forward: You can forward the selected
message to another person.
d Standard View/Conversation View:
Switches the Inbox view mode to
Standard view or Conversation View.
d Copy to SIM/Copy to Phone: You can
copy the message to the phone or
SIM card depending on where the text
message is stored.
d Move to SIM/Move To Phone: You can
move the message to the phone or
SIM card depending on where the text
message is stored.
d Select Multiple: You can select multiple
messages to delete.
d Sort By: Allows you to sort the messages
by date, sender, read/unread, or subject.
d Message Details: You can view the
following information about received
messages: Type, Subject, From, and Time.
d Delete All Read Msg: You can delete all
read messages.
Drafts
Allows you to view and edit the messages
saved as drafts. To access drafts, from the
standby screen, press the Left Soft Key
Menu, Messages
, and Drafts. When
you press the Right Soft Key Delete, it
allows you to delete the message.
While viewing the Drafts, press the Left Soft
Options for the following options:
Key
d Select Multiple: Allows you to select
multiple messages to delete.
d Message Details: Allows you to view the
details of the message.
Outbox
Outbox is the storage place for recently
sent messages. When you press the Send
Key , you can call the recipient of the
selected message.
If the message is not sent from the Outbox,
you will receive a sound alert along with
a Message Sending Failure notice on the
screen. Another attempt will be made to
send the failed message and after two
unsuccessful attempts, the message will no
longer be sent automatically.
25
Page 28

To access the Outbox, from the standby
screen, press the Left Soft Key
Messages
The following options are available for the
Outbox folder by pressing the Left Soft Key
Options:
d View Status: Display the status of
message.
d Delete: Deletes the selected message.
d Edit: Allows you to edit the selected
message.
d Select Multiple: Allows you to select
multiple messages to delete.
d Sort By: Allows you to sort the messages
by date and recipient.
d Message Detail: Allows you to view the
details of the message.
Press the Right Soft Key Forward to
send the selected message to another.
, and Outbox.
Menu,
Message Settings
To access and configure your Message
Settings, from the standby screen, press the
Left Soft Key
Message Settings.
26
Menu, Messages , and
Message Alert
Allows you to set the Sounds, Volume, Alert
Type, and Alert Interval.
Save To
Allows you to choose whether to save to
the SIM Card or the Phone.
Signature
Allows you to create, edit, and delete your
signature, which can be configured to be
sent out with your outgoing messages.
Text Message
Allows you to set preferences for text
messages.
The following options are available:
d Text Templates: Predefined messages
that can quickly be sent. Press the Left
Soft Key Options to access the
following available options:
s Send: Allows you to send the selected
template via Message.
s Delete: Allows you to delete the
selected template message.
Page 29

s Edit: Allows you to edit the selected
template message.
s Delete All: Deletes all messages in the
folder.
s Cancel: Returns to Text Message menu.
d Msg Center No.: Allows you to view and
edit the phone number for the Message
Center. Do not edit unless instructed to
do so by your service provider.
d Insert Signature: Allows you to insert your
signature in outgoing messages.
Multimedia Message
Allows you to set your preferences for
multimedia messages.
The following options are available:
d Multimedia Templates: Allows you
to add, edit, and delete multimedia
templates. Press the Right Soft Key
New to create a new multimedia
template. Press the Left Soft Key
Options while creating a message to
access the following available options:
s Text Entry Mode: Sets the text input
mode. For more details, refer to Entering
Text (page 15).
s Text Entry Settings
- Text Entry Language: Allows you to
set the text entry language to English
or Spanish.
- T9 Word Candidate List: Displays the
word candidates as you type.
- T9 Next Word Prediction: Allows the
phone to predict the next word when
typing in T9 mode.
- T9 Dictionary: Allows you to add,
delete, reset, and modify words.
s Cancel: Allows you to exit the text input
mode without saving your message.
d Download Options
s Download Without Ask: Allows
multimedia messages to be
downloaded automatically.
s Ask Always: You are prompted
to download when a multimedia
message is received.
s Discard: Enabling this option will block
incoming multimedia messages from
being received.
d Message Center: Allows you to view and
edit the phone number for the Message
Center. Do not edit unless instructed to
do so by your service provider.
27
Page 30

Voicemail
This menu allows you to set the Voicemail
Center Number if this feature is supported.
Please check with for details of their
service in order to configure the phone
correctly.
28
Page 31

Sending an email
To send/receive an email, you should set
up an email account.
1
Press the Left Soft Key Menu, select
Email
want to use.
2
Press the Left Soft Key Options and
choose Write Email to write an
email.
3
Enter the recipient’s address in the To
field. Then use the down Navigation Key
to access the Subject and Messages
fields.
4
Enter your message using the keypad
and press the OK Key
the email.
and choose the account you
Send to send
Retrieving your email
1
Press the Left Soft Key Menu, and
select Email
2
Select the account you want to use.
3
Press the Left Soft Key Options and
then press the OK Key
connect to your email account and
retrieve your new messages.
.
Refresh to
Message folders
Open Email, press the Left Soft Key
Options, and select
folders will be displayed.
d Write Email: Create your new message.
d Inbox: All the e-mails you receive are
placed into your Inbox. From here you
can reply, forward and more.
d Drafts: If you don’t have time to finish
writing a e-mail, you can save what you
have written so far in here.
d Outbox: This is a temporary storage folder
while e-mail are being sent or stores the
messages that are failed to sent.
d Sent: Copies of all the e-mail you send
are kept into your Sent folder.
d Trash: All the e-mail you remove are
placed into your Trash.
Mailbox. The list of
Changing your email settings
1
Press the Left Soft Key Menu, choose
Email
>
Settings.
2
Set any of the following options.
> Left Soft Key Options
Mailbox > Options >
29
Page 32

d Accounts: You can edit e-mail account
settings.
d Notification: Choose whether or not to
be alerted to new emails.
d Default Account: Choose which account
to compose e-mail by default.
d Signature: Create an email signature
and switch this feature on.
30
Page 33

Alarm Clock
The alarm function allows you to set up
multiple separate alarms. You can also set
the time, repetition interval, and alarm tone.
If there is no alarm setting, press the Left
Soft Key
To access Alarm Clock, from the standby
screen, press the Left Soft Key
and select Alarm Clock
New to add a new alarm.
Menu
.
Edit Alarm
d Time: Input your desired alarm time by
specifying the hour and minutes.
You can also choose a predefined
amount of time (15 Minutes Later, 30
Minutes Later, 45 Minutes Later, 1 Hour
Later, Off).
d Repeat: Select the desired repeat mode
(Once, Daily, Mon ~ Fri, Sat ~ Sun, Select
Weekday).
d Alarm Tone: Press the OK Key List to
access the list of available Alarm Tones.
d Volume: Press the OK Key List and
then set the volume of the alarm by
pressing the up and down Volume Keys.
Then press the OK Key
Set.
d Type: Select the Ring Alert Type between
Ring, Vibrate, Ring & Vibrate and Vibrate
after Ring.
d Memo: Enter an alarm name.
d Snooze Interval: Select the snooze
interval between 5 Minutes, 15 Minutes,
30 Minutes, 45 Minutes, 1 Hour and Off.
Press the Left Soft Key
your new Alarm.
Save to save
31
Page 34

Browser
The Browser is one of the services provided
by your network operator and it gives you
access to all the cool things you can do
with your wireless phone.
Note
Check the availability of services, pricing,
and tariffs with your network operator
and/or the service provider whose
service you wish to use. Service providers
will also give you instructions on how to
use their services.
Please contact your service provider to
open an Internet account.
Launch the Browser
To launch the browser from the standby
screen, press the Right Soft Key
Browser or press the Left Soft Key
Menu and select the Browser
Navigation Keys.
To exit the browser at any time, press the
End/Power Key .
32
using the
Using the Browser
Once you are connected to the Internet,
the following menu options are available
when you press the Left Soft Key
Options:
d Zoom: Allows you to zoom in/out for
better look.
Note
You can also adjust the Browser text and
image size by pressing the up and down
Volume Keys to zoom in and out.
d Home: Directs you to the homepage.
d Windows: You can have several browser
windows to navigate different web pages
at the same time.
d Enter URL: Allows you to enter URL you
desire to visit.
d Send Link: Allows you to send the URL link
in a message.
d Bookmarks: You can add or save the
current page to Bookmarks or view the
list saved under Bookmarks.
d Navigation Mode: Allows you to select
Back, Forward, and Refresh.
Page 35

d Search Text: Allows you to search the text.
d Recent Pages: Allows you to view your
history of recently viewed web sites.
d Settings: Allows you to set options for
web pages and appearance.
Menus for the Browser
You can surf the Internet using either the
phone keys or the Browser menu.
Using the Navigation Keys
When surfing the Internet, the Navigation
Keys function similarly from when the
phone is on standby mode.
33
Page 36

Camera
To access Camera from the standby
screen, press the Left Soft Key
and select Camera
.
Menu
Take Photo
Using the camera you can take pictures
of people or events while on the move.
Additionally, you can send photos to other
people in a picture message.
The following options will appear (as icons)
at the bottom of the screen.
d Album: Allows you to see saved image
and video files.
d Video: Allows you to switch to
Camcorder mode.
d Capture: Allows you to capture the
image.
d Zoom: Allows you to set the zoom level.
d Brightness: Allows you to set the
Brightness.
Press the Right Soft Key
the following options:
Preview Tab
d Image Size: The resolution of the image
can be captured in 1280*960, 640*480,
320*240.
34
Settings for
d Color Effects: Allows you to choose from
Off, Mono, Sepia, or Negative.
d White Balance: Set the White Balance
as Auto, Daylight, Cloudy, Illuminate, or
Indoors.
d Night Mode: Set Night Mode to On or Off.
d Timer: Timer can be set to Off, 3 Seconds,
5 Seconds, or 10 Seconds.
d Shot Mode
- Normal: This set as normal camera
mode.
- Continuous Shot: This is great for taking
photos of moving objects or at sporting
events. The continuous shot is only
available in QVGA(320x240) mode and
can be set to 3, 6, or 9 shots per event.
d Image Quality: The quality of the
captured image can be set to Super
Fine, Fine, or Normal.
Others Tab
d Shutter Tones: You can choose from Tone
1, Tone 2, Tone 3, or Off.
d Reset settings: Allows you to set the
Camera to the default settings.
Page 37

Using Zoom
In Camera mode, you can zoom in and
out by using the up and down Volume
Keys. The maximum zoom scale depends
on the resolution as follows.
Resolution Zoom scale
1280*960 Not Available
640*480 Level 1 ~ Level 10
320*240 Level 1 ~ Level 10
Record Video
Allows you to record a video clip with your
phone. Before starting to record, press the
Left Soft Key
settings.
The following options will appear (as icons)
at the bottom of the screen.
d Album: Allows you to see saved image
and video files.
d Photo: Allows you to switch to the
Camera function so you to take a
picture.
d Rec: Allows you to begin recording the
video.
d Zoom: Allows you to set the zoom level.
Settings to configure your
d Brightness: Allows you to set the
Brightness.
Press the Left Soft Key
Settings for the
following options:
Preview Tab
d Color Effects: Allows you to choose from
Off, Mono, Sepia, or Negative.
d White Balance: Set the White Balance
as Auto, Daylight, Cloudy, Illuminate, or
Indoors.
d Video Quality: Allows you to set video
quality to Super Fine, Fine, or Normal.
d Duration: Set the recording duration to
General Mode or MMS Video Mode.
Others Tab
d Recording Tones: Allows you set
Recording Tones to On or Off.
d Reset settings: Allows you to set the
Camcorder to the default settings.
Note
In Video mode, you can adjust the zoom
scale by using the up and down Volume
Keys. The zoom scale ranges from Level 1
to Level 9.
35
Page 38

Camera Album
Allows you to view the pictures and videos
that are captured with the camera.
To access Camera Album, from the standby
screen, press the Left Soft Key
and select Camera Album
When a file is highlighted, the following
options are available when you press the
Left Soft Key
For image file:
Use As/Send Via/Print Via Bluetooth/
Delete/Rename/Select Multiple/File
Information.
For video file:
Send Via/Delete/Rename/Select
Multiple/File Information
Options:
Menu
.
36
Page 39

Calendar
When you enter this menu, a calendar will
be displayed. The red square cursor is used
to locate a particular day. The bottom bar
on the calendar indicates saved schedules
(if any) for that day. This function helps you
keep track of your schedule. The phone
can sound an alarm tone if it has been set
for a specific schedule item.
The chart below shows the keys that can
be used to navigate the Calendar:
Key
/
/
/
.
/
To access Calendar, from the standby
screen, press the Left Soft Key
and Calendar
The following options are available when
pressing the Left Soft Key
d Search: Allows you to search the saved
schedule(s).
Description
Weekly
Daily
Annually
Monthly
Menu
Options:
d Set Holiday: Allows you to set specific
dates to display as Holidays on your
calendar.
d View All: Allows you to view all saved
schedules.
d Week View: Allows you to view the
calendar by week.
d Go to Date: Allows you to jump to a
specific date.
d Selective Delete: Allows you to delete
Old Schedules or All Schedules
selectively.
d Settings: Allows you to set various
calendar settings.
37
Page 40

My Folder
Audio
To access Audio, from the standby screen,
press the Left Soft Key
Folder
, and Audio.
d Record Voice: Allows you to record voice
notes.
d Saved audio files are displayed in the list.
Menu, My
Music
You can access Music by pressing the Left
Soft Key
Music.
The following options are available:
d All Songs: Allows you to view all the
songs in your music library.
d Playlists: Allows you to create your own
playlists.
d Artists: Shows the list of artists of all the
songs in your music library, and shows all
the songs by a chosen artist.
d Albums: Shows the list of albums of
all the songs in your music library, and
shows all the songs on a chosen album.
d Genres: Shows the list of genres of all the
songs in your music library, and shows all
songs of a specific genre.
38
Menu, My Folder , and
d Shuffle Songs: Allows you to play all the
songs in your music library in random
order.
Tip!
The music player plays formats such as
MP3, AAC, AAC+, and WMA.
Note
Music files may be protected by
copyright and intellectual property laws.
Please ensure that you adhere to the
applicable Terms of Use of materials laws
prior to downloading or copying files.
Playing Music
To listen to music that you have in your
phone, follow these quick easy steps:
1
Press the Left Soft Key Menu and My
Folder
2
Select Music and then choose from
Now Playing, All Songs, Playlists, Artists,
Albums and Genres or Shuffle Songs to
shuffle your collection.
.
Page 41

s Press the OK Key Play/Pause to
play and pause a selected song. While
playing, press the up or down Navigation
Keys to change the volume and the
left or right Navigation Keys to go to the
previous or next song.
s While playing music, press the Left
Soft Key
functions while music is playing.
Options to access other
Adding Music To Your Phone
Music files can be added to your phone
by using one or more of the following
methods:
s Download music and ringtones over the
network directly to your device.
Note
Some sites are data intensive (i.e.
previews via streaming) so the user
should be enrolled in an unlimited data
plan before using these services to avoid
per-use data charges.
Additional charges may apply when
downloading music, ringtones, etc.
Pictures
To access Picture, from the standby screen,
press the Left Soft Key
Folder
, and Pictures.
d Take Photo: Allows you to take a picture.
d The picture files saved on your phone are
displayed.
Menu, My
Video
To access Video, from the standby screen,
press the Left Soft Key
Folder
, and Video.
d Record Video: Allows you to record a
video.
d The video files saved on your phone are
displayed.
Note
Please note that DRM can restrict some
functions, such as sending and editing.
Menu, My
39
Page 42

Other Files
When you receive files of an undefined
format (such as .vcs, .vcf, etc.) via email,
the files are saved in this folder.
To access Other Files, from the standby
screen, press the Left Soft Key
My Folder
The following options are available by
pressing the Left Soft Key
d Send Via: Send the selected file via
Message, Email, or Bluetooth.
d Delete: Allows you to delete the selected
file.
d Move: Allows you to move the selected
file to another folder.
d Copy: Allows you to copy the selected
file to another folder.
d Rename: Allows you to edit the name of
the selected file.
d Select Multiple: Allows you to select
multiple files at once to perform various
functions.
d Sort By: Allows you to sort the files by
Name, Date, and Type.
d File Information: Allows you to view
information about the selected file or
used memory space on your phone.
40
, and Other Files.
Menu,
Options:
File Manager
This function allows you to view the content
in your internal phone memory.
To access File Manager, from the standby
screen, press the Left Soft Key
My Folder
, and File Manager.
Menu,
Page 43

Tools
Voice Command
Voice Command is the function whereby
your phone’s voice recognition engine
identifies the voice of the user and carries
out the requested commands. When
the user operates the Voice Command
function, there are five possible commands,
Call <Name or Number>, Listen Voicemail,
Missed Calls, Messages, and Time & Date.
To activate the Voice Command function,
hold down the Clear/Back Key
the phone is in standby mode or press the
Left Soft Key
Voice Command.
Call <Name or Number>: This function
1
is activated only when the user says
the command “Call” followed by the
name stored in the address book or say
the phone number. Please note that
interfering noise might cause a problem
displaying candidates. Additionally, the
user has the option to select a number
type at the end, such as “mobile”, “home”,
or “work”.
Listen Voicemail: This command is
2
activated when the user says “Listen
Voicemail”. The user will then be
automatically connected to voicemail.
Menu, Tools , and
while
Missed Calls: This command is activated
3
when the user says the words “Missed
Calls”. The mobile phone presents the
missed call list.
s Follow-up Commands Available
- Yes: Make the phone call.
- No: Moves to the next result.
- Cancel: Go back to the main Voice
Command menu.
- Exit: Terminate Voice Command.
- Next: Moves to the next result.
Messages: This command is activated
4
when the user says “Messages”. The
phone displays details of unread text or
multimedia messages.
Time & Date: This command is activated
5
when the user says “Time & Date”. The
phone displays the current local time
and date.
Voice Command Options
When the Voice Command option is
activated, you can press the Left Soft Key
Options for the following options:
s Mode
- Speed: Voice Command is
abbreviated.
41
Page 44

- Normal: Voice Command is played
normally with prompts.
s Best Match
- 1 Match: The most likely match will
be displayed when finding a number
from the address book.
- 4 Matches: The four most likely
matched names will be displayed
when finding a name from the
address book.
s Sensitivity
- High: Operation and performance
of the voice recognition engine is
rarely affected by the user’s voice
command and surrounding sound.
- Medium: Operation of the voice
recognition engine is normally
affected by user’s voice command
and surrounding sound.
- Low: Operation of the voice
recognition engine is strongly
affected by user’s voice command
and surrounding sound.
42
s Spk. On Mode
- Automatic On: When this option is
selected, the speakerphone is turned
on and the sound is loud enough
so you can hear the output when
the phone is away from the ear, at a
distance
- Off: When this option is selected, the
speakerphone is turned off and the
sound comes from the earpiece,
which is quieter and cannot be
heard when the phone is away from
the ear, at a distance
s Call Alert
- Ring Only: The phone rings
repeatedly during an incoming call.
- Ring After Name: The phone
announces the name or number
of the incoming call, then rings
repeatedly.
- Name Repeat: The phone
announces an incoming call by
repeating the name or number of
the caller.
Page 45

Alarm Clock
The alarm function allows you to set up
multiple separate alarms. You can also set
the time, repetition interval, and alarm tone.
If there is no alarm setting, press the Left
Soft Key
To access Alarm Clock, from the standby
screen, press the Left Soft Key
Alarm Clock
Menu, Tools , and Alarm Clock.
For more details, refer to Alarm Clock on
page 31.
New to add a new alarm.
Menu,
or press the Left Soft Key
Press the Left Soft Key New to create
1
a new memo.
Input the memo and press the OK Key
2
Save to save.
Calculator
The Calculator function allows you to
calculate simple mathematical equations.
To access Calculator, from the standby
screen, press the Left Soft Key
, and Calculator.
Tools
Menu,
Games & Apps
This menu allows you to download or
access the various games.
To access the Games, from the standby
screen, press the Left Soft Key
and Games & Apps.
Tools
Menu,
Notepad
You can create up to a maximum of 30
memos.
To access Notepad, from the standby screen,
press the Left Soft Key
and
Notepad.
Menu, Tools ,
Tasks
This feature allows you to save and
manage a task.
To access Tasks, from the standby screen,
press the Left Soft Key
and Tasks.
1
To add a new task item, press the Left
Soft Key
2
Input the Due Date, Note, Priority, and
Status information for the new Task.
Press the Left Soft Key Save to save
3
the Task item.
The following options are available in the
Task list by pressing the Left Soft Key
New.
Menu, Tools ,
43
Page 46

Options:
d Mark ‘Complete’: Allows you to change
the status of the selected task as
Completed.
d Edit: Allows you to edit a saved task.
d Delete: Deletes the selected task.
d Selective Delete: Allows you to delete All
Completed/All Past Tasks selectively.
d Send Task Via: Enables the selected task
to be sent via Text Message, Multimedia
Message, Email, or Bluetooth.
d Select Multiple: Allows you to select
multiple Tasks.
d View Calendar: Allows you to view the
Calendar.
Stopwatch
This menu allows you to record the elapsed
time of an event. The duration of an
individual lap time (up to 20 laps) and the
total time can also be displayed.
To access Stopwatch, from the standby
screen, press the Left Soft Key
, and Stopwatch.
Tools
d Show Last: Displays the last time
recorded (only available if previous time
was not reset).
44
Menu,
d New Time
To start timing, press the OK Key
1
Start. The running time is displayed as
HH.MM.SS.hh (hours, minutes, seconds,
hundredths of a second).
During the timing, you can record an
2
individual lap time by pressing the Right
Soft Key
be recorded.
You can stop or restart timing by pressing
3
the OK Key
To reset the stop watch, press the Right
4
Soft Key
time, or to save the stop watch, press
the Left Soft Key
select Save.
d Saved Times: Allows you to see a list of
the saved recorded times.
Lap. Up to 20 lap times can
again.
Reset after stopping the
Options and then
Tip Calculator
This feature allows you to quickly and easily
calculate the tip amount based on the
total bill as well as the split of the total bill
based on the number of people.
To access Tip Calculator, from the standby
screen, press the Left Soft Key
, and Tip Calculator.
Tools
Menu,
Page 47

1
Enter the Total Bill ($), Tip (%), and Split
amounts.
2
The Tip ($) and You Owe ($) amounts
will be automatically calculated.
Unit Converter
This function allows you to convert units of
measurement.
There are 6 types of units that can
be converted: Area, Length, Weight,
Temperature, Volume, and Velocity.
To access Unit Converter, from the standby
screen, press the Left Soft Key
, and Unit Converter.
Tools
Menu,
Voice Recorder
Allows you to record an audio clip to your
phone. The recorded audio file is saved
automatically in the Audio menu.
To access Record Voice, from the standby
screen, press the Left Soft Key
, and Voice Recorder.
Tools
The following options are available when
you press the Left Soft Key
d Record Mode: Sets the recording mode
to either MMS Mode or General Mode.
Menu,
Options:
d Quality: Allows you to set the quality
of an audio clip. You can set it to Fine,
Normal, or Economy.
When you press the Right Soft Key
Gallery, it will take you to the Audio gallery.
45
Page 48

Settings
Audio & Ringtones
This menu allows you to configure the
audio and ringtone settings for your phone.
To access Audio & Ringtones, from the
standby screen, press the Left Soft Key
Menu, Settings , and Audio &
Ringtones.
Ringtone
d Sounds: Allows you to set a sound as the
ringtone for your phone.
d Volume: Allows you to control your
Ringtone volume.
d Alert Type: Supports 3 ring alert types:
Ring, Ring and Vibration, and Ring after
Vibration.
Note
Full length music tracks cannot be set as
either ringtones or message tones.
46
Message Tone
d Sounds: Allows you to set a sound as
your message tone.
d Volume: Allows you to control your
Message Tone volume.
d Alert Type: Supports 4 message alert
types: Silent, Vibrate, Ring Only, Ring &
Vibrate.
d Alert Interval: Allows you to set the
interval alert to Once, Every 2 min, Every 5
min, Every 10 min, or Every 15 min.
Alert Tone
d Sounds: Allows you to select a set of alert
tones. Supports 2 alert tone types: Alert
Tone 1 and Alert Tone 2.
d Volume: This menu allows you to control
your Alert Tone volume.
d Alert Type: You can select to turn Alert
Tones to Ring or Silent.
Keypad Tone
d Sounds: Allows you to select a tone that
the phone sounds when a key is pressed
on the dialpad. You can select an option
from Beep and Voice.
Page 49

d Volume: Allows you to control your
Keypad Tone volume.
Multimedia
This menu allows you to control your
Multimedia volume.
Call
This menu allows you to control your Call
volume.
Phone Settings
This menu allows you to configure the
Phone Settings. To access Phone Settings,
from the standby screen, press the Left
Soft Key
Phone Settings.
Date & Time
d Set Date: Allows you to enter the day,
month, and year. You can set to Auto
Update with the Auto Update menu.
d Date Format: Allows you to select the
date format.
ddd, MMM DD (day, month date)
MM/DD/YYYY (month/date/year)
DD/MM/YYYY (date/month/year)
Menu, Settings , and
YYYY/MM/DD (year/month/date)
d Set Time: Allows you to enter the current
time. You can choose the time format via
the Time Format menu option.
d Time Format: Allows you to choose the
time format between 12 Hours and 24
Hours.
d Auto Update: Allows you to set the
phone to automatically update the time
and date according to the current local
time zone.
Languages
Allows you to change the language for the
display text on your phone. This change will
also affect the Language Input mode.
Set Hotkeys
Allows you to change the preferences on
the Hotkeys that are currently assigned for
your Navigation Keys (when in standby
mode).
47
Page 50

Flight Mode
This allows you to only use the phone’s
features that do not require the use of the
wireless network, excluding emergency
calls, when you are in an airplane or
in places where the wireless network is
prohibited. If you set the flight mode on, the
flight mode icon will be displayed on the
screen instead of the network signal icon.
d On: You cannot make (or receive) calls,
excluding emergency calls, or use other
features that require network coverage.
d Off: You can deactivate the flight mode
to access the network.
Security
Various codes and passwords are used to
protect the features and settings of your
phone.
d Phone Lock: You can use a security
code to avoid unauthorized use of the
phone.
If you set the Phone Lock to When Power
On, the phone will request a security
code whenever you switch the phone
on. If you set the Phone Lock to When
SIM Changed, your phone will request
48
a security code only when you change
your SIM Card. If you set the Phone Lock
to Lock Phone Now, your phone will lock
immediately.
d PIN Request: When the PIN Request
feature is turned on, you must enter your
PIN each time you switch the phone on.
Consequently, any person who does not
have your PIN cannot use your phone
without your approval.
Note
Before setting the PIN Request feature off,
you must enter your PIN.
d Fixed Dial Number: This feature allows
you to restrict your outgoing calls to
selected phone numbers, if supported by
your SIM Card. The PIN2 code is required.
s FDN On/Off
- On: You can only call phone numbers
stored in the FDN List. You must enter
your PIN2 code.
- Off: You can call any number.
s FDN List: Allows you to enter a new FDN
entry.
Page 51

d Change Codes: The Change Codes
feature allows you to change your
current password to a new one. You must
enter the current password before you
can specify a new one. You can change
the access codes for: Security Code, PIN
Code, PIN2 Code.
Note
Not all SIM cards have a PIN2 Code. If
your SIM card does not, this menu option
is not displayed.
Reset Settings
This function allows you to restore factory
settings. To do this, you need the security
code.
d Master Reset: Restores the phone
settings (e.g.: Audio, Display, Language,
Bluetooth Settings) to default values.
d Master Clear: Deletes downloaded/user
created contents (e.g.: images, videos)
from the phone.
s Phone
- Deletes all downloaded/user created
images and audios from the phone
memory.
- Deletes personal information stored
in the phone memory (e.g.: Contacts,
Messages, Tasks, Alarm, Calendar
Schedules).
- Restores the settings stored in the
phone memory to the default values.
Display
This menu allows you to configure your
Display settings.
To access Display, from the standby screen,
press the Left Soft Key Menu, Settings
, and Display.
Wallpapers
This menu allows you to set a picture or
color as your background.
Fonts
You can configure the font size and color
of the font that your phone uses.
Clocks & Calendar
This feature allows you to select a Clock or
Calendar to display on the standby screen.
49
Page 52

Brightness
You can set the brightness of the display
screen.
Backlight Timer
Use this to set the duration of the display
backlight and keypad.
Menu Styles
You can set the main menu style to Icon or
List view.
Call
This menu allows you to configure your Call
settings.
To access Call, from the standby screen,
press the Left Soft Key
, and Call.
Call Forwarding
This menu allows you to select when to
forward calls to another number.
50
Menu, Settings
Send My Number
This network service allows you to set your
phone number to be displayed or hidden
from the person you are calling. You can
select Set by Network if you prefer to
have different settings for different service
providers.
Auto Redial
If set to On, your phone redials the number
you’re trying to call up to 10 times after you
hear a quick, busy signal. Press the End/
Power Key
This feature attempts to redial numbers that
are engaged due to the wireless network.
It does not redial numbers to an engaged
party.
Note
There will be no alert indicating the
call has been connected. You must
stay on the line to hear when the call is
connected.
to stop the call attempts.
Page 53

Answer Mode
This allows you to determine how to answer
the phone.
d Any Key: Allows you to answer an
incoming call by pressing any key, except
the End/Power Key
the Right Soft Key Silent.
d Send Key Only: Allows you to only answer
an incoming call by pressing the Send
or Left Soft Key Accept.
Key
d Flip Open: Allows you to Flip open the
phone to answer an incoming call.
, Volume Keys, or
Senior Mode
Senior mode is a function that amplifies
a sound for seniors to hear the voice well
by emphasizing a low voice. It is used for
enhancing the speech quality while you
are on the phone.
You can set the Senior Mode to On or Off.
Minute Minder
This option allows you to specify whether
the phone will beep every minute during
an outgoing call to keep you informed of
the length of the call.
Call Waiting
This menu allows you to activate and
deactivate call waiting on your device.
You can also view the current Call Waiting
status.
Call Reject
This menu allows you to enable or disable
call reject for all numbers or just the
numbers on the Call Reject List.
d Call Reject On/Off: Allows you to
activate or deactivate Call Reject.
When the Reject All Calls option is set,
all incoming calls are routed directly
to Voicemail. Reject on List allows you
to enable Call Reject for the numbers
saved on your Call Reject List.
d Call Reject List: Allows you to view a
list of the numbers you wish to reject
and add new numbers to the list. You
have the option of choosing numbers
from your Contact List or adding a new
number.
Send DTMF Tones
Allows you to manage DTMF tones. Select
from On or Off.
51
Page 54

Accessibility
d TTY: Allows you to enable TTY Mode in
order to contact other TTY devices. Select
from TTY Full, TTY Talk, TTY Hear, TTY Off.
d Hearing Aid: Allows you to turn the
hearing aid functionality on or off.
Accessibility
This menu allows you to easily control
various accessibility options.
To access Accessibility, from the standby
screen, press the Left Soft Key
Settings
, and Accessibility.
Menu Readout
This option allows the phone to read out
menus that are accessed.
Keypad Tone
d Sounds: Allows you to select a tone that
the phone sounds when a key is pressed
on the dialpad. You can select an option
from Beep and Voice.
d Volume: Allows you to control your
Keypad Tone volume.
52
Menu,
Large Text
Allows you to set a large size for text. Select
from On or Off.
Invert Color
Allows you to set the color contrast for
better screen viewing. Select from On or
Off.
Mono Sound
Allows you to enable or disable the Mono
Sound function.
Senior Mode
Allows you to turn the senior mode on or off.
Senior mode enhances high frequencies to
reduce the effects of hearing loss.
TTY
Allows you to enable TTY Mode in order to
contact other TTY devices. Select from TTY
Full, TTY Talk, TTY Hear, or TTY Off.
Hearing Aid
Allows you to enable or disable the Hearing
Aid function.
Page 55

Voice Command
Allows you to set the Voice Command
options. Refer to page 41.
Connectivity
This menu allows you to configure your
Connection settings.
To access Connectivity, from the standby
screen, press the Left Soft Key
Settings
, and Connectivity.
Bluetooth
Your phone has built-in Bluetooth wireless
technology, which makes it possible for
you to connect your phone wirelessly to
other Bluetooth devices such as a handsfree device, PC, laptop, or other phones.
The devices registered in your phone can
only be connected one at a time (To
make a connection to the same type of
device or change Bluetooth preferences,
disconnect the existing device first).
You can also exchange, for example,
business cards, calendar items, and
pictures.
Menu,
To access Bluetooth, from the standby
screen, press the Left Soft Key
Settings
Bluetooth.
Hands-free profile
This
profile is used between the hands-free
device. This allows you to call using a
Bluetooth connection.
A2DP profile
This
used between the stereo headset device
and the phone. This allows you to listen to
an audio clip. A2DP is the Advanced Audio
Distribution Profile, which provides support
for streaming either mono or stereo audio
using Bluetooth.
Hands-free + A2DP profile
This appears when both profiles of the
hands-free and the A2DP are used between
the compatible device and the phone. This
allows you to call and listen to an audio
clip using a Bluetooth connection.
When using each device, see the manual
that comes with the device.
, Connectivity, and
appears when the hands-free
appears when the A2DP profile is
Menu,
53
Page 56

Note
We recommend that your phone
and the Bluetooth device you are
communicating with should be no more
than 10 meters apart. The connection
may be improved if there are no solid
objects between your phone and the
other Bluetooth device.
Turn On/Off
Allows you to turn your Bluetooth
functionality on or off.
Search New Device
This function allows you to search for and
add new devices.
My Devices
This function allows you to view the list of all
devices that are paired with your phone.
My Bluetooth Info
This menu allows you to configure the
profile for Bluetooth.
d My Device Visibility: Allows you to
set your device to be visible to other
Bluetooth devices.
54
d Device Name: Allows you to change the
phone’s name which can be seen by
other Bluetooth devices.
d Supported Services: Shows you all
services that the phone supports.
d My Bluetooth Address: Displays your
device’s Bluetooth address.
To pair with another device
From the standby screen, press the Left
1
Soft Key
Connectivity,
Search New Device.
If you want to stop searching, press the
2
Right Soft Key
All of the devices found are displayed.
3
Select the desired device by pressing
4
the OK Key
password.
Menu, Settings ,
Bluetooth, and
Cancel.
Add and entering the
Connection
This menu allows you to configure your
Connection settings.
To access Connection, from the standby
screen, press Left Soft Key
Settings
, and Connection.
Menu,
Page 57

Internet Profiles
This menu shows the Internet Profiles. You
can add, delete, and edit Internet Profiles
by pressing the Left Soft Key
Options.
Access Points
This menu shows the Access Points. You
can register, delete, and edit by pressing
the Left Soft Key Options.
Network Selection
Allows you to set the network mode from
Automatic or Manual.
Note
This menu may be different depending
on your SIM card.
Memory
This menu allows you to configure your
Memory settings.
To access Memory, from the standby
screen, press the Left Soft Key Menu,
Settings
, and Memory.
Used Space
This function shows the memory status of
the phone.
d Phone Common
This function shows the Memory Status of
the phone and the memory being used
by Audio, Pictures, Video, Multimedia Msg,
Email, Java, and Others types of files.
d Phone Reserved
This function shows the status of the
reserved memory used by Text Message,
Contacts, Calendar, Tasks, and the
Notepad.
d SIM Card
This function shows the status of the SIM
Card memory.
Applications
This menu allows you to configure
application settings
To access Applications, from the standby
screen, press the Left Soft Key
Settings
, and Applications.
Menu,
55
Page 58

Messages
This option allows you to configure the
Messaging option.
For more details, refer to Message Settings
on page 26.
Browser
This menu allows you to configure the
Browser settings.
Accounts
This includes the network information used
to connect the Browser to the Internet.
Select the desired account by highlighting
it and pressing the Right Soft Key
Activate. This will activate the account that
will be used for future connections.
d Activate: Select the account among
the list of accounts, so it can be used for
future connections.
d View: Allows you to see the specific
account information.
The following options will be available
when you press on the Left Soft Key
Options:
d Edit: Allows you to change the account
information. This option is not available
for the default Account.
56
d Delete: Allows you to delete the account.
d New: Allows you to create new account.
Note
s You cannot edit and delete pre-
installed accounts.
s In order to create a new account,
please fill in the network information.
1
Account Name: Name associated with
new account.
2
Homepage: Homepage URL.
3
Internet Profile: You can choose one
from the Internet profiles.
s Creating or editing an account
requires caution. The Browser cannot
connect to the Internet if the account
information is incorrect.
Appe
arance
You can choose the settings of the
browser appearance (Text Size, Character
Encoding, Show Image, Java Script).
Cache
The web pages you have accessed are
stored in the phone memory. This menu
allows you to manage that function.
Page 59

d Clear Cache: Remove all cached data
in the memory.
d Cache: Allows you to turn the memory
cache on or off.
Note
Cache is a type of buffer memory,
which is used to store data temporarily,
especially when it is online.
Cookies
The information of services you have
accessed are stored in what is called a
cookie.
From this menu, you can choose to allow
cookies or to delete cookies that are
already on your phone.
Clear Login Info.
You can delete the history of ID or
Password information that you have saved
previously.
Screen Settings
You can change the settings of the
browser screen (Rendering Mode).
Security
A list of the available certificates is shown.
d Certificates: You can see the list of
certificates and view them in detail.
d Clear Session: Removes the secure
session.
Navigation Mode
You can change the methods of browser
navigation.
d 4 Way Navigation: The cursor of the
browser moves scroll amounts or follows
hyperlinks.
d Mouse Pointer: You can move the cursor
like a mouse pointer.
Secure Popup
You can activate or deactivate the pop-up
which indicates a secure page.
Shortcuts
If set to On, you can use the Browser
more quickly and conveniently with the
keypad in the phone. If Shortcuts is on, the
following shortcuts are available:
57
Page 60

1. Enter URL
3. View Bookmarks
5. Full Screen
7. Page Up
9. Zoom In
*. Page Down
You can adjust the Browser text and image
size by pressing the up and down Volume
Keys to zoom in and out.
2. This Page
4. Page Overview
6. Saved Pages
8. Recent Pages
0. Search Text
#. Zoom Out
Software Update
The user can check for the software
update using the menu “Check for
Update”. If the new software does not exist
the user can not use this feature in 24
hours.
Before updating new software after
downloading it from the network server,
users can decide whether they would
like to postpone the operation. Reminder
times can be set to 1, 4, 8 or 24 hours.
When the time is up, users are prompted
again or users can resume the postponed
operation using this menu at any time. The
software update can only be postponed
three times and will automatically start
58
after the third postpone period expires.
To access Software Update, from the
standby screen, press the Left Soft Key
Menu, Settings , and Software
Update.
Phone Information
This menu is used to view My Numbers,
Manufacturer, Model Name, Device
ID, Hardware Version, Software Version,
Language.
To access Phone Information, from the
standby screen, press the Left Soft Key
Menu, Settings , and Phone
Information.
Page 61

Accessories
There are a variety of accessories available for your mobile phone, some of which
may be sold separately. You can select these options according to your personal
communication requirements. Consult your local dealer for availability.
Travel Adapter
This adapter allows you to charge the battery.
Battery
Standard battery is available.
Note
t"MXBZTVTFHFOVJOF-(BDDFTTPSJFT'BJMVSFUPEPUIJTNBZJOWBMJEBUFZPVSXBSSBOUZ
t"DDFTTPSJFTNBZCFEJGGFSFOUJOEJGGFSFOUSFHJPOTQMFBTFDIFDLXJUIPVSSFHJPOBMTFSWJDF
company or agent for further enquiries.
59
Page 62

For Your Safety
WARNING! This product contains
chemicals known to the State of California
to cause cancer and birth defects or
reproductive harm.
Wash hands after
handling.
Important Information
This user guide contains important
information on the use and operation of
this phone. Please read all the information
carefully for optimal performance and to
prevent any damage to or misuse of the
phone. Any changes or modifications not
expressly approved in this user guide could
void your warranty for this equipment. Any
changes or modifications not expressly
approved by the manufacturer could
void the user’s authority to operate the
equipment.
Before You Start
Safety Instructions
WARNING! To reduce the possibility of
electric shock, do not expose your phone
to high humidity areas, such as the
bathroom, swimming pool, etc.
60
Always store your phone away from heat.
Never store your phone in settings that may
expose it to temperatures less than 32°F
(0°C) or greater than 113°F (45°C), such as
outside during extreme weather conditions
or in your car on a hot day. Exposure
to excessive cold or heat will result in
malfunction, damage and/or catastrophic
failure.
Be careful when using your phone near
other electronic devices. RF emissions
from your mobile phone may affect
nearby in adequately shielded electronic
equipment. You should consult with
manufacturers of any personal medical
devices such as pacemakers and hearing
aides to determine if they are susceptible
to interference from your mobile phone.
Turn off your phone in a medical facility or
at a gas station. Never place your phone
in a microwave oven as this will cause the
battery to explode.
Safety Information
Read these simple guidelines. Breaking the
rules may be dangerous or illegal. Further
detailed information is given in this user
guide.
Page 63

d Do not disassemble this unit. Take it to a
qualified service technician when repair
work is required.
d Keep away from electrical appliances
such as TVs, radios, and personal
computers.
d The unit should be kept away from heat
sources such as radiators or cookers.
d Do not drop.
d Do not subject this unit to mechanical
vibration or shock.
d The coating of the phone may be
damaged if covered with wrap or vinyl
wrapper.
d Use dry cloth to clean the exterior of
the unit. (Do not use solvent such as
benzene, thinner or alcohol.)
d Do not subject this unit to excessive
smoke or dust.
d Do not keep the phone next to credit
cards or transport tickets; it can affect
the information on the magnetic strips.
d Do not tap the screen with a sharp
object; otherwise, it may damage the
phone.
d Do not expose the phone to liquid or
moisture.
d Use the accessories like an earphone
cautiously. Do not touch the antenna
unnecessarily.
Memory card information and
care
d The memory card cannot be used for
recording copyright- protected data.
d Keep the memory card out of the small
children’s reach.
d Do not leave the memory card in
extremely hot location.
d Do not disassemble or modify the
memory card.
FCC RF Exposure Information
WARNING! Read this information before
operating the phone.
In August 1996, the Federal Communications
Commission (FCC) of the United States, with
its action in Report and Order FCC 96-326,
adopted an updated safety standard for
human exposure to radio frequency (RF)
electromagnetic energy emitted by FCC
regulated transmitters. Those guidelines
are consistent with the safety standard
previously set by both U.S. and international
standards bodies.
61
Page 64

The design of this phone complies with the
FCC guidelines and these international
standards.
CAUTION
Use only the supplied and approved
antenna. Use of unauthorized antennas
or modifications could impair call
quality, damage the phone, void your
warranty and/or result in violation of FCC
regulations. Do not use the phone with
a damaged antenna. If a damaged
antenna comes into contact with skin, a
minor burn may result. Contact your local
dealer for a replacement antenna.
Body-worn Operation
This device was tested for typical bodyworn operations with the back of the
phone kept 1.5cm (0.59 inches) between
the user’s body and the back of the
phone. To comply with FCC RF exposure
requirements, a minimum separation
distance of 1.5cm (0.59 inches) must
be maintained between the user’s body
and the back of the phone. Third-party
belt-clips, holsters, and similar accessories
containing metallic components may
62
not be used. Body-worn accessories that
cannot maintain 1.5cm (0.59 inches)
separation distance between the user’s
body and the back of the phone, and
have not been tested for typical body-worn
operations may not comply with FCC RF
exposure limits and should be avoided.
Part 15.19 statement
This device complies with part15 of FCC
rules. Operation is subject to the following
two conditions:
(1) This device may not cause harmful
interference.
(2) This device must accept any
interference received, including
interference that may cause undesired
operation.
Part 15.21 statement
Changes or modifications that are not
expressly approved by the manufacturer
could void the user’s authority to operate
the equipment.
Page 65

Part 15.105 statement
This equipment has been tested and found
to comply with the limits for a class B digital
device, pursuant to Part 15 of the FCC
Rules.
These limits are designed to provide
reasonable protection against harmful
interference in a residential installation.
This equipment generates uses and can
radiate radio frequency energy and, if
not installed and used in accordance
with the instructions, may cause harmful
interference to radio communications.
However, there is no guarantee that
interference will not occur in a particular
installation.
If this equipment does cause harmful
interference or television reception,
which can be determined by turning
the equipment off and on, the user
is encouraged to try to correct the
interference by one or more of the
following measures:
d Reorient or relocate the receiving
antenna.
d Increase the separation between the
equipment and receiver.
d Connect the equipment into an outlet
on a circuit different from that to which
the receiver is connected.
d Consult the dealer or an experienced
radio/TV technician for help.
Cautions for Battery
d Do not disassemble or open crush, bend
or deform, puncture or shred.
d Do not modify or remanufacture, attempt
to insert foreign objects into the battery,
immerse or expose to water or other
liquids, expose to fire, explosion or other
hazard.
d Only use the battery for the system for
which it is specified.
d Only use the battery with a charging
system that has been qualified with
the system per this standard. Use of
an unqualified battery or charger may
present a risk of fire, explosion, leakage,
or other hazard.
d Do not short circuit a battery or allow
metallic conductive objects to contact
battery terminals.
d Promptly dispose of used batteries in
accordance with local regulations.
63
Page 66

d Battery usage by children should be
supervised.
d Avoid dropping the phone or battery. If the
phone or battery is dropped, especially
on a hard surface, and the user suspects
damage, take it to a service center for
inspection.
d Improper battery use may result in a fire,
explosion or other hazard.
d For those host devices that utilize a USB
port as a charging source, the host
device’s user manual shall include a
statement that the phone shall only be
connected to products that bear the
USB-IF logo or have completed the USB-IF
compliance program.
Adapter (Charger) Cautions
d Using the wrong battery charger could
damage your phone and void your
warranty.
d The adapter or battery charger is
intended for indoor use only.
Do not expose the adapter or battery
charger to direct sunlight or use it in places
with high humidity, such as the bathroom.
64
Avoid damage to your hearing
d Damage to your hearing can occur
if you are exposed to loud sound for
long periods of time. We therefore
recommend that you do not turn on or
off the handset close to your ear. We also
recommend that music and call volumes
are set to a reasonable level.
d If you are listening to music while out and
about, please ensure that the volume
is at a reasonable level so that you
are aware of your surroundings. This is
particularly imperative when attempting
to cross the street.
Page 67

Safety Guidelines
TIA Safety Information
Provided herein is the complete TIA Safety
Information for Wireless Handheld phones.
Inclusion of the text covering Pacemakers,
Hearing Aids, and Other Medical Devices
is required in the owner’s manual for
CTIA Certification. Use of the remaining
TIA language is encouraged when
appropriate.
Exposure to Radio Frequency
Signal
Your wireless handheld portable telephone
is a lowpower radio transmitter and
receiver. When it is ON, it receives and also
sends out radio frequency (RF) signals.
In August, 1996, the Federal
Communications Commissions (FCC)
adopted RF exposure guidelines with safety
levels for handheld wireless phones. Those
guidelines are consistent with the safety
standards previously set by both U.S. and
international standards bodies:
ANSI C95.1 (1992) *
NCRP Report 86 (1986)
ICNIRP (1996)
Those standards were based on
comprehensive and periodic evaluations
of the relevant scientific literature. For
example, over 120 scientists, engineers, and
physicians from universities, government
health agencies, and industry reviewed the
available body of research to develop the
ANSI Standard (C95.1).
* American National Standards Institute;
National Council on Radiation Protection
and Measurements; International
Commission on Non-Ionizing Radiation
Protection
The design of your phone complies with
the FCC guidelines (and those standards).
Antenna Care
Use only the supplied or an approved
replacement antenna. Unauthorized
antennas, modifications, or attachments
could damage the phone and may violate
FCC regulations.
Phone Operation
NORMAL POSITION: Hold the phone as you
would any other telephone with the phone
held upright.
65
Page 68

Tips on Efficient Operation
For your phone to operate most efficiently:
d Do not touch the antenna unnecessarily
when the phone is in use. Contact with
the antenna affects call quality and may
cause the phone to operate at a higher
power level than otherwise needed.
Driving
Check the laws and regulations on the use
of wireless phones in the areas where you
drive. Always obey them. Also, if using your
phone while driving, please:
d Give full attention to driving - driving
safely is your first responsibility;
d Use hands-free operation, if available;
d Pull off the road and park before making
or answering a call if driving conditions
so require.
Electronic Devices
Most modern electronic equipment is
shielded from RF signals. However, certain
electronic equipment may not be shielded
against the RF signals from your wireless
phone.
66
Pacemakers
The Health Industry Manufacturers
Association recommends that a minimum
separation of 15cm (6 inches) be
maintained between a handheld wireless
phone and a pacemaker to avoid
potential interference with the pacemaker.
These recommendations are consistent
with the independent research by and
recommendations of Wireless Technology
Research.
Persons with pacemakers:
d Should ALWAYS keep the phone more
than 15cm (6 inches) from their
pacemaker when the phone is turned
ON;
d Should not carry the phone in a breast
pocket.
d Should use the ear opposite the
pacemaker to minimize the potential for
interference.
d If you have any reason to suspect that
interference is taking place, turn your
phone OFF immediately.
Page 69

Hearing Aids
Some digital wireless phones may interfere
with some hearing aids. In the event of
such interference, you may want to consult
your service provider (or call the customer
service line to discuss alternatives).
HAC
This phone has been tested and rated
for use with hearing aids for some of the
wireless technologies that it uses. However,
there may be some newer wireless
technologies used in this phone that have
not been tested yet for use with hearing
aids. It is important to try the different
features of this phone thoroughly and in
different locations, using your hearing aid
or cochlear implant, to determine if you
hear any interfering noise. Consult your
service provider or the manufacturer of
this phone for information on hearing aid
compatibility. If you have questions about
return or exchange policies, consult your
service provider or phone retailer.
Other Medical Devices
If you use any other personal medical
device, consult the manufacturer of your
device to determine if they are adequately
shielded from external RF energy. Your
physician may be able to assist you in
obtaining this information.
Health Care Facilities
Turn your phone OFF in health care
facilities when any regulations posted in
these areas instruct you to do so. Hospitals
or health care facilities may use equipment
that could be sensitive to external RF
energy.
Vehicles
RF signals may affect improperly installed
or inadequately shielded electronic
systems in motor vehicles. Check with
the manufacturer or its representative
regarding your vehicle.
You should also consult the manufacturer
of any equipment that has been added to
your vehicle.
67
Page 70

Posted Facilities
Turn your phone OFF in any facility where
posted notices so require.
Aircraft
FCC regulations prohibit using your phone
while in the air. Turn your phone OFF before
boarding an aircraft.
stations); below deck on boats; fuel or
chemical transfer or storage facilities;
vehicles using liquefied petroleum gas
(such as propane or butane); areas where
the air contains chemicals or particles
(such as grain, dust, or metal powders);
and any other area where you would
normally be advised to turn off your vehicle
engine.
Blasting Areas
To avoid interfering with blasting
operations, turn your phone OFF when in
a ‘blasting areas or in areas posted: ‘Turn
off two-way radio’. Obey all signs and
instructions.
Potentially Explosive
Atmosphere
Turn your phone OFF when in any area with
a potentially explosive atmosphere and
obey all signs and instructions. Sparks in
such areas could cause an explosion or
fire resulting in bodily injury or even death.
Areas with a potentially explosive
atmosphere are often, but not always,
marked clearly. Potential areas may
include: fueling areas (such as gasoline
68
For Vehicles Equipped with an
Air Bag
An air bag inflates with great force. DO NOT
place objects, including either installed
or portable wireless equipment, in the
area over the air bag or in the air bag
deployment area. If in-vehicle wireless
equipment is improperly installed and the
air bag inflates, serious injury could result.
Safety Information
Please read and observe the following
information for safe and proper use of your
phone and to prevent damage. Also, keep
the user guide in an accessible place at
all the times after reading it.
d Do not disassemble or open crush, bend
or deform, puncture or shred.
Page 71

d Do not modify or remanufacture, attempt
to insert foreign objects into the battery,
immerse or expose to water or other
liquids, expose to fire, explosion or other
hazard.
d Only use the battery for the system for
which it is specified.
d Only use the battery with a charging
system that has been qualified with
the system per CTIA Certification
Requirements for Battery System
Compliance to IEEE1725. Use of an
unqualified battery or charger may
present a risk of fire, explosion, leakage,
or other hazard.
d Do not short circuit a battery or allow
metallic conductive objects to contact
battery terminals.
d Replace the battery only with another
battery that has been qualified with the
system per this standard, IEEE-Std-1725.
Use of an unqualified battery may
present a risk of fire, explosion, leakage or
other hazard.
d Promptly dispose of used batteries in
accordance with local regulations.
d Battery usage by children should be
supervised.
d Avoid dropping the phone or battery.
If the phone or battery is dropped,
especially on a hard surface, and the
user suspects damage, take it to a
service center for inspection.
d Improper battery use may result in a fire,
explosion or other hazard.
d The phone shall only be connected to
USB products that bear the USB-IF logo or
have completed the USB-IF compliance
program.
Charger and Adapter Safety
d The charger and adapter are intended
for indoor use only.
Battery Information and Care
d Please dispose of your battery properly
or take it to your local wireless carrier for
recycling.
d The battery does not need to be fully
discharged before recharging.
d Use only LG-approved chargers specific
to your phone model since they are
designed to maximize battery life.
69
Page 72

d Do not disassemble or impact the
battery as it may cause electric shock,
short-circuit, and fire. Store the battery in
a place out of reach of children.
d Keep the battery’s metal contacts clean.
d Replace the battery when it no longer
provides acceptable performance.
The battery can be recharged several
hundred times before replacement.
d Recharge the battery after long periods
of non-use to maximize battery life.
d Battery life will vary due to usage patterns
and environmental conditions.
d Use of extended backlighting, Mobile
Web Browsing, and data connectivity kits
affect battery life and talk/standby times.
d The self-protection function of the battery
cuts the power of the phone when its
operation is in an abnormal state. In this
case, remove the battery from the phone,
reinstall it, and turn the phone on.
d Actual battery life will depend on
network configuration, product
settings, usage patterns, battery and
environmental conditions.
70
d Always unplug the charger from the wall
socket after the phone is fully charged to
save unnecessary power consumption of
the charger.
Explosion, Shock, and Fire
Hazards
d Do not put your phone in a place
subject to excessive dust and keep the
minimum required distance between the
power cord and heat sources.
d Unplug the power cord prior to cleaning
your phone, and clean the power plug
pin when it is dirty.
d When using the power plug, ensure that
it is firmly connected. If it is not, it may
cause excessive heat or fire.
d If you put your phone in a pocket or bag
without covering the receptacle of the
phone (power plug pin), metallic articles
(such as a coin, paperclip or pen) may
short-circuit the phone. Always cover the
receptacle when not in use.
d Do not short-circuit the battery. Metallic
articles such as a coin, paperclip or pen
in your pocket or bag may short-circuit
the + and – terminals of the battery
(metal strips on the battery) upon
Page 73

moving. Short-circuit of the terminal may
damage the battery and cause an
explosion.
General Notice
d Using a damaged battery or placing a
battery in your mouth may cause serious
injury.
d Do not place items containing magnetic
components such as a credit card,
phone card, bank book or subway ticket
near your phone. The magnetism of the
phone may damage the data stored in
the magnetic strip.
d Talking on your phone for a long period
of time may reduce call quality due to
heat generated during use.
d When the phone is not used for a long
period time, store it in a safe place with
the power cord unplugged.
d Using the phone in proximity to receiving
equipment (i.e., TV or radio) may cause
interference to the phone.
d Do not use the phone if the antenna
is damaged. If a damaged antenna
contacts skin, it may cause a slight
burn. Please contact an LG Authorized
Service Centre to replace the damaged
antenna.
d Do not immerse your phone in water. If
this happens, turn it off immediately and
remove the battery. If the phone does not
work, take it to an LG Authorized Service
Centre.
d Do not paint your phone.
d The data saved in your phone might
be deleted due to careless use, repair
of the phone, or upgrade of the
software. Please backup your important
phone numbers. (Ring tones, text
messages, voice messages, pictures,
and videos could also be deleted.) The
manufacturer is not liable for damage
due to the loss of data.
d When you use the phone in public
places, set the ring tone to vibration so
as not to disturb others.
d Do not turn your phone on or off when
putting it in your ear.
FDA Consumer Update
The U.S. Food and Drug Administration
Centre for Devices and Radiological Health
Consumer Update on Mobile Phones.
1. Do wireless phones pose a health
hazard?
The available scientific evidence does
71
Page 74

not show that any health problems are
associated with using wireless phones.
There is no proof, however, that wireless
phones are absolutely safe. Wireless phones
emit low levels of radiofrequency energy
(RF) in the microwave range while being
used. They also emit very low levels of RF
when in the standby mode. Whereas high
levels of RF can produce health effects (by
heating tissue), exposure to low level RF that
does not produce heating effects causes
no known adverse health effects. Many
studies of low level RF exposures have not
found any biological effects. Some studies
have suggested that some biological
effects may occur, but such findings have
not been confirmed by additional research.
In some cases, other researchers have had
difficulty in reproducing those studies, or
in determining the reasons for inconsistent
results.
2. What is the FDA’s role concerning the
safety of wireless phones?
Under the law, the FDA does not review
the safety of radiation-emitting consumer
products such as wireless phones before
they can be sold, as it does with new
drugs or medical devices. However, the
agency has authority to take action
72
if wireless phones are shown to emit
radiofrequency energy (RF) at a level
that is hazardous to the user. In such
a case, the FDA could require the
manufacturers of wireless phones to
notify users of the health hazard and to
repair, replace, or recall the phones so
that the hazard no longer exists.
Although the existing scientific data do
not justify FDA regulatory actions, the FDA
has urged the wireless phone industry
to take a number of steps, including the
following:
d Support needed research into possible
biological effects of RF of the type
emitted by wireless phones;
d Design wireless phones in a way that
minimizes any RF exposure to the
user that is not necessary for device
function; and
d Cooperate in providing users of
wireless phones with the best possible
information on possible effects of
wireless phone use on human health.
The FDA belongs to an interagency
working group of the federal agencies
that have responsibility for different
aspects of RF safety to ensure
Page 75

coordinated efforts at the federal level.
The following agencies belong to this
working group:
d National Institute for Occupational
Safety and Health
d Environmental Protection Agency
d Occupational Safety and Health
Administration (Administración de la
seguridad y salud laborales)
d Occupational Safety and Health
Administration
d National Telecommunications and
Information Administration
The National Institutes of Health
participates in some interagency working
group activities, as well.
The FDA shares regulatory responsibilities
for wireless phones with the Federal
Communications Commission (FCC). All
phones that are sold in the United States
must comply with FCC safety guidelines
that limit RF exposure. The FCC relies on
the FDA and other health agencies for
safety questions about wireless phones.
The FCC also regulates the base stations
that the wireless phone networks rely
upon. While these base stations operate
at higher power than do the wireless
phones themselves, the RF exposures
that people get from these base stations
are typically thousands of times lower
than those they can get from wireless
phones. Base stations are thus not the
subject of the safety questions discussed
in this document.
3. What kinds of phones are the subject of
this update?
The term ‘wireless phone’ refers here
to handheld wireless phones with
built-in antennas, often called ‘cell’,
‘mobile’, or ‘PCS’ phones. These types of
wireless phones can expose the user to
measurable radiofrequency energy (RF)
because of the short distance between
the phone and the user’s head. These
RF exposures are limited by FCC safety
guidelines that were developed with
the advice of the FDA and other federal
health and safety agencies. When the
phone is located at greater distances
from the user, the exposure to RF is
drastically lower because a person’s
RF exposure decreases rapidly with
increasing distance from the source. The
so-called ‘cordless phones’, which have
a base unit connected to the telephone
wiring in a house, typically operate at far
73
Page 76

lower power levels, and thus produce RF
exposures far below the FCC safety limits.
4. What are the results of the research
done already?
The research done thus far has
produced conflicting results, and
many studies have suffered from flaws
in their research methods. Animal
experiments investigating the effects of
radiofrequency energy (RF) exposures
characteristic of wireless phones have
yielded conflicting results that often
cannot be repeated in other laboratories.
A few animal studies, however, have
suggested that low levels of RF could
accelerate the development of cancer
in laboratory animals. However, many of
the studies that showed increased tumor
development used animals that had
been genetically engineered or treated
with cancer causing chemicals so as
to be pre-disposed to develop cancer
in the absence of RF exposure. Other
studies exposed the animals to RF for up
to 22 hours per day.
These conditions are not similar to the
conditions under which people use
wireless phones, so we don’t know
74
with certainty what the results of such
studies mean for human health. Three
large epidemiology studies have been
published since December 2000.
Between them, the studies investigated
any possible association between the
use of wireless phones and primary brain
cancer, glioma, meningioma, or acoustic
neuroma, tumors of the brain or salivary
gland, leukemia, or other cancers.
None of the studies demonstrated the
existence of any harmful health effects
from wireless phone RF exposures.
However, none of the studies can answer
questions about long-term exposures,
since the average period of phone use
in these studies was around three years.
5. What research is needed to decide
whether RF exposure from wireless
phones poses a health risk?
A combination of laboratory studies
and epidemiological studies of people
actually using wireless phones would
provide some of the data that are
needed. Lifetime animal exposure studies
could be completed in a few years.
However, very large numbers of animals
would be needed to provide reliable
proof of a cancer promoting effect if
Page 77

one exists. Epidemiological studies can
provide data that is directly applicable to
human populations, but 10 or more years
follow-up may be needed to provide
answers about some health effects,
such as cancer. This is because the
interval between the time of exposure
to a cancer-causing agent and the
time tumors develop - if they do- may
be many, many years. The interpretation
of epidemiological studies is hampered
by difficulties in measuring actual RF
exposure during day-to-day use of
wireless phones. Many factors affect
this measurement, such as the angle at
which the phone is held, or which model
of phone is used.
6. What is the FDA doing to find out more
about the possible health effects of
wireless phone RF?
The FDA is working with the U.S. National
Toxicology Program and with groups
of investigators around the world to
ensure that high priority animal studies
are conducted to address important
questions about the effects of exposure
to radiofrequency energy (RF). The
FDA has been a leading participant
in the World Health Organization
International Electromagnetic Fields
(EMF) Project since its inception in
1996. An influential result of this work
has been the development of a
detailed agenda of research needs
that has driven the establishment of
new research programs around the
world. The project has also helped
develop a series of public information
documents on EMF issues. The FDA and
the Cellular Telecommunications &
Internet Association (CTIA) have a formal
Cooperative Research and Development
Agreement (CRADA) to do research on
wireless phone safety. The FDA provides
the scientific oversight, obtaining input
from experts in government, industry,
and academic organizations. CTIAfunded research is conducted through
contracts with independent investigators.
The initial research will include both
laboratory studies and studies of wireless
phone users. The CRADA will also include
a broad assessment of additional
research needs in the context of the
latest research developments around the
world.
75
Page 78

7. How can I find out how much radio
frequency energy exposure I can get
by using my wireless phone?
All phones sold in the United States must
comply with Federal Communications
Commission (FCC) guidelines that limit
radio frequency energy (RF) exposures.
The FCC established these guidelines in
consultation with the FDA and the other
federal health and safety agencies. The
FCC limit for RF exposure from wireless
telephones is set at a Specific Absorption
Rate (SAR) of 1.6 watts per kilogram
(1.6 W/kg). The FCC limit is consistent
with the safety standards developed by
the Institute of Electrical and Electronic
Engineering (IEEE) and the National
Council on Radiation Protection and
Measurement. The exposure limit takes
into consideration the body’s ability
to remove heat from the tissues that
absorb energy from the wireless phone
and is set well below levels known to
have effects. Manufacturers of wireless
phones must report the RF exposure level
for each model of phone to the FCC.
The FCC website (http://www.fcc.gov/)
gives directions for locating the FCC
identification number on your phone so
76
you can find your phone’s RF exposure
level in the online listing.
8. What has the FDA done to measure the
radio frequency energy coming from
wireless phones?
The Institute of Electrical and Electronic
Engineers (IEEE) is developing a
technical standard for measuring the
radio frequency energy (RF) exposure
from wireless phones and other wireless
handsets with the participation and
leadership of FDA scientists and
engineers. The standard, ‘Recommended
Practice for Determining the SpatialPeak Specific Absorption Rate (SAR)
in the Human Body Due to Wireless
Communications Devices: Experimental
Techniques’, sets forth the first consistent
test methodology for measuring the
rate at which RF is deposited in the
heads of wireless phone users. The test
method uses a tissuesimulating model
of the human head. Standardized
SAR test methodology is expected
to greatly improve the consistency
of measurements made at different
laboratories on the same phone. SAR
is the measurement of the amount of
energy absorbed in tissue, either by the
Page 79

whole body or a small part of the body. It
is measured in watts/kg (or milliwatts/g)
of matter. This measurement is used to
determine whether a wireless phone
complies with safety guidelines.
9. What steps can I take to reduce my
exposure to radiofrequency energy
from my wireless phone?
If there is a risk from these products -
and at this point we do not know that
there is - it is probably very small. But
if you are concerned about avoiding
even potential risks, you can take a few
simple steps to minimize your exposure to
radiofrequency energy (RF). Since time
is a key factor in how much exposure a
person receives, reducing the amount
of time spent using a wireless phone will
reduce RF exposure. If you must conduct
extended conversations by wireless
phone every day, you could place more
distance between your body and the
source of the RF, since the exposure level
drops off dramatically with distance. For
example, you could use a headset and
carry the wireless phone away from your
body or use a wireless phone connected
to a remote antenna. Again, the scientific
data do not demonstrate that wireless
phones are harmful. But if you are
concerned about the RF exposure from
these products, you can use measures
like those described above to reduce
your RF exposure from wireless phone
use.
10. What about children using wireless
phones?
The scientific evidence does not show
a danger to users of wireless phones,
including children and teenagers.
If you want to take steps to lower
exposure to radiofrequency energy
(RF), the measures described above
would apply to children and teenagers
using wireless phones. Reducing
the time of wireless phone use and
increasing the distance between the
user and the RF source will reduce RF
exposure. Some groups sponsored
by other national governments have
advised that children be discouraged
from using wireless phones at all.
For example, the government in the
United Kingdom distributed leaflets
containing such a recommendation
in December 2000. They noted that no
evidence exists that using a wireless
phone causes brain tumors or other ill
77
Page 80

effects. Their recommendation to limit
wireless phone use by children was
strictly precautionary; it was not based
on scientific evidence that any health
hazard exists.
11. What about wireless phone
interference with medical equipment?
Radio frequency energy (RF) from
wireless phones can interact with some
electronic devices. For this reason, the
FDA helped develop a detailed test
method to measure electromagnetic
interference (EMI) of implanted cardiac
pacemakers and defibrillators from
wireless telephones. This test method is
now part of a standard sponsored by
the Association for the Advancement of
Medical instrumentation (AAMI). The final
draft, a joint effort by the FDA, medical
device manufacturers, and many other
groups, was completed in late 2000. This
standard will allow manufacturers to
ensure that cardiac pacemakers and
defibrillators are safe from wireless phone
EMI. The FDA has tested hearing aids
for interference from handheld wireless
phones and helped develop a voluntary
standard sponsored by the Institute of
Electrical and Electronic Engineers (IEEE).
78
This standard specifies test methods and
performance requirements for hearing
aids and wireless phones so that no
interference occurs when a person uses
a ‘compatible’ phone and a ‘compatible’
hearing aid at the same time. This
standard was approved by the IEEE
in 2000. The FDA continues to monitor
the use of wireless phones for possible
interactions with other medical devices.
Should harmful interference be found
to occur, the FDA will conduct testing
to assess the interference and work to
resolve the problem.
12. Where can I find additional
information?
For additional information, please refer to
the following resources:
FDA web page on wireless phones
(http://www.fda.gov/
Radiation-EmittingProducts/
RadiationEmittingProductsandProcedures/
HomeBusinessandEntertainment/
CellPhones/default.htm)
Federal Communications Commission
(FCC) RF Safety Program
(http://www.fcc.gov/oet/rfsafety)
Page 81

International Commission on Non-lonizing
Radiation Protection
(http://www.icnirp.de)
World Health Organization (WHO)
International EMF Project
(http://www.who.int/peh-emf/project/es)
National Radiological Protection Board
(UK)
(http://www.nrpb.org.uk/radiation)
10 Driver Safety Tips
Your wireless phone gives you the
powerful ability to communicate by voice
almost anywhere, anytime. An important
responsibility accompanies the benefits of
wireless phones, one that every user must
uphold.
When operating a car, driving is your first
responsibility.
When using your wireless phone behind
the wheel of a car, practice good common
sense and remember the following tips:
1
Get to know your wireless phone and its
features such as speed dial and redial.
Carefully read your instruction manual
and learn to take advantage of valuable
features most phones offer, including
automatic redial and memory. Also, work
to memorize the phone keypad so you
can use the speed dial function without
taking your attention off the road.
2
When available, use a hands-free
device. A number of hands-free wireless
phone accessories are readily available
today. Whether you choose an installed
mounted device for your wireless phone
or a speaker phone accessory, take
advantage of these devices if available
to you.
3
Position your wireless phone within easy
reach. Make sure you place your wireless
phone within easy reach and where you
can reach it without removing your eyes
from the road. If you get an incoming
call at an inconvenient time, if possible,
let your voicemail answer it for you.
4
Suspend conversations during hazardous
driving conditions or situations. Let the
person you are speaking with know you
are driving; if necessary, suspend the call
in heavy traffic or hazardous weather
conditions. Rain, sleet, snow and ice can
be hazardous, but so is heavy traffic. As
a driver, your first responsibility is to pay
attention to the road.
5
Do not take notes or look up phone
numbers while driving. If you are reading
79
Page 82

an address book or business card,
or writing a “to-do” list while driving a
car, you are not watching where you
are going. It is common sense. Don’t
get caught in a dangerous situation
because you are reading or writing
and not paying attention to the road or
nearby vehicles.
6
Dial sensibly and assess the traffic; if
possible, place calls when you are not
moving or before pulling into traffic. Try
to plan your calls before you begin your
trip or attempt to coincide your calls with
times you may be stopped at a stop
sign, red light or otherwise stationary. But
if you need to dial while driving, follow
this simple tip— dial only a few numbers,
check the road and your mirrors, then
continue.
7
Do not engage in stressful or emotional
conversations that may be distracting.
Stressful or emotional conversations and
driving do not mix; they are distracting
and even dangerous when you are
behind the wheel of a car. Make
people you are talking with aware you
are driving and if necessary, suspend
conversations which have the potential
to divert your attention from the road.
80
8
Use your wireless phone to call for help.
Your wireless phone is one of the greatest
tools you can own to protect yourself
and your family in dangerous situations
— with your phone at your side, help is
only three numbers away. Dial 911 or
other local emergency number in the
case of fire, traffic accident, road hazard
or medical emergency. Remember, it is a
free call on your wireless phone!
9
Use your wireless phone to help others
in emergencies. Your wireless phone
provides you a perfect opportunity to be
a “Good Samaritan” in your community.
If you see an auto accident, crime in
progress or other serious emergency
where lives are in danger, call 911 or
other local emergency number, as you
would want others to do for you.
10
Call roadside assistance or a special
wireless non-emergency assistance
number when necessary. Certain
situations you encounter while driving
may require attention, but are not
urgent enough to merit a call for
emergency services. But you can still
use your wireless phone to lend a
hand. If you see a broken-down vehicle
posing no serious hazard, a broken
Page 83

traffic signal, a minor traffic accident
where no one appears injured or a
vehicle. you know to be stolen, call
roadside assistance or other special
non-emergency wireless number.
For more information, please call to 888901-SAFE, or visit our website www.ctia.org.
Consumer Information on SAR (Specific
Absorption Rate)
This Model Phone Meets the
Government’s Requirements for Exposure
to Radio Waves.
Your wireless phone is a radio transmitter
and receiver. It is designed and
manufactured not to exceed the emission
limits for exposure to radiofrequency (RF)
energy set by the Federal Communications
Commission (FCC) of the U.S. Government.
These FCC exposure limits are derived
from the recommendations of two expert
organizations, the National Counsel on
Radiation Protection and Measurement
(NCRP) and the Institute of Electrical and
Electronics Engineers (IEEE). In both cases,
the recommendations were developed
by scientific and engineering experts
drawn from industry, government, and
academia after extensive reviews of the
scientific literature related to the biological
effects of RF energy. The exposure limit for
wireless mobile phones employs a unit
of measurement known as the Specific
Absorption Rate, or SAR. The SAR is a
measure of the rate of absorption of RF
energy by the human body expressed
in units of watts per kilogram (W/kg).
The FCC requires wireless phones to
comply with a safety limit of 1.6 watts per
kilogram (1.6 W/kg). The FCC exposure
limit incorporates a substantial margin
of safety to give additional protection
to the public and to account for any
variations in measurements. Tests for SAR
are conducted using standard operating
positions specified by the FCC with the
phone transmitting at its highest certified
power level in all tested frequency bands.
Although SAR is determined at the highest
certified power level, the actual SAR level
of the phone while operating can be well
below the maximum value. Because the
phone is designed to operate at multiple
power levels to use only the power required
to reach the network, in general, the closer
you are to a wireless base station antenna,
the lower the power output.
81
Page 84

Before a phone model is available for
sale to the public, it must be tested and
certified to the FCC that it does not exceed
the limit established by the government
adopted requirement for safe exposure.
The tests are performed in positions and
locations (e.g., at the ear and worn on
the body) as required by the FCC for each
model. The FCC has granted an Equipment
Authorization for this model phone with
all reported SAR levels evaluated as in
compliance with the FCC RF emission
guidelines.
The highest SAR value for this model phone
when tested for use at the ear is 0.47 W/kg
and when worn on the body, as described
in this user’s manual, is 0.56 W/kg. While
there may be differences between SAR
levels of various phones and at various
positions, they all meet the government
requirement for safe exposure. SAR
information on this model phone is on file
with the FCC and can be found under the
Display Grant section of http://www.fcc.
gov/oet/ea/fccid/ after searching on FCC
ID ZNFB460.
To find information that pertains to a
particular model phone, this site uses the
82
phone FCC ID number which is usually
printed somewhere on the case of the
phone. Sometimes it may be necessary
to remove the battery pack to find the
number. Once you have the FCC ID
number for a particular phone, follow the
instructions on the website and it should
provide values for typical or maximum
SAR for a particular phone. Additional
information on Specific Absorption Rates
(SAR) can be found on the Cellular
Telecommunications Industry Association
(CTIA) website at http://www.ctia.org/
* In the United States and Canada, the
SAR limit for mobile phones used by the
public is 1.6 watts/kg (W/kg) averaged
over one gram of tissue. The standard
incorporates a substantial margin of
safety to give additional protection for the
public and to account for any variations in
measurements.
FCC Hearing-Aid Compatibility (HAC)
Regulations for Wireless Devices
On July 10, 2003, the U.S. Federal
Communications Commission (FCC)
Report and Order in WT Docket 01-309
modified the exception of wireless phones
under the Hearing Aid Compatibility Act of
Page 85

1988 (HAC Act) to require digital wireless
phones be compatible with hearing-aids.
The intent of the HAC Act is to ensure
reasonable access to telecommunications
services for persons with hearing
disabilities.
While some wireless phones are used
near some hearing devices (hearing aids
and cochlear implants), users may detect
a buzzing, humming, or whining noise.
Some hearing devices are more immune
than others to this interference noise,
and phones also vary in the amount of
interference they generate.
The wireless telephone industry has
developed a rating system for wireless
phones, to assist hearing device users to
find phones that may be compatible with
their hearing devices. Not all phones have
been rated. Phones that are rated have the
rating on their box or a label located on
the box.
The ratings are not guarantees. Results
will vary depending on the user’s hearing
device and hearing loss. If your hearing
device happens to be vulnerable to
interference, you may not be able to use
a rated phone successfully. Trying out the
phone with your hearing device is the best
way to evaluate it for your personal needs.
M-Ratings: Phones rated M3 or M4
meet FCC requirements and are likely
to generate less interference to hearing
devices than phones that are not labeled.
M4 is the better/higher of the two ratings.
T-Ratings: Phones rated T3 or T4 meet FCC
requirements and are likely to generate
less interference to hearing devices than
phones that are not labeled. T4 is the
better/ higher of the two ratings.
Hearing devices may also be rated. Your
hearing device manufacturer or hearing
health professional may help you find
this rating. Higher ratings mean that the
hearing device is relatively immune to
interference noise. The hearing aid and
wireless phone rating values are then
added together. A sum of 5 is considered
acceptable for normal use. A sum of 6 is
considered for best use.
In the above example, if a hearing aid
meets the M2 level rating and the wireless
83
Page 86

phone meets the M3 level rating, the sum
of the two values equal M5. This should
provide the hearing aid user with “normal
usage” while using their hearing aid with
the particular wireless phone. “Normal
usage” in this context is defined as a
signal quality that’s acceptable for normal
operation.
The M mark is intended to be synonymous
with the U mark. The T mark is intended to
be synonymous with the UT mark. The M
and T marks are recommended by the
Alliance for Telecommunications Industries
Solutions (ATIS). The U and UT marks are
referenced in Section 20.19 of the FCC
Rules. The HAC rating and measurement
procedure are described in the American
National Standards Institute (ANSI) C63.19
standard.
To ensure that the Hearing Aid
Compatibility rating for your phone is
maintained, secondary transmitters
such as Bluetooth components must be
disabled during a call.
For information about hearing aids and
digital wireless phones
Wireless Phones and Hearing Aid
Accessibility
84
http://www.accesswireless.org/
Gallaudet University, RERC
http://tap.gallaudet.edu/Voice/
FCC Hearing Aid Compatibility and Volume
Control
http://www.fcc.gov/cgb/dro/hearing.html
The Hearing Aid Compatibility FCC Order
http://hraunfoss.fcc.gov/edocs_public/
attachmatch/FCC-03-168A1.pdf
Hearing Loss Association of America
[HLAA]
http://hearingloss.org/content/
telephones-and-mobile-devices
Page 87

Guía del usuario
t
Las visualizaciones e ilustraciones de la
pantalla pueden variar de las que ve en el
teléfono.
t
Es posible que parte del contenido de esta
guía no se aplique al teléfono, en función
del software o del proveedor de servicios.
Toda la información de este documento
está sujeta a cambios sin previo aviso.
t
Copyright ©2014 LG Electronics, Inc. Todos los
derechos reservados. LG y el logotipo de LG
son marcas registradas de LG Group y sus
entidades relacionadas. Todas las demás
marcas son propiedad de sus respectivos
titulares.
Page 88

INFORME SOBRE LA GARANTIA LIMITADA
1. LO QUE CUBRE ESTA GARANTÍA
LG le ofrece una garantía limitada de que la
unidad de suscriptor adjunta y sus accesorios
incluidos estarán libres de defectos de materiales
o mano de obra según los términos y condiciones
siguientes:
1. La garantía limitada del producto se extiende
durante DOCE (12) MESES contados a partir
de la fecha del producto con una prueba de
compra válida o, de no haber una prueba de
compra válida, QUINCE (15) MESES contados
a partir de la fecha de fabricación según se
determine por el código de fecha de fabricación
de la unidad.
2. La garantía limitada se extiende sólo al
comprador original del producto y no es
asignable ni transferible a ningún otro comprador
o usuario final subsecuentes.
3. Esta garantía sólo es buena para el comprador
original del producto durante el período de
garantía y siempre que se encuentre en los
EE.UU., incluidos Alaska, Hawai, los
EE.UU. y Canadá.
4. La carcasa externa y las partes cosméticas
estarán libres de defectos al momento de la
distribución, y por tanto no estarán cubiertas por
los términos de esta garantía limitada.
5. A solicitud de LG, el consumidor debe
proporcionar información para probar de
manera razonable la fecha de compra.
6. El cliente se hará cargo del costo de envío del
producto al Departamento de servicio al cliente
de LG. LG se hará cargo del costo de envío del
producto de vuelta al consumidor después de
realizar el servicio según esta garantía limitada.
territorios de los
2. LO QUE NO CUBRE ESTA GARANTÍA
1. Defectos o daños producto del uso del
producto de una forma distinta de la normal y
acostumbrada.
2. Defectos o daños producto de un uso anormal,
condiciones anormales, almacenamiento
inadecuado, exposición a humedad o agua,
modificaciones no autorizadas, conexiones no
autorizadas, reparación no autorizada, mal uso,
negligencia, abuso, accidentes, alteraciones,
instalación incorrecta o cualquier otro acto que
no sea responsabilidad de LG, incluido el daño
causado por la transportación, fusibles fundidos y
derrames de alimentos o líquidos.
3. Rotura o daños a las antenas a menos que hayan
sido ocasionadas directamente por defectos en los
materiales o mano de obra.
4. Que el Departamento de servicio al cliente de LG
no fuera notificado por el consumidor del defecto
o avería del producto durante el período de
garantía limitada aplicable.
5. Productos a los que se haya eliminado el número
de serie, o en los que éste sea ilegible.
6. Esta garantía limitada se otorga en lugar de
cualquier otra garantía, explícita o implícita, de
hecho o por lo dispuesto en las leyes, establecido
por ellas o implicado, incluso, aunque de manera
enunciativa y no limitativa, cualquier garantía
implícita de comerciabilidad o adecuación para
un uso en particular.
7. Daños resultantes del uso de accesorios no
aprobados por LG. El uso de cualquier accesorio
no aprobado por LG anula de inmediato esta
garantía y LG no será responsable de daños
incidentales, consecuenciales, especiales ni de
ningún otro tipo que resulten del uso de cualquier
accesorio no aprobado por LG.
Page 89

8. Todas las superficies de plástico y todas las demás
piezas externas expuestas que se rayen o dañen
debido al uso normal por parte del cliente.
9. Productos que hayan sido puestos en
funcionamiento por encima de las limitaciones
máximas indicadas.
10. Productos utilizados u obtenidos en un programa
de arrendamiento.
11. Consumibles (como sería el caso de los fusibles).
3. LO QUE HARÁ LG:
LG, a su exclusivo criterio, reparará, reemplazará
o rembolsará el precio de compra de cualquier
unidad que no cumpla con la presente garantía
limitada. LG puede, a su elección, optar por
usar partes o unidades nuevas, restauradas o
reacondicionadas equivalentes en cuanto a
funcionalidad. Además, LG no reinstalará o realizará
copias de seguridad de ningún dato, aplicación o
software que el usuario haya agregado al teléfono.
Por lo tanto, se recomienda que usted realice una
copia de seguridad de todo dato o información
de ese tipo antes de enviar la unidad a LG, de
modo de evitar una pérdida permanente de esa
información.
4. DERECHOS DE LEYES ESTATALES:
No es aplicable ninguna otra garantía explícita
a este producto. LA DURACIÓN DE CUALQUIER
GARANTÍA IMPLÍCITA, INCLUIDA LA GARANTÍA
IMPLÍCITA DE COMERCIABILIDAD, ESTÁ LIMITADA
A LA DURACIÓN DE LA GARANTÍA EXPLÍCITA
INCLUIDA EN EL PRESENTE. LG INFOCOMM INC.
NO SERÁ RESPONSABLE POR LA PÉRDIDA DE
USO DEL PRODUCTO, LOS INCONVENIENTES,
PÉRDIDA O CUALQUIER OTRO DAÑO DIRECTO O
CONSECUENCIAL QUE SE DESPRENDA DEL USO DEL
PRODUCTO O DE LA IMPOSIBILIDAD DE USARLO,
O POR CUALQUIER INFRECCIÓN DE CUALQUIER
GARANTÍA EXPLÍCITA O IMPLÍCITA, INCLUIDA
LA GARANTÍA IMPLÍCITA DE COMERCIABILIDAD
APLICABLE A ESTE PRODUCTO.
Algunos estados no permiten la exclusión o
limitación de daños incidentales o consecuenciales,
o no permiten limitaciones sobre cuánto tiempo
dura una garantía implícita, de modo que estas
limitaciones y exclusiones podrían no aplicársele
a usted. Esta garantía le da derechos legales
concretos, y podría tener otros derechos que varían
de un estado a otro.
5. COMO OBTENER EL SERVICIO DE ESTA
GARANTÍA:
Para obtener servicio por garantía, llame o
envíe un fax a los siguientes números telefónicos
desde cualquier punto de los Estados Unidos
continentales:
Tel. 1-800-793-8896 o Fax. 1-800-448-4026
O visite www.lgeservice.com.
También se puede enviar correspondencia a:
LG Electronics MobileComm U.S.A., Inc.
201 James Record Road Huntsville, AL 35824
NO DEVUELVA SU PRODUCTO A LA DIRECCIÓN ARRIBA
INDICADA
Llame o escriba para conocer la ubicación del
centro de servicio autorizado de LG más cercano a
usted y para conocer los procedimientos necesarios
para obtener reclamaciones por la garantía.
Page 90

Contenido
El teléfono .....................7
Componentes del teléfono ..........7
Vista posterior .....................9
Introducción ..................10
Instalación de la tarjeta SIM y la
batería ..........................10
Cargar el teléfono .................11
Iconos en pantalla ................... 12
Funciones generales ...........13
Antes de comenzar ................13
Hacer una llamada ...............13
Hacer una llamada con la Tecla Enviar . . 13
Hacer llamadas internacionales ........ 13
Finalizar una llamada. . . . . . . . . . . . . . . . . 13
Hacer una llamada desde contactos . . . 14
Responder una llamada ...........14
Ajuste del volumen ................14
Modo vibración (Rápido) .............14
Potencia de la señal. . . . . . . . . . . . . . . . . . 15
Introducir texto ...................15
Cambio del modo de entrada de texto . 15
Modo 123 (Modo de números) ........ 15
Uso del modo 123 (modo de números). . 15
Modo símbolo .......................15
Modo ABC ..........................16
Uso del modo ABC ...................16
4
Menú En llamada ..............17
Durante una llamada ..............17
Hacer una segunda llamada ..........17
Alternar entre dos llamadas ........... 17
Responder una llamada entrante ......17
Rechazar una llamada entrante ........17
Silenciar el micrófono ................. 18
Usando el altavoz .................... 18
Llamadas Recientes ............19
Contactos ....................20
Lista de contactos ................20
Nuevo Contacto ..................20
Grupos ..........................20
Lista de Marcación Rápida .........20
Administración de la Tarjeta SIM .....21
Número Propio ...................21
Mi tarjeta de visita ................21
Mensajes .....................22
Nuevo mensaje ...................22
Buzón de Entrada .................25
Borradores .......................26
Buzón de Salida ..................26
Config. de Mensaje ................27
Alerta de Mensajes ..................27
Page 91

Guardar en .........................27
Firma ..............................27
Mensaje de Texto ....................27
Mensaje Multimedia .................. 27
Correo de voz .......................28
E-mail ........................29
Enviar un correo electrónico ...........29
Recuperar sus mensajes de correo
electrónico .........................29
Carpetas de mensajes. . . . . . . . . . . . . . . . 29
Cambiar la configuración del correo
electrónico .........................30
Alarma ......................31
Opciones de la alarma ...............31
Acceso Web ..................32
Inicio del Acceso Web ................32
Menús del Acceso Web ............... 33
Uso de las Teclas de Navegación .......33
Cámara ......................34
Tomar Foto .......................34
Grabar Video .....................35
Álbum de la Cámara ...........37
Calendario ...................38
Mi Carpeta ...................39
Audio ...........................39
Musica ..........................39
Reproducción de música .............39
Agregar música al teléfono ............40
Imágenes .......................40
Video ...........................41
Otros Archivos ....................41
Admin. Archivos ..................41
Herramientas .................42
Comando de Voz .................42
Despertador .....................44
Juegos ..........................44
Bloc de Notas ....................44
Calculadora .....................45
Tareas ..........................45
Cronómetro ......................45
Calc. de propinas .................46
Conversor de Unidad ..............46
Grabador de Voz ..................47
Configuración .................48
Audio y tonos de timbre ............48
Timbre ............................. 48
Tono de Mensaje ....................48
Tono de Alerta ....................... 48
Tono de Teclado .....................48
5
Page 92

Multimedia .........................49
Llamada ...........................49
Config. del teléfono ...............49
Fecha y Hora ........................49
Idiomas ............................ 49
Establecer teclas de acceso directo .... 49
Modo de Avión ......................50
Seguridad .......................... 50
Restaurar Configuraciones ............51
Pantalla .........................51
Fondos de Pantalla ................... 52
Fuentes ............................52
Relojes y calendario ..................52
Brillo ...............................52
Tiempo de Luz de Fondo ..............52
Estilos de menú ......................52
Llamada ........................52
Desvío de Llamada ..................52
Enviar Mi Número ....................52
Marcación Automática ............... 53
Modo de Respuesta ..................53
Modo Senior ........................ 53
Alerta de minuto ....................53
Llamada En Espera ................... 53
Rechazar de Llamadas ...............54
Enviar tonos DTMF ...................54
Accesibilidad .......................54
Accesibilidad ....................54
Menú por voz ....................... 54
6
Tono de Teclado .....................54
Texto Grande ........................ 55
Invertir color ......................... 55
Sonido Mono ........................ 55
Modo Senior ........................ 55
TTY ................................55
Prótesis Auditiva ......................55
Comando de Voz ....................55
Conectividad ....................55
Bluetooth ...........................55
Conexión ........................57
Perfiles de Internet .................... 57
Puntos de acceso .................... 57
Selección de red. . . . . . . . . . . . . . . . . . . . . 58
Memoria ........................58
Espacio Utilizado .....................58
Aplicaciones .....................58
Mensajes ...........................58
Acceso Web ........................58
Actualización de software ..........61
Información del teléfono ...........61
Accessories. . . . . . . . . . . . . . . . . . . 62
Por su seguridad ..............63
Indicaciones de seguridad ......69
Page 93

El teléfono
Componentes del teléfono
1
2
3
4
5
6
7
Toque y mantenga
presionada esta
tecla para activar
el Modo Vibración.
8
9
10
11
12
13
7
Page 94

1. Auricular: Permite escuchar a la persona
que llama.
2. Pantalla LCD principal: Muestra a
todo color los iconos de estado del
teléfono, los elementos de los menús, los
elementos web, la información web, las
fotos y mucho más.
3. Teclas Suave Derecha e Izquierda: Cada
una de estas teclas ejecuta las funciones
indicadas por el texto en pantalla
ubicado justo sobre ellas.
4. Tecla de Cámara: Permite activar la
cámara y tomar fotografías.
5. Tecla Mensaje: Le permite crear un
mensaje nuevo inmediatamente.
6. Teclas de Navegación
- Funciones de la pantalla principal:
Mensajes
Lista de contactos
E-mail
Calendario
- En un menú: Permite desplazarse por los
menús.
8
7. Tecla Enviar:
el modo de espera para acceder
rápidamente a las llamadas entrantes,
salientes y perdidas más recientes.
También marca llamadas cuando
introduce un número.
8. Tecla Borrar/Volver:
para regresar a la pantalla anterior.
También puede mantener oprimida para
activar la función Comando de voz.
9. Tecla Modo TTS: Le permite activar o
desactivar el mo Audio y tonos de timbre
do de texto a voz.
10. Tecla OK
11. Tecla Fin/Encender:
o apagar el teléfono, finalizar llamadas o
volver al modo de espera.
12. Teclas de Volumen:
el volumen de los tonos de timbre
cuando el teléfono está en modo
de espera y el volumen del auricular
durante una llamada.
13. Puerto para Cargador/USB: Permite
conectar un cargador u otros
accesorios admitidos.
Oprima esta tecla en
Oprima esta tecla
: Seleccione opciones y menús.
Permite encender
Permiten controlar
Page 95

Vista posterior
Ranura para
Tarjeta SIM
Tapa posterior
Batería
9
Page 96

Introducción
Instalación de la tarjeta SIM y la batería
1. Extraiga la tapa posterior
Coloque su pulgar en la parte superior
de la tapa posterior y deslícela hacia
abajo para extraerla.
2. Extraiga la batería
Sostenga el borde superior del teléfono
y use la abertura de dedos cerca de la
parte inferior de la batería para levantar
la batería del teléfono.
10
Advertencia
No retire la batería cuando el teléfono
esté encendido porque puede dañarlo.
3. Inserte la tarjeta SIM
Deslice la tarjeta SIM hasta colocarla
en su ranura. Asegúrese de que el área
de contactos dorados de la tarjeta esté
orientada hacia abajo. Para extraer la
tarjeta SIM, deslice suavemente hacia la
dirección contraria.
Page 97

4. Inserte la batería
Inserte primero la parte superior de
la batería en el borde superior del
compartimiento de la batería. Asegúrese
de que el área de contacto de la
batería esté alineada con los terminales
del teléfono. Oprima la parte inferior de
la batería hasta que encaje en su lugar.
5. Instale la tapa posterior
Alinee la tapa posterior sobre el
compartimiento de la batería y deslícela
hacia arriba hasta que se trabe en su
lugar.
Información y cuidado de la batería
Siempre desconecte el cargador de la
toma después de cargar completamente
el teléfono para evitar el consumo de
energía no necesario del cargador.
Cargar el teléfono
Ubique el Puerto para Cargador/USB en
el lado izquierdo del teléfono. Inserte el
conector del cargador en el teléfono (el
lado “B” del conector debe orientarse
hacia arriba al conectarlo en el teléfono)
y después enchufe el otro extremo en
la toma de pared. El teléfono deberá
cargarse hasta que el mensaje “Batería
completa” aparezca en la pantalla.
Importante
Debe insertar la batería antes de
cargarla.
11
Page 98

Advertencia
El uso de accesorios no autorizados
podría dañar el teléfono y anular la
garantía.
Iconos en pantalla
La tabla debajo describe varios
indicadores o iconos que aparecen en la
pantalla principal del teléfono.
ICONO/
INDICADOR
12
Potencia de la señal de red (varía
la cantidad de barras)
Sin señal de red
Batería baja
Nuevo mensaje de texto
Nuevo correo eletrónico
Hay una alarma establecida
Perfil de Timbre en uso
Perfil de Silencio en uso
DESCRIPCIÓN
ICONO/
INDICADOR
DESCRIPCIÓN
Red EDGE disponible
Bluetooth activo
Red 3G disponible
El navegador está activo
Modo vibración activado
Altavoz
Llamada en curso
Correo de voz
Batería llena
Batería cargando
Modo de Avión activado
Cámara en uso
Videocámara grabando
Temporizador de la videocámara
Page 99

Funciones generales
Antes de comenzar
Recuerde que puede seleccionar los
iconos de menú en la pantalla Menú
utilizando las teclas numéricas si establece
la opción Estilos de menú como Lista. Si
establece la opción Estilos de menú como
Icono, sólo puede utilizar las Teclas de
Navegación para seleccionar los iconos
del menú.
Hacer una llamada
1
Asegúrese de que el teléfono esté
encendido.
2
Ingrese un número de teléfono, incluido
el código de área. Para modificar un
número que aparece en la pantalla
de visualización, sólo tiene que oprimir
la Tecla Borrar/Volver
dígitos, de a uno por vez.
d Mantenga oprimida la Tecla Borrar/
Volver
3
Oprima la Tecla Enviar para llamar
al número seleccionado.
4
Para finalizar la llamada, oprima la Tecla
Fin/Encender .
para borrar todo el número.
y borrar los
Hacer una llamada con la Tecla Enviar
Oprima la Tecla Enviar y aparecerán
1
los historiales de las llamadas recibidas,
realizadas y perdidas más recientes.
Resalte el número que desea usar con
2
las Teclas de Navegación.
Oprima la Tecla Enviar
3
.
Hacer llamadas internacionales
Mantenga oprimida la tecla y
1
aparecerá “+”, el carácter de larga
distancia internacional.
Introduzca el código de país, el código
2
de área y el número de teléfono.
Oprima la Tecla Enviar
3
.
Finalizar una llamada
Para finalizar una llamada, oprima la Tecla
Fin/Encender
.
13
Page 100

Hacer una llamada desde contactos
Es posible guardar nombres de personas y
números de teléfono a los que llama con
frecuencia en la tarjeta SIM y también la
Lista de Contactos.
Se puede marcar un número con
sólo resaltar un nombre de la Lista de
Contactos y oprimir la Tecla Enviar
Oprima la Tecla de Navegación inferior
1
para acceder a la Lista de
Contactos.
Resalte el Contacto y oprima la Tecla
2
Enviar
.
.
establecido en Cualquier tecla
(
Menú > Configuración >
Llamada >
puede oprimir cualquier tecla para
responder la llamada, excepto la Tecla
Fin/Encender
Derecha .
Para finalizar la llamada, oprima la Tecla
2
Fin/Encender
Nota
Puede responder una llamada mientras
usa otras funciones del menú.
Modo de Respuesta),
, la Tecla Suave
.
Responder una llamada
Al recibir una llamada, el teléfono suena
y/o vibra y una notificación aparece en la
pantalla. Si la persona que llama puede
ser identificada, se mostrará el número de
teléfono (o el nombre, si almacenado en
la Contactos).
Oprima la Tecla Enviar o la Tecla
1
Suave Izquierda Aceptar para
contestar una llamada entrante.
Si el Modo de Respuesta se ha
14
Ajuste del volumen
Si desea ajustar el volumen de los
auriculares durante una llamada, use las
Teclas de Volumen del teléfono.
En el modo de inactividad, puede ajustar
el volumen del timbre con las Teclas de
Volumen.
Modo vibración (Rápido)
El Modo vibración se puede activar al
mantener oprimida la tecla
.
 Loading...