

LG ATNQ48GMLH0 Owner's Manual
P/NO : MFL68120714
CEILING CASSETTE
www.lg.com
Please read this manual carefully before operating
your set and retain it for future reference.
OWNER’S MANUAL
AIR
CONDITIONER
ENGLISH
ESPAÑOL
TIPS FOR SAVING ENERGY
2
ENGLISH
TIPS FOR SAVING ENERGY
Here are some tips that will help you minimize the power consumption when you use the air
conditioner. You can use your air conditioner more efficiently by referring to the instructions
below:
• Do not cool excessively indoors. This may be harmful for your health and may consume more
electricity.
• Block sunlight with blinds or curtains while you are operating the air conditioner.
• Keep doors or windows closed tightly while you are operating the air conditioner.
• Adjust the direction of the air flow vertically or horizontally to circulate indoor air.
• Speed up the fan to cool or warm indoor air quickly, in a short period of time.
• Open windows regularly for ventilation as the indoor air quality may deteriorate if the air conditioner is used for many hours.
• Clean the air filter once every 2 weeks. Dust and impurities collected in the air filter may block
the air flow or weaken the cooling / dehumidifying functions.
For your records
Staple your receipt to this page in case you need it to prove the date of purchase or for warranty
purposes. Write the model number and the serial number here:
Model number :
Serial number :
You can find them on a label on the side of each unit.
Dealer’s name :
Date of purchase :
IMPORTANT SAFETY INSTRUCTIONS
IMPORTANT SAFETY INSTRUCTIONS
READ ALL INSTRUCTIONS BEFORE USING THE APPLIANCE.
Always comply with the following precautions to avoid dangerous situations and ensure peak
performance of your product
WARNING
!
It can result in serious injury or death when the directions are ignored
CAUTION
!
It can result in minor injury or product damage when the directions are ignored
WARNING
!
• Always ground the product. There is a risk of electric shock.
• Do not use a defective or underrated circuit breaker. Use the correctly rated breaker and fuse.
There is risk of fire or electric shock.
• Do not use a multi consent. Always use this appliance on a dedicated cicuit and breaker. Otherwise it can cause electric shock or fire.
• For electrical work, contact the dealer, seller, a qualified electrician, or an Authorized Service
Center. Do not disassemble or repair the product by yourself. There is risk of fire or electric
shock.
• Always ground the product as per the wiring diagram. Do not connect the ground wire to gas
or water pipes lightening rod or telephone ground wire. There is risk of fire or electric shock.
• Install the panel and the cover of control box securely. There is risk of fire or electric shock
due to dust, water etc.
• Use the correctly rated breaker or fuse. There is risk of fire or electric shock.
• Do not modify or extend the power cable. If the power cable or cord has scrathes or skin
peeled off or deteriorated then it must be replaced. There is risk of fire or electric shock.
• For installation, removal or reinstall, always contact the dealer or an Authorized Service Center. There is risk of fire, electric shock, explosion, or injury.
• Do not install the product on a defective installation stand. Be sure that the installation area
does not deteriorate with age. It may cause product to fall.
• Never install the outdoor unit on a moving base or a place from where it can fall down. The
falling outdoor unit can cause damage or injury or even death of a person.
• When the product is soaked (flooded or submerged) in water, contact an Authorized Service
Center for repair before using it again. There is risk of fire or eletric shock.
• Be sure to check the refrigerant to the used. Please read the label on the product. Incorrect
refrigerant used can prevent the normal operation of the unit.
• Don't use a power cable, a plug or a loose socket which is damaged. Otherwise it may cause
a fire or electrical shock.
• Do not touch, operate, or repair the product with wet hands. Hold the plug by hand when taking out. There is risk of electric shock or fire.
• Do not place a heater or other heating appliances near the power cable. There is risk of fire
and electric shock.
• Do not allow water to run into electric parts. Install the unit away from water sources. There
is risk of fire, failure of the product, or electric shock.
• Do not store or use or even allow flammable gas or combustibles near the product. There is
risk of fire.
3
ENGLISH

4
ENGLISH
• Indoor/outdoor wiring connections must be secured tightly and the cable should be routed
• Safely dispose off the packing materials. Like screws, nails, batteries, broken things etc after
• Make sure to check that the power cable plug is not dirty, loose or broken and then only in-
• In outdoor unit the step-up capacitor supplies high voltage electricity to the electrical compo-
• When installing the unit, use the installation kit provided with the product. Otherwise the unit
• Be sure to use only those parts which are listed in the svc parts list. Never attempt to modify
• Do not use the product in a tightly closed space for a long time. Perform ventilation regularly.
• Do not open the front grille of the product during operation. (Do not touch the electrostatic fil-
• If strange sounds, smell or smoke comes from product. Immediately turn the breaker off or
• Ventilate the product room from time to time when operating it together with a stove, or heat-
• Turn the main power off and unplug the unit when cleaning or repairing the product. There is
• When the product is not to be used for a long time, disconnect the power supply plug or turn
• Take care to ensure that nobody especially kids could step on or fall onto the outdoor unit.
• Take care to ensure that power cable could not be pulled out or damaged during operation.
• Do not place ANYTHING on the power cable. There is risk of fire or electric shock.
• Do not plug or unplug the power supply plug to turn the unit ON/OFF. There is risk of fire or
• When flammable gas leaks, turn off the gas and open a window for ventilation before turn the
IMPORTANT SAFETY INSTRUCTIONS
properly so that there is no force pulling the cable from the connection terminals. Improper or
loose connections can cause heat generation or fire.
installation or svc and then tear away and thraw away the plastic packaging bags. Children
may play with them and cause injury.
sert the plug completely. Dirty, loose or broken power plug can cause electric shock or fire.
nents. Be sure to discharge the capacitor completely before conducting the repair work. An
charged capacitor can cause electrical shock.
may fall and cause severe injury.
the equipment. The use of inappropriate parts can cause an electrical shock, excessive heat
generation or fire.
Oxygen deficiency could occur and hence harm your health.
ter, if the unit is so equipped.) There is risk of physical injury, electric shock, or product failure.
disconnect the power supply cable. There is risk of electric shock or fire.
ing element etc. Oxygen deficiency can occur and hence harm your health.
risk of electric shock.
off the breaker. There is risk of product damage or failure, or unintended operation.
This could result in personal injury and product damage.
There is risk of fire or electric shock.
electric shock.
product on. Do not use the telephone or turn switches on or off. There is risk of explosion or
fire.
CAUTION
!
• Two or more people must lift and transport the product. Avoid personal injury.
• Do not install the product where it will be exposed to sea wind (salt spray) directly. It may
cause corrosion on the product.
• Install the drain hose to ensure that the condensed water is drained away properly. A bad connection may cause water leakage.
• Keep level even when installing the product. To avoid vibration or noise.
• Do not install the product where the noise or hot air from the outdoor unit could damage or
disturb the neighborhoods. It may cause a problem for your neighbors and hence dispute.

IMPORTANT SAFETY INSTRUCTIONS
• Always check for gas (refrigerant) leakage after installation or repair of product. Low refrigerant levels may cause failure of product.
• Do not use the product for special purposes, such as preserving foods, works of art, etc. It is
a consumer air conditioner, not a precision refrigeration system. There is risk of damage or
loss of property.
• Do not block the inlet or outlet of air flow. It may cause product failure.
• Use a soft cloth to clean. Do not use harsh detergents, solvents or splashing water etc. There
is risk of fire, electric shock, or damage to the plastic parts of the product.
• Do not touch the metal parts of the product when removing the air filter. There is risk of personal injury.
• Do not step on or put anyting on the product. (outdoor units) There is risk of personal injury
and failure of product.
• Always insert the filter securely after cleaning. Clean the filter every two weeks or more often
if necessary. A dirty filter reduces the efficiency.
• Do not insert hands or other objects through the air inlet or outlet while the product is operating. There are sharp and moving parts that could cause personal injury.
• Be cautious when unpacking and installing the product. Sharp edges could cause injury.
• If the refrigerant gas leaks during the repair, do not touch the leakaing refrigerant gas. The refrigernat gas can cause frostbite (cold burn)
• Do not tilt the unit when removing or uninstalling it. The condensed water inside can spill.
• Do not mix air or gas other than the specified refrigerant used in the system. If air enters the
refrigerant system, an excessively high pressure results, causing equipment damage or injury.
• If the refrigerant gas leaks during the installation, ventilate the area immediately. Otherwise it
can be harmfull for your health.
• Dismantling the unit, treatment of the refrigerant oil and eventual parts should be done in accordance with local and national standards. Replace the all batteries in the remote control
with new ones of the same type. Do not mix old and new batteries or different types of batteries. There is risk of fire or product failure.
• Do not recharge or disassemble the batteries. Do not dispose off batteries in a fire. They may
burn or explode.
• If the liquid from the batteries gets onto your skin or clothes, wash it well with clean water.
Do not use the remote if the batteries have leaked. The chemicals in batteries could cause
burns or other health hazards.
• If you eat the liquid from the batteries, brush your teeth and see doctor. Do not use the remote if the batteries have leaked. The chemicals in batteries could cause burns or other
health hazard.
• Do not let the air conditioner run for a long time when the humidity is very high and a door or
a window is left open. Moisture may condense and wet or damage furniture.
• Do not expose your skin or kids or plants to the cool or hot air draft. This could harm to your
health.
• Do not drink the water drained from the product. It is not sanitary and could cause serious
health issues.
• Use a firm stool or ladder when cleaning, maintaining or repairing the product at an height. Be
careful and avoid personal injury.
5
ENGLISH

TABLE OF CONTENTS
6
ENGLISH
TABLE OF CONTENTS
2 TIPS FOR SAVING EN-
ERGY
3 IMPORTANT SAFETY IN-
STRUCTIONS
7 BEFORE USE
7 Preparing for operation
7 Usage
7 Cleaning and maintenance
7 Service
8 PRODUCT INTRODUC-
TION
8 Name and function of parts
8 Operation Indication Lamps
9 Wired Remote Controller (Accessory)
10 Wireless Remote Controller
11 OPERATING INSTRUC-
TION
11 How to insert the Batteries
11 Wireless Remote Controller Mainte-
nance
11 Operating Method
12 OWNER'S INSTRUC-
TION
12 Cooling Mode - Standard Operation
12 Cooling Mode - Power Cooling
13 Heating Mode
14 Dehumidification Mode
15 Fan Mode
16 Auto Operation Mode
17 Auto Changeover Mode
18 Auto Changeover Mode - Setting the
Mode Change Temperature
19 Airflow Setting
20 Temperature Setting/Room Tempera-
ture checking
21 SUB FUNCTION
21 Plasma Purification(Optional)
21 Auto Clean (Optional)
22 Smart Clean (Optional)
23 LCD Luminosity Control (Optional)
23 Celsius/Fahrenheit Switching
23 Electric heater (Optional)
24 Individual vane angle control (Optional)
25 TIMER
25 Setting the Current Time
25 Sleep Timer Setting
25 On Timer Setting
26 Off Timer Setting
26 To cancel the Timer Setting
27 MAINTENANCE AND
SERVICE
27 Indoor Unit
28 Purifying filter(Optional)
29 Operation Tips!
29 When the air conditioner is not
going....
30 Troubleshooting Tips! Save time and
money!
30 Call the service immediately in the fol-
lowing situations

BEFORE USE
BEFORE USE
Preparing for operation
• Contact an installation specialist for installation.
• Use a dedicated circuit.
Usage
• Being exposed to direct airflow for an extended period of time could be hazardous to your
health. Do not expose occupants, pets, or plants to direct airflow for extended periods of time.
• Due to the possibility of oxygen deficiency, ventilate the room when used together with stoves
or other heating devices.
• Do not use this air conditioner for non-specified special purposes (e.g. preserving precision devices, food, pets, plants, and art objects). Such usage could damage the items.
Cleaning and maintenance
• Do not touch the metal parts of the unit when removing the filter. Injuries can occur when handling sharp metal edges.
• Do not use water to clean inside the air conditioner. Exposure to water can destroy the insulation, leading to possible electric shock.
• When cleaning the unit, first make sure that the power and breaker are turned off. The fan rotates at a very high speed during operation. There is a possibility of injury if the unit’s power is
accidentally triggered on while cleaning inner parts of the unit.
7
ENGLISH
Service
For repair and maintenance, contact your authorized service dealer.

PRODUCT INTRODUCTION
4
8
ENGLISH
PRODUCT INTRODUCTION
Name and function of parts
7
6
2
1
5
4
1 Indoor unit
2 Outdoor unit
3 Remote controller
4 Inlet air
5 Discharge air
6 Refrigerant piping, connection electric wire
7 Drain pipe
8 Ground wire
Wire to ground outdoor unit to prevent electrical shocks.
3
8
Operation Indication Lamps
On/Off : Lights up during the system operation.
Filter Sign : Lights up after 2 400 hours from the time of first operating unit.
Timer : Lights up during Timer operation.
Defrost Mode : Lights up during Defrost Mode or Hot Start operation.
(Heat pump model only)
Forced operation : To operate the unit when the remote control can't be used for
any reason.
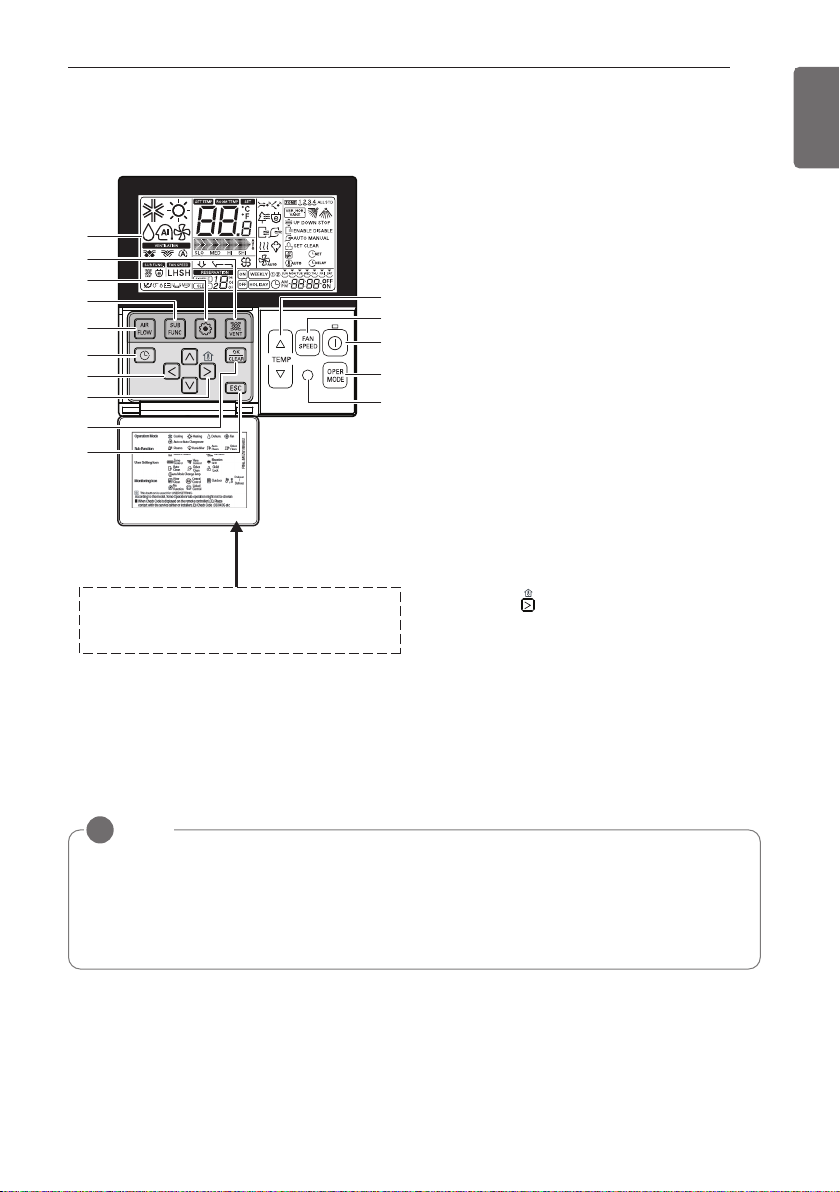
Wired Remote Controller (Accessory)
1 OPERATION INDICATION SCREEN
2 SET TEMPERATURE Button
1
1
10
10
9
9
8
8
7
7
11
11
12
12
13
13
14
14
15
15
Please attach the inform label inside of the door.
Please attach the inform label inside of the door.
Please choose proper language depend on your
Please choose proper language depend on your
country.
country.
3 FAN SPEED Button
4 ON/OFF Button
2
2
5 OPRATION MODE SELECTION Button
3
3
6 WIRELESS REMOTE CONTROLLER RE-
4
4
5
5
6
6
CEIVER
• Some products don't receive the wireless
7 AIR FLOW Button
8 SUBFUNCTION Bu
9 FUNCTION SETTING Button
10 VENTILATION Button
11 RESERVATION
12 UP,DOWN,LEFT,RIGHT Button
13 ROOM TEMPERATURE Button
14 SETTING/CANCEL Button
15 EXIT Button
PRODUCT INTRODUCTION
signals.
tton
• To check the indoor temperature, press
button .
9
ENGLISH
h Some functions may not be operated and displayed depending on the product type.
NOTE
!
• Display temperature can be different from actual room temperature if the remote controller is
installed at the place where sun-rays are falling directly or the place nearby heat source.
• The actual product can be different from above contents depending upon model type.
• When using simultaneous operation system, whenever press remote controller button, system
will approximately operate after 1~2 minutes.

PRODUCT INTRODUCTION
10
ENGLISH
Wireless Remote Controller
1
2
3
4
5
6
7
8
9
Operation Mode
Cooling Mode
Auto Mode or Auto Changeover
Dehumidification mode
Heating Mode
Fan Mode
• Cooling Model( ), Heat Pump Model( )
VANE ANGLE Button
1
Used to set each vane angle.
FUNCTION SETTING Button
2
Used to set or clear Auto Clean, Smart
Clean, Electric heater or Individual vane
angle control.
ON/OFF Button
3
Used to turn on/off the unit.
10
11
12
13
14
15
16
17
JET COOL Button
4
Speed cooling operates super high fan
speed.
LEFT/RIGHT AIRFLOW Button (OPTIONAL)
5
Used to set the desired left/right(horizontal)
airflow direction.
UP/DOWN AIRFLOW Button
6
Used to stop or start louver movement and
set the desired up/down airflow direction.
ON TIMER Button
7
Used to set the time of starting operation.
SLEEP TIMER Button
8
Used to set the time of sleeping operation.
SET / CLEAR Button
9
Used to set/clear the timer.
Used to set the current time(if it input for
3 sec.)
PLASMA Button (OPTIONAL)
10
Used to start or stop the plasma-purification function.
ROOM TEMPERATURE SETTING Button
11
Used to select the room temperature.
OPERATION MODE SELECTION Button
12
Used to select the operation mode.
INDOOR FAN SPEED SELECTION Button
13
Used to select fan speed in four steps low,
medium, high and chaos.
ROOM TEMPERATURE CHECKING Button
14
Used to check the room temperature.
OFF TIMER Button
15
Used to set the time of stopping operation.
TIMER SETTING(Up/Down)/LIGHT Button
16
Used to set the timer.
Used to adjust the brightness.(if it is not
time adjust mode)
RESET Button
17
Used to reset the remote controller.
 Loading...