

Page 1

G S M / G P R S / E D G E 850 / 18 0 0 / 19 0 0 M H Z
A7110
W O R L D C A PA B L E
V
e
r
y
m
o
v
i
n
g
p
i
c
t
u
r
e
s
.
T R A I N I N G M A N U A L
Page 2
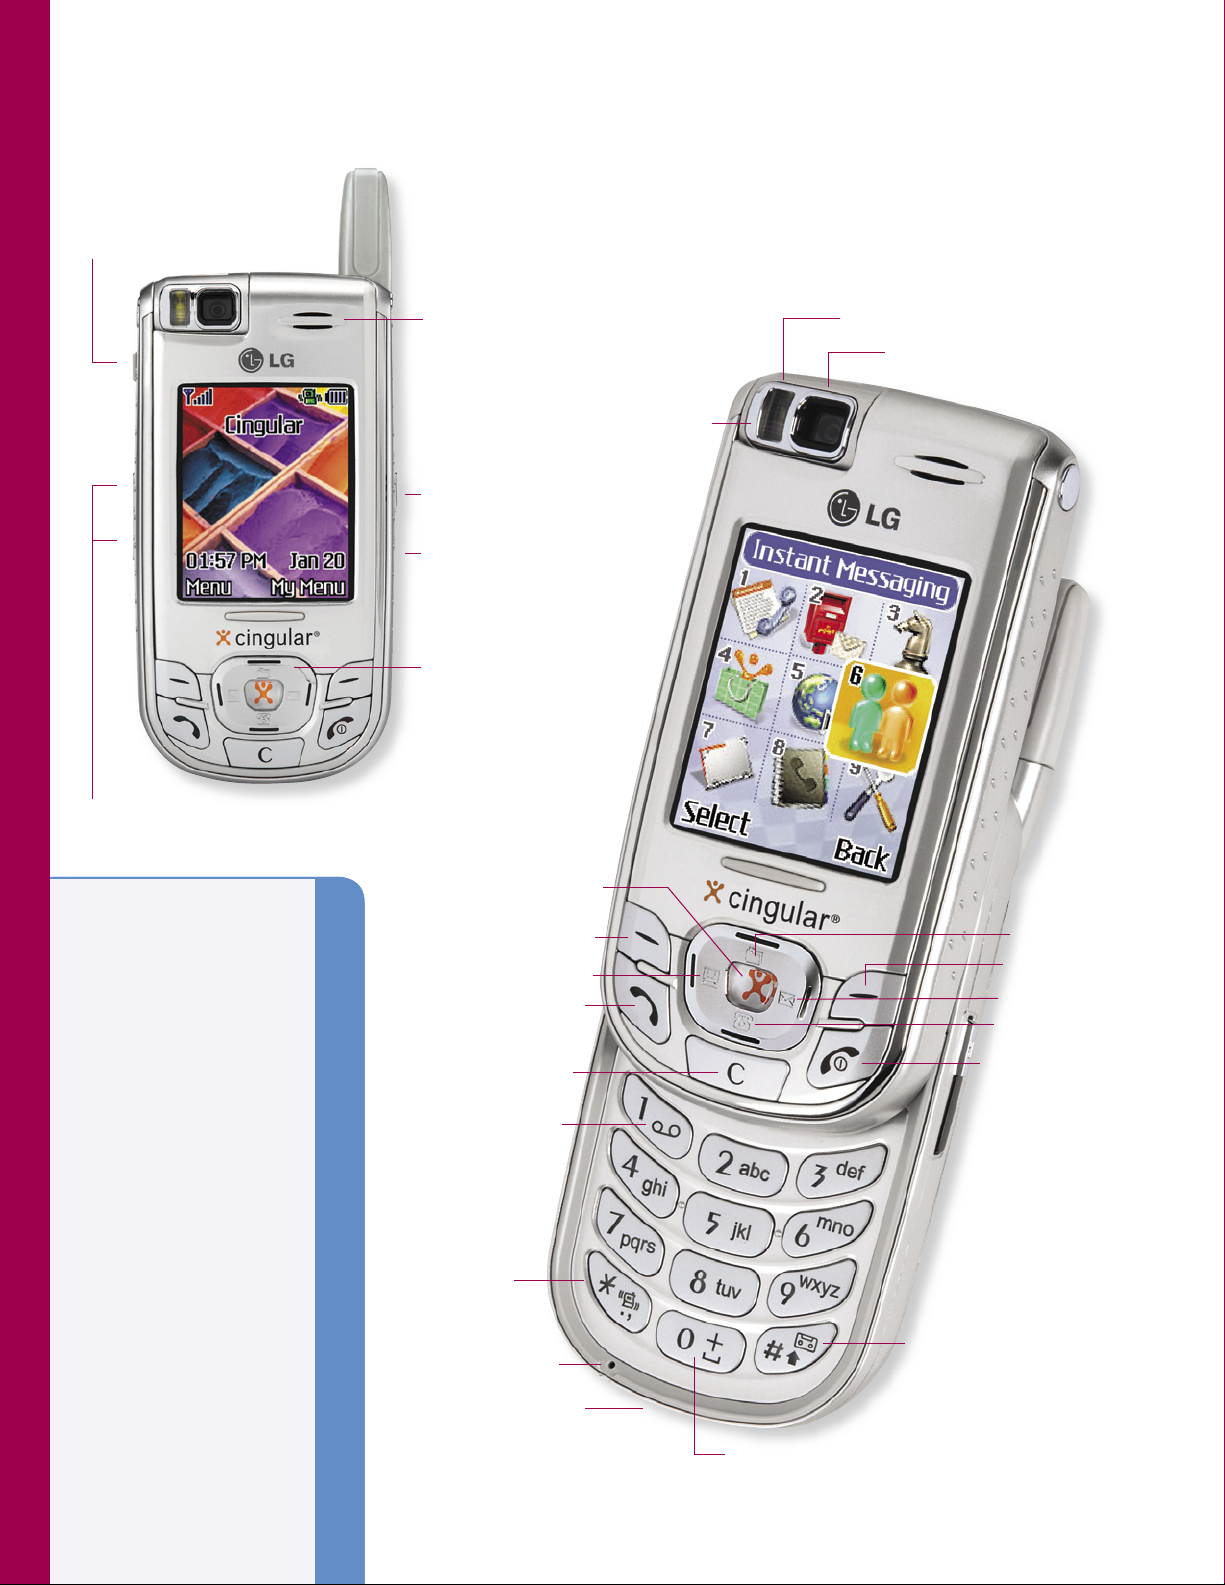
H e ad s et
Ja c k
A7110
O P E R AT I N G I N S T R U C T I O N S
Vo lu me C on tr o l Ke ys /
V i ew f in d er I m ag e F l i p
E a r P ie ce
R o ta ti ng L en s
S i de Ca me r a Ke y
I n fr a re d
Po r t
N a vi g at i on K ey :
S c ro l ls th ro ug h m en u s
a n d d is pl a ys th e n e x t
o r p r ev i ou s m es sa g e,
e n tr y o r i t em
O K K e y / We b
F l as h
C a me r a
Video Recording
2
Still Photography
2
Preview Mode Options
3
Saving, Assigning &
3
Sending Photos/Video
Downloading Content
4
Accessing the Web
4
Text Messaging
4
Instant Messaging
4
Sound, Display &
5
Security Settings
Recent Calls
5
Tools
6
Address Book
6
Notable Settings
6
L e ft So ft Ke y
I M K e y
S e nd Ke y
C l ea r K e y
TA B L E O F C O N T E N T S
Vo ic e Ma il K e y
V i br a te
M o de Ke y
M i cr o ph o ne
C h ar g in g Po r t
( C ha r gi n g t im e:
u p t o 2 . 5 ho u rs )
I n te r na t io na l C a ll i n g K ey
( p re s s a nd ho ld t o e na b le )
Vo ic e Re c or d K e y
M y M E di a
R i gh t S of t Ke y
Te x t M es s ag e
A d dr e ss Bo o k
E N D /P W R Ke y:
Po w er On / Of f,
E nd Ca l l , R et u rn
t o M a in M e nu
Phone Menu (back)
Page 3

A 7110
DIGITAL CAMERA/CAMCORDER FEATURES
VIDEO RECORDING
The A7110 is equipped for standard video recording and can store up to 30 minutes of video. Actual
storage capacity will depend on the resolution setting and memory already used/available in the phone.
Recording Video
1. Press the Side Camera Key.
2. Press the Left Soft Key for Video.
3. To start recording, press OK.
4. To Pause and Resume the recording, press the Left Soft Key.
To Stop the recording, press the Right Soft Key.
5. To send the clip to someone immediately, press the Left Soft Key for Send.
To delete the clip immediately, press the Right Soft Key, select Delete (1) and press OK.
To access the Video Gallery, press the Right Soft Key, select Video Gallery (2) and press OK.
To name the clip, press the Right Soft Key and select Rename (3) and press OK.
Choosing the Recording Mode
The A7110 has two recording modes: General mode is for general video recording up to 30 minutes; MMS
Video mode is for video clips you want to send via multimedia messaging. MMS Video mode automatically
limits the video fi le size to 100 KB and the length to approx. 15 seconds depending on resolution and target.
1. In video mode, press the Right Soft Key for Options and select Recording Mode (1).
2. Choose General (1) or MMS Video (2) and press OK.
Playing Back Video
1. Press the top icon on the Navigation Key (My MEdia), select Video Gallery (6) and press OK.
2. Use the Navigation Key to select the video clip you want to access from the thumbnail images.
3. Press OK to play that clip. During the playback, press the Right Soft Key for Pause or Play.
Setting the Video Resolution
The A7110 offers two video resolution options: Low (128 x 96) and Hi (176 x144).
1. Press the Side Camera Key.
2. Press the Left Soft Key for Video.
3. Press the Right Soft Key for Options, select Resolution (2) and press OK.
4. Select Low(128 x 96) or Hi(176 x144) and press OK.
STILL PHOTOGRAPHY
Taking a Photo
1. Press the Side Camera Key to activate the viewfi nder.
2. Press the Side Camera Key again to take the picture.
Using the Multishot Feature
The A7110 can take 3 or 6 photos in rapid succession.
1. Press the Side Camera Key.
2. Press the Right Soft Key for Options, scroll down to Multishot (9) and press OK.
3. Select 3 Photos or 6 Photos and press OK.
4. Press the Side Camera Key to trigger the multishot feature.
Setting the Photo Resolution
The A7110 offers three still image resolutions: Low (128 x 160), Med (320 x 240), and Hi (640 x 480).
1. Press the Side Camera Key.
2. Press the Right Soft Key for Options, select Resolution (1) and press OK.
3. Press left or right on the Navigation Key to change the resolution.
4. Press OK to select.
2
Page 4

A 7110
PREVIEW MODE OPTIONS
Setting Digital Zoom and Brightness Levels
Zoom: To zoom in, press the Navigation Key up. To zoom out, press it down. (Four zoom levels are
available when resolution is set to low and medium. Zoom is not available for the high resolution setting in
camera mode.)
Brightness: To brighten an image, press the Navigation Key to the right. To darken, press it to the left.
Flipping the Viewfi nder Image
The lens on the A7110 rotates 180° from front to back for shooting fl exibility. You may need to “fl ip” the
image in the viewfi nder depending on the lens position to correct an upside down image. To do this, simply
press one of the Volume Control Keys on the left side of the phone.
Using the Flash
1. Press the Side Camera Key.
2. Press the Right Soft Key for Options, select Flash (5) and press OK.
3. Select Off (1) or On (2) and press OK. The fl ash icon will display in the upper right corner when the
fl ash is on.
Shortcut: Press the “#” key to toggle the fl ash on or off.
SAVING AND ASSIGNING PHOTOS
Assigning a Wallpaper and Photo ID
1. Press the top icon on the Navigation Key, select Photo Gallery (5) and press OK.
2. Use the Navigation Key to select the photo you want to assign.
3. Press the Left Soft Key for Options:
To set as Wallpaper…
1. Select Set As Wallpaper (3) and press OK.
To set as Photo ID…
1. Select Set As Photo ID (4) and press OK.
2. Press the Right Soft Key for Zoom (options are dependent on resolution).
3. Position and crop the photo by using the following keys:
To zoom in, press the Left Soft Key. To zoom out, press the Right Soft Key.
Use the Navigation Key to position the screen area on the desired portion of the photo.
4. When you have the image cropped, press OK. Then press the Left Soft Key for Set.
5. Select a contact for this Photo ID and press OK.
SENDING PHOTOS OR VIDEO CLIPS
1. Press the top icon on the Navigation Key, select Photo Gallery (5) or Video Gallery (6) and press OK.
2. Use the Navigation Key to select the photo or video clip you want to send.
3. Press the Left Soft Key for Options, select Send Via Multimedia Message and press OK.
4. Enter a text message under the photo thumbnail or video icon and press OK.
5. Select Send To (1) and press OK.
To send to a phone number or e-mail address…
1. Enter the number, scroll down to add more numbers or e-mail addresses (up to 6 total), then press the Right
Soft Key for Send.
To send to an existing contact…
1. Press the Right Soft Key for Contacts.
2. Choose a contact and corresponding number from the list and press OK.
3. Repeat for each contact you want to add as a recipient.
4. Press the Right Soft Key for Send.
3
Page 5

A 7110
CONNECTIVITY FEATURES
DOWNLOADING MEDIA MALL CONTENT
Ringtones, games, applications, utilities and graphics can be downloaded and run on the phone.
Downloading New Content from MEdia Mall
1. From the MEdia Mall (4) menu, select from Shop Ringtones (1), Shop Games (2), Shop Graphics (3),
Shop Multimedia (4) or Shop Applications (5) and press OK.
2. Once connected, choose the content you want to download.
ACCESSING THE WEB
Using the Internet
1. Press and hold the OK/Web button in the center of the Navigation Key until you see the “MEdia Net
Connecting” screen.
2. Once connected, choose a category and press OK.
3. Press the End Key to exit or end your browsing session.
TEXT MESSAGING
Sending an SMS Message
1. Press the Messaging icon (right) on the Navigation Key.
2. Type in your text message and press OK.
3. Select Send To (1) and press OK.
To send to a phone number or e-mail address…
1. Enter the number, scroll down to add more numbers or e-mail addresses (up to 6 total), then press the Right
Soft Key for Send.
To send to an existing contact…
1. Press the Right Soft Key for Contacts.
2. Choose a contact and corresponding number from the list and press OK.
3. Repeat for each contact you want to add as a recipient.
4. Press the Right Soft Key for Send.
INSTANT MESSAGING
Signing On (AIM)
1. Press the IM icon (left) on the Navigation Key, select an IM provider and press OK.
2. Select Sign On (1) to establish a connection with the IM provider that appears in the screen header.
3. Enter your screen name and password and press OK to sign on.
One Touch Sign On
One Touch Sign On lets you simply press and hold the IM icon on the Navigation Key to connect through
the most recently used provider and screen name. To enable One Touch Sign On:
1. Prior to signing on, select Settings (3).
2. Select Save Password (1).
3. Choose Yes (1) and press OK. Proceed with signing on. One Touch Sign On will now be enabled for
future sessions.
Auto Sign On
Auto Sign On automatically signs you on to IM when you power on the phone. To enable Auto Sign On:
1. After completing the Save Password step above, select Auto Sign On (2).
2. Choose the IM Provider you wish to auto connect to and press OK. Proceed with signing on.
Auto Sign On will be now be enabled for future sessions.
4
Page 6

A 7110
CUSTOMIZABLE FEATURES
CUSTOMIZING THE SOUND SETTINGS
Selecting a Ringer
1. From the Settings (9) menu, select Sounds (1) and press OK.
2. Select Ringtones (2) and press OK.
3. Choose from the list of ringers and press OK.
Adjusting Volume Settings
1. From the Settings (9) menu, select Sounds (1) and press OK.
2. Select Volume (3) and press OK.
3. Select Ringtone, Key/Slide Tone, Call, Headset, or Handsfree and press OK.
4. Use the Navigation Key to choose the desired volume level and press OK.
Shortcut: To adjust the ringtone volume, press the side Volume Control Keys at the idle screen.
CUSTOMIZING THE DISPLAY SETTINGS
Changing the Wallpaper Image
1. From the Settings (9) menu, select Display (2) and press OK.
2. Select Wallpaper (1) and press OK.
3. Select an image from the Graphics (1) or Photo Gallery (2) menus.
4. Press OK to set.
SETTING YOUR SECURITY PREFERENCES
Setting PIN Code Request
1. From the Settings (9) menu, select Security (5).
2. Select PIN Code Request (1).
3. Select Enable (1) or Disable (2) and press OK.
Security Code Levels
Security Code: Helps protect the phone from unauthorized use. The security code is required to delete
all phone entries, to activate the Reset Setting menu, and to lock the phone. Your initial security code is
commonly “0000.”
PIN1 Code: When the PIN code request feature is set to the “on” position, you must enter your PIN each
time you switch the phone on.
PIN2 Code: Allows you to restrict your outgoing calls to selected phone numbers, if this function is
supported by your SIM card. The PIN2 code is required.
PERSONAL INFORMATION TOOLS
RECENT CALLS
Recent Calls automatically logs up to 20 numbers for dialed calls and 10 numbers for received or missed
calls. It is continually updated as new numbers are added to the beginning of the list and the oldest entries
are removed from the bottom of the list.
Making a Call from Recent Calls
1. Press the Send Key to access a mix of the most recent incoming, outgoing and missed calls.
2. Select the desired number and press the Send Key to call.
5
Page 7

A 7110
TOOLS
Scheduling an Event
1. Press the My MEdia icon (up) on the Navigation Key, select Tools (7) and press OK.
2. Select Calendar (3) and press OK.
3. Highlight the event date using the Navigation Key and press the Left Soft Key for Options.
4. Select Add New (2) and press OK.
5. Enter the subject of the event and press OK.
6. Set the appropriate start time, recurrence (if any), and alarm by scrolling to the corresponding fi eld and
entering the desired information.
7. When fi nished, press OK to save.
Recording a Voice Memo
You can record 10 voice memos of up to 20 seconds each.
1. Press and hold the # key until the recording screen appears.
2. Recording starts immediately. To stop recording, press OK.
3. Enter a title to identify the memo and press OK.
Note: Recorded voice memos can be found under My MEdia (7) > Tools (7) > Voice Recorder (4) > View List (2).
ADDRESS BOOK
Adding a New Address Book Entry
1. Press the Address Book icon (down) on the Navigation Key and press the Right Soft Key for New.
2. Select SIM (1) or Phone (2) and press OK.
3. Enter the name, number(s) and e-mail address.
4. Scroll down and press left or right on the Navigation Key to assign a Group, Character or Picture (Photo ID).
5. When fi nished, press OK to save.
Setting a One-Touch Speed Dial
1. From the Address Book (8) menu, select Speed Dial List (3) and press OK.
2. Scroll down to an empty slot and press OK.
3. Choose a contact and corresponding number from the list and press OK.
OTHER NOTABLE SETTINGS
Setting Vibrate Mode
1. To set vibrate mode, press and hold the * key until the phone vibrates. An icon will appear in the top
right corner.
2. To return to ringer mode, press and hold the * key until the check mark graphic appears on the screen.
Conference Calls
With the conference call feature, the A7110 is capable of connecting several people into a group conversation.
1. After establishing a connection with the fi rst caller, hold the fi rst call by pressing the Send Key or by
pressing the Left Soft Key for Options and select Hold Call (2).
2. Dial the second party you wish to conference into a call. After the second call is connected, press the
Left Soft Key for Options and select Conference Call (4).
3. Select Join All (1).
6
Page 8

A 7110
Recent Calls (1)
Messaging (2)
MEdia Mall (4)
MEdia Net (5)
My MEdia (7)
Address Book (8)
Instant
Messaging (6)
a
Side Camera Key
Vi de o Op ti on s
1 R ec o rd in g M od e
2 R es ol ut io n
3 Q ua l i ty
4 W hi te B al an ce
5 F la s h
6 R ev ers e Vi e w
7 C ol o r E f fe ct
P H O N E M E N U
8 D ef a u lt Se tt in gs
P h ot o O p ti o ns
1 R es ol ut io n
2 Q ua l i ty
3 W hi te B al an ce
4 S el f Ti me r
5 F la s h
6 R ev ers e Vi e w
7 C ol o r E f fe ct
8 F un F r a m es
9 M ul t i sh o t
0 S hu t t er To ne s
De f au l t Se tt in g s
*
Recent Calls (1)
1 M is s e d C a l ls
2 D ia l e d C a l ls
3 R ec e iv e d C al l s
4 D el e t e R e ce n t
C a ll s
5 C al l Du r at i on
1 L as t C al l
2 R ec e iv e d C al l s
3 D ia l e d C al ls
4 A ll C al l s
5 R es et Al l
6 D at a I n f o rm a ti o n
1 C al l Du r at io n
2 D at a Vo lu me
Messaging (2)
1 C re a te N e w
M e ss a g e
1 Te xt
2 M ul t im e di a
2 I nb o x
3 O ut b o x
4 D ra ft s
5 C ha t
6 V o ic e M a i l
1 L is t e n to
Vo i ce M ai l
2 Vo i ce M a il b ox
N um be r
7 Te m pl a te s
1 Te xt
2 M ul t im e di a
3 B us i ne s s C ar d
8 S ett in gs
1 Te x t M es s ag e s
2 M ul t i me d ia
M e ss a ge s
3 D ow n lo a d
M e ss a ge s
9 M em o r y St a tu s
Games & Apps (3)
1 S ho p Ga m es
2 G am e s & Ap p s
3 F a vo ri t es
4 I nf o rm at io n
1 M e m or y S ta tu s
2 J av a Ve rs io n
MEdia Mall (4)
1 S ho p Ri n g t o ne s
2 S ho p Ga m es
3 S ho p Gr a ph i cs
4 S ho p Mu l t i me d ia
5 S ho p A pp li ca ti on s
6 M Ed i a H o m e
MEdia Net (5)
1 M Ed i a N e t
2 F a vo ri t es
3 G o To U RL
4 A cc e ss P o in t
5 C ac h e Se tt in g s
1 C l e ar Ca ch e
2 A l l ow Ca c he
6 C oo k ie Se t ti n g s
1 D e l ete C oo ki es
2 A l l ow Co o ki e s
7
Security Cer t i f i c a tes
8 I nf o rm at io n
Instant
Messaging (6)
1 A IM
2 I CQ
3 C W
4 F ut u r e 1
5 F ut u r e 2
My MEdia (7)
1 F a vo ri t es
2 G am e s & Ap p s
3 R in g to n e s / A ud i o
4 G ra p hi c s
5 P ho t o G a ll e ry
6 V id e o G al l e r y
7 To o ls
1 C a m era /V id e o
2 A l a rm Cl oc k
3 C a l en d ar
4 Vo i ce Re c or d er
5 C a l cu l at o r
6 M e m o
7 Wo r ld Ti m e
8 Un i t C o nverter
9 I r DA
0 M y M e nu
Address Book (8)
1 C on t ac t L is t
2 N ew Co n ta c t
3 S pe e d D i a l L i st
4 C al l er G ro u ps
5 C opy A l l
6 D el e t e A l l
7 S ett i ng s
8 I nf o r ma t io n
Settings (9)
1 S ou n d s
1 Sh o p R i ngtones
2 R i n gt o ne s
3 Vo l um e
4 R i n g Aler t Type
5 M e ss a ge Al er t
To n es
6 Key Ton e s
7 S l id e To ne s
8 Vo ic e Rec o rd e r
2 D is p l ay
1 Wa l lp a pe r
2 B a c kl i gh t
Ti me ou t
3 L an g ua g es
4 M e nu St y l e
5 B a nn er
6 C o l or
S c h em e
7 I n fo rm a t io n
Wi n do w
3 D ate & T i me
1 S e t D a te
2 D a t e Fo r ma t
3 S et T i me
4 Ti m e F o r ma t
5 Au to U p d a te
4 C al l
1 C a l l
Fo r wa r d i ng
2 A n s we r
M o de
3 S e n d M y
N u mb e r
4 C a l l Waiti n g
5 Mi n u te
Mind e r
6 A u tomatic
Re dial
7 S e n d
DTMF
5 S ec u ri ty
1 P IN Co de
Re qu e st
2 P ho n e L o ck
3 A ut o Ke y
L o ck
4 C al l Ba r ri ng
S e rv i ce
5 F ixe d Di a l
N u mb e r
6 C ha n ge C od es
6 C on n ec ti o n
1 Wo r ld P h on e
2 G P R S A tt ac h
7 R es et Se t t i ng s
LG I nf o co mm U SA , I nc .
1022 5 Wi ll ow Cr e ek Ro a d
S a n D ie go , C A 92131 - 1639
w w w. LG mo b il e ph o n es . co m
C u st o me r S e rv ic e: 80 0 -793 - 88 9 6
A c ce s so r ie s : 80 0- 8 51 -673 4
A7110TM/Cingular
All materials in this training manual including, without limitation, the design, the text, and
any marks are the property of LG Electronics, Inc. ALL RIGHTS RESERVED. Copyright ©
2004 LG Electronics, Inc. All product and service marks contained herein that are not
LG Electronics, Inc. proprietary marks are the trademarks of their respective owners. LG
Electronics, Inc. makes no claim to such properties. Phone features and specifi cations
are subject to change without prior notice. The use of non-LG approved accessories will
void the warranty and may result in damage to the phone, the phone exploding, or other
dangerous conditions.
 Loading...