

Order Number : GETEC-C1-19-411 FCC Part 18
Test Report Number : GETEC-E3-18-021 Page 1 / 1
APPENDIX H
: USER’S MANUAL
EUT Type: Household Refrigerator
FCC ID.: BEJA408SW19

OWNER'S MANUAL
WINE CELLAR
Read this owner’s manual thoroughly before operating the appliance and keep it
handy for reference at all times.
ENGLISH
MFL71467802
Rev.00_102219
www.lg.com
Copyright © 2019 LG Electronics Inc. All Rights Reserved
2
TABLE OF CONTENTS
3 SAFETY INSTRUCTIONS
3 IMPORTANT SAFETY INSTRUCTIONS
8 PRODUCT OVERVIEW
8 Product Features
8 Exterior
9 Interior
11 INSTALLATION
11 Installation Overview
11 Unpacking the Refrigerator
12 Choosing the Proper Location
13 Dimensions and Clearances
14 Leveling
14 Turning on the Power
15 OPERATION
15 Before Use
16 Control Panel
19 Sabbath Mode
20 Storing Wine
21 Storage Racks
24 InstaView Door
24 Storing Food
26 Auto-lift Device
35 TROUBLESHOOTING
35 FAQs: Frequently Asked Questions
36 Before Calling for Service
42 LIMITED WARRANTY
42 FOR USA
45 FOR CANADA
28 SMART FUNCTIONS
28 LG ThinQ Application
30 Using the Voice Assistant
32 Smart Diagnosis™ Feature
33 MAINTENANCE
33 Cleaning
34 Air Filter
SAFETY INSTRUCTIONS
SAFETY INSTRUCTIONS
3
READ ALL INSTRUCTIONS BEFORE USE
Your safety and the safety of others are very important.
We have provided many important safety messages in this manual and on your appliance. Always
read and follow all safety messages.
This is the safety alert symbol.
This symbol alerts you to potential hazards that can kill or injure you and others.
All safety messages will follow the safety alert symbol and either the word WARNING or
CAUTION. These words mean:
WARNING
You may be killed or seriously injured if you do not follow instructions.
CAUTION
You may be injured or cause damage to the product if you do not follow instructions.
All safety messages will tell you what the potential hazard is, tell you how to reduce the chance of
injury, and tell you what may happen if the instructions are not followed.
ENGLISH
IMPORTANT SAFETY INSTRUCTIONS
WARNING
To reduce the risk of explosion, fire, death, electric shock, scalding or injury to persons
when using this product, follow basic precautions, including the following:
INSTALLATION
• To reduce the risk of injury to persons, adhere to all industry recommended safety procedures including
the use of long-sleeved gloves and safety glasses.
• Never attempt to operate this appliance if it is damaged, malfunctioning, partially disassembled, or has
missing or broken parts, including a damaged cord or plug.
• Only connect this product to a dedicated grounded electrical outlet rated for use with this product
(115 V, 60 Hz, AC only). It is the user’s responsibility to replace a standard 2-prong wall outlet with a
standard 3-prong wall outlet.
• Do not use an outlet that can be turned off with a switch. Do not use an extension cord.
• The appliance must be positioned for easy access to a power source.
• When moving the refrigerator, be careful not to roll over or damage the power cord.
• Contact an authorized service center when installing or relocating the refrigerator.

SAFETY INSTRUCTIONS
4
• Do not, under any circumstances, cut or remove the third (ground) prong from the power cord.
• Keep packing materials out of the reach of children. Packaging material can be dangerous for children.
There is a risk of suffocation.
• Do not install the refrigerator in a damp or dusty place where insulation on electrical parts may
deteriorate.
• Do not place the refrigerator in direct sunlight or expose it to the heat from heating appliances such as
stoves or heaters.
• Do not bend or pinch the power cord excessively or place heavy objects on it.
OPERATION
• This product is not to be used for special purposes such as the storage of medicine or test materials or
for use on ships, etc.
• DO NOT allow children to climb, stand, or hang on the refrigerator doors or on the shelves in the
refrigerator. They could damage the refrigerator and seriously injure themselves.
• Do not allow children to climb into the refrigerator. They could be trapped and suffocated.
• Children should be supervised to ensure that they do not play with the refrigerator.
• Keep fingers out of pinch point areas; clearances between the doors and cabinets are necessarily
small. Be careful closing doors when children are nearby.
• Do not touch frozen food or the metal parts in the freezer compartment with wet or damp hands. Doing
so may cause frostbite.
• Do not refreeze frozen food that has thawed completely. Doing so may result in a serious health hazard.
• Do not use an adapter plug or plug the power plug into a multi-outlet extension cord.
• Do not use a cord that shows cracks or abrasion damage along its length or at either the plug or
connector end. Immediately have all power cords that have become frayed or otherwise damaged
repaired or replaced by qualified service personnel.
• Do not operate the refrigerator or touch the power cord with wet hands.
• Do not modify or extend the power cord.
• Do not use an uncertified power outlet. Do not plug appliance into a damaged wall outlet.
• Do not put hands, feet or other objects into the air vents or bottom of the refrigerator. Doing so could
result in personal injury or electric shock.
• In the event of a gas leak (propane/LPG), ensure the area is adequately ventilated and contact an
authorized service center before resuming use. Do not touch the refrigerator or power cord of the
refrigerator.
• Disconnect the power cord immediately and contact an authorized service center if there is a strange
noise, odor, or smoke coming from the appliance.
• Do not use any fuse (such as copper, steel wire, etc.) other than a standard fuse.
• Do not place or use an electrical appliance inside the refrigerator, unless it is of a type recommended by
the manufacturer.
• Do not put animals inside the appliance.
• Do not place heavy or fragile objects, liquid filled containers, combustible substances, or flammable
objects (such as candles and lamps) on the appliance.
• If connected to a circuit protected by fuses, use time delay fuse.
• Do not store explosive substances such as aerosol cans with a flammable propellant in this appliance.
• Keep ventilation openings, in the appliance enclosure or in the built-in structure, clear of obstruction.

SAFETY INSTRUCTIONS
• Do not use mechanical devices or other means to accelerate the defrosting process, other than those
recommended by the manufacturer.
• Do not damage the refrigerant circuit.
• Do not use electrical appliances inside the food storage compartments of the appliance, unless they are
of the type recommended by the manufacturer.
• The refrigerant and insulation blowing gas used in the appliance require special disposal procedures.
When disposing, please consult with service agent or a similarly qualified person.
5
Auto-lift Feature
• If your household includes children or persons with reduced physical, sensory or mental capabilities or
lack of experience and knowledge, turn off the Auto Lift function on the control panel to prevent risk of
injuries when using the Auto Drawer.
• Do not allow children to play with or climb inside the drawer’s inner compartment.
• Do not use the auto-lift function while folding the rear drawer back cover.
• Do not put your hand in the open areas at the sides or back of the drawer when open.
• Keep feet away from the bottom drawer when using the auto-open feature.
• Turn off the refrigerator before cleaning the bottom drawer compartment.
• The auto-lift device is heavy, so remove it with both hands.
• Do not unlock the locking knob of auto-lift device. The device could be activated, unfold, and be
damaged.
ENGLISH
MAINTENANCE
• Do not use a hair dryer to dry the inside of the refrigerator.
• Do not light a candle to remove odors in the refrigerator.
• In the event of a refrigerant leak, move flammable objects away from the refrigerator. Ensure the area is
adequately ventilated and contact an authorized service center.
• Keep flammable materials and vapors, such as gasoline, away from the refrigerator.
• This appliance can be used by children aged from 8 years and above and persons with reduced
physical, sensory or mental capabilities or lack of experience and knowledge if they have been given
supervision or instruction concerning use of the appliance in a safe way and understand the hazards
involved. Children shall not play with the appliance. Cleaning and user maintenance shall not be made
by children without supervision.
• Unplug the power plug before cleaning or repairing the refrigerator.
• The refrigerator compartment lights are interior LED lighting, and service should be performed by a
qualified technician.
• Unplug the power plug immediately in the event of a blackout or thunderstorm.
• Turn the power off if water or dust penetrates into the refrigerator. Call a service agent.
• Do not store glass containers or soda in the freezer compartment. Contents may expand when frozen,
break the container and cause injury.
• Do not store, disassemble or repair the appliance yourself or allow unqualified personnel to do so.
• Do not use or place flammable substances (chemicals, medicine, cosmetics, etc) near the refrigerator
or store them inside the refrigerator. Do not place the refrigerator in the vicinity of flammable gas.
SAFETY INSTRUCTIONS
6
DISPOSAL
• Junked or abandoned refrigerators are dangerous, even if they are sitting for only a few days. When
disposing of the refrigerator, remove the packing materials from the door or take off the doors but leave
the shelves in place so that children may not easily climb inside.
• If disposing of a refrigerator, make sure the refrigerant is removed for proper disposal by a qualified
servicer. If you release the refrigerant, you may be fined or imprisoned in accordance with the relevant
environmental law.
GROUNDING INSTRUCTIONS
• Improper connection of the equipment-grounding conductor can result in a risk of electric shock. Check
with a qualified electrician or service personnel if you are in doubt whether the appliance is properly
grounded. Do not modify the plug provided with the appliance; if it will not fit the outlet, have a proper
outlet installed by a qualified electrician.
• Have a certified electrician check the wall outlet and wiring for proper grounding.
• Never unplug the appliance by pulling on the power cord. Always grip the plug firmly and pull straight out
from the outlet. Failure to do so may damage the power cord, resulting in a risk of fire and electric shock.
CAUTION
To reduce the risk of minor or moderate injury to persons, malfunction, or damage to
the product or property when using this product, follow basic precautions, including
the following:
INSTALLATION
• Do not install the refrigerator where there may be a danger of the unit falling.
• The refrigerator must be properly installed in accordance with the Installation Instructions.
OPERATION
• Do not use aerosols near the refrigerator.
• This appliance is intended to be used only in domestic and similar applications.
• Do not strike or apply excessive force to any glass surface. Do not touch glass surfaces if they are
cracked or broken.
• Do not overfill or pack items too tightly into door bins. Doing so may cause damage to the bin or
personal injury if items are removed with excessive force.
• Do not overfill the appliance with food. Doing so may cause personal injury or property damage.
Wine Storage
• Pull wine racks open gently. Jerking the racks out may cause bottles to fall.
• Store only wine bottles in the wine storage compartment. The temperature of the compartment is too
high to safely preserve refrigerated foods.
SAFETY INSTRUCTIONS
MAINTENANCE
• Do not use strong detergents like wax or thinners for cleaning. Clean with a soft cloth.
• Remove foreign objects (such as dust and water) off the prongs of the power plug and contact areas.
Do not use a wet or damp cloth when cleaning the plug.
• Do not spray water directly on the inside or outside of the refrigerator.
• Do not clean glass shelves or covers with warm water when they are cold. They may break if exposed
to sudden temperature changes.
This appliance contains a small amount of isobutane refrigerant (R600a), which is combustible.
When transporting and installing the appliance, care should be taken to ensure that no parts of
the refrigerating circuit are damaged. Refrigerant squirting out of the pipes could ignite or cause
an eye injury. If a leak is detected, avoid any naked flames or potential sources of ignition and
air the room in which the appliance is standing for several minutes.
In order to avoid the creation of a flammable gas air mixture if a leak in the refrigerating circuit
occurs, the size of the room in which the appliance may be sited depends on the amount of
refrigerant used. The room must be 10.8 square feet (1 square meter) in size for every 8g of
R600a refrigerant inside the appliance. The amount of refrigerant in your particular appliance is
shown on the identification plate inside the appliance. Never start up an appliance showing any
signs of damage. If in doubt, consult your dealer.
7
ENGLISH
SAVE THESE INSTRUCTIONS
PRODUCT OVERVIEW
8
PRODUCT OVERVIEW
Product Features
The images in this guide may be different from the actual components and accessories, which are subject
to change by the manufacturer without prior notice for product improvement purposes.
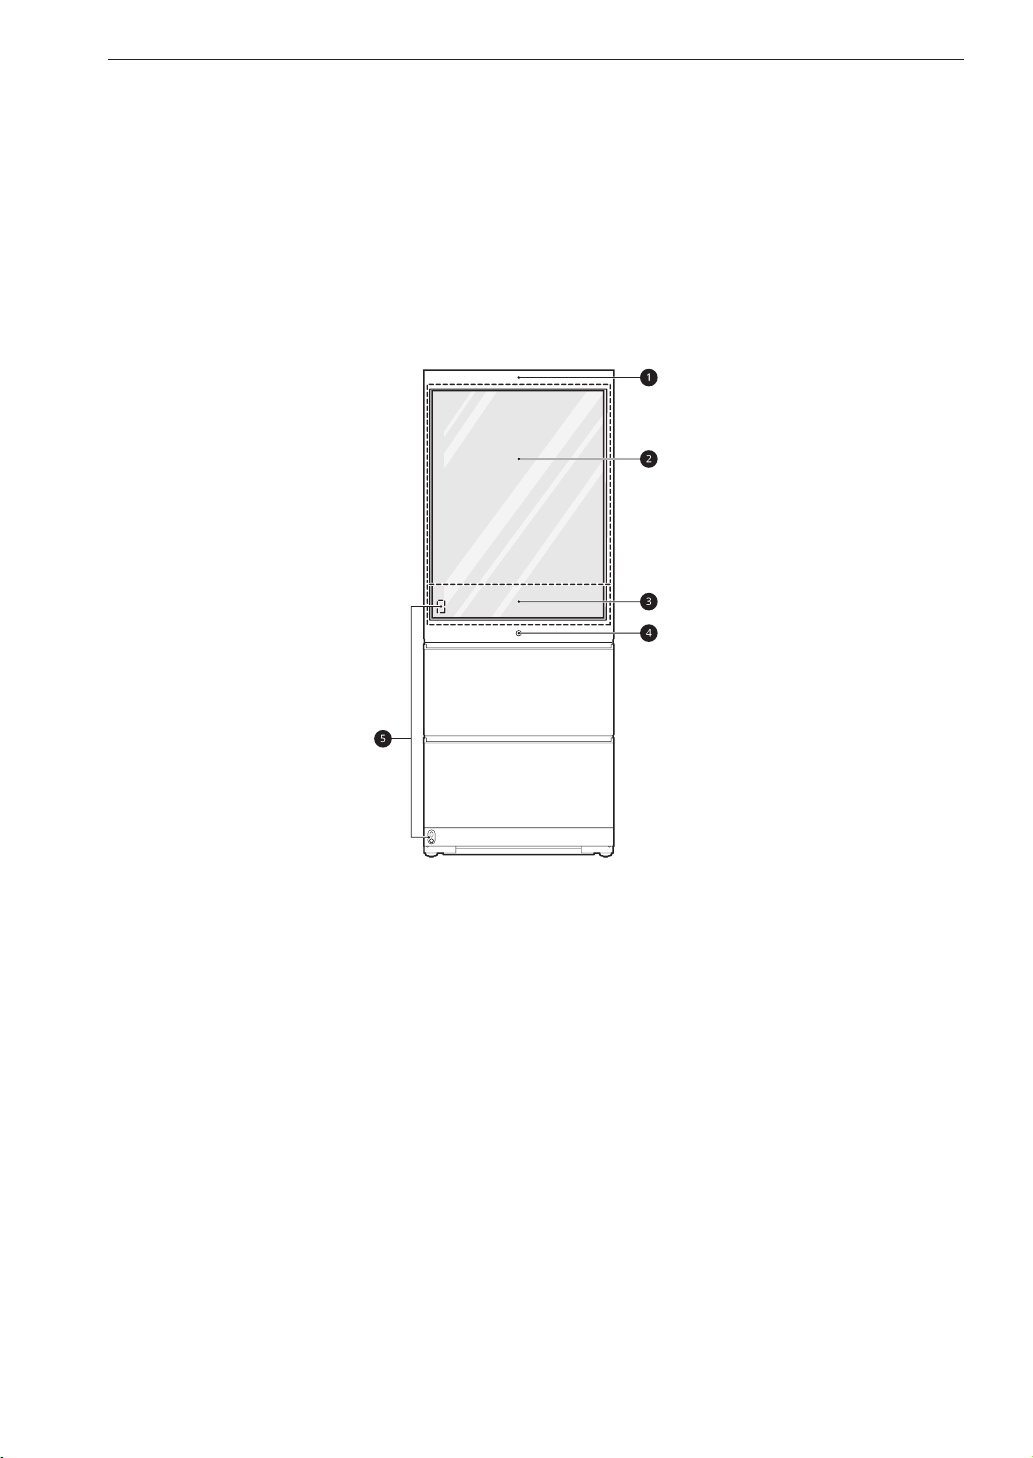
Exterior
a
Voice Assistant Device
A voice assistant device is built into the door.
b
InstaView Door
The sleek tinted glass panel illuminates with two quick knocks, allowing you to see inside the easy
access compartment without ever opening the door.
c
Control Panel
Displays the wine, refrigerator, and freezer temperature controls.
d
Bottom Pullout Drawer button
When the button is pressed, the bottom drawer opens automatically and the inner compartment rises
up for convenient access.
e
Automatic Door Opening Sensors
Stand close enough to the front of the appliance and DOOR OPEN appears on the floor. Pass your
foot over the words on the floor to open the wine storage door automatically.
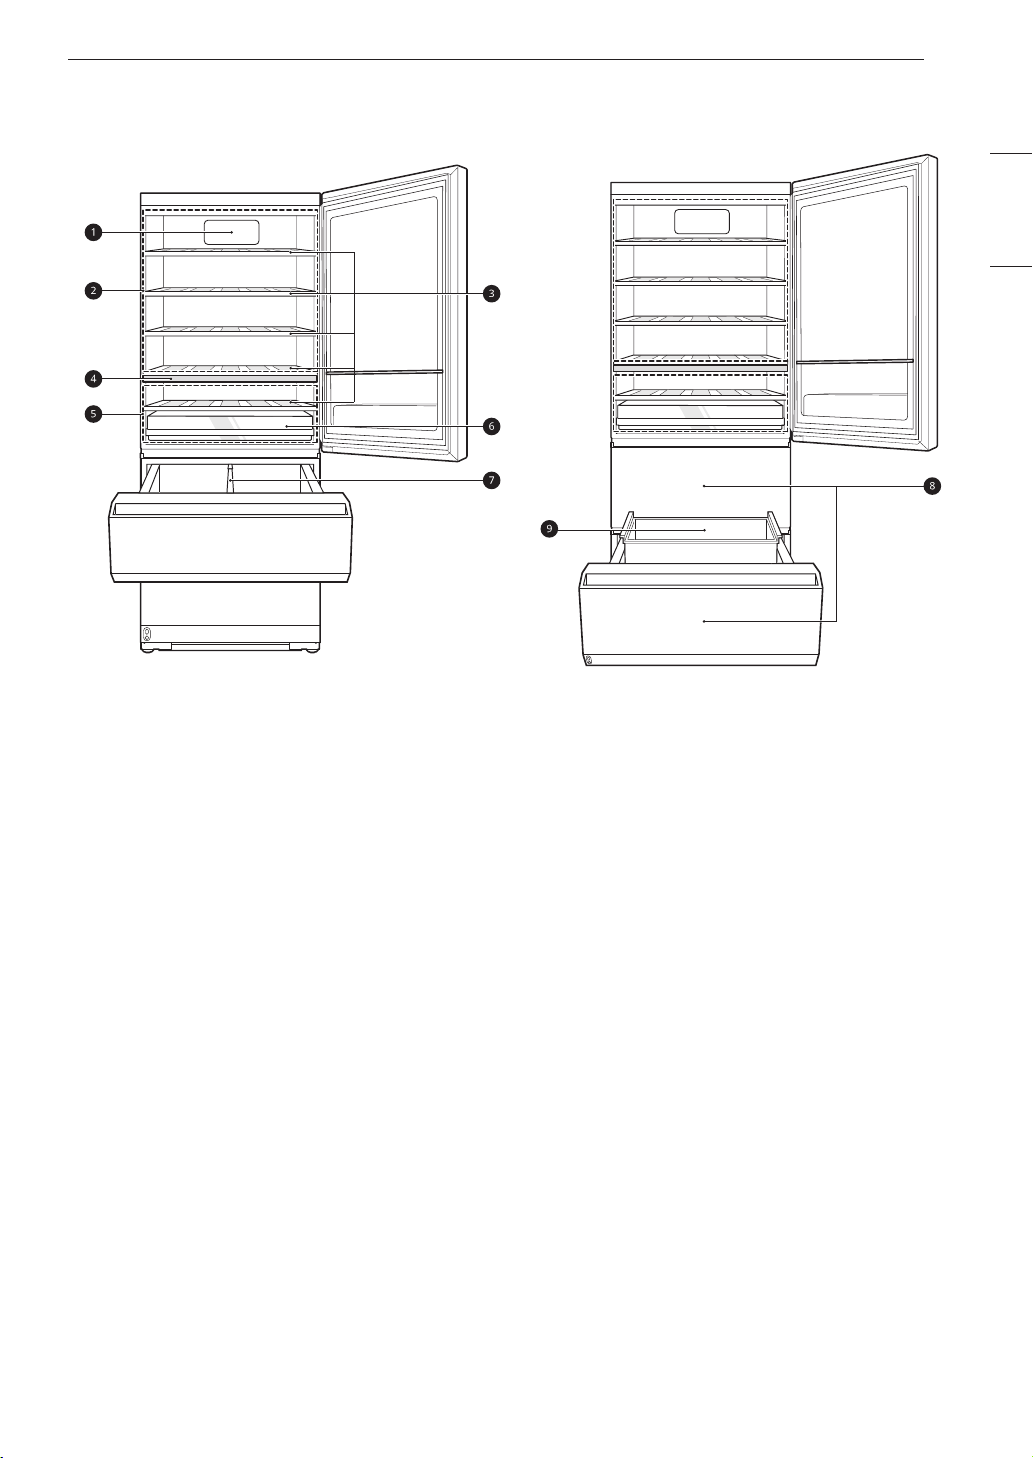
Interior
PRODUCT OVERVIEW
9
ENGLISH
a
Fresh Filter
This reduces odors inside the wine compartment.
b
Upper Zone
Stores bottles of red wine.
c
Storage Rack
Stores wine bottles on their sides for best long-term storage.
d
Zone Divider
Helps maintain separate temperature zones.
e
Lower Zone
Stores bottles of white wine and champagne.
f
Champagne Drawer
Stores champagne bottles. Before storing champagne, turn on the champagne function in the control
panel.
g
Durabase Divider
Provides storage for large food items.

PRODUCT OVERVIEW
10
h
Middle / Bottom Drawer
The 2 drawers can be set to either Refrigerator or Freezer mode. Both drawers must use the same
mode.
• To store fresh food, press the Refrigerator Drawer button for at least 1 second.
• To store frozen food, press the Freezer Drawer button for at least 1 second.
CAUTION
• Empty out both drawers before changing the mode from freezer to refrigerator or vice versa.
• If the mode is changed while food is in the drawer, the food could be spoiled.
i
Inner Compartment
Rises during the auto-lift operation.
PRODUCT SPECIFICATIONS
The appearance and specifications listed in this manual may vary due to constant product improvements.
Electrical requirements: 115 V, 60 Hz
Model URETC1408N
Description Wine Cellar
Net weight 368 lb (167 kg)
INSTALLATION
INSTALLATION
11
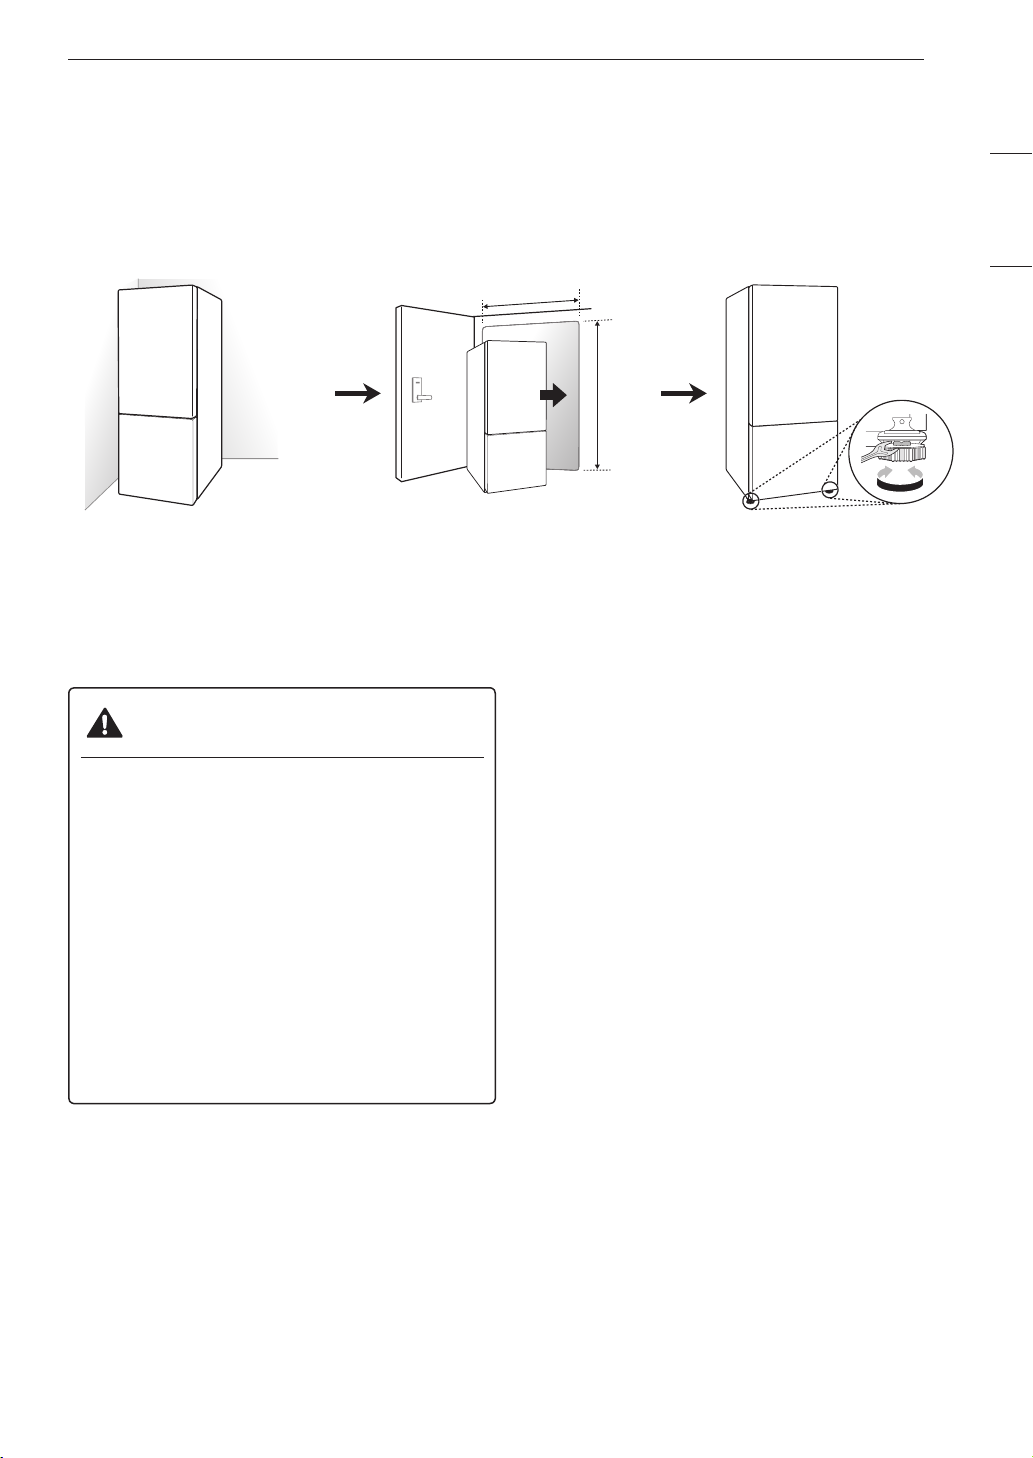
Installation Overview
Please read the following installation instructions first after purchasing this product or transporting it to
another location.
Unpacking the Refrigerator
Choosing the Proper
Location
Unpacking the Refrigerator
WARNING
• Use two or more people to move and install
the refrigerator. Failure to do so can result in
back injury or other injury.
• The refrigerator is heavy. Protect the floor
when moving the refrigerator for cleaning or
service. Always pull the refrigerator straight
out when moving it. Do not wiggle or walk the
refrigerator when trying to move it, as floor
damage could occur.
• Keep flammable materials and vapors, such
as gasoline, away from the refrigerator.
Failure to do so can result in fire, explosion,
or death.
• To remove any remaining tape or glue, rub
the area briskly with your thumb. Tape or glue
residue can also be easily removed by rubbing
a small amount of liquid dish soap over the
adhesive with your fingers. Wipe with warm
water and dry.
• Do not use sharp instruments, rubbing alcohol,
flammable fluids, or abrasive cleaners to remove
tape or glue. These products can damage the
surface of your refrigerator.
• Reinstall or adjust shelves as needed.
Refrigerator shelves are installed in the shipping
position. Reinstall shelves according to your
individual storage needs.
Leveling and Door
Alignment
ENGLISH
NOTE
• Remove tape and any temporary labels from
your refrigerator before using. Do not remove
any warning labels, the model and serial number
label, or the Tech Sheet that is located under the
front of the refrigerator.
INSTALLATION
12
Choosing the Proper
Location
Electricity
Use an individual, grounded outlet:115 Volts, 60
Hz, AC, 15 Amps minimum.
WARNING
• Do not overload house wiring and cause a
fire hazard by plugging in multiple appliances
in the same outlet with the refrigerator.
• To reduce the risk of electric shock, do not
install the refrigerator in a wet or damp area.
Flooring
To avoid noise and vibration, the unit must be
installed and leveled on a solidly constructed floor.
If required, adjust the leveling legs to compensate
for the unevenness of the floor.
NOTE
• Installing on carpeting, soft tile surfaces, a
platform or weakly supported structure is not
recommended.
Ambient Temperature
Install this appliance in an area where the
temperature is between 50 °F (10 °C) and 95 °F
(35 °C).
If the temperature around the appliance is too low
or high, cooling ability may be adversely affected.
Dimensions and Clearances
INSTALLATION
13
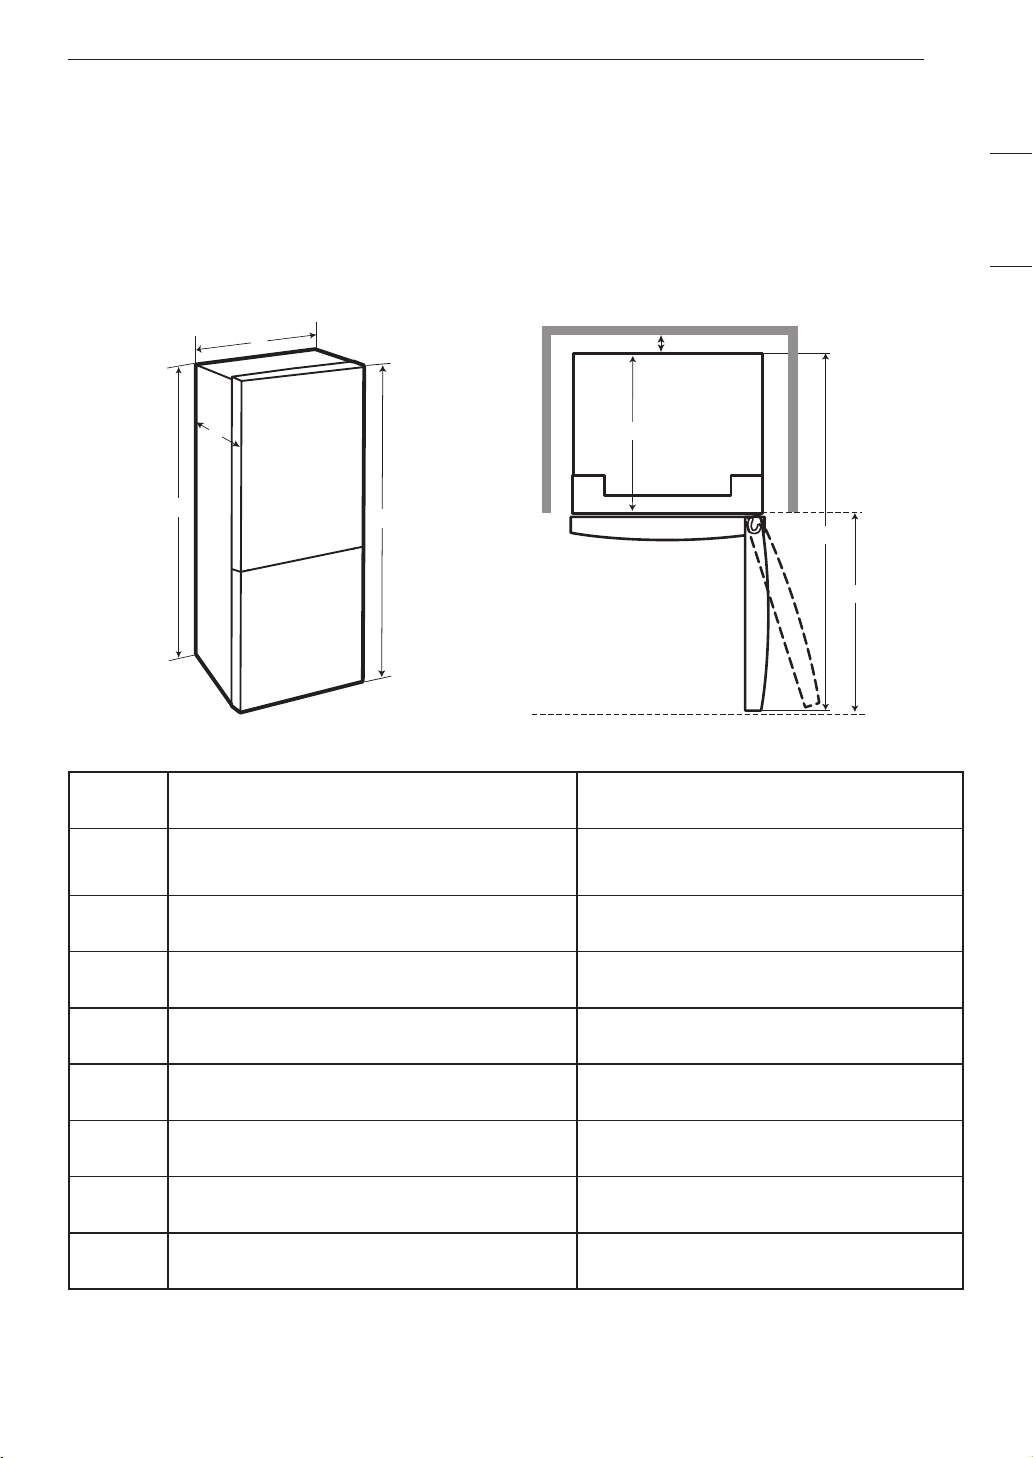
• Check the dimensions of the appliance and the installation path to ensure there is sufficient room to
move the refrigerator through doors or narrow openings.
• The installation location chosen for the refrigerator should allow space behind the unit for connections
and airflow and space in front to open the doors.
• Too small of a distance from adjacent items may result in lowered freezing capability and increased
electricity consumption charges.
B
A
C
D
E
F
G
H
ENGLISH
- List URETC1408N
A Depth
B Width
C Height to Top of Case
D Height to Top of Hinge
E Back Clearance
F Depth without Door
G Depth (Total with Door Open 90°)
H Front Clearance
28 15/16”
(735 mm)
27 9/16”
(700 mm)
69 1/16”
(1754 mm)
70 5/8”
(1793 mm)
2”
(50 mm)
24 15/16”
(633 mm)
53 3/16”
(1350 mm)
25 5/8”
(727 mm)
INSTALLATION
14
Leveling
The refrigerator has two front leveling legs. Adjust
the legs to alter the tilt from front-to back or side-to
side. If the refrigerator seems unsteady, or the
door does not close easily, adjust the refrigerator’s
tilt using the instructions below:
Open the bottom drawer and remove the cover
1
from the appliance.
Turn the leveling leg to the left to raise that
2
side of the refrigerator or to the right to lower
it. It may take several turns of the leveling leg
to adjust the tilt of the refrigerator.
Open the door and the drawers and check to
3
make sure that they close easily. If they do
not close easily, tilt the refrigerator slightly
more to the rear by turning both leveling legs
to the left. It may take several more turns, and
be sure to turn both leveling legs the same
amount.
When the refrigerator is level, open the bottom
4
drawer and reassemble the cover.
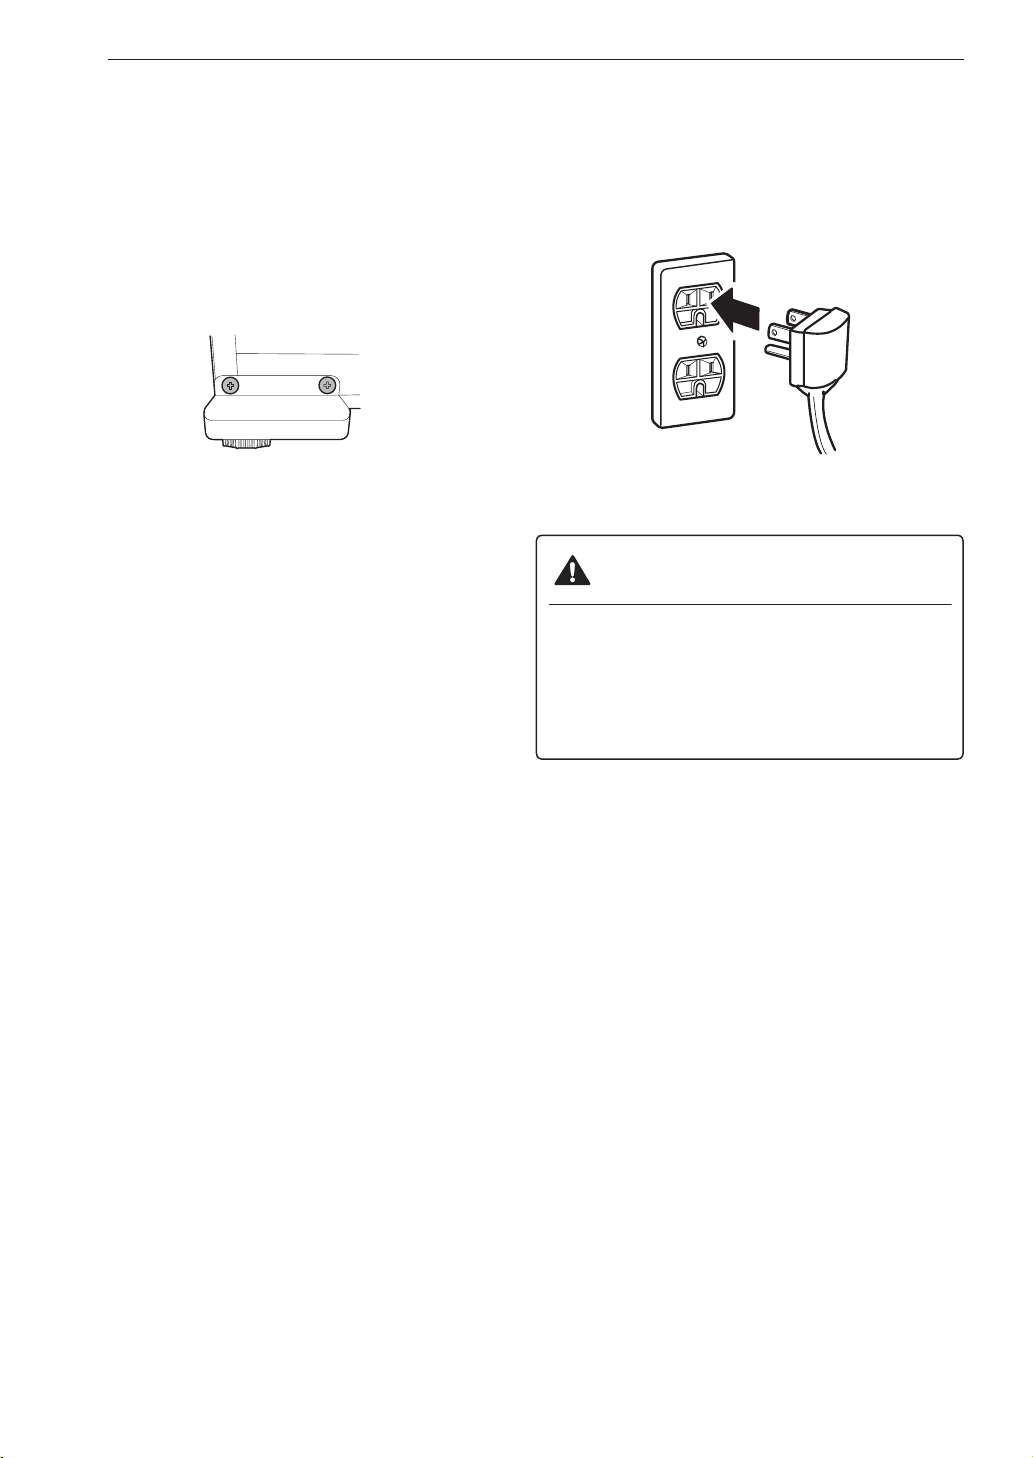
Turning on the Power
• After installing, plug the refrigerator’s power cord
into a 3-prong grounded outlet and push the
refrigerator into the final position.
CAUTION
• Connect to a rated power outlet.
• Have a certified electrician check the wall
outlet and wiring for proper grounding.
• Do not damage or cut off the ground terminal
of the power plug.
Position the Refrigerator
• Arrange the refrigerator so that it does not
vibrate against adjoining surfaces or against the
wall. Be sure to maintain at least a 2” clearance
behind the refrigerator for proper ventilation.
OPERATION
OPERATION
15
Before Use
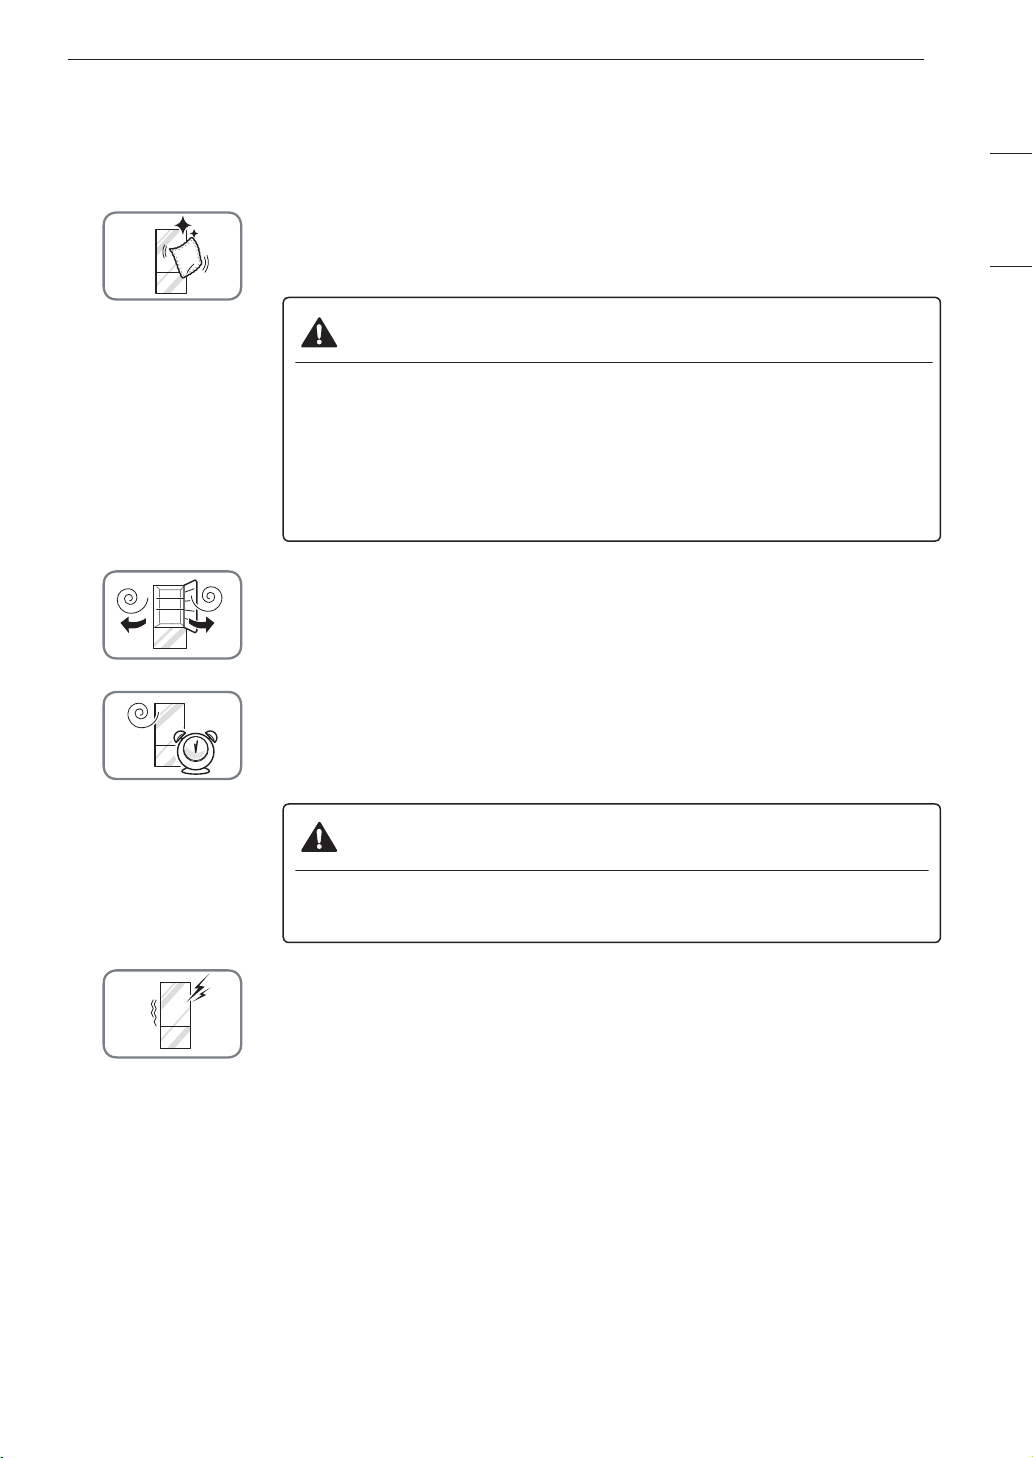
Clean the refrigerator.
Clean the refrigerator thoroughly and wipe off all dust that accumulated during
shipping.
CAUTION
• Do not scratch the refrigerator with a sharp object or use a detergent
that contains alcohol, a flammable liquid or an abrasive when removing
any tape or adhesive from the refrigerator. Remove adhesive residue by
wiping it off with your thumb or dish detergent.
• Do not peel off the model or serial number label or the technical
information on the rear surface of the refrigerator.
Open refrigerator doors to ventilate the interior.
The inside of the refrigerator may smell like plastic at first. Remove any
adhesive tape from inside the refrigerator and open the refrigerator doors for
ventilation.
Wait for the refrigerator to cool.
Allow the refrigerator to run for at least two to three hours before putting food
in it. Check the flow of cold air in the freezer compartment to ensure proper
cooling.
ENGLISH
CAUTION
• Putting food in the refrigerator before it has cooled could cause the food
to spoil, or a bad odor to remain inside the refrigerator.
The refrigerator makes a loud noise after initial operation.
This is normal. The volume will decrease as the temperature decreases.
OPERATION
16
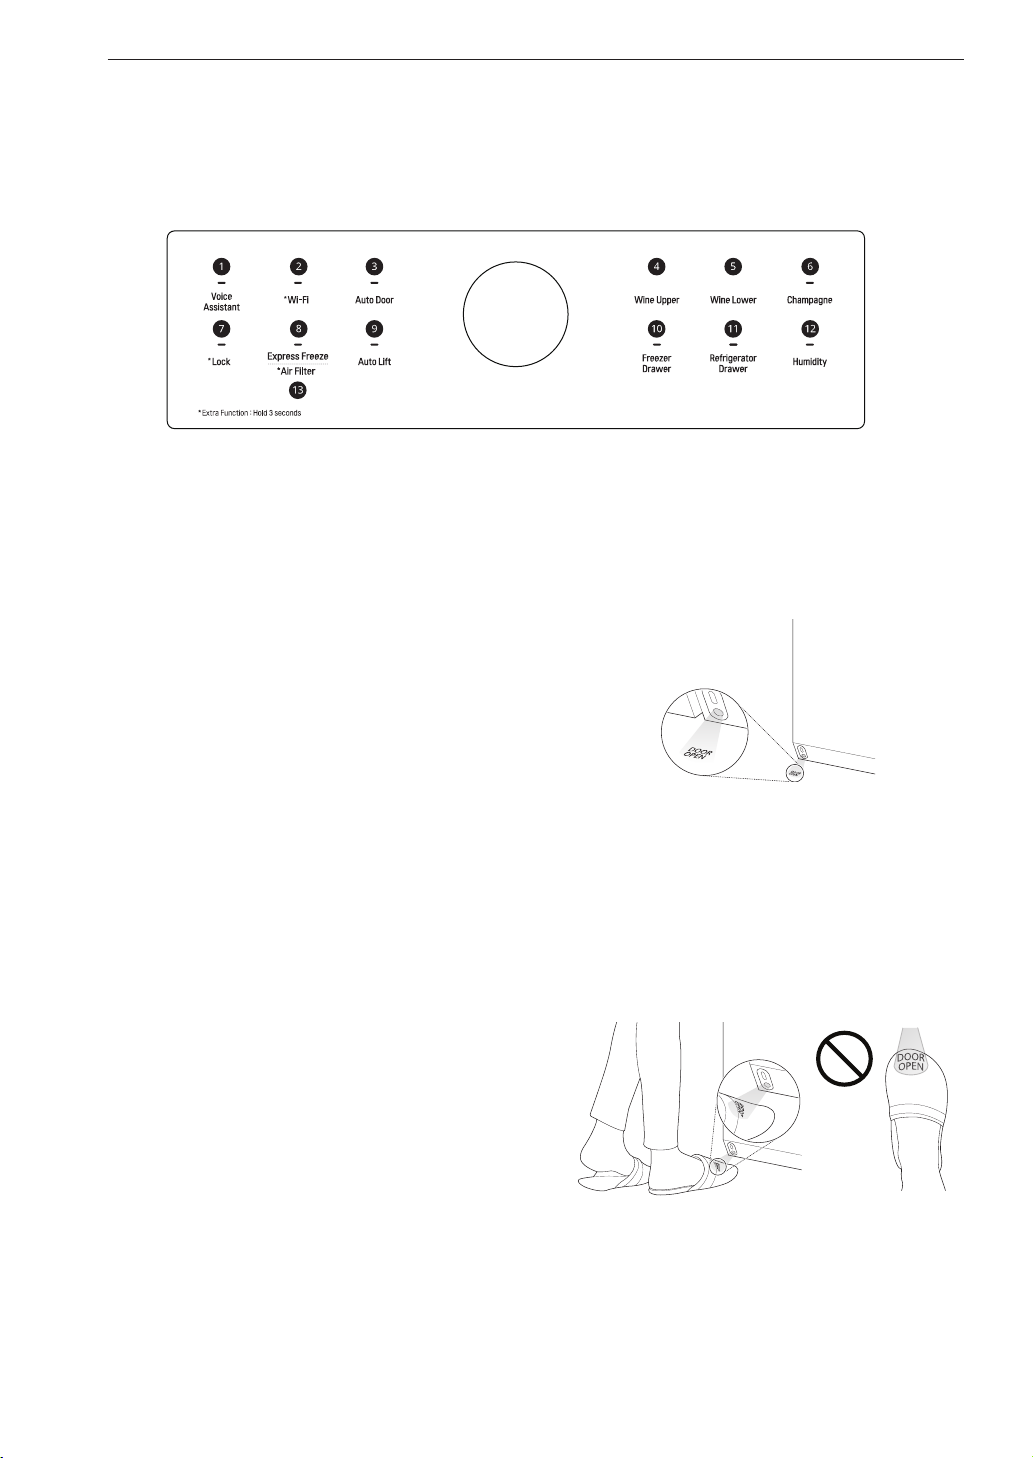
Control Panel
The control panel may differ from model to model.
Control Panel Features
a
Voice Assistant
Changes voice assistant settings. This button
allows the appliance to connect to a home Wi-Fi
network. Refer to SMART FUNCTIONS for
information on the initial setup of the LG ThinQ
application.
Using the Auto Door Function
When the automatic door opening
1
function is enabled, text is displayed on
the floor near the motion sensor.
b
Wi-Fi
The Wi-Fi button, when used with the
LG ThinQ app, allows the refrigerator to
connect to a home Wi-Fi network. Refer to
Smart Functions for information on the initial
setup of the application.
The icon shows the status of the
refrigerator’s network connection. The icon
illuminates when the refrigerator is connected
to the Wi-Fi network.
Press and hold the Wi-Fi button for 3
seconds to connect to the network. The
icon blinks while the connection is being
made, then turns on once the connection is
successfully made.
c
Auto Door
The wine compartment door opens
automatically if you place a foot near the
motion sensor at the bottom of the door. This
is convenient when you have both hands
full and need to open the wine compartment
door. To set the automatic opening door
function, press the button repeatedly to
toggle between the ON, Sound Off, and OFF
settings.
Pass one foot in front of the motion
2
sensor and step on the displayed text.
The wine compartment door opens. If the
door opens less than about 20 degrees
and is not opened further, it will close
automatically after 3 seconds.
NOTE
Place your foot close enough to the sensor
that the text appears on top of the foot, not
just on the toes.
CAUTION
You may want to disable the automatic
door opening function if you have
young children or persons with reduced
physical, sensory, or mental capabilities
in the home. They could be injured if the
door opens unexpectedly while they are
nearby.
NOTE
• The displayed text may not be readable
on some flooring materials, but this will not
affect the performance of the automatic
door opening function.
• If flooring material is highly reflective
(metal, glass tile), the motion sensor
may malfunction and the automatic door
opening function may not work properly.
• Reflective objects placed in front of the
motion sensor may cause the text to
display, but the text disappears if no
movement is detected.
• If a pet passes by below when a person
stands in front of the product, the
automatic door opening function may be
triggered.
d
Wine Upper
Indicates the set temperature of the upper
zone in Celsius (°C) or Fahrenheit (°F).
The default temperature is 55 °F (13 °C).
Press the Wine Upper button repeatedly to
select a new set temperature from 52 °F to
64 °F (11 °C to 18 °C).
OPERATION
f
Champagne
Press the Champagne button repeatedly
to turn on and off this function. The default
condition is turned off.
NOTE
• If you turn off this function, the temperature
inside the champagne drawer remains the
same as the temperature of the lower wine
compartment.
g
Lock
The lock function disables every other button
on the display.
• When power is initially connected to the
refrigerator, the lock function is off.
• To lock the control panel buttons, press
and hold the Lock button until the icon
appears in the display and the function is
activated.
• To disable the function, press and hold
the Lock button for approximately three
seconds.
h
Express Freeze
This function increases the freezing
capabilities.
• To activate, press and hold the Express
Freeze button until the LED lights up on
the control panel.
• The function operates for about 24 hours,
then turns off automatically.
• Stop the function manually by pressing and
holding the button again.
17
ENGLISH
e
Wine Lower
Indicates the set temperature of the lower
zone in Celsius (°C) or Fahrenheit (°F).
The default temperature is 46 °F (8 °C).
Press the Wine Lower button repeatedly to
select a new set temperature from 41 °F to
52 °F (5 °C to 11 °C).
OPERATION
18
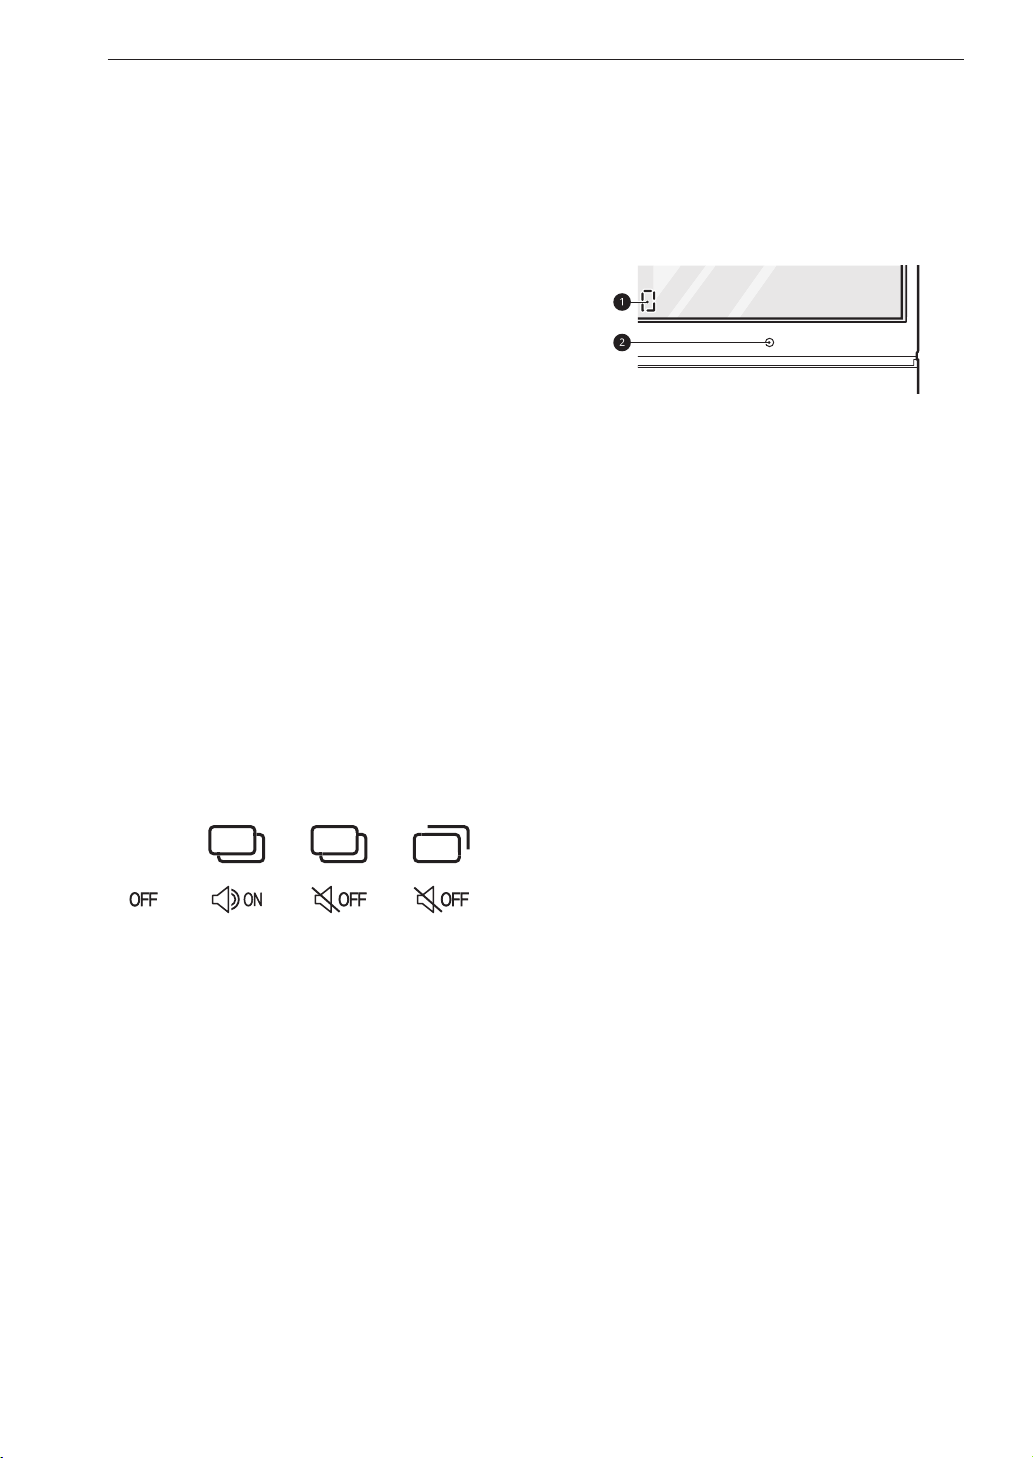
i
Auto Lift
When Auto Lift is enabled, pressing the
bottom pullout drawer button automatically
opens the drawer and raises the inner
compartment for convenient access.
Press the bottom pullout drawer button again
to automatically lower the inner compartment
and close the drawer.
Setting Auto Lift
Press the Auto Lift button repeatedly to
toggle between Off ~ Sound On ~ Sound
Off ~ Auto Drawer Opening Only.
The setting is indicated by the icon in the
display.
• When the auto door sensor a detects
motion in front of the refrigerator, the
bottom pullout drawer button b lights
up. If the button does not light up, move
closer to the refrigerator to trip the
sensor.
− Off: The drawer must be opened
manually and the auto-lift function is
disabled.
− Sound On: Sound is heard, the drawer
is automatically opened and the inner
compartment is raised
− Sound Off: The drawer automatically
opens without sound and the inner
compartment is raised
− Auto Drawer Opening Only: The drawer
opens automatically without sound, but
the inner compartment is not raised.
Using Auto Lift
Press the Auto Lift button to turn Auto
1
Lift on.
Press the bottom pullout drawer button
3
b to automatically lower the inner
compartment and close the drawer.
NOTE
• When the auto-lift function is turned off in
the control panel:
− Standing in front of the refrigerator will
not activate the light around the bottom
pullout drawer button.
− When the bottom pullout drawer button
is pressed, the light blinks 3 times.
• When the auto-lift function is turned on in
the control panel:
− If pressing the bottom pullout drawer
button does not close the bottom drawer,
open the middle drawer or manually
close the bottom drawer.
− If pressing the bottom pullout drawer
button does not open the bottom drawer,
manually opening the drawer will cause
the inner compartment to lift up.
Press the bottom pullout drawer button
2
b. The bottom drawer automatically
opens and the inner compartment is
raised.
− The auto-lift function does not work
when the middle drawer is open.
 Loading...