

LG 85063 Owner’s Manual
USE & CARE
MANUAL
MODEL No.
85063
KNOW YOUR UNIT
Read this booklet so you will be
able to enjoy all the features in
your Kenmore Microwave
Oven.
Record in the space provided
below the Model No. and the
Serial No. of the appliance.
Model No.
Serial No.
Retain this information
for future reference.
*Distributed by Sears Canada Inc.
Part No. MFL06402704
MICROWAVE OVEN
Use and Care Manual
SEARS. CANADA INC., TORONTO. M5B 2C3

Table of Contents
Safety ....................................................................3~5
Getting To Know Your Microwave Oven .........6~11
How your kenmore microwave hood combination
works .......................................................................6
Radio interference ..................................................6
Testing your microwave oven .................................6
Testing your dinnerware or cookware ....................7
Operating safety precautions ..................................7
Electrical connection ..............................................7
Microwave oven features .......................................8
Installation instructions for glass tray .....................9
Using an oblong dish ..............................................9
Control panel features .....................................10~11
Microwave Cooking Tips .................................12~13
Using Your Microwave Oven ...........................14~26
Dial Control
Function Selections ............................................
Clock ..................................................................
Timer ..................................................................
Vent ....................................................................
Light
Add 30 Seconds .................................................
Manual Cook ......................................................
Two-Stage Cooking ............................................
Cooking Guide for Power Levels ........................
Options ...............................................................
.........................................................14
14
14
14
15
....................................................................15
15
16
16
17
18
Soften/Melt .........................................................20
Control Lock .......................................................20
Back .............................................................20, 22
Favorites
Using Sensor Cooking
Popcorn ..............................................................
Cook ...................................................................
Reheat ................................................................
Warm & Hold ......................................................23
Auto Defrost .......................................................24
Weight Conversion Chart ...................................24
1 Lb Defrost ........................................................24
Defrosting Tips ...................................................24
Defrost Table ................................................25~26
Caring for Your Microwave Oven ....................27~29
Caring for the Filters..............................................28
Replacing the Cooktop and Oven Lights...............29
Questions and Answers.........................................30
Troubleshooting ...............................................31~32
Warranty ..................................................................33
Service .....................................................Back Cover
.............................................................21
........................................22
22
22
22
2

Safety
IMPORTANT SAFETY INSTRUCTIONS
The safety instructions below will tell you how to use your oven and avoid harm to yourself or damage to your
oven.
To reduce the risk of burns, electric
WARNING
shock, fire, injury to persons, or exposure to excessive
microwave energy.
• Read all the instructions before using your
oven.
• Do not allow children to use this oven without
close supervision.
•
Read and follow the specific PRECAUTIONS TO
AVOID POSSIBLE EXPOSURE TO EXCESSIVE
MICROWAVE ENERGY found on page 4.
• Do not
sulfide and chloride, in this appliance. This type of
oven is specifically designed to heat, cook, or dry
food. It is not designed for industrial or laboratory
use.
• Do not use or store
not use this product near water - for example,
near a kitchen sink, in a wet basement, or near a
swimming pool, and the like.
• Do not use
leave paper products, cooking utensils, or food in
the cavity when not in use.
• Clean the ventilating hood frequently.
allow grease to accumulate on the hood or the
filters.
•
Use care when cleaning the vent hood filters.
Corrosive cleaning agents such as lye-based oven
cleaners may damage the filters.
• Do not tamper with the built-in safety switches
on the oven door. The oven has several built-in
safety switches to make sure the power is off when
the door is open.
• When food flames under the hood, turn the fan on.
• Suitable for use above both gas and electric
cooking equipment 36 inches wide or less.
•
Do not use this oven for commercial purposes.
It is made for household use only.
-
use corrosive chemicals or vapors, such as
this appliance outdoors. Do
the cavity for storage purposes. Do not
Do not
• When cleaning the door and the surfaces that
touch the door, use only mild, non-abrasive
soaps or detergents and a sponge or soft cloth.
• If your oven is dropped or damaged, have it
thoroughly checked by a qualified service
technician before using it again.
• To avoid a fire hazard:
Do not severely overcook food. Severely
-
overcooked foods can start a fire in the oven.
Watch the oven carefully, especially if you have
paper, plastic, or other combustibles in the oven.
Do not store combustible items (bread,
-
cookies, etc.) in the oven, because if lightning
strikes the power lines it may cause the oven to
turn on.
Do not use wire twist-ties in the oven. Be sure
-
to inspect purchased items for wire twist-ties and
remove them before placing the item in the oven.
- If materials inside the oven ignite, keep the oven
door closed, turn the oven off and disconnect the
power cord, or shut off power at the fuse or circuit
breaker panel. If the door is opened, the fire may
spread.
• If a fire should start:
Keep the oven door closed.
-
Turn the oven off.
-
Disconnect the power cord or shut off the
-
power at the fuse or circuit breaker panel.
• To avoid electric shock:
- This appliance must be grounded.
it only to a properly grounded outlet. See the
electrical GROUNDING INSTRUCTIONS on page
5.
- Do not operate this appliance if it has a
damaged cord or plug, if it is not working
properly or if it has been damaged or dropped.
- Do not immerse the electrical cord or plug in
water.
- Keep the cord away from heated surfaces.
Connect
3

Safety
• To avoid improperly cooking some foods.
- Do not heat any types of baby bottles or
baby food. Uneven heating may occur and
possibly cause personal injury.
- Do not heat small-necked containers, such
as syrup bottles.
- Do not deep-fat fry in your microwave oven.
- Do not attempt home canning in your
microwave oven.
- Do not heat the following items in the
microwave oven: whole eggs in the shell,
water with oil or fat, sealed containers, or closed
glass jars. These items may explode.
• Do not cover or block any openings in the oven.
• Use your oven only for the operations described
in this manual.
• Do not run the oven empty, without food in it.
• Do not let cord hang over edge of table or
counter.
SAVE THESE INSTRUCTIONS
• Preserve the oven floor:
- Do not heat the oven floor excessively.
- Do not
microwave-cooking packages to touch the oven
floor. Put the package on a microwavable dish.
Do not cook anything directly on the oven floor
-
or turntable. Use a microwavable dish.
- Keep a browning dish at least 3/16 inch above
floor. Carefully read and follow the instructions
for the browning dish. If you use a browning
dish ncorrectly, you could damage the oven
floor.
• Install or locate this appliance only in accordance
with the provided installation instructions.
• This appliance should be serviced only by
qualified service personnel. Contact the nearest
authorized service facility for examination, repair,
or adjustment.
• As with any appliance, close supervision is
necessary when used by children.
allow the gray film on special
PRECAUTIONS TO AVOID POSSIBLE
EXPOSURE TO EXCESSIVE MICROWAVE
ENERGY ...
• Do not attempt to operate this oven with the door open, since open-door operation can result in
harmful exposure to microwave energy. It is important not to defeat or tamper with the safety interlock.
• Do not operate the oven if it is damaged. It is particularly important that the oven door close properly
and that there is no damage to the:
- door (bent)
- hinges and latches (broken or loosened)
- door seals and sealing surfaces.
• Do not place any object between the oven front face and the door, or allow soil or cleaner residue to
accumulate on sealing surfaces.
• The oven should not be adjusted or repaired by anyone except properly qualified service personnel.
4

Safety
Ensure proper ground
exists before use
GROUNDING INSTRUCTIONS
This appliance must be grounded. If an electrical
short circuit occurs, grounding reduces the risk of
electric shock by providing an escape wire for the
electric current. The cord for this appliance has
a grounding wire with a grounding plug. Put the
plug into an outlet that is properly installed and
grounded.
WARNING - If you use the grounding plug
improperly, you risk electric shock.
Ask a qualified electrician if you do not understand
the grounding instructions or if you wonder
whether the appliance is properly grounded.
Because this appliance fits under the cabinet, it
has a short power-supply cord. See the separate
Installation Instructions for directions on properly
placing the cord. Keep the electrical power cord
dry and do not pinch or crush it in any way.
If it is necessary to use an extension cord, use
only a 3-wire extension cord that has a 3-blade
grounding plug, and a 3-slot receptacle that will
accept the plug on the appliance. The marked
rating of the extension cord shall be equal to or
greater than the electrical rating of the appliance.
For a permanently connected appliance:
This appliance must be connected to a grounded,
metallic, permanent wiring system, or an
equipment grounding conductor should be run
with the circuit conductors and connected to the
equipment grounding terminal or lead on the
appliance.
5
Getting to Know Your
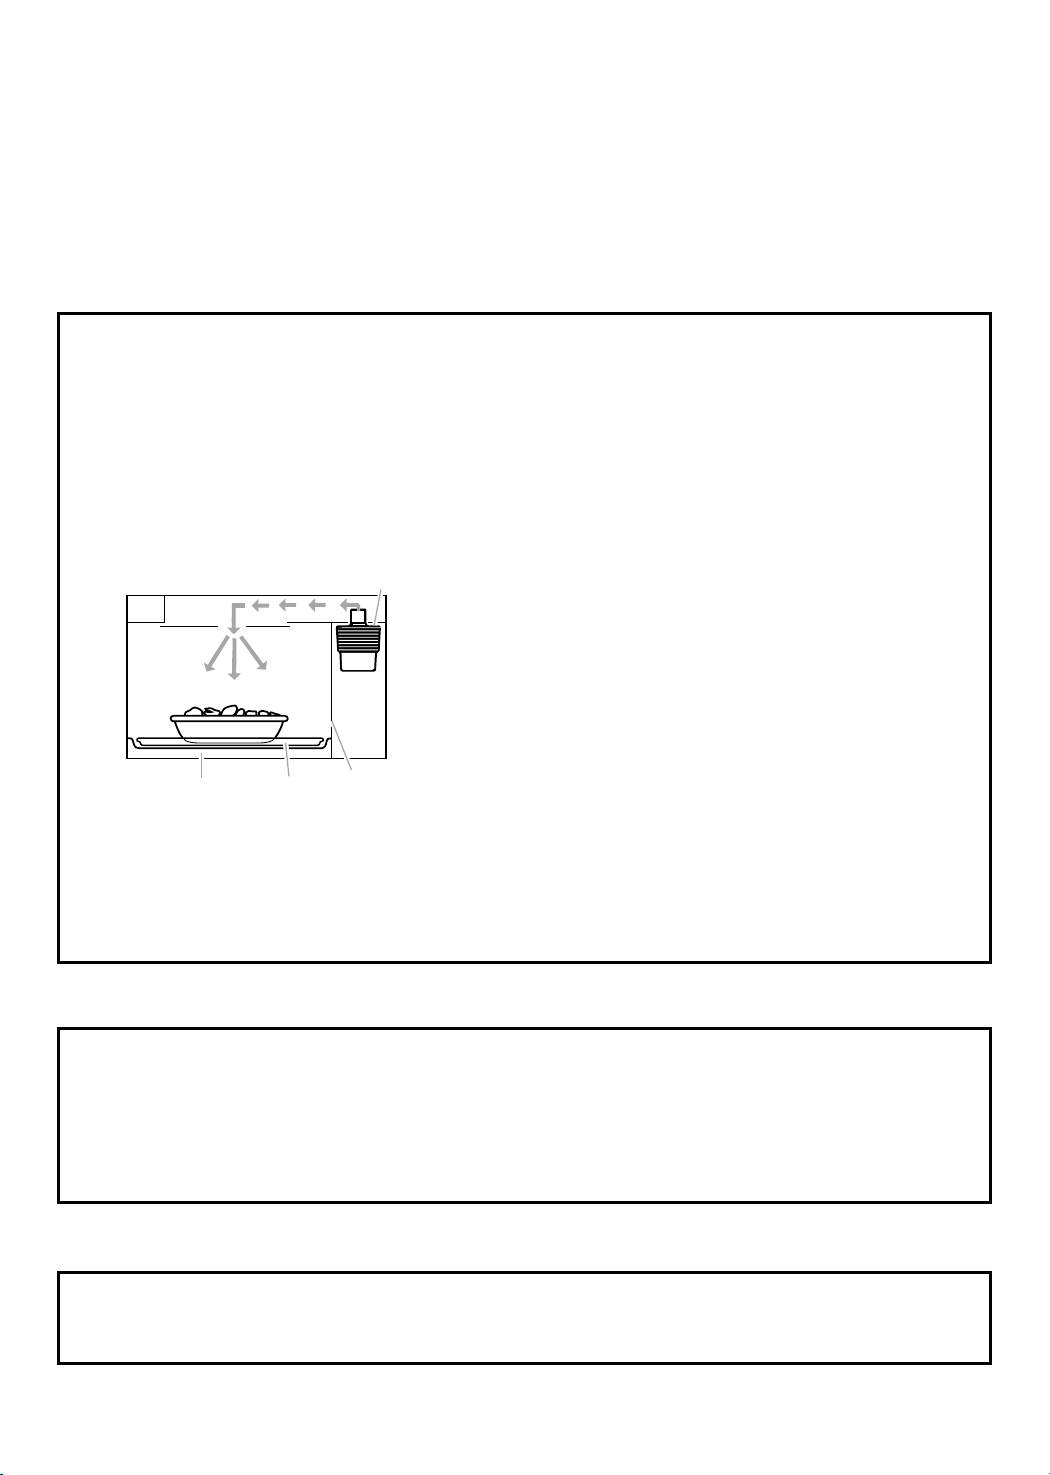
Magnetron
Metal floor Glass tray
Oven cavity
Microwave Oven
This section discusses the concepts behind microwave cooking. It also shows you the basics you need to
know to operate your microwave oven. Please read this information before you use your oven.
How your kenmore microwave hood combination works
Microwave energy is not hot. It causes food to
make its own heat, and it’s this heat that cooks the
food.
Microwaves are like TV waves, radio waves, or
light waves. You cannot see them, but you can
see what they do.
A magnetron in the microwave oven produces
microwaves. The microwaves move into the
oven where they contact food as it turns on the
turntable.
The glass turntable of your microwave oven lets
microwaves pass through. Then they bounce off a
metal floor, back through the glass turntable, and
are absorbed by the food.
Microwaves pass through most glass, paper, and
plastics without heating them so food absorbs the
energy. Microwaves bounce off metal containers
so food does not absorb the energy.
For the best cooking results
• Always cook food for the shortest cooking time
recommended. Check to see how the food is
cooking.
• Stir, turn over, or rearrange
cooked about halfway through the cooking time
for all recipes. This will help make sure the food
is evenly cooked.
• If you do not have a cover for a dish,
paper, or microwave-approved paper towels or
plastic wrap. Remember to turn back a corner of
the plastic wrap to vent steam during cooking.
the food being
use wax
Radio interference
Using your microwave oven may cause
interference to your radio, TV, or similar
equipment. When there is interference, you can
reduce it or remove it by:
• Cleaning
oven.
the door and sealing surfaces of the
Testing your microwave oven
To test the oven put about 1 cup of cold water
in a glass container in the oven. Close the door.
Make sure it latches. Cook at 100% power for 1
6
• Adjusting
television.
• Moving
oven.
• Plugging
outlet so that the microwave oven and receiver
are on different branch circuits.
minute. When the time is up, the water should be
heated.
the receiving antenna of the radio or
the receiver away from the microwave
the microwave oven into a different

GETTING TO KNOW YOUR MICROWAVE OVEN
Testing your dinnerware or cookware
Test dinnerware or cookware before using. To
test a dish for safe use, put it into the oven with a
cup of water beside it. Cook at 100% cook power
for one minute. If the dish gets hot, do not
use it. Some dishes (melamine, some ceramic
dinnerware, etc.) absorb microwave energy,
Operating safety precautions
• Never lean on the door or allow a child to swing
on it when the door is open.
• Use hot pads.
containers, but the heat from the food can make
the container hot.
• Do not
the oven.
• Do not
gourds, or clothes in the oven.
• Do not
Product life may be shortened. If you practice
programming the oven, put a container of water
in the oven. It is normal for the oven door to look
wavy after the oven has been running for a while.
• Do not
Paraffin wax will not melt in a microwave oven
because it allows microwaves to pass through it.
• Do not
glass turntable is securely in place and can move
freely. The turntable can move in either direction.
Make sure the turntable is correct-side up in the
oven. Handle your turntable with care when
removing it from the oven to avoid possibly
breaking it. If your turntable cracks or breaks,
contact your dealer for a replacement.
• When you use a browning dish,
dish bottom must be at least 3 ⁄16 inch above the
turntable. Follow the directions supplied with the
browning dish.
dry flowers, fruit, herbs, wood, paper,
start a microwave oven when it is empty.
try to melt paraffin wax in the oven.
Microwave energy does not heat
use newspaper or other printed paper in
operate the microwave oven unless the
the browning
becoming too hot to handle and slowing cooking
times. Cooking in metal containers not designed
for microwave use could damage the oven, as
could containers with hidden metal (twist-ties, foil
lining, staples, metallic glaze or trim).
• Never cook or reheat a whole egg inside
the shell. Steam buildup in whole eggs may
cause them to burst, and possibly damage the
oven. Slice hard-boiled eggs before heating.
In rare cases, poached eggs have been known
to explode. Cover poached eggs and allow a
standing time of one minute before cutting into
them.
• For best results, stir any liquid several times
during heating or reheating. Liquids heated in
certain containers (especially containers shaped
like cylinders) may become overheated. The
liquid may splash out with a loud noise during or
after heating or when adding ingredients (coffee
granules, tea bags, etc.). This can harm the
oven.
• Microwaves
The heat spreads to the center from the outer,
cooked areas just as in regular oven cooking.
This is one of the reasons for letting some foods
(for example, roasts or baked potatoes) stand for
a while after cooking, or for stirring some foods
during the cooking time.
• Do not deep fry in the oven.
utensils are not suitable and it is difficult to
maintain appropriate deep-frying temperatures.
• Do not overcook potatoes.
recommended cooking time, potatoes should be
slightly firm because they will continue cooking
during standing time. After microwaving, let
potatoes stand for 5 minutes. They will finish
cooking while standing.
may not reach the center of a roast.
Microwavable
At the end of the
Electrical connection
If your electric power line or outlet voltage is
less than 110 volts, cooking times may be longer.
Have a qualified electrician check your electrical
system.
7

GETTING TO KNOW YOUR MICROWAVE OVEN
Microwave oven features
A. Metal Shielded Window. The shield prevents
microwaves from escaping. It is designed as a
screen to allow you to view food as it cooks.
B. Model and Serial Number Plate
C. Charcoal Filter (behind Vent Grille)
D. Vent Grille
E. Glass Turntray/Guide Tray. The glass tray
moves food as it cooks for more even cooking.
It must be in the oven during operation for best
cooking results. NOTE: The Even Glide Plus
system is capable of handling dishes up to 12 x
15 inches.
F. Cooktop/Countertop Light
G. Grease Filter. See “Caring for the lters”
section.
H. Control Panel. Touch the pads on this panel to
Your microwave oven is designed to make your
cooking experience as enjoyable and productive
as possible. To get you up and running quickly, the
following is a list of the oven’s basic features:
perform all functions.
I. Cooking Rack. Use for extra space when
cooking in more than one container at the same
time. Remove cooking rack when you are not
using it.
J. Door Handle
K. Door Safety Lock System
L. Cooking Guide Label
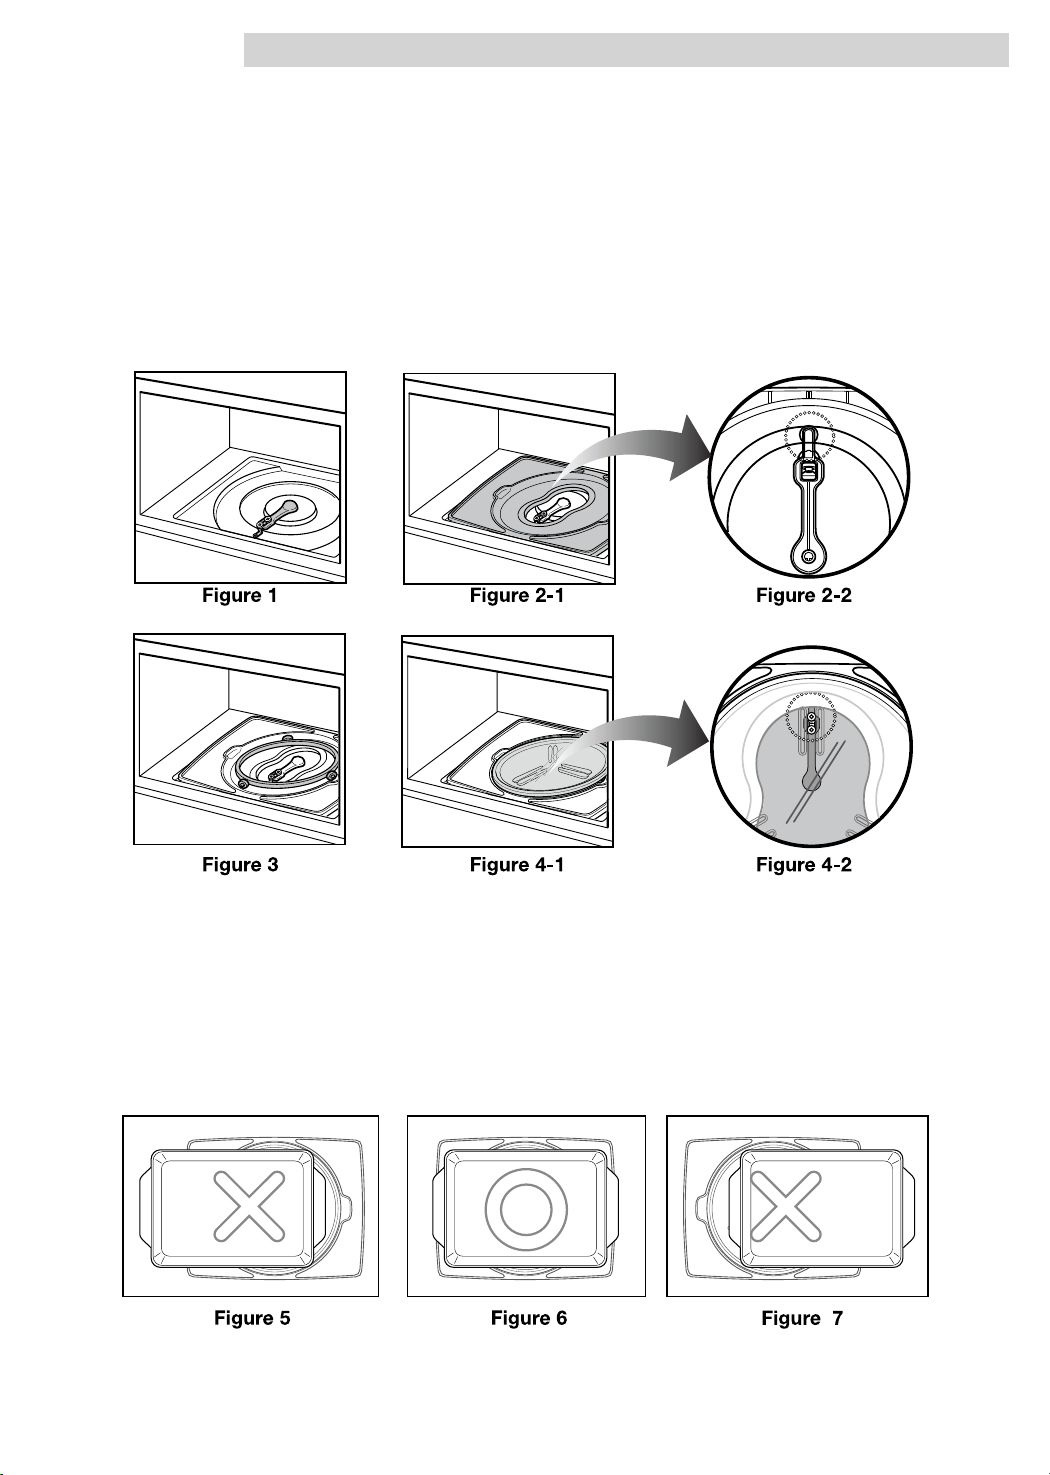
1. Glass tray
2. Rotating ring
3. Guide tray
4. Shaft
8
The glass tray moves in both directions and
turns to help cook food more evenly. Do not
operate the microwave oven without the
glass tray in place.
GETTING TO KNOW YOUR MICROWAVE OVEN
Installation instructions for glass tray
To install:
1. Place the guide tray on the oven cavity bottom. The rollers on the shaft should t inside the guide tray
bottom groove. (See Figures 1, 2-1, and 2-2)
2. Place the rotating ring on the guide tray. (See Figure 3)
3. Place the glass tray on the rotating ring. Fit the rollers of the shaft between the raised, hollowed groove
of the glass tray bottom. The rollers on the rotating ring should t inside the glass tray bottom ridge. (See
Figures 4-1 and 4-2)
Using an oblong dish
When using an oblong dish, don’t forget to place it in the center of the guide tray, or poor performance will
result. An oblong dish which is smaller than 13 inches should be placed on the glass tray. A dish larger than
13 inches should be placed on the raised edge of the guide tray preventing it from touching the glass tray.
Otherwise, poor performance will result. (See Figure 6)
9
GETTING TO KNOW YOUR MICROWAVE OVEN
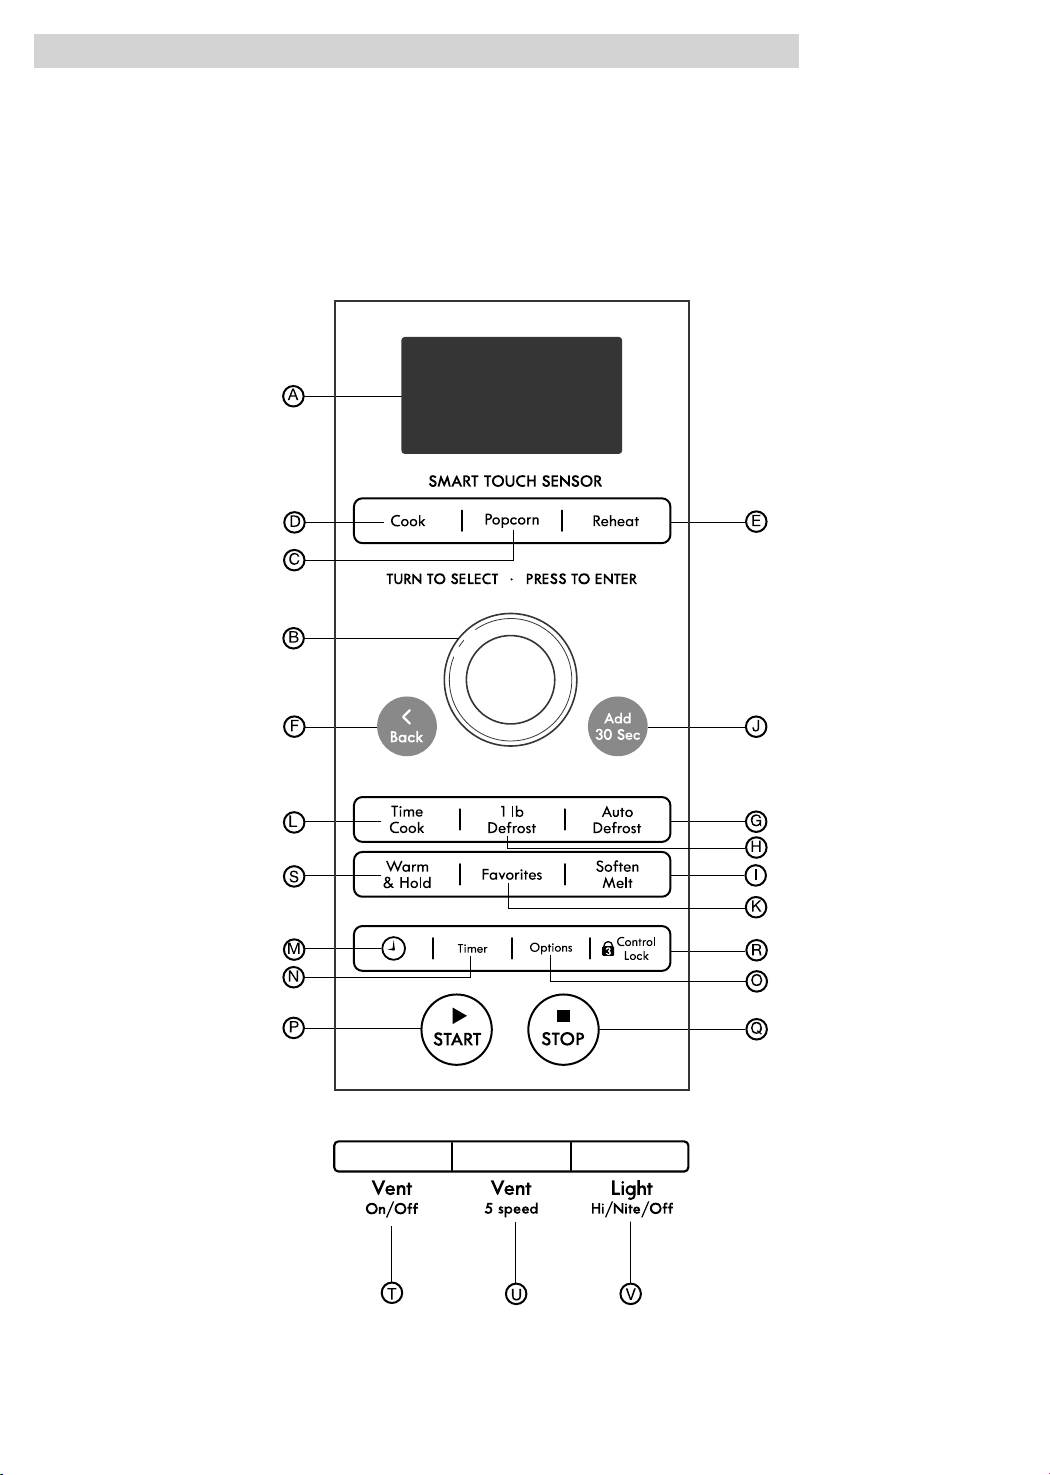
Control panel features
Your microwave oven control panel lets you select the desired cooking function quickly and easily. All
you have to do is touch the necessary Command Pad. The following is a list of all the Command and
Number Pads located on the control panel. For more information on these features, see the “Using
your microwave oven” section.
10

GETTING TO KNOW YOUR MICROWAVE OVEN
A. Display Screen Shows the time of day and
cook mode when the microwave oven is not in
use. During programming, it displays function
menus for you to choose from, servings
and weights for you to enter, preparation
instructions, and cooking time/power settings
for you to select. During a cooking cycle, it
counts down the remaining time and prompts
you to stir, turn food, etc., as necessary.
B. Touch Dial Control
oven functions, such as quantities of food and
cooking times/powers.
C. Popcorn
the sensor feature. The oven’s sensor will tell
the oven how long to cook depending on the
amount of humidity it detects from the popcorn.
D. Cook
foods without entering a cook time or power.
E. Reheat
foods without entering a cook time or power.
F. Back
return to the previous screen.
G. Auto Defrost
Number Pads, to thaw frozen meat by weight.
H. 1 lb Defrost
“GROUND BEEF 1.0 LBS TOUCH START” will
appear in the display.
I. Soften/Melt
cream cheese, butter or frozen juice and melt
chocolate, cheese, butter, or marshmallows.
Touch this pad to pop popcorn with
Touch this pad to cook microwavable
Touch this pad to reheat microwavable
This button can be used within menus to
Touch this pad to express defrost.
Touch this pad to soften ice cream,
Use this dial to select
Touch this pad, followed by
J. Add 30 Seconds
seconds at 100% cook power, or to add extra
seconds at the set cook power to your cooking
cycle.
K. Favorites
instruction previously placed in memory.
L. Time Cook
cook time and power level.
M. Clock
N. Timer
O. Options
default settings for sound, clock, display speed
and defrost weight.
P. Start
open the door after the oven begins to cook,
retouch Start.
Q. Stop
oven function.
R. Control Lock
seconds to lock the control panel.
S. Warm & Hold
cooked foods safely warm in your oven for up to
90 minutes.
T. Vent On/Off
on/off.
U. Vent 5 Speed
ve fan speeds.
V. Light Hi/Nite/Off
light on high, night (low) or off.
Touch this pad to enter the time of day.
Touch this pad to set the kitchen timer.
Touch this pad to change the oven’s
Touch this pad to start a function. If you
Touch this pad to stop and cancel any
Touch this pad to cook for 30
Touch this pad to recall a cooking
Touch this pad for manual control of
Touch and hold this pad for three
Touch this pad to keep hot,
Touch this pad to turn the fan
Touch this pad to choose one of
Tough this pad to turn the
11
 Loading...