

LG 75UL3E-T INSTALLATION MANUAL

INSTALLATION MANUAL
LG Digital Signage
(MONITOR SIGNAGE)
Please read this manual carefully before operating your set
and retain it for future reference.
65UL3E
75UL3E
86UL3E
www.lg.com
Copyright © 2018 LG Electronics Inc. All Rights Reserved.

Table of contents
ENGLISH
3 Location and Function of Controls
3 Parts and Button
3 Basic functions
4 Firstuse
5 Basic Settings
5 - Language & Location
5 - Network Settings
6 Data Cloning
6 Installation Menu Settings
6 Installation Menu
6 Introduction
7 Public Display Settings
7 - Public Display Settings
7 - Power On Status
8 - Volume
8 - Key Management
9 - Limited Mode
10 - Power On Default
10 - Aux Source Setting
10 - Power Management
10 - Factory Reset
11 Network
11 - MAC Address
11 - Network Setting
12 - Wake On LAN
12 - Server Setting
13 General
13 - Configuration Setup
15 - Set ID Setup
15 - Power Saving
16 - HCEC Setup
17 - Clock Setup
17 - Password Change
17 - Lock Mode
17 - Crestron
18 Portal Settings
18 - PreLoaded App
19 Media Share
19 - Screen Share
19 - DIAL
19 - Signage Name
19 - SoftAP
20 - Beacon
21 Signage Manager
28 - USB Download Menu
29 IR Codes
30 External control device Setup
30 RS-232C Setup
30 Phone jack Type
30 Type of Connector : D-Sub 9-Pin Male
31 RS-232C Configurations
31 Communication Parameters
31 IR OUT Using Guide
31 - Suitable / Not Recommend remote-controller data
format
31 - IR Receiver specifications
32 Command Reference List
32 Transmission / Receiving Protocol
2
Location and Function of Controls
Parts and Button
ENGLISH
Basic functions
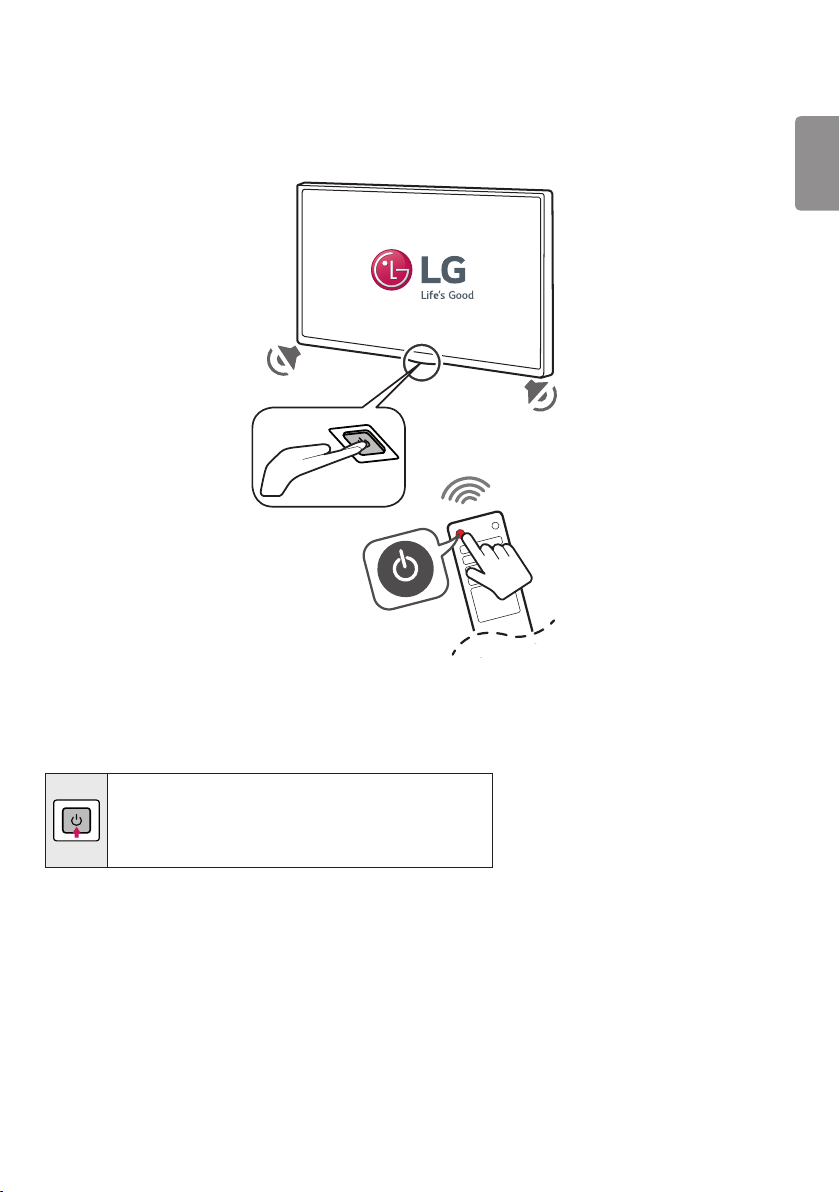
Power On (Press)
Power O1 (Press and Hold)
Menu Control (Press2)
Menu Selection (Press and Hold3)
1 All running apps will close.
2 You can access and adjust the menu by pressing the button when Signage is on.
3 You can use the function when you access menu control.
3
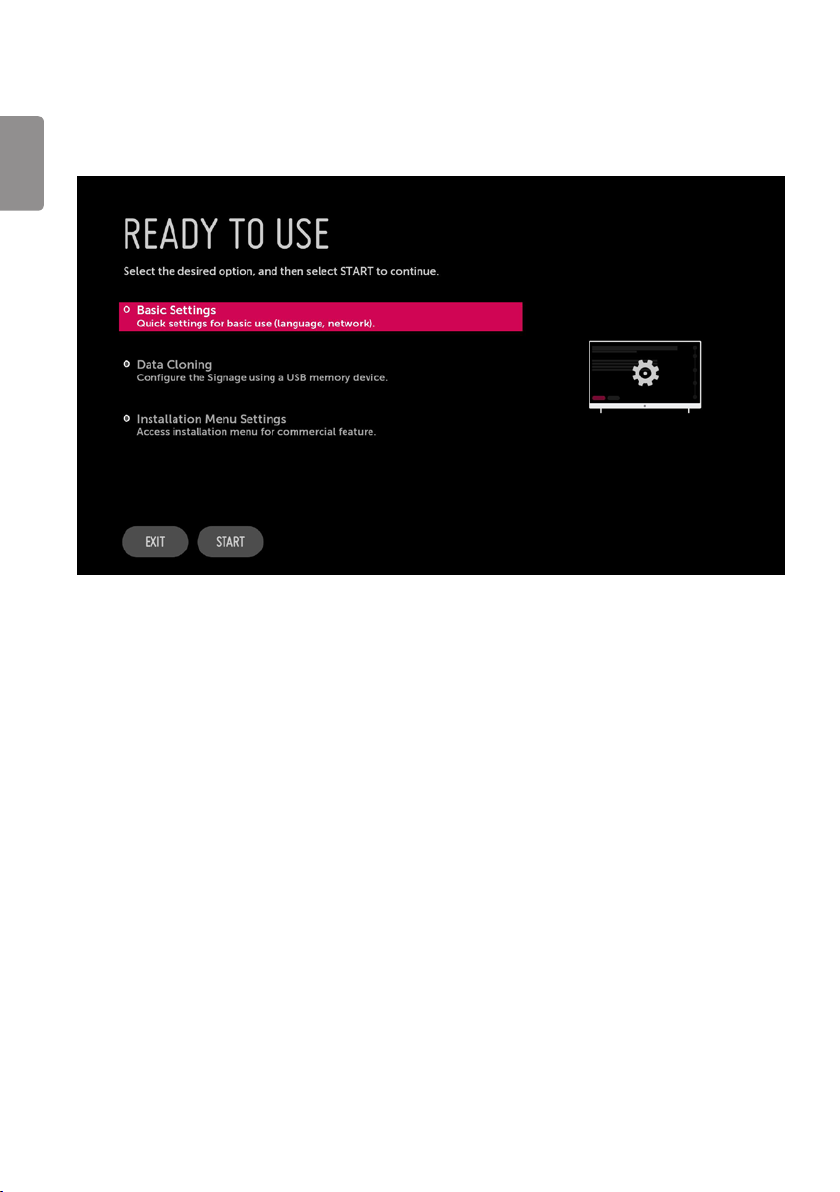
Firstuse
* Image shown may differ from your Signage.
ENGLISH
• There are three options - Basic Settings, Data Cloning, and Installation Menu Settings. Each menu can access by START button.
4
Basic Settings
This menu is for basic settings related to language, network setting.
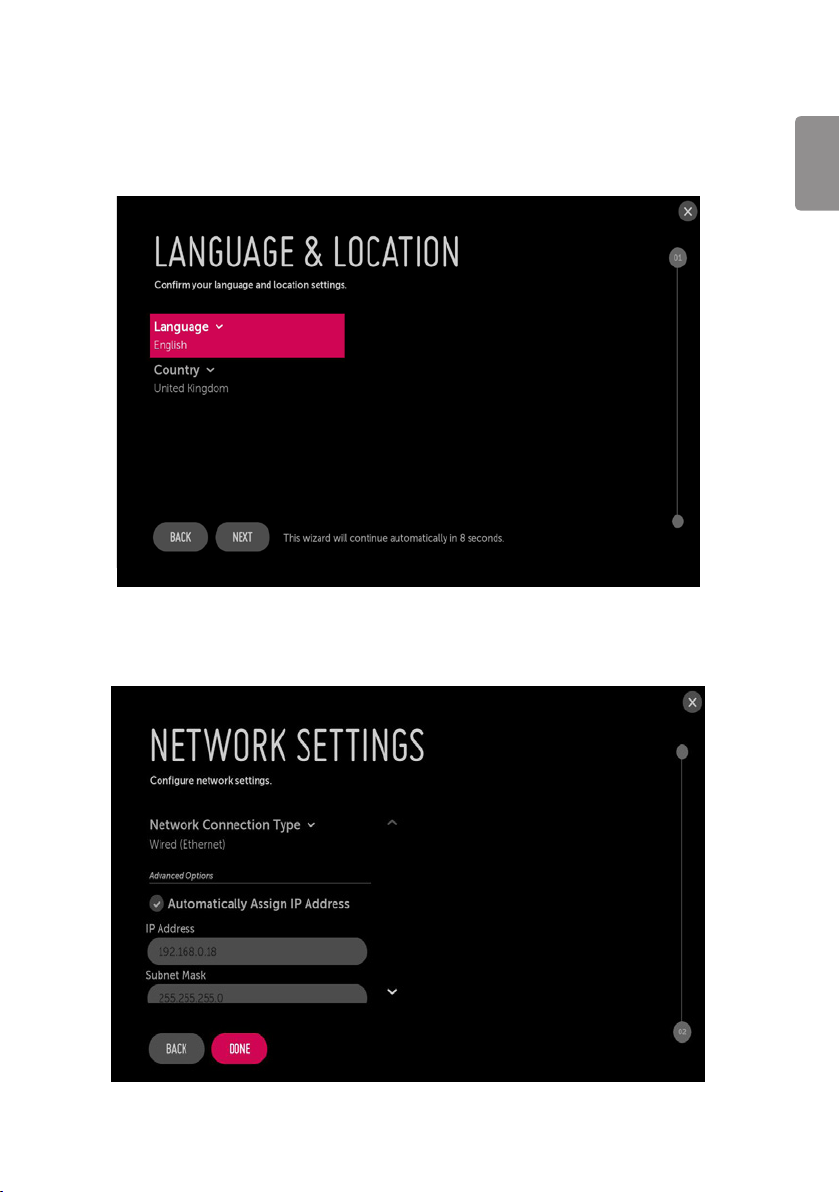
Language & Location
• Select the Language and Country. Some countries need to select the Time Zone.
Network Settings
• Set Network connection. You can connect easily to wired/wireless network. (“Network Setting” on page 11)
ENGLISH
5
Data Cloning
Access Data cloning menu of Signage Manger application for applying cloning le.
ENGLISH
Installation Menu Settings
Access Installation menu for Signage feature settings.
Installation Menu
* Image shown may differ from your Signage.
Introduction
The abundant functions for Signage linked with software installation can be projected on OSD as ‘Installation Menu’.
The wide range of features can be performed simply on additional window to enhance the Signage’s easy installation and convenient operation for
System Integrators.
1 Press the Setting button for more than 5 seconds using the user remote control, banner will appear at top left on the screen.
2 Enter a four digit password and press button.
- The initial password “1-1-0-5”.
6

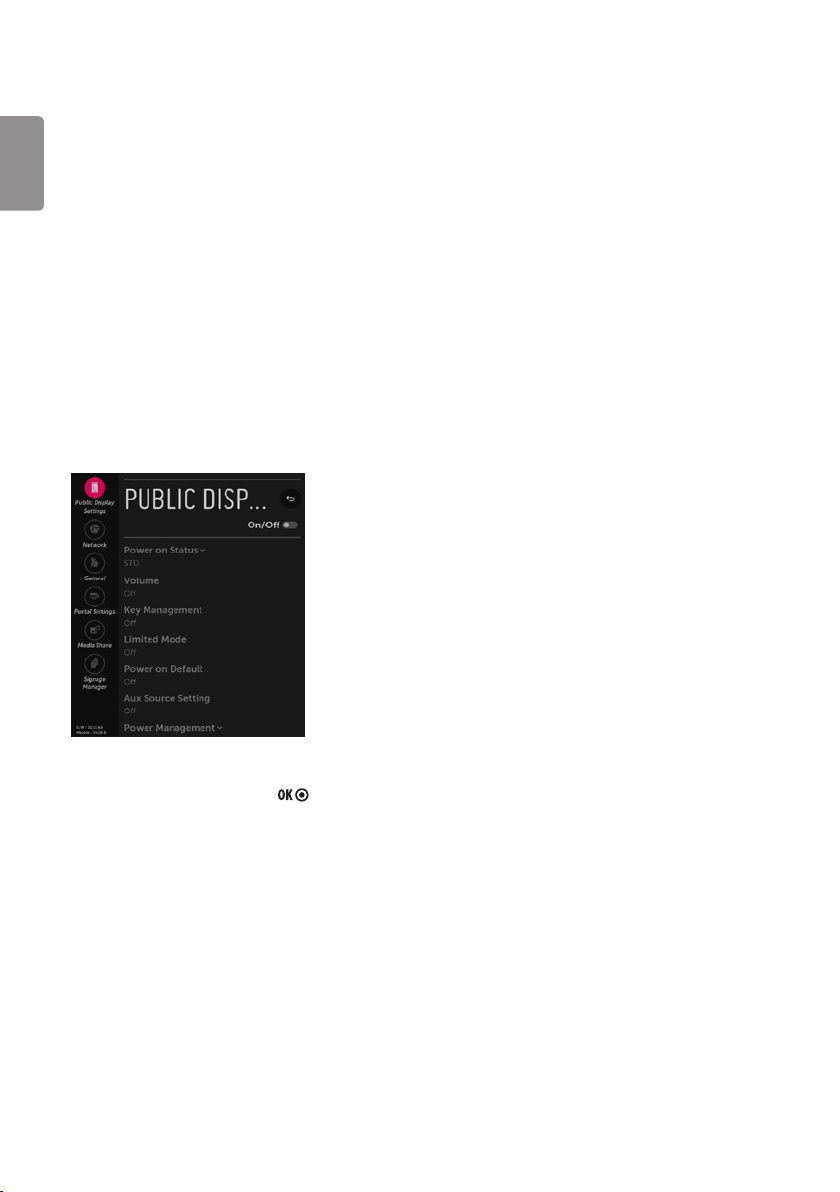
Public Display Settings
When ‘Public Display Settings’ is set to On (Work), all functions of Public Display Mode apply.
Public Display Settings
• Decide to work all functions of ‘Public Display Settings’ or not by setting ‘Public Display Settings’ as On (Work) or O (Do Not Work).
• When ‘Public Display Settings’ is set to On (Work), all functions of Public Display Mode apply.
• When ‘Public Display Settings’ is set to O (Do Not Work), all functions of Public Display Mode Do Not apply.
• When it is set to ‘On’, all items reserved at the Schedule list are deleted and the reservation function is not supported. (applied for the model
oering the reservation function)
Power On Status
• Decide to select working status of Signage Set when turn on main power.
• You can set with PWR, STD, LST.
• PWR always make Signage set On status when turn on main power.
• STD make Stand-by status when turn on main power.
• LST make Signage Set work like previous power status. As same concept as Power Backup mode; If main power were turned o in Power On
status, Signage Set would work in On status. If main power were turned o in Stand-by status, Signage Set would work in Stand-by status.
• If there Block All is both IR Operation and Local Key Operation from Key Management, In order to provide the Option that must be able to turn
on the Signage in the Signage turned o situation, change the value of the PWR. (Reference the Key Management)
ENGLISH
7

Volume
• Decide to apply volume policy of ‘Start Volume’, ‘Maximum Volume’ and ‘Minimum Volume’ as On (Work) or O (Do Not Work).
• (0 ≤ Min ≤ Start ≤ Max ≤ 100)
ENGLISH
Start Volume
• This entry sets the start volume level when is power on.
Maximum Volume
• This entry sets the maximum volume level the set. The level is specied as a number between ‘Minimum Volume’ to 100. (Min ≤ Max ≤ 100).
Minimum Volume
• This entry sets the minimum volume level the set will produce.
Key Management
• Manage key usability of Local(Front) Key and Remote Control. When selected to ‘On’, following ‘IR Operation’ and ‘Local Key Operation’ will be
worked by below.
-The level is specified as a number between minimum volume to maximum value. (Min ≤ Start ≤ Max)
-The default setting is ‘Off ’ (disabled).
-When enabled, if the value is lower then the minimum specified in the minimum volume entry, the minimum volume entry must be
used.
-When enabled, if the value is larger then the maximum specified in the maximum volume entry, the maximum volume value must be
used.
-If the command volume up to higher than maximum volume’ is received, that should be ignored.
-The default value is 100.
-The level is specified as a number between 0 to ‘Maximum Volume’. (0 ≤ Min ≤ Max)
-If the command volume down to lower than minimum volume is received, that should be ignored.
-The default value is 0.
IR Operation
• Decide whether work the LG remote control or not.
-When ‘IR Operation’ is set to 'Normal', all remote keys are available.
-'Use PWR Only' makes block all remote keys except power key.
-When ‘IR Operation’ is set to 'Block All', all normal remote keys don’t work.
Local Key Operation
• Decide to operate 'Local/Front Key' working behavior by setting ‘Local Key Operation’ as 'Normal', 'Use PWR Only' and 'Block All'.
-When ‘Local Key Operation’ is set to 'Normal', all local keys are available.
-'Use PWR Only' makes block all local keys except power key.
-When ‘Local Key Operation’ is set to 'Block All', all local keys don’t work.
8

Limited Mode
• Congure Signage function’s limitation. When selected to ‘On’, following sub-menus will be worked by below.
Menu Display
• Function to decide whether work with menu (including relevant menus too) of control key (On – Enter possible) or not (O – Enter
Impossible).
-Although select Off (Enter impossible), the action that press a Menu button for 5 seconds to enter ‘Installation Menu’ is available.
-When select On (Enter possible), Menu works.
OSD Display
• Decide to display OSD or not by setting ‘OSD Display’ as On (Display) or O (Do not Display).
-When ‘OSD Display’ is set to ‘Off’(Do not Display), all OSD is not displayed except some exception.
-Although select ‘Off’ (Do not Display), the action that press a Menu button for 5 seconds to enter ‘Installation Menu’ and entering service
menu are available. (In-Start, Power-Only, Adjust, Installation Menu...)
System Provider Mode
• ‘System Provider Mode’ allows access to the menu system from the front panel or remote control but access is controlled as follows:
-When value is ‘On’, Accessible Items on the menu system, others are not permissible. (Depending on model)
» Input select screens
» Sleep timer
» Aspect Ratio
» 'Music' / ‘Network’ / ‘Bluetooth’ Menu.
» Input Manager
ENGLISH
9

Power On Default
• Set to On (Work) or O (Do Not Work).
ENGLISH
• When ‘Power On Default’ is set to O, it is not applied to the subordinate Input, A/V Setting, Aspect Ratio menu.
• When Power On Default is set to On, it can set by entering the subordinate menu.
Input
• Set whether it is turned on by the set input source or by the last stored input source.
A/V Setting
• If ‘A/V Setting’ is changed from ‘O ’ to ‘On’, A/V parameters that are set before entering ‘Installation Menu’ are applied whenever turn on power.
Aspect Ratio
• The aspect ratio determines the default aspect ratio that the set returns to on power up.
Aux Source Setting
• Set to On (Work) or O (Do Not Work).
• The Auxiliary (Input) Source Setting feature will enable or disable for each external input.
• User cannot disable the current input’s ‘Aux Source Setting’.
Power Management
• The Power Management feature will turn o the Signage if no input control command is received from either the Local or IR Key within a
selected hours.
-Activity on either of these inputs shall reset the ‘Power Management’ timer and prevent interruption of Signage viewing.
-This entry can be set to a value which is corresponding to the desired hours (1 hour to 7 hours).
-Default value is ‘Off (disabled)’.
Factory Reset
• Change all settings to their default values.
10
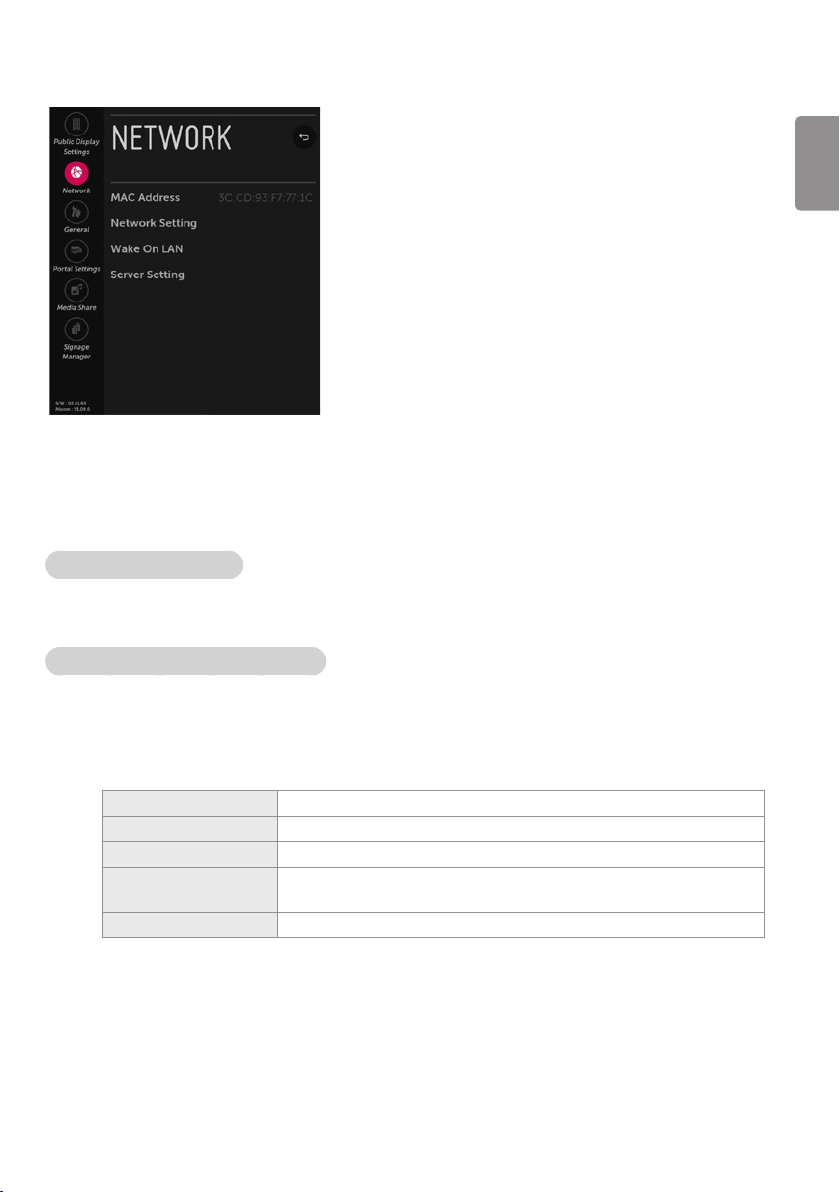
Network
MAC Address
• Displays the MAC address (not customizable).
Network Setting
One-click network connection
• Connects easily to a wired/wireless network.
• This menu supports to connect to an available network.
ENGLISH
To connect to a network through Set Expert
• For use in special circumstances such as in oces (in cases where a static IP is used).
1 Selec t a network connection, either Wired or Wireless.
2 When connecting via Wired, Congures the IP settings of the Signage set. You can set the IP address, subnet mask, gateway and DNS
server.
3 When connecting via Wi-Fi, use the one of the following network connection methods.
AP List
Enter the SSID
WPS-PBC Connects easily when the button of a wireless AP supporting PBC is pressed.
WPS-PIN
Advanced Wi-Fi Settings
-Default setting is on.
Connects to the network selected from the AP List.
Connects to the wireless AP typed in.
Connects easily when the PIN of the wireless AP that you wish to connect to is entered in to the
AP website.
After connects Wi-Fi, you can set the IP address, subnet mask, gateway and DNS server.
11

Wake On LAN
ENGLISH
Server Setting
(Depending on model)
• Sets the Wake On LAN function to Enable or Disable.
-The Wake On LAN feature enables the Signage to receive software updates and/or be powered ON upon receipt of Wake Up Frame
packets and/or Magic Packet data via the wired LAN. To facilitate use of this feature, note that the appropriate wired connection must be
made. (‘Wake up Frame’ - Depending on model)
• Sets the information to connect to the external server.
CMS Server
• Sets the network information to connect to SuperSign CMS. (or other compatible solutions)
Control Server
• Sets the network information to connect to SuperSign Control. (or other compatible solutions)
12
 Loading...