

Page 1

Multi Type Air Conditioner
OWNER'S MANUAL
MODELS:
6710 YS
6720 YS
IMPORTANT
Please read through this manual. It contains valuable
information about your air conditioner. This manual may
help save time and money by explaining proper product
maintenance and preventing improper use.
PRECAUTIONS
Pay close attention to precautions in order to prevent
potential hazards and damage from misuse or improper
installation. LG is not responsible for any damages caused
by misuse of the product.
Prior to installation, this air-conditioning
unit must be submitted for approval by the
utility service which provides electricity
(EN 61000-3 Norm.)
Page 2
F or Your Records
R ead This Manual
CAUTION
2
Multi-Type Air Conditioner Owner’s Manual
TABLE OF CONTENTS
Write the model and serial numbers here:
Model #
Serial #
You can find them on a label on the side of each unit.
Dealer's Name
Date Purchased
Inside you will find many helpful hints on how to use
and maintain your air conditioner properly. Just a little
preventive care on your part can save you a great
deal of time and money over the life of your air
conditioner.
You'll find many answers to common problems in the
chart of troubleshooting tips. If you review our chart of
Troubleshooting Tips first, you may not need to call
for service at all.
• Contact the authorized service technician for repair
or maintenance of this unit.
• Contact the installer for installation of this unit.
• The air conditioner is not intended for use by young
children or invalids without supervision.
• Young children should be supervised to ensure that
they do not play with the air conditioner.
• When the power cord is to be replaced, replacement
work shall be performed by authorized personnel
only.
• Installation work must be performed in accordance
with the national wiring standards by authorized
personnel only.
1. Safety Precautions
2. Operating Instructions
a. Preparation before operation
b. Remote Control Features
c. Operation Mode Selection
d. Additional features
3. Care and Maintenance
4.
Troubleshooting Tips
Before You Call For Service
Page 3
WARNING
WARNING
WARNING
CAUTION
Never Do This
Always Do This
Precautions
Safety
Precautions
3
ENGLISH
To prevent injury and property damage, follow these instructions.
Incorrect operation due to ignoring instructions will cause harm or damage, the seriousness of which is
indicated by the following symbols.
■ The following items are classified by these symblos.
Plug in the power plug
properly.
Do not operate or stop the
unit by inserting or pulling
out the power plug.
Do not damage or use an
unspecified power cord.
• Otherwise, it will cause electric
shock or fire due to heat
generation or electric shock.
• It will cause electric shock or fire
due to heat generation.
• It will cause electric shock or fire.
•
In the supply cord is damaged, it mut be
replaced by the manufacturer or its
service agent or a similarly quallfied
person in order to avoid a hazard.
Do not modify power cord
length or share the outlet
with other appliances.
Do not operate with wet
hands or in damp
environment.
Do not direct airflow at
room occupants only.
• It will cause electric shock or fire
due to heat generation.
• It may cause electric shock. • This could damage your health.
Always perform grounding
work.
Do not allow water to run
into electric parts.
Always install air leakage
breaker and a dedicated
switching board.
•
No grounding may cause electric
shock (See Installation Manual).
• It may cause failure of machine
or electric shock.
• No installation may cause fire
and electric shock accident.
Unplug the unit if strange
sounds, smell, or smoke
comes from it.
Do not use the socket if it is
loose or damaged.
Do not open the entrance
during operation.
• It may cause fire and electric
shock accident.
• It may cause fire and electric
shock.
• It may cause electric shock.
Keep firearms away.
Do not use the power cord close to
the heating tools.
Do not use the power cord near
flammable gas or combustibles, such
as gasoline, benzene, thinner, etc.
• It may cause fire. • It may cause fire and electric
shock.
• It may cause an explosion or fire.
This symbol shows the possibility of death or serious injury.
This symbol indicates the possibility of injury or damage to property.
Page 4
CAUTION
CAUTION
CAUTION
CAUTION
4
• Contact the authorized Service technician for repair or maintenance of this unit.
• Contact the installer for installation of this unit.
• The air conditioner is not intended for use by young children or infirm persons without
supervision.
• Young children should be supervised to ensure that they do not play with the air conditioner.
When the airfilteris to be
removed, do not touch the
metal parts of the indoor unit.
• It may cause an injury.
• Should be disconnected from
supply
Do not clean the air
conditioner with water.
• Water may enter the unit and
degrade the insulation. It may
cause an electric shock.
Ventilate well when used
together with a stove, etc.
• An oxygen shortage may
occur.
When the unit is to be
cleaned, switch off, and
turn off the circuit breaker.
• Since the fan rotates at high
speed during operation, it may
causeaninjury.
Do not put a pet or house
plant where it will be
exposedtodirectairflow.
• This could injure the pet or
plant.
Do not leave on installation
stand which is damaged.
• The unit may drop or fall down
and cause an injury.
Do not apply an insecticide
or flammable spray.
• It may cause a fire or
deformation of the cabinet.
Do not put a stove, etc.
where is exposed to direct
air flow.
•
It may affect combustion.
Do not step on the
indoor/outdoor unit and
do not put anything on it.
• It may cause an injury through
dropping or falling down.
Do not insert hands
through vanes when the air
conditioner is operationg
• It will cause an injury by the
rotating blower.
When the unit is not going
to be used for a long time,
turn off the circuit breaker.
•Ifnot,dirtmaycollectand
causeafire.
Do not step onto an unstable
bench when cleaning and/or
maintaining the unit.
• It may cause an injury, etc. by
falling down.
Do not use for special purposes.
• Do not use this air conditioner to preserve
precision devices, food, animal, plants, and
art objects.
It may cause deterioration of quality, etc.
Do not operate for a long time in high
humidity, e.g. leaving a door or window
open.
• In the cooling mode, if it is operated in a
room with high humidity (80%RH or more) for
a long time, water condensed in the air
conditioner may drop and may wet and spoil
furniture, etc.
Page 5
Signal
receptor
Operation indication lamps
Preparation before operation
Operating
Instructions
5
ENGLISH
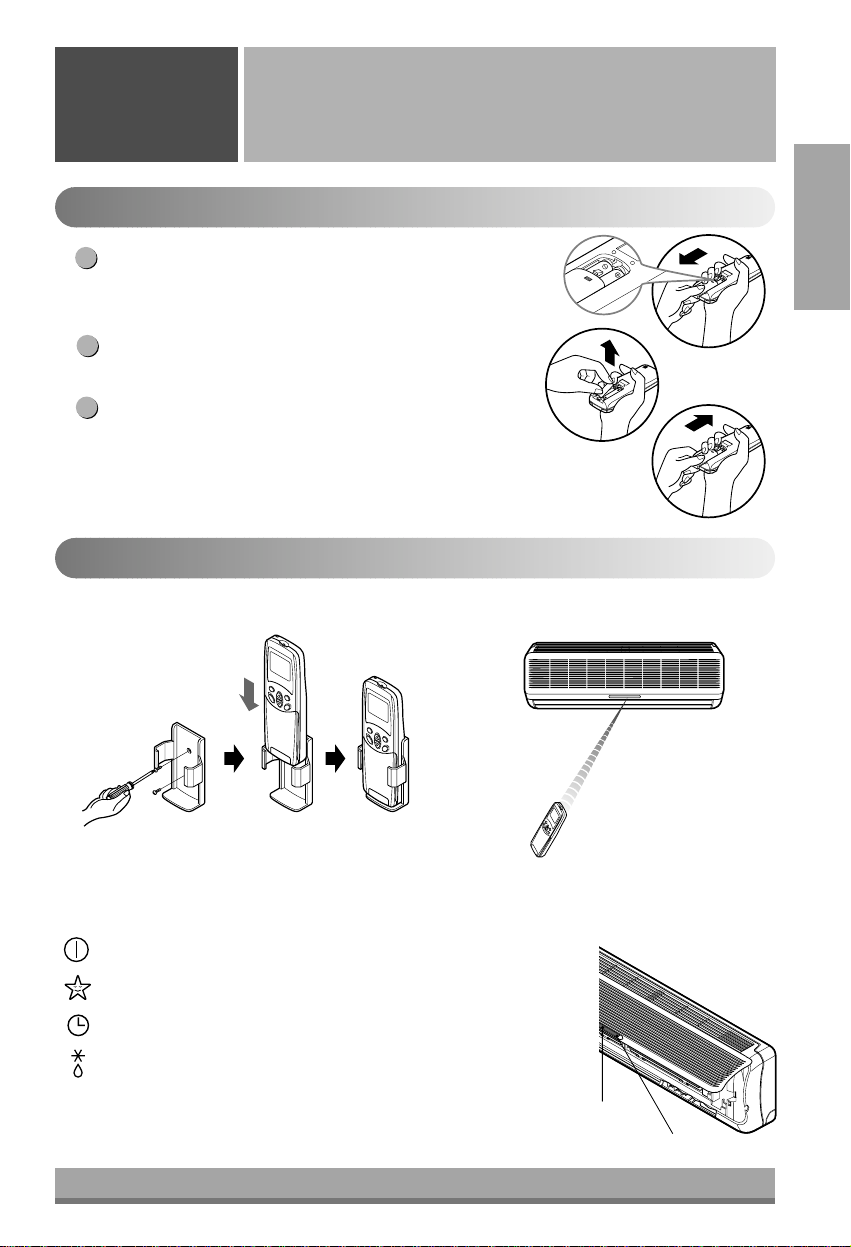
How to Insert the Batteries
Remove the battery cover by pulling it according to the arrow
direction.
Insert new batteries making sure that the (+) and (-) of battery are
installed correctly.
Reattach the cover by sliding it back into position.
NOTES:
• Use 2 AAA(1.5volt) batteries. Do not use rechargeable batteries.
3
2
1
Storage and Tips For Using the Remote Control
• The remote control may be stored mounted on a
wall.
• To operate the room air conditioner, aim the
remote control at the signal receptor.
Signal Receptor
Receives the signals from the remote control.(Signal receiving sound: two short beeps or one long beep.)
Operation Indication Lamps
On/Off : Lights up during the system operation.
Sleep Mode : Lights up during Sleep Mode Auto operation.
Timer : Lights up during Timer operation.
Defrost Mode : Lights up during Defrost Mode or Hot
Start operation (Heat pump model only)
: Lights up during outdoor unit operation.
(Cooling model only)
OUT
DOOR
Page 6
Cooling Operation
Auto Operation
Healthy Dehumidification Operation
Heating Operation
•
Cooling Model( ), Heat Pump Model( )
ON OFF
PLASMA
SET
CANCEL
Flip-up door
(opened)
Signal transmitter
65
4
7
8
9
2
1
3
10
11
12
13
14
6
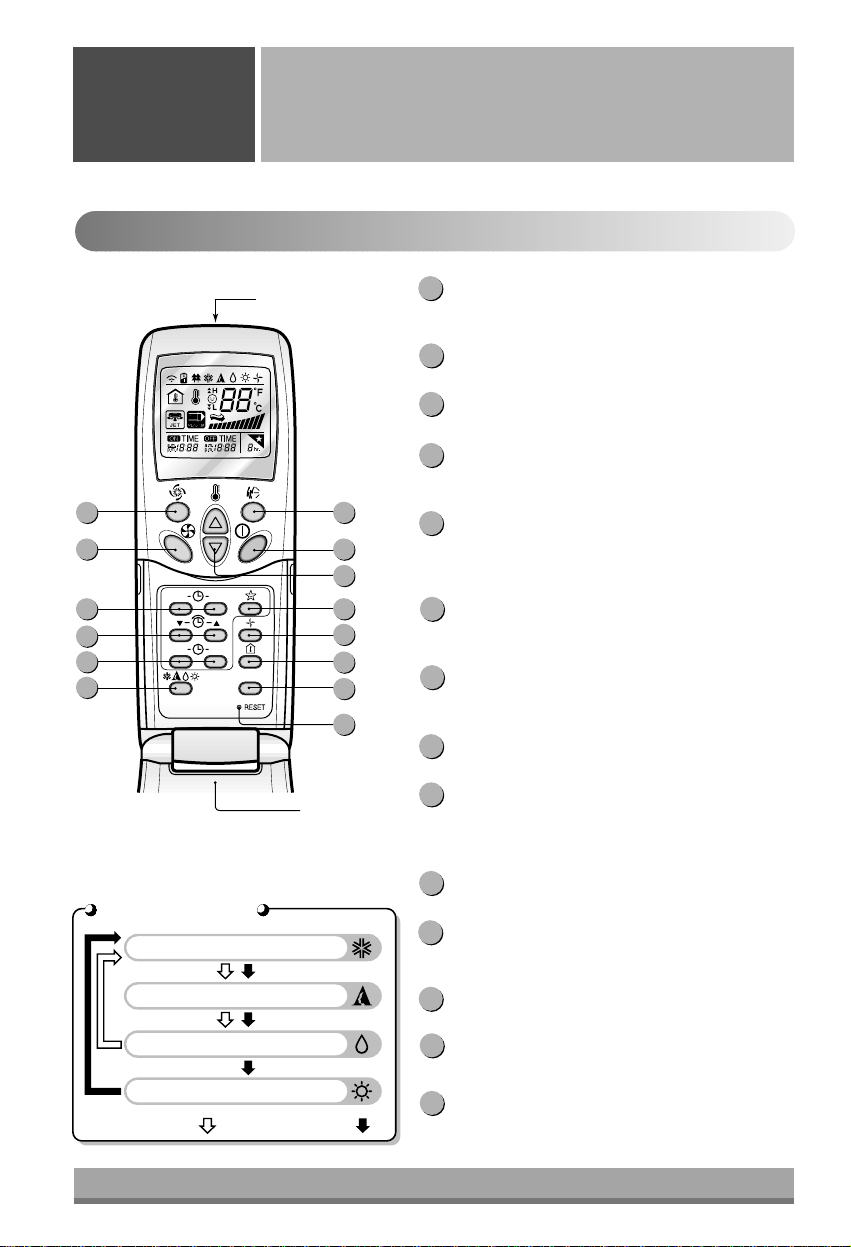
About the remote control on the system
Operating
Instructions
The remote control transmits the signals to the system.
Features of the Remote Control
START/STOP BUTTON
Operation starts when this button is pressed and
stops when the button is pressed again.
OPERATION MODE SELECTION BUTTON
Used to select the operation mode.
ROOM TEMPERATURE SETTING BUTTONS
Used to select the room temperature.
INDOOR FAN SPEED SELECTOR
Used to select fan speed in four steps low, medium,
high, or CHAOS.
JET COOL
Used to start or stop the speed cooling. (Speed
cooling operates super high fan speed in cooling
mode.)
CHAOS SWING BUTTON
Used to stop or start louver movement and set the
desired up/down airflow direction.
ON/OFF TIMER BUTTONS
Used to set the time of starting and stopping
operation.
TIME SETTING BUTTONS
Used to adjust the time. (See page 13)
TIMER SET/CANCEL BUTTONS
Used to set the timer when the desired time is
obtained and to cancel the Timer operation.
(See page 13)
SLEEP MODE AUTO BUTTON
Used to set Sleep Mode Auto operation.
(See page 13)
AIR CIRCULATION BUTTON
Used to circulate the room air without cooling or
heating (turns indoor fan on/off). (See page 14)
ROOM TEMPERATURE CHECKING BUTTON
Used to check the room temperature.
PLASMA(OPTIONAL)
Used to start or stop the plasma-purification function.
(See page 12)
RESET BUTTON
Used prior to resetting time or after replacing
batteries.
1
2
3
4
5
6
7
8
9
10
11
12
13
14
Operation Mode
Page 7
ENGLISH
Cooling
Healthy
Dehumidification
Auto
Heating
(Heat pump model only)
To raise the temperature
To lower the temperature
7
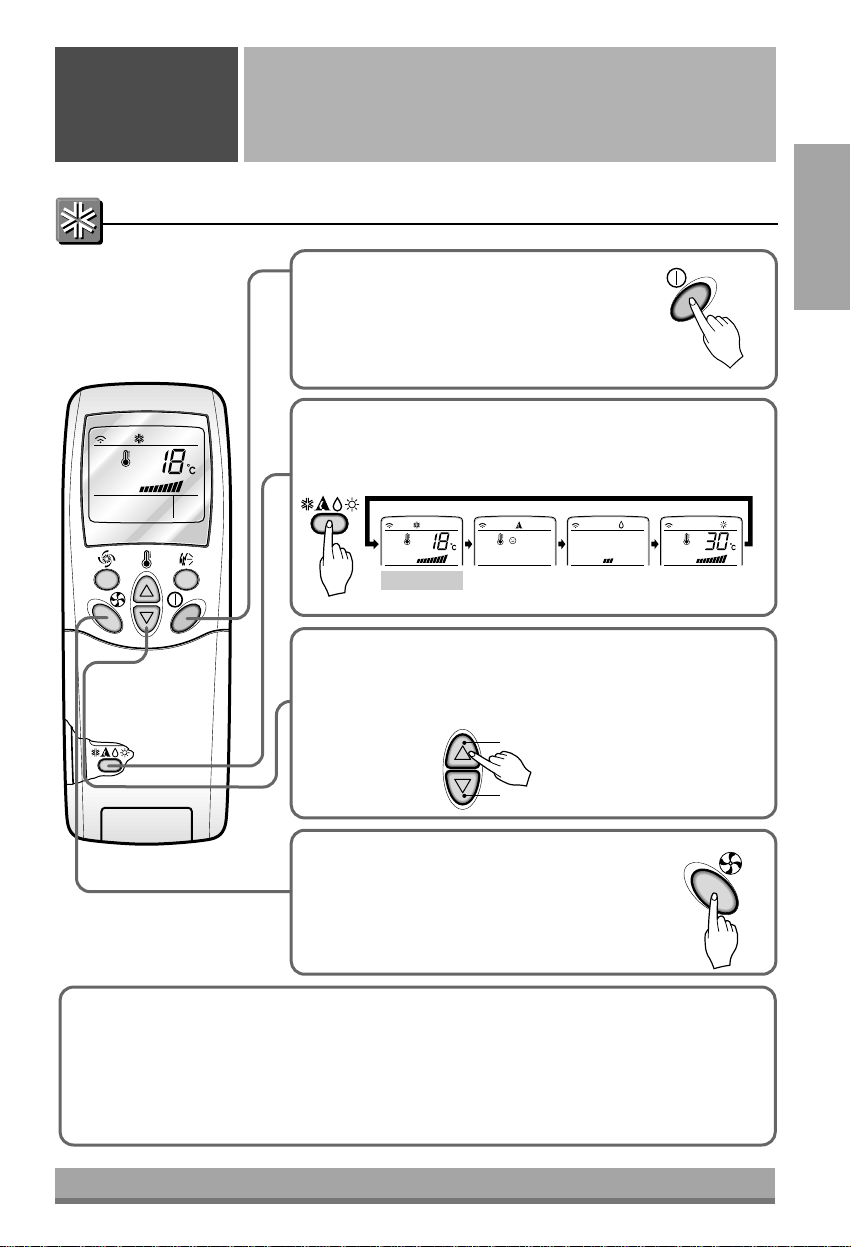
How to use the Operation Mode
Selection button
Operating
Instructions
Open the door on the remote control. To select Cooling
Operation, press the Operation Mode Selection button.
Each time the button is pressed, the operation mode is shifted
in the direction of the arrow.
Close the door on the remote control. Set the temperature
lower than the room temperature. The temperature can be set
within a range of 18°C~30°Cin1°C increments.
Set the fan speed again with the door of the
remote control still closed. You can select the
fan speed in four steps-low, medium, high, or
CHAOS. Each time the button is pressed, the
fan speed mode is shifted.
Cooling Operation
Natural wind by the CHAOS logic
❏ For more fresh feeling than other fan speed, press the Indoor Fan Speed Selector and set to CHAOS
mode. In this mode, the wind blows like natural breeze by automatically changing fan speed according
to the CHAOS logic.
Press the Start/Stop button.
The unit will respond with a beep.
1
2
3
4
Page 8

Cooling
Healthy
Dehumidification
Auto
Heating
(Heat pump model only)
To raise the temperature
To lower the temperature
8
Press the Start/Stop button.
The unit will respond with a beep.
Open the door on the remote control. To select Auto
Operation, press the Operation Mode Selection button.
Each time the button is pressed, the operation mode is
shifted in the direction of the arrow.
The temperature and fan speed are automatically set by the
electronic controls based on the actual room temperature. If
you want to change the set temperature, close the door on
the remote control and press the Room Temperature Setting
buttons. The cooler or warmer you feel, the more times (up to
two times) you should press the button. The set temperature
will then be changed automatically.
DURING AUTO OPERATION:
❏ You cannot switch the indoor fan speed. It has already been set by the Fuzzy rule.
❏ If the system is not operating as desired, manually switch to another mode. The system will not
automatically switch from the cooling mode to the heating mode, or from heating to cooling, it must be
done by manually resetting.
❏ During Auto Operation, pressing the chaos swing button makes the horizontal louvers swing up and
down automatically. If you want to stop auto-swing, press the chaos swing button again.
Auto Operation
1
2
3
Page 9
ENGLISH
Cooling
Healthy
Dehumidification
Auto
Heating
(Heat pump model only)
9
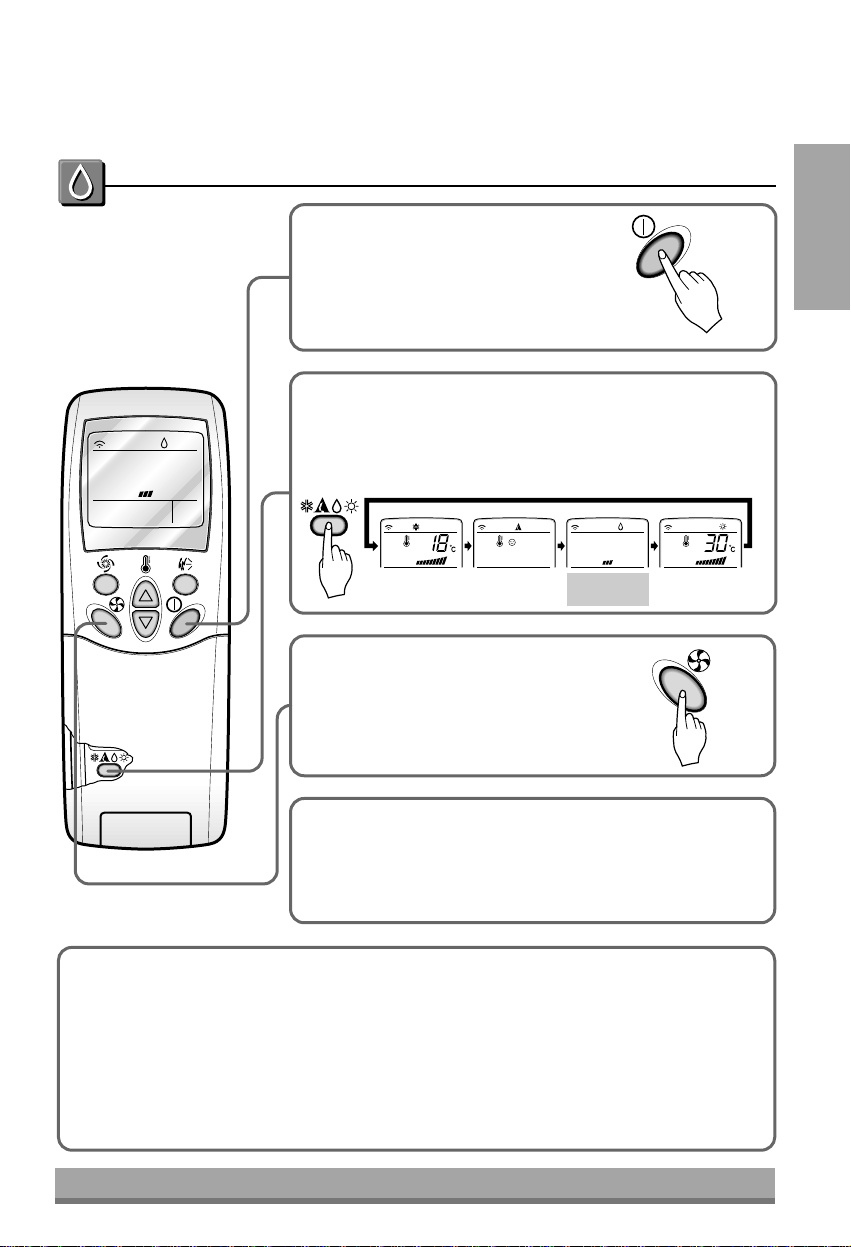
Press the Start/Stop button.
The unit will respond with a beep.
Open the door on the remote control. To select Healthy
Dehumidification Operation, press the Operation Mode
Selection button.
Each time the button is pressed, the operation mode is shifted
in the direction of the arrow.
Set the fan speed again with the door of the
remote control still closed. You can select
the fan speed in four steps-low, medium,
high, or CHAOS. Each time the button is
pressed, the fan speed mode is shifted.
DURING HEALTHY DEHUMIDIFICATION OPERATION:
❏ If you select the dehumidification mode on the operation selection button, the A/C starts to run the
dehumidification function, automatically setting the room temp. and airflow volume to the best
condition for dehumidification based on the sensed current room temp.
In this case, however, the setting temp. is not displayed in the remote control and you are not able to
control the room temp. either.
❏ During the healthy dehumidification function, the airflow volume is automatically set according to the
optimization algorithm responding to the current room temp. status and makes the room condition
healthy and comfortable even in the high humidity season.
Healthy Dehumidification Operation
NATURAL WIND BY THE CHAOS LOGIC
❏ For more fresh feeling than other fan speed, press the Indoor Fan
Speed Selector and set to CHAOS mode. In this mode, the wind
blows like natural breeze by automatically changing fan speed
according to the CHAOS logic.
1
2
3
Page 10
10
Cooling
Healthy
Dehumidification
Auto
To raise the temperature
To lower the temperature
Heating
(Heat pump model only)
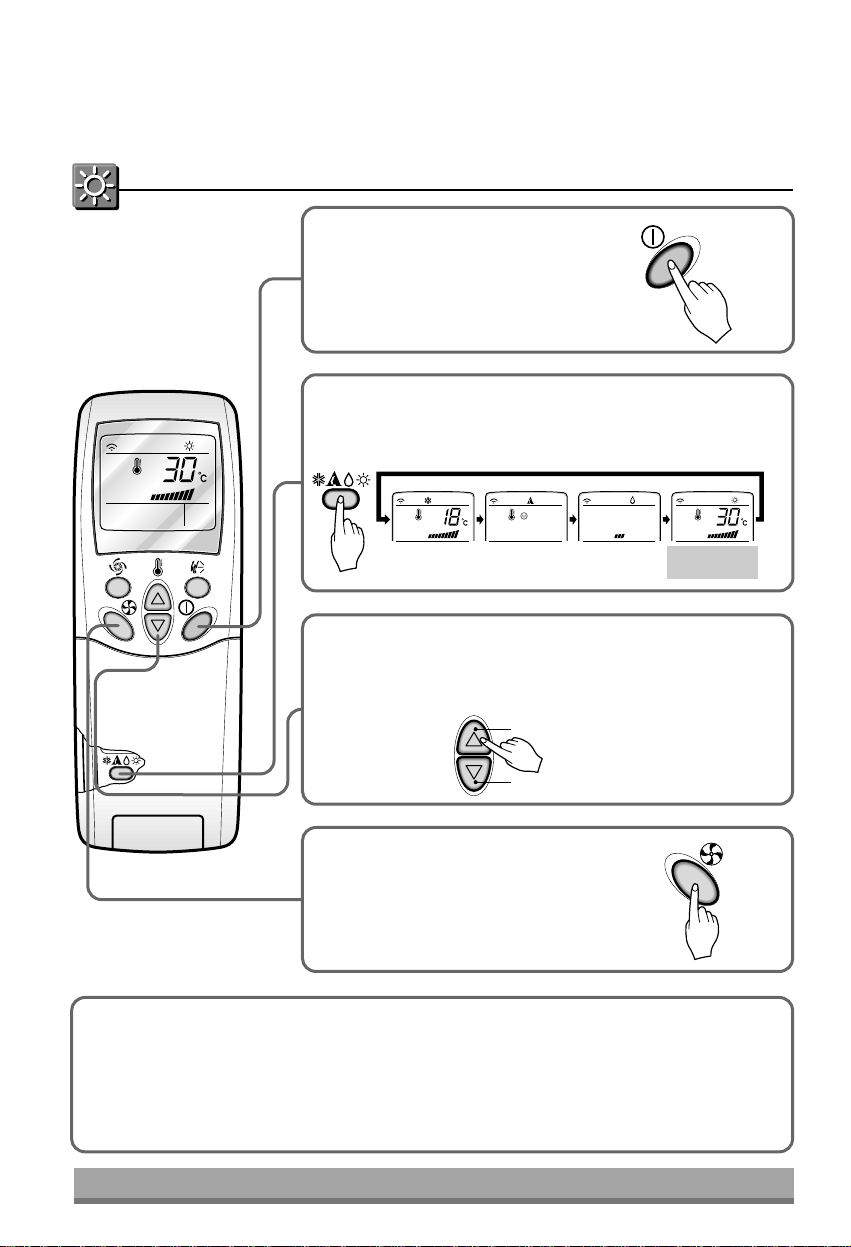
Press the Start/Stop button.
The unit will respond with a beep.
Open the door on the remote control. To select Heating
Operation, press the Operation Mode Selection button.
Each time the button is pressed, the operation mode is shifted in
the direction of the arrow.
Close the door on the remote control.
Set the temperature higher than the room temperature.
The temperature can be set within a range of 16°C~30°Cin1°C
increments.
Heating Operation(Heat pump model only)
Set the fan speed again with the door of the
remote control still closed. You can select
the fan speed in four steps–low, medium,
high, or CHAOS. Each time the button is
pressed, the fan speed mode is shifted.
NATURAL WIND BY THE CHAOS LOGIC
❏ For more fresh feeling than other fan speed, press the Indoor Fan Speed Selector and set to
CHAOS mode. In this mode, the wind blows like natural breeze by automatically changing fan
speed according to the CHAOS logic.
1
2
3
4
Page 11
ENGLISH
or or
11
Press the Start/Stop button.
The unit will respond with a beep.
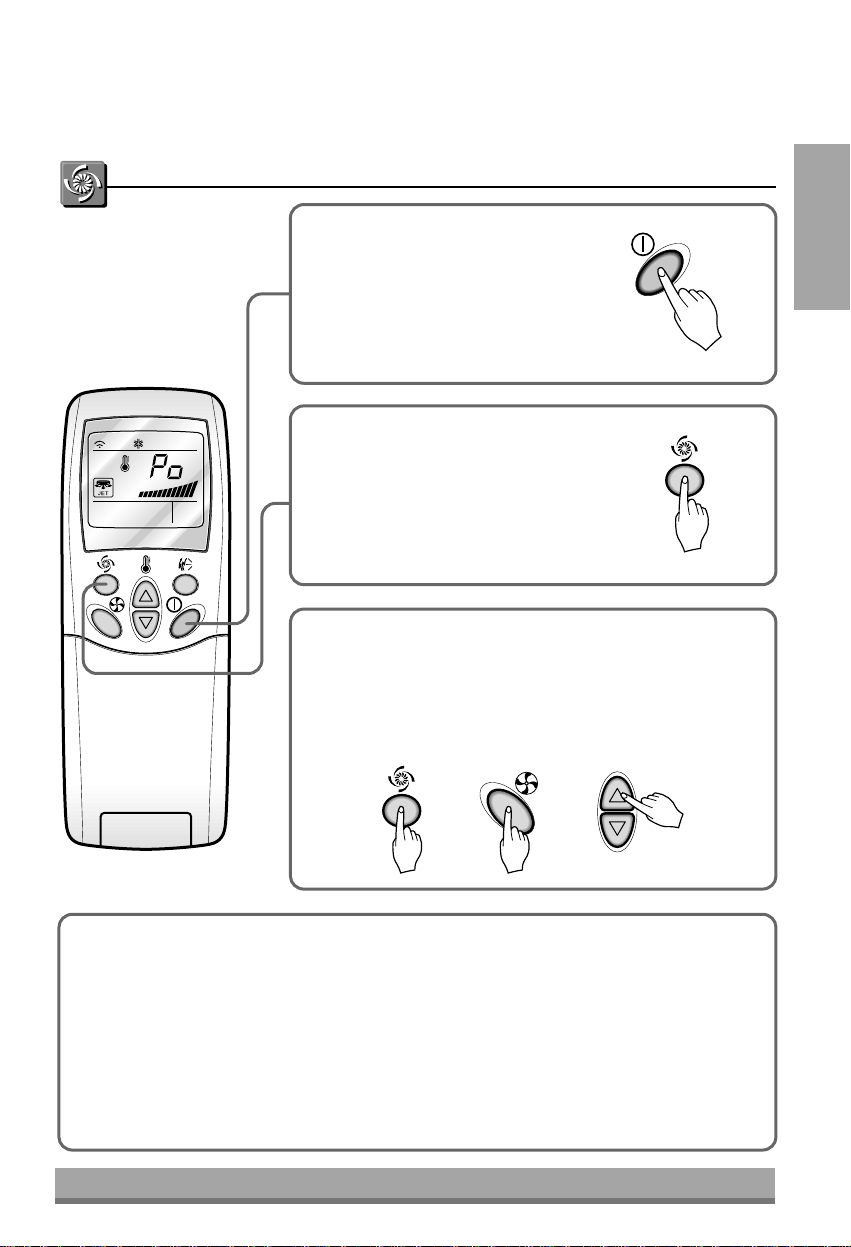
Press the Jet Cool button to operate the
speed cooling mode and the unit will operate
in super high fan speed on cooling mode for
30 minutes.
To cancel the Jet Cool mode, press the Jet Cool button
again or the fan speed button or the room temperature setting
button and the unit will operate in high fan speed on cooling
mode.
Jet Cool Operation
NOTE:
❏ During the JET COOL function at any moment, the A/C starts to blow the cool air at
extremely high speed for 30 minutes setting the room temp. automatically to 18°C. It is
especially used to cool the room temp. in the shortest time in a hot summer.
In heat pump mode or neuro fuzzy mode however, the JET COOL function is not available.
❏ In order to return to the normal cooling mode from the JET COOL mode, you just press
either the operation mode selection button, airflow volume selection or temp. setting
button or the JET COOL button again.
1
2
3
Page 12
12
PLASMA
PLASMA
PLASMA Purification Operation(Optional)
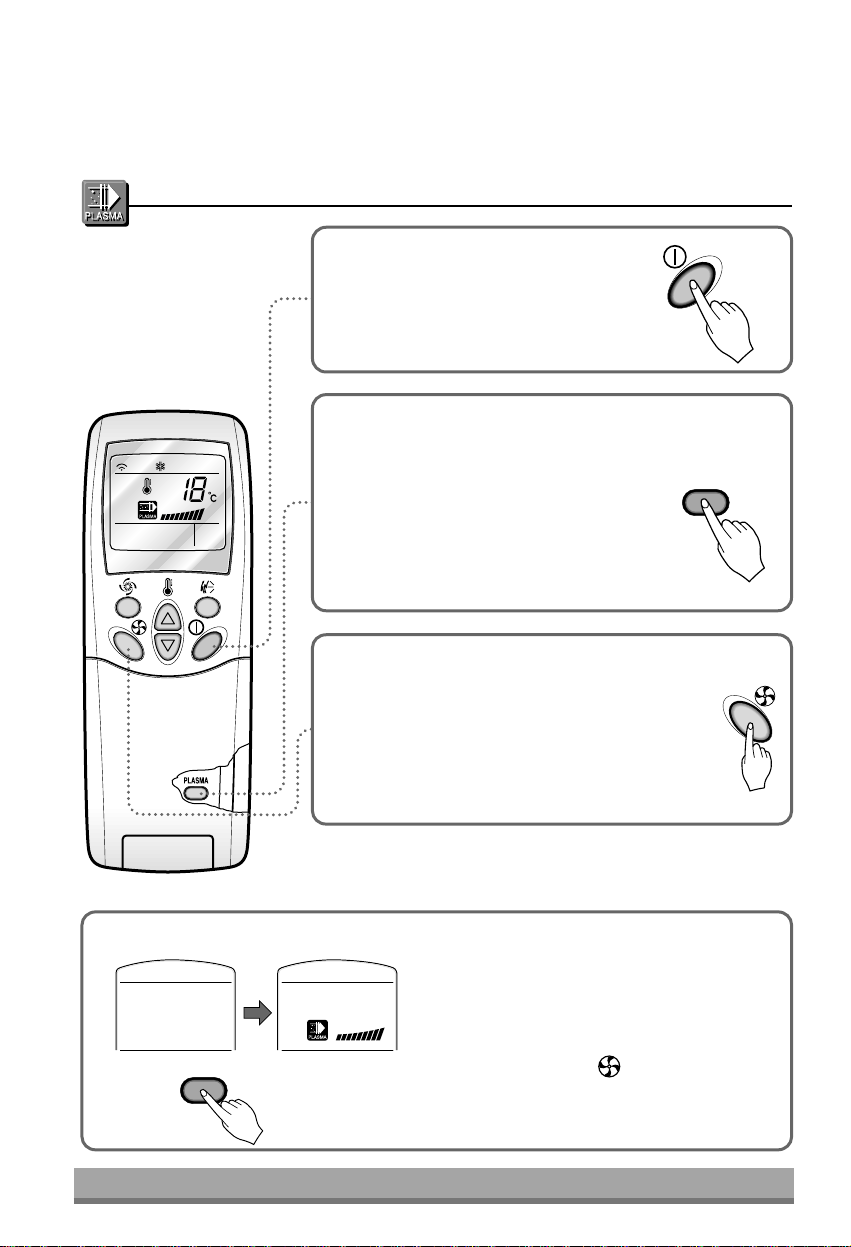
Press the Start/Stop button. The unit
will respond with a beep.
Open the door on the remote control.
Press the PLASMA air purifying
operation ON/OFF button.
Operation will start when the button is
pressed and stop when the button is
pressed again.
Set the fan speed again with door of the remote control
closed. You can select the fan speed in four steps-low,
medium, high or CHAOS. Each time the
buttonispressed,thefanspeedmode
is shifted.
✴ Air purifying operation (PLASMA) can be
with cooling, Heating or any other operations.
PLASMA Air Purifying Operation only
If you press the only PLASMA button, only
PLASMA air purifying operates.
Then, fan speed is low. You can select the fan
speed in four steps-low, medium, high or
CHAOS.
Each time the button ( ) is pressed, the fan
speed mode is shifed.
1
2
3
Page 13
ENGLISH
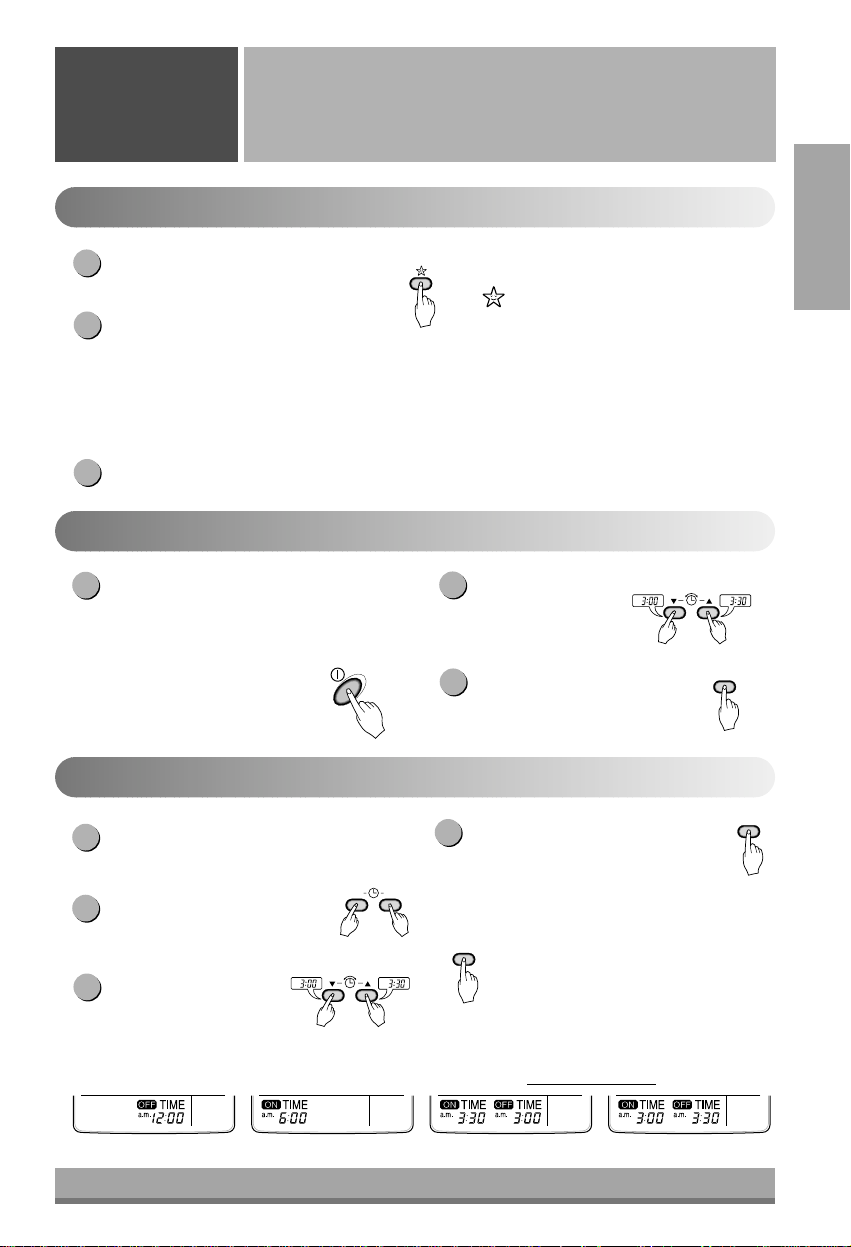
Delay OFF Timer Delay ON Timer Delay OFFand ON Timer Delay ONand OFF Timer
13
Sleep Mode
Setting the Time
Delay Start/Pre-Set Stop
Additional features
Operating
Instructions
Press the Sleep Mode Auto button to set the time
you want the unit to turn off automatically.
The Timer is programmed in one-hour
increments by pressing the Sleep Mode Auto
button1to7times.
The sleep mode is available for 1 to 7 times. To
alter the time period in steps of 1 hour, press the
Sleep Mode Button while aiming at air
conditioner.
Make sure the Sleep Mode Auto LED lights up.
To cancel the Sleep Mode, press the sleep
Mode Auto button several times until the star
( ) disappears from the operation display.
Note: The Sleep Mode will be operated at
low fan speed (cooling) or medium fan
speed (heat pump only) for quiet sleeping.
IN COOLING MODE: The temperature will
automatically rise by 1°C over the next 30
minutes and by 2°C in 1 hour for comfortable
sleeping.
Time can be set only when you have pressed
the Reset button. If you have just replaced the
batteries, the Reset button should be pressed
to reset the time.
Press the Start/Stop button.
Press the Time Setting buttons until the
desiredtimeisset.
Press the Timer SET button.
Note: Check the indicator
for A.M. and P.M.
Make sure the time is set correctly on the
remote control display.
Press the ON/OFF Timer
buttons to turn Timer on or off.
Press the Time Setting
buttons until the desired
time is set.
Press the selected on/off setting by
pressing the Timer SET button while
aiming the remote control at the signal
receptor.
To cancel the setting the timer.
Press the Timer Cancel button while
aiming remote control at the signal
receptor.
(The timer lamp on the air conditioner and
the display will go out.)
NOTE: Select one of the following four types of operation.
1
2
3
1
2
3
4
1
2
3
with the unit running
ON OFF
SET
SET
CANCEL
Page 14
14
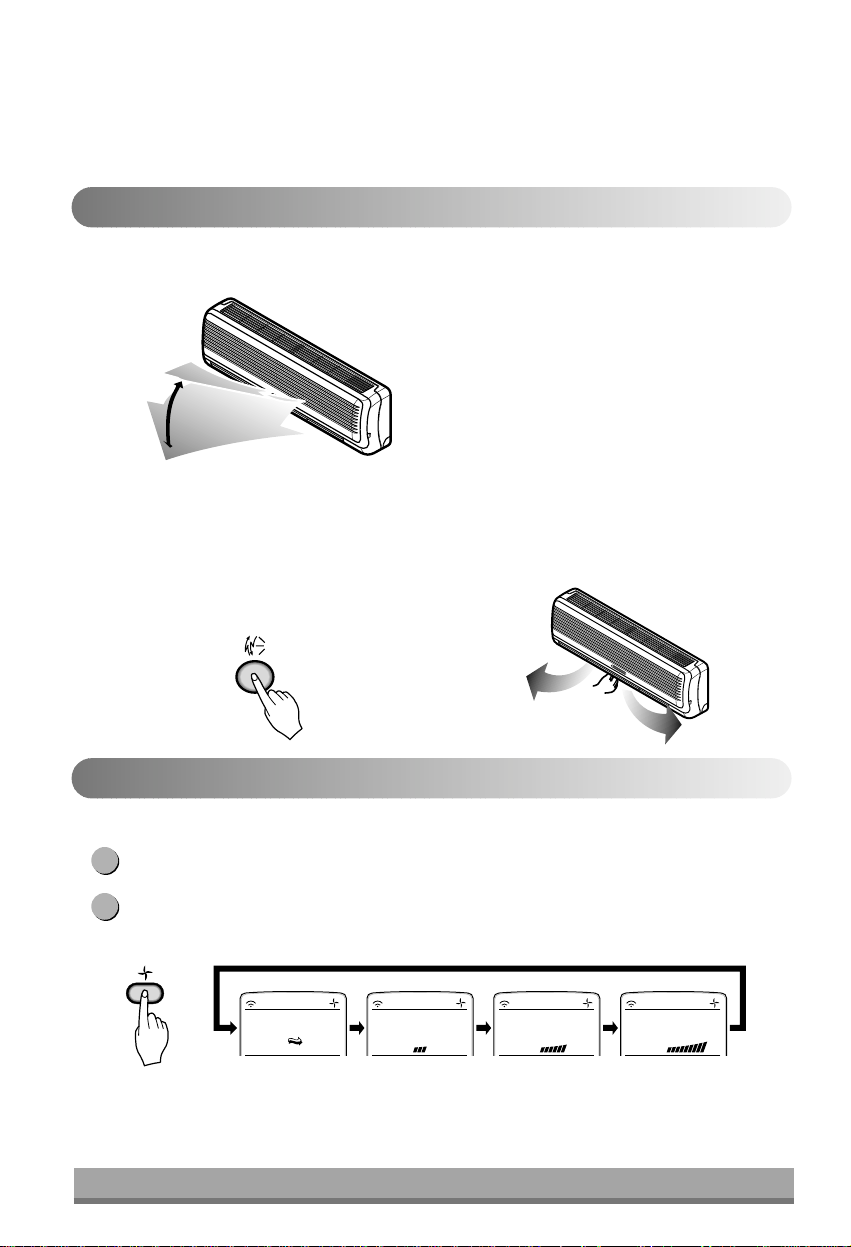
Fan speed is on low. Fan speed is on medium. Fan speed is on high.CHAOS Air
Vertical Airflow Direction Control
Air Circulation Mode
1
2
The up/down airflow (Vertical Airflow) can be adjusted
by using the remote control.
Press the Start/Stop button to start the unit.
Open the door on the remote control.
Press Chaos Swing button and the louvers will swing
up and down. Press the Chaos Swing button again to
set the vertical louver at the desired airflow direction.
Note:
❏ If you press the CHAOS swing button, the horizontal
airflow direction is changed automatically based on
the CHAOS algorithm to distribute the air in the room
evenly and at the same time to make the human body
feel most comfortable, as if enjoying a natural breeze.
❏ Always use the remote control to adjust the up/down
airflow direction. Manually moving the vertical airflow
direction louver by hand could damage the air
conditioner.
❏ When the unit is shut off, the up/down airflow direction
louver will close the air outlet vent of the system.
To adjust left/right(Horizontal Airflow) direction
Caution :
Ensure unit is turned off before adjusting the
horizontal airflow direction control. Carefully
open vertical louver to allow access to the
horizontal airflow direction.
Adjust the left/right airflow direction by hand.
Circulates the room air without cooling or heating.
Press the Start/Stop button. the unit will respond with a beep.
Open the door on the remote control. Press the Air Circulation button. Close the door on the remote
control. Now each time that you press the Indoor Fan Speed Selector, the fan speed is shifted from low
to CHAOS and back to low again.
Note:
❏ CHAOS Air economizes power consumption and prevents overcooling. The fan speed is automatically
changed from high to low or vice versa, depending on the ambient temperature.
Page 15
ENGLISH
15
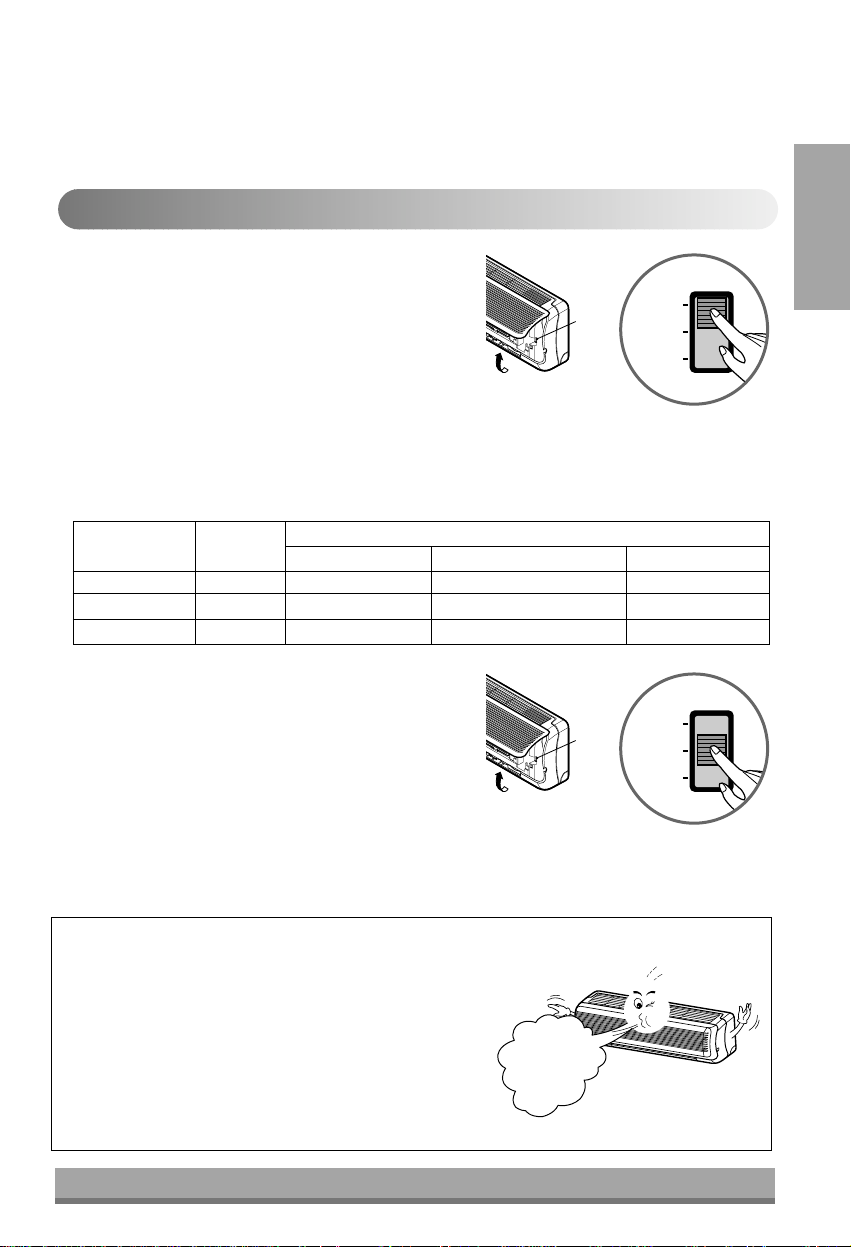
Open the front
panel upward
Slide
Switch
Slide Switch
FORCED
OPERATION
AUTO
RESTART
REMOTE
CONTROL
Open the front
panel upward
Slide
Switch
Slide Switch
FORCED
OPERATION
AUTO
RESTART
REMOTE
CONTROL
Slide Switch Operation
FORCED OPERATION
Operation procedures when the remote control can't be
used.
Open the front panel upward and move the Slide
Switch to the Forced Operation position.
If you want to stop operation, move the Slide Switch to
the Auto Restart or the Remote Control position.
In case the power comes on again after powerfailure
on the Forced Operation position, the operating
conditions are automatically set as follows:
During Forced Operation, the initial mode continues.
Auto restart
In case the power comes on again after a power failure,
Auto Restarting Operation is the function to operate
procedures automatically to the previous operating
conditions.
If you want to use this operation, Open the front panel
upward and move the slide switch to the Auto Restart
position.
If you do not want to use this operation, move the Slide
Switch to the Remote Control position.
Heat pump Model
Cooling Model
Room Temp. ≥ 24°C21°C ≤ Room Temp. < 24°C Room Temp. < 21°C
Operating mode Cooling Cooling Healthy Dehumidification Heating
Indoor FAN Speed
High High
Healthy Dehumidification Rule
High
Setting Temperature
22°C22°C23°C24°C
HELPFUL INFORMATION
Fan speed and cooling capacity.
The cooling capacity indicated in the specification is the
value when the fan speed is set to high, and the capacity will
be lower at low or medium fan speed.
High fan speed is recommended when you wish to cool the
room quickly.
High
Speed
When you are out for a while, put the
Slide Switch on the Remote Control.
Page 16
16
Care and maintenance of the air conditioner
Care and maintenance
of the air conditioner
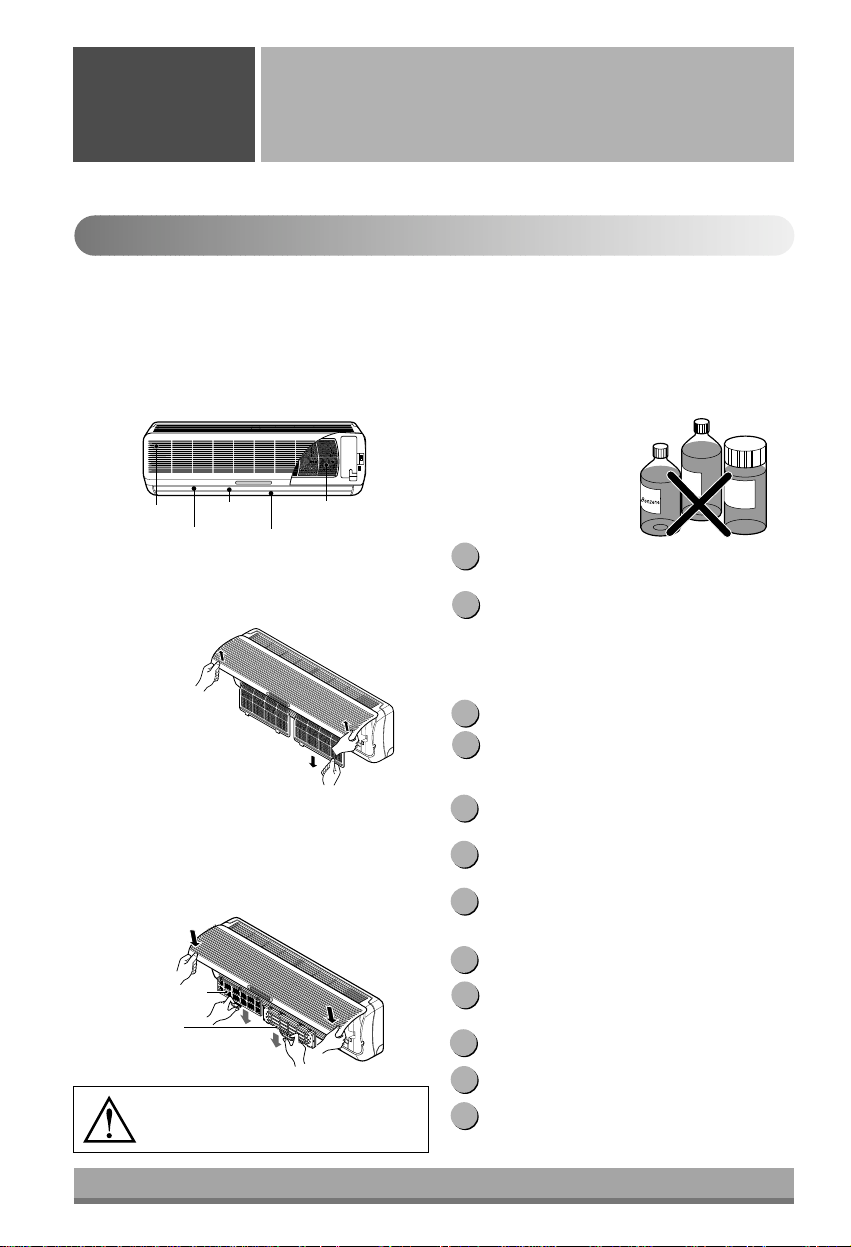
Indoor Unit
CAUTION: Before performing any maintenance, turn off the main power to the system.
Grille, Case, and Remote Control
❏ Turn the system off before cleaning. To
clean, wipe with a soft, dry cloth. Do not
use bleach or abrasives.
NOTE:
Supply power must be disconnected before
cleaning the indoor unit.
AIR FILTERS
Theairfiltersbehindthefrontgrilleshouldbe
checked and cleaned once every 2 weeks or more
often if neccessary.
❏
Never use any of the followings:
• Water hotter than 40°C
Could cause deformation and/or
discoloration.
• Volatile substances
Could damage the surfaces of the air
conditioner.
Lift the front access panel and pull the filter tab
slightly forward to remove the filter.
Clean the filter with a vacuum or warm, soapy
water.
• If dirt is conspicuous, wash with a solution
of detergent in lukewarm water.
• If hot water (40°C or more) is used, it may
be deformed.
After washing with water, dry well in the shade.
Re-install the air filter.
Vertical louver
Horizontal louver
Air filters
(behind front panel)
Air outlet vent
Air inlet vent
G
a
s
o
l
i
n
e
P
o
w
d
e
r
1
2
3
4
1
2
3
4
5
1
2
3
After removing the air filters, pull slightly
forward to remove the PLASMA filter.
Dip the PLASMA filter into the water mixed with
neutral detergent, for 20~30 minutes.
DrythePLASMAfilterintheshadeforaday
(Especially, the humidity must be removed
perfectly on this parts).
Note the cuts of electric discharge lines.
Re-install the PLASMA filter to the original
position.
After removing the air filters, pull slightly
forward to remove the DEODORIZER filter.
Dry in the sunlight for two hours.
Re-install the DEODORIZER filter to the original
position.
PLASMA FILTER, DEODORIZER
FILTER(OPTIONAL)
The PLASMA filter behind the air filters should be
checked and cleaned once in every 3 months or more
often if necessary.
DEODORIZER Filter
PLASMA Filter
Don’t touch this PLASMA Filter within 10
seconds after opening the inlet grille, it may
cause an electric shock.
Page 17
ENGLISH
17
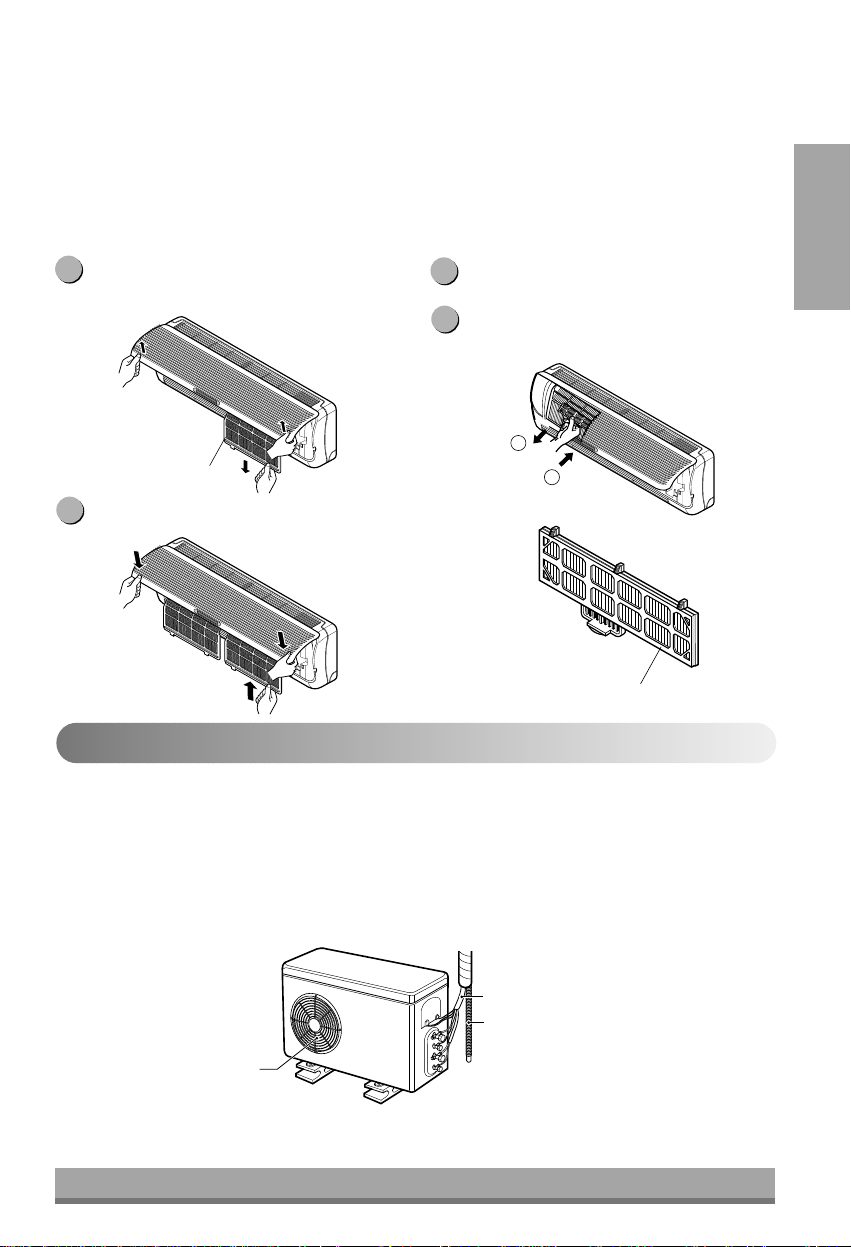
Air outlet
vents
Piping
Drain Hose
Air purifying filter
Air filter
3
2
Outdoor Unit
Replacement of Purifying Filter(Option)
• Recomended use period : About 2 years
Open front panel and remove air
filters.
Reinsert air filters and close front
panel.
Remove air purifying filters.
Insert new air purifying filters.
The heat exchanger coils and panel vents of the outdoor unit should be checked regularly. If clogged with dirt or
soot, the heat exchanger and panel vents may be professionally steam cleaned.
NOTE:
Dirty or clogged coils will reduce the operating efficiency of the system and cause higher operating costs.
1
2
3
4
Page 18
18
CAUTION
CAUTION
1
1
2
2
3
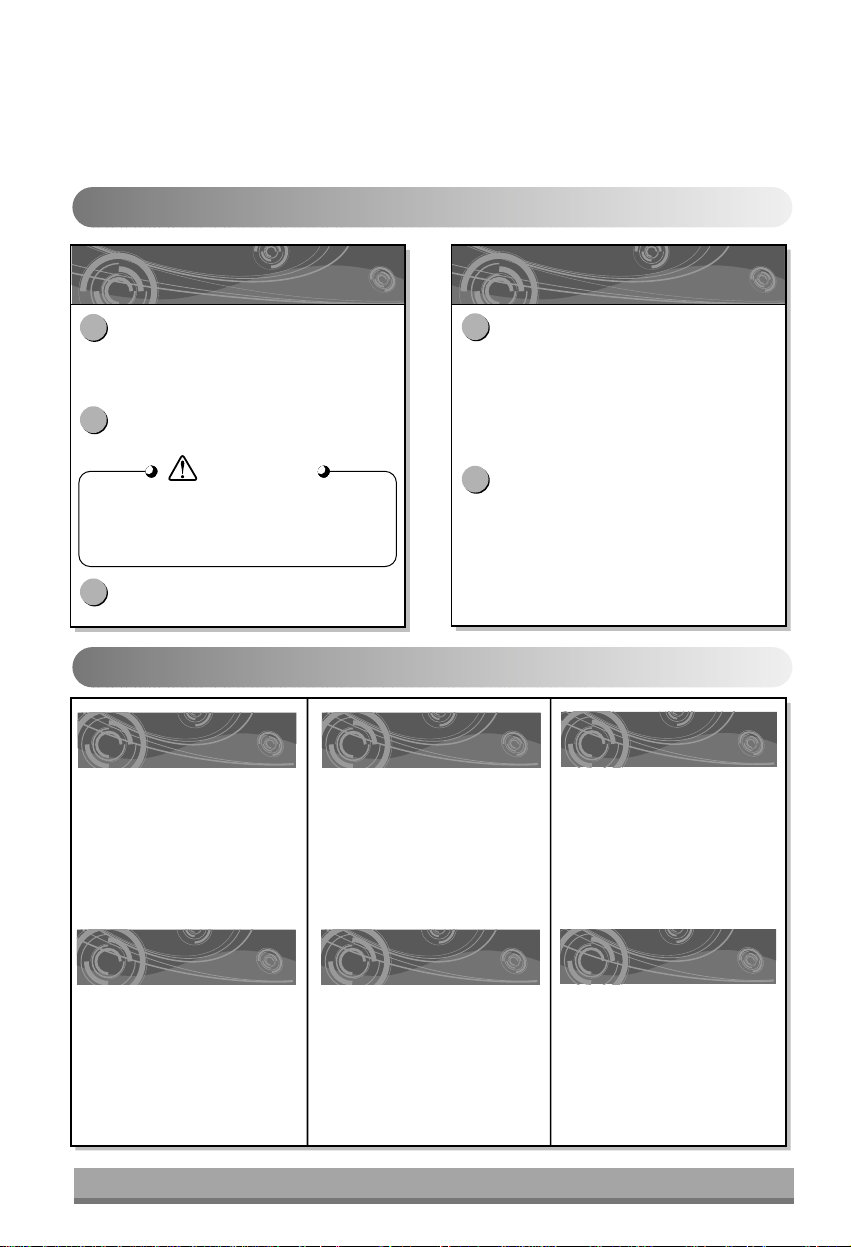
When the air conditioner is not going to be used for a long time.
Operation Tips
Operate the air conditioner on Air circulation
mode (Refer to page 14) for 2 to 3 hours.
• This will dry out the internal mechanisms.
When air conditioner is not going to be
used for a long time.
When the air conditioner is to be used again.
Turn off the circuit breaker, and disconnect
the plug.
Remove the batteries from the remote
control.
Turn off the circuit breaker when the air
conditioner is not going to be used for a long time.
Dirt may collect and may cause a fire.
Clean the air filter and install it in the indoor
unit.
(Refer to page 16 for cleaning filters.)
Check that the air inlet and outlet of the
indoor/outdoor unit are not blocked.
Do not overcool the room.
This is not good for the health
and wastes electricity.
Make sure that the doors
and windows are shut tight.
Avoid opening doors and
windows as much as possible
to keep the cool air in the room.
Keep blinds or curtains
closed.
Do not let direct sunshine enter
the room when the air
conditioner is in operation.
Clean the air filter regularly.
Blockages in the air filter reduce
the airflow and lower cooling
and dehumidifying effects.
Clean at least once every two
weeks.
Keep the room temperature
uniform.
Adjust the vertical and
horizontal airflow direction to
ensure a uniform temperature in
the room.
Ventilate the room
occasionally.
Since windows are kept closed,
itisagoodideatoopenthem
and ventilate the room now and
then.
Page 19
ENGLISH
19
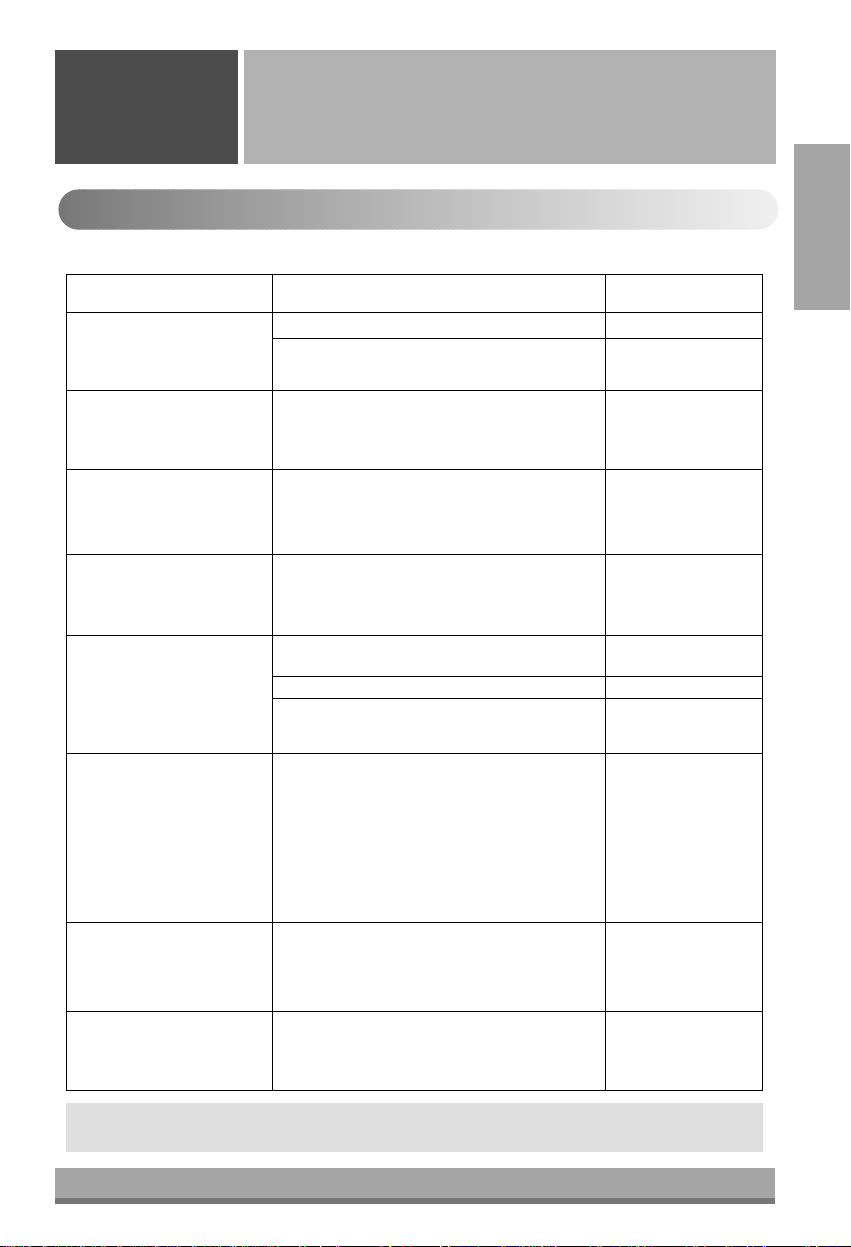
Before you call for service...
Troubleshooting Tips!
Save time and money!
Check the following points before requesting repairs or service.... If the fault persists, please contact your dealer or service center.
Case Explanation See page
The air conditioner does not
operate.
The room has a peculiar
odor.
It seems that condensation
is leaking from the air
conditioner.
Air conditioner does not
operate for about 3 minutes
when restarted.
Does not cool or heat
effectively.
The air conditioner
operation is noisy.
Remote control display is
faint, or no display at all.
Crack sound is heard.
• Have you made a mistake in timer operation?
• Has the fuse blown or has the circuit breaker
been tripped?
• Check that this is not a damp smell exuded by
the walls, carpet, furniture, or cloth items in the
room.
• Condensation occurs when the airflow from
the air conditioner cools the warm room air.
• This is the protector of the mechanism.
• Wait about three minutes and operation will
begin.
• Is the air filter dirty? See air filter cleaning
instructions.
• Has the temperature been set incorrectly?
• Are the indoor unit's air inlet or outlet vents
obstructed?
• For a noise that sounds like water flowing.
-This is the sound of freon flowing inside the
air conditioner unit.
• For a noise that sounds like the compressed
air releasing into atmosphere.
-This is the sound of the dehumidifying water
being processed inside the air conditioning
unit.
• Are the batteries depleted?
• Are the batteries inserted in the opposite (+)
and (-) directions?
• This sound is generated by the
expansion/constriction of the front panel, etc.
due to changes of temperature.
13
-
-
-
-
16
7, 10
-
-
5
-
NOTE
WATER RESISTANT: The outdoor side of this appliance is WATER RESISTANT.
The indoor side is not water resistant and should not be exposed to excess water.
Troubleshooting Tips! Save time and money!
 Loading...