

Page 1
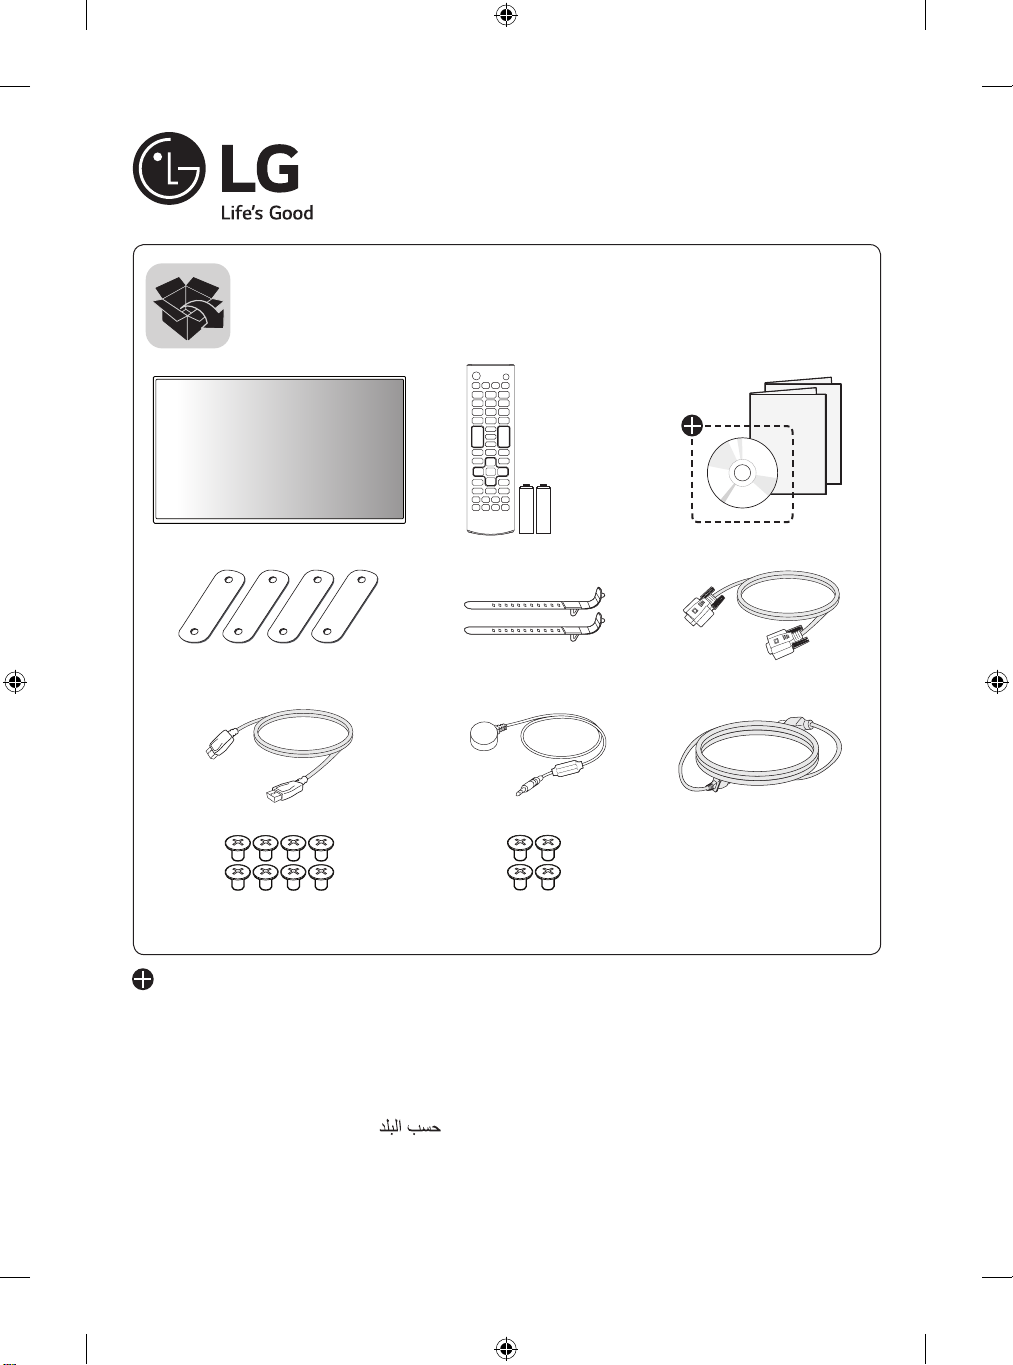
AAA
LG Digital Signage
(MONITOR SIGNAGE)
55LV75D 55LV77D
(M4 x L6)
Depending upon country / Závisí na zemi / Afhængigt af landet / En función del país /
Maan mukaan / Selon pays / Abhängig vom Land / Ανάλογα με τη χώρα / Országfüggő /
Tergantung pada negaranya / A seconda del Paese / Елге байланысты / 지역에 따라 다름 /
Afhankelijk van het land / Avhengig av land / Zależnie od kraju / Dependendo do país /
В зависимости от страны / Závisí od krajiny / Beroende på land / 視國家, 地區而定 /
(M6 x L10)
Ülkeye bağlı / Залежно від країни / Mamlakatga bog’liq ravishda / 国によって異なります /
Depende do país / הנידמב יולת /
*MFL70344501*
P/No: MFL70344501 (1712-REV01)
Page 2
English You can download the web manuals for this product at the following
websites. (Keyword : LV75D, LV77D)
Česky
Dansk Du kan downloade webvejledningen til dette produkt på følgende
Español Puede descargar los manuales web de este producto en los
Suomi Voit ladata tuotteen verkko-oppaat seuraavilta verkkosivuilta.
Français Vous pouvez télécharger le guide Web pour ce produit sur les sites
Deutsch
Ελληνικά Μπορείτε να κατεβάσετε τα εγχειρίδια web για αυτό το προϊόν
Magyar A termék internetes útmutatóját a következő weboldalakról töltheti
Bahasa
Indonesia
Můžete si stáhnout webové návody kobsluze tohoto produktu
znásledujících webových stránek. (Klíčové slovo : LV75D, LV77D)
websteder. (Nøgleord : LV75D, LV77D)
siguientes sitios web. (Palabra clave : LV75D, LV77D)
(Avainsana : LV75D, LV77D)
suivants. (Mot-clé : LV75D, LV77D)
Sie können die Webhandbücher für dieses Produkt auf den folgenden
Websites herunterladen. (Schlüsselwort : LV75D, LV77D)
στις παρακάτω τοποθεσίες web.
(Λέξη-κλειδί : LV75D, LV77D)
le. (Kulcsszó : LV75D, LV77D)
Anda dapat mengunduh manual web untuk produk ini di situs web
berikut. (Kata kunci : LV75D, LV77D)
Italiano È possibile scaricare i manuali online di questo prodotto dai seguenti
Қазақша Бұл өнімге арналған пайдаланушы нұсқаулығын төмендегі
한국어
Nederlands U kunt de internethandleidingen voor dit product vanaf de volgende
Norsk Du kan laste ned webhåndbøker for dette produktet fra de følgende
• www.lg.com/b2b
siti Web. (Parola chiave : LV75D, LV77D)
веб-сайттарынаң жүктеп алуға болады. (Негізгі сөз :
LV75D, LV77D)
웹 매뉴얼을 통해 보다 상세한 제품정보를 확인 할 수 있습니다.
아래의 사이트를 참조하세요. (키워드 : LV75D, LV77D)
websites downloaden. (Term : LV75D, LV77D)
webområdene. (Nøkkelord : LV75D, LV77D)
Page 3
Polski
Português Pode transferir os manuais na Internet deste produto nos websites
Instrukcje obsługi tego produktu można pobrać na następujących
stronach internetowych. (Słowo kluczowe : LV75D, LV77D)
que se seguem. (Palavra-chave : LV75D, LV77D)
Русский
Slovenčina
Svenska Du kan hämta produktens onlinehandböcker på följande
台灣語 您可以於下列網站下載本產品的網頁手冊。
Онлайн-руководства для данного устройства можно
скачать на следующих веб-сайтах.
(Ключевое слово : LV75D, LV77D)
Webové príručky pre tento výrobok môžete stiahnuť na nasledujúcich
webových stránkach. (Kľúčové slovo : LV75D, LV77D)
webbplatser. (Nyckelord : LV75D, LV77D)
(關鍵字 : LV75D, LV77D)
Türkçe Bu ürünün web kılavuzlarını aşağıdaki web sitelerinden
indirebilirsiniz. (Anahtar sözcük : LV75D, LV77D)
Українська
O’zbekcha Ushbu mahsulot uchun qo‘llanmalarni quyidagi veb-saytlarda yuklab
日本語 この製品のWeb版取扱説明書は次のWebサイトからダウン
Português
Do Brasil
Завантажити веб-посібники для цього виробу можна на вебсайтах, поданих нижче. (Ключове слово : LV75D, LV77D)
olishingiz mumkin. (Kalit so’z : LV75D, LV77D)
ロードできます。 (キーワード : LV75D, LV77D)
Você pode fazer download dos manuais na Web deste produto nos
seguintes sites. (Palavra-chave : LV75D, LV77D)
• www.lg.com/b2b
SuperSign : http://partner.lge.com
(LV75D, LV77D
(LV75D, LV77D
Page 4

Network
Page 5
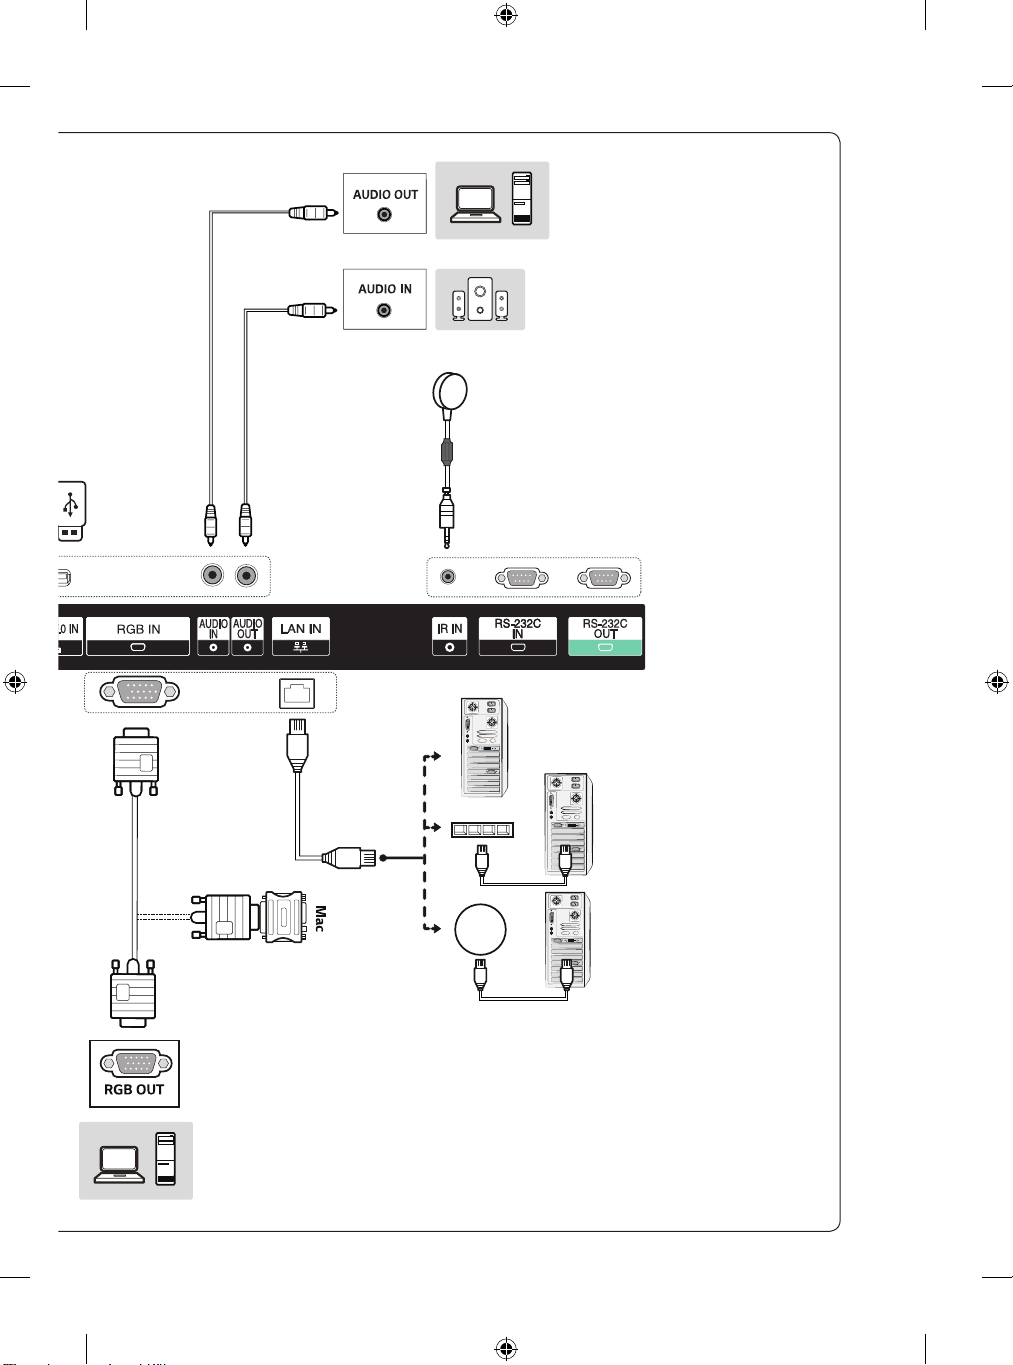
Network
Page 6
2
1
1
3
2
4
Page 7
(TAIWAN ONLY)
限用物質含有情況標示聲明書
設備名稱:液晶彩色顯示器,型號(型式):
限用物質及其化學符號
單元
鉛
(Pb)
電路板 - ○ ○ ○ ○ ○
外殼, 支架 ○ ○ ○ ○ ○ ○
玻璃面板 - ○ ○ ○ ○ ○
配件(例:纜線, 遙控器) - ○ ○ ○ ○ ○
備考1.〝超出0.1 wt %〞及〝超出0.01 wt %〞係指限用物質之百分比含量超出百分比含量基準值。
備考2.〝○〞係指該項限用物質之百分比含量未超出百分比含量基準值。
備考3.〝-〞係指該項限用物質為排除項目。
汞
(Hg)鎘(Cd)
六價鉻
(Cr+6)
多溴聯苯
(PBB)
多溴二苯醚
(PBDE)
Page 8
Page 9

OWNER’S MANUAL
LG Digital
Signage
(MONITOR SIGNAGE)
Please read this manual carefully before operating your set and retain it
for future reference.
55LV75D
55LV77D
www.lg.com
Copyright © 2017 LG Electronics Inc. All Rights Reserved.
Page 10

2
TABLE OF CONTENTS
ENGLISH
SAFETY PRECAUTIONS ................3
- Precautions In Installing the Product .....................3
- Precautions to the AC Adapter and Electrical
Power ......................................................................................5
- Precautions In Moving the Product ........................7
- Precautions In Using the Product ............................8
- Mounting on a Wall .........................................................9
LICENSES .................................... 10
ASSEMBLY AND PREPARATION 11
- Parts and Buttons .........................................................12
- Portrait Layout ................................................................13
- Remove L-brackets before Installation ..............13
- Storage Method for Panel Protection ................14
- Installing on a Wall ........................................................16
- EXTERNAL EQUIPMENT SETUP ...........................17
- Tiling Displays ..................................................................17
REMOTE CONTROL .................... 19
MAKING CONNECTIONS ........... 21
- Connecting to a PC.......................................................21
- External Device Connection .....................................21
- Using the Input List ......................................................21
- Daisy Chain Monitors ..................................................23
TROUBLESHOOTING .................. 24
PRODUCT SPECIFICATIONS ...... 27
Page 11
3
Warning: This equipment is compliant with Class A of CISPR 32. In a residential environment this equipment may cause
radio interference.
SAFETY PRECAUTIONS
Please read these safety precautions carefully before using the product.
WARNING
If you ignore the warning message, you may be seriously injured or there is a possibility of accident or death.
CAUTION
If you ignore the caution message, you may be slightly injured or the product may be damaged.
WARNING
• Indoor Use Only.
Precautions In Installing the Product
WARNING
• Keep away from heat sources like electrical heaters.
- Electrical shock, fire, malfunction, or deformation may occur.
• Keep the packing anti-moisture material or vinyl packing out of the reach of children.
- Anti-moisture material is harmful if swallowed. If swallowed by mistake, force the patient to vomit and visit the
nearest hospital. Additionally, vinyl packing can cause suffocation. Keep it out of the reach of children.
• Do not put heavy objects on the product or sit upon it.
- If the product collapses or is dropped, you may be injured. Children must pay particular attention.
• Do not leave the power or signal cable unattended on the pathway.
- The passerby can trip or fall, which can cause electrical shock, fire, product breakdown, or injury.
• Install the product in a neat and dry place.
- Dust or moisture can cause electrical shock, fire or product damage.
• If you can smell smoke or other odors or hear a strange sound unplug the power cord and contact the service center.
- If you continue to use without taking proper measures, electrical shock or fire can occur.
• If you dropped the product or the case is broken, turn off the product and unplug the power cord.
- If you continue to use without taking proper measures, electrical shock or fire can occur. Contact the service center.
ENGLISH
Page 12
4
• Do not drop an object on or apply impact to the product. Do not throw any toys or objects on the product screen.
ENGLISH
- It can cause injury to human, problem to product and damage the display.
• Do not let the product fall or drop when connecting it with an external device.
- This may cause injury and/or damage to the product.
• When connecting it to a game device, keep a distance of four times the diagonal measurement of the screen from the
device.
- If the product falls because of the short cable, this may cause injury and/or damage to the product.
• Leaving a fixed image on the screen for a long time may cause damage to the screen and cause image burn-in. To use
the product for a long period of time, use a screen saver on the PC or utilize the residual image prevention function
on the product, and when the product is not used, turn off the power. Burn-in and related problems are not covered
by the warranty on this product.
• Do NOT install this product on a wall where there is high risk of exposure to oil fumes or mist.
- This may damage product and cause it to fall.
CAUTION
• Make sure the product ventilation holes are not blocked. Install the product in a suitably wide place (more than 100
mm from the wall).
- If you install the product too close to the wall, it may be deformed or fire can break out due to internal heat.
• Do not block the ventilation hole of the product by a tablecloth or curtain.
- The product can be deformed or fire can break out due to overheating inside the product.
• Install the product on a flat and stable place that has no risk of dropping the product.
- If the product is dropped, you may be injured or the product may be broken.
• Install the product where no EMI occurs.
• Keep the product away from direct sunlight.
- The product can be damaged.
• If you install the product in a place that does not meet the recommended conditions, this may cause serious damage
to the product’s picture quality, life cycle, and appearance. Please check with LG or a qualified installer before
installing. This caution applies to a place where there is an abundance of fine dust or oil mist, chemical substances are
used, the temperature is very high or low, the humidity is very high, or the product is likely to remain turned on for a
long period of time (airport and train station), failure to do so will invalidate the warranty.
• Do not install the product in an area with poor ventilation (e.g.on a bookshelf, in a closet) or outside and avoid placing
on cushions or carpets.
• In addition, do not install it where there are heating objects such as lighting equipment.
Page 13

5
Precautions to the AC Adapter and Electrical Power
WARNING
• If water or any foreign substance goes inside the product (TV, monitor, power cord, or AC adapter), disconnect the
power cord immediately and contact the service center.
- Otherwise, this may cause a fire or electric shock due to damage to the product.
• Do not touch the power plug or AC adapter with wet hands. If the pins of the plug are wet or dusty, wipe and dry
them before use.
- Otherwise, this may cause a fire or electric shock.
• Make sure to completely insert the power cord into the AC adapter.
- If loosely connected, the poor connection may cause a fire or electric shock.
• Be sure to use power cords and AC adapters provided or approved by LG Electronics, Inc.
- The use of non-approved products may cause a fire or electric shock.
• When unplugging the power cord, always pull it by the plug. Do not bend the power cord with excessive force.
- The power line can be damaged, which may cause electric shock or fire.
• Be careful not to step or place heavy objects (electronic appliances, clothing, etc.) on the power cord or AC adapter.
Be careful not to damage the power cord or AC adapter with sharp objects.
- Damaged power cords may cause a fire or electric shock.
• Never disassemble, repair or modify the power cord or AC adapter.
- This may cause a fire or electric shock.
• Make sure to connect the power cable to the grounded current.
- You may be electrocuted or injured.
• Use the rated voltage only.
- The product can be damaged, or you may be electrocuted.
• In the presence of thunder and lightning, never touch the power cord and signal cable because it can be very
dangerous.
- It can cause electric shock.
• Do not connect several extension cords, electrical appliances, or electrical heaters to a single outlet. Use a power strip
with a grounding terminal designed for exclusive use with the computer.
- A fire can break out due to overheating.
• Do not touch the power plug with wet hands. Additionally, if the cord pin is wet or covered with dust, dry the power
plug completely or wipe dust off.
- You may be electrocuted due to excess moisture.
ENGLISH
Page 14
6
• If you don’t intend to use the product for a long time, unplug the power cable from the product.
ENGLISH
- Covering dust can cause a fire, or insulation deterioration can cause electric leakage, electric shock or fire.
• Fix the power cable completely.
- If the power cable is not fixed completely, a fire can break out.
• Do not insert a conductor (like a metal chopstick) into one end of the power cable while the other end is connected
to the input terminal on the wall. Additionally, do not touch the power cable right after plugging into the wall input
terminal.
- You may be electrocuted.
• The appliance coupler is used as the disconnect device.
• Please make sure the device is installed near the wall outlet to which it is connected and that the outlet is easily
accessible.
• As long as this unit is connected to the AC wall outlet, it is not disconnected from the AC power source even if the
unit is turned off.
CAUTION
• Be sure to keep the outlet, AC adapter, and pins of the power plug clean from dust and etc.
- This may cause a fire.
• Do not unplug the power cord while the product is in use.
- Electrical shock can damage the product.
• Use only the power cord supplied with the unit. If you use another power cord, make sure that it is certified by the
applicable national standards when not provided by the supplier. If the power cable is faulty in any way, please contact
the manufacturer or the nearest authorized repair service provider for a replacement.
Page 15
7
Precautions In Moving the Product
WARNING
• Make sure to turn off the product.
- You may be electrocuted or the product can be damaged.
• Make sure to remove all cables before moving the product.
- You may be electrocuted or the product can be damaged.
• Make sure the panel faces forward and hold it with both hands to move. If you drop the product, the damaged
product can cause electric shock or fire. Contact an authorized the service center for repair.
• Make sure the product is turned off, unplugged, and all cables have been removed. It may take 2 or more people to
carry larger apparatus. Do not press against or put stress on the front panel of the apparatus.
CAUTION
• Do not shock the product when moving it.
- You may be electrocuted or the product can be damaged.
• Do not dispose the product-packing box. Use it when you move.
ENGLISH
Page 16
8
Precautions In Using the Product
ENGLISH
WARNING
• Do not disassemble, repair or modify the product at your own discretion.
- Fire or electric shock accident can occur.
- Contact the service center for check, calibration or repair.
• When the display is to be left unattended for an extended period of time, unplug it from the wall outlet.
• Keep the product away from water.
- Fire or electric shock accident can occur.
• Do not shock or scratch the front and sides of the screen with metallic objects.
- Otherwise, it may cause damage to the screen.
• Avoid high temperatures and humidity.
CAUTION
• Do not put or store inflammable substances near the product.
- There is a danger of explosion or fire due to careless handling of the inflammable substances.
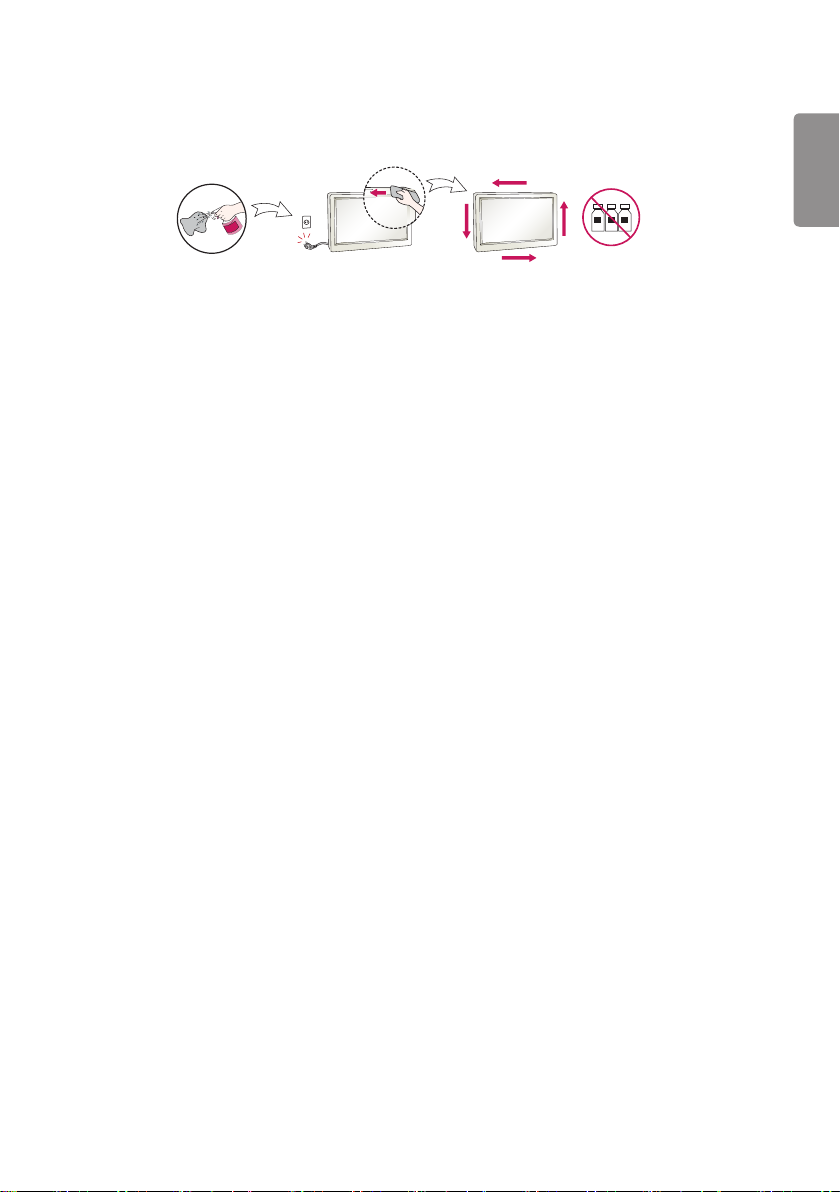
• When cleaning the product, unplug the power cord and scrub gently with a soft cloth to prevent scratching. Do not
clean with a wet cloth or spray water or other liquids directly onto the product. An electric shock may occur. (Do not
use chemicals such as benzene, paint thinners, or alcohol.)
• Take a rest from time to time to protect your vision.
• Keep the product clean at all times.
• Take a comfortable and natural position when working with a product to relax the muscles.
• Take a regular break when working with a product for a long time.
• Do not press strongly upon the panel with a hand or sharp object such as nail, pencil, or pen, or make a scratch on it.
• Keep the proper distance from the product.
- Your vision may be impaired if you look at the product too closely.
• Set the appropriate resolution and clock by referring to the User’s Guide.
- Your vision can be impaired.
• Use authorized detergent only when cleaning the product. (Do not use benzene, thinner, or alcohol.)
- Product can be deformed.
• Do not expose to dripping or splashing and do not place objects filled with liquids, such as vases, cups, etc. on or over
the apparatus (e.g. on shelves above the unit).
• Batteries should not be exposed to excessive heat. For example, keep away from direct sunlight, open fireplace, and
electric heaters.
• Do NOT place non-rechargeable batteries in charging device.
• Using headsets (earphones) for a long time or listening loudly can cause damage to your hearing.
Page 17
9
• Spray water onto a soft cloth 2 to 4 times, and use it to clean the front frame; wipe in one direction only. Too much
moisture may cause staining.
WATER
CHEMICALS
• Do not use products using high voltage around the Monitor. (e.g., a bug zapper)
- Monitor may have malfunction as its electrical shock.
Mounting on a Wall
• Do NOT install this product by yourself as you may injure yourself or cause damage to product. Please contact service
personnel authorised by manufacturer.
ENGLISH
Page 18
10
LICENSES
ENGLISH
Supported licenses may differ by model. For more information of the licenses, visit www.lg.com.
The terms HDMI and HDMI High-Definition Multimedia Interface, and the HDMI Logo are trademarks or registered
trademarks of HDMI Licensing Administrator, Inc. in the United States and other countries.
This DivX Certified® device has passed rigorous testing to ensure it plays DivX® video.
To play purchased DivX movies, first register your device at vod.divx.com. Find your registration code in the DivX VOD
section of your device setup menu.
DivX Certified® to play DivX® video up to HD 1080p, including premium content.
DivX®, DivX Certified® and associated logos are trademarks of DivX, LLC and are used under license.
Covered by DivX Patents 7,295,673; 7,515,710; RE45,052; and others available at [www.divx.com/patents]
Manufactured under license from Dolby Laboratories. Dolby, Dolby Vision, Dolby Audio, Dolby Atmos, and the double-D
symbol are trademarks of Dolby Laboratories.
Page 19

11
ASSEMBLY AND PREPARATION
CAUTION
• Always use genuine components to ensure safety and product performance.
• The product warranty will not cover damage or injury caused by the use of counterfeit components.
NOTE
• The accessories provided with your product may vary depending on the model or region.
• Product specifications or contents in this manual may be changed without prior notice due to upgrade of product
functions.
• SuperSign Software & Manual
- Downloading from the LG Electronics website.
- Visit the LG Electronics website (http://partner.lge.com) and download the latest software for your model.
• The warranty will not cover any damage caused by using the product in an excessively dusty environment.
ENGLISH
Page 20
12
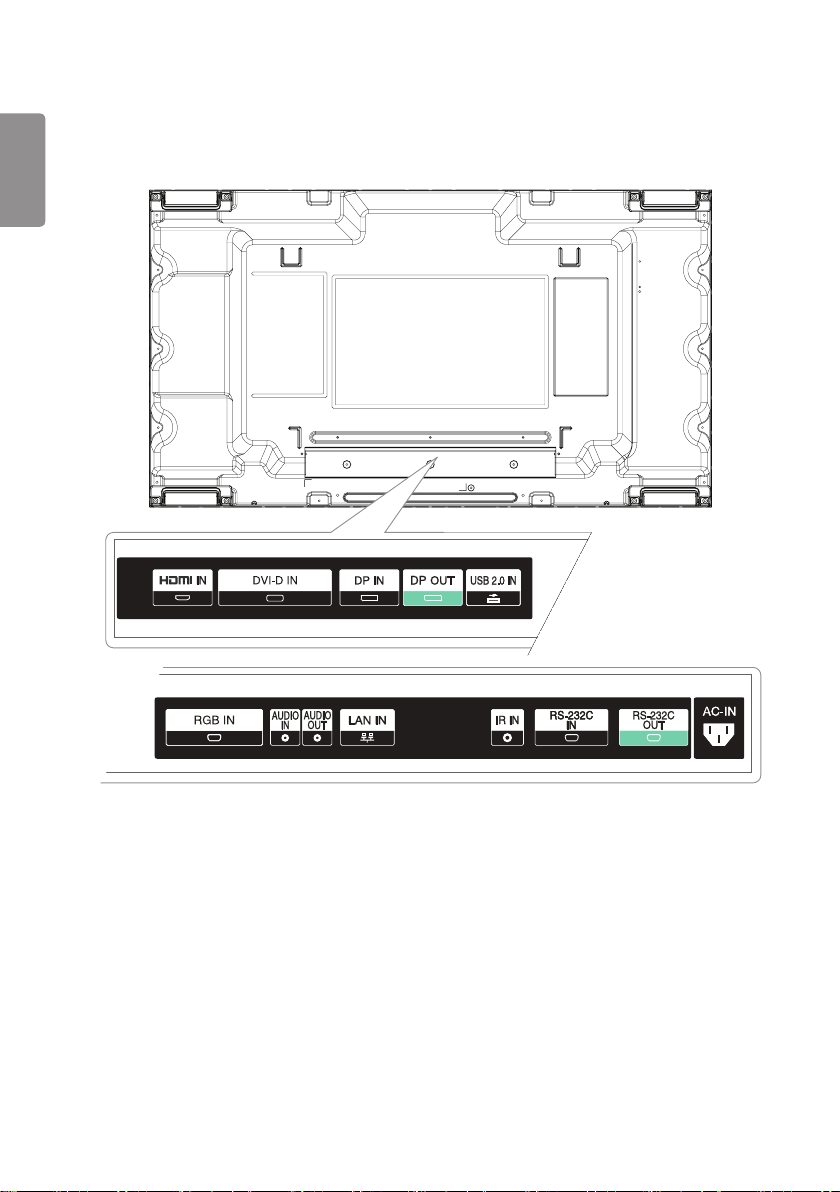
Parts and Buttons
ENGLISH
The image may be different according to the model.
Page 21
13
Portrait Layout
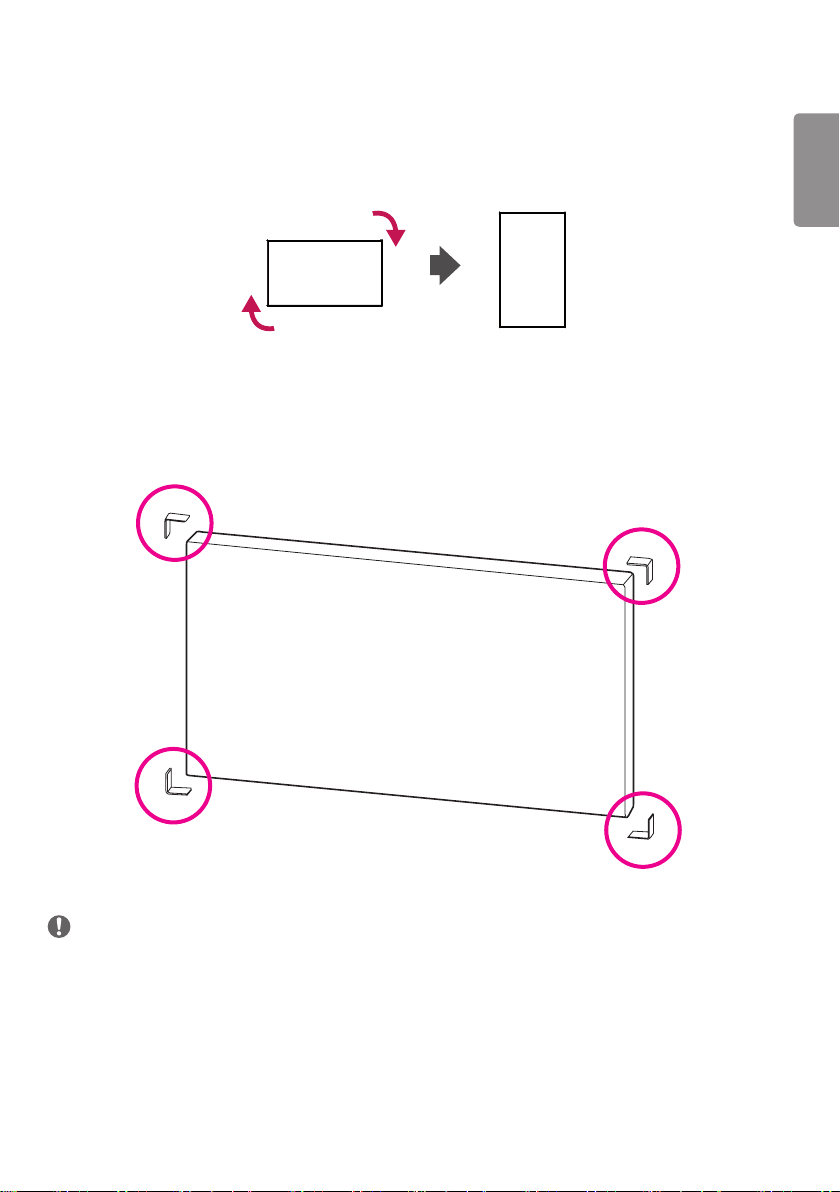
When installing in a portrait layout, rotate the monitor clockwise 90 degrees (when facing the screen).
Remove L-brackets before Installation
Remove the L-brackets from each corner of the monitor before installing it.
ENGLISH
NOTE
• Keep the removed L-brackets and use them when moving the monitor later.
Page 22
14
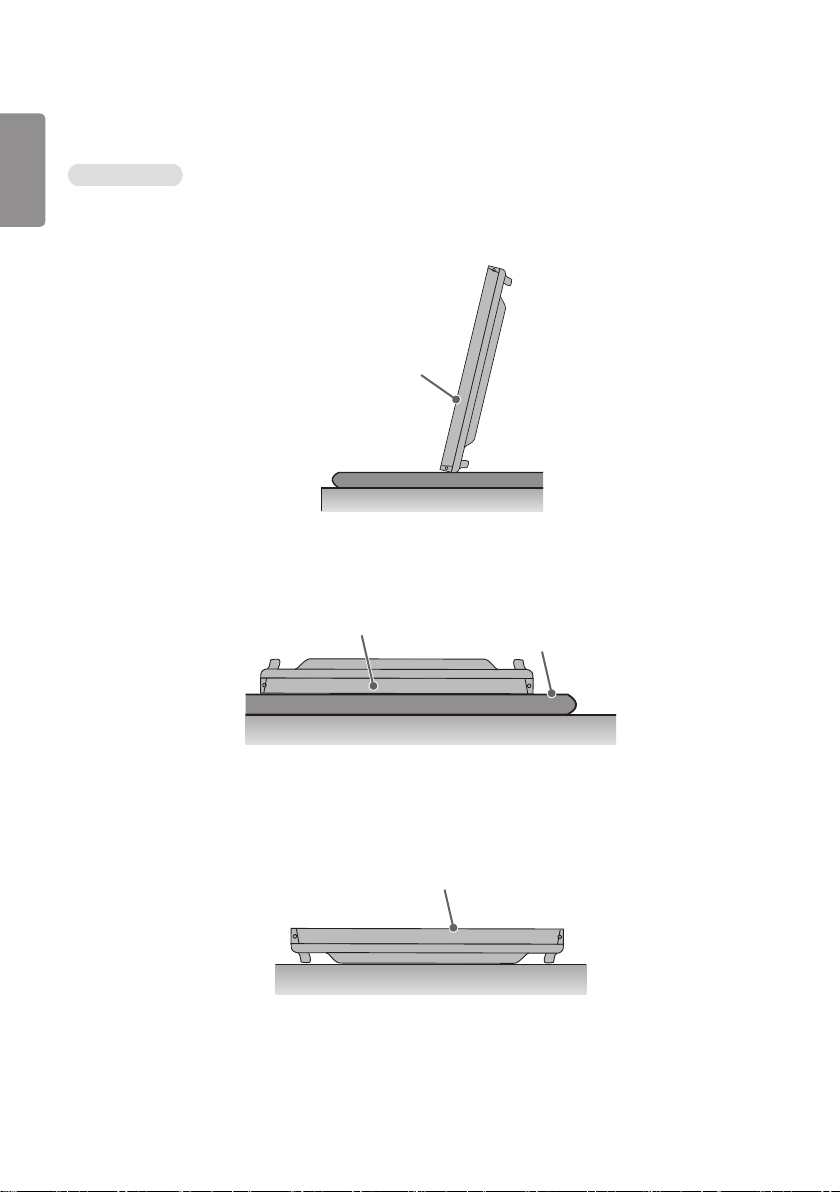
Storage Method for Panel Protection
ENGLISH
Correct Method
1 If the product needs to be set upright, hold both sides of the product, and tilt backward carefully for. Do not let the
panel to touch the floor.
Panel
2 When laying down the product, lay a cushion on a flat floor. Put the product on it with the panel of the product
facing down.
Panel
Cushion
3 If there is not a cushion available, ensure the floor is clean and then lay the product down carefully with the panel
facing either upward or downward. At this time, be careful for objects not to fall on the panel.
Panel
Page 23
15
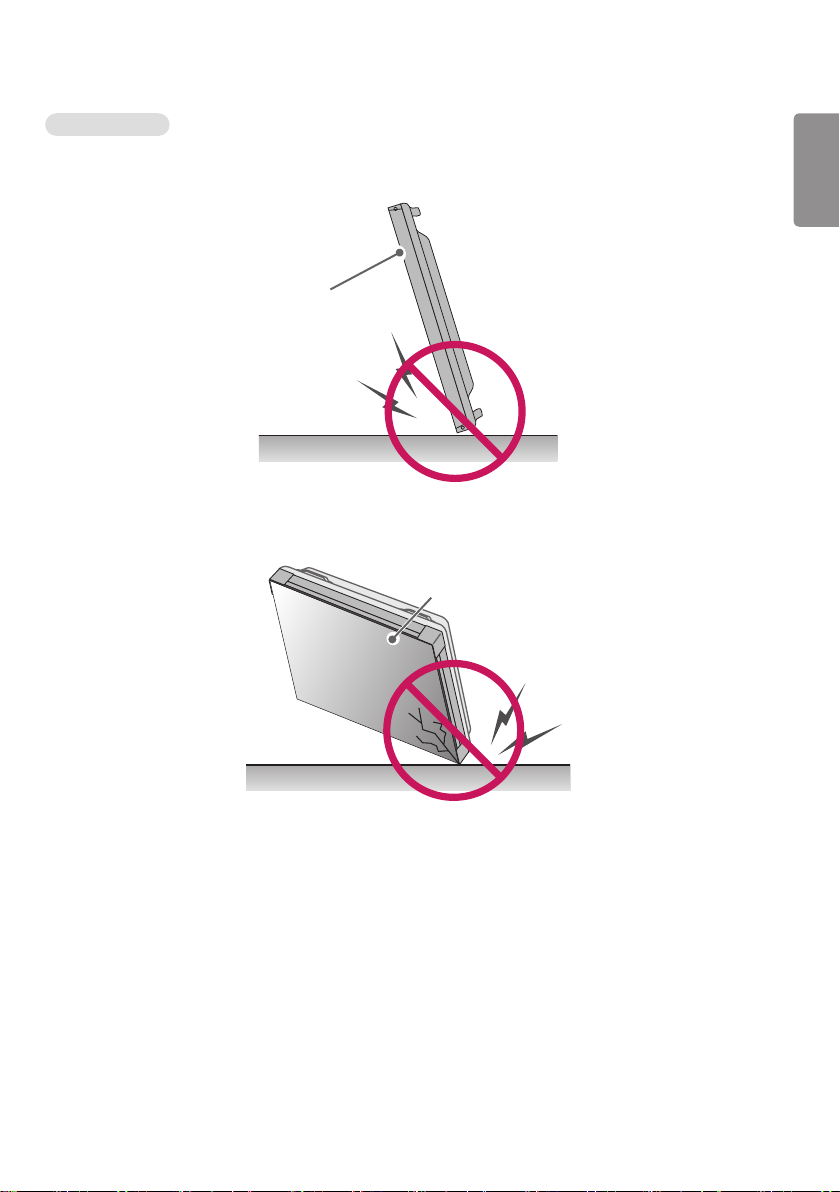
Incorrect Method
1 If the product is tilted onto the bezel, the bottom of the panel may be damaged.
Panel
2 If the product is tilted onto the edge of the panel, the panel may be damaged.
Panel
ENGLISH
Page 24
16
Installing on a Wall
ENGLISH
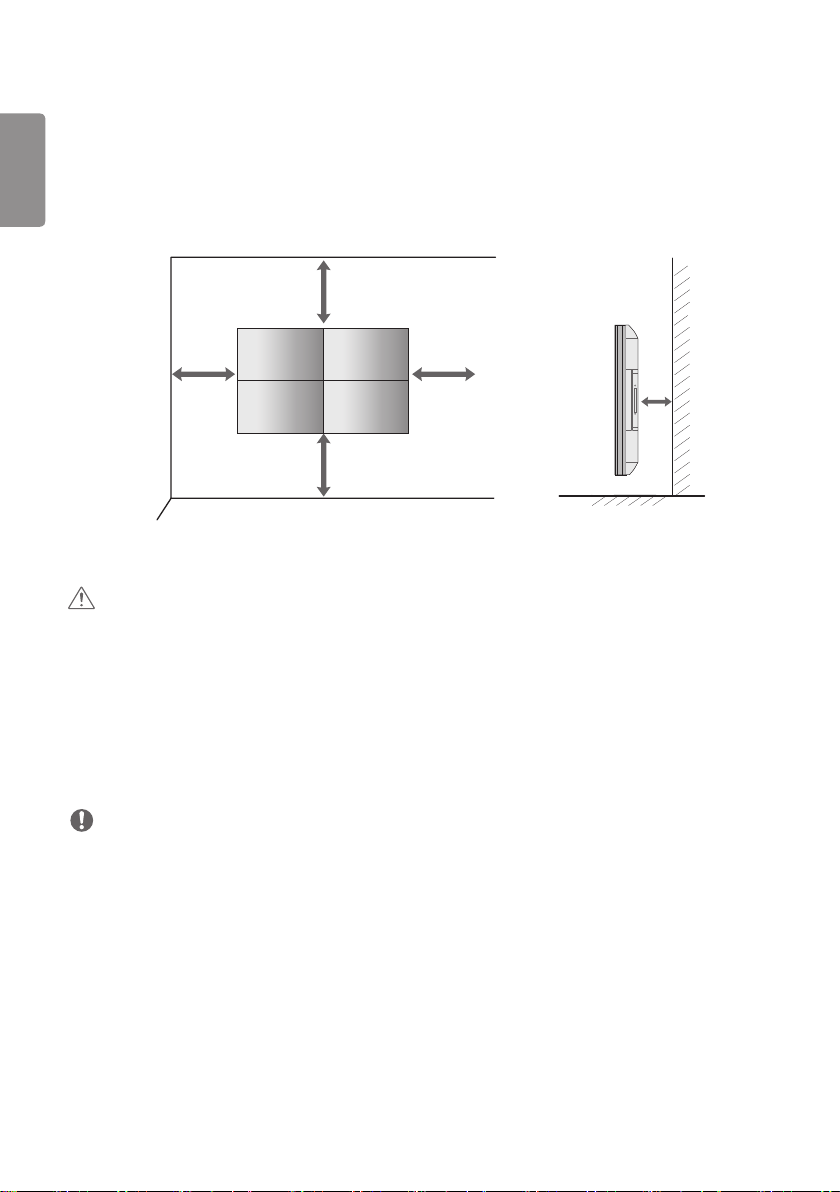
To install the Monitor on a wall (optional), use the VESA screws provided as accessories to fasten it.
Install the monitor at least 200 mm away from the wall and leave about 100 mm of space at each side of the monitor
to ensure sufficient ventilation.
Use the wall mount plate and screws that comply with the VESA standard.
100 mm
100 mm
100 mm
100 mm
200 mm
CAUTION
• Disconnect the power cord before moving or installing the monitor to avoid risk of electric shock.
• If you install the monitor on a ceiling or slanted wall, it may fall and result in injury. Use an authorized LG wall mount
and contact your local dealer or qualified personnel to assist with the installation.
• Do not over tighten the screws as this may damage the monitor and void your warranty.
• Use only screws and wall mounting brackets that meet the VESA standard. Any damage or injuries caused by misuse
or use of improper accessories are not covered by the warranty.
• To prevent injury, this apparatus must be securely attached to the wall in accordance with the installation instructions.
(This pertains only to Australia and New Zealand.)
NOTE
• Do not install the product in a place with no ventilation (e.g., on a bookshelf or in a closet) or on a carpet or cushion. If
there is no other option but to mount the product on the wall, make sure that sufficient ventilation is provided before
installation.
- Failure to do so may result in a fire due to the increase in the internal temperature.
• The illustration shows a general example of installation and may look different from the actual product.
Page 25
17
EXTERNAL EQUIPMENT SETUP
IR RECEIVER
This allows a remote control sensor to be placed in a custom location. Then that display can control other displays via
an RS-232C cable.
Tiling Displays
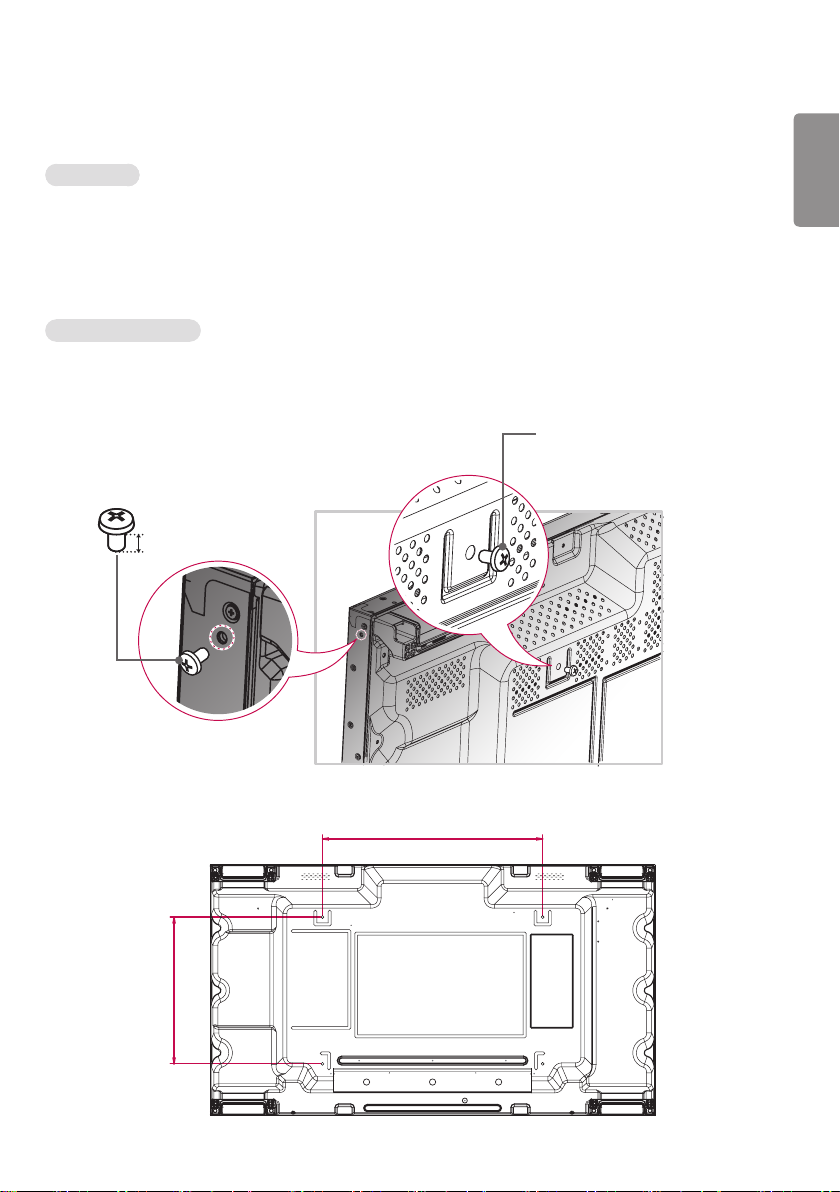
How to Mount the Set
Example of 2 x 2 Tiling
Using the screws for attaching the VESA wall mount, mount the set to the wall mount plate or the wall.
Screws for attaching the VESA
wall mount (M6 x L10)
16-M4 Screw
≤ 6 mm
ENGLISH
400 mm
600 mm
Page 26
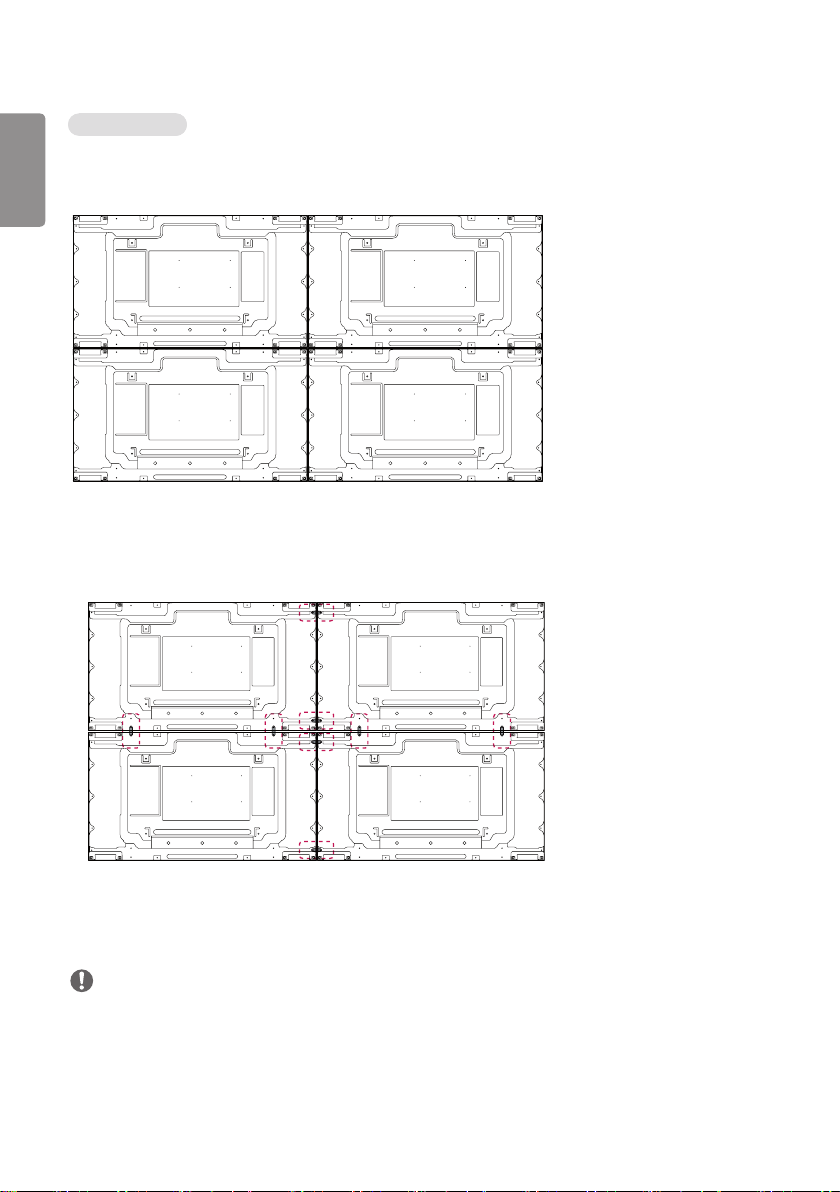
18
How to Join Sets
ENGLISH
1 Join other sets using screws for fixing the VESA wall mount in the same way as above.
2 After joining the sets, use the tiling guide to adjust the gap between the sets.
Set 4 joined to the rest of the sets
(2 x 2 tiling)
3 Now the 2 x 2 tiling is complete. You can tile in various combinations, such as 3 x 3.
NOTE
• The load applied to each set should be supported by the wall mount plate or the wall using a VESA wall mount (600
x 400).
• The load applied to each set should be supported by the wall mount plate using a VESA wall mount. (Each set must
be firmly mounted to the wall mount plate or the wall.)
• You may mount the set without using the tiling guide; this does not affect the performance of the device.
• The screws are enclosed with the other components in the box, including the tiling guides.
Page 27

19
REMOTE CONTROL
The descriptions in this manual are based on the buttons on the remote control. Please read this manual carefully to
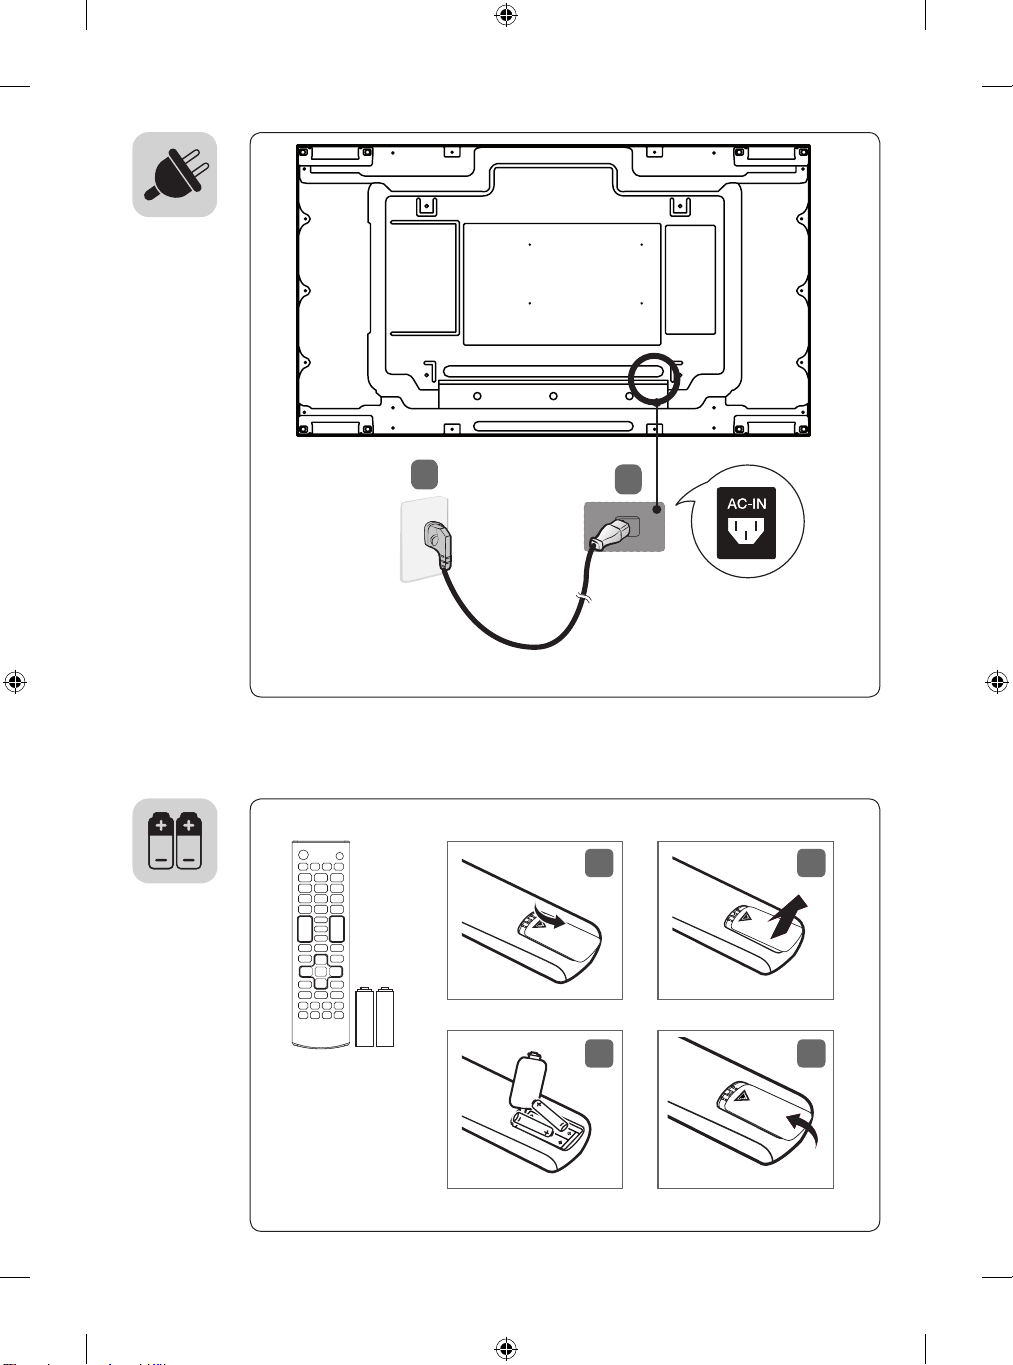
use the monitor correctly. To install batteries, open the battery cover, place batteries (1.5 V AAA) matching and
terminals to the labels inside the compartment, and close the battery cover. To remove the batteries, perform the
installation actions in reverse. The illustrations may differ from the actual accessories.
CAUTION
• Do not mix old and new batteries, as this may damage the remote control.
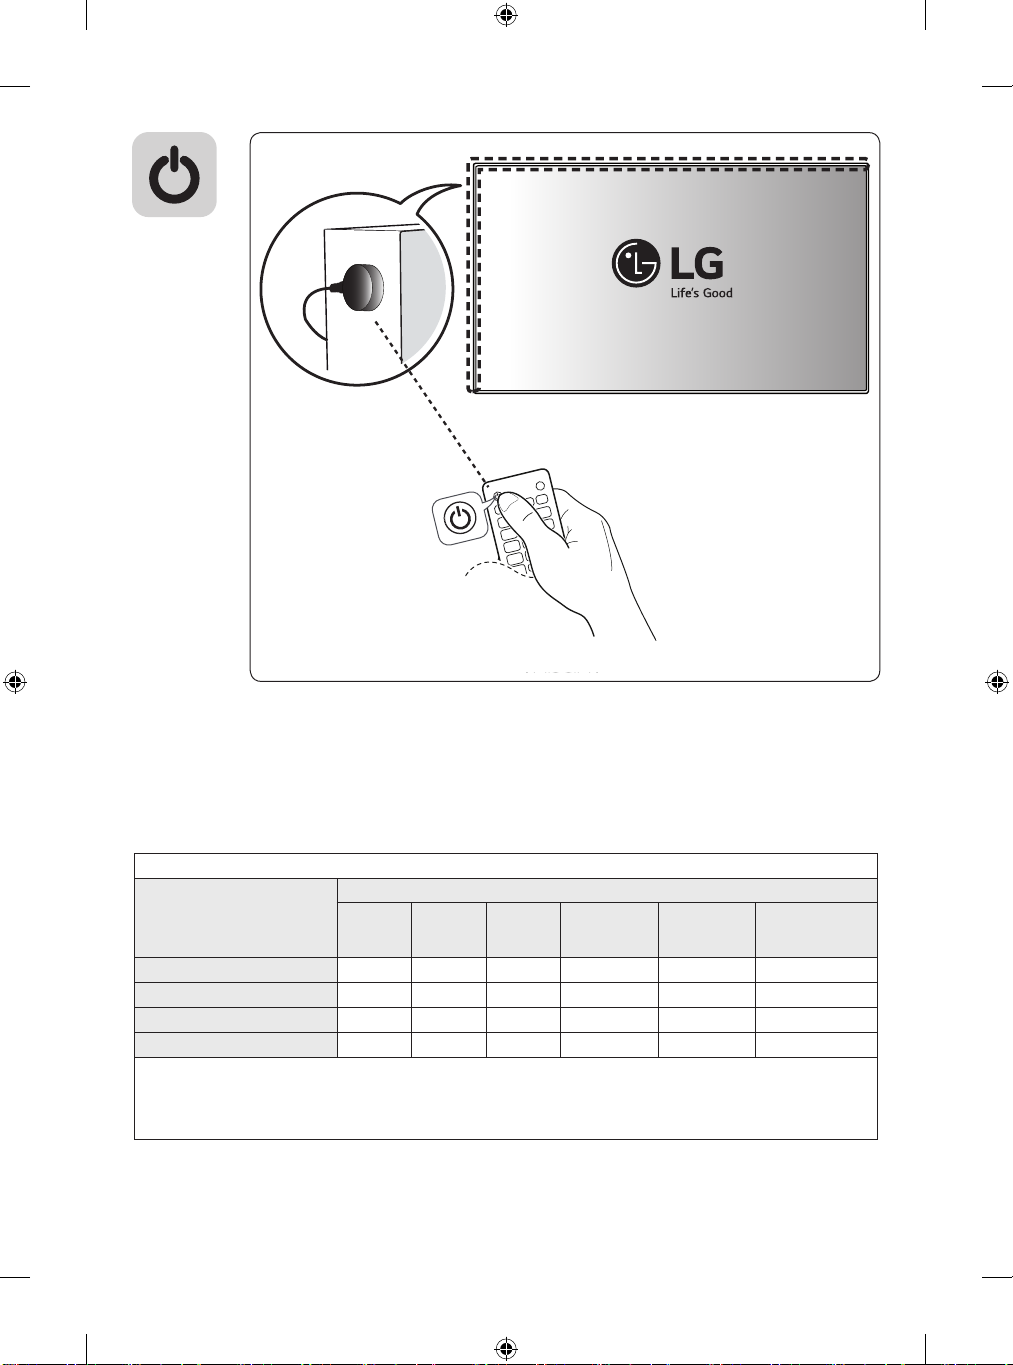
• Be sure to point the remote control toward the remote control sensor on the monitor.
• Some features of the remote control may not be supported in certain models.
(Power) Turns the monitor on or off.
Turns the monitor on.
Turns the monitor off.
Adjusts the brightness of the picture to reduce energy
consumption.
Selects the input mode.
Used for viewing 3D videos.
Toggles between numerical and alphabetical.
Number and Alphabet buttons
Enters numerical or alphabetical characters depending upon the setting.
Deletes the entered numerical or alphabetical character.
Volume Up/Down Button Adjusts the volume.
Selects the Aspect Ratio mode.
Automatically adjusts picture position and minimizes image instability
(available for RGB input only).
Mutes all sounds.
Adjusts the brightness of the display. PAGE function is not
supported in this model.
ENGLISH
Page 28
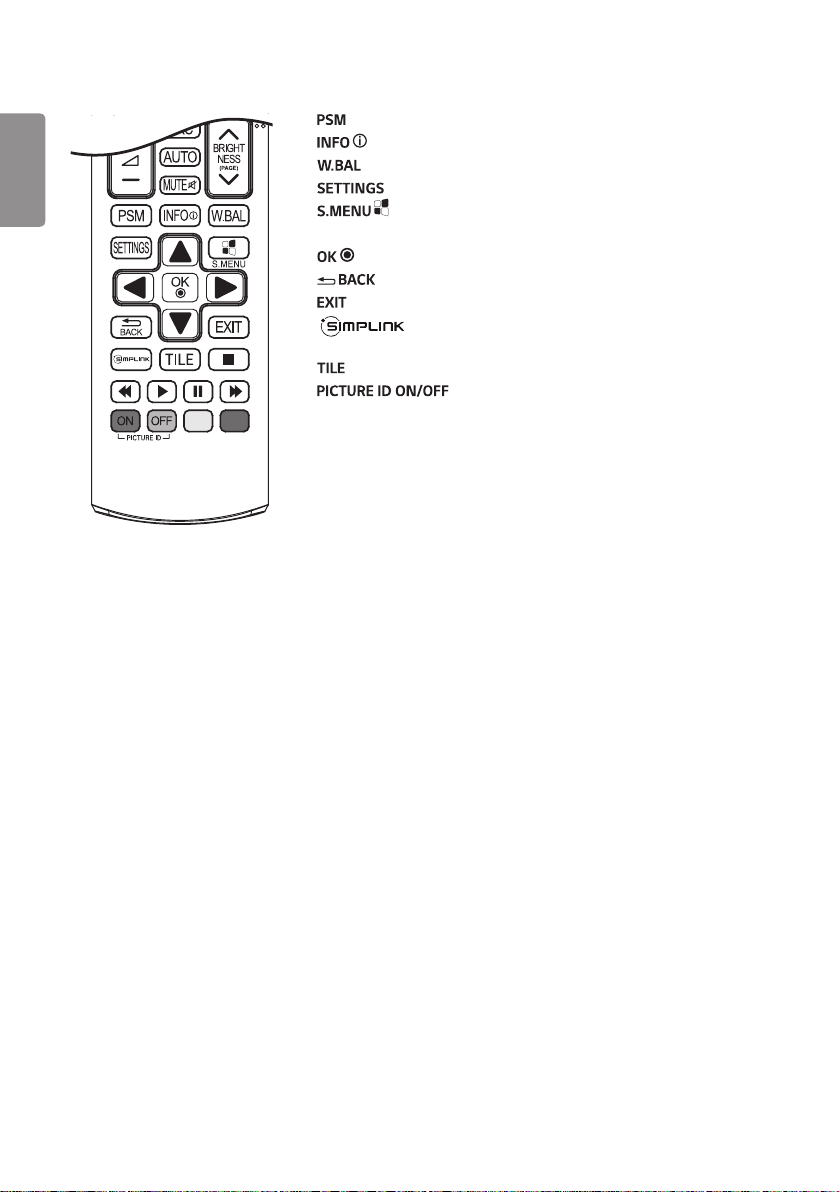
20
ENGLISH
Selects the Picture Mode.
Views the information of the currently program and the screen.
Enters the White Balance menu.
Accesses the main menus or saves your input and exit menus.
SuperSign menu key.
Navigation Buttons Scrolls through menus or options.
Selects menus or options and confirms your input.
Allows you to move back one step in the user interaction function.
Quit all OSD tasks and applications.
Allows you to control various multimedia devices to enjoy
multimedia simply by using the remote control through the SimpLink menu.
Selects the TILE Mode.
When the Picture ID number matches the Set ID
number, you can control whichever monitor you want in multi-display format.
USB Menu Control Buttons Controls media playback.
Page 29
21
MAKING CONNECTIONS
You can connect various external devices to your monitor. Change the input mode and select the external device you
want to connect. For more information about external device connections, see the user manual provided with each
device.
Connecting to a PC
Some of the cables are not provided.
This monitor supports the Plug and Play* feature.
* Plug and Play: a feature that enables a PC to recognize devices attached by the user without device configuration or
user intervention when powering up.
External Device Connection
Connect a HD receiver, DVD, or VCR player to the monitor and select an appropriate input mode.
Some of the cables are not provided. For the best picture and sound quality, connecting external devices to your
monitor using HDMI cables is recommended.
Using the Input List
• HDMI, DISPLAYPORT, DVI-D, RGB, USB
ENGLISH
Page 30
22
ENGLISH
NOTE
• For the best image quality, using the monitor with HDMI connection is recommended.
• To comply with the specifications of the product, use a shielded interface cable with ferrite core, such as a D-sub 15-
pin cable and DVI-D/HDMI cable.
• If you turn the monitor on when the set is cold, the screen may flicker. This is normal.
• Sometimes red, green, or blue spots may appear on the screen. This is normal.
• Use a High Speed HDMI®/TM cable.
• Use a certified cable with the HDMI logo attached. If you do not use a certified HDMI cable, the screen may not
display or a connection error may occur.
• Recommended HDMI Cable Types
- High-Speed HDMI®/TM Cable
- High-Speed HDMI®/TM Cable with Ethernet
• If you cannot hear any sound in HDMI mode please check your PC settings. Some PCs require you to manually change
the default audio output to HDMI.
• If you want to use HDMI-PC mode, you must set your PC/DTV to PC mode.
• You may experience compatibility issues if you use HDMI-PC mode.
• Make sure the power cable is disconnected.
• If you connect a gaming device to the monitor, use the cable provided with the gaming device.
• High Speed HDMI®/TM cables transmit a HD signal up to 1080p and higher.
• Use the standard Macintosh adapter since an incompatible adapter is available in the market. (Different signaling
system)
• Apple computers may require an adapter to connect to this monitor. Call or visit their web site for more information.
• When connecting an external audio device, use a device with audio amplifier.
CAUTION
• Connect the signal input cable and tighten it by turning the screws clockwise.
• Do not press the screen with your finger for a prolonged period as this may result in temporary distortion on the
screen.
• Avoid displaying static images on the screen for a long period of time to prevent image burn. Use a screensaver if
possible.
• A wireless communication device near your monitor can affect the image.
Page 31
23
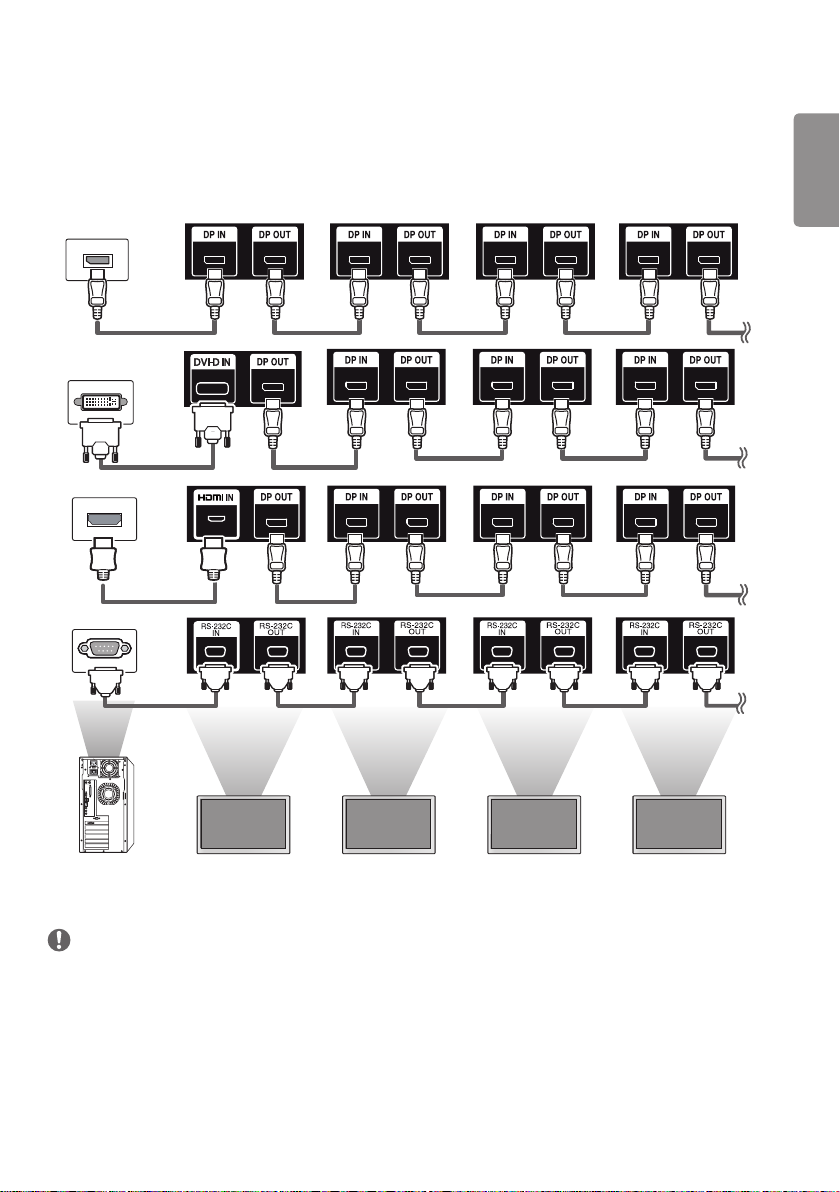
Daisy Chain Monitors
To use different products connected to each other, connect one end of the signal input cable (DP Cable) to the DP Out
connector of Monitor 1 and connect the other end to the DP In connector of the other product.
ENGLISH
Monitor 1 Monitor 2 Monitor 3 Monitor 4
NOTE
• If the signal cable between the product and your PC is too long, make sure to use the Booster or optical cable.
• Daisy chaining the video output may be limited depending on the performance of the input device that supports
HDCP.
Page 32
24
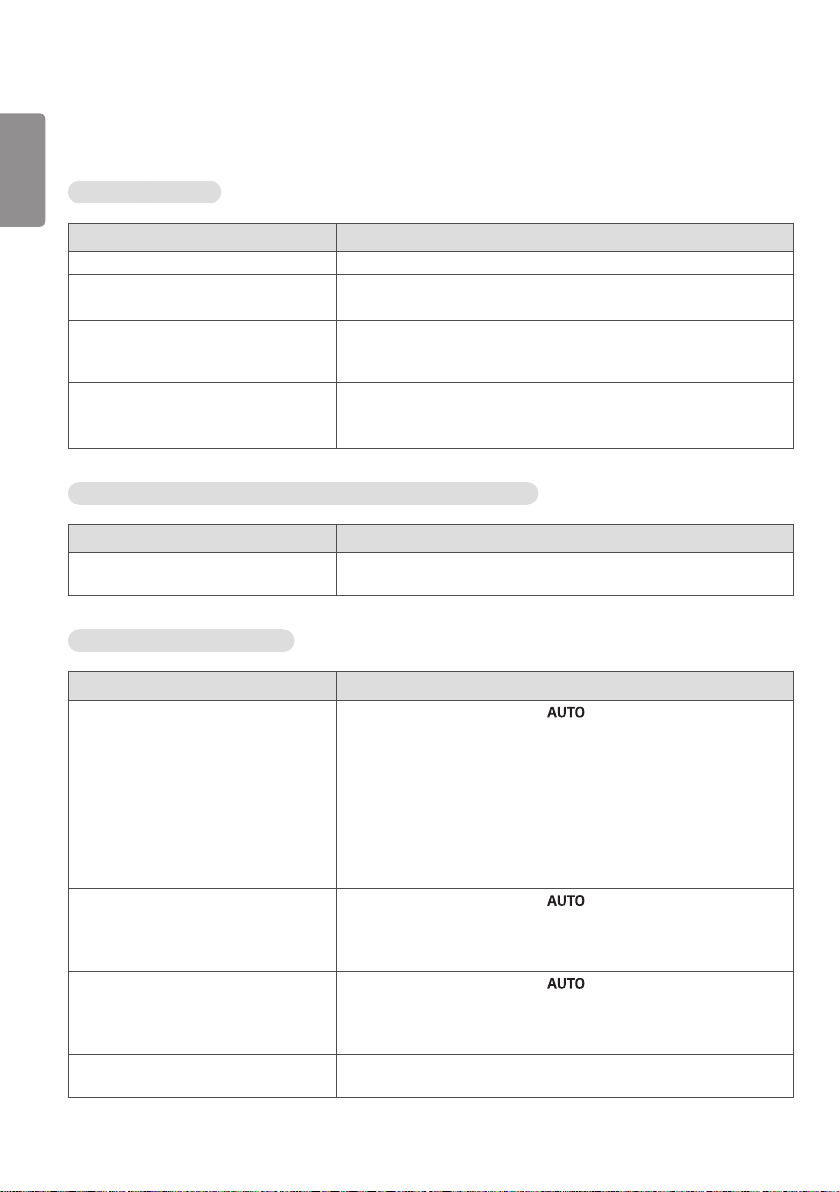
TROUBLESHOOTING
ENGLISH
No image is displayed.
Problem Action
Is the product power cord connected? • Check if the power cord is correctly plugged into the power outlet.
Power is on, but the screen appears
extremely dark.
Does the “Invalid Format” message
appear?
Does the “No Signal” message appear? • The signal cable between PC and product is not connected. Check the
The Unknown Product message appears when the product is connected.
Problem Action
Did you install the driver? • Check if the Plug and Play function is supported by referring to the
The screen image looks abnormal.
• Adjust brightness and contrast again.
• Backlight may need repair.
• The signal from the PC (Graphics card) is out of the vertical or
horizontal frequency range of the product. Adjust the frequency range
by referring to the Specifications in this manual.
signal cable.
• Access the input menu to check the input signal.
graphics card user manual.
Problem Action
Is the screen position wrong? • D-Sub analog signal - Press the button in the remote control to
automatically select the optimal screen status that fits into the current
mode. If adjustment is not satisfactory, select PICTURE → Screen →
Position in OSD menu.
• See if the graphics card resolution and frequency are supported by
the product. If the frequency is out of range, set to the recommended
resolution in the Control Panel [Display] Setting menu.
• Certain graphics cards themselves resize the screen. Adjust the
graphics card settings.
Do thin lines appear on the background
screen?
Horizontal noise appears or the
characters look blurred.
The screen is displayed abnormally. • The proper input signal is not connected to the signal port. Connect the
• D-Sub analog signal - Press the button in the remote control to
automatically select an optimal screen status that fits into the current
mode. If adjustment is not satisfactory, select PICTURE → Screen →
Size in OSD menu.
• D-Sub analog signal - Press the button in the remote control to
automatically select an optimal screen status that fits into the current
mode. If adjustment is not satisfactory, select PICTURE → Screen →
Phase in OSD menu.
signal cable that matches with the source input signal.
Page 33
25
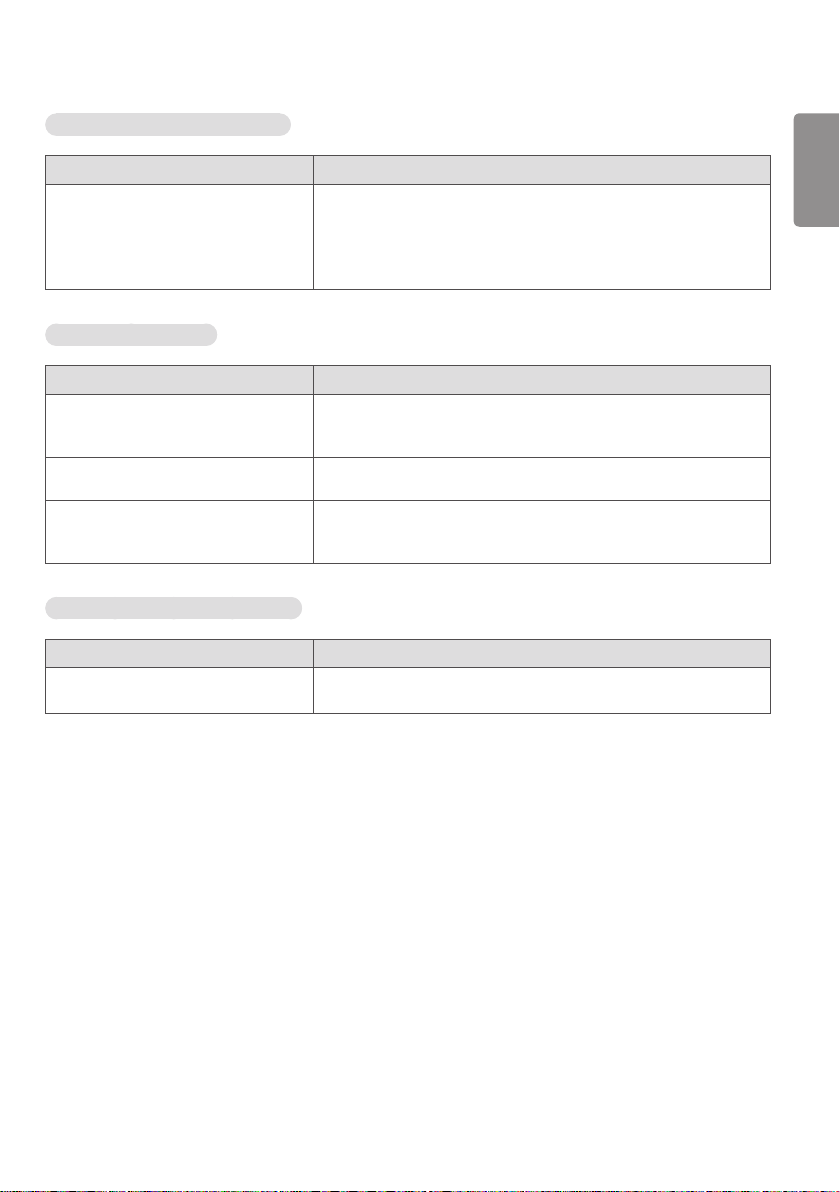
After-image appears on the product.
Problem Action
After-image appears when the product is
turned off.
Screen color is abnormal.
Problem Action
Screen has poor color resolution (16
colors).
Screen color is unstable or mono-colored. • Check the connection status of the signal cable. Or, re-insert the PC
Do black spots appear on the screen? • Several pixels (red, green, blue, white, or black color) may appear on the
The operation does not work normally.
Problem Action
The power suddenly turned off. • Is the Timer set?
• If you use a fixed image for a long time, the pixels may be damaged.
Use the screen-saver function.
• When a dark image is displayed on the screen after an image with high
contrast (black and white or gray), this may cause image sticking. This
is normal for LCD screen products.
• Set the number of colors to more than 24 bits (true color). Select
[Control Panel] → [Display] → [Settings] → [Color Table] in Windows.
(The settings may differ depending on your operating system.)
graphics card.
screen, which can be attributable to the unique characteristics of the
LCD panel. This is not a malfunction of the LCD.
• Check the power control settings. Power interrupted.
ENGLISH
Page 34
26
ENGLISH
CAUTION
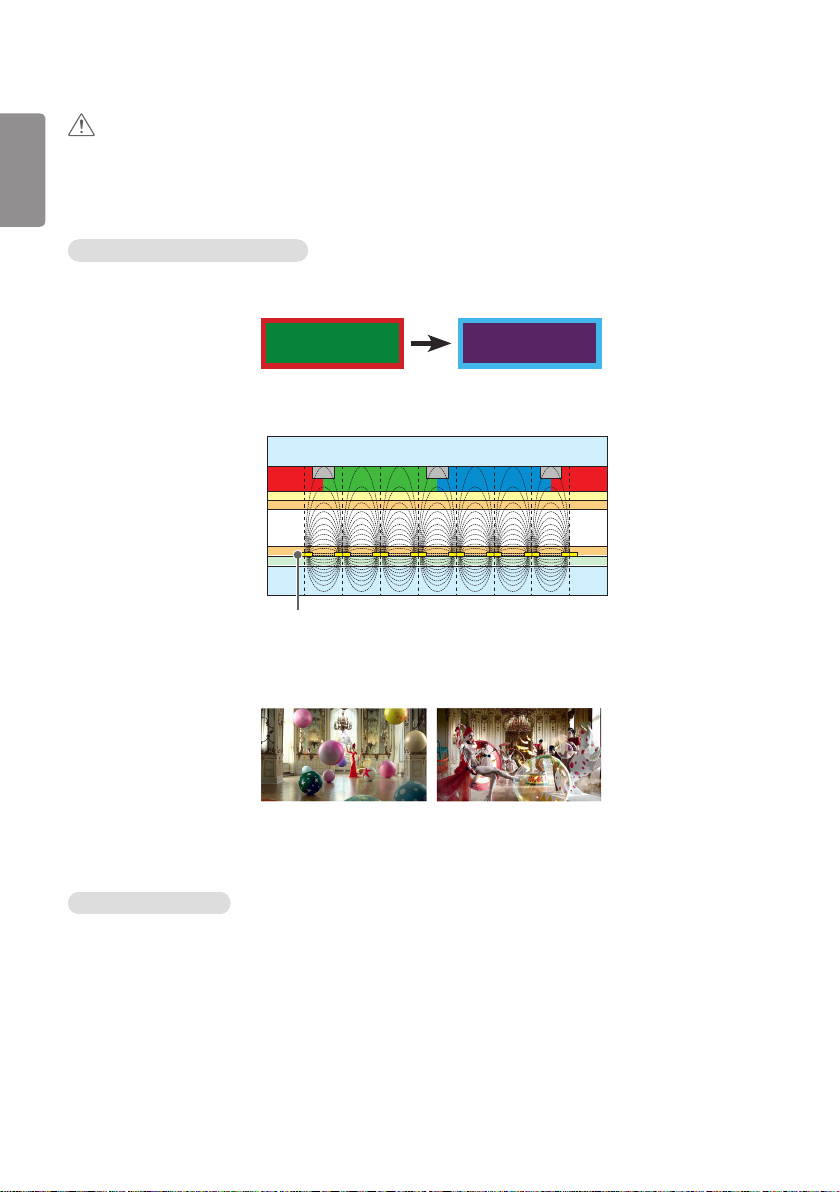
• Image sticking does not occur when using constantly changing images but may occur when using a fixed image for an
extended period of time. Therefore, it is recommended that you use the instructions below to decrease the likelihood
of image sticking occurring when using a fixed image. It is recommended that you change the screen at least once
every 12 hours at the very minimum; if done more frequently, the prevention of image sticking is more effective.
Recommended operating conditions
1 Change the background and the character colors using the same time interval.
ID: UPM 123
PW: ****
When changing colors, using complementary colors helps to prevent image sticking.
BM BM BM
CF
ITO or MoTi Pixel Layer
Glass
OC
PI
LC
PI
TFT Layers
Glass
ID: UPM 123
PW: ****
CFCFCF
2 Change the image using the same time interval.
Make sure that the characters or images before changing the image remain in the same location after changing the
image.
What is image sticking?
When the LCD panel displays a static image for an extended period of time, it can cause a voltage difference between
the electrodes that operate the liquid crystals. When the voltage difference between the electrodes builds up over
time, liquid crystals have a tendency to remain aligned in one direction. During this process, a previously displayed image
remains visible. This phenomenon is referred to as image sticking.
Page 35
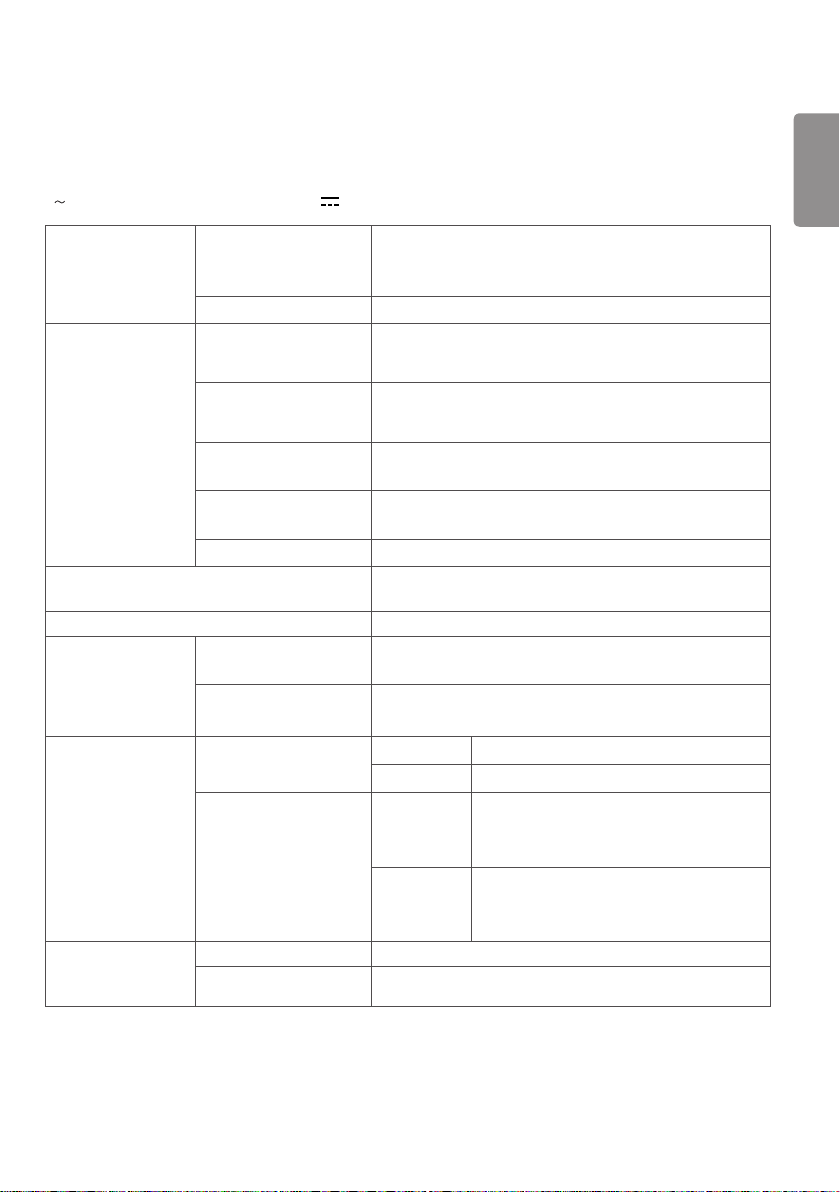
27
PRODUCT SPECIFICATIONS
The product specifications below may be changed without prior notice due to upgrade of product functions.
“ ” refers to alternating current (AC), and “ ” refers to direct current (DC).
LCD screen Screen type 139 cm Wide TFT (Thin Film Transistor)
LCD (Liquid Crystal Display) Panel
Visible diagonal size : 139 cm
Pixel Pitch 0.630 mm (H) x 0.630 mm (V)
Video signal Maximum resolution 1920 x 1080 @ 60 Hz
Recommended resolution 1920 x 1080 @ 60 Hz
Horizontal frequency RGB: 30 kHz to 83 kHz
Vertical frequency RGB: 50 Hz to 75 Hz
Synchronization Separate Sync, Digital
Input/output ports IR IN, RS-232C IN/OUT, HDMI IN, DVI-D IN, DP IN/OUT, USB2.0
Embedded battery Applied
Environmental
Conditions
Power Rated power 55LV75D AC 100-240 V ~ 50/60 Hz, 2.1 A
Dimensions (Width x
Height x Depth) /
Weight
Operating Temperature 0 °C to 40 °C
Operating Humidity 10 % to 80 %
Storage Temperature -20 °C to 60 °C
Storage Humidity 5 % to 85 %
Power consumption 55LV75D On Mode: 160 W (Typ.)
55LV75D 1213.4 mm x 684.2 mm x 88.5 mm / 23 kg
55LV77D 1213.4 mm x 684.2 mm x 88.5 mm / 23.2 kg
- This may not be supported on some OS or graphics card
types.
- This may not be supported on some OS or graphics card
types.
HDMI/ DVI-D/ DisplayPort: 30 kHz to 83 kHz
HDMI/ DVI-D/ DisplayPort: 56 Hz to 60 Hz
IN, RGB IN, AUDIO IN/OUT, LAN IN
55LV77D AC 100-240 V ~ 50/60 Hz, 3.1 A
Sleep Mode: ≤ 0.5 W
Off Mode: ≤ 0.5 W
55LV77D On Mode: 230 W (Typ.)
Sleep Mode: ≤ 0.5 W
Off Mode: ≤ 0.5 W
ENGLISH
Page 36
28
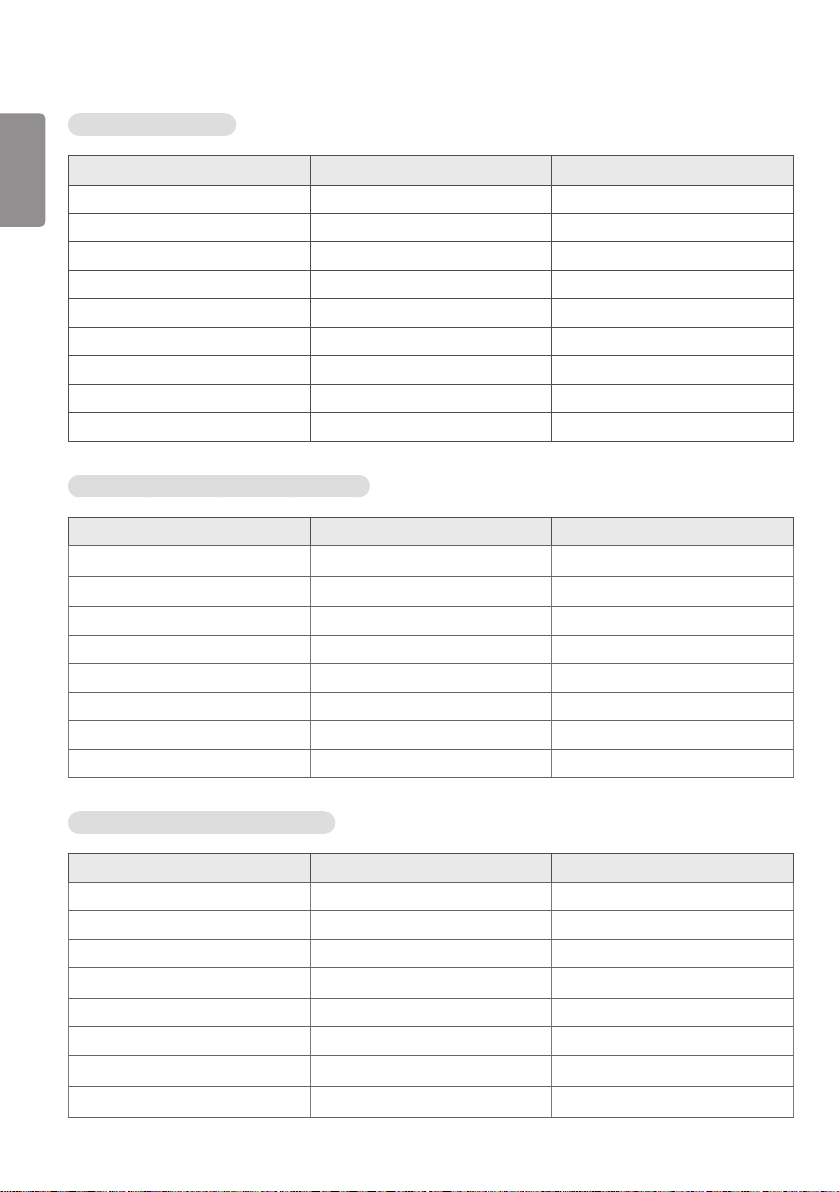
RGB (PC) Support Mode
ENGLISH
Resolution Horizontal frequency (kHz) Vertical frequency (Hz)
640 x 480 31.469 59.94
720 x 400 31.468 70.8
800 x 600 37.879 60.317
1024 x 768 48.363 60
1152 x 864 57.717 59.934
1280 x 720 44.772 59.855
1280 x 960 60 60
1280 x 1024 63.981 60.02
1920 x 1080 67.5 60
DVI-D/HDMI/DisplayPort (PC) Support mode
Resolution Horizontal frequency (kHz) Vertical frequency (Hz)
640 x 480 31.469 59.94
800 x 600 37.879 60.317
1024 x 768 48.363 60
1280 x 720 44.772 59.855
1280 x 1024 63.981 60.02
1366 x 768 47.7 60
1680 x 1050 65.290 59.954
1920 x 1080 67.5 60
HDMI/DisplayPort (DTV) Support Mode
Resolution Horizontal frequency (kHz) Vertical frequency (Hz)
480/60p 31.5 60
576/50p 31.25 50
720/50p 37.5 50
720/60p
1080/50i 28.1 50
1080/60i 33.75 60
1080/50p
1080/60p 67.5 60
45 60
56.25 50
Page 37

29
NOTE
• When the cable is connected to the DVI-D, HDMI or the DisplayPort, you can select the PC/DTV mode optionally. It
is recommended that you select PC mode when connecting to a PC and select DTV mode when connecting to other
devices. The DTV mode refers to all modes excluding the PC mode.
• Vertical frequency: The product display functions by the screen image changing dozens of times every second like a
fluorescent lamp.
The vertical frequency or refresh rate is the number of image displays per second. The unit is Hz.
• Horizontal frequency: The horizontal interval is the time taken to display one horizontal line. When 1 is divided by
the horizontal interval, the number of horizontal lines displayed every second can be tabulated as the horizontal
frequency. The unit is kHz.
ENGLISH
Page 38
ENERGY STAR® is a set of power-saving
guidelines issued by the U.S.Environmental
S. A.,
Protection Agency (EPA).
As an ENERGY STAR® Partner LGE U.
Inc. has determined that this product
meets the ENERGY STAR® guidelines for
Refer to ENERGYSTAR.gov for more information on the
ENERGY STAR® program.
energy efficiency.
Make sure to read the Safety Precautions before using
the product.
The model and serial numbers of the SET are located on
the back and one side of the SET. Record it below should
you ever need service.
MODEL
SERIAL
NOTE
• 55LV77D is not certified with EPA’s ENERGY STAR.
Temporary noise is normal when powering ON or OFF
this device.
Page 39
INSTALLATION MANUAL
LG Digital
Signage
(MONITOR SIGNAGE)
Please read this manual carefully before operating your set and retain it for
future reference.
L15
www.lg.com
Page 40

ENGLISH
POL
2
Contents
ACCESSING INSTALLATION
MENU .........................................3
INSTALLATION MENU ..............4
- LG Digital Signage Setup Menu ................................ 4
- USB Cloning ...................................................................12
- Password Change .........................................................17
- Set ID Setup....................................................................18
- Configuration Setup ...................................................19
- Lock Mode ......................................................................20
- External Speaker ...........................................................21
- Fail Over ........................................................................... 22
- ISM Method ....................................................................24
- Easy Brightness Control .............................................28
- SuperSign Server Setup .............................................29
- Holiday Schedule .........................................................30
- No Signal Image ...........................................................31
- Digital Signage Media Player ................................... 32
Page 41
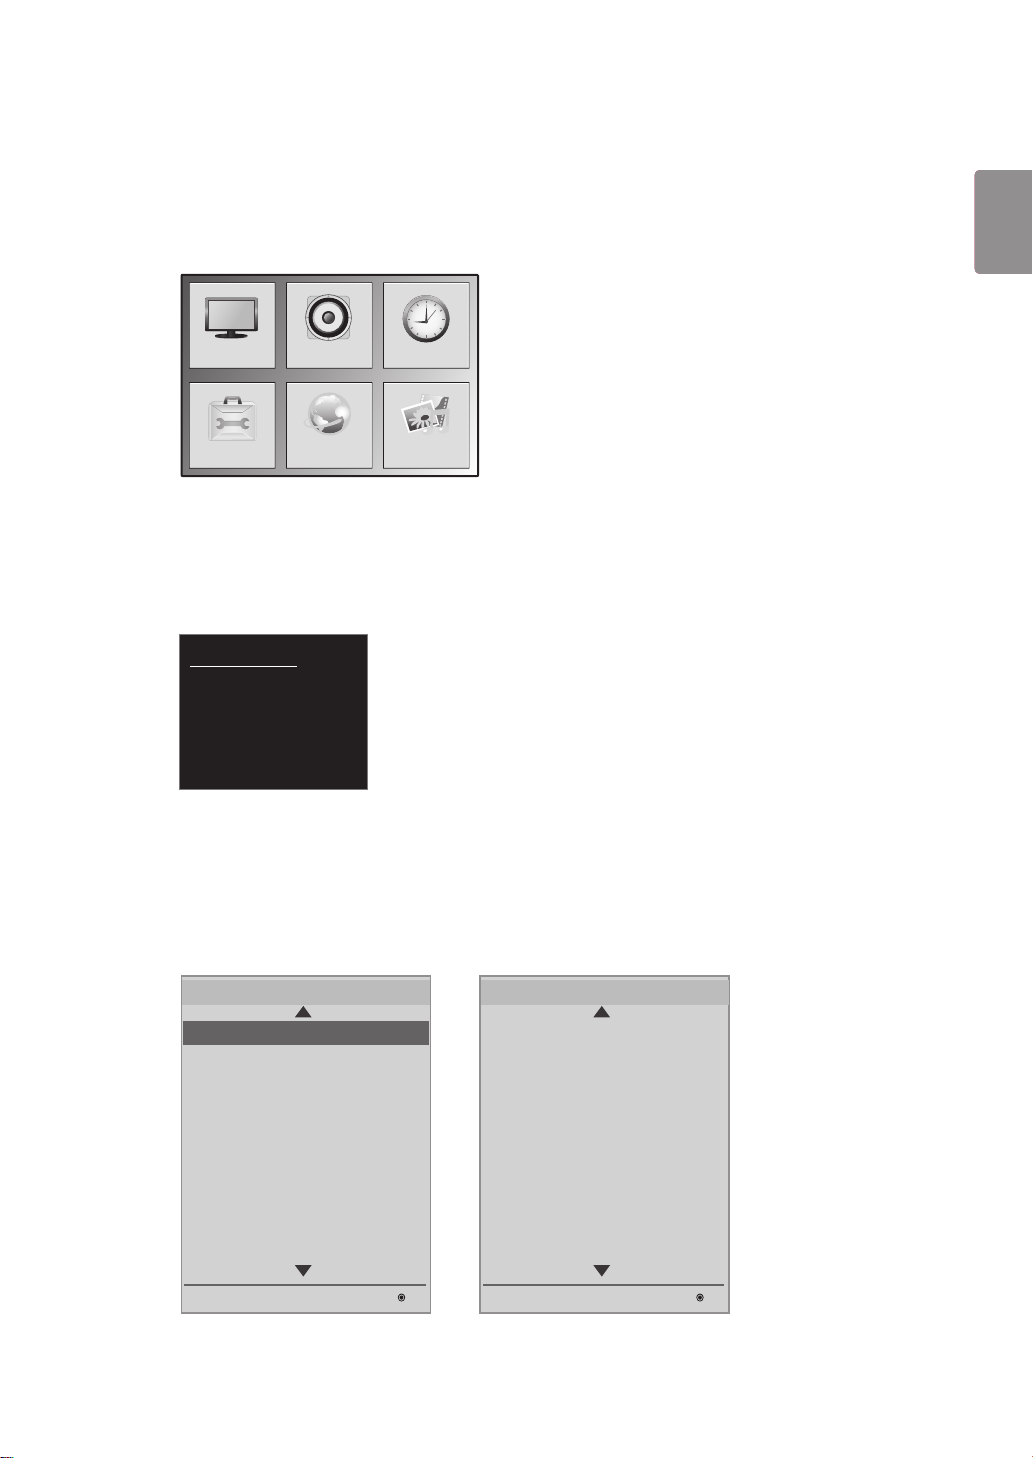
Accessing Installation Menu
3
ENGLISH
POL
1
2
Press and hold the SETTINGS button for more than 5 seconds.
PICTURE
OPTION
AUDIO TIME
NETWORK
MY MEDIA
Enter the correct password (default: 0000) and press the OK button.
HDMI
(DTV)
No Signal
3
When the Installation Menu is displayed, select the desired item.
Installation Menu (V 3.0)
LG Digital Signage Setup
LG Digital Signage Setup
USB Cloning
Password Change
Set ID Setup
Configuration Setup
Lock Mode
External Speaker
Fail Over
ISM Method
Easy Brightness Control
S/W : xx.xx.xx.xx Micom : x.xx.x
OK
Installation Menu (V 3.0)
SuperSign Server Setup
Holiday Schedule
No Signal Image
S/W : xx.xx.xx.xx Micom : x.xx.x
OK
Page 42
4
Installation Menu
ENGLISH
POL
NOTE
Default values may differ by region.
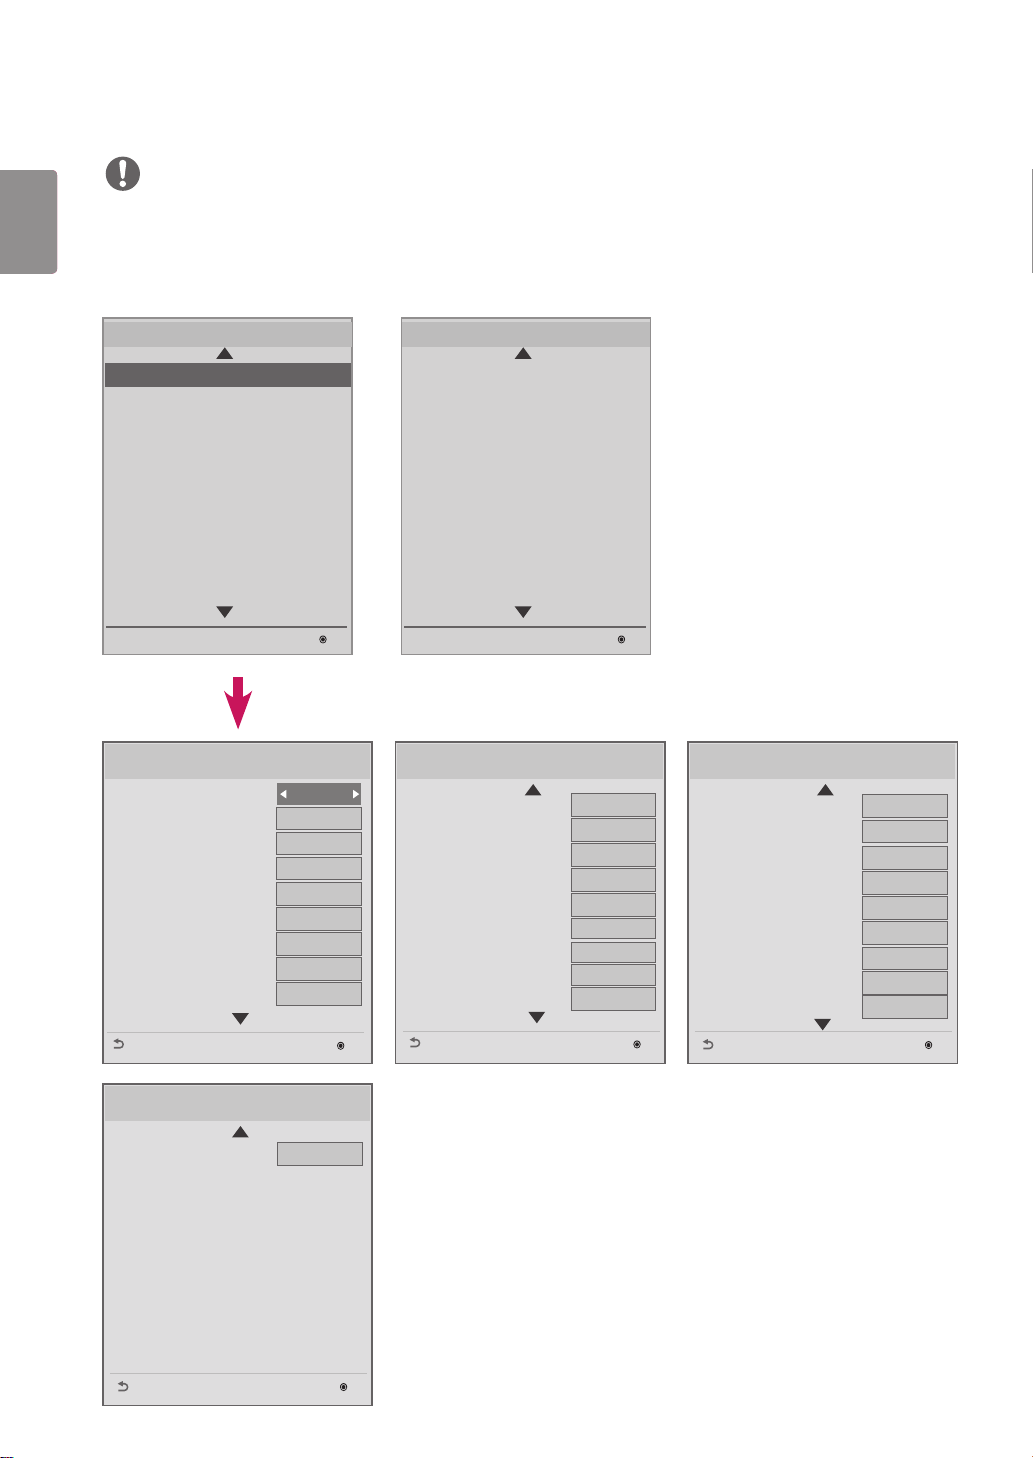
LG Digital Signage Setup Menu
Use this menu to configure the Digital Signage after installation.
Installation Menu (V 3.0)
LG Digital Signage Setup
LG Digital Signage Setup
USB Cloning
Password Change
Set ID Setup
Configuration Setup
Lock Mode
External Speaker
Fail Over
ISM Method
Easy Brightness Control
S/W : xx.xx.xx.xx Micom : x.xx.x
OK
Installation Menu (V 3.0)
SuperSign Server Setup
Holiday Schedule
No Signal Image
S/W : xx.xx.xx.xx Micom : x.xx.x
OK
LG Digital Signage Setup
Signage Mode Operation
• Power On Status
• Key Operation
• IR Operation
• Local Key Operation
• Limited Mode
• Input Source Change
• Menu Display
• OSD Display
Previous
LG Digital Signage Setup
• Factory Reset
Yes
LST
No
Normal
Normal
No
Yes
Yes
Yes
Confirm
LG Digital Signage Setup
• Power On Default
• Input Source
• A/V Setting
• Aspect Ratio
• Wake On LAN
• DPM
• Digital Audio Input
• Speaker
• Power On Delay
OK
Previous
No
Off
No
Disable
Off
10min.
Analog
On
Off
LG Digital Signage Setup
• Pivot mode
• OSD Portrait Mode
• Intelligent Auto
• Master/Slave Mode
• Time Sync Clock
• Sync Mode
• DPM Wakeup Control
• Still Image Detecting
• PM Mode
OK
Previous
Off
Off
On
Slave
Stand-by
Off
Clock
Yes
Power Off
OK
Previous
OK
Page 43
Signage Mode Operation
Enable or disable all Signage Mode Operation functions by setting the feature to Yes or No.
If you set Signage Mode Operation to Yes, all Signage Mode functions are enabled.
If you set Signage Mode Operation to No, all Signage Mode functions are disabled, and the product operates
with its default settings.
(Depending on the model, this feature may not be supported.)
Power On Status
You can select the operating status of the monitor when the main power is turned on.
You can choose PWR, STD, or LST.
PWR sets the monitor status to On whenever the main power is turned on.
STD sets the monitor status to Standby when the main power is turned on.
LST sets the monitor status back to its previous status. As in Power Backup mode, if you turn off the main power
while the monitor is turned on, the monitor status changes back to On. Also, if you turn off the main power
while the monitor is in standby mode, the monitor goes into standby mode.
(This feature may not be available with some models.)
Key Operation
This feature allows you to manage the usability and operation of the local/front keys and your remote control.
It works according to the "IR Operation" settings.
(This feature may not be available with some models.)
IR Operation / Local Key Operation
This feature allows you to set how the product operates after receiving a signal from a LG remote control or
local key. (0 - Normal, 1 - Use PWR Only, 2 - Block All)
Selecting 'Block All' blocks any signal coming from a LG remote control/local key. (Power On feature is avail-
able.)
Selecting 'Use PWR Only' blocks any signal coming from a LG remote control/local key, except the Power button.
Selecting 'Normal' enables signals from any LG remote control/local key to be received normally.
There are keys that must be operated in 'Service mode' when 'Use PWR Only' or 'Block All' is selected: In-Start,
In-Stop, Power-Only, ADJ, Installation Menu, P-Check, and S-Check.
(This feature may not be available with some models.)
5
ENGLISH
POL
NOTE
When all IR key signals or all local key signals are blocked, the "Power On Status" value switches to "PWR".
Changing this value is not impossible to ensure the correct powering on operation. (To prevent mistakes by
the user)
Limited Mode
This feature allows you inhibit the operations of particular Signage functions. This feature works according to
the 'Input Source Change', 'Menu Display', or 'OSD Display' settings.
(This feature may not be available with some models.)
Input Source Change
Enable or disable input source changes by setting this feature to Yes or No.
If you set this feature to No (changes disabled), the INPUT key is disabled.
If you set this feature to Yes (changes enabled), the input source can be changed.
(This feature may not be available with some models.)
Page 44

ENGLISH
POL
6
Menu Display
Setting this feature to Yes will display the menu. Setting this feature to No will hide the menu.
However, even if you have set this feature to No, you can easily open the Installation Menu by pressing and
holding the Menu button for more than 5 seconds.
(This feature may not be available with some models.)
OSD Display
Enable or disable OSDs by setting this feature to Yes (displayed) or No (not displayed).
If you set this feature to No (not displayed), OSDs other than Installation Menu are not displayed.
(This feature may not be available with some models.)
Power On Default (Input Source, Video Setting, Aspect Ratio)
You can configure 'Input Source', 'A/V Setting', and 'Aspect Ratio' after the monitor is turned on.
You can set this feature to Yes (enabled) or No (disabled).
If you set 'Power On Default' to No, the settings for 'Input Source', 'A/V Setting', and 'Aspect Ratio' are not
applied.
If you set 'Power On Default' to Yes, the settings for the menus above are applied.
(This feature may not be available with some models.)
Input Source
This feature allows you to set whether to use a new input source or a pre-existing input source.
Set 'Input Source' to Off to use the pre-existing input source.
You can use any of the sources supported by the given model as the input source.
If both 'Input Source' and 'On Time' have been set, 'Input Source' takes priority.
(This feature may not be available with some models.)
A/V Settings
When your monitor is powered on, you can set certain video options.
If you set this feature to Yes, the video settings configured before entering the Installation Menu are saved. In
addition, even if you changed the video settings before turning off the monitor, the saved settings are restored
when you turn the monitor on again.
Saves video settings: Picture Mode, DPM Select, Smart Energy Saving, Backlight, Contrast, Brightness, Sharp-
ness, Color, Tint, and Color Temp.
Saves audio settings: Sound Mode and Balance.
(This feature may not be available with some models.)
Aspect Ratio
This feature allows you to set the screen aspect ratio applied to your monitor when turned on.
Selecting 'Disable' sets the screen aspect ratio to 'Aspect Ratio' when the monitor is turned on.
Selecting 'Set By Program' sets the screen aspect ratio to 'Set By Program' when the monitor is turned on.
Selecting '4:3' sets the screen aspect ratio to '4:3' when the monitor is turned on.
Selecting'16:9' sets the screen aspect ratio to '16:9' when the monitor is turned on.
(This feature may not be available with some models.)
Page 45

Wake On LAN
Set whether to use the 'Wake On LAN' feature.
You can set 'Wake On LAN' to On or Off.
If you set this feature to On, 'Wake On LAN' is enabled and you can turn the product on remotely via a LAN.
If you set this feature to Off, 'Wake On LAN' is disabled.
(This feature may not be available with some models.)
DPM
Set whether to use 'Display Power Management (DPM)'.
You can set this feature to Off, 5 sec, 10 sec, etc.
If this feature is not set to Off, the monitor will enter Power Saving Mode when there is no input signal.
If you set this feature to Off, DPM is disabled.
(This feature may not be available with some models.)
Digital Audio Input
You can set the audio for each input as 'Analog' or 'Digital'.
In the case of RGB input, audio is fixed as 'Analog'.
In the case of digital input, you can select 'Analog' or 'Digital' for audio.
(This feature may not be available with some models.)
Speaker
You can restrict the audio settings by choosing whether or not to use the speakers.
If you set this feature to Off, audio output is disabled, and you cannot enter the 'Audio' menu.
If you set this feature to On, audio output is enabled, and the 'Audio' menu is accessible.
(This feature may not be available with some models.)
7
ENGLISH
POL
Power On Delay
When multiple monitors are connected, this feature enables the monitors to turn on at specified time intervals
to prevent overload. You can choose an interval value between 1 and 250 seconds.
(This feature may not be available with some models.)
Pivot Mode
This feature allows you to rotate the screen 180 degrees.
Both the input signal and OSD rotate.
You can set this feature to On or O.
If you set this feature to O, the function is disabled.
If you set this feature to On, the screen rotates 180°.
If any changes are made, they are applied after reboot.
(This feature may not be available with some models.)
OSD Portrait Mode (O, 90, 270)
This feature allows you to rotate the OSD clockwise.
You can set this feature to Off/90/270.
If you set this feature to Off, the function is disabled.
If you set this feature to 90, the OSD rotates clockwise 90 degrees.
If you set this feature to 270, the OSD rotates clockwise 270 degrees.
(This feature may not be available with some models.)
Page 46
ENGLISH
POL
8
Intelligent Auto
You can set this feature to On (enabled) or Off (disabled).
If you change the screen resolution after setting this feature to 'Yes', the display is automatically adjusted to the
new resolution.
(This feature may not be available with some models.)
Master/Slave Mode
This feature allows you to sync monitors connected via RS-232C.
When various monitors are connected via RS-232C, the forefront monitor becomes the Master.
Once the Master is selected, the rest become Slaves.
If you want to change the Master monitor, you must change it in Master/Slave Mode.
(This feature may not be available with some models.)
NOTE
The Master/Slave Mode menu is only enabled when Picture ID is set to Off.
When entering or editing Master/Slave Mode, the menu cursors on the Slave monitors may not be moved.
Time Sync Clock
This feature syncs the Slave monitors' clocks to the Master monitor's at a specified time via RS-232C.
On the Master monitor, you can set the sync time as well as setting Time Sync Clock to Off .
You can select a sync time between 0:00 - 23:00.
While Time Sync Clock is performed, RS-232C control of other commands may not work.
(This feature may not be available with some models.)
NOTE
To synchronize Time Sync Clock, be sure to set each slave monitor's clock so that they are at least one minute
later than the master monitor's clock.
If the Clock setting is Auto, the setting is changed to Manual when Time Sync Clock runs.
Page 47
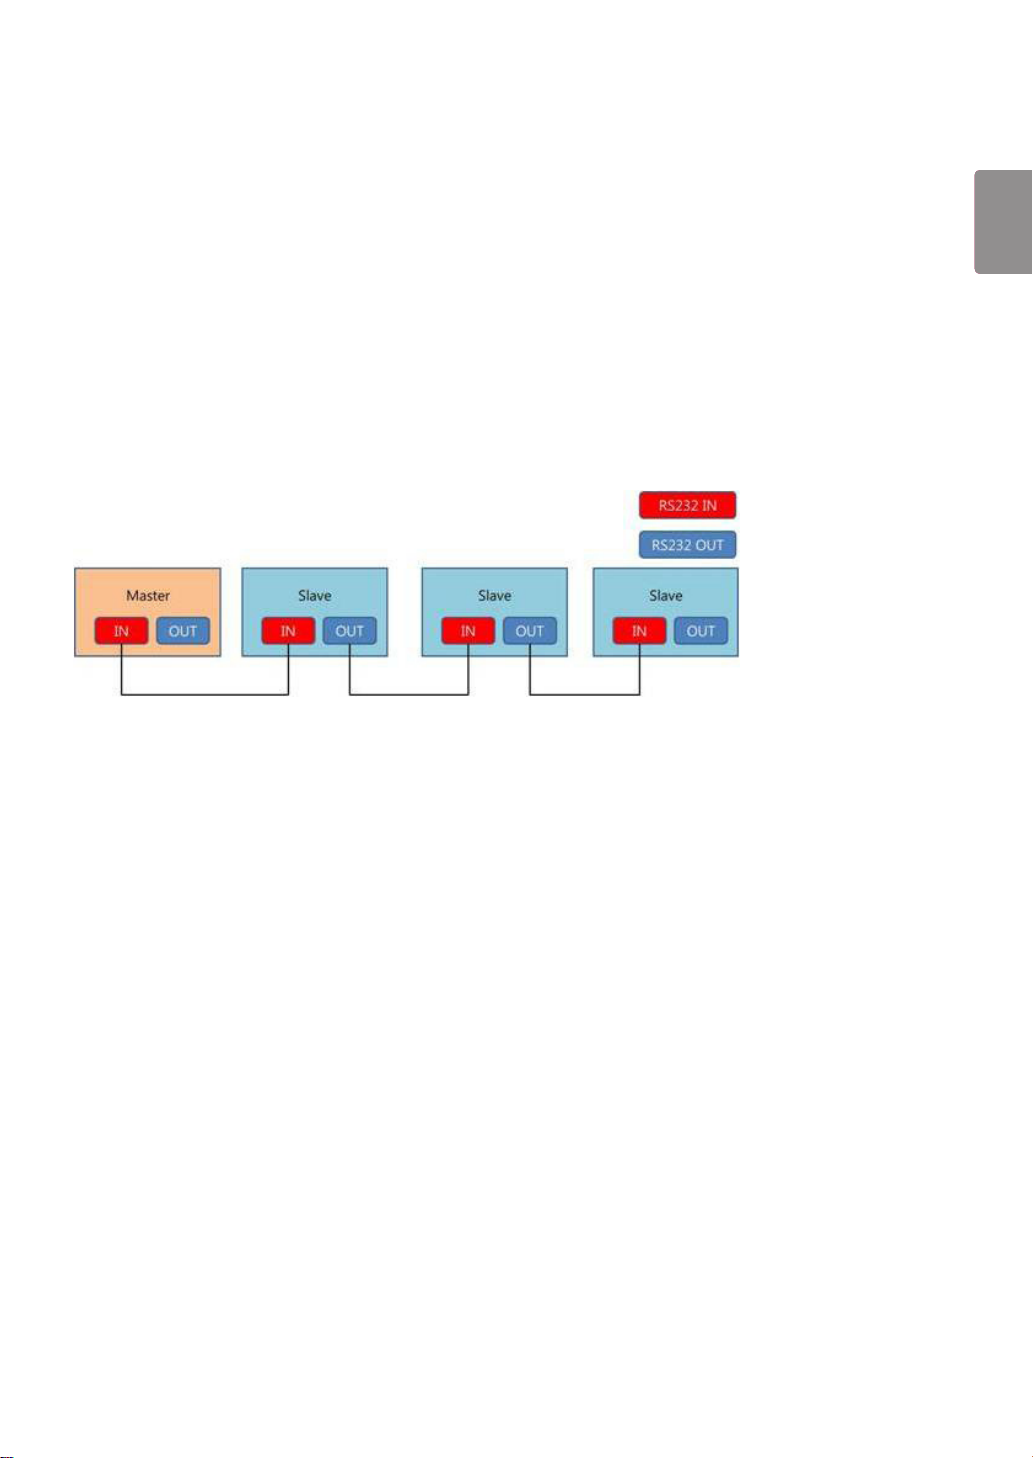
Sync Mode
This feature allows you to sync the start times of contents (videos or images that have been distributed by
SuperSign Software) played back on the Master and Slave monitors.
If you set Sync Mode to Off, the sync feature is disabled.
A Slave monitor plays contents at the same time as the Master monitor.
While Sync Mode is performed, RS-232C control of other commands may not work.
(This feature may not be available with some models.)
Sync Mode
(Only for SE3C models.)
The Sync feature is used to start playing content (video or image) distributed by Elite-W across multiple
monitors connected via RS-232C at the same time.
If set to Off, the Sync feature is disabled.
If set to Master for a monitor, the monitor is set as the reference monitor.
If set to Slave for a monitor, the monitor plays content at the same time as the Master monitor.
9
ENGLISH
POL
DPM Wakeup Control
This feature sets conditions for releasing the DPM status according to the DVI/HDMI's processing of digital
signals.
Clock: Checks the clock signal of the digital signal and, if the clock signal exists, releases the DPM status.
Sync: Releases the DPM status when both the clock signal and data of the digital signal are entered.
Still Image Detecting
This feature detects still images.
If you set this feature to Yes, you can use the RS-232C command for detecting still images.
PM Mode
This feature activates some of the monitor's functions after it enters Off status, allowing the monitor to remain
practically the same as when it is turned on.
Power Off: All functions remain turned off except some functions (Power, Time, etc.) when the monitor turns
off. (Extended Display Identification Data (EDID) may be sustained depending on the input and
model.)
Sustain Aspect Ratio: Sustains Extended Display Identification Data (EDID) even when the monitor is turned off.
Screen Off: Only turns off the screen and audio when the monitor enters Auto Off/Automatic Standby/DPM.
Network-based control is possible.
Screen Off Always: Has the same function as PM Mode's Screen Off. Entering and releasing the Screen Off status
using a remote control is also possible.
Page 48
ENGLISH
POL
10
Factory Reset
This feature allows you to restore all set values to their factory default values.
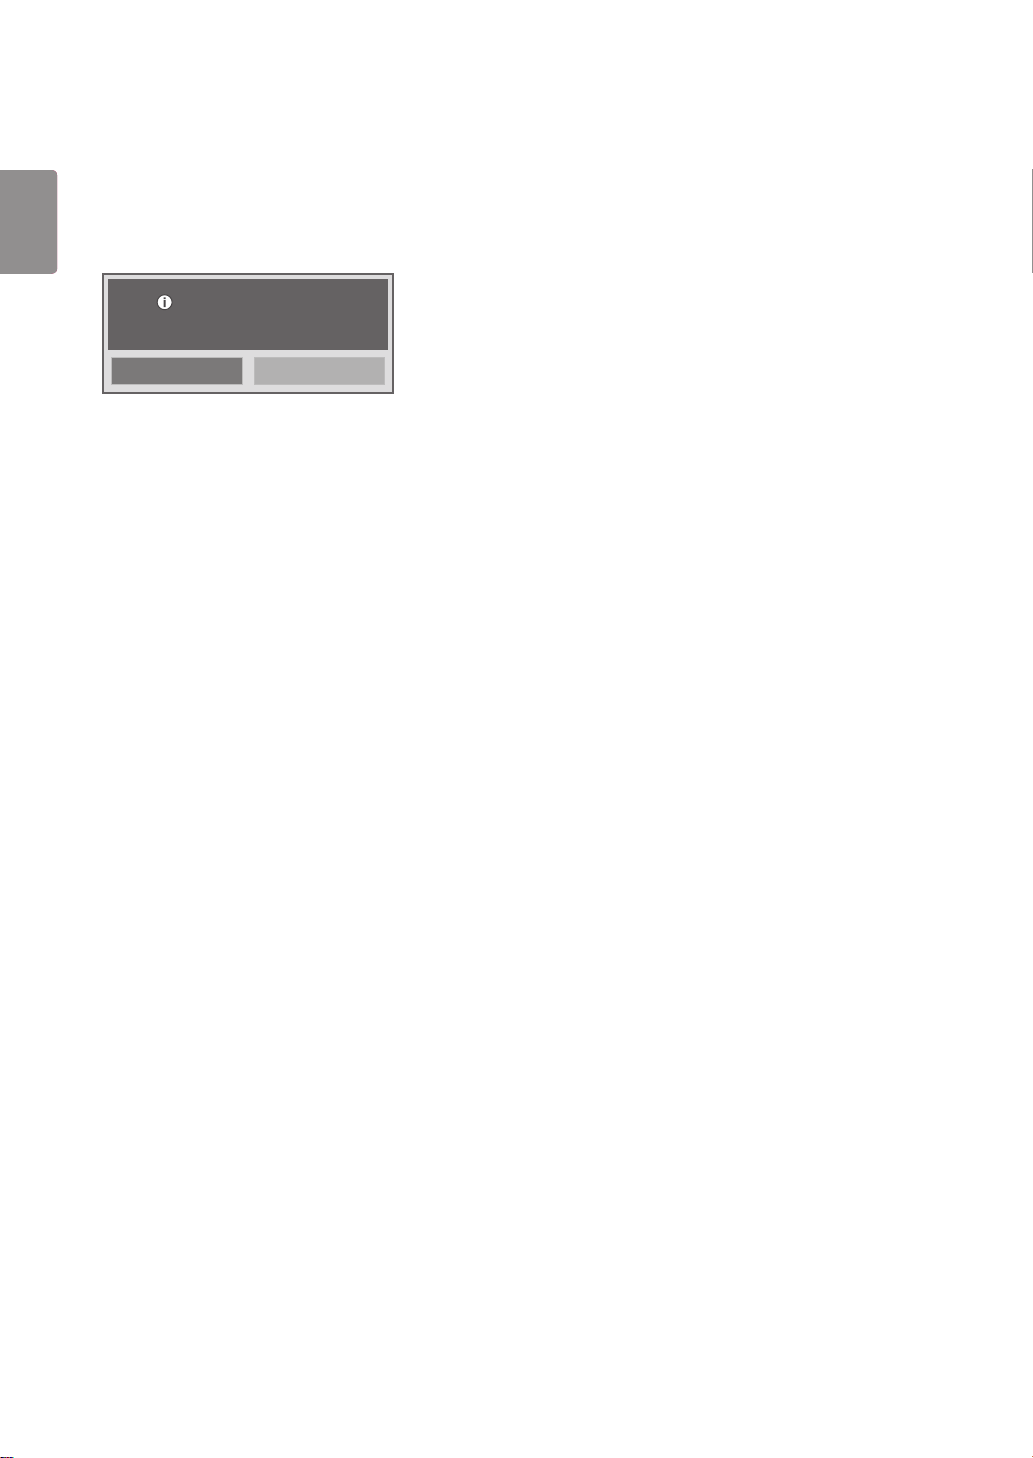
If you set this feature to Yes, all Signage settings except UTT setting (the Signage panel's operational hours) are
restored to their factory default settings.
(This feature may not be available with some models.)
All user settings will be reset.
Still Continue?
Yes No
OPS/PC Power Control
You can control the power of the OPS (media player) by turning the display power on or off.
Disable: Disables the PC Power Control.
Sync (on): Synchronizes the power status of the OPS (media player) only when the monitor is turned on.
Sync (on/off): Synchronizes the power status of the OPS (media player) with the monitor.
The PC Power Control feature can be used with the external RS-232C connection of the media player.
(This feature may not be supported in certain models.)
Interface Selection
You can configure serial communication with the connected OPS.
RS-232C: Enables communication with external devices via the serial port.
OPS: Enables communication via the OPS connected to the product.
Interface Selection is enabled only when the OPS kit is connected.
(This feature may not be supported in certain models.)
Check Screen
The Check Screen feature judges whether there are abnormalities on the edges of the screen. R, G, and B
OSDs are formed on the screen at one second intervals and an RGB sensor tests the areas.
If set to On, the Check Screen feature is enabled.
If set to Off, the Check Screen feature is disabled.
If the Portrait mode is set to 90 or 270, the Check Screen feature is off and deactivated.
If the Pivot mode is On, the Check Screen feature is off and deactivated.
When the Portrait mode and Pivot mode is off, the Check Screen feature is activated.
(This feature may not be supported in certain models.)
Page 49
11
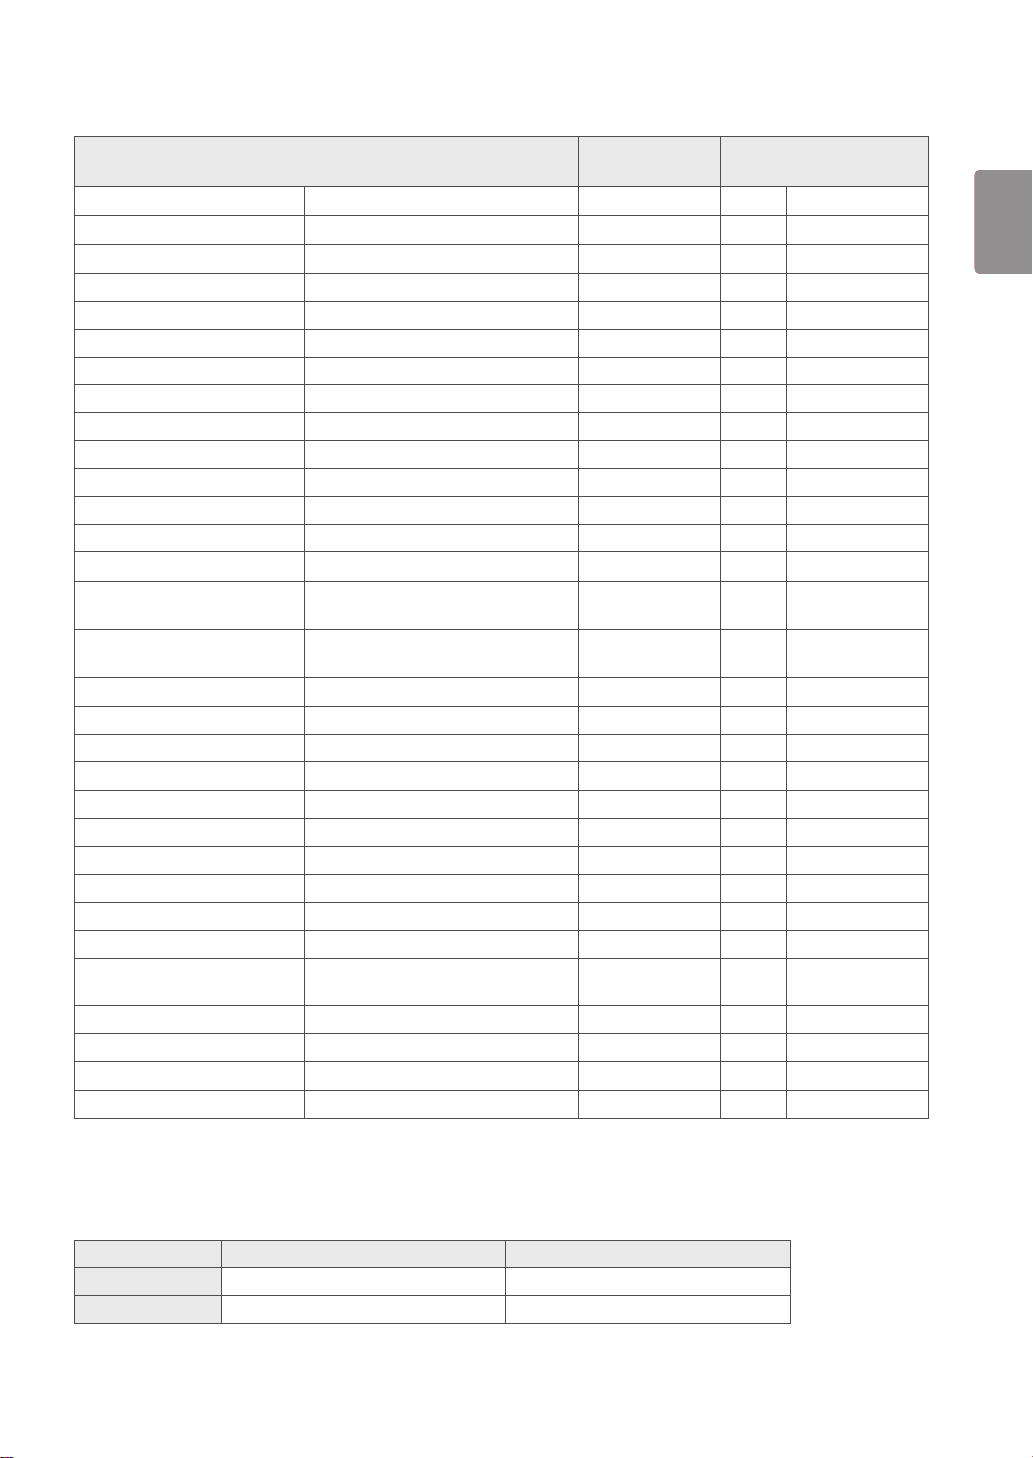
LG Digital Signage Setup
Initial setting/
Factory Reset
Signage Mode Opera-
tion
Signage Mode Operation Yes/No No Yes No
Power On Status STD/PWR/LST LST User LST
Key Operation Yes/No No User No
IR Operation Normal/Use PWR Only/Block All Normal User Normal
Local Key Operation Normal/Use PWR Only/Block All Normal User Normal
Limited Mode Yes/No No User No
Input Source Change Yes/No Yes User Ye s
Menu Display Yes/No Yes User Yes
OSD Display Yes/No Yes User Ye s
Power On Default Yes/No No User No
Input Source O/RGB/HDMI/DVI-D /OPS O User O
A/V Settings Yes/No No User No
Aspect Ratio Disable/Set By Program/4:3/16:9 Disable User Disable
Wake On LAN On/O O User O
DPM O/ 5sec./ 10sec./ 15sec./ 1min./
10min. User 10min.
3min./ 5min./ 10min.
Digital Audio Input Analog/Digital Digital
(RGB: Analog)
User Digital
(RGB: Analog)
Speaker On/O On User On
Power On Delay O, 1 - 250 sec O User O
Pivot mode On/O O User User
OSD Portrait Mode O/90/270 O User O
Intelligent Auto On/O On User On
Master/Slave Mode Master/Slave Slave User Slave
Time Sync Clock O / Stand-by / 0:00 - 23:00 Stand-by User Stand-by
Sync Mode On/O O User O
DPM Wakeup Control Clock/Sync Clock User Clock
Still Image Detecting Yes/No Yes User User
PM Mode Power O/Sustain Aspect Ratio/
Power O User Power O
Screen O/Screen O Always
Factory Reset Conrm
OPS/PC Power Control
Disable, Sync(On), Sync(On/Off)
Disable User Disable
Interface Selection RS-232C/OPS RS-232C User RS-232C
Check Screen Off/On Off User Off
ENGLISH
POL
** User: User settings
Factory Reset vs. Initial Setting
Item Factory Reset Initial Setting
Set ID User 1
IP User Reset to default value "0"
** The rest are the same as each other.
Page 50
ENGLISH
POL
12
USB Cloning
The administrator can configure a monitor more quickly via USB and configure multiple monitors simultaneously.
All monitors that have been configured this way operate according to the settings of the same master monitor.
Using this method reduces installation time compared to the standard RS-232C method.
CAUTION
To use the USB function, make sure to use only USB storage devices formatted as FAT32. USB storage devices
formatted as other file systems may not work.
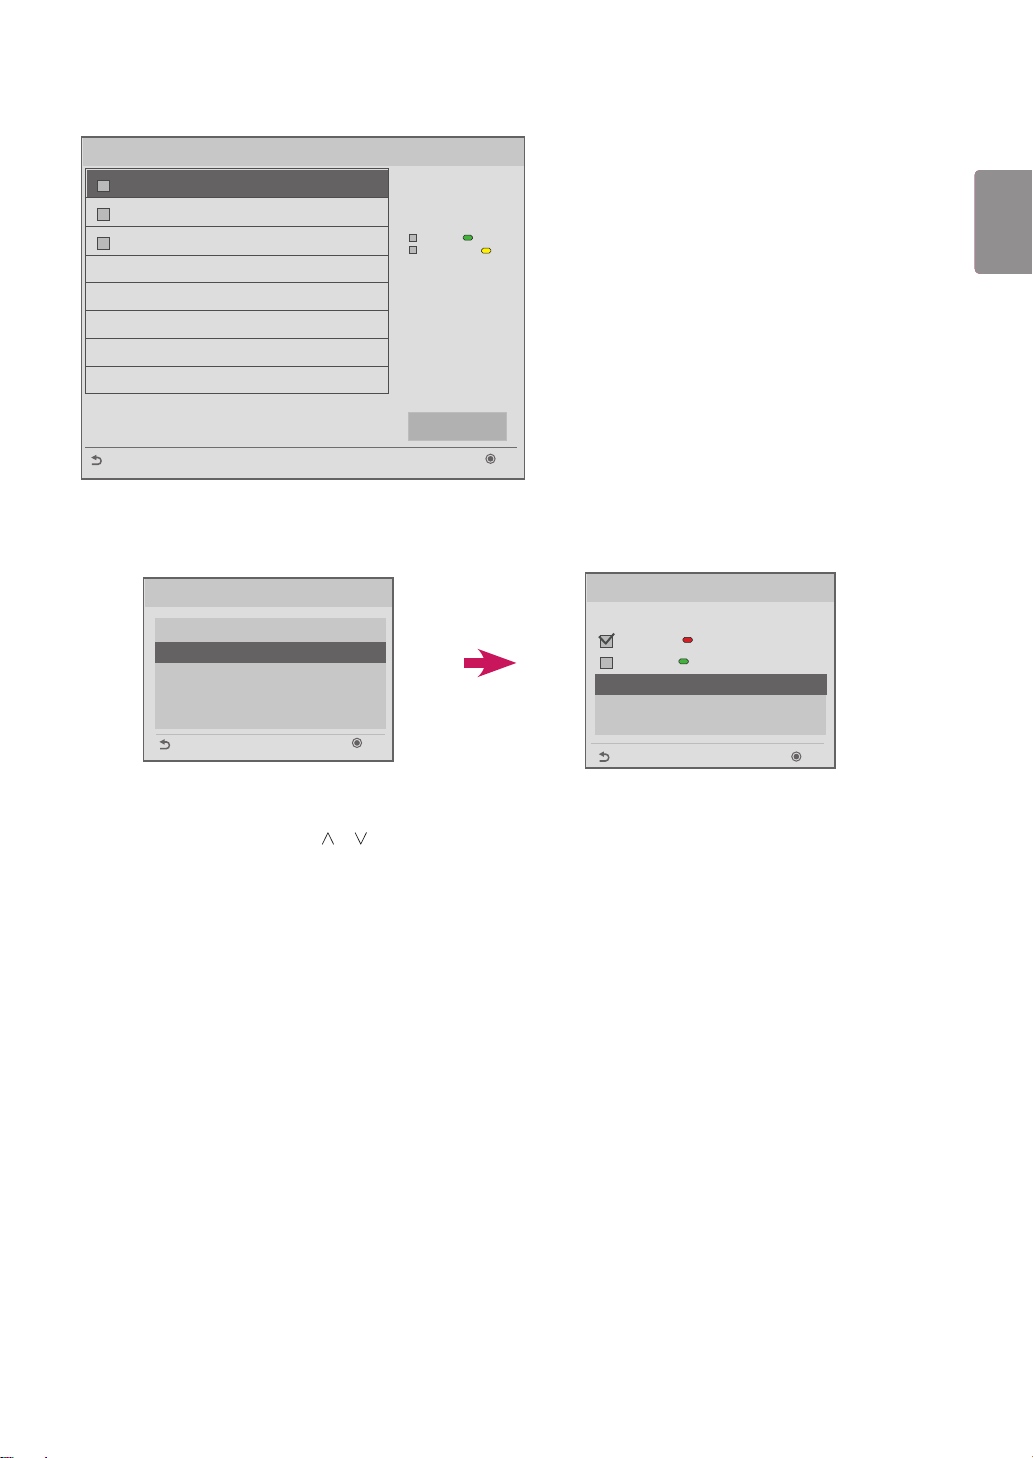
Ez Download
Items such as EPK, TLL, Splash Image, and Micom need to be downloaded.
Because there are many items to download and many downloading methods, users can experience difficulty and inconvenience
when downloading. Ez Download was created to facilitate the download process.
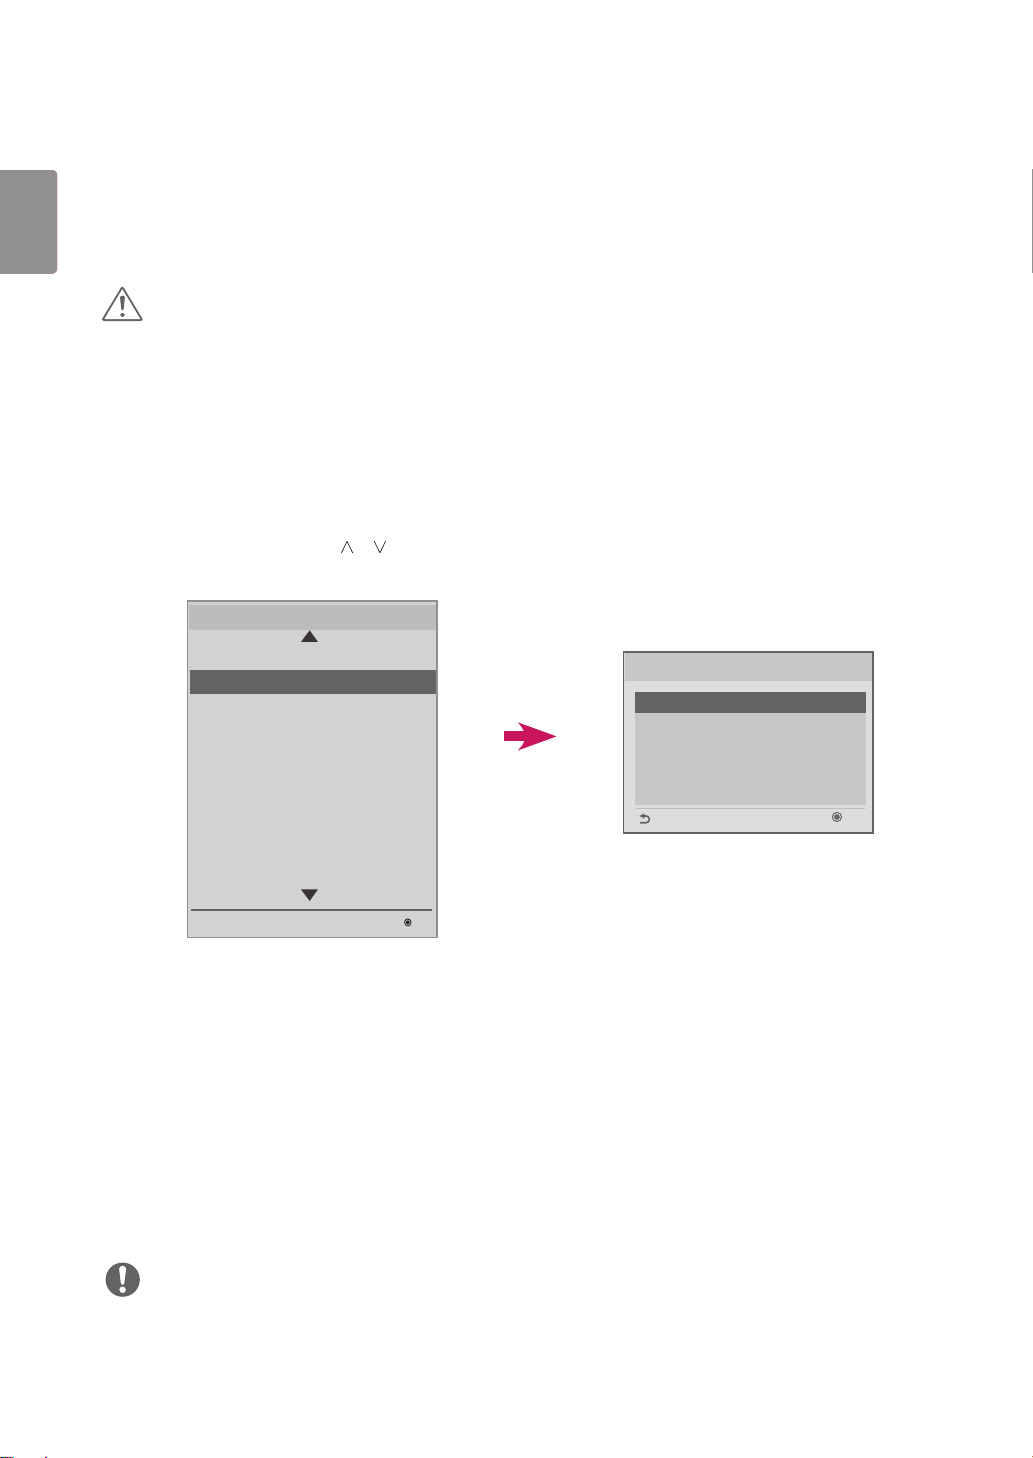
Select 'Ez Download' using the or buttons and press the OK button.
1
Installation Menu (V 3.0)
LG Digital Signage Setup
USB Cloning
USB Cloning
Password Change
Set ID Setup
Configuration Setup
Lock Mode
External Speaker
Fail Over
ISM Method
Easy Brightness Control
S/W : xx.xx.xx.xx Micom : x.xx.x
Select the items you wish to download from the list and select Apply.
2
- If you check the EPK item, the Display EPK Version , SPI Boot, and LG Boot Logo items are enabled.
- If you check both the EPK and JPG items, the LG Boot Log item is disabled; if you uncheck the JPG item after wards, LG Boot
Log item is enabled.
- If both the Global TLL and Model TLL files exist, only the Global TLL file is displayed.
The selected TLL, JPG, and EPK items are downloaded in that order. During the download, the Downloading Percent UI for
3
each item is displayed. When the download is complete, the monitor turns off.
OK
USB Cloning
Ez Download
Receive from USB
Send to USB
Logo Image Download
Send to Daisy Chain
Previous
OK
NOTE
No Signal Image Download's UI only displays one language (English) correctly.
When you download files, only files with English names are displayed correctly.
An item list for Ez Download can include up to 255 items.
Page 51
Ez Download
[TLL] GlobalClone00001.TLL
[TLL] GlobalClone99999.TLL
[EPK] M1A_ATSC_KR_RevNo2800_V01...
Previous
Receive from USB
[ Software Version ]
Current : 02.00.00.01
EPK : 02.00.00.01
[ Forced Update Option ]
SPI Boot
LG Boot Logo
[No Signal Image]
Max Size : 1024KB
Total Size : 0KB
[ISM Bar Image]
Max Size : 1024KB
Total Size : 0KB
[ISM User Image]
Max Size : 1024KB
Total Size : 0KB
Apply
13
ENGLISH
POL
OK
USB Cloning
Ez Download
Receive from USB
Send to USB
Logo Image Download
Send to Daisy Chain
Previous
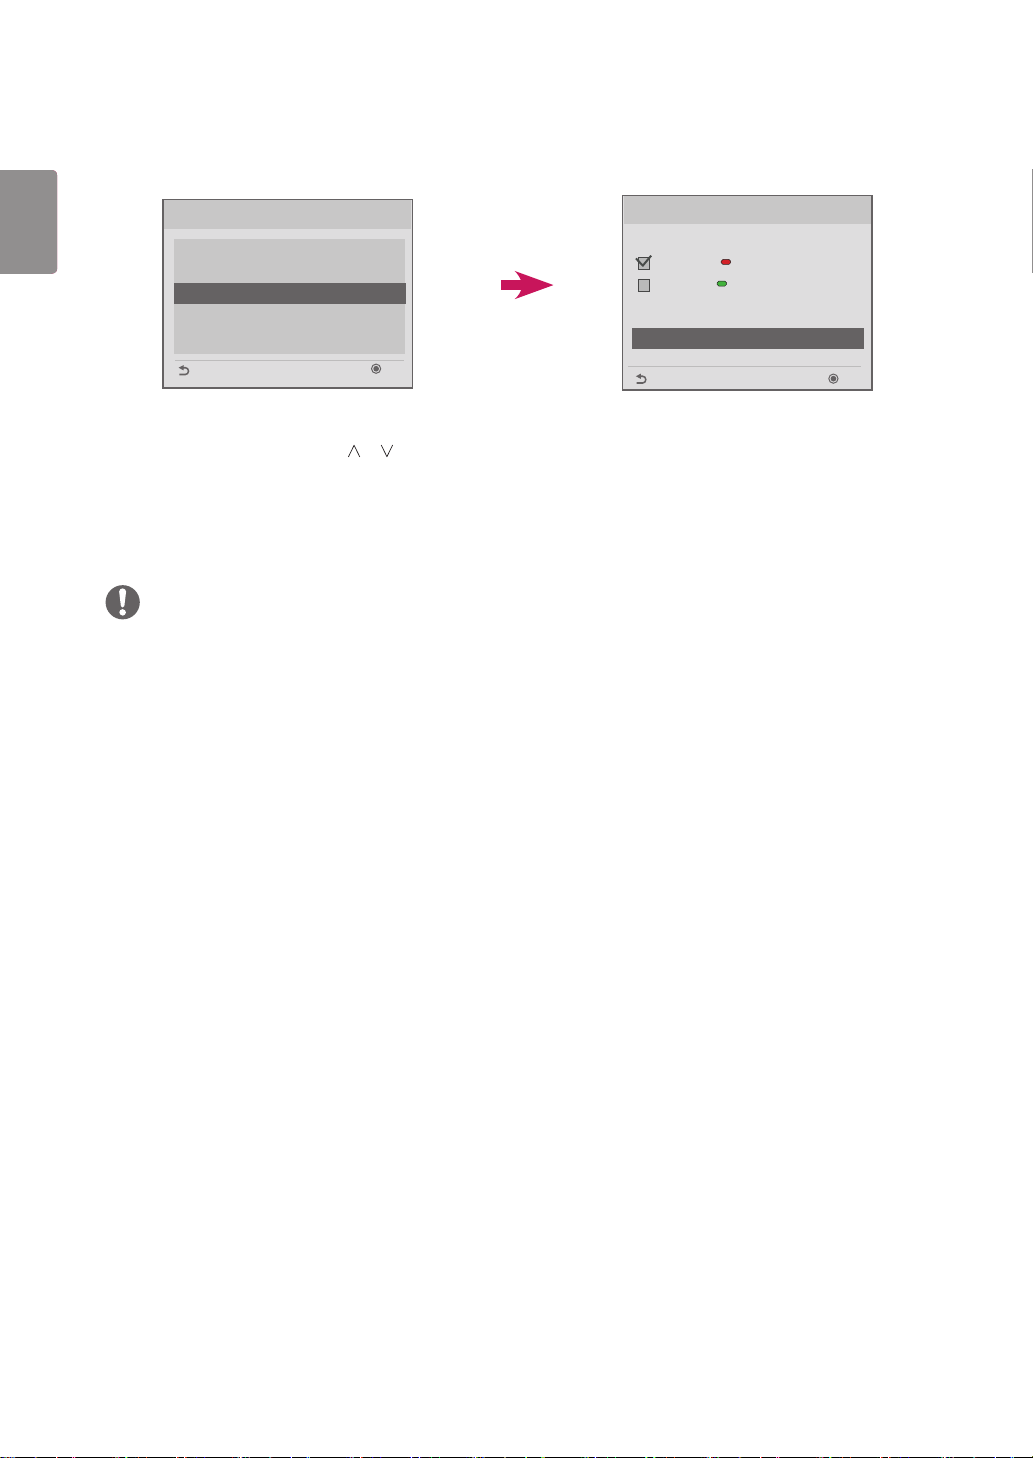
Select the desired files using the or buttons and press the OK button.
1
When the download is complete, the monitor goes into standby mode. When the download fails, the screen switches to the
2
OK
Receive from USB
Select file type
Global TLL
Model TLL
GlobalClone00001.TLL
GlobalClone99999.TLL
Previous
OK
initial installation screen.
Page 52
ENGLISH
POL
14
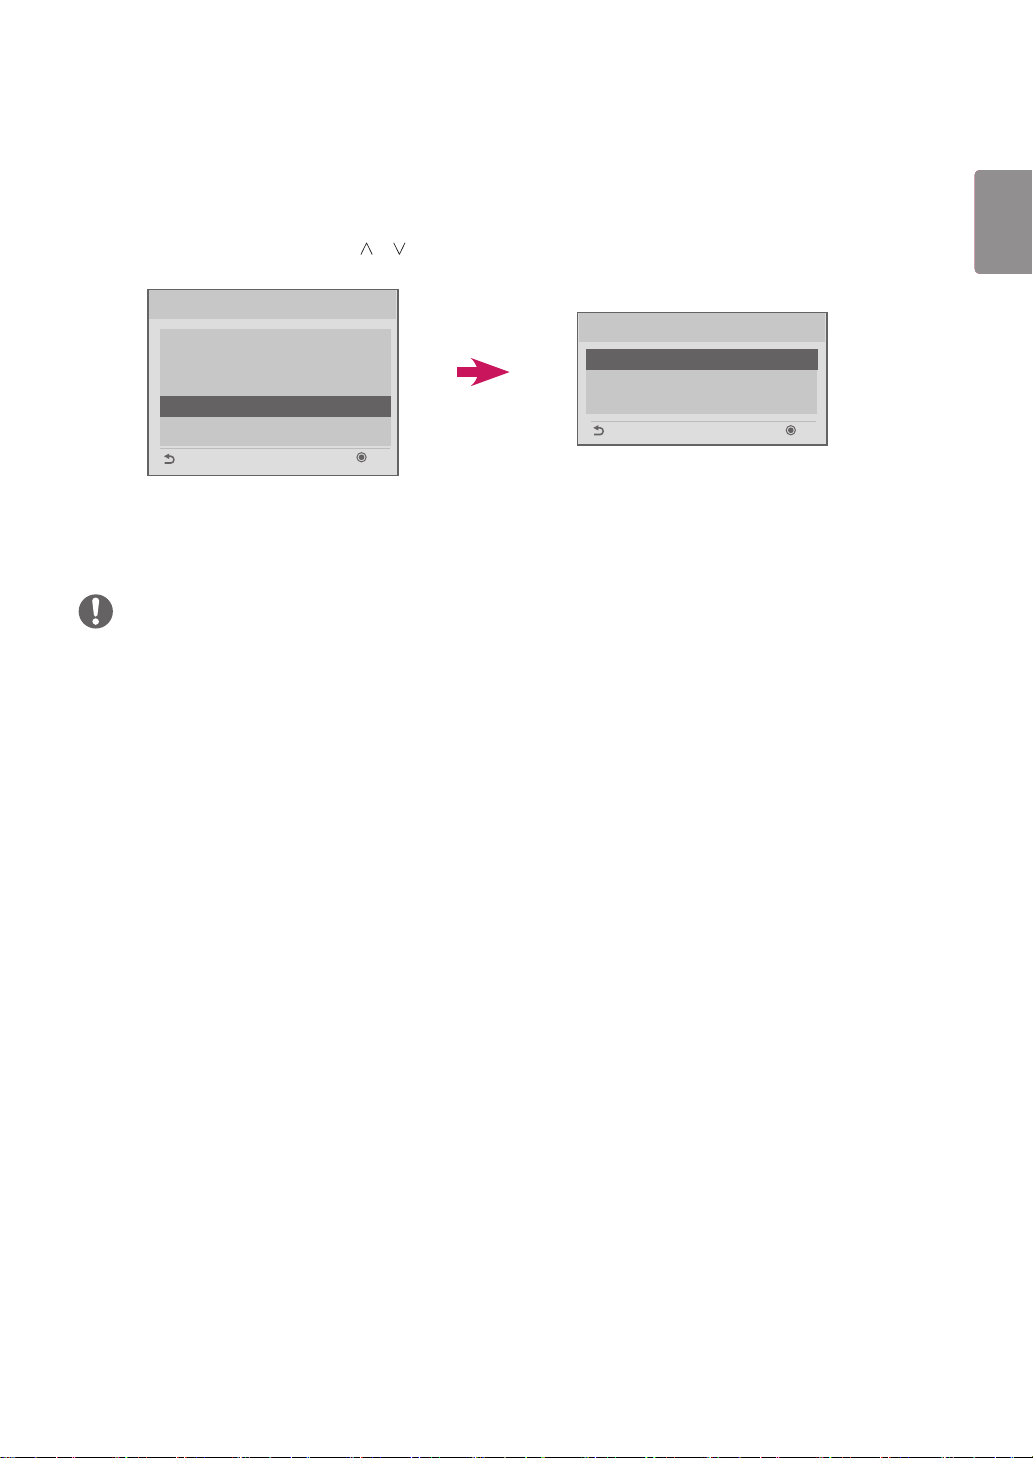
Send to USB
USB Cloning
Ez Download
Receive from USB
Send to USB
Logo Image Download
Send to Daisy Chain
Previous
Select the desired files using the or buttons and press the OK button.
1
When the download is complete, the screen switches to the initial installation screen.
2
OK
NOTE
Send To USB
Select file type
Global TLL
Model TLL
Select the file name and press OK to start
ꔠ
GlobalClone00001.TLL
ꔡ
Previous
OK
Model TLL: Appears under the top-level folder on your USB drive in the form of an xx(model name)xxxxx .TLL.
The 'xxxxx' refers to a number. Model TTL files appear only when they are compatible with the given model,
and they are transferrable only when the model names match.
For example, if the model is 43SE3B-5DC, its Model TLL file is saved as a file with any name between xxSE3B5DC00001.TLL and xxSE3B-5DC99999.TLL.)
Global TLL: Appears under top-level folder on your USB drive in the form of a GlobalClonexxxxx.TLL. The
'xxxxx' refers to a number.
For example, if the model is 43SE3B-5DC, its Global TLL file is saved as a file with any name between GlobalClone00001.TLL and GlobalClone99999.TLL.)
(* For a Global TLL file to be cloned, the Model TLL file located in the same folder needs to be deleted or moved
to a different folder.)
When Global TLL and Model TLL files are both present in the top-level folder, press the red button to display
the Global TLL file or the green button to display the Model TLL file.
Page 53
Logo Image Download
15
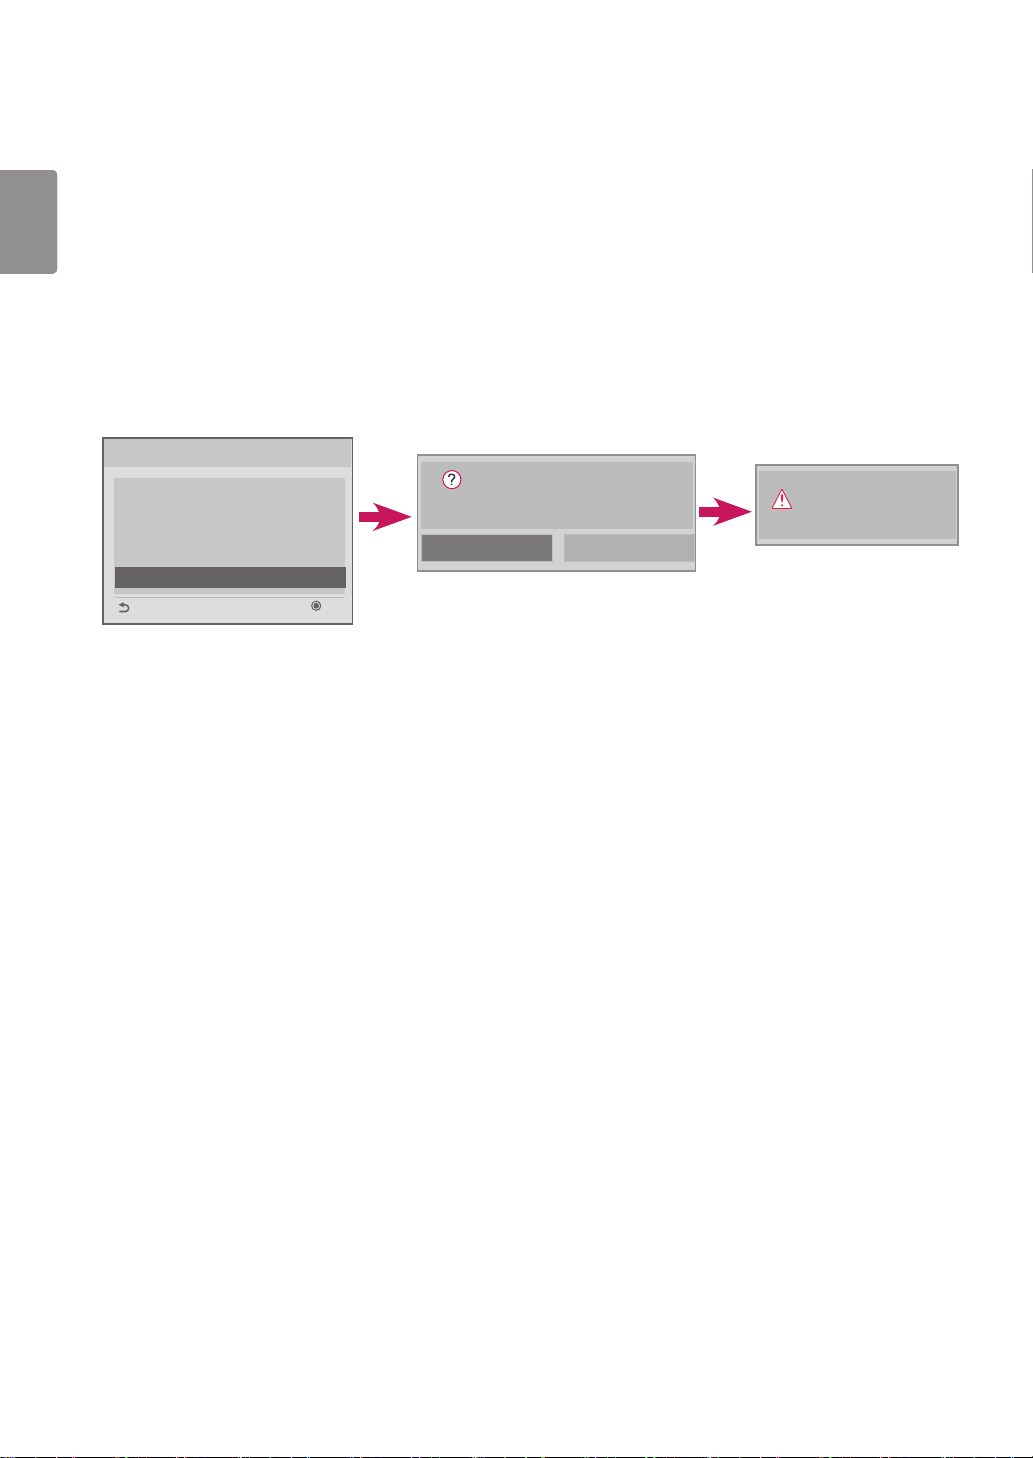
This feature allows you to download splash image files onto your monitor.
Create a 'LG_MONITOR' folder on your USB flash drive and copy a splash image file into the folder.
Select the desired image file using the or buttons and press the OK button.
1
USB Cloning
Ez Download
Receive from USB
Send to USB
Logo Image Download
Send to Daisy Chain
Previous
Wait until the download is complete. When the download is complete, the monitor turns off and on again.
2
When the monitor turns on, you can see your new splash image.
3
OK
Logo Image Download
Image1.jpg
Image2.jpg
Image3.jpg
Previous
OK
NOTE
Only JPEG files 1 MB or smaller can be used as splash images.
Progressively encoded JPEG files are not applicable.
Make sure that splash images have a resolution suitable for the screen resolution of the monitor.
The maximum resolution for a splash image is Full HD, 1920 x 1080 and HD, 1360 x 768. The minimum resolution
for a splash image is 64 x 64.
ENGLISH
POL
Page 54
16
Send to DaisyChain
ENGLISH
POL
This feature allows you to copy the settings of a monitor to other monitors using RS-232C.
Transfer the settings of your current monitor to other linked monitors via RS-232C outputs.
1
The settings of the foremost monitor are copied, while the settings for other monitors in the RS-232C daisy-chain are not.
2
Select Send to DaisyChain, then select Yes to transfer the data or select No to go back to the previous menu.
3
Repeat this until all monitors that are connected to the current monitor's RS-232C output port turn off. After the monitors
4
turn off, turn them on and check if the settings have been copied.
(This feature may not be available with some models.)
USB Cloning
Ez Download
Receive from USB
Send to USB
Logo Image Download
Send to Daisy Chain
Previous
OK
All user settings will be Send
to Daisy Chain. Still Continue?
Yes No
Transfer Start !!!!
Page 55
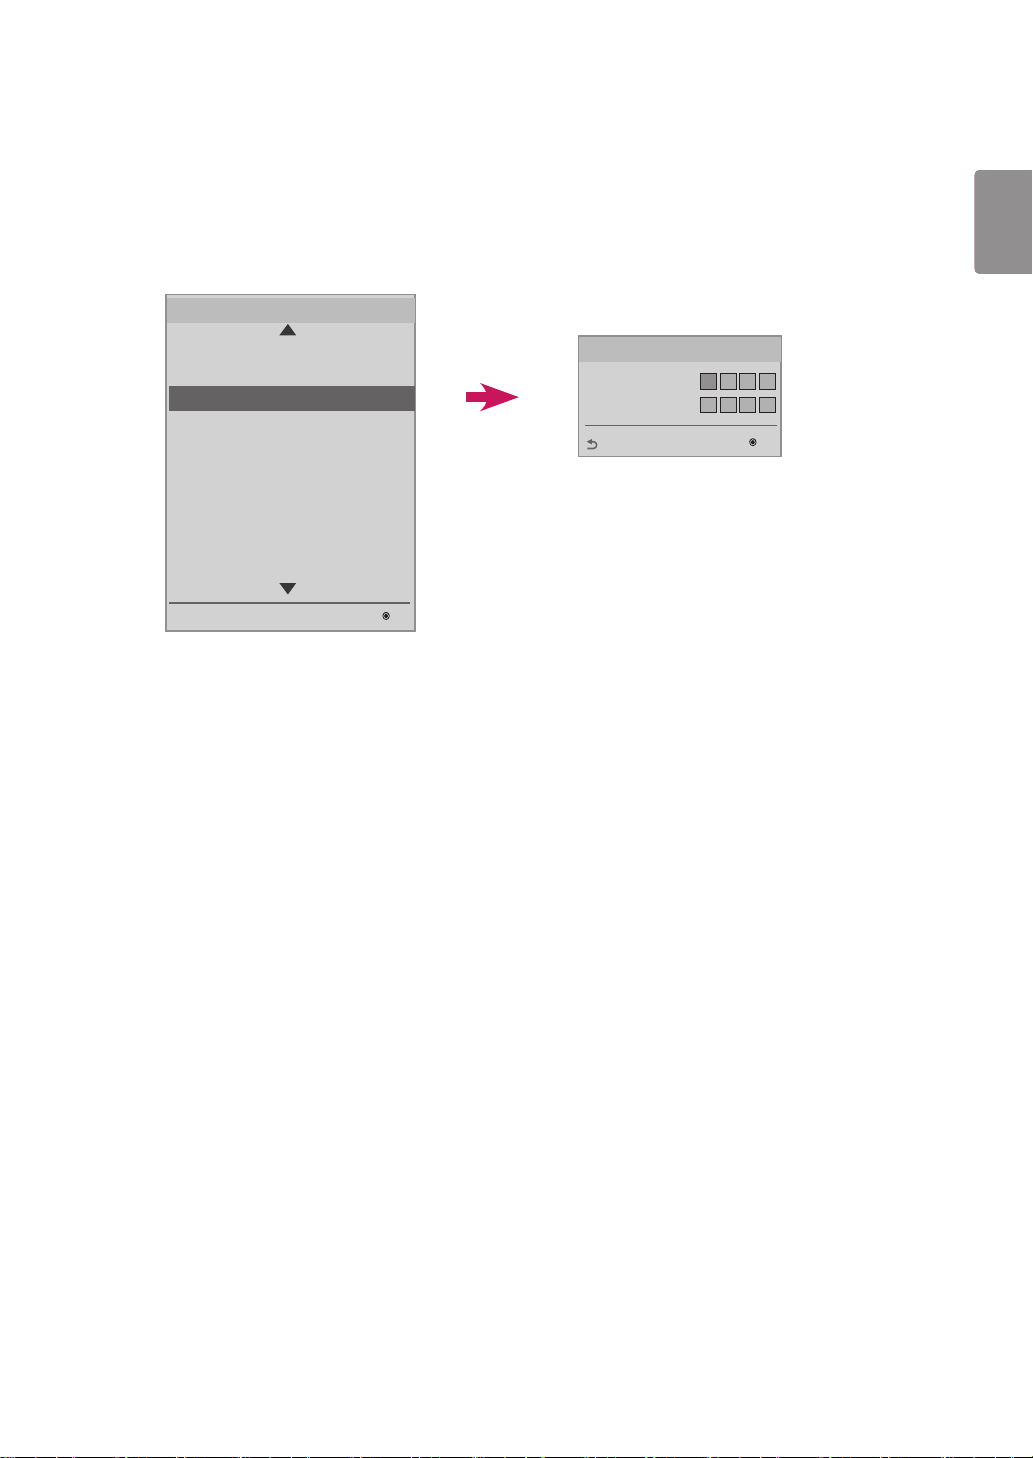
Password Change
You can change your password for security purposes.
Enter a new 4-digit number in Change Password.
Enter the same number again in Confirm Password to confirm the password.
Installation Menu (V 3.0)
17
ENGLISH
POL
LG Digital Signage Setup
USB Cloning
Password Change
Password Change
Set ID Setup
Configuration Setup
Lock Mode
External Speaker
Fail Over
ISM Method
Easy Brightness Control
S/W : xx.xx.xx.xx Micom : x.xx.x
OK
Password Change
Change Password
Confirm Password
Previous
*******
*
OK
Page 56
ENGLISH
Press OK
1
POL
18
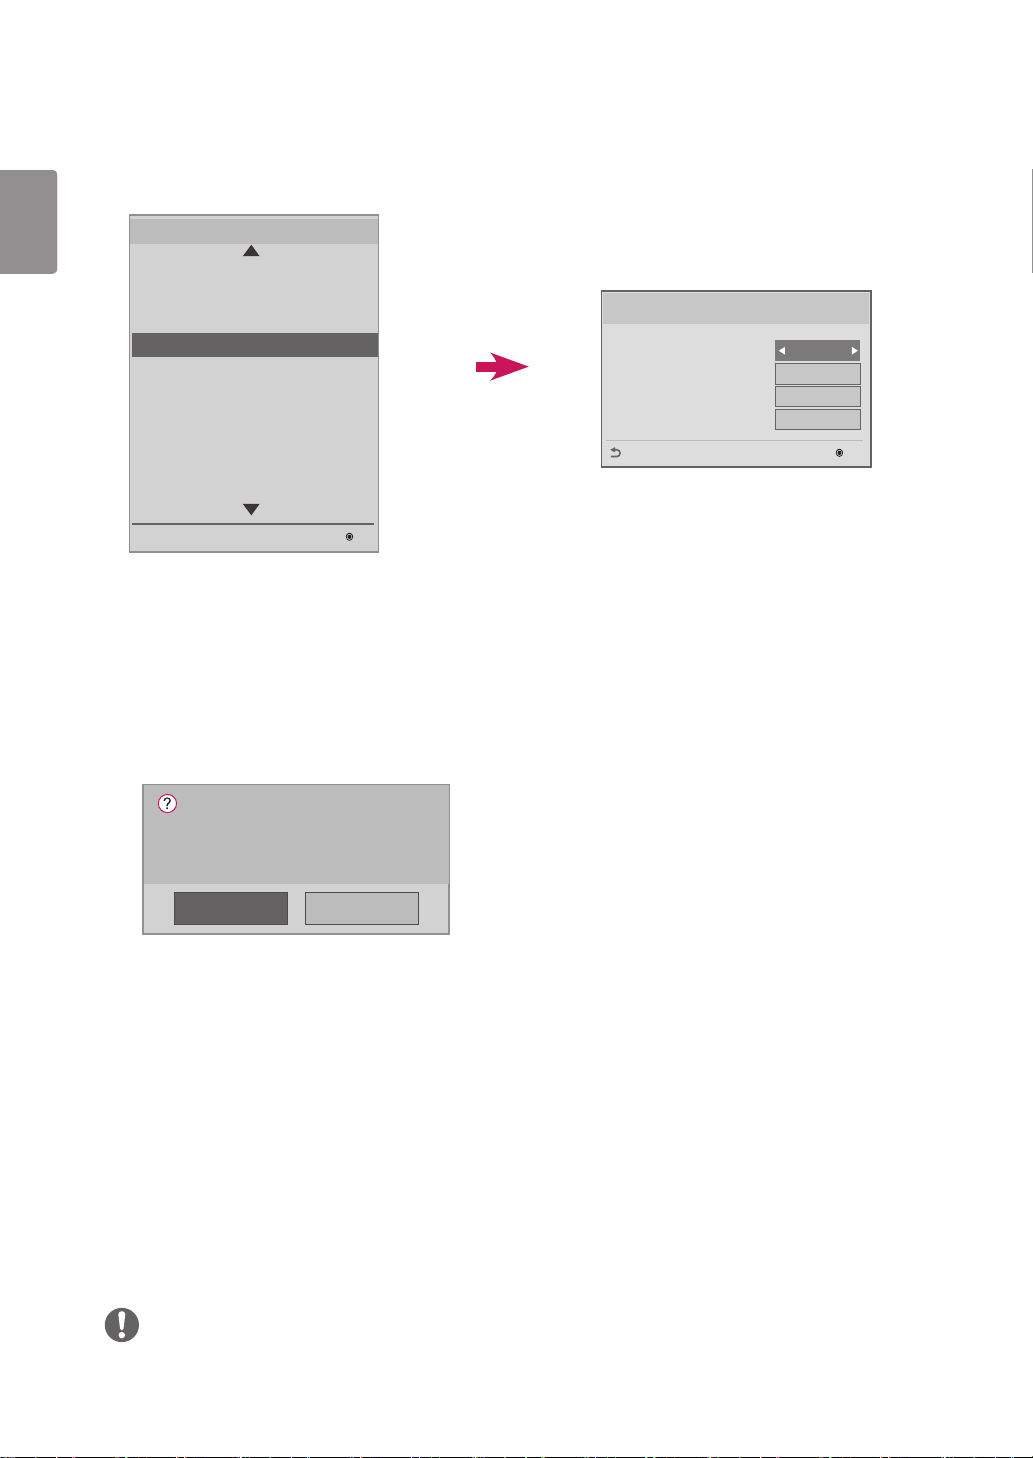
Set ID Setup
This feature allows you to set an ID for the product.
Installation Menu (V 3.0)
LG Digital Signage Setup
USB Cloning
Password Change
Set ID Setup
Set ID Setup
Configuration Setup
Lock Mode
External Speaker
Fail Over
ISM Method
Easy Brightness Control
Set ID Setup
Set ID Lock
Set ID
Auto Set ID
Reset ID
Previous
No
Press OK
OK
S/W : xx.xx.xx.xx Micom : x.xx.x
OK
Set ID Lock
You can enable Set ID Lock by selecting "Yes" or cancel Set ID Lock by selecting "No".
Set ID
Pick and enter a number between 1 - 255 (1 - 1000, with some models) for the Set ID.
Auto Set ID
This feature sets an ID for the product automatically.
Setting ID Automatically.
Do you want to start with 1?
(Current Set ID : 1)
Yes No
If you set this feature to Yes, all monitor in the RS-232C daisy-chain are assigned a sequential Set ID, starting
with 1.
If you set this feature to No, Set IDs are assigned to the monitor sequentially, starting with the foremost set.
A Set ID cannot be decreased from its current value. Therefore, it is recommended that you execute Reset ID
before using this feature.
Execution time may vary depending on the installation environment.
If the Auto Set ID operation is not completed normally, turn the product off and on, and then try again.
The Yes/No options only work on the foremost monitor in the daisy-chain.
(This feature may not be available with some models.)
Reset ID
This feature initializes the Set ID of the product.
After execution, the Set IDs of all monitor in the RS-232C daisy chain are reset to 1.
(This feature may not be available with some models.)
NOTE
Be sure to execute Auto Set ID/Reset ID when Picture ID is set to Off.
Page 57
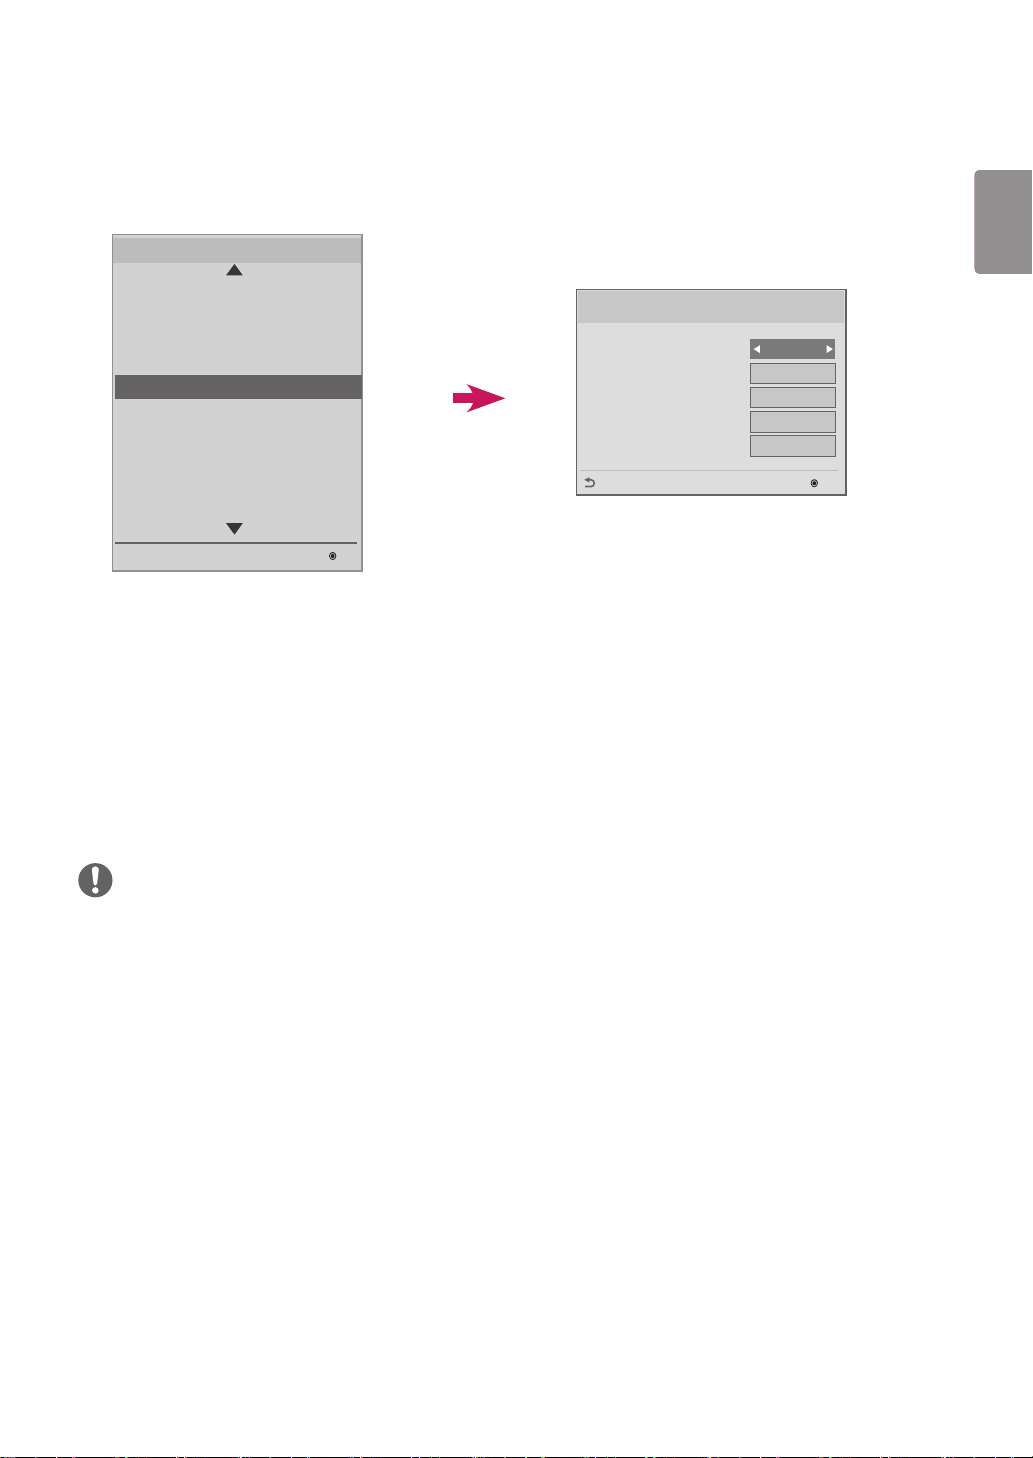
Conguration Setup
This feature enables a detailed configuration of the product.
Installation Menu (V 3.0)
19
ENGLISH
POL
LG Digital Signage Setup
USB Cloning
Password Change
Set ID Setup
Configuration Setup
Configuration Setup
Lock Mode
External Speaker
Fail Over
ISM Method
Easy Brightness Control
S/W : xx.xx.xx.xx Micom : x.xx.x
OK
Configuration Setup
Splash Offset Time
USB Auto Playback
15Min Auto Off
Automatic Standby
Screen Saver Cube
Previous
+0 sec
Disable
Off
Off
Yes
OK
Splash Oset Time
This feature controls the amount of time a splash image is displayed.
You can select a time between 0 and 10 seconds.
USB Auto Playback
This is a feature that automatically plays video or photo files from your USB storage device.
This feature is activated when you connect a USB device to your monitor or when you turn on your monitor
with a USB device connected to it.
Video and photo files must be located in the root folder, in the first partition of your USB storage device.
Video or photo files located here will play back repeatedly.
NOTE
Contents stored on the USB storage device connected to USB 1 are played back if USB storage devices are
connected to both USB 1 and USB 2.
15 Min Auto O
Set whether to use 15 Min Force Off.
This feature can be set to On or Off.
On: If there is no signal for 15 minutes, the product turns off.
Off: 15 Min Force Off is disabled.
It is recommended that you set this feature to Off if you intend to use the product for long periods of time.
Automatic Standby
Set whether to use 4 Hours Off.
This feature can be set to On or Off.
If you set this feature to On, the product turns off if there is no input from the remote control for 4 hours.
If you set this feature to Off, 4 Hours Off is disabled.
It is recommended that you set this feature to Off if you intend to use the product for long periods of time.
Screen Saver Cube
This Screen Saver feature lets you enable/disable the 360-degree-rotating LG Cube which appears on the
screen when there is no signal.
Page 58
ENGLISH
POL
20
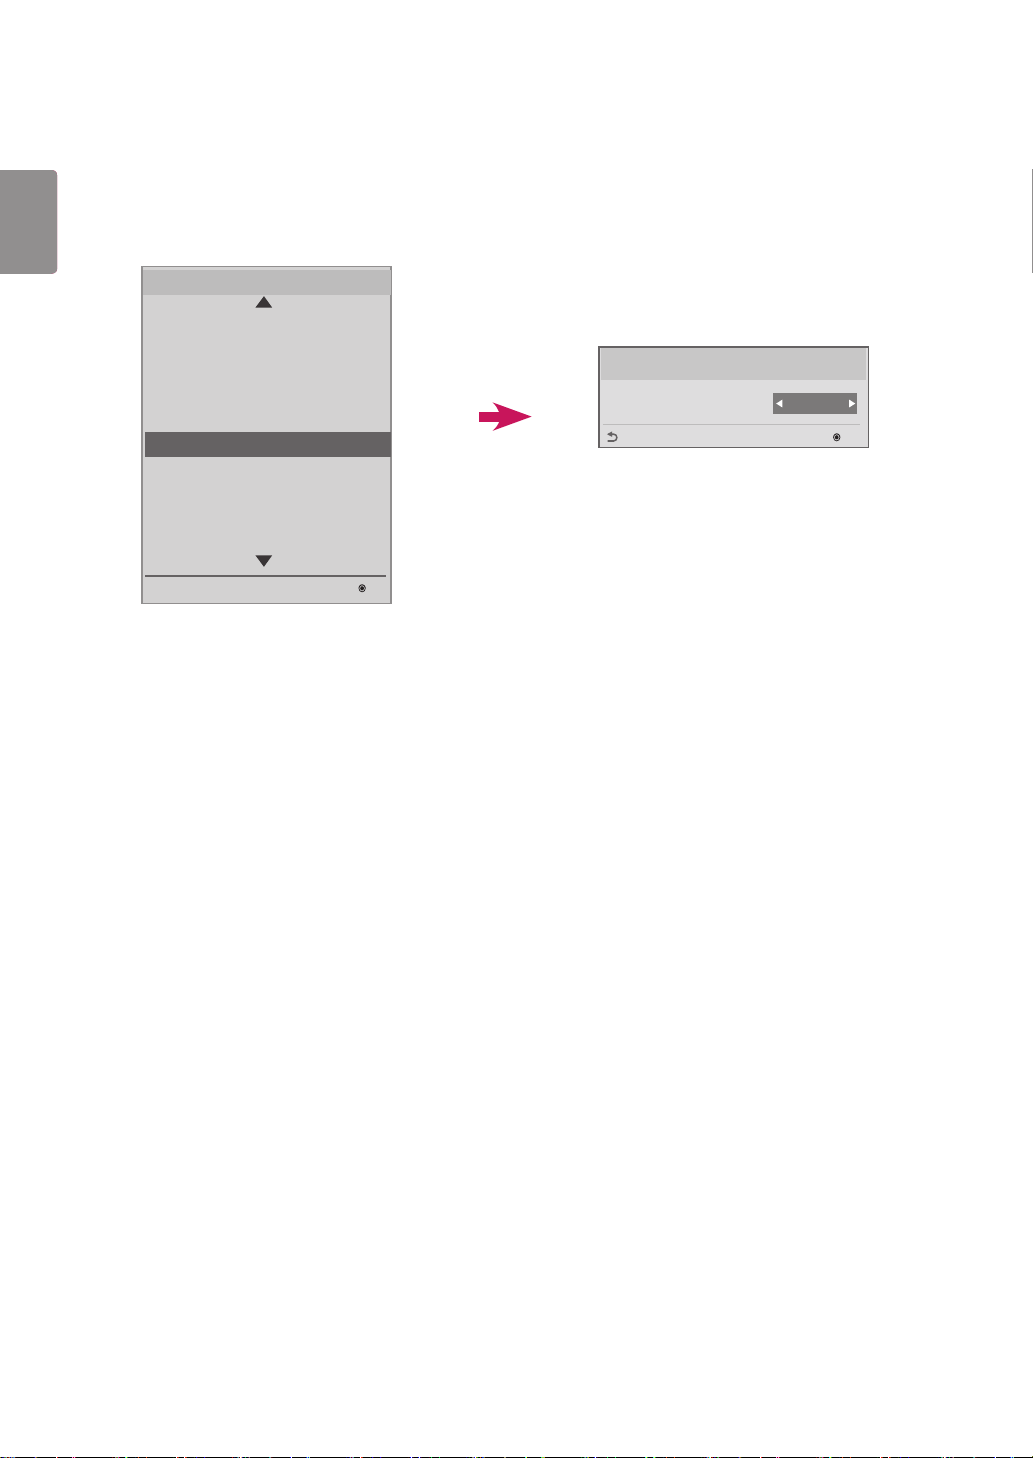
Lock Mode
This feature allows you to select an input that you want to restrict. The selected input is automatically restricted according to your settings.
Installation Menu (V 3.0)
LG Digital Signage Setup
USB Cloning
Password Change
Set ID Setup
Configuration Setup
Lock Mode
Lock Mode
External Speaker
Fail Over
ISM Method
Easy Brightness Control
Lock Mode
USB
Previous
Enable
OK
S/W : xx.xx.xx.xx Micom : x.xx.x
OK
USB
Enables/disables USB input. The following will happen when USB input is disabled:
The pop-up window that appears when a USB disk is connected to your monitor is blocked.
You cannot enter 'My Media' in the menu.
You cannot enter 'USB Input' in the Input List.
'USB Auto Playback' is set to No, and input is not possible. (* However, you can download software updates
and Welcome Screens.)
Page 59
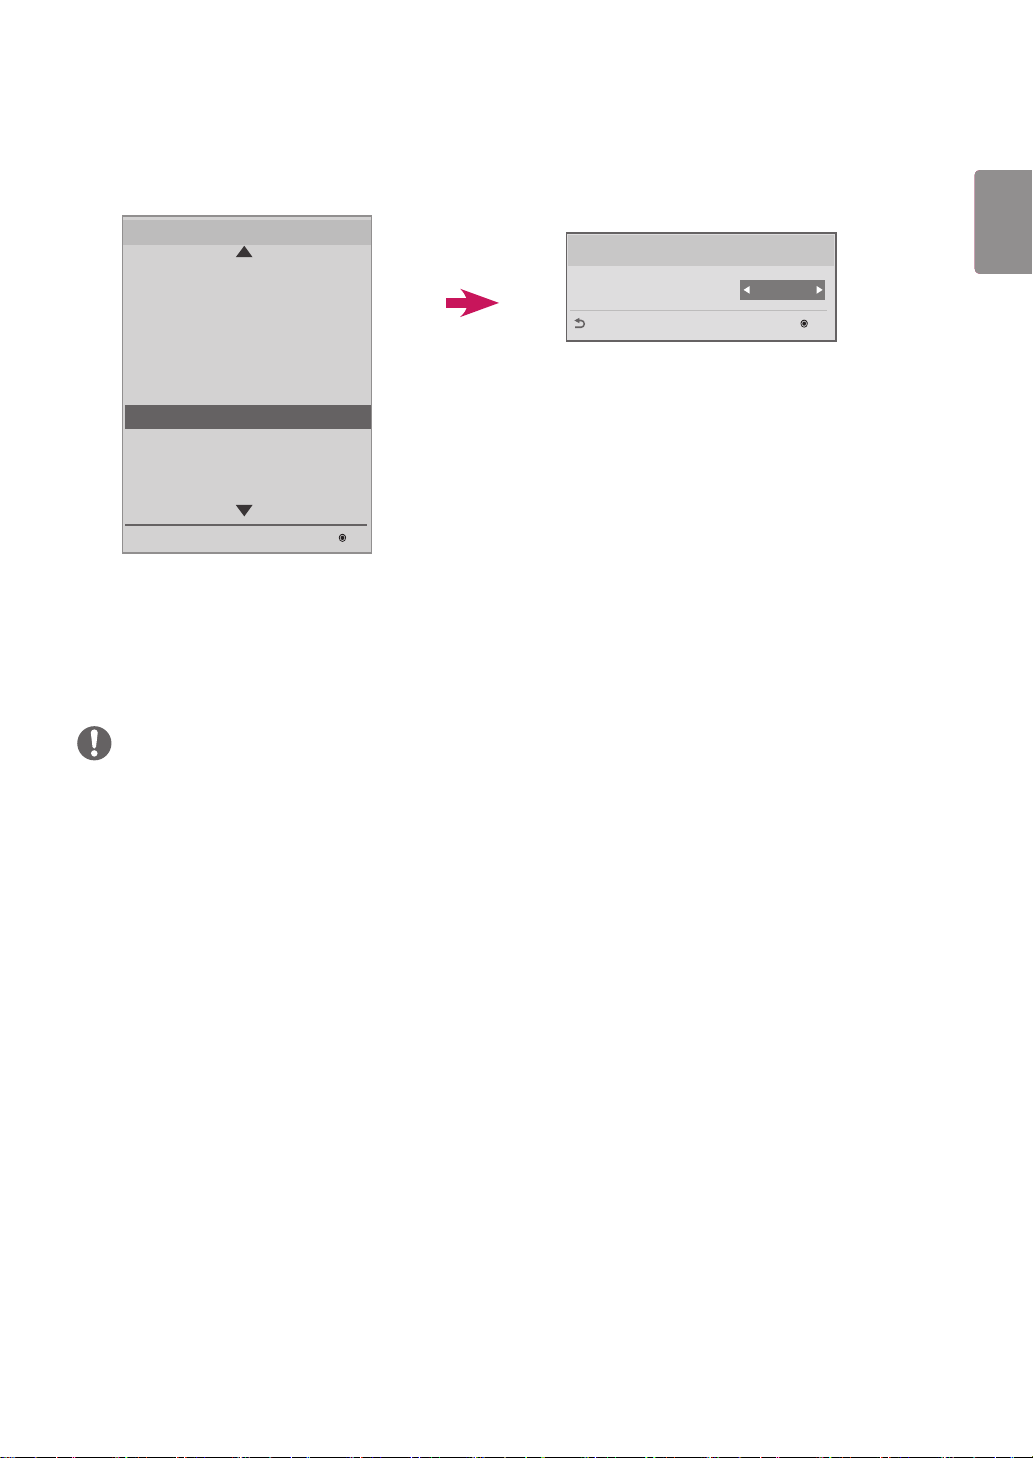
External Speaker
This feature enables the transfer of analog/digital audio signals from your monitor to external devices.
Installation Menu (V 3.0)
LG Digital Signage Setup
USB Cloning
Password Change
Set ID Setup
Configuration Setup
Lock Mode
External Speaker
External Speaker
Fail Over
ISM Method
Easy Brightness Control
External Speaker
Output Control
Previous
Off
OK
21
ENGLISH
POL
S/W : xx.xx.xx.xx Micom : x.xx.x
OK
Output Control
Off: Does not transfer audio signals to external devices.
Fixed: Outputs the volume at a fixed level.
(The volume of an external audio device cannot be muted.)
NOTE
When connecting an external audio device to your monitor, be sure to use one with a built-in audio amplifier.
Page 60
ENGLISH
POL
22
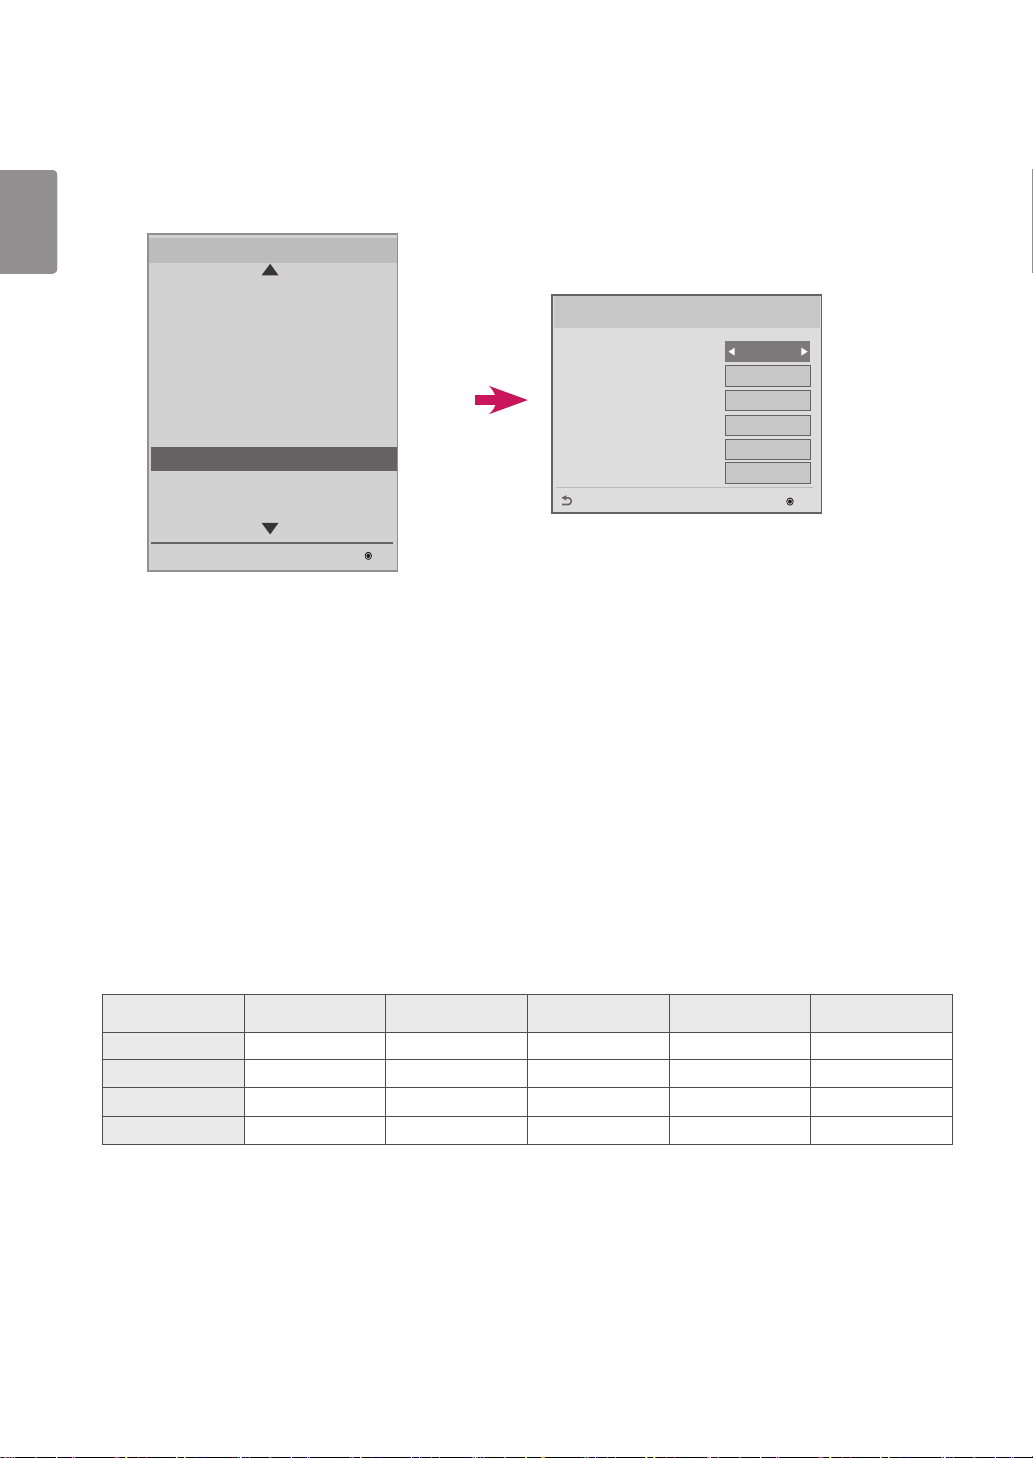
Fail Over
This feature enables automatic switching to another input signal when there is no signal from the current input.
Installation Menu (V 3.0)
LG Digital Signage Setup
USB Cloning
Password Change
Set ID Setup
Configuration Setup
Lock Mode
External Speaker
Fail Over
Fail Over
ISM Method
Easy Brightness Control
S/W : xx.xx.xx.xx Micom : x.xx.x
OK
Fail Over
Mode
USB
Priority1
Priority2
Priority3
Priority4
Previous
Off
Off
-----
-----
-----
-----
OK
You can set Mode to Off, Auto, or Manual.
Off: Fail Over is disabled.
Auto: If there is no signal from the current input, the product input switches to a different input that has a
video signal following a specified order (*see table).
Manual: You can set switching priorities for inputs when there is no signal. If there are a multiple video signals,
the current input switches to the input with the highest priority.
You can set USB to O, Movie, or Photo.
Off: Fail Over USB is disabled.
Movie: If you set this feature to Auto, a movie is played back when there is no input signal. If you set this fea-
ture to Manual, a movie is played back when there is no signal from any of the prioritized inputs.
Photo: If you set this feature to Auto, a photo slideshow is played back when there is no input signal. If you set
this feature to Manual, a photo slideshow is played back when there is no signal from any of the prioritized inputs.
Fail Over priority when set to Auto
Current source 1st change 2nd change 3rd change 4th change 5th change
RGB HDMI DVI-D OPS USB Auto play RGB NO SIGNAL
DVI-D HDMI OPS RGB USB Auto play DVI NO SIGNAL
HDMI DVI-D OPS RGB USB Auto play HDMI NO SIGNAL
OPS HDMI DVI-D RGB USB Auto play OPS NO SIGNAL
Page 61
NOTE
The number of priorities may vary depending on the model.
If you set Mode to Off, all of its sub-options are disabled.
If you set Mode to Auto, the Priority menus are disabled.
If you set USB to Movie or Photo, the USB Auto Playback option in Configuration Setup is disabled, and the corre-
sponding function is also disabled.
If you set the USB Auto Playback option in Configuration Setup to Movie or Photo, the USB option in Fail Over is
disabled, and the corresponding function is also disabled.
When the USB option in Lock Mode is disabled, both the USB Auto Playback option and Fail Over's USB option are
disabled, and the corresponding functions are also disabled.
For the Fail Over USB function to work, your USB drive must have a FAIL_OVER or fail_over folder, as well as valid
contents (movies and images).
If your USB drive does not have either a FAIL_OVER/fail_over folder or contents, the default USB pop-up menu ap-
pears when the Fail Over USB function is performed.
The USB Fail Over function does not work after the distribution of contents (or the playback of a contents schedule).
However, if a Fail Over event occurs (input signal connection/change to Fail Over USB option/USB reconnection),
the Fail Over USB function works.
USB Fail Over does not work during playback of a contents file or while in standby for the playback of a contents
schedule.
USB Fail Over does not work during software updates, including EZ Download.
Contents stored on the USB storage device connected to USB 1 are played back if USB storage devices are
connected to both USB 1 and USB 2.
23
ENGLISH
POL
Page 62
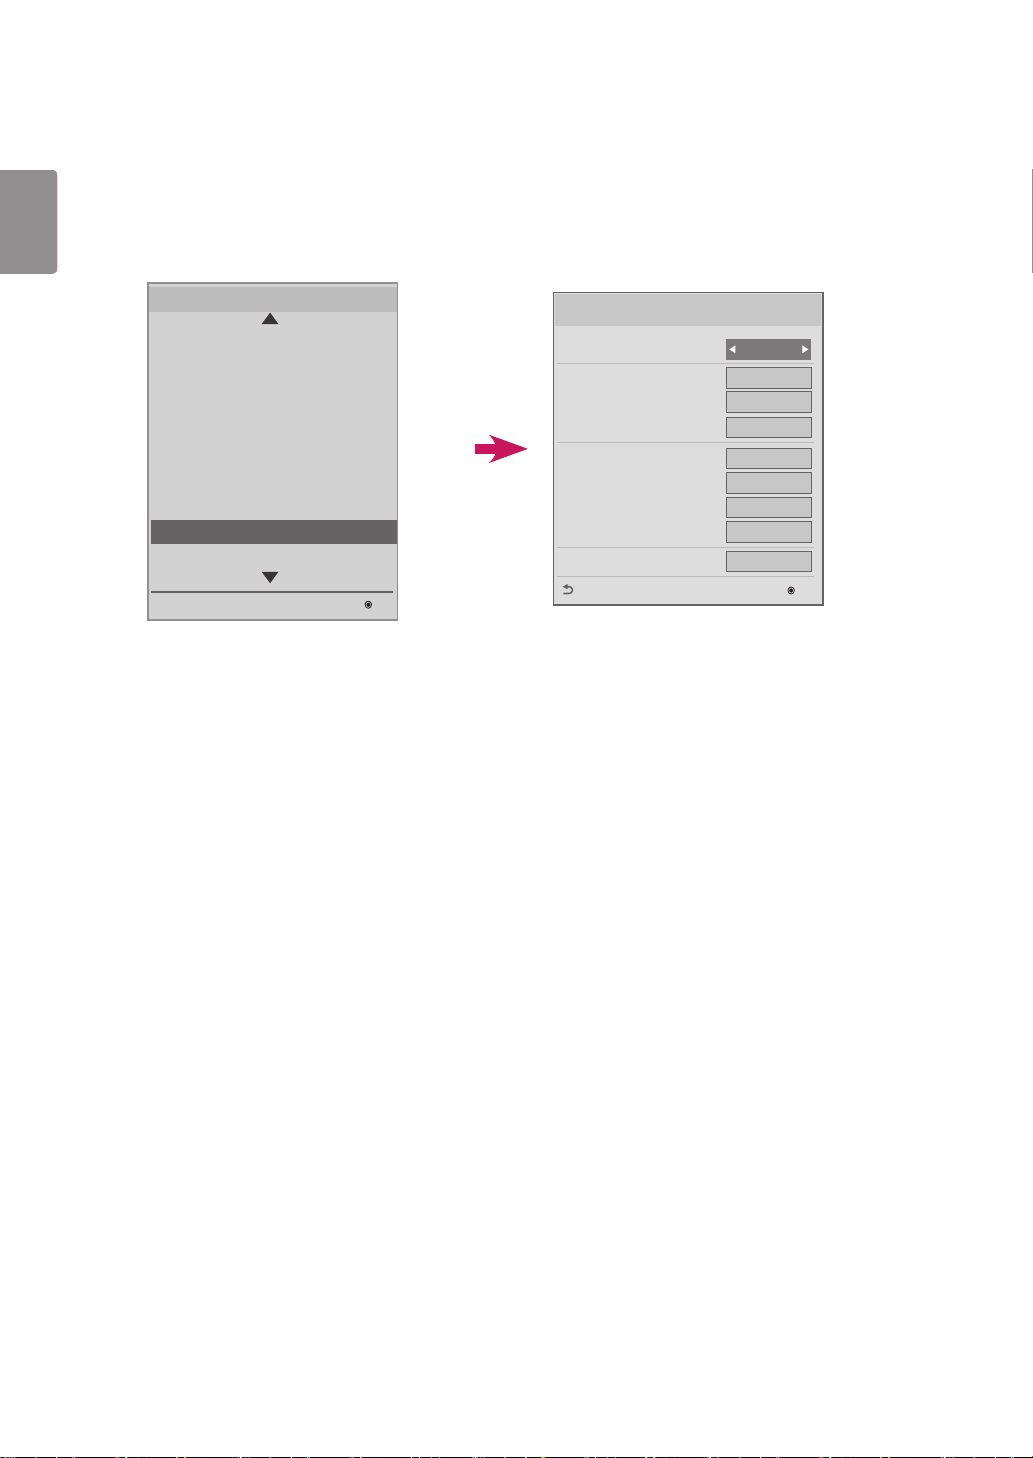
ENGLISH
POL
24
ISM Method
If a still image is displayed on the screen for an extended period of time, image sticking can occur. The ISM method
is a feature that prevents image sticking.
Installation Menu (V 3.0)
LG Digital Signage Setup
USB Cloning
Password Change
Set ID Setup
Configuration Setup
Lock Mode
External Speaker
Fail Over
ISM Method
ISM Method
Easy Brightness Control
S/W : xx.xx.xx.xx Micom : x.xx.x
OK
ISM Method
Mode
Timer
Period
Time
Bar Image
Bar Color
Bar Transparency
Bar Direction
User Image
Previous
Normal
Immediately
1 hour
1 min.
Off
Red
Off
Left -> Right
Movie
OK
Mode
Normal: Disables the ISM method.
Inversion: Inverts screen colors to remove image sticking.
Orbiter: Moves the image's position on the screen a certain number of pixels at regular intervals in a certain
order to remove image sticking.
White Wash: Displays a white pattern to remove image sticking.
Color Wash: Alternately displays a white pattern and a color pattern to remove image sticking.
Washing Bar: Displays a bar on the screen to make the image move smoothly.
(If you select Washing Bar, Bar Image, Bar Color, or Bar Transparency is enabled.)
User Image: Plays your photos or movies using a USB storage device.
Page 63
Timer
Immediately: Performs the ISM function immediately after the ISM Method menu window disappears. The
Period/Time option is disabled.
a) Inversion: Inverts the screen every 30 minutes.
b) Orbiter: The image moves 3 pixels every 2 minutes in a certain order.
c) User Image: Displays the image on repeat until you press the EXIT button on your remote control.
Repeat: Performs the ISM function for a specified amount of time in each period. (Period and Time are only
enabled when Repeat is selected.)
a) Inversion: Inverts the screen for a specified amount of time and then restores the screen to its original
settings. The period will be calculated again after the screen is restored.
b) Orbiter: Moves the image 3 pixels at specified time intervals. In Repeat mode, the Orbiter function is
terminated only when a movie is output or when there is a button input from the remote control.
After the termination of the Orbiter function, the period will be calculated again.
c) User Image: You can terminate User Image by pressing the EXIT button on your remote control before a
specified time passes. After termination of the User Image function, the period will be calculated
again.
Period
You can set the period between 1 and 24 hours.
When there is a button input from your remote control, this function is terminated and the period is calculated
again.
25
ENGLISH
POL
Time
You can select from among 1 - 10 mins / 20 mins / 30 mins / 60 mins / 90 mins / 120 mins / 180 mins / 240 mins
The ISM function is performed for a specified period.
NOTE
Still Image Detecting and ISM Method
If you set Still Image Detecting to Yes, the ISM function starts when the amount of time the image has been still
reaches a specified period. When a movie is output, the function is terminated and the period is recalculated.
If you set Still Image Detecting to No, the ISM function starts when the amount of time no button input from the
remote control is detected reaches a specified period.
Page 64
ENGLISH
POL
26
Bar Image
Off: Displays a bar with a fixed resolution of 300 x 1080, then moves the bar.
On: Displays a user-downloaded image, and moves the image.
NOTE
Images can be displayed at your desired size without a size limit. (However, the image height is fixed at 1080.)
If only one image is downloaded, the image is displayed alone and the bar moves.
If multiple images are downloaded, the images move alternately fading in and out of each other.
Each of the downloaded images is displayed once per cycle.
How to Download an ISM Bar Image in Ez Download.
In order to download an image in Ez Download, there must be an image file in an 'ism_bar' or 'ISM_BAR' folder
1
on your USB storage device.
Delete the existing contents stored on internal memory before downloading a new image file.
2
Add [ISMBAR] as a prefix to the name of a file to distinguish the file from others (EPK, Logo, No Signal, etc.).
3
Download ISM photos or movies in Ez Download.
4
NOTE
You can download multiple images up to 5 MB combined.
The total bit size of images must be under 50 MB.
For example, in the case of a 500 KB image with a resolution of 1920 x 1080, its bit size, as calculated by image
decoding, is about 7.91 MB (1920 * 1080 * 32 bit / 1024 / 1024 / 8).
Therefore, if you download 7 images of the same size, the total size of the images is about 3.5 MB, which falls
within 5 MB, but because its total bit size is 7.91 MB * 7 = 55.3 MB, they cannot be downloaded.
Bar Color
You can choose from six colors: red, green, blue, white, black, and gray.
This feature is only applicable when Bar Image is set to Off.
Bar Transparency
Off: Displays the bar opaquely.
On: Displays the bar translucently.
Bar Direction
Left -> Right: The bar moves from left to right.
Right -> Left: The bar moves from right to left.
Page 65
User Image
This feature enables the playback of your desired photos and movies using your USB storage device.
(If you select User Image, the contents options of Movie and Photo are enabled.
- Movie: Plays movies stored in the ISM (or ism) folder on your USB storage device
- Photo: Plays a slide show of images stored in the ISM (or ism) folder on your USB storage device.
If both USB 1 and USB 2 are active, the User Image feature is performed on the device connected to USB 1.
While User Image is performed, menus are not displayed until you press a key.
If you press a key, menus are displayed and you can change settings.
The User Image feature is performed on the USB 1 device if USB storage devices are connected to both USB 1
and USB 2.
While User Image is performed, USB 1 and USB 2 must be unoccupied for the playback of contents stored on
internal memory.
When there is no valid folder/contents, no action is performed.
You can store movies and photos on internal memory using Ez Download.
How to Download an ISM Photo/Movie in Ez Download.
In order to download a user image in Ez Download, there must be a user image file in an 'ism' or 'ISM' folder on
1
your USB drive.
27
ENGLISH
POL
Delete the existing contents stored on internal memory before downloading a new image file.
2
Add [ISMPHO] as a prefix to the name of a file for photos or [ISMMOV] if the file contains movies, to distinguish
3
the file from others (EPK, Logo, No Signal, etc).
Download ISM photos or movies in Ez Download.
4
NOTE
You can download one movie file of up to 30 MB.
You can download multiple photos of up to 5 MB combined.
Page 66
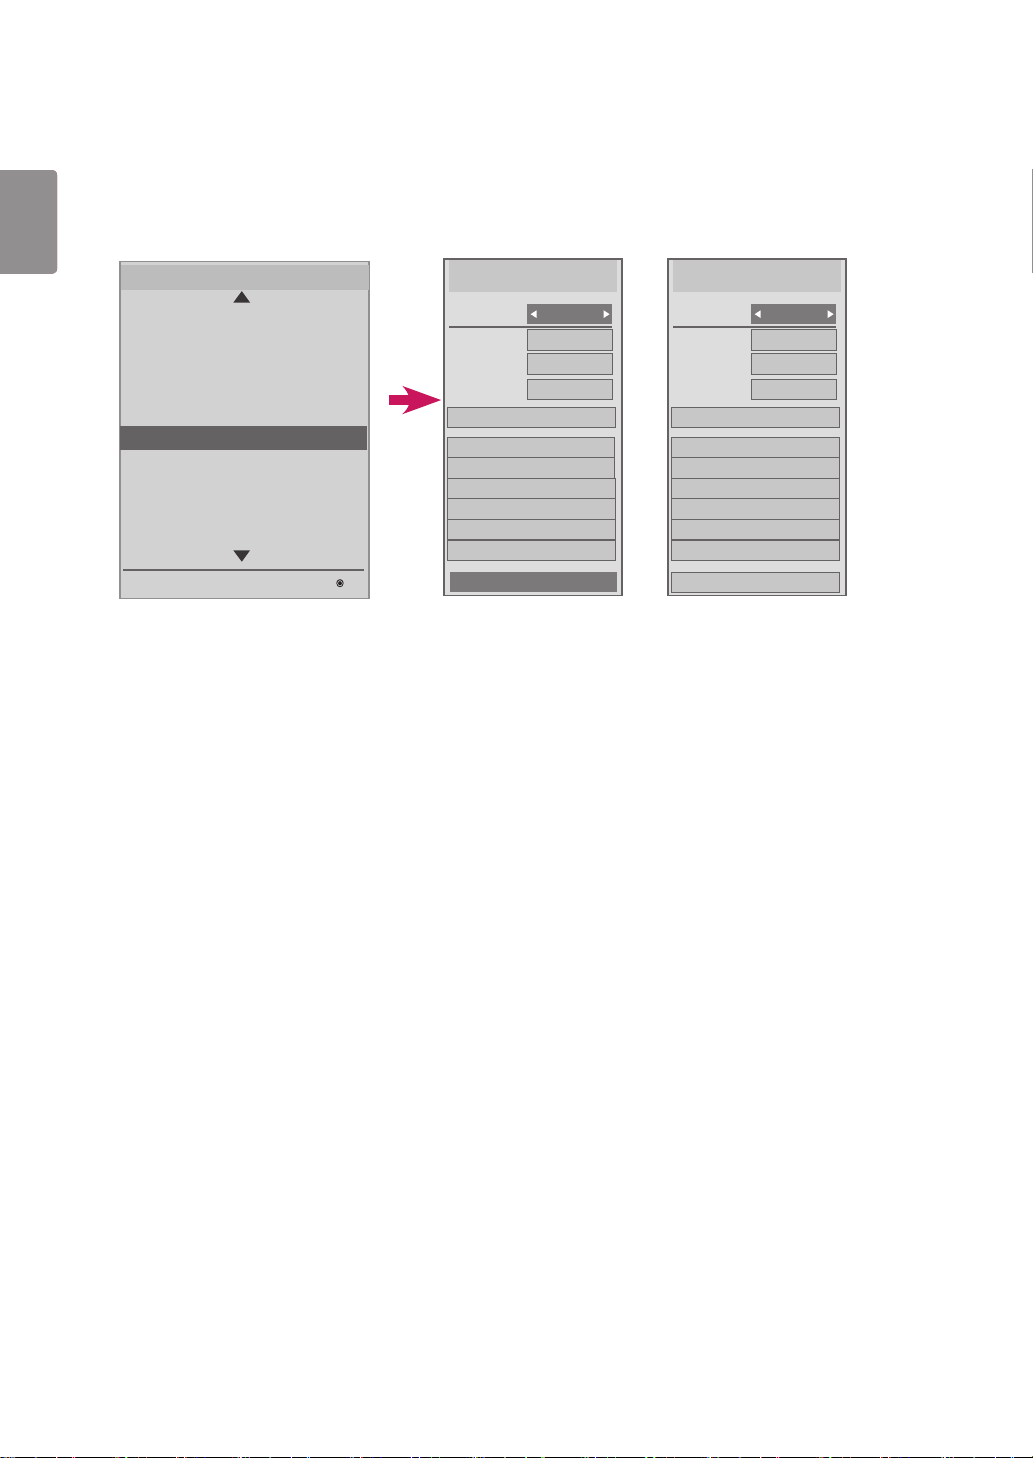
ENGLISH
POL
28
Easy Brightness Control
The backlight is adjusted according to your schedule(s).
Installation Menu (V 3.0)
Configuration Setup
Lock Mode
External Speaker
Fail Over
ISM Method
Easy Brightness Control
Easy Brightness Control
SuperSign Server Setup
Holiday Schedule
No Signal Image
S/W : xx.xx.xx.xx Micom : x.xx.x
The backlight is adjusted according to your schedule(s).
You can set this feature to On (enabled) or Off (disabled).
Easy Brightness Control is disabled if the current time is not set.
Easy Brightness Control is disabled if Energy Saving is set to Maximum.
You can add up to six schedules, and they are sorted in ascending order by time.
If more than six schedules are added, the latest schedule is automatically deleted.
You can delete a schedule by selecting it from the list and pressing the OK button.
Duplicate schedules are not added. However, the backlight value is renewed.
OK
Easy Brightness Control
Mode
Hour
Minute
Backlight
Add Schedule
12:00 (70)
-------------------
-------------------
-------------------
-------------------
-------------------
On
12
00
70
Close
Easy Brightness Control
Mode
Hour
Minute
Backlight
-------------------
-------------------
-------------------
-------------------
-------------------
-------------------
(This feature may not be available with some models.)
Off
--
--
--
Add Schedule
Close
Page 67
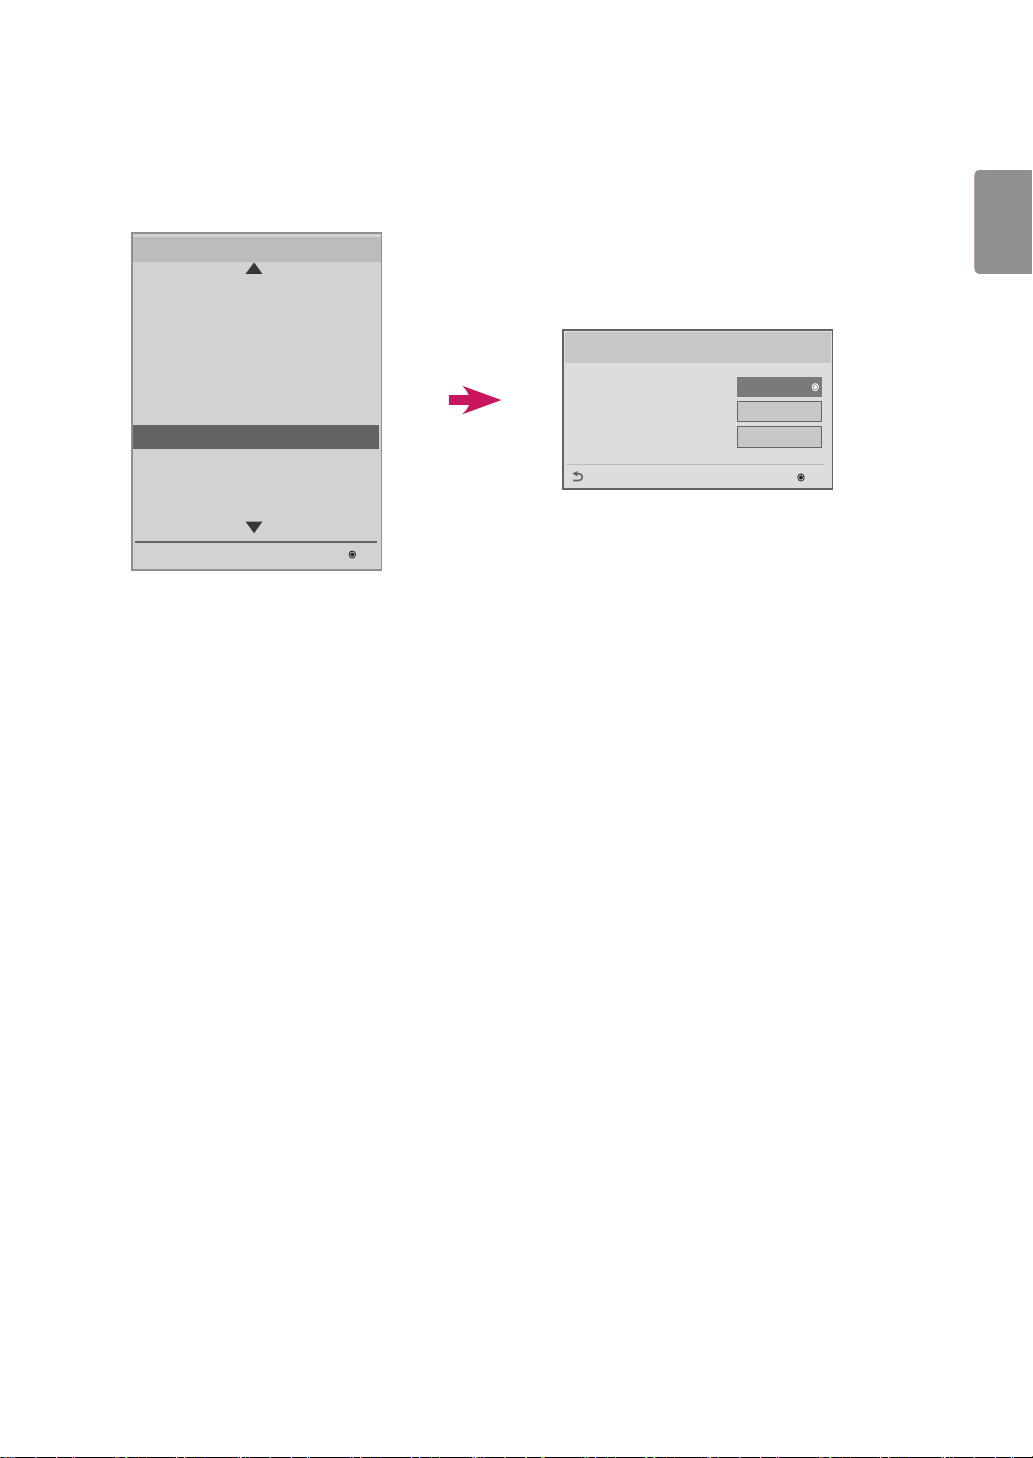
SuperSign Server Setup
This feature is designed for linkage with SuperSign Manager.
Installation Menu (V 3.0)
Configuration Setup
Lock Mode
External Speaker
Fail Over
ISM Method
Easy Brightness Control
SuperSign Server Setup
SuperSign Server Setup
Holiday Schedule
No Signal Image
SuperSign Server Setup
Player Name
Server IP Setting
Server IP Status
Previous
Press OK
Press OK
Not connected
OK
29
ENGLISH
POL
S/W : xx.xx.xx.xx Micom : x.xx.x
OK
Player Name
You can set the name of a player you want to control in SuperSign Manager. (You can enter up to 20
characters.)
Server IP Setting
You can set the IP address of the computer (server) on which SuperSign Manager is installed.
Server IP Status
This feature displays the status of the connection between your monitor and the SuperSign server.
- Not connected: Your monitor is not connected to the SuperSign server.
- Waiting for Approval: Your monitor is connected to the SuperSign server but has not yet been approved.
- Rejected: Your monitor is connected to the SuperSign server but has been rejected.
- Connected: Your monitor is connected to the SuperSign server and has been approved.
Page 68
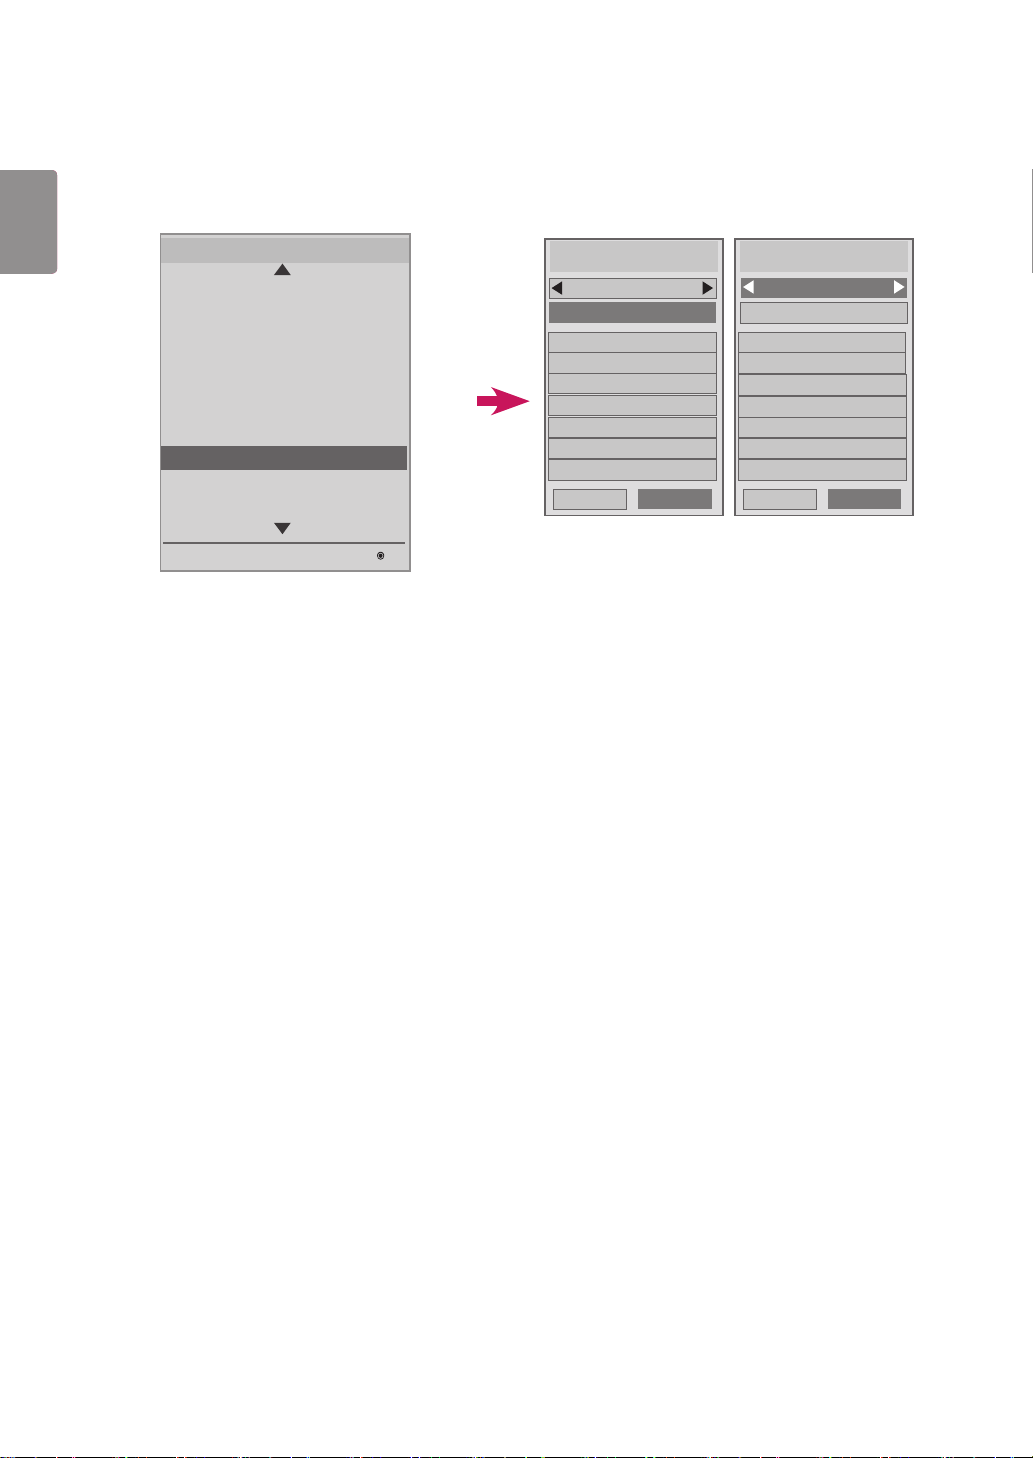
ENGLISH
POL
30
Holiday Schedule
This feature allows you to specify holidays (unit: day) when the product will not be used.
Installation Menu (V 3.0)
Configuration Setup
Lock Mode
External Speaker
Fail Over
ISM Method
Easy Brightness Control
SuperSign Server Setup
Holiday Schedule
Holiday Schedule
No Signal Image
S/W : xx.xx.xx.xx Micom : x.xx.x
Holidays are specified according to your schedule(s).
You can set this feature to On (enabled) or Off (disabled).
Holiday Schedule is disabled if the current time is not set.
You can add up to seven schedules.
Duplicate schedules cannot be added.
OK
Holiday Schedule
On
Add Schedule
January 1 ~ January 1
-------------------
-------------------
-------------------
-------------------
-------------------
-------------------
Delete All
Close
Holiday Schedule
Off
Add Schedule
-------------------
-------------------
-------------------
-------------------
-------------------
-------------------
-------------------
Delete All
Close
Page 69
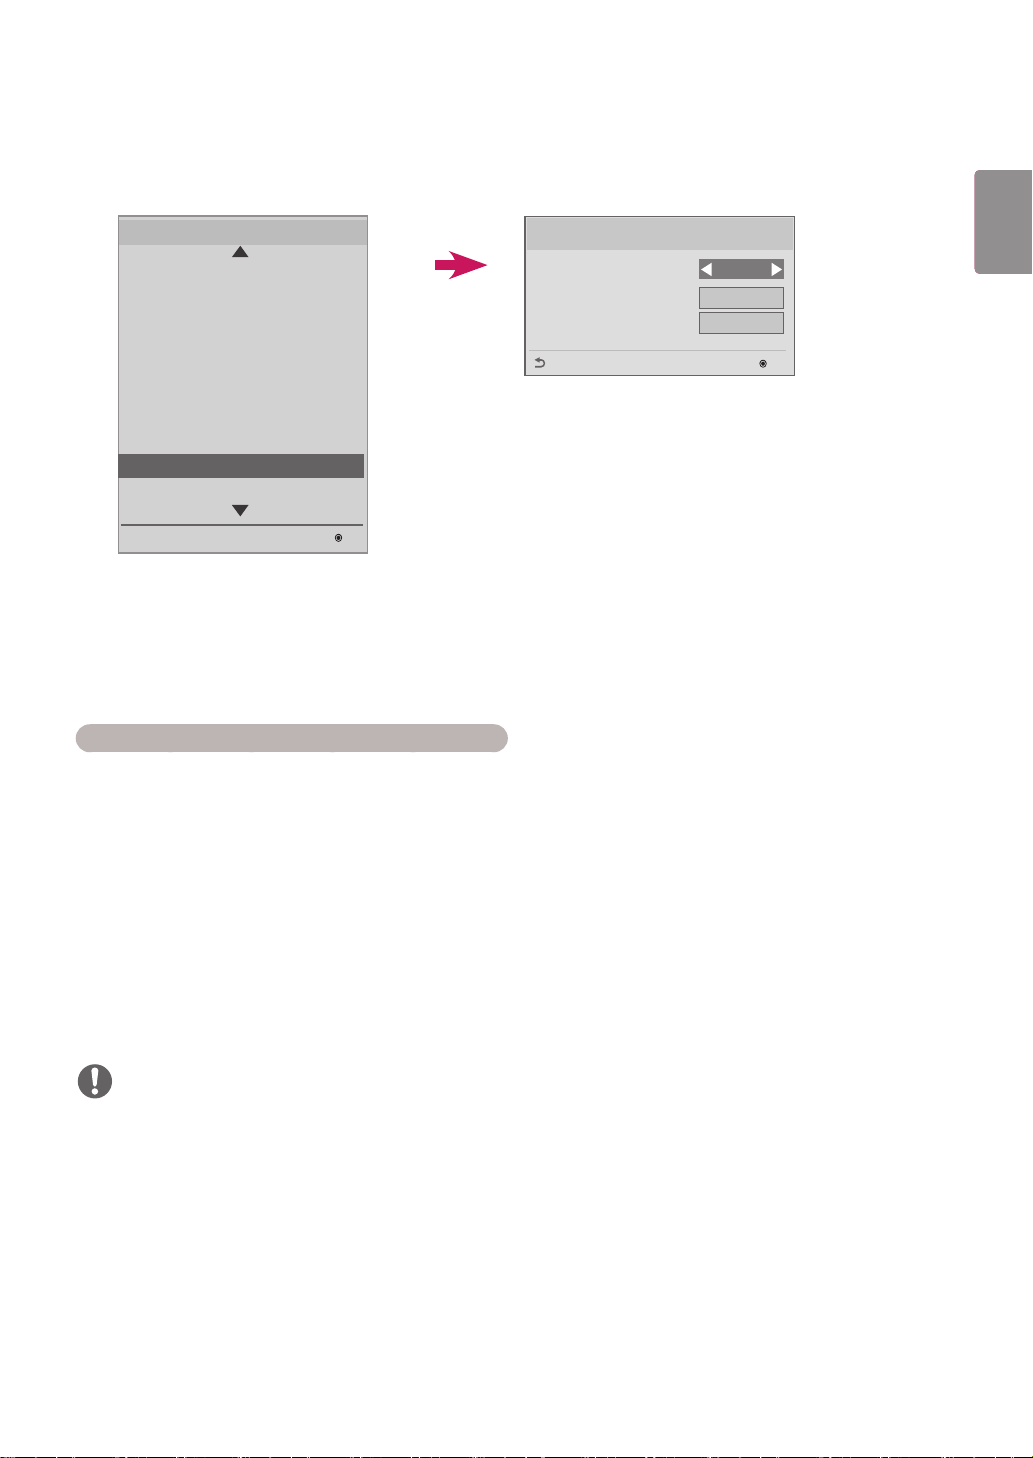
No Signal Image
This feature allows the screen image to be changed when there is no signal.
Installation Menu (V 3.0)
No Signal Image
31
ENGLISH
POL
Configuration Setup
Lock Mode
External Speaker
Fail Over
ISM Method
Easy Brightness Control
SuperSign Server Setup
Holiday Schedule
No Signal Image
No Signal Image
S/W : xx.xx.xx.xx Micom : x.xx.x
You can use the default image of "No Signal" or a new image by disabling or enabling the No Signal Image
OK
No Signal Image
Mode
Slide Time
Previous
Disable
Original
5 sec
OK
feature.
You can change the image size to Full, Original, or Fit in the Mode option.
You can set Slide Time if you download multiple images. (5 / 10 / 15 / 20 sec)
How to Download a No Signal Image in Ez Download
In order to download an image in Ez Download, there must be an image file in an 'lg_sig' or 'LG_SIG' folder on
1
your USB drive.
Delete the existing contents stored in internal memory before downloading a new image file.
2
Select the image(s) you want to download. Please make sure that the Total Size in the right-hand corner of the
3
Ez Download menu does not exceed the Max Size 10240 KB (10 MB).
Download the image file for No Signal Image in EZ Download.
4
NOTE
Only JPEG files 1 MB or smaller in size can be used as No Signal Image update.
Progressively encoded JPEG files are not applicable.
The maximum file resolution for a No Signal Image is Full HD, 1920 x 1080 and HD, 1360 x 768. The minimum file
resolution for a No Signal Image is 64 x 64.
No Signal Image files with a resolution of Full HD, 1920 x 1080 can cause image sticking.
Only No Signal Image files with English names are displayed correctly.
Page 70

ENGLISH
POL
32
Digital Signage Media Player
The Digital Signage Media Player can play content produced and distributed by SuperSign Elite-W.
Supported content types include external inputs, texts and music as well as photographs, videos and Signage
Monitor.
Executable content
*.cts: These files can be played at any time.
*.sce: These files can be played at any time like *.cts files or they can be played to a specific schedule.
Using the My Media menu to play les
After inserting the USB storage device, access the My Media menu and select an executable content file under
the “All Media” tab or the “Contents List” tab to play the file.
Auto-play on USB insertion
Turning on the main power or inserting a USB device when the main power is on will automatically play ex-
ecutable content in a specific folder.
If a USB device has already been inserted when the main power is turned on, executable content in the "nor-
mal" folder is played by default. If the "normal" folder does not exist, executable content in the "AutoPlay"
folder is played.
If a USB device is inserted some time after the main power has been turned on, executable content in the
“AutoPlay” folder is played by default. If the “AutoPlay” folder does not exist, executable content in the “normal”
folder is played.
Autoplay for an inserted USB device is only supported on USB port 1.
Distributing and playing content via SuperSign Elite-W
If a USB storage device is inserted in USB port #1, the LAN cable is connected and the SuperSign Server set-
tings are configured, content can be received from the SuperSign Elite-W server.
Schedules can be set to play a variety of specific content or media files, including photos and videos, from
SuperSign Elite-W whenever the user wants.
Messages created by the user can be sent to the player via SuperSign Elite-W.
For more information, see the SuperSign Elite-W manual.
Page 71
Page 72

USER GUIDE
LG Digital
Signage
(MONITOR SIGNAGE)
Please read this manual carefully before operating your set and retain it
for future reference.
L15
www.lg.com
Page 73

2
ENGLISH
TABLE OF CONTENTS
USING THE MONITOR ............. 3
- Using the Input List .................................. 3
- Adjusting Aspect Ratio ............................. 3
ENTERTAINMENT .................... 5
- Using the Network .................................... 5
Connecting to a Network
Network Status
- Using the My Media ................................. 7
Connecting USB storage devices
Browsing Files
Viewing Movies
Viewing Photos
Listening to Music
Viewing the Contents List
CUSTOMIZING SETTINGS .... 20
- Accessing Main Menus .......................... 20
PICTURE Settings
AUDIO Settings
TIME Settings
OPTION Settings
NETWORK Settings
- PICTURE ID Settings ............................. 30
IR CODES ............................... 31
TO CONTROL MULTIPLE
PRODUCTS ............................ 33
- Connecting the Cable ............................ 33
- RS-232C Configurations ........................ 34
4P Cable
RS-232C Cable
- Communication Parameter .................... 34
- Command Reference List ...................... 35
- Transmission / Receiving Protocol ......... 37
To obtain the source code under GPL, LGPL,
MPL, and other open source licenses, that is
contained in this product, please visit
http://opensource.lge.com.
In addition to the source code, all referred
license terms, warranty disclaimers and
copyright notices are available for download.
LG Electronics will also provide open source
code to you on CD-ROM for a charge covering
the cost of performing such distribution (such
as the cost of media, shipping, and handling)
upon email request to
This offer is valid for three (3) years from the
date on which you purchased the product.
Page 74
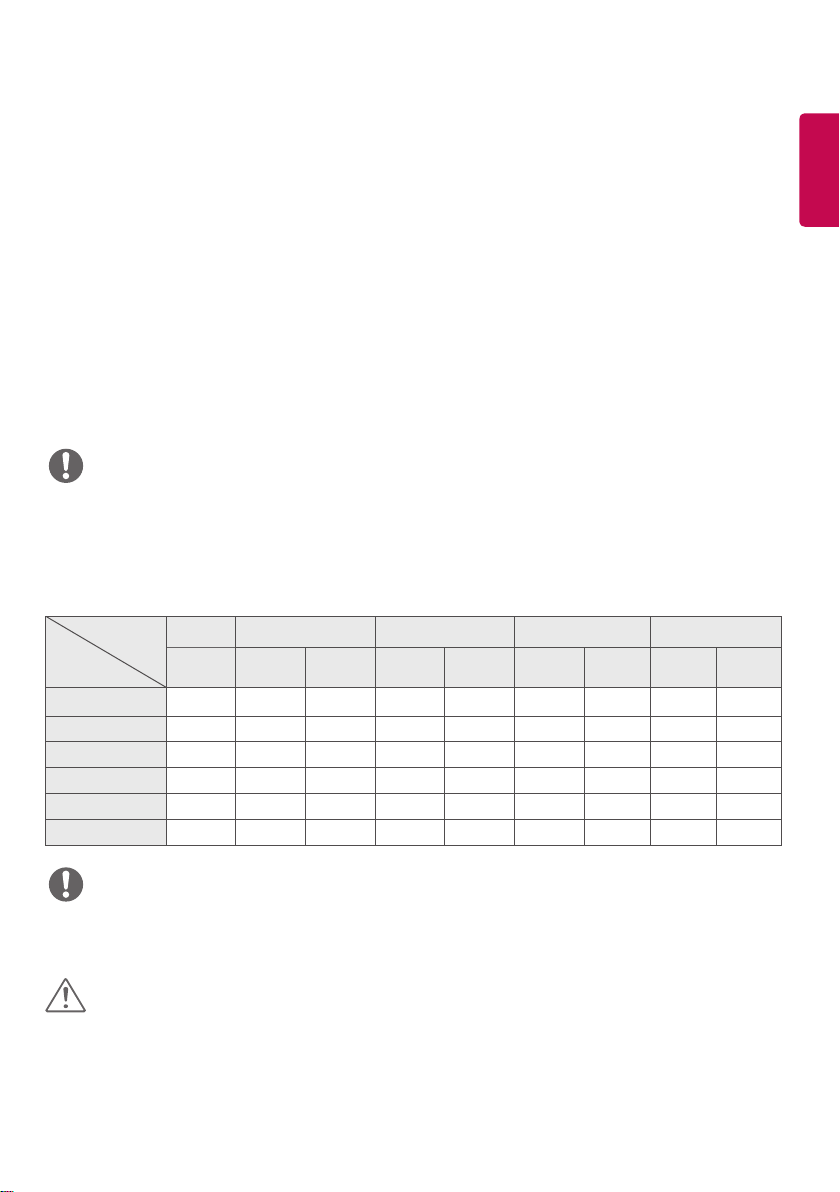
3
USING THE MONITOR
Using the Input List
Press INPUT to access the Input List.
1
Press the navigation buttons to scroll to one of the input mode and press OK.
2
yRGB-PC
yHDMI
yDVI-D
yUSB
yDisplay Port
yOPS
NOTE
• Some input signals may not be supported depending on the model.
Adjusting Aspect Ratio
Resize the image to view the image at its optimal size by pressing ARC while you are watching monitor set.
Aspect Ratio
16:9
Just Scan x o x o x o x o x
Set By Program x o x o x o x o x
4:3 o o o o o o o o o
Zoom x o x o x o x o x
Cinema Zoom1 x o x o x o x o x
NOTE
• You can also change the image size by accessing the main menus.
• The Just Scan mode operates when a video signal has resolution of 720p or higher.
MODE
RGB HDMI DVI-D Display Port OPS
PC DTV PC DT V PC DTV PC DT V PC
o o o o o o o o o
ENGLISH
CAUTION
• If a fixed image displays on the screen for a long period of time, it will be imprinted and become a
permanent disfigurement on the screen. This is image burn or burn-in and not covered by the warranty.
• If you don't use your monitor, turn the power off or set a screen saver program from the PC or the system to
prevent image retention.
• If the aspect ratio is set to 4:3 for a long period of time, image burn may occur on the letterboxed area of the
screen.
Page 75

4
y16:9 : This selection will allow you to adjust the picture horizontally, in linear proportion, to fill the entire
ENGLISH
screen (useful for viewing 4:3 formatted DVDs).
yJust Scan : This Selection will allow you view the picture of best quality without loss of original picture
in high resolution image. Note: If there is noise in original Picture, You can see the noise at the
edge.
ySet By Program : Depending on the input signal, screen aspect ratio changes to 4:3 or 16:9.
y4:3 : This selection will allow you to view a picture with an original 4:3 aspect ratio, black bars will appear
on both the left and right of the screen.
yZoom : This selection will allow you to view the picture without any alteration, while filling the entire
screen. However, the top and bottom of the picture will be cropped.
yCinema Zoom1 : Choose Cinema Zoom when you want to enlarge the picture in correct proportion.
Note: When enlarging or reducing the picture, the image may become distorted.
Page 76
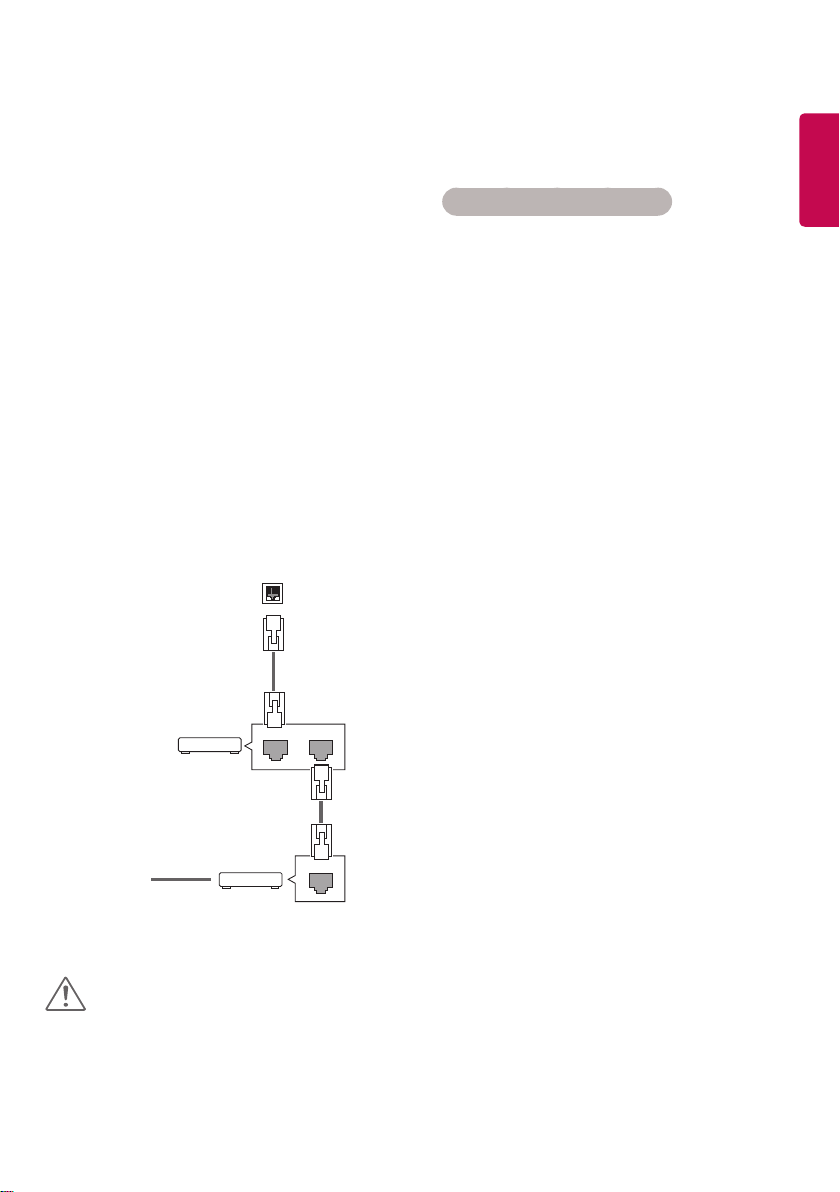
5
NW
@
ENTERTAINMENT
Using the Network
Connecting to a Network
For wired network connections, connect the
display to a local area network (LAN) via the LAN
port as shown on the following diagram. Then, set
up the network settings. For wireless network connections, connect the Wi-Fi USB module to the USB
port. Then, set up the network settings.
After making a physical connection, a small
number of home networks may require the display
network settings to be adjusted. For most home
networks, the display will connect to automatically
without any adjustments.
For detail information, contact your internet pro-
vider or router manual.
LAN
LA
Router
AN
To set up the network settings: (Even if your display
has already connected automatically, running
setup again will not harm anything),
Connecting to a wired network
1 Press SETTINGS to access the main menus.
2 Press the navigation buttons to scroll to NET-
WORK and press OK.
3 Press the navigation buttons to select Net-
work Setting and press OK.
4 If you already set network setting, select
Resetting. The new connection settings resets
the current network settings.
5 Select IP Auto Setting or IP Manual Setting.
- IP Manual Setting
press the navigation and number buttons. IP
addresses will need to be input manually.
- IP Auto Setting
Select this if there is a DHCP server (Router)
on the local area network (LAN) via wired
connection, the display will automatically
be allocated an IP address. If you’re using a
broadband router or broadband modem that
has a DHCP (Dynamic Host Configuration
Protocol) server function. The IP address will
automatically be determined.
ENGLISH
Internet
Internet
CAUTION
• Do not connect a modular phone cable to the
LAN port.
• Since there are various connection methods,
please follow the specifications of your
telecommunication carrier or internet service
provider.
Cable modem
6 When you are finished, press EXIT.
ETHERNET
Page 77
6
Connecting to a wireless network
ENGLISH
1 Press SETTINGS to access the main menus.
2 Press the navigation buttons to scroll to NET-
WORK and press OK.
3 Press the navigation buttons to select Net-
work Setting and press OK.
4 Select Setting from the AP list or Simple
setting (WPS-button mode).
-Setting from the AP list
Select an AP to connect to a wireless network.
- Simple setting (WPS-button mode)
Press the button on the wireless router that
supports PBC to easily connect to the router.
5 When you are finished, press EXIT.
CAUTION
• Network setting menu will not be available until
the display connected to physical network.
• Since there are various connection methods,
please follow the specifications of your
telecommunication carrier or internet service
provider.
• When a Wi-Fi dongle is used with a model that
has only one USB input port, the distribution or
content schedule via the SuperSign software is
not available.
NOTE
• If you want to access the Internet directly on
your display, the Internet connection should
always be on.
• If you cannot access the Internet, check the
network conditions from a PC on your network.
• When you use Network Setting, check the LAN
cable or check if DHCP in the router is turned on.
• If you do not complete the network settings, the
network may not work properly.
Tips for Network setting
y Use a standard LAN cable with this display. Cat5 or
better with a RJ45 connector.
y Many network connection problems during set
up can often be fixed by re-setting the router or
modem. After connecting the display to the home
network, quickly power off and/or disconnect the
power cable of the home network router or cable
modem. Then power on and/or connect the power
cable again.
y Depending on the internet service provider (ISP),
the number of devices that can receive internet
service may be limited by the applicable terms of
service. For details, contact your ISP.
y LG is not responsible for any malfunction of the
display and/or the internet connection feature due
to communication errors/malfunctions associated
with your internet connection, or other connected
equipment.
y LG is not responsible for problems within your
internet connection.
y You may experience undesired results if the net-
work connection speed does not meet the requirements of the content being accessed.
y Some internet connection operations may not be
possible due to certain restrictions set by the Internet service provider (ISP) supplying your Internet
connection.
y Any fees charged by an ISP including, without limi-
tation, connection charges are your respon- sibility.
y A 10 Base-T or 100 Base-TX LAN port is required
when using a wired connection to this display. If
your internet service does not allow for such a connection, you will not be able to connect the display.
y A DSL modem is required to use DSL service and
a cable modem is required to use cable modem
service. Depending on the access method of and
subscriber agreement with your ISP, you may not
be able to use the Internet connection feature contained in this display or you may be limited to the
number of devices you can connect at the same
time. (If your ISP limits subscription to one device,
this display may not be allowed to connect when a
PC is already connected.)
y The use of a router may not be allowed or its usage
may be limited depending on the policies and
restrictions of your ISP. For details, contact your ISP
directly.
Page 78
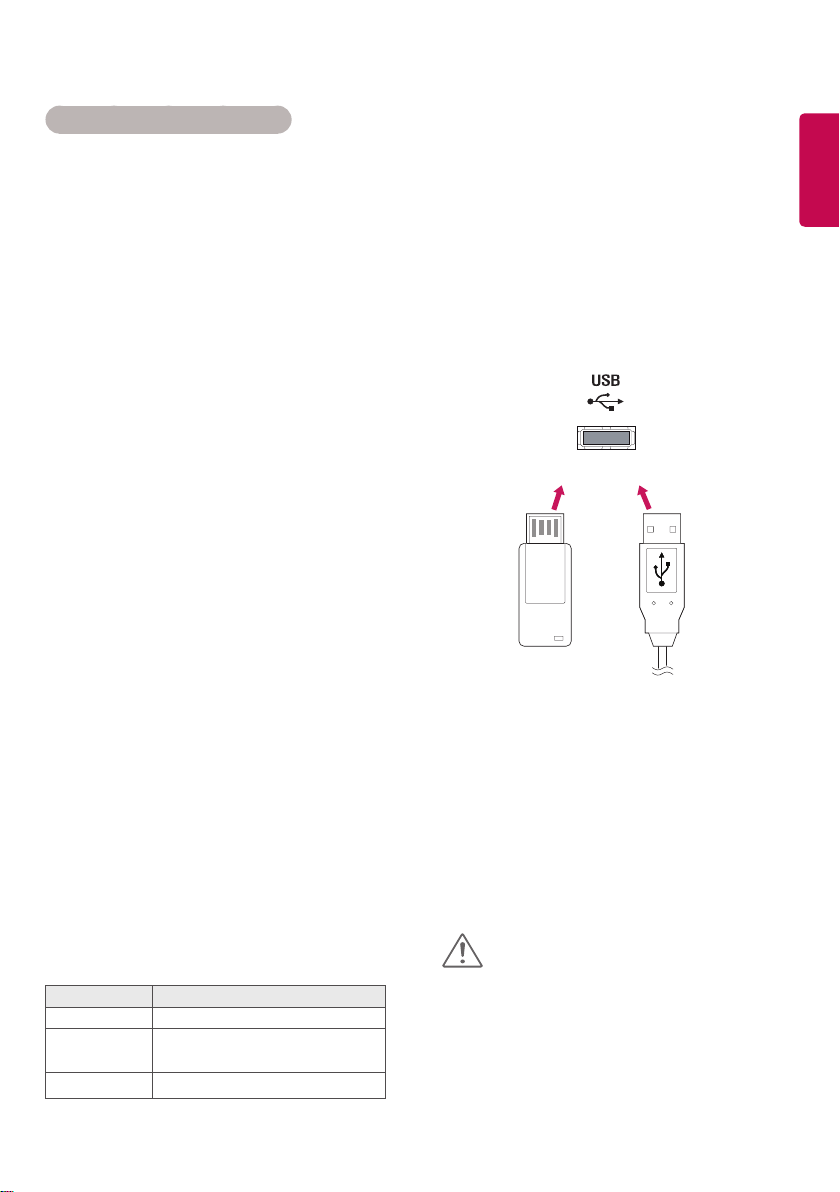
7
Tips for Wireless Network Setting
y Wireless networks can be subject to interfer-
ence from other devices operating at a frequency of 2.4 GHz (wireless phones, Bluetooth
devices, or microwave ovens). There may also
be interference from devices with a frequency
of 5 GHz, same as other Wi-Fi devices.
y The surrounding wireless environment can
cause the wireless network service to run
slowly.
y For an AP connection, an access point device
that supports wireless connection is required
and the wireless connection feature must be
enabled on the device. Contact your service
provider regarding availability of wireless connection on your access point.
y Check the SSID and security settings of the AP
for AP connection. Refer to the appropriate
documentation for SSID and security settings
of the AP.
y Invalid settings on network devices (wired/
wireless line sharer, hub) can cause the
monitor to run slowly or not operate properly.
Install the devices correctly according to the
appropriate manual and set the network.
y Connection method may differ according to
the AP manufacturer.
Network Status
Using the My Media
Connecting USB storage devices
Connect USB storage devices such as a USB flash
memory, external hard drive to the display and use
multimedia features.
Connect a USB flash memory or USB memory card
reader to the Display as shown on the following
illustration. The My Media screen appears.
or
ENGLISH
1 Press SETTINGS to access the main menus.
2 Press the navigation buttons to scroll to
NETWORK and press OK.
3 Press the navigation buttons to select
Network Status.
4 Press OK to check the network status.
5 When you are finished, press EXIT.
Option Description
Setting Return to the network setting menu.
Test
Close Return to the previous menu.
Test the current network status after
setting the network.
CAUTION
• Do not turn the display off or remove a USB
storage device while MY MEDIA menu is
activated, as this could result in loss of files or
damage to the USB storage device.
• Back up your files saved on a USB storage device
frequently, as you may lose or damage the files
and this may be not covered by the warranty.
Page 79

8
Tips for using USB storage devices
ENGLISH
y Only a USB storage device is recognizable.
y If the USB storage device is connected through
a USB hub, the device is not recognizable.
y A USB storage device using an automatic rec-
ognition program may not be recognized.
y A USB storage device which uses its own driver
will not be recognized.
y The recognition speed of a USB storage device
may depend on each device.
y Please do not turn off the display or unplug
the USB device when the connected USB storage device is working. When such a device is
suddenly separated or unplugged, the stored
files or the USB storage device may be damaged.
y Please do not connect the USB storage device
which was artificially maneuvered on the PC.
The device may cause the product to malfunction. Only use a USB storage device which has
normal music files, image files
or movie files.
y Please only use USB storage devices formatted
using the FAT32 file system. Storage devices
formatted with utility programs that are not
supported by Windows may not be recognized.
y Please connect power to a USB storage device
(over 0.5 A) which requires an external power
supply. If not, the device may not be recognized.
y Please connect a USB storage device with the
cable included by the device maker.
y Some USB storage devices may not be sup-
ported or operate smoothly.
y File alignment method of USB storage devices
is similar to Window XP and the monitor can
recognize up to 100 English characters.
y Be sure to back up important files since data
stored on a USB memory device may be damaged. We will not be responsible for any data
loss.
y If the USB HDD does not have an external
power source, the USB device may not be
detected. So be sure to connect the external
power source.
- Please use a power adaptor for an external
power source.
y If your USB memory device has multiple parti-
tions, or if you use a USB multi-card reader,
you can use up to 4 partitions or USB memory
devices.
y If a USB memory device is connected to a USB
multi-card reader, its volume data may not be
detected.
y If the USB memory device does not work prop-
erly, disconnect and reconnect it.
y How fast a USB memory device is detected
differs from device to device.
y If the USB is connected in Standby Mode, that
drive will automatically be loaded when the
display is turned on.
y The recommended capacity is 1 TB or less for
a USB external hard disk and 32 GB or less for
USB memory.
y Any device with more than the recommended
capacity may not work properly.
y If a USB external hard disk with a Energy Sav-
ing function does not work, turn the hard disk
off and on again to make it work properly.
y USB storage devices below USB 2.0 are sup-
ported as well. But they may not work properly
with videos.
y A maximum of 999 folders or files can be
recognized under one folder.
y It is recommended you use a certified USB
storage device and cable. Otherwise, a USB
storage device may not be detected or a playback error may occur.
y Only a USB memory device can be used to play
back the files distributed and stored by SuperSign Manager. A USB hard disk or multi-card
reader will not work.
y Only an FAT 32 file formatted storage device
can play back the files distributed and stored
by SuperSign manager.
y A USB 3.0 storage device may not work.
y Data on some USB storage devices may be
damaged in a high temperature environment.
y It is recommended that you avoid playing
contents using more than two USB ports
simultaneously.
Page 80
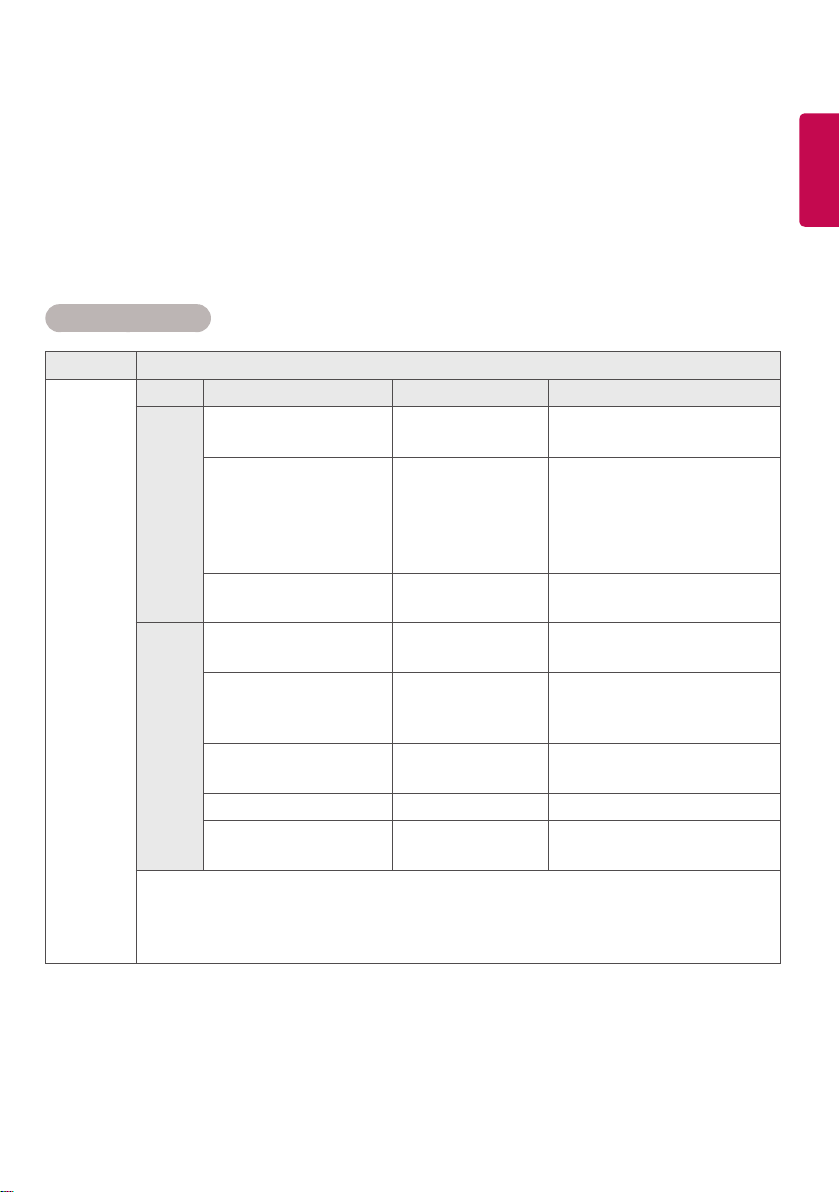
9
Browsing Files
Browse files saved in a USB storage device.
Press SETTINGS to access the main menu.
1
Press the search button to scroll to MY MEDIA and press OK.
2
Press the Search button to go to the Movie List, Photo List, Music List, or Content List that you want, and
3
press OK.
Supported file format
Typ e Supported file format
Movie Codec Media Container Profile
Video MPEG1 / MPEG2 DAT, MPG, MPEG, TS, TP 1080P @ 30 fps
MPEG4
(DivX 3.11, DivX 4,
DivX 5, DivX 6,
Xvid 1.01, Xvid 1.02, Xvid
1.03, Xvid 1.10-beta1/2)
H.264 AVI, MP4, MKV, TS, TRP, TP1080P @ 60 fps
Audio MP3 MP3 8 kbps to 320 kbps (Bit rate)
AC3 AC3 32 kbps to 640 kbps (Bit rate)
MPEG MP3 32 kbps to 448 kbps (Bit rate)
AAC, HEAAC MP4 8 kHz to 48 kHz (Sample rate)
LPCM AVI, WAV 64 kbps to 1.5 Mbps (Bit rate)
Bit rate : within 8 kbps to 320 kbps(MP3)
External Subtitle format : *.smi/*.srt/*.sub(MicroDVD, Subviewer1.0/2.0)/*.ass/*.ssa/*.txt(TMPlayer)/
*.psb(PowerDivX)
Internal Subtitle format : only, XSUB (It is the subtitle format used in DivX6 files)
AVI, DIVX, MP4, MKV, TS,
TRP
1080P @ 30 fps
16 kHz to 48 kHz (Sample rate)
32 kHz, 44.1 kHz, 48 kHz
(Sample rate)
16 kHz to 48 kHz (Sample rate)
8 kHz to 48 kHz (Sample rate)
ENGLISH
Page 81
10
ENGLISH
Photo
Music
Content
(when using
SuperSign
Manager)
Typ e Supported file format
JPEG
Min : 64 x 64
Max : Normal Type: 15360 (W) x 8640 (H)
Progressive Type: 1920 (W) x 1440 (H)
BMP
Min : 64 x 64
Max : 9600 x 6400
PNG
Min : 64 x 64
Max : Interlace: 1200 x 800
Non-Interlace: 9600 x 6400
y Non-supported files are displayed in the form of predefined icon.
mp3
[Bit rate] 32 kbps ~ 320 kbps
[Sample freq] 16 kHz ~ 48 kHz
[Support] MPEG1, MPEG2, Layer2, Layer3
AAC
[Bit rate] Free Format
[Sample freq.] 8 kHz ~ 48 kHz
[Support] ADIF, ADTS
M4A
[Bit rate] Free Format
[Sample freq.] 8 kHz ~ 48 kHz
[Support] MPEG-4
OGG
[Bit rate] Free Format
[Sample freq.] ~ 48 kHz
[Support] Vorbis
WMA
[Bit rate] 128 kbps ~ 320 kbps
[Sample freq.] 8 kHz ~ 48 kHz
[Support] WMA7, 8, 9 Standard
WMA 10 Pro
[Bit rate] ~768 kbps
[Channel / Sample freq.]
M0 : Up to 2 / 48 kHz
M1 : Up to 5.1 / 48 kHz
M2 : Up to 5.1 / 96 kHz
[Support] WMA 10 Pro
File Extensions : *.cts/ *.sce
Movie
File Extensions: *.mpg/*.mpeg/*.dat/*.ts/*.trp/*.tp/*.mp4/*.mkv/*.avi/*. avi(motion JPEG)/*.mp4(motion
JPEG)/*.mkv(motion JPEG)
Video format: MPEG1, MPEG2, MPEG4,H.264, DivX 3.11, DivX 4, DivX 5, DivX 6,
Xvid 1.00,Xvid 1.01, Xvid 1.02, Xvid 1.03,Xvid 1.10-beta1/2, JPEG
Audio format: MP3, Dolby Digital, LPCM, AAC, HE-AAC
Page 82
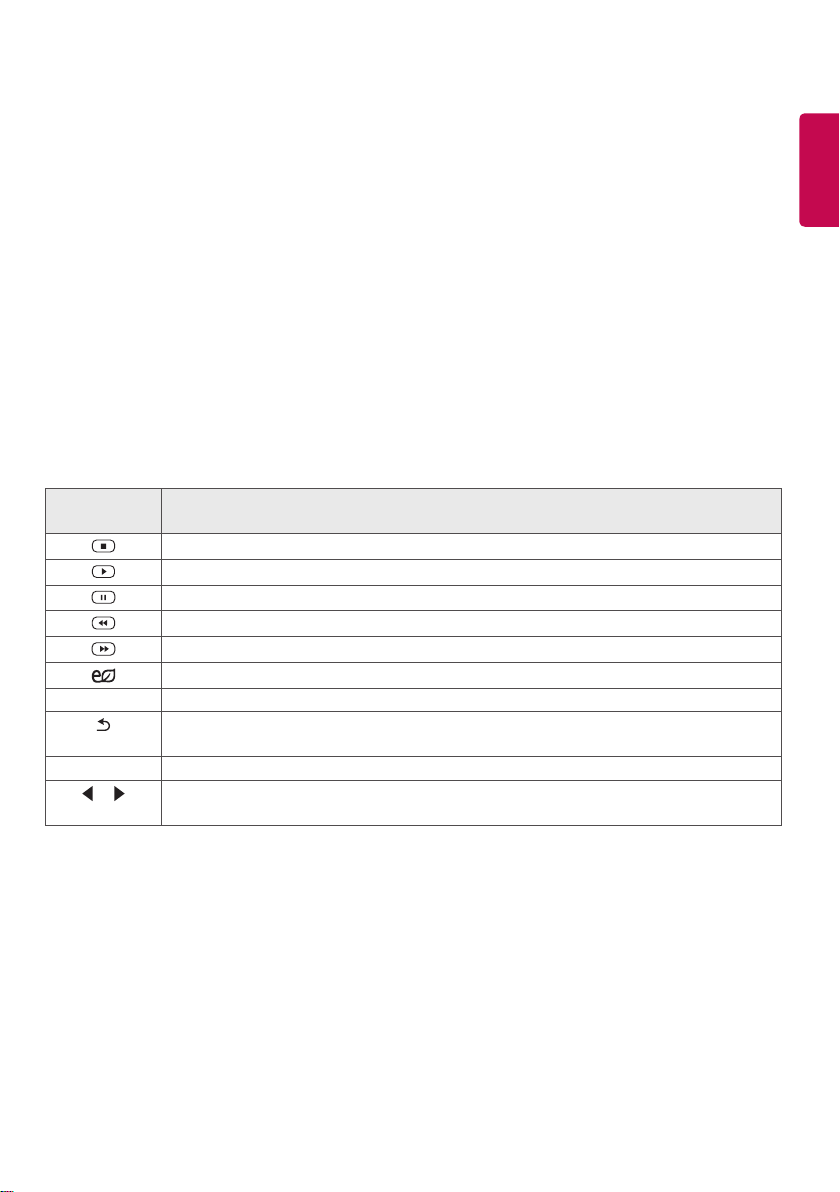
11
Viewing Movies
Plays movie files saved in the USB storage device.
Press SETTINGS to access the main menu.
1
Press the navigation button to scroll to MY MEDIA and press OK.
2
Press the navigation button to scroll to Movie List and press OK.
3
Press the navigation buttons to scroll to a folder you want and press OK.
4
Press the navigation buttons to scroll to a file you want and press OK.
5
y Change Device : Selects the USB storage device. (Depending on model)
y Go to root folder : Returns to the home screen of My Media.
y Go to upper folder : Returns to the previous screen.
y Exit : Exits My Media.
6 During movie playback, press OK to access the following settings.
Remote
button
Stops the playback.
Plays a video.
Pauses or resumes the playback.
Scans backward in a file.
Scans forward in a file.
Adjusts the screen brightness to save energy.
SETTINGS Show the Option menu.
Hide the menu on the full-sized screen.
BACK
EXIT Returns to Movie List.
or
Skips to specific points in a file during playback. The time of a specific point will appear on
the status bar. In some files, this function may not work properly.
Description
ENGLISH
Page 83
12
Tips for using playing video files
ENGLISH
y Some user-created subtitles may not work properly.
y Some special characters are not supported in subtitles.
y HTML tags are not supported in subtitles.
y Subtitles in languages other than the supported languages are not available.
y The screen may suffer temporary interruptions (image stoppage, faster playback, etc.) when the audio
language is changed.
y A damaged movie file may not be played correctly, or some player functions may not be usable.
y Movie files produced with some encoders may not be played correctly.
y If the video and audio structure of recorded file is not interleaved, either video or audio is outputted.
y HD videos with a maximum of 1920 x 1080 @ 25/30p or 1280 x 720 @ 50/60p are supported, depending
on the frame.
y Videos with resolutions higher than 1920 x 1080 @ 25/30p or 1280 x 720 @ 50/60p may not work prop-
erly depending on the frame.
y Movie files other than the specified types and formats may not work properly.
y Max bitrate of playable movie file is 20 Mbps. (only, Motion JPEG : 10 Mbps)
y We do not guarantee smooth playback of profiles encoded level 4.1 or higher in H.264/AVC.
y DTS Audio codec is not supported.
y A movie file more than 30 GB in file size is not supported for playback.
y A DivX movie file and its subtitle file must be located in the same folder.
y A video file name and its subtitle file name must be identical for it to be displayed.
y Playing a video via a USB connection that doesn’t support high speed may not work properly.
y Files encoded with GMC(Global Motion Compensation) may not be played.
Video options
1 Press SETTINGS to access the Pop-Up menus.
2 Press the navigation buttons to scroll to Set Video Play, Set Video, or Set Audio, and press OK.
NOTE
y The option values changed in Movie List do not affect Photo List or Music List. Therefore, they are not
affected by option values changed in Photo List or Music List.
y The option values changed in Photo List and Music List do affect each other.
y When replaying the video file after stopping, you can play from where it stopped previously.
Page 84
13
Select Set Video Play to access the following menus:
Menu Description
Picture Size Selects your desired picture format during movie play.
Audio
Language
Subtitle
Language
Language Activated for SMI subtitle and can select the language within the subtitle.
Code Page Can select the font for subtitle.
Sync Adjusts the time synchronisation of the subtitle from -10 secs to +10 secs by steps of
Position Changes the position of the subtitle either up or down during movie play.
Size Selects your desired Subtitle size during movie play.
Repeat Turn on/off repeat function of movie playback. When turned on, the file within the
Changes the Language Group of the audio during movie play. Files with a single audio
track cannot be selected.
Turn on/off the subtitle.
When set to default, same font as general menu will be used.
0.5 secs during movie play.
folder will be played back repeatedly. Even when the repeated playback is turned off, it
can run the playback if the file name is similar to the previous file.
ENGLISH
NOTE
y Only 10,000 of sync blocks can be supported within the subtitle file.
y When playing a video, you can adjust the picture size by pressing the ARC button.
y Subtitles in your language are only supported when the OSD menu is also in this language.
y The code page options may be disabled depending on the language of the subtitle files.
y Select the appropriate code page for the subtitle files.
Page 85
14
ENGLISH
Viewing Photos
View image files saved in the USB storage device.
Press SETTINGS to access the main menu.
1
Press the navigation button to scroll to MY MEDIA and press OK.
2
Press the navigation button to scroll to Photo List and press OK.
3
Press the navigation buttons to scroll to a folder you want and press OK.
4
Press the navigation buttons to scroll to a file you want and press OK.
5
y Change Device : Selects the USB storage device. (Depending on model)
y Go to root folder : Returns to the home screen of My Media.
y Go to upper folder : Returns to the previous screen.
y Exit : Exits My Media.
While viewing photos, you can access the following settings.
6
Menu Description
Slideshow Starts or stops a slideshow with selected photos. If there are no selected photos, all photos
saved in the current folder display during a slideshow. To set a slideshow speed, select Option.
BGM Turns the background music on or off. To set the background music folder, select Option.
You can adjust option by SETTINGS button on the remote control.
Rotates photos clockwise (90 °, 180 °, 270 °, 360 °).
NOTE
y The supported photo size is limited. You cannot rotate a photo if the resolution of the rotated
width is larger than the supported resolution size.
Enlarges the photo by 100 %, 200 % or 400 %.
Adjusts the brightness of the screen for energy saving.
Option To display the OPTIONs.
Hide Hides the option window.
Exit Return to Photo List.
Page 86
15
Photo options
1 Press SETTINGS to show the Option menus.
2 Press the navigation buttons to scroll to Set Photo View, Set Video, or Set Audio, and press OK.
NOTE
y The option values changed in Movie List do not affect Photo List or Music List. Therefore, they are not
affected by option values changed in Photo List or Music List.
y The option values changed in Photo List and Music List do affect each other.
Select Setting Photo View to access the following menus:
Menu Description
Slide Speed Select a slideshow speed.
(Options: Fast, Medium, or Slow.)
BGM Selects a music folder for the background music.
Repeat Plays background music on repeat.
Random Plays background music in random order.
ENGLISH
Page 87
16
ENGLISH
Listening to Music
Plays music files saved in the USB storage device.
Press SETTINGS to access the main menu.
1
Press the navigation button to scroll to MY MEDIA and press OK.
2
Press the navigation button to scroll to Music List and press OK.
3
Press the navigation buttons to scroll to a folder you want and press OK.
4
Press the navigation buttons to scroll to a file you want and press OK.
5
y Change Device : Selects the USB storage device. (Depending on model)
y Go to root folder : Returns to the home screen of My Media.
y Open Music Player : Opens the settings window for music. This feature is activated only during playback.
y Go to upper folder : Returns to the previous screen.
y Exit : Exits My Media.
6 During music playback, press OK to access the following settings.
Remote
button
Stops playing back the file and moves back to the Music List.
Plays a music file.
Pauses or resumes playback.
Skips to the previous file.
Skips to the next file.
Adjusts the brightness of the screen for energy saving (Off and Screen Off work only.)
SETTINGS Show the Option menu.
Hides the option window.
BACK
EXIT Return to Music List.
or
Skips to specific points in a file during playback. The time of a specific point will appear on
the status bar. In some files, this function may not work properly.
Description
Page 88
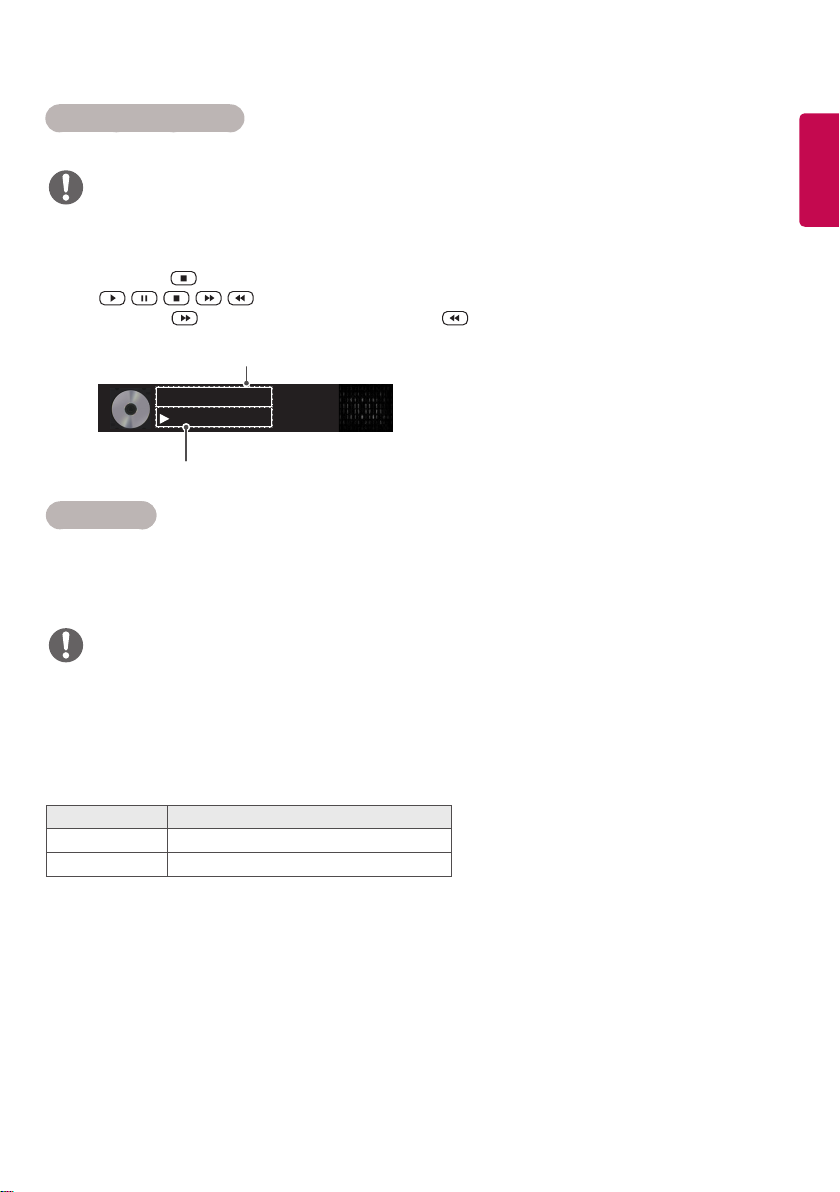
17
Tips for playing music files
y This unit cannot support the ID3 Tag embedded MP3 files.
NOTE
y A damaged or corrupted music file does not play but displays 00:00 in playtime.
y A music downloaded from a paid service with copyright protection does not start but displays inappropriate informa-
tion in playtime.
y If you press OK, buttons, screen saver is stopped.
y The , , , , buttons on the remote control are also available in this mode.
y You can use the button to select the next music and the button to select the previous music.
file name
002. B02.mp3
00:31 / 04:04
Time elapsed/ Duration
Music options
1 Press SETTINGS to access the pop-up menus.
2 Press the navigation buttons to scroll to Set Audio Play or Set Audio and press OK.
NOTE
y The option values changed in Movie List do not affect Photo List or Music List.Therefore, they are not
affected by option values changed in Photo List or Music List.
y The option values changed in Photo List and Music List do affect each other.
ENGLISH
When you select the Set Audio Play,
Menu Description
Repeat Repeats the music playback.
Random Plays random music tracks.
Page 89
18
ENGLISH
Viewing the Contents List
Plays back the stored files using the Export option in SuperSign Manager.
Press SETTINGS to access the main menu.
1
Press the navigation button to scroll to MY MEDIA and press OK.
2
Press the navigation button to scroll to Contents List and press OK.
3
Press the navigation buttons to scroll to a folder you want and press OK.
4
Press the navigation buttons to scroll to a file you want and press OK.
5
y Change Device : Selects the USB storage device. (Depending on model)
y Go to root folder : Returns to the home screen of My Media.
y Go to upper folder : Returns to the previous screen.
y Exit : Exits My Media.
NOTE
y While playing media files from Contents List, only the BACK, EXIT, or volume button are available.
Selecting the BACK or EXIT button stops playing media files and returns to the Contents List.
y When you use the distribution feature which utilizes SuperSign Software, the storage device used to
store contents is determined based on the size of the remaining memory space. (Note: If USB ports 1
and 2 have the same memory space, contents will be saved on the storage device connected to USB
port 1.
(Depending on model)
y If there is the AutoPlay folder in the USB device and its files are in supported formats, they can be played
back automatically when the USB device is connected to the monitor.
y It is recommended that you avoid playing contents using more than two USB ports simultaneously.
y With respect to the playback of distribution or contents schedules through SuperSign Software, the
schedule executed last time is played.
)
Page 90
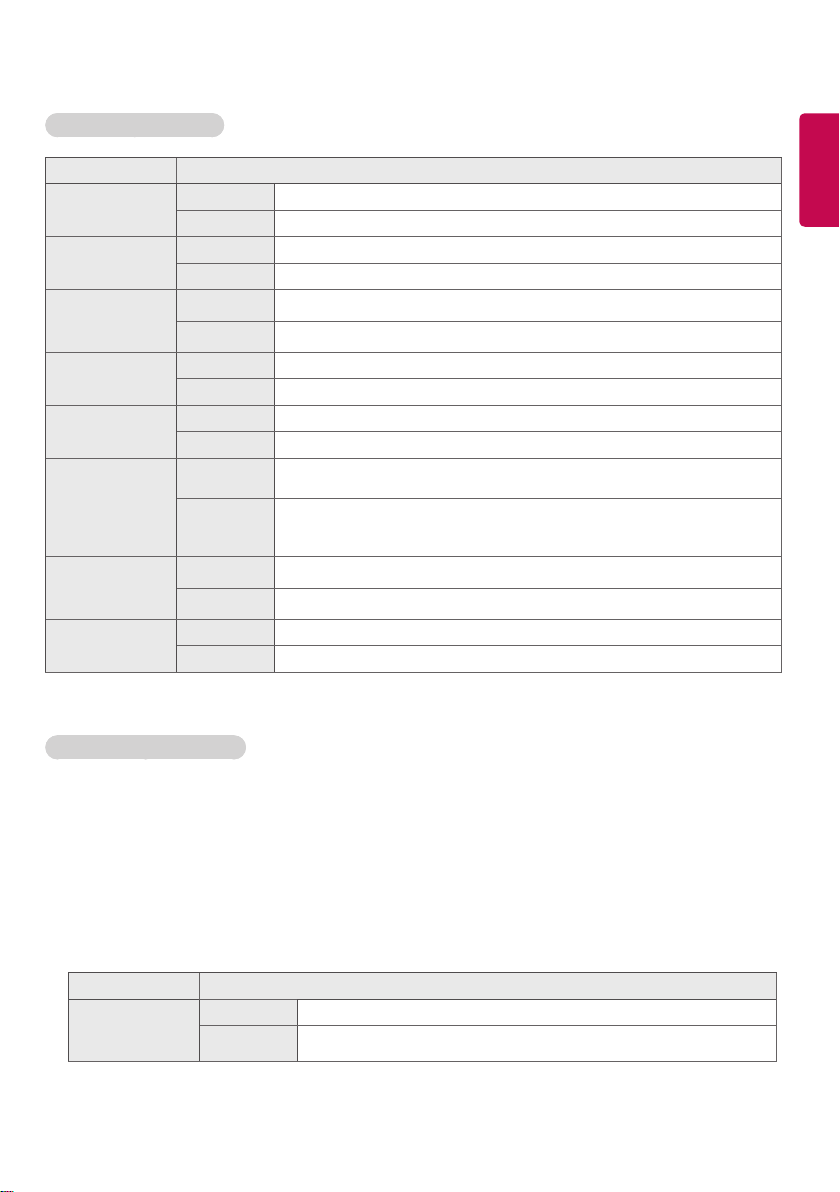
19
Supported Video Codec
Extension Codec
.asf
.wmv
.divx
.avi
.mp4
.m4v
.mov
.3gp
.3g2
.mkv Videos H.264/AVC
.ts
.trp
.tp
.mts
.m2ts
.mpg
.mpeg
.vob Videos MPEG-1, MPEG-2
Videos VC-1 Simple and Main Profiles
Audio WMA Standard, WMA 10 Professional
Videos DivX3.11, DivX4, DivX5, DivX6, XViD, H.264/AVC, Motion Jpeg, MPEG-4 Part2
Audio MPEG-1 Layer I, II, MPEG-1 Layer III (MP3), Dolby Digital, LPCM, ADPCM, DTS
Videos H.264/AVC, MPEG-4 Part2
Audio AAC, MPEG-1 Layer III (MP3)
Videos H.264/AVC, MPEG-4 Part2
Audio AAC, AMR-NB, AMR-WB
Audio HE-AAC, Dolby Digital
Videos H.264/AVC, MPEG-2
Audio MPEG-1 Layer I, II, MPEG-1 Layer III (MP3), Dolby Digital, Dolby Digital Plus, AAC, PCM
Videos MPEG-1, MPEG-2
Audio MPEG-1 Layer I, II, MPEG-1 Layer III (MP3), AAC
Audio Dolby Digital, MPEG-1 Layer I, II, DVD-LPCM
ENGLISH
Tips for Playing Video Files
• A damaged movie file may not play correctly, or some player features may not be usable.
• Movie files produced with some encoders may not be played correctly.
• Movie files other than the specified types and formats may not work properly.
• Max bit rate of playable movie file is 20 Mbps. (For Motion JPEG: 10 Mbps only)
• We do not guarantee smooth playback of profiles encoded level 4.1 or higher in H.264 / AVC.
• Video files larger than 50 MB may not upload properly from mobile devices. We recommend that you play
such files via USB/SD storage devices.
• [For Ultra HD models only] Ultra HD image: 3840 X 2160
Some HEVC-encoded Ultra HD videos other than the content officially provided by LG Electronics may not
be played.
Extension Codec
.mkv
.mp4
.ts
Video H.264/AVC, HEVC
Audio Dolby Digital, Dolby Digital Plus, AAC, HE-AAC
• Some codecs can be used after upgrading software.
Page 91

20
ENGLISH
CUSTOMIZING SETTINGS
Accessing Main Menus
Press SETTINGS to access the main menus.
1
Press the navigation buttons to scroll to one of the following menus and press OK.
2
Press the navigation buttons to scroll to the setting or option you want and press OK.
3
When you are finished, press EXIT. When you return to the previous menu, press BACK.
4
y PICTURE : Adjusts the image size, quality, or effect.
y AUDIO : Adjusts the sound quality, effect, or volume level.
y TIME : Sets the time, date, or timer feature.
y OPTION : Customizes the general settings.
y NETWORK : Sets up the network setting.
y MY MEDIA : Display and play movie, photo and music contents stored on your USB or signage device
(Internal storage device).
Page 92
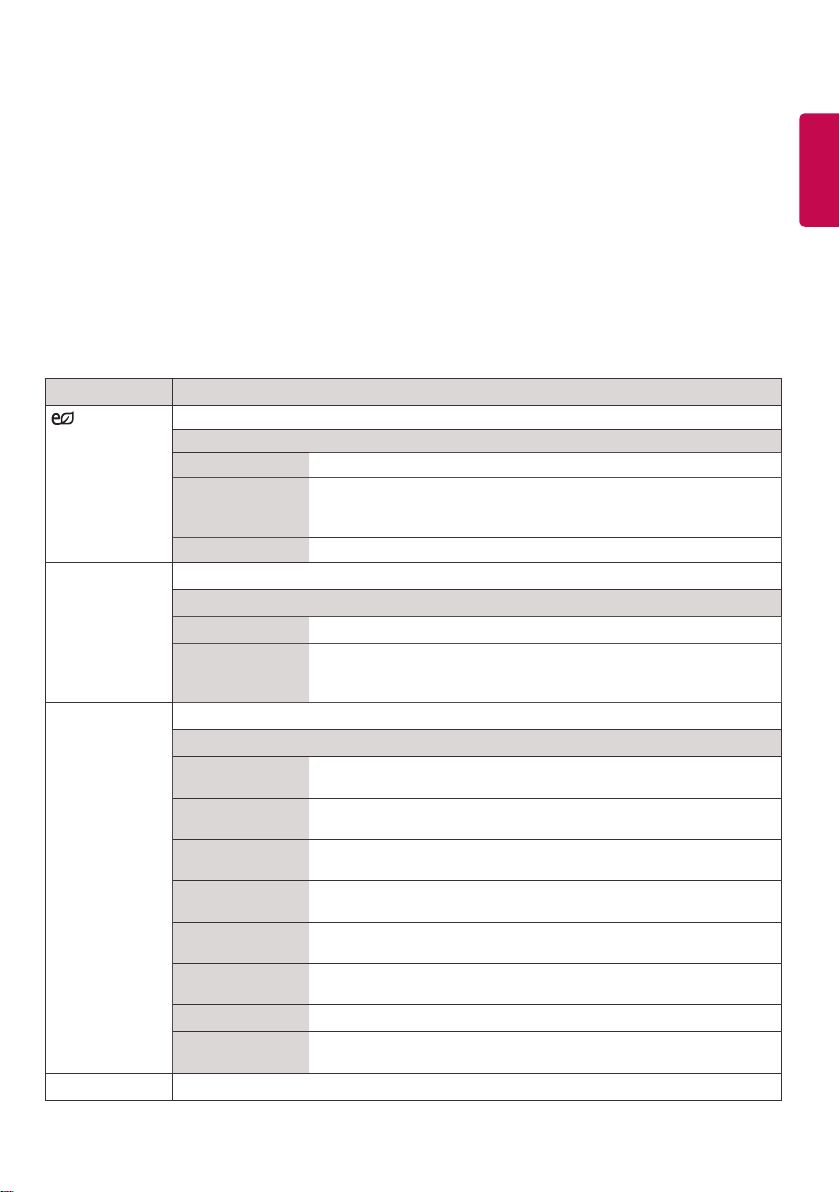
21
PICTURE Settings
Press SETTINGS to access the main menus.
1
Press the navigation buttons to scroll to PICTURE and press OK.
2
Press the navigation buttons to scroll to the setting or option you want and press OK.
3
- To return to the previous level, press BACK.
When you are finished, press EXIT.
4
When you return to the previous menu, press BACK.
The available picture settings are described in the following:
Setting Description
Energy
Saving
Smart Energy
Saving
Picture Mode Selects the picture mode optimized for the viewing environment or the programme.
Aspect Ratio Changes the image size to view images at its optimal size.
Reduces power consumption by adjusting peak screen brightness.
Level
Off Disables Energy Saving function.
Minimum/
Medium/
Maximum
Screen Off The screen turns off in 3 seconds.
Adjusts the backlight and contrast depending on the screen brightness.
Level
Off Disables the Smart Energy Saving function.
On Enables the Smart Energy Saving function to save power
Mode
Vivid Heightens contrast, brightness, and sharpness to display vivid
Standard Displays images in standard levels of contrast, brightness, and
APS APS ( Auto power saving ) mode reduces power consumption by
Cinema Optimizes the video image for a cinematic look to enjoy movies as if
Sport Optimizes the video image for high and dynamic actions by
Game Optimizes the video image for a fast gaming screen such as PCs or
Calibration Applies user-customized white balance based on Standard.
Expert1·2 Menu for adjusting picture quality that allows experts and amateurs
Selects the brightness level of the backlight.
consumption as much as the value set in the smart energy saving
rate.
images.
sharpness.
dimming control.
you are in a movie theater.
emphasizing primary Colors such as white, grass, or sky blue.
games.
to enjoy the best Monitor viewing.
ENGLISH
Page 93
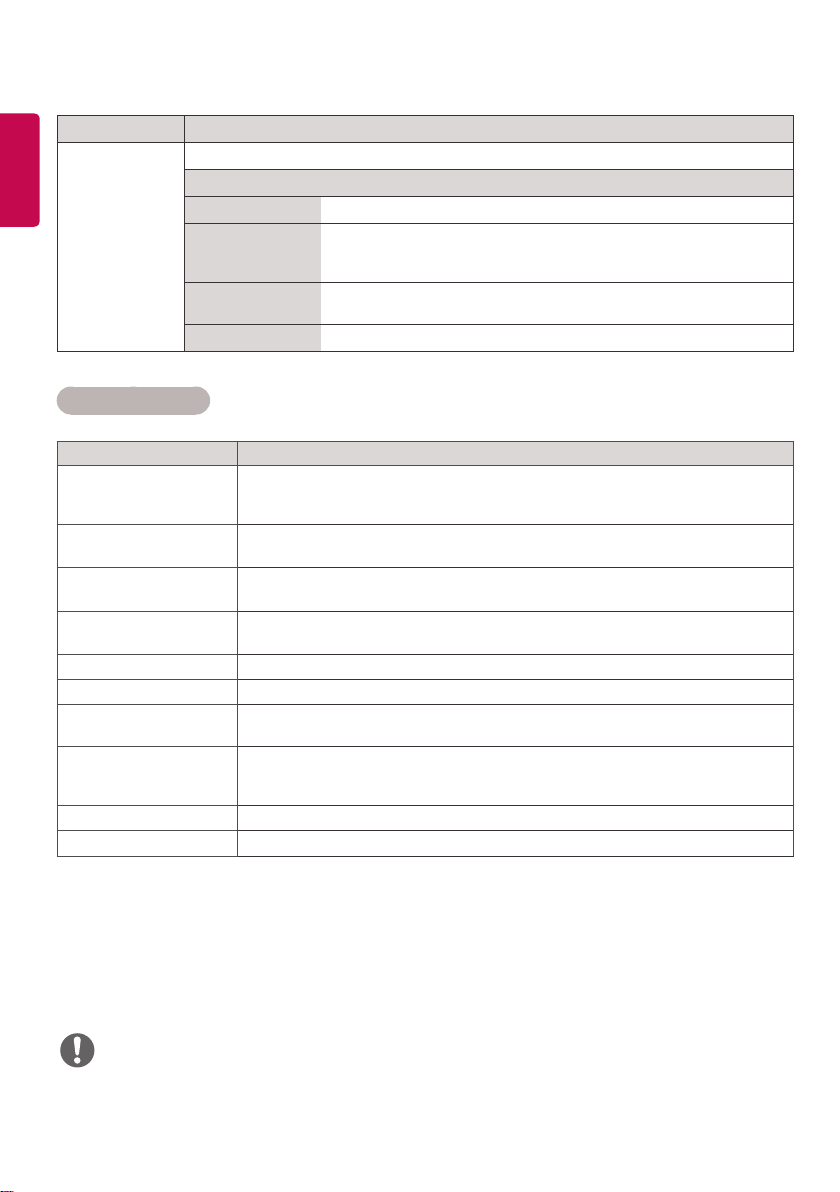
22
ENGLISH
Setting Description
Screen
(In RGB
Mode Only)
Customizes the PC display options in RGB mode.
Option
Resolution Selects a proper resolution.
Auto Configure Sets to adjust the screen position, clock, and phase automatically.
Position/Size/
Phase
Reset Restores the options to the default setting.
The displayed image may be unstable for a few seconds while the
configuration is in progress.
Adjusts the options when the picture is not clear, especially when
characters are shaky, after the auto configuration.
Basic image options
Setting Description
Backlight Adjusts the brightness of the screen by controlling the LCD backlight. If you
Contrast Increases or decreases the gradient of the video signal. You may use Contrast
Brightness Adjusts the base level of the signal in the picture. You may use Brightness when
Sharpness Adjusts the level of crispness in the edges between the light and dark areas of the
Color Adjusts intensity of all colors.
Tint Adjusts the balance between red and green levels.
Color Temp. Set to warm to enhance hotter Colors such as red, or set to cool to make picture
Advanced Control/
Expert Control
Picture Option Sets additional picture option.
Picture Reset Restores the options to the default setting.
decrease the brightness level, the screen becomes darker and the power
consumption will be reduced without any video signal loss.
when the bright part of the picture is saturated.
the dark part of the picture is saturated.
picture. The lower the level, the softer the image.
bluish.
You can adjust the picture for each Picture Mode, or adjust the picture settings
according to a specific picture image. First, select a desired Picture Mode.
* This option is unavailable if Picture Mode is set to Vivid.
NOTE
y When you select a picture mode, related menus are set automatically.
y When using the Smart Energy Saving function, the screen may look saturated in the white area of a still image.
y If Energy Saving is set to Minimum, Medium, or Maximum, the Smart Energy Saving function is disabled.
Page 94
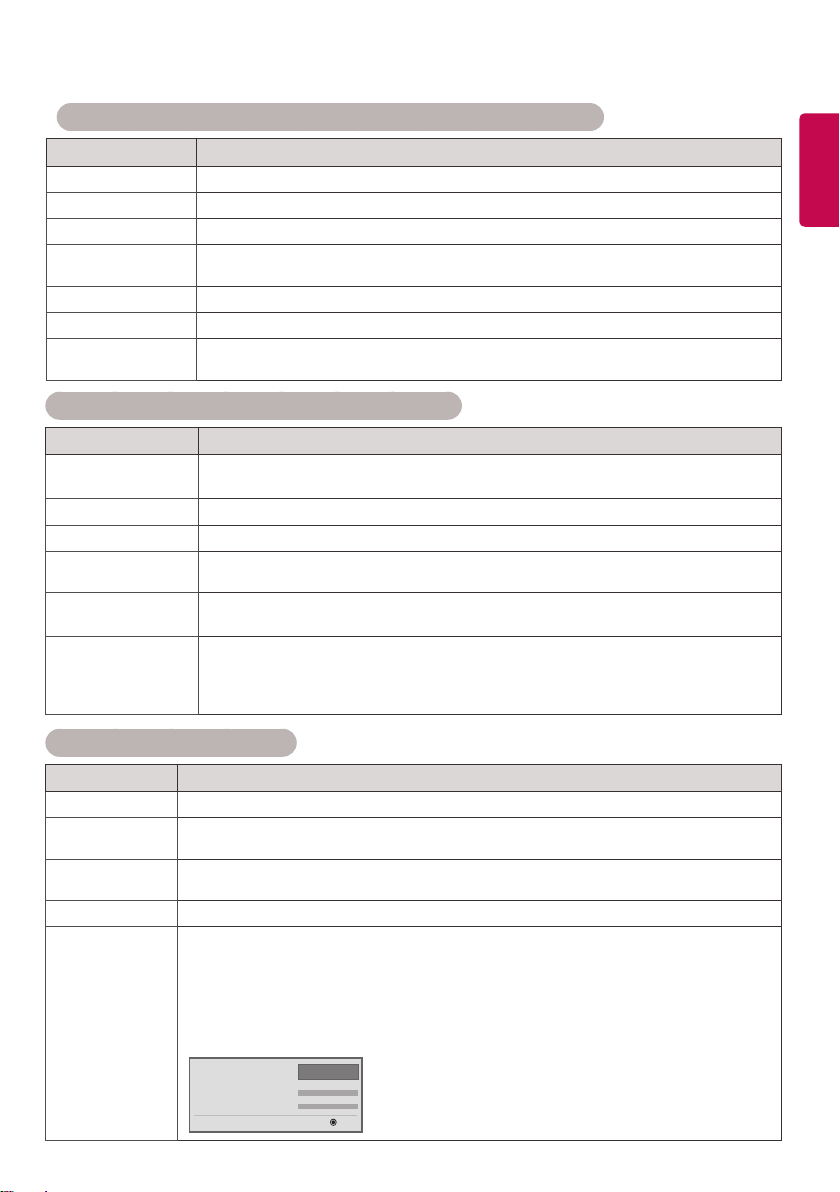
23
Advanced Control - Picture Mode (Standard/ APS/ Sport/ Game/ Calibration)
Setting Description
Dynamic Contrast Adjusts the contrast to the optimal level according to the brightness of the image.
Dynamic Color Adjusts color for more natural-looking colors.
Color Gamut Selects the range of colours that can be expressed.
Skin Color Skin color spectrum can be separately set to implement the skin color as defined by
the user.
Sky Color Sky color is set separately.
Grass Color Natural color spectrum (meadows, hills, etc.) can be separately set.
Gamma Sets the gradation curve according to the output of the picture signal in relation to the
input signal.
Expert Control - Picture Mode (Cinema/ Expert1/ Expert2)
Setting Description
Dynamic Contrast Adjusts the contrast to the optimal level according to the brightness of the image.
(Function works in the following mode - HDMI-DTV)
Color Gamut Selects the range of colours that can be expressed.
Edge Enhancer Shows clearer and distinctive yet natural edges of the video.
Color Filter Filters a specific colour spectrum in RGB colours to fine-tune colour saturation and
hue accurately.
Color Temperature Adjusts the overall tone of the screen as desired. In Expert mode, detailed fine-tuning
can be set via Gamma method, etc.
Color Management
System
This is a system that experts use when they adjust colour with a test pattern. They
can select from six colour areas (Red / Green / Blue / Cyan / Magenta / Yellow) without
affecting other colours. For normal images, adjustments may not result in noticeable
colour changes.
ENGLISH
Picture Option - HDMI(DTV) Mode
Setting Description
Noise Reduction Reduces screen noise in the video.
MPEG Noise
Reduces noise caused by compressing digital video.
Reduction
Black Level Adjusts the brightness or darkness of the screen to suit the black level of the picture
input using the degree of darkness (black level) of the screen.
Real Cinema Optimizes the screen for movie viewing.
TruMotion
(This feature
is supported
by 65SE3B and
65SE3KB only.)
Corrects images to display smoother motion sequences.
• Off : Turn off the TruMotion.
• Smooth/ Clear : De-Judder / De-Blur can be set Auto.
• User : De-Judder / De-Blur can be set manually.
- De-Judder : This function adjusts juddering of
the screen.
- De-Blur : This function adjusts and eliminates blurring of the screen.
◄
TruMotion
• De-Judder Auto
• De-Blur Auto
Smooth
►
OK
Page 95
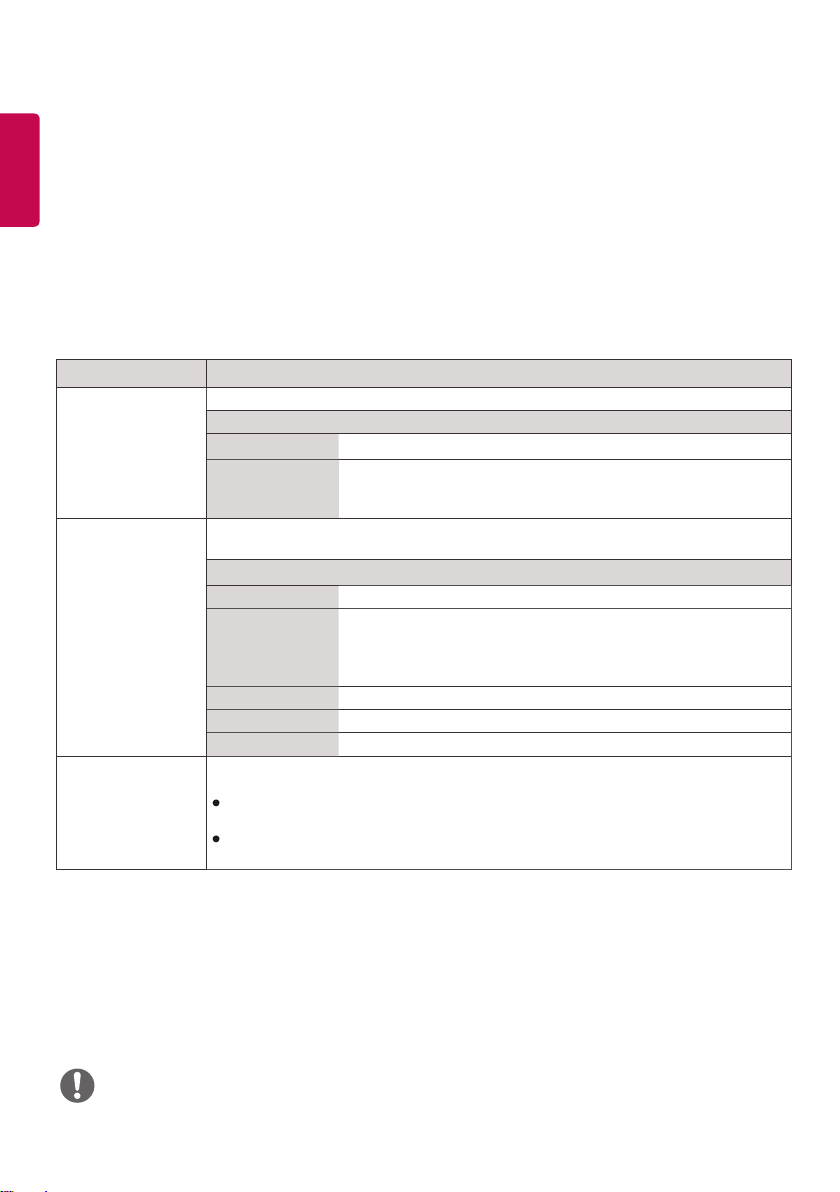
24
ENGLISH
AUDIO Settings
Press SETTINGS to access the main menus.
1
Press the navigation buttons to scroll to AUDIO and press OK.
2
Press the navigation buttons to scroll to the setting or option you want and press OK.
3
- To return to the previous level, press BACK.
When you are finished, press EXIT.
4
When you return to the previous menu, press BACK.
The available audio options are described in the following:
Setting Description
Sound Mode Allows optimized sound for custom Monitor installation.
Level
Standard Suitable for all types of video.
News/ Music/
Cinema/ Sport/
Game
Sound Effect The user can select various sound effects.
- Sound Effect function is available only for Standard mode in Sound Mode menu.
Level
Clear Voice ll Boosts voice clarity.
Virtual Surround LG’s proprietary audio processing technology allows 5.1ch-like
Equalizer Adjusts the volume to a level of your choice using the Equalizer.
Balance Adjusts left/right audio balance.
Reset You can reset the settings under the Sound Effects menu.
AV Sync. Adjust Synchronizes video and audio directly when they do not match.
If you set AV Sync. to ON, you can adjust the sound output to the screen image.
Speaker: Adjusts the synchronization of the sound from the speakers. The "-" button
makes the sound output faster and the "+" button slower than the default value.
Bypass : The audio of an external device without audio delay. Audio may be output
before video as it takes time to process video input into the Monitor.
Sets audio optimized for a specific genre.
surround sound from two speakers.
- If Clear Voice ll is set to On, Virtual Surround will not be
chosen.
NOTE
y Some models may not have built-in speakers. In that case, you need to connect external speakers to listen to sound.
Page 96
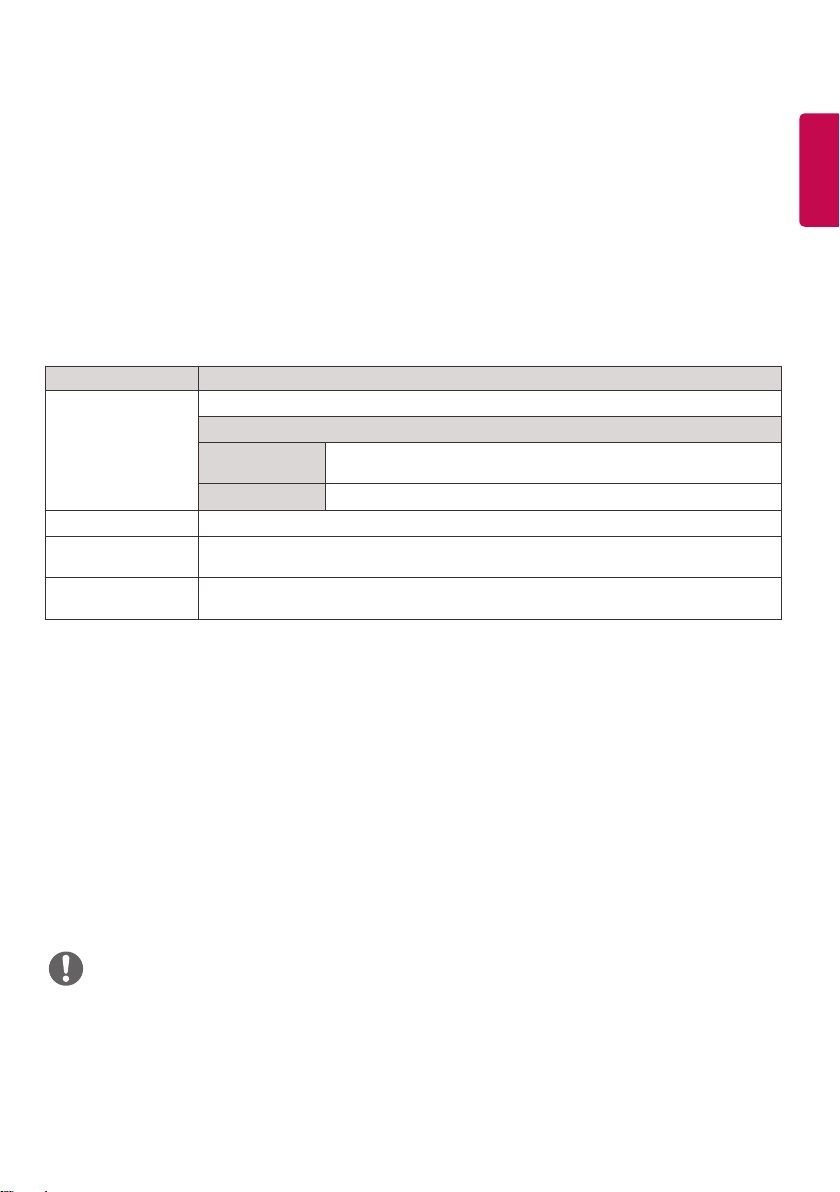
25
TIME Settings
Press SETTINGS to access the main menus.
1
Press the navigation buttons to scroll to TIME and press OK.
2
Press the navigation buttons to scroll to the setting or option you want and press OK.
3
- To return to the previous level, press BACK.
When you are finished, press EXIT.
4
When you return to the previous menu, press BACK.
The available time settings are described in the following:
Setting Description
Clock Sets the time feature.
Level
Auto The current time is entered according to the selected country
Manual The current time needs to be entered manually.
On/Off Time Sets the time to turn on or off the monitor set.
Auto Off (15Min.) If Auto-off is active and there is no input signal, the set switches to off mode
automatically after 15 minutes.
Automatic Standby If the monitor is left unattended for a set period of time, it automatically goes into standby
mode.
when connected to a network.
ENGLISH
NOTE
y Off Time/ On Time can be saved for up to seven schedules; the monitor is turned on or off at the preset time in the
schedule list. If multiple preset times are stored in the schedule list, this function works at the nearest time from the
current time.
y Once the on or off time is set, these functions operate daily at the preset time.
y When the scheduled power-on and power-off times are the same, the power-off time has priority over the power-on
time if the set is turned on, and vice versa if the set is turned off.
y If port 123 is blocked by a firewall, your monitor cannot receive the current time from the network.
Page 97
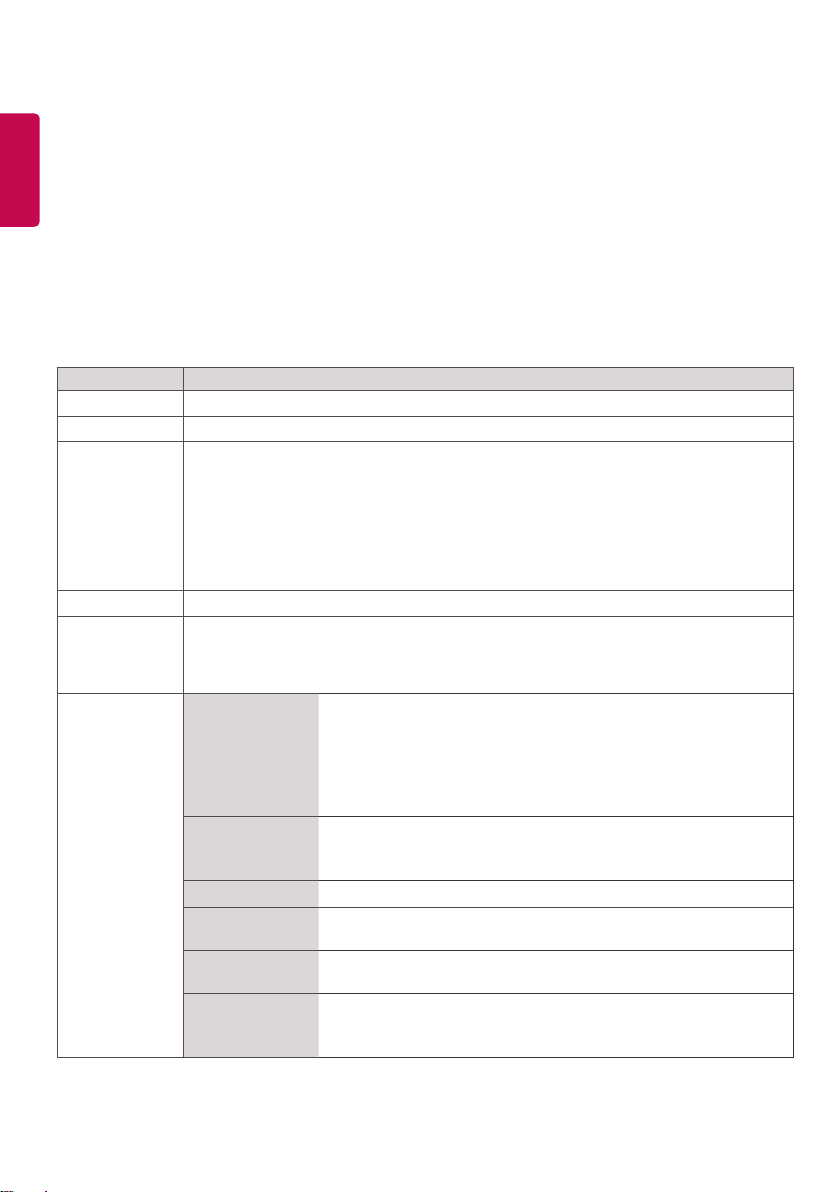
26
ENGLISH
OPTION Settings
Press SETTINGS to access the main menus.
1
Press the navigation buttons to scroll to OPTION and press OK.
2
Press the navigation buttons to scroll to the setting or option you want and press OK.
3
- To return to the previous level, press BACK.
When you are finished, press EXIT.
4
When you return to the previous menu, press BACK.
The available option settings are described in the following:
Setting Description
Language Selects a language for the display text.
Country Select your country.
DivX(R) VOD Registers or releases DivX.
Initial Setting Deletes all optional settings and returns to initial default mode.
Set ID You can assign a unique Set ID NO (name assignment) to each product when several
Tile Mode Tile Mode To use this function
Checks DivX Registration Code for playing DivX-protected videos.
Register at
Uses Registration Code to rent or purchase movies at
* Rented/purchased DivX files cannot be played if the DivX Registration Code of a
different device is used. Use only the DivX Registration Code granted to this device.
* Converted files not conforming to the DivX Codec Standard may not play or may
produce abnormal images.
products are connected for display. Specify the number (1 to 255 or 1 to 1,000) using the
button and exit. Use the assigned Set ID to individually control each product using the
Product Control Program.
Auto Config. Sets to adjust the screen position, clock, and phase automatically.
Position Moving the screen position horizontally and vertically.
Size Adjust the horizontal and vertical size of the screen taking into
Natural The image is omitted by the distance between the screens to be
Reset Function to initialize and release Tile.
http://vod.divx.com
- Must be displayed with various other products.
- Select Tile Mode, set rows and columns, and then enter the tile ID to
set the location.
- Tile Mode: row x column (row = 1-15, column = 1-15).
- 15 x 15 available.
The displayed image may be unstable for a few seconds while the
configuration is in progress.
account the size of the bezel.
naturally shown.
All Tile setting are released when selecting Tile recall and the screen
returns to Full screen.
.
www.divx.com/vod
.
Page 98
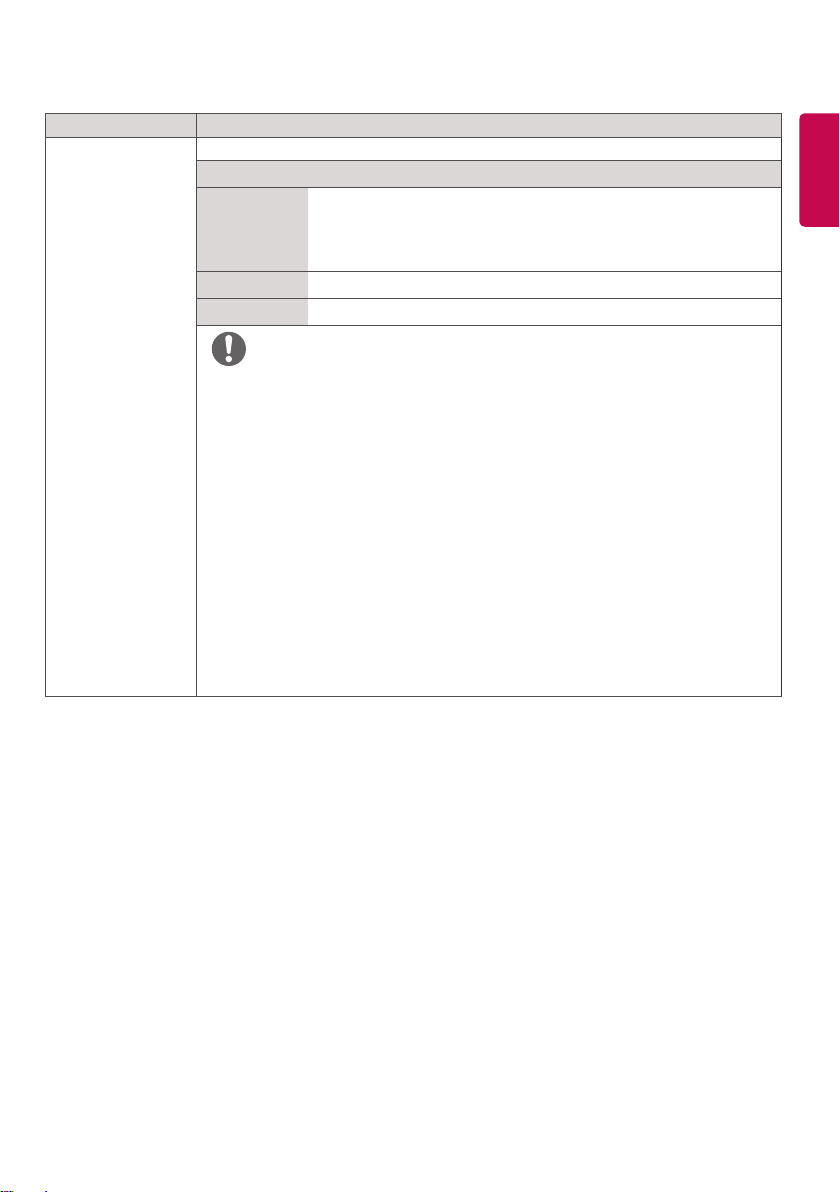
27
SETTINGS Description
Contents Schedule Creates simple schedules and sets playback using files in My Media.
Level
Add Schedule Creates a contents schedule.
- Media: Select the file to which you want to apply the contents
schedule.
- Select [Create] to register the contents schedule.
Play Plays a contents schedule.
Delete All Deletes all registered schedules.
NOTE
yInformation about registered schedules is stored on your USB storage device.
This feature does not work when your USB storage device has been removed.
yThe picture size is 1920 x 1080.
yYou can use photo and video files only.
yYou can add up to 50 files (photo files + video files = 50).
yOnly photos whose resolution is 1920 x 1080 or below are supported.
yThe default display time for photos is 1 minute. Playback time for movies
differs depending on the running time.
yYou can create up to 7 schedules.
yYou cannot register a schedule when no file has been selected.
yContents schedules that have had information forcibly modified using a PC,
etc. may not function properly.
yWith respect to the playback of distribution or contents schedules through
SuperSign Software, the schedule executed last time is played.
ENGLISH
Page 99
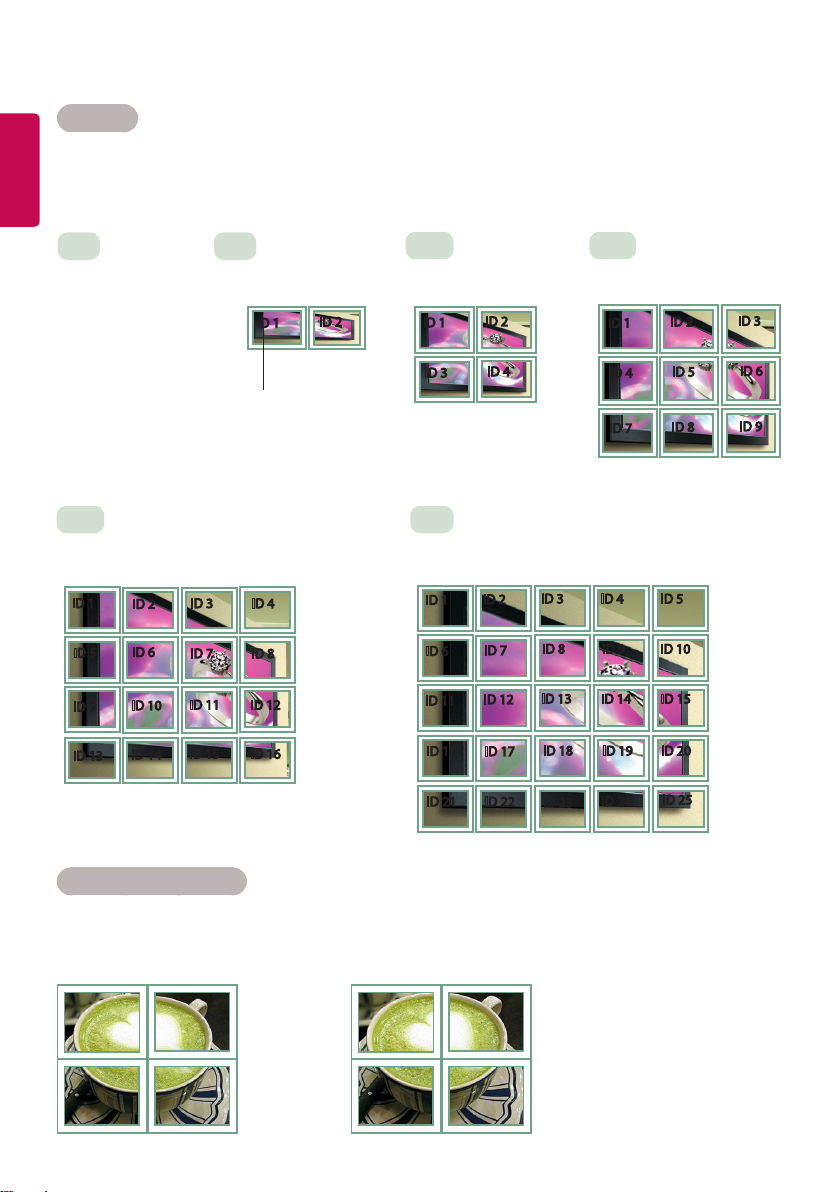
28
Tile Mode
ENGLISH
This monitor can be tiled with additional monitors to create a large tiled display.
Off
When the Tile Mode
option is disabled
4X4
When using 16 monitors
ID 1
ID 5
ID 9
ID 13
ID 2
ID 6
ID 10
ID 14
ID 3
ID 7
ID 11
ID 15
1X2
When using 2 monitors
ID 1
ID 2
Tile ID
ID 4
ID 8
ID 12
ID 16
2X2
When using 4 monitors
ID 1
ID 3
ID 2
ID 4
5X5
When using 25 monitors
ID 3
ID 2
ID 1
ID 8
ID 7
ID 6
ID 13
ID 16
ID 21
ID 12
ID 17
ID 22
ID 18
ID 23
ID 11
3X3
When using 9 monitors
ID 1
ID 4
ID 7
ID 4 ID 5
ID 9 ID 10
ID 14 ID 15
ID 19
ID 24
ID 2
ID 5
ID 8
ID 20
ID 25
ID 3
ID 6
ID 9
Tile Mode - Natural mode
When active, the part of the image that would normally be displayed in the gap between the monitors
is omitted.
Before After
Page 100
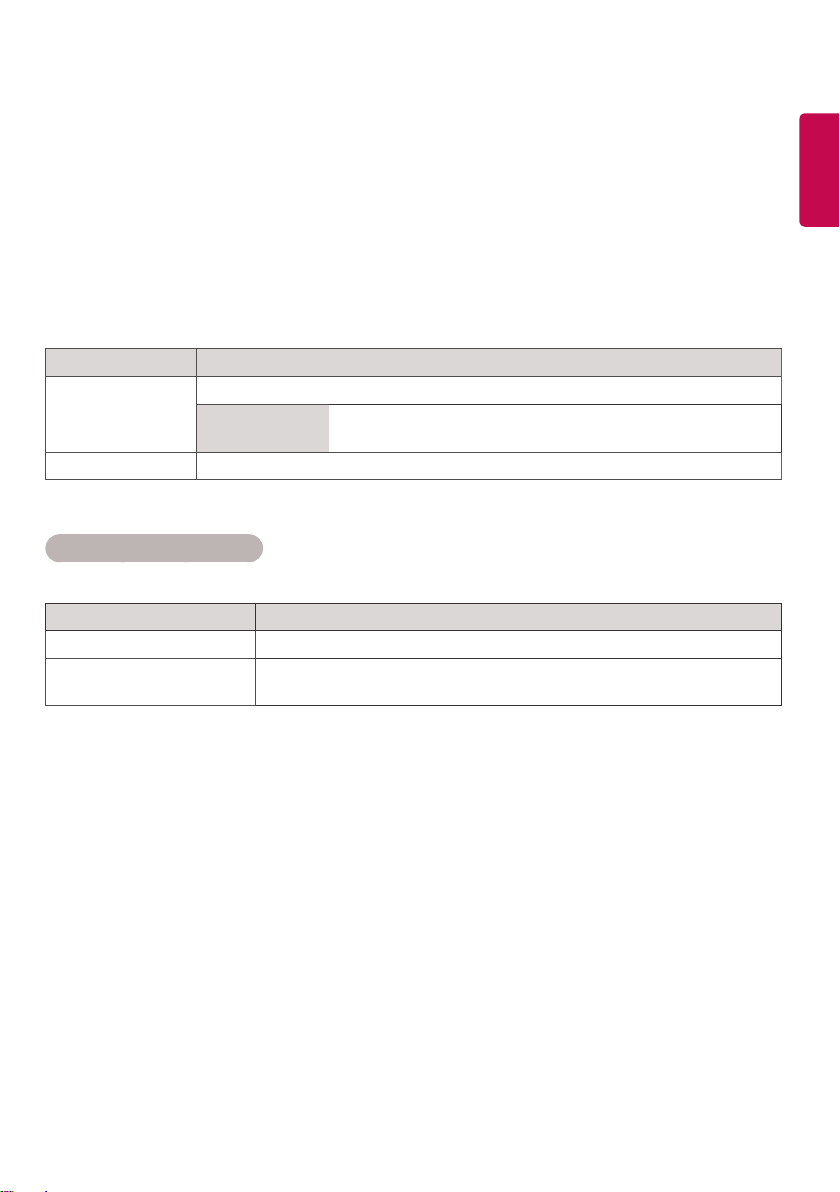
29
NETWORK Settings
Press SETTINGS to access the main menus.
1
Press the navigation buttons to scroll to NETWORK and press OK.
2
Press the navigation buttons to scroll to the setting or option you want and press OK.
3
- To return to the previous level, press BACK.
When you are finished, press EXIT.
4
When you return to the previous menu, press BACK.
The available option settings are described in the following:
Setting Description
Network Setting Configure the network settings.
Network setting When the Wi-Fi dongle is connected, you can view and connect to
any available wireless network.
Network Status Display the network status.
Network Connection Options
Setting Description
Setting from the AP list Select an AP to connect to a wireless network.
Simple setting
(WPS-button mode)
Press the button on the wireless router that supports PBC to easily connect
to the router.
ENGLISH
 Loading...