

Page 1
LLGG55555500
User Guide
MMBB0114401(1.0)
UUsseerr GGuuiiddee
LG5550
Page 2
Introduction . . . . . . . . . . . . . . . . . . . . . . . . . . . . . . . . . . . . 7
Check Accessories . . . . . . . . . . . . . . . . . . . . . . . . . . . . 7
Important Information . . . . . . . . . . . . . . . . . . . . . . . . . . 7
Phone Overview . . . . . . . . . . . . . . . . . . . . . . . . . . . . . . . 10
Menus Overview . . . . . . . . . . . . . . . . . . . . . . . . . . . . . . . 12
Getting Your Phone Started . . . . . . . . . . . . . . . . . . . . . . 14
The Battery . . . . . . . . . . . . . . . . . . . . . . . . . . . . . . . . . 14
Turning the Phone On and Off . . . . . . . . . . . . . . . . . . 15
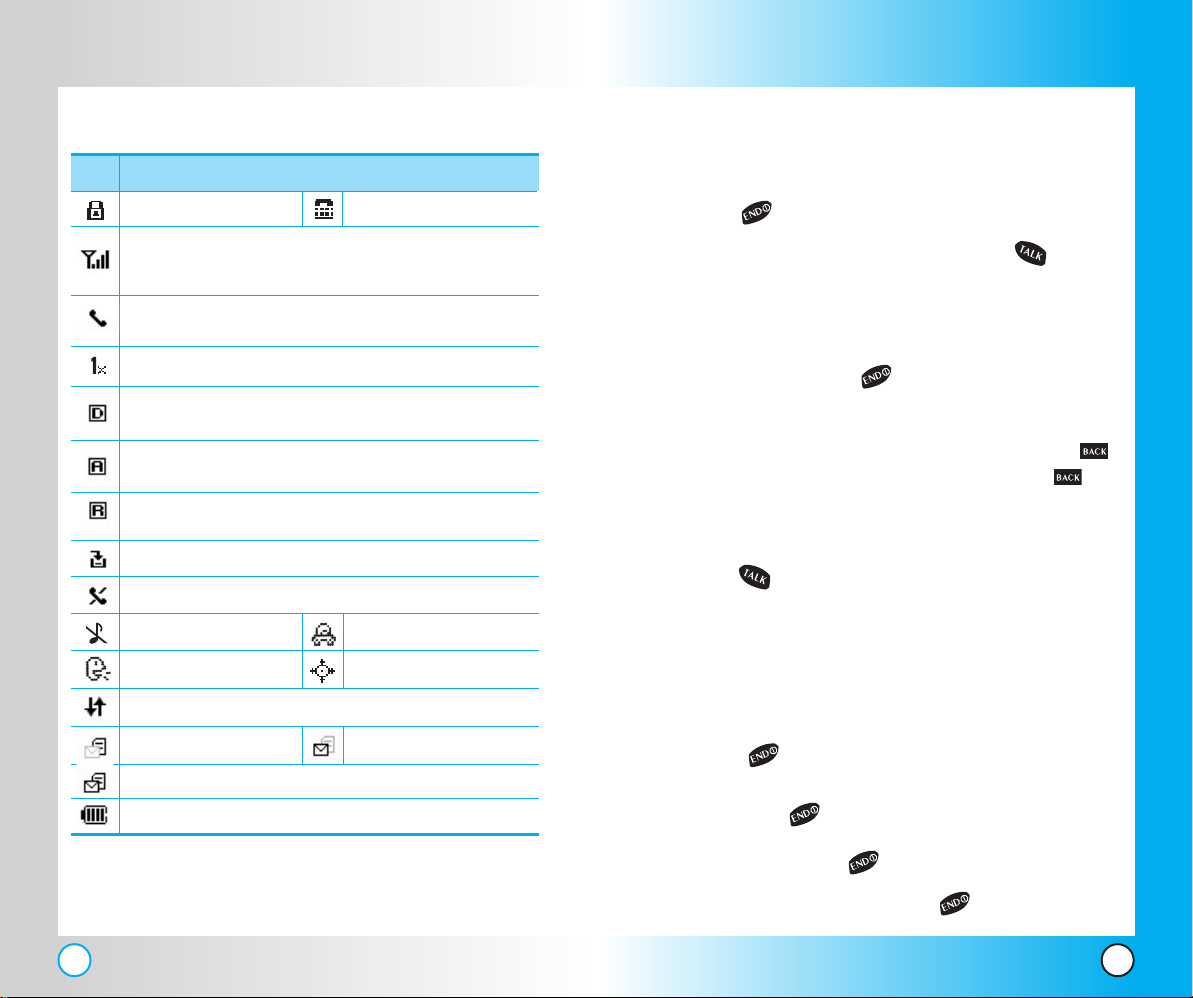
Screen Icons . . . . . . . . . . . . . . . . . . . . . . . . . . . . . . . 16
Making Calls . . . . . . . . . . . . . . . . . . . . . . . . . . . . . . . .17
Receiving Calls . . . . . . . . . . . . . . . . . . . . . . . . . . . . . . 17
Quick Access to Convenient Features . . . . . . . . . . . . . 18
Vibrate Mode . . . . . . . . . . . . . . . . . . . . . . . . . . . . . . . . 18
Silence Mode . . . . . . . . . . . . . . . . . . . . . . . . . . . . . . . .18
Mute Function . . . . . . . . . . . . . . . . . . . . . . . . . . . . . . . 19
Volume Quick Adjustment . . . . . . . . . . . . . . . . . . . . . 19
Call Waiting . . . . . . . . . . . . . . . . . . . . . . . . . . . . . . . . . 20
Caller ID . . . . . . . . . . . . . . . . . . . . . . . . . . . . . . . . . . . 20
Speed Dialing . . . . . . . . . . . . . . . . . . . . . . . . . . . . . . 21
Voice Command . . . . . . . . . . . . . . . . . . . . . . . . . . . . . 21
Entering and Editing Information . . . . . . . . . . . . . . . . . 22
Text Input . . . . . . . . . . . . . . . . . . . . . . . . . . . . . . . . . . 22
Text Input Examples . . . . . . . . . . . . . . . . . . . . . . . . . . 24
Phone Book in Your Phone’s Memory . . . . . . . . . . . . . 26
The Basics of Storing Phone Book Entries . . . . . . . . .26
Options to Customize Your Phone Book . . . . . . . . . . 28
Adding or Changing the Group . . . . . . . . . . . . . . . 28
Changing the Call Ringer . . . . . . . . . . . . . . . . . . . .29
Adding or Changing the Memo . . . . . . . . . . . . . . . 29
Adding or Changing the Picture ID . . . . . . . . . . . . 30
LG5550
1
Page 3

Changing the Secret Setting . . . . . . . . . . . . . . . . . 30
Adding or Changing the URL . . . . . . . . . . . . . . . . 31
Adding Speed Dial . . . . . . . . . . . . . . . . . . . . . . . . . 31
Editing Phone Book Entries . . . . . . . . . . . . . . . . . . . . 32
Adding Another Phone Number . . . . . . . . . . . . . . 32
Default Numbers . . . . . . . . . . . . . . . . . . . . . . . . . . 33
Editing Stored Phone Numbers . . . . . . . . . . . . . . . 34
Editing Stored Names . . . . . . . . . . . . . . . . . . . . . . 34
Editing Customized Options . . . . . . . . . . . . . . . . . 35
Deleting . . . . . . . . . . . . . . . . . . . . . . . . . . . . . . . . . . . 36
Deleting a Phone Number from a Phone Book . . . . . .36
Deleting a Phone Book Entry . . . . . . . . . . . . . . . . 36
Additional Ways to Delete a Phone Book . . . . . . . 36
Deleting a Speed Dial . . . . . . . . . . . . . . . . . . . . . . 37
Phone Numbers With Pauses . . . . . . . . . . . . . . . . . . 38
Searching Your Phone’s Memory . . . . . . . . . . . . . . . . 40
Making a Call From Your Phone’s Memory . . . . . . . . 42
From Phone Book . . . . . . . . . . . . . . . . . . . . . . . . . 42
From Call History . . . . . . . . . . . . . . . . . . . . . . . . . . 42
Using Phone Menus . . . . . . . . . . . . . . . . . . . . . . . . . . . . 43
Menu Access . . . . . . . . . . . . . . . . . . . . . . . . . . . . . . . .43
Call History . . . . . . . . . . . . . . . . . . . . . . . . . . . . . . . . . 44
Outgoing Calls . . . . . . . . . . . . . . . . . . . . . . . . . . . . 45
Incoming Calls . . . . . . . . . . . . . . . . . . . . . . . . . . . . 45
Missed Calls . . . . . . . . . . . . . . . . . . . . . . . . . . . . . 45
Erase Calls . . . . . . . . . . . . . . . . . . . . . . . . . . . . . . 46
Call Timer . . . . . . . . . . . . . . . . . . . . . . . . . . . . . . . 46
Phone Book . . . . . . . . . . . . . . . . . . . . . . . . . . . . . . . . 46
List Entries . . . . . . . . . . . . . . . . . . . . . . . . . . . . . . . 47
New Entry . . . . . . . . . . . . . . . . . . . . . . . . . . . . . . . 47
Speed Dials . . . . . . . . . . . . . . . . . . . . . . . . . . . . . 48
Groups . . . . . . . . . . . . . . . . . . . . . . . . . . . . . . . . . 48
Messaging . . . . . . . . . . . . . . . . . . . . . . . . . . . . . . . . . 49
Send Message . . . . . . . . . . . . . . . . . . . . . . . . . . . . 51
The Basics of Sending a Message . . . . . . . . . .51
Customizing the Message Using Options . . . . . 52
Web Msg . . . . . . . . . . . . . . . . . . . . . . . . . . . . . . . . 52
Inbox . . . . . . . . . . . . . . . . . . . . . . . . . . . . . . . . . . . 53
Out of Memory Warning . . . . . . . . . . . . . . . . . . 53
Viewing Your Inbox . . . . . . . . . . . . . . . . . . . . . . 53
Outbox . . . . . . . . . . . . . . . . . . . . . . . . . . . . . . . . . . 54
Viewing Your Outbox . . . . . . . . . . . . . . . . . . . . . 55
Saved . . . . . . . . . . . . . . . . . . . . . . . . . . . . . . . . . . . 56
Voicemail . . . . . . . . . . . . . . . . . . . . . . . . . . . . . . . . . 56
Web . . . . . . . . . . . . . . . . . . . . . . . . . . . . . . . . . . . . . . 57
Start Web . . . . . . . . . . . . . . . . . . . . . . . . . . . . . . . . 57
Ending a MiniBrowser Session . . . . . . . . . . . . . . . 57
Navigating Through the Browser . . . . . . . . . . . . . . 57
Entering Text, Numbers or Symbols . . . . . . . . . . . 59
Initiating a Phone Call From MiniBrowser . . . . . . . 60
Downloads . . . . . . . . . . . . . . . . . . . . . . . . . . . . . . . . . . 60
Voice . . . . . . . . . . . . . . . . . . . . . . . . . . . . . . . . . . . . . . 62
Start Commands . . . . . . . . . . . . . . . . . . . . . . . . . . 63
Voice Scheduler . . . . . . . . . . . . . . . . . . . . . . . . . . . 64
Voice Memos . . . . . . . . . . . . . . . . . . . . . . . . . . . . . 65
Voice Settings . . . . . . . . . . . . . . . . . . . . . . . . . . . . 65
Driving Mode . . . . . . . . . . . . . . . . . . . . . . . . . . . . .67
Help . . . . . . . . . . . . . . . . . . . . . . . . . . . . . . . . . . . .67
Tools . . . . . . . . . . . . . . . . . . . . . . . . . . . . . . . . . . . . . . 68
Alarm . . . . . . . . . . . . . . . . . . . . . . . . . . . . . . . . . . . 69
Notepad . . . . . . . . . . . . . . . . . . . . . . . . . . . . . . . . . 69
EZ Tip Calc. . . . . . . . . . . . . . . . . . . . . . . . . . . . . . . 70
2
LG5550
LG5550
3
Page 4

Calculator . . . . . . . . . . . . . . . . . . . . . . . . . . . . . . . . 70
World Clock . . . . . . . . . . . . . . . . . . . . . . . . . . . . . . 70
Settings . . . . . . . . . . . . . . . . . . . . . . . . . . . . . . . . . . . . 71
Sounds . . . . . . . . . . . . . . . . . . . . . . . . . . . . . . . . . . 72
Ringers . . . . . . . . . . . . . . . . . . . . . . . . . . . . . . . 72
Key Tones . . . . . . . . . . . . . . . . . . . . . . . . . . . . . . 72
Volume . . . . . . . . . . . . . . . . . . . . . . . . . . . . . . . 73
Alerts . . . . . . . . . . . . . . . . . . . . . . . . . . . . . . . . . 73
Service Change . . . . . . . . . . . . . . . . . . . . . . 73
Minute Beep . . . . . . . . . . . . . . . . . . . . . . . . . 73
Call Connect . . . . . . . . . . . . . . . . . . . . . . . . 73
Display . . . . . . . . . . . . . . . . . . . . . . . . . . . . . . . . . . 74
Greeting . . . . . . . . . . . . . . . . . . . . . . . . . . . . . . 74
Backlight . . . . . . . . . . . . . . . . . . . . . . . . . . . . . . 74
Phone . . . . . . . . . . . . . . . . . . . . . . . . . . . . . . 74
Web . . . . . . . . . . . . . . . . . . . . . . . . . . . . . . . 75
Screens . . . . . . . . . . . . . . . . . . . . . . . . . . . . . . . 75
Brightness . . . . . . . . . . . . . . . . . . . . . . . . . . . . 75
Contrast . . . . . . . . . . . . . . . . . . . . . . . . . . . . . . 75
Menu Style . . . . . . . . . . . . . . . . . . . . . . . . . . . . . 76
Clocks . . . . . . . . . . . . . . . . . . . . . . . . . . . . . . . . 76
Theme Colors . . . . . . . . . . . . . . . . . . . . . . . . . . 76
Text Input Fonts . . . . . . . . . . . . . . . . . . . . . . . . . 76
Data Setting . . . . . . . . . . . . . . . . . . . . . . . . . . . . . . 77
Data/Fax . . . . . . . . . . . . . . . . . . . . . . . . . . . . . . 77
Method . . . . . . . . . . . . . . . . . . . . . . . . . . . . . . . 77
Data Baud . . . . . . . . . . . . . . . . . . . . . . . . . . . . 78
Roaming . . . . . . . . . . . . . . . . . . . . . . . . . . . . . . . . 78
Set Mode . . . . . . . . . . . . . . . . . . . . . . . . . . . . . 78
Call Guard . . . . . . . . . . . . . . . . . . . . . . . . . . . . . 78
Location . . . . . . . . . . . . . . . . . . . . . . . . . . . . . . . . . 79
Messaging . . . . . . . . . . . . . . . . . . . . . . . . . . . . . . . 79
Display Pop-up . . . . . . . . . . . . . . . . . . . . . . . . . 79
Delivery Receipt . . . . . . . . . . . . . . . . . . . . . . . . . 79
Msg Alerts . . . . . . . . . . . . . . . . . . . . . . . . . . . . .79
Auto Delete . . . . . . . . . . . . . . . . . . . . . . . . . . . 80
Signature . . . . . . . . . . . . . . . . . . . . . . . . . . . . . . 80
Canned Msgs . . . . . . . . . . . . . . . . . . . . . . . . . . 80
Edit Voice Mailbox # . . . . . . . . . . . . . . . . . . . . . 80
Security . . . . . . . . . . . . . . . . . . . . . . . . . . . . . . . . . 81
Lock Phone . . . . . . . . . . . . . . . . . . . . . . . . . . . . 81
Change Lock . . . . . . . . . . . . . . . . . . . . . . . . . . . 82
Special # . . . . . . . . . . . . . . . . . . . . . . . . . . . . . . 82
Erase Phone Book . . . . . . . . . . . . . . . . . . . . . . 82
Reset Default . . . . . . . . . . . . . . . . . . . . . . . . . . 83
Airplane Mode . . . . . . . . . . . . . . . . . . . . . . . . . . . . 83
Setup/Others . . . . . . . . . . . . . . . . . . . . . . . . . . . . . . 83
Shortcut Key . . . . . . . . . . . . . . . . . . . . . . . . . . 83
Call Answer . . . . . . . . . . . . . . . . . . . . . . . . . . . . 84
Auto-Answer . . . . . . . . . . . . . . . . . . . . . . . . . . 84
Language . . . . . . . . . . . . . . . . . . . . . . . . . . . . . 84
TTY Mode . . . . . . . . . . . . . . . . . . . . . . . . . . . . . 85
Phone Info . . . . . . . . . . . . . . . . . . . . . . . . . . . . . . . 85
Safety . . . . . . . . . . . . . . . . . . . . . . . . . . . . . . . . . . . . . . . . 86
TIA Safety Information . . . . . . . . . . . . . . . . . . . . . . . . 86
Exposure to Radio Frequency Signal . . . . . . . . . . 86
Antenna Care . . . . . . . . . . . . . . . . . . . . . . . . . . . . 86
Phone Operation . . . . . . . . . . . . . . . . . . . . . . . . . . 86
Driving . . . . . . . . . . . . . . . . . . . . . . . . . . . . . . . . . . 87
Electronic Devices . . . . . . . . . . . . . . . . . . . . . . . . . 87
Pacemakers . . . . . . . . . . . . . . . . . . . . . . . . . . . . . . 87
Hearing Aids . . . . . . . . . . . . . . . . . . . . . . . . . . . . . 88
4
LG5550
LG5550
5
Page 5

Intr
oduction
Intr
oduction
Other Medical Devices . . . . . . . . . . . . . . . . . . . . . 88
Health Care Facilities . . . . . . . . . . . . . . . . . . . . . . . 88
Vehicles . . . . . . . . . . . . . . . . . . . . . . . . . . . . . . . . . 88
Posted Facilities . . . . . . . . . . . . . . . . . . . . . . . . . . . 88
Aircraft . . . . . . . . . . . . . . . . . . . . . . . . . . . . . . . . . .88
Blasting Areas . . . . . . . . . . . . . . . . . . . . . . . . . . . . 88
Potentially Explosive Atmosphere . . . . . . . . . . . . . 89
For Vehicles Equipped with an Air Bag . . . . . . . . . 89
Charger and Adapter Safety . . . . . . . . . . . . . . . . . . . . 89
Battery Information and Care . . . . . . . . . . . . . . . . . . . 89
Safety Information . . . . . . . . . . . . . . . . . . . . . . . . . . . 90
FDA Consumer Update . . . . . . . . . . . . . . . . . . . . . . . 93
Consumer Information on SAR . . . . . . . . . . . . . . . . 100
Accessories . . . . . . . . . . . . . . . . . . . . . . . . . . . . . . . . . 102
Warranty Information . . . . . . . . . . . . . . . . . . . . . . . . . . 104
Index . . . . . . . . . . . . . . . . . . . . . . . . . . . . . . . . . . . . . . . 106
Congratulations for choosing the advanced and compact
LG5550 cellular phone, designed to operate with the
latest digital mobile communication technology, Code
Division Multiple Access (CDMA). Along with the many
advanced features of the CDMA system, such as greatly
enhanced voice clarity, this phone offers:
● Large, easy-to-read, 8-line backlight LCD with status
icons.
● Paging, messaging, voice mail, and caller ID.
● 19-key keypad.
● Long battery standby and talk time.
● Menu-driven interface with prompts for easy operation
and configuration.
● Driving Mode.
● Any key answer, auto answer, one-touch and speed
dialing with 99 memory locations.
● Bilingual(English and French) capabilities.
Check Accessories
Your mobile phone comes with an AC adaptor and a
rechargeable battery. Please verify that these accessories
are included.
6
LG5550
Important Information
This user’s guide provides important information on the
use and operation of your phone. Please read all the
information carefully prior to using the phone for the best
performance and to prevent any damage to or misuse of
the phone. Any unapproved changes or modifications
will void your warranty.
LG5550
7
Page 6
FCC RF Exposure Information
Vehicle-Mounted External Antenna
WARNING! Read this information before
operating the phone.
In August 1996, the Federal Communications
Commission (FCC) of the United States, with its action in
Report and Order FCC 96-326, adopted an updated safety
standard for human exposure to radio frequency (RF)
electromagnetic energy emitted by FCC regulated
transmitters. Those guidelines are consistent with the
safety standard previously set by both U.S. and
international standards bodies.
The design of this phone complies with the FCC guidelines
and these international standards.
Bodily Contact During Operation
This device was tested for typical use with the back of the
phone kept 3/4 inches (2 cm) from the body. To comply
with FCC RF exposure requirements, a minimum
separation distance of 3/4 inches (2 cm) must be
maintained between the user’s body and the back of the
phone, including the antenna, whether extended or
retracted. Third-party belt-clips, holsters, and similar
accessories containing metallic components should not
be used. Avoid the use of accessories that cannot
maintain 3/4 inches (2 cm) distance between the user’s
body and the back of the phone and have not been
tested for compliance with FCC RF exposure limits.
(Optional, if available.)
A minimum distance of 8 inches (20 cm) must be
maintained between the user / bystander and the vehiclemounted external antenna to satisfy FCC RF exposure
requirements. For more information about RF exposure,
visit the FCC website at www.fcc.gov.
Caution
Use only the supplied and approved antenna. Use of
unauthorized antennas or modifications could impair call
quality, damage the phone, void your warranty and/or
result in violation of FCC regulations.
Do not use the phone with a damaged antenna. If a
damaged antenna comes into contact with the skin a
minor burn may result. Contact your local dealer for a
replacement of antenna.
8
LG5550
LG5550
9
Page 7
Phone Over
Phone Over
1. Earpiece
2. Flip
3. LCD Screen
4. Headset Jack
5. Left Soft Key
6. Side Keys
7.TALK Key
8.Voice Command
Key
view
view
9. Right Soft Key
10. Navigation Key
11. Message Key
12. BACK Key
13. END Key
14.Alphanumeric
Keypad
15. Microphone
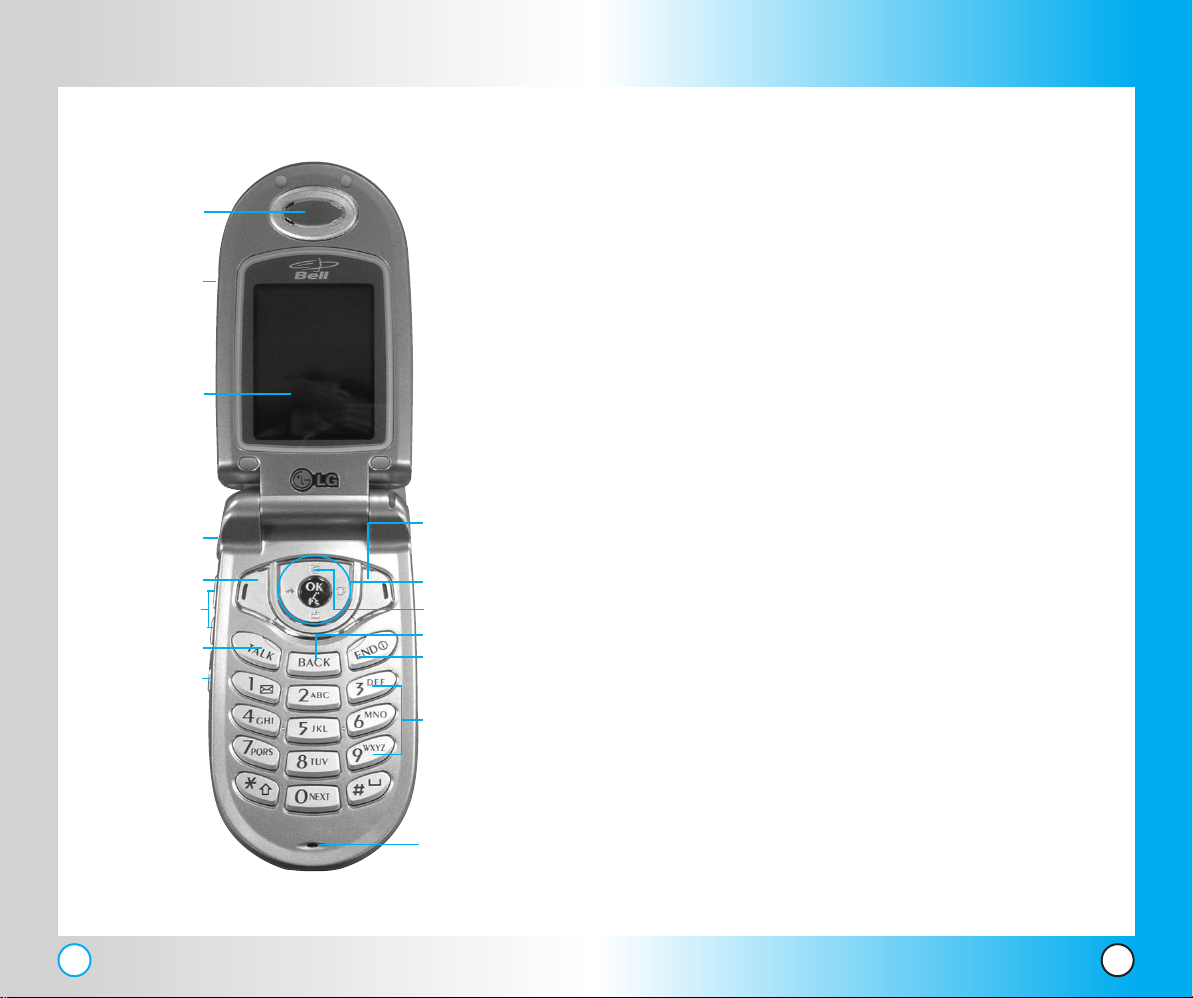
1. Earpiece
2. Flip Flip open the case to answer an incoming call
and close to end the call.
3. LCD Screen Displays messages and indicator
icons.
4. Headset Jack
5. Left Soft Key Use to display the function setting
menu.
6. Side Keys Use to adjust the ringer volume in
standby mode and the earpiece volume during a
call. Use to set Vibrate/Off/Silence Mode.
7. TALK Key Use to place or answer calls.
8. Voice Command Key Use for quick access to
Voice Commands and Driving Mode.
9. Right Soft Key Use to select an action within a
menu.
10. Navigation Key Use for quick access to messages,
Schedule, Downloads, Web.
11. Message Key Use to retrieve or send voice and
text messages.
12. BACK Key Press to delete a single space or
character. Press and hold to delete entire words.
Press this key once in a menu to go back one level.
Use for quick access to Shortcut Help.
13. END Key Use to turn the power on/off and to end
a call. Also return to the main menu display screen.
14. Alphanumeric Keypad Use to enter numbers and
characters and select menu items.
15. Microphone
10
LG5550
LG5550
11
Page 8
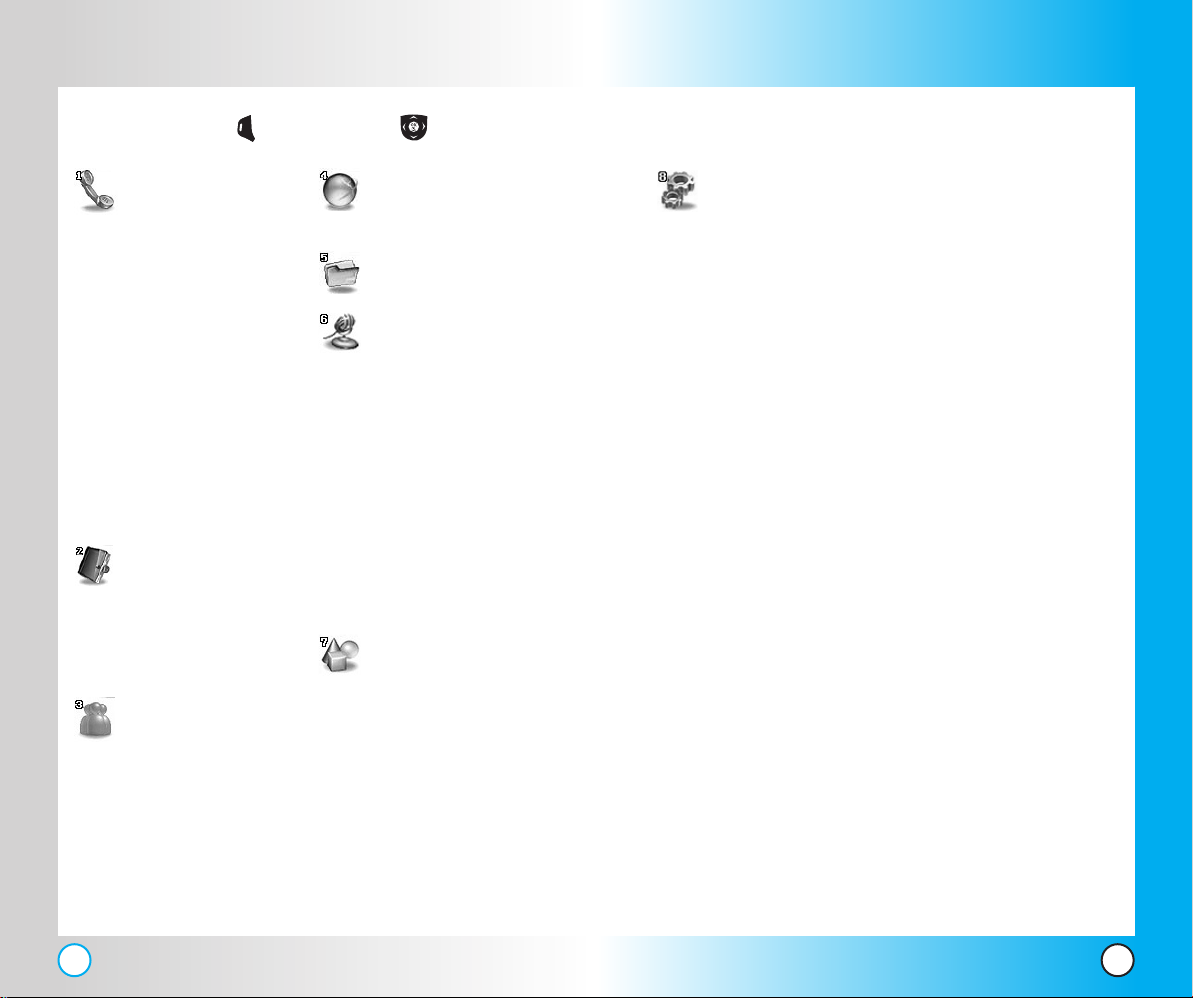
Menus Over
Menus Over
view
view
Press Left Soft Key Menu. Press to Scroll.
Call History
1. Outgoing Calls
2. Incoming Calls
3. Missed Calls
4. Erase Calls
1. Outgoing Calls
2. Incoming Calls
3. Missed Calls
4. All Calls
5. Call Timer
1. Last Call
2. Home Calls
3. Roam Calls
4. All Calls
Phone Book
1. List Entries
2. New Entry
3. Speed Dials
4. Groups
Messaging
1. Send Message
2. Web Msg
3. Inbox
4. Outbox
5. Saved
6. Voicemail
Web
1. Start Web
Downloads
Voice
1. Start Commands
2. Voice Scheduler
3. Voice Memos
4. Voice Settings
1. Voice Commands
2. Announce Alerts
3. Best Match
4. Train Commands
5. Train Digits
5. Driving Mode
6. Help
Tools
1. Alarm
1. Alarm 1
2. Alarm 2
3. Alarm 3
4. Quick Alarm
2. Notepad
3. EZ Tip Calc.
4. Calculator
5. World Clock
Settings
1. Sounds
1. Ringers
2. Key Tones
3. Volume
4. Alerts
2. Display
1. Greeting
2. Backlight
3. Screens
4. Brightness
5. Contrast
6. Menu Style
7. Clocks
8. Theme Colors
9. Text Input Fonts
3. Data Setting
1. Data/Fax
2. Method
3. Data Baud
4. Roaming
1. Set Mode
2. Call Guard
5. Location
6. Messaging
1. Display Pop-up
2. Delivery Receipt
3. Msg Alerts
4. Auto Delete
5. Signature
6. Canned Msgs
7. Edit Voice Mailbox #
7. Security
1. Lock Phone
2. Change Lock
3. Special #
4. Erase Phone Book
5. Reset Default
8. Airplane Mode
9. Setup/Others
1. Shortcut Key
2. Call Answer
3. Auto-Answer
4. Language
5. TTY Mode
0. Phone Info
12
LG5550
LG5550
13
Page 9
Getting Y
Getting Y
our Phone Star
our Phone Star
ted
ted
The Battery
NOTE: It is important to fully charge the battery before initial use of
the phone.
The phone comes with a rechargeable battery. Keep the
battery charged while not in use in order to maximize talk
and standby time. The battery charge level is shown at
the top of the LCD screen.
Installing the Battery
To install the battery, insert the bottom of the battery into
the opening on the back of the phone. Push the battery
down until the latch clicks.
Removing the Battery
Turn the power off. Lift the release latch and to detach
the battery.
Charging the Battery
To use the charger provided with your phone:
Warning! Use only the charger provided with the
phone. Using any charger other than the one included
with the LG5550 may damage your phone or battery.
1. Plug the round end of the adapter into the phone’s
charger jack and the other end into an electrical
outlet.
2. The charge time varies depending upon the battery
level.
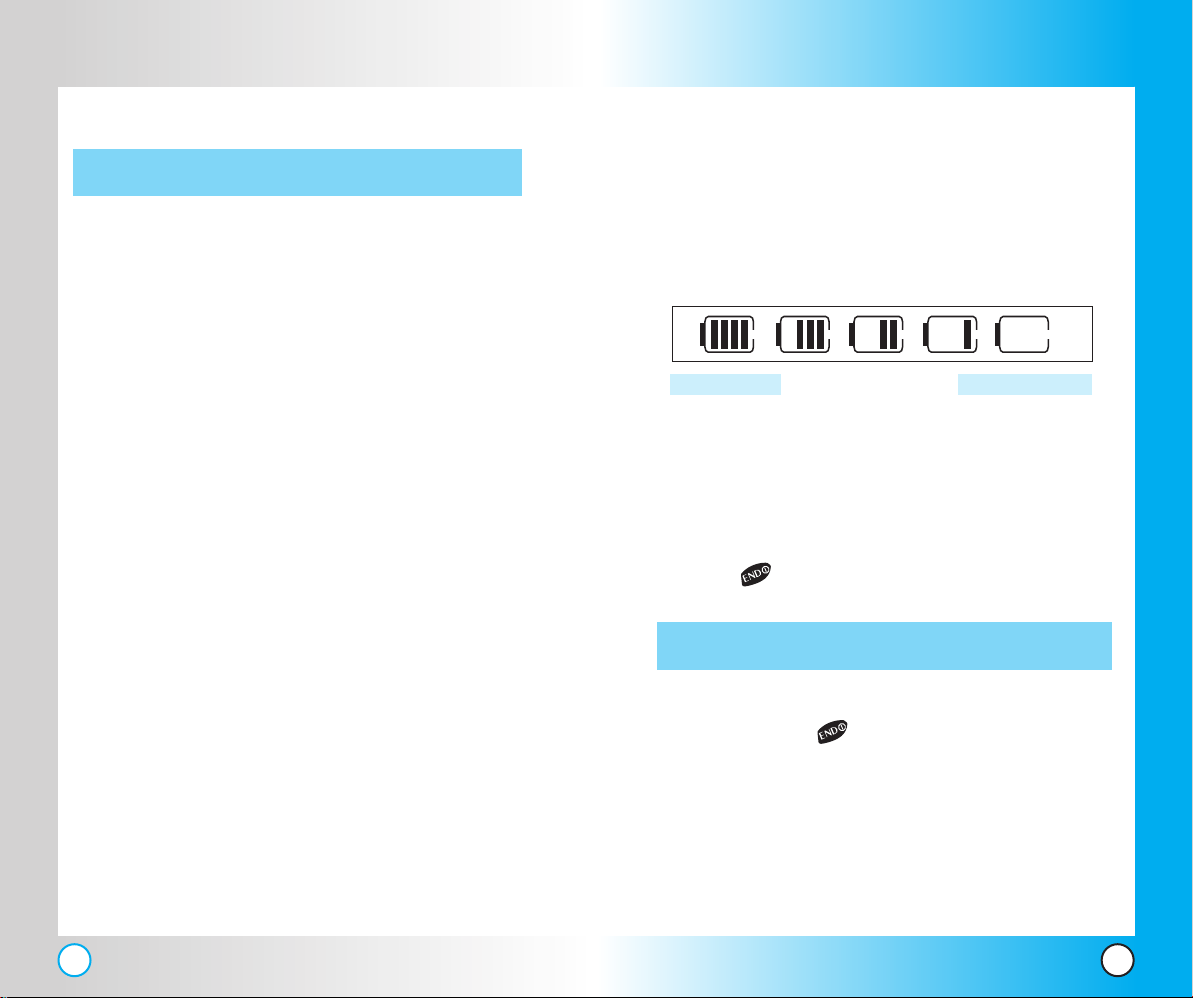
Battery Charge Level
The battery charge level is shown at the top right of the
LCD screen. When the battery charge level becomes low,
the low battery sensor alerts you in three ways: sounding
an audible tone, blinking the battery icon, and displaying
LOW BATTERY WARNING! If the battery charge level
becomes exceedingly low, the phone automatically
switches off and any function in progress is not saved.
Fully DischargedFully Charged
Turning the Phone On and Off
Turning the Phone On
1. Install a charged battery or connect the phone to an
external power source such as a car charger or
hands-free car kit.
2. Press for a few seconds until the LCD screen
lights up.
NOTE: Like any other radio device, avoid any unnecessary contact
with the antenna while your phone is on.
Turning the Phone Off
1. Press and hold until the display turns off.
Signal Strength
Call quality depends on the signal strength in your area.
The signal strength is indicated on the screen as the
number of bars next to the signal strength icon:
The more bars, the better the signal strength. If the signal
quality is poor, move to an open area. If you are in a
building, the reception may be better near a window.
14
LG5550
LG5550
15
Page 10
Getting Y
Getting Y
our Phone Star
our Phone Star
ted
ted
Screen Icons Making Calls
Every time you make a call, follow these steps:
Icon
Description
1. Make sure that the phone is turned on. If not, hold
SSL
Displays the strength of the signal received by the phone
and current signal strength is indicated by the number of
bars displayed on the screen.
In use.A call is in progress.
* No icon indicates the phone is in standby mode.
IS-2000
Digital indicator
Digital service is available.
Analog indicator
Analog service is available.
Roaming indicator
The phone is outside of the home service area.
New Downloads
No service.The phone is not receiving a system signal.
Silence All
TTY
Driving Mode
down for 2 seconds.
2. Type the phone number and then press .
● If the phone is locked, type the lock code.
The lock code is commonly the last four digits of
your phone number.
3. To end the call press .
Correcting Dialing Mistakes
If you make a mistake while dialing a number, press
once to erase the last digit entered or hold down for
at least 2 seconds to delete all digits.
Redialing Calls
1. Press twice to redial the last number you dialed.
The last 30 numbers are stored in the call history list
and you can also select one of these to redial.
Announce Alerts
3G Service
New Text Msgs
New Text&Voice
Battery Strength
LG5550
Location On
New V oicemails
Receiving Calls
1. Open the folder or if the folder is open, press any key
except to answer the call. Answer the call as per
the Call Settings.
● If you press once when you receive a call, the
phone stops ringing or vibrating and the call remains
unanswered. Press twice to disconnect.
2. To end an answered call press .
LG5550
1716
Page 11
Quick Access to Convenient Featur
Quick Access to Convenient Featur
es
es
Vibrate Mode
Vibrate Mode should be used in settings where you wish
to be contacted, but noise is an issue.
When Vibrate Mode is set, the key tones are silent, and
the phone is set to vibrate.
To Enter Vibrate Mode
1. From Standby mode, press lower side key( ) to
enter the ringer volume.
2. Press lower side key ( ) until Vibrate is indicated.
NOTE: The phone remains in Vibrate Mode even if you turn it
off and back on.
Silence Mode
Silence Mode should be used if you wish to be contacted,
have the phone in view, but noise is an issue.
When Silence Mode is set, the key tones are silent, and the
lamp blinks instead of the phone ringing or vibrating.
Silence All Mode Quick Activation
1. From Standby mode, hold lower side key( ) to
activate Silence Mode.
Mute Function
The Mute function prevents the other party from hearing
your voice, but allows you to hear the other party.
Mute Quick Activation
1. Press Left Soft Key Mute during a call.
Mute Quick Cancellation
1. Press Left Soft Key Unmute again.
Volume Quick Adjustment
Use the side keys to adjust the earpiece and ringer
volumes. The upper key increases the volume and the
lower key decreases the volume.
● Earpiece volume can be adjusted during a call.
● Ringer volume can be adjusted while the phone is in
Standby mode.
NOTE: Key beep volume is adjusted through the Menu.
Silence Mode Cancellation
1. Press upper side key ( ) to exit Silence mode.
18
LG5550
LG5550
19
Page 12
Quick Access to Convenient Featur
Quick Access to Convenient Featur
es
es
Call Waiting
Your cellular service may offer call waiting. While a call is
in progress, two beeps indicate another incoming call.
When call waiting is enabled, you may put the active call
on hold while you answer the other incoming call. Check
with your cellular service provider for information about
this function.
1. Press to receive a waiting call.
2. Press again to switch between calls.
Caller ID
Caller ID displays the number of the person calling when
your phone rings. If the caller’s identity is stored in
Contacts, the name appears with the number.
Check with your service provider to ensure they offer this
feature.
Speed Dialing
Speed dialing is a convenient feature that allows you to
make phone calls quickly and easily with a few
keystrokes. Your phone recalls the number from your
Contacts, displays it briefly, and then dials it. Speed Dial
number 1 is always for Voice mail.
Dialing Speed Dials from 2 to 9
1. Press and hold the Speed Dial number.
OR
Enter the speed dial number and press .
Dialing Speed Dials from 10 to 99
Press the first digit and then press and hold the key
of the last digit.
OR
Enter the first and second digits and press
.
Voice Command
Voice command is an advanced feature that allows you
to perform several functions verbally.
20
LG5550
Voice Command Quick Activation
1. Press the Voice Command key( ).
2. Choose a feature verbally
For more information about the Voice Command
feature set, please see Page 63 for more details.
NOTE: Voice Command is available in English Only, Voice
Command will not operate if the phone is in French.
LG5550
21
Page 13
Entering and Editing Infor
Entering and Editing Infor
mation
mation
Text Input
You can input and edit your Greeting, Notepad, Phone
Book, and Messaging.
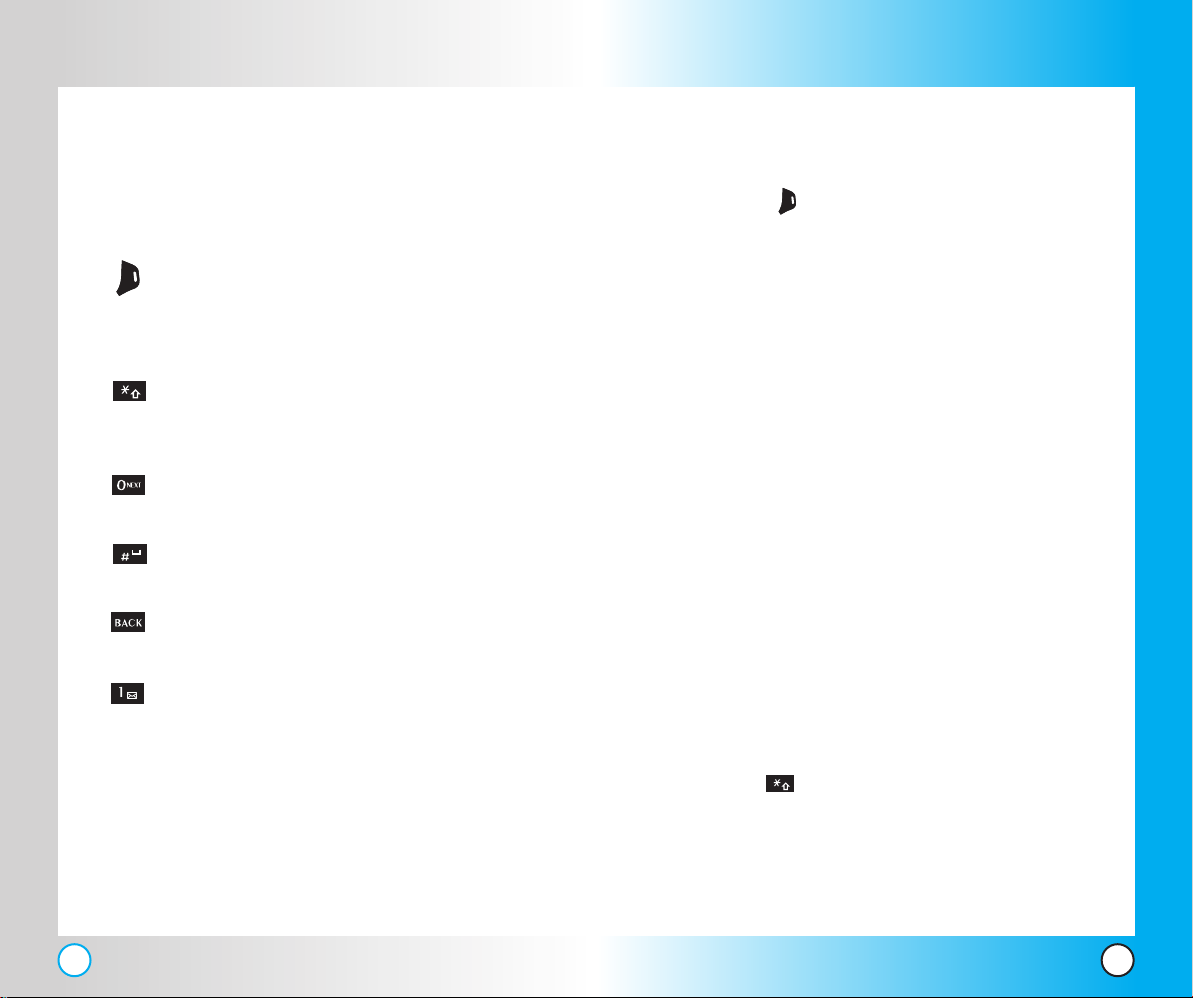
Key Functions
Right Soft Key: Press to scroll through the
following text input modes:
T9Word -> Abc -> 123 -> Symbols ->
Smileys.
Shift: Press to change case.
T9 text: T9Word -> T9WORD -> T9word
Abc text: Abc -> ABC -> abc
Next: In T9 mode, press to display other
matching words.
Space: Press to complete a word and
insert a space.
Back: Press to delete a single space or
character. Hold to delete the entire message.
Punctuation: In T9 mode, press to insert a
punctuation and complete a sentence.
Text Input Modes
There are five modes for entering text, numbers, special
characters, and punctuation. In a text entry field, pressing
Right Soft Key displays a pop-up list of text modes.
T9Word (T9) Mode
Use to type text using one keystroke per letter. The phone
translates keystrokes into common words by using the
letters on each key and a compressed database.
Abc (Multi-tap) Mode
Use to add words to the T9 database.
123 (Numbers) Mode
Use to type numbers using one keystroke per number.
Symbols Mode
Use to insert special characters or punctuation. There are
35 special characters including “SP” which inserts a
space and “LF” which forces the text to the next line.
Smileys Mode
Use to insert smiley graphics. There are 36 smiley
characters.
Changing Letter Case
Using T9 and Abc text input, you can set the Capitalization
mode. Press to cycle through the following:
22
LG5550
Initial Cap (T9Word / Abc)
Only the first letter is capitalized. All subsequent letters
are lower case.
LG5550
23
Page 14
Entering and Editing Infor
Entering and Editing Infor
mation
mation
Caps Lock (T9WORD / ABC)
All letters are capitalized.
Lower Case (T9word / abc)
All letters are in lower case.
Text Input Examples
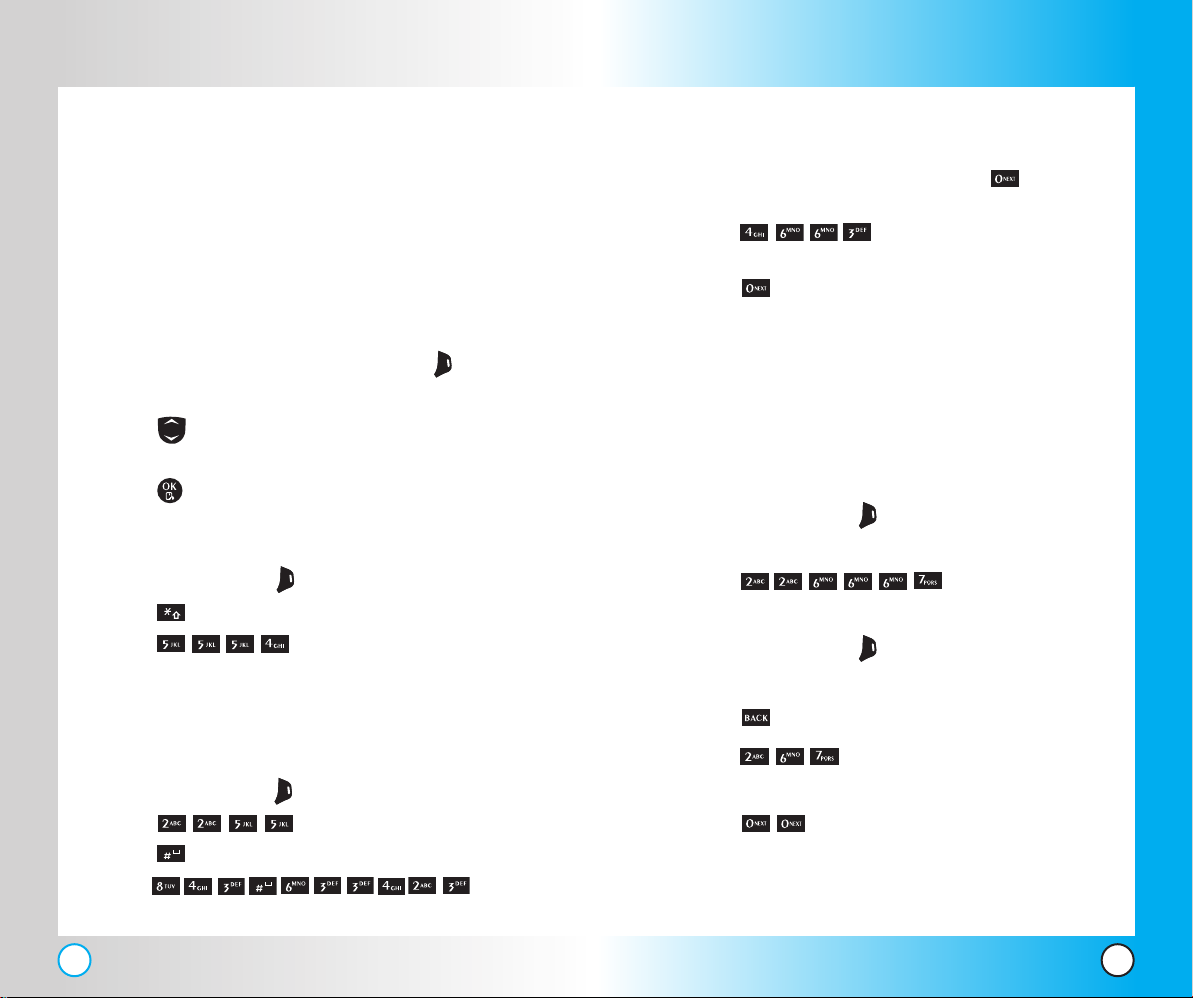
Display the text modes and select a text mode:
1. In a text entry field, press Right Soft Key to display
text modes.
2. Press to highlight the text input mode you want
to use.
3. Press to select the highlighted text input mode.
Using Abc (Multi-tap) Text Input
1. Press Right Soft Key to change to Abc mode.
2. Press to change to ABC Caps Lock.
3. Press .
LG is displayed.
Using the NEXT Key(to be used only with T9 Text Input)
After you have finished entering a word, if the word
displayed is not the one you want, press to display
additional choices of words from the database.
1. Press .
Good is displayed.
2. Press .
The display gives you additional choices such as:
Home, Gone, Hood, etc.
Adding Words to the T9 Database
If a word is not in the T9 database, add it using Abc
(Multi-tap) mode text entry. The word is automatically
added to the T9 database.
1. Press Right Soft Key to change to Abc (multi-tap)
mode.
2. Press .
Bop is displayed.
3. Press Right Soft Key to change to T9 mode to add
the word Bop to the T9 database.
Using T9 Mode Text Input
To type the message “Call The Office” follow these steps:
1. Press Right Soft Key to change to T9Word mode.
2. Press .
3. Press to complete the word and add a space.
4. Press .
Call The Office is displayed.
24
LG5550
4. Press to erase the existing word.
5. Press .
Cop is displayed.
6. Press .
Bop is displayed.
LG5550
25
Page 15
Phone Book in Y
Phone Book in Y
our Phone’
our Phone’
s Memoryy
s Memor
Phone Book Entries
This allows you to have easy access to your most
frequently dialed phone numbers. You may store up to
200 entries with up to 5 phone numbers each. Each entry
may be up to 22 characters. Each phone number may be
up to 48 digits.
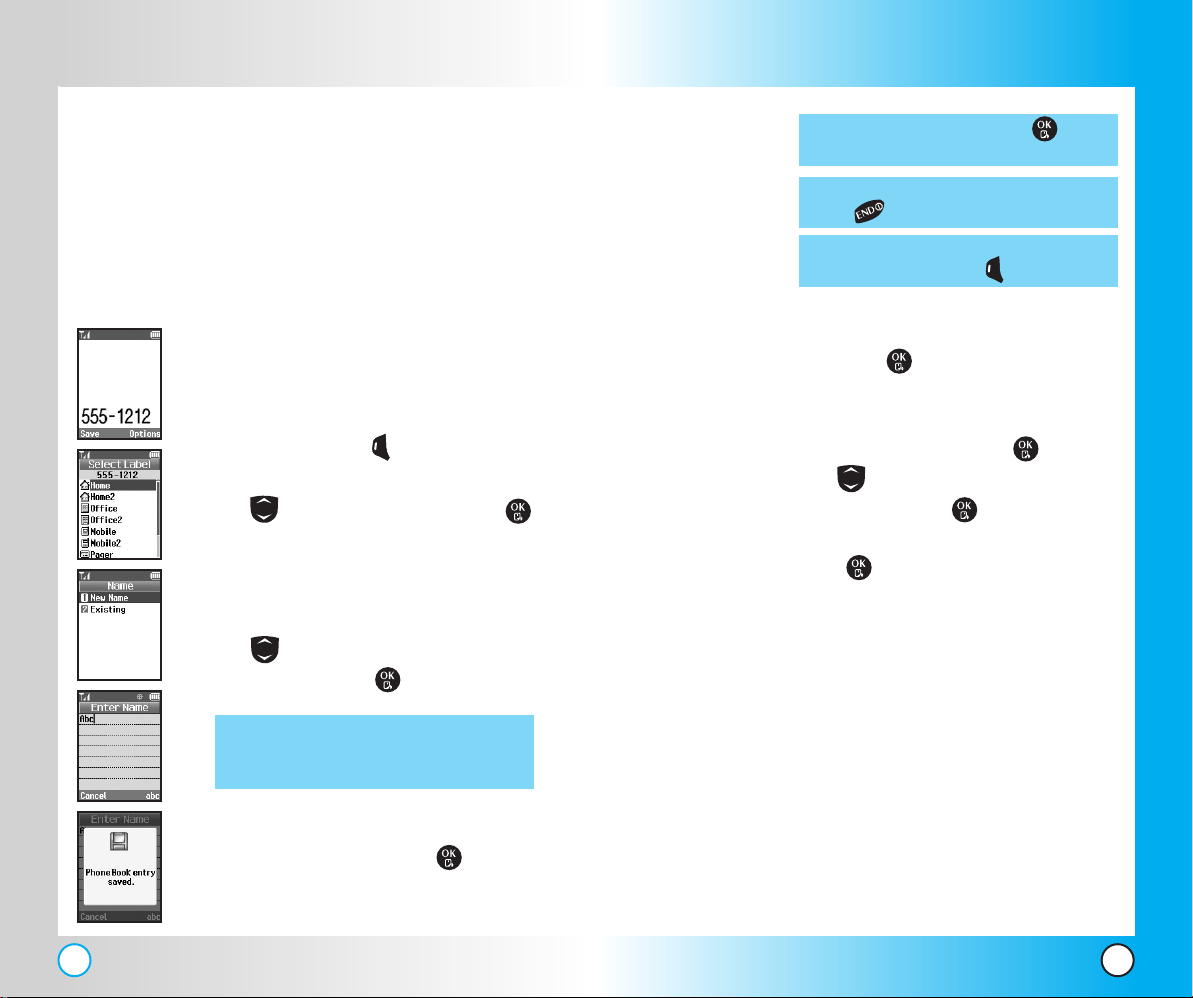
The Basics of Storing Phone Book Entries
1. From standby mode enter the phone
number you want to save (up to 48
digits).
2. Press Left Soft Key Save.
3. Use to select a Label and press .
Home / Home2 / Office / Office2 /
Mobile / Mobile2 / Pager / Fax / Fax2 /
None
4. Use to select New Name or
Existing and press .
NOTE: To skip name entry, press to go to
the next step.
NOTE: If the information is complete, press
to return to the Main Menu screen.
NOTE: To further customize the Contact entry,
press Left Soft Key Done.
6. Continue saving the entry as a Speed
Dial, press to select Speed Dial.
7. Enter a Speed Dial digit (e.g., 2)
Use the keypad and press or
Use to highlight the Speed Dial
location and press .
8. Press to select OK.
26
LG5550
NOTE: Use Existing to add another phone
number to a contact already stored in
memory.
5. Enter a name for the phone number (up
to 22 characters) and press .
A confirmation message is displayed
briefly.
LG5550
27
Page 16
Phone Book in Y
Phone Book in Y
our Phone’
our Phone’
s Memoryy
s Memor
Options to Customize Your Phone Book
Once basic phone number and name information is stored
in your Phone Book, you can edit and / or customize the
entries.
1.
From standby mode, press Right Soft Key Search.
Your Phone Book display alphabetically.
2. Select the appropriate contact and press .
3. Press Left Soft Key Edit to access the Edit Entry
screen.
4. Use to highlight the information you want to
customize and press .
Adding or Changing the Group
Allows you to manage your Phone Book entries by
organizing them into groups.
1. Access your Phone Book and use to highlight
an entry. Once you find your entry, press .
2. Press Left Soft Key Edit.
3. Use to highlight
4. Use to select the Group and press .
No Group / Family / Friends / Colleagues / Business /
School
5. Press Left Soft Key Done to continue editing the
Contact entry.
NOTE: You can change the name of the group, add groups,
and delete groups.
No Group and press .
Changing the Call Ringer
Allows you to identify who is calling by setting different
ringers for different phone numbers in your Phone Book.
It is automatically set to the default ringer when the
Phone Book is saved.
1. Access your Phone Book entries and use to
highlight an entry. Once you find your entry, press
.
2. Press Left Soft Key Edit.
3. Use to highlight
4. Use to select the Ring Type. If you wish to review
the ring tone, press .
5. Press Left Soft Key Done to continue editing the
Phone Book entry.
Adding or Changing the Memo
Allows you to enter up to 32 characters as a memo to the
Phone Book entry.
1. Access your Phone Book and use to highlight
an entry.
2. Press Left Soft Key Edit.
3. Use to highlight
4. Enter text and press .
5. Press Left Soft Key Done to continue editing the
Phone Book entry.
Default and press .
Memo and press .
28
LG5550
LG5550
29
Page 17
Phone Book in Y
Phone Book in Y
our Phone’
our Phone’
s Memoryy
s Memor
Adding or Changing the Picture ID
Allows the phone to display a picture to identify the caller .
1. Access your Phone Book and use to highlight
an entry.
2. Press Left Soft Key Edit.
3. Use to highlight
4. Use to select a Graphic and press
5. Press Left Soft Key Done to continue editing the
Phone Book entry.
Changing the Secret Setting
Allows you to hide certain phone numbers from being
displayed when the Phone Book are searched.
1. Access your Phone Book and use to highlight an
entry.
2. Press Left Soft Key Edit.
3. Use to highlight
4. Use to select the Secret setting and press .
5. Press Left Soft Key Done to continue editing the
Phone Book entry.
NOTE: To access a Secret entry, you will have to input the 4
digit lock code.
Default and press .
Select.
Not Secret and press .
Adding or Changing the URL
Allows you to enter a Web address associated with the
Phone Book entry.
1. Access your Phone Book and use to highlight
an entry.
2. Press Left Soft Key Edit.
3. Use to highlight
4. Enter a Web address and press .
5. Press Left Soft Key Done to continue editing the
Phone Book entry.
Adding Speed Dial
1. Access your Phone Book and use to highlight an
entry.
2. Press Left Soft Key Edit.
3. Use to highlight the phone number you want to
set with a Speed Dial and press .
4. Press to select
5. Enter a Speed Dial digit.
Use the Keypad and press , or Use to highlight
the Speed Dial digit and press .
6. Press Left Soft Key Done to continue editing the
Phone Book entry, or
Press to return to the Main Menu.
URL and press .
Speed Dial.
30
LG5550
LG5550
31
Page 18
Phone Book in Y
Phone Book in Y
our Phone’
our Phone’
s Memoryy
s Memor
Editing Phone Book Entries
Adding Another Phone Number
From standby mode
1. From standby mode, enter the phone number you
want to save (up to 48 digits).
2. Press Left Soft Key Save.
3. Use to highlight a Label and press .
Home / Home2 / Office / Office2 / Mobile / Mobile2
/ Pager / Fax / Fax2 / None
4. Use to highlight Existing and press .
5. Use to highlight the existing Phone Book entry
and press .
A confirmation message is displayed.
Through Phone Book
1. From standby mode, press Right Soft Key Search.
Your Phone Book will be displayed alphabetically.
2. Use to highlight the Phone Book entry you want
to edit, then press .
3. Press Left Soft Key Edit.
Default Numbers
The first phone number entered will be automatically be
considered as the Default Number. If more than one
number is saved in a Phone Book entry, another number
can be saved as the Default Number.
NOTE: The Default Number cannot be deleted by itself. The entire
Contact entry can be deleted or another number can be set
as the Default Number allowing you to delete the original
saved number and keep the Contact entry.
Changing the Default Number
1. From standby mode, press Right Soft Key Search.
Your Phone Book will be displayed alphabetically.
2. Use to highlight the Phone Book entry you want
to edit, then press .
3. Press Left Soft Key Edit.
4. Use to highlight the phone number you want to
set as the Default Number and press Right Soft Key
Options.
5. Press Set as Default#.
A confirmation message is displayed.
4. Use to highlight Add Number, then press .
5. Enter the number and press .
6. Use to highlight a Label, then press .
A confirmation message is displayed.
32
LG5550
LG5550
33
Page 19
Phone Book in Y
Phone Book in Y
our Phone’
our Phone’
s Memoryy
s Memor
Editing Stored Phone Numbers
1. From standby mode, press Right Soft Key Search.
Your Phone Book display alphabetically.
2. Use to highlight the Phone Book entry you want
to edit, then press .
3. Press Left Soft Key Edit.
4.
Use to highlight the phone number and press .
5.
Use to highlight the phone number and press .
6. Edit the phone number as necessary and press .
Editing Stored Names
1. From standby mode, press Right Soft Key Search.
Your Phone Book display alphabetically.
2. Use to highlight the Phone Book entry you want
to edit, then press .
3. Press Left Soft Key Edit.
4. Use to highlight the name and press .
Editing Customized Options
Edit any of the Phone Book options in the same manner
as when the Phone Book was created.
1. From standby mode, press Right Soft Key Search.
Your Phone Book display alphabetically.
2. Use to highlight the Phone Book entry you want
to edit, then press .
3. Press Left Soft Key Edit.
4. Use to highlight the information you want to
customize and press .
5. Edit the information as necessary and press .
5. Edit the name as necessary and press .
34
LG5550
LG5550
35
Page 20
Phone Book in Y
Phone Book in Y
our Phone’
our Phone’
s Memoryy
s Memor
Deleting
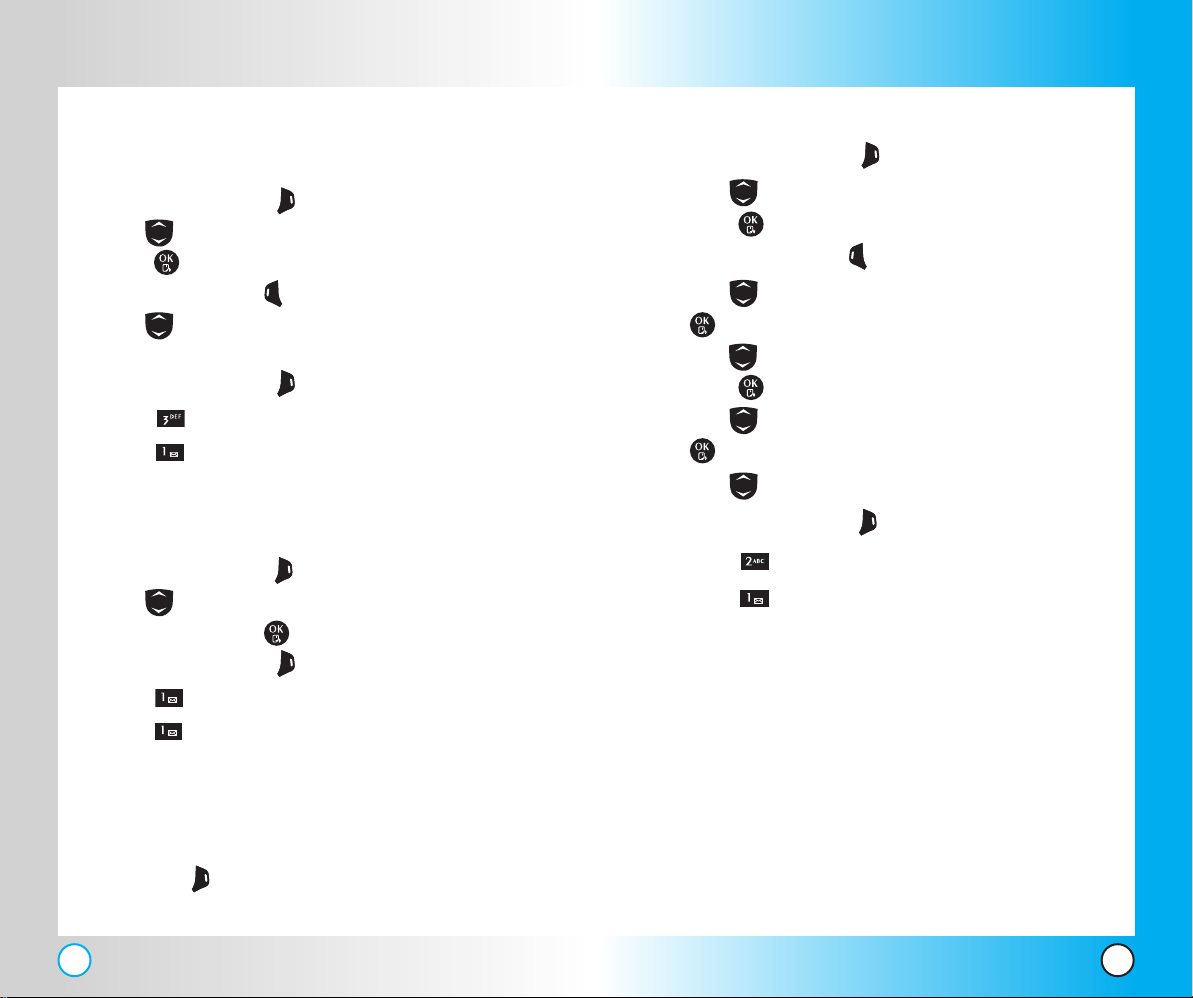
Deleting a Phone Number from a Phone Book
1. Press Right Soft Key Search.
2. Use to highlight the Phone Book entry, then
press .
3. Press Left Soft Key Edit.
4. Use to highlight the phone number to be
deleted.
5. Press Right Soft Key Options.
6. Press Erase Number.
7. Press Erase number.
A confirmation message is displayed.
Deleting a Phone Book Entry
1. Press Right Soft Key Search.
2. Use to highlight the Phone Book entry to be
deleted, then press .
3. Press Right Soft Key Options.
4. Press Erase entry.
5. Press Erase.
A confirmation message is displayed.
Deleting a Speed Dial
1. Press Right Soft Key Search.
2. Use to highlight the Phone Book entry, then
press .
3. Press Left Soft Key Edit.
4. Use to highlight the phone number and press
.
5. Use to highlight the Speed Dial number and
press .
6. Use to highlight the Speed Dial entry and press
.
7. Use to highlight the Speed Dial location.
8. Press Right Soft Key Options.
9. Press Remove.
10. Press Remove.
A confirmation message is displayed.
Additional Ways to Delete a Phone Book
Once you have accessed your Phone Book, pressing
Right Soft Key Options. at any point provides the
option to erase the entry.
36
LG5550
LG5550
37
Page 21
Phone Book in Y
Phone Book in Y
our Phone’
our Phone’
s Memoryy
s Memor
Phone Numbers With Pauses
When you call automated systems such as voice mail or
credit billing numbers, you often have to enter a series of
numbers. Instead of entering these numbers by hand,
you can store the numbers in your Phone Book
separated by special pause characters (P, T). There are
two different types of pauses you can use when storing a
number:
Hard pause (P)
The phone stops dialing until you press Left Soft Key
Release to advance to the next number.
2-sec pause (T)
The phone waits 2 seconds before sending the next
string of digits.
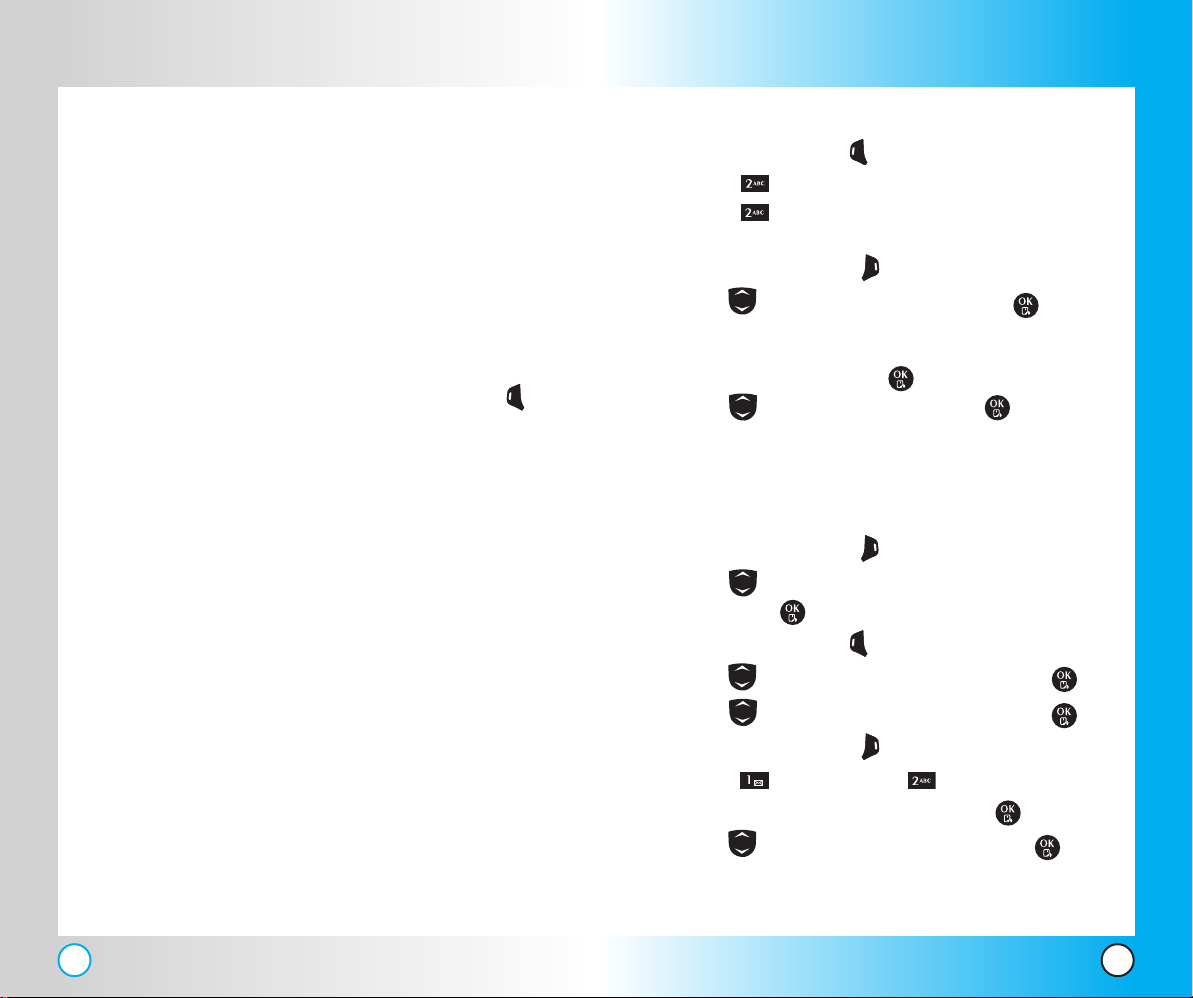
Storing a Number With Pauses
1. Press Left Soft Key Menu.
2. Press Phone Book.
3. Press New Entry.
4. Enter the number.
5. Press Right Soft Key Pause.
6. Use to select pause type and press .
Hard pause / 2-sec pause
7. Enter additional number(s) (e.g., pin number or credit
card number) and press .
8. Use to select a Label and press .
9. Enter a name (up to 22 characters).
A confirmation message is displayed.
Adding a Pause to an Existing Number
1. Press Right Soft Key Search.
2. Use to highlight the Phone Book entry to edit,
then press .
3. Press Left Soft Key Edit.
4. Use to highlight the number then press .
38
LG5550
5. Use to highlight the number then press .
6. Press Right Soft Key Pause.
7. Press Hard pause or 2-sec pause.
8. Enter additional number(s) and press .
9. Use to select the label type and press .
A confirmation message is displayed.
LG5550
39
Page 22
Phone Book in Y
Phone Book in Y
our Phone’
our Phone’
s Memoryy
s Memor
Searching Your Phone’s Memory
The LG5550 phone is able to perform a dynamic search
of the contents in your phone’s memory. A dynamic
search compares entered letters or numbers against the
entries in your Phone Book. A matching list is displayed
in descending order. You can then select a number from
the list to call or edit. There are several ways to search:
● Scrolling Alphabetically
● Searching by Letter
● Searching by Options
- Name
- Number
- Speed Dial#
- Group
Scrolling Through Your Phone Book
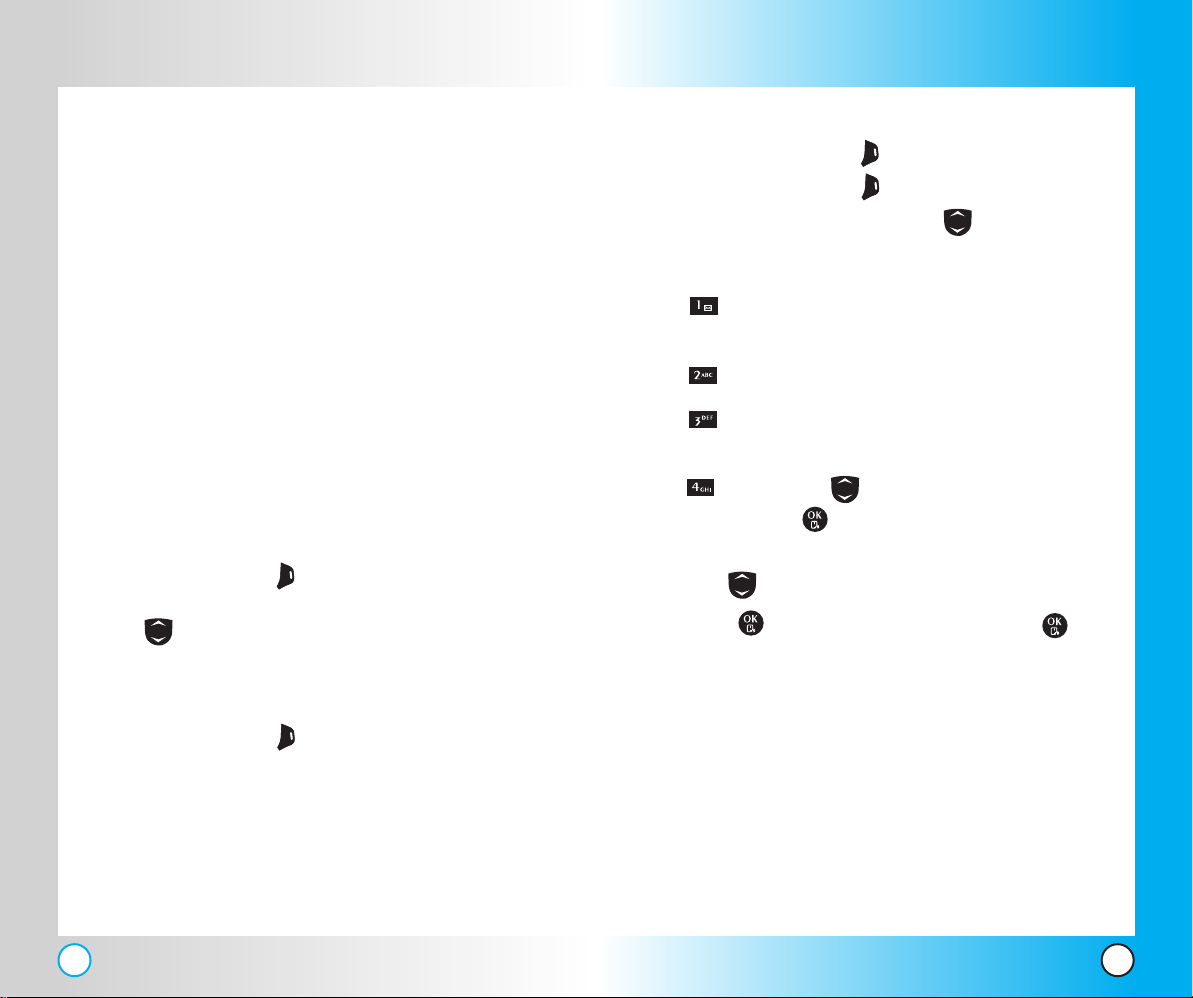
1. Press Right Soft Key Search.
Phone Book list is displayed alphabetically.
2. Use to scroll through the list.
Searching Options
1. Press Right Soft Key Search.
2. Press Right Soft Key Options.
3. Select the search criteria using (or press the
corresponding number on the keypad):
Name - Enter the character(s) to search for (such
as the first letters of the name).
Number - Enter the number(s) to search.
Speed Dial# - Enter the speed dial number(s) to
search.
Group - Use to highlight the group to search
for and press .
4. A list of matches is displayed.
Use to highlight a matched entry.
5. Press to see more information or press to
place a call.
Searching by Letter
1. Press Right Soft Key Search.
Phone Book list is displayed alphabetically.
2. Press (or press repeatedly) the key on the keypad
that corresponds with the search letter.
40
LG5550
LG5550
41
Page 23
Phone Book in Y
Phone Book in Y
our Phone’
our Phone’
s Memoryy
s Memor
Using Phone Menus
Using Phone Menus
Making a Call From Your Phone’s Memory
Once you have stored phone numbers into your Phone
Book, you can place calls to those numbers quickly and
easily.
● Pressing after you have searched for a phone
number in the Phone Book or Call History.
● Using Speed Dialing
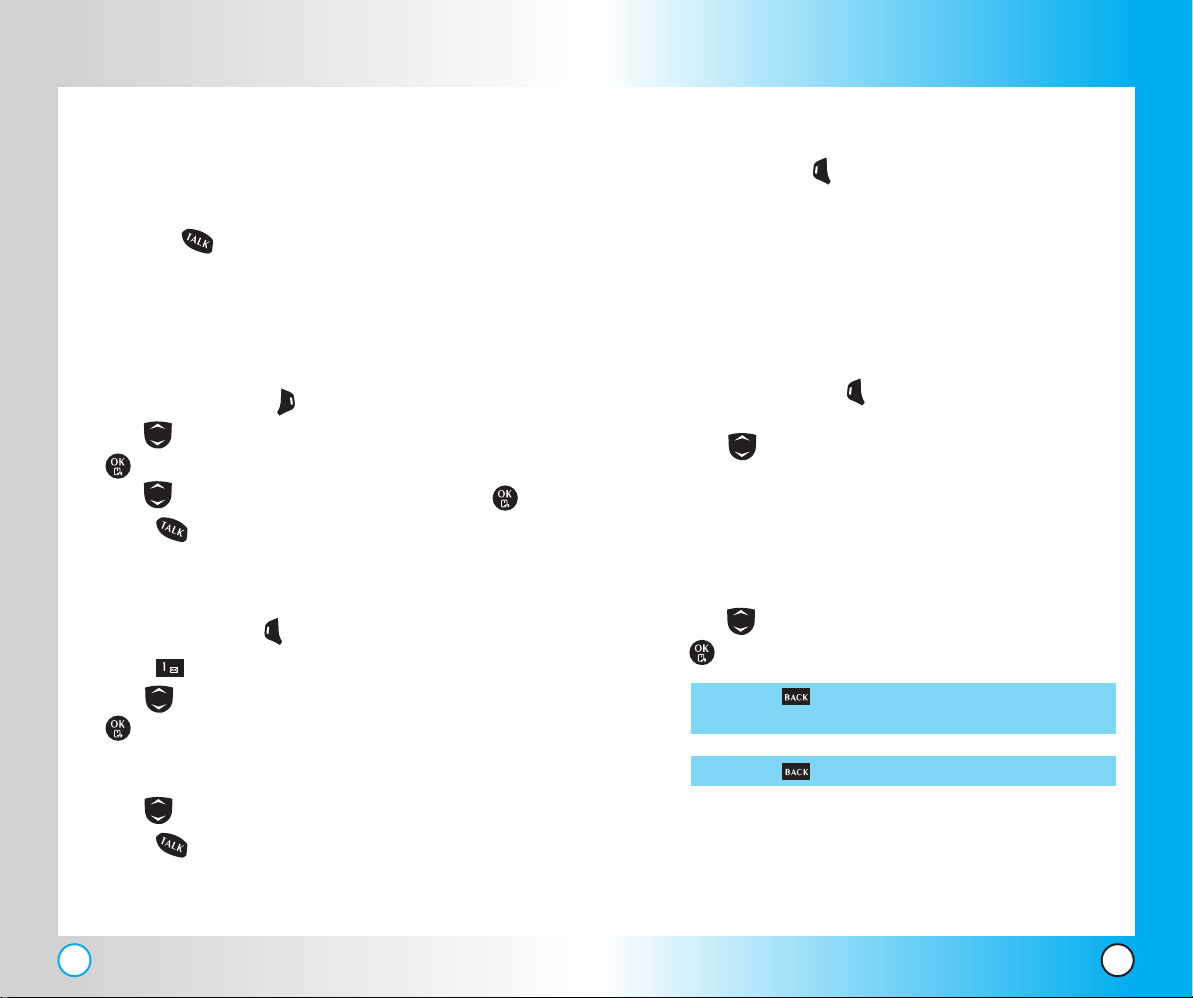
From Phone Book
1. Press Right Soft Key Search.
2. Use to select the Phone Book entry and press
.
3. Use to select the phone number and press .
4. Press to place the call.
From Call History
1. Press Left Soft Key Menu.
2. Press Call History.
3. Use to select the type of recent call and press
.
Outgoing Calls / Incoming Calls / Missed Calls /
Erase Calls / Call Timer
4. Use to highlight the phone number.
5. Press to place the call.
Menu Access
Press Left Soft Key Menu to have access to eight
phone menus. There are two methods to access menus
and submenus:
● Use the navigation key to highlight and select, or
● Press the number key that corresponds to the menu
or submenu.
For example:
1. Press Left Soft Key Menu.
Nine menu items are displayed.
Use to scroll through the list of menus.
2. Press the appropriate number key corresponding to
the menu item you want to select.
The sub-menu list will be displayed.
3. Press the appropriate number key corresponding to
the sub-menu you want to access.
4. Use to highlight your preferred setting and press
to select it.
NOTE: Press to go back one step while accessing the
menu or selecting a setting.
NOTE: Press to cancel without saving.
42
LG5550
LG5550
43
Page 24
Using Phone Menus
Using Phone Menus
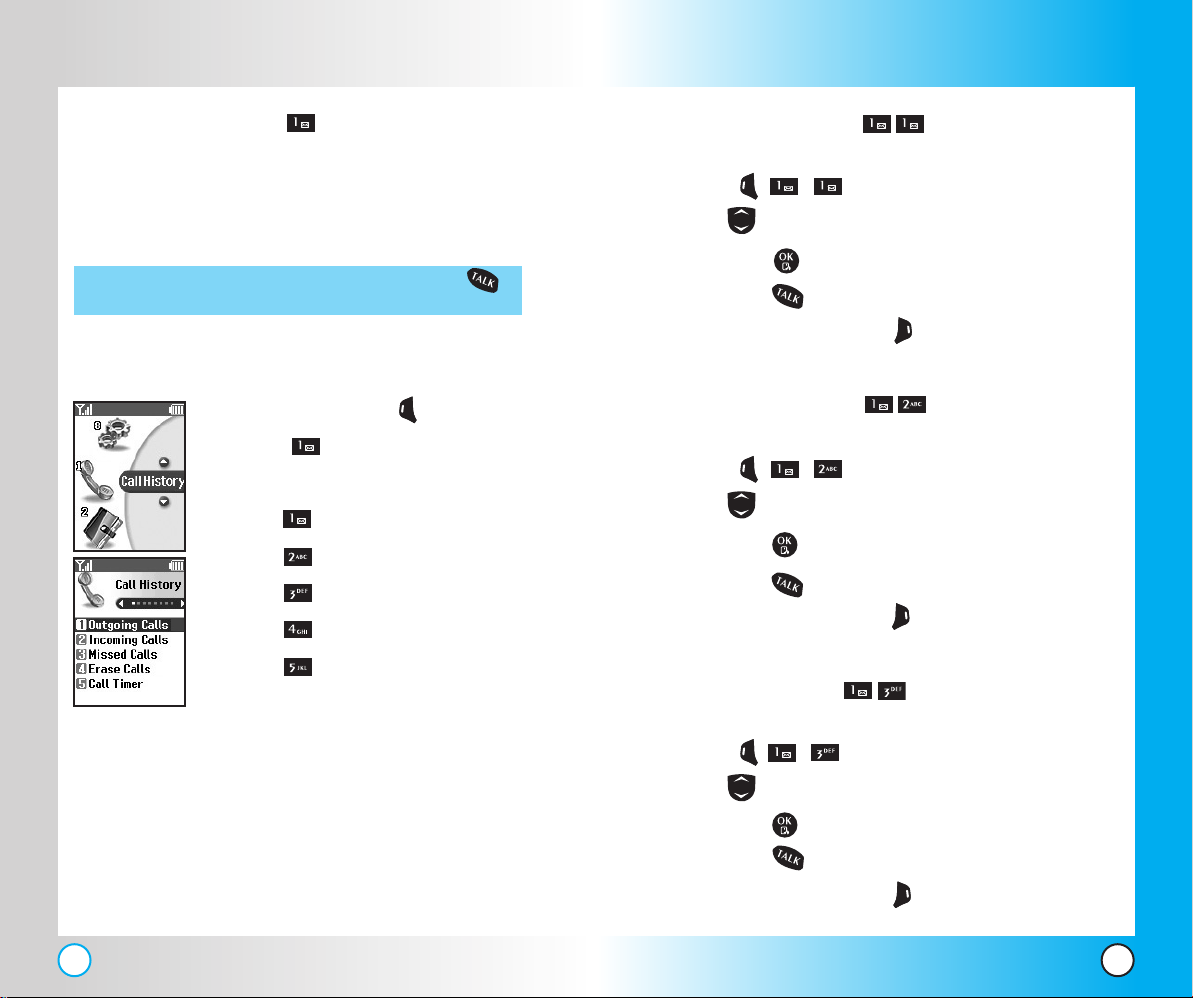
Call History (Menu )
There are three Call Menus that can be accessed by the
phone. It is continually updated as new numbers are
added to the beginning of the list and the oldest entries
are removed from the bottom of the list.
NOTE: To view a quick list of all your outgoing calls, press
from the standby screen.
Access and Options
1. Press Left Soft Key Menu.
2. Press Call History.
3. Select a sub-menu.
● Outgoing Calls
● Incoming Calls
● Missed Calls
● Erase Calls
● Call Timer
Outgoing Calls (Menu )
Allows you to view the list of outgoing calls; up to 30 entries.
1. Press , , .
2. Use to highlight an entry, then
● Press to view the entry.
● Press to place a call to the number.
● Press Right Soft Key Options to select:
Save / Prepend / Erase / Erase all
Incoming Calls (Menu )
Allows you to view the list of incoming calls; up to 30 entries.
1. Press , , .
2. Use to highlight an entry, then
● Press to view the entry.
● Press to place a call to the number.
● Press Right Soft Key Options to select:
Save / Prepend / Erase / Erase all
Missed Calls (Menu )
Allows you to view the list of missed calls; up to 30 entries.
44
LG5550
1. Press , , .
2. Use to highlight an entry, then
● Press to view the entry.
● Press to place a call to the number.
● Press Right Soft Key Options to select:
Save / Prepend / Erase / Erase all
LG5550
45
Page 25
Using Phone Menus
Using Phone Menus
Erase Calls (Menu )
Allows you to erase selected call list(s).
1. Press , , .
2. Use to highlight the list of calls to erase and press .
Outgoing Calls / Incoming Calls / Missed Calls / All Calls
3. Press Erase or Cancel.
Call Timer (Menu )
There are four call timers that you can use to track the
number of minutes that you spend on your phone.
1. Press , , .
2. Use to highlight a call list and press .
Last Call / Home Calls / Roam Calls / All Calls
NOTE: Home Calls and Roam Calls can be reset, while the Last
Call and All Calls are not.
Phone Book (Menu )
The Phone Book Menu allows you to store names, phone
numbers and other information in your phone’s memory. When
you access your Phone Book, the number in parenthesis
represents the number of entries you have stored (up to 200).
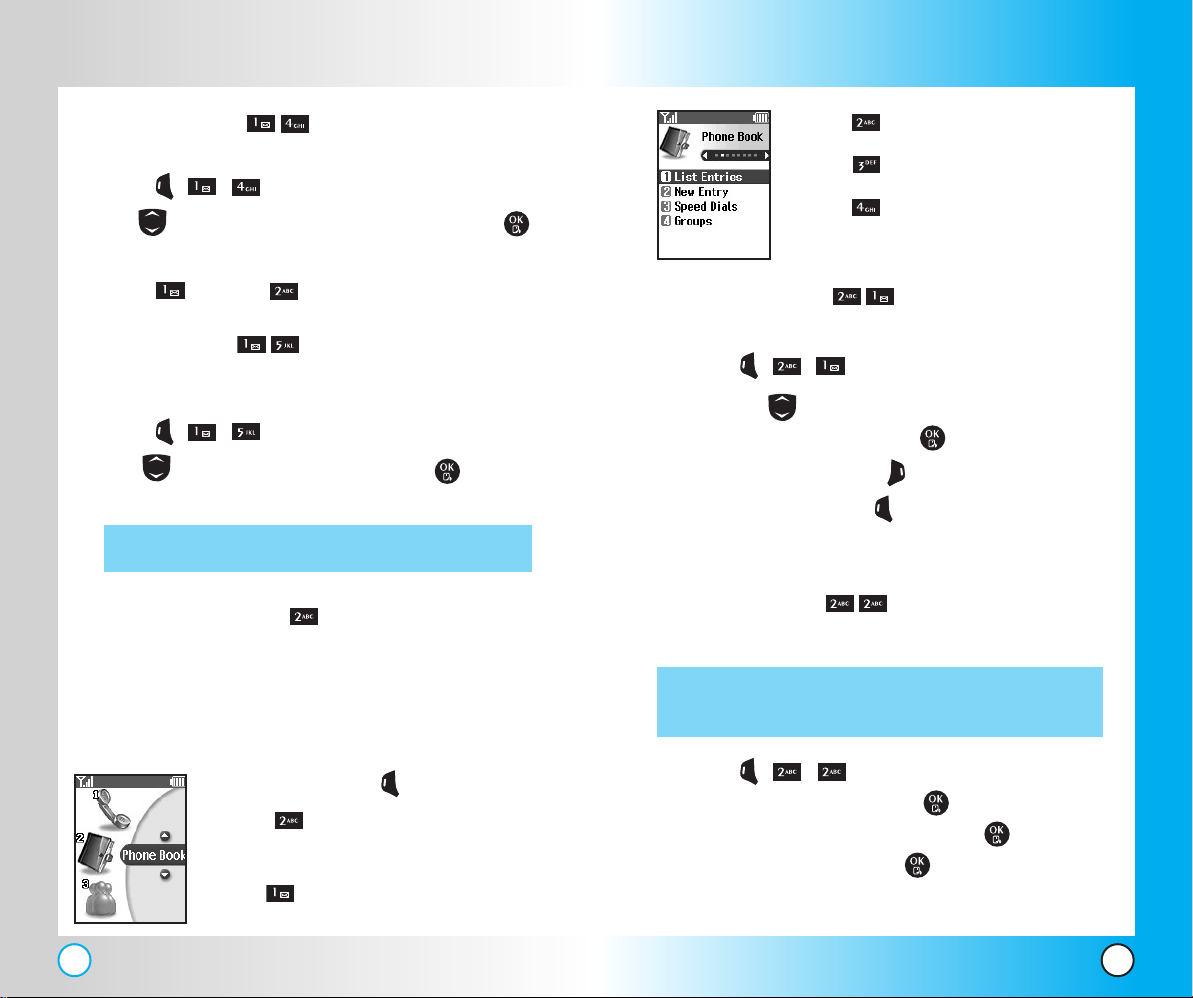
Access and Options
1. Press Left Soft Key Menu.
2. Press Phone Book.
3. Select a sub-menu.
● List Entries
● New Entry
● Speed Dials
● Groups
List Entries (Menu )
Allows you to view your Phone Book list.
1. Press , , .
● Press to scroll through your Phone Book
alphabetically and press .
● Press Right Soft Key Options: Search/Erase.
● Press Left Soft Key New to store a new phone
number or new e-mail.
New Entry (Menu )
Allows you to add a new number.
NOTE: Using this sub-menu, the number is saved as a new Phone
Book. To save the number into an existing Phone Book,
edit the Phone Book entry.
1. Press , , .
2. Enter the number and press .
3. Select the label you want and press .
4. Enter the name and press .
5. Continue saving the entry as necessary.
46
LG5550
LG5550
47
Page 26
Using Phone Menus
Using Phone Menus
Speed Dials (Menu )
Allows you to view your list of Speed Dials or designate
Speed Dial for numbers entered in your Phone Book.
1. Press , , .
2. Use to highlight the Speed Dial position, or enter
the Speed Dial digit and press .
3. Use to highlight the Phone Book and press .
4. Use to highlight the number and press .
A confirmation message is displayed.
Groups (Menu )
Allows you to view your grouped Phone Book, add a new
group, change the name of a group, or delete a whole group.
1. Press , , .
2. Options from here:
● Use to highlight a group to view and press .
● Press Left Soft Key Add to add a new group to
the list.
Messaging (Menu )
Text messages, pages, and the voice mail box become
available as soon as the phone is powered on.
● Check types of messages by pressing the message
key .
● Make a call to the callback number by pressing
during a message check.
● Read and edit messages saved in the outbox during
transmission and send them.
The phone can store up to 151messages (for example, 1
voice message, 50 inbox text messages, 50 outbox text
messages, 50 saved text messages).
The LG5550 supports up to 140 characters per message.
The information stored in the message is determined by
phone mode and service capability. Other limits to
available characters per message may exist. Please check
with your service provider for system features and
capabilities.
New Message Alert
There are three ways your phone alerts you to new
messages.
1. The phone displays the message on the screen.
2. One of five ring types is heard, if selected.
3. The message icon ( ) is displayed on the display
screen. In the case of an urgent message, the icon
will flash and
Urgent message is displayed.
48
LG5550
NOTE: If you receive the same message twice, your phone deletes
the older one and the new one is stored as a Duplicate.
LG5550
49
Page 27
Using Phone Menus
Using Phone Menus
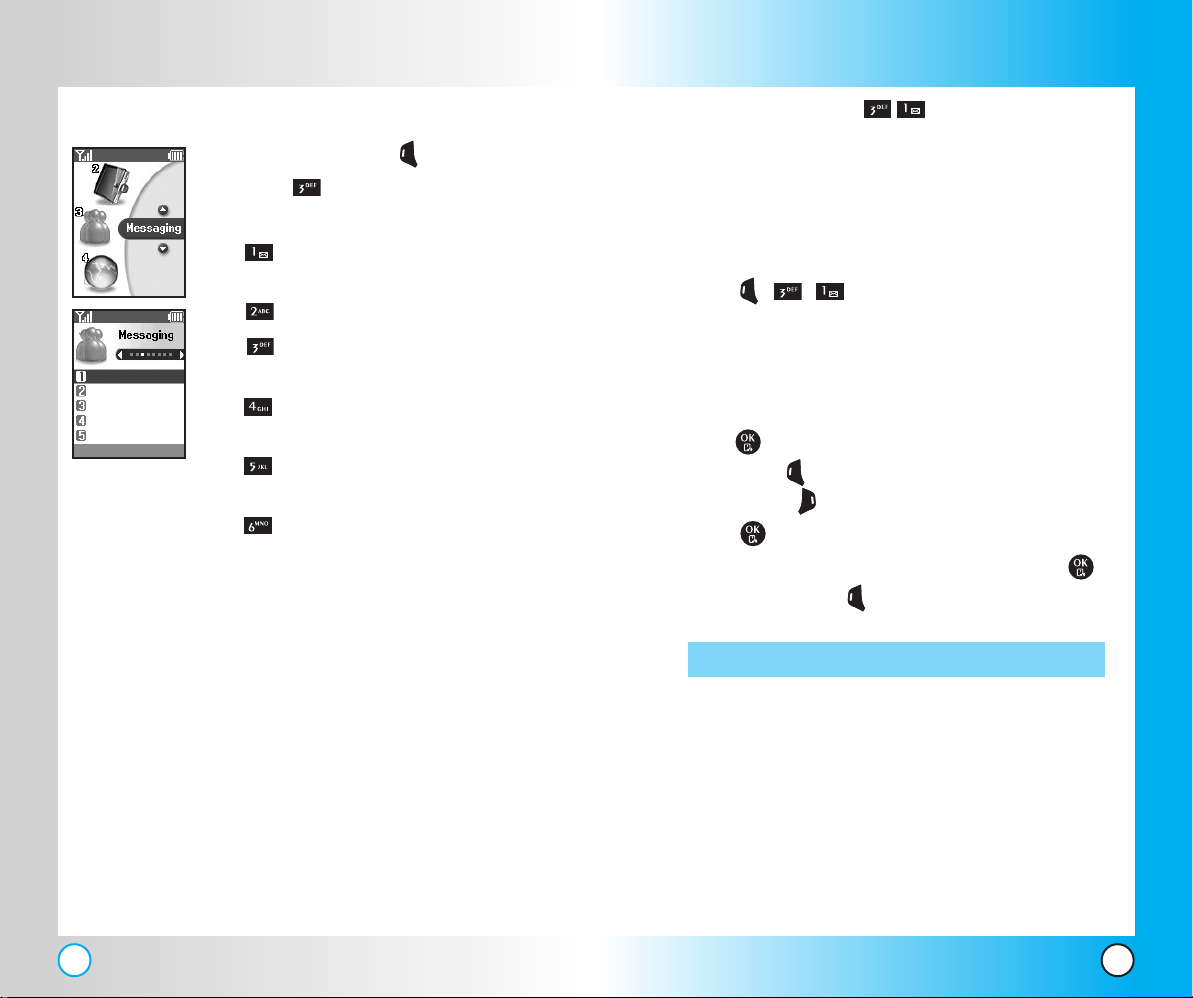
Access and Options
1. Press Left Soft Key Menu.
2. Press Messaging.
3. Select a sub-menu.
● Send Message: Sends a
message.
● Web Msg
● Inbox: Shows the list of
Send Message
Web Msg
Inbox(0/4)
Outbox(1)
Saved(1)
Options
received messages.
● Outbox: Shows the list of sent
messages.
● Saved: Shows the list of saved
and draft messages.
● Voicemail: Shows the number
of messages in voice mail box.
Send Message (Menu )
Allows you to send text messages, pages, and
e-mail transmissions. Each message has a destination
(Address 1) and information (Message). These are
dependent upon the type of message you want to send.
The Basics of Sending a Message
1. Press , , .
2. Enter the message destination in Address 1.
● SMS phone number for a text message.
● SMS phone number for a page.
● E-mail address for an e-mail message.
3.
Press and you will be taken to your Phone Book. Press
Left Soft Key New if you are dialing a new book or press
Right Soft Key Group if you wish to send to a group.
4. Press to access the message screen.
5. Type your message (text or e-mail) then press .
6. Press Left Soft Key Send.
A confirmation message is displayed.
NOTE: You can send up to 10 different addresses.
50 51
LG5550LG5550
Page 28
Using Phone Menus
Using Phone Menus
Customizing the Message Using Options
1. Create a new message.
2. Press Right Soft Key Options.
3. Select the option(s) to customize.
Recent Address
If you are sending a message to a prior
recipient, you can access their number quickly.
Erase Address To easily delete a recipient from your list.
Callback # You can either show, edit or choose not
to display your callback number to your
recipient(s).
Signature
Add a signature to the end of your message.
On / Off
Priority Provides the user the flexibility to
delivery the message with either Normal
or Urgent Priority.
Delivery
Acknowledgement
Normal / Urgent.
Get notification once your message is delivered.
Off / On
Save
If you do not want to send the message
as of yet, save it in the Saved Submenu.
4. Complete and send the message.
Inbox (Menu )
The phone alerts you in 3 ways when you receive a new
message:
● By displaying a message notification on the screen.
● By sounding a beep or vibrating, if set.
● By blinking .
Received text messages, page messages, and
e-mail lists may be searched and the contents viewed.
Received messages are displayed from newest to oldest.
Select a message with and press right soft key
Options.
1. Lock/Unlock : Lock or Unlock the selected message.
2. Erase : Deletes the selected message from the inbox.
3. Erase All : Deletes the all messages from the inbox.
Out of Memory Warning
If the memory is full, no more messages can be received
until enough memory space becomes available. The
message Message is rejected is displayed and new
messages are not accepted.
Web Msg (Menu )
Web Msg are special links or message provided from the
carrier to inform users of special offers, bulletins and
announcements.
Viewing Your Inbox
1. Press , , , .
2. Press to view the message.
3. Options from here:
1. Press , , .
Web Msg is notified to the user with 4 kinds of alert. The
Alert type is determined by its priority.
52 53
● Left Soft Key Reply.
● Right Soft Key Options.
LG5550LG5550
Page 29
Using Phone Menus
Using Phone Menus
Goto URL You can extract a URL string in the text
Message to save in an existing Phone Book
entry or you can go directly to the site
through the phone miniBrowser.
Call Calling origination address.
Reply Replies to the SMS with the Original
message attached.
Forward Forward a received message to other
destination address.
Lock/Unlock Locks or unlocks the selected message.
locked messages can not be deleted by the
Erase Inbox and Erase All functions.
Save to Phonebook
Save Canned Msg
Erase Deletes the selected message from the Inbox.
Outbox (Menu )
Up to 50 sent messages can be stored in the Outbox.
View lists and contents of sent messages and verify
whether the transmission was successful or not.
Store the callback number, e-mail address
and numbers in user data include in the
received message into your contacts.
Saves the message into the Canned
message list.
Erase Deletes the selected message from the
Outbox.
Erase All Deletes the all message from the Outbox.
Viewing Your Outbox
1. Select a message with and press Key.
2. Press Left Soft Key Forward.
Press Right Soft Key Options.
Goto URL
Call
Forward
Lock
Save Canned Msg
Erase
Send Message
Status Code (Display Msg ID, Class and Code)
1. Press , , .
2. Press Left Soft Key Resend.
Press Right Soft Key Options.
Lock/Unlock
54 55
Locks a message so that it is not
erased if the Erase Outbox or Erase All
feature is used.
LG5550LG5550
Page 30
Using Phone Menus
Using Phone Menus
Saved (Menu )
Displays saved messages and draft messages.
1. Press , , .
Select a message with and press Right Soft Key
Options.
Lock/Unlock, Erase, Erase All
2. Press , , , .
Press Left Soft Key Resend.
Press Right Soft Key Options.
Edit, Add Recipient, Resend, Lock/Unlock, Erase
Voicemail (Menu )
Allows you to view new voice messages recorded in the
voice mail box. Once you exceed the storage limit, old
messages are overwritten. When you have a new voice
message, your phone alerts you.
Checking Your Voice Mail Box
1. Press , , .
2. Press to view the message.
3. Options from here:
● Press Left Soft Key Clear to delete information,
and then select Clear count.
● Press to listen to the message(s).
Web (Menu )
The MiniBrowser feature allows you to view internet
content, vespecially designed for your mobile phone.
Access and selections within this feature are dependent
upon your service provider. For specific information on
MiniBrowser access through your phone, contact your
service provider.
Access and Options
1. Press Left Soft Key Menu.
2. Press Web.
● Start Web
Start Web (Menu )
Allows you to initiate a MiniBrowser session.
1. Press , , .
2. After a few seconds, you see the Home Page.
Ending a MiniBrowser Session
End a MiniBrowser session by pressing .
Navigating Through the Browser
On-screen items may be presented in one of the following
ways:
56 57
LG5550LG5550
Page 31

Using Phone Menus
Using Phone Menus
● Numbered options
You can use your numeric keypad or you can select
the items by moving the cursor and pressing the
appropriate Soft Keys.
●
Links embedded in content
You can act on the options or the links by using the
Soft Keys just below the display screen.
●
Text or numbers
You can select the items by moving the cursor and
pressing the appropriate Soft Keys.
Scrolling
Use to scroll through the content if the current page
does not fit on one screen. The currently selected item is
indicated by a cursor on the screen.
Fast Scrolling
Press and hold to quickly move the cursor up and
down on the current screen.
Scrolling by Page
Press the Side Keys to move up and down a page at a time.
View Browser Menu
Press and hold to use the browser menu.
Soft Keys
To navigate to different screens or select special functions,
use the Soft Keys. The function associated with the Soft
Keys can change for each page and depends on each
highlighted item.
Left Soft Key
Left Soft Key is used primarily for first options or
selecting an item but its function may change, depending
on the content displayed.
Right Soft Key
Right Soft Key is used primarily for secondary options
or a menu of secondary options.
Entering Text, Numbers or Symbols
When prompted to enter text, the current text entry
method appears above the Right Soft Key as
Alphabetical, Symbol, Number, Word, or Smart. To
change the input mode, press the Right Soft Key . To
create an upper case character, use . The current text
method appears above the Right Soft Key as ALPHA
or SMART and allows you to shift input case sensitivity.
Clearing Out Text/Number Entered
When entering text or numbers, press to clear the
last number, letter or symbol. Press and hold to clear
the input field completely.
58 59
LG5550LG5550
Page 32

Using Phone Menus
Using Phone Menus
Initiating a Phone Call From MiniBrowser
You can make a phone call from MiniBrowser if the site
you are using supports the feature (the phone number
may be highlighted and Left Soft Key appears as Call).
The browser connection is terminated when you initiate
the call. After you end the call, your phone returns to the
screen from which you initiated the call.
Downloads (Menu )
Access and Options
1. Press Left Soft Key Menu.
2. Press Downloads.
Downloads
Downloads allows you to do more than just talk on your
phone. Downloads is a technology and service that
allows you to download and use applications on your
phone. With Downloads, it is quick and easy to
personalize your phone to your lifestyle and tastes. Just
download the applications that appeal to you. With a
wide range of software available, from Ring Tones to
games to productivity tools, you can be assured that you
can find something useful, practical, or entertaining.
Plus, there are constantly new applications being created
for your use.
You can download applications and use Downloads
anywhere on the your carrier’s network, as long as your
handset has a digital signal available.
Most applications do not use a network connection while
in use. While downloading an application, any incoming
calls will automatically be sent to your voicemail, if
available. If you do not have voicemail, downloading will
not be interrupted by an incoming call, however the
caller will receive a busy signal.
When using an application an incoming call will
automatically pause the application and allow you to
answer the call. When you complete your call, you can
resume using the application.
You can personalize your phone by adding new
applications and by removing old ones, at any time.
If you need more memory, but still want to be able to
access the application later, try using Disable. Disabling
keeps the application usage and purchase information,
but removes it from memory. To restore an application,
go to Options, select the application and click on Restore.
Only removing an application deletes it completely from
the memory of the phone. To restore an application once
it has been removed will require that you pay and
download it again.
Start: allows you to download selected applications while
displaying the Downloads application list relayed from
the Downloads server in connection. Gives you
information about the Downloads selection key.
60 61
LG5550LG5550
Page 33

Using Phone Menus
Using Phone Menus
Voice (Menu )
Voice menu allows you to activate main functions by
recording your voice info the phone as well as schedule
and memo.
Access and Options
1. Press Left Soft Key Menu.
2. Press Voice.
3. Select a sub-menu.
● Start Commands
● Voice Scheduler
● Voice Memos
● Voice Settings
● Driving Mode
● Help
NOTE: For voice recognition, keep surrounding area quiet and
speak clearly.
Start Commands (Menu )
Allows you to use your voice to activate certain features
of your phone.
1. Press , , .
● Contacts: Phone call is made by saying the
name that is saved on the Contacts. It will dial
the default number only.
● Digit Dial: Phone call is made by saying the
digits of a 4, 7, 10 and 11 phone number.
●
Redial:
Calls a recently dialed number again.
● Voice mail: Connects to Voice Mailbox Number.
● Driving: Switches the hands-free driving mode
on and off.
● Schedule: Reads out the events that you have
scheduled and enables you to add new events.
● Time: Announces the time and displays it on the
phone.
To voice-dial a name from your Contacts list:
NOTE: When entering names in your Contacts list, avoid symbols
other than letters (such as digits and punctuation marks).
1. Flip open the phone, and press the Voice Dial Key.
2. When prompted, say "Contacts."
3. When prompted again, say a name from your Phone
NOTE: Pronounce phone numbers digit by digit. Do not say "1-
800" as "one eight hundred." Instead, say "One, eight, zero,
zero."
NOTE: Voice Command functions are available in English Only,
Voice Command will not operate if the phone is in French.
62 63
Book list.
4. When asked to confirm, say "Yes". The phone will
then dial the number.
LG5550LG5550
Page 34

Using Phone Menus
Using Phone Menus
To voice-dial a number:
1. Flip open the phone, and press the Voice Dial key.
2. When prompted, say "Digit Dial."
3. When prompted again, say a phone number.
4. When asked to confirm, say "Yes". The phone will then
dial the number.
Voice Scheduler (Menu )
Scheduler keeps your agenda convenient and easy to
access. Simply store your appointments and your phone
alerts you with a reminder of your appointment. You can
also take advantage of the Alarm Clock feature.
NOTE: Scheduler will not alert you during a call, when
transmitting SMS, or when connecting up. After exiting, it
will sound the reminder.
Allows you to input your schedule. If you input the time
and memo, an alarm rings at the set time.
1. Press , , .
2. Press Left Soft Key New.
3. Press Right Soft Key Options.
● Go To Today:Moves to today.
● Go To Date:Allows you to set the date.
● Search:Shows you the saved events.
● Erase Old: Allows you to erase events that are
older than: One Week / One Month/ One Year/
One Day .
● Erase All: Allows you to erase all events.
Voice Memos (Menu )
Allows you to listen to, add, and erase short verbal
reminders.
1. Press , , .
2. Press Left Soft Key New to record a new voice
memo.
3. Follow the Voice Memo prompts. A confirmation
message is displayed.
Voice Settings (Menu )
Allows you to select options for Voice Commands,
Announce Alerts, Best March, Train Commands and Train
Digits; and enables you to adapt the phone to recognize
your way of saying numbers.
Voice Commands (Menu )
Allows you to set how you activate voice recognition.
1. Press , , , .
2. Select either of the following then press .
● Flip Open: Activates voice recognition whenever
the phone is open. (When the phone is already
open, you activate voice recognition by pressing
the voice dial key.)
● OK key: Activates voice recognition when you
press the voice dial key or the key.
64 65
LG5550LG5550
Page 35

Using Phone Menus
Using Phone Menus
Announce Alerts (Menu )
If this is set to On, you will receive a contact name (if it is in
your Phone Book) or the phone number when receiving an
incoming call.
1. Press , , , .
2. Select On/Off and press .
NOTE: When Announce Alerts is set, is displayed on the
screen.
Best Match (Menu )
After you say a name or a number, your phone displays
the recognition results—the name or number that best
matches the one you said—and asks you to confirm.
Select the number of results that you want your phone to
display.
1. Press , , , .
2. Select an option and press .
● 1 Result: Displays the name or number that
best matches the one you said.
● 4 Results: Displays the four names or numbers
that best match the one you said and asks you if
the first one is correct. If you say "Yes," the
phone makes the call. If you say "No," the phone
suggests the second one in the list, and so on,
up to the fourth result.
Train Commands (Menu )
While the handset does not require prior training, you can train
the phone to understand your voice in greater detail. This
training module will go through the words that you would use in
the Voice Command system.
1. Press , , , .
2. Select Training On / Training Off and press .
Train Digits (Menu )
While the handset does not require prior training, you can train
the phone to understand your voice in greater detail. This
training module will go through the numbers that you would
use in the Voice Command system.
1. Press , , , .
2. Select Training On / Training Off and press .
Driving Mode (Menu )
Allows you to switch the hands-free calling on and off
during driving without the need for Car Kit.
1. Press , , .
2. Select Activate/Deactivate and press .
● Pressing key is a hot key to Speaker Phone.
NOTE: Immediate setting into Driving Mode when ( ) is pressed
for three seconds after closing the folder.
Help (Menu )
Helps you to use the Voice Command Menu.
1. Press , , .
66 67
LG5550LG5550
Page 36

Using Phone Menus
Using Phone Menus
Tools (Menu )
Your phone tools include Alarm, Notepad, EZ Tip Calc,
Calculator, and World Clock.
Access and Options
1. Press Left Soft Key Menu.
2. Press Tools.
3. Select a sub-menu.
● Alarm
● Notepad
● EZ Tip Calc.
● Calculator
● World Clock
Alarm (Menu )
Allows you to set one of four alarms. The current time is
displayed at the top of the screen when you select an
alarm to set. At the alarm time, Alarm 1 (or 2 or 3, as
Quick Alarm) will be displayed on the LCD screen and the
alarm will sound.
1. Press , , .
2. Select the alarm you want to edit.
Alarm 1 / Alarm 2 / Alarm 3 / Quick Alarm
3. Use to highlight the alarm time then press .
4. Set the time for alarm and press .
5. Use to highlight Once (frequency setting).
6. Press to select one of the following:
Once / Daily / Mon-Fri / Weekends
7. Use to highlight Ring (ring type setting) and
press .
8. Use to select one of the available alarm ring
types and press .
9. Press Left Soft Key Save.
Notepad (Menu )
Allows you to read, add, edit, and erase notes to yourself.
1. Press , , .
2. Press Left Soft Key Add to write a new note.
68 69
LG5550LG5550
Page 37

Using Phone Menus
Using Phone Menus
EZ Tip Calc. (Menu )
Allows you to quickly and easily calculate the amounts
for a bill with the amount of the bill, the amount of the tip
and the number of people as variables.
1. Press , , .
Calculator (Menu )
Allows you to calculate simple mathematical
computations. You can enter numbers up to the second
decimal place.
1. Press , , .
NOTE: Calculations can be made with up to 32 characters at one
time (e.g., 63+78-21 would be considered 8 characters).
World Clock (Menu )
Allows you to determine the current time in another time
zone or country.
1. Press , , .
Settings (Menu )
The Setup menu has options to customize your phone.
Access and Options
1. Press Left Soft Key Menu.
2. Press Settings.
3. Select a sub-menu.
● Sounds
● Display
● Data Setting
● Roaming
Display
Data Setting
Roaming
Location
Messaging
● Location
● Messaging
● Security
● Airplane Mode
● Setup/Others
● Phone Info
NOTE: Press Left Soft Key Set DST to factor Daylight Savings
Time.
70 71
LG5550LG5550
Page 38

Using Phone Menus
Using Phone Menus
Sounds (Menu )
Options to customize the phone’s sounds.
Ringers (Menu )
Sets ring tones for types of incoming calls.
1. Press , , , .
2. Press Voice Calls.
Select Caller ID / No Caller ID / Roaming.
3. Press Messaging.
Select Voicemail / Text Messaging.
4. Use to select a ringer then press to save the
sound.
Key Tones (Menu )
Allows you to set the Key Tone length and touch tone
playback speed.
1. Press , , , .
2. Select either of the following then press .
Short Tones
Sends out a tone for a fixed period of
time even if you keep the key pressed.
Long Tones
Sends out a continuous tone for as long
as you keep the key pressed.
NOTE: Dual-Tone Multi Frequency (DTMF) Signaling by the
simultaneous transmission of two tones, one from a group
of low frequencies and another from a group of high
frequencies. Each group of frequencies consists of four
frequencies. Setting the Key Beep length to Long will extend
the DTMF tone.
Volume (Menu )
Allows you to set various volume settings.
1. Press , , , .
2. Select
Ringer / Earpiece / Key Beep / Power On/Off
.
3. Adjust the volume of the ringer with then press
to save the setting.
Alerts (Menu )
Allows you to set any of the three Alert options to either
On or Off.
1. Press , , , .
2. Select an alert option.
Service Change (Menu )
Alerts you when service changes. When you enter a
service area, the phone displays Entering Service Area
message. When you leave a service area, the phone
displays Leaving Service Area message.
Minute Beep (Menu )
Alerts you 10 seconds before the end of every
minute during a call.
Call Connect (Menu )
Alerts you when the call is connected.
3. Select an option and press .
4. Set On / Off with then press .
72 73
LG5550LG5550
Page 39
Using Phone Menus
Using Phone Menus
Display (Menu )
Options to customize the phone’s display screen.
Greeting (Menu )
1. Press , , , .
Backlight (Menu )
Allows you to set the duration for illuminating the
Backlight or the Main LCD and keypad when the phone
is open.
1. Press , , , .
2. Choose a Backlight sub-menu and press .
Phone / Web
If an amount of time is set for the timer option, the time
starts after the last key was pressed.
Phone (Menu )
Timer Options
● 8 seconds
● 15 seconds
● 30 seconds
● Always off means that the backlight is never on.
● On flip open means that the backlight is always
on while flip (cell case) is open.
Web (Menu )
● 15 seconds
● On flip open means that the backlight is always
on while flip (cell case) is open.
Screens (Menu )
Allows you to choose the kind of background to be
displayed on the phone.
1. Press , , , .
2. Select Wallpaper.
3. Select from different screens then press Left Soft Key
Save.
Brightness (Menu )
Allows you to set the brightness level of the backlight.
1. Press , , , .
2. Use to adjust the brightness level.
3. Press key to save the setting.
Contrast (Menu )
Allows you to set the contrast level for your LCD screen.
1. Press , , , .
2. Use to adjust the contrast level.
3. Press key to save the setting.
74 75
LG5550LG5550
Page 40

Using Phone Menus
Using Phone Menus
Menu Style (Menu )
1. Press , , , .
2. Set Icon / List with then press .
Clocks (Menu )
Allows you to choose the kind of clock to be displayed on
the LCD screen.
1. Press , , , .
2. Select Normal / Analog / Digital then press
Left Soft Key Save.
Theme Colors (Menu )
Allows you to choose the color of the background screen.
1. Press , , , .
2. Select Blue / Green / Orange / Violet then press .
Text Input Fonts (Menu )
Allows you to set the size and color of the font.
Data Setting (Menu )
This menu allows you to use wireless data
communication services. Wireless data communication
services refers to the utilization of subscriber terminals
for access to the internet with personal computers or
laptops at 19.2 Kbps or at a maximum of 230.4 Kbps. The
connection speed depends on your carrier’s network and
other variables. Contact communication information
specifications must match the network.
Data/Fax (Menu )
Allows you to use your phone to transmit data and faxes.
1. Press , , , .
2. Select Off / Fax In Once / Fax In Always / Data In
Once / Data In Always then press .
NOTE: The Data Connection Kit allows you to connect your PC or
PDA to your LG wireless phone, freeing you from having to
locate a telephone outlet. You can send or receive an e-mail,
a fax, or access the Internet anytime, anywhere.
Method (Menu )
1. Press , , , .
2. Select Size / Color.
3. Press until you find the size or color you desire
then press to save.
76 77
Allows you to select the data port.
1. Press , , , .
2. Select USB / RS-232C(COM Port) / Closed then
press .
LG5550LG5550
Page 41
Using Phone Menus
Using Phone Menus
Data Baud (Menu )
Allows you to set the port speed. Set the port speed
based on your carrier’s network. Contact your carrier to
determine the maximum available speed.
1. Press , , , .
2. Select 19200 bps / 115200 bps / 230400 bps
then press .
NOTE: When using the 1X HSPD data service via an RS-232C data
cable, the port speed is set to 115,200 (230,400 is not
supported). When using the 1X HSPD data service via a
USB data cable, you may get better port speed if the port
speed is set to 230,400 rather than 115,200.
Roaming (Menu )
Set Mode (Menu )
Allows you to set up the phone producer’s management
environment. Leave this setting as the default unless you
want to alter system selection as instructed by your
service provider.
1. Press , , , .
2. Select
Automatic / Home Only/ Digital Only/ Analog
Only
then press .
Location (Menu )
Menu for GPS (Global Positioning System: Satellite
assisted location information system) mode.
1. Press , , .
2. Press key, then select On/Off.
3. Press key to save the setting.
NOTE: GPS satellite signals are not always transmitted,
especially under bad atmospheric and environmental
conditions, indoors or otherwise.
Messaging (Menu )
With this feature on, new messages are directly
displayed, while with this feature off, just alerted when
new messages are received.
Display Pop-up (Menu )
When message receives, activate pop-up window. When
set on, pop-up window is displayed.
1. Press , , , .
2. Select
Delivery Receipt (Menu )
On / Off
then press .
Call Guard (Menu )
Call Guard reminds you when you are making or receiving
1. Press , , , .
2. Select
On / Off
then press .
a roaming call and requires you to take additional steps
before placing or answering roaming calls.
1. Press , , , .
2. Select
78 79
On / Off
then press .
Msg Alerts (Menu )
Allows you to select the alert type for a new message.
1. Press , , , .
LG5550LG5550
Page 42

Using Phone Menus
Using Phone Menus
2. Select an option then press .
● Off / Vib once / Vib & Ring / Ring / Beep once
Auto Delete (Menu )
With this feature on, read messages are automatically
deleted when you exceed the storage limit.
1. Press , , , .
2. Select
Signature (Menu )
On / Off
then press .
Allows you make/edit a signature to automatically send
with your messages.
1. Press , , , .
2. Select
Canned Msgs (Menu )
None / Custom
then press .
1. Press , , , .
2. Use to highlight your selection then press to
select.
Edit Voice Mailbox # (Menu )
Security (Menu )
The Security menu allows you to secure the phone
electronically.
Lock Phone (Menu )
Keeps your phone from unauthorized use. Once the
phone is locked, it is in restricted mode until the lock
code is entered. You can receive phone calls and still
make emergency calls.
You can modify the lock code using the New Lock code
within the Security menu.
1. Press , , .
2. Enter the four-digit lock code.
The lock code is commonly the last 4 digits of your
phone number.
3. Press Lock Phone.
4. Select an option then press .
Unlock The phone is never locked (Lock
mode can be used).
Lock The phone is always locked.
When locked, you can receive
incoming calls or make only
emergency calls.
Allows you to manually enter the access number for V oice
Mail Service. This number should be only used when VMS
access number is not provided from the network.
1. Press , , , .
80 81
LG5550LG5550
Page 43

Using Phone Menus
Using Phone Menus
Change Lock (Menu )
Allows you to enter a new four-digit lock code.
1. Press , , .
2. Enter the four-digit lock code.
3. Press Change Lock.
4. For confirmation, it will ask you to enter the new lock
code again.
Special # (Menu )
You can call emergency numbers, even when the phone
is locked or restricted. To enter 10 emergency numbers:
1. Press , , .
2. Enter the four-digit lock code.
3. Press Special #.
4. Select emergency number using .
5. Enter an emergency phone number then press .
Erase Phone Book (Menu )
Allows you to erase all of your Contacts at once.
1. Press , , .
2. Enter the four-digit lock code.
3. Press Erase Phone Book.
4. Select Erase all #s then press .
Reset Default (Menu )
Allows you to reset your phone to the factory default
settings.
1. Press , , .
2. Enter the four-digit lock code.
3. Press Reset Default.
4. Press , select Revert then press .
Airplane Mode (Menu )
Turning Airplane Mode will prevent any incoming and
outgoing calls as well as any online access.
1. Press , , .
2. Press , Select
On / Off
then press .
Setup/Others (Menu )
Shortcut Key (Menu )
Allows you to set a shortcut to Call History, Phone Book,
Messaging, Web, Downloads, V oice, Tools, or Settings and
their submenus using the Left Navigation key.
1. Press , , , .
An explanation message is displayed.
2. Press to continue.
3. Select the shortcut.
82 83
LG5550LG5550
Page 44

Using Phone Menus
Using Phone Menus
Call Answer (Menu )
Allows you to determine how to initiate an answered call.
1. Press , , , .
2. Select Open/Any Key / Talk Only then press .
Auto-Answer (Menu )
Allows you to select the number of rings before the
phone automatically answers a call. This feature is
intended for use with hands free devices, but is an
independent feature of the phone and must be manually
turned on/off when connected or disconnected from the
device.
1. Press , , , .
2. Select an option then press .
●
Off
●
Car-Kit/Driving
Language (Menu )
Allows you to set the bilingual feature according to your
preference. Choose between English and French.
TTY Mode (Menu )
Allows you to attach a TTY device enabling you to
communicate with parties also using a TTY device. A
phone with TTY support is able to translate typed
characters to voice. Voice can also be translated into
characters and then displayed on the TTY.
1. Press , , , .
2. Select
TTY Full / TTY+TALK/ TTY+HEAR/ TTY+Off
Phone Info (Menu )
The Phone Info menu provides you with specific
information pertaining to your phone model.
1. Press , , .
.
1. Press , , , .
2. Select English / French then press .
84 85
LG5550LG5550
Page 45

Safety
Safety
TIA Safety Information
The following is the complete TIA Safety Information for wireless
handheld phones.
Exposure to Radio Frequency Signal
Your wireless handheld portable phone is a low power radio
transmitter and receiver. When it is ON, it receives and also sends
out radio frequency (RF) signals.
In August, 1996, the Federal Communications Commissions (FCC)
adopted RF exposure guidelines with safety levels for handheld
wireless phones. Those guidelines are consistent with the safety
standards previously set by both U.S. and international standards
bodies:
ANSI C95.1 (1992) *
NCRP Report 86 (1986)
ICNIRP (1996)
American National Standards Institute; National Council on
Radiation Protection and Measurements; International Commission
on Non-Ionizing Radiation Protection
Those standards were based on comprehensive and periodic
evaluations of the relevant scientific literature. For example, over
120 scientists, engineers, and physicians from universities,
government health agencies, and industry reviewed the available
body of research to develop the ANSI Standard (C95.1).
The design of your phone complies with the FCC guidelines (and
those standards).
Antenna Care
Use only the supplied or an approved replacement antenna.
Unauthorized antennas, modifications, or attachments could
damage the phone and may violate FCC regulations.
Phone Operation
NORMAL POSITION: Hold the phone as you would any other
telephone with the antenna pointed up and over your shoulder.
Tips on Efficient Operation
For your phone to operate most efficiently:
Do not touch the antenna unnecessarily when the phone is in use.
Contact with the antenna affects call quality and may cause the
phone to operate at a higher power level than otherwise needed.
Driving
Check the laws and regulations on the use of wireless phones in the
areas where you drive and always obey them. Also, if using your
phone while driving, please observe the following:
● Give full attention to driving -- driving safely is your first
responsibility;
● Use hands-free operation, if available;
● Pull off the road and park before making or answering a call if
driving conditions or the law so require.
Electronic Devices
Most modern electronic equipment is shielded from RF signals.
However, certain electronic equipment may not be shielded against
the RF signals from your wireless phone.
Pacemakers
The Health Industry Manufacturers Association recommends that a
minimum separation of six (6) inches be maintained between a
handheld wireless phone and a pacemaker to avoid potential
interference with the pacemaker. These recommendations are
consistent with the independent research by and recommendations
of Wireless Technology Research.
Persons with pacemakers:
• Should ALWAYS keep the phone more than six (6) inches from
their pacemaker when the phone is turned ON;
• Should not carry the phone in a breast pocket;
• Should use the ear opposite the pacemaker to minimize the
potential for interference;
• Should turn the phone OFF immediately if there is any reason to
suspect that interference is taking place.
86 87
LG5550LG5550
Page 46

Safety
Safety
Hearing Aids
Some digital wireless phones may interfere with some hearing aids.
In the event of such interference, you may want to consult your
service provider (or call the customer service line to discuss
alternatives.) Optional for each phone manufacturer.
Other Medical Devices
If you use any other personal medical device, consult the
manufacturer of your device to determine if it is adequately
shielded from external RF energy. Your physician may be able to
assist you in obtaining this information.
Health Care Facilities
Turn your phone OFF in health care facilities when any regulations
posted in these areas instruct you to do so. Hospitals or health care
facilities may use equipment that could be sensitive to external RF
energy.
Vehicles
RF signals may affect improperly installed or inadequately shielded
electronic systems in motor vehicles. Check with the manufacturer
or its representative regarding your vehicle.
You should also consult the manufacturer of any equipment that
has been added to your vehicle.
Posted Facilities
Turn your phone OFF in any facility where posted notices so require.
Potentially Explosive Atmosphere
Turn your phone OFF when in any area with a potentially explosive
atmosphere and obey all signs and instructions. Sparks in such
areas could cause an explosion or fire resulting in bodily injury or
even death.
Areas with a potentially explosive atmosphere are often, but not
always marked clearly. Potential areas may include: fueling areas
(such as gasoline stations); below deck on boats; fuel or chemical
transfer or storage facilities; vehicles using liquefied petroleum gas
(such as propane or butane); areas where the air contains chemicals
or particles (such as grain, dust, or metal powders); and any other
area where you would normally be advised to turn off your vehicle
engine.
For Vehicles Equipped with an Air Bag
An air bag inflates with great force. DO NOT place objects, including
either installed or portable wireless equipment, in the area over the
air bag or in the air bag deployment area. If in-vehicle wireless
equipment is improperly installed and the air bag inflates, serious
injury could result.
Charger and Adapter Safety
●
The charger and adapter are intended for indoor use only.
●
Do not expose the battery charger or adapter to direct sunlight
or use it in places with high humidity, such as a bathroom.
Aircraft
FCC regulations prohibit using your phone while in the air. Switch
OFF your phone before boarding an aircraft.
Blasting Areas
To avoid interfering with blasting operations, turn your phone OFF
when in a “blasting area” or in areas posted: “Turn off two-way
radio”. Obey all signs and instructions.
88 89
Battery Information and Care
●
Please dispose of your battery properly or take it to your local
wireless carrier for recycling.
●
Do not dispose of your battery in fire or with hazardous or
flammable materials.
●
Never store your phone in temperatures less than -4° F or
greater than 122° F.
●
Never use an unapproved battery since this could damage the
phone and/or battery and could cause the battery to explode.
LG5550LG5550
Page 47

Safety
Safety
●
The battery does not need to be fully discharged before
recharging.
●
Use only LG-approved chargers specific to your phone model
since they are designed to maximize battery life.
●
Do not disassemble or short-circuit the battery.
●
Keep the battery’s metal contacts clean.
●
Replace the battery when it no longer provides acceptable
performance. The battery can be recharged several hundred
times before replacement.
●
Recharge the battery after long periods of non-use to maximize
battery life.
●
Battery life will vary due to usage patterns and environmental
conditions.
●
Use of extended backlighting, MiniBrowser, and data
connectivity kits affect battery life and talk/standby times.
Safety Information
Please read and observe the following information for safe and
proper use of your phone and to prevent damage. Also, keep the
user’s guide in an accessible place at all the times after reading it.
Explosion, Shock, and Fire Hazards
●
Make sure that no sharp-edged items such as animal’s teeth,
nails, come into contact with the battery. There is a risk of this
causing a fire.
●
Do not use harsh chemicals(such as alcohol, benzene, thinners,
etc.) or detergents to clean your phone. There is a risk of this
causing a fire.
●
When riding in a car, do not leave your phone or set up the
hands-free kit near to the air bag. If wireless equipment is
improperly installed and the air bag is activated, you may be
seriously injured.
●
Do not handle the phone with wet hands while it is being
charged. It may cause an electric shock or seriously damage
your phone.
●
Do not drop, strike, or shake your phone severely. Such actions
may harm the internal circuit boards of the phone.
●
Be careful that children do not swallow any parts such as
rubber plugs (earphone, connection parts of the phone, etc.).
This could cause asphyxiation or suffocation.
●
Do not use your phone in high explosive areas as the phone
may generate sparks.
●
Do not put your phone in a place subject to excessive dust and
keep the minimum required distance between the power cord
and heat sources.
●
Unplug the power cord prior to cleaning your phone, and clean
the power plug pin when it is dirty.
●
Do not damage the power cord by bending, twisting, pulling,
or heating. Do not use the plug if it is loose as it may cause a
fire or electric shock.
●
When using the power plug, ensure that it is firmly connected.
If it is not, it may cause excessive heat or fire.
●
Do not place any heavy items on the power cord. Do not allow
the power cord to be crimped as it may cause fire or electric
shock.
●
Do not disassemble the phone.
●
Do not place or answer calls while charging the phone as it
may short-circuit the phone and/or cause electric shock or fire.
●
If you put your phone in a pocket or bag without covering the
receptacle of the phone (power plug pin), metallic articles
(such as a coin, paperclip or pen) may short-circuit the phone.
Always cover the receptacle when not in use.
●
Do not short-circuit the battery. Metallic articles such as a coin,
paperclip or pen in your pocket or bag may short-circuit the +
and – terminals of the battery (metal strips on the battery)
upon moving. Short-circuit of the terminal may damage the
battery and cause an explosion.
●
Never place your phone in a microwave oven as it will cause
the battery to explode.
90 91
LG5550LG5550
Page 48

Safety
Safety
General Warnings and Cautions
●
Only use the batteries, antennas, and chargers provided by LG.
The warranty will not be applied to products provided by other
suppliers.
●
Store the battery in a place out of reach of children.
●
Using a damaged battery or placing a battery in your mouth
may cause serious injury.
●
Do not place items containing magnetic components such as a
credit card, phone card, bank book or subway ticket near your
phone. The magnetism of the phone may damage the data
stored in the magnetic strip.
●
Do not hold or let the antenna come in contact with your body
during a call.
●
Talking on your phone for a long period of time may reduce
call quality due to heat generated during use.
●
When the phone is not used for a long period time, store it in a
safe place with the power cord unplugged.
●
Using the phone in proximity to receiving equipment (i.e., TV
or radio) may cause interference to the phone.
●
Only authorized personnel should service the phone and its
accessories. Faulty installation or service may result in
accidents and consequently invalidate the warranty.
●
Do not use the phone if the antenna is damaged. If a damaged
antenna contacts skin, it may cause a slight burn. Please
contact an LG Authorized Service Center to replace the
damaged antenna.
●
Do not use the phone in areas where its use is prohibited. (For
example: aircraft).
●
Do not immerse your phone in water. If this happens, turn it off
immediately and remove the battery. If the phone does not
work, take it to an LG Authorized Service Center.
●
The power cord on this product will expose you to lead, a
chemical known to the State of California to cause (cancer,
and) birth defects or other reproductive harm. Wash hands
after handling.
FDA Consumer Update
The U.S. Food and Drug Administration’s Center for Devices and
Radiological Health Consumer Update on Mobile Phones:
1. Do wireless phones pose a health hazard?
The available scientific evidence does not show that any health
problems are associated with using wireless phones. There is no
proof, however, that wireless phones are absolutely safe. Wireless
phones emit low levels of radio frequency energy (RF) in the
microwave range while being used. They also emit very low levels
of RF when in the standby mode. Whereas high levels of RF can
produce health effects (by heating tissue), exposure to low level RF
that does not produce heating effects causes no known adverse
health effects. Many studies of low level RF exposures have not
found any biological effects. Some studies have suggested that
some biological effects may occur, but such findings have not been
confirmed by additional research. In some cases, other researchers
have had difficulty in reproducing those studies, or in determining
the reasons for inconsistent results.
2. What is the FDA's role concerning the safety of wireless
phones?
Under the law, the FDA does not review the safety of radiation emitting
consumer products such as wireless phones before they can be sold, as
it does with new drugs or medical devices. However, the agency has
authority to take action if wireless phones are shown to emit radio
frequency energy (RF) at a level that is hazardous to the user. In such a
case, the FDA could require the manufacturers of wireless phones to
notify users of the health hazard and to repair, replace, or recall the
phones so that the hazard no longer exists.
Although the existing scientific data do not justify FDA regulatory
actions, the FDA has urged the wireless phone industry to take a
number of steps, including the following:
● Support needed research into possible biological effects of RF
of the type emitted by wireless phones;
Design wireless phones in a way that minimizes any RF exposure
●
to the user that is not necessary for device function; and
● Cooperate in providing users of wireless phones with the best
possible information on possible effects of wireless phone use
on human health.
92 93
LG5550LG5550
Page 49

Safety
Safety
The FDA belongs to an interagency working group of the federal
agencies that have responsibility for different aspects of RF safety to
ensure coordinated efforts at the federal level. The following
agencies belong to this working group:
● National Institute for Occupational Safety and Health
● Environmental Protection Agency
● Occupational Safety and Health Administration
● National Telecommunications and Information Administration
The National Institutes of Health participates in some interagency
working group activities, as well.
The FDA shares regulatory responsibilities for wireless phones with
the Federal Communications Commission (FCC). All phones that are
sold in the United States must comply with FCC safety guidelines
that limit RF exposure. The FCC relies on the FDA and other health
agencies for safety questions about wireless phones.
The FCC also regulates the base stations that the wireless phone
networks rely upon. While these base stations operate at higher
power than do the wireless phones themselves, the RF exposures
that people get from these base stations are typically thousands of
times lower than those they can get from wireless phones. Base
stations are thus not the subject of the safety questions discussed in
this document.
3. What kinds of phones are the subject of this update?
The term “wireless phone” refers here to handheld wireless phones
with built-in antennas, often called “cell”, “mobile”, or “PCS”
phones. These types of wireless phones can expose the user to
measurable radio frequency energy (RF) because of the short
distance between the phone and the user’s head.
These RF exposures are limited by FCC safety guidelines that were
developed with the advice of the FDA and other federal health and
safety agencies. When the phone is located at greater distances
from the user, the exposure to RF is drastically lower because a
person's RF exposure decreases rapidly with increasing distance
from the source. The so-called “cordless phones,” which have a
base unit connected to the telephone wiring in a house, typically
operate at far lower power levels, and thus produce RF exposures
far below the FCC safety limits.
4. What are the results of the research done already?
The research done thus far has produced conflicting results, and
many studies have suffered from flaws in their research methods.
Animal experiments investigating the effects of radio frequency
energy (RF) exposures characteristic of wireless phones have yielded
conflicting results that often cannot be repeated in other laboratories.
A few animal studies, however, have suggested that low levels of RF
could accelerate the development of cancer in laboratory animals.
However, many of the studies that showed increased tumor
development used animals that had been genetically engineered or
treated with cancer-causing chemicals so as to be pre-disposed to
develop cancer in the absence of RF exposure. Other studies exposed
the animals to RF for up to 22 hours per day. These conditions are not
similar to the conditions under which people use wireless phones, so
we don’t know with certainty what the results of such studies mean
for human health.
Three large epidemiology studies have been published since
December 2000. Between them, the studies investigated any possible
association between the use of wireless phones and primary brain
cancer, glioma, meningioma, or acoustic neuroma, tumors of the
brain or salivary gland, leukemia, or other cancers. None of the
studies demonstrated the existence of any harmful health effects
from wireless phone RF exposures. However, none of the studies can
answer questions about long-term exposures, since the average
period of phone use in these studies was around three years.
5. What research is needed to decide whether RF exposure
from wireless phones poses a health risk?
A combination of laboratory studies and epidemiological studies of
people actually using wireless phones would provide some of the
data that are needed. Lifetime animal exposure studies could be
completed in a few years. However, very large numbers of animals
would be needed to provide reliable proof of a cancer promoting
effect if one exists. Epidemiological studies can provide data that is
directly applicable to human populations, but 10 or more years
follow-up may be needed to provide answers about some health
effects, such as cancer. This is because the interval between the time
of exposure to a cancer-causing agent and the time tumors develop
— if they do — may be many, many years. The interpretation of
epidemiological studies is hampered by difficulties in measuring
actual RF exposure during day-to-day use of wireless phones.
94 95
LG5550LG5550
Page 50

Safety
Safety
Many factors affect this measurement, such as the angle at which the
phone is held, or which model of phone is used.
6. What is the FDA doing to find out more about the
possible health effects of wireless phone RF?
The FDA is working with the U.S. National Toxicology Program and
with groups of investigators around the world to ensure that high
priority animal studies are conducted to address important
questions about the effects of exposure to radio frequency energy
(RF). The FDA has been a leading participant in the World Health
Organization International Electromagnetic Fields (EMF) Project
since its inception in 1996. An influential result of this work has
been the development of a detailed agenda of research needs that
has driven the establishment of new research programs around the
world. The project has also helped develop a series of public
information documents on EMF issues.
The FDA and the Cellular Telecommunications & Internet
Association (CTIA) have a formal Cooperative Research and
Development Agreement (CRADA) to do research on wireless
phone safety. The FDA provides the scientific oversight, obtaining
input from experts in government, industry, and academic
organizations. CTIA-funded research is conducted through contracts
with independent investigators. The initial research will include both
laboratory studies and studies of wireless phone users. The CRADA
will also include a broad assessment of additional research needs in
the context of the latest research developments around the world.
7. How can I find out how much radio frequency energy
exposure I can get by using my wireless phone?
All phones sold in the United States must comply with Federal
Communications Commission (FCC) guidelines that limit radio
frequency energy (RF) exposures. The FCC established these
guidelines in consultation with the FDA and the other federal health
and safety agencies. The FCC limit for RF exposure from wireless
telephones is set at a Specific Absorption Rate (SAR) of 1.6 watts per
kilogram (1.6 W/kg). The FCC limit is consistent with the safety
standards developed by the Institute of Electrical and Electronic
Engineering (IEEE) and the National Council on Radiation Protection
and Measurement. The exposure limit takes into consideration the
body’s ability to remove heat from the tissues that absorb energy
from the wireless phone and is set well below levels known to have
effects. Manufacturers of wireless phones must report the RF
exposure level for each model of phone to the FCC. The FCC website
(http://www.fcc.gov/oet/ rfsafety) gives directions for locating the FCC
identification number on your phone so you can find your phone’s RF
exposure level in the online listing.
8. What has the FDA done to measure the radio frequency
energy coming from wireless phones?
The Institute of Electrical and Electronic Engineers (IEEE) is
developing a technical standard for measuring the radio frequency
energy (RF) exposure from wireless phones and other wireless
handsets with the participation and leadership of FDA scientists and
engineers. The standard, “Recommended Practice for Determining
the Spatial-Peak Specific Absorption Rate (SAR) in the Human Body
Due to Wireless Communications Devices: Experimental
Techniques,” sets forth the first consistent test methodology for
measuring the rate at which RF is deposited in the heads of wireless
phone users. The test method uses a tissue-simulating model of the
human head. Standardized SAR test methodology is expected to
greatly improve the consistency of measurements made at different
laboratories on the same phone. SAR is the measurement of the
amount of energy absorbed in tissue, either by the whole body or a
small part of the body. It is measured in watts/kg (or milliwatts/g) of
matter. This measurement is used to determine whether a wireless
phone complies with safety guidelines.
9. What steps can I take to reduce my exposure to radio
frequency energy from my wireless phone?
If there is a risk from these products — and at this point we do not
know that there is — it is probably very small. But if you are
concerned about avoiding even potential risks, you can take a few
simple steps to minimize your exposure to radio frequency energy
(RF). Since time is a key factor in how much exposure a person
receives, reducing the amount of time spent using a wireless phone
will reduce RF exposure.
If you must conduct extended conversations by wireless phone
every day, you could place more distance between your body and
the source of the RF, since the exposure level drops off dramatically
with distance. For example, you could use a headset and carry the
96 97
LG5550LG5550
Page 51

Safety
Safety
wireless phone away from your body or use a wireless phone
connected to a remote antenna.
Again, the scientific data do not demonstrate that wireless phones
are harmful. But if you are concerned about the RF exposure from
these products, you can use measures like those described above to
reduce your RF exposure from wireless phone use.
10. What about children using wireless phones?
The scientific evidence does not show a danger to users of wireless
phones, including children and teenagers. If you want to take steps to
lower exposure to radio frequency energy (RF), the measures
described above would apply to children and teenagers using
wireless phones. Reducing the time of wireless phone use and
increasing the distance between the user and the RF source will
reduce RF exposure. Some groups sponsored by other national
governments have advised that children be discouraged from using
wireless phones at all. For example, the government in the United
Kingdom distributed leaflets containing such a recommendation in
December 2000. They noted that no evidence exists that using a
wireless phone causes brain tumors or other ill effects. Their
recommendation to limit wireless phone use by children was strictly
precautionary; it was not based on scientific evidence that any health
hazard exists.
11. What about wireless phone interference with medical
equipment?
Radio frequency energy (RF) from wireless phones can interact with
some electronic devices. For this reason, the FDA helped develop a
detailed test method to measure electromagnetic interference (EMI)
of implanted cardiac pacemakers and defibrillators from wireless
telephones. This test method is now part of a standard sponsored
by the Association for the Advancement of Medical instrumentation
(AAMI). The final draft, a joint effort by the FDA, medical device
manufacturers, and many other groups, was completed in late 2000.
This standard will allow manufacturers to ensure that cardiac
pacemakers and defibrillators are safe from wireless phone EMI.
The FDA has tested hearing aids for interference from handheld
wireless phones and helped develop a voluntary standard
sponsored by the Institute of Electrical and Electronic Engineers
(IEEE). This standard specifies test methods and performance
requirements for hearing aids and wireless phones so that no
interference occurs when a person uses a “compatible” phone and
a “compatible” hearing aid at the same time. This standard was
approved by the IEEE in 2000.
The FDA continues to monitor the use of wireless phones for
possible interactions with other medical devices. Should harmful
interference be found to occur, the FDA will conduct testing to
assess the interference and work to resolve the problem.
12. Where can I find additional information?
For additional information, please refer to the following resources:
FDA web page on wireless phones
(http://www.fda.gov/cdrh/phones/index.html)
Federal Communications Commission (FCC) RF Safety Program
(http://www.fcc.gov/oet/rfsafety)
International Commission on Non-lonizing Radiation Protection
(http://www.icnirp.de)
World Health Organization (WHO) International EMF Project
(http://www.who.int/emf)
National Radiological Protection Board (UK)
(http://www.nrpb.org.uk/)
98 99
LG5550LG5550
Page 52

Safety
Safety
Consumer Information on SAR
(Specific Absorption Rate)
This Model Phone Meets the Government’s Requirements for
Exposure to Radio Waves. Your wireless phone is a radio
transmitter and receiver. It is designed and manufactured not to
exceed the emission limits for exposure to radio frequency (RF)
energy set by the Federal Communications Commission of the U.S.
Government. These limits are part of comprehensive guidelines and
establish permitted levels of RF energy for the general population.
The guidelines are based on standards that were developed by
independent scientific organizations through periodic and thorough
evaluation of scientific studies. The standards include a substantial
safety margin designed to assure the safety of all persons,
regardless of age and health.
The exposure standard for wireless mobile phones employs a unit
of measurement known as the Specific Absorption Rate, or SAR.
The SAR limit set by the FCC is 1.6 W/kg. Tests for SAR are
conducted using standard operating positions specified by the FCC
with the phone transmitting at its highest certified power level in all
tested frequency bands. Although SAR is determined at the highest
certified power level, the actual SAR level of the phone while
operating can be well below the maximum value. Because the
phone is designed to operate at multiple power levels to use only
the power required to reach the network, in general, the closer you
are to a wireless base station antenna, the lower the power output.
Before a phone model is available for sale to the public, it must be
tested and certified to the FCC that it does not exceed the limit
established by the government-adopted requirement for safe
exposure. The tests are performed in positions and locations (e.g.,
at the ear and worn on the body) as required by the FCC for each
model. The highest SAR value for this model phone when tested for
use at the ear is 1.21 W/kg and when worn on the body, as
described in this user guide, is 0.99 W/kg (body-worn
measurements differ among phone models, depending upon
available accessories and FCC requirements). While there may be
differences between SAR levels of various phones and at various
positions, they all meet the government requirement for safe
exposure.
The FCC has granted an Equipment Authorization for this model
phone with all reported SAR levels evaluated as in compliance with
the FCC RF emission guidelines. SAR information on this model
phone is on file with the FCC and can be found under the Display
Grant section of http://www.fcc.gov/oet/fccid after searching on FCC
ID BEJLG5550. Additional information on Specific Absorption Rates
(SAR) can be found on the Cellular Telecommunications Industry
Association (CTIA) website at http://www.wow-com.com.
* In the United States and Canada, the SAR limit for mobile phones
used by the public is 1.6 watts/kg (W/kg) averaged over one gram
of tissue. The standard incorporates a substantial margin of safety
to give additional protection for the public and to account for any
variations in measurements.
100
LG5550
LG5550
101
Page 53

Accessories
Accessories
There are a variety of accessories available for your mobile
phone. Consult your local dealer for availability.
Battery
Two batteries are available. The
standard battery, and the extended
battery.
Cigarette Lighter Charger
The cigarette lighter charger, model
CLC-43W, allows you to operate the
phone and trickle charge the phone’s
battery from your vehicle. It takes 5
hours to charge a completely
discharged battery.
Hands-Free Car Kit (Portable)
The hands-free car kit, model PHF50W, enables you to attach the phone
to the power jack in your car,
providing you with hands-free
operation. It can charge a completely
discharged battery in 5 hours.
USB Cable
The USB cable, enables you to
connect your phone to your PC.
Headset
The headset, model 1000, connects to
your phone allowing hands-free
operation. It includes earpiece,
microphone, and integrated call
answer / termination button.
AC Adaptor
The AC adaptor, model
AC-100 or 8102, allows you to power
your phone using.
Input Voltage: AC100~240V 50/60Hz
0.2A~
Output Voltage: DC 5V, 1A
Holster
Data Cable Kit
The data cable kit, model
LG-DC200DJ, enables you to connect
your phone to your PC.
102 103
LG5550LG5550
Page 54

ranty Infor
WWararranty Infor
mation
mation
1. WHAT THIS WARRANTY COVERS:
LG offers you a limited warranty that the enclosed subscriber unit and
its enclosed accessories will be free from defects in material and
workmanship, according to the following terms and conditions:
(1) The limited warranty for the product extends for ONE (1) year
beginning on the date of purchase of the product by the original
end user.
(2) The limited warranty extends only to the original end user of the
product and is not assignable or transferable to any subsequent
purchaser/end user.
(3) This warranty is good only to the original end user of the product
during the warranty period as long as it is in Canada.
(4) Upon request from LG, the consumer must provide information to
reasonably prove the date of purchase.
(5) During the applicable warranty period, LG will repair or replace at
LG’s sole option, without charge to the original end user, any
defective component part of the phone or accessory.
(6) LG may, use rebuilt, reconditioned, or new parts or components
when repairing any product or replace a product with a rebuilt,
reconditioned or new product.
2. WHAT THIS WARRANTY DOES NOT COVER:
(1) Defects or damages resulting from use of the product in other than
its normal and customary manner.
(2) Defects or damages from abnormal use, abnormal conditions,
improper storage, exposure to moisture or dampness,
unauthorized modifications, unauthorized connections,
unauthorized repair, misuse, neglect, abuse, accident, alteration,
improper installation, or other acts which are not the fault of LG,
including damage caused by spills of food or liquids.
(3) Breakage or damage to antennas unless caused directly by defects
in material or workmanship.
(4) The fact that the Customer Service Department at LG was not
notified by the original end user of the alleged defect or
malfunction of the product, during the warranty period.
(5) Products which have had their serial numbers removed or made
illegible.
(6) Damage resulting from use of non-LG approved accessories.
(7) All plastic surfaces and all other externally exposed parts that are
scratched or damaged due to normal customer use.
(8) Products serviced by non-authorized persons or companies.
NOTES:
(1) This limited warranty is in lieu of all other warranties, express or
implied either in fact or by operations of law, statutory or
otherwise, including, but not limited to any implied warranty of
merchantability or fitness for a particular purpose.
(2) Shipping damage is the sole responsibility of the shipping company.
3. EXCLUSION OF LIABILITY:
No other express warranty is applicable to this product. THE DURATION
OF ANY IMPLIED WARRANTIES, INCLUDING THE IMPLIED WARRANTY
OF MARKETABILITY, IS LIMITED TO THE DURATION OF THE EXPRESS
WARRANTY HEREIN. LG ELECTRONICS CANADA, INC. SHALL NOT BE
LIABLE FOR THE LOSS OF THE USE OF THE PRODUCT,
INCONVENIENCE, LOSS OR ANY OTHER DAMAGES, DIRECT OR
CONSEQUENTIAL, ARISING OUT OF THE USE OF, OR INABILITY TO
USE, THIS PRODUCT OR FOR ANY BREACH OF ANY EXPRESS OR
IMPLIED WARRANTY, INCLUDING THE IMPLIED WARRANTY OF
MARKETABILITY APPLICABLE TO THIS PRODUCT.
4. HOW TO GET WARRANTY SERVICE:
To obtain warranty service, please call the following telephone number
from anywhere in Canada:
LG Electronics Canada, Inc.
Tel. 1-888-542-2623
Electronics Canada Inc
Mississauga, Ontario
104 105
LG5550LG5550
Page 55

Index
Index
10 Driver Safety Tips 100
AA
Accessories 104
Airplane Mode 83
Alarm 69
Alerts 73
Announce Alerts 66
Auto-Ans wer 84
Auto Delete 80
BB
Backlight 74
Best Match 66
Brightness 75
CC
Calculator 70
Call Answer 84
Caller ID 20
Call Guard 78
Call History 44
Call Timer 46
Call Waiting 20
Canned Msgs 80
Change Lock 82
Check Accessories 7
Clocks 76
Consumer Information on SAR
102
Contrast 75
DD
Data Baud 78
Data Setting 77
Data/Fax 77
Deleting 36
Delivery Receipt 79
Display 74
Display Pop-up 79
Downloads 60
Driving Mode 67
EE
Edit V oice Mailbox # 80
Editing Phone Book Entries 32
Entering Text, Numbers or
Symbols 59
Erase Calls 46
Erase Phone Book 82
EZ Tip Calc 70
FF
FDA Consumer Update 93
GG
Getting Your Phone Started 14
Greeting 74
Groups 48
HH
Help 67
II
Inbox 53
Incoming Calls 45
Introduction 7
KK
Key Tone 72
LL
Language 84
List Entries 47
Location 79
Lock Phone 81
MM
Making Calls 17
Making a Call From Your
Phone’s Memory 42
Menu Style 76
Menus Overview 12
Messaging 79
Method 77
Missed Calls 45
Msg Alerts 79
Mute Function 19
NN
New Entry 47
Notepad 69
OO
Options to Customize Your
Phone Book 28
Outbox 54
Outgoing Calls 45
PP
Phone Book 46
Phone Info 85
Phone Overview 10
RR
Receiving Calls 17
Reset Default 83
Ringers 72
Roaming 78
SS
Safety 86
Safety Information 90
Saved 56
Screen Icons 16
Screens 75
Searching Your Phone Memory
40
Security 81
Send Message 51
Set Mode 78
Settings 71
Setup/Others 83
Shortcut Key 83
Signature 80
Silence Mode 18
106
LG5550
LG5550
107
Page 56

Index
Index
Sounds 72
Special # 82
Speed Dialing 21
Speed Dials 48
Start Commands 63
Start Web 57
TT
Text Input 22
Text Input Fonts 76
Text Input Examples 24
The Battery 14
Theme Colors 76
TIA Safety Information 86
Tools 68
Train Commands 66
Train Digits 67
TTY Mode 85
Turning the Phone On and Off
15
VV
Vibrate Mode 18
Volume 73
Volume Quick Adjustment 19
Voice 62
Voice Command 21
Voice Commands 65
Voice Memos 65
Voice Scheduler 64
Voice Settings 65
Voicemail 56
WW
Web 57
Web Msg 52
World Clock 70
108
LG5550
Page 57

Introduction . . . . . . . . . . . . . . . . . . . . . . . . . . . . . . . . . . . . 7
Vérification des accessories . . . . . . . . . . . . . . . . . . . . . 7
Renseignements importants . . . . . . . . . . . . . . . . . . . . 7
Vue d’ensemble du téléphone . . . . . . . . . . . . . . . . . . . . 10
Référence des menus du téléphone . . . . . . . . . . . . . . 12
Obtenir Votre Téléphone A Commencé . . . . . . . . . . . . 14
Utilisation du bloc de batterie . . . . . . . . . . . . . . . . . . . 14
Comment allumer et éteindre le téléphone . . . . . . . . . 15
Icônes de l’écran . . . . . . . . . . . . . . . . . . . . . . . . . . . . 16
Comment faire un appel . . . . . . . . . . . . . . . . . . . . . . . .17
Comment répondre à un appel . . . . . . . . . . . . . . . . . . 17
Accès rapide aux fonctions pratiques . . . . . . . . . . . . . 18
Mode Vibreur . . . . . . . . . . . . . . . . . . . . . . . . . . . . . . . . 18
Mode Amortissez . . . . . . . . . . . . . . . . . . . . . . . . . . . . .18
Fonction Muet . . . . . . . . . . . . . . . . . . . . . . . . . . . . . . . 19
Ajustement rapide du volume . . . . . . . . . . . . . . . . . . . 19
Appel en attente . . . . . . . . . . . . . . . . . . . . . . . . . . . . . 20
Identification de l'appelant . . . . . . . . . . . . . . . . . . . . . . 20
Composition abrégée . . . . . . . . . . . . . . . . . . . . . . . . 20
Commande vocale . . . . . . . . . . . . . . . . . . . . . . . . . . . 21
Comment entrer et modifier de l'information . . . . . . . 22
Comment entrer des informations avec l’entrée de texte T9
. . 22
Exemples d'entrée de texte . . . . . . . . . . . . . . . . . . . . . 24
Le répertoire dans la mémoire de votre téléphone . . 26
Fonctions de base d'entrée dans l'annuaire . . . . . . . . .26
Options de personnalisation du répertoire . . . . . . . . . 28
Comment ajouter ou changer un groupe . . . . . . . 28
Comment changer la sonnerie . . . . . . . . . . . . . . . .29
Comment ajouter ou changer une mémo . . . . . . . 29
Comment ajouter ou changer une image . . . . . . . . 30
LG5550
1
Page 58

Comment changer l'indicateur Secret . . . . . . . . . . 30
Comment ajouter ou changer un URL . . . . . . . . . 31
Comment ajouter un numéro de Composition abrégée
. . . 31
Comment modifier une entrée de répertoire . . . . . . . . 32
Comment ajouter un numéro de téléphone . . . . . . 32
Numéros par défaut . . . . . . . . . . . . . . . . . . . . . . . . 33
Comment modifier un numéro de téléphone dans une entrée
. . . 34
Comment modifier un nom dans une entrée . . . . . 34
Comment modifier une option personnalisée . . . . . 35
Suppression . . . . . . . . . . . . . . . . . . . . . . . . . . . . . . . . . 36
Comment supprimer un numéro de téléphone dans
une entrée de répertoire . . . . . . . . . . . . . . . . . . . . . .36
Comment supprimer une entrée de répertoire . . . 36
Autres façons d'effectuer une suppression dans le répertoire
Comment supprimer un numéro de Composition abrégée
. . . . 36
. . . 37
Numéro de téléphone contenant une pause . . . . . . . 38
Comment effectuer une recherche dans la mémoire de votre téléphone
Comment établir un appel à partir d'une entrée de répertoire
. . 40
. . 42
À partir du répertoire . . . . . . . . . . . . . . . . . . . . . . . 42
À partir du journal des appels . . . . . . . . . . . . . . . . 42
Comment utiliser les menus du téléphone . . . . . . . . . 43
Accès au menu . . . . . . . . . . . . . . . . . . . . . . . . . . . . . . .43
Journal des appels . . . . . . . . . . . . . . . . . . . . . . . . . . . 44
Appels sortants . . . . . . . . . . . . . . . . . . . . . . . . . . . . 45
Appels entrants . . . . . . . . . . . . . . . . . . . . . . . . . . . 45
Appels manqués . . . . . . . . . . . . . . . . . . . . . . . . . . 45
Effacer appels . . . . . . . . . . . . . . . . . . . . . . . . . . . . 46
Durée des appels . . . . . . . . . . . . . . . . . . . . . . . . . 46
Répertoire . . . . . . . . . . . . . . . . . . . . . . . . . . . . . . . . . 47
Liste des entrées . . . . . . . . . . . . . . . . . . . . . . . . . . 47
Nouvelle entrée . . . . . . . . . . . . . . . . . . . . . . . . . . 48
Composition abrégée . . . . . . . . . . . . . . . . . . . . . . 48
Groupes . . . . . . . . . . . . . . . . . . . . . . . . . . . . . . . . 49
Messagerie . . . . . . . . . . . . . . . . . . . . . . . . . . . . . . . . . 49
Envoyer message . . . . . . . . . . . . . . . . . . . . . . . . . . 51
Fonctions de base d'envoi de message . . . . . 51
Comment personnaliser un message à l'aide des options
. . . 52
Web Msg . . . . . . . . . . . . . . . . . . . . . . . . . . . . . . . . 53
Arrivée . . . . . . . . . . . . . . . . . . . . . . . . . . . . . . . . . . 53
Avertissement de maque de mémoire . . . . . . . 54
Comment afficher le contenu de la boîte de réception
. . . . 54
Départ . . . . . . . . . . . . . . . . . . . . . . . . . . . . . . . . . . 55
Gardé . . . . . . . . . . . . . . . . . . . . . . . . . . . . . . . . . . . 56
Messagerie vocale . . . . . . . . . . . . . . . . . . . . . . . . . 56
Web . . . . . . . . . . . . . . . . . . . . . . . . . . . . . . . . . . . . . . 57
Début Web . . . . . . . . . . . . . . . . . . . . . . . . . . . . . . . 57
Comment mettre fin à une session de navigation . . . 57
Comment naviguer à l'aide du mini-navigateur . . . 58
Comment entrer du texte, des chiffres et des symboles
Comment établir un appel à partir du mini-navigateur
. . 59
. . . . 60
Téléchargements . . . . . . . . . . . . . . . . . . . . . . . . . . . . .60
Voix . . . . . . . . . . . . . . . . . . . . . . . . . . . . . . . . . . . . . . . 62
Commandes de départ . . . . . . . . . . . . . . . . . . . . . . 63
Ordonnanceur vocal . . . . . . . . . . . . . . . . . . . . . . . 64
Mémos vocaux . . . . . . . . . . . . . . . . . . . . . . . . . . . . 65
Configurations vocales . . . . . . . . . . . . . . . . . . . . . 65
Mode Conduite . . . . . . . . . . . . . . . . . . . . . . . . . . . .67
Help . . . . . . . . . . . . . . . . . . . . . . . . . . . . . . . . . . . . .67
Outils . . . . . . . . . . . . . . . . . . . . . . . . . . . . . . . . . . . . . . 68
Alarme . . . . . . . . . . . . . . . . . . . . . . . . . . . . . . . . . . 69
Bloc-notes . . . . . . . . . . . . . . . . . . . . . . . . . . . . . . . . 70
Conseils utiles . . . . . . . . . . . . . . . . . . . . . . . . . . . . . 70
2
LG5550
LG5550
3
Page 59

Calculatrice . . . . . . . . . . . . . . . . . . . . . . . . . . . . . . . 70
Horloge universelle . . . . . . . . . . . . . . . . . . . . . . . . 70
Réglages . . . . . . . . . . . . . . . . . . . . . . . . . . . . . . . . . . . 71
Sons . . . . . . . . . . . . . . . . . . . . . . . . . . . . . . . . . . . . 72
Sonneries . . . . . . . . . . . . . . . . . . . . . . . . . . . . . . 72
Tonalité des touches . . . . . . . . . . . . . . . . . . . . . 72
Volume . . . . . . . . . . . . . . . . . . . . . . . . . . . . . . . 73
Alertes . . . . . . . . . . . . . . . . . . . . . . . . . . . . . . . . 73
Changement de service . . . . . . . . . . . . . . . . 73
Tonalité minute . . . . . . . . . . . . . . . . . . . . . . . 73
Connexion d’appel . . . . . . . . . . . . . . . . . . . 74
Affichage . . . . . . . . . . . . . . . . . . . . . . . . . . . . . . . . 74
Salutations . . . . . . . . . . . . . . . . . . . . . . . . . . . . . 74
Rétroéclairage . . . . . . . . . . . . . . . . . . . . . . . . . . 74
Téléphone . . . . . . . . . . . . . . . . . . . . . . . . . . 74
Web . . . . . . . . . . . . . . . . . . . . . . . . . . . . . . . 75
Écrans . . . . . . . . . . . . . . . . . . . . . . . . . . . . . . . . 75
Luminosité . . . . . . . . . . . . . . . . . . . . . . . . . . . . . 75
Contraste . . . . . . . . . . . . . . . . . . . . . . . . . . . . . . 75
Style de menu . . . . . . . . . . . . . . . . . . . . . . . . . . 76
Horloge . . . . . . . . . . . . . . . . . . . . . . . . . . . . . . . 76
Couleur de théme . . . . . . . . . . . . . . . . . . . . . . . 76
Polices d’entrée de texte . . . . . . . . . . . . . . . . . . 76
Configuration données . . . . . . . . . . . . . . . . . . . . . . 77
Données/Fax . . . . . . . . . . . . . . . . . . . . . . . . . . . 77
Méthode . . . . . . . . . . . . . . . . . . . . . . . . . . . . . . . 77
Baud Données . . . . . . . . . . . . . . . . . . . . . . . . . 78
Itinérance . . . . . . . . . . . . . . . . . . . . . . . . . . . . . . . . 78
Fijar modalidad . . . . . . . . . . . . . . . . . . . . . . . . . 78
Protector de llamadas . . . . . . . . . . . . . . . . . . . . 78
Position . . . . . . . . . . . . . . . . . . . . . . . . . . . . . . . . . . 79
Messagerie . . . . . . . . . . . . . . . . . . . . . . . . . . . . . . . 79
Affichange contextual . . . . . . . . . . . . . . . . . . . . 79
Récépissé au destinataire . . . . . . . . . . . . . . . . . 79
Alerte msgs . . . . . . . . . . . . . . . . . . . . . . . . . . . . .79
Suppression automatique . . . . . . . . . . . . . . . . 80
Signature . . . . . . . . . . . . . . . . . . . . . . . . . . . . . . 80
Msgs ordinaries . . . . . . . . . . . . . . . . . . . . . . . . . 80
Edit Voice Mailbox # . . . . . . . . . . . . . . . . . . . . . 80
Sécurité . . . . . . . . . . . . . . . . . . . . . . . . . . . . . . . . . 81
Verrouiller téléphone . . . . . . . . . . . . . . . . . . . . . 81
Modifier verrouillage . . . . . . . . . . . . . . . . . . . . . 82
Numéro spécial . . . . . . . . . . . . . . . . . . . . . . . . . 82
Effacer répertoire . . . . . . . . . . . . . . . . . . . . . . . . 82
Réinitialiser-valeur défaut . . . . . . . . . . . . . . . . . . 83
Mode d’avion . . . . . . . . . . . . . . . . . . . . . . . . . . . . . 83
Configuration/Otros . . . . . . . . . . . . . . . . . . . . . . . . . 83
Raccourci . . . . . . . . . . . . . . . . . . . . . . . . . . . . . 83
Réception d’appel . . . . . . . . . . . . . . . . . . . . . . . 84
Réponse automatique . . . . . . . . . . . . . . . . . . . . 84
Langue . . . . . . . . . . . . . . . . . . . . . . . . . . . . . . . 84
Mode TTY . . . . . . . . . . . . . . . . . . . . . . . . . . . . . 85
Information . . . . . . . . . . . . . . . . . . . . . . . . . . . . . . . 85
Sécurité . . . . . . . . . . . . . . . . . . . . . . . . . . . . . . . . . . . . . . 86
Renseignements sur la sécurité TIA . . . . . . . . . . . . . . 86
Exposition à un signal radioélectrique . . . . . . . . . . 86
Entretien de l’antenne . . . . . . . . . . . . . . . . . . . . . . . 86
Utilisation du téléphone . . . . . . . . . . . . . . . . . . . . . 86
Conseils pour un fonctionnement efficace . . . . . . . 86
Conduite automobile . . . . . . . . . . . . . . . . . . . . . . . . 87
Appareils électroniques . . . . . . . . . . . . . . . . . . . . . 87
Stimulateurs cardiaques . . . . . . . . . . . . . . . . . . . . . 87
4
LG5550
LG5550
5
Page 60

Intr
oduction
Intr
oduction
Prothèses auditives . . . . . . . . . . . . . . . . . . . . . . . . 87
Autres appareils médicaux . . . . . . . . . . . . . . . . . . . 88
Établissements de soins de santé . . . . . . . . . . . . . 88
Véhicules . . . . . . . . . . . . . . . . . . . . . . . . . . . . . . . . 88
Installations avec avertissements . . . . . . . . . . . . . .88
Avions . . . . . . . . . . . . . . . . . . . . . . . . . . . . . . . . . . . 88
Zones de dynamitage . . . . . . . . . . . . . . . . . . . . . . . 88
Atmosphères potentiellement explosives . . . . . . . . 88
Pour les véhicules équipés d’un coussin de
sécurité gonflable . . . . . . . . . . . . . . . . . . . . . . . . . . 89
Sécurité pour l'adaptateur et le chargeur . . . . . . . . . . 89
Information sur la batterie et soins de la batterie . . . . 89
Renseignements sur la sécurité . . . . . . . . . . . . . . . . . 90
Informations de la FDA . . . . . . . . . . . . . . . . . . . . . . . . 93
Renseignements sur le TAS . . . . . . . . . . . . . . . . . . 100
Accessoires . . . . . . . . . . . . . . . . . . . . . . . . . . . . . . . . . 102
GARANTIE LIMITÉE LG . . . . . . . . . . . . . . . . . . . . . . . . 104
Index . . . . . . . . . . . . . . . . . . . . . . . . . . . . . . . . . . . . . . . 106
Félicitations pour votre achat du téléphone cellulaire LG5550
compact et moderne, conçu pour fonctionner avec la
technologie de communication numérique mobile la plus
récente, accès multiple par répartition en code (CDMA - Code
Division Multiple Access). En plus des nombreuses fonctions
perfectionnées du système CDMA, comme la clarté vocale
considérablement accrue, ce téléphone offre :
● un grand écran à cristaux liquides rétroéclairé facile à lire de
six lignes avec des icônes d’activité;
● des services de téléavertissement, de messagerie écrite et
vocale et d’identification de l’appelant;
● un clavier à 19 touches;
● une longue durée de veille et de conversation sur batterie;
● une interface à menus avec invites pour faciliter l’utilisation
et la configuration.
● Mode Conduite.
● la prise d’appel toute touche, la réponse automatique, la
relance automatique, la composition abrégée à une seule
touche avec 99 adresses de mémoire.
● un affichage multilingue (anglais et français offerts).
Vérification des accessoires
Votre téléphone cellulaire est accompagné des accessoires
suivants : un chargeur de bureau à une fente, un guide et une
batterie rechargeable. Veuillez vérifier que tous ces accessoires
sont inclus.
6
LG5550
Renseignements importants
Ce guide d’utilisation fournit des renseignements importants sur
l’utilisation et le fonctionnement de votre téléphone. Veuillez lire
soigneusement tous les renseignements avant d’utiliser le
téléphone pour en obtenir le meilleur rendement et pour éviter
de l’endommager ou de mal l’utiliser. Toute modification ou
altération non autorisée annulera votre garantie.
LG5550
7
Page 61

Renseignements de la FCC sur l’exposition aux
radiofréquences (RF)
AVERTISSEMENT! Lisez ces renseignements avant d’utiliser
le téléphone.
En août 1996, la Commission fédérale des communications
(FCC) des États-Unis, par ses rapport et ordonnance FCC96-326,
a adopté une norme de sécurité modifiée pour l’exposition
humaine à l’énergie électromagnétique de radiofréquences (RF)
émise par les émetteurs-récepteurs réglementés par la FCC. Ces
directives sont conformes aux normes de sécurité
précédemment établies par les organismes de normalisation
américains et internationaux.
La conception de ce téléphone est conforme aux directives de la
FCC et aux normes internationales.
Contact avec le corps pendant l’utilisation
Cet appareil a été testé pour des utilisations typiques avec le dos
du téléphone maintenu à une distance de 2 cm (_ po) du corps.
Pour respecter les normes d’exposition RF de la FCC, une
distance de séparation minimale de 2 cm (_ po) doit être
maintenue entre le corps de l’utilisateur et le dos du téléphone, y
compris l’antenne, qu’elle soit déployée ou rentrée. Les
accessoires d’autres fabricants, tels que pinces de ceinture, étuis
et autres accessoires similaires, contenant des pièces
métalliques ne devraient pas être utilisés. Évitez l’utilisation
d’accessoires qui ne permettent pas de maintenir une distance
minimale de 2 cm (_ po) entre le corps de l’utilisateur et le dos
du téléphone et dont la conformité aux limites d’exposition RF
de la FCC n’a pas été testée.
Antenne externe installée sur véhicule
(En option, le cas échéant)
Une distance minimale de 8 po (20 cm) doit être maintenue
entre l’utilisateur/personne à proximité et l’antenne externe
installée sur le véhicule pour respecter les normes d’exposition
RF de la FCC. Pour plus de renseignements sur l’exposition RF,
visitez le site de la FCC, à www.fcc.gov.
ATTENTION
Utilisez uniquement l’antenne fournie et approuvée. L’utilisation
d’une antenne modifiée ou non autorisée pourrait nuire à la
qualité des appels, endommager le téléphone, annuler votre
garantie ou enfreindre la réglementation de la FCC.
N’utilisez pas le téléphone avec une antenne abîmée. Si
l’antenne abîmée entre en contact avec la peau, une légère
brûlure pourrait se produire. Consultez votre revendeur local
pour faire remplacer l’antenne.
8
LG5550
LG5550
9
Page 62

ue d’ensemble du téléphone
VVue d’ensemble du téléphone
1. Écouteur
2. Forme clapet
3. Écran à cristaux
4. Prise pour écouteur
programmable gauche
6.Touche latérale
7.Touche de TALK
commande vocale
liquides
5.Touche
8.Touche de
9. Touche programmable
droite
10.Touche de navigation
11.Touche de Message
12.Touche de BACK
13.Touche de END
14.Clavier alphanumérique
15. Microphone
1. Écouteur
2. Forme clapet Ouvrez le boîtier pour répondre à un appel
et fermez-le pour y mettre fin.
3. Écran à cristaux liquides Affiche des messages et des
icônes d’activité.
4. Prise pour écouteur
5. Touche programmable gauche Utilisez-la pour lancer
la commande affichée dans le coin inférieur gauche de
l’écran.
6. Touches latérales Utilisez-les pour régler le volume
sonore des touches en mode veille et le volume de
l’écouteur pendant un appel. À utiliser pour régler le
mode Vibreur, Éteint ou Amortissez.
7. Touche de TALK Utilisez-la pour lancer un appel ou
répondre à un appel.
8.
Touche de commande vocale appuyez sur cette touche pour
accéder aux commandes vocales et au mode Mains libres.
9. Touche programmable droite Utilisez-la pour lancer la
commande affichée dans le coin inférieur droit de l’écran.
10.
Touche de navigation Appuyez sur cette touche pour accéder
aux messages, au calendrier, aux téléchargements et à Web.
11. Touche de Message Utilisez-la pour récupérer ou
envoyer des messages vocaux ou écrits.
12. Touche de BACK Appuyez sur cette touche pour
effacer un seul espace ou caractère. Appuyez plus
longtemps sur cette touche pour effacer des mots entiers.
Appuyez une fois sur cette touche dans un menu pour
retourner à l’écran précédent.
13.
Touche de END Utilisez-la pour allumer et éteindre l’appareil
et pour mettre fin à un appel. Avec cette touche, vous pouvez
retourner à l’écran d’affichage du menu principal.
14. Clavier alphanumérique Utilisez-le pour entrer des
chiffres et des caractères et choisir des articles de menu.
15. Microphone
10
LG5550
LG5550
11
Page 63

Référ
Référ
ence des menus du téléphone
ence des menus du téléphone
Appuyez sur la touche programmable gauche Menu.
Appuyez sur pour naviguer les menus.
Journal des appels
1. Appels sortants
2. Appels entrants
3. Appels manqués
4. Effacer appels
1. Appels sortants
2. Appels entrants
3. Appels manqués
4. Tous les appels
5. Durée des appels
1. Dernier appel
2. Appels locaux
3. Appels itinérants
4. Tous les appels
Répertoire
1. Liste des entrées
2. Nouvelle entrée
3. Composition abrégée
4. Groupes
Messagerie
1. Envoyer message
2. Web Msg
3. Arrivée
4. Départ
5. Gardé
6. Messagerie vocale
Web
1. Début Web
Téléchargements
Voix
1. Commandes de départ
2. Ordonnanceur vocal
3. Mémos vocaux
4. Configurations vocales
1. Voice Commands
2. Alertes d’annonces
3. Meilleur résultat
4.
Commandes d’entraînement
5.
Chiffres d’entraînement
5. Mode Conduite
6. Help
Outils
1. Alarme
1. Alarme 1
2. Alarme 2
3. Alarme 3
4. Alarme rapide
2. Bloc-notes
3. Conseils utiles
4. Calculatrice
5. Horloge universelle
Réglages
1. Sons
1. Sonneries
2. Tonalité des touches
3. Volume
4. Alertes
2. Affichage
1. Salutations
2. Rétroéclairage
3.Écrans
4. Luminosité
5. Contraste
6. Style de menu
7. Horloge
8. Couleur de thème
9.
Polices d’entrée de texte
3. Configuration données
1. Données/Fax
2. Méthode
3. Baud Données
4. Itinérance
1. Fijar modalidad
2.
Protector de llamadas
5. Position
6. Messagerie
1.
Affichange contextuel
2.
Récépissé au destinataire
3. Alerte msgs
4.
Suppression automatique
5. Signature
6. Msgs ordinaires
7. Edit Voice Mailbox #
7. Sécurité
1. Verrouiller téléphone
2. Modifier verrouillage
3. Numéro spécial
4. Effacer répertoire
5.
Réinitialiser-valeur défaut
8. Mode d’avion
9. Configuration/Otros
1. Raccourci
2. Réception d’appel
3.
Réponse automatique
4. Langue
5. Mode TTY
0. Information
12
LG5550
LG5550
13
Page 64
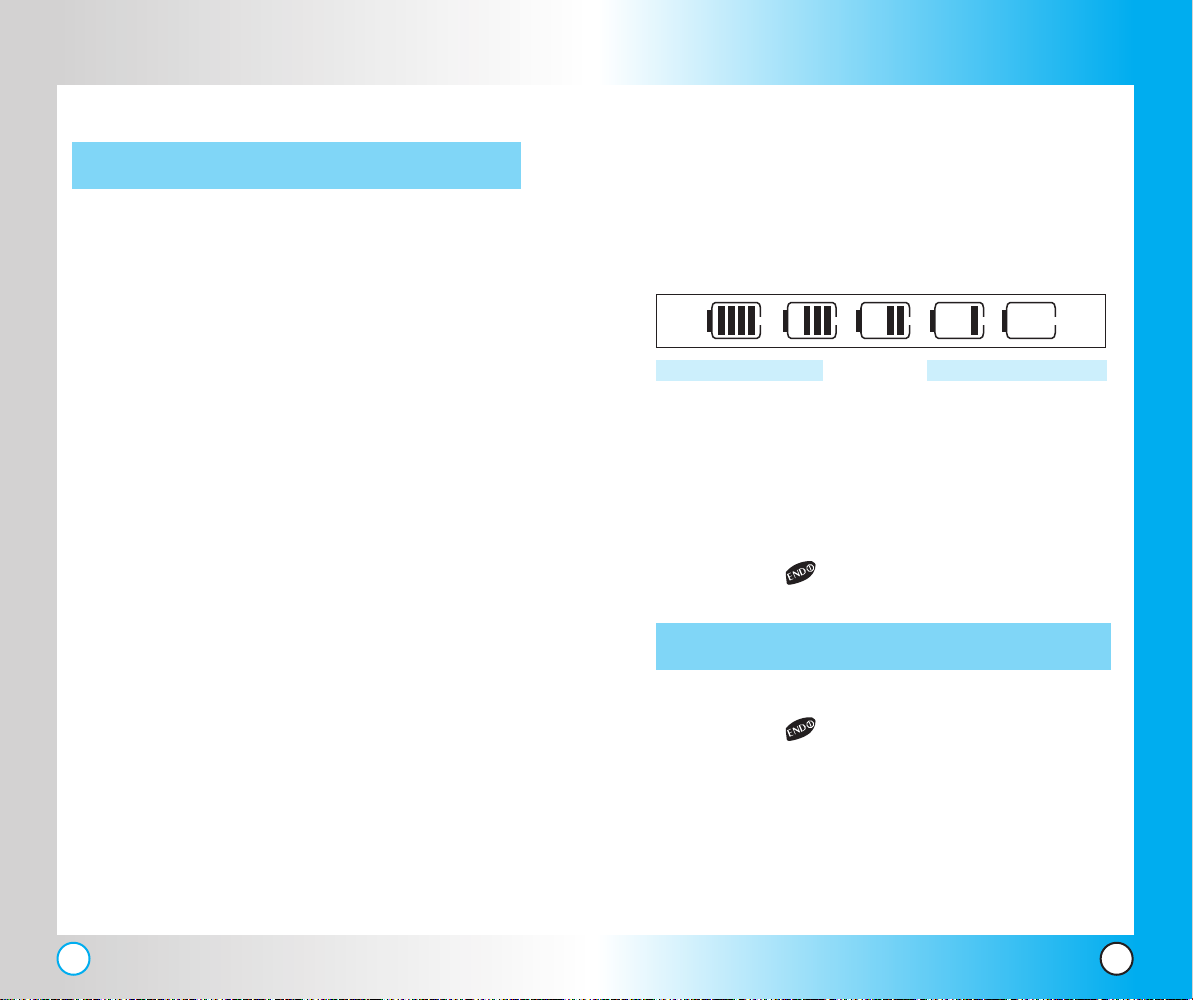
Obtenir V
Obtenir V
otr
otr
e Téléphone A Commencé
e Téléphone A Commencé
Utilisation du bloc de batterie
Remarque : Il est important de recharger complètement la batterie
avant d’utiliser le téléphone pour la première fois.
Le téléphone est fourni avec une batterie rechargeable.
Maintenez la batterie chargée lorsque le téléphone n’est pas
utilisé afin de maximiser les durées de conversation et de veille
lors de l’utilisation du téléphone.
Installation de la batterie
Pour installer la batterie, insérez-la par le bas dans l’ouverture au
dos du téléphone. Enfoncez la batterie dans le compartiment de
manière que le loquet s’enclenche.
Retrait de la batterie
Mettez l’appareil hors tension. Soulevez le loquet de blocage et
retirez la batterie.
Chargement de la batterie
Le chargeur de bureau est muni d'une fente lui permettant
d'accueillir le téléphone et la batterie durant le chargement.
Avertissement! Utilisez uniquement le chargeur de bureau
fourni avec le téléphone. L'utilisation d'un chargeur autre que
celui fourni pour le téléphone LG5550 risque d'endommager le
téléphone ou la batterie.
1. Branchez le chargeur dans une prise de courant murale. Le
téléphone doit être rechargé par une source d'alimentation
de 120V c.a.
2. Le voyant rouge indique que le chargement est en cours et
le voyant vert, que le chargement est terminé.
Niveau de charge de la batterie
Le niveau de charge de la batterie est indiqué dans le coin supérieur
droit de l'écran à ACL. Lorsque la batterie est presque déchargée, le
détecteur de faible charge vous en averti de trois façons : en faisant
retentir une sonnerie, en faisant clignoter l'icône de la batterie et en
affichant le message AVERTISSEMENT BATTERIE FAIBLE! Si la
charge de la batterie devient extrêmement faible, le téléphone s'éteint
automatiquement et la fonction en cours n'est pas sauvegardée.
Entièrement déchargéeEntièrement chargée
Comment allumer et éteindre le téléphone
Comment allumer le téléphone
1. Installez un bloc batterie chargé ou branchez le téléphone à
une source d’alimentation électrique externe avec, par
exemple, un adaptateur pour allume-cigare ou un ensemble
pour voiture.
2. Appuyez sur quelques secondes avant que l’ecran
LCD s’allume.
REMARQUE : Comme pour tout autre appareil radio, évitez tout contact inutile
avec l’antenne lorsque votre téléphone est allumé.
Comment éteindre le téléphone
1. Appuyez sur jusqu’à ce que l’écran s’éteigne.
Puissance de signal
La qualité de l’appel dépend de la puissance de signal du lieu où
vous êtes. La puissance de signal est indiquée à l’écran par le
nombre de barres près de l’icône de puissance de signal. Plus il
y a de barres, meilleure est la puissance de signal. Si la qualité
du signal est mauvaise, trouvez un lieu ouvert. Si vous êtes dans
un bâtiment, la réception peut être meilleure près d’une fenêtre.
14
LG5550
LG5550
15
Page 65

Obtenir V
Obtenir V
otr
e Téléphone A Commencé
otr
e Téléphone A Commencé
Icônes de l’écran Comment faire un appel
Icon
SSL
Affiche la puissance du signal reçu par le téléphone et la
puissance actuelle du signal est indiquée par le nombre de
barres affichées à l’écran.
Utilisé. Un appel est en cours.
*L’absence d’icône indique que le téléphone est en mode veille.
IS-2000
Indicateur de service numérique
Le service numérique est disponible.
Indicateur de service analogique
Le service analogique est disponible.
Itinérance : Le téléphone est en dehors de la zone de service
local.
Nouveaux téléchargements
Aucun service.Le téléphone ne reçoit pas de signal de système.
Amortissez tous
Avisos de anuncios
Service 3G
Nouveaux msgs écrits
Nouv.texte et voix
Niveau de charge
Description
TTY
Mode Conduite
Position enclenché
Nouveaux msgs vocaux
Pour faire un appel, effectuez les étapes suivantes :
1. Assurez-vous que le téléphone est allumé. S'il ne l'est pas,
maintenez la touche enfoncée pendant deux secondes.
2. Composez le numéro de téléphone, puis appuyez sur .
● Si le téléphone est verrouillé, entrez le code de verrouillage.
Le code de verrouillage est généralement formé par les
quatre derniers chiffres de votre numéro de téléphone.
3. Pour mettre fin à l'appel, appuyez sur .
Comment corriger une erreur de composition
Si vous faites une erreur en composant un numéro, appuyez
brièvement sur pour supprimer le dernier chiffre entré ou
maintenez la touche enfoncée pendant deux secondes
pour supprimer tous les chiffres entrés.
Comment recomposer un numéro
1. Appuyez deux fois sur pour recomposer le dernier
numéro entré. Le journal d'appel contient la liste des trente
derniers numéros composés; vous pouvez également
choisir de recomposer l'un de ces numéros.
Comment répondre à un appel
1. Pour répondre à un appel, ouvrez le rabat ou, si le rabat est
ouvert, appuyez sur n'importe quelle touche sauf .
Répondez à l'appel selon les réglages d'appel.
● Si vous appuyez sur une fois pendant que le
téléphone sonne ou vibre, il arrête de sonner ou de vibrer et
l'appel prend fin sans que vous y ayez répondu. Appuyez
deux fois sur pour couper la communication.
2. Pour mettre fin à un appel auquel vous avez répondu,
appuyez sur .
LG5550
LG5550
1716
Page 66

Accès rapide aux fonctions pratiques
Accès rapide aux fonctions pratiques
Mode Vibreur
Utilisez le mode Vibreur dans les lieux publics.
Lorsque le mode Vibreur est actif, les touches sont
Amortissez et le téléphone est en mode vibreur.
Accès au mode Vibration
1. En mode Veille, appuyez sur la touche latérale
inférieure ( ) our ajuster le volume de la sonnerie.
2. Appuyez sur la touche latérale inférieure ( ) jusqu’à
ce que Vibrate s’affiche.
REMARQUE: Le téléphone demeure en mode Vibration même
si vous l'éteignez et le rallumez.
Mode Amortissez
Utilisez le mode Amortissez dans les lieux publics.
Lorsque le mode Amortissez est actif, les touches sont
Amortissez et le voyant clignote au lieu qu'une sonnerie
retentisse ou que l'appareil vibre.
Activation rapide du mode Amortissez
1. En mode Veille, tenez la touche latérale inférieure ( )
enfoncée pour activer le mode Amortissez.
Fonction Muet
La fonction Muet empêche votre interlocuteur de vous
entendre, mais vous permet d'entendre votre
interlocuteur.
Activation rapide de la fonction Muet
1. Appuyez sur la touche programmable de gauche
Muet en cours d,appel.
Annulation rapide de la fonction Muet
1. Appuyez de nouveau sur la touche programmable de
gauche Sonore.
Ajustement rapide du volume
Utilisez les touches latérales pour ajuster le volume de
l'écouteur et de la sonnerie. La touche supérieure
augmente le volume et la touche inférieure le diminue.
● est possible d'ajuster le volume de l'écouteur en
cours d'appel.
● est possible d'ajuster le volume de la sonnerie
pendant que le téléphone sonne.
REMARQUE: Le volume des touches est réglé par une option
de menu.
Annulation du mode Amortissez
1. Appuyez sur la touche latérale supérieure ( ) pour
quitter le mode Amortissez.
18
LG5550
LG5550
19
Page 67

Accès rapide aux fonctions pratiques
Accès rapide aux fonctions pratiques
Appel en attente
Votre fournisseur de services cellulaires peut offrir la fonction
Appel en attente. En cours d'appel, deux bips indiquent la
présence d'un autre appel entrant. Si la fonction Appel en
attente est activée, vous pouvez mettre en attente l'appel en
cours et répondre à l'autre appel entrant. Pour obtenir de plus
amples renseignements sur cette fonction, communiquez avec
votre fournisseur de services cellulaires.
1. Appuyez sur pour répondre à un appel en attente.
2. Appuyez de nouveau sur pour alterner entre les appels.
Identification de l'appelant
La fonction Identification de l'appelant affiche le numéro de
téléphone de la personne qui appelle lorsque le téléphone
sonne. Si l'appelant figure dans votre répertoire, son nom est
affiché avec son numéro.
Communiquez avec votre fournisseur de services pour vous
assurer qu'il offre cette fonction.
Composition abrégée
La Composition abrégée est une fonction pratique qui vous
permet d'établir un appel rapidement et facilement en appuyant
sur quelques touches. Votre téléphone extrait le numéro de
votre répertoire, l'affiche brièvement, puis le compose. Le
numéro de Composition abrégée 1 réfère toujours à votre
numéro de boîte vocale.
Numéros de composition abrégée 2 à 9
1. Maintenez enfoncée la touche correspondant au numéro de
composition abrégée.
OU
Entrez le numéro de composition abrégée et appuyez sur
.
Numéros de composition abrégée 10 à 99
1. Appuyez sur le premier chiffre et maintenez enfoncé le
deuxième chiffre.
OU
Entrez les deux chiffres et appuyez sur
.
Commande vocale
La Commande vocale est une fonction pratique permettant
d'établir un appel rapidement et facilement à l'aide d'une
commande vocale. Votre téléphone extrait le numéro de votre
répertoire, l'affiche brièvement, puis le compose.
Activation rapide de la Commande vocale
1. Appuyez sur la touche de Commande vocale ( ).
2. Choisissez une fonction verbalement.
Pour plus d’information sur les fonctions de commande
vocale, voir les détails à la page 63.
NOTE: La Commande vocale n’est offerte qu’en anglais. Elle ne
fonctionnera donc pas sur un téléphone en langue française.
20
LG5550
LG5550
21
Page 68
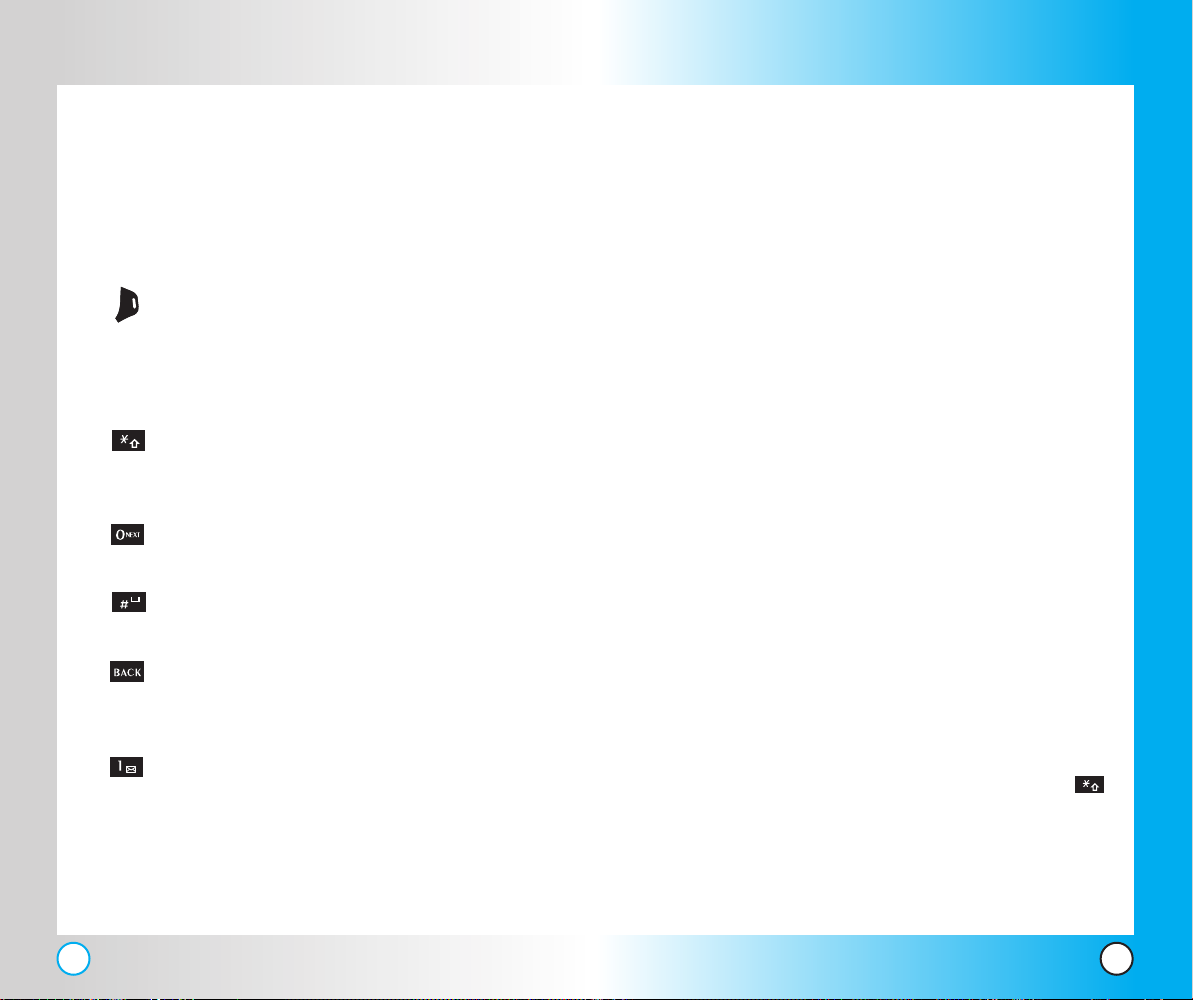
Comment entr
Comment entr
er et modifier de l'infor
er et modifier de l'infor
mation
mation
Comment entrer des informations avec
l’entrée de texte T9
Vous pouvez modifier la page Salutations, Bloc-notes, un court
Messagerie et le Répertoire en utilisant l’entrée de texte T9.
Fonctions des touches
Touche programmable droite: Appuyez sur
cette touche pour faire défiler les menus dans
l’ordre suivant:
T9Mot -> Abc -> 123 -> Symboles ->
Émoticones.
Majuscule: à utiliser pour passer aux majuscules.
T9 text: T9Mot -> T9MOT -> T9mot
Abc text: Abc -> ABC -> abc
Suivant: En mode T9, appuyez sur cette touche
pour afficher d’autres mots correspondants.
Espace: Appuyez sur cette touche pour terminer
un mot ou pour entrer un blanc.
Effacer: Appuyez sur cette touche pour effacer
un blanc ou un caractère. Appuyez plus
longtemps pour effacer un mot entier.
Ponctuation: En mode T9, appuyez sur cette
touche pour entrer un signe de ponctuation dans
un mot et pour terminer une phrase.
Mode d’entrée
L’entrée de texte T9 offre cinq modes pour entrer des lettres, des
chiffres, des caractères spéciaux et des signes de ponctuation.
Mode T9Mot (T9)
Entrez des textes utilisant une touche par lettre. Le téléphone
traduit les touches enfoncées en mots courants, en utilisant les
lettres sur chaque touche et une base de données compressée.
Mode Abc (multi-frappe)
Utilisez le mode Abc pour ajouter des mots dans la base de
données T9.
Mode 123 (chiffres)
Entrez des nombres en utilisant une touche par chiffre.
Mode Symboles
Il sert à entrer des caractères spéciaux et des signes de
ponctuation. Vous avez le choix entre 35 caractères spéciaux.
Lorsque le curseur se trouve là où vous voulez entrer le
caractère spécial, passez au mode Symbole.
Mode Émoticones
Lorsque le curseur se trouve là où vous voulez ajouter une
émoticone, passez en mode Émoticones.
Comment choisir les lettres majuscules et minuscules
À l'aide des modes d'entrée de texte T9Mot Abc, vous pouvez
choisir les lettres majuscules ou minuscules. Appuyez sur
pour parcourir les options suivantes :
Initial Cap (T9Mot / Abc)
Seule la première lettre est une lettre majuscule. T outes les autres
lettres sont minuscules.
22
LG5550
LG5550
23
Page 69

Comment entr
Comment entr
er et modifier de l'infor
er et modifier de l'infor
mation
mation
Verrouillage des majuscules (T9MOT / ABC)
Toutes les lettres sont majuscules.
Minuscules (T9mot / abc)
Toutes les lettres sont minuscules.
Exemples d'entrée de texte
Affichez les modes d'entrée de texte et choisissez-en un :
1. Dans un champ d'entrée de texte, appuyez sur la touche
programmable de droite pour afficher les modes
d'entrée de texte.
2. Appuyez sur pour mettre en évidence le mode choisi.
3. Appuyez sur pour sélectionner le mode d'entrée de
texte mis en évidence.
Comment utiliser le mode d'entrée de texte Abc (multi-frappe)
1. Appuyez sur la touche programmable de droite pour
mettre en évidence le mode Abc.
2. Appuyez sur pour passer au mode ABC verrouillage
des majuscules.
3. Appuyez sur .
Le texte LG est alors affiché.
Comment utiliser le mode d'entrée de texte T9
Pour entrer le message “Ball Vie Office” effectuez ces étapes :
1. Appuyez sur la touche programmable de droite pour
passer au mode T9Mot.
2. Appuyez sur les touches .
Appuyez sur pour terminer le mot et insérer une espace.
3.
4. Appuyez sur les touches
.
Le message
Ball Vie Office
est alors affiché.
Utilisation de la touche NEXT (uniquement pour l’entrée
de texte en mode T9)
Lorsque vous avez terminé d'écrire un mot et que le mot affiché
n'est pas celui que vous voulez écrire, appuyez sur la touche
pour afficher les autres mots de la base de données
correspondant à la séquence de touches.
1. Appuyez sur les touches .
Le mot
Home est affiché.
2. Appuyez sur la touche .
À l'écran sont affichés les autres mots pouvant être choisis :
Inné, Good, Immé, etc.
Comment ajouter des mots à la base de données de T9
Si un mot ne se trouve pas dans la base de données de T9,
ajoutez-le en utilisant e mode d'entrée de texte Abc (multifrappe). Le mot est automatiquement ajouté à la base de
données de T9.
1. Appuyez sur la touche programmable de droite pour
passer au mode Abc (multi-frappe).
2. Appuyez sur .
Le mot Bop est affiché.
3. Appuyez sur la touche programmable de droite pour
passer au mode T9 et ajouter le mot Bop dans la base de
données de T9.
4. Appuyez sur pour supprimer le mot existant.
5. Appuyez sur les touches .
Ans est affiché.
Le mot
6. Appuyez sur les touches .
Bop est affiché.
Le mot
24
LG5550
LG5550
25
Page 70
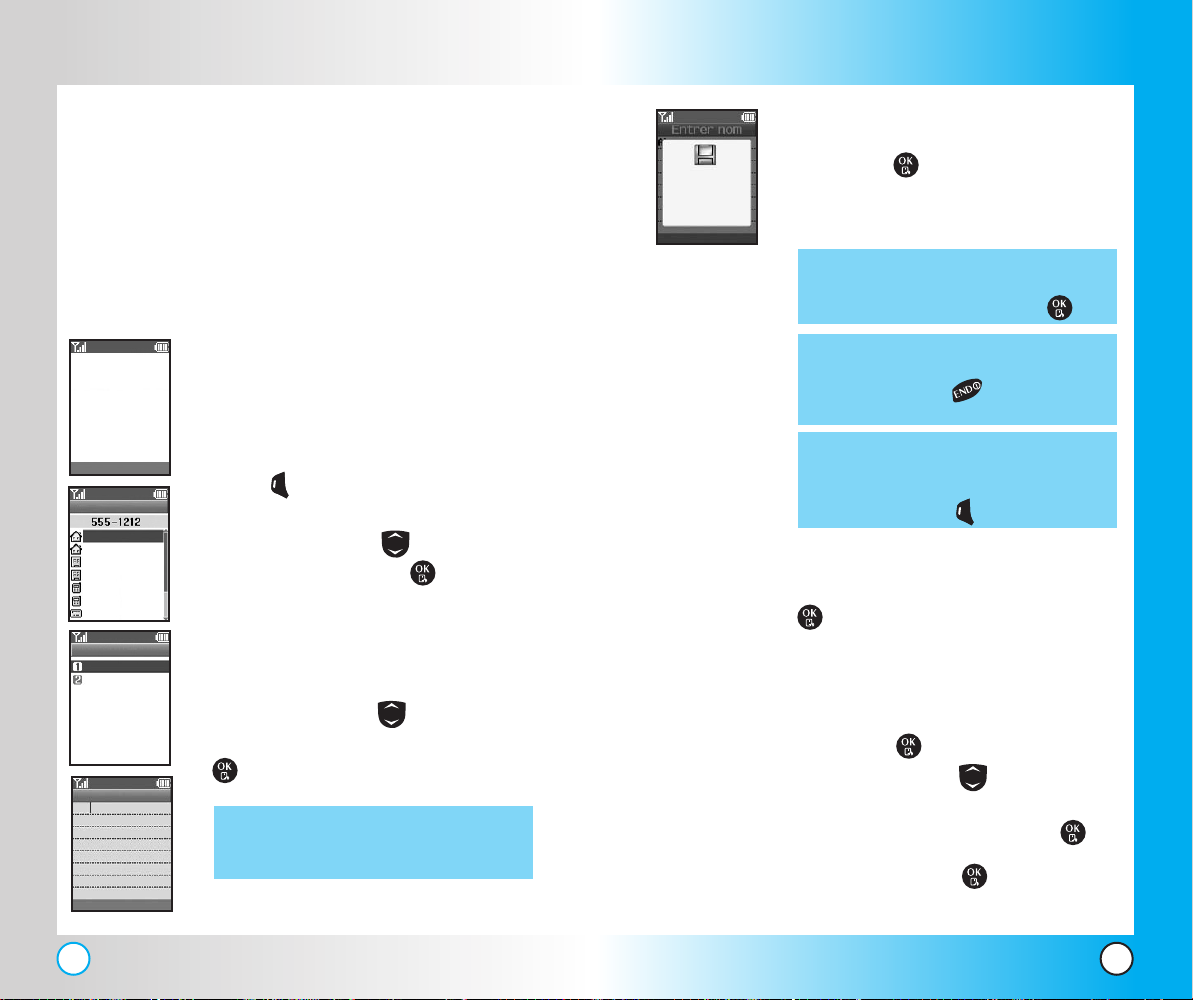
Le réper
Le réper
toir
toir
e dans la mémoir
e dans la mémoir
e de votr
e de votr
e téléphone
e téléphone
Entrées du répertoire
Le répertoire vous permet accéder facilement aux numéros que
vous composez le plus fréquemment. Vous pouvez stocker
jusqu'à 200 entrées, chacune contenant jusqu'à cinq numéros de
téléphone. Chaque entrée peut être composée d'un maximum
de 22 caractères. Chaque numéro de téléphone peut être
composé d'un maximum de 48 chiffres.
Fonctions de base d'entrée dans l'annuaire
1. En mode Veille, entrez le numéro de
téléphone (max. de 48 chiffres) que vous
désirez sauvegarder.
555-1212
Garder
Choisir étiquette
Maison
Maison2
Bureau
Bureau2
Mobile
Mobile2
Téléavertisseur
Nom
Nouveau nom
Existant
Entrer nom
Abc
Annuler Abc
2. Appuyez sur la touche programmable de
Options
gauche Garder.
3. Appuyez sur la touche pour choisir une
étiquette, puis appuyez sur .
Maison / Maison2 / Bureau / Bureau2 /
Mobile / Mobile2 / Téléavertisseur /
Télécopieur / Télécopieur2 / Aucun
4. Appuyez sur la touche pour choisir
Nouveau nom ou Existant et appuyez sur
.
REMARQUE:
Pour ajouter un numéro à un
contact existant, sélectionnez
l'option Existant
Inscription
d’ annuaire
sauvegardée.
Annuler Abc
5. Entrez le nom qui sera associé au numéro de
téléphone (maximum de 22 caractères) et
appuyez sur .
Un message de confirmation est affiché
brièvement.
REMARQUE:
REMARQUE: Si vous avez terminé d'entrer
REMARQUE: Si vous désirer personnaliser
Pour sauter l'étape d'entrée du
nom et passer à l'étape suivante,
appuyez sur la touche .
l'information, appuyez sur la
touche pour retourner au
menu principal.
davantage l'entrée, appuyez sur
la touche programmable de
gauche Fait
6. Associez ensuite l'entrée à un numéro de
Composition abrégée, appuyez sur la touche
pour sélectionner la fonction
Composition abrégée.
7. Utilisez le clavier pour entrer un chiffre de
composition abrégée (p. ex. : 2) et appuyez
sur la touche ou
Appuyez sur la touche pour mettre en
évidence l'emplacement de Composition
abrégée, puis appuyez sur la touche .
8. Appuyez sur la touche pour sélectionner.
26
LG5550
LG5550
27
Page 71
Le réper
Le réper
toir
toir
e dans la mémoir
e dans la mémoir
e de votr
e de votr
e téléphone
e téléphone
Options de personnalisation du répertoire
Une fois que le numéro de téléphone de base et le nom sont
stockés dans le répertoire, vous pouvez modifier et
personnaliser les entrées.
1. En mode Veille, appuyez sur la touche programmable de
droite Trouver. Le contenu de votre répertoire est
affiché en ordre alphabétique.
2. Sélectionnez le contact voulu et appuyez sur la touche .
3. Appuyez sur la touche programmable de gauche
Modifier pour accéder à l’écran Modifier inscription
(modification d'une entrée).
4. Appuyez sur pour mettre en évidence l'information à
personnaliser, puis appuyez sur la touche .
Comment ajouter ou changer un groupe
Les groupes vous permettent d'attribuer un groupe à vos
entrées de répertoire afin d'en faciliter la gestion.
1. Accédez au répertoire et appuyez sur la touche pour
sélectionner une entrée. Une fois que vous avez repéré
votre entrée, appuyez sur la touche .
2. Appuyez sur la touche programmable de gauche Modifier.
3. Appuyez sur la touche pour mettre en
évidence l'optio
4. Appuyez sur la touche pour choisir un groupe,
puis appuyez sur .
No Grupo / Familia / Amigos / Colegas / Negocio /
Escuela
5. Appuyez sur la touche programmable de gauche Fait
pour poursuivre la modification de l'entrée.
REMARQUE: Vous pouvez changer le nom d'un groupe ou
No Grupo puis appuyez sur la touche .
ajouter ou supprimer un groupe.
Comment changer la sonnerie
Cette option vous permet de savoir qui vous appelle en attribuant
différentes sonneries aux différents numéros dans votre
répertoire. Lorsque vous sauvegardez une entrée de répertoire, la
sonnerie par défaut lui est automatiquement attribuée.
1. Accédez au répertoire et appuyez sur la touche pour
sélectionner une entrée. Une fois que vous avez repéré
votre entrée, appuyez sur la touche .
2. Appuyez sur la touche programmable de gauche Modifier.
3. Appuyez sur la touche pour mettre en
évidence l'option Défaut, puis appuyez sur la touche .
4. Appuyez sur la touche Pour vérifier la sonnerie,
appuyez sur .
5. Appuyez sur la touche programmable de gauche Fait
pour poursuivre la modification de l'entrée de répertoire.
Comment ajouter ou changer une mémo
Cette option vous permet d'ajouter un mémo d'un maximum de
32 caractères à une entrée de répertoire.
1. Accédez au répertoire et appuyez sur la touche pour
sélectionner une entrée.
2. Appuyez sur la touche programmable de gauche Modifier.
3. Appuyez sur la touche pour mettre en évidence
l'option Mémo, puis appuyez sur la touche .
4. Entrez le texte et appuyez sur la touche .
5. Appuyez sur la touche programmable de gauche Fait
pour poursuivre la modification de l'entrée de
répertoire.
28
LG5550
LG5550
29
Page 72

Le réper
Le réper
toir
toir
e dans la mémoir
e dans la mémoir
e de votr
e de votr
e téléphone
e téléphone
Comment ajouter ou changer une image
Cette fonction vous permet d'afficher une image pour identifier
l'appelant.
1. Accédez au répertoire et appuyez sur la touche pour
sélectionner une entrée.
2. Appuyez sur la touche programmable de gauche Modifier.
3. Appuyez sur la touche pour mettre en
évidence l'option Implicite, puis appuyez sur la touche .
4. Appuyez sur la touche pour choisir une image, puis
appuyez sur .
5. Appuyez sur la touche programmable de gauche Fait
pour poursuivre la modification de l'entrée de répertoire.
Comment changer l'indicateur Secret
Le répertoire vous permet de cacher certaines entrées; ces
entrées n'apparaissent pas lors d'une recherche dans le
répertoire.
1. Accédez au répertoire et appuyez sur la touche pour
sélectionner une entrée.
2. Appuyez sur la touche programmable de gauche Modifier.
3. Appuyez sur la touche pour mettre en évidence l'option
Pas secret, puis appuyez sur la touche .
4. Appuyez sur la touche pour choisir l'indicateur Secret,
puis appuyez sur .
5. Appuyez sur la touche programmable de gauche Fait
pour poursuivre la modification de l'entrée de répertoire.
REMARQUE: pour accéder à une entrée secrète, vous devrez
entrer le code de verrouillage à 4 chiffres.
Comment ajouter ou changer un URL
Cette fonction vous permet d'associer un URL (adresse
Web) à une entrée de répertoire.
1. Accédez au répertoire et appuyez sur la touche
pour sélectionner une entrée.
2. Appuyez sur la touche programmable de gauche Modifier.
3. Appuyez sur la touche pour mettre en évidence
l'option URL, puis appuyez sur la touche .
4. Entrez une adresse Web, puis appuyez sur la touche .
5.
Appuyez sur la touche programmable de gauche Fait
pour poursuivre la modification de l'entrée de répertoire.
Comment ajouter un numéro de Composition abrégée
1. Accédez au répertoire et appuyez sur la touche
pour sélectionner une entrée.
2. Appuyez sur la touche programmable de gauche Modifier.
3. Appuyez sur la touche pour mettre en évidence
le numéro de téléphone auquel vous désirez
attribuer un numéro de Composition abrégée, puis
appuyez sur la touche .
4. Appuyez sur la touche pour sélectionner l'option
Composition abrégée.
5. Entrez un chiffre de Composition abrégée.
Utilisez le clavier numérique et appuyez sur la touche
, ou appuyez sur la touche pour mettre en
évidence le chiffre de Composition abrégée, puis
appuyez sur la touche .
6.
Appuyez sur la touche programmable de gauche Fait
pour poursuivre la modification de l'entrée de répertoire ou
Appuyez sur la touche pour retourner au menu principal.
30
LG5550
LG5550
31
Page 73

Le réper
Le réper
toir
toir
e dans la mémoir
e dans la mémoir
e de votr
e de votr
e téléphone
e téléphone
Comment modifier une entrée de répertoire
Comment ajouter un numéro de téléphone
À partir du menu principal
1.
En mode Veille, entrez le numéro de téléphone (max. de 48
chiffres) que vous désirez sauvegarder.
2.
Appuyez sur la touche programmable de gauche Garder.
3. Appuyez sur la touche pour mettre en évidence
une étiquette, puis appuyez sur .
Maison / Maison2 / Bureau / Bureau2 / Mobile / Mobile2 /
Téléavertisseur / Télécopieur / Télécopieur2 / Aucun
4.
Appuyez sur la touche pour mettre en évidence l'option
Existant, puis appuyez sur la touche .
5.
Appuyez sur la touche pour mettre en évidence l'entrée
de répertoire existante, puis appuyez sur la touche .
Un message de confirmation est affiché.
À partir du répertoire
1.
En mode Veille, appuyez sur la touche programmable de
droite Trouver. Le contenu de votre répertoire est
affiché en ordre alphabétique.
2.
Appuyez sur la touche pour mettre en évidence l'entrée
que vous désirez modifier, puis appuyez sur la touche .
3.
Appuyez sur la touche programmable de gauche Modifier.
4.
Appuyez sur la touche pour mettre en évidence l'option
Ajouter numéro, puis appuyez sur la touche .
5. Entrez le numéro, puis appuyez sur la touche .
Numéros par défaut
Le numéro de téléphone enregistré lors de la création
d'une entrée est le numéro par défaut. Si l'entrée
comporte plus d'un numéro, il est possible de choisir un
autre numéro par défaut.
REMARQUE:
Comment changer le numéro par défaut
1. En mode Veille, appuyez sur la touche programmable
de droite Trouver. Le contenu de votre répertoire
est affiché en ordre alphabétique.
2. Appuyez sur la touche pour mettre en évidence
l'entrée que vous désirez modifier, puis appuyez sur
la touche .
3. Appuyez sur la touche programmable de gauche
Modifier.
4. Appuyez sur la touche pour mettre en évidence
le nouveau numéro par défaut, puis appuyez sur la
touche programmable de droite Options.
5. Appuyez sur la touche Définir comme no par
défaut.
Un message de confirmation est affiché.
Il est impossible de supprimer uniquement le
numéro par défaut. Il faut supprimer l'entrée en
entier ou bien sélectionner un autre numéro par
défaut, ce qui vous permettra de supprimer l'ancien
numéro par défaut sans avoir à supprimer l'entrée.
6.
Appuyez sur la touche pour mettre en évidence une
étiquette, puis appuyez sur . Un message de confirmation
est affiché.
32
LG5550
LG5550
33
Page 74

Le réper
Le réper
toir
toir
e dans la mémoir
e dans la mémoir
e de votr
e de votr
e téléphone
e téléphone
Comment modifier un numéro de téléphone dans une entrée
1. En mode Veille, appuyez sur la touche programmable
de droite Trouver. Le contenu de votre répertoire
est affiché en ordre alphabétique.
2. Appuyez sur la touche pour mettre en évidence
l'entrée que vous désirez modifier, puis appuyez sur
la touche .
3. Appuyez sur la touche programmable de gauche
Modifier.
4. Appuyez sur la touche pour mettre en évidence
le numéro de téléphone, puis appuyez sur .
5. Appuyez sur la touche pour mettre en évidence
le numéro de téléphone, puis appuyez sur .
6. Apportez les modifications nécessaires au numéro
de téléphone, puis appuyez sur la touche .
Comment modifier un nom dans une entrée
1. En mode Veille, appuyez sur la touche programmable
de droite Trouver. Le contenu de votre répertoire
est affiché en ordre alphabétique.
2. Appuyez sur la touche pour mettre en évidence
l'entrée que vous désirez modifier, puis appuyez sur
la touche .
3. Appuyez sur la touche programmable de gauche
Modifier.
4. Appuyez sur la touche pour mettre en évidence
le nom, puis appuyez sur .
5. Apportez les modifications nécessaires au nom, puis
appuyez sur la touche .
Comment modifier une option personnalisée
Vous pouvez modifier n'importe quelle option de
répertoire personnalisée de la même façon que lorsque
vous avez créé le répertoire.
1. En mode Veille, appuyez sur la touche programmable
de droite Trouver.
Le contenu de votre répertoire est affiché en ordre
alphabétique.
2. Appuyez sur la touche pour mettre en évidence
l'entrée que vous désirez modifier, puis appuyez sur
la touche .
3. Appuyez sur la touche programmable de gauche
Modifier.
4. Appuyez sur la touche pour mettre en évidence
l'information à personnaliser, puis appuyez sur la
touche .
5. Apportez les modifications nécessaires à
l'information, puis appuyez sur la touche .
34
LG5550
LG5550
35
Page 75

Le réper
Le réper
toir
toir
e dans la mémoir
e dans la mémoir
e de votr
e de votr
e téléphone
e téléphone
Suppression
Comment supprimer un numéro de téléphone
dans une entrée de répertoire
1. Appuyez sur la touche programmable de droite Trouver.
2. Appuyez sur la touche pour mettre en évidence
l'entrée de répertoire, puis appuyez sur la touche .
3.
Appuyez sur la touche programmable de gauche Modifier.
4. Appuyez sur la touche pour mettre en évidence
le numéro de téléphone à supprimer.
5.
Appuyez sur la touche programmable de droite Options.
6. Appuyez sur la touche Effacer numéro.
7. Appuyez sur la touche Effacer numéro.
Un message de confirmation est affiché.
Comment supprimer une entrée de répertoire
1.
Appuyez sur la touche programmable de droite Trouver.
2. Appuyez sur la touche pour mettre
en évidence l'entrée que vous désirez supprimer,
puis appuyez sur la touche .
3.
Appuyez sur la touche programmable de droite Options.
4. Appuyez sur la touche Effacer inscriptionée.
5. Appuyez sur la touche Effacer.
Un message de confirmation est affiché.
Autres façons d'effectuer une suppression dans
le répertoire
Lorsque vous avez ouvert votre répertoire, le fait d'appuyer
sur la touche programmable de droite Options. vous
permet en tout temps de supprimer l'entrée.
Comment supprimer un numéro de Composition
abrégée
1. Appuyez sur la touche programmable de droite
Trouver.
2. Appuyez sur la touche pour mettre en évidence
l'entrée de répertoire, puis appuyez sur la touche .
3. Appuyez sur la touche programmable de gauche
Modifier.
4. Appuyez sur la touche pour mettre en évidence
numéro de téléphone, puis appuyez sur la touche .
5. Appuyez sur la touche pour mettre en évidence
le numéro de Composition abrégée, puis appuyez
sur la touche .
6. Appuyez sur la touche pour mettre en évidence
l'entrée de Composition abrégée, puis appuyez sur la
touche .
7. Appuyez sur la touche pour mettre en évidence
l'emplacement de Composition abrégée.
8. Appuyez sur la touche programmable de droite
Options.
9. Appuyez sur la touche Retirer.
10. Appuyez sur la touche Retirer.
Un message de confirmation est affiché.
36
LG5550
LG5550
37
Page 76

Le réper
Le réper
toir
toir
e dans la mémoir
e dans la mémoir
e de votr
e de votr
e téléphone
e téléphone
Numéro de téléphone contenant une pause
Lorsque vous composez le numéro d'un système
automatisé, comme une boîte vocale ou un service de
carte de crédit, vous devez souvent entrer une série de
chiffres. Au lieu d'entrer manuellement ces chiffres, vous
pouvez les stocker dans votre répertoire en insérant un
caractère spécial de pause (P, T) entre chaque chiffre.
Vous pouvez utiliser deux types de pause dans un
numéro :
Pause ferme (P)
Le téléphone interrompt la composition du numéro
jusqu'à ce que vous appuyez sur la touche programmable
de gauche Liberer pour passer au chiffre suivant.
Pause 2 sec (T)
Le téléphone attend deux secondes avant de composer le
chiffre suivant.
Comment stocker un numéro contenant des pauses
1. Appuyez sur la touche programmable de gauche
Menu.
2. Appuyez sur la touche Répertoire.
3. Appuyez sur la touche Nouvelle entrée.
4. Entrez le numéro.
5. Appuyez sur la touche programmable de droite
Pause.
6. Appuyez sur la touche pour choisir un type de
pause, puis appuyez sur .
Pause ferme / Pause 2 sec
7. Entrez les chiffres suivants (p. ex. : un NIP ou un
numéro de carte de crédit), puis appuyez sur .
8. Appuyez sur la touche pour choisir une étiquette,
puis appuyez sur .
9. Entrez un nom (maximum 22 caractères).
Un message de confirmation est affiché.
Comment ajouter une pause à un numéro existant
1. Appuyez sur la touche programmable de droite
Trouver.
2. Appuyez sur la touche pour mettre en évidence
l'entrée que vous désirez modifier, puis appuyez sur
la touche .
3. Appuyez sur la touche programmable de gauche
Modifier.
4. Appuyez sur la touche pour mettre en évidence
le numéro, puis appuyez sur la touche .
5. Appuyez sur la touche pour mettre en évidence
le numéro, puis appuyez sur la touche .
6. Appuyez sur la touche programmable de droite
Pause.
7. Appuyez sur la touche Pause ferme ou
Pause 2 sec.
8. Entrez les autres chiffres, puis appuyez sur la touche
.
9. Appuyez sur la touche pour choisir un type
d'étiquette, puis appuyez sur .
Un message de confirmation est affiché.
38
LG5550
LG5550
39
Page 77

Le réper
Le réper
toir
toir
e dans la mémoir
e dans la mémoir
e de votr
e de votr
e téléphone
e téléphone
Comment effectuer une recherche dans
la mémoire de votre téléphone
Le téléphone LG5550 est capable d'effectuer une recherche
dynamique dans le contenu de sa mémoire. Une recherche
dynamique est la recherche de lettres et de chiffres entrés
dans les entrées de votre répertoire. Le téléphone affiche la
liste des correspondances en ordre croissant. Vous pouvez
ensuite choisir dans la liste un numéro que vous pouvez
composer ou modifier. Il existe plusieurs façons d'effectuer
une recherche :
● Faire défiler les entrées en ordre alphabétique
● Faire une recherche par lettre
● Faire une recherche par
- Nom
- Numéro
- No composition abrégée
- Groupe
Parcourir les entrées du répertoire
1. Appuyez sur la touche programmable de droite
Trouver.
La liste des entrées du répertoire est affichée en
ordre alphabétique.
2. Appuyez sur la touche pour parcourir la liste.
Faire une recherche par lettre
1. Appuyez sur la touche programmable de droite
Trouver.
La liste des entrées du répertoire est affichée en
ordre alphabétique.
2. Appuyez (une ou plusieurs fois)sur la touche du
clavier correspondant à la lettre cherchée.
Faire une recherche par option
1. Appuyez sur la touche programmable de droite
Trouver.
2. Appuyez sur la touche programmable de droite
Options.
3. Sélectionnez le critère de recherche en appuyant sur
la touche (ou sur la touche du clavier du chiffre
correspondant) :
Nom - Entrez les lettres à chercher (les
premières lettres du nom, par exemple).
Numéro - Entrez le numéro à chercher.
No composition abrégée - Entrez le numéro
de Composition abrégée à chercher.
Groupe - Appuyez sur la touche pour mettre
en évidence le groupe faisant l'objet de la recherche,
puis appuyez sur la touche .
4. La liste des entrées correspondant aux critères de
recherche est ensuite affichée.
Appuyez sur la touche pour mettre en évidence
une entrée affichée.
5. Appuyez sur la touche pour obtenir plus
d'information sur cette entrée ou sur la touche
pour établir un appel.
40
LG5550
LG5550
41
Page 78

Le réper
Le réper
toir
toir
e dans la mémoir
e dans la mémoir
e de votr
e de votr
e téléphone
e téléphone
Comment utiliser les menus du téléphone
Comment utiliser les menus du téléphone
Comment établir un appel à partir d'une
entrée de répertoire
Une fois que des entrées sont créées dans votre répertoire,
vous pouvez les utiliser pour établir rapidement et facilement
un appel.
● En appuyant sur la touche après avoir effectué une
recherche dans le répertoire ou le journal des appels.
● En utilisant la Composition abrégée.
À partir du répertoire
1. Appuyez sur la touche programmable de droite
Trouver.
2. Appuyez sur la touche our mettre en évidence
l'entrée de répertoire, puis appuyez sur la touche .
3. Appuyez sur la touche pour mettre en évidence
le numéro de téléphone, puis appuyez sur .
4. Appuyez sur la touche pour établir l'appel.
À partir du journal des appels
1. Appuyez sur la touche programmable de gauche
Menu.
2. Appuyez sur la touche Journal des appels.
3. Appuyez sur la touche pour sélectionner le type
d'appel récent, puis appuyez sur .
Appels sortants / Appels entrants / Appels manqués
/ Effacer appels / Durée des appels
4. Appuyez sur la touche pour mettre en évidence
le numéro de téléphone.
5. Appuyez sur la touche pour établir l'appel.
Accès au menu
Appuyez sur la touche programmable de gauche Menu
pour accéder aux neufs menus du téléphone. Il existe deux
méthodes pour accéder aux menus et aux sous-menus :
● Utilisez les touches de navigation pour mettre en
évidence le menu désiré, ou
● appuyez sur le chiffre correspondant au menu ou
sous-menu désiré.
Par exemple :
1. Appuyez sur la touche programmable de gauche
Menu.
Les neufs options du menu principal sont affichées.
Appuyez sur la touche pour parcourir la liste des
options.
2. Appuyez sur le chiffre correspondant à l'option de
menu désirée. Les options de ce sous-menu sont
alors affichées.
3. Appuyez sur le chiffre correspondant à l'option de
sous-menu désirée.
4. Appuyez sur la touche pour mettre en évidence
le réglage désiré, puis appuyez sur la touche
pour le sélectionner.
REMARQUE: Appuyez sur la touche pour retourner au
menu précédent lorsque vous parcourez les
menus et les réglages.
REMARQUE:
Appuyez sur la touche pour annuler les
changements apportés.
42
LG5550
LG5550
43
Page 79
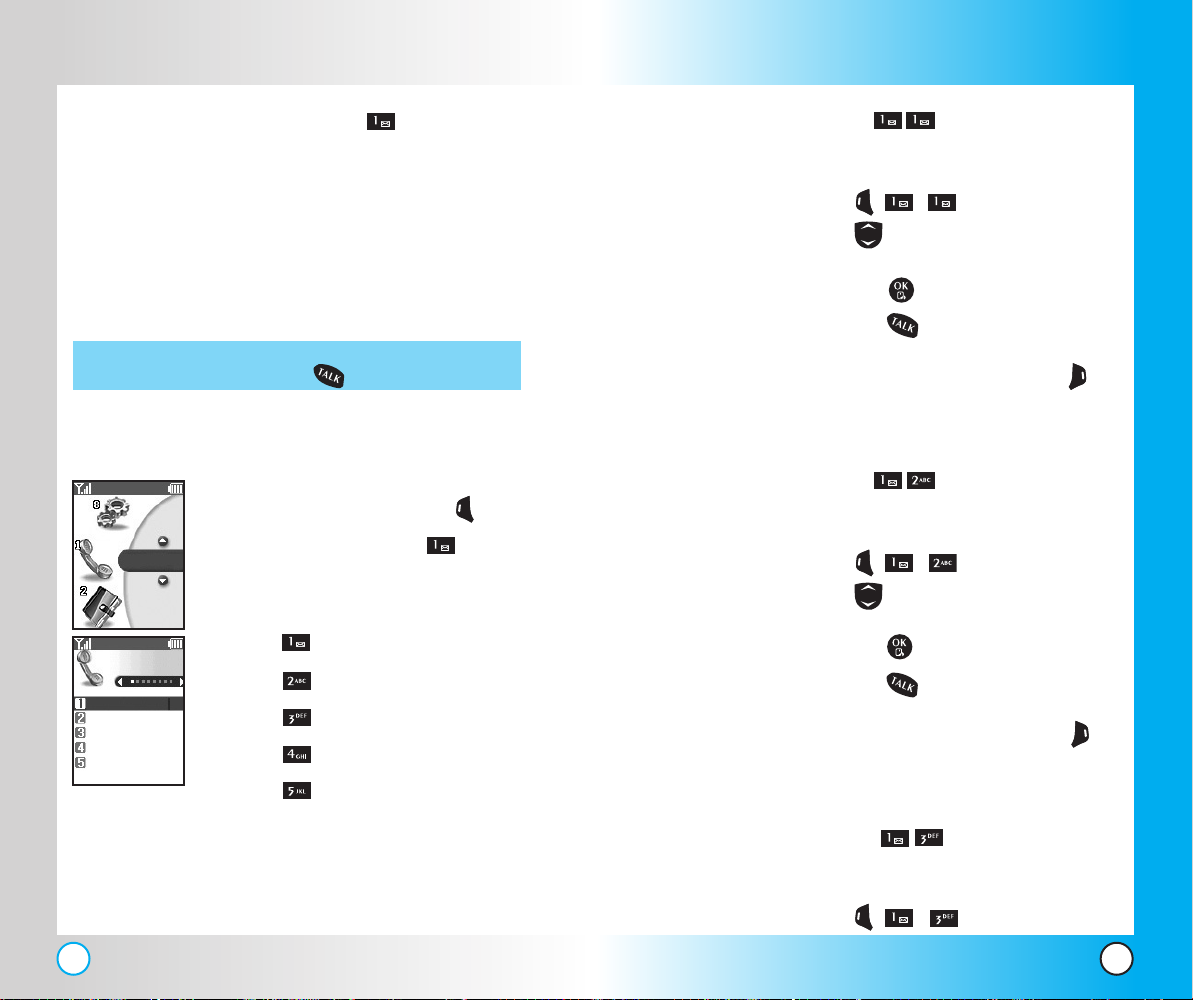
Comment utiliser les menus du téléphone
Comment utiliser les menus du téléphone
Journal des appels (Menu )
Le menu Journal des appels permet de consulter la liste
des numéros de téléphone ou des entrées de répertoire
correspondant aux derniers appels que vous avez établis,
que vous avez reçus ou que vous avez manqués. Cette
liste est continuellement mise à jour; au fur et à mesure,
des nouveaux numéros sont ajoutés au début de la liste
et les numéros les plus anciens sont supprimés à la fin
de la liste.
REMARQUE: Pour afficher rapidement le journal des appels,
appuyez sur la touche à partir du menu principal.
Accès et options
1. Appuyez sur la touche
programmable de gauche Menu.
Journal
des appels
Journal des...
Appels sortants
Appels entrants
Appels manqués
Effacer appels
Durée des appels
2. Appuyez sur la touche Journal
des appels.
3. Sélectionnez un sous-menu.
● Appels sortants
● Appels entrants
● Appels manqués
● Effacer appels
● Durée des appels
Appels sortants (Menu )
Cette option vous permet de consulter une liste (maximum 20
numéros) des appels établis.
1. Appuyez sur la touche , , .
2. Appuyez sur la touche pour mettre un numéro en
évidence, puis
● Appuyez sur la touche pour voir le numéro.
● Appuyez sur la touche pour établir un appel à
l'aide de ce numéro.
● Appuyez sur la touche programmable de droite
Options pour sélectionner :
Garder / Préfixe temporaire / Effacer / Effacer tous
Appels entrants (Menu )
Cette option vous permet de consulter une liste (maximum 20
numéros) des appels reçus.
1. Appuyez sur la touche , , .
2. Appuyez sur la touche pour mettre un numéro en
évidence, puis
● Appuyez sur la touche pour voir le numéro.
● Appuyez sur la touche pour établir un appel à
l'aide de ce numéro.
● Appuyez sur la touche programmable de droite
Options pour sélectionner :
Garder / Préfixe temporaire / Effacer / Effacer tous
44
LG5550
Appels manqués (Menu )
Cette option vous permet de consulter une liste (maximum 20
numéros) des appels manqués.
1. Appuyez sur la touche , , .
LG5550
45
Page 80

Comment utiliser les menus du téléphone
Comment utiliser les menus du téléphone
2. Appuyez sur la touche pour mettre un numéro en
évidence, puis
● Appuyez sur la touche pour voir le numéro.
● Appuyez sur la touche pour établir un appel à
l'aide de ce numéro.
● Appuyez sur la touche programmable de droite
Options pour sélectionner :
Garder / Préfixe temporaire / Effacer / Effacer tous
Effacer appels (Menu )
Cette option vous permet de supprimer le contenu d'une liste.
1. Appuyez sur la touche , , .
2. Appuyez sur la touche pour mettre en évidence la liste
des appels dont vous désirez supprimer le contenu, puis
appuyez sur .
Appels sortants / Appels entrants / Appels manqués /
Tous les appels
3. Appuyez sur la touche Effacer ou Annuler.
Durée des appels (Menu )
Vous pouvez utiliser l’une
des quatre minuteries d’appel pour gérer le temps que
vous passez au téléphone.
1.
Appuyez sur la touche
,,.
2. Appuyez sur la touche pour mettre en évidence la liste
des appels dont vous désirez supprimer le contenu, puis
appuyez sur .
Dernier appel / Appels locaux / Appels itinérants / Tous les appels
REMARQUE: Les options Dernier appel et Appels appel peuvent être
remises à zéro, mais non les options Appels itinérants et
Tous les appels.
Répertoire (Menu )
Le menu Répertoire vous permet de stocker des noms, des
numéros de téléphone et d'autres renseignements dans la
mémoire de votre téléphone. Lorsque vous accédez au
répertoire, le nombre indiqué entre parenthèses est le nombre
d'entrées actuellement en mémoire (maximum de 200).
Accès et options
1. Appuyez sur la touche programmable
de gauche Menu.
Répertoire
Répertoire
Liste des entré...
Nouveelle entrée
Composition ab...
Groupes
Liste des entrées (Menu )
Cette option vous permet d'afficher la liste des entrées de
votre répertoire.
1. Appuyez sur la touche , , .
● Appuyez sur la touche pour parcourir la liste
des entrées de votre répertoire classées en ordre
alphabétique, puis appuyez sur la touche .
● Appuyez sur la touche programmable de droite
Options: Recherche/Effacer.
2. Appuyez sur la touche Répertoire.
3. Sélectionnez un sous-menu.
● Liste des entrées
● Nouveelle entrée
● Composition abrégée
● Groupes
46
LG5550
LG5550
47
Page 81
Comment utiliser les menus du téléphone
Comment utiliser les menus du téléphone
● Appuyez sur la touche programmable de gauche
Nouveau pour ajouter un numéro de
téléphone ou une adresse de courriel.
Nouvelle entrée (Menu )
Cette option vous permet d'ajouter un numéro de téléphone.
REMARQUE: En utilisant ce sous-menu, vous créez une nouvelle
entrée. Si vous désirez plutôt ajouter un numéro à une
entrée existante, vous devez modifier cette entrée.
1. Appuyez sur la touche , , .
2. Entrez le numéro, puis appuyez sur la touche .
3. Sélectionnez l'étiquette désirée, puis appuyez sur la
touche .
4. Entrez le nom, puis appuyez sur la touche .
5.
Poursuivez la modification de cette entrée selon vos besoins.
Composition abrégée (Menu )
Cette fonction vous permet d'afficher la liste des numéros de
composition abrégée ou d'attribuer des numéros de composition
abrégée à une entrée existante.
1. Appuyez sur la touche , , .
Appuyez sur la touche pour sélectionner un
2.
emplacement de composition abrégée ou entrez le chiffre
de composition abrégée et appuyez sur la touche .
3. Appuyez sur la touche pour mettre en
évidence l'entrée de répertoire, puis appuyez sur .
4.
Appuyez sur la touche pour mettre en évidence
le numéro de téléphone, puis appuyez sur .
Un message de confirmation est affiché.
Groupes (Menu )
Cette fonction vous permet d'afficher les groupes utilisés
pour organiser les entrées du répertoire, d'ajouter un
groupe, de changer le nom d'un groupe ou de supprimer
un groupe en entier.
1. Appuyez sur la touche , , .
2. Voici les options offertes :
● Appuyez sur la touche pour mettre en évidence
le groupe à afficher , puis appuyez sur la touche .
● Appuyez sur la touche programmable de gauche
Ajouter pour ajouter un groupe à la liste.
Messagerie (Menu )
Vous avez accès à vos messages texte, de téléavertissement
et de boîte vocale aussitôt que vous allumez votre téléphone.
● Appuyez sur la touche de message pour sélectionner
le type de message à consulter.
● Pendant que vous affichez un message, appuyez sur
pour établir un appel au numéro de rappel affiché.
● Vous pouvez lire et modifier les messages sauvegardés dans
la boîte d'envoi pendant la transmission, puis les envoyer.
Votre téléphone peut stocker jusqu'à 151 messages (p.
exemple, 1 message vocal, 50 messages texte dans la boîte
de réception, 50 messages texte dans la boîte d'envoi et 50
messages texte sauvegardés).
Le téléphone LG5550 permet d'envoyer des messages d'un
maximum de 140 caractères. Le mode de votre téléphone et la
capacité du service utilisé déterminent le type d'information pouvant
être stockée dans un message. D'autres facteurs peuvent limiter le
nombre de caractères par message. Pour connaître les fonctions et
48
LG5550
LG5550
49
Page 82
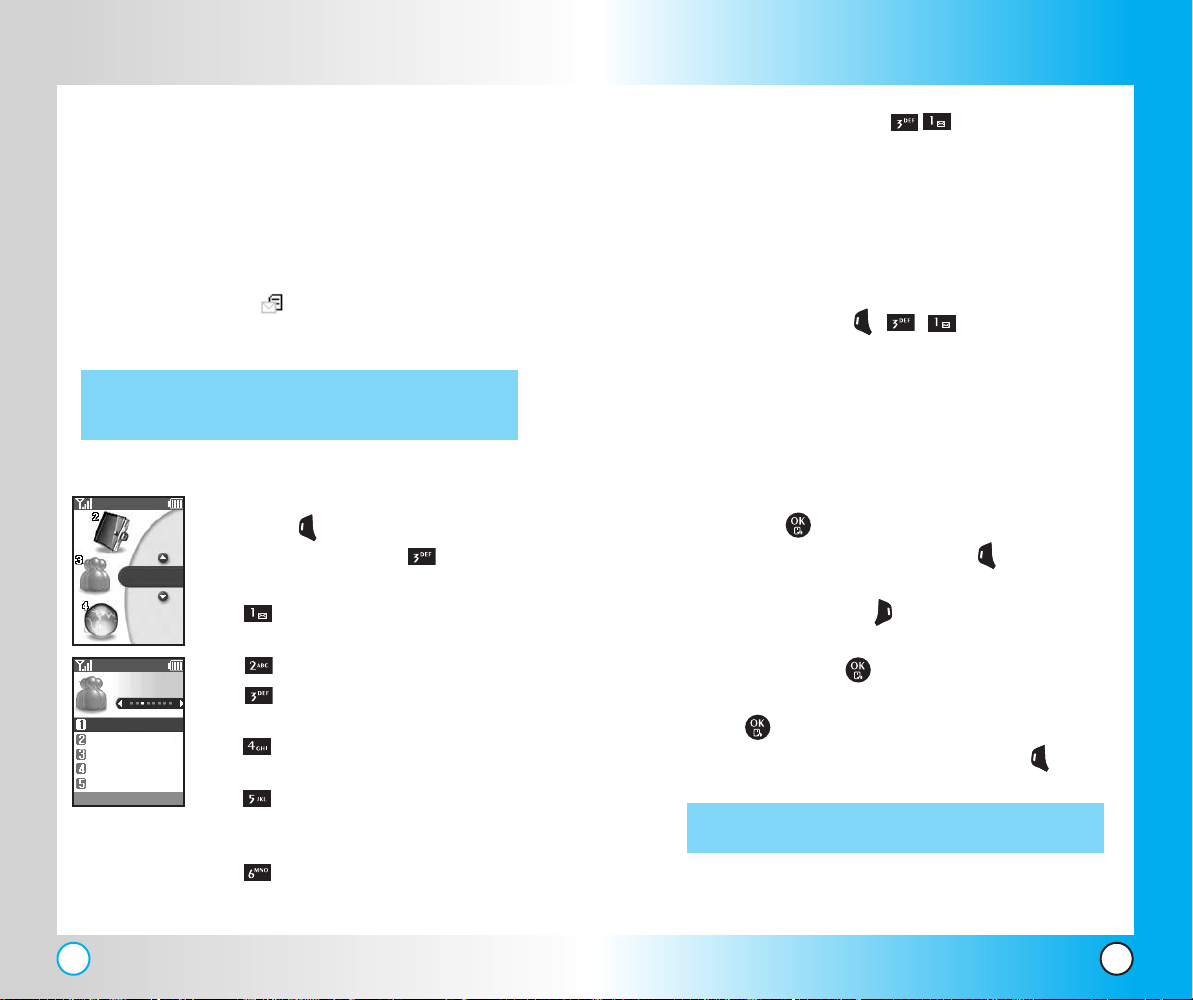
Comment utiliser les menus du téléphone
Comment utiliser les menus du téléphone
la capacité du système, veuillez communiquer avec votre fournisseur
de services.
Alerte de nouveau message
Votre téléphone peut vous avertir de l'arrivée d'un nouveau
message de trois façons.
1. Il affiche le message à l'écran.
2. L'un des cinq types de sonnerie retentit, s'il est sélectionné.
Envoyer message (Menu )
Cette option vous permet d'envoyer des messages texte ou
de téléavertissement et des courriels. Chaque message est
composé d'une destination (Address 1) et de l'information
(Message). Le contenu de ces champs varie selon le type de
message à envoyer.
Fonctions de base d'envoi de message
3. L'icône de message ( ) est affichée à l'écran. Dans le cas
d'un message urgent, l'icône clignote et le message
Urgente est affiché.
REMARQUE: Si vous recevez le même message deux fois, votre téléphone
supprime le premier message reçu et stocke l'autre en tant que
copie (DUPLICATE).
1. Appuyez sur la touche , , .
2. Entrez la destination du message dans le champ Address 1.
Accès et options
1. Appuyez sur la touche programmable de
Messagerie
gauche Menu.
2. Appuyez sur la touche Messagerie.
3. Sélectionnez un sous-menu.
3. Appuyez sur pour accéder à votre répertoire. Appuyez
● Envoyer message: Envoyer un
message.
Envoyer
Web Msg
Arrivée
Départ
Gardé
Messagerie
Options
● Web Msg
● Arrivée: Affiche la liste des
messages reçus.
● Départ: Affiche la liste des
messages envoyés.
●
Gardé: Affiche la liste des
4. Appuyez sur la touche pour accéder à l'écran de rédaction.
5. Tapez votre message (texte ou courriel), puis appuyez sur la
6. Appuyez sur la touche programmable de gauche Envoyer.
messages sauvegardés et des
ébauches de message.
●
Messagerie vocale: Affiche le
nombre de messages que contient la
boîte vocale.
● Dans le cas d'un message texte, entrez un numéro de
téléphone SMS.
● Dans le cas d'un message de télé avertissement,
entrez un numéro de téléphone SMS.
● Dans le cas d'un courriel, entrez une adresse de courriel.
sur la touche programmable de gauche Nouveau si
vous composerez un nouveau numéro ou sur la touche
programmable de droite Groupe si vous désirez
envoyer le message à un groupe.
touche .
Un message de confirmation est affiché.
REMARQUE: Vous pouvez changer le nom d'un groupe ou
ajouter ou supprimer un groupe.
50
LG5550
LG5550
51
Page 83

Comment utiliser les menus du téléphone
Comment utiliser les menus du téléphone
Comment personnaliser un message à l'aide des options
1. Créez un message.
2. Appuyez sur la touche programmable de droite Options.
3. Sélectionnez les options avec lesquelles vous désirez
personnaliser votre message.
Adresse récente Si vous envoyez un message à un
destinataire précédent, vous pouvez
accéder rapidement à son numéro.
Effacer adresse Permet de supprimer aisément un
destinataire de votre liste.
No de rappel Vous pouvez modifier votre numéro de
rappel ou choisir de l’afficher ou de le
masquer à vos destinataires.
Signature Ajoute une signature à la fin de votre
message.
On / Off
Priorité Détermine le niveau de priorité du
message, soit normal ou urgent.
Normal / Urgent.
Accusé de livraison
Cette option vous permet de recevoir
une confirmation de livraison de votre
message.
Off / On
Sauvegarde Si vous ne souhaitez pas envoyer le
message tout de suite, sauvegardez-le
dans le sous-menu Gardé.
4. Terminez le message et envoyez-le.
Web Msg (Menu )
Msgs Web sont des liens spéciaux ou des messages fournis par
le transporteur pour informer les utilisateurs sur les offres
spéciaux, les bulletins et les annonces.
1. Appuyez sur la touche , , .
Msgs Web sont notifiés aux utilisateurs avec 4 types d’alerte. Le
type d’alerte est déterminé par la priorité.
Arrivée (Menu )
Le téléphone vous indique l'arrivée d'un nouveau message de
trois façons :
● En affichant un message d'alerte à l'écran.
● En faisant retentir une sonnerie ou en faisant vibrer le
téléphone, si une sonnerie a été sélectionnée.
● En faisant clignoter l'icône .
Les listes de messages reçus, de messages de télé avertissement
et de courriels peuvent être affichés et faire l'objet d'une recherche.
Les messages reçus sont affichés par ordre chronologique inverse,
c'est-à-dire du plus récent au plus ancien.
Sélectionnez un message avec puis appuyez sur la touche
programmable de droite pour sélectionner Options.
1. Verrouiller/Décaler : Verrouillé ou déverrouillé le message.
2. Effacer : Supprime le message de la boîte de réception.
3. Effacer tous : Supprime tous les messages de la boîte de réception.
52
LG5550
LG5550
53
Page 84

Comment utiliser les menus du téléphone
Comment utiliser les menus du téléphone
Avertissement de maque de mémoire
Si la mémoire est pleine, il est impossible de recevoir d'autres
messages tant que l'espace suffisant n'a pas été libéré. Le
message Message est refuse. est affiché et aucun nouveau
message n'est accepté.
Comment afficher le contenu de la boîte de réception
1. Appuyez sur la touche , , , .
2. Appuyez sur la touche pour consulter le message.
3. Voici les options offertes :
● Touche programmable de gauche Répondre.
● Touche programmable de droite Options.
Aller à URL Si un URL est joint au message
SMS, permet d’y accéder
directement.
Appeler Composer le numéro de rappel joint
au message SMS, le cas échéant.
Répondre. Envoyer un message au numéro de
rappel joint au message SMS, le cas
échéant.
Expédier Transférer le contenu du message à
un autre numéro.
Verrouiller/Décaler Verrouiller le message afin d’en
prévenir la suppression.
Sauvegarder dans annuaire
Sauvegarder le numéro de rappel
dans le répertoire.
Sauvegardée msg ordinaire
Extraire le message pour le
sauvegarder dans la liste des
messages Ordinaire.
Effacer Effacer le message de votre boîte de
réception.
Départ (Menu )
Vous pouvez stocker jusqu'à 50 messages dans la boîte d'envoi.
Vous pouvez également consulter la liste des message envoyés,
voir le contenu des messages envoyés et vous assurer que la
transmission a réussit.
1. Appuyez sur la touche , , .
2.
Appuyez sur la touche programmable de gauche Renvoyer.
Appuyez sur la touche programmable de droite Options.
Verrouiller/Décaler Verrouiller un message, ce qui
empêche de le supprimer à l'aide
des fonctions Effacer Arrivée et
Effacer tous.
Effacer Effacer le message sélectionné de la
boîte d'envoi.
Effacer tous
Avertissement de la boîte de réception
1.
Sélectionnez un message avec puis appuyez sur la
touche
.
2. Appuyez sur la touche programmable de gauche Expédier.
Appuyez sur la touche programmable de droite Options.
Aller à URL
Appeler
Expédier
Verrouiller/Décaler
Sauvegarder message préparé
Effacer
Envoyer message
Code de statut (ID Msg, Catég ou Code)
54
LG5550
LG5550
55
Page 85

Comment utiliser les menus du téléphone
Comment utiliser les menus du téléphone
Gardé (Menu )
Vous permet d'afficher les messages sauvegardés et les
ébauches de message.
1. Appuyez sur la touche
,,.
Sélectionnez un message avec puis appuyez sur la touche
programmable de droite pour sélectionner Options.
Verrouiller/Décaler, Effacer, Effacer tous
2. Appuyez sur la touche
,,, .
Appuyez sur la touche programmable de gauche Renvoyer.
Appuyez sur la touche programmable de droite
Options.
Modifier, Ajouter des destinataire, Renvoyer,
Verrouiller/Décaler, Effacer
Messagerie vocale (Menu )
Vous permet d'écouter un message nouvellement enregistré
dans la boîte vocale. Lorsque vous atteignez la limite de
capacité, les messages les plus anciens sont supprimés. Votre
téléphone vous avertit de l'arrivée d'un nouveau message vocal.
Comment écouter les messages dans votre boîte vocale
1. Appuyez sur la touche , , .
2. Voici les options offertes :
● Appuyez sur la touche programmable de gauche
Effacer pour supprimer de l'information, puis appuyez
sur la touche Effacer.
● Appuyez sur la touche pour écouter vos messages.
Web (Menu )
La fonction MiniBrowser (mini-navigateur) vous permet de
consulter le contenu Internet, via VZW avec MSN, spécialement
conçu pour votre téléphone mobile. L'accès et les options offerts
par cette fonction dépendent de votre fournisseur de services.
Pour obtenir de l'information précise sur l'accès du mininavigateur par votre téléphone, communiquez avec votre
fournisseur de services.
Accès et options
1. Appuyez sur la touche
programmable de gauche Menu.
2. Appuyez sur la touche Web.
● Début Web
Début Web (Menu )
Cette fonction vous permet de démarrer une séance de navigation
avec votre mini-navigateur.
1. Appuyez sur la touche , , .
2. Un rappel sur les frais encourus apparaît; appuyez sur la
touche Yes pour lancer le mini-navigateur, au besoin.
Après quelques secondes, la page d'accueil est affichée.
Comment mettre fin à une session de navigation
Appuyez sur la touche pour mettre fin à la séance de navigation.
56
LG5550
LG5550
57
Page 86
Comment utiliser les menus du téléphone
Comment utiliser les menus du téléphone
Comment naviguer à l'aide du mini-navigateur
Les éléments visuels ont l'une des formes suivantes :
Des options numérotées
●
Pour sélectionner un élément, utilisez votre clavier
numérique ou utilisez le curseur et appuyez sur la touche
programmable appropriée.
Des liens intégrés au contenu
●
Sélectionnez les options ou les liens en appuyant sur les
touches programmables sous l'écran.
Du texte ou des numéros
●
Pour sélectionner les éléments, déplacez le curseur et
appuyez sur la touche programmable appropriée.
Défilement
Appuyez sur la touche pour faire défiler le contenu de la
page s'il ne peut être entièrement affiché à l'écran.
L'emplacement du curseur sur l'écran indique l'élément
sélectionné.
Défilement rapide
Maintenez enfoncée la touche pour faire défiler rapidement
le contenu de la page.
Défilement par page
Appuyez sur les touches latérales pour faire défiler le contenu
ver le haut ou vers le bas, une page à la fois.
Affichage du menu du navigateur
Maintenez enfoncée la touche pour afficher le menu du
navigateur .
Touches programmables
Utilisez les touches programmables pour atteindre divers écrans
et pour sélectionner des fonctions spéciales. La fonction
associée à une touche programmable peut changer d'une page
à l'autre ou selon l'élément sélectionné.
Touche programmable de gauche
La touche programmable de gauche sert principalement aux
options principales ou à sélectionner un élément, mais sa
fonction peut changer en fonction du contenu affiché.
Touche programmable de droite
La touche programmable de droite sert principalement aux
options secondaires et aux menus d'options secondaires.
Comment entrer du texte, des chiffres et des symboles
Lorsque vous devez entrer du texte, la méthode d'entrée de
texte actuellement choisie est affichée au-dessus de la touche
programmable de droite Alpha, Symbol, Number, Word ou
Smart. Pour changer la méthode d'entrée de texte, appuyez sur
la touche programmable de droite .
Pour écrire une lettre majuscule, appuyez sur la touche . La
méthode d'entrée de texte sélectionnée est affichée au-dessus
de la touche programmable de droite (ALPHA ou SMART)
vous pouvez ainsi écrire une lettre majuscule.
Comment supprimer les chiffres ou le texte entré
Lorsque vous entrez du texte ou des chiffres, appuyez sur la
touche pour supprimer la dernière lettre ou le dernier
chiffre ou symbole entré. Pour supprimer le contenu du champ,
maintenez enfoncée la touche .
58
LG5550
LG5550
59
Page 87
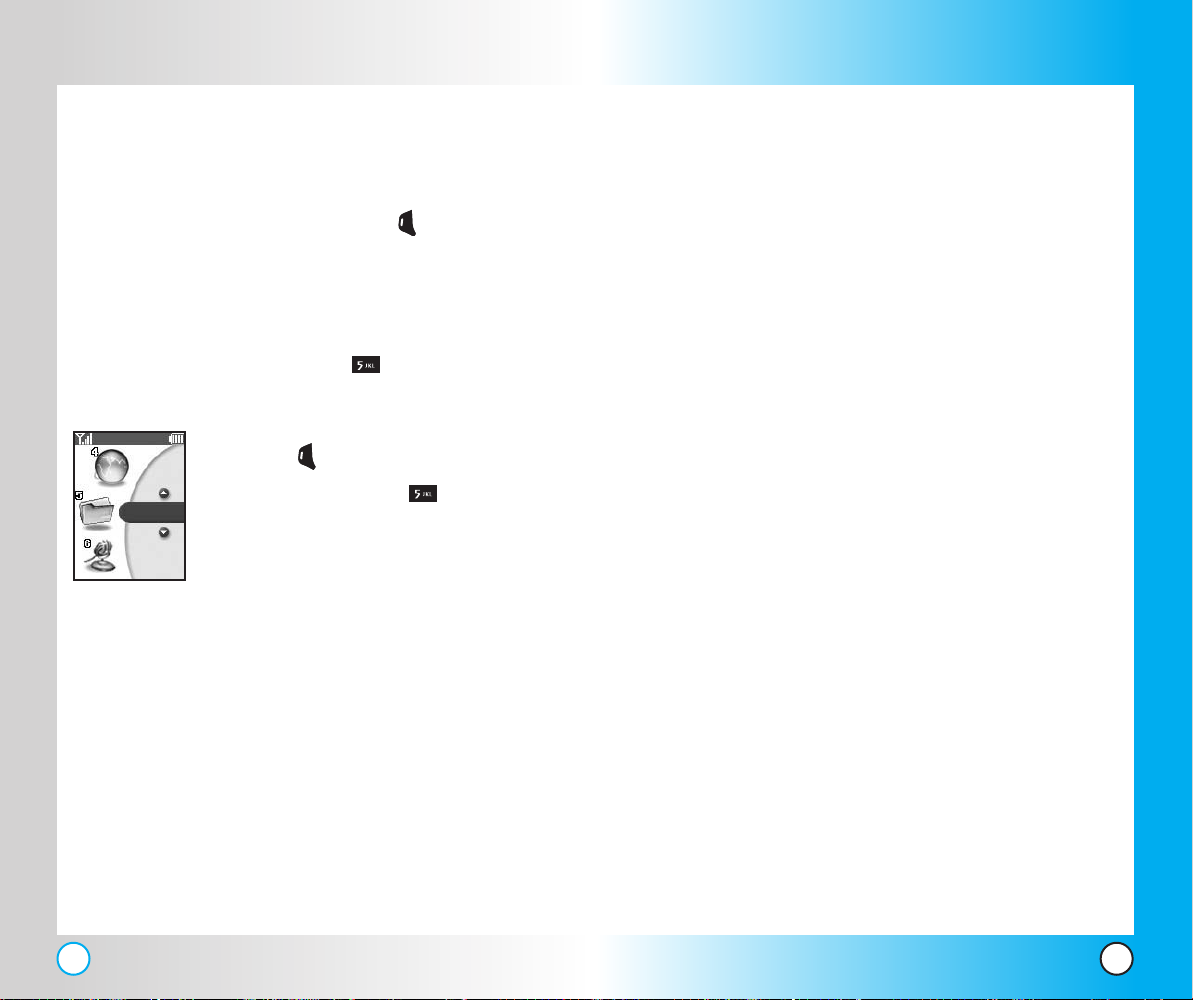
Comment utiliser les menus du téléphone
Comment utiliser les menus du téléphone
Comment établir un appel à partir du mini-navigateur
Vous pouvez établir un appel à partir du mini-navigateur si le site
auquel vous accédez prend en charge cette fonction (le numéro
de téléphone peut être mis en évidence et la commande au-
dessus de la touche programmable de droite est Call).
Lorsque vous établissez l'appel, la connexion du mini-navigateur
est interrompue. Une fois l'appel terminé, votre téléphone
retourne à l'écran affiché au moment d'établir l'appel.
Téléchargements (Menu )
Accès et options
1. Appuyez sur la touche programmable de
gauche Menu.
Télécharge
ments
L'option Téléchargements vous offre des possibilités allant
au-delà de la conversation. Il s'agit d'une technologie et d'un
service vous permettant de télécharger et d'utiliser des
applications dans votre téléphone. Grâce à Télécharge
ments, il est rapide et facile de personnaliser votre téléphone
en fonction de votre mode de vie et de vos goûts. Il suffit de
télécharger les applications qui vous plaisent. Parmi la vaste
gamme de logiciels disponibles, des sonneries aux jeux, en
passant par les applications de productivité, vous en
trouverez un qui sera utile, pratique ou tout simplement
divertissant. De plus, de nouvelles applications sont
constamment ajoutées. Vous pouvez télécharger des
applications et utiliser Téléchargements n'importe où sur le
2. Appuyez sur la touche Télécharge
ments.
réseau de votre fournisseur de service, pourvu que votre
appareil se trouve dans une zone de couverture numérique.
La plupart des applications ne requièrent pas de connexion
réseau pour fonctionner. Pendant le téléchargement d'une
application, tous les appels entrants sont automatiquement
redirigés vers votre boîte vocale, si vous en avez une. Si
vous n'avez pas de boîte vocale, votre téléchargement ne
sera pas interrompu; l'appelant recevra simplement un
signal occupé. Lorsque vous utilisez une application, les
appels entrants interrompent l'application pour vous
permettre de répondre. Une fois l'appel terminé, vous
pouvez continuer à utiliser l'application. Vous pouvez
personnaliser votre téléphone en ajoutant de nouvelles
applications et en supprimant les anciennes, en tout temps.
Si vous avez besoin de plus de mémoire et que vous désirez
utiliser vos applications dans l'avenir, utilisez la fonction
Disable. Cette fonction conserve les données d'utilisation et
d'achat de l'application, mais la supprime de la mémoire.
Pour récupérer une application, accédez au menu Options,
sélectionnez l'application et cliquez sur Restore. Pour effacer
entièrement une application de la mémoire, vous devez la
supprimer. Pour restaurer une application qui a été
supprimée, vous devrez la payer pour la télécharger de
nouveau.
Début: Vous permet de télécharger les applications
sélectionnées tout en affichant la liste de d'applications
Téléchargements relayées à partir du serveur
Téléchargements auquel vous êtes connecté. Vous indique
également la touche de sélection de Téléchargements.
60
LG5550
LG5550
61
Page 88

Comment utiliser les menus du téléphone
Comment utiliser les menus du téléphone
Voix (Menu )
Le menu Commandes vocales permet d'accéder aux principales
fonctions de l'appareil, à l'agenda et aux mémos à l'aide de
commandes vocales que vous enregistrez.
Accès et options
1. Appuyez sur la touche
programmable de gauche Menu.
Voix
Voix
Commandes de d..
Ordonnanceur v...
Mémos vocaux
Configurations...
Mode Conduite
Help
REMARQUE:
REMARQUE:
REMARQUE:
REMARQUE:
2. Appuyez sur la touche Voix.
3. Sélectionnez un sous-menu.
● Commandes de départ
● Ordonnanceur vocal
.
● Mémos vocaux
● Configurations vocales
● Mode Conduite
● Help
Pour que les commandes vocales fonctionnent, vous
devez parler distinctement et utiliser le téléphone
dans un endroit calme.
Lorsque vous entrez un nom dans une entrée de
répertoire, évitez d'utiliser des caractères autres que
des lettres (comme des chiffres et des signes de
ponctuation).
Prononcez les numéros de téléphone un chiffre à la
fois. Ne dites pas ‘un-huit-cent’ pour ‘1-800’, mais
plutôt ‘un-huit-zéro-zéro’.
La Commande vocale n’est offerte qu’en anglais.
Elle ne fonctionnera donc pas sur un téléphone en
langue française.
Commandes de départ (Menu )
Cette option vous permet d'activer certaines fonctions de votre
téléphone.
1. Appuyez sur la touche , , .
● Contacts: Établir un appel en prononçant le nom
sauvegardé dans le répertoire, selon une recherche
dans la liste des entrées du répertoire.
● Digit Dial: Établir un appel en prononçant le numéro
de 4, 7, 10 ou 11 chiffres.
● Redial: Recomposer un numéro récemment composé.
● Voice maill: Accéder à boîte vocale un numéro.
● Driving: Activer ou désactiver la fonction mains libres
pour le mode Conduite automobile.
● Schedule: Lire les événements inscrits à l'agenda et
vous permettre d'ajouter de nouveaux événements.
● Time: Dire l'heure et l'afficher à l'écran du téléphone.
Comment utiliser la commande vocale pour
composer un numéro sauvegardé dans votre
répertoire :
1. Ouvrez le rabat et appuyez sur la touche de composition
vocale.
2. À l'invite, dites ‘Contacts’.
3. À l'invite suivante, prononcez un nom qui figure dans votre
répertoire.
4. Lorsque vous devez confirmer, dites ’Yes’. Le téléphone
compose ensuite le numéro de la personne.
62
LG5550
LG5550
63
Page 89

Comment utiliser les menus du téléphone
Comment utiliser les menus du téléphone
Comment composer un numéro à l'aide de la
commande vocale :
1. Ouvrez le rabat et appuyez sur la touche de composition vocale.
2. À l'invite, dites ‘Digit Dial’.
3. À l'invite suivante, prononcez un numéro de téléphone.
4. Lorsque vous devez confirmer, dites ‘Yes’.
Le téléphone compose ensuite le numéro.
Ordonnanceur vocal (Menu )
L'ordonnanceur facilite l'accès à votre agenda. Il vous
suffit d'entrer vos rendez-vous et votre téléphone vous
les rappelle à l'aide d'une alerte. Vous pouvez également
utiliser la fonction réveil.
REMARQUE:
L'ordonnanceur ne vous rappelle pas vos rendez-vous en
cours d'appel ou de transmission d'un message SMS ou
lorsque vous établissez une connexion. L'alerte retentit
une fois l'appel, la transmission ou la connexion terminé.
Cette fonction vous permet d'entrer vos événements. Si vous
entrez l'heure et un mémo, une alarme retentit à l'heure prévue.
1. Appuyez sur la touche , , .
2. Appuyez sur la touche programmable de droite Options.
● Aller à aujourd`hui:Affiche le calendrier de la date
courante
● Aller à date:Affiche le calendrier d'une date précise
● Recherche:Affiche les événements entrés
● Effacer anciens: Supprime les événements échus il y
a : Une semaine / Un mois / Une annee / Un jour.
● Effacer tous: Supprime tous les événements
Mémos vocaux (Menu )
Cette fonction vous permet d'enregistrer, d'écouter ou de
supprimer des courtes notes vocales.
1. Appuyez sur la touche , , .
2. Appuyez sur la touche programmable de gauche
Nouveau pour enregistrer un nouveau mémo vocal.
3. Suivez les invites de mémo vocal. Un message de confirmation
est affiché.
Configurations vocales (Menu )
Cette option vous permet de régler les options V oice Commands,
Alertes d’ annonces, Meilleur résultat, Commandes d’
entraînement, Chiffres d’ entraînement; elle vous permet
également d'adapter le téléphone à votre façon de prononcer les
chiffres.
Voice Commands (Menu )
Cette option vous permet de régler la façon dont vous activez la
reconnaissance vocale.
1. Appuyez sur la touche , , , .
2. Sélectionnez l'un des modes d'activation suivants, puis
appuyez sur la touche .
● Rabat ouvert: Active la reconnaissance vocale lorsque
vous ouvrez le rabat. (Lorsque le téléphone est déjà
ouvert, vous pouvez activer la reconnaissance vocale
en appuyant sur la touche de composition vocale.)
● OK pour: Active la reconnaissance vocale lorsque vous
ouvrez le rabat et que vous appuyez sur la touche de
composition vocale touche de
.
64
LG5550
LG5550
65
Page 90
Comment utiliser les menus du téléphone
Comment utiliser les menus du téléphone
Alertes d’annonces (Menu )
Si cette fonction est activée, le nom de l’appelant (s’il figure dans
votre répertoire) ou son numéro de téléphone vous sera indiqué
sur réception d’un appel de sa part.
1. Appuyez sur la touche , , , .
2. Sélectionnez Allumé ou Éteint, puis appuyez sur .
REMARQUE: Lorsque l'alerte vocale est activée, l'icône est
affichée à l'écran.
Meilleur résultat (Menu )
Après que vous ayez prononcé un nom ou un chiffre, le
téléphone affiche le résultat de la reconnaissance vocale, le nom
ou le chiffre qui correspond le mieux à ce que vous avez
prononcé, et vous demande une confirmation. Sélectionnez le
nombre de résultats que doit afficher votre téléphone.
1. Appuyez sur la touche , , , .
2. Sélectionnez une option, puis appuyez sur .
● 1 résultat: Affiche le nom ou le numéro correspondant
le plus à ce que vous avez prononcé.
● 4 résultats: Affiche les quatre noms ou numéros
correspondant le plus à ce que vous avez prononcé et
vous demande si le premier choix est le bon. Si vous
dites ‘Yes’, le téléphone établit l'appel. Si vous dites
‘No’, le téléphone vous suggère le deuxième nom de
la liste et ainsi de suite jusqu'au quatrième choix.
Commandes d’entraînement (Menu )
Bien que l’appareil n’exige pas d’entraînement préalable, vous
pouvez faire en sorte qu’il comprenne mieux vos paroles. Ce
module d’entraînement passera à travers les mots que vous
utiliseriez dans le système de commande vocale.
1. Appuyez sur la touche , , , .
2. Sélectionnez Entraînement ho Allume ou Entraînement ho
Eteint, puis appuyez sur
Chiffres d’entraînement (Menu )
.
Bien que l’appareil n’exige pas d’entraînement préalable, vous
pouvez faire en sorte qu’il comprenne mieux vos paroles. Ce
module d’entraînement passera à travers les chiffres que vous
utiliseriez dans le système de commande vocale.
1. Appuyez sur la touche , , , .
2. Sélectionnez Entraînement ho Allume ou Entraînement ho
Eteint, puis appuyez sur
.
Mode Conduite (Menu )
Cette option vous permet d'activer et de désactiver la fonction mains
libres pendant la conduite, sans utiliser la trousse pour voiture.
1. Appuyez sur la touche , , .
2. Sélectionnez En service/Hors service, puis appuyez sur .
● La touche permet d'activer ou de désactiver la
fonction mains libres.
REMARQUE: Le fait d'appuyer sur la touche ( ) pendant trois
secondes lorsque le rabat est fermé permet d'activer
le mode Conduite.
66
LG5550
Help (Menu )
1. Appuyez sur la touche , , .
LG5550
67
Page 91

Comment utiliser les menus du téléphone
Comment utiliser les menus du téléphone
Outils (Menu )
Votre téléphone intègre des fonctions Alarme, Bloc-notes,
Conseils utiles, Calculatrice, Horloge universelle.
Accès et options
1. Appuyez sur la touche
programmable de gauche Menu.
Outils
Outils
Alarme
Bloc-notes
Conseils utiles
Calculatrice
Horloge univer...
2. Appuyez sur la touche Outils.
3. Sélectionnez un sous-menu.
● Alarme
● Bloc-notes
● Conseils utiles
● Calculatrice
● Horloge universelle
Alarme (Menu )
Cette fonction vous permet de programmer jusqu'à quatre
alertes. Lorsque vous sélectionnez une alerte à programmer,
l'heure courante est affichée au haut de l'écran. Au moment de
l'alerte, la mention Alarme 1 (ou 2 ou 3, Alarme rapide) sera
affichée à l'écran et l'alerte retentira.
1. Appuyez sur la touche , , .
2. Sélectionnez l'alerte à modifier.
Alarme 1 / Alarme 2 / Alarme 3 / Alarme rapide
3. Appuyez sur la touche pour mettre en évidence le
numéro, puis appuyez sur la touche .
4. Réglez l'heure de l'alarme et appuyez sur .
5. Appuyez sur la touche pour mettre en évidence l'option
Une fois (réglage de répétition).
6. Appuyez sur la touche pour sélectionner l'un des
types de répétition suivant :
Une fois / Quotidiennement / Lun-Ven / Week-ends
7. Appuyez sur la touche pour mettre en évidence
l'option Sonnerie (réglage du type de sonnerie), puis
appuyez sur .
68
LG5550
8. Appuyez sur la touche pour sélectionner l'un des types
de sonnerie d'alerte offerts, puis appuyez sur la touche .
9. Appuyez sur la touche programmable de gauche Garder.
LG5550
69
Page 92

Comment utiliser les menus du téléphone
Comment utiliser les menus du téléphone
Bloc-notes (Menu )
Cette fonction vous permet de consulter, d'ajouter, de modifier
et de supprimer des notes personnelles.
1. Appuyez sur la touche , , .
2. Appuyez sur la touche programmable de gauche Ajouter
pour rédiger une nouvelle note.
Conseils utiles (Menu )
Cette fonction vous permet de calculer rapidement et facilement
des montants selon le montant de la facture, du pourboire et du
nombre de personnes.
1. Appuyez sur la touche , , .
Calculatrice (Menu )
Cette fonction vous permet d'effectuer des opérations
mathématiques simples. Vous pouvez entrer des chiffres jusqu'à
la deuxième décimale.
1. Appuyez sur la touche , , .
REMARQUE: Il est possible d'utiliser jusqu'à 32 caractères pour
effectuer un calcul (p. ex. :, 63+78-21 est composé de
8 caractères).
Réglages (Menu )
Le menu Configuration fournit des options permettant de
personnaliser votre téléphone.
Accès et options
1. Appuyez sur la touche programmable de
gauche Menu.
Réglages
Réglages
Sons
Affichage
Configuration...
Itinérance
Position
Messagerie
2. Appuyez sur la touche Réglages.
3. Sélectionnez un sous-menu.
● Sons
● Affichage
● Configuration données
● Itinérance
● Position
● Messagerie
● Sécurité
● Mode d’avion
● Configuration/Otros
● Information
Horloge universelle (Menu )
Cette fonction vous permet de calculer l'heure courante dans un
autre fuseau horaire ou dans un autre pays.
1. Appuyez sur la touche , , .
REMARQUE: Aappuyez sur la touche programmable de gauche
Choisir DST pour tenir compte de l'heure avancée.
70
LG5550
LG5550
71
Page 93
Comment utiliser les menus du téléphone
Comment utiliser les menus du téléphone
Sons (Menu )
Ce menu contient des options vous permettant de personnaliser
les sons de votre téléphone.
Sonneries (Menu )
Cette option vous permet de choisir des sonneries pour les
différents types d'appels entrants.
1. Appuyez sur la touche , , , .
2. Appuyez sur la touche Communications vocales.
Sélectionnez Afficheur, Pas d’afficheur ou Itinérance.
3. Appuyez sur la touche Messages.
Sélectionnez Messagerie vocale ou Messagerie textuelle.
4. Appuyez sur la touche pour sélectionner une sonnerie,
puis sur pour enregistrer le son.
Tonalité des touches (Menu )
Cette option vous permet de régler la durée de la tonalité des
touches et la vitesse de lecture des sons Tonalité des touches.
1. Appuyez sur la touche , , , .
2. Sélectionnez l'un des modes d'activation suivants, puis
appuyez sur la touche .
Courtes tonalités La tonalité est entendue pour une
courte période, même si vous
maintenez la touche enfoncée.
Longues tonalitésLa tonalité est entendue aussi
longtemps que la touche est maintenue
enfoncée.
REMARQUE: Le signal à multifréquence à deux tonalités (DTMF – Dual-
Tone Multi Frequency) fonctionne par la transmission
simultanée de deux tonalités, une d’un groupe de basses
fréquences et l’autre d’un groupe de hautes fréquences.
Chaque groupe de fréquences consiste en quatre
fréquences. Le réglage de la durée de la tonalité des
touches à Longtemps prolonge la tonalité DTMF.
Volume (Menu )
Cette option vous permet de régler les différents volumes.
1. Appuyez sur la touche , , , .
2. Sélectionnez Sonnerie / Écouteur / Tonalité des touches
/ Sous/Hors tension.
3. Ajustez le volume à l'aide des touches puis appuyez
sur la touche pour sauvegarder le réglage.
Alertes (Menu )
Cette option vous permet d'activer ou de désactiver n'importe
laquelle des quatre alertes.
1. Appuyez sur la touche , , , .
2. Sélectionnez une option d'alerte.
Changement de service (Menu )
Cette option vous indique un changement de service.
Lorsque vous entrez dans une zone de couverture, le
téléphone affiche le message Entrée dans la zone de
service. Lorsque vous quittez une zone de couverture, le
téléphone affiche le message Sortie de la zone de service.
Tonalité minute (Menu )
En cours d'appel, cette option fait retentir une alerte 10
secondes avant la fin de chaque minute.
72
LG5550
LG5550
73
Page 94
Comment utiliser les menus du téléphone
Comment utiliser les menus du téléphone
Connexion d’appel (Menu )
Cette option vous alerte lorsque l'appel est établi.
5. Sélectionnez une option, puis appuyez sur .
6. Sélectionnez Allumé ou Éteint à l'aide de la touche
puis appuyez sur la touche .
Affichage (Menu )
Ce menu contient des options vous permettant de personnaliser
l'affichage de votre téléphone.
Salutations (Menu )
1. Appuyez sur la touche , , , .
Rétroéclairage (Menu )
Cette option vous permet de régler la durée d'activation du
rétroéclairage de l’écran principal et des touches lorsque le
téléphone est ouvert.
1. Appuyez sur la touche , , , .
2. Choisissez un sous-menu du menu Rétroéclairage, puis
appuyez sur la touche .
Téléphone / Web
Si une durée est précisée, elle est calculée à partir de la dernière
touche enfoncée.
Téléphone (Menu )
Options de durée
● 8 secondes
● 15 secondes
● 30 secondes
● Toujours hors service Le rétro-éclairage n'est jamais activé.
● Lorsque le rabat est Le rétroéclairage est toujours
activé lorsque le rabat est ouvert.
Web (Menu )
● 15 secondes
● Lorsque le rabat est Le rétroéclairage est toujours
activé lorsque le rabat est ouvert.
Écrans (Menu )
Cette option vous permet de choisir l'arrière-plan qui sera affiché
à l'écran de votre téléphone.
1. Appuyez sur la touche , , , .
2. Sélectionnez Tapiz.
3. Sélectionnez l'arrière-plan, puis appuyez sur la touche
programmable de gauche Garder.
Luminosité (Menu )
Cette option vous permet de choisir le degré d'illumination du
rétroéclairage.
1. Appuyez sur la touche , , , .
2. Appuyez sur la touche pour ajuster le degré de luminosité.
3.
Appuyez sur la touche touche de gardé réglages.
Contraste (Menu )
Cette option vous permet de régler le degré de contraste de
l'écran à ACL .
1. Appuyez sur la touche , , , .
2. Appuyez sur la touche pour ajuster le degré de contraste.
3.
Appuyez sur la touche touche de gardé réglages.
74
LG5550
LG5550
75
Page 95

Comment utiliser les menus du téléphone
Comment utiliser les menus du téléphone
Style de menu (Menu )
1. Appuyez sur la touche , , , .
2. Sélectionnez Icône/ Liste à l'aide de la touche puis
appuyez sur la touche .
Horloge (Menu )
Cette option vous permet de choisir l'horloge qui sera affichée à
l'écran de votre téléphone.
1. Appuyez sur la touche , , , .
2. Sélectionnez Normal / Analogique / Numérique puis
appuyez sur la touche programmable de gauche Garder.
Couleur de thème (Menu )
Cette option vous permet de choisir la couleur d'arrière-plan de
l'écran.
1. Appuyez sur la touche , , , .
2. Sélectionnez Bleu / Vert / Orange / Violette puis appuyez
sur la touche .
Polices d’entrée de texte (Menu )
Cette option vous permet de choisir la taille et la couleur de la
police de caractères.
1. Appuyez sur la touche , , , .
2. Sélectionnez Taille / Couleur.
3. Appuyez sur la touche pour sélectionner la taille ou la
couleur désirée, puis appuyez sur la touche pour
sauvegarder votre sélection.
Configuration données (Menu )
Ce menu vous permet d'utiliser des services de transmission de
données sans fil. Les services de transmission de données sans
fil font référence à l'utilisation de terminaux d'abonnés pour
l'accès à Internet avec des ordinateurs personnels ou des
ordinateurs portatifs à 19,2 Kbps ou à un maximum de 230,4
Kbps. La vitesse de la connexion dépend du réseau de votre
fournisseur et d'autres facteurs. Les réglages de communication
doivent correspondre à ceux du réseau.
Données/Fax (Menu )
Cette fonction vous permet d'utiliser votre téléphone pour
transmettre des données ou des télécopies.
1. Appuyez sur la touche , , , .
2. Sélectionnez Éteint / Télécopie entrée une fois /
Télécopie entrée toujours / Données une fois /
Données toujours puis appuyez sur .
REMARQUE: La trousse de connexion pour transmission de données
vous permet de brancher votre PC ou votre ANP à votre
téléphone sans fil LG; vous n'avez donc pas à chercher
une prise téléphonique. Vous pouvez envoyer ou
recevoir des courriels ou des télécopies ou accéder à
Internet n'importe où et en tout temps.
Méthode (Menu )
Cette fonction vous permet de sélectionner le port de
transmission de données.
1. Appuyez sur la touche , , , .
2. Sélectionnez USB / RS-232C(COM Port) / Fermé puis
appuyez sur la touche .
76
LG5550
LG5550
77
Page 96

Comment utiliser les menus du téléphone
Comment utiliser les menus du téléphone
Baud Données (Menu )
Cette fonction vous permet de régler le débit du port. Régler la
vitesse en fonction du réseau de votre fournisseur . Pour connaître
le débit maximal, communiquez avec votre fournisseur.
1. Appuyez sur la touche , , , .
2. Sélectionnez 19200 bps / 115200 bps / 230400 bps
puis appuyez sur la touche .
REMARQUE: Lorsque vous utilisez le service de données 1X HSPD au moyen
d'un câble de connexion RS-232C, vous devez régler le débit du
port à 115,200 (le débit 230 400 n'est pas pris en charge). Par
contre, si vous utilisez un câble de connexion USB, vous
obtiendrez une plus grande vitesse si vous réglez le débit du
port à 230 400 plutôt qu'à 115,200.
Itinérance (Menu )
Fijar modalidad (Menu )
Cette option vous permet de modifier les réglages de gestion du
fabricant. Laissez les réglages par défaut, à moins d'instructions
contraires de votre fournisseur de services.
1. Appuyez sur la touche , , , .
2. Sélectionnez Automatique / Local seulement /
Numérique / Analogique puis appuyez sur la touche .
Protector de llamadas (Menu )
Cette fonction vous alerte quand vous établissez ou recevez des
appels dans une zone d'itinérance et que devez effectuer des
étapes supplémentaires avant d'établir ou de recevoir un appel.
1. Appuyez sur la touche , , , .
Sélectionnez Allumé / Éteint puis appuyez sur la touche .
2.
Position (Menu )
Menu du mode GPS (Global Positioning System :système
d'information de repérage par satellite).
1. Appuyez sur la touche , , .
2. Appuyez sur la touche touche, puis Sélectionnez Allumé / Éteint.
3.
Appuyez sur la touche touche de gardé réglages.
REMARQUE: Les signaux satellites GPS ne sont pas toujours transmis, à
l'intérieur ou à l'extérieur, particulièrement dans le cas de
conditions atmosphériques difficiles.
Messagerie (Menu )
Lorsque cette fonction est activée, les nouveaux messages
s'affichent automatiquement. Lorsqu'elle est désactivée, un
avis vous indique la réception des nouveaux messages.
Affichange contextuel (Menu )
Quand un message arrive, pop-up window apparaît. Lorsque
vous appuyez sur Allumé, pop-up window apparaît.
1. Appuyez sur la touche , , , .
2. Sélectionnez Allumé / Éteint puis appuyez sur .
Récépissé au destinataire (Menu )
1. Appuyez sur la touche , , , .
2. Sélectionnez Allumé / Éteint puis appuyez sur .
Alerte msgs (Menu )
Cette option vous permet de choisir le type d'alerte pour les
nouveaux messages.
1. Appuyez sur la touche , , , .
78
LG5550
LG5550
79
Page 97

Comment utiliser les menus du téléphone
Comment utiliser les menus du téléphone
2. Sélectionnez une option, puis appuyez sur la touche .
● Éteint / Vibrer une fois / Sonnerie et vib / Sonnerie
/ Bip une fois
Suppression automatique (Menu )
Si cette fonction est activée, les messages lus sont
automatiquement supprimés lorsque la limite de stockage est
atteinte.
1. Appuyez sur la touche , , , .
2. Sélectionnez Allumé / Éteint puis appuyez sur .
Signature (Menu )
Permet de créer et de modifier une signature qui est ajoutée
automatiquement aux messages que vous envoyez.
1. Appuyez sur la touche , , , .
2. Sélectionnez Aucun / Personnalisé then press .
Msgs ordinaires (Menu )
1. Appuyez sur la touche , , , .
2. Appuyez sur la touche pour mettre en évidence votre
sélection, puis appuyez sur pour confirmer votre choix.
Edit Voice Mailbox # (Menu )
Cette fonction vous permet d'entrer manuellement le numéro
d'accès aux services de boîte vocale. Cette option doit être
utilisée uniquement lorsque votre réseau ne fournit pas de
numéro d'accès.
1. Appuyez sur la touche , , , .
Sécurité (Menu )
Cette option vous permet d'assurer de façon électronique la
sécurité de votre téléphone.
Verrouiller téléphone (Menu )
Cette fonction vous permet d'empêcher toute utilisation non
autorisée de votre téléphone. Lorsque votre téléphone est
verrouillé, il est en mode restreint jusqu'à ce que le code de
verrouillage soit entré. Vous pouvez toujours recevoir des appels
et établir des appels d'urgence.
Utilisez la fonction Entrez le code du menu Sécurité pour
changer le code de verrouillage.
1. Appuyez sur la touche , , .
2. Entrez le code de verrouillage de quatre chiffres.
Le code couramment utilisé est constitué des quatre
derniers chiffres de votre numéro de téléphone.
3. Appuyez sur la touche Verrouiller téléphone.
4. Sélectionnez une option, puis appuyez sur la touche .
Décaler Le téléphone n'est jamais verrouillé (Il
est possible d'utiliser le mode
Verrouillage).
Verrouiller Lorsque le téléphone est verrouillé, vous
pouvez toujours recevoir des appels et
établir des appels d'urgence.
80
LG5550
LG5550
81
Page 98

Comment utiliser les menus du téléphone
Comment utiliser les menus du téléphone
Modifier verrouillage (Menu )
Cette fonction vous permet d'entrer un nouveau code de
verrouillage de quatre chiffres.
1. Appuyez sur la touche , , .
2. Entrez le code de verrouillage de quatre chiffres.
3. Appuyez sur la touche Modifier verrouillage.
4. Pour confirmer votre choix, vous êtes invité à entrer le code
de nouveau.
Numéro spécial (Menu )
L’utilisateur peut programmer jusqu’à 10 numéros spéciaux qui
peuvent être composés même lorsque le téléphone est
verrouillé.
1. Appuyez sur la touche , , .
2. Entrez le code de verrouillage de quatre chiffres.
3. Appuyez sur la touche Numéro spécial .
4. Appuyez sur la touche pour sélectionner un nouveau
numéro d'urgence.
5. Entrez un numéro de téléphone d'urgence, puis appuyez
sur la touche .
Effacer répertoire (Menu )
Cette option vous permet de supprimer simultanément toutes
vos entrées de répertoire.
1. Appuyez sur la touche , , .
2. Entrez le code de verrouillage de quatre chiffres.
3. Appuyez sur la touche Effacer répertoire.
4. Sélectionnez Effacer tous les numéros, puis appuyez sur
la touche .
Réinitialiser-valeur défaut (Menu )
Cette option vous permet de réinitialiser toutes les options aux
réglages initiaux, appliqués à l'usine.
1. Appuyez sur la touche , , .
2. Entrez le code de verrouillage de quatre chiffres.
3. Appuyez sur la touche Réinitialiser-valeur défaut.
4. Appuyez sur la touche , sélectionnez Revenir, puis
appuyez sur la touche .
Mode d’avion (Menu )
Activez le mode Airplane afin de bloquer tous les appels
entrants et sortants, de même que tout accès en ligne.
1. Appuyez sur la touche , , .
2.
Sélectionnez Allumé / Éteint, puis appuyez sur la touche .
Configuration/Otros (Menu )
Raccourci (Menu )
Cette fonction vous permet d'attribuer un raccourcis à la
fonction Journal des appels, Répertoire, Messagerie, Web,
Téléchargements, Voix, Outils, ou Réglages à la touche de
navigation vers le haut.
1. Appuyez sur la touche , , , .
Un message explicatif est alors affiché.
2. Appuyez sur la touche pour continuer.pour continuer.
3. Sélectionnez le raccourcis.
82
LG5550
LG5550
83
Page 99
Comment utiliser les menus du téléphone
Comment utiliser les menus du téléphone
Réception d’appel (Menu )
Cette option vous permet de choisir la façon de répondre à un
appel.
1. Appuyez sur la touche , , , .
2. Sélectionnez Ouvrir/N’importe quelle touche / Talk
seulement, puis appuyez sur la touche .
Réponse automatique (Menu )
Cette fonction vous permet de sélectionner la durée de la
sonnerie avant que le téléphone ne réponde automatiquement à
un appel. Elle a été conçue pour être utilisée avec un dispositif
mains libres, mais elle est une fonction autonome et doit donc
être activée ou désactivée manuellement lorsque vous branchez
ou débranchez un tel dispositif.
1. Appuyez sur la touche , , , .
2. Sélectionnez une option, puis appuyez sur la touche .
● Arrêt
● Nécessaire de voiture
Langue (Menu )
Mode TTY (Menu )
Cette fonction vous permet de raccorder un ATS dans le but de
communiquer avec d'autres personnes possédant le même type
d'appareil. Un téléphone prenant en charge un ATS est capable
de transposer en signal auditif les caractères tapés. Il est
également capable de transposer les paroles en caractères et de
les afficher à l'écran de l'ATS.
1. Appuyez sur la touche , , , .
2. Sélectionnez TTY plein / TTY+PARLER / TTY+ENTENDRE
/ TTY+Éteint.
Information (Menu )
Le menu téléphone Information vous permet d'accéder à de
l'information précise sur votre modèle de téléphone.
1. Appuyez sur la touche , , .
Cette option vous permet d'afficher les commandes dans la
langue de votre choix. Sélectionnez l'anglais ou le français.
1. Appuyez sur la touche , , , .
2. Sélectionnez Anglais / Français puis appuyez sur la touche
.
84
LG5550
LG5550
85
Page 100

Sécurité
Sécurité
Renseignements sur la sécurité TIA
Ce qui suit est l’ensemble complet des renseignements sur la sécurité TIA pour
les téléphones cellulaires portatifs sans fil.
Exposition à un signal radioélectrique
Votre téléphone cellulaire portatif sans fil est un émetteur et récepteur radio de
faible puissance. Lorsqu’il est allumé, il reçoit et envoie des signaux
radioélectriques (RF)
En août 1996, la Commission fédérale des communications (FCC – Federal
Communications Commission) a adopté des directives d’exposition aux RF avec
des niveaux de sécurité pour les téléphones cellulaires sans fil. Ces directives
sont conformes aux normes de sécurité précédemment établies par les
organismes américains et internationaux de normalisation :
ANSI C95.1 (1992) *
NCRP Report 86 (1986)
ICNIRP (1996)
Ces normes s’appuient sur des évaluations complètes et régulières de la
documentation scientifique applicable. Par exemple, plus de 120 chercheurs,
ingénieurs et médecins d’universités, d’agences gouvernementales sur la santé
et de l’industrie ont étudié l’ensemble des recherches existantes pour établir la
norme ANSI (C95.1).
La conception de votre téléphone est conforme aux directives de la FCC (et à ces
normes).
Entretien de l’antenne
Utilisez uniquement l’antenne fournie ou une antenne de rechange approuvée.
Les antennes, modifications ou accessoires non autorisés pourraient
endommager le téléphone et enfreindre les règlements de la FCC.
Utilisation du téléphone
POSITION NORMALE: Tenez le téléphone comme vous le feriez pour n’importe
quel autre téléphone, antenne dirigée vers le haut, au-dessus de votre épaule.
Ne touchez pas inutilement l’antenne quand le téléphone est utilisé. Tout contact
avec l’antenne détériore la qualité de l’appel et peut forcer le téléphone à
fonctionner à un niveau de puissance plus élevé que nécessaire.
Conduite automobile
Vérifiez les lois et les règlements sur l’utilisation des téléphones sans fil dans les
régions où vous conduisez et respectez-les toujours. De plus, si vous utilisez
votre téléphone en conduisant, veuillez prendre les précautions suivantes:
● Maintenez toute votre attention sur la conduite : votre première
responsabilité au volant est de conduire prudemment.
● Utilisez un système mains-libres, si possible.
● Quittez la chaussée et garez le véhicule avant de lancer ou de recevoir un
appel, si les conditions routières ou la loi l’exigent.
Appareils électroniques
La plupart des appareils électroniques modernes sont protégés contre les
signaux RF. Certains appareils électroniques peuvent cependant ne pas être
protégés contre les signaux RF émis par votre téléphone sans fil.
Stimulateurs cardiaques
La Health Industry Manufacturers Association recommande de maintenir une
distance minimale de six pouces entre un téléphone cellulaire sans fil et un
stimulateur cardiaque pour éviter tout risque d’interférence avec ce dernier. Ces
recommandations sont conformes aux recherches et aux recommandations
indépendantes de Wireless Technology Research.
Les personnes ayant un stimulateur cardiaque:
• devraient TOUJOURS tenir le téléphone à plus de six pouces de leur
stimulateur cardiaque lorsque le téléphone est allumé;
• ne devraient pas transporter le téléphone dans une poche de poitrine;
• devraient utiliser l’oreille opposée au stimulateur afin de minimiser les risques
d’interférence; et
• devraient immédiatement ÉTEINDRE le téléphone si elles ont des raisons de
croire qu’il y a des interférences.
Conseils pour un fonctionnement efficace
Pour que votre téléphone fonctionne plus efficacement:
86
LG5550
Prothèses auditives
Certains téléphones numériques sans fil peuvent créer des interférences dans
des prothèses auditives. Dans le cas de telles interférences, vous pouvez
LG5550
87
 Loading...