

Page 1

OWNER’S MANUAL
LED LCD TV
Please read this manual carefully before operating
your set and retain it for future reference.
LM62**
LM64**
LM66**
LM67**
LM76**
LS57**
P/NO : MFL67441708 (1202-REV00)
Printed in Korea
www.lg.com
Page 2

TABLE OF CONTENTS
A-2
TABLE OF CONTENTS
A-3 SETTING UP THE TV
A-3 Attaching the stand
A-6 Tidying cables
LANGUAGE LIST
English
Svenska
Norsk
Dansk
Suomi
B-1 MAKING CONNECTIONS
B-1 Antenna connection
B-2 Satellite dish connection
B-2 HDMI connection
B-5 DVI to HDMI connection
B-6 RGB-PC connection
B-7 Component connection
B-8 Composite connection
B-9 Audio connection
B-9 - Digital optical audio connection
B-10 USB connection
B-12 CI module connection
B-13 Headphone Connection
B-14 Euro Scart connection
COMMON
LANGUAGE
B-20 SPECIFICATIONS
COMMON
Page 3
SETTING UP THE TV
A-3
SETTING UP THE TV
Image shown may differ from your TV.
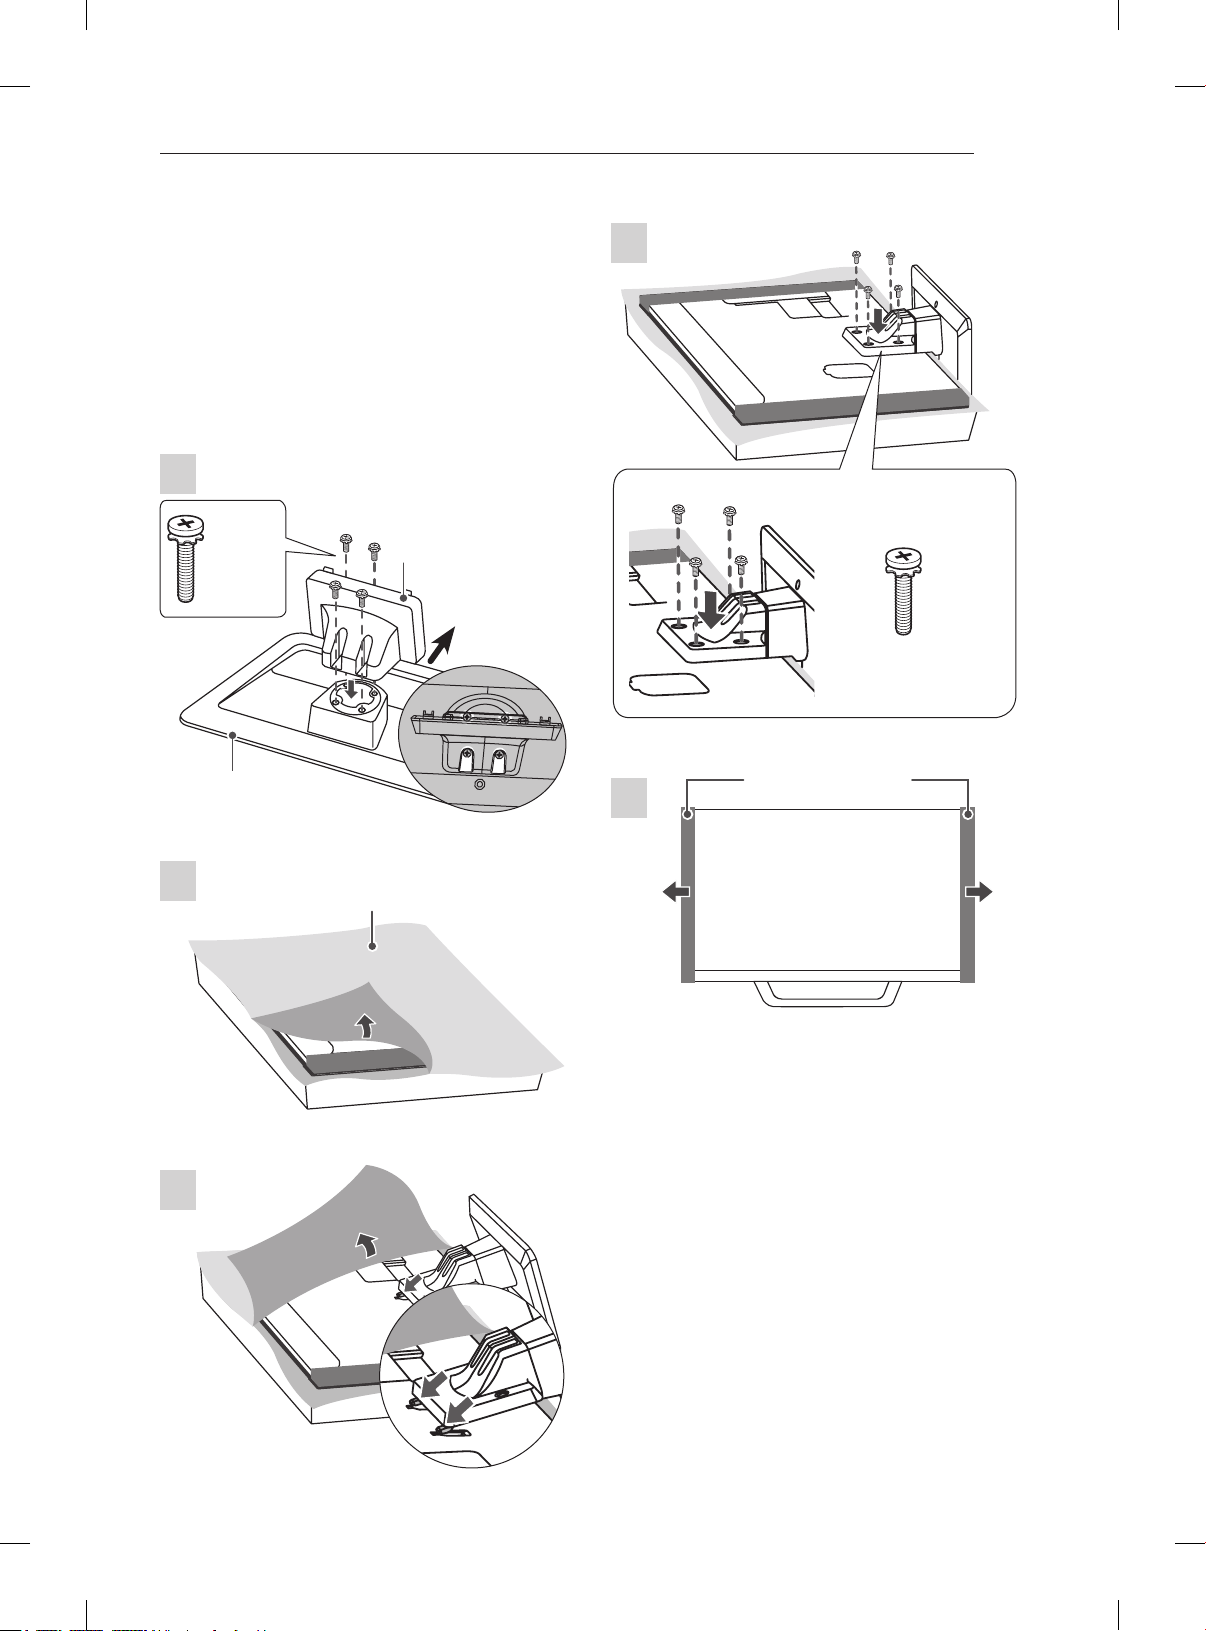
Attaching the stand
42/47LM669*
1
M4 x 20
Stand Body
4EA
Front
Stand Base
Top View
4
M4 x 20
4EA
Protection pad
5
2
Wrapping bag
3
Page 4
SETTING UP THE TV
A-4
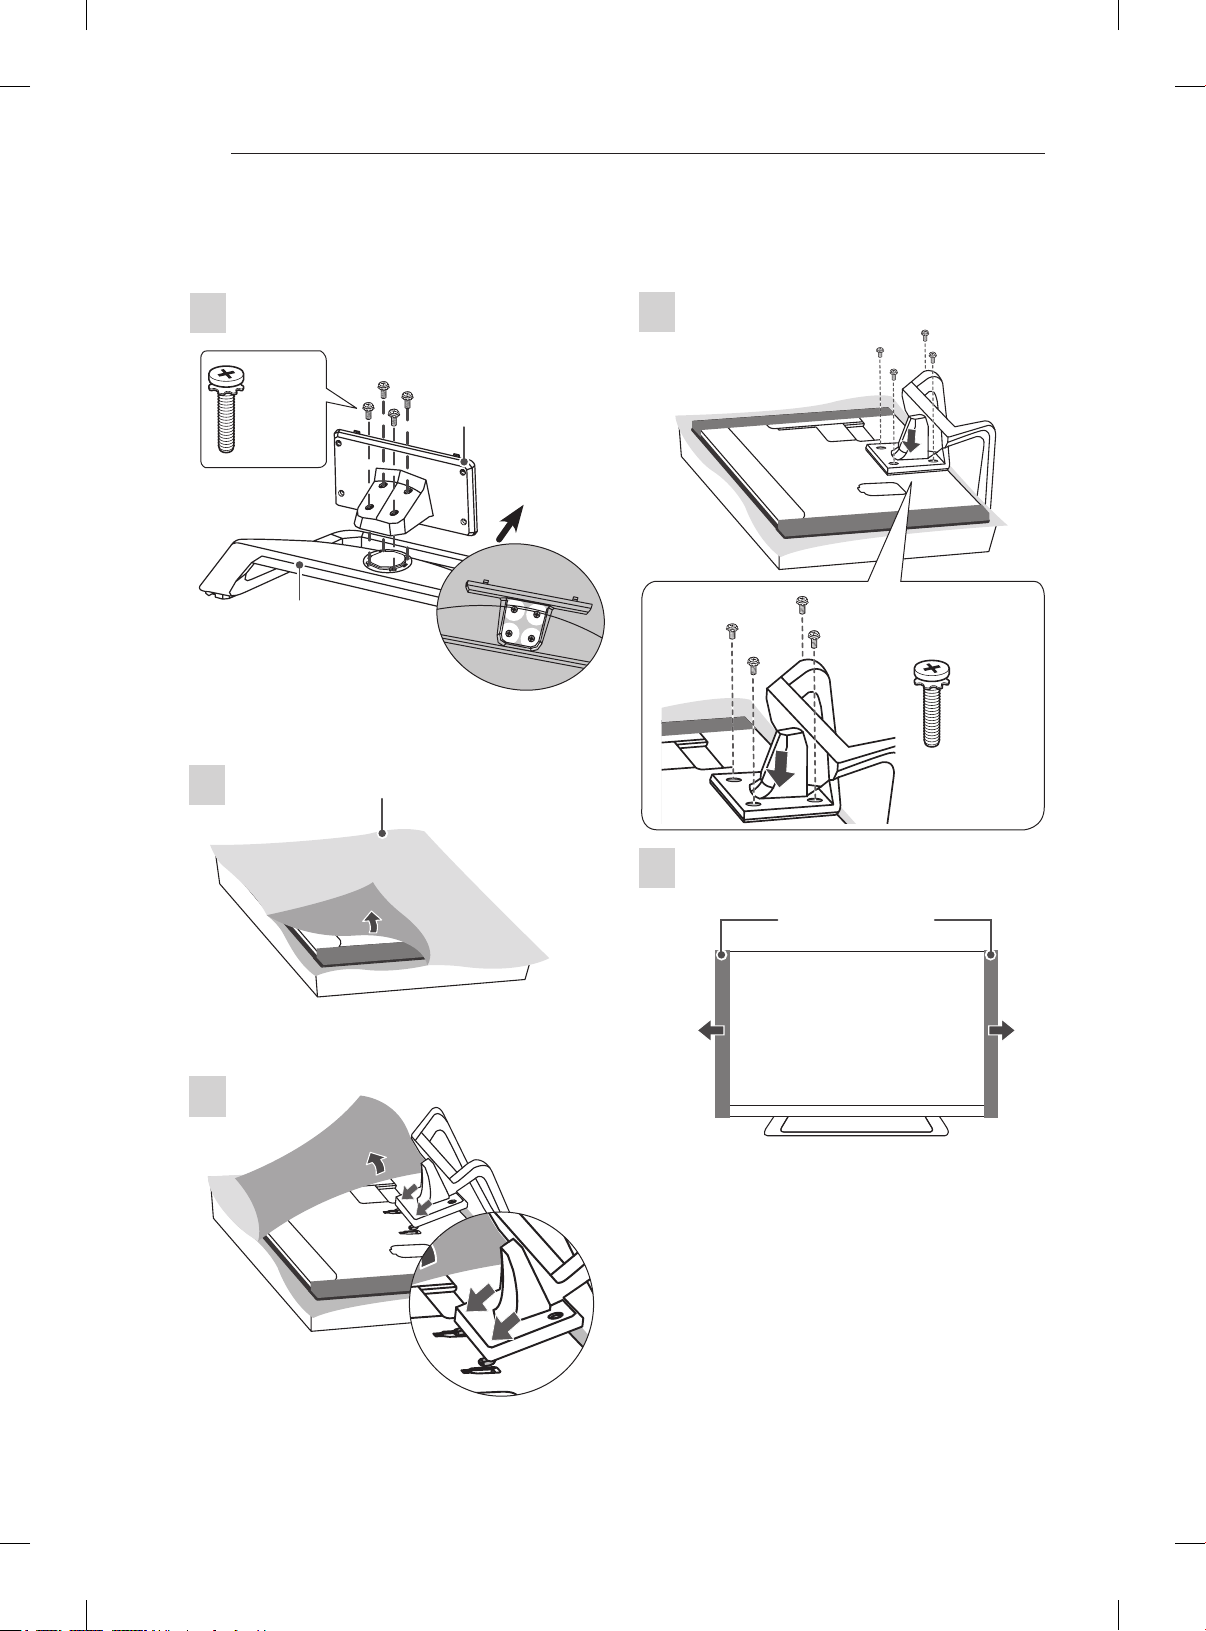
42/47/55/60LM64**, 42/47/55LM660*, 42/47/55LM67**, 42/47/55LM76**
1
M4 x 20
4EA
Stand Base
2
Wrapping bag
Stand Body
Front
Top View
4
M4 x 20
4EA
5
Protection pad
3
Page 5

SETTING UP THE TV
32/37/42LS57**, 65LM62**, 32LM669* 32LM64**, 32/37/42/47/55LM62**, 32LM660*
A-5
1
M4 x 20
4EA
Stand Base
2
Stand Body
Front
Top View
1
M4 x 20
Stand Body
4EA
Front
Stand Base
Top View
2
3
M4 x 20
4EA
3
M4 x 20
4EA
Page 6
SETTING UP THE TV
A-6
CAUTION
yWhen attaching the stand to the TV
set, place the screen facing down on a
cushioned table or flat surface to protect the
screen from scratches.
yMake sure that the screws are fastened
completely. (If they are not fastened securely
enough, the TV may tilt forward after being
installed.)
Do not fasten the screws with too much
force; otherwise they may be worn out and
get loosened.
NOTE
Remove the stand before installing the TV
on a wall mount by performing the stand
attachment in reverse.
Tidying cables
Only 32/37/42LS57**, 65LM62**, 32/42/47LM669*
1 Gather and bind the cables with the Cable
Holder.
Cable Holder
Only 32/37/42/47/55LM62**,
32/42/47/55/60LM64**, 32/42/47/55LM660*,
42/47/55LM67**, 42/47/55LM76**
1 Gather and bind the cables with the Cable
Management.
2 Fix the Cable Management rmly to the TV.
Cable Holder
Cable Management
CAUTION
Do not move the TV by holding the cable
holders, as the cable holders may break, and
injuries and damage to the TV may occur.
Page 7

OWNER’S MANUAL
LED LCD TV
Please read this manual carefully before operating
your set and retain it for future reference.
www.lg.com
Page 8
TABLE OF CONTENTS
2
ENGLISH
ENG
TABLE OF CONTENTS
3 LICENSES
3 OPEN SOURCE SOFTWARE NOTICE
4 SAFETY INSTRUCTIONS
10 - Viewing 3D Imaging (Only 3D models)
12 INSTALLATION PROCEDURE
12 ASSEMBLING AND PREPARING
12 Unpacking
15 Separate purchase
16 Parts and buttons
17 Lifting and moving the TV
18 Mounting on a table
20 Mounting on a wall
21 REMOTE CONTROL
23 MAGIC REMOTE CONTROL
FUNCTIONS
24 Registering Magic Remote Control
24 How to use Magic Remote Control
24 Precautions to Take when Using the Magic
Remote Control
25 USING THE USER GUIDE
26 MAINTENANCE
26 Cleaning your TV
26 - Screen, frame, cabinet and stand
26 - Power cord
26 TROUBLESHOOTING
27 SPECIFICATIONS
WARNING
yIf you ignore the warning message, you may
be seriously injured or there is a possibility
of accident or death.
CAUTION
yIf you ignore the caution message, you may
be slightly injured or the product may be
damaged.
NOTE
yThe note helps you understand and use
the product safely. Please read the note
carefully before using the product.
Page 9

LICENSES / OPEN SOURCE SOFTWARE NOTICE
3
LICENSES
Supported licenses may differ by model. For more information about licenses, visit www.lg.com.
Manufactured under license from Dolby Laboratories. “Dolby” and the double-D
symbol are trademarks of Dolby Laboratories.
HDMI, the HDMI logo and High-Definition Multimedia Interface are trademarks or
registered trademarks of HDMI Licensing LLC.
ABOUT DIVX VIDEO: DivX® is a digital video format created by DivX, LLC, a
subsidiary of Rovi Corporation. This is an ofcial DivX Certied® device that plays
DivX video. Visit divx.com for more information and software tools to convert your
les into DivX video.
ABOUT DIVX VIDEO-ON-DEMAND: This DivX Certied® device must be registered
in order to play purchased DivX Video-on-Demand (VOD) movies. To obtain your
registration code, locate the DivX VOD section in your device setup menu. Go to vod.
divx.com for more information on how to complete your registration.
ENGENGLISH
“DivX Certied® to play DivX® video up to HD 1080p, including premium content.”
“DivX®, DivX Certied® and associated logos are trademarks of Rovi Corporation or
its subsidiaries and are used under license.”
“Covered by one or more of the following U.S. patents :
7,295,673; 7,460,668; 7,515,710; 7,519,274”
Manufactured under license under U.S. Patent Nos: 5,956,674; 5,974,380; 6,487,535
& other U.S. and worldwide patents issued & pending. DTS, the Symbol & DTS and
the Symbol together are registered trademarks & DTS 2.0+Digital Out is a trademark
of DTS, Inc. Product includes software. © DTS, Inc. All Rights Reserved.
OPEN SOURCE SOFTWARE NOTICE
To obtain the source code under GPL, LGPL, MPL and other open source licenses, that is contained in this
product, please visit http://opensource.lge.com .
In addition to the source code, all referred license terms, warranty disclaimers and copyright notices are
available for download.
LG Electronics will also provide open source code to you on CD-ROM for a charge covering the cost of
performing such distribution (such as the cost of media, shipping and handling) upon email request to
opensource@lge.com. This offer is valid for three (3) years from the date on which you purchased the
product.
Page 10
SAFETY INSTRUCTIONS
4
ENGLISH
ENG
SAFETY INSTRUCTIONS
Please read these safety precautions carefully before using the product.
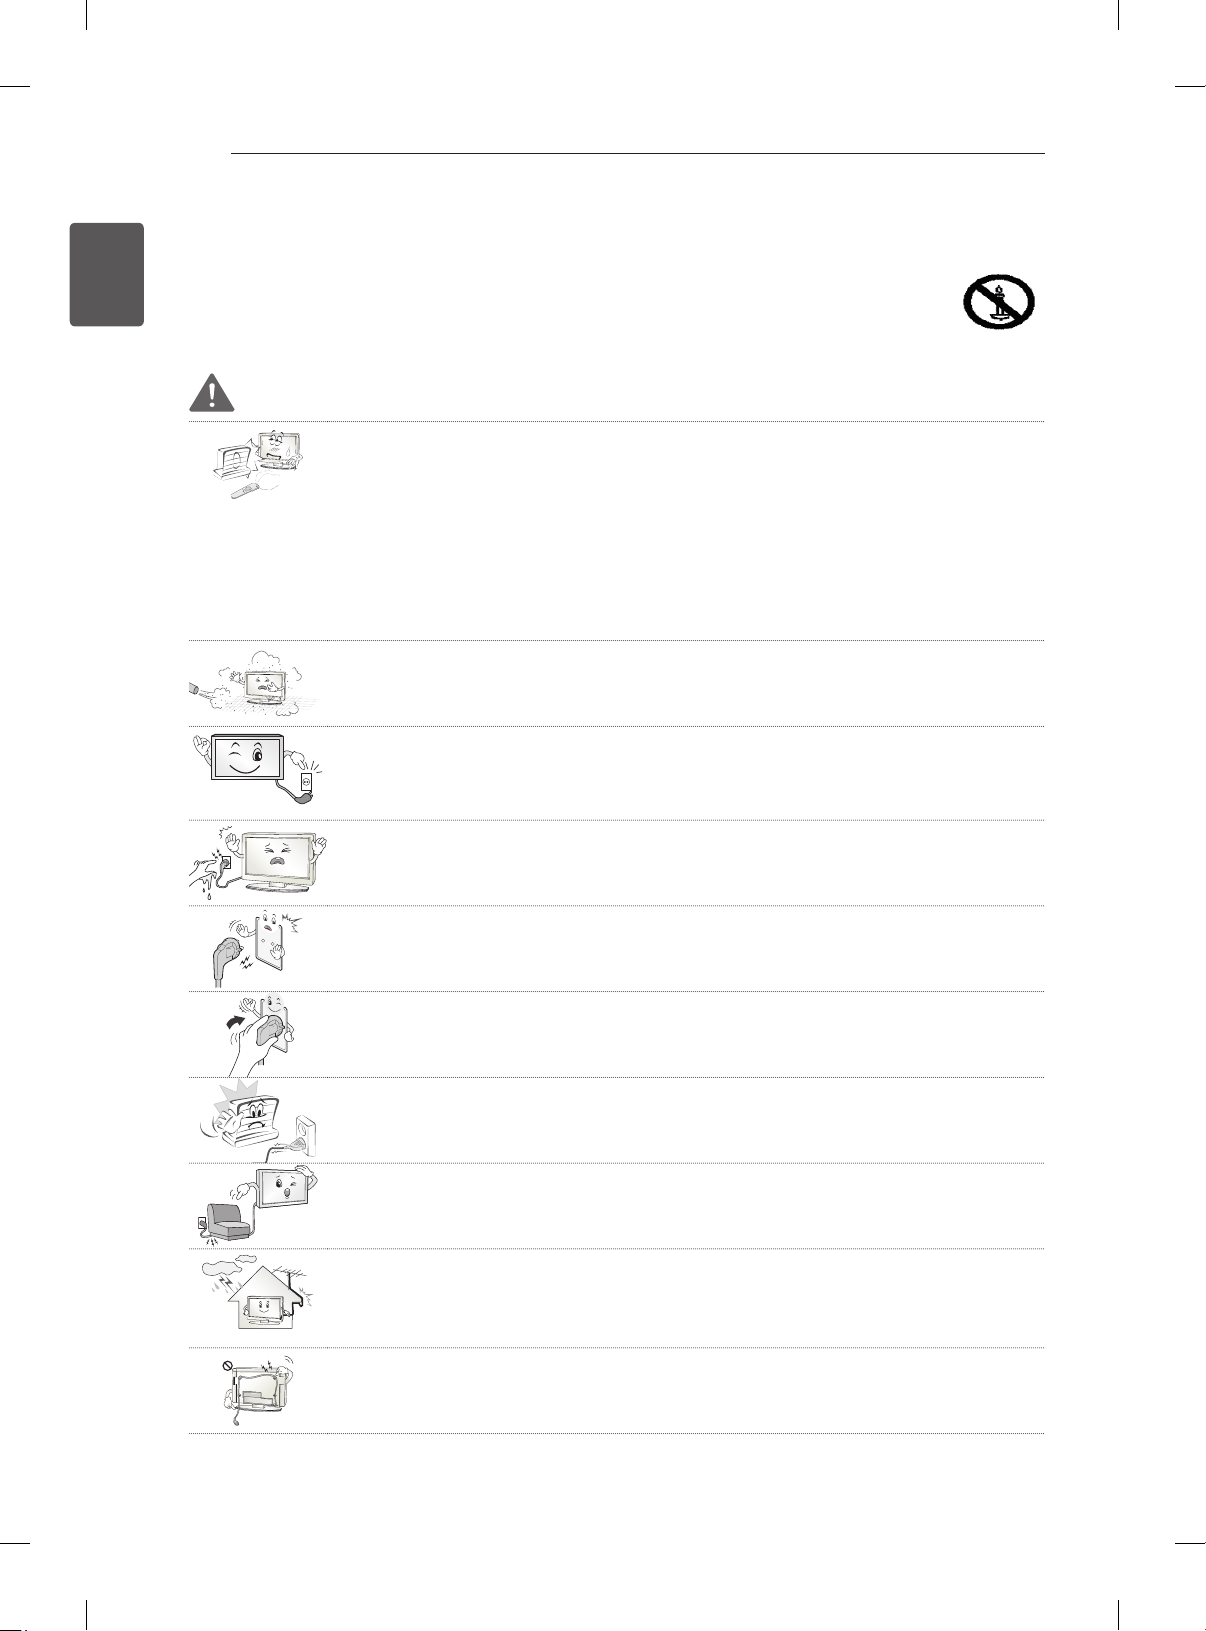
WARNING
Do not place the TV and remote control in the following environments:
y
- A location exposed to direct sunlight
- An area with high humidity such as a bathroom
- Near any heat source such as stoves and other devices that produce heat
- Near kitchen counters or humidifiers where they can easily be exposed to steam
or oil
- An area exposed to rain or wind
- Near containers of water such as vases
Otherwise, this may result in fire, electric shock, malfunction or product deformation.
Do not place the product where it might be exposed to dust.
y
This may cause a fire hazard.
Mains plug is the disconnecting device. The plug must remain readily operable.
y
Do not touch the power plug with wet hands. Additionally, if the cord pin is wet or
y
covered with dust, dry the power plug completely or wipe dust off.
You may be electrocuted due to excess moisture.
Make sure to connect the power cable to the grounded current. (Except for devices
y
which are not grounded.)
You may be electrocuted or injured.
Fix the power cable completely.
y
If the power cable is not fixed completely, a fire can break out.
Ensure the power cord does not come into contact with hot objects such as a
y
heater.
This may cause a fire or an electric shock hazard.
Do not place a heavy object, or the product itself, on power cables.
y
Otherwise, this may result in fire or electric shock.
Bend antenna cable between inside and outside building to prevent rain from
y
flowing in.
This may cause water damaged inside the Product and could give an electric
shock.
When mounting a TV it on the wall, make sure not to install TV by hanging power
y
and signal cables on the back of the TV.
It may cause fire, electric shock.
Page 11
Desiccant
SAFETY INSTRUCTIONS
Do not plug too many electrical devices into a single multiple electrical outlet.
y
Otherwise, this may result in fire due to over-heating.
Do not drop the product or let it fall over when connecting external devices.
y
Otherwise, this may result in injury or damage to the product.
Keep the packing anti-moisture material or vinyl packing out of the reach of
y
children.
Anti-moisture material is harmful if swallowed. If swallowed by mistake, force the
patient to vomit and visit the nearest hospital. Additionally, vinyl packing can cause
suffocation. Keep it out of the reach of children.
Do not let your children climb or cling onto the TV.
y
Otherwise, the TV may fall over, which may cause serious injury.
Dispose of used batteries carefully to protect a child from eating them.
y
In case that it eats them, take it to see a doctor immediately.
Do not insert a conductor (like a metal chopstick) into one end of the power cable
y
while the other end is connected to the input terminal on the wall. Additionally, do
not touch the power cable right after plugging into the wall input terminal.
You may be electrocuted.
(Depending on model)
Do not put or store inflammable substances near the product.
y
There is a danger of explosion or fire due careless handling of the inflammable
substances.
5
ENGENGLISH
Do not drop metallic objects such as coins, hair pins, chopsticks or wire into the
y
product, or inflammable objects such as paper and matches. Children must pay
particular attention.
Electrical shock, fire or injury can occur. If a foreign object is dropped into the
product, unplug the power cord and contact the service centre.
Do not spray water on the product or scrub with an inflammable substance (thinner
y
or benzene). Fire or electric shock accident can occur.
Do not allow a impact shock or any objects to fall into the product, and do not drop
y
onto the screen with something.
You may be injured or the product can be damaged.
Never touch this product or antenna during a thunder or lighting storm.
y
You may be electrocuted.
Never touch the wall outlet when there is leakage of gas, open the windows and
y
ventilate.
It may cause a fire or a burn by a spark.
Page 12
SAFETY INSTRUCTIONS
6
ENGLISH
ENG
Do not disassemble, repair or modify the product at your own discretion.
y
Fire or electric shock accident can occur.
Contact the service center for check, calibration or repair.
If any of the following occur, unplug the product immediately and contact your local
y
service centre.
- The product has been impacted by shock
- The product has been damaged
- Foreign objects have entered the product
- The product produced smoke or a strange smell
This may result in fire or electric shock.
If you don’t intend to use the product for a long time, unplug the power cable from
y
the product.
Covering dust can cause a fire, or insulation deterioration can cause electric
leakage, electric shock or fire.
Apparatus shall not be exposed to dripping or splashing and no objects filled with
y
liquids, such as vases, shall be placed on the apparatus.
Page 13
SAFETY INSTRUCTIONS
5~7 times
7
CAUTION
Install the product where no radio wave occurs.
y
There should be enough distance between an outside antenna and power lines to
y
keep the former from touching the latter even when the antenna falls.
This may cause an electric shock.
Do not install the product on places such as unstable shelves or inclined surfaces.
y
Also avoid places where there is vibration or where the product cannot be fully
supported.
Otherwise, the product may fall or flip over, which may cause injury or damage to
the product.
If you install the TV on a stand, you need to take actions to prevent the product
y
from overturning. Otherwise, the product may fall over, which may cause injury.
If you intend to mount the product to a wall, attach VESA standard mounting interface (optional
y
parts) to the back of the product. When you install the set to use the wall mounting bracket (optional
parts), fix it carefully so as not to drop.
Only use the attachments / accessories specified by the manufacturer.
y
When installing the antenna, consult a qualified service man.
y
This may create a fire hazard or an electric shock hazard.
ENGENGLISH
We recommend that you maintain a distance of at least 5 to 7 times the diagonal
y
screen size when watching TV.
If you watch TV for a long period of time, this may cause blurred vision.
Only use the specified type of battery.
y
This could cause damage to the remote control.
Do not mix new batteries with old batteries.
y
This may cause the batteries to overheat and leak.
Make sure there are no objects between the remote control and its sensor.
y
Signal from the remote control may be disturbed by sun light or other strong light.
y
In this case, darken the room.
When connecting external devices such as video game consoles, make sure the
y
connecting cables are long enough.
Otherwise, the product may fall over, which may cause injury or damage the
product.
Page 14
SAFETY INSTRUCTIONS
8
ENGLISH
ENG
Do not turn the product On/Off by plugging-in or unplugging the power plug to the
y
wall outlet. (Do not use the power plug for switch.)
It may cause mechanical failure or could give an electric shock.
Please follow the installation instructions below to prevent the product from
y
overheating.
- The distance between the product and the wall should be more than 10 cm.
- Do not install the product in a place with no ventilation (e.g., on a bookshelf or in
a cupboard).
- Do not install the product on a carpet or cushion.
- Make sure the air vent is not blocked by a tablecloth or curtain.
Otherwise, this may result in fire.
Take care not to touch the ventilation openings when watching the TV for long
y
periods as the ventilation openings may become hot. This does not affect the
operation or performance of the product.
Periodically examine the cord of your appliance, and if its appearance indicates damage or
y
deterioration, unplug it, discontinue use of the appliance, and have the cord replaced with an exact
replacement part by an authorized servicer.
Prevent dust collecting on the power plug pins or outlet.
y
This may cause a fire hazard.
Protect the power cord from physical or mechanical abuse, such as being twisted,
y
kinked, pinched, closed in a door, or walked upon. Pay particular attention to plugs,
wall outlets, and the point where the cord exits the appliance.
Do not press strongly upon the panel with a hand or sharp object such as nail,
y
pencil or pen, or make a scratch on it.
Avoid touching the screen or holding your finger(s) against it for long periods of
y
time. Doing so may produce some temporary distortion effects on the screen.
When cleaning the product and its components, unplug the power first and wipe it
y
with a soft cloth. Applying excessive force may cause scratches or discolouration.
Do not spray with water or wipe with a wet cloth. Never use glass cleaner, car or
industrial shiner, abrasives or wax, benzene, alcohol etc., which can damage the
product and its panel.
Otherwise, this may result in fire, electric shock or product damage (deformation,
corrosion or breakage).
As long as this unit is connected to the AC wall outlet, it is not disconnected from the AC power
y
source even if you turn off this unit by SWITCH.
When unplugging the cable, grab the plug and unplug it.
y
If the wires inside the power cable are disconnected, this may cause fire.
When moving the product, make sure you turn the power off first. Then, unplug the
y
power cables, antenna cables and all connecting cables.
The TV set or power cord may be damaged, which may create a fire hazard or
cause electric shock.
Page 15
SAFETY INSTRUCTIONS
When moving or unpacking the product, work in pairs because the product is
y
heavy.
Otherwise, this may result in injury.
Contact the service center once a year to clean the internal parts of the product.
y
Accumulated dust can cause mechanical failure.
Refer all servicing to qualified service personnel. Servicing is required when the
y
apparatus has been damaged in any way, such as power supply cord or plug is
damaged, liquid has been spilled or objects have fallen into the apparatus, the
apparatus has been exposed to rain or moisture, does not operate normally, or has
been dropped.
If the product feels cold to the touch, there may be a small “flicker” when it is turned
y
on. This is normal, there is nothing wrong with product.
The panel is a high technology display product with resolution of two million to six
y
million pixels. You may see tiny black dots and/or brightly coloured dots (red, blue
or green) at a size of 1 ppm on the panel. This does not indicate a malfunction and
does not affect the performance and reliability of the product.
This phenomenon also occurs in third-party products and is not subject to
exchange or refund.
You may find different brightness and color of the panel depending on your viewing
y
position(left/right/top/down).
This phenomenon occurs due to the characteristic of the panel. It is not related with
the product performance, and it is not malfunction.
9
ENGENGLISH
Displaying a still image (e.g., broadcasting channel logo, on-screen menu, scene from a video
y
game) for a prolonged time may cause damage to the screen, resulting in retention of the image,
which is known as image sticking. The warranty does not cover the product for image sticking.
Avoid displaying a fixed image on your television’s screen for a prolonged period (2 or more hours
for LCD, 1 or more hours for Plasma).
Also, if you watch the TV at a ratio of 4:3 for a long time, image sticking may occur on the borders of
the panel.
This phenomenon also occurs in third-party products and is not subject to exchange or refund.
Generated Sound
y
“Cracking” noise: A cracking noise that occurs when watching or turning off the TV is generated by
plastic thermal contraction due to tempera-ture and humidity. This noise is common for products
where thermal deformation is required. Electrical circuit humming/panel buzzing: A low level noise is
generated from a high-speed switching circuit, which supplies a large amount of current to operate a
product. It varies depending on the product.
This generated sound does not affect the performance and reliability of the product.
Page 16
SAFETY INSTRUCTIONS
10
ENGLISH
ENG
Viewing 3D Imaging (Only 3D models)
WARNING
Viewing Environment
yViewing Time
- When watching 3D contents, take 5 - 15 minute breaks every hour. Viewing 3D contents for a long
period of time may cause headache, dizziness, fatigue or eye strain.
Those that have a photosensitive seizure or chronic illness
ySome users may experience a seizure or other abnormal symptoms when they are exposed to a
ashing light or particular pattern from 3D contents.
yDo not watch 3D videos if you feel nausea, are pregnant and/ or have a chronic illness such as epilepsy,
cardiac disorder, or blood pressure disease, etc.
y3D Contents are not recommended to those who suffer from stereo blindness or stereo anomaly. Double
images or discomfort in viewing may be experienced.
yIf you have strabismus (cross-eyed), amblyopia (weak eyesight) or astigmatism, you may have trouble
sensing depth and easily feel fatigue due to double images. It is advised to take frequent breaks than
the average adult.
yIf your eyesight varies between your right and left eye, revise your eyesight prior to watching 3D
contents.
Symptoms which require discontinuation or refraining from watching 3D contents
yDo not watch 3D contents when you feel fatigue from lack of sleep, overwork or drinking.
yWhen these symptoms are experienced, stop using/watching 3D contents and get enough rest until the
symptom subsides.
- Consult your doctor when the symptoms persist. Symptoms may include headache, eyeball pain,
dizziness, nausea, palpitation, blurriness, discomfort, double image, visual inconvenience or fatigue.
Page 17
SAFETY INSTRUCTIONS
11
CAUTION
Viewing Environment
y Viewing Distance
- Maintain a distance of at least twice the screen diagonal length when watching 3D contents. If you
feel discomfort in viewing 3D contents, move further away from the TV.
Viewing Age
yInfants/Children
- Usage/ Viewing 3D contents for children under the age of 5 are prohibited.
- Children under the age of 10 may overreact and become overly excited because their vision is in
development (for example: trying to touch the screen or trying to jump into it. Special monitoring
and extra attention is required for children watching 3D contents.
- Children have greater binocular disparity of 3D presentations than adults because the distance
between the eyes is shorter than that of adults. Therefore they will perceive more stereoscopic
depth compared to adults for the same 3D image.
yTeenagers
- Teenagers under the age of 19 may react with sensitivity due to stimulation from light in 3D
contents. Advise them to refrain from watching 3D contens for a long time when they are tired.
yElderly
- The elderly may perceive less 3D effect compared to the young. Do not sit closer to the TV than the
recommended distance.
ENGENGLISH
Cautions when using the 3D glasses
y Make sure to use LG 3D glasses. Otherwise, you may not be able to view 3D videos properly.
y Do not use 3D glasses instead of your normal glasses, sunglasses or protective goggles.
y Using modied 3D glasses may cause eye strain or image distortion.
y Do not keep your 3D glasses in extremely high or low temperatures. It will cause deformation.
y The 3D glasses are fragile and are easily scratched. Always use a soft, clean piece of cloth when wiping
the lenses. Do not scratch the lenses of the 3D glasses with sharp objects or clean/wipe them with
chemicals.
Page 18

ENGLISH
<
<
ENG
INSTALLATION PROCEDURE / ASSEMBLING AND PREPARING
12
NOTE
yImage shown may differ from your TV.
yYour TV’s OSD (On Screen Display) may differ slightly from that shown in this manual.
yThe available menus and options may differ from the input source or product model that you are
using.
yNew features may be added to this TV in the future.
yThe TV can be placed in standby mode in order to reduce the power consumption. And the TV should
be turned off if it will not be watched for some time, as this will reduce energy consumption.
yThe energy consumed during use can be significantly reduced if the level of brightness of the picture
is reduced, and this will reduce the overall running cost.
INSTALLATION PROCEDURE
1 Open the package and make sure all the accessories are included.
2 Attach the stand to the TV set.
3 Connect an external device to the TV set.
4 Make sure the network connection is available.
You can use the TV network functions only when the network connection is made.
ASSEMBLING AND PREPARING
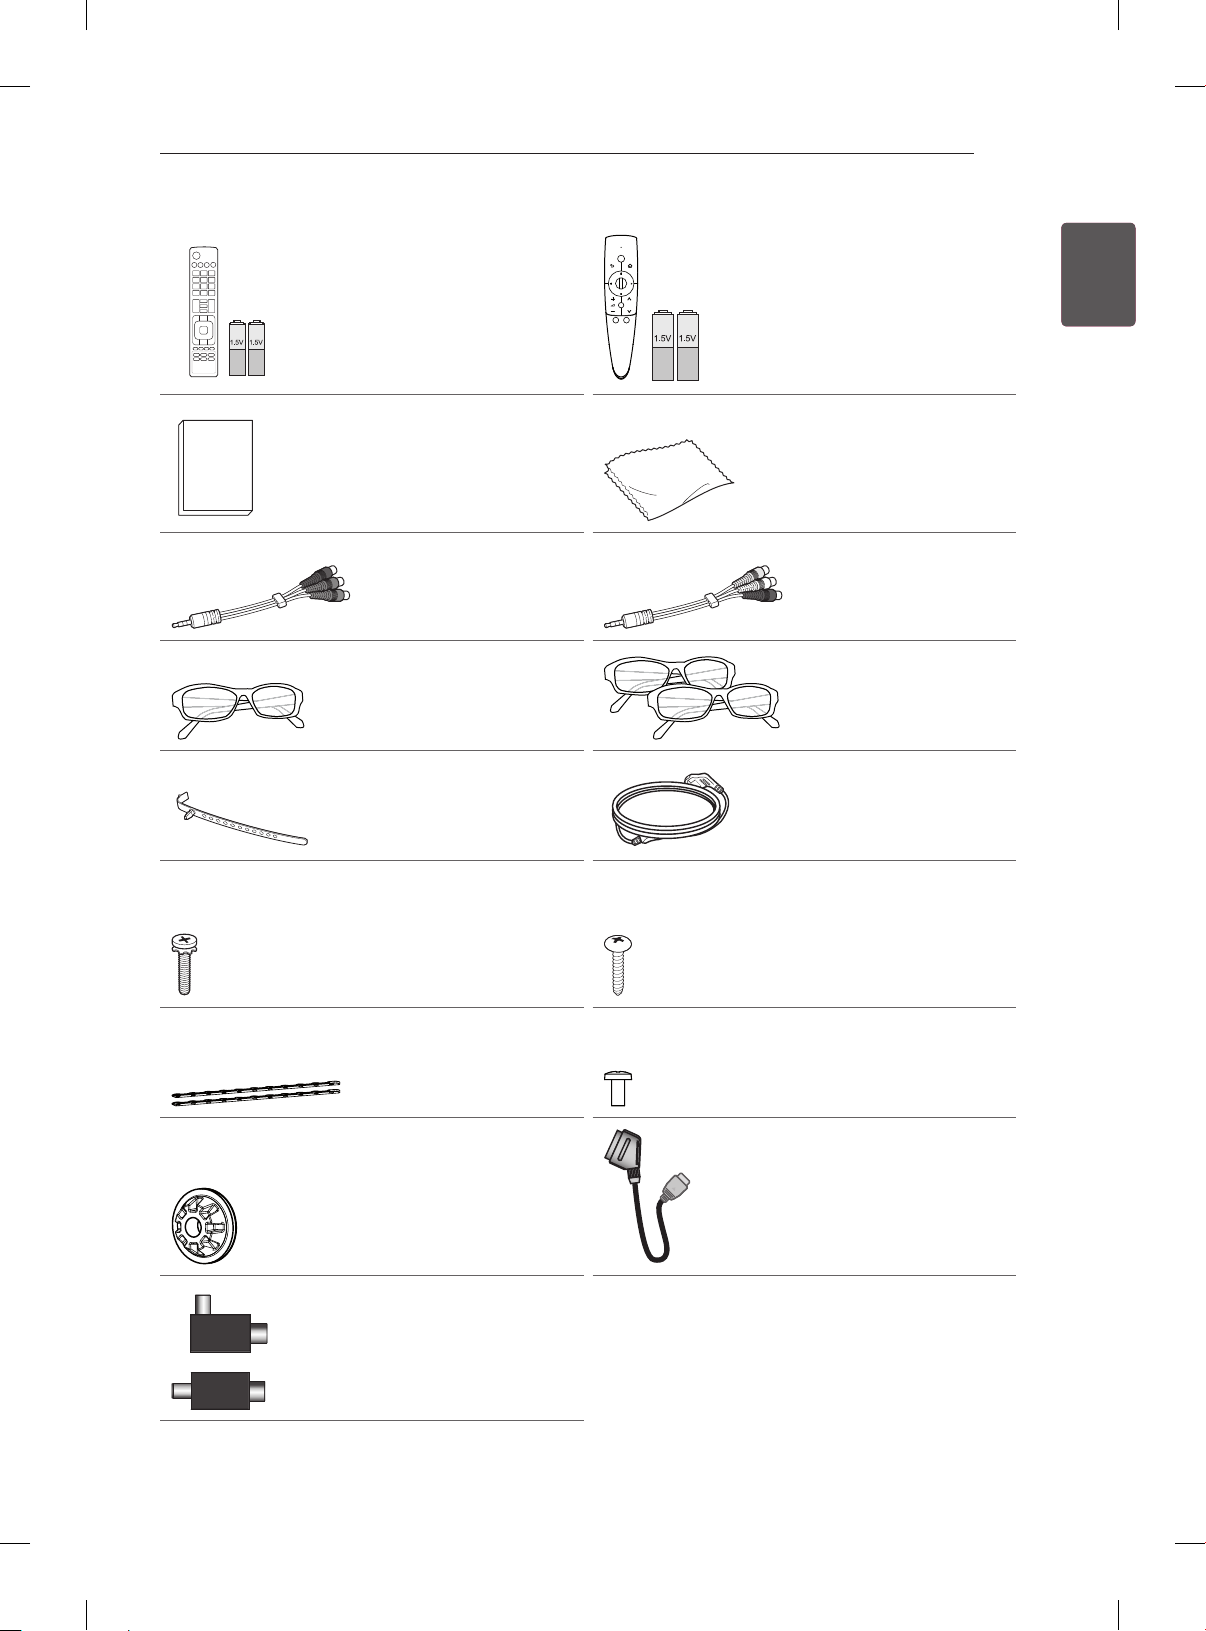
Unpacking
Check your product box for the following items. If there are any missing accessories, contact the local
dealer where you purchased your product. The illustrations in this manual may differ from the actual
product and item.
CAUTION
yDo not use any unapproved items to ensure the safety and product life span.
yAny damag or injuries caused by using unapproved items are not covered by the warranty.
ySome models have a thin film attached on to the screen and this must not be removed.
NOTE
yThe items supplied with your product may vary depending on the model.
yProduct specifications or contents of this manual may be changed without prior notice due to upgrade
of product functions.
yFor an optimal connection, HDMI cables and USB devices should have bezels less than 10 mm thick
and 18 mm width. Use an extension cable that supports USB 2.0 if the USB cable or USB memory
stick does not fit into your TV’s USB port.
B
A
B
*A
10 mm
=
18 mm
*B
A
=
Page 19
ASSEMBLING AND PREPARING
13
ENERGY
SAVING
AV MODE
1 2 3
4 5 6
7 809
LIST
MENU
BACK
INPUT
TV
FLASHBK
MARK
FAV
P
A
G
3D
CHVOL
E
MUTE
INFO
Q.MENU
ENTER
EXIT
L/R SELECT
FREEZE
RATIO
Remote control and
batteries (AAA)
P
(See p. 21, 22)
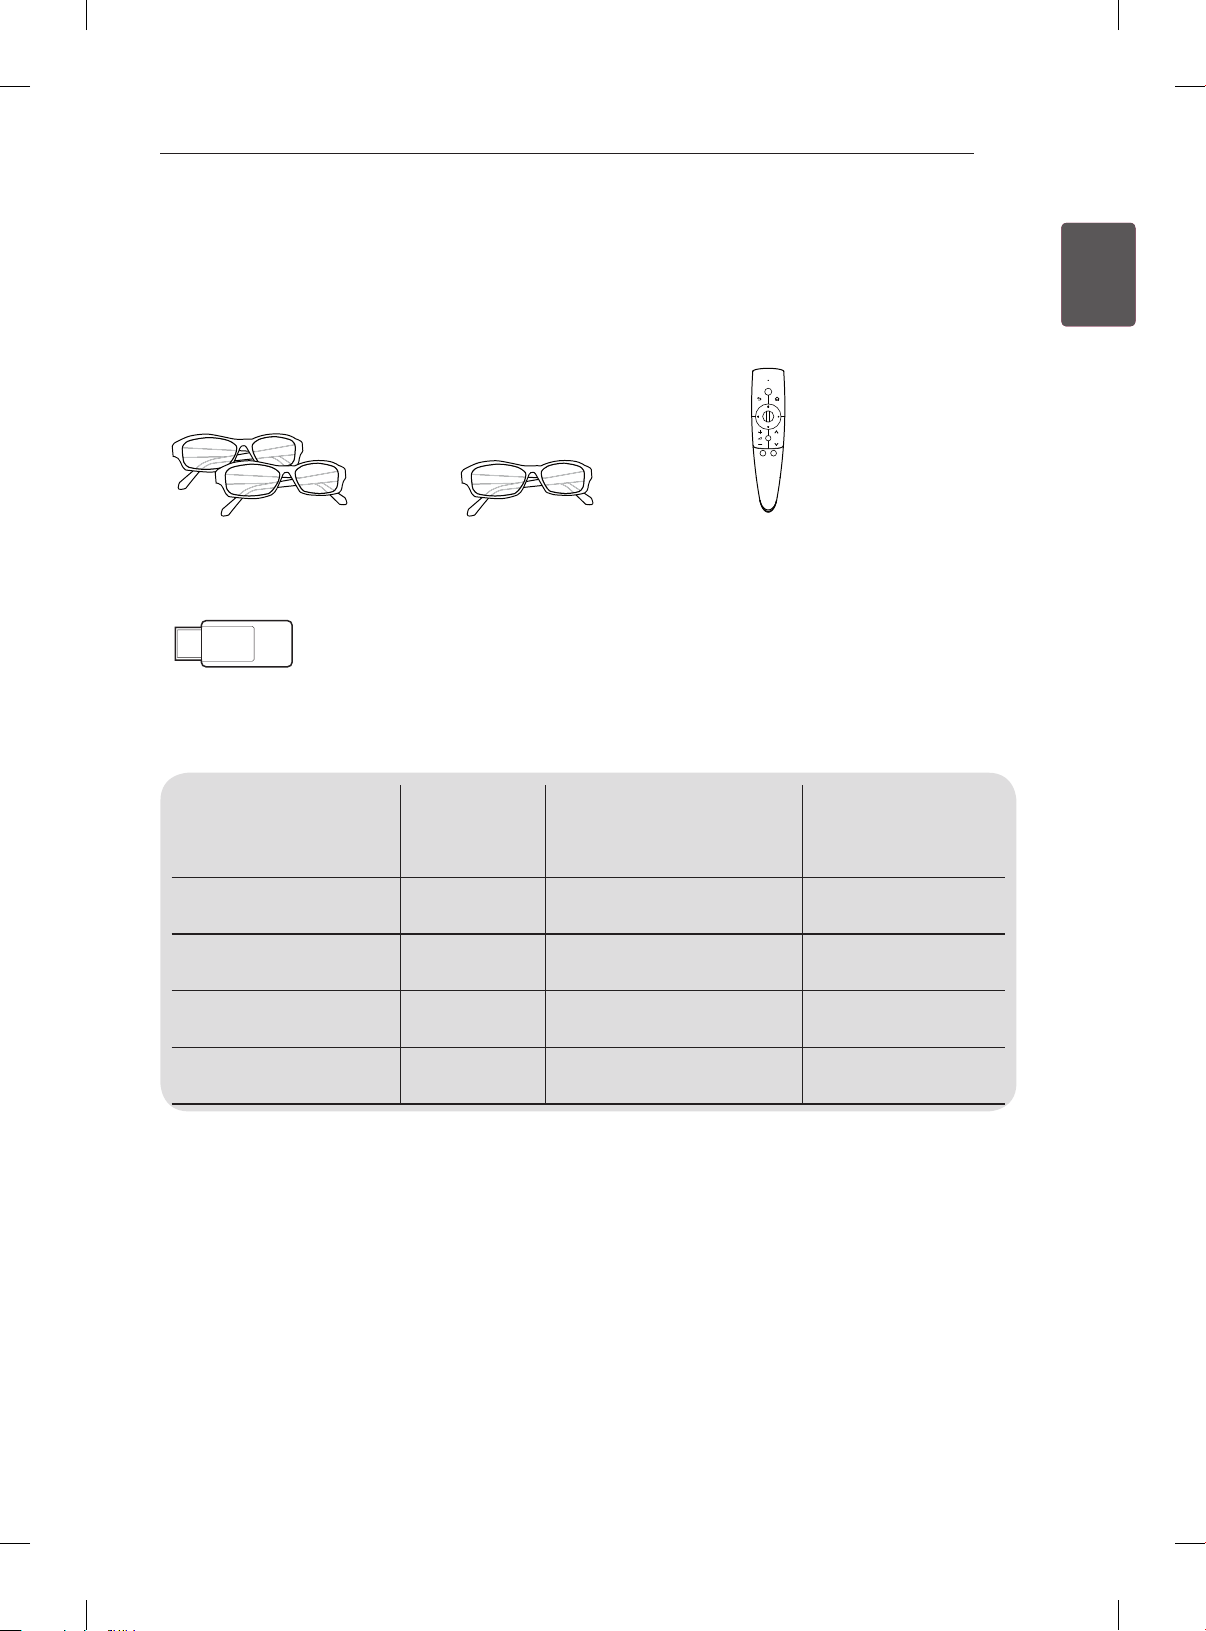
Magic Remote Control,
Batteries (AA)
(Only 60LM645*,
32/42/47/55LM66**,
42/47/55LM67**,
42/47/55LM76**)
(See p. 23)
ENGENGLISH
Polishing cloth
(Depending on model)
Use this to remove dust
Owner’s manual
Component video cable
(See p. B-7)
from the cabinet.
Composite video cable
(See p. B-7 , B-8)
Cinema 3D Glasses
The number of 3D glasses
may differ depending on
the model or country.
(Except 32/37/42LS57**)
Cable holder
(Depending on model)
(See p. A-6)
Dual play glasses
(Only 42/47/55LM76**)
Power Cord
(Only 32/37/42LS57**,
32/37/42/47/55LM62**)
or
Stand Screws
8EA, M4 x 20
(See p. A-3, A-4, A-5)
Desk-mount Cable
2EA
(Only 32/37LM62**,
32LM660*)
(See p. 18)
Wall mount inner spacers
4EA
(Only 32/37/42LS57**,
32/37/42/47/55LM62**)
(See p.20)
Isolator
(Depending on model)
(See p. 14)
Desk-mount Screw
(1EA: Only
32/37/42LS57**,
32/42/47LM669*)
(2EA: Only 32/37LM62**,
32LM660*)
(See p. 18)
Bracket Screw
2EA, M4 x 8
(Only 32/37LM62**,
32LM660*)
(See p. 18)
SCART Gender Cable
(See p. B-14)
Page 20

ENGLISH
ENG
ASSEMBLING AND PREPARING
14
Stand Body / Stand Base
(Only 32/37/42LS57**, 65LM62**, 32/42/47LM669*)
(See p. A-3, A-5)
Stand Body / Stand Base
(Only 32/37/42/47/55LM62**, 32/42/47/55/60LM64**, 32/42/47/55LM660*,
42/47/55LM67**, 42/47/55LM76**)
(See p. A-4, A-5)
NOTE
yAntenna Isolator Installation Guide
- Use this to install TV in a place where there is a voltage difference between TV Set and GND of
antenna signal.
»If there is a voltage difference between TV Set and GND of antenna signal, the antenna contact
might be heated and excessive heat might cause an accident.
- You can improve the safety when watching TV by efficiently removing power voltage from TV
antenna. It is recommended to mount the isolator to the wall. If it cannot be mounted to the wall,
mount it on the TV. Avoid disconnecting the antenna Isolator after installation.
- Before starting, be sure that the TV antenna is connected.
Wall
1. Connect to TV.
ANTENNA/
CABLE IN
Cable / Antenna
or
Isolator
2. Connect to Set-Top box.
Connect one end of the isolator to cable/antenna jack and the other to TV set or set-top box.
“Equipment connected to the protective earthing of the building installation through the mains connection
or through other equipment with a connection to protective earthing - and to a cable distribution system
using coaxial cable, may in some circumstances create a re hazard. Connection to a cable distribution
system has therefore to be provided through a device providing electrical isolation below a certain
frequency range (galvanic isolator, see EN 60728-11)”
When applying the RF Isolator, a slight loss of signal sensitivity can occur.
Page 21
ASSEMBLING AND PREPARING
15
Separate purchase
Separate purchase items can be changed or modied for quality improvement without any notication.
Contact your dealer to buy these items.
These devices only work with certain models.
P
AG-F2**DP, AG-F3**DP
Dual play glasses
AN-WF100
Wireless LAN
Compatibility
AG-F2**DP, AG-F3**DP
Dual play glasses
AG-F2**, AG-F3
Cinema 3D Glasses
AN-MR300
Magic Remote Control
AN-WF100
Wireless LAN
**
AG-F2**, AG-F3
Cinema 3D Glasses
32/37/42LS57**
**
32/37/42/47/55/65LM62**,
32/42/47/55/60LM64**
(Except 60LM645*)
AN-MR300
Magic Remote Control
• •
• •
• • •
• •
60LM645*,
32/42/47/55LM66**,
42/47/55LM67**,
42/47/55LM76**
ENGENGLISH
The model name or design may be changed depending on the upgrade of product functions, manufacturer’s
circumstances or policies.
Page 22
ASSEMBLING AND PREPARING
H
H
H
16
ENGLISH
ENG
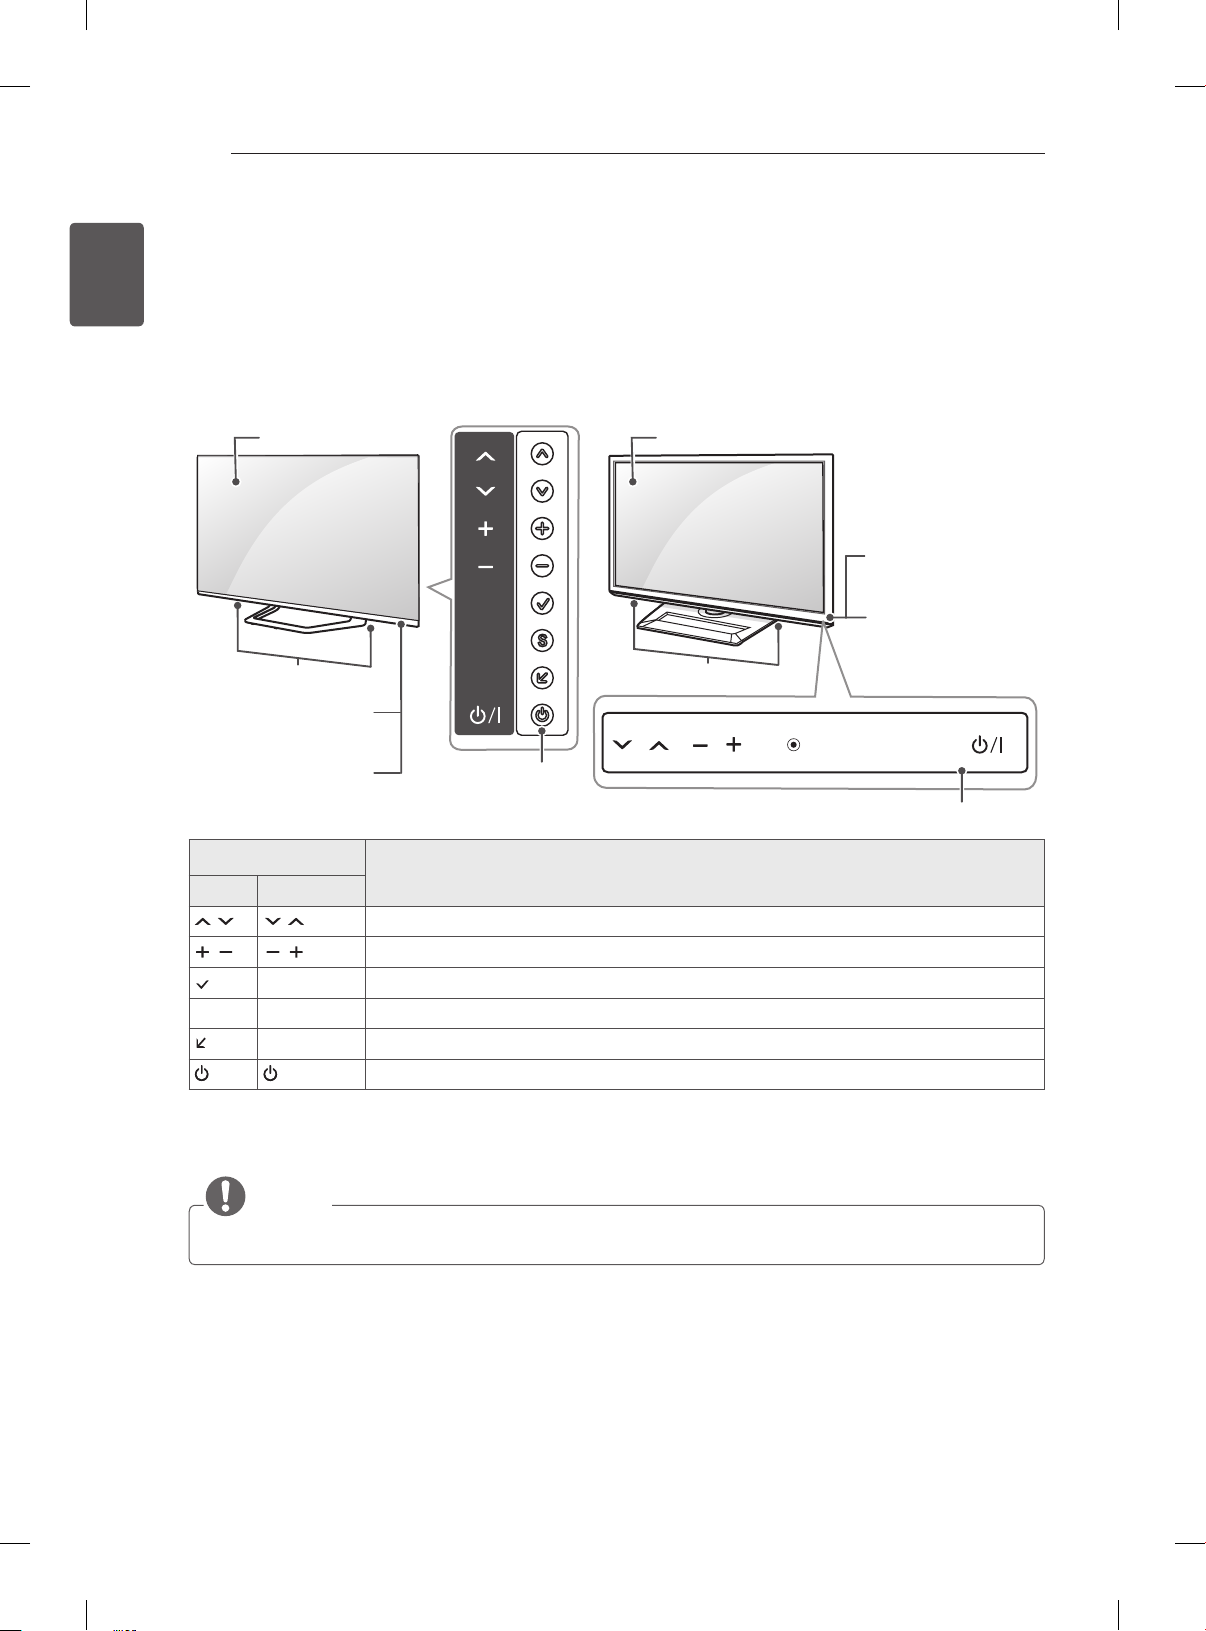
Parts and buttons
32/42/47/55LM66**, 42/47/55LM67**,
42/47/55LM76**
Screen Screen
Speakers Speakers
Remote control and
intelligent sensors
Power indicator
1
OK
SETTINGS
INPUT
Buttons
B type : 32/37/42LS57**, 32/37/42/47/55/65LM62**A type : 32/42/47/55/60LM64**,
Remote control and
intelligent sensors
1
Power indicator
OK
SETTINGS
INPUT
Touch buttons
2
Button Description
A type B type
Scrolls through the saved programmes.
Adjusts the volume level.
OK
ꔉ
Selects the highlighted menu option or confirms an input.
S SETTINGS Accesses the main menu, or saves your input and exits the menus.
INPUT Changes the input source.
/ I
Turns the power on or off.
1 Intelligent sensor - Adjusts the image quality and brightness based on the surrounding environment.
2 B type buttons are touch sensitive and can be operated through simple touch with your nger.
NOTE
yYou can set the power indicator light to on or off by selecting OPTION in the main menus.
Page 23
ASSEMBLING AND PREPARING
17
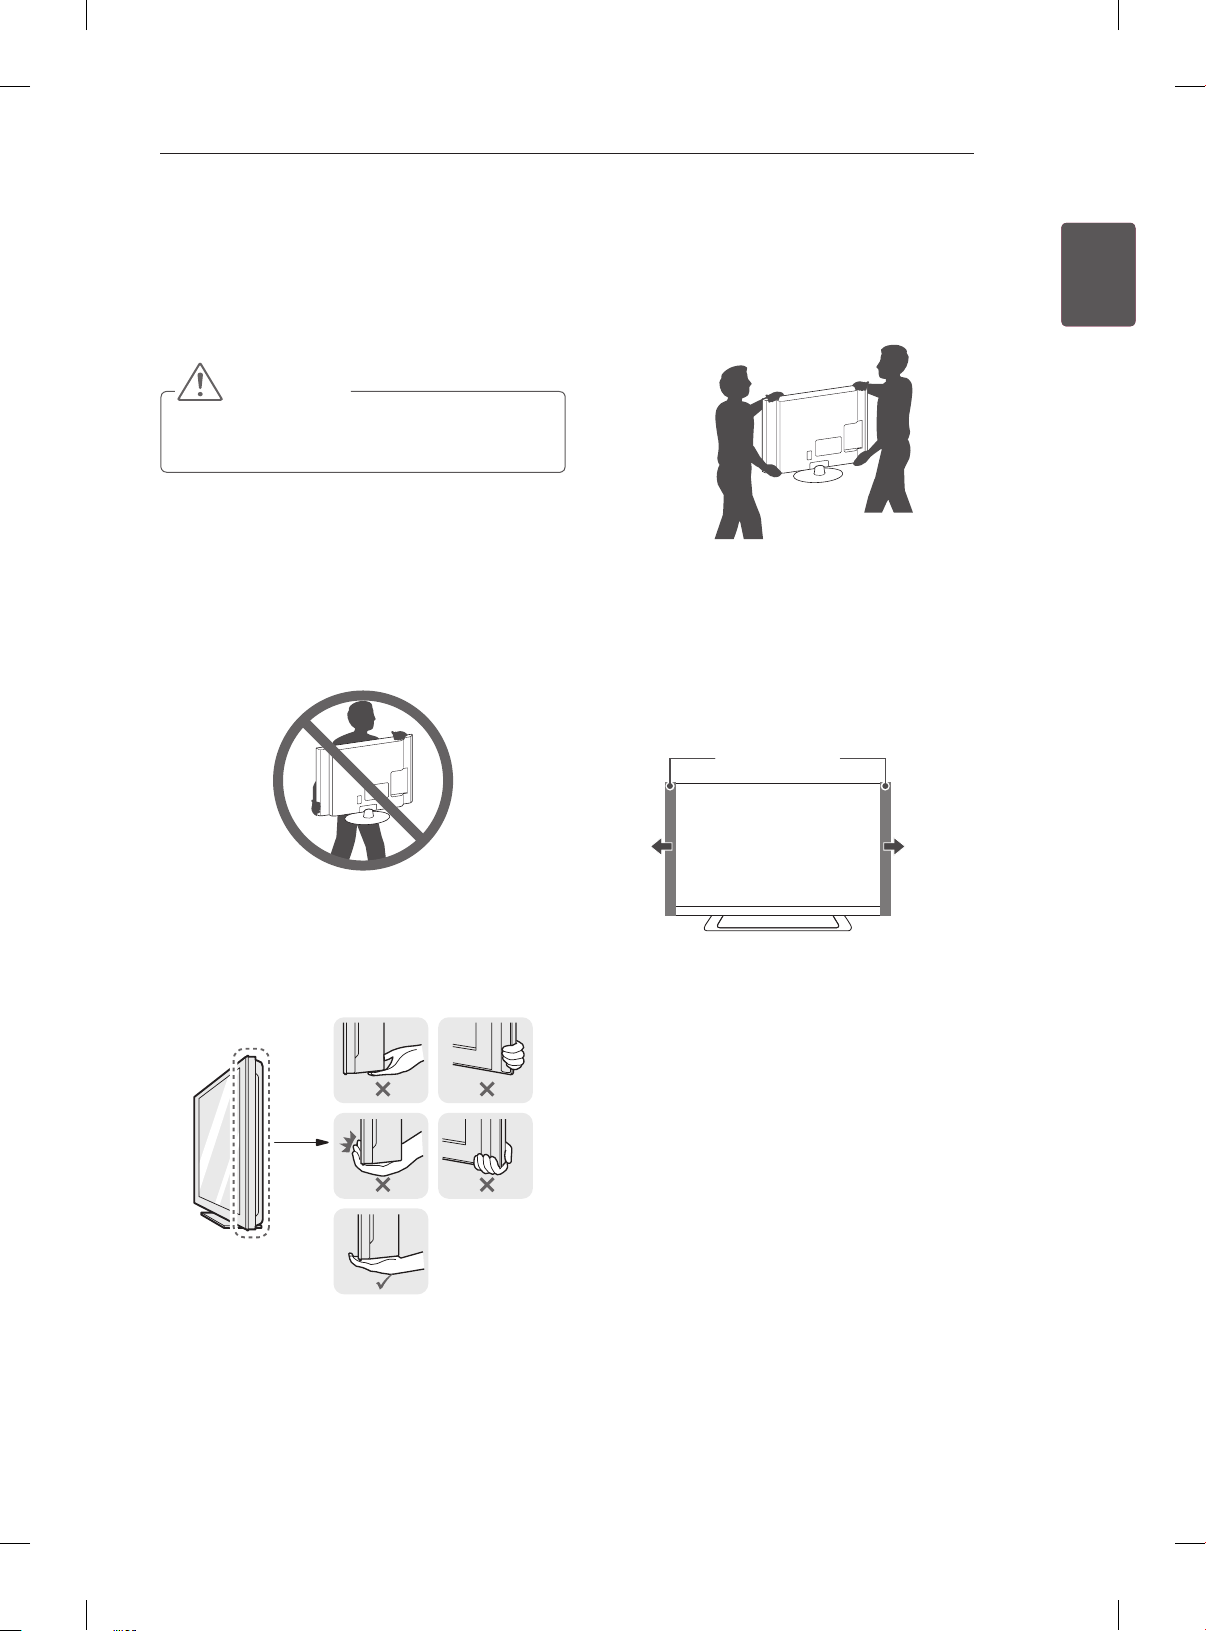
Lifting and moving the TV
Please note the following advice to prevent the
TV from being scratched or damaged and for safe
transportation regardless of its type and size.
CAUTION
yAvoid touching the screen at all times, as
this may result in damage to the screen.
yIt is recommended to move the TV in the box
or packing material that the TV originally came
in.
yBefore moving or lifting the TV, disconnect the
power cord and all cables.
yWhen holding the TV, the screen should face
away from you to avoid damage.
yWhen transporting a large TV, there should be
at least 2 people.
yWhen transporting the TV by hand, hold the TV
as shown in the following illustration.
yWhen transporting the TV, do not expose the
TV to jolts or excessive vibration.
yWhen transporting the TV, keep the TV upright,
never turn the TV on its side or tilt towards the
left or right.
yWhenever you handle TV, Protection pad
should be covered with side of TV. (Depending
on model)
Protection Pad
ENGENGLISH
yHold the top and bottom of the TV frame rmly.
Make sure not to hold the transparent part,
speaker, or speaker grill area.
Page 24

ASSEMBLING AND PREPARING
18
ENGLISH
ENG
Mounting on a table
1 Lift and tilt the TV into its upright position on a
table.
- Leave a 10 cm (minimum) space from the
wall for proper ventilation.
10 cm
10 cm
2 Connect the power cord to a wall outlet.
CAUTION
yDo not place the TV near or on sources
of heat, as this may result in fire or other
damage.
10 cm
10 cm
Securing the TV to a table
Fix the TV to a table to prevent from tilting forward,
damage, and potential injury.
To secure the TV to a table, insert and tighten the
supplied screw on the rear of the stand.
(Only 32/37/42LS57**, 32/42/47LM669*)
(Only 32/37LM62**, 32LM660*
)
M4 x 8
2EA
NOTE
(Only 32/37LM62**, 32LM660*)
How to fix the TV to a table
1. Connect the Desk-mount Cables to the
Stand Base using the Bracket Screws.
2. Fix the Desk-mount Cables to a table using
the Desk-mount Screws.
3. Once the TV is fixed, move the table close
to the wall. Children may go in, causing
injuries.
WARNING
yTo prevent TV from falling over, the TV
should be securely attached to the floor/
wall per installation instructions. Tipping,
shaking, or rocking the TV may cause injury.
Page 25
ASSEMBLING AND PREPARING
19
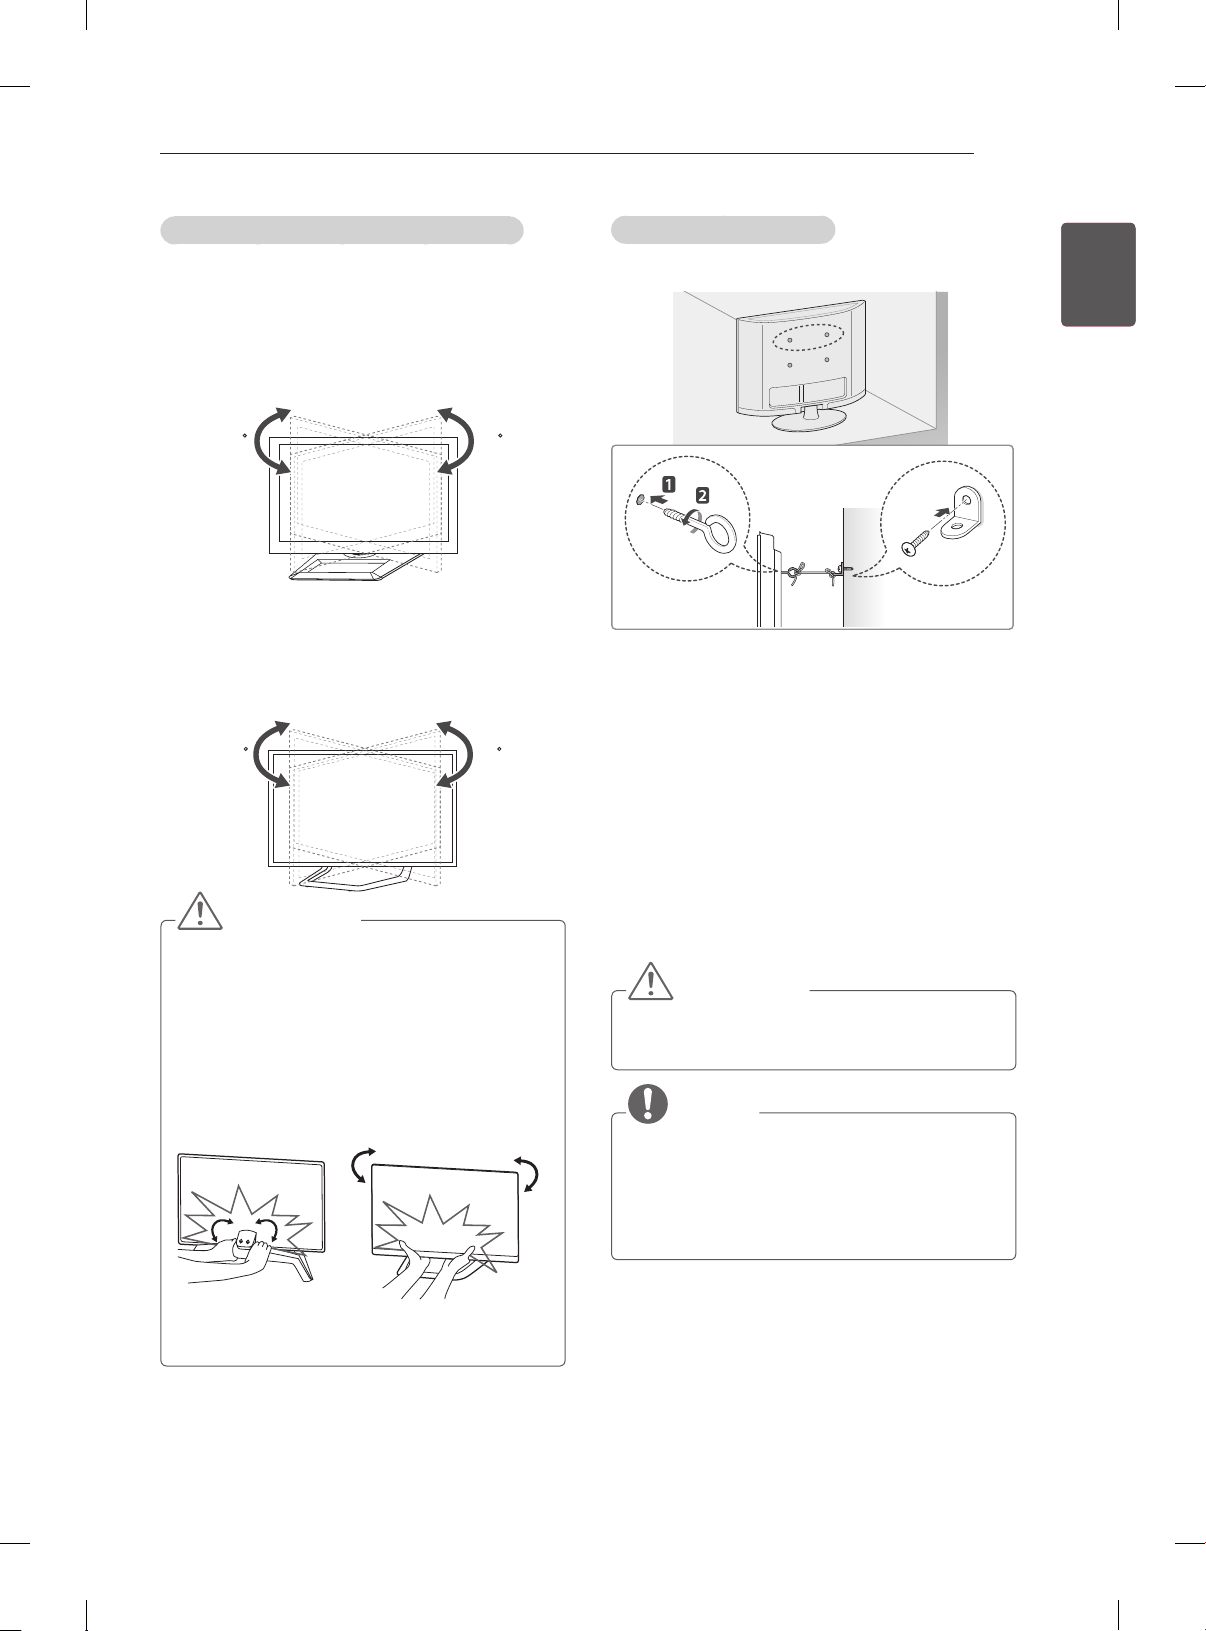
Adjusting the angle of the TV to suit view
(This feature is not available for all models.)
Adjusting the angle of the TV to suit view
Swivel 20 degrees to the left or right and adjust the
angle of the TV to suit your view.
(Only 32/37/42LS57**, 65LM62**,
32/42/47LM669*)
2020
Swivel 10 degrees to the left or right and adjust the
angle of the TV to suit your view.
(Only 32/37/42/47/55LM62**,
32/42/47/55/60LM64**, 32/42/47/55LM660*,
42/47/55LM67**, 42/47/55LM76**)
1010
CAUTION
When adjusting the angle of the product,
watch out for your fingers.
»
Personal injury may occur if hands or fingers
are pinched. If the product is tilted too much, it
may fall, causing damage or injury.
(Only 32/37/42/47/55LM62**,
32/42/47/55/60LM64**, 32/42/47/55LM660*,
42/47/55LM67**, 42/47/55LM76**)
Securing the TV to a wall
(This feature is not available for all models.)
1 Insert and tighten the eye-bolts, or TV brackets
and bolts on the back of the TV.
- If there are bolts inserted at the eye-bolts
position, remove the bolts first.
2 Mount the wall brackets with the bolts to the
wall.
Match the location of the wall bracket and the
eye-bolts on the rear of the TV.
3 Connect the eye-bolts and wall brackets tightly
with a sturdy rope.
Make sure to keep the rope horizontal with the
at surface.
CAUTION
yMake sure that children do not climb on or
hang on the TV.
NOTE
yUse a platform or cabinet that is strong and
large enough to support the TV securely.
yBrackets, bolts and ropes are not provided.
You can obtain additional accessories from
your local dealer.
ENGENGLISH
<Rear> <Front>
Page 26

ASSEMBLING AND PREPARING
20
ENGLISH
ENG
Mounting on a wall
Attach an optional wall mount bracket at the rear
of the TV carefully and install the wall mount
bracket on a solid wall perpendicular to the
oor. When you attach the TV to other building
materials, please contact qualied personnel.
LG recommends that wall mounting be performed
by a qualied professional installer.
10 cm
10 cm
10 cm
10 cm
Make sure to use screws and wall mount
bracket that meet the VESA standard. Standard
dimensions for the wall mount kits are described in
the following table.
Separate purchase(Wall Mounting Bracket)
Model 32/37LS57**
32/37LM62**
32LM64**
32LM66**
VESA (A x B) 200 x 200 400 x 400
Standard screw M6 M6
Number of screws 4 4
Wall mount bracket LSW200BX,
LSW200BXG
42LS57**
42/47/55LM62**
42/47/55/60LM64**
42/47/55LM66**
42/47/55LM67**
42/47/55LM76**
LSW400BX,
LSW400BXG
CAUTION
yDisconnect the power first, and then move
or install the TV. Otherwise electric shock
may occur.
yIf you install the TV on a ceiling or slanted
wall, it may fall and result in severe injury.
Use an authorised LG wall mount and
contact the local dealer or qualified
personnel.
yDo not over tighten the screws as this may
cause damage to the TV and void your
warranty.
yUse the screws and wall mounts that meet
the VESA standard. Any damages or injuries
by misuse or using an improper accessory
are not covered by the warranty.
NOTE
yUse the screws that are listed on the VESA
standard screw specifications.
yThe wall mount kit includes an installation
manual and necessary parts.
yThe wall mount bracket is not provided. You
can obtain additional accessories from your
local dealer.
yThe length of screws may differ depending
on the wall mount. Make sure to use the
proper length.
yFor more information, refer to the manual
supplied with the wall mount.
yWhen attaching a third-party wall mounting
bracket to the TV, insert the wall mount inner
spacers into the TV wall mount holes to
move your TV in vertical angle. Please make
sure not to use the spacers for LG wall
mounting bracket. (Only 32/37/42LS57**,
32/37/42/47/55LM62**)
Model
VESA (A x B)
Standard screw
Number of screws
Wall mount bracket
65LM62**
600 x 400
M8
4
LSW600B
A
B
Wall Mount Inner Spacer
(Depending on model)
yIn order to protect the TV screen(scratch,
fingerprint), put TV on flat table without
removing wrapping bag.
yAfter removing the wrapping bag on the
back of the TV, install TV according to
manual included in wall mounting bracket
product.
yRemove protection pads after installing TV.
Page 27
REMOTE CONTROL
21
REMOTE CONTROL
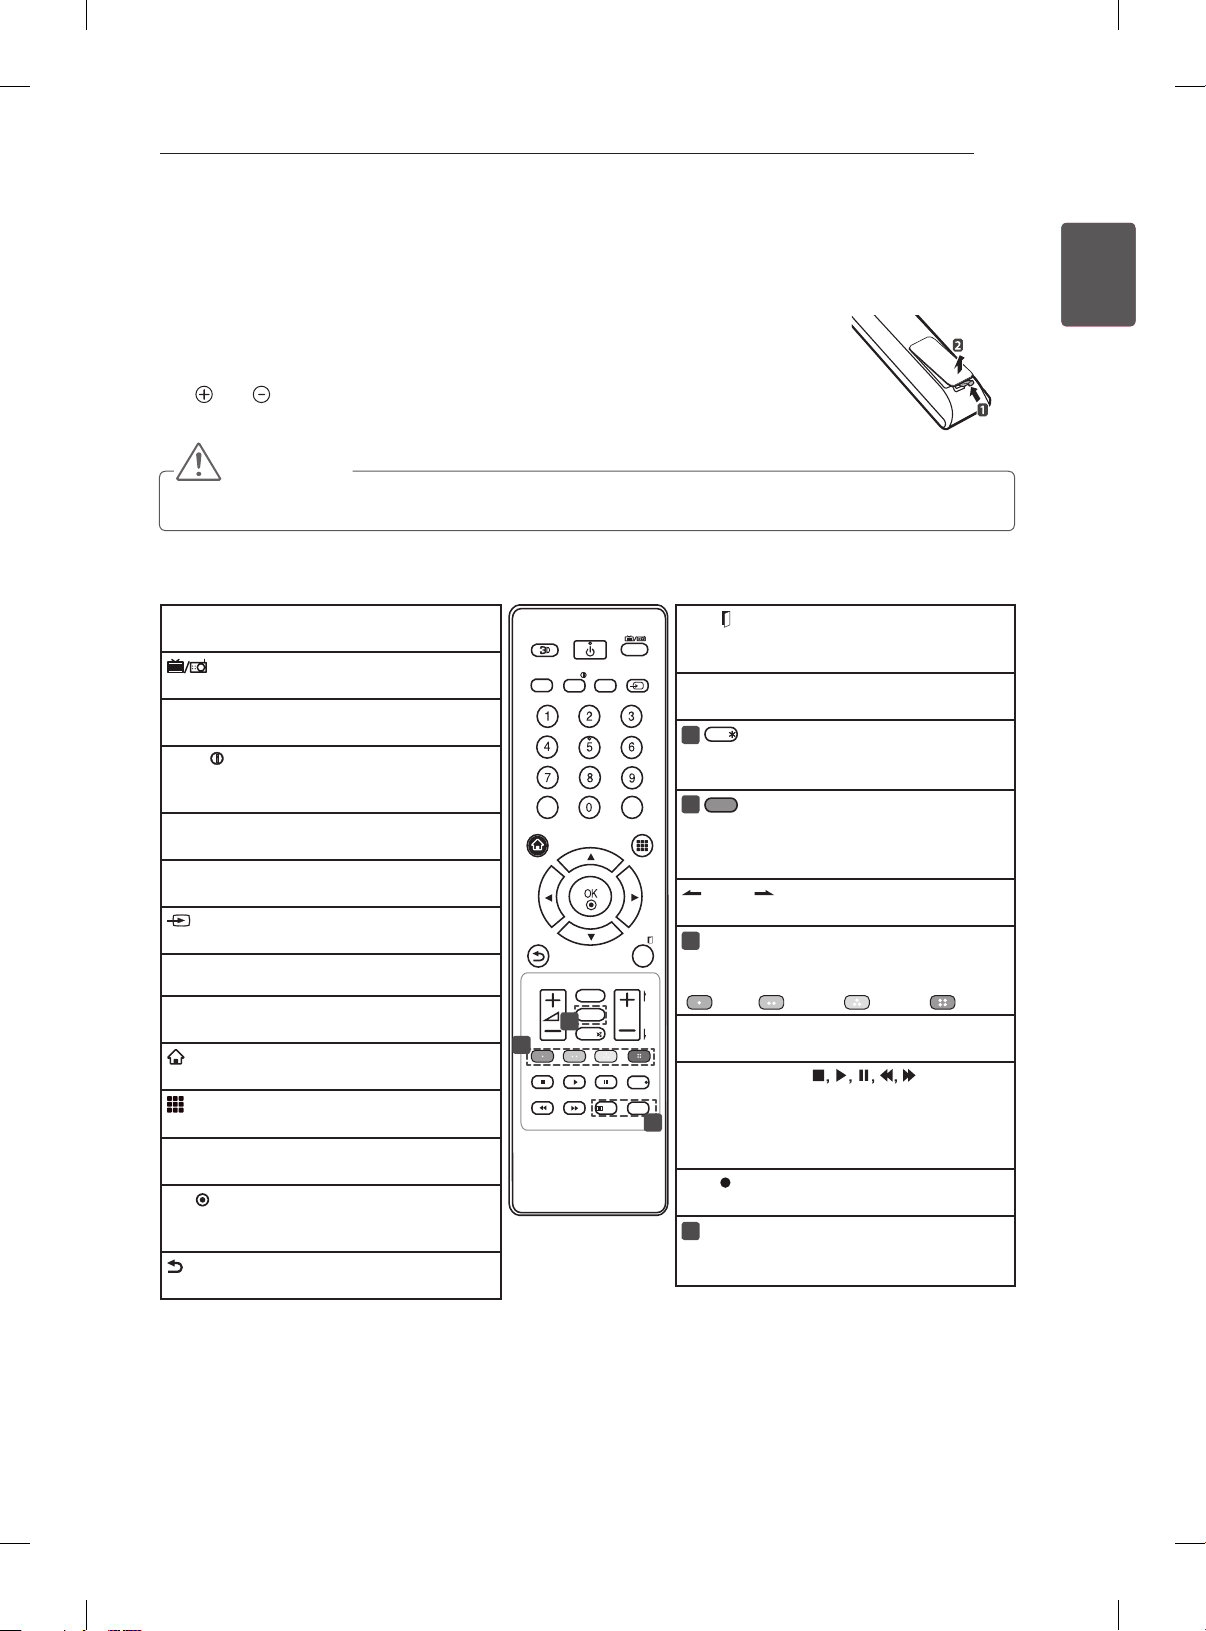
The descriptions in this manual are based on the buttons on the remote control.
Please read this manual carefully and use the TV correctly.
To replace batteries, open the battery cover, replace batteries (1.5 V AAA) matching
the
and ends to the label inside the compartment, and close the battery cover.
To remove the batteries, perform the installation actions in reverse.
CAUTION
yDo not mix old and new batteries, as this may damage the remote control.
Make sure to point the remote control toward the remote control sensor on the TV.
(Only LM669*)
3D
Used for viewing 3D video.
TV/RAD
Selects Radio, TV and DTV programme.
GUIDE
Shows programme guide.
INFO
Views the information of the current
programme and screen.
SUBTITLE
Recalls your preferred subtitle in digital mode.
Q. MENU
Accesses the quick menus.
INPUT
Changes the input source.
LIST
Accesses the saved programme list.
Q.VIEW
Returns to the previously viewed programme.
HOME
Accesses the Home menus.
MY APPS
Shows the list of Apps.
Navigation buttons (up/down/left/right)
Scrolls through menus or options.
OK
Selects menus or options and confirms your
input.
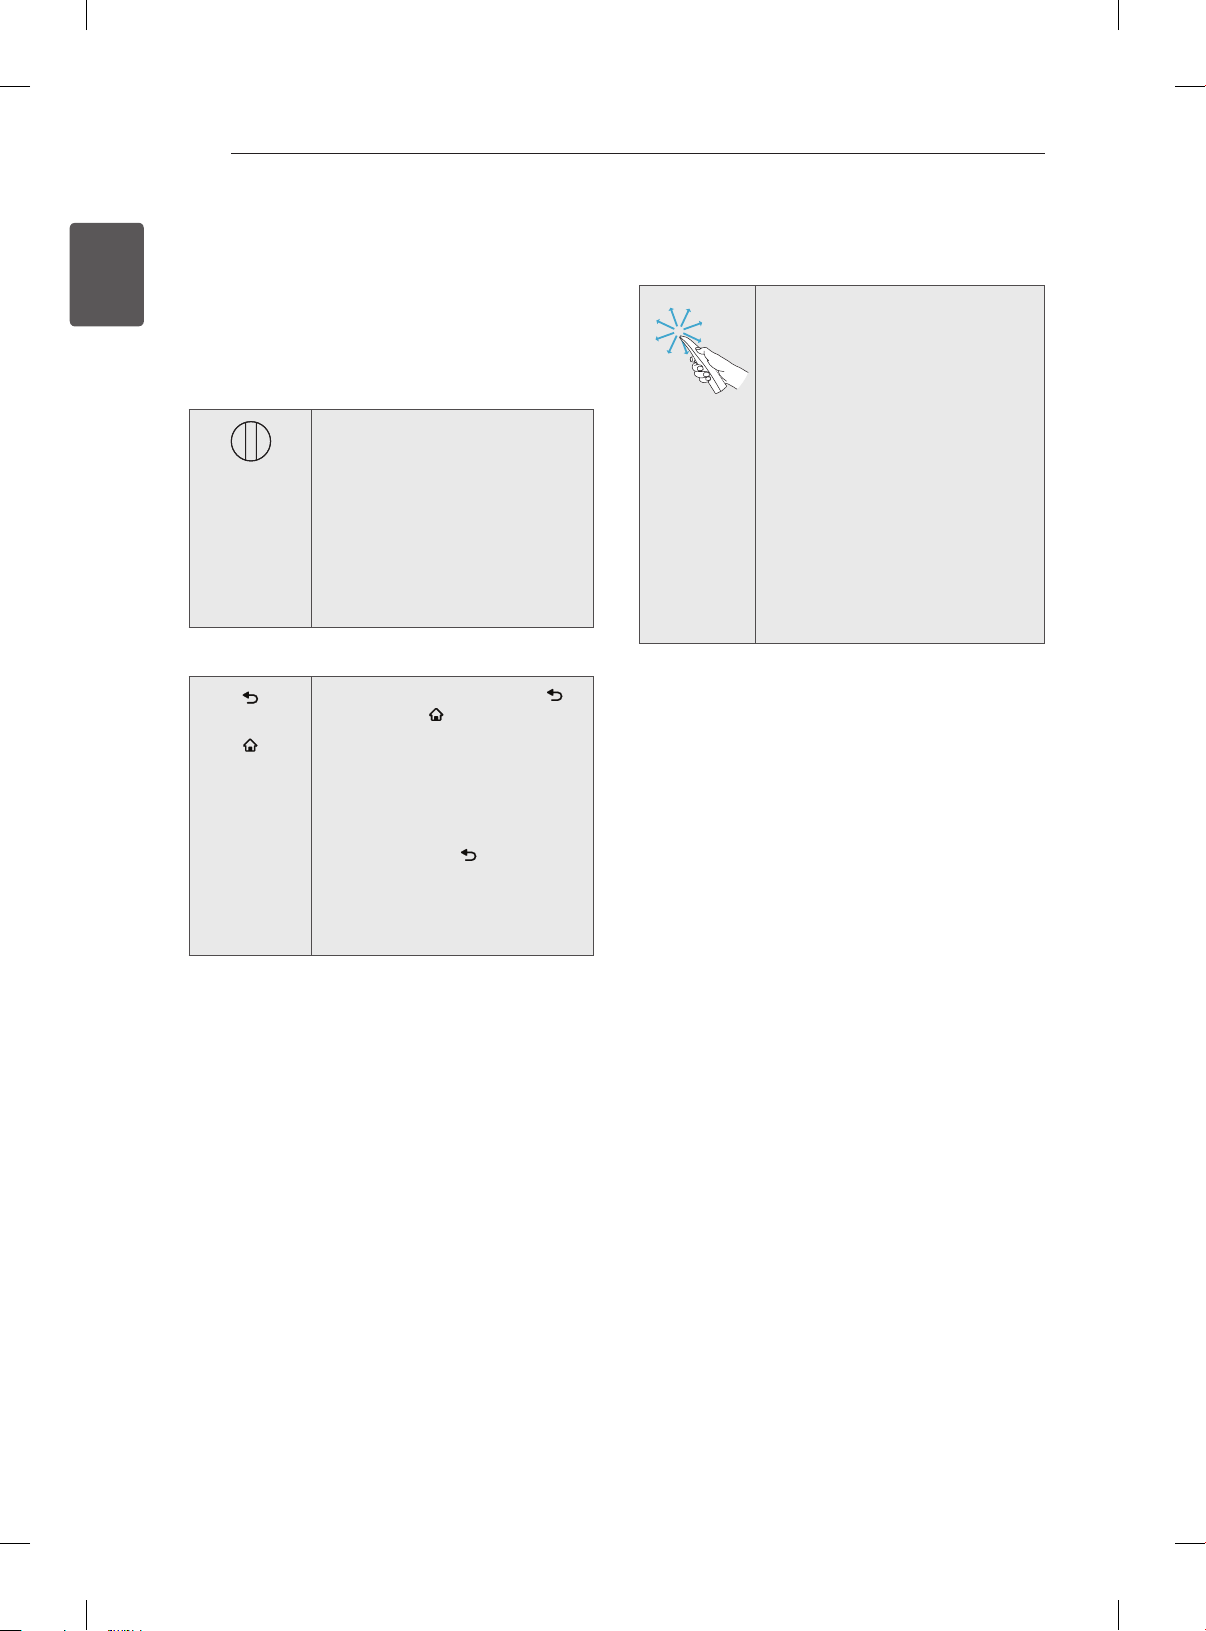
(Back)
Returns to the previous level.
POWER
INFO
GUIDE
HOME MY APPS
2
LIVE TV
SUBTITLE
Q.MENU
LIST
FAV
1
MUTE
TEXT
EXIT
Clears on-screen displays and return to TV
TV/RAD
viewing.
INPUT
FAV
Accesses your favourite programme list.
APP/
1
APP/
Select the MHP TV menu source. (Only Italy)
*
(Depending on model)
Q.VIEW
1
@ ORANGE
Direct access to your internet portal of
entertainment and news services developed
by Orange. (Only France)
PAGE
Moves to the previous or next screen.
EXIT
2
Colour buttons
These access special functions in some
menus.
( : Red, : Green, : Yellow, : Blue)
P
A
P
G
E
LIVE TV
Return to LIVE TV.
Control buttons (
REC
Controls the Premium contents, DVR or
T.OPT
Smart Share menus or the SIMPLINK
3
compatible devices (USB or SIMPLINK or
DVR).
REC
Uses to adjust DVR menu.
3
TELETEXT BUTTONS
These buttons are used for teletext.
For further details, see the ‘Teletext’ section.
ENGENGLISH
)
Page 28
REMOTE CONTROL
22
ENGLISH
ENG
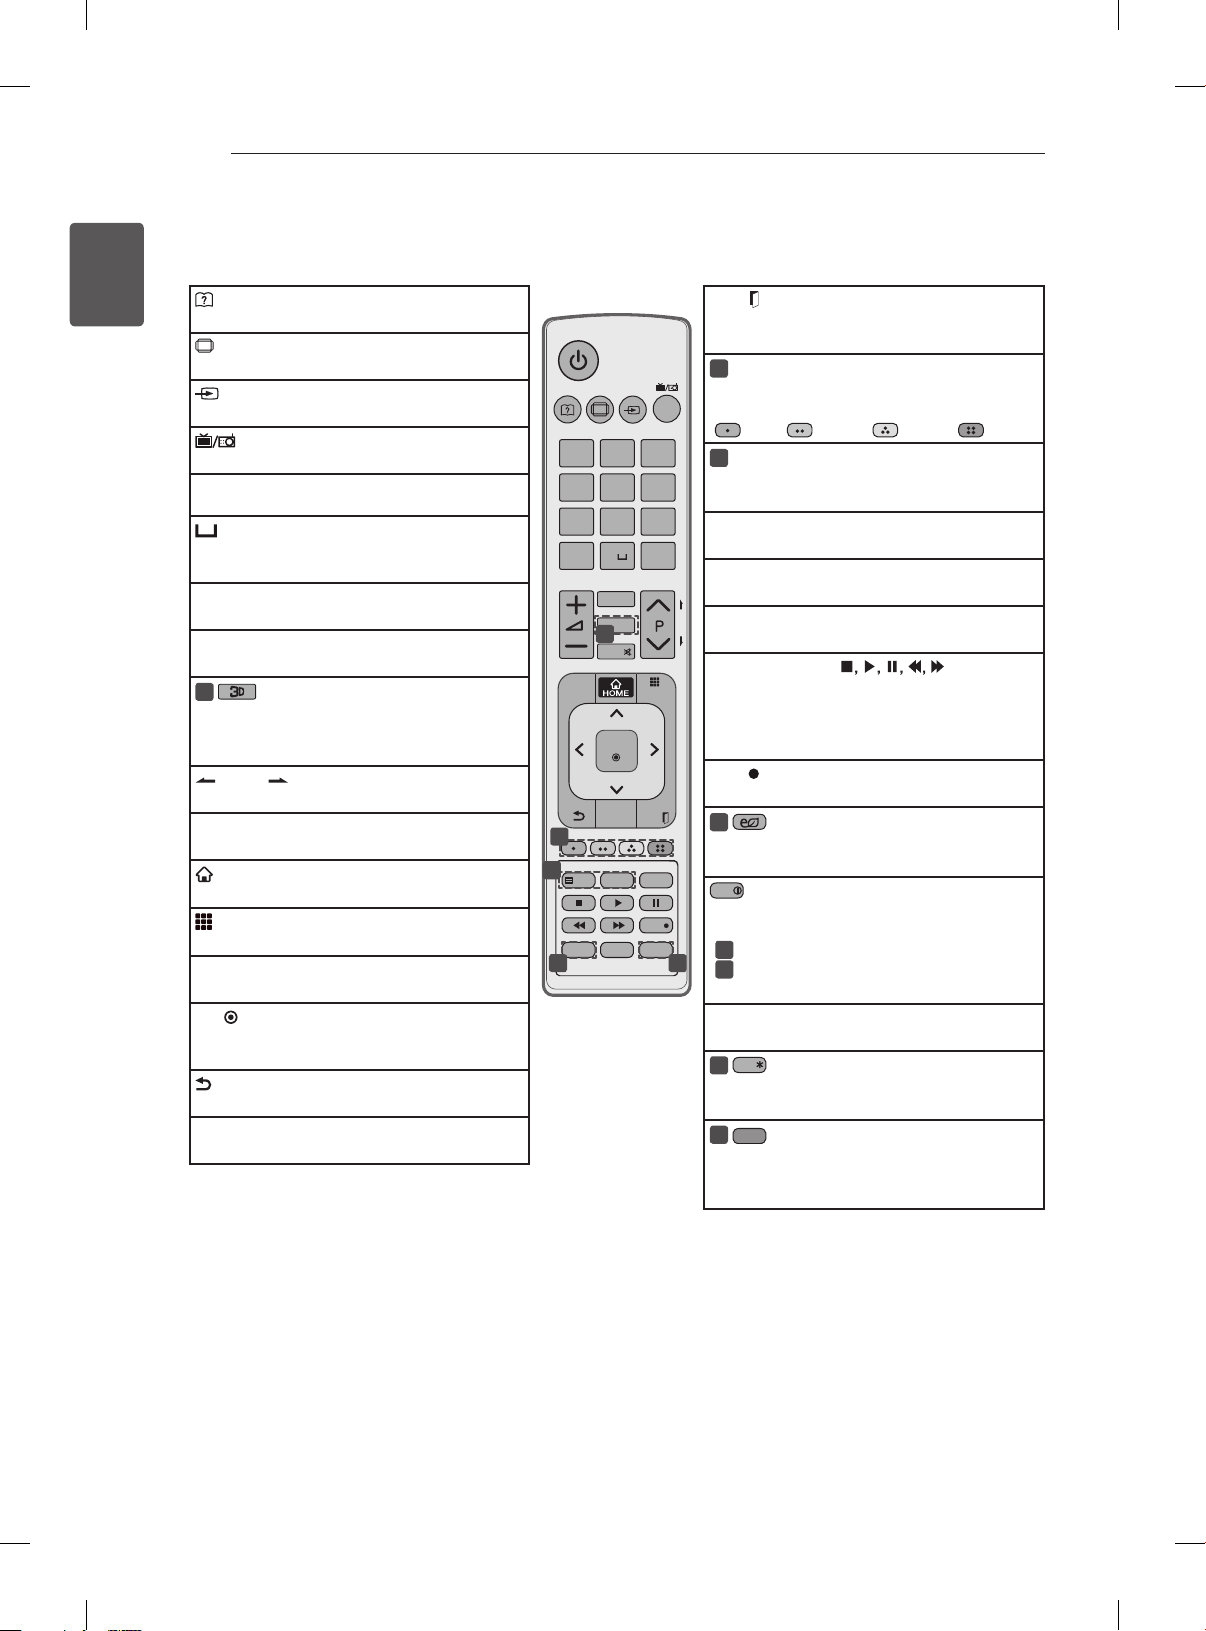
(Only LS57**, LM62**, LM64**, LM660*, LM67**, LM76**)
(User Guide)
Sees user-guide.
RATIO
Resizes an image.
INPUT
RATIO INPUT
Changes the input source.
TV/RAD
Selects Radio, TV and DTV programme.
LIST
Accesses the saved programme list.
(Space)
Opens an empty space on the screen
keyboard.
Q.VIEW
1
4
7
LIST
.,;@
ghi
pqrs
2
abc
5
jkl
8
tuv
0
FAV
Returns to the previously viewed programme.
SETTINGS
1
MUTE
FAV
Accesses your favourite programme list.
1
3D
Used for viewing 3D video.
(Only LM62**, LM64**, LM66**, LM67**,
LM76**)
OK
PAGE
Moves to the previous or next screen.
SETTINGS
Accesses the main menus.
HOME
Accesses the Home menus.
GUIDE
2
3
TEXT
T.OPT
LIVE TV
MY APPS
Shows the list of Apps.
Navigation buttons (up/down/left/right)
AD
4 5
Scrolls through menus or options.
OK
Selects menus or options and confirms your
input.
(Back)
Returns to the previous level.
GUIDE
Shows programme guide.
TV/
RAD
3
def
6
mno
wxyz
9
Q.VIEW
MY APPS
EXIT
SUBTITLE
Q.MENU
REC
EXIT
Clears on-screen displays and return to TV
viewing.
2
Colour buttons
These access special functions in some
menus.
( : Red, : Green, : Yellow, : Blue)
3
TELETEXT BUTTONS
These buttons are used for teletext.
For further details, see the ‘Teletext’ section.
SUBTITLE
Recalls your preferred subtitle in digital mode.
Q. MENU
Accesses the quick menus.
P
A
LIVE TV
G
E
Return to LIVE TV.
Control buttons (
)
Controls the Premium contents, DVR or
Smart Share menus or the SIMPLINK
compatible devices (USB or SIMPLINK or
DVR).
REC
Uses to adjust DVR menu.
4
ENERGY SAVING
Adjusts the brightness of the screen to reduce
energy consumption. (Only LS57**)
INFO
INFO
Views the information of the current
programme and screen.
1
: Only LS57**)
(
4
: Only LM62**, LM64**, LM660*, LM67**,
(
LM76**)
AD
Switches the Audio Description On or Off.
APP/
5
APP/
Select the MHP TV menu source. (Only Italy)
*
(Depending on model)
5
@ ORANGE
Direct access to your internet portal of
entertainment and news services developed
by Orange. (Only France)
Page 29
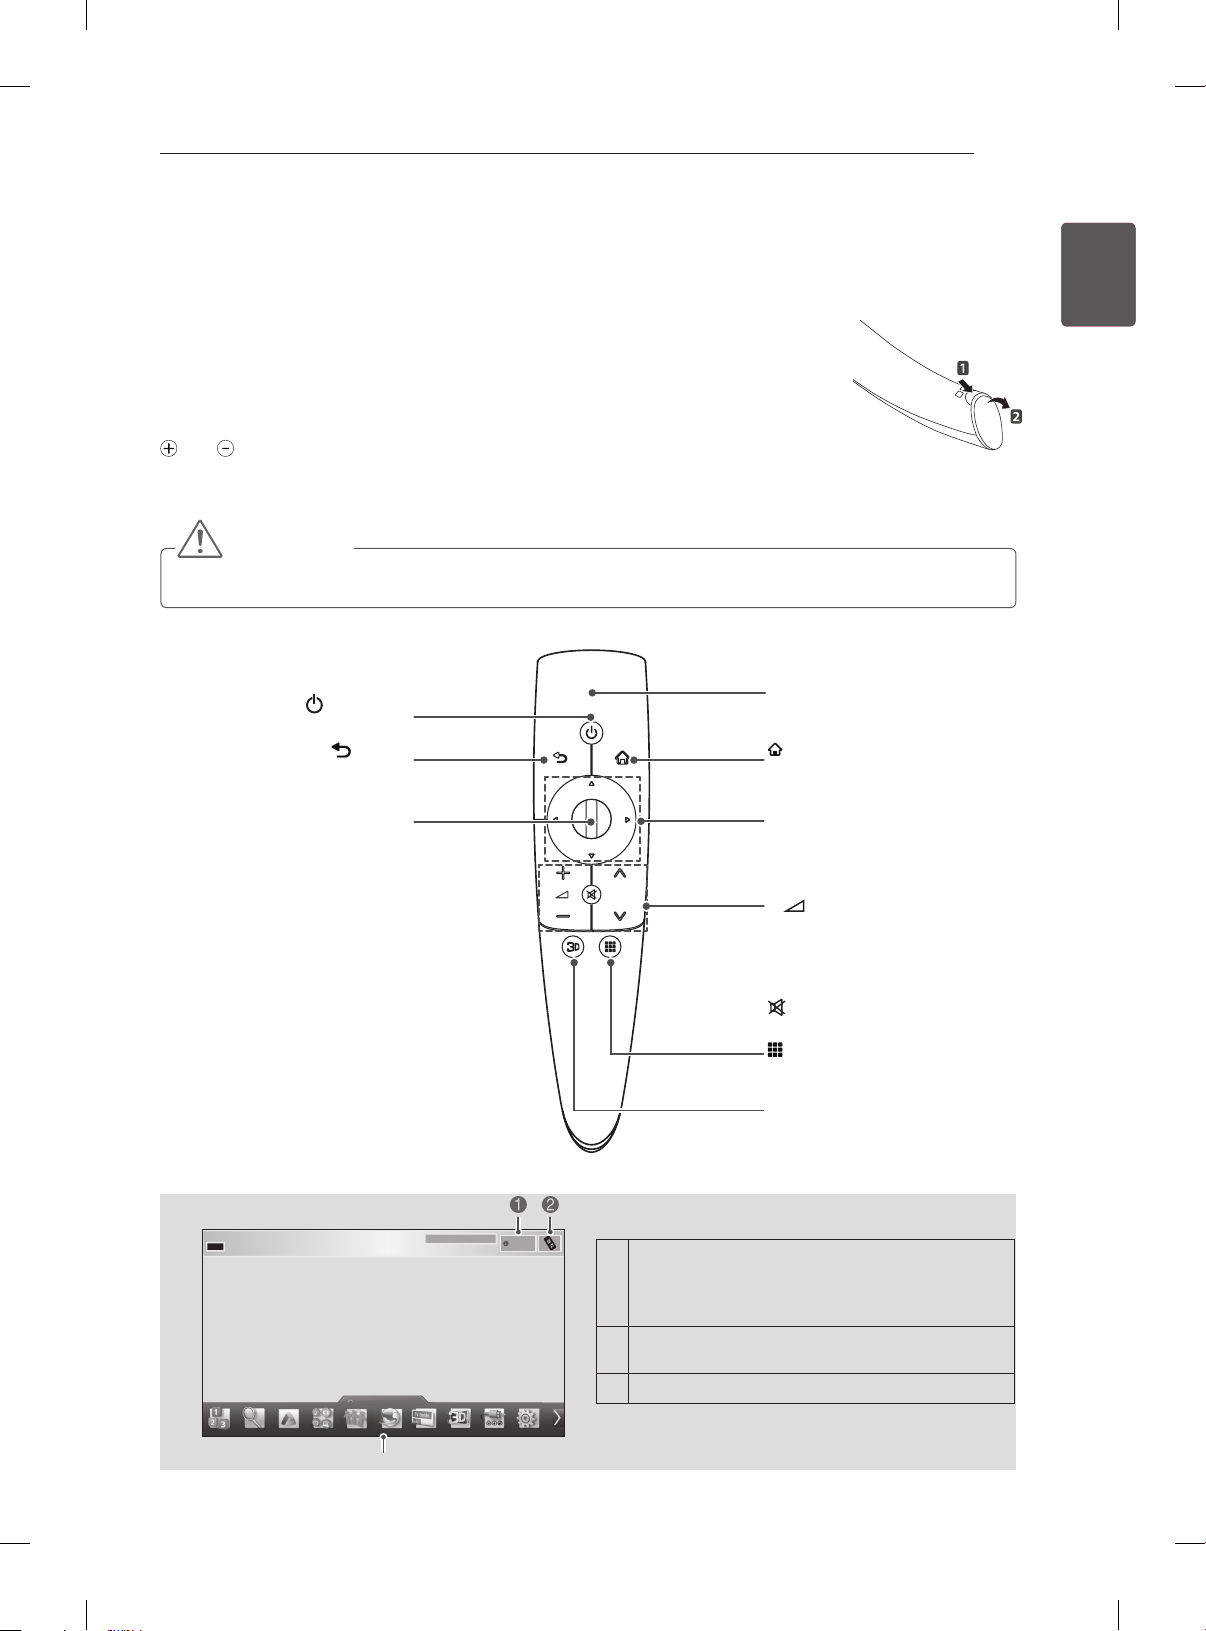
MAGIC REMOTE CONTROL FUNCTIONS
23
MAGIC REMOTE CONTROL FUNCTIONS
This item is not included for all models.
When the message “Magic Remote Control battery is low. Change the battery.” is
displayed, replace the battery.
To replace batteries, open the battery cover, replace batteries (1.5 V AA) matching
and ends to the label inside the compartment, and close the battery cover. Be
sure to point the remote control toward the remote control sensor on the TV.
To remove the batteries, perform the installation actions in reverse.
CAUTION
yDo not mix old and new batteries, as this may damage the remote control.
(Only 60LM645*, 32/42/47/55LM66**, 42/47/55LM67**, 42/47/55LM76**)
(POWER)
Turns the TV on or off.
BACK
Returns to the previous level.
Wheel(OK)
Selects menus or options and
confirms your input.
Scrolls through the saved
programmes.
If you press the navigation
button while moving the pointer
on the screen, the pointer
disappears, and the Magic
Remote Control works as a
regular remote control.
To display the pointer again,
shake the Magic Remote
Control from side to side.
BACK
HOME
P
MY APPS
Pointer (RF transmitter)
HOME
Accesses the Home menu.
Navigation buttons (up/down/
left/right)
Scrolls through menus or
options.
+ -
Adjusts the volume level.
ꕌPꕍ
Scrolls through the saved
programmes or channels.
MUTE
Mutes all sounds.
MY APPS
Shows the list of Apps.
3D
Used for viewing 3D video.
ENGENGLISH
11-1 Brief Info Title Test...
My Apps
3
Info.
If you press Wheel(OK) on the Magic Remote
Control, the following screen appears.
1
Shows information about the current
programme and screen.
Pressing this button will display number keypad
2
which you can select programme number.
You can select My Apps Menu.
3
Page 30
MAGIC REMOTE CONTROL FUNCTIONS
HOME
24
ENGLISH
ENG
Registering Magic Remote
Control
It is necessary to ‘pair’ (register) the magic remote
control to your TV before it will work.
How to register the Magic Remote Control
1 To register automatically,
turn the TV on and press the
Wheel(OK) button. When
registration is completed, the
completion message appears
on the screen.
2 If registration fails, turn the TV
off and back on, then press
the Wheel(OK) button to
complete registration.
How to re-register the Magic Remote Control
BACK
HOME
1 Press and hold the BACK
and HOME
for 5 seconds to reset, then
register it by following “How
to register the Magic Remote
Control” above.
2 To re-register the Magic
Remote Control, press and
hold the BACK
seconds toward the TV. When
registration is completed, the
completion message appears
on the screen.
buttons together
button for 5
How to use Magic Remote
Control
1 If the pointer disappears, move
the Magic Remote Control
slightly to left or right. Then, it
will automatically appear on
the screen.
»
If the pointer has not been
used for a certain period of
time, it will disappear.
2 You can move the pointer by
aiming the Pointer Receiver of
the Magic Remote Control at
your TV then move it left, right,
up or down.
»
If the pointer does not work
properly, leave the Magic
Remote Control for 10
seconds then use it again.
Precautions to Take when
Using the Magic Remote
Control
Use the Magic Remote Control within the
y
maximum communication distance (10 m).
Using the Magic Remote Control beyond this
distance, or with an object obstructing it, may
cause a communication failure.
A communication failure may occur due to
y
nearby devices. Electrical devices such as
a microwave oven or wireless LAN product
may cause interference, as these use the
same bandwidth (2.4 GHz) as the Magic
Remote Control.
The Magic Remote Control may be damaged
y
or may malfunction if it is dropped or receives
a heavy impact.
Take care not to bump into nearby furniture
y
or other people when using the Magic
Remote Control.
Manufacturer and installer cannot provide
y
service related to human safety as the
applicable wireless device has possibility of
electric wave interference.
It is recommended that an Access Point (AP)
y
be located more than 1 m away from the
TV. If the AP is installed closer than 1 m, the
Magic Remote Control may not perform as
expected due to frequency interference.
Page 31

USING THE USER GUIDE
25
USING THE USER GUIDE
User Guide allows you to more easily access the detailed TV information.
1 Press the
HOME button to access the HOME
menu.
2 Select User Guide and press Wheel(OK).
My Apps
Input List Settings Live TV
Search
Internet3DLG Smart W
Programme Guide
User Guide
Recent List
User Guide
NOTE
yYou can also access the User Guide by
pressing
control.
User Guide
1
PROGRAMME Setting
PICTURE, SOUND Setting
OPTION
LG SMART Function
Advanced Function
Information
(User Guide) in the remote
3
To use input device
To use Energy Saving feature
To set time options
To set TV lock options
To set language
Disabled Assistance
To set Magic Remote Control
4
2
User Guide
PROGRAMME Setting
PICTURE, SOUND Setting
OPTION
LG SMART Function
Advanced Function
Information
Shows the description of the selected menu.
1
You can use ꕌ/ꕍto move between pages.
Moves to the selected menu directly from the
2
User Guide.
Zooms in or out the screen.
3
1
HOME Settings OPTION Language
Selects Menu Language and Audio Language displayed on the screen.
Menu Language
Audio Language
Subtitle
Language
Try Now Close
OPTION > To set language
HOME Settings OPTION Language
Selects Menu Language and Audio Language displayed on the screen.
Menu Language
Selects a language for the display text.
[In Digital Mode Only]
Audio Language
When watching a digital broadcast containing several
audio languages, you can select the language you want.
[In Digital Mode Only]
Use the Subtitle function when two or more subtitle
Subtitle
languages are broadcast.
Language
✎ If subtitle data in a selected language is not broadcast,
the default language subtitle will be displayed.
Try Now Close
2
Selects a language for the display text.
[In Digital Mode Only]
When watching a digital broadcast containing several
audio languages, you can select the language you want.
[In Digital Mode Only]
Use the Subtitle function when two or more subtitle
languages are broadcast.
✎ If subtitle data in a selected language is not broadcast,
the default language subtitle will be displayed.
Zoom Out
3
Zoom In
3
ENGENGLISH
Shows the current watching programme or
1
input source screen.
Allows to select the category you want.
2
Allows to select the item you want.
3
You can use ꕌ/ꕍto move between pages.
Allows to browse the description of the
4
function you want from the index.
Page 32

MAINTENANCE / TROUBLESHOOTING
26
ENGLISH
ENG
MAINTENANCE
Cleaning your TV
Clean your TV regularly to keep the best performance and to extend the product lifespan.
CAUTION
yMake sure to turn the power off and disconnect the power cord and all other cables first.
yWhen the TV is left unattended and unused for a long time, disconnect the power cord from the wall
outlet to prevent possible damage from lightning or power surges.
Screen, frame, cabinet and stand
yTo remove dust or light dirt, wipe the surface with a dry, clean, and soft cloth.
yTo remove major dirt, wipe the surface with a soft cloth dampened in clean water or a diluted mild
detergent. Then wipe immediately with a dry cloth.
CAUTION
yAvoid touching the screen at all times, as this may result in damage to the screen.
yDo not push, rub, or hit the screen surface with your fingernail or a sharp object, as this may result in
scratches and image distortions.
yDo not use any chemicals as this may damage the product.
yDo not spray liquid onto the surface. If water enters the TV, it may result in fire, electric shock, or
malfunction.
Power cord
Remove the accumulated dust or dirt on the power cord regularly.
TROUBLESHOOTING
Problem Solution
Cannot control
the TV with the
remote control.
No image display
and no sound is
produced.
The TV turns off
suddenly.
When connecting
to the PC (RGB/
HDMI DVI),
‘No signal’ or
‘Invalid Format’ is
displayed.
yCheck the remote control sensor on the product and try again.
yCheck if there is any obstacle between the product and the remote control.
yCheck if the batteries are still working and properly installed (
yCheck if the product is turned on.
yCheck if the power cord is connected to a wall outlet.
yCheck if there is a problem in the wall outlet by connecting other products.
yCheck the power control settings. The power supply may be interrupted.
yCheck if the Auto sleep feature is activated in the Time settings.
yIf there is no signal while the TV is on, the TV will turn off automatically after
15 minutes of inactivity.
yTurn the TV off/on using the remote control.
yReconnect the RGB/HDMI cable.
yRestart the PC with the TV on.
to , to ).
Page 33

SPECIFICATIONS
27
SPECIFICATIONS
Product specifications may be changed without prior notice due to upgrade of product functions.
(Only 60LM645*, 32/42/47/55LM66**, 42/47/55LM67**, 42/47/55LM76**)
Wireless LAN module(TWFM-B003D) specification
Standard IEEE802.11a/b/g/n
2400 to 2483.5 MHz
Frequency Range
Modulation CCK / OFDM / MIMO
Output Power
(Typical)
Data rate
Antenna Gain
(Typical)
Occupied bandwidth
Because band channel used by the country could be different, the user can not change or adjust the
y
operating frequency and this product is set for the regional frequency table.
5150 to 5250 MHz
5725 to 5850 MHz
802.11a: 11 dBm
802.11b: 15 dBm
802.11g: 13 dBm
802.11n - 2.4GHz: 13 dBm
802.11n - 5GHz: 13 dBm
802.11a/g: 54 Mbps
802.11b: 11 Mbps
802.11n: 300 Mbps
2400 to 2483.5 MHz: -2.5dBi
5150 to 5250 MHz: -2.2dBi
5725 to 5850 MHz: -2.9dBi
802.11a/b/g: HT20
802.11n: HT20/40
ENGENGLISH
Bluetooth module (BM-LDS302) specification
Standard Bluetooth Version 3.0
Frequency Range 2400 ~ 2483.5 MHz
Output Power (Max.) 10 dBm or lower
Data rate (Max.) 3 Mbps
Communication Distance Line of Open Sight approx. 10 m
Page 34

Page 35

HANDBOK
LED-LCD-TV
Läs den här handboken noggrant innan du använder
produkten och spara den för framtida bruk.
www.lg.com
Page 36

INNEHÅLLSFÖRTECKNING
2
INNEHÅLLSFÖRTECKNING
SVENSKA
SVE
3 LICENSER
3 MEDDELANDE OM PROGRAMVARA
4 SÄKERHETSFÖRESKRIFTER
10 - Visa 3D-bilder (endast för 3D-modeller)
12 INSTALLATIONSANVISNINGAR
12 MONTERA OCH FÖRBEREDA
12 Uppackning
15 Köpa separat
16 Delar och knappar
17 Lyfta och flytta TV:n
18 Placera TV:n på ett bord
20 Montering på vägg
21 FJÄRRKONTROLL
23 DEN MAGISKA
24 Registrera den magiska fjärrkontrollen
24 Så här använder du den magiska
24 Att tänka på när du använder den magiska
25 ANVÄNDA ANVÄNDARHANDBOKEN
26 SKÖTSEL
26 Rengöra TV:n
26 - Skärm, ram, skåp och stativ
26 - Strömkabel
26 FELSÖKNING
FÖR ÖPPEN KÄLLKOD
FJÄRRKONTROLLENS FUNKTIONER
fjärrkontrollen
fjärrkontrollen
VARNING
yOm du ignorerar varningstexten kan du råka
ut för en olycka och skada dig allvarligt,
t.o.m. dödligt.
VARNING!
yOm du ignorerar varningstexten kan du
få lättare skador, eller så kan produkten
skadas.
27 SPECIFIKATIONER
Obs!
yAnmärkningen hjälper dig att förstå och
använda produkten på ett säkert sätt. Läs
anmärkningen noggrant innan du använder
produkten.
Page 37

LICENSER/MEDDELANDE OM PROGRAMVARA FÖR ÖPPEN KÄLLKOD
LICENSER
Vilka licenser som kan användas varierar beroende på modellen. Mer information om de olika licenserna
nns på www.lg.com.
Tillverkad på licens från Dolby Laboratories. ”Dolby” och symbolen med dubbelt D är
varumärken som tillhör Dolby Laboratories.
HDMI, HDMI logotypen och High-DefinitionMultimedia Interface är varumärken eller
inregistrerade varumärken tillhörande HDMI Licensing LLC.
OM DIVX VIDEO: DivX® är ett digitalt videoformat som skapats av DivX, LLC, ett
dotterbolag till Rovi Corporation. Denna DivX Certied®-enhet kan spela upp DivXvideo. Mer information om och programvaruverktyg för konvertering av ler till DivXvideoformat nns på webbplatsen divx.com.
3
SVESVENSKA
OM DivX VIDEO-ON-DEMAND: Den här DivX Certied®-enheten måste
vara registrerad för att det ska gå att spela upp DivX VOD-lmer (Video-on-
Demand). Registreringskoden hittar du genom att gå till alternativet DivX VOD i
kongureringsmenyn. Besök vod.divx.com om du vill ha mer information om hur du
genomför registreringen.
”DivX Certied® för uppspelning av DivX®-video upp till 1080p, inklusive
specialinnehåll.”
”DivX®, DivX Certied® och tillhörande logotyper är varumärken som tillhör Rovi
Corporation eller dess dotterbolag och används under licens.”
”Omfattas av ett eller era av följande amerikanska patent:
7,295,673; 7,460,668; 7,515,710; 7,519,274”
Tillverkad på licens under följande amerikanska patent: 5,956,674; 5,974,380;
6,487,535 och andra utfärdade och väntande amerikanska och världsomfattande
patent. DTS, symbolen & DTS och symbolen är tillsammans inregistrerade
varumärken & DTS 2.0+Digital Out är ett varumärke som tillhör DTS, Inc. I produkten
ingår programvaror. © DTS, Inc. Med ensamrätt.
MEDDELANDE OM PROGRAMVARA FÖR
ÖPPEN KÄLLKOD
På webbplatsen http://opensource.lge.com kan du hämta källkoden för GPL, LGPL, MPL och andra öppna
källkod-licenser som ingår för den här produkten.
Förutom källkoden kan du även hämta alla tillhörande licensvillkor, samt information om garantifriskrivning
och upphovsrätt.
Det nns en CD-ROM-skiva med öppen källkod som du kan köpa från LG Electronics till självkostnadspris
(inkl. mediakostnad, frakt och hanteringskostnader). Gör din beställning till LG Electroncis via e-post på
opensource@lge.com: Erbjudandet gäller i tre (3) år från produktens inköpsdatum.
Page 38

SÄKERHETSFÖRESKRIFTER
4
SÄKERHETSFÖRESKRIFTER
SVENSKA
SVE
Läs säkerhetsföreskrifterna noggrant innan du använder produkten.
VARNING
Placera inte TV:n och fjärrkontrollen i följande omgivningar:
y
- En plats med direkt solljus
- En plats med hög fuktighet, t.ex. ett badrum
- I närheten av en värmekälla, t.ex. en spis, och andra apparater som genererar
värme
- Nära diskbänkar eller luftfuktare där de lätt kan utsättas för ånga eller olja
- En plats med regn och vind
- Nära behållare med vatten, t.ex. vaser
Annars finns risk för brand, elektriska stötar eller tekniska fel.
Placera inte produkten där den kan utsättas för damm.
y
Detta medför risk för brand.
Kontakten till eluttaget används för bortkoppling. Kontakten måste alltid vara fullt
y
fungerande.
Rör aldrig nätkontakten med våta händer. Torka genast av hela nätsladden noga
y
om stickkontakten blir blöt eller täckt av damm.
Annars kan du få livshotande elektriska stötar på grund av fukten.
Anslut nätkabeln till ett jordat uttag. (Med undantag för apparater som inte är
y
jordade.)
Annars kan du få livsfarliga elektriska stötar.
Anslut nätkabeln noga så den inte glappar.
y
Om kabeln glappar kan eldsvåda uppstå.
Kontrollera att strömsladden inte kommer i kontakt med varma föremål som
y
element.
Detta ökar risken för brand och elektriska stötar.
Placera inte tunga föremål eller själva produkten på strömsladdar.
y
Detta kan resultera i eldsvåda eller elektriska stötar.
Böj antennkabeln längs med husfasaden, så nära som möjligt, för att förhindra att
y
regn läcker in.
Annars kan det uppstå vattenskador inuti produkten vilket kan leda till elektriska
stötar.
När du monterar en TV på väggen ska du se till du inte installerar den genom att
y
hänga ström- och signalkablar på baksidan av den.
Detta kan orsaka eldsvåda eller elektriska stötar.
Page 39

Desiccant
SÄKERHETSFÖRESKRIFTER
Anslut inte för många elektriska apparater till en och samma förgreningsdosa.
y
Detta kan leda till att eldsvåda uppstår på grund av överhettning.
Se till att inte tappa eller välta produkten när du ansluter externa enheter.
y
Det kan resultera i personskador eller skador på produkten.
Förvara torkmedel, plast och annat förpackningsmaterial utom räckhåll för barn.
y
Antifuktmaterial är skadligt vid förtäring. Vid oavsiktlig förtäring ska du tvinga
patienten att kräkas och sedan besöka närmaste sjukhus. Plastemballaget kan
dessutom orsaka kvävning. Förvaras utom räckhåll för barn.
Låt inte barn klättra eller hänga på TV:n.
y
Då kan TV:n ramla och detta kan orsaka allvarliga skador.
Kassera använda batterier noggrant så att barn inte kommer åt att äta dem.
y
Om detta händer ska du omedelbart ta barnet till en läkare.
Sätt inte in en strömledande produkt (som metallbestick) i ena änden av
y
strömkabeln medan den andra änden är ansluten till ingången i väggen. Rör inte
heller strömkabeln direkt efter att du anslutit den till ingången i väggen.
Då kan du få elektriska stötar.
(Beroende på modell)
Du bör inte ställa eller förvara brandfarliga ämnen i närheten av produkten.
y
Vårdslös hantering av brandfarliga ämnen innebär risk för explosion eller eldsvåda.
5
SVESVENSKA
Se till att metallföremål som mynt, hårnålar och gem inte kan falla ner i produkten.
y
Var också försiktig med lättantändliga föremål som papper eller tändstickor. Barn
måste vara extra försiktiga.
Elektriska stötar, eldsvåda eller skador kan inträffa. Om ett främmande föremål
hamnar i produkten kopplar du från strömsladden och kontaktar servicecenter.
Spreja inte vatten på produkten och gnugga inte brandfarliga vätskor på den (som
y
thinner eller bensen). Det kan leda till elektriska stötar eller eldsvåda.
Skydda produkten från stötar, se till att inte något objekt ramlar in i produkten eller
y
på skärmen.
Du eller produkten kan skadas.
Vidrör aldrig denna produkt under åskväder.
y
Då kan du få elektriska stötar.
Rör aldrig vid vägguttaget vid gasläckor. Öppna fönstren och vädra.
y
Eldsvådor eller brännskador kan uppstå på grund av gnistor.
Page 40

6
SVENSKA
SVE
SÄKERHETSFÖRESKRIFTER
Ta inte själv isär produkten. Försök inte heller att reparera eller modifiera den på
y
egen hand.
Det kan leda till elektriska stötar eller eldsvåda.
Kontakta servicecentret vid kontroll, finjustering eller reparation.
Om något av följande inträffar kopplar du ur produkten och kontaktar ett lokalt
y
servicecenter.
- Produkten har utsatts för stötar
- Produkten har skadats
- Främmande föremål har kommit in i produkten
- Det kom rök eller konstig lukt från produkten
Detta kan resultera i eldsvåda eller elektriska stötar.
Dra ur nätkabeln om du vet att du inte kommer att använda produkten under en
y
längre tid.
Ansamlat damm kan orsaka eldsvåda, och försämrad isolering kan leda till
krypströmmar, kortslutning eller eldsvåda.
Produkten får inte utsättas för vatten (droppar eller stänk). Placera inte föremål
y
som innehåller vätska, t.ex. vaser, på apparaten.
Page 41

VARNING!
5~7 times
y
SÄKERHETSFÖRESKRIFTER
Installera produkten på en plats där det inte förekommer radiovågor.
7
Avståndet mellan utomhusantennen och eventuella kraftledningar ska vara
y
tillräckligt stort så att antennen inte nuddar kraftledningarna om den faller.
Detta medför risk för elektriska stötar.
Installera inte produkten på platser som instabila hyllor eller lutande ytor. Undvik
y
också platser där det finns vibrationer eller där produkten inte har ordentligt stöd.
Annars kan produkten falla eller välta vilket kan orsaka personskada eller skada på
produkten.
Om du installerar TV:n på ett stativ måste montera den på ett säkert sätt så att den
y
inte kan välta. Om produkten välter kan det orsaka allvarliga skador.
Om du tänker montera apparaten på en vägg fäster du VESA standardväggmonteringsfäste (valfri
y
komponent) på apparatens baksida. När du installerar TV:n med hjälp av väggmonteringsfästet (valfri
komponent) ska du sätta fast det ordentligt så att det inte ramlar ner.
Använd endast tillbehör som angivits av tillverkaren.
y
Kontakta en kvalificerad serviceperson när du installerar antennen.
y
På så sätt minimeras risken för brand eller elektriska stötar.
Vi rekommenderar att du håller ett avstånd på minst fem till sju gånger den
y
diagonala skärmstorleken när du tittar på TV.
Om du tittar på TV under lång tid kan du börja se suddigt.
Använd enbart angiven typ av batteri.
y
Annars kan fjärrkontrollen gå sönder.
SVESVENSKA
Blanda inte gamla och nya batterier.
y
Detta kan leda till att batterierna överhettas och läcker.
Kontrollera att det inte finns några föremål mellan fjärrkontrollen och sensorn.
y
Signalen från fjärrkontrollen kan störas av solljus eller annat starkt ljus. I så fall ska
y
du göra det mörkare i rummet.
Se till att anslutningskablarna är tillräckligt långa vid anslutning av externa enheter
y
som t.ex spelkonsoler.
Annars kan produkten ramla vilket kan orsaka personskada eller skada på
produkten.
Page 42

8
SVENSKA
SVE
SÄKERHETSFÖRESKRIFTER
Använd inte stickproppen för att knäppa på eller stänga av apparaten. (Använd inte
y
strömkabeln som kontakt.)
Det kan orsaka mekaniska fel eller leda till elektriska stötar.
Följ installationsanvisningarna nedan för att förhindra att produkten överhettas.
y
- Avståndet mellan apparat och vägg bör vara minst 10 cm.
- Installera inte produkten på en plats som saknar ventilation (t.ex. i en bokhylla
eller ett skåp).
- Installera inte produkten på en matta eller en dyna.
- Se till att luftventilen inte blockeras av en duk eller gardin.
Annars kan eldsvåda uppstå.
Vidrör inte ventilationshålen när du tittar på TV eftersom dessa kan vara heta.
y
Detta påverkar inte produktens funktion eller prestanda.
Kontrollera produktens sladdar regelbundet, och om utseendet visar på skador eller nedbrytning
y
kopplar du från den, slutar att använda den och får sladden ersatt med exakt samma
ersättningsprodukt från en auktoriserad återförsäljare.
Se till att damm inte samlas på nätkontakten eller i vägguttaget.
y
Detta medför risk för brand.
Skydda nätsladden från fysisk eller mekanisk felanvändning, t.ex. att böja, slå
y
knutar på, klämma i dörrar eller gå på den. Var extra uppmärksam på kontakter,
vägguttag och de punkter där sladden kommer ut från apparatens hölje.
Tryck eller skrapa inte på skärmytan med handen eller med vassa föremål som
y
naglar, spik, pennor eller liknande, som kan orsaka repor.
Undvik att vidröra skärmen eller hålla fingrarna mot den en längre tid. Detta kan
y
orsaka tillfälliga förvrängningseffekter på skärmen.
När du rengör produkten och dess komponenter kopplar du bort strömmen och
y
torkar med en mjuk trasa. Om du trycker för hårt kan det leda till repor eller
missfärgningar. Spraya inte vatten på produkten eller torka den med en våt trasa.
Använd aldrig fönsterputs, rengöringsmedel för bilar, industriella rengöringsmedel,
skurmedel, vax, bensen, alkohol o.s.v. som kan skada produkten och dess panel.
Annars kan det uppstå eldsvåda, elektriska stötar eller produktskada (deformation,
korrosion eller att produkten går sönder).
Så länge som den här enheten är ansluten till ett vägguttag kommer den inte att kopplas från
y
växelströmkällan, även om du stänger av enheten med strömbrytaren.
När du ska dra ur sladden tar du tag i stickproppen och drar ur den.
y
Om ledningarna inuti strömkabeln kopplas bort kan det orsaka eldsvåda.
Se till att du stänger av strömmen innan du flyttar produkten. Sedan drar du ur
y
strömkablarna, antennkablarna och alla anslutningskablar.
TV:n eller strömsladden kan vara skadade vilket kan leda till brand eller orsaka
elektriska stötar.
Page 43

SÄKERHETSFÖRESKRIFTER
Ta hjälp av någon annan när du flyttar eller packar upp produkten eftersom den är
y
tung.
Annars kan personskador uppstå.
Kontakta servicecenter en gång om året för rengöring av produktens interna delar.
y
Damm som samlas inne i projektorn kan förorsaka mekaniska fel.
Lämna all service till kvalificerad servicepersonal. Service krävs när produkten har
y
skadats, t.ex. när strömsladden eller -kontakten har skadats, vätska har spillts i
produkten, produkten har utsatts för regn eller fukt, inte fungerar normalt eller har
tappats.
Om produkten är sval kan det hända att du ser lite ”flimmer” när den slås på. Det
y
är helt normalt. Det är inte fel på produkten.
Panelen är en högteknologisk produkt med en upplösning på två miljoner till sex
y
miljoner pixlar. Det kan hända att du ser små svarta prickar och/eller färgade
prickar (röda, blå eller gröna) i storleken 1 ppm på panelen. Detta är inte ett tecken
på att något är fel, och det påverkar inte produktens prestanda eller pålitlighet.
Det här fenomenet förekommer också i produkter från tredje part och ger inte rätt
till byte eller återbetalning.
Panelens ljusstyrka och färg kan se olika ut beroende på vilken vinkel du tittar från
y
(vänster/höger/uppåt/nedåt).
Det här fenomenet uppstår på grund av panelens egenskaper. Det har inget med
produktens prestanda att göra och det är inte ett tecken på att något är fel.
9
SVESVENSKA
Om du visar en stillbild (t.ex. en TV-kanals logotyp, meny på skärmen, scen från ett TV-spel)
y
för länge, kan det skada skärmen och orsaka eftersläckning av bilden. Detta kallas frysta bilder.
Produktens garanti täcker inte frysta bilder.
Undvik att visa stillbilder på TV-skärmen under en längre period (2 timmar eller längre för LCDskärmar, 1 timme eller längre för plasma-TV).
Om bildformatet är inställt på 4:3 under lång tid, kan det resultera i frysta bilder på panelens kanter.
Det här fenomenet förekommer också i produkter från tredje part och ger inte rätt till byte eller
återbetalning.
Genererat ljud
y
”Knäppande” ljud: Ett knäppande ljud som hörs när du tittar på eller stänger av TV:n orsakas av
termisk sammandragning i plasten på grund av temperatur och fuktighet. Detta ljud är vanligt för
produkter där termisk deformation krävs. Brummande från elektrisk krets/surrande från panelen: Ett
lågfrekvent ljud genereras från en snabb växlingskrets som tillhandahåller en stor mängd ström för
att driva produkten. Detta varierar beroende på produkten.
De här genererade ljuden påverkar inte produktens prestanda eller pålitlighet.
Page 44

SÄKERHETSFÖRESKRIFTER
10
Visa 3D-bilder (endast för 3D-modeller)
SVENSKA
SVE
VARNING
Tittarmiljö
yTittartid
- Ta pauser på 5–15 minuter varje timme när du tittar på 3D-innehåll. Om du tittar på 3D-innehåll
länge kan du få huvudvärk, känna yrsel, trötthet och trötthet i ögonen.
Personer som har ljuskänslig epilepsi eller någon kronisk sjukdom
yVissa användare kan drabbas av anfall eller andra avvikande symptom när de utsätts för blinkande ljus
eller särskilda mönster i 3D-innehåll.
yTitta inte på 3D-video om du känner dig illamående, är gravid och/eller har en kronisk sjukdom som
epilepsi, hjärtsjukdom, blodtryckssjukdom, o.s.v.
y3D-innehåll rekommenderas inte för dem som lider av stereoblindhet eller stereoanomali. Dubbla bilder
eller obehag av att titta kan upplevas.
yOm du skelar, har nedsatt syn eller astigmatism kan du ha problem med att uppfatta djup, och du
kan lätt bli trött i ögonen på grund av dubbla bilder. Vi rekommenderar att du tar paus oftare än en
genomsnittlig vuxen person.
yOm din syn varierar mellan höger och vänster öga, bör du kontrollera din syn innan du tittar på
3D-innehåll.
Symptom som kräver avbrott eller att du avstår från att titta på 3D-innehåll
yTitta inte på 3D-innehåll när du känner trötthet på grund av sömnbrist, överansträngning eller alkohol.
yOm du upplever dessa symptom ska du sluta använda/titta på 3D-innehåll och vila tills symptomen
försvinner.
- Kontakta din läkare om symptomen inte försvinner. Symptomen kan inbegripa huvudvärk, smärta i
ögongloberna, yrsel, illamående, hjärtklappning, suddighet, obehag, dubbla bilder, obehagskänsla
eller trötthet i ögonen.
Page 45

SÄKERHETSFÖRESKRIFTER
VARNING!
Tittarmiljö
yTittaravstånd
- När du tittar på 3D-filmer bör avståndet till TV:n vara minst dubbla den diagonala storleken på den.
Om du känner obehag när du tittar på 3D-innehåll flyttar du längre bort från TV:n.
Tittarålder
ySpädbarn/Barn
- Det är förbjudet för barn under fem år att utsättas för/titta på 3D-innehåll.
- Barn under 10 år kan överreagera och bli överdrivet upprymda eftersom deras syn är under
utveckling (till exempel: försöker peka på skärmen eller försöker hoppa in i den). Särskild tillsyn och
extra uppmärksamhet krävs när barn tittar på 3D-innehåll.
- Barn har större binokulär skillnad för 3D-bilder än vuxna eftersom avståndet mellan deras ögon
är kortare än hos vuxna. Därför uppfattar de mer stereoskopiskt djup jämfört med vuxna i samma
3D-bild.
yTonåringar
- Tonåringar under 19 år kan reagera med känslighet på grund av stimuleringen från ljuset i
3D-innehåll. Råd dem att avstå från att titta på 3D under lång tid när de är trötta.
yÄldre
- Äldre personer kan uppfatta mindre 3D-effekt än unga. Sitt inte närmare TV:n än det
rekommenderade avståndet.
11
SVESVENSKA
Säkerhetstips när du använder 3D-glasögonen
ySe till att du använder 3D-glasögon från LG. Annars kanske du inte kan se 3D-innehåll korrekt.
yAnvänd inte 3D-glasögonen istället för dina vanliga glasögon, solglasögon eller skyddsglasögon.
yModierade 3D-glasögon kan göra så att du bli trött i ögonen eller så att bilden förvrängs.
yFörvara inte 3D-glasögonen i extremt hög eller låg temperatur. Det leder till deformation.
y3D-glasögonen är ömtåliga och repas lätt. Använd alltid en mjuk, ren trasa när du torkar av glasen.
Repa inte linserna på 3D-glasögonen med vassa föremål och rengör inte med kemikalier.
Page 46

12
<
<
SVENSKA
SVE
INSTALLATIONSANVISNINGAR
1 Öppna förpackningen och kontrollera att alla tillbehör nns med.
2 Fäst stativet på tv:n.
3 Anslut en extern enhet till tv:n.
4 Se till att nätverksanslutningen är tillgänglig.
INSTALLATIONSANVISNINGAR/MONTERA OCH FÖRBEREDA
Obs!
yIllustrationen kan se annorlunda ut än den gör på TV:n.
yTV-apparatens skärmvisningar (OSD, On Screen Display) kan se lite annorlunda ut jämfört med vad
som visas i användarhandboken.
yTillgängliga menyer och alternativ kan skilja sig åt beroende på vilken ingångskälla eller
produktmodell du använder.
yI framtiden kommer den här TV:n att förses med nya funktioner.
yTV:n kan placeras i standby-läge för att minska strömförbrukningen. TV:n bör dessutom stängas av
om den inte ska användas på ett tag eftersom det minskar strömförbrukningen ytterligare.
yDen ström som förbrukas under användningen kan minskas rejält om bildens ljusstyrka minskas
vilket minskar de totala driftskostnaderna.
Du kan bara använda TV:ns nätverksfunktioner när nätverksanslutningen är aktiv.
MONTERA OCH FÖRBEREDA
Uppackning
Kontrollera att din produktkartong innehåller följande föremål. Om några tillbehör saknas ska du kontakta
den återförsäljare som du köpte produkten av. Bilderna i den här användarhandboken kan skilja sig från
den verkliga produkten och det verkliga föremålet.
VARNING!
yAnvänd inte några ej godkända produkter eftersom det kan ha negativ inverkan på säkerheten och produktens
livslängd.
yAlla skador eller personskador som orsakats av användning av ej godkända produkter täcks inte av garantin.
yVissa modeller har en tunn film som sitter fast på skärmen och den här filmen får inte tas bort.
Obs!
yVilka föremål som medföljer din produkt kan variera beroende på modell.
yProduktspecifikationer och innehåll i den här användarhandboken kan ändras utan föregående
meddelande på grund av uppgradering av produktens funktioner.
yFör bästa möjliga anslutning bör HDMI-kablar och USB-enheter inte vara större än 10 mm tjocka och
18 mm breda. Använd en förlängningskabel med stöd för USB 2.0 om USB-kabeln eller USB-minnet
inte passar i TV:ns USB-port.
B
A
B
*A
10 mm
=
18 mm
*B
A
=
Page 47

MONTERA OCH FÖRBEREDA
13
ENERGY
SAVING
1 2 3
4 5 6
7 809
LIST
MENU
BACK
AV MODE
INPUT
TV
FLASHBK
MARK
FAV
P
A
G
3D
CHVOL
E
MUTE
INFO
Q.MENU
ENTER
EXIT
L/R SELECT
FREEZE
RATIO
Fjärrkontroll och
batterier (AAA)
(Se sid. 21, 22)
P
Magisk fjärrkontroll,
Batterier (AA)
(Endast 60LM645* ,
32/42/47/55LM66**,
42/47/55LM67**,
42/47/55LM76**)
(Se sid. 23)
SVESVENSKA
Polerduk
(Beroende på modell)
Använd den här för att ta
Användarhandbok
Komponentvideokabel
(Se sid. B-7)
bort damm från skåpet.
Kompositvideokabel
(Se sid. B-7 , B-8)
Cinema 3D-glasögon
3D-glasögonens nummer
kan variera beroende på
modell eller land.
(Utom 32/37/42LS57**)
Kabelsamlare
(Beroende på modell)
(Se sid. A-6)
Dual play-glasögon
(Endast 42/47/55LM76**)
Nätsladd
(Endast 32/37/42LS57**,
32/37/42/47/55LM62**)
eller
Stativskruvar
8 EA, M4 x 20
(Se sid. A-3, A-4, A-5)
Bordsfästeskabel
2 EA
(Endast 32/37LM62**,
32LM660*)
(Se sid. 18)
Väggmontering, inre
distanser
4 EA
(Endast 32/37/42LS57**,
32/37/42/47/55LM62**)
(Se sid. 20)
Isolator
(Beroende på modell)
(Se sid. 14)
Bordsfästesskruv
(1 EA: Endast
32/37/42LS57**,
32/42/47LM669*)
(2 EA: Endast
32/37LM62**,
32LM660*)
(Se sid. 18)
Skruv till fäste
2 EA, M4 x 8
(Endast 32/37LM62**,
32LM660*)
(Se sid. 18)
SCART-kabel
(Se sid. B-14)
Page 48

MONTERA OCH FÖRBEREDA
14
SVENSKA
SVE
Stativ/Fot
(Endast 32/37/42LS57**, 65LM62**, 32/42/47LM669*)
(Se sid. A-3, A-5)
Stativ/Fot
(Endast 32/37/42/47/55LM62**, 32/42/47/55/60LM64**, 32/42/47/55LM660*,
42/47/55LM67**, 42/47/55LM76**)
(Se sid. A-4, A-5)
Obs!
yInstallationsguide för antennisolator
- Använd den här komponenten när du ska installera din TV och den jordade strömmen inte har
samma spänning som den jordade antennsignalen.
»Om TV:n inte har samma spänning som den jordade antennsignalen kan antennkontakten
värmas upp, och den höga värmen kan orsaka olyckor.
- Du kan förbättra säkerheten när du tittar på TV genom att ta bort spänningen från TV-antennen. Vi
rekommenderar att du fäster isolatorn vid väggen. Om den inte kan fästas vid väggen fäster du den
på TV:n. Koppla inte från antennisolatorn efter installationen.
- Innan du börjar ska du se till att TV-antennen är ansluten.
Vägg
1. Anslut till TV:n.
ANTENNA/
CABLE IN
Kabel/antenn
eller
Isolator
2. Anslut till digitalboxen.
Anslut den ena änden av isolatorn till kabel/antennuttaget och den andra till TV:n eller digitalboxen.
“Utrustning som är kopplad till skyddsjord via jordat vägguttag och/eller via annan utrustning och
samtidigt är kopplad till kabel-TV nät kan i vissa fall medföra risk för brand.
För att undvika detta skall vid anslutning av utrustningen till kabel-TV nät galvanisk isolator nnas
mellan utrustningen och kabel-TV nätet.”
När du använder RF-isolatorn kan du förlora viss signalkänslighet.
Page 49

MONTERA OCH FÖRBEREDA
Köpa separat
Tillbehör som köps separat kan ändras eller justeras för kvalitetsförbättring utan föregående meddelande.
Dessa tillbehör nns att köpa hos din återförsäljare.
Dessa enheter fungerar bara med vissa modeller.
P
15
SVESVENSKA
AG-F2**DP, AG-F3**DP
Dual play-glasögon
AN-WF100
Trådlöst nätverk
Kompatibilitet
AG-F2**DP, AG-F3**DP
Dual play-glasögon
AG-F2
Cinema 3D-glasögon
AN-MR300
Magisk fjärrkontroll
AN-WF100
Trådlöst nätverk
Modellnamnet och -designen kan ändras på grund av uppgraderingar av produktfunktioner, tillverkaren eller
på grund av olika regler.
**,
AG-F3
**
AG-F2
Cinema 3D-glasögon
32/37/42LS57**
AG-F3
**,
**
32/37/42/47/55/65LM62**,
32/42/47/55/60LM64**
(Utom 60LM645*)
AN-MR300
Magisk fjärrkontroll
• •
• •
• • •
• •
60LM645*,
32/42/47/55LM66**,
42/47/55LM67**,
42/47/55LM76**
Page 50

MONTERA OCH FÖRBEREDA
H
H
H
16
Delar och knappar
SVENSKA
SVE
32/42/47/55LM66**, 42/47/55LM67**,
Typ B: 32/37/42LS57**, 32/37/42/47/55/65LM62**Typ A: 32/42/47/55/60LM64**,
42/47/55LM76**
Skärm Skärm
Fjärrkontrollssensor
och intelligent
1
OK
sensor
Strömindikator
SETTINGS
Högtalare Högtalare
INPUT
Fjärrkontrollssensor
och intelligent sensor
Strömindikator
1
OK
SETTINGS
INPUT
Knappar
Funktionsknappar
Knapp Beskrivning
Typ A: Typ B:
Bläddrar mellan sparade program.
Justerar volymen.
OK
ꔉ
Väljer det markerade menyalternativet eller bekräftar en ingång.
S SETTINGS Ger åtkomst till hemmenyn, eller sparar din inmatning och går ur menyerna.
INPUT Ändrar ingångskällan.
/ I
Stänger av eller slår på strömmen.
2
1 Intelligent sensor – Justerar bildkvaliteten och ljusstyrkan i enlighet med den omgivande miljön.
2 B-knapparna är pekkänsliga och du styr dem enkelt genom att bara peka med ngret.
Obs!
yDu kan ställa in strömindikatorn på av eller på genom att välja ALT. i huvudmenyn.
Page 51

MONTERA OCH FÖRBEREDA
17
Lyfta och ytta TV:n
Innan du lyfter eller yttar TV:n bör du läsa
följande så att den inte repas eller skadas, samt
som en garanti för säker transport oavsett TVapparatens typ eller storlek.
VARNING!
yUndvik att röra vid skärmen eftersom det
kan skada den.
yVi rekommenderar att TV:n är kvar i kartongen
eller förpackningsmaterialet när du yttar den.
yKoppla bort strömsladden och alla kablar innan
du yttar eller lyfter TV:n.
ySe till att skärmen är vänd bort från dig när du
håller TV:n för att skydda den mot skador.
yDet krävs minst 2 personer för att ytta en
större TV.
yOm du ska bära TV:n ska den hållas på samma
sätt som bilden visar.
SVESVENSKA
yUtsätt inte TV:n för stötar eller stora vibrationer
vid transport.
yHåll TV:n upprätt när du lyfter den och se till
att inte vända den på sidan eller luta den åt
vänster eller höger.
yNär du yttar TV:n ska skyddsplattorna täcka
TV:ns sidor. (Beroende på modell)
Skyddsplatta
yHåll den övre och undre delen av ramen
i ett fast grepp. Se till att inte hålla i den
transparenta delen, högtalarna eller
högtalargallren.
Page 52

MONTERA OCH FÖRBEREDA
18
Placera TV:n på ett bord
1 Lyft upp TV:n i upprätt position på ett bord.
SVENSKA
SVE
2 Anslut strömsladden till ett eluttag.
- Lämna ett utrymme på (minst) 10 cm
mellan bildskärmen och väggen för god
ventilation.
10 cm
10 cm
10 cm
10 cm
VARNING!
yPlacera inte TV:n i närheten av eller på
värmekällor eftersom det kan leda till brand
eller annan skada.
Säkra TV:n i ett bord
Fäst TV:n i ett bord så att den inte välter framåt,
skadas eller orsakar annan skada.
För att säkra TV:n i ett bord sätter du i och skruvar
fast medföljande skruv i stativets baksida .
(Endast 32/37/42LS57**, 32/42/47LM669*)
(Endast 32/37LM62**, 32LM660*)
M4 x 8
2EA
Obs!
(Endast 32/37LM62**, 32LM660*)
Så här fäster du TV:n i ett bord
1. Anslut bordsfästeskablarna till stativets fot
med skruvarna till fästet.
2. Säkra bordfästeskablarna till ett bord med
bordfästesskruvarna.
3. När TV:n är säkrad vid bordet kan du
flytta bordet närmare väggen. Barn kan
annars stöta till det, vilket kan resultera i
personskador.
VARNING
yTV-apparaten bör fästas säkert i golvet/
väggen enligt installationsanvisningarna
så att den inte tippar över. Om TV:n välter
omkull, skakas eller gungar till kan någon bli
skadad.
Page 53

MONTERA OCH FÖRBEREDA
19
Justerar TV:ns vinkel så att den passar din
synvinkel
(Denna funktion nns inte på alla modeller.)
Justera TV:n för att få en bra vinkel: du kan vrida
TV:n 20 grader till vänster eller höger och justera
TV:n för att få en bra vinkel.
(Endast 32/37/42LS57**, 65LM62**,
32/42/47LM669*)
2020
Du kan vrida TV:n 10 grader åt höger eller vänster
för att få en bra vinkel.
(Endast 32/37/42/47/55LM62**,
32/42/47/55/60LM64**, 32/42/47/55LM660*,
42/47/55LM67**, 42/47/55LM76**)
1010
VARNING!
Var försiktig så att du inte klämmer fingrarna
när du justerar produktens vinkel.
»
Personskada kan uppstå om händer eller
fingrar kläms. Om produkten lutas för
mycket kan den falla och skadas, eller skada
personer.
Säkra TV:n i en vägg
(Denna funktion nns inte på alla modeller.)
SVESVENSKA
1 Sätt i och skruva åt skruvöglorna eller
vinkeljärnen och skruvarna på baksidan av
TV:n.
- Om det redan sitter skruvar där
skruvöglorna ska sättas fast tar du bort
dem först.
2 Fäst vinkeljärnen med skruvarna på väggen.
Passa in vinkeljärnen på väggen mot
skruvöglorna på baksidan av TV:n.
3 Fäst ihop skruvöglorna och vinkeljärnen
ordentligt med ett stadigt rep.
Se till att repet är horisontellt mot den plana
ytan.
VARNING!
ySe till att barn inte klättrar på TV:n eller
hänger i den.
Endast 32/37/42/47/55LM62**,
(
32/42/47/55/60LM64**, 32/42/47/55LM660*,
42/47/55LM67**, 42/47/55LM76**)
<Baksida> <Fram>
Obs!
yAnvänd en hållare eller ett skåp som är
stark/t och stor/t nog att klara TV:ns vikt på
ett säkert sätt.
yVinkeljärn, skruvar och rep medföljer inte.
Du kan köpa ytterligare tillbehör från din
lokala återförsäljare.
Page 54

MONTERA OCH FÖRBEREDA
20
Montering på vägg
Sätt försiktigt fast ett valfritt väggmonteringsfäste
på baksidan av TV:n och montera väggfästet på
en bärkraftig vägg i rät vinkel mot golvet. Kontakta
SVENSKA
SVE
kvalicerad personal om du vill fästa TV:n i andra
byggnadsmaterial.
LG rekommenderar att väggmonteringen utförs av en
professionell installatör.
Se till att använda skruvar och väggmonteringsfästen
som uppfyller VESA-standarden. Standardmått för
väggmonteringsutrustningen anges i tabellen nedan.
Modell 32/37LS57**
VESA (A x B) 200 x 200 400 x 400
Standardskruv M6 M6
Antal skruvar 4 4
Väggmonteringsfäste
10 cm
10 cm
10 cm
10 cm
Köps separat (väggmonteringsfäste)
32/37LM62**
32LM64**
32LM66**
LSW200BX,
LSW200BXG
42LS57**
42/47/55LM62**
42/47/55/60LM64**
42/47/55LM66**
42/47/55LM67**
42/47/55LM76**
LSW400BX,
LSW400BXG
VARNING!
yKoppla först bort strömsladden innan du
flyttar eller installerar TV:n. Annars finns risk
för elektriska stötar.
yOm du installerar TV:n i taket eller på en
lutande vägg kan den falla och orsaka
personskador.
Använd ett godkänt väggmonteringsfäste
från LG och kontakta en lokal återförsäljare
eller kvalificerad personal.
yDra inte åt skruvarna alltför hårt eftersom
det kan skada TV:n och medföra att garantin
blir ogiltig.
yAnvänd skruvar och väggfästen som
uppfyller VESA-standarden. Skador eller
personskador som orsakats av felaktig
användning eller olämpliga tillbehör täcks
inte av garantin.
Obs!
yAnvänd skruvar som följer specifikationerna
i VESA-standarden.
yI väggmonteringsutrustningen ingår en
installationsmanual och nödvändiga delar.
yVäggmonteringsfästet köps separat. Du
kan köpa ytterligare tillbehör från din lokala
återförsäljare.
yLängden på skruvarna kan variera beroende
på väggmonteringen. Se till att använda rätt
längd.
yMer information finns i den
användarhandbok som medföljde
väggmonteringsutrustningen.
yNär du sätter fast ett väggmonteringsfäste
från tredje part på TV:n, sätter du i
väggmonteringsfästets inre distanser i
TV:ns väggmonteringshål för att flytta TV:n
i lodrät vinkel. Se till att du inte använder
distanserna för LG:s väggmonteringsfäste.
(Endast 32/37/42LS57**,
32/37/42/47/55LM62**)
Modell
VESA (A x B)
Standardskruv
Antal skruvar
Väggmonteringsfäste
65LM62**
600 x 400
M8
4
LSW600B
Väggmontering, inre distanser
(Beroende på modell)
yFör att skydda TV-skärmen (mot repor,
fingeravtryck) ska du placera TV:n på ett
A
B
plant bord utan att ta bort omslagsplasten.
yNär du har tagit bort omslagsplasten på
TV:ns baksida installerar du TV:n enligt
användarhandboken som medföljer
produkter med väggmonteringsfäste.
yTa bort skyddsplattorna när du har installerat
TV:n.
Page 55

FJÄRRKONTROLL
FJÄRRKONTROLL
Beskrivningarna i den här användarhandboken utgår från knapparna på fjärrkontrollen.
Läs användarhandboken noggrant och använd TV:n på rätt sätt.
När du ska byta ut batterierna öppnar du luckan och byter ut batterierna (1,5 V AAA).
Se till att och är vända åt det håll som visas på etiketten inuti batterifacket och
stäng sedan luckan.När du ska ta ur batterierna gör du precis som vid isättning, men
tvärtom.
VARNING!
yBlanda inte gamla och nya batterier, eftersom det kan skada fjärrkontrollen.
Se till att fjärrkontrollen riktas mot fjärrkontrollsensorn på TV:n.
(Endast LM669*)
21
SVESVENSKA
3D
Används för att titta på 3D-video.
TV/RAD
Väljer program för radio, TV och digital-TV.
GUIDE
Visar programguiden.
INFO
Visar information om det aktuella programmet
och skärmbilden.
SUBTITLE
Visar önskad undertextning i digitalt läge.
Q. MENU
Ger åtkomst till snabbmenyerna.
INPUT
Ändrar ingångskällan.
LIST
Ger åtkomst till den sparade programlistan.
Q.VIEW
Återgår till föregående program.
HOME
2
Ger åtkomst till hemmenyerna.
MY APPS
Visar listan på appar.
Navigeringsknappar (uppåt/nedåt/vänster/
höger)
Bläddrar i menyer eller alternativ.
OK
Väljer menyer eller alternativ och bekräftar
din inmatning.
(Bakåt)
Går tillbaka till föregående nivå.
POWER
TV/RAD
INFO
GUIDE
LIST
HOME MY APPS
1
LIVE TV
FAV
MUTE
SUBTITLE
Q.MENU
TEXT
INPUT
Q.VIEW
EXIT
P
REC
T.OPT
P
A
G
E
EXIT
Stänger alla skärmbilder och återgår till
normalt TV-läge.
FAV
Ger åtkomst till listan över favoritkanaler.
APP/
1
APP/
Välj MHP TV-menykällan. (Endast Italien)
*
(Beroende på modell)
1
@ ORANGE
Direktåtkomst till din internetportal för
underhållning och nyhetstjänster som
utvecklats av Orange. (Enbart Frankrike)
PAGE
Går till föregående eller nästa sida.
2
Färgknappar
Med de här knapparna kommer du åt
specialfunktioner i vissa menyer.
(
: Röd, : Grön, : Gul, : Blå)
LIVE TV
Återgår till live-TV.
Kontrollknappar (
)
Styr Premium-innehåll, DVR- och Smart
Share-menyer eller SIMPLINK-kompatibla
3
enheter (USB, SIMPLINK eller DVR).
REC
Används för att justera DVR-menyn.
3
TEXT-TV-KNAPPAR
Dessa knappar används för text-tv.
Mer information hittar du i avsnittet “Text-TV”.
Page 56

FJÄRRKONTROLL
22
(Endast LS57**, LM62**, LM64**, LM660*, LM67**, LM76**)
SVENSKA
SVE
(Användarhandbok)
Se användarhandboken.
RATIO
Ändrar bildstorleken.
INPUT
Ändrar ingångskällan.
TV/RAD
Väljer program för radio, TV och digital-TV.
LIST
Ger åtkomst till den sparade programlistan.
(Mellanslag)
Öppnar en tom plats på skärmtangentbordet.
Q.VIEW
Återgår till föregående program.
FAV
Ger åtkomst till listan över favoritkanaler.
1
3D
Används för att titta på 3D-video.
(Endast LM62**, LM64**, LM66**, LM67**,
LM76**)
PAGE
Går till föregående eller nästa sida.
SETTINGS
Ger åtkomst till huvudmenyerna.
HOME
Ger åtkomst till hemmenyerna.
MY APPS
Visar listan på appar.
Navigeringsknappar (uppåt/nedåt/vänster/
höger)
Bläddrar i menyer eller alternativ.
OK
Väljer menyer eller alternativ och bekräftar
din inmatning.
(Bakåt)
Går tillbaka till föregående nivå.
GUIDE
Visar programguiden.
RATIO INPUT
1
.,;@
2
abc
3
4
ghi
5
jkl
6
7
pqrs
8
tuv
9
0
FAV
1
MUTE
OK
GUIDE
Q.VIEW
MY APPS
EXIT
LIST
SETTINGS
2
T.OPT
AD
SUBTITLE
Q.MENU
REC
3
TEXT
LIVE TV
4 5
EXIT
Stänger alla skärmbilder och återgår till
normalt TV-läge.
2
Färgknappar
Med de här knapparna kommer du åt
TV/
specialfunktioner i vissa menyer.
RAD
(
: Röd, : Grön, : Gul, : Blå)
def
3
TEXT-TV-KNAPPAR
Dessa knappar används för text-tv.
mno
Mer information hittar du i avsnittet "Text-TV".
wxyz
SUBTITLE
Visar önskad undertextning i digitalt läge.
Q. MENU
Ger åtkomst till snabbmenyerna.
P
A
LIVE-TV
G
E
Återgår till live-TV.
Kontrollknappar (
)
Styr Premium-innehåll, DVR- och Smart
Share-menyer eller SIMPLINK-kompatibla
enheter (USB, SIMPLINK eller DVR).
REC
Används för att justera DVR-menyn.
4
ENERGY SAVING
Justerar skärmens ljusstyrka för att minska
energiförbrukningen. (Endast LS57**)
INFO
INFO
Visar information om det aktuella programmet
och skärmbilden.
1
(
: Endast LS57**)
4
(
: Endast LM62**, LM64**, LM660*,
LM67**, LM76**)
AD
Aktiverar eller avaktiverar ljudbeskrivning eller
taltjänst.
APP/
5
APP/
Välj MHP TV-menykällan. (Endast Italien)
*
(Beroende på modell)
5
@ ORANGE
Direktåtkomst till din internetportal för
underhållning och nyhetstjänster som
utvecklats av Orange. (Enbart Frankrike)
Page 57

DEN MAGISKA FJÄRRKONTROLLENS FUNKTIONER
DEN MAGISKA FJÄRRKONTROLLENS
FUNKTIONER
23
Den här delen medföljer inte alla modeller.
När meddelandet ”Batterinivån i den magiska fjärrkontrollen är låg. Byt batteri." visas
är det dags att byta batteri.
När du behöver byta batterier öppnar du luckan och byter ut batterierna (1,5 V AA)
med och vänt åt det håll som visas på etiketten inuti batterifacket. Stäng sedan
luckan. Se till att rikta fjärrkontrollen mot fjärrkontrollsensorn på TV:n.
När du ska ta ur batterierna gör du precis som vid isättning, men tvärtom.
VARNING!
yBlanda inte gamla och nya batterier, eftersom det kan skada fjärrkontrollen.
(Endast 60LM645*, 32/42/47/55LM66**, 42/47/55LM67**, 42/47/55LM76**)
(Strömknapp)
Slår på eller stänger av TV:n.
Går tillbaka till föregående
OK (mittknappen)
Väljer menyer eller alternativ
och bekräftar din inmatning.
Bläddrar mellan sparade
Om du trycker på
navigeringsknappen
samtidigt som pekaren
flyttas på skärmen försvinner
pekaren, och den magiska
fjärrkontrollen fungerar som en
vanlig fjärrkontroll.
Om du vill att pekaren ska
visas igen skakar du den
magiska fjärrkontrollen i sidled.
BACK
nivå.
kanaler.
BACK
HOME
P
MY APPS
Pekare (RF-sändare)
HOME
Öppnar hemmenyn.
Navigeringsknappar (uppåt/
nedåt/vänster/höger)
Bläddrar i menyer eller alternativ.
+ -
Justerar volymen.
ꕌPꕍ
Bläddrar mellan de sparade
programmen eller kanalerna.
Tyst
Stänger av allt ljud.
MY APPS
Visar listan på appar.
3D
Används för att titta på
3D-video.
SVESVENSKA
11-1 Kort info namntest...
Mina Appar
3
Info
Om du trycker på OK (mittknappen) på den
magiska fjärrkontrollen visas följande skärm.
1
Visar information om det aktuella programmet
och skärmen.
Om du trycker på den här knappen visas
den numeriska knappsatsen som du väljer
2
programnummer med.
Du kan välja menyn Mina appar.
3
Page 58

DEN MAGISKA FJÄRRKONTROLLENS FUNKTIONER
HOME
24
Registrera den magiska
fjärrkontrollen
SVENSKA
SVE
Det är nödvändigt att ”Para ihop” (registrera)
magiska fjärrkontrollen med TVn innan den kan
användas fullt ut.
Så här registrerar du den magiska
fjärrkontrollen
Så här omregistrerar du den magiska
fjärrkontrollen
BACK
HOME
1 För att registrera automatiskt,
starta TVn och tryck på OK
(mittknappen)-knappen. När
fjärrkontrollen återregistrerats
kommer ett meddelande visas
på TVn att detta är utfört.
2 Om registreringen misslyckas,
starta om TVn och tryck på
OK (mittknappen)-knappen
för att slutföra registreringen.
1 Tryck och håll BACK
samt HOME
nedtryckta samtidigt i 5
sekunder. Sedan registrerar
du kontrollen genom att följa
”Så här registrerar du magiska
fjärrkontrollen” ovan.
2 För att återregistrera
fjärrkontrollen, håll BACK
-knappen nedtryckt i 5
sekunder med fjärrkontrollen
riktad mot TVn. När
fjärrkontrollen återregistrerats
kommer ett meddelande visas
på TVn att detta är utfört.
-knapparna
Så här använder du den
magiska fjärrkontrollen
1 Om pekaren försvinner rör du
fjärrkontrollen lite till höger
eller vänster. Då dyker den
automatiskt upp på skärmen.
»
Om pekaren inte används
på en stund kommer den att
försvinna.
2 Du kan ytta pekaren genom
att rikta pekarmottagaren på
fjärrkontrollen mot TV:n och
sedan ytta den åt vänster, åt
höger, uppåt eller nedåt.
»
Om pekaren inte fungerar
ordentligt, låter du
fjärrkontrollen vara i 10
sekunder innan du använder
den igen.
Att tänka på när du
använder den magiska
fjärrkontrollen
Använd fjärrkontrollen inom längsta
y
kommunikationsavstånd (10 m). Om du
använder fjärrkontrollen på längre avstånd
än så, eller om det står saker i vägen, kanske
den inte fungerar.
Avbrott i kommunikationen kan även
y
uppstå på grund av närstående enheter.
Elektriska enheter som mikrovågsugnar
eller trådlösa nätverksprodukter kan orsaka
störningar, eftersom dessa använder samma
radiofrekvensband som den magiska
fjärrkontrollen (2,4 GHz).
Den magiska fjärrkontrollen kan skadas eller
y
sluta fungera om du tappar den eller utsätter
den för kraftiga stötar.
Se till att du inte stöter till möbler eller
y
personer i närheten när du använder den
magiska fjärrkontrollen.
Tillverkaren och installatören kan inte
y
tillhandahålla service som är relaterad till
personsäkerhet, då den trådlösa enheten
kan orsaka störningar från elektromagnetiska
vågor.
Åtkomstpunkten (ÅP) bör installeras minst
y
1 meter från TV:n. Om åtkomstpunkten är
installerad inom 1 meter kan det hända att
den magiska fjärrkontrollen inte fungerar
ordentligt på grund av frekvensstörningar.
Page 59

ANVÄNDA ANVÄNDARHANDBOKEN
ANVÄNDA ANVÄNDARHANDBOKEN
Användarhandboken gör det lättare för dig att få detaljerad information om TV:n.
25
1 Tryck på
HOME för att komma till Hem-
menyn.
2 Välj Bruksanvisning och tryck på OK
(mittknappen).
Mina Appar
Ingångslista Inställningar
Live TV
Sök
Internet3DLG Smart W
Programguide
Bruksanvisning
Listan Nyligen
Bruksanvisning
Obs!
yDu kan också komma till
användarhandboken genom att trycka på
(Bruksanvisning) på fjärrkontrollen.
Bruksanvisning
1
Inställning av KANAL
Inställning av BILD, LJUD
ALTERNATIV
LG SMART-funktion
Avancerad funktion
Information
3
Använda inmatningsenhet
Använda Energisparfunktionen
Ställa in tidsalternativ
Ställa in TV-lås
Ställa in språk
Avaktiverad assistans
Ställa in den magiska fjärrkontrollen
2
4
Bruksanvisning
Inställning av KANAL
Inställning av BILD, LJUD
ALTERNATIV
LG SMART-funktion
Avancerad funktion
Information
Visar beskrivningen av den valda menyn.
1
1
ALT. > Ställa in språk
HOME Inställningar ALT. Språk
Väljer menyspråk och språk för ljud som visas på skärmen.
Väljer språk för skärmtexten.
Menyspråk (Language)
[Endast i digitalt läge]
Ljudspråk
När du tittar på digitala sändningar med era språk för
ljud kan du välja vilket språk du vill ha.
[Endast i digitalt läge]
Du kan använda textningsfunktionen om två eller era
Under-
undertextspråk sänds.
textningsspråk
✎ Om textningsdata inte sänds på det valda språket
kommer textningen att visas på standardspråket.
3
Zooma in
Stäng
Kör
2
HOME Inställningar ALT. Språk
Väljer menyspråk och språk för ljud som visas på skärmen.
Väljer språk för skärmtexten.
Menyspråk (Language)
[Endast i digitalt läge]
När du tittar på digitala sändningar med era språk för
Ljudspråk
ljud kan du välja vilket språk du vill ha.
[Endast i digitalt läge]
Du kan använda textningsfunktionen om två eller era
Språk för
undertextspråk sänds.
textning
✎ Om textningsdata inte sänds på det valda språket
kommer textningen att visas på standardspråket.
3
Zooma ut
Kör
Du kan använda ꕌ/ꕍför att flytta mellan
sidor.
Flyttar till den valda menyn direkt från
2
användarhandboken.
Zoomar in eller ut skärmen.
3
SVESVENSKA
Stäng
Visar aktuellt program eller skärmen för
1
ingångskällor.
Välja den kategori du vill ha.
2
Välja det alternativ du vill ha.
3
Du kan använda ꕌ/ꕍför att flytta mellan
sidor.
Söka efter beskrivningen av funktionen som
4
du vill ha i indexet.
Page 60

SKÖTSEL/FELSÖKNING
26
SKÖTSEL
SVENSKA
SVE
Rengöra TV:n
Rengör TV:n regelbundet för att bibehålla optimal prestanda och förlänga produktens livslängd.
Skärm, ram, skåp och stativ
VARNING!
ySe först till att stänga av strömmen och koppla bort strömkabeln och alla andra kablar.
yOm TV:n står oövervakad och oanvänd under lång tid bör du dra ur stickproppen för att förhindra
skador p.g.a. åska eller spänningsfall.
yTorka ytan med en torr, ren och mjuk trasa för att avlägsna damm och lätt smuts.
yFör att ta bort mer omfattande smuts kan du torka ytan med en mjuk trasa som har fuktats med rent
vatten eller utspätt, milt rengöringsmedel. Torka sedan direkt med en torr trasa.
VARNING!
yUndvik att röra vid skärmen eftersom det kan skada den.
yDu bör inte trycka, gnugga eller slå på ytan med dina fingernaglar eller ett vasst objekt, eftersom det
kan orsaka repor på skärmen och bildförvrängning.
yAnvänd inte kemikalier eftersom det kan skada produkten.
ySpraya inte vätska på ytan. Om det kommer in vatten i TV:n kan det resultera i brand, elektriska
stötar eller tekniska fel.
Strömkabel
Ta regelbundet bort damm och smuts som samlats på strömkabeln.
FELSÖKNING
Problem Lösning
Kan inte manövrera
TV:n med
fjärrkontrollen.
Ingen bild visas och
inget ljud hörs.
TV:n stängs plötsligt
av.
När du ansluter till en
dator (RGB/HDMI DVI)
visas “Ingen signal”
eller “Ogiltigt format”.
yKontrollera fjärrkontrollens sensor och försök igen.
yKontrollera om det finns något hinder mellan produkten och fjärrkontrollen.
yKontrollera om batterierna fortfarande fungerar och är korrekt isatta ( till , till ).
yKontrollera att produkten är påslagen.
yKontrollera att strömkabeln är ansluten till ett eluttag.
yKontrollera om det finns något problem med eluttaget genom att ansluta andra produkter.
yKontrollera inställningarna för strömkontroll. Strömförsörjningen kan avbrytas.
yKontrollera om insomningsfunktionen är aktiverad i avsnittet Tidsinställning.
yOm det inte finns någon signal medan TV:n är på kommer den att stängas av automatiskt efter 15
minuters inaktivitet.
yStäng av/slå på TV:n med fjärrkontrollen.
yÅteranslut RGB/HDMI-kabeln.
yStarta om datorn när TV:n är på.
Page 61

SPECIFIKATIONER
SPECIFIKATIONER
Produktspecikationer kan ändras utan föregående meddelande på grund av uppgradering av produktens
funktioner.
(Endast 60LM645*, 32/42/47/55LM66**, 42/47/55LM67**, 42/47/55LM76**)
Specifikation för Wireless LAN-modul (TWFM-B003D)
Standard IEEE 802.11a/b/g/n
2400 till 2483,5 MHz
Frekvensområde
Modulering CCK / OFDM / MIMO
Uteffekt
(Vanligast)
Datahastighet
Antennförstärkning
(Vanligast)
Upptagen bandbredd
Då kanalbandet som används i landet kan avvika kan användaren varken ändra eller justera
y
funktionsfrekvensen. Produkten är inställd efter den regionala frekvenstabellen.
5150 till 5250 MHz
5725 till 5850 MHz
802.11a: 11 dBm
802.11b: 15 dBm
802.11g: 13 dBm
802.11n – 2.4GHz: 13 dBm
802.11n – 5GHz: 13 dBm
802.11a/g: 54 Mbit/s
802.11b: 11 Mbit/s
802.11n: 300 Mbit/s
2400 till 2483,5 MHz: -2,5 dBi
5150 till 5250 MHz: -2,2 dBi
5725 till 5850 MHz: -2,9 dBi
802.11a/b/g: HT20
802.11n: HT20/40
27
SVESVENSKA
Specifikation för Bluetooth-modul (BM-LDS302)
Standard Bluetooth-version 3.0
Frekvensområde 2400 ~ 2483,5 MHz
Uteffekt (Max.) 10 dBm eller lägre
Datahastighet (Max.) 3 Mbit/s (megabit per sekund)
Kommunikationsavstånd Fri sikt ungefär 10 m
Page 62

Page 63

BRUKERHÅNDBOK
LED LCD-TV
Les denne håndboken nøye før settet tas i bruk, og ta vare på
denne informasjonen for fremtidig referanse.
www.lg.com
Page 64

NORSK
NO
INNHOLDSFORTEGNELSE
2
INNHOLDSFORTEGNELSE
3 LISENSER
3 MERKNAD OM PROGRAMVARE MED
ÅPEN KILDEKODE
4 SIKKERHETSINSTRUKSJONER
10 - Vise 3D-bilder (bare 3D-modeller)
12 INSTALLERING
12 MONTERE OG KLARGJØRE
12 Pakke ut
15 Kjøpes separat
16 Deler og knapper
17 Løfte og flytte TV-en
18 Bordmontering
20 Veggmontering
21 FJERNKONTROLL
23 FUNKSJONER FOR DEN MAGISKE
FJERNKONTROLLEN
24 Registrere den magiske fjernkontrollen
24 Slik bruker du den magiske fjernkontrollen
24 Forholdsregler for bruk av den magiske
fjernkontrollen
25 BRUKE BRUKERHÅNDBOK
26 VEDLIKEHOLD
26 Rengjøre TV-en
26 - Skjerm, ramme, kabinett og stativ
26 - Strømledning
26 FEILSØKING
27 SPESIFIKASJONER
ADVARSEL
yHvis du ignorerer en ADVARSEL-melding,
kan du risikere alvorlig personskade eller
død.
ADVARSEL
yHvis du ignorerer en FORSIKTIG-melding,
kan du risikere lettere personskade eller
skade på produktet.
MERK
yMerknader inneholder informasjon som
hjelper deg med å forstå produktet
og bruke det på en trygg måte. Les
sikkerhetsinformasjonen nøye før du bruker
produktet.
Page 65

LISENSER / MERKNAD OM PROGRAMVARE MED ÅPEN KILDEKODE
LISENSER
Hvilke lisenser som støttes, avhenger av modellen. Hvis du vil ha mer informasjon om lisenser, kan du gå til
www.lg.com.
Produsert under lisens fra Dolby Laboratories. "Dolby" og dobbel-D-symbolet er
varemerker for Dolby Laboratories.
HDMI, HDMI-logoen og High-Definition Multimedia Interface er varemerker eller
registrerte varemerker for HDMI Licensing LLC.
OM DIVX-VIDEO: DivX® er et digitalt videoformat som er skapt av DivX, LLC,
et datterselskap av Rovi Corporation. Dette er en ofsiell DivX Certied®-enhet
som spiller av DivX-video. Besøk divx.com hvis du vil ha mer informasjon og
programvareverktøy for å konvertere ler til DivX-video.
3
NONORSK
OM DIVX VIDEO-ON-DEMAND: Denne DivX Certied®-enheten må være registrert
før du kan spille av DivX Video-on-Demand-lmer (VOD) du har kjøpt. Du kan skaffe
registreringskoden under DivX VOD i enhetens kongurasjonsmeny. Gå til vod.divx.
com hvis du vil ha mer informasjon om hvordan du fullfører registreringen.
DivX-sertisert for å spille av DivX-video opptil HD 1080p, inkludert Premium-innhold
DivX®, DivX Certied® og tilknyttede logoer er varemerker for Rovi Corporation og
tilknyttede selskaper og brukes med lisens.
Beskyttet av ett eller ere av de følgende amerikanske patentene:
7,295,673; 7,460,668; 7,515,710; 7,519,274”
Produsert med lisens og følgende amerikanske patenter: 5 956 674, 5 974 380,
6 487 535 og andre amerikanske og globale patenter. DTS, symbolet og DTS og
symbolet sammen er registrerte varemerker, og DTS 2.0+Digital Out er et varemerke
for DTS, Inc. Produktet inkluderer programvare. © DTS, Inc. Med enerett.
MERKNAD OM PROGRAMVARE MED ÅPEN
KILDEKODE
Besøk http://opensource.lge.com for å motta kildekoden under GPL, LGPL, MPL og andre åpne
kildelisenser som dette produktet inneholder.
I tillegg til kildekoden er alle lisensvilkår, garantifraskrivelser og merknader om opphavsrett tilgjengelige for
nedlasting.
LG Electronics vil også sende deg åpen kildekode på CD-ROM mot å få dekket distribusjonskostnadene,
inkludert utgifter til media, frakt og ekspedisjon. Send en forespørsel til opensource@lge.com. Tilbudet
gjelder i tre (3) år fra kjøpsdatoen for dette produktet.
Page 66

NORSK
NO
SIKKERHETSINSTRUKSJONER
4
SIKKERHETSINSTRUKSJONER
Les disse forholdsreglene nøye før du bruker produktet.
ADVARSEL
Ikke plasser TV-en eller fjernkontrollen på følgende steder:
y
- Steder som utsettes for direkte sollys
- Steder med høy fuktighet som baderom
- Nær varmekilder som komfyrer eller andre enheter som avgir varme
- Nær kjøkkenbenker eller luftfuktere der produktet kan utsettes for damp eller
oljeHvis du ikke gjør dette
- Områder som utsettes for regn eller vind
- Nær vannbeholdere som vaser
Ellers kan resultatet bli elektrisk støt, brann, feil eller skader på produktet.
Ikke plasser produktet på steder hvor det kan utsettes for støv.
y
Dette kan utgjøre en brannrisiko.
Produktet kobles fra via stikkontakten. Kontakten må være lett tilgjengelig.
y
Ikke berør kontakten med våte hender. Hvis pinnene på støpselet er våte eller dek-
y
ket av støv, må du tørke støpselet fullstendig eller tørke av støvet.
Fuktighet kan føre til elektrisk støt.
Sørg for at strømledningen kobles til en jordet stikkontakt. (Unntatt enheter som
y
ikke er jordet.)
Du kan få støt eller bli skadet.
Fest strømledningen skikkelig.
y
Hvis strømledningen ikke er skikkelig festet, kan det oppstå brann.
Sørg for at strømledningen ikke kommer i kontakt med varme gjenstander, for
y
eksempel varmeovner.
Dette kan forårsake brann eller elektrisk støt.
Ikke plasser tunge gjenstander eller selve produktet på strømledninger.
y
Hvis du gjør dette, kan det føre til elektrisk støt eller brann.
Plasser antennekabelen slik at ikke regn kommer inn.
y
Dette kan forårsake vannskader på produktet og føre til elektrisk støt.
Hvis du monterer TV-en på en vegg, må den ikke installeres ved å henge strøm-
y
og signalkabler på baksiden av TV-en.
Det kan føre til elektrisk støt eller brann.
Page 67

Desiccant
SIKKERHETSINSTRUKSJONER
Unngå å koble for mange apparater til samme strømuttak.
y
Hvis du gjør dette, kan det føre til brann som følge av overoppvarming.
Ikke slipp produktet i bakken, og pass på at det ikke velter når du kobler til ekster-
y
ne enheter.
Dette kan forårsake personskade eller skade på enheten.
Hold vinylemballasjen og tørkemiddelet unna barn.
y
Det fuktabsorberende materialet kan være helseskadelig ved svelging. Hvis noen
svelger dette, må du prøve å få personen til å kaste opp, og oppsøke nærmeste
sykehus. Vinylemballasjen kan innebære kvelningsfare. Hold den utenfor rekke-
vidde for barn.
Sørg for at barn ikke klatrer på eller henger i TV-en.
y
Ellers kan TV-en falle ned eller velte, noe som kan føre til alvorlig personskade.
Vær forsiktig når du kasserer brukte batterier, slik at barn ikke putter dem i mun-
y
nen.
Hvis barn svelger batterier, må lege oppsøkes umiddelbart.
Ikke sett inn en strømleder (for eksempel en metallpinne) i en av endene av strøm-
y
ledningen mens den andre er koblet til stikkontakten i veggen. I tillegg må du
unngå å ta på strømledningen rett etter at du har koblet den til stikkontakten.
Dette kan føre til elektrisk støt.
(Avhengig av modell)
Ikke plasser eller oppbevar lettantennelig materiale i nærheten av produktet.
y
Uaktsom håndtering av lettantennelig materiale kan føre til eksplosjon eller brann.
5
NONORSK
Ikke la metallgjenstander, for eksempel mynter, hårnåler, spisepinner eller metall-
y
tråd, komme inn i produktet. Dette gjelder også brennbare gjenstander som papir
og fyrstikker. Barn må være spesielt forsiktige.
Elektrisk støt, brann eller andre skader kan oppstå. Hvis et fremmedlegeme kommer inn i produktet, må du koble fra strømledningen og kontakte kundestøtte.
Ikke spray vann på produktet eller vask det med lettantennelig materiale (tynner
y
eller benzen). Dette kan føre til brann eller elektrisk støt.
Ikke utsett produktet for støt eller slag, og pass på at gjenstander ikke kommer inn
y
i produktet. Ikke la noe falle ned på skjermen.
Hvis ikke kan du eller produktet bli skadet.
Unngå å berøre produktet eller antennen i tordenvær.
y
Dette kan føre til elektrisk støt.
Berør aldri stikkontakten i veggen ved gasslekkasje. Åpne vinduet og luft ut.
y
Det kan føre til brann eller brannskade som følge av gnister.
Page 68

NORSK
NO
SIKKERHETSINSTRUKSJONER
6
Ikke demonter, reparer eller endre produktet etter eget forgodtbefinnende.
y
Dette kan føre til brann eller elektrisk støt.
Kontakt kundestøtte ved behov for kontroll, kalibrering eller reparasjon.
Hvis noe av det følgende oppstår, må du umiddelbart koble fra produktet og kon-
y
takte service.
- Produktet har blitt utsatt for støt eller slag
- Produktet har blitt skadet
- Det har kommet fremmedelementer inn i produktet
- Produktet avgir røyk eller lukt
Dette kan føre til elektrisk støt eller brann.
Hvis du ikke planlegger å bruke produktet på en stund, kobler du strømledningen
y
fra produktet.
Støv kan føre til brann, og ledningsslitasje kan føre strømlekkasjer, elektrisk støt
eller brann.
Unngå at det drypper eller sprutes væske på apparatet, og gjenstander som er fylt
y
med væske, for eksempel vaser, må ikke plasseres oppå det.
Page 69

SIKKERHETSINSTRUKSJONER
5~7 times
ADVARSEL
Monter produktet på et sted hvor det ikke forekommer radiobølger.
y
Det må være tilstrekkelig avstand mellom en utendørsantenne og strømledninger
y
til at disse ikke vil berøre hverandre selv om antennen faller ned.
Dette kan føre til elektrisk støt.
Ikke plasser produktet på steder som ustabile hyller eller overflater som ikke er helt
y
flate. Unngå også plasseringer som utsettes for vibrasjoner, eller der det ikke er
plass til hele TV-en på underlaget.
Ellers kan produktet falle ned eller velte, noe som kan føre til personskade eller
skade på produktet.
Hvis du plasserer TV-en på et stativ, må du ta forholdsregler for å unngå at den
y
velter. Ellers kan produktet falle ned eller velte, noe som kan føre til personskade.
Hvis du skal montere produktet på en vegg, skal du feste veggmonteringsbraketten med VESA-stan-
y
dard (tilleggsutstyr) til baksiden av produktet. Når du installerer TV-en med veggmonteringsbraketten
(tilleggsutstyr), må du feste den godt så den ikke faller ned.
Bruk bare tilbehør/ekstrautstyr som angitt av produsenten.
y
Få hjelp fra en kvalifisert servicetekniker til å montere antennen.
y
Dette kan forårsake brann eller elektrisk støt.
7
NONORSK
Når du ser på TV, anbefaler vi en avstand til skjermen som er minst 5–7 ganger så
y
lang som skjermens diagonale lengde.
Hvis du ser på TV en lang stund, kan du oppleve uklart syn.
Bruk bare angitt type batteri.
y
Dette kan føre til skade på fjernkontrollen.
Bland ikke nye batterier med gamle batterier.
y
Dette kan gjør at batteriene overopphetes og springer lekk.
Sørg for at det ikke finnes noen gjenstander mellom fjernkontrollen og sensoren.
y
Sollys eller annet kraftig lys kan forstyrre signalet fra fjernkontrollen. I slike tilfeller
y
demper du lyset i rommet.
Når du skal koble til eksterne enheter som spillkonsoller, må du sørge for at ka-
y
blene er lange nok.
Ellers kan produktet falle ned, noe som kan føre til personskade eller skade på
produktet.
Page 70

NORSK
NO
SIKKERHETSINSTRUKSJONER
8
Ikke slå produktet på eller av ved å sette inn eller ta ut støpselet fra stikkontakten.
y
(Ikke bruk støpselet som av/på-bryter.)
Dette kan føre til teknisk feil eller elektrisk støt.
Følg monteringsinstruksjonene nedenfor for å forebygge overoppheting av produk-
y
tet.
- Avstanden mellom produktet og veggen bør være mer enn 10 cm.
- Ikke monter produktet på et sted med utilstrekkelig ventilasjon (f.eks. på en bokhylle eller i et skap).
- Ikke plasser produktet på et teppe eller en polstret overflate.
- Pass på at lufteventilen ikke blokkeres av tekstiler som duker eller gardiner.
Hvis du ikke gjør dette, kan det føre til brann.
Pass på at du ikke berører luftehullene når du ser på TV i lengre perioder, siden
y
luftehullene kan bli varme. Dette berører ikke funksjonen eller ytelsen til produktet.
Undersøk med jevne mellomrom ledningen til apparatet. Hvis ledningen ser skadet eller slitt ut, må
y
du koble den fra, slutte å bruke apparatet, og få en autorisert reparatør til å skifte ut ledningen med
en tilsvarende reserveledning.
Unngå at det samler seg støv på pinnene på støpselet eller i stikkontakten.
y
Dette kan utgjøre en brannrisiko.
Beskytt strømledningen mot fysiske eller mekaniske belastninger, som å bli vridd,
y
bøyd, klemt i en døråpning, eller kjørt eller tråkket på. Vær oppmerksom på støpsler, veggkontakter, samt stedet hvor strømledningen kommer ut av apparatet.
Ikke trykk hardt på panelet med hånden eller en skarp gjenstand, for eksempel en
y
spiker, blyant eller penn. Du må heller ikke lage riper i panelet.
Unngå å berøre skjermen eller holde fingrene mot den i lengre tid. Dette kan forår-
y
sake forbigående forvrengning på skjermen.
Ved rengjøring av produktet og komponentene kobler du fra strømmen og tørker av
y
med en myk klut. For kraftig trykk kan forårsake riper eller misfarging. Ikke spray
med vann eller tørk av med en fuktet klut. Bruk aldri vindusvask, pussemidler for
bil eller industrielt bruk, slipemidler eller voks, benzen, alkohol osv., fordi dette kan
skade produktet og skjermen.
Ellers kan resultatet bli elektrisk støt, brann, feil eller skader på produktet.
Så lenge denne enheten er koblet til stikkontakten i veggen, er den ikke koblet fra strømkilden selv
y
om du slår av enheten ved hjelp av bryteren.
Når du skal koble fra kabelen, må du gripe selve kontakten og trekke den ut.
y
Hvis ledningene inne i strømkabelen rives løs, kan dette forårsake brann.
Når du skal flytte produktet, må du først slå av strømmen. Deretter kobler du fra
y
strømledning, antennekabel og alle andre tilkoblede kabler.
TV-en eller strømledningen kan bli skadet, noe som kan utgjøre en brannrisiko eller
forårsake elektrisk støt.
Page 71

SIKKERHETSINSTRUKSJONER
Samarbeid om å flytte eller pakke ut produktet fordi det er tungt.
y
Hvis du ikke gjør dette, kan det føre til personskade.
Kontakt kundestøtte én gang i året for å rengjøre delene inne i produktet.
y
Støv som samles opp, kan forårsake mekanisk svikt.
La kvalifisert servicepersonell utføre alt vedlikehold. Vedlikehold er nødvendig når
y
apparatet har blitt skadet på noe som helst vis. Dette kan for eksempel være hvis
strømledningen eller støpselet har blitt skadet, væske har blitt sølt eller gjenstander
har kommet inn i apparatet, eller hvis det har blitt utsatt for regn eller fuktighet, ikke
fungerer som det skal, eller har blitt mistet i bakken.
Hvis produktet er kaldt ved berøring, kan det forekomme en lett flimring når det
y
slås på. Dette er normalt, det er ingenting galt med produktet.
Skjermen er et høyteknologisk produkt med en oppløsning på mellom to og seks
y
millioner piksler. Du kan se ørsmå svarte eller fargede (røde, blå eller grønne) prikker med en størrelse på 1 ppm på skjermen. Dette er ikke en feil og påvirker ikke
produktets ytelse eller driftssikkerhet.
Det samme fenomenet oppstår for tredjepartsprodukter og utgjør ikke grunnlag for
bytte eller refusjon av produktet.
Avhengig av hvor du befinner deg i forhold til skjermen, kan lysstyrken eller far-
y
gene se ut til å variere.
Dette fenomenet skyldes skjermens egenskaper. Det påvirker ikke produktets
ytelse og er ikke en feil.
9
NONORSK
Hvis et stillbilde vises på skjermen i lang tid (for eksempel en kanallogo, skjermmeny eller en scene
y
fra et TV-spill), kan dette skade skjermen ved at bildet "brennes fast". Garantien dekker ikke denne
typen skade på produktet.
Ikke vis statiske bilder på TV-skjermen i lengre perioder (2 eller flere timer for LCD, 1 eller flere timer
for Plasma-TV), slik at du unngår bildebrenning.
Hvis bredde-/høydeforholdet er satt til 4:3 over en lengre periode, kan bildebrenning forekomme
langs kantene av skjermen.
Det samme fenomenet oppstår for tredjepartsprodukter og utgjør ikke grunnlag for bytte eller refusjon av produktet.
Generert lyd
y
"Knakende" lyd: En knakende lyd som oppstår når du ser på eller slår av TV-en, og som skyldes at
plasten trekker seg sammen som følge av endringer i temperatur og fuktighet. Denne lyden er normal for produkter der temperaturendringer fører til at materialer trekker seg sammen eller utvides.
Summing fra elektroniske kretser / skjerm: En lav lyd som genereres av en krets med høy hastighet
som leverer høy spenning som driver produktet. Dette varierer avhengig av produktet.
Denne genererte lyden påvirker ikke produktets ytelse eller driftssikkerhet.
Page 72

NORSK
NO
SIKKERHETSINSTRUKSJONER
10
Vise 3D-bilder (bare 3D-modeller)
ADVARSEL
Visningsmiljø
yVisningstid
- Når du ser på 3D, bør du ta en pause på 5–15 minutter hver time. Hvis du ser på 3D en lang stund,
kan du oppleve hodepine, svimmelhet, tretthet eller slitne øyne.
Personer med kroniske lidelser eller anfall som utløses av lysfølsomhet
yNoen seere kan få krampeanfall, epilepsianfall eller andre symptomer når de blir utsatt for blinkende lys
eller visse mønstre i 3D-innhold.
yIkke se på video i 3D hvis du er kvalm, gravid og/eller har kroniske lidelser som epilepsi, hjertesykdom,
problemer med blodtrykk osv.
y3D-innhold anbefales ikke for personer med stereoblindhet eller stereoanomali. Disse personene kan
oppleve dobbeltsyn eller ubehag.nced.
yHvis du er skjeløyd eller lider av amblyopi (svaksynthet) eller astigmatisme, kan du ha problemer med
dybdesynet og kan oppleve tretthet og dobbeltsyn. Hyppigere pauser enn for gjennomsnittspersonen
anbefales.
yHvis du har ulikt syn på høyre og venstre øye, bør du korrigere synet før du ser på 3D-innhold.
Symptomer som krever at du slutter eller lar være å se på 3D-innhold
yIkke se på 3D-innhold når du er sliten, har sovet for lite, arbeidet for mye eller drukket alkohol.
yHvis du opplever slike symptomer, bør du la være å se på 3D-innhold til symptomene gir seg.
- Hvis slike symptomer vedvarer, bør du lontakte lege. Symptomene inkluderer hodepine, øyesmerter, svimmelhet, hvalme, hjertebank, uskarpt syn, ubehag, dobbeltsyn, visuelt ubehag eller tretthet.
Page 73

SIKKERHETSINSTRUKSJONER
ADVARSEL
Visningsmiljø
yVisningsavstand
- Når du ser på 3D, anbefaler vi en avstand til skjermen som er minst dobbelt så lang som skjermens
diagonale lengde. Hvis du opplever ubehag når du ser på 3D, bør du flytte deg lenger unna TV-en.
Visningsalder
ySmåbarn/barn
- Barn under 5 år skal ikke se på eller bruke 3D.
- Barn under 10 år kan overreagere eller bli svært oppspilte fordi synet deres fortsatt er under utvik-
ling. De kan for eksempel prøve å berøre skjermen eller hoppe inn i den. Vær spesielt forsiktig og
oppmerksom når barn skal se på 3D-innhold.
- Fordi avstanden mellom barns øyne er mindre enn hos voksne, vil 3D-effekten virke sterkere på
dem. Det samme 3D-bildet vil derfor se ut til å ha større stereoskopisk dybde for barn.
yTenåringer
- Tenåringer under 19 år kan være følsomme for lysstimulering fra 3D-innhold. De bør ikke se lenge
på 3D-innhold hvis de er slitne.
yEldre
- Sammenlignet med ungdom kan eldre oppleve en svakere 3D-effekt. Ikke sitt nærmere TV-en enn
den anbefalte avstanden.
11
NONORSK
Forholdsregler når du bruker 3D-briller
yBruk 3D-briller fra LG. Ellers er det ikke sikkert at 3D-innhold vises på riktig måte.
yIkke bruk 3D-brillene i stedet for korrigerende briller, solbriller eller vernebriller.
yModiserte 3D-briller kan være anstrengende for øynene eller forvrenge bildet.
yIkke oppbevar 3D-brillene på svært varme eller kalde steder. Dette kan misforme brillene.
y3D-brillene er skjøre og kan lett ripes opp. Bruk alltid en myk, ren klut til å tørke av brilleglassene. Unngå
å lage riper i overaten på 3D-brilleglassene med skarpe gjenstander. Bruk heller ikke kjemikalier når du
rengjør dem.
Page 74

NORSK
<
<
NO
INSTALLERING / MONTERE OG KLARGJØRE
12
MERK
yIllustrasjonen kan avvike fra din TV.
ySkjermbildet på TV-en din kan være litt annerledes enn det som vises i denne håndboken.
yDe tilgjengelige menyene og alternativene kan variere avhengig av inndatakilde og produktmodell.
yTV-en kan få nye funksjoner i fremtiden.
yTV-en kan settes i standbymodus for å redusere strømforbruket. TV-en bør være slått av hvis den
ikke skal brukes på en stund, siden dette vil redusere strømforbruket.
yEnergiforbruket kan reduseres betydelig hvis lysstyrken for bildet reduseres, og dette vil redusere de
totale brukskostnadene.
INSTALLERING
1 Åpne pakken, og kontroller at tilbehøret følger med.
2 Fest stativet på TV-apparatet.
3 Koble en ekstern enhet til TV-apparatet.
4 Kontroller at nettverkstilkoblingen er tilgjengelig.
Du kan bare bruke TV-funksjonene når nettverkstilkoblingen er opprettet.
MONTERE OG KLARGJØRE
Pakke ut
Kontroller at produktesken inneholder følgende artikler. Hvis det er noe som mangler, må du kontakte
den lokale forhandleren du kjøpte produktet hos. Illustrasjonene i denne håndboken kan avvike fra faktisk
produkt og artikkel.
ADVARSEL
yIkke bruk kopier som ikke er godkjente, siden det kan påvirke produktets sikkerhet og levetid.
yGarantien dekker ikke eventuelle materielle skader eller personskader som skyldes bruk av kopier
som ikke er godkjent.
yNoen modeller har en tynn film festet til skjermen, og denne filmen må ikke fjernes.
MERK
yHvilke artikler som leveres med produktet, avhenger av modellen.
yProduktspesifikasjonene eller innholdet i denne håndboken kan endres uten forhåndsvarsel ved
oppgradering av produktfunksjoner.
yFor at tilkoblingen skal bli optimal, bør endene på HDMI-kabler og USB-enheter være mindre enn
10 mm tykke og 18 mm lange. Hvis USB-kabelen eller USB-minnepinnen ikke passer til USB-porten
på TV-en, bruker du en USB-skjøtekabel som støtter USB 2.0.
B
A
B
* A
10 mm
=
18 mm
* B
A
=
Page 75

MONTERE OG KLARGJØRE
13
ENERGY
SAVING
1 2 3
4 5 6
7 809
LIST
MENU
BACK
AV MODE
INPUT
TV
FLASHBK
MARK
FAV
P
A
G
3D
CHVOL
E
MUTE
INFO
Q.MENU
ENTER
EXIT
L/R SELECT
FREEZE
RATIO
Fjernkontroll og batterier
(AAA)
(Se s. 21, 22)
P
Den magiske fjernkontrollen, batterier (AA)
(bare 60LM645*,
32/42/47/55LM66**,
42/47/55LM67**,
42/47/55LM76**)
(Se s. 23)
Pusseklut
Brukerhåndbok
Komponentvideokabel
(Se s. B-7)
(Avhengig av modell)
Brukes til å fjerne støv fra
kabinettet.
Komposittvideokabel
(Se s. B-7 , B-8)
NONORSK
Kino-3D-briller
Antallet 3D-briller kan variere avhengig av land og
modell.
(unntatt 32/37/42LS57**)
Kabelholder
(Avhengig av modell)
(Se s. A-6)
Sett med to briller
(bare 42/47/55LM76**)
Strømkabel
(bare 32/37/42LS57**,
32/37/42/47/55LM62**)
eller
Stativskruer
8EA, M4 x 20
(Se s. A-3, A-4, A-5)
Bordmonteringskabel
2EA
(bare 32/37LM62**,
32LM660*)
(Se s. 18)
Avstandsstykker for
veggmontering
4EA
(bare 32/37/42LS57**,
32/37/42/47/55LM62**)
(Se s. 20)
Isolator
(Avhengig av modell)
(Se s. 14)
Bordmonteringsskrue
(1EA: bare
32/37/42LS57**,
32/42/47LM669*)
(2EA: bare 32/37LM62**,
32LM660*)
(Se s. 18)
Brakettskrue
2EA, M4 x 8
(bare 32/37LM62**,
32LM660*)
(Se s. 18)
SCART-kabel
(Se s. B-14)
Page 76

MONTERE OG KLARGJØRE
14
Stativ/stativsokkel
(bare 32/37/42LS57**, 65LM62**, 32/42/47LM669*)
(Se s. A-3, A-5)
NORSK
NO
Stativ/stativsokkel
(bare 32/37/42/47/55LM62**, 32/42/47/55/60LM64**, 32/42/47/55LM660*,
42/47/55LM67**, 42/47/55LM76**)
(Se s. A-4, A-5)
MERK
yInstalleringsveiledning for antenneisolator
- Brukes ved installering av TV-en der det er spenningsforskjell mellom TV og GND for antennesignal.
»Hvis det er spenningsforskjell mellom TV og GND for antennesignal, kan antennekontakten bli
overopphetet, noe som kan forårsake en ulykke.
- Du kan forbedre sikkerheten ved å fjerne spenningen fra TV-antennen. Montering av isolatoren på
veggen anbefales. Monter isolatoren på TV-en hvis den ikke kan monteres på veggen. Unngå å
koble fra antenneisolatoren etter installering.
- Kontroller at TV-antennen er koblet til før du begynner.
Vegg
ANTENNA/
CABLE IN
Kabel/antenne
eller
Isolator
1. Koble til TV.
2. Koble til digitalboksen.
Koble en ende av isolatoren til kabel-/antennekontakten og den andre til TV-en eller digitalboksen.
“Utstyr som er koplet til beskyttelsesjord via nettplugg og/eller via annet jordtilkoplet utstyr - og er
tilkoplet et kabel-TV nett, kan forårsake brannfare.
For å unngå dette skal det ved tilkopling av utstyret til kabel-TV nettet installeres en galvanisk isolator
mellom utstyret og kabel-TV nettet.”
Ved bruk av RF-isolator kan dette redusere signalfølsomheten noe.
Page 77

Kjøpes separat
Tilleggsutstyr kan endres uten varsel for å bedre kvaliteten.
Kontakt forhandleren for kjøp av disse elementene.
Disse enhetene fungerer bare med bestemte modeller.
MONTERE OG KLARGJØRE
P
15
AG-F2**DP, AG-F3**DP
Sett med to briller
AN-WF100
Trådløst LAN
Kompatibilitet
AG-F2**DP, AG-F3**DP
Sett med to briller
AG-F2
Kino-3D-briller
AN-MR300
Den magiske fjernkontrollen
AN-WF100
Trådløst LAN
**,
AG-F3
**
AG-F2
Kino-3D-briller
32/37/42LS57**
AG-F3
**,
**
32/37/42/47/55/65LM62**,
32/42/47/55/60LM64**
(unntatt 60LM645*)
AN-MR300
Den magiske fjernkontrollen
• •
• •
• • •
• •
NONORSK
60LM645*,
32/42/47/55LM66**,
42/47/55LM67**,
42/47/55LM76**
Modellnavnet eller utformingen kan endres avhengig av oppgradering av produktfunksjoner, retningslinjer
eller forhold hos produsenten.
Page 78

NORSK
H
H
H
NO
MONTERE OG KLARGJØRE
16
Deler og knapper
32/42/47/55LM66**, 42/47/55LM67**,
42/47/55LM76**
Lerret Lerret
Type B: 32/37/42LS57**, 32/37/42/47/55/65LM62**Type A: 32/42/47/55/60LM64**,
Fjernkontroll og
intelligente sensorer
OK
Strømindikator
SETTINGS
Høyttalere Høyttalere
INPUT
Fjernkontroll og
intelligente sensorer
Strømindikator
1
OK
SETTINGS
INPUT
Knapper
Berøringsknapper
Knapp Beskrivelse
Type A Type B
Brukes til å bla gjennom de lagrede programmene.
Brukes til å justere lydnivået.
OK
ꔉ
Brukes til å velge det uthevede menyalternativet eller bekrefte inndata.
s SETTINGS Brukes til å vise hovedmenyen eller til å lagre innsignal og lukke menyene.
INPUT Brukes til å endre innsignalkilde.
/ I
Brukes til å slå strømmen av eller på.
1 Intelligente sensorer - justerer bildekvaliteten og lysstyrken basert på omgivelsene.
2 Knappene av type B er berøringsfølsomme og kan betjenes ved en enkel berøring.
1
2
MERK
yDu kan slå strømindikatorlampen på eller av ved å velge ALT. i hovedmenyene.
Page 79

MONTERE OG KLARGJØRE
17
Løfte og ytte TV-en
Hvis TV-en skal løftes eller yttes, må du lese
informasjonen nedenfor for å unngå riper eller
skader på TV-en, og for å sikre trygg transport
uavhengig av type og størrelse.
ADVARSEL
yUnngå å ta på skjermen til enhver tid, siden
dette kan forårsake skader på skjermen.
yHvis TV-en skal yttes, anbefales det at den
oppbevares i esken eller emballasjen den ble
levert i.
yFør du ytter eller løfter TV-en, må du koble fra
strømledningen og alle andre kabler.
yNår du holder TV-en, bør du ha skjermen vekk
fra deg for å unngå skade.
yNår en stor TV skal transporteres, bør det være
minst to personer som hjelper til.
yHvis TV-en skal transporteres for hånd, skal
den holdes som vist i illustrasjonen nedenfor.
NONORSK
yTV-en må ikke utsettes for støt eller for mye
vibrering under transport.
yUnder transport må TV-en holdes oppreist. Den
må aldri legges på siden eller helle mot venstre
eller høyre.
yNår du håndterer TV-en, bør beskyttelsen
dekke siden av TV-en. (Avhengig av modell)
Beskyttelse
yTa en godt tak oppå og under TV-en, og hold
den slik. Ikke hold i den transparente delen,
høyttalerne eller høyttalergrillene.
Page 80

MONTERE OG KLARGJØRE
18
NORSK
NO
Bordmontering
1 Løft og vipp TV-en i oppreist posisjon på et
bord.
- La det være (minst) 10 cm avstand fra
veggen for å sikre tilstrekkelig ventilasjon.
10 cm
10 cm
2 Koble strømledningen til en stikkontakt.
ADVARSEL
yIkke sett TV-en i nærheten av eller på
varmekilder, for det kan føre til brann eller
andre skader.
10 cm
10 cm
Feste TV-en til et bord
Fest TV-en på et bord for å hindre at den faller
fremover, skades eller forårsaker personskade.
Monter TV-en på et bord, og sett deretter inn
skruen på baksiden av stativet og stram den til.
(bare 32/37/42LS57**, 32/42/47LM669*)
(bare 32/37LM62**, 32LM660*)
M4 x 8
2EA
MERK
(bare 32/37LM62**, 32LM660*)
Slik fester du TV-en på et bord
1. Koble bordmonteringskablene til
stativsokkelen ved hjelp av brakettskruene.
2. Fest bordmonteringskablene til et bord ved
hjelp av bordmonteringsskruene.
3. Når TV-en er festet, kan du flytte bordet inn
mot veggen. Barn kan forårsake skade.
ADVARSEL
yFor å unngå at TV-en velter må TV-en
festes ordentlig til gulvet/veggen i henhold
til installeringsinstruksjonene. Hvis TVen vippes eller ristes, kan dette forårsake
skade.
Page 81

MONTERE OG KLARGJØRE
19
Justere vinkelen på TV-en etter behov
(Denne funksjonen er ikke inkludert for alle
modeller.)
Du kan justere TV-vinkelen etter eget behov ved å
vri TV-en 20 grader mot høyre eller venstre.
(bare 32/37/42LS57**, 65LM62**,
32/42/47LM669*)
2020
Vri 10 grader mot venstre eller høyre, og juster
vinkelen på TV-en etter behov.
(bare 32/37/42/47/55LM62**,
32/42/47/55/60LM64**, 32/42/47/55LM660*,
42/47/55LM67**, 42/47/55LM76**)
1010
ADVARSEL
Vær forsiktig så du ikke skader fingrene når du
justerer vinkelen på produktet.
»
Det kan oppstå personskade hvis hender eller
fingre kommer i klem. Hvis produktet vinkles
for mye, kan det velte og falle ned, og dette
kan forårsake skader eller personskader.
bare 32/37/42/47/55LM62**,
(
32/42/47/55/60LM64**, 32/42/47/55LM660*,
42/47/55LM67**, 42/47/55LM76**)
Feste TV-en på veggen
(Denne funksjonen er ikke inkludert for alle
modeller.)
NONORSK
1 Sett inn øyeboltene, eller TV-brakettene og
boltene, på baksiden av TV-en, og stram dem
til.
- Hvis det allerede er plassert bolter i hullene til øyeboltene, fjerner du disse først.
2 Monter veggbrakettene med boltene på
veggen.
Innrett plasseringen av veggbraketten med
øyeboltene på baksiden av TV-en.
3 Fest øyeboltene og veggbrakettene godt til
hverandre med et kraftig tau.
Pass på at tauet blir vannrett med den plane
overaten.
ADVARSEL
yPass på at ikke barn klatrer eller henger på
TV-en.
MERK
yBruk en plattform eller et kabinett som er
sterkt og stort nok til at TV-en står støtt.
yBraketter, bolter og tau følger ikke med. Du
kan skaffe annet tilleggsutstyr fra den lokale
forhandleren.
<Bakside> <Forside>
Page 82

MONTERE OG KLARGJØRE
20
NORSK
NO
Veggmontering
Fest en veggmonteringsbrakett forsiktig på baksiden av
TV-en, og installer braketten på en solid vegg som står
loddrett på gulvet. Kontakt kvalisert personell hvis du
skal feste TV-en på annet byggemateriell.
LG anbefaler at veggmontering utføres av en kvalisert
profesjonell installatør.
10 cm
10 cm
10 cm
10 cm
Vær nøye med å bruke skruer og
veggmonteringsbraketter som oppfyller kravene i VESAstandarden. Standardmålene for veggmonteringssettene
er angitt i tabellen nedenfor.
Kjøpes separat (veggmonteringsbrakett)
Modell 32/37LS57**
VESA (A x B) 200 x 200 400 x 400
Standardskrue M6 M6
Antall skruer 4 4
Veggmonterings-
brakett
32/37LM62**
32LM64**
32LM66**
LSW200BX,
LSW200BXG
42LS57**
42/47/55LM62**
42/47/55/60LM64**
42/47/55LM66**
42/47/55LM67**
42/47/55LM76**
LSW400BX,
LSW400BXG
ADVARSEL
yKoble fra strømmen først, og flytt eller
monter deretter TV-en. Hvis ikke kan det
forårsake elektriske støt.
yHvis du monterer TV-en i taket eller på en
hellende vegg, kan den falle ned, noe som
kan føre til alvorlig personskade.
Bruk en godkjent veggmonteringsbrakett fra
LG, og kontakt den lokale forhandleren eller
kvalifisert personell.
yIkke stram skruene for hardt, for det kan
skade TV-en og gjøre garantien ugyldig.
yBruk skruer og veggmonteringer som
oppfyller kravene i VESA-standarden.
Garantien dekker ikke materielle skader
eller personskader som skyldes misbruk
eller bruk av tilbehør som ikke er godkjent.
MERK
yBruk skruene som er angitt i
spesifikasjonene i VESA-standarden.
yVeggmonteringssettet inneholder en
installeringshåndbok og alle nødvendige
deler.
yVeggmonteringsbraketten er tilleggsutstyr.
Du kan skaffe annet tilleggsutstyr fra den
lokale forhandleren.
yLengden på skruene kan variere avhengig
av veggfestet. Kontroller at du bruker riktig
lengde.
yHvis du vil ha mer informasjon, kan
du se i håndboken som fulgte med
veggmonteringen.
yNår du fester en tredjeparts
veggmonteringsbrakett til TV-en,
setter du avstandsstykkene inn i
veggmonteringshullene på TV-en for
å justere TV-ens vertikale vinkel. Ikke
bruk avstandsstykkene sammen med
LGs veggmonteringsbrakett. (bare
32/37/42LS57**, 32/37/42/47/55LM62**)
Modell
VESA (A x B)
Standardskrue
Antall skruer
Veggmonterings-
brakett
65LM62**
600 x 400
M8
4
LSW600B
A
B
Avstandsstykke for veggmontering
(Avhengig av modell)
yBeskytt TV-en mot riper eller fingeravtrykk
ved å plassere TV-en på en bordflate, uten å
fjerne emballasjeposen.
yNår du har fjernet emballasjen fra TV-
ens bakside, installerer du TV-en i
henhold til veiledningen som følger med
veggmonteringsproduktet.
yFjern beskyttelsen når du har installert TV-
en.
Page 83

FJERNKONTROLL
FJERNKONTROLL
Beskrivelsene i denne håndboken er basert på knappene på fjernkontrollen.
Les denne håndboken nøye, og bruk TV-en på riktig måte.
Når batteriene må byttes, åpner du dekselet på batterirommet, bytter batteriene (1,5 V
AAA) i samsvar med og på etiketten i batterirommet, og lukker dekselet.
For å fjerne batteriene går du gjennom trinnene for å sette dem inn i motsatt
rekkefølge.
ADVARSEL
yIkke kombiner gamle og nye batterier, for da kan fjernkontrollen bli skadet.
Du må holde fjernkontrollen mot fjernkontrollsensoren på TV-en.
(bare LM669*)
21
NONORSK
3D
Brukes til visning av 3D-video.
TV/RAD
Brukes til å velge radio-, TV- og DTV-program.
GUIDE
Viser programguide.
INFO
Viser informasjonen om det gjeldende programmet og skjermen.
SUBTITLE
Viser ønsket undertekst i digital modus.
Q. MENU
Brukes til å vise hurtigmenyene.
INPUT
Brukes til å endre innsignalkilde.
LIST
Viser den lagrede programlisten.
Q.VIEW
Gå tilbake til programmet som ble vist.
HOME
Brukes til å vise hovedmenyen.
MY APPS
Viser listen over programmer.
Navigeringsknapper (opp/ned/venstre/
høyre)
Brukes til å bla gjennom menyer eller alternativer.
OK
Brukes til å velge menyer eller alternativer og
bekrefte inndata.
(Tilbake)
Brukes til å gå tilbake til det forrige nivået.
POWER
INFO
GUIDE
HOME MY APPS
2
LIVE TV
SUBTITLE
Q.MENU
LIST
FAV
1
MUTE
TEXT
EXIT
Brukes til å avslutte alle skjermvisninger og
TV/RAD
gå tilbake til TV-visning.
INPUT
FAV
Brukes til å vise favorittkanallisten.
APP/
1
APP/
Velg MHP TV som menykilde. (bare Italia)
*
(avhengig av modell)
1
Q.VIEW
@ ORANGE
Direkte tilgang til din Internett-portal for
underholdning og nyhetstjenester utviklet av
Orange. (Bare Frankrike)
PAGE
Brukes til å gå til forrige eller neste skjermbilde.
EXIT
2
Fargede knapper
Brukes for å gå til spesialfunksjoner i noen
menyer.
P
A
P
G
(
E
: Rød, : Grønn, : Gul, : Blå)
LIVE TV
Går tilbake til DIREKTE TV.
REC
Kontrollknapper (
T.OPT
Styrer Premium-innholdet, DVR eller Smart
3
Share-menyene eller enhetene som er kompatible med SIMPLINK (USB eller SIMPLINK
eller DVR).
REC
Brukes til å justere DVR-menyen.
3
TELETEXT-KNAPPER
Disse knappene brukes for tekst-TV.
Hvis du vil ha mer informasjon, kan du se
avsnittet Tekst-TV.
)
Page 84

FJERNKONTROLL
22
(bare LS57**, LM62**, LM64**, LM660*, LM67**, LM76**)
NORSK
NO
(Brukerhåndbok)
Viser brukerhåndboken.
RATIO
Brukes til å endre størrelsen på et bilde.
INPUT
Brukes til å endre innsignalkilde.
TV/RAD
Brukes til å velge radio-, TV- og DTV-program.
LIST
Viser den lagrede programlisten.
(Mellomrom)
Åpne et tomt felt på tastaturet på skjermen.
Q.VIEW
Gå tilbake til programmet som ble vist.
FAV
Brukes til å vise favorittkanallisten.
1
3D
Brukes til visning av 3D-video.
(bare LM62**, LM64**, LM66**, LM67**,
LM76**)
PAGE
Brukes til å gå til forrige eller neste skjermbilde.
SETTINGS
Brukes til å vise hovedmenyene.
HOME
Brukes til å vise hovedmenyen.
MY APPS
Viser listen over programmer.
Navigeringsknapper (opp/ned/venstre/
høyre)
Brukes til å bla gjennom menyer eller alternativer.
OK
Brukes til å velge menyer eller alternativer og
bekrefte inndata.
(Tilbake)
Brukes til å gå tilbake til det forrige nivået.
GUIDE
Viser programguide.
RATIO INPUT
1
.,;@
2
abc
3
4
ghi
5
jkl
6
7
pqrs
8
tuv
9
0
FAV
1
MUTE
OK
GUIDE
Q.VIEW
MY APPS
EXIT
LIST
SETTINGS
2
T.OPT
AD
SUBTITLE
Q.MENU
REC
3
TEXT
LIVE TV
4 5
AVSLUTT
Brukes til å avslutte alle skjermvisninger og
gå tilbake til TV-visning.
2
Fargede knapper
Brukes for å gå til spesialfunksjoner i noen
TV/
menyer.
RAD
(
: Rød, : Grønn, : Gul, : Blå)
def
3
TELETEXT-KNAPPER
Disse knappene brukes for tekst-TV.
mno
Hvis du vil ha mer informasjon, kan du se
avsnittet Tekst-TV.
wxyz
SUBTITLE
Viser ønsket undertekst i digital modus.
Q. MENU
P
Brukes til å vise hurtigmenyene.
A
G
E
LIVE TV
Går tilbake til DIREKTE TV.
Kontrollknapper (
)
Styrer Premium-innholdet, DVR eller Smart
Share-menyene eller enhetene som er kompatible med SIMPLINK (USB eller SIMPLINK
eller DVR).
REC
Brukes til å justere DVR-menyen.
4
ENERGY SAVING
Brukes til å justere lysstyrken på skjermen for
å redusere strømforbruket. (bare LS57**)
INFO
INFO
Viser informasjonen om det gjeldende programmet og skjermen.
1
(
: bare LS57**)
4
(
: bare LM62**, LM64**, LM660*, LM67**,
LM76**)
AD
Slå lydbeskrivelsen på eller av.
APP/
5
APP/
Velg MHP TV som menykilde. (bare Italia)
*
(avhengig av modell)
5
@ ORANGE
Direkte tilgang til din Internett-portal for
underholdning og nyhetstjenester utviklet av
Orange. (Bare Frankrike)
Page 85

FUNKSJONER FOR DEN MAGISKE FJERNKONTROLLEN
FUNKSJONER FOR DEN MAGISKE
FJERNKONTROLLEN
Denne artikkelen er ikke inkludert for alle modeller.
Når meldingen Batteriet for den magiske fjernkontrollen er snart tomt. Bytt batteri
vises, må du bytte batteri.
Når batteriene må byttes, åpner du dekselet på batterirommet, bytter batteriene (1,5 V
AA) i samsvar med og på etiketten i batterirommet, og lukker dekselet. Du må
holde fjernkontrollen mot fjernkontrollsensoren på TV-en.
For å fjerne batteriene går du gjennom trinnene for å sette dem inn i motsatt
rekkefølge.
ADVARSEL
yIkke kombiner gamle og nye batterier, for da kan fjernkontrollen bli skadet.
(bare 60LM645*, 32/42/47/55LM66**, 42/47/55LM67**, 42/47/55LM76**)
23
NONORSK
(POWER)
Brukes til å slå TV-en av eller
Brukes til å gå tilbake til det
Brukes til å velge menyer
eller alternativer og bekrefte
Brukes til å bla gjennom de
Hvis du trykker på navige-
ringsknappen mens du flytter
pekeren på skjermen, forsvin-
ner pekeren, og den magiske
fjernkontrollen fungerer som
For å vise pekeren igjen rister
du Magic-fjernkontrollen fra
på.
BACK
forrige nivået.
Hjul(OK)
inndata.
lagrede programmene.
en vanlig fjernkontroll.
side til side.
11-1 Test for kort infotittel…
Mine Programmer
Info.
BACK
Peker (RF-sender)
HOME
HOME
P
MY APPS
Hvis du trykker på Hjul(OK) på den magiske
fjernkontrollen, vises følgende skjermbilde.
1
Viser informasjon om det gjeldende programmet og skjermen.
Hvis du trykker på denne tasten, vises talltas-
2
taturet der du kan velge programnummer.
Du kan velge Mine programmer.
3
Brukes til å vise hovedmenyen.
Navigeringsknapper (opp/
ned/venstre/høyre)
Brukes til å bla gjennom menyer eller alternativer.
+ -
Brukes til å justere lydnivået.
ꕌPꕍ
Brukes til å bla gjennom de
lagrede programmene eller
kanalene.
MUTE
Brukes til å dempe alle lyder.
MINE PROGRAMMER
Viser listen over programmer.
3D
Brukes til å vise 3D-video.
3
Page 86

FUNKSJONER FOR DEN MAGISKE FJERNKONTROLLEN
HOME
24
NORSK
NO
Registrere den magiske
fjernkontrollen
Det er nødvendig at ´pare`(registrere) den magiske
fjernkontrollen med din TV før den vill fungere.
Slik registrerer du den magiske fjernkontrollen
1 For at registrere automatisk
skru på din TV og trykk
knappen Hjul(OK). Når
registrering er fullført, kommer
ferdigstillelse meldingen opp
på skjermen.
2 Hvis registrering mislykkes,
skru av din TV og på igjen,
trykk sen på Hjul(OK) knapp
for at fullføre registeringen.
Slik registrerer du den magiske fjernkontrollen
på nytt
og
knappen
BACK
HOME
1 Trykk og hold BACK
HOME
i 5 sekunder for tilbakestilling,
registrere sen med følgende ”
Slik registerer du den magiske
fjernkontrollen” ovenstående.
2 For at registrere den Magiske
Fjernkontrollen på nytt, trykk
og hold BACK
i 5 sekunder i retning mot
din TV. Når registrering er
fullført, kommer ferdigstillelse
meldingen opp på skjermen.
knapperne sammen
Slik bruker du den magiske
fjernkontrollen
1 Hvis pekeren forsvinner,
beveger du fjernkontrollen
litt mot venstre eller høyre.
Pekeren vil deretter vises på
skjermen.
»
2 Du kan ytte pekeren ved
å rette pekermottakeren på
fjernkontrollen mot TV-en
og deretter bevege den mot
venstre, høyre, opp eller ned.
»
Hvis pekeren ikke vises på
en stund, forsvinner den.
Hvis pekeren ikke fungerer
som den skal, lar du fjernkontrollen være i 10 sekunder før du prøver på nytt.
Forholdsregler for bruk av
den magiske fjernkontrollen
Bruk fjernkontrollen innenfor den maksimale
y
kommunikasjonsavstanden (10 m). Hvis du
bruker fjernkontrollen på større avstand enn
dette, eller hvis det er plassert en gjenstand
mellom TV-en og fjernkontrollen, er det ikke
sikkert at kommunikasjonen fungerer som
den skal.
Kommunikasjonsfeil kan også skyldes en-
y
heter i nærheten. Elektriske enheter som
mikrobølgeovner eller produkter for trådløse
lokalnettverk kan forårsake interferens hvis
de bruker samme båndbredde som den magiske fjernkontrollen (2,4 GHz).
Den magiske fjernkontrollen kan bli skadet
y
og vil kanskje ikke fungere riktig hvis den
faller i gulvet eller blir utsatt for kraftige støt
eller slag.
Pass på at du ikke dunker borti møbler eller
y
andre mennesker når du bruker den magiske
fjernkontrollen.
Ettersom den trådløse enheten kan utsettes
y
for elektromagnetisk interferens, kan den
ikke levere tjenester som er livsviktige for
mennesker.
Det anbefales at et tilgangspunkt (AP) loka-
y
liseres lenger enn 1 meter unna TV-en. Hvis
AP installeres nærmere enn 1 meter, kan det
hende at den magiske fjernkontrollen ikke
fungerer som forventet på grunn av frekvensforstyrrelser.
Page 87

BRUKE BRUKERHÅNDBOK
Brukerhåndbok gir deg enkel tilgang til detaljert TV-informasjon.
BRUKE BRUKERHÅNDBOK
25
1 Trykk på HOME for å vise hovedmenyen.
2 Velg Brukerveiledning, og trykk på Hjul
(OK).
Mine Programmer
Innstillinger
Direkte TV
Søk
Internett3DLG Smart W
Programguide Brukerhåndbok
Nylig liste
Inngangsliste
Brukerveiledning
MERK
yDu kan også åpne Brukerhåndbok ved
å trykke på
fjernkontrollen.
Brukerveiledning
1
PROGRAM Innstilling
BILDE, LYDKANALER Innstilling
Alt.
LG SMART-funksjon
Avansert funksjon
Informasjon
(Brukerveiledning) på
3
Slik bruker du en innsignalenhet
Bruke funksjonen Energisparing
Angi tidsalternativer
Angi låsealternativer for TV
Angi språk
Hjelp til funksjonshemmede
Stille inn den magiske fjernkontrollen
2
4
Brukerveiledning
PROGRAM Innstilling
BILDE, LYDKANALER Innstilling
Alt.
LG SMART-funksjon
Avansert funksjon
Informasjon
Viser beskrivelsen av den valgte menyen.
1
Du kan bruke ꕌ/ꕍ til å gå fra side til side.
Går til valgt meny direkte fra Brukerhåndbok.
2
Zoomer inn eller ut på skjermen.
3
1
ALT. > Angi språk
HOME Innstillinger ALT. Språk
Velger menyspråk og språk for lyd som vises på skjermen.
Menyspråk
Velger tekstspråket som skal vises.
[Bare i digital modus]
Språk for lyd
Når du ser på en digital kringkasting som inneholder ere
språk for lyd, kan du velge det språket du vil ha.
[Bare i digital modus]
Bruk undertekstfunksjonen når to eller ere undertekst-
Språk for
språk kringkastes.
undertekst
✎ Hvis det ikke sendes undertekstdata på det valgte
språket, vises teksten på standardspråket.
3
Zoom inn
Avslutt
Start
2
HOME Innstillinger ALT. Språk
Velger menyspråk og språk for lyd som vises på skjermen.
Velger tekstspråket som skal vises.
Menyspråk
[Bare i digital modus]
Når du ser på en digital kringkasting som inneholder ere
Språk for lyd
språk for lyd, kan du velge det språket du vil ha.
[Bare i digital modus]
Bruk undertekstfunksjonen når to eller ere undertekst-
Språk for
språk kringkastes.
undertekst
✎ Hvis det ikke sendes undertekstdata på det valgte
språket, vises teksten på standardspråket.
3
Zoom ut
Start
NONORSK
Avslutt
Viser gjeldende program eller inndatakilde.
1
Lar deg velge ønsket kategori.
2
Lar deg velge ønsket element.
3
Du kan bruke ꕌ/ꕍ til å gå fra side til side.
Viser beskrivelsen av ønsket funksjon fra
4
innholdsfortegnelsen.
Page 88

NORSK
NO
VEDLIKEHOLD/FEILSØKING
26
VEDLIKEHOLD
Rengjøre TV-en
Rengjør TV-en regelmessig for å sikre optimal ytelse og forlenge levetiden.
ADVARSEL
yHusk på at du først må slå av strømmen og trekke ut strømledningen og alle andre kabler.
yNår TV-en ikke skal brukes på en lang stund, må du trekke strømledningen ut av stikkontakten
for å beskytte mot mulig skade som følge av lynnedslag eller spenningssvingninger.
Skjerm, ramme, kabinett og stativ
yDu fjerner støv eller smuss ved å tørke av overaten med en tørr, ren og myk klut.
yHvis TV-en er ekstra skitten, kan du tørke av overaten med en myk klut som er fuktet med rent vann
eller et utblandet mildt rengjøringsmiddel. Etterpå tørker du umiddelbart av den med en tørr klut.
ADVARSEL
yUnngå å ta på skjermen til enhver tid, siden dette kan forårsake skader på skjermen.
yIkke skyv, gni eller kom borti overflaten med fingeren eller skarpe gjenstander, for da kan det bli riper
på skjermen, og bildet kan bli forvrengt.
yIkke bruk kjemikalier, for det kan skade produktet.
yIkke spray væske på overflaten. Hvis det kommer vann inn i TV-en, kan det forårsake brann, elektrisk
støt eller feil.
Strømledning
Fjern regelmessig støv eller smuss som har samlet seg på strømledningen.
FEILSØKING
Problem Løsning
Kan ikke styre
TV-en med
fjernkontrollen.
Det vises ikke
bilde på skjermen,
og lyden mangler.
TV-en slås
plutselig av.
Hvis du kobler til
PC (RGB/ HDMI
DVI), vises Ingen
signaler eller
Ugyldig format.
yKontroller fjernkontrollsensoren på produktet, og prøv på nytt.
yUndersøk om det er noen hindringer mellom produktet og fjernkontrollen.
yKontroller om batteriene fremdeles virker og er riktig installert (
yKontroller om TV-en er slått på.
yKontroller om strømledningen er satt i stikkontakten.
yKontroller om stikkontakten fungerer ved å koble til andre produkter.
yKontroller innstillingene for strømtilførsel. Det har kanskje vært strømbrudd.
yKontroller om funksjonen for automatisk innsovning er aktivert i
tidsinnstillingene.
yHvis det ikke er noen signaler når TV-en er på, slås TV-en automatisk av når
den har vært inaktiv i 15 minutter.
ySlå TV-en av og deretter på igjen ved hjelp av fjernkontrtollen.
yKoble til RGB/HDMI-kabelen
yStart PC-en på nytt med TV-en på.
til , til ).
Page 89

SPESIFIKASJONER
SPESIFIKASJONER
Produktspesikasjonene kan endres uten forhåndsvarsel ved oppgradering av produktfunksjoner.
(bare 60LM645*, 32/42/47/55LM66**, 42/47/55LM67**, 42/47/55LM76**)
Spesifikasjon for trådløs LAN-modul (TWFM-B003D)
Standard IEEE802.11a/b/g/n
2400–2483,5 MHz
Frekvensområde
Modulering CCK / OFDM / MIMO
Utgangseffekt
(Typisk)
Datafrekvens
Antenneforsterkning
(Typisk)
Båndbredde i bruk
Båndkanalen som brukes, kan variere mellom ulike land. Brukeren kan ikke endre eller justere driftsfre-
y
kvensen, og dette produktet er konfigurert for den regionale frekvenstabellen.
5150–5250 MHz
5725–5850 MHz
802.11a: 11 dBm
802.11b: 15 dBm
802.11g: 13 dBm
802.11n – 2,4 GHz: 13 dBm
802.11n – 5 GHz: 13 dBm
802.11a/g: 54 Mbps
802.11b: 11 Mbps
802.11n: 300 Mbps
2400–2483,5 MHz: –2,5 dBi
5150–5250 MHz: –2,2 dBi
5725–5850 MHz: –2,9 dBi
802.11a/b/g: HT20
802.11n: HT20/40
27
NONORSK
Spesifikasjon for Bluetooth-modul (BM-LDS302)
Standard Bluetooth-versjon 3.0
Frekvensområde 2400–2483,5 MHz
Utgangseffekt (maks.) 10 dBm eller mindre
Datafrekvens (maks.) 3 Mbps
Kommunikasjonsrekkevidde Med fri sikt ca. 10 m
Page 90

Page 91

BRUGERVEJLEDNING
LED LCD-TV
Læs denne vejledning grundigt inden betjening af
produktet, og behold den til evt. senere brug.
www.lg.com
Page 92

INDHOLDSFORTEGNELSE
2
INDHOLDSFORTEGNELSE
3 LICENSER
3 BEMÆRKNING VEDR. OPEN
SOURCE-SOFTWARE
4 SIKKERHEDSINSTRUKTIONER
10 - Visning af 3D-billeder (kun 3D-modeller)
DANSK
DAN
12 FREMGANGSMÅDE VED
INSTALLATION
12 SAMLING OG KLARGØRING
12 Udpakning
15 Købes separat
16 Dele og knapper
17 Løft og flytning af TV'et
18 Montering på et bord
20 Montering på en væg
21 FJERNBETJENING
23 FUNKTIONER PÅ DEN MAGISKE
FJERNBETJENING
24 Registrering af den magiske fjernbetjening
24 Sådan bruger du den magiske fjernbetjening
24 Forholdsregler ved brug af den magiske
fjernbetjening
25 BRUG AF BRUGERMANUALEN
26 VEDLIGEHOLDELSE
26 Rengøring af TV'et
26 - Skærm, ramme, kabinet og stander
26 - Strømkabel
26 FEJLFINDING
27 SPECIFIKATIONER
ADVARSEL
yHvis du ignorerer advarselsmeddelelsen,
kan du blive alvorligt kvæstet eller muligvis
blive udsat for en alvorlig eller dødelig
ulykke.
FORSIGTIG
yHvis du ignorer forsigtighedsmeddelelsen,
kan du blive let kvæstet, eller produktet kan
blive beskadiget.
BEMÆRK
yBemærkningen hjælper dig med at forstå
og bruge produktet på en sikker måde. Læs
bemærkningen omhyggeligt, før du bruger
produktet.
Page 93

LICENSER / BEMÆRKNING VEDR. OPEN SOURCE-SOFTWARE
LICENSER
Understøttede licenser varierer, afhængigt af modellen. Du kan få ere oplysninger om licenserne ved at
besøge www.lg.com.
Fremstillet under licens fra Dolby Laboratories. "Dolby" og dobbelt-D-symbolet er
varemærker tilhørende Dolby Laboratories.
HDMI, HDMI-logoet og High-Definition Multimedia Interface er varemærker eller
registrerede varemærker fra HDMI Licensing LLC.
3
OM DIVX-VIDEO: DivX® er et digitalt videoformat skabt af DivX, LLC, et
datterselskab til Rovi Corporation. Dette er en DivX Certied®-enhed, der afspiller
DivX-video. Besøg divx.com for ere oplysninger og softwareværktøjer til at
konvertere dine ler til DivX-videoer.
OM DIVX VIDEO-ON-DEMAND: Denne DivX Certied®-enhed skal være registreret
for at kunne afspille købte DivX VOD (Video-on-Demand)-lm. For at få din
registreringskode skal du nde DivX VOD-sektionen i menuen for enhedsopsætning.
Gå til vod.divx.com for at få ere oplysninger om, hvordan du fuldfører din
registrering.
"DivX Certied® til afspilning af DivX®-video op til HD 1080p, inkl. betalingsindhold."
"DivX®, DivX Certied® og tilknyttede logoer er varemærker tilhørende Rovi
Corporation eller dets datterselskaber og anvendes under licens."
"Dækket af én eller ere af følgende amerikanske patenter:
7,295,673; 7,460,668; 7,515,710; 7,519,274”
Fremstillet under licens under følgende amerikanske patenter: 5.956.674, 5.974.380,
6.487.535. Andre amerikanske patenter er udtaget og under behandling. DTS, logo
og DTS og logo samlet er registrerede varemærker og DTS 2.0+Digital Out er et
varemærke tilhørende DTS, Inc. Produkt er inklusive software. © DTS, Inc. Alle
rettigheder forbeholdes.
DANDANSK
BEMÆRKNING VEDR. OPEN SOURCESOFTWARE
Du kan hente kildekoden til GPL, LGPL, MPL og andre open source-licenser, der ndes i dette produkt, på
http://opensource.lge.com.
Ud over kildekoden er det muligt at hente alle licensbetingelser, garantifraskrivelser og meddelelser om
ophavsret.
LG Electronics tilbyder også levering af open source-kode på en CD-ROM til en pris, der dækker
omkostningerne ved en sådan distribution (f.eks. omkostningerne til medier, forsendelse og håndteringen)
ved e-mail-forespørgsel sendt til opensource@lge.com. Dette tilbud gælder i tre (3) år fra produktets
købsdato.
Page 94

DANSK
DAN
SIKKERHEDSINSTRUKTIONER
4
SIKKERHEDSINSTRUKTIONER
Læs disse sikkerhedsmæssige forholdsregler grundigt, inden du anvender produktet.
ADVARSEL
TV og fjernbetjening må ikke placeres i følgende miljøer:
y
- Et sted, der er udsat for direkte sollys
- Et område med høj luftfugtighed, f.eks. et badeværelse
- Nær ved varmekilder, f.eks. ovne eller andre enheder, der frembringer varme
- Nær køkkenborde eller luftfugtere, hvor damp eller olie kan forekomme
- Et område, der er udsat for regn eller vind
- Nær beholdere med vand, f.eks. blomstervaser
Dette kan forårsage brand, elektrisk stød, fejlfunktion eller deformation af produktet.
Placer ikke produktet på et sted, hvor det kan blive udsat for støv.
y
Det kan forårsage brandfare.
Ved frakobling fjernes stikket fra stikkontakten Stikket skal forblive klar til brug.
y
Rør ikke ved strømstikket med våde hænder. Desuden skal strømstikket tørre helt
y
eller renses for støv, hvis stikbenet er vådt eller dækket af støv.
Du kan få dødbringende elektrisk stød pga. for høj fugtighed.
Sørg for at tilslutte strømkablet til den jordforbundne strømkilde. (undtagen enhe-
y
der, der ikke er koblet til jord).
Du kan få dødbringende elektrisk stød eller komme til skade.
Sæt strømkablet sikkert fast.
y
Hvis strømkablet ikke sidder godt nok fast, kan der opstå brand.
Sørg for, at strømkablets ikke kommer i kontakt med varme genstande som f.eks.
y
et varmeapparat.
Dette kan forårsage ildebrand eller fare for elektrisk stød.
Anbring ikke tunge genstande eller produktet oven på strømførende kabler.
y
Dette kan forårsage ildebrand eller elektrisk stød.
Bøj antennekablet mellem dets ud- og indvendige dele for at forhindre, at regnvand
y
kan løbe ind.
Dette kan medføre vandskade indvendigt i produktet og eventuelt medføre elektrisk stød.
Kontroller ved montering af TV på en væg, at strøm- og signalkabler ikke hænger
y
løst på TV'ets bagside.
Det kan forårsage brand eller elektrisk stød.
Page 95

Desiccant
SIKKERHEDSINSTRUKTIONER
Sæt ikke for mange elektriske enheder i en enkelt kontakt.
y
Det kan forårsage brand pga. af overopvarmning.
Tab ikke produktet og undgå, at det vælter ved tilslutning af eksterne enheder.
y
Det kan forårsage personskade eller skade på produktet.
Hold emballagens anti-fugt-middel eller vinylindpakning uden for børns rækkevid-
y
de.
Anti-fugt-middel er skadeligt, hvis det spises. Hvis en person indtager anti-fugt-
middel, skal personen tvinges til at kaste op og derefter transporteres til nærmeste
hospital. Vinylindpakning kan desuden medføre kvælning. Hold det uden for børns
rækkevidde.
Lad ikke børn klatre eller hænge på TV'et.
y
TV'et kan vælte, hvilket kan medføre alvorlige personskader.
Bortskaf omhyggeligt brugte batterier, så børn ikke kan komme til at spise dem.
y
Hvis et batteri spises, skal der straks søges lægehjælp.
Stik ikke ledende elementer (f.eks. en strikkepind) ind i strømkablets frie ende,
y
mens den anden ende er sat i stikkontakten. Undlad desuden at berøre strømkablet straks efter, at det er sat i stikkontakten.
Du kan få dødbringende elektrisk stød.
(afhængigt af modellen)
Placer eller opbevar ikke brandbare substanser i nærheden af produktet.
y
Der er fare for eksplosion eller brand ved skødesløs håndtering af de brandbare
substanser.
5
DANDANSK
Tab ikke metalgenstande som f.eks. mønter, hårnåle, spisepinde eller ledninger
y
ned i produktet. Det samme gælder for brandbare genstande som f.eks. papir og
tændstikker. Børn skal være særligt opmærksomme.
Det kan medføre elektrisk stød, brand eller personskade. Hvis et fremmedelement
tabes ind i produktet, skal strømkablet tages ud af stikkontakten, og servicecentret
kontaktes.
Undlad at sprøjte vand på produktet eller at skrubbe det med brandbare væsker
y
(fortynder eller benzen). Det kan medføre brand eller elektrisk stød.
Undgå sammenstød eller genstande, der falder ned på produktet. Sæt ikke noget
y
hårdt ned oven på skærmen.
Du kan komme til skade eller produktet kan blive beskadiget.
Rør aldrig ved produktet eller antennen under en storm eller tordenvejr.
y
Du kan få dødbringende elektrisk stød.
Rør aldrig ved stikkontakten, hvis der er gasudslip. Åbn vinduerne, og luft ud.
y
Det kan medføre brand eller forbrændinger pga. gnister.
Page 96

DANSK
DAN
SIKKERHEDSINSTRUKTIONER
6
Skil ikke produktet ad, og forsøg ikke at reparere eller ændre produktet på egen
y
hånd.
Det kan medføre brand eller elektrisk stød.
Kontakt servicecentret for kontrol, kalibrering eller reparation.
Hvis et af følgende forhold opstår, frakobel produktet øjeblikkeligt, og kontakt det
y
lokale servicecenter.
- Produktet er blevet udsat for stød
- Produktet er blevet beskadiget
- Fremmedlegemer er kommet ind i produktet
- Produktet har udsendt røg eller en mistænkelig lugt
Dette kan forårsage brand eller elektrisk stød.
Hvis produktet ikke skal bruges i en længere periode, skal du frakoble strømkablet
y
fra produktet.
Et lag af støv kan forårsage brand, og forringelse af isoleringen kan medføre en
elektrisk udladning, elektrisk stød eller brand.
Apparatet må ikke udsættes for dryp eller stænk, og der må ikke placeres væske-
y
fyldte genstande, f.eks. vaser, på apparatet.
Page 97

SIKKERHEDSINSTRUKTIONER
5~7 times
FORSIGTIG
Installer produktet på et sted, hvor der ikke opstår radiobølger.
y
Der skal være tilstrækkelig afstand mellem en udendørsantenne og strømkabler,
y
så de ikke berører hinanden. Dette gælder også, hvis antennen skulle vælte eller
falde ned.
Dette kan i modsat fald forårsage elektrisk stød.
Undlad at installere produktet på steder som f.eks. ustabile hylder eller overflader
y
med hældning. Undgå ligeledes steder med vibration, eller hvor der ikke er fuld
understøttelse af produktet.
Produktet kan i modsat fald falde ned eller vælte, hvilket kan medføre personskade
eller skade på produktet.
Hvis du har monteret TV'et på en stander, skal det beskyttes mod at vælte. TV'et
y
kan i modsat fald vælte, hvilket kan medføre personskader.
Hvis du vil montere produktet på væggen, skal du fastgøre VESA-monteringsbeslaget (ekstraudstyr)
y
bag på produktet. Fastgør VESA-beslaget omhyggeligt (ekstraudstyr) for at undgå, at produktet kan
falde ned.
Brug kun de tilføjelser og det tilbehør, der er angivet af producenten.
y
Kontakt en kvalificeret serviceperson ved installation af antennen.
y
Dette kan forårsage brandfare eller fare for elektrisk stød.
7
DANDANSK
Vi anbefaler, at der holdes en afstand på mindst 5 til 7 gange skærmens diagonale
y
størrelse, når du ser TV.
Hvis du ser TV i et langt tidsrum, kan det medføre et forvrænget syn.
Brug kun den angivne type batteri.
y
Det kan forårsage skader på fjernbetjeningen.
Bland ikke nye batterier med gamle.
y
Det kan medføre, at batterierne overophedes eller lækker.
Sørg for, at der ikke står genstande mellem fjernbetjeningen og dens sensor
y
Signalet fra fjernbetjeningen kan forstyrres af sollys eller andre stærke lyskilder. Er
y
dette tilfældet, kan lokalet gøres mørkere.
Kontroller, at tilslutningskablerne er tilstrækkeligt lange, når der tilsluttes eksterne
y
enheder som f.eks. spilkonsoller.
Produktet kan i modsat fald vælte, hvilket kan medføre personskade eller skade på
produktet.
Page 98

SIKKERHEDSINSTRUKTIONER
8
Tænd og sluk ikke for produktet ved at sætte stikket i eller tage stikket ud af stik-
y
kontakten på væggen. (Brug ikke strømstikket som tænd/sluk-knap).
Det kan forårsage mekanisk fejl eller give elektrisk stød.
Følg installationsvejledningen nedenfor for at forhindre, at produktet overophedes.
y
- Afstanden mellem produktet og væggen bør være på mere end 10 cm.
- Produktet må ikke installeres på steder uden ventilation (f.eks. på en hylde eller i
et skabskabinet).
- Produktet må ikke installeres på tæpper eller hynder.
- Kontroller, at udluftningen ikke blokeres af duge eller gardiner.
Dette kan i modsat fald forårsage brand.
Undgå at røre ved ventilationsåbningerne, når TV'et har været tændt længe, da
y
ventilationsåbningerne kan blive varme. Dette påvirker ikke produktets funktion eller ydeevne.
DANSK
DAN
Undersøg jævnligt apparatets ledning. Hvis den ser ud til at være beskadiget eller nedslidt, skal du
y
frakoble den, stoppe med at anvende apparatet, og få ledningen udskiftet med den helt korrekte
reservedel af en autoriseret serviceleverandør.
Undgå, at der samler sig støv på strømstikkets ben eller på stikkontakten.
y
Det kan forårsage brandfare.
Beskyt strømkablet mod fysisk eller mekanisk misbrug, og undgå at vride det,
y
knække det, klemme det, klemme det i en dør eller træde på det. Vær opmærksom
på stik, vægstikkontakter og der, hvor kablet kommer ud fra apparatet.
Tryk ikke hårdt på skærmen med hånden eller et skarpt objekt som f.eks. et søm,
y
en blyant eller en kuglepen, og rids ikke skærmen.
Undgå at berøre skærmen eller at holde fingre mod den i lange tidsrum. Dette kan
y
medføre opstå midlertidig forvrængning af skærmbilledet.
Når produktet og dets komponenter rengøres, skal strømforsyningen forkobles,
y
hvorefter der aftørres med en blød klud. Undgå brug af unødvendig kraft, da dette
kan medføre ridser eller misfarvning. Brug ikke vand fra en spraybeholder, og tør
ikke af med en våd klud. Brug aldrig rengøringsmidler til glas, poleringsmidler til
biler eller industrielle formål, slibemiddelbaserede produkter, voks, benzen, alkohol
mv. da disse kan beskadige produktet og dets panel.
Disse kan forårsage brand, elektrisk stød eller skader på produktet (deformation,
korrosion eller brud).
Så længe denne enhed er sluttet til AC-stikkontakten, er den ikke frakoblet AC-strømkilden - heller
y
ikke, hvis du slukker for enheden vha. KONTAKTEN.
Hold på stikket, når kablet tages ud af stikkontakten.
y
Hvis ledningerne indvendigt i strømkablet ikke er forbundet, kan det medføre brad.
Kontroller, at strømmen er slukket, får produktet flyttes. Tag derefter strømkabler,
y
antennekabler og alle tilsluttede kabler ud af deres respektive stik.
TV-apparatet eller strømkablet kan blive beskadiget, hvilket kan forårsage brandfare eller medføre elektrisk stød.
Page 99

SIKKERHEDSINSTRUKTIONER
Få hjælp fra en anden person ved flytning og udpakning af produktet. Produktet er
y
tungt.
Dette kan i modsat fald forårsage personskade.
Kontakt servicecentret årligt for at få rengjort produktets indre dele.
y
Ophobet støv kan medføre mekaniske fejl.
Alt service skal udføres af kvalificeret servicepersonale. Service er påkrævet ved
y
enhver form for skade på apparatet, f.eks. skader på strømkabel eller -stik, spildte
væsker eller tabte genstande inden i apparatet, eller hvis apparatet er blevet udsat
for regn eller fugt, ikke fungerer normalt eller er blevet tabt.
Hvis produktet er koldt at røre ved, kan der opstå en smule flimmer, når det tæn-
y
des. Dette er normalt. Der er ikke noget galt med produktet.
9
Panelet er et højteknologisk produkt med en opløsning på mellem to og seks mil-
y
lioner pixel. Du kan muligvis se små sorte pletter og/eller klart farvede pletter (røde,
blå eller grønne) med en størrelse på 1 ppm på panelet. Dette angiver ikke fejlfunktion og påvirker ikke produktets ydeevne eller driftssikkerhed.
Dette fænomen opstår også i produkter fra tredjeparter og kan ikke gøres til genstand for bytning eller refusion.
Du kan muligvis finde forskellige lysstyrker og farver på panelet afhængigt af din
y
placering i forhold til panelet (venstre/højre/oppefra/nedefra).
Dette fænomen opstår som følge af panelets opbygning. Det er ikke relateret til
produktets ydeevne og er ikke en fejlfunktion.
Visning af faste billeder (f.eks. et logo på en TV-kanal, menuer på skærmen, en scene i et videospil)
y
i et længere tidsrum kan beskadige skærmen og medføre at billedet sidder fast (kaldes også for
"image sticking"). Produktgarantien gælder ikke i dette tilfælde.
Undgå at vise et statisk billede på din TV-skærm i et længere tidsrum (2 timer eller mere for LCD, 1
time eller mere for Plasma).
Et fastfrosset billede kan også opstå ved panelets kanter, hvis du ser TV med forholdet 4:3 i et langt
tidsrum.
Dette fænomen opstår også i produkter fra tredjeparter og kan ikke gøres til genstand for bytning
eller refusion.
Lyde, der kan forekomme
y
"Knækken": En knækkende lyd kan forekomme som følge af plastisktermisk sammentrækning pga.
temperaturudsving og fugt, når TV'et anvendes eller slukkes. Denne lyd er normal for produkter,
hvor termisk deformation er påkrævet. Summelyd fra elektriske kredsløb/brummelyd fra panelet: Lyd
med et lavt støjniveau, der genereres af højhastighedskredsløb, som leverer strøm til produktets
drift. Dette varierer afhængigt af produktet.
Den frembragte lyd påvirker ikke produktets ydeevne eller driftssikkerhed.
DANDANSK
Page 100

DANSK
DAN
SIKKERHEDSINSTRUKTIONER
10
Visning af 3D-billeder (kun 3D-modeller)
ADVARSEL
Omgivelserne
yTidsrum
- Tag 5-15 minutters pause hver time, når der ses indhold i 3D. Hvis du ser indhold i 3D i lange tids-
rum kan det medføre hovedpine, svimmelhed, træthed eller trætte øjne.
Personer med fotosensitive anfald eller kroniske lidelser
yVisse brugere kan opleve anfald eller andre unormale symptomer, når de udsættes for blinkende lys
eller bestemte mønstre fra indhold i 3D.
ySe ikke 3D-videoer, hvis du får kvalme, er gravid og/eller har en kronisk lidelse som f.eks. epilepsi eller
har problemer med hjerte, blodtryk eller lignende.
y3D-indhold anbefales ikke til personer, der lider stereoblindhed eller stereoanomali. Dobbelte billeder
eller ubehag kan opleves ved visning.
yHvis du har skelen, er svagsynet eller har bygningsfejl i øjnene, kan du have problemer med at
registrere dybde og nemt føle træthed pga. dobbelte billeder. Det anbefales i disse tilfælde, at der tages
ere pauser.
yHvis dit syn er forskelligt på højre og venstre øje, bør du tage hensyn til dette ved visning af indhold i
3D.
Symptomer, der kræver afbrydelse eller undgåelse af visning af indhold i 3D
yUndgå at se indhold i 3D, når du føler dig træt som følge af søvnmangel, overarbejde eller indtagelse af
alkohol.
yNår disse symptomer opleves, skal brug og visning af indhold i 3D stoppes, indtil symptomerne går væk
igen.
- Kontakt din læge, hvis disse symptomer fortsætter. Symptomer kan inkludere hovedpine, smerter i
øjeæbler, svimmelhed, kvalme, hjertebanken, nedsat fokuseringsevne, ubehag, dobbeltsyn, visuelle
gener og træthed.
 Loading...