

Page 1
Please read this manual carefully before operating
your set.
Retain it for future reference.
Record model number and serial number of the set.
See the label attached on the back cover and quote
this information to your dealer
when you require service.
LCD TV PLASMA TV
OWNER’S MANUAL
LCD TV MODELS
32LG30 37LG50
37LG30 42LG50
42LG30 47LG50
42LGX 52LG50
47 LG X
32LG60 32LG70
37LG60 42LG70
42LG60 47LG70
47LG60 52LG70
52LG60
47LG90
PLASMA TV MODELS
42PG25
50PG25
50PG60
60PG60
50PG70
60PG70
P/NO : SAC30708020 (0809-REV08)
www.lgusa.com / www.lg.ca
As an ENERGY STAR Partner
LG Electronics USA, Inc.
has determined that this
product meets the ENERGY
STAR guidelines for energy
efficiency.
ENERGY STAR is a set of power-saving
guidelines issued by the U.S.
Environmental Protection Agency (EPA).
Page 2
A
WARNING / CAUTION
WARNING / CAUTION
To prevent fire or shock hazards, do not expose
this product to rain or moisture.
FCC NOTICE
Class B digital device
This equipment has been tested and found to comply
with the limits for a Class B digital device, pursuant to
Part 15 of the FCC Rules. These limits are designed
to provide reasonable protection against harmful
interference in a residential installation. This equipment
generates, uses and can radiate radio frequency energy
and, if not installed and used in accordance with the
instructions, may cause harmful interference to radio
communications. However, there is no guarantee that
interference will not occur in a particular installation.
If this equipment does cause harmful interference to
radio or television reception, which can be determined
by turning the equipment off and on, the user is
encouraged to try to correct the interference by one
or more of the following measures:
- Reorient or relocate the receiving antenna.
- Increase the separation between the equipment and
receiver.
- Connect the equipment to an outlet on a circuit
different from that to which the receiver is connected.
- Consult the dealer or an experienced radio/TV
technician for help.
Any changes or modifications not expressly approved
by the party responsible for compliance could void
the user’s authority to operate the equipment.
CAUTION
Do not attempt to modify this product in any way
without written authorization from LG Electronics.
Unauthorized modification could void the user’s
authority to operate this product
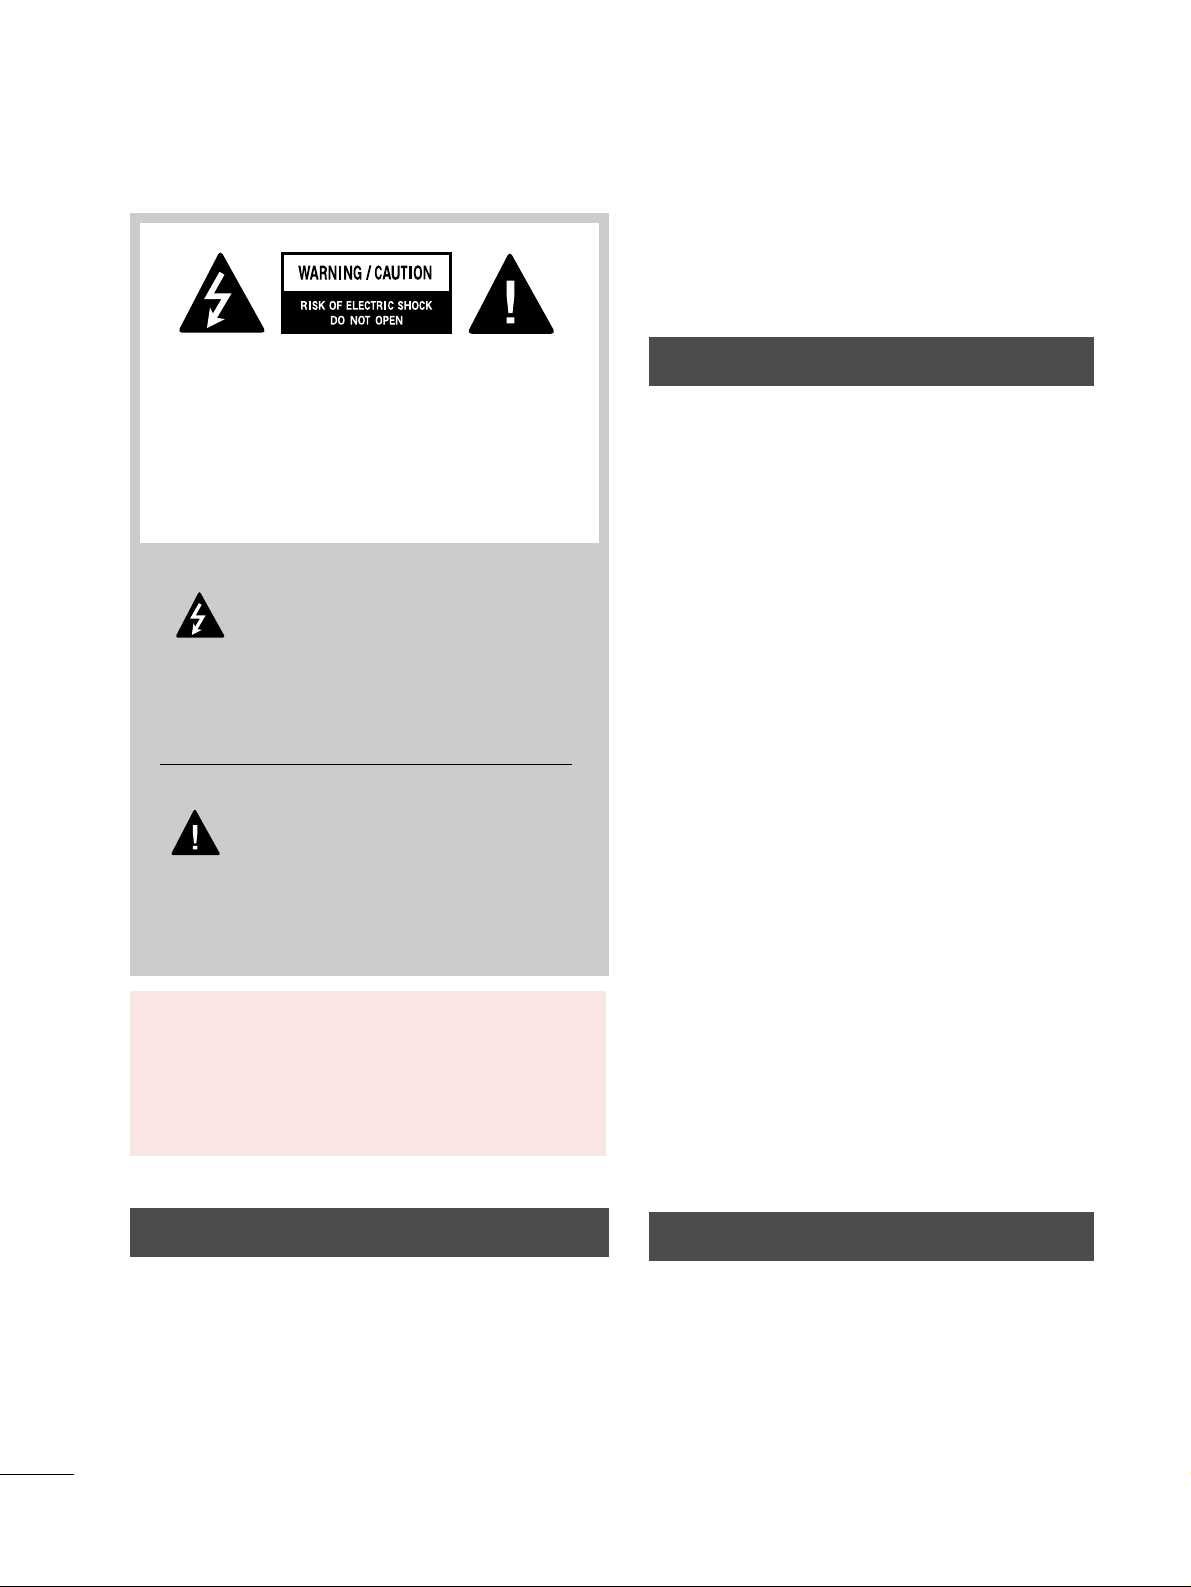
The lightning flash with arrowhead
symbol, within an equilateral triangle, is
intended to alert the user to the presence
of uninsulated “dangerous voltage” within the
product’s enclosure that may be of sufficient
magnitude to constitute a risk of electric shock to
persons.
The exclamation point within an equilateral
triangle is intended to alert the user to
the presence of important operating and
maintenance (servicing) instructions in the literature accompanying the appliance.
TO REDUCE THE RISK OF ELECTRIC SHOCK
DO NOT REMOVE COVER (OR BACK). NO
USER SERVICEABLE PARTS INSIDE. REFER TO
QUALIFIED SERVICE PERSONNEL.
WARNING/CAUTION
TO REDUCE THE RISK OF FIRE AND ELECTRIC
SHOCK, DO NOT EXPOSE THIS PRODUCT TO
RAIN OR MOISTURE.
NOTE TO CABLE/TV INSTALLER
This reminder is provided to call the CATV system
installer’s attention to Article 820-40 of the National
Electric Code (U.S.A.). The code provides guidelines for
proper grounding and, in particular, specifies that the
cable ground shall be connected to the grounding system
of the building, as close to the point of the cable entry
as practical.
Page 3
1
IMPORTANT SAFETY INSTRUCTIONS
SAFETY INSTRUCTIONS
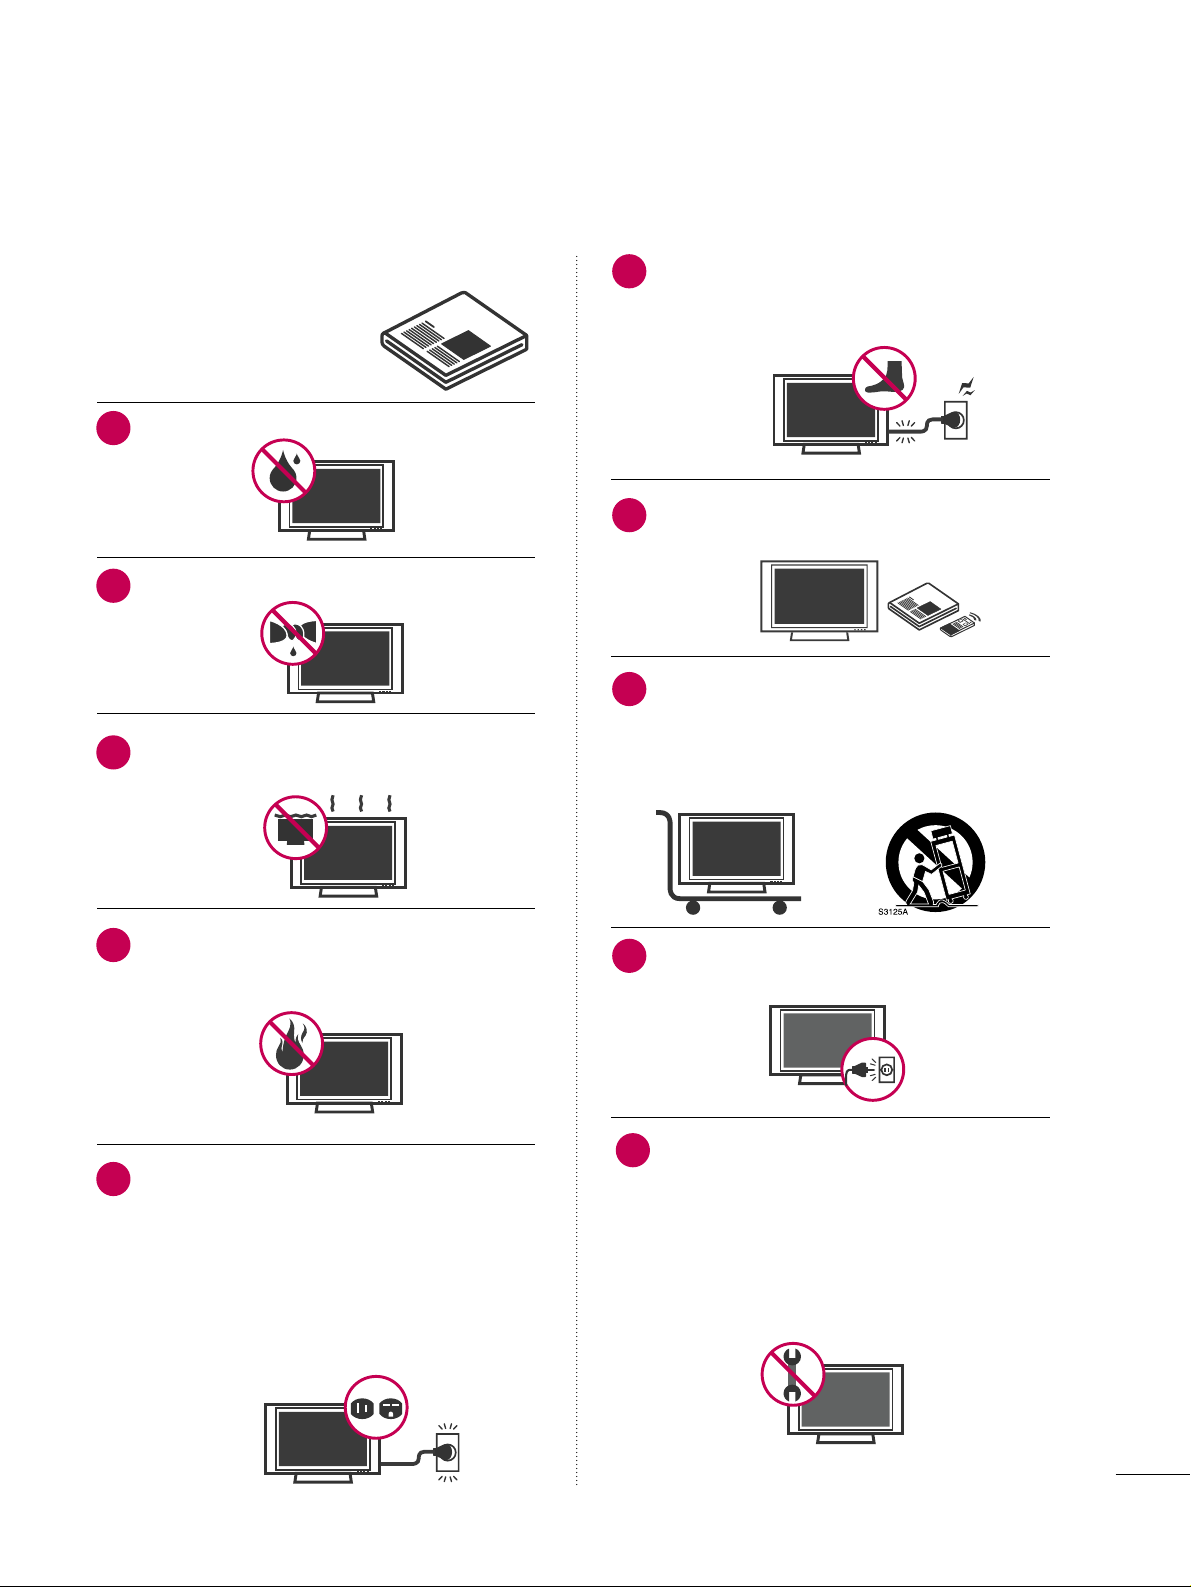
Read these instructions.
Keep these instructions.
Heed all warnings.
Follow all instructions.
Do not use this apparatus near water.
Clean only with dry cloth.
Do not block any ventilation openings. Install in
accordance with the manufacturer’s instructions.
Do not install near any heat sources such as
radiators, heat registers, stoves, or other
apparatus (including amplifiers)that produce
heat.
Do not defeat the safety purpose of the polarized
or grounding-type plug. A polarized plug has
two blades with one wider than the other. A
grounding type plug has two blades and a
third grounding prong, The wide blade or the
third prong are provided for your safety. If the
provided plug does not fit into your outlet,
consult an electrician for replacement of the
obsolete outlet.
Protect the power cord from being walked on
or pinched particularly at plugs, convenience
receptacles, and the point where they exit from
the apparatus.
Only use attachments/accessories specified by
the manufacturer.
Use only with the cart, stand, tripod, bracket,
or table specified by the manufacturer, or sold
with the apparatus. When a cart is used, use
caution when moving the cart/apparatus combination to avoid injury from tip-over.
Unplug this apparatus during lighting storms
or when unused for long periods of time.
Refer all servicing to qualified service personnel.
Servicing is required when the apparatus has
been damaged in any way, such as powersupply cord or plug is damaged, liquid has
been spilled or objects have fallen into the
apparatus, the apparatus has been exposed to
rain or moisture, does not operate normally, or
has been dropped.
1
2
3
4
5
7
8
6
9
10
Page 4
2
SAFETY INSTRUCTIONS
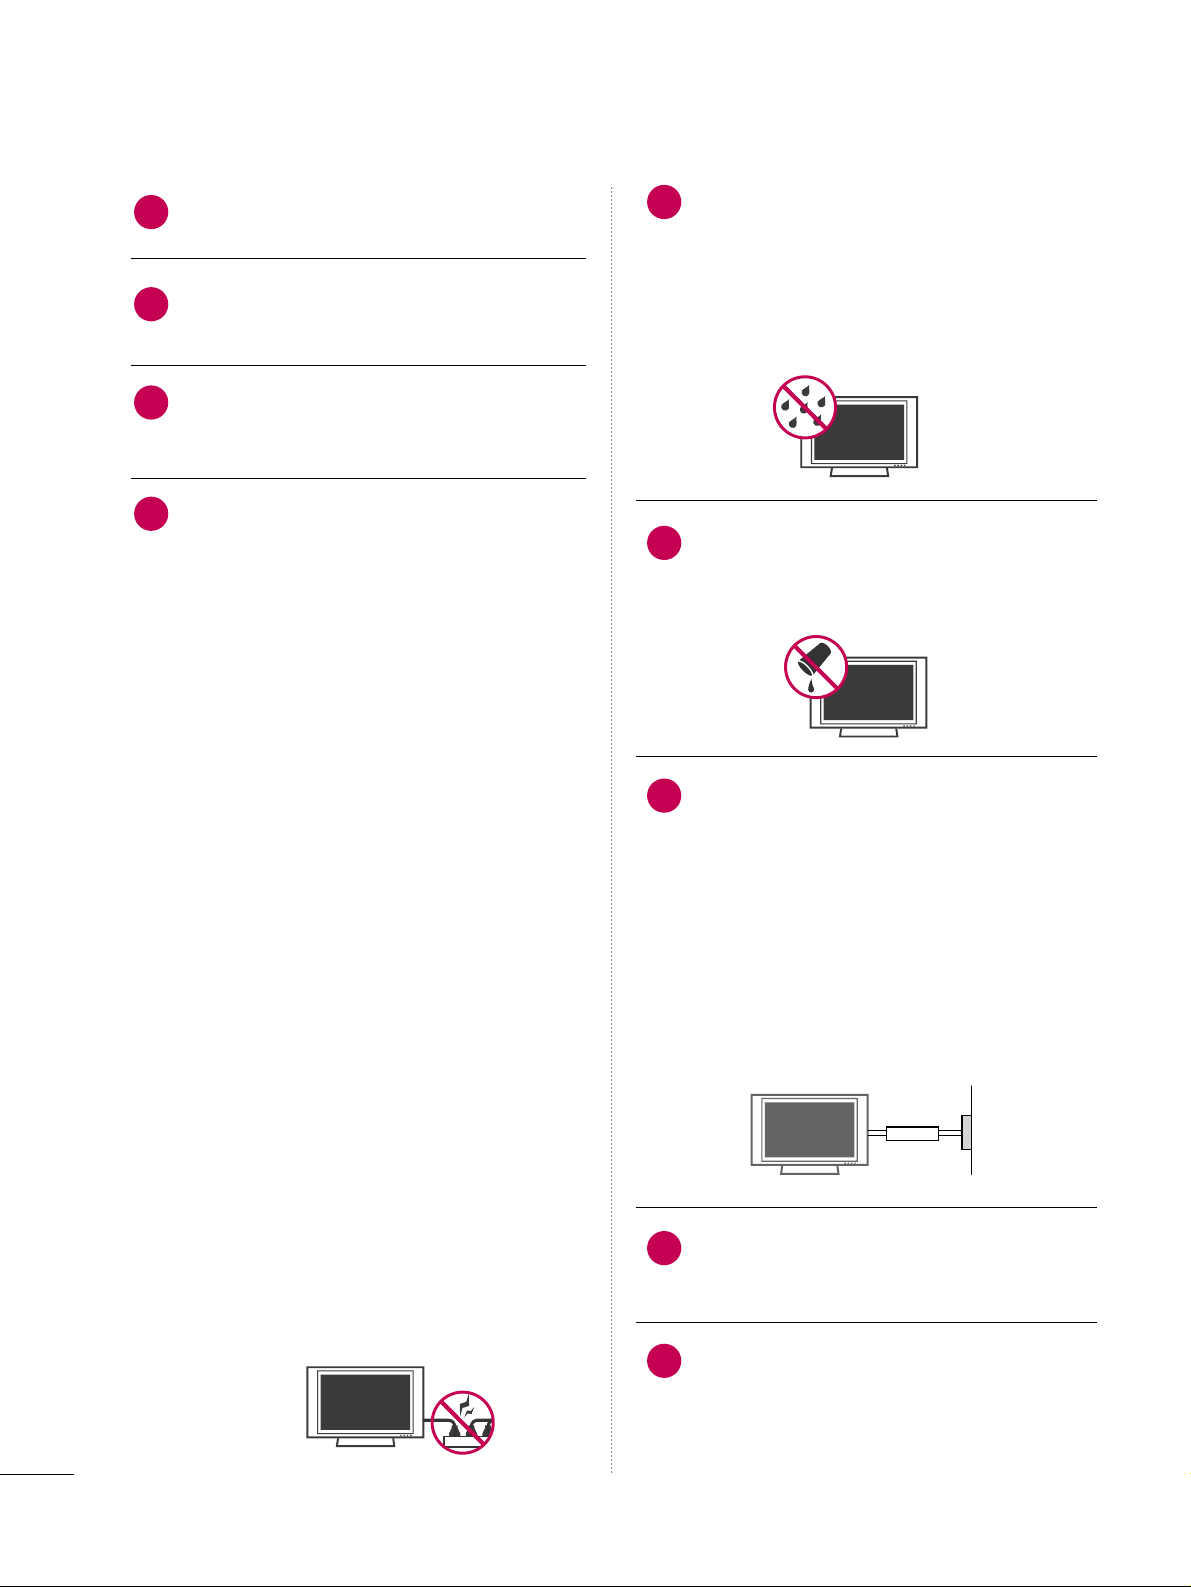
Never touch this apparatus or antenna during
a thunder or lighting storm.
When mounting a TV on the wall, make sure
not to install the TV by the hanging power and
signal cables on the back of the TV.
Do not allow an impact shock or any objects to
fall into the product, and do not drop onto the
screen with something.
CAUTION concerning the Power Cord:
It is recommend that appliances be placed
upon a dedicated circuit; that is, a single
outlet circuit which powers only that appliance
and has no additional outlets or branch
circuits. Check the specification page of this
owner's manual to be certain.
Do not connect too many appliances to the
same AC power outlet as this could result in
fire or electric shock.
Do not overload wall outlets. Overloaded wall
outlets, loose or damaged wall outlets, extension
cords, frayed power cords, or damaged or
cracked wire insulation are dangerous. Any of
these conditions could result in electric shock
or fire. Periodically examine the cord of your
appliance, and if its appearance indicates damage
or deterioration, unplug it, discontinue use of
the appliance, and have the cord replaced with
an exact replacement part by an authorized
servicer. Protect the power cord from physical
or mechanical abuse, such as being twisted,
kinked, pinched, closed in a door, or walked
upon. Pay particular attention to plugs, wall
outlets, and the point where the cord exits the
appliance.
Do not make the TV with the power cord
plugged in. Do not use a damaged or loose
power cord. Be sure do grasp the plug when
unplugging the power cord. Do not pull on the
power cord to unplug the TV.
WARNING - To reduce the risk of fire or electrical
shock, do not expose this product to rain,
moisture or other liquids. Do not touch the TV
with wet hands. Do not install this product
near flammable objects such as gasoline or
candles or expose the TV to direct air
conditioning.
Do not expose to dripping or splashing and do
not place objects filled with liquids, such as
vases, cups, etc. on or over the apparatus (e.g.
on shelves above the unit).
GGRROOUUNN DD IINN GG
Ensure that you connect the earth ground wire
to prevent possible electric shock (i.e. a TV
with a three-prong grounded AC plug must be
connected to a three-prong grounded AC outlet). If grounding methods are not possible,
have a qualified electrician install a separate
circuit breaker.
Do not try to ground the unit by connecting it
to telephone wires, lightening rods, or gas
pipes.
DDIISSCCOONNNNEECCTTIINNGG DDEEVVIICCEE FFRROOMM MMAAIINNSS
Mains plug is the disconnecting device. The
plug must remain readily operable.
Keep the product away from direct sunlight.
12
11
14
13
16
17
18
19
Power
Supply
Short-circuit
Breaker
15
Page 5
3
AANN TT EENN NNAASS
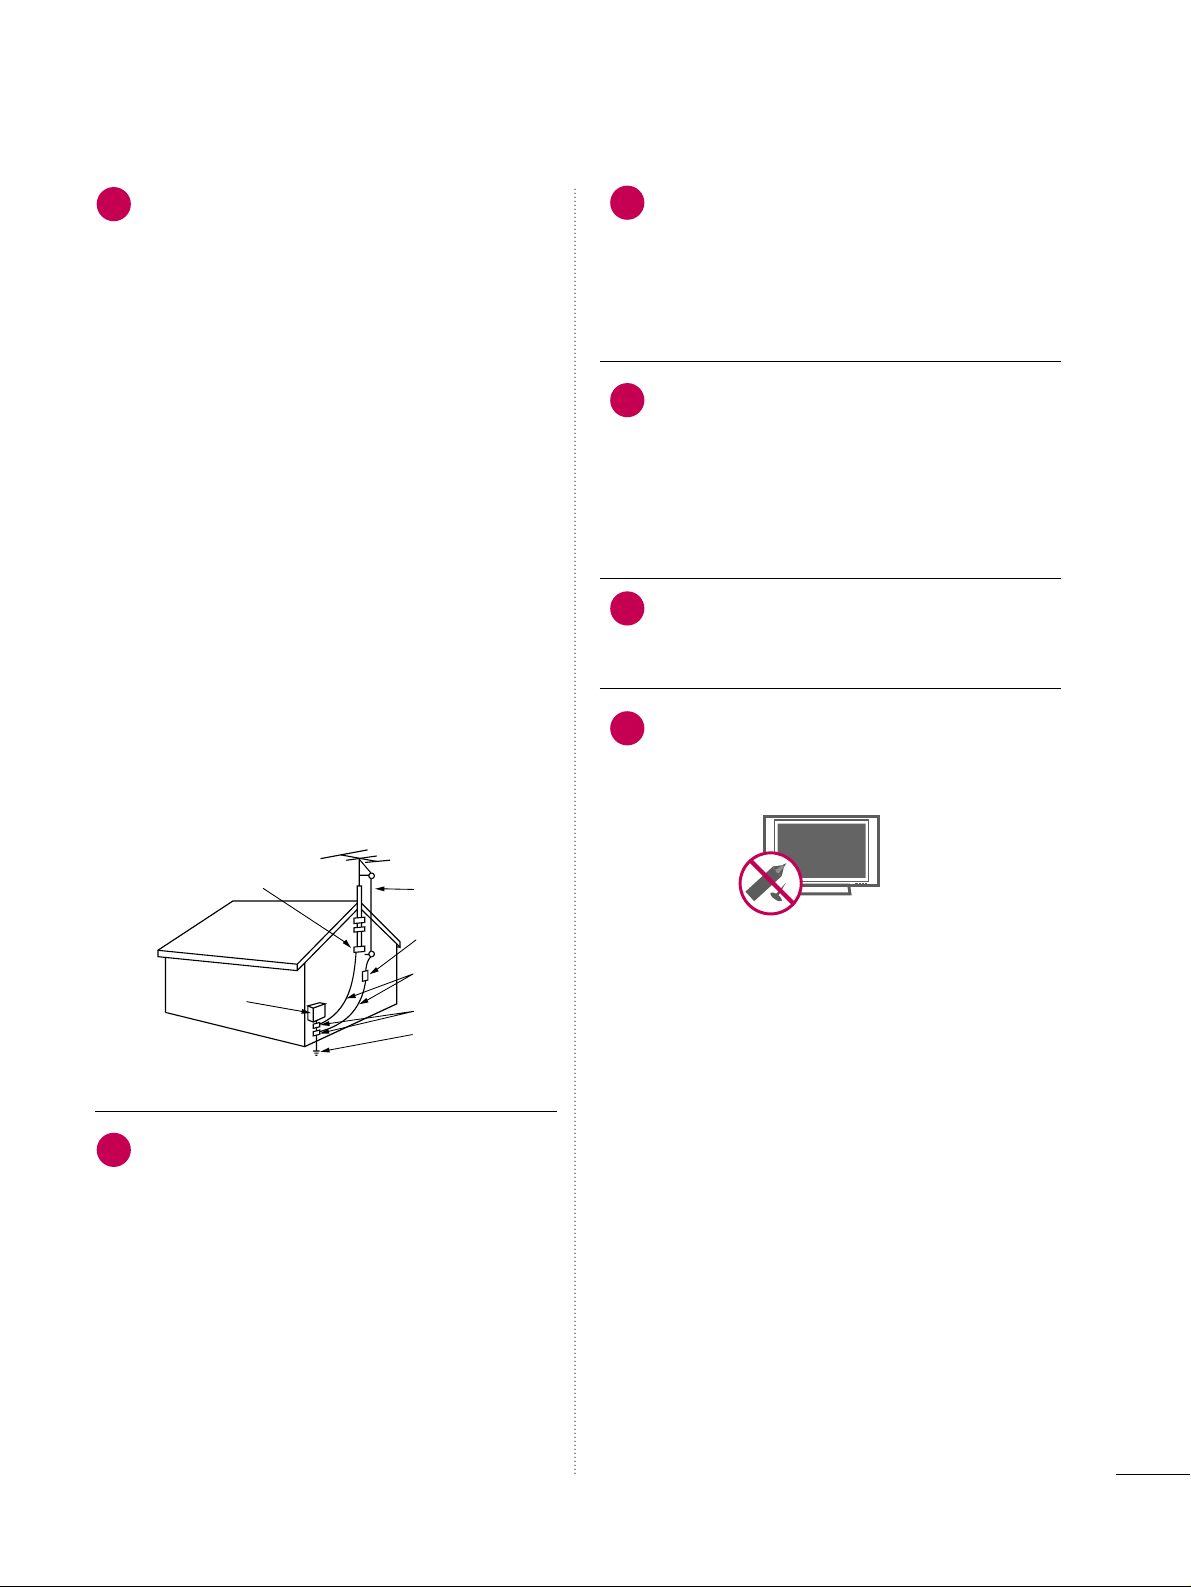
OOuuttddoooo rr aanntteennnnaa ggrr oo uunnddiinngg
If an outdoor antenna is installed, follow the
precautions below. An outdoor antenna system
should not be located in the vicinity of overhead power lines or other electric light or
power circuits, or where it can come in contact
with such power lines or circuits as death or
serious injury can occur.
Be sure the antenna system is grounded so as
to provide some protection against voltage
surges and built-up static charges.
Section 810 of the National Electrical Code
(NEC) in the U.S.A. provides information with
respect to proper grounding of the mast and
supporting structure, grounding of the lead-in
wire to an antenna discharge unit, size of
grounding conductors, location of antenna discharge unit, connection to grounding electrodes and requirements for the grounding
electrode.
AAnntteennnnaa ggrroouunnddiinngg aaccccoorrddiinngg ttoo tthhee
NNaattiioonnaall EElleeccttrriiccaall CCooddee,, AANNSSII//NNFFPPAA 7700
CC llee aanniinn gg
When cleaning, unplug the power cord and
scrub gently with a soft cloth to prevent
scratching. Do not spray water or other liquids
directly on the TV as electric shock may occur.
Do not clean with chemicals such as alcohol,
thinners or benzene.
MMoovv iinngg
Make sure the product is turned off,
unplugged and all cables have been removed. It
may take 2 or more people to carry larger TVs.
Do not press against or put stress on the front
panel of the TV.
VVeennttiillaattiioonn
Install your TV where there is proper ventilation. Do not install in a confined space such as
a bookcase. Do not cover the product with
cloth or other materials (e.g.) plastic while
plugged in. Do not install in excessively dusty
places.
If you smell smoke or other odors coming from
the TV or hear strange sounds, unplug the power
cord contact an authorized service center.
Do not press strongly upon the panel with
hand or sharp object such as nail, pencil or
pen, or make a scratch on it.
22
20
23
24
25
21
Antenna Lead in Wire
Antenna Discharge Unit
(NEC Section 810-20)
Grounding Conductor
(NEC Section 810-21)
Ground Clamps
Power Service Grounding
Electrode System (NEC
Art 250, Part H)
Ground Clamp
Electric Service
Equipment
NEC: National Electrical Code
Page 6

4
CONTENTS
WARNING / CAUTION
. . . . . . . . . . . . . . . . . . . . . . . . . . . . A
SAFETY INSTRUCTIONS
. . . . . . . . . . . . . . . . . . . . . . . . . . 1
FEATURE OF THIS TV
. . . . . . . . . . . . . . . . . . . . . . . . . . . . . . . 6
PREPARATION
Accessories
. . . . . . . . . . . . . . . . . . . . . . . . . . . . . . . . . . . . . . . . . . . . . . . . . . . . . . 7
Front Panel Information . . . . . . . . . . . . . . . . . . . . . . . . . . . . . . . . . . . . . 8
Back Panel Information
. . . . . . . . . . . . . . . . . . . . . . . . . . . . . . . . . . . .
10
Stand Instruction
. . . . . . . . . . . . . . . . . . . . . . . . . . . . . . . . . . . . . . . . . . . . .
13
VESA Wall Mounting
. . . . . . . . . . . . . . . . . . . . . . . . . . . . . . . . . . . . . . . .
17
Cable Management
. . . . . . . . . . . . . . . . . . . . . . . . . . . . . . . . . . . . . . . . . .
18
Desktop Pedestal Installation
. . . . . . . . . . . . . . . . . . . . . . . . . . .
20
Swivel Stand
. . . . . . . . . . . . . . . . . . . . . . . . . . . . . . . . . . . . . . . . . . . . . . . . . . .20
Attaching the TV to a Desk
. . . . . . . . . . . . . . . . . . . . . . . . . . . . . . 20
Securing the TV to the wall to prevent falling when
the TV is used on a stand
. . . . . . . . . . . . . . . . . . . . . . . . . . . . . . . .
21
Antenna or Cable Connection
. . . . . . . . . . . . . . . . . . . . . . . . . .
22
EXTERNAL EQUIPMENT SETUP
HD Receiver Setup
. . . . . . . . . . . . . . . . . . . . . . . . . . . . . . . . . . . . . . . . .
23
DVD Setup
. . . . . . . . . . . . . . . . . . . . . . . . . . . . . . . . . . . . . . . . . . . . . . . . . . . . .
29
VCR Setup
. . . . . . . . . . . . . . . . . . . . . . . . . . . . . . . . . . . . . . . . . . . . . . . . . . . . . 33
Other A/V Source Setup
. . . . . . . . . . . . . . . . . . . . . . . . . . . . . . . . .36
PC Setup
. . . . . . . . . . . . . . . . . . . . . . . . . . . . . . . . . . . . . . . . . . . . . . . . . . . . . . . .
37
USB Connection
. . . . . . . . . . . . . . . . . . . . . . . . . . . . . . . . . . . . . . . . . . . .
46
Audio Out Connection . . . . . . . . . . . . . . . . . . . . . . . . . . . . . . . . . . . 47
WATCHING TV / CHANNEL CONTROL
Remote Control Functions
. . . . . . . . . . . . . . . . . . . . . . . . . . . . . . . 48
Turning On the TV
. . . . . . . . . . . . . . . . . . . . . . . . . . . . . . . . . . . . . . . . . .
50
Channel Selection
. . . . . . . . . . . . . . . . . . . . . . . . . . . . . . . . . . . . . . . . . . .
50
Volume Adjustment
. . . . . . . . . . . . . . . . . . . . . . . . . . . . . . . . . . . . . . . . .
50
Quick Menu
. . . . . . . . . . . . . . . . . . . . . . . . . . . . . . . . . . . . . . . . . . . . . . . . . . . .
51
Initial Setting
. . . . . . . . . . . . . . . . . . . . . . . . . . . . . . . . . . . . . . . . . . . . . . . . . . 52
On-Screen Menus Selection
. . . . . . . . . . . . . . . . . . . . . . . . . . . . 54
Channel Setup
- Auto Scan (Auto Tuning)
. . . . . . . . . . . . . . . . . . . . . . . . . . . 56
- Add / Delete Channel (Manual Tuning) . . . . . . 57
- Channel Editing
. . . . . . . . . . . . . . . . . . . . . . . . . . . . . . . . . . . . . . . .
58
Input List
. . . . . . . . . . . . . . . . . . . . . . . . . . . . . . . . . . . . . . . . . . . . . . . . . . . . . . . .59
Input Label
. . . . . . . . . . . . . . . . . . . . . . . . . . . . . . . . . . . . . . . . . . . . . . . . . . . . . 60
AV Mode
. . . . . . . . . . . . . . . . . . . . . . . . . . . . . . . . . . . . . . . . . . . . . . . . . . . . . . . .61
SIMPLINK
. . . . . . . . . . . . . . . . . . . . . . . . . . . . . . . . . . . . . . . . . . . . . . . . . . . . . . .
62
USB
Entry Modes . . . . . . . . . . . . . . . . . . . . . . . . . . . . . . . . . . . . . . . . . . . . . . . . . . .
64
Photo List
. . . . . . . . . . . . . . . . . . . . . . . . . . . . . . . . . . . . . . . . . . . . . . . . . . . . . . . 65
Music List
. . . . . . . . . . . . . . . . . . . . . . . . . . . . . . . . . . . . . . . . . . . . . . . . . . . . . . . 69
PICTURE CONTROL
Picture Size (Aspect Ratio) Control
. . . . . . . . . . . . . . . . . . 72
Preset Picture Settings
- Picture Mode - Preset
. . . . . . . . . . . . . . . . . . . . . . . . . . . . . . .
74
- Color Tone - Preset
. . . . . . . . . . . . . . . . . . . . . . . . . . . . . . . . . . . 75
Manual Picture Adjustment
- Picture Mode - User Mode
. . . . . . . . . . . . . . . . . . . . . . . .
76
- Picture Mode - Expert Control
. . . . . . . . . . . . . . . . . .
77
Picture Improvement Technology
. . . . . . . . . . . . . . . . . . . . . 78
Advanced Control - Black (Darkness) Level
. . . . . . .
79
Advanced Control - Eye Care
. . . . . . . . . . . . . . . . . . . . . . . . . . .
80
Advanced Control - Real Cinema/Film Mode
. . . . . 81
Advanced Control - TruMotion
. . . . . . . . . . . . . . . . . . . . . . . .
82
TruMotion Demo
. . . . . . . . . . . . . . . . . . . . . . . . . . . . . . . . . . . . . . . . . . . .
82
Local Dimming
. . . . . . . . . . . . . . . . . . . . . . . . . . . . . . . . . . . . . . . . . . . . . . . . 83
Local Dimming Demo
. . . . . . . . . . . . . . . . . . . . . . . . . . . . . . . . . . . . . .
83
Picture Reset
. . . . . . . . . . . . . . . . . . . . . . . . . . . . . . . . . . . . . . . . . . . . . . . . .
84
Power Indicator
. . . . . . . . . . . . . . . . . . . . . . . . . . . . . . . . . . . . . . . . . . . . . .
85
Image Sticking Minimization (ISM) Method
. . . . . .
86
Power Saving Picture Mode
. . . . . . . . . . . . . . . . . . . . . . . . . . . . . .
87
Page 7

5
SOUND & LANGUAGE CONTROL
Auto Volume Leveler (Auto Volume) . . . . . . . . . . . . . . . . . 88
Preset Sound Settings (Sound Mode)
. . . . . . . . . . . . . . 89
Sound Setting Adjustment - User Mode
. . . . . . . . . . .
90
Clear Voice
. . . . . . . . . . . . . . . . . . . . . . . . . . . . . . . . . . . . . . . . . . . . . . . . . . . . . 91
Balance
. . . . . . . . . . . . . . . . . . . . . . . . . . . . . . . . . . . . . . . . . . . . . . . . . . . . . . . . . .
92
TV Speakers On/Off Setup
. . . . . . . . . . . . . . . . . . . . . . . . . . . . . .
93
Audio Reset
. . . . . . . . . . . . . . . . . . . . . . . . . . . . . . . . . . . . . . . . . . . . . . . . . . .94
Stereo/SAP Broadcast Setup
. . . . . . . . . . . . . . . . . . . . . . . . . . . 95
Audio Language
. . . . . . . . . . . . . . . . . . . . . . . . . . . . . . . . . . . . . . . . . . . . . . 96
On-Screen Menus Language Selection
. . . . . . . . . . . . . . 97
Caption Mode
- Analog Broadcasting System Captions
. . . . . . .
98
- Digital Broadcasting System Captions
. . . . . . . .
99
- Caption Option
. . . . . . . . . . . . . . . . . . . . . . . . . . . . . . . . . . . . . 10 0
TIME SETTING
Clock Setting
- Auto Clock Setup
. . . . . . . . . . . . . . . . . . . . . . . . . . . . . . . . . . .
101
- Manual Clock Setup
. . . . . . . . . . . . . . . . . . . . . . . . . . . . . . . 102
Auto On/Off Time Setting . . . . . . . . . . . . . . . . . . . . . . . . . . . .
10 3
Sleep Timer Setting
. . . . . . . . . . . . . . . . . . . . . . . . . . . . . . . . . . . . . . .
10 4
Auto Shut-off Setting . . . . . . . . . . . . . . . . . . . . . . . . . . . . . . . . . . . . . 105
PARENTAL CONTROL / RATINGS
Set Password & Lock System
. . . . . . . . . . . . . . . . . . . . . . . . . .
10 6
Channel Blocking
. . . . . . . . . . . . . . . . . . . . . . . . . . . . . . . . . . . . . . . . . .10 9
Movie & TV Rating
. . . . . . . . . . . . . . . . . . . . . . . . . . . . . . . . . . . . . . . .
110
Downloadable Rating
. . . . . . . . . . . . . . . . . . . . . . . . . . . . . . . . . . . . .
115
External Input Blocking
. . . . . . . . . . . . . . . . . . . . . . . . . . . . . . . . . . .
116
Key lock . . . . . . . . . . . . . . . . . . . . . . . . . . . . . . . . . . . . . . . . . . . . . . . . . . . . . . . . .
117
APPENDIX
Troubleshooting
. . . . . . . . . . . . . . . . . . . . . . . . . . . . . . . . . . . . . . . . . . . . . 118
Maintenance
. . . . . . . . . . . . . . . . . . . . . . . . . . . . . . . . . . . . . . . . . . . . . . . . . 12 0
Product Specifications . . . . . . . . . . . . . . . . . . . . . . . . . . . . . . . . . . .
121
Programming the Remote Control
. . . . . . . . . . . . . . . . . . 12 4
IR Codes
. . . . . . . . . . . . . . . . . . . . . . . . . . . . . . . . . . . . . . . . . . . . . . . . . . . . .127
External Control Through RS-232C
. . . . . . . . . . . . . . . . .12 9
Open Source License
. . . . . . . . . . . . . . . . . . . . . . . . . . . . . . . . . . . . . .13 6
Page 8
6
FEATURE OF THIS TV
is a trademark of SRS Labs, Inc.
TruSurround XT technology is incorporated under
license from SRS Labs, Inc.
Manufactured under license from Dolby Laboratories.
“
Dolby
“and the double-D symbol are trademarks of
Dolby Laboratories.
CALIBRATE LIKE A PRO: Sophisticated and detailed
calibrations can be made through the ISFccc mode.
Detailed calibration requires a licensed technician.
Please contact your local dealer to inquire about an
ISF certified technician.
THX (Thomlinson Holman’s Experiment) is the audio
and video certification standard of THX established
by George Lucas, who directed the movie Star Wars,
and Thomlinson.
This is the product to be certified in THX display area
and guarantees screen quality that exceeds the display
standard specification in both hardware and software.
FOR LCD TV
■
If the TV feels cold to the touch, there may be a small “flicker” when it is turned on. This is normal, there is
nothing wrong with TV.
■
Some minute dot defects may be visible on the screen, appearing as tiny red, green, or blue spots. However, they
have no adverse effect on the monitor's performance.
■
Avoid touching the LCD screen or holding your finger(s) against it for long periods of time. Doing so may produce
some temporary distortion effects on the screen.
On Disposal (Only Hg lamp used LCD TV)
The fluorescent lamp used in this product contains a small amount of mercury. Do not dispose of this product with
general household waste. Disposal of this product must be carried out in accordance to the regulations of your local
authority.
Install the power plug closely.
Use of ferrite core
(This feature is not available for all models.)
Ferrite core can be used to reduce the electromagnetic wave
when connecting the power cord.
The closer the location of the ferrite core to the power plug,
the better it is.
■
This feature is not available for all models.
Page 9
PREPARATION
7
PREPARATION
ACCESSORIES
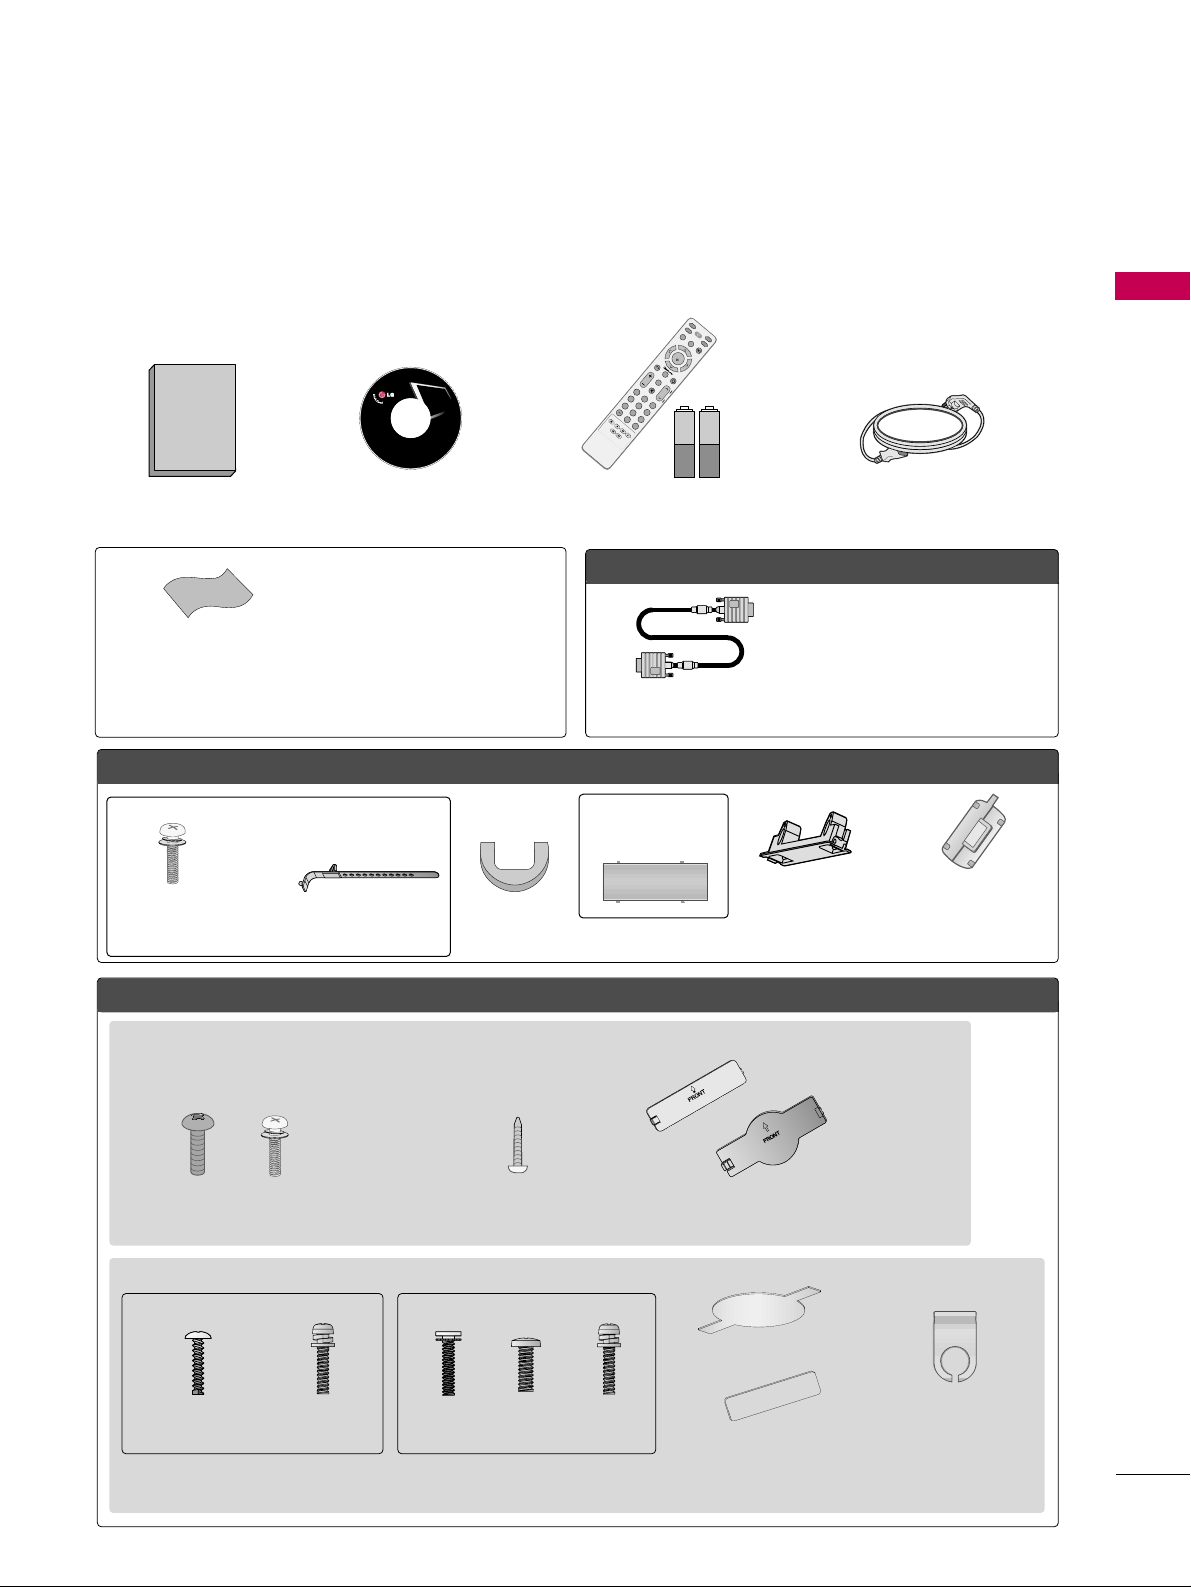
Ensure that the following accessories are included with your TV. If an accessory is missing, please contact the
dealer where you purchased the TV.
The accessories included may differ from the images below.
OOppttiioonn EExxttrraass
FFoorr LLCCDD TTVV mmooddeellss
FFoorr PPllaassmmaa TTVV mmooddeellss
* Wipe spots on the exterior only with
the polishing cloth.
* Do not wipe roughly when removing
stain. Excessive pressure may cause
scratch or discoloration.
Polishing Cloth
(This feature is not available
for all models.)
Copyright© 2007 LGE,
All Rights Reserved.
D-sub 15 pin Cable
1.5V 1.5V
Owner’s Manual Power Cord
Remote Control,
Batteries
INPUT
FAV
MUTE
T
V
S
T
B
POWER
Q. MENU
MENU
A
V
M
O
D
E
R
E
T
U
R
N
ENTER
V
O
L
C
H
123
456
78
0
9
FLASHBK
P
A
G
E
D
V
D
V
C
R
CD Manual
When using the VGA (D-sub 15 pin
cable) PC connection, the user
must use shielded signal interface
cables with ferrite cores to maintain
standards compliance.
32/37/42LG30, 37/42/47/52LG50, 32/42/47/52LG70, 47LG90
Bolts for stand assembly
(Refer to P.16)
(Only 32/37/42LG30, 37/42LG50,
32/42LG70)
Protection Cover
Screw for stand fixing
(Refer to P.20)
(Only 32LG30/70,
37LG30/50, 42LG30/50)
x 4 x 4
32/37/42/47/52LG60, 42/47LGX
Protection Cover Cable Management
Clip
2EA 4EA 1EA 4EA 32LG60: 3EA
37LG60: 4EA
Bolts for stand assembly
(Refer to P.14)
(Only 32/37LG60)
(Only 42LG60, 42LGX)
Cable Management Clip
Protection
Cover
Ferrite core
(Refer to P.6)
(This feature is not available
for all models.)
(Only 50PG25,
50/60PG60,
50/60PG70)
(Only 42PG25)
or
or
Cable Holder
Bolts for stand
assembly
(Refer to P.13)
x 4
Page 10
PREPARATION
8
FRONT PANEL INFORMATION
PREPARATION
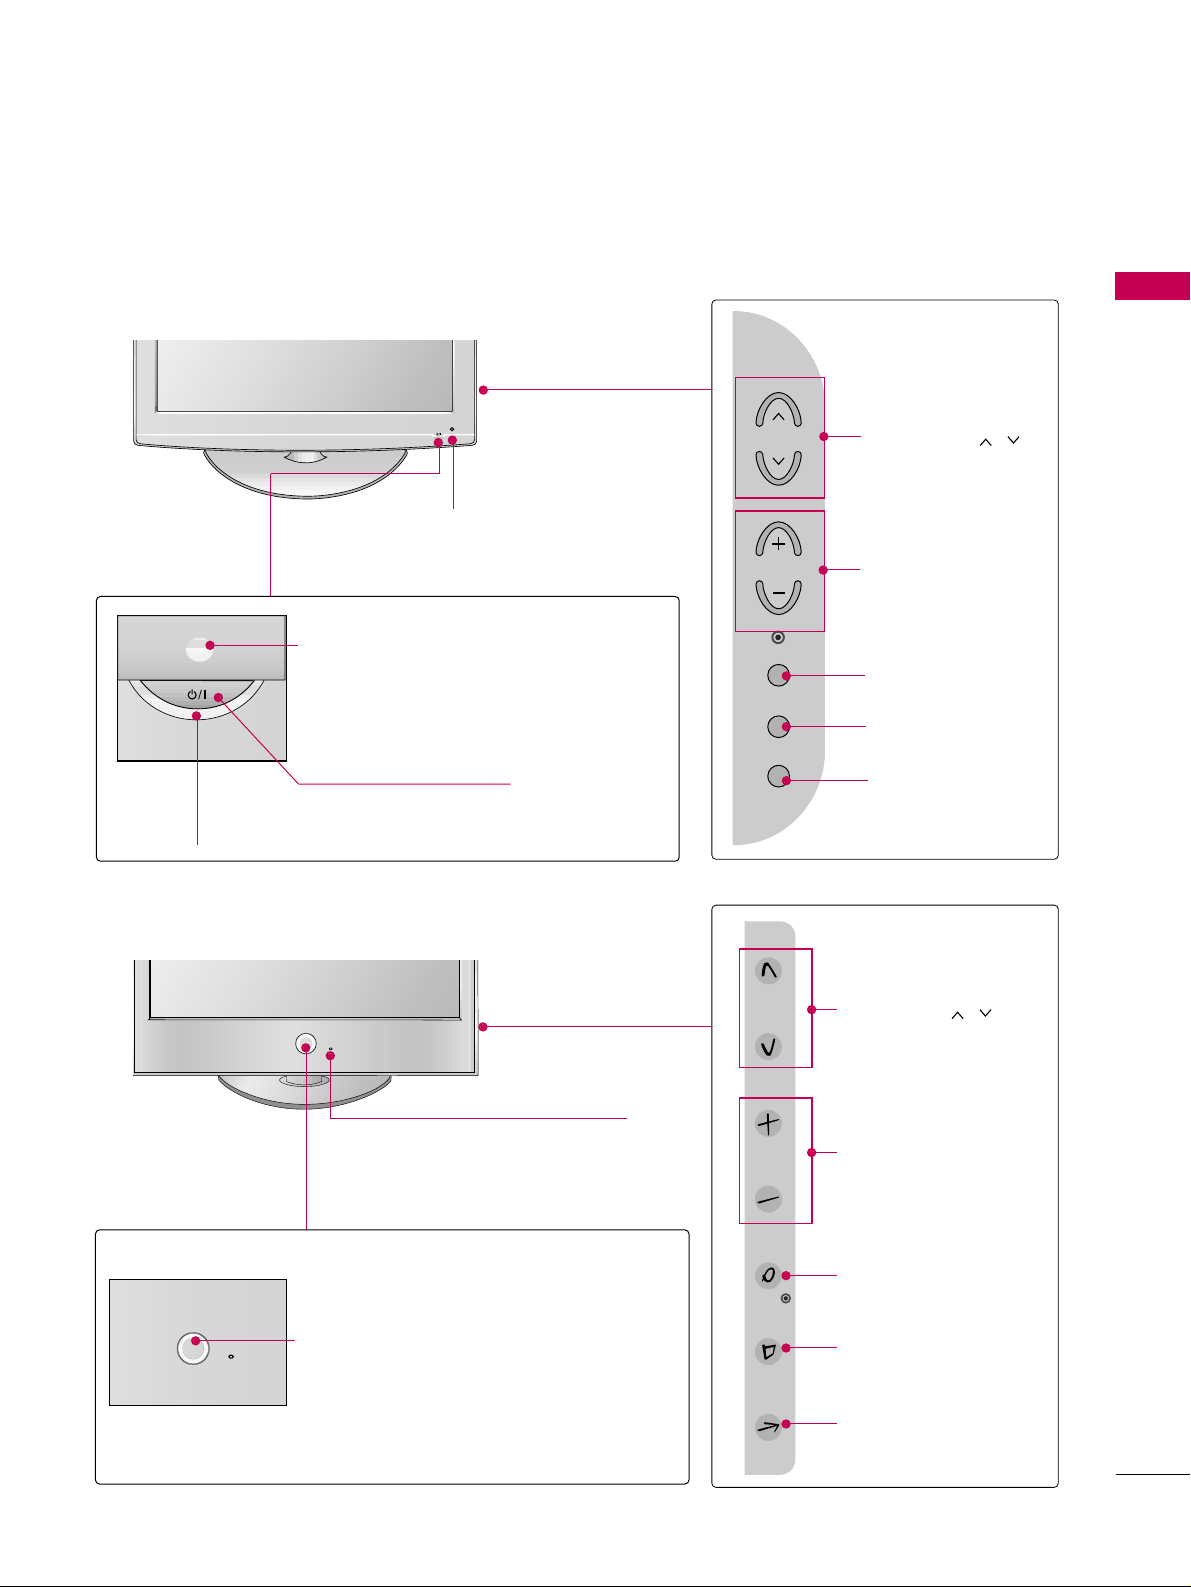
■
Image shown may differ from your TV.
■
NOTE: If your TV has a protection tape attached, remove the tape.
And then wipe the TV with a cloth (If a polishing cloth is included with your TV, use it).
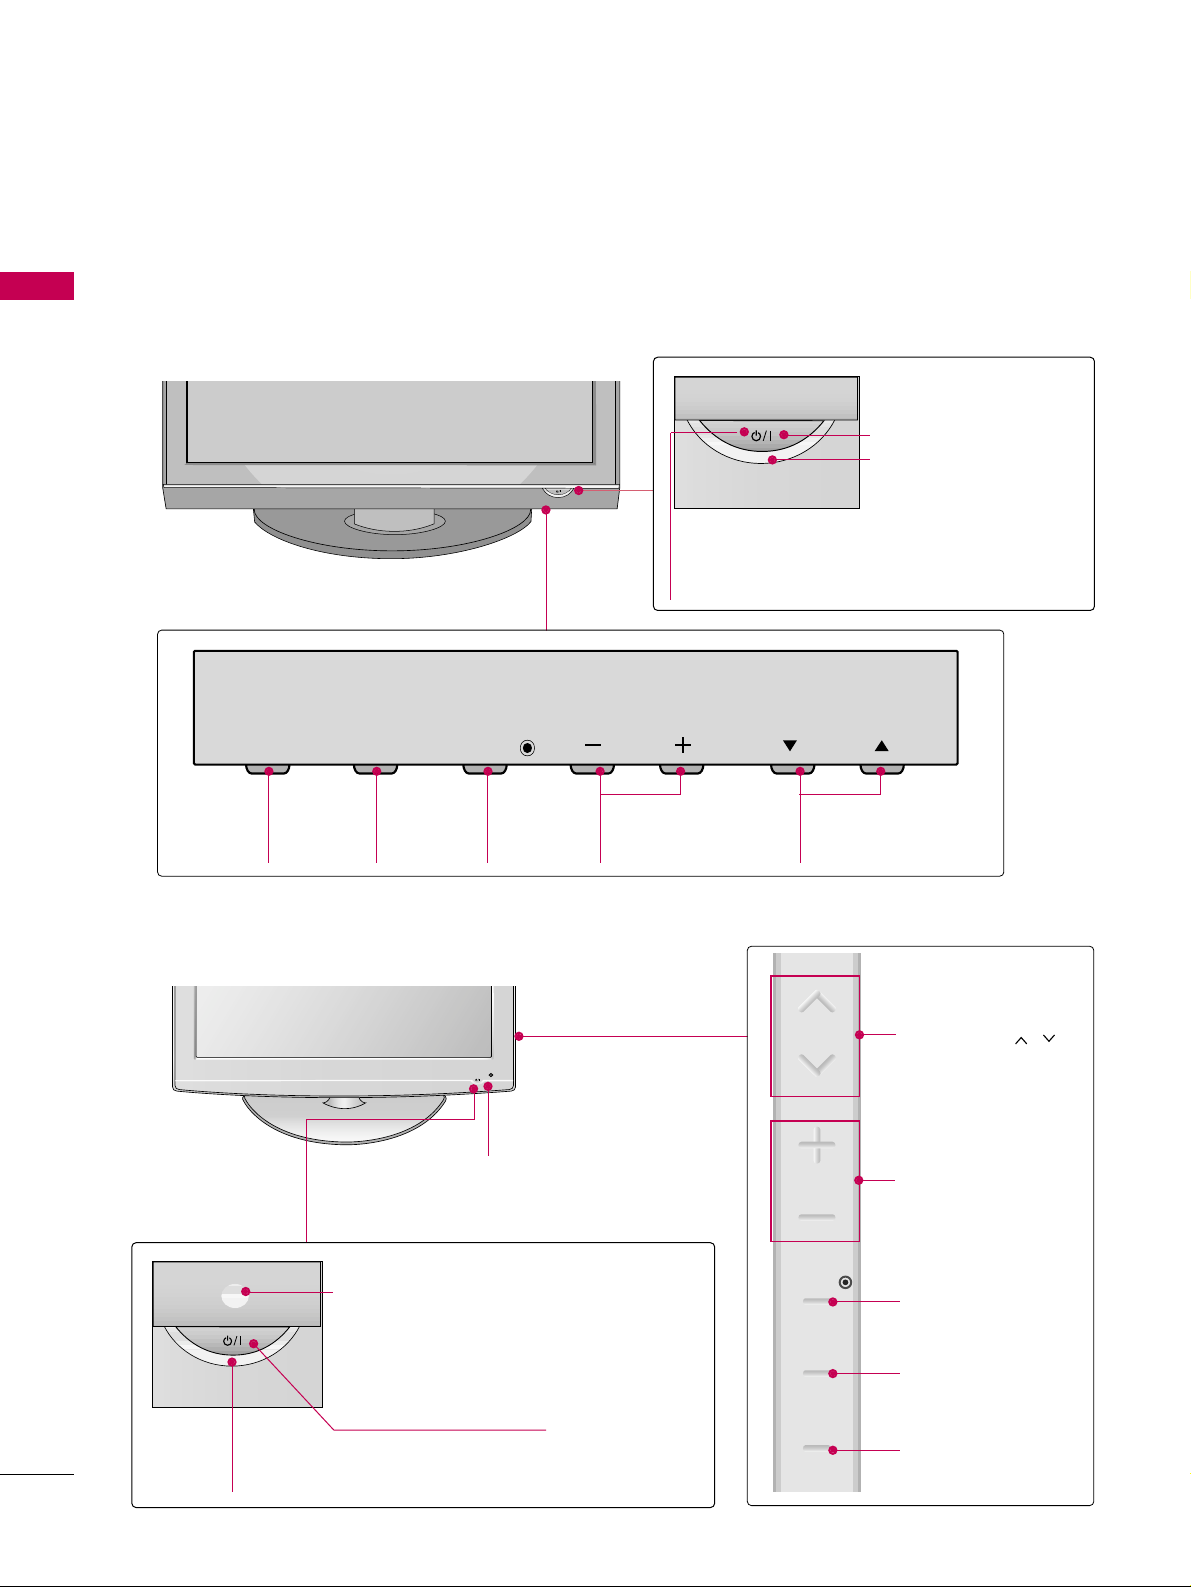
Plasma TV Models
INPUT
Button
MENU
Button
ENTER
Button
VOLUME
(-, +) Buttons
CHANNEL
(
EE,DD
)Buttons
Remote Control Sensor
POWER Button
Power/Standby Indicator
Illuminates red in standby mode.
Illuminates blue when the TV is switched on.
LCD TV Models
POWER Button
Power/Standby Indicator
Illuminates red in standby mode.
Illuminates blue when the set is switched on.
(Can be adjusted using
PPoowweerr IInn ddiiccaattoorr
in
the OPTION menu.
GG
pp..8855
)
CHANNEL ( , )
Buttons
VOLUME (+, -)
Buttons
ENTER Button
MENU Button
INPUT Button
Intelligent Sensor
Adjusts picture according to the surrounding
conditions
32/42/47/52LG70, 47LG90
Remote Control Sensor
INPUT
MENU
ENTER
VOL
CH
CH
VOL
ENTER
MENU
INPUT
Page 11
PREPARATION
9
LCD TV Models
POWER Button
Power/Standby Indicator
Illuminates red in standby mode.
Illuminates blue when the set is switched on.
(Can be adjusted using
PPoowweerr IInn ddiiccaattoorr
in
the OPTION menu.
GG
pp..8855
)
CHANNEL ( , )
Buttons
VOLUME (+, -)
Buttons
ENTER Button
MENU Button
INPUT Button
Intelligent Sensor
Adjusts picture according to the
surrounding conditions.
Intelligent Sensor (Except 32/37/42LG30)
Adjusts picture according to the surrounding
conditions
CHANNEL ( , )
Buttons
VOLUME (+, -)
Buttons
ENTER Button
MENU Button
INPUT Button
32/37/42LG30, 37/42/47/52LG50
32/37/42/47/52LG60, 42/47LGX
POWER Button
Remote Control Sensor
Power/Standby Indicator
Illuminates red in standby mode.
Illuminates white when the set is switched on.
(Can be adjusted using
PPoowweerr IInn ddiiccaattoorr
in
the OPTION menu.
GG
pp..8855
)
Remote Control Sensor
CH
VOL
ENTER
MENU
INPUT
CH
VOL
ENTER
MENU
INPUT
Page 12
PREPARATION
10
BACK PANEL INFORMATION
PREPARATION
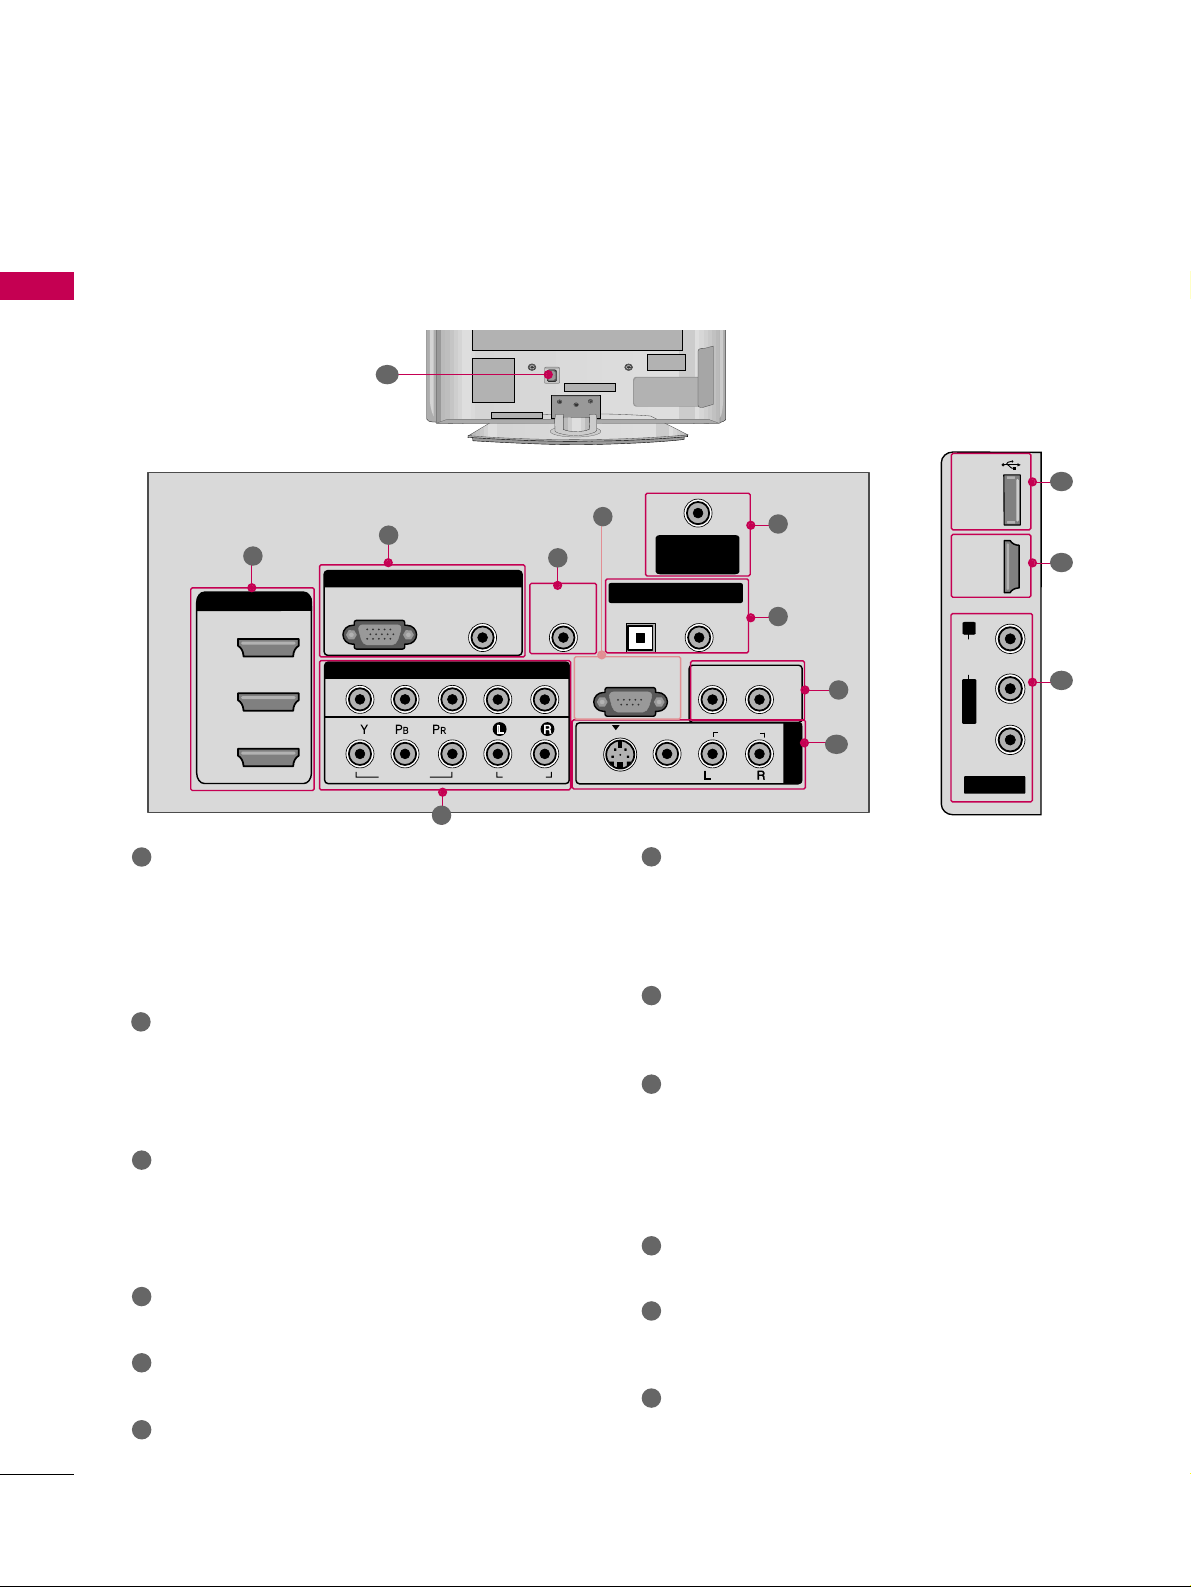
Plasma TV Models
■
Image shown may differ from your TV.
R
12
AV IN 2
L/ MONO
R
AUDIO
VIDEO
USB IN
HDMI IN 4
9
10
1
R
RGB IN
COMPONENT IN
AUDIO
(RGB/DVI)
RGB(PC)
ANTENNA/
CABLE IN
1
2
RS-232C IN
(CONTROL & SERVICE)
VIDEO
AUDIO
VIDEO
AUDIO OUT
OPTICAL COAXIAL
MONO
( )
AUDIO
S-VIDEO
DIGITAL AUDIO OUT
AV IN 1
HDMI/DVI IN
3
2
1
REMOTE
CONTROL IN
1
3
4
6
7
8
2
9
5
HDMI/DVI IN, HDMI IN
Digital Connection.
Supports HD video and Digital audio. Doesn’t
support 480i.
Accepts DVI video using an adapter or HDMI to
DVI cable (not included).
COMPONENT IN
Analog Connection.
Supports HD.
Uses a red, green, and blue cable for video & red
and white for audio.
RGB (PC)
Analog PC Connection. Uses a D-sub 15 pin cable
(VGA cable).
AUDIO (RGB/DVI)
1/8” headphone jack for analog PC audio input.
REMOTE CONTROL IN PORT
For a wired remote control.
RS-232C IN (CONTROL & SERVICE) PORT
Used by third party devices.
ANTENNA/CABLE IN
Connect over-the air signals to this jack.
Connect cable signals to this jack.
DIGITAL AUDIO OUT
Digital audio output for use with amps and home
theater systems.
Includes an optical and/or coaxial connection.
Note: In standby mode, these ports do not work.
AUDIO OUT
Analog audio output for use with amps and home
theater systems.
AV (Audio/Video) IN
Analog composite connection. Supports standard
definition video only (480i).
S-VIDEO
Better quality than standard composition.
Supports standard definition video only (480i).
USB INPUT
Used for viewing photos and listening to MP3s.
USB SERVICE ONLY or RS-232C IN (SERVICE
ONLY)
Used for software updates.
Power Cord Socket
For operation with AC power.
Caution: Never attempt to operate the TV on DC
power.
1
2
3
4
5
6
9
10
11
12
7
8
Page 13
PREPARATION
11
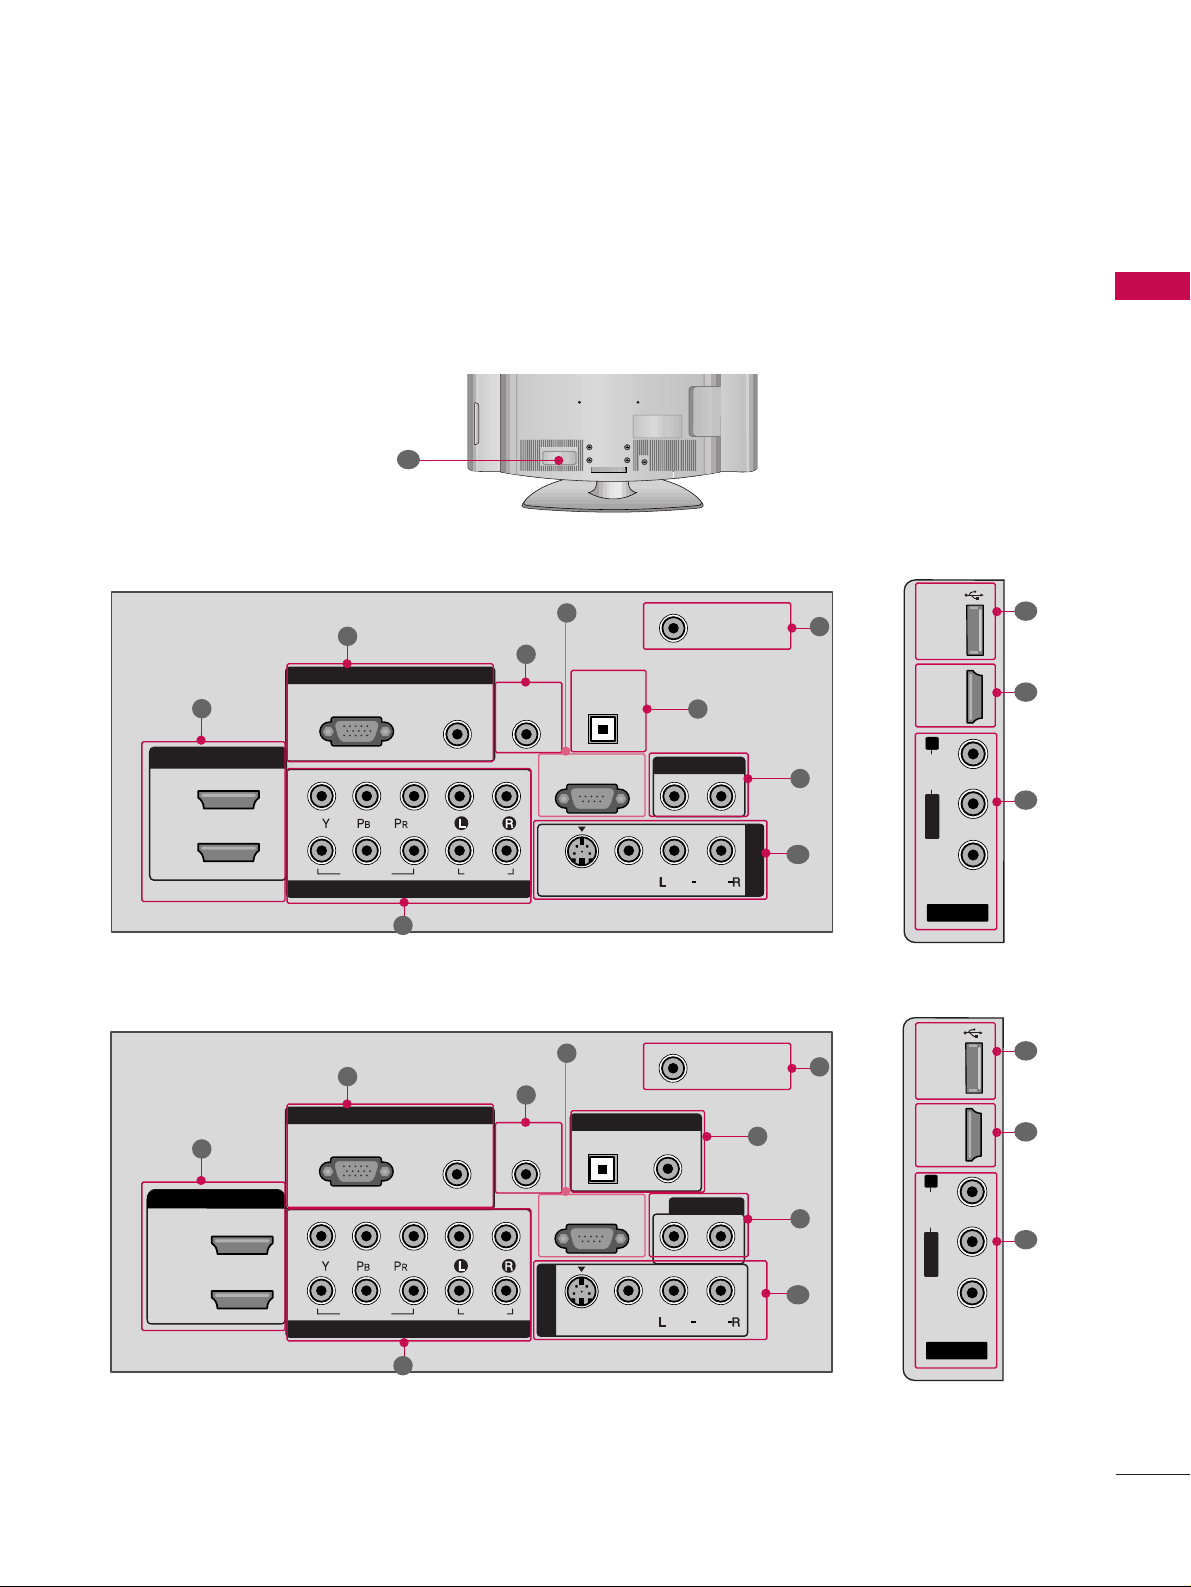
LCD TV Models
AV IN 2
L/ MONO
R
AUDIO
VIDEO
HDMI IN 3 USB IN
RGB IN
COMPONENT IN
AUDIO
(RGB/DVI)
RGB(PC)
REMOTE
CONTROL IN
ANTENNA/
CABLE IN
1
2
RS-232C IN
(CONTROL & SERVICE)
VIDEO
AUDIO
OPTICAL COAXIAL
DIGITAL AUDIO OUT
AUDIO OUT
AV IN 1
R
HDMI/DVI IN
2
1
VIDEO
MONO
( )
AUDIO
S-VIDEO
1
3
4
6
7
8
2
9
9
5
RGB IN
COMPONENT IN
AUDIO
(RGB/DVI)
RGB(PC)
REMOTE
CONTROL IN
ANTENNA/
CABLE IN
1
2
RS-232C IN
(CONTROL & SERVICE)
VIDEO
AUDIO
DIGITAL
AUDIO OUT
OPTICAL
AUDIO OUT
AV IN 1
R
VIDEO
MONO
( )
AUDIO
S-VIDEO
2
1
HDMI/DVI IN
1
3
4
6
7
8
2
9
5
10
1
AV IN 2
L/ MONO
R
AUDIO
VIDEO
USB
SERVICE ONLY
HDMI IN 3
9
11
1
37/42/47/52LG50, 32LG70
32/37/42LG30
R
12
Page 14
PREPARATION
12
PREPARATION
R
AV IN 2
L/ MONO
R
AUDIO
VIDEO
HDMI IN 4 USB IN
9
10
1
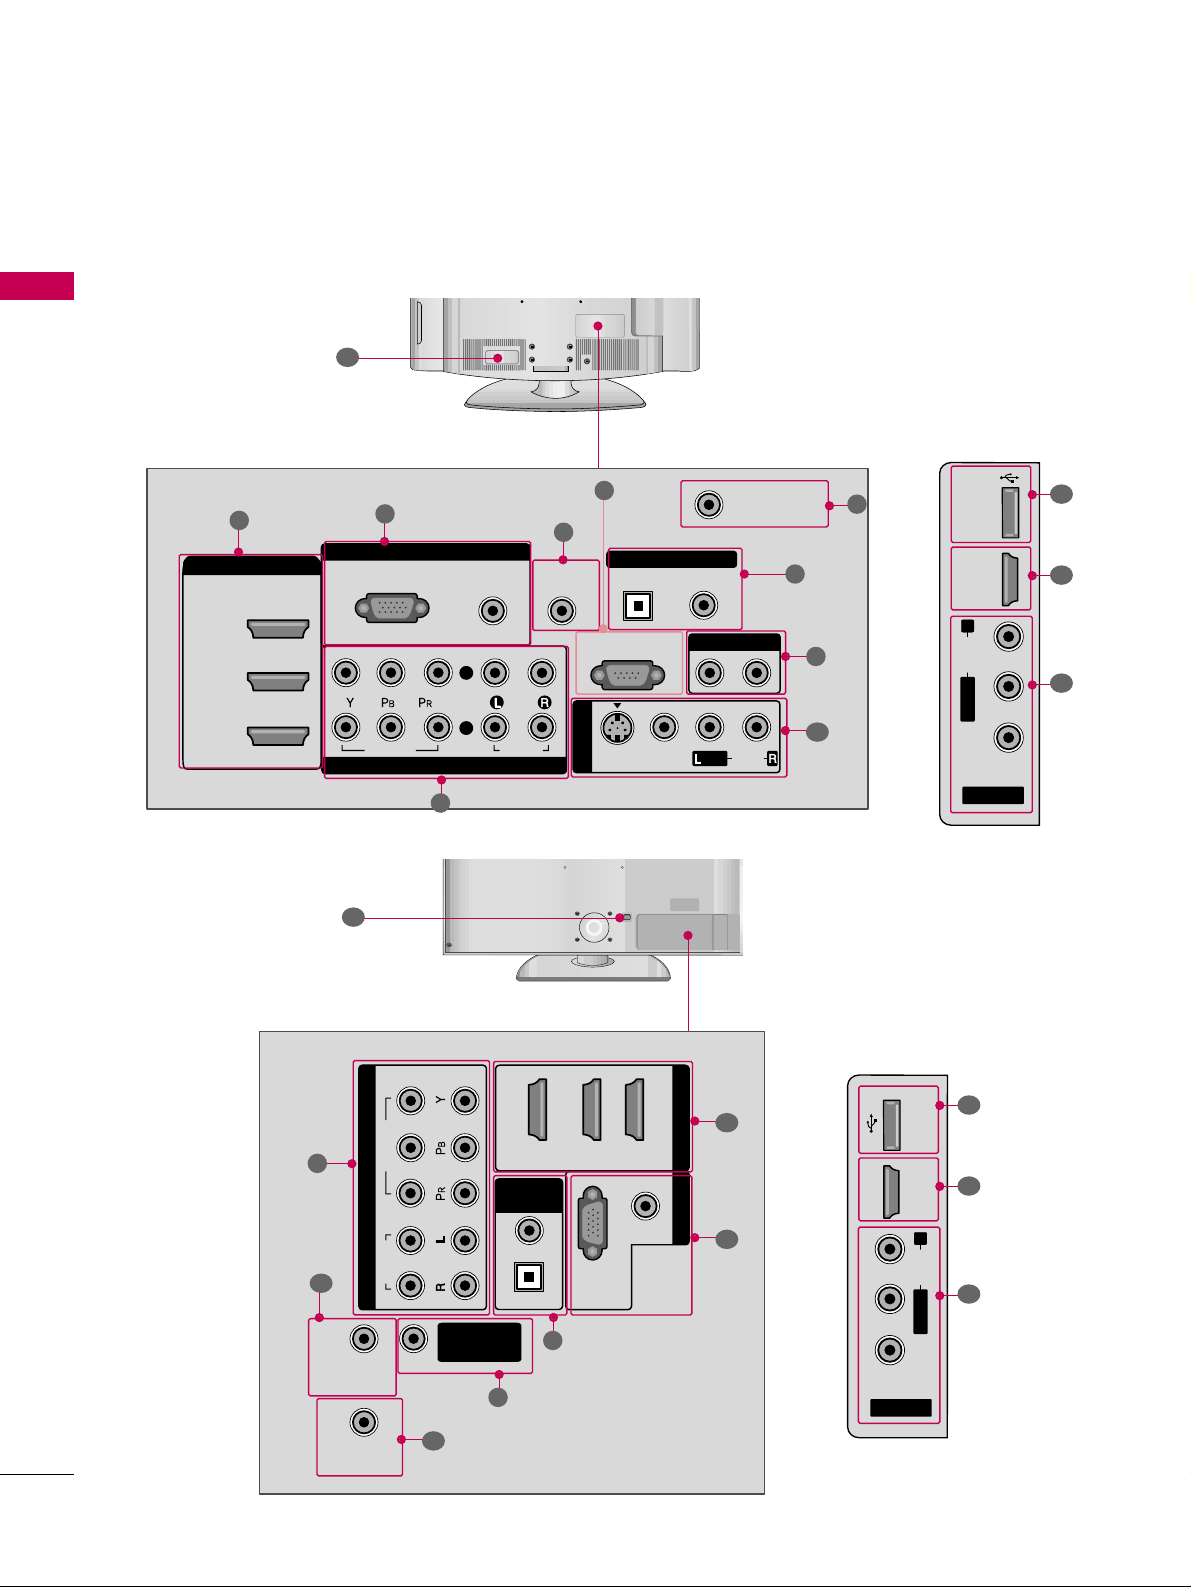
■
Image shown may differ from your TV.
32/37/42/47/52LG60, 42/47LGX
42/47/52LG70, 47LG90
LCD TV Models
R
12
12
RGB IN
COMPONENT IN
AUDIO
(RGB/DVI)
RGB(PC)
REMOTE
CONTROL IN
ANTENNA/
CABLE IN
RS-232C IN
(CONTROL & SERVICE)
VIDEO
AUDIO
OPTICAL COAXIAL
DIGITAL AUDIO OUT
AUDIO OUT
AV IN 1
R
HDMI/DVI IN
2
3
1
VIDEO
MONO
( )
AUDIO
S-VIDEO
2
1
1
3
4
6
7
8
2
9
5
AV IN
L/ MONO
R
AUDIO
VIDEO
HDMI IN 4 USB IN
9
10
1
(RGB/DVI)
AUDIO
RGB(PC)
REMOTE
CONTROL IN
RS-232C IN
(SERVICE ONLY)
OPTICAL
COAXIAL
DIGITAL
AUDIO OUT
R
123
COMPONENT IN
2
1
VIDEO
AUDIO
HDMI/DVI IN RGB IN
ANTENNA/
CABLE IN
2
7
4
1
3
6
11
Page 15
PREPARATION
13
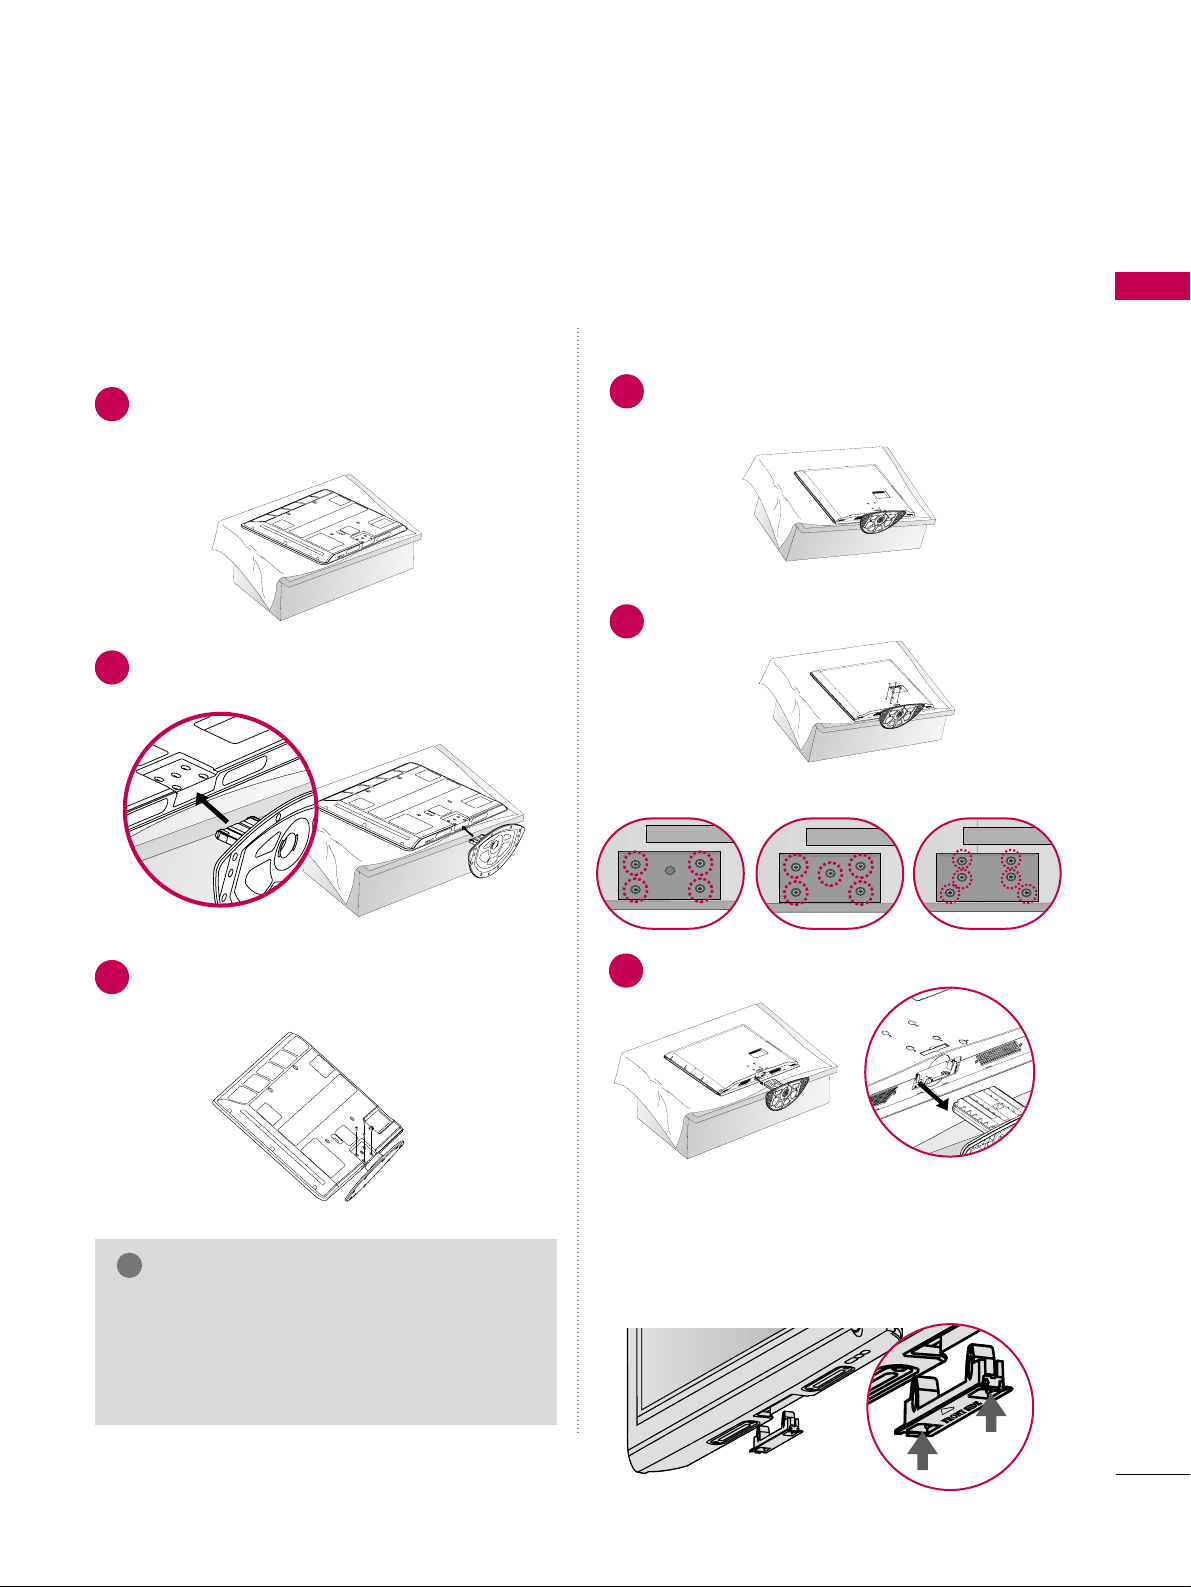
STAND INSTRUCTION
■
Image shown may differ from your TV.
Carefully place the TV screen side down on a
cushioned surface to protect the screen from
damage.
Assemble the TV as shown.
Fix the 4 bolts securely using the holes in the
back of the TV.
1
2
3
INSTALLATION (
Only 42PG25)
Plasma TV models
DETACHMENT
Carefully place the TV screen side down on a
cushioned surface to protect the screen from
damage.
1
Loose the bolts from TV.
2
42PG25 50PG25/60/70 60PG60/70
Detach the stand from TV.
3
After removing the stand, install the included
pp rroo tteeccttiioonn cc oovvee rr
over the hole for the stand.
Press the
PPRROOTT EECC TTIIOONN CCOOVVEERR
into the TV
until you hear it click.
PROTECTION COVER
GG
When assembling the desk type stand, make sure
the bolt is fully tightened (If not tightened fully,
the TV can tilt forward after the product installation). Do not over tighten.
NOTE
!
Page 16
PREPARATION
14
PREPARATION
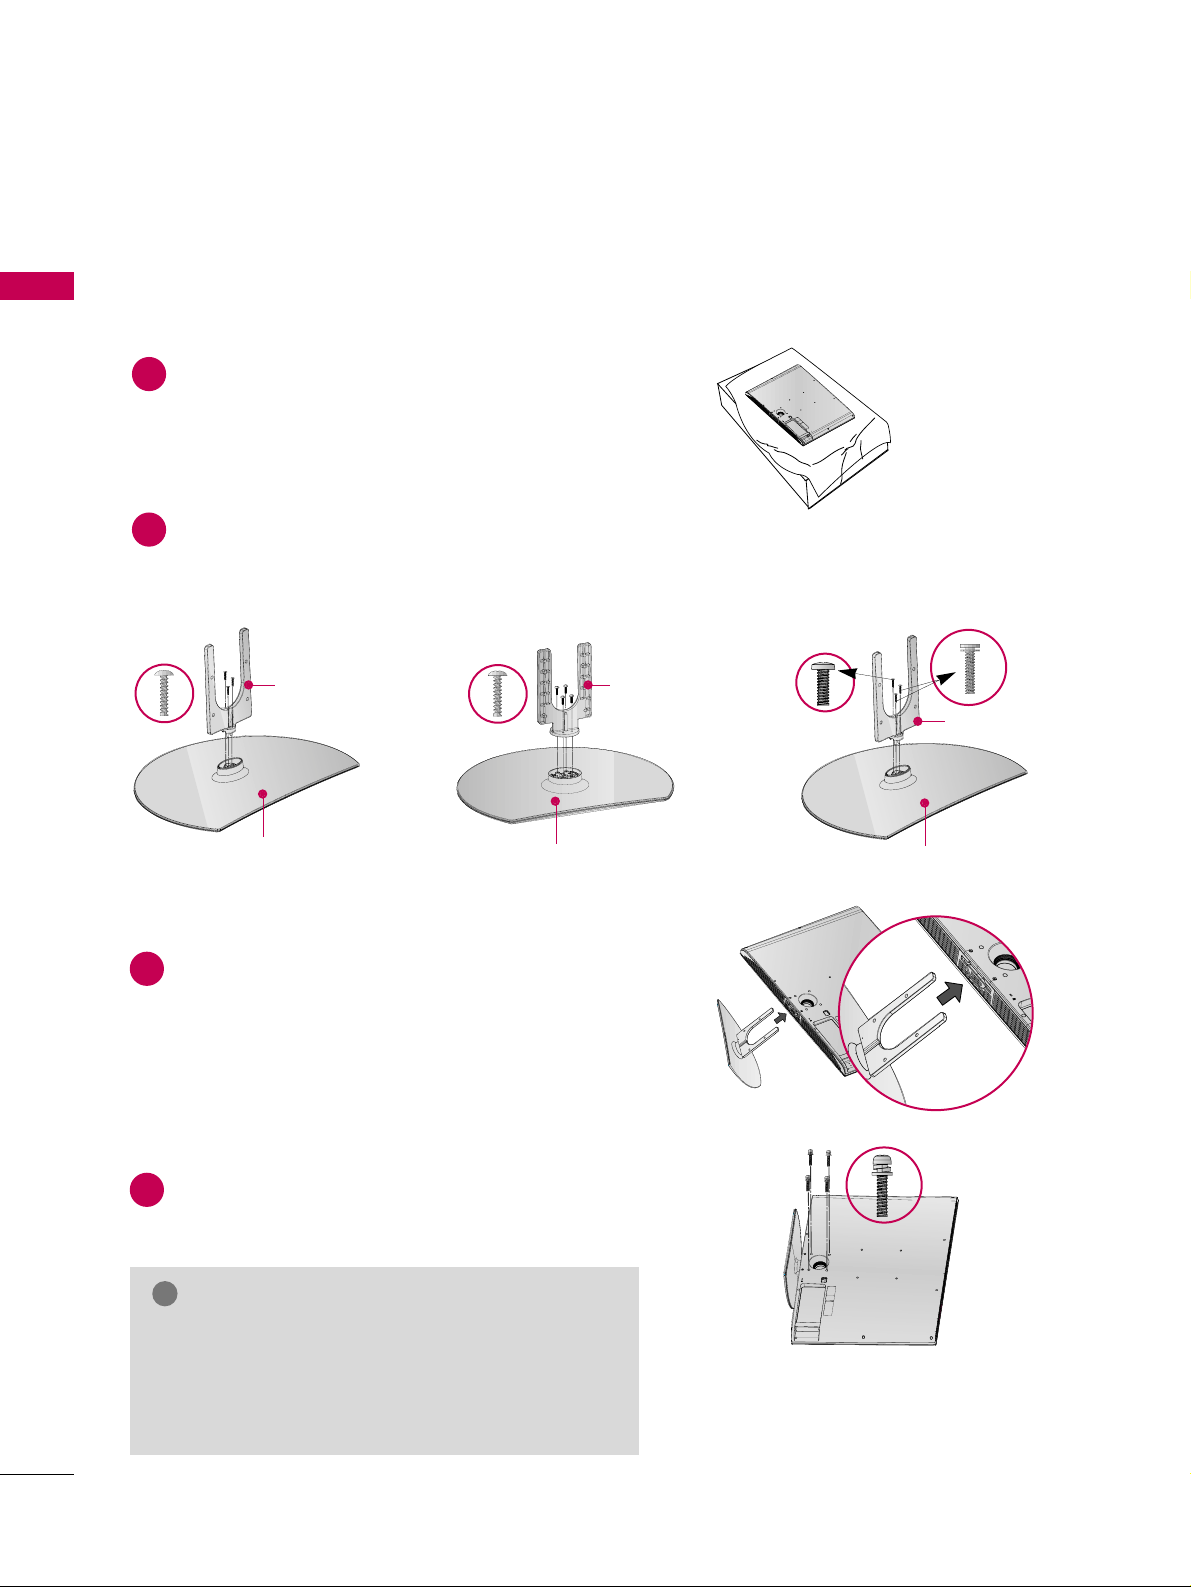
32/37/42/47/52LG60, 42/47LGX
Assemble the parts of the
SS TT AANNDD BBOODDYY
with
CCOOVVEERR BBAASS EE
of the TV.
2
Assemble the TV as shown.
3
Fix the 4 bolts securely using the holes in the
back of the TV.
4
Carefully place the TV screen side down on a
cushioned surface to protect the screen from
damage.
1
32LG60 37LG60 42LG60, 42LGX
SS TT AANNDD BBOODDYY SS TT AANNDD BBOODDYY
CCOOVVEERR BBAASS EE
SS TT AANNDD BBOODDYY
CCOOVVEERR BBAASS EE
CCOOVVEERR BBAASS EE
INSTALLATION (
Only 32/37/42LG60, 42LGX)
■
Image shown may differ from your TV.
GG
When assembling the desk type stand, make sure the
bolt is fully tightened (If not tightened fully, the TV
can tilt forward after the product installation). Do not
over tighten.
NOTE
!
Page 17
PREPARATION
15
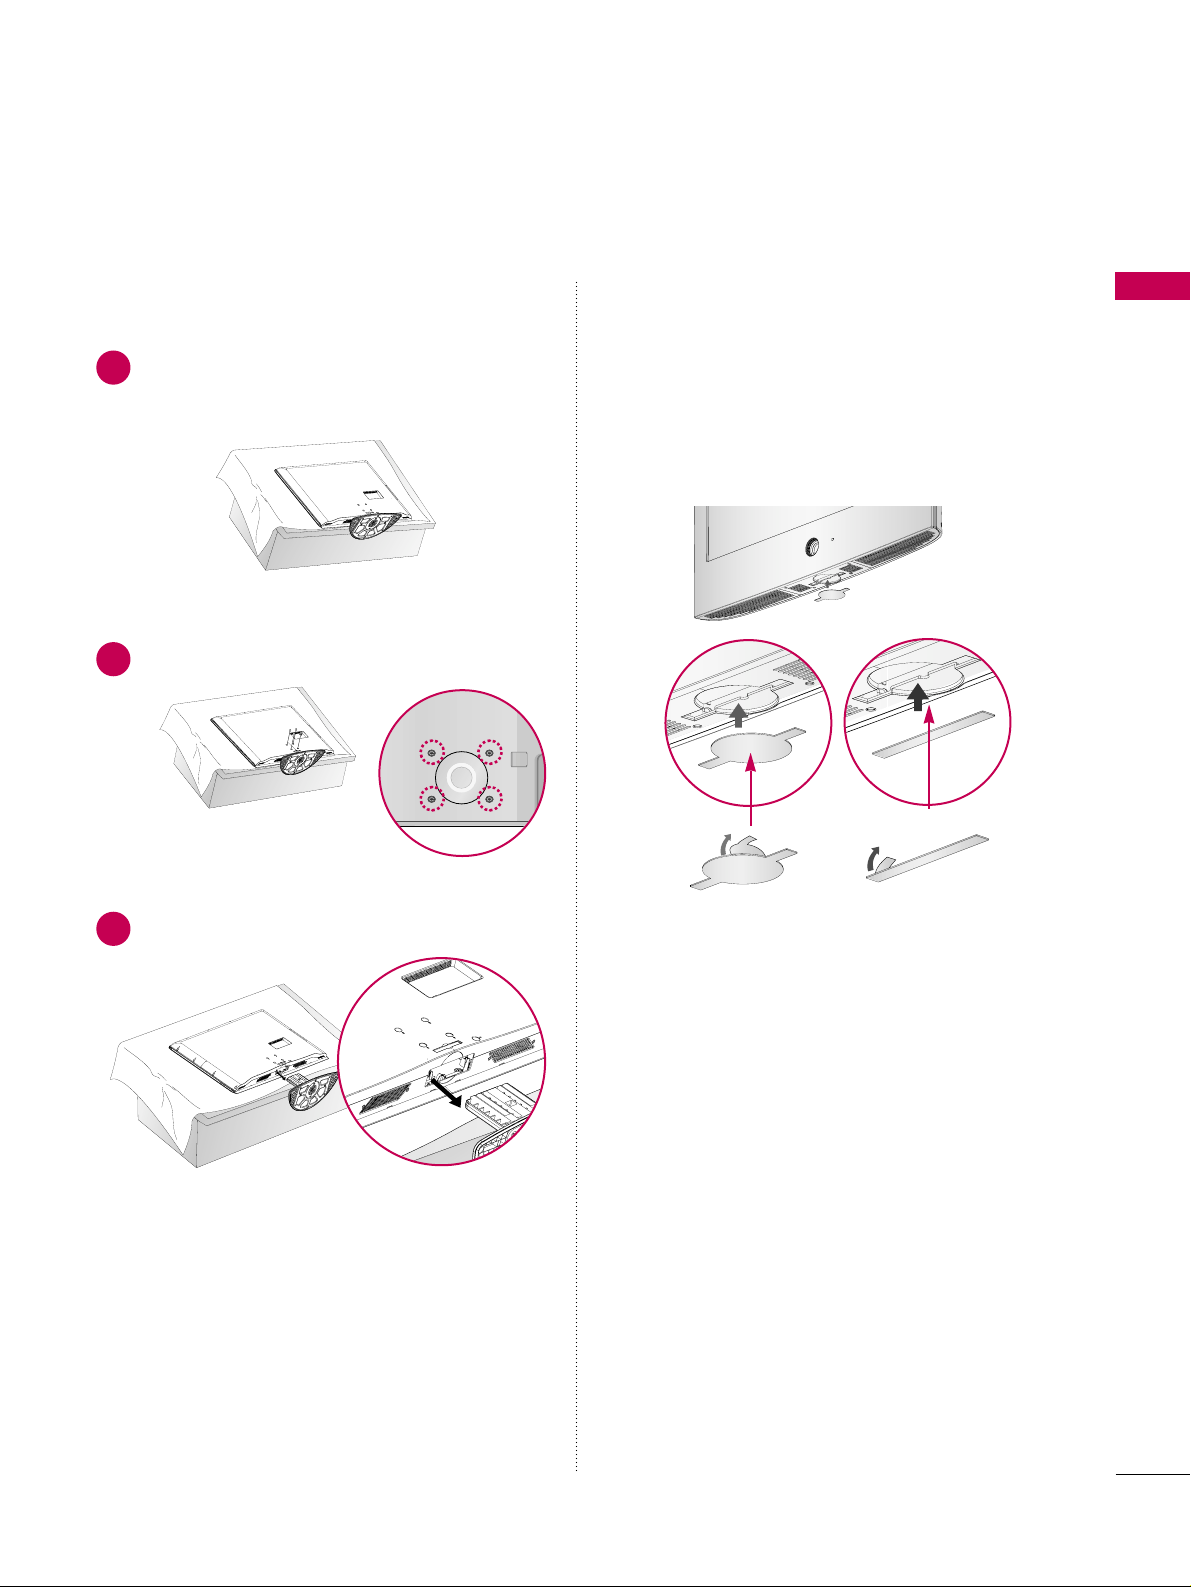
DETACHMENT
Carefully place the TV screen side down on a
cushioned surface to protect the screen from
damage.
1
Loose the bolts from TV.
2
Detach the stand from TV.
3
After removing the stand, install the included
pp rr oo--
tteeccttiioonn ccoovvee rr
over the hole for the stand.
After removing the protection paper from the
protection cover, adhere it to the TV as shown.
PROTECTION COVER
Page 18
PREPARATION
16
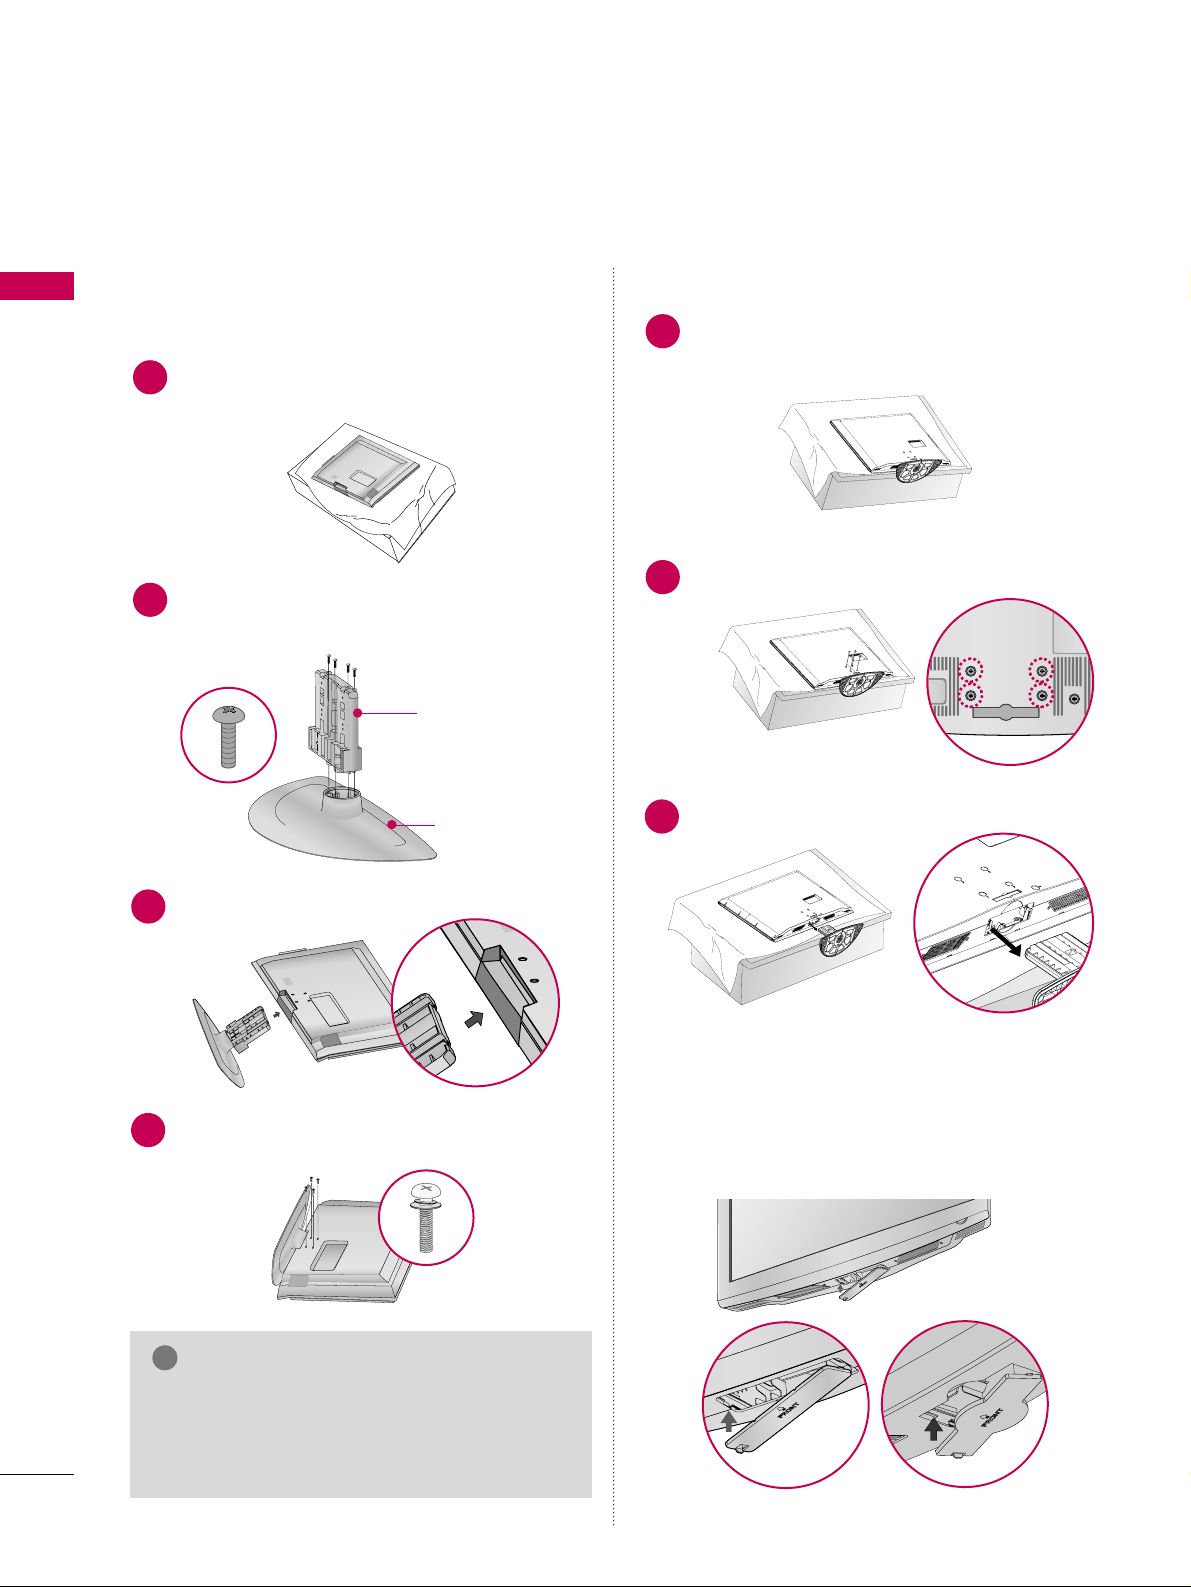
32/37/42LG30, 37/42/47/52LG50, 32/42/47/52LG70, 47LG90
PREPARATION
■
Image shown may differ from your TV.
Assemble the parts of the
SS TT AANNDD BBOODDYY
with
CCOOVVEERR BBAASS EE
of the TV.
2
Assemble the TV as shown.
3
Fix the 4 bolts securely using the holes in the
back of the TV.
4
SS TT AANNDD BBOODDYY
CCOOVVEERR BBAASS EE
Carefully place the TV screen side down on a cushioned surface to protect the screen from damage.
1
INSTALLATION
(
Only 32/37/42LG30, 37/42LG50, 32/42LG70)
DETACHMENT
Carefully place the TV screen side down on a
cushioned surface to protect the screen from
damage.
1
Loose the bolts from TV.
2
Detach the stand from TV.
3
After removing the stand, install the included
pp rroo tteeccttiioonn cc oovvee rr
over the hole for the stand.
Press the
PPRROOTT EECC TTIIOONN CCOOVVEERR
into the TV
until you hear it click.
PROTECTION COVER
GG
When assembling the desk type stand, make sure
the bolt is fully tightened (If not tightened fully,
the TV can tilt forward after the product installation). Do not over tighten.
NOTE
!
Page 19
PREPARATION
17
VESA WALL MOUNTING
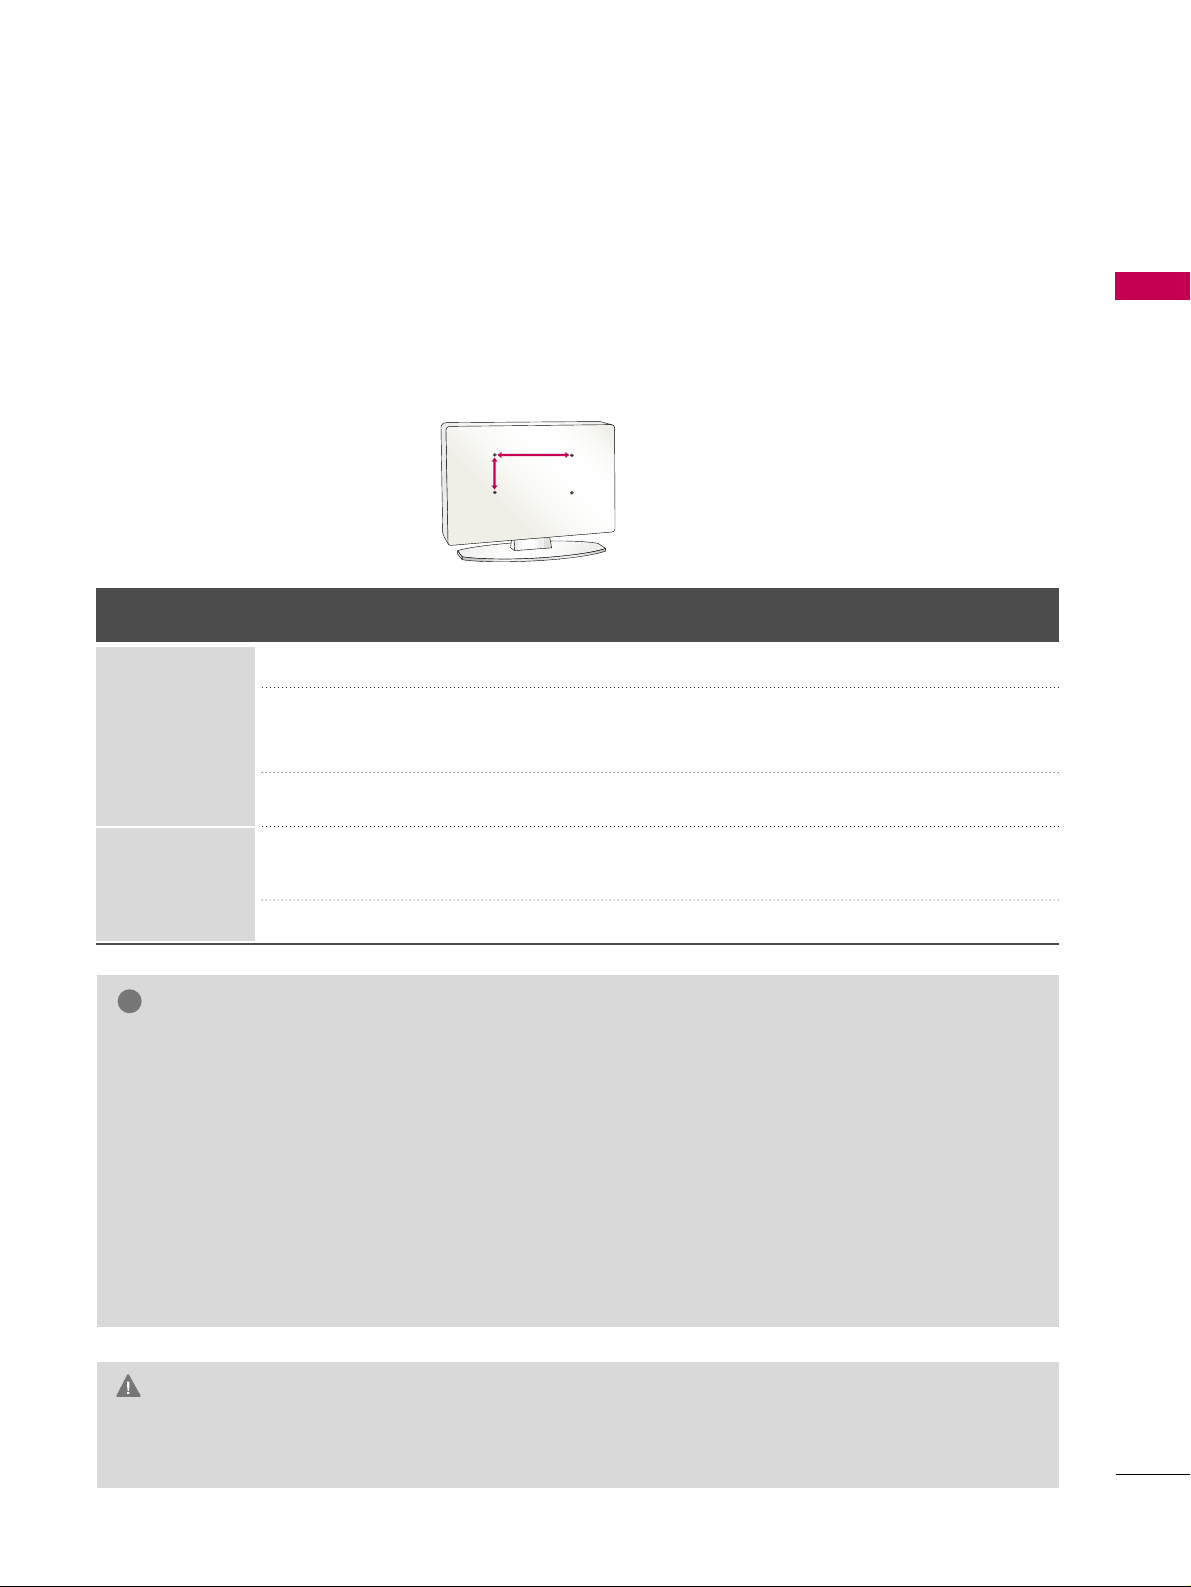
Install your wall mount on a solid wall perpendicular to the floor. When attaching to other building materials, please
contact your nearest dealer.
If installed on a ceiling or slanted wall, it may fall and result in severe personal injury.
We recommend that you use an LG brand wall mount when mounting the TV to a wall.
LG recommends that wall mounting be performed by a qualified professional installer.
GG
Do not install your wall mount kit while your TV is turned on. It may result in personal injury due to electric
shock.
CAUTION
GG
Screw length needed depends on the wall mount
used. For further information, refer to the instructions included with the mount.
GG
Standard dimensions for wall mount kits are shown
in the table.
GG
When purchasing our wall mount kit, a detailed
installation manual and all parts necessary for
assembly are provided.
GG
Do not use screws longer then the standard dimension, as they may cause damage to the inside to
the TV.
GG
For wall mounts that do not comply with the VESA
standard screw specifications, the length of the
screws may differ depending on their specifications.
GG
Do not use screws that do not comply with the
VESA standard screw specifications.
Do not use fasten the screws too strongly, this may
damage the TV or cause the TV to a fall, leading to
personal injury. LG is not liable for these kinds of
accidents.
GG
LG is not liable for TV damage or personal injury
when a non-VESA or non specified wall mount is
used or the consumer fails to follow the TV installation instructions.
NOTE
!
AA
BB
Product Model
VESA
(A *B)
Standard Screw Quantity
32LG30, 32LG60, 32LG70
37LG30, 37LG60, 37LG50
42LG30, 42LG50, 42LG60, 42LG70, 42LGX
47LG50, 47LG60, 47LG70, 47LG90, 47LGX
52LG50, 52LG60, 52LG70
42PG25
50PG25, 50PG60, 50PG70
60PG60, 60PG70
200* 10 0
200* 200
800* 400
400* 400
600* 400
M4
M6
M6
M6
M8
4
4
4
4
4
LCD TV
PLASMA TV
Page 20
PREPARATION
18
CABLE MANAGEMENT
PREPARATION
■
Image shown may differ from your TV.
Plasma TV Models
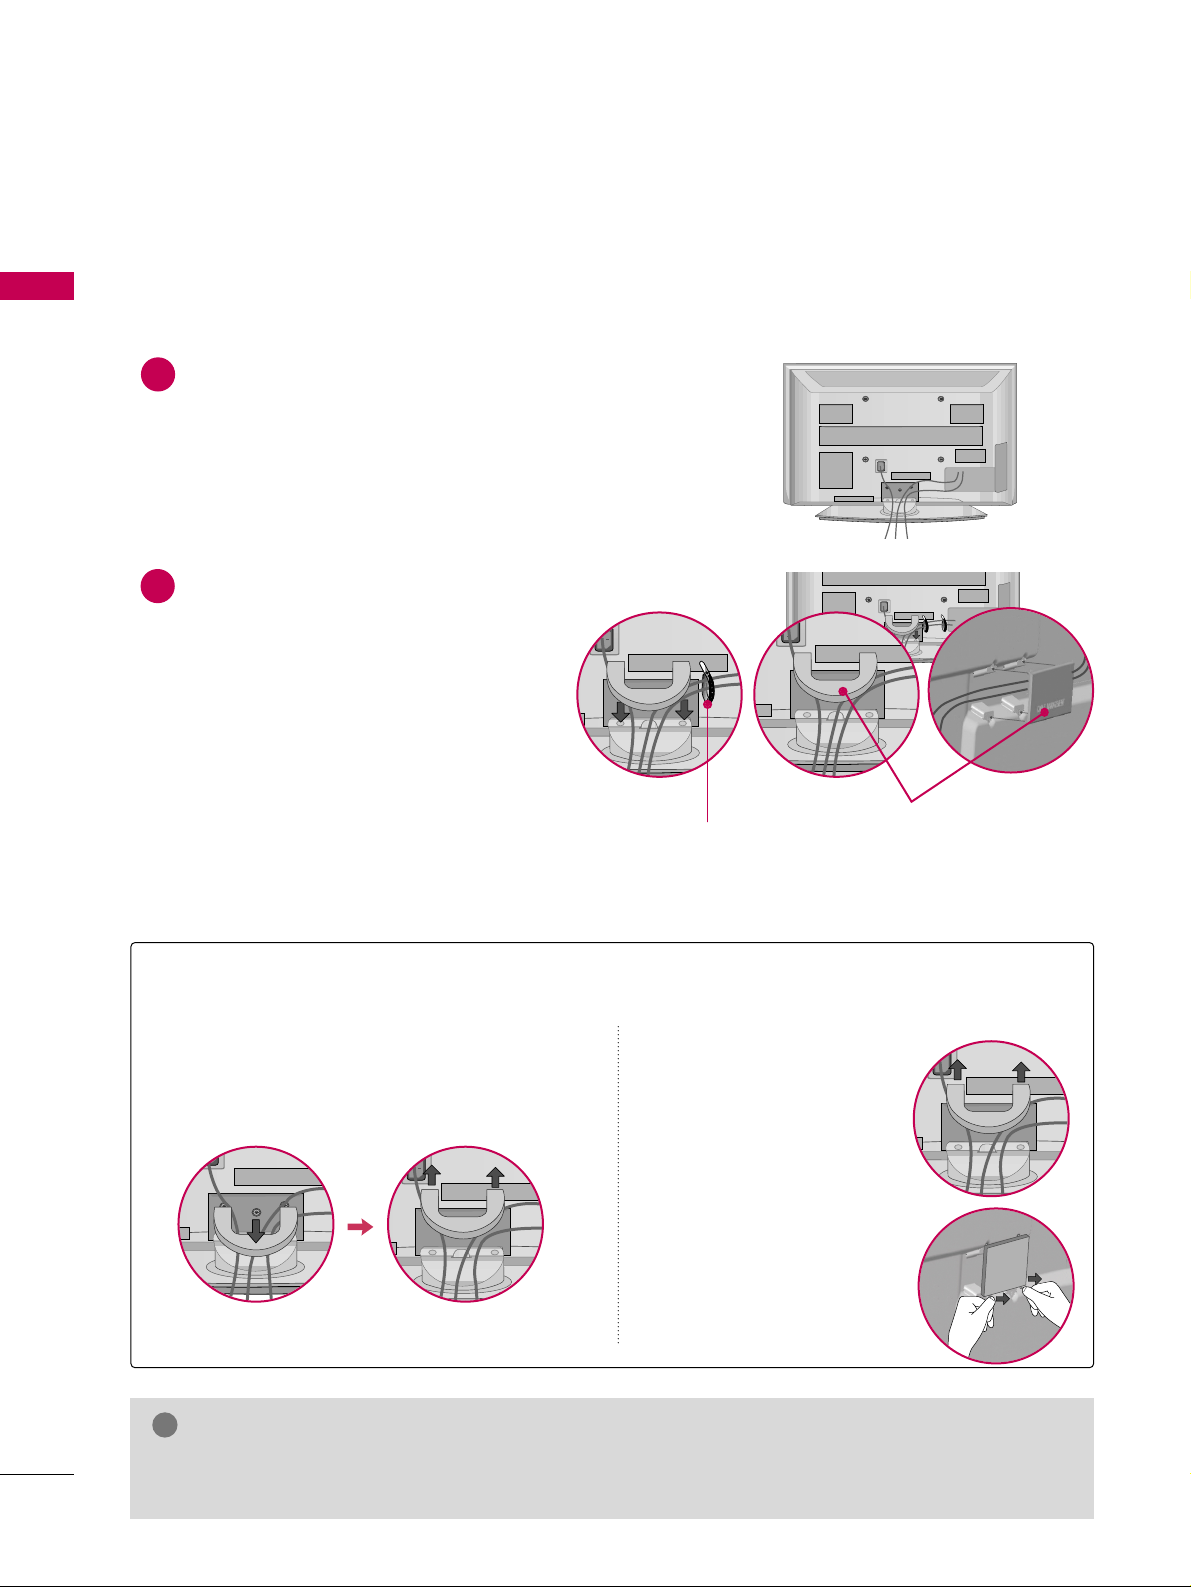
Connect the cables as necessary.
To connect additional equipment, see the
EXTERNAL EQUIPMENT SETUP section.
Install the CABLE MANAGEMENT CLIP as
shown.
If your TV has the CABLE HOLDER, install it
as shown and bundle the cables.
1
2
GG
Do not hold the CABLE MANAGEMENT CLIP when moving the TV.
- If the TV is dropped, you may be injured or the product may be broken.
NOTE
!
How to remove the CABLE MANAGEMENT CLIP
GG
First, press the cable management. Hold the
CCAABBLLEE MMAA NNAAGGEEMMEENN TT CCLLIIPP
with both
hands and pull it upward.
GG
Separate
CC AABBLLEE MMAA NN--
AAGGEEMMEENN TT CC LL IIPP
from TV
by pressing two latches.
GG
Hold the CABLE MANAGEMENT CLIP with both
hands and pull it upward.
42PG25
50PG25, 50/60PG60, 50/60PG70
CABLE MANAGEMENT CLIP
CABLE HOLDER
Page 21
PREPARATION
19
LCD TV Models
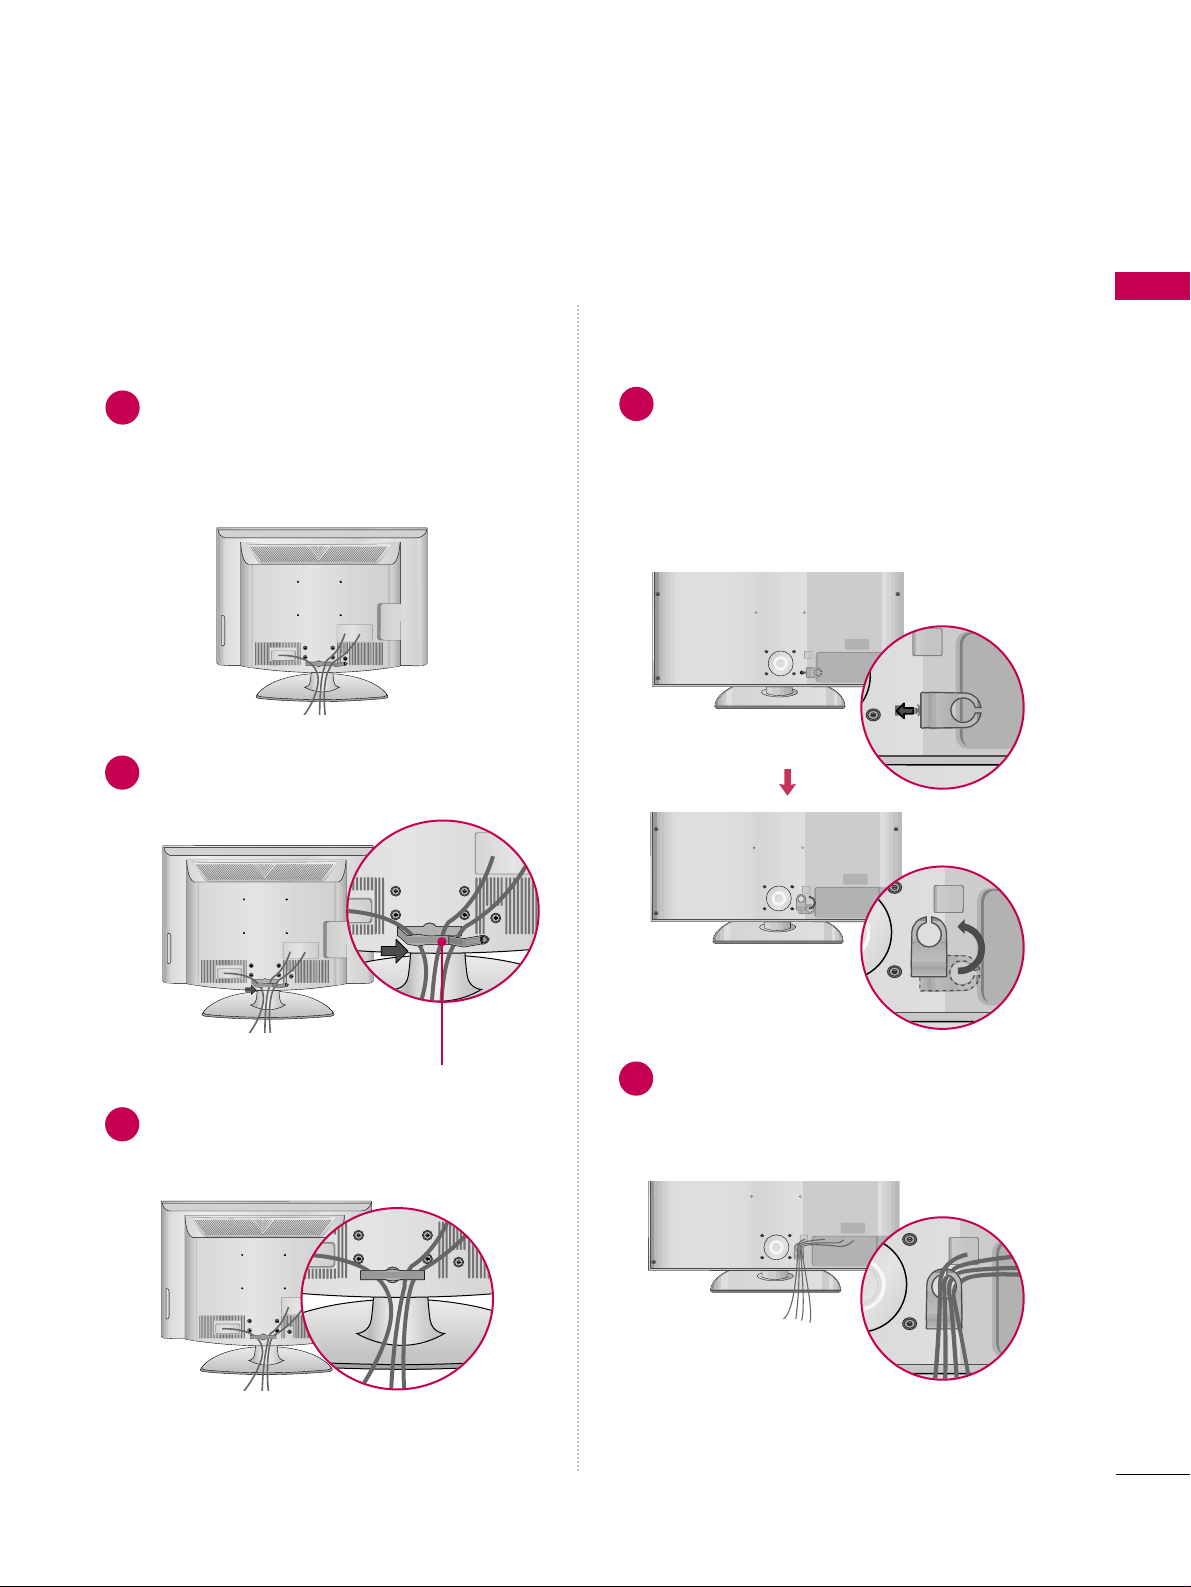
Connect the cables as necessary.
To connect additional equipment, see the
EXTERNAL EQUIPMENT SETUP section.
Install the CABLE MANAGEMENT CLIP as
shown.
CABLE MANAGEMENT CLIP
1
2
Align the hole with the tab on the
CC AABB LL EE
MMAA NNAAGGEEMMEENN TT CC LLIIPP
.
Turn the
CCAABBLLEE MMAA NNAAGGEEMMEENN TT CCLLIIPP
as
shown.
Note: This cable management clip can be bro-
ken by excessive pressure.
Connect the cables as necessary.
To connect additional equipment, see the
EXTERNAL EQUIPMENT SETUP section.
1
2
Put the cables inside the CABLE MANAGEMENT
CLIP and snap it closed.
3
32/37/42/47/52LG60, 42/47LGX32/37/42LG30, 37/42/47/52LG50,
32/42/47/52LG70, 47LG90
Page 22
PREPARATION
20
DESKTOP PEDESTAL INSTALLATION
PREPARATION
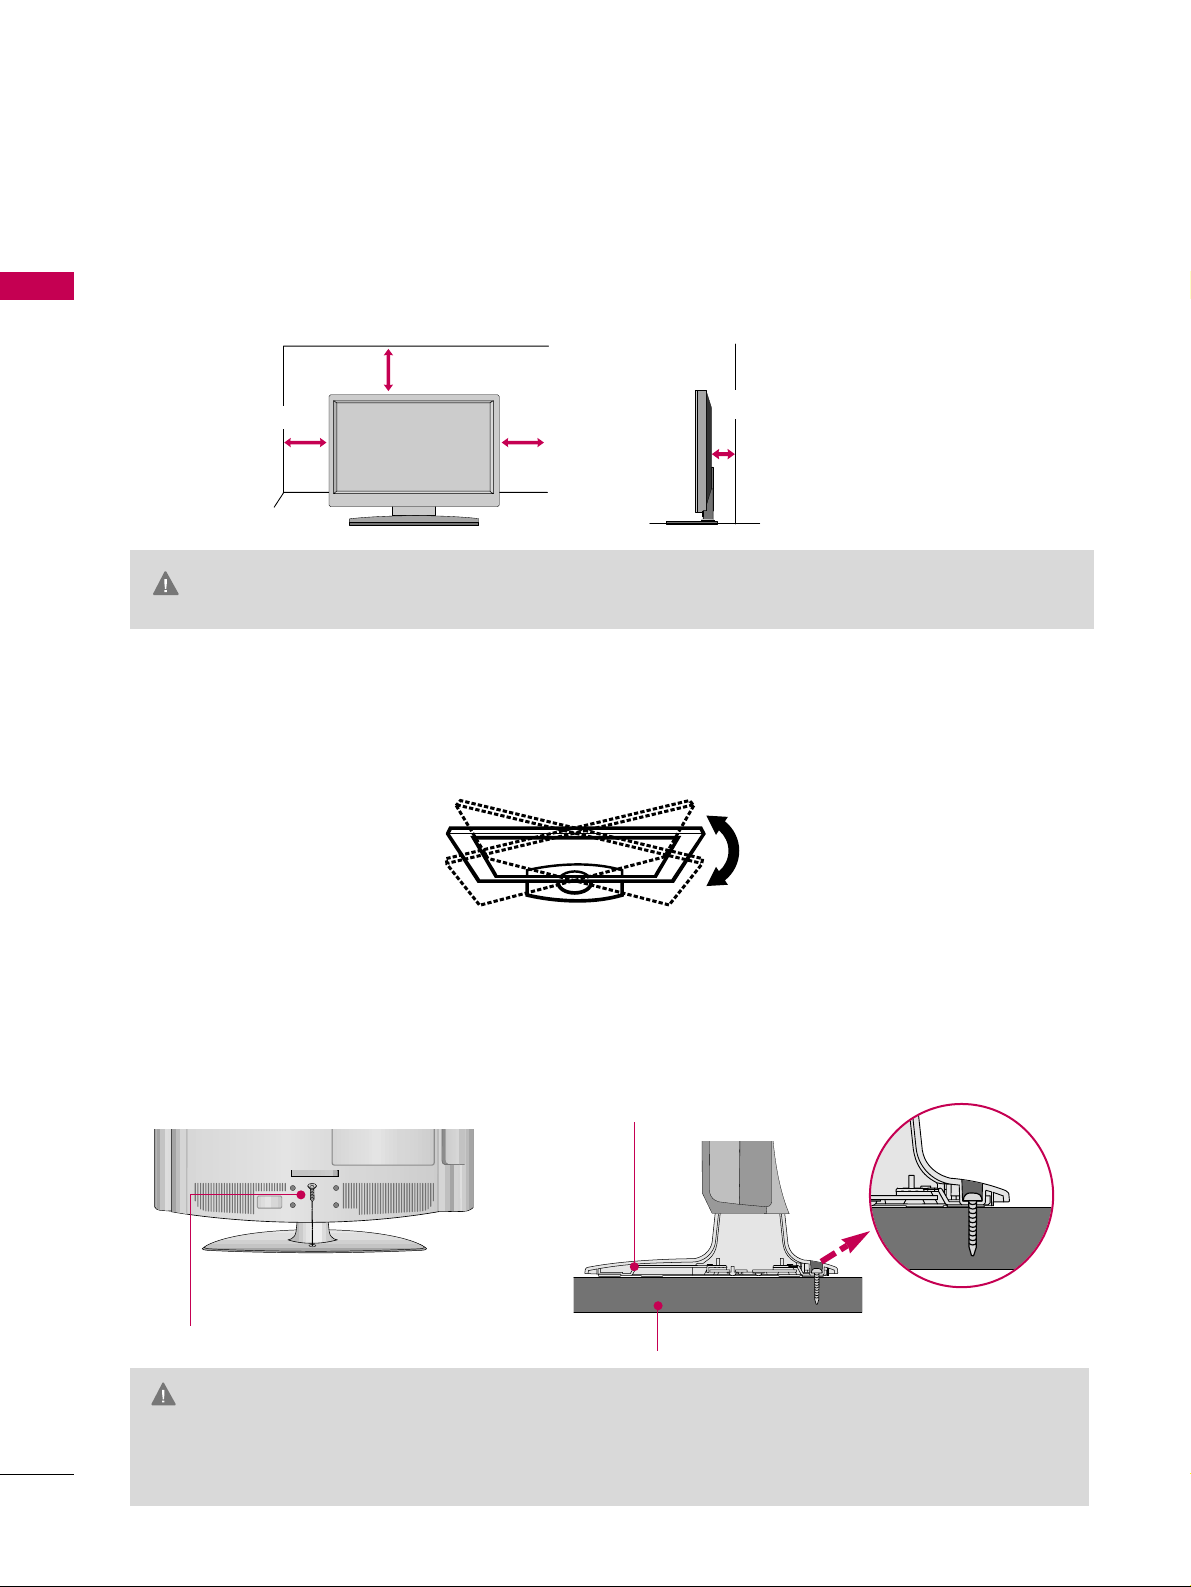
For proper ventilation, allow a clearance of 4 inches on all four sides from the wall.
■
Image shown may differ from your TV.
4 inches
4 inches
4 inches
4 inches
SWIVEL STAND
After installing the TV, you can adjust the TV set manually to the left or right direction by 20 degrees to suit
your viewing position.
GG
Ensure adequate ventilation by following the clearance recommendations.
GG
Do not mount near or above any type of heat source.
CAUTION
ATTACHING THE TV TO A DESK (Only 32LG30/70, 37LG30/50, 42LG30/50)
The TV must be attached to a desk so it cannot be pulled in a forward/backward direction, potentially causing
injury or damaging the product.
GG
To prevent TV from falling over, the TV should be securely attached to the floor/wall per installation
instructions. Tipping, shaking, or rocking the machine may cause injury.
WARNING
1-Screw
(provided as parts of the product)
Desk
Stand
Page 23
PREPARATION
21
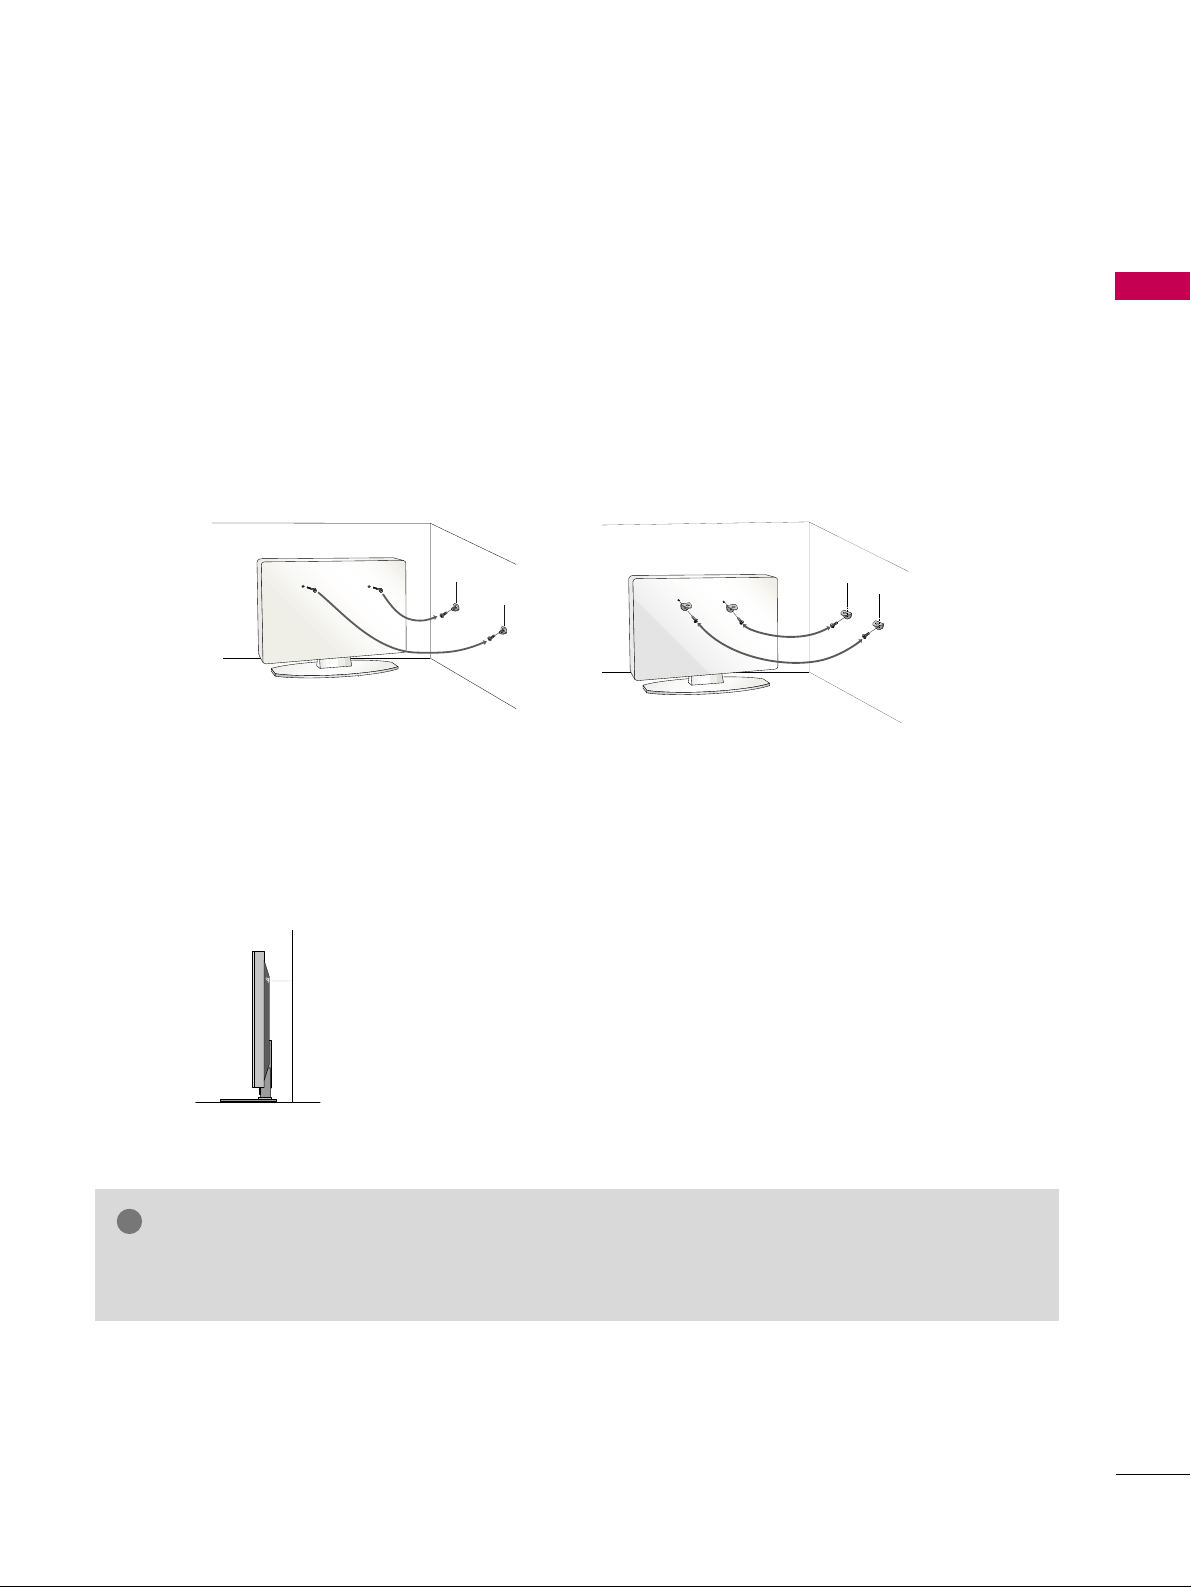
SECURING THE TV TO THE WALL TO PREVENT FALLING WHEN THE TV IS USED ON A STAND
We recommend that you set up the TV close to a wall so it cannot fall over if pushed backwards.
Additionally, we recommend that the TV be attached to a wall so it cannot be pulled in a forward direction,
potentially causing injury or damaging the product.
Caution: Please make sure that children don’t climb on or hang from the TV.
■
Insert the eye-bolts (or TV brackets and bolts) to tighten the product to the wall as shown in the picture.
*If your product has the bolts in the eye-bolts position before inserting the eye-bolts, loosen the bolts.
* Insert the eye-bolts or TV brackets/bolts and tighten them securely in the upper holes.
Secure the wall brackets with the bolts (sold separately) to the wall. Match the height of the bracket that is
mounted on the wall to the holes in the product.
Ensure the eye-bolts or brackets are tightened securely.
■
Use a sturdy rope (sold separately) to tie the product. It is safer to tie
the rope so it becomes horizontal between the wall and the product.
■
You should purchase necessary components to prevent TV from falling off of the stand.
■
Image shown may differ from your TV.
GG
Use a platform or cabinet strong enough and large enough to support the size and weight of the TV.
GG
To use the TV safely make sure that the height of the bracket on the wall and the one on the TV are the same.
NOTE
!
Page 24
PREPARATION
22
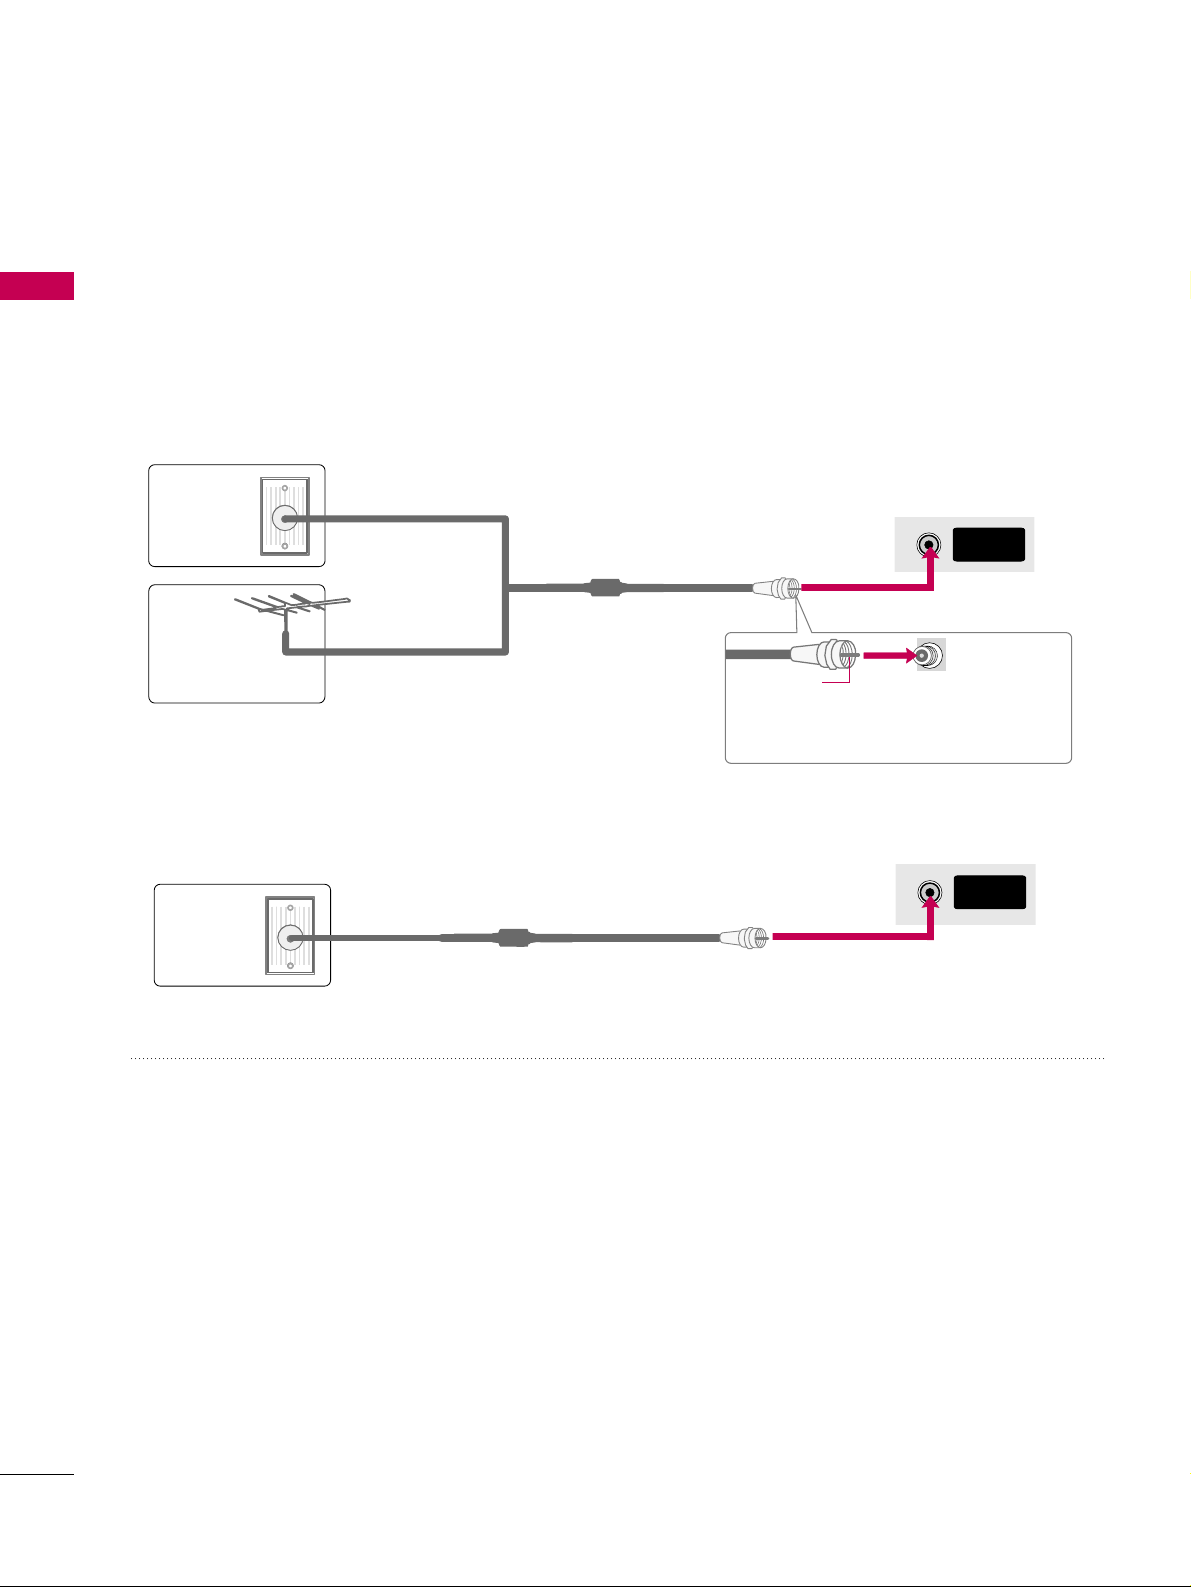
ANTENNA OR CABLE CONNECTION
PREPARATION
1. Antenna (Analog or Digital)
Wall Antenna Socket or Outdoor Antenna without a Cable Box
Connection.
For optimum picture quality, adjust the antenna direction if needed.
2. Cable
Wa ll
Antenna
Socket
Outdoor
Antenna
(VHF, UHF)
Cable TV
Wall Jack
Multi-family Dwellings/Apartments
(Connect to wall antenna socket)
RF Coaxial Wire (75 ohm)
RF Coaxial Wire (75 ohm)
Single-family Dwellings /Houses
(Connect to wall jack for outdoor antenna)
Be careful not to bend the copper wire
when connecting the antenna.
Copper Wire
■
To improve the picture quality in a poor signal area, please purchase a signal amplifier and install properly.
■
If the antenna needs to be split for two TV’s, install a 2-Way Signal Splitter.
■
If the antenna is not installed properly, contact your dealer for assistance.
ANTENNA/
CABLE IN
R
ANTENNA/
CABLE IN
R
■
To prevent damage do not connect to the power outlet until all connections are made between the devices.
Page 25
EXTERNAL EQUIPMENT SETUP
23
EXTERNAL EQUIPMENT SETUP
HD RECEIVER SETUP
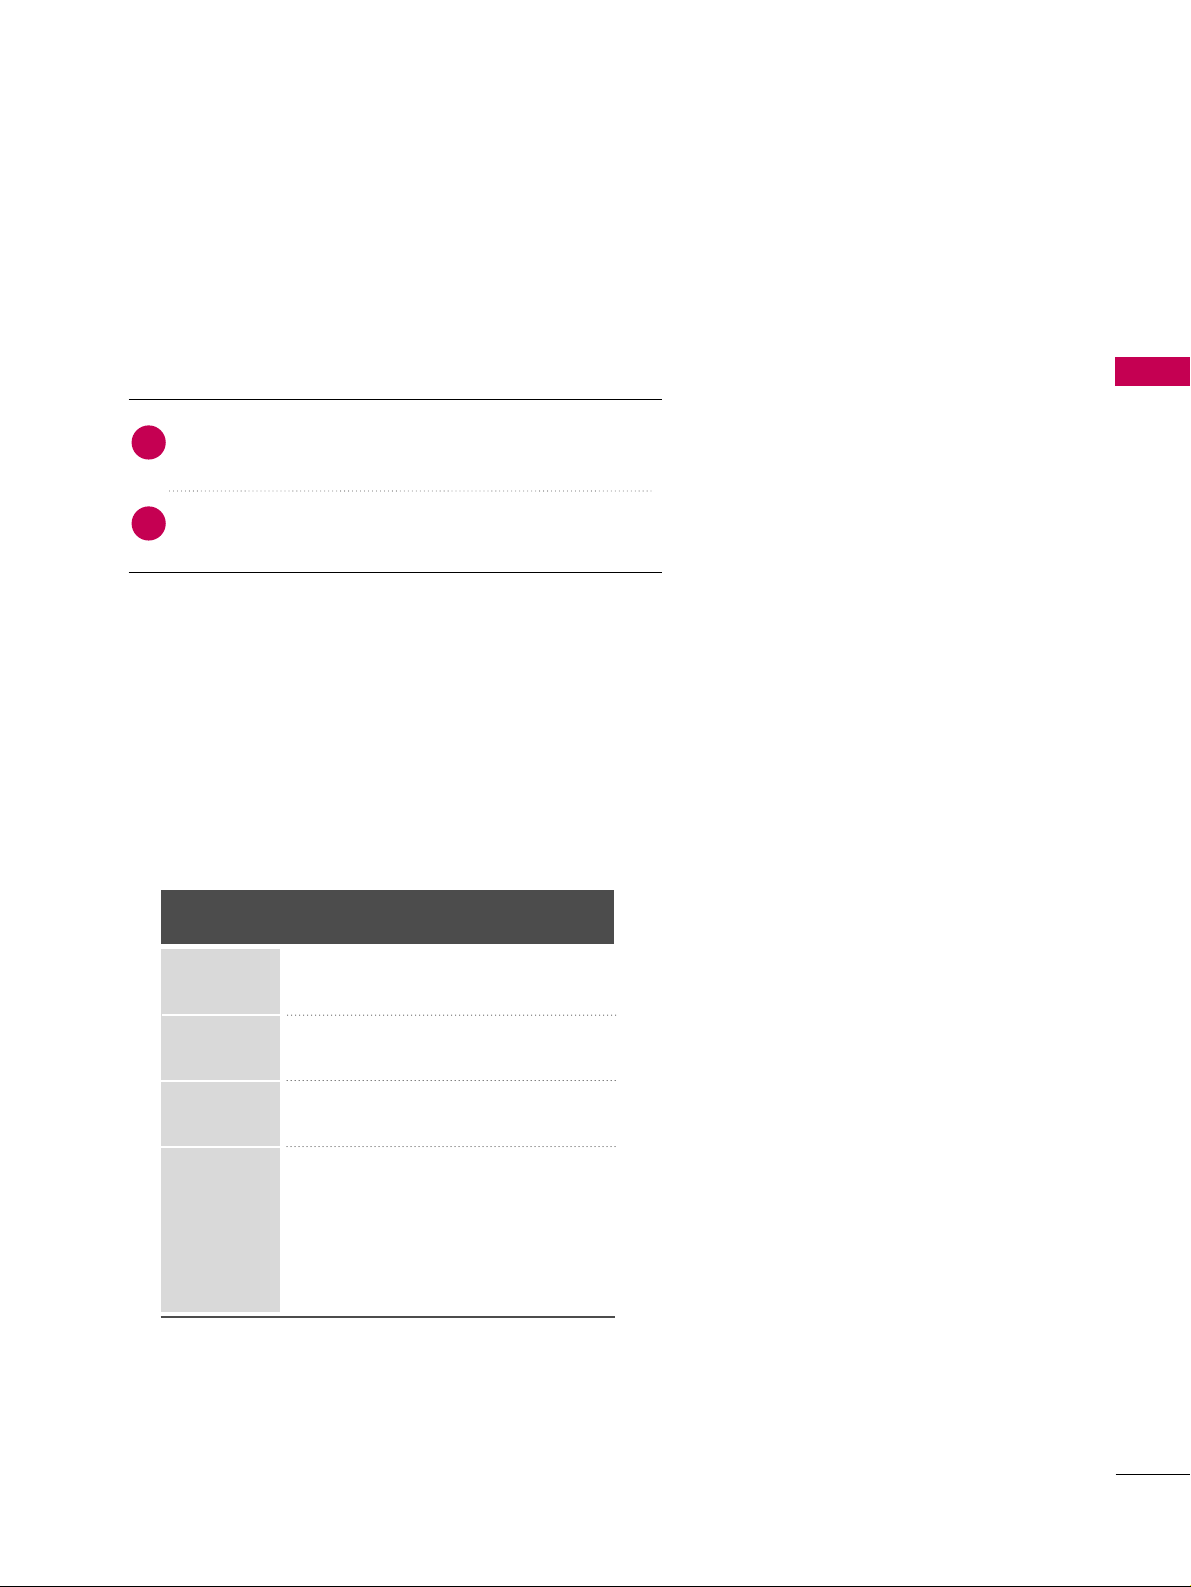
This TV can receive digital over-the-air/digital cable signals without an external digital set-top box. However, if
you do receive digital signals from a digital set-top box or other digital external device.
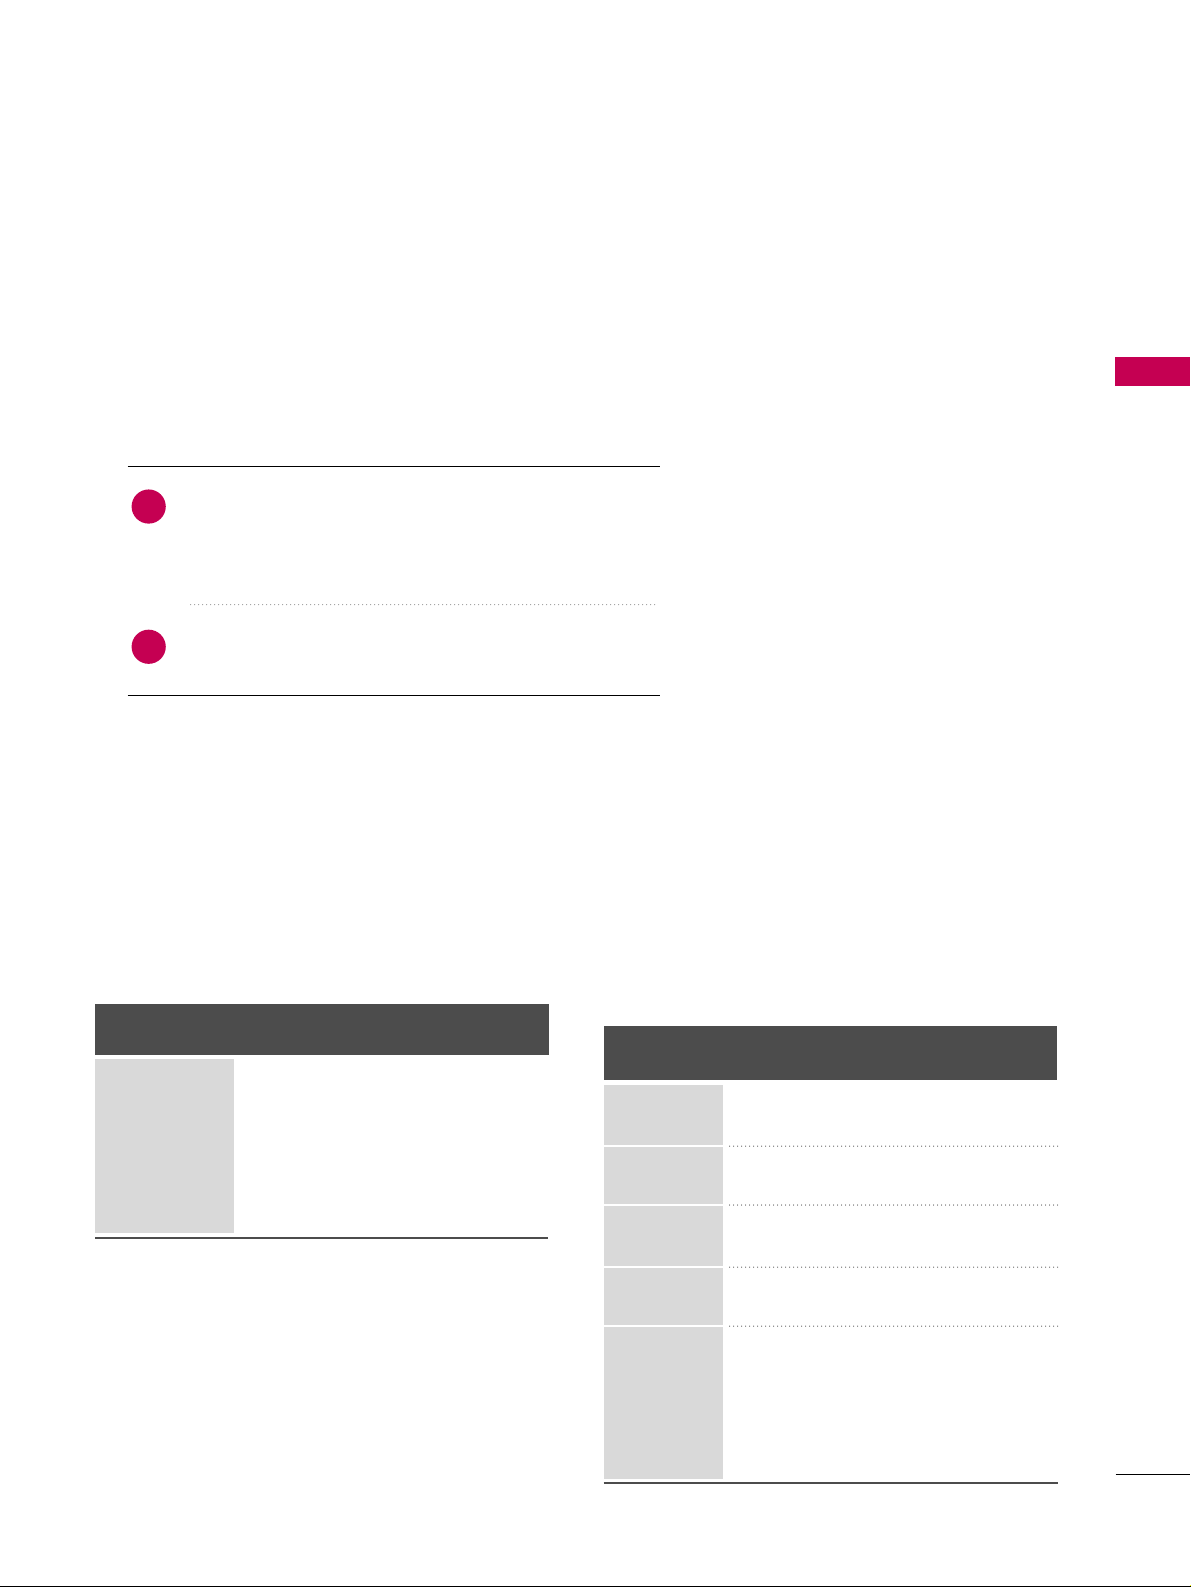
Component Connection
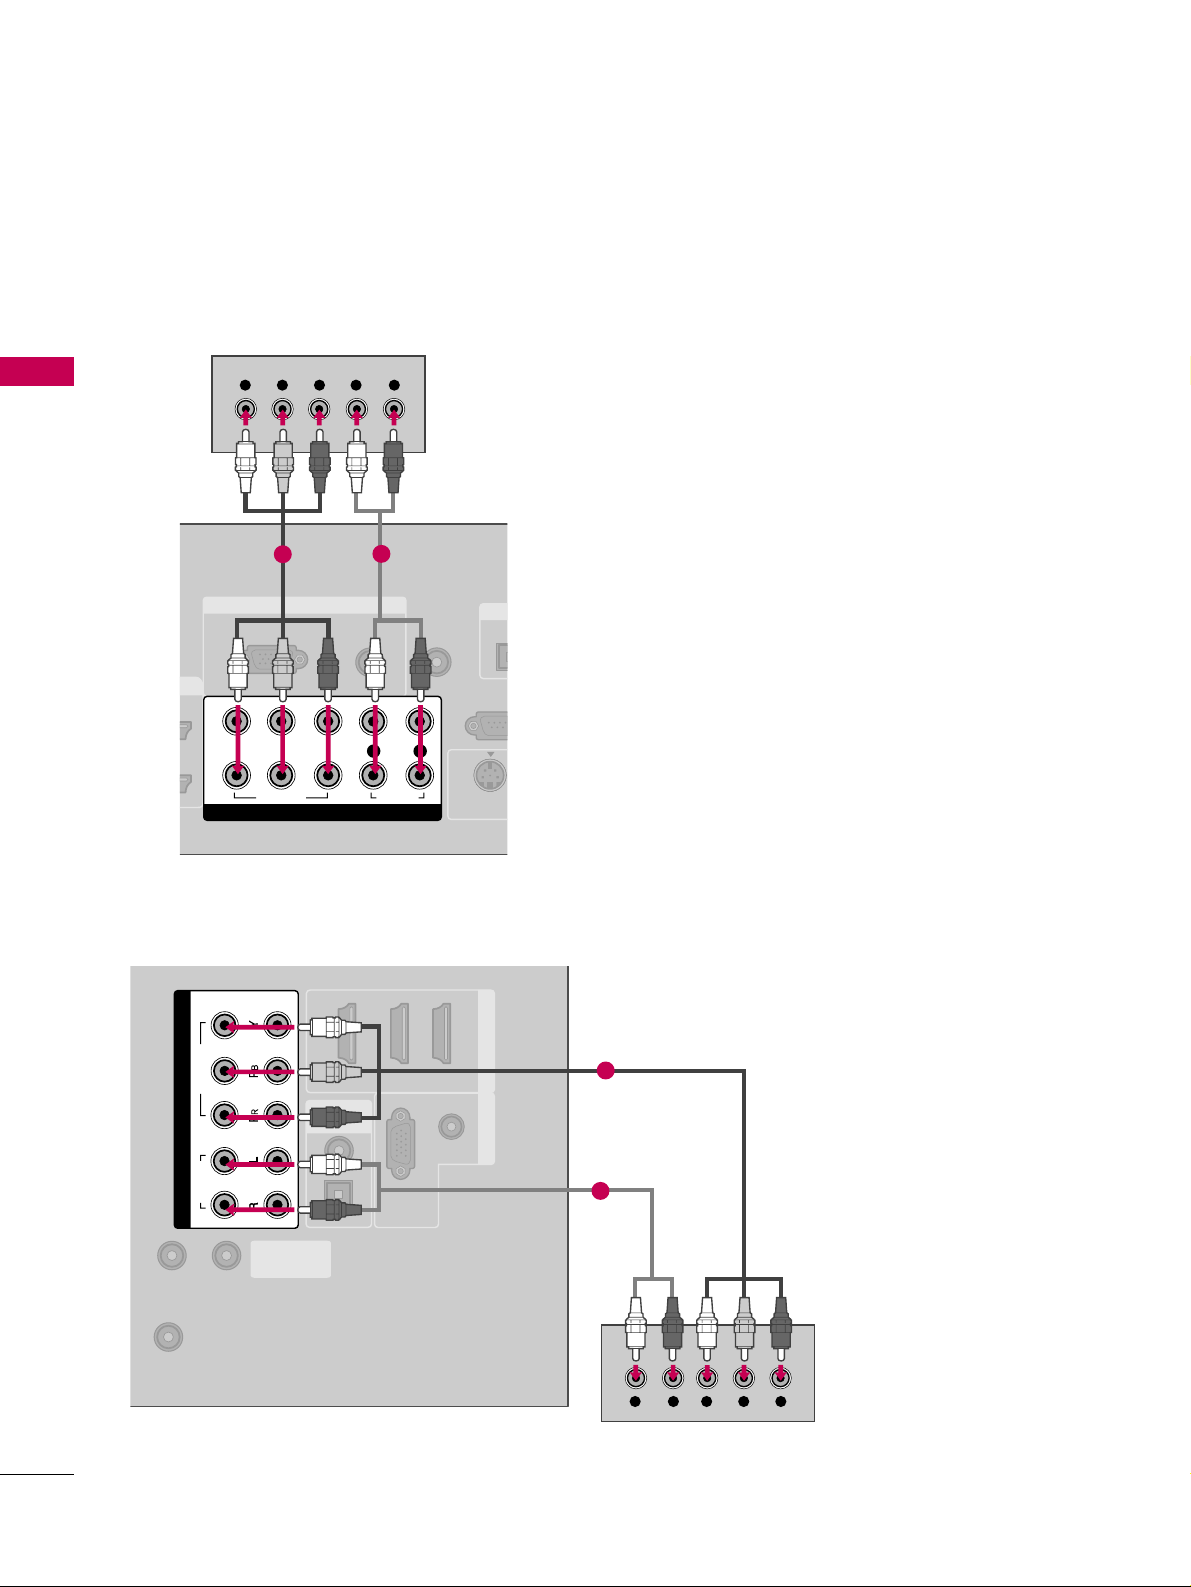
1. How to connect
Connect the video outputs (Y, P
B, P
R
)
of the digital set-
top box to the
CC OO MMPP OO NNEENNTT IINN VVIIDD EEOO 11
jacks on
the TV. Match the jack colors (Y = green, P
B
= blue, and
P
R
= red).
Connect the audio output of the digital set-top box to
the
CC OO MMPP OO NNEENNTT IINN AAUUDDIIOO 11
jacks on the TV.
2
1
2. How to use
■
Turn on the digital set-top box.
(
Refer to the owner’s manual for the digital set-top box. operation
)
■
Select the
CC oomm ppoonnee nn tt 11
input source on the TV using
the
IINN PP UU TT
button on the remote control.
■
If connected to
CC OO MMPP OO NNEENNTT IINN 22
input, select the
CC oomm ppoonnee nn tt 22
input source on the TV.
■
To prevent the equipment damage, never plug in any power cords until you have finished connecting all equipment.
■
Image shown may differ from your TV.
Y, C
B/
P
B, CR/
P
R
Supported Resolutions
Horizontal Vertical
Frequency(KHz)Frequency(Hz
)
15.73 59.94
15.73 60.00
31.47 59.94
31.50 60.00
44.96 59.94
45.00 60.00
33.72 59.94
33.75 60.00
26.97 23.976
27.00 24.00
33.71 29.97
33.75 30.00
67.432 59.94
67.50 60.00
Resolution
720x480i
720x480p
1280x720p
1920x1080i
1920x1080p
Signal
480i
480p
720p
10 8 0 i
10 8 0 p
Component
Yes
Yes
Yes
Yes
Yes
HDMI
No
Yes
Yes
Yes
Yes
Page 26
EXTERNAL EQUIPMENT SETUP
24
EXTERNAL EQUIPMENT SETUP
RGB IN
AUDIO
(RGB/DVI)
RGB(PC)
REMOTE
CONTROL IN
RS-232
(CONTROL &
OPT
DIGI
S-VIDEO
COMPONENT IN
1
2
VIDEO
LYP
BPR
R
AUDIO
Y L RPB PR
1
2
(RGB/DVI)
AUDIO
RGB(PC)
REMOTE
CONTROL IN
RS-232C IN
(SERVICE ONLY)
OPTICAL
COAXIAL
DIGITAL
AUDIO OUT
123
HDMI/DVI IN RGB IN
ANTENNA/
CABLE IN
COMPONENT IN
2
1
VIDEO
AUDIO
YL R PB PR
1
2
32/37/42/47/52LG60, 42/47LGX
Plasma TV, 32/37/42LG30, 37/42/47/52LG50,
32/42/47/52LG70, 47LG90
Page 27
EXTERNAL EQUIPMENT SETUP
25
HDMI Connection
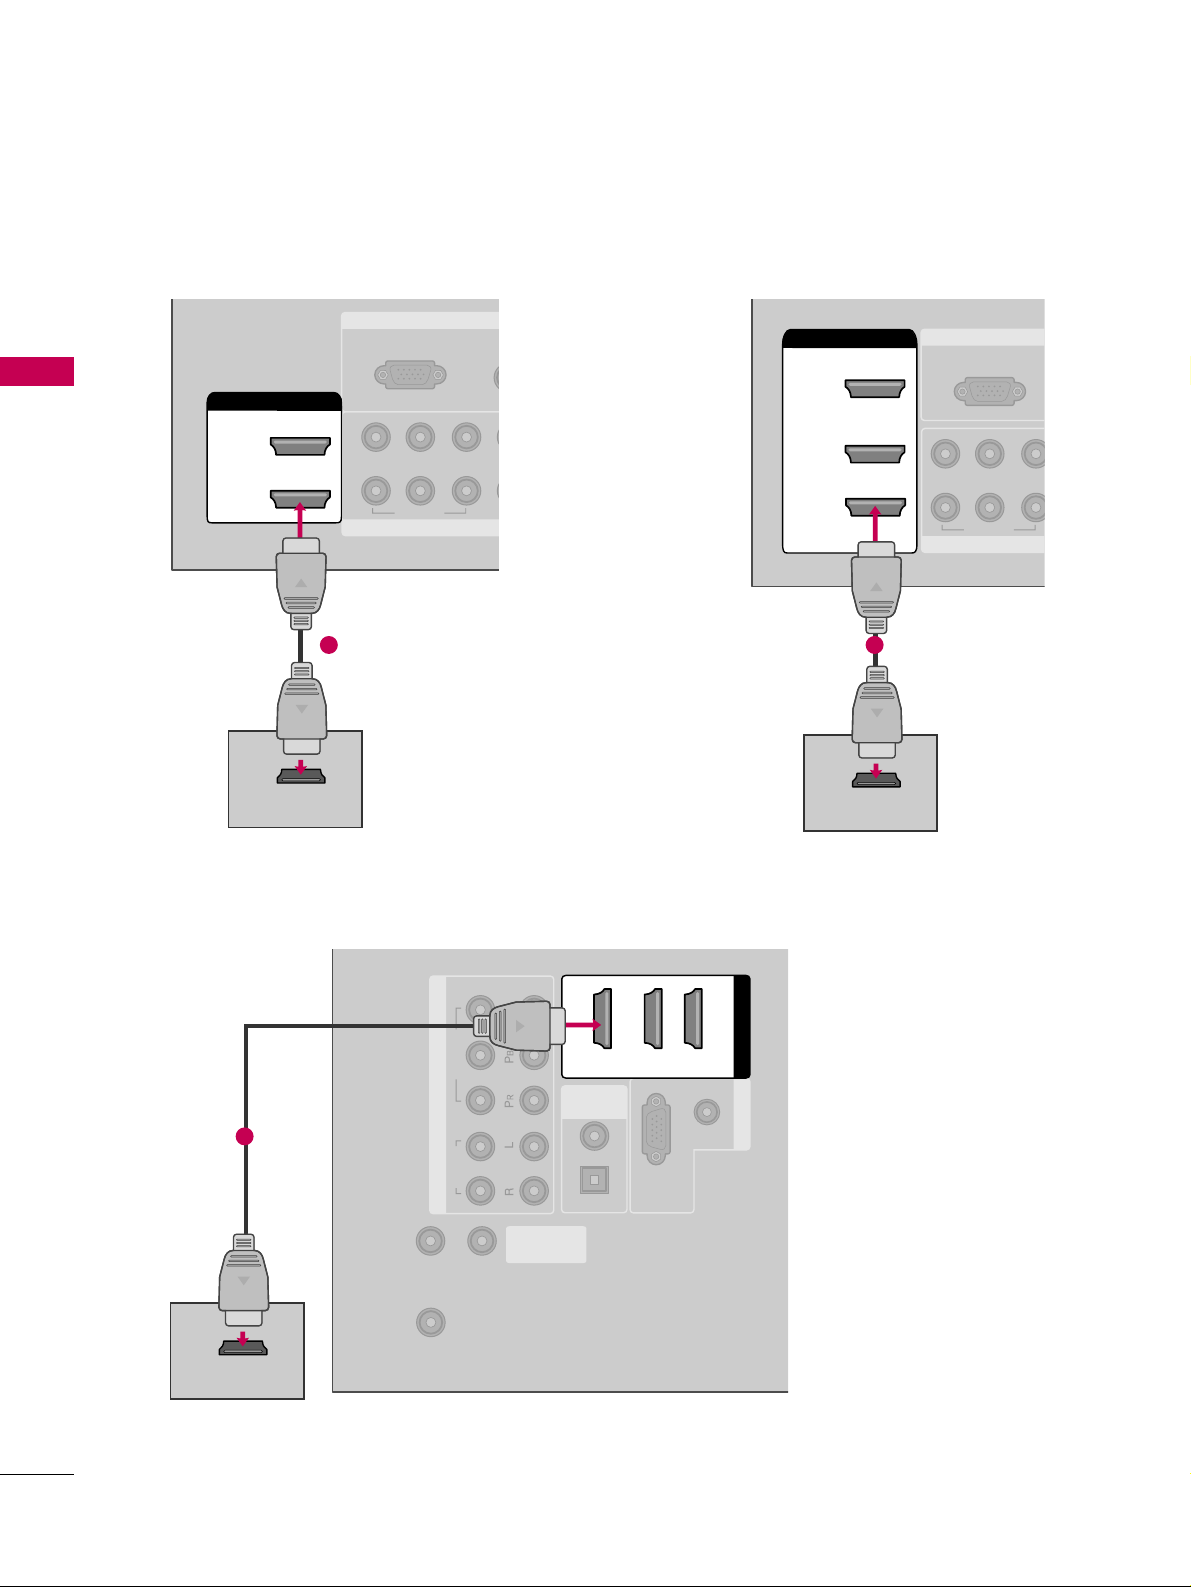
Connect the digital set-top box to
HHDDMMII// DDVVII II NN11
,
22, 33
, or
44
jack on the TV.
No separate audio connection is necessary.
HDMI supports both audio and video.
1. How to connect
2. How to use
■
Turn on the digital set-top box.
(
Refer to the owner’s manual for the digital set-top box.
)
■
Select the
HHDDMMII11, HHDDMMII22, HHDDMMII33
, or
HHDDMMII44
input
source on the TV using the
IINNPPUUTT
button on the remote
control.
2
1
HDMI-DTV
Horizontal Vertical
Frequency(KHz)Frequency(Hz
)
31.47 59.94
31.50 60.00
44.96 59.94
45.00 60.00
33.72 59.94
33.75 60.00
26.97 23.976
27.00 24.00
33.71 29.97
33.75 30.00
67.432 59.939
67.50 60.00
Resolution
720x480p
1280x720p
1920x1080i
1920x1080p
Page 28
EXTERNAL EQUIPMENT SETUP
26
EXTERNAL EQUIPMENT SETUP
RGB IN
COMPONENT
A
(RG
RGB(PC)
1
2
VIDEO
YP
B
P
R
HDMI/DVI IN
2
1
HDMI-DTV OUTPUT
1
RGB IN
COMPON
RGB(PC)
VIDEO
YP
B
P
R
2
3
( )
HDMI/DVI IN
1
HDMI-DTV OUTPUT
1
(RGB/DVI)
AUDIO
RGB(PC)
REMOTE
CONTROL IN
RS-232C IN
(SERVICE ONLY)
OPTICAL
COAXIAL
DIGITAL
AUDIO OUT
RGB IN
ANTENNA/
CABLE IN
COMPONENT IN
2
1
VIDEO
AUDIO
HDMI/DVI IN
123
HDMI-DTV OUTPUT
1
32/37/42/47/52LG60, 42/47LGX
32/37/42LG30, 37/42/47/52LG50, 32LG70 Plasma TV, 42/47/52LG70, 47LG90
Page 29
EXTERNAL EQUIPMENT SETUP
27
DVI to HDMI Connection
32/37/42LG30, 37/42/47/52LG50, 32LG70, Plasma TV
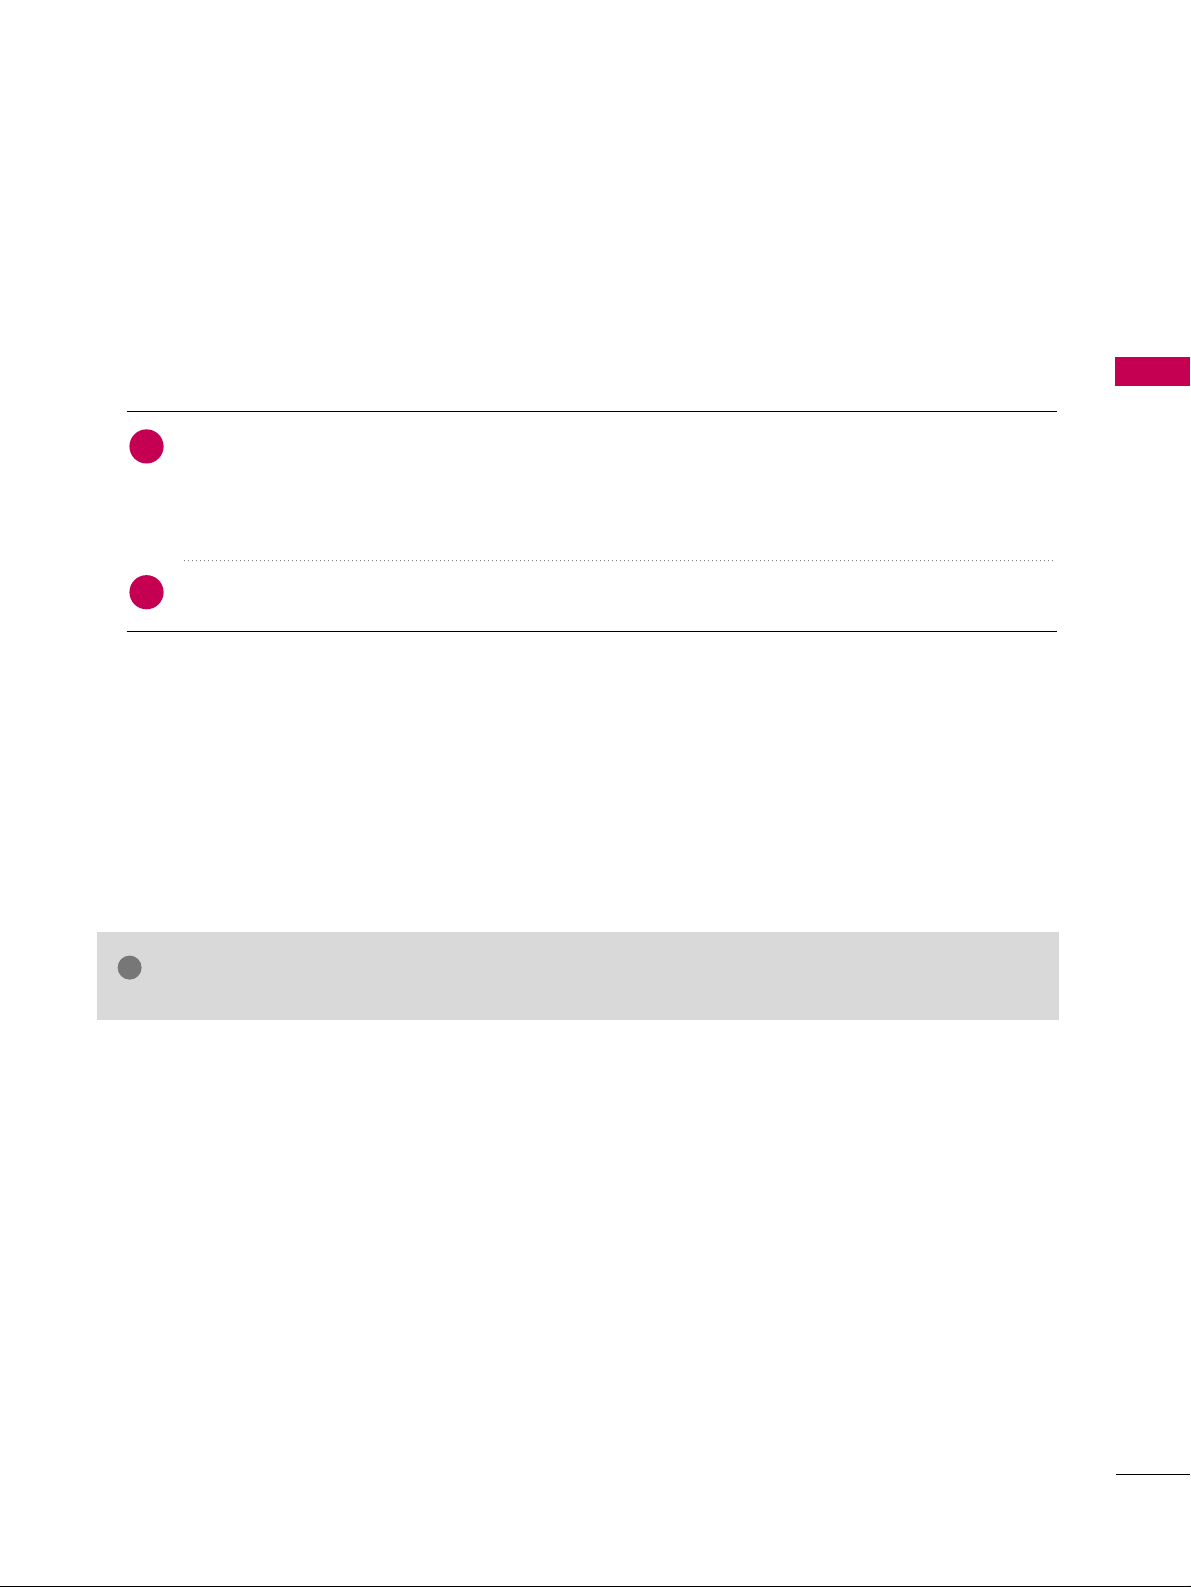
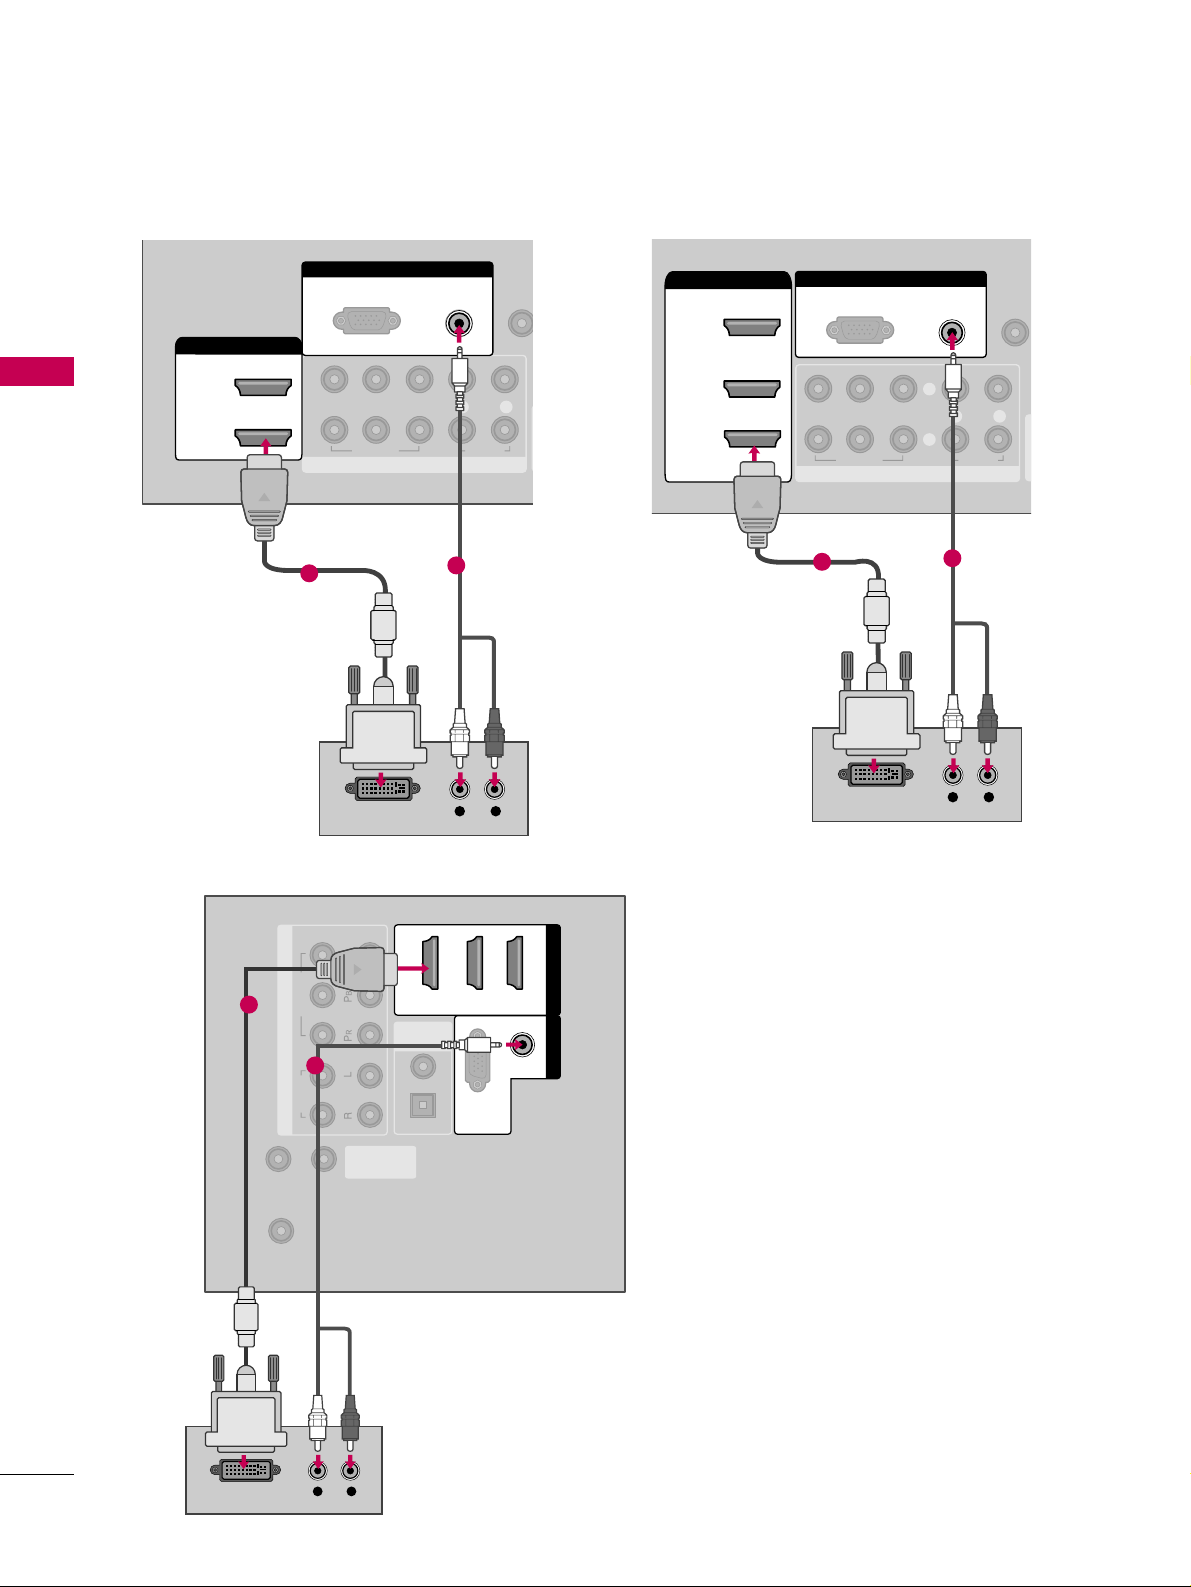
- Connect the DVI output of the digital set-top box to the
HHDDMMII// DD VV II II NN 11, 22
, or 33jack on the TV.
32/37/42/47/52LG60, 42/47/52LG70, 42/47LGX, 47LG90
- Connect the DVI output of the digital set-top box to the
HHDDMMII//DDVVII IINN 11, 22, 33
, or 44jack on the TV.
Connect the PC audio output to the
AAUUDDIIOO
((
RRGGBB//DDVVII
))
jack on the TV.
1. How to connect
2. How to use
■
Turn on the digital set-top box. (Refer to the owner’s manual for the digital set-top box.
)
■
32/37/42LG30, 37/42/47/52LG50, 32LG70, Plasma TV
- Select the
HHDDMMII11,HHDDMMII22
,or
HHDDMMII33
input source on the TV using the
IINNPPUUTT
button on the remote control.
■
32/37/42/47/52LG60, 42/47/52LG70, 42/47LGX, 47LG90
- Select the
HHDDMMII11,HHDDMMII22,HHDDMMII33
,or
HHDDMMII44
input source on the TV using the
IINNPPUUTT
button on the remote
control.
2
1
GG
A DVI to HDMI cable or adapter is required for this connection. DVI doesn't support audio,
so a separate audio connection is necessary.
NOTE
!
Page 30
EXTERNAL EQUIPMENT SETUP
28
EXTERNAL EQUIPMENT SETUP
REMOTE
CONTROL IN
RS-232C IN
(SERVICE ONLY)
OPTICAL
COAXIAL
DIGITAL
AUDIO OUT
ANTENNA/
CABLE IN
COMPONENT IN
2
1
VIDEO
AUDIO
HDMI/DVI IN
123
(RGB/DVI)
AUDIO
RGB(PC)
RGB IN
L R
DVI-DTV OUTPUT
1
2
32/37/42/47/52LG60, 42/47LGX
RGB IN
COMPONENT IN
AUDIO
(RGB/DVI)
RGB(PC)
REMO
CONTRO
1
2
VIDEO
LYP
BPR
R
AUDIO
HDMI/DVI IN
2
1
L R
DVI-DTV OUTPUT
1
2
32/37/42LG30, 37/42/47/52LG50, 32LG70
( )
RGB IN
COMPONENT IN
AUDIO
(RGB/DVI)
RGB(PC)
REMOT
CONTROL
(
VIDEO
LYP
BPR
R
AUDIO
AV IN 1
2
3
2
1
( )
HDMI/DVI IN
1
L R
DVI-DTV OUTPUT
1
Plasma TV, 42/47/52LG70, 47LG90
2
Page 31
EXTERNAL EQUIPMENT SETUP
29
DVD SETUP
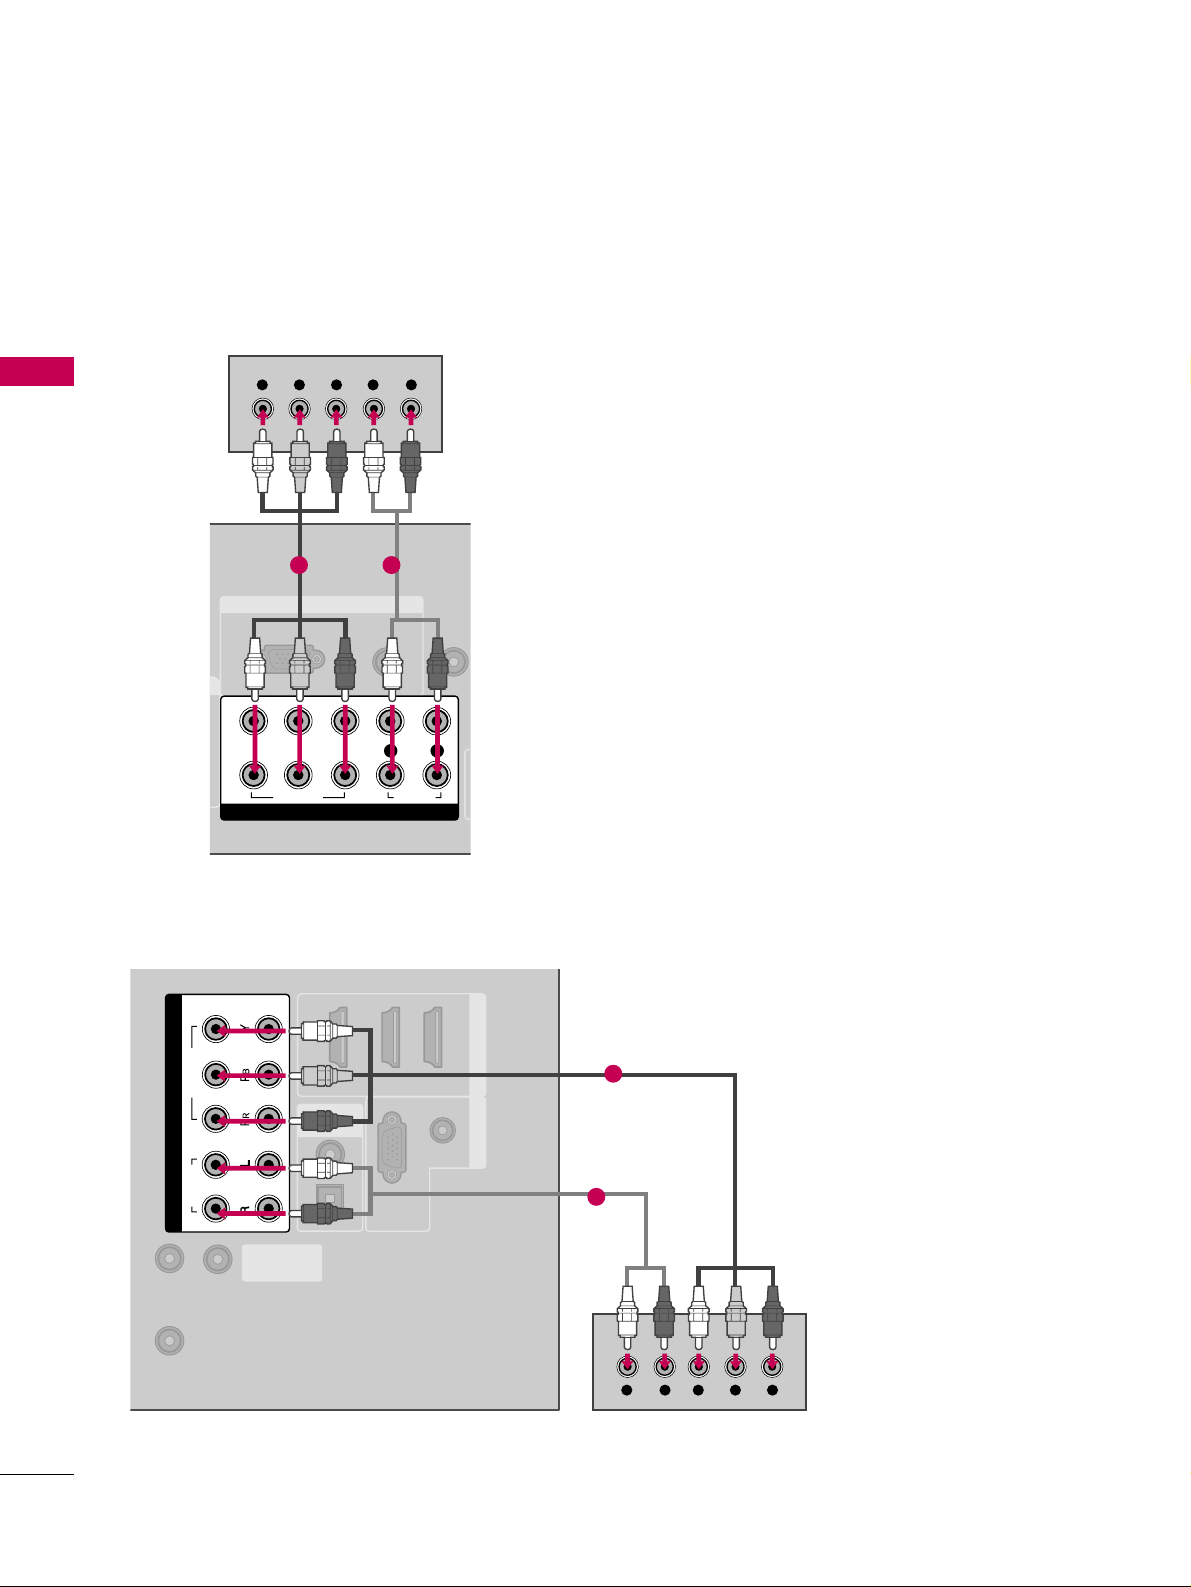
Component Connection
Component Input ports
To get better picture quality, connect a DVD player to the component input ports as shown below.
Component ports on the TV
YPBP
R
Video output ports
on DVD player
Y
Y
Y
Y
P
B
B-Y
Cb
Pb
P
R
R-Y
Cr
Pr
Connect the video outputs (Y, P
B, P
R
)
of the DVD to the
CC OO MM PP OO NNEENNTT IINN VVIIDD EE OO 11
jacks on the TV.
Match the jack colors (Y = green, P
B = blue, and PR
= red
)
.
Connect the audio outputs of the DVD to the
CC OO MM PP OO NNEENNTT IINN AAUUDDII OO 11
jacks on the TV.
1. How to connect
2. How to use
■
Turn on the DVD player, insert a DVD.
■
Select the
CC oomm ppoonnee nn tt 11
input source on the TV using
the
IINN PP UU TT
button on the remote control.
■
If connected to
CC OO MMPP OO NNEENNTT IINN 22
input, select the
CC oomm ppoonnee nn tt 22
input source on the TV.
■
Refer to the DVD player's manual for operating instructions.
2
1
Page 32
EXTERNAL EQUIPMENT SETUP
30
EXTERNAL EQUIPMENT SETUP
RGB IN
AUDIO
(RGB/DVI)
RGB(PC)
REMOT
CONTROL
(
COMPONENT IN
1
2
VIDEO
LYP
B
P
R
R
AUDIO
Y L RPB PR
1 2
(RGB/DVI)
AUDIO
RGB(PC)
REMOTE
CONTROL IN
RS-232C IN
(SERVICE ONLY)
OPTICAL
COAXIAL
DIGITAL
AUDIO OUT
1 2 3
HDMI/DVI IN RGB IN
ANTENNA/
CABLE IN
COMPONENT IN
2
1
VIDEO
AUDIO
YL R PB PR
1
2
32/37/42/47/52LG60, 42/47LGX
Plasma TV, 32/37/42LG30, 37/42/47/52LG50,
32/42/47/52LG70, 47LG90
Page 33
EXTERNAL EQUIPMENT SETUP
31
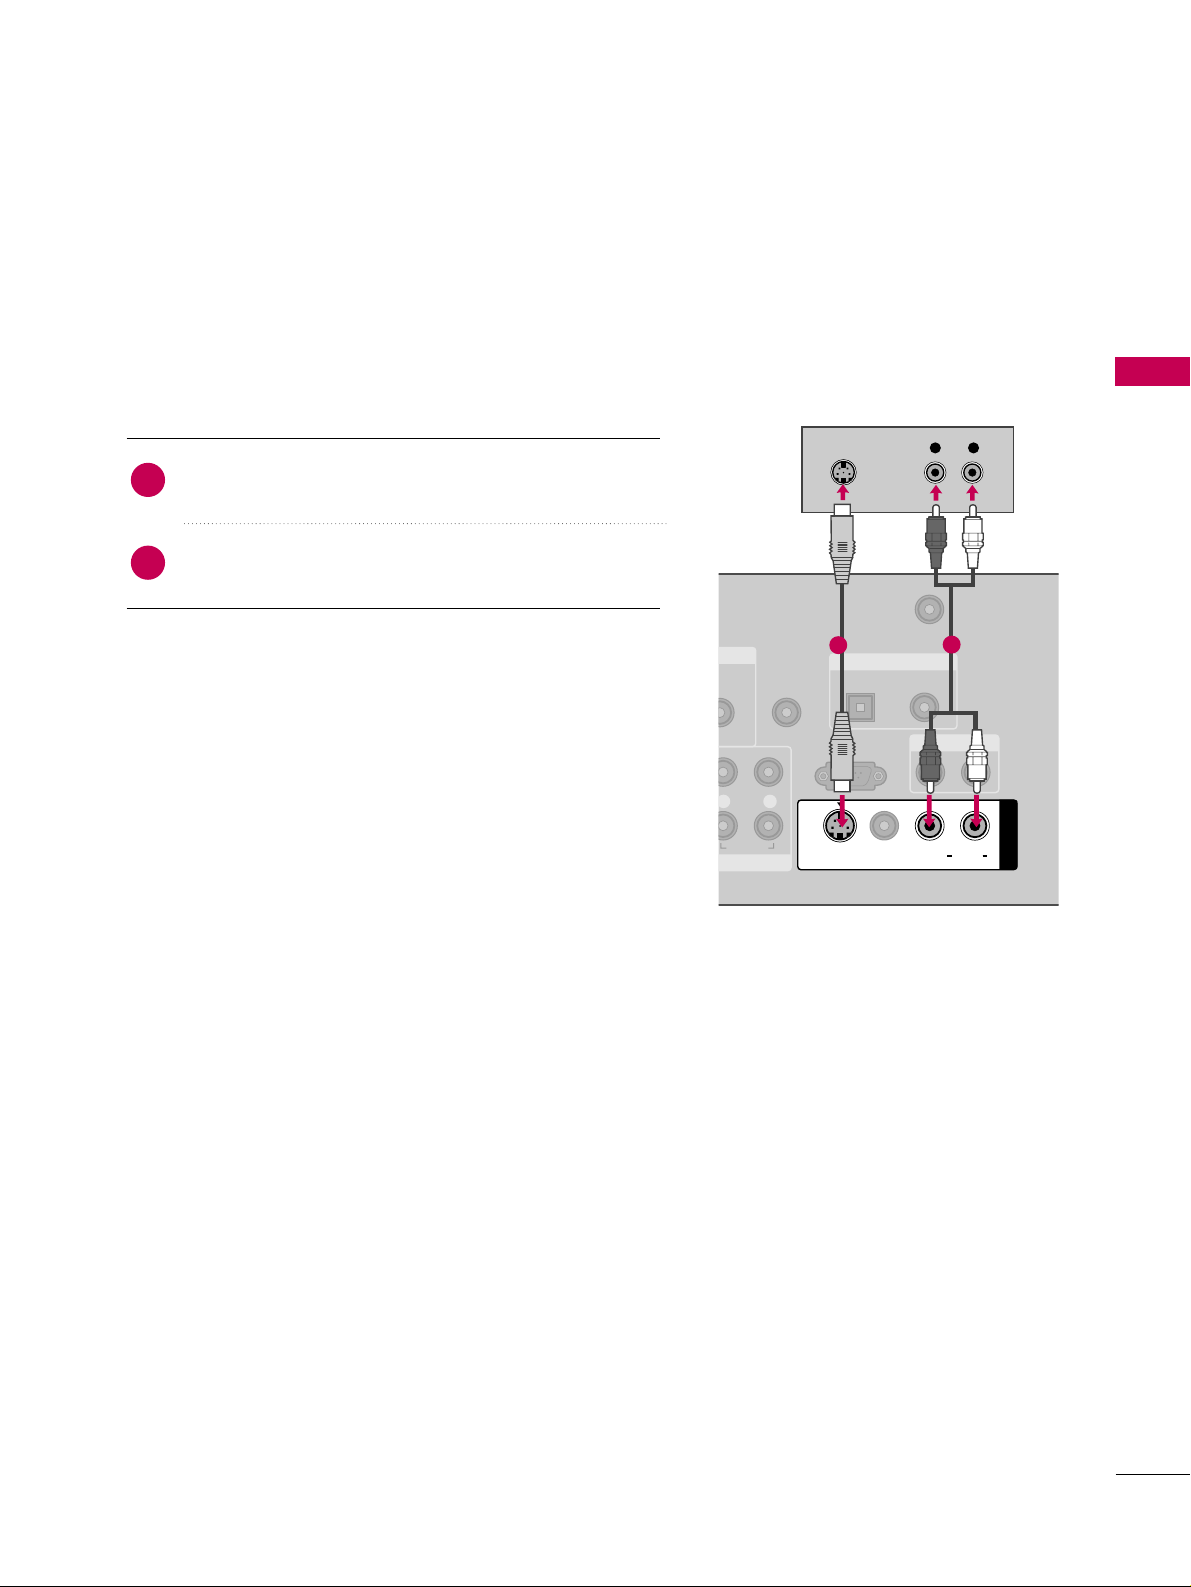
S-Video Connection
(Except 32/37/42/47/52LG60, 42/47LGX)
REMOTE
CONTROL IN
ANTENNA/
CABLE IN
RS-232C IN
(CONTROL & SERVICE)
L R
AUDIO
OPTICAL COAXIAL
DIGITAL AUDIO OUT
AUDIO OUT
AV IN 1
VIDEO LR
(MONO)
AUDIO
S-VIDEO
L R
S-VIDEO
AUDIO
1
2
Connect the S-VIDEO output of the DVD to the
SS --VV IIDDEEOO
input on the TV.
Connect the audio outputs of the DVD to the
AAUUDDIIOO
input jacks on the TV.
1. How to connect
2. How to use
■
Turn on the DVD player, insert a DVD.
■
Select the
AAVV11
input source on the TV using the
IINN PP UU TT
button on the remote control.
■
Refer to the DVD player's manual for operating instructions.
2
1
Page 34
EXTERNAL EQUIPMENT SETUP
32
EXTERNAL EQUIPMENT SETUP
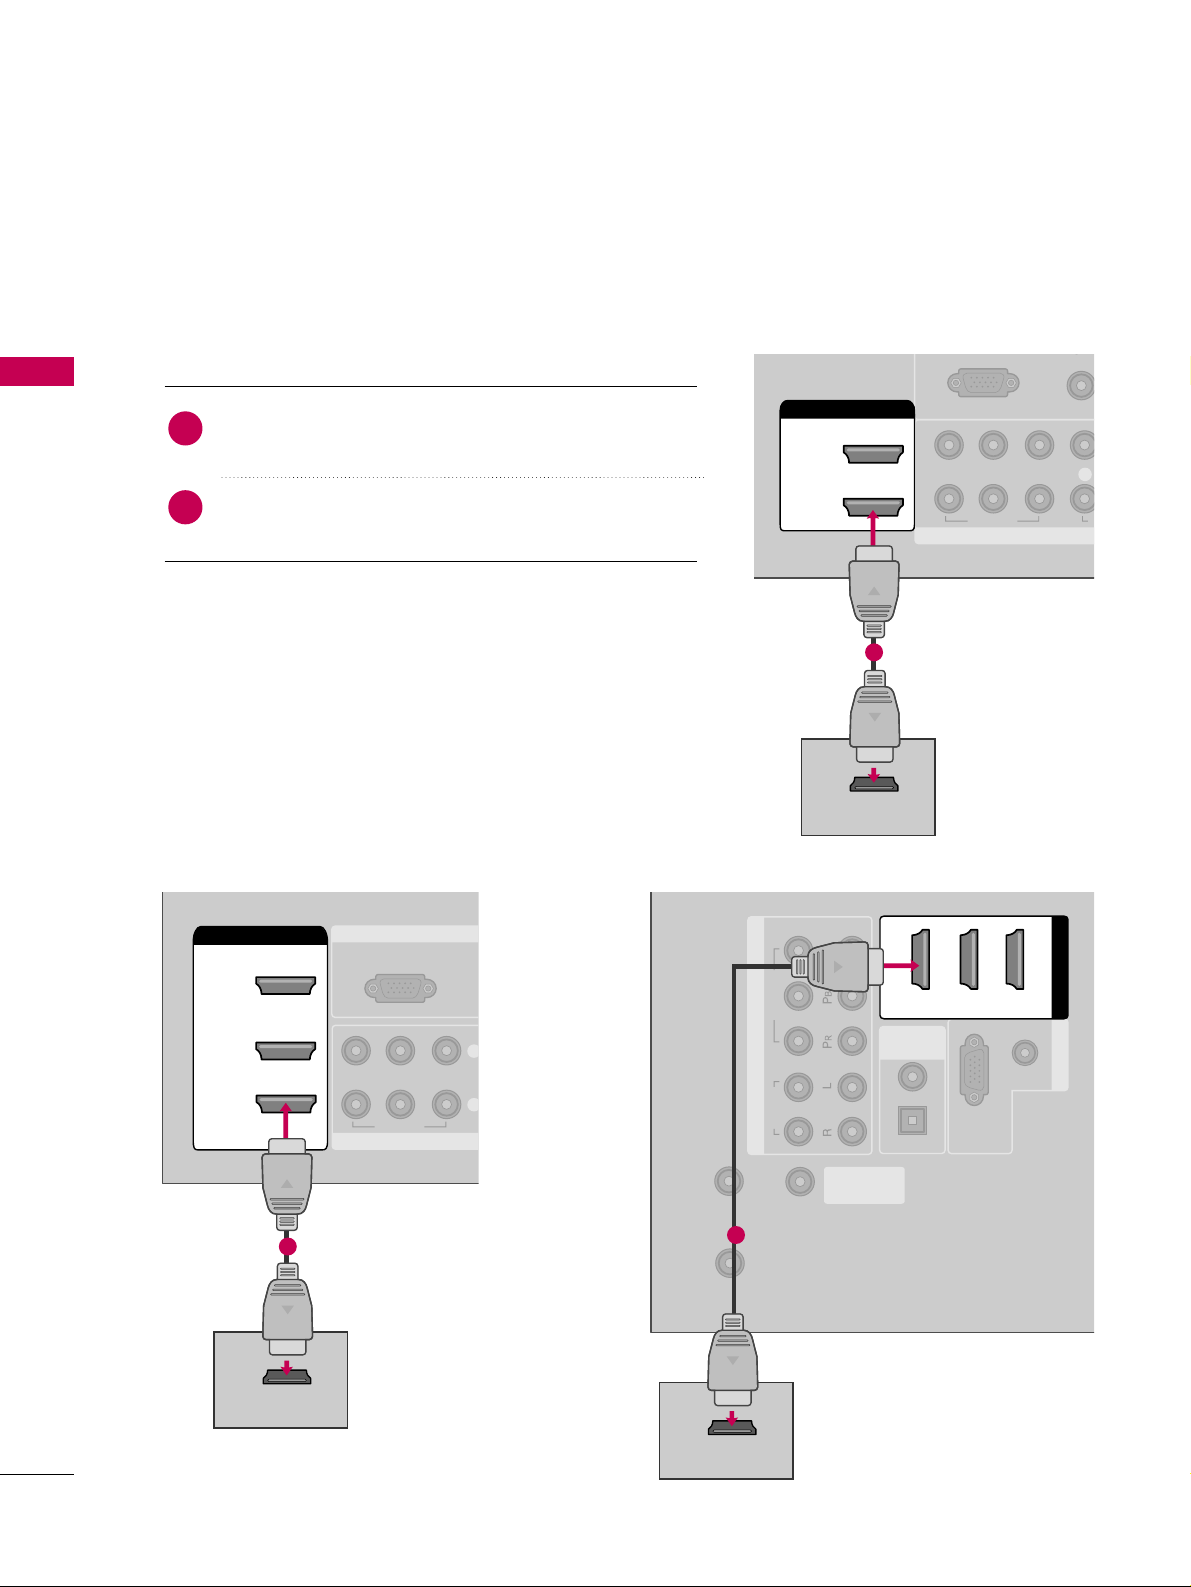
HDMI Connection
Connect the HDMI output of the DVD to the
HHDDMMII// DDVVII IINN11, 22, 33
or 44jack on the TV.
No separate audio connection is necessary.
HDMI supports both audio and video.
1. How to connect
2. How to use
■
Select the
HHDDMMII11, HHDDMMII22, HHDDMMII33
, or
HHDDMMII44
input
source on the TV using the
IINN PP UU TT
button on the remote
control.
■
Refer to the DVD player's manual for operating instructions.
2
1
COMPONENT IN
AUDIO
(RGB/D
RGB(PC)
1
2
VIDEO
LYP
BPR
A
HDMI/DVI IN
2
1
HDMI-DVD OUTPUT
1
(RGB/DVI)
AUDIO
RGB(PC)
REMOTE
CONTROL IN
RS-232C IN
(SERVICE ONLY)
OPTICAL
COAXIAL
DIGITAL
AUDIO OUT
RGB IN
ANTENNA/
CABLE IN
COMPONENT IN
2
1
VIDEO
AUDIO
HDMI/DVI IN
123
HDMI-DVD OUTPUT
1
32/37/42LG30, 37/42/47/52LG50,
32LG70
32/37/42/47/52LG60, 42/47LGX
RGB IN
COMPONENT
(R
RGB(PC)
VIDEO
YP
B
P
R
2
3
2
1
( )
HDMI/DVI IN
1
HDMI-DVD OUTPUT
1
Plasma TV, 42/47/52LG70, 47LG90
Page 35
EXTERNAL EQUIPMENT SETUP
33
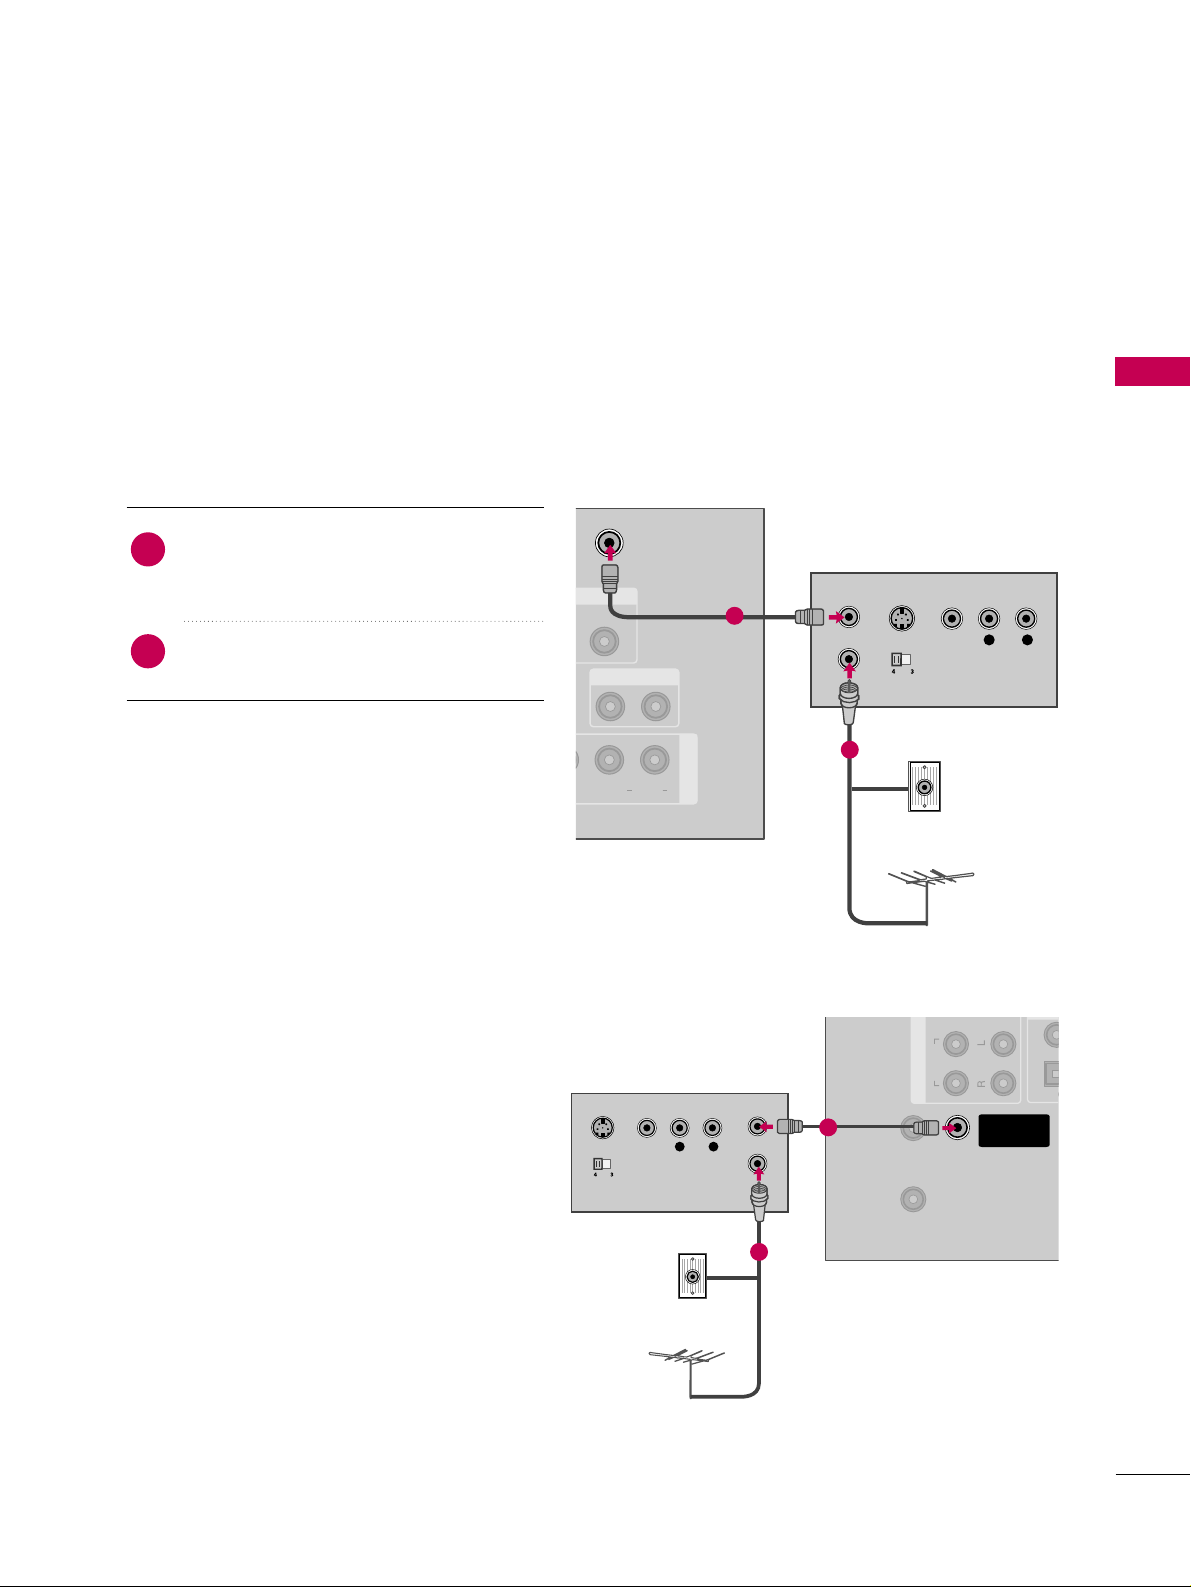
VCR SETUP
Antenna Connection
■
To avoid picture noise (interference), leave an adequate distance between the VCR and TV.
■
Use the ISM feature in the Option menu to avoid having a fixed image remain on the screen for a long period
of time
(
Plasma TV models
only)
. If the 4:3 picture format is used; the fixed images on the sides of the screen
may remain visible on the screen. This phenomenon is common to all TVs and is not covered by warranty.
ANTENNA/
CABLE IN
COAXIAL
AUDIO OUT
AV IN 1
(MONO)
AUDIO
L R
S-VIDEO VIDEO
OUTPUT
SWITCH
ANT IN
ANT OUT
Wall Jack
Antenna
1
2
REMOTE
CONTROL IN
RS-232C IN
(SERVICE ONLY)
OPTIC
COAX
ANTENNA/
CABLE IN
COMP
AUDIO
L R
S-VIDEO VIDEO
OUTPUT
SWITCH
ANT IN
ANT OUT
R
Wall Jack
Antenna
1
2
Connect the RF antenna out socket of the
VCR to the
AANN TT EE NNNNAA// CCAA BBLL EE IINN
sock-
et on the TV.
Connect the antenna cable to the RF
antenna in socket of the VCR.
1. How to connect
2. How to use
■
Set VCR output switch to 3 or 4 and then
tune TV to the same channel number.
■
Insert a video tape into the VCR and press
PLAY on the VCR. (Refer to the VCR owner’s
manual.
)
2
1
Plasma TV, 32/37/42LG30, 37/42/47/52LG50,
32/42/47/52LG70, 47LG90
32/37/42/47/52LG60, 42/47LGX
Page 36
EXTERNAL EQUIPMENT SETUP
34
EXTERNAL EQUIPMENT SETUP
L R
S-VIDEO VIDEO
OUTPUT
SWITCH
ANT IN
ANT OUT
AV IN
L/ MONO
R
AUDIO
VIDEO
HDMI IN 4 USB IN
1
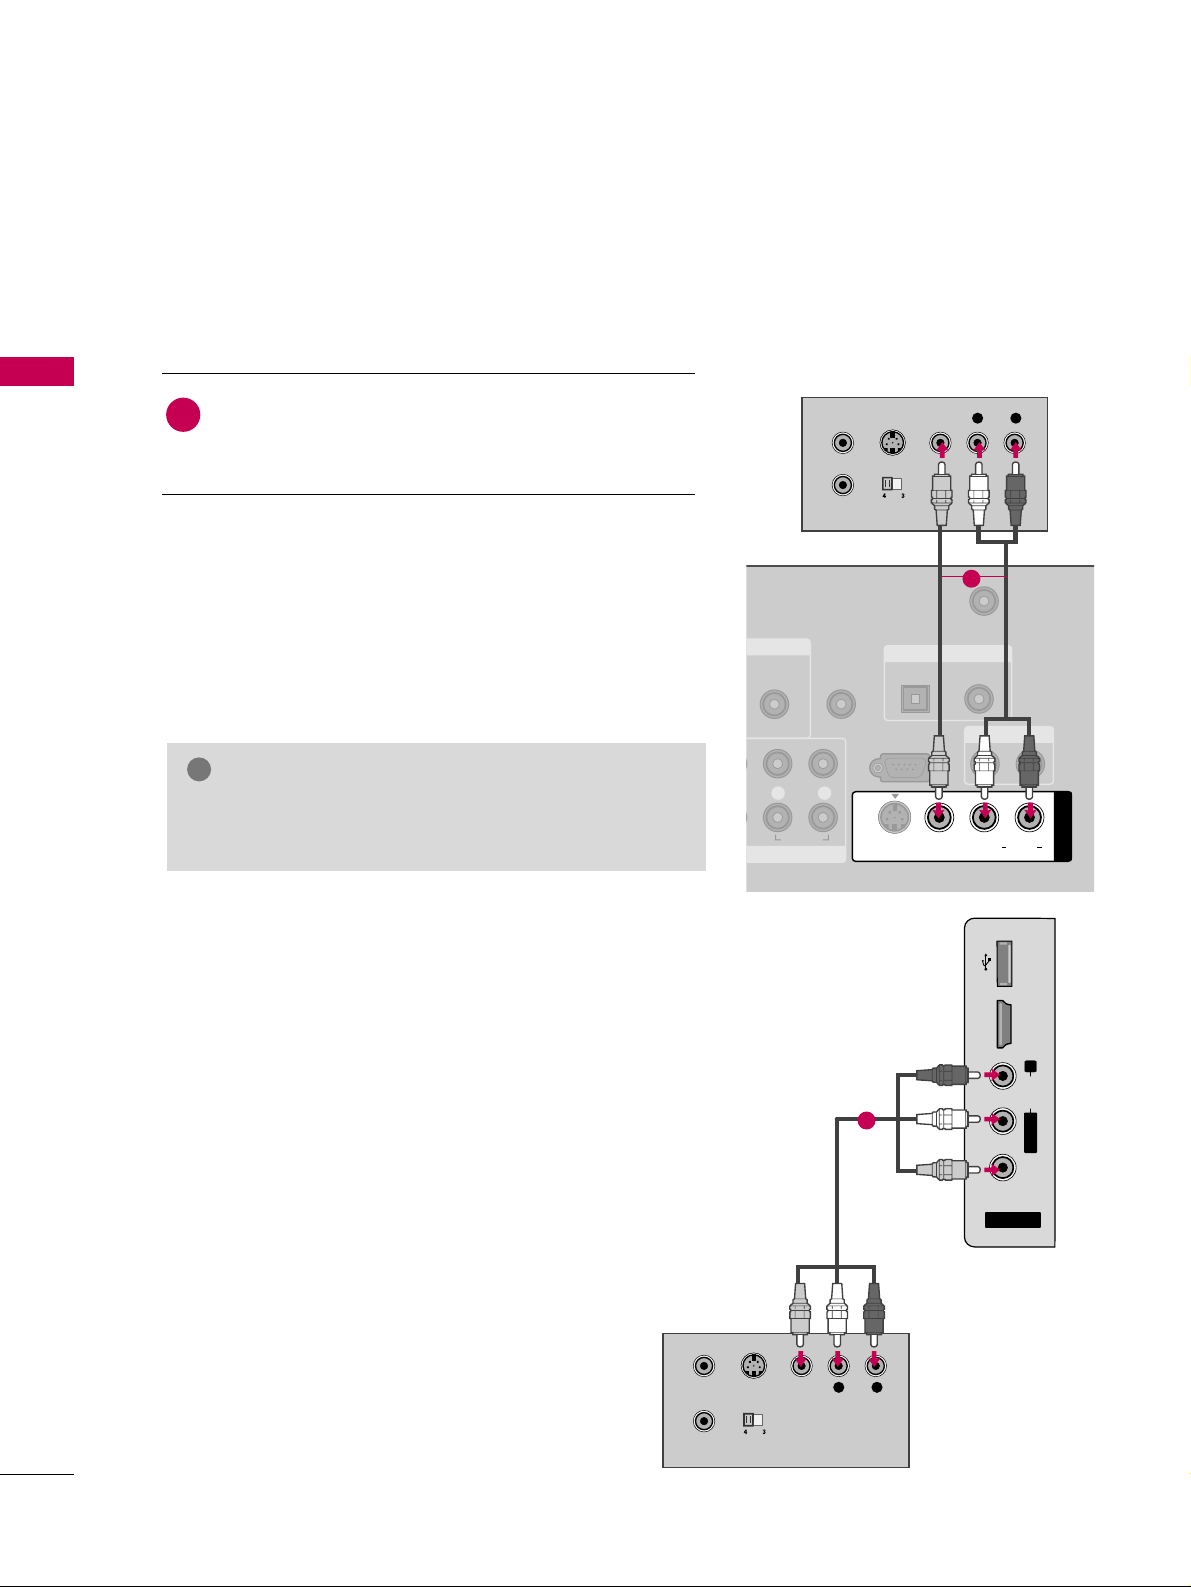
Composite (RCA) Connection
GG
If you have a mono VCR, connect the audio cable from
the VCR to the
AAUUDDII OO LL //MM OO NNOO
jack of the TV.
NOTE
!
AUDIO
(RGB/DVI)
REMOTE
CONTROL IN
ANTENNA/
CABLE IN
RS-232C IN
(CONTROL & SERVICE)
L R
AUDIO
OPTICAL COAXIAL
DIGITAL AUDIO OUT
AUDIO OUT
AV IN 1
VIDEO L R
(MONO)
AUDIO
S-VIDEO
L R
S-VIDEO VIDEO
OUTPUT
SWITCH
ANT IN
ANT OUT
1
Plasma TV, 32/37/42LG30,
37/42/47/52LG50,
32/42/47/52LG70, 47LG90
32/37/42/47/52LG60, 42/47LGX
Connect the
AAUUDDIIOO/VVIIDDEE OO
jacks between TV and
VCR. Match the jack colors (Video = yellow, Audio Left
= white, and Audio Right = red)
1. How to connect
2. How to use
■
Insert a video tape into the VCR and press PLAY on the VCR.
(
Refer to the VCR owner’s manual.
)
■
Select the
AAVV11
input source on the TV using the
IINN PP UU TT
button on the remote control.
■
If connected to
AAVV IINN22
, select
AAVV22
input source on the TV.
1
Page 37
EXTERNAL EQUIPMENT SETUP
35
GG
Do not connect to both Video and S-Video at the same
time. In the event that you connect both Video and the
S-Video cables, only the S-Video will work.
CAUTION
GG
S-Video provides better quality than composite. Use it
when available.
NOTE
!
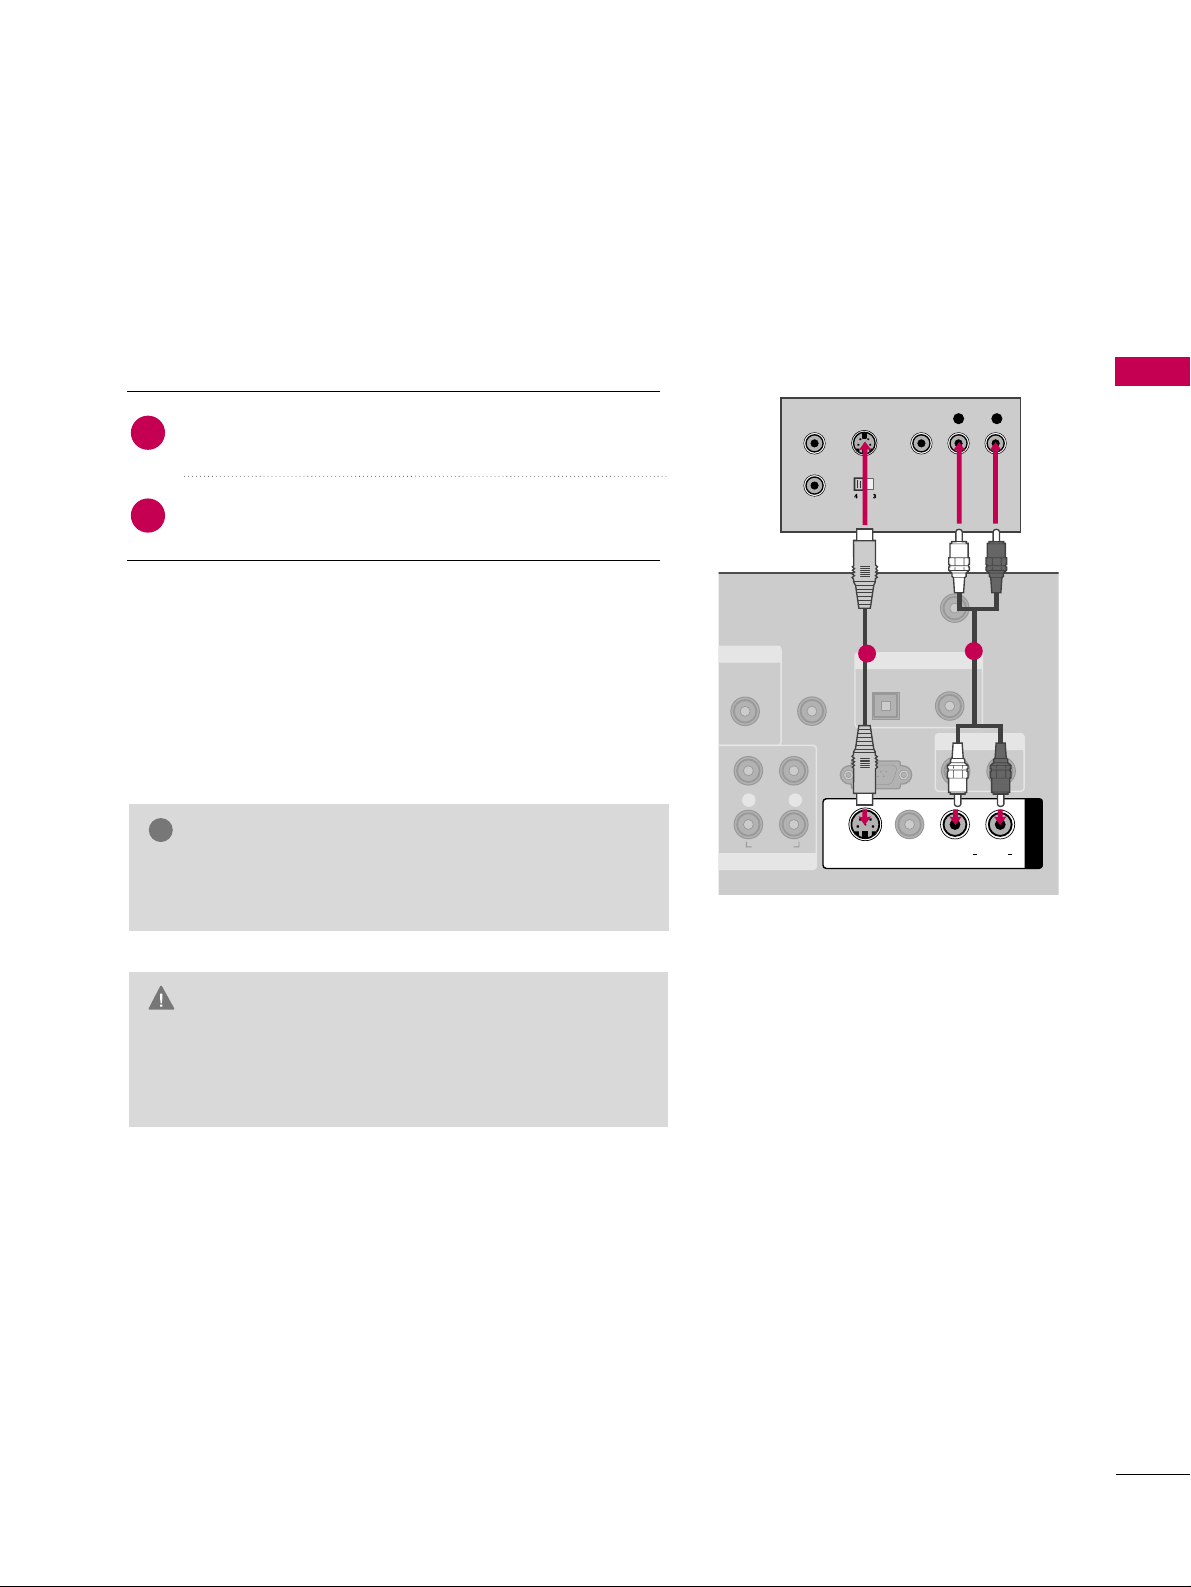
S-Video Connection
(Except 32/37/42/47/52LG60, 42/47LGX)
AUDIO
REMOTE
CONTROL IN
ANTENNA/
CABLE IN
RS-232C IN
(CONTROL & SERVICE)
L R
AUDIO
OPTICAL COAXIAL
DIGITAL AUDIO OUT
AUDIO OUT
AV IN 1
VIDEO LR
(MONO)
AUDIO
S-VIDEO
L R
S-VIDEO VIDEO
OUTPUT
SWITCH
ANT IN
ANT OUT
1
2
Connect the S-VIDEO output of the VCR to the
SS --VV IIDDEEOO
input on the TV.
Connect the audio outputs of the VCR to the
AAUUDDIIOO
input jacks on the TV.
1. How to connect
2. How to use
■
Insert a video tape into the VCR and press PLAY on the VCR.
(
Refer to the VCR owner’s manual.
)
■
Select the
AAVV11
input source on the TV using the
IINN PP UU TT
button on the remote control.
2
1
Page 38
EXTERNAL EQUIPMENT SETUP
36
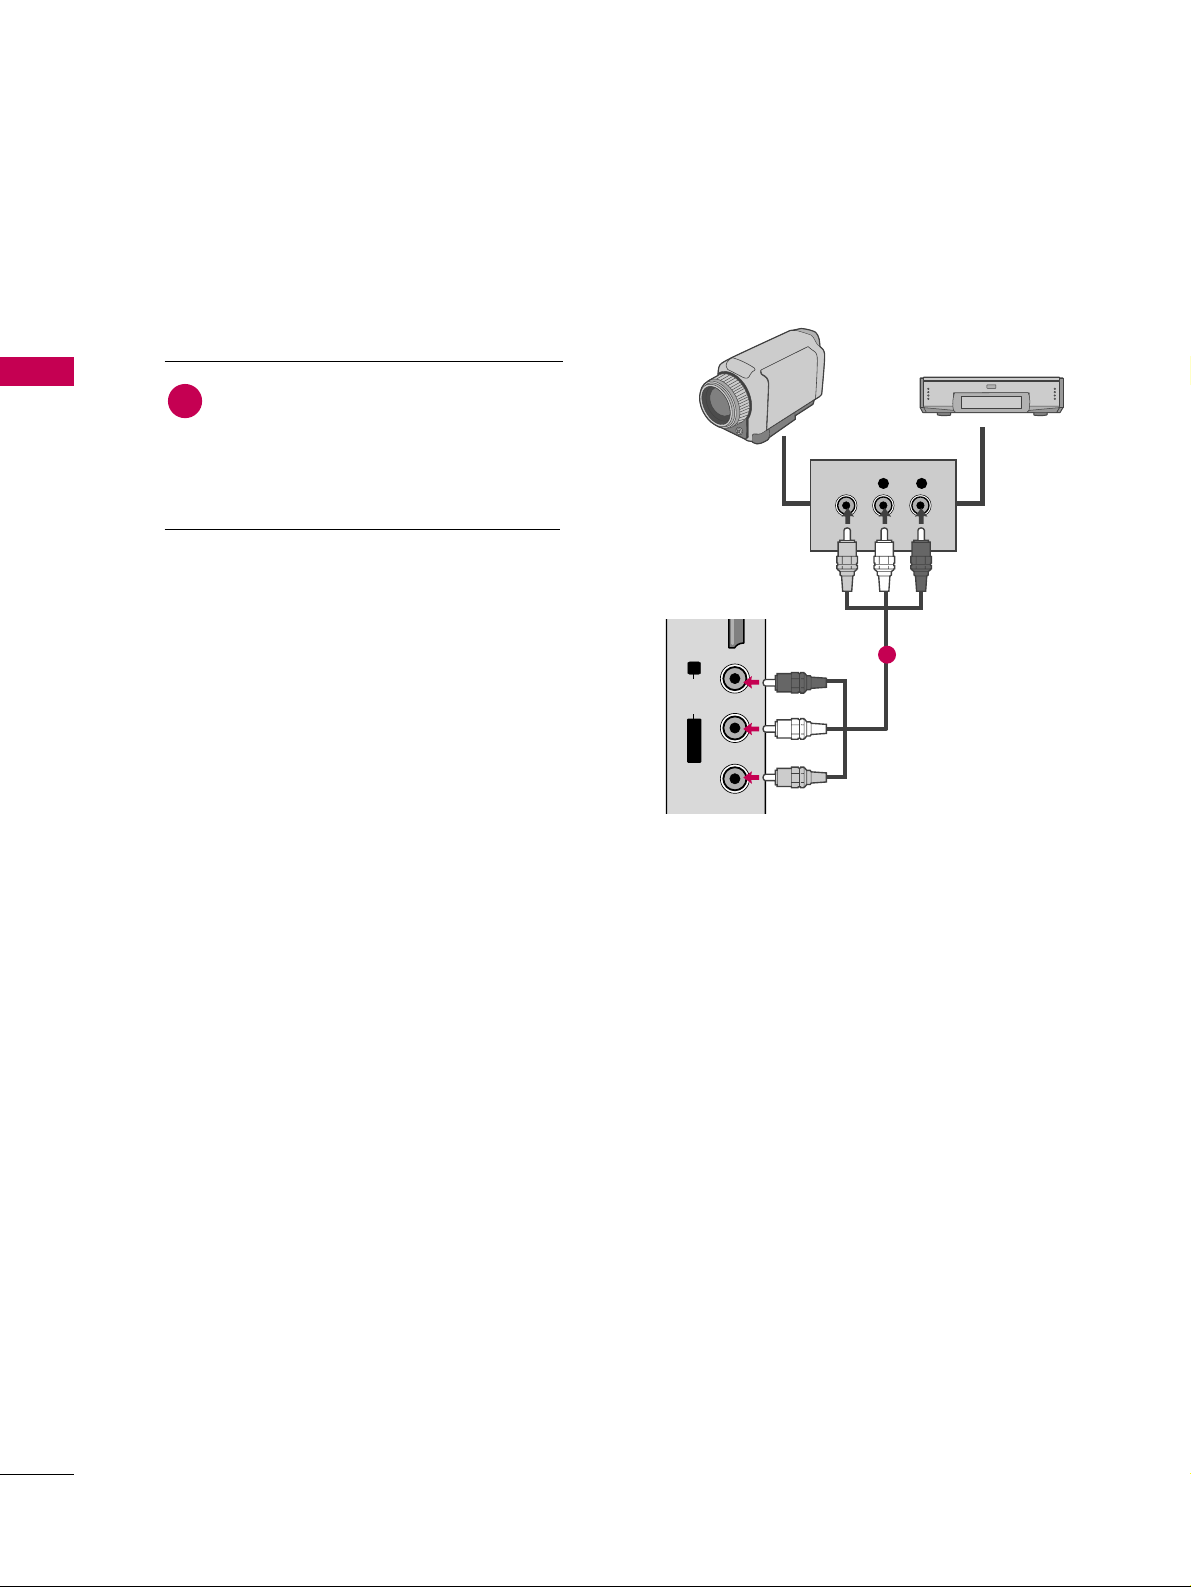
OTHER A/V SOURCE SETUP
EXTERNAL EQUIPMENT SETUP
L/ MONO
R
AUDIO
VIDEO
HDMI IN 3 USB IN
L R
VIDEO
Camcorder
Video Game Set
Connect the
AAUUDDIIOO/VVIIDDEEOO
jacks
between TV and external equipment.
Match the jack colors
.
(
Video = yellow, Audio Left = white, and
Audio Right = red
)
1. How to connect
2. How to use
■
Select the
AAVV22
input source on the TV using
the
IINN PP UU TT
button on the remote control.
■
If connected to
AAVV IINN 11
input, select the
AAVV11
input source on the TV.
■
Operate the corresponding external equipment.
1
1
Page 39
EXTERNAL EQUIPMENT SETUP
37
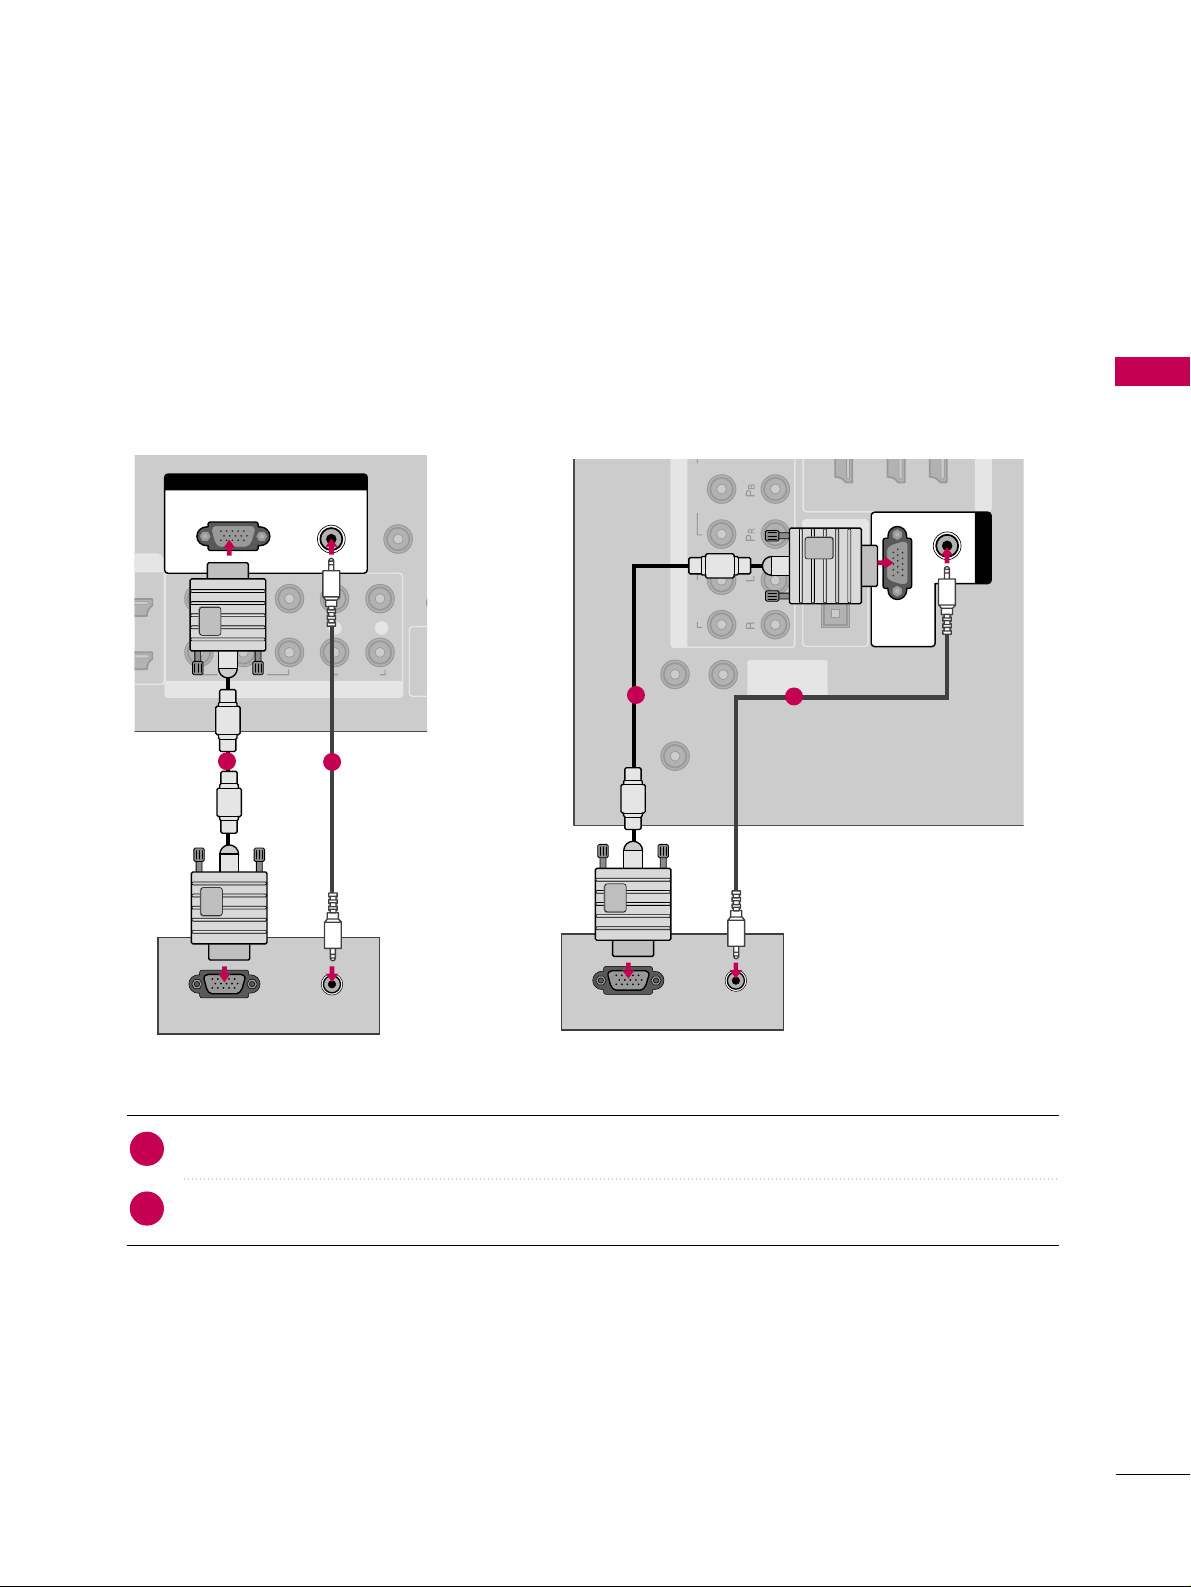
PC SETUP
This TV provides Plug and Play capability, meaning that the PC adjusts automatically to the TV's settings.
VGA (D-Sub 15 pin) Connection
Connect the VGA output of the PC to the
RRGGBB ((PP CC
))
jack on the TV.
Connect the PC audio output to the
AAUUDDIIOO ((RRGGBB//DDVVII
))
jack on the TV.
1. How to connect
2. How to use
■
Turn on the PC and the TV.
■
Select the
RRGGBB--PP CC
input source on the TV using the
IINN PP UU TT
button on the remote control.
2
1
COMPONENT IN
REMOTE
CONTROL IN
1
2
(CO
VIDEO
LYP
BPR
R
AUDIO
RGB IN
AUDIO
(RGB/DVI)
RGB(PC)
RGB OUTPUT
AUDIO
1
2
REMOTE
CONTROL IN
RS-232C IN
(SERVICE ONLY)
OPTICAL
COAXIAL
DIGITAL
AUDIO OUT
123
HDMI/D
ANTENNA/
CABLE IN
COMPONENT IN
VIDEO
AUDIO
(RGB/DVI)
AUDIO
RGB(PC)
RGB IN
RGB OUTPUT
AUDIO
1
2
Plasma TV, 32/37/42LG30, 37/42/47/52LG50,
32/42/47/52LG70, 47LG90
32/37/42/47/52LG60, 42/47LGX
Page 40

EXTERNAL EQUIPMENT SETUP
38
EXTERNAL EQUIPMENT SETUP
GG
32/37/42LG30, 42/50PG25: To get the the best
picture quality, adjust the PC graphics card to
1360x768.
GG
37/42/47/52LG50, 32/37/42/47/52LG60,
32/42/47/52LG70, 42/47LGX, 47LG90,
50/60PG60, 50/60PG70: To get the the best
picture quality, adjust the PC graphics card to
1920x1080.
GG
Depending on the graphics card, DOS mode may
not work if a HDMI to DVI Cable is in use.
GG
In PC mode, there may be noise associated with
the resolution, vertical pattern, contrast or brightness. If noise is present, change the PC output to
another resolution, change the refresh rate to
another rate or adjust the brightness and contrast
on the PICTURE menu until the picture is clear.
GG
Avoid keeping a fixed image on the screen for a
long period of time. The fixed image could become
permanently imprinted on the screen.
GG
The synchronization input form for Horizontal and
Vertical frequencies is separate.
NOTES
!
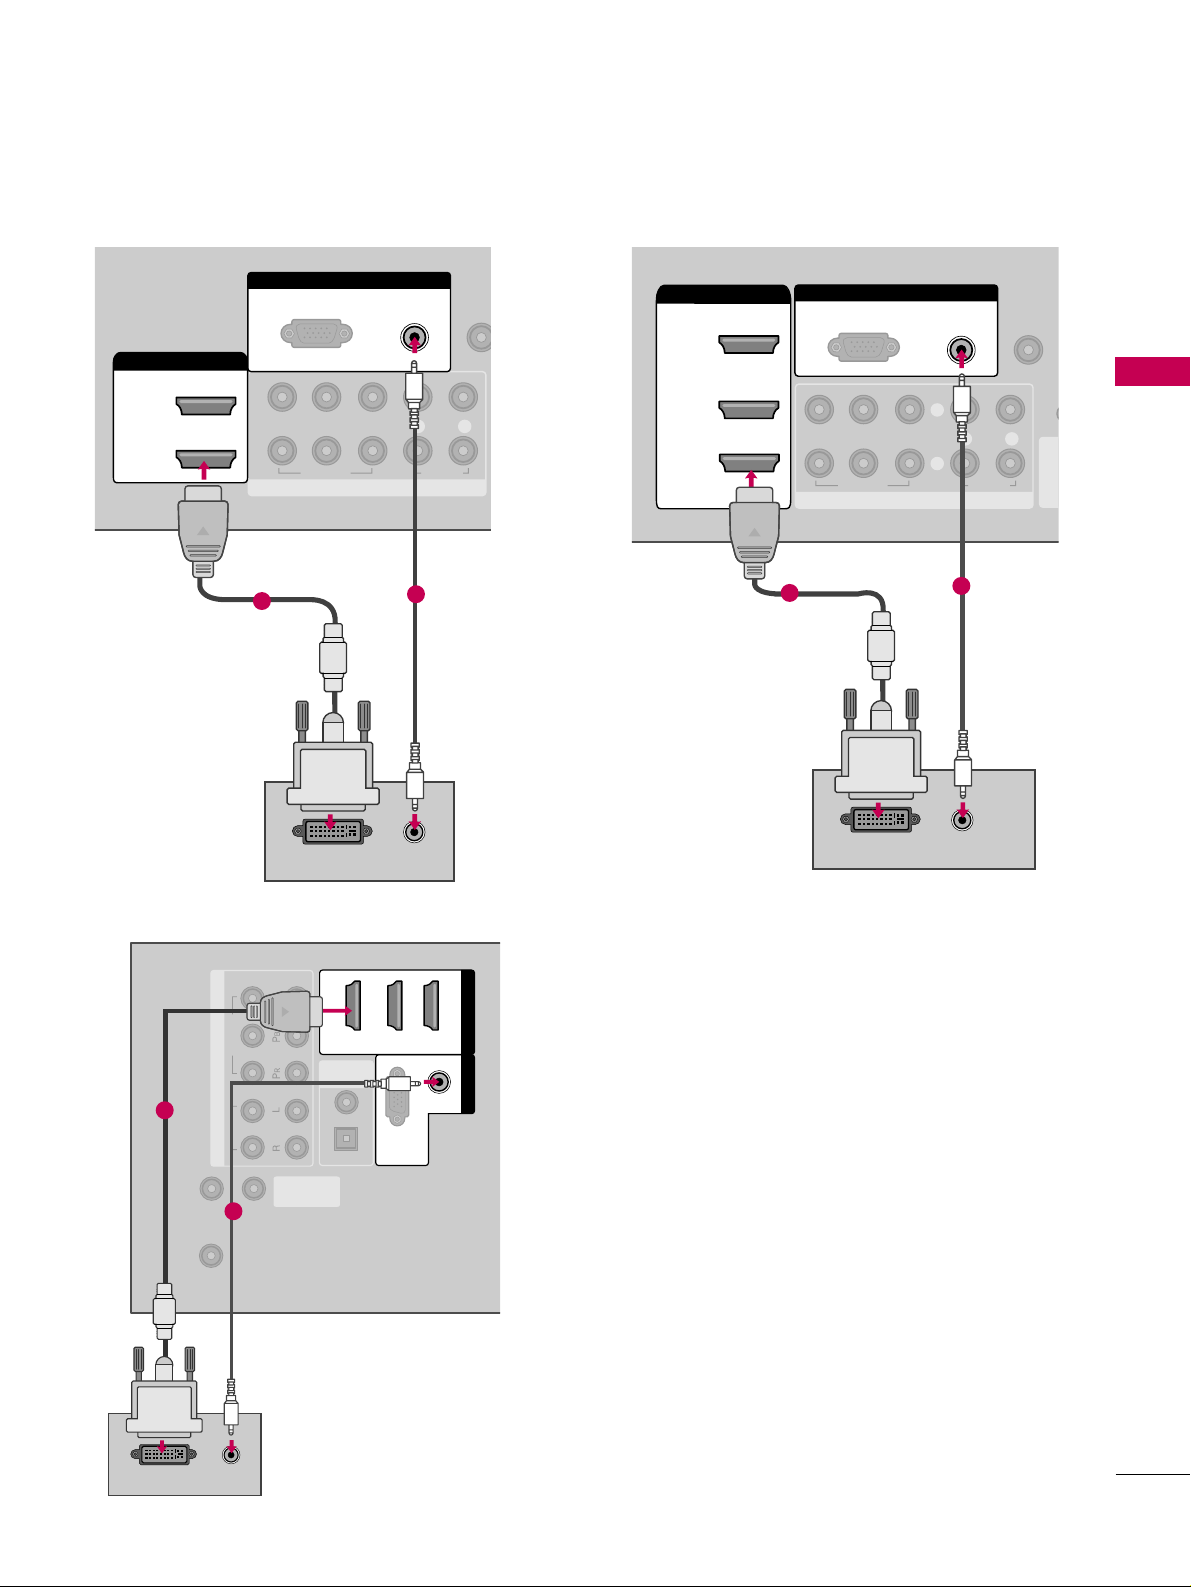
DVI to HDMI Connection
32/37/42LG30, 37/42/47/52LG50, 32LG70, Plasma TV
- Connect the DVI output of the PC to the
HHDDMMII// DD VV II II NN 11, 22
, or
33
jack on the TV.
32/37/42/47/52LG60, 42/47/52LG70, 42/47LGX, 47LG90
- Connect the DVI output of the PC to the
HHDDMMII// DD VV II II NN 11, 22, 33
, or
44
jack on the TV.
Connect the PC audio output to the
AAUUDDII OO ((RRGGBB// DDVVII))
jack on the TV.
1. How to connect
■
Turn on the PC and the TV.
■
32/37/42LG30, 37/42/47/52LG50, 32LG70, Plasma TV
- Select the
HHDDMMII11,HHDDMMII22
,or
HHDDMMII33
input source on the TV using the
IINN PP UU TT
button on the remote control.
■
32/37/42/47/52LG60, 42/47/52LG70, 42/47LGX, 47LG90
- Select the
HHDDMMII11,HHDDMMII22,HHDDMMII33
,or
HHDDMMII44
input source on the TV using the
IINN PP UU TT
button on the remote
control.
2. How to use
2
1
Page 41
EXTERNAL EQUIPMENT SETUP
39
REMOTE
CONTROL IN
RS-232C IN
(SERVICE ONLY)
OPTICAL
COAXIAL
DIGITAL
AUDIO OUT
ANTENNA/
CABLE IN
COMPONENT IN
2
1
VIDEO
AUDIO
HDMI/DVI IN
123
(RGB/DVI)
AUDIO
RGB(PC)
RGB IN
DVI-PC OUTPUT
AUDIO
1
2
32/37/42/47/52LG60, 42/47LGX
RGB IN
COMPONENT IN
AUDIO
(RGB/DVI)
RGB(PC)
REMOTE
CONTROL IN
(CO
VIDEO
LYP
B
P
R
R
AUDIO
AV IN 1
2
3
2
1
( )
HDMI/DVI IN
1
DVI-PC OUTPUT
AUDIO
COMPONENT IN
REMO
CONTRO
1
2
VIDEO
LYP
B
P
R
R
AUDIO
HDMI/DVI IN
2
1
RGB IN
AUDIO
(RGB/DVI)
RGB(PC)
DVI-PC OUTPUT
AUDIO
1
2
2
32/37/42LG30, 37/42/47/52LG50, 32LG70
1
Plasma TV, 42/47/52LG70, 47LG90
Page 42
EXTERNAL EQUIPMENT SETUP
40
EXTERNAL EQUIPMENT SETUP
Horizontal Vertical
Frequency(KHz)Frequency(Hz
)
31.469 70.08
31.469 70.08
31.469 59.94
37.879 60.31
48.363 60.00
47.776 59.87
47.720 59.799
47.130 59.65
Resolution
720x400
1360x768
640x350
640x480
800x600
1024x768
1280x768
1366x768
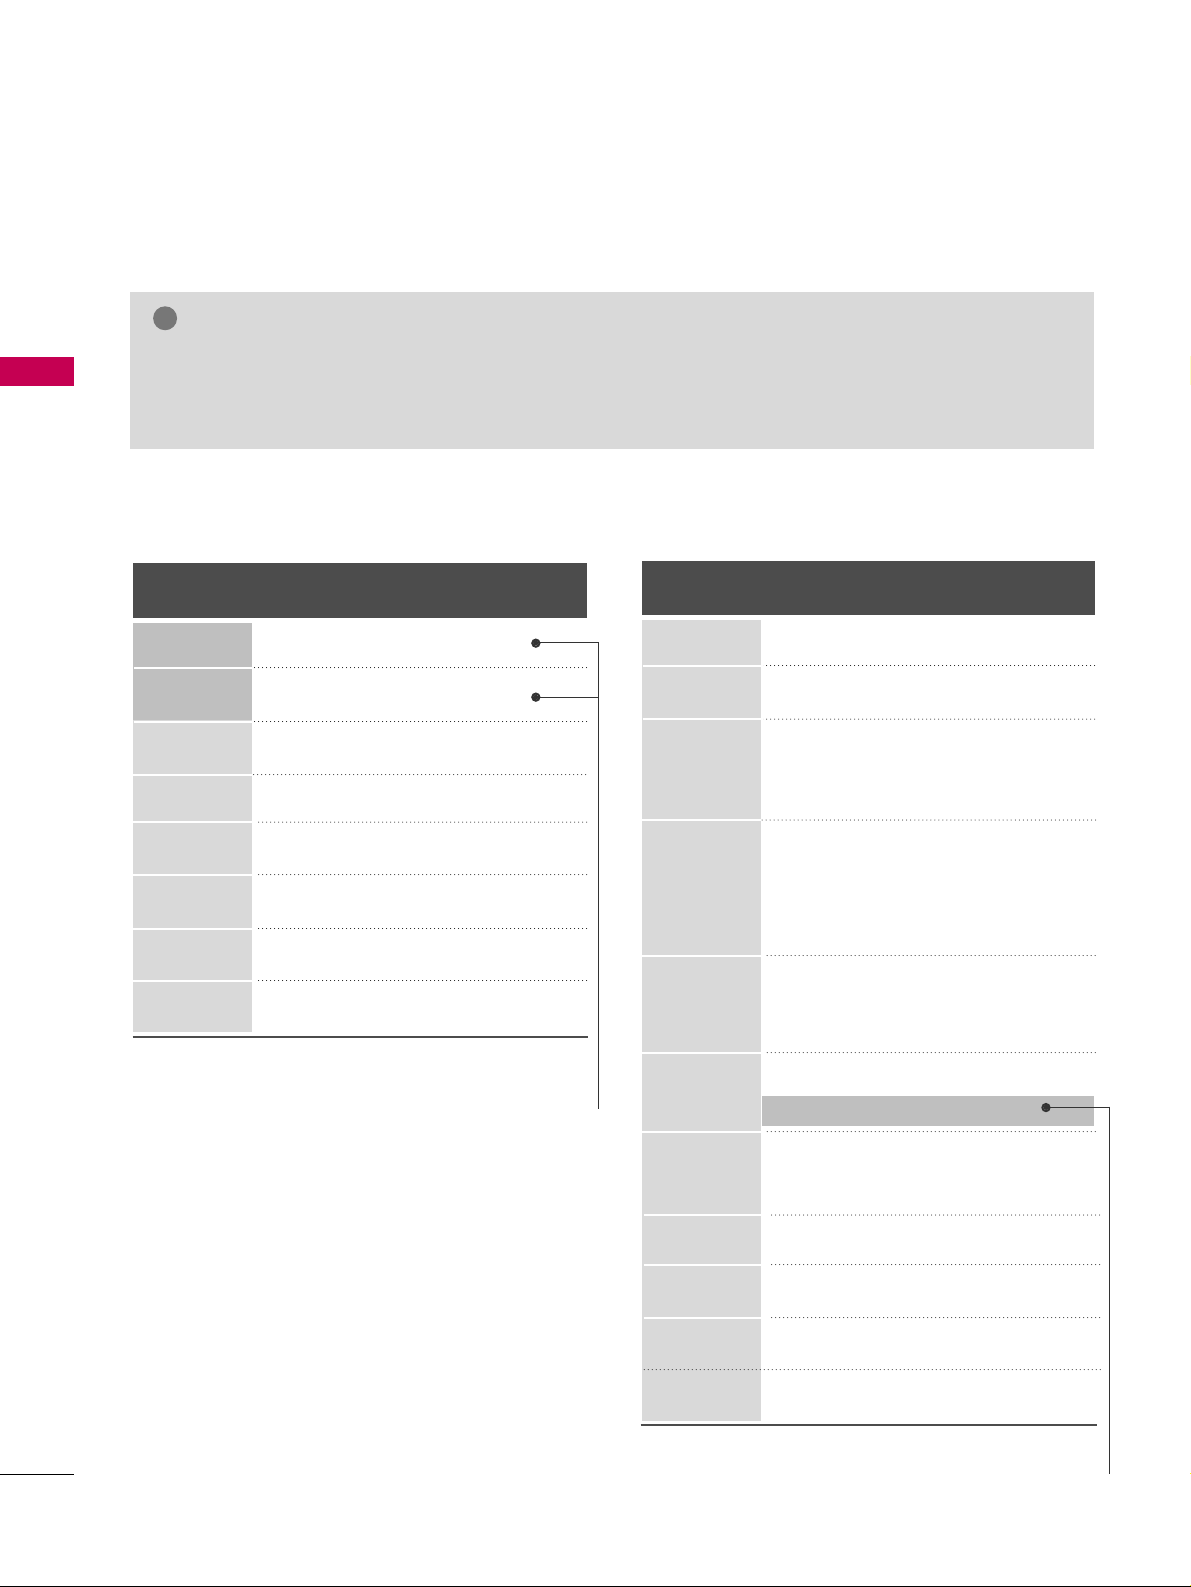
Supported Display Specifications (RGB-PC, HDMI-PC)
For 32/37/42LG30
For 37/42/47/52LG50, 32/37/42/47/52LG60,
32/42/47/52LG70, 42/47LGX, 47LG90
* Only RGB-PC mode
GG
Depending on the graphics card, some resolution settings may not allow the image to be positioned on the
screen properly.
GG
If there are overscan in HDMI-PC 1920x1080, change aspect ratio to
JJuusstt ss ccaann
.
NOTE
!
Resolution
720x400
1360x768
640x350
640x480
800x600
1024x768
1280x1024
1600x1200
1920x1080
RGB-PC
1920x1080
HDMI-PC
1280x768
Horizontal Vertical
Frequency(KHz)Frequency(Hz
)
31.468 70.09
31.469 70.08
31.469 59.94
37.500 75.00
37.861 72.80
35.156 56.25
37.879 60.31
46.875 75.00
48.077 72.18
48.363 60.00
56.476 70.06
60.023 75.02
47.776 59.87
60.289 74.893
63.981 60.02
79.976 75.025
47.712 60.015
75.00 60.00
66.587 59.934
67.5 60.00
* Only RGB-PC mode
Page 43
EXTERNAL EQUIPMENT SETUP
41
Resolution
720x400
1360x768
640x350
640x480
800x600
1024x768
1280x1024
1600x1200
1920x1080
1280x768
Horizontal Vertical
Frequency(KHz)Frequency(Hz
)
31.468 70.09
31.469 70.08
31.469 59.94
37.500 75.00
37.861 72.80
35.156 56.25
37.879 60.31
46.875 75.00
48.077 72.18
48.363 60.00
56.476 70.06
60.023 75.02
47.776 59.87
60.289 74.893
63.981 60.02
79.976 75.025
47.712 60.015
75.00 60.00
66.587 59.934
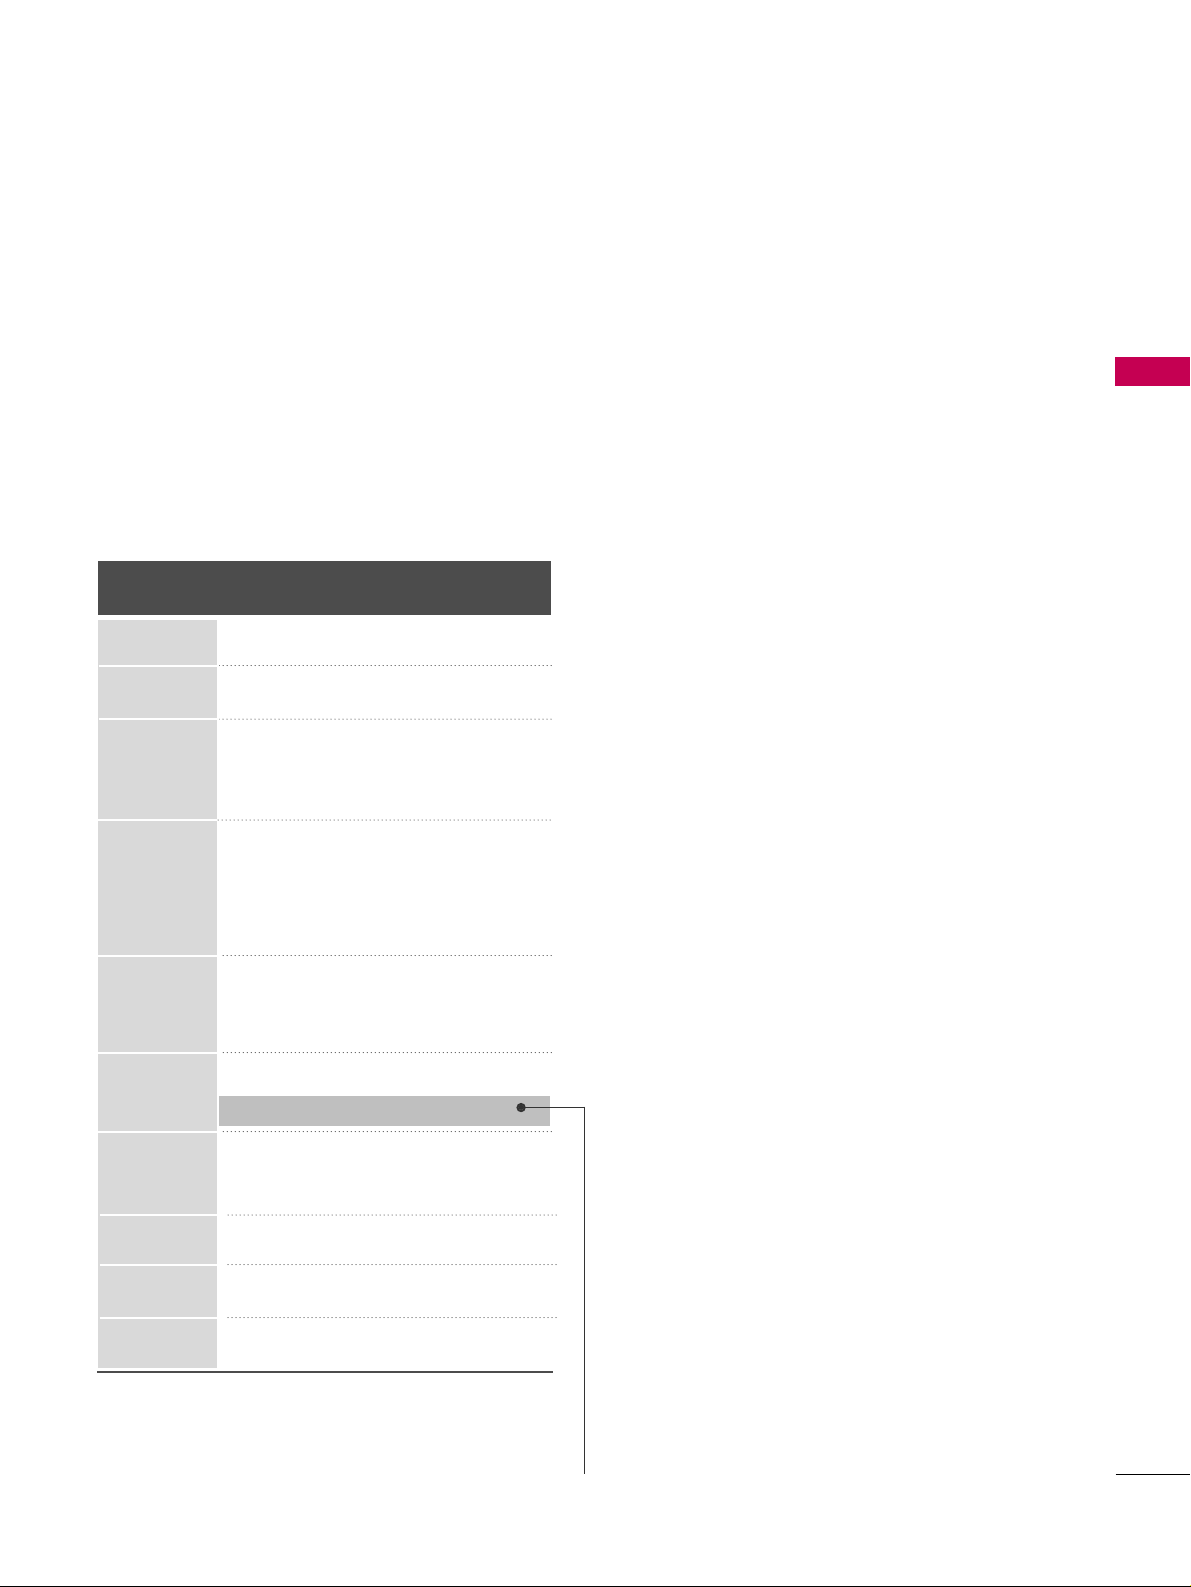
For 42/50PG25, 50/60PG60, 50/60PG70
* Only RGB-PC mode
Page 44
EXTERNAL EQUIPMENT SETUP
42
EXTERNAL EQUIPMENT SETUP
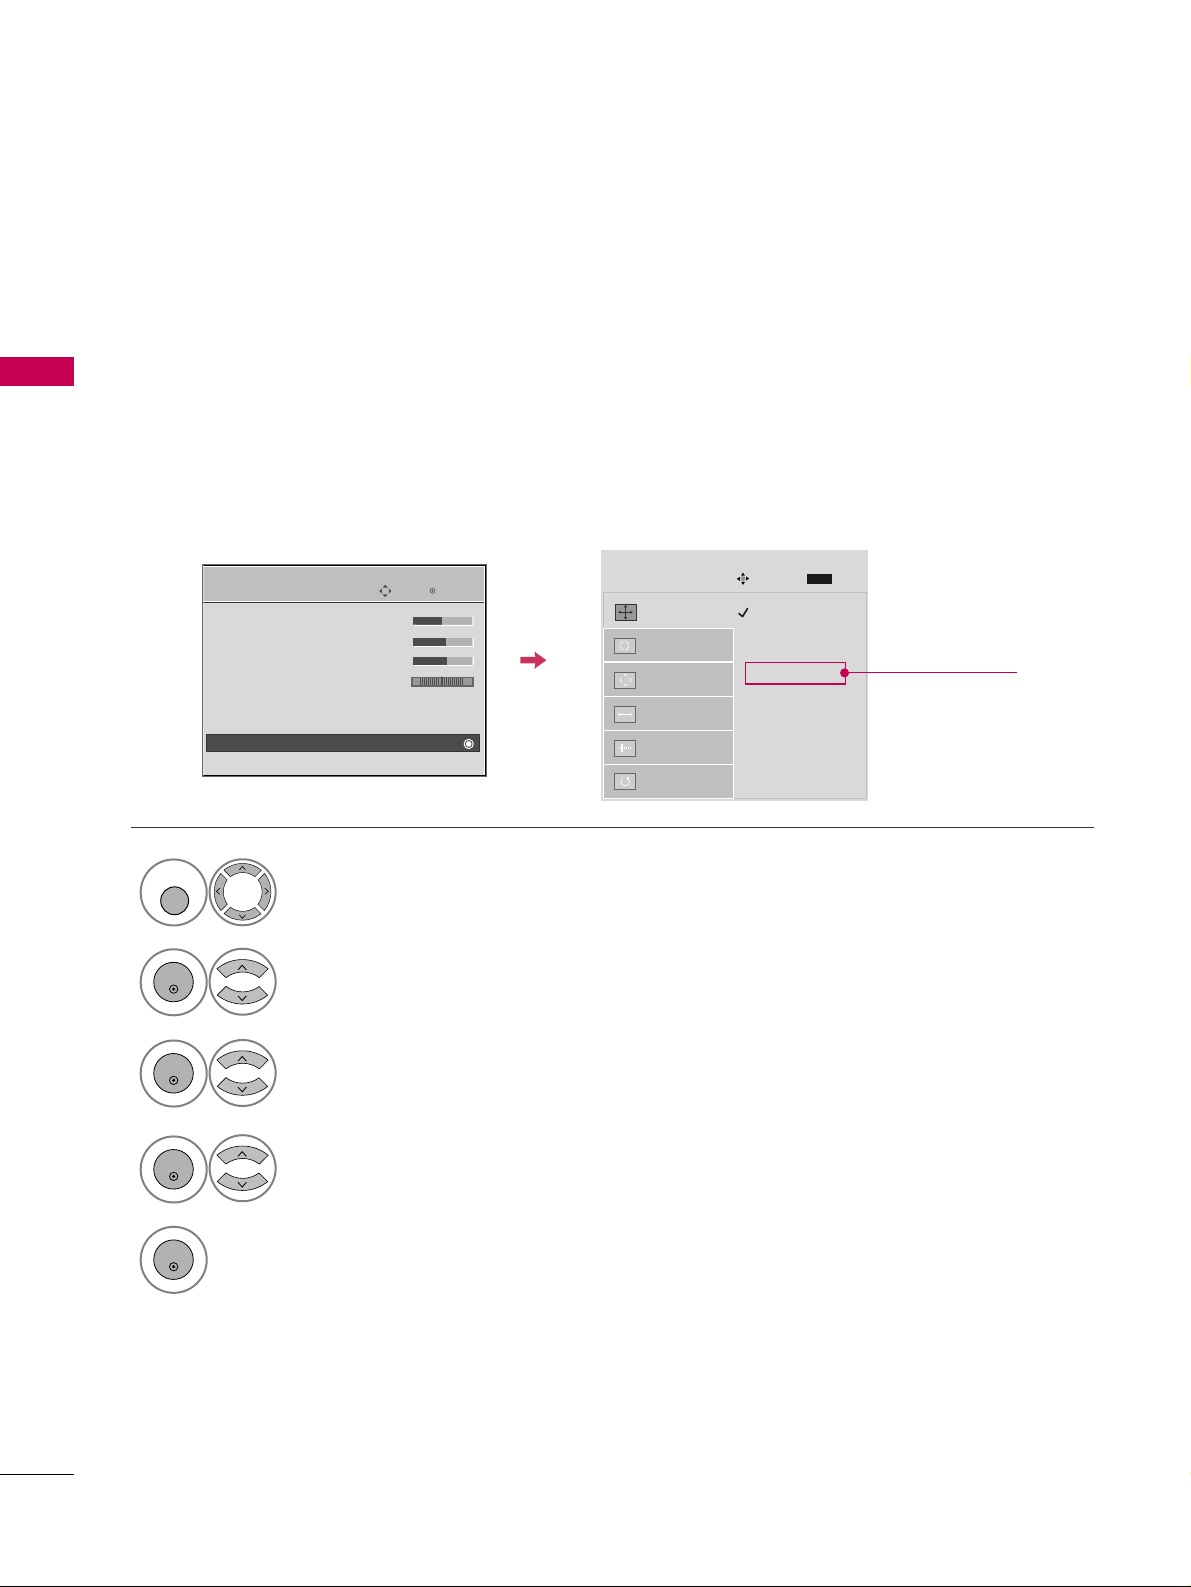
Screen Setup for PC mode
Selecting Resolution
You can choose the resolution in RGB-PC mode.
The
PP ooss iitt iioonn, PP hhaassee
, and
SS iizzee
can also be adjusted.
Select
PPIICCTTUURREE
.
Select
SS cc rree eenn (( RR GGBB--PP CC))
.
Select
RRee ssoolluuttiioonn
.
Select the desired resolution.
1024 x 768
1280 x 768
1360 x 768
1366 x 768
Auto config.
Resolution
G
Position
Size
Phase
Reset
SCREEN
Move
Prev.
MENU
1
MENU
3
4
2
ENTER
ENTER
ENTER
5
ENTER
Enter
Move
PICTURE
E
• Brightness 50
• Sharpness 60
• Color 60
• Tint 0
• Advanced Control
• Reset
Screen (RGB-PC)
TruMotion Demo
RG
Only for
32/37/42LG30
Page 45
EXTERNAL EQUIPMENT SETUP
43
Auto Configure
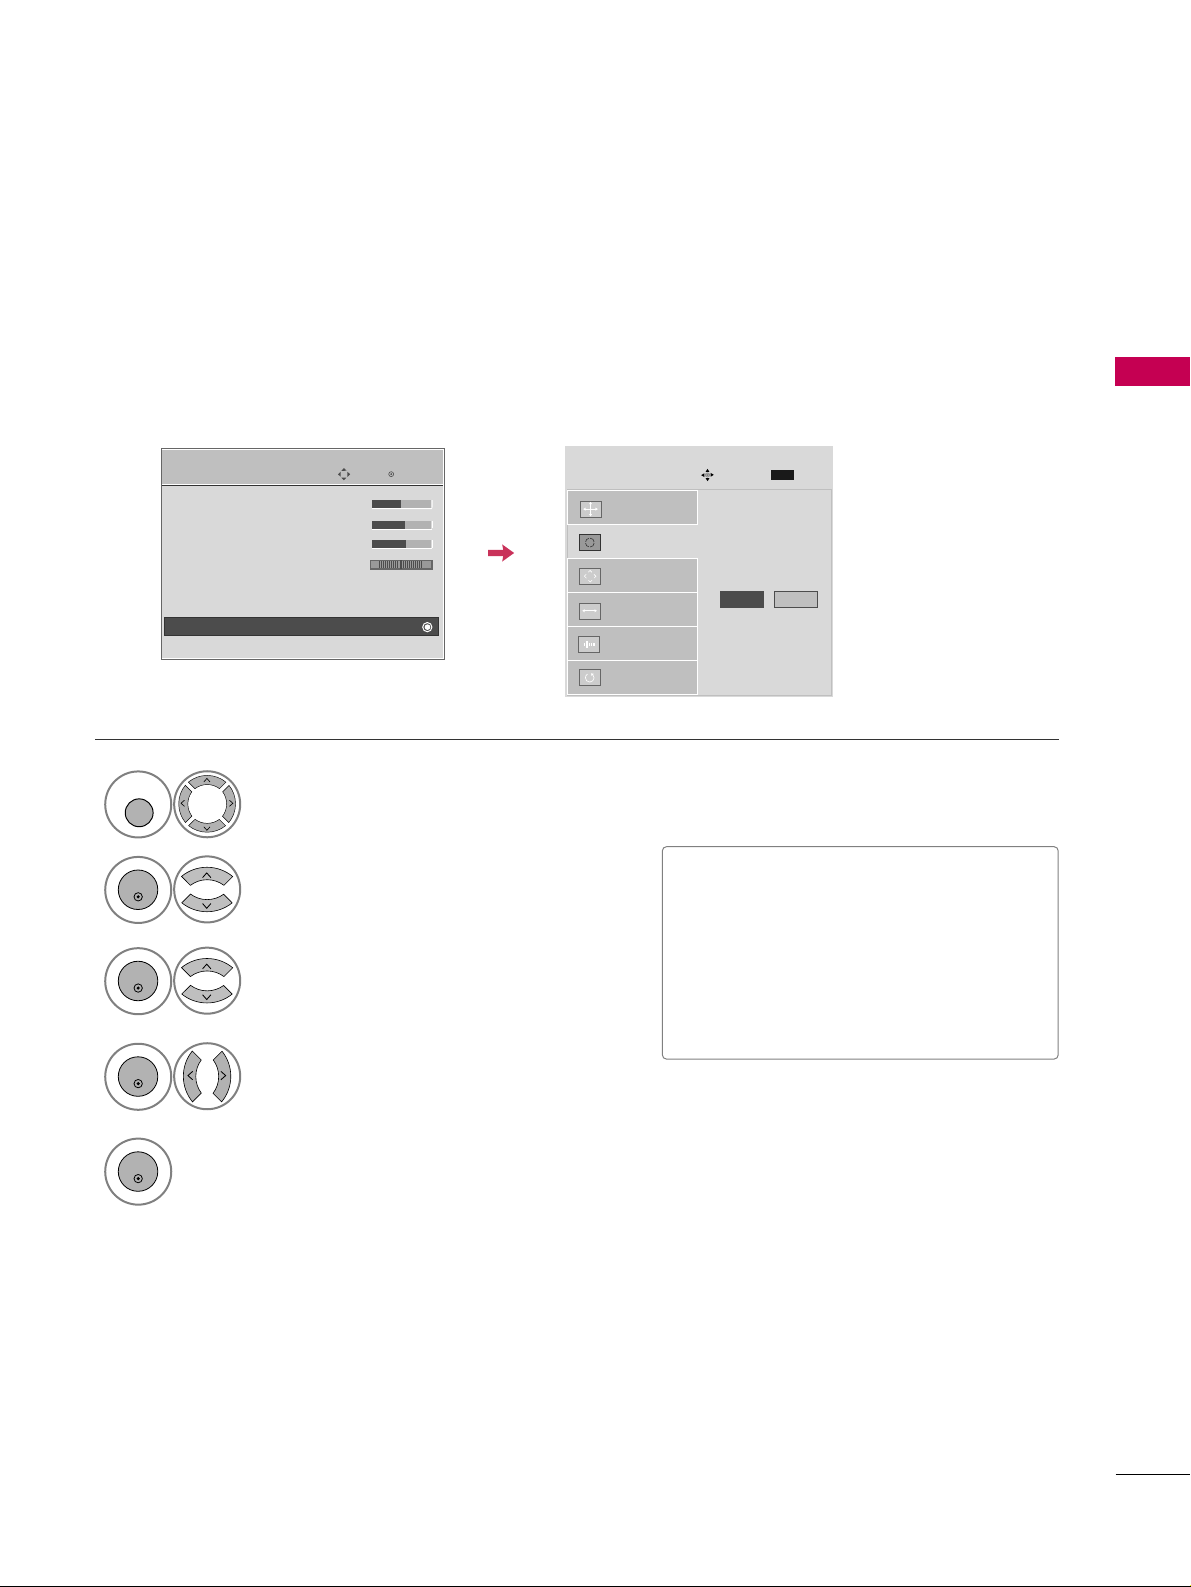
Automatically adjusts picture position and minimizes image instability. After adjustment, if the image is still
not correct, try using the manual settings or a different resolution or refresh rate on the PC.
Select
SS cc rree eenn (( RR GGBB--PP CC))
.
Select
AAuuttoo ccoonnff ii gg ..
.
Auto config.
G
Resolution
Position
Size
Phase
Reset
SCREEN
Move
Prev.
MENU
To Set
3
2
ENTER
ENTER
Select
YYee ss
.
4
ENTER
Start Auto Configuration.
5
ENTER
Select
PPIICCTTUURREE
.
1
MENU
• If the position of the image is still not
correct, try Auto adjustment again.
• If picture needs to be adjusted again
after Auto adjustment in RGB-PC, you
can adjust the
PPoo ss iittii oonn, SS ii zzee
or
PPhhaa ssee
.
Enter
Move
PICTURE
E
• Brightness 50
• Sharpness 60
• Color 60
• Tint 0
• Advanced Control
• Reset
Screen (RGB-PC)
TruMotion Demo
RG
Yes No
Page 46
EXTERNAL EQUIPMENT SETUP
44
EXTERNAL EQUIPMENT SETUP
Adjustment for screen Position, Size, and Phase
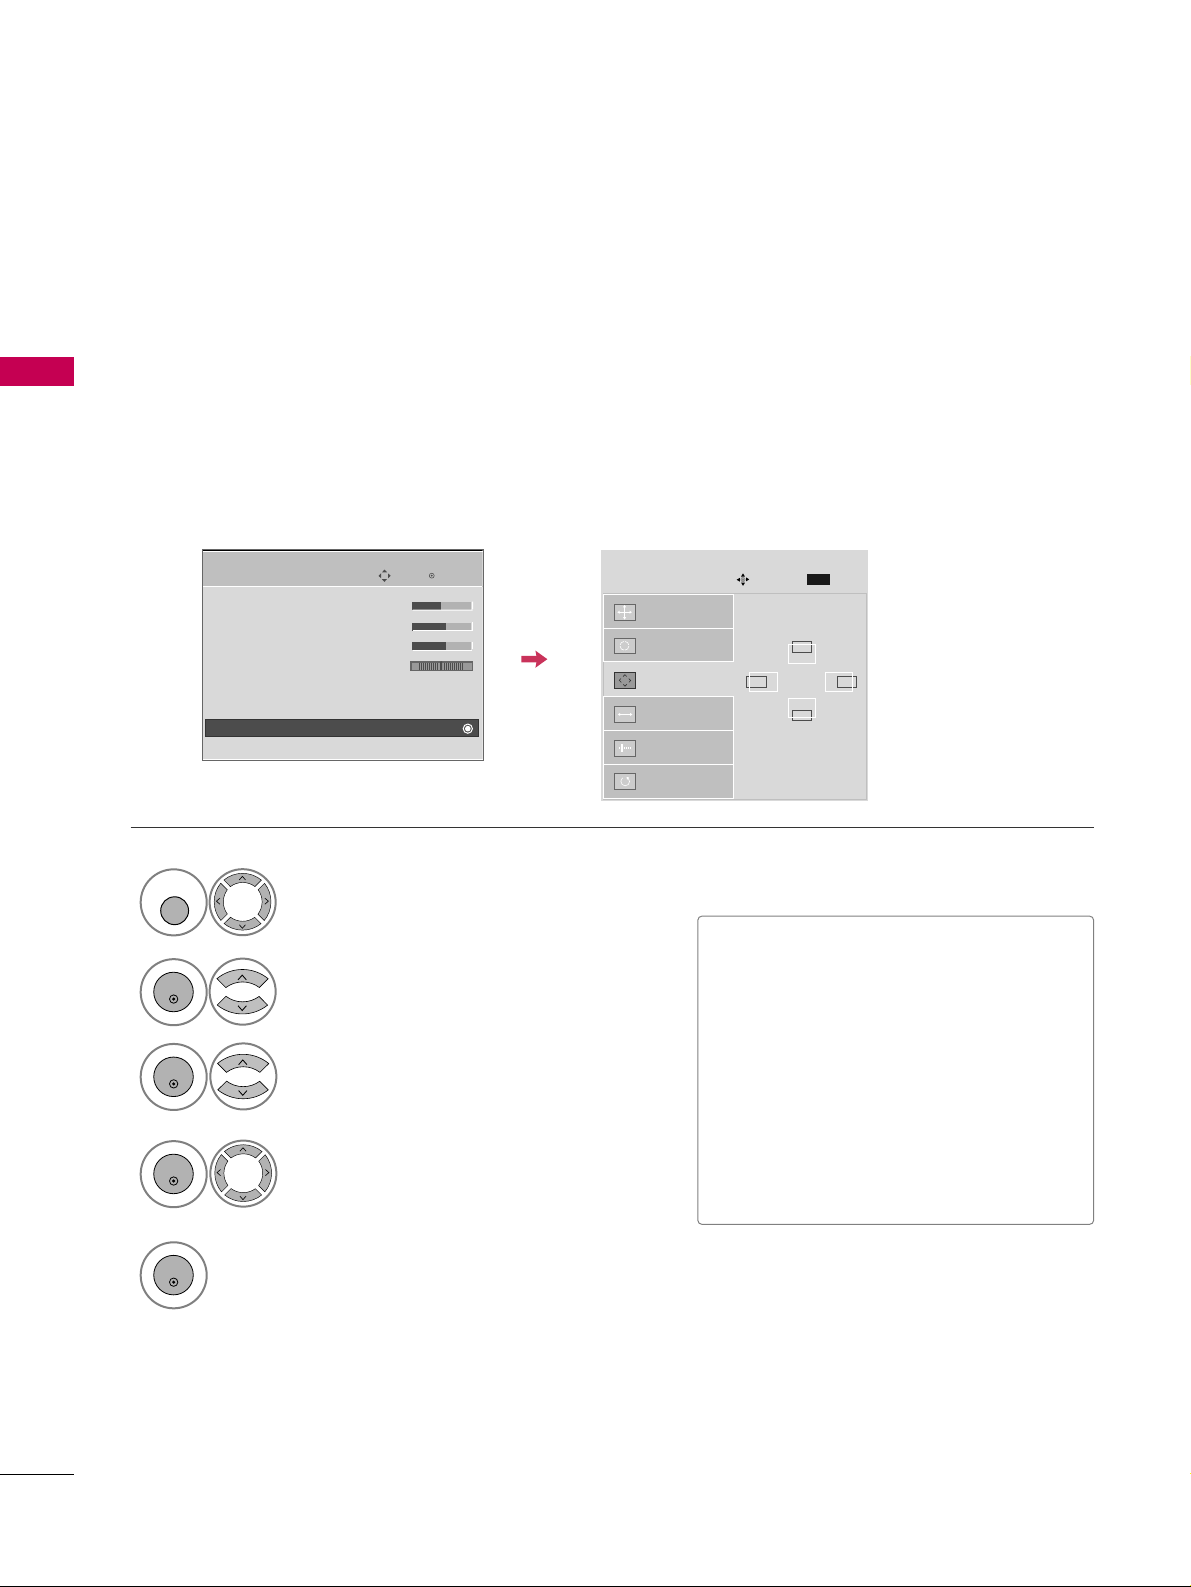
If the picture is not clear after auto adjustment and especially if characters are still trembling, adjust the picture
phase manually.
This feature operates only in RGB-PC mode.
Select
PPooss ii ttiioo nn, SS iizz ee
, or
PPhhaa ssee
.
Make appropriate adjustments.
Auto config.
Resolution
Position
G
Size
Phase
Reset
GF
D
E
SCREEN
Move
Prev.
MENU
3
ENTER
4
ENTER
■
PPooss ii ttiioo nn
: This function is to adjust picture to left/right and up/down as you
prefer.
■
SS iizz ee
: This function is to minimize any
vertical bars or stripes visible on the
screen background. And the horizontal
screen size will also change.
■
PPhh aa ssee
: This function allows you to
remove any horizontal noise and clear or
sharpen the image of characters.
Select
PPIICCTTUURREE
.
Select
SS cc rree eenn (( RR GGBB--PP CC))
.
1
MENU
2
ENTER
5
ENTER
Enter
Move
PICTURE
E
• Brightness 50
• Sharpness 60
• Color 60
• Tint 0
• Advanced Control
• Reset
Screen (RGB-PC)
TruMotion Demo
RG
Page 47
EXTERNAL EQUIPMENT SETUP
45
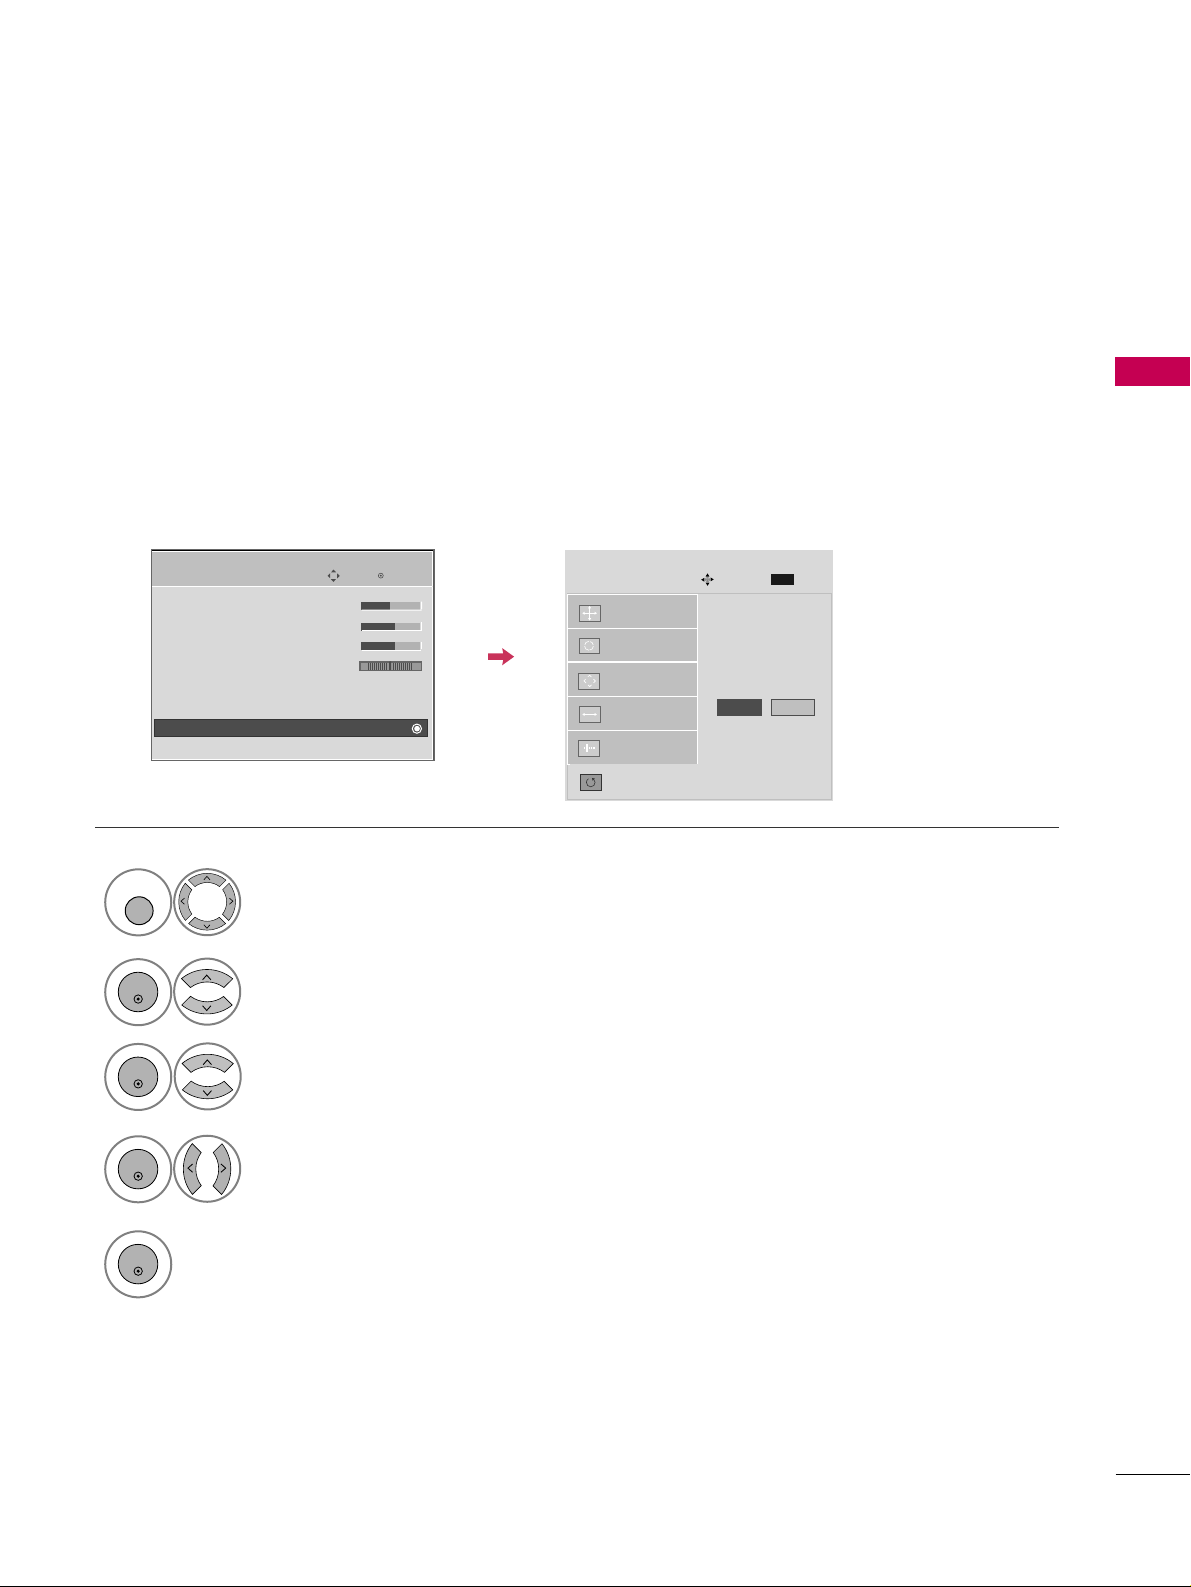
Screen Reset (Reset to original factory values)
Returns
PP ooss iittii oo nn, SS ii zzee
, and
PP hh aass ee
to the default factory settings.
This feature operates only in RGB-PC mode.
Auto config.
Position
Resolution
Size
Phase
Reset
G
SCREEN
Move
Prev.
MENU
To Set
Select
RRee sseett
.
3
ENTER
Select
PPIICCTTUURREE
.
Select
SS cc rree eenn (( RR GGBB--PP CC))
.
1
MENU
2
ENTER
Select
YYee ss
.
4
ENTER
5
ENTER
Enter
Move
PICTURE
E
• Brightness 50
• Sharpness 60
• Color 60
• Tint 0
• Advanced Control
• Reset
Screen (RGB-PC)
TruMotion Demo
RG
Yes No
Page 48
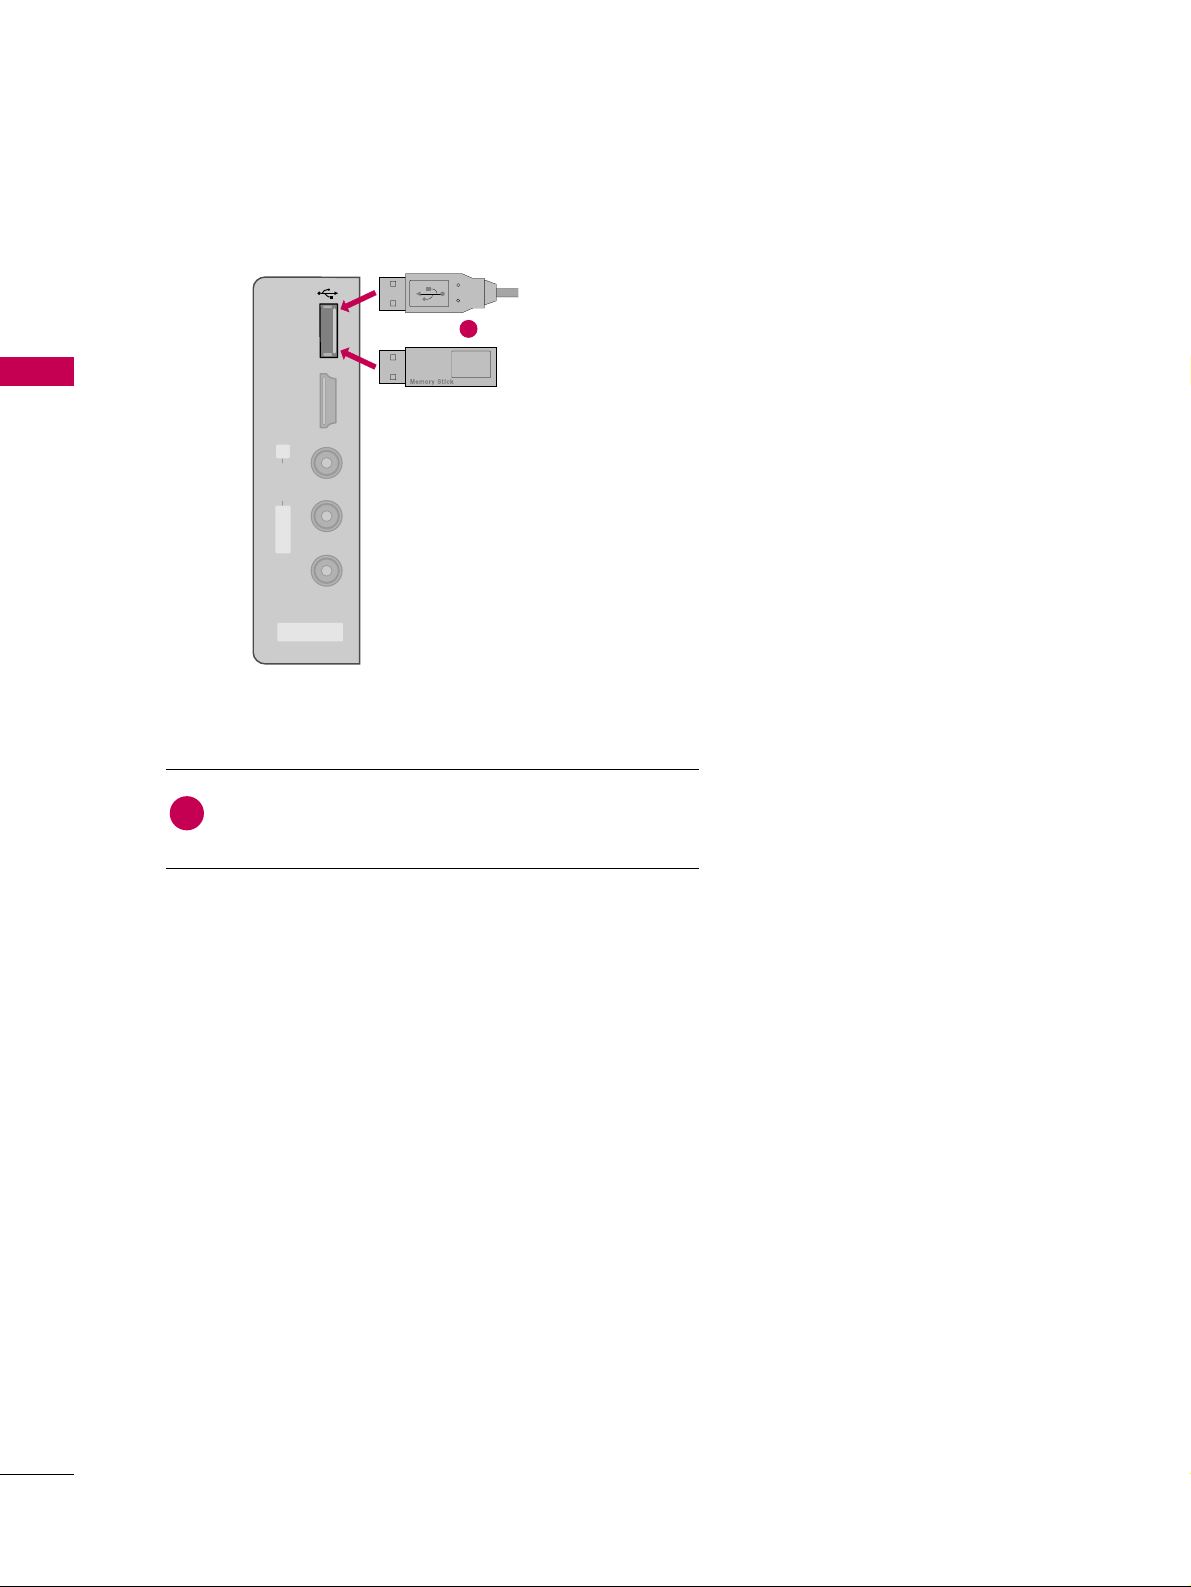
EXTERNAL EQUIPMENT SETUP
46
USB CONNECTION
(Except 32/37/42LG30)
EXTERNAL EQUIPMENT SETUP
AV IN 2
L/ MONO
R
AUDIO
VIDEO
HDMI IN 3 USB IN
Connect the USB device to the
UUSSBB II NN
jack on the side
of TV.
1. How to connect
1
2. How to use
■
After connecting the
UUSSBB II NN
jack, you use the USB func-
tion. (
GG
pp..6644
)
1
or
i.e)
Page 49
EXTERNAL EQUIPMENT SETUP
47
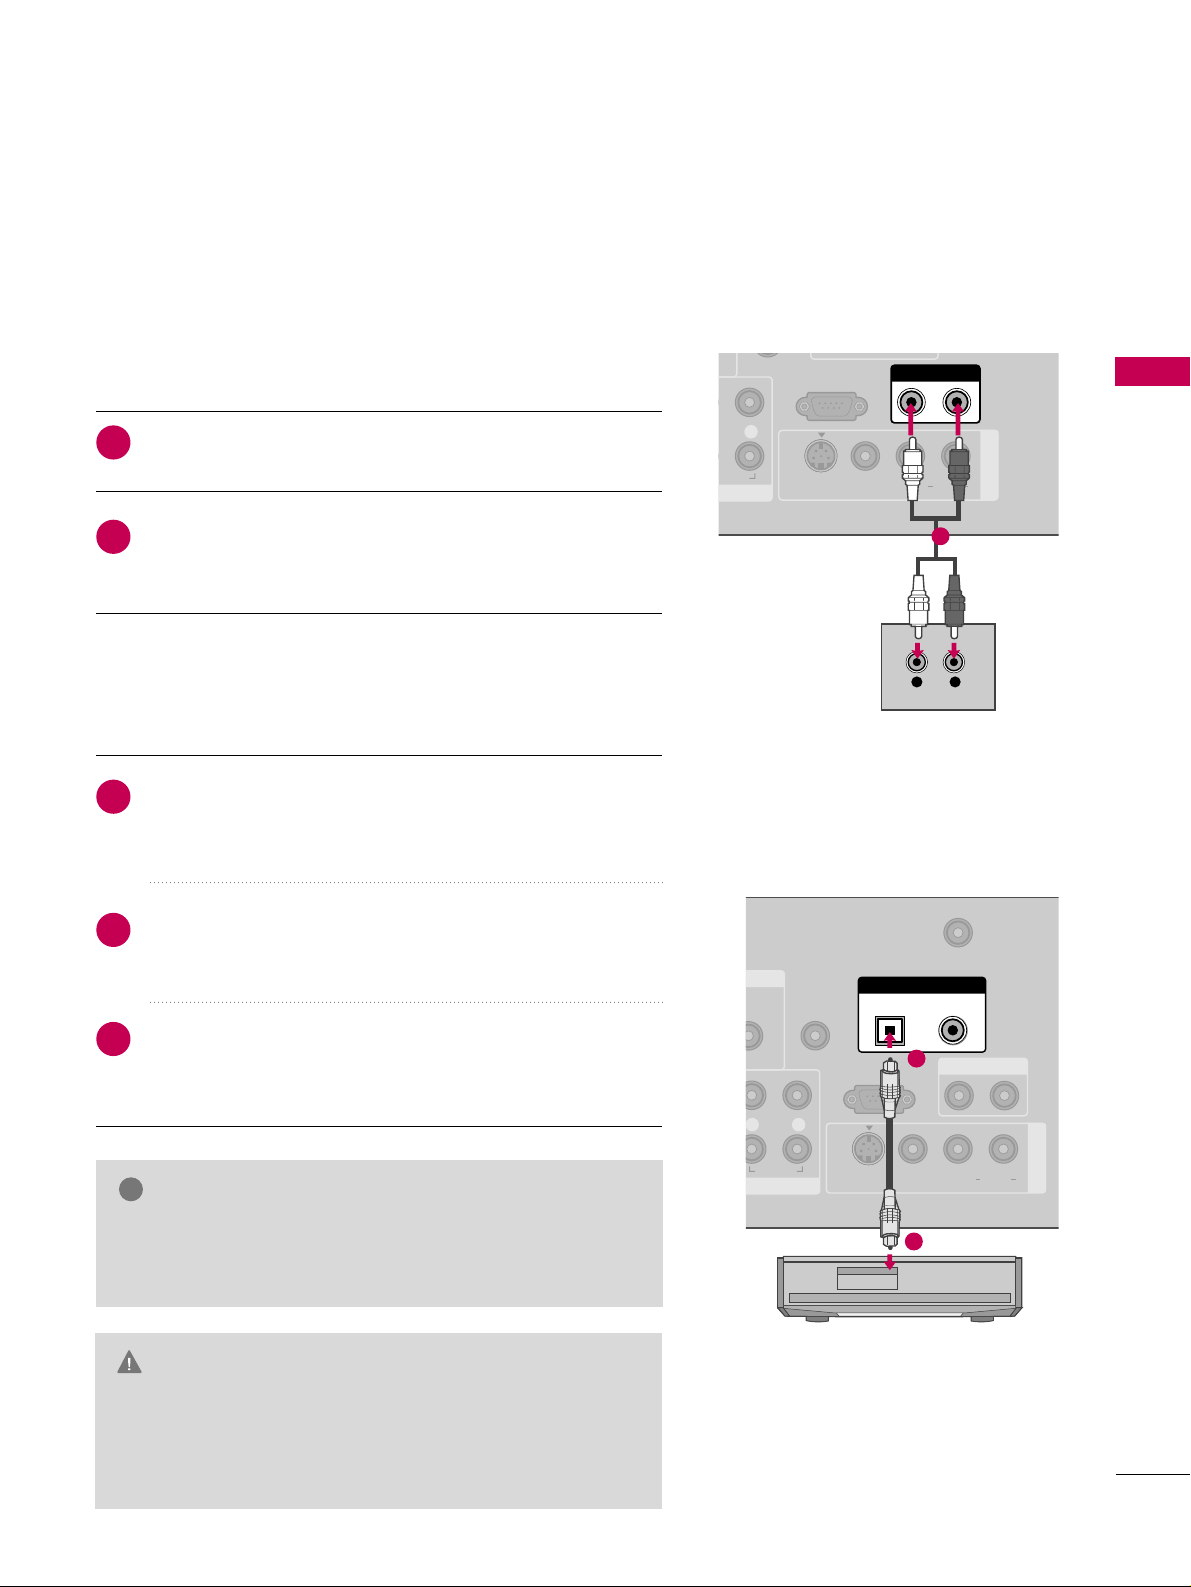
AUDIO OUT CONNECTION
Send the TV’s audio to external audio equipment via the Audio Output port.
RS-232C IN
(CONTROL & SERVICE)
R
AUDIO OUT
AV IN 1
VIDEO L R
(MONO)
AUDIO
S-VIDEO
L R
AUDIO
1
REMOTE
CONTROL IN
ANTENNA/
CABLE IN
RS-232C IN
(CONTROL & SERVICE)
L R
AUDIO
OPTICAL COAXIAL
DIGITAL AUDIO OUT
AUDIO OUT
AV IN 1
VIDEO L R
(MONO)
AUDIO
S-VIDEO
1
2
GG
When connecting with external audio equipments, such as
amplifiers or speakers, you can turn the TV speakers off in
the menu. (
GG
pp..9933
)
NOTE
!
G
Do not look into the optical output port. Looking at the
laser beam may damage your vision.
GG
Block the SPDIF out (optical/coaxial) about the contents
with ACP(Audio Copy Protection) function.
CAUTION
Connect one end of the optical or coaxial cable to the
TV’s
OOPPTTII CCAA LL
or
CCOOAAXXIIAALL
(Except 32/37/42LG30)
port of
DDIIGGIITTAALL AAUUDDIIOO OOUUTT
.
Connect the other end of the optical or coaxial cable to
the digital audio input on the audio equipment.
Set the “TV Speaker option - Off” in the AUDIO menu. (
GG
pp..9933
). See the external audio equipment instruction manu-
al for operation.
1. How to connect
2
3
1
Connect audio outputs to the TV’s
AAUUDDIIOO OOUUTT
jacks.
Set the “TV Speaker option - Off” in the AUDIO menu.
(
GG
pp ..99 33
). See the external audio equipment instruction
manual for operation.
1. How to connect
2
1
Analog
(Except 32/37/42/47/52LG60, 42/47LGX)
Digital
Page 50
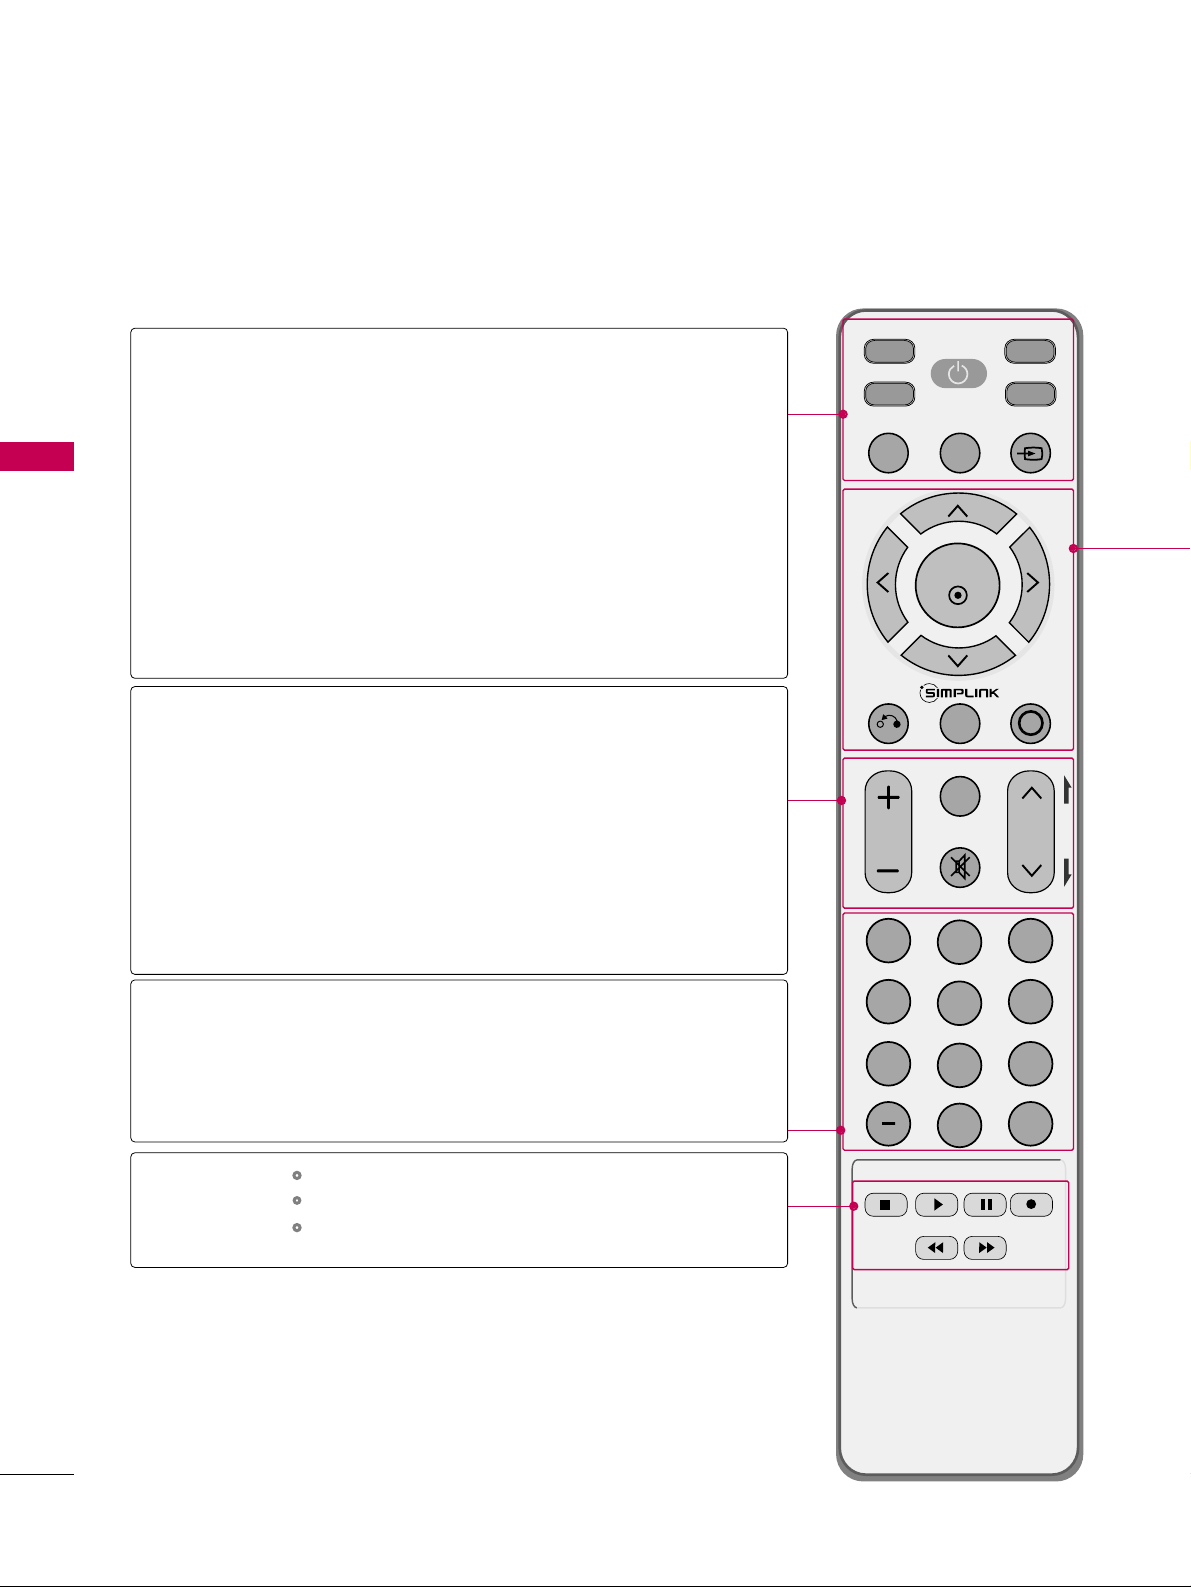
WATCHING TV / CHANNEL CONTROL
48
REMOTE CONTROL FUNCTIONS
WATCHING TV / CHANNEL CONTROL
When using the remote control, aim it at the remote control sensor on the TV.
INPUT
FAV
MUTE
TV
STB
POWER
Q. MENU MENU
AV MODERETURN
ENTER
VOL
CH
123
456
7809
FLASHBK
P
A
G
E
DVD
VCR
TV/STB/DVD/VCR
POWER
Q.MENU
MENU
INPUT
VOLUME UP
/DOWN
FAV
MUTE
CHANNEL
UP/DOWN
PAGE
UP/DOWN
— (DASH)
FLASHBK
Select the remote operating mode: TV, STB, DVD, or VCR.
Turns your TV or any other programmed equipment on or
off, depending on the mode.
Select the desired quick menu source.
GG
pp..5511
Displays the main menu.
Clear all on-screen displays and return to TV viewing from
any menu.
External input modes rotate in regular sequence.
Increase/decrease the sound level.
Scroll through the programmed Favorite channels.
GG
pp..5511
Switch the sound on or off.
GG
pp..5500
Select available channels.
Move from one full set of screen information to the next one.
Used to enter a program number for multiple
program channels such as 2-1, 2-2, etc.
Tune to the last channel viewed.
Control video cassette recorders or DVD players.
Control USB menu (PHOTO LIST and MUSIC LIST.)
Control the SIMPLINK compatible devices.
NUMBER button
VCR/DVD, USB,
SIMPLINK
Control buttons
Page 51
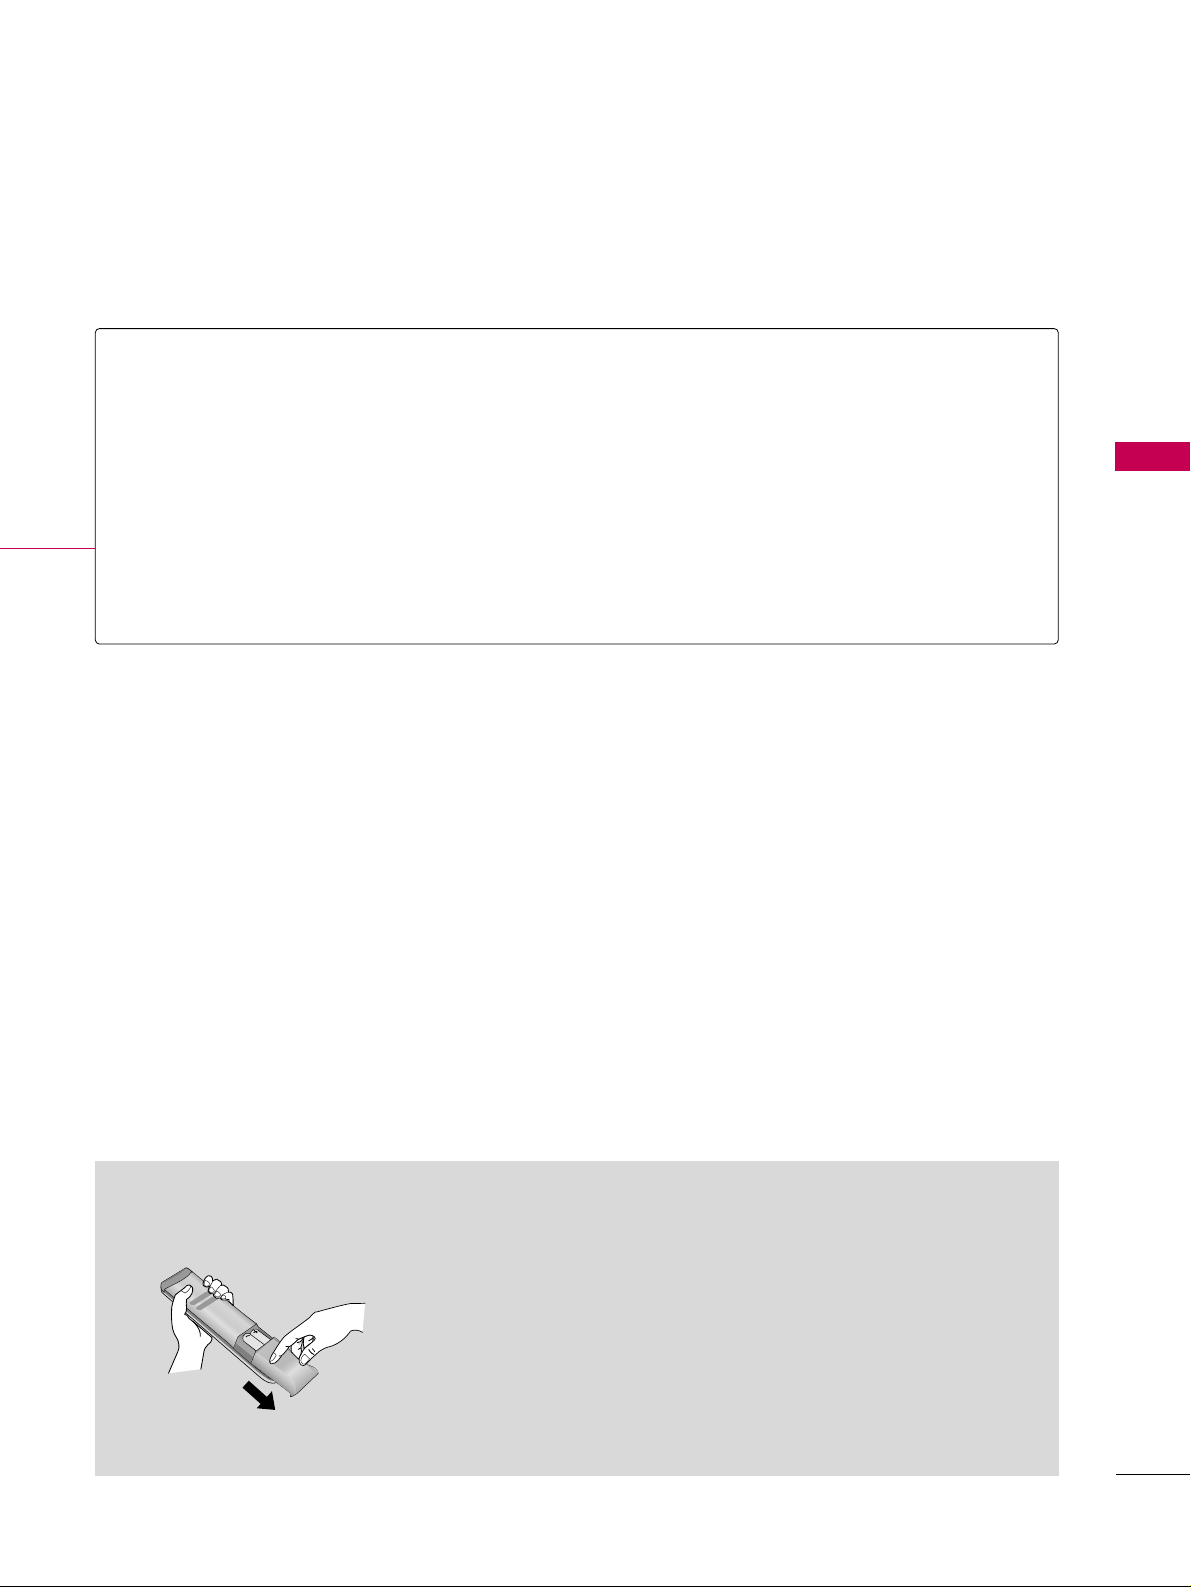
WATCHING TV / CHANNEL CONTROL
49
Installing Batteries
■
Open the battery compartment cover on the back side and install
the batteries matching correct polarity (+with +,-with -).
■
Install two 1.5V AAA batteries. Don’t mix old or used batteries with
new ones.
■
Close cover.
THUMBSTICK
(Up/Down/Left
Right/ENTER)
RETURN
SIMPLINK
AV MODE
Navigate the on-screen menus and adjust the system settings to your preference.
Allows the user to move return one step in an interactive application or other user interaction
function.
See a list of AV devices connected to TV.
When you toggle this button, the SIMPLINK menu appears at the screen.
GG
pp..6622--6633
It helps you select and set images and sounds.
GG
pp..6611
Page 52
WATCHING TV / CHANNEL CONTROL
50
TURNING ON THE TV
WATCHING TV / CHANNEL CONTROL
NOTE
!
GG
If you intend to be away on vacation, disconnect the power plug from the wall power outlet.
First, connect power cord correctly.
At this moment, the TV switches to standby mode.
■
In standby mode to turn TV on, press the ,
IINNPPUUTT,CCHH ((
DDEE
or
))
button on the TV or press the
PPOOWWEERR, IINNPPUUTT, CCHH((
or )),
NNuummbbeerr
((00~99))
button on the remote control.
Select the viewing source by using the
IINNPPUUTT
button on the remote control.
■
This TV is programmed to remember which power state it was last set to,
even if the power cord is out.
When finished using the TV, press the
PPOOWWEERR
button on the remote control.
The TV reverts to standby mode.
1
2
3
Press the
CCHH ((
or ))or
NNUUMMBBEERR
buttons to select a channel number.
1
VOLUME ADJUSTMENT
CHANNEL SELECTION
Press the
VVOOLL ((++
or
--))
button to adjust the volume.
If you want to switch the sound off, press the
MMUUTTEE
button.
You can cancel the Mute function by pressing the
MMUUTTEE
or
VVOOLL ((++
or
--))
button.
Adjust the volume to suit your personal preference.
1
2
3
Page 53
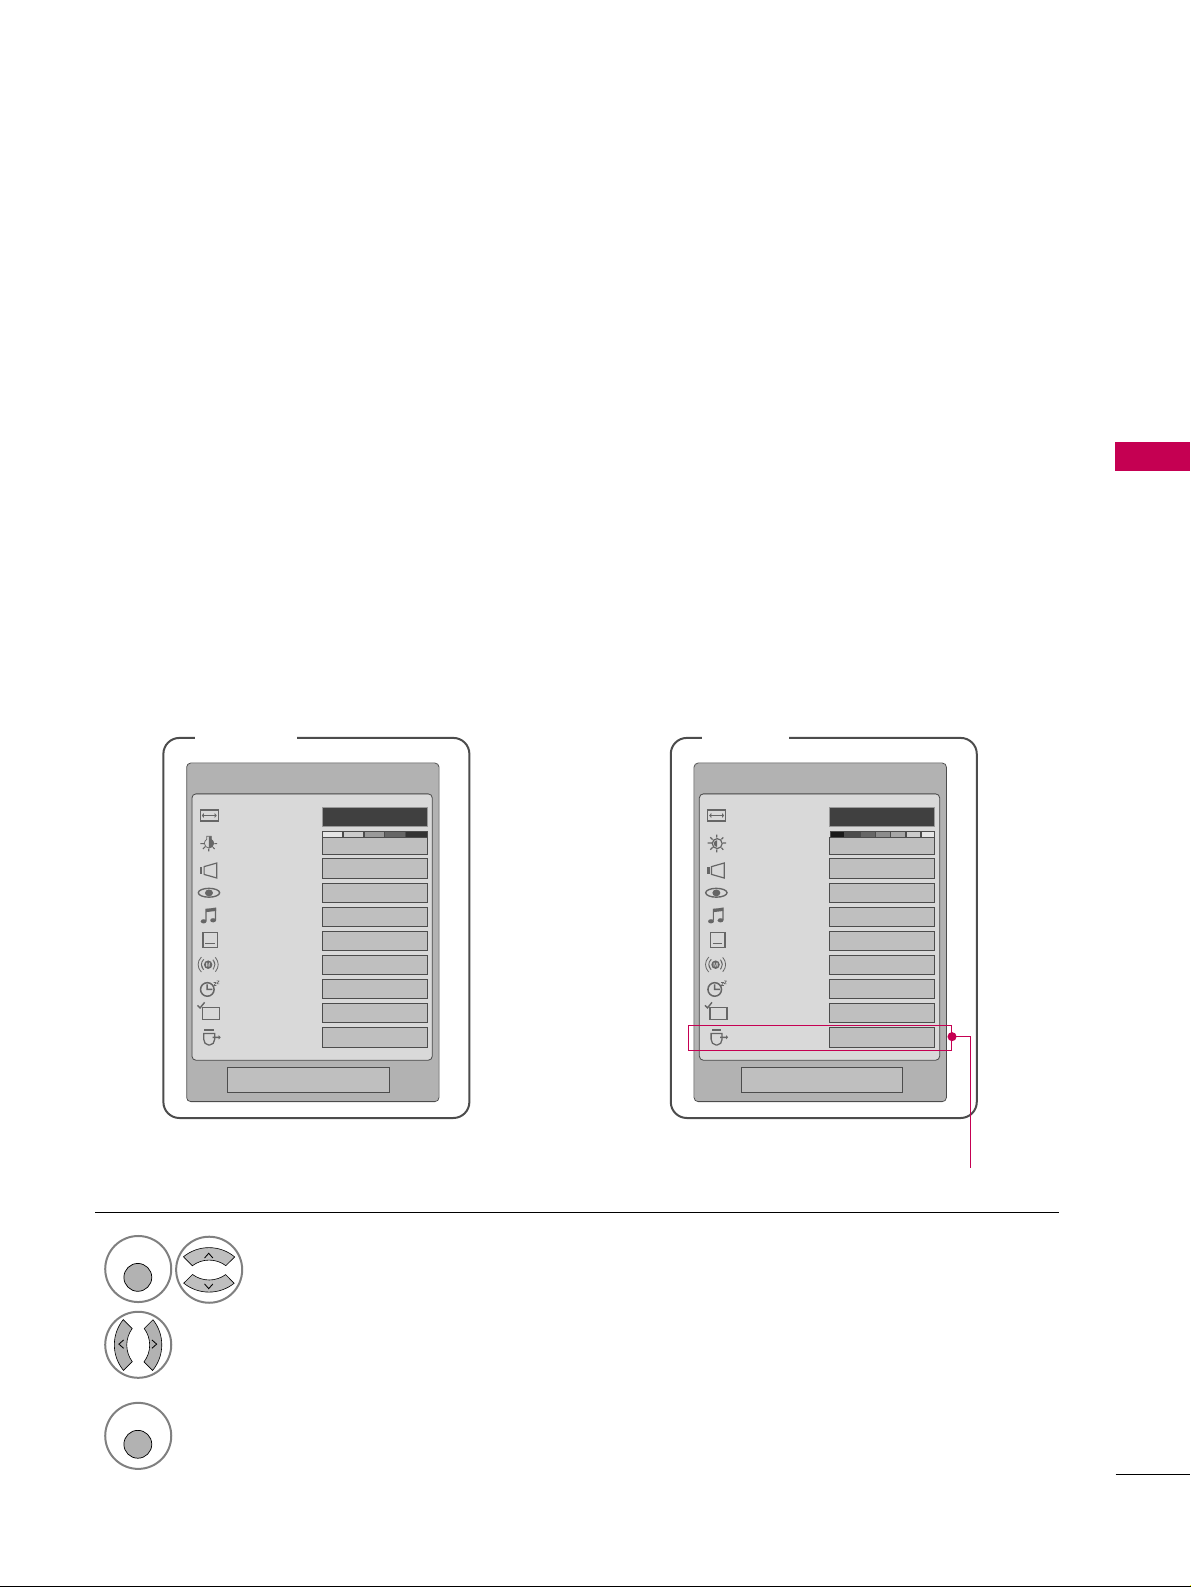
WATCHING TV / CHANNEL CONTROL
51
QUICK MENU
Display each menu.
Make appropriate adjustments.
■
AAsspp eecctt RRaattiioo
: Selects your desired picture format.
■
PPoowweerr SSaa vv iinngg
(Plasma TV Only): Adjusts screen
brightness to reduce the power consumption of the
TV.
■
BBaa cc kk ll iigghhtt
(LCD TV Only): Adjust the brightness
of LCD panel to control the brightness of the screen.
■
CC llee aarr VVoo ii ccee
: By differentiating the human sound
range from others, it helps make human voices
sound better.
■
PPiicc ttuurree MMoo ddee
: Selects the factory preset picture
depend on the viewing environment.
■
SS oouunndd MMoo ddee
: Selects the factory preset sound for
type of program.
■
CC aapp ttiioo nn
: Select on or off.
■
MMuullttii AAuuddiioo
: Changes the audio language (Digital
signal).
SS AA PP
: Selects MTS sound (Analog signal).
■
SS ll eeeepp TTiimm eerr
: Select the amount of time before
your TV turns off automatically.
■
DDeell//AAdddd//FFaavv
: Select channel you want to add/delete
or add the channel to the Favorite List.
■
UUSS BB EEjjee cc tt
: Select “USB Eject” in order to eject
USB device.
Your TV's OSD (On Screen Display) may differ slightly from what is shown in this manual.
Q.Menu (Quick Menu) is a menu of features which users might use frequently.
1
Q. MENU
2
LCD TV
Q.Menu
3
FF
16:9
GG
Vivid
Off
Standard
Off
English
Off
Add
Eject
Aspect Ratio
Backlight
Clear Voice
Picture Mode
Sound Mode
Caption
Multi Audio
Sleep Timer
Del/Add/Fav
USB Eject
CH
Plasma TV
Q.Menu
Close Close
3
FF
16:9
GG
Vivid
Off
Standard
Off
English
Off
Add
Eject
Aspect Ratio
Power Saving
Clear Voice
Picture Mode
Sound Mode
Caption
Multi Audio
Sleep Timer
Del/Add/Fav
USB Eject
CH
3
Q. MENU
Return to TV viewing.
Except 32/37/42LG30
Page 54
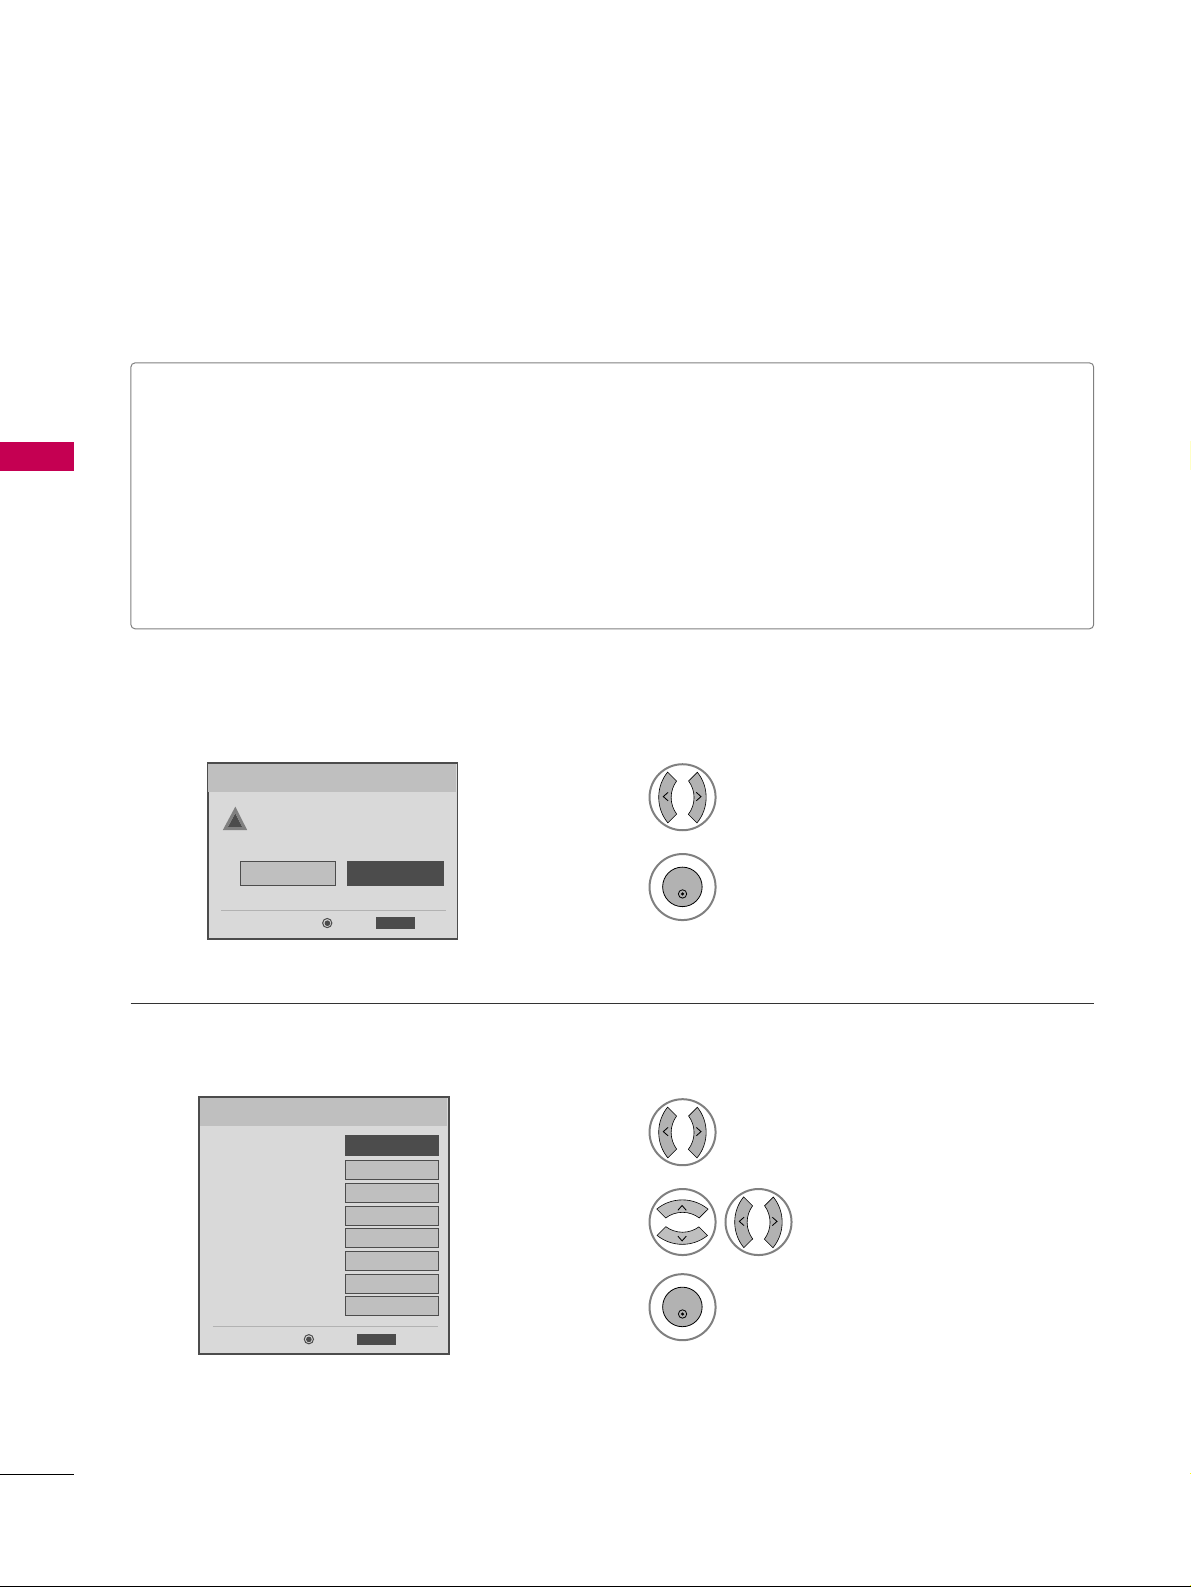
WATCHING TV / CHANNEL CONTROL
52
INITIAL SETTING
WATCHING TV / CHANNEL CONTROL
This Function guides the user to easily set the essential items for viewing the TV for the first time when purchasing the TV. If will be displayed on the screen when turning the TV on for the first time. It can also be activated from the user menus.
Select
HHoo mmee
Mode.
1
2
ENTER
Select
AAuuttoo
or
MM aannuuaall
.
Select desired time option.
1
3
ENTER
2
Year
Current Time Setting
2007
Month
11
Date
15
Hour
5 PM
Minute
52
Time Zone
Eastern
Daylight Saving
Off
FF
Auto
GG
ExitEnter
RETURN
Step2. Time Setting
Selecting the environment.
Choose the setting mode you want.
In Store
Home
ExitEnter
RETURN
Step1. Mode Setting
Step1. Mode setting
Step2. Time setting
■
Default selection is “
HHoo mmee
”. We recommend setting the TV to “
HHoo mmee
” mode for the best picture in your
home environment.
■
“
IInn--ssttoorree
” Mode is only intended for use in retail environments. Customers can adjust the “
PPiicc ttuurree
menu -
PPiicc ttuurree mmoodd ee
” manually while inspecting the TV, but the TV will automatically return to preset in-store
mode after 5 minutes.
■
“
IInn--ssttoorree
” Mode is an optimal setting for displaying at stores. “In-Store” mode initializes the TV to set the
image quality and operates “
TTrruu MMoottiioonn DDeemmoo
(For 37/42/47/52LG60, 42/47/52LG70, 42/47LGX)” or
“
LLooccaall DDiimmmmiinn gg DDee mmoo
(For 47LG90)” after a certain period of time.
!
Page 55
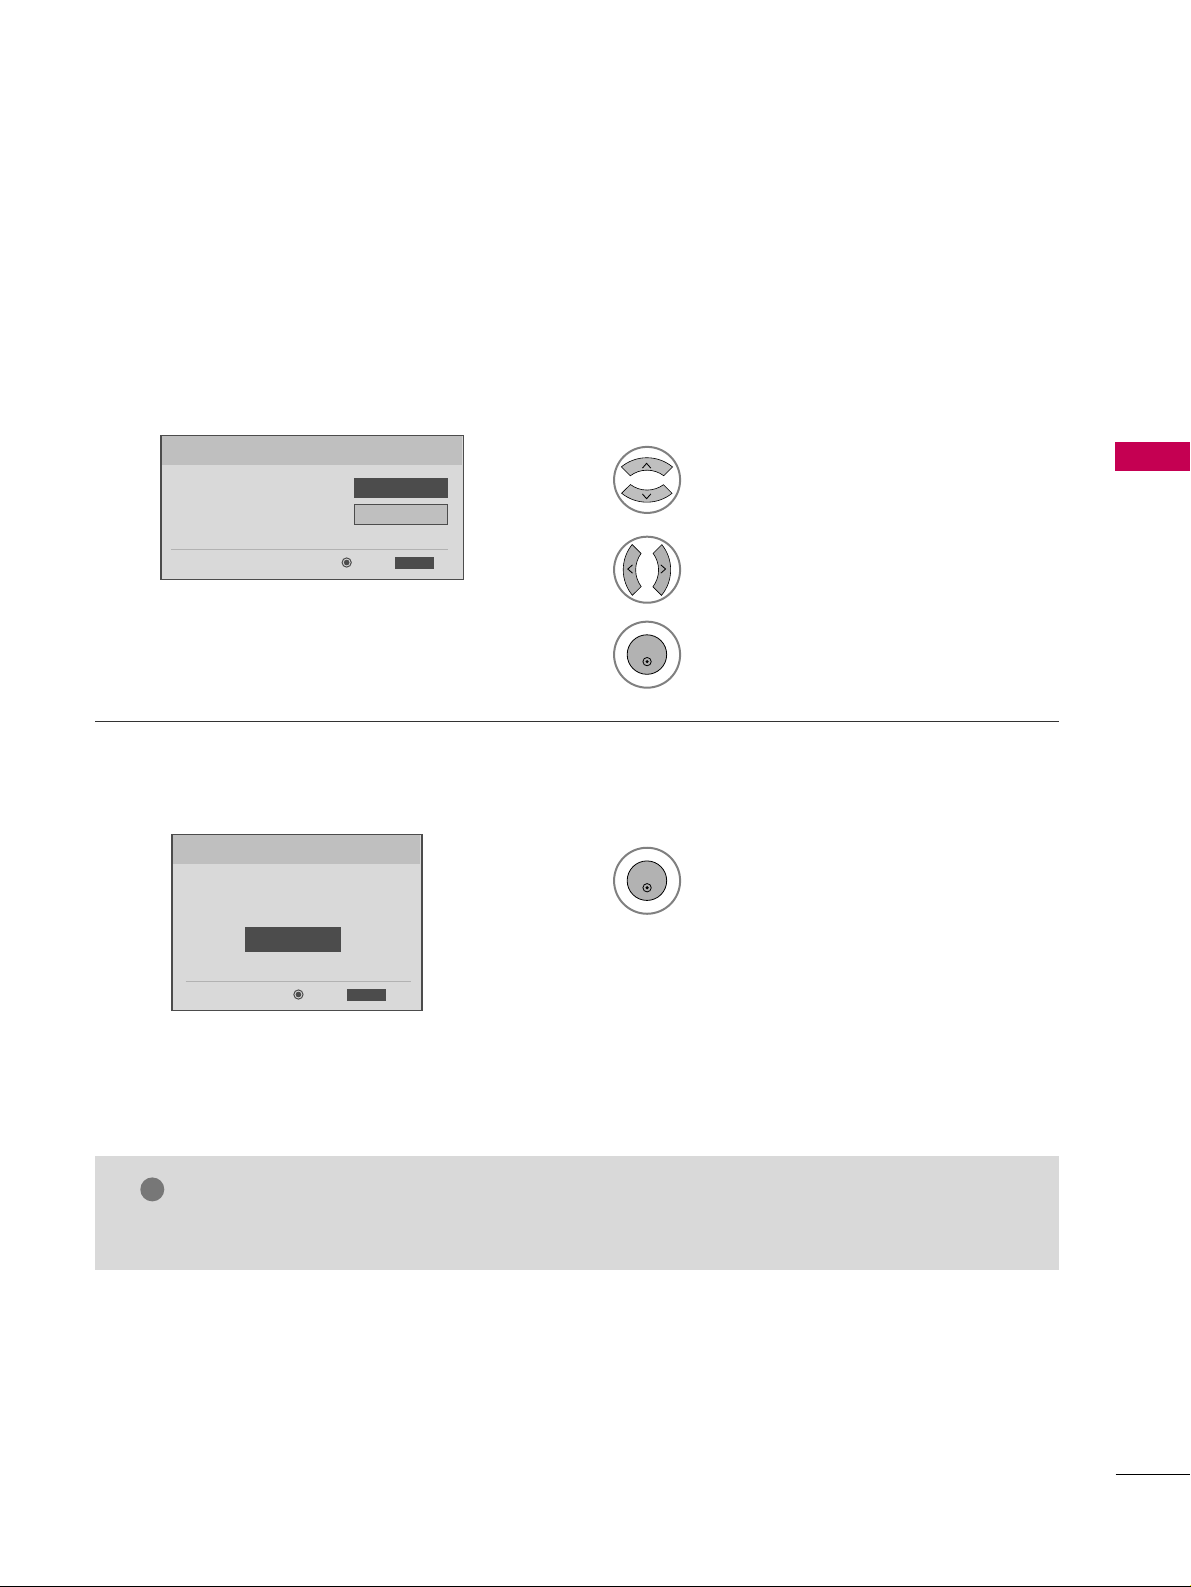
WATCHING TV / CHANNEL CONTROL
53
Select
OOSS DD LLaann gg uu aaggee SSeettttii nngg
or
AAuu ddiioo LLaa nn gg uuaaggee SS eettttiinngg
.
Start
AAuuttoo TTuu nn ii nn gg
.
Select your desired language.
1
3
ENTER
1
ENTER
2
Auto Tuning can change channel map.
Do you want to start Auto Tuning?
Enter
Exit
Enter
RETURN
Step4. Auto Tuning
ExitEnter
RETURN
Step3. Option Setting
1. OSD Language Setting
FF
English
GG
2. Audio Language Setting
French
Step3. Option setting
Step4. Auto Tuning
■
You can also adjust
IInniitt ii aall SS eettttiinngg
in the
OO PP TTIIOONN
menu
.
NOTE
!
Page 56
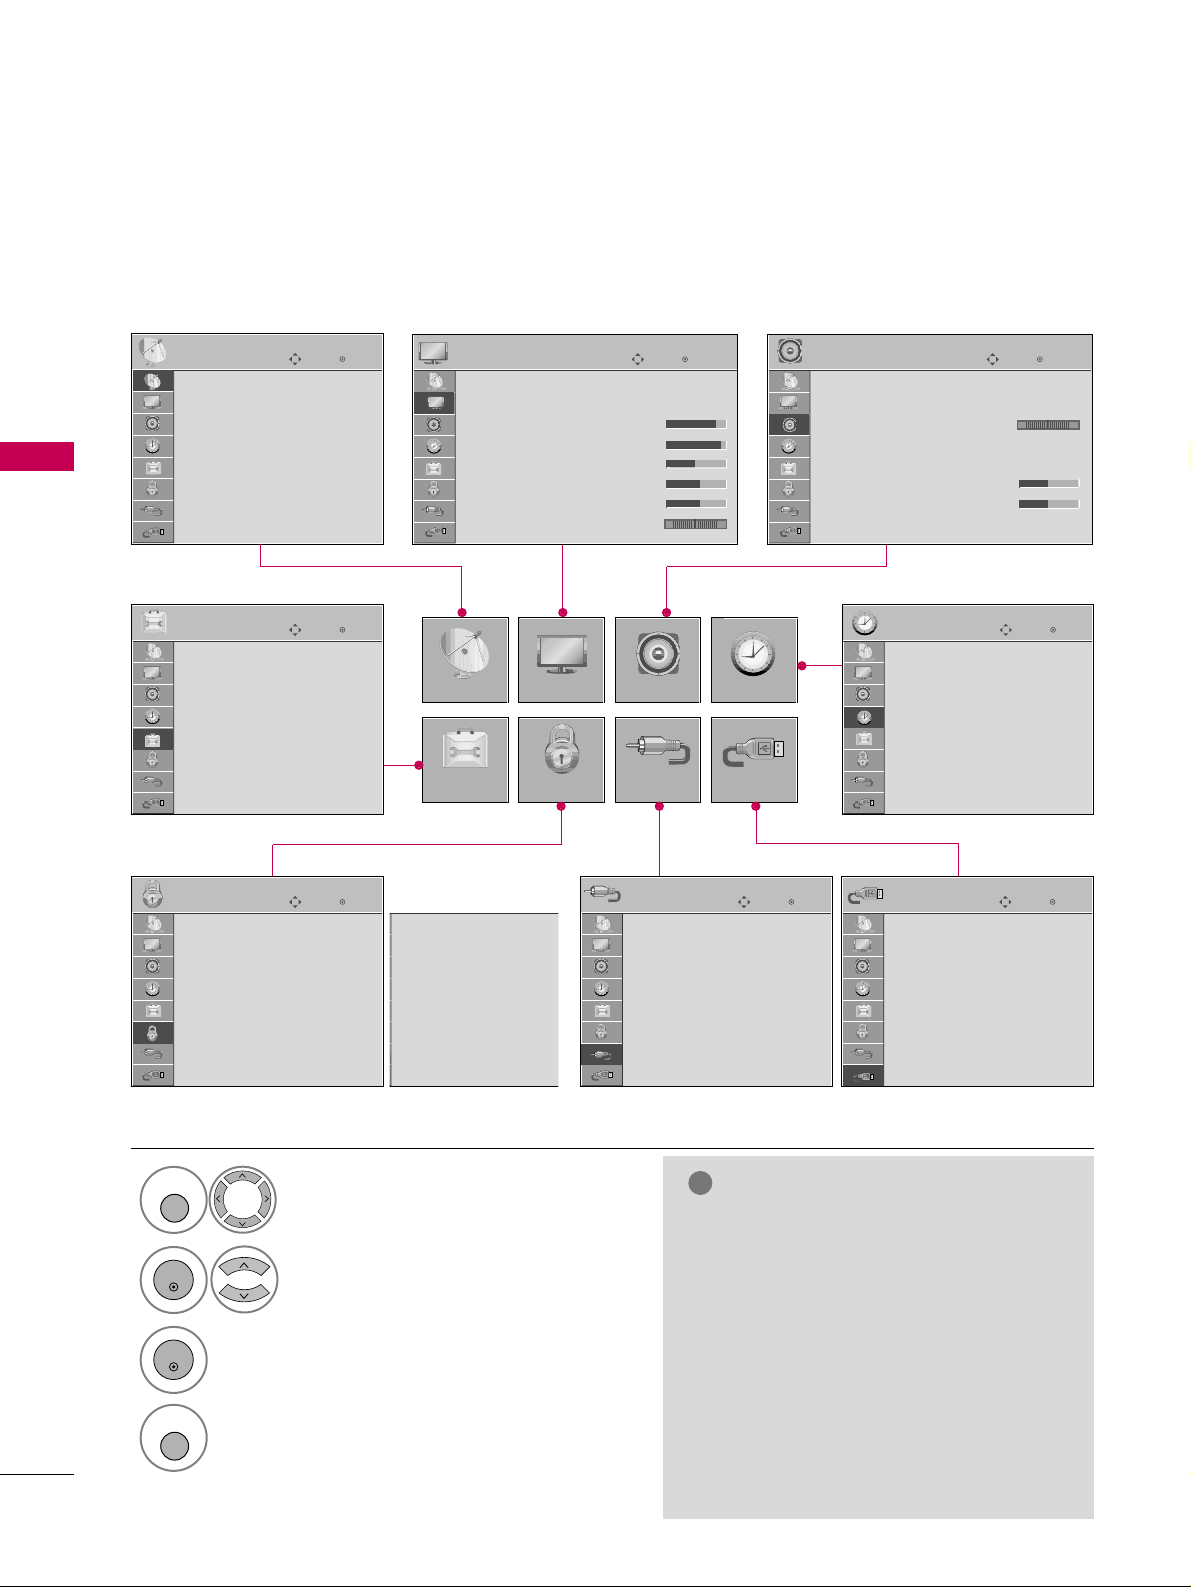
WATCHING TV / CHANNEL CONTROL
54
ON-SCREEN MENUS SELECTION
WATCHING TV / CHANNEL CONTROL
Your TV's OSD (On Screen Display) may differ slightly from that shown in this manual.
NOTE
!
GG
IISS MM MMee tthhoo dd, PPoowweerr SS aavviinngg
: Only
PPllaassmmaa TTVV
.
GG
BBaa cc kklliigghhtt,, PPoowweerr IInndd iiccaattoorr,,
TTrruu MMoottiioonn DDeemmoo
: Only
LLCC DD TTVV
.
(But,
TTrr uu MM oottii oonn DD ee mmoo
: Only for
3377//4422//4477//5522LLGG6600,, 4422//4477//5522LLGG7700,,
4422//4477LLGGXX,, 4477LLGG9900
)
GG
SS eett IIDD
:
Except
3322//33 77// 4422 // 4477 //5522LLGG6600
,,
4422//4477LLGGXX
.
GG
LLoo ccaall DDiimm mmiinngg, LLoo ccaall DDiimm mmiinngg
DDee mmoo
: Only
4477LL GG9900
Display each menu.
Select a menu item.
Enter to the pop up menu.
1
MENU
3
2
ENTER
ENTER
Return to TV viewing.
4
MENU
Enter
Move
Auto Tuning
Manual Tuning
Channel Edit
CHANNEL
CHANNEL
OPTION
PICTURE
LOCK
AUDIO
INPUT
TIME
USB
Enter
Move
Aspect Ratio : 16:9
Picture Mode : Standard
• Backlight 80
• Contrast 90
• Brightness 50
• Sharpness 60
• Color 60
• Tint 0
PICTURE
E
Enter
Move
Auto Volume : Off
Clear Voice : On
Balance 0
Sound Mode : Standard
•
SRS TruSurround XT:
Off
• Treble 50
• Bass 50
• Reset
AUDIO
E
LR
Enter
Move
Clock :
Feb/21/2008 2:10 AM
Off Time : Off
On Time : Off
Sleep Timer : Off
Auto Sleep : Off
TIME
Enter
Move
PHOTO LIST
MUSIC LIST
USB
Enter
Move
Antenna
Cable
AV1
AV2
Component1
Component2
RGB-PC
HDMI1
INPUT
E
Enter
Move
Lock System : Off
Set Password
Block Channel
Movie Rating
TV Rating-Children
TV Rating-General
Downloadable Rating
Input Block
LOCK
Lock System : Off
Set Password
Block Channel
TV Rating-English
TV Rating-French
Downloadable Rating
Input Block
Enter
Move
Language : English
Input Label
SIMPLINK : On
Key Lock : Off
Caption : Off
ISM Method : Normal
Power Saving : Level 0
Set ID : 1
OPTION
For USA For Canada
E
All models (Except 32/37/42LG30)
RG
Page 57
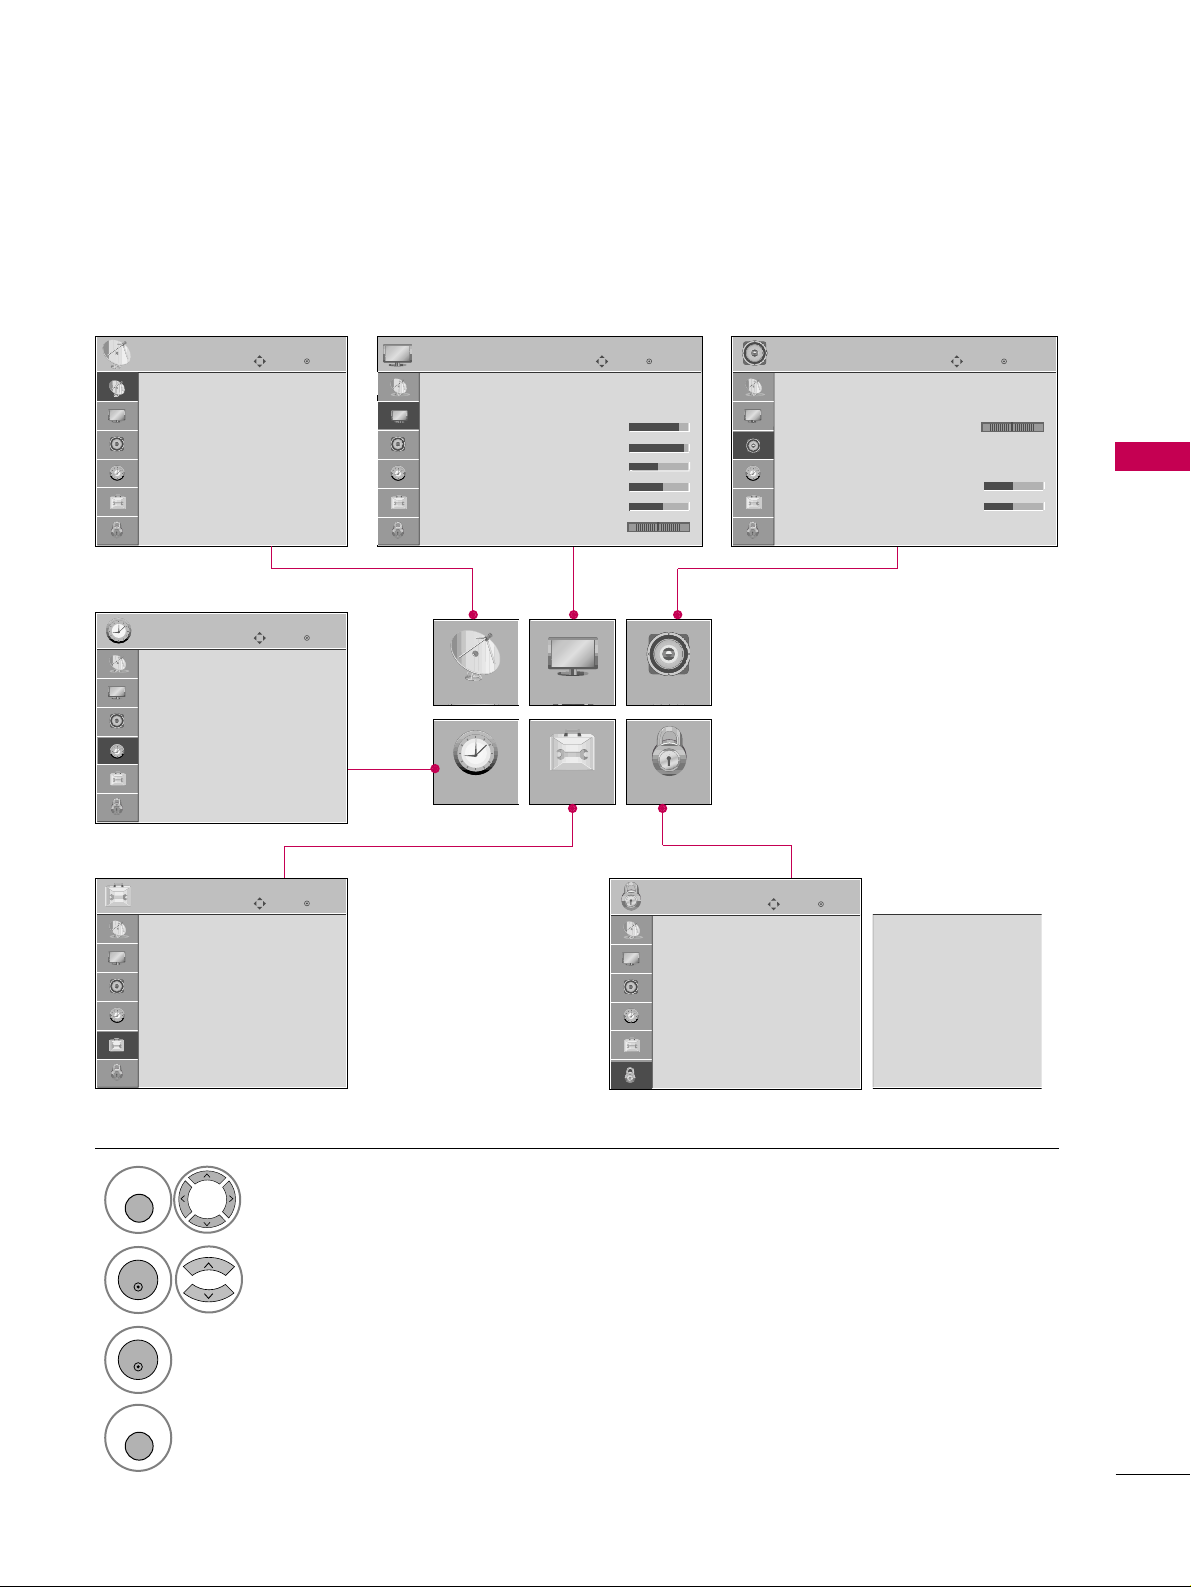
WATCHING TV / CHANNEL CONTROL
55
Only for 32/37/42LG30
Display each menu.
Select a menu item.
Enter to the pop up menu.
1
MENU
3
2
ENTER
ENTER
Return to TV viewing.
4
MENU
Enter
Move
Auto Tuning
Manual Tuning
Channel Edit
CHANNEL
CHANNEL
TIME
PICTURE
OPTION
AUDIO
LOCK
Enter
Move
Aspect Ratio : 16:9
Picture Mode : Standard
• Backlight 80
• Contrast 90
• Brightness 50
• Sharpness 60
• Color 60
• Tint 0
PICTURE
E
Enter
Move
Auto Volume : Off
Clear Voice : On
Balance 0
Sound Mode : Standard
•
SRS TruSurround XT:
Off
• Treble 50
• Bass 50
• Reset
AUDIO
E
LR
Enter
Move
Clock :
Feb/21/2008 2:10 AM
Off Time : Off
On Time : Off
Sleep Timer : Off
Auto Sleep : Off
TIME
Enter
Move
Lock System : Off
Set Password
Block Channel
Movie Rating
TV Rating-Children
TV Rating-General
Downloadable Rating
Input Block
LOCK
Enter
Move
Language : English
Input Label
SIMPLINK : On
Key Lock : Off
Caption : Off
Set ID : 1
Power Indicator
Initial Setting : Home
OPTION
Lock System : Off
Set Password
Block Channel
TV Rating-English
TV Rating-French
Downloadable Rating
Input Block
For USA For Canada
RG
Page 58
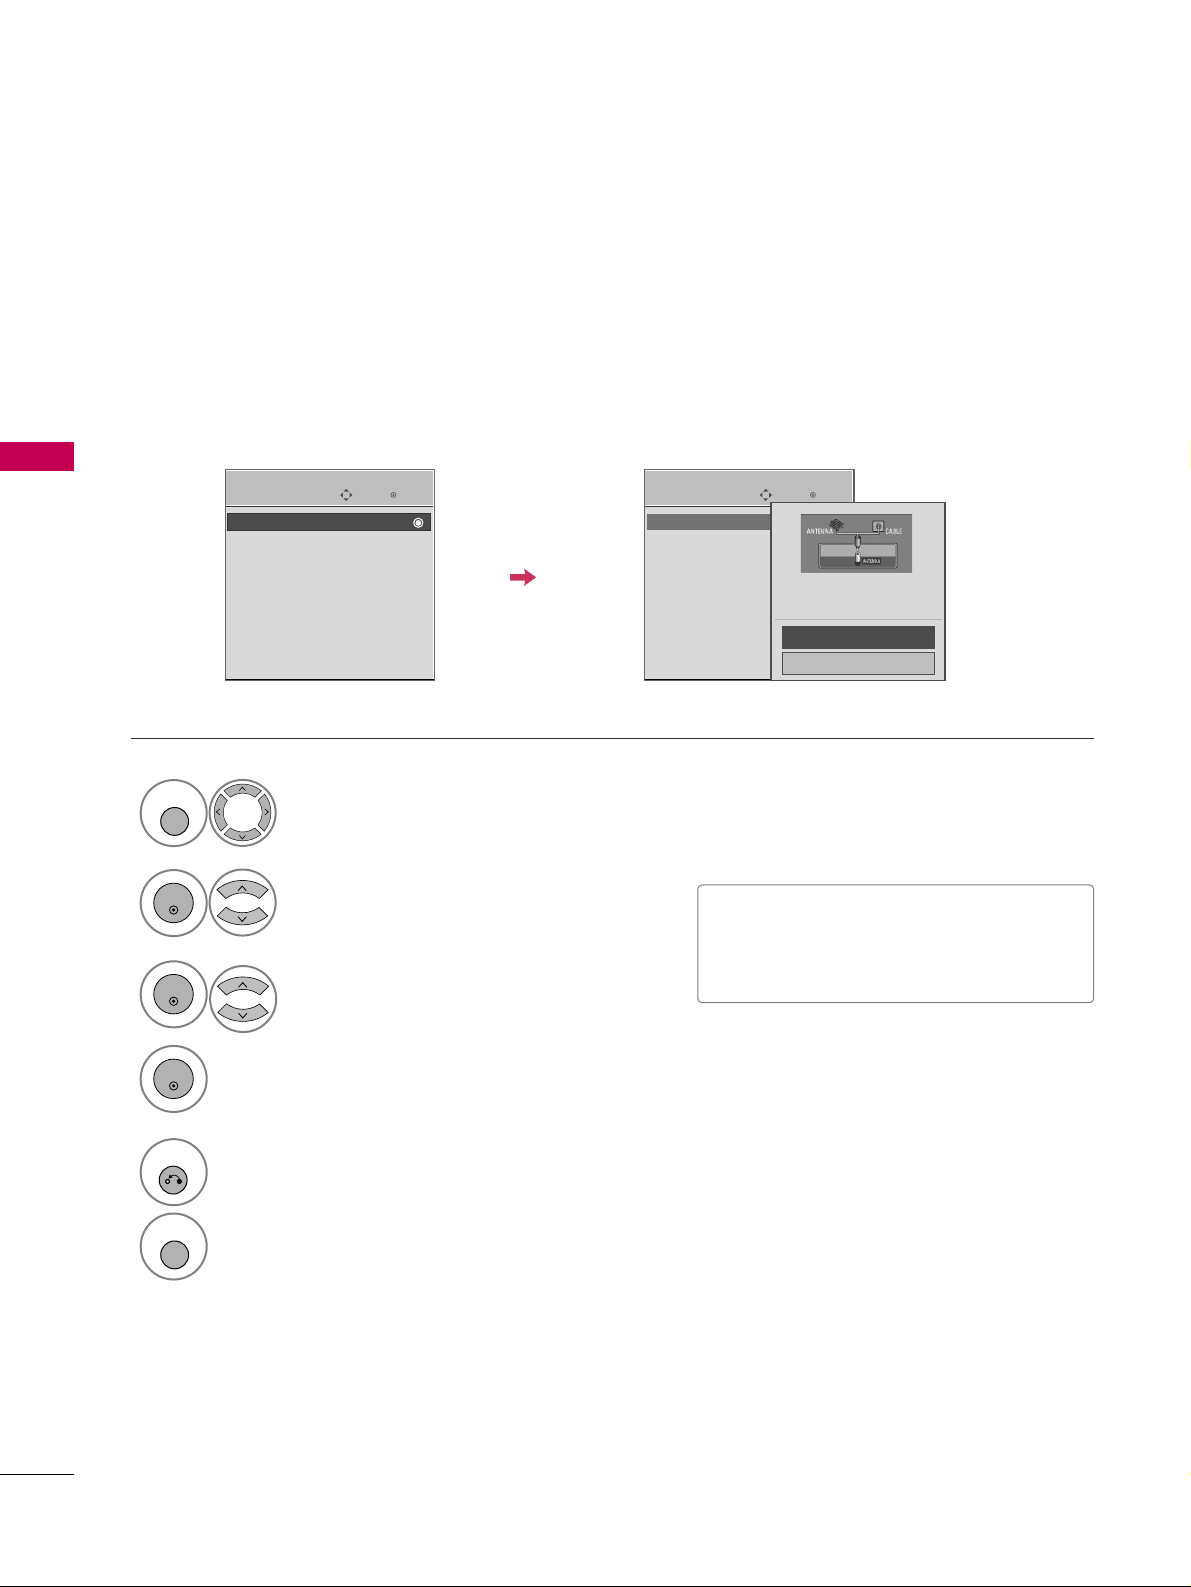
WATCHING TV / CHANNEL CONTROL
56
CHANNEL SETUP
WATCHING TV / CHANNEL CONTROL
Auto Scan (Auto Tuning)
Automatically finds all channels available through antenna or cable inputs, and stores them in memory on the
channel list.
Run Auto Tuning again after any Antenna/Cable connection changes.
Select
CC HH AANNNNEE LL
.
Select
AAuuttoo TTuu nn ii nn gg
.
Select
YYee ss
.
Run
AAuuttoo ttuunniinn gg
.
Enter
Move
CHANNEL
Enter
Move
CHANNEL
1
MENU
3
2
ENTER
ENTER
4
ENTER
Auto Tuning
Manual Tuning
Channel Edit
Auto Tuning
Manual Tuning
Channel Edit
Press ‘Yes’ button to begin
auto tuning.
Yes
No
■
A password is required to gain access to
Auto Tuning menu if the Lock System is
turned on.
5
RETURN
Return to the previous menu.
MENU
Return to TV viewing.
Page 59
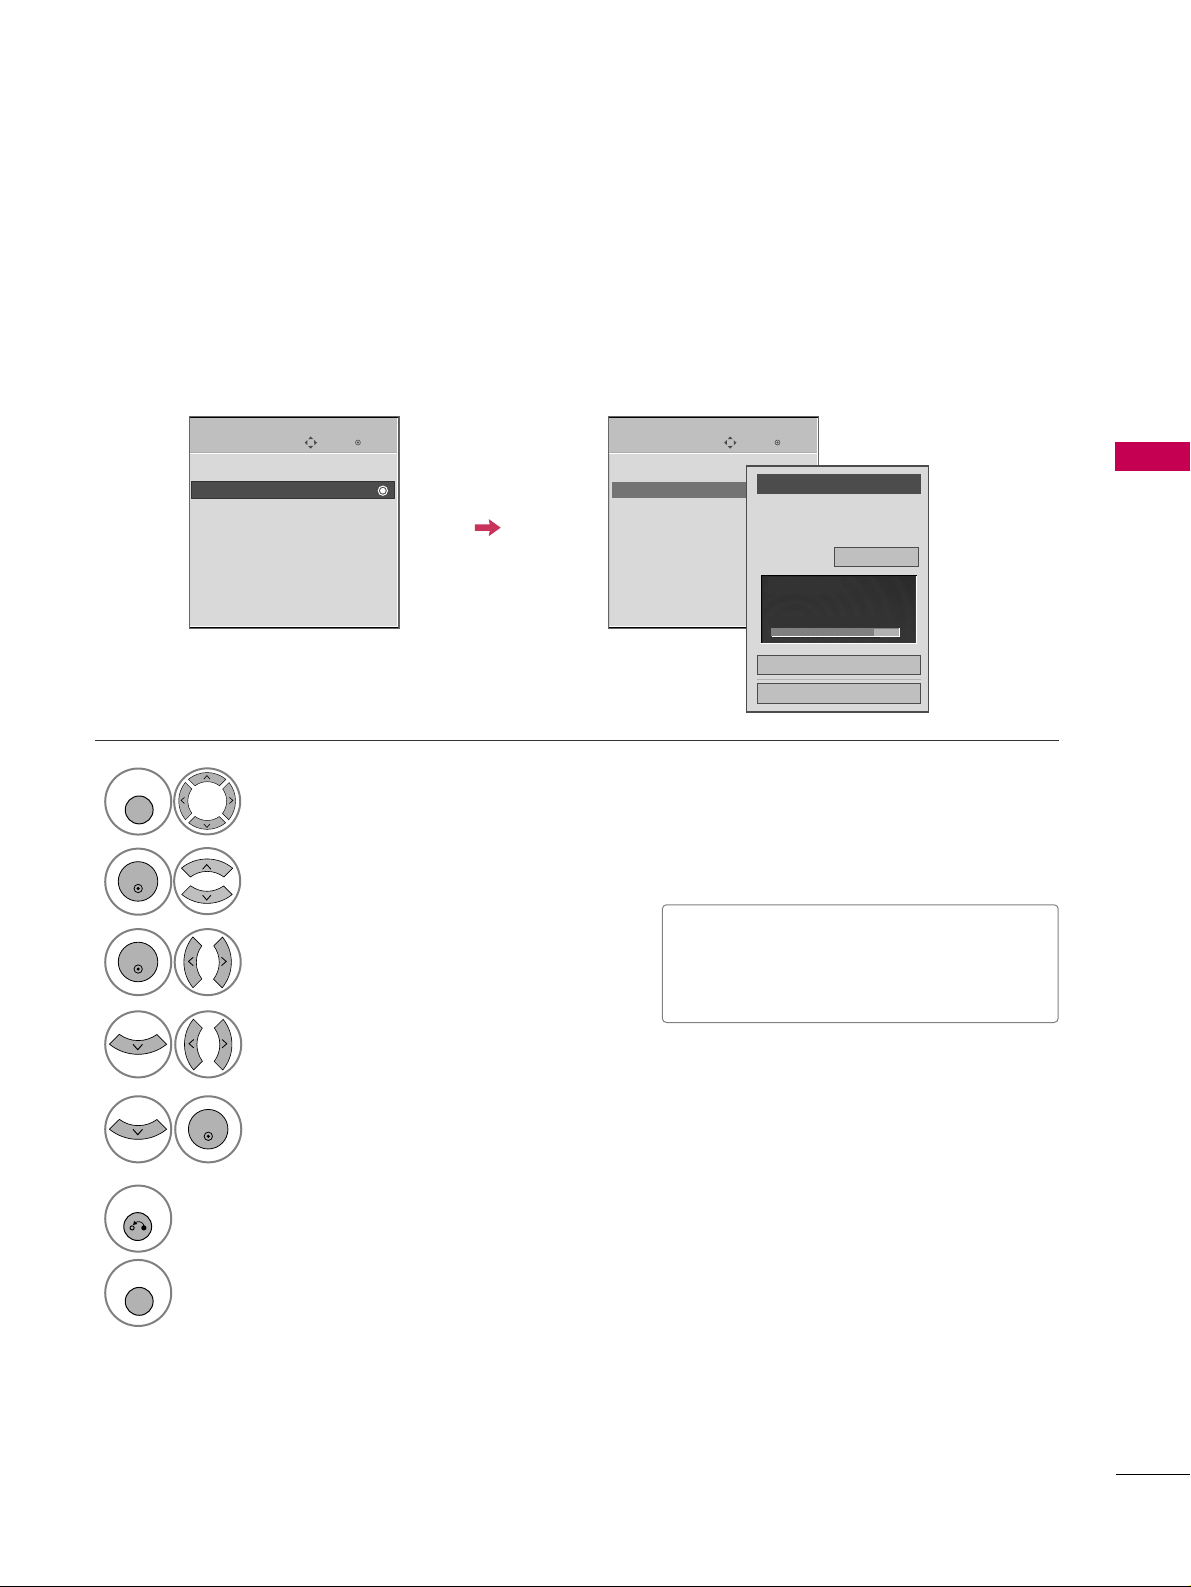
WATCHING TV / CHANNEL CONTROL
57
Select
CC HH AANNNNEE LL
.
1
MENU
2
ENTER
If selecting DTV or CADTV input signal, you can view the on-screen signal strength monitor to see the quality
of the signal being received.
Add/Delete Channel (Manual Tuning)
Enter
Move
CHANNEL
Enter
Move
CHANNEL
Channel
Select channel type and
RF-channel number.
FF
DTV
GG
2
Close
Delete
Auto Tuning
Manual Tuning
Channel Edit
DTV 2-1
Bad Normal Good
Select
MMaannuuaa ll TTuunn ii nn gg
.
Select
DDTTVV, TT VV, CC AA DD TTVV
, or
CC AA TT VV
.
Select channel you want to add
or delete.
3
ENTER
4
Select
AAdd dd
or
DDee llee ttee
.
5
ENTER
Auto Tuning
Manual Tuning
Channel Edit
■
A password is required to gain access to
Manual Tuning menu if the Lock System
is turned on.
6
RETURN
Return to the previous menu.
MENU
Return to TV viewing.
Page 60
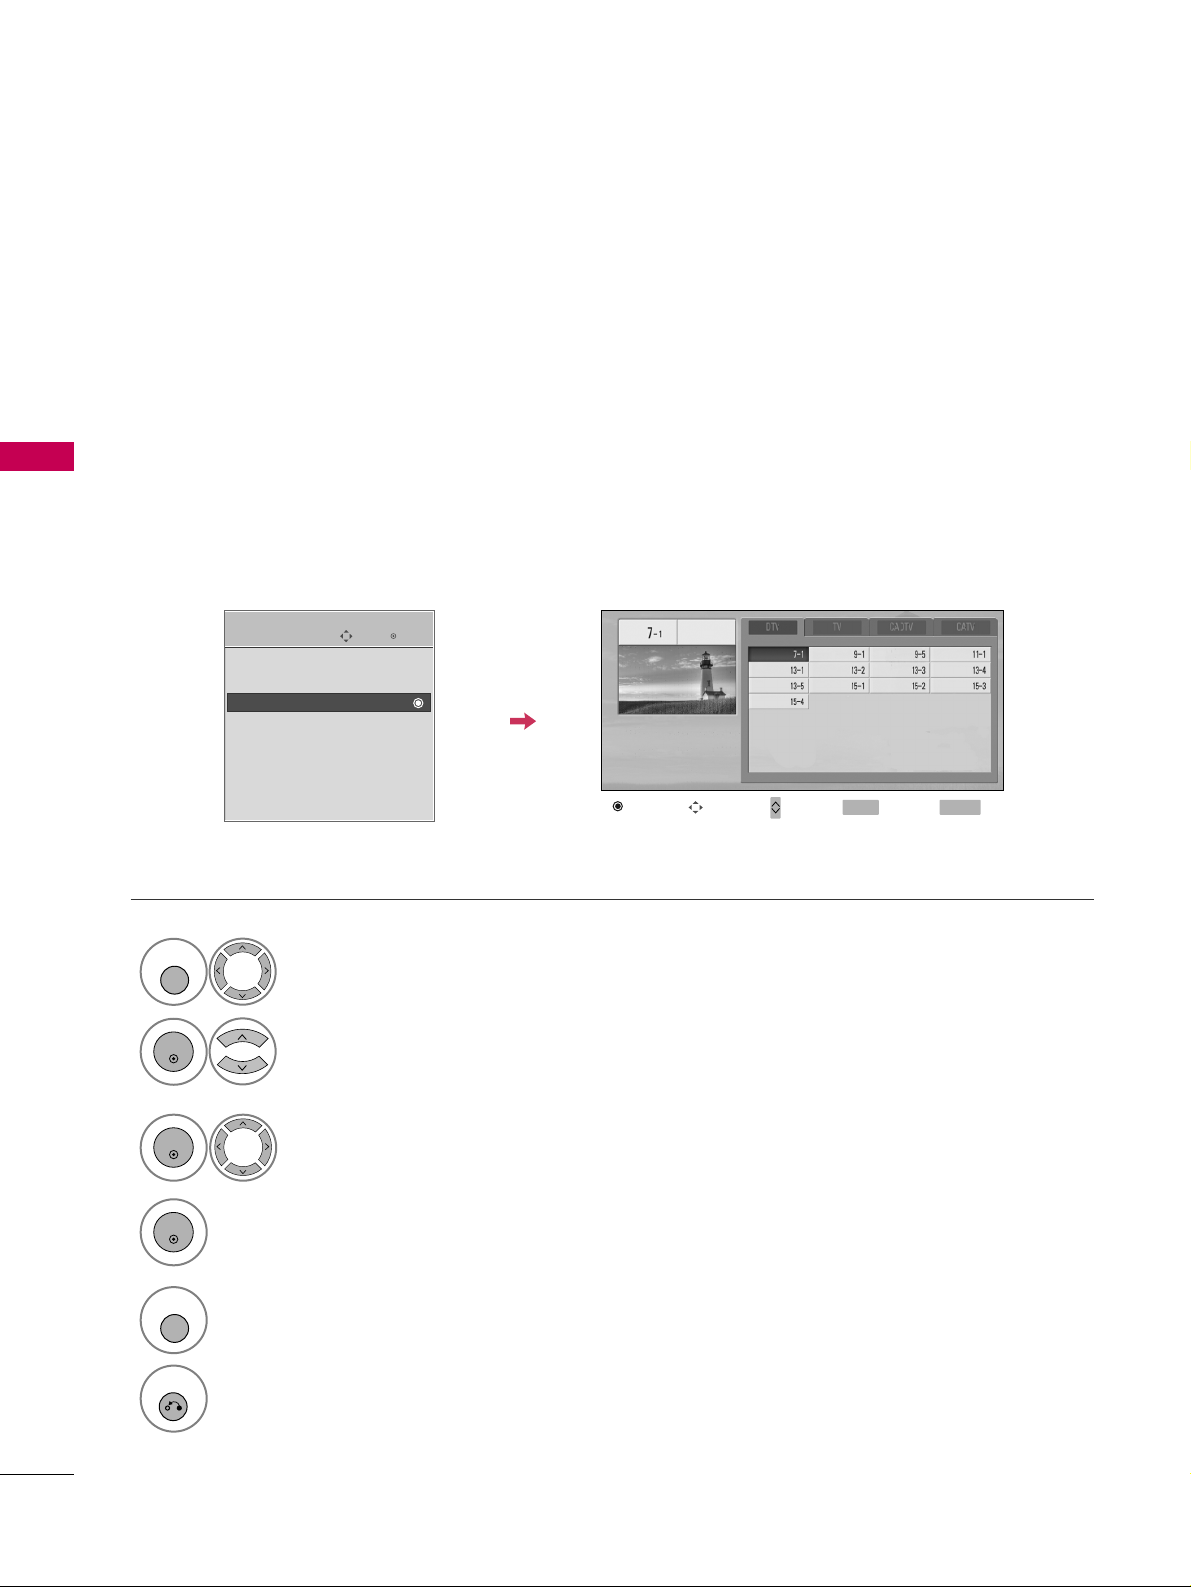
WATCHING TV / CHANNEL CONTROL
58
CHANNEL SETUP
WATCHING TV / CHANNEL CONTROL
Select a channel.
Select channel you want to add or
delete.
3
ENTER
4
ENTER
A custom list can be created by toggling each channel on or off with ENTER button. The channels in the Custom
List are displayed in black and the channels deleted from the Custom List are displayed in gray.
Once a channel is highlighted you can add or delete the channel by referring to the small window at the topright corner of the screen.
Channel Editing
Enter
Move
CHANNEL
Auto Tuning
Manual Tuning
Channel Edit
Select
CC HH AANNNNEE LL
.
1
MENU
2
ENTER
Select
CC hhaannnn eell EEddiitt
.
RETURN
Return to TV viewing.
Return to the previous menu.
5
MENU
Add/Delete
Move Page
CH
Move
Previous
MENU
Exit
RETURN
Page 61
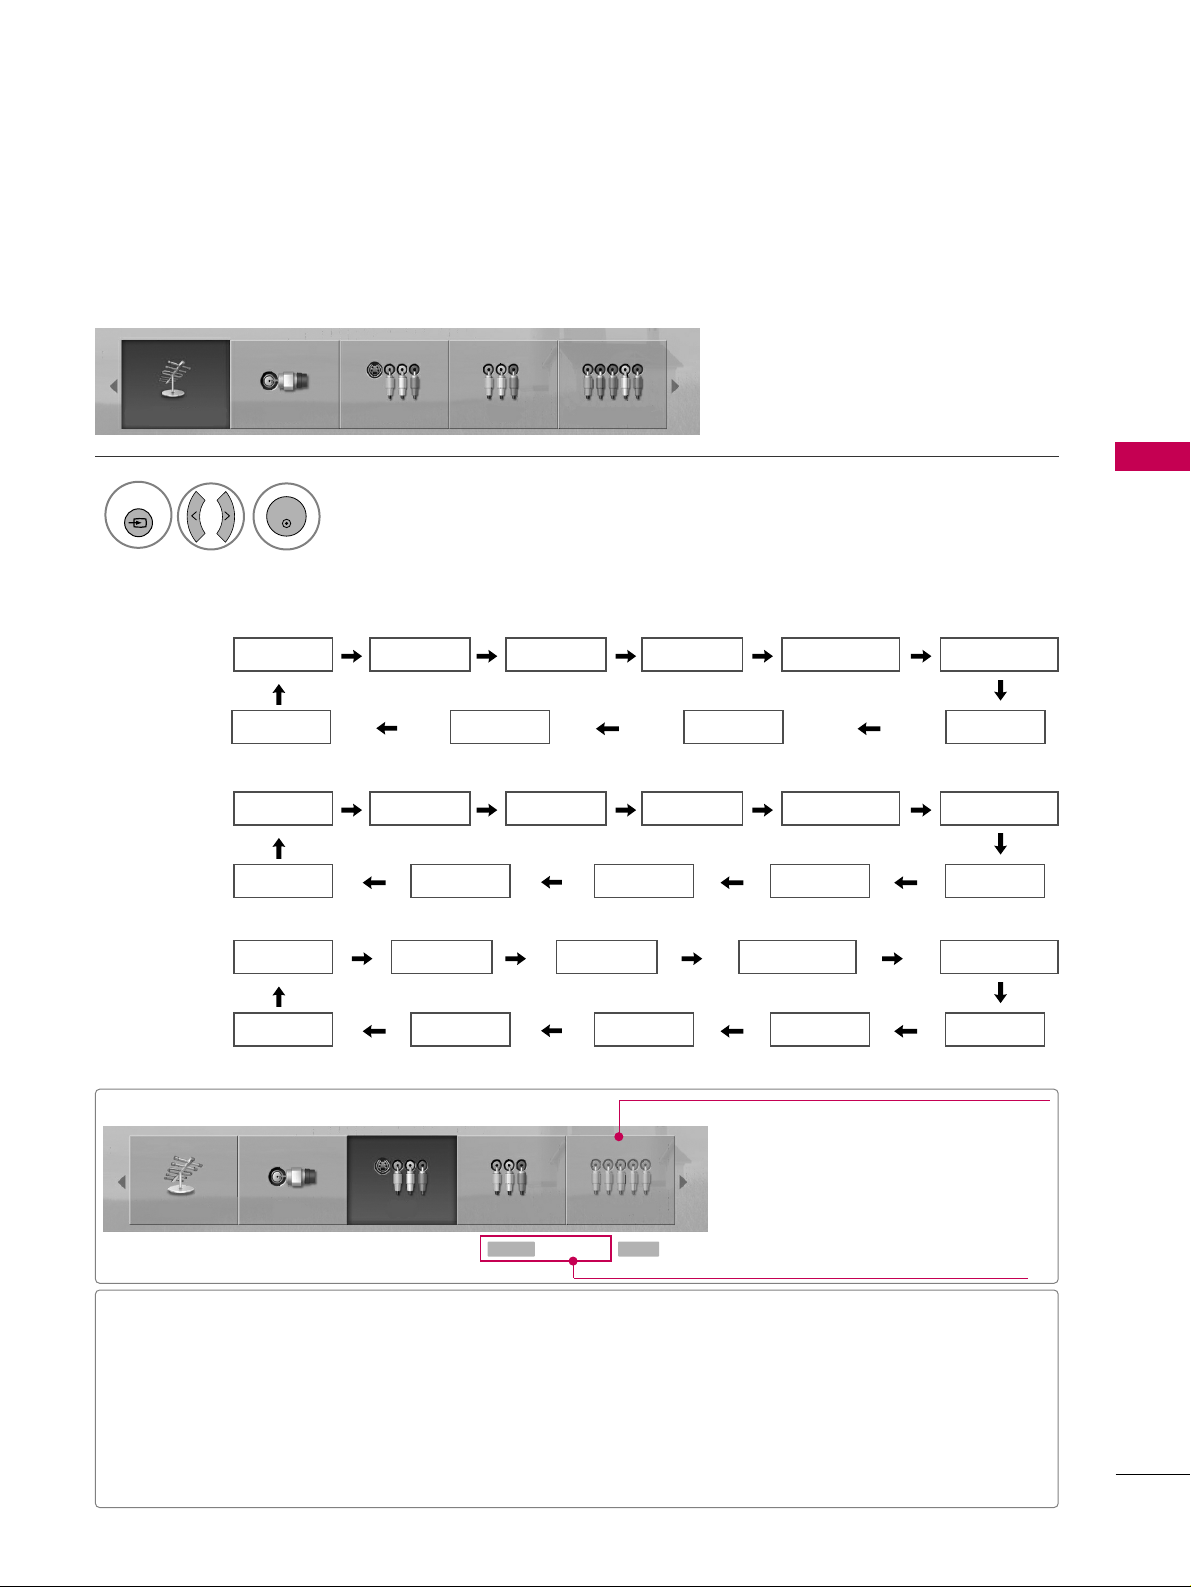
WATCHING TV / CHANNEL CONTROL
59
INPUT LIST
Only these input signals which are connected to a TV can be activated and selected.
Select the desired input source.
■
You can also select the desired input source in the
IINNPPUUTT
menu
(Except 32/37/42LG30).
1
INPUT
Antenna Cable AV1 AV2 Component1
HDMI3 HDMI2 HDMI1 RGB-PC
Component2
Antenna Cable AV1 AV2 Component1
ENTER
■
AAnn ttee nn nn aa
: Select it to watch over-the-air broadcasts.
■
CC aabb ll ee
: Select it to watch cable and digital cable.
■
AA VV
: Select them to watch a VCR or other external equipment.
■
CC oomm ppoonnee nn tt
: Select them to watch DVD or a Digital set-top box.
■
RRGGBB--PP CC
: Select it to view PC input.
■
HHDDMM II
: Select them to watch high definition devices.
Antenna Cable AV1 AV 2 Component1
Input Label
Q.MENU
Exit
RETURN
Select a desired input source (except
AAnn tteennnnaa
or
CCaa bb ll ee
). Then, you can select
your desired Input Label with using Q. MENU
button.
GG
pp..6600
Disconnected inputs are inactive (grayed out)
ie)
32/37/42LG30, 37/42/47/52LG50, 32LG70
Antenna
Cable AV1 AV2 Component1
HDMI4 HDMI3 HDMI2 HDMI1 RGB-PC
Component2
Plasma TV, 42/47/52LG70, 47LG90
Antenna
Cable AV Component1
HDMI4 HDMI3 HDMI2 HDMI1 RGB-PC
Component2
32/37/42/47/52LG60, 42/47LGX
Page 62
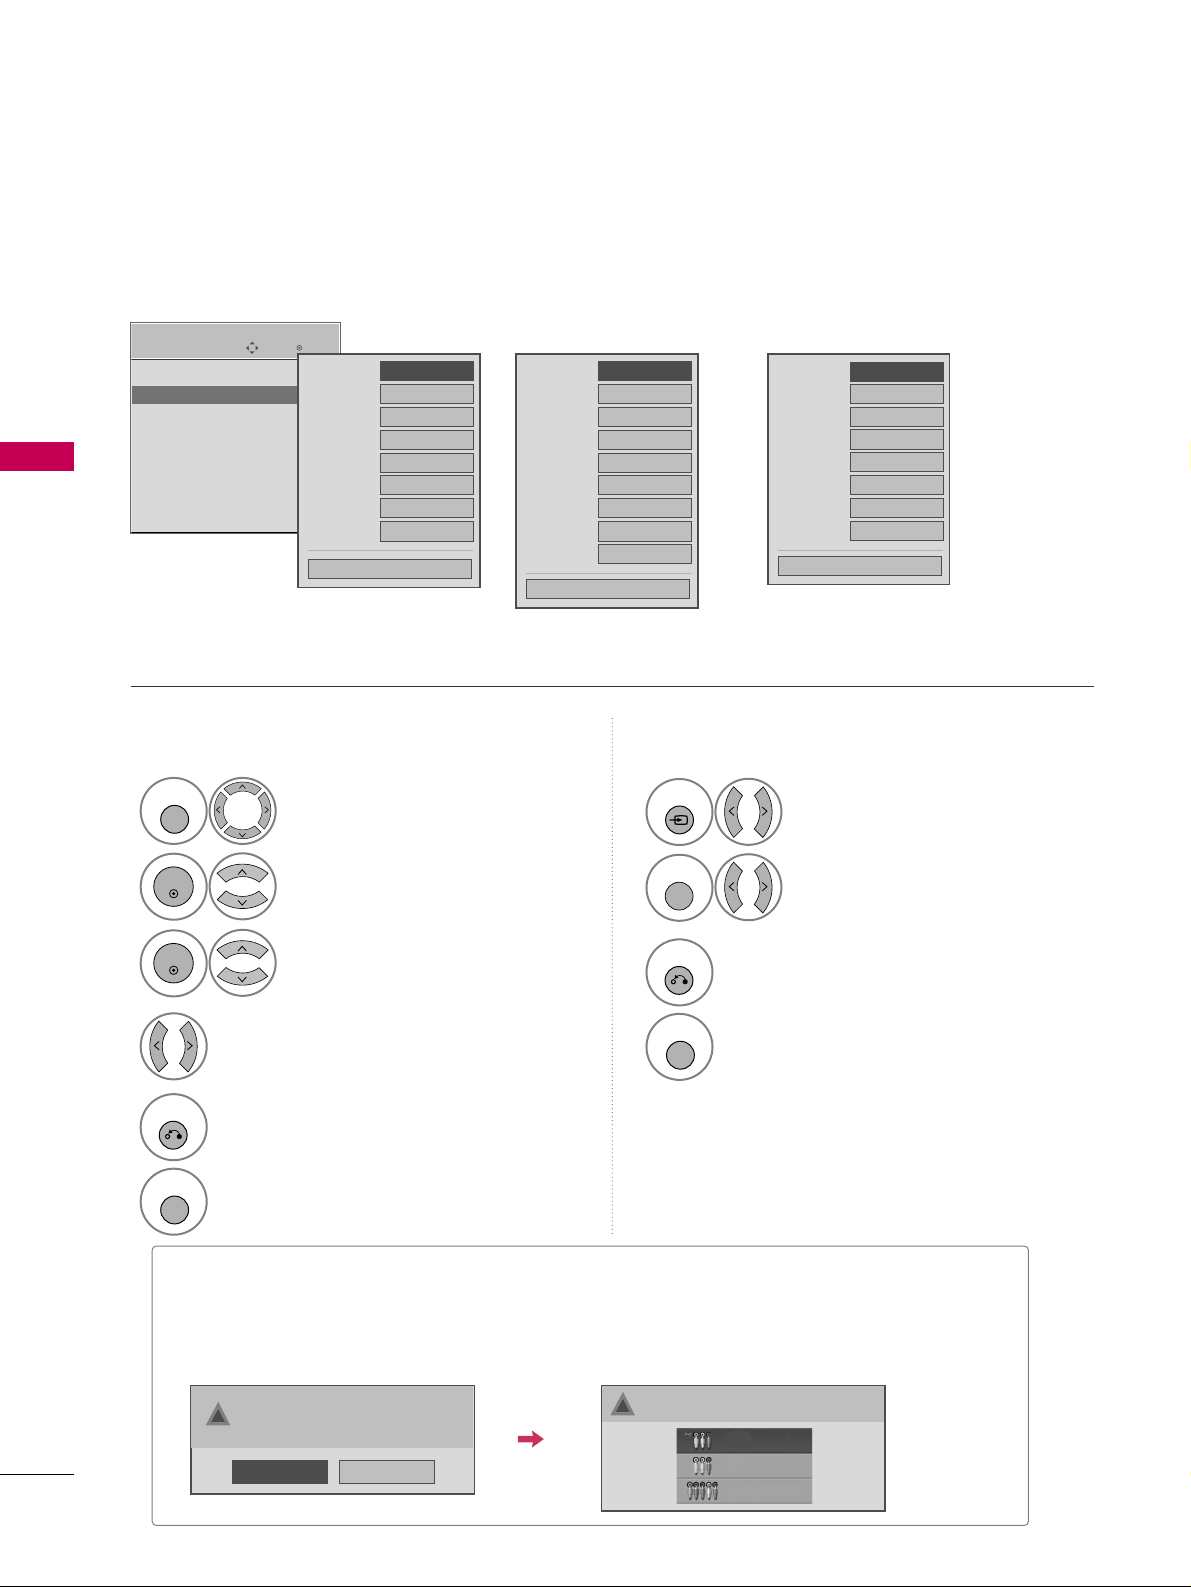
WATCHING TV / CHANNEL CONTROL
60
INPUT LABEL
WATCHING TV / CHANNEL CONTROL
You can set a label for each input source when it's not in use.
Enter
Move
OPTION
Language : English
Input Label
SIMPLINK : On
Key Lock : Off
Caption : Off
ISM Method : Normal
Power Saving : Level 0
Set ID : 1
EE
Select
OOPPTTIIOONN
.
Select
IInnppuutt LLaa bbee ll
.
Select the label.
1
MENU
2
ENTER
Select the source.
3
ENTER
4
5
RETURN
Return to the previous menu.
MENU
Return to TV viewing.
With using OPTION menu
Select the source.
Select the label.
1
INPUT
2
Q. MENU
3
RETURN
Return to the previous menu.
MENU
Return to TV viewing.
With using INPUT button
■
When new external device is connected, this popup menu is displayed automatically.
If selecting
YYee ss
, you can select input source that you want to appreciate.
■
But, when selecting “
SS IIMM PPLLIINN KK- OO nn
”, popup menu for HDMI input will not be displayed.
No
Ye s
!
New external device is connected.
Do you want to enjoy this?
!
Select input source that you want to appreciate.
AV1
AV2
Component1
AV1
FF GG
AV2
Component1
HDMI1
RGB-PC
Component2
HDMI2
HDMI3
Close
AV1
FF GG
AV2
Component1
HDMI1
RGB-PC
Component2
HDMI2
HDMI3
HDMI4
Close
FF GG
AV
Component1
HDMI1
RGB-PC
Component2
HDMI2
HDMI3
HDMI4
Close
Plasma TV, 42/47/52LG70,
47LG90
32/37/42/47/52LG60,
42/47LGX
32/37/42LG30,
37/42/47/52LG50,
32 LG 70
Page 63
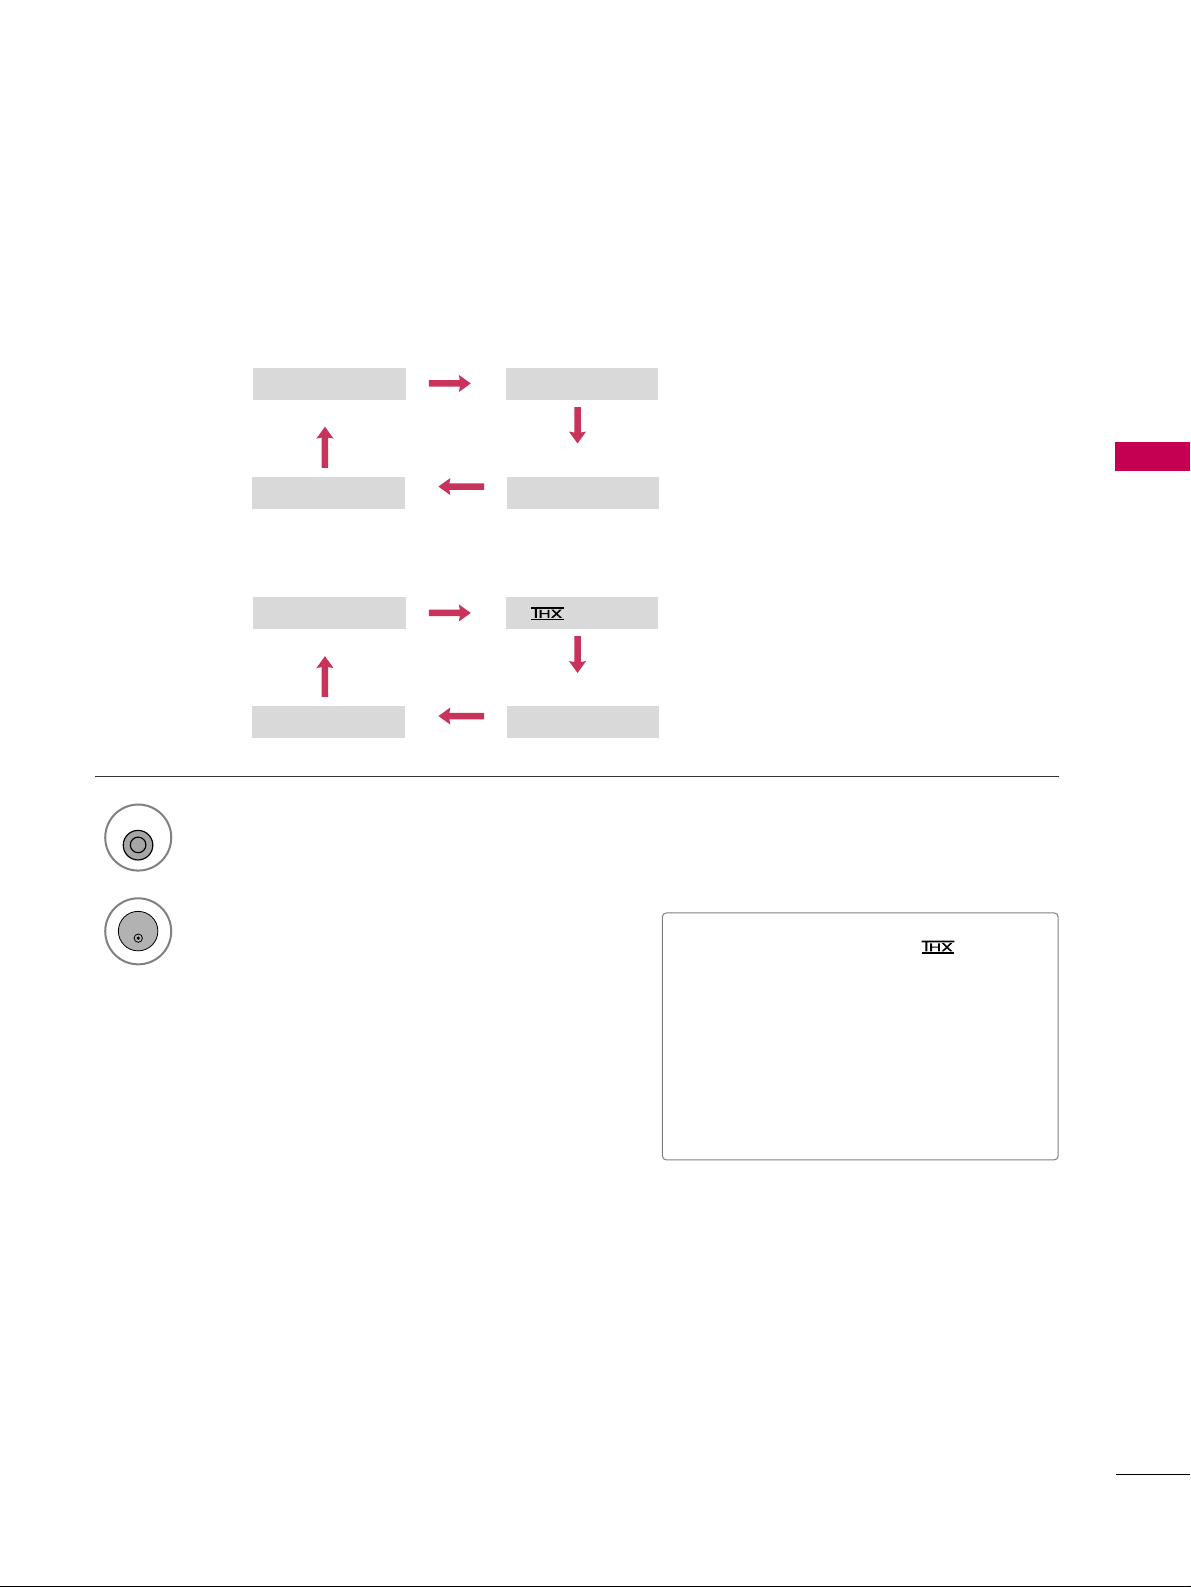
WATCHING TV / CHANNEL CONTROL
61
AV MODE
You can select the optimal images and sounds.
1
AV MODE
2
Off Cinema
Game Sport
Off Cinema
Game Sport
Press the
AAVV MMOODDEE
button repeatedly to select the desired source.
ENTER
■
If you select “
CC iinnee mmaa // CCiinneemm aa
”
in AV mode,
CC ii nnee mmaa
will be selected
both for “PICTURE menu - Picture
Mode” and “AUDIO menu - Sound
Mode” respectively.
■
If you select “
OO ffff
” in AV mode, the
“
PPiicc ttuurree MMoodd ee
” and “
SS oouunndd MMoo ddee
”
return to previous selected value.
All models (Except 50/60PG60, 50/60PG70)
Only for 50/60PG60, 50/60PG70
Page 64
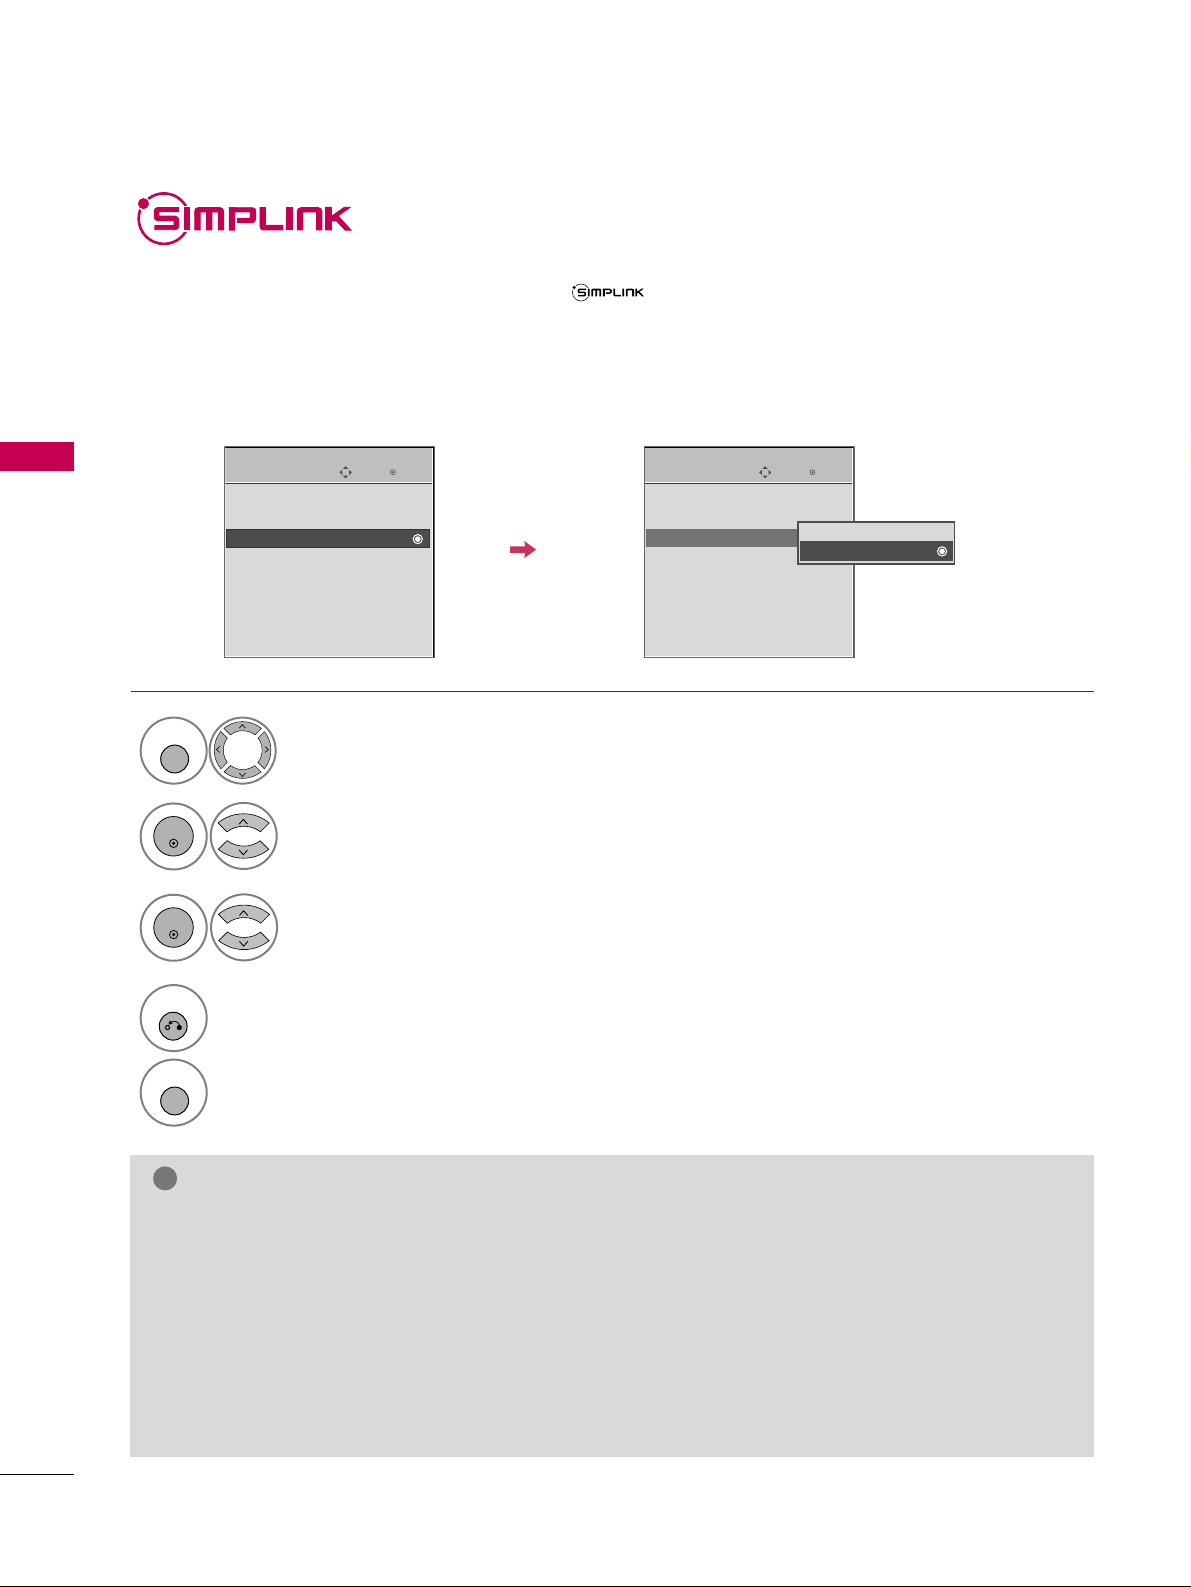
WATCHING TV / CHANNEL CONTROL
62
WATCHING TV / CHANNEL CONTROL
This function operates only with devices with the logo.
The TV might not function properly when using it with other products with HDMI-CEC function.
This allows you to control and play other AV devices connected with HDMI cable without additional cables and
settings.
To start using SIMPLINK, turn it on in the user menus.
Enter
Move
OPTION
Select
OOPPTTIIOONN
.
Select
SS IIMM PP LL IINNKK
.
Select
OO nn orOO ffff
.
Enter
Move
OPTION
E
1
MENU
3
2
ENTER
ENTER
Language : English
Input Label
SIMPLINK : On
Key Lock : Off
Caption : Off
ISM Method : Normal
Power Saving : Level 0
Set ID : 1
Language : English
Input Label
SIMPLINK : On
Key Lock : Off
Caption : Off
ISM Method : Normal
Power Saving : Level 0
Set ID : 1
Off
On
NOTE
!
GG
Connect the HDMI/DVI IN or HDMI IN terminal of the TV to the rear terminal (HDMI terminal) of the
SIMPLINK device with the HDMI cable.
GG
When you switch the Input source with the INPUT button on the remote control, the SIMPLINK device
will stop.
GG
When you select a device with home theater functionality, the sound output automatically switches to
the home theater speakers.
GG
If a connected SIMPLINK home theater system doesn't play the audio from the TV, connect the DIGITAL
AUDIO OUT terminal on the back of the TV to the DIGITAL AUDIO IN terminal on the back of the SIMPLINK device with an OPTICAL cable.
E
4
RETURN
Return to the previous menu.
MENU
Return to TV viewing.
Page 65
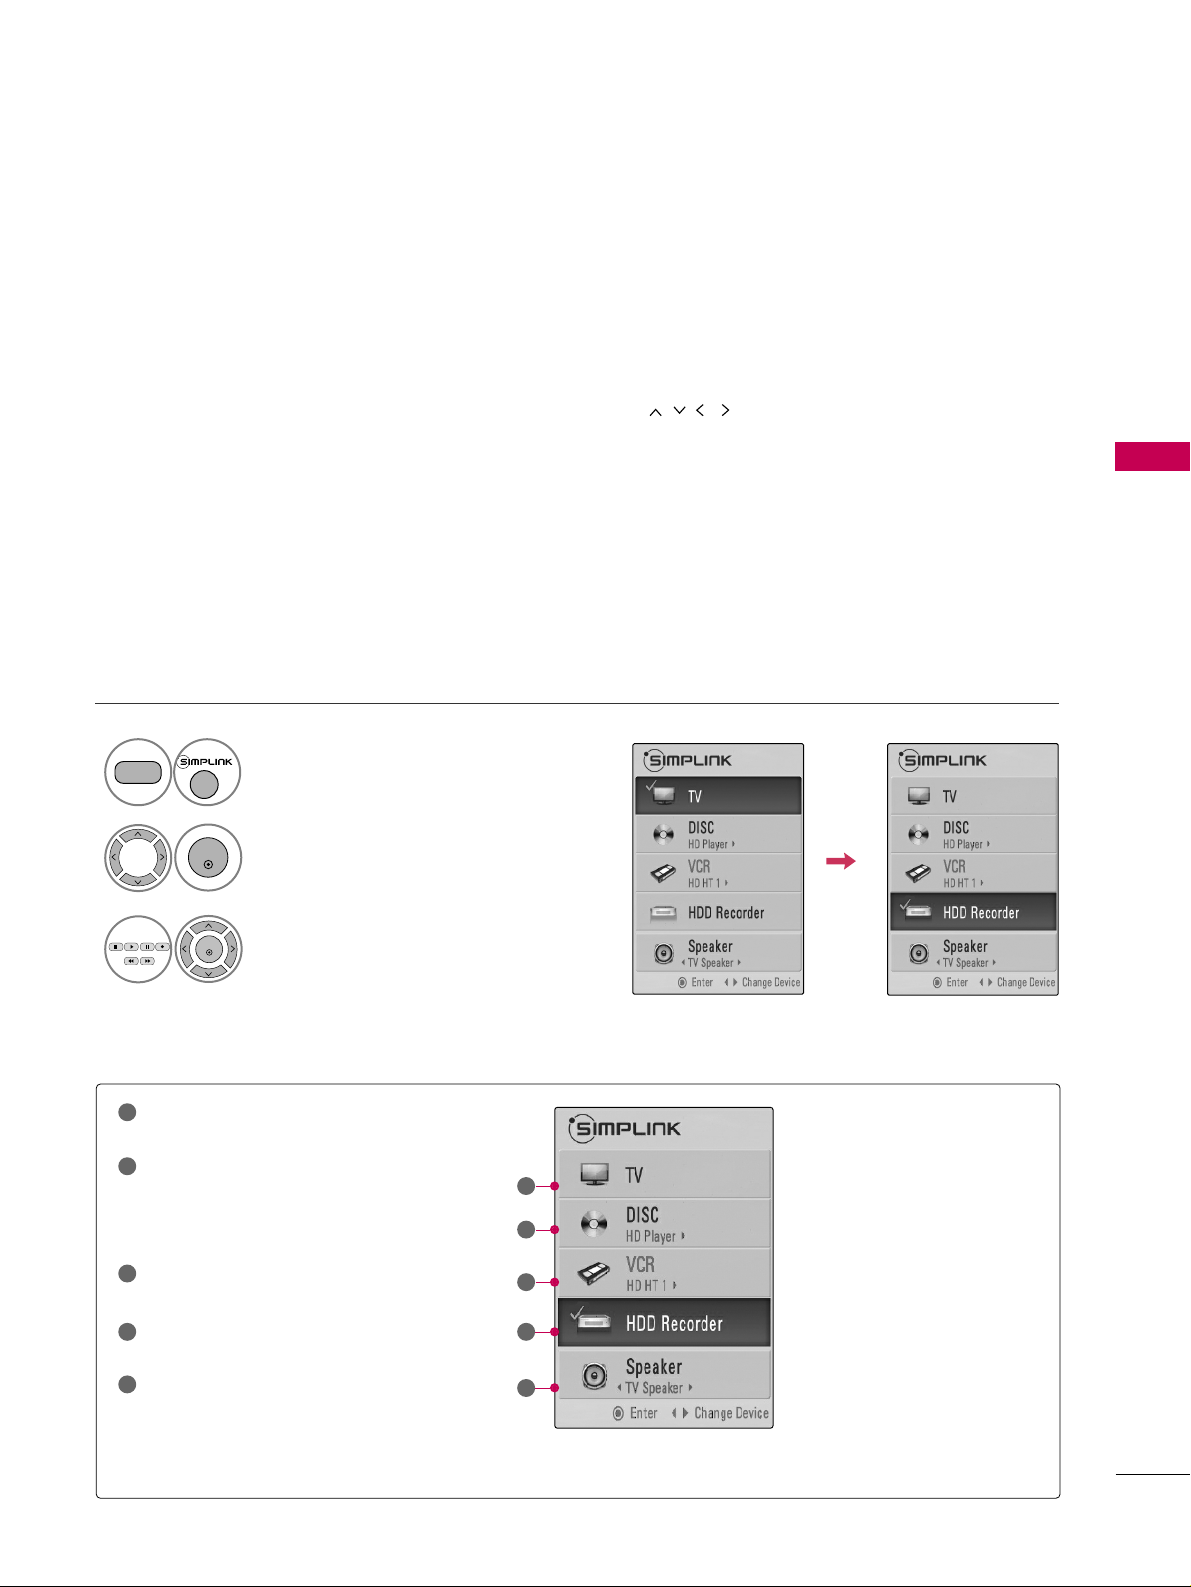
WATCHING TV / CHANNEL CONTROL
63
■
DDiirreecctt PP llaayy::
After connecting AV devices to the TV, you can directly control the devices and play media with-
out additional settings.
■
SS eelleecctt AAVV ddeevviiccee::
Enables you to select one of the AV devices connected to TV.
■
DDiisscc ppllaayybbaa cckk::
Control connected AV devices by pressing the ,
ENTER, G, A,
ll ll
, FFand GGbuttons.
■
PPoowweerr ooffff aallll ddeevviicceess::
When you power off the TV, all connected devices are turned off.
■
SS wwiitt cchh aa uuddiioo--oouutt::
Offers an easy way to switch audio-out.
■
SS yynn cc PPoowweerr oo nn::
When you play the connected AV device, TV will automatically turn on.
(A device, which is connected to the TV through a HDMI cable but does not support SIMPLINK, does not provide
this function)
Note: To operate SIMPLINK, an HDMI cable over Version 1.2 with *CEC function should be used. (*CEC: Consumer
Electronics Control).
SIMPLINK Menu
TTVV vv ii eeww iinngg
: Switch to the previous TV
channel regardless of the current mode.
DDIISSCC ppllaa yy bbaa cckk
: Select and play discs.
When multiple discs are available, the titles
of discs are conveniently displayed at the
bottom of the screen.
VVCCRR ppllaayy bbaa cckk
: Control the connected
VCR.
HHDDDD RR ee cc oorrddiinnggss ppllaa yy bbaa cckk
: Control
recordings stored in HDD.
AAuu ddiioo OOuutt ttoo HHoommee TT hhee aatteerr ssppeeaa kk--
eerr// AA uudd ii oo OO uutt ttoo TTVV
: Select Home
Theater speaker or TV speaker for Audio
Out.
SIMPLINK Functions
1
2
3
4
5
GG
When no device is connected
(displayed in gray)
GG
Selected Device
GG
When a device is connected
(displayed in bright color)
1
2
3
4
5
Display
SS IIMM PPLL IINN KK
menu.
Select the desired device.
Control connected AV devices.
1
TV
3
2
ENTER
ENTER
Page 66
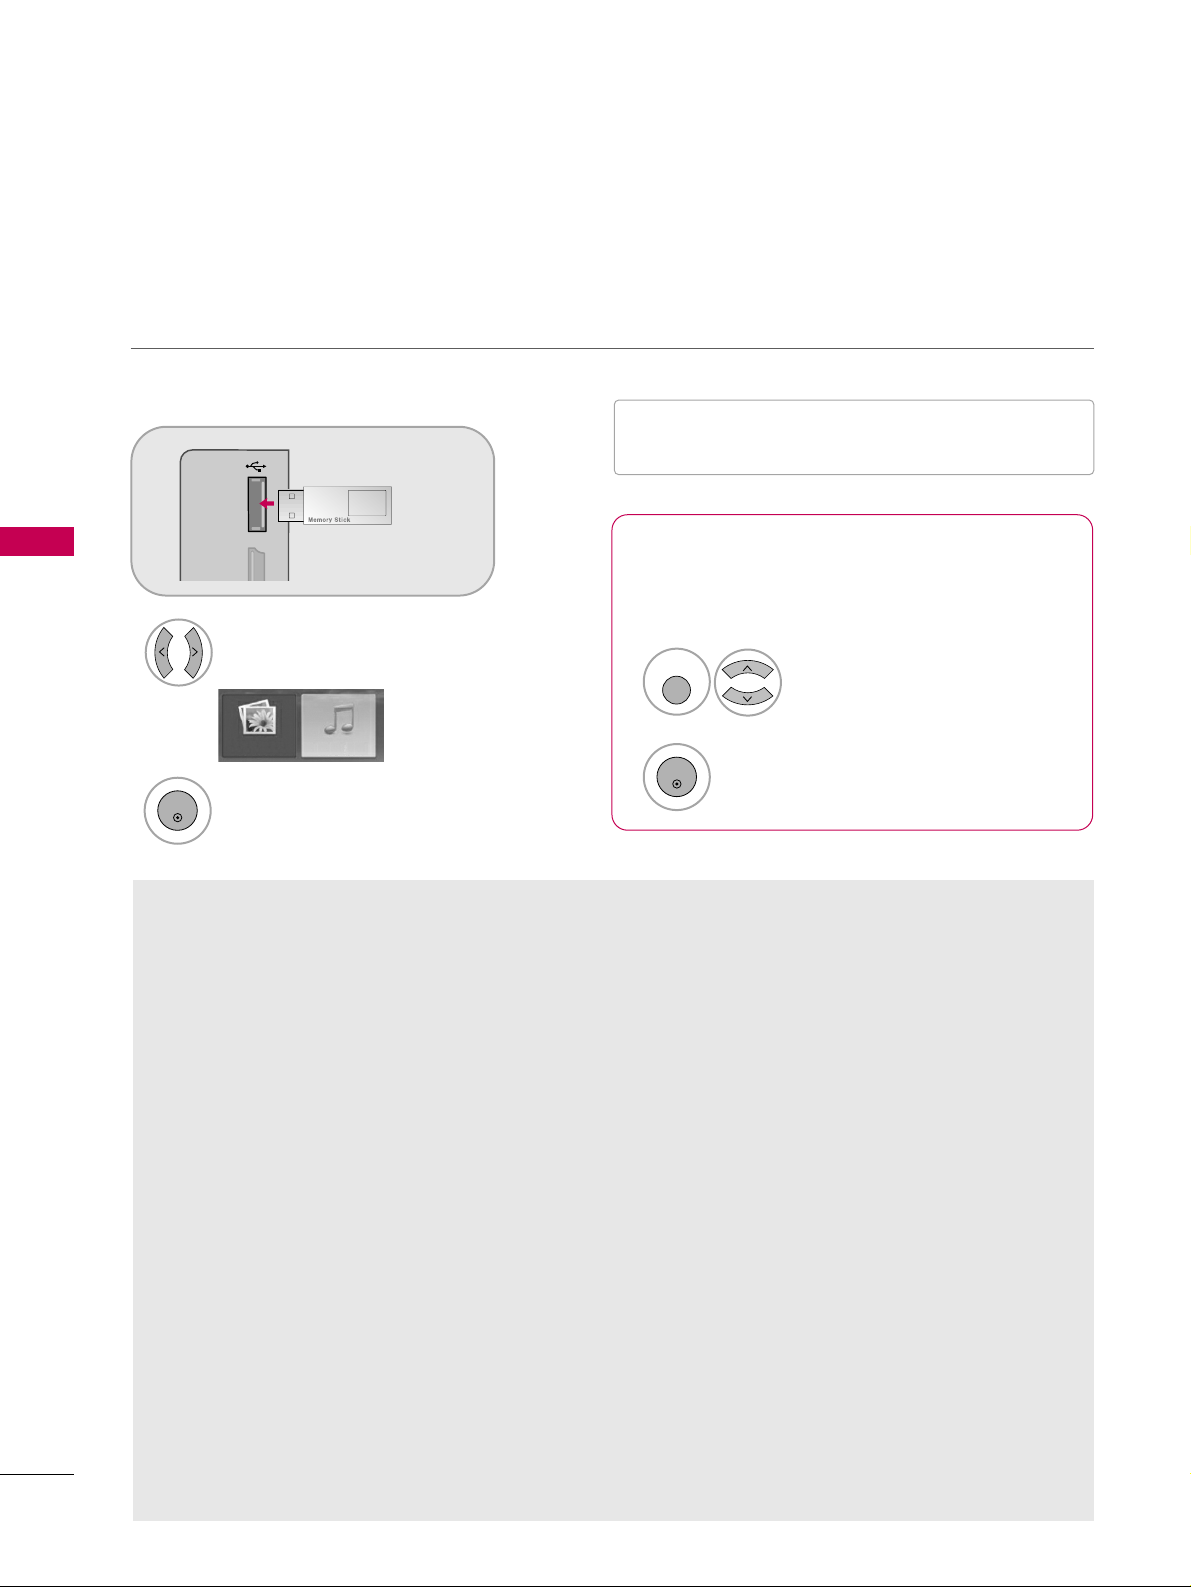
USB
USB
ENTRY MODES
64
When you connect a USB device, this screen is displayed automatically.
In USB device, you can not add a new folder or delete the existing folder.
Precautions when using the USB device
GG
Only a USB storage device is recognizable.
GG
If the USB storage device is connected through a
USB hub, the device is not recognizable.
GG
A USB storage device using an automatic recognition program may not be recognized.
GG
A USB storage device which uses its own driver
may not be recognized.
GG
In case of a card reader, up to four memory cards
are concurrently recognizable.
GG
The recognition speed of a USB storage device
may depend on each device.
GG
Please do not turn off the TV or unplug the USB
device when the connected USB storage device is
working. When such device is suddenly separated
or unplugged, the stored files or the USB storage
device may be damaged.
GG
Please do not connect the USB storage device
which was artificially maneuvered on the PC. The
device may cause the product to malfunction or
fail to be played. Never forget to use only a USB
storage device which has normal music files or
image files.
GG
Please use only a USB storage device which was
formatted as a FAT or NTFS file system provided
with the Windows operating system. In case of a
storage device formatted as a different utility program which is not supported by Windows, it may
not be recognized.
GG
Please connect power to a USB storage device
which requires an external power supply. If not,
the device may not be recognized.
GG
Please connect a USB storage device with cable is
offered by USB maker. If connected with cable is
not offered by USB maker or an excessively long
cable, the device may not be recognized.
GG
Some USB storage devices may not be supported
or operated smoothly.
GG
File alignment method of USB storage device is
similar to Window XP and filename can recognize
up to 100 English characters.
GG
Please backup important files because data on
USB device may be damaged. Data management is
consumer's responsibility and as a result, the manufacturer does not cover data damage.
When removing the USB device
Connect the USB device to the
UUSSBB IINN
jacks on the side of TV.
3
Select
PPHHOO TT OO LL IISS TT orMM UU SS IICC LLII SSTT
1
PHOTO LIST MUSIC LIST
Select
UUSS BB EE jj eecctt
.
Select the
UUSS BB EE jj eecctt
menu before removing the
USB device.
2
ENTER
1
Q. MENU
2
ENTER
* Except 32/37/42LG30
■
It doesn’t support USB HDD
■
This TV supports JPG and MP3.
Page 67
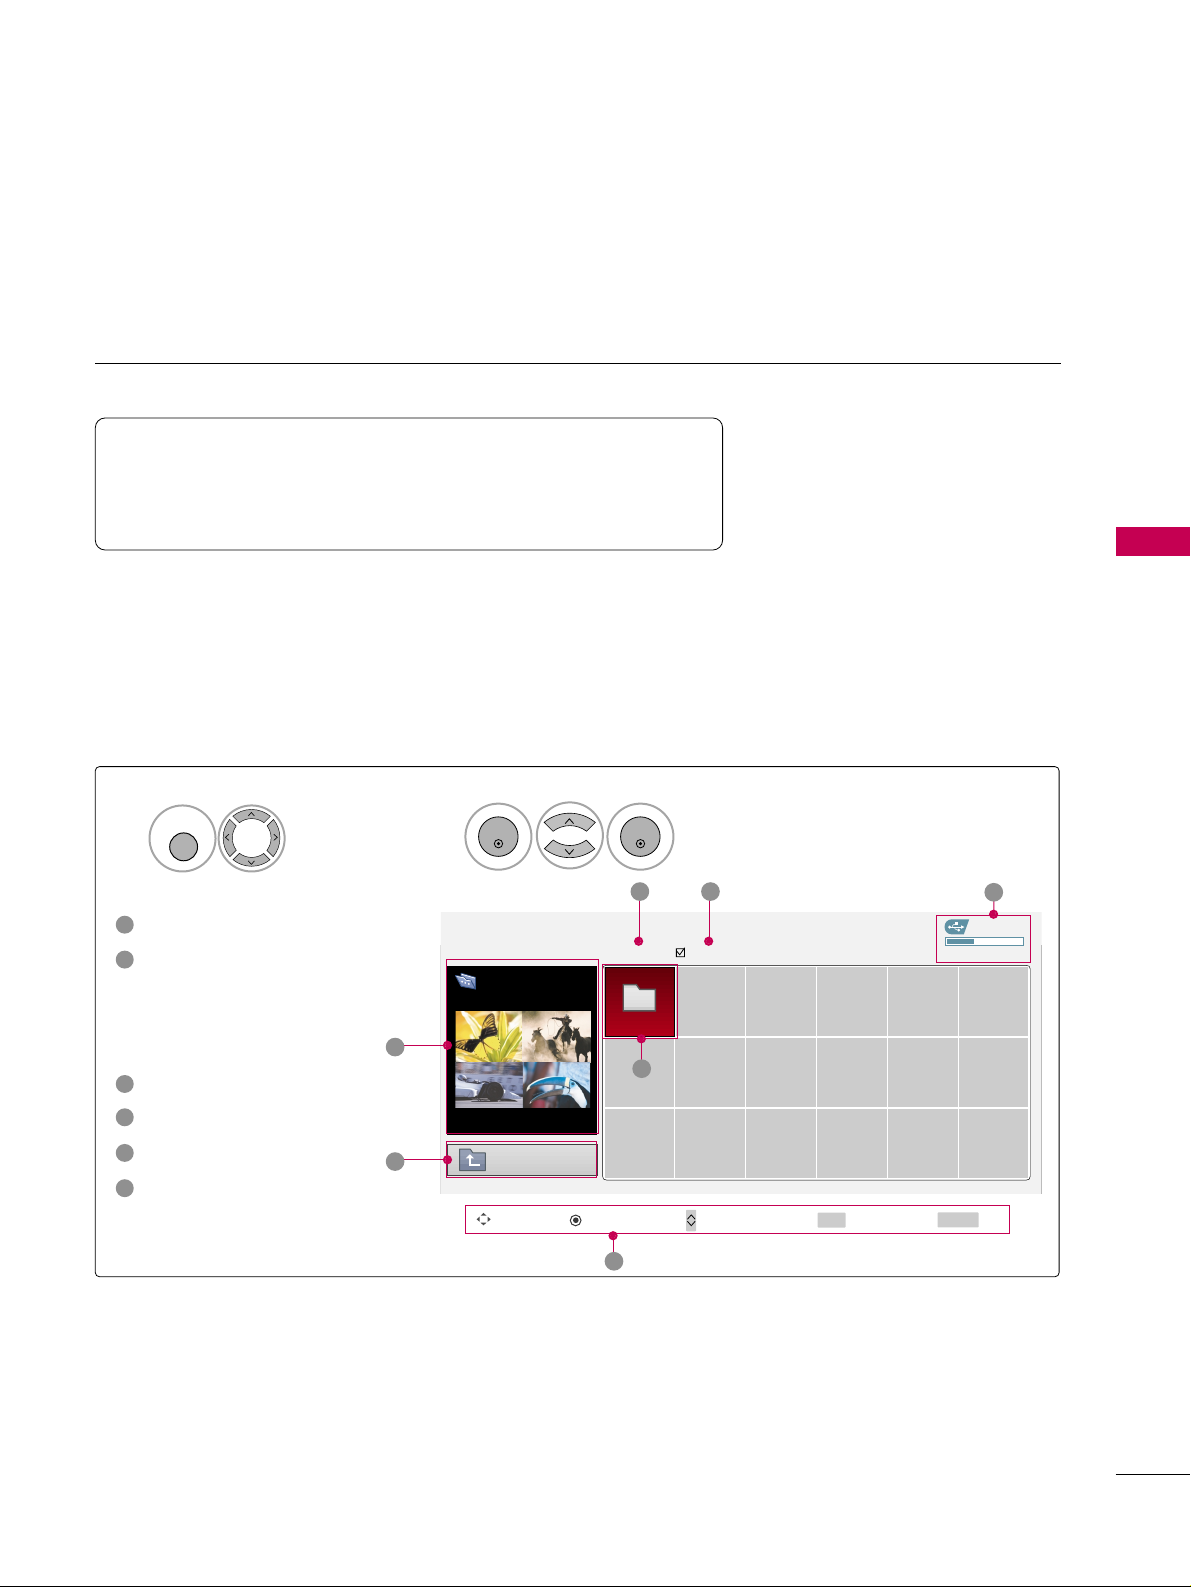
PHOTO LIST
USB
65
You can view .JPG files from USB storage devices.
The On Screen Display on your model may be slightly different.
Screen Components
Moves to upper level file
Preview: Display the
thumbnail/folder name of
the photo in the selected
folder
Current page/Total pages
Total number of marked photos
Usable USB memory
Corresponding buttons on
the remote control
Supported photo file: *.JPG
■
You can play JPG files only.
■
Only baseline scan is supported among JPG.
USB Device
Page 1/1
No Marked
PHOTO LIST
Upper
Free Space 150MB
Navigate PopUp Menu Move Page Mark Exit
2Folders, 4Files
3 4
5
1
1
2
Select
UUSS BB
.
Select
PPHHOO TT OO LL IISS TT
.
2
TOP FOLDER
Drive1
1
MENU
ENTER
ENTER
1
2
3
4
5
6
Drive1
CH
FAV
RETURN
6
Page 68
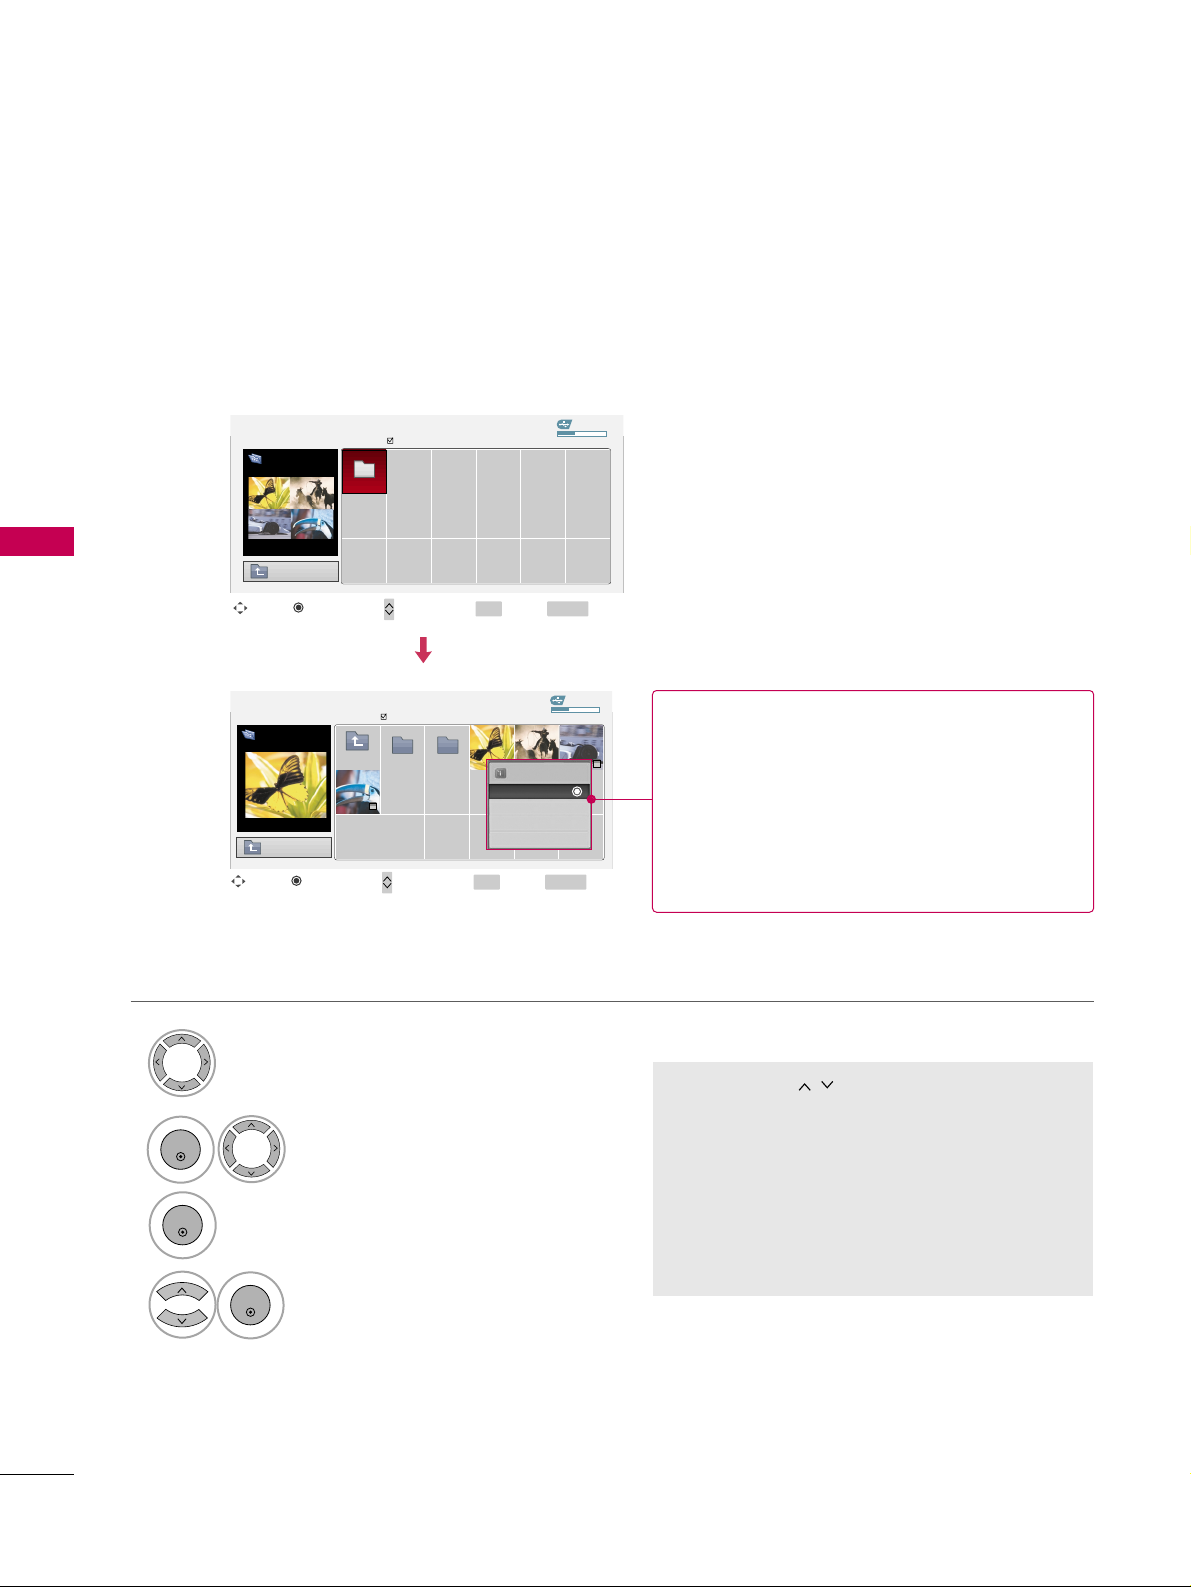
USB
66
USB
Photo Selection and Popup Menu
USB Device
Page 1/1
No Marked
PHOTO LIST
Upper
Free Space 150MB
2Folders, 4Files
USB Device
Page 1/1
No Marked
PHOTO LIST
Upper
Free Space 150MB
1366x768 125KB
Select the target folder or drive.
Select the desired photos.
2
Show the Popup menu.
3
1
■
Use the
CC HH
button to navigation in the
photo page.
■
Use the
FFAAVV
button to mark or unmark a
photo. When one or more photos are marked,
you can view individual photos or a slide show
of the marked photos. If no photos are marked,
you can view all photos individually or all photos in the folder in a slide show.
TOP FOLDER
Drive1
4
Select the desired Popup menu.
ENTER
ENTER
ENTER
Navigate Move Page Mark Exit
CH
FAV
RETURN
PopUp Menu
Navigate Move Page Mark Exit
CH
FAV
RETURN
PopUp Menu
Drive1
Drive1
Butterfly
Upper Photo X.Box
1366x768
125KB
View
Mark All
Delete
Cancel
When you select a file (not folder), this PopUp
menu is displayed.
GG
VViieeww
: Display the selected item.
GG
MMaarrkk AAllll
: Mark all photos on the screen.
GG
UUnnmm aarrkk AAllll
: Deselect all marked photos.
GG
DDee llee ttee
: Delete the selected photo item.
GG
CC aannccee ll
: Close the pop-up menu.
Page 69
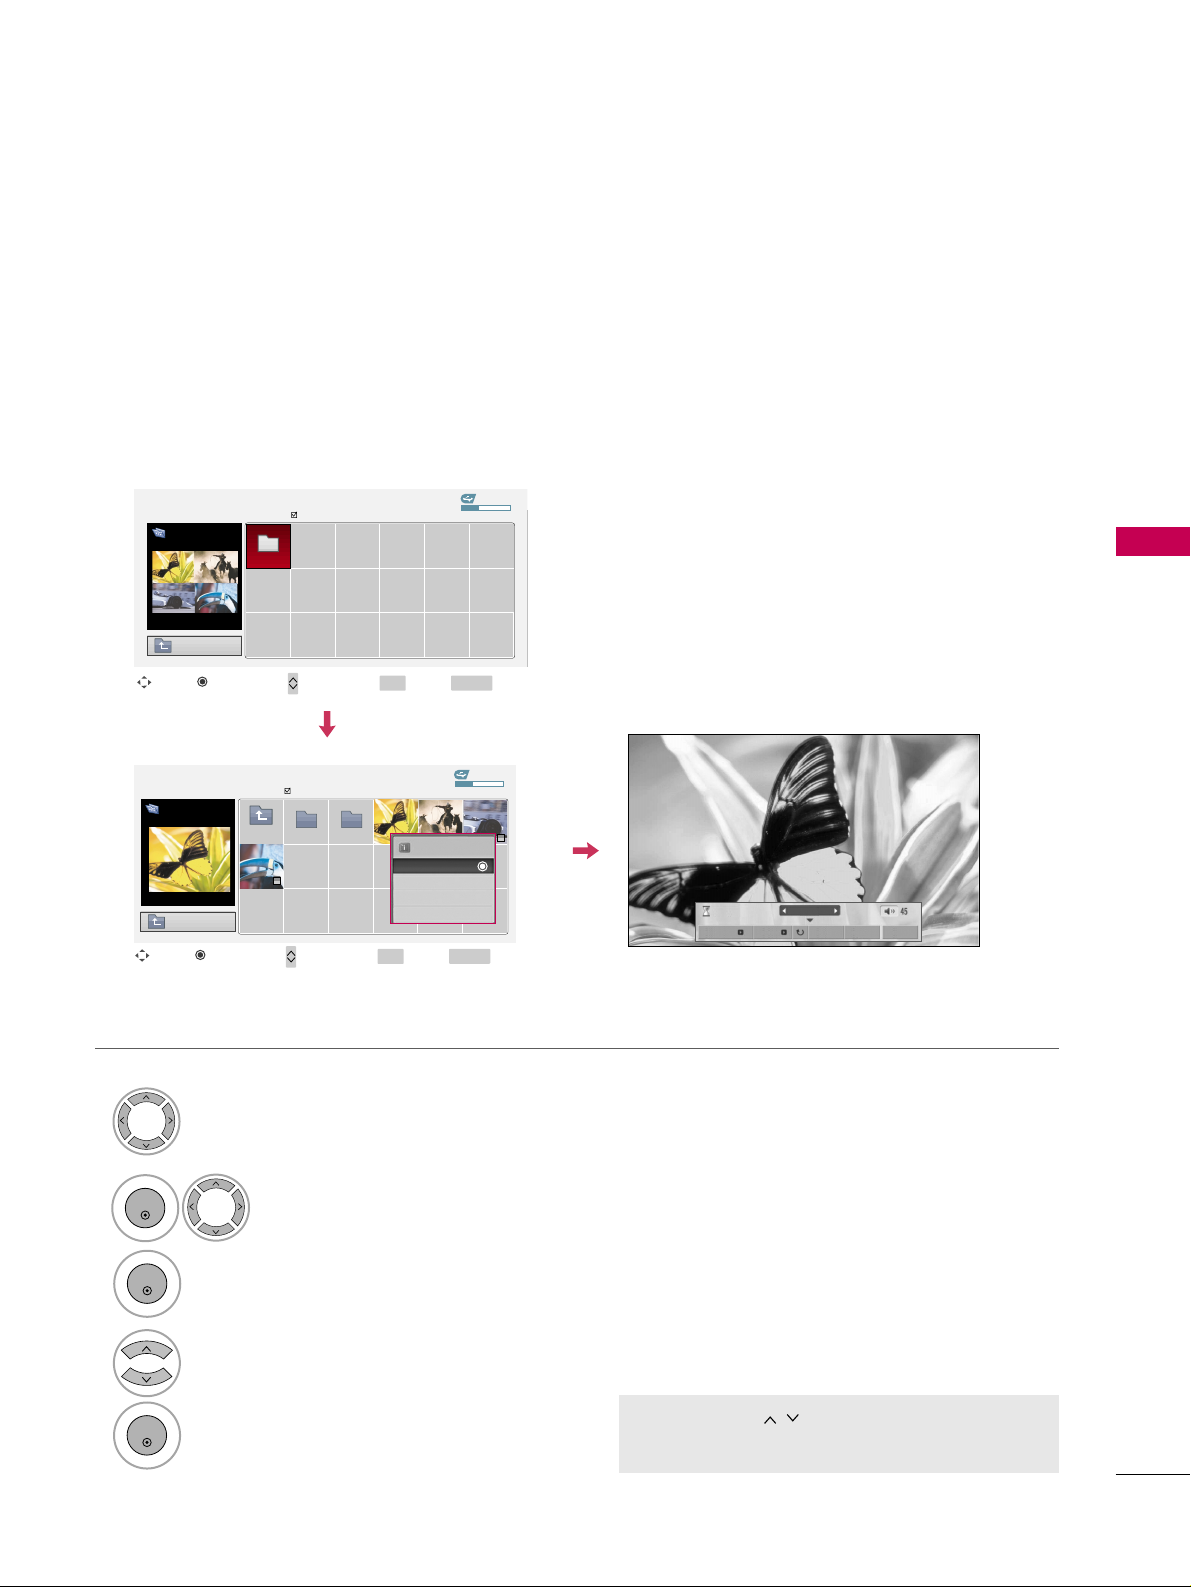
USB
67
Full Screen Menu
You can change the Photo List view so that it fills the screen. More operations are available in full
screen mode.
■
Use the
CC HH
button to navigation in the
photo page.
The aspect ratio of a photo may change the size of
the photo displayed on the screen in full size.
1/17
Sideshow BGM Delete Option Hide
Select the target folder or drive.
Select the desired photos.
Show the Popup menu.
5
Select
VViiee ww
.
The selected photo is displayed in
full size.
2
3
1
4
ENTER
ENTER
ENTER
USB Device
Page 1/1
No Marked
PHOTO LIST
Upper
Free Space 150MB
2Folders, 4Files
USB Device
Page 1/1
No Marked
PHOTO LIST
Upper
Free Space 150MB
1366x768 125KB
TOP FOLDER
Drive1
Navigate Move Page Mark Exit
CH
FAV
RETURN
PopUp Menu
Navigate Move Page Mark Exit
CH
FAV
RETURN
PopUp Menu
Drive1
Drive1
Butterfly
Upper Photo X.Box
1366x768
125KB
View
Mark All
Delete
Cancel
Page 70
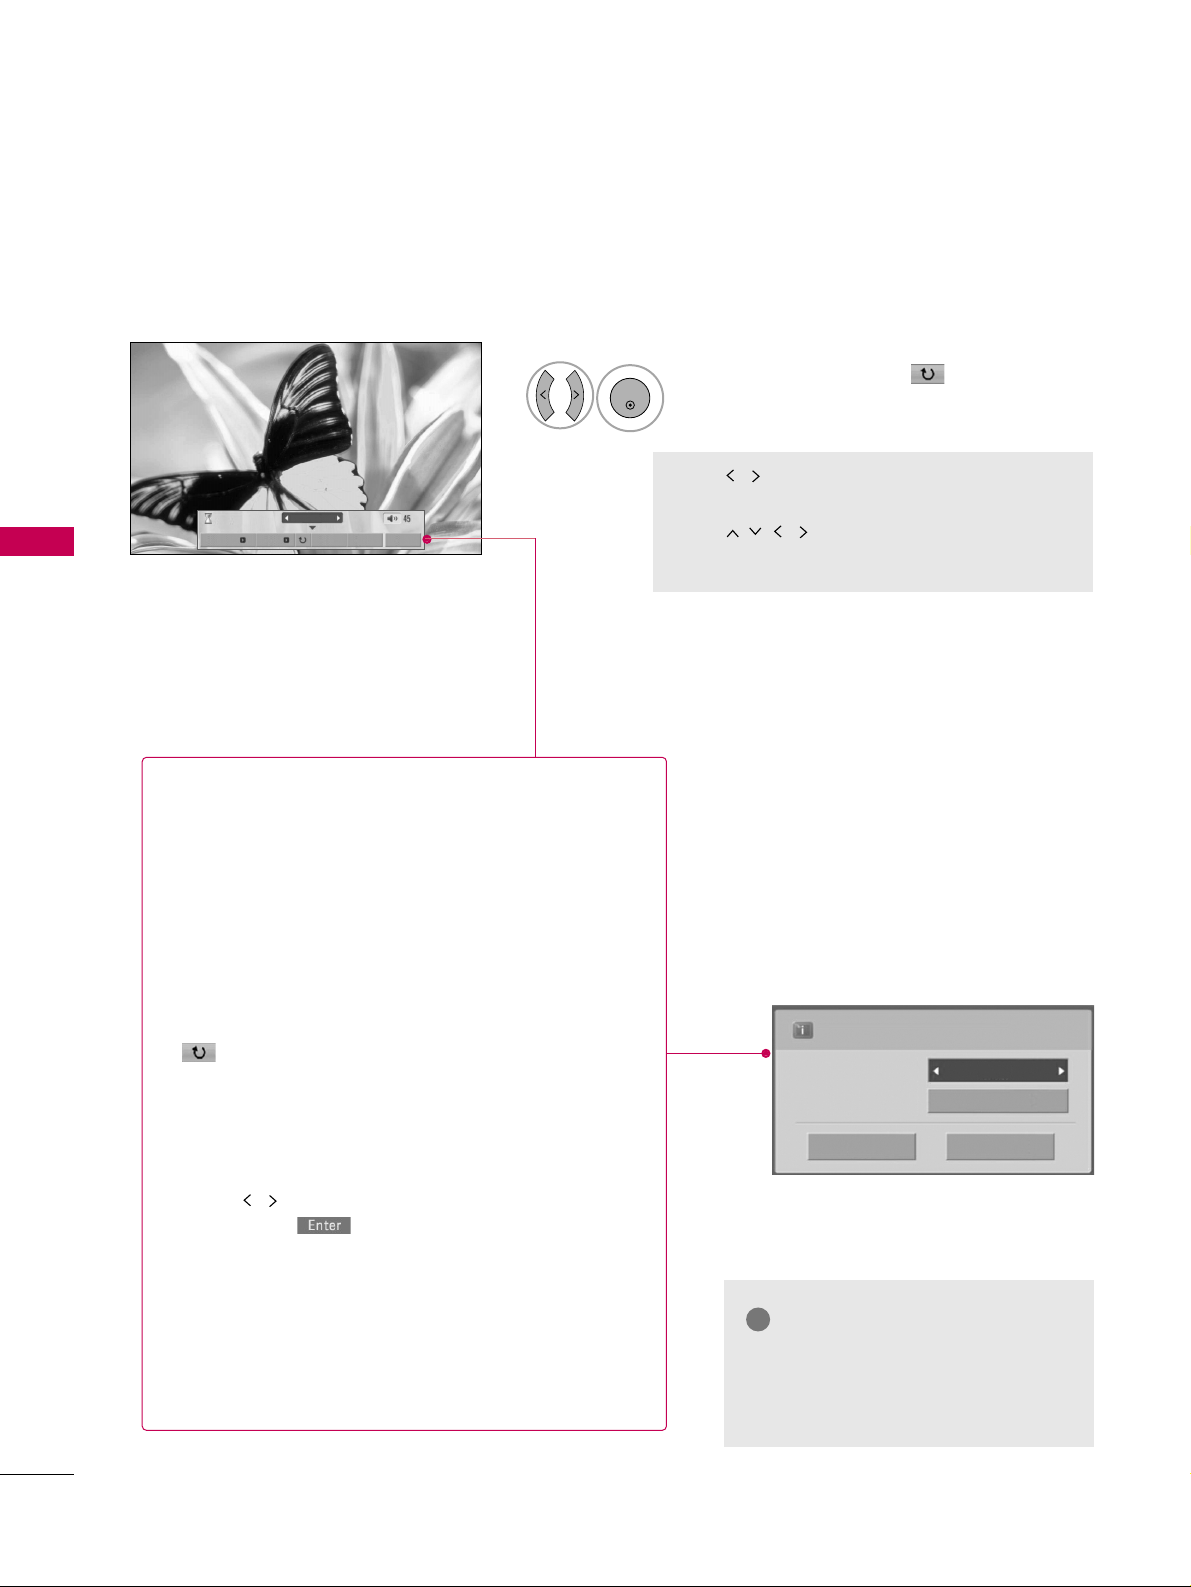
USB
68
USB
1/17
Sideshow B GM Delete O ption Hide
Select the
SSiiddeesshhooww, BBGGMM
,
((RRoottaattee))
,
DDeellee ttee,OOppttiioonn
, or
HHiiddee..
Press
FF GG
to set the time interval between slides.
Slide Speed
Fast
Cancel
...
Music Folder
ENTER
■
Use button to select the previous or
next photo.
■
Use button to select and control
the menu on the full-sized screen.
ENTER
6
GG
SS ii ddee sshhooww
: Selected photos are displayed during the
slide show. If no photo is selected, all photos in the current folder are displayed during slide show.
■
Set the time interval of the slide show in
OOpp ttiioo nn
.
■
A slide show continues for a maximum of 4 hours.
After 4 hours, the slide show will end and go to TV
mode or external input mode.
GG
BB GG MM
: Listen to music while viewing photos in full size.
■
Set the BGM device and album in
OOpp ttiioo nn
.
GG
((RRoottaattee))
: Rotate photos.
■
Rotates the photo 90°, 18 0 °, 270°, 360° clockwise.
GG
DDee llee ttee
: Delete photos.
GG
OOpp ttiioo nn
: Set values for
SS ll ii ddee SS ppeeee dd
and
MM uu ssiicc
FF oolldd eerr
.
■
Use button and
EENNTTEERR
button to set values.
Then go to and press
EENNTTEERR
to save the set-
tings.
■
You cannot change
MM uu ssii cc FFoo ll ddeerr
while BGM is
playing.
GG
HHiidd ee
: Hide the menu on the full-sized screen.
■
To see the menu again on the full-sized screen, press
EENNTTEERR
button to display.
NOTE
!
GG
This TV will not be able to decode
most JPEG images saved using the
Progressive option.
Page 71
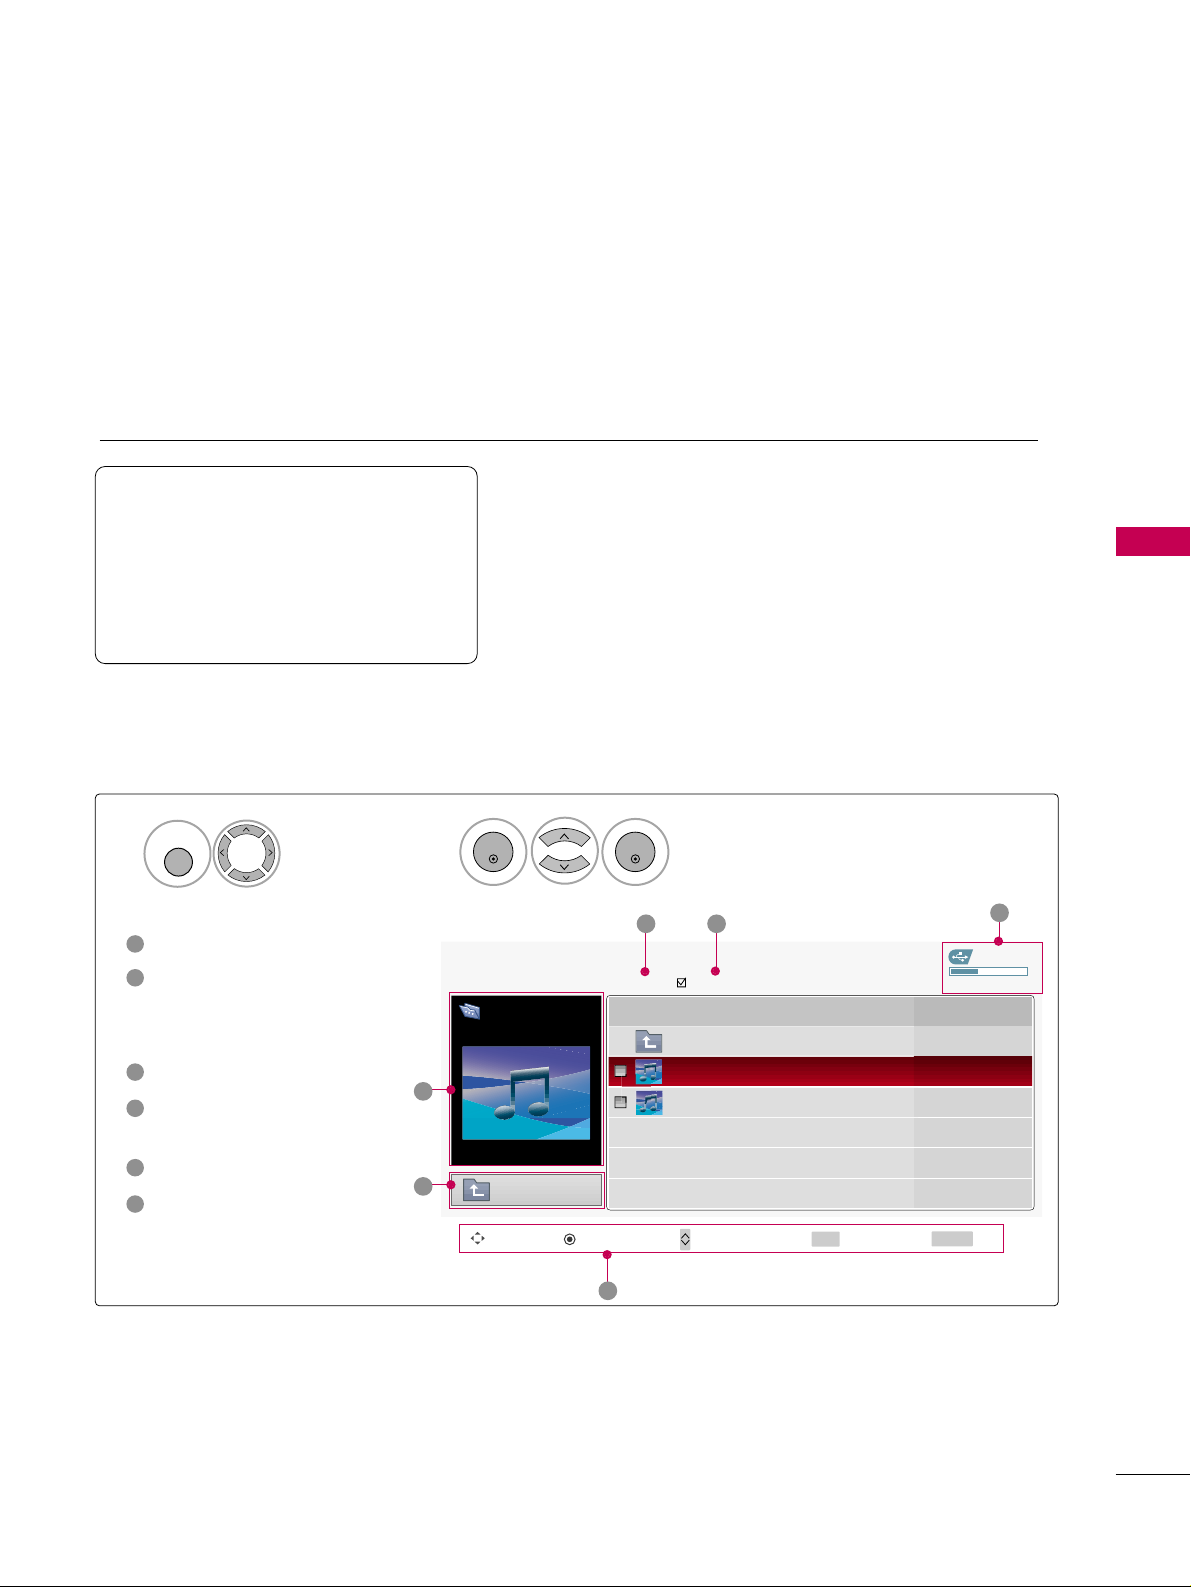
MUSIC LIST
USB
69
You can use the Music List menu to play MP3 files form a USB storage device.
This TV cannot play back copy-protected files.
The On Screen Display on your model may be slightly different.
Screen Components
Supported music file: *.MP3
Bit rate range 40Kbps ~ 320Kbps
• Sampling rate (Sampling Frequency)
MPEG1 : 32000, 44100, 48000Hz
MPEG2 : 16000, 24000, 22050Hz
MPEG2.5 : 16 ~ 48KHz
Moves to upper level file
Preview: If any album jacket
for the file exists, this jacket is displayed.
Current page/Total pages
Total number of marked
musics
Usable USB memory
Corresponding buttons on
the remote control
1
3
4
5
6
2
Select
UUSS BB
.
Select
MM UU SSIICC LL IISSTT
.
1
2
MENU
ENTER
ENTER
USB Device
MUSIC LIST
Upper
Free Space 150MB
3945 KB, 128 Kbps
Title Play Time
Upper
Good Bye
Arirang 04:12
05:30
3 4
5
1
2
Navigate PopUp Menu Move Page Mark Exit
CH
FAV
RETURN
6
Page 1/1
No Marked
Drive1
Arirang
Page 72
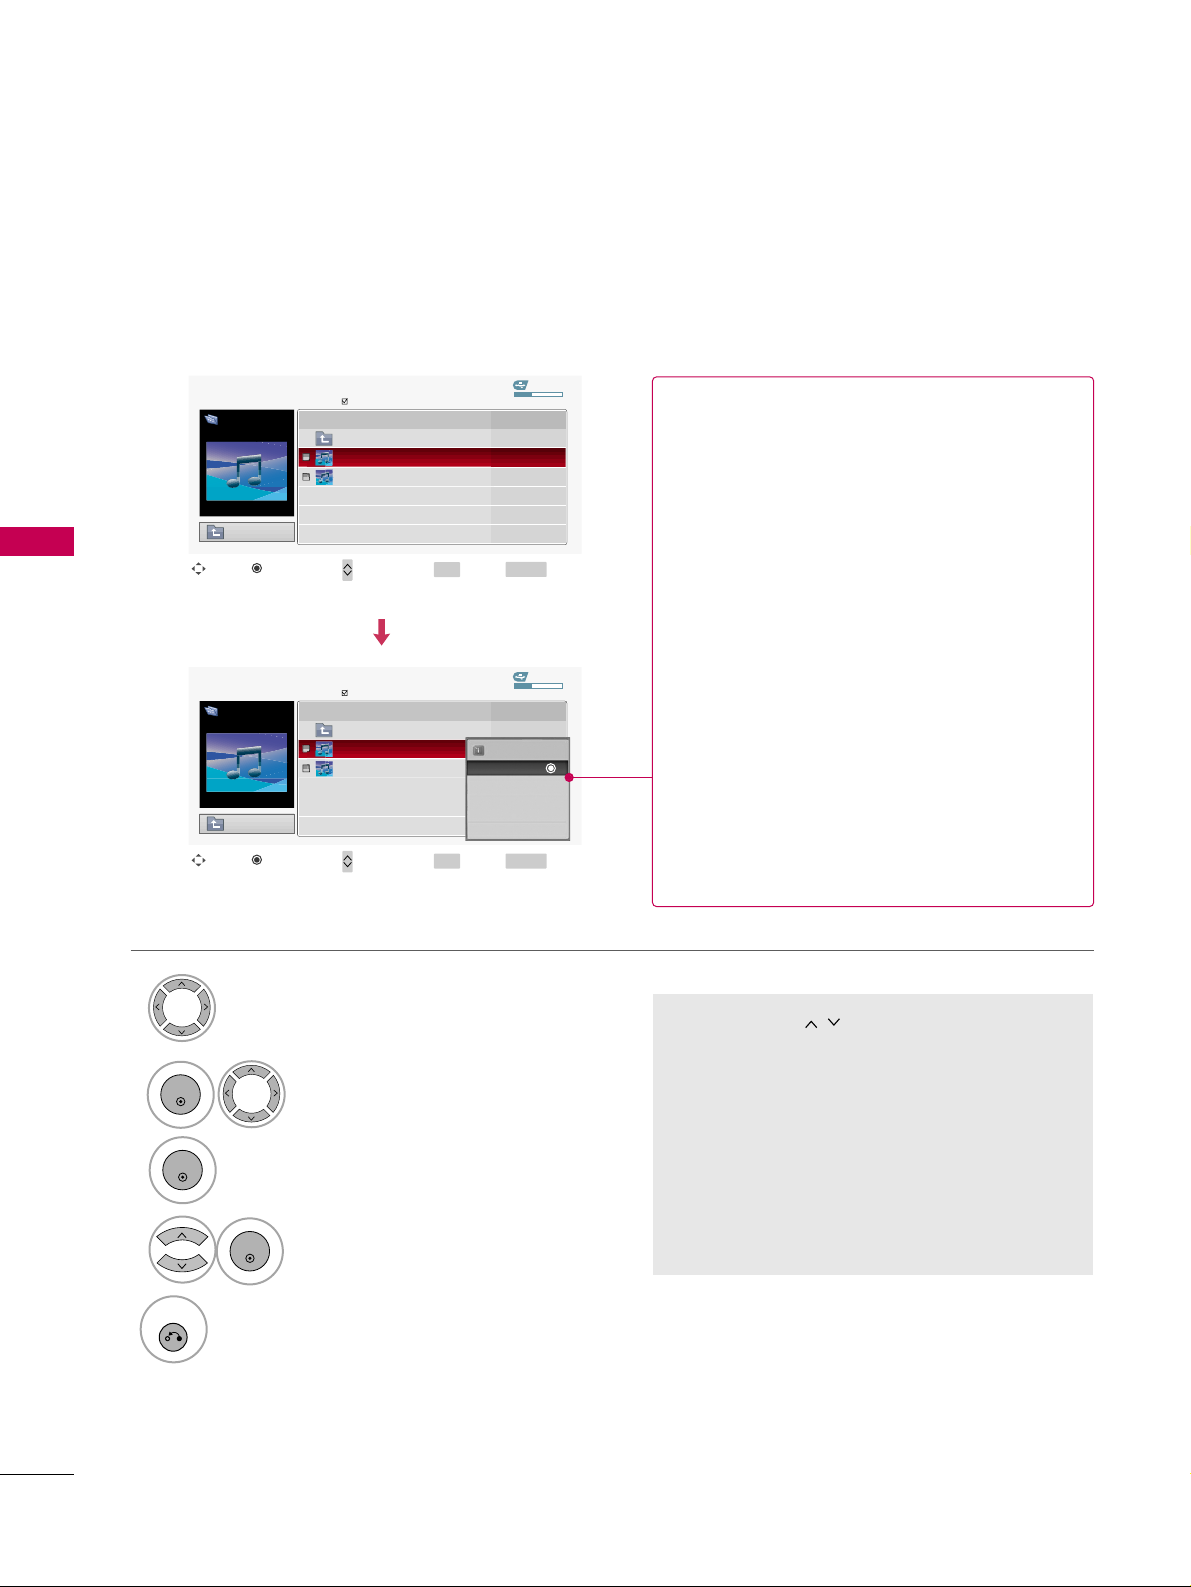
USB
USB
70
Music Selection and Popup Menu
■
Use the
CC HH
button to navigation in
the music page.
■
Use
FF AA VV
button to mark or unmark a music
file. If no music is marked, all the music in the
folder will be played in sequence. When one or
more music files are marked, the marked music
files will be played in sequence. If you want to
listen to only one song repeatedly, just mark
that one file and play.
Up to 6 music titles are listed per page.
Select the target folder or drive.
Select the desired musics.
Show the Popup menu.
Select the desired Popup menu.
2
3
1
4
ENTER
ENTER
ENTER
5
RETURN
Return to TV viewing
USB Device
Page 1/1
No Marked
MUSIC LIST
Upper
Free Space 150MB
3945 KB, 128 Kbps
Drive1
Arirang
Navigate Move Page Mark Exit
CH
FAV
RETURN
PopUp Menu
Play TimeTitle
Upper
Good Bye
Arirang
USB Device
Page 1/1
No Marked
MUSIC LIST
Upper
Free Space 150MB
3945 KB, 128 Kbps
Drive1
Arirang
Navigate Move Page Mark Exit
CH
FAV
RETURN
PopUp Menu
Play TimeTitle
Upper
Good Bye
Arirang
05:30
04:12
3945 KB
128 Kbps
Play
Play with Photo
Mark All
Delete
Cancel
GG
PPllaa yy
(During stop): Play the selected music.
Once a song finishes playing, the next selected
one will be played. When there are no selected
musics to play, the next one in the current folder will be played. If you go to a different folder
and press the
EENNTTEERR
button, the current
music in playback will stop.
GG
PPllaayy MM aarrkk eedd
: Play the selected musics. Once
a music finishes playing, the next selected one
will be played automatically.
GG
SS ttoo pp PPllaa yy
(During playback): Stop the play-
ing musics.
GG
PPllaayy ww ii tthh PPhhoo ttoo
: Start playing the selected
musics and then move to the Photo List.
GG
MM aarrkk AAllll
: Mark all musics in the folder.
GG
UUnnmm aarrkk AAllll
: Deselect all marked music.
GG
DDee llee ttee
: Delete the selected music.
GG
CC aannccee ll
: Close the pop-up menu.
Page 73
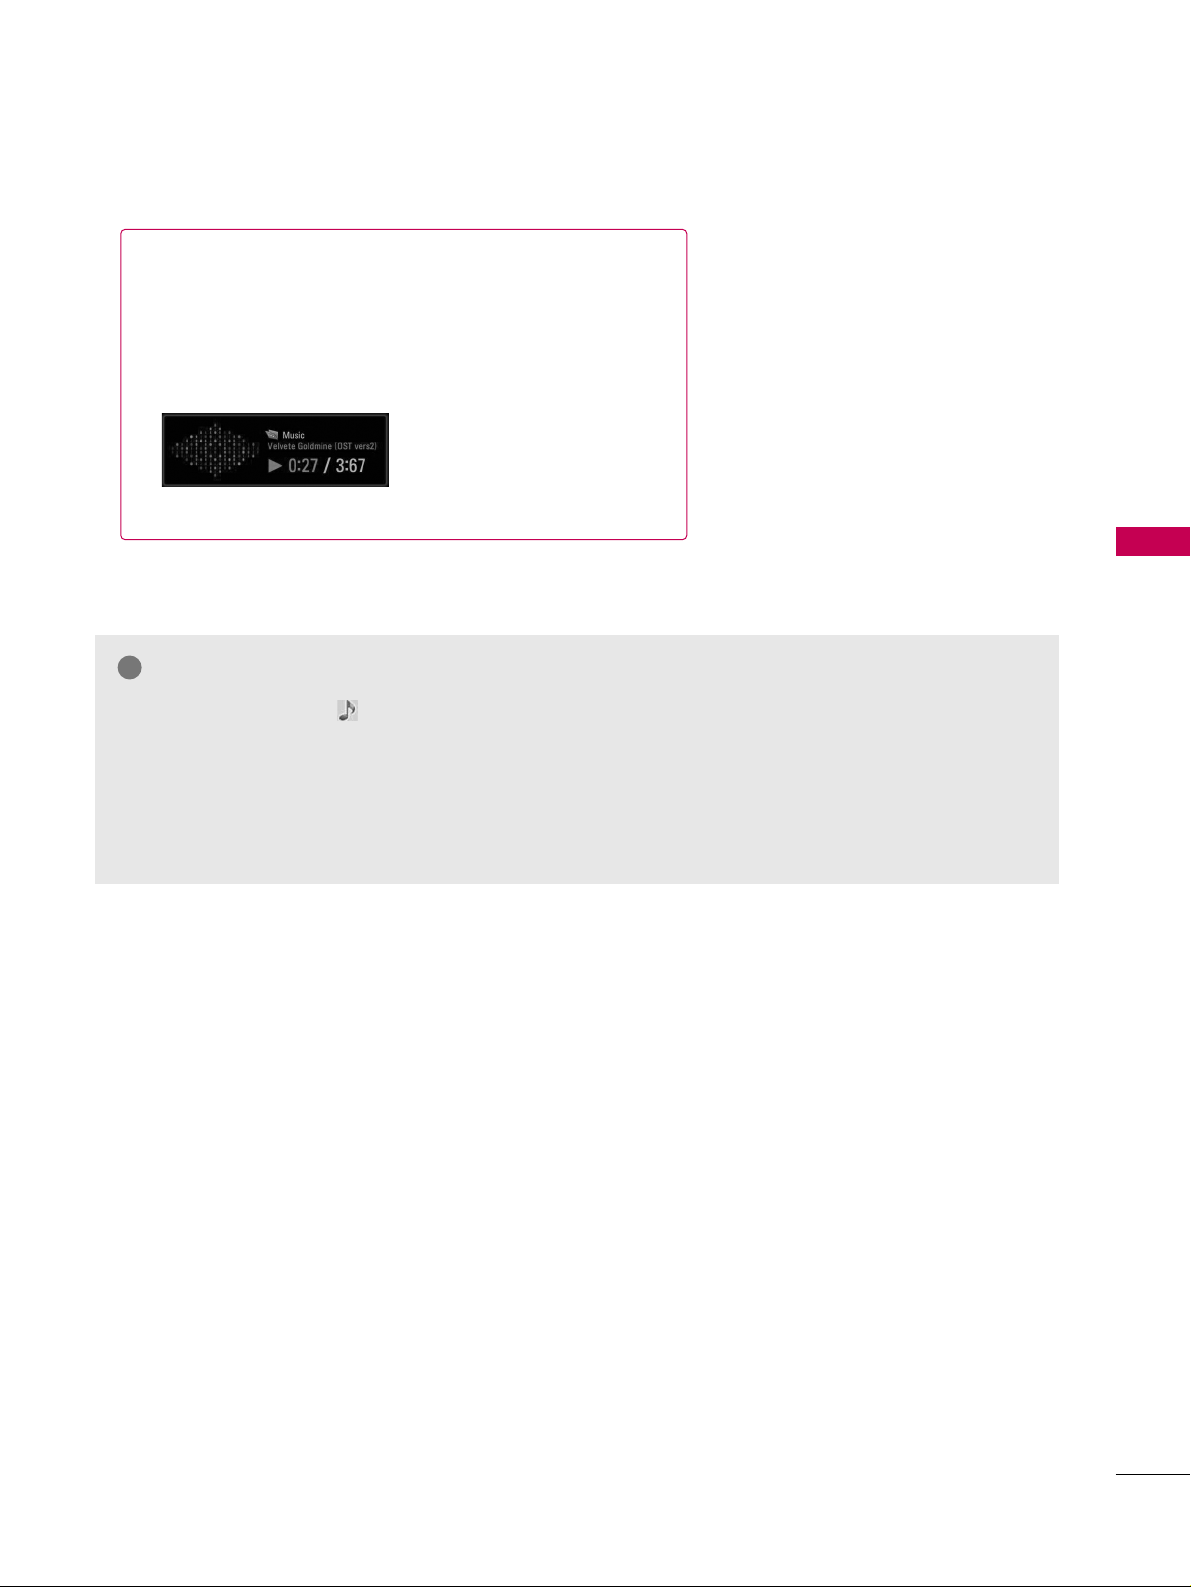
USB
71
■
The play information box (as shown below) will automatically
move across the screen when there is no user input to prevent a fixed image remaining on the screen for a extended
period of time.
NOTE
!
GG
When music is playing, is displayed in front of the music play time.
GG
A damaged or corrupted music file that does not play displays 00:00 as the play time.
GG
Music files with copy-protection will not play.
GG
Press
EENNTTEERR
, AA, or
RREETTUURRNN
button to stop the screen saver.
GG
This TV can not play music files less than 16 Kbytes.
Page 74
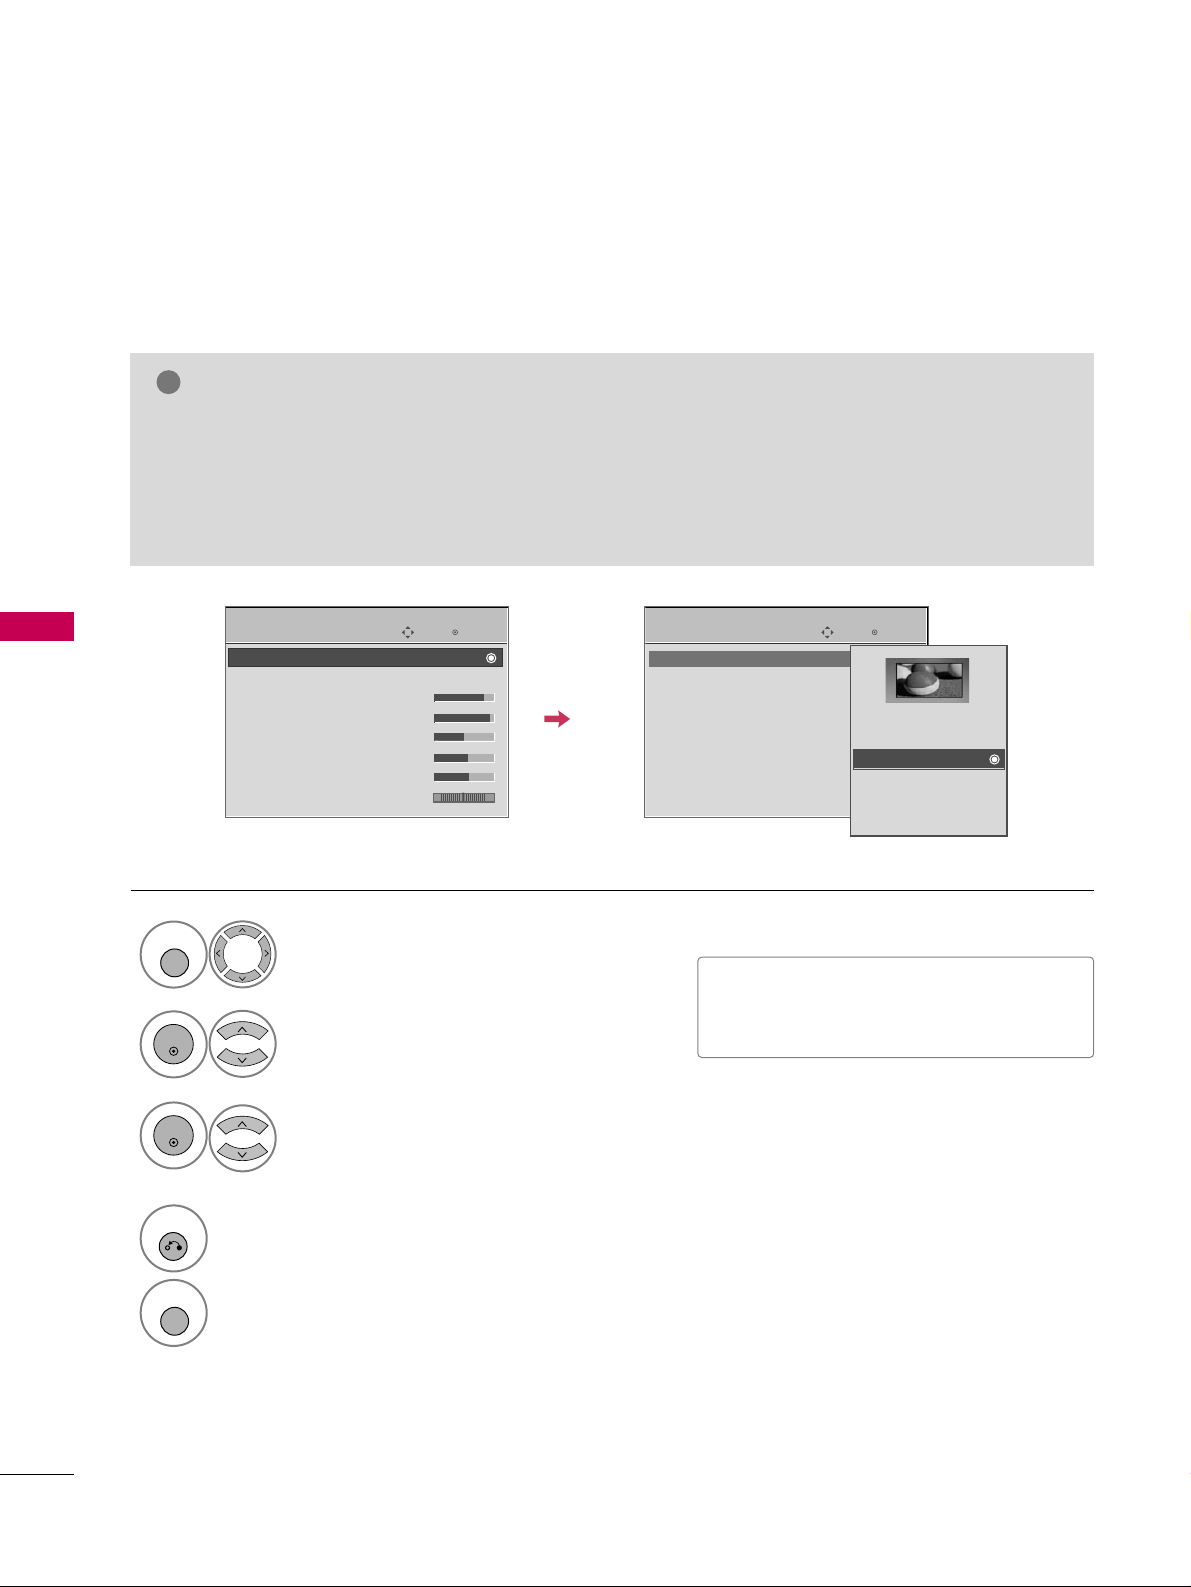
PICTURE CONTROL
72
PICTURE SIZE (ASPECT RATIO) CONTROL
PICTURE CONTROL
This feature lets you choose the way an analog picture with a 4:3 aspect ratio is displayed on your TV.
■
RGB-PC input source use 4:3 or 16:9 aspect ratio.
NOTE
!
GG
If a fixed image is displayed on the screen for a long time, the image could become imprinted on the
screen and remain visible.
This phenomenon is common to all manufacturers and is not covered by warranty. Although, after watching video that did not fill the screen, any after-image from the black bars will normally dissipate after a few
minutes.
■
You can also adjust
AAsspp eecctt RR aattiioo
in
the
QQ -- MMeennuu
.
Enter
Move
PICTURE
E
Enter
Move
PICTURE
E
RG
Aspect Ratio : 16:9
Picture Mode : Standard
• Backlight 80
• Contrast 90
• Brightness 50
• Sharpness 60
• Color 60
• Tint 0
Aspect Ratio : 16:9
Picture Mode : Standard
• Backlight 80
• Contrast 90
• Brightness 50
• Sharpness 60
• Color 60
• Tint 0
RG
Set By Program
4:3
16:9
Zoom1
Zoom2
Just Scan
Select
PPIICCTTUURREE
.
Select
AAsspp eecctt RR aattiioo
.
Select the desired picture format.
1
MENU
3
2
ENTER
ENTER
4
RETURN
Return to the previous menu.
MENU
Return to TV viewing.
Page 75
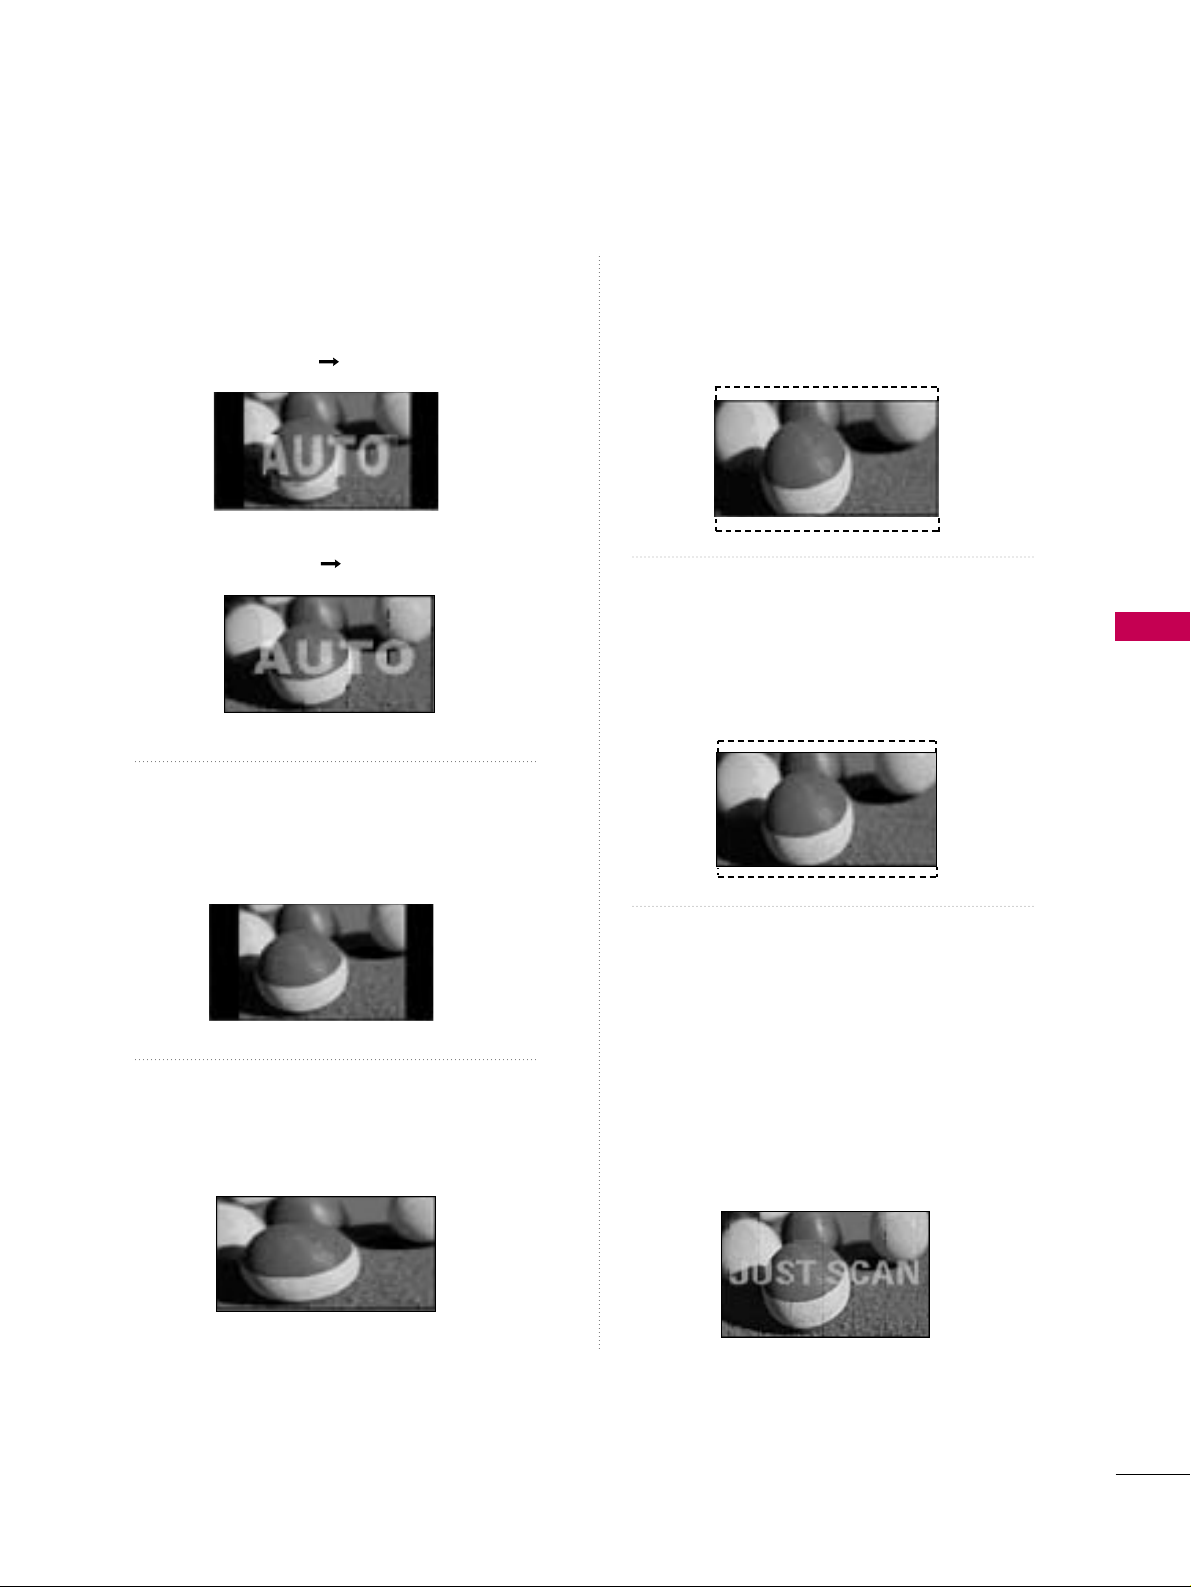
PICTURE CONTROL
73
Set by program
Selects the proper picture proportion to match
the source’s image.
4:3
Choose 4:3 when you want to view a picture
with an original 4:3 aspect ratio.
16:9
Adjust the picture horizontally, in a linear proportion to fill the entire screen.
Zoom 1
Choose Zoom 1 when you want to view the picture without any alteration. However, the top and
bottom portions of the picture will be cropped.
Zoom 2
Choose Zoom 2 when you want the picture to be
altered, both vertically extended and cropped.
The picture taking a halfway trade off between
alteration and screen coverage.
Just Scan
Normally the edges of video signals are cropped
1-2%. Just Scan turns off this cropping and
shows the complete video.
Notes: If there is noise on the edges of the original
signal, it will be visible when Just Scan is activated.
JJuuss tt SS ccaann
operates only in
DTV/CADTV/Component/HDMI-DTV/DVI-DTV
(720p/1080i/1080p) input source.
(4:3 4:3)
(16:9 16:9)
Page 76
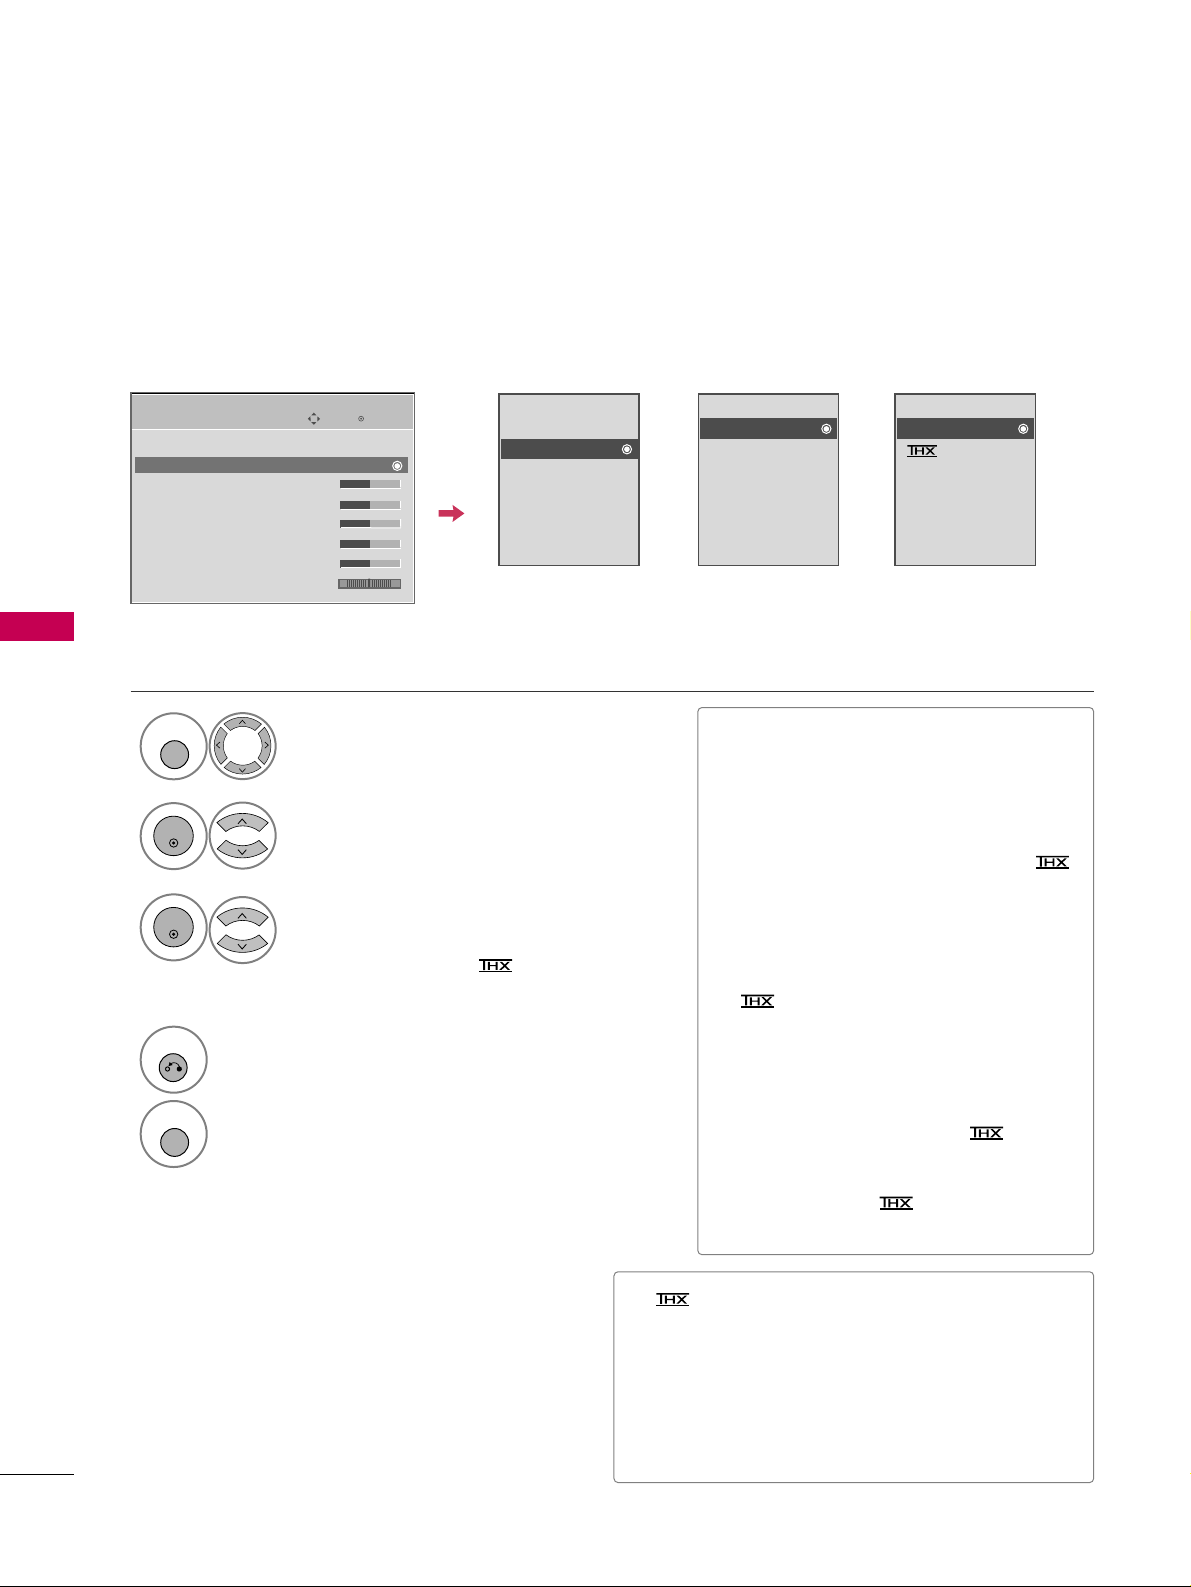
PICTURE CONTROL
74
PRESET PICTURE SETTINGS
PICTURE CONTROL
Picture Mode - Preset
There are factory presets for picture settings available in the user menus. You can use a preset, change each
setting manually, or use the Intelligent Sensor.
Enter
Move
PICTURE
E
Select
PPIICCTTUURREE
.
Select
PPiicc ttuurree MMoo ddee
.
Select
IInntteellll iiggeenntt SS eennss oorr
(Except
32/37/42LG30, Plasma TV),
VViivv ii dd
,
SS ttaannddaarrdd, CCiinneemm aa// CCiinn eemmaa
(Only for 50/60PG60, 50/60PG70) ,
SS ppoorrtt
, or
GGaa mmee
.
■
When selecting
IInn tteelllliiggeenntt SSeennssoo rr
(Except 32/37/42LG30, Plasma TV),
the most suitable picture is automatically
adjusted according to the surrounding
conditions.
■
VVii vv ii dd, SS ttaa nn ddaarrdd, CC ii nn ee mmaa //
CCiinneemm aa, SS ppoorrtt
, and
GGaa mmee
Settings are
preset for the optimum picture quality at
the factory and are not adjustable.
■
You can also adjust
PPiicc ttuurree MM oo ddee
in
the
QQ .. MM eenn uu
.
■
Cinema (Only for 50/60PG60,
50/60PG70): This is cinema quality
mode to provide you the experience of
watching a movie at home. The user will
be able enjoy the best level of satisfactory screen quality in any movie without
any separate adjustments. Cinema
expresses the optimal screen quality
when it is darkest.
■
When selecting
CC ii nnee mm aa
, Aspect
ratio changes to Just scan.
■
(Thomlinson Holman’s Experiment) is the
audio and video certification standard of THX
established by George Lucas, who directed the
movie Star Wars, and Thomlinson.
This is the product to be certified in THX display
area and guarantees screen quality that exceeds the
display standard specification in both hardware and
software.
1
MENU
3
2
ENTER
ENTER
Aspect Ratio : 16:9
Picture Mode : Standard
• Backlight 80
• Contrast 90
• Brightness 50
• Sharpness 60
• Color 60
• Tint 0
RG
Intelligent Sensor
Vivid
Standard
Cinema
Sport
Game
Expert1
Expert2
Vivid
Standard
Cinema
Sport
Game
Expert1
Expert2
Vivid
Standard
Cinema
Sport
Game
Expert1
Expert2
4
RETURN
Return to the previous menu.
MENU
Return to TV viewing.
32/37/42LG30,
42/50PG25
50/60PG60,
50/60PG70
37/42/47/52LG50,
32/37/42/47/52LG60,
32/42/47/52LG70,
42/47LGX, 47LG90
Page 77
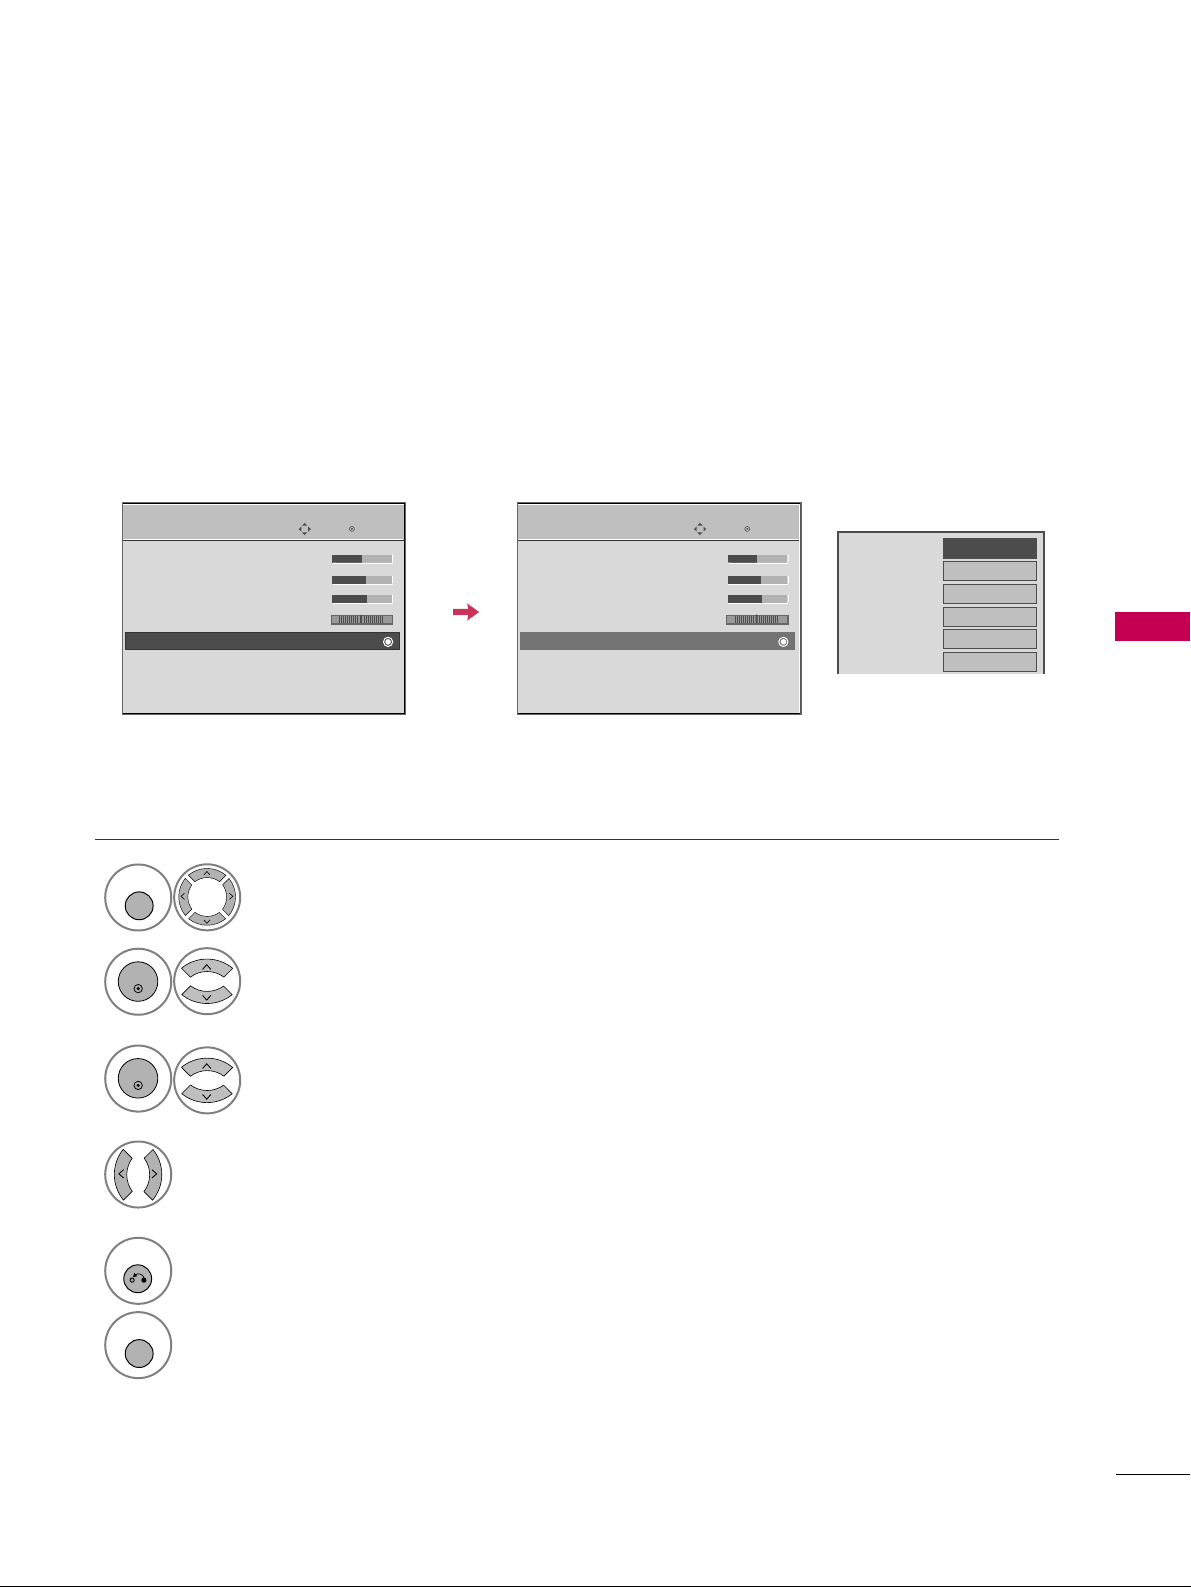
PICTURE CONTROL
75
Color Tone - Preset
Choose one of three automatic color adjustments. Set to warm to enhance hotter colors such as red, or set to
cool to see less intense colors with more blue.
Enter
Move
PICTURE
E
Select
PPIICCTTUURREE
.
Select
CC oolloorr TTeemmpp ee rr aattuurree
.
1
MENU
3
ENTER
Select
CC oooo ll, MM eedd ii uu mm
, or
WWaa rr mm
.
4
• Brightness 50
• Sharpness 60
• Color 60
• Tint 0
• Advanced Control
• Reset
Screen (RGB-PC)
TruMotion Demo
Select
AAddvvaann cc eedd CC oonn ttrrooll
.
2
ENTER
5
RETURN
Return to the previous menu.
MENU
Return to TV viewing.
RG
Enter
Move
PICTURE
E
• Brightness 50
• Sharpness 60
• Color 60
• Tint 0
• Advanced Control
• Reset
Screen (RGB-PC)
TruMotion Demo
RG
Color Temperature
FF
Medium
GG
Fresh Contrast
Off
Fresh Color
Off
Noise Reduction
Off
Gamma
Medium
Black Level
Low
Eye Care
Off
Real Cinema
Off
TruMotion
High
Close
Page 78
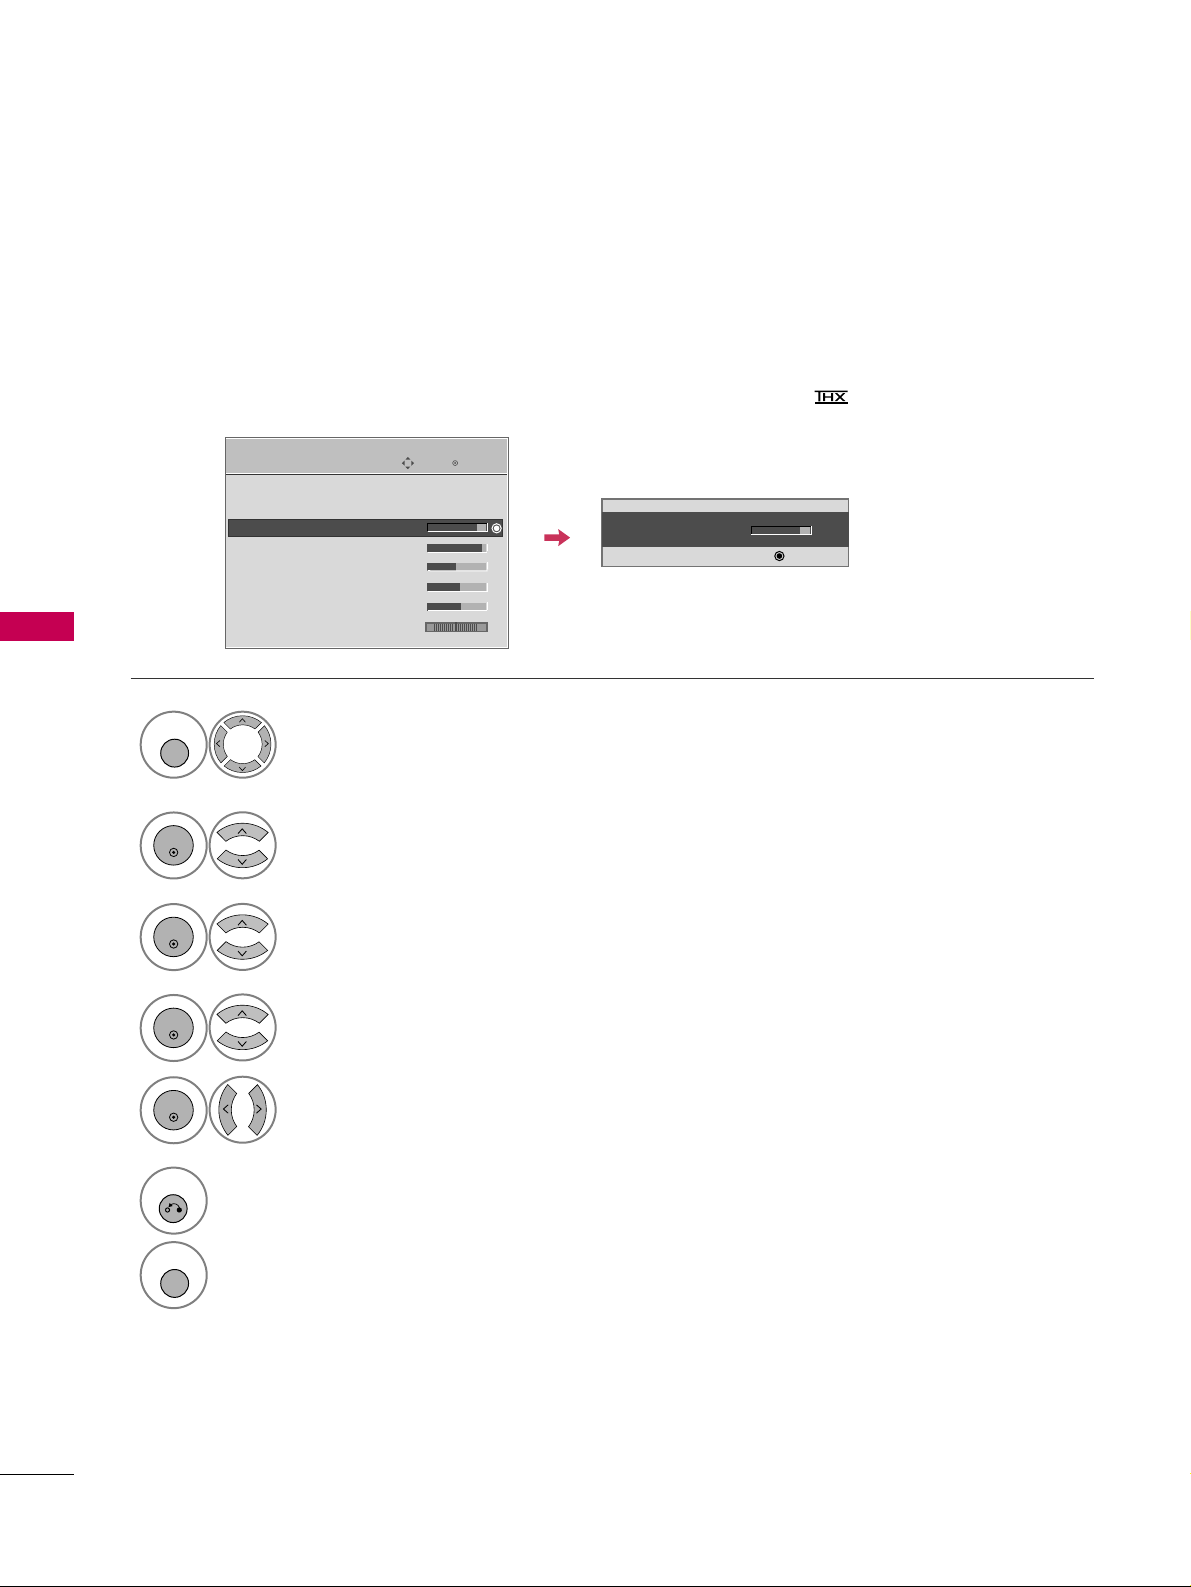
PICTURE CONTROL
76
MANUAL PICTURE ADJUSTMENT
PICTURE CONTROL
Picture Mode - User Mode
Adjust the picture appearance to suit your preference and viewing situations.
LCD TV only: This feature is disable in “
PP iiccttuu rree MM ooddee--IInn tteellll iiggeenn tt SS ee nnss oorr
”.
50/60PG60, 50/60PG70 only: This feature is disabled in “
PP iiccttuu rree MMooddee -- CC iinn ee mm aa
”.
Enter
Move
PICTURE
Select
PPIICCTTUURREE
.
Make appropriate adjustments.
Select
BBaa cc kk ll iigghhtt
(Only LCD TV),
CC oonn ttrraa sstt
,
BBrriigg hh ttnnee ssss, SS hh aarrpp nn eessss, CC oolloo rr
, or
TTiinntt
.
1
MENU
Select
PPiicc ttuurree MMoo ddee
.
2
ENTER
Select
VViivv ii dd,SS ttaannddaarrdd, CCiinneemm aa, SS ppoorrtt
, or
GGaa mmee
.
3
ENTER
4
ENTER
5
ENTER
E
Aspect Ratio : 16:9
Picture Mode : Standard
• Backlight 80
• Contrast 90
• Brightness 50
• Sharpness 60
• Color 60
• Tint 0
RG
• Backlight 80
EE
EE
EE
EE
Enter
6
RETURN
Return to the previous menu.
MENU
Return to TV viewing.
Page 79
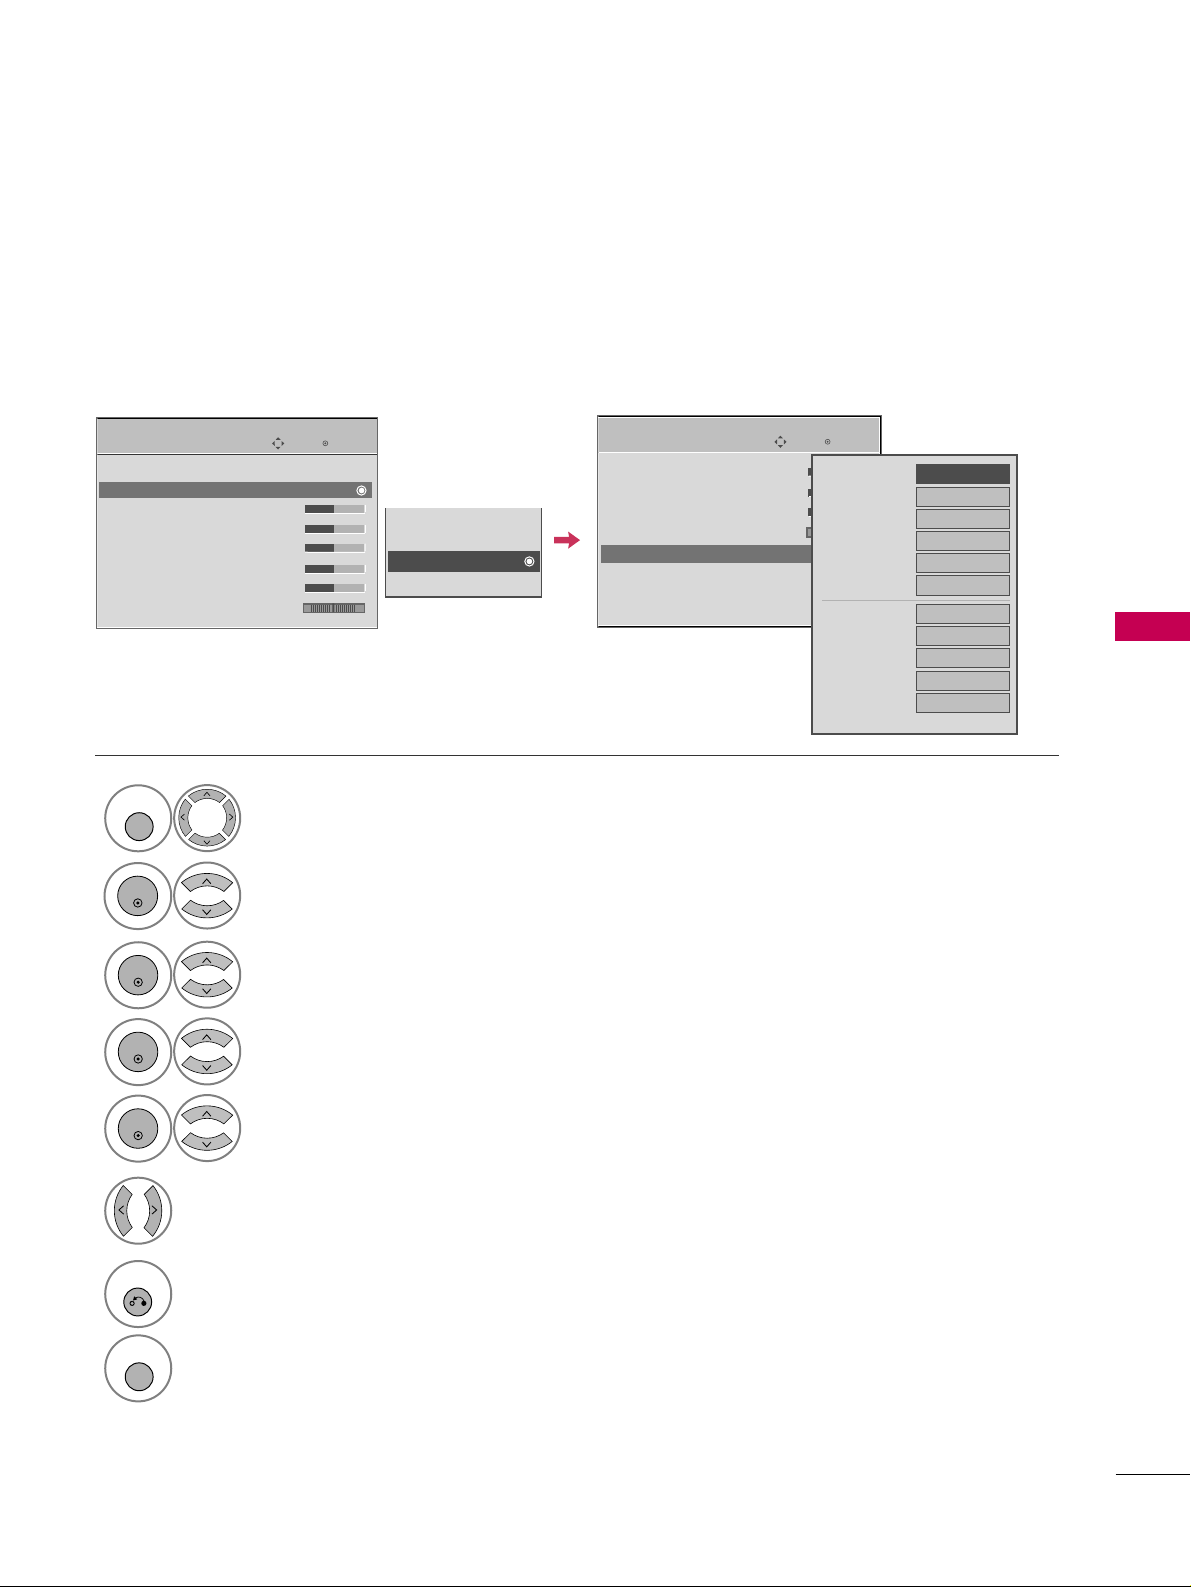
PICTURE CONTROL
77
Select your desired menu option.
Select
PPIICCTTUURREE
.
Select
PPiicc ttuurree MMoo ddee
.
Select
EExx ppeerrtt CCoonnttrr ooll
.
Select
EExx ppee rrtt11
or
EExx ppee rrtt22
.
1
MENU
3
2
ENTER
ENTER
4
ENTER
5
ENTER
Make appropriate adjustments.
6
Picture Mode - Expert Control
By segmenting categories,
EExxppee rrtt 11
and
EExxppee rrtt 22
provide more categories which users can set as they see
fit, offering the optimal picture quality for users.
Enter
Move
PICTURE
E
Aspect Ratio : 16:9
Picture Mode : Standard
• Backlight 80
• Contrast 90
• Brightness 50
• Sharpness 60
• Color 60
• Tint 0
RG
Sport
Game
Expert1
Expert2
7
RETURN
Return to the previous menu.
MENU
Return to TV viewing.
Enter
Move
PICTURE
E
• Brightness 50
• Sharpness 60
• Color 60
• Tint 0
• Expert Control
• Reset
Screen (RGB-PC)
TruMotion Demo
RG
FF
Off
GG
Fresh Contrast
Noise Reduction
Off
Gamma
Medium
Black Level
Off
Off
Real Cinema
Color Standard
SD
White Balance
Normal
• Method
2 Points
• Red Contrast
50
• Green Contrast
50
• Blue Contrast
50
E
Page 80
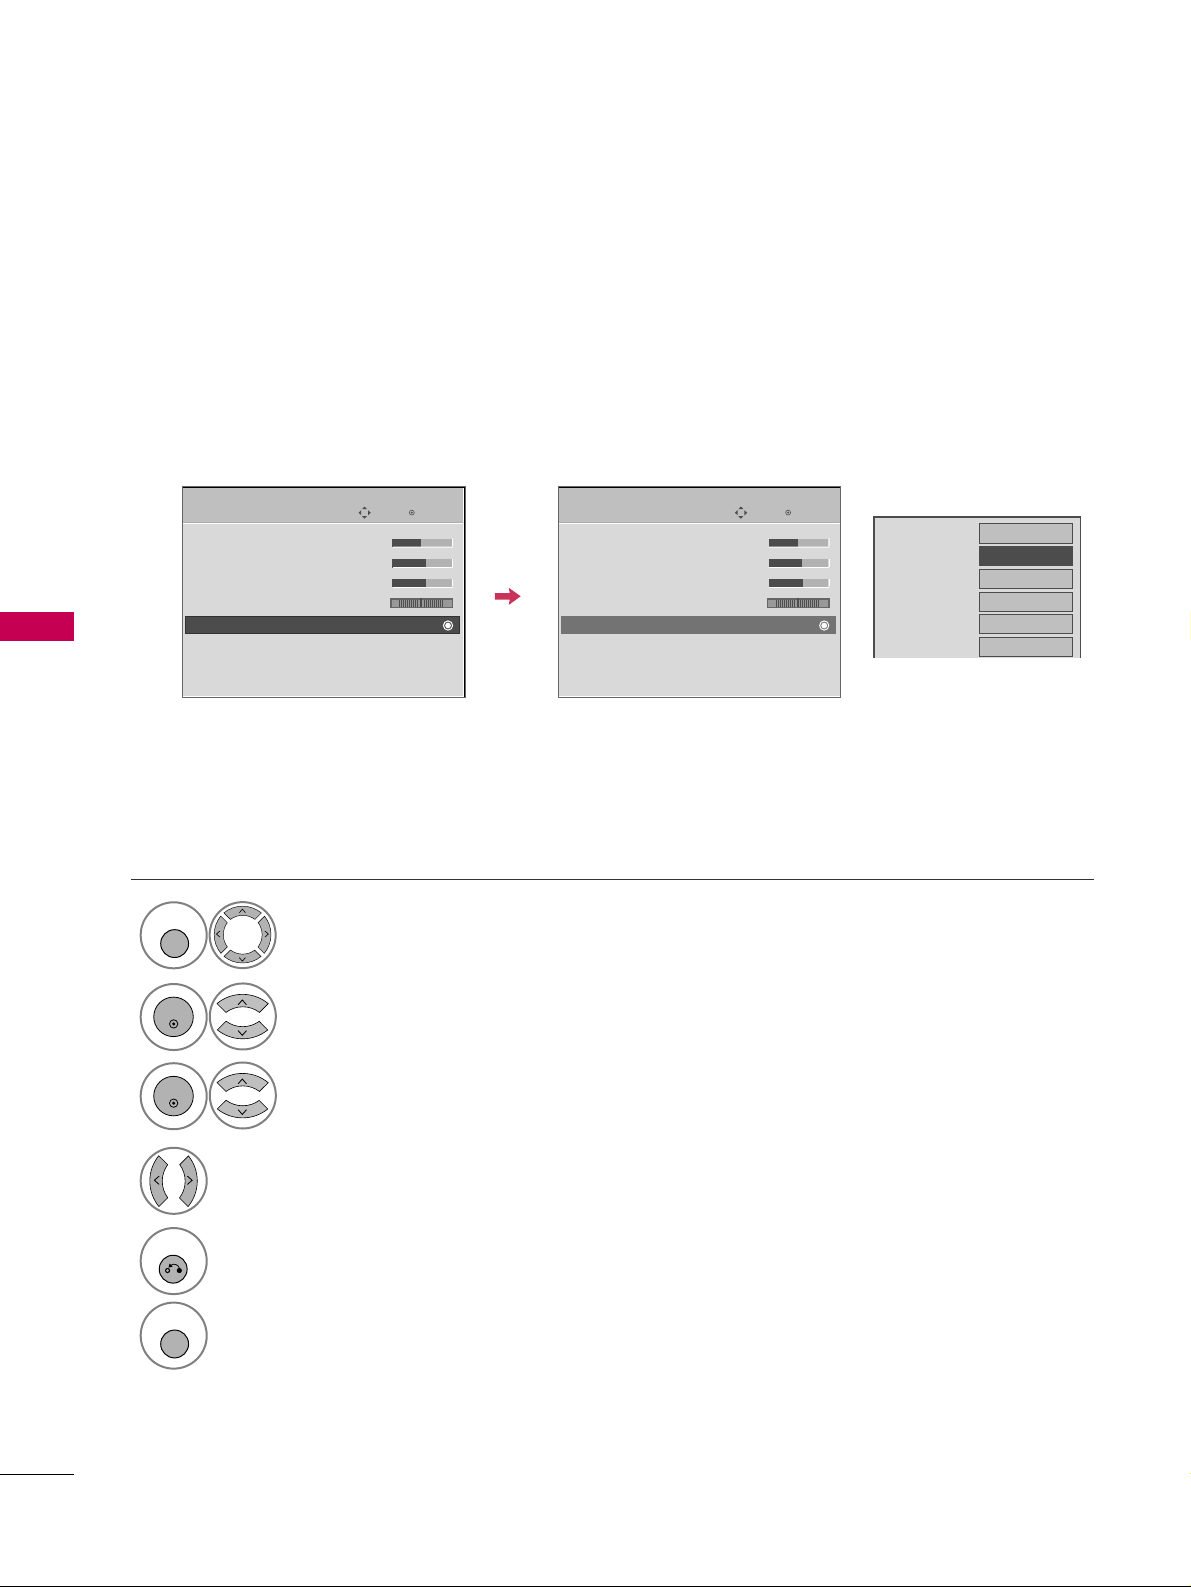
PICTURE CONTROL
78
PICTURE IMPROVEMENT TECHNOLOGY
PICTURE CONTROL
Fresh Contrast: Optimizes the contrast automatically according to the brightness of the reflection.
Fresh Color: Adjusts the color of the reflection automatically to reproduce as close as possible natural colors.
Noise Reduction: Removes interference up to the point where it does not damage the original picture.
Gamma: High gamma values display whitish images and low gamma values display high contrast images.
Color Gamut (Only for 47LG90): Select the range of colors that can be expressed.This feature is disabled in
“
PP iiccttuu rree MMooddee--VVii vv iidd, SS ppoorrtt
”.
Select
PPIICCTTUURREE
.
Select
AAddvvaann cc eedd CC oonn ttrrooll
.
Select
FF rr eesshh CCoonnttrr aass tt, FF rr eesshh CCoolloorr, NNooiiss ee
RRee dduuccttii oonn, GGaa mmmm aa
, or
CC oolloorr GGaa mmuutt
.
1
MENU
3
2
ENTER
ENTER
5
RETURN
Return to the previous menu.
MENU
Return to TV viewing.
Select your desired options.
4
Enter
Move
PICTURE
E
• Brightness 50
• Sharpness 60
• Color 60
• Tint 0
• Advanced Control
• Reset
Screen (RGB-PC)
TruMotion Demo
RG
Enter
Move
PICTURE
E
• Brightness 50
• Sharpness 60
• Color 60
• Tint 0
• Advanced Control
• Reset
Screen (RGB-PC)
TruMotion Demo
RG
Color Temperature
Medium
Fresh Contrast
FF
Off
GG
Fresh Color
Off
Noise Reduction
Off
Gamma
Medium
Black Level
Low
Eye Care
Off
Real Cinema
Off
TruMotion
High
Close
Page 81
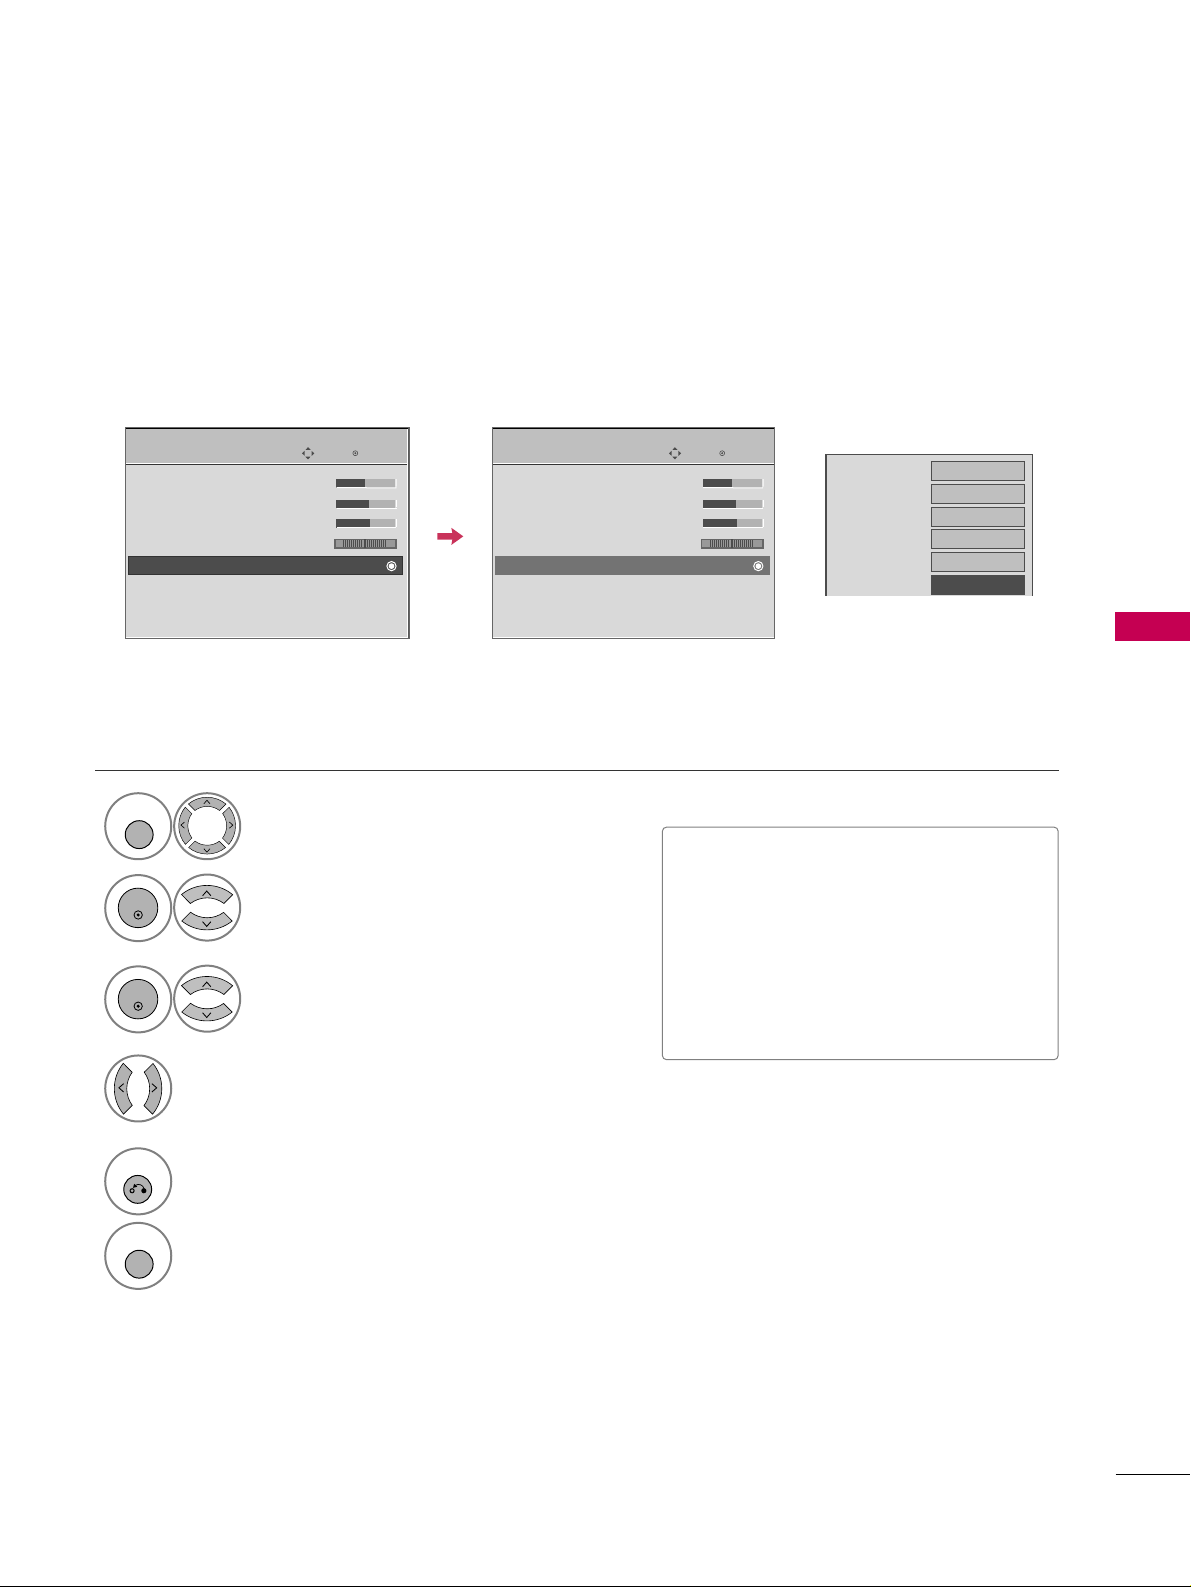
PICTURE CONTROL
79
ADVANCED CONTROL - BLACK (DARKNESS) LEVEL
Adjusting the contrast and the brightness of the screen using the black level of the screen.
This feature is disabled in DTV and RGB-PC mode.
Select
PPIICCTTUURREE
.
Select
AAddvvaann cc eedd CC oonn ttrrooll
.
Select
BBllaa cc kk LLee vv eell
.
1
MENU
3
2
ENTER
ENTER
Select
LLoo ww
or
HHiigghh
.
4
■
LLoo ww
: The reflection of the screen gets
darker.
■
HHiigghh
: The reflection of the screen gets
brighter.
■
AAuuttoo
: Realizing the black level of the
screen and set it to High or Low automatically.
5
RETURN
Return to the previous menu.
MENU
Return to TV viewing.
Enter
Move
PICTURE
E
• Brightness 50
• Sharpness 60
• Color 60
• Tint 0
• Advanced Control
• Reset
Screen (RGB-PC)
TruMotion Demo
RG
Enter
Move
PICTURE
E
• Brightness 50
• Sharpness 60
• Color 60
• Tint 0
• Advanced Control
• Reset
Screen (RGB-PC)
TruMotion Demo
RG
Color Temperature
Medium
Fresh Contrast
Off
Fresh Color
Off
Noise Reduction
Auto
Gamma
Medium
Black Level
FF
Low
GG
Eye Care
Off
Real Cinema
Off
TruMotion
High
Close
Page 82
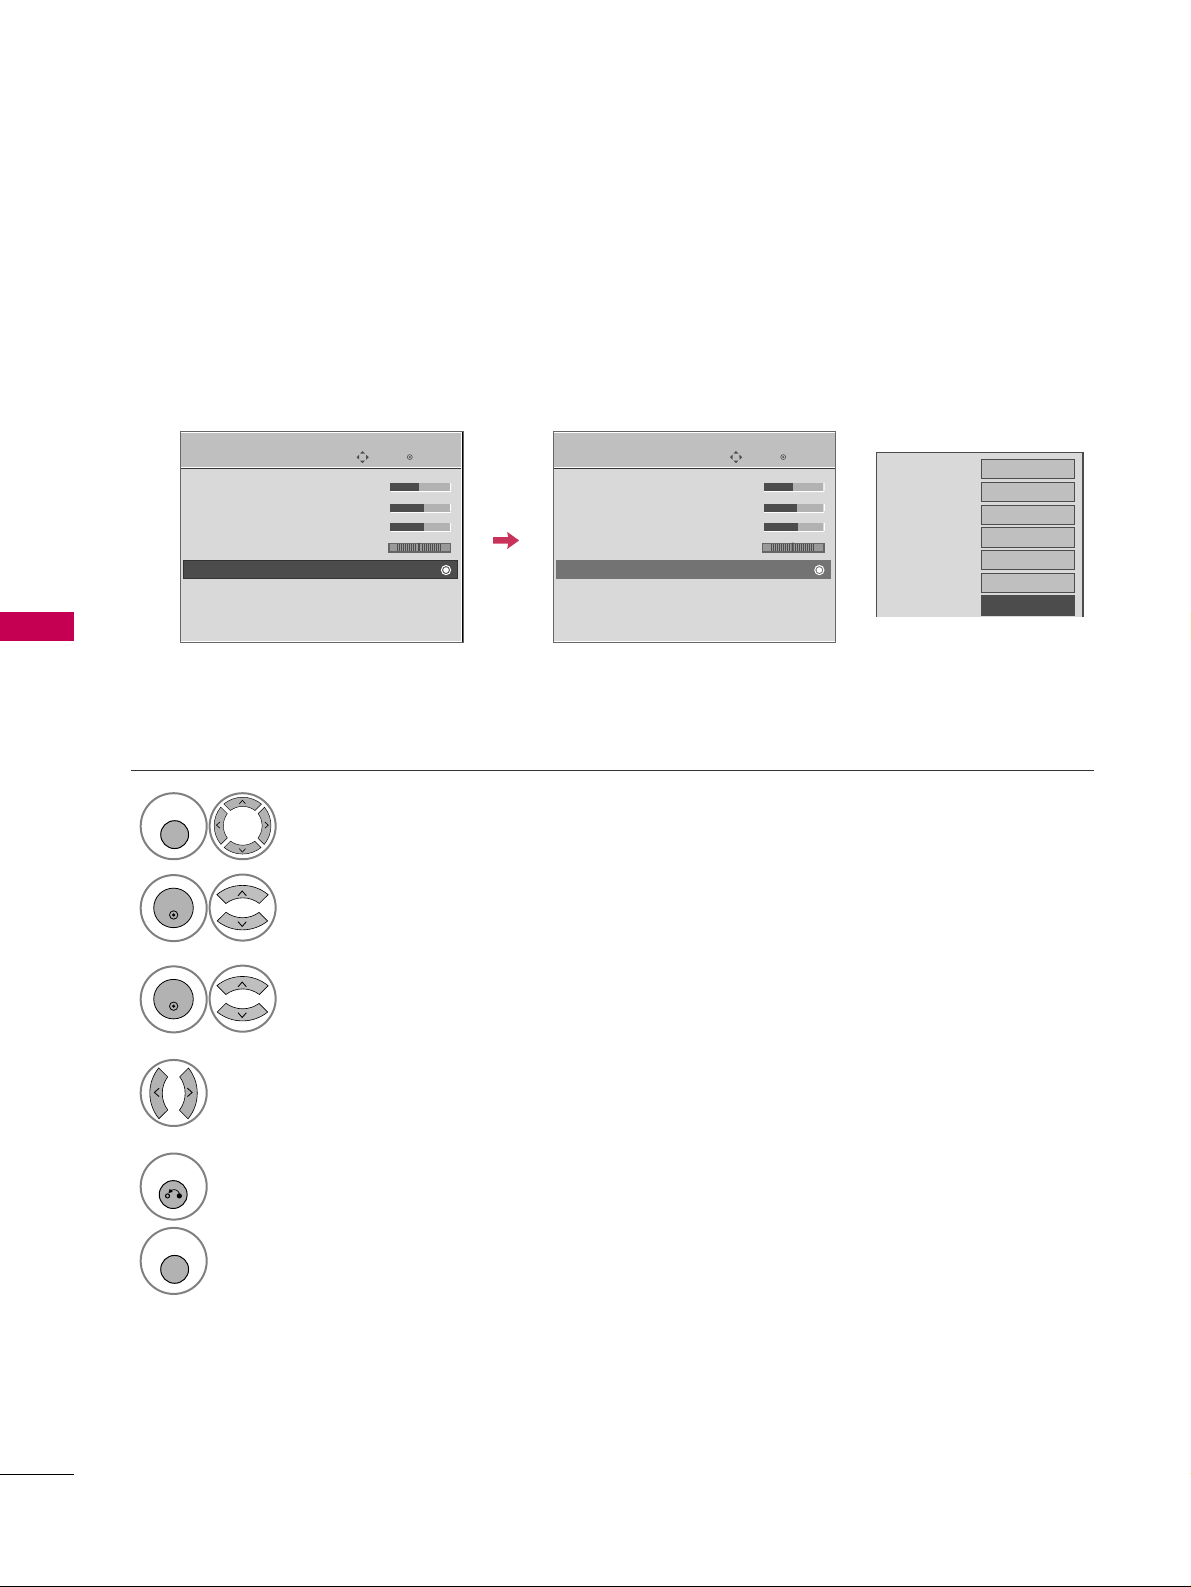
PICTURE CONTROL
80
ADVANCED CONTROL - EYE CARE
-
LCD TV Only
PICTURE CONTROL
Dims extremely bright pictures.
This feature is disabled in “
PP iiccttuu rree MMooddee--VVii vv iidd, CCiinn eemmaa
”.
Select
PPIICCTTUURREE
.
Select
AAddvvaann cc eedd CC oonn ttrrooll
.
Select
EEyyee CCaarree
.
1
MENU
3
2
ENTER
ENTER
Select
OO nn
or
OO ffff
.
4
5
RETURN
Return to the previous menu.
MENU
Return to TV viewing.
Enter
Move
PICTURE
E
• Brightness 50
• Sharpness 60
• Color 60
• Tint 0
• Advanced Control
• Reset
Screen (RGB-PC)
TruMotion Demo
RG
Enter
Move
PICTURE
E
• Brightness 50
• Sharpness 60
• Color 60
• Tint 0
• Advanced Control
• Reset
Screen (RGB-PC)
TruMotion Demo
RG
Color Temperature
Medium
Fresh Contrast
Off
Fresh Color
Off
Noise Reduction
Off
Gamma
Medium
Black Level
Low
Eye Care
FF
Off
GG
Real Cinema
Auto
TruMotion
High
Close
Page 83
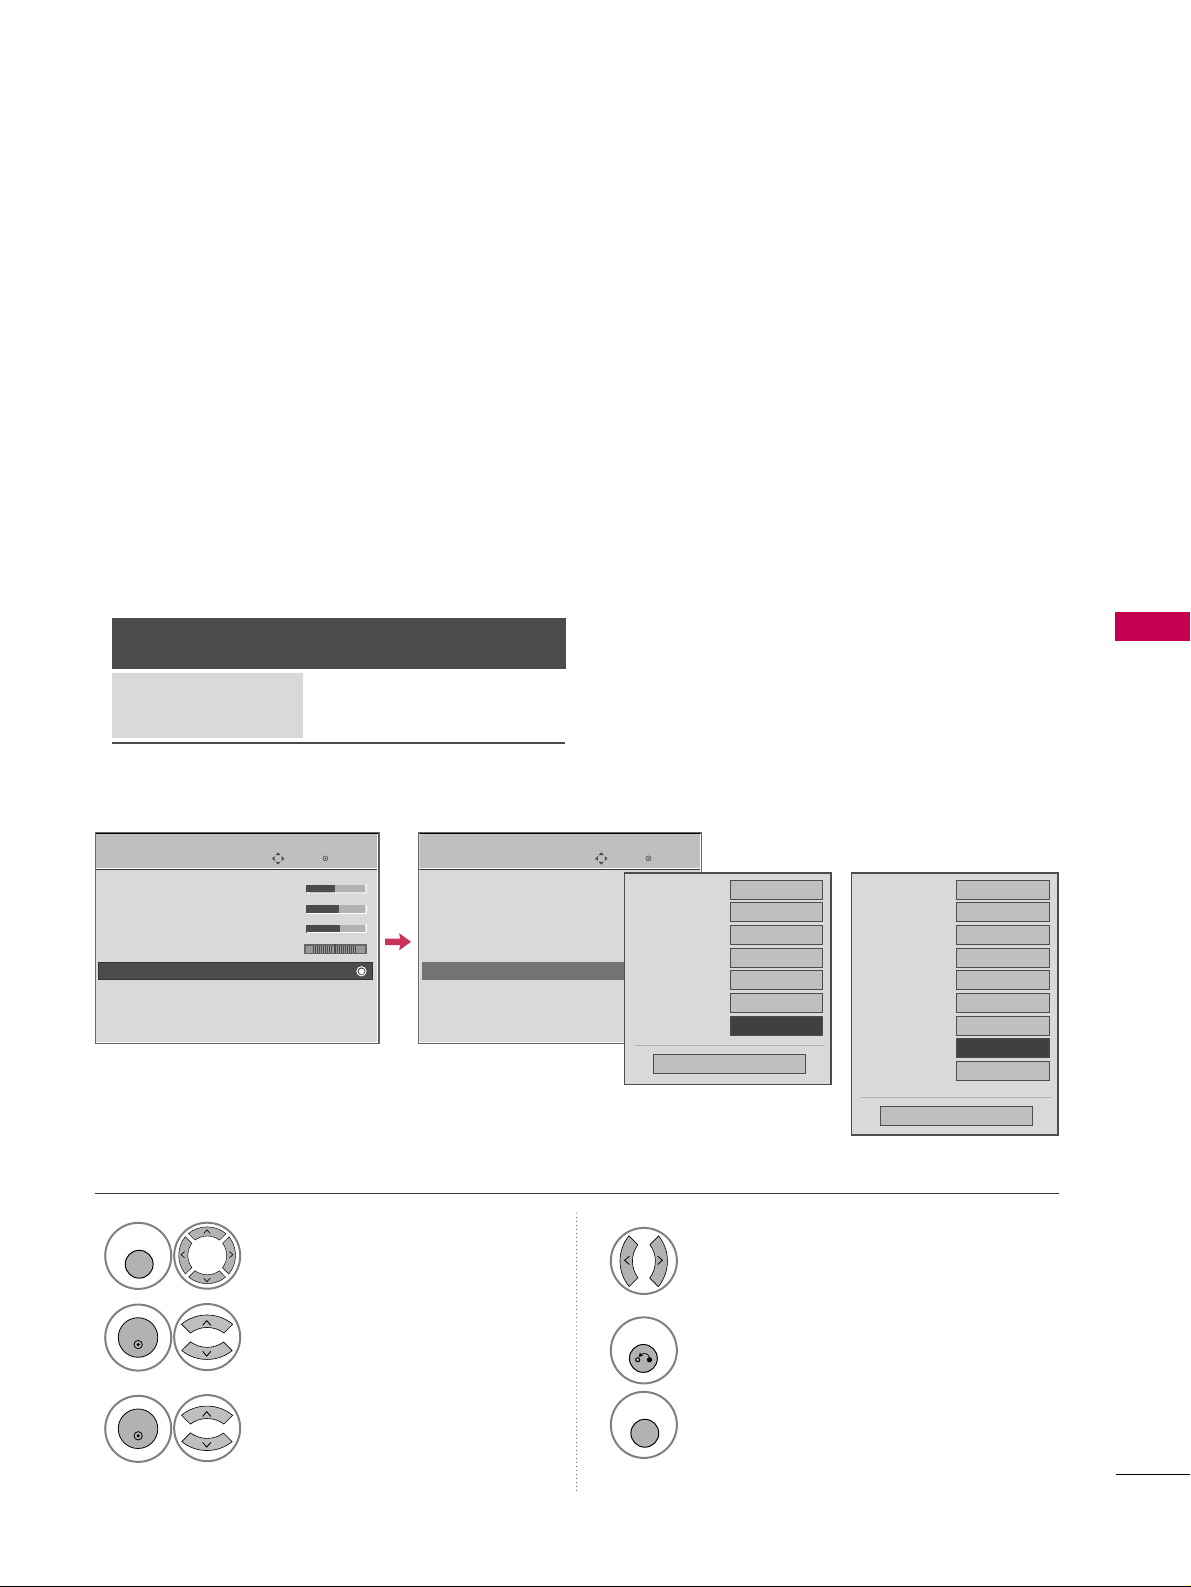
PICTURE CONTROL
81
ADVANCED CONTROL - REAL CINEMA / FILM MODE
Set up the TV for the best picture appearance for viewing movies.
When you operate Real Cinema/Film Mode (3:2 Pull-Down Mode or Cinema Correction Mode), the TV will
adjust 24 fps video from movies to 30 fps video for display.
■
Plasma TV, 32/37/42LG30
This feature operates only in TV (Analog TV/CATV, Digital DTV/CADTV), AV1, AV2, Component 480i/1080i,
and HDMI 1080i mode.
■
37/42/47/52LG50, 32LG60, 32LG70
This feature operates only in TV (Analog TV/CATV, Digital DTV/CADTV), AV1, AV2, Component 480i/1080i,
and HDMI 1080i mode.
This TV ouputs 48Hz in DTV, Component, and HDMI 1080p (24Hz).
■
37/42/47/52LG60, 42/47/52LG70, 42/47LGX, 47LG90
This function works with all inputs except PC mode.
Select
PPIICCTTUURREE
.
Select
AAddvvaann cc eedd CC oonn ttrrooll
.
Select
RRee aall CCiinneemmaa
or
FF iillmm
MM oodd ee
.
1
MENU
3
2
ENTER
ENTER
Select
OO nn
or
OO ffff
.
4
5
RETURN
Return to the previous menu.
MENU
Return to TV viewing.
Enter
Move
PICTURE
E
• Brightness 50
• Sharpness 60
• Color 60
• Tint 0
• Advanced Control
• Reset
Screen (RGB-PC)
TruMotion Demo
RG
Enter
Move
PICTURE
E
• Brightness 50
• Sharpness 60
• Color 60
• Tint 0
• Advanced Control
• Reset
Screen (RGB-PC)
TruMotion Demo
RG
Color Temperature
Medium
Fresh Contrast
Off
Fresh Color
Off
Noise Reduction
Off
Gamma
Medium
Black Level
Low
Film Mode
FF
Off
GG
Close
Color Temperature
Medium
Fresh Contrast
Off
Fresh Color
Off
Noise Reduction
Off
Gamma
Medium
Black Level
Low
Eye Care
Off
Real Cinema
FF
Off
GG
TruMotion
High
Close
For Plasma TV
For LCD TV
Real Cinema
On
On
TruMotion
Off
On
Screen
5:5 Pull-Down
3:2 Pull-Down
Page 84
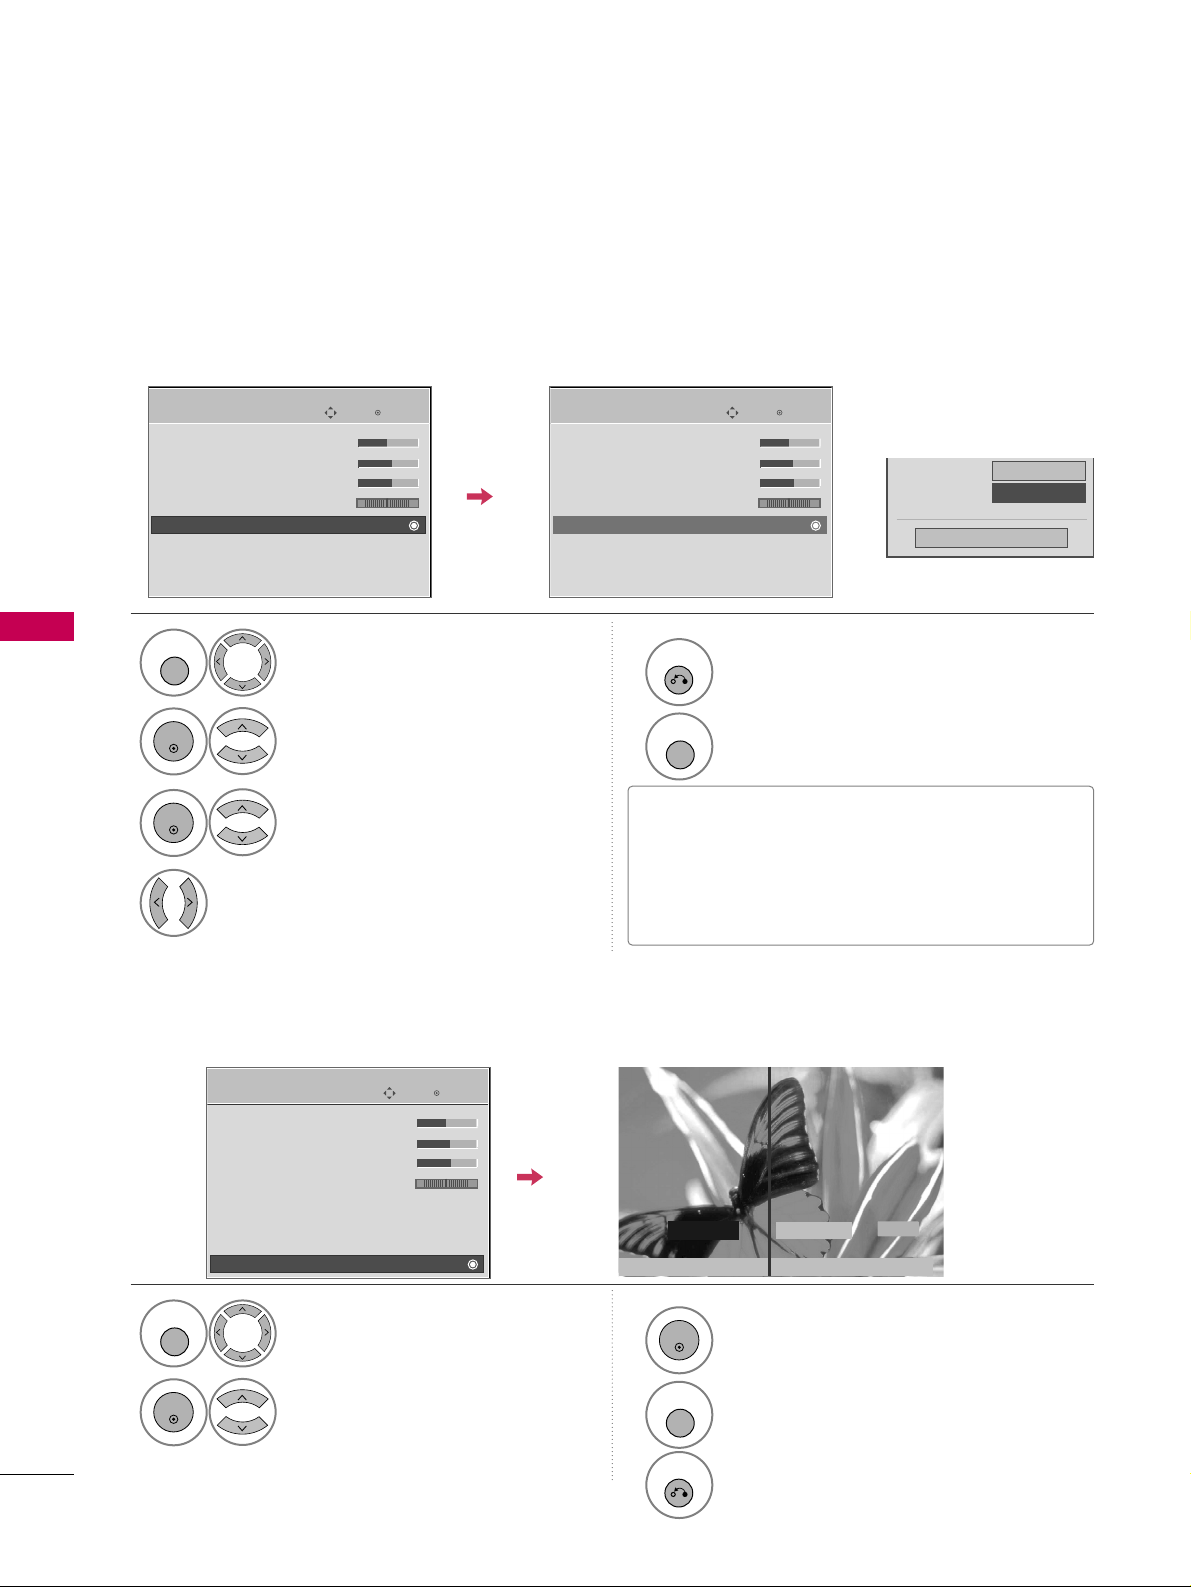
PICTURE CONTROL
82
ADVANCED CONTROL - TRUMOTION
-
Only 37/42/47/52LG60, 42/47/52LG70, 42/47LGX, 47LG90
TRUMOTION DEMO
-
Only 37/42/47/52LG60, 42/47/52LG70, 42/47LGX, 47LG90
PICTURE CONTROL
■
HHiigghh
: Provides smoother picture movement.
■
LLoo ww
: Provides smooth picture movement. Use
this setting for standard use.
■
OO ffff
: Use this setting when “High”and “Low” set-
ting result in noise.
■
If you enable "TruMotion", noise may appear on
the screen. If this occurs, set "TruMotion" to "Off".
Enter
Move
PICTURE
E
• Brightness 50
• Sharpness 60
• Color 60
• Tint 0
• Advanced Control
• Reset
Screen (RGB-PC)
TruMotion Demo
RG
Enter
Move
PICTURE
E
• Brightness 50
• Sharpness 60
• Color 60
• Tint 0
• Advanced Control
• Reset
Screen (RGB-PC)
TruMotion Demo
RG
Color Temperature
Medium
Fresh Contrast
Off
Fresh Color
Off
Noise Reduction
Off
Gamma
Medium
Black Level
Low
Eye Care
Off
Real Cinema
Off
TruMotion
FF
High
GG
Close
Select
PPIICCTTUURREE
.
Select
AAddvvaann cc eedd CC oonn ttrrooll
.
Select
TTrruu MMoo ttiioonn
.
1
MENU
3
2
ENTER
ENTER
Select
OO ffff, LLoo ww
, or
HHiigghh
.
4
5
RETURN
Return to the previous menu.
MENU
Return to TV viewing.
TruMotion On
TruMotion Off
LG’s Advanced TruMotion 120Hz technology provides images whi
Use this feature to see the difference TruMotion makes.
TruMotion works with all inputs except PC mode.
Enter
Move
PICTURE
E
• Brightness 50
• Sharpness 60
• Color 60
• Tint 0
• Advanced Control
• Reset
Screen (RGB-PC)
TruMotion Demo
RG
Select
PPIICCTTUURREE
.
Select
TTrruu MMoottiioonn DDeemmoo
.
1
MENU
2
ENTER
3
4
ENTER
Begin
TTrruu MMoottiioonn DDeemmoo
.
MENU
Stop
TTrruu MMoottiioonn DDeemmoo
.
RETURN
Return to TV viewing.
Exit
RETURN
TruMotion provides even better quality for movies than 3:2 Pull-Down conversions.
TruMotion means the panel supports faster frame rates that normal panels which makes for smoother motion
in video. TruMotion LCD models support 120Hz instead of 60Hz. This means twice the information on the
screen in the same amount of time and easier film conversions (120 is equally divisible by 24, so no interpretations or double frames are needed).
TruMotion works with all inputs except PC mode.
Page 85
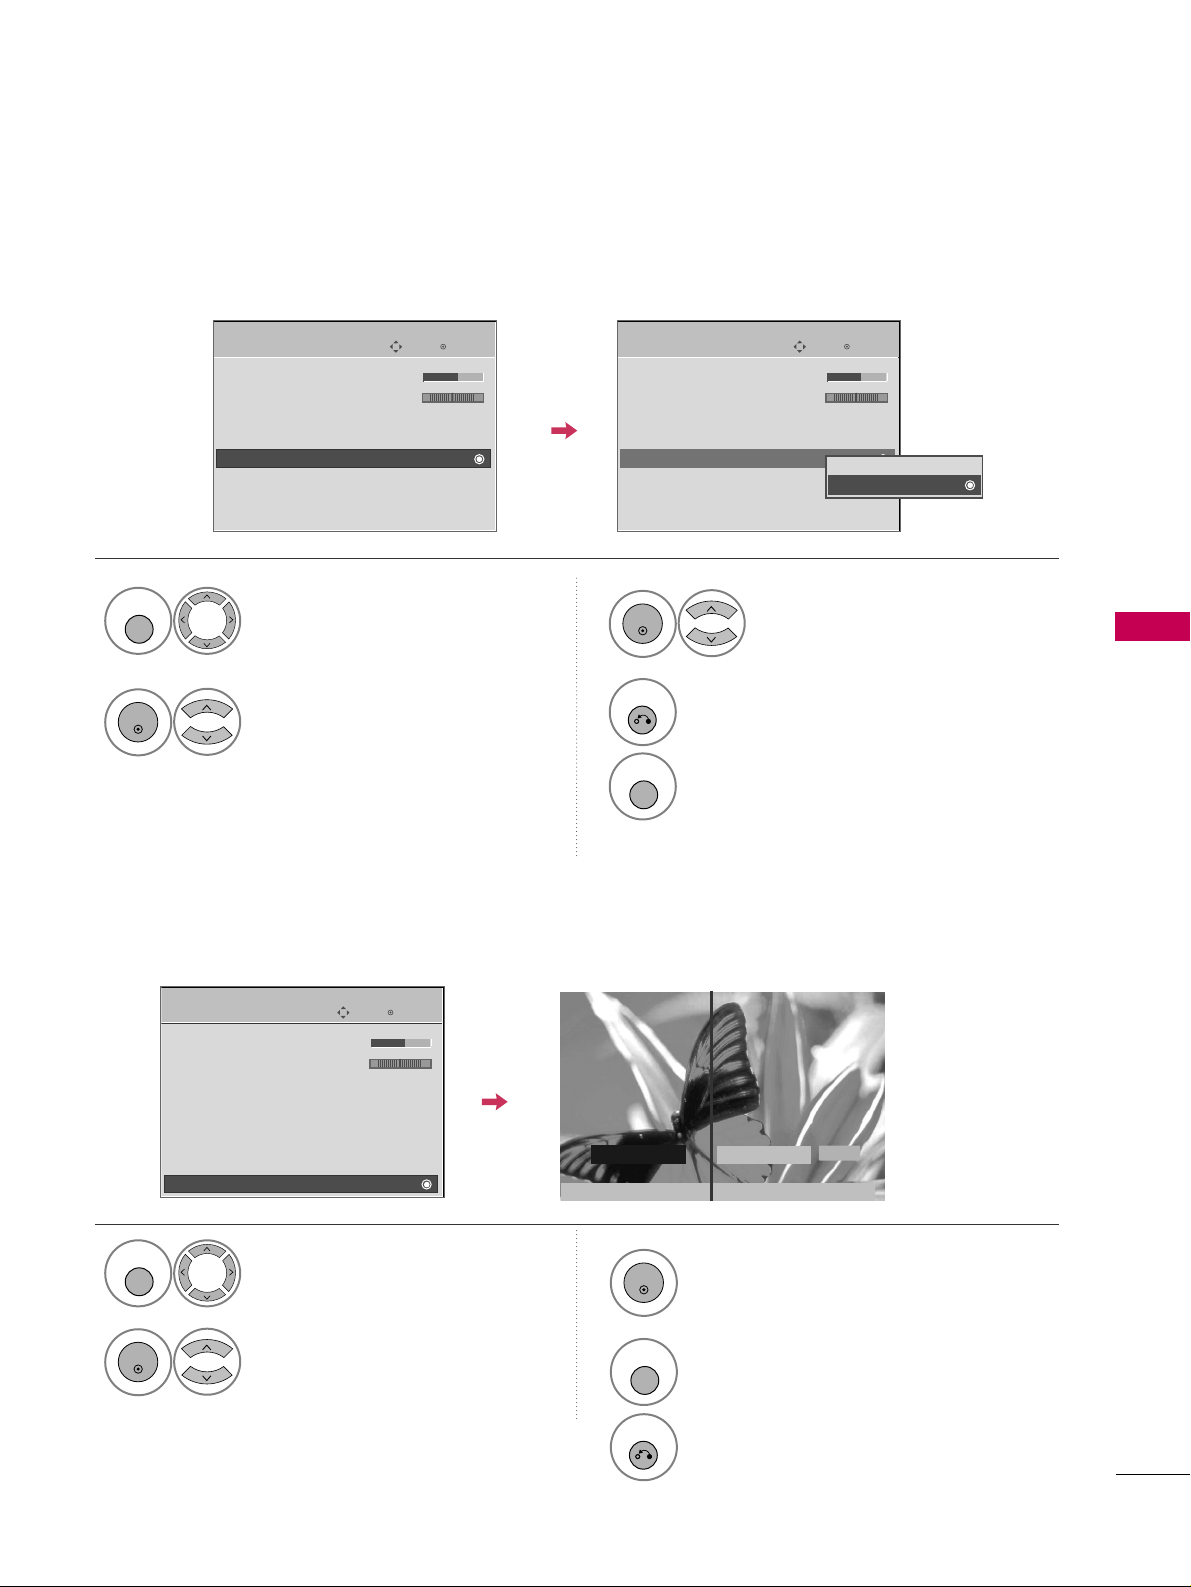
PICTURE CONTROL
83
LOCAL DIMMING
-
Only 47LG90
After analyzing the signal of the input video by areas of the screen, it adjusts the backlight to improve the
contrast ratio. This feature is disabled in “
PP iiccttuu rree MM ooddee--CCii nnee mmaa ,, GG aammee
”.
Enter
Move
PICTURE
E
• Color 60
• Tint 0
• Advanced Control
• Reset
Local Dimming : On
Screen (RGB-PC)
TruMotion Demo
Local Dimming Demo
RG
Enter
Move
PICTURE
E
• Color 60
• Tint 0
• Advanced Control
• Reset
Local Dimming : On
Screen (RGB-PC)
TruMotion Demo
Local Dimming Demo
RG
Off
On
Select
PPIICCTTUURREE
.
Select
LLoo ccaall DDiimm mmiinngg
.
1
MENU
2
ENTER
Select
OO nn
or
OO ffff
.
3
ENTER
4
RETURN
Return to the previous menu.
MENU
Return to TV viewing.
LOCAL DIMMING DEMO
-
Only 47LG90
Use this feature to see the difference Local Dimming makes.
Select
PPIICCTTUURREE
.
Select
LLoo ccaall DDiimm mmiinngg DD eemm oo
.
1
MENU
2
ENTER
3
4
ENTER
Begin
LLoo ccaall DDiimm mmiinngg DD eemm oo
.
MENU
Stop
LLoo ccaall DDiimm mmiinngg DD eemm oo
.
RETURN
Return to TV viewing.
Enter
Move
PICTURE
E
• Color 60
• Tint 0
• Advanced Control
• Reset
Local Dimming : On
Screen (RGB-PC)
TruMotion Demo
Local Dimming Demo
RG
LED TruMotion On
LED TruMotion Off
LG’s Advanced TruMotion 120Hz technology provides images whi
Exit
RETURN
Page 86
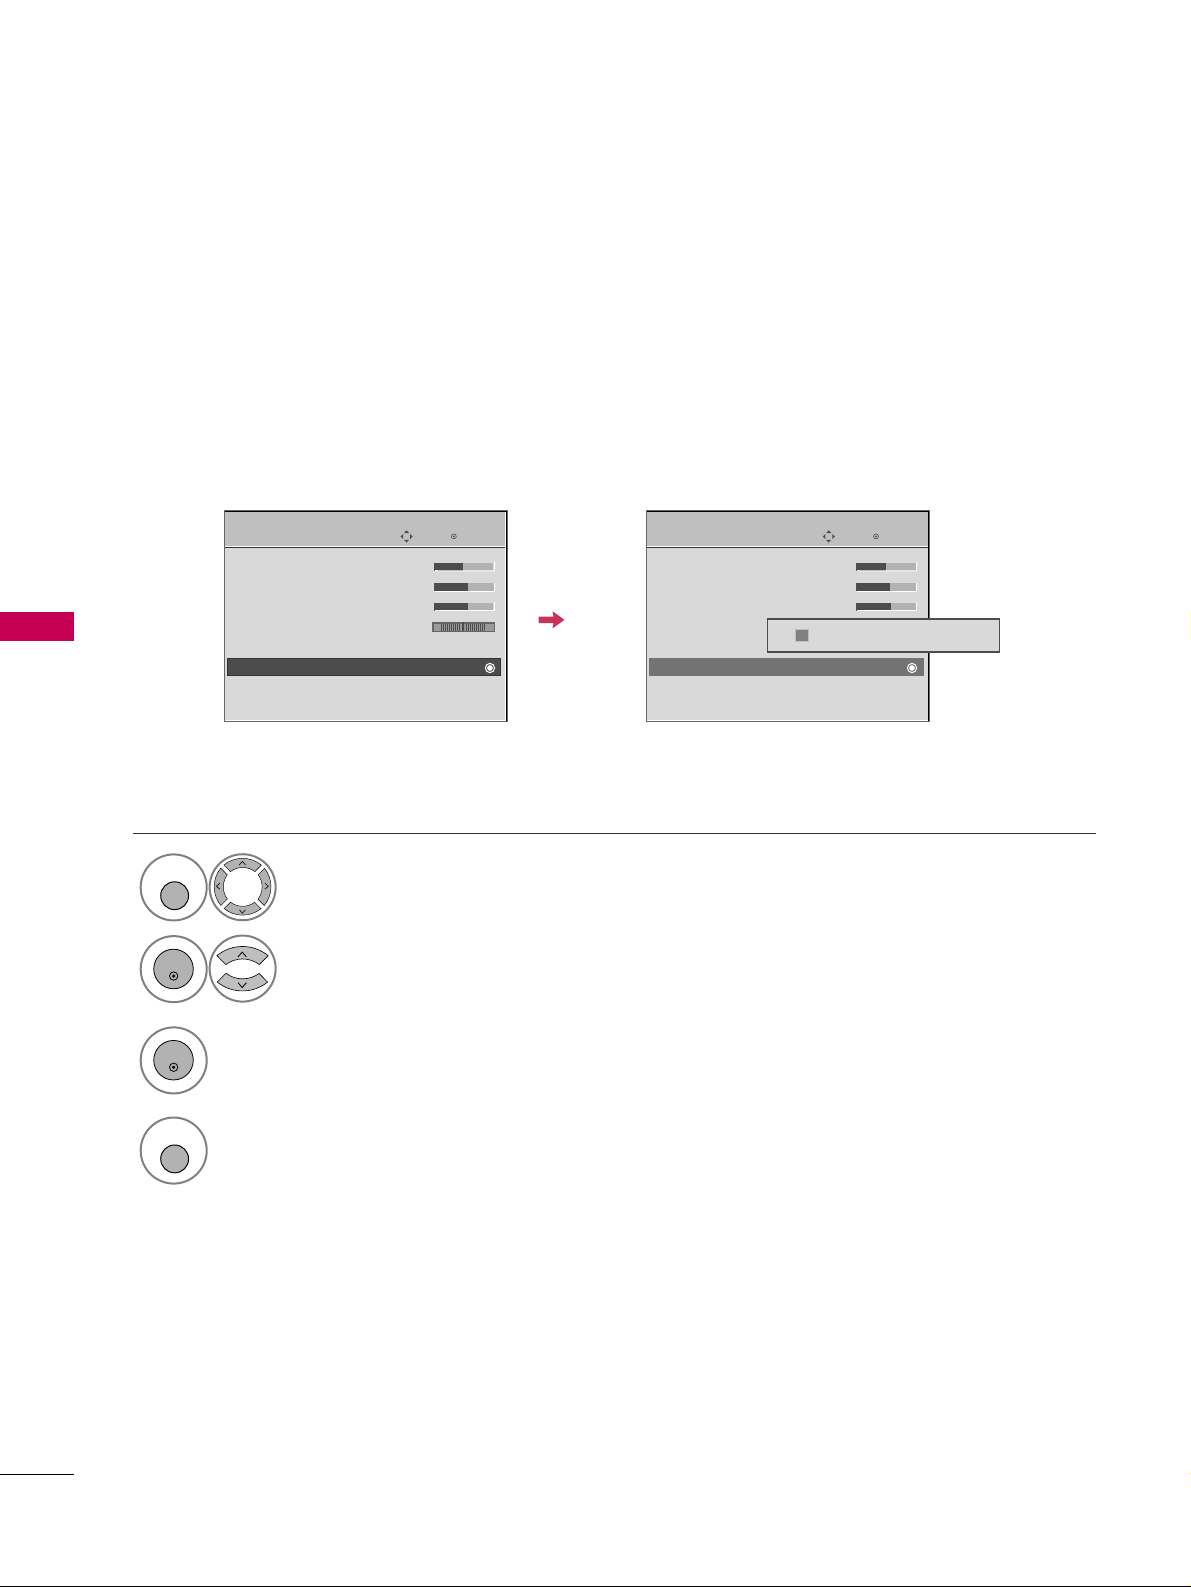
PICTURE CONTROL
84
PICTURE RESET
PICTURE CONTROL
Settings of the selected picture modes return to the default factory settings.
Select
PPIICCTTUURREE
.
Select
RRee sseett
.
Initialize the adjusted value.
1
MENU
3
2
ENTER
ENTER
4
MENU
Return to TV viewing.
Enter
Move
PICTURE
E
• Brightness 50
• Sharpness 60
• Color 60
• Tint 0
• Advanced Control
• Reset
Screen (RGB-PC)
TruMotion Demo
RG
Enter
Move
PICTURE
E
• Brightness 50
• Sharpness 60
• Color 60
• Tint 0
• Advanced Control
• Reset
Screen (RGB-PC)
TruMotion Demo
RG
Resetting video configuration...
ii
Page 87
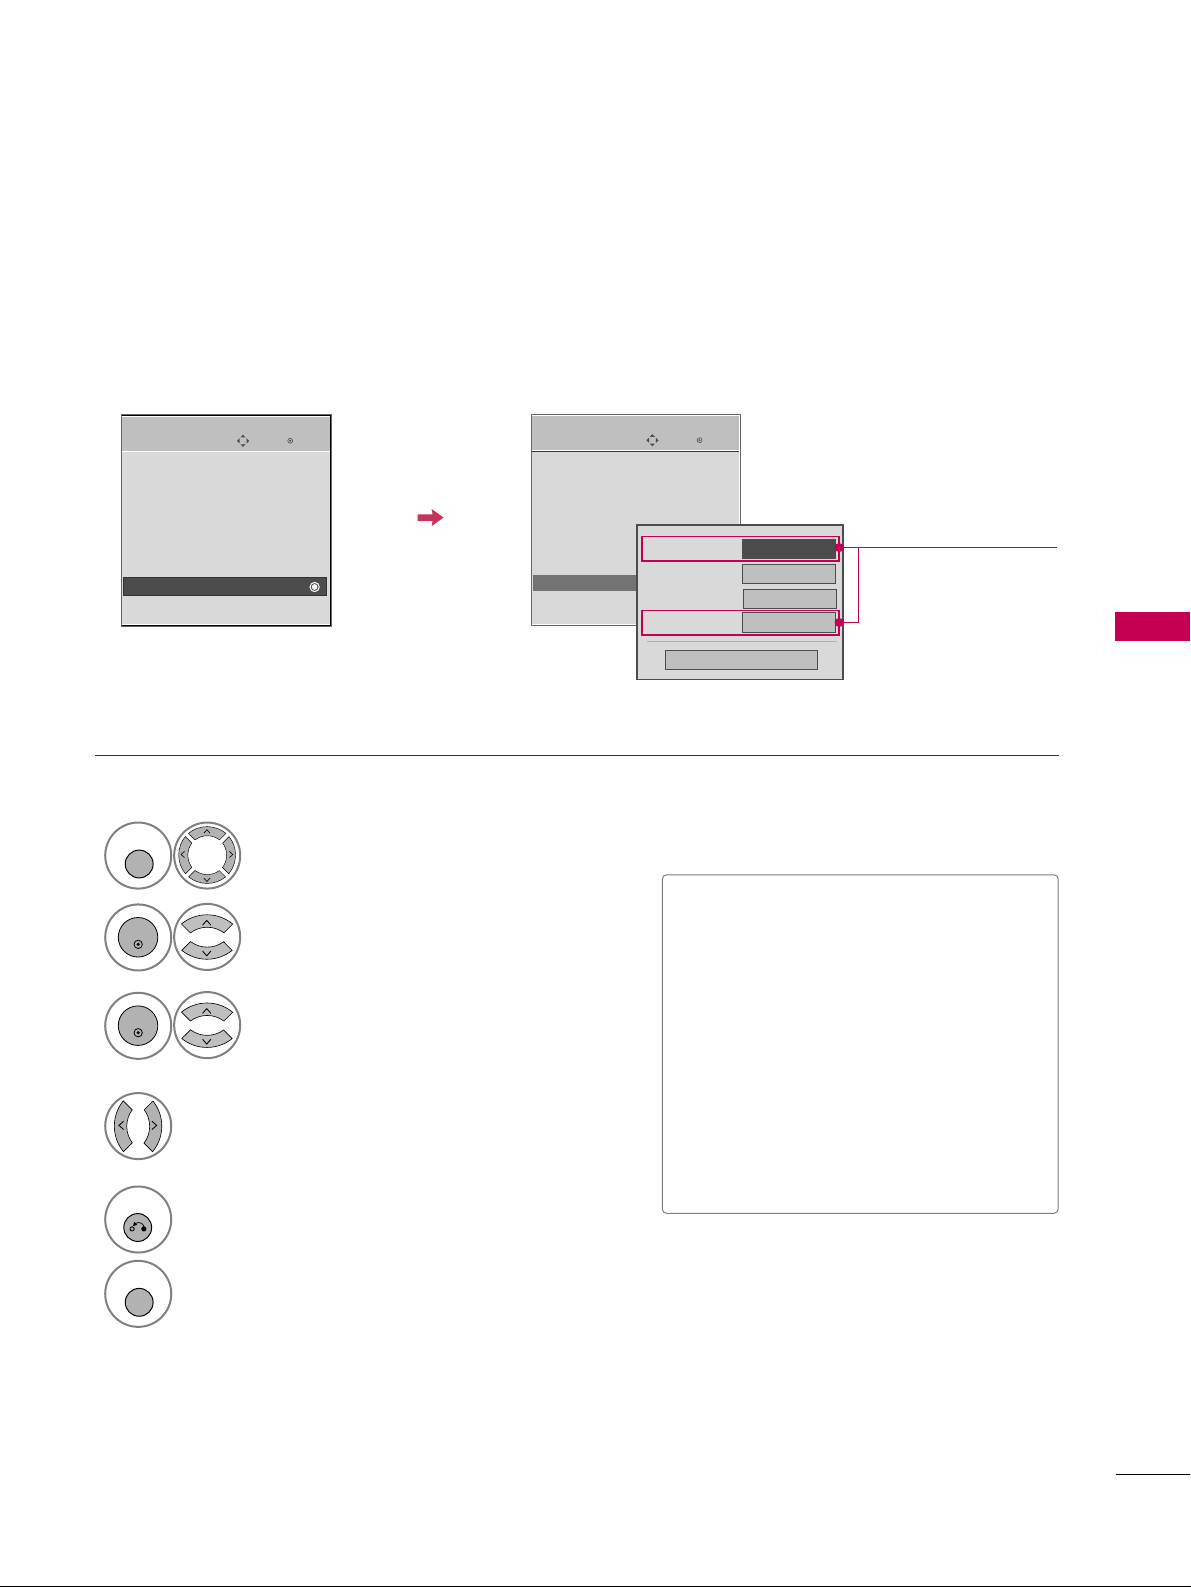
PICTURE CONTROL
85
POWER INDICATOR
-
LCD TV Only
Select
OOPPTTIIOONN
.
Select
PPoowweerr II nn ddiicc aattoorr
.
1
MENU
2
ENTER
Select
SS rraarr ttuu pp SS oouu nn dd,SS ttaa nn dd bb yy
LLiigghhtt,PPoowweerr LLiigg hh tt orDDeemmoo MMoo ddee
.
3
ENTER
Select your desired options.
4
5
RETURN
Return to the previous menu.
MENU
Return to TV viewing.
■
SS ttaa rr ttuupp SSoo uu nn dd
: You can turn off the
starting sound of the TV or set the volume.
■
SS ttaa nn ddbb yy LL iigghhtt
: You can set the
brightness of the LED on the front side
of the TV during power standby.
■
PPoowweerr LLiigg hh tt
: You can set the the LED
on the front side of the TV to be turned
on or off while watching the TV.
■
DDeemmoo MMoo ddee
: You can set the LED on
the front side of the TV to flash.
Enter
Move
OPTION
Language : English
Input Label
SIMPLINK : On
Key Lock : Off
Caption : Off
Set ID : 1
Power Indicator
Initial Setting : Home
Enter
Move
OPTION
Language : English
Input Label
SIMPLINK : On
Key Lock : Off
Caption : Off
Set ID : 1
Power Indicator
Initial Setting : Home
Standby Light
On
Demo Mode
Off
Srartup Sound
Off
Close
FF
Low
GG
Power Light
Only for
32/37/42/47/52LG60,
42/47LGX
Page 88
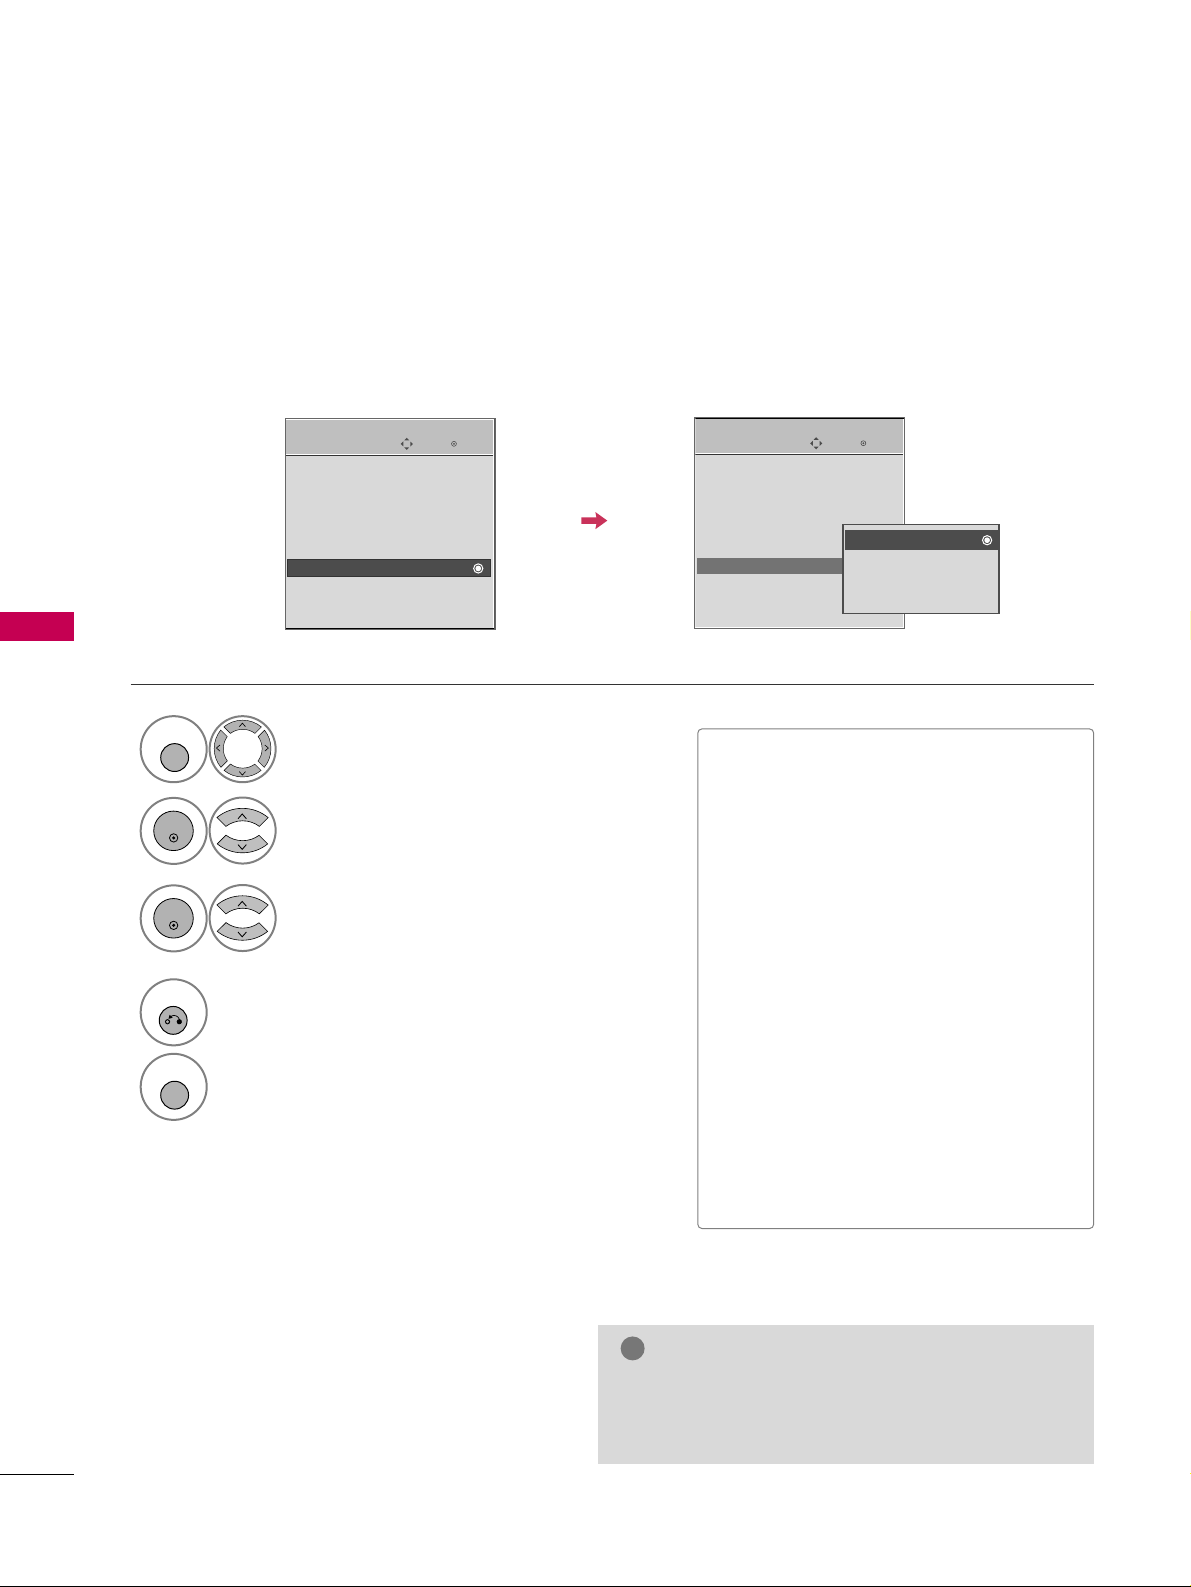
PICTURE CONTROL
86
IMAGE STICKING MINIMIZATION (ISM) METHOD
-
Plasma TV Only
PICTURE CONTROL
A frozen still picture from a PC/video game displayed on the screen for prolonged periods can result in a ghost
image. You can use Orbiter to help prevent image sticking. The other two functions are for removing a ghost
image.
GG
An excessive ghosted image may be impossible to
clear entirely with White Wash. To return to normal viewing, press the any button.
NOTE
!
Enter
Move
OPTION
Language : English
Input Label
SIMPLINK : On
Key Lock : Off
Caption : Off
ISM Method : Normal
Power Saving : Level 0
Set ID : 1
Normal
Orbiter
Inversion
White Wash
EE
■
NNoorrmm aall
: If image sticking is never a
problem, ISM is not necessary - set to
Normal.
■
OO rr bb ii ttee rr
: Orbiter may help prevent
ghost images. However, it is best not to
allow any fixed image to remain on the
screen. To avoid a ghost image on the
screen, the image will move every 2 minutes.
■
IInnvveerrss ii oonn
: Inversion will automatically
invert the plasma display panel color
every 30 minutes.
■
WWhh ii tt ee WWaass hh
: White Wash removes
ghost images from the screen. Use sparingly. Watch the TV normally for a while
before using this feature to see if the
ghost image disappears on its own.
Select
OOPPTTIIOONN
.
Select
IISS MM MMee tthhoo dd
.
1
MENU
2
ENTER
Select
NNoorrmmaall,, OOrrbbiitteerr,,
IInnvveerrss iioo nn
or
WWhh iittee WWaass hh ..
3
ENTER
4
RETURN
Return to the previous menu.
MENU
Return to TV viewing.
Enter
Move
OPTION
Language : English
Input Label
SIMPLINK : On
Key Lock : Off
Caption : Off
ISM Method : Normal
Power Saving : Level 0
Set ID : 1
EE
Page 89
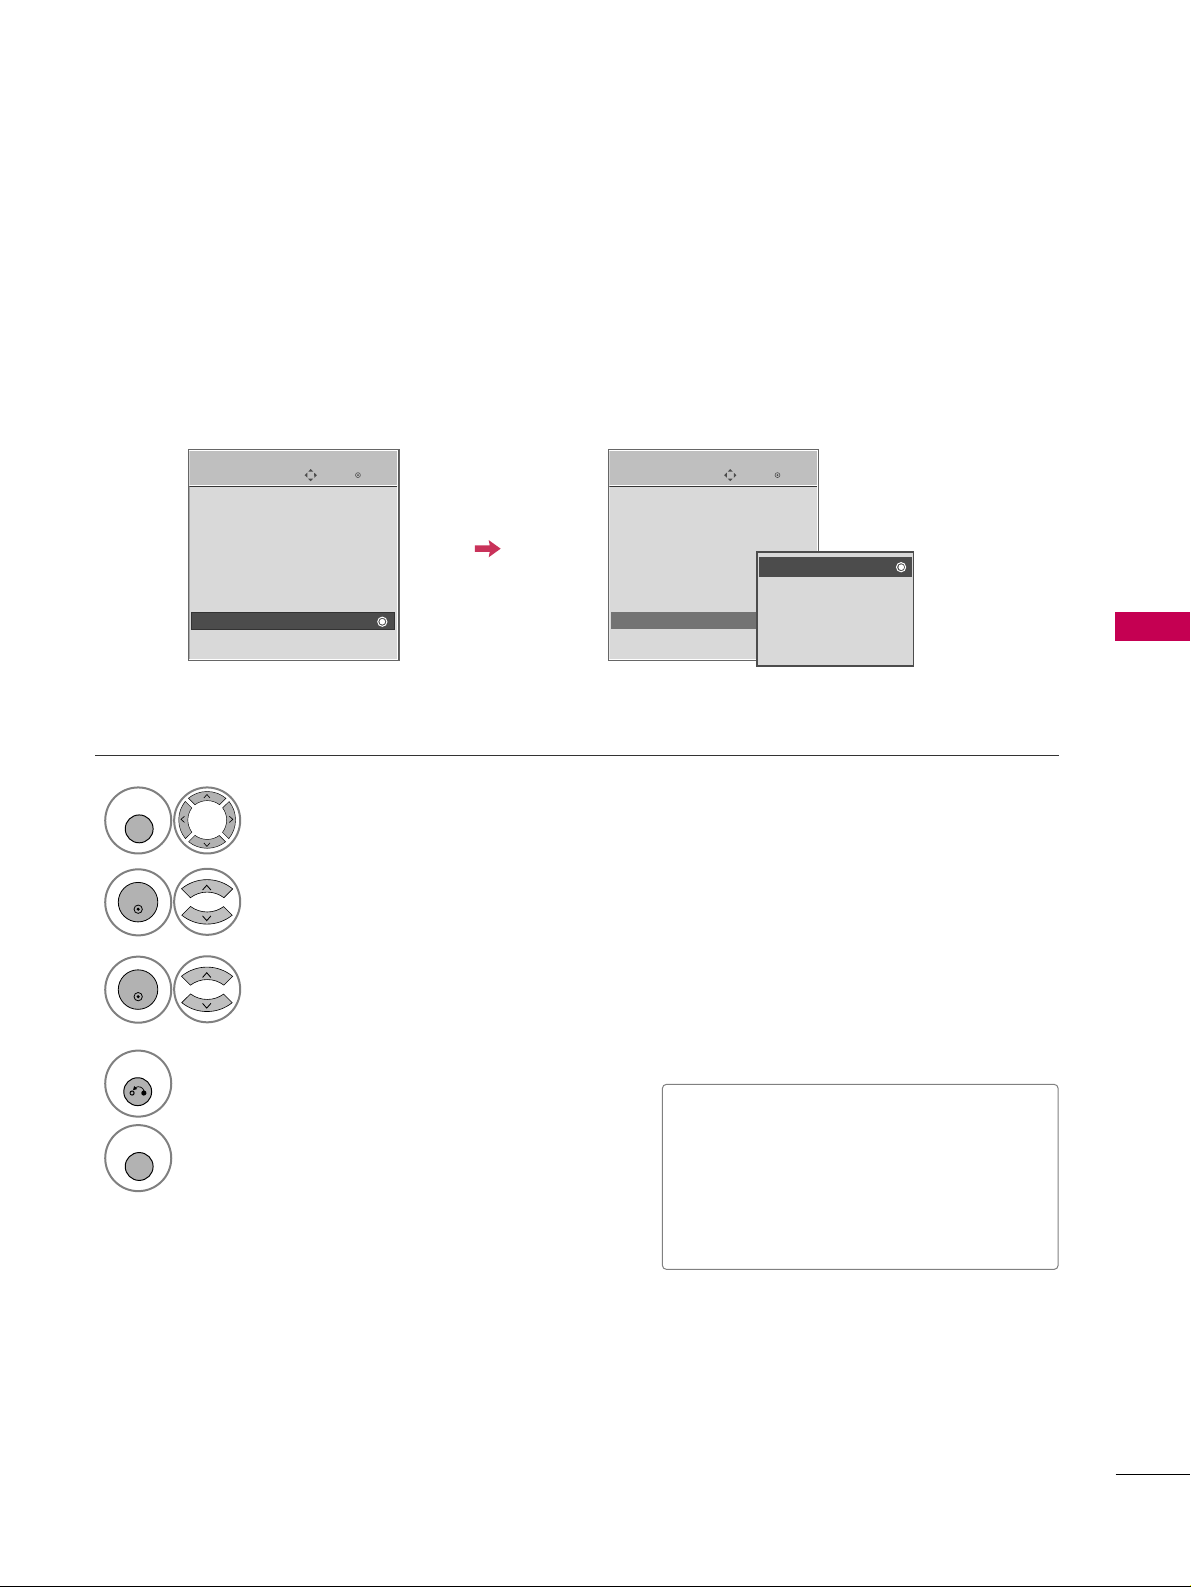
PICTURE CONTROL
87
POWER SAVING PICTURE MODE
-
Plasma TV Only
It reduces the plasma display’s power consumption.
Enter
Move
OPTION
Enter
Move
OPTION
Language : English
Input Label
SIMPLINK : On
Key Lock : Off
Caption : Off
ISM Method : Normal
Power Saving : Level 0
Set ID : 1
Language : English
Input Label
SIMPLINK : On
Key Lock : Off
Caption : Off
ISM Method : Normal
Power Saving : Level 0
Set ID : 1
Level 0
Level 1
Level 2
Level 3
Level 4
■
Level 0 is the brightest.
■
Level 0 > Level 1 > Level 2 > Level 3 >
Level 4
■
You can also adjust
PPoowweerr SSaavviinn gg
in
the
QQ .. MM eenn uu
.
EE
EE
Select
OOPPTTIIOONN
.
Select
PPoowweerr SS aavviinngg
.
1
MENU
2
ENTER
Select
LLee vv eell 00, LLee vv eell 11
,
LLee vv eell 22, LLee vv eell 33
, or
LLee vv eell 44
.
3
ENTER
4
RETURN
Return to the previous menu.
MENU
Return to TV viewing.
Page 90
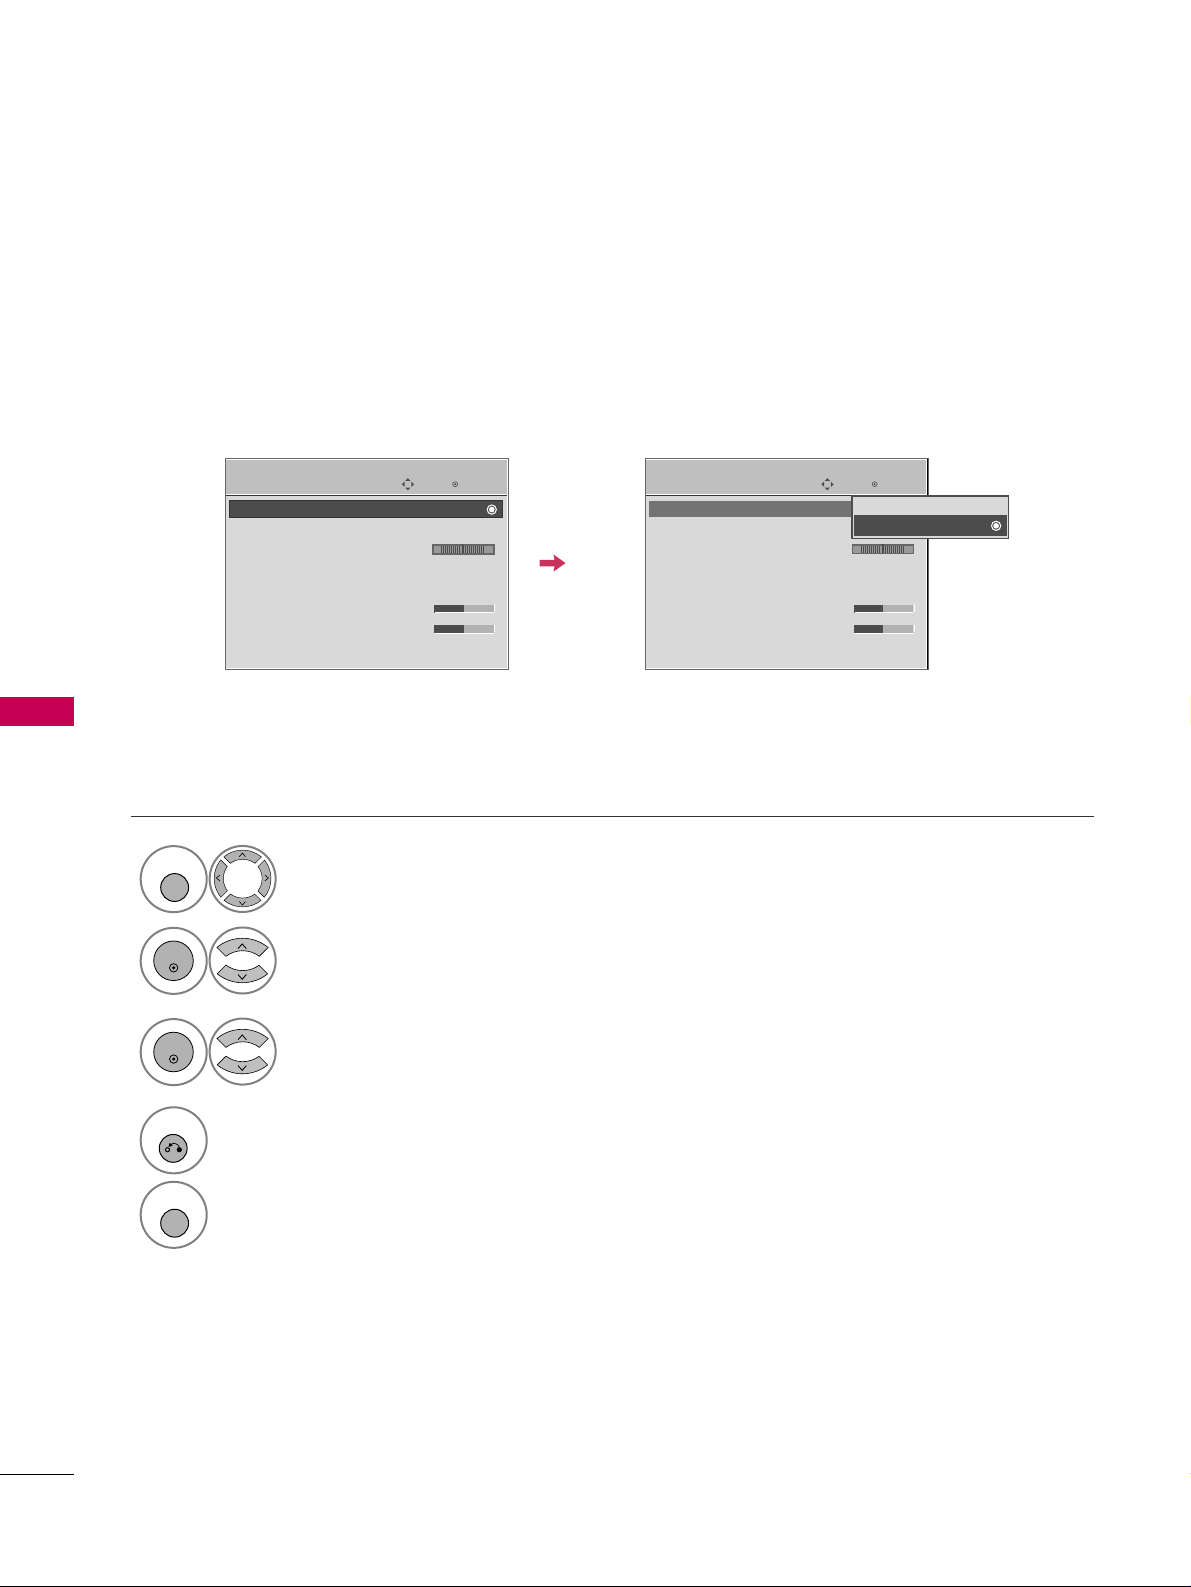
SOUND & LANGUAGE CONTROL
88
SOUND & LANGUAGE CONTROL
AUTO VOLUME LEVELER (AUTO VOLUME)
Auto Volume makes sure that the volume level remains consistent whether you are watching a commercial or a
regular TV program.
Select
AAUUDDIIOO
.
Select
AAuuttoo VVoolluumm ee
.
Select
OO nn
or
OO ffff
.
Enter
Move
AUDIO
E
LR
Enter
Move
AUDIO
E
LR
1
MENU
3
2
ENTER
ENTER
Auto Volume : Off
Clear Voice : On
Balance 0
Sound Mode : Standard
•
SRS TruSurround XT:
Off
• Treble 50
• Bass 50
• Reset
Auto Volume : On
Clear Voice : On
Balance 0
Sound Mode : Standard
•
SRS TruSurround XT:
Off
• Treble 50
• Bass 50
• Reset
Off
On
4
RETURN
Return to the previous menu.
MENU
Return to TV viewing.
Page 91
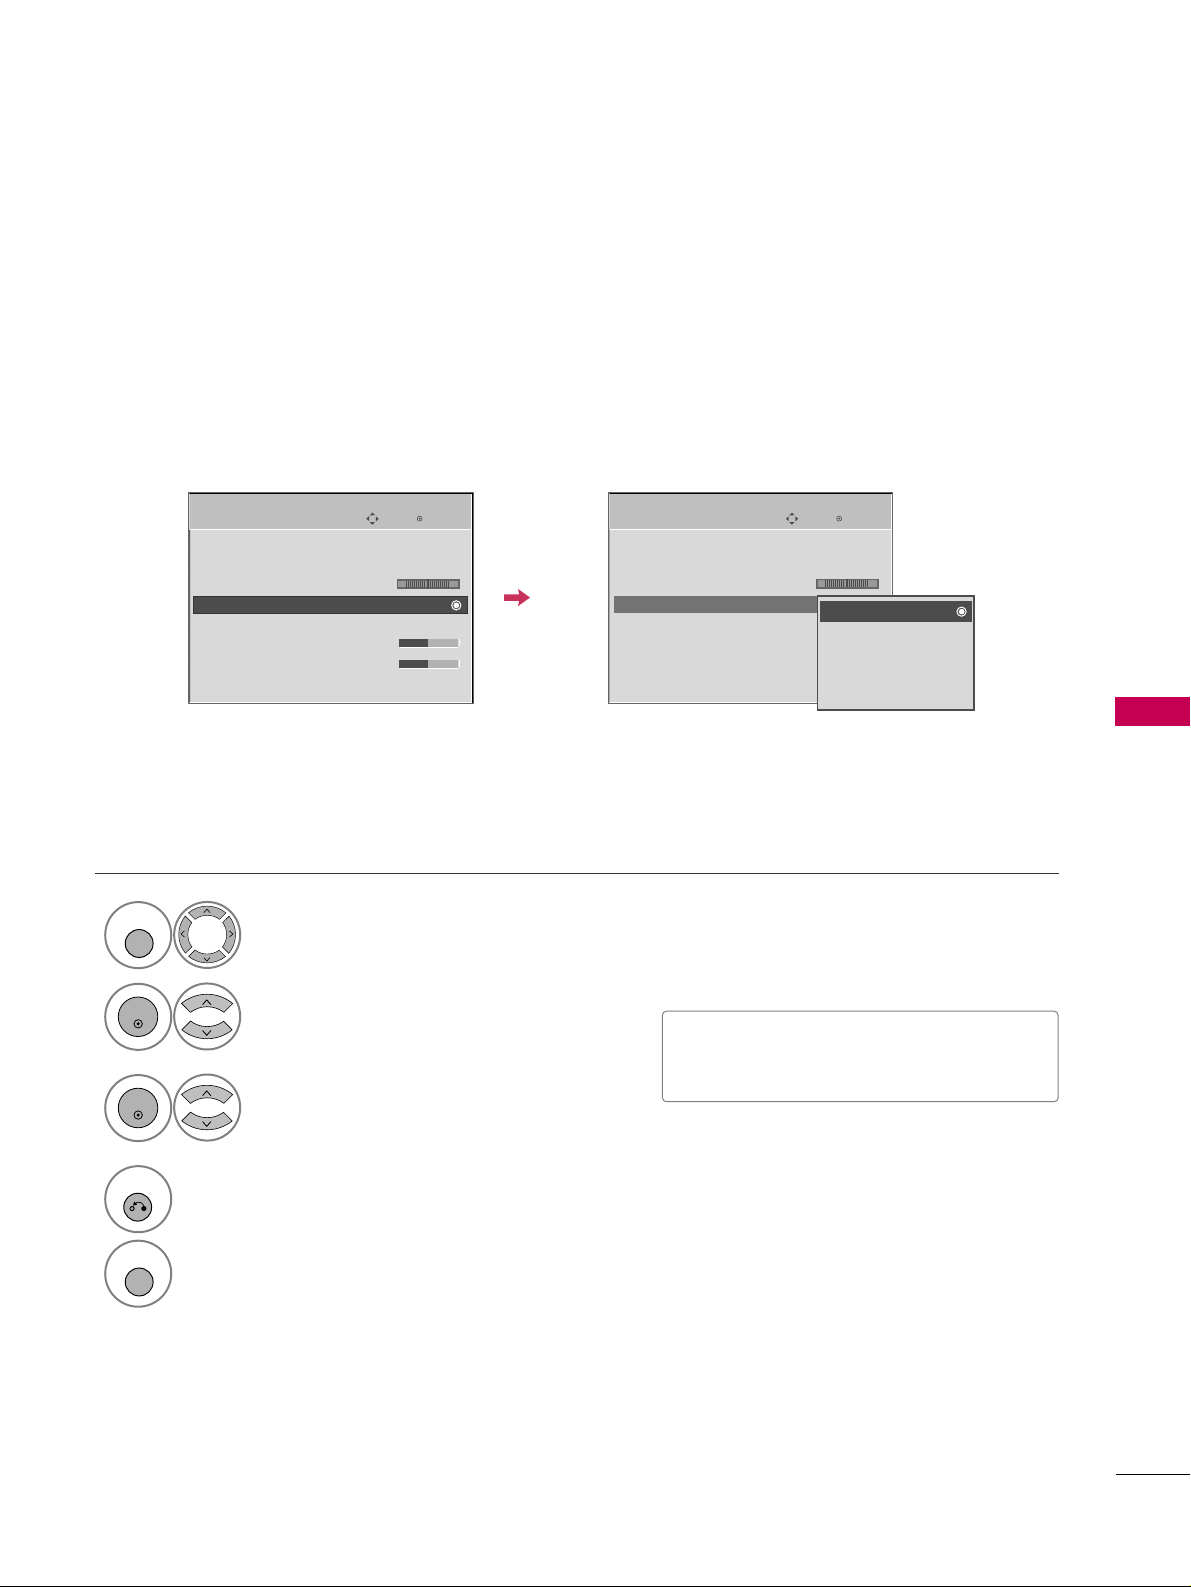
SOUND & LANGUAGE CONTROL
89
PRESET SOUND SETTINGS (SOUND MODE)
Sound Mode lets you enjoy the best sound without any special adjustment as the TV sets the appropriate
sound options based on the program content.
SS ttaannddaa rrdd, MM uuss ii cc, CCiinn eemmaa, SS ppoorrtt
, and
GGaa mm ee
are preset for optimum sound quality at the factory and are
not adjustable.
Select
AAUUDDIIOO
.
Select
SS oouunndd MM oodd ee
.
Select
SS ttaannddaarrdd, MM uu ssiicc
,
CC ii nn eemm aa, SS pp oorrtt
, or
GGaa mmee
.
1
MENU
3
2
ENTER
ENTER
Enter
Move
AUDIO
E
LR
Enter
Move
AUDIO
E
LR
Auto Volume : Off
Clear Voice : On
Balance 0
Sound Mode : Standard
•
SRS TruSurround XT:
Off
• Treble 50
• Bass 50
• Reset
Auto Volume : Off
Clear Voice : On
Balance 0
Sound Mode : Standard
•
SRS TruSurround XT:
Off
• Treble 50
• Bass 50
• Reset
Standard
Music
Cinema
Sport
Game
■
You can also adjust
SS oouunndd MM oodd ee
in
the
QQ .. MM eenn uu
.
4
RETURN
Return to the previous menu.
MENU
Return to TV viewing.
Page 92
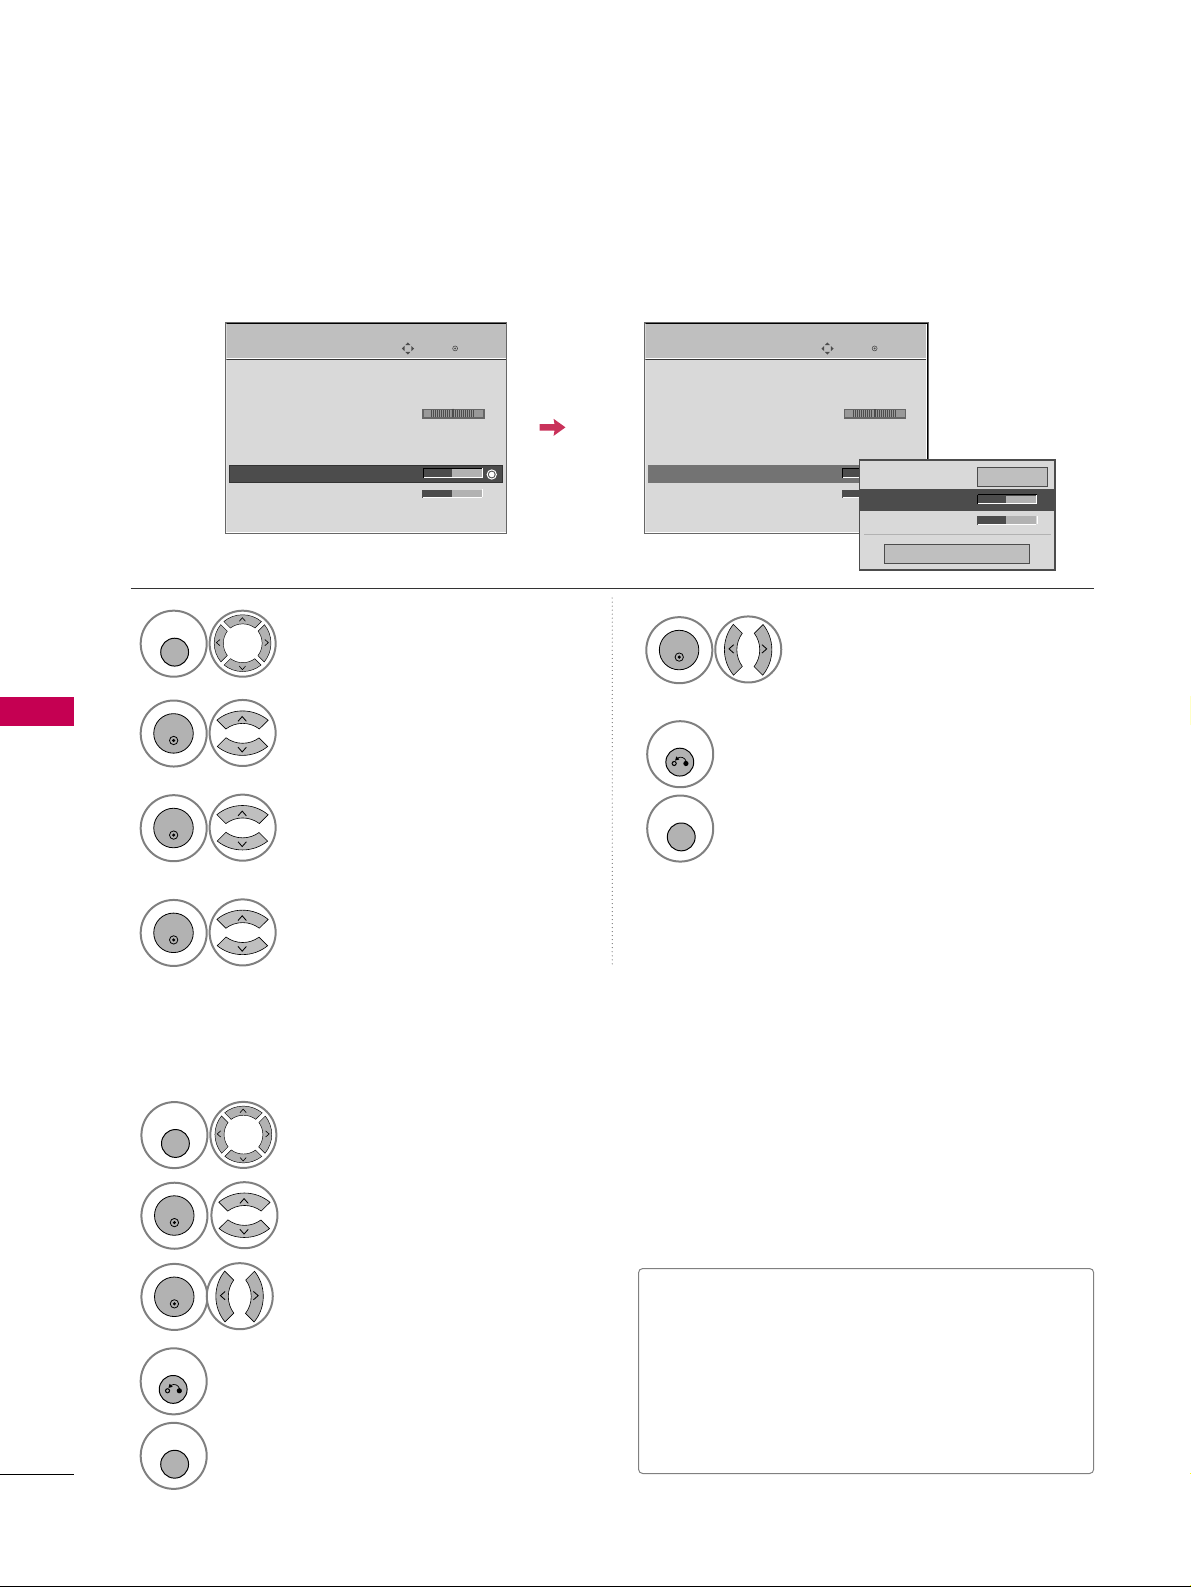
SOUND & LANGUAGE CONTROL
90
SOUND & LANGUAGE CONTROL
SOUND SETTING ADJUSTMENT - USER MODE
SRS TRUSURROUND XT
Adjust the sound to suit your taste and room situations.
Select
AAUUDDIIOO
.
Select
SS oouunndd MM oodd ee
.
Select
TTrreebb ll ee
or
BBaass ss
.
1
MENU
4
2
ENTER
Select
SS ttaannddaarrdd, MM uu ssiicc
,
CC ii nn eemm aa, SS pp oorrtt
, or
GGaa mmee
.
3
ENTER
ENTER
Enter
Move
AUDIO
LR
E
Auto Volume : Off
Clear Voice : On
Balance 0
Sound Mode : Standard
•
SRS TruSurround XT:
Off
• Treble 50
• Bass 50
• Reset
Enter
Move
AUDIO
LR
E
Auto Volume : Off
Clear Voice : On
Balance 0
Sound Mode : Standard
•
SRS TruSurround XT:
Off
• Treble 50
• Bass 50
• Reset
Select
AAUUDDIIOO
.
Select
SS RR SS TTrruu SS uu rrrroouunndd XXTT
Select
OO nn
or
OO ffff
.
1
MENU
3
2
ENTER
ENTER
■
SS RR SS TTrruuSSuurrrr oouunn dd XXTT
: Takes advantage of
any multi-channel format without needing to
add extra speakers or equipment. Dialog clarity,
bass enrichment, and the addition of stereo
audio enhancement produces an immersive
sound experience from standard stereo material.
6
RETURN
Return to the previous menu.
MENU
Return to TV viewing.
4
RETURN
Return to the previous menu.
MENU
Return to TV viewing.
Close
EE
EE
Treble 50
Bass 50
SRS TruSurround XT
Off
Make appropriate adjustments.
5
ENTER
Page 93
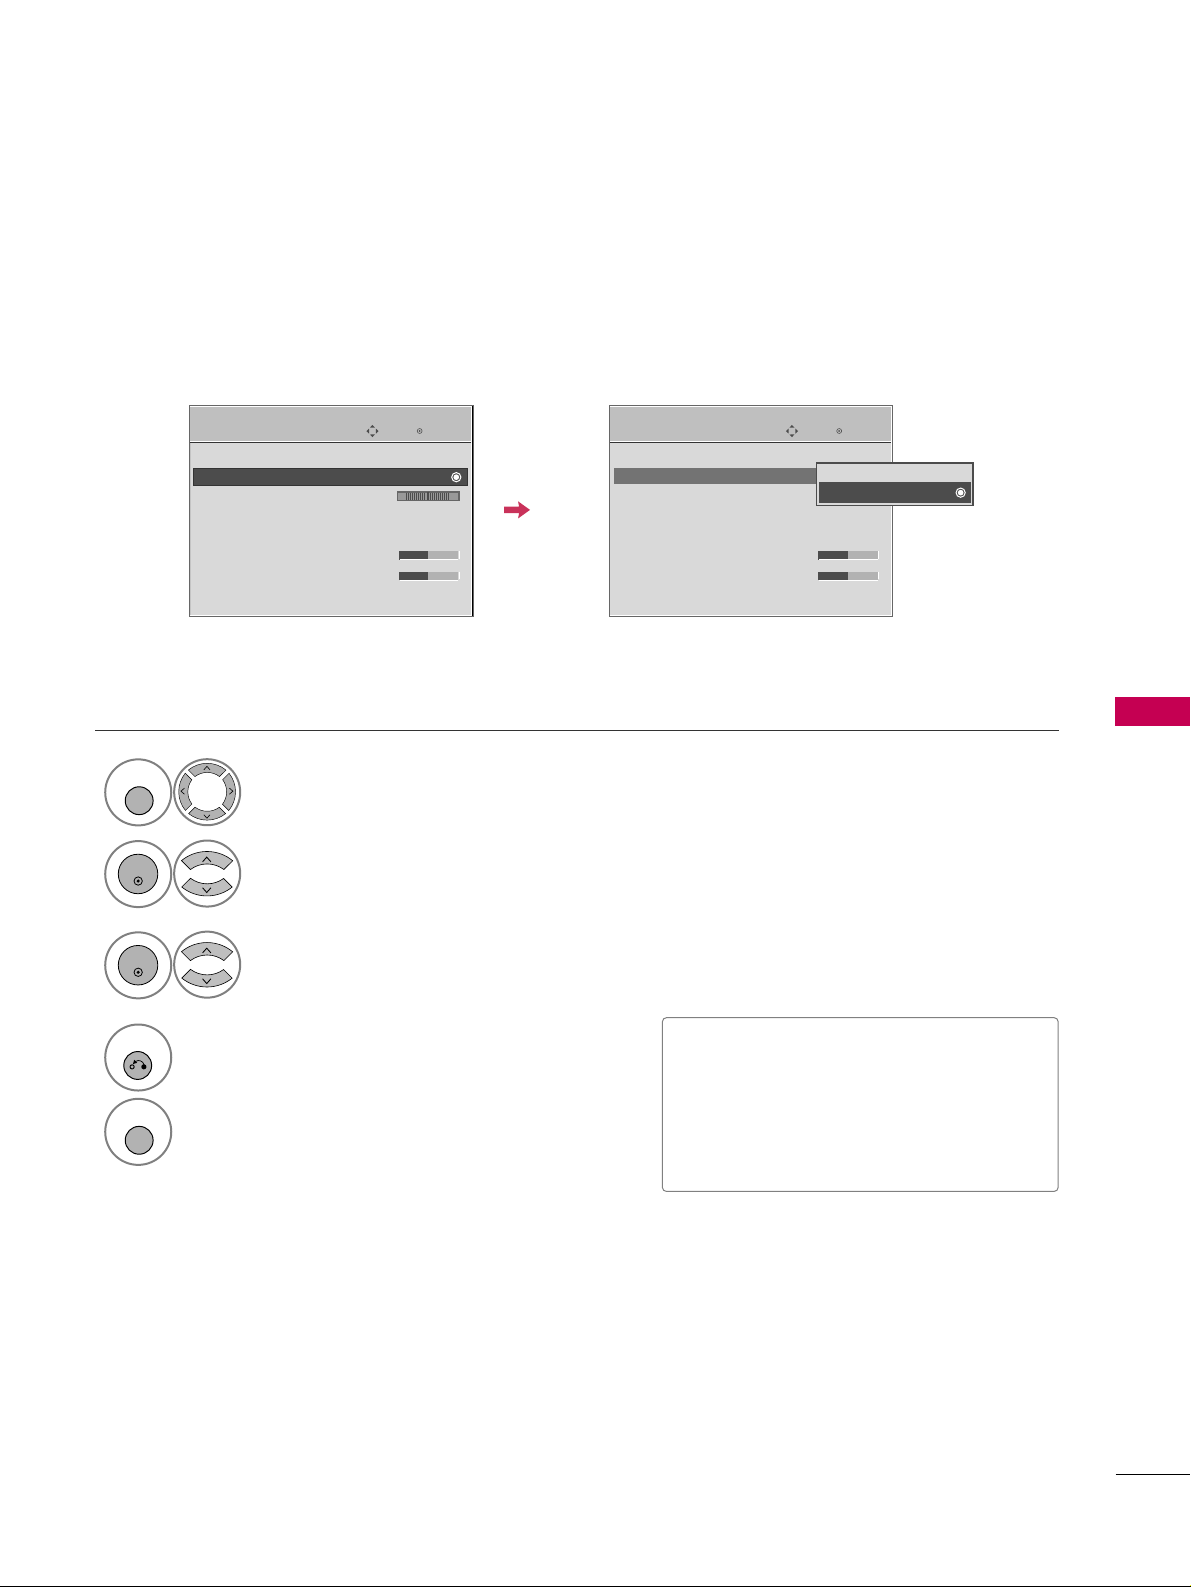
SOUND & LANGUAGE CONTROL
91
CLEAR VOICE
By differentiating the human sound range from others, it improves the sound quality of voices.
■
If you select “
CC llee aarr VVooiiccee--OO nn
”,
SS RR SS
TTrruuSSuu rr rr oouunn dd XXTT
feature will not
work.
■
You can also adjust
CC llee aarr VVooiiccee
in the
QQ -- MMeennuu
.
Enter
Move
AUDIO
E
LR
Enter
Move
AUDIO
E
LR
Auto Volume : Off
Clear Voice : On
Balance 0
Sound Mode : Standard
•
SRS TruSurround XT:
Off
• Treble 50
• Bass 50
• Reset
Auto Volume : Off
Clear Voice : On
Balance 0
Sound Mode : Standard
•
SRS TruSurround XT:
Off
• Treble 50
• Bass 50
• Reset
Off
On
Select
AAUUDDIIOO
.
Select
CC llee aarr VVooiiccee
.
Select
OO nn
or
OO ffff
.
1
MENU
3
2
ENTER
ENTER
4
RETURN
Return to the previous menu.
MENU
Return to TV viewing.
Page 94
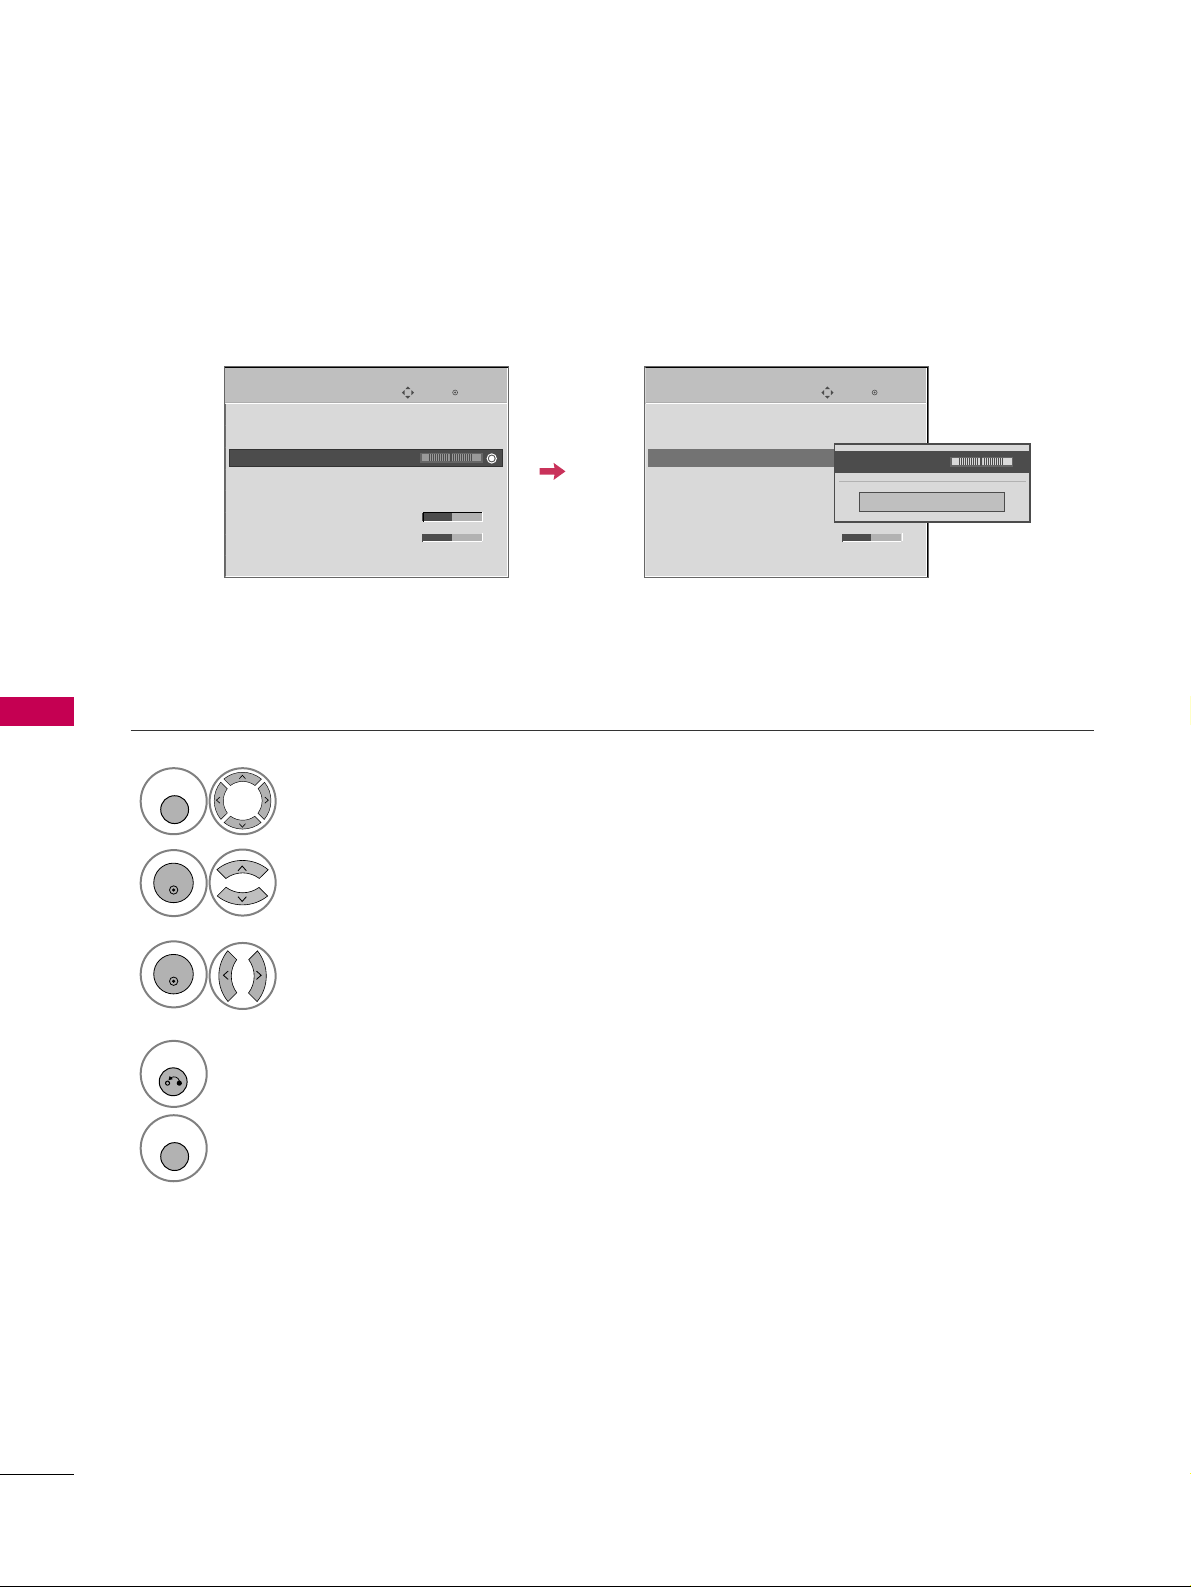
SOUND & LANGUAGE CONTROL
92
BALANCE
SOUND & LANGUAGE CONTROL
Select
AAUUDDIIOO
.
Select
BBaa ll aannccee
.
Make appropriate adjustments.
1
MENU
3
2
ENTER
ENTER
Adjust the left/right sound of speaker to suit your taste and room situations.
Enter
Move
AUDIO
Enter
Move
AUDIO
LR
E
Auto Volume : Off
Clear Voice : On
Balance 0
Sound Mode : Standard
•
SRS TruSurround XT:
Off
• Treble 50
• Bass 50
• Reset
LR
E
Auto Volume : Off
Clear Voice : On
Balance 0
Sound Mode : Standard
•
SRS TruSurround XT:
Off
• Treble 50
• Bass 50
• Reset
Close
EE
EE
Balance 0
LR
4
RETURN
Return to the previous menu.
MENU
Return to TV viewing.
Page 95
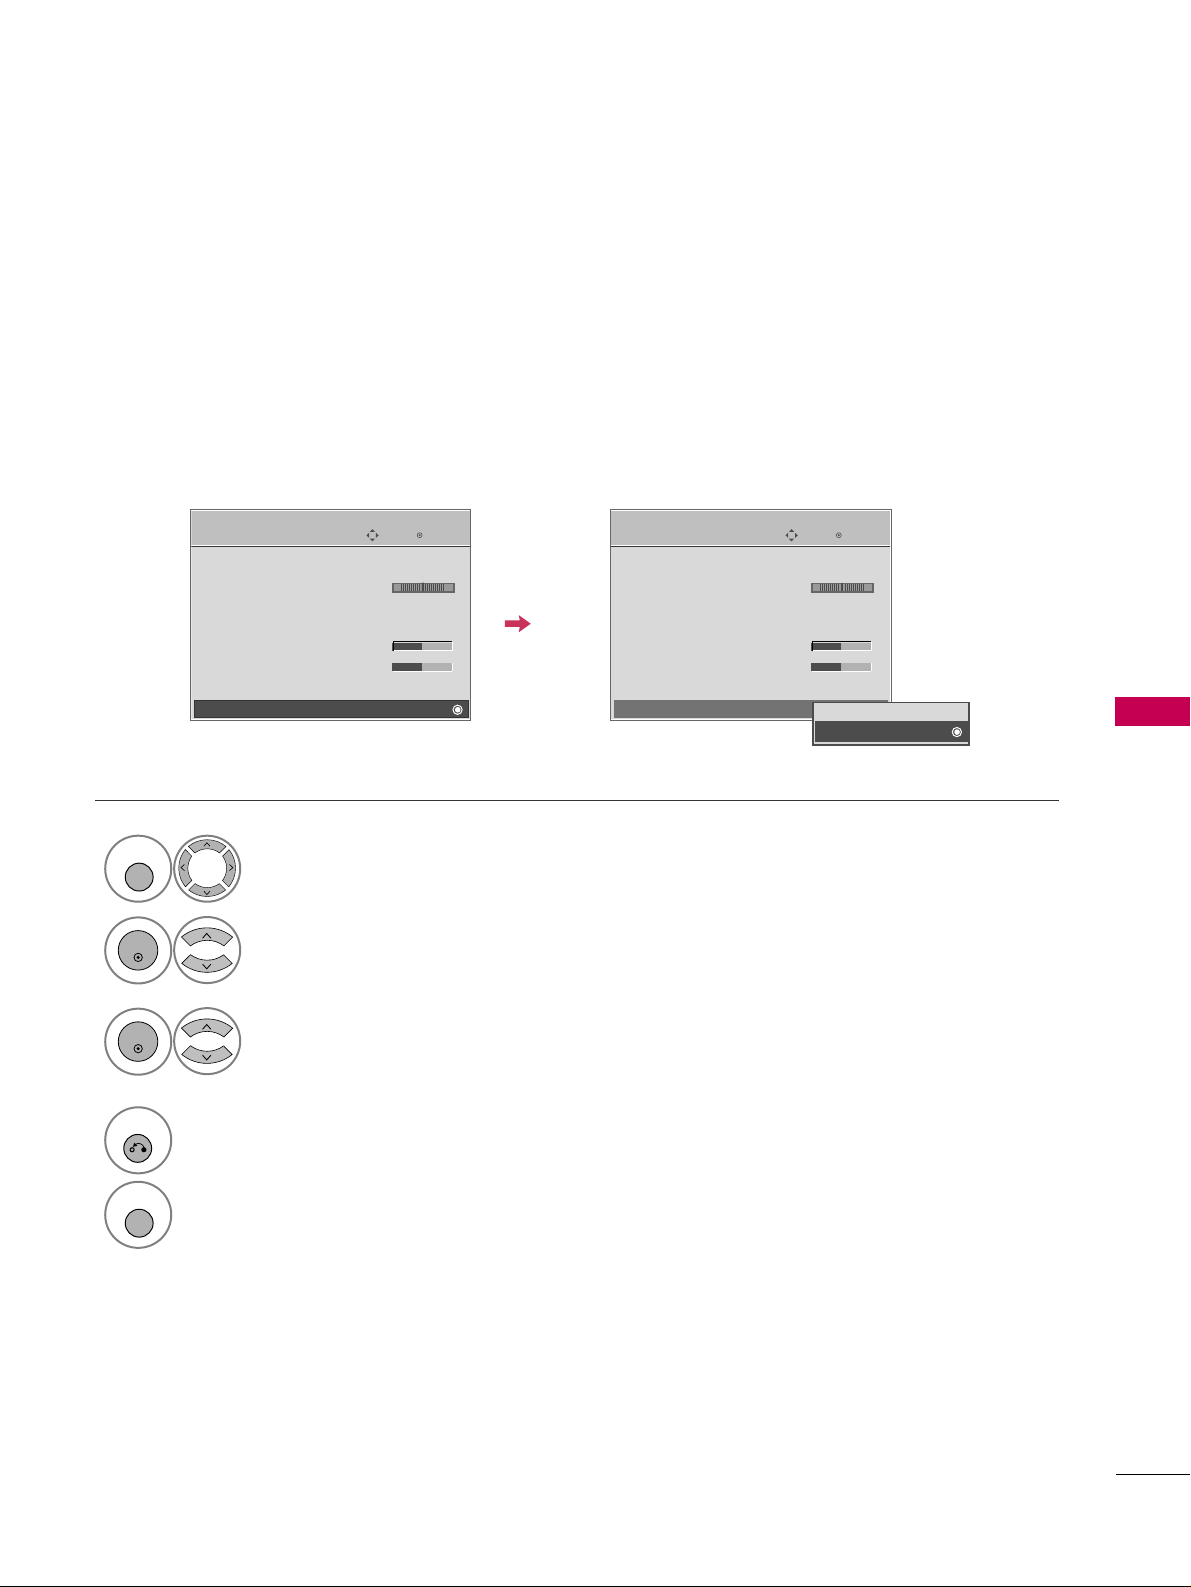
SOUND & LANGUAGE CONTROL
93
TV SPEAKERS ON/OFF SETUP
Turn the TV speakers off if using external audio equipment.
Enter
Move
AUDIO
E
Clear Voice : On
Balance 0
Sound Mode : Standard
•
SRS TruSurround XT:
Off
• Treble 50
• Bass 50
• Reset
TV Speaker : On
Select
AAUUDDIIOO
.
Select
TTVV SSpp eeaa kk eerr
.
Select
OO nn
or
OO ffff
.
1
MENU
3
2
ENTER
ENTER
4
RETURN
Return to the previous menu.
MENU
Return to TV viewing.
LR
Enter
Move
AUDIO
E
Clear Voice : On
Balance 0
Sound Mode : Standard
•
SRS TruSurround XT:
Off
• Treble 50
• Bass 50
• Reset
TV Speaker : On
LR
Off
On
Page 96
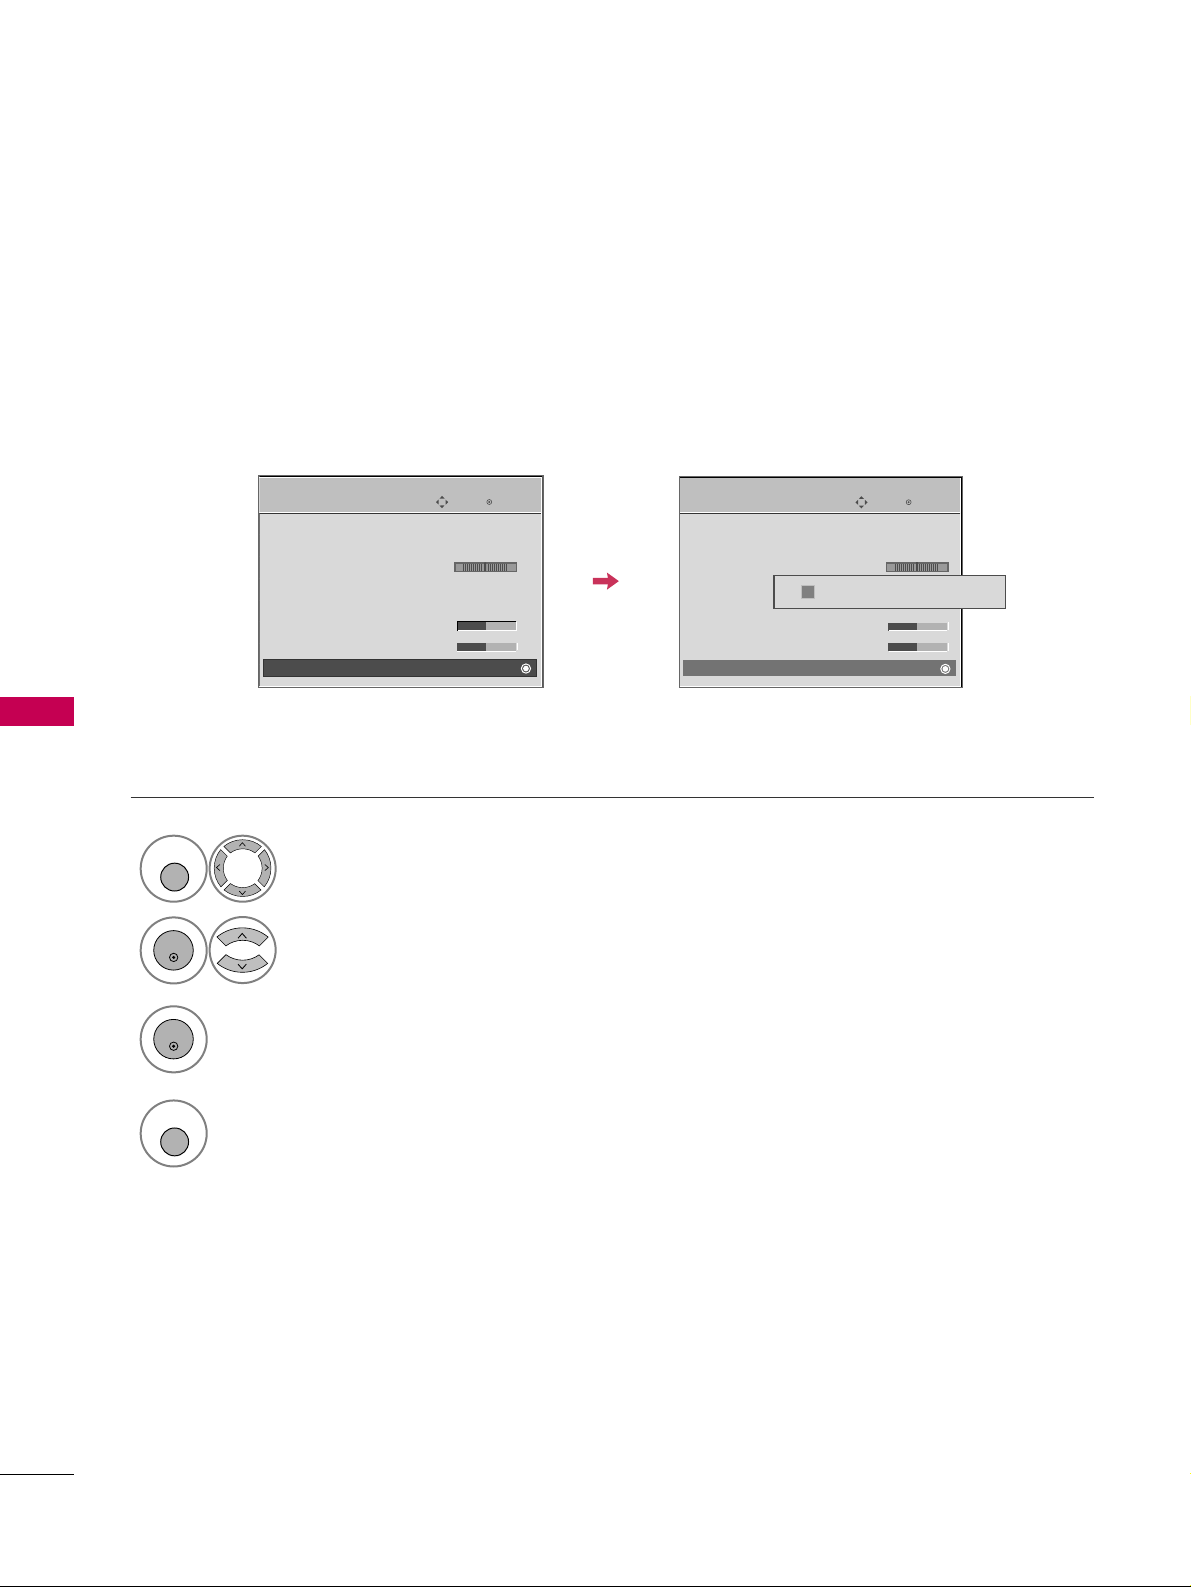
SOUND & LANGUAGE CONTROL
94
AUDIO RESET
SOUND & LANGUAGE CONTROL
Settings of the selected Sound Mode return to the default factory settings.
Select
AAUUDDIIOO
.
Select
RRee sseett
.
1
MENU
2
ENTER
Initialize the adjusted value.
3
ENTER
Enter
Move
AUDIO
E
LR
Auto Volume : Off
Clear Voice : On
Balance 0
Sound Mode : Standard
•
SRS TruSurround XT:
Off
• Treble 50
• Bass 50
• Reset
Resetting audio configuration...
ii
4
MENU
Return to TV viewing.
Enter
Move
AUDIO
LR
E
Auto Volume : Off
Clear Voice : On
Balance 0
Sound Mode : Standard
•
SRS TruSurround XT:
Off
• Treble 50
• Bass 50
• Reset
Page 97
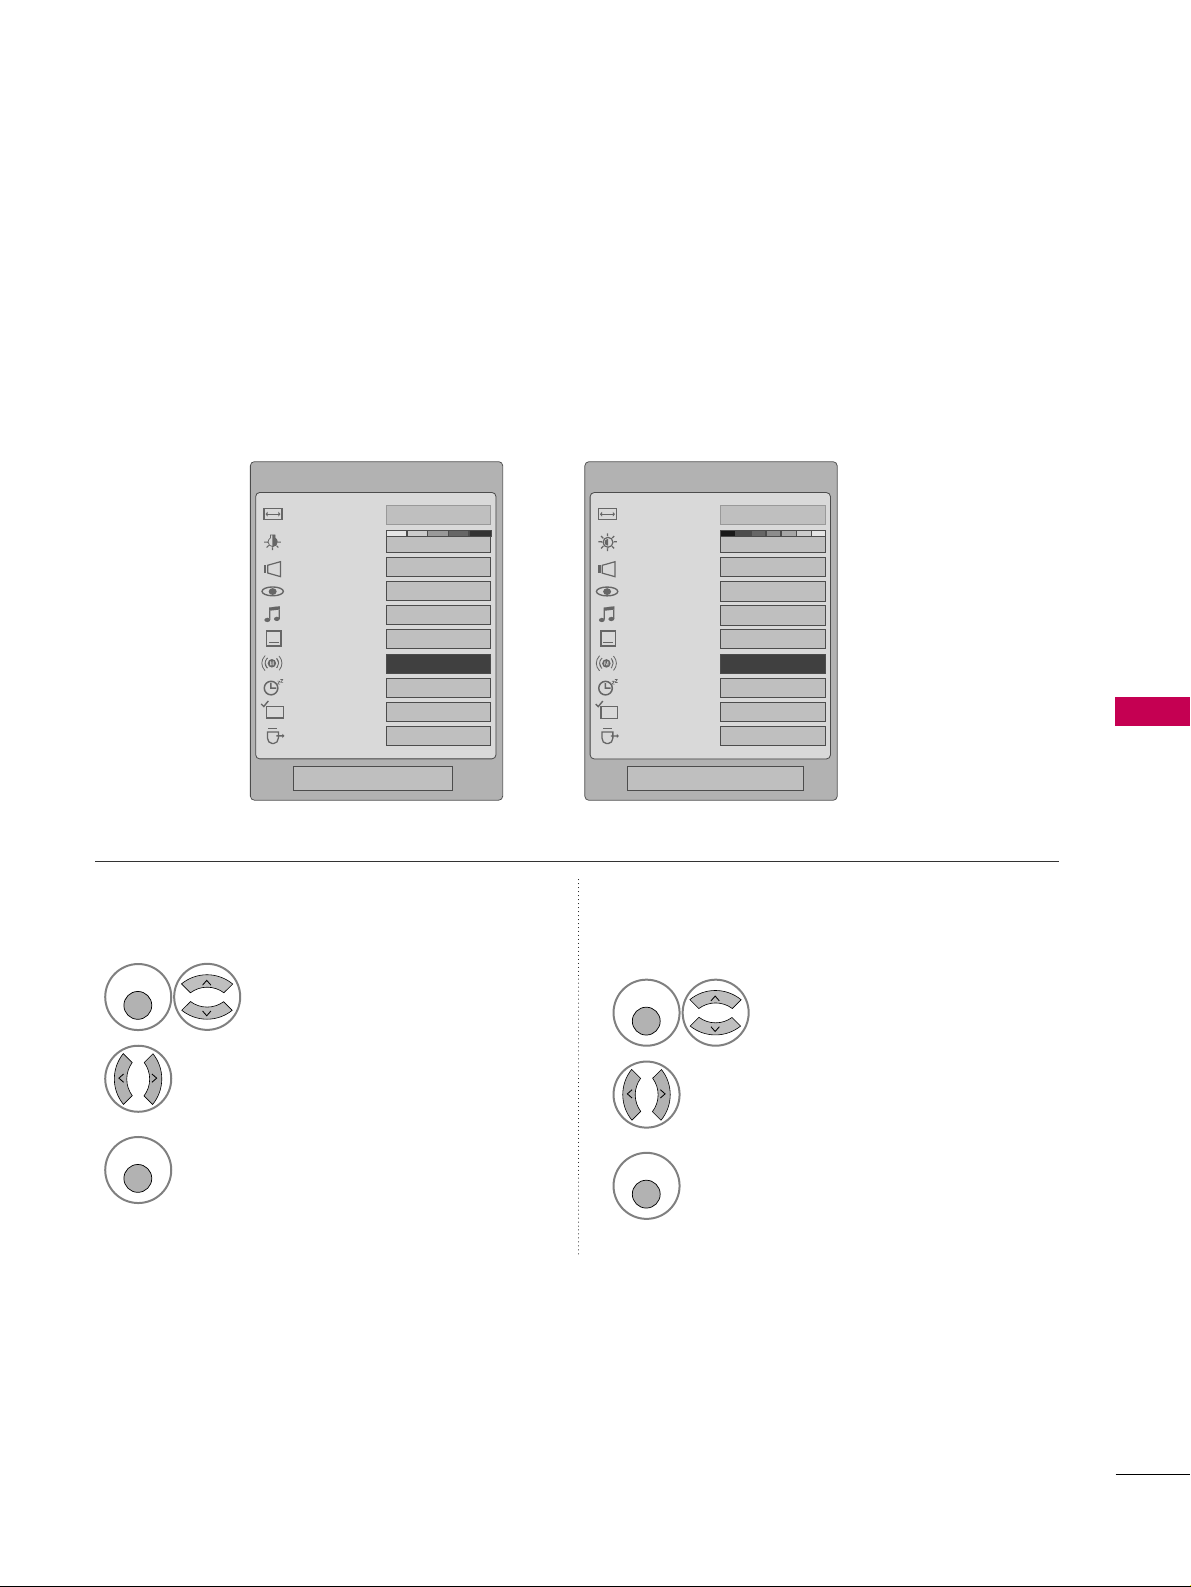
SOUND & LANGUAGE CONTROL
95
STEREO/SAP BROADCAST SETUP
For Analog only: This TV can receive MTS stereo programs and any SAP (Secondary Audio Program) that accompanies the stereo program if the station transmits an additional sound signal. Mono sound is automatically used
if the broadcast is only in Mono.
Q.Menu
Close
3
16:9
Vivid
Off
Standard
Off
FF
English
GG
Off
Add
Eject
Aspect Ratio
Backlight
Clear Voice
Picture Mode
Sound Mode
Caption
Multi Audio
Sleep Timer
Del/Add/Fav
USB Eject
CH
Select
SS AAPP
.
Select
MM oonnoo, SS ttee rr eeoo
, or
SS AAPP
.
Return to TV viewing.
1
Q. MENU
3
2
Q. MENU
Select
MM uu llttii AAuu ddiioo
.
Select other languages.
Return to TV viewing.
1
Q. MENU
3
2
Q. MENU
Analog TV Digital TV
Q.Menu
Close
3
16:9
Vivid
Off
Standard
Off
FF
English
GG
Off
Add
Eject
Aspect Ratio
Power Saving
Clear Voice
Picture Mode
Sound Mode
Caption
Multi Audio
Sleep Timer
Del/Add/Fav
USB Eject
CH
LCD TVPlasma TV
Page 98
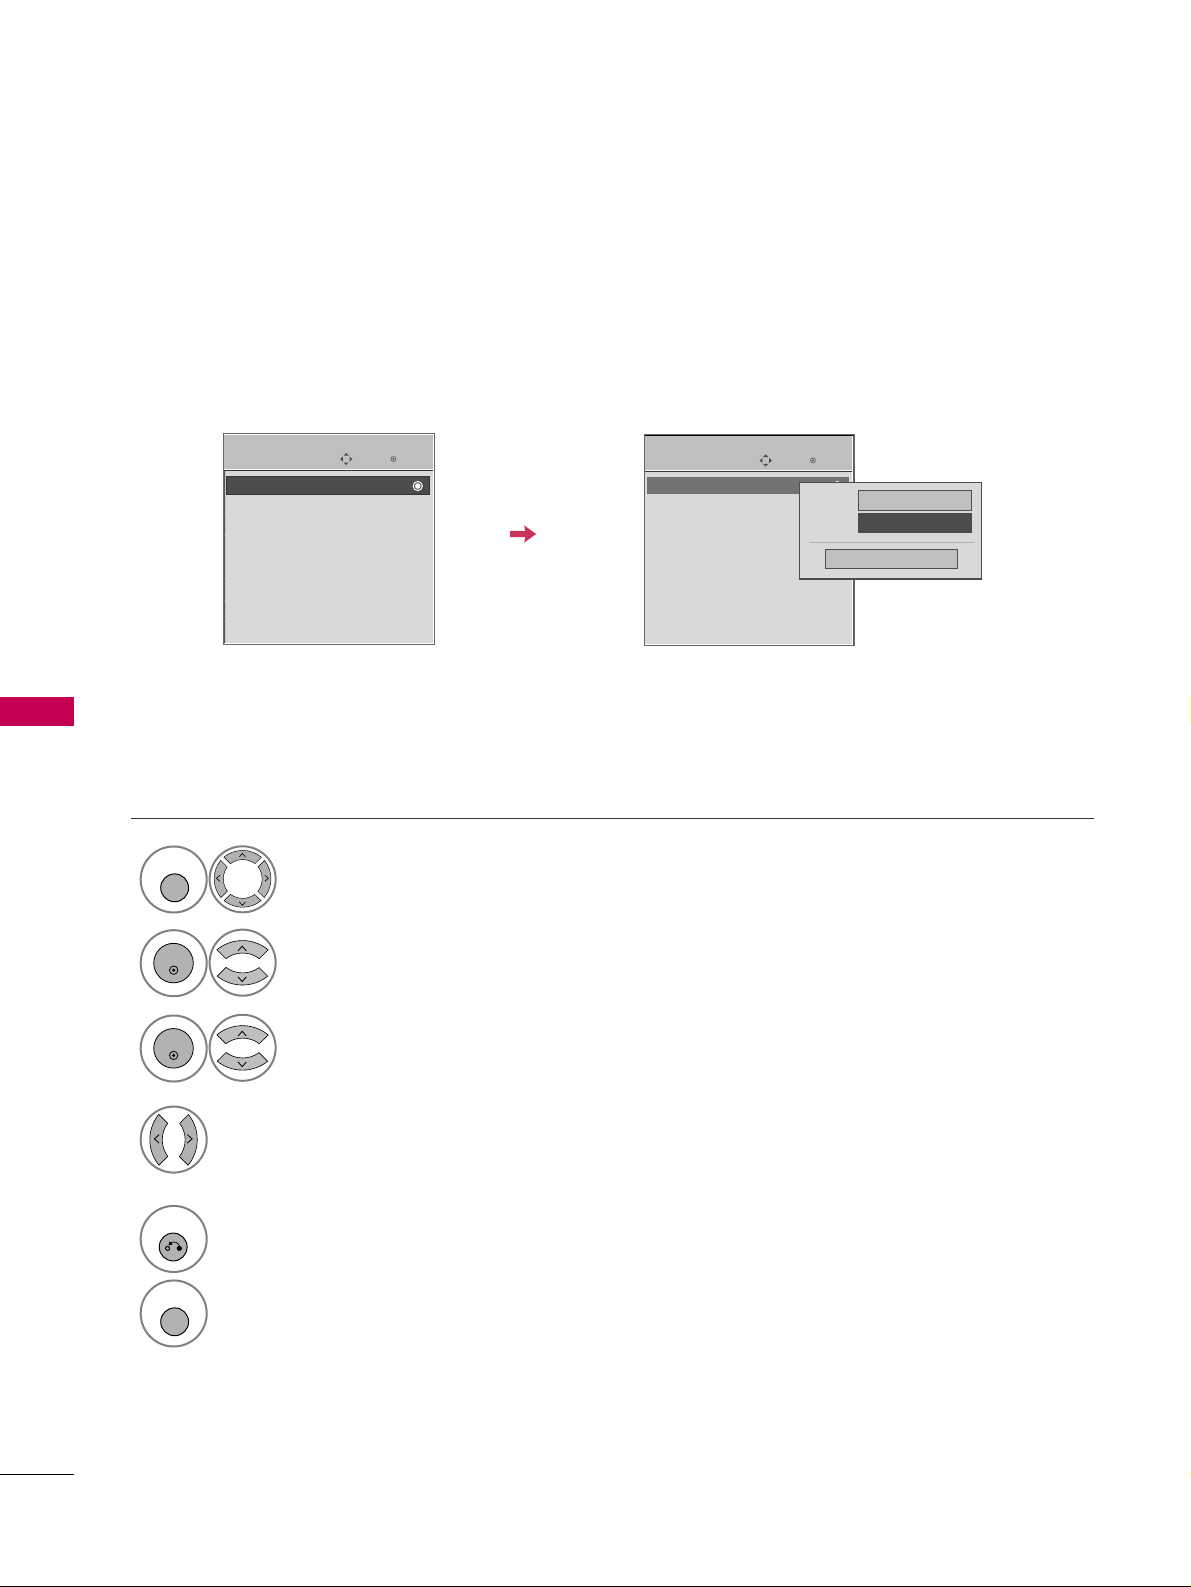
SOUND & LANGUAGE CONTROL
96
AUDIO LANGUAGE
SOUND & LANGUAGE CONTROL
Other languages may be available if a digital signal is provided by the broadcasting station.
This feature operates only in DTV/CADTV mode.
Select
OOPPTTIIOONN
.
Select
LLaa nn gg uu aagg ee
.
Select
AAuudd ii oo
.
1
MENU
3
2
ENTER
ENTER
Select your desired language:
EEnngglliisshh, SS ppaann ii sshh
, or
FF rr eenncc hh
4
Enter
Move
OPTION
Language : English
Input Label
SIMPLINK : On
Key Lock : Off
Caption : Off
ISM Method : Normal
Power Saving : Level 0
Set ID : 1
Menu
English
Audio
FF
English
GG
Close
Enter
Move
OPTION
E
E
Language : English
Input Label
SIMPLINK : On
Key Lock : Off
Caption : Off
ISM Method : Normal
Power Saving : Level 0
Set ID : 1
5
RETURN
Return to the previous menu.
MENU
Return to TV viewing.
Page 99
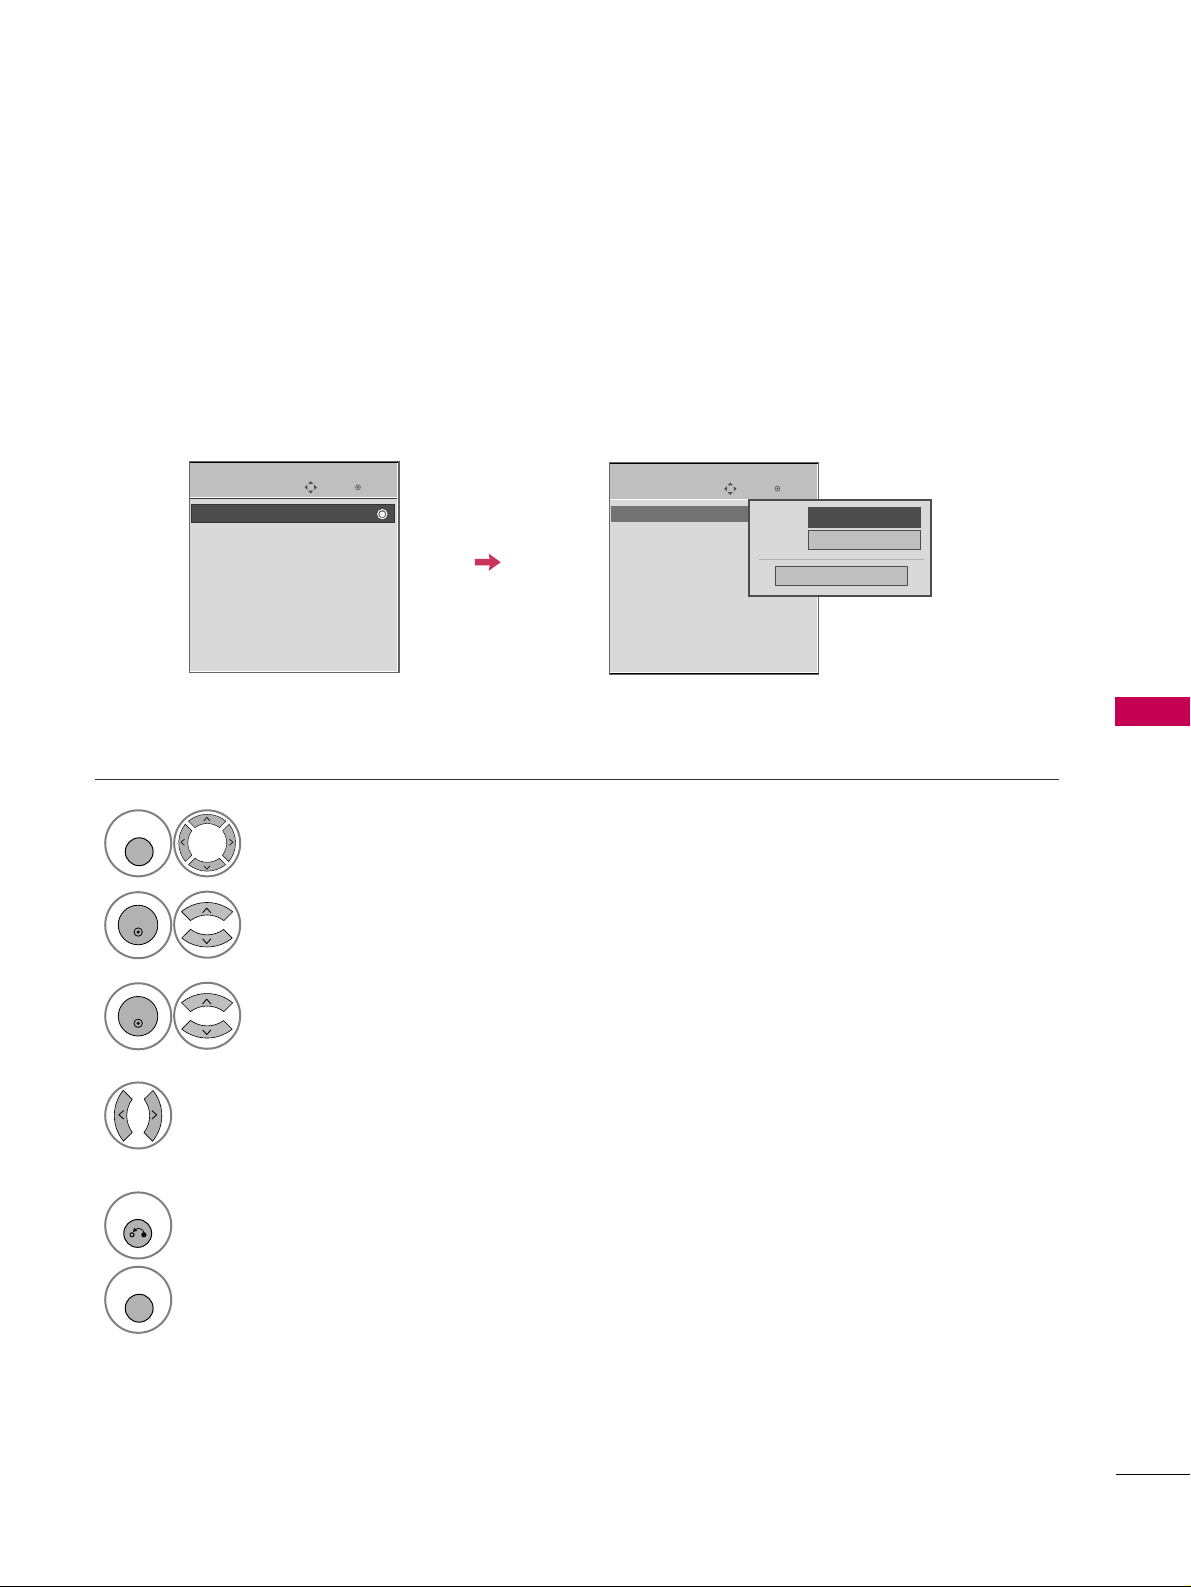
SOUND & LANGUAGE CONTROL
97
ON-SCREEN MENUS LANGUAGE SELECTION
The menus can be shown on the screen in the selected language.
Select
OOPPTTIIOONN
.
Select
LLaa nn gg uu aagg ee
.
Select
MM eennuu
.
1
MENU
3
2
ENTER
ENTER
Select your desired language.
From this point on, the on-screen menus
will be shown in the selected language.
4
Enter
Move
OPTION
Language : English
Input Label
SIMPLINK : On
Key Lock : Off
Caption : Off
ISM Method : Normal
Power Saving : Level 0
Set ID : 1
Enter
Move
OPTION
E
E
Language : English
Input Label
SIMPLINK : On
Key Lock : Off
Caption : Off
ISM Method : Normal
Power Saving : Level 0
Set ID : 1
Menu
FF
English
GG
Audio
English
Close
5
RETURN
Return to the previous menu.
MENU
Return to TV viewing.
Page 100
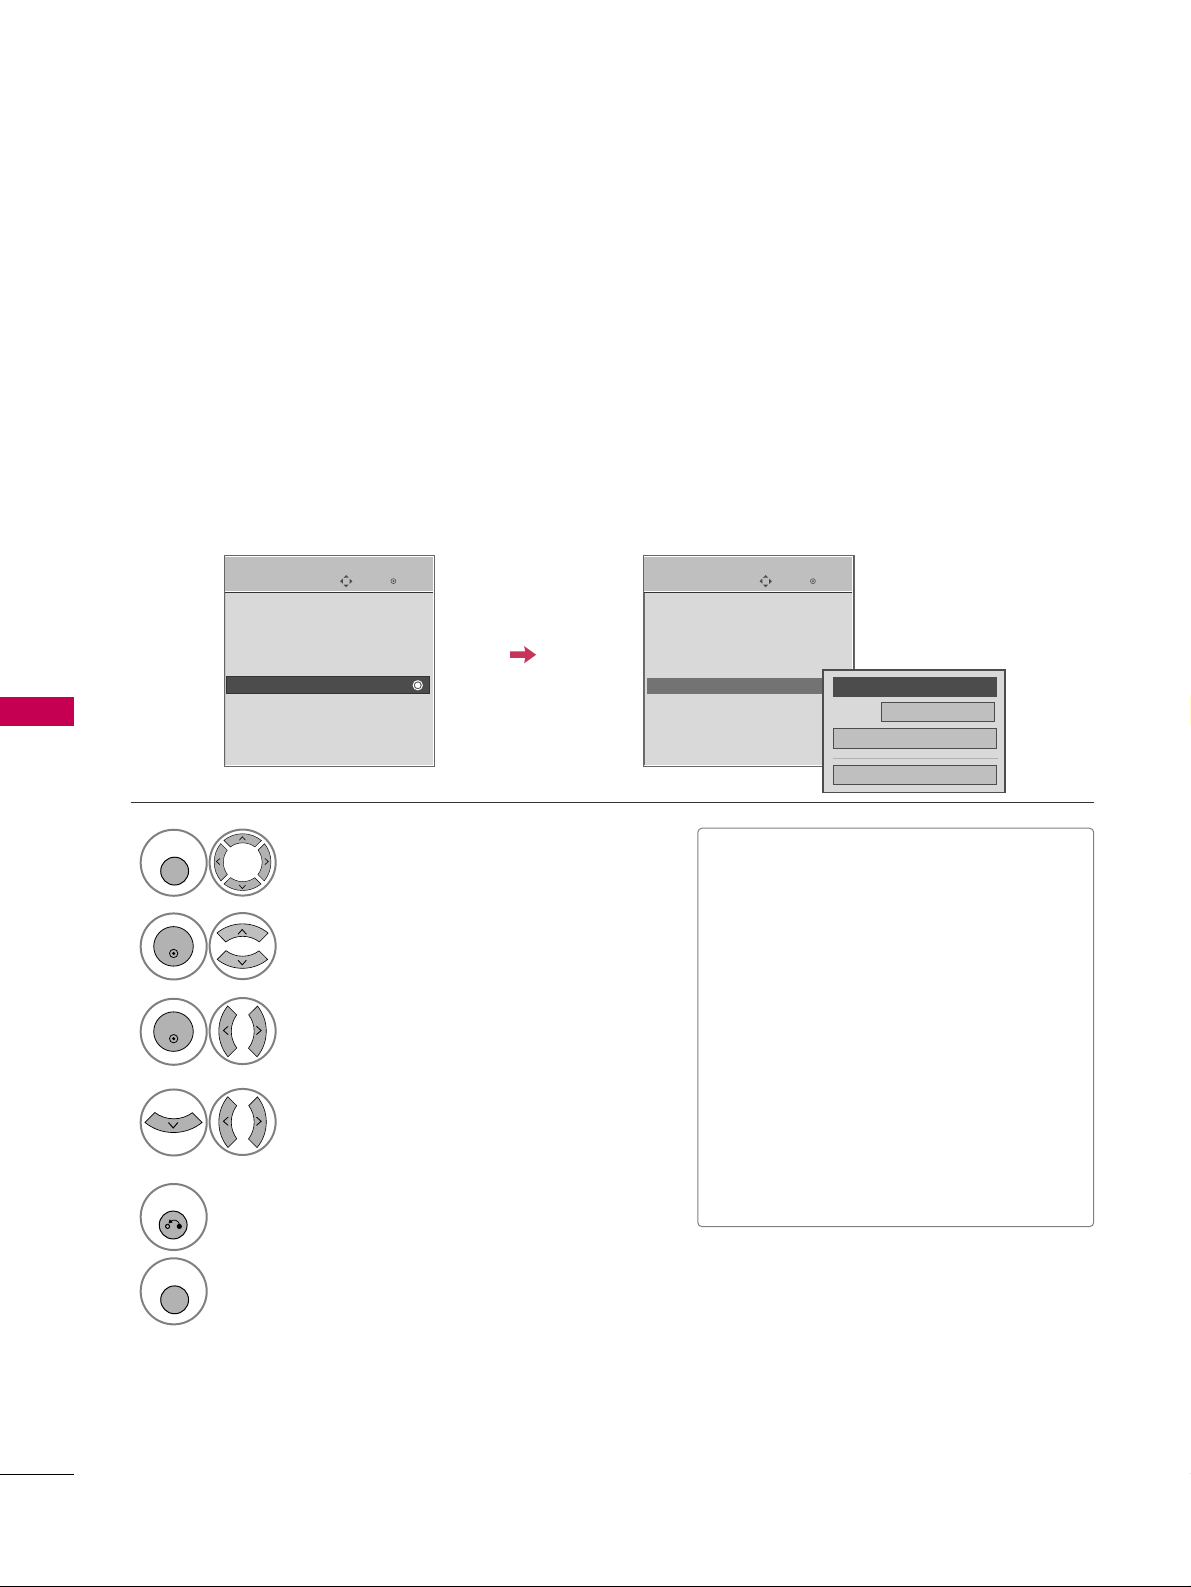
SOUND & LANGUAGE CONTROL
98
CAPTION MODE
SOUND & LANGUAGE CONTROL
Caption must be provided to help people with hearing loss watch TV. Select a caption mode for displaying captioning information if provided on a program. Analog caption displays information at any position on the screen
and is usually the program's dialog. Caption/Text, if provided by the broadcaster, would be available for both
digital and analog channels on the Antenna/Cable. This TV is programmed to memorize the caption/text mode
which was last set when you turned the power off. This function is only available when
CCaa ppttii oo nn
Mode is set
OO nn
.
Select
OOPPTTIIOONN
.
Select
CC aapp ttiioo nn
.
Select
OO nn
.
1
MENU
3
2
ENTER
ENTER
Select
CC CC11-44
or
TTeexx tt11-44
.
4
Enter
Move
OPTION
Enter
Move
OPTION
Language : English
Input Label
SIMPLINK : On
Key Lock : Off
Caption : Off
ISM Method : Normal
Power Saving : Level 0
Set ID : 1
Language : English
Input Label
SIMPLINK : On
Key Lock : Off
Caption : CC1
ISM Method : Normal
Power Saving : Level 0
Set ID : 1
Mode
CC1
Close
Digital Option
FF
On
GG
Analog Broadcasting System Captions
■
When selecting
OO ffff
, Sub-menus for
Analog, DTV, and Digital Option
become disabled.
■
CC AAPPTTIIOONN
The term for the words that scroll
across the bottom of the TV screen;
usually the audio portion of the program provided for the hearing impaired.
■
TTEEXXTT
The term for the words that appear in a
large black frame and almost cover the
entire screen; usually messages provided by the broadcaster.
E E
5
RETURN
Return to the previous menu.
MENU
Return to TV viewing.
 Loading...