

Page 1

AAss aann EENNEERRGGYY SS TT AA RR
PP aarrtt nn ee rr LLGGEE UU ..SS ..AA..,,
IInncc .. hhaass ddee ttee rrmmiinn ee dd
tt hhaa tt tt hhiiss pp rroodd uu cctt
mmeeeett ss tt hh ee EENNEERRGG YY
SS TT AA RR gguuii ddee lliinn eess ffoo rr
eenneerrggyy eeffffii ccii eenncc yy ..
EENNEERRGGYY SSTT AARR ii ss aa ss ee tt ooff ppoowweerr-- ss aavv iinn gg
gguuiidd eellii nn eess iiss ss uu ee dd bbyy tthhee UU.. SS..
EEnn vv iirroonnmmeenn ttaall PPrroottee cctt iioonn AAggee nnccyy((EEPPAA))..
wwwwww..llgguussaa..ccoomm // wwwwww..llgg..ccaa
Please read this manual carefully before operating your set.
Retain it for future reference.
Record model number and serial number of the set.
See the label attached on the back cover and quote this
information to your dealer when you require service.
PLASMA TV
OWNER’S MANUAL
MODELS :
4422PPBB44DD 5500PPBB44DD
6600PPBB44DD
Page 2

1
WARNING / CAUTION
WARNING / CAUTION
To prevent fire or shock hazards, do not expose
this product to rain or moisture.
FCC NOTICE
Class B digital device
This equipment has been tested and found to comply with the limits for a Class B digital device, pursuant to Part 15 of the FCC Rules. These limits are
designed to provide reasonable protection against
harmful interference in a residential installation. This
equipment generates, uses and can radiate radio frequency energy and, if not installed and used in
accordance with the instructions, may cause harmful
interference to radio communications. However,
there is no guarantee that interference will not
occur in a particular installation. If this equipment
does cause harmful interference to radio or television reception, which can be determined by turning
the equipment off and on, the user is encouraged to
try to correct the interference by one or more of
the following measures:
- Reorient or relocate the receiving antenna.
- Increase the separation between the equipment
and receiver.
- Connect the equipment to an outlet on a circuit
different from that to which the receiver is connected.
- Consult the dealer or an experienced radio/TV
technician for help.
Any changes or modifications not expressly
approved by the party responsible for compliance
could void the user’s authority to operate the
equipment.
CAUTION
Do not attempt to modify this product in any way
without written authorization from LG Electronics.
Unauthorized modification could void the user’s
authority to operate this product
The lightning flash with arrowhead
symbol, within an equilateral triangle,
is intended to alert the user to the
presence of uninsulated “dangerous voltage”
within the product’s enclosure that may be of
sufficient magnitude to constitute a risk of electric shock to persons.
The exclamation point within an equi-
lateral triangle is intended to alert the
user to the presence of important
operating and maintenance (servicing) instructions in the literature accompanying the
appliance.
TO REDUCE THE RISK OF ELECTRIC SHOCK
DO NOT REMOVE COVER (OR BACK). NO
USER SERVICEABLE PARTS INSIDE. REFER TO
QUALIFIED SERVICE PERSONNEL.
WARNING/CAUTION
TO REDUCE THE RISK OF FIRE AND ELECTRIC SHOCK, DO NOT EXPOSE THIS PRO-
DUCT TO RAIN OR MOISTURE.
NOTE TO CABLE/TV INSTALLER
This reminder is provided to call the CATV system installer’s attention to Article 820-40 of the
National Electric Code (U.S.A.). The code provides guidelines for proper grounding and, in
particular, specifies that the cable ground shall
be connected to the grounding system of the
building, as close to the point of the cable
entry
as practical.
Page 3

2
SAFETY INSTRUCTION
IMPORTANT SAFETY INSTRUCTIONS
Read these instructions.
Keep these instructions.
Heed all warnings.
Follow all instructions.
Do not use this apparatus near water.
Clean only with dry cloth.
Do not block any ventilation openings. Install in
accordance with the manufacturer’s instructions.
Do not install near any heat sources such as
radiators, heat registers, stoves, or other apparatus
(including amplifiers)that produce heat.
Do not defeat the safety purpose of the polarized
or grounding-type plug. A polarized plug has
two blades with one wider than the other. A
grounding type plug has two blades and a third
grounding prong, The wide blade or the third
prong are provided for your safety. If the provided
plug does not fit into your outlet, consult an
electrician for replacement of the obsolete outlet.
Protect the power cord from being walked on
or pinched particularly at plugs, convenience
receptacles, and the point where they exit from
the apparatus.
Only use attachments/accessories specified by
the manufacturer.
Unplug this apparatus when unused for long
periods of time.
Important safety instructions shall be provided with each apparatus. This information shall be given in a separate
booklet or sheet, or be located before any operating instructions in an instruction for installation for use and
supplied with the apparatus.
This information shall be given in a language acceptable to the country where the apparatus is intended to be used.
The important safety instructions shall be entitled “Important Safety Instructions”. The following safety
instructions shall be included where applicable, and, when used, shall be verbatim as follows. Additional safety
information may be included by adding statements after the end of the following safety instruction list. At the
manufacturer’s option, a picture or drawing that illustrates the intent of a specific safety instruction may be
placed immediately adjacent to that safety instruction:
Owner Manual
Owner Manual
Owner Manual
Owner Manual
Owner Manual
Owner Manual
Owner Manual
1
2
3
4
5
6
7
8
Page 4

3
Use only with the cart, stand, tripod, bracket,
or table specified by the manufacturer, or sold
with the apparatus. When a cart is used, use
caution when moving the cart/apparatus
combination to avoid injury from tip-over.
Never touch this apparatus or antenna during
a thunder or lighting storm.
Do not allow a impact shock or any objects to
fall into the product, and do not drop onto the
screen with something. (You may be injured or
the product can be damaged.)
Refer all servicing to qualified service personnel.
Servicing is required when the apparatus has
been damaged in any way, such as power-supply
cord or plug is damaged, liquid has been
spilled or objects have fallen into the apparatus,
the apparatus has exposed to rain or moisture,
does not operate normally, or has been
dropped.
CAUTION concerning the Power Cord :
Most appliances recommend they be placed
upon a dedicated circuit; that is, a single outlet
circuit which powers only that appliance and
has no additional outlets or branch circuits.
Check the specification page of this owner's
manual to be certain.
Do not overload wall outlets. Overloaded wall
outlets, loose or damaged wall outlets, extension
cords, frayed power cords, or damaged or
cracked wire insulation are dangerous. Any of
these conditions could result in electric shock
or fire. Periodically examine the cord of your
appliance, and if its appearance indicates damage or deterioration, unplug it, discontinue use
of the appliance, and have the cord replaced
with an exact replacement part by an authorized
servicer. Protect the power cord from physical
or mechanical abuse, such as being twisted,
kinked, pinched, closed in a door, or walked
upon. Pay particular attention to plugs, wall
outlets, and the point where the cord exits the
appliance.
Outdoor use marking :
WARNING - To reduce the risk of fire or elec-
tric shock, do not expose this appliance to rain
or moisture.
Wet Location Marking : Apparatus shall not be
exposed to dripping or splashing and no
objects filled with liquids, such as vases, shall
be placed on or over apparatus.
GG RROOUU NNDDIINN GG
Ensure that you connect the earth ground wire
to prevent possible electric shock. If grounding
methods are not possible, have a qualified
electrician install a separate circuit breaker.
Do not try to ground the unit by connecting it
to telephone wires, lightening rods, or gas pipes.
DD IISSCCOONNNNEECCTTIINNGG DDEE VVIICCEE FF RROOMM MMAA IINNSS
Mains plug is the disconnecting device. The
plug must remain readily operable.
Owner Manual
Owner Manual
Owner Manual
Owner Manual
Owner Manual
Owner Manual
9
12
10
11
13
14
15
16
17
Power
Supply
Short-circuit
Breaker
Page 5

4
CONTENTS
WARNING / CAUTION
. . . . . . . . . . . . . . . . . . . . . . . . . . .
1
SAFETY INSTRUCTION
. . . . . . . . . . . . . . . . . . . . . . . . . . . . 2
TV GUIDE ON SCREEN
TTMM
NOTICES FOR
U.S.A/ DIGITAL CABLE COMPATIBILITY
. . . 6
FEATURES OF THIS TV
. . . . . . . . . . . . . . . . . 7
PREPARATION
Accessories . . . . . . . . . . . . . . . . . . . . . . . . . . . . . . 8
Home Menu . . . . . . . . . . . . . . . . . . . . . . . . . . . . . 9
Front Panel Controls . . . . . . . . . . . . . . . . . . . . . 10
Back Panel Information . . . . . . . . . . . . . . . . . . . 11
Attaching the TV to a Wall . . . . . . . . . . . . . . . . . 12
Back Cover for Wire Arrangement . . . . . . . . . . . 13
Vesa Wall Mounting . . . . . . . . . . . . . . . . . . . . . . . 14
Desktop Pedestal Installation . . . . . . . . . . . . . . . 15
Antenna or Cable Connection . . . . . . . . . . . . . . 16
CableCARD
TM
. . . . . . . . . . . . . . . . . . . . . . . . . . . . 17
EXTERNAL EQUIPMENT SETUP
HD Receiver Setup . . . . . . . . . . . . . . . . . . . . . . . . . . . . . . . . . . . . . . . . . 22
DVD Setup . . . . . . . . . . . . . . . . . . . . . . . . . . . . . . . . . . . . . . . . . . . . . . . . . . . . . 25
VCR Setup
. . . . . . . . . . . . . . . . . . . . . . . . . . . . . . . . . . . . . . . . . . . . . . . . . . . . . . 27
Other A/V Source Setup
. . . . . . . . . . . . . . . . . . . . . . . . . . . . . . . . . 29
PC Setup
. . . . . . . . . . . . . . . . . . . . . . . . . . . . . . . . . . . . . . . . . . . . . . . . . . . . . . . . 30
Audio Out Setup
. . . . . . . . . . . . . . . . . . . . . . . . . . . . . . . . . . . . . . . . . . . . . 35
WATCHING TV / CHANNEL CONTROL
Remote Control Functions . . . . . . . . . . . . . . . . . .36
Turning on TV . . . . . . . . . . . . . . . . . . . . . . . . . . . 38
Channel Selection . . . . . . . . . . . . . . . . . . . . . . . 39
Volume Adjustment . . . . . . . . . . . . . . . . . . . . . . 39
On-Screen Menus Selection . . . . . . . . . . . . . . . 40
Channel Setup
-Auto Scan ( EZ Scan) . . . . . . . . . . . . . . . . . . 41
- Add / Delete Channel ( Manual Scan) . . . . 42
- Channel Editing . . . . . . . . . . . . . . . . . . . . . . .43
Brief Info. . . . . . . . . . . . . . . . . . . . . . . . . . . . . . . . 44
Input Source Selection. . . . . . . . . . . . . . . . . . . . 45
Auto Link . . . . . . . . . . . . . . . . . . . . . . . . . . . . . . . 46
SimpLink . . . . . . . . . . . . . . . . . . . . . . . . . . . . . . . 47
Input Label . . . . . . . . . . . . . . . . . . . . . . . . . . . . . 49
DTV Signal Strength . . . . . . . . . . . . . . . . . . . . . . 50
TV GUIDE ON SCREENTMSYSTEM
Setup of TV Guide On ScreenTM . . . . . . . . . . . . 51
Functions of TV Guide On ScreenTM . . . . . . . . . 55
-Overview . . . . . . . . . . . . . . . . . . . . . . . . . . . 55
-
Screen Components/Panel Menu
. . . . . . . . 56
-
Listings
. . . . . . . . . . . . . . . . . . . . . . . . . . . . . 58
-
Search
. . . . . . . . . . . . . . . . . . . . . . . . . . . . . . 59
-
Recorded program list
. . . . . . . . . . . . . . . . . 63
-
Schedule
. . . . . . . . . . . . . . . . . . . . . . . . . . . . 65
-
Change Setup
. . . . . . . . . . . . . . . . . . . . . . . . 66
-
Record
. . . . . . . . . . . . . . . . . . . . . . . . . . . . . . 70
-
Remind
. . . . . . . . . . . . . . . . . . . . . . . . . . . . . . 73
DVR (Digital Video Recording)
Timeshift ( Pause & Replay of Live TV) . . . . . . . 76
Instant Recording . . . . . . . . . . . . . . . . . . . . . . . . 79
Programmed Recording . . . . . . . . . . . . . . . . . . . 82
Recorded TV Program List . . . . . . . . . . . . . . . . . 83
Format Hard Disc . . . . . . . . . . . . . . . . . . . . . . . . 89
PICTURE CONTROL
Watching PIP ( Picture-in-Picture)/
POP( Picture-out-of-Picture)/Twin Picture . . . .90
Picture Size (Aspect Ratio) Control . . . . . . . . . .94
Preset Picture Settings
- EZ Picture - Preset . . . . . . . . . . . . . . . . . . 95
- Adaptive Picture Mode (APM). . . . . . . . . .96
- Color Tone - Preset . . . . . . . . . . . . . . . . . . .97
Manual Picture Adjustment
- EZ Picture - User Mode . . . . . . . . . . . . . . 98
- Color Tone - User Mode. . . . . . . . . . . . . . .99
XD - Picture Improvement Technology . . . . . . . . . 100
Page 6

5
Advanced - Cinema 3:2 Pulldown Mode . . . . . 101
Advanced - Black( Darkness) Level . . . . . . . . . 102
Picture Reset . . . . . . . . . . . . . . . . . . . . . . . . . . . 103
Image Sticking Minimization( ISM) Method . . . . . . 104
Low-Power Picture Mode . . . . . . . . . . . . . . . . . 105
SOUND & LANGUAGE CONTROL
Auto Volume Leveler ( EZ SoundRite) . . . . . . . 106
Preset Sound Settings( EZ Sound) . . . . . . . . . 107
Sound Setting Adjustment - User Mode . . . . . . . 108
Balance . . . . . . . . . . . . . . . . . . . . . . . . . . . . . . . .110
BBE - Sound Improvement Technology . . . . . . 111
Stereo / SAP Broadcast Setup . . . . . . . . . . . . . 112
TV Speakers On/ Off Setup . . . . . . . . . . . . . . . 113
Audio Language . . . . . . . . . . . . . . . . . . . . . . . . . 114
On-Screen Menus Lanaguage Selection . . . . . . 115
Caption / Text . . . . . . . . . . . . . . . . . . . . . . . . . . 116
Caption Option . . . . . . . . . . . . . . . . . . . . . . . . . .118
TIME SETTING
Clock Setting . . . . . . . . . . . . . . . . . . . . . . . . . . . 119
Auto On/ Off Timer Setting . . . . . . . . . . . . . . . .121
Sleep Timer Setting . . . . . . . . . . . . . . . . . . . . . .122
Auto Shut-off Setting . . . . . . . . . . . . . . . . . . . . 123
PARENTAL CONTROL / RATINGS
Set Password & Lock System . . . . . . . . . . . . . . 124
Channel Blocking . . . . . . . . . . . . . . . . . . . . . . . 127
Movie & TV Rating . . . . . . . . . . . . . . . . . . . . . . 128
External Input Blocking . . . . . . . . . . . . . . . . . . . 131
APPENDIX
Troubleshooting . . . . . . . . . . . . . . . . . . . . . . . . .132
Maintenance . . . . . . . . . . . . . . . . . . . . . . . . . . .135
Product Specifications . . . . . . . . . . . . . . . . . . . 136
Programming the Remote Control . . . . . . . . . 137
IR Codes . . . . . . . . . . . . . . . . . . . . . . . . . . . . . . 141
External Control through RS-232C . . . . . . . . . 143
Page 7

6
TM
This digital television is capable of receiving basic analog, digital basic and digital premium cable
television programming by direct connection to a cable system providing such programming. A
security card provided by your cable operator is required to view encrypted digital programming.
Cable operator enhanced program (For example, electronic program guide provided by the cable
operator), and data enhanced television service may require the use of a set top box. For more
information contact your local cable operator.
Trademark Notice
In the United States, TV GUIDE and other related marks are registered marks of Gemstar-TV Guide
International, Inc. and/or one of its affiliates. In Canada, TV GUIDE is a registered mark of
Transcontinental Inc., and is used under license by Gemstar-TV Guide International, Inc.
License Notice
The TV Guide On ScreenTMsystem is manufactured under license from Gemstar-TV Guide
International, Inc. and/or one of its affiliates.
Patent Notice
The TV Guide On ScreenTMsystem is protected by one or more of the following issued United
States patents 6,498,895, 6,418,556, 6,331,877; 6,239,794; 6,154,203; 5,940,073; 4,908,713;
4,751,578; 4,706,121.
Use of the CableCARD
TM
TradeMark.
“CableCARD
TM
is a trademark of Cable Television Laboratories, Inc.”
R
Official term for an HDTV that conforms to the plugand-play digital cable TV standard using POD (Point
of Deployment) access cards, also called
CableCARDs, that allow users to plug the cable
directly into an HDTV set and enjoy HDTV and digital cable without having to use a separate set-top
box.
is a trademark of SRS Labs, Inc.
TruSurround XT technology is incorporated under
license from SRS Labs, Inc.
A Digital Video Recorder (DVR) is a device that
empowers you to control what you watch, when you
watch it. It allows you to store and access TV programs - functioning like a VCR, but with no videotape. With a DVR, you can also pause live TV and
choose the shows you want to record through an
electronic program guide.
Manufactured under license from BBE Sound, Inc.
R
TruSurround XT
R
Manufactured under license from Dolby Laboratories.
“
Dolby
“and the double-D symbol are trademarks of
Dolby Laboratories.
High-definition television. High-resolution digital
television broadcast and playback system composed
of roughly a million or more pixels, 16:9 aspect-ratio
screens, and AC3 digital audio. A subset of digital
television, HDTV formats include 1080i and 720p
resolutions.
It has two HDMI ports that connect audio and video
devices with one cable and produces the highest
quality digital images and sound.
LG's own special digital image generator, consisting
of a full digital image processor, six different main
picture quality factors.
With HDMI CEC support of LG’s audio/video device
connected to the HDMI (high-definition multimedia
interface), LG TV with this logo works easily with one
remote control.
R
TruSurround XT
R
R
TV GUIDE ON SCREEN
TM
NOTICES FOR U.S.A.
DIGITAL CABLE COMPATIBILITY
R
Page 8

7
FEATURES OF THIS TV
What is a Plasma TV ?
Using plasma is the best way to achieve flat panel
displays with excellent image quality and large screen
sizes that are easily viewable. The Plasma TV can be
thought of as a descendant of the neon lamp and or
a series of fluorescent lamps.
How does it work?
Plasma TV is an array of cells, known as pixels, which
are comprised of three sub-pixels, corresponding to
the colors red, green, and blue. Gas in a plasma state
is used to react with phosphors in each sub-pixel to
produce colored light (red, green, or blue). These
phosphors are the same types used in Cathode Ray
Tube (CRT) devices such as televisions and common
computer monitors.
Plasma TV offers a rich, dynamic display because
each sub-pixel is individually controlled by advanced
electronics to produce over 16 million different colors. This means that you get perfect images that are
easily viewable in a display that is fewer than five
inches thick.
160° - Wide angle range of vision
Your flat panel plasma screen offers an exceptionally
broad viewing angle of over 160 degrees. This means
that the display is clear and visible to viewers anywhere in the room.
Wide Screen
The wide screen offers a theater-like experience in
your own home.
Multimedia
Connect your plasma display to a PC and use it for
conferencing, games, and Internet browsing. The
Picture-in-Picture feature allows you to view your PC
and video images simultaneously.
Versatile
The light weight and thin size makes it easy to install
your plasma display in a variety of locations where
conventional TVs do not fit.
The Plasma TV Manufacturing Process: a few
minute colored dots may be present on the
Plasma TV screen
The Plasma TV is composed of 0.9
to 2.2 million
cells. A few cell defects will normally occur in the
Plasma TV manufacturing process. Several tiny,
minute colored dots visible on the screen should be
acceptable. This also occurs in other Plasma TV
manufacturers' products. The tiny dots appearing
does not mean that this Plasma TV is defective. Thus
a few cell defects are not sufficient cause for the
Plasma TV to be exchanged or returned. Our production technology minimizes these cell defects during the manufacture and operation of this product.
Cooling Fan Noise (This feature is not available for all models.)
In the same way that a fan is used in a PC computer
to keep the CPU (Central Processing Unit) cool, the
Plasma TV is equipped with cooling fans to cool the
Monitor and improve its reliability. Therefore, a certain level of noise could occur while the fans are
operating and cooling the Plasma TV.
The fan noise doesn't have any negative effect on
the Plasma TV's efficiency or reliability. The noise
from these fans is normal during the operation of
this product. We hope you understand that a certain
level of noise from the cooling fans is acceptable and
is not sufficient cause for the Plasma TV to be
exchanged or returned.
Page 9

PREPARATION
8
ACCESSORIES
MODE
DAY -
DAY +
FLASHBK
APM
CC
AUTO DEMO
M/C EJECT
TV INPUT
TV/VIDEO
Owner's Manual
1.5V
1.5V
Owner’s Manual Batteries
75 Ω Round Cable
Remote Control
PREPARATION
Ensure that the following accessories are included with your plasma display. If an accessory is missing, please
contact the dealer where you purchased the product.
User must use shielded signal interface cables(D-sub 15 pin cable) with ferrite cores to maintain standard
compliance for the product.
2- Wall brackets
2- TV brackets
FFoorr 6600 iinncchheess
2- TV Bracket Bolts
2- Wall brackets
FFoorr 4422//5500 iinncchheess
2- eye-bolts
■
Slightly wipe stained spot on the exterior only with the polishing
cloth for the product exterior if there is stain or fingerprint on
surface of the exterior.
■
Do not wipe roughly when removing stain. Please be cautions of
that excessive power may cause scratch or discoloration.
Polishing Cloth
CD Manual
LCD TV PLASMA TV
Owner's Manual
http://www.lgusa.com
www.lg.ca
Copyright© 2007 LGE,
All Rights Reserved.
Power Cord
OOppttiioonn EExxttrraass
D-sub 15 pin Cable
Page 10

PREPARATION
9
HOME MENU
This menu is a contents guide.
In HOME Menu, you can enter the recorded list of DVR, TV Guide,
Schedule of the TV Guide, Manual Record of DVR or TV Menu.
MODE
LIVE TV
DAY -
DAY +
INPUT
SIMPLINK
TV Guide
pp..5511
DVR
pp..7766
Page 11

PREPARATION
10
PREPARATION
■
Here shown may be somewhat different from your TV.
■
If your product has a protection tape attached, remove the tape. And then wipe the product with a cloth (If a
polishing cloth is included with your product, use it).
Remote
Control Sensor
POWER
Button
TV
GUIDE
Button
INPUT
Button
MENU
Button
VOLUME
(
FF , GG
)Buttons
CHANNEL
(EE, DD)Buttons
Power/Standby Indicator
Illuminates red in standby
mode.
When the TV is turned on,
the indicator blinks white
and then illuminates white
before the picture is displayed.
FRONT PANEL CONTROLS
Page 12

ANTENNA IN
Connect over-the air signals to this jack.
CABLE IN
Connect cable signals to this jack.
HDMI/DVI IN
Connect a HDMI signal to 1 or 2.
Or DVI(VIDEO)signal to the 1 or 2 port
with a DVI to HDMI cable.
COMPONENT IN
Connect a component video/audio device to
these jacks.
REMOTE CONTROL IN
Connect your wired remote control.
DIGITAL AUDIO OUT
Connect digital audio from various types of
equipment.
Note: In standby mode, these ports do not work.
AUDIO OUT
Connect analog audio to various types of
equipment.
AV (Audio/Video) IN 1
Connect audio/video output from an external
device to these jacks.
S-VIDEO
Connect S-Video out from an S-VIDEO device.
RS-232C IN (CONTROL & SERVICE) PORT
Connect to the RS-232C port on a PC.
RGB IN
Connect the monitor output from a PC to the
appropriate input port.
Power Cord Socket
For operation with AC power.
Caution :
Never attempt to operate the TV on DC power.
PREPARATION
11
S-VIDEO Input
Provides better picture
quality than the video
input.
AUDIO Input
Connections are available
for listening to stereo
sound from an external
device.
VIDEO Input
Connects the video signal
from a video device.
CableCARD
™
Used for
CableCARD
™
Cable Service
Provider.
BACK PANEL INFORMATION
AV IN 2
S-VIDEO
AV IN 2
S-VIDEO
AV IN 2AV IN 2
S-VIDEOS-VIDEO
AV IN 2
S-VIDEO
AV IN 2
S-VIDEO
Cable CARD
Cable CARD
AV IN 2
S-VIDEO
AV IN 2
S-VIDEO
42/50 inches
60 inches
AV IN 2
S-VIDEO
Page 13

PREPARATION
12
PREPARATION
ATTACHING THE TV TO A WALL
We recommend that you set up the TV close to a wall so it cannot fall over if pushed backwards.
Additionally, we recommend that the TV be attached to a wall so it cannot be pulled in a forward direction, potentially causing injury or damaging the product.
Caution: Please make sure that children don’t climb on or hang from the TV.
■
Insert the eye-bolts (or TV brackets and bolts) to tighten the product to the wall as shown in the picture.
*Insert the eye-bolts and tighten them securely in the upper holes.
Secure the wall brackets with the bolts (not provided as parts of the product, must purchase separately )
on the wall. Match the height of the bracket that is mounted on the wall to the holes in the product.
Ensure the eye-bolts or brackets are tightened securely.
■
Use a sturdy rope (not provided as parts of the product, must purchase separately) to tie the product. It is safer to tie the rope so it becomes horizontal
between the wall and the product.
42/50 inches
60 inches
Page 14

PREPARATION
13
BACK COVER FOR WIRE ARRANGEMENT
Hold the CABLE MANAGEMENT with both hands and pull it backward as shown.
Connect the cables as necessary.
To connect an additional equipment, see the External equipment Connections section.
1
2
Install the CABLE MANAGEMENT as shown.
3
CABLE MANAGEMENT
Page 15

PREPARATION
14
PREPARATION
VESA WALL MOUNTING
This product accepts a VESA-compliant mounting interface pad. (optional)
There 4 threaded holes are available for attaching the bracket.
GG
Screw length needed depends on the wall mount used. For further information, refer to the VESA
Wall Mounting Instruction Guide.
NOTE
400mm
600mm
Page 16

PREPARATION
15
DESKTOP PEDESTAL INSTALLATION
For proper ventilation, allow a clearance of 4inches on all four sides from the wall.
CAUTION
Ensure adequate ventilation by following the clearance recommendations.
4 inches
4 inches
4 inches
4 inches
Page 17

PREPARATION
16
PREPARATION
ANTENNA OR CABLE CONNECTION
1. Antenna (analog or digital)
Wall Antenna Socket or Outdoor Antenna without a Cable Box
Connections. For optimum picture quality, adjust antenna direction
if needed.
ANTENNA
IN
CABLECABLE
IN
CABLE
IN
ANTENNA
IN
CABLE
IN
CABLE
IN
ANTENNA
IN
CABLE
IN
2. Cable
3. Using both cable and antenna
Multi-family Dwellings/Apartments
(Connect to wall antenna socket)
Single-family Dwellings /Houses
(Connect to wall jack for outdoor antenna)
Outdoor
Antenna
(VHF, UHF)
Wall
Antenna
Socket
RF Coaxial Wire (75 ohm)
Bronze Wire
Be careful not to bend the bronze
wire when connecting the antenna.
Cable TV
Wall Jack
Antenna
Cable TV
Wall Jack
RF Coaxial Wire (75 ohm)
RF Coaxial Wire (75 ohm)
RF Coaxial Wire (75 ohm)
Page 18

PREPARATION
17
The TV will let you know when the analog, cable, and digital channel scans are complete.
NOTE
CABLE
IN
ANTENNA
IN
CABLECABLE
IN
CABLECARD
TM
How to use
Insert the CableCARDTMfrom your cable service provider into the CableCARDTMslot on the back of your TV.
If pairing information about this TV and the CableCARD is displayed on the screen, contact your cable ser-
vice provider.
Cable CARD
■
To improve the picture quality in a poor signal area, please purchase a signal amplifier and install properly.
■
If the antenna needs to be split for two TV’s, install a 2-Way Signal Splitter.
■
If the antenna is not installed properly, contact your dealer for assistance.
Antenna
UHF
Signal
Amplifier
VHF
This TV supports CableCARDTMtechnology from
Motorola, Scientific Atlanta, and SCM.
NOTE
When removing, do not drop it as this may cause
damage to the CableCARD
TM
.
CAUTION
CableCARDTMSetup
Page 19

PREPARATION
18
PREPARATION
CableCARD
TM
Function
Cable menu options
In case of Scientific Atlanta CableCARD
™
CableCARD™/ Host ID Screen
As shown, the pairing number means
your TV and CableCARDTM ID. For
further information regarding cable
TV service, contact your local cable
TV service provider(s).
Press the
MMEENNUU
button and then use
DD
or EEbutton
to select the
CCAABBLLEE
menu.
Press the
GG
button and then useDDor EEbutton to
select your desired item.
Press the
GG
button.
Press
EEXXIITT
button to return to TV viewing.
The Cable sub menu displays when inserting the CableCARD
TM
to the TV.
The CableCARD
TM
type is Motorola, Scientific Atlanta (SA), or
SCM etc. The OSD (On screen display) is different from your
TV according to your CableCARD
TM
type.
In this manual, the OSD (On Screen Display) may be different from your TV’s because it is just
example to help the TV operation.
CableCARD(tm) Message
In order to start service for
this device, please contact
customer service at
Ph#: 1-866-303-0422
CableCARD(tm): 0-010-405-698-001
HOST ID: 0-080-000-000-226
Exit
EXIT
2
3
4
1
MODE
LIVE TV
INPUT
DAY -
DAY +
SIMPLINK
SA CableCARD CP Screen
SA CableCARD Diag Screen
SA CableCARD Host ID Screen
G
Page 20

PREPARATION
19
Scrambled channel
LIVE TV
PPllee aassee cc aallll yyoo uurr ooppee rraa ttoorr aanndd rreepp oorrtt aann iinn vvaallii dd CCaa bblleeCCAA RRDD
TTMM
..
Insert the CableCARDTM. It takes about 1 minute to
exchange data between the TV and the CableCARD
TM
. The
screen displays information as shown to the right.
Let your cable TV service provider know the CableCARD
TM
ID and Host ID.
If your cable TV service provider registers the
CableCARD
TM
ID and Host ID, you can watch premium or
high value channel. If you are subscribed to them.
If you registered with the cable TV service provider, you can
watch premium or high value channel without a message.
If the certificates don’t match between the TV and the
CableCARD
TM
, the OSD (On screen display)displays as
shown right.
CableCARD™ Message
In order to start service for
this device, please contact
customer service at
Ph#: 1-866-303-0422
CableCARD(tm): 0-010-405-698-001
HOST ID: 0-080-000-000-226
Exit
EXIT
2
3
4
5
1
INPUT
MODE
DAY -
DAY +
SIMPLINK
Page 21

PREPARATION
20
PREPARATION
Cable Channel List
If you select
CChhaannnneell EEddiitt
after running the EZ Scan without a CableCARDTM, the cable channel list displays,
as in the picture below.
Insert the CableCARD
TM
. After a few minutes(about 2~3 minutes), the TV receives a new cable channel list .
(
Occasionally more time will be needed)
2
1
EZ Scan
G
Manual Scan
Channel Edit
DTV Signal
Main Input
Sub Input
Input Label
Set ID
EZ Scan
Manual Scan
Channel Edit
G
DTV Signal
Main Input
Sub Input
Input Label
Set ID
Selection (Gor )
leads you to the EZ
scan screen.
Selection ( Gor ) leads
you to the channel edit
screen.
Page 22

PREPARATION
21
Emergency Message Alert
If an emergency situation occurs while you are watching
the TV/DTV/CATV/CADTV, you may receive a message
from your cable TV service provider(s).
When receiving an emergency message, the message is
displayed on the screen as shown or the channel is
changed to one that maintains the emergency message.
When the broadcast is complete the TV returns to the
channel you were viewing.
EEmmeerrggee nnccyy AAccttiioonn NN oottiiffiicc aa tt ii oonn
HHuurr rriiccaannee ww iillll bbee ccoo mmiinngg !!!! !!
2
1
Page 23

EXTERNAL EQUIPMENT SETUP
22
EXTERNAL EQUIPMENT SETUP
HD RECEIVER SETUP
This TV can receive Digital Over-the-air/Cable signals without an external digital set-top box. However, if you
do receive digital signals from a digital set-top box or other digital external device, refer to the figure as
shown below.
This TV supports HDCP (High-bandwidth Digital Contents Protection)protocol for Digital Contents.
Y L RPB PR
When connecting Component cable
1. How to connect
Connect the video outputs (Y, P
B, P
R
)
of the digital set
top box to the
CCOOMMPPOONNEENNTT IINN VVIIDDEEOO 11
jacks on
the set. Match the jack colors
(Y = green, P
B = blue, and PR = red).
Connect the audio output of the digital set-top box to
the
CCOOMMPPOONNEENNTT IINN AAUUDDIIOO 11
jacks on the set.
2. How to use
■
Turn on the digital set-top box.
(
Refer to the owner’s manual for the digital set-top box.
)
■
Select
CCOOMMPPOONNEENNTT 11
input source with using the
IINNPPUUTT
button on the remote control.
■
If connected to
CCOOMMPPOONNEENNTT IINN 22
input, select
CCOOMMPPOO--
NNEENNTT 22
input source.
Signal
480i
480p
720p
10 8 0 i
Component 1/2
Yes
Yes
Yes
Yes
RGB-DTV,
HDMI1/DVI, HDMI2
No
Yes
Yes
Yes
2
1
Page 24

EXTERNAL EQUIPMENT SETUP
23
When connecting D-sub 15pin cable
L R
RGB OUTPUT
HDMI-DTV OUTPUT
AUDIOAUDIO
L
R
Connect the RGB output of the digital set-top box to
the
RRGGBB ((PPCC//DDTTVV
))
jack on the set.
Connect the audio outputs of the set-top box to the
AAUUDDIIOO ((RRGGBB//DDVVII
))
jack on the set.
1. How to connect
2. How to use
■
Turn on the digital set-top box.
(
Refer to the owner’s manual for the digital set-top box.
)
■
Select
RRGGBB--DDTTVV
input source with using the
IINNPPUUTT
button
on the remote control.
When connecting HDMI cable
Connect the digital set-top box to
HH DDMMII//DDVVII IINN 11
or
22
jack on the set.
No separated audio connection is necessary.
1. How to connect
2. How to use
■
Turn on the digital set-top box.
(
Refer to the owner’s manual for the digital set-top box.
)
■
Select
HHDDMMII11//DDVVIIorHHDDMMII22
input source with using the
IINNPPUUTT
button on the remote control.
2
1
2
1
Page 25

EXTERNAL EQUIPMENT SETUP
24
EXTERNAL EQUIPMENT SETUP
When connecting HDMI to DVI cable
AUDIOUDIO
L R
DVI-DTV OUTPUT
Connect the DVI output of the digital set-top box to the
HH DD MMII//DDVV II IINN 11
jack on the set.
Connect the audio output of the digital set-top box to the
AAUUDDIIOO((RRGGBB//DDVVII
))
jack on the set.
1. How to connect
■
Turn on the digital set-top box. (Refer to the owner’s manual for the digital set-top box.
)
■
Select
HHDDMMII11//DDVVII
input source with using the
IINNPPUUTT
button on the remote control.
2. How to use
2
1
Page 26

EXTERNAL EQUIPMENT SETUP
25
DVD SETUP
Component Input ports
To get better picture quality, connect a DVD player to the component input ports as shown below.
Component ports on the TV
YPB PR
Video output ports
on DVD player
Y
Y
Y
Y
P
B
Pb
B-Y
Cb
PR
Pr
R-Y
Cr
Y L RPB PR
When connecting Component cable
Connect the video outputs (Y, PB, PR
)
of the DVD to
the
CCOOMMPPOONNEE NNTT IINN VV IIDDEEOO11
jacks on the set.
Match the jack colors
(
Y = green, P
B = blue, and PR = red
)
.
Connect the audio outputs of the DVD to the
CCOOMMPPOONNEE NNTT IINN AAUUDDIIOO11
jacks on the set.
1. How to connect
2. How to use
■
Turn on the DVD player, insert a DVD.
■
Select
CCOOMMPPOONNEENNTT 11
input source with using the
IINNPPUUTT
button on the remote control.
■
If connected to
CCOOMMPPOONNEENNTT IINN 22
input, select
CCOOMM--
PPOONNEENNTT 22
input source.
■
Refer to the DVD player's manual for operating instructions.
2
1
Page 27

EXTERNAL EQUIPMENT SETUP
26
EXTERNAL EQUIPMENT SETUP
When connecting with an S-Video cable
AUDIOUDIO
L
R
HDMI-DVD OUTPUT
L R
S-VIDEO
AUDIO
AUDIO
Connect the S-VIDEO output of the DVD to the
SS--VVIIDDEEOO
input on the set.
Connect the audio outputs of the DVD to the
AAUUDDIIOO
input jacks on the set.
1. How to connect
2. How to use
■
Turn on the DVD player, insert a DVD.
■
Select
AAVV11
input source with using the
IINNPPUU TT
button on
the remote control.
■
If connected to
AAVV IINN 22
, select
AAVV22
input source.
■
Refer to the DVD player's manual for operating instructions.
When connecting HDMI cable
Connect the HDMI output of the DVD to the
HH DDMMII//DDVVII IINN11 or22
jack on the set.
No separated audio connection is necessary.
1. How to connect
2. How to use
■
Select
HHDDMMII11//DDVVIIorHHDDMMII22
input source with using the
IINNPPUUTT
button on the remote control.
■
Refer to the DVD player's manual for operating instructions.
2
1
2
1
Page 28

EXTERNAL EQUIPMENT SETUP
27
VCR SETUP
When connecting with an antenna
■
To avoid picture noise (interference), leave an adequate distance between the VCR and TV
■
Use the ISM feature in the Option menu to avoid having a fixed image remain on the screen for a long period of time. If the 4:3 picture format is used; the fixed images on the sides of the screen may remain visible
on the screen.
L R
S-VIDEO VIDEO
OUTPUT
SWITCH
ANT IN
ANT OUT
Wall Jack
Antenna
Connect the RF antenna out socket of the VCR to the
AAnntteennnnaa
socket on the set.
Connect the antenna cable to the RF antenna in socket of the VCR.
1. How to connect
■
Set VCR output switch to 3 or 4 and then tune TV to the same channel number.
■
Insert a video tape into the VCR and press PLAY on the VCR. (Refer to the VCR owner’s manual.
)
2. How to use
2
1
Page 29

EXTERNAL EQUIPMENT SETUP
28
EXTERNAL EQUIPMENT SETUP
When connecting with a RCA cable
In the event that you connect both
Video and the S-Video cables, only
the S-Video will work.
CAUTION
L R
S-VIDEOVIDEO
OUTPUT
SWITCH
ANT IN
ANT OUT
L R
S-VIDEO VIDEO
OUTPUT
SWITCH
ANT IN
ANT OUT
Connect the
AAUUDDIIOO/VVIIDDEEOO
jacks between TV and
VCR. Match the jack colors(Video = yellow, Audio Left =
white,and Audio Right = red)
1. How to connect
2. How to use
■
Insert a video tape into the VCR and press PLAY on the
VCR. (Refer to the VCR owner’s manual.
)
■
Select
AAVV11
input source with using the
IINNPPUU TT
button on
the remote control.
■
If connected to
AAVV IINN 22
, select
AAVV22
input source.
If you have a mono VCR, connect the audio cable from the
VCR to the
AAUUDDIIOO
LL// MMOONNOO
jack of the set.
NOTE
When connecting with an S-Video
Connect the S-VIDEO output of the VCR to the
SS--
VV II DD EEOO
input on the set. The picture quality is
improved; compared to normal composite (RCA cable
)
input.
Connect the audio outputs of the VCR to the
AAUUDDIIOO
input jacks on the set.
1. How to connect
2. How to use
■
Insert a video tape into the VCR and press PLAY on the VCR.
(
Refer to the VCR owner’s manual.
)
■
Select
AAVV11
input source with using the
IINNPPUUTT
button on the
remote control.
■
If connected to
AAVV IINN 22
, select
AAVV22
input source.
1
2
1
Page 30

EXTERNAL EQUIPMENT SETUP
29
OTHER A/V SOURCE SETUP
Camcorder
Video Game Set
Connect the
AAUUDDIIOO/VVIIDDEEOO
jacks between TV and
external equipment. Match the jack colors
.
(
Video = yellow, Audio Left = white, and Audio Right = red
)
1. How to connect
2. How to use
■
Select
AAVV11
input source with using the
IINNPPUUTT
button on
the remote control.
■
If connected to
AAVV IINN 22
input, select
AAVV22
input source.
■
Operate the corresponding external equipment.
1
AV IN 2
L/L/MONOMONO
R
AUDIOAUDIO
VIDEOVIDEO
S-VIDEO
L R
VIDEO
i.e) 42/50 inches
Page 31

EXTERNAL EQUIPMENT SETUP
30
EXTERNAL EQUIPMENT SETUP
PC SETUP
This TV provides Plug and Play capability, meaning that the PC adjusts automatically to the TV's settings.
The TV perceives 640x480, 60Hz as DTV 480p based on the PC graphic card. If necessary, change the
screen scanning rate for the graphic card accordingly.
Check the image on your TV. There may be noise associated with the resolution, vertical pattern, contrast or
brightness in PC mode. If noise is present, change the PC
output to another resolution, change the refresh rate to
another rate or adjust the brightness and contrast on the
VIDEO menu until the picture is clear. If the refresh rate
of the PC graphic card can not be changed, change the
PC graphic card or consult the manufacturer of the PC
graphic card.
NOTE
AUDIO
AUDIO
RGB OUTPUT
When connecting D-sub 15 pin cable
Connect the RGB output of the PC to the
RRGGBB
((
PPCC//DDTTVV
))
jack on the set.
Connect the PC audio output to the
AAUUDDIIOO
((
RRGGBB//DDVVII
))
jack on the set.
1. How to connect
2. How to use
■
Turn on the PC and the set.
■
Select
RRGGBB--PPCC
input source in main input option of SETUP
menu.(
pp..4455
)
■
Once you select
RRGGBB--PPCC
in main input option of
SSEETTUUPP
menu,
IINNPPUUTT
button is also available for this purpose.
2
1
Page 32

EXTERNAL EQUIPMENT SETUP
31
When connecting HDMI to DVI cable
HDMI2 source does not support DVI source.
If the PC has a DVI output and no HDMI output, a separated audio connection is necessary.
NOTE
AUDIOUDIO
DVI-PC OUTPUT
AUDIO
Connect the DVI output of the PC to the
HHDDMMII//DDVVII IINN 11
jack on the set.
Connect the PC audio output to the
AAUUDDIIOO((RRGGBB//DDVVII
))
jack on the set.
1. How to connect
■
Turn on the PC and the set
■
Select
HHDDMMII11//DDVVII
input source with using the
IINNPPUUTT
button on the remote control.
2. How to use
2
1
Page 33

EXTERNAL EQUIPMENT SETUP
32
EXTERNAL EQUIPMENT SETUP
To get the the best picture quality, adjust the PC
graphics card to 1024x768, 60Hz.
Depending on the graphics card, DOS mode may
not work if a HDMI to DVI Cable is in use.
When Source Devices are connected with
HDMI/DVI Input, the output PC Resolution(VGA,
SVGA, XGA), Position and Size may not fit on the
Screen. As shown in the picture, press the
ADJUST button to adjust the screen Position of
the TV SET and contact a PC graphics card service center.
When Source Devices connected with HDMI/DVI
Input, output TV SET Resolution (480p, 720p,
1080i) and TV SET Display fit EIA/CEA-861-B
Specification to Screen. If not, refer to the
Manual of HDMI/DVI Source Devices or contact
your service center.
If the HDMI/DVI Source Device is not connected
to the Cable or if there is a poor cable connection, "No signal" is displayed in the HDMI/DVI
Input. In this case, that Video Resolution is not
supported. If "Invalid Format" is displayed, refer
to the Source Device manual or contact your service center.
Avoid keeping a fixed image on the screen for a
long period of time. The fixed image may become
permanently imprinted on the screen.
The synchronization input form for Horizontal
and Vertical frequencies is separate.
NOTES
Page 34

EXTERNAL EQUIPMENT SETUP
33
Supported Display Specifications (RGB/HDMI-PC
)
Horizontal Vertical
Frequency(KHz)Frequency(Hz
)
31.468 70.09
31.469 70.08
31.469 59.94
37.861 72.80
37.50 0 75 .0 0
35.156 56.25
37.879 60.31
48.077 72.18
46 .875 75. 00
48.363 60.00
56.476 70.06
60.023 75.02
47.776 59. 870
47.720 59.799
Resolution
720x400
1360x768
640x350
* RGB-PC mode only: 640x350, 720X400
640x480
800x600
1024x768
Supported Display Specifications (RGB/HDMI-DTV
)
Horizontal Vertical
Frequency(KHz)Frequency(Hz
)
31.47 60
31.47 59.94
45.00 60.00
44.96 59.94
33.75 60.00
33.72 59.94
Resolution
720x480p
1280x720p
1920x1080i
1280x768
Page 35

EXTERNAL EQUIPMENT SETUP
34
EXTERNAL EQUIPMENT SETUP
Screen Setup for PC mode
Overview
When RGB connect to PC output and select the RGB-PC in Main
Input, this function is used.
When HDMI IN 1(DVI) connect to PC output and select
HDMI1/DVI input, this function is used.
In RGB-DTV mode, SIZE and PHASE is not available.
Position
GG
Size
Phase
Reset
Adjust Close
Position
Size
Phase
Reset
GG
FLASHBK
APM
CC
Initialize Settings
Yes
No
Adjust
Previous Move Select
PPoossiittiioonn
This function is to adjust picture
to left/right and up/down as you
prefer.
SSiizzee
This function is to minimize any
vertical bars or stripes visible on
the screen background. And the
horizontal screen size will also
change.
PPhhaassee
This function allows you to
remove any horizontal noise and
clear or sharpen the image of characters. In HDMI/DVI-PC mode,
PHASE is not available.
Press the
AADDJJUUSSTT
button and then use DDor EEbutton to
select
PPoossiittiioonn, SSiizzee
, or
PPhhaassee
.
Press the
EENNTTEERR
button and then use
DD / EE
or
FF / GG
button to make appropriate adjustments.
■
The
PPhhaassee
adjustment range is
--1166~++1166
.
■
The
SSiizzee
adjustment range is
--3300~++3300
.
Press the
EENNTTEERR
button.
Adjustment for screen Position, Size, Phase, Reset
Press the
AADDJJUUSSTT
button and then use DDor EEbutton to
select
RReesseett
.
Press the
EENNTTEERR
button and then use
FF
or GGbutton to
select
YYeess
.
Press the
EENNTTEERR
button.
Initializing (Reset to original factory values
)
2
3
1
2
3
1
To initialize the adjusted values.
Page 36

EXTERNAL EQUIPMENT SETUP
35
AUDIO OUT SETUP
Send the TV’s audio to external audio equipment via the Audio Output (Optical)port.
When connecting with external audio equipment, such as
amplifers or speakers, please turn the TV speakers off.
(
pp..111133
)
NOTE
Do not look into the optical output port. Looking at the
laser beam may damage your vision.
CAUTION
L R
S-VIDEO
Connect audio outputs to the TV’s
AAUUDDIIOO OOUUTT
jacks.
Set the “TV Speaker option - Off” in the AUDIO menu.
(
GG
pp..111133
). See the external audio equipment instruction
manual for operation.
1. How to connect
Connect one end of the optical or coaxial cable to the
TV’s
OOPPTTIICC AALL
or
CCOOAAXXIIAALL
port of
DDIIGGIITTAALL AAUUDDIIOO
OOUUTT
.
Connect the other end of the optical or coaxial cable
to the digital audio input on the audio equipment.
Set the “TV Speaker option - Off” in the AUDIO menu.
(
GG
pp..111133
). See the external audio equipment instruc-
tion manual for operation.
2
1
2
3
1
AAnnaalloogguuee
DD iiggiitt aall
Page 37

WATCHING TV / CHANNEL CONTROL
36
WATCHING TV /CHANNEL CONTROL
REMOTE CONTROL FUNCTIONS
When using the remote control, aim it at the remote control sensor on the TV.
APM
CC
AUTO DEMO
M/C EJECT
SIMPLINK
MODE
DAY+/DAY-
THUMBSTICK
(Up/Down/Left
Right/ENTER)
EXIT
MARK
INFO
SIMPLINK
VOLUME UP
/DOWN
MUTE
FAV
CHANNEL
UP/DOWN
PAGE UP/
PAGE DOWN
FLASHBK
— (DASH)
Select the remote operating mode: TV, DVD, VCR,
AUDIO, CABLE or STB.
■
Use for DVR record or trick play.
pp..7788,, 8866
■
Controls the mode.
■
For further details, see the
DD VV RR
section.
Control video cassette recorders or DVD players.
Move the Listings Grid forward or backward in 24 hour
increments.
Displays the main menu. Enters or exits a Panel Menu
in the TV Guide On Screen system.
Displays the TV Guide On Screen system.
pp ..5511
Enter to the mode.
Navigate the on-screen menus and adjust the system
settings to your preference.
Clear all on-screen displays and return to TV viewing from
any menu.
Enter the selected functions.
pp..8844
Enter the selected functions.
pp..4444
See a list of AV devices connected to TV.
When you toggle this button, the Simplink menu appears
at the screen.
Increase/decrease the sound level.
Switch the sound on or off.
pp..3399
Scroll through the programmed Favorite channels.
Select available channels.
Move from one full set of screen information
to the next one.
Tune to the last channel viewed.
Used to enter a program number for multiple
program channels such as 2-1, 2-2, etc.
mode control
buttons
NUMBER button
VCR/DVD
buttons
MENU
TV GUIDE
Page 38

WATCHING TV / CHANNEL CONTROL
37
TIMER
RATIO
ADJUST
APM
CC
FLASHBK
POWER
LIVE TV
INPUT
Turns your TV or any other programmed equipment on or off, depending on the mode.
In AV 1-2, Component 1-2, RGB-DTV (or RGB-PC), HDMI1/DVI, and HDMI2 input sources,
screen returns to the last TV channel.
External input modes rotate in regular sequence: Antenna, Cable, AV1-2, Component 1-2, RGBDTV (or RGB-PC), HDMI1/DVI and HDMI2. (AV 1-2, Component 1-2, RGB-DTV (or RGB-PC),
HDMI1/DVI, and HDMI2 input sources are linked automatically, only if these are connected ).
Inside the Sliding Cover
PIP
PIPCH-/PIPCH+
PIP INPUT
SWAP
SAP
EZ PIC
APM
EZ SOUND
CC
Switches the sub picture PIP, POP, Twin picture or off mode.
pp.. 9900
Changes the PIP channel.
pp.. 9911
Select the connected input source for the
sub-picture.
pp.. 9911
Exchange the main/sub images.
pp.. 9922
Select MTS sound: Mono, Stereo, and SAP
analog mode. Change the audio language
DTV mode.
Adjust the factory preset picture depend
on the viewing environment.
Compare the Daylight, Normal, Night Time
and User1(or2) on the screen.
pp.. 9966
Select the appropriate type of sound for
type of program.
Select closed caption.
pp.. 111166
(*In DTV/CADTV modes
pp.. 111177
)
Installing Batteries
■
Open the battery compartment cover on the
back side and install the batteries matching correct polarity (+with +,-with -).
■
Install two 1.5V AA batteries. Don’t mix old or
used batteries with new ones.
■
Close cover.
■
Use a remote control up to 7 meters distance and 30
degree (left/right) within the receiving unit scope.
■
Dispose of used batteries in a recycle bin to preserve environment.
Remote control effective range
Select the amount of time
before your TV turns off
automatically.
pp..112222
Change the aspect ratio.
pp..9944
Adjust the screen
position,size,and phase
in PC mode.
pp..3344
LIVE TV
INPUT
MODE
DAY
Y
A
+
D
Page 39

WATCHING TV / CHANNEL CONTROL
38
WATCHING TV /CHANNEL CONTROL
TURNING ON TV
NOTE
If you intend to be away on vacation, disconnect
the power plug from the wall power outlet.
After turning on the TV, it could take up to a
week for the TV Guide On Screen system to
receive full listings data.
First, connect power cord correctly.
At this moment, the TV switches to standby mode.
■
In standby mode, press the
(
or ON/OFF),
IINNPPUUTT
,
CCHH
((
DD
or
EE
))
button on the TV or press the
PPOOWWEERR, IINNPPUUTT, LLIIVVEE TTVV, CCHH
((
DD
or
EE
))
,
NNuummbbeerr ((00~99
))
button on the remote control.
Select the viewing source by using the
IINNPPUUTT
button on
the remote control.
■
This TV is programmed to remember which mode it was
last set to, even if you turn the TV off.
When finished using the TV, press the
PPOOWWEERR
button on
the remote control. The TV reverts to standby mode.
2
3
1
LIVE TV
DAY -
CC
INPUT
MODE
DAY +
SIMPLINK
FLASHBK
APM
Page 40

WATCHING TV / CHANNEL CONTROL
39
VOLUME ADJUSTMENT
CHANNEL SELECTION
Press the
CCHH
DD
or
EE
or
NNUUMMBBEERR
buttons to select a
channel number.
Press the
VVOOLL
DD
or
EE
button to adjust the volume.
If you want to switch the sound off, press the
MMUUTTEE
but-
ton.
You can cancel the Mute function by pressing the
MMUUTTEE
or
VVOOLL
DD
or
EE
button.
APM
CC
FLASHBK
SIMPLINK
Adjust the volume to suit your personal preference.
MODE
LIVE TV
DAY -
DAY +
INPUT
SIMPLINK
2
3
1
1
Page 41

WATCHING TV / CHANNEL CONTROL
40
WATCHING TV /CHANNEL CONTROL
Timeshift Mode
Aspect Ratio
Caption/Text
Caption Option
Language
ISM Method
Low Power
HDD Format
SimpLink
Auto Clock
Manual Clock
Off Timer
On Timer
Sleep Timer
Auto Off
ON-SCREEN MENUS SELECTION
Press the
MMEENNUU
button and then use DDor EEbutton to select each menu.
Press the
GG
button and then use
DD EE FF GG
button to display the available menus.
Your TV's OSD (On Screen Display)may differ slightly from what is shown in this manual.
SETUP VIDEO
OPTIONLOCK
TIME
EZ Scan
Manual Scan
Channel Edit
DTV Signal
Main Input
Sub Input
Input Label
Set ID
EZ Picture
Color Temperature
XD
Advanced
Video Reset
2
1
CABLE
AUDIO
Audio Language
EZ SoundRite
EZ Sound
Balance 0
TV Speaker
BBE
Audio Language
EZ SoundRite
EZ Sound
Balance
TV Speaker
BBE
SA CableCARD CP Screen
G
SA CableCARD Diag Screen
SA CableCARD Host ID Screen
In case of Scientific Atlanta CableCARD™
Lock System
Set Password
Block Channel
Movie Rating
TV Rating-Children
TV Rating-General
Input Block
Lock System
Set Password
Block Channel
TV Rating-English
TV Rating-French
Input Block
For USA For Canada
Page 42

WATCHING TV / CHANNEL CONTROL
41
EZ Scan
G
Manual Scan
Channel Edit
DTV Signal
Main Input
Sub Input
Input Label
Set ID
Selection (Gor )
leads you to the EZ
scan screen.
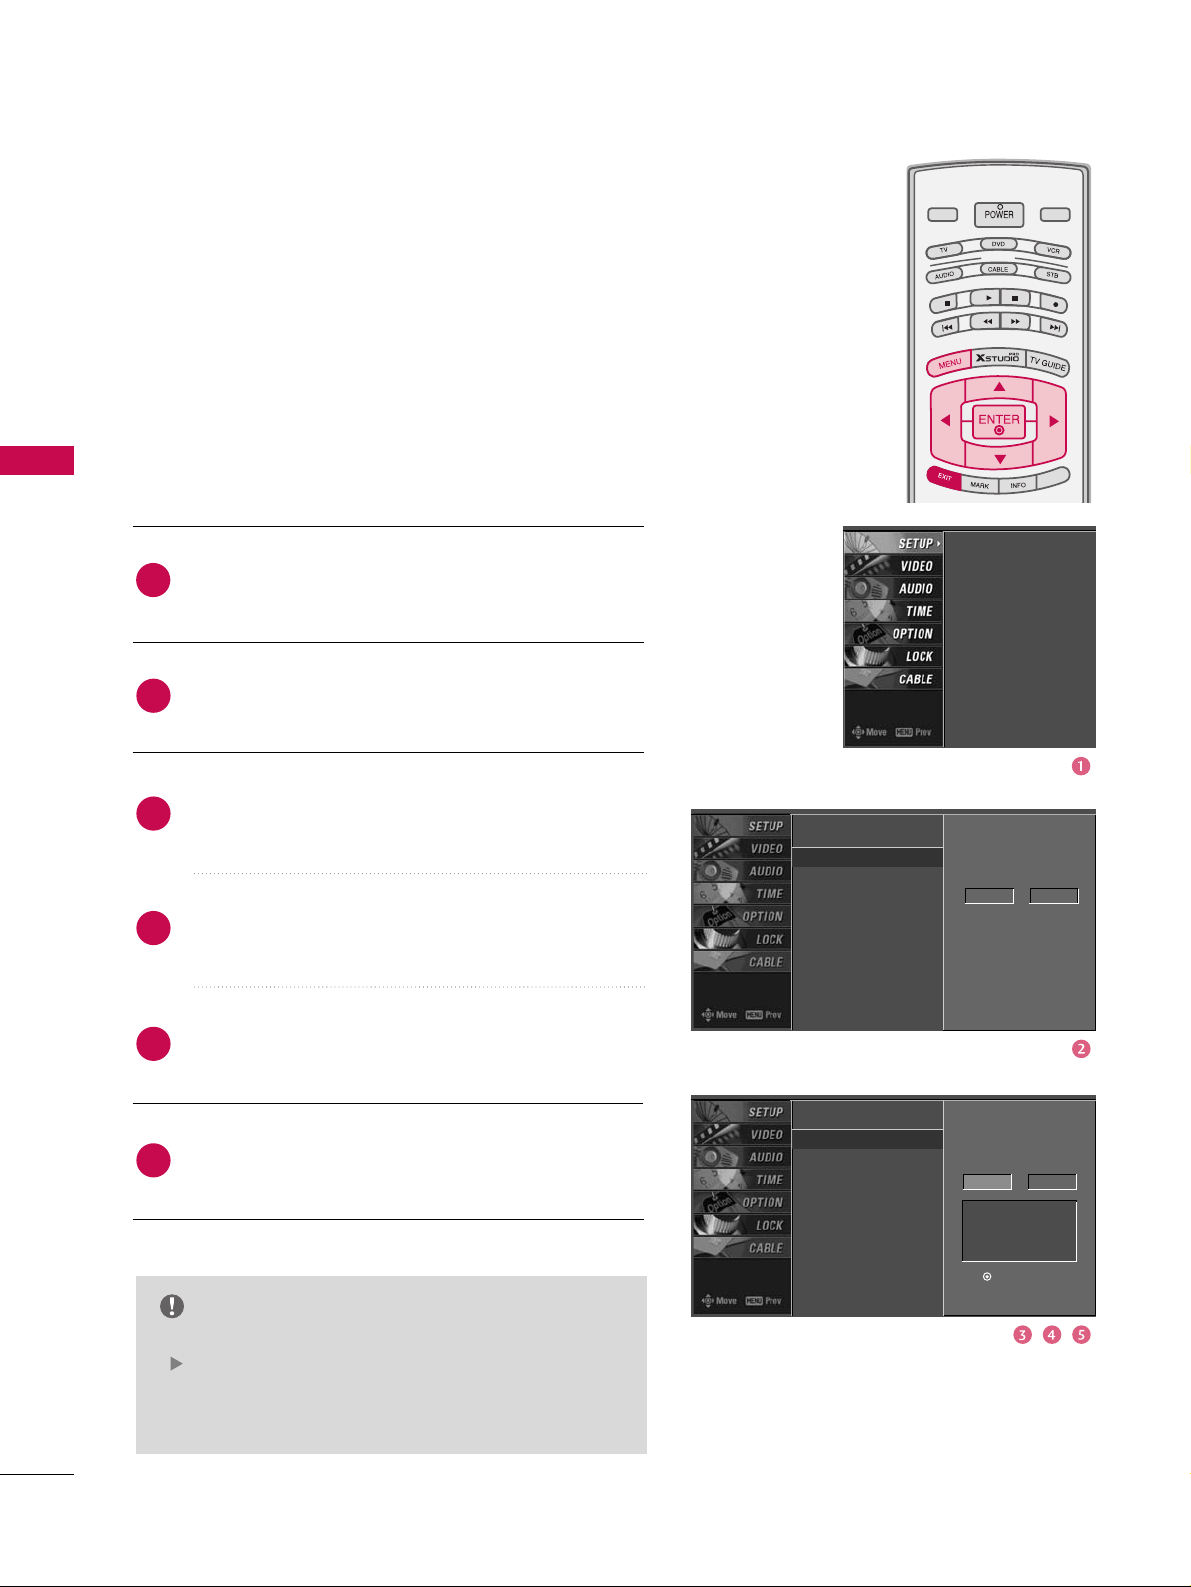
AUTO SCAN (EZ SCAN)
MODE
LIVE TV
INPUT
DAY -
DAY +
SIMPLINK
Press the
MMEENNUU
button and then use DDor EEbut-
ton to select the
SSEETTUUPP
menu.
Press the
GG
button and then use DDor EEbutton to
select
EEZZ SSccaann
.
Press the
EENNTTEERR
button to begin the channel
search. Allow
EEZZ SSccaann
to complete the channel
search cycle for
AANNTTEENNNNAA
and
CCAABBLLEE
.
Automatically finds all channels available through antenna or
cable inputs, and stores them in memory on the channel list.
Run EZ Scan again after any Antenna/Cable connection
changes.
A password is required to gain access to EZ Scan menu if the
Lock System is turned on.
EZ Scan
Manual Scan
Channel Edit
DTV Signal
Main Input
Sub Input
Input Label
Set ID
EZ Scan
Manual Scan
Channel Edit
DTV Signal
Main Input
Sub Input
Input Label
Set ID
Selection (Gor )
leads you to the EZ
scan screen.
2
3
1
NOTE
!
Analog TV signal
Digital DTV signal
Analog CATV signal
Digital CADTV signal
Processing EZ scan...
ANTENNA Ch.20
3channel(s) found
Press to stop the
current scan and start
CABLE channel scan.
MENU Previous
Next
Page 43
WATCHING TV / CHANNEL CONTROL
42
WATCHING TV /CHANNEL CONTROL
EZ Scan
Manual Scan
G
Channel Edit
DTV Signal
Main Input
Sub Input
Input Label
Set ID
EZ Scan
Manual Scan
Channel Edit
DTV Signal
Main Input
Sub Input
Input Label
Set ID
ADD/DELETE CHANNEL (MANUAL SCAN
)
A password is required to gain access to Manual Scan
menu if the Lock System is turned on.
While using the CableCARD
TM
, CATV, CADTV is not work-
ing in Manual Scan.
Press the
MMEENNUU
button and then use
DD
or EEbutton
to select the
SSEETTUUPP
menu.
Press the
GG
button and then use DDor EEbutton to
select
MMaannuuaall SSccaann
.
Press the
GG
button and then use DDor EEbutton to
select TV, DTV, CATV, and CADTV.
Press the
GG
button and then use DDor EEbutton to
select channel number you want to add or delete.
Press the
EENNTTEERR
button to add or delete for the
channel number.
Press
EEXXIITT
button to return to TV viewing or press
MMEENNUU
button to return to the previous menu.
MODE
LIVE TV
INPUT
DAY -
DAY +
SIMPLINK
NOTE
This digital channel number is a physical channel
number, which is different from the normal channel
number shown in Channel Edit.
Select channel type and
RF-channel number.
TV 2
EZ Scan
Manual Scan
Channel Edit
DTV Signal
Main Input
Sub Input
Input Label
Set ID
Select channel type and
RF-channel number.
TV
GG
2
Press to delete the
channel
TV 2-0
DD
EE
4
5
6
2
3
1
Page 44

WATCHING TV / CHANNEL CONTROL
43
CHANNEL EDITING
Press the
MMEENNUU
button and then use DDor EEbutton
to select the
SSEETTUUPP
menu.
Press the
GG
button and then use DDor EEbutton to
select
CChhaannnnee ll EEddiitt
.
Press the
GG
button. You will now see a screen filled
with channel numbers and a preview picture.
Use button to select a channel and
then use the
EENNTTEERR
button to add or delete it.
Press
FFAAVV
button to add the channel to the Favorite
List. The surfing icon will appear in front of that
channel number.
Press
EEXXIITT
button to return to TV viewing or press
MMEENNUU
button to return to the previous menu.
MODE
LIVE TV
INPUT
DAY -
DAY +
SIMPLINK
From the default channel list created from the EZ Scan channel search, you can
create two different types of channel lists in memory: “custom list” and “favorite
channel list”.
A custom list can be created by toggling each channel on or off with ENTER button. The channels in the Custom List are displayed in black and the channels
deleted from the Custom List are displayed in gray. Once a channel is highlighted
you can add or delete the channel by referring to the small window at the topleft corner of the screen.
You can create your own Favorite List. Use the
FFAAVV
button on the remote control
when a channel is highlighted and then add or delete the channel to/from your
Favorite List.
EZ Scan
Manual Scan
Channel Edit
G
DTV Signal
Main Input
Sub Input
Input Label
Set ID
EZ Scan
Manual Scan
Channel Edit
DTV Signal
Main Input
Sub Input
Input Label
Set ID
Selection ( Gor ) leads
you to the channel edit
screen.
4
5
2
3
1
Page 45

WATCHING TV / CHANNEL CONTROL
44
WATCHING TV /CHANNEL CONTROL
What is Brief Info.?
: Brief Info shows the present screen information.
: On Watching with the upper Input signal, press the
IINNFFOO
button.
How To Use?
1. Press the
IINNFFOO
button to show the Brief Info on the screen.
2. Press the
IINNFFOO
button or
EEXXIITT
button to exit.
BRIEF INFO.
Program title
Day, Month, Year
Program start time
Program progress bar
Program finish time
Present time
Program information
Banner information
MMuullttiilliinngguuaall
: Press the SAP button to select your choice.
CCaappttiioonn
:Press the CC button to select wanted Closed caption.
Screen Ratio of Input Signal 4:3
Screen Ratio of Input Signal 16:9
Resolution of Input Signal 720x480i
Resolution of Input Signal 720x480p
Resolution of Input Signal 1280x720p
Resolution of Input Signal 1920x1080i
Input Signal have rating information. Refer to the <Lock Menu>.
D(Dialogue), L(Language), S(Sex), V(Violence), FV(Fantasy Violence
)
480i
480p
720p
10 8 0 i
4:3
16:9
CC
No description is available
MODE
LIVE TV
DAY -
DAY +
INPUT
SIMPLINK
Page 46

WATCHING TV / CHANNEL CONTROL
45
EZ Scan
Manual Scan
Channel Edit
DTV Signal
Main Input
G
Sub Input
Input Label
Set ID
EZ Scan
Manual Scan
Channel Edit
DTV Signal
Main Input
Sub Input
Input Label
Set ID
Antenna
Cable
AV1
AV2
Component1
Component2
RGB-PC
HDMI1/DVI
HDMI2
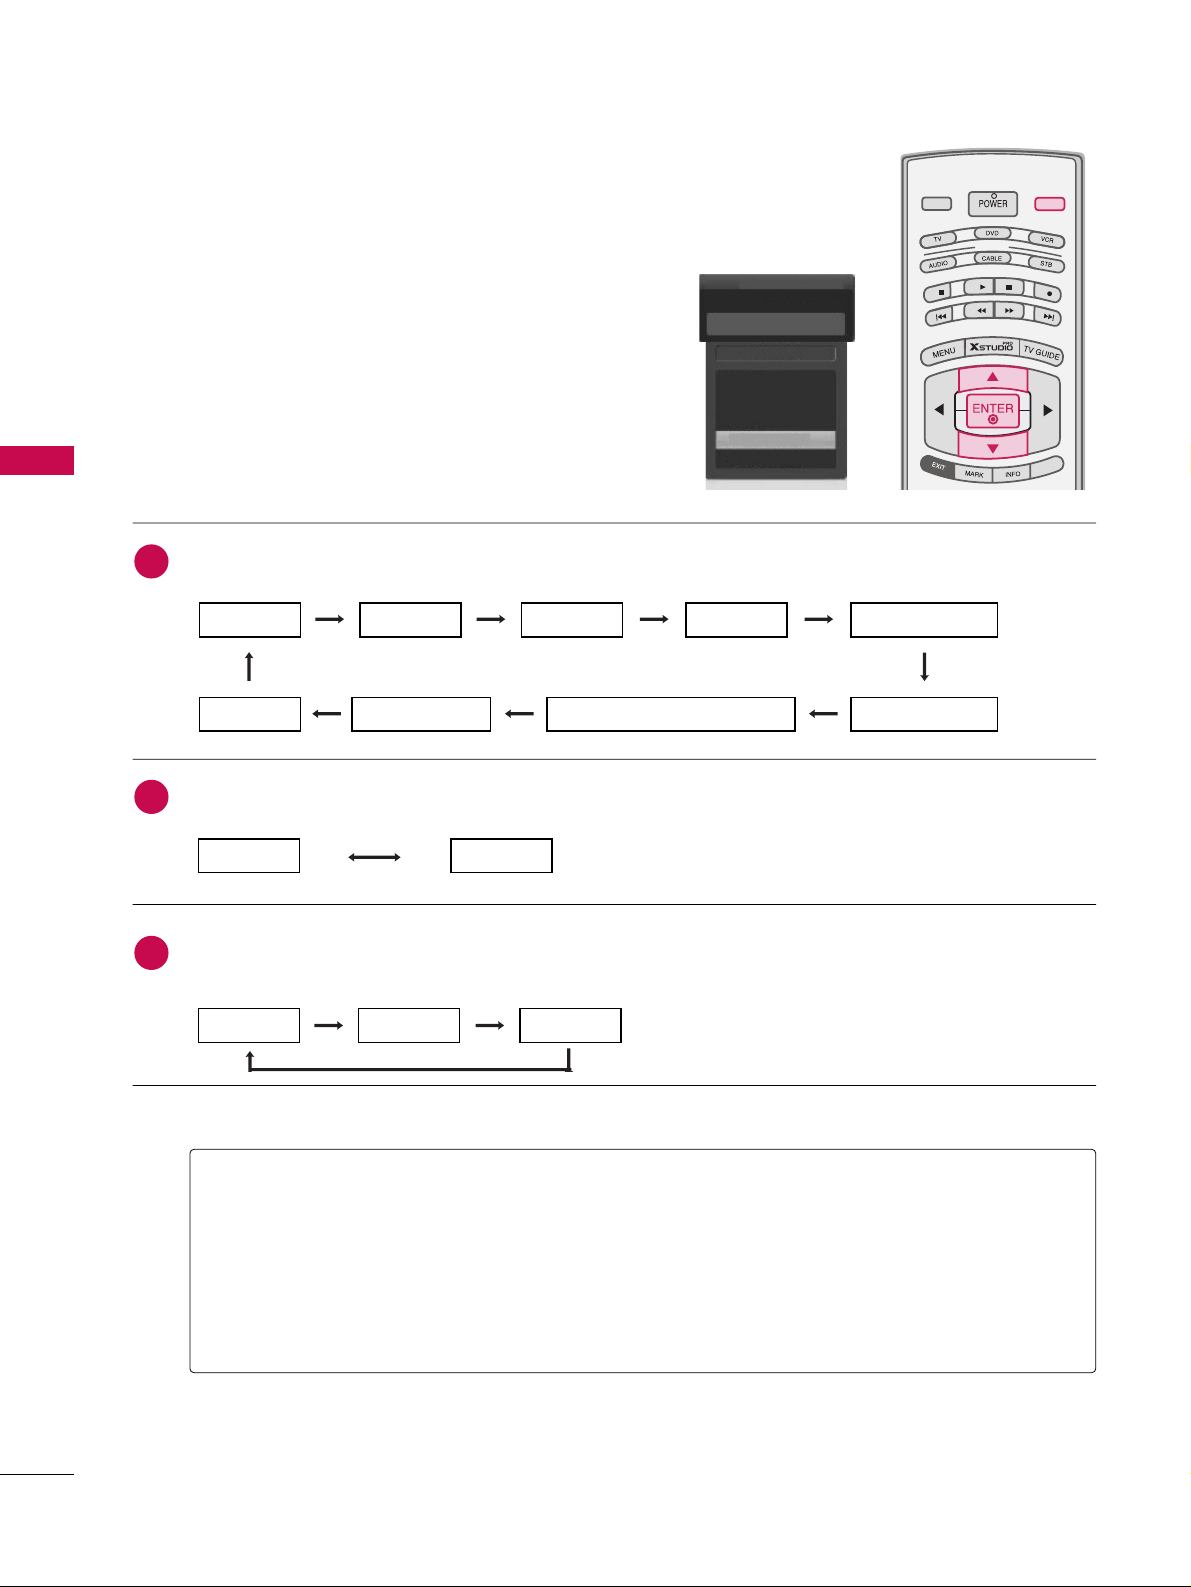
INPUT SOURCE SELECTION
Changes the picture source so you can watch your off-air TV,
cable TV, VCR, DVD, or any other devices that are connected to
your TV.
Press the
MMEENNUU
button and then use
DD
or
EE
button
to select the
SSEETTUUPP
menu.
Press the
GG
button and then useDDor
EE
button to
select
MMaaiinn IInnppuutt..
Press the
GG
button and then useDDor
EE
button to
select the source: Antenna, Cable, AV1, AV2,
Component1, Component2, RGB-DTV (or RGB-PC),
HDMI1/DVI, HDMI2.
■
To toggle RGB-DTV and RGB-PC, select RGBDTV(or RGB-PC) and press
GG
button.
Press
EEXXIITT
button to return to TV viewing or press
MMEENNUU
button to return to the previous menu.
Select sources for the
SSuubb IInnppuutt
in the
SSEETTUUPP
menu.
See Page 91 for selecting the input
source for the sub picture by pressing
the
PPIIPP IINNPPUUTT
button.
Sub Picture Source Selection
MODE
LIVE TV
INPUT
DAY -
DAY +
SIMPLINK
2
3
4
1
Page 47
WATCHING TV / CHANNEL CONTROL
46
WATCHING TV /CHANNEL CONTROL
AUTO LINK
AAnntteennnnaa
: Select it when watching the TV/DTV.
CCaabbllee
: Select it when watching the CATV/CADTV.
AAVV 11,, AAVV 22
: Select it when watching the VCR or external equipment.
CCoommppoonneenntt 11--22
: Select it when using the DVD or the Digital set-top box depend on connector.
RRGGBB--PPCC //RRGGBB--DDTTVV
: Select it when using PC or Digital set-top box depend on connector.
HHDDMMII11 //DDVVII,, HHDDMMII22
: Select it when using DVD, PC or Digital set-top box depend on connector.
Antenna
Cable
AV 1
AV 2
Component1
EE
Auto Link
AV 2
Press the
IINNPPUUTT
button and then displays the connected
external equipment list on the screen.
Press the
EENNTTEERR
button to change the main input to the
active external equipment. Use the
DD
or
EE
button to
select the main input source.
MODE
LIVE TV
DAY -
DAY +
INPUT
SIMPLINK
■
You can also select
MMaaiinn IInnppuutt
in the
SSeettuupp
menu.
AAnntteennnnaa
CCaabbllee
When every external equipment is connected:
When any external equipment is not connected:
When some External Equipment is connected:
(ex: When connected only to AV 2)
AAnntteennnnaa CCaabbllee
AAVV11
AAnntteennnnaa CCaabbllee AAVV22
AAVV22 CCoommppoonneenntt11
HHDDMMII22 HHDDMMII11//DDVVII RRGGBB--DDTTVV ((oorr RRGGBB--PPCC)) CCoommppoonneenntt22
2
3
1
Page 48

WATCHING TV / CHANNEL CONTROL
47
This operates only for the devices with the
logo. Please check the logo.
This allows you to control and play other AV devices
connected to the display through HDMI cable without
additional cables and settings.
■
While simplink function is using, Timeshift function is not
operated in HDMI1/DVI or HDMI2 mode.
MODE
LIVE TV
DAY -
DAY +
INPUT
SIMPLINK
Connect the HDMI/DVI IN 1or 2 terminal of the TV
to the rear terminal (HDMI output) of the Simplink
device with the HDMI cable.
After connecting the HDMI jack for the home theater
with simplink function in the above method, connect
the DIGITAL AUDIO OUT OPTICAL on the back of
the TV to the DIGITAL AUDIO IN terminal on the
back of the simplink device with the Optical cable.
Press the
MMEENNUU
button and then use
DD
or EEbutton
to select the
OOPPTTIIOONN
menu.
Press the
GG
button and then use DDor EEbutton to
select
SSiimmppLLiinnkk
.
Press the
GG
button and then useDDor EEbutton to
select
OOnn
.
Press
EEXXIITT
button to return to TV viewing or press
MMEENNUU
button to return to the previous menu.
4
2
3
1
Timeshift Mode
Aspect Ratio
Caption/Text
Caption Option
Language
ISM Method
Low Power
HDD Format
SimpLink
G
Off
On
NOTE
GG
When operating the external device with Simplink, press the TV button among the MODE button on the
remote control.
GG
When you switch the Input source with the INPUT button on the remote control, you can stop the
operation of device worked by Simplink.
GG
When you select or operate the media device with home theater function, the speaker automatically
switches to home theater speaker (HT speaker).
GG
When you execute ‘Recorded TV’ function during DVD playback included in home theater, DVD play-
back stops and the applicable function is executed after switching the input to TV.
SimpLink Preparations
5
Timeshift Mode
Aspect Ratio
Caption/Text
Caption Option
Language
ISM Method
Low Power
HDD Format
SimpLink
Page 49

WATCHING TV / CHANNEL CONTROL
48
WATCHING TV /CHANNEL CONTROL
SimpLink Functions
DD ii rreecctt PPll aayy
After connecting AV devices to TV, you can directly control the devices and play media
without additional settings.
SSeellee cc tt AAVV ddee vv iicc ee
Enables you to select one of AV devices connected to TV and play it.
DD ii sscc ppllaa yybbaacckk
Control connected AV devices by pressing the
, , , , , ,
,
DDEE
FF GG
,
EENN TTEE RR
buttons and buttons for play, pause, stop, fast reverse, fast forward,
chapter skip.
PPoowwee rr ooffff aallll ddeevviiccee ss
When you power off TV, all connected devices are turned off.
SSwwiittcchh aauuddiioo --oo uutt
Offers an easy way to switch audio-out.
(A device, which is connected to TV through HDMI cable but does not support
Simplink, does not provide this function)
SimpLink Menu
DD IISSCC ppllaayybbaa cc kk
: Select and play discs.
When multiple discs are available, the
titles of the discs are conveniently displayed at the bottom of the screen.
VVCC RR ppllaayybbaacckk
: Play and control the
connected VCR.
HH DDDD RReeccoo rrddii nnggss ppllaa yybbaacckk
: Play and
control recordings stored in HDD.
AAuuddiioo OOuu tt tt oo HHTT sspp eeaakkeerr//AAuu ddiioo
OOuu tt ttoo TTVV
: Select HT speaker or TV
speaker for Audio Out.
TTVV vviieewwiinngg
: Switch to the previous TV
channel regardless of the current mode.
GG
Selected Device
GG
When no device is
connected (displayed in gray)
GG
When a device is
connected (displayed in
bright color)
1
2
3
4
5
MODE
LIVE TV
DAY -
DAY +
INPUT
SIMPLINKSIMPLINK
After selecting the
TT VV
button of the MODE on the remote control,
press the
SSIIMMPPLLIINNKK
button.
Use
DD EE FF GG
button to select the desired device and then press
the
EENNTTEERR
button.
Control connected AV devices by pressing the
, , ,
,,,
,
DDEE
FF GG
,
EENN TTEE RR
buttons.
2
1
3
1
2
3
4
5
Page 50
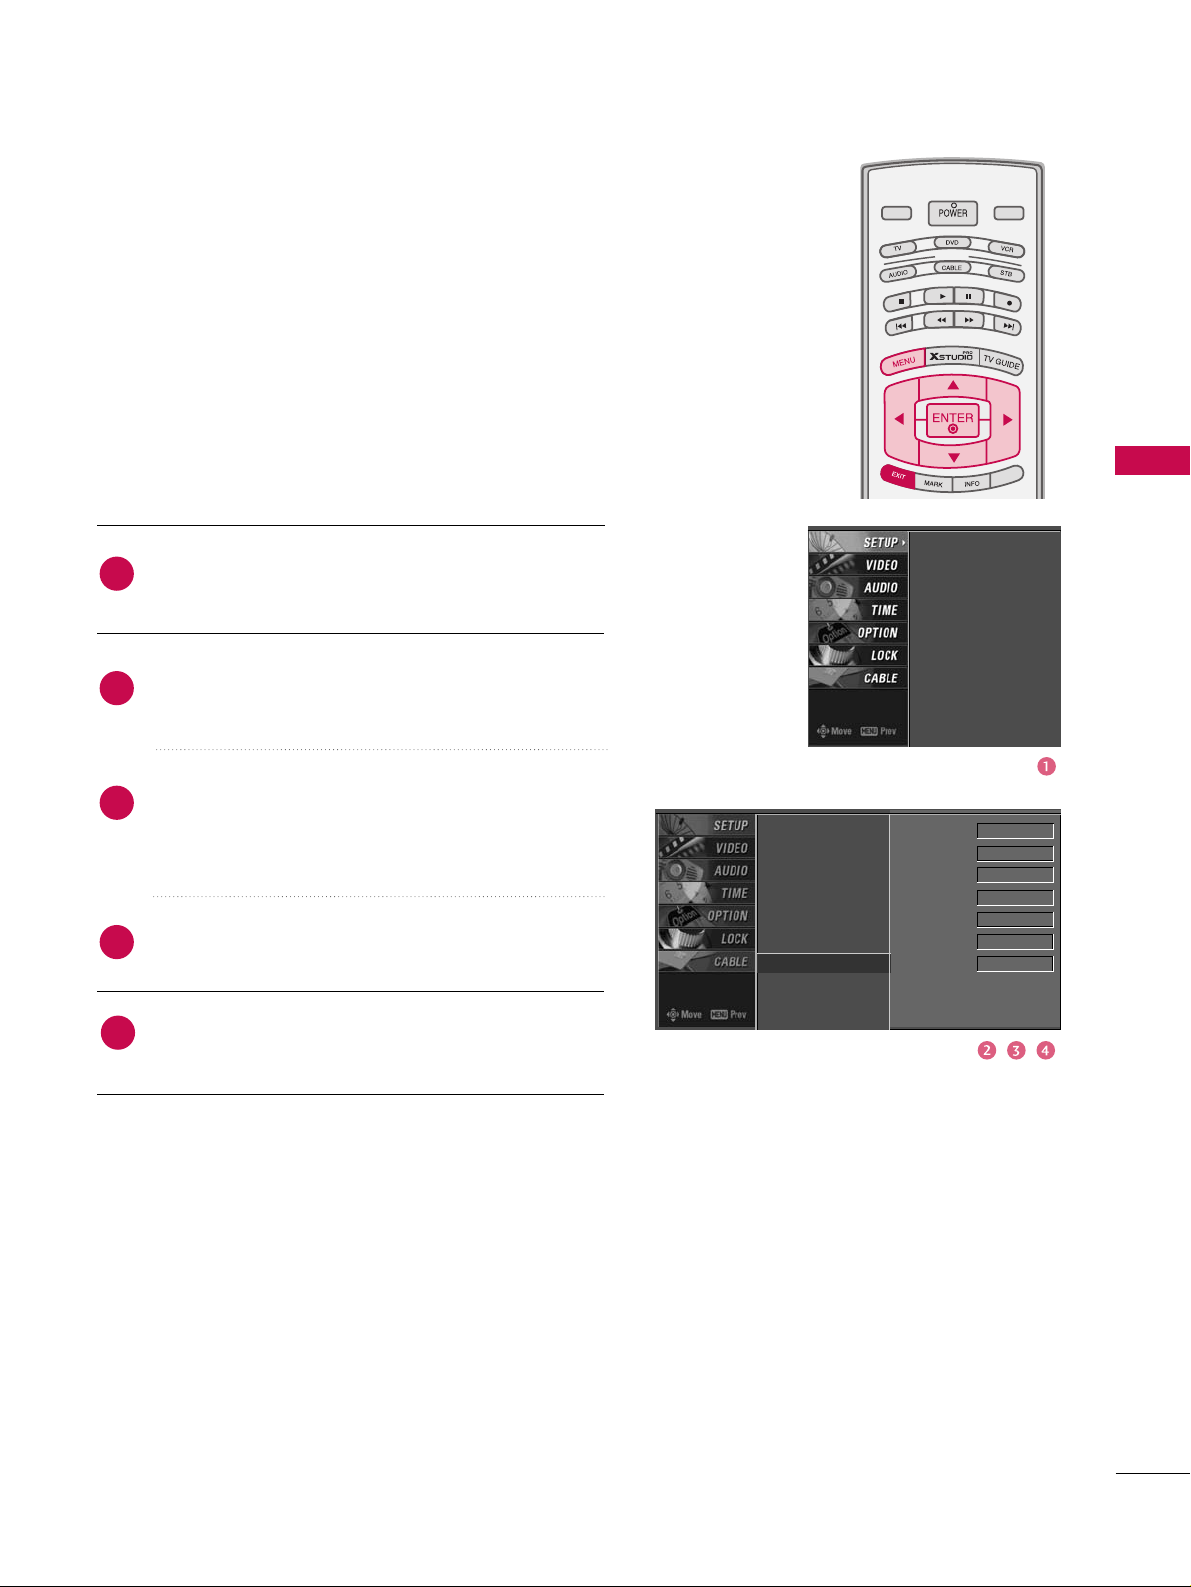
WATCHING TV / CHANNEL CONTROL
49
INPUT LABEL
Sets a label to each input source which is not in use when you
press INPUT button.
Press the
MMEENNUU
button and then use
DD
or EEbut-
ton to select the
SSEETTUUPP
menu.
Press the
GG
button and then useDDor EEbutton to
select
IInnppuutt LLaabbeell
.
Press the
GG
button and then useDDor EEbutton to
select the source: AV1, AV2, Component1,
Component2, RGB, HDMI1/DVI or HDMI2.
Press the
DD
or EEbutton to select the label.
Press
EEXXIITT
button to return to TV viewing or press
MMEENNUU
button to return to the previous menu.
MODE
LIVE TV
INPUT
DAY -
DAY +
SIMPLINK
EZ Scan
Manual Scan
Channel Edit
DTV Signal
Main Input
Sub Input
Input Label
G
Set ID
EZ Scan
Manual Scan
Channel Edit
DTV Signal
Main Input
Sub Input
Input Label
Set ID
AV1 Cable Box
AV2 VCR
Component1 DVD
Component2 Set Top Box
RGB PC
HDMI1/DVI Game
HDMI2 Satellite
2
3
4
1
5
Page 51

WATCHING TV / CHANNEL CONTROL
50
WATCHING TV /CHANNEL CONTROL
Press the
MMEENNUU
button and then use
DD
or
EE
but-
ton
to select the
SSEETTUUPP
menu.
Press the
GG
button
and then use
DD
or
EE
button
select
DDTTVV SSiiggnnaall..
View the on-screen signal strength monitor to see
the quality of the signal being received.
Press
EEXXIITT
button to return to TV viewing or press
MMEENNUU
button to return to the previous menu.
DTV SIGNAL STRENGTH
This feature displays the DTV signal levels being received
and indicates whether you need to adjust your antenna or
digital cable input. The higher the signal strength, the less
likely you are to experience picture degradation.
DTV Signal: This function is only available when the input
signal is DTV or CADTV.
MODE
LIVE TV
INPUT
DAY -
DAY +
SIMPLINK
EZ Scan
Manual Scan
Channel Edit
DTV Signal
Main Input
Sub Input
Input Label
Set ID
EZ Scan
Manual Scan
Channel Edit
DTV Signal
Main Input
Sub Input
Input Label
Set ID
Bad Normal Good
2
3
4
1
Page 52

TV GUIDE ON SCREEN
TM
SYSTEM
51
TV GUIDE ON SCREENTMSYSTEM
SETUP OF TV GUIDE ON SCREEN
TM
The TV Guide On Screen system uses Setup information to provide you with show listings and lineups in your
area—which are updated several times a day.
Once you set up the TV according to manufacturer’s instructions, you are ready to set up the TV Guide On
Screen system.
NOTE
The TV Guide On Screen system provides listings for cable-ready, and digital cable services as well as
over-the-air broadcast. It does not provide listings for satellite services.
Page 53
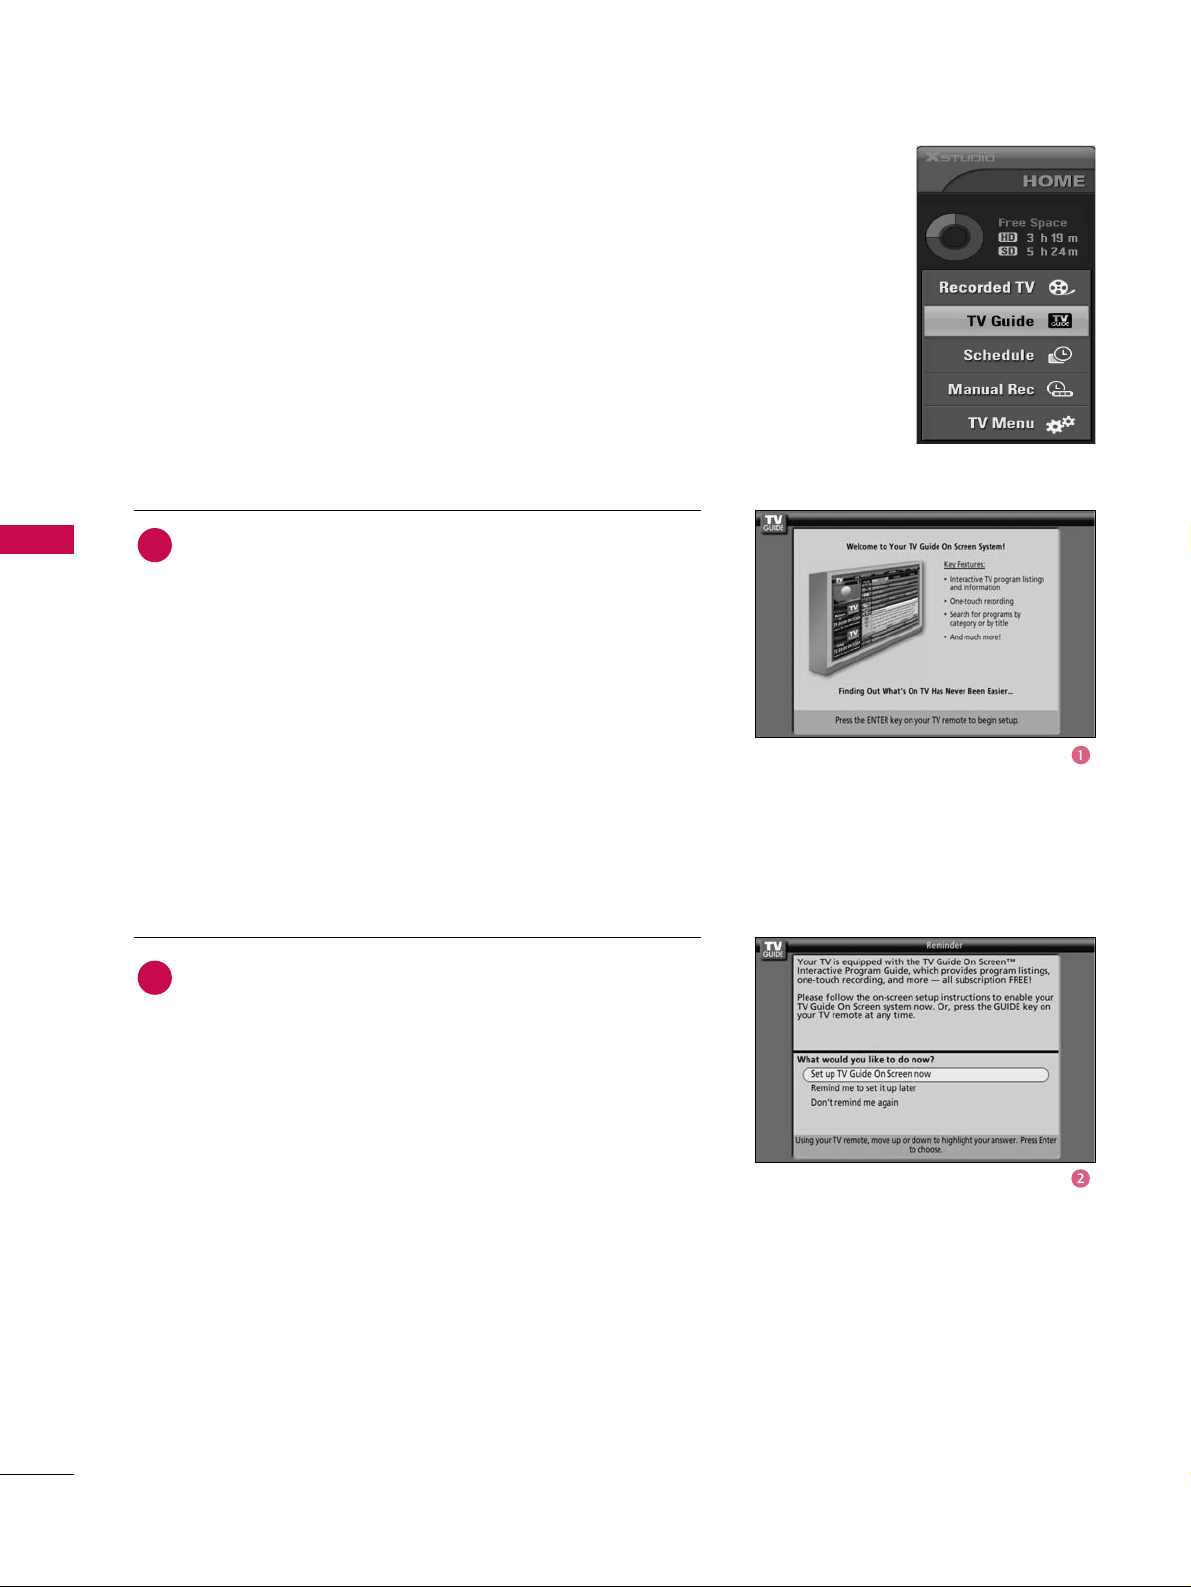
TV GUIDE ON SCREEN
TM
SYSTEM
52
TV GUIDE ON SCREENTMSYSTEM
Ready to setup
Reminder Screen
The TV Guide On Screen system's Reminder Screen
appears:
■
After initial TV set up.
■
If you power Off the TV and then power it back On.
To make a selection, use the
DD
or
EE
button to highlight
an option, and press
EENNTTEERR
.
■
"Set up TV Guide On Screen now", displays the
Welcome Screen. Press
EENNTTEERR
button to begin Setup.
■
"Remind me to set up later" returns you to watching TV.
■
"Don't remind me again" returns you to watching TV
and stops the reminder screen from appearing upon
power On.
Welcome Screen
The TV Guide On Screen system's Welcome Screen
appears:
■
By pressing the
TTVV GGuuiiddee
button
■
When you power On your TV if you previously skipped
"Set up TV Guide On Screen now" on the Reminder
Screen.
The Welcome Screen highlights features of the TV Guide
On Screen system.
Press
EENNTTEERR
to begin Setup.
2
1
Page 54

TV GUIDE ON SCREEN
TM
SYSTEM
53
Using TV Guide
Screen 1: Country
■
This screen asks you the location of your TV.
■
Use the DDor
EE
button to highlight a country.
■
Press
EENNTTEERR
button to display Screen 2.
Screen 2: Enter ZIP or Postal Code
OOppttiioonn 11
■
If you selected USA in Screen 1, you see the ZIP Code
screen.
■
You input numbers by either pressing the number keys on
the remote or using the
DD
or
EE
button to display a num-
ber, and then the
FF
or GGbutton to move to another
field.
■
Press
EENNTTEERR
button to display Screen 3.
OOppttiioonn 22
■
If you selected Canada in Screen 1, you can see the
Postal Code screen.
■
You input characters by using the DDor
EE
button, and
then the
FF
or GGbutton to move to another field.
■
Press
EENNTTEERR
button to display Screen 3.
Screen 3: Do you have Cable Service connected?
■
If you select Yes, you see Screen 4.
■
If you select No, you see Screen 4.
1
2
3
Page 55

TV GUIDE ON SCREEN
TM
SYSTEM
54
TV GUIDE ON SCREENTMSYSTEM
Screen 4: Do you have an antenna connected?
■
If you select Yes, you see Screen 5.
■
If you select No, you see Screen 5.
Screen 5: Are your basic settings correct?
■
If you select Yes, you see Screen 6.
■
If you select No, you see Screen 1.
Screen 6: Congratulations
■
Press
EENN TTEE RR
button to display Screen 7.
Screen 7: Helpful Information
■
This screen tells you valuable information on using your
Guide.
■
Press
EENN TTEE RR
button to watch TV.
NOTE
If you selected No in Screen 3 then you must select Yes
in this screen to receive a channel lineup and listings.
NOTE
The TV Guide On Screen system receives program
listings data through your cable or over-the-air
video signal. In order to receive regular program listings, please remember to do the following:
1. Turn OFF your TV when it is not in use. (Do not
unplug the power cord.
)
2. If you have more than one Cable system in your
area, you may be prompted to select which Cable
system’s program data to download. If so prompted, please follow the on-screen instructions.
Program listings are updated several times a day. It
may take up to 24 hours to begin to receive any TV
program listings. It may take up to one week to
receive all eight days of TV program listings.
4
5
6
7
Page 56

TV GUIDE ON SCREEN
TM
SYSTEM
55
FUNCTIONS OF TV GUIDE ON SCREEN
TM
Overview
Your new TV contains the TV Guide On Screen Interactive Program Guide.
The TV Guide On Screen system has features that help you get the most out of your viewing experience.
TV Guide On Screen Overview
The TV Guide On Screen system has the following features:
■
Eight days of show listings (today plus seven days).
■
Icons that indicate show rating, stereo, HDTV, new episode, etc.
■
Intuitive up/down/left/right navigation using your remote control.
■
Set shows to Record.
■
Schedule show Reminders.
■
Search shows by category (e.g., Movies, Sports, Children, etc.).
■
Search for shows based on keywords or alphabetically by title.
■
Direct tuning to a channel.
■
Streamlined System Setup and default setting options.
■
Channel lineup customization.
■
Help screens while in the TV Guide On Screen system.
Page 57

TV GUIDE ON SCREEN
TM
SYSTEM
56
TV GUIDE ON SCREENTMSYSTEM
Screen Components
The screens displayed in the TV Guide On Screen system share many of the same components, as shown in
the following figure:
Video Window - Displays TV video while The TV
Guide On Screen system is displayed.
Service Bar - Provides access to the 5 main
Guide Services.
Current Service Label - Indented to indicate current Service displayed.
Tile - Displays show title.
Highlight - Indicates an active tile.
INFO Box - Provides information for a highlighted item.
INFO Button - Indicates you can cycle through
the various Info Box sizes.
Channel Logo - Identifies network.
Record/Remind Icons - Indicates a show is set to
Record or set as a Reminder.
Panel Ad - Location where show- or product-specific information appears (and also where Panel
Menu appears).
TV Guide logo Current Service Label Service bar
Time slot
Tile
INFO button
INFO box
Remind icon
Record iconHighlightChannel logo
Panel Ad
and
Panel
Menu Entry
Video
Window
Page 58
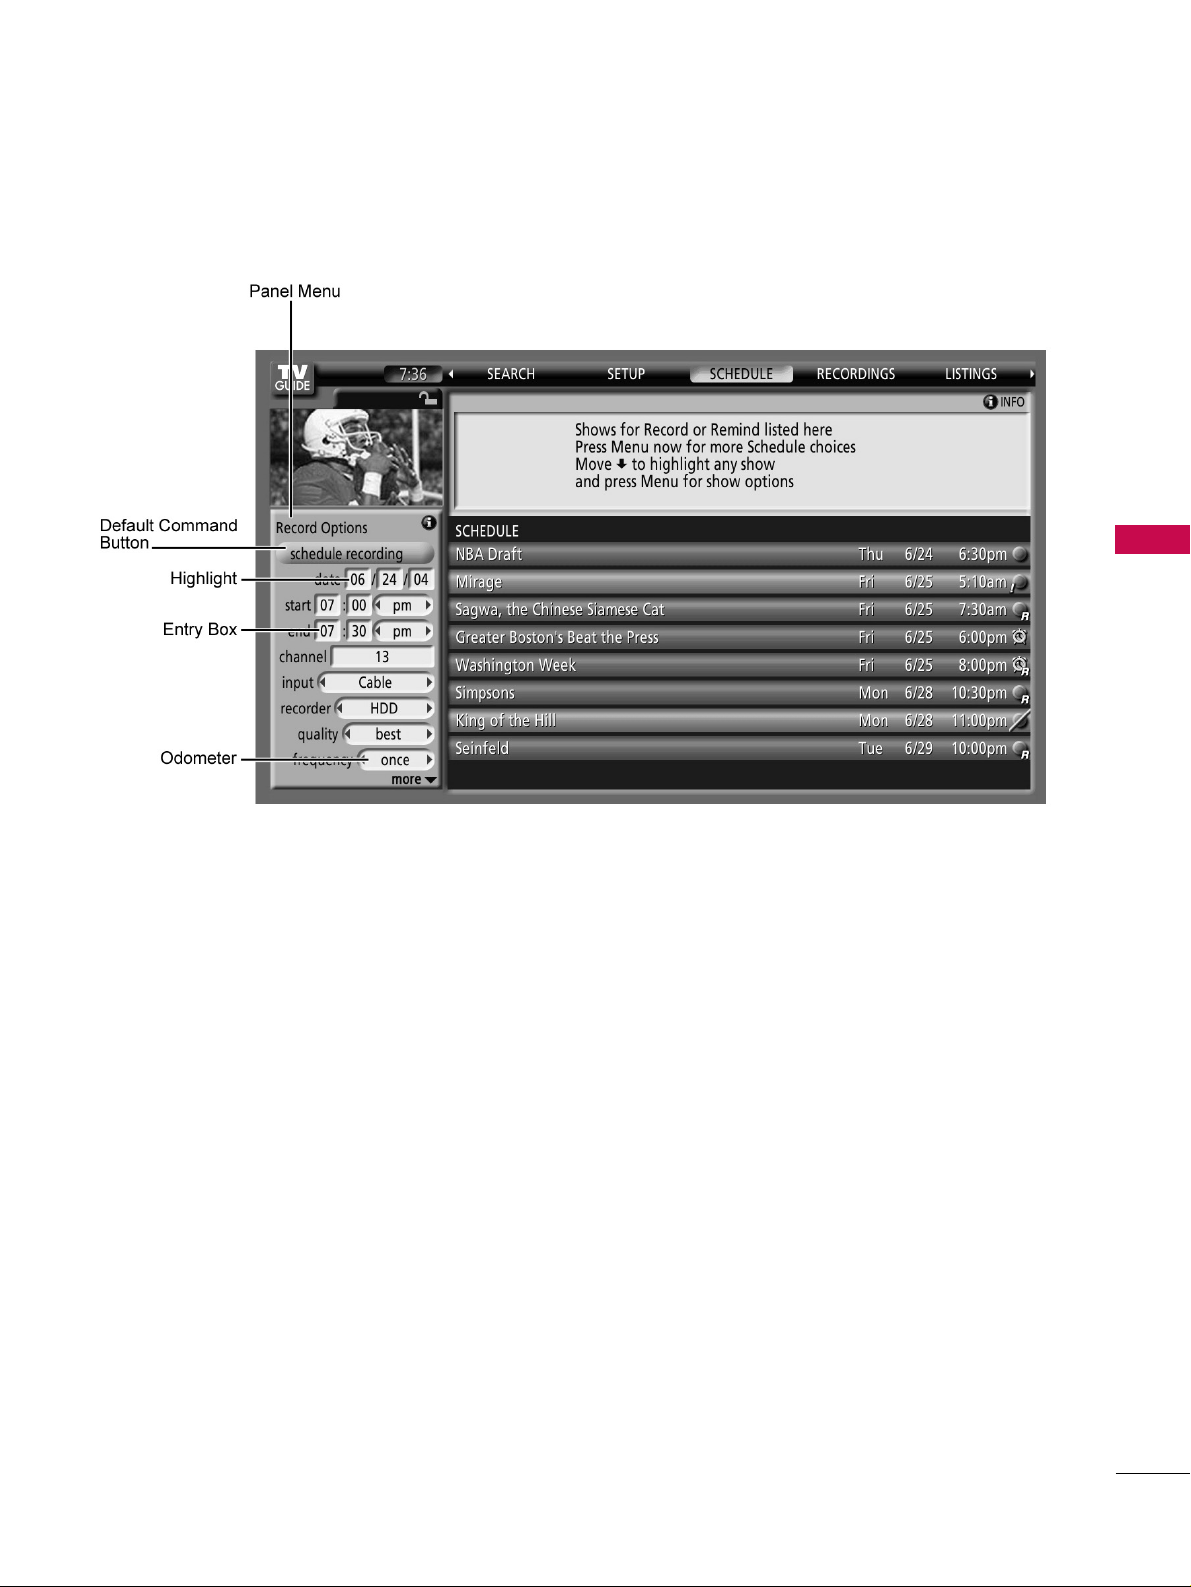
TV GUIDE ON SCREEN
TM
SYSTEM
57
Panel Menu
■
A Panel Menu appears when the
MMEE NN UU
button is pressed on a highlighted tile and additional options are
available. It also appears when you press
EENN TTEE RR
button on a show starting in the future.
■
When a Panel Menu appears, the highlighted tile changes color to indicate the Panel Menu relates to this
tile.
■
The Panel Menu displays below the Video Window.
■
Help is available for a displayed Panel Menu by pressing the
IINNFFOO
button.
■
The
DD
or
EE
button move between the options within the Panel Menu.
■
The left and right arrows move to adjacent options unless the highlight is on an odometer, where these
arrows change the odometer choice.
■
Pressing
EENN TTEE RR
button from an odometer or number entry box moves the highlight to the default com-
mand button of that Panel Menu, for example, Schedule Recording.
■
Pressing
EENN TTEE RR
button from a highlighted command button executes the action and closes the Panel
Menu (e.g., Schedule Recording, Cancel).
■
Select Cancel to cancel any changes and press
EENN TTEE RR
button to close the menu.
■
Pressing Menu is a shortcut to Cancel. Press
MMEE NN UU
button to cancel any changes and close the menu.
■
If a Panel Menu contains more menu options than can be displayed on a single screen, the more
EE
text
appears at the bottom of the menu. Simply scroll down to access additional options.
Page 59
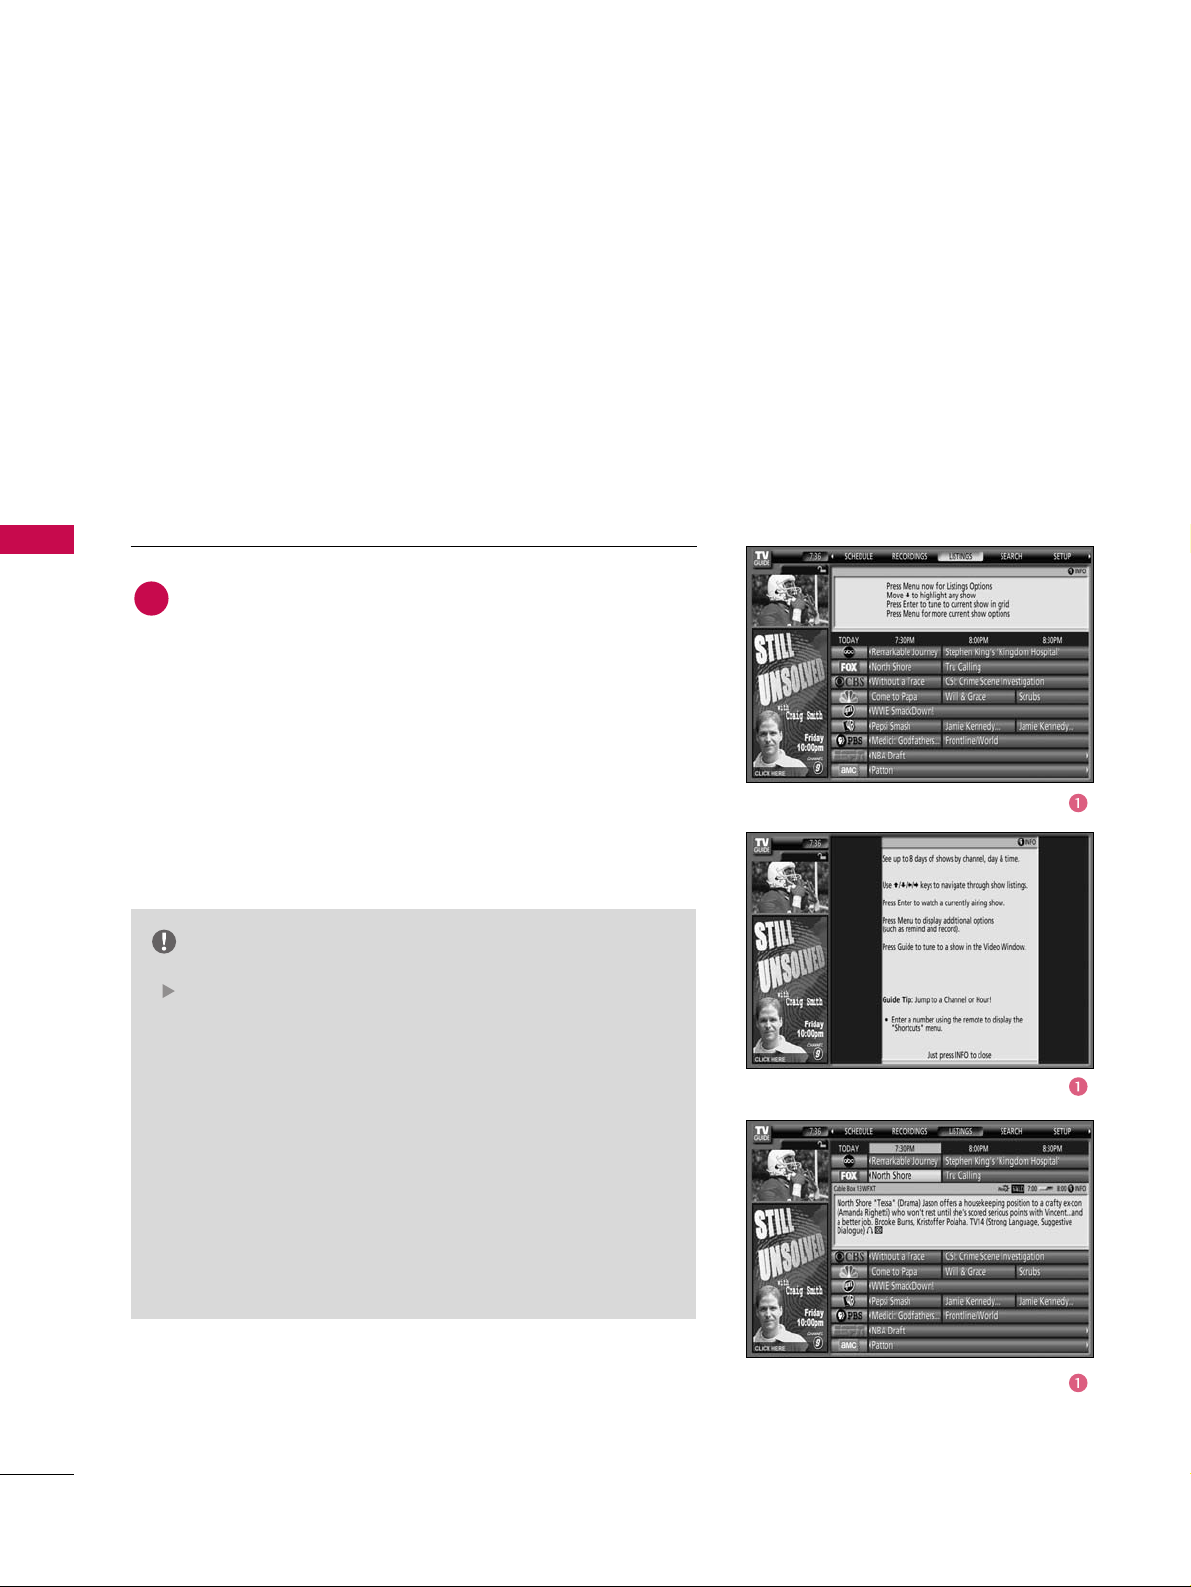
TV GUIDE ON SCREEN
TM
SYSTEM
58
TV GUIDE ON SCREENTMSYSTEM
Main Services
Listings
Use the
DD EE FF GG
button to move the highlight within
Listings to:
■
View 8 days of show listings
■
Read show descriptions
■
Tune directly to a show currently airing
■
Set a show to Remind
■
Set a show to Record
■
Lock and Unlock the Video Window
■
Access Panel and Channel Ads
Access Listings by pressing the TV GUIDE button on your remote
or on the front panel of your TV.
Listings is always the first Service displayed in the Guide.
With Listings highlighted, press the INFO button to display a Help
screen. Press the INFO button again to close the screen.
NOTE
There may be times when the TV Guide On Screen system
could display partial or no program listings. The reasons
for this include:
■
Program schedule information was not provided to TV
Guide On Screen.
■
The transmission of the program listings was interrupted.
■
The phrase “No Listings” will be replaced with program
information during the next transmission, which should
occur within the next 24 hours.
■
Please remember to turn off your TV when not in use in
order to receive program listings.
1
Page 60

TV GUIDE ON SCREEN
TM
SYSTEM
59
Search
From Search, use the
EE
button to highlight Movies.
Search lets you find shows alphabetically, by category (Movies,
Sports, Children, Educational, News, Variety, Series, HDTV) or
by Keyword.
With Search highlighted, press the INFO button to display a
Help screen. Press the INFO button again to close the screen.
Category Search Example: Movies
1
Page 61
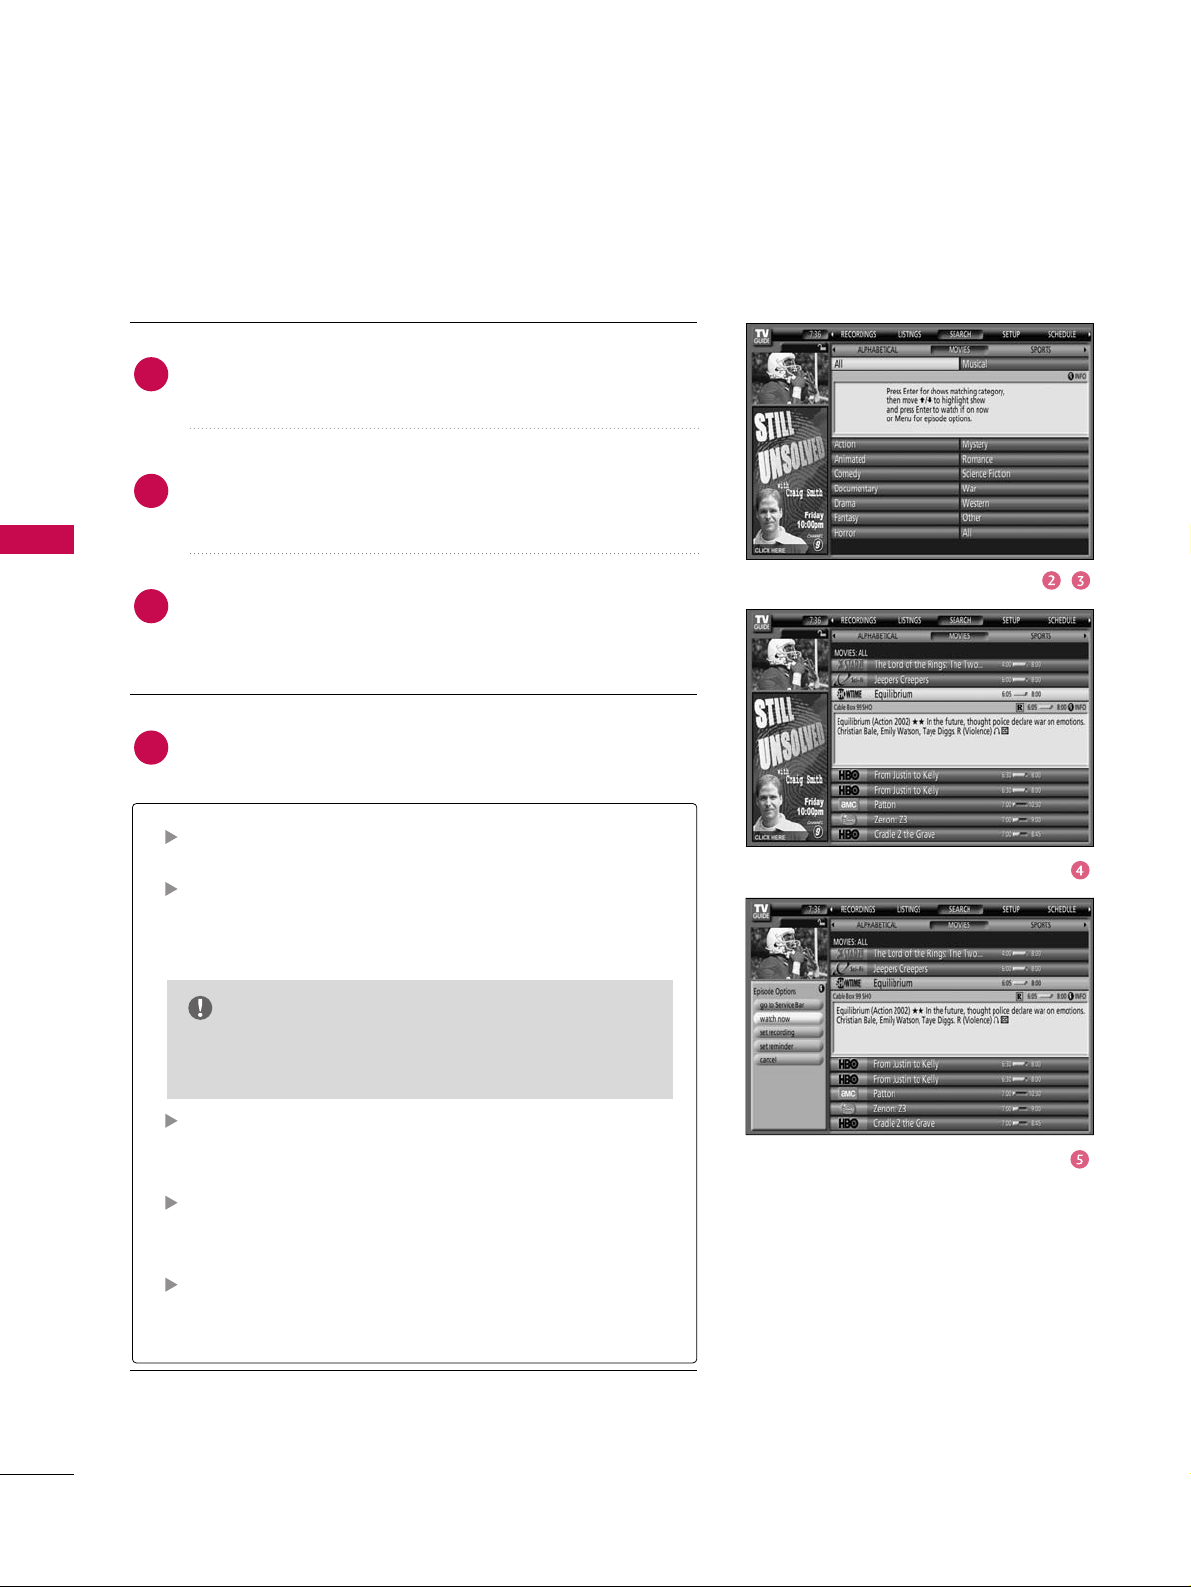
TV GUIDE ON SCREEN
TM
SYSTEM
60
TV GUIDE ON SCREENTMSYSTEM
Go to Service Bar - Closes the menu, changes no information, and returns to the Search Service Bar.
Tune to Channel - Exits the Guide and tunes to the
channel of the highlighted show (show airs in the
future).
Set Recording - Displays the Record Options menu,
from which you can set frequency, start and end time,
etc.
Set Reminder - Displays the Remind Options menu, from
which you can set frequency, when, automatically power
On, and auto-tune the TV.
Cancel - Closes the menu, changes no information, and
returns to the highlighted show.
Use the
EE
button to highlight a subcategory (for exam-
ple, All).
Press
EENNTTEERR
button to display a list of all Movies, orga-
nized by date and time.
Highlight a show and press
EENNTTEERR
button to watch (if on
now)or the
MMEE NN UU
button to display the Episode
Options menu.
You can choose to set a recording, a reminder, or tune to
the channel.
This option reads Watch Now if the show is currently
airing.
NOTE
2
3
4
5
Page 62

TV GUIDE ON SCREEN
TM
SYSTEM
61
Keyword Search
Highlight the Keyword navigation label, and press
EENNTTEERR
button to display the Keyword Search menu.
Highlight New Search, and press
EENNTTEERR
button.
The Search Options menu is displayed.
Highlight Category, and use the
FF
or
GG
button to select a
category to search (e.g. All, HDTV, Children, Sports, etc.).
When finished, use the
EE
button to highlight Enter
Keyword.
Highlight Enter Keyword, and press
EENNTTEERR
button.
The keyboard is displayed.
Use the
DD EE FF GG
button to highlight a character, and
press
EENNTTEERR
button to display it. When complete, high-
light Done and press
EENNTTEERR
button.
Keyword search lets you enter a word(s) to look for a particular
show by category or for every show title that matches.
1
2
3
4
5
6
Page 63
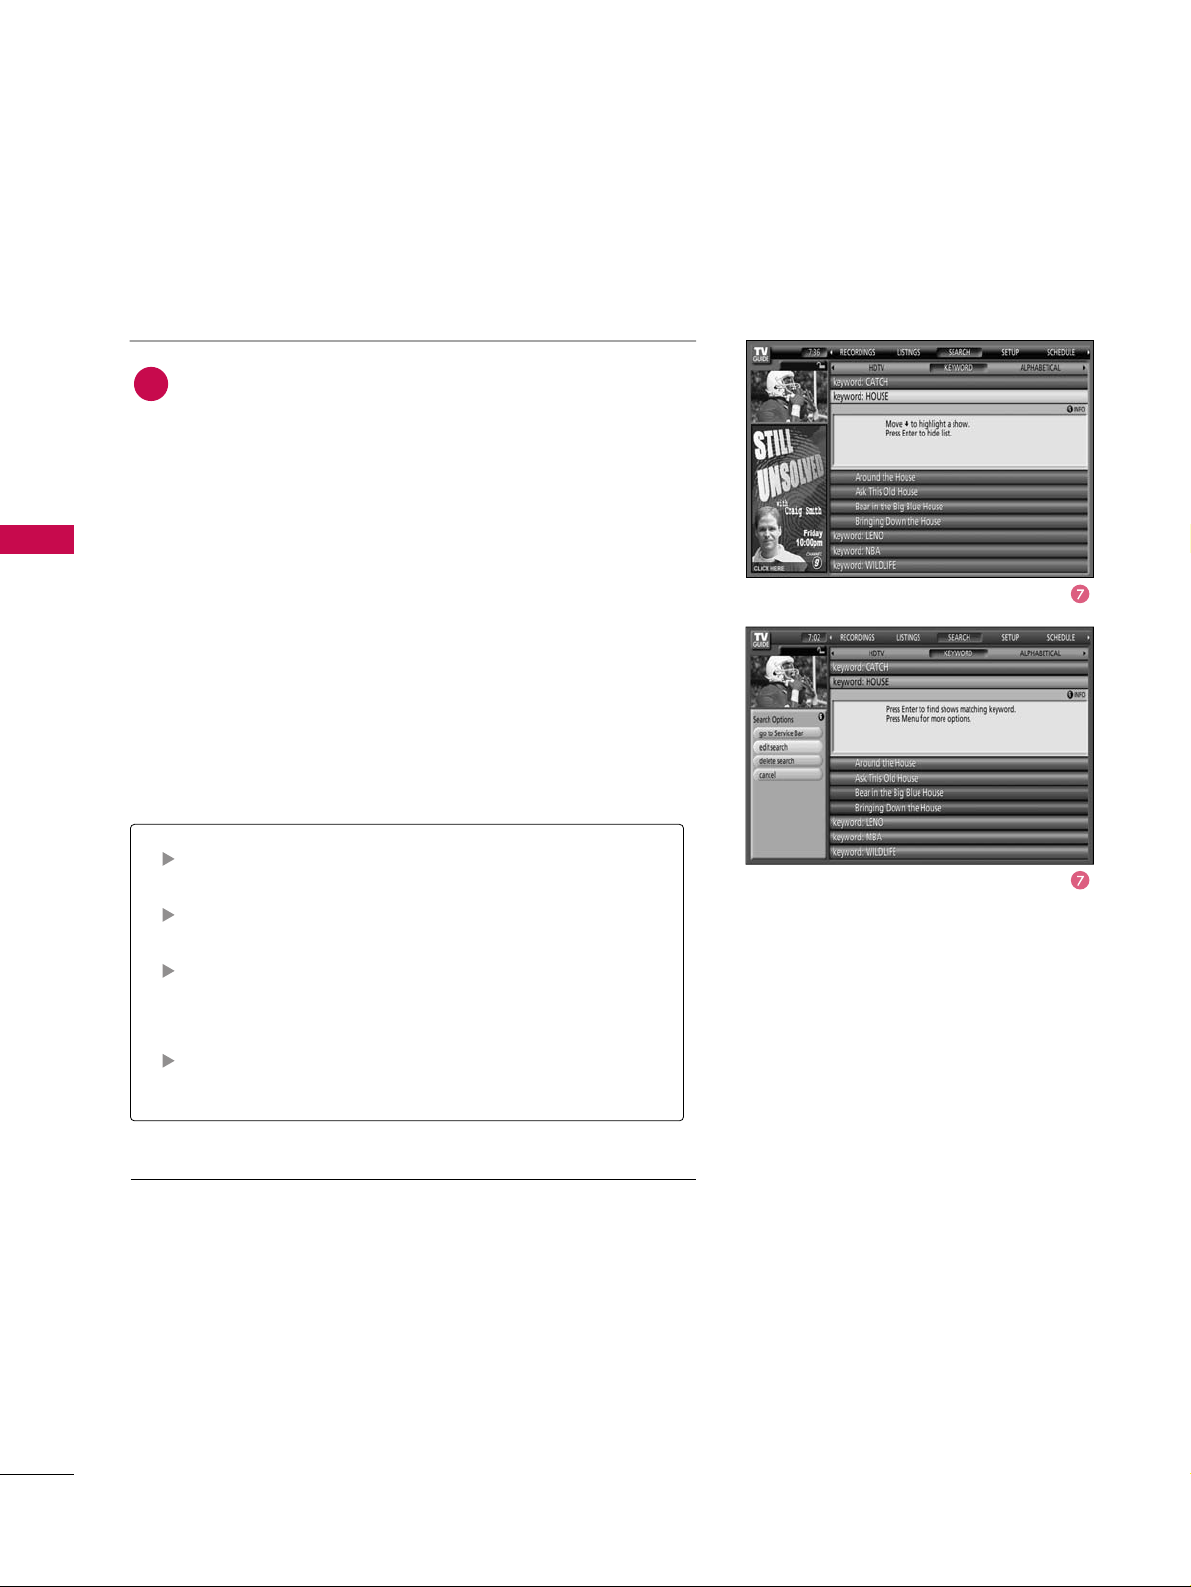
TV GUIDE ON SCREEN
TM
SYSTEM
62
TV GUIDE ON SCREENTMSYSTEM
Go to Service Bar - Closes the menu, changes no information, and returns to the Search Service Bar.
Edit Search - Displays the keyboard, where you can
change the keyword.
Delete Search - A Confirm menu is displayed.
■
Yes - Deletes the Search.
■
No - Closes the panel menu.
Cancel - Closes the menu, changes no information, and
returns to the highlighted show.
A list of all matching shows for that keyword is displayed.
You can highlight a show, and press
EENNTTEERR
button to display all airings. You can then highlight a specific listing and
press
EENNTTEERR
to watch (if On now)or the
MMEENNUU
button to
display the Episode Options menu.
From the Episode Options menu, choose to set a recording, a reminder, or tune to the channel, as previously
described.
The TV Guide On Screen system stores all the keywords
you create. To edit or delete a keyword, highlight the keyword and press the
MMEENNUU
button. A Search Options menu
is displayed.
7
Page 64

TV GUIDE ON SCREEN
TM
SYSTEM
63
Recorded program list
With Recordings highlighted, press the
IINNFFOO
button to
display a Help screen. Press the
IINNFFOO
button again to
close the screen.
Choose the way Recordings are displayed by highlighting
Recordings on the Service Bar and then press the
MMEENNUU
button to display the Recordings Options menu. Use the
DD
or
EE
buttons to choose between the following:
■
In View As, use the FFor
GG
buttons to choose between
Group - Recorded shows are listed without listing
every recorded episode (see example in Screen A).
List - Displays a complete list of every recorded
episode for a show(see example in Screen B).
■
In Sort By, use the FFor
GG
buttons to choose between
Title - Shows are displayed in alphabetical order (see
example in Screen A).
Date - Shows are displayed by date and time, with
most recent date and time first (see example in
Screen B).
When finished, press
EENNTTEERR
button to highlight Done.
Press
EENNTTEERR
button again to close the menu and display
the Recordings with the selected options.
Recordings displays a list of previously recorded or currently recording shows on a
DVR.
Screen A
Screen B
1
2
3
Page 65
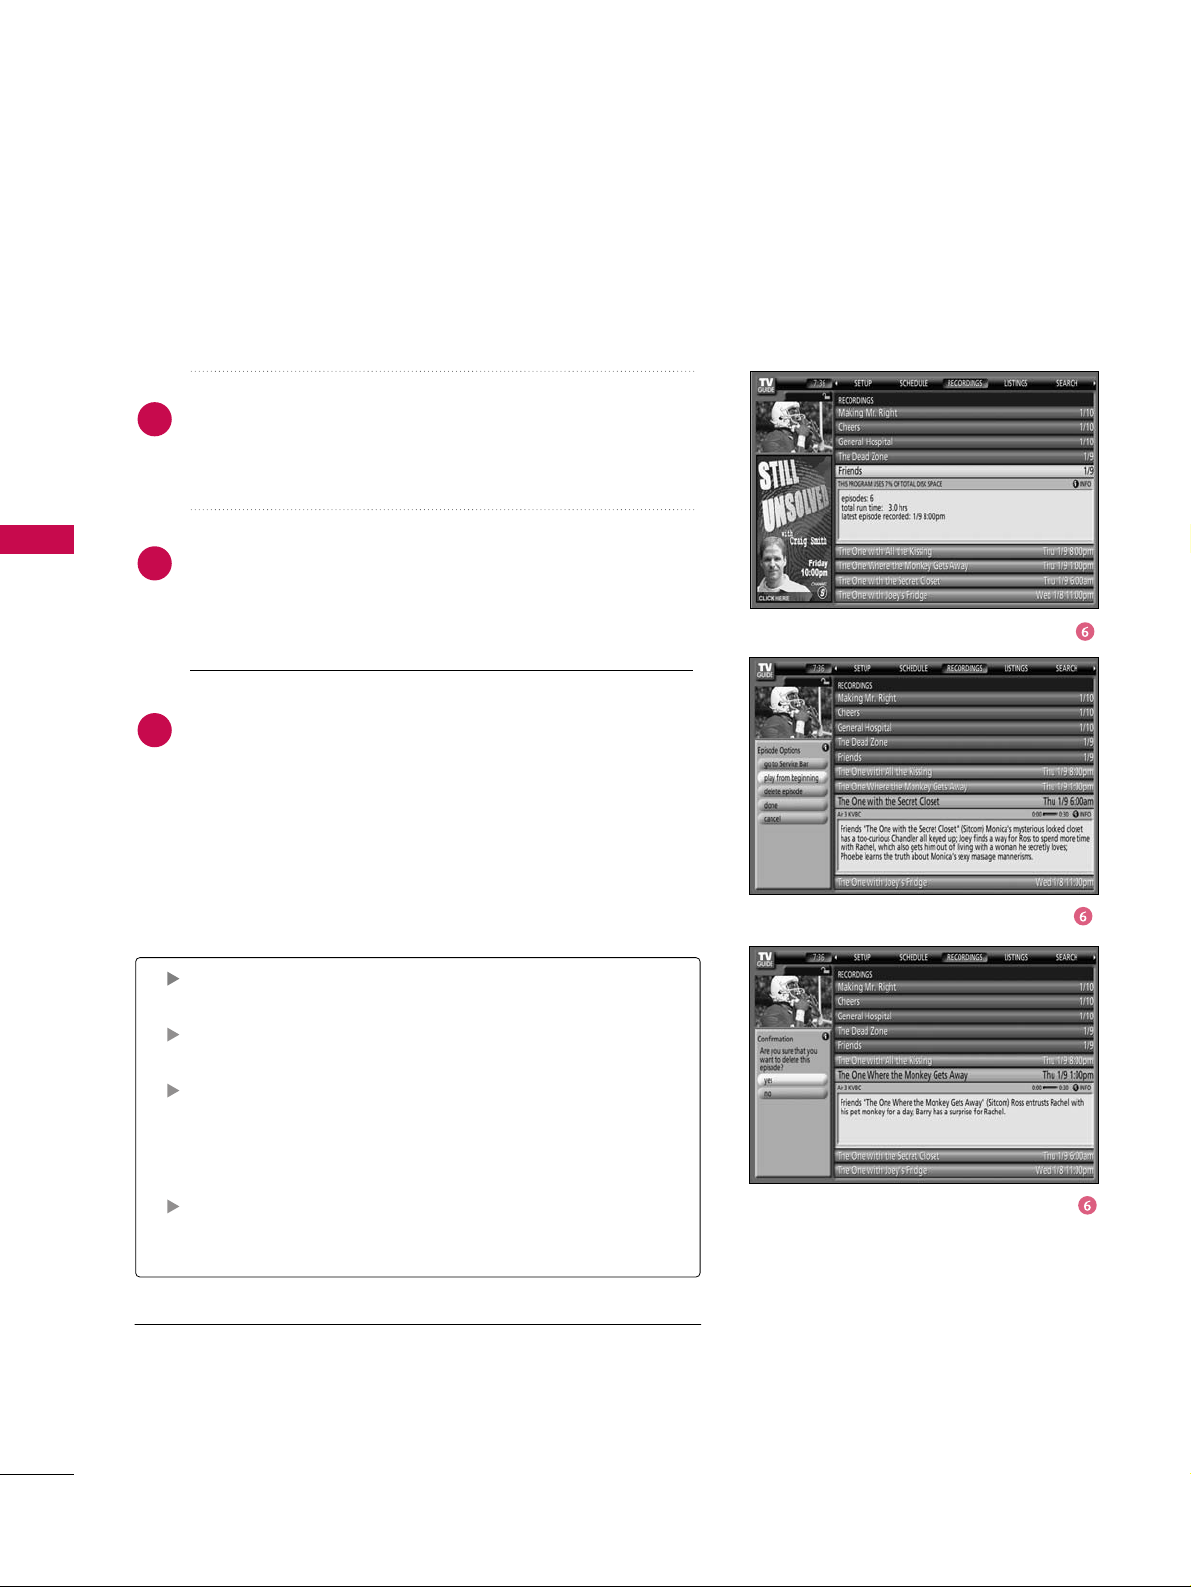
TV GUIDE ON SCREEN
TM
SYSTEM
64
TV GUIDE ON SCREENTMSYSTEM
In List View, highlight an episode and an Info box provides
show information. Press the
MMEE NN UU
button to display the
Episode Options menu.
In Group View, highlight a show and press
EENNTTEERR
button
to view a summary for the all the recorded shows along
with the episode list (Press
EENNTTEERR
button again to col-
lapse the episode list).
Highlight a specific episode and press the
MMEENNUU
button
to display the Episode Options menu.
To view an episode, you can do one of the following:
■
Highlight an episode, and press
EENNTTEERR
button to view it
now.
Go to Service Bar - Close the menu, changes no information, and returns to the Recordings Service Bar.
Play from beginning - View the episode from the beginning in TV Mode.
Delete Episode - Deletes the episode from the
Recordings, A Confirm menu is displayed.
■
Yes - Deletes the episode.
■
No - Closes the panel menu.
Cancel - Closes the menu, changes no information, and
returns to the highlighted show.
4
5
6
Page 66

TV GUIDE ON SCREEN
TM
SYSTEM
65
Schedule
Highlight an event, and press the
MMEE NN UU
button for options.
(Note options vary depending on the type of event you select.)
Schedule lets you review, edit, or delete Record and Remind events that you set
previously.
With Schedule highlighted, press the INFO button to display a Help screen. Press
the INFO button again to close the screen.
An icon identifies the event type:
Remind
Once - Sets a show reminder one time.
Regularly - Sets a show reminder every time the show airs on
the same channel and starts at the same time.
Weekly - Sets a show reminder each time the show airs on the
same day of the week, on the same channel and starts at the
same time.
Off - Keeps the show in the list but will not remind the show
until the frequency is changed.
Go to Service Bar - Closes the menu, changes no information,
and returns to the Schedule Service Bar.
Tune to channel - Exits the TV Guide On Screen system and
tunes to the highlighted show.
Set Recording- Opens a menu from which you can set a recording
for the show. (Remind is not cancelled)
Set Reminder- Opens a menu from which you can set a Reminder
for the show. (Record is not cancelled)
Delete Recording- Removes the recording from the Schedule after
a Confirm screen.
Delete Reminder- Removes the reminder from the Schedule after
a Confirm screen.
Edit Recording- Opens a menu from which you can change existing recording information.
Edit Reminder- Opens a menu from which you can change existing reminder information.
Cancel- Closes the menu, changes no information, and returns to
the highlighted show.
Record
Once - Records the show one time.
Regularly - Records the show every time the show airs on the
same channel and starts at the same time.
Weekly - Records the show each time the show airs on the
same day of the week, on the same channel and starts at the
same time.
Off - Keeps the show in the list but will not record the show
until the frequency is changed.
Page 67

TV GUIDE ON SCREEN
TM
SYSTEM
66
TV GUIDE ON SCREENTMSYSTEM
Highlight a choice, press
EENNTTEERR
button, and follow the
on-screen instructions.
With Setup highlighted, press the
IINNFFOO
button to display
a Help screen. Press the
IINNFFOO
button again to close the
screen.
Change System Settings
This option appears after you have completed the initial
Guide Setup process.
Press
EENNTTEERR
button to display the Confirming Your
Settings screen. You can see your current settings.
Choose one of the options, press
EENNTTEERR
button, and fol-
low the on-screen instructions.
Change Setup
After you initially complete Guide Setup, you can make changes
to Guide settings in the following areas:
■
Change System Settings
■
Change Channel Display
■
Change Default Options
1
2
3
4
Page 68

TV GUIDE ON SCREEN
TM
SYSTEM
67
Change Channel Display lets you edit channel information
that appears in Listings. With Change Channel Display
you can :
■
Re-order the position of the channel in Listings.
■
Change the tune channel number.
■
Switch a channel.
Press
EENNTTEERR
button to display the Channel Editor screen.
Then, highlight a channel and press
MMEENNUU
button. A Grid
Options menu is displayed.
Highlight Go Back to Setup to close the menu, change no
information, and return to the Setup Service Bar.
Or make changes and when finished, press
EENNTTEERR
button
to highlight Done. Press ENTER button again to close the
menu and accept the changes.
Highlight Cancel to close the menu, change no information, and return to the highlighted channel.
Change Channel Display
On - The channel is always displayed.
Off - The channel is never displayed.
Auto-Hide - The channel is only displayed when
program information is available.
1
2
Page 69

TV GUIDE ON SCREEN
TM
SYSTEM
68
TV GUIDE ON SCREENTMSYSTEM
GGeenneerraall DDeeffaauulltt OOppttiioonnss
General Defaults lets you set defaults for the following:
■
The initial Info Box size when the TV Guide On Screen
system is entered.
Choices are No, Small, Large, and Last Used. (Default =
Last Used
)
■
The Info Box size rotation when the
IINNFFOO
button is
pressed while in the TV Guide On Screen system.
Choices are No only, Small only, Large only, No & Small,
No & Large, Small & Large, All.(Default = All
)
■
Automatic entry into the TV Guide On Screen system
(
Auto-Guide)when the TV is powered On. Choices are
On and Off.(Default = Off)
Highlight General Defaults, and press the
MMEE NN UU
button
to display the General Defaults menu.
Highlight Go to Service Bar to close the menu, change no
information, and return to the Setup Service Bar.
When finished, press
EENNTTEERR
button to highlight Done.
Press
EENNTTEERR
button again to close the menu and accept
the changes.
Highlight Cancel to close the menu, change no information, and return to the highlighted option.
Change Default Options
Change Default Options lets you change default settings in the
following categories:
■
General Defaults
■
Record Defaults
■
Remind Defaults
Highlight Change Default Options, and press
EENNTTEERR
button.
1
Page 70

TV GUIDE ON SCREEN
TM
SYSTEM
69
RReeccoorrdd DDeeffaauullttss
Record Defaults lets you set defaults for the following:
■
When to start the record event. Choices are 120 minutes
early to 120 minutes late, to On time. (Default = On time
)
■
When to end the record event. Choices are 120 minutes
early to 120 minutes late, to On time. (Default = On time
)
■
Recorder choice: Please choose HDD only. This TV does
not support other recording devices.
Highlight Record Defaults, and press the
MMEENNUU
button to
display the Record Defaults menu.
Highlight Go to Service Bar to close the menu, change no
information, and return to the Setup Service Bar.
RReemmiinndd DDeeffaauullttss
Remind Defaults lets you set defaults for the following:
■
Power On the TV, if Off, when a Reminder is scheduled.
Choices are Yes and No. (Default = No
)
■
Automatically tune the TV to the channel (TV must be
On), when a Reminder is scheduled. Choices are Yes and
No. (Default = No
)
■
When to display the reminder screen, choices are 30 seconds to 15 minutes early, to 30 seconds to 15 minutes
■
late, to On time. (Default = 1 min early
)
Highlight Remind Defaults, and press the
MMEENNUU
button to
display the Remind Defaults menu.
Highlight Go to Service Bar to close the menu, change no
information, and return to the Setup Service Bar.
When finished, press
EENNTTEERR
button to highlight Done.
Press
EENNTTEERR
button again to close the menu and accept
the changes.
Highlight Cancel to close the menu, change no information,
and return to the highlighted option.
2
3
Page 71
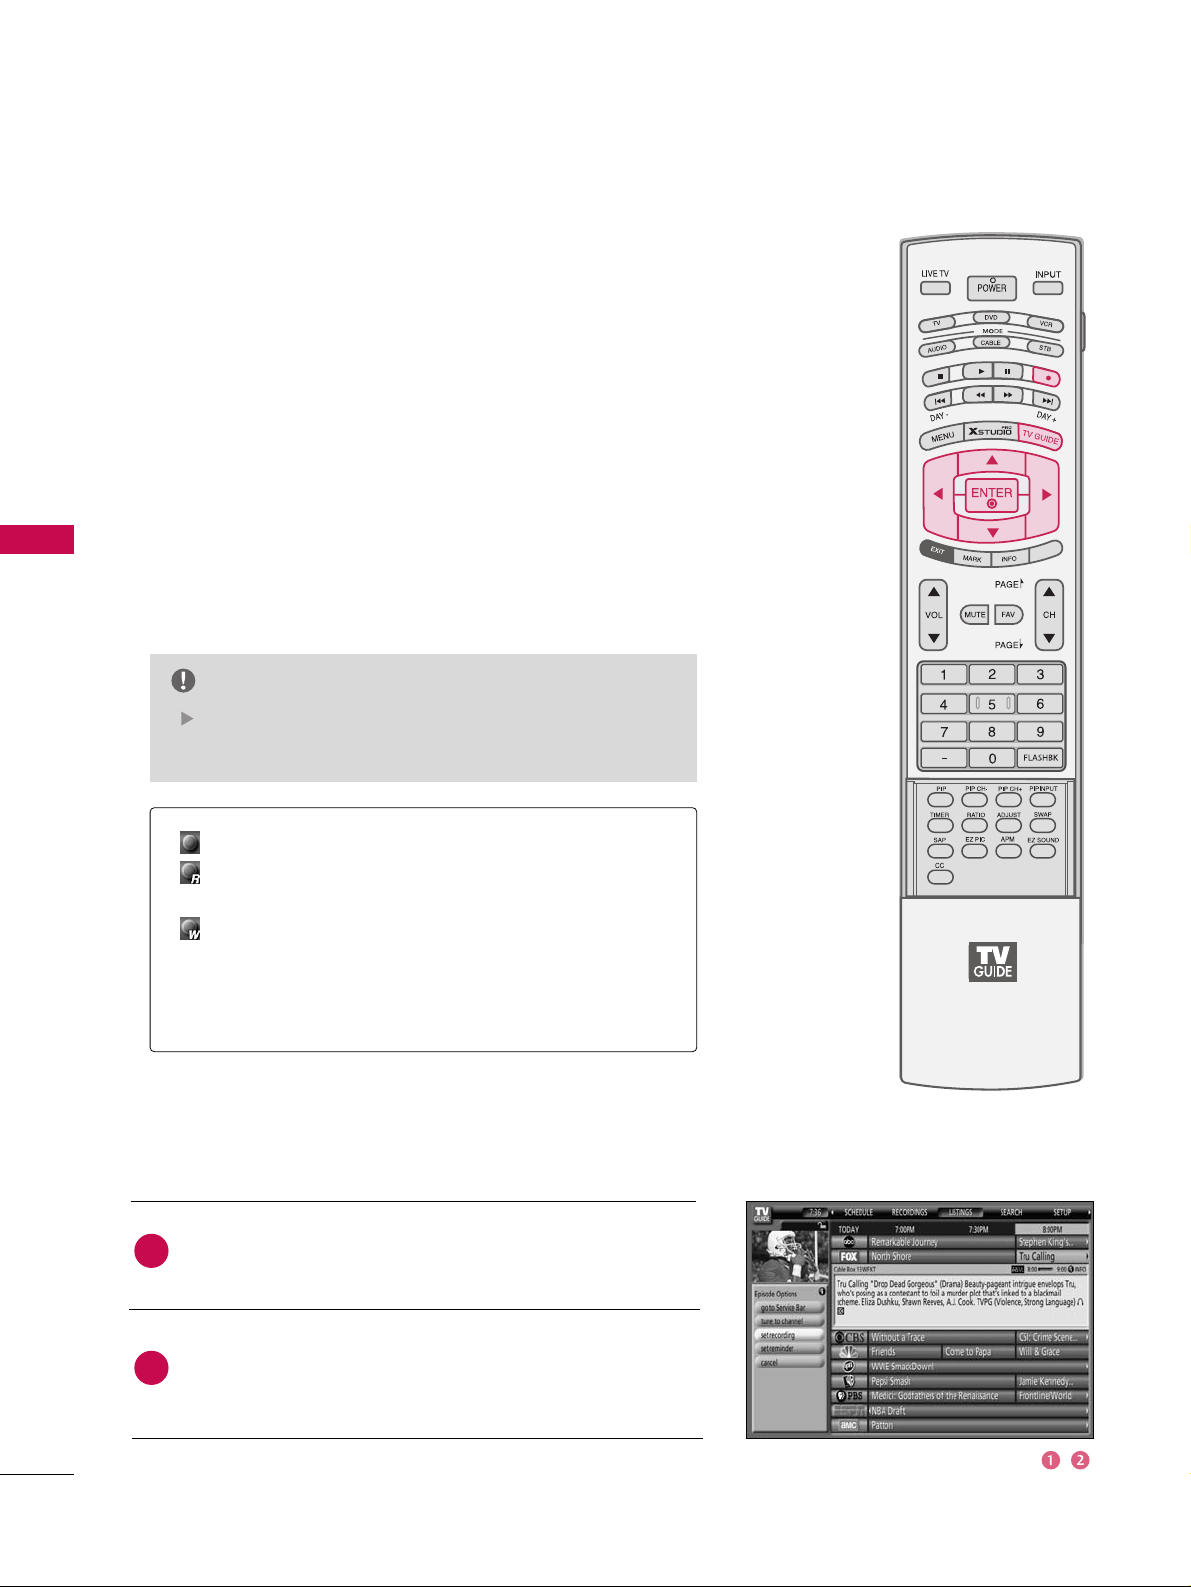
TV GUIDE ON SCREEN
TM
SYSTEM
70
TV GUIDE ON SCREENTMSYSTEM
Record And Remind Features
Using the Record Button on the Remote
■
Press the
RReeccoorrdd
button on the remote to record the show
Once with current default settings (Start and End recording On
Time). Each time you press the
RReeccoorrdd
button, you can change
the record frequency (but not the default settings) among Once
(default), Regularly, Weekly and then Cancel.
Record
You can set a show to Record in Listings, Search, and Schedule
or change Record settings for a show in Schedule.
There are 3 ways to set a show to Record:
Once - Records the show one time.
Regularly - Records the show every time the show airs
on the same channel and starts at the same time.
Weekly - Records the show each time the show airs on
the same day of the week, on the same channel and
starts at the same time.
Cancel (no icon displayed) - Does not record.
The proper Record icon appears on the show tile, as
the
RReeccoorrdd
button is pressed.
NOTE
Highlight a show, and press
MMEE NN UU
button to display the
Episode Options menu.
Highlight Set Recording, and press
EENNTTEERR
button to dis-
play the Record Options menu.
From a Panel Menu
1
2
SIMPLINK
Page 72

TV GUIDE ON SCREEN
TM
SYSTEM
71
Highlight the Frequency option, and use the left and right
arrows to choose among Once, Regularly, Weekly, and Off,
as previously described.
Recorder choice: Please choose HDD only. This TV does
not support other recording devices.
When finished, press
EENNTTEERR
button to highlight Schedule
Recording.
Press
EENNTTEERR
button again to close the menu. You can see
a Record icon for the selected frequency next to the show
title.
Highlight Cancel to close the menu, change no information, and return to the highlighted show.
Highlight the Schedule Service label, and press
MMEE NN UU
button to display the Schedule Options menu.
Highlight New Manual Recording and press
EENNTTEERR
but-
ton to display the Record Options menu.
Current information (i.e., date, start and end times, channel, input) is displayed.
Use the
DD EE FF GG
button to move through the options.
Use the number or the
DD EE FF GG
button to change the
information, as necessary.
Recorder choice: Please choose HDD only. This TV does
not support other recording devices.
In Listings, use the
PPIIPP
button to change the sta-
tus of the Video Window (locked or unlocked) .
NOTE
Manual Recording
3
4
1
2
3
4
5
Page 73
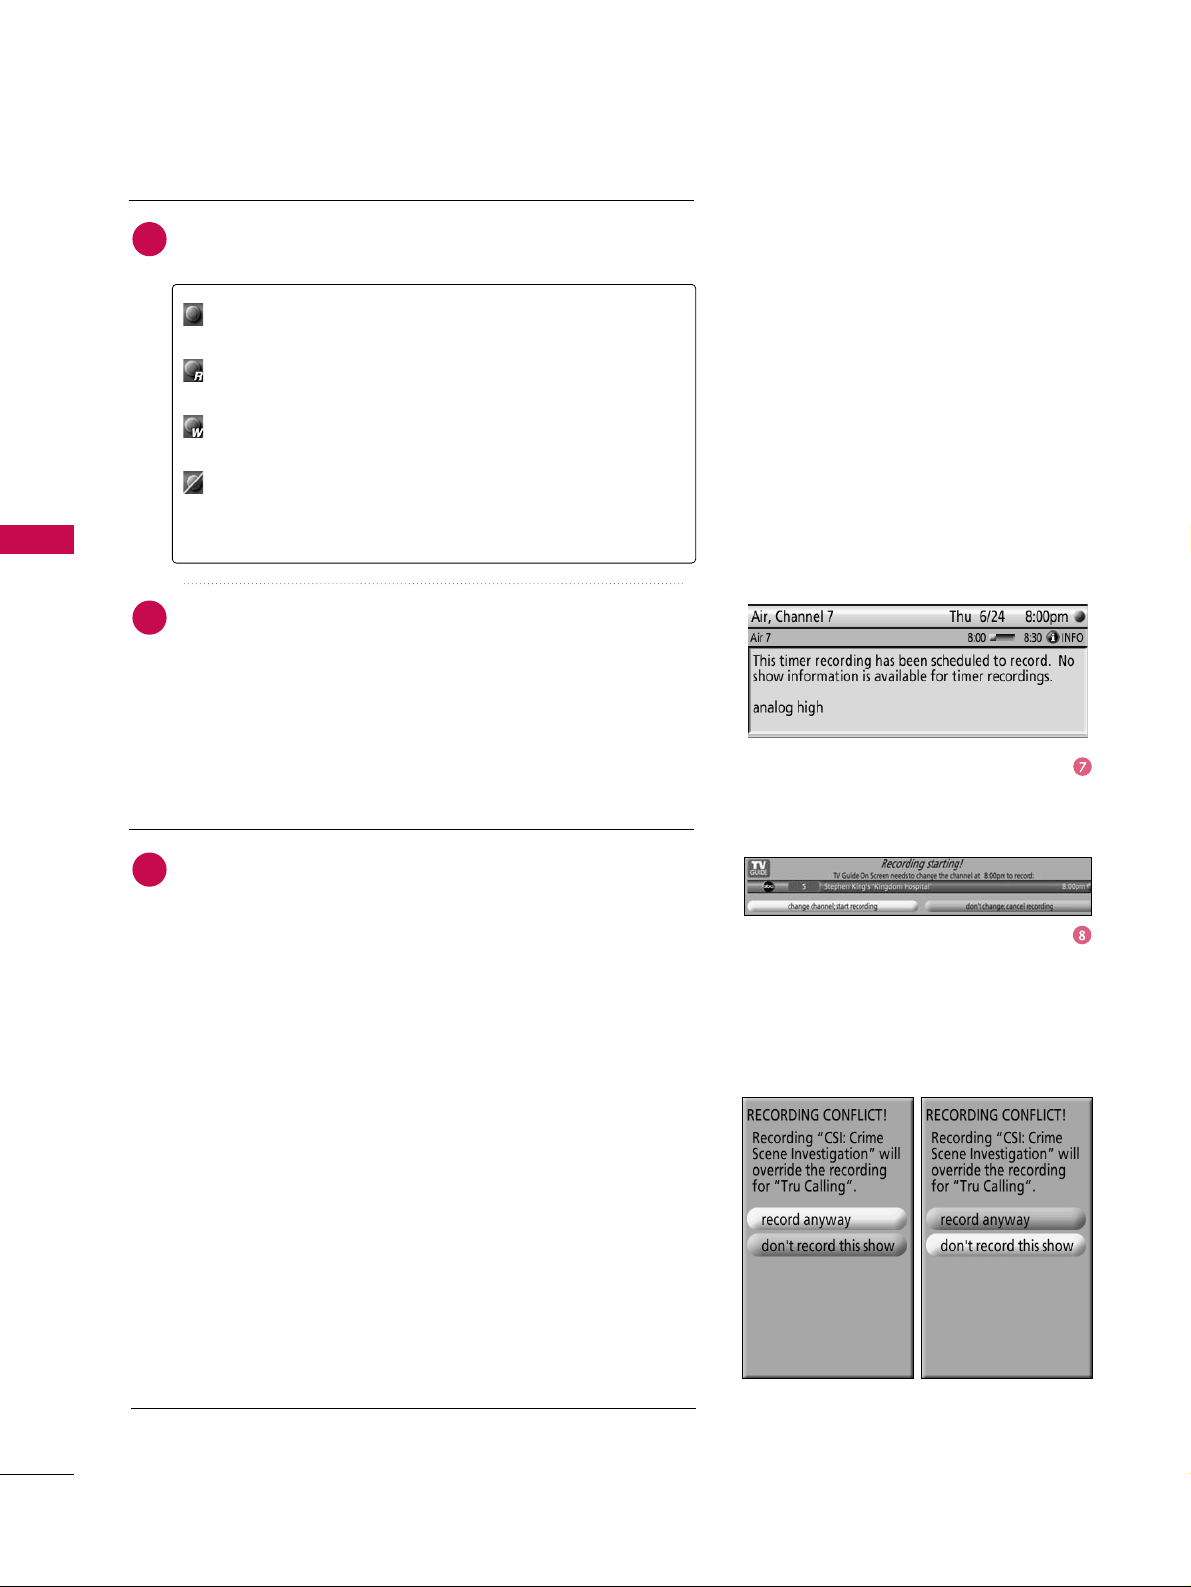
TV GUIDE ON SCREEN
TM
SYSTEM
72
TV GUIDE ON SCREENTMSYSTEM
Highlight Cancel to close the menu, change no information, and return to the highlighted show.
Before a recording begins, a notification screen appears if
your TV is On. At that time, you can choose to start or
cancel recording. If the TV is not On, the recording occurs
as scheduled. If there is no activity for 3 minutes, the notification screen automatically closes and completes the
highlighted item.
Record Conflict
A conflict message appears for the following reasons:
■
A show set to Record overlaps with any part of another
show previously set to Record.
■
A show set to Record overlaps with a show previously set
to auto tune.
Select one of these options:
■
Record anyway - This show will override an existing show
set to Record or auto-tune.
■
Don't record this show - Cancel the Recording.
Highlight the Frequency option, and use the
FF
or GGbutton to
choose between Once, Daily, Weekly, and Off, as follows :
Once - Records the time, channel, input, recorder combination one time.
Daily - Records the time, channel, input, recorder combination Monday through Friday.
Weekly - Records the time, channel, input, recorder combination once a week on this selected day of the week.
Off (not cancel) - Keeps the time, channel, input,
recorder combination in the list without recording until
the frequency is changed.
When finished, press
EENNTTEERR
button to highlight Schedule
Recording.
Press
EENNTTEERR
button again to close the menu. You can see
a Record icon for the selected frequency next to the
input and channel number.
6
7
8
Page 74
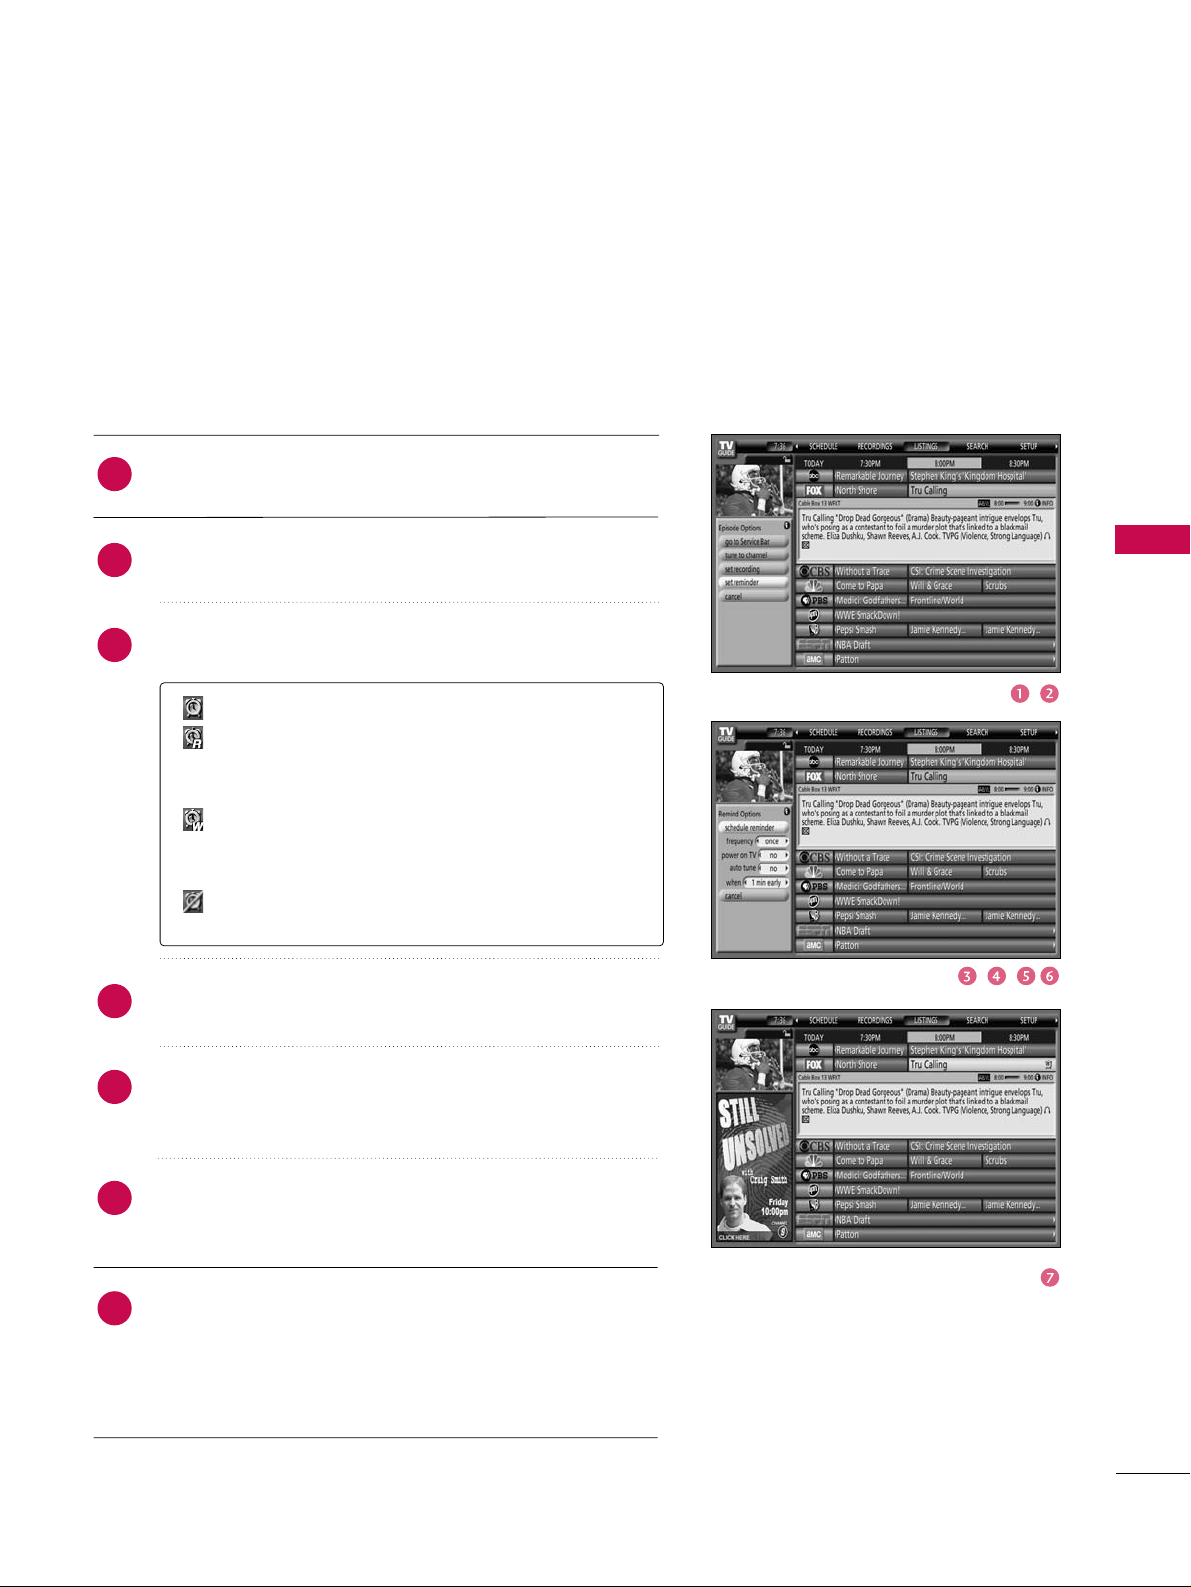
TV GUIDE ON SCREEN
TM
SYSTEM
73
From a Panel Menu
Highlight a show, and press Menu button to display the
Episode Options menu.
Highlight Set Reminder, and press
EENNTTEERR
button to display
the Remind Options menu.
Highlight the Frequency option, and use the left and right
arrows to choose between:
Power On the TV, if Off, when a Reminder is scheduled.
Choices are Yes and No. (Default = No
)
Automatically tune the TV to the channel (TV must be
On), when a Reminder is scheduled. Choices are Yes and
No. (Default =No
)
When to display the reminder screen. Choices are 30 se-
conds to 15 minutes early, to 30 seconds to 15 minutes
late, to On time. (Default = 1 min early
)
When finished, press
EENNTTEERR
button to highlight Schedule
Reminder. Press
EENNTTEERR
button again to close the menu.
You can see a Remind icon for the selected frequency next
to the show title. Highlight Cancel to close the menu,
change no information, and return to the highlighted show.
Remind
You can set a show Reminder in Listings, Search, and Schedule
or change Reminder settings for a show in Schedule.
There are 2 ways to set a show Reminder:
Once - Sets a show reminder one time.
Regularly - Sets a show reminder every time the
show airs on the same channel and starts at the
same time.
Weekly - Sets a show reminder each time the show
airs on the same day of the week, on the same
channel and starts at the same time.
Off - Keeps the show in the list but will not remind
until the frequency is changed.
1
2
3
4
5
6
7
Page 75

TV GUIDE ON SCREEN
TM
SYSTEM
74
TV GUIDE ON SCREENTMSYSTEM
Highlight the Schedule Service label, and press
MMEE NN UU
button to display the Schedule Options menu.
Highlight New Manual Reminder and press
EENNTTEERR
button
to display the Remind Options menu.
Current information (i.e., date, start and end times, channel, input) is displayed.
Use the
DD EE FF GG
button to move through the options.
Use the number or the
DD EE FF GG
button to change the
information, as necessary.
Highlight the Frequency option, and use the
FF
or GGbutton to choose among Once, Daily, Weekly, and Off, as follows :
Power On the TV, if the TV is Off, when a Reminder is
scheduled. Choices are Yes and No.(Default =No)
Automatically tune the TV to the channel (TV must be
On), when a Reminder is scheduled. Choices are Yes and
No.(Default = No)
Manual Reminder
Once - Sets a show reminder for the time, channel,
input combination one time.
Daily - Reminds for the time, channel, input combination Monday through Friday.
Weekly - Sets a show reminder for the time, channel, input combination once a week on this selected
day of the week.
Off (not cancel) - Keeps the time, channel, input
combination in the list without reminding until the
frequency is changed.
1
2
3
4
5
6
7
Page 76

TV GUIDE ON SCREEN
TM
SYSTEM
75
‘
Remind Conflict
A conflict message appears for the following reasons:
■
A show set with an Auto-Tune Reminder has the same start
time as an existing Auto-Tune Reminder.
■
A show set with an Auto-Tune Reminder overlaps with a
Recording already scheduled.
Select one of these options:
■
Auto-tune anyway - This show will override an existing
show set to auto-tune.
■
Proceed, no auto-tune - Set the show as a Reminder but
do not auto-tune.
■
Don't set this reminder - Cancel the Reminder.
When finished, press
EENNTTEERR
button to highlight Schedule
Reminder. Press
EENNTTEERR
button again to close the menu.
You can see a Remind icon for the selected frequency next
to the input and channel number.
Highlight Cancel to close the menu, change no information,
and return to the highlighted show.
If more than 2 reminders are set for the same
time, arrows appear on the Reminder screen. Use
the
DD
or EEbutton to view the shows.
NOTE
Based on your option settings, a notification screen will
appear, if your TV is On at the reminder time. Then you can
choose to hide the reminder, or highlight the show, and
press
EENNTTEERR
button to tune to the show. If there is no
activity for 3 minutes, the notification screen automatically
closes and completes the highlighted item (hide reminders).
If you choose Hide Reminders, the window closes for the
show or shows, but does not affect other Reminders you set.
8
9
10
Page 77
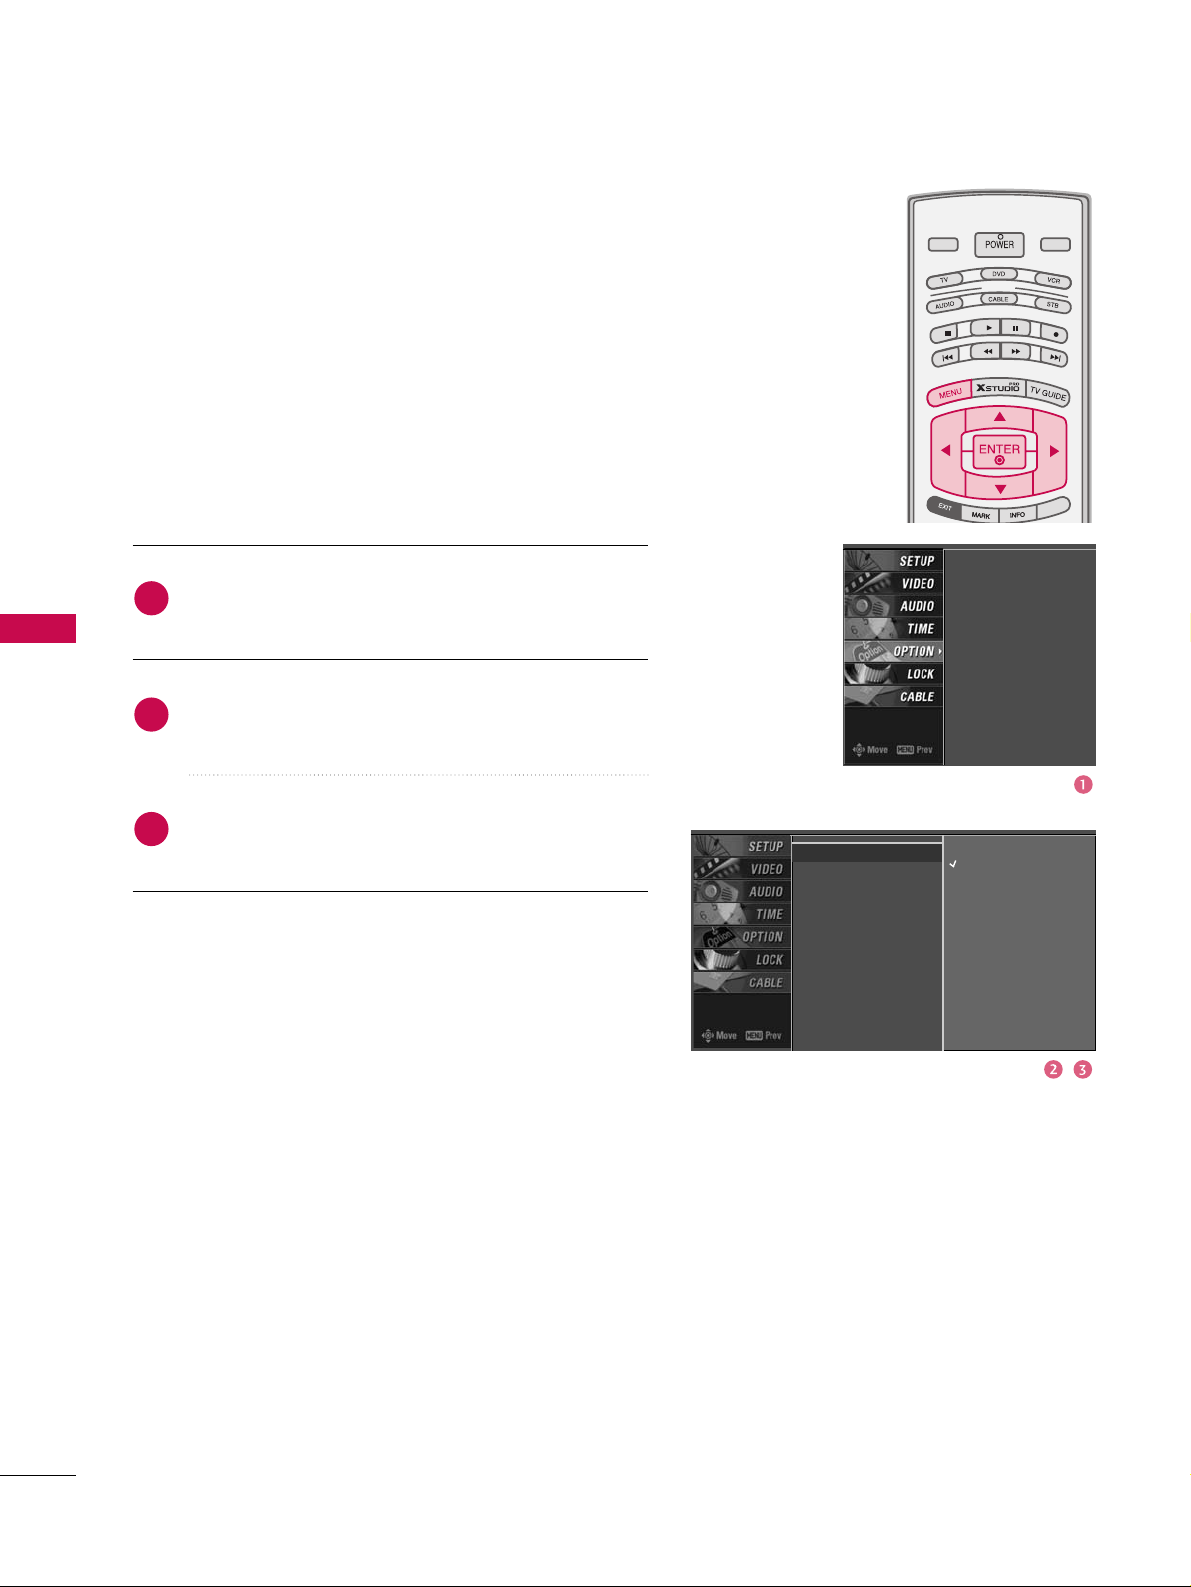
DVR (DIGITAL VIDEO RECORDER)
76
DVR (DIGITAL VIDEO RECORDING)
Timeshift Mode
G
Aspect Ratio
Caption/Text
Caption Option
Language
ISM Method
Low Power
HDD Format
SimpLink
Off
On
When timeshift mode is
on, DVR will automatically
buffer current TV program
up to 1 hour.
Timeshift Mode
Aspect Ratio
Caption/Text
Caption Option
Language
ISM Method
Low Power
HDD Format
SimpLink
TIMESHIFT (PAUSE &REPLAY OF LIVE TV)
This function allows the unit to automatically record live
TV and make it available for reviewing at any time.
With Timeshift turned on, you may pause and rewind normal TV viewing at any time without missing any of the live
broadcast.
■
While simplink function is using, Timeshift function is not
operated in HDMI1/DVI or HDMI2 mode.
Press the
MMEENNUU
button and then use
DD
or EEbutton
to select the
OOPPTTIIOONN
menu.
Press the
GG
button and then use DDor EEbutton to
select the
TTiimmeesshhiifftt MMooddee
.
Press the
GG
button and then use DDor EEbutton to
select
OOnn
or
OOffff
.
MODE
DAY -
DAY +
LIVE TV
INPUT
SIMPLINKSIMPLINK
2
3
1
Page 78

DVR (DIGITAL VIDEO RECORDER)
77
Progressing the Timeshift function
After selecting the
TTiimmeesshhiifftt MMooddee OOnn
, press the
EENNTTEERR
button.
■
As soon as Timeshift starts, a progress bar indicating the
current recording status is displayed in the bottom of the
screen.
■
Press the
EEXXIITT
button to hide the ‘Progress Bar’ or press
the
EENNTTEERR
button to display the 'Progress Bar'.
■
This function is preserved even change a channel on progressing the Timeshift.
When finishing the Timeshift function, enter the option
menu and turn
TTiimmeesshhiifftt MMooddee OOffff
.
NOTE
DVR (Digital Video Recorder): A device which
records and plays broadcast program contents
onto a hard disk in TV or SET TOP BOX.
If available hard-disk space is low when Timeshift
is initiated, the oldest information is deleted.
In order to save hard-disk space, nothing is saved
when there is no signal.
The total storage space of the hard-disk is 160
GB. 10GB minimum is reserved for Timeshift.
When turning power on, it may take up to 3 mi-
nutes to initialize the HDD.
The Timeshift function will not initiate for a copyprotected program.
Because an analog broadcast is transferred to a
digital signal, video that contains rapid movement
may show "cross stripes". This happens when the
analog signal is compressed and then restored in
the digital signal. The unit will attempt to reduce
this excessive picture noise.
When using the PIP/POP mode, Timeshift is
stopped.
Timeshift is available in AV1, AV2, Antenna, Cable
mode.
Timeshift is available in Component1,2, HDMI1,
2 mode.
Timeshift is not available for Audio only channels.
The timeshift may not work properly in some
audio streams.
2
1
TThhee ‘‘PPrrooggrreessss BBaarr’’??
This function indicates a possible DVR reshowing
section, a current on-screen and real on-broad-
casting position, a section of section-recording.
Status of current displayed video.
Current save time.
15 minute intervals from Timeshift start time.
(Total - one hour).
Indicates current Timeshift position.
Page 79

DVR (DIGITAL VIDEO RECORDER)
78
DVR (DIGITAL VIDEO RECORDING)
Progressing the Timeshift function, play
On progressing Timeshift, It can do a diversified playing.
Indicates that the current broadcast and displayed video differ.
When playing, press the
RREEWW(( )) oorr FFFF(( ))
button.
■
Press -> -> -> to speed up.
■
Pressing these buttons repeatedly increases the fast forward/reverse speed.
Press the or button to move back and forth within the current program.
■
Press the button to jump about 20 seconds forward.
■
Pressing the button to jump about 8 seconds backward.
During playback, press the
PPaauussee(( ))
button.
■
Still screen is displayed.
■
Repeatedly press the
PPaauussee(( ))
button to advance frame by frame.
■
Press the
PPaauussee(( ))
button and then the
FFFF(( ))
button for slow motion
(as showing the . )
■
When using the
FF
or
GG
button during playback the cursor can be viewed on
the screen.
Press the
PPLLAAYY(( ))
button to return to normal playback.
If you want to return to the live broadcast, press the
LLIIVVEE TTVV
button.
Using the remote control
You can shift playback to any point within playing the recorded program.
Forth and Back +/- Directly View Stop Play
Frame by
Frame
Pause
Slow motion
LIVE TV
INPUT
MODE
SIMPLINK
LIVE TV
Page 80

DVR (DIGITAL VIDEO RECORDER)
79
Select the desired channel to record and then press the button.
During recording is displayed. Use this feature to record up to 2
hours of programming.
If you want to stop recording, press the button. And then recording will
stop.
You can add/subtract recording time by pressing the button while recording. Press the
FF
or GGbutton repeatedly to add/subtract to the recording time.
Each time you press
FF
or GGbutton the recording duration changes as shown
below.
INSTANT RECORDING
Instant Record
Use this function to record the program you are watching on the main screen
(Analog or Digital broadcast.)
This function records the currently displayed channel.
++ 1100 mmii nn-->> ++ 22 00 mmiinn-->> ++ 33 00 mmiinn-->> ++ 44 00 mmiinn-->> ++ 55 00 mmiinn-->> ++11hhrr
--1100 mmii nn-->> --2200mmii nn-->> --3300mmii nn-->> --4400mmii nn-->> --5500mmii nn-->> --11hhrr
NNoo CC hhaa nn ggee
■
While recording, if you press the button fewer than
10 seconds, this message is displayed.
■
If you press the button more than 10 seconds, this
message is displayed.
■
Do not subtract more than the current recorded time or you will receive
the following error message.
( For example, if you have recorded for 35 minutes, you cannot subtract
40 minutes. )
RReeaacchheedd pp oo ssssii bbllee mmiinniimm uumm rr eeccoorrddiinngg dduurraattiioonn..
2
3
1
Page 81
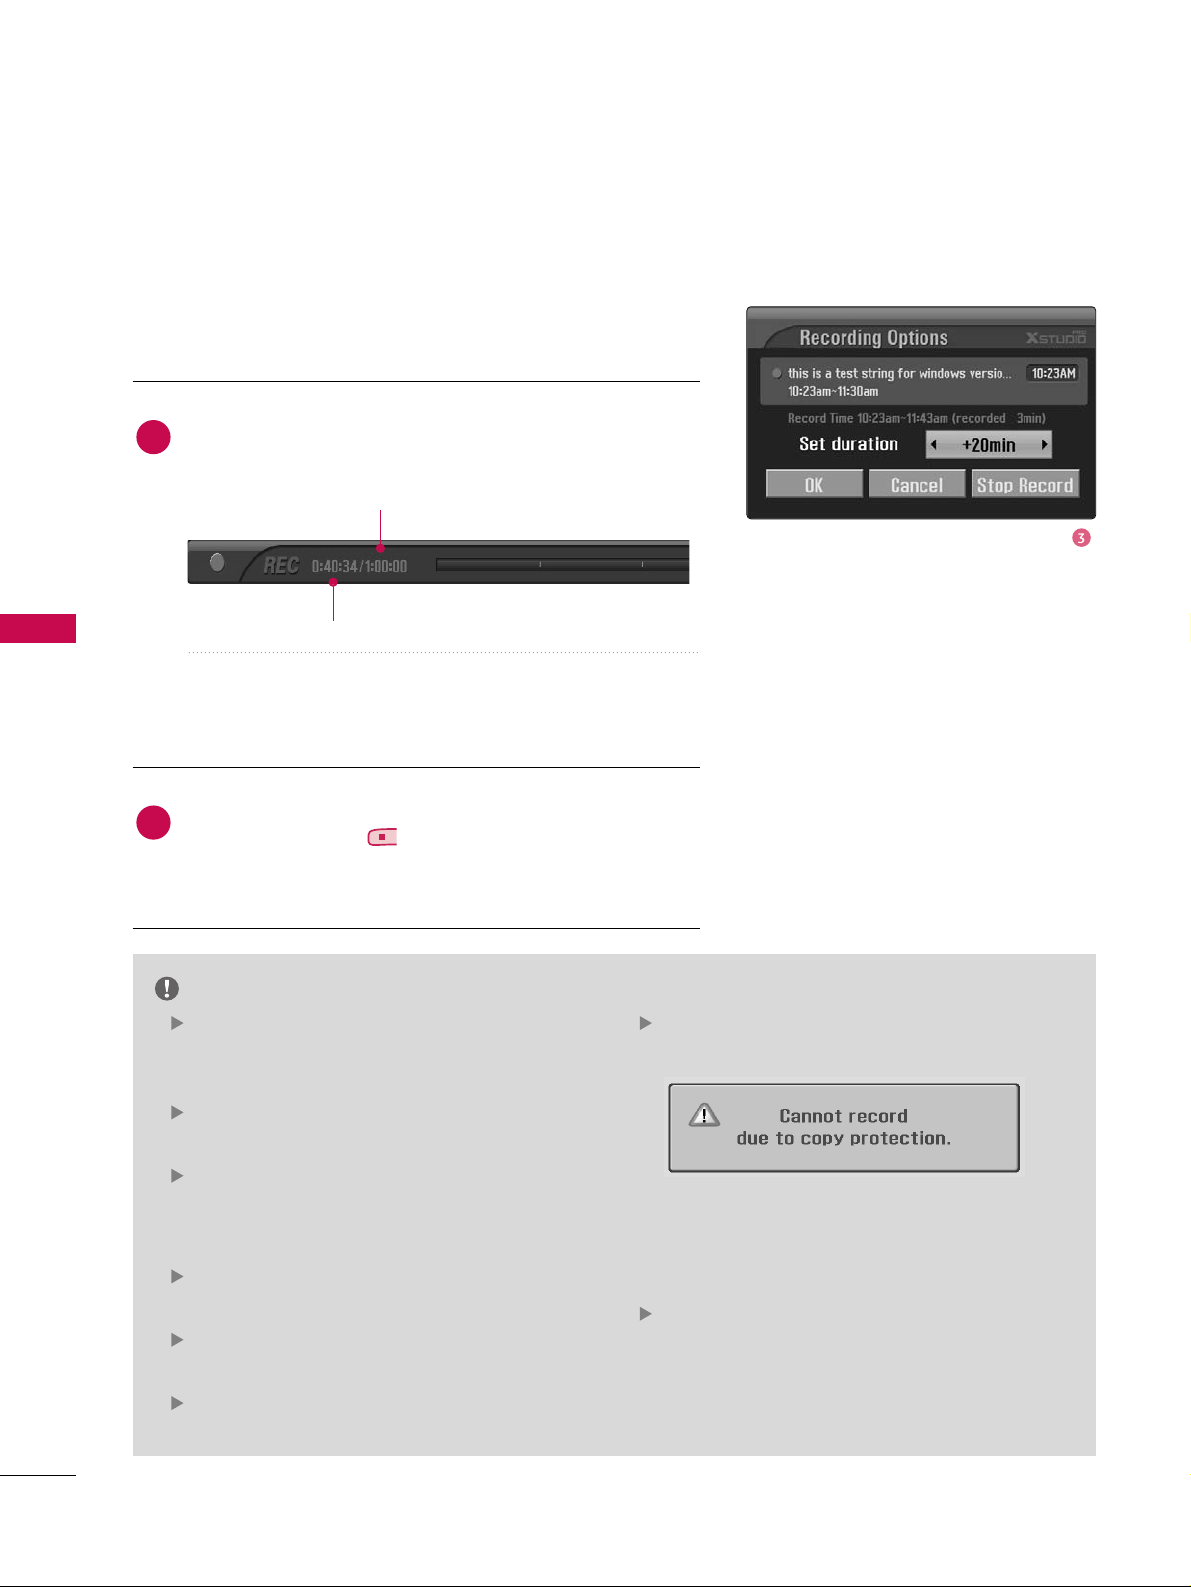
DVR (DIGITAL VIDEO RECORDER)
80
DVR (DIGITAL VIDEO RECORDING)
NOTE
When recording, if the available storage space
becomes low, the recording will be automatically
stopped.
Recordings of less than 10 seconds will not be
saved.
To save disk space while recording analog or di-
gital broadcasts, no data is saved if there is no
signal.
The recording function will not initiate for a
copy-protected program.
The displayed time slightly differ from the actual
time.
In no signal or film source, the displayed time
slightly differ from the actual time.
The recording can not be used with copy-protected programs on progressing Timeshift .
If you press Record while watching a broadcast
(with content-protected program) using the
Timeshift function, recording begins from that
point.
If you record for a long time, in a state of the
Analog signal is weak, remained recording time
may be short.
The extra recording time added to the existing setting
equals the final recording time.
After adjusting the recording time, select
OOKK
. The progress
bar will be displayed.
■
Press the
EEXXIITT
button to hide the Progress Bar. Press the
EENNTTEERR
button to display the progress bar.
Recording stops when the selected duration is reached or
when you press the button.
Note: Although recording has stopped, the Timeshift feature remains active.
Elapsed recording time
Total recording duration
4
5
Page 82

DVR (DIGITAL VIDEO RECORDER)
81
Watching & Record
screen being recorded
Watch & Record Input
While recording, you can change channels or inputs without disturbing the recording. The broadcast being recorded can be
shown in the lower-right corner of the main screen.
After starting an Instant Record or Reserved Record,
change the channel or input.
■
You can check the show being recorded in the lower-right
corner the main screen (as shown below).
■
Press the
PPIIPP
button to cancel or show the program being
recorded.
■
Press the
SSWWAAPP
button to return to the program being
recorded in Watch & Record.
■
When changing to the channel being recorded in Watch &
Record, the screen is changed to Instant Record state or
Reserved Record state.
NOTE
CAUTION
When a digital broadcast is being recorded, another
digital broadcast cannot be watched.
if you turn the power off on recording, this message is
displayed as shown below.
If you selects Yes, recording stops and then power is off.
If you selects No, recording continues and the power is
turned off.
Digital Analog AV1 AV2
Digital X 0 0 0
Analog 0 0 0 0
AV1 0 0 0 0
AV2 0 0 0 0
Component1 0 0 0 0
Component2 0 0 0 0
RGB-PC/DTV 0 0 0 0
HDMI1/DVI 0 0 0 0
HDMI2 0 0 0 0
Record
Watch
FLASHBK
APM
CC
1
Component1 Component2
Digital X X
Analog X X
AV1 X X
AV2 X X
Component1 X X
Component2 X X
RGB-PC/DTV X X
HDMI1/DVI X X
HDMI2 X X
Record
Watch
Page 83

DVR (DIGITAL VIDEO RECORDER)
82
DVR (DIGITAL VIDEO RECORDING)
MODE
LIVE TV
INPUT
DAY -
DAY +
SIMPLINK
Press the button to display
HHOOMMEE
menu. Use the
DD
or EEbutton to select the
MMaannuuaall RReecc
and then use the
EENNTTEERR
or
GG
button.
MMaannuuaall RReecc
screen is displayed as shown below.
Use the
DD EE FF GG
button to set the
IInnppuutt,CChhaannnneell
,
DDaattee,SSttaarrtt TTiimmee,EEnndd TTiimmee,FFrreeqquueennccyy
.
After setting the
MMaannuuaall RReecc
, press the
EENNTTEERR
button.
IInn pp uutt
: Select the input source from the available options
(TV, DTV, CATV, CADTV, AV1, AV2, Component1,2).
Note: If the TV Guide On Screen is Setup only for antenna :
CATV and CADTV are not available, and if the TV Guide On
Screen is Setup only for cable : TV and DTV are not available.
CChhaannnnee ll
: Select either the current channel or a scanned
channel.
DD aa tt ee
: You can select a date up to one month in the
future.
SStt aarr tt TTiimmee // EEnndd TTiimmee
: Ensure you have set AM or PM
correctly.
FF rree qquueennccyy
: Choose among Once, Daily and Weekly.
NOTE
You can see scheduled detail
information on the SCHEDULE
menu of the TV Guide On
Screen.
• You can also set the manual
recording in the Schedule Options
panel menu of the SCHEDULE.
(
p.65)
2
3
1
This function is easy to register to reserved recording.
- In order to use this feature, you must first setup the TV Guide
On Screen system.
PROGRAMMED RECORDING
Page 84
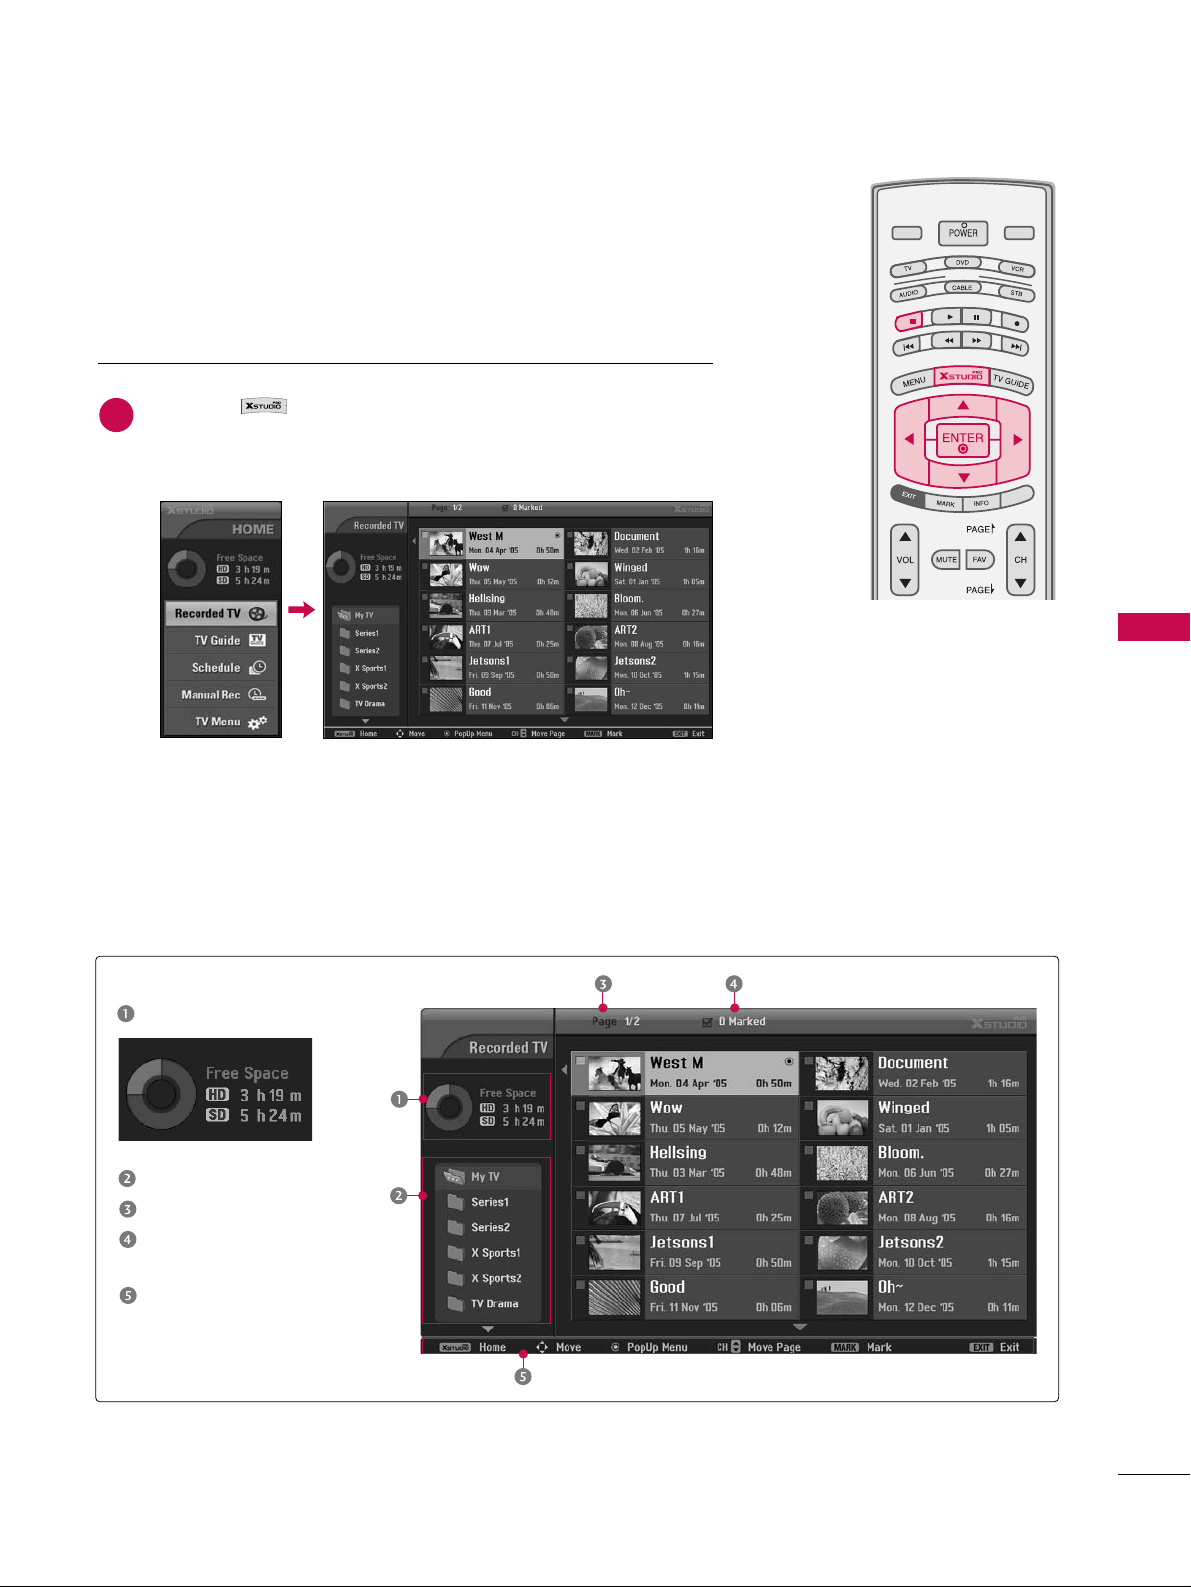
DVR (DIGITAL VIDEO RECORDER)
83
RECORDED TV PROGRAM LIST
You can watch the recorded program list at a glance.
Press the button to display
HHOOMMEE
menu.
Use the
DD
or
EE
button to select the
RReeccoorrddeedd TTVV
and then
use the
EENNTTEERR
or
GG
button.
Screen Components
Folder List
Current page/Total pages
Marked thumbnail photo
number
Direct Buttons
Usable HDD
1
LIVE TV
INPUT
DAY -
MODE
DAY +
MPLINK
SI
Page 85

DVR (DIGITAL VIDEO RECORDER)
84
DVR (DIGITAL VIDEO RECORDING)
Folder List
Select a desired folder in the folder list and then press the
EENNTTEERR
button to view the detailed menu.
Use the
CCHH
DD
or
EE
button for page up/down navigation.
Use the button to move or delete from the list. A
is displayed next to the thumbnail photo if an item is
marked.
Recorded program Selection and PopUp Menu
The thumbnail recorded list is shown above.
Create: Create new folder.
Delete: Delete folder (except ‘My TV’).
Rename: Edit folder name (except ‘My TV’).
Use the
DD EE FF GG
and
EENNTTEERR
button to edit folder
name.
Move the cursor to OK and press the
EENNTTEERR
button to
save.
Cancel: Close the detailed menu.
2
1
DAY -
DAY +
SIMPLINK
Page 86

DVR (DIGITAL VIDEO RECORDER)
85
■
If the HDD has a problem performing a function
(Recording) related to the DVR, select
YYeess
or
NNoo
to ini-
tialize HDD.
If you select
YYeess
, the Recorded List (Recording) will be
deleted. If you select
NNoo
, the DVR may not function pro-
perly.
■
If the temperature is below zero (0°), a warning message
is displayed and you need to initialize the HDD.
Use
DD EE FF GG
button to navigate the appropriate thumb-
nail photo, then press the
EENNTTEERR
button to open the pop-
up menu.
Repeatedly, press
EEXXIITT
button to return to TV viewing or
press button to return to the
HHOOMMEE
menu.
PPllaayy
: Begin playback of selected recorded program.
MMaarrkk AAllll
: mark all recorded programs on the screen.
UUnnmmaarrkk AAllll
: Change marked recorded programs to
unmarked recorded programs.
MMoovvee
: Move recorded program saved in HDD to a dif-
ferent folder.
DDeelleettee
: Delete the selected recorded programs.
RReennaammee
: Edit recorded program title.
CCaanncceell
: Close the Pop-up menu.
4
3
Page 87

DVR (DIGITAL VIDEO RECORDER)
86
DVR (DIGITAL VIDEO RECORDING)
Playing recorded programs
You can play the selected program in the recorded program list.
Play a recorded program.
While playing, You can see a diversified playback screen as shown below.
■
At first, an icon showing current playback mode is displayed as marking
. Then press the
EENNTTEERR
button to display the progress bar.
■
To stop displaying the recorded programs icon, press the
EEXXIITT
button.
TThh ee ‘‘PPrrooggrreessss BBaarr’’??
This function indicates a possible DVR
reshowing section, a current on-screen
and real on-broadcasting position, a
section of section-recording.
Indicates movement of recorded
program.
Indicates status of recorded program.
Indicates elapsed playback time.
Indicates total playback time.
Indicates a quarter of program runtime.
Indicates current playback position.
Using the remote control
You can shift playback to any point within the recorded program.
When playing, press the
RREEWW(( )) oorr FFFF(( ))
button.
■
Press -> -> -> to speed up.
■
Pressing these buttons repeatedly increases the fast forward/reverse speed.
Press the or button to move back and forth within the current program.
■
Press the button to jump about 20 seconds forward.
■
Pressing the button to jump about 8 seconds backward.
During playback, press the
PPaauussee(( ))
button.
■
Still screen is displayed.
■
Repeatedly press the
PPaauussee(( ))
button to advance frame by frame.
■
Press the
PPaauussee(( ))
button and then the
FFFF(( ))
button for slow motion
(as showing the ).
■
After using
GG
to rewind while playing, press the
FF
button to return to the
prior screen.
Press the
PPLLAAYY(( ))
button to return to a normal playback.
■
If you want to return to the live broadcast, press the
LLIIVVEE TTVV
button.
■
If you press the
SSTTOOPP(( ))
button, you can watch TV.
2
1
LIVE TV
Page 88
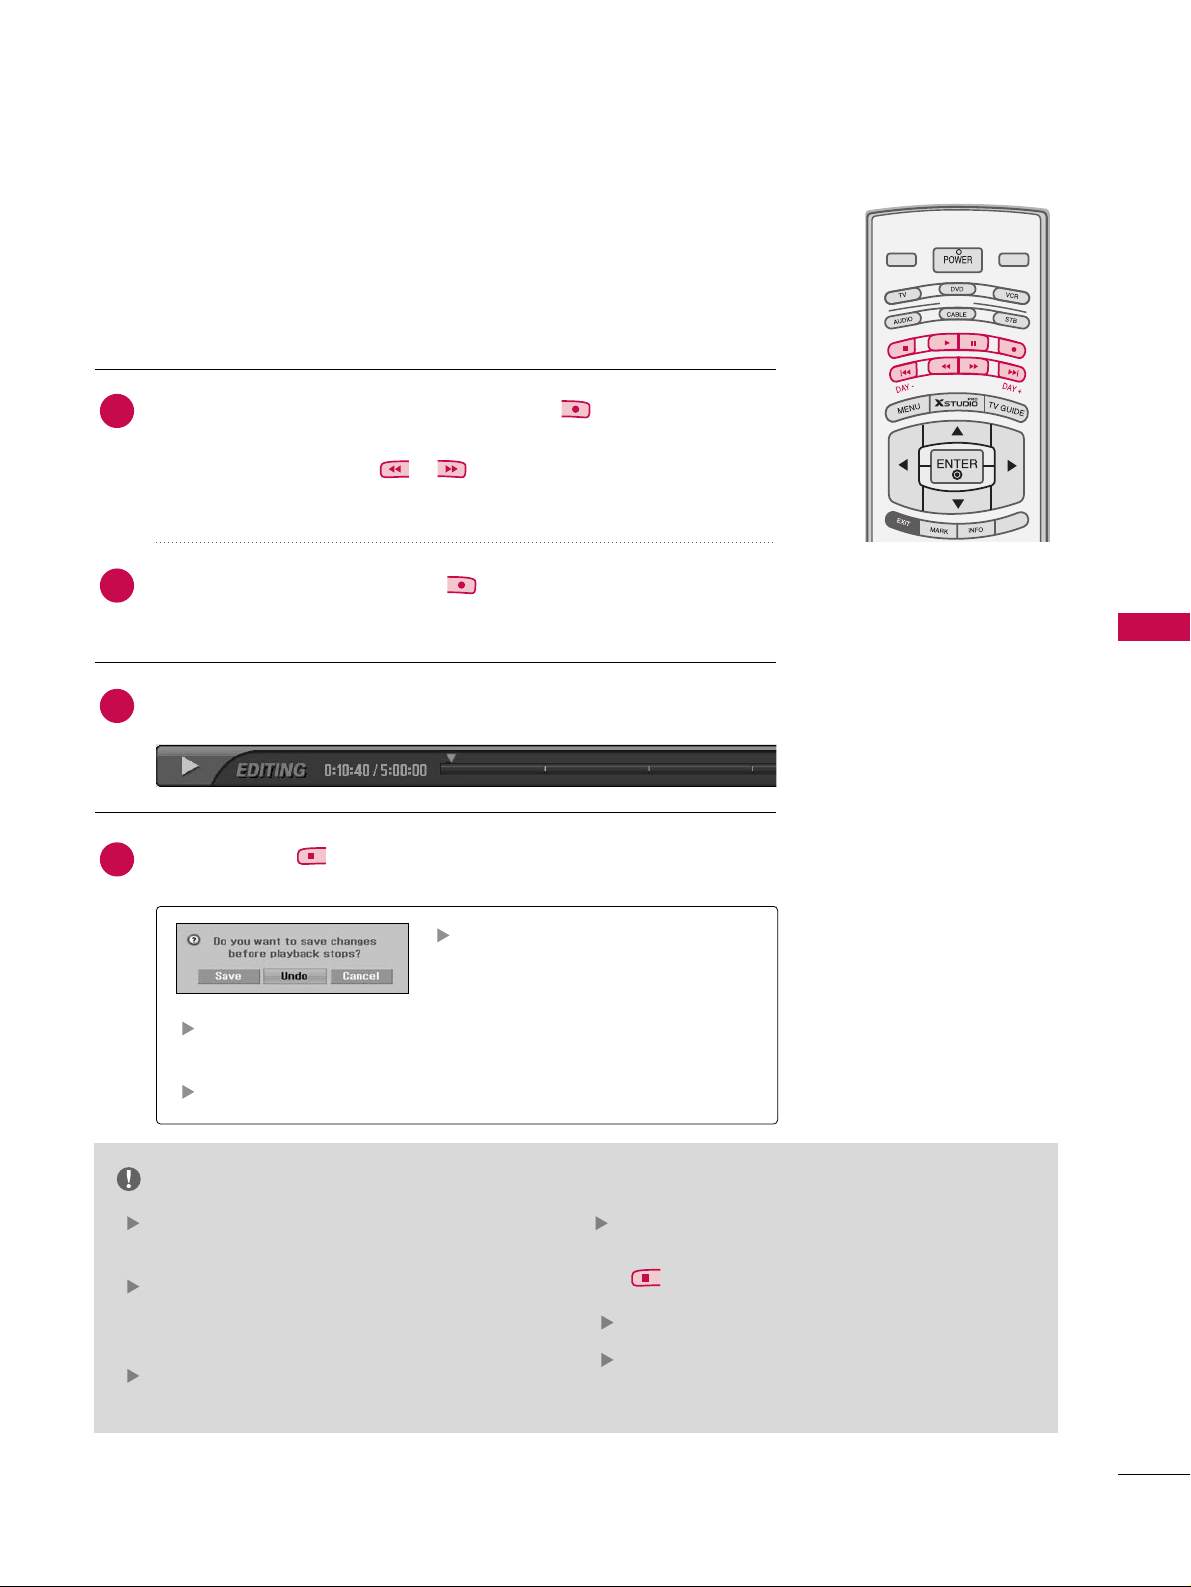
DVR (DIGITAL VIDEO RECORDER)
87
At the point you wish to start editing, press the button.
■
The progress bar will show the edited section as red.
■
It is possible to search ( or ), and pause while editing the section.
When you wish to stop, press the button.
■
Stop editing the section.
If you repeat steps 1,2, it is possible to edit more programs.
If you press the button to stop the recorded program playback, this
message is displayed as shown below.
NOTE
It is possible to play the recording / reserved
recording.
You may hear noise from the hard-disk during
playback of the recorded program. This is normal
and does not indicate a problem.
When saving the content of the edited section,
delete the portion not selected.
When power fails during editing, the program
may not be saved or edited. Press the
SSTTOOPP
(( ))
button after checking the recording list.
You can edit up to 10 programs.
You must select at least 10 seconds for the edited portion to be saved.
MODE
LIVE TV
INPUT
SIMPLINK
Editing a section
You can save the desired screen in the recorded program list after editing the
recorded program.
UUnnddoo
: Don't save contents of the edited section and finish the
playback of the recorded program.
CCaanncceell
: The screen returns to playback.
SSaavvee
: Save contents of the edited
section and finish the playback of
the recorded program.
4
2
3
1
Page 89

DVR (DIGITAL VIDEO RECORDER)
88
DVR (DIGITAL VIDEO RECORDING)
On playing the recorded program, repeat a section
MODE
LIVE TV
INPUT
SIMPLINK
You can set the recording to repeat the same section.
At the point you wish to start, press the button.
■
The following symbol will appear: .
At the point you wish to finish, press the button.
■
The following symbol appears: .
■
Repeatedly play the marked section.
■
You can not make sections of less than 5 seconds.
■
The progress bar for the repeated section will be shown in blue.
Press the button to stop playing the repeat section.
NOTE
It is possible to search using ( / ).
Pause to edit a section while repeating.
2
3
1
Page 90

DVR (DIGITAL VIDEO RECORDER)
89
FORMAT HARD DISC
Erases all programs and initializes the hard drive.
Press the
MMEENNUU
button and then use
DD
or EEbutton
to select the
OOPPTTIIOONN
menu.
Press the
GG
button and then useDDor EEbutton to
select
HHDDDD FFoorrmmaatt
.
Press the
EENNTTEERR
or
GG
button.
Select
YYeess
or
NNoo
to format HDD as shown below.
Press
EEXXIITT
button to return to TV viewing or press
MMEENNUU
button to return to the previous menu.
MODE
LIVE TV
INPUT
DAY -
DAY +
SIMPLINK
- If you select
YYeess
, the Recorded List (Recording) will
be deleted. Even if you selects
YYeess
, the DVR may not
function if there are problems with the hard drive.
2
3
4
1
Timeshift Mode
Aspect Ratio
Caption/Text
Caption Option
Language
ISM Method
Low Power
HDD Format
G
SimpLink
Timeshift Mode
Aspect Ratio
Caption/Text
Caption Option
Language
ISM Method
Low Power
HDD Format
SimpLink
Selection ( Gor ) leads
you to delete all programs
from list and initialize
HDD.
Page 91

TV 4-0
TV 6-0
PICTURE CONTROL
90
PICTURE CONTROL
APM
CC
Watching PIP/POP/Twin Picture
Press the PIP button to access the sub picture.
Each press of PIP changes the PIP options as shown below.
PIP Mode POP Mode
Twin picture Mode
PIP lets you view 2 different inputs (sources) on your TV screen
at the same time. One source will be large, and the other
source will show a smaller inset image.
Twin Picture mode splits the screen into two images, allowing
two picture sources to be shown on the TV screen at the same
time. Each source is given half the screen.
TV 2-0
PIP Off
WATCHING PIP (PICTURE-IN-PICTURE)/ POP(PICTURE-OUT-OF-PICTURE)/TWIN PICTURE
Page 92

Moving the PIP sub picture
PICTURE CONTROL
91
Selecting an Input Signal Source for PIP/Twin Picture
Use the
PPIIPP IINNPPUUTT
button to select the input source for the sub picture. Each press of
PPIIPP IINNPPUUTT
button
changes the PIP source. You can also select sources for the
SSuubb IInnppuutt
in the
SSEETTUUPP
menu.
Main Picture Source Available Sub Picture Sources
DTV/CADTV Analog(TV/CATV), AV1, and AV2
TV/CATV, AV1, AV2, Component1,
Component2, RGB-PC/RGB-DTV, DTV/CADTV, Analog(TV/CATV), AV1, and AV2
HDMI1/DVI, HDMI2
TV Program selection for PIP
Press the
PPIIPP
button.
Select the Antenna or Cable option on the Sub input menu
or with the
PPIIPP IINNPPUUTT
button.
Use the
PPIIPPCCHH++/ PPIIPPCCHH--
button to select a channel for
the sub picture.
(You can’t select DTV for main and sub picture simulta-
neously).
In PIP mode, press the
DD EE FF GG
button to move the sub
picture to a different location on the screen.
2
1
1
Page 93

PICTURE CONTROL
92
PICTURE CONTROL
Swapping the PIP/Twin Picture
Repeatedly, use the
SSWWAAPP
button to switch the main and sub pictures.
■
Component 1, Component 2, RGB-PC (or RGB-DTV), HDMI1/DVI, HDMI2 input sources for the main
picture can’t be used to swap the main and sub pictures.
Main Picture Sub Picture
Adjusting Main and Sub Picture Sizes for Twin Picture
Use the
DD EE FF GG
button to change main and sub picture
sizes in Twin Picture mode.
■
If screen is adjusted to the maximum size, the large screen
is filled with entire screen vertically as shown.
SWAP
PIP
Twin
Picture
1
1
SWAP
Main Picture Sub Picture
Page 94

TV 4-0
TV 6-0
PICTURE CONTROL
93
POP (Picture-out-of-Picture : Channel Scan)
Press the
PPIIPP
button to activate the
PPOOPP mmooddee
while in
PPIIPP
mmooddee..
■
CChhaannnneell sseelleecctt iioonn
: Use FFbutton to Enlarge the
selected channel being searched on the PIP screen to
shift it for viewing on the Main screen.
■
PPIIPP sseelleecc ttiioo nn
: UseDDor EEbutton to select one of 3
PIP screen pictures in
PPOOPP
mode.
■
When watching TV/CATV, TV/DTV or CATV/CADTV Sub
pictures are scanned. However, when watching
DTV/CADTV , only TV/CATV Sub pictures are scanned.
Press the
EEXXIITT
button to cancel POP mode.
Use POP to search the programs of all the memorized channels
one-by-one on the 3 PIP screen display, (while the main picture
source remains the current channel). The pictures of all the
programmed channels are searched with the 3 POP screens.
NOTE
Run EZ Scan channel search before using POP mode.
When Sub pictures are changed from the TV/DTV to
CATV/CADTV in POP mode, you may hear a noise from
the Tuner switch.
2
1
TV 2-0
Page 95

PICTURE CONTROL
94
PICTURE CONTROL
Set by program
Selects the proper picture proportion to match
the source’s image.
4:3
Choose 4:3 when you want to view a picture
with an original 4:3 aspect ratio.
16:9
Adjust the picture horizontally, in a linear proportion to fill the entire screen.
Horizon
The screen size is, more enlarged at both sides,
to create a spectacular view.
Zoom 1
Choose Zoom 1 when you want to view the
picture without any alteration. However, the top
and bottom portions of the picture will be
cropped.
Zoom 2
Choose Zoom 2 when you want the picture to
be altered, both vertically extended and
cropped. The picture taking a halfway trade off
between alteration and screen coverage.
Cinema Zoom
Choose Cinema Zoom when you want to
enlarge the picture in correct proportion. Note:
When enlarging or reducing the picture, the
image may become distorted.
This feature lets you choose the way an analog picture with a 4:3 aspect ratio is displayed on your TV. When you receive an analog picture with a 4:3 aspect ratio on
your 16:9 TV, you need to specify how the picture is to be displayed.
■
RGB-PC/DVI-PC input source use 4:3 or 16:9 aspect ratio.
PICTURE SIZE (ASPECT RATIO)CONTROL
FLASHBK
APM
CC
Press the
RRAATTIIOO
button repeatedly to select the desired picture format.
You can also adjust
AAssppeecctt RRaattiioo
in the
OOPPTTIIOONN
menu.
■
The adjustment range is 1-16.
1
Set By Program
4:3
16:9
Horizon
Zoom 1
Zoom 2
Cinema Zoom DD1
Set By Program
(4:3 4:3)
(16:9 16:9)
Page 96

95
EZ Picture - Preset
Press the
EEZZ PPIICC
button repeatedly to select the picture
appearance setup option as shown below :
DDaayylliigghhtt,NNoorrmmaall,NNiigghhtt TTiimmee,UUsseerr11
, and
UUsseerr22
(your
own settings).
Press the
EEXXIITT
button to save and return to TV viewing.
FLASHBK
APM
CC
EZ Picture adjusts the TV for the best picture appearance.
Select the preset value in the EZ Picture menu based on the
program category.
DDaayylliigghhtt,NNoorrmmaall,NNiigghhtt TTiimmee
Settings are preset for optimum
picture quality at the factory and are not adjustable.
In the
UU sseerr 11
, and
UU sseerr 22
modes only, user can directly
adjust the contrast, brightness, color, sharpness, tint.
■
You can also use the
VVIIDDEEOO
menu to adjust EZ Picture.
EZ Picture
G
Color Temperature
XD
Advanced
Video Reset
EZ Picture
Color Temperature
XD
Advanced
Video Reset
Daylight
Normal
Night Time
User 1
user 2
2
1
PRESET PICTURE SETTINGS
PICTURE CONTROL
Page 97

PICTURE CONTROL
96
PICTURE CONTROL
Adaptive Picture Mode(APM
)
Press the
AAPPMM
button at once. As shown below, the screen
is divided to 4-split.
Use the
DD EE FF GG
button to navigate 4 EZ Pictures.
By pressing the
EENNTTEERR
button, you can select the desired
mode.
Press the
AAPPMM
button twice times. The 4-same screens are
displayed. You can easily compare with 4 modes.
Use the
DD EE FF GG
button to navigate 4 EZ Pictures.
By pressing the
EENNTTEERR
button, you can select the desired
mode.
Allows you to select your preferred picture mode after comparing the four different picture (Daylight , Normal , Night Time ,
User 1 and User 2) settings.
Daylight Normal
User 1
Night Time
EXIT
Navigate Select Exit
NOTE
While operating the 4-split, any button except
AAPPMM, EENNTTEERR, EEXXIITT, VVOOLLUUMMEE
or ,
MMUUTTEE
or
button on the remote control are not usable.
2
3
4
1
Daylight Normal
User 1Night Time
EXIT
Navigate Select Exit
FLASHBK
APM
CC
Page 98

PICTURE CONTROL
97
Color Tone -Preset
Choose one of three automatic color adjustments. Set to warm
to enhance hotter colors such as red, or set to cool to see less
intense colors with more blue.
When selecting EZ Picture options (Daylight, Normal and Night
Time),
CCoolloorr TTeemmppeerraattuurree
is automatically change.
When selecting EZ Picture options (User 1 and User 2), you
can choose the
CCoolloorr TTeemmppeerraattuurree
.
Press the
MMEENNUU
button and then use
DD
or EEbutton
to select the
VVIIDDEEOO
menu.
Press the
GG
button and then useDDor EEbutton to
select
CCoolloorr TTeemmppeerraattuurree
.
Press the
GG
button and then useDDor EEbutton to
select either
CCooooll,, MMeeddiiuumm,, WWaarrmm
or
UUsseerr
.
Press
EEXXIITT
button to return to TV viewing or press
MMEENNUU
button to return to the previous menu.
MODE
LIVE TV
INPUT
DAY -
DAY +
SIMPLINK
EZ Picture
Color Temperature
G
XD
Advanced
Video Reset
EZ Picture
Color Temperature
XD
Advanced
Video Reset
Cool
Medium
Warm
User
2
3
4
1
Page 99
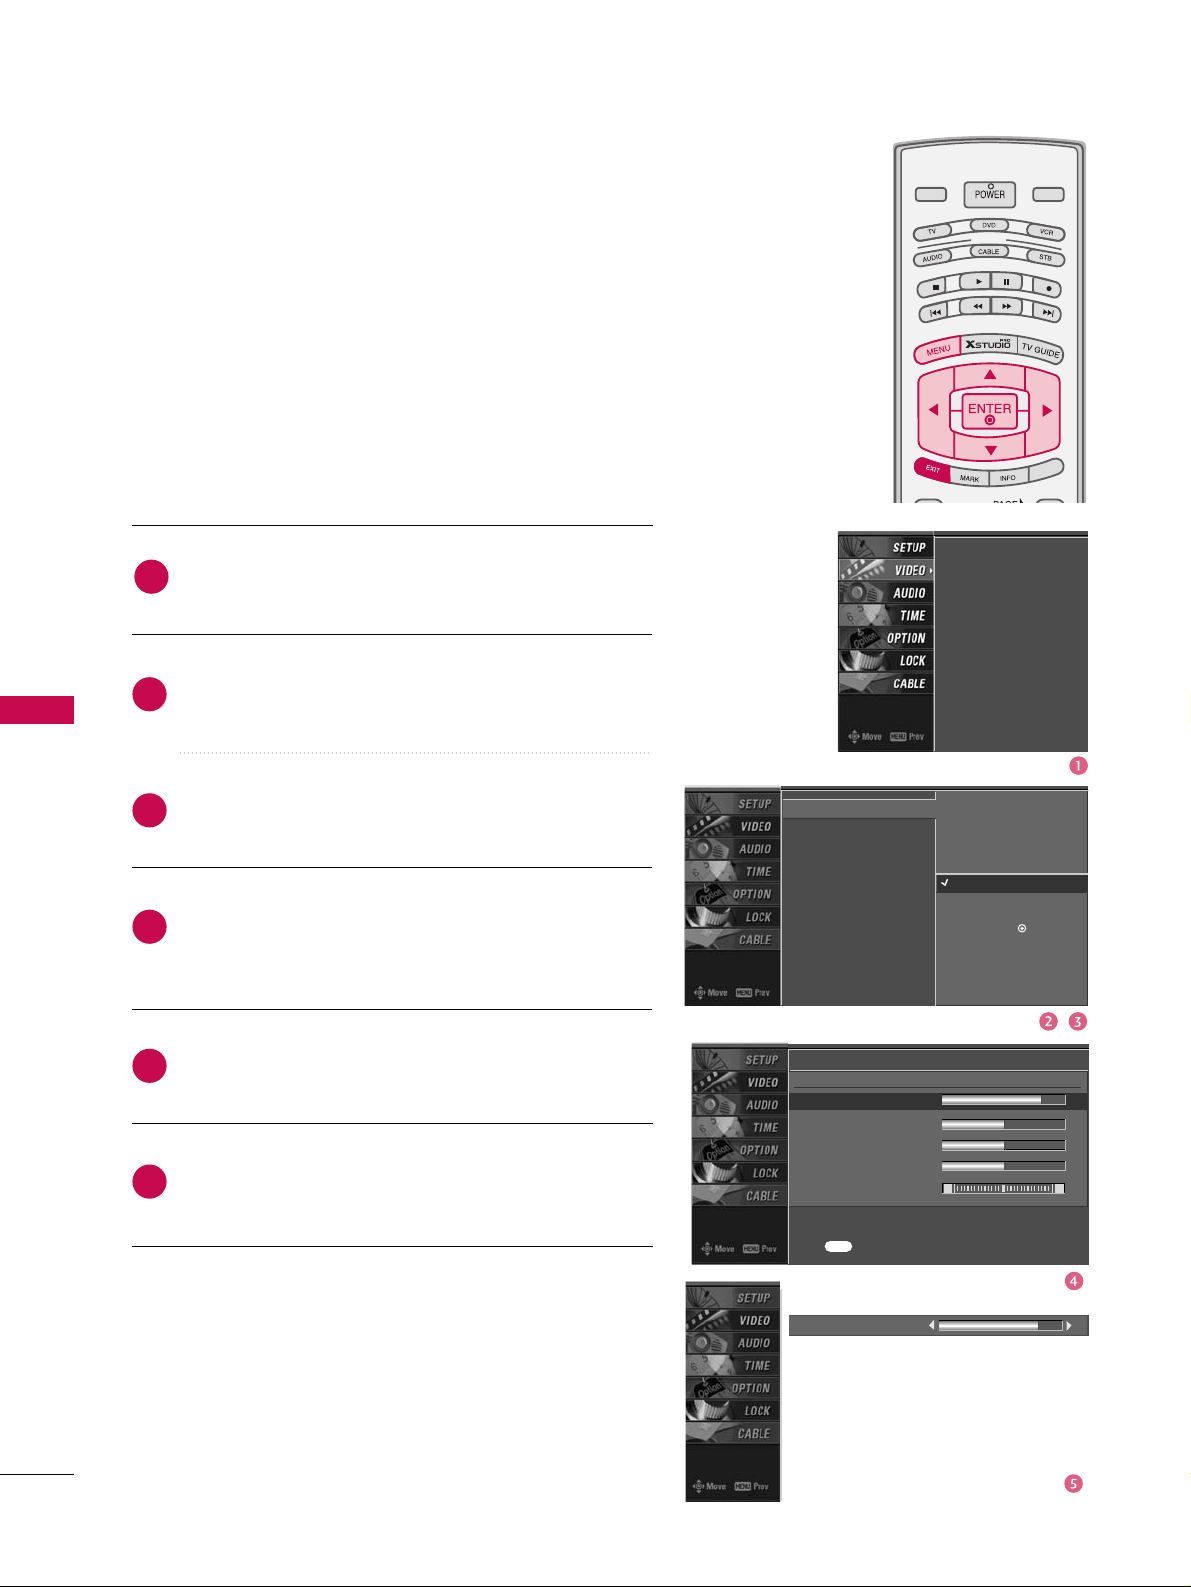
PICTURE CONTROL
98
PICTURE CONTROL
EZ Picture -User Mode
MANUAL PICTURE ADJUSTMENT
Press the
MMEENNUU
button and then useDDor EEbutton
to select the
VVIIDDEEOO
menu.
Press the
GG
button and then useDDor EEbutton to
select
EEZZ PPiiccttuurree
.
Press the
GG
button and then useDDor EEbutton to
select
UUsseerr 11
or
UUsseerr 22
.
Press the
GG
button and then useDDor EEbutton to
select the desired picture option
((
CCoonnttrraasstt,,
BBrriigghhttnneessss,, CCoolloorr,, SShhaarrppnneessss,, oorr TTiinntt
))
.
Press the
GG
button and then useFForGGbutton to
make appropriate adjustments.
Press
EEXXIITT
button to return to TV viewing or press
MMEENNUU
button to return to the previous menu.
Adjust the picture appearance to suit your preference and
viewing situations.
MODE
LIVE TV
INPUT
DAY -
DAY +
SIMPLINK
2
3
4
5
6
1
EZ Picture
Color Temperature
XD
Advanced
Video Reset
Daylight
Normal
Night Time
User 1
G
User 2
Selection ( Gor ) leads you
to the detailed setting
screen.
Contrast 85
EE
User1
Contrast 85
G
Brightness 50
Color 50
Sharpness 50
Tint 0
R G
Press to confirm.
MENU
EZ Picture
Color Temperature
XD
Advanced
Video Reset
Page 100

PICTURE CONTROL
99
You can also adjust the detailed settings(Red, Green, Blue)
by selecting the
UUsseerr
menu.
Press the
MMEENNUU
button and then use
DD
or EEbutton
to select the
VVIIDDEEOO
menu.
Press the
GG
button and then useDDor EEbutton to
select
CCoolloorr TTeemmppeerraattuurree
.
Press the
GG
button and then useDDor EEbutton to
select
UUsseerr
.
Press the
GG
button and then useDDor EEbutton to
select
RReedd, GGrreeeenn
, or
BBlluuee
.
Press the
GG
button and then useFForGGbutton to
make appropriate adjustments.
■
The adjustment range of
RR eedd, GG rree eenn
, or
BBll uuee
is -20~ +20.
Press
EEXXIITT
button to return to TV viewing or press
MMEENNUU
button to return to the previous menu.
MODE
LIVE TV
INPUT
DAY -
DAY +
SIMPLINK
Red 0
EE
EZ Picture
Color Temperature
XD
Advanced
Video Reset
EZ Picture
Color Temperature
XD
Advanced
Video Reset
Press to confirm.
MENU
Selection ( Gor ) leads you
to the detailed setting
screen.
Cool
Medium
Warm
User
G
User
Red 0
G
Green 0
Blue 0
2
3
4
5
6
1
Color Tone -User Mode
 Loading...