

LG 42VX30, 47VX30, 42WS10, 47WS10, 55WS10 Installation Manual
...
•Openframe
•Media Player
•Transparent Signage
•Video Wall
MONITOR SIGNAGE MODELS

1 OPENFRAME SIGNAGE
1-1. Keep temperature 0°C ~ 40°C(Mandatory)
1-2. Consider using a cooling & heater solution(Mandatory)
1-3. Do not disassemble Handle, Fan or Side bracket(Mandatory)
1-4. Do not use a screw is longer than 9.0mm(Mandatory)
1-5. Recommend not to place the front panel in direct sunlight
1-6. Use the side bracket to mount into the enclosure
1-7. Refer to brightness of according to ambient luminance
2 MEDIA PLAYER
2-1. Minimum distance between media player and structure(100mm)
2-2. Install Dust filter & keep temperature 0°C ~ 40°C(Mandatory)
3 TRANSPARENT SIGNAGE
3-1. Preparation for Installation
3-2. Portrait mode: Rotate the set clockwise 90°(Mandatory)
3-3. Attach the product using the prepared screw holes(Mandatory)
3-4. How to connect cable assembly
3-5. Refer to ventilation hole of enclosure
3-6. Refer to Lighting set up
3-7. Refer to storage place(AD Board & Media Player)
3-8. Dimension of Screw Holes(26TS30MF/47TS30MF)
3-9. Recommendation: Lighting is 600 LUX or more
4 VIDEO WALL
4-1. Precaution in movement & handling
4-2. Installing the Product
4-3. Tiling Display(How to join Sets)
4-4. Daisy Chain Monitors
4-5. Function Setting(Multivision Configuration)
4-6. Setting the Installation Menu
4-7. Setting the Tile Mode
4-8. Setting the Picture ID
CONTENTS

OPENFRAME SIGNAGE
1-1. Keep temperature 0°C ~ 40°C(Mandatory)
When designing the enclosure, the temperature inside the enclosure must be maintained
between 0°C and 40°C.
The Measurement method for checking the operating temperature inside the enclosure
Enclosure
0’C ~ 40’C
Openframe Signage (eg. 47WX50MF)
5cm
Thermal sensor
5cm
5cm
Example
1. Should install a thermal sensor inside the enclosure.
There are three location for thermal sensor.
(backside of the top , backside of the middle,
backside of the bottom)
2. On this basis of you measuring temperature,
Ensuring that you keep the temperature being 0°C ~ 40°C
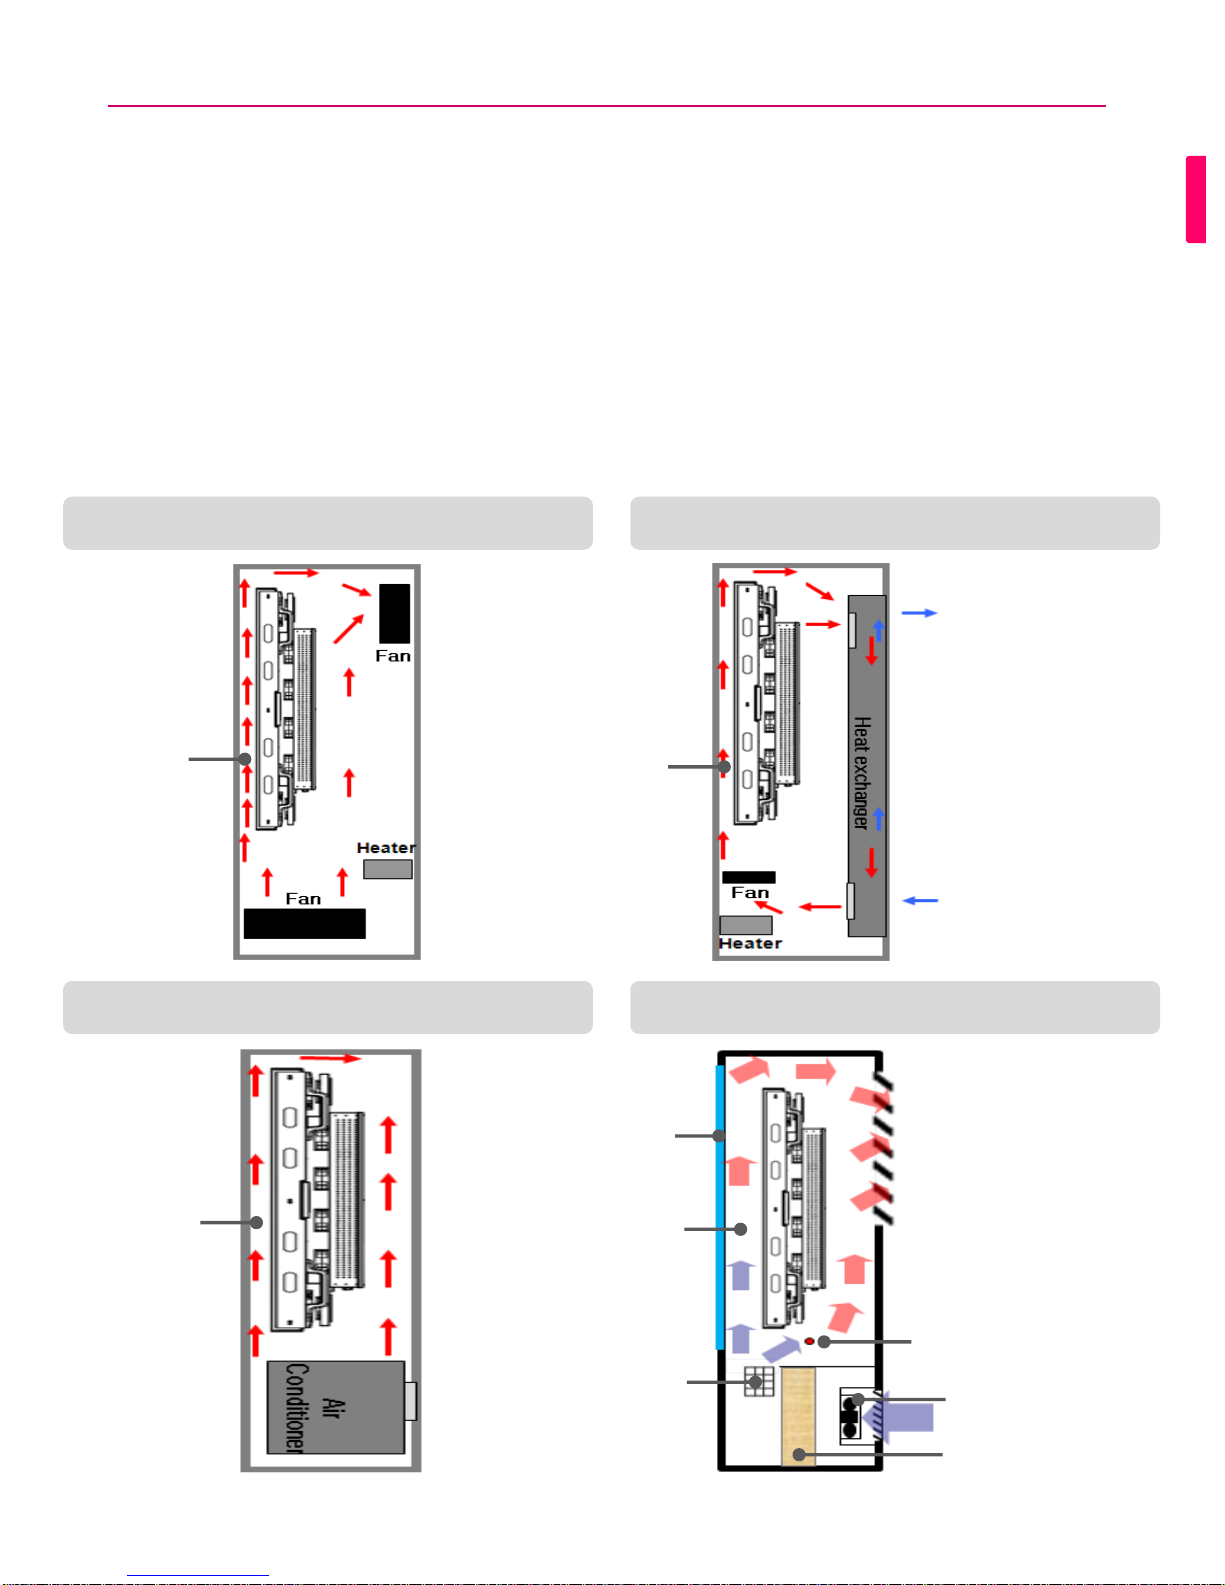
1-2. Consider using a cooling & heater solution (Mandatory)
To maintain the temperature inside the enclosure, you may consider using a cooling
and heater solution such as an air conditioner, heat exchanger, or combined cooler
and heater depending on the external environment. (Please see below examples)
You can also employ an air flow circulation system and air curtain* between the front
panel and the enclosure.
Example 2 : Enclosure (Heat exchanger) Example 1 : Enclosure (Just fans)
Example 4 : Direct Air Cooling Solution Example 3 : Enclosure (Air conditioner)
Air Curtain
Air Curtain
Air Curtain
Air Curtain
Heater
Membrane Filter
FAN
Humidity Sensor
Protection
glass
Recommend to design the exterior of the enclosure to meet with the IP65 standard.
Use a dust filter to prevent dust .(At air inlet and outlet )
Filter should be used for filtering out bugs, dust and water.
For preventing from rust of lead frame in circuit board,
operates the Heater if relative humidity is high.
*Air curtain :
Air flow circulation system between
the front panel and the enclosure.
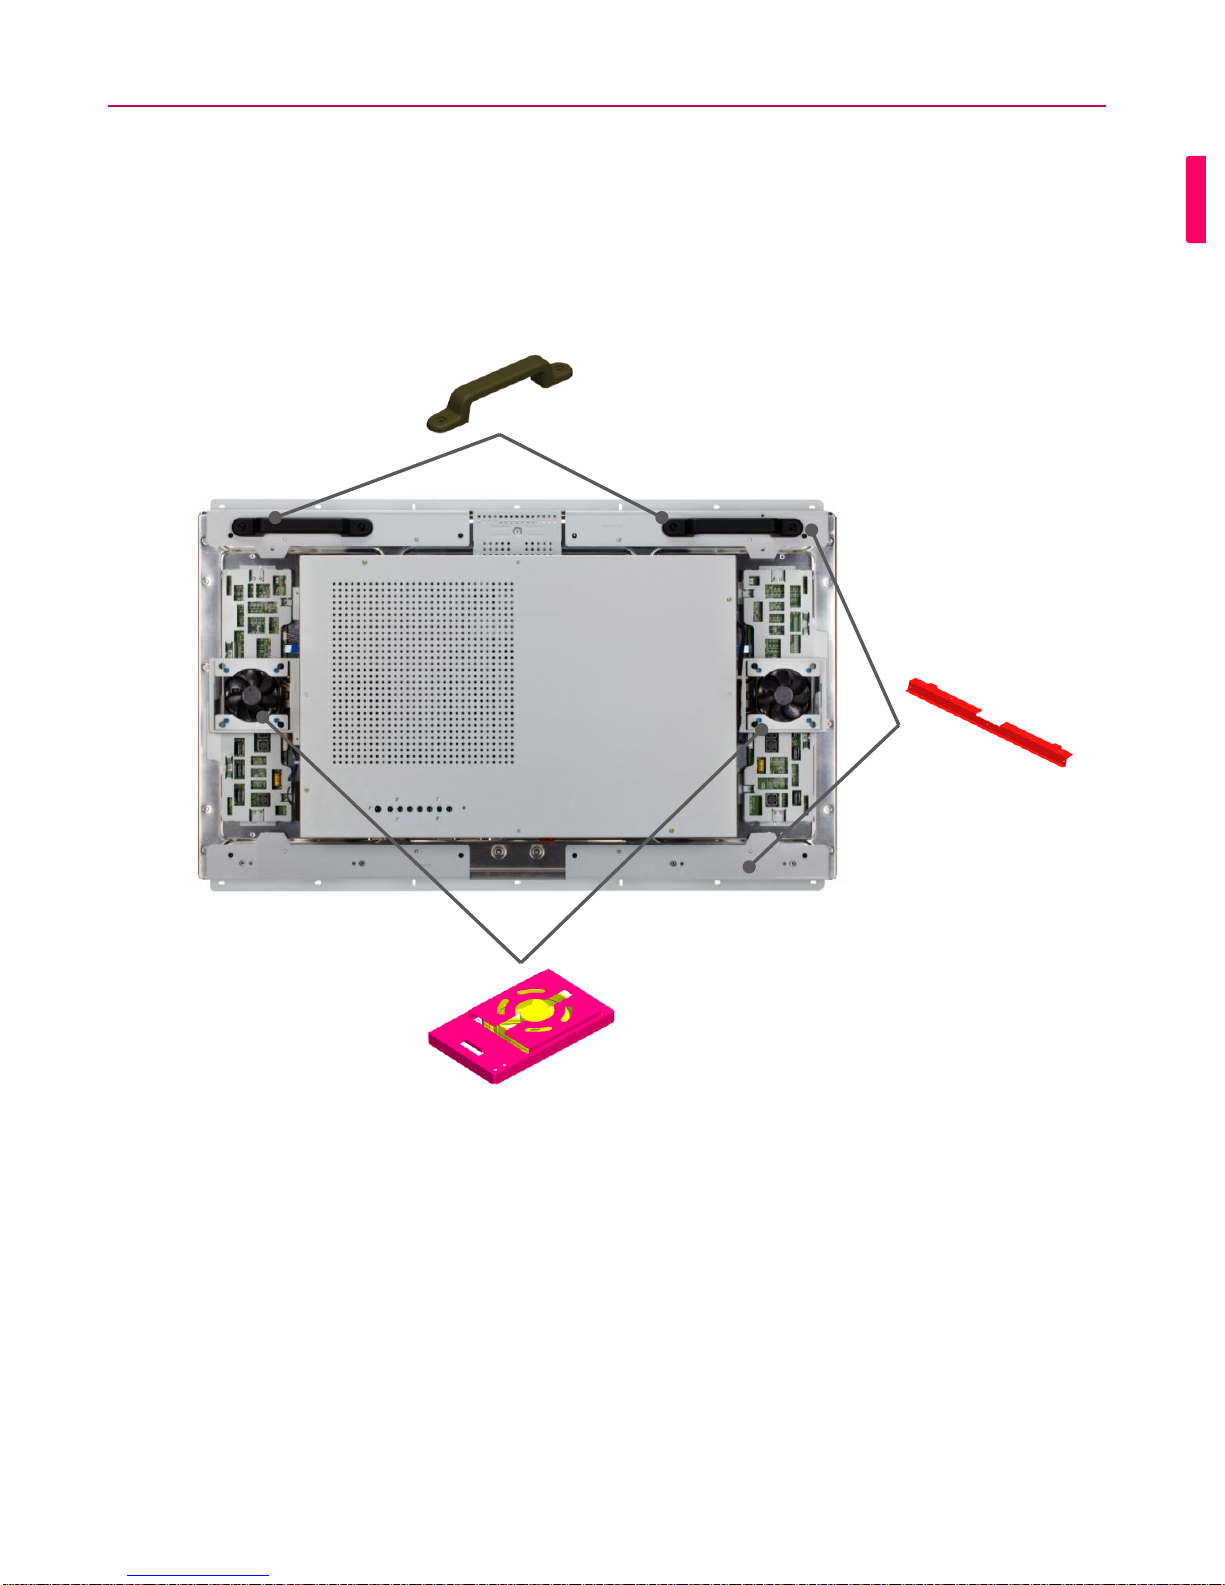
1-3. Do not disassemble Handle, Fan or Side bracket (Mandatory)
Do not disassemble the parts such as Handle, Fan or Side bracket
for preventing of product safety & function problem
Handle
Side bracket
Fan
*47WX50MF

1-4. Do not use a screw is longer than 9.0mm (Mandatory)
You must use the side screw holes when mounting the panel
The Side screw holes are M4.0 Tap , Torque 4~5Kgf.cm, pitch 0.7mm
The Screw hole depth of the panel is:9.0mm (Max)
If a screw is longer than 9.0mm, it may cause damage to the LCD panel
It is advisable to only use spring washer-type screws.
▪Example : Spring washer type
Side Hole
47WX50MF

1-5. Recommend not to place the front panel in direct sunlight
NOTE
• To prevent sunlight, consider to attach a UV film on the glass
• It is recommended not to place the front panel in direct sunlight.
• For Example-Using a canopy may prevent the enclosure temperature increase due to
direct sunlight.
Good Example

1-6. Use the side bracket to mount into the enclosure
1-7. Refer to brightness of according to ambient luminance
• You should use the side bracket to mount the signage display into the enclosure.
•This is measurement of 47WX50MF’s Auto Brightness Control function
Ambient Luminance
(Lx)
Brightness
(nits)
0
410
10
415
25
419
50
421
100
602
200
784
300
1131
400
1850
500
2024
Brightness (nits)
Side Bracket
47WX50MF
Ambient light (Lx)
Auto Brightness Control Curve(47WX50MF)
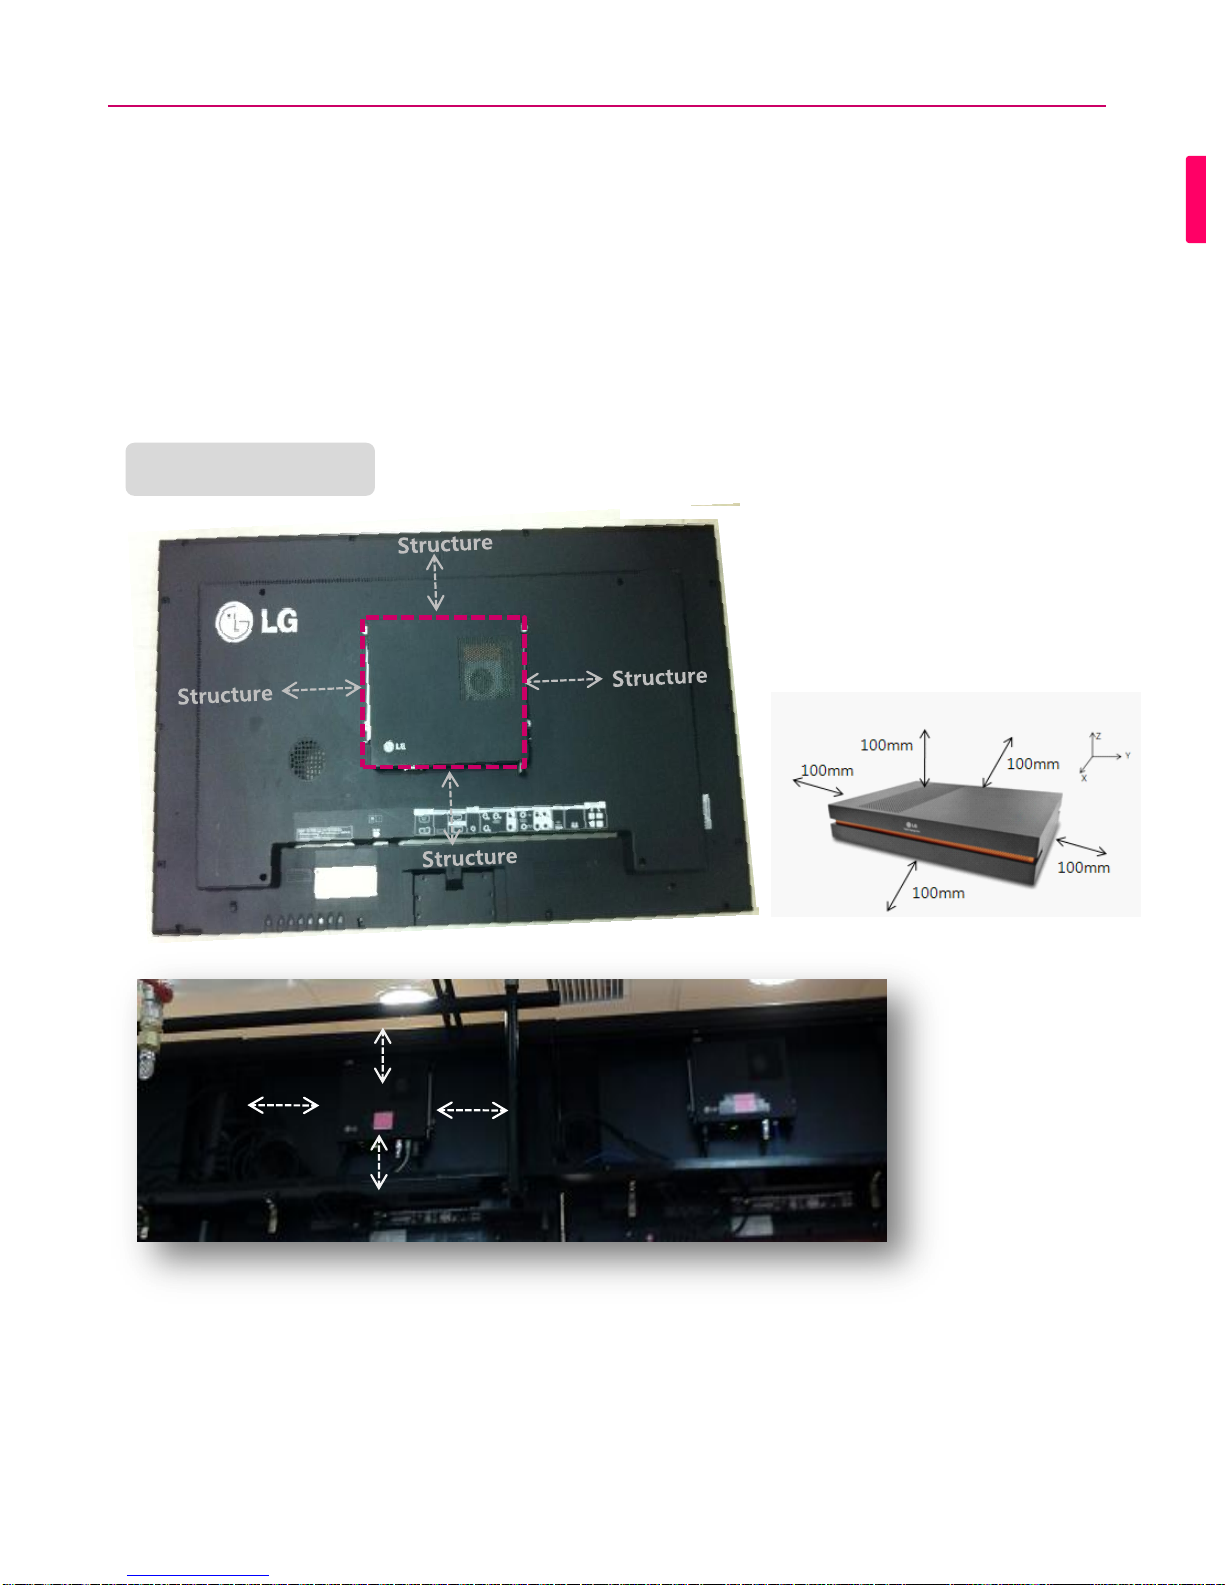
2-1. Minimum distance between media player and structure
(100mm)
MEDIA PLAYER
• Monitor Back Cover Mount Condition
• Application model : NC1000, NA1000, NA1100, MP500, PC100
• Minimum distance between player & structure : 100mm distance to X,Y,Z axis direction
• 0°C< Ambient temperature <40°C
100mm
100mm
100mm
100mm
Piggy bag type

2-2. Install Dust filter & keep temperature 0°C ~ 40°C (Mandatory)
• Embedded Mount Condition
• Application model : NC1000, NA1000, NA1100, MP500, PC100
• Minimum distance between media player and structure : 100mm distance to X,Y,Z axis direction
•Should install dust filter in ventilation area
• When the unit is operating, you must keep temperature inside being 0°C ~ 40°C
100mm
100mm
100mm
100mm
100mm
Ventilation
Ventilation
Ventilation
Hot air
Cool air
▪ Dust filter
Enclosure
Media player

3-1. Preparation for Installation
TRANSPARENT SIGNAGE
• Preparation for Installation
• Please refer to the “LVDS Pin Map Guide” in the manual.
Preparation Items
(26TS30MF/47TS30MF)
• Need to purchase separately the below items
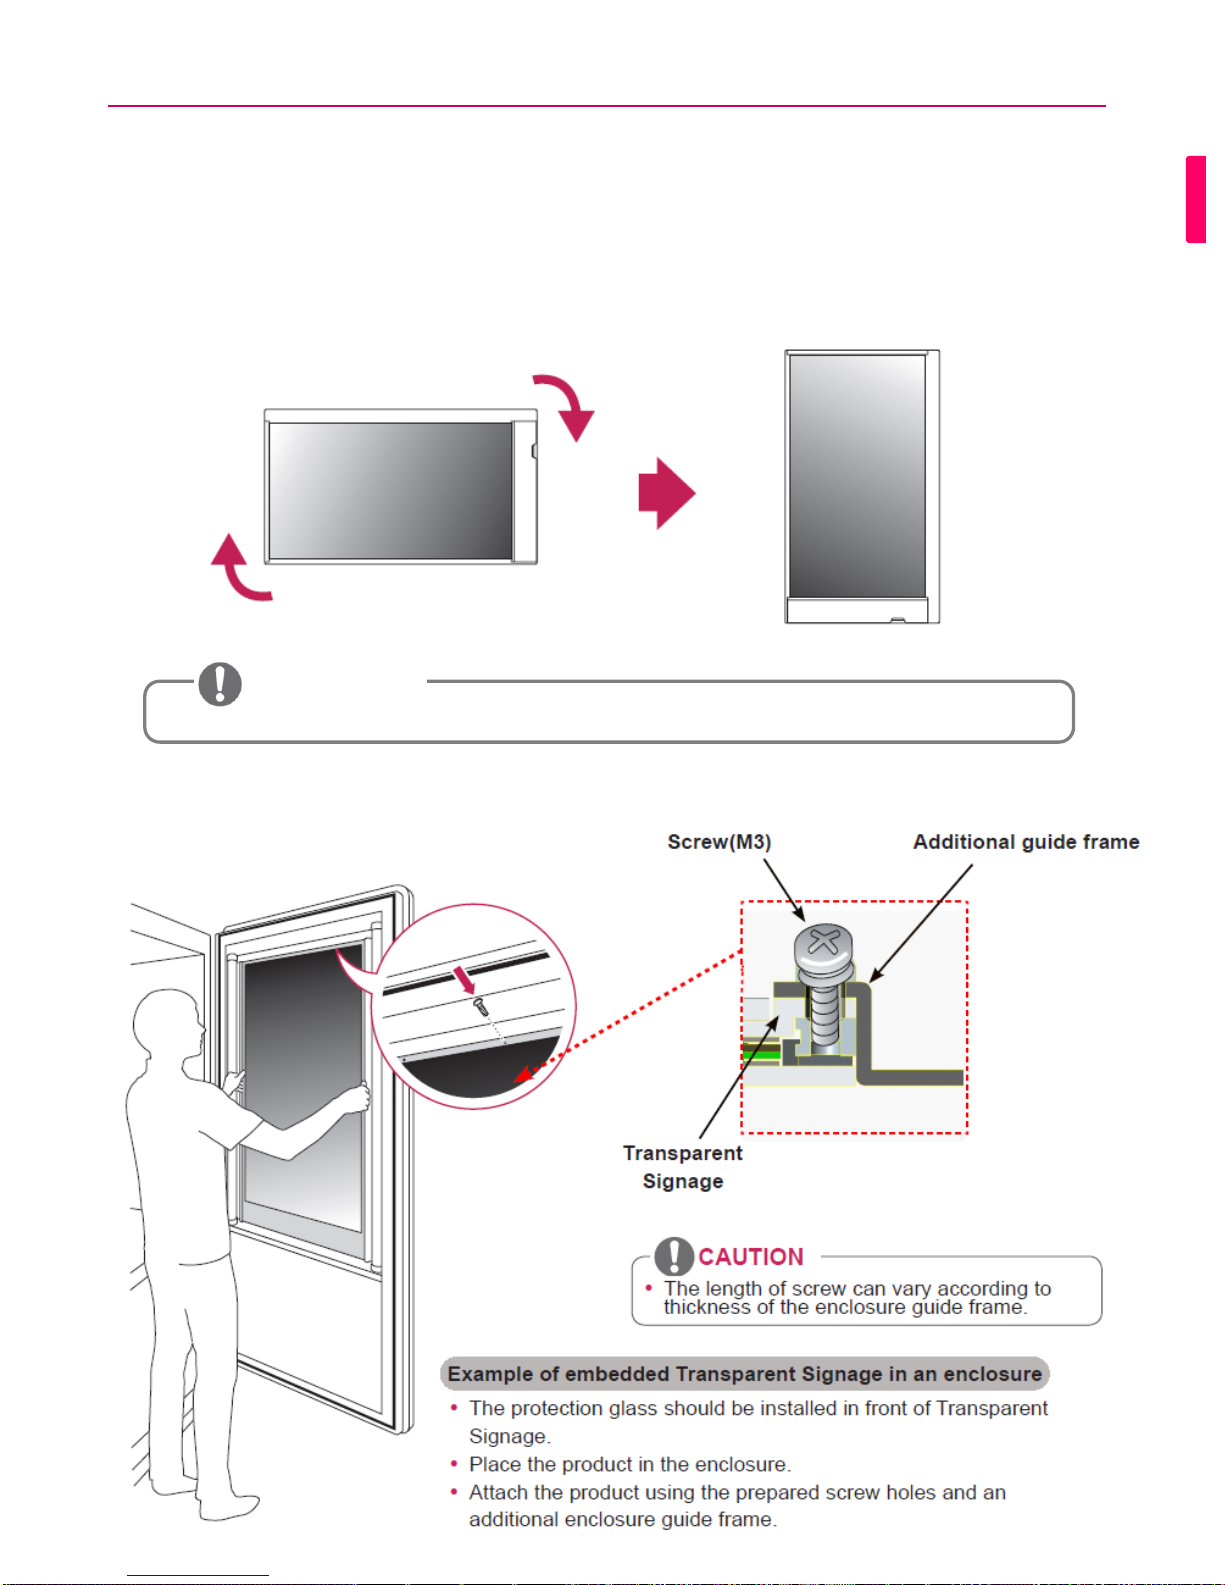
3-2. Portrait mode: Rotate the set clockwise 90°(Mandatory)
• Portrait Layout(Only supported for 47TS30MF)
• To install in portrait mode, rotate the set clockwise 90 degrees when looking at the front.
(The AD board should support portrait mode)
3-3. Attach the product using the prepared screw holes (Mandatory)
Landscape
Portrait
CAUTION
• The 26TS30MF model don’t support the portrait mode because of module characteristic
• Transparent Signage enclosure construction.
 Loading...