

Page 1

Please read this manual carefully before operating
your set.
Retain it for future reference.
Record model number and serial number of the set.
See the label attached on the back cover and quote
this information to your dealer when you require
service.
LCD TV PLASMA TV
OWNER’S MANUAL
LCD TV MODELS
3322LLTT77
**
3377LLTT77
**
4422LLTT77
**
PLASMA TV MODELS
4422PPTT88
**
5500PPTT88
**
ENGLISH
Tr ademark of the DVB Digital Video
Broadcasting Project (1991 to 1996)
IIDD NNuummbbeerr((ss)) ::
4652: 42PT85 4651: 50PT85
4681: 32LT75 4680: 37LT75
4679: 42 LT75
Page 2

Page 3

1
ACCESSORIES
ACCESSORIES
Ensure that the following accessories are included with your TV. If an accessory is missing, please contact the
dealer where you purchased the product.
Owner's
Manual
Owner’s manual
Owner’s Manual
Batteries
OK
IN
P
U
T
M
O
D
E
TV
D
/
A
D
V
D
E
X
I
T
T
I
M
E
S
H
I
F
T
T
I
M
E
S
H
I
F
T
V
O
L
P
R
GUIDE
B
A
C
K
M
E
N
U
D
VR
L
I
V
E
T
V
V
C
R
PO
W
E
R
123
456
789
0
Q.VIEW
L
IS
T
INDEX
S
L
E
E
P
H
O
L
D
R
E
V
E
A
L
?
S
U
B
T
IT
L
E
R
A
T
I
O
T
E
X
T
I
N
P
U
T
BRIGHT
M
U
T
E
M
A
R
K
TV/RAD
IO
U
P
D
A
T
E
S
IM
P
L
IN
K
IN
F
O
i
F
A
V
T
I
M
E
I
/
I
I
Remote Control
Power Cord
Cable Management
2- TV Brackets
2- Wall Brackets
This feature is not
available for all models.
2-bolts
This feature is not
available
for all models.
Twister Holder
Arrange the wires with
the twister holder.
This feature is not available
for all models.
LLCCDD TTVV mmooddeellss
PPllaassmmaa TTVV mmooddeellss
4-bolts for stand assembly
Refer to p. 9
33 22””,, 3377 ”” oonn ll yy
2-Wall brackets
This feature is not available
for all models.
2-eye-bolts
This feature is not available
for all models.
Polishing Cloth
Polish the screen with the cloth.
This feature is not available
for all models.
Slightly wipe stained spot on the exterior
only with the cleansing cloths for the product exterior if there is stain or fingerprint
on surface of the exterior.
Do not wipe roughly when removing stain.
Please be aware that excessive force may
cause scratch or discoloration.
33 22//3377LLTT77**oonn llyy
1-screw for stand fixing
Refer to p. 9
Page 4

2
CONTENTS
ACCESSORIES
. . . . . . . . . . . . . . . . . . . . . . . . . . . . . . . . . . . . . . . . . . . . .
1
PREPARATION
Home Menu . . . . . . . . . . . . . . . . . . . . . . . . . . . . . . . 4
Front Panel Controls . . . . . . . . . . . . . . . . . . . . . . . . 5
Back Panel Information . . . . . . . . . . . . . . . . . . . . . . 7
Stand installation . . . . . . . . . . . . . . . . . . . . . . . . . . . . 9
AT TA CHING THE TV TO A DESK (Only 32/37LT7*model) . . .9
Attaching the TV to a wall . . . . . . . . . . . . . . . . . . . . 10
Back Cover for Wire Arrangement . . . . . . . . . . . . . 11
Desktop Pedestal Installation . . . . . . . . . . . . . . . . . 13
Wall Mount: Horizontal installation . . . . . . . . . . . . 13
Antenna Connection . . . . . . . . . . . . . . . . . . . . . . . . 14
EXTERNAL EQUIPMENT SETUP
HD Receiver Setup . . . . . . . . . . . . . . . . . . . . . . . . 15
DVD Setup . . . . . . . . . . . . . . . . . . . . . . . . . . . . . . . . 17
Insertion of CI module . . . . . . . . . . . . . . . . . . . . . . 19
VCR Setup . . . . . . . . . . . . . . . . . . . . . . . . . . . . . . . . 20
Digital Audio Out Setup . . . . . . . . . . . . . . . . . . . . . 22
Other A/V Source Setup . . . . . . . . . . . . . . . . . . . . 23
PC Setup . . . . . . . . . . . . . . . . . . . . . . . . . . . . . . . . . 24
- Screen Setup for PC Mode . . . . . . . . . . . . . . . 27
WATCHING TV / PROGRAMME CONTROL
Remote Control Key Functions . . . . . . . . . . . . . . . . 31
Turning on the TV . . . . . . . . . . . . . . . . . . . . . . . . . . 33
Programme Selection . . . . . . . . . . . . . . . . . . . . . . . 34
Volume Adjustment . . . . . . . . . . . . . . . . . . . . . . . . 34
On-Screen Menus Selection and Adjustment . . . . 35
Auto Programme Tuning (In Digital Mode) . . . . . . 36
Manual Programme Tuning (In Digital Mode) . . . . 37
Programme Edit (In Digital Mode) . . . . . . . . . . . . . 38
5V antenna Power (In Digital Mode only) . . . . . . . 40
Booster (In Digital Mode only) . . . . . . . . . . . . . . . 40
Software Update (In Digital Mode only) . . . . . . . . 41
Diagnostics (In Digital Mode only) . . . . . . . . . . . . 42
CI Information (In Digital Mode only) . . . . . . . . . . 43
Auto Programme Tuning (In Analogue Mode) . . . . . 44
Manual Programme Tuning (In Analogue Mode)
. . . . . . . 45
Fine Tuning (In Analogue Mode) . . . . . . . . . . . . . . 46
Assigning a Station Name (In Analogue Mode)
. . . . . . 46
Programme Edit (In Analogue Mode)
. . . . . . . . . . . . . 47
Calling the Programme Table . . . . . . . . . . . . . . . . 49
Input Source Selection . . . . . . . . . . . . . . . . . . . . . 50
SIMPLINK Function . . . . . . . . . . . . . . . . . . . . . . . . . 51
DVR (DIGITAL VIDEO RECORDER)
TimeShift Mode ( Pause & Replay of Live TV) . . . 53
Instant Recording . . . . . . . . . . . . . . . . . . . . . . . . . . 56
Manual Recording
. . . . . . . . . . . . . . . . . . . . . . . . . . 59
Recorded TV Programme List . . . . . . . . . . . . . . . . . 60
Schedule List . . . . . . . . . . . . . . . . . . . . . . . . . . . . . . 64
Record Quality . . . . . . . . . . . . . . . . . . . . . . . . . . . . 65
Format Hard Disc . . . . . . . . . . . . . . . . . . . . . . . . . . 66
EPG (Electronic programme guide)(In Digital Mode)
Switch on/off EPG . . . . . . . . . . . . . . . . . . . . . . . . 67
Select programme . . . . . . . . . . . . . . . . . . . . . . . . 67
Button function in NOW/NEXT guide mode . . . 67
Button function in 8 days guide mode . . . . . . . . 68
Button function in date change mode . . . . . . . . 69
Button function in extended description box . . . 69
Record Popup . . . . . . . . . . . . . . . . . . . . . . . . . . . .70
Collision Popup . . . . . . . . . . . . . . . . . . . . . . . . . . .70
PICTURE CONTROL
Picture Size (Aspect Ratio) Control . . . . . . . . . . . . 71
Preset Picture Settings
- Picture Mode-Preset . . . . . . . . . . . . . . . . . . . . 73
-
Auto Colour Tone Control (Warm/Medium/Cool)
. . . . .74
Manual Picture Adjustment
- Picture Mode-User option . . . . . . . . . . . . . . . . 75
- Colour Tone - User option . . . . . . . . . . . . . . . .76
CONTENTS
Page 5

3
CONTENTS
XD - Picture Improvement Technology . . . . . . . . . . . . . 77
XD Demo . . . . . . . . . . . . . . . . . . . . . . . . . . . . . . . . . 78
Advanced - Cinema . . . . . . . . . . . . . . . . . . . . . . . . . 79
Advanced - Black(Darkness) Level . . . . . . . . . . . . . 80
Picture Reset . . . . . . . . . . . . . . . . . . . . . . . . . . . . . . 81
Image Sticking Minimization(ISM) Method . . . . . . . . . . 82
Low-Power Picture Mode . . . . . . . . . . . . . . . . . . . . 83
SOUND & LANGUAGE CONTROL
Auto Volume Leveler . . . . . . . . . . . . . . . . . . . . . . . . 84
Preset Sound Settings - Sound Mode . . . . . . . . . . 85
Sound Setting Adjustment - User Mode . . . . . . . . . . 86
Balance . . . . . . . . . . . . . . . . . . . . . . . . . . . . . . . . . . . 87
TV Speakers On/ Off Setup . . . . . . . . . . . . . . . . . . 88
Selecting digital audio out . . . . . . . . . . . . . . . . . . . 89
I/II
-
Stereo/Dual Reception (In Analogue Mode Only)
. . . . 90
-
NICAM Reception (In Analogue Mode Only) . . . . . . .
91
- Speaker Sound Output Selection . . . . . . . . . . 91
On-Screen Menus Language/Country Selection
. . . . . . . 92
Language selection (In Digital Mode only) . . . . . . 93
TIME SETTING
Clock Setup . . . . . . . . . . . . . . . . . . . . . . . . . . . . . . . 94
Auto On/ Off Timer Setting . . . . . . . . . . . . . . . . . . 95
Auto Shut-off Setting . . . . . . . . . . . . . . . . . . . . . . . 96
Time zone Setup . . . . . . . . . . . . . . . . . . . . . . . . . . . 97
Sleep Timer Setting . . . . . . . . . . . . . . . . . . . . . . . . . 97
PARENTAL CONTROL / RATINGS
Set Password & Lock System . . . . . . . . . . . . . . . . . 98
Parental Control . . . . . . . . . . . . . . . . . . . . . . . . . . . 99
TELETEXT
Switch on/off . . . . . . . . . . . . . . . . . . . . . . . . . . . . . 100
SIMPLE Text . . . . . . . . . . . . . . . . . . . . . . . . . . . . . . 100
TOP Text . . . . . . . . . . . . . . . . . . . . . . . . . . . . . . . . 100
FAS TEXT . . . . . . . . . . . . . . . . . . . . . . . . . . . . . . . . 101
Special Teletext Functions . . . . . . . . . . . . . . . . . . . 101
DIGITAL TELETEXT
Teletext within Digital Service . . . . . . . . . . . . . . 102
Teletext in Digital Service . . . . . . . . . . . . . . . . . 102
APPENDIX
Tr oubleshooting . . . . . . . . . . . . . . . . . . . . . . . . . . . 103
Maintenance . . . . . . . . . . . . . . . . . . . . . . . . . . . . . 105
Product Specifications . . . . . . . . . . . . . . . . . . . . . 106
Programming the Remote Control . . . . . . . . . . . . 107
IR Codes . . . . . . . . . . . . . . . . . . . . . . . . . . . . . . . . 109
External Control Device Setup . . . . . . . . . . . . . . . 111
Page 6
4
PREPARATION
PREPARATION
HOME MENU
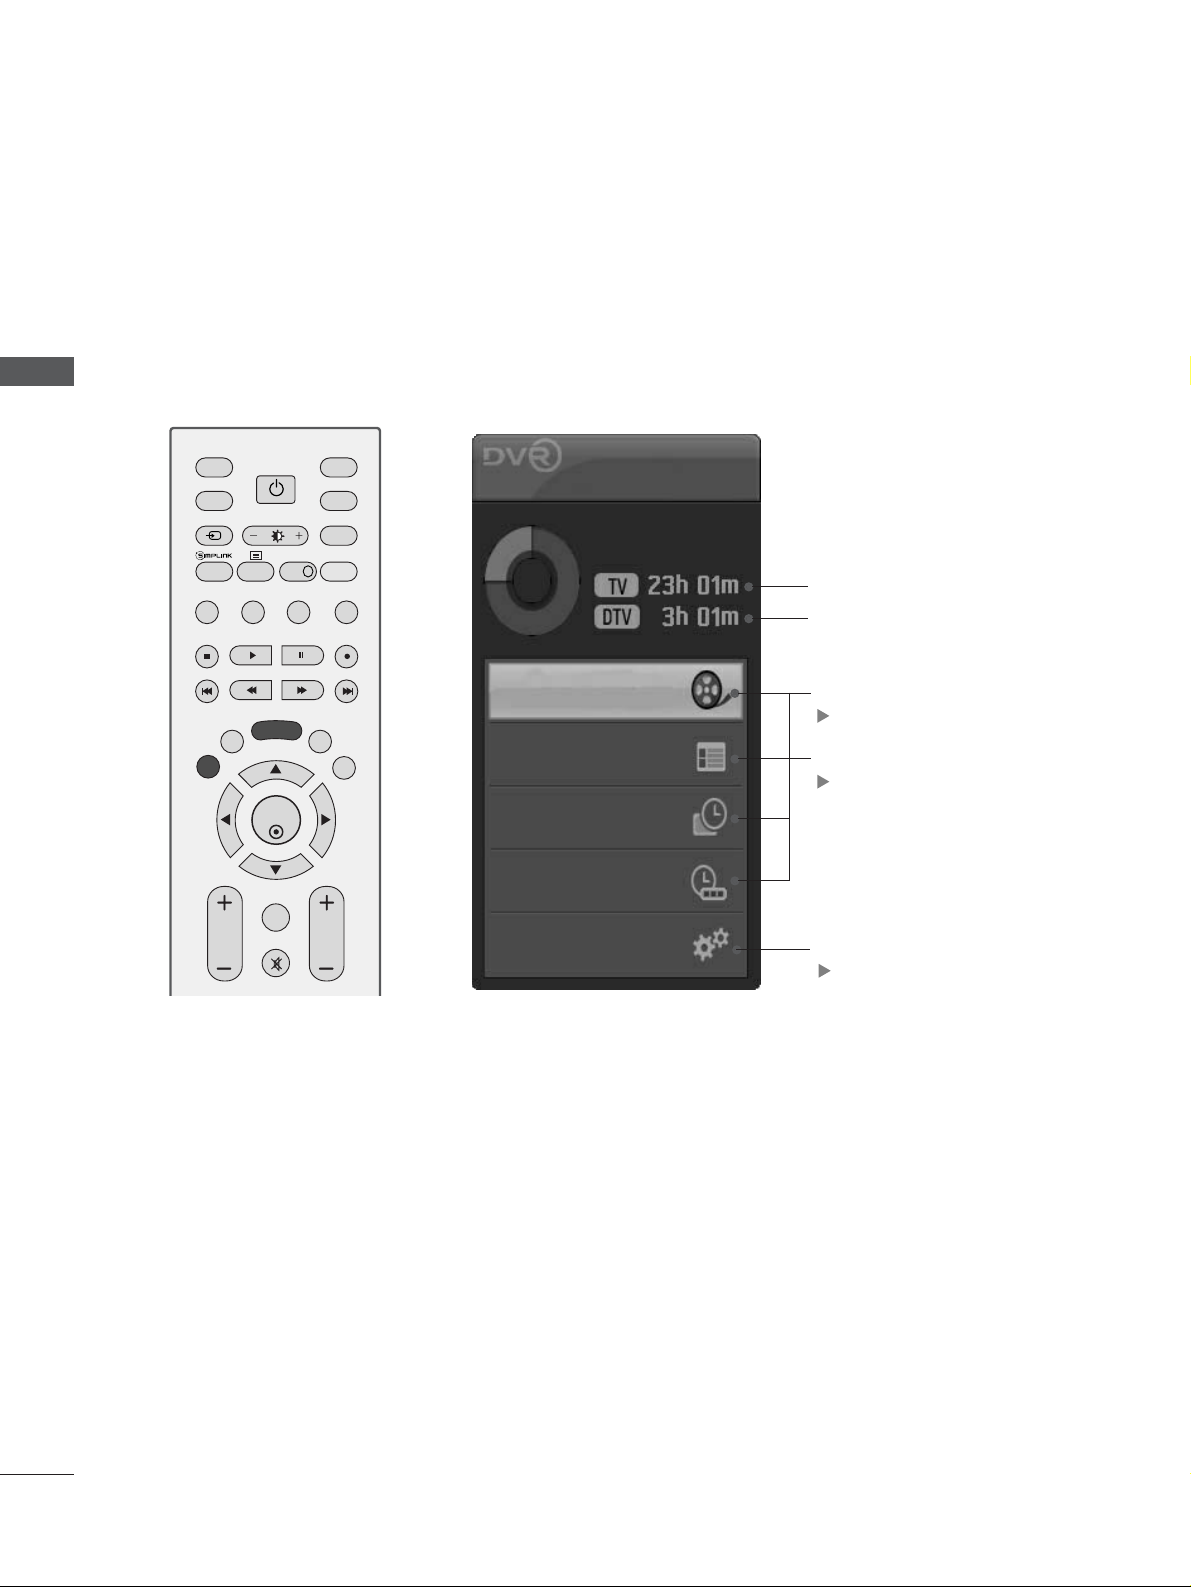
This menu is a contents guide.
In the Home Menu, you can access the Recorded list of the DVR, Manual Recording of the DVR,
Schedule List or the TV Menu.
OK
INPUT MODE
TV
D/A
DVD
EXIT
TIME
SHIFT
TIME
SHIFT
VOL PR
GUIDE
BACK MENU
DVR
LIVE TV
VCR
POWER
TEXT
INPUT
BRIGHT
MUTE
MARK
TV/RADIO
SIMPLINK
INFO i
FAV
Home
Free Space
Programme Guide
Recorded TV
Schedule List
Manual Record
TV Menu
DVR
pp..5533
EPG
pp..6677
TV Menu
pp..3355
It displays the remaining record
time for analog input.(Analog
TV, AV1,AV2, AV3)
It displays the remaining record
time only for DTV input.
Page 7

5
FRONT PANEL CONTROLS
A
This is a simplified representation of the front panel. Image shown may be somewhat different from your TV.
A
If your product has a protection film attached, remove the film and then wipe the product with a polishing cloth.
PREPARATION
PROGRAMME
Buttons
VOLUME
Buttons
MENU
Button
OK
Button
INPUT
Button
POWER
Button
Plasma TV Models
Remote Control Sensor
Power/Standby Indicator
• illuminates red in standby mode.
• illuminates green when the set is switched on.
INPUT
MENU
OK
VOL
PR
Page 8

6
PREPARATION
PREPARATION
LCD TV Models
Remote Control Sensor
Power/Standby Indicator
• illuminates red in standby mode.
• illuminates green when the set is switched on.
PROGRAMME Buttons
VOLUME Buttons
OK Button
MENU Button
INPUT Button
POWER Button
Intelligent Eye
Adjusts picture
according to the
surrounding conditions.
PR
VOL
OK
MENU
INPUT
/I
Page 9
7
USB
AV IN 2
L/MONO
R
AUDIO
VIDEO
S-VIDEO
Plasma TV Models
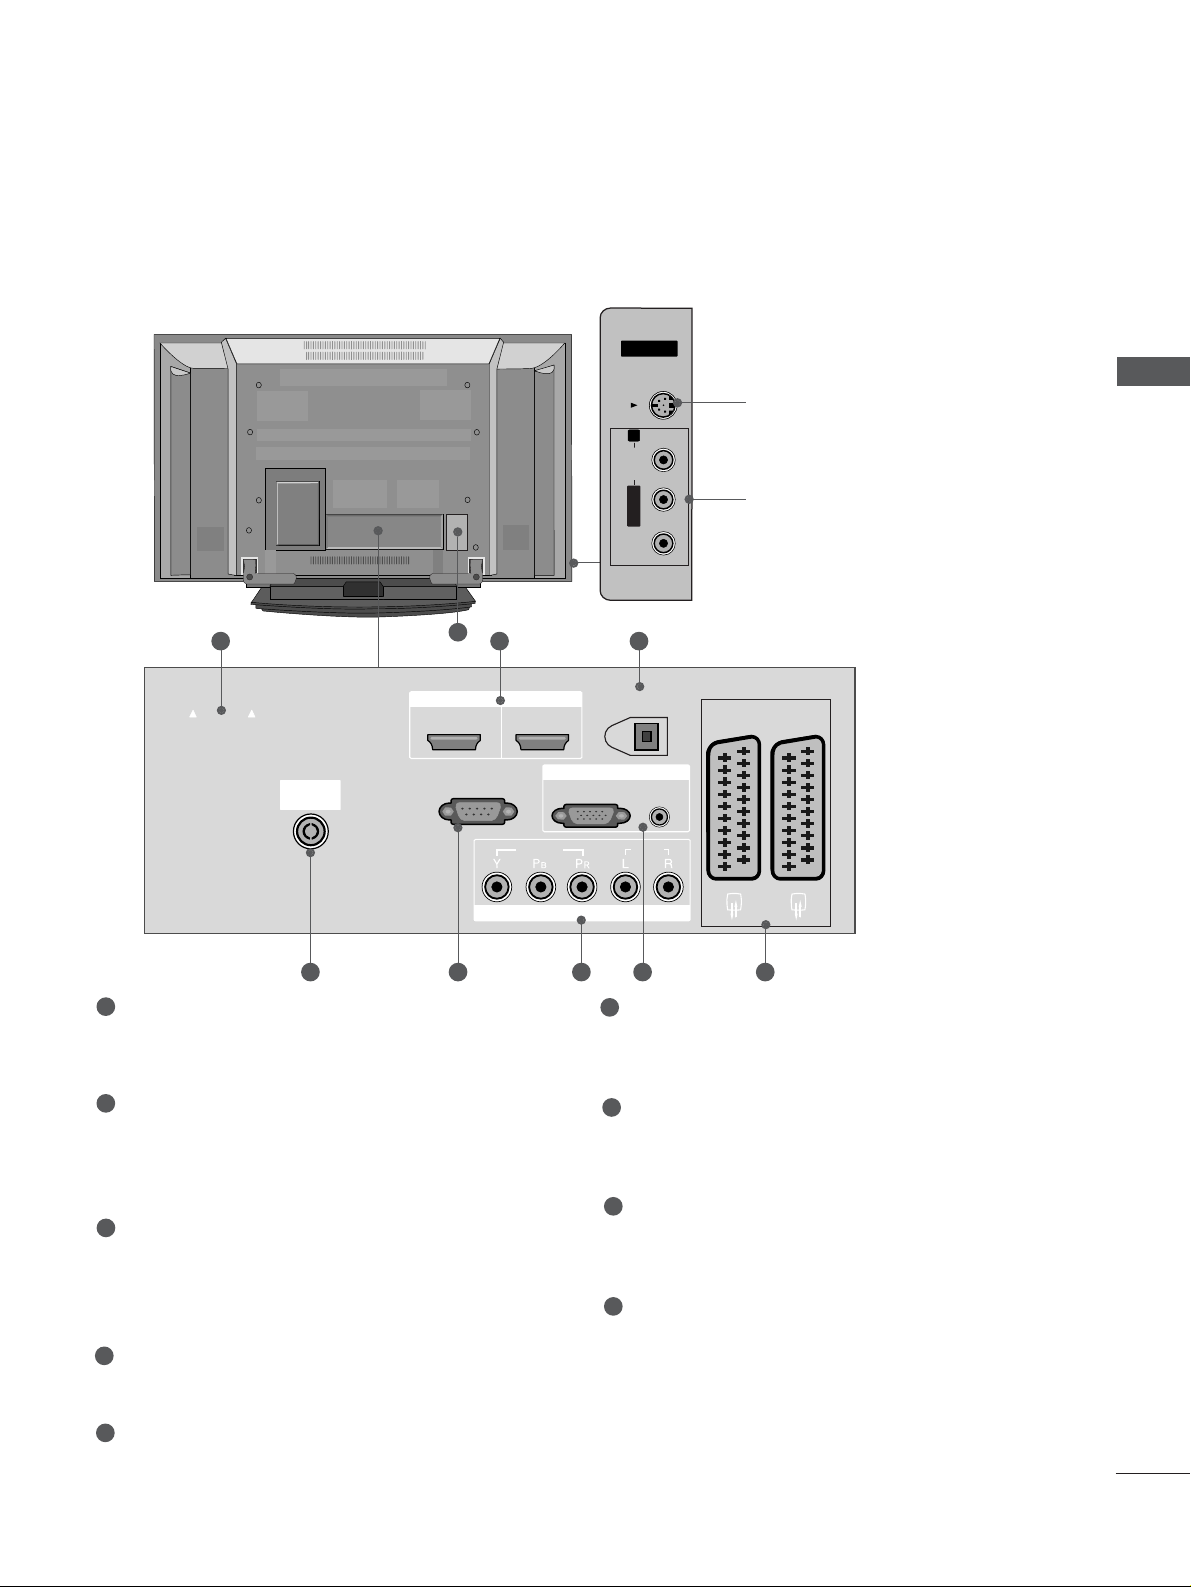
S-Video Input
Connect S-Video out from an
S-VIDEO device.
Audio/Video Input
Connect audio/video output
from an external device to
these jacks.
AV IN 3V IN 3
L/L/MONOMONO
R
AUDIOAUDIO
VIDEOVIDEO
S-VIDEOS-VIDEO
AV IN 3
L/MONO
R
AUDIO
VIDEO
S-VIDEO
AUDIO
VIDEO
V 1
V 2
EJECT
PCMCIA
CARD SLOT
RS-232C IN
1 32
9
PCMCIA (Personal Computer Memory Card
International Association) Card Slot
(This feature is not available in all countries.)
HDMI Input
Connect a HDMI signal to HDMI IN.
Or DVI(VIDEO)signal to HDMI/DVI port with DVI
to HDMI cable.
DIGITAL AUDIO OUT (OPTICAL)
Connect digital audio from various types of equipment.
Note: In standby mode, these ports do not work.
Antenna Input
Connect over-the-air signals to this jack.
RS-232C IN (CONTROL & SERVICE) PORT
Connect to the RS-232C port on a PC.
Component Input
Connect a component video/audio device to
these jacks.
RGB/DVI Audio Input
Connect the monitor output from a PC to the
appropriate input port.
Euro Scart Socket (AV1/AV2)
Connect scart socket input or output from an
external device to these jacks.
Power Cord Socket
This TV operates on an AC power. The voltage is
indicated on the Specifications page. Never
attempt to operate the TV on DC power.
1
2
3
4
5
6
7
8
9
84 5 6 7
BACK PANEL INFORMATION
A
This is a simplified representation of the back panel. Image shown may be somewhat different from your TV.
PREPARATION
EJECT
PCMCIA
CARD SLOT
ANTENNA
IN
HDMI/DVI IN
12
RS-232C IN
(CONTROL & SERVICE)
HDMI IN
VIDEO
COMPONENT IN
DIGITAL AUDIO OUT
(OPTICAL)
RGB IN
RGB(PC)
AUDIO
(RGB/DVI)
AUDIO
AV 1
AV 2
Page 10

8
PREPARATION
PREPARATION
LCD TV Models
AV IN 3
L/MONO
R
AUDIO
VIDEO
S-VIDEO
AV IN 3
L/MONO
R
AUDIO
VIDEO
S-VIDEO
AV IN 3
L/MONO
R
AUDIO
VIDEO
S-VIDEO
AV IN 3
L/MONO
R
AUDIO
VIDEO
S-VIDEO
AUDIO
VIDEO
V 1
V 2
EJECT
PCMCIA
CARD SLOT
RS-232C IN
1
9
32
84 5 6 7
PCMCIA (Personal Computer Memory Card
International Association) Card Slot
(This feature is not available in all countries.)
HDMI Input
Connect a HDMI signal to HDMI IN.
Or DVI(VIDEO)signal to HDMI/DVI port with DVI
to HDMI cable.
DIGITAL AUDIO OUT (OPTICAL)
Connect digital audio from various types of equipment.
Note: In standby mode, these ports do not work.
Antenna Input
Connect over-the-air signals to this jack.
RS-232C IN (CONTROL & SERVICE) PORT
Connect to the RS-232C port on a PC.
Component Input
Connect a component video/audio device to
these jacks.
RGB/DVI Audio Input
Connect the monitor output from a PC to the
appropriate input port.
Euro Scart Socket (AV1/AV2)
Connect scart socket input or output from an
external device to these jacks.
Power Cord Socket
This TV operates on an AC power. The voltage is
indicated on the Specifications page. Never
attempt to operate the TV on DC power.
1
2
3
4
5
6
7
8
9
S-Video Input
Connect S-Video out
from an S-VIDEO device.
Audio/Video Input
Connect audio/video
output from an external
device to these jacks.
3322LLTT77
**
AV IN 3V IN 3
L/L/MONOMONO
R
AUDIOAUDIO
VIDEOVIDEO
S-VIDEOS-VIDEO
3377LLTT77
**
4422LLTT77
**
AV IN 3V IN 3
L/L/MONOMONO
R
AUDIOAUDIO
VIDEOVIDEO
S-VIDEOS-VIDEO
PCMCIA
CARD SLOT
EJECT
ANTENNA
IN
HDMI/DVI IN
12
RS-232C IN
(CONTROL & SERVICE)
HDMI IN
DIGITAL AUDIO OUT
(OPTICAL)
RGB IN
RGB(PC)
AUDIO
(RGB/DVI)
AV 1
AV 2
VIDEO
COMPONENT IN
AUDIO
Page 11
9
PREPARATION
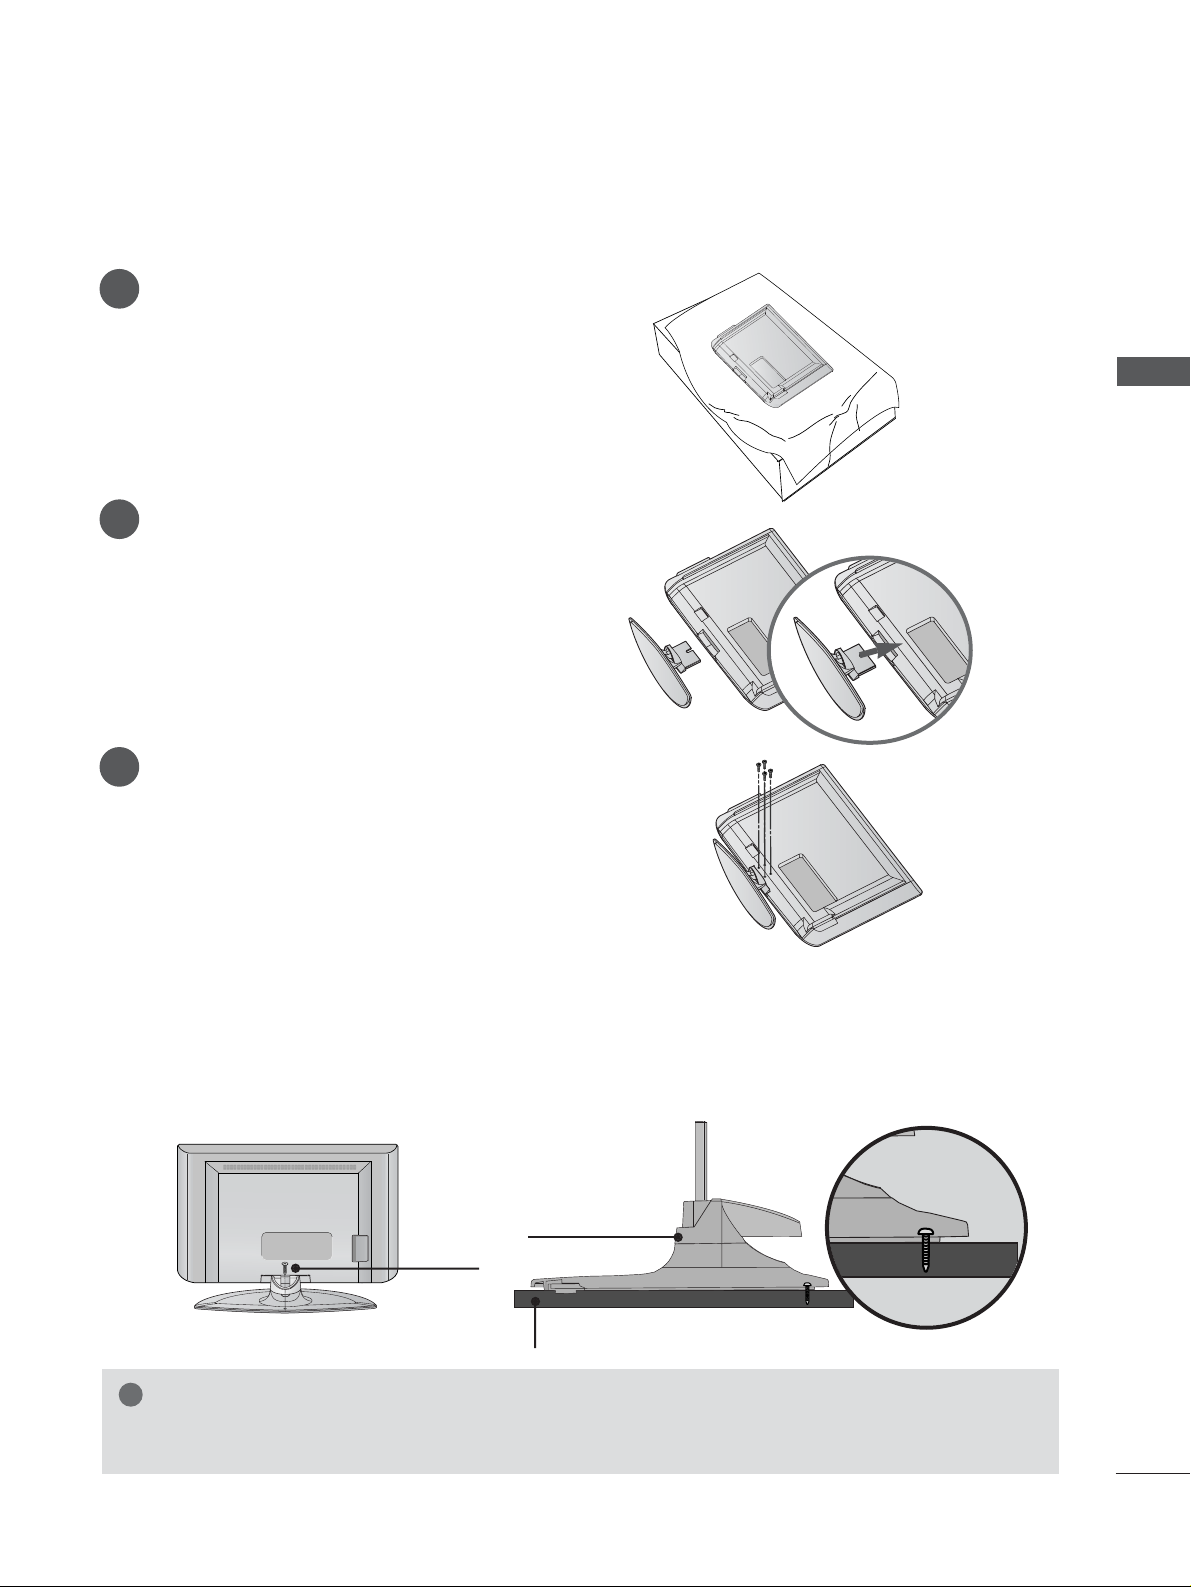
STAND INSTALLATION (Only 32, 37 inch LCD TV Models)
1
2
3
Carefully place the product screen side down on
a cushioned surface that will protect product and
screen from damage.
Assemble the product stand with the product as
shown.
Install the 4 bolts securely, in the back of the
product in the holes provided.
ATTA CHING THE TV TO A DESK (Only 32/37LT7
*
model)
The TV must be attached to desk so it cannot be pulled in a forward/backward direction, potentially causing
injury or damaging the product. Use only an attached screw.
1-Screw
Stand
Desk
WARNING
!
GG
To prevent TV from falling over, the TV should be securely attached to the floor/wall per
installation instructions. Tipping, shaking, or rocking the machine may cause injury.
Page 12

10
PREPARATION
PREPARATION
ATTA CHING THE TV TO A WALL
(This feature is not available for all models.)
or
2
1
A
Set it up close to the wall so the product doesn’t fall over when it is pushed backwards.
A
The instructions shown below is a safer way to set up the product, which is to fix it on the wall so the
product doesn’t fall over when it is pulled in the forward direction. It will prevent the product from
falling for-ward and hurting people. It will also prevent the product from damage caused by fall. Please
make sure that children don’t climb on or hang from the product.
NOTE
!
G
When moving the product to another place undo the ropes first.
G
Use a product holder or a cabinet that is big and strong enough for the size and weight of the product.
G
To use the product safely make sure that the height of the bracket that is mounted on the wall is same
as that of the product.
3
1
2
Use the eye-bolts or TV brackets/bolts to fix the product to the wall as shown in the picture.
(If your product has the bolts in the eye-bolts position before inserting the eye-bolts, loosen the bolts.)
* Insert the eye-bolts or TV brackets/bolts and tighten them securely in the upper holes.
Secure the wall brackets with the bolts (not provided as parts of the product, must purchase separately) on
the wall. Match the height of the bracket that is mounted on the wall.
3
Use a sturdy rope (not provided as parts of the product, must purchase separately) to tie the
product. It is safer to tie the rope so it becomes horizontal between the wall and the product.
2
1
Page 13

11
PREPARATION
BACK COVER FOR WIRE ARRANGEMENT
Plasma TV models
Connect the cables as necessary.
To connect an additional equipment, see the
EExxtteerrnnaall eeqquuiippmmeenntt CCoonnnneeccttiioonnss
section.
Reinstall the
CC AABBLLEE MMAANN AAGGEEMMEENN TT
as shown.
2
1
3
Hold the
CC AABBLLEE MMAANN AAGGEEMMEENN TT
with hands and push it as shown.
CABLE MANAGEMENT
Page 14

12
PREPARATION
PREPARATION
LCD TV models
Connect the cables as necessary.
To connect an additional equipment, see the
EExxtteerrnnaall eeqquuiippmmeenntt CCoonnnneeccttiioonnss
section.
1
Install the
CC AABBLLEE MMAANN AAGGEEMMEENN TT
as shown.
2
Bundle the cables using the supplied twister
holder.
(This feature is not available for all models.)
3
Hold the
CC AABBLL EE MMAANN AAGG EEMM EENNTT
with both
hands and pull it upward.
NOTE
!
GG
Do not hold the CABLE MANAGEMENT when moving the product.
- If the product is dropped, you may be injured or the product may be broken.
How to remove the cable management
CABLE MANAGEMENT
Page 15

13
Desktop Pedestal Installation
For proper ventilation, allow a clearance of 4" on each side and from the wall.
Wall Mount: Horizontal installation
For proper ventilation, allow a clearance of 4" on each side and from the wall. Detailed installation
instructions are available from your dealer, see the optional Tilt Wall Mounting Bracket Installation and
Setup Guide.
GROUNDING
Ensure that you connect the earth ground wire to prevent
possible electric shock. If grounding methods are not possible, have a qualified electrician install a separate circuit
breaker. Do not try to ground the unit by connecting it to
telephone wires, lightening rods, or gas pipes.
Power Supply
Short-circuit
Breaker
■
The set can be installed in various ways such as on a wall, or on a desktop etc.
■
The set is designed to be mounted horizontally.
4 inches
4 inches 4 inches 4 inches
4 inches
4 inches
4 inches 4 inches
4 inches
PREPARATION
Page 16

14
PREPARATION
PREPARATION
AV 3
L/MONO
R
AUDIO
VIDEO
S-VIDEO
AUDIO
VIDEO
AV 1 AV 2
ANTENNA
IN
EJECT
HDMI/DVI IN 1 HDMI IN 2
AV 3
L/MONO
R
AUDIO
VIDEO
S-VIDEO
AUDIO
VIDEO
AV 1 AV 2
ANTENNA
IN
EJECT
HDMI/DVI IN 1 HDMI IN 2
■
For optimum picture quality, adjust antenna direction.
■
An antenna cable and converter are not supplied.
■
To prevent the equipment damage, never plug in any power cords until you have finished connecting all equipment.
Multi-family Dwellings/Apartments
(Connect to wall antenna socket)
Single-family Dwellings /Houses
(Connect to wall jack for outdoor antenna)
Outdoor
Antenna
(VHF, UHF)
Wall
Antenna
Socket
RF Coaxial Wire (75 ohm)
ANTENNA CONNECTION
Antenna
UHF
Signal
Amplifier
VHF
■
In poor signal areas,to get better picture quality, install a signal amplifier to the antenna as shown above.
■
If signal needs to be split for two TVs,use an antenna signal splitter for connection.
- Be careful not to bend the bronze
wire when connecting to an antenna
port.
- 5V antenna power works In Digital
mode only. (Refer to p. 40)
AV IN 3
L/MONO
R
AUDIO
VIDEO
S-VIDEO
AV IN 3
L/MONO
R
AUDIO
VIDEO
S-VIDEO
USB
AV IN 2
L/MONO
R
AUDIO
VIDEO
S-VIDEO
Page 17
15
EXTERNAL EQUIPMENT SETUP
HD RECEIVER SETUP
■
This TV can receive Digital Over-the-air/Cable signals without an external digital set-top box.However,if you do
receive Digital signals from a digital set-top box or other digital external device,refer to the figure as shown
below.
COMPONENT IN
AUDIOAUDIO
VIDEOVIDEO
AV 1 AV 2
RS-232C IN
VIDEO
EJECT
PCMCIA
CARD SLOT
RS-232C IN
ANTENNA
IN
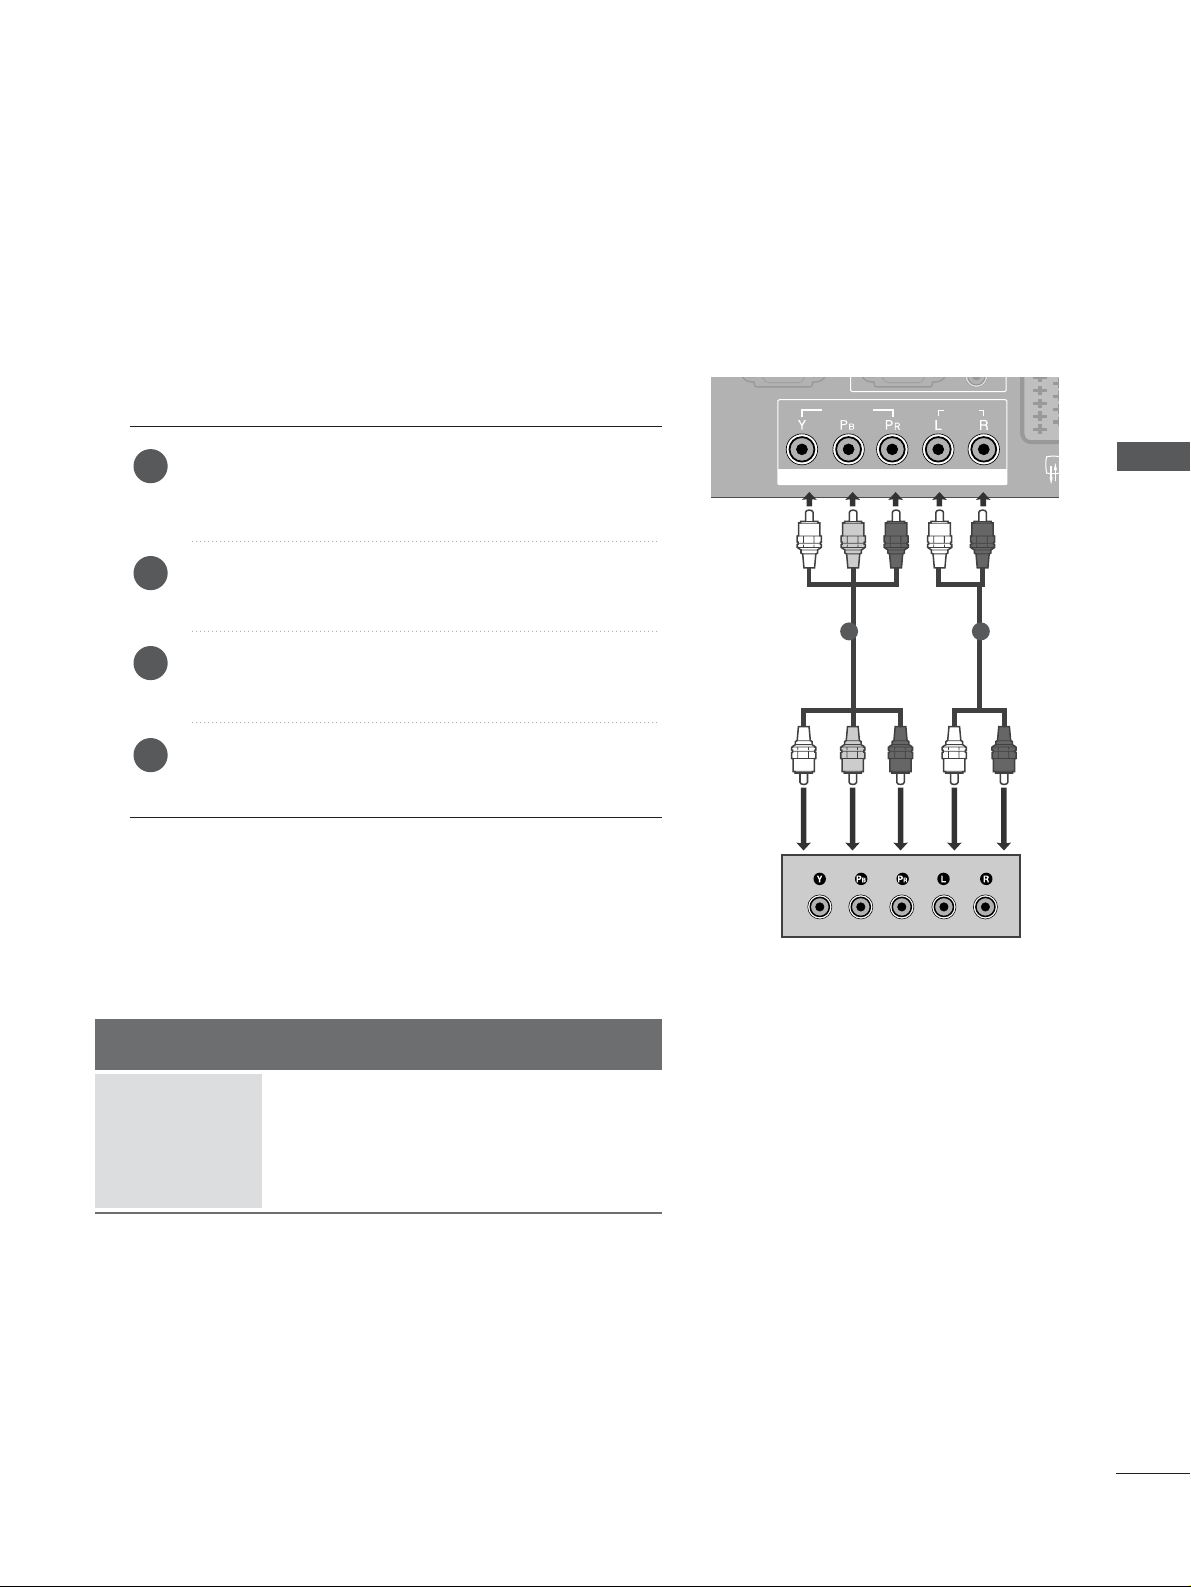
When connecting with a component cable
Connect the video outputs (Y, PB, P
R
)
of the digital set
top box to the
CC OO MM PPOONN EENNTT II NN VVIIDDEEOO
jacks on the
set.
Connect the audio output of the digital set-top box to
the
CC OO MM PPOONN EENNTT II NN AAUUDD IIOO
jacks on the set.
Turn on the digital set-top box.
(
Refer to the owner’s manual for the digital set-top box.
)
Select
COMPONENT input source with using the
IINN PPUUTT
button on the remote control.
2
3
4
1
Signal
480i/576i
480p/576p
720p/1080i
10 8 0 p
Component
Yes
Yes
Yes
No
HDMI1/2
No
Yes
Yes
Yes
1 2
■
To prevent the equipment damage, never plug in any power cords until you have finished connecting all equipment.
■
This part of EXTERNAL EQUIPMENT SETUP mainly use pictures for the Plasma TV models.
EXTERNAL EQUIPMENT SETUP
Page 18

16
EXTERNAL EQUIPMENT SETUP
EXTERNAL EQUIPMENT SETUP
AUDIO
VIDEO
AV 1 AV 2
RS-232C IN
AUDIO
VIDEO
AV 1 AV 2
EJECT
PCMCIA
CARD SLOT
RS-232C IN
ANTENNA
IN
RGB(PC)
AUDIO
(RGB/DVI)
RGB IN
COMPONENT IN
AUDIOAUDIO
VIDEOVIDEO
AV 1V 1 AV 2
RS-232C IN
(CONTROL & SERVICE)
(OPTICAL)
DIGITAL AUDIO OUT
HDMI/DVI IN
12
HDMI IN
AUDIO
VIDEO
1
2
Connect the digital set-top box to
HHDD MMII//DD VVII IINN
jack
on the set.
Connect the audio output of the digital set-top box to
the
AAUUDDIIOO IINN (( RRGGBB // DDVVII))
jack on the set.
Turn on the digital set-top box. (Refer to the owner’s
manual for the digital set-top box.
)
Select
HDMI1 input source with using the
IINN PPUUTT
button on the remote control.
2
3
4
1
When connecting with a HDMI cable
Connect the digital set-top box to
HHDD MMII//DD VVII IINN
or
HHDD MMII IINN
jack on the set.
Turn on the digital set-top box.
(
Refer to the owner’s manual for the digital set-top box.
)
Select
HDMI1 or HDMI2 input source with using the
IINN PPUUTT
button on the remote control.
2
3
1
1
When connecting with a HDMI to DVI cable
HDMI/DVI IN
(CONTROL & SERVICE)
HDMI IN
12
RS-232C IN
VIDEO
COMPONENT IN
DIGITAL AUDIO OUT
RGB IN
RGB(PC)
(OPTICAL)
AUDIO
(RGB/DVI)
AUDIO
AV 1 AV 2
Page 19

17
DVD SETUP
When connecting with a component cable
RGB(PC)
AUDIO
(RGB/DVI)
RGB IN
COMPONENT IN
AUDIOAUDIO
VIDEOVIDEO
AV 1 AV 2
RS-232C INRS-232C IN
(CONTROL & SERVICE)
AV IN 3
L/MONO
R
AUDIO
VIDEO
S-VIDEO
Component Input ports
To get better picture quality, connect a DVD player to the component input ports as shown below.
Component ports on the TV
YPB PR
Video output ports
on DVD player
Y
Y
Y
Y
PB
B-Y
Cb
Pb
P
R
R-Y
Cr
Pr
Connect the video outputs (Y, P
B, PR
)
of the DVD to the
CC OO MM PPOONN EENNTT II NN VVIIDDEEOO
jacks on the set.
Connect the audio outputs of the DVD to the
CC OO MM PPOONN EENNTT II NN AAUUDD IIOO
jacks on the set.
Tu r n on the DVD player, insert a DVD.
Select
COMPONENT input source with using the
IINN PPUUTT
button on the remote control.
Refer to the DVD player's manual for operating
instructions.
2
3
4
5
1
1
2
EXTERNAL EQUIPMENT SETUP
Page 20

18
EXTERNAL EQUIPMENT SETUP
EXTERNAL EQUIPMENT SETUP
When connecting with a Euro Scart
Connect the Euro scart socket of the DVD to the
AAVV 11
Euro scart socket on the set.
Tu r n on the DVD player, insert a DVD.
Select
AV 1 input source with using the
IINN PPUUTT
button
on the remote control.
If connected to
AV 2 Euro scart socket, select AV 2
input source.
Refer to the DVD player's manual for operating
instructions.
2
3
4
1
AUDIO
(RGB/DVI)
GB IN
AV 1 AV 2
(OPTICAL)
AUDIO
(R) AUDIO (L)
AUDIO/
VIDEO
AV IN 3
L/MONO
R
AUDIO
VIDEO
S-VIDEO
AV 1 AV 2
EJECT
PCMCIA
CARD SLOT
RS-232C IN
ANTENNA
IN
AUDIO
VIDEO
1
NOTE
!
GG
If you want to use the EURO scart cable, you have to use
the signal shielded Euro scart cable.
When connecting with an S-Video cable
L R
S-VIDEOVIDEO
OUTPUT
SWITCH
ANT IN
ANT OUT
AV IN 3V IN 3
L/MONOMONO
R
AUDIOAUDIO
VIDEOVIDEO
S-VIDEOS-VIDEO
Connect the S-VIDEO output of the DVD to the
SS--
VVII DD EE OO
input on the set.
Connect the audio outputs of the DVD to the
AAUU DDIIOO
input jacks on the set.
Tu r n on the DVD player, insert a DVD.
Select
AV 3 input source with using the
IINN PPUUTT
button
on the remote control.
Refer to the DVD player's manual for operating instructions.
2
3
4
5
1
1
2
Page 21
19
AV IN 3
L/MONO
R
AUDIO
VIDEO
S-VIDEO
RGB(PC)
AUDIO
(RGB/DVI)
RGB IN
AV 1 AV 2
RS-232C IN
(CONTROL & SERVICE)
(OPTICAL)
DIGITAL AUDIO OUT
HDMI/DVI IN
12
HDMI IN
COMPONENT IN
AUDIO
VIDEO
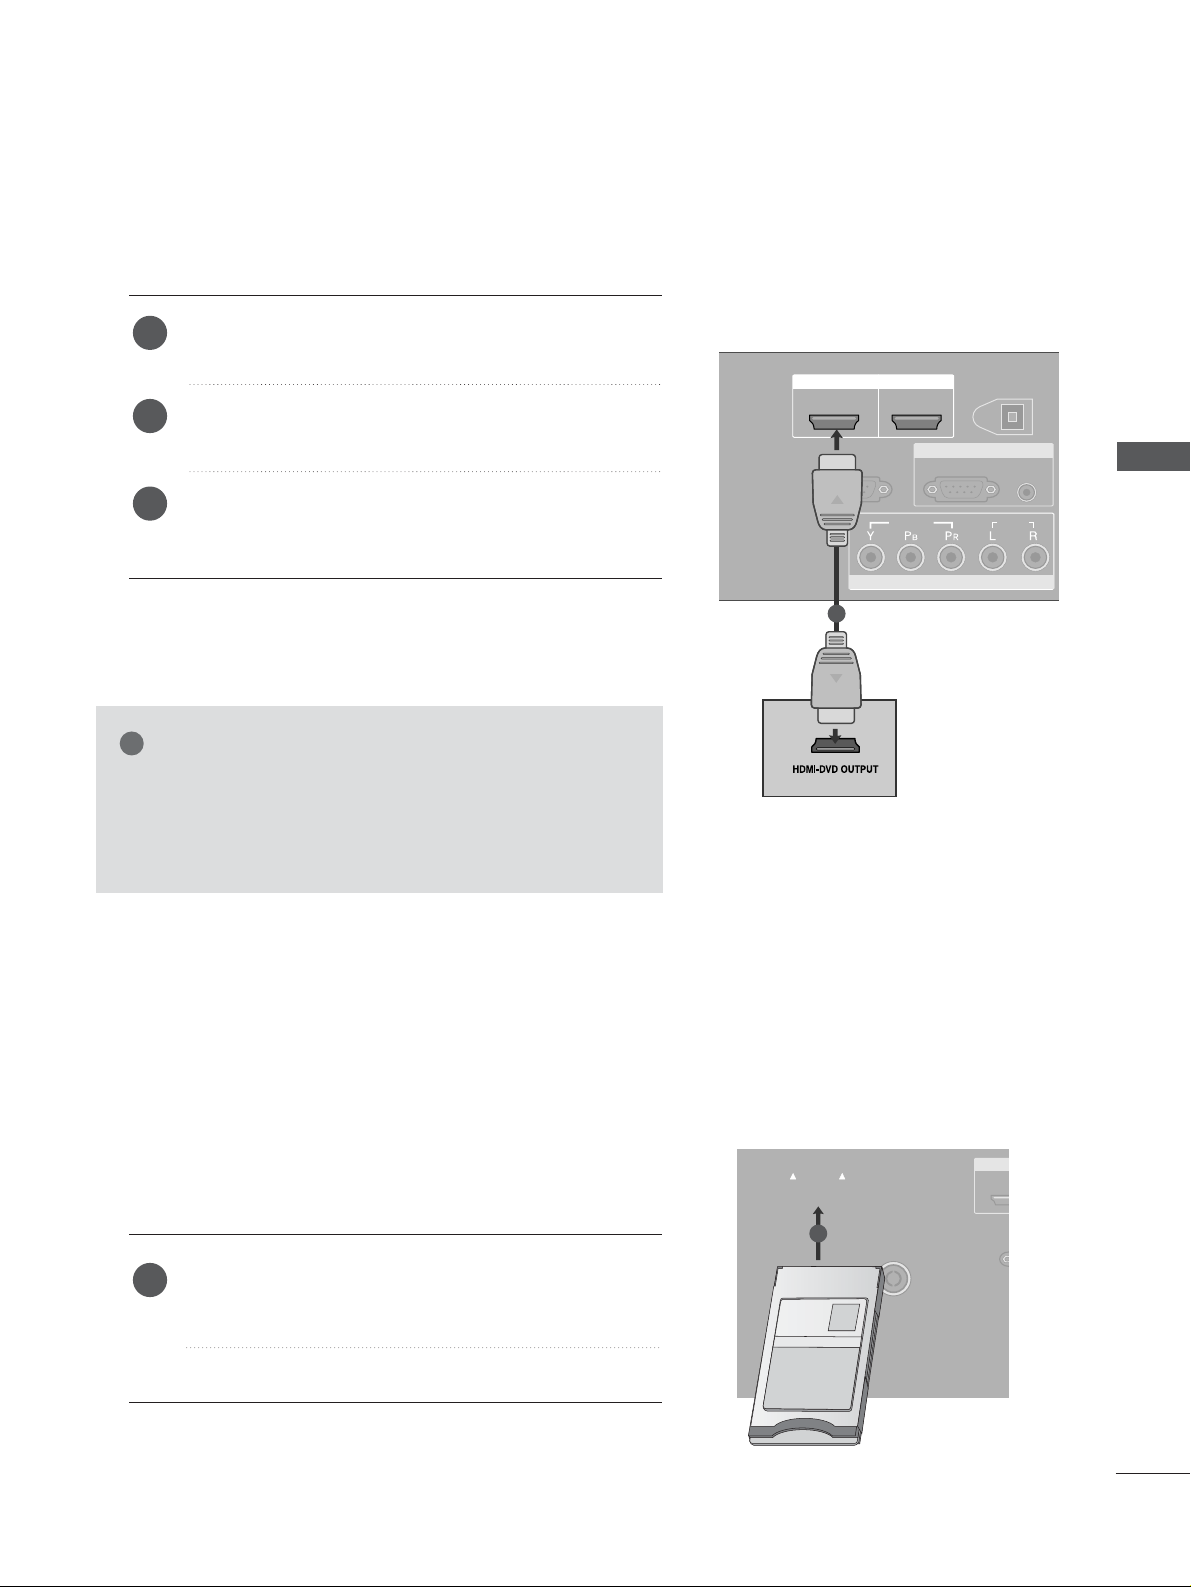
When connecting HDMI cable
Connect the HDMI output of the DVD to the
HHDDMMII//DDVVII
IINN
or
HHDDMMII IINN
jack on the set.
Select
HDMI1or HDMI2 input source with using the
IINN PPUUTT
button on the remote control.
Refer to the DVD player's manual for operating
instructions.
1
2
3
Insert the CI Module to
PPCC MMCC IIAA
(Personal Computer
Memory Card International Association)
CC AA RR DD SSLLOOTT
of TV as shown.
For further information, see p.43.
1
GG
TV can receive the video and audio signal simultaneously
with using a HDMI cable.
GG
If the DVD does not support Auto HDMI, you need to set
the output resolution appropriately.
NOTE
!
1
INSERTION OF CI MODULE
AV 1 AV 2
EJECT
PCMCIA
CARD SLOT
RS-232C IN
(CONT
HDMI/
ANTENNAANTENNA
IN
AUDIO
VIDEO
TVTVTV
-- TToo vviiee ww tthhee ssccrr aammbblleedd ((pp aa yy)) ss eerrvviicceess iinn ddiiggiittaall TTVV
mmoo ddee..
-- TThhiiss ffeeaattuu rree iiss nnoott aavvaaiillaabbllee iinn aall ll cc oo uunnttrriiee ss..
1
EXTERNAL EQUIPMENT SETUP
Page 22
20
EXTERNAL EQUIPMENT SETUP
EXTERNAL EQUIPMENT SETUP
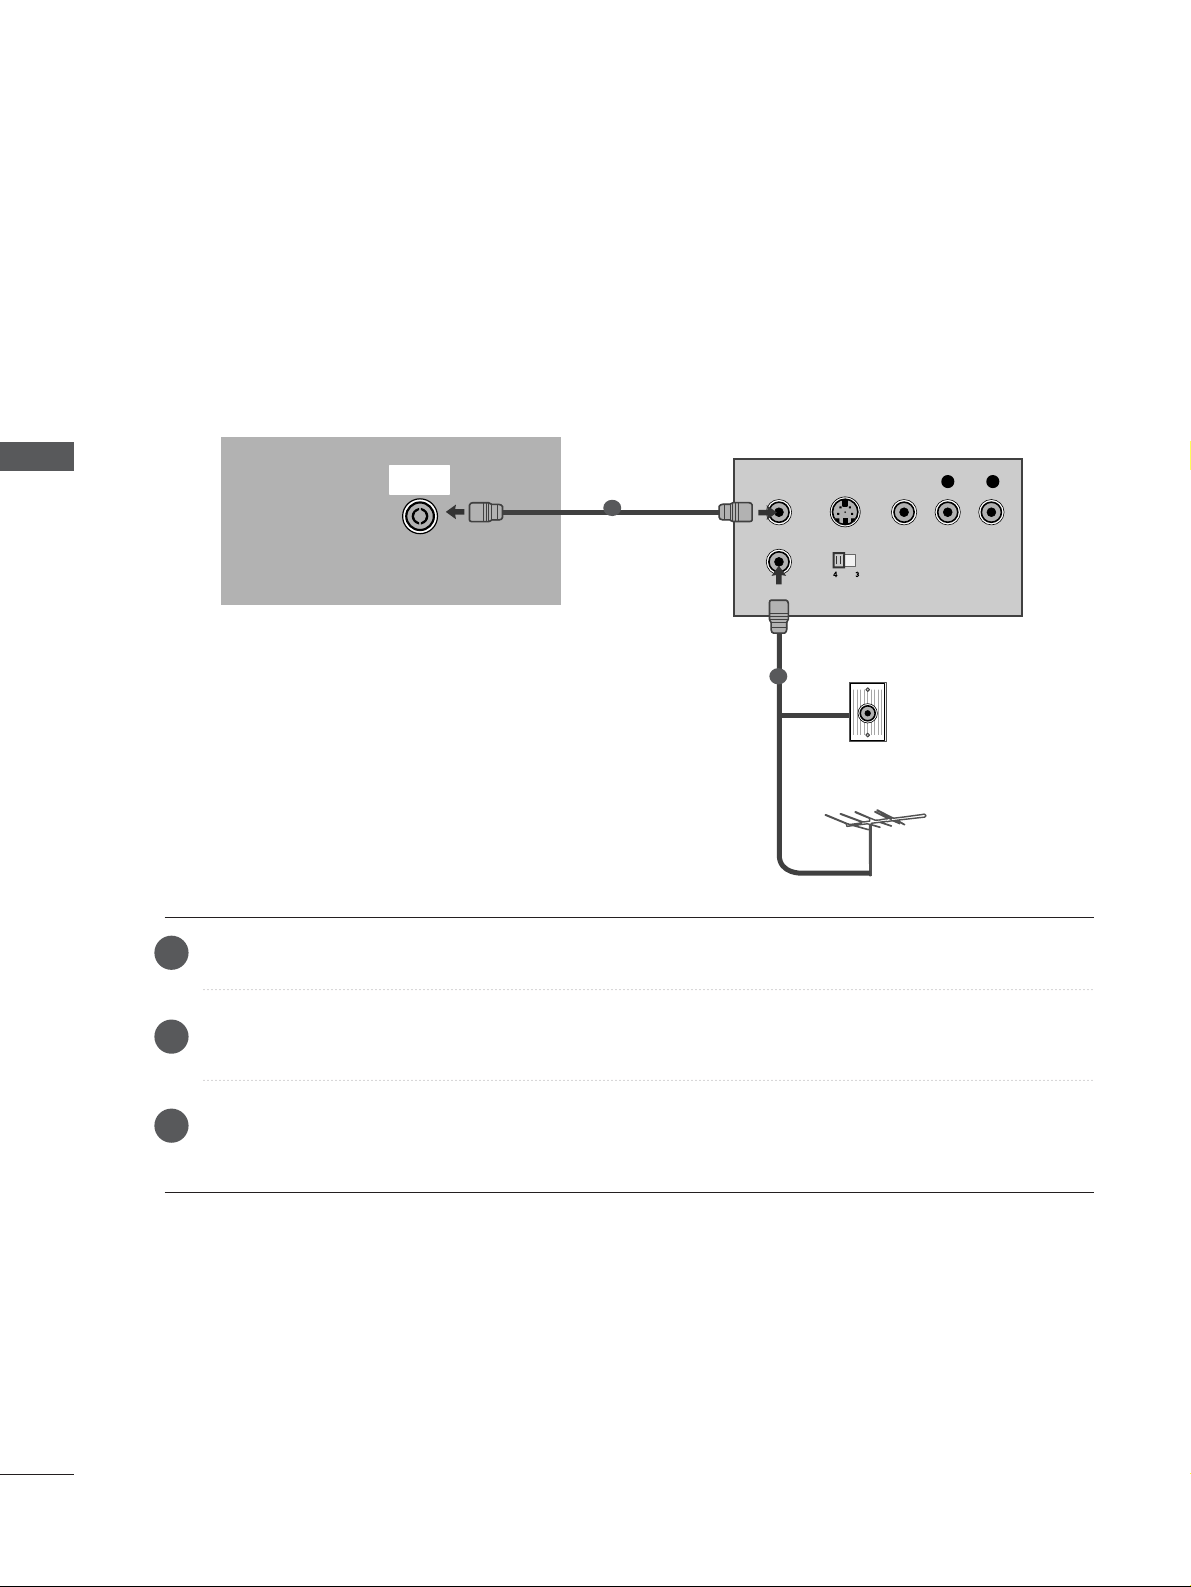
When connecting with an antenna
■
To avoid picture noise (interference), leave an adequate distance between the VCR and TV.
■
If the 4:3 picture format keeps for a long time the fixed images on the sides of the screen may remain visible
on the screen. (Only Plasma TV models)
VIDEOVIDEO
EJECT
PCMCIA
CARD SLOT
RS-232C INRS-232C IN
(CONTROL & SERVICE)
AUDIOAUDIO
OUTPUT
SWITCH
ANT IN
R
S-VIDEO VIDEO
ANT OUT
L
ANTENNA
IN
Wall Jack
Antenna
Connect the
AANNTT OOUUTT
socket of the VCR to the
AANNTT EENNNN AA II NN
socket on the set.
Connect the antenna cable to the
AANNTT IINN
socket of the VCR.
Press the
PPLLAAYY
button on the VCR and match the appropriate programme between the TV and VCR for
viewing.
VCR SETUP
1
2
2
3
1
Page 23
21
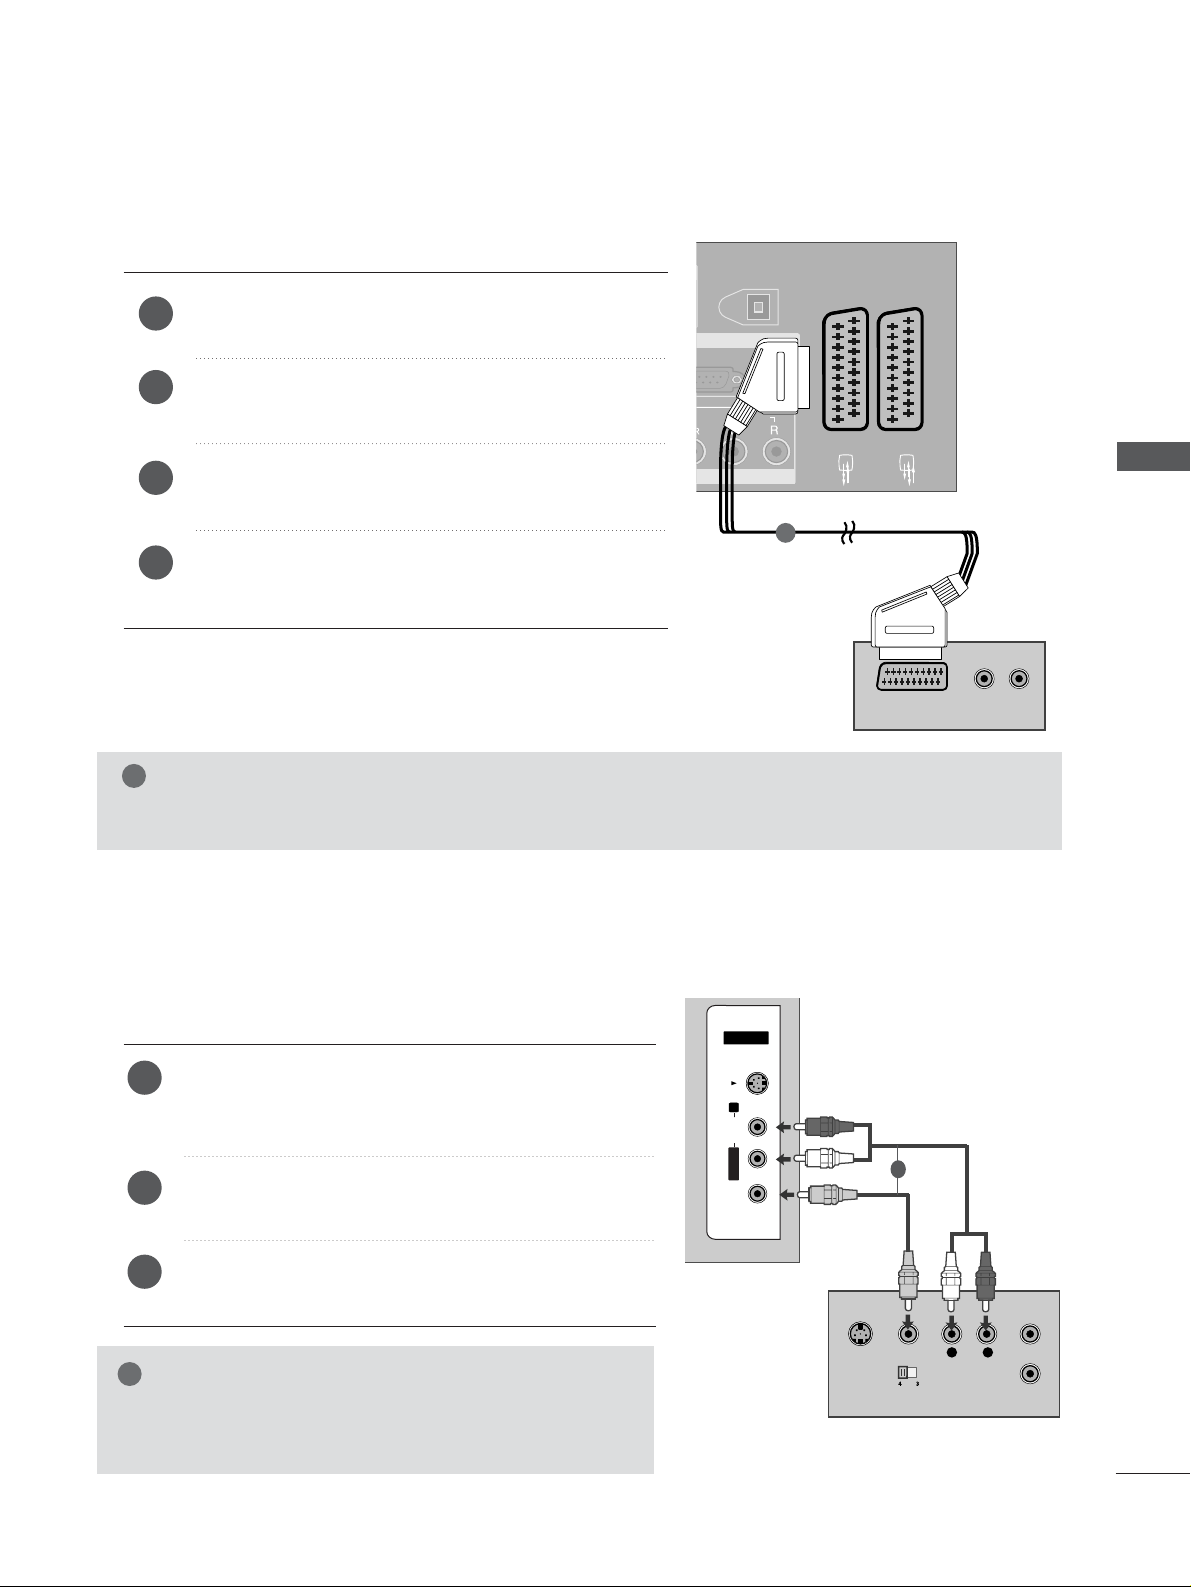
When connecting with a Euro Scart
Connect the Euro scart socket of the VCR to the
AAVV 11
Euro scart socket on the set.
Insert a video tape into the VCR and press PLAY on
the VCR. (Refer to the VCR owner’s manual.)
Select
AV 1 input source with using the
IINN PPUUTT
button
on the remote control.
If connected to
AAVV 22
Euro scart socket, select
AV 2
input source.
2
3
4
1
VIDEO
EJECT
PCMCIA
CARD SLOT
RS-232C IN
ANTENNA
IN
AUDIO
AUDIO
(RGB/DVI)
RGB IN
AV 1 AV 2
(OPTICAL)
DIGITAL AUDIO OUT
AUDIO
(R) AUDIO (L)
AUDIO/
VIDEO
AV IN 3
1
NOTE
!
GG
If you want to use the EURO scart cable, you have to use the signal shielded Euro scart cable.
When connecting with an RCA cable
L
R
S-VIDEO
VIDEO
OUTPUT
SWITCH
ANT IN
ANT OUT
AV IN 3
L/MONO
R
AUDIO
VIDEO
S-VIDEO
AV IN 3V IN 3
L/MONOMONO
R
AUDIOAUDIO
VIDEOVIDEO
S-VIDEOS-VIDEO
Connect the
AAUU DD IIOO/VVIIDDEE OO
jacks between TV and
VCR. Match the jack colours (Video = yellow, Audio Left
= white, and Audio Right = red)
Insert a video tape into the VCR and press PLAY on
the VCR. (Refer to the VCR owner’s manual.
)
Select
AV 3 input source using the
IINN PPUU TT
button on
the remote control.
1
2
3
GG
If you have a mono VCR, connect the audio cable from the
VCR to the
AAUU DDIIOO LL // MMOONN OO
jack of the set.
NOTE
!
1
EXTERNAL EQUIPMENT SETUP
Page 24

22
EXTERNAL EQUIPMENT SETUP
EXTERNAL EQUIPMENT SETUP
GG
If both S-VIDEO and VIDEO sockets have been connected to
the S-VHS VCR simultaneously, only the S-VIDEO can be
received.
NOTE
!
L
R
S-VIDEO
VIDEO
OUTPUT
SWITCH
ANT IN
ANT OUT
AV IN 3V IN 3
L/L/MONOMONO
R
AUDIOAUDIO
VIDEOVIDEO
S-VIDEOS-VIDEO
When connecting with an S-Video cable
Connect the S-VIDEO output of the VCR to the
SS--
VVIIDD EE OO
input on the set. The picture quality is
improved; compared to normal composite (RCA cable)
input.
Connect the audio outputs of the VCR to the
AAUU DDIIOO
input jacks on the set.
Insert a video tape into the VCR and press PLAY on the
VCR. (Refer to the VCR owner’s manual.)
Select
AV 3 input source with using the
IINNPPUUTT
button on
the remote control.
2
3
4
1
1 2
DIGITAL AUDIO OUT SETUP
Send the TV’s audio to external audio equipment via the Digital Audio Output (Optical)port.
G
Do not look into the optical output port. Looking at the
laser beam may damage your vision.
CAUTION
RGB(PC)
AUDIO
(RGB/DVI)
RGB IN
AV 1 AV 2
2
HDMI IN
(OPTICAL)
DIGITAL AUDIO OUT
COMPONENT IN
AUDIO
VIDEO
Connect one end of an optical cable to the TV Digital
Audio (Optical)Output port.
Connect the other end of the optical cable to the digital audio (optical)input on the audio equipment.
Set the “TV Speaker option - Off” in the AUDIO menu.
(
G
pp..8888
). See the external audio equipment instruction
manual for operation.
2
3
1
1
2
Page 25

23
OTHER A/V SOURCE SETUP
Connect the
AAUU DDIIOO/VVII DD EE OO
jacks between TV and external equipment. Match the jack colours
.
(
Video = yellow, Audio Left = white, and Audio Right = red
)
Select AV 3 input source with using the
IINN PPUUTT
button on the remote control.
Operate the corresponding external equipment.
Refer to external equipment operating guide.
L R
VIDEO
AV IN 3
L/L/MONOMONO
R
AUDIO
VIDEO
S-VIDEOS-VIDEO
Camcorder
Video Game Set
1
1
2
3
EXTERNAL EQUIPMENT SETUP
Page 26

24
EXTERNAL EQUIPMENT SETUP
EXTERNAL EQUIPMENT SETUP
PC SETUP
This TV provides Plug and Play capability, meaning that the PC adjusts automatically to the TV's settings.
When connecting with a D-sub 15 pin cable
AV 1 AV 2
RS-232C INRS-232C IN
(CONTROL & SERVICE)
COMPONENT IN
AUDIOAUDIO
VIDEOVIDEO
RGB(PC)
AUDIO
(RGB/DVI)
RGB IN
RGB OUTPUT
AUDIO
Connect the RGB output of the PC to the
RRGGBB
((
PPCC
))
jack on the set.
Connect the PC audio output to the
AAUU DDII OO IINN
((RRGGBB // DDVVII))
jack on the set.
Turn on the PC and the set.
Select
RGB input source with using the
IINN PPUUTT
but-
ton on the remote control.
2
3
4
1
1 2
When connecting with a HDMI to DVI cable
GG
If the PC has a DVI output and no HDMI output, a separated audio connection is necessary.
GG
If the PC does not support Auto DVI, you need to set the output resolution appropriately.
NOTE
!
AV 1 AV 2
EJECT
RS-232C IN
ANTENNA
IN
AUDIO
VIDEO
RGB(PC)
AUDIO
(RGB/DVI)
RGB IN
COMPONENT IN
AUDIOAUDIO
VIDEOVIDEO
AV 1V 1 AV 2V 2
RS-232C INRS-232C IN
(CONTROL & SERVICE)
(OPTICAL)
DIGITAL AUDIO OUT
HDMI/DVI IN
12
HDMI IN
DVI-PC OUTPUT
AUDIO
1
2
Connect the DVI output of the PC to the
HHDD MMII // DDVVII
IINN
jack on the set.
Connect the PC audio output to the
AAUU DDII OO IINN
((RRGGBB // DDVVII))
jack on the set.
Turn on the PC and the set
Select
HDMI1 input source with using the
IINN PPUUTT
button on the remote control.
2
3
4
1
Page 27

25
NOTE
!
G
To enjoy vivid picture and sound, connect a PC to
the set.
G
Avoid keeping a fixed image on the set’s screen for
a long period of time. The fixed image may become
permanently imprinted on the screen; use a screen
saver when possible.
G
Connect PC to the RGB (PC) or HDMI IN (or
HDMI/DVI IN) port of the set; change the resolution output of PC accordingly.
G
There might be noise according to some resolution,
vertical pattern, contrast or brightness in PC mode.
Change the PC mode into another resolution or
change the refresh rate into another rate or adjust the
brightness and contrast on the menu until the picture
is clean. If the refresh rate of the PC graphic card can
not be changed, change the PC graphic card or consult it to the manufacturer of the PC graphic card.
G
RGB input only supports the separate horizontal
and vertical synchronization pulses in separate
channels.
G
We recommend using 1360x768, 60Hz (LCD TV
models / 50 inch PLASMA TV models) /
10 2 4x768, 60Hz (42 inch PLASMA TV models)
for the PC mode, they provide the best picture
quality.
G
Connect the signal cable from the monitor output
port of the PC to the RGB (PC/DTV) port of the
set or the signal cable from the HDMI output port
of the PC to the HDMI IN (or HDMI/DVI IN) port
on the set.
G
Connect the audio cable from the PC to the Audio
input on the set. (Audio cables are not included
with the set).
G
If using a sound card, adjust PC sound as required.
G
This set uses a VESA Plug and Play Solution. The
set provides EDID data to the PC system with a
DDC protocol. The PC adjusts automatically when
using this set.
G
DDC protocol is preset for RGB (Analogue RGB),
HDMI (Digital RGB) mode.
G
If required, adjust the settings for Plug and Play
functionally.
G
If graphic card on the PC does not output analogue
and digital RGB simultaneously, connect only one
of either RGB or HDMI IN (or HDMI/DVI IN) to
display the PC on the set.
G
If graphic card on the PC does output analogue
and digital RGB simultaneously, set the set to
either RGB or HDMI; (the other mode is set to Plug
and Play automatically by the set.)
G
DOS mode may not work depending on video card
if you use a HDMI to DVI cable.
G
When you use too long RGB-PC cable, there might
be a noise on the screen. We recommend using
under 5m of the cable. It provides the best picture
quality.
EXTERNAL EQUIPMENT SETUP
Page 28

26
EXTERNAL EQUIPMENT SETUP
EXTERNAL EQUIPMENT SETUP
13 6 6x768
70.08
59.94
75.00
60.31
75.00
74.55
60.00
70.00
75.029
59.87
59.8
59.6
59.988
31.468
31.469
37.684
37.879
46.875
49.725
48.363
56.476
60.123
47.78
47.72
47.56
66.647
Supported Display Resolution
Resolution
720x400
640x480
Horizontal
Frequency(KHz)
Ver tical
Frequency(Hz)
800x600
832x624
10 2 4x768
12 8 0x768
13 6 0x768
RGB[PC] / HDMI[PC] mode
1920x1080
640x480
720x480
720x576
12 8 0x720
1920x1080
59.94
60.00
59.94
60.00
50.00
50.00
59.94
60.00
59.94
60.00
50.00
24.00
50.00
59.94
60.00
31.469
31.469
31.47
31.50
31.25
37.50
44.96
45.00
33.72
33.75
28.125
27.00
56.25
67.433
67.50 0
HDMI[DTV] mode
Resolution
Horizontal
Frequency(KHz)
Ver tical
Frequency(Hz)
Page 29

27
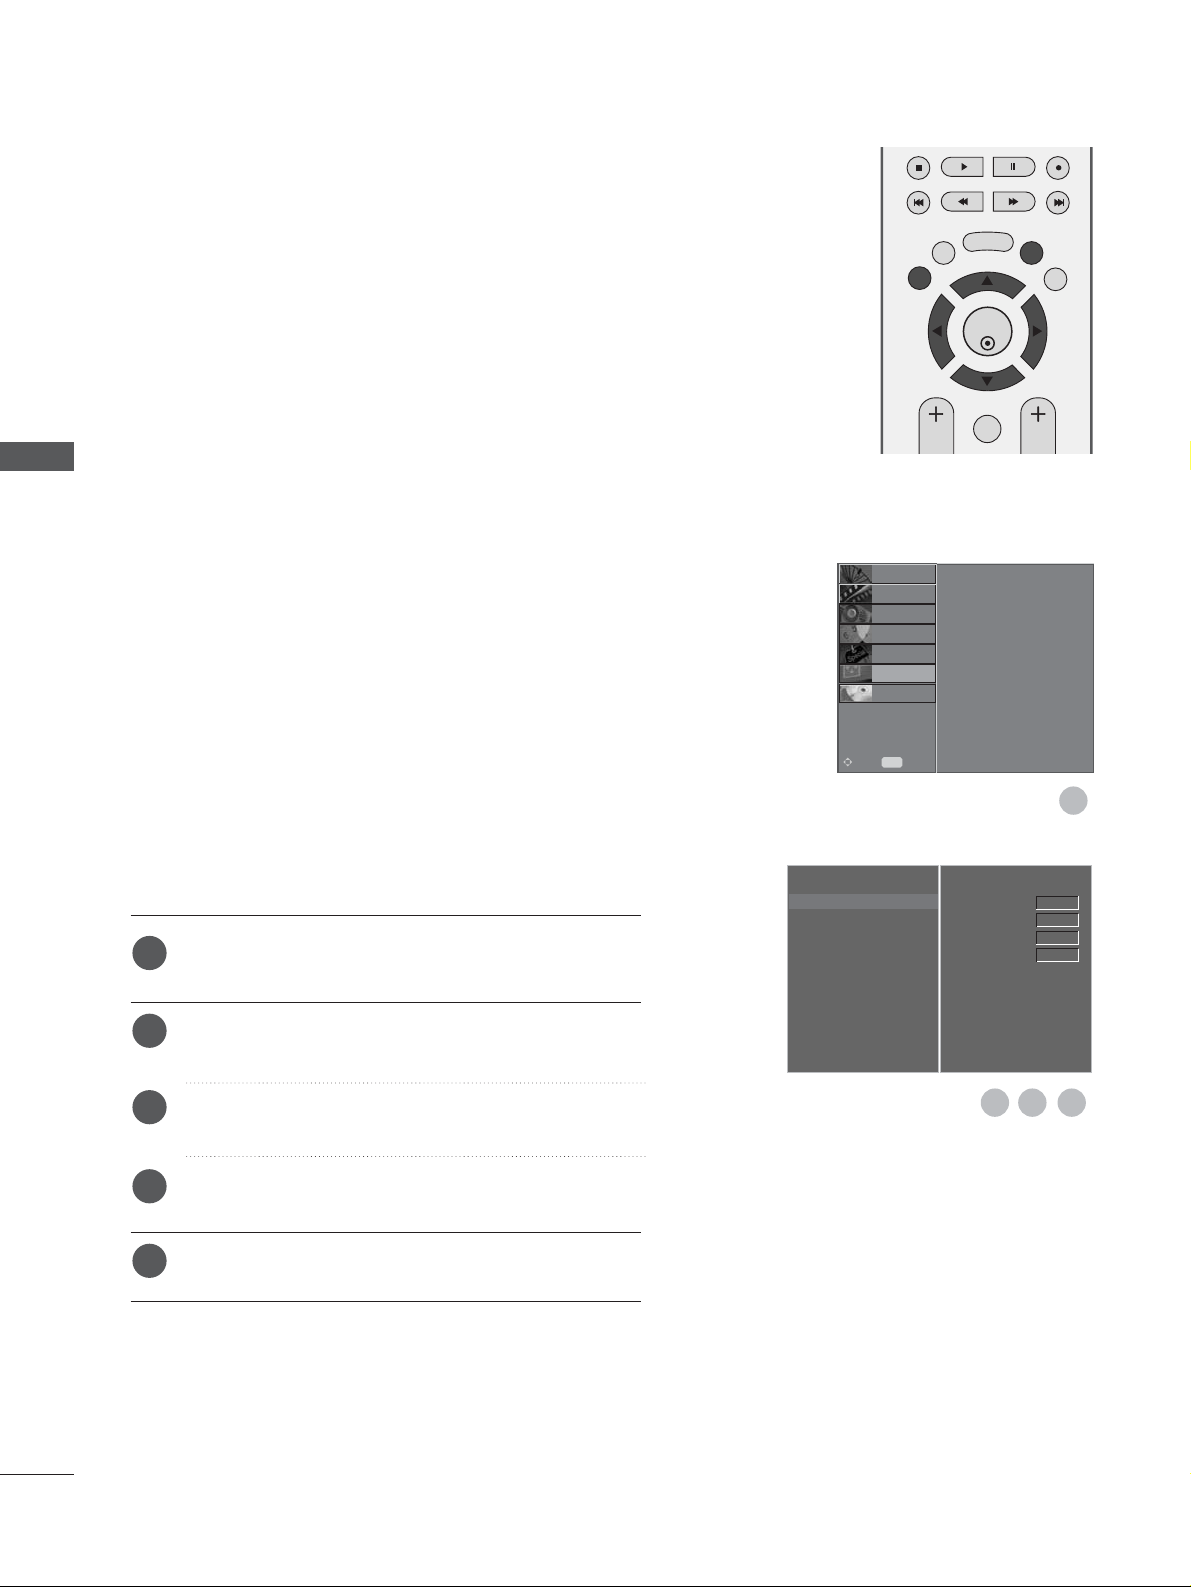
Screen Setup for PC mode
Automatically adjusts picture position and minimizes image
shaking.After adjustment, if the image is still not correct,
your set is functioning properly but needs further adjustment.
AAuutt oo cc oo nnffiigguurr ee
This function is for the automatic adjustment of the screen
position, clock, and phase. The displayed image will unstable
for a few seconds while the auto configuration is in progress.
Press the
MMEENNUU
button and then use
D
or
E
button
to select the SCREEN menu.
Press the
G
button and then use
D
or
E
button to
select Auto Config..
Press the
G
button to start Auto Config..
• When Auto Config. has finished, OK will be shown
on screen.
• If the position of the image is still not correct, try
Auto adjustment again.
• If picture needs to be adjusted more after Auto adjustment in RGB (PC), you can adjust the Manual
Config..
Press the EXIT button to return to normal TV viewing.
Auto Configure (RGB [PC] mode only)
Auto Config. G
Manual Config.
XGA Mode
Aspect Ratio
Reset
To Set
OK
EXIT
TIME
SHIFT
TIME
SHIFT
VOL PR
GUIDE
BACK MENU
DVR
MARK
FAV
1
3
2
1
2
3
4
Auto Config.
Manual Config.
XGA Mode
Aspect Ratio
Reset
SETUP
O
PICTURE
O
Prev.
MENU
Move
AUDIO
O
TIME
O
OPTION
O
SCREEN
G
D V R
O
EXTERNAL EQUIPMENT SETUP
Page 30
28
EXTERNAL EQUIPMENT SETUP
EXTERNAL EQUIPMENT SETUP
If the picture isn’t clear after auto adjustment and especially if characters are still trembling, adjust the picture
phase manually.
To correct the screen size, adjust
CC ll oo cckk
.
This function works in the following mode : RGB[PC].
CC ll oo cckk
This function is to minimize any vertical bars or
stripes visible on the screen background. And the
horizontal screen size will also change.
PPhh aa ssee
This function allows you to remove any horizontal
noise and clear or sharpen the image of characters.
Press the MENU button and then use
D
or
E
button
to select the SCREEN menu.
Press the Gbutton and then
D
or
E
button to select
Manual Config..
Press the
G
button and then
D
or
E
button to select
Phase, Clock, H-Position or V-Position.
Press the
F
or
G
button to make appropriate adjust-
ments.
Press the EXIT button to return to normal TV viewing.
Adjustment for screen Phase, Clock, Position
Auto Config.
Manual Config.
G
XGA Mode
Aspect Ratio
Reset
Phase
Clock
H-Position
V-Position
0
0
0
0
OK
EXIT
TIME
SHIFT
TIME
SHIFT
VOL PR
GUIDE
BACK MENU
DVR
MARK
FAV
1
1
2
3
4
5
3 4
2
Auto Config.
Manual Config.
XGA Mode
Aspect Ratio
Reset
SETUP
O
PICTURE
O
Prev.
MENU
Move
AUDIO
O
TIME
O
OPTION
O
SCREEN
G
D V R
O
Page 31
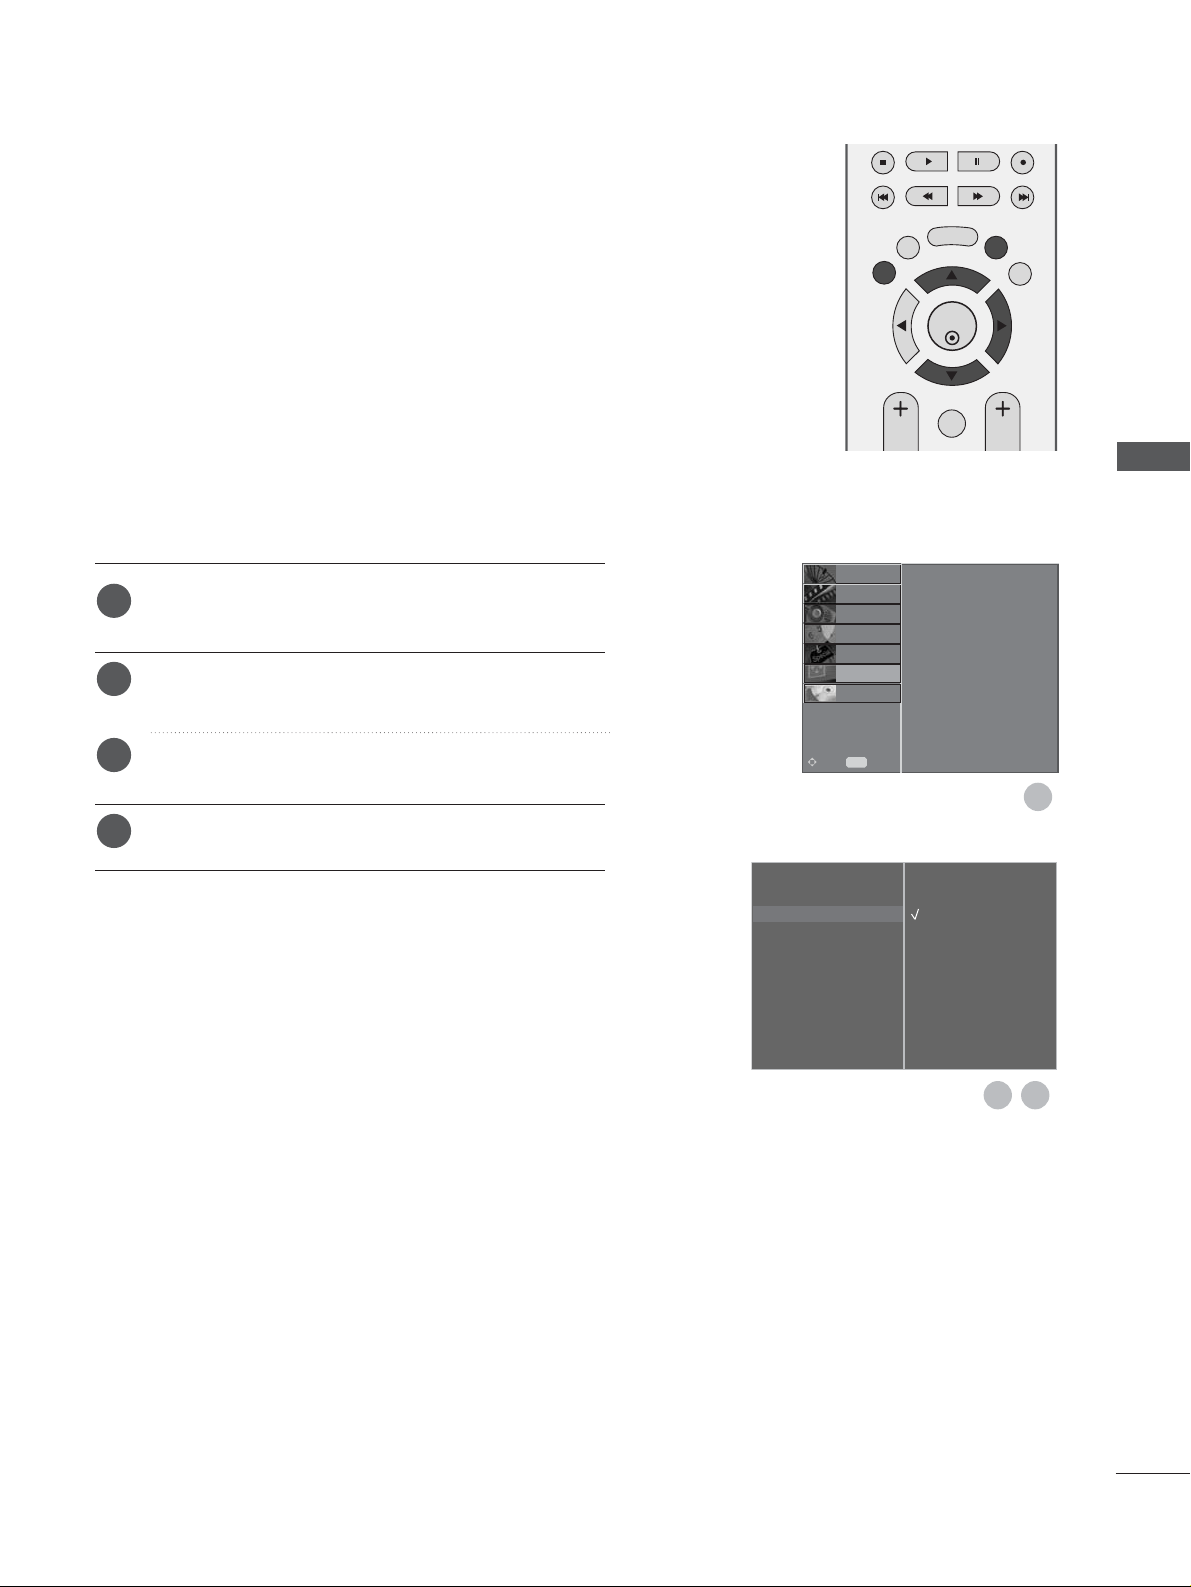
29
To see a normal picture, match the resolution of RGB mode
and selection of XGA mode.
This function works in the following mode: RGB[PC] mode
Press the MENU button and then use
D
or
E
button
to select the SCREEN menu.
Press the
G
button and then use
D
or
E
button to
select XGA Mode.
Press the
G
button and then use
D
or
E
button to
select the desired XGA resolution.
Press the EXIT button to return to normal TV viewing.
Selecting Wide XGA mode
Auto Config.
Manual Config.
XGA Mode
G
Aspect Ratio
Reset
1024 X 768
1280 X 768
1360 X 768
1366 X 768
OK
EXIT
TIME
SHIFT
TIME
SHIFT
VOL PR
GUIDE
BACK MENU
DVR
MARK
FAV
1
1
2
3
4
3
2
EXTERNAL EQUIPMENT SETUP
Auto Config.
Manual Config.
XGA Mode
Aspect Ratio
Reset
SETUP
O
PICTURE
O
Prev.
MENU
Move
AUDIO
O
TIME
O
OPTION
O
SCREEN
G
D V R
O
Page 32
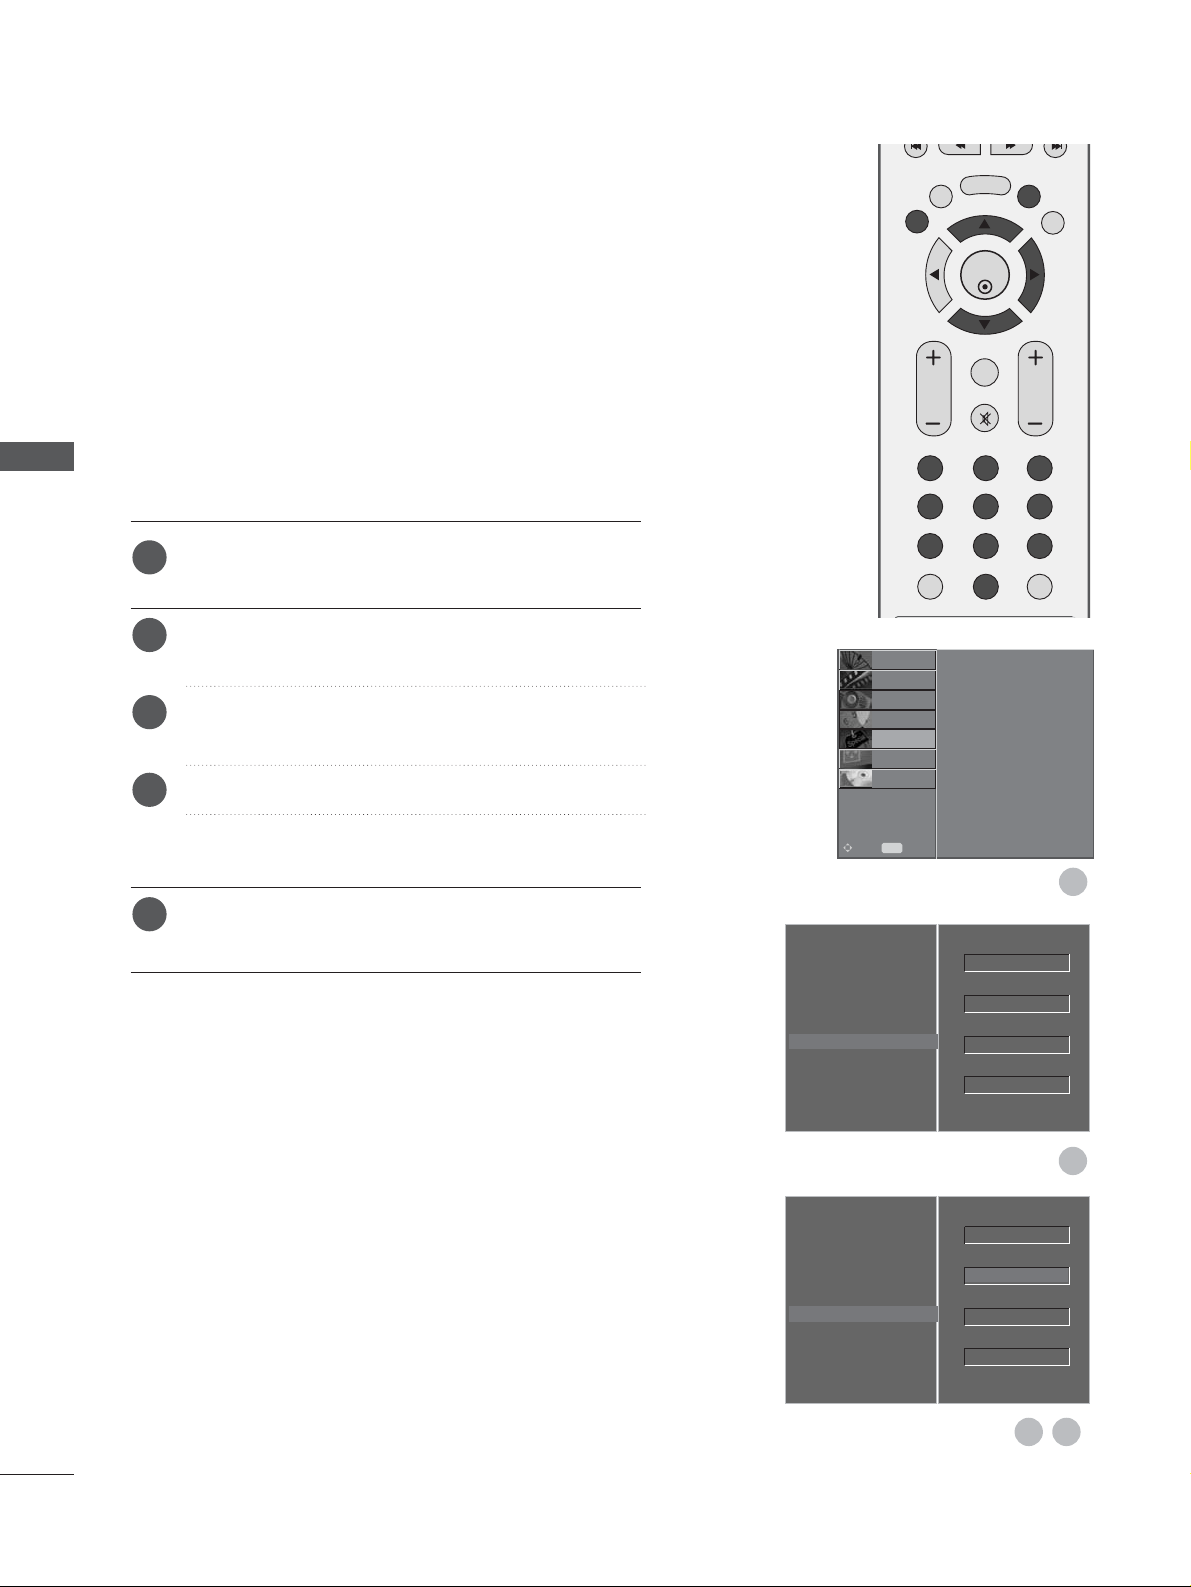
30
EXTERNAL EQUIPMENT SETUP
EXTERNAL EQUIPMENT SETUP
This function operates in current mode.
To initialise the adjusted value
It’s not available to use ISM Method and Low power in
LL CCDD TTVV
models.
Press the MENU button and then
D
or
E
button to
select the OPTION menu.
Press the
G
button and then
D
or
E
button to select
Factory Mode.
Press the
G
button and then
D
or
E
button to select
Factory Reset.
Press the
G
button.
The message “If you enter a password, all user
setting will be reset” will appear.
Use NUMBER buttons to input a 4-digit password.
The TV is set up with the initial password “0-0-0-0”.
Initialising
(Reset to original factory settings)
OK
EXIT
TIME
SHIFT
TIME
SHIFT
VOL PR
GUIDE
BACK MENU
DVR
123
456
789
0
Q.VIEW
LIST
MUTE
MARK
FAV
1
2
3
4
5
Language
Country
Lock System
Parental Control
Input Label
SIMPLINK
Factory Mode
G
Set ID
Factory Reset
ISM Method
Low Power
1
2
Language
Country
Lock System
Parental Control
Input Label
SIMPLINK
Factory Mode
Set ID
Factory Reset
ISM Method
Low Power
OK
4
3
OK
Normal
Off
1
Normal
Off
1
Language
Country
Lock System
Parental Control
Input Label
SIMPLINK
Factory Mode
SETUP
O
PICTURE
O
SCREEN
O
D V R
O
Prev.
MENU
Move
AUDIO
O
TIME
O
OPTION
G
Page 33
31
WATCHING TV /PROGRAMME CONTROL
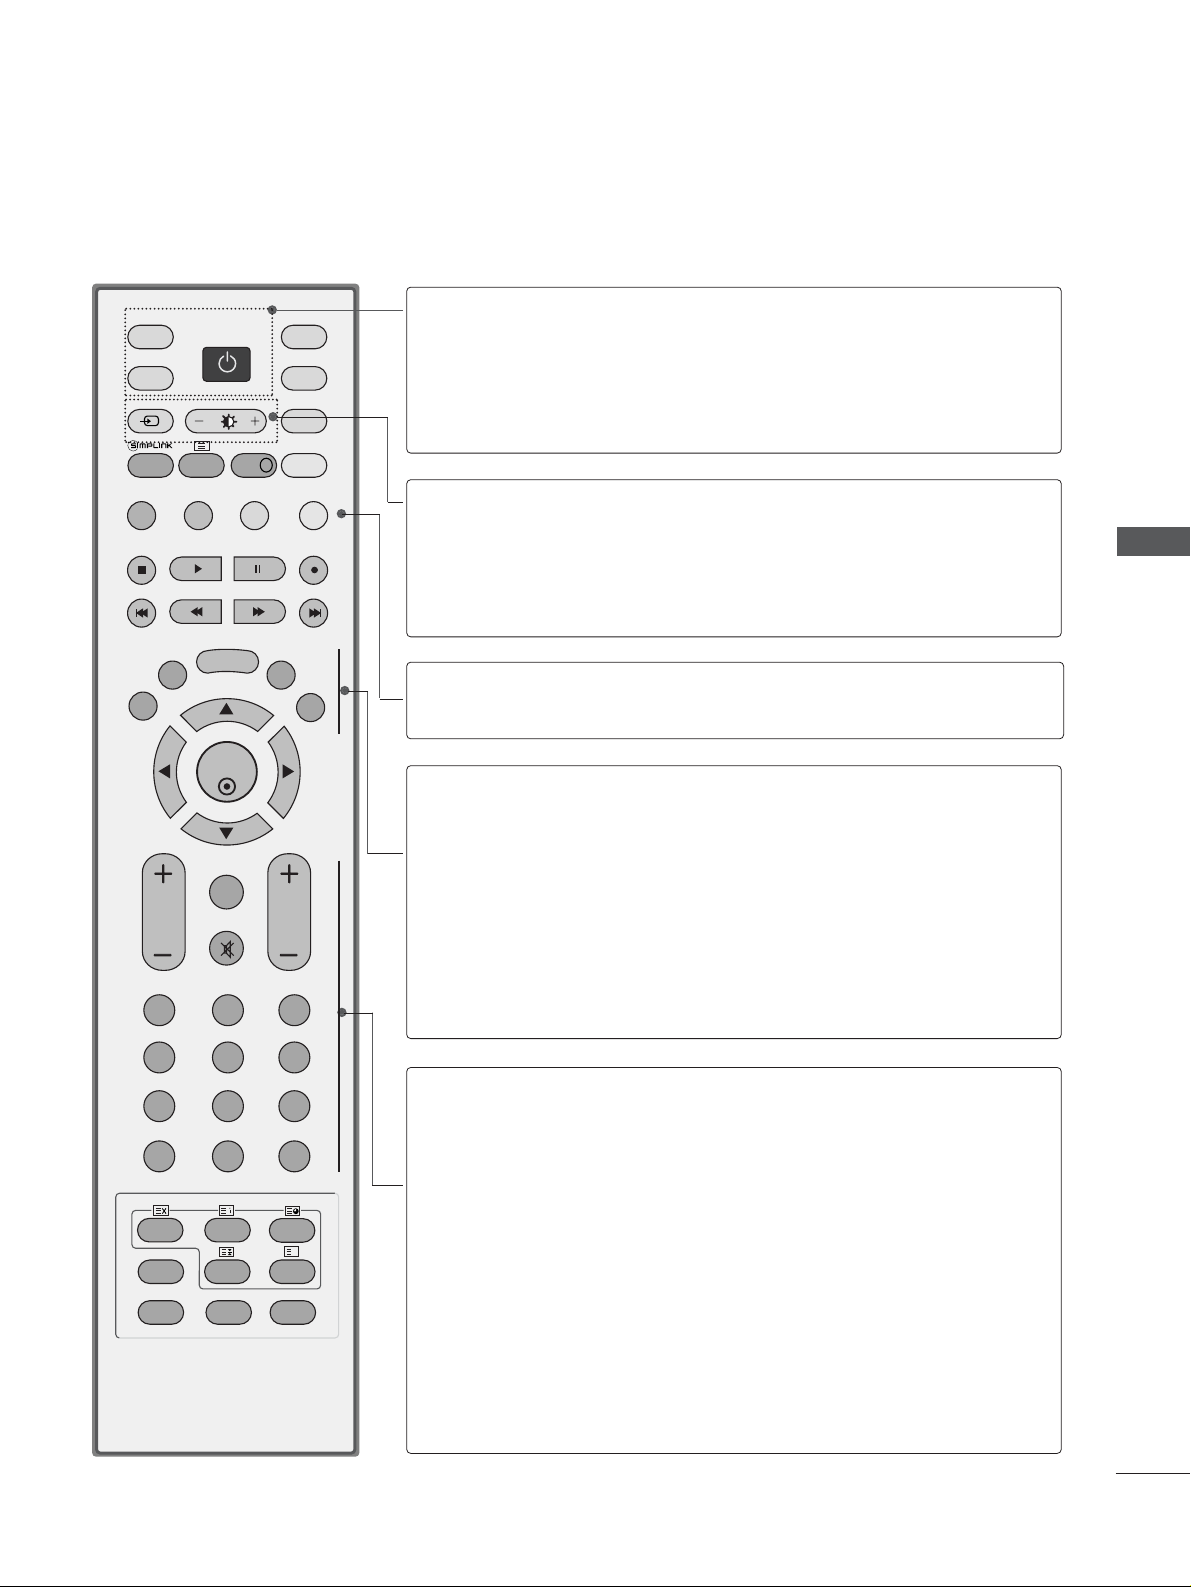
REMOTE CONTROL KEY FUNCTIONS
When using the remote control, aim it at the remote control sensor on the TV.
OK
INPUT MODE
TV
D/A
DVD
EXIT
TIME
SHIFT
TIME
SHIFT
VOL PR
GUIDE
BACK MENU
DVR
LIVE TV
VCR
POWER
123
456
789
0
Q.VIEW
LIST
INDEX
SLEEP
HOLD
REVEAL
?
SUBTITLE
RATIO
TEXT
INPUT
BRIGHT
MUTE
MARK
TV/RADIO
UPDATE
SIMPLINK
INFO i
FAV
TIME
I/II
POWER
D/A INPUT
TV/RADIO
Switches the set on from standby or off to standby.
Selects digital or analogue mode.
Switches the set on from standby.
Selects Radio or TV channel in digital mode.
INPUT
Brightness
adjustment
External input mode rotate in regular sequence.
Switches the set on from standby.
Adjusts screen brightness.
It returns to the default settings brightness by changing
mode source.
Coloured
buttons
These buttons are used for teletext (only
TTEELLEETT EEXXTT
models) or
PPrroo ggrraammmmee ee ddiitt
.
EXIT
BACK
DVR
MENU
GUIDE
Clears all on-screen displays and returns to TV viewing
from any menu.
Allow the user to move back one step in an interactive
application, EPG or other user interaction function.
Brings up the Home menu.
Selects a menu.
Shows programme schedule.
VOLUME UP
/DOWN
FAV/MARK
MUTE
Programme
UP/DOWN
0~9 number
button
LIST
Q.VIEW
Adjusts the volume.
Displays the selected favourite programme.
Check and un-check programmes in the recorded TV menu.
Switches the sound on or off.
Selects a programme.
Selects a programme.
Selects numbered items in a menu.
Displays the programme table.
Returns to the previously viewed programme.
WATCHING TV / PROGRAMME CONTROL
Page 34
32
WATCHING TV /PROGRAMME CONTROL
WATCHING TV / PROGRAMME CONTROL
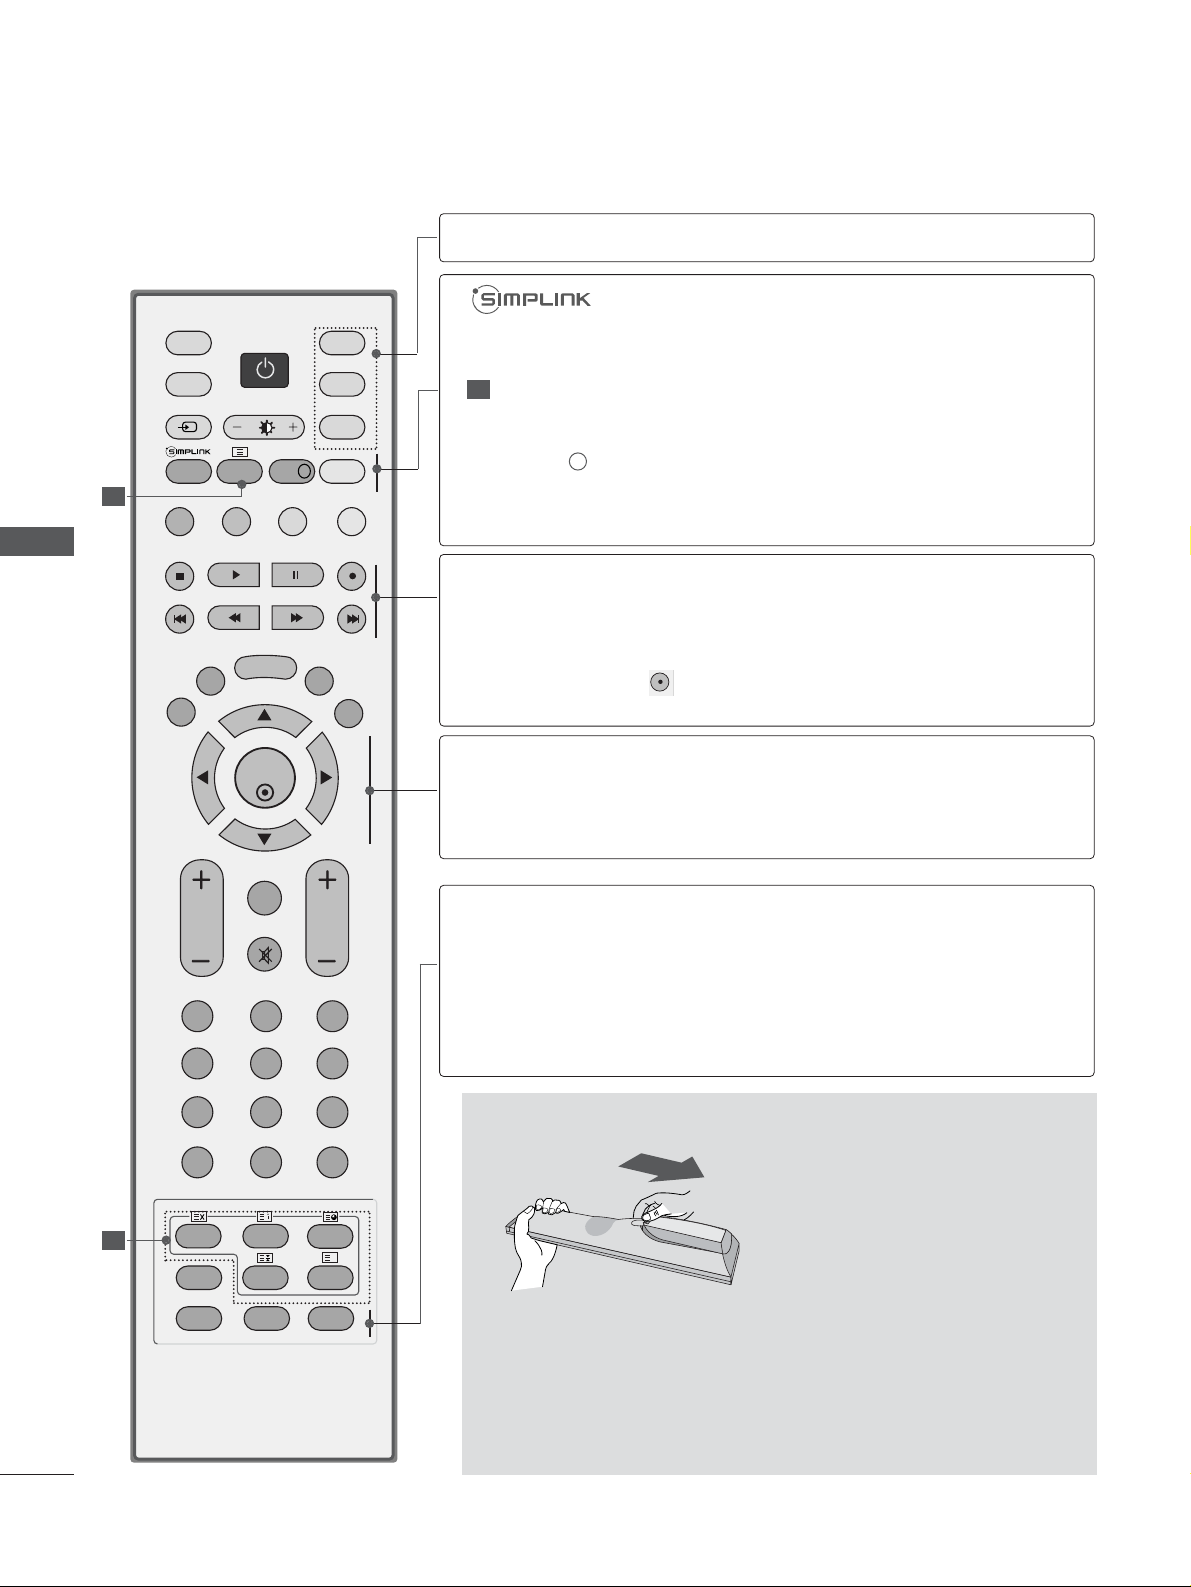
Installing Batteries
■
Open the battery compartment cover on the back side and install
the batteries matching correct polarity (+with +,-with -).
■
Install two 1.5V AA batteries. Don’t mix old or used batteries with
new ones.
■
Close cover.
OK
INPUT MODE
TV
D/A
DVD
EXIT
TIME
SHIFT
TIME
SHIFT
VOL PR
GUIDE
BACK MENU
DVR
LIVE TV
VCR
POWER
123
456
789
0
Q.VIEW
LIST
INDEX
SLEEP
HOLD
REVEAL
?
SUBTITLE
RATIO
TEXT
INPUT
BRIGHT
MUTE
MARK
TV/RADIO
UPDATE
SIMPLINK
INFO i
FAV
TIME
I/II
1
1
MODE
Selects the remote operating modes.
TELETEXT
BUTTONS
INFO i
LIVE TV
See a list of AV devices connected to TV.
When you toggle this button, the Simplink menu appears
at the screen. (
G p.51)
These buttons are used for teletext.
For further details, see the ‘Teletext’ section.
Shows the present screen information. (In Digital Mode only)
In Delayed mode, the screen returns to Live programme
from DTV, TV, AV1, AV2 and AV3 modes.
DD/ EE
or
FF/ GG
(TIME SHIFT)
OK
Allows you to navigate the on-screen menus and adjust
the system settings to your preference.
Accepts your selection or displays the current mode.
SLEEP
SUBTITLE
RATIO
I/II
Sets the sleep timer.
Recalls your preferred subtitle in digital mode.
Selects your desired picture format.
Selects the sound output.
DVR/VCR/DVD
control buttons
Controls some video cassette recorders or DVD players
when you have already selected DVD or VCR mode button.
Control connected AV devices by pressing the
DD
or EEor
FF
or GG, OK buttons and buttons for play, stop, pause,
fast reverse, fast forward, chapter skip.
(The button does not provide such functions.)
Use for DVR record or trick play.
1
Page 35
33
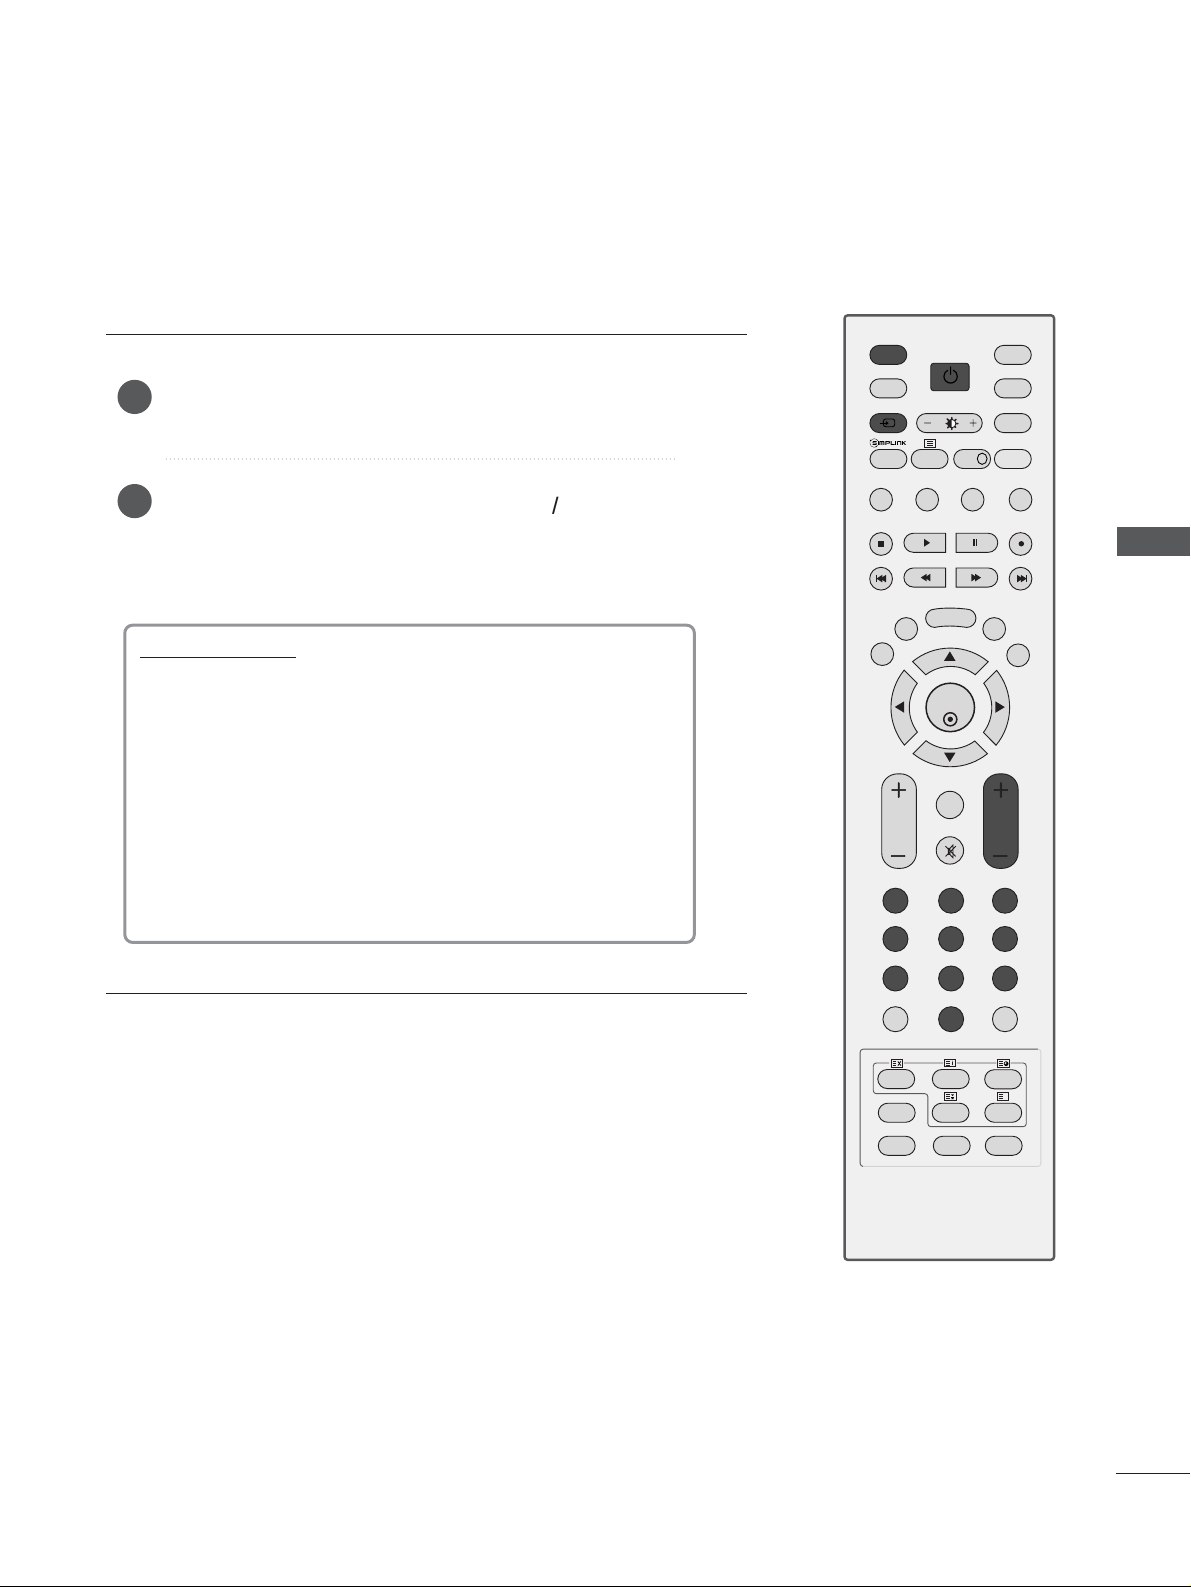
First, connect power cord correctly.
At this moment, the TV switches to standby mode.
In standby mode to turn TV on, press the
rr
/ I, INPUT or
PR
D
or Ebutton on the TV or press the POWER,
INPUT, D/A, PR + or - or NUMBER button on the remote
control and then the TV will switch on.
2
1
TURNING ON THE TV
Initialising setup
Note:
a. It will automatically disappear after approx. 40 seconds
unless a button is pressed.
b. Press the
BBAA CC KK
button to change current OSD into
previous OSD.
If the OSD (On Screen Display) is displayed on the screen
as figure after turning on the set, you can adjust the
Language, Country, Time Zone, Auto programme tuning.
- If your TV will be turned on, you will be able to use its features.
WATCHING TV / PROGRAMME CONTROL
INPUT
D/A
POWER
TV/RADIO
INPUT
BRIGHT
INFO i
TEXT
SIMPLINK
BACK MENU
EXIT
TIME
SHIFT
DVR
OK
MARK
FAV
VOL PR
MUTE
123
MODE
TV
DVD
VCR
LIVE TV
GUIDE
TIME
SHIFT
456
789
0
INDEX
HOLD
RATIO
Q.VIEW
TIME
?
REVEAL
I/II
LIST
UPDATE
SLEEP
SUBTITLE
Page 36
34
WATCHING TV /PROGRAMME CONTROL
WATCHING TV / PROGRAMME CONTROL
PROGRAMME SELECTION
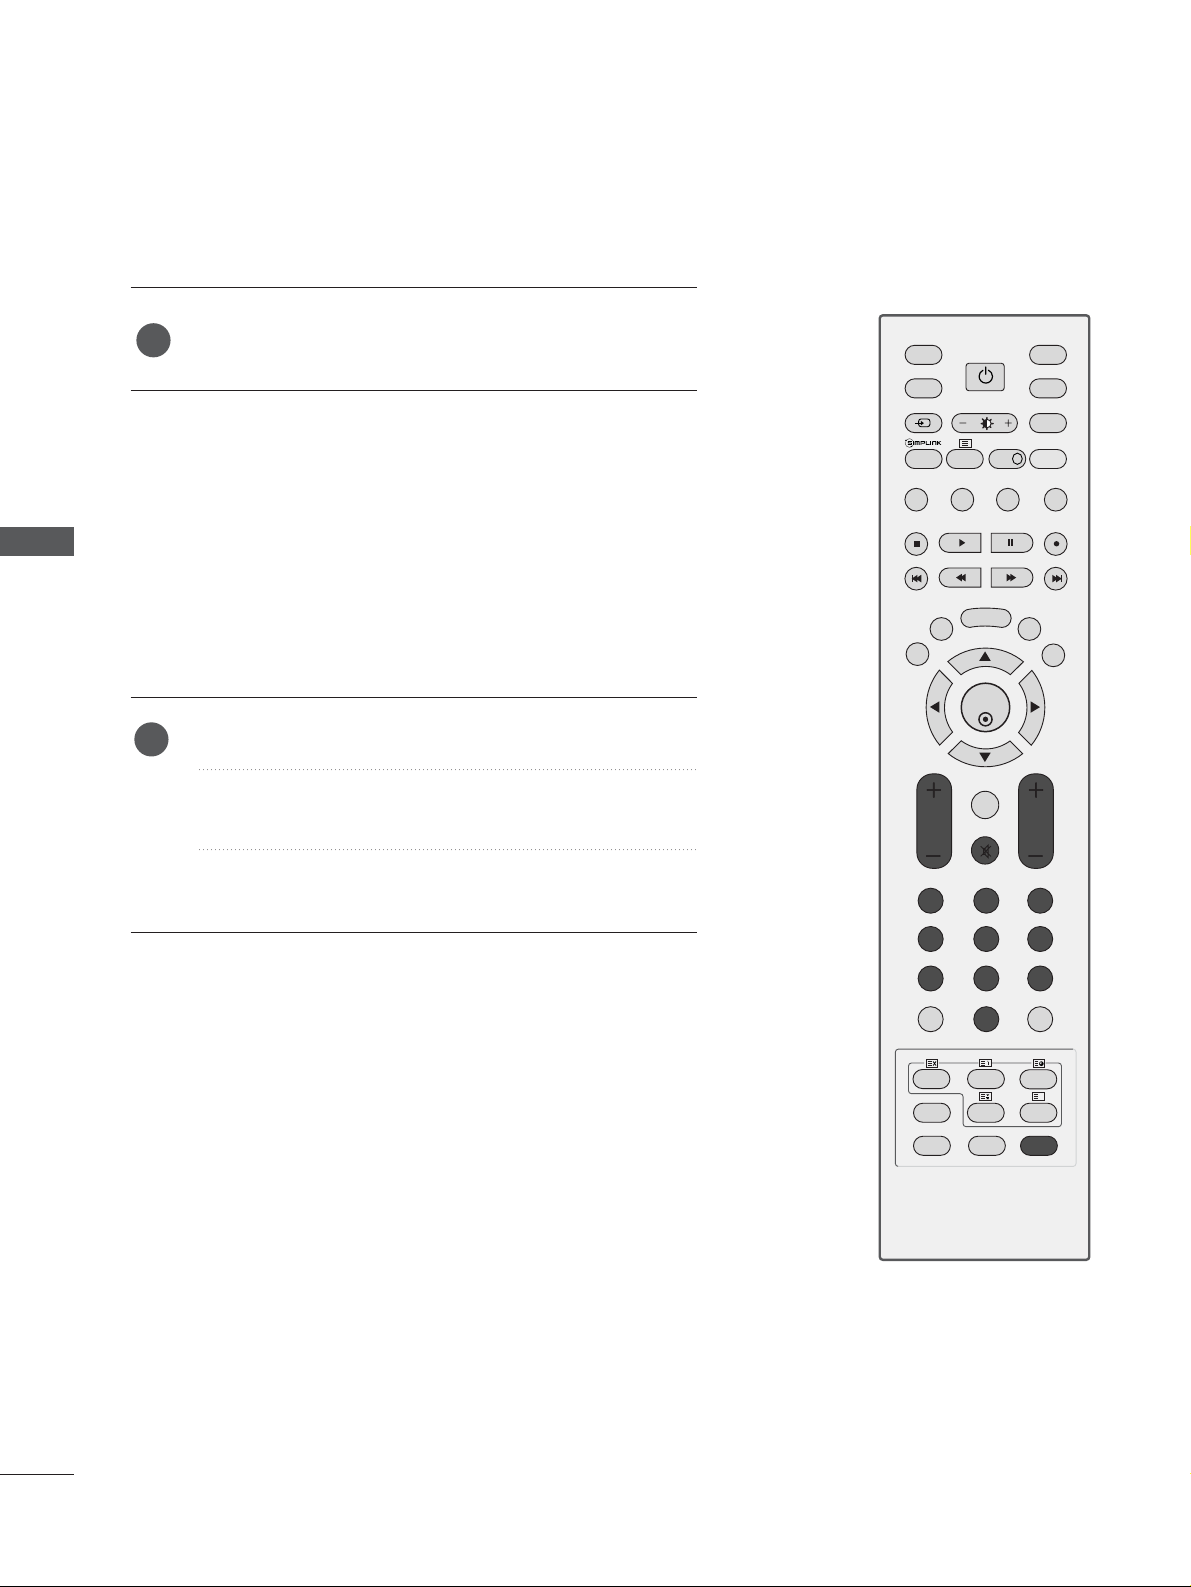
Press the
PPRR ++ or--
or NUMBER buttons to select a pro-
gramme number.
1
VOLUME ADJUSTMENT
Press the VOL
++ or--
button to adjust the volume.
If you want to switch the sound off, press the MUTE
button.
You can cancel this function by pressing the MUTE,
VOL
++ or--
, or I/II button.
OK
INPUT
MODE
TV
D/A
DVD
EXIT
TIME
SHIFT
TIME
SHIFT
VOL PR
GUIDE
BACK MENU
DVR
LIVE TV
VCR
POWER
123
456
789
0
Q.VIEW
LIST
INDEX
SLEEP
HOLD
REVEAL
?
SUBTITLE
RATIO
TEXT
INPUT
BRIGHT
MUTE
MARK
TV/RADIO
UPDATE
SIMPLINK
INFO i
FAV
TIME
I/II
1
Page 37
35
ON SCREEN MENUS SELECTION AND ADJUSTMENT
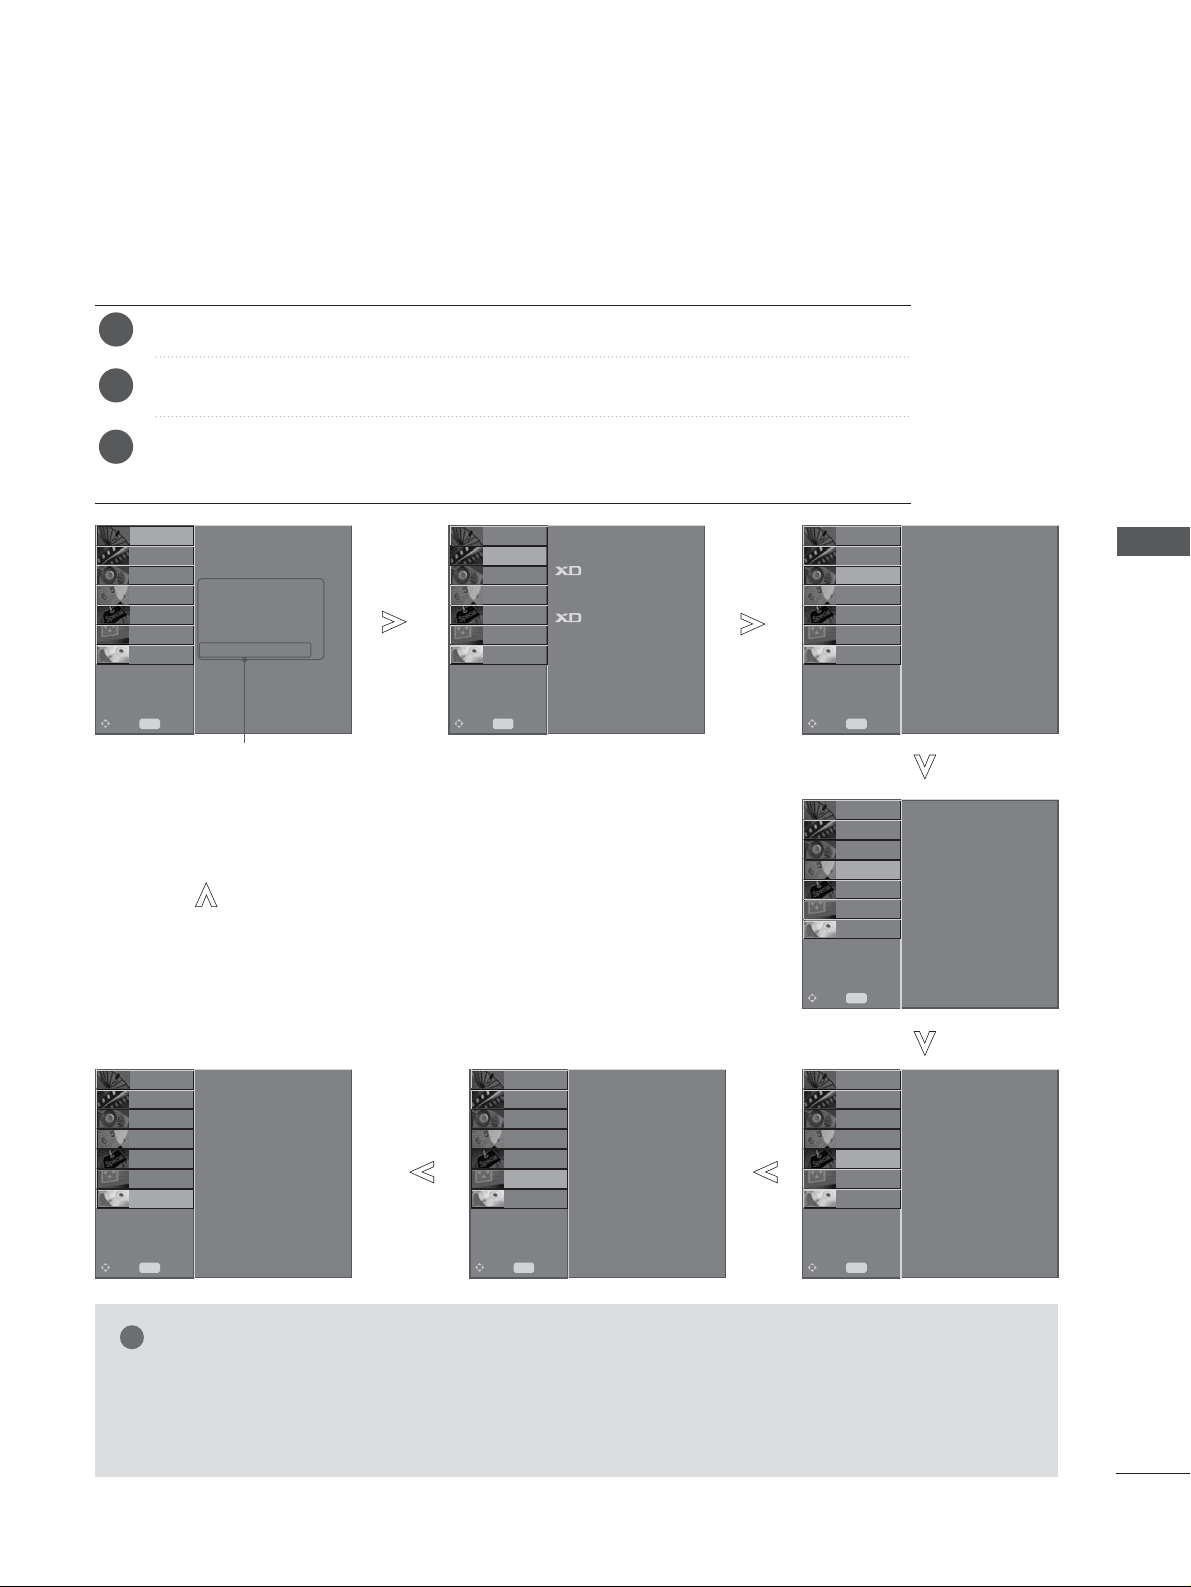
Press the
MMEENN UU
button and thenDDor EEbutton to display each menu.
Press the
GG
button and thenDDor EEbutton to select a menu item.
Change the setting of an item in the sub or pull-down menu with
F or G button.
You can move to the higher level menu by pressing the
OO KK
or
MMEENN UU
button.
Your TV's OSD (On Screen Display)may differ slightly from what is shown in this manual.
2
3
1
NOTE
!
G
It’s not available to use ISM Method and Low power in
LL CCDD TTVV
models.
G
In Analogue mode, 5V Antenna Power, Booster, CI Information, Software Update and
Diagnostics will not display.
G
When you play recorded programmes, some of SETUP functions are not activated.
Auto Tuning
Manual Tuning
Programme Edit
5V Antenna Power
Booster
Software Update
Diagnostics
CI Information
PICTURE
O
AUDIO
O
TIME
O
OPTION
O
SCREEN
O
D V R
O
Prev.
MENU
Move
Picture Mode
Colour Temperature
Advanced
Picture Reset
Demo
SETUP
O
AUDIO
O
TIME
O
OPTION
O
SCREEN
O
D V R
O
Prev.
MENU
Move
Sound Mode
Auto Volume
Balance 0
TV Speaker
Digital Audio Out
SETUP
O
PICTURE
O
TIME
O
OPTION
O
SCREEN
O
D V R
O
Prev.
MENU
Move
SETUP
G
PICTURE
G
AUDIO
G
Clock
Off Time
On Time
Auto Sleep
Time Zone
SETUP
O
PICTURE
O
OPTION
O
SCREEN
O
D V R
O
Prev.
MENU
Move
AUDIO
O
TIME
G
Language
Country
Lock System
Parental Control
Input Label
SIMPLINK
Factory Mode
SETUP
O
PICTURE
O
SCREEN
O
D V R
O
Prev.
MENU
Move
AUDIO
O
TIME
O
OPTION
G
TimeShift Mode
Record Quality
Recorded TV
Schedule List
Manual Record
HDD Format
SETUP
O
PICTURE
O
Prev.
MENU
Move
AUDIO
O
TIME
O
OPTION
O
D V R
G
SCREEN
O
Auto Config.
Manual Config.
XGA Mode
Aspect Ratio
Reset
SETUP
O
PICTURE
O
Prev.
MENU
Move
AUDIO
O
TIME
O
OPTION
O
D V R
O
SCREEN
G
WATCHING TV / PROGRAMME CONTROL
*
:This feature is not
available in all countries.
Page 38
36
WATCHING TV /PROGRAMME CONTROL
WATCHING TV / PROGRAMME CONTROL
Use it to automatically find and store all of the programmes.
When you start auto programming in digital mode, all the
stored service information will be deleted.
It’s not available to use this function on recording programme.
AUTO PROGRAMME TUNING (IN DIGITAL MODE)
OK
EXIT
TIME
SHIFT
TIME
SHIFT
VOL PR
GUIDE
BACK MENU
DVR
MARK
FAV
1
Auto Tuning G
Manual Tuning
Programme Edit
5V Antenna Power
Booster
Software Update
Diagnostics
CI Information
Start
2
3
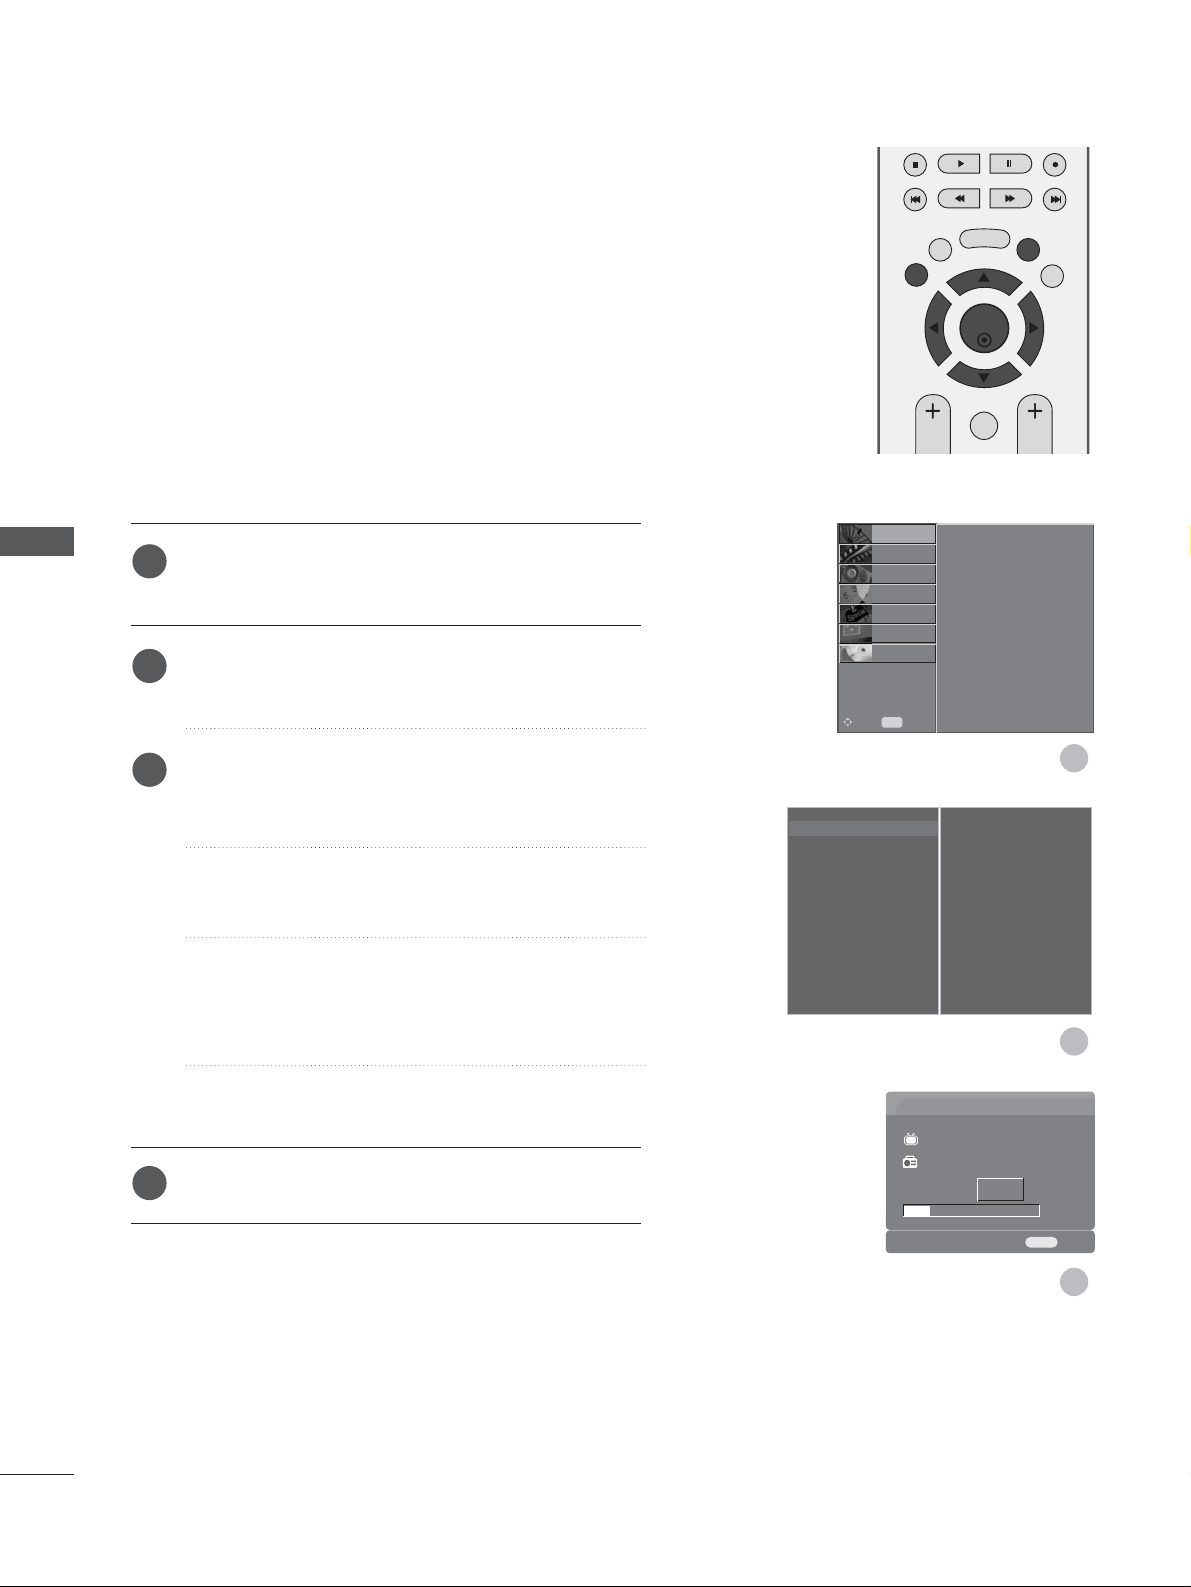
Press the MENU button and then
D
or
E
button to
select the SETUP menu.
Press the
G
button and then
D
or
E
button to select
Auto Tuning.
Press the
G
button to begin auto tuning.
Use NUMBER buttons to input a 4-digit password in
Lock System ‘On’.
The message “All service-information will be
updated. Continue?” will appear.
If you want to keep on auto tuning select YES with
using the
F
or
G
button. Then, press the OK button.
Otherwise select NO.
To stop auto tuning, press the MENU button.
Press the EXIT button to return to normal TV viewing.
2
3
4
1
Auto Tuning
MENU
Stop
24 %
UHF CH.
14
0Programme(s)
0Programme(s)
Auto Tuning
Manual Tuning
Programme Edit
5V Antenna Power
Booster
Software Update
Diagnostics
CI Information
PICTURE
O
AUDIO
O
TIME
O
OPTION
O
SCREEN
O
D V R
O
Prev.
MENU
Move
SETUP
G
Page 39
37
Auto Tuning
Manual Tuning
G
Programme Edit
5V Antenna Power
Booster
Software Update
Diagnostics
CI Information
Your receiver will
add this channel to
your channel list.
UHF CH.
35
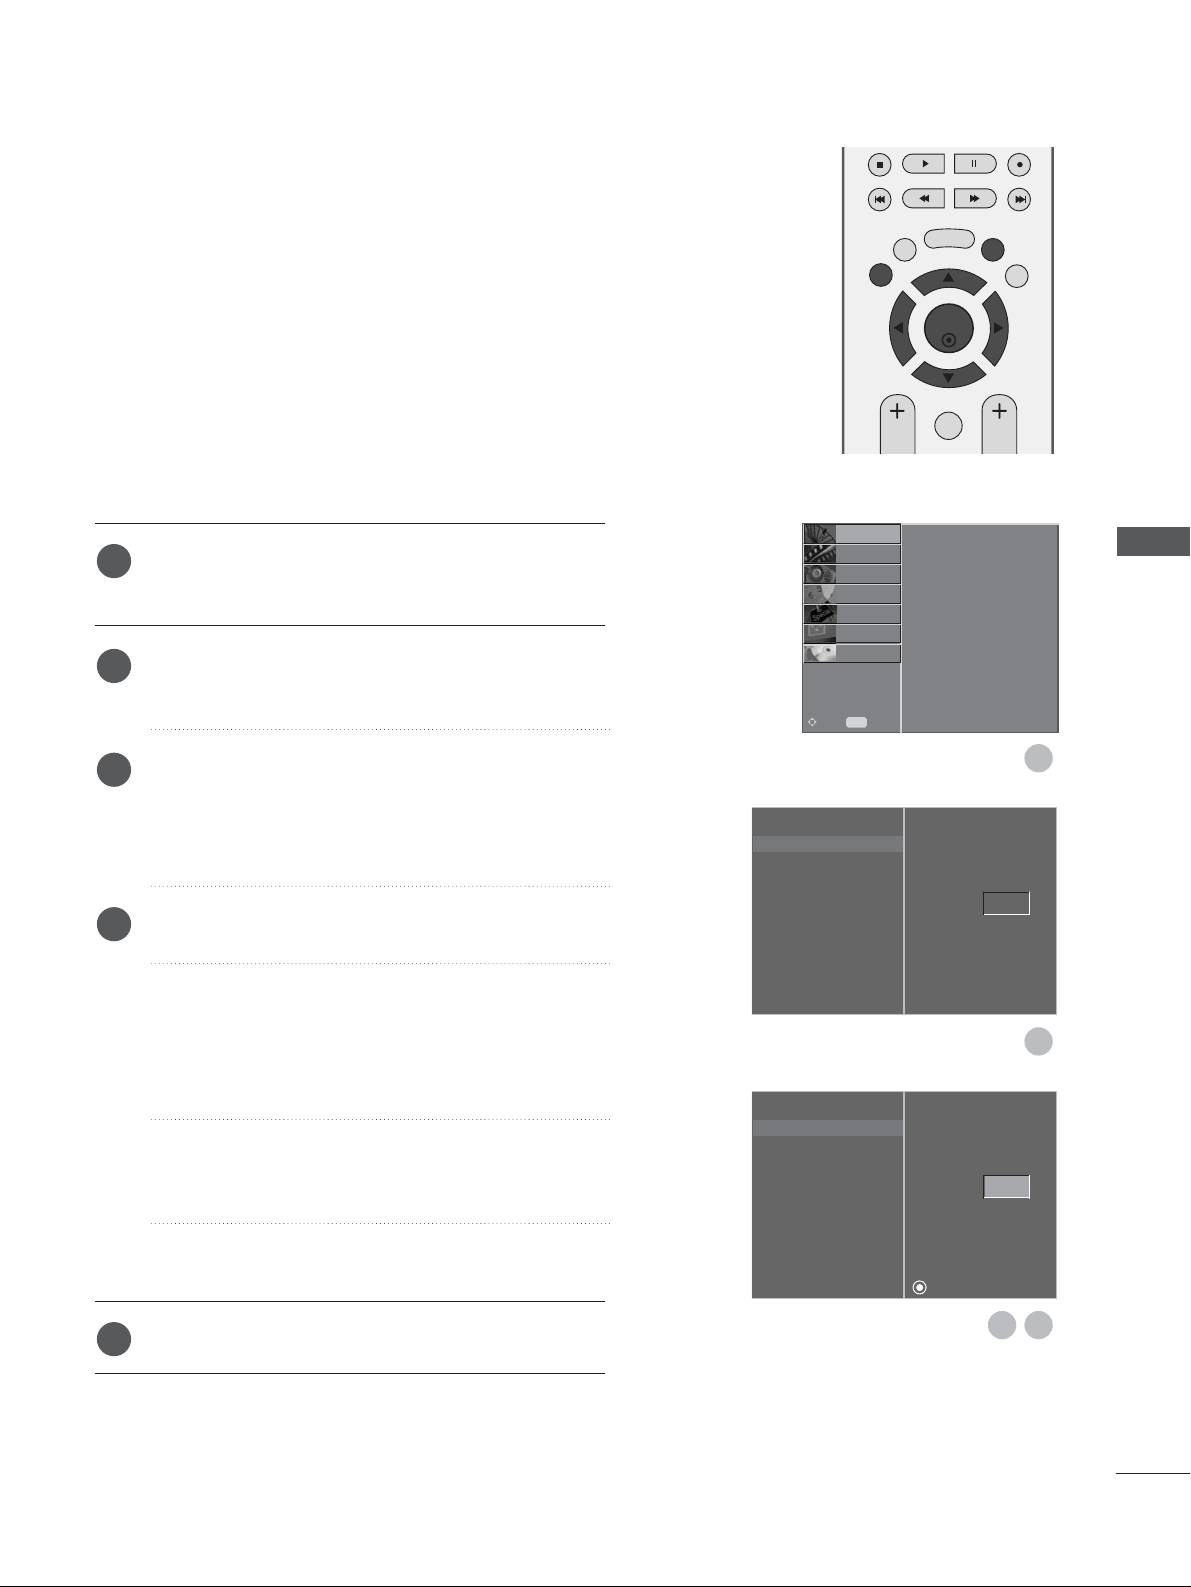
Manual Tuning lets you manually add a programme to your programme
list.
MANUAL PROGRAMME TUNING (IN DIGITAL MODE)
OK
EXIT
TIME
SHIFT
TIME
SHIFT
VOL PR
GUIDE
BACK MENU
DVR
MARK
FAV
1
2
Auto Tuning
Manual Tuning
Programme Edit
5V Antenna Power
Booster
Software Update
Diagnostics
CI Information
Your receiver will
add this channel to
your channel list.
UHF CH
35
43
Press the MENU button and then
D
or
E
button to
select the SETUP menu.
Press the
G
button and then
D
or
E
button to select
Manual Tuning.
Press the
G
button and then
D
or
E
button or NUMBER buttons to select the desired channel number.
Use NUMBER buttons to input a 4-digit password in
Lock System ‘On’.
Press the OK button to save.
When the channel number you want to add is already
added in programme list, the massage “Setup infor-
mation for the channel will be updated.
Continue?” will appear.
If you want to keep on manual tuning, select YES
with using the
F
or
G
button.
Then, press the OK button. Otherwise select NO.
Press the EXIT button to return to normal TV viewing.
2
3
4
5
1
D
E
Search
WATCHING TV / PROGRAMME CONTROL
Auto Tuning
Manual Tuning
Programme Edit
5V Antenna Power
Booster
Software Update
Diagnostics
CI Information
PICTURE
O
AUDIO
O
TIME
O
OPTION
O
SCREEN
O
D V R
O
Prev.
MENU
Move
SETUP
G
Page 40
38
WATCHING TV /PROGRAMME CONTROL
WATCHING TV / PROGRAMME CONTROL
Auto Tuning
Manual Tuning
Programme Edit
G
5V Antenna Power
Booster
Software Update
Diagnostics
CI Information
To Set
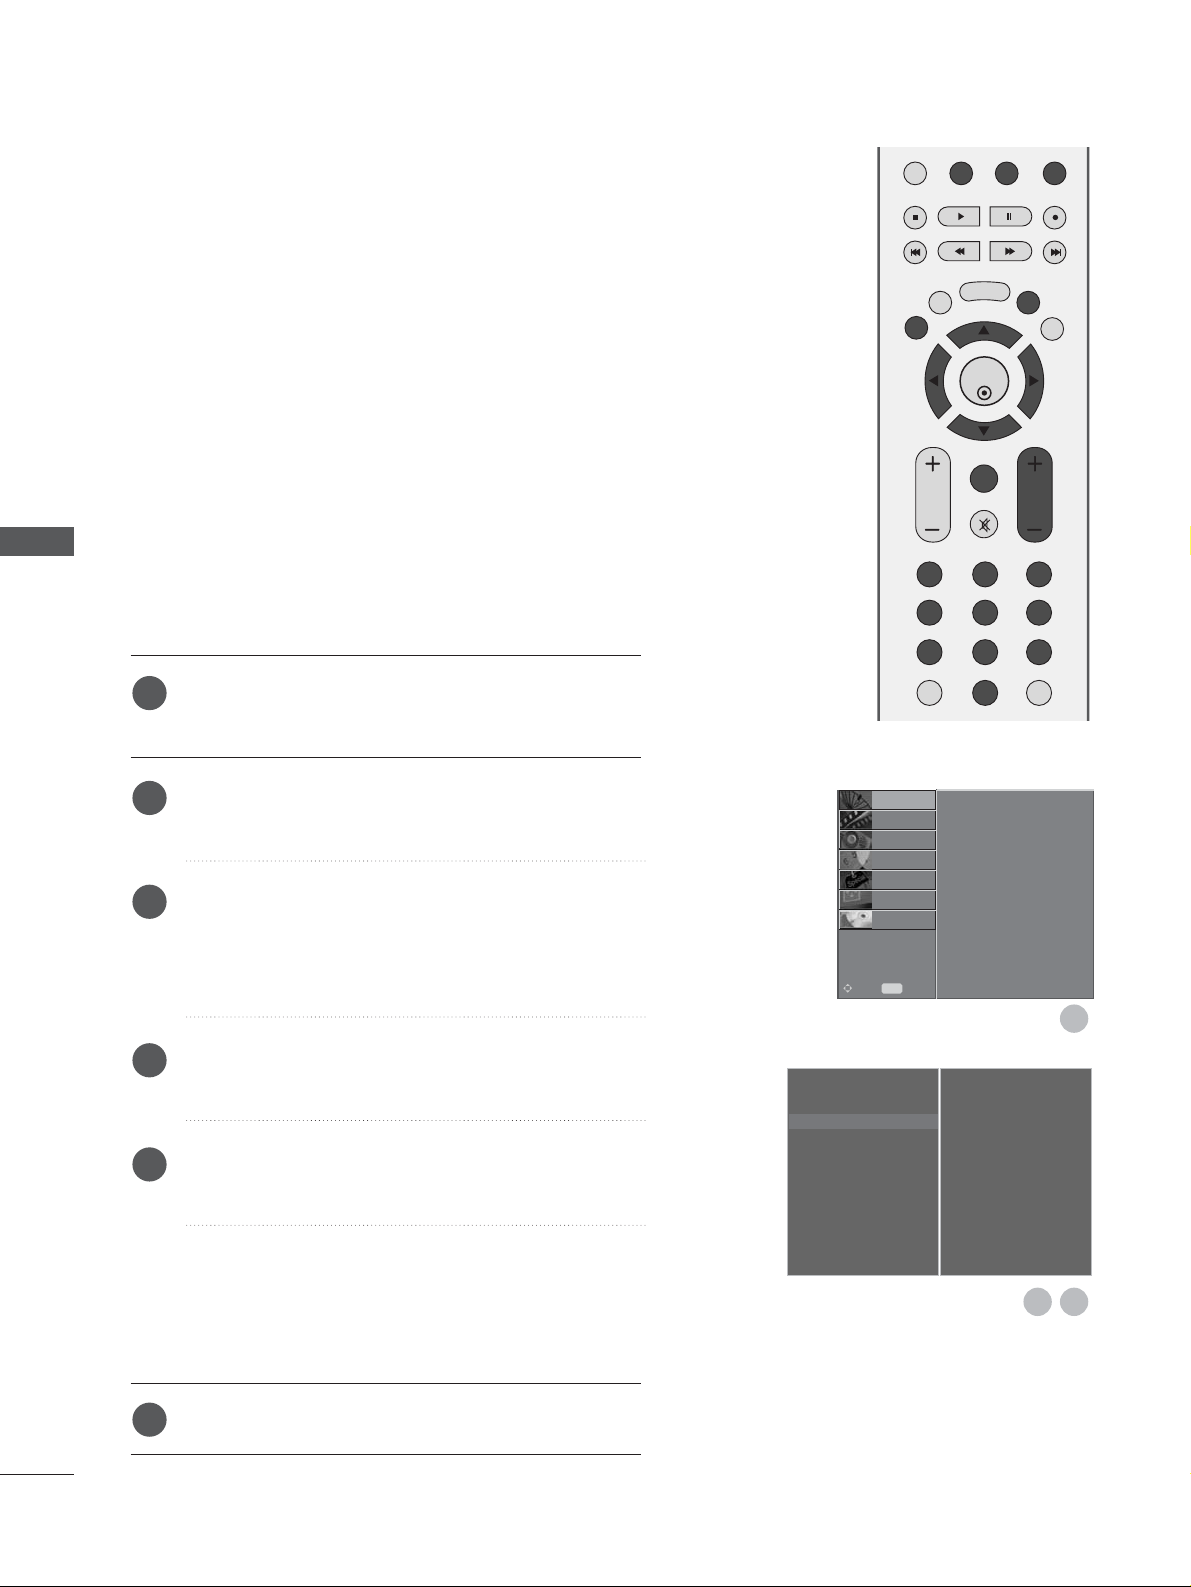
When a programme number is skipped, it means that you will be
unable to select it using PR + or - button during TV viewing.
If you want to select the skipped programme, directly enter the
programme number with the NUMBER buttons or select it in the
Programme edit menu.
This function enables you to skip the stored programmes.
It’s available in some contries only to move a programme number by YELLOW button.
It’s not available to use this function on recording programme.
PROGRAMME EDIT (IN DIGITAL MODE)
OK
EXIT
TIME
SHIFT
TIME
SHIFT
VOL PR
GUIDE
BACK MENU
DVR
123
456
789
0
Q.VIEW
LIST
MUTE
MARK
FAV
1
32
Press the MENU button and then
D
or
E
button to
select the SETUP menu.
Press the
G
button and then
D
or
E
button to select
Programme Edit menu.
Press the
G
button to enter the Programme Edit
menu.
Use NUMBER buttons to input a 4-digit password in
Lock System ‘On’.
Select a programme to be stored or skipped with the
D
or
E
or
F
or
G
button.
Press the BLUE button repeatedly to have the pro-
gramme skipped or stored.
In case of programmes to be skipped, skipped programme shows in blue colour and these programmes
will not be selected by the PR + or - buttons during
TV viewing.
Press the EXIT button to return to normal TV viewing.
2
3
4
5
6
1
Auto Tuning
Manual Tuning
Programme Edit
5V Antenna Power
Booster
Software Update
Diagnostics
CI Information
PICTURE
O
AUDIO
O
TIME
O
OPTION
O
SCREEN
O
D V R
O
Prev.
MENU
Move
SETUP
G
Page 41
39
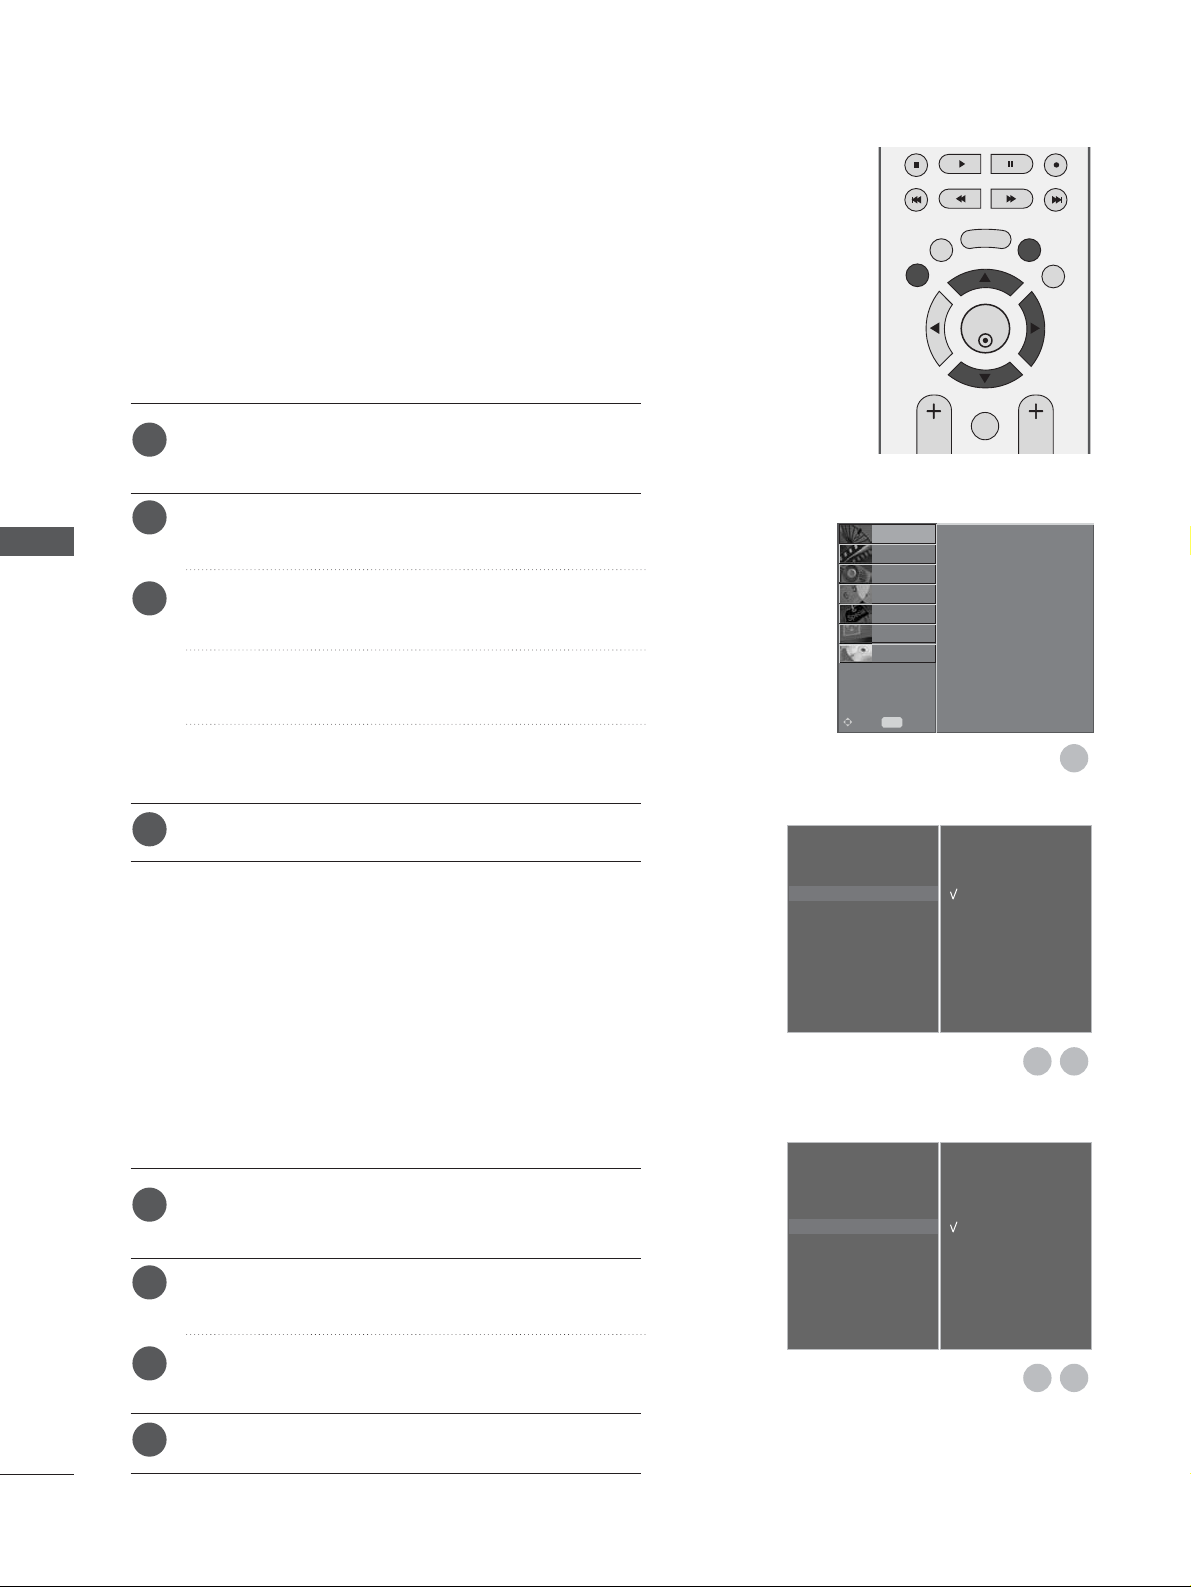
A Skipping a programme number
Select a programme number to be skipped with the
D
or
E
or
F
or
G
button.
Press the BLUE button. The skipped programme number turns to blue.
Press the BLUE button again to release the skipped programme.
When a programme number is skipped it means that you will be unable to select it using the PR + or - button during normal TV viewing.
If you want to select the skipped programme, directly enter the programme number with the NUMBER buttons or select it in the programme edit or EPG.
Press the EXIT button to return to TV viewing.
A Locking a programme (In Lock System On mode only)
Select a programme to be locked with the
D
or
E
or
F
or
G
button.
Press the GREEN button. The lock mark will appear in front of that programme number.
Press the GREEN button again to release this function.
Note :
G
To watch a locked programme, input a 4-digit password in Lock system. Be sure to remember this number!
G
If you forgot your password, press ‘7’, ‘7’, ‘7’, ‘7’ on the remote control handset.
G
If you select other programme after releasing a locked programme and then return to the locked programme
within 1 minute, you needn’t input a password to select the locked programme.
A Selecting favourite programme
Select your favourite programme number by pressing
D
or
E
or
F
or
G
button and then press the FAV but-
ton on your remote control handset.
It will automatically include the selected programme into your favourite programme list and heart-mark will
appear in front of that programme number.
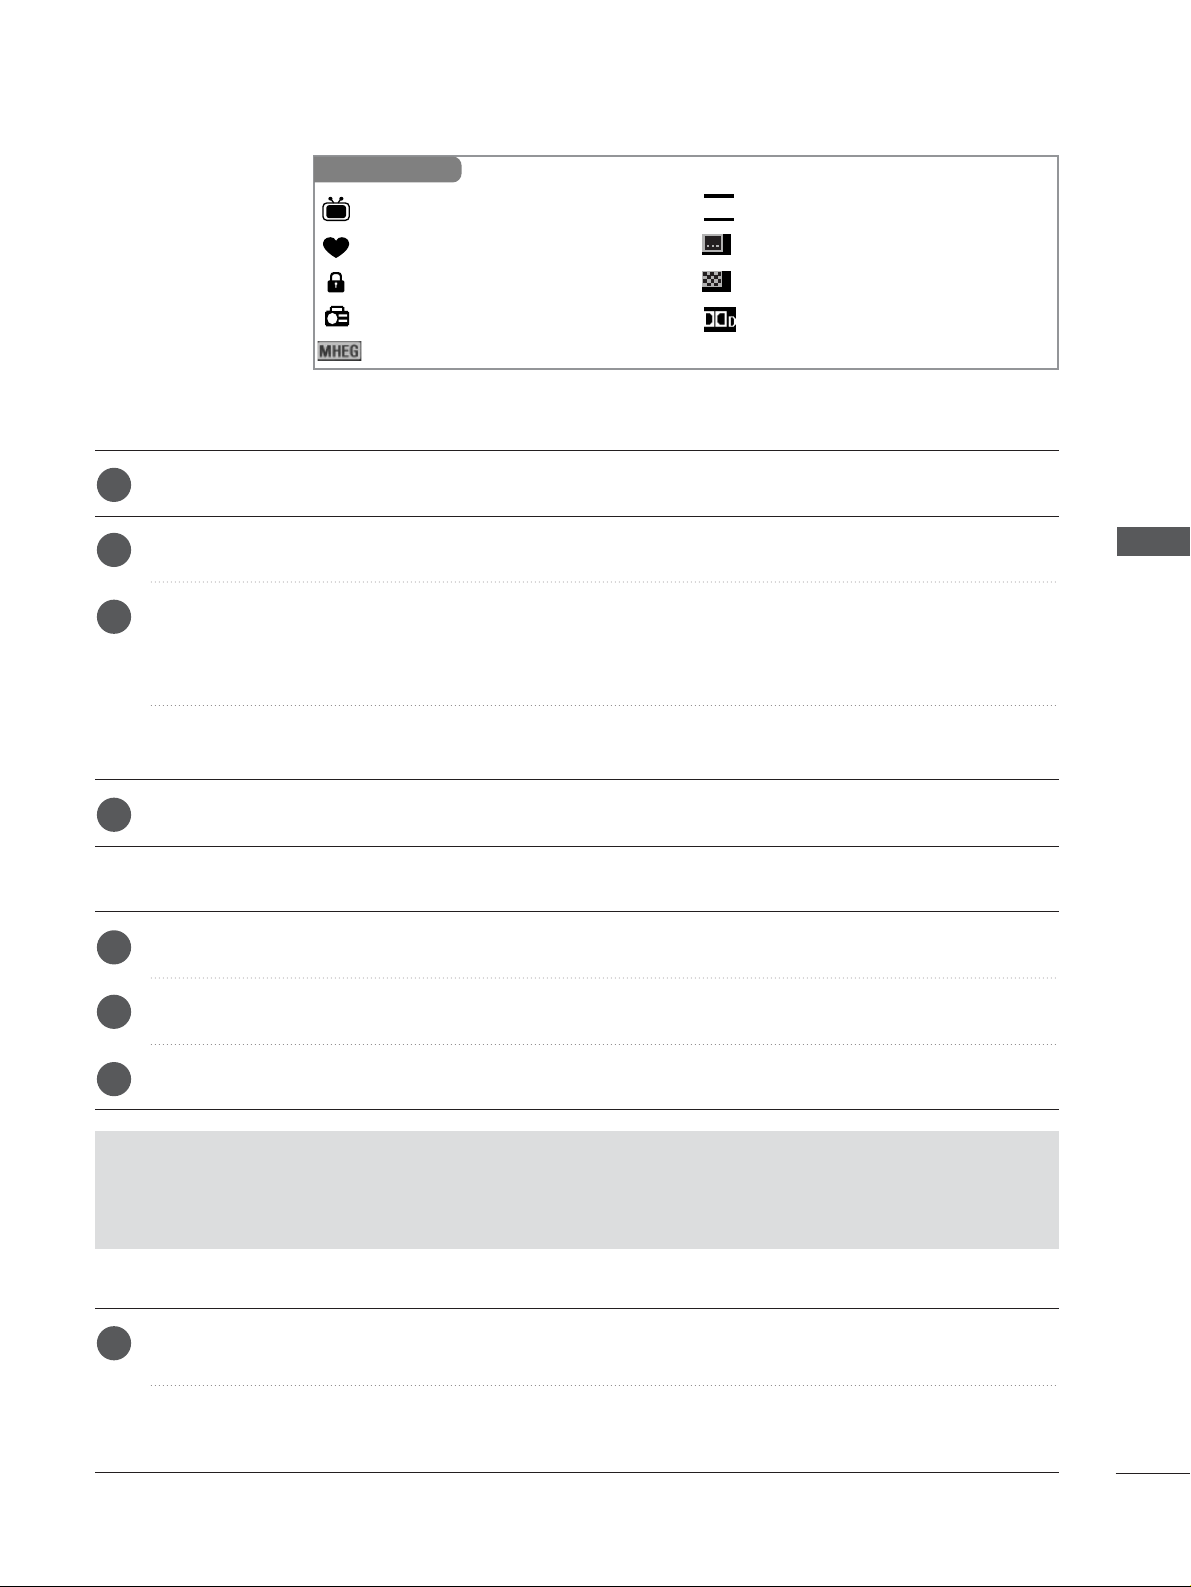
Displayed when the DTV Programme.
Displayed when the Favourite Programme.
Displayed when the Locked Programme.
Displayed when the Radio Programme.
Displayed when the MHEG Programme.
Displayed when the Teletext Programme.
Displayed when the Subtitle Programme.
Displayed when the Scramble Programme.
Displayed when the Dolby Programme.
Mini Glossary
TEXT
1
2
3
4
1
2
3
1
WATCHING TV / PROGRAMME CONTROL
Page 42
40
WATCHING TV /PROGRAMME CONTROL
WATCHING TV / PROGRAMME CONTROL
Even if there isn’t a special 5V adapter power in the external
antenna, this function can output 5V in the set.
Press the MENU button and then
D
or
E
button to
select the SETUP menu.
Press the
G
button and then use
D
or
E
button to
select
5V Antenna Power
.
Press the
G
button and then use
D
or
E
button to
select
On
or
Off
.
In
5V Antenna Power On
, if the set is short-cir-
cuit, it will automatically return to
Off
.
The message “Antenna feed overloaded.
Automatically switched off.” will appear.
Press the EXIT button to return to normal TV viewing.
5V ANTENNA POWER (IN DIGITAL MODE ONLY)
Auto Tuning
Manual Tuning
Programme Edit
5V Antenna Power
G
Booster
Software Update
Diagnostics
CI Information
Off
On
OK
EXIT
TIME
SHIFT
TIME
SHIFT
VOL PR
GUIDE
BACK MENU
DVR
MARK
FAV
1
32
Auto Tuning
Manual Tuning
Programme Edit
5V Antenna Power
Booster
G
Software Update
Diagnostics
CI Information
Off
On
32
1
2
3
4
If the reception is poor at the fringe area of TV signal, select Booster
to On.
If TV signal is strong, select Booster to Off.
Press the MENU button and then
D
or
E
button to
select the SETUP menu.
Press the
G
button and then use
D
or
E
button to
select
Booster
.
Press the
G
button and then use
D
or
E
button to
select
On
or
Off
.
Press the EXIT button to return to normal TV viewing.
BOOSTER (IN DIGITAL MODE ONLY)
1
2
3
4
Auto Tuning
Manual Tuning
Programme Edit
5V Antenna Power
Booster
Software Update
Diagnostics
CI Information
PICTURE
O
AUDIO
O
TIME
O
OPTION
O
SCREEN
O
D V R
O
Prev.
MENU
Move
SETUP
G
Page 43
41
Auto Tuning
Manual Tuning
Programme Edit
5V Antenna Power
Booster
Software Update
G
Diagnostics
CI Information
Off
On
1
32
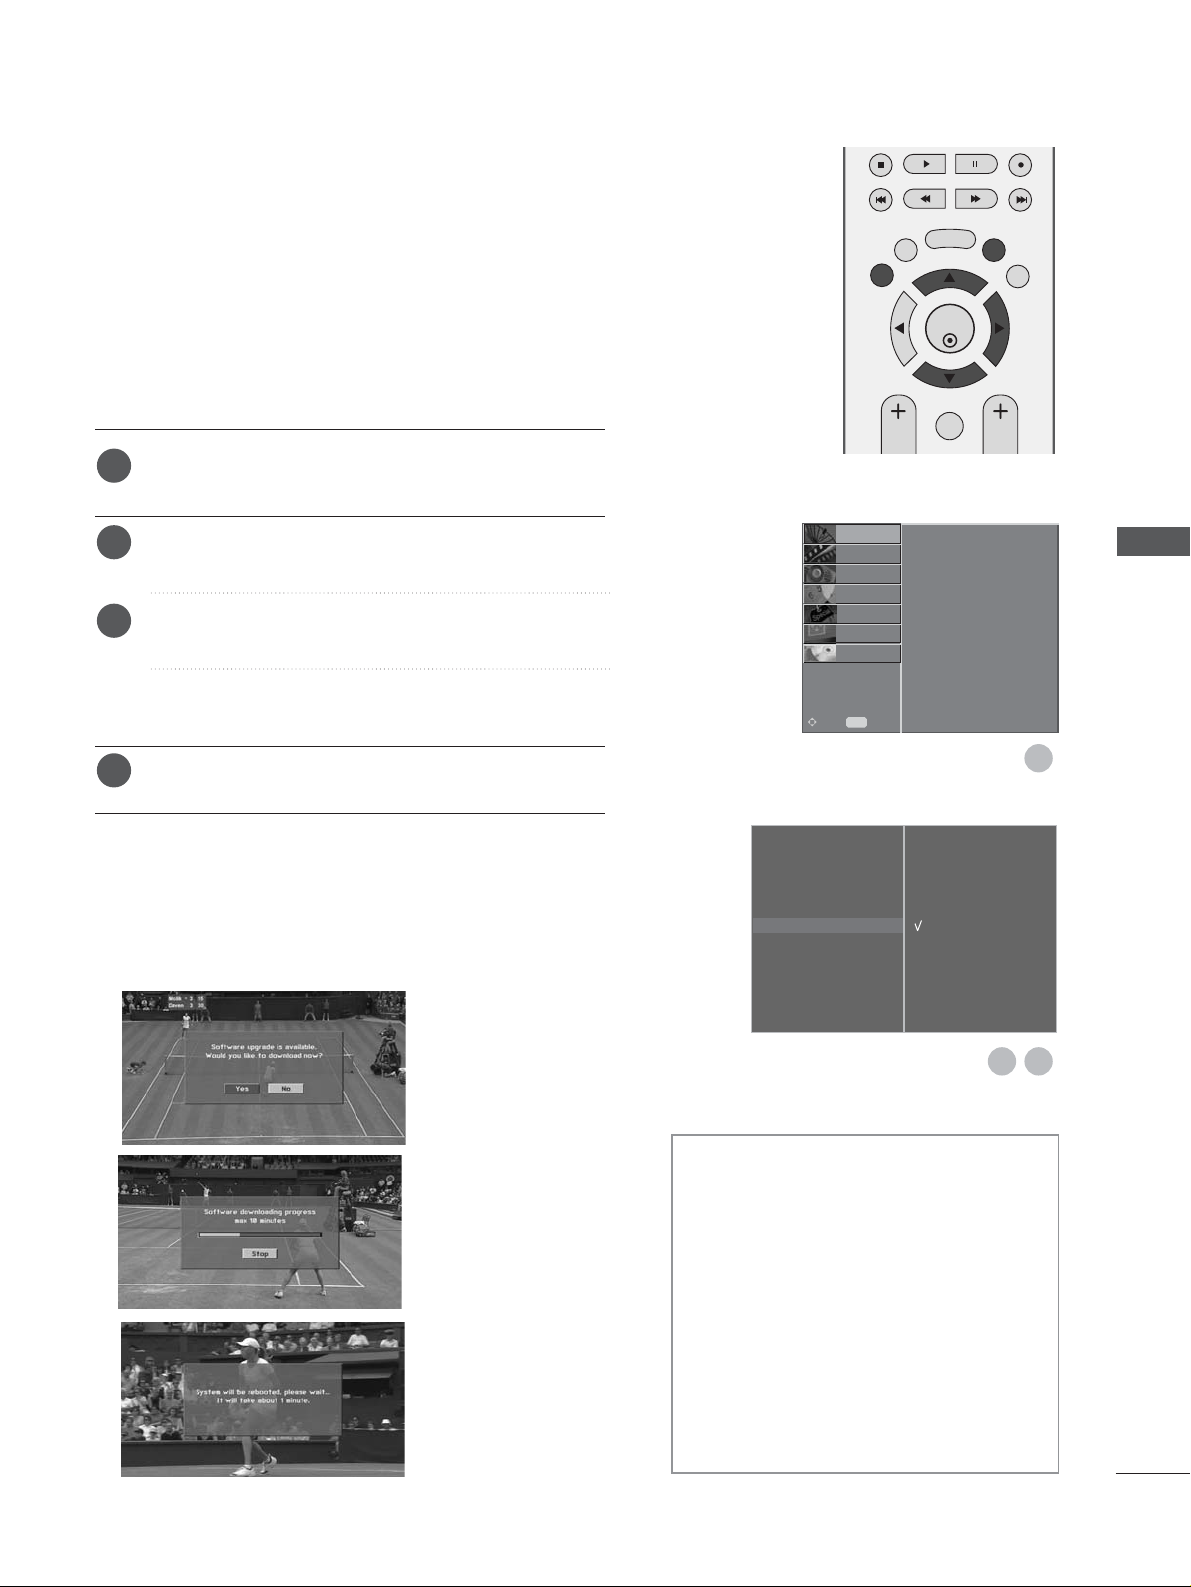
Software Update means software can be downloaded through
the digital terrestrial broadcasting system.
After Software Update, HDD format might be necessary. In
this case, the HDD Failure message is displayed in the DVR
Home menu.
SOFTWARE UPDATE (IN DIGITAL MODE ONLY)
Press the MENU button and then
D
or
E
button to
select the SETUP menu.
Press the
G
button and then
D
or
E
button to select
Software update.
Press the
G
button and then
D
or
E
button to select
Off or On.
• If you select On, a user confirm message box will be
displayed to notify that new software is found.
Press the EXIT button to return to normal TV viewing.
* When setting “Software Update”
Occasionally, a transmission of updated digital
software information will
result in the following
menu on the TV screen.
Select the YES using the
F
or
G
button and when
you see the following
picture.
After Software Update is
completed, the System
takes about one minute to
restart.
- During Progress of Software Update,
please note the following:
• The power of the set must not be interrupted.
• The set must not be switched off.
• The antenna must not be disconnected.
• During this time, you should not switch off
the power to the set.
• At this time, you should not work power
On/Off.
• After Software Update, you can confirm the
updated software version in Diagnostics
menu.
• OTA cannot be performed while the DVR
function(recording, playback) is running.
1
2
3
4
WATCHING TV / PROGRAMME CONTROL
Auto Tuning
Manual Tuning
Programme Edit
5V Antenna Power
Booster
Software Update
Diagnostics
CI Information
PICTURE
O
AUDIO
O
TIME
O
OPTION
O
SCREEN
O
D V R
O
Prev.
MENU
Move
SETUP
G
BACK MENU
EXIT
DVR
GUIDE
TIME
SHIFT
VOL PR
OK
MARK
FAV
TIME
SHIFT
Page 44
42
WATCHING TV /PROGRAMME CONTROL
WATCHING TV / PROGRAMME CONTROL
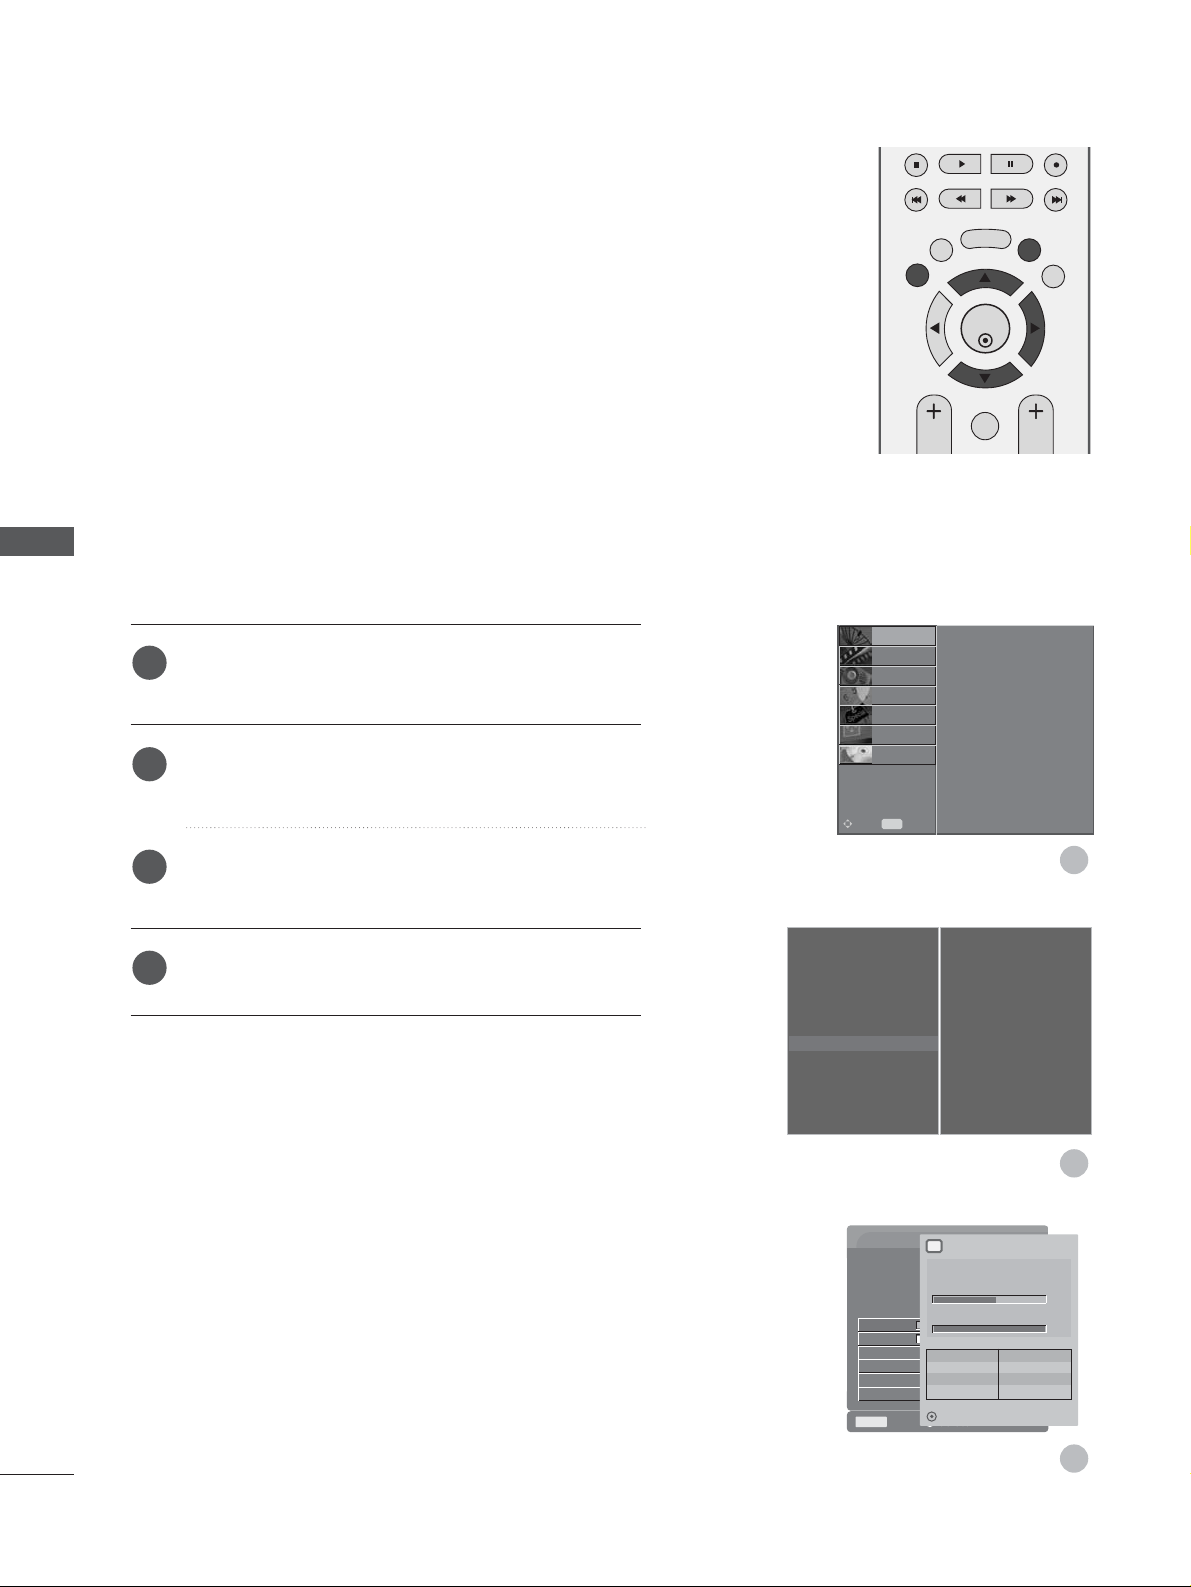
This function enables you to watch Manufacturer,
Model/Type, Serial Number and Software Version.
It’s displayed the information and signal strength of the
tuned MUX.
It’s displayed the signal information and service name of the
selected MUX.
Press the
MMEENNUU
button and then
D
or
E
button to
select the SETUP menu.
Press the
G
button and then use
D
or
E
button to
select Diagnostics.
Press the
G
button to display Manufacturer,
Model/Type, Serial Number and Software Version.
Press the
EEXXIITT
button to return to normal TV viewing.
DIAGNOSTICS (IN DIGITAL MODE ONLY)
Auto Tuning
Manual Tuning
Programme Edit
5V Antenna Power
Booster
Software Update
Diagnostics
G
CI Information
To Set
OK
EXIT
TIME
SHIFT
TIME
SHIFT
VOL PR
GUIDE
BACK MENU
DVR
MARK
FAV
1
2
3
1
2
3
4
Engineering Diagnostics
Menu
Prev.
Manufacturer : LG Electronics Inc.
Model / Type : 37LC2D-EC
Serial No. : 604KG0000006
Software version : 1.1.0
CH 30
CH 34
Select
Transmitter : Teracom_Mux_2
Signal strength 53%
Signal quality 100%
1 YLE PEU 1 YLE TV1
3 YLE TV2 4 YLEQ
5 YLE FST
6 YLEN KLASS
7 YLE FSR+ 8 YLE24
Back
i Channel 30
Auto Tuning
Manual Tuning
Programme Edit
5V Antenna Power
Booster
Software Update
Diagnostics
CI Information
PICTURE
O
AUDIO
O
TIME
O
OPTION
O
SCREEN
O
D V R
O
Prev.
MENU
Move
SETUP
G
Page 45
43
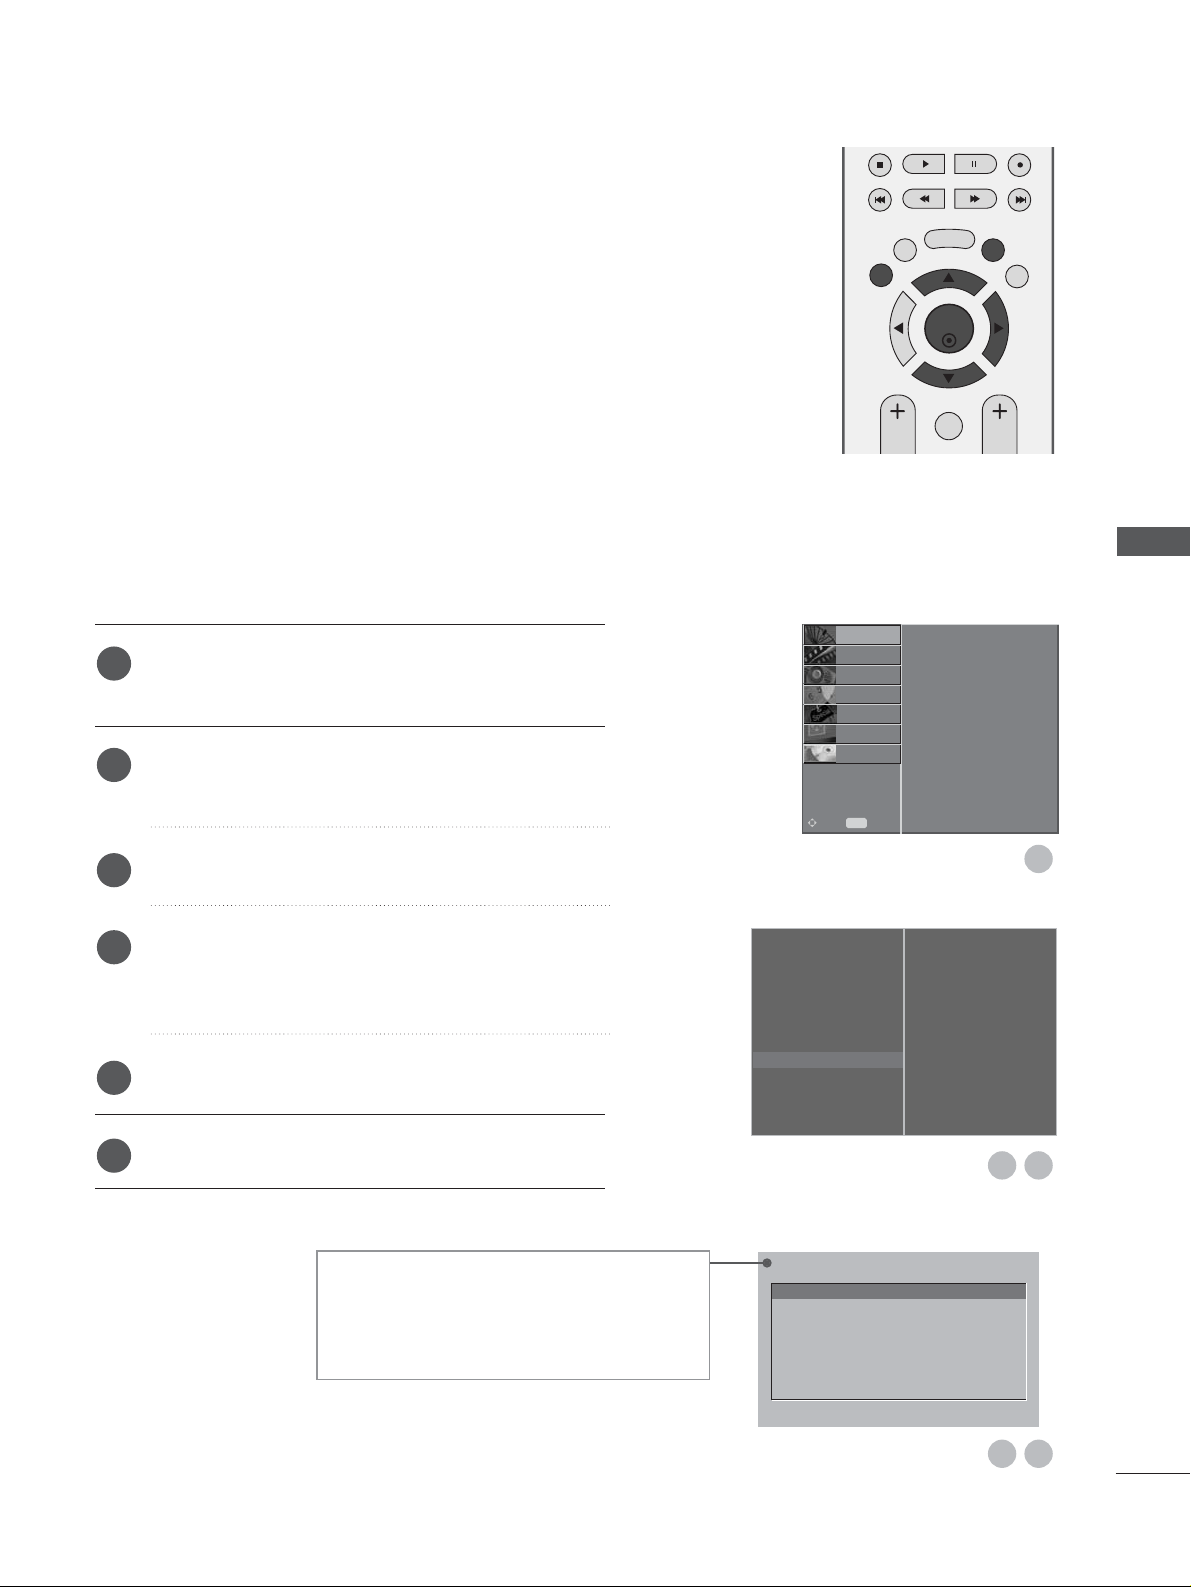
This function enables you to watch some scrambled services (pay services). If you remove the CI Module, you can’t watch the pay services.
When the module is inserted to CI slot, you can access the module menu.
To purchase a module and smart card, contact your supplying dealer. Do
not often insert or remove a CAM module from the set. It may cause a
trouble. When the set turned on after inserting the CI Module, you often
can’t hear the sound.
There might be unnatural picture according to CI module and smart card.
CI (Common Interface) function may not be applied based on country
broadcasting circumstance.
Press the MENU button and then
D
or
E
button to
select the SETUP menu.
Press the
G
button and then
D
or
E
button to select
CI Information.
Press the
G
button and then OK button.
Press the
D
or
E
button to select the desired item:
Module information, smart card information, language, or software download etc.
Press the OK button.
Press the EXIT button to return to normal TV viewing.
• This OSD is only for illustration and the menu
options and screen format will vary according to
the Digital pay services provider.
• It’s possible for you to change CI (Common
Interface) menu screen and service by your dealer.
Viaccess Module
Select the item
Consultations
Authorizations
Module information
CI [COMMON INTERFACE] INFORMATION (IN DIGITAL MODE ONLY)
Auto Tuning
Manual Tuning
Programme Edit
5V Antenna Power
Booster
Software Update
Diagnostics
CI Information
G
Module
OK
EXIT
TIME
SHIFT
TIME
SHIFT
VOL PR
GUIDE
BACK MENU
DVR
MARK
FAV
1
2
3
4
5
6
32
54
1
WATCHING TV / PROGRAMME CONTROL
Auto Tuning
Manual Tuning
Programme Edit
5V Antenna Power
Booster
Software Update
Diagnostics
CI Information
PICTURE
O
AUDIO
O
TIME
O
OPTION
O
SCREEN
O
D V R
O
Prev.
MENU
Move
SETUP
G
Page 46
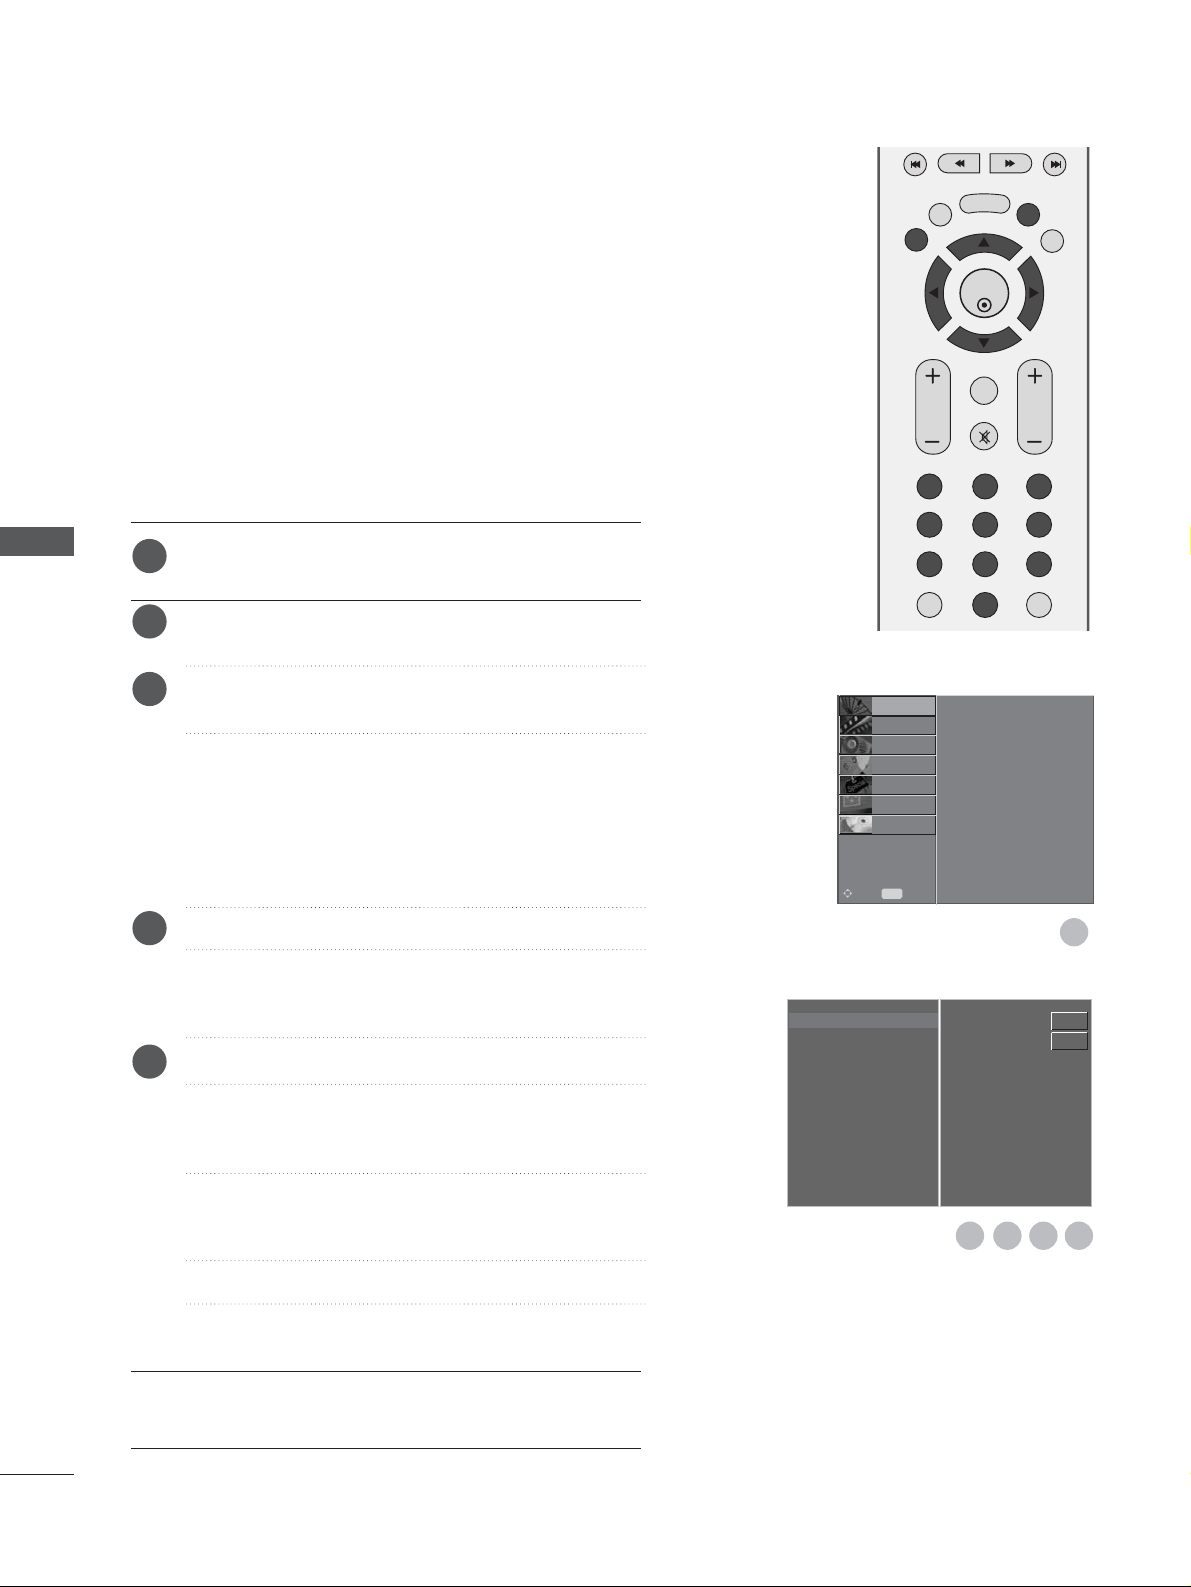
44
WATCHING TV /PROGRAMME CONTROL
WATCHING TV / PROGRAMME CONTROL
1
5432
All stations that can be received are stored by this method. It is
recommended that you use Auto tuning during installation of
this set.
It’s not available to use this function on recording programme.
AUTO PROGRAMME TUNING (IN ANALOGUE MODE)
Press the
MMEENNUU
button and then
D
or
E
button to
select the SETUP menu.
Press the
G
button and then
D
or
E
button to select
Auto Tuning.
Press the
G
button to select System. Select a TV
system with the
F
or
G
button;
L : SECAM L/L’ (France)
BG : PAL B/G, SECAM B/G (Europe / East Europe /
Asia / New Zealand / M.East / Africa / Australia)
I : PAL I/II (U.K. / Ireland / Hong Kong / South
Africa)
DK : PAL D/K, SECAM D/K (East Europe / China /
Africa / CIS)
Press the
E
button to select Storage From.
Select the beginning programme number with the
F
or
G
button or NUMBER buttons on the Storage
From menu.
Press the
E
button to select Start.
The station name is stored for stations which broadcast VPS (Video Programme Service), PDC
(Programme Delivery Control) or TELETEXT data.
If no station name can be assigned to a station, the
channel number is assigned and stored as C (V/UHF
01-69) or S (Cable 01-47), followed by a number.
To stop auto tuning, press the MENU button.
When auto tuning is completed, the Programme
Edit menu appears on the screen.
See the ‘Programme Edit’ section to edit the
stored programme.
Auto Tuning G
Manual Tuning
Programme Edit
System
Storage From
Start
BG
2
OK
EXIT
TIME
SHIFT
TIME
SHIFT
VOL PR
GUIDE
BACK MENU
DVR
123
456
789
0
Q.VIEW
LIST
MUTE
MARK
FAV
1
2
3
4
5
Auto Tuning
Manual Tuning
Programme Edit
PICTURE
O
AUDIO
O
TIME
O
OPTION
O
SCREEN
O
D V R
O
Prev.
MENU
Move
SETUP
G
Page 47
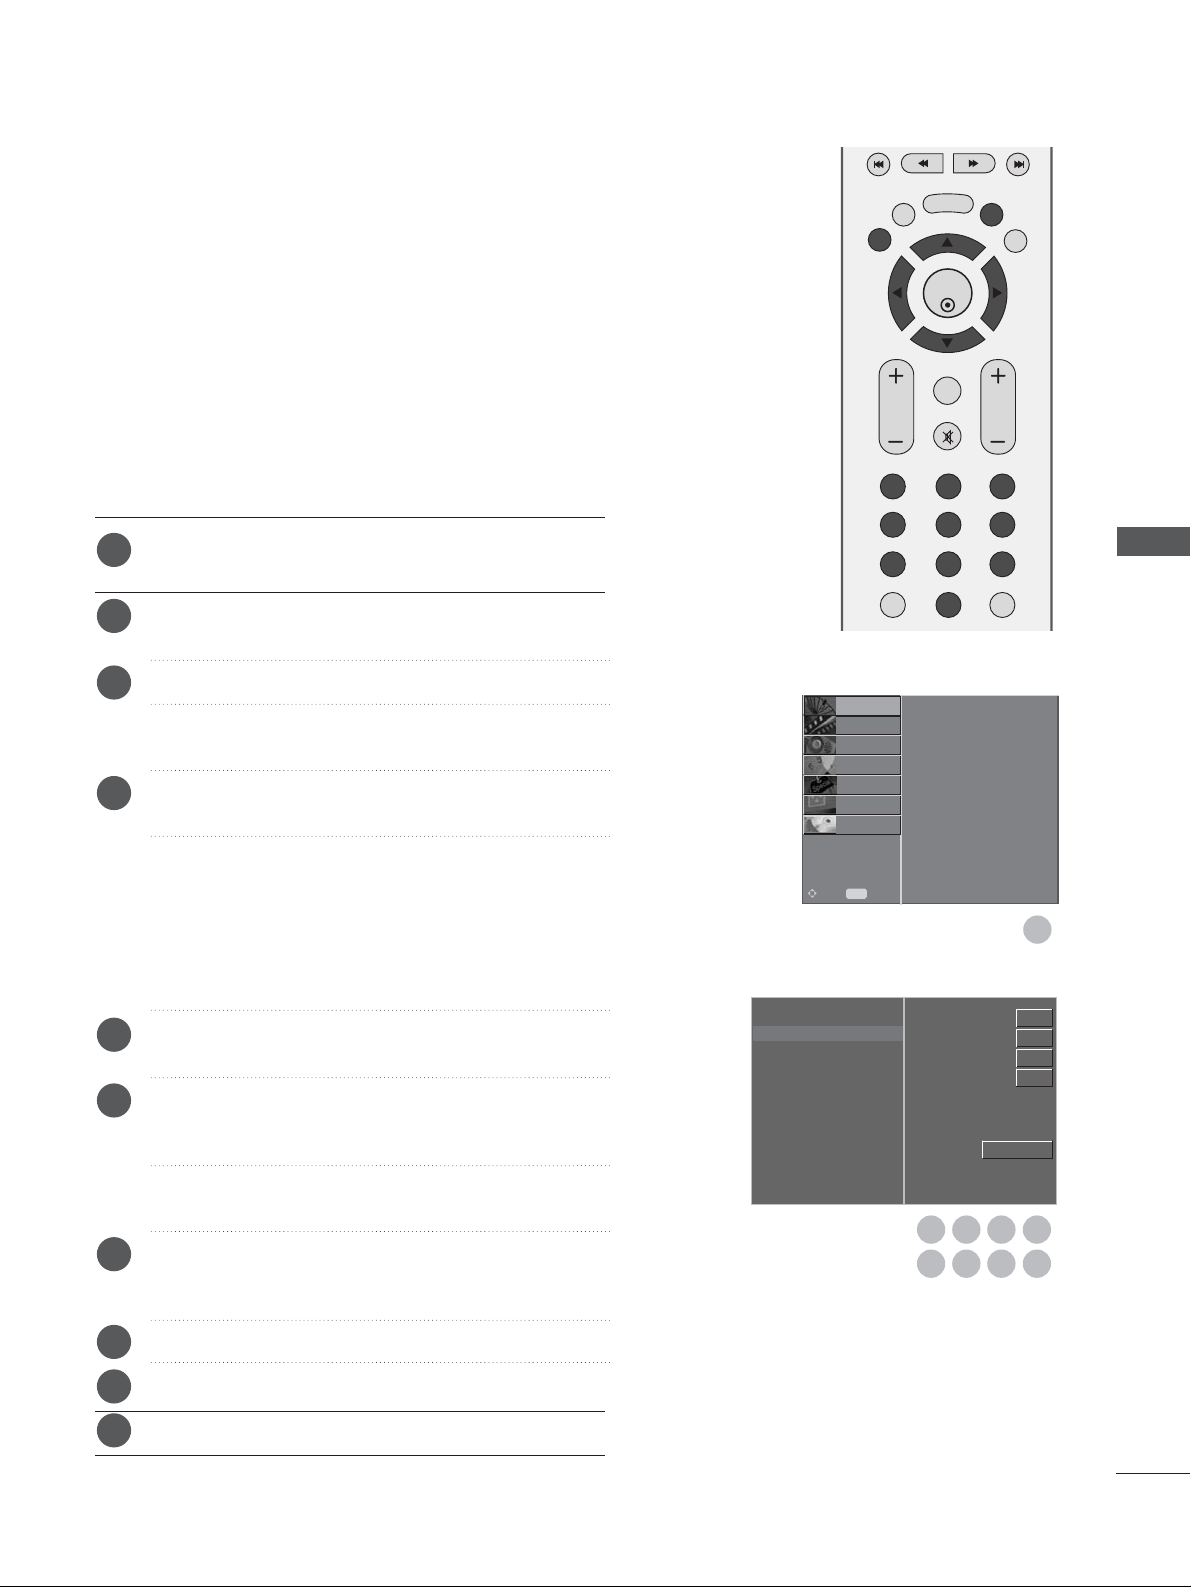
45
Manual Tuning lets you manually tune and arrange the stations in
whatever order you desire.
It’s not available to use this function in TimeShift Mode On mode.
It’s not available to use this function on recording programme.
MANUAL PROGRAMME TUNING (IN ANALOGUE MODE)
Press the MENU button and then
D
or
E
button to
select the SETUP menu.
Press the
G
button and then
D
or
E
button to select
Manual Tuning.
Press the
G
button to select Storage.
Select the desired programme number with the
F
or
G
button or NUMBER buttons on the Storage menu.
Press the
E
button to select System. Select a TV
system with the
F
or
G
button;
L : SECAM L/L’ (France)
BG : PAL B/G, SECAM B/G (Europe / East Europe /
Asia / New Zealand / M.East / Africa / Australia)
I : PAL I/II (U.K. / Ireland / Hong Kong / South
Africa)
DK : PAL D/K, SECAM D/K (East Europe / China /
Africa / CIS)
Press the
E
button to select Band. Press the
F
or
G
button to select V/UHF or Cable as required.
Press the
E
button to select Channel. You can
select the desired channel number with the
F
or
G
button or NUMBER buttons.
If possible, select the channel number directly with
the NUMBER buttons.
Press the
E
button to select Search. Press the
F
or
G
button to commence searching. If a station is
found the search will stop.
Press the OK button to store it.
To store another station, repeat steps 3 to 8.
Press the EXIT button to return to normal TV viewing.
Auto Tuning
Manual Tuning
G
Programme Edit
Storage
System
Band
Channel
Fine
Search
Name
1
1
C 01
BG
V/UHF
1
OK
EXIT
TIME
SHIFT
TIME
SHIFT
VOL PR
GUIDE
BACK MENU
DVR
123
456
789
0
Q.VIEW
LIST
MUTE
MARK
FAV
5
432
9
876
1
2
3
4
5
6
7
8
9
10
WATCHING TV / PROGRAMME CONTROL
Auto Tuning
Manual Tuning
Programme Edit
PICTURE
O
AUDIO
O
TIME
O
OPTION
O
SCREEN
O
D V R
O
Prev.
MENU
Move
SETUP
G
Page 48
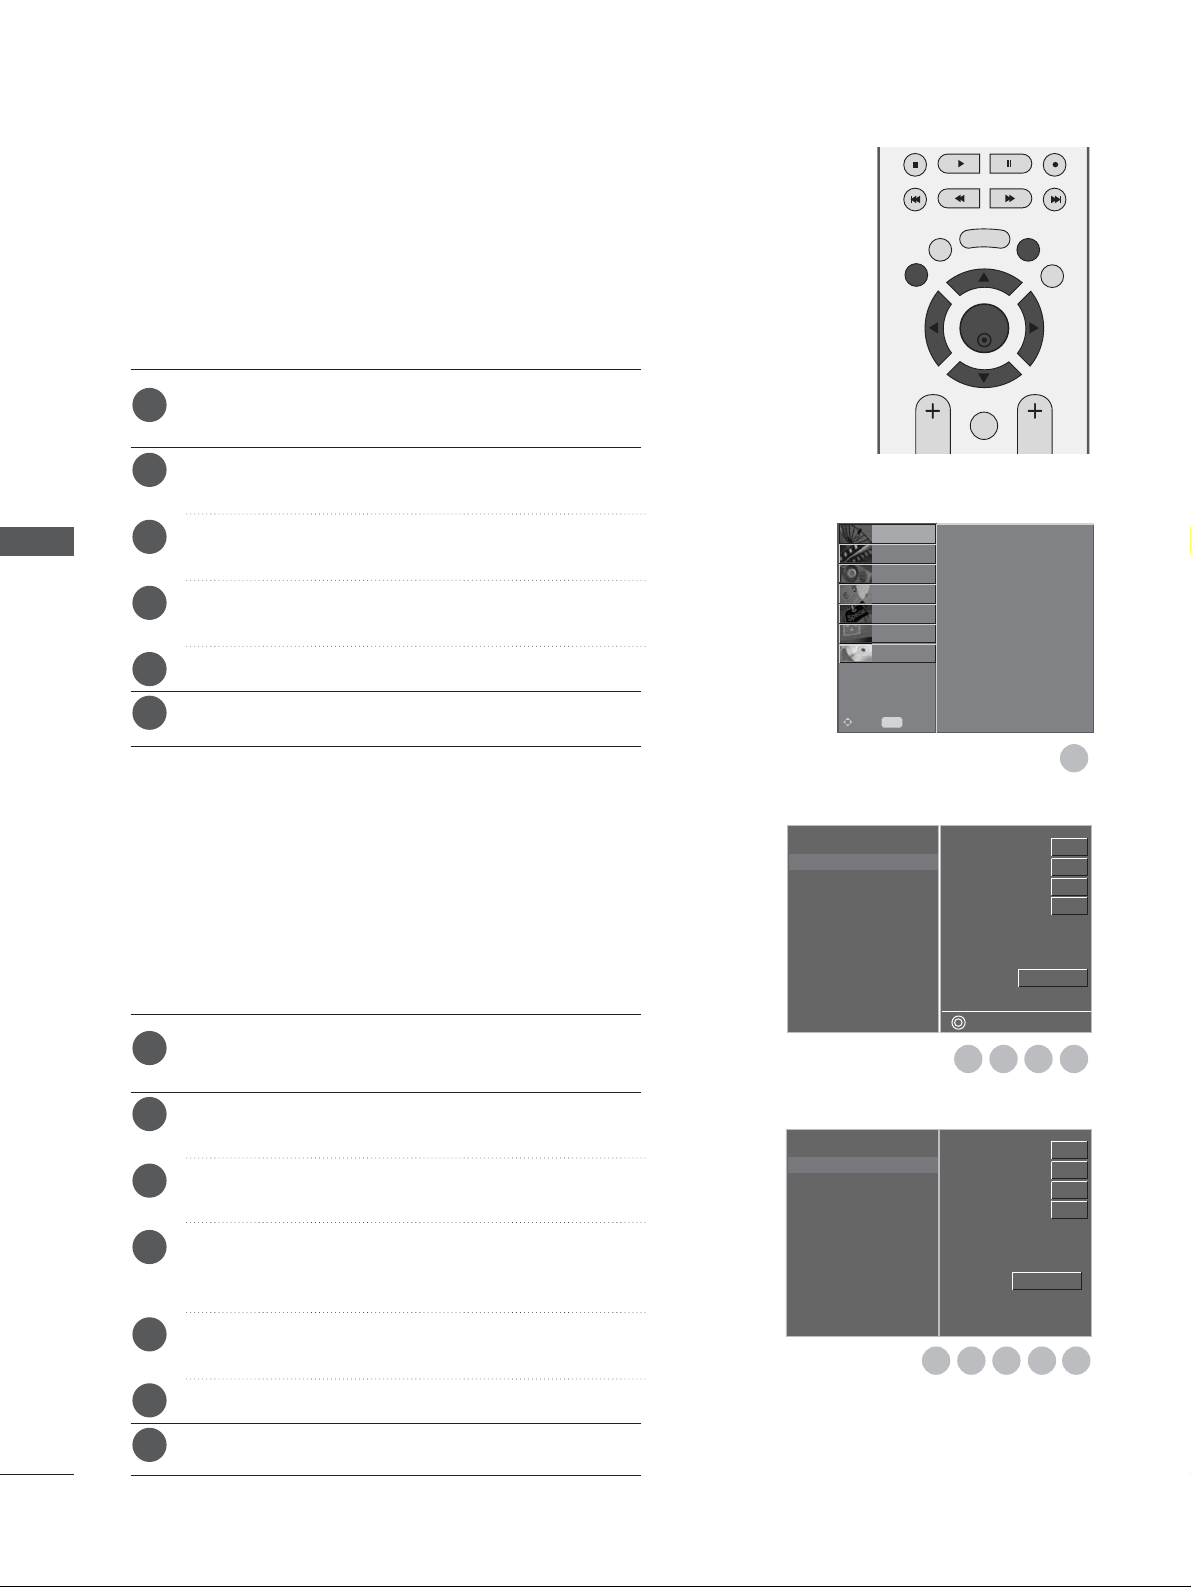
46
WATCHING TV /PROGRAMME CONTROL
WATCHING TV / PROGRAMME CONTROL
Press the MENU button and then
D
or
E
button to
select the SETUP menu.
Press the
G
button and then
D
or
E
button to select
Manual Tuning.
Press the
G
button and then
D
or
E
button to select
Name.
Press the
G
button and then
D
or
E
button. You can
use a the alphabet A to Z, the number 0 to 9, +/ -,
and blank.
Press the
F
or
G
button to select the position and
make your choice of the second character, and so on.
Press the OK button to store it.
Press the EXIT button to return to normal TV viewing.
Normally fine tuning is only necessary if reception is poor.
Press the MENU button and then
D
or
E
button to
select the SETUP menu.
Press the
G
button and then
D
or
E
button to select
Manual Tuning.
Press the
G
button and then
D
or
E
button to select
Fine.
Press the
G
button and then
F
or
G
button to fine
tune for the best picture and sound.
Press the OK button to store it.
Press the EXIT button to return to normal TV viewing.
FINE TUNING (IN ANALOGUE MODE)
ASSIGNING A STATION NAME (IN ANALOGUE MODE)
You can assign a station name to each programme number.
Auto Tuning
Manual Tuning
Programme Edit
FG
Store
Storage
System
Band
Channel
Fine
Search
Name
1
1
C 01
BG
V/UHF
Auto Tuning
Manual Tuning
Programme Edit
Storage
System
Band
Channel
Fine
Search
Name
1
1
C 01
BG
V/UHF
FG
D
E
1
OK
EXIT
TIME
SHIFT
TIME
SHIFT
VOL PR
GUIDE
BACK MENU
DVR
MARK
FAV
1
2
3
4
5
6
1
2
3
4
5
6
7
5
432
5
432 6
Auto Tuning
Manual Tuning
Programme Edit
PICTURE
O
AUDIO
O
TIME
O
OPTION
O
SCREEN
O
D V R
O
Prev.
MENU
Move
SETUP
G
Page 49
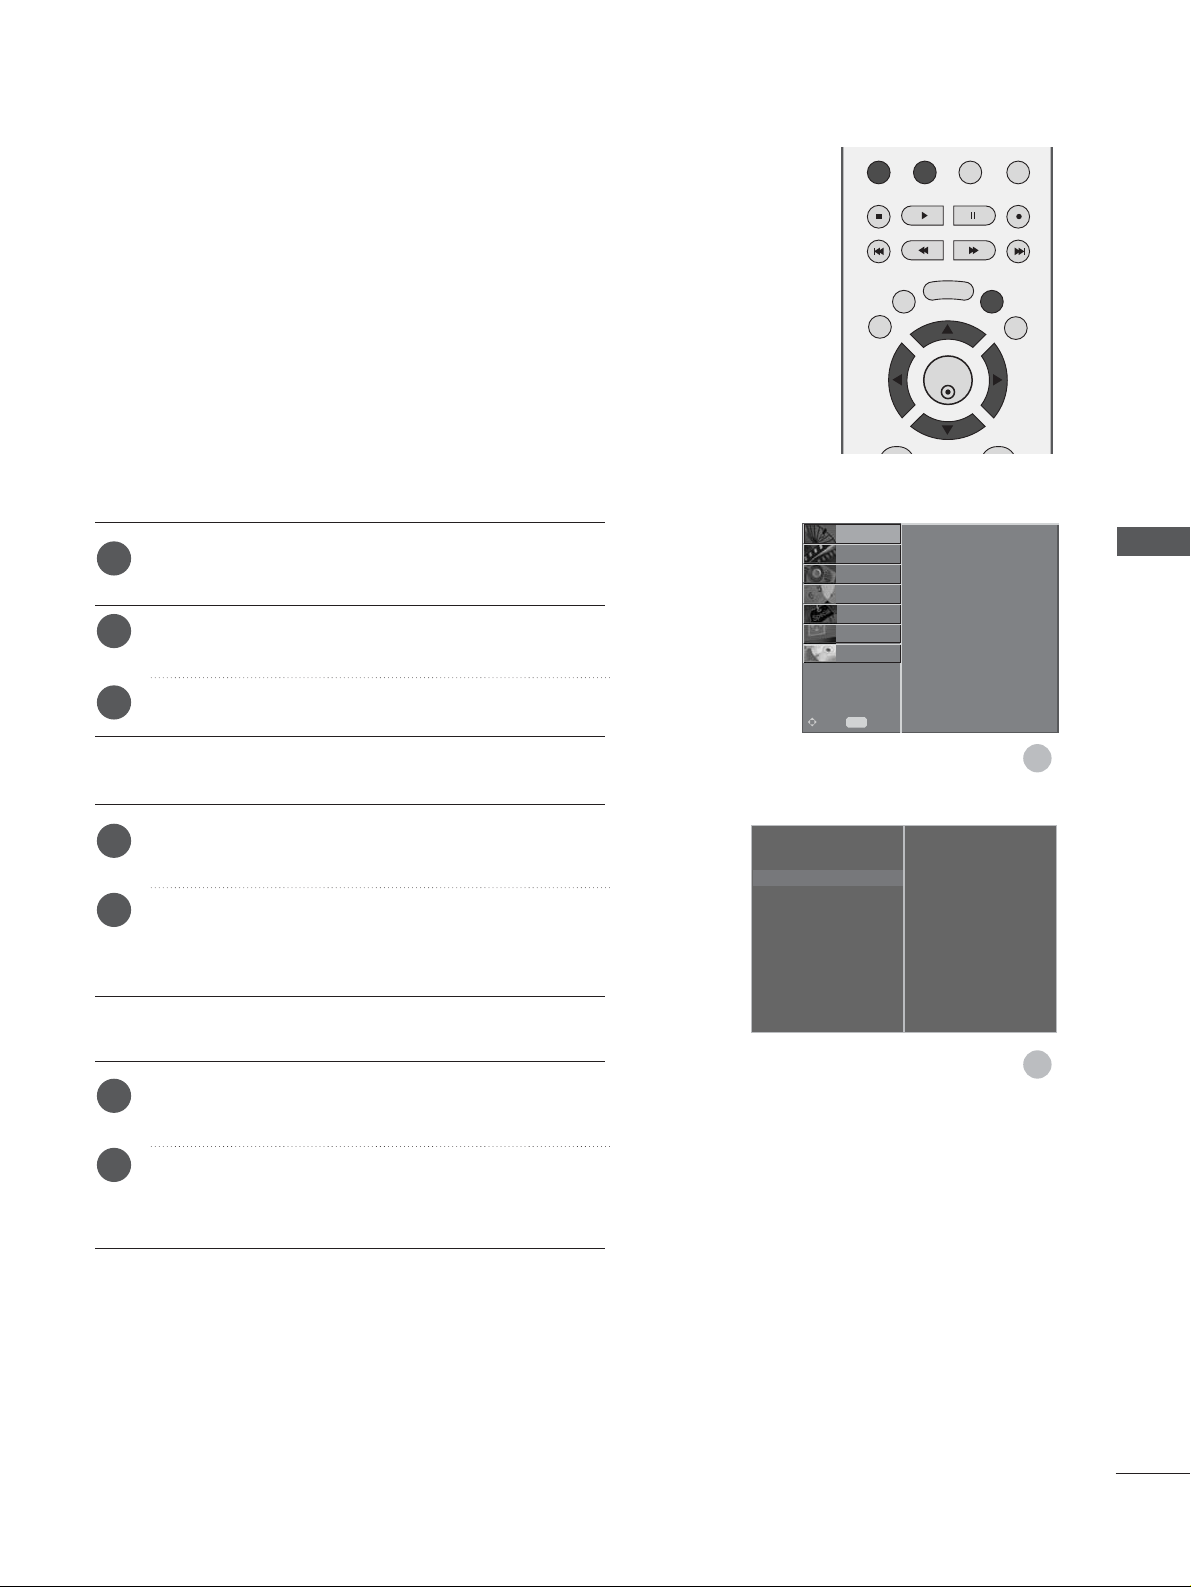
47
Press the MENU button and then
D
or
E
button to
select the SETUP menu.
Press the
G
button and then
D
or
E
button to select
Programme Edit.
Press the
G
button to display the Programme Edit menu.
A Deleting a programme
Select a programme to be deleted with the
D
or
E
or
F
or
G
button.
Press the RED button twice. The selected programme
is deleted, all the following programmes are shifted
up one position.
A Copying a programme
Select a programme to be copied with the
D
or
E
or
F
or
G
button.
Press the GREEN button. All the following programmes
are shifted down one position.
This function enables you to delete or skip the stored programmes.
Also you can move some stations to other programme numbers or
copy a blank station data into the selected programme number.
It’s not available to use this function on recording programme.
PROGRAMME EDIT (IN ANALOGUE MODE)
1
2
OK
EXIT
TIME
SHIFT
TIME
SHIFT
GUIDE
BACK MENU
DVR
Auto Tuning
Manual Tuning
Programme Edit
G
To Set
1
2
3
a
b
a
b
WATCHING TV / PROGRAMME CONTROL
Auto Tuning
Manual Tuning
Programme Edit
PICTURE
O
AUDIO
O
TIME
O
OPTION
O
SCREEN
O
D V R
O
Prev.
MENU
Move
SETUP
G
Page 50
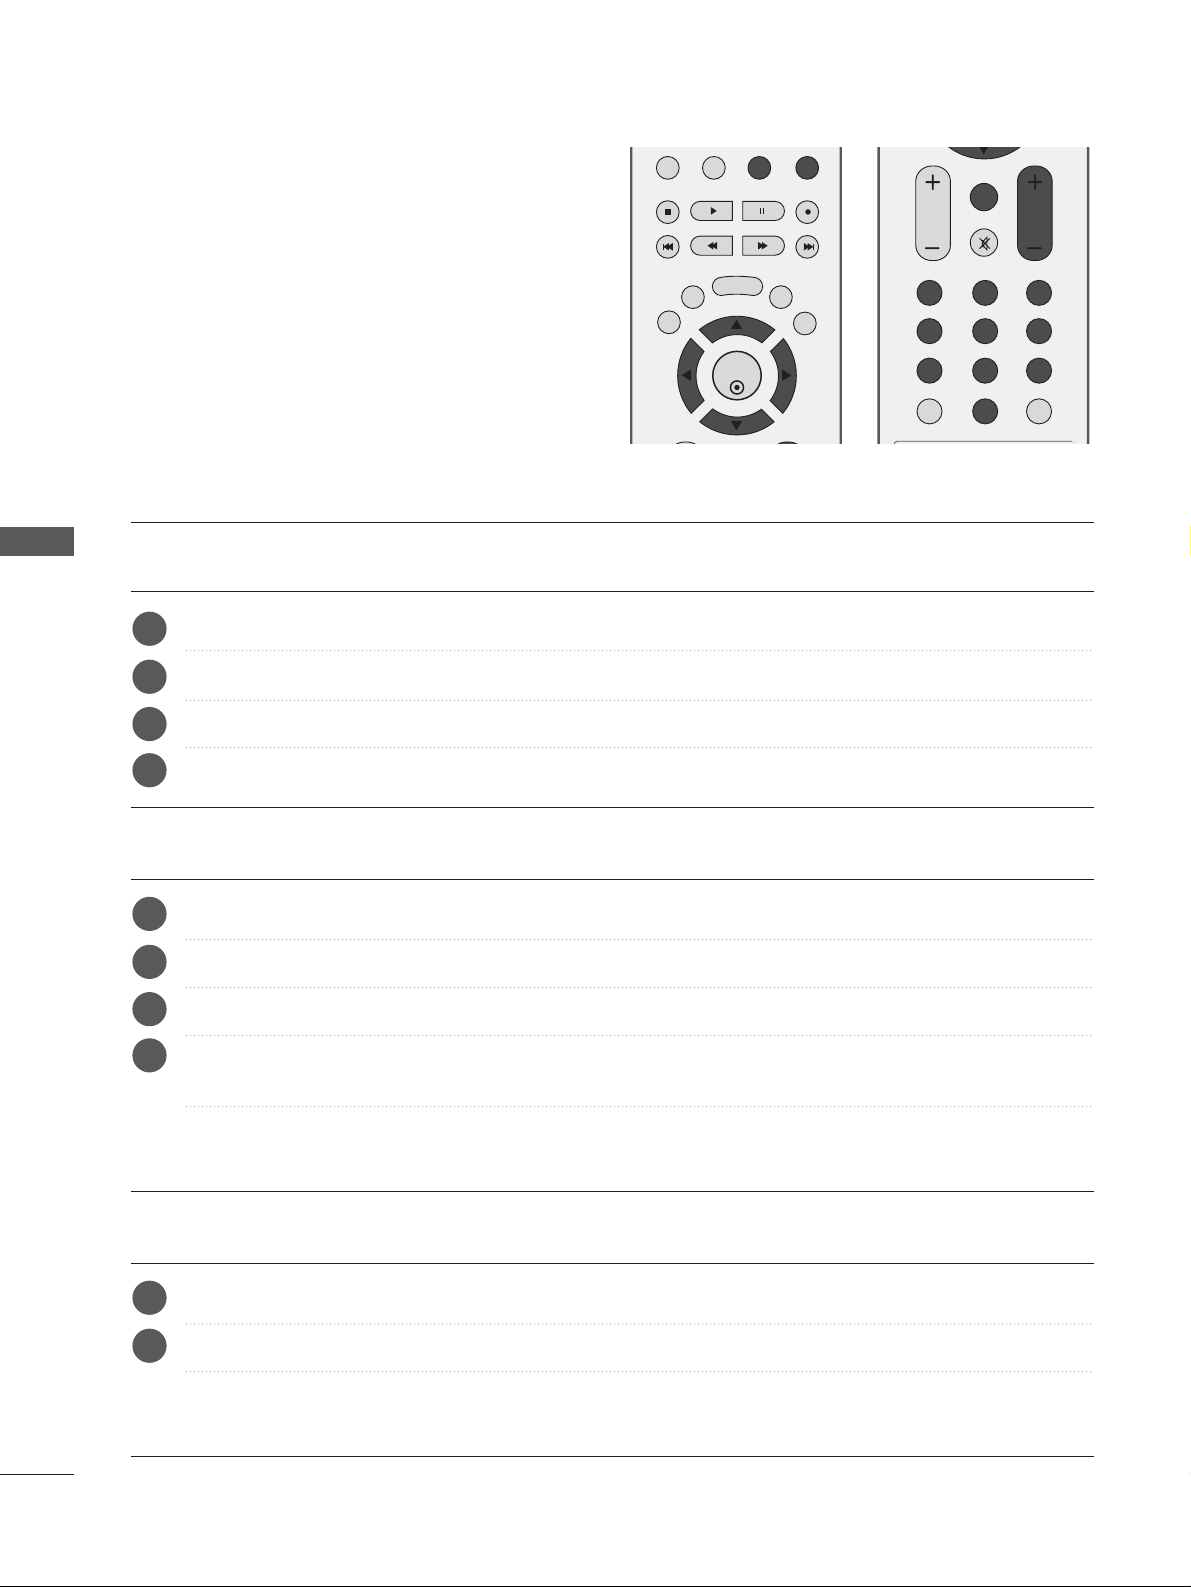
48
WATCHING TV /PROGRAMME CONTROL
WATCHING TV / PROGRAMME CONTROL
A Moving a programme
Select a programme to be moved with
D
or
E
or
F
or
G
button.
Press the YELLOW button.
Move the programme to the desired programme number with the
D
or
E
or
F
or
G
button.
Press the YELLOW button again to release this function.
A Skipping a programme number
Select a programme number to be skipped with
D
or
E
or
F
or
G
button.
Press the BLUE button. The skipped programme number turns to blue.
Press the BLUE button to release the skipped programme.
When a programme number is skipped it means that you will be unable to select it using the PR + or button during normal TV viewing.
If you want to select the skipped programme, directly enter the programme number with the NUMBER
buttons or select it in the programme edit or table menu.
A Selecting Favourite Programme
Select your favourite programme number with
D
or
E
or
F
or
G
button.
Press the FAV button.
The selected programme will be added to the favourite programme list and heart-mark will appear in front
of that programme number.
a
b
c
d
a
b
a
b
c
d
VOL PR
123
456
789
0
Q.VIEW
LIST
MUTE
MARK
FAV
OK
EXIT
TIME
SHIFT
TIME
SHIFT
GUIDE
BACK MENU
DVR
Page 51
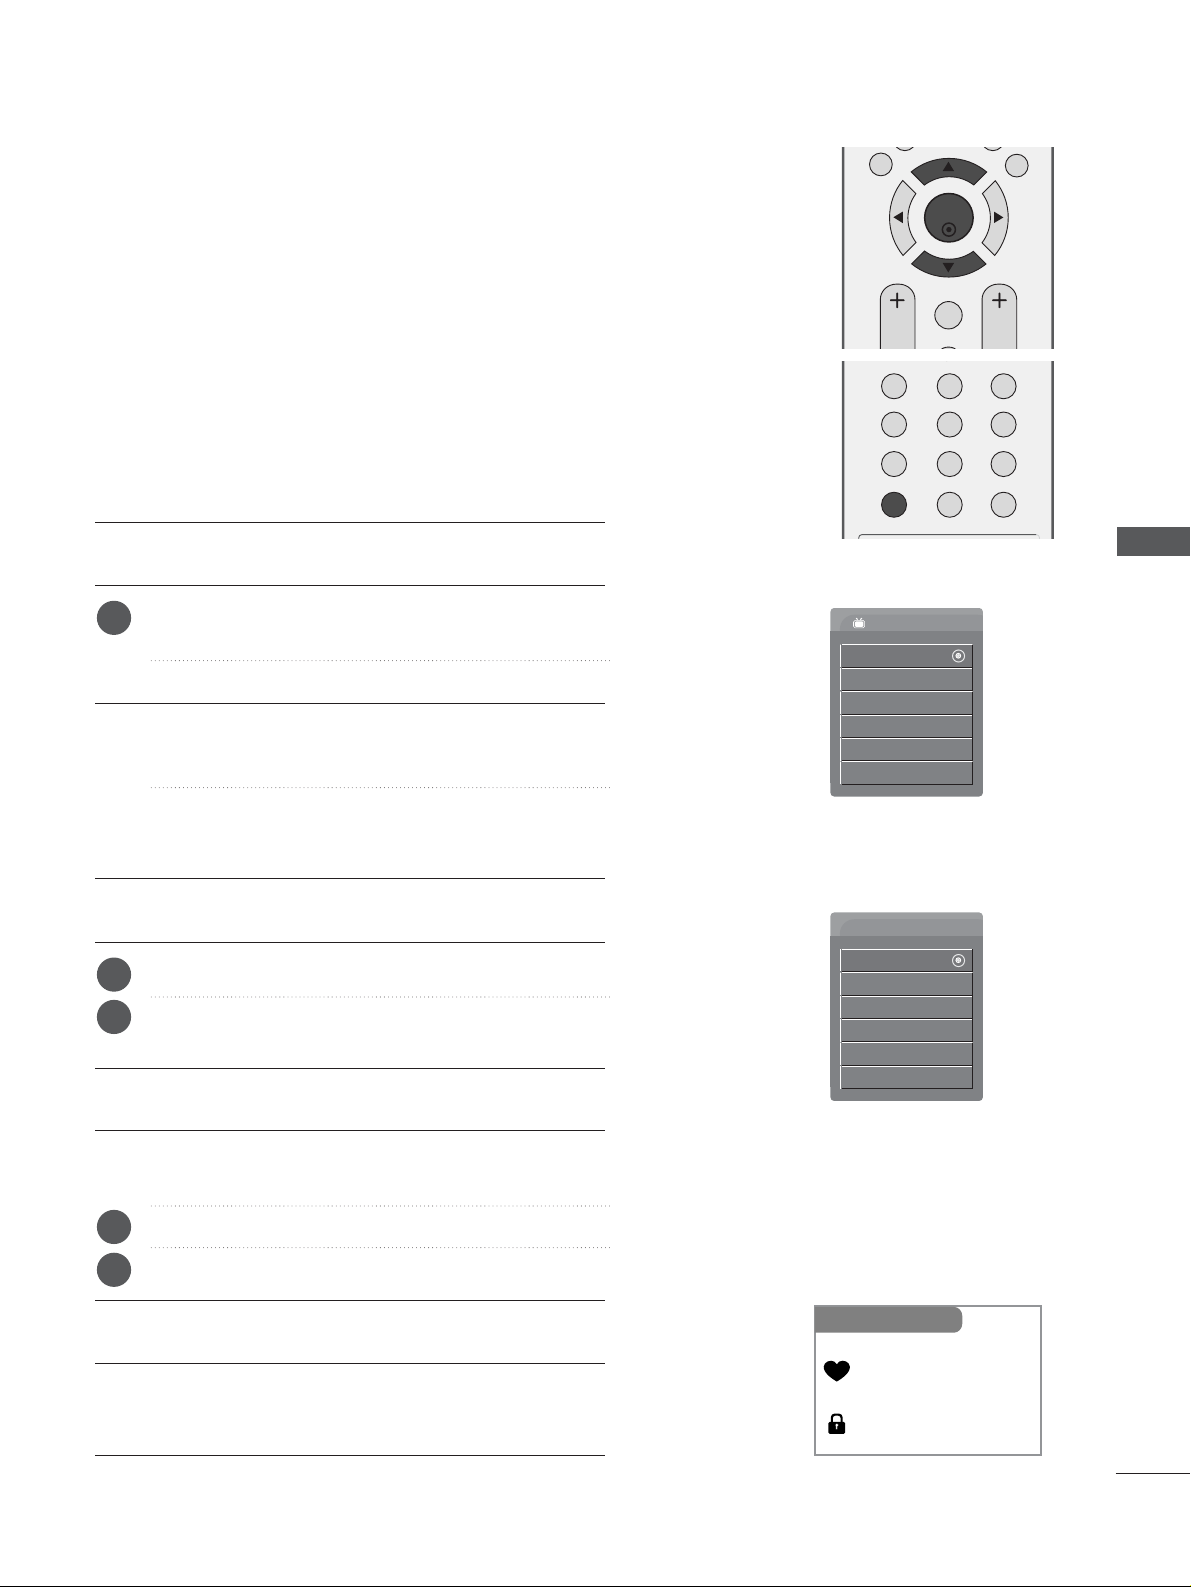
49
A Displaying programme LIST
Press the LIST button to display the PROGRAMME
LIST menu.
The programme list appears on the screen.
•You may find some blue programmes.
They have been set up to be skipped by auto
programming or in the programme edit mode.
• Some programmes with the channel number shown
in the programme LIST indicate there is no station
name assigned.
A Selecting a programme in the programme list
Select a programme with the
D
or
E
button.
Press the OKbutton. The set switches to the chosen programme number.
A Paging through a programme list
There are programme LIST pages which total contain
100 programmes.
Press the
D
or
E
button repeatedly to turns the pages.
Press the LIST button to return to normal TV viewing.
A
Displaying favourite programme table
Press the
FAV
button to display the Favourite
Programme table menu.
You can check the programmes stored in the memory by
displaying the programme table.
CALLING THE PROGRAMME TABLE
Displayed when the
Favourite Programme.
Displayed when the
Locked Programme.
Mini Glossary
< In Digital Mode >
< In Analogue Mode >
123
456
789
0
Q.VIEW
LIST
U
OK
EXIT
TIME
SHIFT
TIME
SHIFT
VOL PR
GUIDE
MARK
FAV
1
1
2
1
2
DTV List
D
801 YLE TV1
802 YLE TV2
803 YLE FST
804 YLE24
805
YLE Teema
806 TV4
Programme List
0 BBC1
1C 01
2C 04
3C 05
4
BLN 2
5
C 05
WATCHING TV / PROGRAMME CONTROL
Page 52
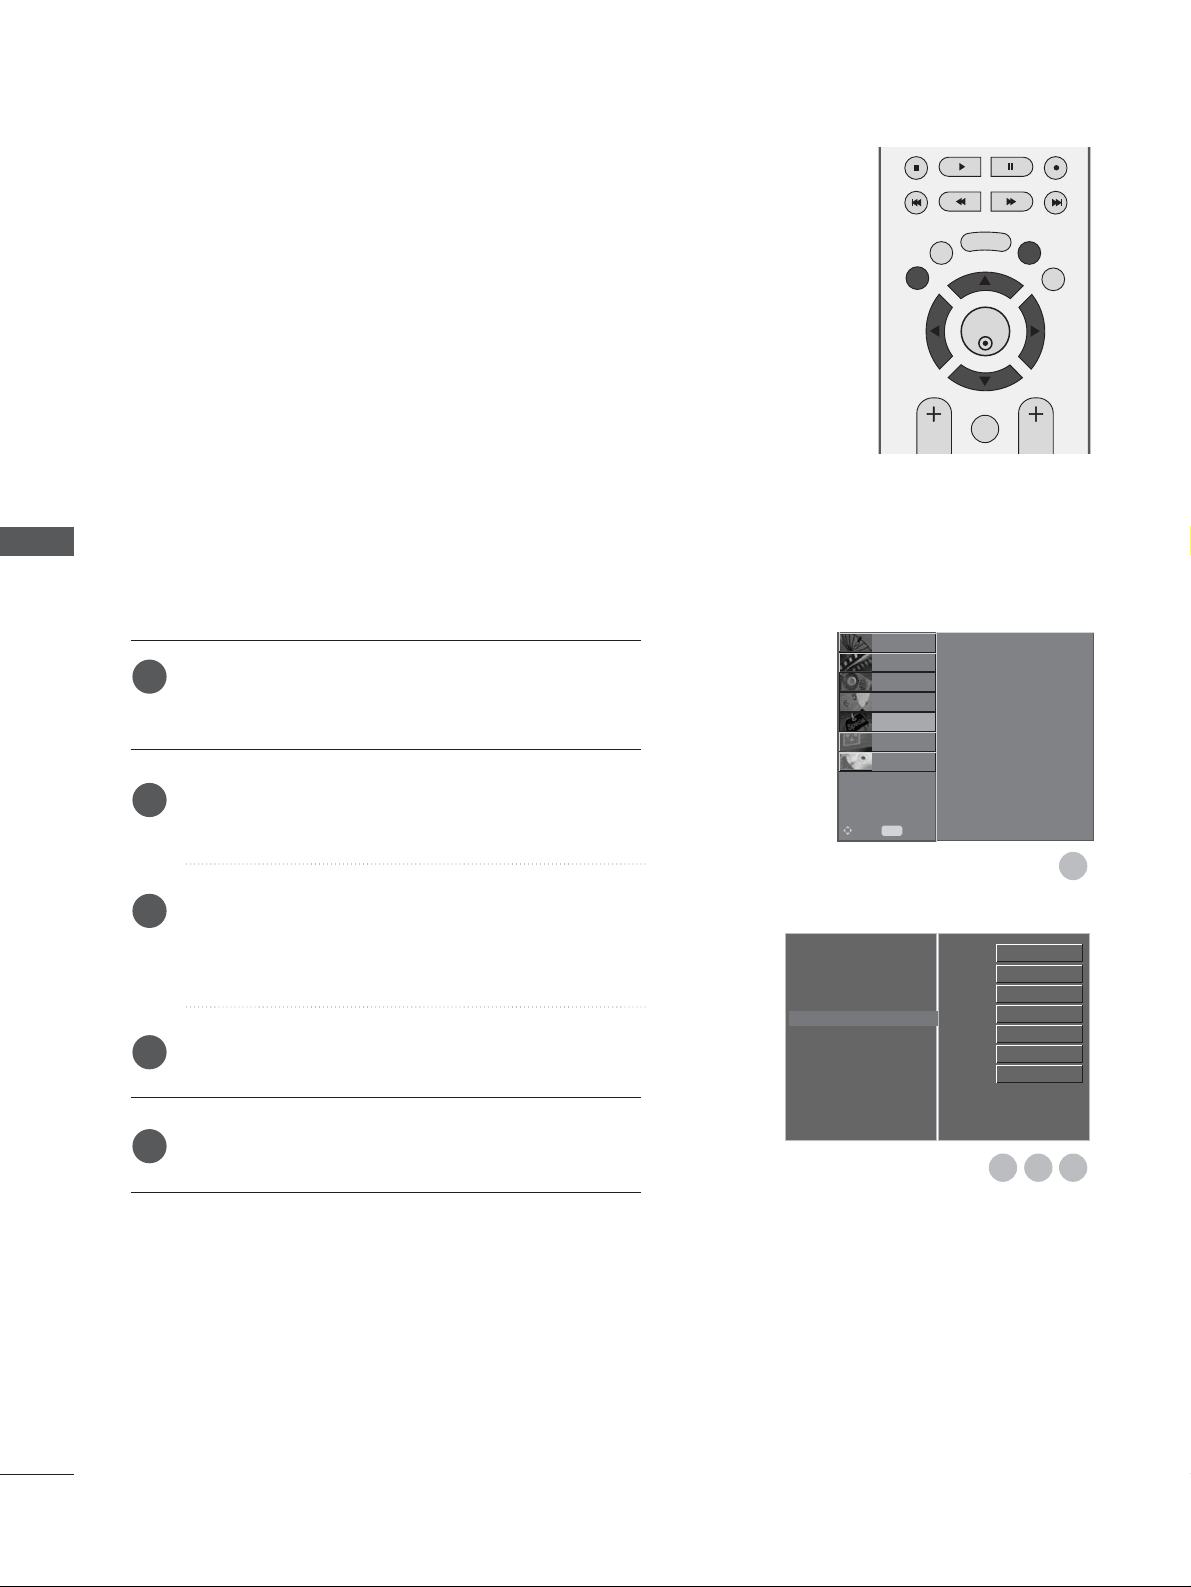
50
WATCHING TV /PROGRAMME CONTROL
WATCHING TV / PROGRAMME CONTROL
Sets a label for each input source which is not in use.
Press the
MMEENNUU
button and then use
D
or
E
button
to select the OPTION menu.
Press the
G
button and then use
D
or
E
button to
select Input Label.
Press the
G
button and then use
D
or
E
button to
select the source: AV1, AV2, AV3, Comp., RGB,
HDMI1 or HDMI2.
Press the
F
or
G
button to select the label.
Press EXIT button to return to normal TV viewing.
INPUT SOURCE SELECTION
Language
Country
Lock System
Parental Control
Input Label
G
SIMPLINK
Factory Mode
AV1
AV2
AV3
Comp.
RGB
HDMI1
HDMI2
OK
EXIT
TIME
SHIFT
TIME
SHIFT
VOL PR
GUIDE
BACK MENU
DVR
MARK
FAV
1
1
2
3
4
5
3 42
Language
Country
Lock System
Parental Control
Input Label
SIMPLINK
Factory Mode
SETUP
O
PICTURE
O
SCREEN
O
D V R
O
Prev.
MENU
Move
AUDIO
O
TIME
O
OPTION
G
Page 53
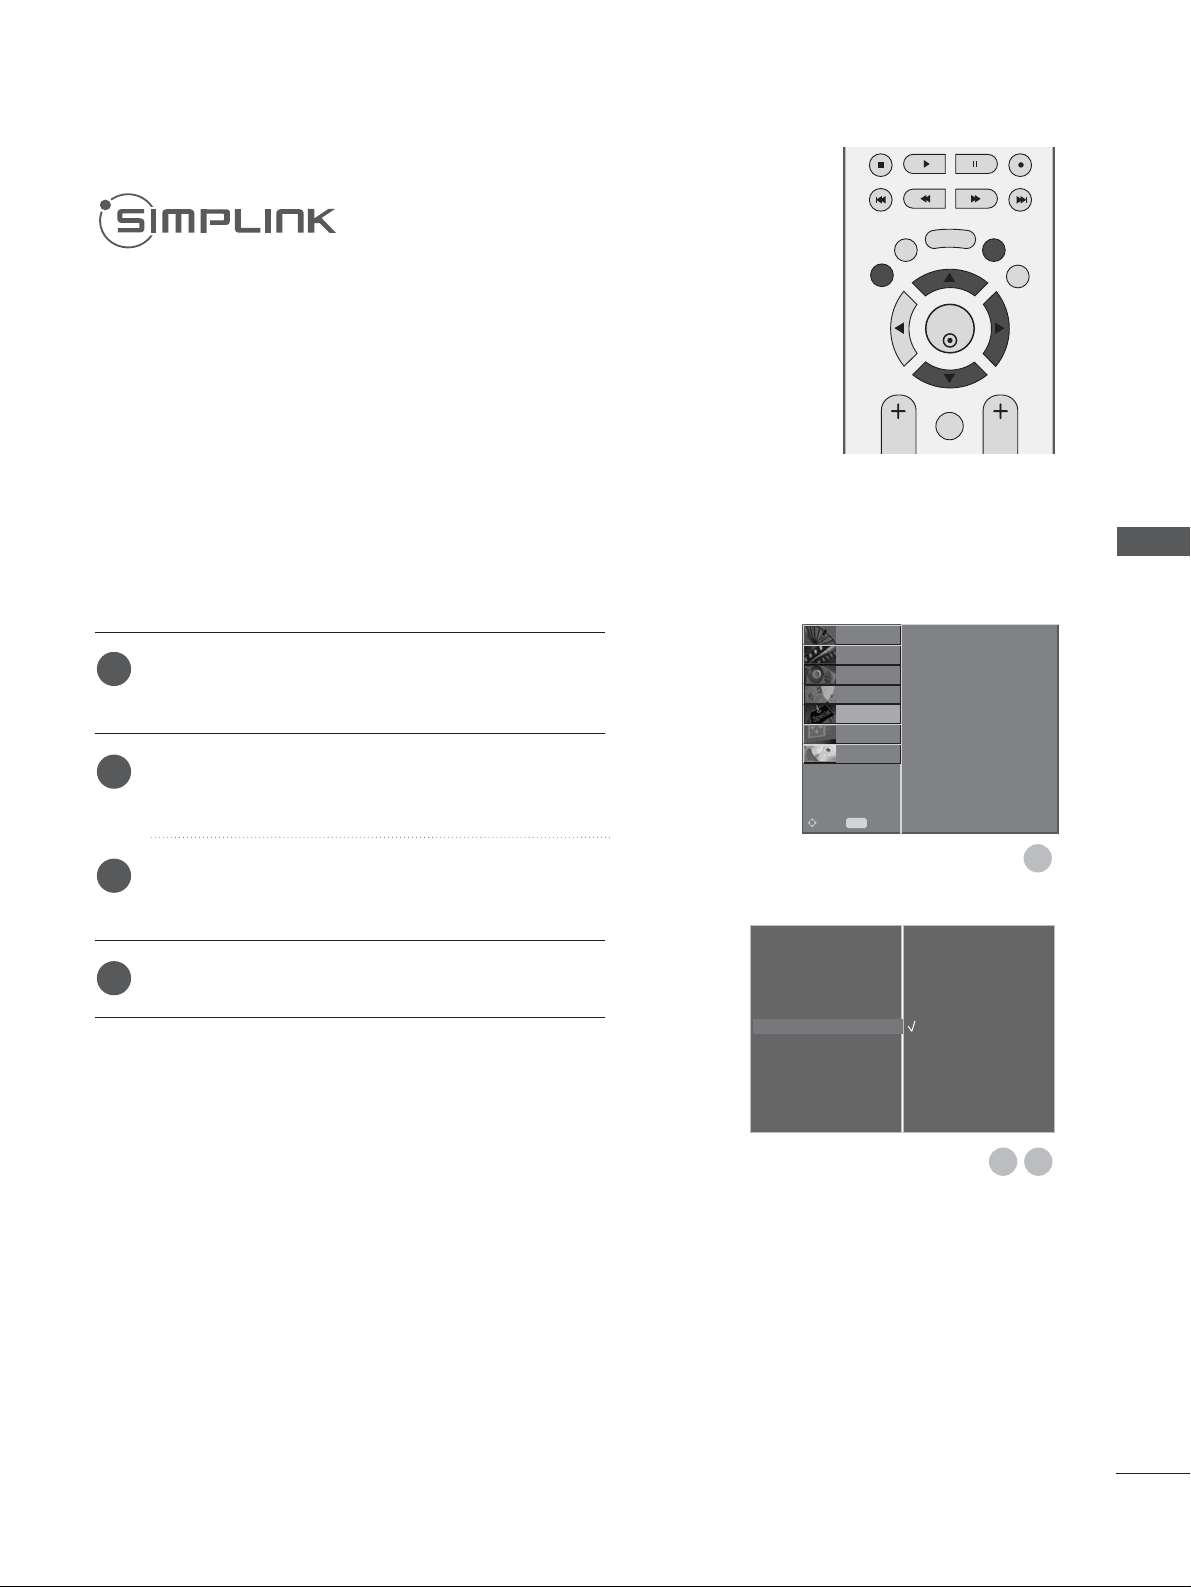
51
Press the MENU button and then
D
or
E
button to
select the OPTION menu.
Press the
G
button and then
D
or
E
button to select
SIMPLINK.
Press the
G
button and then
D
or
E
button to select
Off or On.
Press the EXIT button to return to normal TV viewing.
Language
Country
Lock System
Parental Control
Input Label
SIMPLINK
G
Factory Mode
Off
On
OK
EXIT
TIME
SHIFT
TIME
SHIFT
VOL PR
GUIDE
BACK MENU
DVR
MARK
FAV
1
1
2
3
4
FUNCTION
This operates only for the devices with the SIMPLINK logo.
Please check the SIMPLINK logo.
This allows you to control and play other AV devices connected
to the display through HDMI cable without additional cables
and settings.
If you want SIMPLINK menu, select “On”.
32
WATCHING TV / PROGRAMME CONTROL
Language
Country
Lock System
Parental Control
Input Label
SIMPLINK
Factory Mode
SETUP
O
PICTURE
O
SCREEN
O
D V R
O
Prev.
MENU
Move
AUDIO
O
TIME
O
OPTION
G
Page 54
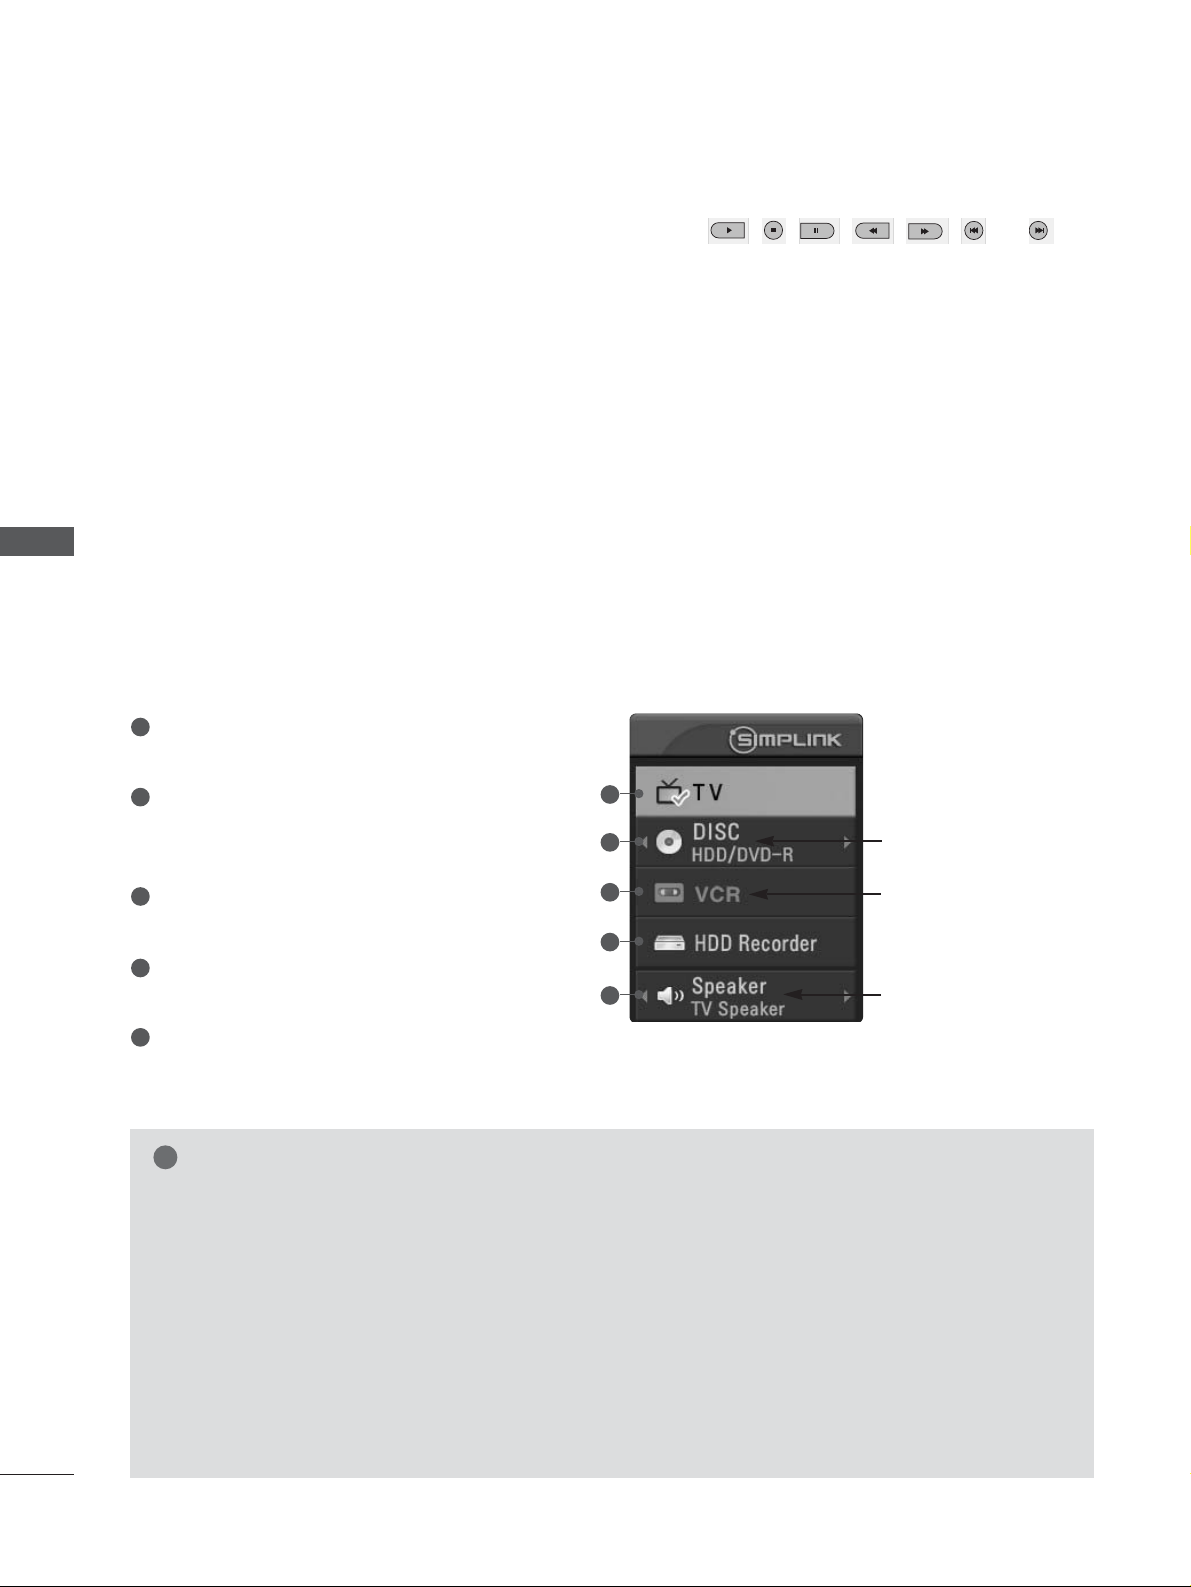
52
WATCHING TV /PROGRAMME CONTROL
WATCHING TV / PROGRAMME CONTROL
NOTE
!
GG
Connect the HDMI/DVI IN or HDMI IN terminal of the TV to the rear terminal (HDMI terminal) of the
SIMPLINK device with the HDMI cable.
GG
After connecting the HDMI terminal for the home theater with SIMPLINK function in the above method,
connect the DIGITAL AUDIO OUT terminal on the back of the TV to the DIGITAL AUDIO IN terminal on
the back of the SIMPLINK device with the OPTICAL cable.
GG
When operating the external device with SIMPLINK, press the TV button among the MODE button on the
remote controller.
GG
When you switch the Input source with the INPUT button on the remote controller, you can stop the
operation of device controlled by SIMPLINK.
GG
When you select or operate the media device with home theater function, the speaker automatically
switches to home theater speaker (HT speaker).
GG
If the SIMPLINK is operated, the keys such as stop / play / pause / fast reverse / fast forward / chapter
skip are used for driving the SIMPLINK device, but not used for the DVR feature.
DDiisscc ppllaayybbaacckk
Control connected AV devices by pressing the
DD
or EEor FFor
GG
, OK, , , , , , and
buttons.
DDiirreecc tt ppllaayy
After connecting AV devices to TV, you can directly control the devices and play media without additional settings.
SSeelleecctt AAVV ddeevvii ccee
Enables you to select one of AV devices connected to TV and play it.
PPoowwee rr ooffff aallll ddee vviicceess
When you power off TV, all connected devices are turned off.
SSwwiittcchh aauuddiioo--oouutt
Offers an easy way to switch audio-out.
**
A device, which is connected to TV through HDMI cable but does not support SIMPLINK, does not provide this function.
SIMPLINK Functions
TTVV vvii eewwiinngg ::
Switch to the previous TV programme
regardless of the current mode.
DDII SSCC pp ll aayy bbaa cc kk ::
Select and play connected discs.
When multiple discs are available, the titles of discs are
conveniently displayed at the bottom of the screen.
VVCCRR ppllaayybbaacckk ::
Play and control the connected
VCR.
HHDD DD RReeccoo rrddii nnggss ppllaa yybbaacckk ::
Play and control
recordings stored in HDD.
AAuuddiioo OOuutt ttoo HHoommee tthheeaattrree// AAuuddiioo OOuutt ttoo TT VV::
Select Home theatre or TV speaker for Audio Out.
Selected Device
When no device is connected (displayed in gray)
When a device is connected
(displayed in bright colour)
1
2
3
4
5
1
2
3
4
5
SIMPLINK Menu
Press the
DD
or EEor FFor
GG
button and then OK button to select the desired SIMPLINK source.
Page 55
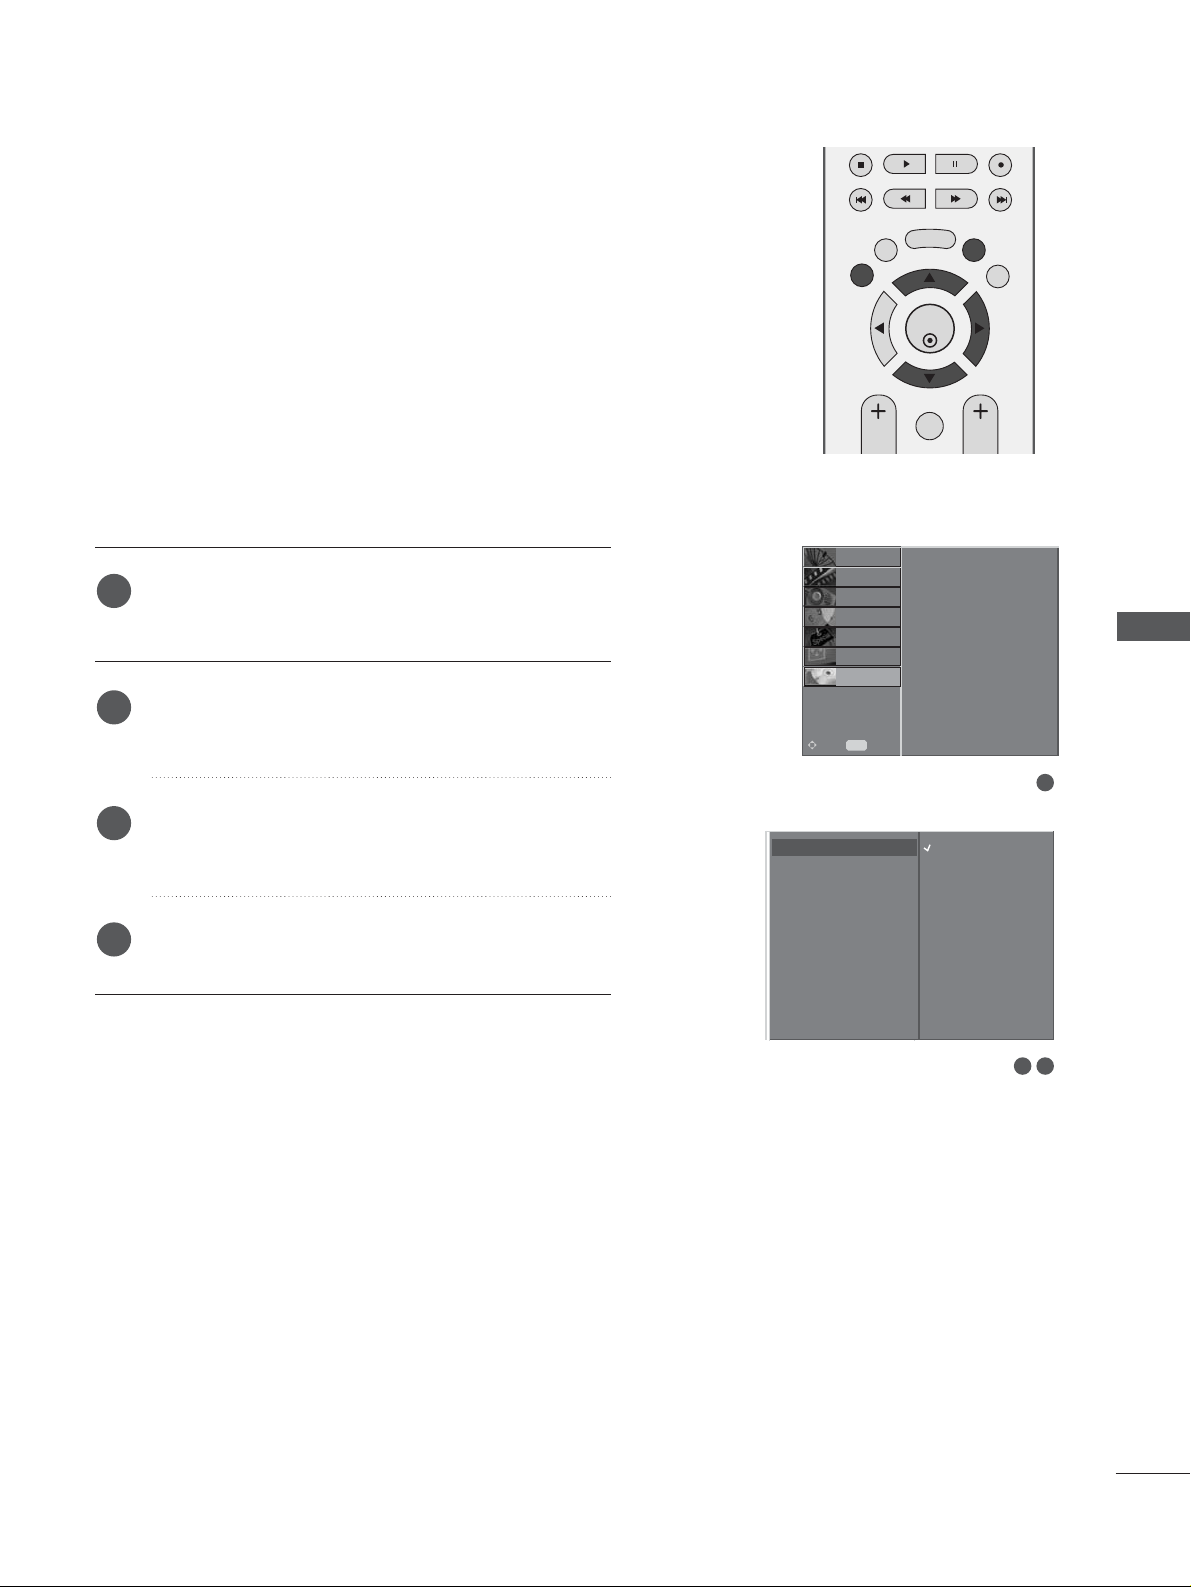
53
DVR (DIGITAL VIDEO RECORDER)
DVR (DIGITAL VIDEO RECORDER)
TIMESHIFT MODE (PAUSE & REPLAY OF LIVE TV)
This function allows the unit to automatically record live TV
and make it available for reviewing at any time.
With TimeShift Mode turned on, you may pause and rewind normal TV viewing at any time without missing any of the live broadcast.
(TimeShift Mode and Recording functions might not work if the
signal strength is weak.)
Press the
MMEENNUU
button and then use
DD / EE
button
to select the
DDVVRR
menu.
Press the
GG
button and then use
DD / EE
button to
select the
TTiimmeeSShhiifftt MMooddee
.
Press the
GG
button and then use
DD / EE
button to
select
OOnn
or
OOffff
.
Press the EXIT button to return to normal TV viewing.
2
3
4
1
1
2 3
OK
EXIT
TIME
SHIFT
TIME
SHIFT
VOL PR
GUIDE
BACK MENU
DVR
MARK
FAV
Off
On
TimeShift Mode
Record Quality
Recorded TV
Schedule List
Manual Record
HDD Format
SETUP
O
PICTURE
O
Prev.
MENU
Move
AUDIO
O
TIME
O
OPTION
O
D V R
G
SCREEN
O
TimeShift Mode
GG
Record Quality
Recorded TV
Schedule List
Manual Record
HDD Format
Page 56
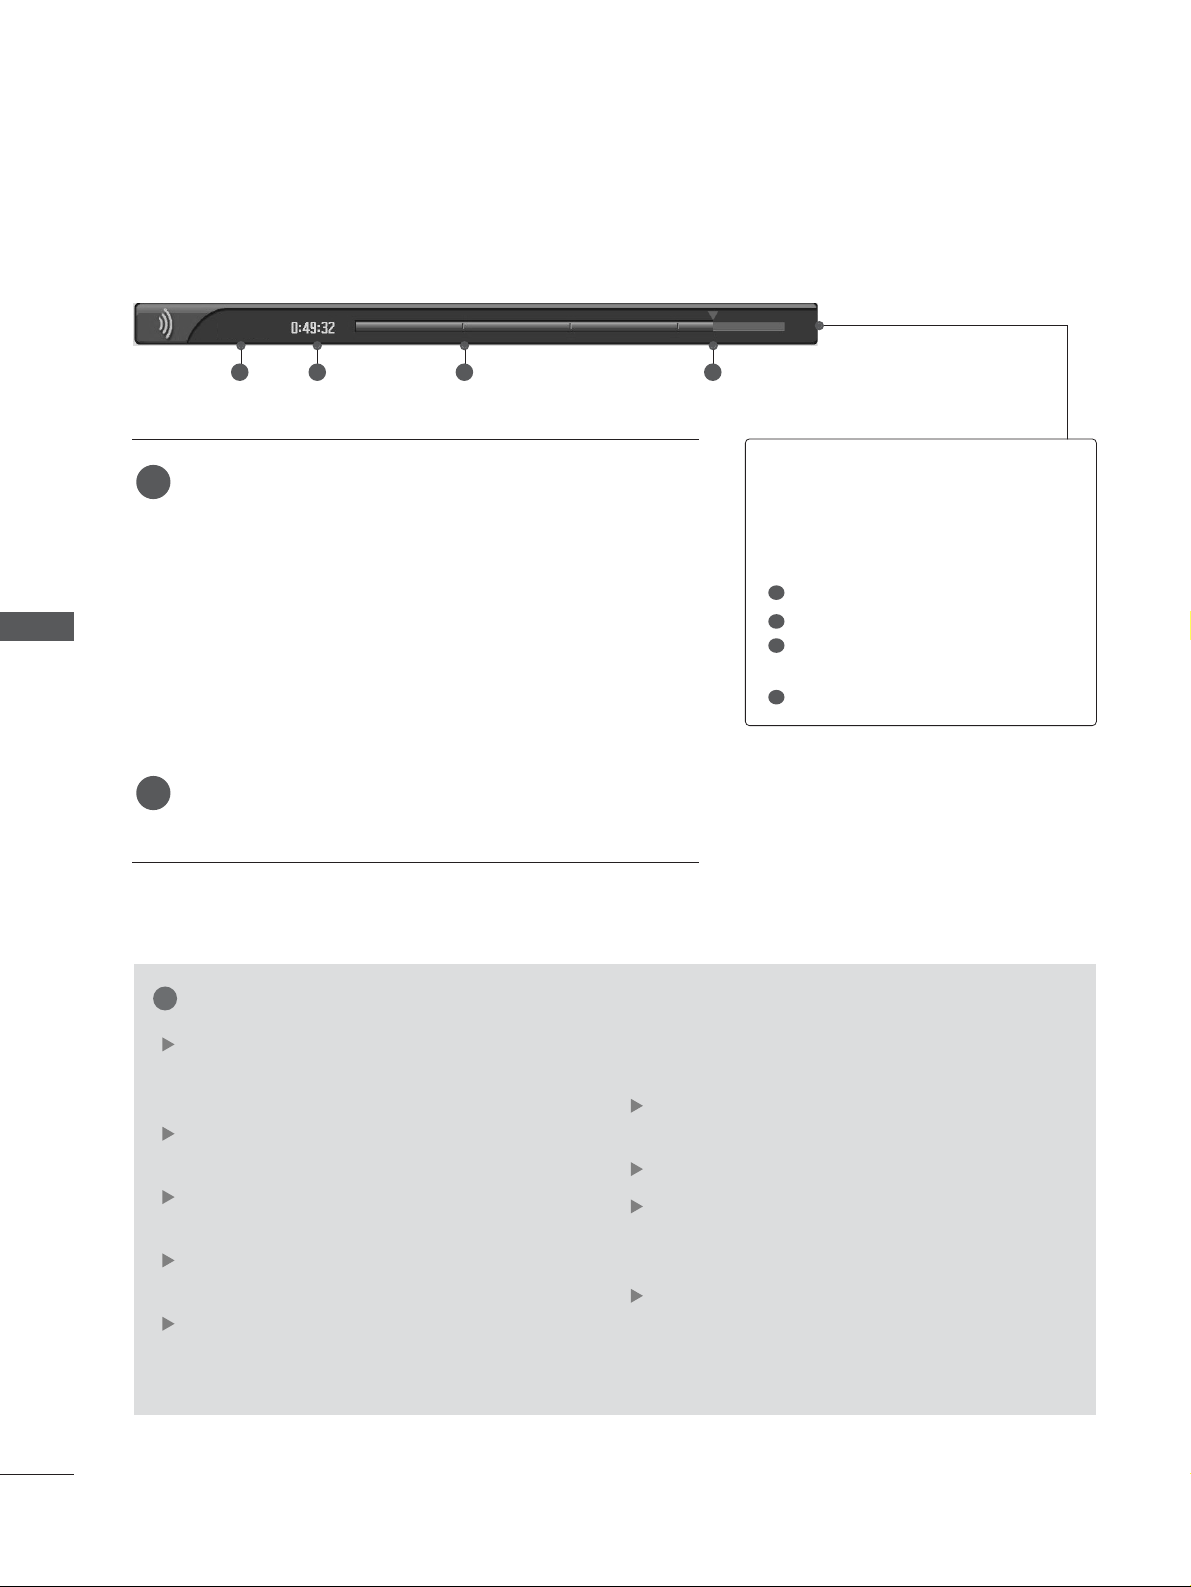
54
DVR (DIGITAL VIDEO RECORDER)
DVR (DIGITAL VIDEO RECORDER)
Using the TimeShift Mode function
After selecting the
TTiimmeeSShhiifftt MMooddee OOnn
, press the
OOKK
button.
■
As soon as TimeShift Mode starts, a progress bar indicating the current recording status is displayed in the bottom of the screen.
■
Press the
EEXXIITT
button to hide the ‘Progress Bar’ or press
the
OOKK
button to display the 'Progress Bar'.
■
This function is preserved even when changing a programme or progressing the TimeShift Mode.
When finishinging with the TimeShift Mode function, enter
the option menu and turn
TTiimmeeSShhiifftt MMooddee OOffff
.
NOTE
!
DVR (Digital Video Recorder): A device which
records and plays broadcast programme contents
onto a hard disk in set or SET TOP BOX.
The total storage space of the hard-disk is 160 GB.
4 GB minimum is reserved for TimeShift Mode.
When turning power on, it may take up to a maximum of 3 minutes to initialise the HDD.
The Recording function will not initiate for a
copy-protected programme.
Because an analogue broadcast is converted to a
digital signal, video that contains rapid movement may show "cross stripes". This happens
when the analogue signal is compressed and
then restored in the digital signal. The unit will
attempt to reduce this excessive picture noise.
TimeShift Mode is available in DTV, TV, AV1,
AV2, AV3 mode.
TimeShift Mode is available for Audio only channels.
When pressing the
PPaa uussee((II II
))
button in TimeShift
Off mode, TimeShift starts. TimeShift remains active
even when you change channels.
In the case of DTV, the maximum DTV recording
duration displayed in Free space can be slightly
different from the actual maximum recording
duration.
2
1
TThhee ‘‘PPrrooggrreessss BBaarr’’??
This function indicates a possible DVR reshowing
section ,a current on-screen and real live broad-
casting position.
Status of current displayed video.
C
urrent save time.
15 minute intervals from TimeShift Mode start
time. (Total - one hour).
Indicates current TimeShift Mode position.
1
2
3
4
1 2 3 4
LIVE
Page 57
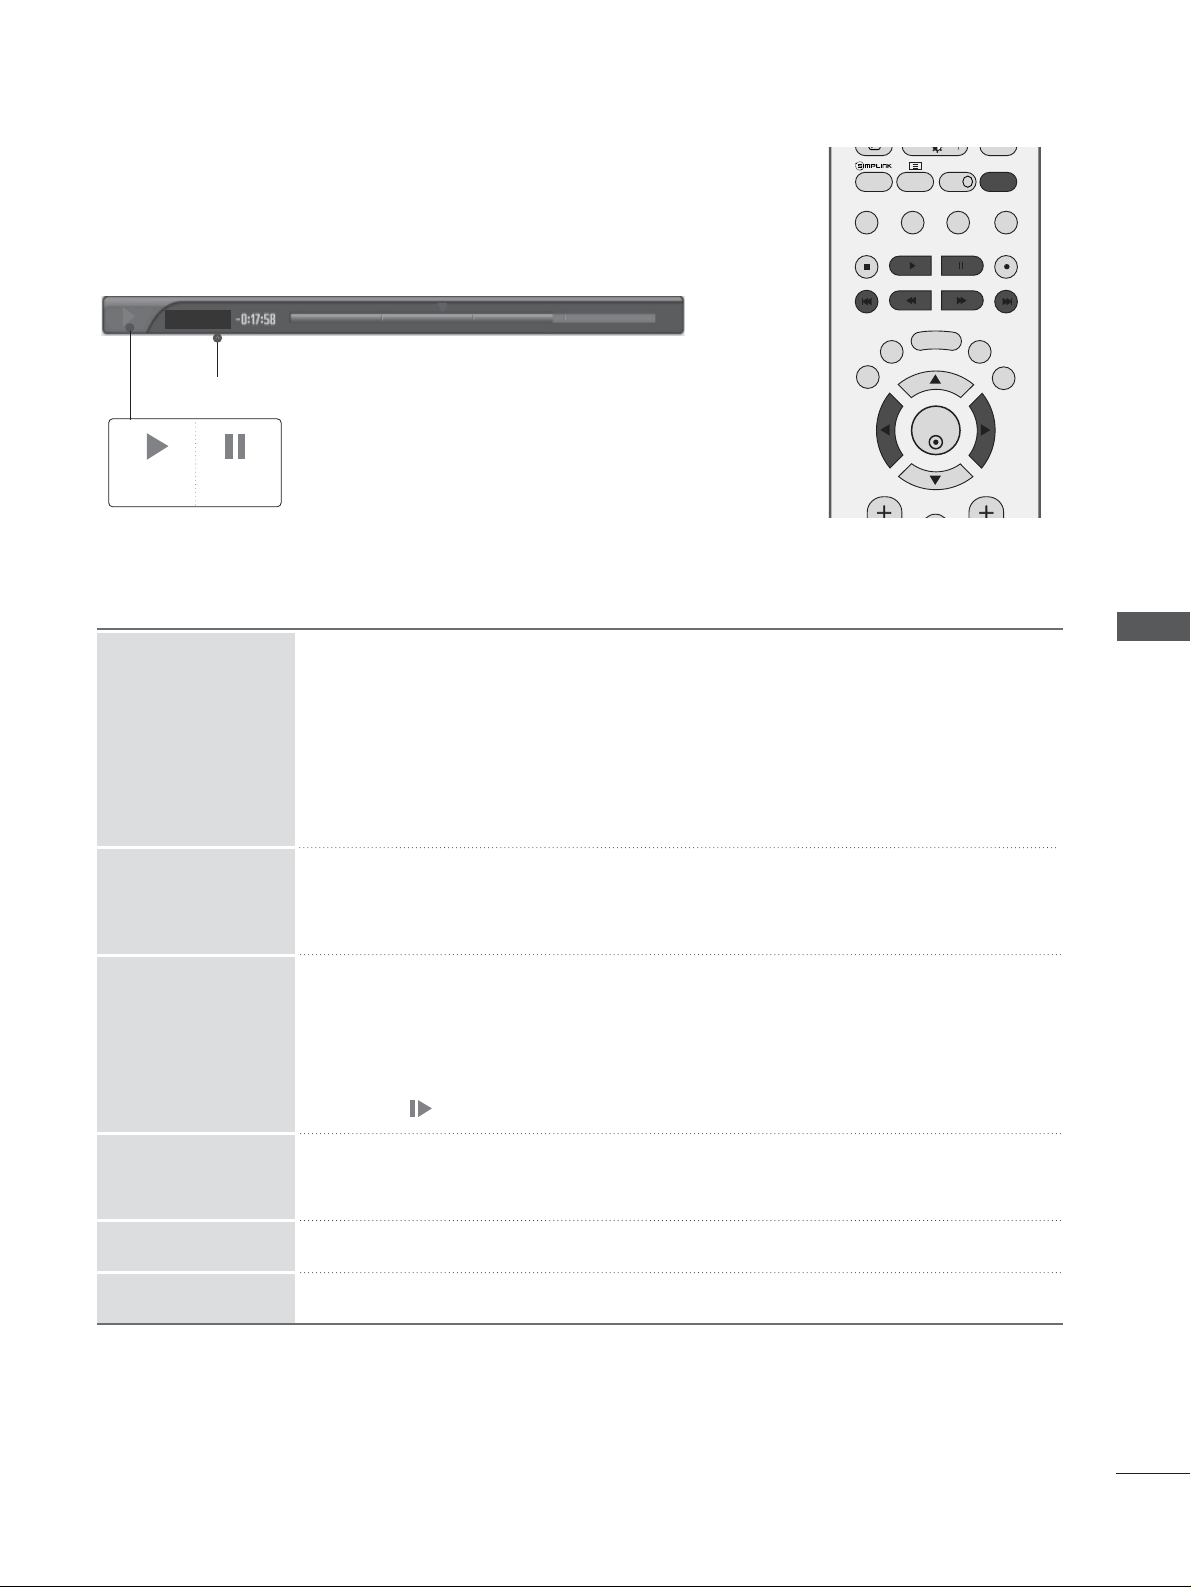
55
DVR (DIGITAL VIDEO RECORDER)
Using the TimeShift Mode function, play
When in TimeShift Mode, the following options are available.
Indicates that the current broadcast and displayed video differ.
When playing,
repeatedly, press the
RR EE WW
((
FFFF
))
button to speed up
FF
->
FFFF
->
FFFFFF
->
FFFFFFFF
->
FFFFFFFFFF
.
repeatedly, press the
FF FF
((
GGGG
))
button to speed up
GGGG
->
GGGGGG
->
GGGGGGGG
->
GGGGGGGGGG
.
■
Pressing these buttons repeatedly increases the fast forward/reverse speed.
Press the
GGGG
II
button to jump about 20 seconds forward.
■
Pressing the
II
FFFF
button to jump about 8 seconds backward.
During playback, press the
PPaa uussee((II II
))
button.
■
Still screen is displayed.
■
Repetedly press the
PPaa uussee((II II
))
button to advance frame by frame.
■
Press the
PPaa uussee((II II
))
button and then use the
FF FF ((
GGGG
))
button for slow motion
(the icon is displayed.)
■
When using the FFor
GG
button during playback a cursor indicating the position
can be viewed on the screen.
Press the
PPLLAAYY
((
GG
))
button to return to normal playback.
If you want to return to the current live broadcast, press the LIVE TV button.
Using the remote control
You can shift playback to any point within the recorded programme.
Play Pause
VCR
FFFF
or
GGGG
II
FFFF
or
GGGG
II
FF
or
GG
LIVE TV
PPLLAAYY
((
GG
))
II II
DELA YED
SIMPLINK
TEXT
INFO i
LIVE TV
BACK MENU
EXIT
TIME
SHIFT
DVR
OK
MARK
GUIDE
TIME
SHIFT
Page 58
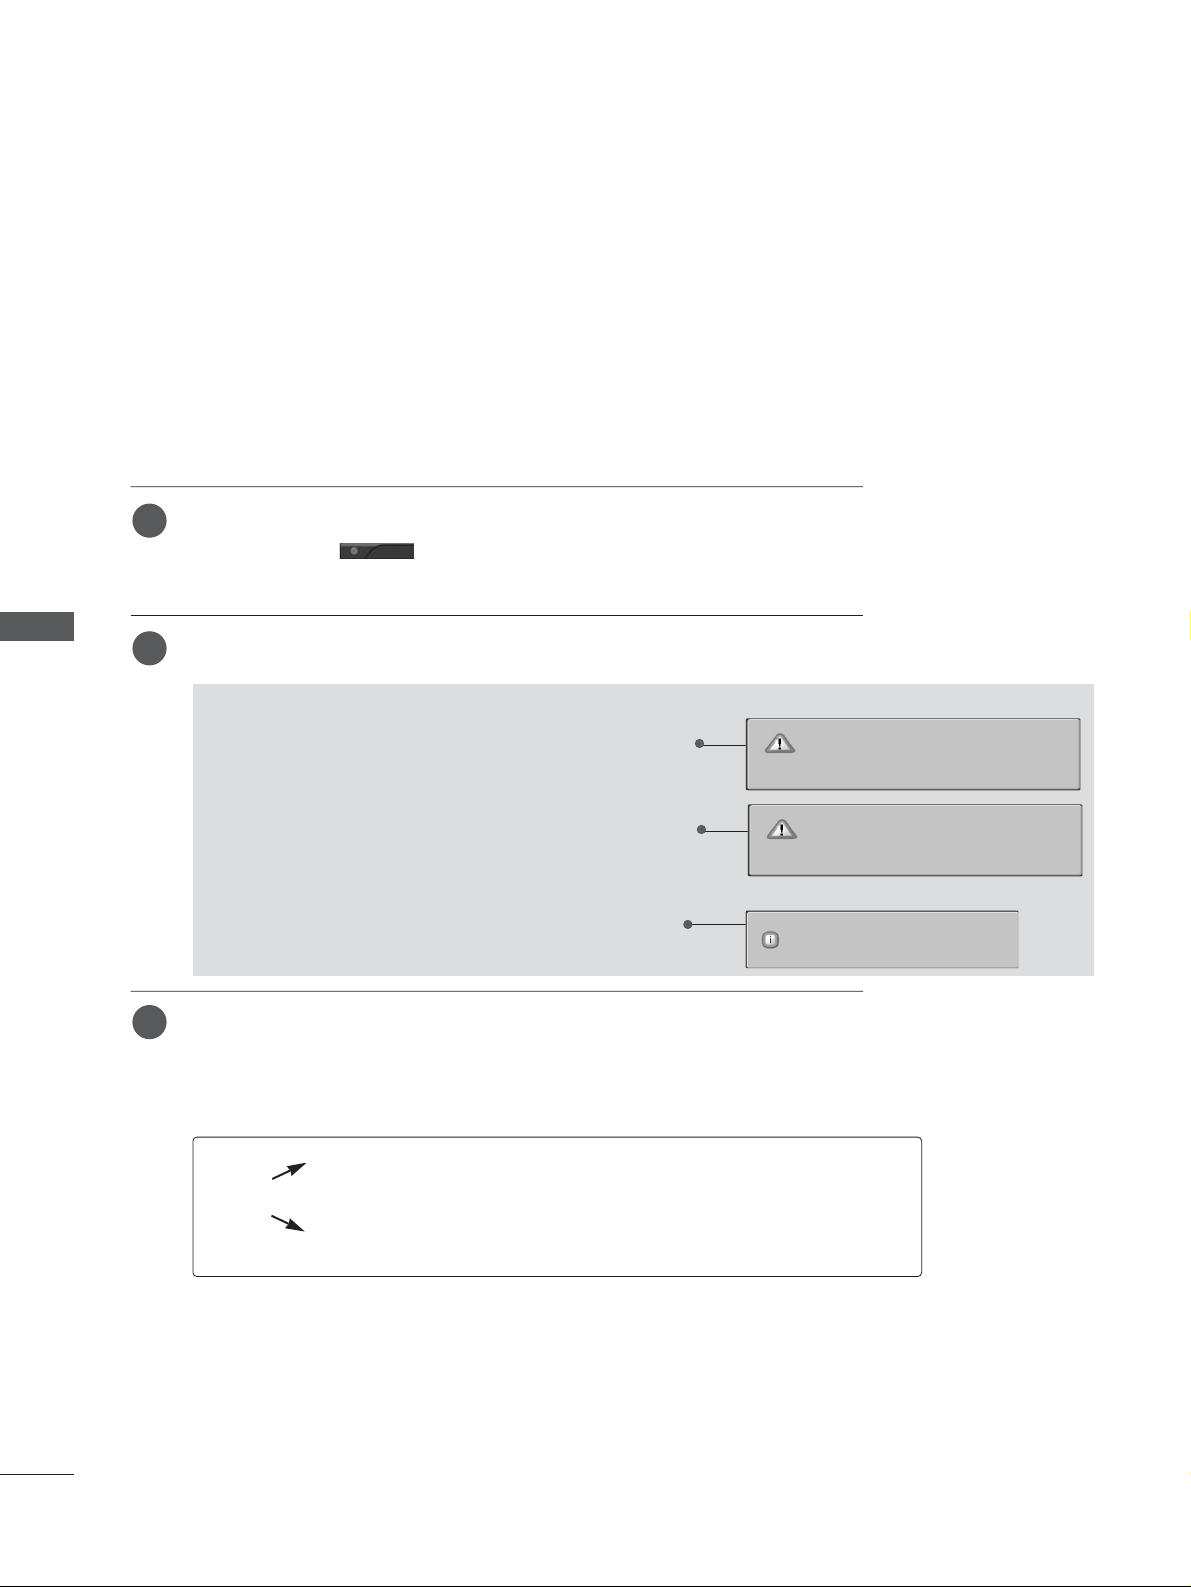
56
DVR (DIGITAL VIDEO RECORDER)
DVR (DIGITAL VIDEO RECORDER)
Select the programme you wish to record and then press the OObutton.
During recording is displayed. Use this feature to record up to 2
hours of programming.
If you want to stop recording, press the
AA
button.
You can increase or decrease recording time by pressing the
OO
button while
recording. After pressing the
OO
button, press the
FF
or GGbuttons repeatedly to
increase or decrease the recording time. Each time you press
FF
or GGbutton
the recording duration changes as shown below.
INSTANT RECORDING
Instant Record
Use this function to record the programme you are watching on the main screen
(Analogue or Digital broadcast).
This function records the currently displayed programme.
++1100mmiinn
--
>> ++2200mmii nn-->> ++3300mmii nn-->> ++4400mmii nn-->> ++5500mmii nn-->> ++6600mmii nn
-- 1100mmiinn-->> --2200mmiinn-->> --3300mmiinn-->> --4400mmiinn-->> --5500mmiinn-->> --6600mmiinn
NNoo CC hhaa nnggee
■
While recording, if you press the AAbutton before 10 seconds
of recording time has passed, this message is displayed.
■
While Audio recording, if you press the AAbutton before 30
seconds of recording time has passed, this message is displayed.
■
If you press the AAbutton after more than 10 seconds of
recording time has passed, this message is displayed.
2
3
1
Recording completed.
Recording failed.
Length is less than 10 seconds.
Recording failed.
Length is less than 30 seconds.
REC
Page 59
57
DVR (DIGITAL VIDEO RECORDER)
The extra recording time added to existing setting equals
the final recording time.
After adjusting the recording time, select
OOKK
. The Status
bar will be displayed.
■
Press the
EEXXIITT
button to hide the Status bar. Press the
OOKK
button to display the Status bar.
Recording stops when the selected duration is reached or
when you press the
AA
button.
Although recording has stopped, the TimeShift Mode feature
remains active.
Elapsed recording time
To t al recording duration
4
5
3
23:57
Recording Options
23:40~00:40
FF
No change
GG
0:00:00 / 2:00:00
Cricket World Cup
23:54~01:55 (2 min recorded)
Recording time
Set duration
OK Cancel
REC
Page 60
58
DVR (DIGITAL VIDEO RECORDER)
DVR (DIGITAL VIDEO RECORDER)
NOTE
!
When recording, if the available storage space
becomes low, the recording will be automatically
stopped.
In Radio mode, recordings of less than 30 seconds will not be saved. In other modes, recordings of less than 10 seconds will not be saved.
No data will be saved on paid channels with no
CI Card or expired period of validity of CI Card,
in invalid services and in data only channels (ex.
MHEG) In order to save disk space.
The recording function will not initiate for a
copy-protected programme.
The displayed time differs slightly from the actual time.
In there is no signal or a film source is being
viewed, the displayed time may differ slightly
from the actual time.
Recording is not possible with copy-protected
programmes.
■
When Instant Recording, this message is displayed.
■
When Manual Recording, this message is displayed.
When a poor quality external source is recorded
(for example old VHS tape) the quality of the
recording will not be as good as it could be.
Programmes are stored separately according to
the colour system that they are using. e.g.
PAL/NTSC.
Recording is based on the currently being viewed
source. The Auto AV source is recorded while
viewing the SCART Auto AV, but the Analog TV
source is recorded while viewing the Analog TV
source. When the reserved recording is performed, even if the channel is set to the Analog
TV, if the Scart Auto AV operates, the Auto AV
source is recorded.
When the channel switch key is entered while
recording the Analog TV source, the channel is
switched to the Digital TV source. However, when
the numeric key is entered, it is not switched.
The maximum schedule recording duration is 12
hours. The maximum number of schedule recording is 60 in the UK and 30 in the rest of the
world.
When Manual Recording, it’s stored the default
sound of the set.
When the recording time collides with that of
existing recordings, the Collision message is displayed in Popup window in the UK and recording
is not registered in the rest of the world.
When recording a DTV source, you cannot watch
scramble channels (paid channel).
When you choose a scramble channel (paid
channel), the following message is displayed.
When you change channels while recording an
Analog TV source, the channel will be switched
to the DTV mode.
Cannot record due to copy protection.
Schedule recording cannot start.
Copy protected.
Cannot watch a scrambled programme.
while recording another DTV programme.
Page 61
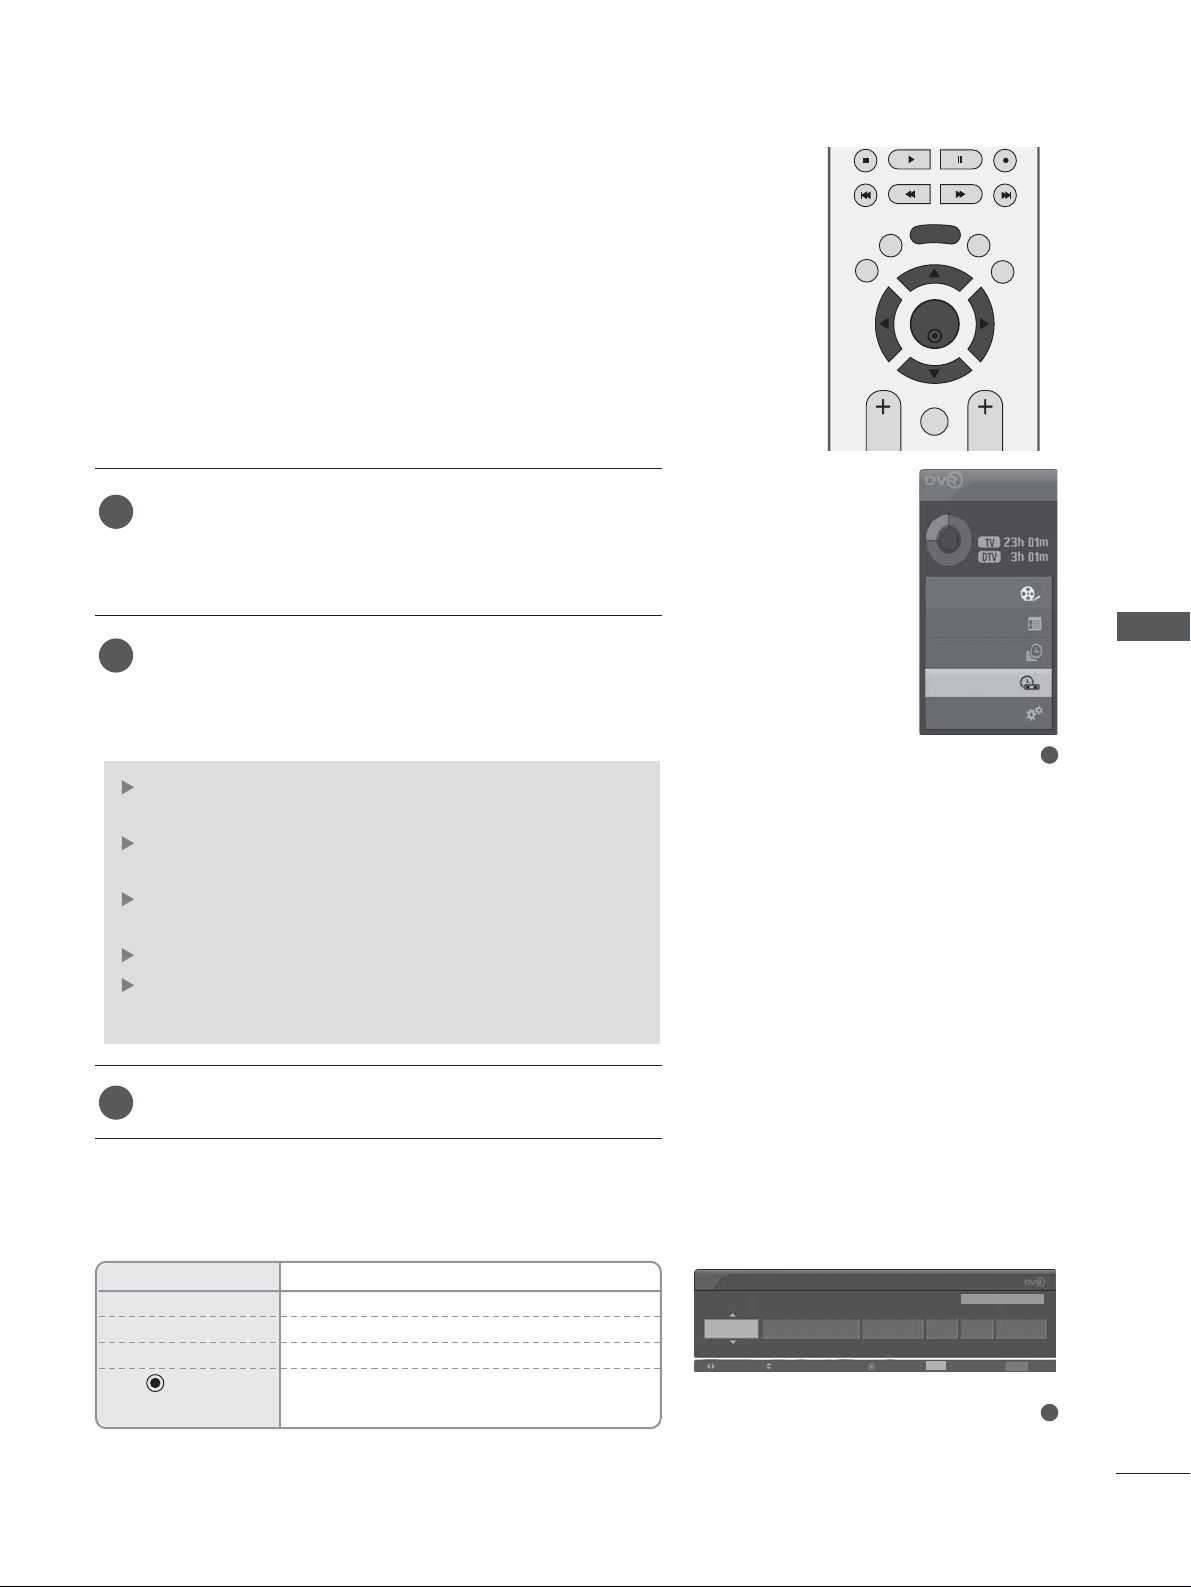
59
DVR (DIGITAL VIDEO RECORDER)
MANUAL RECORDING
This function is used to perform reserved recording.
This function is available to use in DVR menu.
When Manual Recording, it’s stored the default sound of the set.
Press the
DD VVRR
button to display
HHoommee
menu. Use the
DD
or EEbutton to select the
MMaa nnuuaa ll RReeccoo rrdd
and then
use the
OO KK
or
GG
button.
MMaa nnuuaa ll RReeccoo rrdd
screen is displayed as shown below.
Use the
DD
or
EE
or
FF
or
GG
button to set the
IInn ppuu tt
,
PPrrooggrraammmmee,DDaattee,SSttaarrtt//EEnndd,RReepp ee aatt
.
After setting the
MMaa nnuuaa ll RReeccoo rrdd
, press the
OO KK
button.
II nn ppuutt
: Select the input source from the DTV, RADIO,
TV, AV1, AV2, AV3.
PPrrooggrraammmmee
: Select either the current programme or a
scanned programme.
DDaattee
: You can select a date up to one month in the
future.
SSttaarrtt//EEnndd
: Ensure you have set correctly.
RReepp ee aatt
: Choose either Once, Daily, Weekly, Weekend,
Weekday.
2
3
1
2
1
OK
EXIT
TIME
SHIFT
TIME
SHIFT
VOL PR
GUIDE
BACK MENU
DVR
MARK
FAV
Home
Free Space
Programme Guide
Recorded TV
Schedule List
Manual Record
TV Menu
Button Function in Manual Record Mode
Remote Control Buttons
Function
D
or
E
Select preferred items with Up/down button.
F
or
G
Move the focus.
EXIT Disappears OSD.
Displays the reservation list after the
record has been registered.
Manual Record
Input
Programme Date Start End Repeat
DTV 1 BBC ONE
Navigation Modify Enter Cancel
Exit
Exit
Fri Mar 30 10:26 10:56 Once
Fri Mar 30 10:24
Page 62
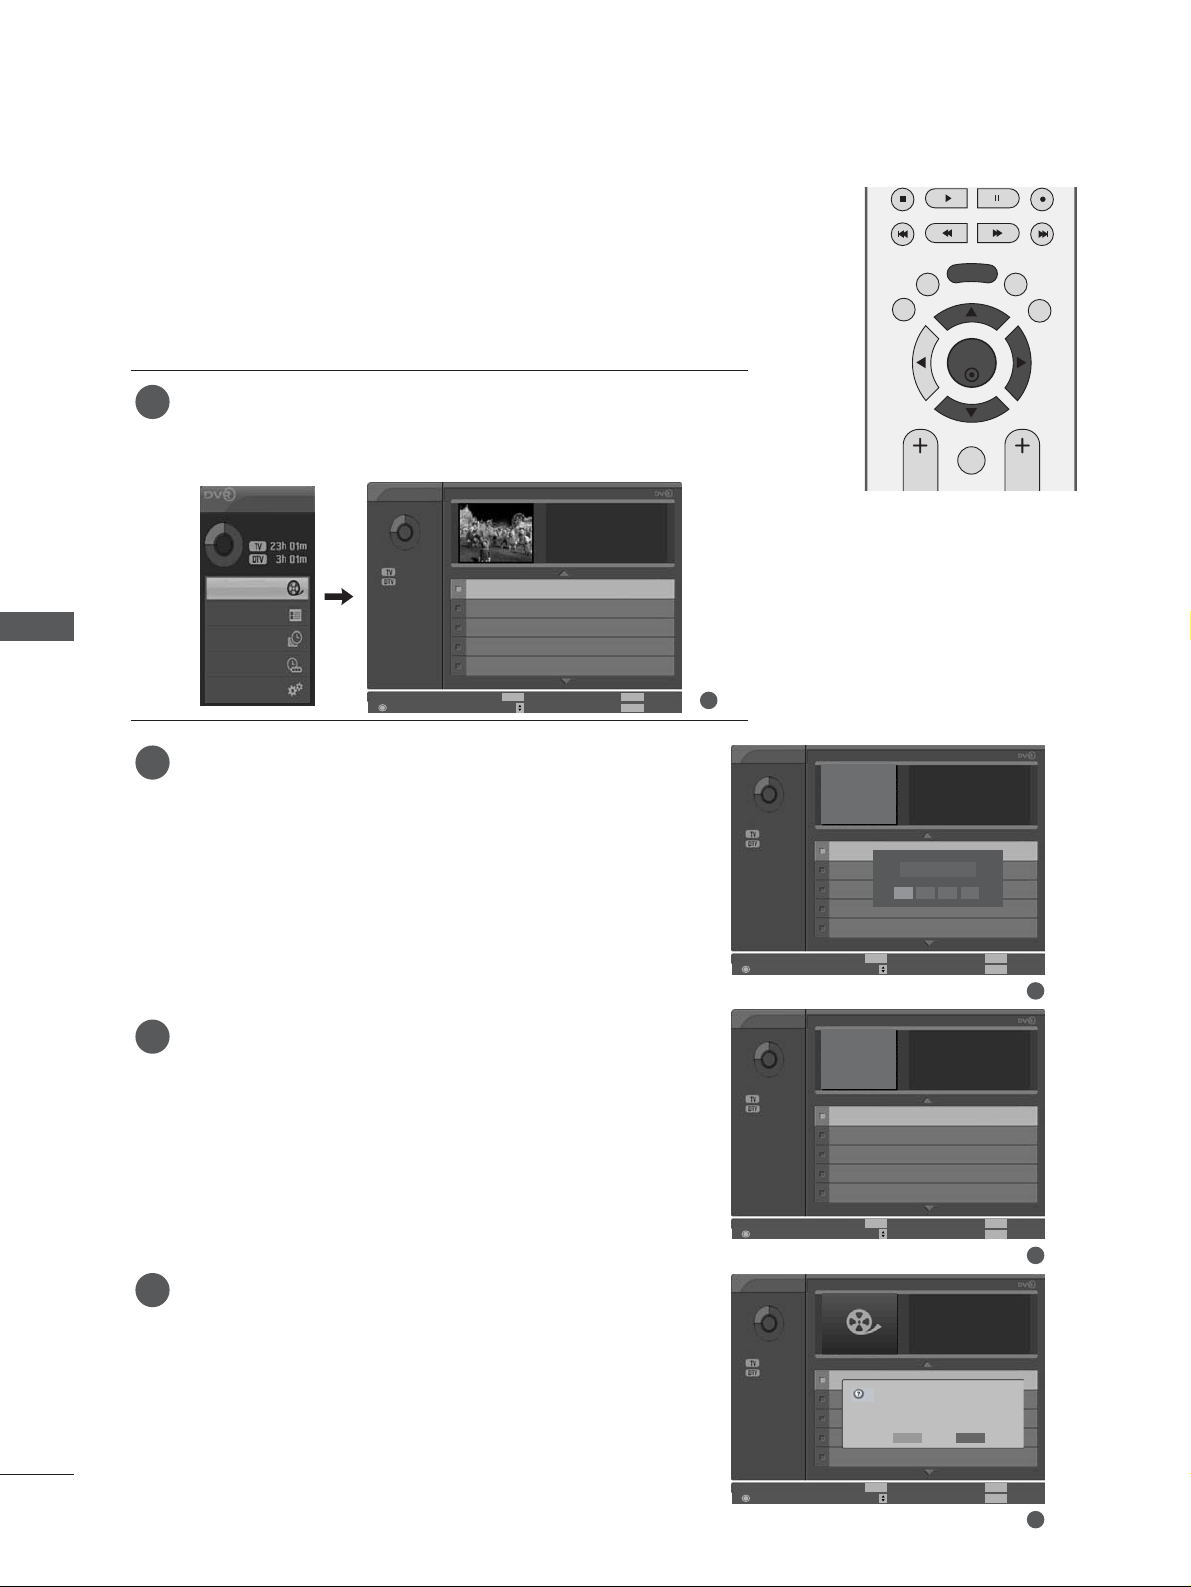
60
DVR (DIGITAL VIDEO RECORDER)
DVR (DIGITAL VIDEO RECORDER)
RECORDED TV PROGRAMME LIST
You can view the recorded programme list at a glance.
This function is also available in DVR menu.
Information function is only applicable when country is selected as UK.
Press the
DD VVRR
button to display
HHOOMMEE
menu.
Use the
DD
or EEbutton to select
RReeccoorrddeedd TTVV
and then use
the
OOKK
or
GG
button.
1
OK
EXIT
TIME
SHIFT
TIME
SHIFT
VOL PR
GUIDE
BACK MENU
DVR
MARK
FAV
Home
Free Space
Programme Guide
Recorded TV
Schedule List
Manual Record
TV Menu
Recorded TV
Free Space
23h 01m
3h 01m
Popup Menu Move Page
Information
Exit
Mark
PR
INFO
EXIT
MARK
Input : DTV 1
Date : Fri Mar 30 2007
Duration : 30m
Quality : High
Page 3/27
To Buy or Not to Buy Fri Mar 30 10:49
In the Night Garden Fri Mar 30 10:36
Schools : Primary Geog Fri Mar 30 10:36
Class TV : Revisewise Fri Mar 30 10:21
30 Jahre ‘68 : Revolte Fri Mar 30 10:20
0 Marked
Recorded TV
Free Space
23h 01m
3h 01m
Popup Menu
Move Page
Information Exit
Mark
PR
INFO EXIT
MARK
Input : DTV 1
Date : Fri Mar 30 2007
Duration : 30m
Quality : High
Page 3/27
To Buy or Not to Buy Fri Mar 30 10:49
In the Night Garden Fri Mar 30 10:36
Schools : Primary Geog Fri Mar 30 10:36
Class TV : Revisewise Fri Mar 30 10:21
30 Jahre ‘68 : Revolte Fri Mar 30 10:20
0 Marked
LOCKED
SERVICE
Recorded TV
Free Space
23h 01m
3h 01m
Popup Menu Move Page
Information Exit
Mark
PR
INFO EXIT
MARK
Input : DTV 1
Date : Fri Mar 30 2007
Duration : 30m
Quality : High
Page 3/27
To Buy or Not to Buy Fri Mar 30 10:49
In the Night Garden Fri Mar 30 10:36
Schools : Primary Geog Fri Mar 30 10:36
Class TV : Revisewise Fri Mar 30 10:21
30 Jahre ‘68 : Revolte Fri Mar 30 10:20
0 Marked
AUDIO ONLY
When the focused recording is a locked programme or a rated
programme, Preview window displays ‘LOCKED SERVICE’
instead of Play screen.
If you want to play locked or rated recordings, you must
enter the password.
In the case of recording Audio only programme, Preview window
displays ‘AUDIO ONLY’ instead of Play screen.
When schedule recording fails for various reasons such as
signal strength, it is registered to the Recorded TV List and
Preview window displays the OSD as shown in the picture.
When you press the OK button to execute the failed recording,
a message is displayed as shown in the picture.
2
3
4
1
2
3
Recorded TV
Free Space
23h 01m
3h 01m
Popup Menu Move Page
Information Exit
Mark
PR
INFO EXIT
MARK
Input : DTV 1
Date : Fri Mar 30 2007
Duration : 30m
Quality : High
Page 3/27
To Buy or Not to Buy Fri Mar 30 10:49
In the Night Garden Fri Mar 30 10:36
Schools : Primary Geog Fri Mar 30 10:36
Class TV : Revisewise Fri Mar 30 10:21
30 Jahre ‘68 : Revolte Fri Mar 30 10:20
0 Marked
3
- - - -
Enter Password
Schedule recording failed
due to no signal.
Do you want to delete?
YES
NO
Page 63
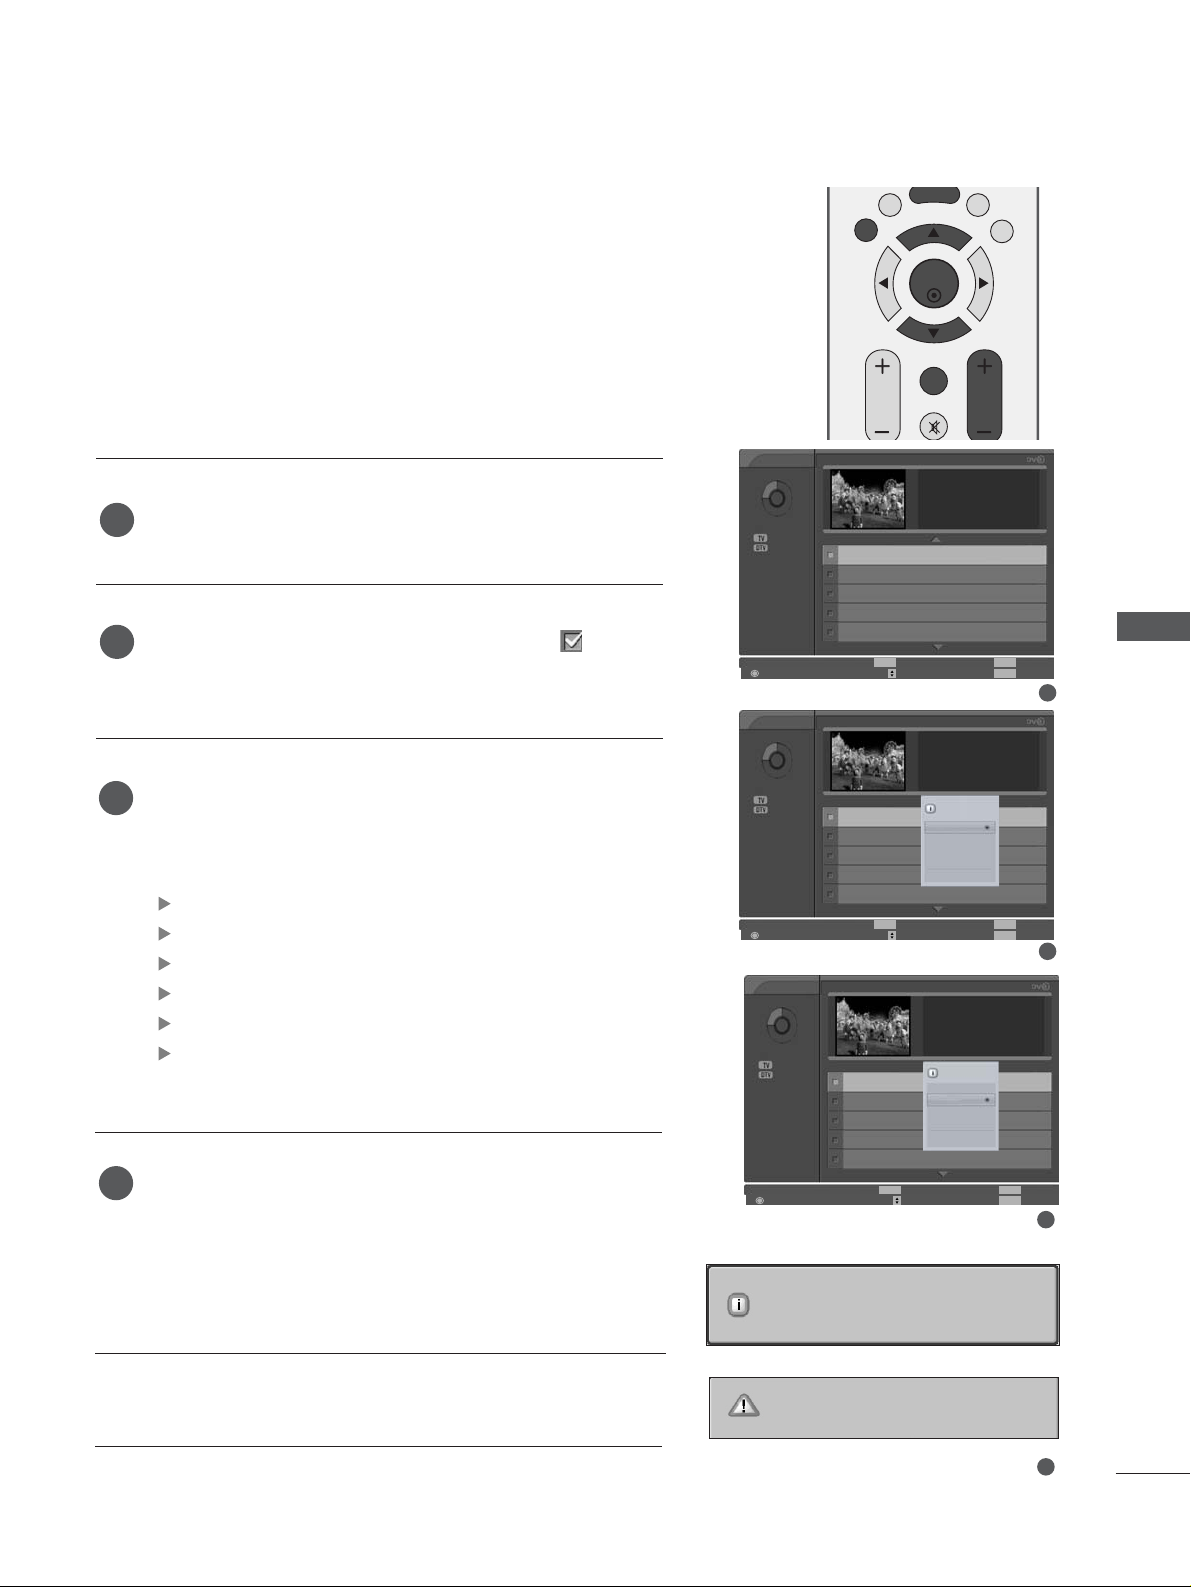
61
DVR (DIGITAL VIDEO RECORDER)
■
If the HDD has a problem performing a recording related
function, this message is displayed.
■
If the temperature is below zero (0°), a warning message is
displayed and you will not be able to use the DVR functions.
Use
DD
or
EE
button to navigate the appropriate thumbnail
photo, then press the
OOKK
button to open the Pop-up
Menu.
Repeatedly, press
EEXXIITT
button to return to TV viewing or
press
DD VVRR
button to return to the
HHoommee
menu.
PPllaayy
: Begin playback of the selected recording.
MMaarrkk AAllll
: mark all recordings on the screen.
UUnnmmaarrkk AAllll
: Change marked recordings to unmarked recordings.
DDeelleettee
: Delete the selected recording.
RReennaammee
: Edit the recorded programme title.
CCaanncceell
: Close the Pop-up Menu.
4
3
3
4
HDD initialisation in progress.
Please try again later.
Low temperature.
DVR initialisation cannot start.
Recorded TV
Free Space
23h 01m
3h 01m
Popup Menu Move Page
Information Exit
Mark
PR
INFO EXIT
MARK
Input : DTV 1
Date : Fri Mar 30 2007
Duration : 30m
Quality : High
Page 3/27
To Buy or Not to Buy
Play
Mark All
Delete
Rename
Cancel
DTV 1
10:49~11:19
10:49
10:36
10:36
10:21
In the Night Garden
Schools : Primary Geog
Class TV : Revisewise
30 Jahre ‘68 : Revolte Fri Mar 30 10:20
0 Marked
Use the PR + or PR - button for page up/down navigation.
Use the
MMAARRKK
button to delete from the list. A is dis-
played next to the preview window if an item is marked.
Recorded programme Selection and Popup Menu
The preview recorded list is shown above.
2
1
1
2
OK
EXIT
TIME
SHIFT
TIME
SHIFT
VOL PR
GUIDE
BACK MENU
DVR
MARK
FAV
Recorded TV
Free Space
23h 01m
3h 01m
Popup Menu Move Page
Information Exit
Mark
PR
INFO EXIT
MARK
Input : DTV 1
Date : Fri Mar 30 2007
Duration : 30m
Quality : High
Page 3/27
To Buy or Not to Buy Fri Mar 30 10:49
In the Night Garden Fri Mar 30 10:36
Schools : Primary Geog Fri Mar 30 10:36
Class TV : Revisewise Fri Mar 30 10:21
30 Jahre ‘68 : Revolte Fri Mar 30 10:20
0 Marked
Recorded TV
Free Space
23h 01m
3h 01m
Popup Menu Move Page
Information Exit
Mark
PR
INFO EXIT
MARK
Input : DTV 1
Date : Fri Mar 30 2007
Duration : 30m
Quality : High
Page 3/27
To Buy or Not to Buy
Play
Mark All
Delete
Rename
Cancel
DTV 1
10:49~11:19
10:49
10:36
10:36
10:21
In the Night Garden
Schools : Primary Geog
Class TV : Revisewise
30 Jahre ‘68 : Revolte Fri Mar 30 10:20
0 Marked
Page 64
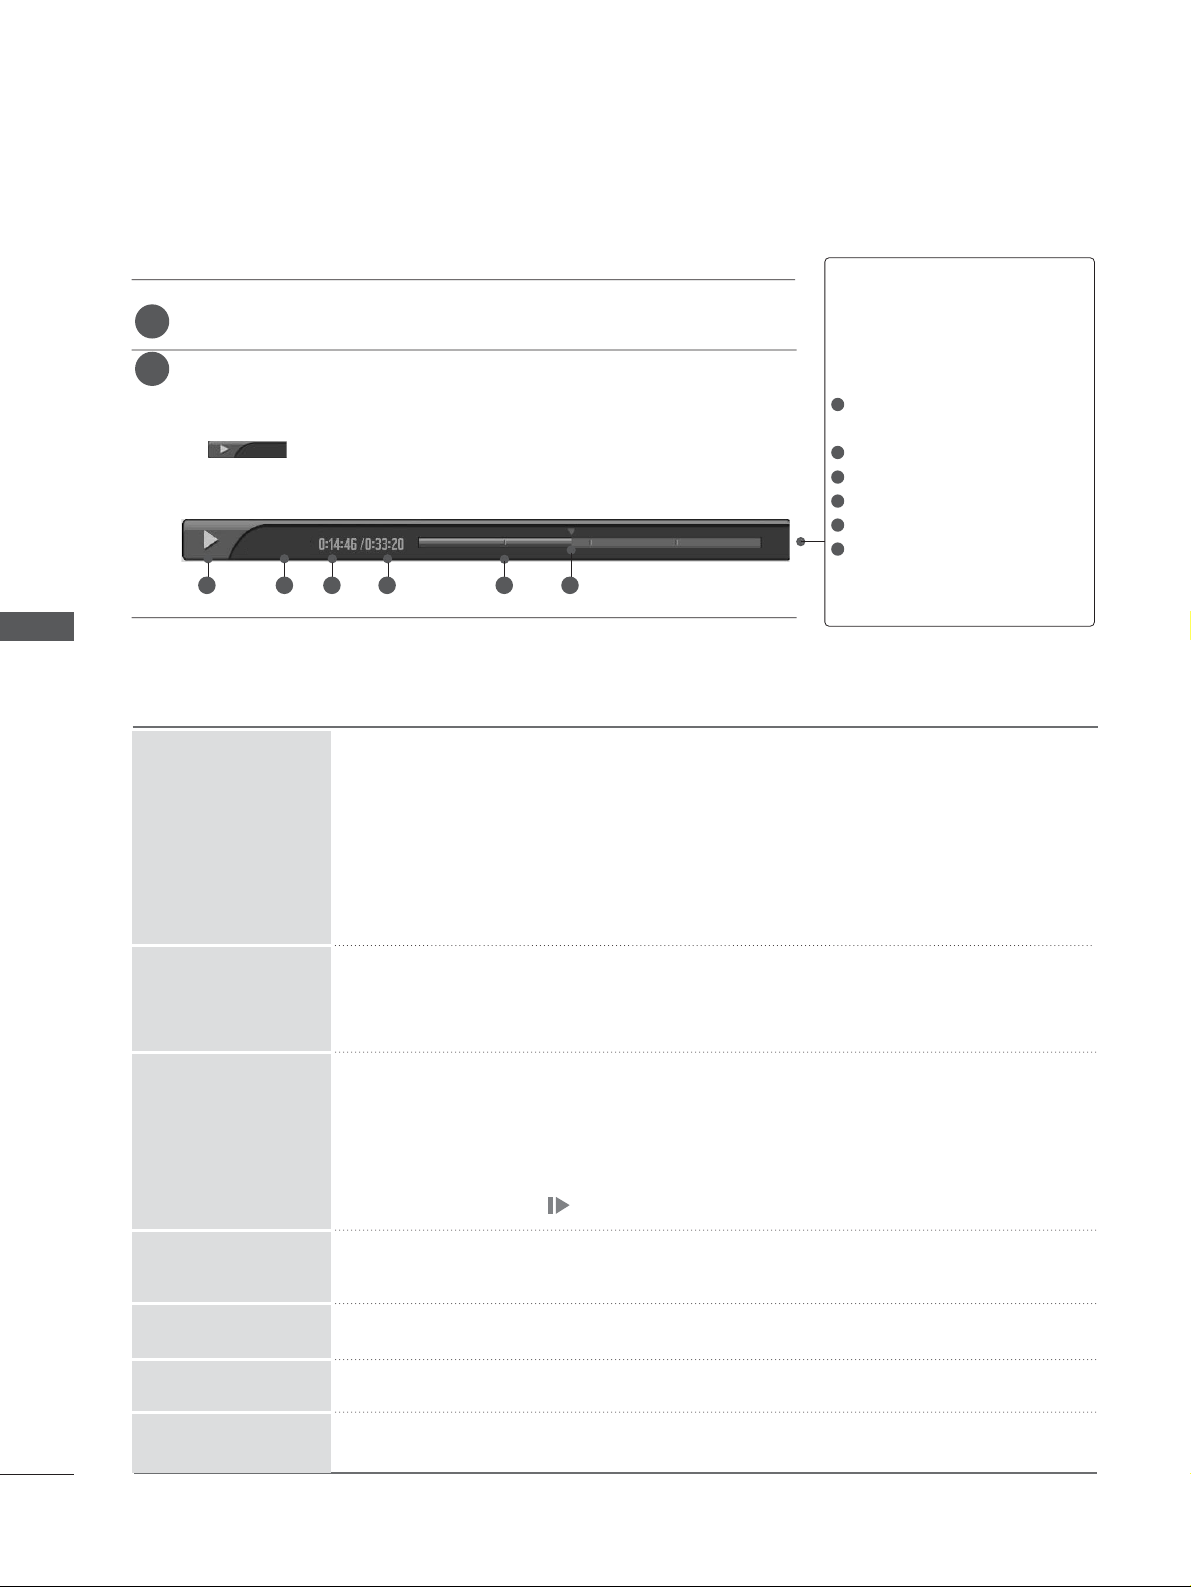
62
DVR (DIGITAL VIDEO RECORDER)
Playing recorded programmes
-You can play the selected programme in the recorded programme list.
Play a recorded programme.
While playing, You will see a playback screen as shown below.
■
Initially, an icon showing the current playback mode is displayed
.
Press the
OOKK
button to display the progress bar
■
To stop displaying the recorded programmes icon, press the
EEXXIITT
button.
TThhee ‘‘PPrrooggrreessss BBaarr’’??
This function indicates a possible DVR
reshowing section ,a current on-screen
and real on-broadcasting position, a section of section-recording.
Indicates movement of recorded programme.
Indicates status of recorded programme.
Indicates elapsed playback time.
Indicates total playback time.
Indicates a quarter of programme runtime.
Indicates current playback position.
2
1
1
2
3
4
5
6
1 2 3 4 5 6
When playing,
repeatedly, press the
RR EE WW
((
FFFF
))
button to speed up
FF
->
FFFF
->
FFFFFF
->
FFFFFFFF
->
FFFFFFFFFF
.
repeatedly, press the
FF FF
((
GGGG
))
button to speed up
GGGG
->
GGGGGG
->
GGGGGGGG
->
GGGGGGGGGG
.
■
Pressing these buttons repeatedly increases the fast forward/reverse speed.
Press the
GGGG
II
button to jump about 20 seconds forward.
■
Pressing the
II
FFFF
button to jump about 8 seconds backward.
During playback, press the
PPaa uussee((II II
))
button.
■
Still screen is displayed.
■
Repetedly press the
PPaa uussee((II II
))
button to advance frame by frame.
■
Press the
PPaa uussee((II II
))
button and then use the
FF FF ((
GGGG
))
button for slow motion
(as showing the .)
■
When using the FFor
GG
button during playback the cursor can be viewed on the
screen.
Press the
PPLLAAYY
((
GG
))
button to return to normal playback.
If you want to return to the current live broadcast, press the
LL IIVVEE TTVV
button.
■
If you press the
SSTTOOPP((AA))
button, you can watch set.
Using the remote control
You can shift playback to any point within playing the recorded programme.
FFFF
or
GGGG
II
FFFF
or
GGGG
II
FF
or
GG
LL II VVEE TT VV
PPLLAAYY
((
GG
))
AA
II II
PLAYING
PLA YING
DVR (DIGITAL VIDEO RECORDER)
Page 65
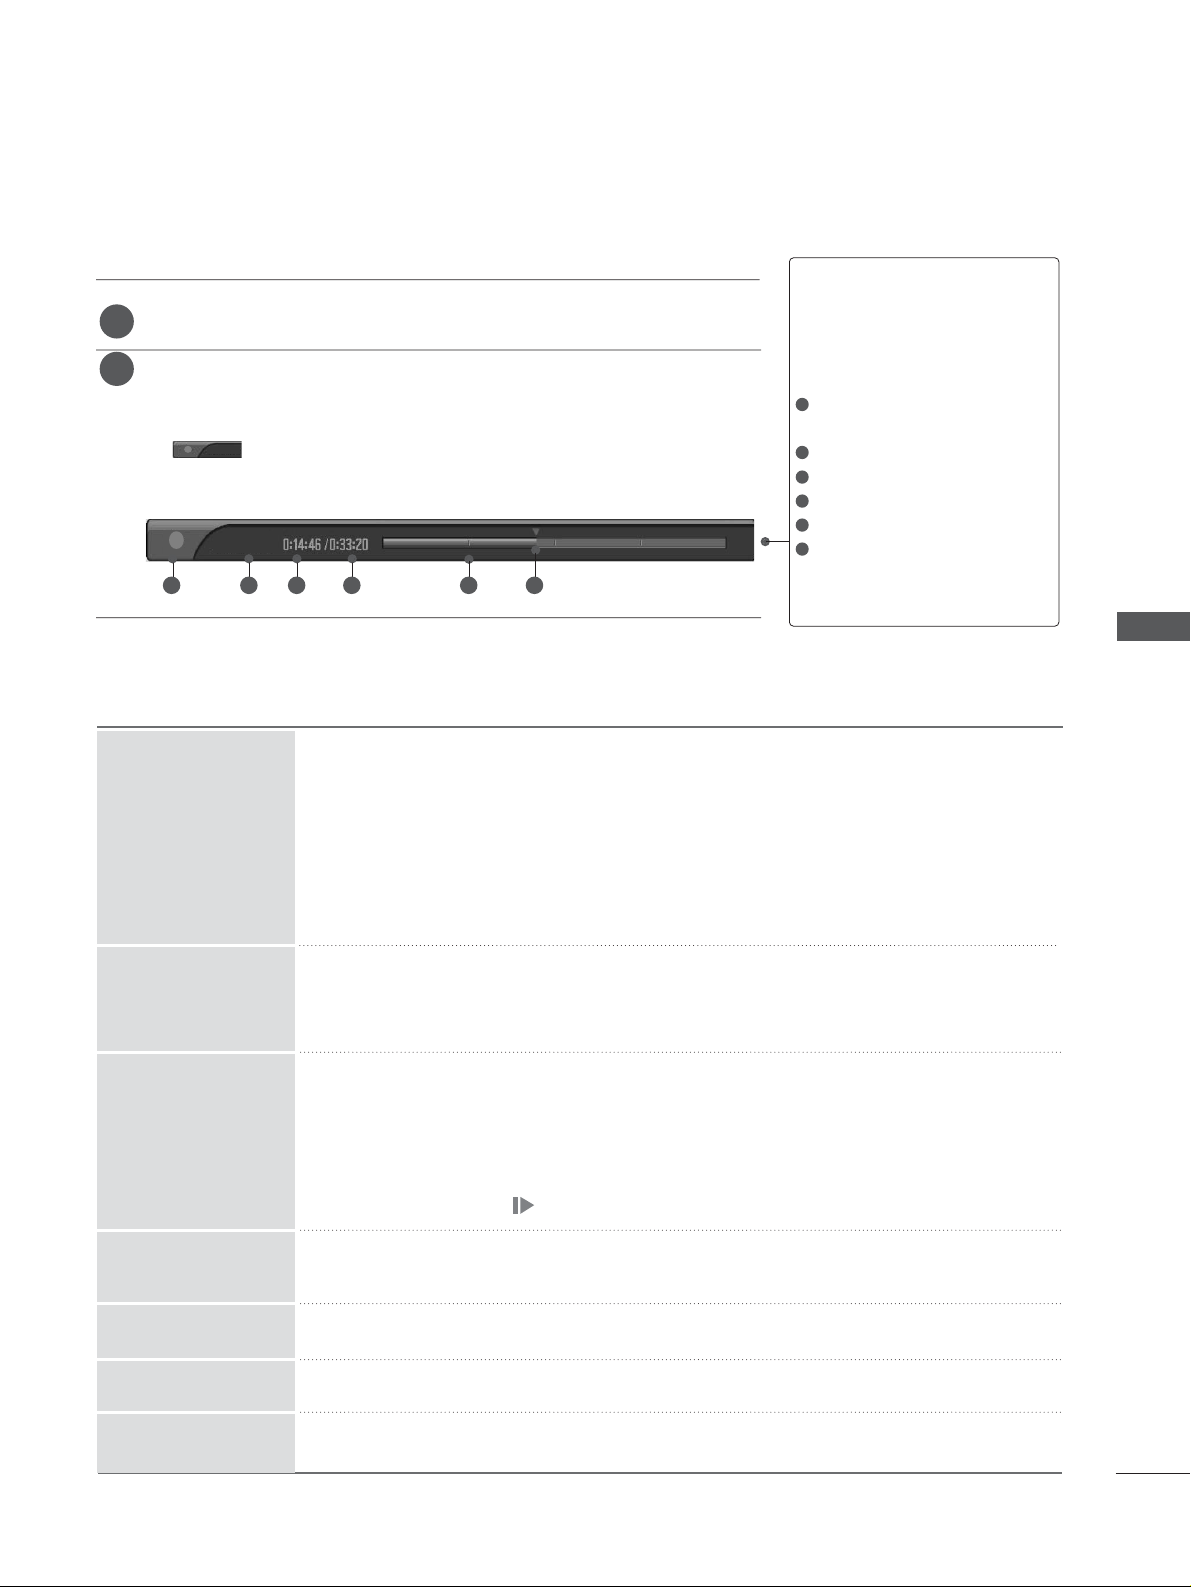
63
Chase playback
During recording, you can “Trick play” a programme that is being recorded
without interrupting recording by using the Progress Bar.
Record a programme.
While recording, You will see a playback screen as shown below.
■
Initially, an icon showing the current playback mode is displayed
.
Press the
OOKK
button to display the progress bar
■
To stop displaying the recorded programmes icon, press the
EEXXIITT
button.
TThhee ‘‘PPrrooggrreessss BBaarr’’??
This function indicates a possible DVR
reshowing section ,a current on-screen
and real on-broadcasting position, a section of section-recording.
Indicates movement of recording programme.
Indicates status of recording programme.
Indicates elapsed recording time.
Indicates total recording time.
Indicates a quarter of programme runtime.
Indicates current playback position.
2
1
1
2
3
4
5
6
1 2 3 4 5 6
When playing,
repeatedly, press the
RR EE WW
((
FFFF
))
button to speed up
FF
->
FFFF
->
FFFFFF
->
FFFFFFFF
->
FFFFFFFFFF
.
repeatedly, press the
FF FF
((
GGGG
))
button to speed up
GGGG
->
GGGGGG
->
GGGGGGGG
->
GGGGGGGGGG
.
■
Pressing these buttons repeatedly increases the fast forward/reverse speed.
Press the
GGGG
II
button to jump about 20 seconds forward.
■
Pressing the
II
FFFF
button to jump about 8 seconds backward.
During recording, press the
PPaa uussee((II II
))
button.
■
Still screen is displayed.
■
Repetedly press the
PPaa uussee((II II
))
button to advance frame by frame.
■
Press the
PPaa uussee((II II
))
button and then use the
FF FF ((
GGGG
))
button for slow motion
(as showing the .)
■
When using the FFor
GG
button during recording the cursor can be viewed on
the screen.
Press the
PPLLAAYY
((
GG
))
button to return to normal playback.
If you want to return to the current live broadcast, press the
LL IIVVEE TTVV
button.
■
If you press the
SSTTOOPP((AA))
button, you can watch set.
Using the remote control
You can shift playback to any point while recording programme.
FFFF
or
GGGG
II
FFFF
or
GGGG
II
FF
or
GG
LL II VVEE TT VV
PPLLAAYY
((
GG
))
AA
II II
REC
REC
DVR (DIGITAL VIDEO RECORDER)
Page 66
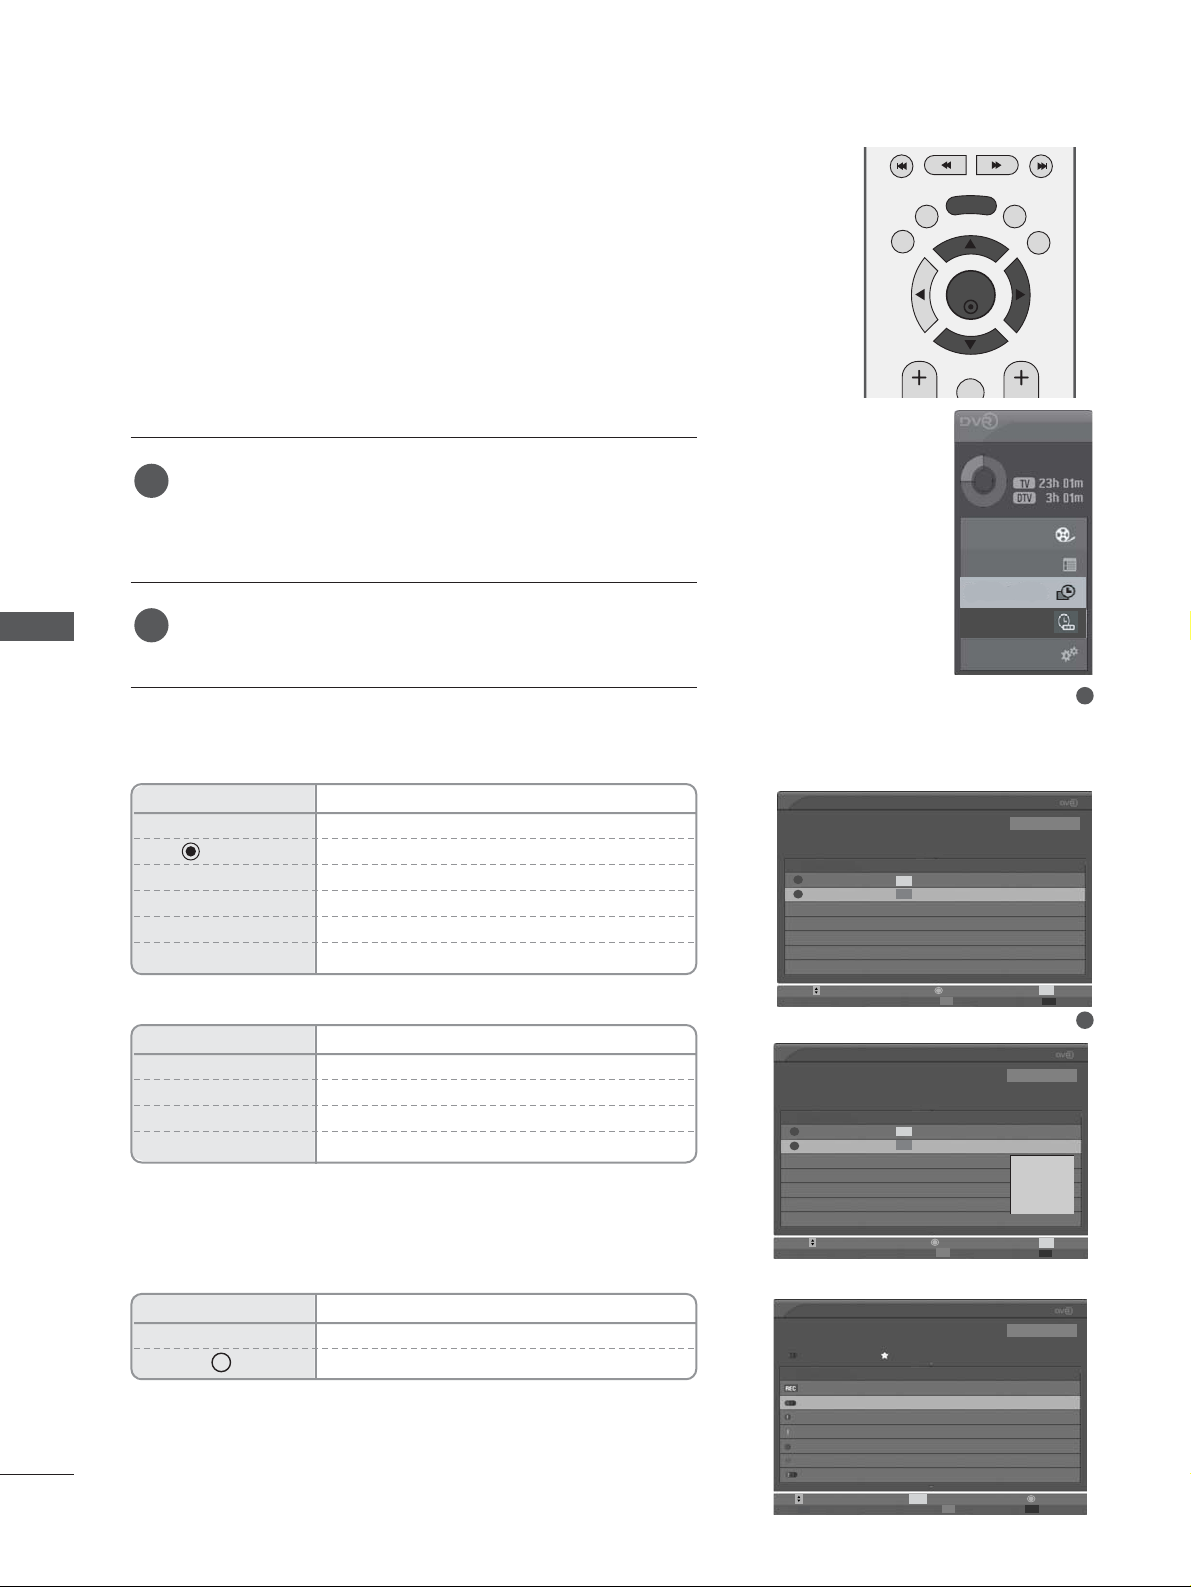
64
DVR (DIGITAL VIDEO RECORDER)
SCHEDULE LIST
This function is used to show scheduled recordings.
This function is available to use in DVR menu.
You can store up to 30 programmes.
60 programmes can be stored in the United Kingdom.
Press the
DDVVRR
button to display
HHoommee
menu. Use the
DD
or EEbutton to select the
SScchheedduullee LLiisstt
and then use
the
OOKK
or
GG
button.
SScchheedduullee LLiisstt
screen is displayed as shown below.
Use the
DD
or
EE
button to select recorded programme.
2
1
2
1
OK
EXIT
TIME
SHIFT
TIME
SHIFT
GUIDE
BACK MENU
DVR
MARK
FAV
Button Function in Schedule List Mode
Remote Control Buttons
Function
D
or
E
Select programmes Up/down.
Display Popup window
EXIT Disappears OSD.
YELLOW Enter Manual record mode.
BLUE Change to Guide mode.
PR
D
or
E
Page Up/Down
Popup Menu Function
Modify
Modify to the Schedule Recording.
Delete Delete Schedule Recording.
Delete All Delete All Schedule Recording.
Cancel Delete Popup window.
Remote Control Buttons
Function
RED
Select by turns Overall Schedule/Weekly Schedule.
INFO i The detail information on or off
* The contents below are only applicable when country is selected as UK.
In UK, this function is available to use in Overall Schedule mode.
Home
Free Space
Programme Guide
Recorded TV
Schedule List
Manual Record
TV Menu
Schedule List
Catch me if you can Sat. Oct 30 19:10
027 Discovery Channel Wed Oct 17 18:20 - 21:20
Series Record
Overall Schedule
The Lord of the Rings Tue. Feb 13 13:00
Catch me if you can Tue. Feb 13 15:12
TV 11 DiscoveryRTime Wed. Feb 14 5:34
TV 1BBC (Weekdays) Wed. Feb 14 6:00
Ally Mcbeal (Weekends) Thu. Feb 15 7:35
DTV 4 Bloomberg (Weekly) Fri. Feb 16 15:21
Royal Ceremony Fri. Feb 16 22:00
Recommended
Schedule List
This is BBC THREE
DTV 7 BBC THREE
Sun Apr 01 16:48~17:18 (30min) Page 1/1
Mon Mar 26 15:47
Title Programme Date Start Repeat
No title 1 C 01 Wed Mar 28 15:18 Once
This is BBC THREE 7 BBC THREE Sun Apr 01 16:48 Weekly
TV
DTV
Move Page
PR
Exit
ExitPopup Menu
Manual Record Guide
Schedule List
This is BBC THREE
DTV 7 BBC THREE
Sun Apr 01 16:48~17:18 (30min) Page 1/1
Page 1/1
Mon Mar 26 15:47
Title Programme Date Start Repeat
No title 1 C 01 Wed Mar 28 15:18 Once
This is BBC THREE 7 BBC THREE Sun Apr 01 16:48 Weekly
TV
DTV
Move Page
PR
Exit
ExitPopup Menu
Manual Record Guide
Modify
Delete
Delete All
Cancel
Weekly Schedule
Move Page
PR
Information Popup Menu
Manual Record Guide
INFO
DVR (DIGITAL VIDEO RECORDER)
Page 67
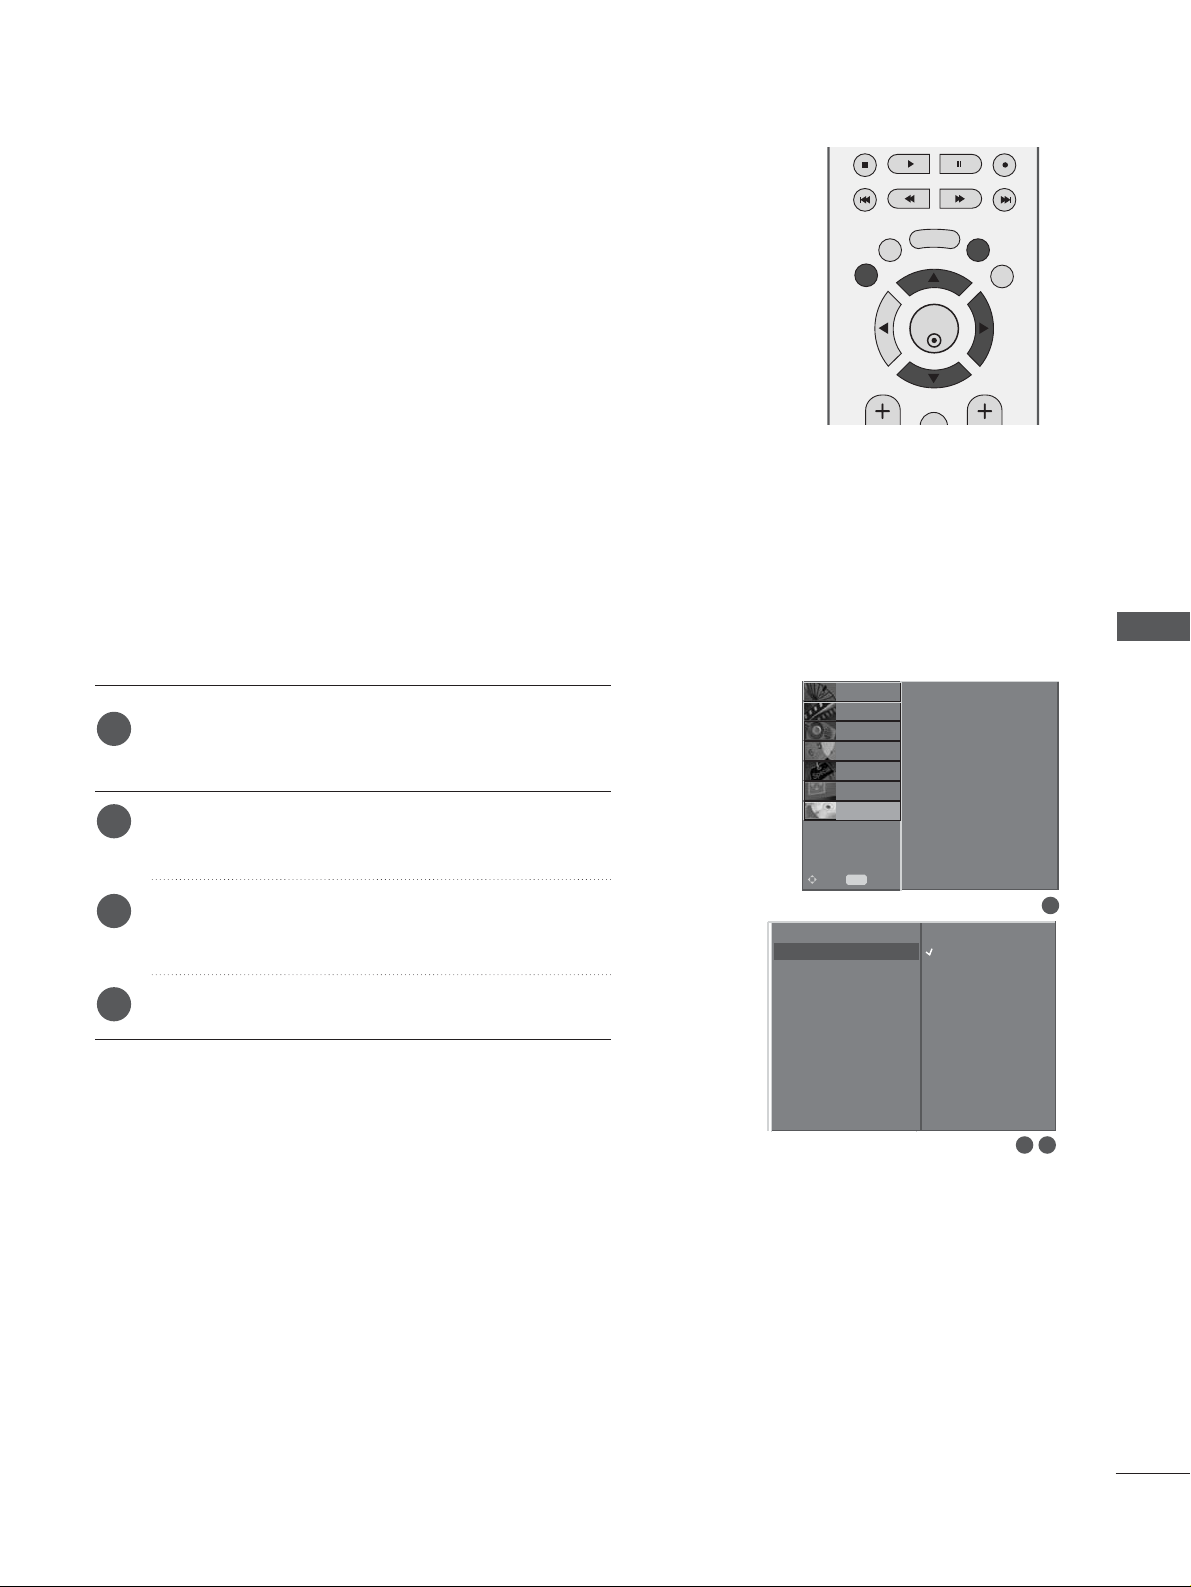
65
Press the
MMEENNUU
button and then use
DD / EE
button
to select the
DDVVRR
menu.
Press the
GG
button and then use
DD / EE
button to
select Record Quality.
Press the
GG
button and then use
DD / EE
button to
select
HHiigghh
or
NNoorrmmaall
.
Press the EXIT button to return to normal TV viewing.
2
3
4
1
2 3
High
Normal
Only for analogue
schedule recording
(TV, AV1, AV2, AV3).
This function is not available while a recording is taking place.
(Only for analogue schedule recording)
RECORD QUALITY
1
OK
EXIT
TIME
SHIFT
TIME
SHIFT
GUIDE
BACK MENU
DVR
MARK
TimeShift Mode
Record Quality
Recorded TV
Schedule List
Manual Record
HDD Format
TimeShift Mode
Record Quality
Recorded TV
Schedule List
Manual Record
HDD Format
SETUP
O
PICTURE
O
Prev.
MENU
Move
AUDIO
O
TIME
O
OPTION
O
D V R
G
SCREEN
O
TimeShift Mode
Record Quality
GG
Recorded TV
Schedule List
Manual Record
HDD Format
DVR (DIGITAL VIDEO RECORDER)
Page 68
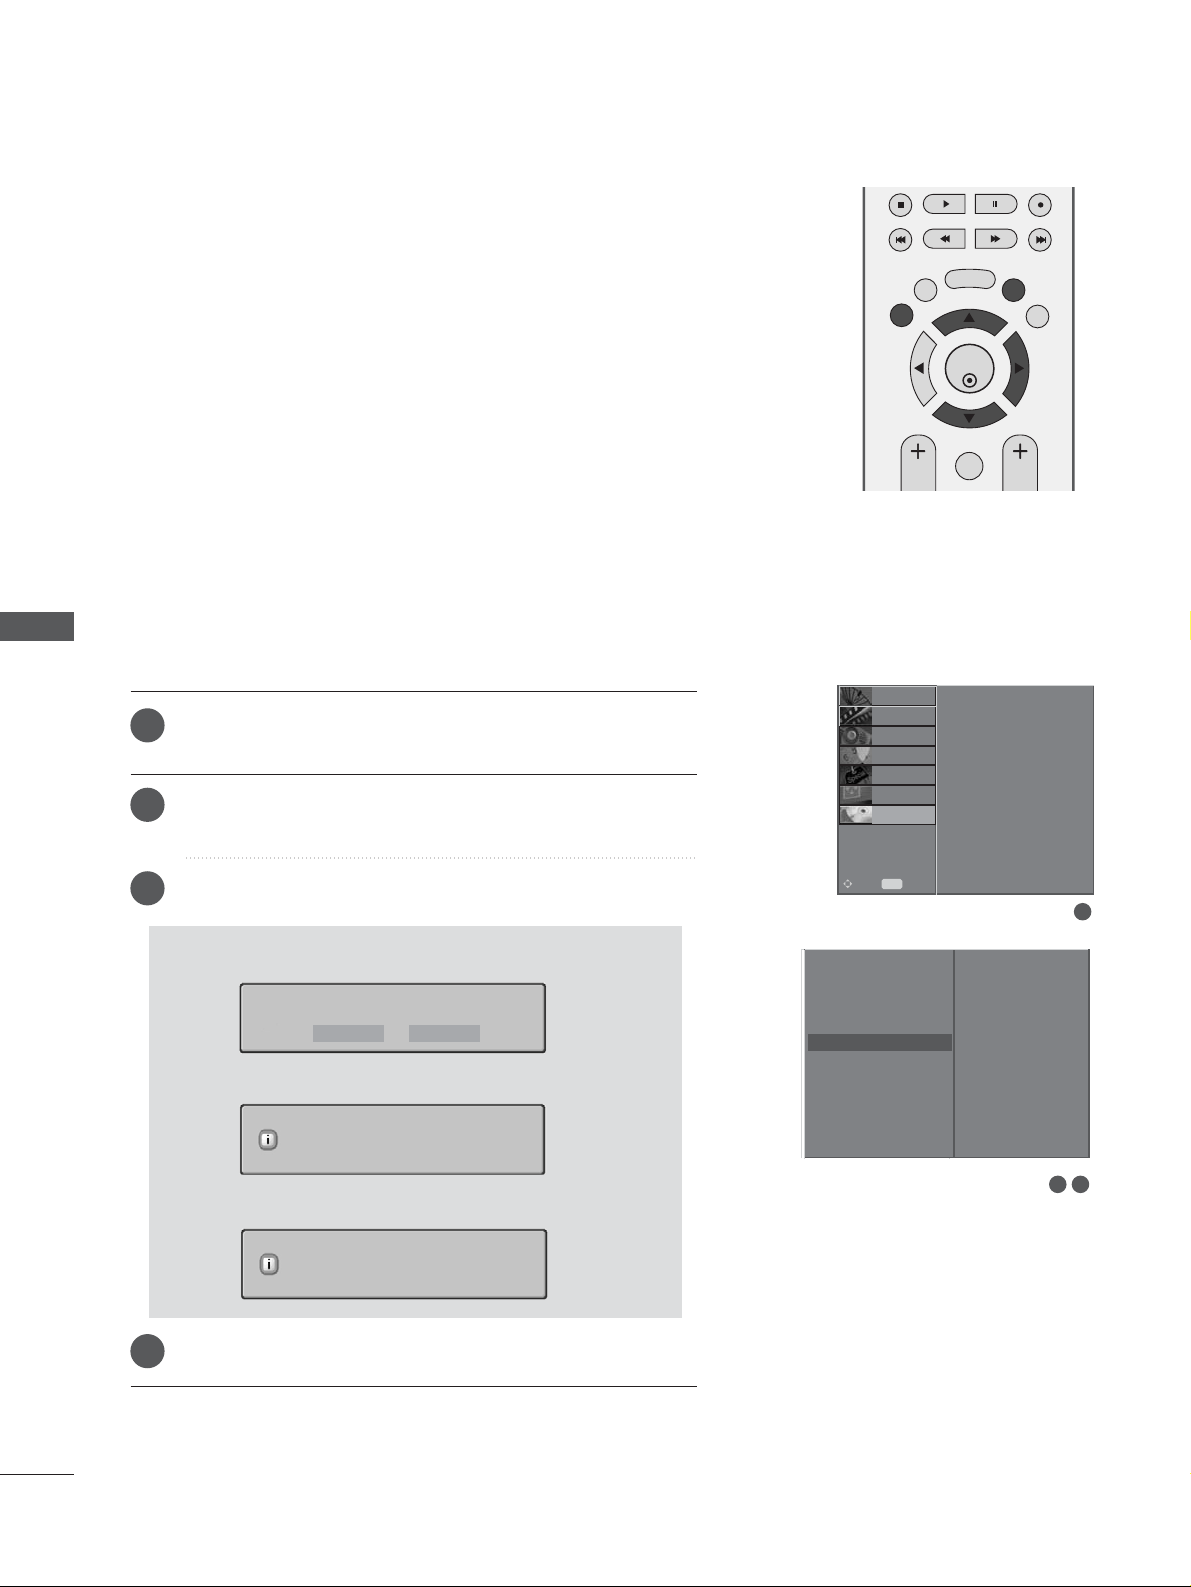
66
2 3
To set
Press the
MMEENNUU
button and then use
DD / EE
button to
select the
DDVVRR
menu.
Press the
GG
button and then use
DD / EE
button to select
HDD Format.
Press the
GG
button to start HDD Format.
Press the EXIT button to return to normal TV viewing.
FORMAT HARD DISK
1
2
3
4
1
■
if you press the GGbutton, this message is displayed.
■
if you select Yes, this message is displayed.
■
When completing, this message is displayed.
HDD format in progress.
Do you want to format HDD?
HDD initialisation successful.
Yes No
OK
EXIT
TIME
SHIFT
TIME
SHIFT
VOL PR
GUIDE
BACK MENU
DVR
MARK
FAV
TimeShift Mode
Record Quality
Recorded TV
Schedule List
Manual Record
HDD Format
SETUP
O
PICTURE
O
Prev.
MENU
Move
AUDIO
O
TIME
O
OPTION
O
D V R
G
SCREEN
O
Erases all programmes and initialises the hard drive.
TimeShift Mode
Record Quality
Recorded TV
Schedule List
Manual Record
HDD Format
GG
TimeShift Mode
Record Quality
Recorded TV
Schedule List
Manual Record
HDD Format
GG
DVR (DIGITAL VIDEO RECORDER)
DVR (DIGITAL VIDEO RECORDER)
Page 69
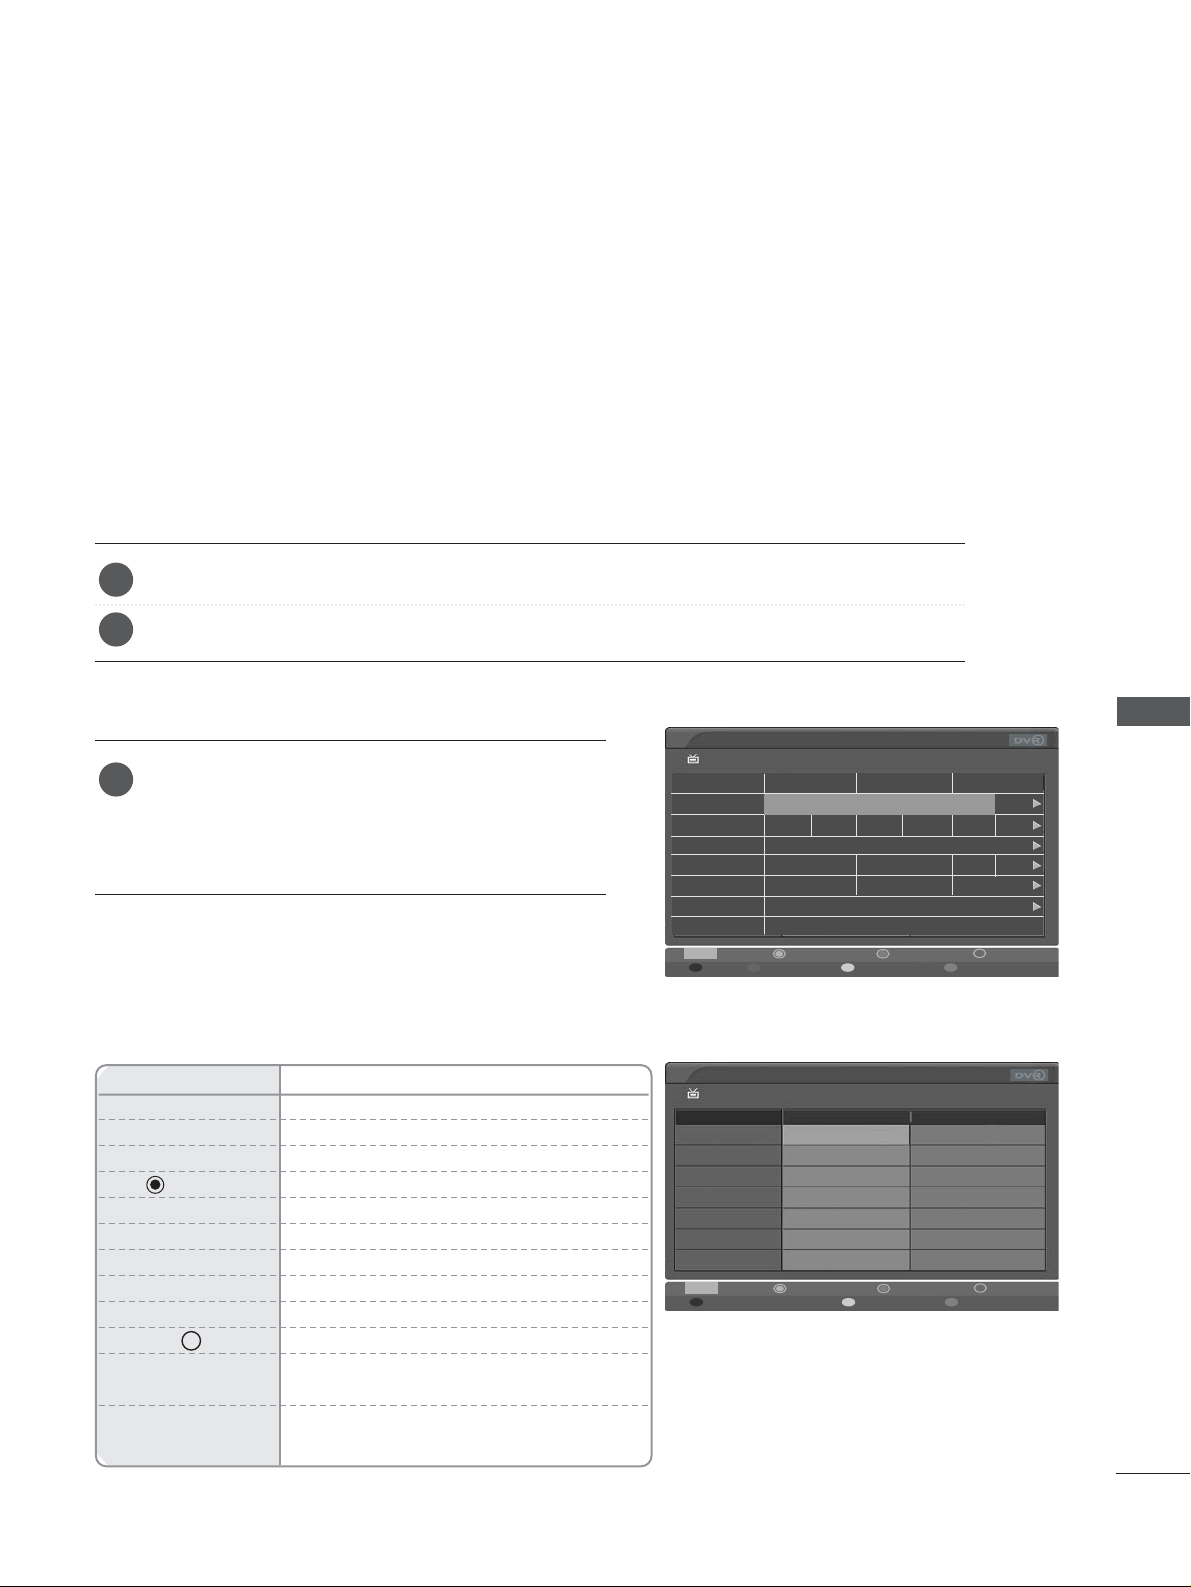
67
EPG (ELECTRONIC PROGRAMME GUIDE)
EPG (ELECTRONIC PROGRAMME GUIDE) (IN DIGITAL MODE)
Press the GUIDE button to switch on EPG.
Press the GUIDE or EXIT button again to switch off EPG and return to normal TV viewing.
Press the
D
or E, F or G, PR + or - button to
select desired programme, and then OK button is
pressed, the popup window to select the function is
displayed.
This system has an Electronic Programme Guide (EPG) to help your navigation through all the
possible viewing options.
The EPG supplies information such as programme listings, start and end times for all available
services. In addition, detailed information about the programme is often available in the EPG (the
availability and amount of these programme details will vary, depending on the particular
broadcaster).
This function can be used only when the EPG information is broadcasted by broadcasting companies.
The EPG displays the programme description for next 8 days.
Switch on/off EPG
Select a programme
1
2
1
Remote Control Buttons
Function
RED Change EPG mode
YELLOW Enter Manual Record setting mode
BLUE Enter Schedule list mode
Display Popup window
F
or
G
Select NOW or NEXT Programme
D
or
E
Select the Broadcasting Programme
PR + or - Page Up/Down
GUIDE/EXIT Switch off EPG
TV/RADIO Select TV or RADIO Programme
INFO i The detail information on or off
RECORD Select by turns Record/delete focused
programme.
FAV Select by turns Favourite programme/total
programme.
Button Function in NOW/NEXT Guide Mode
Programme Guide
1 BBC ONE 08:25 26 Mar
DTV
08:00 26 Mar
Cramp
...
Chuck
...
This is BBC THREE
BBCi
Dogstar
Breakfast BBC News BBC News
Young Dracula
Class TV:
...
To
...
Number ja
...
Nina a
...Lu...
CI
...
Breakfast
08:30 09:00
Don’
...
1 BBC ONE
2 BBC TWO
7 BBC THREE
70 CBBC Channel
80 BBC NEWS 24
105 BBCi
TV/RADIO
Radio
Mode Date Manual Record Schedule List
Popup Record Information
i
Programme Guide
1 BBC ONE
DTV NOW
Breakfast
ChuckleVision
This is BBC THREE
Dogstar
Breakfast
BBCi
Don’t Get Done Get Dom
Tommy Zoom
This is BBC THREE
Young Dracula
BBC News
BBCi
NEXT
1 BBC ONE
2 BBC TWO
7 BBC THREE
70 CBBC Channel
80 BBC NEWS 24
105 BBCi
TV/RADIO
Radio
Mode Manual Record Schedule List
Popup Record Information
08:25 26 Mar
i
Page 70
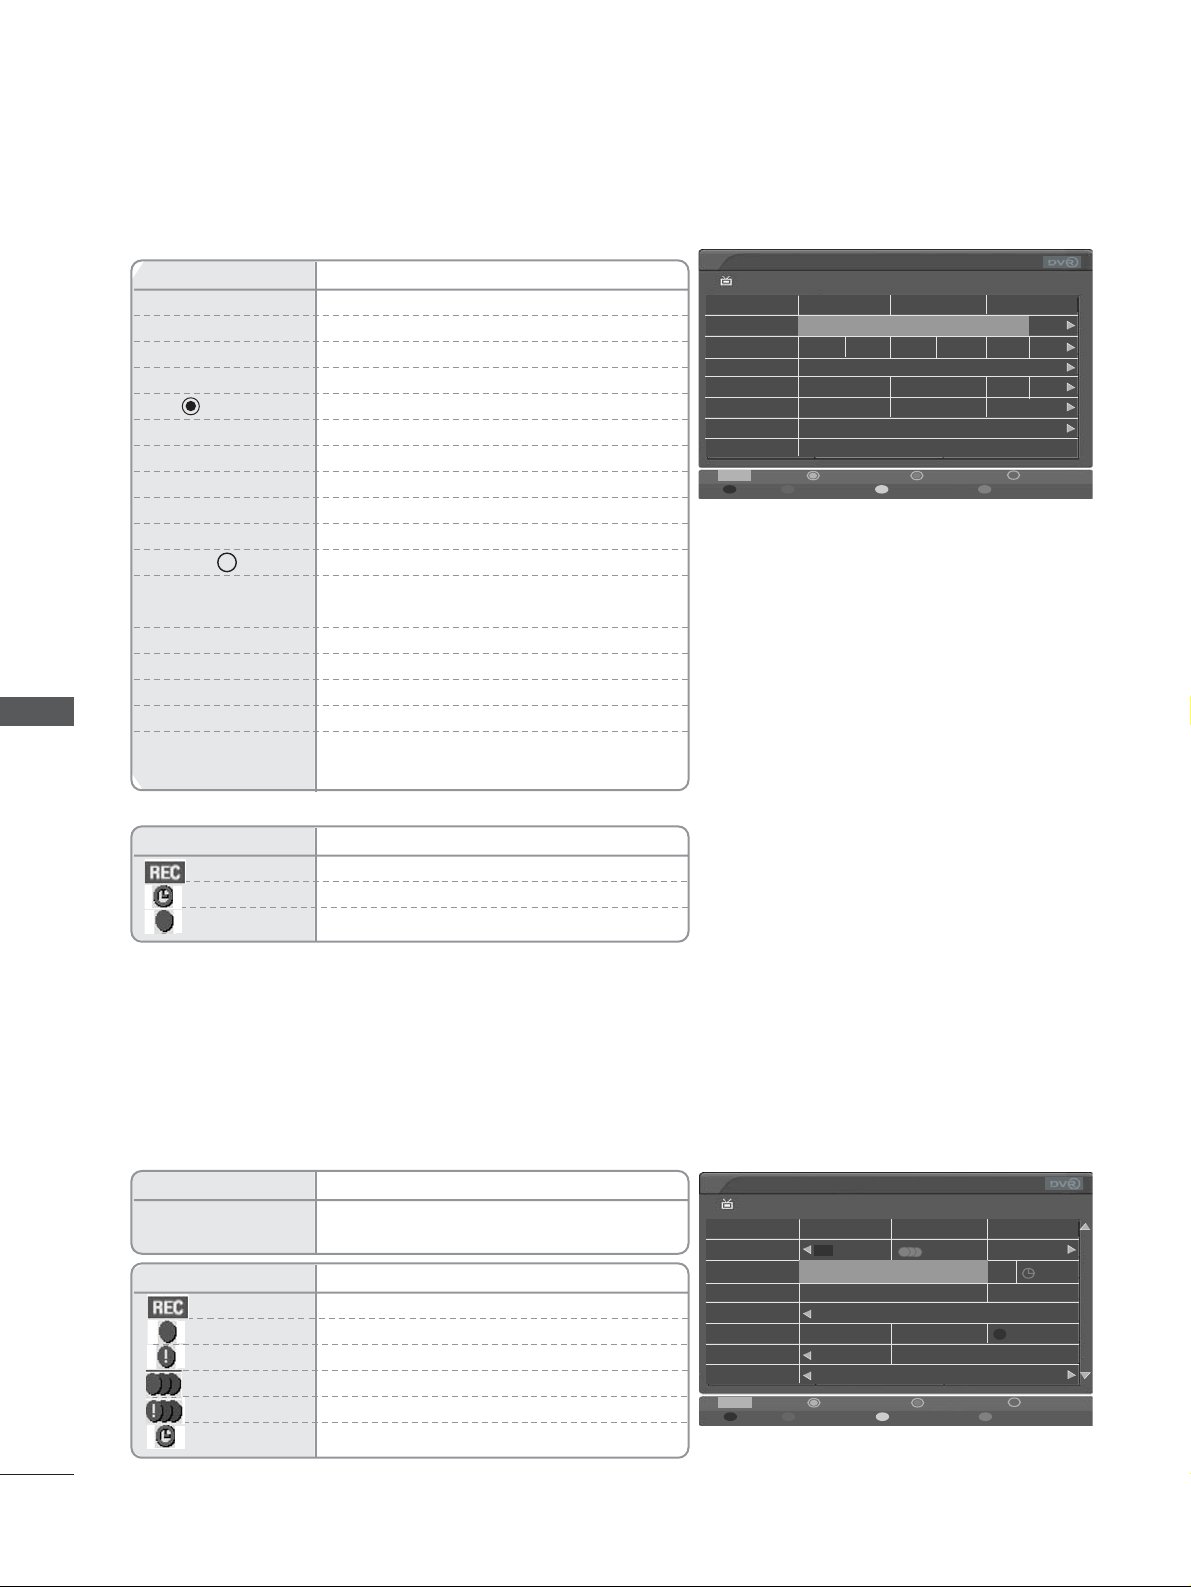
68
EPG (ELECTRONIC PROGRAMME GUIDE) (IN DIGITAL MODE)
Remote Control Buttons
Function
RED Change EPG mode
GREEN Enter Date setting mode
YELLOW Enter Manual Record setting mode
BLUE Enter Schedule list mode
Display Popup window
F
or
G
Select NOW or NEXT Programme
D
or
E
Select the Broadcasting Programme
PR + or - Page Up/Down
GUIDE/EXIT Switch off EPG
TV/RADIO Select TV or RADIO Programme
INFO i The detail information on or off
FAV Select by turns Favourite programme/total
programme.
FF
Move to the left every one and a half hours.
GG
Move to the right every one and a half hours.
I
FF
Turn to the left every six hours.
GG
I
Turn to the right every six hours.
RECORD Select by turns Record/delete focused
programme.
Button Function in 8 Days Guide Mode
* The contents below are only applicable when country is selected as UK.
Icon
Function
Recording
(Red colour) Record Single Episode
Record Single Episode Collision
Record Series
Record Series Collision
(Blue colour) Reminder
Remote Control Buttons
Function
RECORD
Select by turns Schedule Recording/Schedule
Recording Series/delete focused programme.
Icon
Function
Recording
(Blue colour) Reminder
(Red colour) Schedule Recording
i
Programme Guide
1 BBC ONE 08:25 26 Mar
DTV 08:00 26 Mar
Cramp
...
Chuck
...
This is BBC THREE
BBCi
Dogstar
Breakfast BBC News BBC News
Young Dracula
Class TV:
...
To
...
Number ja
...
Nina a
...Lu...
CI
...
Breakfast
08:30 09:00
Don’
...
1BBC ONE
2 BBC TWO
7 BBC THREE
70 CBBC Channel
80 BBC NEWS 24
105 BBCi
TV/RADIO
Radio
Mode Date Manual Record Schedule List
Popup Record Information
i
Programme Guide
1 BBC ONE 10:28 30 Mar
DTV 10:30 30 Mar
Escape t
...
Trisha Goddard
8 Simple Rules
Silver Day
Silver Day
Closedown
Home Improvem
...
Home Improv
...
This is BBC THREE
Five News
Schools: Primary Geography
To Buy or
...
Car Booty
Sc
...
School
...
REC
11:00 1 1:30
1BBC ONE
2 BBC TWO
5 Five
7 BBC THREE
15 abc1
16 QVC
17 UKTV Gold
TV/RADIO
Radio
Mode Date Manual Record Schedule List
Popup Record Information
EPG (ELECTRONIC PROGRAMME GUIDE)
Page 71
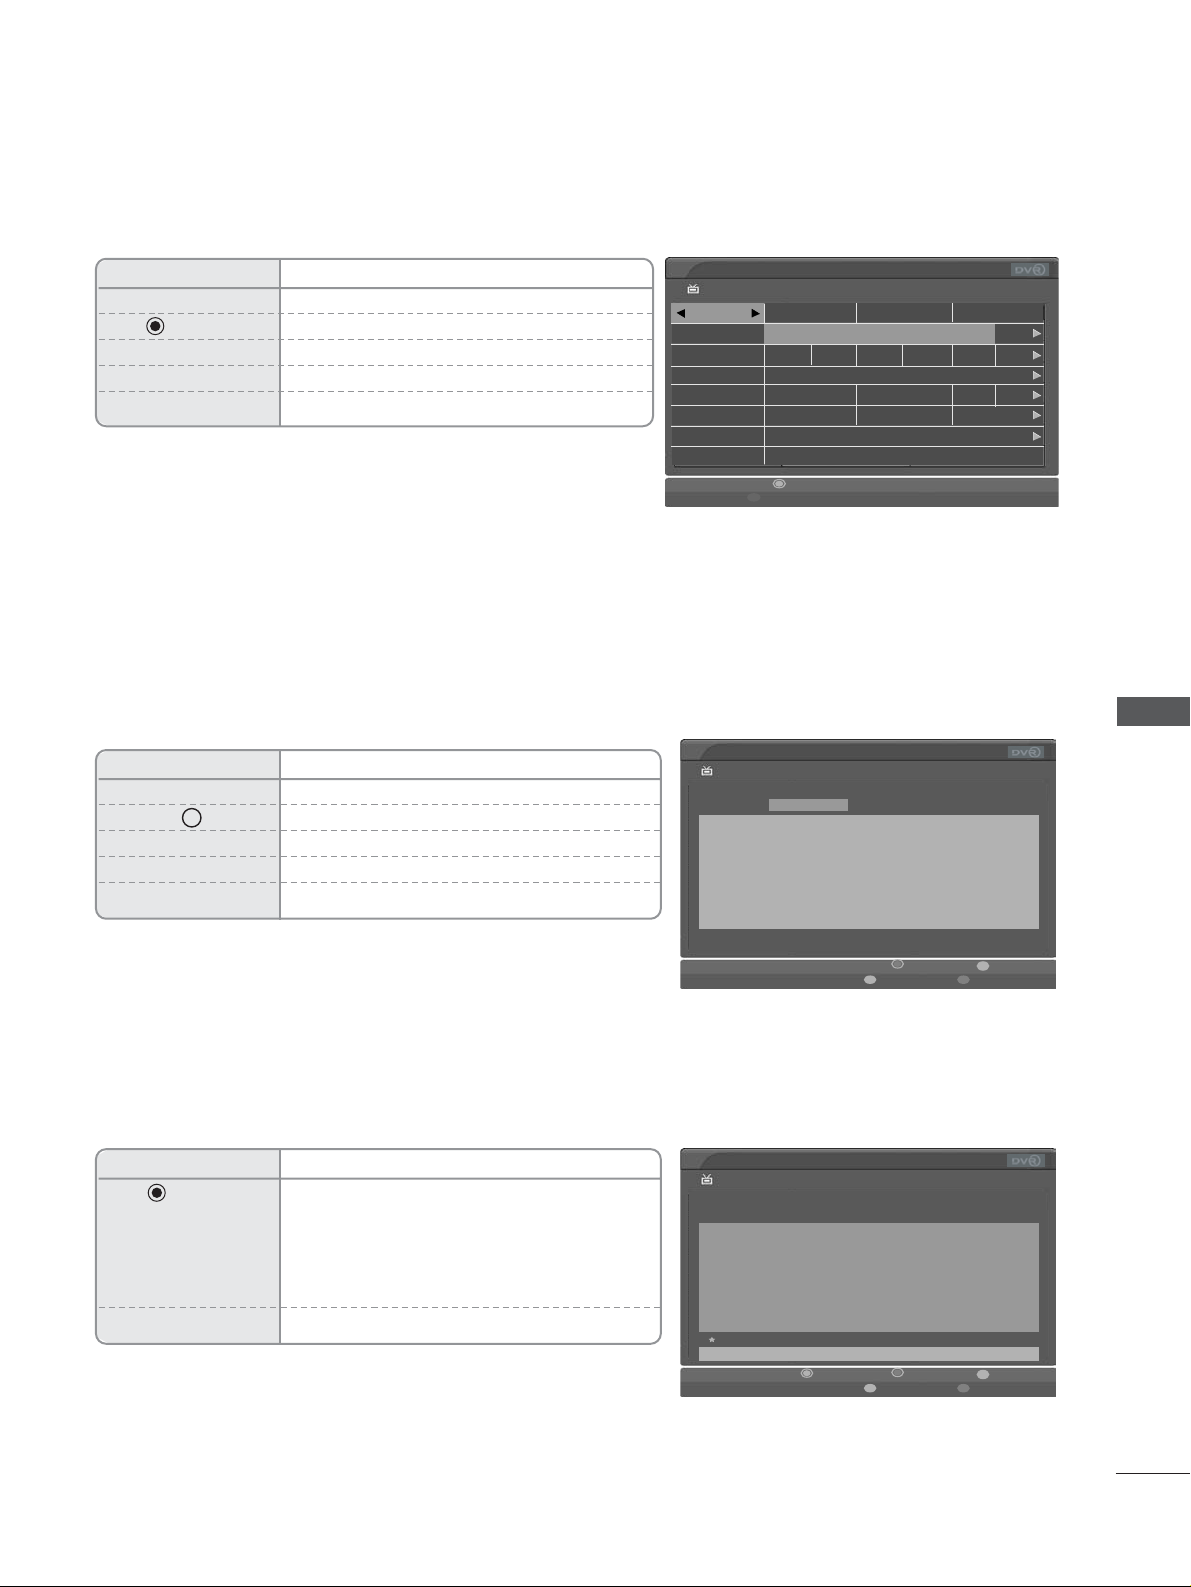
69
Button Function in Extended Description Box
i
Remote Control Buttons
Function
D
or
E
Te xt Up/Down
INFO i The detail information on or off
GUIDE/EXIT Switch off EPG
YELLOW Enter Manual Record setting mode.
BLUE Enter schedule list mode.
Remote Control Buttons
Function
With a recommended programme in place,
the display shows pop-up of record setting
which helps you set up or delete a
Recommended Timer Record Series/Record
Single Episode.
D
or
E
Recommended programme Up/Down.
Button Function in Date Change Mode
Remote Control Buttons
Function
GREEN Switch off Date setting mode
Change to the selected date
F
or
G
Select a date
E
Switch off Date setting mode
GUIDE/EXIT Switch off EPG
* The contents below are only applicable when country is selected as UK.
* Recommended : Recommended programmes which are related to selected programmes
Programme Guide
1 BBC ONE 08:25 26 Mar
Today 08:00 26 Mar
Cramp
...
Chuck
...
This is BBC THREE
BBCi
Dogstar
Breakfast BBC News
BBC News
Young Dracula
Class TV:
...
To
...
Number ja
...
Nina a
...Lu...
CI
...
Breakfast
08:30 09:00
Don’
...
1 BBC ONE
2 BBC TWO
7 BBC THREE
70 CBBC Channel
80 BBC NEWS 24
105 BBCi
Date Exit
Date Change
Information
1 BBC ONE
To Buy or Not to buy
11:00 11:30 30 Mar
Presenters Sarah Walker and Simon Rimmer are looking for a house in
Cheshire for a couple with a growing family. [S]
10:31 30 Mar
Manual Record Schedule List
Record Info. Exit
i
Information
261 EIT 1
News Update
13:05 ~ 13:07 2 Apr
Recommended programmes
Weather DTV261 EIT 1 Series
Latest breaking news stories from around the world.
13:02 2 Apr
Info. Exit
Manual Record Schedule List
Popup Record
EPG (ELECTRONIC PROGRAMME GUIDE)
Page 72
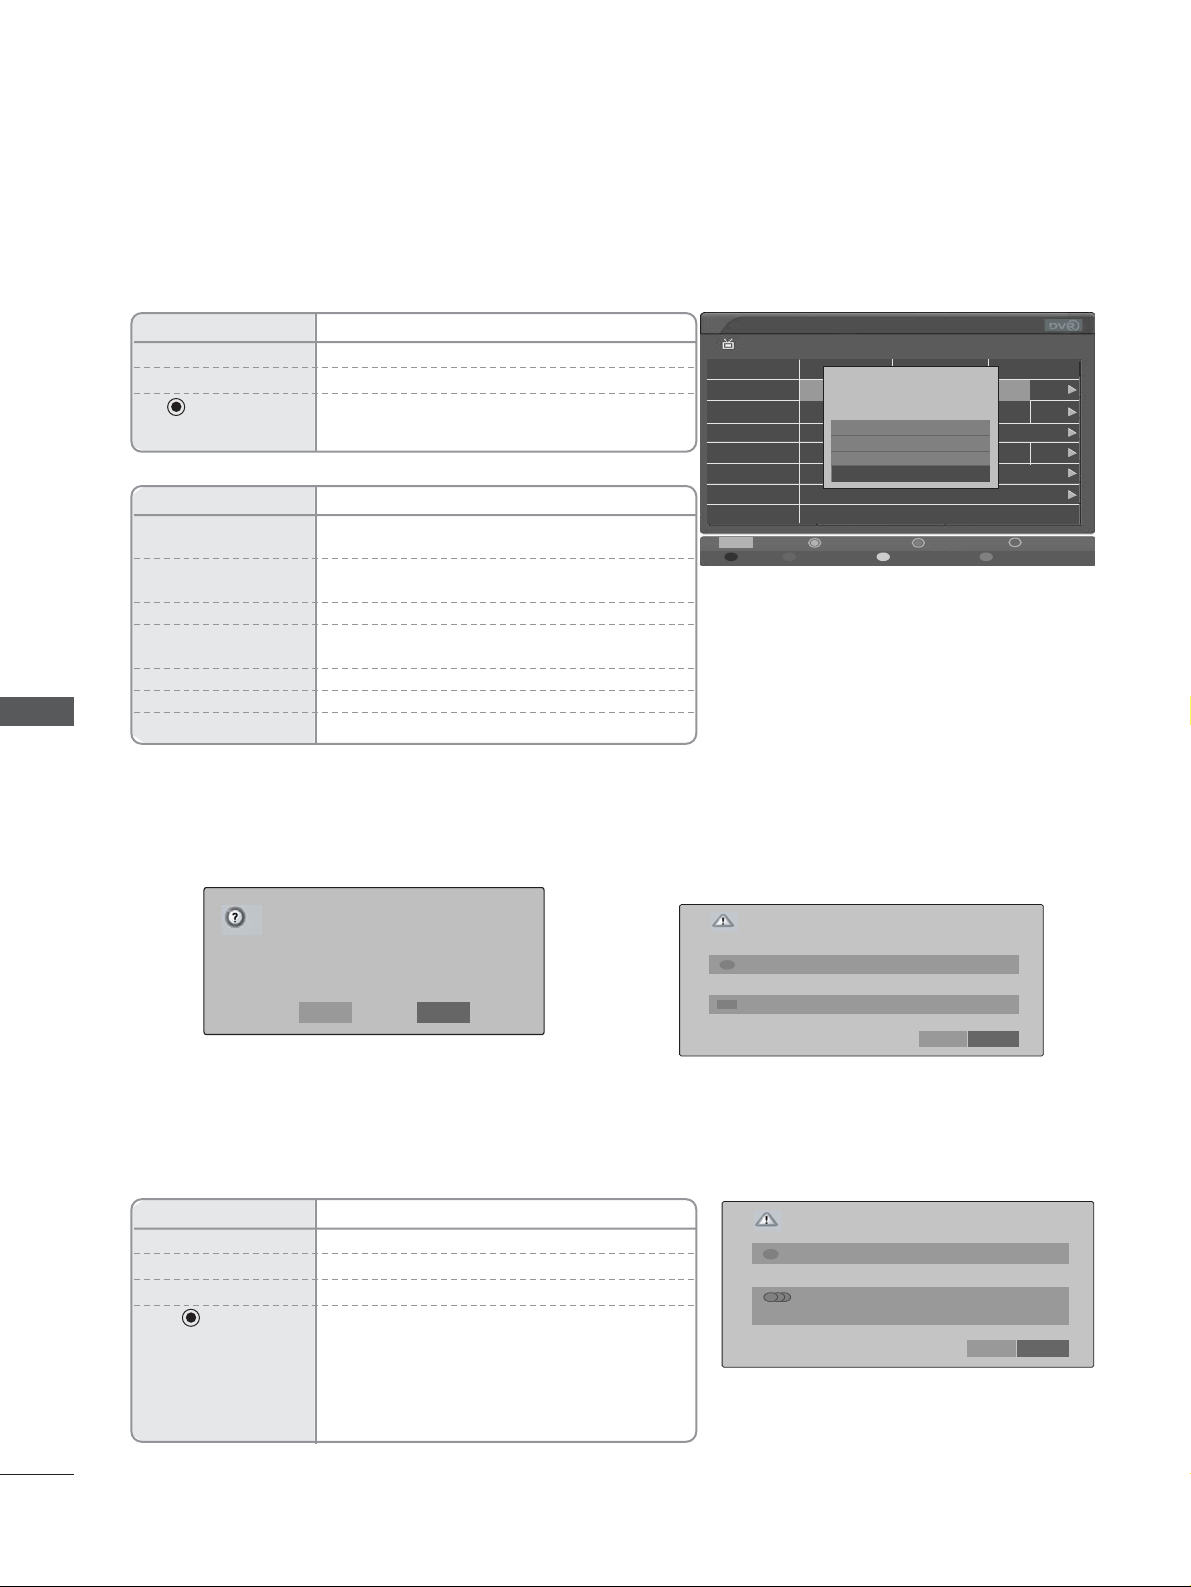
70
EPG (ELECTRONIC PROGRAMME GUIDE) (IN DIGITAL MODE)
Record Popup
* You can set up and activate Record Series only when country is set to the UK.
* You cannot activate reminder during power off mode.
* The contents below are only applicable when country is selected as UK.
Remote Control Buttons
Function
EXIT/BACK Delete the pop-up.
D
or
E
Move the focus of the button.
Follow the order of functions of the selected
button.
Popup Menu Function
Record series Set up Record Series operation for
selected programme.
Record programme Set up Record Programme operation for
selected programme.
Watch this pro. Move to selected channel.
Set reminder
When the selected programme is not broadcasted,
set up Schedule Recording operation.
Delete this Delete Recording or Reminder mode.
Delete series Delete series Recording mode
Cancel Delete the pop-up.
Collision Popup
When current watching channel is different from schedule recording channel, a message as shown below will
come up on the display 1 minute before the start of
schedule recording.
i
When next timer recording is scheduled to start before you
finish recording a programme, a message as shown below will
come up on the display 1 minute before the scheduled start
time of next recording. (UK only)
Remote Control Buttons
Function
EXIT Delete the pop-up.
F
or
G
Move the focus.
D
or
E
The list of collisions scrolls.
When you press OK button, you can delete
the list of collisions or switch the mode to
rerun and set up Record operation.
When you press NO button, you can
delete
Recording pop-up.
Programme Guide
1 BBC ONE 10:45 30 Mar
DTV
10
To B uy or Not to Buy
DTV1 BBC ONE
Fri. 30 Mar 11:00~11:30
Record series
Record programme
Set reminder
Cancel
Cr
BBC News
ass TV:
...
ina a
...Lu...
CI
...
09:00
Don’
...
1BBC ONE
2 BBC TWO
7 BBC THREE
70 CBBC Channel
80 BBC NEWS 24
105 BBCi
TV/RADIO
Radio
Mode Date Manual Record Schedule List
Popup Record Information
A Recording is scheduled,
the channel will change
in 1 minute. Continue?
A Recording is scheduled,
the channel will change
in 1 minute. Continue?
YES NO
Schedule Overlap
Schedule recording will start in a few minutes.
Current schedule recording will stop to record this.
EVENT 7 3 Channel 3 Thu Oct 12 13:10~13:14
EVENT 10 4 Channel 4 Thu Oct 12 13:07~13:12
REC
OK No
Schedule Overlap
The Weakest Link 2 BBC TWO Fri Mar 23 17:15~18:00
Gina’s Laughing Gear 1 BBC ONE Fri Mar 23 17:00~17:30
To schedule this, some timer changes are needed.
-> Gina’s Laughing Gear 70 CBBC Channel Sat Mar 24 18:30~18:58
OK No
EPG (ELECTRONIC PROGRAMME GUIDE)
i
Page 73
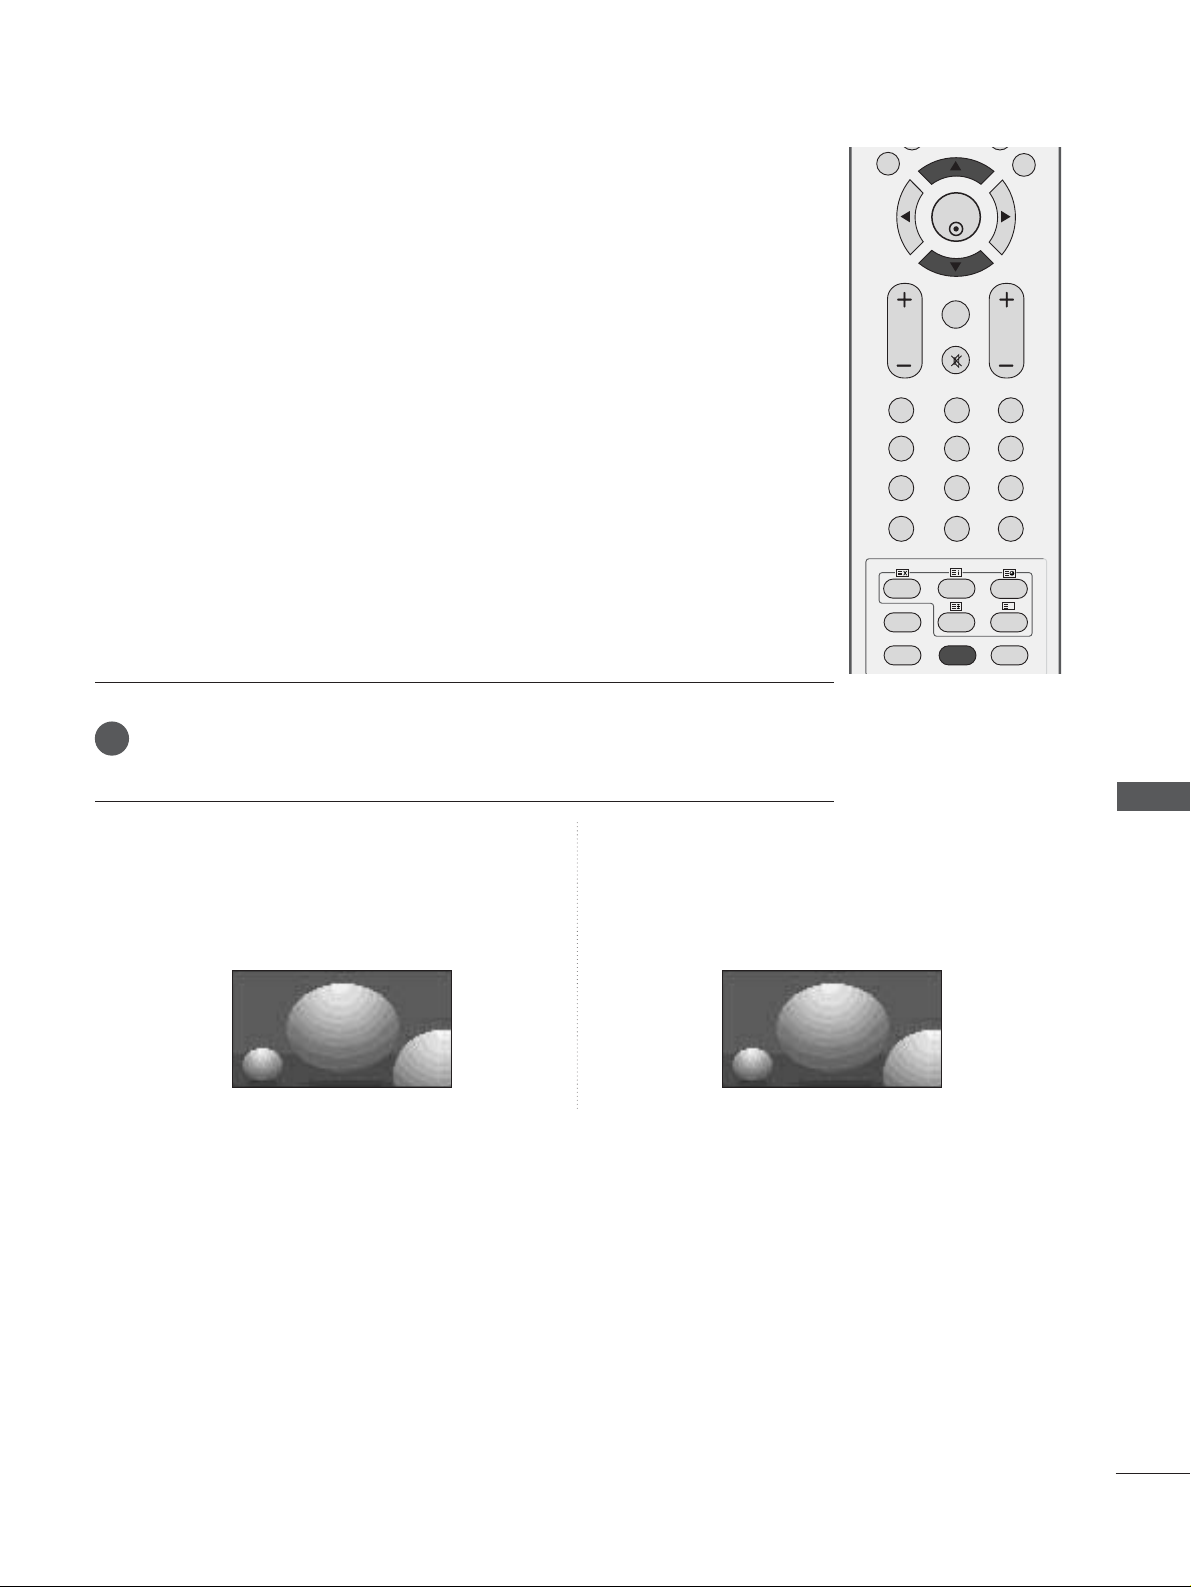
71
PICTURE CONTROL
PICTURE CONTROL
You can watch the screen in various picture formats;
1166:: 99, OOrriiggiinnaall
,
44:: 33, 1144:: 99
and
ZZoooo mm 11 //22
.
If a fixed image is displayed on the screen for a long time, that fixed image
may become imprinted on the screen and remain visible.
You can adjust the enlarge proportion using
DDorEE
button.
This function works in the following signal.
PICTURE SIZE (ASPECT RATIO) CONTROL
OK
EXIT
TIME
SHIFT
TIME
SHIFT
VOL PR
GUIDE
123
456
789
0
Q.VIEW
LIST
INDEX
SLEEP
HOLD
REVEAL
?
SUBTITLE
RATIO
MUTE
MARK
UPDATE
FAV
TIME
I/II
•
1166::99
Following selection will lead you to adjust the picture
horizontally, in a linear proportion, to fill the entire
screen (useful for viewing 4:3 formatted DVDs).
•
OOrriiggiinnaall
When your TV receives the wide screen signal, it will be
automatically changed to the picture format to be sent.
Press the
RRAATTIIOO
button repeatedly to select the desired picture format.
You can also adjust
AAssppeecctt RRaattiioo
in the
SCREEN menu.
1
Original
16:9
Page 74
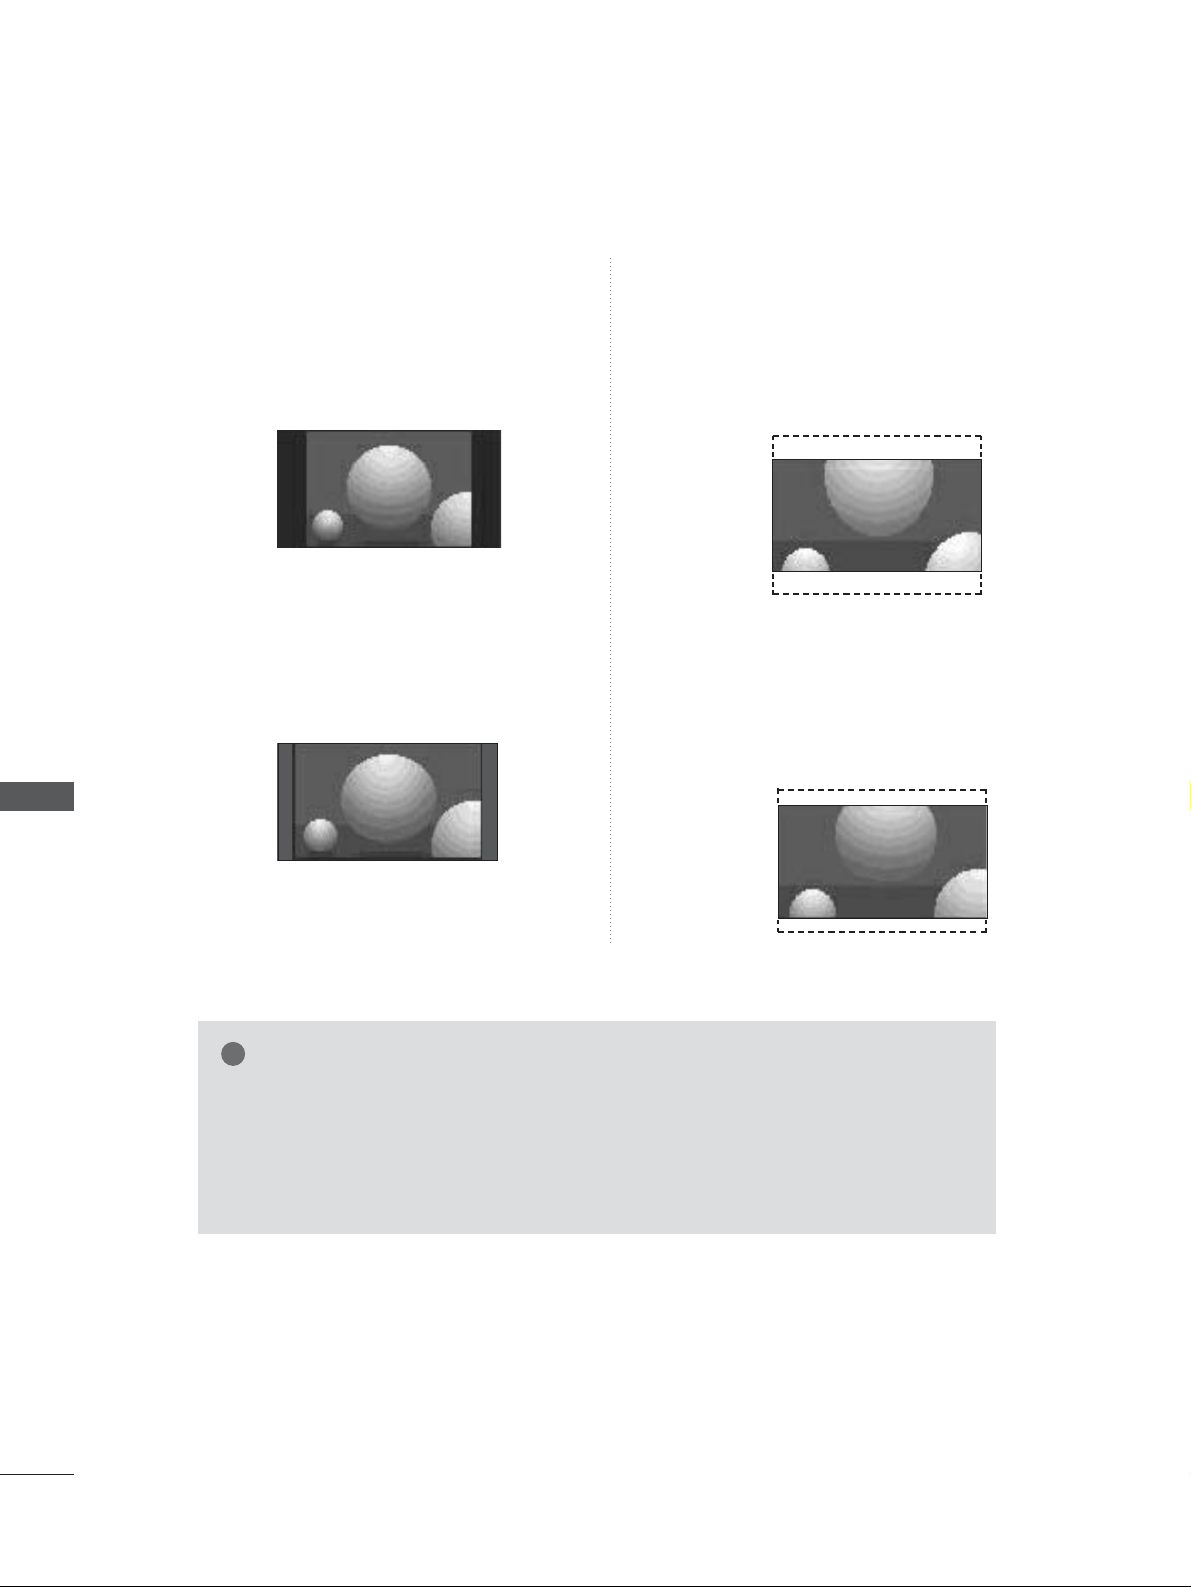
72
PICTURE CONTROL
•
44::33
Following selection will lead you to view a picture with
an original 4:3 aspect ratio, with gray bars appearing at
both the left and right sides.
.
•
1144::99
You can enjoy the picture format of 14:9 or general TV
programme through the 14:9 mode. The screen 14:9 is
viewed just like that the screen 4:3 is magnified to the
left / right.
•
ZZoo oo mm11
Following selection will lead you to view the
picture without any alternation, while filling
the entire screen. However, the top and bottom portions of the picture will be cropped.
•
ZZoo oo mm22
Choose Zoom2 when you want the picture to
be altered, both horizontally extended and
vertically cropped. The picture taking a
halfway trade off between alteration and
screen coverage.
NOTE
!
GG
You can only select
1166:: 99
(Wide),
44:: 33
, Zoom 1/2 in Component, HDMI mode.
GG
You can only select
1166:: 99
(Wide),
44:: 33
, in RGB mode only.
GG
You can only select
1166:: 99
(Wide),
44:: 33, 1144:: 99
, Zoom 1/2 at a delayed mode and at
the playback of recordings of TV, AV1, AV2 and AV3 input.
GG
Aspect ratio control of the delayed mode and the playback is managed separately
with the normal input mode.
14:9
DE
Zoom1
DE
Zoom2
DE
4:3
PICTURE CONTROL
Page 75
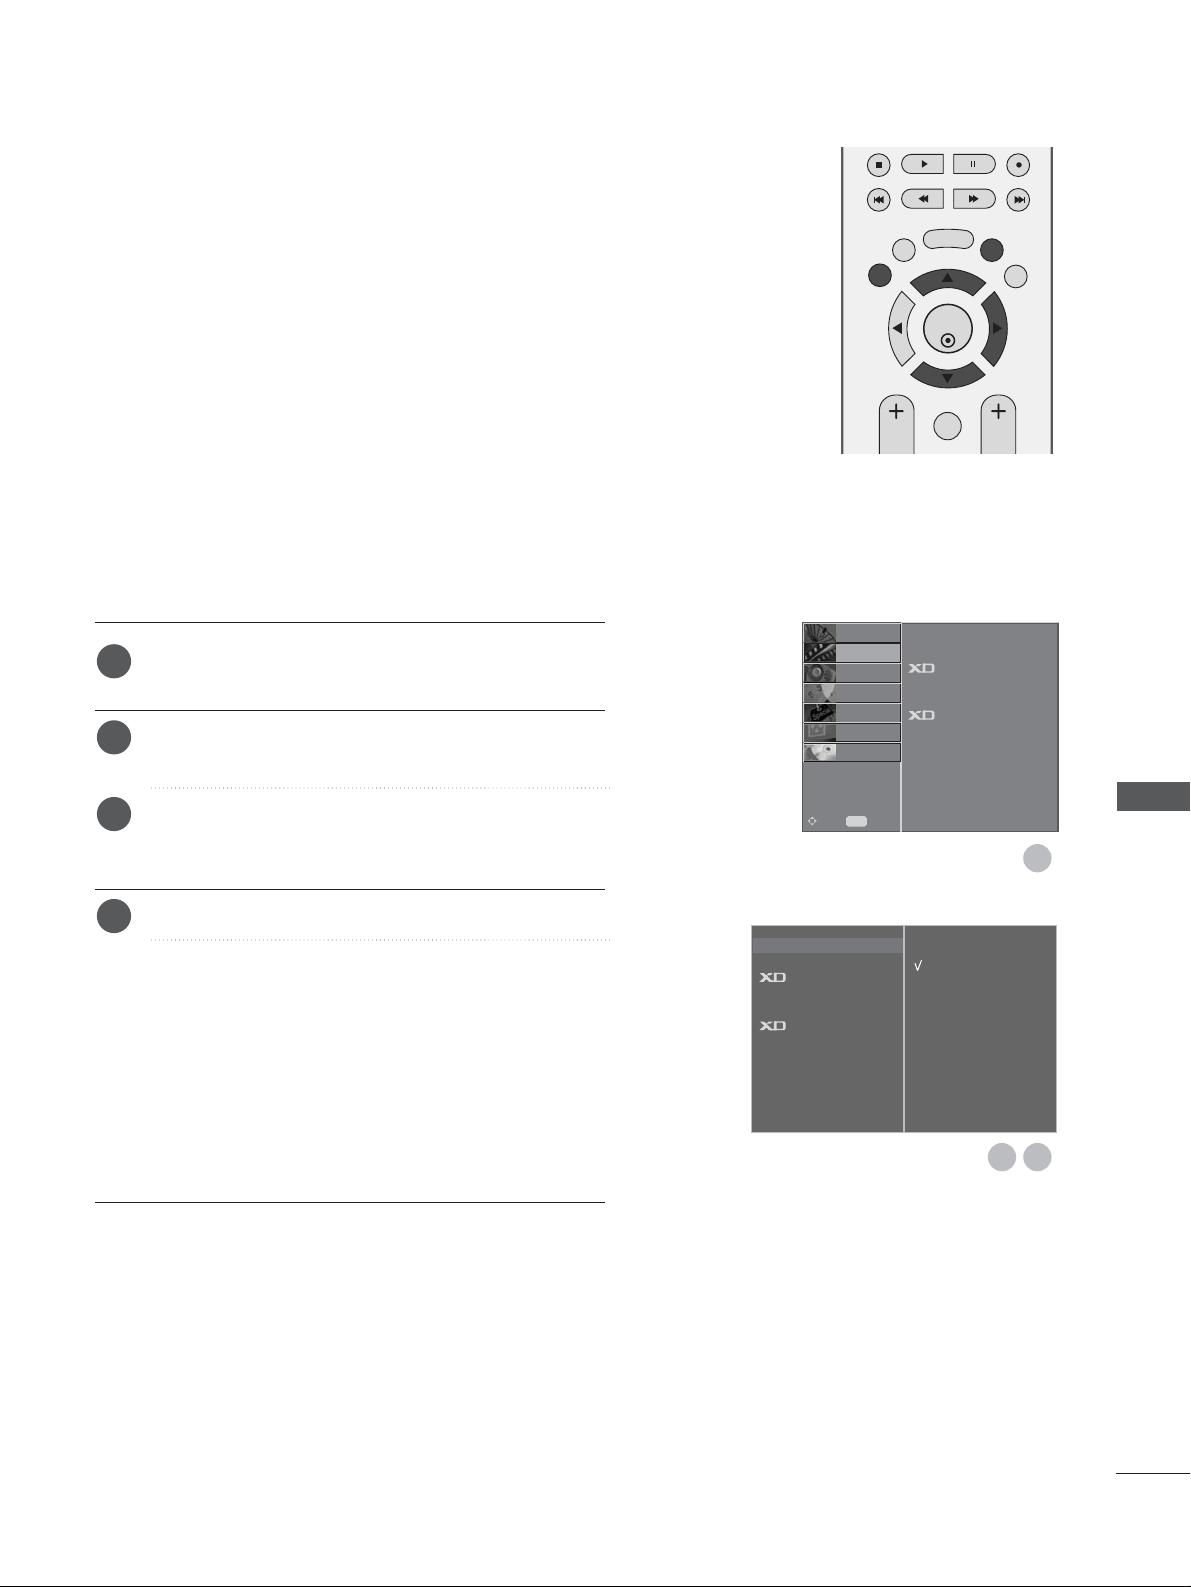
73
PICTURE CONTROL
Press the MENU button and then
D
or
E
button to
select the PICTURE menu.
Press the
G
button and then
D
or
E
button to select
Picture Mode.
Press the
G
button and then
D
or
E
button to select
Intelligent Eye (LCD TV Models only), Dynamic,
Standard, Mild, User 1, or User 2.
Press the EXIT button to return to normal TV viewing.
Picture Mode adjusts the set for the best picture
appearance. Select the preset value in the Picture
Mode menu based on the programme category.
Intelligent Eye (LCD TV Models only), Dynamic,
Standard
and
Mild
are programmed for optimum picture reproduction at the factory and cannot be changed.
When the Intelligent eye function is on, the most suitable
picture is automatically adjusted according to the
surrounding conditions.
(LCD TV Models only)
IInntt eellll iiggee nntt EEyy ee
Adjusts picture according to the surrounding
conditions.
(LCD TV Models only)
DDyy nn aamm ii cc
Select this option to display with a sharp image.
SS tt aannddaarrdd
The most general and natural screen display status.
MMii ll dd
Select this option to display with a mild image.
UUss eerr 11//22
Select this option to use the user-defined setting.
PRESET PICTURE SETTINGS
Picture Mode-Preset
Picture Mode G
Colour Temperature
Advanced
Picture Reset
Demo
Intelligent Eye
Dynamic
Standard
Mild
User 1
User 2
1
2
3
4
OK
EXIT
TIME
SHIFT
TIME
SHIFT
VOL PR
GUIDE
BACK MENU
DVR
MARK
FAV
1
32
Picture Mode
Colour Temperature
Advanced
Picture Reset
Demo
SETUP
O
AUDIO
O
TIME
O
OPTION
O
SCREEN
O
D V R
O
Prev.
MENU
Move
PICTURE
G
Page 76
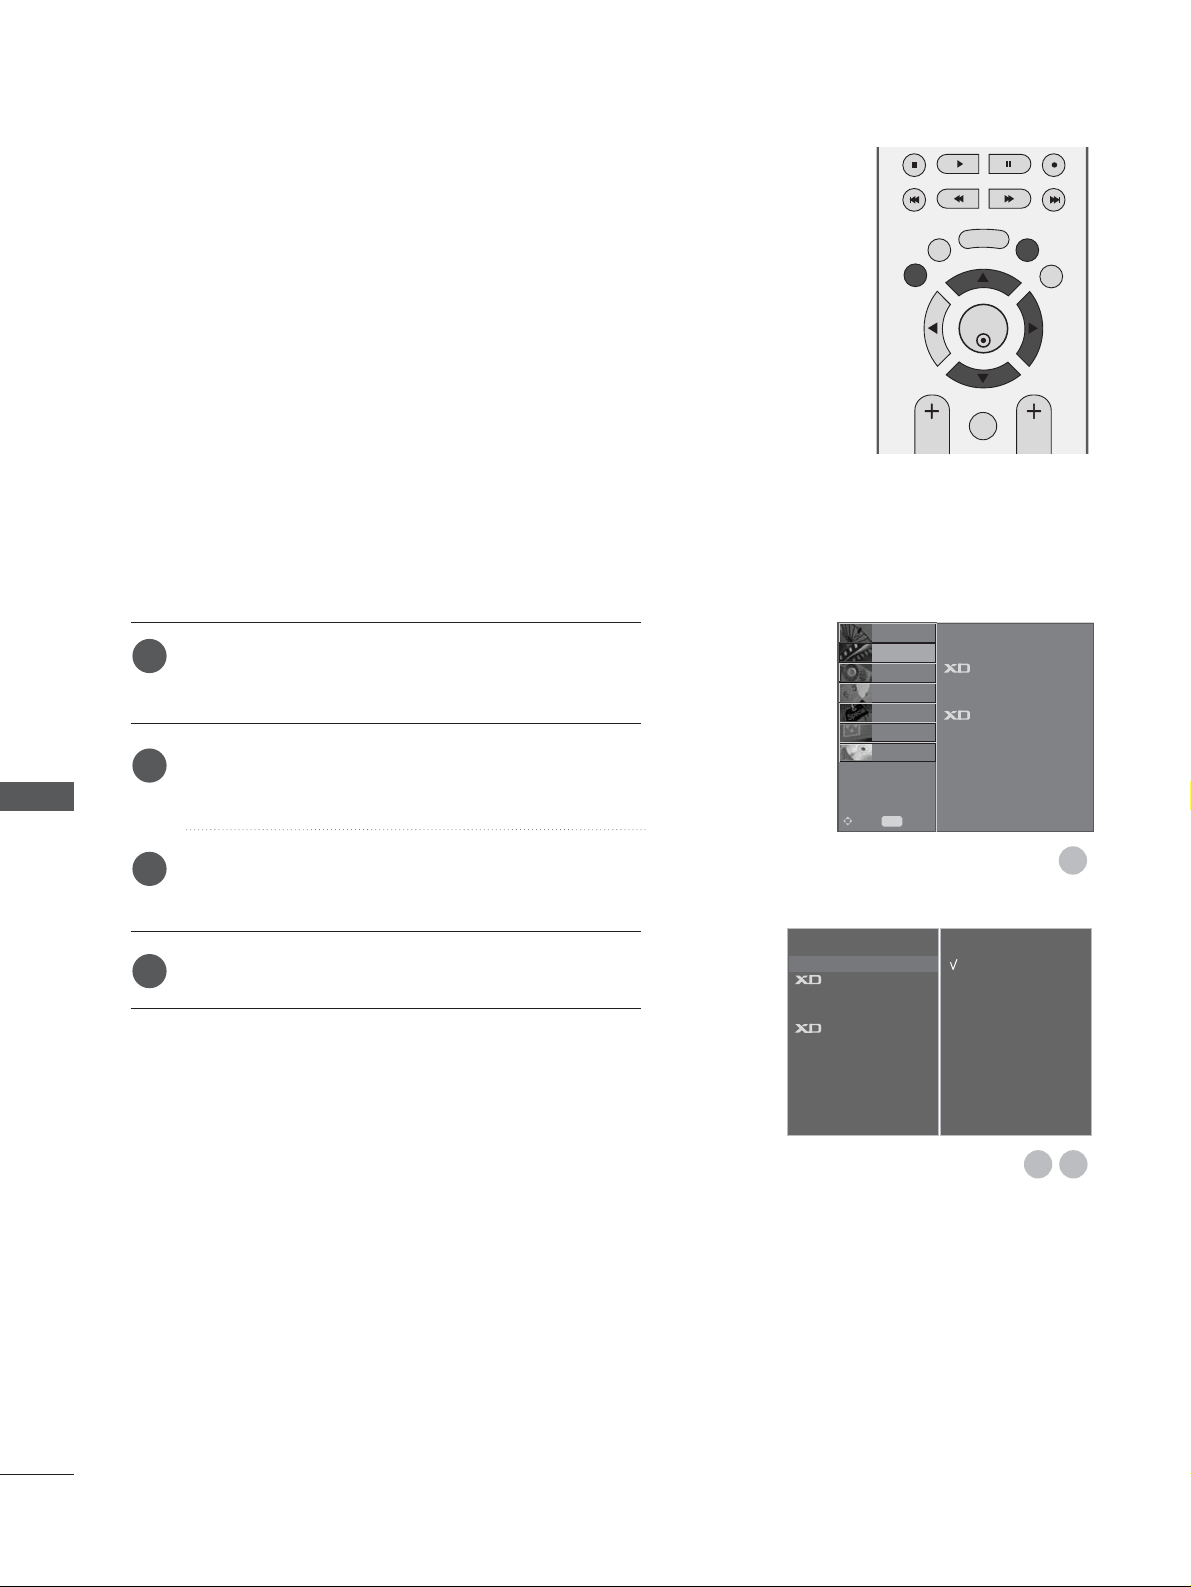
74
PICTURE CONTROL
Press the MENU button and then
D
or
E
button to
select the PICTURE menu.
Press the
G
button and then
D
or
E
button to select
Colour Temperature.
Press the
G
button and then
D
or
E
button to select
either Cool, Medium, War m , or User.
Press the EXIT button to return to normal TV viewing.
To initialise values (reset to default settings), select the
Cool option.
Choose one of three automatic colour adjustments. Set to
warm to enhance hotter colours such as red, or set to cool
to see less intense colours with more blue.
This menu is activated after selecting the
User1 or User2 of
PPiiccttuu rree MMooddee
.
Auto Colour Tone Control (Warm/Medium/Cool)
Picture Mode
Colour Temperature
G
Advanced
Picture Reset
Demo
Cool
Medium
Warm
User
OK
EXIT
TIME
SHIFT
TIME
SHIFT
VOL PR
GUIDE
BACK MENU
DVR
MARK
FAV
1
1
2
3
4
32
Picture Mode
Colour Temperature
Advanced
Picture Reset
Demo
SETUP
O
AUDIO
O
TIME
O
OPTION
O
SCREEN
O
D V R
O
Prev.
MENU
Move
PICTURE
G
PICTURE CONTROL
Page 77
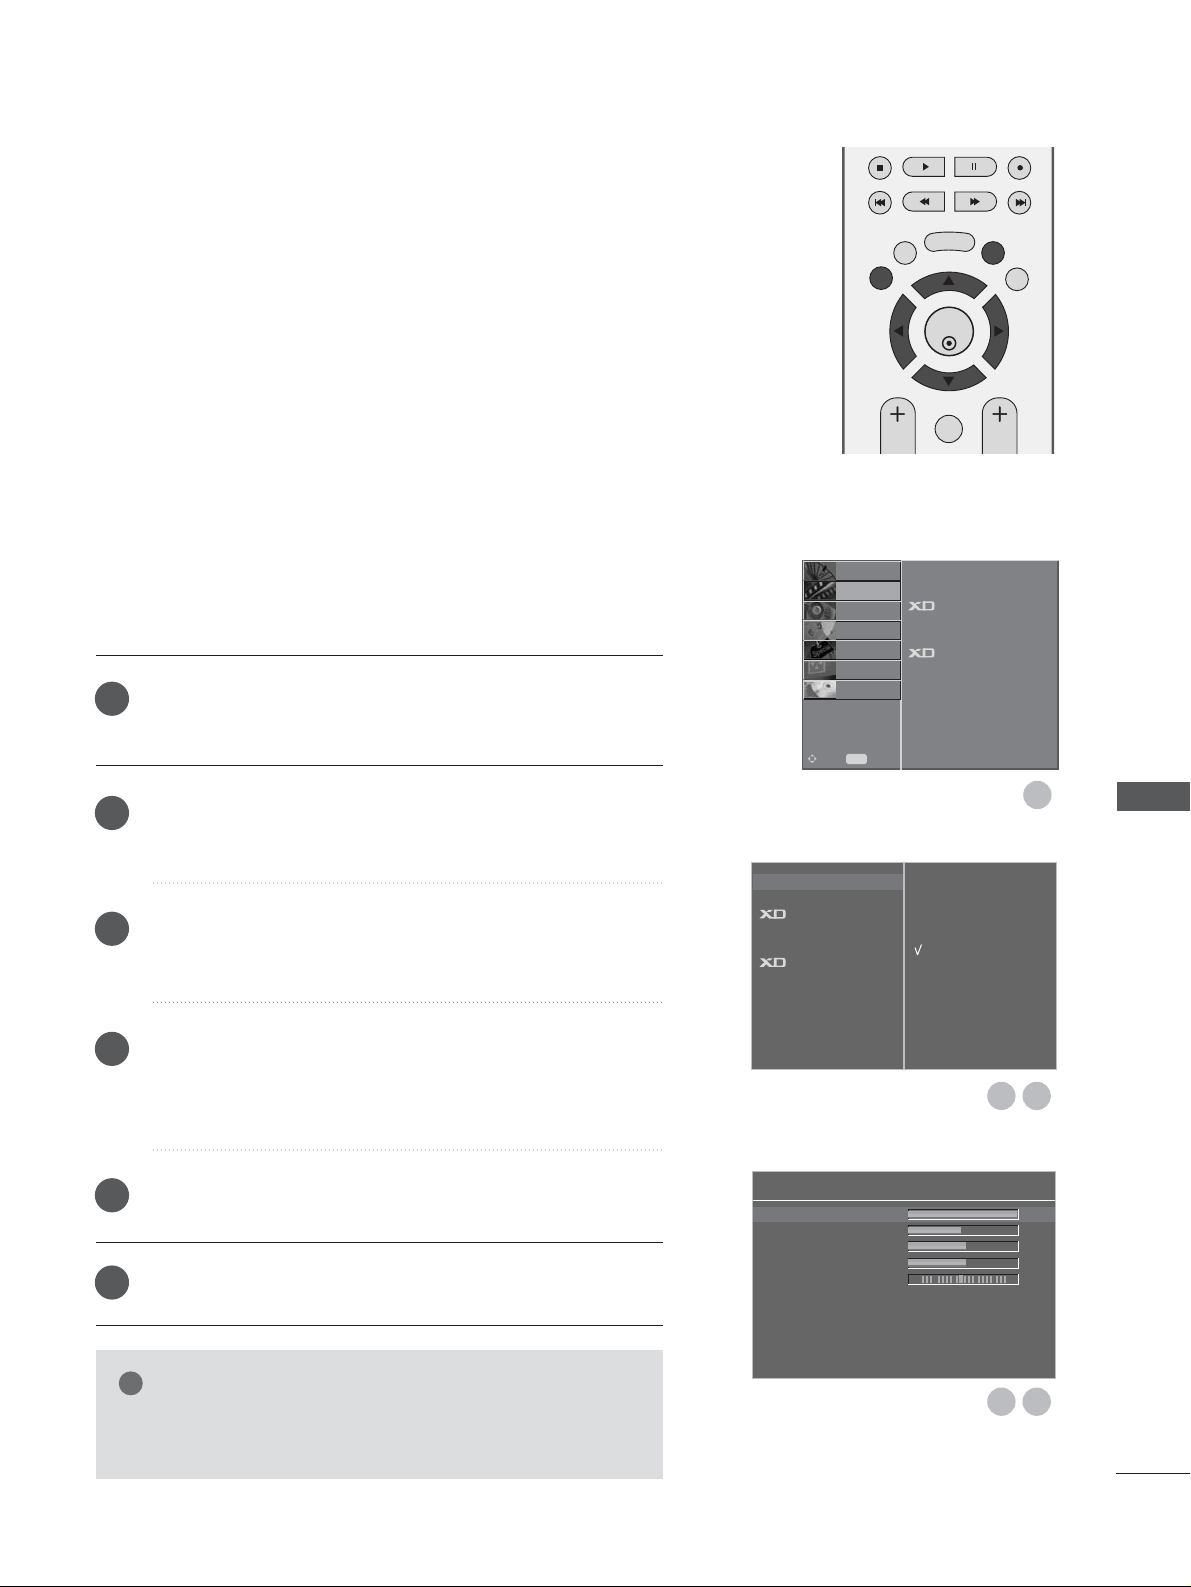
75
PICTURE CONTROL
Contrast 100 G
Brightness 45
Colour 50
Sharpness 50
Tint 0
User 1
OK
EXIT
TIME
SHIFT
TIME
SHIFT
VOL PR
GUIDE
BACK MENU
DVR
MARK
FAV
Picture Mode G
Colour Temperature
Advanced
Picture Reset
Demo
Intelligent Eye
Dynamic
Standard
Mild
User 1
User 2
1
RG
MANUAL PICTURE ADJUSTMENT
Press the
MMEENN UU
button and then
DD
or
EE
button to select
the
PICTURE menu.
Press the
GG
button and then
DD
or
EE
button to select
Picture Mode.
Press the
G button and then
D
or
E
button to select User 1
or User 2.
Press the
GG
button and then
DD
or
EE
button to select the
desired picture option (
Contrast, Brightness, Colour,
Sharpness and Tint).
Press the
FF
or
GG
button to make appropriate adjustments.
Press the
EEXXIITT
button to return to normal TV viewing.
Picture Mode-User option
CC oonntt rr aass tt
Adjusts the difference between the light and
dark levels in the picture.
BBrrii gghhtt nneessss
Increases or decreases amount of white in the
your picture.
CC oo lloouurr
Adjusts intensity of all colours.
SS hhaarrppnnee ssss
Adjusts the level of crispness in the edges
between the light and dark areas of the picture.
The lower the level, the softer the image.
TTiinntt
Adjusts the balance between red and green levels.
NOTE
!
GG
You can’t adjust colour, sharpness and tint in the RGBPC mode to the levels you prefer.
1
2
3
4
5
6
32
54
Picture Mode
Colour Temperature
Advanced
Picture Reset
Demo
SETUP
O
AUDIO
O
TIME
O
OPTION
O
SCREEN
O
D V R
O
Prev.
MENU
Move
PICTURE
G
Page 78
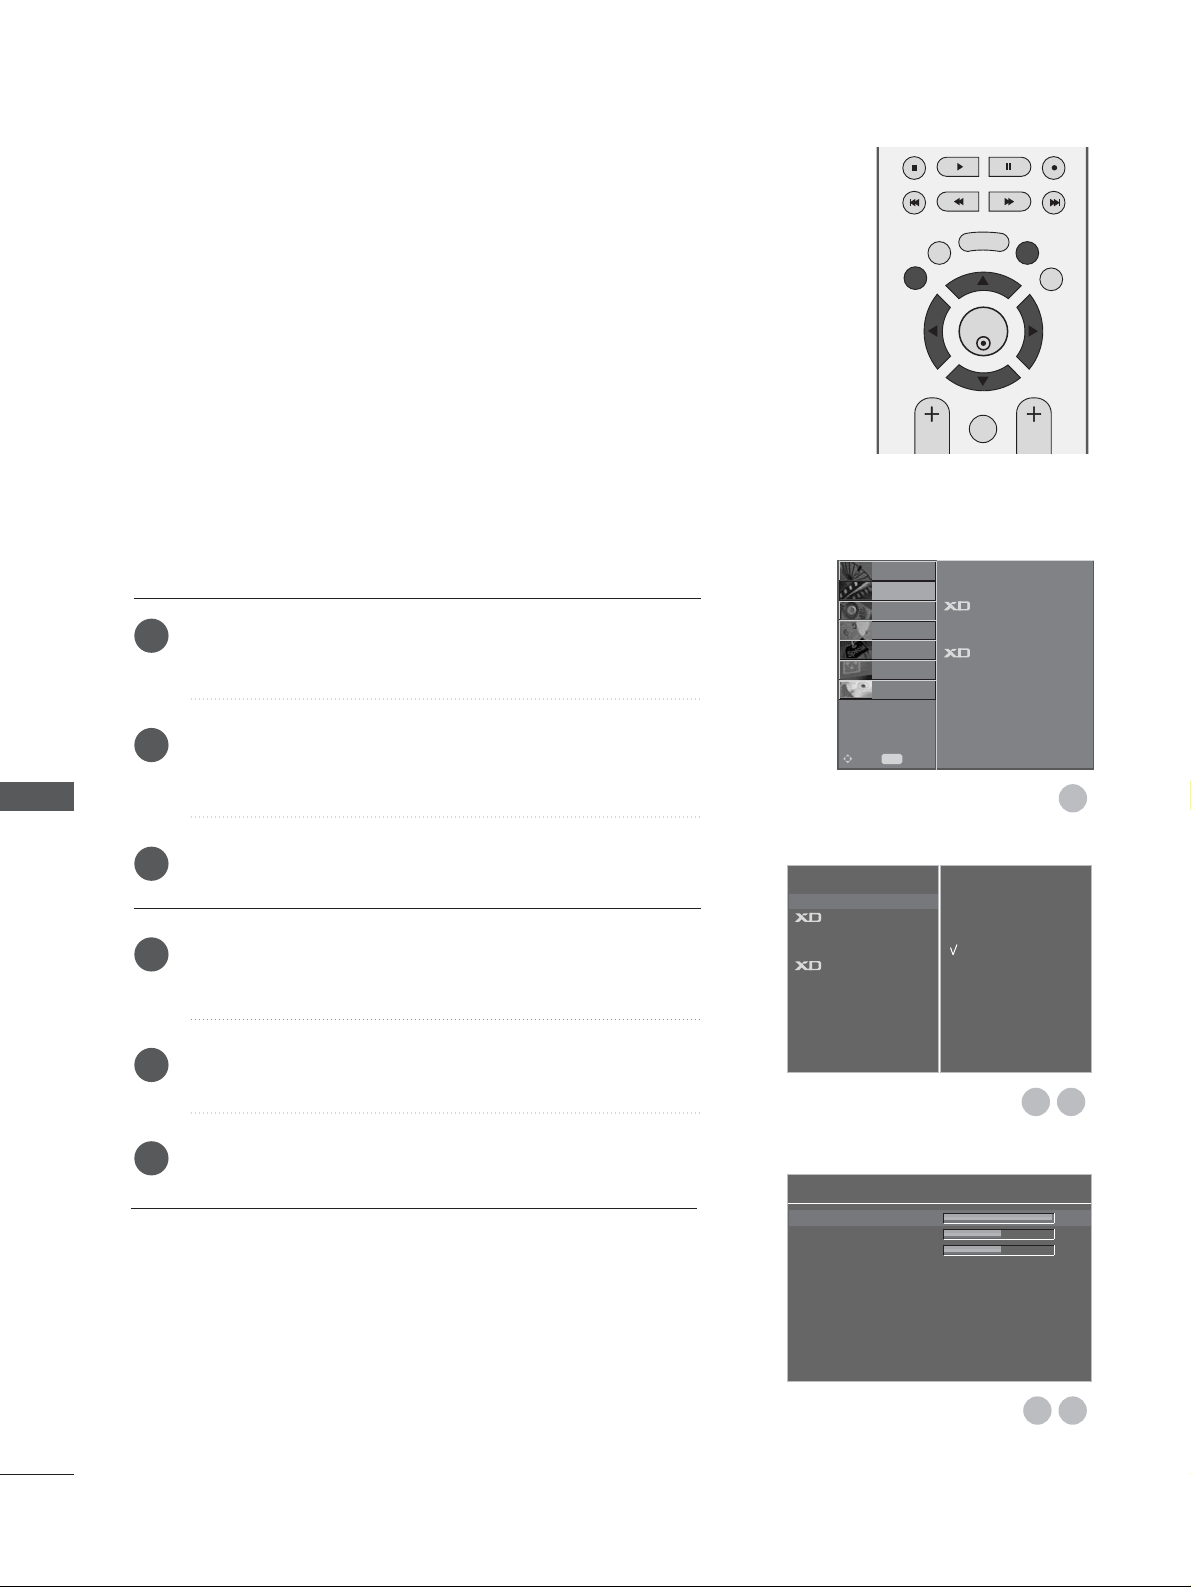
76
PICTURE CONTROL
Picture Mode
Colour Temperature
G
Advanced
Picture Reset
Demo
Cool
Medium
Warm
User
Red 40 G
Green 0
Blue 0
User
OK
EXIT
TIME
SHIFT
TIME
SHIFT
VOL PR
GUIDE
BACK MENU
DVR
MARK
FAV
1
To adjust red, green, blue to any colour temperature you prefer.
Colour Tone - User option
Press the
MMEENN UU
button and then
DD
or
EE
button to select
the
PICTURE menu.
Press the
GG
button and then
DD
or
EE
button to select
Colour Temperature.
Press the
GG
button and then
DD
or
EE
button to select User.
Press the
GG
button and then
DD
or
EE
button to select Red,
Green or Blue.
Press the
FF
or
GG
button to make appropriate adjustments.
Press the
EEXXIITT
button to return to normal TV viewing.
1
2
3
4
5
6
32
54
Picture Mode
Colour Temperature
Advanced
Picture Reset
Demo
SETUP
O
AUDIO
O
TIME
O
OPTION
O
SCREEN
O
D V R
O
Prev.
MENU
Move
PICTURE
G
PICTURE CONTROL
Page 79
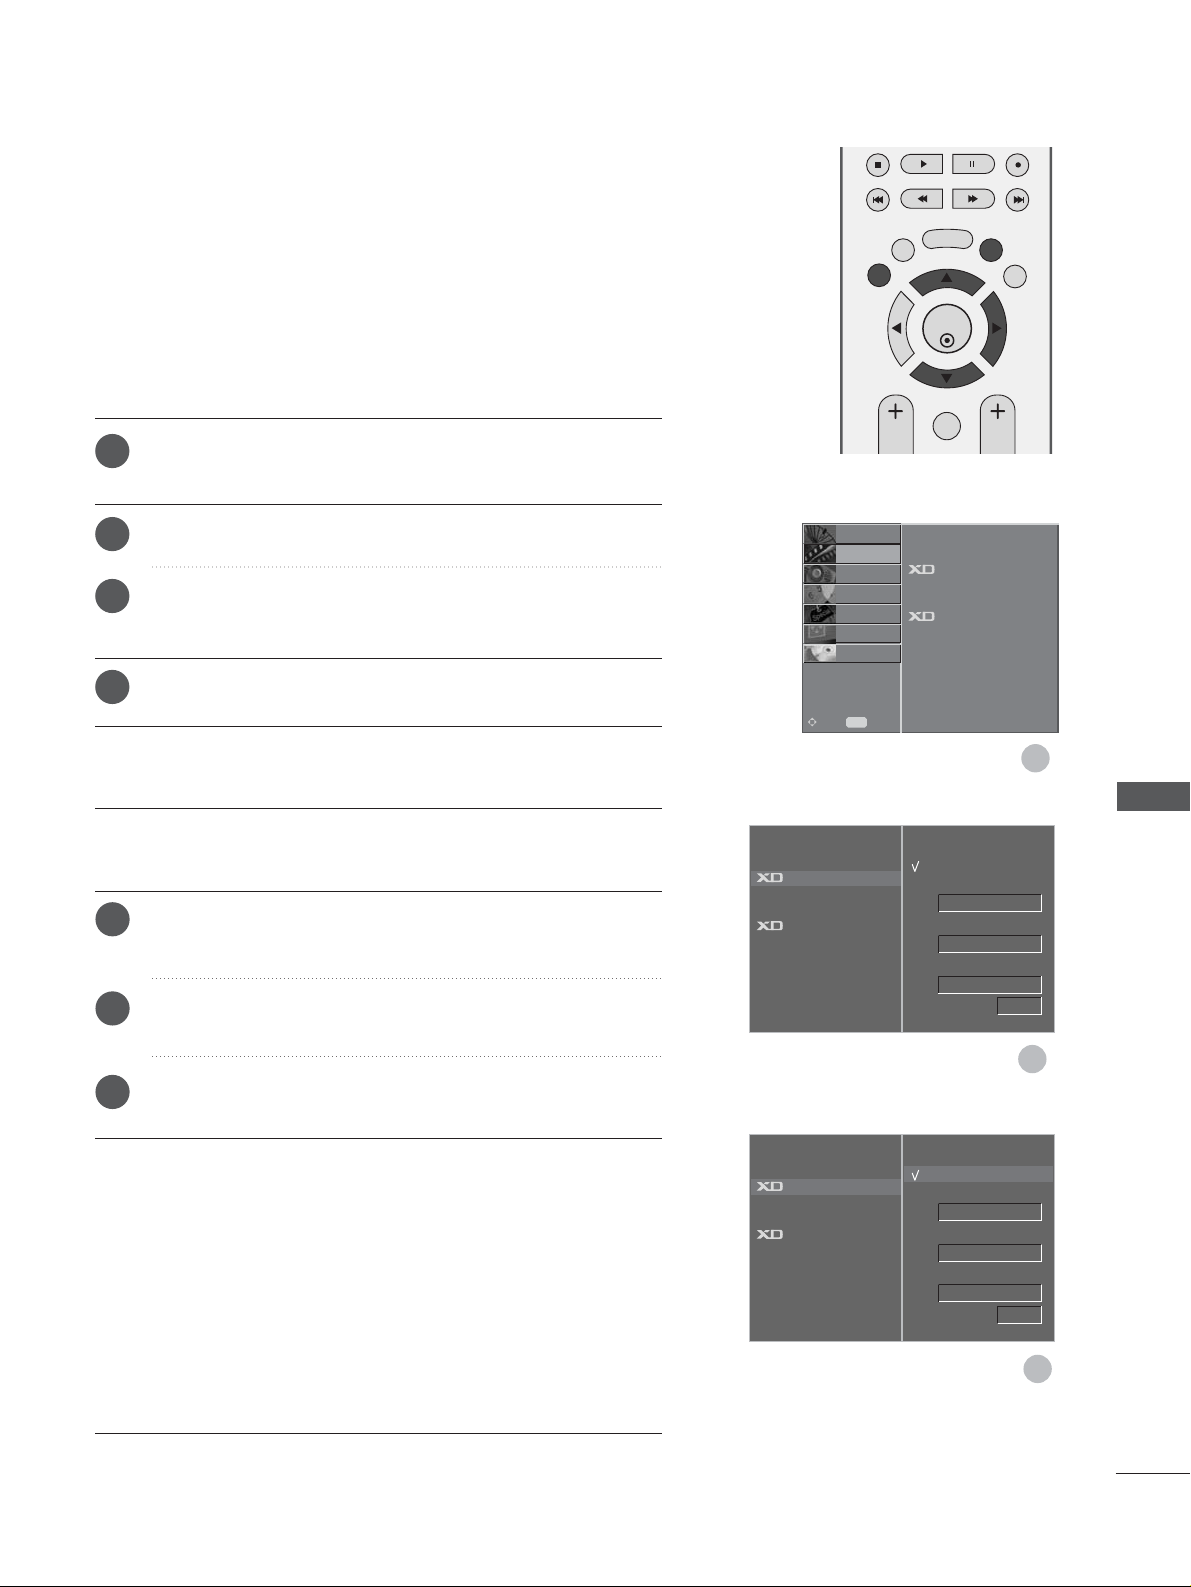
77
PICTURE CONTROL
AA
XXDD CCoo nn tt rraa sstt ::
Optimizing the contrast automatically
according to the brightness of the reflection.
AA
XXDD CCoo ll oo uurr ::
Adjusting the colours of the reflection
automatically to reproduce as closely as possible to natural colours.
AA
XXDD NN RR
: Removing the noise up to the point where it
does not damage the original picture.
AA
MMPPEEGG NNRR
: To reduce the picture noise which may
appear on the screen while watching the TV.
Picture Mode
Colour Temperature
G
Advanced
Picture Reset
Demo
Auto
Manual
XD Contrast
XD Colour
XD NR
MPEG NR
0
On
On
Low
Picture Mode
Colour Temperature
Advanced
Picture Reset
Demo
OK
EXIT
TIME
SHIFT
TIME
SHIFT
VOL PR
GUIDE
BACK MENU
DVR
MARK
FAV
1
2
XD - PICTURE IMPROVEMENT TECHNOLOGY
3
Press the MENU button and then
DD
or
EE
button to select
the
PICTURE menu.
Press the
GG
button and then
DD
or
EE
button to select XD.
Press the
GG
button and then
DD
or
EE
button to select
Auto or Manual.
Press the
EEXXII TT
button to return to normal TV viewing.
* Selecting the Manual
This menu is activated after selecting the
User1
or
User2
of
PPiiccttuurree
MM oo dd ee
.
Press theGGbutton and then DDorEEbutton to select
XXDD
Contrast, XD Colour, XD NR or MPEG NR.
Press the
GG
button and then DDorEEbutton to select On
or Off.
Press the
EEXXIITT
button to return to normal TV viewing.
XD is LG electronic's unique picture improving technology to
display a real HD source through an advanced digital signal processing algorithm.
It’s not available to use this function in RGB-PC mode.
1
2
3
4
1
2
3
Auto
Manual
G
XD Contrast
XD Colour
XD NR
MPEG NR
0
On
On
Low
Picture Mode
Colour Temperature
Advanced
Picture Reset
Demo
SETUP
O
AUDIO
O
TIME
O
OPTION
O
SCREEN
O
D V R
O
Prev.
MENU
Move
PICTURE
G
Page 80
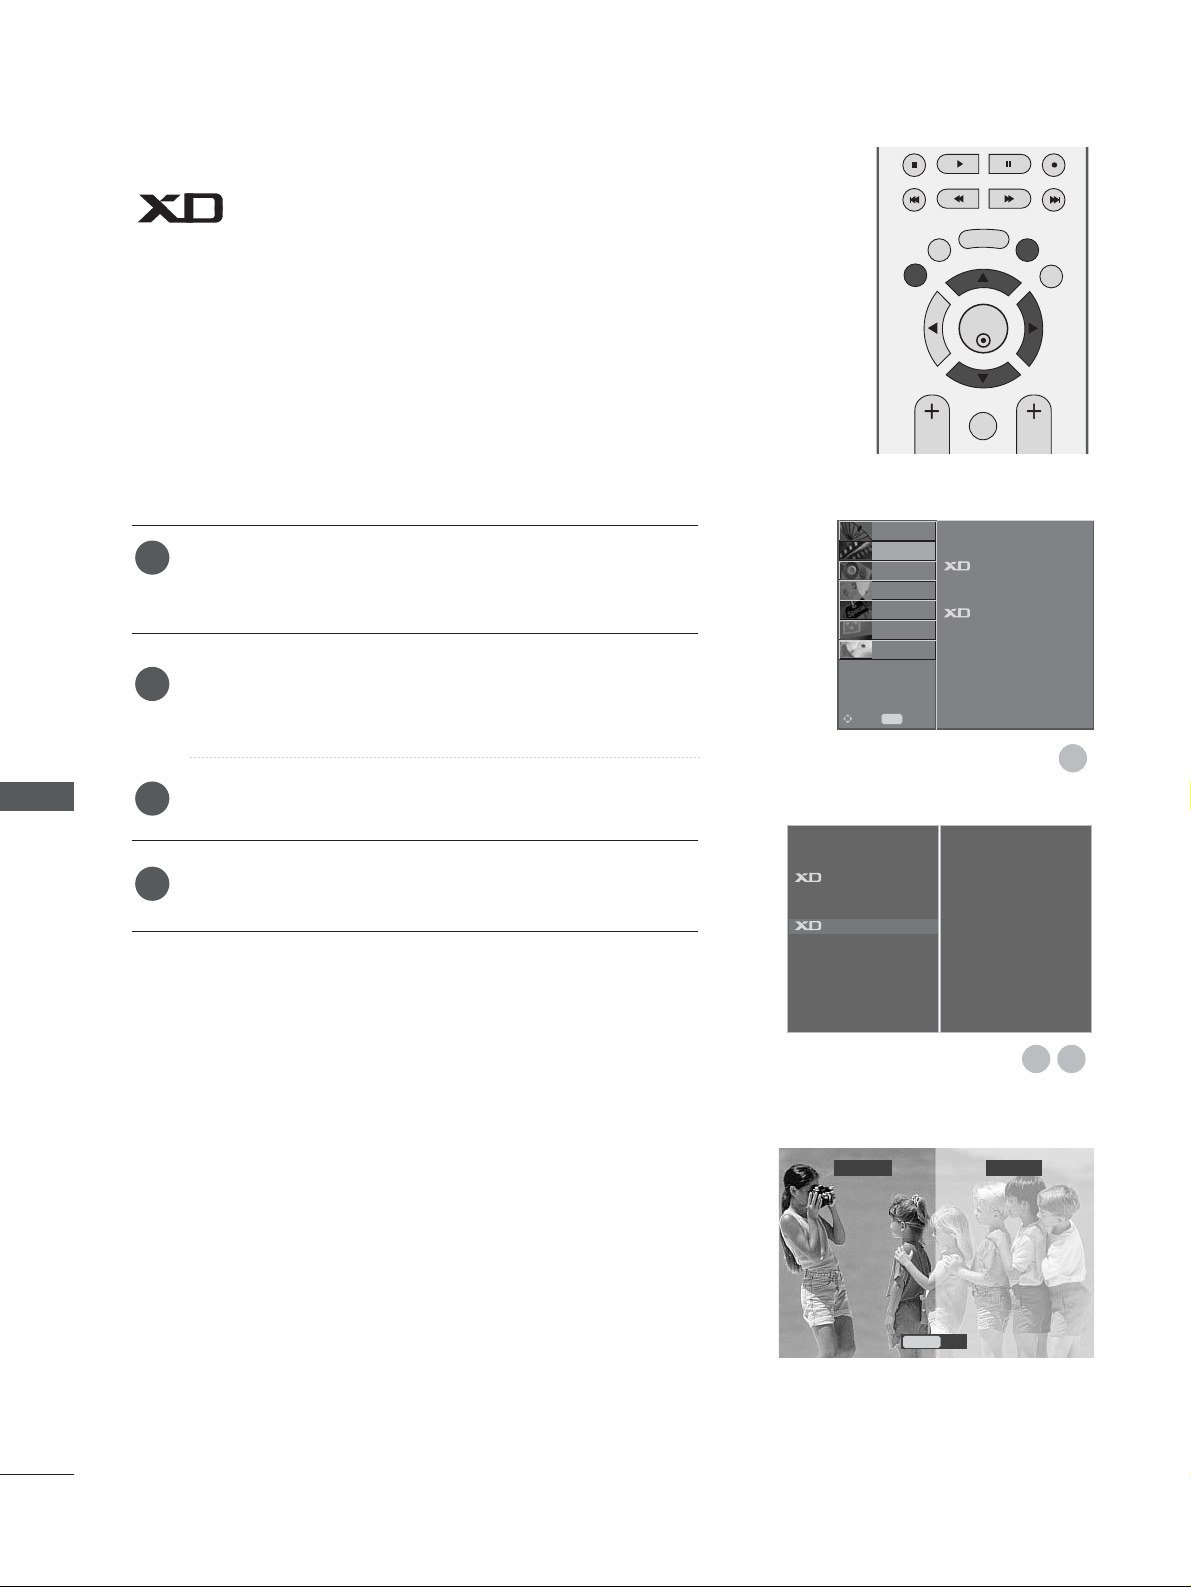
78
PICTURE CONTROL
DEMO
Use it to see the difference between XD Demo on and XD
Demo off.
It’s not available to use this function in RGB[PC], HDMI[PC]
mode.
Press the MENU button and then
DD
or
EE
button to select
the
PICTURE menu.
Press the MENU button and then
DD
or
EE
button to select
XD Demo.
Press the GGbutton to begin XD Demo.
To s to p
XXDD DD eemmoo
, press the
MMEENN UU
or
EEXXIITT
button.
1
2
3
4
Picture Mode
Colour Temperature
Advanced
Picture Reset
Demo
G
To Start
OK
EXIT
TIME
SHIFT
TIME
SHIFT
VOL PR
GUIDE
BACK MENU
DVR
MARK
FAV
1
• XD Demo
XD™Off XD™ On
Exit
Menu
32
Picture Mode
Colour Temperature
Advanced
Picture Reset
Demo
SETUP
O
AUDIO
O
TIME
O
OPTION
O
SCREEN
O
D V R
O
Prev.
MENU
Move
PICTURE
G
PICTURE CONTROL
Page 81
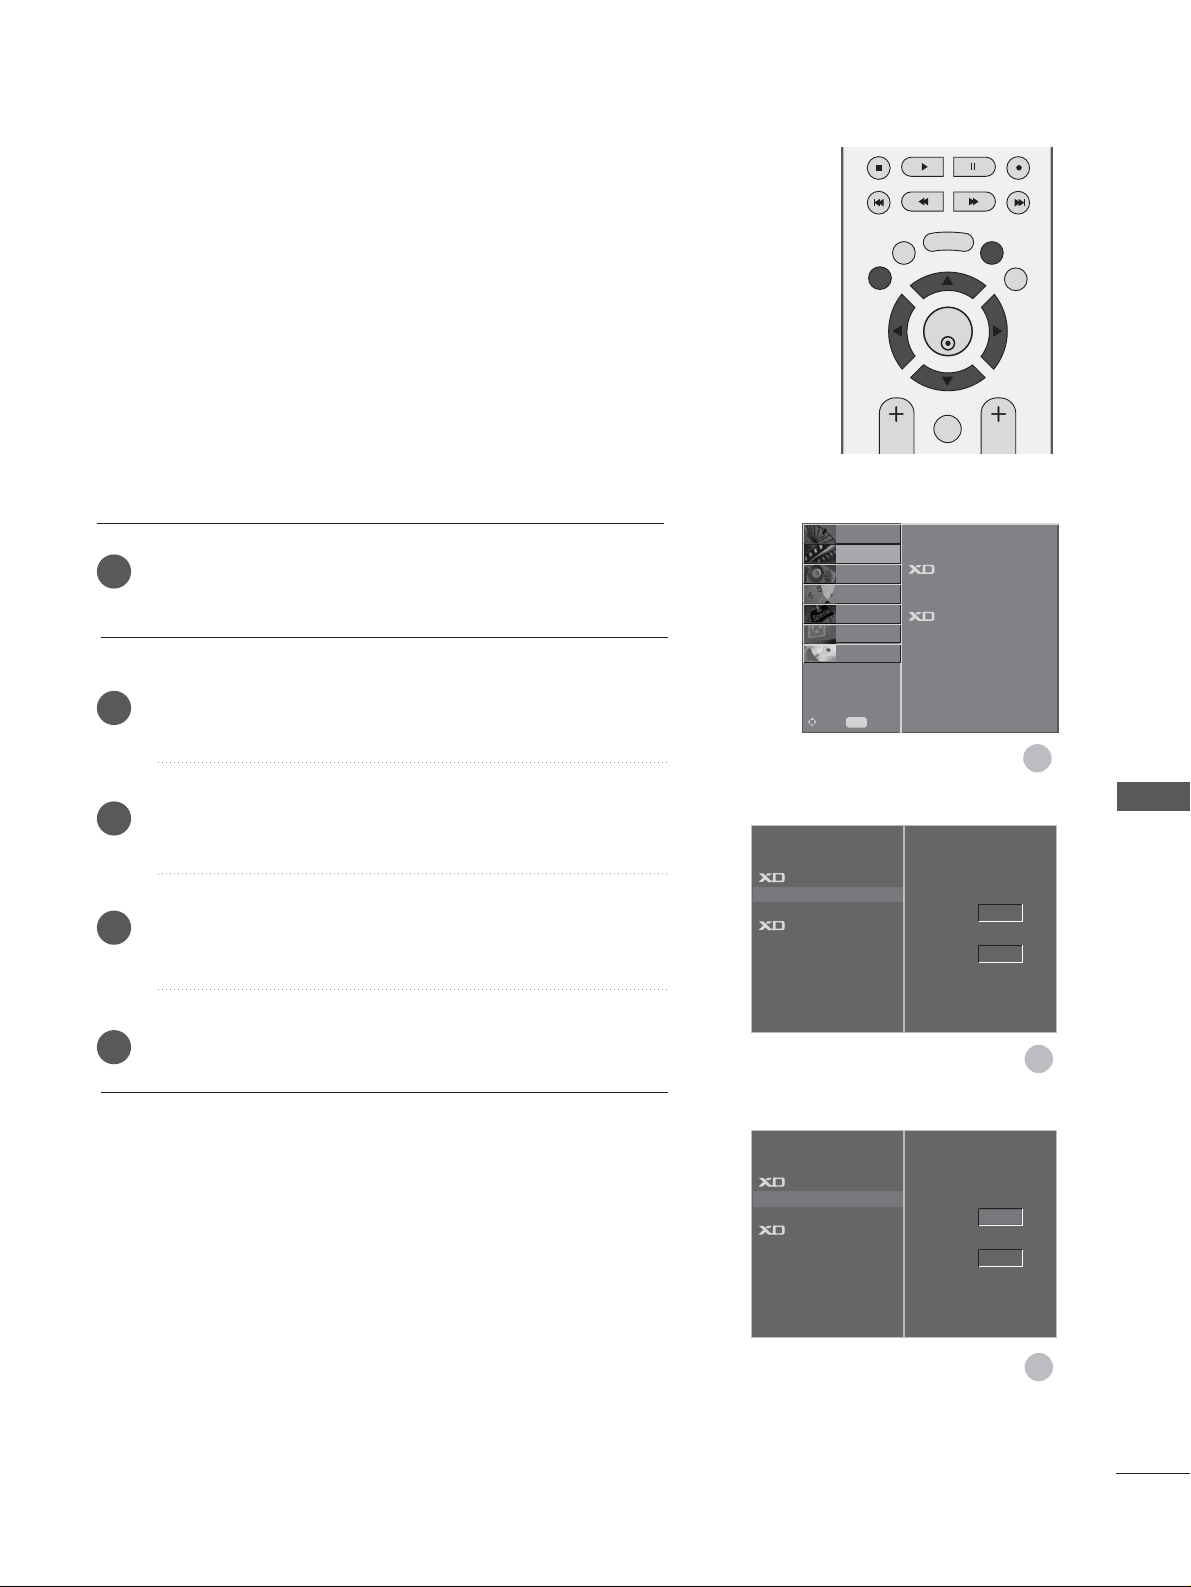
79
PICTURE CONTROL
Picture Mode
Colour Temperature
Advanced G
Picture Reset
Demo
Cinema
Black Level
Off
Low
Picture Mode
Colour Temperature
Advanced
Picture Reset
Demo
Cinema
Black Level
Low
OK
EXIT
TIME
SHIFT
TIME
SHIFT
VOL PR
GUIDE
BACK MENU
DVR
MARK
FAV
1
2
3
ADVANCED - CINEMA
Set up the TV for the best picture appearance for viewing
movies.
This feature operates only in TV, AV, S-Video and
Component 480i/576i mode.
It’s not available to use this function on playing recorded
programme.
Press the
MMEE NNUU
button and then
DD
or
EE
button to select
the
PICTURE menu.
Press the
GG
button and then
DD
or
EE
button to select Advanced.
Press the
GG
button and then
DD
or
EE
button to select Cinema.
Press the
GG
button and then
FF
or
GG
button to select On or Off.
Press the
EEXXII TT
button to return to normal TV viewing.
1
2
3
4
5
On
GF
Picture Mode
Colour Temperature
Advanced
Picture Reset
Demo
SETUP
O
AUDIO
O
TIME
O
OPTION
O
SCREEN
O
D V R
O
Prev.
MENU
Move
PICTURE
G
Page 82
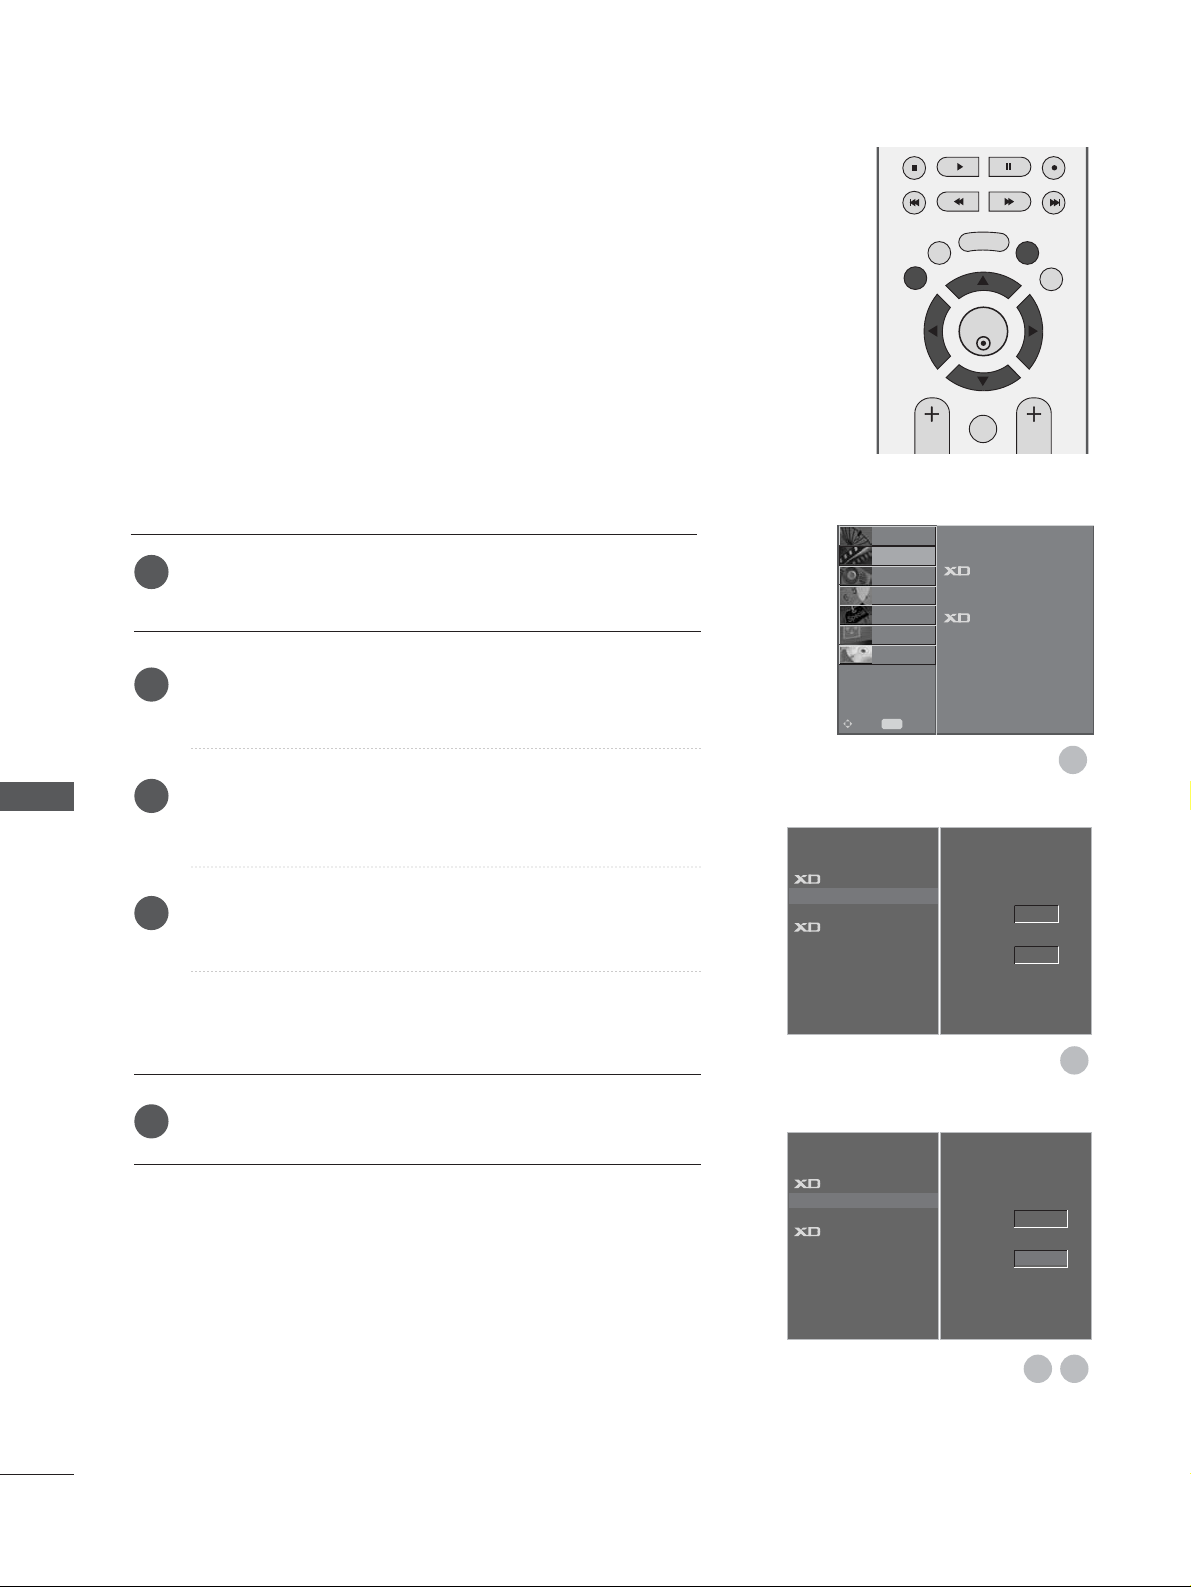
80
PICTURE CONTROL
OK
EXIT
TIME
SHIFT
TIME
SHIFT
VOL PR
GUIDE
BACK MENU
DVR
MARK
FAV
ADVANCED - BLACK(DARKNESS) LEVEL
When you watch the movie, this function adjusts the set to the
best picture appearance. Adjusting the contrast and the brightness of the screen using the black level of the screen.
This function works in the following mode: AV (NTSC-M), SVideo (NTSC-M) or HDMI.
It’s not available to use this function on playing recorded programme.
Press the
MMEENN UU
button and then
DD
or
EE
button to select
the
PICTURE menu.
Press the
GG
button and then
DD
or
EE
button to select
Advanced.
Press the
GG
button and then
DD
or
EE
button to select Black
Level.
Press the
GG
button and then
FF
or
GG
button to select Low
or High.
AA
LL ooww
::
The black level of the screen gets darker.
AA
HHiigg hh
::
The black level of the screen gets brighter.
Press the
EEXXIITT
button to return to normal TV viewing.
1
2
3
4
5
Picture Mode
Colour Temperature
Advanced G
Picture Reset
Demo
Cinema
Black Level
Off
Low
Picture Mode
Colour Temperature
Advanced
Picture Reset
Demo
Cinema
Black Level
1
2
43
Off
Low
GF
Picture Mode
Colour Temperature
Advanced
Picture Reset
Demo
SETUP
O
AUDIO
O
TIME
O
OPTION
O
SCREEN
O
D V R
O
Prev.
MENU
Move
PICTURE
G
PICTURE CONTROL
Page 83
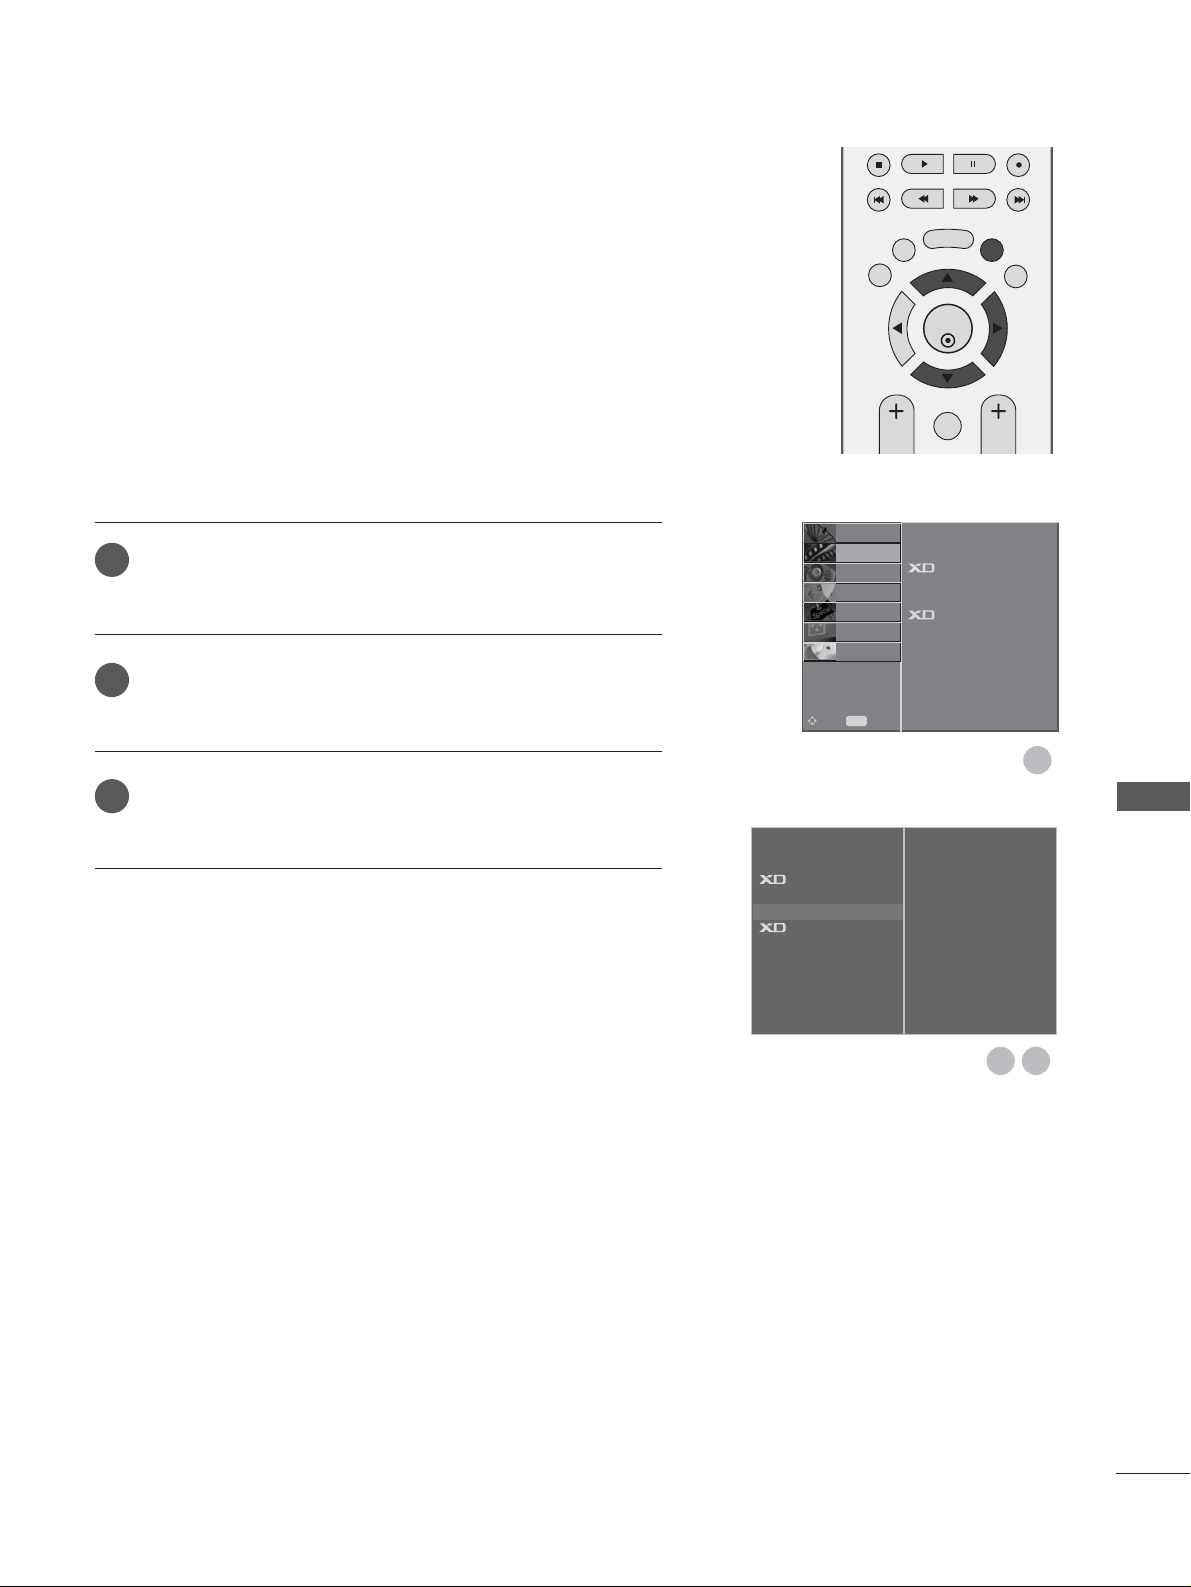
81
PICTURE CONTROL
OK
EXIT
TIME
SHIFT
TIME
SHIFT
VOL PR
GUIDE
BACK MENU
DVR
MARK
FAV
PICTURE RESET
Press the
MMEENN UU
button and then
DD
or
EE
button to select
the
PICTURE menu.
Press the
GG
button and then
DD
or
EE
button to select
Picture Reset.
Press the
GG
button to initialise the adjusted value.
Returns to the default settings Picture Mode, Colour
Temperature, XD, Advanced at the factory.
1
2
3
Picture Mode
Colour Temperature
Advanced
Picture Reset
G
Demo
To Set
1
32
Picture Mode
Colour Temperature
Advanced
Picture Reset
Demo
SETUP
O
AUDIO
O
TIME
O
OPTION
O
SCREEN
O
D V R
O
Prev.
MENU
Move
PICTURE
G
Page 84
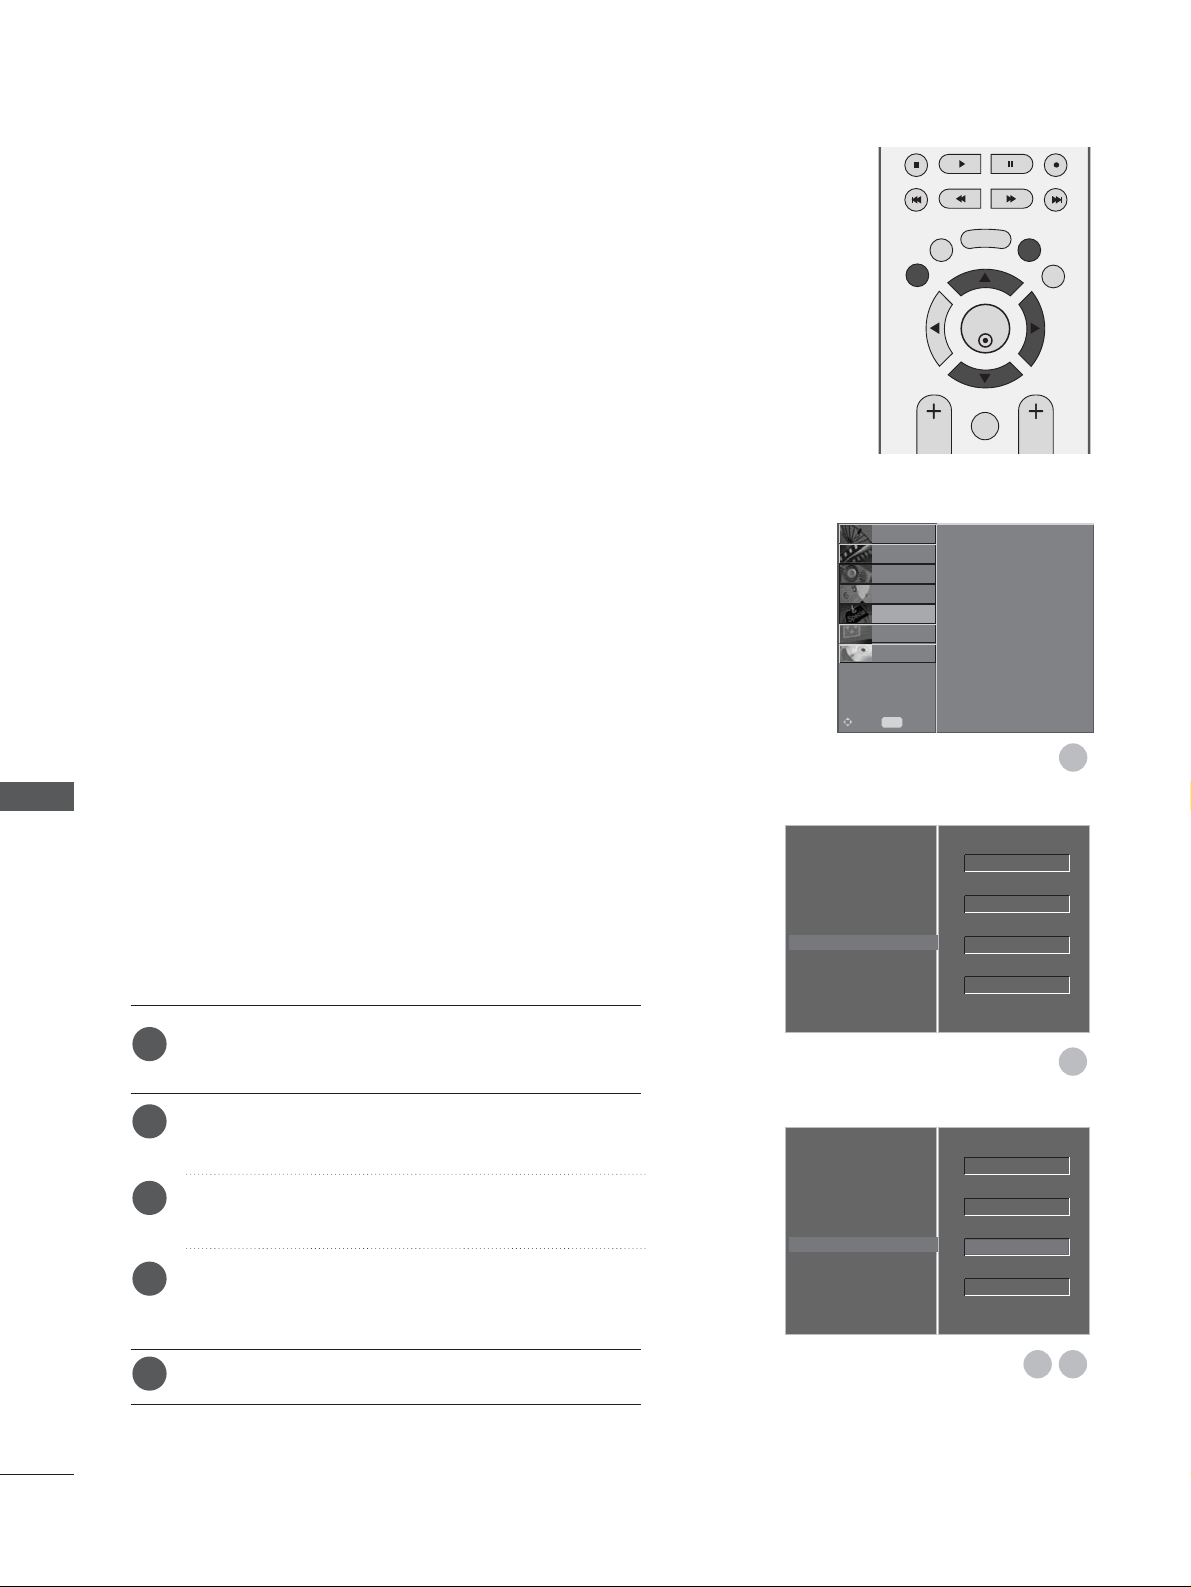
82
PICTURE CONTROL
A frozen of still picture from a PC/video game displayed on
the screen for prolonged periods will result in a ghost image
remaining even when you change the image. Avoid allowing a
fixed image to remain on the set's screen for a long period of
time.
It’s not available to use this function in LCD models.
WWhhii tt ee wwaass hh
White wash removes permanent images from the screen.
Note: An excessive permanent image may be impossible to
clear entirely with White Wash.
OOrrbbii tt eerr
Orbiter may help prevent ghost images. However, it is best
not to allow any fixed image to remain on the screen. To
avoid a permanent image on the screen, the screen will
move every 2 minutes.
IInnvveerrss ii oonn
This is the function to invert the panel colour of the
screen. The panel colour is automatically inverted every 30
minutes.
Press the MENU button and then
D
or
E
button to
select the OPTION menu.
Press the
G
button and then
D
or
E
button to select
Factory Mode.
Press the
G
button and then
D
or
E
button to select
ISM Method.
Press the
G
button and then
D
or
E
button to select
either Normal, Orbiter, White wash or Inversion.
If you unnecessary to set this function, set Normal.
Press the EXIT button to return to normal TV viewing.
IMAGE STICKING MINIMIZATION (ISM) METHOD
Language
Country
Lock System
Parental Control
Input Label
SIMPLINK
Factory Mode
G
Set ID
Factory Reset
ISM Method
Low Power
OK
EXIT
TIME
SHIFT
TIME
SHIFT
VOL PR
GUIDE
BACK MENU
DVR
MARK
FAV
1
2
1
2
3
4
5
Language
Country
Lock System
Parental Control
Input Label
SIMPLINK
Factory Mode
Set ID
Factory Reset
ISM Method
Low Power
Normal
GF
43
OK
Normal
Off
1
OK
Off
1
Language
Country
Lock System
Parental Control
Input Label
SIMPLINK
Factory Mode
SETUP
O
PICTURE
O
SCREEN
O
D V R
O
Prev.
MENU
Move
AUDIO
O
TIME
O
OPTION
G
PICTURE CONTROL
Page 85
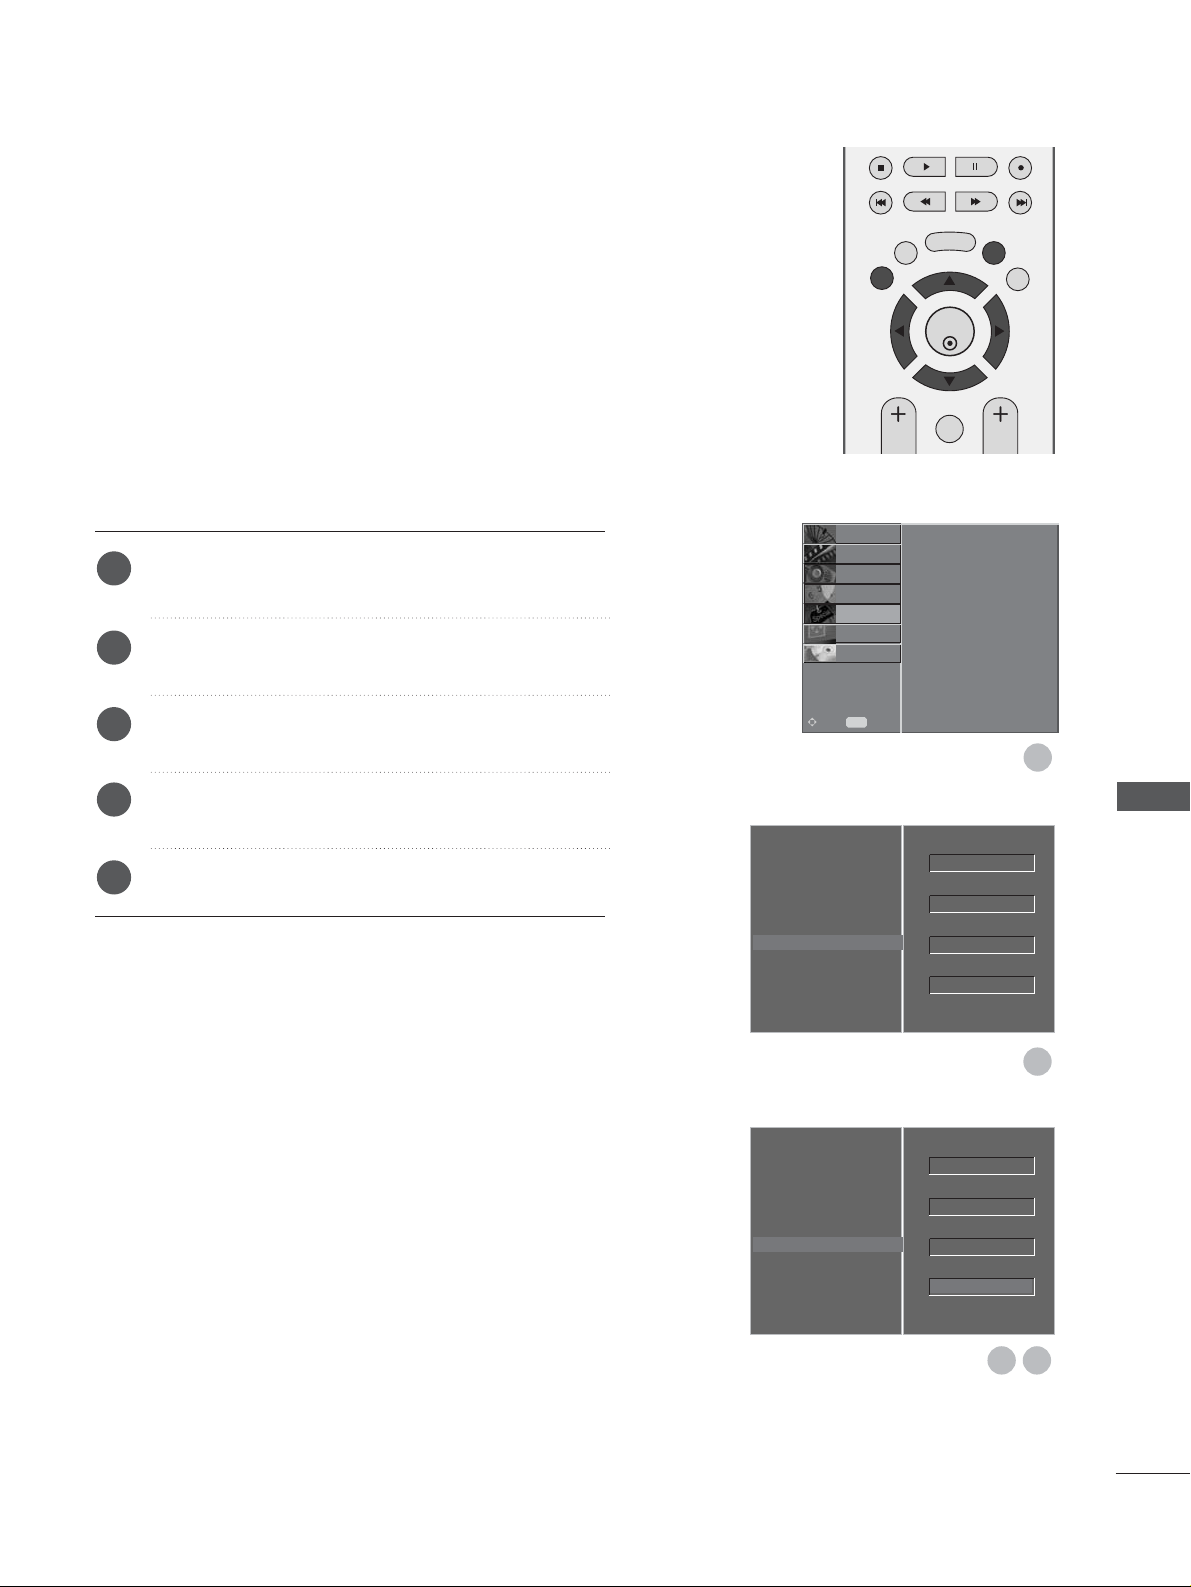
83
PICTURE CONTROL
This is the function to reduce the power consumption of the
set.
It’s not available to use this function in LCD TV models.
Press the MENU button and then
D
or
E
button to
select the OPTION menu.
Press the
G
button and then
D
or
E
button to select
Factory Mode.
Press the
G
button and then
D
or
E
button to select
Low power.
Press the
G
button and then
F
or
G
button to select
Off or On.
Press the EXIT button to return to normal TV viewing.
LOW-POWER PICTURE MODE
OK
EXIT
TIME
SHIFT
TIME
SHIFT
VOL PR
GUIDE
BACK MENU
DVR
MARK
FAV
1
2
3
4
5
Language
Country
Lock System
Parental Control
Input Label
SIMPLINK
Factory Mode
G
Set ID
Factory Reset
ISM Method
Low Power
1
2
Language
Country
Lock System
Parental Control
Input Label
SIMPLINK
Factory Mode
Set ID
Factory Reset
ISM Method
Low Power
On
GF
43
OK
Normal
Off
1
OK
Normal
1
Language
Country
Lock System
Parental Control
Input Label
SIMPLINK
Factory Mode
SETUP
O
PICTURE
O
SCREEN
O
D V R
O
Prev.
MENU
Move
AUDIO
O
TIME
O
OPTION
G
Page 86
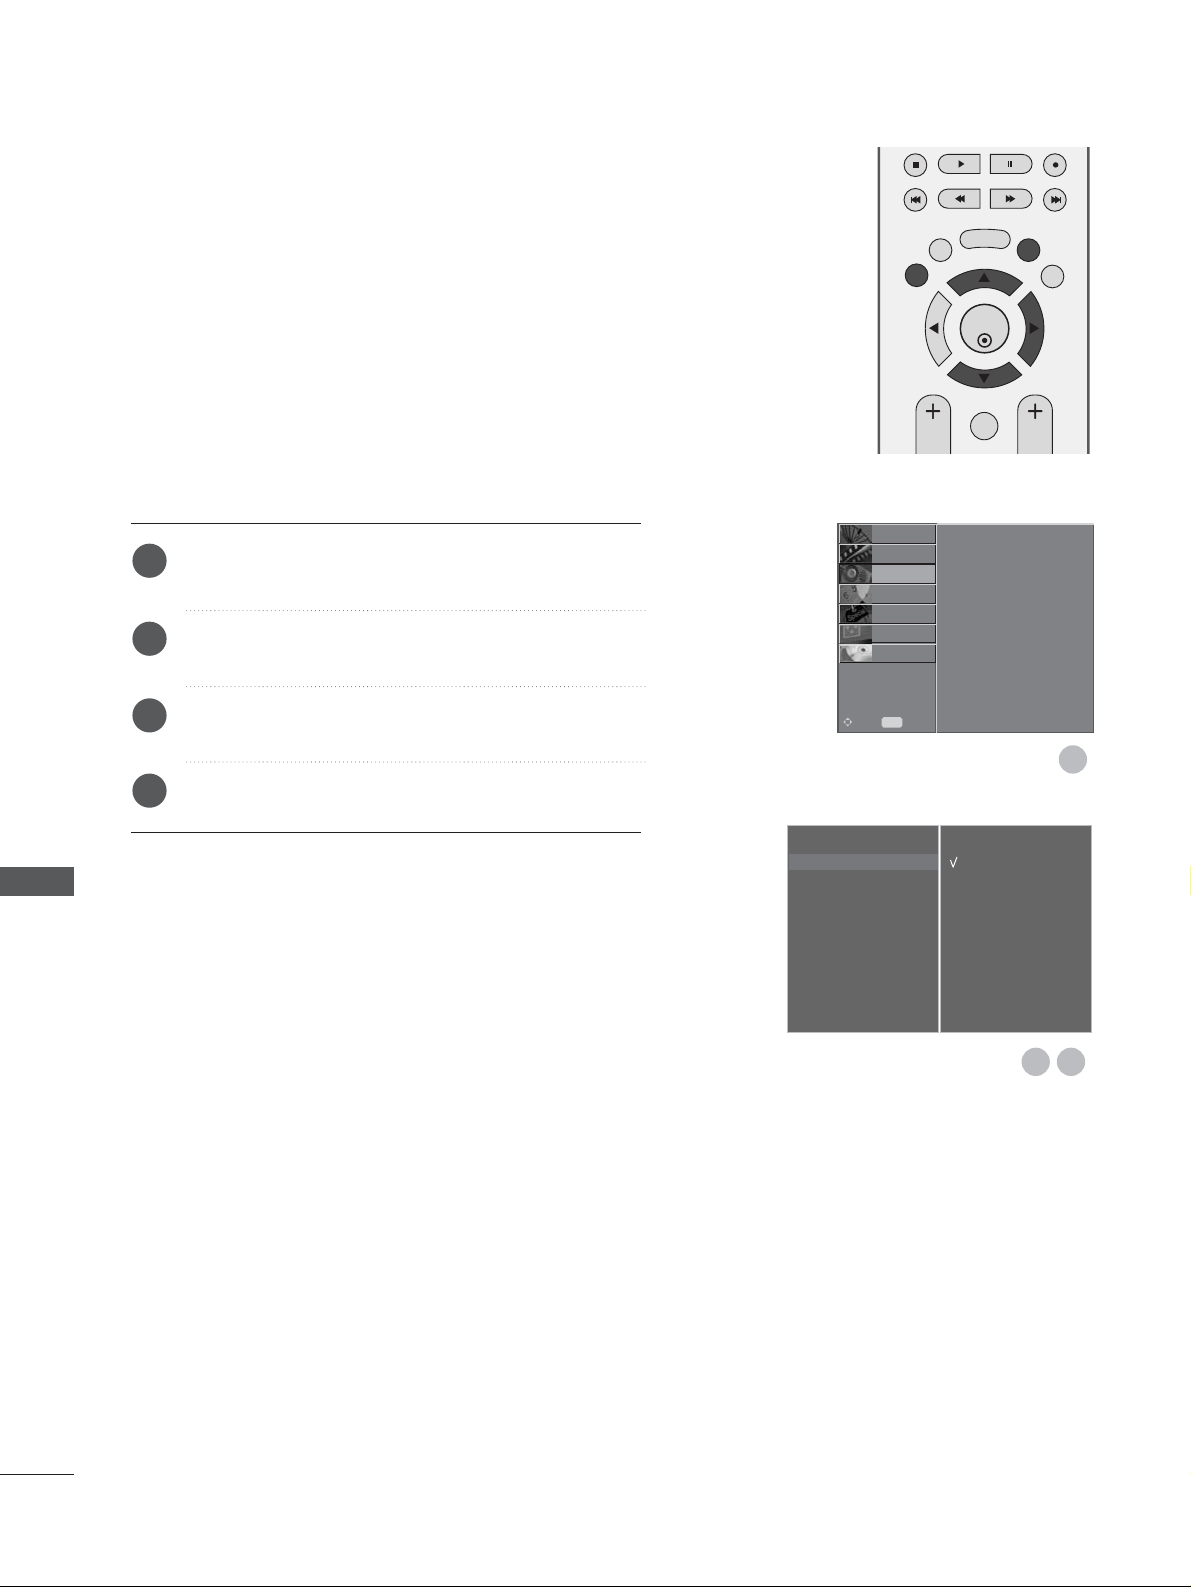
84
SOUND & LANGUAGE CONTROL
OK
EXIT
TIME
SHIFT
TIME
SHIFT
VOL PR
GUIDE
BACK MENU
DVR
MARK
FAV
1
AVL automatically keeps on an equal volume level even if
you change programmes.
Press the MENU button and then
D
or
E
button to
select the AUDIO menu.
Press the
G
button and then
D
or
E
button to select
Auto Volume.
Press the
G
button and then
D
or
E
button to select
Off or On.
Press the EXIT button to return to normal TV viewing.
AUTO VOLUME LEVELER
Sound Mode
Auto Volume
G
Balance 0
TV Speaker
Digital Audio Out
Off
On
1
2
3
4
32
Sound Mode
Auto Volume
Balance 0
TV Speaker
Digital Audio Out
SETUP
O
PICTURE
O
TIME
O
OPTION
O
SCREEN
O
D V R
O
Prev.
MENU
Move
AUDIO
G
SOUND & LANGUAGE CONTROL
Page 87
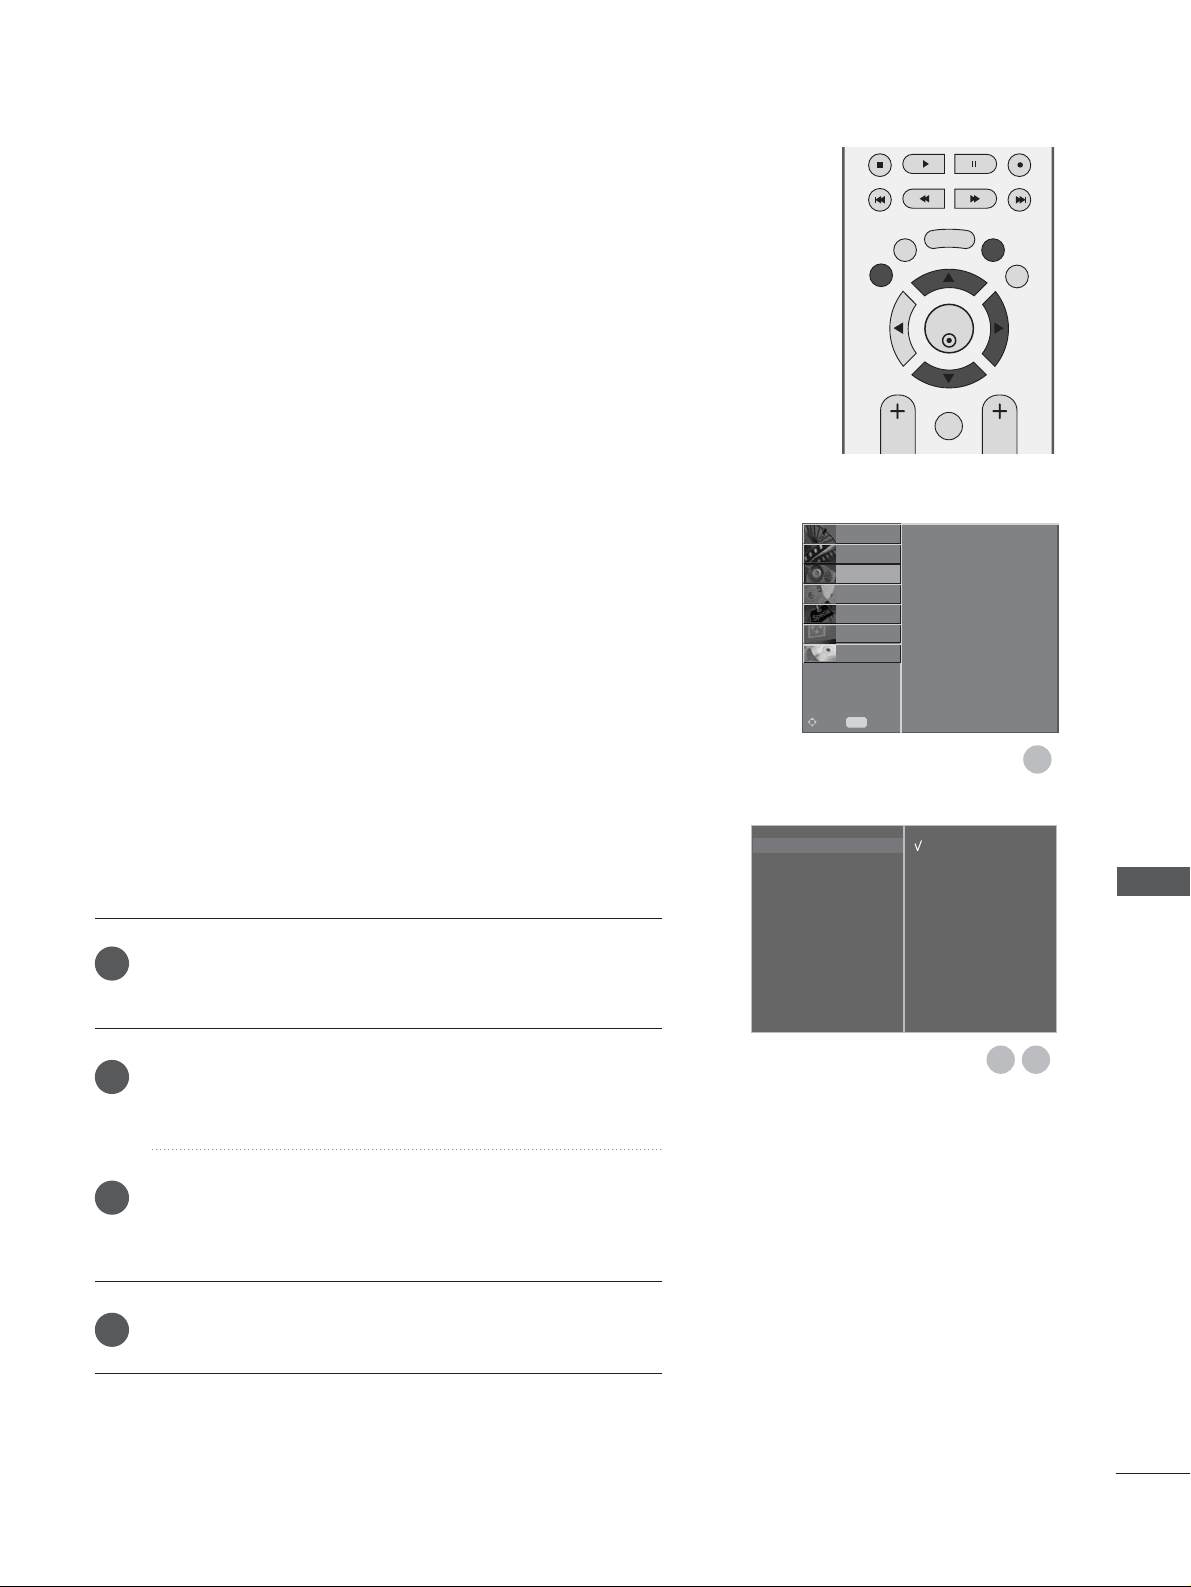
85
SOUND & LANGUAGE CONTROL
Sound Mode G
Auto Volume
Balance 0
TV Speaker
Digital Audio Out
Surround MAX
Standard
Music
Movie
Sports
User
OK
EXIT
TIME
SHIFT
TIME
SHIFT
VOL PR
GUIDE
BACK MENU
DVR
MARK
FAV
1
PRESET SOUND SETTINGS-SOUND MODE
You can select your preferred sound setting; Surround MAX,
Standard, Music, Movie or Sports and you can also adjust the
sound frequency of the equalizer.
Sound Mode lets you enjoy the best sound without any Special
adjustment because the TV sets the appropriate sound options
based on the programme content.
SS uurr rr oouunndd MMAAXX, SS tt aannddaarrdd, MMuuss iicc, MMoo vvii ee
, and
SS pp oorrttss
are
preset for good sound quality at the factory and are not
adjustable.
SS uurr rr oouunndd MMAAXX
Select this option to sound realistic.
SS tt aannddaarrdd
The most commanding and natural audio.
MMuuss iicc
Select this option to enjoy the original sound when
listening to the music.
MMoo vvii ee
Select this option to enjoy sublime sound.
SS pp oo rr tt ss
Select this option to watch sports broadcasting.
UUss ee rr
Select this option to use the user-defined audio settings.
Press the
MMEENN UU
button and then
DDorEE
button to select
the
AUDIO menu.
Press the
GG
button and then DDorEEbutton to select
Sound Mode.
Press the
GG
button and then DDorEEbutton to select
Surround MAX, Standard, Music, Movie, Sports or
User
.
Press the
EEXXIITT
button to return to normal TV viewing.
1
2
3
4
32
Sound Mode
Auto Volume
Balance 0
TV Speaker
Digital Audio Out
SETUP
O
PICTURE
O
TIME
O
OPTION
O
SCREEN
O
D V R
O
Prev.
MENU
Move
AUDIO
G
Page 88
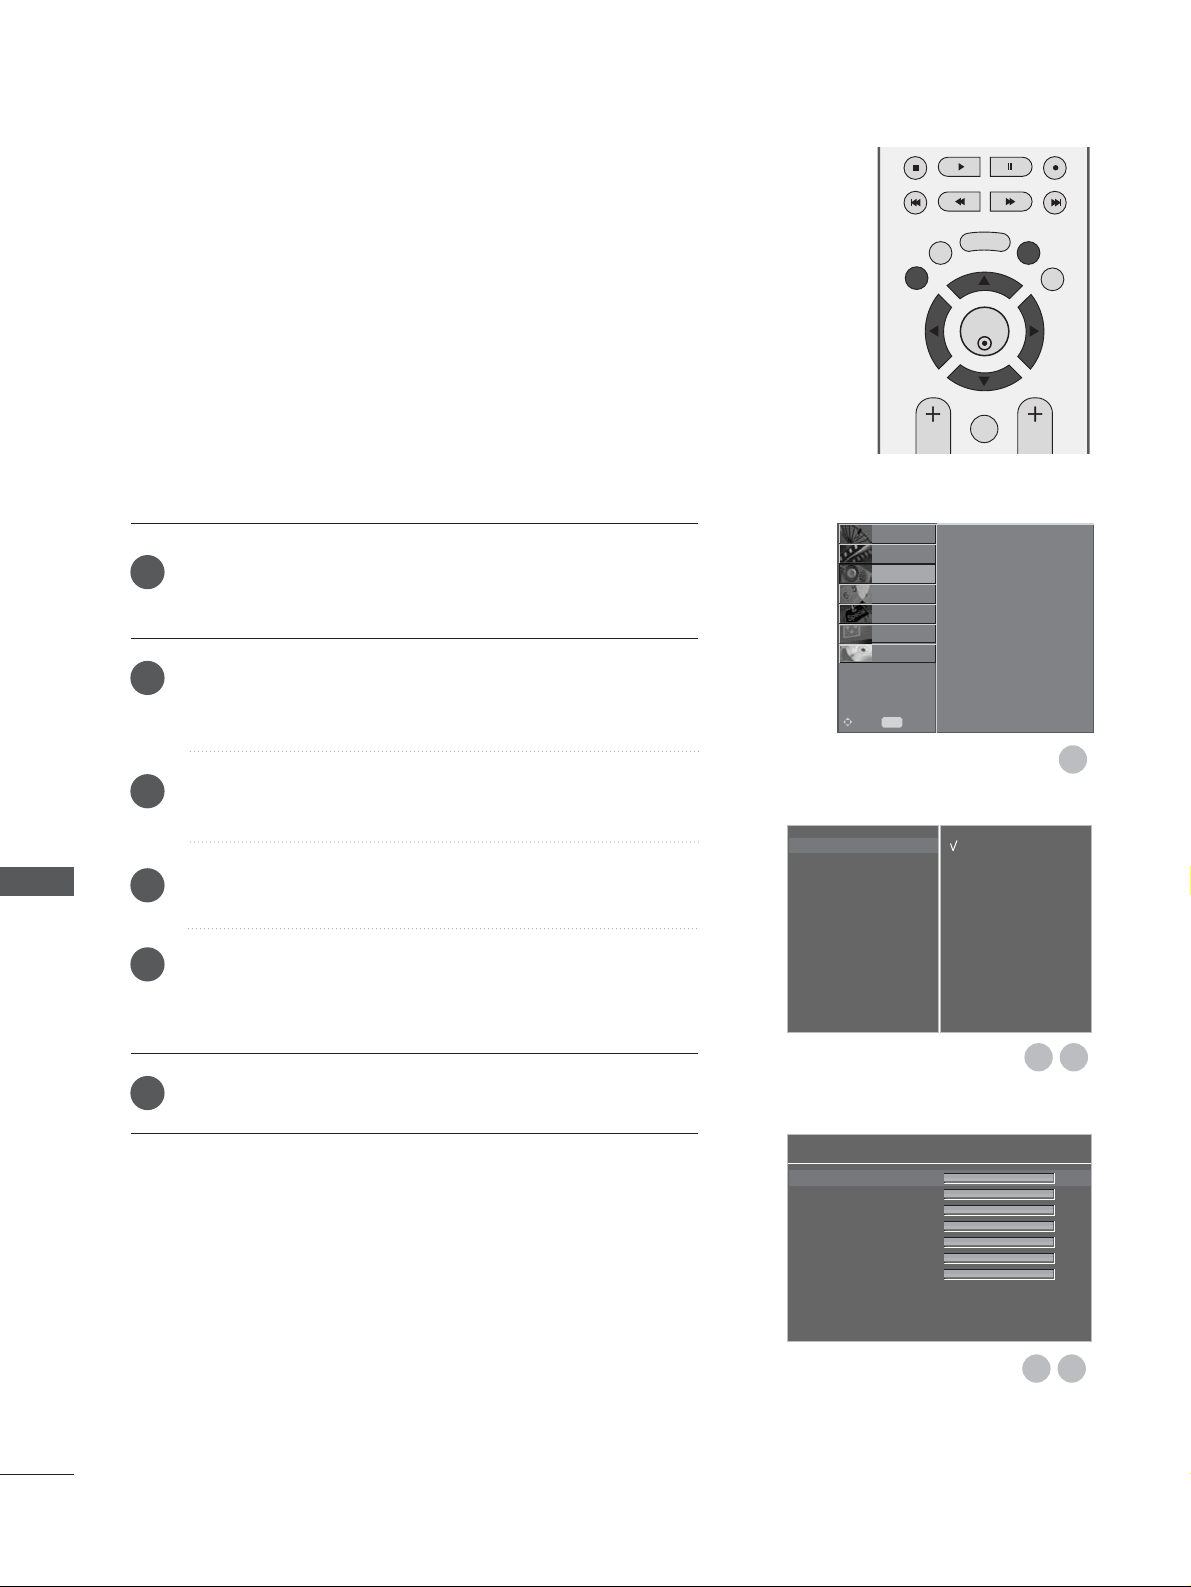
86
SOUND & LANGUAGE CONTROL
Sound Mode G
Auto Volume
Balance 0
TV Speaker
Digital Audio Out
Surround MAX
Standard
Music
Movie
Sports
User
120Hz FG
200Hz
500Hz
1.2KHz
3KHz
7.5KHz
12KHz
User
OK
EXIT
TIME
SHIFT
TIME
SHIFT
VOL PR
GUIDE
BACK MENU
DVR
MARK
FAV
1
SOUND SETTING ADJUSTMENT -USER MODE
Press the
MMEENN UU
button and then DDorEEbutton to select
the
AUDIO menu.
Press the
GG
button and then DDorEEbutton to select
Sound Mode.
Press the
GG
button and then DDorEEbutton to select User.
Press the
GG
button.
Select a sound band by pressing the
FForGG
button.
Make appropriate sound level with the
DDorEE
button.
Press the
EEXXIITT
button to return to normal TV viewing.
Adjust the sound equalizer.
1
2
3
4
5
6
32
54
Sound Mode
Auto Volume
Balance 0
TV Speaker
Digital Audio Out
SETUP
O
PICTURE
O
TIME
O
OPTION
O
SCREEN
O
D V R
O
Prev.
MENU
Move
AUDIO
G
SOUND & LANGUAGE CONTROL
Page 89
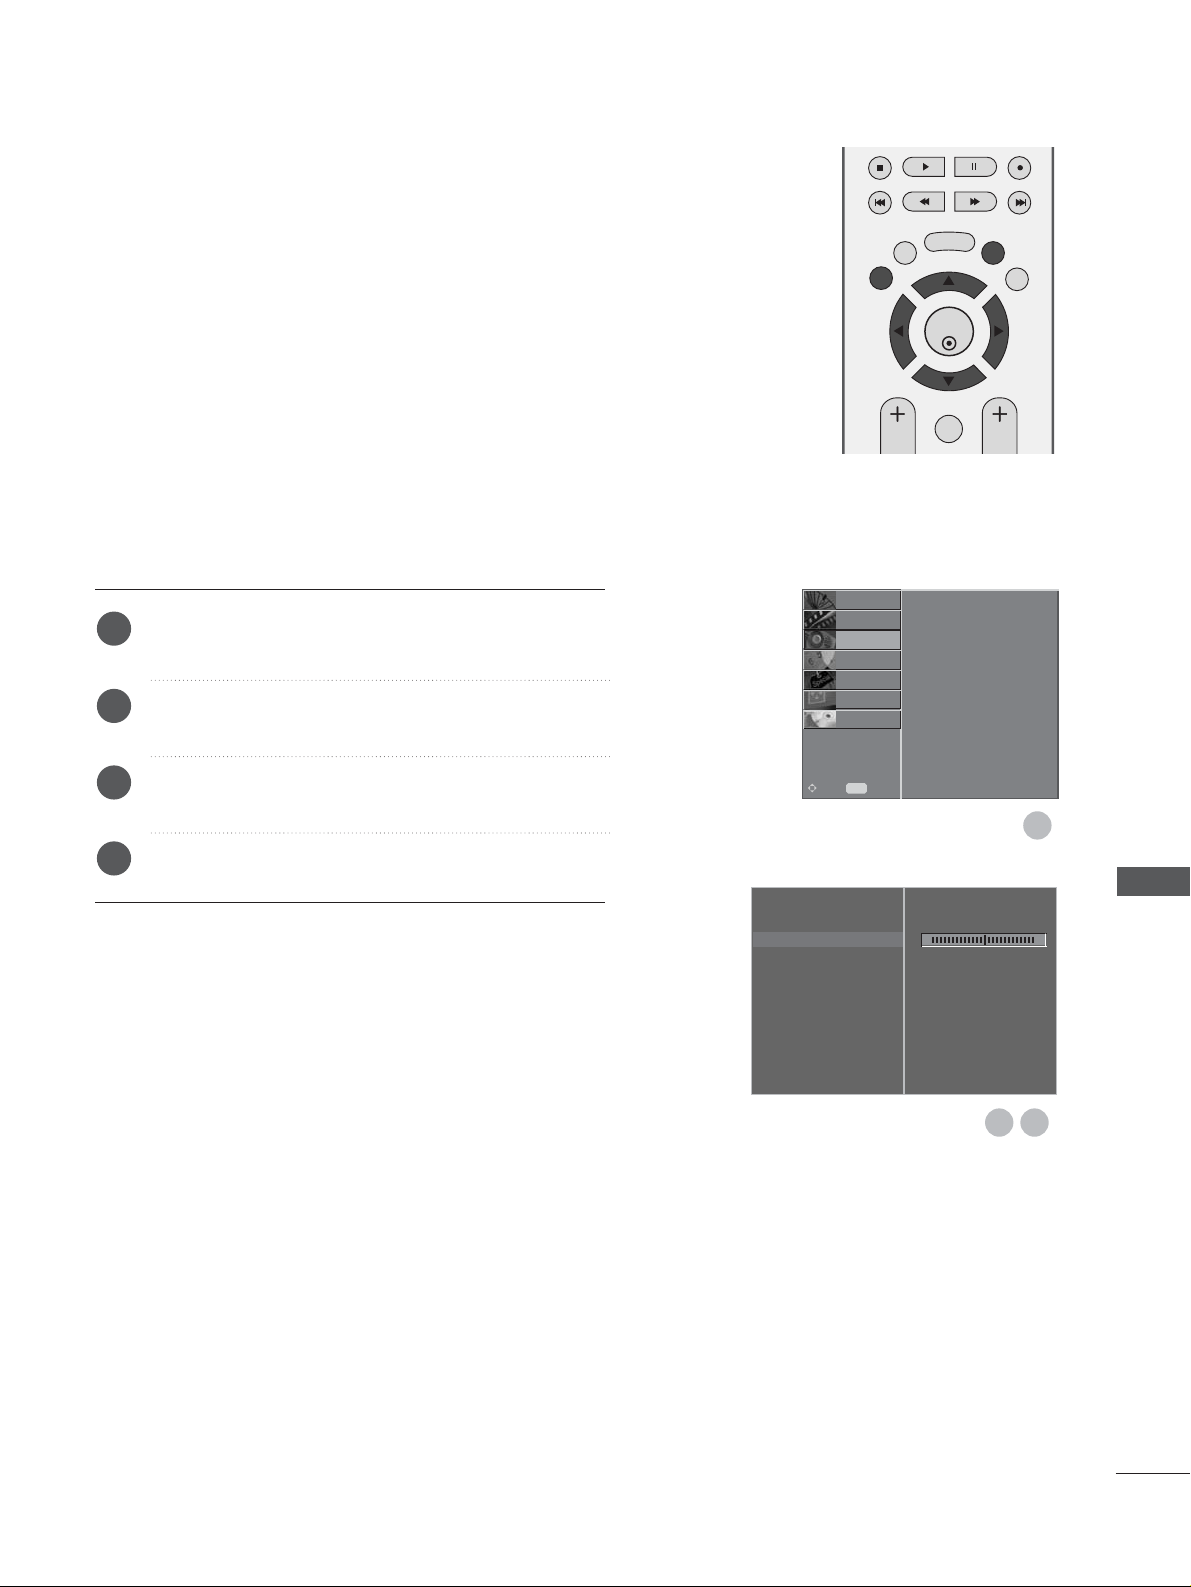
87
SOUND & LANGUAGE CONTROL
OK
EXIT
TIME
SHIFT
TIME
SHIFT
VOL PR
GUIDE
BACK MENU
DVR
MARK
FAV
1
Press the MENU button and then
D
or
E
button to
select the AUDIO menu.
Press the
G
button and then
D
or
E
button to select
Balance.
Press the
G
button and then
F
or
G
button to make
desired adjustment.
Press the EXIT button to return to normal TV viewing.
You can adjust the sound balance of speaker to the levels you
prefer.
BALANCE
Sound Mode
Auto Volume
Balance 0
G
TV Speaker
Digital Audio Out
LR
1
2
3
4
32
Sound Mode
Auto Volume
Balance 0
TV Speaker
Digital Audio Out
SETUP
O
PICTURE
O
TIME
O
OPTION
O
SCREEN
O
D V R
O
Prev.
MENU
Move
AUDIO
G
Page 90
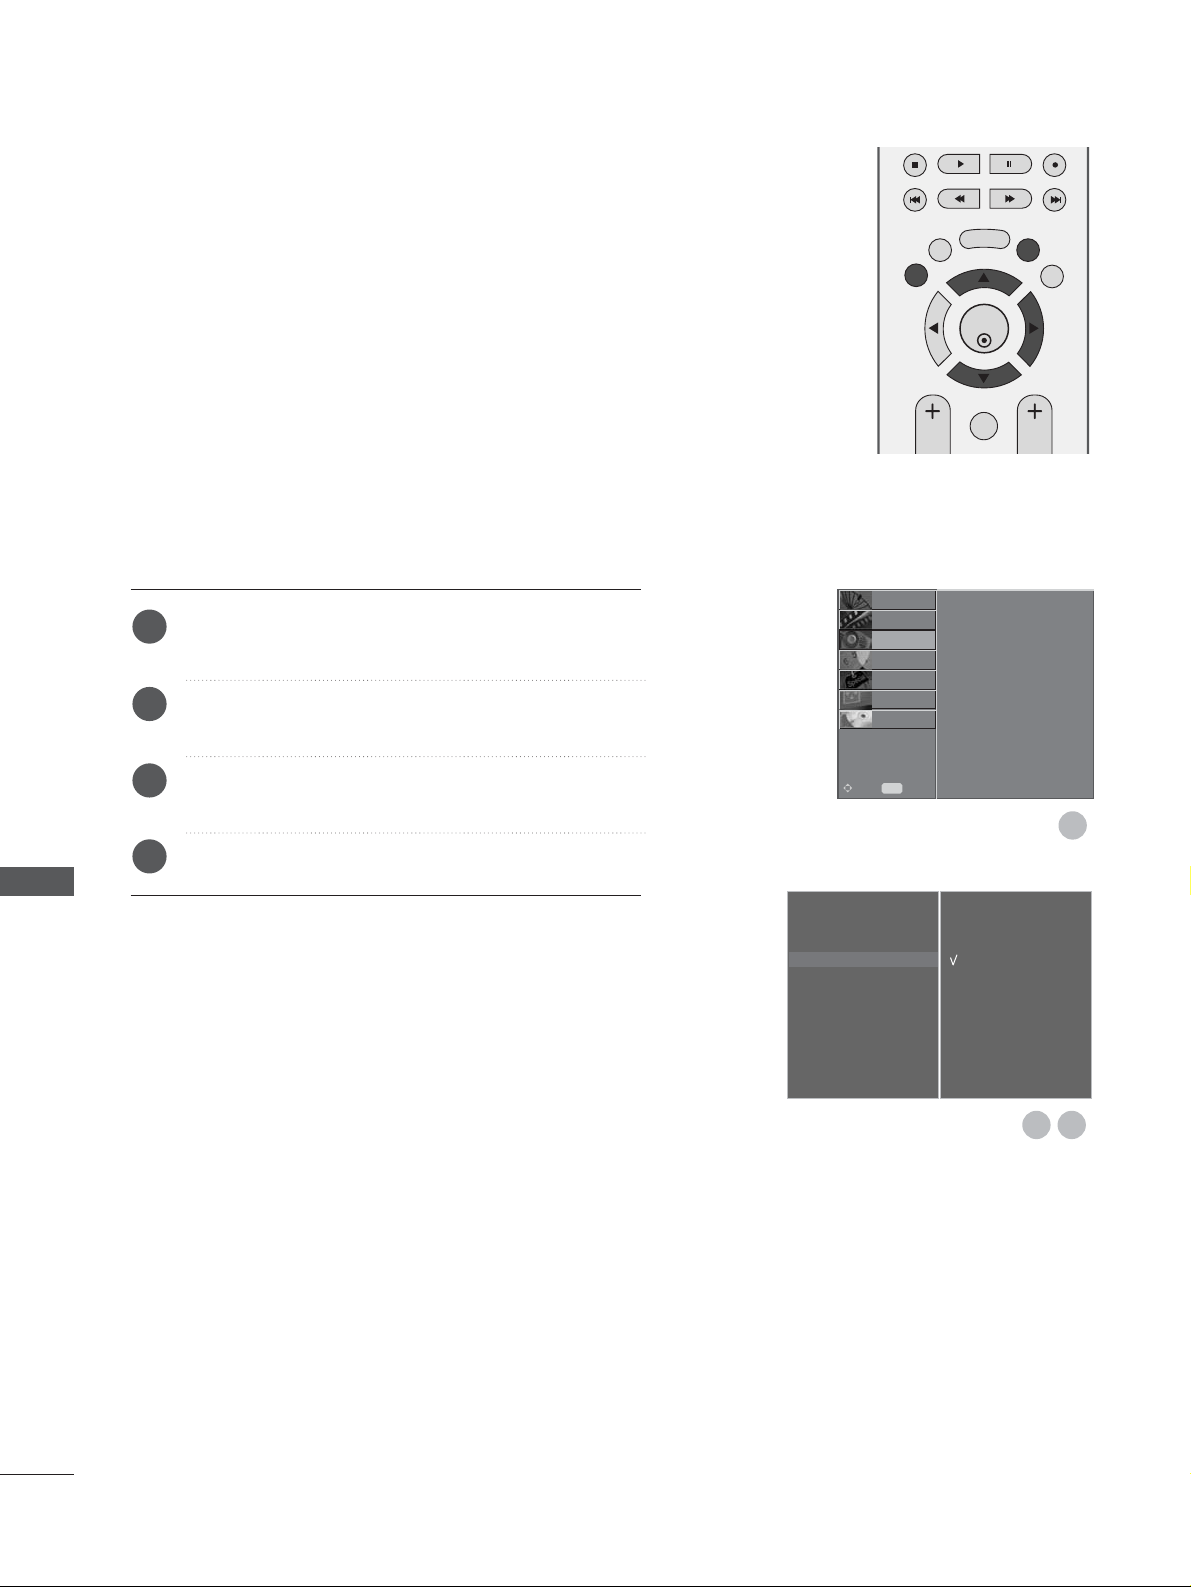
88
SOUND & LANGUAGE CONTROL
Press the MENU button and then
D
or
E
button to
select the AUDIO menu.
Press the
G
button and then
D
or
E
button to select
TV Speaker
.
Press the
G
button and then
D
or
E
button to select
Off or On.
Press the EXIT button to return to normal TV viewing.
You can adjust the internal speaker status.
In
AAVV11,, AAVV22,, AA VV33,, CCOOMM PPOONN EENNTT ,, RRGG BB
and
HHDDMMII
wwiitthh HHDD MMII ttoo DD VVII ccaa bb llee
, TV speaker can be outputted
even though there is no video signal.
If you want to use your external hi-fi stereo system, turn off
the internal speakers of the set.
TV SPEAKERS ON/ OFF SETUP
Sound Mode
Auto Volume
Balance 0
TV Speaker
G
Digital Audio Out
Off
On
OK
EXIT
TIME
SHIFT
TIME
SHIFT
VOL PR
GUIDE
BACK MENU
DVR
MARK
FAV
1
1
2
3
4
32
Sound Mode
Auto Volume
Balance 0
TV Speaker
Digital Audio Out
SETUP
O
PICTURE
O
TIME
O
OPTION
O
SCREEN
O
D V R
O
Prev.
MENU
Move
AUDIO
G
SOUND & LANGUAGE CONTROL
Page 91
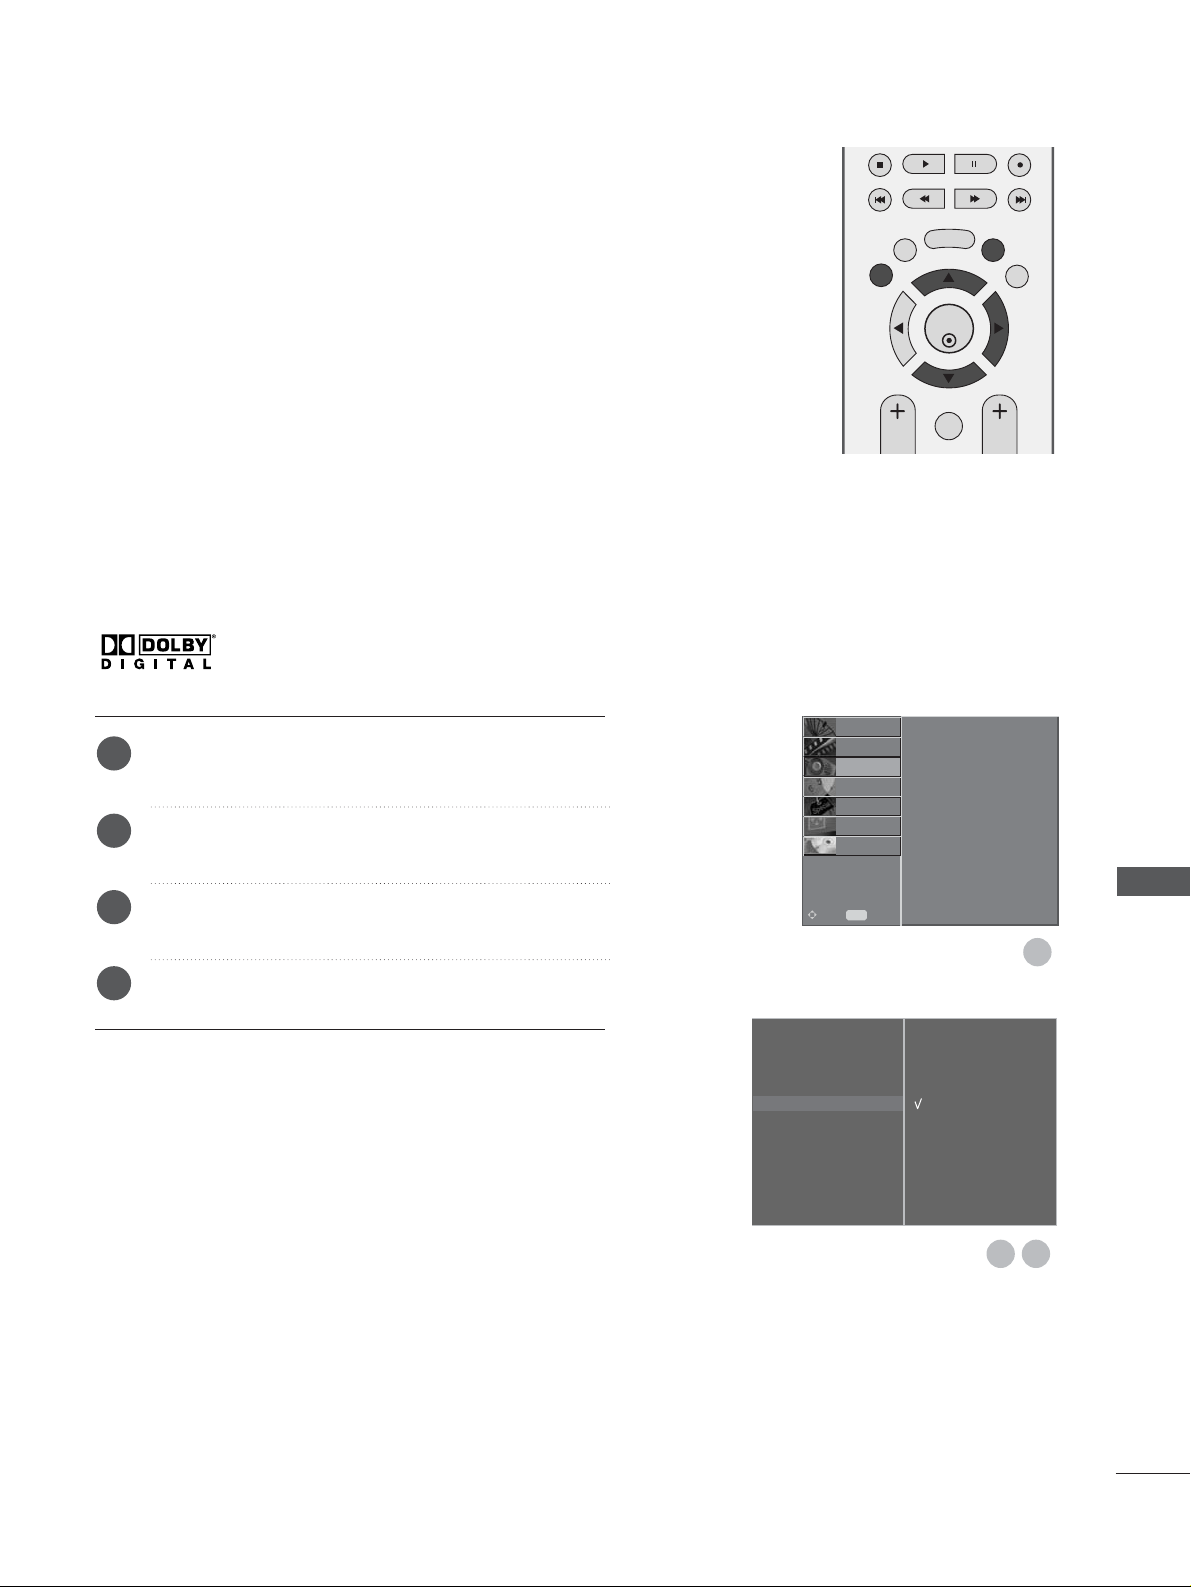
89
SOUND & LANGUAGE CONTROL
Press the MENU button and then
D
or
E
button to
select the AUDIO menu.
Press the
G
button and then
D
or
E
button to select
Digital Audio Out.
Press the
G
button and then
D
or
E
button to select
Dolby Digital or PCM.
Press the EXIT button to return to normal TV viewing.
1
1
2
3
4
Sound Mode
Auto Volume
Balance 0
TV Speaker
Digital Audio Out
G
Dolby Digital
PCM
OK
EXIT
TIME
SHIFT
TIME
SHIFT
VOL PR
GUIDE
BACK MENU
DVR
MARK
FAV
This function lets you select your preferred Digital Audio Output.
The set can output Dolby Digital in a channel only which
broadcast Dolby Digital Audio.
When it’s applied the Dolby Digital format, if you select Dolby
Digital on Digital audio out menu, SPDIF Output will be outputted Dolby Digital.
Even if it’s selected Dolby Digital, when it doesn’t apply
Dolby Digital format, SPDIF Output will be outputted PCM.
Even if both Dolby Digital and Audio language have been set
in a channel which broadcast Dolby Digital Audio, only Dolby
Digital will be played.
This function is not displayed in the Analogue mode.
SELECTING DIGITAL AUDIO OUT
Manufactured under license from Dolby
Laboratories. “
Dolby
“and the double-D symbol
are trademarks of Dolby Laboratories.
32
Sound Mode
Auto Volume
Balance 0
TV Speaker
Digital Audio Out
SETUP
O
PICTURE
O
TIME
O
OPTION
O
SCREEN
O
D V R
O
Prev.
MENU
Move
AUDIO
G
Page 92
90
SOUND & LANGUAGE CONTROL
I/II
AA
MMoo nnoo ss oo uunndd sseelleecctt ii oonn
If the stereo signal is weak in stereo reception, you can switch to mono by pressing
the
II//II II
button twice. In mono reception, the clarity of sound is improved. To switch
back to stereo, press the
II//II II
button twice again.
AA
LL aanngg uuaaggee ss eellee cc tt iioo nn ffoorr dduuaall llaanngguuaa gg ee bbrrooaadd ccaa sstt
If a programme received two languages (dual language), you can switch to
DUAL I,
DUAL II or DUAL I+II by pressing the
II//II II
button repeatedly.
DUAL I Sends the primary broadcast language to the loudspeakers.
DUAL II Sends the secondary broadcast language to the loudspeakers.
DUAL I+II Sends a separate language to each loudspeaker.
Broadcast
Mono
Stereo
Dual
On Screen Display
MONO
STEREO
DUAL I
Stereo/Dual Reception (In Analogue Mode Only)
When a programme is selected, the sound information for the station appears after
the programme number and station name disappear.
SOUND & LANGUAGE CONTROL
Page 93
91
SOUND & LANGUAGE CONTROL
NICAM Reception (In Analogue Mode Only)
When
NNIICCAAMM mmoonnoo
is received, you can select
NNIICCAAMM MMOONNOO
or
FFMM MMOONNOO
.
When
NNII CC AAMM
stereo is received, you can select
NNIICCAAMM SSTTEE RREEOO
or
FFMM MMOONNOO
.
If the stereo signal is weak, switch to
FFMM mmoo nnoo
.
When NICAM dual is received, you can select
NNIICCAAMM DD UUAA LL II, NNIICCAAMM DD UUAA LL II II
or
NNIICCAAMM DD UUAA LL II++II II
or
MMOONNOO
.
If the set is equipped with the receiver for NICAM reception, the high quality NICAM (Near
Instantaneous Companding Audio Multiplex) digital sound can be received.
Sound output can be selected according to the type of received broadcast as follows by pressing the I/II button repeatedly.
Speaker Sound Output Selection
In AV, S-Video, Component, RGB and HDMI mode, you can select output sound for the left and
right loudspeakers.
Repeatedly press the
II//II II
button to select the sound output.
L+R: Audio signal from audio L input is sent to the left loud speaker and audio signal from audio
R input is sent to the right loud speaker.
L+L: Audio signal from audio L input is sent to left and right loud speakers.
R+R: Audio signal from audio R input is sent to left and right loud speakers.
1
2
3
Page 94
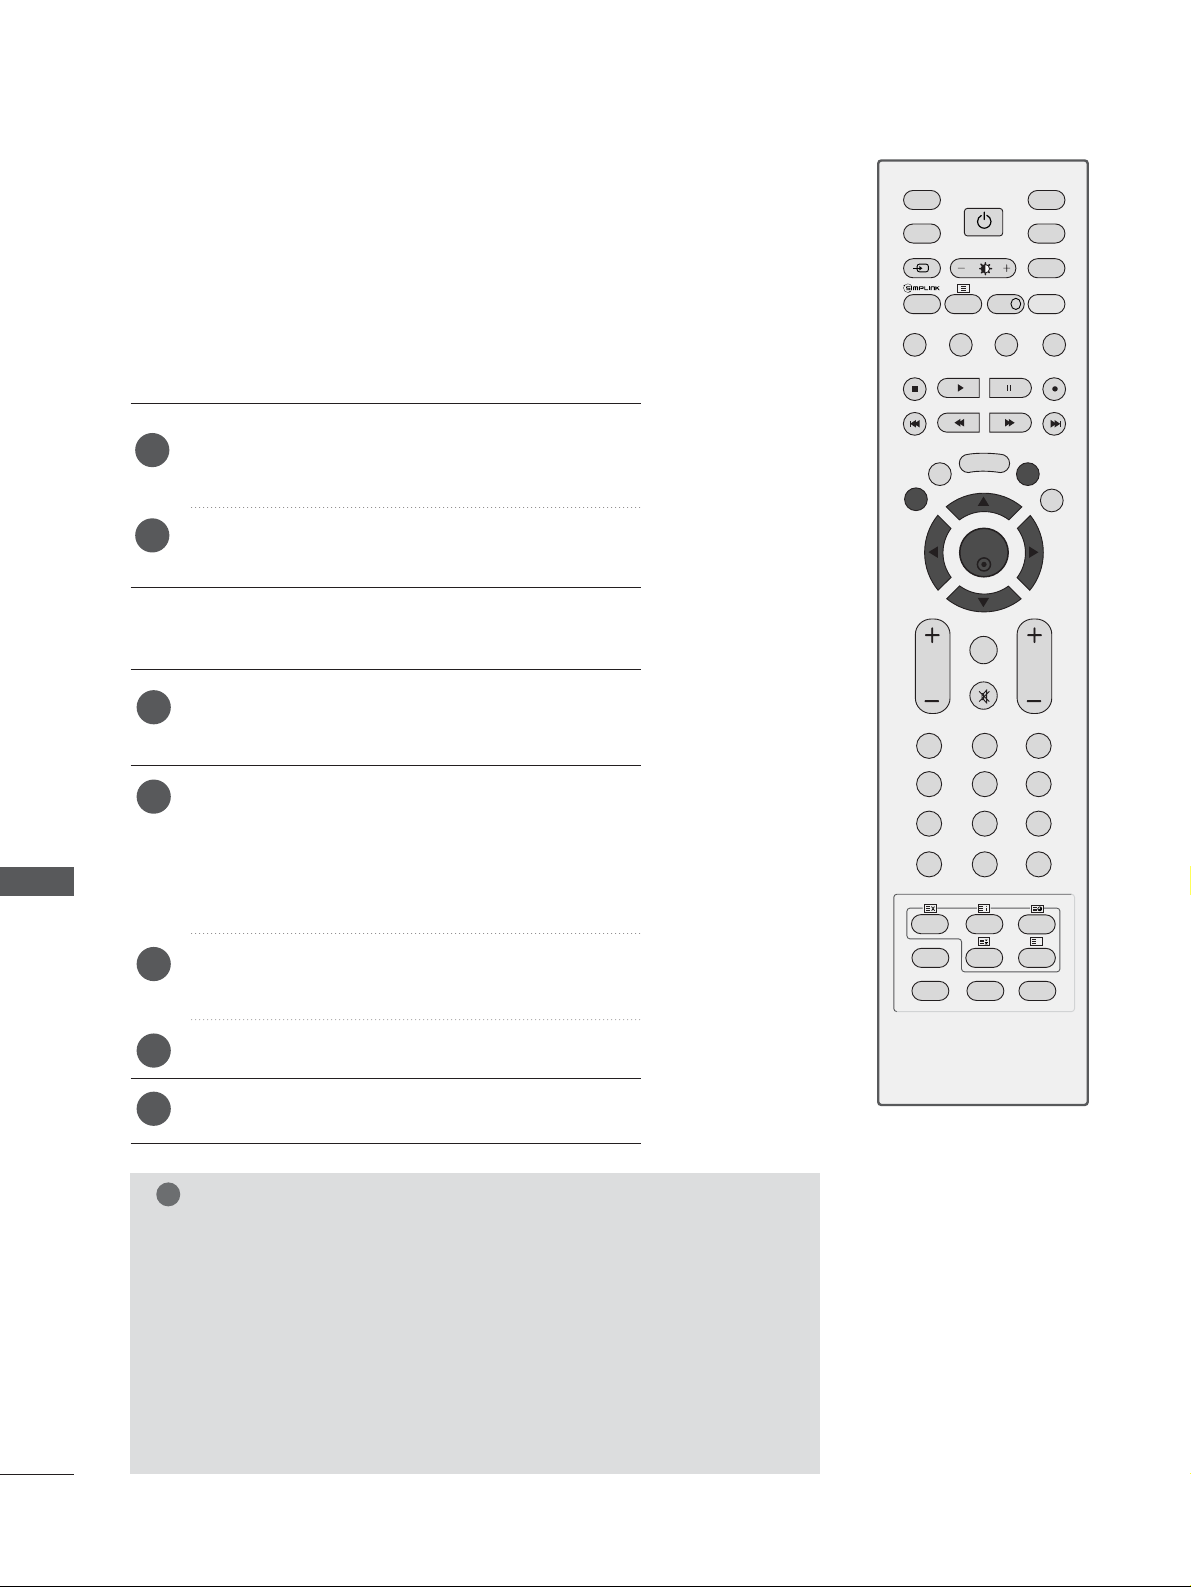
92
SOUND & LANGUAGE CONTROL
ON-SCREEN MENU LANGUAGE / COUNTRY SELECTION
Press the
MM EENN UU
button and then use
DD
or
EE
button
to select the OPTION menu.
Press the G button and then use DDor EEbutton to
select
Language. The menus can be shown on the
screen in the selected language.
Or, Press the
G button and then use
DD
or EEbutton
to select
Country.
Press the
G button and then use
FF
or GGbutton to
select your desired language or country.
Press the
OO KK
button.
Press the
EEXX IITT
button to return to normal TV viewing.
1
2
3
4
5
Installation guide menu appears on TV screen when it is turned
on for the first time.
Press the
DD
or EEor F or G button and then,
OOKK
button to select your desired language.
Press the
DD
or
EE
button and then,
OOKK
button to
select your country.
1
2
** IIff yyoouu wwaanntt ttoo cchhaannggee LLaanngguuaaggee// CCoouunnttrryy sseelleeccttiioonn
NOTE
!
GG
If you don’t finish set up
IInnssttaallllaattiioonn GGuuiiddee
by pressing
EEXXII TT
button
or time out of OSD (On Screen Display) display, it will continuously
appear until completing set up whenever the set is turned on.
GG
If you select wrong local country, the teletext may not appear correctly
on the screen and some problem may happen during teletext operation.
GG
CI (Common Interface) function may not be applied based on country
broadcasting circumstance.
GG
DTV mode control buttons may not be working based on country
broadcasting circumstance.
OK
INPUT
MODE
TV
D/A
DVD
EXIT
TIME
SHIFT
TIME
SHIFT
VOL PR
GUIDE
BACK MENU
DVR
LIVE TV
VCR
POWER
123
456
789
0
Q.VIEW
LIST
INDEX
SLEEP
HOLD
REVEAL
?
SUBTITLE
RATIO
TEXT
INPUT
BRIGHT
MUTE
MARK
TV/RADIO
UPDATE
SIMPLINK
INFO i
FAV
TIME
I/II
SOUND & LANGUAGE CONTROL
Page 95
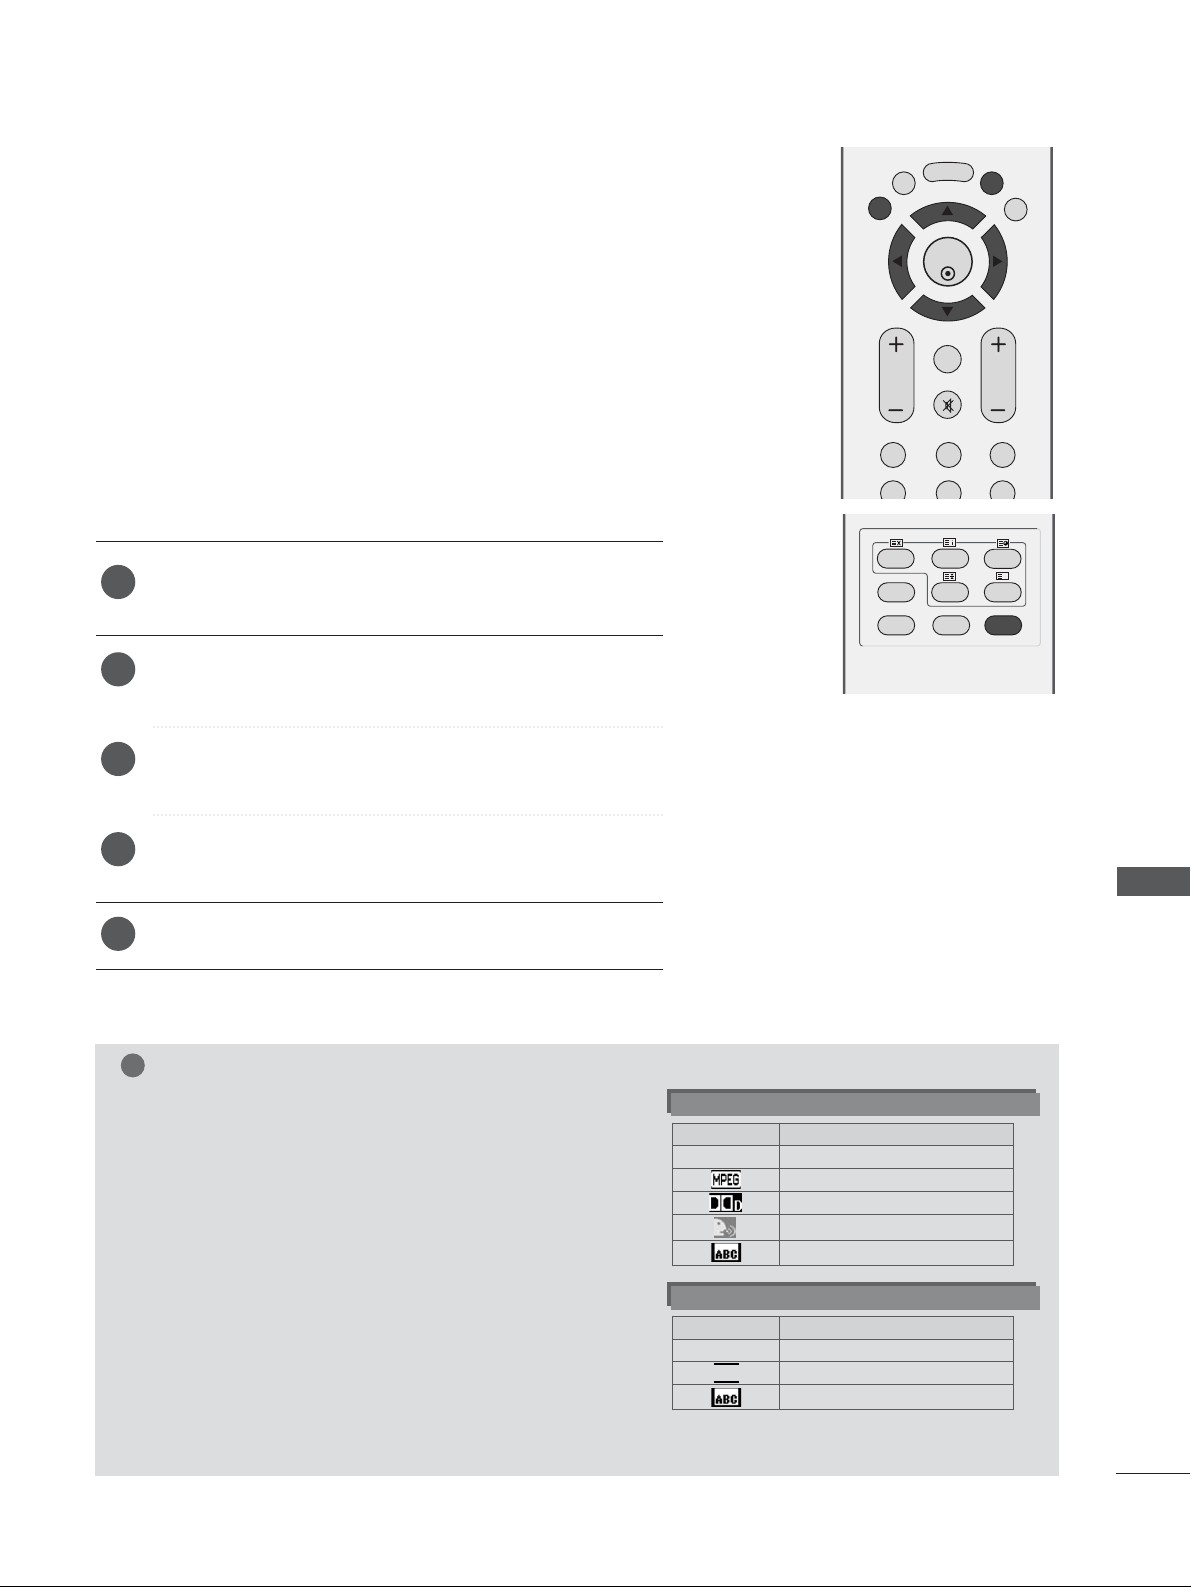
93
SOUND & LANGUAGE CONTROL
Press the
MMEENNUU
button and then use
D
or
E
button to select
the OPTION menu.
Press the G button and then use Dor Ebutton to select
LL aa nngguuaaggee
.
Press the
G button and then use
D
or Ebutton to select
AAuuddiioo, SSuubbtt ii ttllee
or
SSuu bb tt iitt ll ee HHaarrdd oo ff hheeaarriinngg
.
Press the
G button and then use
F
or Gbutton to select
your desired language.
Press the
EEXX IITT
button to return to normal TV viewing.
AAuuddiioo
function lets you select your preferred language for audio. If
the audio data in selected language is not broadcasted, default language audio will be played.
Use
SSuubbtt ii ttllee
function when two or more subtitle languages are
broadcasted. If the subtitle data in selected language is not broadcasted, default language subtitle will be displayed.
LANGUAGE SELECTION (IN DIGITAL MODE ONLY)
1
2
3
4
5
OK
EXIT
TIME
SHIFT
TIME
SHIFT
VOL PR
GUIDE
BACK MENU
DVR
123
456
MUTE
MARK
FAV
INDEX
SLEEP
HOLD
REVEAL
?
SUBTITLE
RATIO
UPDATE
TIME
I/II
NOTE
!
< Audio Language Selection >
GG
When two or more audio languages are broadcasted, you
can select audio language with the I/II button on the
remote control.
GG
Press the
D
or
E
button to select an audio language.
GG
Press the
F
or
G
button to select L+R, L+L or R+R.
- The audio/subtitle can be displayed simpler form with 1 to 3 characters which is broadcast by service provider.
- When you select supplementary Audio (Audio for “Visual/Hearing Impaired”) it may speak out a part of Main audio.
Audio Language OSD Information
Status
Not Available
MPEG Audio
Dolby Digital Audio
Audio for “Visual Impaired”
Audio for “Hearing Impaired”
Display
N.A
TEXT
< Subtitle Language Selection >
GG
When two or more subtitle languages are broadcasted, you
can select subtitle language with the SUBTITLE button on
the remote control.
GG
Press the
D
or
E
button to select a subtitle language.
Subtitle Language OSD Information
Status
Not Available
Teletext Subtitle
Subtitle for “Hard of Hearing”
Display
N.A
Page 96
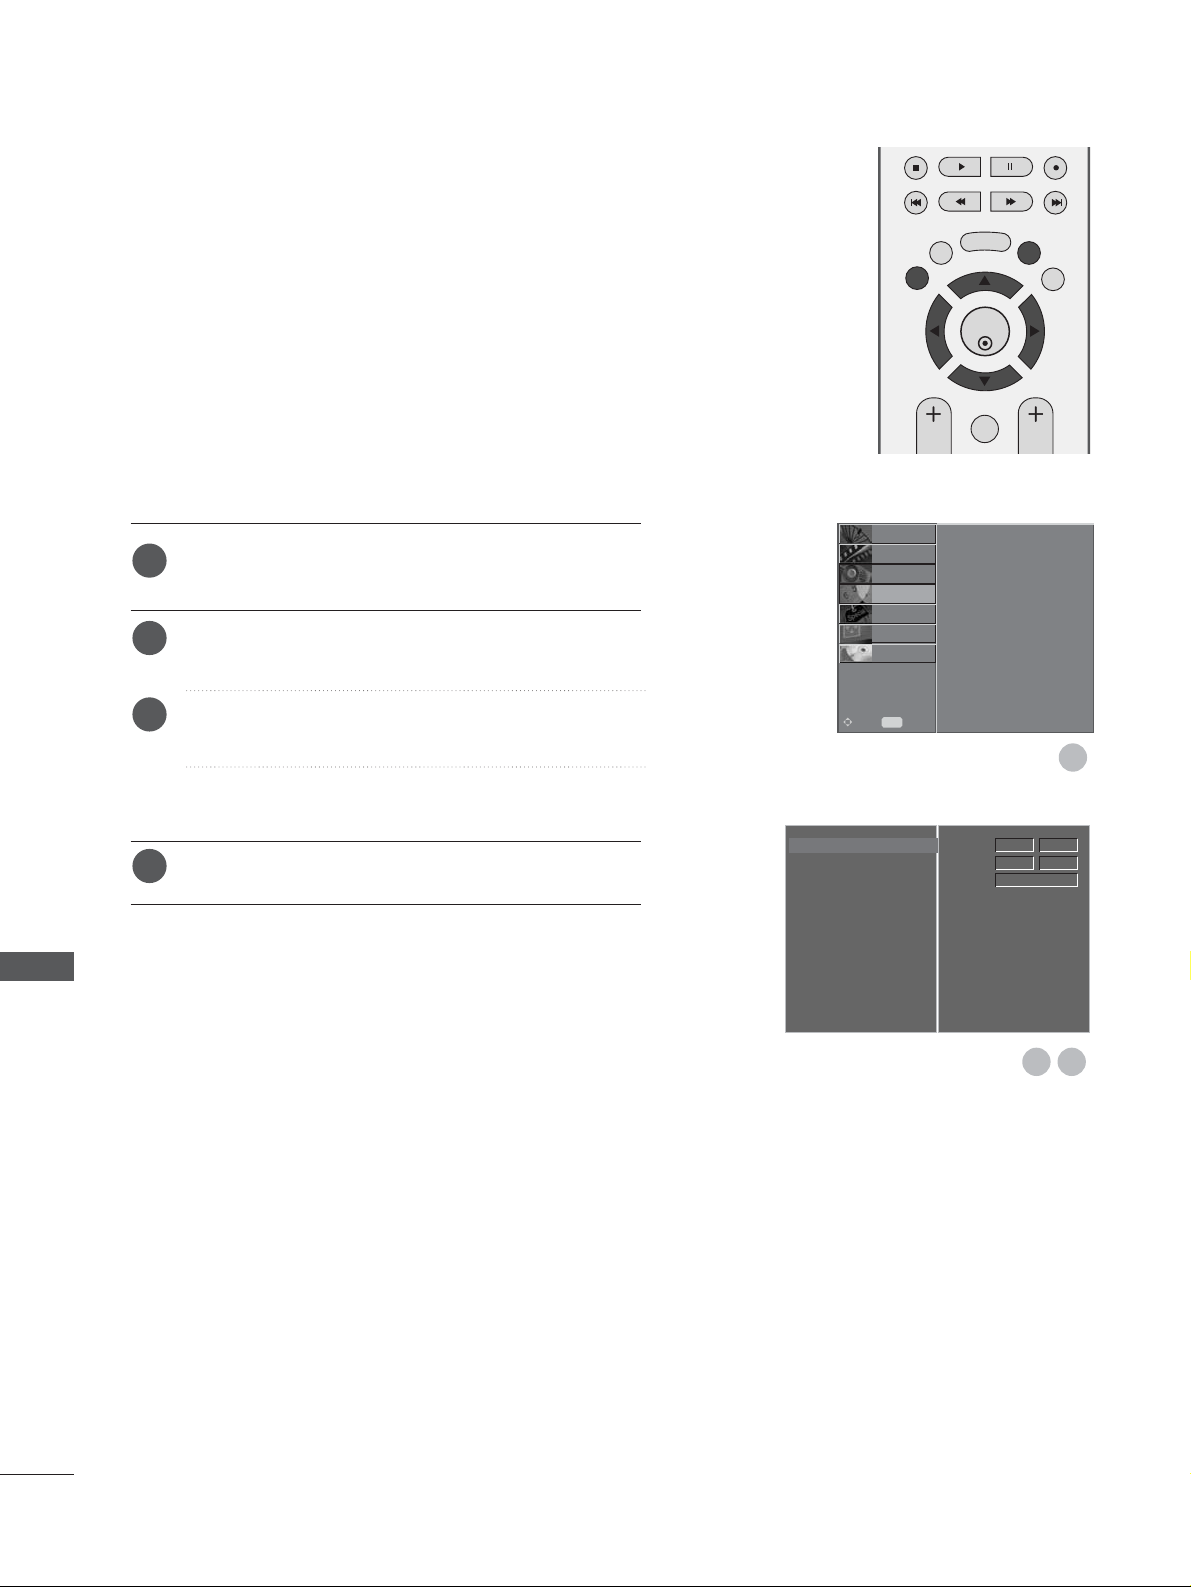
94
TIME SETTING
Press the MENU button and then
D
or
E
button to
select the TIME menu.
Press the
G
button and then
D
or
E
button to select
Clock.
Press the
G
button and then
F
or
G
button to select
either the year, date, or time option.
Once selected, use the
D
or
E
button to set the year,
date, and time options.
Press the EXIT button to return to normal TV viewing.
The clock is set automatically when receiving the digital signal.
(You can set the clock manually only if the TV has no DTV signal.)
You must set to the time correctly before using on/off time
function.
CLOCK SETUP
Clock G
Off Time
On Time
Auto Sleep
Time Zone
Time
Date
Year
12
2007
Apr
20 14
OK
EXIT
TIME
SHIFT
TIME
SHIFT
VOL PR
GUIDE
BACK MENU
DVR
MARK
FAV
1
1
2
3
4
32
Clock
Off Time
On Time
Auto Sleep
Time Zone
SETUP
O
PICTURE
O
OPTION
O
SCREEN
O
D V R
O
Prev.
MENU
Move
AUDIO
O
TIME
G
TIME SETTING
Page 97
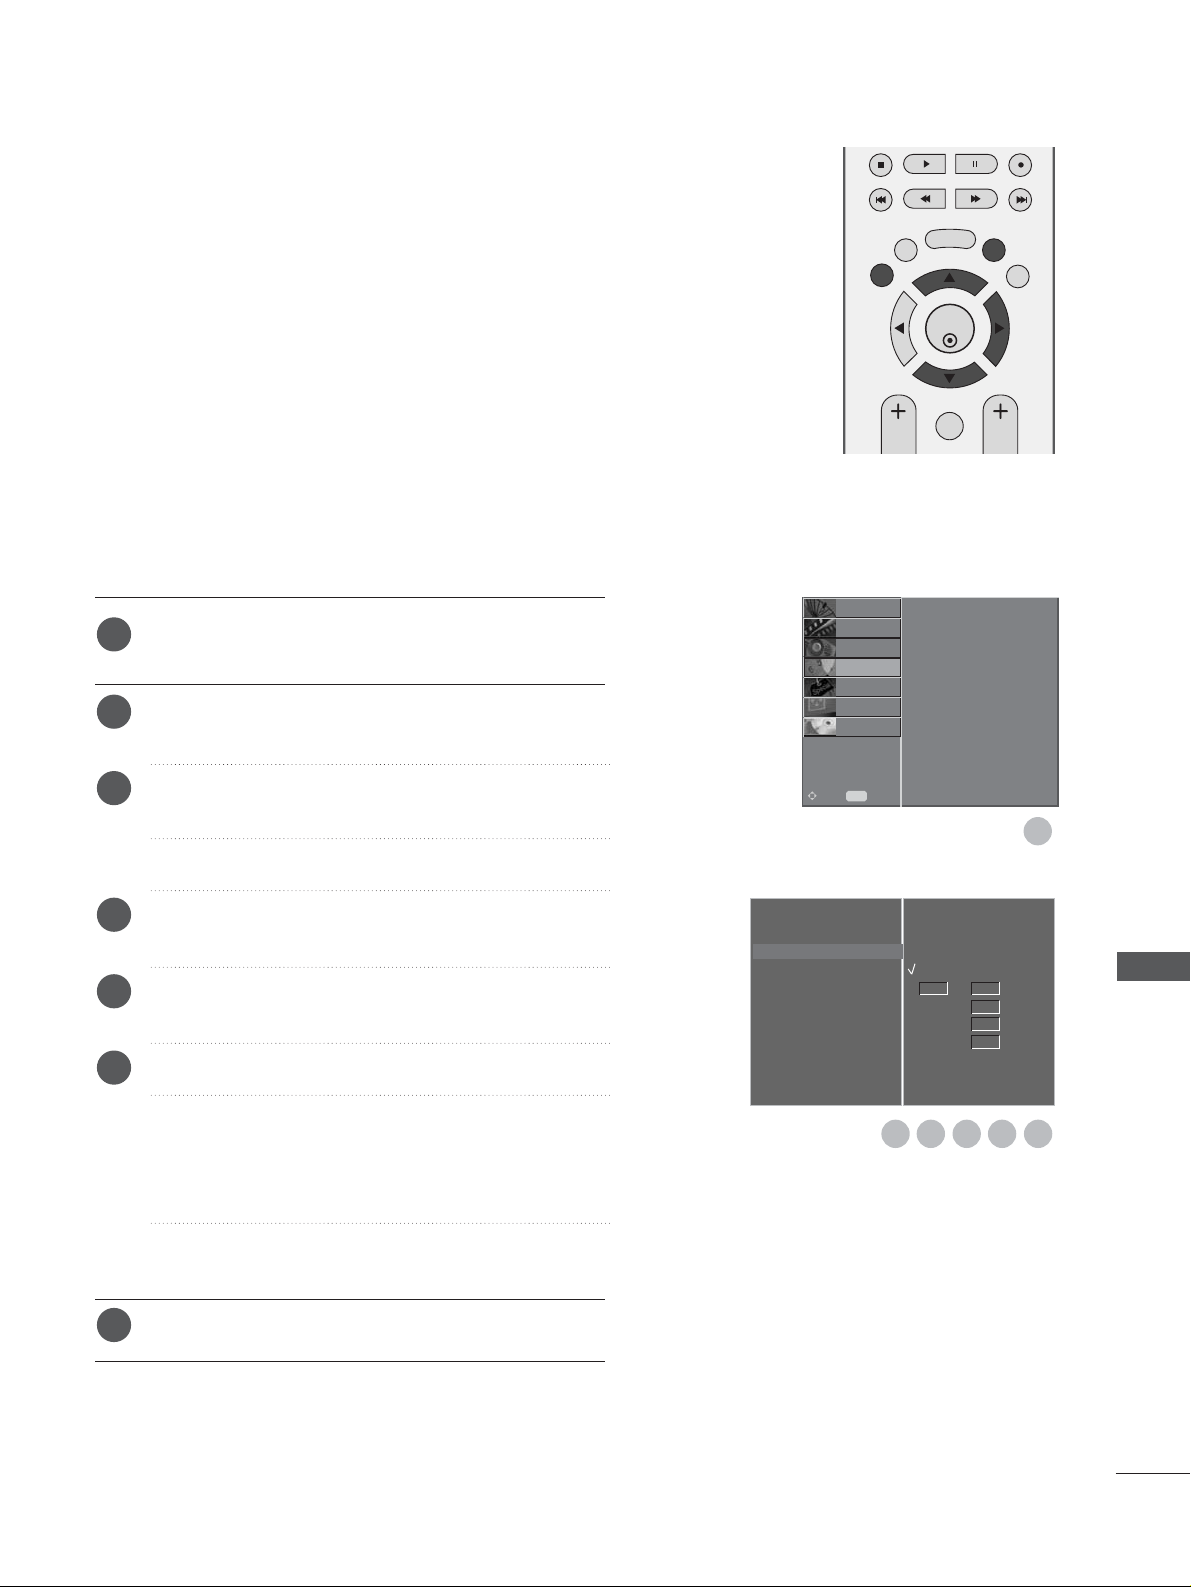
95
TIME SETTING
Press the MENU button and then
D
or
E
button to
select the TIME menu.
Press the
G
button and then
D
or
E
button to select
Off Time/On Time.
Press the
G
button and then
D
or
E
button to select
On.
• To cancel On/Off Time function, select Off.
Press the
G
button and then
D
or
E
button to set the
hour.
Press the
G
button and then
D
or
E
button to set the
minutes.
For only On Time function
• Programme: Press the
G
button and then
D
or
E
button to select TV, DTV or Radio in the Mode menu.
And then, Press the
G
button and then
D
or
E
button to
select the programme.
• Volume: Press the
G
button and then
D
or
E
but-
ton to adjust volume level at turn-on.
Press the EXIT button to return to normal TV viewing.
The Off time function automatically switches the set to standby
at the preset time.
Tw o hours after the set is switched on by the On time function
it will automatically switch back to standby mode unless a button has been pressed.
Once the on time/off time is set, these functions operate daily
at the preset time.
The Off time function overrides the On timer function if they are
set both to the same time.
The set must be in standby mode for the On time function to
work.
AUTO ON/OFF TIMER SETTING
Clock
Off Time
On Time
G
Auto Sleep
Time Zone
Off
On
:
Volume
Mode
PR
18 00
3
TV
0
OK
EXIT
TIME
SHIFT
TIME
SHIFT
VOL PR
GUIDE
BACK MENU
DVR
MARK
FAV
1
1
2
3
4
5
6
7
5 6432
Clock
Off Time
On Time
Auto Sleep
Time Zone
SETUP
O
PICTURE
O
OPTION
O
SCREEN
O
D V R
O
Prev.
MENU
Move
AUDIO
O
TIME
G
Page 98
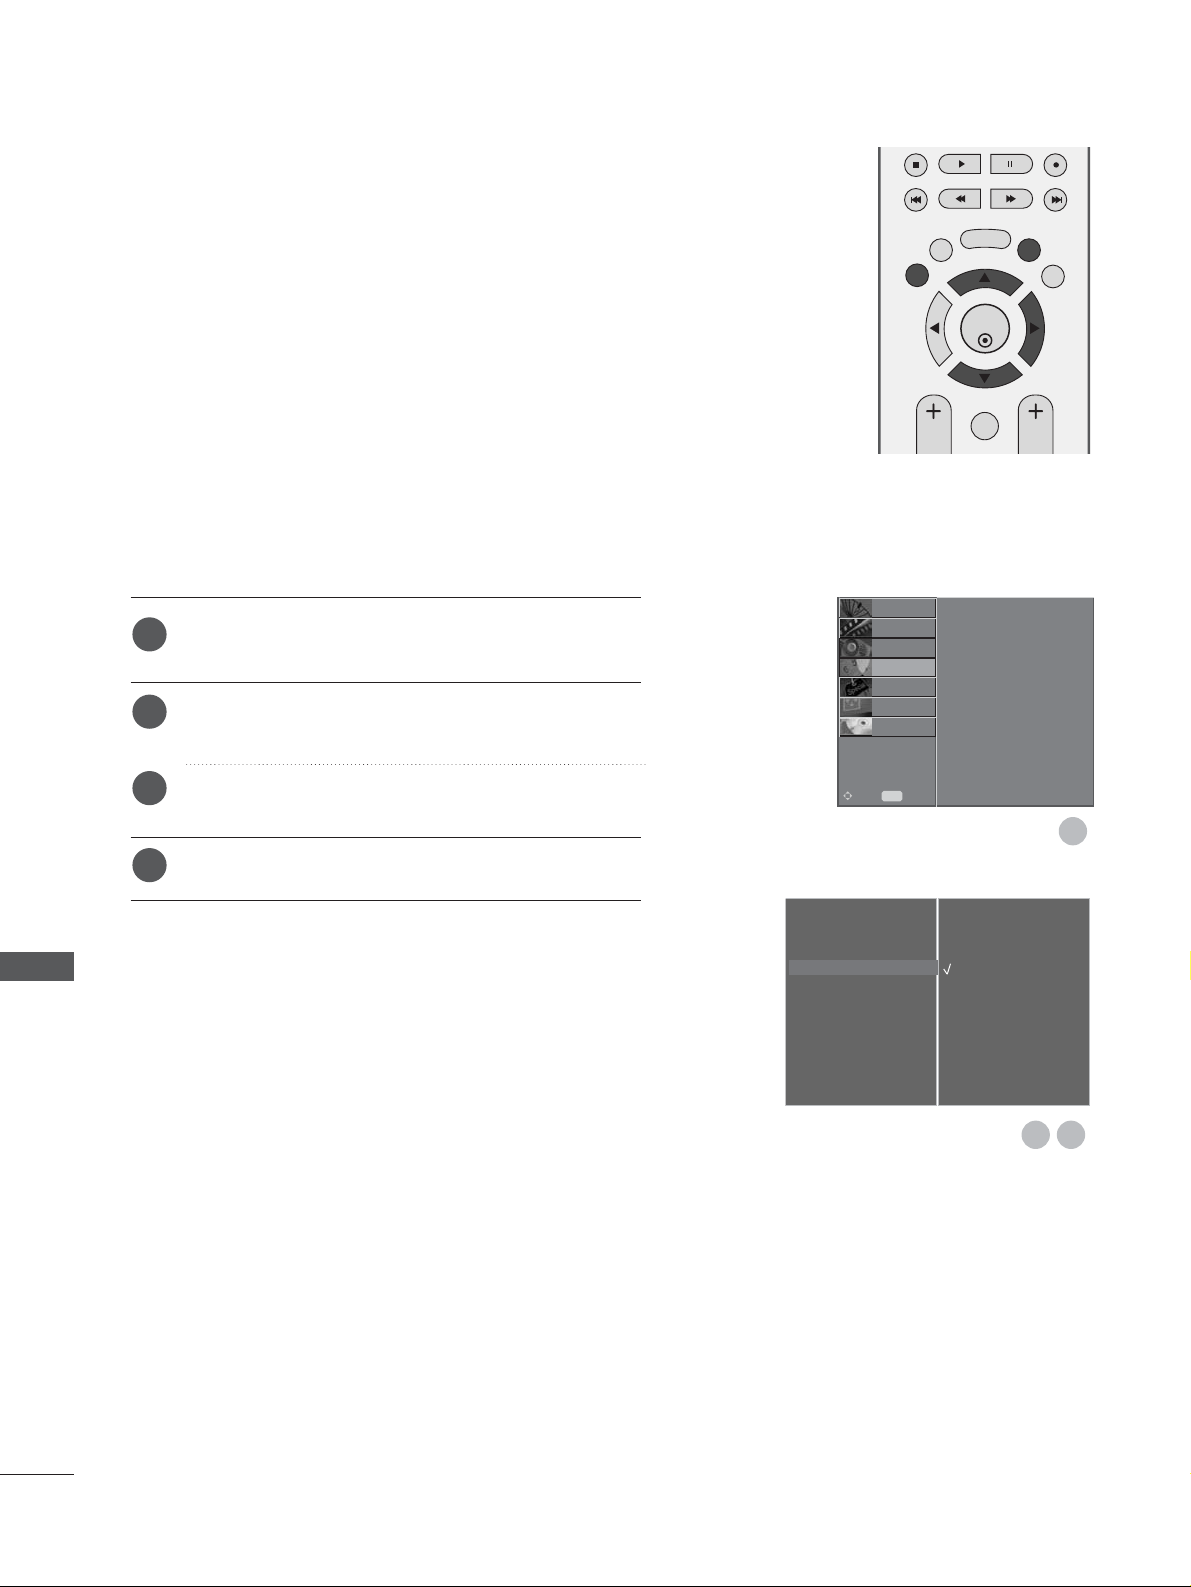
96
TIME SETTING
1
If set to on and there is no input signal, the set turns off automatically after 10 minutes.
Press the MENU button and then
D
or
E
button to
select the TIME menu.
Press the
G
button and then
D
or
E
button to select
Auto Sleep.
Press the
G
button and then
D
or
E
button to select
Off or On.
Press the EXIT button to return to normal TV viewing.
AUTO SHUT-OFF SETTING
Clock
Off Time
On Time
Auto Sleep
G
Time Zone
Off
On
1
2
3
4
OK
EXIT
TIME
SHIFT
TIME
SHIFT
VOL PR
GUIDE
BACK MENU
DVR
MARK
FAV
32
Clock
Off Time
On Time
Auto Sleep
Time Zone
SETUP
O
PICTURE
O
OPTION
O
SCREEN
O
D V R
O
Prev.
MENU
Move
AUDIO
O
TIME
G
TIME SETTING
Page 99
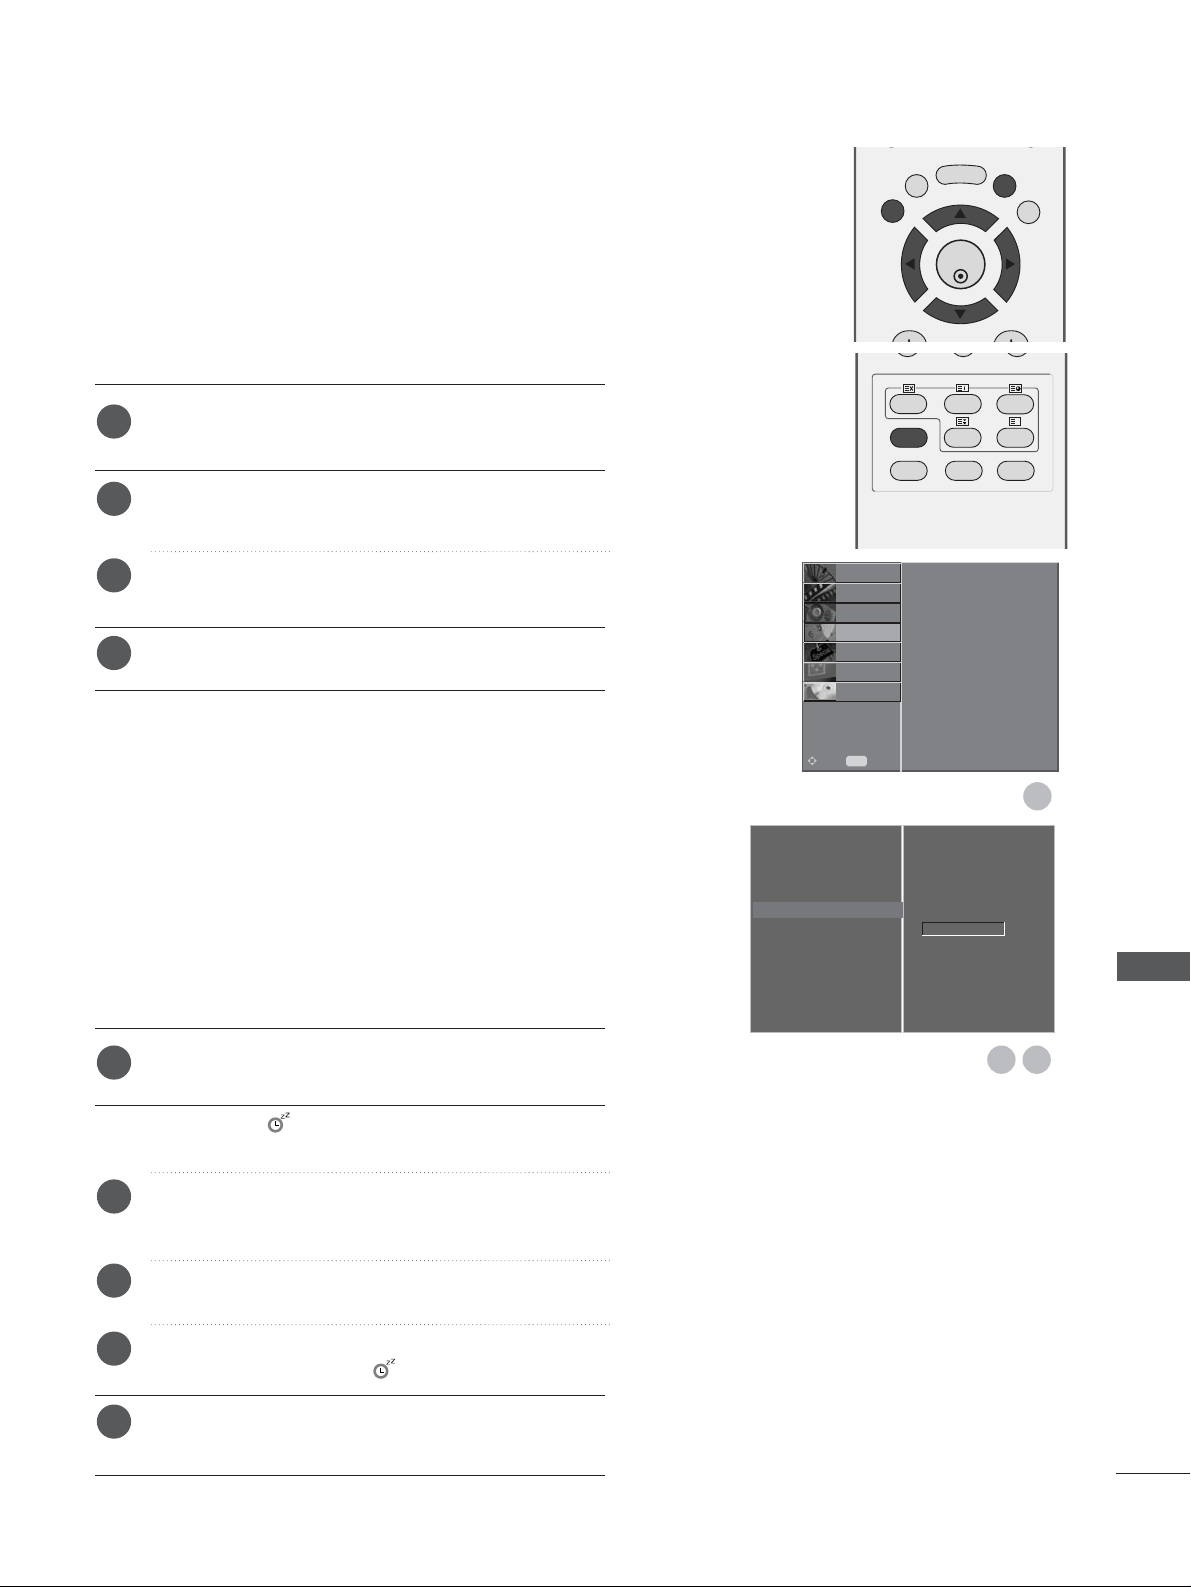
97
TIME SETTING
You don’t have to remember to switch the set off before you
go to sleep.
The sleep timer automatically switches the set to standby
after the preset time has elapsed.
SLEEP TIMER SETTING
Press the SLEEP button repeatedly to select the number of minutes.
The display ‘
- - - Min
’ will appear on the screen,
followed by 10, 20, 30, 60, 90, 120, 180 and 240.
When the number of minutes you want is displayed on
the screen, the timer begins to count down from the
number of minutes selected.
To view the remaining sleep time, press the SLEEP but-
ton once.
To cancel the sleep time, repeatedly press the SLEEP
button until the display ‘
- - - Min
’ appears.
When you switch the set off, the set cancels the preset sleep time.
a
b
c
d
e
1
When you select a Time Zone city, TV time is set by the time
offset information based on Time Zone and GMT (Greenwich
Mean Time) information which is received to broadcasting
signal when time is set automatically by a digital signal.
Press the MENU button and then
D
or
E
button to
select the TIME menu.
Press the
G
button and then
D
or
E
button to select
Time Zone.
Press the
G button and then F or G button to select
your viewing area time zone.
Press the EXIT button to return to normal TV viewing.
TIME ZONE SETUP
Clock
Off Time
On Time
Auto Sleep
Time Zone
G
1
2
3
4
OK
EXIT
TIME
SHIFT
TIME
SHIFT
GUIDE
BACK MENU
DVR
INDEX
SLEEP
HOLD
REVEAL
?
SUBTITLE
RATIO
UPDATE
TIME
I/II
32
Time Zone
London GMT
Clock
Off Time
On Time
Auto Sleep
Time Zone
SETUP
O
PICTURE
O
OPTION
O
SCREEN
O
D V R
O
Prev.
MENU
Move
AUDIO
O
TIME
G
Page 100
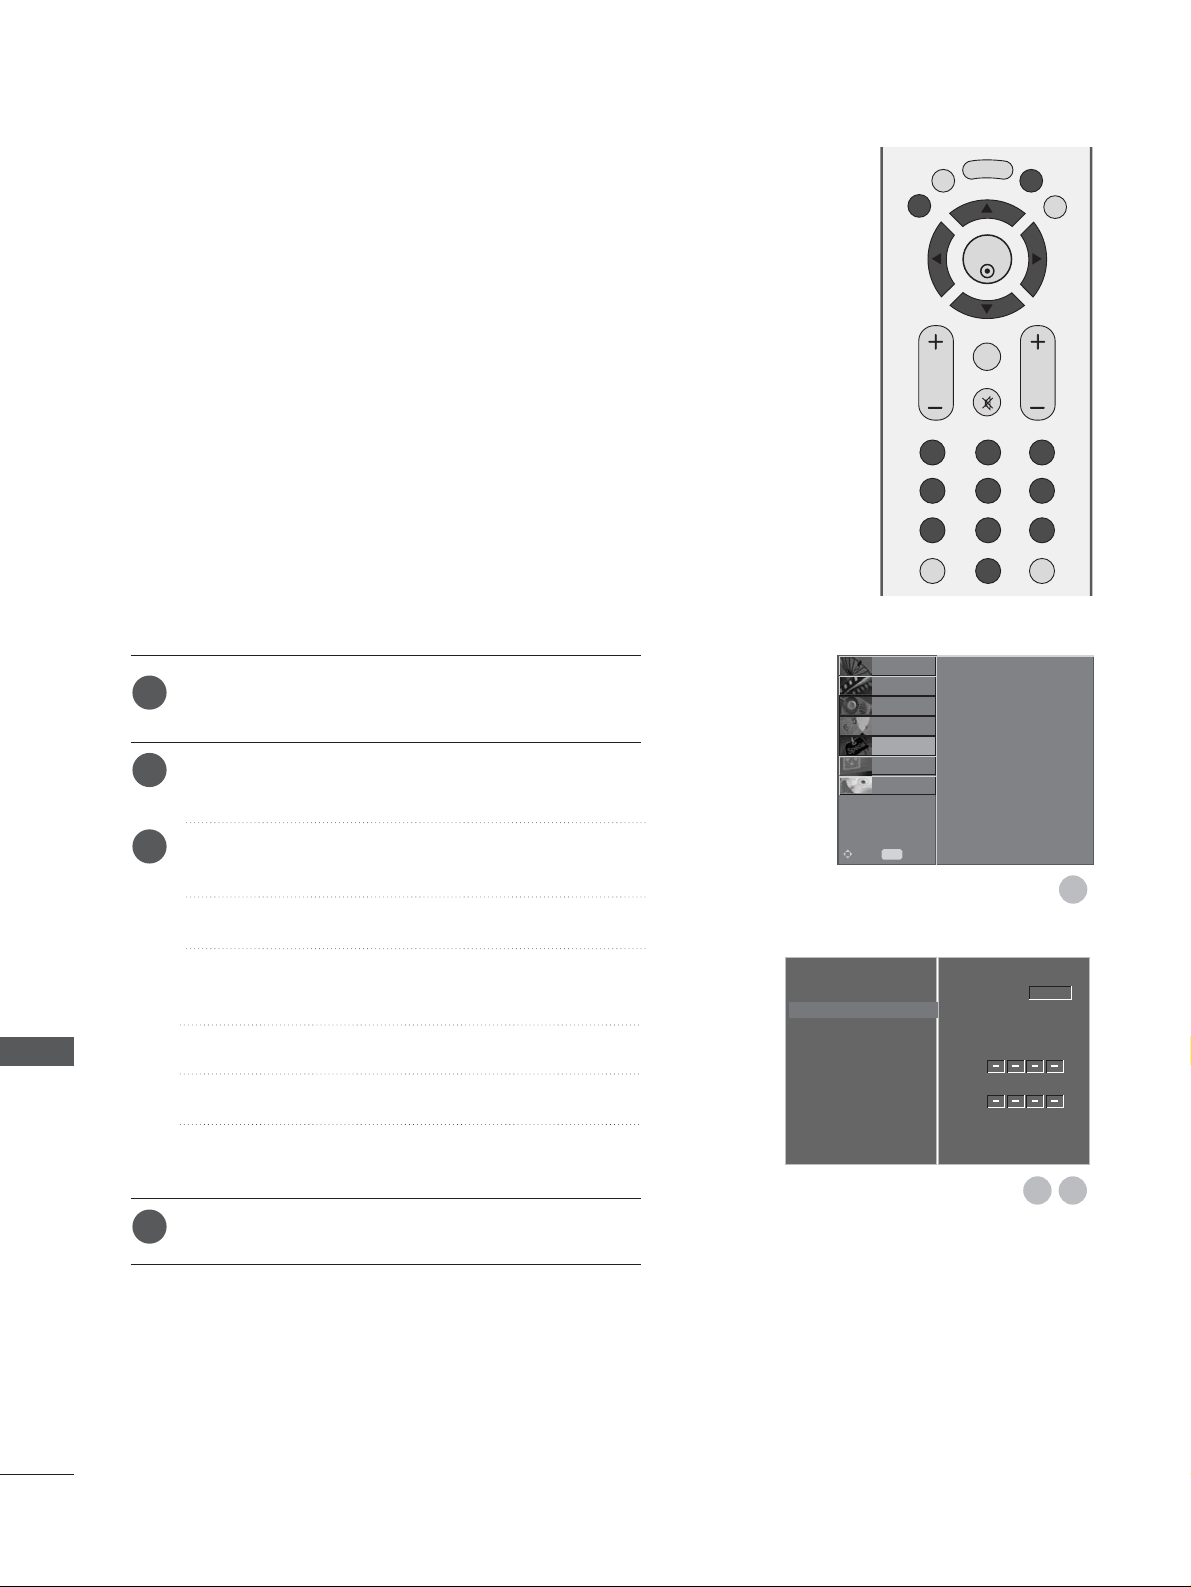
98
PARENTAL CONTROL / RATINGS
SET PASSWORD & LOCK SYSTEM
Language
Country
Lock System
G
Parental Control
Input Label
SIMPLINK
Factory Mode
Lock
Set Password
New
Confirm
Off
If you first enter the password, press ‘0’, ‘0’, ‘0’, ‘0’ on the
remote control handset.
OK
EXIT
TIME
SHIFT
TIME
SHIFT
VOL PR
GUIDE
BACK MENU
DVR
123
456
789
0
Q.VIEW
LIST
MUTE
MARK
FAV
1
Press the MENU button and then
D
or
E
button to
select the OPTION menu.
Press the
G
button and then
D
or
E
button to select
Lock System.
Press the
G
button and then
F
or
G
button to select
On.
To set the password
Press the
G
button and then use NUMBER buttons to
input a 4-digit password.
Be sure to remember this number!
Re-enter new password for confirm.
If you forgot your password, press ‘7’, ‘7’, ‘7’, ‘7’ on the
remote control handset.
Press the EXIT button to return to normal TV viewing.
1
2
3
4
32
Language
Country
Lock System
Parental Control
Input Label
SIMPLINK
Factory Mode
SETUP
O
PICTURE
O
SCREEN
O
D V R
O
Prev.
MENU
Move
AUDIO
O
TIME
O
OPTION
G
PARENTAL CONTROL / RATING
 Loading...