How it Works
Log In / Sign Up
Buy Points
How it Works
FAQ
Contact Us
Questions and Suggestions
Users
LG
Loading...
#
42LS3100-CA
42LS3100-CE
42LS310C-CE
42LS3150-CA
42LS315H-CA
42LS33A
2
42LS33A-5B
3
42LS33A-5D
4
42LS3400
40
42LS3400-TA
2
42LS3400UA
42LS340S
42LS340T
6
42LS341C
42LS3450
16
42LS3450UA
42LS3450-ZC
42LS345S
2
42LS345T
6
42LS349C
2
42LS35A
2
42LS35A-5B
2
42LS35A-5D
2
42LS4100-CA
42LS4100-CE
42LS4600
10
42LS4600-DA
3
42LS4600-TA
2
42LS460Y
42LS4610
3
42LS53A
2
42LS53A-5B
42LS55A
3
42LS55A-5B
2
42LS55A-5D
2
42LS5600
16
42LS5600UC
42LS560T
6
42LS5610
42LS561T
3
42LS5620
42LS562T
2
42LS5650
42LS5700
12
42LS5700-SB
42LS5700-TB
2
42LS5700UA
42LS570S
14
42LS570S-ZA
42LS570S-ZB
42LS570T
13
42LS570T-ZA
42LS570T-ZB
2
42LS570Y
5
42LS575S
42LS575T
2
42LS575T-ZD
42LS669C
42LS679C-ZC
42LS73B
42LS73B-5B
4
42LS73C
42LS73D-B
42LS75A
42LS75A-5B
10
42LS75C
42LS75C-B
4
42LT360C
14
42LT360C-CA
42LT360C-ZA
42LT380C
42LT380H
2
42LT55A
42LT55A-5B
42LT560C
42LT560CUA
42LT560E
6
42LT560E-CA
42LT640E
42LT640H
6
42LT650H
2
42LT660H
2
42LT670H
4
42LT670HUA
42LT7
22
42LT75
13
42LT76
42LT760H
7
42LT76-ZA
3
42LT770H
2
42LT770HUA
42LT777H
3
42LT777HUA
42LV3300
42LV34
42LV3400
15
42LV3400-TA
42LV340N
6
42LV35
42LV3500
15
Loading...
Loading...
Nothing found
42LS570T
Quick Guide
184 pgs
27.76 Mb
0
Quick Guide [lt,lv]
178 pgs
17.47 Mb
0
Quick Guide [lt]
178 pgs
17.76 Mb
0
User guide [uk]
178 pgs
17.84 Mb
0
User Manual [ru]
180 pgs
19.37 Mb
0
Quick Guide [es]
178 pgs
17.2 Mb
0
User guide [no]
178 pgs
17.66 Mb
0
User Manual
119 pgs
10.81 Mb
0
Owner's Manual
52 pgs
9.96 Mb
0
User Manual
45 pgs
7.57 Mb
0
User Manual
168 pgs
15.24 Mb
0
User Manual
176 pgs
47.07 Mb
0
User Manual
178 pgs
47.14 Mb
0
Table of contents
Loading...
LG 42LS570T Quick Guide
...
LG Quick Guide
Download
Specifications and Main Features
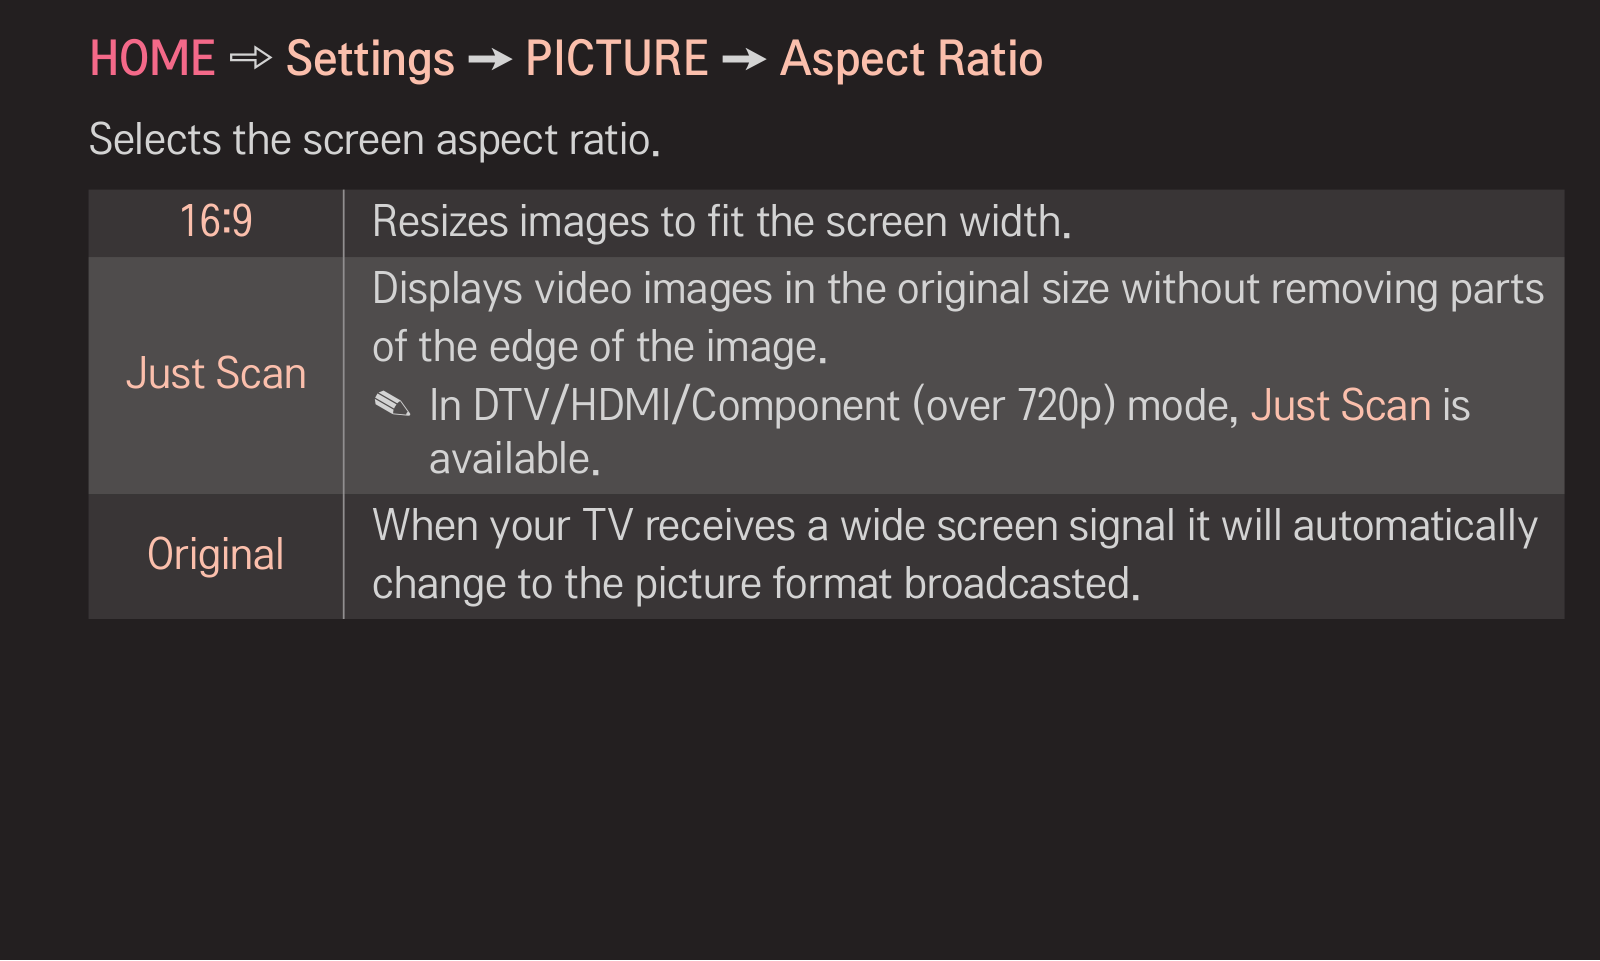
Frequently Asked Questions
User Manual
Download
Loading...
+
154
hidden pages
Unhide
You need points to download manuals.
1 point = 1 manual.
You can buy points or you can get point for every manual you upload.
Buy points
Upload your manuals
 Loading...