

LG 3828VA0231D, MV008A, 026N/U TX, 3840VA0024A/B, 3840VA0016A Owner's Manual
...
Colour TVCR
OWNER'S MANUAL
P/NO : 3828VA0213D (MV008A, 026N/U TX)
(3840VA0024A/B, 3840VA0016A, 373-026F)
Please read this manual carefully before operating your set.
Retain it for future reference.
Record model number and serial number of the set.
See the label attached on the back cover and quote this
information to your dealer when you require service.
Model number :
Serial number :
FOR THE GUARANTEE TERMS & CONDITIONS,
PLEASE REFER TO BACK COVER OF THIS MANUAL
is a trademark of Gemstar Development
Corporation.
The system is manufactured under license
from Gemstar Development corporation.

Contents
Installation 3
Location and function of controls 4
Remote control handset / Battery installation
Front panel
Basic operation 7
On and off / Programme selection
Volume adjustment / Mute function
Quick view / On screen language selection
On screen menus 8
Menu selection
Setting up TV stations 9
Auto programme tuning
Manual programme tuning
Fine tuning / Programme edit
Picture adjustment 13
Picture adjustment
Sound adjustment 14
Sound adjustment
Stereo/Dual reception
NICAM reception
Sound output selection / VCR Hi-Fi sound system
Other functions 16
TV and AV modes
Child lock / Auto sleep
Auto repeat / AVL (Auto volume leveler)
VCR colour system setting / Sleep timer
Time setting 18
Clock / On/off time
VCR operation 19
Playing tapes
Tape tracking control
Pause/still picture / Slow picture
Fast forward, cue, rewind and review
Clock/count selection / Memory stop
Recording 22
Manual recording
Instant timer recording (ITR)
Timer programme setting
Timer recording standby (option)
Showview (VIDEOplus+) (option)
Teletext (option) 25
Switch on/off
SIMPLE text / TOP text (option) / FASTEXT
Special teletext functions
Connection of external equipment 28
Aerial socket
Euro scart socket
Audio/Video in sockets
S-Video/Audio in sockets (S-AV) (option)
Headphone socket (option)
Troubleshooting check list 30
2

Installation
3
Power
This set operates on an AC mains supply, the voltage is as
indicated on the label on the back cover. Never apply DC power to
the set. In the event of thunderstorms or powercuts, please pull
out the aerial and mains plugs.
Warning
To prevent fire or shock hazard, do not expose the set to rain or
moisture.
Service
Never remove the back cover of the set as this can expose you to
very high voltage and other hazards. If the set does not operate
properly, unplug it and call your dealer.
Wiring (in U.K. only)
This set is supplied with a BS 1363 approved 13 amp mains plug,
fused at 5 amp. When replacing the fuse always use a 5 amp BS
1362, BSI or ASTA approved type. Never use this plug with the
fuse cover omitted. To obtain a replacement fuse cover contact
your dealer or "LG Electronics U.K. Ltd.".
If the type of plug supplied is not suitable for the mains sockets in
your home, then the plug should be removed and a suitable type
fitted. Please refer to the wiring instructions below:
Warning (in U.K. only)
A mains plug removed from the mains lead of this set must be
destroyed. A mains plug with bared wires is hazardous if inserted
in a mains socket.
Do not connect either wire to the earth pin, marked with the letter
E or with the earth symbol or coloured green or green and
yellow.
If any other plug is fitted, use a 5 amp fuse, either in the plug, or at
the distribution board.
Important (in U.K. only)
The wires in this mains lead are coloured in accordance with the
following codes:
BLUE: NEUTRAL
BROWN: LIVE
As the colours of the wires in the mains lead of this set may not
correspond with the coloured marking identifying the terminals in
your plug, proceed as follows:
The wire which is coloured blue must be connected to the terminal
which is marked with the letter N or coloured black. The wire
which is coloured brown must be connected to the terminal which
is marked with the letter L or coloured red.
Aerial
Connect the aerial cable to the socket marked +75Ω on the back
cover. For the best reception an outdoor aerial should be used.
Location
Position your set so that no bright light or sunlight falls directly
onto the screen. Care should be taken not to expose the set to
any unnecessary vibration, moisture, dust or heat. Also ensure that
the set is placed in a position to allow a free flow of air. Do not
cover the ventilation openings on the back cover.
Location and function of controls
All the functions can be controlled with the remote control handset.
Some functions can also be adjusted with the buttons on the front
panel of the set.
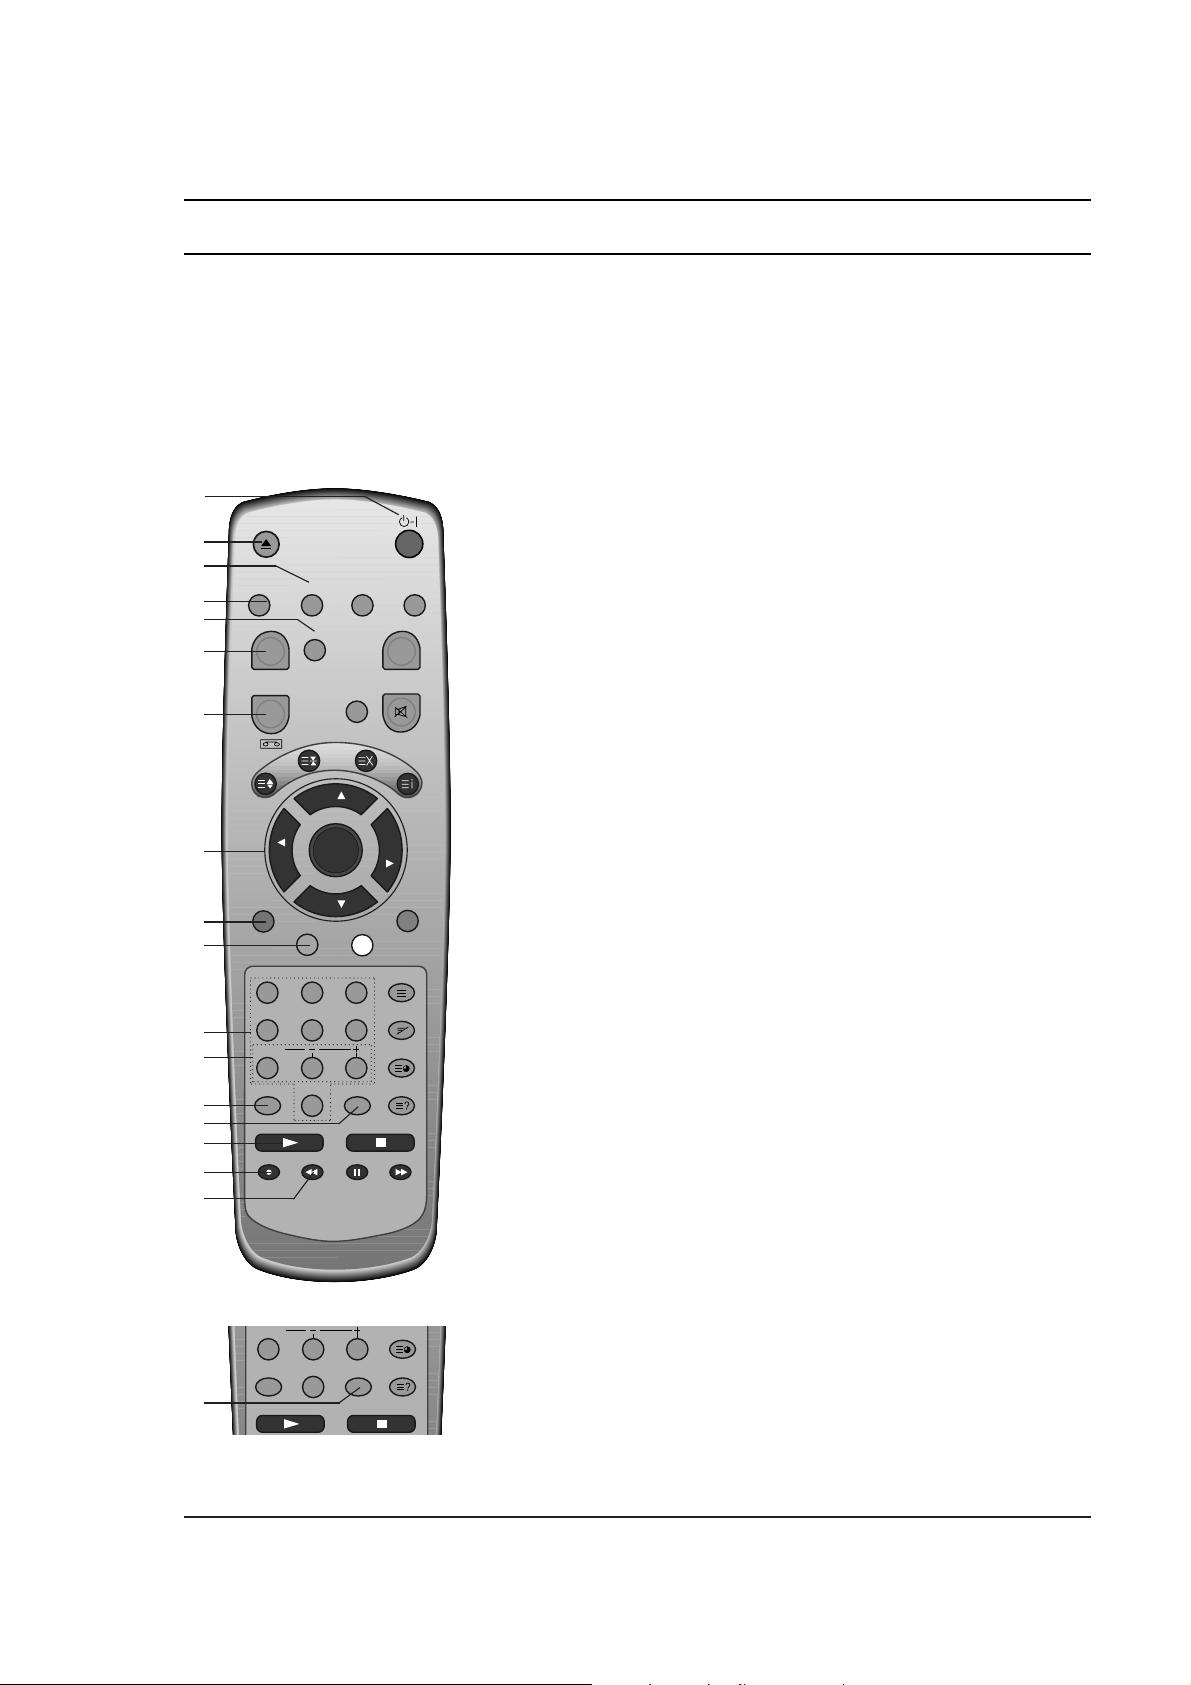
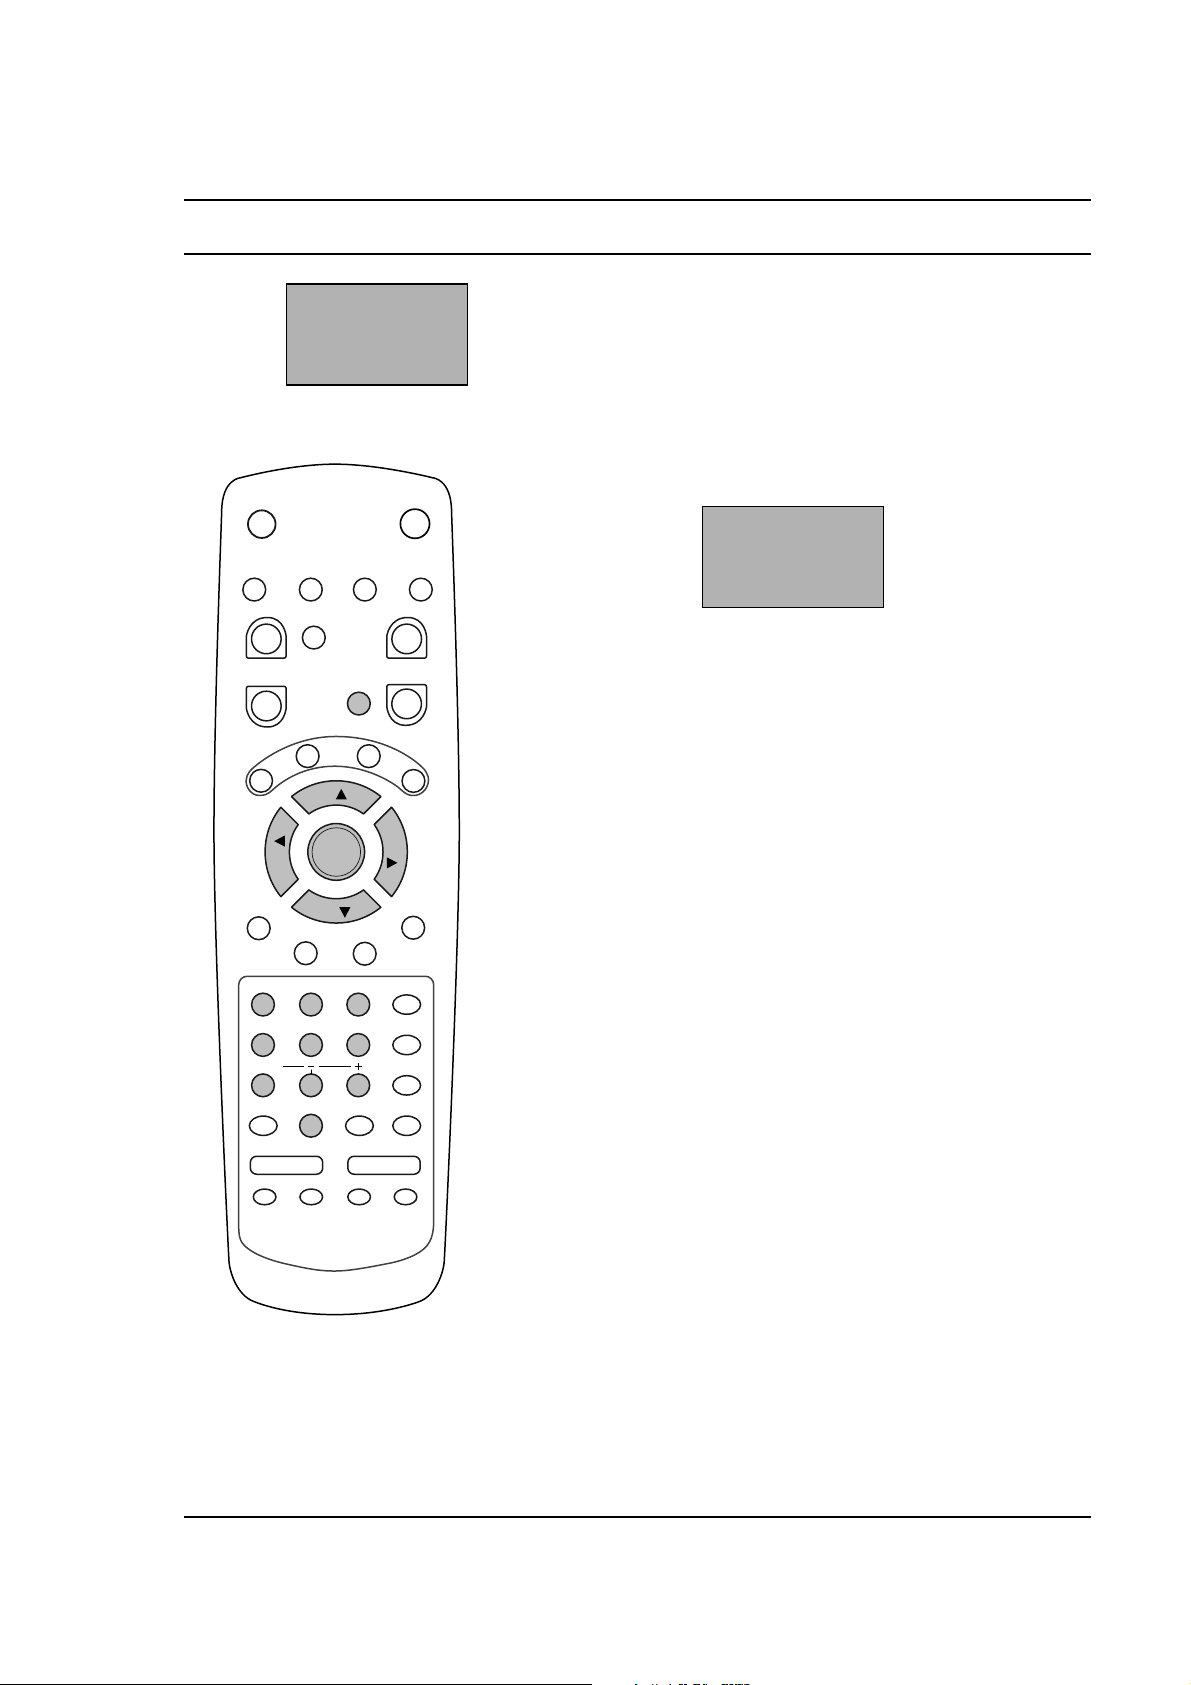
Remote control handset
Before you use the remote control handset, please install the
batteries. See the next page.
1. r-I (POWER)
switches the set on from standby or off to standby.
2. EJECT
ejects the tape.
3. SYSTEM
selects the desired VCR colour system.
4. SLEEP
sets the sleep timer.
5. TV/AV
selects a TV or AV mode.
6. TIMER REC
lets you operate VCR buttons which do not function while the
timer programme is set for recording.
7. TIMER PROG
displays the timer programme recording menu.
8.
D
/
E
(PROGRAMME UP/DOWN)
switches the set on from standby.
selects a programme or a menu item.
F/G
(VOLUME UP/DOWN)
adjusts the volume.
adjusts menu settings.
OK
accepts your selection or displays the current mode.
9. PSM (Picture Status Memory)
recalls your preferred picture setting.
10. SSM (Sound Status Memory)
recalls your preferred sound setting.
11. NUMBER BUTTONS
switch the set on from standby or directly select a number.
12. AUTO, +/-
adjust the picture/Hi-Fi sound automatically or manually during
playback.
13. SLOW
displays a slow picture during playback.
14. SHOWVIEW (VIDEOplus+) (option)
displays the Showview (VIDEOplus+) mode.
15. PLAY(X2)
plays back the tape at normal or double speed.
16. REC/ITR
starts a manual recording or instant timer recording.
17. REW (REWIND/REVIEW)
rewinds the tape at high speed in the stop mode.
fast review of tape during playback.
4
Q.VIEW
I/II
MENU
SYSTEMSLEEP
PSM
SLOW
REC/ITR
REW FF
SSM
EJECT
OK
PLAY(X2) STOP
P/STILL
REVEAL
TIME
MIX
SP/LP
VOL
PR
PR
VOL
CLOCK/COUNT
TIMER REC
TIMER PROG
TV/AV
CLEAR/RESET
MUTE
TEXT
1
2
3
4
5
6
7
8
9
0
AUTO
SHOWVIEW
2
3
4
5
6
7
8
9
10
11
12
13
14
15
16
17
1
14
AUTO
8
7
SLOW
PLAY(X2) STOP
VIDEOplus
0
TIME
9
+
REVEAL

Location and function of controls
18. QUICK VIEW
returns to the previously viewed programme.
confirms the recording programme when watching another
programme, if your model has two tuner.
19. CLOCK/COUNT
displays the current time or tape counter.
20. CLEAR/RESET
resets the tape counter or clears a data in the Timer
programme
menu.
21. MENU
selects a menu.
22. MUTE
switches the sound on or off.
23. TELETEXT BUTTONS (option)
These buttons are used for teletext.
For further details, see the ‘Teletext’ section.
24. SP/LP
selects a recording tape speed SP or LP.
25. DUAL (I/II)
selects the language during dual language broadcast.
selects mono sound during stereo broadcast.
26. STOP
stops the tape during playback or recording.
27. FF (FAST FORWARD/CUE)
winds the tape forward at high speed in the stop mode.
fast forward playback.
28. PAUSE/STILL
pause the tape during recording.
displays a still picture during playback.
Battery installation
The remote control handset is powered by two AAA type batteries.
To load the batteries, turn the handset over and slide open the
battery compartment. Install two batteries as indicated by the
polarity symbols( and ) marked inside the compartment.
Note : To avoid damage from possible battery leakage, remove the
batteries if you do not plan to use the remote control handset for an
extended period of time.
5
Q.VIEW
I/II
MENU
SYSTEMSLEEP
PSM
SLOW
REC/ITR
REW FF
SSM
EJECT
OK
PLAY(X2) STOP
P/STILL
REVEAL
TIME
MIX
SP/LP
VOL
PR
PR
VOL
CLOCK/COUNT
TIMER REC
TIMER PROG
TV/AV
CLEAR/RESET
MUTE
TEXT
1
2
3
4
5
6
7
8
9
0
AUTO
SHOWVIEW
18
19
20
21
22
23
24
25
26
27
28
Location and function of controls
6
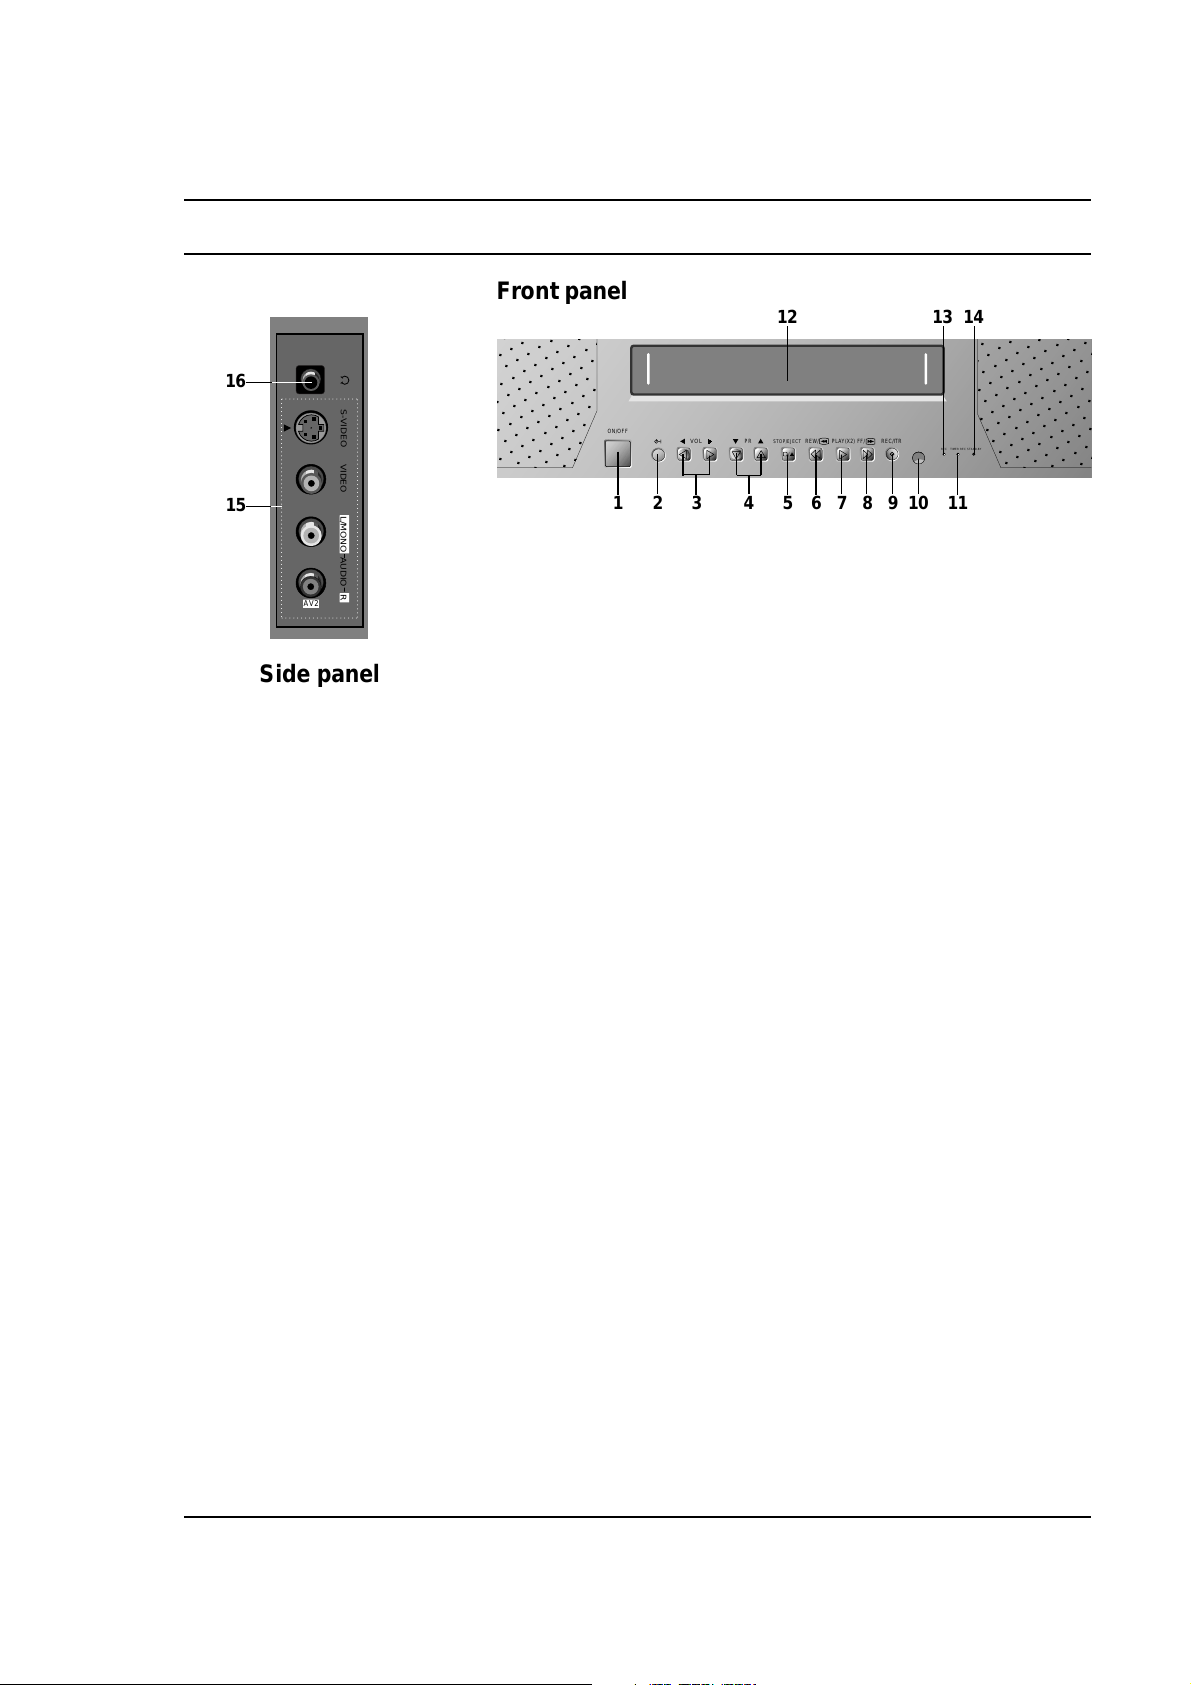
1. MAIN POWER (ON/OFF)
switches the set on or off.
Note : One power line lives even when the
main power is off.
2. POWER (r-I)
switches the set on from standby or off to
standby.
3. VOLUME UP/DOWN
adjusts the volume.
adjusts menu settings.
4. PROGRAMME UP/DOWN
switches the set on from standby.
selects a programme or a menu item.
5. STOP/EJECT
stops the tape during playback or recording
or ejects the tape.
6. REW (REWIND/REVIEW)
rewinds the tape at high speed in the stop
mode.
fast review of tape during playback.
7. PLAY(X2)
plays back the tape at normal or double
speed.
8. FF (FAST FORWARD/CUE)
winds the tape forward at high speed in the
stop mode.
fast forward playback.
9. REC/ITR
starts a manual recording or instant timer
recording.
10. REMOTE CONTROL SENSOR
11. TIMER REC INDICATOR
illuminates green when the timer programme
is set for recording.
12. CASSETTE COMPARTMENT
To insert a video cassette tape here.
13. REC INDICATOR
illuminates red during recording.
14. STAND-BY INDICATOR
illuminates red brightly when the set is in
standby mode.
dims red when the set is switched on.
15. AUDIO/VIDEO IN SOCKETS (AV 2)
connects the audio/video out sockets of
external equipment to these sockets.
S-VIDEO/AUDIO IN SOCKETS (S-AV)
(option)
connects the video out sockets of an SVIDEO VCR to the S-VIDEO socket.
connects the audio out sockets of the SVIDEO VCR to the audio sockets as in AV 2.
16. HEADPHONE SOCKET (option)
connects the headphone plug to this socket.
Front panel
Side panel
1 3 42 5 6 7 8 9 10 11
12 13 14
S-VIDEO
VIDEO
L/MONO RAUDIO
AV2
16
15
ON/OFF
VOL
PR
STOP/EJECT
/
FF/
REC/ITR
PLAY(X2)
REW/
REC TIMER RECSTAND-BY
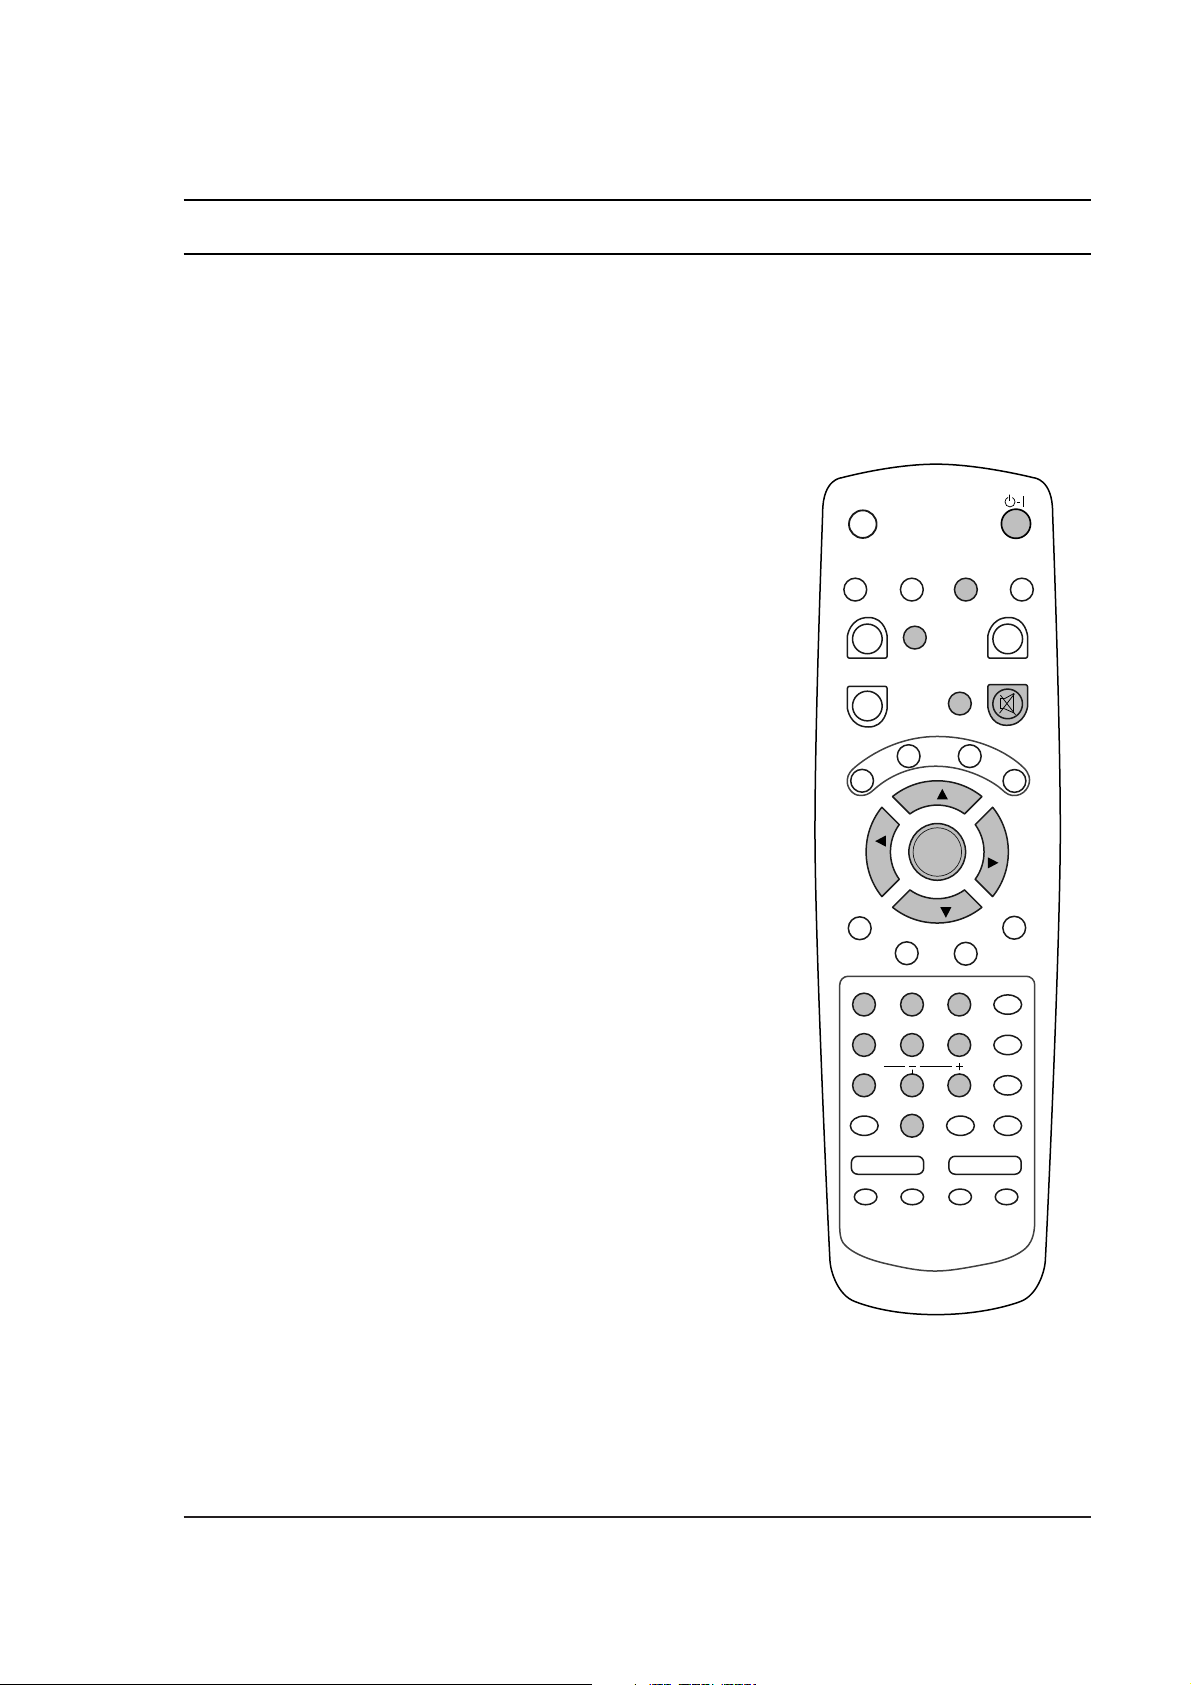
Basic operation
On and off
1. Press the main power button on the front of the set to switch the
set on.
2. If the set is in standby mode, press the r-I (POWER),
D
/
E
,
TV/AV or NUMBER buttons to switch it on fully.
3. Press the r-I (POWER) button. The set reverts to standby
mode.
4. Press the main power button again to switch the set off.
Note : If, while the set is switched on, the mains plug is disconnected the set will switch to standby when the mains plug is
replaced in the mains power socket.
Programme selection
You can select a programme number with the
D
/
E
or NUMBER
buttons.
Volume adjustment
Press the
F/G
button to adjust the volume.
Mute function
Press the MUTE button. The sound is switched off and the display
WW
appears. You can cancel it by pressing the MUTE,
F/G
, SSM
or I/II button.
Quick view
Press the Q.VIEW button to view the last programme you were
watching.
Option :
On some models (two tuner TVCR), press and hold the Q.VIEW
button to view the recording programme. Release this button to
return to the previously viewed programme.
On screen language selection
This is an optional function. In the models which have on screen
language function, the menu can be displayed on the screen in the
desired language. First select your language.
1. Repeatedly press the MENU button to select MENU 1.
2. Press the
D
/
E
button to select Language.
3. Press the OK button.
4. Press the
D
/
E
button to select the desired language.
All the on screen displays will appear in the selected language.
5. Press the OK button to return to normal TV viewing.
7
Q.VIEW
TV/AV
MUTE
MENU
PR
VOL
OK
VOL
PR
1 2
3
4 5 6
7
8
9
0
AUTO

The dialogue between you and your set takes place on screen with
an operator menu. The buttons required for the operating steps are
also displayed.
Menu selection
1. Repeatedly press the MENU button to display each menu.
2. Press the
D
/
E
button to select a menu item.
The selected menu item changes from green to purple.
3. Press the
F/G
button to set a menu item or OK button to
display the sub menu.
Note :
a. The menus automatically disappear in about 10 seconds if you
do not press a button. However if you press the MENU button again,
the last selected menu will appear.
b. In the AV, playback or recording mode, MENU 1 is not displayed.
c. In the teletext mode, menus are not displayed.
On screen menus
8
MENU
PR
VOL
OK
VOL
PR
TV PROGRAMME
MENU 1
MENU 2
MENU 3
MENU 4
MENU 5
OAuto 0programme
OManual0programme
OProgramme0edit
OLanguage
0()0OK00000000000MENU
OSystem I
OStart
O()O}{OOKOOOOOOOOMENU
‚OContrast 80
ΩOBrightness 50
·OColour 50
≥OSharpness 50
O()O}{OOKOOOOOOOOMENU
OClockO__:__
OOOOOOO__.__.____0___
OOffOtimeO__:__OHold
OOnOOtimeO __:__OORunO01
O()O}{OOKOOOOOOOO0MENU
OProgramme 01
OSearch ]]]]
OFine ]]]]
OSystem BG
O()O}{O0~9OOKOOOOMENU
0∞0Bass 50
0¶0Treble 50
0¢0Balance 00
ºSurround Off
0§0Volume 20
0()0}{0OK000000000000MENU
OProgramme 0100__
OName ЕЕЕЕЕ
OPR0skip Off
OAuto0AV Off
0()0}{00~90OK0000MENU
OInput TV
OChild Olock Off
OAutoOsleep Off
OAutoOrepeat Off
OAVL Off
O()O}{OOKOOOOOOOOMENU
>
<
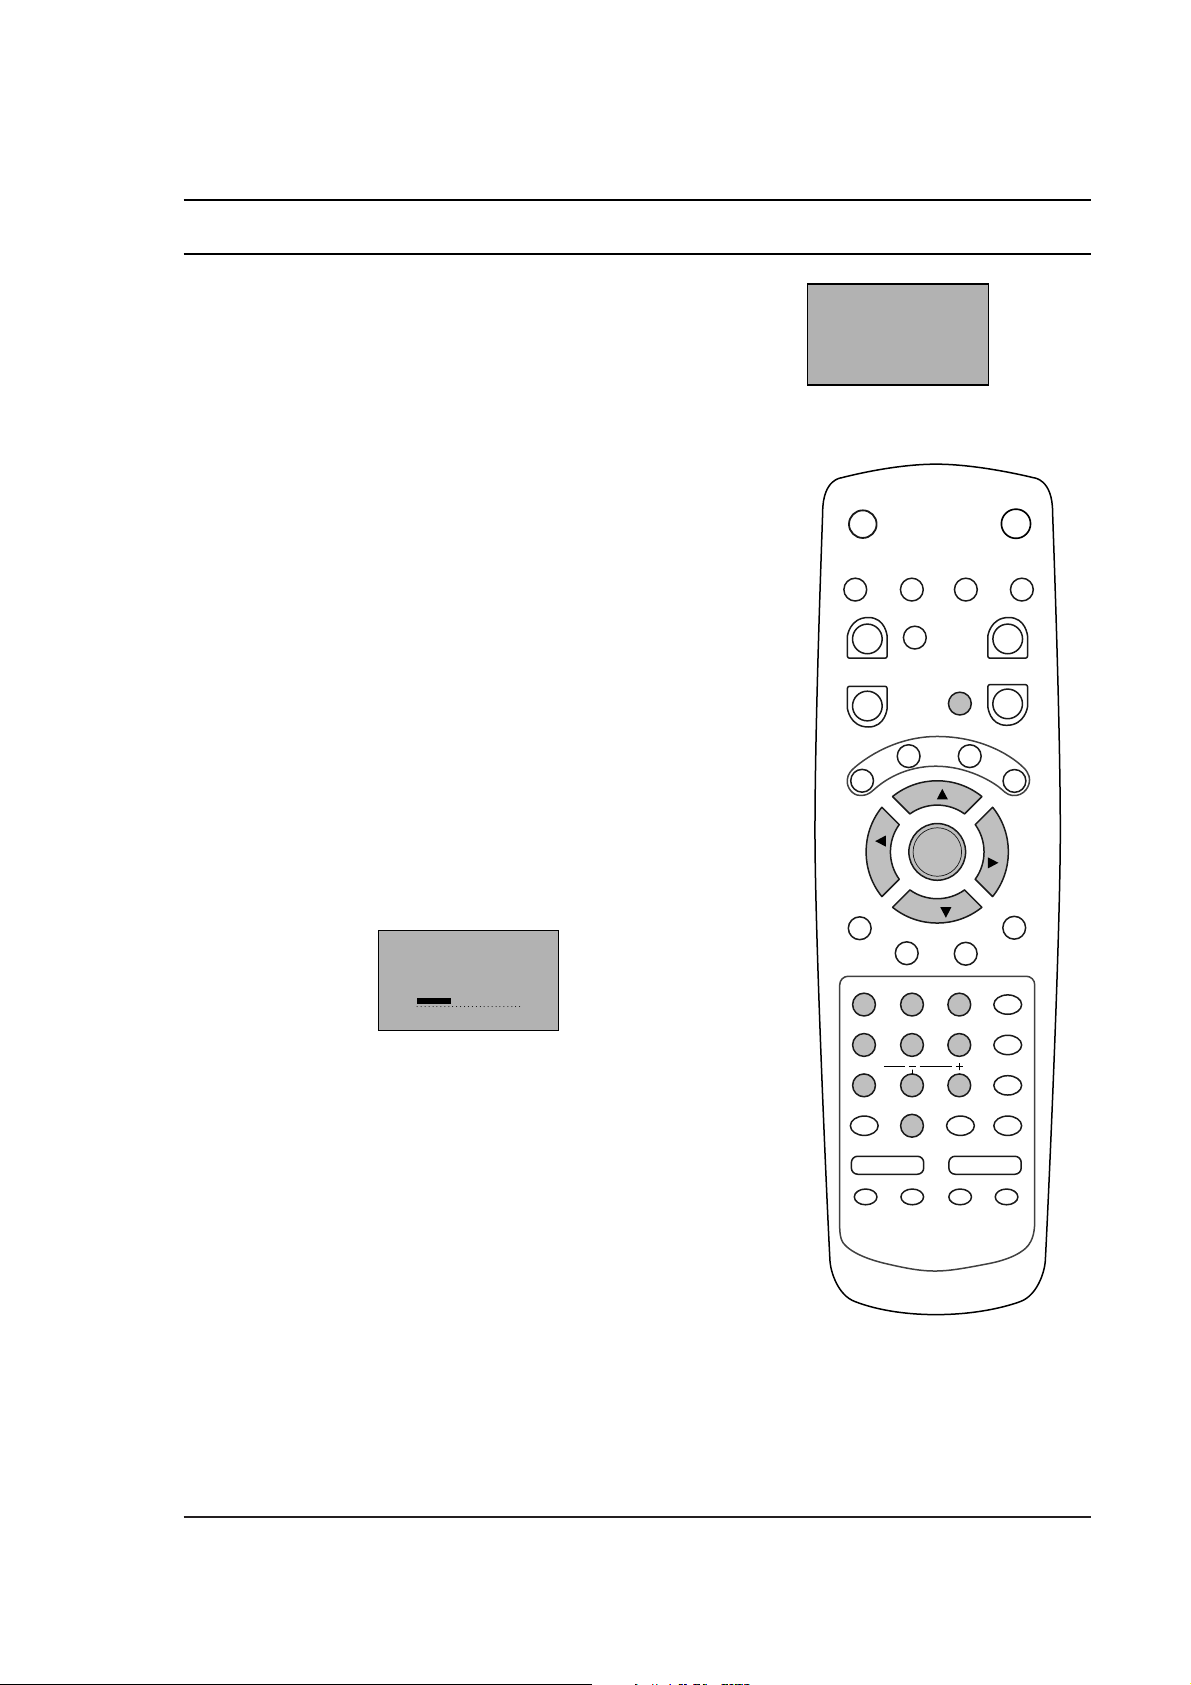
Setting up TV stations
Up to 100 TV stations can be stored in this set by programme
numbers (00 to 99). Once you have preset the stations, you will be
able to use the
D
/
E
or NUMBER buttons to scan the stations you
programmed.
Stations can be tuned using an automatic or a manual mode.
Auto programme tuning
All stations that can be received are stored by this method. It is
recommended that you use auto programme during installation of
this set.
1. Repeatedly press the MENU button to select MENU 1.
2. Press the
D
/
E
button to select Auto programme.
3. Press the
F/G
button to select the beginning system I, DK or
BG.
I : PAL I/II (U.K./ Ireland)
DK : PAL D/K, SECAM D/K (East Europe)
BG : PAL B/G, SECAM B/G (option) (Europe/East Europe etc.)
Option :
On some models, the display L or BG in Auto programme
mode appears on the screen.
L : SECAM L/L’ (France)
BG : PAL B/G, SECAM B/G (Europe/East Europe etc.)
4. Press the
D
/
E
button to select start.
5. Press the OK button to begin auto programming.
When auto programming is completed, the station stored into
programme number 1 will appear on the screen.
To stop auto programming, press the OK button. The active
programme at that time will be displayed.
Note :
a. On some models, the station name may be stored for stations
which broadcast VPS (Video Programme Service), PDC
(Programme Delivery Control) or TELETEXT data. If no station
name can be assigned to a station, the channel number is
assigned and stored.
b. Some undesired stations may be stored, such as noisy or
unclear signals from distant transmitters. You can easily skip
these stations by entering
Programme edit
mode.
9
MENU
PR
VOL
OK
VOL
PR
1 2
3
4 5 6
7
8
9
0
AUTO
MENU 1
OSystem I
OStartOOOOOOOOOOOO]]]]
OOOOOOOOOOOKOOOOOO
01
20%
OAuto 0programme
OManual0programme
OProgramme0edit
OLanguage
0()0OK00000000000MENU
Setting up TV stations
Manual programme tuning
Manual programme lets you manually tune and arrange the
stations in whatever order you desire.
1. Repeatedly press the MENU button to select MENU 1.
2. Press the
D
/
E
button to select Manual programme.
3. Press the OK button to display the Manual programme
mode.
4. Press the
D
/
E
button to select Programme. Select the
desired programme number with the
F/G
button or NUMBER
buttons. Any number under 10 is entered with a numeric '0' in
front of it, i.e. '05' for 5.
5. Press the
D
/
E
button to select System. Press the
F/G
button to select I, DK or BG as required.
Option :
On some models, the display System (L or BG) appears. In
that case, press the
D
/
E
button to select System then select
L or BG with the
F/G
button.
6. Press the
D
/
E
button to select Search. Press the
F/G
button to commence searching. If a station is found the search
will stop.
7. If this station is the one required press the OK button, if not
press the
F/G
button again.
8. Press the OK button. The display Stored will appear.
9. To store another station repeat steps 4 to 8.
10. Repeatedly press the MENU button to return to normal TV
viewing.
Fine tuning
Normally fine tuning is only necessary if reception is poor.
1. Repeat steps 1 to 3 above.
2. Press the
D
/
E
button to select Fine.
3. Press the
F/G
button to fine tune for the best picture and
sound.
4. Press the OK button. The display Stored will appear.
5. Repeatedly press the MENU button to return to normal TV
viewing.
The finely tuned programme will be indicated by a yellow
number during programme selection.
10
MENU
PR
VOL
OK
VOL
PR
1 2
3
4 5 6
7
8
9
0
AUTO
MENU 1
OAuto 0programme
OManual0programme
OProgramme0edit
OLanguage
0()0OK00000000000MENU
OProgramme 01
OSearch ]]]]
OFine ]]]]
OSystem BG
O()O}{O0~9OOKOOOOMENU
 Loading...