

LG Electronics 3828ER3020V User Manual

Installation Instructions
Pedestal
For washer, dryer, and combo
LG 27
P/No. : 3828ER3020V
25.4"
(64.5cm)
18.4"
(46.7 cm)
3"
(7.7cm)
27"
(68.6cm)
13.6"
(34.5cm)

2
IMPORTANT: Read and follow these instructions.
Safety is foremost---both your own and that of other
people. Many important safety instructions are provided
in this instruction and your appliance. Always read and
observe all safety instructions.
1
Remove pedestal, installation hardware, and
instructions from the shipping carton.
2
Position the washer/combo on top of the pedestal.
NOTE:
Because of the weight of the
washer/combo, two or more people
may be needed.
NOTE:
If the washer or combo was previously
installed, unplug it, disconnect the inlet
hose (s) from the faucet (s), disconnect
the drain hose, and drain all hoses.
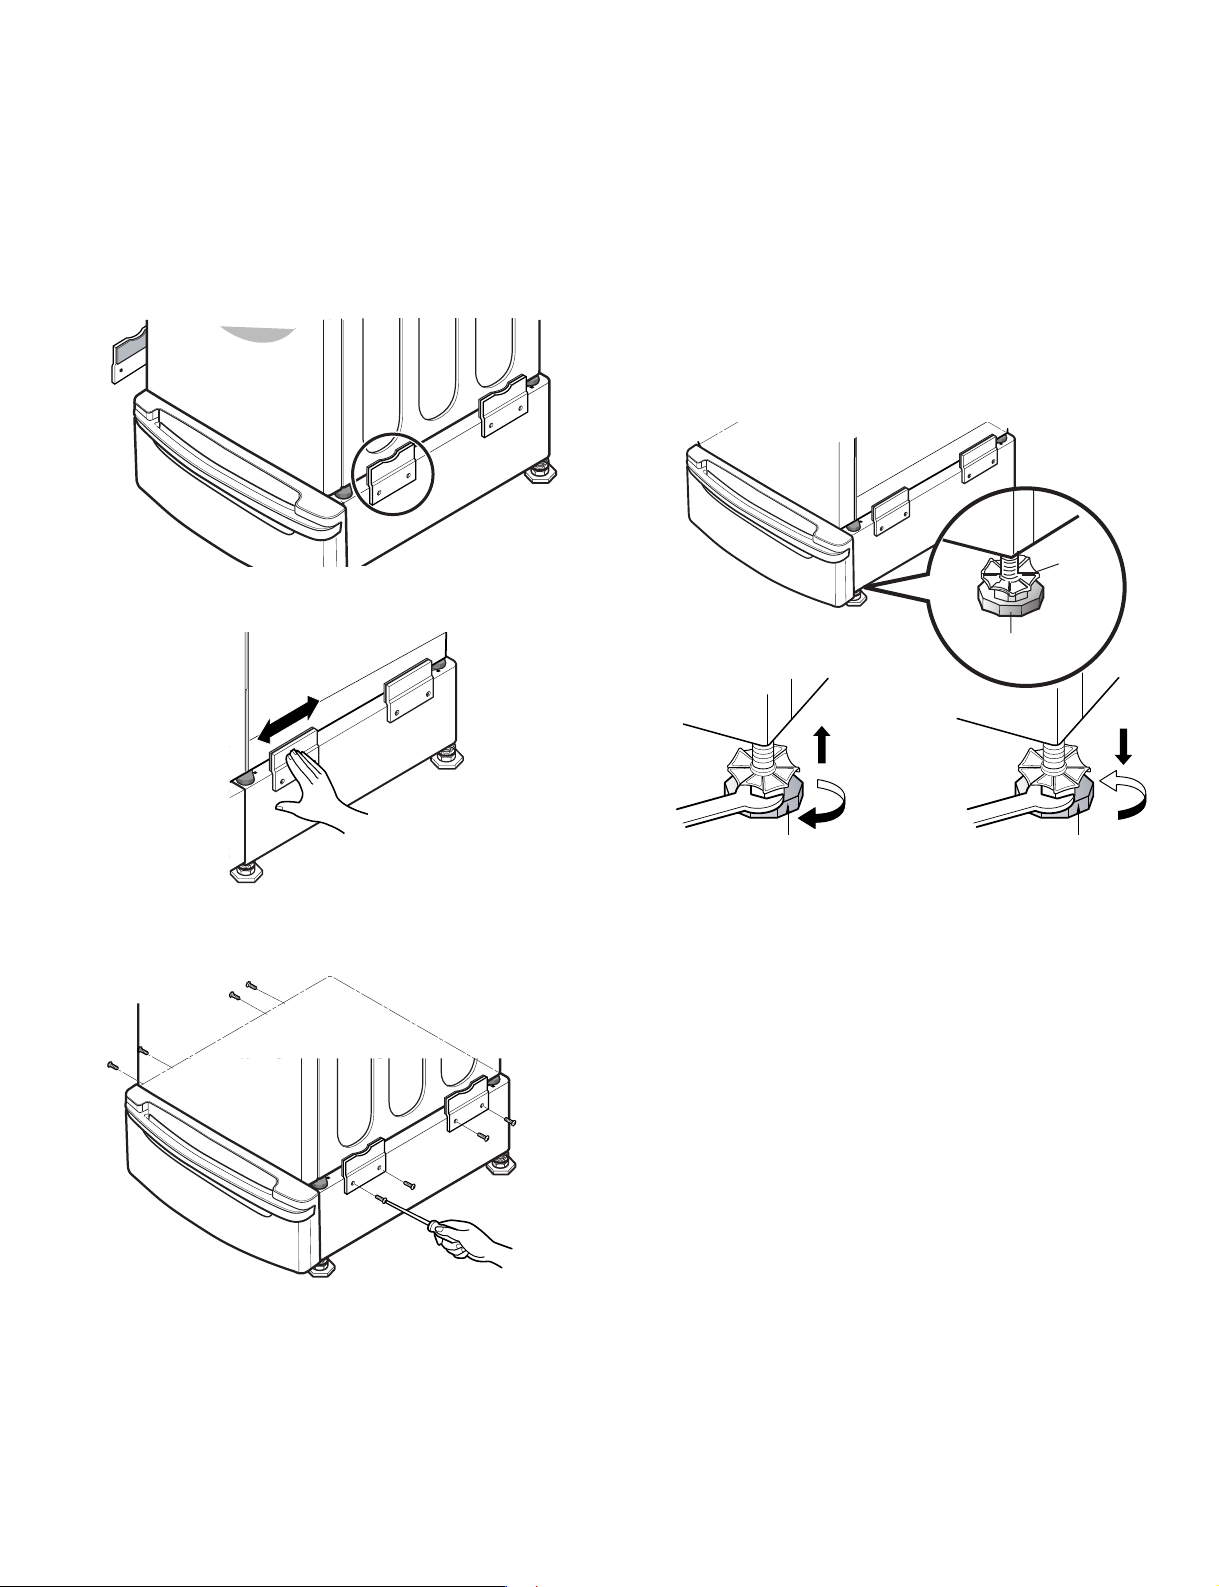
4
Remove the paper from the
bracket.
5
Attach the double-faced tape of the bracket to the
washer/combo as shown so the bent parts of the
brackets align with the edge and can be attached
to the pedestal with screws.
NOTE:
Attach the lower side first.
6
Be sure to press the adhesive parts of the brackets
firmly to the appliance.
7
Install the eight (8) screws (supplied) to attach the
brackets to the pedestal.
8
Move the washer/combo to the desired place.
NOTE:
The appliance and pedestal assembly
must be placed on a solid and level floor
for proper operation. Adjust the legs of
the appliance and pedestal by turning
with a wrench. Then, adjust the lock nut
toward the pedestal while holding the
pedestal leg using a wrench.
The installer must have electrical and mechanical training and acceptable knowledge in the
required work.
Excessive Weight Hazard
Two or more people may be needed to install and
move the appliance and pedestal assembly.
Do not allow children to play on the drawer.
Do not step on the handle.
NOTICE
W
WASHER/COMBO INSTALLATION
ARNING
for washer/
combo
for dryer
for washer/
combo
for dryer
5
Attach the double-faced tape of the bracket to the
washer/combo as shown so the bent parts of the
brackets align with the edge and can be attached
to the pedestal with screws.
NOTE:
Attach the lower side first.
4
Remove the paper from the
bracket.
3
Level the washer/combo on the pedestal by
adjusting the feet.
Lock
nut
Adjustable
feet
Adjustable
feet
Adjustable
feet
Higher Lower

1
Remove pedestal, installation hardware, and
instructions from the shipping carton.
2
Position dryer on top of the pedestal.
NOTE:
Because of the weight of the dryer,
two or more people may be needed.
NOTE:
If dryer was previously installed, uninstall
it as follows:
A. Uninstalling an electric dryer:
1) Unplug the power supply cord,
2) Pull the dryer away from the wall enough to
loosen the vent clamp. Loosen the clamp and
carefully remove the exhaust vent from the
dryer exhaust outlet.
B. Uninstalling a gas dryer:
1) Unplug power supply cord.
2) Turn off the gas supply.
3) Pull the dryer away from the wall enough to
loosen the vent clamp. Loosen the clamp and
carefully remove the exhaust vent from the
dryer exhaust outlet.
3
Remove the paper from the
bracket.
for washer/
combo
for washer/
combo
for dryer
for dryer
DRYER INSTALLATION
for washer/
combo
for dryer
for dryer
for washer/
combo
6
Be sure to press the adhesive parts of the brackets
firmly to the appliance.
7
Install the eight (8) screws (supplied) to attach the
brackets to the pedestal.
8
Move the washer/combo to the desired place.
NOTE:
The appliance and pedestal assembly
must be placed on a solid and level floor
for proper operation. Adjust the legs of
the appliance and pedestal by turning
with a wrench. Then, adjust the lock nut
toward the pedestal while holding the
pedestal leg using a wrench.
Lock
nut
Adjustable
feet
Adjustable
feet
Adjustable
feet
Higher
Lower
3
4
4
Attach the double-faced tape of the bracket to the
dryer as shown so the bent parts of the brackets
align with the edge and can be attached to the
pedestal with screws.
NOTE:
Attach the lower side first.
5
Be sure to press the adhesive parts of the brackets
firmly to the appliance.
6
Install the eight (8) screws(supplied) to attach the
brackets to the pedestal.
7
Move the dryer to the desired place.
NOTE:
The appliance and pedestal assembly
must be placed on a solid and level floor
for proper operation. Adjust the legs of the
appliance and pedestal by turning with a
wrench. Then, adjust the lock unt toward
the pedestal while holding the pedestal leg
using a wrench.
Lock
nut
Adjustable
feet
Adjustable
feet
Adjustable
feet
Higher
Lower

5
LG Electronics Inc., Will repair or at its option replace, without charge, your product if it proves to be defective material
or workmanship under normal use during the warranty period set forth below, effective from the date of original consumer
purchase of the product. This limited warranty is good only to the original purchaser of the product and effective only
when used in the United states including Alaska, Hawail, and U.S. Territories; and Canada.
WARRANTY PERIOD:
1Year from the Date of Purchase.
Call 1-877-714-7486 (USA) or 1-888-542-2623 (Canada) and choose the
appropriate prompt. Please have product type, model number, serial number,
and ZIP code ready.
HOW SERVICE IS HANDLED:
THIS WARRANTY IS IN LIEU OF ANY OTHER WARRANTIES, EXPRESS OR IMPLIED, INCLUDING WITHOUT
LIMITATION, ANY WARRANTY OF MERCHANTABILITY OR FITNESS FOR A PARTICULAR PURPOSE. TO THE
EXTENT ANY IMPLIED WARRANTY IS REQUIRED BY LAW, IT IS LIMITED IN DURATION TO THE EXPRESS
WARRANTY PERIOD ABOVE. LG WILL NOT BE LIABLE FOR ANY CONSEQUENTIAL, INDIRECT, OR
INCIDENTAL DAMAGES OF ANY KIND, INCLUDING LOST REVENUSE OR PROFITS, IN CONNECTION WITH THE
PRODUCT.
SOME STATES DO NOT ALLOW LIMITATION ON HOW LONG AN IMPLIED WARRANTY LASTS OR THE
EXCLUSION OF INCIDENTAL OR CONSEQUENTIAL DAMAGES, SO THE ABOVE LIMITATIONS OR EXCLUSIONS
MAY NOT APPLY TO YOU.
THIS LIMITED WARRANTY DOES NOT APPLY TO:
1. Service trips to your home to deliver, pick up, and/or install the product, instruct, or replace house fuses or correct
wiring, or correction of unauthorized repairs; and
2. Damages or operating problems that result from misuse, abuse, operation outside environmental specifications or
contrary to the requirements or precautions in the Operating Guide, accident, vermin, fire, flood, improper installation,
acts of God, unauthorized modification or alteration, incorrect electrical current or voltage, or commercial use, or use
for other than intended purpose.
3. Therefore, the cost of repair or replacement of such a defective product shall be borne by the consumer.
CUSTOMER INTER-ACTIVE CENTER NUMBERS:
To Prove Warranty Coverage
To Obtain Nearest Authorized
Service Center or Sales Dealer,
or to Obtain Product,Customer,
or Service Assistance
Retain your Sales Receipt to prove date of purchase.
A copy of your Sales Receipt must be submitted at the time warranty service
is provided.
Call 1-877-714-7486 or 1-888-542-2623 and choose the appropriate prompt
from the menu, and have your product type, model number,
serial number, and ZIP Code; or visit our website at
http://www.lgservice.com
WARRANTY
 Loading...