

LG 19LV23 Series, 42LK43 Series, 32LK43 Series, 37LK43 Series, 32LK53 Series Owner's Manual
...
OWNER’S MANUAL
LCD TV / LED LCD TV
Please read this manual carefully before operating your
set and retain it for future reference.
P/NO : MFL67099914 (1110-REV05)
Printed in Korea
www.lg.com

1. ATTACHING THE STAND
5. TABLE OF CONTENTS
2. TIDYING CABLES
3. CONNECTING YOUR UNIT
4. APPLIED LANGUAGE LIST
English
Swedish
Norwegian
Danish
Finnish
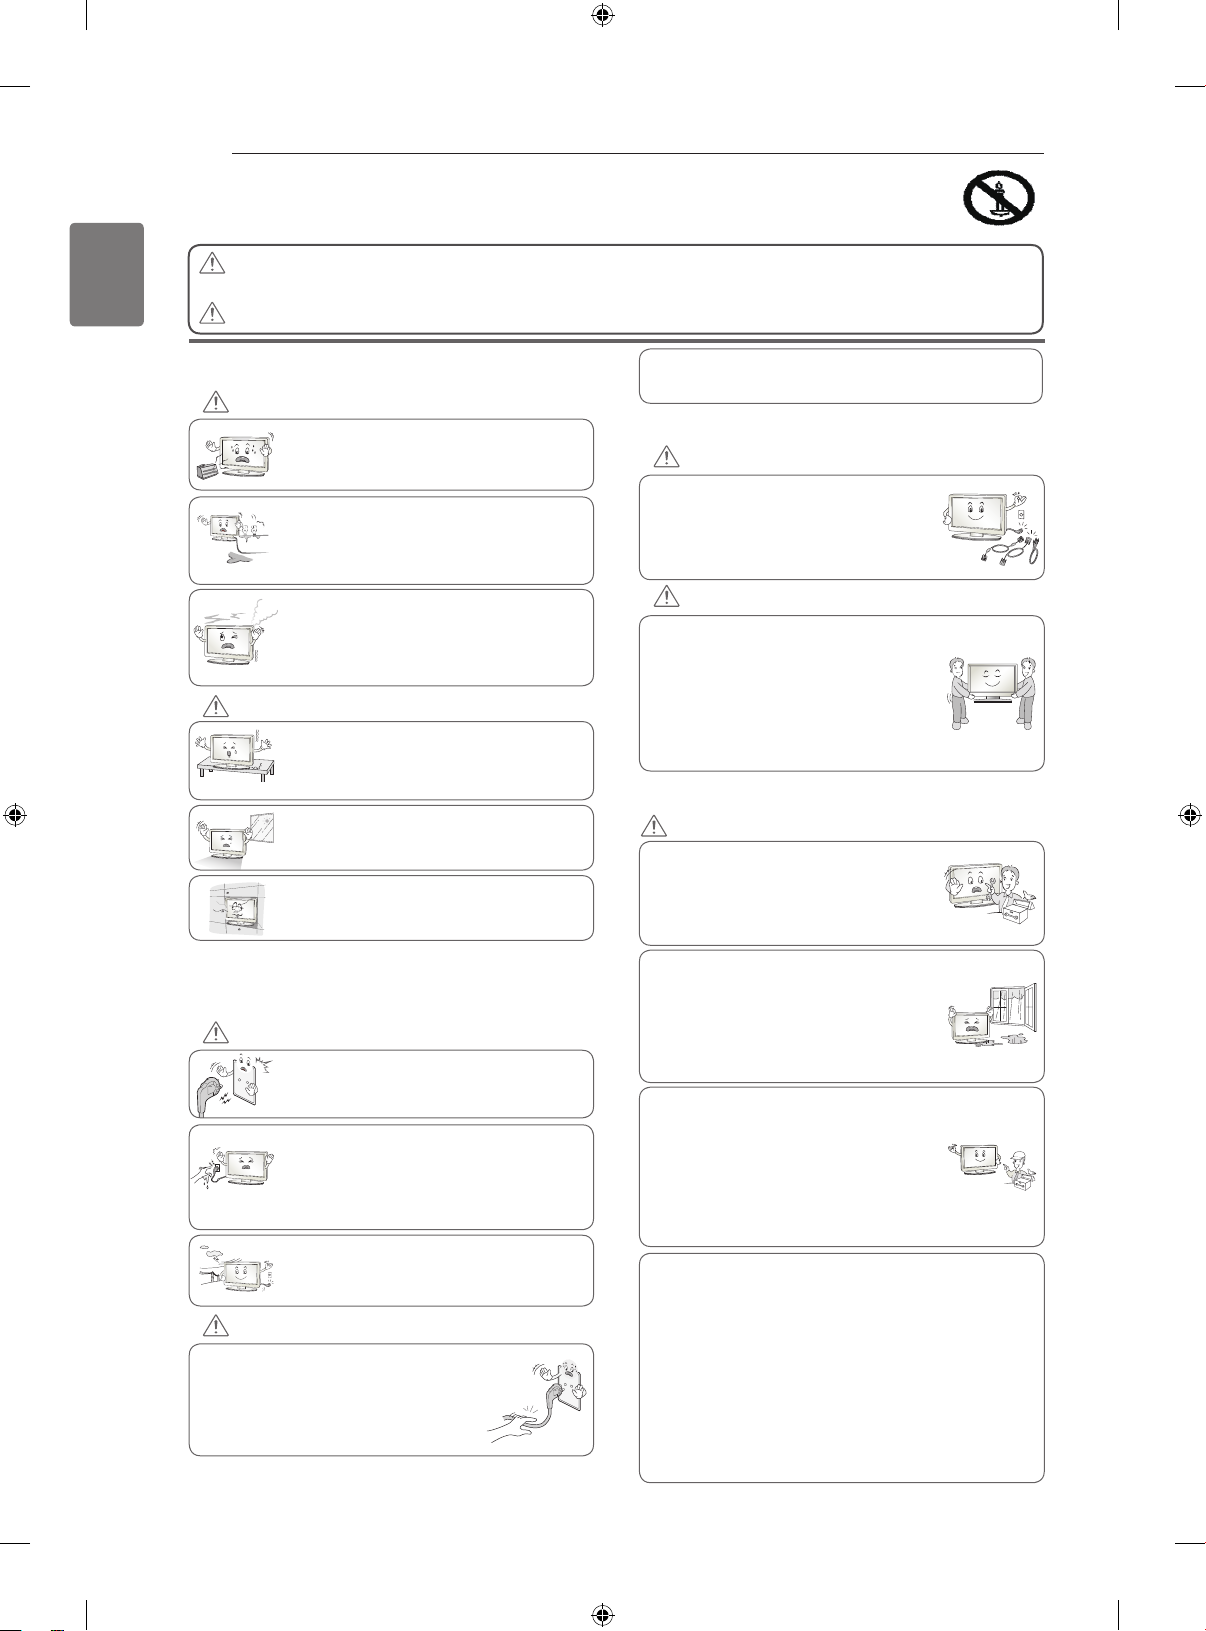
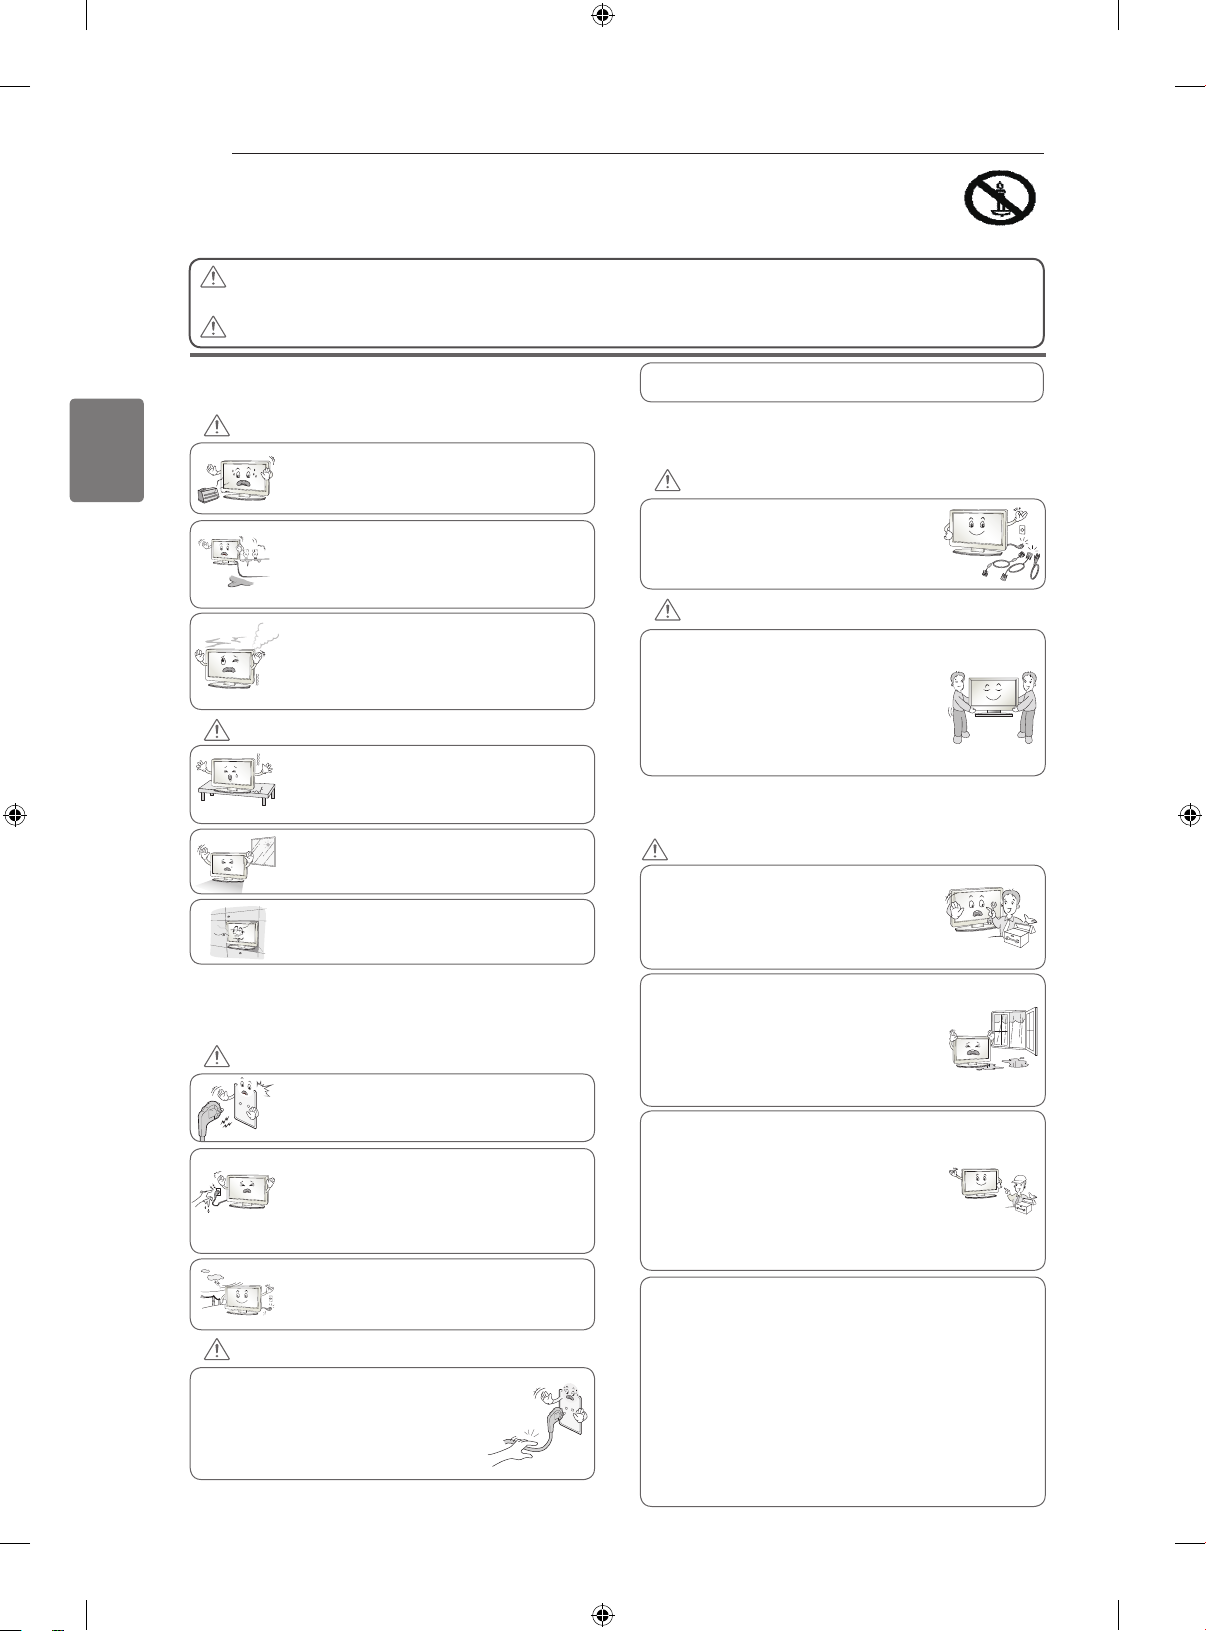
SAFETY INSTRUCTIONS
Precaution in Installing the Product
Electrical Power Related Precautions
Precautions When Moving the Product
Precautions When Using the Product
ASSEMBLING AND PREPARING
Unpacking
Parts and buttons
Not using the Desk Type stand
Mounting on a table
Mounting on a wall
Positioning your display
Connection of TV
REMOTE CONTROL
WATCHING TV
Connecting an antenna
Turning the TV on for the first time
3D IMAGING
TROUBLESHOOTING
WEIGHT
OPEN SOURCE SOFTWARE NOTICE
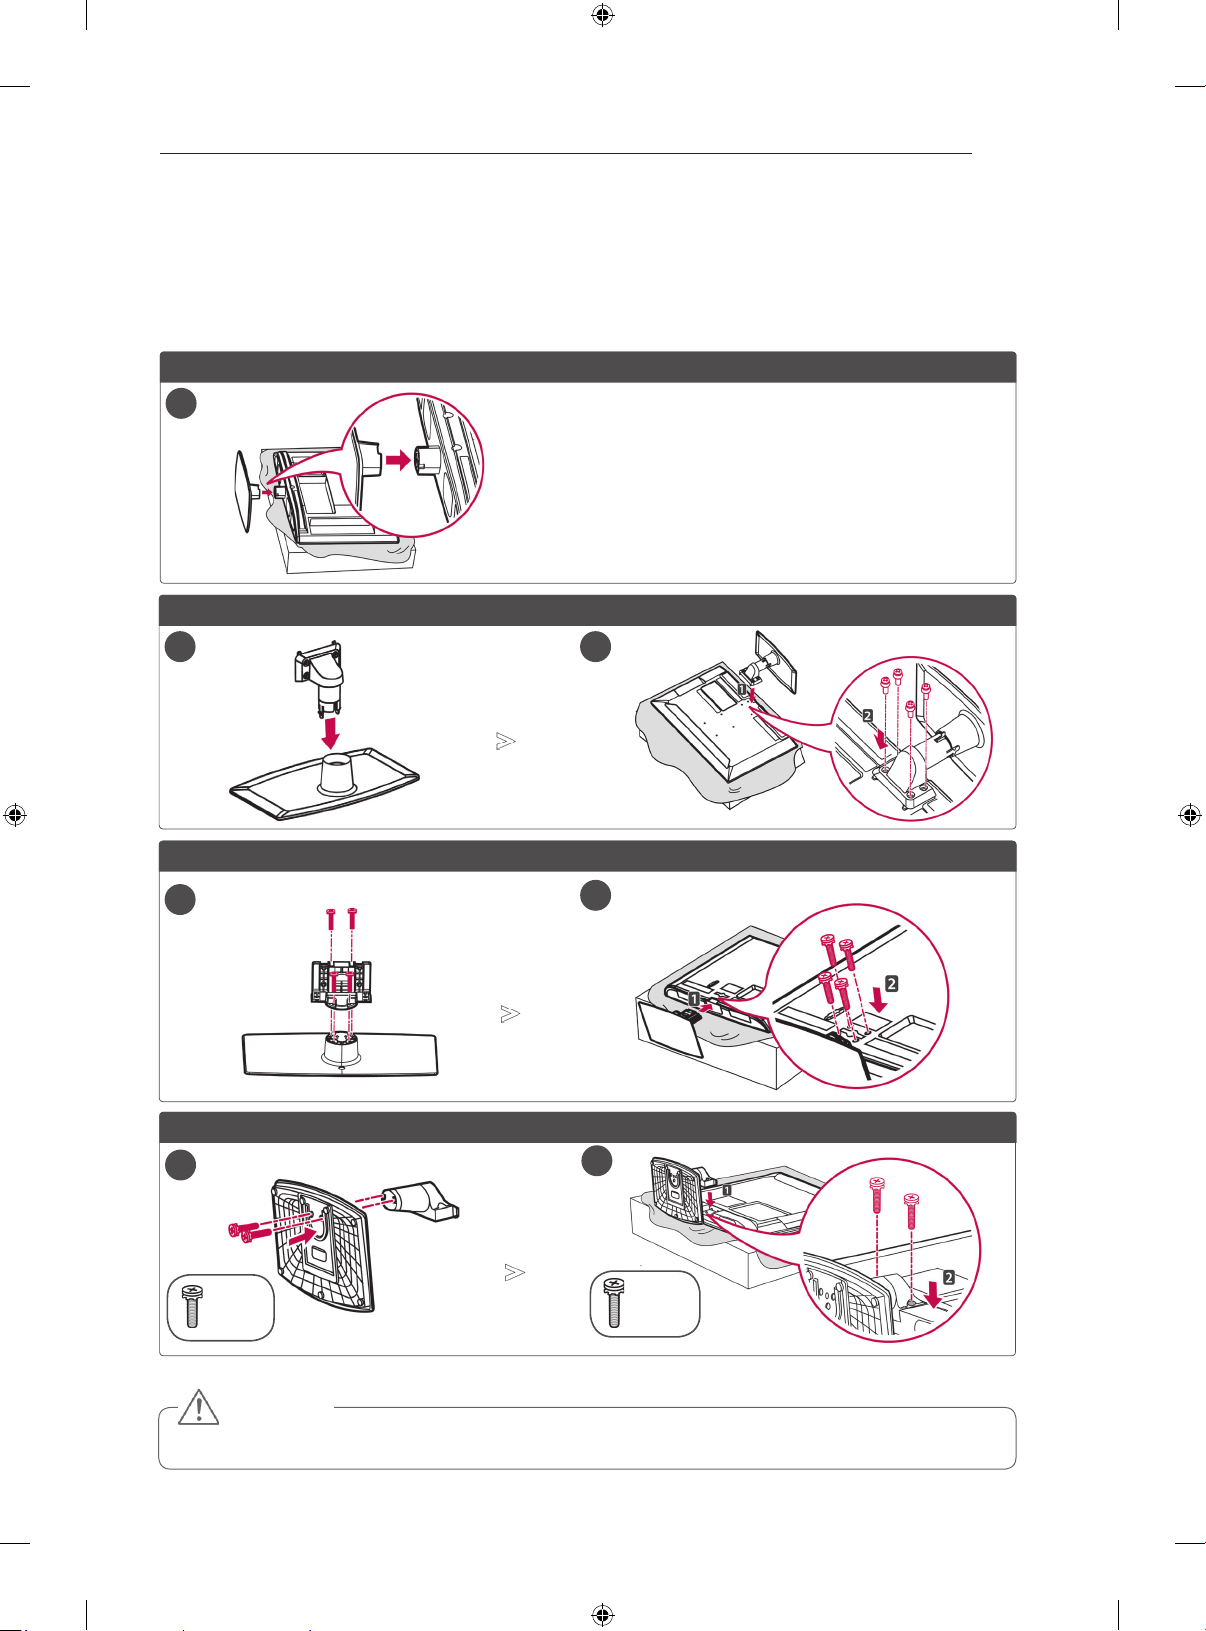
ATTACHING THE STAND
ATTACHING THE STAND
■ Image shown may differ from your TV.
Lay the TV with the screen side down on a flat surface.
22LK33**
1
19/22LV23**
26/32LK33**, 32/37/42LK43**, 32/42/47LK53**, 32/37/42LK45**, 32/42LK55**
1 2
3
26/32LK33**, 32/37/42LK43**, 32/42/47LK53**, 32/37/42LK45**, 32/42LK55**, 47LK95**, 32/37/42LK46**
26/32LK33**, 32/37/42LK43**, 32/42/47LK53**, 32/37/42LK45**, 32/42LK55**
1
19/22/26LV25**, 22/26LV55**
1
(M4x6)
CAUTION
Lay a foam mat or soft protective cloth on the surface to protect the screen from damage.
2
2
(M4x16)
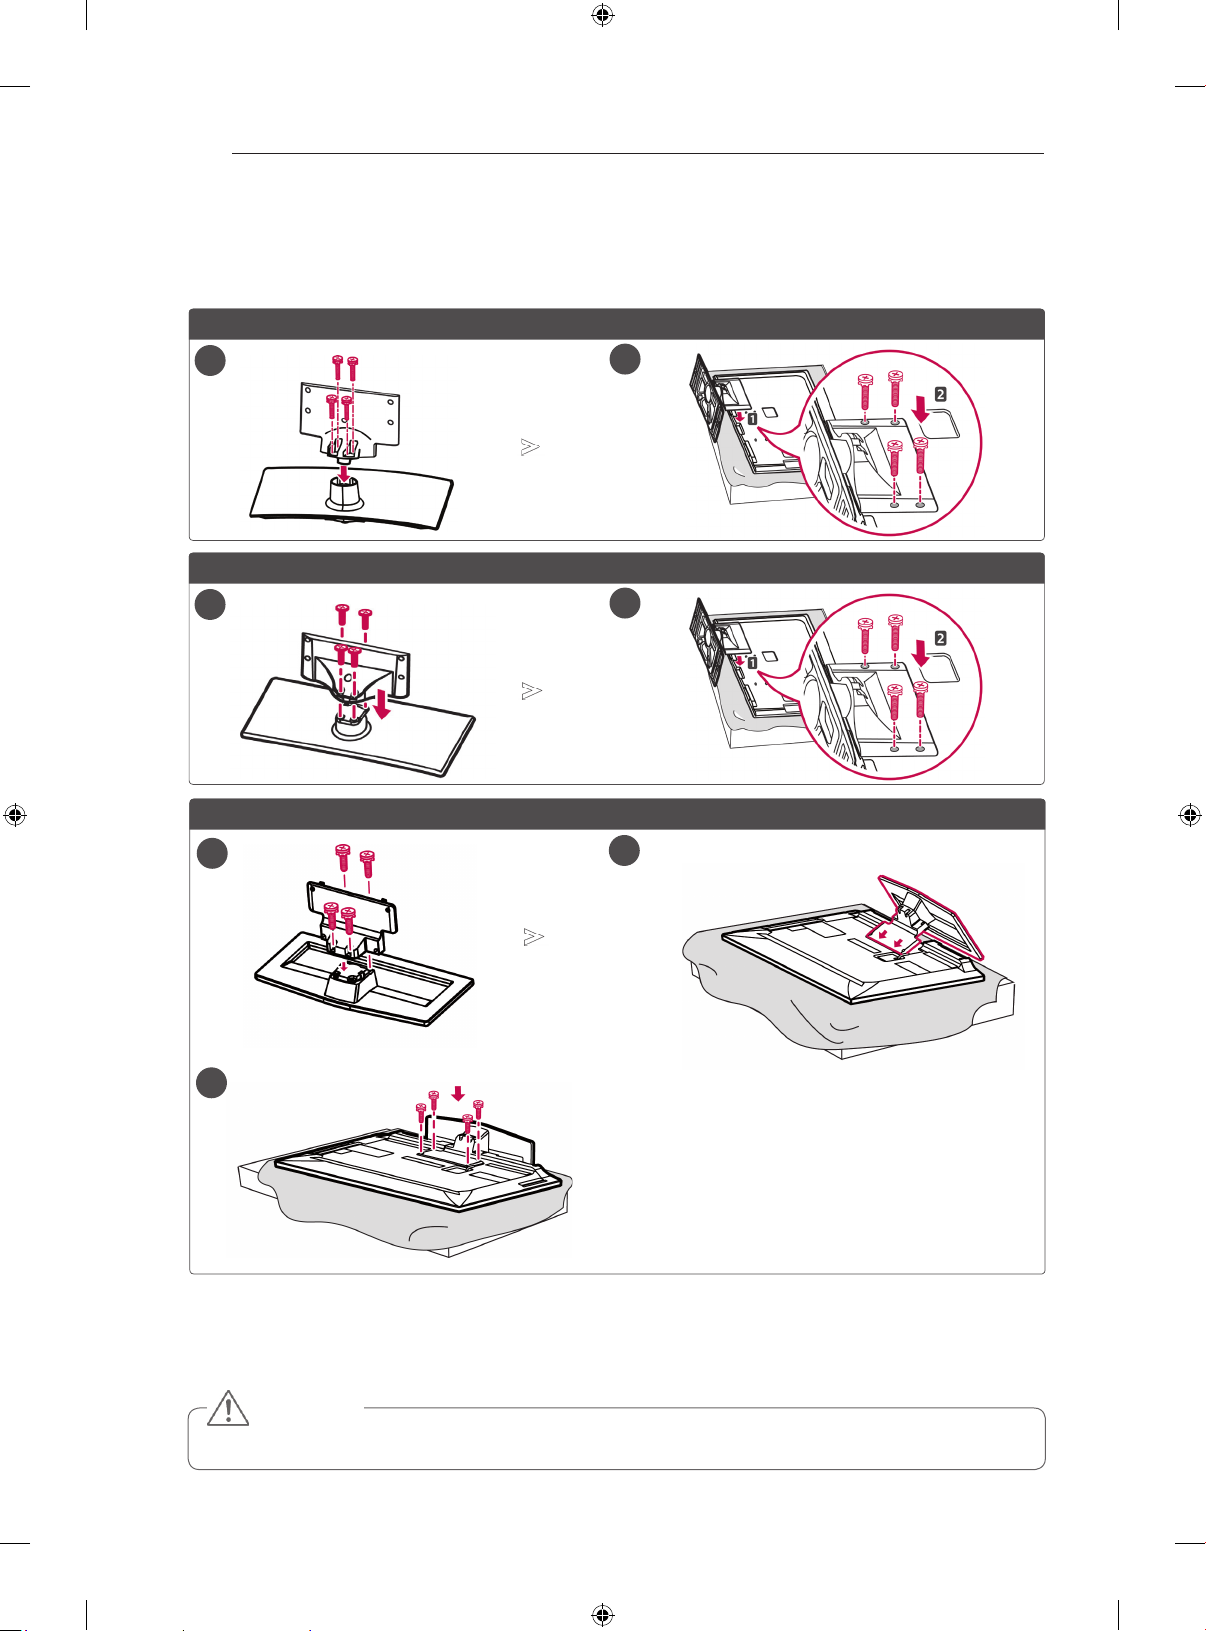
ATTACHING THE STAND
4
■ Image shown may differ from your TV.
Lay the TV with the screen side down on a flat surface.
32LV25**
1
32/42LV34**, 32/37/40/42/47LV35**, 32/37/42/47LV45**, 32/42/47/55LW45**, 32/37/42/47LV36**
1
42/47LW54**
1
2
2
2
3
CAUTION
Lay a foam mat or soft protective cloth on the surface to protect the screen from damage.
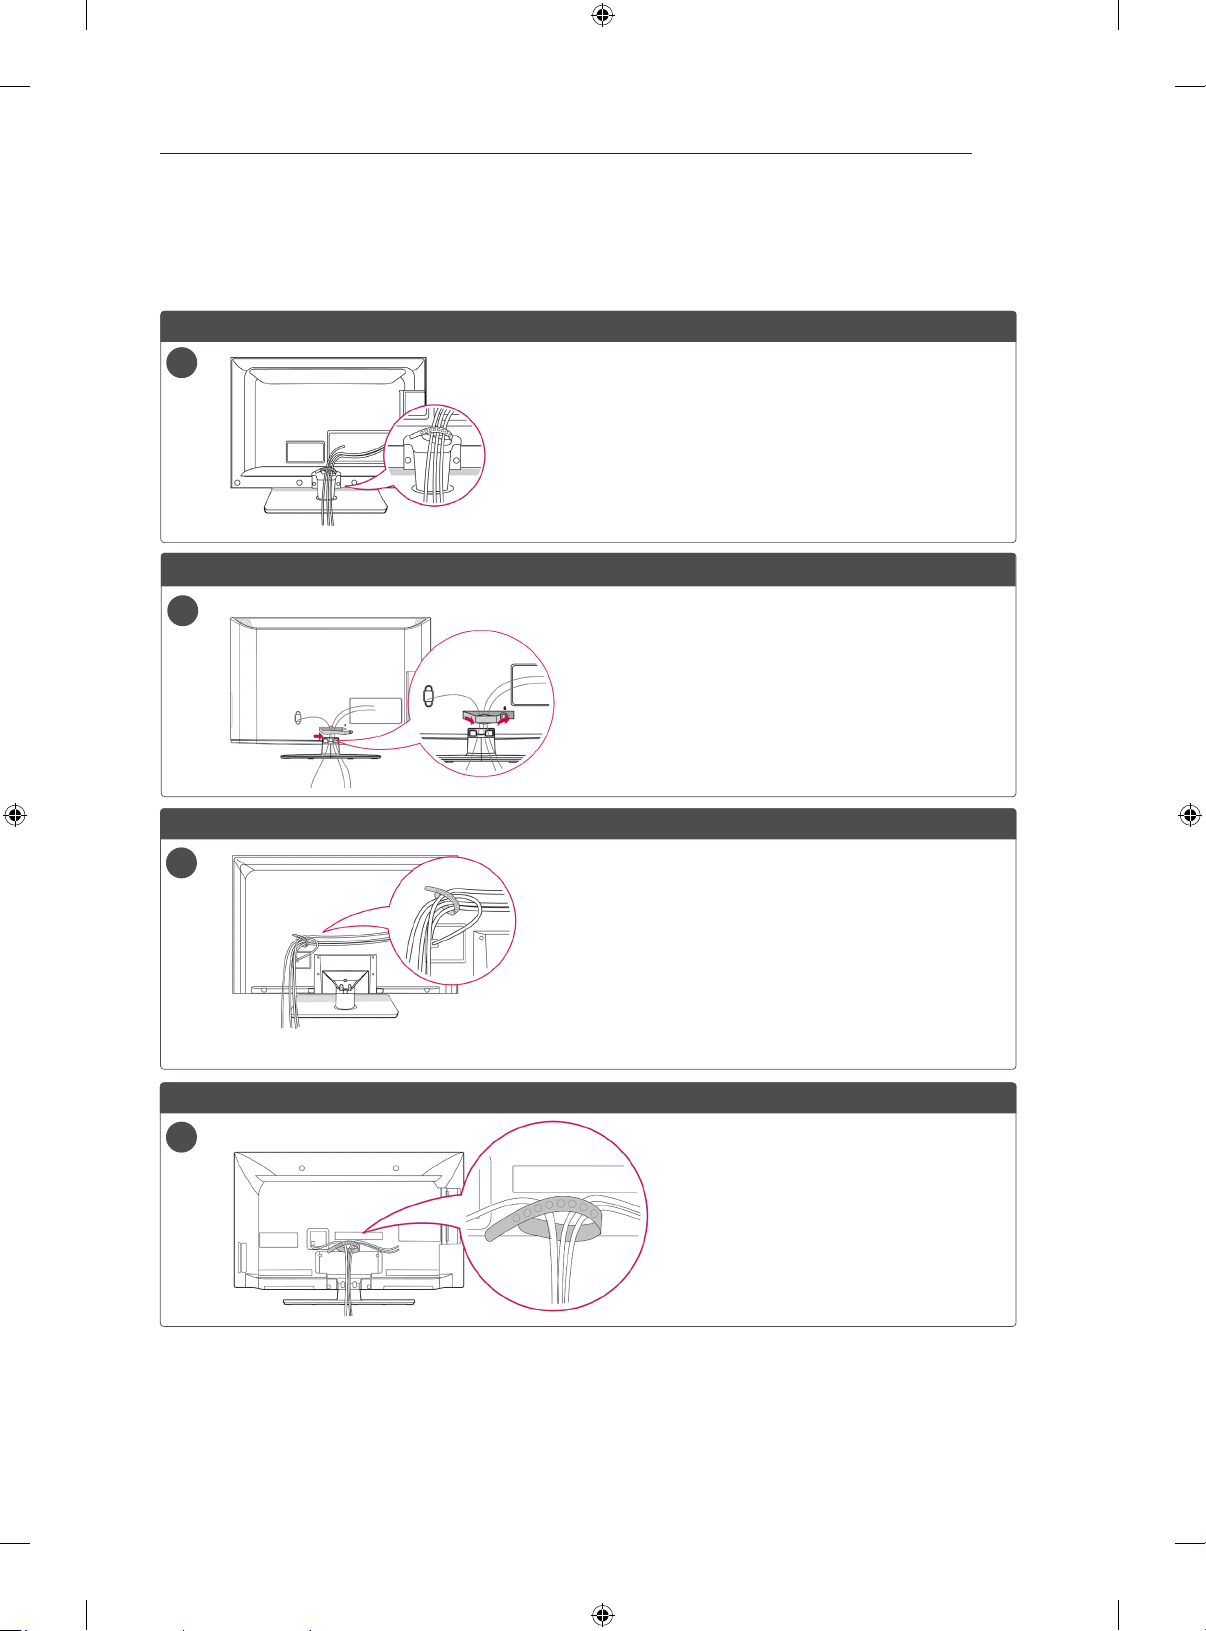
TIDING CABLES
TIDYING CABLES
■ Image shown may differ from your TV.
22LK33**, 19/22/26LV25**, 22/26LV55**, 19/22LV23**
1
26/32LK33**, 32/37/42LK43**, 32/37/42LK45**, 32/42/47LK53**, 32/42LK55**, 47LK95**, 32/37/42LK46**
26/32LK33**, 32/37/42LK43**, 32/42/47LK53**, 32/37/42LK45**, 32/42LK55**
1
5
32LV25**, 32/37/40/42/47LV35**, 32/42/47/55LW45**, 32/37/42/47LV45**, 32/42LV34**, 32/37/42/47LV36**
26/32LK33**, 32/37/42LK43**, 32/42/47LK53**, 32/37/42LK45**, 32/42LK55**
1
42/47LW54**
1
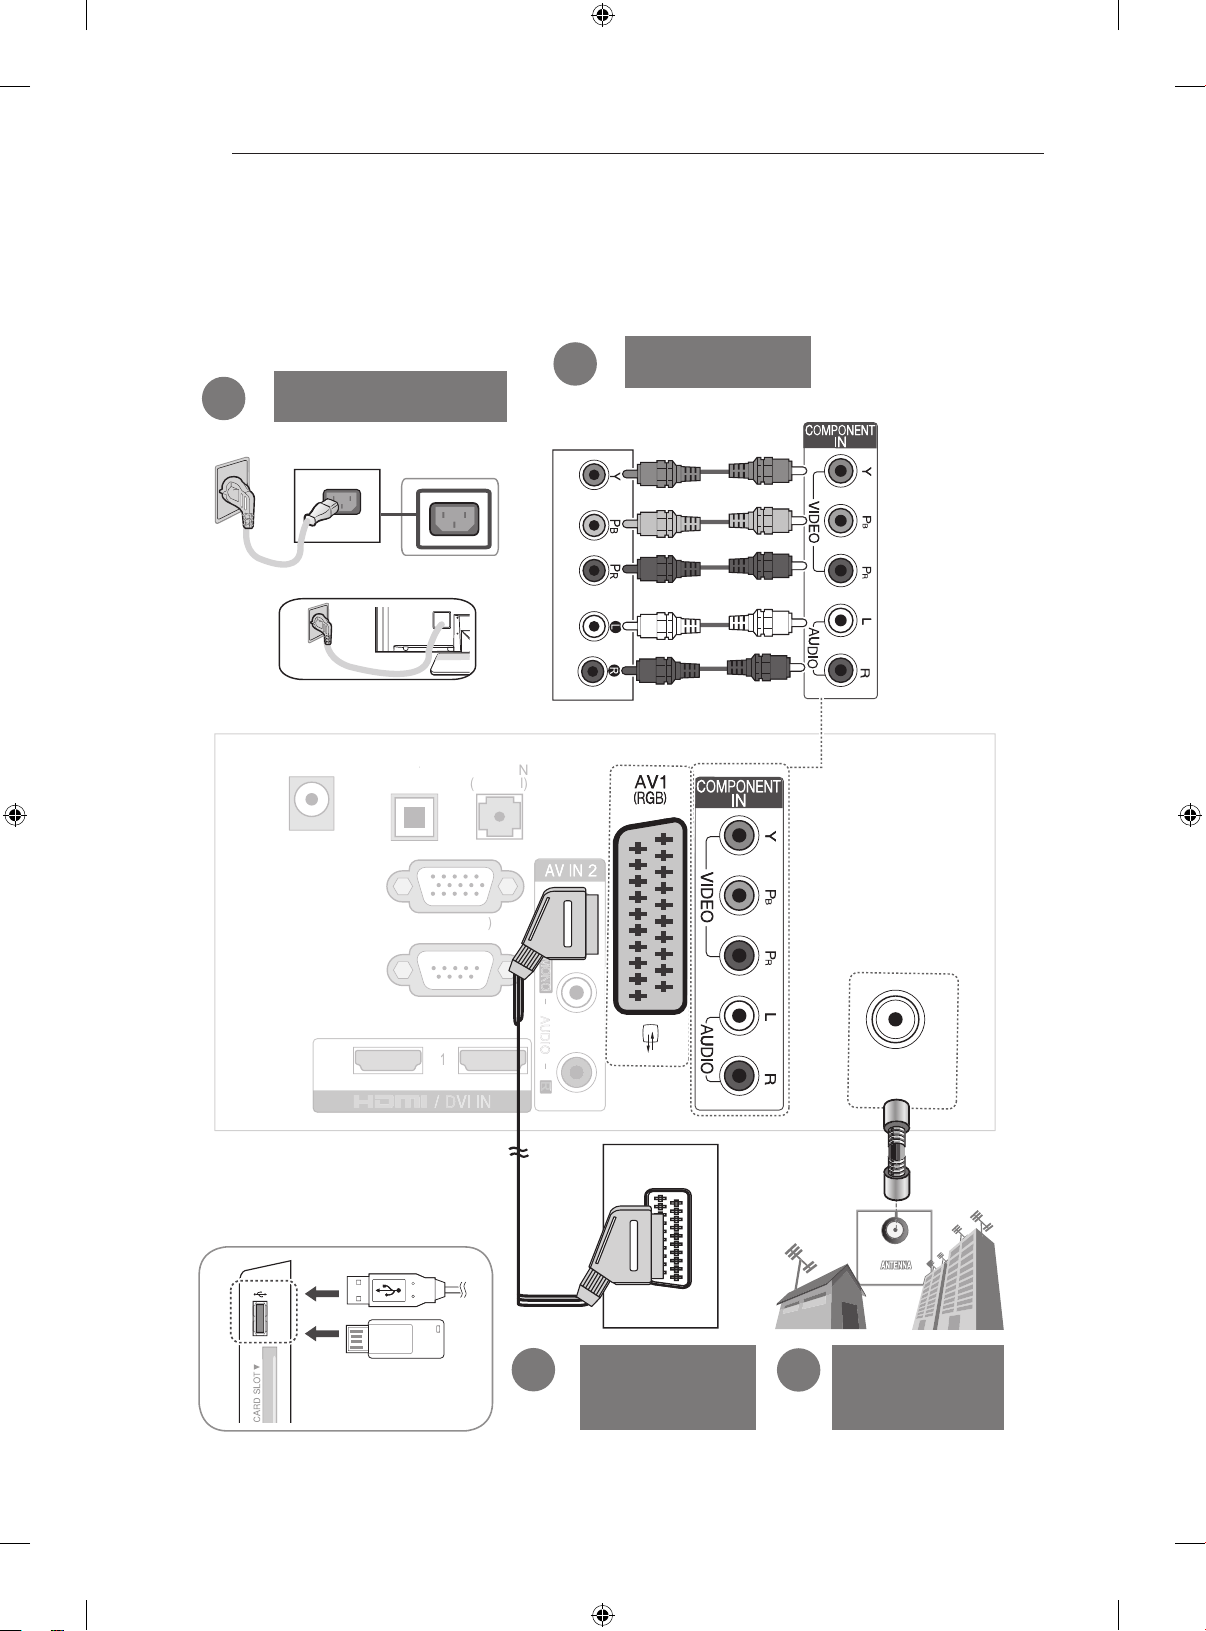
CONNECTING YOUR UNIT
O
PTI
CAL
D
IGIT
A
L
A
A
I
N
(
R
G
B/DV
I
)
N
C
)
(
)
L/
MONO
R
AUDIO
VIDEO
6
CONNECTING YOUR UNIT
■ Image shown may differ from your TV.
3
Power Cord
or
UDIO OUT
DC-I
RGB IN (P
UDIO
2
DVD/STB back
DVD/STB
RS-232C IN
CONTROL & SERVICE
ANTENNA
IN
USB IN
or
2
VCR
Connection
1
Antenna
Connection

OWNER’S MANUAL
LCD TV / LED LCD TV
Please read this manual carefully before operating your
set and retain it for future reference.
www.lg.com
2
ENGLISH
SAFETY INSTRUCTIONS
Please read these safety precautions carefully before using the product.
In this manual, the illustration may be somewhat different from your product because it is
just example to help the instruction.
WARNING
If you ignore the warning message, you may be seriously injured or there is a
possibility of accident or death.
CAUTION
If you ignore the caution message, you may be slightly injured or the product may be damaged.
PRECAUTION IN INSTALLING THE PRODUCT
WARNING
Keep away from heat sources such as
electrical heaters.
- Electrical shock, fire, malfunction or
deformation may occur.
Do not use the product in damp place such
as a bathroom or any place where it is likely
to get wet.
- This may cause a fire or could give an
electric shock.
If you can smell smoke or other odours or hear
a strange sound unplug the Power cord and
contact the service center.
- If you continue to use without taking proper
measures, an electrical shock or a fire can occur.
CAUTION
Install the product on a flat and stable place
that has no risk of dropping the product.
- If the product is dropped, you may be injured
or the product may be broken.
Keep the product away from direct sunlight.
- The product can be damaged.
Do not place the product in a built-in
installation such as bookcase or rack.
- Adequate ventilation is required.
As long as this unit is connected to the AC wall outlet, it is
not disconnected from the AC power source even if you
turn off this unit by SWITCH.
PRECAUTIONS WHEN MOVING THE PRODUCT
WARNING
Make sure to turn off the product.
Make sure to remove all cables before
moving the product.
- You may be electrocuted or the product
can be damaged.
CAUTION
Do not impact the product when moving it.
- You may be electrocuted or the product
can be damaged.
Make the panel face forward and hold it
with both hands to move.
- If you drop the product, the damaged
product can cause electric shock or fire.
Contact your nearest service center for
repair.
PRECAUTIONS WHEN USING THE PRODUCT
WARNING
Do not disassemble, repair or modify the
product at your own discretion.
- Fire or electric shock accident can occur.
- Contact the service center for check,
calibration or repair.
ELECTRICAL POWER RELATED
PRECAUTIONS
WARNING
Make sure to connect the power cable to a
properly earthed outlet.
- You may be electrocuted or injured.
Do not touch the power plug with wet hands.
Additionally, it the cord pin is wet or covered
with dust, dry the power plug completely or wipe
dust off.
- You may be electrocuted due to excess
moisture.
During a thunder or lightning storm, unplug the
power cable or signal cable.
- You may be electrocuted or a fire can break
out.
CAUTION
Protect the Power cord from physical or
mechanical abuse, such as being twisted,
kinked, pinched, closed in a door, or walked
upon. Pay particular attention to plugs, wall
outlets, and the point where the cord exits
the appliance.
To reduce the risk of fire or electric shock,
do not expose this apparatus to rain or
moisture.
Apparatus should not be exposed to
dripping liquids or splashing and no
objects filled with liquids, such as vases,
should be placed on the apparatus.
Refer all servicing to qualified service
personnel. Servicing is required when
the apparatus has been damaged in any
way, such as power supply cord or plug
is damaged, liquid has been spilled or
objects have fallen into the apparatus, the
apparatus has been exposed to rain or
moisture, does not operate normally, or
has been dropped.
IMPORTANT INFORMATION TO PREVENT “IMAGE BURN /
BURN-IN” ON YOUR TELEVISION SCREEN
-
When a fixed image (e.g. logos, screen menus, video game,
computer display and teletext pages) is displayed on the
television for an extended period it can become permanently
imprinted on the screen. This phenomenon is known as “image
burn” or “burn-in”. Image burn is not covered under the
manufacturer’s warranty.
-
In order to prevent image burn, avoid displaying a fixed
image on your television’s screen for a prolonged period (2 or
more hours for LCD, 1 or more hours for Plasma).
-
Image burn can also occur on the letterboxed areas of
your television if you use the 4:3 aspect ratio setting for an
extended period.

ASSEMBLING AND PREPARING
ANTENNA
IN
3
ASSEMBLING AND PREPARING
Unpacking
Check your product box for the following items. If there are any missing accessories, contact the local
dealer where you purchased your product. The illustrations in this manual may differ from the actual product
and item.
2
Remote control and batteries(AAA) Owner’s Manual Isolator
included for all models.)
(
This item is not
ENGLISH
Polishing cloth1 (This item is not
included for all models.)
1 Gently wipe the spots on the cabinet with the polishing cloth.
2 Antenna Isolator Installation Guide
Use this to install TV in a place where there is a voltage difference between GND of power and GND of antenna signal.
- If there is a voltage difference between GND of power and GND of antenna signal, the antenna contact might be
heated and excessive heat might cause an accident.
You can improve the safety when watching TV by efficiently removing power voltage from TV antenna. Avoid
disconnecting the antenna Isolator after installation.
Exterior of antenna isolator:
Connection method :
- Connect Plug 1 with a signal cable.
- Connect Plug 2 with ANT input end on the back of TV.
“Equipment connected to the protective earthing of the building installation through the mains connection or through other
equipment with a connection to protective earthing - and to a cable distribution system using coaxial cable, may in some
circumstances create a fire hazard.
Connection to a cable distribution system has therefore to be provided through a device providing electrical isolation below a
certain frequency range (galvanic isolator, see EN 60728-11)”
Ferrite core
(Depending on model)
Plug2
Plug1
Isolator
RF Coaxial Wire Isolator
RF Coaxial Wire Isolator
Power cord (
This item is not
included for all models.)
Plug1 Plug2
STB
ANTENNA
IN
ANTENNA
IN
When applying the RF Isolator, a slight loss of signal sensitivity can occur.
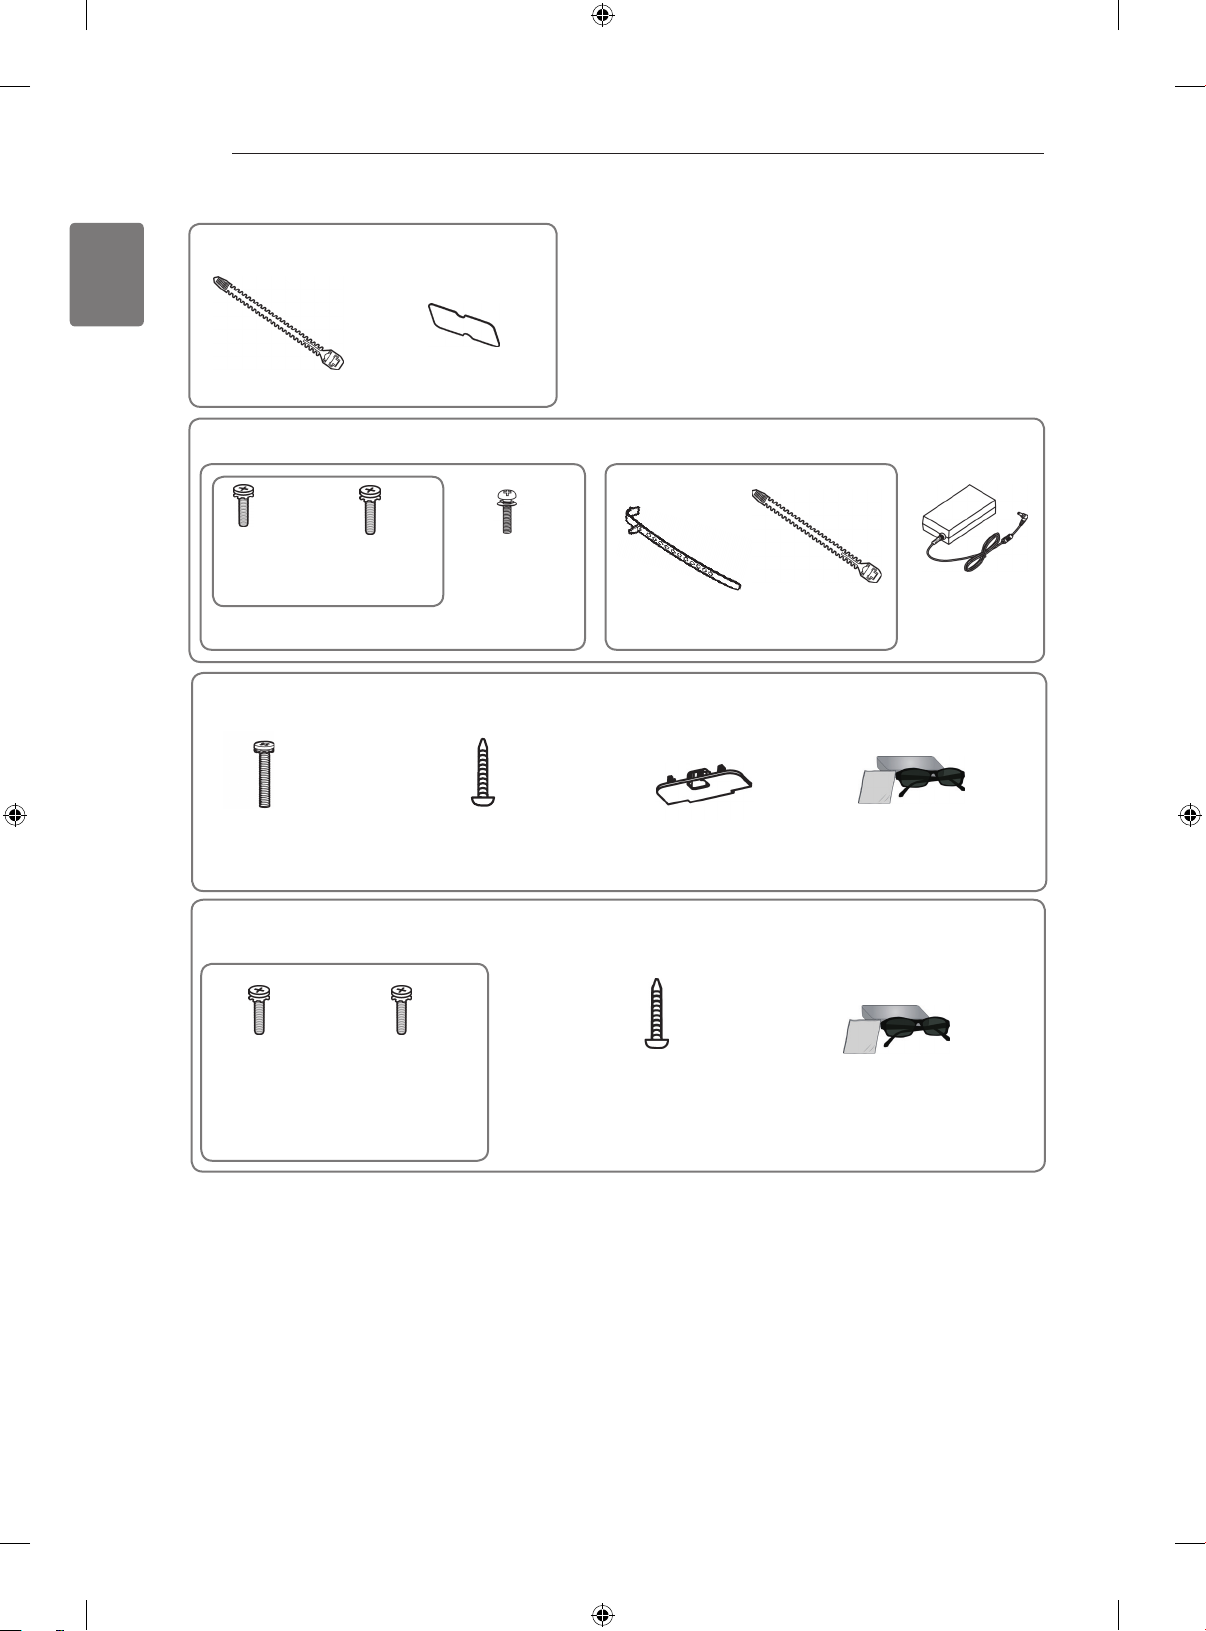
ASSEMBLING AND PREPARING
4
ENGLISH
Only 22LK33**
Cable holder Protection cover
Only 19/22/26LV25**, 22/26LV55**, 19/22LV23**
x 2
(M4x6)
(Except for 19/22LV23**)
Screw for assembly
x 2
(M4x16)
x 4
M4 x 14
(Only 19/22LV23**)
or
Cable holder
DC Adapter
Only 26/32LK33**, 32/37/42LK43**, 32/42/47LK53**, 32/37/42LK45**, 32/42LK55**, 47LK95**,
32/37/42LK46**
x 8
(M4x20)
Screw for assembly Screw for fixing Protection cover
Only 32LV25**, 32/37/40/42/47LV35**, 32/42/47/55LW45**, 32/37/42/47LV45**, 32/42LV34**,
(Except for 47LK53**,
47LK95**)
(Only 47LK95**)
FPR 3D glasses
42/47LW54**, 32/37/42/47LV36**
x 8
(M4x12)
(Except for 32LV25**)
Screw for assembly
1 The number of 3D glasses may differ depending on the country.
x 8
(M4x14)
(Only 32LV25**)
(Only 32LV25**,
32/37LV35**, 32LW45**,
32/37LV45**, 32LV34**,
32/37LV36**)
Screw for fixing
(Only 32/
42/47/55LW45**,
42/47LW54**)
FPR 3D glasses
1
1

ASSEMBLING AND PREPARING
5
CAUTION
Do not use any pirated items to ensure the safety and product life span.
Any damages or injuries by using pirated items are not covered by the warranty.
NOTE
The items supplied with your product may vary depending on the model.
Product specifications or contents of this manual may be changed without prior notice due to
upgrade of product functions.
For an optimal connection, HDMI cables and USB devices should have bezels less than 10 mm
thick and 18 mm width.(Except for 22/26/32LK33**, 32/37/42LK43**, 32/42/47LK53**, 47LK95**)
*A 10 mm
*B 18 mm
ENGLISH
Parts and buttons
NOTE
The TV can be placed in standby mode in order to reduce the power consumption. And the TV
should be turned off if it will not be watched for some time, as this will reduce energy consumption.
The energy consumed during use can be significantly reduced if the level of brightness of the
picture is reduced, and this will reduce the overall running cost.
CAUTION
Do not step on the glass stand or subject it to any impact. It may break, causing possible injury
from fragments of glass, or the TV may fall.
Do not drag the TV. The floor or the product may be damaged.
Some models have a thin film attached on to the screen and this must not be removed.

ASSEMBLING AND PREPARING
6
ENGLISH
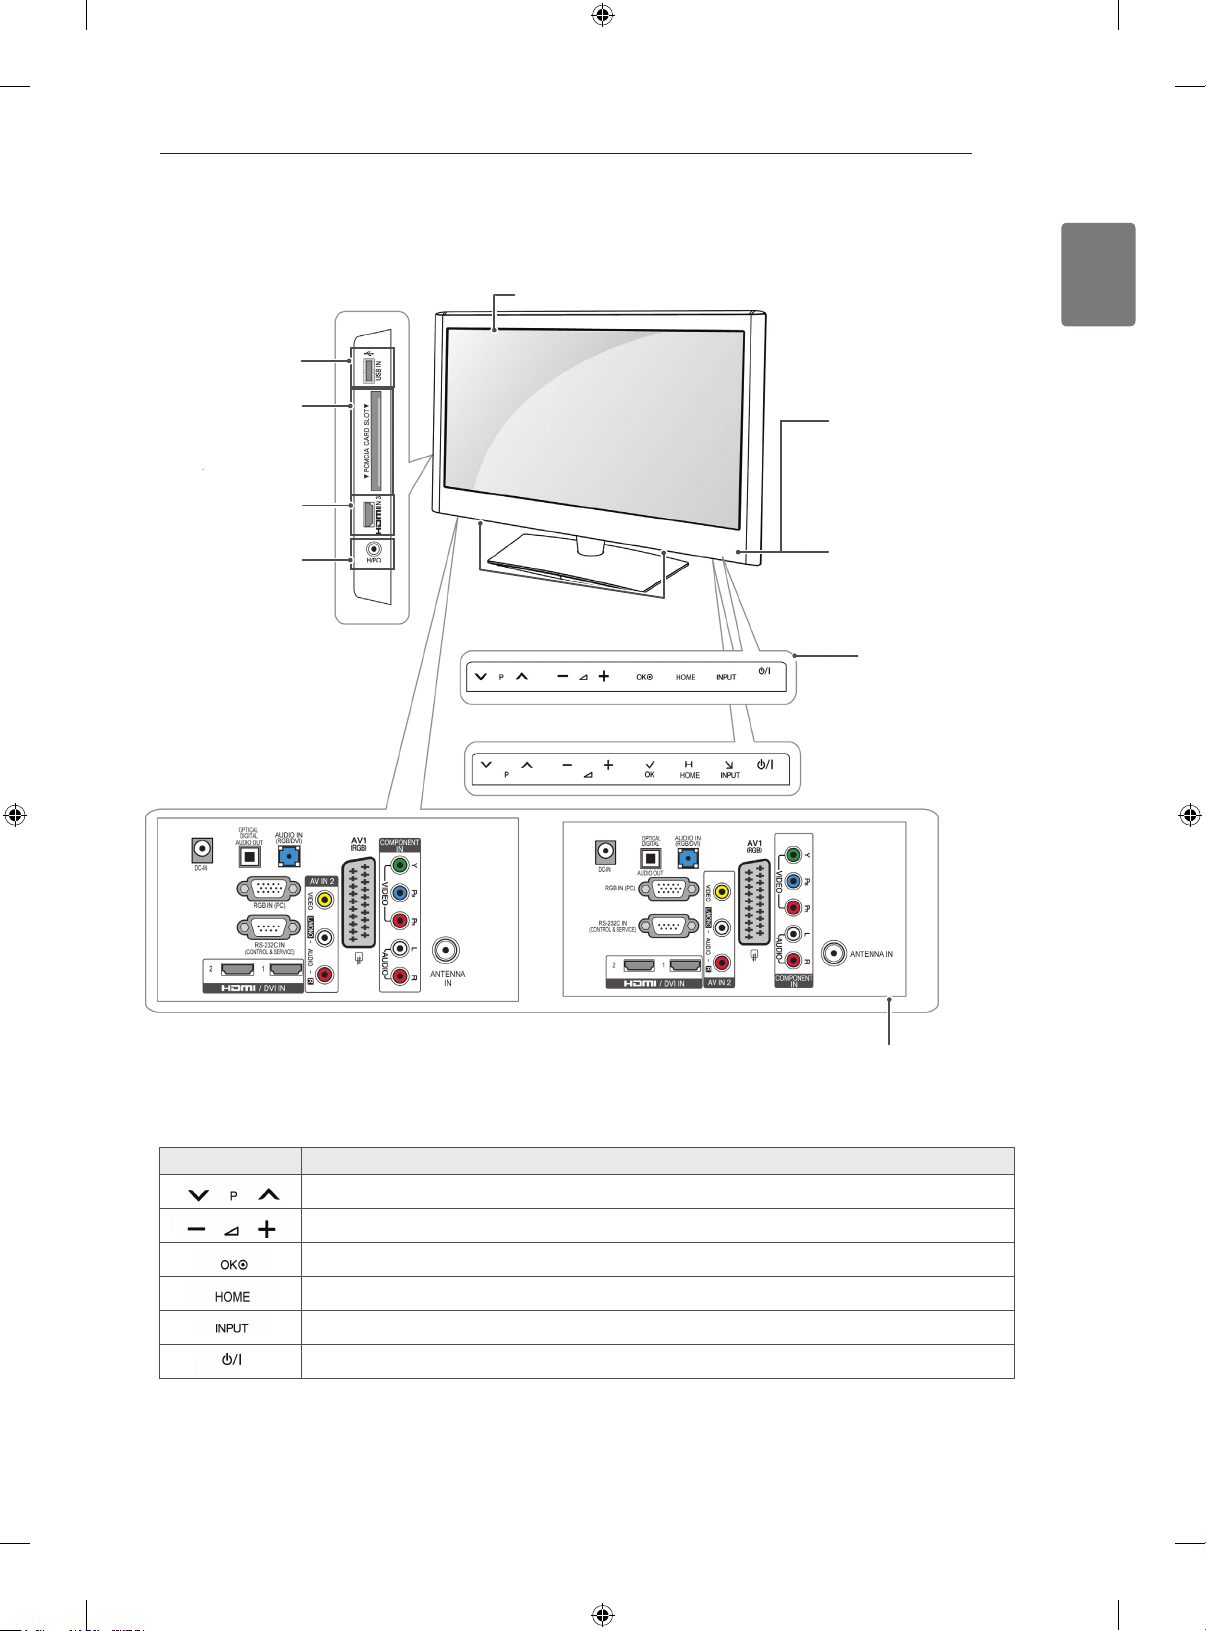
Only 22/26/32LK33**, 32/37/42LK43**, 32/42/47LK53**(Except for 32/42/47LK530T), 47LK95**
Image shown may differ from your TV.
(Only 22/26/32LK33**)
(Only
32/37/42LK43**,
32/42/47LK53**,
47LK95**)
No. Description
1
USB input
2
PCMCIA Card Slot
HDMI IN(Except for
3
22LK33**)
4
Headphone Socket
1
2
3
4
Screen
Speakers
(Only 22LK33**)
(Only 26/32LK33**)
(Only 32/37/42LK43**)
(Only 32/42/47LK53**,
47LK95**)
Remote control and intelligent1
sensors
Power Indicator
(Can be adjusted using
the Power Indicator in the
menu.)
OPTION
Connection panel
(Except for 22/26/32LK33**)
Button Description
Turns the power on or off
Changes the input source
Accesses the main menus, or saves your input and exits the menus
Selects the highlighted menu option or confirms an input
Adjusts the volume level
Scrolls through the saved programmes
1 Intelligent sensor - Adjusts the image quality corresponding to the surrounding environment.(Only
32/42/47LK53**, 47LK95**)
ASSEMBLING AND PREPARING
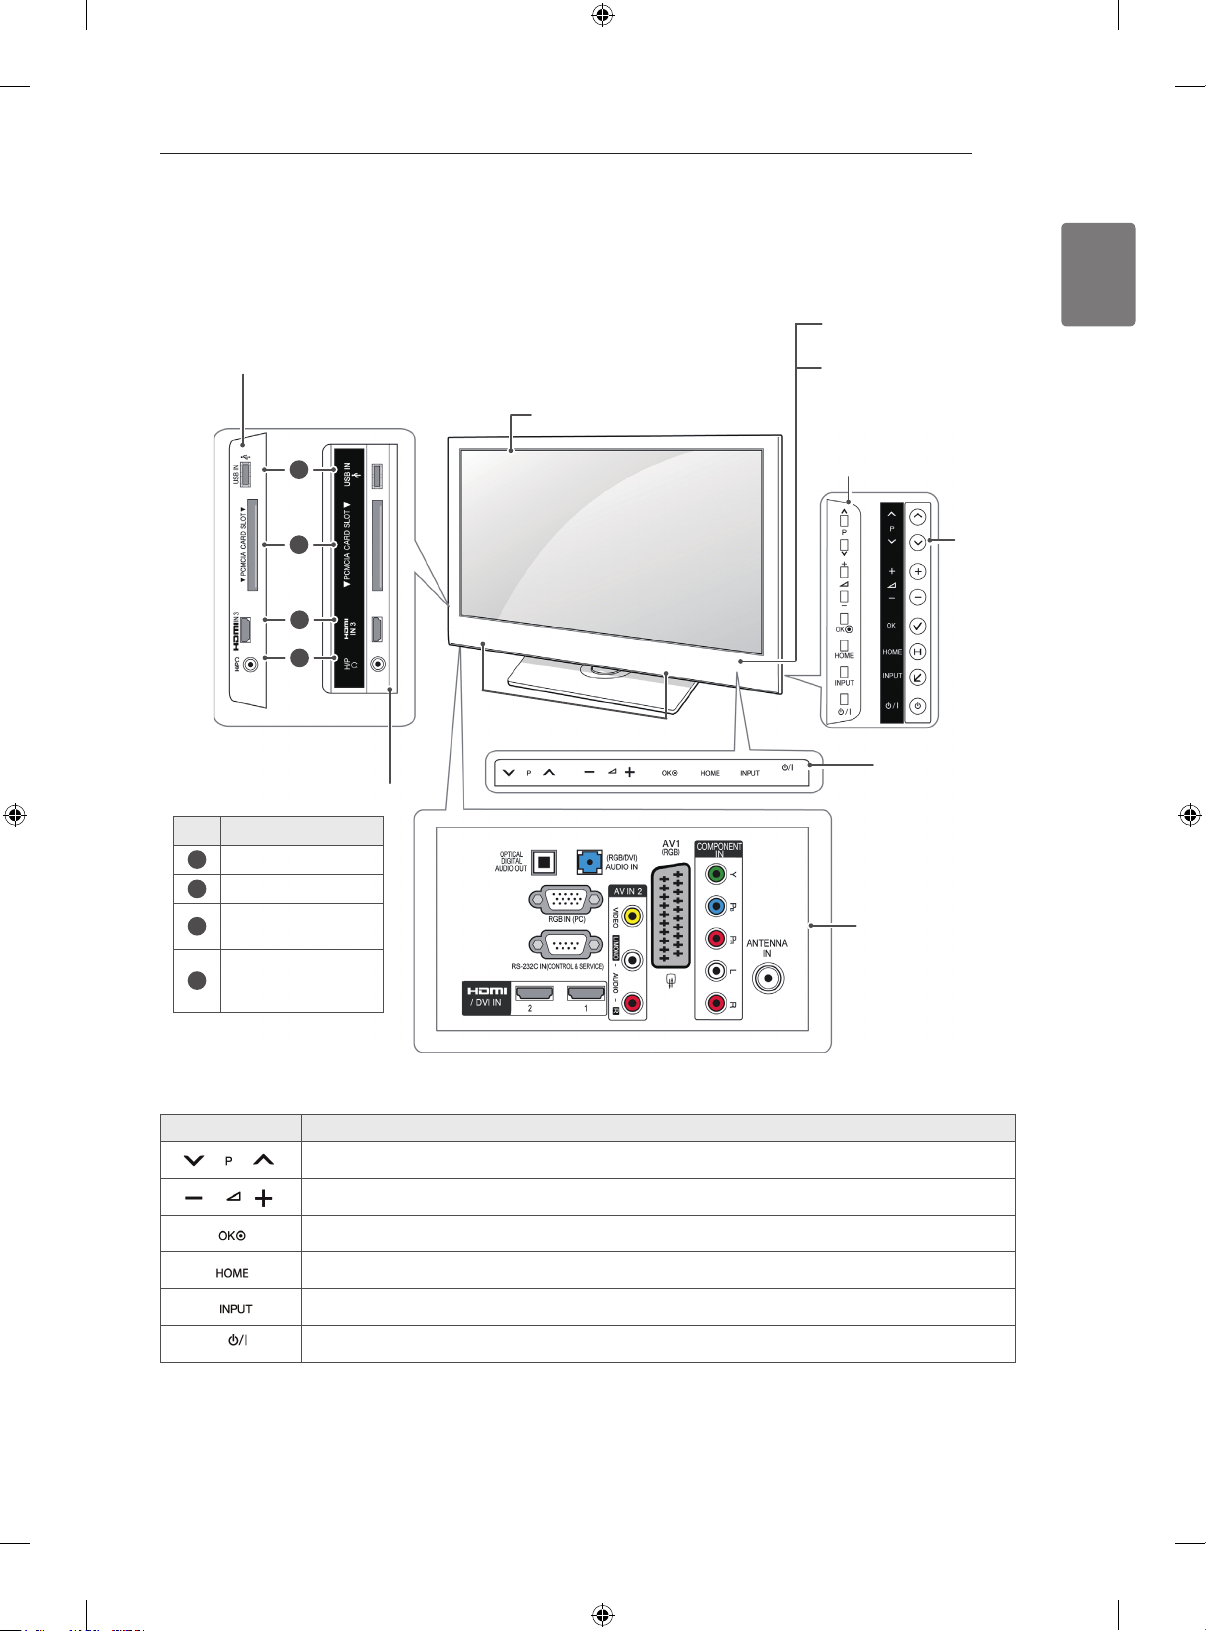
7
Image shown may differ from your TV.
Only 19/22/26LV25**, 19/22LV23**, 22/26LV55**
USB input
PCMCIA Card Slot
(Only 26LV25**, 26LV55**)
Headphone Socket
HDMI IN
(Only 19/22/26LV25**)
(Only 22/26LV55**, 19/22LV23**)
Screen
Speakers
Remote control and intelligent1 sensors
Power Indicator
(Can be adjusted using
the Power Indicator in the
OPTION menu.)
Touch buttons
2
ENGLISH
(Only 19/22/26LV25**, 19/22LV23**)
Button Description
Scrolls through the saved programmes
Adjusts the volume level
Selects the highlighted menu option or confirms an input
Accesses the main menus, or saves your input and exits the menus
Changes the input source
Turns the power on or off
(Only 22/26LV55**)
Connection panel
1 Intelligent sensor - Adjusts the image quality corresponding to the surrounding environment.
2. Touch Button - You can use the desired button function by touching.

ASSEMBLING AND PREPARING
8
ENGLISH
Only 32/42/47LK530T, 32/42LK550T, 32/37/42/47LV355T
Image shown may differ from your TV.
USB input
PCMCIA Card
Slot
HDMI IN
Headphone
Socket
Speakers
Screen
Remote control and intelligent1 sensors
Power Indicator
(Can be adjusted using
the Power Indicator in the
OPTION menu.)
(Only
32/42/47LK530T)
Touch buttons
(Except for
32/42/47LK530T)
2
Connection panel
Button Description
Scrolls through the saved programmes
Adjusts the volume level
Selects the highlighted menu option or confirms an input
Accesses the main menus, or saves your input and exits the menus
Changes the input source
Turns the power on or off
1 Intelligent sensor - Adjusts the image quality corresponding to the surrounding environment.
2. Touch Button - You can use the desired button function by touching.
ASSEMBLING AND PREPARING
9
Image shown may differ from your TV.
Only 32/37/42LK45**, 32/42LK55**, 32LV25**, 32/42LV34**, 32/37/40/42/47LV35**, 32/37/42/47LV45**,
32/42/47/55LW45**, 42/47LW54**, 32/37/42LK46**, 32/37/42/47LV36**(Except for 32/42LK550T,
32/37/42/47LV355T)
(Only 32/37/42LK45**,
32/42LK55**, 32/37/42LK46**)
1
2
3
4
Screen
Speakers
Remote control and intelligent1 sensors
Power Indicator
(Can be adjusted using
the Power Indicator in the
menu.)
OPTION
(Only 32/42LV34**)
(Only
42/47LW54**)
(Except for 32/37/
42LK45**, 32/42LK55**,
32/37/42LK46**)
No. Description
1
USB input
2
PCMCIA Card Slot
HDMI IN(Except for
3
32/42LV34**)
Headphone Socket
4
(Except for
32/42LV34**)
Touch buttons
(Except for
32/42LV34**,
42/47LW54**)
Connection panel
ENGLISH
2
Button Description
Scrolls through the saved programmes
Adjusts the volume level
Selects the highlighted menu option or confirms an input
Accesses the main menus, or saves your input and exits the menus
Changes the input source
Turns the power on or off
1 Intelligent sensor - Adjusts the image quality corresponding to the surrounding environment.
2. Touch Button - You can use the desired button function by touching.
ASSEMBLING AND PREPARING
10
ENGLISH
Not using the Desk Type stand
(Only 26/32LK33**, 32/37/42LK43**,
32/42/47LK53**, 32/37/42LK45**, 32/42LK55**,
47LK95**, 32/37/42LK46**)
1
(Only 22LK33**)
1
2
Image shown may differ from your TV.
Push the supplied Protection cover into the
opening at the bottom of the TV until clicking
sound.
Protection cover
Lay the TV with the screen side down on a flat
surface.
Remove the 2 screws and pull the stand away
from the TV.
Mounting on a table
Image shown may differ from your TV.
Lift and tilt the TV into its upright position on a
1
table.
- Leave a 10 cm (minimum) space from the
wall for proper ventilation.
10 cm
10 cm
Connect the Power cord to a wall outlet.
2
CAUTION
Do not place the TV near or on sources
of heat, as this may result in fire or other
damage.
10 cm
10 cm
Push the supplied protection cover into the
3
opening at the bottom of the TV until it locks in
place.
This will protect the opening from accumulating
dust and dirt.
Protection cover
NOTE
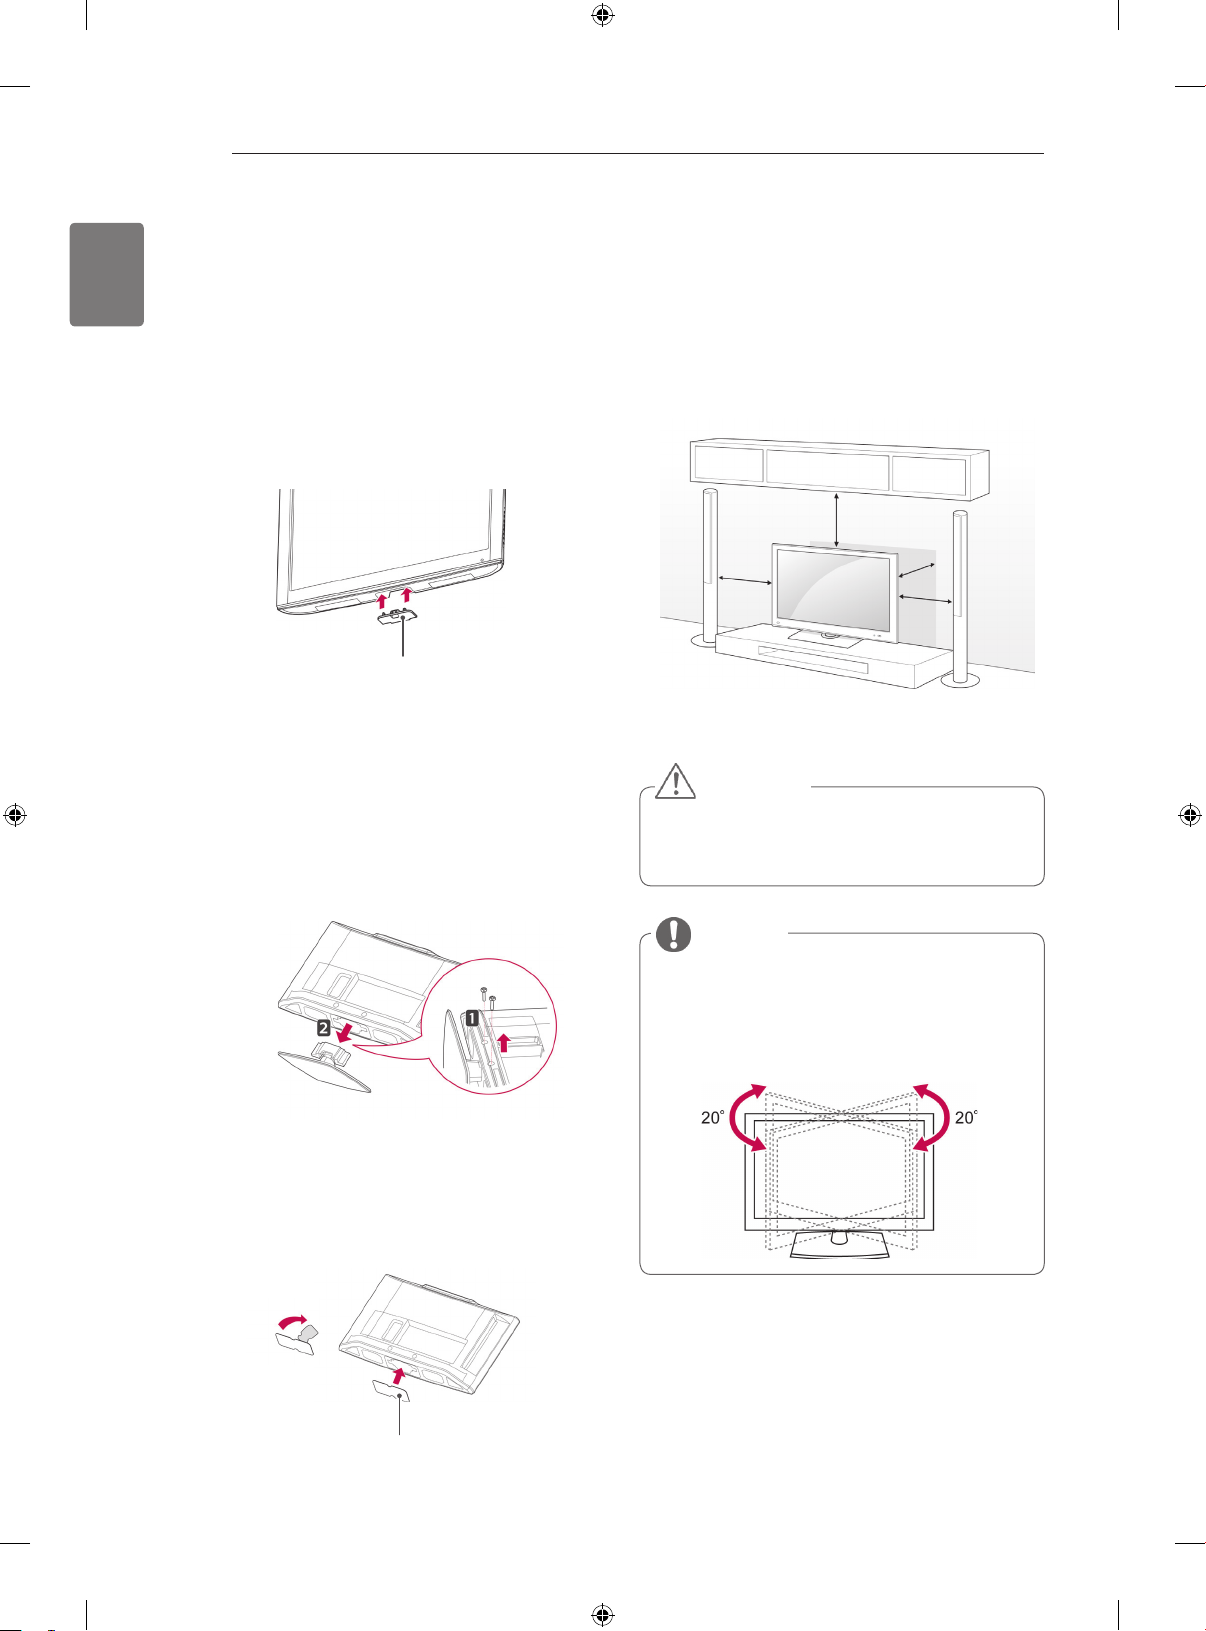
Swivel 20 degrees to the left or right
and adjust the angle of the TV to
suit your view.(Except for 22LK33**,
19/22/26LV25**, 22/26LV55**,
19/22LV23**)
ASSEMBLING AND PREPARING
11
Securing the TV to a table
Image shown may differ from your TV.
(Only 26/32LK33**, 32/37/42LK43**,
32/37/42LK45**, 32/42LK53**, 32/42LK55**,
32LV25**, 32/37LV35**, 32LW45**, 32/37LV45**,
32LV34**, 32/37/42LK46**, 32/37LV36**)
Fix the TV to a table to prevent from tilting forward,
damage, and potential injury.
Mount the TV on a table, and then insert and
tighten the supplied screw on the rear of the stand.
WARNING
To prevent the TV from falling over, the
TV should be securely attached to the
floor/wall per installation instructions.
Tipping, shaking, or rocking the TV may
cause injury.
Securing the TV to a wall
Image shown may differ from your TV.
Insert and tighten the eye-bolts, or TV brackets
1
and bolts on the back of the TV.
- If there are bolts inserted at the eye-bolts
position, remove the bolts first.
Mount the wall brackets with the bolts to the
2
wall.
Match the location of the wall bracket and the
eye-bolts on the rear of the TV.
Connect the eye-bolts and wall brackets tightly
3
with a sturdy rope.
Make sure to keep the rope horizontal with the
flat surface.
ENGLISH
CAUTION
Make sure that children do not climb on
or hang on the TV.
NOTE
Use a platform or cabinet that is strong
and large enough to support the TV
securely.
ASSEMBLING AND PREPARING
12
ENGLISH
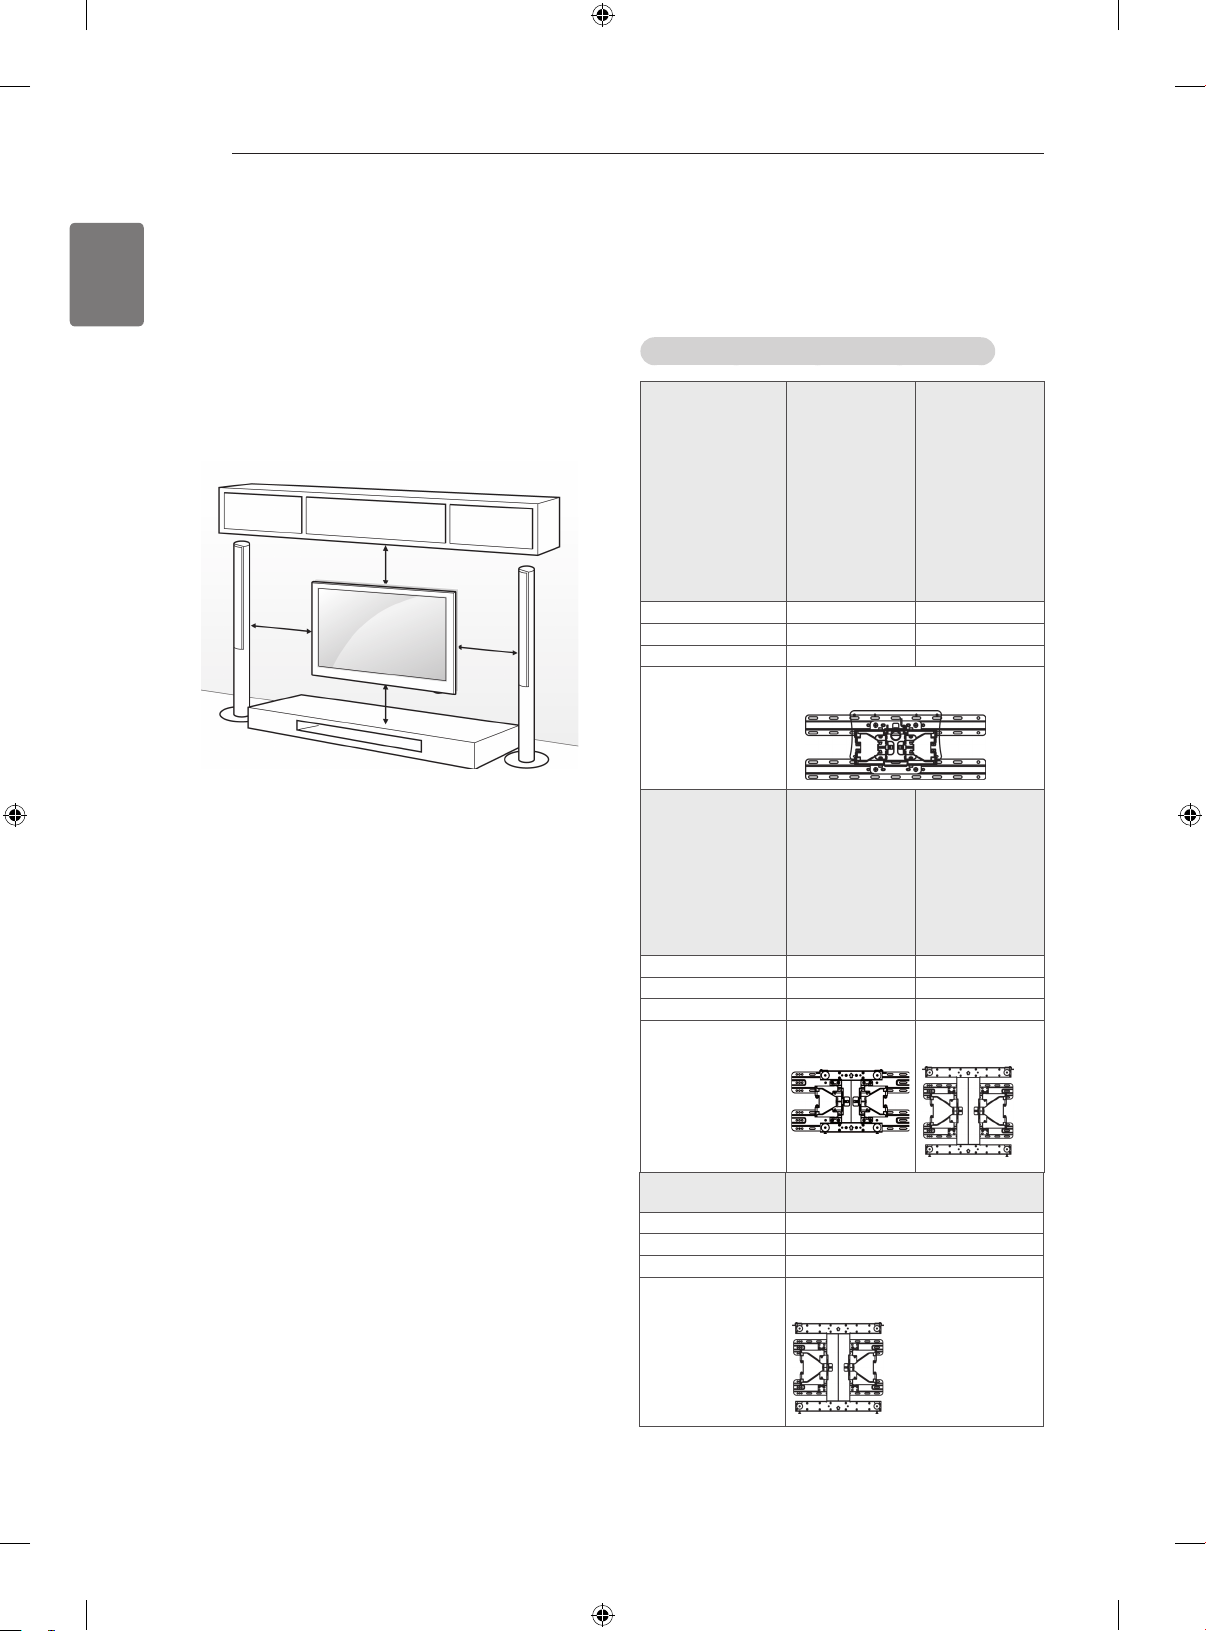
Mounting on a wall
Attach a wall mount bracket at the rear of the TV
carefully and install the wall mount bracket on a
solid wall perpendicular to the floor. When you
attach the TV to other building materials, please
contact qualified personnel.
LG recommends that wall mounting be performed
by a qualified professional installer.
10 cm
10 cm
10 cm
10 cm
Make sure to use screws and wall mount
bracket that meet the VESA standard. Standard
dimensions for the wall mount kits are described in
the following table.
Separate purchase(Wall Mounting Bracket)
Model 22LK33**
VESA (A x B) 100 x 100 200 x 100
Standard screw M4 M4
Number of screws 4 4
Wall mount
bracket
Model 37/42LK43**
VESA (A x B) 200 x 200 400 x 400
Standard screw M6 M6
Number of screws 4 4
Wall mount
bracket
19/22/26LV25**
22/26LV55**
19/22LV23**
LSW100B, LSW100BG
37/42LK45**
42LK55**
42/47LK53**
37LV35**
37LV45**
47LK95**
37/42LK46**
37LV36**
LSW200B,
LSW200BG
26/32LK33**
32LK43**
32LK45**
32LK53**
32LK55**
32LV25**
32LV35**
32LV45**
32LW45**
32LV34**
32LK46**
32LV36**
40/42/47LV35**
42/47LV45**
42/47/55LW45**
42/47LV36**
LSW400B,
LSW400BG,
Model 42LV34**
VESA (A x B) 400 x 400
Standard screw M6
Number of screws 4
Wall mount
bracket
42/47LW54**
LSW400BX,
LSW400BXG
ASSEMBLING AND PREPARING
13
A
B
CAUTION
Disconnect the power first, and then move
or install the TV. Otherwise electric shock
may occur.
If you install the TV on a ceiling or slanted
wall, it may fall and result in injury. Use
an authorized LG wall mount bracket
and contact the local dealer or qualified
personnel.
Do not over tighten the screws as this may
cause damage to the TV and void your
warranty.
Use the screws and wall mount bracket that
meet the VESA standard. Any damages
or injuries by misuse or using an improper
accessory are not covered by the warranty.
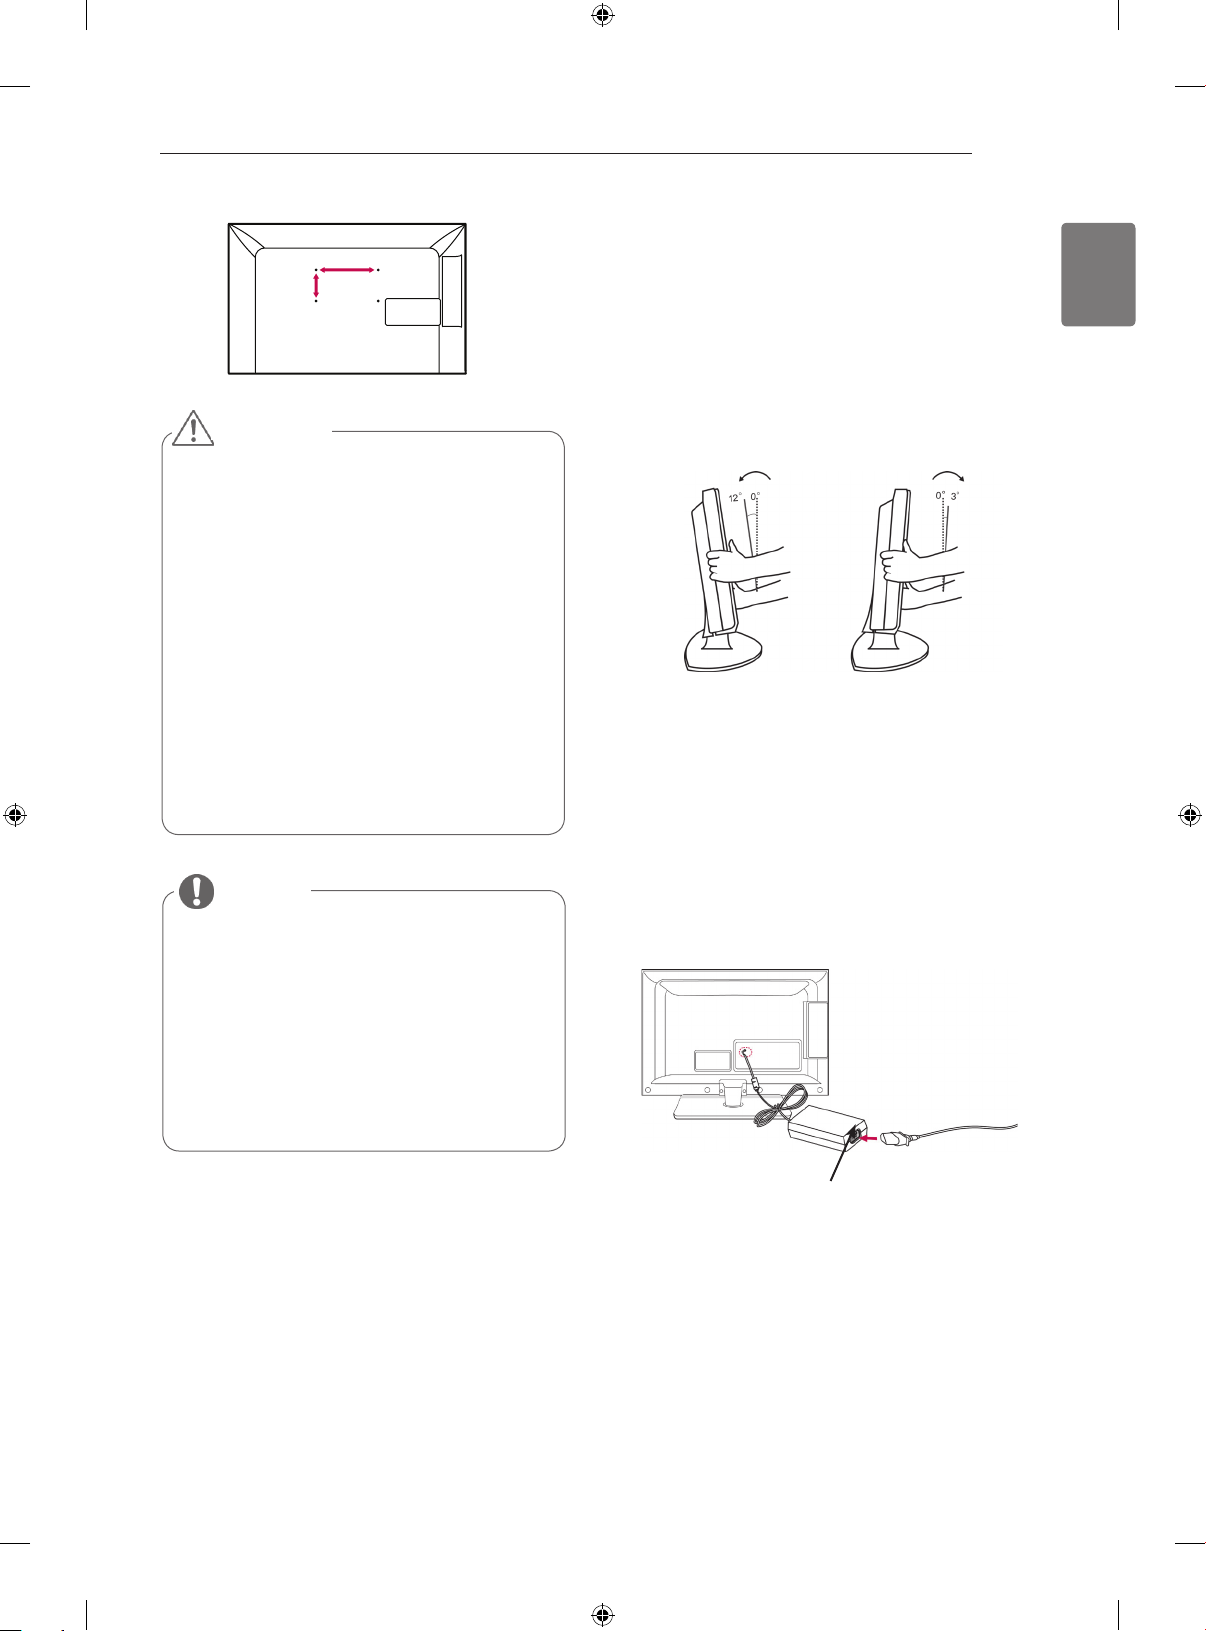
Positioning your display
Image shown may differ from your TV.
(Only 22LK33**)
Adjust the position of the panel in various ways for
maximum comfort.
• Tilt range
ENGLISH
NOTE
Use the screws that are listed on the
VESA standard screw specifications.
The wall mount kit includes an installation
manual and necessary parts.
The length of screws may differ
depending on the wall mount. Make sure
to use the proper length.
For more information, refer to the manual
supplied with the wall mount bracket.
Connection of TV
Image shown may differ from your TV.
(Only 19/22/26LV25**, 22/26LV55**, 19/22LV23**)
DC Adapter
Connect the antenna cable to the antenna
1
input port on the TV.
Connect the DC adapter plug to the power
2
input jack on the TV.
Connect the Power cord to the DC adapter first,
3
then plug the Power cord into the wall power
outlet.

14
ENGLISH
REMOTE CONTROL
The descriptions in this manual are based on the buttons on the remote control.
Please read this manual carefully and use the TV correctly.
To replace batteries, open the battery cover, replace batteries (1.5 V AAA)
matching and ends to the label inside the compartment, and close the
battery cover. Be sure to point the remote control to the remote control sensor on
the TV.
To remove the batteries, perform the installation actions in reverse.
REMOTE CONTROL
CAUTION
Do not mix old and new batteries, as this may damage the remote control.
Image shown may differ from your TV.
Turns the TV on or off.
AV MODE INPUT
ENERGY
SAVING
1 2 3
4 5 6
7 809
LIST
MARK
FAV
CHAR/NUM
3D
DELETE
MUTE
Home
GUIDE
LIGHT
Q.VIEW
P
Q.MENU
(POWER)
LIGHT Illuminates the remote control buttons.
TV/
ENERGY SAVING Adjusts the brightness of the screen to reduce energy consumption .
RAD
AV MODE Selects an AV mode.
INPUT Changes the input source; Turns the TV on .
TV/RAD Selects Radio, TV and DTV programme.
Number buttons Enters numbers.
LIST Accesses the saved programme list.
Q.VIEW Returns to the previously viewed programme.
P
A
G
+ - Adjusts the volume level.
E
MARK Selects a menu or option.
FAV Accesses your favourite programme list.
CHAR/NUM Switches between Letter and Number input modes.
OK
3D (Only 3D Models) Used for viewing 3D video.
DELETE Deletes letters and numbers.
INFO
EXIT
BACK
3D SETTING
1
MUTE Mutes all sounds.
P
Scrolls through the saved programmes.
PAGE Moves to the previous or next screen.
GUIDE Shows programme guide.
RATIO
AD
Home Accesses the main menus.
Q. MENU Accesses the Quick menus.
Navigation buttons
Scrolls through menus or options.
(up/down/left/right)
OK Selects menus or options and confirms your input.
BACK Returns to the previous level.
INFO Views the information of the current programme and screen.
EXIT Clears all on-screen displays and return to TV viewing.
Coloured buttons These buttons are used for teletext (on TELETEXT models only),
Programme edit.
3D SETTING
Use this to view 3D video.
(Only 3D Models)
1
TELETEXT
BUTTONS
These buttons are used for teletext.
For further details, see the ‘Teletext’ section.
SUBTITLE Recalls your preferred subtitle in digital mode.
Control buttons
(
, , , , )
Controls the MY MEDIA menus, or the SIMPLINK compatible devices
(USB,SIMPLINK).
SIMPLINK Accesses the AV devices connected to the TV;
Opens the SIMPLINK menu.
RATIO Resizes an image.
AD Switches the Audio Description on or off.

WATCHING TV
15
WATCHING TV
Connecting an antenna
Connect an antenna to watch TV while referring to
the following.
To prevent damage do not connect to the mains
outlet until all connections are made between the
devices.
Connect the TV to a wall antenna socket with an
RF cable (75 Ω).
NOTE
For optimum picture quality, adjust
antenna direction.
In poor signal areas, to achieve better
picture quality it may be necessary to
install a signal amplifier to the antenna.
If the image quality is poor with an
antenna connected, aim the antenna to
the correct direction.
An antenna cable and converter are not
supplied.
Turning the TV on for the first
time
Language
Selects a language to display.
Mode Setting
Power Indicator
Country
Selects Home Use for the
home environment.
Sets the Power Indicator.
(When you select Home Use
from Mode Setting - only
LED LCD TV)
Selects a country to display.
(Depending on model)
Time Zone
Set Password
Auto Tuning
NOTE
For those countries without confirmed
DTV broadcasting standards, some DTV
features might not work, depending on
the DTV broadcasting environment.
When France is selected for Country,
password is not ‘0’, ‘0’, ‘0’, ‘0’ but ‘1’, ‘2’,
‘3’, ‘4’.
Selects the time zone and
daylight saving.
(When Russia is selected for
Country)
Set the password.
(When France is selected for
Country)
Scans and saves
available programmes
automatically.
ENGLISH
When you turn the TV on for the first time, the
Initial setting screen appears. Select a language
and customize the basic settings.
Connect the Power cord to a power outlet.
1
In Standby mode, press (POWER) to turn the TV
2
on.
The Initial setting screen appears if you turn
the TV on for the first time.
NOTE
You can also access Factory Reset by
accessing OPTION in the main menus.
Follow the on-screen instructions to customize
3
your TV settings according to your preferences.
4 When the basic settings are complete,
press OK.
NOTE
If you do not complete the Initial setting, it
will appear whenever the TV turns on.
Disconnect the Power cord from the
power outlet when you do not use the TV
for a long period of time.
5 To turn the TV off, press
(POWER)
.
16
ENGLISH
3D IMAGING
(Only 3D Models)
3D IMAGING
3D Technology
This TV can display in 3D via 3D broadcasting or
when the TV is connected to a compatible device,
such as a Blu-ray 3D Player. You need such a
device to watch the TV in 3D. The 3D TV displays
two separate pictures formatted for each eye. The
viewer needs to wear 3D glasses in order to see
these images in 3D format.
WARNING
When watching 3D images, you should
maintain a distance of at least twice the
screen width, and you should also be
able to see all of the screen at eye level.
If you watch the 3D imaging too closely or
for a long period of time, it may harm your
eyesight.
Watching the TV or playing video games
that incorporate 3D imaging with the 3D
glasses for a long period of time can
cause drowsiness, headaches or fatigue
to you and/or your eyes. If you have a
headache, or otherwise feel fatigued or
drowsy, stop watching the TV and take a
rest.
Pregnant woman, seniors, persons with
heart problems or persons who experience frequent drowsiness should refrain
from watching 3D TV.
Some 3D imaging may cause you to
duck or dodge the image displayed in the
video. Therefore, it is best if you do not
watch 3D TV near fragile objects or near
any objects that can be knocked over
easily.
Please prevent children under the age of
5 from watching 3D TV. It may affect their
vision development.
Warning for photosensitization seizure:
Some viewers may experience a seizure
or epilepsy when exposed to certain factors, including flashing lights or images
in TV or video games. If you or anybody
from your family has a history of epilepsy
or seizure, please consult with your doctor before watching 3D TV.
Also certain symptoms can occur in
unspecified conditions without any previous history. If you experience any of the
following symptoms, immediately stop
watching the 3D imaging and consult a
doctor: dizziness or lightheadedness,
visual transition or altered vision, visual
or facial instability, such as eye or muscle
twitching, unconscious action, convulsion,
loss of conscience, confusion or disorientation, loss of directional sense, cramps,
or nausea. Parents should monitor their
children, including teenagers, for these
symptoms as they may be more sensitive
to the effects of watching 3D TV.
Risk of photosensitization seizure can be
reduced with the following actions.
» Take frequent breaks from watching 3D
TV.
» For those who have vision that is dif-
ferent in each eye, they should watch
the TV after taking vision correction
measures.
» Watch the TV so that your eyes are on
the same level as the 3D screen and
refrain from sitting too closely to the TV.
» Do not watch the 3D imaging when
tired or sick, and avoid watching the 3D
imaging for a long period of time.
» Do not wear the 3D glasses for any
other purpose than viewing 3D imaging
on a 3D TV.
» Some viewers may feel disoriented
after watching 3D TV. Therefore, after
you watch 3D TV, take a moment to regain awareness of your situation before
moving.
NOTE
To watch the TV in 3D, you must put on
your 3D glasses. For best results, you
should wear LG Brand 3D glasses. The
3D imaging may not display properly
when using another brand of 3D glasses.
Please see the 3D glasses manual for instructions on how to use the 3D glasses.
After powering on the TV, a few seconds
may be needed for your TV to calibrate.
When watching 2D images, it is recom-
mended to take off the 3D glasses. If you
watch 2D images with the 3D glasses on,
you may see distorted images.
If 3D TV broadcast standard changes in
the future and it is not supported by this
TV set, you may need a separate device,
such as a set-top-box.
TROUBLESHOOTING
Problem Resolution
Cannot control the TV with the
remote control.
No image display and no sound is
produced.
Image appears slowly when the TV
turns on.
Cannot connect external devices.
The TV turns off suddenly.
Problem Resolution
No sound is produced while images
are displaying.
One of the speakers produce noises
or does not produce sound.
Check the remote control sensor on the product and try again.
Check if there is any obstacle between the product and the remote control.
Check if the batteries are still working and properly installed ( to , to ).
Check if the product is turned on.
Check if the Power cord is connected to a wall outlet.
Check if there is a problem in the wall outlet by connecting other products.
The image is muted during the product startup process. This is normal. If the
image does not appear in a few minutes, unplug the TV for 30 seconds and try
again. If the image still does not appear, contact the authorized service center
in your local area.
Refer to the “Connection overview” and connect an external device.
Check the power control settings. The power supply may be interrupted.
Check if the Auto sleep feature is activated in the Time settings.
Refer to the “Sleep Timer”.
If there is no signal while the TV is on, the TV will turn off automatically after
15 minutes of inactivity.(Except for 22/26/32LK335C, 32/37/42LK455C,
19/22/26/32LV255C, 32/37/42/47LV355C, 32/37/42LK469C,
32/37/42/47LV369C, 22/26/32LK336C, 32/37/42LK456C)
Press + or - button.
Check if the sound is muted by pressing MUTE.
Scroll to other channels. There may a problem with the broadcast.
Check if the audio cables are connected properly.
A change in ambient humidity or temperature may result in an unusual noise
when the product turns on or off.
There is no problem with your product.
TROUBLESHOOTING
17
ENGLISH
Problem Resolution
An image displays in black and
white or the colour quality is poor.
Horizontal or vertical bars appears
or images blur
Lines or streaks appear on images
Afterimages (ghosts) appear when
the product turns off
The power is on but the screen
appears extremely dark.
“No Signal” appears on the screen.Check if the signal cable is connected between the TV and products properly.
Black spots appear on the screen.
The display offset is wrong.
Thin lines appear in the background
of the screen.
Horizontal noises appear or
characters blur.
The reception on some channels is
poor
Adjust the colour setting in the PICTURE menu.
Keep a sufficient distance between this product and other electronic products.
Scroll to other channels. There may a problem with the broadcast.
Check if there are local interferences such as an electrical appliance or power
tool.
Check the antenna or aim the antenna to the proper direction.
Pixels may have been damaged from a fixed image displayed for a long time
(image burn). Use a screen saver to prevent the pixel damage on the screen.
Adjust the brightness and contrast in the PICTURE menu.
Check the selected input source by pressing INPUT.
Several pixels in red, green, white, or black may appear on the screen that can
attribute to the characteristics of the panel. This is normal.
Adjust the position setting in the PICTURE menu.
Check if the video card resolution and frequency are supported by the product.
If the frequency is out of range, set to the recommended resolution using the
display settings on the external device.
Check the video cable connections.
Adjust the Phase setting in the PICTURE menu. Refer to the “SCREEN”.
Scroll to other channels. There may a problem with the broadcast.
The station signal may be weak. Aim the antenna to the proper direction.
Check if there is local interference such as an electrical appliance or power
tool.

18
ENGLISH
WEIGHT
Product specifications shown above may be changed without prior notice due to upgrade of product
functions.
SPECIFICATIONS
22LK33** 26LK33**
22LK330-ZB / 22LK330A-ZB
MODELS
Weight With stand 4.3 kg 7.6 kg
Without stand 4.0 kg 6.5 kg
MODELS
Weight With stand 9.6 kg 9.4 kg
Without stand 8.6 kg 8.4 kg
MODELS
Weight With stand 12.5 kg 15.1 kg
Without stand 10.8 kg 13.5 kg
MODELS
Weight With stand 9.6 kg 12.8 kg
Without stand 8.5 kg 11.1 kg
MODELS
Weight With stand 15.1 kg 9.8 kg
Without stand 13.4 kg 8.7 kg
MODELS
Weight With stand 15.5 kg 20.3 kg
Without stand 13.9 kg 18.3 kg
MODELS
Weight With stand 20.3 kg
Without stand 18.3 kg
22LK330N-ZB / 22LK331-ZA
22LK330U-ZB / 22LK335C-ZB
22LK330-ZH / 22LK330N-ZH
22LK330A-ZH / 22LK330U-ZH
22LK331-ZG / 22LK336C-ZB
32LK33** 32LK43**
32LK330-ZB / 32LK330A-ZB
2LK330N-ZB / 32LK331-ZA
32LK330U-ZB / 32LK335C-ZB
32LK330-ZH / 32LK330N-ZH
32LK330A-ZH / 32LK330U-ZH
32LK331-ZG /
37LK430-ZA / 37LK430N-ZA
37LK430A-ZA / 37LK430U-ZA
37LK430-ZG / 37LK430N-ZG
37LK430A-ZG / 37LK430U-ZG
32LK450-ZB / 32LK450A-ZB
32LK450N-ZB / 32LK450U-ZB
32LK451-ZA / 32LK455C-ZB
32LK450-ZH / 32LK450A-ZH
32LK450U-ZH / 32LK450N-ZH
32LK451-ZG / 32LK455-ZA
42LK450-ZB / 42LK450A-ZB
42LK450N-ZB / 42LK450U-ZB
42LK451-ZA / 42LK455C-ZB
42LK450-ZH / 42LK450A-ZH
42LK450U-ZH / 42LK450N-ZH
42LK451-ZG / 42LK455-ZA
42LK530-ZC / 42LK530N-ZC
42LK530A-ZC/ 42LK530U-ZC
32LK336C-ZB
37LK43** 42LK43**
32LK45** 37LK45**
32LK456C-ZB
42LK45** 32LK53**
42LK456C-ZB
42LK53** 47LK53**
42LK530T-ZC
47LK950-ZA / 47LK950N-ZA
47LK950A-ZA/ 47LK950U-ZA
26LK330-ZB / 26LK330A-ZB
26LK330N-ZB / 26LK331-ZA
26LK330U-ZB / 26LK335C-ZB
26LK330-ZH / 26LK330N-ZH
26LK330A-ZH / 26LK330U-ZH
26LK331-ZG / 26LK336C-ZB
32LK430-ZA / 32LK430N-ZA
32LK430A-ZA / 32LK430U-ZA
32LK430-ZG / 32LK430N-ZG
32LK430A-ZG / 32LK430U-ZG
42LK430-ZA / 42LK430N-ZA
42LK430A-ZA / 42LK430U-ZA
42LK430-ZG / 42LK430N-ZG
42LK430A-ZG / 42LK430U-ZG
37LK450-ZB / 37LK450A-ZB
37LK450N-ZB / 37LK450U-ZB
37LK451-ZA / 37LK455C-ZB
37LK450-ZH / 37LK450A-ZH
37LK450U-ZH / 37LK450N-ZH
37LK451-ZG / 37LK455-ZA
37LK456C-ZB
32LK530-ZC / 32LK530N-ZC
32LK530A-ZC / 32LK530U-ZC
32LK530T-ZC
47LK530-ZC / 47LK530N-ZC
47LK530A-ZC/ 47LK530U-ZC
47LK530T-ZC
47LK95**
SPECIFICATIONS
19
32LK55** 42LK55**
MODELS
Weight With stand 9.2 kg 15.1 kg
Without stand 8.1 kg 13.4 kg
MODELS
Weight With stand 2.8 kg 3.4 kg
Without stand 2.5 kg 3.2 kg
MODELS
Weight With stand 5.6 kg 11.9 kg
Without stand 5.0 kg 10.7 kg
MODELS
Weight With stand 11.4 kg 13.5 kg
Without stand 9.6 kg 11.7 kg
MODELS
Weight With stand 37.3 kg 15.5 kg
Without stand 34.3 kg 13.3 kg
MODELS
Weight With stand 20.9 kg
Without stand 18.7 kg
32LK550-ZA / 32LK550A-ZA
32LK550N-ZA / 32LK550U-ZA
32LK551-ZB / 32LK550T-ZA
19LV25** 22LV25**
19LV2500-ZA / 19LV250N-ZA
19LV250A-ZA / 19LV250U-ZA
19LV255C-ZA / 19LV2500-ZG
19LV250A-ZG / 19LV250U-ZG
19LV250N-ZG
26LV25** 32LV25**
26LV2500-ZA / 26LV2540-ZE
26LV250A-ZA / 26LV254A-ZE
26LV250N-ZA / 26LV254N-ZE
26LV250U-ZA / 26LV254U-ZE
26LV255C-ZA
26LV250A-ZG / 26LV250U-ZG
26LV250N-ZG / 26LV2540-ZL
32LV3500-ZA / 32LV3550-ZB
32LV350A-ZA / 32LV355A-ZB
32LV350N-ZA / 32LV355N-ZB
32LV350U-ZA / 32LV355U-ZB
32LV355T-ZC / 32LV355C-ZB
32LV3551-ZD / 32LV355T-ZJ
32LV3550-ZH / 32LV355A-ZH
32LV355U-ZH / 32LV355N-ZH
32LV3500-ZG / 32LV3551-ZK
40LV3550-ZB / 40LV355N-ZB
40LV355A-ZB / 40LV355U-ZB
/ 26LV2500-ZG
32LV35** 37LV35**
32LV355C-ZD
40LV35** 42LV35**
47LV3500-ZA / 47LV3550-ZB
47LV350A-ZA / 47LV355A-ZB
47LV350N-ZA / 47LV355N-ZB
47LV350U-ZA / 47LV355U-ZB
47LV355T-ZC / 47LV355C-ZB
47LV3551-ZD / 47LV355T-ZJ
47LV3550-ZH / 47LV355A-ZH
47LV355U-ZH / 47LV355N-ZH
47LV3500-ZG /
47LV355C-ZD
42LK550-ZA / 42LK550A-ZA
42LK550N-ZA / 42LK550U-ZA
42LK551-ZB / 42LK550T-ZA
22LV2500-ZA / 22LV250N-ZA
22LV250A-ZA / 22LV250U-ZA
22LV255C-ZA / 22LV2500-ZG
22LV250A-ZG / 22LV250U-ZG
22LV250N-ZG
32LV2500-ZA / 32LV2540-ZE
32LV250A-ZA / 32LV254A-ZE
32LV250N-ZA / 32LV254N-ZE
32LV250U-ZA / 32LV254U-ZE
32LV255C-ZA
32LV250A-ZG / 32LV250U-ZG
32LV250N-ZG / 32LV2540-ZL
37LV3500-ZA / 37LV3550-ZB
37LV350A-ZA / 37LV355A-ZB
37LV350N-ZA / 37LV355N-ZB
37LV350U-ZA / 37LV355U-ZB
37LV355T-ZC / 37LV355C-ZB
37LV3551-ZD / 37LV355T-ZJ
37LV3550-ZH / 37LV355A-ZH
37LV355U-ZH / 37LV355N-ZH
37LV3500-ZG /
37LV355C-ZD
42LV3500-ZA / 42LV3550-ZB
42LV350A-ZA / 42LV355A-ZB
42LV350N-ZA / 42LV355N-ZB
42LV350U-ZA / 42LV355U-ZB
42LV355T-ZC / 42LV355C-ZB
42LV3551-ZD / 42LV355T-ZJ
42LV3550-ZH / 42LV355A-ZH
42LV355U-ZH / 42LV355N-ZH
42LV3500-ZG / 42LV3551-ZK
42LV355C-ZD
47LV35**
47LV3551-ZK
/ 32LV2500-ZG
37LV3551-ZK
Product specifications shown above may be changed without prior notice due to upgrade of product
functions.
ENGLISH

SPECIFICATIONS
20
ENGLISH
Product specifications shown above may be changed without prior notice due to upgrade of product
functions.
32LV34** 42LV34**
MODELS
Weight With stand 11.0 kg 14.8 kg
Without stand 9.3 kg 12.4 kg
MODELS
Weight With stand 10.9 kg 12.4 kg
Without stand 9.1 kg 10.6 kg
MODELS
Weight With stand 15.2 kg 20.7 kg
Without stand 13.0 kg 18.5 kg
MODELS
Weight With stand 11.4 kg 15.9 kg
Without stand 9.1 kg 13.0 kg
MODELS
Weight With stand 21.4 kg 27.0 kg
Without stand 18.5 kg 22.0 kg
MODELS
Weight With stand 16.6 kg 21.9 kg
Without stand 12.4 kg 17.7 kg
MODELS
Weight With stand 3.2 kg 5.05 kg
Without stand 2.8 kg 4.4 kg
MODELS
Weight With stand 3.4 kg 4.2 kg
Without stand 3.2 kg 3.9 kg
32LV3400-ZA / 32LV340N-ZA
32LV340A-ZA / 32LV340U-ZA
32LV3400-ZG / 32LV340N-ZG
32LV340A-ZG / 32LV340U-ZG
32LV45** 37LV45**
32LV4500-ZC / 32LV450N-ZC
32LV450A-ZC / 32LV450U-ZC
42LV45** 47LV45**
42LV4500-ZC / 42LV450N-ZC
42LV450A-ZC / 42LV450U-ZC
32LW45** 42LW45**
32LW4500-ZB / 32LW450N-ZB
32LW450A-ZB / 32LW450U-ZB
32LW451C-ZB
47LW45** 55LW45**
47LW4500-ZB / 47LW450N-ZB
47LW450A-ZB / 47LW450U-ZB
47LW451C-ZB
42LW54** 47LW54**
42LW5400-ZA / 42LW540N-ZA
42LW540A-ZA / 42LW540U-ZA
22LV55** 26LV55**
22LV5500-ZC / 22LV550N-ZC
22LV550A-ZC / 22LV550U-ZC
22LV5510-ZD / 22LV551N-ZD
22LV551A-ZD / 22LV551U-ZD
22LV5500-ZJ / 22LV550A-ZJ
22LV550N-ZJ / 22LV550U-ZJ
22LV5510-ZK
19LV23** 22LV23**
19LV2300-ZA / 19LV230N-ZA
19LV230A-ZA / 19LV230U-ZA
19LV2300-ZG
42LV3400-ZA / 42LV340N-ZA
42LV340A-ZA / 42LV340U-ZA
42LV3400-ZG / 42LV340N-ZG
42LV340A-ZG / 42LV340U-ZG
37LV4500-ZC / 37LV450N-ZC
37LV450A-ZC / 37LV450U-ZC
47LV4500-ZC / 47LV450N-ZC
47LV450A-ZC / 47LV450U-ZC
42LW4500-ZB / 42LW450N-ZB
42LW450A-ZB / 42LW450U-ZB
42LW451C-ZB
55LW4500-ZB / 55LW450N-ZB
55LW450A-ZB
47LW5400-ZA / 47LW540N-ZA
47LW540A-ZA / 47LW540U-ZA
26LV5500-ZC / 26LV550N-ZC
26LV550A-ZC / 26LV550U-ZC
26LV5510-ZD / 26LV551N-ZD
26LV551A-ZD / 26LV551U-ZD
26LV5500-ZJ / 26LV550A-ZJ
26LV550N-ZJ / 26LV550U-ZJ
22LV2300-ZA / 22LV230N-ZA
22LV230A-ZA / 22LV230U-ZA
/ 55LW450U-ZB
55LW451C-ZB
26LV5510-ZK
22LV2300-ZG
SPECIFICATIONS
21
MODELS
Weight With stand 9.6 kg 12.8 kg
Without stand 8.5 kg 11.1 kg
MODELS
Weight With stand 15.1 kg
Without stand 13.4 kg
MODELS
Weight With stand 11.4 kg 13.5 kg
Without stand 9.6 kg 11.7 kg
MODELS
Weight With stand 15.5 kg 20.9 kg
Without stand 13.3 kg 18.7 kg
Product specifications shown above may be changed without prior notice due to upgrade of product
functions.
32LK46** 37LK46**
32LK469C-ZB 37LK469C-ZB
42LK46**
42LK469C-ZB
32LV36** 37LV36**
32LV369C-ZD 37LV369C-ZD
42LV36** 47LV36**
42LV369C-ZD 47LV369C-ZD
ENGLISH
Open source software notice
To obtain the source code under GPL, LGPL, MPL and other open source licenses, that is contained in this
product, please visit http://opensource.lge.com.
In addition to the source code, all referred license terms, warranty disclaimers and copyright notices are
available for download.
Additional information of the manual
Viewing the owner’s manual
The owner’s manual in a PDF file format is supplied on a CD. Install the Adobe Acrobat Reader to view the
owner’s manual on your PC.
Insert the supplied CD.
1
The web page appears automatically.
Click Owner’s Manual on the web page.
2
View the owner’s manual.
3
NOTE
If the web page does not appear automatically, access My computer and then click LG and index.
htm to view the owner’s manual.


ANVÄNDARHANDBOK
LCD-TV / LED-LCD-TV
Läs den här handboken noggrant innan du använder
produkten och spara den för framtida bruk.
www.lg.com
SÄKERHETSANVISNINGAR
2
Läs dessa säkerhetsanvisningar noga innan du börjar använda produkten.
I denna bruksanvisning kan bilderna skilja sig något från din produkts utseende, eftersom de
bara är ett hjälpmedel i instruktionen.
VARNING
Om du ignorerar varningsmeddelandet kan du skadas allvarligt och det finns risk för
olycksfall eller dödsfall.
SE UPP!
Om du ignorerar detta meddelande löper du risk för mindre skador, personligen eller på produkten.
SVENSKA
AV PRODUKTEN
SÄKERHETSANVISNINGAR FÖR
ELEKTRICITETEN
FÖRSIKTIGHETSÅTGÄRDER VID INSTALLATION
VARNING
Placeras en bit ifrån värmekällor som t ex
elektriska element.
- Elektrisk stöt, brand, elektriskt fel eller
deformation kan uppstå.
Använd inte produkten på en fuktig plats som
exempelvis ett badrum, eller på en plats där
det finns risk för att den blir blöt.
- Detta kan orsaka brand eller en elektrisk stöt.
Om du känner rök eller annan lukt eller hör ett
konstigt ljud, dra ur strömkabeln och kontakta
servicecentrat.
- Om du fortsätter utan att vidta korrekt åtgärd,
kan en elektrisk stöt eller brand uppstå.
SE UPP!
Installera produkten på en plan och stabil plats
där det inte finns risk för att produkten faller.
- Om produkten faller kan du eller produkten
skadas.
Skydda produkten mot direkt solljus.
- Produkten kan skadas.
Placera inte produkten i en inbyggd
konstruktion som t ex en bokhylla eller ett
rack.
- Ventilation behövs.
VARNING
Var noga med att ansluta strömkabeln till ett
jordat uttag.
- Du kan få en dödande stöt eller skadas.
Rör inte kontakten med blöta händer. Om
kontaktens stift är blöta eller dammiga ska de
dessutom torkas av.
- Du kan få en dödande stöt till följd av den
höga fukthalten.
Dokler je ta aparat prikljuãen na elektriãno vtiãnico, je
pod napetostjo, tudi ãe ste ga izklopili s STIKALOM.
FÖRSIKTIGHETSÅTGÄRDER VID TRANSPORT AV
PRODUKTEN
VARNING
Se till att apparaten är avstängd.
Lossa alla kablar innan produkten flyttas.
- Du kan få en dödlig stöt eller så kan
produkten skadas.
SE UPP!
Skaka inte produkten när den flyttas.
- Du kan få en dödlig stöt eller så kan
produkten skadas.
Håll apparaten med båda händerna och
flytta den med skärmen riktad framåt.
- Om du tappar produkten kan den
skadade produkten orsaka elektriska
stötar eller brand. Kontakta servicecentrat
för reparation.
FÖRSIKTIGHETSÅTGÄRDER VID
ANVÄNDNING AV PRODUKTEN
VARNING
Demontera, reparera eller modifiera inte
produkten efter eget behag.
- En olycka med brand eller elektrisk stöt
kan inträffa.
- Kontakta servicecentrat för kontroll,
kalibrering eller reparation.
Utsätt inte apparaten för regn eller fukt för
att minska risken för brand eller elektrisk
stöt.
Apparaten får inte utsättas för droppande
eller stänkande och inga objekt fyllda
med vätskor såsom vaser får placeras på
apparaten.
Lämna över allt servicearbete till
kvalificerad personal.
Service behövs när apparaten skadats på
något sätt, t ex om strömkabeln eller
kontakten är skadade, vätska har spillts
eller objekt har ramlat in i apparaten,
apparaten har utsatts för regn eller fukt,
eller om apparaten tappats.
Dra ur strömkabeln och antennsladden vid
åska eller blixtoväder.
- Du kan få en dödande stöt och brand kan
bryta ut.
SE UPP!
Skydda strömkabeln från fysisk eller
mekanisk misshandel, som att t ex vridas,
knäckas, perforeras, klämmas i en dörr eller
trampas på. Var särskilt noga med kontakter,
vägguttag och den punkt där kabeln kommer
ut ur apparaten.
VIKTIG INFORMATION FÖR ATT FÖREBYGGA
“FASTBRÄNNING” PÅ TV-SKÄRMEN
- Om en fast bild (t.ex. logotyp, skärmmeny, videospel,
datorskärm eller text-tv) visas på TV-skärmen under en
längre tid kan den fastna permanent på skärmen. Det
här fenomenet kallas för “fastbränning” eller “inbränning”.
Fastbränning omfattas inte av tillverkarens garanti.
- Du förebygger fastbränning genom att undvika att visa
fasta bilder på skärmen under längre perioder (2 timmar
eller längre för LCDskärmar och längre än 1 timme för
plasmaskärmar).
- Fastbränning kan även uppstå på de svarta remsor
som omger bilden (letterbox-området) om du använder
bildformatet 4:3 under en längre period.
 Loading...