

Page 1

3377LLCC22RRRR
**
4422PPCC11RR RR
**
4422LLCC22RRRR
**
5500PPCC11RR RR
**
LCD TV MODELS PLASMA TV MODELS
PPlleeaassee rreeaadd IInnffoorrmmaattiioonn
M
aannuuaall iinncclluuddeedd
ttooggeetthheerr bbeeffoorree rreeaaddiinngg tthhiiss mmaannuuaall aanndd ooppeerraatt--
iinngg yyoouurr sseett..
Retain it for future reference.
Record model number and serial number of the set.
See the label attached on the back cover and quote
this information to your dealer when you require service.
Model number :
Serial number :
OWNER’S MANUAL
LCD TV
PLASMA TV
ENGLISH
DEUTSCH
FRANÇAIS
ITALIANO
ESPAÑOL
PORTUGUÊS
NEDERLANDS
∂ППЛУИО
¿
P/NO: 38289U0564B (
0611-REV04)
Page 2

ACCESSORIES
1
ACCESSORIES
2-Wall brackets
2-eye-bolts
FFoo rr 4422PPCC11RRRR
**,,
5500PPCC11RRRR
**
2-bolts for stand assembly
(Refer p.11)
This feature is not available
for all models.
FFoo rr 3377LLCC22RRRR
**,,
4422LLCC22RRRR
**
2-TV brackets
2-Wall brackets
2-bolts
Cable
Management
Twister Holder
Arrange the wires
with the twister holder.
Ensure that the following accessories are included with your set. If an accessory is missing, please contact the
dealer where you purchased the set.
Owner's Manual
Owner’s Manual Batteries
MODE
INPUT
T
V
DVD
V
C
R
A
U
D
I
O
PI
P
P
R
-
P
IP
P
R
+
S
W
A
P
PI
P IN
PUT
S
T
B
M
E
N
U
MUTE
SIZE POSITION INDEX
SLEEP
FAV
I/II
PIP ARC
Q.VIEWLIST
TEXT
OK
VOL PR
MULTIMEDIA
POWER
CABLE
HOLD
REVEAL
?
TIME
E
X
I
T
M
A
R
K
L
I
V
E
T
V
TIME
SHIFT
TIME
SHIFT
Remote Control Power Cord Polishing Cloth
Polish the screen with the cloth
(Option)
Slightly wipe stained spot on the
exterior only with the cleansing
cloths for the product exterior if
there is stain or fingerprint on
surface of the exterior.
Do not wipe roughly when
removing stain. Please be cautious of that excessive power may
cause scratch or discoloration.
Page 3

CONTENTS
2
CONTENTS
Accessories . . . . . . . . . . . . . . . . . . . . . . . . . . . . . . . . . . . . . . . . . . . . 1
INTRODUCTION
Controls / Connection Options
. . . . . . . . . . . . . . . . . . 4-7
Remote Control Key Functions
. . . . . . . . . . . . . . . . . . . . . 8-9
Home Menu
. . . . . . . . . . . . . . . . . . . . . . . . . . . . . . . . . . . . . . . . . . 10
INSTALLATION
Unfolding The Base Stand
. . . . . . . . . . . . . . . . . . . . . . . . . . . 11
Basic connection
. . . . . . . . . . . . . . . . . . . . . . . . . . . . . . . . . 12 - 13
How to join the set assembly to the wall to protect the
set from tumbling
. . . . . . . . . . . . . . . . . . . . . . . . . . . . . . . . . . . . . .
14
Stand installation . . . . . . . . . . . . . . . . . . . . . . . . . . . . . . . . . . . . . 15
CONNECTIONS & SETUP
Antenna Connection . . . . . . . . . . . . . . . . . . . . . . . . . . . . . . . . . 16
VCR Setup
. . . . . . . . . . . . . . . . . . . . . . . . . . . . . . . . . . . . . . . . 17 - 18
External Equipment Connections
. . . . . . . . . . . . . . . . . . . . 19
DVD Setup
. . . . . . . . . . . . . . . . . . . . . . . . . . . . . . . . . . . . . . .
20-21
STB(SET-TOP BOX) Setup
. . . . . . . . . . . . . . . . . . . . . . 22 -23
PC Setup
. . . . . . . . . . . . . . . . . . . . . . . . . . . . . . . . . . . . . . . . . 24 - 26
BASIC OPERATION
Turning the set on . . . . . . . . . . . . . . . . . . . . . . . . . . 27
Volume Adjustment . . . . . . . . . . . . . . . . . . . . . . . . . 27
Programme Selection . . . . . . . . . . . . . . . . . . . . . . . . 28
On-Screen Menu Language Selection (option) . . . 28
SPECIAL FUNCTIONS
DVR (Digital Video Recorder
)
TimeShift
. . . . . . . . . . . . . . . . . . . . . . . . . . . . . . . . . . . . . . . . . . . . . 29
Progressing the Timeshift function
. . . . . . . . . . . . . .30-31
Recording
. . . . . . . . . . . . . . . . . . . . . . . . . . . . . . . . . . . . . . . . .32 -33
Watching & Record
. . . . . . . . . . . . . . . . . . . . . . . . . . . . . . . . . . .34
Recorded TV
. . . . . . . . . . . . . . . . . . . . . . . . . . . . . . . . . . . . . . . . . .35
Recorded program Selection and Popup Menu
.35- 36
Playing recorded programs
. . . . . . . . . . . . . . . . . . . . . . . . . . .36
Using the remote control
. . . . . . . . . . . . . . . . . . . . . . . . . . . .37
Manual Recording
. . . . . . . . . . . . . . . . . . . . . . . . . . . . . . . . . . . .38
Scheduled List
. . . . . . . . . . . . . . . . . . . . . . . . . . . . . . . . . . . . . . . .39
Video Quality
. . . . . . . . . . . . . . . . . . . . . . . . . . . . . . . . . . . . . . . .
39
Format hard disk . . . . . . . . . . . . . . . . . . . . . . . . . . . . . . . . . . . .40
PIP/POP/Twin Picture
PIP (Picture-In-Picture) Feature . . . . . . . . . . . . . . . . 41
Watching PIP . . . . . . . . . . . . . . . . . . . . . . . . . . . . . . 41
Adjusting PIP Transparency (PIP mode only) . . . . . 41
Programme Selection for Sub Picture . . . . . . . . . . . 42
Adjusting the screen for the PIP . . . . . . . . . . . . . . . 42
Selecting an Input Signal Source for the PIP . . . . . 42
Sub Picture Size Adjustment (PIP mode only) . . . . 42
Moving the PIP (PIP mode only) . . . . . . . . . . . . . . . 42
Swapping between main and sub pictures . . . . . . . 43
POP (Picture-out-of-Picture: Channel Scan) . . . . . 43
TELETEXT
Teletext Language Selection (option) . . . . . . . . . . . . . . . 44
Switch on/off
. . . . . . . . . . . . . . . . . . . . . . . . . . . . . . . . . . . . . . . . 44
SIMPLE Text (option)
. . . . . . . . . . . . . . . . . . . . . . . . . . . . . . . . 45
TOP Text (option)
. . . . . . . . . . . . . . . . . . . . . . . . . . . . . . . . . . . 45
FASTEXT
. . . . . . . . . . . . . . . . . . . . . . . . . . . . . . . . . . . . . . . . . . . . . 45
Special Teletext Functions
. . . . . . . . . . . . . . . . . . . . . . . . . . . 46
Page 4

CONTENTS
3
TV MENU
On Screen Menus Selection and Adjustment . . . . . . . 47
Setting up TV stations
Auto programme Tuning
. . . . . . . . . . . . . . . . . . . . . . . . . . . . . 48
Manual programme Tuning
. . . . . . . . . . . . . . . . . . . . . . . . . . 49
Fine tuning
. . . . . . . . . . . . . . . . . . . . . . . . . . . . . . . . . . . . . . . . . . . 50
Assigning a station name
. . . . . . . . . . . . . . . . . . . . . . . . . . . . 51
Booster (option)
. . . . . . . . . . . . . . . . . . . . . . . . . . . . . . . . . . . . . 52
Programme edit
. . . . . . . . . . . . . . . . . . . . . . . . . . . . . . . . . . . . . . 53
Favourite programme
. . . . . . . . . . . . . . . . . . . . . . . . . . . . . . . . 54
Calling the programme table
. . . . . . . . . . . . . . . . . . . . . . . . 55
Picture Menu Options
PSM (Picture Status Memory) . . . . . . . . . . . . . . . . . . . . . . 56
CSM (Colour Status Memory)
. . . . . . . . . . . . . . . . . . . . . . 57
Manual Colour Temperature Control (CSM - User option)
. . . . . .
58
XD Function . . . . . . . . . . . . . . . . . . . . . . . . . . . . . . . . . . . . . . . . . . 59
sRGB Function . . . . . . . . . . . . . . . . . . . . . . . . . . . . . 60
ACM (Active Colour Management) . . . . . . . . . . . . . 61
Manual Picture Control . . . . . . . . . . . . . . . . . . . . . . 62
Sound Menu Options
SSM (Sound Status Memory) . . . . . . . . . . . . . . . . . . . . . . . 63
AVL (Auto Volume Leveler)
. . . . . . . . . . . . . . . . . . . . . . . . . . 64
Adjusting Sound Control
. . . . . . . . . . . . . . . . . . . . . . . . . . . . 65
TV Speaker
. . . . . . . . . . . . . . . . . . . . . . . . . . . . . . . . . . . . . . . . . . . 65
Stereo/Dual Reception
. . . . . . . . . . . . . . . . . . . . . . . . . . . . . . 66
NICAM Reception (option)
. . . . . . . . . . . . . . . . . . . . . . . . . 67
Sound Output Selection
. . . . . . . . . . . . . . . . . . . . . . . . . . . . 67
Time Menu Options
Setting the Clock . . . . . . . . . . . . . . . . . . . . . . . . . . . 68
Setting the On/Off Time . . . . . . . . . . . . . . . . . . . . . 69
Auto Sleep
. . . . . . . . . . . . . . . . . . . . . . . . . . . . . . . . . . . . . . . . . . . 70
Sleep Timer
. . . . . . . . . . . . . . . . . . . . . . . . . . . . . . . . . . . . . . . . . . 70
Special Menu Options
Child Lock
. . . . . . . . . . . . . . . . . . . . . . . . . . . . . . . . . . . . . . . . . . . . 71
ISM Method (Image Sticking Minimization)
. . . . . . . . 72
Low Power
. . . . . . . . . . . . . . . . . . . . . . . . . . . . . . . . . . . . . . . . . . . . 73
XD Demo
. . . . . . . . . . . . . . . . . . . . . . . . . . . . . . . . . . . . . . . . . . . . . 73
Index (option)
. . . . . . . . . . . . . . . . . . . . . . . . . . . . . . . . . . . . . . . . 74
Screen Menu Options
Auto Config. . . . . . . . . . . . . . . . . . . . . . . . . . . . . . . 75
Manual Config. . . . . . . . . . . . . . . . . . . . . . . . . . . . . 76
Selecting Wide XGA/VGA mode . . . . . . . . . . . . . . . 77
Setting Picture Format . . . . . . . . . . . . . . . . . . . . . . . 78
Cinema . . . . . . . . . . . . . . . . . . . . . . . . . . . . . . . . . . . 79
NR (Noise Reduction) . . . . . . . . . . . . . . . . . . . . . . . 80
Initializing (Reset to original factory settings) . . . . 80
APPENDIX
Programming the Remote . . . . . . . . . . . . . . . . . . . . 81
Programming Codes . . . . . . . . . . . . . . . . . . . . . 82-85
Troubleshooting Checklist . . . . . . . . . . . . . . . . . 86-87
Maintenance . . . . . . . . . . . . . . . . . . . . . . . . . . . . . . 88
Product Specifications . . . . . . . . . . . . . . . . . . . 89-90
Page 5

INTRODUCTION
4
INTRODUCTION
CONTROLS
This manual explains the features available on the 42PC1RR
*,
50PC1RR* set.
A
This is a simplified representation of a front panel. The illustrations shown here may differ slightly from your set.
Front Panel Controls
PROGRAMME Buttons
VOLUME Buttons
MENU Button
OK Button
INPUT Button
POWER Button
PR
VOL
OK
MENU
INPUT
Power/Standby Indicator
• illuminates red in standby mode.
• illuminates white when the set is
switched on.
• illuminates orange when manual
recording in stanby mode.
PR
VOL
OK
MENU
INPUT
Page 6

INTRODUCTION
5
CONNECTION OPTION
This is the back panel of 42PC1RR
*
,
50PC1RR*sets.
HDMI/DVI Input
Connect an HDMI signal to HDMI/DVI.
RGB/Audio Input
Connect the monitor output from a PC/DTV to
the appropriate input port.
Component Input
Connect a component video/audio device to
these jacks.
Power Cord Socket
This set operates on AC power. The voltage is
indicated on the Specifications page. Never
attempt to operate the set on DC power.
Euro Scart Socket (AV1/AV2)
Connect a scart socket input or output from an
external device to these jacks.
Antenna Input
RS-232C Input
(CONTROL&SERVICE)
Port
Connect the serial port of system control devices
to the RS-232C jack.
Remote Control Port
S-Video Input
Connect S-Video out from an S-VIDEO device.
Audio/Video Input
Connect audio/video output from an external
device to these jacks.
Variable Audio Output
Connect an external amplifier or add a subwoofer
to your surround sound system.
1
2
3
4
5
6
7
8
9
10
11
ANTENNA
IN
AV 1
AV 2
AUDIO OUT
VARIABLE
RGB IN
COMPONENTCOMPONENT IN
VIDEOVIDEO
AUDIO
AV IN 4
L/MONO
R
AUDIOAUDIO
VIDEOVIDEO
MONO
( )
AUDIO
VIDEO
S-VIDEO
AV IN 3
RGB
(PC/DTV)(PC/DTV)
AUDIO
(RGB/DVI)
CONTROL IN
REMOTE
S-VIDEOS-VIDEO
AC IN
HDMI/
DVI IN
RS-232C IN
(CONTROL
& SERVICE)
Back Connection Panel
S-VIDEO Input
Connect S-Video out from an S-VIDEO
device.
AUDIO Input
Connections are available for listening
stereo sound from an external device.
VIDEO Input
Connects the video signal from a video
device.
4
11
9
8
7
10
3
21
5
6
Page 7
INTRODUCTION
6
INTRODUCTION
CONTROLS
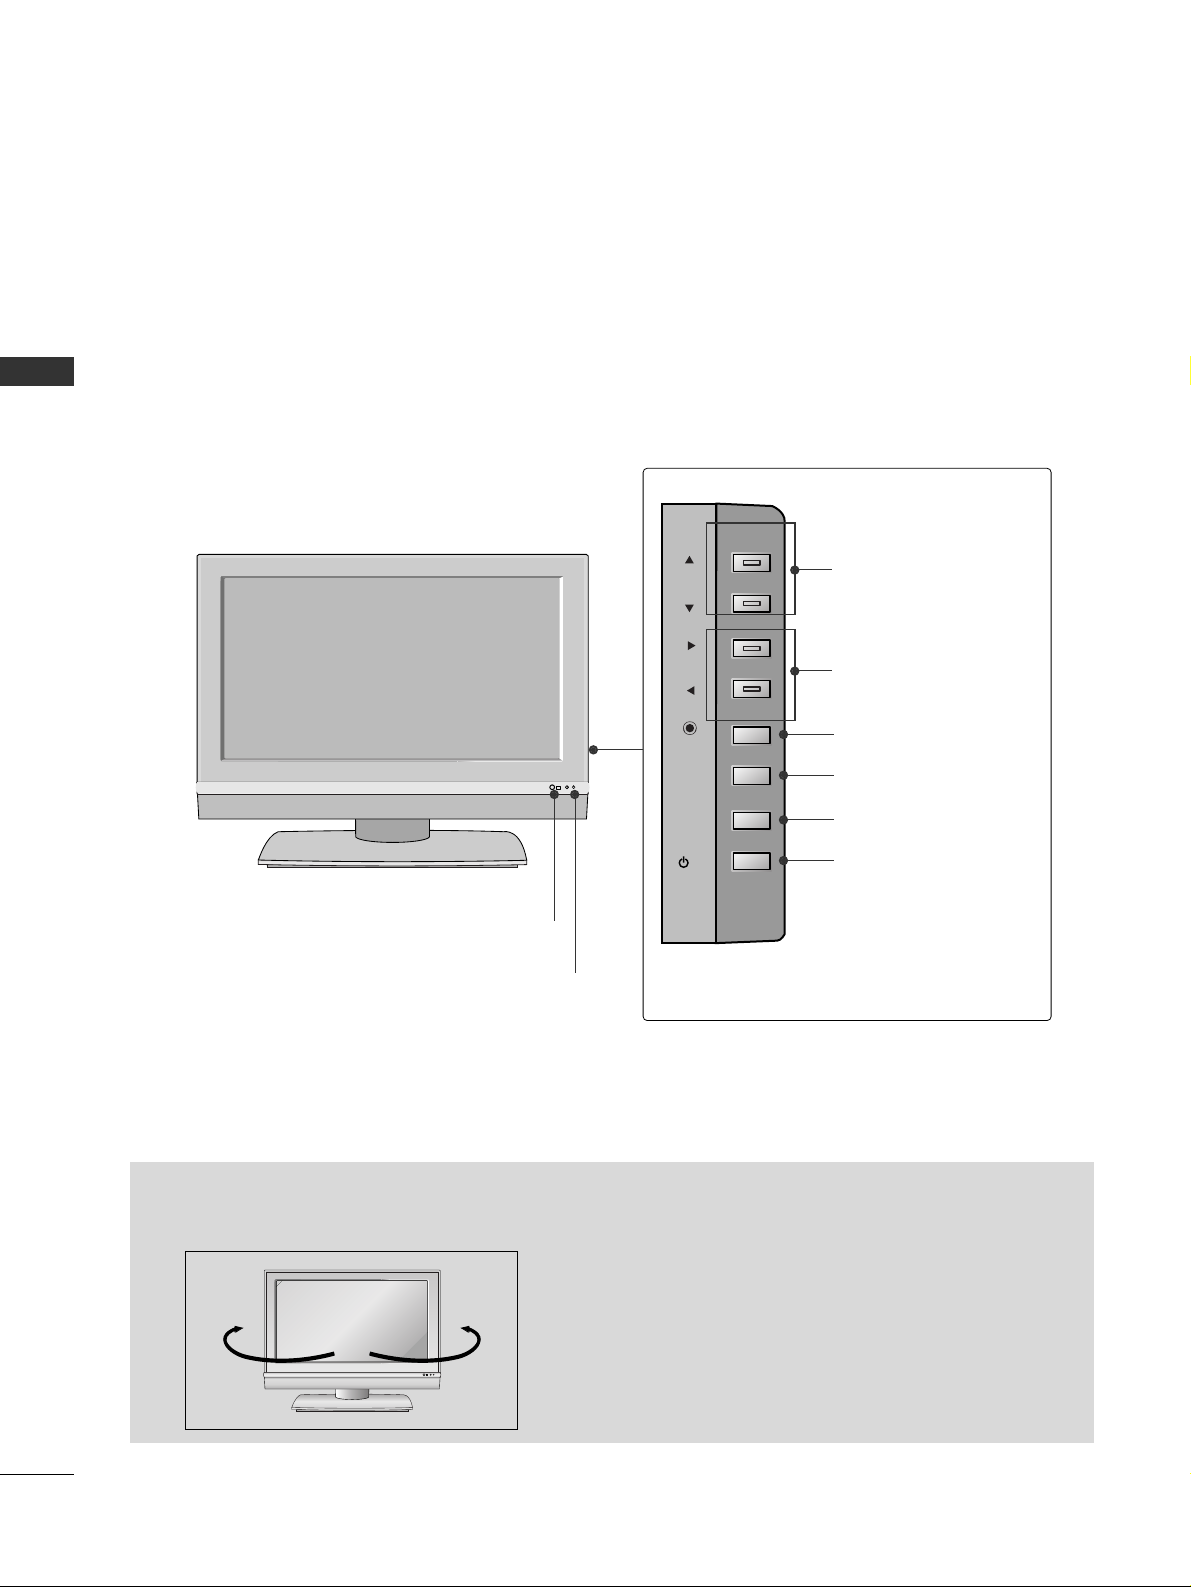
This is the front panel of models
3377LL CC22RR RR
*
,
4422LL CC22RR RR
*
sets.
■
This is a simplified representation of a front panel. The illustrations shown here may differ slightly from your set.
PR
VOL
OK
MENU
INPUT
R
/I
Remote Control Sensor
Power/Standby Indicator
• illuminates red in standby mode.
• illuminates white when the set is switched on.
• illuminates orange when manual recording in
stanby mode.
PROGRAMME Buttons
VOLUME Buttons
OK Button
MENU Button
INPUT Button
POWER Button
<Front Panel >
<Side Panel >
- The set can be conveniently swivelled on its stand 30°
to the left or right to provide the optimum viewing
angle.
Swivel Stand (42LC2RR *only)
R
30° 30°
- This feature is not available for all models.
Page 8

INTRODUCTION
7
CONNECTION OPTION
This is the back panel of models
3377LL CC22RR RR
*
,
4422LL CC22RR RR
*
sets.
HDMI/DVI Input
Connect an HDMI signal to HDMI/DVI.
RGB/Audio Input
Connect the monitor output from a PC/DTV to
the appropriate input port.
Component Input
Connect a component video/audio device to
these jacks.
Power Cord Socket
This set operates on AC power. The voltage is
indicated on the Specifications page. Never
attempt to operate the set on DC power.
Euro Scart Socket (AV1/AV2)
Connect a scart socket input or output from an
external device to these jacks.
Antenna Input
RS-232C Input
(CONTROL&SERVICE)
Port
Connect the serial port of system control devices
to the RS-232C jack.
Remote Control Port
S-Video Input
Connect S-Video out from an S-VIDEO device.
Audio/Video Input
Connect audio/video output from an external
device to these jacks.
Variable Audio Output
Connect an external amplifier or add a subwoofer
to your surround sound system.
1
2
3
4
5
6
7
8
9
10
11
AC IN
AV IN 4
AUDIOAUDIOVIDEOVIDEO
S-VIDEOS-VIDEO
L/MONO
R
ANTENNA
IN
AV 1
AV 2
AUDIO OUT
VARIABLEARIABLE
RGB IN
COMPONENTCOMPONENT IN
VIDEO
AUDIO
MONO
( )
AUDIO
VIDEO
S-VIDEO
AV IN 3
RGB
(PC/DTV)
AUDIO
(RGB/DVI)
CONTROL IN
REMOTE
HDMI/
DVI IN
RS-232C IN
(CONTROL
& SERVICE)
Back Connection Panel
S-VIDEO Input
Connect S-Video out from an SVIDEO device.
AUDIO Input
Connections are available for listening stereo sound from an
external device.
VIDEO Input
Connects the video signal from a
video device.
4
11
9
8
7
10
3
21
5
6
Page 9

INTRODUCTION
8
INTRODUCTION
REMOTE CONTROL KEY FUNCTIONS
When using the remote control, aim it at the remote control sensor on the set.
MODE
INPUT
TV
DVD
V
C
R
A
U
D
IO
PIP P
R
-
P
IP
P
R
+
SWAP
PIP INPUT
S
T
B
M
EN
U
MUTE
SIZE POSITION INDEX
SLEEP
FAV
I/II
PIP ARC
Q.VIEWLIST
TEXT
OK
VOL PR
MULTIMEDIA
POWER
CABLE
HOLD
REVEAL
?
TIME
EXIT
MARK
LIVE TV
TIME
SHIFT
TIME
SHIFT
POWER
INPUT
MULTIMEDIA
MODE
VCR BUTTONS
MARK
LIVE TV
MENU
EXIT
VOL
DD/ EE
(Volume Up/Down)
PR
DD/ EE
(Programme
Up/Down)
MUTE
TEXT
ARC
I/II
switches the set on from standby or off to standby.
Selects the TV, AV, Component, RGB or HDMI/DVI modes.
switches the set on from standby.
Selects the Component, RGB or HDMI/DVI modes.
switches the set on from standby.
Switches the remote control mode to operate another device.
Controls a video cassette recorder.
These buttons are also used for X Studio;
for further details, see the ‘X Studio’ section.
Check and un-check programs in the recorded TV menu.
In TV, AV1, AV2, S-Video2, AV3, AV4 modes, screen
returns to the live programme. (Refer to p.37)
Brings up the Home menu.
Displays on screen menus one by one.
Exits the current menu.
Memorizes menu changes.
Clears all on-screen displays and returns to TV viewing
from any menu.
Increases/decreases sound level.
Select a programme.
Switchs the set on from standby.
Switches the sound on or off.
These buttons are used for teletext.
For further details, see the ‘Teletext’ section.
Note : In teletext mode, the PIP PR +/-, SWAP and PIP
INPUT buttons are used for teletext function.
Changes the picture format.
Selects the language during dual language broadcast.
Selects the sound output.
Page 10

INTRODUCTION
9
Installing Batteries
■
The remote control will work up to 7 meters away
from the receiving window and 30 degrees to the
left or right.
■
Dispose of used batteries in a recyclebin to help
preserve the environment.
Remote control effective range
REMOTE CONTROL KEY FUNCTIONS
P
IP
P
R -
P
IP
P
R
+
SWAP
PIP IN
PU
T
M
ENU
MUTE
SIZE POSITION INDEX
SLEEP
FAV
I/II
PIP ARC
Q.VIEWLIST
TEXT
OK
VOL PR
HOLD
REVEAL
?
TIME
EXIT
IVE TV
TIME
SHIFT
TIME
SHIFT
OK
DD/ EE
or
FF/ GG
(TIME SHIFT)
PIP
PIP PR +/-
SWAP
PIP INPUT
SIZE
POSITION
NUMBER buttons
LIST
Q.VIEW
SLEEP
FAV
accepts your selection or displays the
current mode.
Adjusts menu settings.
Selects menu item.
Switches the sub picture on or off.
Selects PIP , POP or DW modes.
Selects a programme for the sub picture.
Alternates between main and sub picture.
Selects the input mode for the sub picture.
Adjusts the sub picture size.
Moves the sub picture to
DD/ EE
or FF/ GGdirection.
Selects a programme.
Selects numbered items in a menu.
Switchs the set on from standby.
Displays the programme table.
Returns to the previously viewed programme.
Sets the sleep timer.
Selects a favourite programme.
Open the battery compartment cover on the back side.
Insert two batteries observing
the correct polarity (+ with
+, - with -). Don’t mix old or
used batteries with new ones.
Close the cover.
1
2
3
MULTIMEDIA
INPUT
POWER
DVD
V
C
R
V
T
MODE
CABLE
S
O
I
T
D
B
U
A
M
A
R
K
L
I
V
E
T
V
E
X
U
I
N
T
E
M
OK
TIME
TIME
SHIFT
SHIFT
PIP PR -
T
U
P
N
I
P
I
P
P
I
P
P
P
R
A
+
W
S
MUTE
TEXT
VOL PR
INPUT
V
T
O
I
D
U
A
U
N
E
M
TIME
SHIFT
PIP PR -
VOL PR
MULTIMEDIA
POWER
DVD
V
C
R
MODE
CABLE
S
T
B
M
A
R
K
L
I
V
E
T
V
E
X
I
T
OK
TIME
SHIFT
T
U
P
IN
P
I
P
P
I
P
P
P
R
A
+
W
S
MUTE
TEXT
Page 11

INTRODUCTION
10
INTRODUCTION
HOME MENU
This menu is a contents guide.
In Home Menu, you enter the Recorded list of DVR, Manual Rec, Scheduled List or
TV Menu.
MODE
INPUT
T
V
DVD
VCR
AUDIO
P
IP
P
R
-
PIP PR +
SW
A
P
P
IP
IN
P
U
T
STB
MENU
OK
VOL PR
MULTIMEDIA
CABLE
EXIT
MARK
LIVE TV
TIME
SHIFT
TIME
SHIFT
POWER
MUTE
TEXT
DVR
pp..2299
TV Menu
pp..4477
Home
Free Space
3h 19m
High
Normal 5h 24m
Manual Rec.
Recorded TV
Scheduled List
TV Menu
Page 12

INSTALLATION
11
INSTALLATION
UNFOLDING THE BASE STAND (42PC1RR
*
)
■
This feature is not available for all models.
The illustrations shown here may differ slightly from your set.
WWhheenn cclloossii nngg tthhee sstt aa nndd ffoorr sstt oorraaggee
First remove the screws in the holes (B) on the bottom
of the stand. And then pull two Hooks (D) of the stand bottom
and fold the stand into the back of the set.
After folding, push two Locks (A) of the stand bottom outward.
NOTE
!
■
Place the set with the screen facing down on a cushion or soft cloth as shown in Figure 1.
Before unfolding the stand, please make sure two locks (A) on the bottom of the stand are pushed outward.
■
Pull the stand out as shown above in Figures 2 ~ 3.
After unfolding the stand, insert and tighten the screws in the holes (B) on the bottom of the stand.
■
When connecting cables to the set, Do not disengage the lock (C).
This may cause the set to fall, causing serious bodily injury and serious damage to the set.
A
D
A
C
B
B
1
3 4
2
Page 13

INSTALLATION
12
INSTALLATION
BASIC CONNECTION (42PC1RR
*,
50PC1RR *)
Arrange the cables as shown picture.
Hold the
CC AABBLLEE MMAANNAA GG EEMMEENN TT
with both
hands and push it as shown.
Connect the cables as necessary.
To connect an additional equipment, see the
EExxtt ee rrnnaall ee qquuii ppmmeenntt CCoonnnneeccttiioo nnss
section.
Reinstall the
CC AABBLL EE MM AANNAA GG EE MMEENNTT
as
shown.
1
2
3
CABLE MANAGEMENT
■
These models have two cable arrangement methods according to the stand type.
Stand type 1
Stand type 2
Page 14

INSTALLATION
13
BASIC CONNECTION (37LC2RR
*
, 42LC2RR*)
Hold the
CC AABBLL EE MM AANNAA GG EE MMEENNTT
with both
hands and pull it upward.
NOTE
!
GG
Do not hold the
CC AABBLL EE MM AANNAA GG EEMMEENNTT
when moving the product.
If the product is dropped, you may be injured or the product may be broken.
HOW TO REMOVE THE CABLE MANAGEMENT
Connect the cables as necessary.
After connecting the cables neatly, arrange
the cables to the Cable Holder.
To connect an additional equipment, see the
CONNECTIONS & SETUP
section.
1
Install the
CC AABBLL EE MM AANNAA GG EE MMEENNTT
as shown.
2
Bundle the cables using the supplied
twister holder.
3
Page 15

INSTALLATION
14
INSTALLATION
HOW TO JOIN THE SET ASSEMBLY TO THE WALL TO PROTECT THE SET FROM TUMBLING
2
1
■
Place the set close to the wall so that it doesn’t fall over if pushed backwards.
■
The instructions shown below detail a safer way to secure the set. This method fixes the set to the wall so
that it cannot fall over when pulled forward. This will prevent the set from causing injury or damage. Please
make sure that children don’t climb on or hang from the set.
3
Use a sturdy rope (not provided as parts of the set, must purchase separately) to tie the set. It is safer to tie
the rope so it becomes horizontal between the wall and the set.
Use the eye-bolts or set brackets/screws to fix the set to the wall as shown in the picture.
(If there are bolts already installed where the eye bolts need to be fitted, remove them first.)
Insert the eye-bolts or set brackets/screws and tighten them securely in the upper holes.
Secure the wall brackets with heavy duty screws (not provided as parts of the set, must purchase separately)
onto the wall. Match the height of the brackets that are mounted on the wall.
NOTE
!
GG
When moving the set to another place undo the ropes first.
GG
Use a set holder or a cabinet that is big and strong enough for the size and weight of the set.
GG
To use the set safely make sure that the height of the bracket that is mounted on the wall is same as that
of the set.
2
3
1
1
3
2
or
Page 16

INSTALLATION
15
STAND INSTALLATION
Desktop Pedestal Installation
For proper ventilation, allow a clearance of 4" on each side and from the wall.
Wall Mount: Horizontal installation
For proper ventilation, allow a clearance of 4" on each side and from the wall. Detailed installation instructions are available from your dealer, see the optional Tilt Wall Mounting Bracket Installation and Setup Guide.
GGRR OO UUNNDDIINNGG
Ensure that you connect the earth ground wire to prevent
possible electric shock. If grounding methods are not possible,
have a qualified electrician install a separate circuit breaker. Do
not try to ground the unit by connecting it to telephone
wires, lightening rods, or gas pipes.
Power
Supply
Short-circuit
Breaker
■
The set can be installed in various ways such as on a wall, or on a desktop etc.
■
The set is designed to be mounted horizontally.
<< OOnn llyy 4422PPCC11RR RR**>>
Remove two screws of the backside of the set before
installing the wall mounting bracket.
4 inches
4 inches4 inches
4 inches
4 inches
4 inches
4 inches
4 inches
4 inches
Page 17

CONNECTIONS & SETUP
16
CONNECTIONS & SETUP
ANTENNA CONNECTION
■
To prevent damage to the set, never plug in any power cords until you have finished connecting all equipment.
■
The illustrations shown here may differ slightly from your set.
■
For optimum picture quality, adjust antenna direction.
■
An antenna cable and converter are not supplied.
Multi-family Dwellings/Apartments
(Connect to wall antenna socket)
Single-family Dwellings /Houses
(Connect to wall jack for outdoor antenna)
Outdoor Antenna
Wall Antenna Socket
VHF Antenna
UHF Antenna
RF Coaxial Wire (75 ohm)
Turn clockwise to tighten.
ANTENNA
IN
■
In poor signal areas, to get better picture quality,
install a signal amplifier to the antenna as shown
to the right.
■
If the signal needs to be split for two TVs, use an
antenna signal splitter for connection.
SSiiggnnaall
AAmmpplliiffiieerr
UHF
VHF
ANTENNA
IN
Page 18

CONNECTIONS & SETUP
17
VCR SETUP
■
To avoid picture noise (interference), leave an adequate distance between the VCR and TV.
■
Typically a frozen still picture from a VCR. If the 4:3 picture format is used; the fixed images on the sides of
the screen may remain visible on the screen.
When connecting with an antenna
S-VIDEO
OUT
IN
(R) AUDIO (L) VIDEO
34
OUTPUT
SWITCH
ANT OUT
ANT IN
AV 1
AV 2
ANTENNA
IN
Connect the
AA NNTT OOUUTT
of the VCR to the
AA NNTT EE NNNNAA IINN
socket on the set.
Connect the antenna cable to the
AA NN TT II NN
antenna socket of the VCR.
Press the
PPLL AAYY
button on the VCR and match
the appropriate programme between the TV
and VCR for viewing.
VVCC RR
When connecting with a RCA cable
S-VIDEO
OUT
IN
(R) AUDIO (L) VIDEO
34
OUTPUT
SWITCH
ANT OUT
ANT IN
ANTENNA
IN
RGB IN
COMPONENT IN
VIDEO
AUDIO
MONO
( )
AUDIO
VIDEOVIDEO
S-VIDEO
AV IN 3V IN 3
RGB
(PC/DTV)
AUDIO
(RGB/DVI)
CONTROL IN
REMOTE
AV 1
AV 2
( )
AUDIO
VIDEO
S-VIDEO
AV IN 3
VVCC RR
Connect the
AA UU DDIIOO/VV IIDDEEOO
jacks between
TV and VCR. Match the jack colors (Video =
yellow, Audio Left = white, and Audio Right =
red)
Insert a video tape into the VCR and press
PLAY on the VCR. (Refer to the VCR owner’s
manual.)
Select
AA VV33
input source using the
II NN PPUUTT
button on the remote control.
- If connected to
AA VV IINN44
, select
AA VV44
input
source.
NOTE
!
GG
If you have a mono VCR, connect the audio cable from the VCR to the
AA UU DD IIOO LL //MMOONNOO
jack
of the set.
2
1
3
1
2
3
1
2
1
Page 19

CONNECTIONS & SETUP
18
CONNECTIONS & SETUP
VCR SETUP
When connecting with an S-Video cable
S-VIDEO
OUT
IN
(R) AUDIO (L) VIDEO
34
OUTPUT
SWITCH
ANT OUT
ANT IN
AV IN 4
L/MONO
R
AUDIO
VIDEO
RGB IN
COMPONENT IN
VIDEO
AUDIO
MONO
( )
AUDIO
VIDEO
S-VIDEO
AV IN 3V IN 3
RGB
(PC/DTV)
AUDIO
(RGB/DVI)
CONTROL IN
REMOTE
VVCC RR
4
Connect the S-VIDEO output of the VCR to
the
SS-- VVIIDDEEOO
input on the set. The picture
quality is improved; compared to normal composite (RCA cable) input.
Connect the audio outputs of the VCR to the
AA UU DDIIOO
input jacks on the set.
Insert a video tape into the VCR and press
PLAY on the VCR. (Refer to the VCR owner’s
manual.)
Select
AA VV 33
input source with using the
II NN PPUUTT
button on the remote control.
When connecting with a Euro Scart
GG
If the S-VIDEO(Y/C) signal is received
through the Euro scart socket 2 (AV2),
you must change to the S-Video2 mode.
GG
If you want to use the EURO scart cable,
you have to use the signal shielded Euro
scart cable.
ANTENNA
IN
AV IN 4
L/MONO
R
AUDIO
VIDEO
(R) AUDIO (L)
AUDIO/
VIDEO
AV 1
AV 2
( )
AUDIO
VIDEO
S-VIDEO
AV IN 3
VVCC RR
1
2
3
Connect the Euro scart socket of the VCR to
the
AA VV11
Euro scart socket on the set.
Insert a video tape into the VCR and press
PLAY on the VCR. (Refer to the VCR owner’s
manual.)
Select
AA VV11
input source with using the
IINNPPUUTT
button on the remote control.
- If connected to
AA VV22
Euro scart socket,
select
AA VV22
input source.
NOTE
!
GG
If both S-Video and VIDEO sockets have been connected to the S-VHS VCR simultaneousiy.
only the S-Video can be received.
NOTE
!
1
1
2
3
1
2
Page 20

CONNECTIONS & SETUP
19
EXTERNAL EQUIPMENT CONNECTIONS
RL
AUDIO VIDEO
AV IN 4V IN 4
L/MONO
R
AUDIOAUDIO
VIDEOVIDEO
S-VIDEO
Camcorder
Video Game Set
1
Connect the
AA UU DDIIOO/VV IIDDEEOO
jacks between
TV and external equipment. Match the jack
colors (Video = yellow, Audio Left = white, and
Audio Right = red).
Select
AA VV44
input source with using the
II NN PPUUTT
button on the remote control.
- If connected to
AA VV II NN 33
input, select
AA VV33
input source.
Operate the corresponding external equipment.
Refer to external equipment operating guide.
1
2
3
Page 21

CONNECTIONS & SETUP
20
CONNECTIONS & SETUP
DVD SETUP
When connecting with a S-Video cable
AV IN 4
L/MONO
R
AUDIO
VIDEO
S-VIDEO
(R) AUDIO (L)
RGB IN
COMPONENT IN
VIDEO
AUDIO
MONO
( )
AUDIO
VIDEO
S-VIDEO
AV IN 3V IN 3
RGB
(PC/DTV)
AUDIO
(RGB/DVI)
CONTROL IN
REMOTE
COMPONENT IN
VIDEO
AUDIO
DD VV DD
When connecting with a HDMI cable
AV IN 4
L/MONO
R
AUDIO
VIDEO
HDMI OUTPUT
( )
AUDIO
VIDEO
S-VIDEO
AV IN 3
HDMI/
DVI IN
RS-232C IN
(CONTROL
& SERVICE)
RGB IN
RGB
(PC/DTV)
AUDIO
(RGB/DVI)
CONTROL IN
REMOTE
COMPONENT IN
VIDEO
AUDIO
RGB IN
RGB
(PC/DTV)
DD VV DD
11
Connect the S-VIDEO output of the DVD to the
SS-- VVIIDDEEOO
input on the set.
Connect the audio outputs of the DVD to the
AA UU DDIIOO
input jacks on the set.
Turn on the DVD player, insert a DVD.
Select
AA VV33
input source with using the
II NN PPUUTT
button on the remote control.
Refer to the DVD player's manual for operating
instructions.
44
55
1
2
3
1
2
Connect the HDMI output of the DVD to the
HHDDMMII// DD VVII IINN
jack on the set.
Select
HHDDMMII// DDVVII
input source with using the
II NN PPUUTT
button on the remote control.
Refer to the DVD player's manual for operating
instructions.
1
NOTE
!
GG
Set can receive the video and audio signal simultaneously with using a HDMI cable.
GG
If the DVD supports Auto HDMI function, the DVD output resolution will be automatically set
to 1280x720p.
GG
If the DVD does not support Auto HDMI, you need to set the output resolution appropriately.
To get the best picture quality, adjust the output resolution of the DVD to 1280x720p.
2
3
Page 22

CONNECTIONS & SETUP
21
DVD SETUP
When connecting with a component cable
Connect the video outputs (Y, PB, PR) of the
DVD to the
CC OOMMPPOONNEENN TT IINN VVIIDDEEOO
jacks
on the set.
Connect the audio outputs of the DVD to the
CC OOMMPPOONNEENN TT II NN AAUUDDIIOO
jacks on the set.
Turn on the DVD player, insert a DVD.
Select
CC oomm ppoo nneenntt
input source with using
the
II NN PPUUTT
button on the remote control.
Refer to the DVD player's manual for operating
instructions.
B
R
(R) AUDIO (L)
MONO
( )
AUDIO
VIDEO
S-VIDEO
AV IN 3
COMPONENT IN
VIDEO
AUDIO
DD VV DD
When connecting with a Euro Scart
ANTENNA
IN
AV IN 4
L/MONO
R
AUDIO
VIDEO
(R) AUDIO (L)
AUDIO/
VIDEO
AV 1
AV 2
( )
AUDIO
VIDEO
S-VIDEO
AV IN 3
DVD
1
Connect the Euro scart socket of the DVD to
the
AA VV11
Euro scart socket on the set.
Turn on the DVD player, insert a DVD.
Select
AA VV11
input source with using the
II NN PPUUTT
button on the remote control.
- If connected to
AA VV22
Euro scart socket,
select
AA VV22
input source.
44
55
1
2
3
1 2
1
2
3
NOTE
!
GG
Please use the shield scart cable.
NOTE
!
GG
CC oomm ppoo nneenntt IInnpp uutt ppoorr tt ss
To get better picture quality, connect a DVD
player to the component input ports as
shown below.
Y PB
PR
Component ports on the SET
Y
Y
Y
Y
Pb
B-Y
Cb
PB
Pr
R-Y
Cr
PR
Video output ports
on DVD player
Page 23

CONNECTIONS & SETUP
22
CONNECTIONS & SETUP
■
This set can receive Digital Over-the-air/Cable signals without an external digital set-top box. However, if
you do receive Digital signals from a digital set-top box or other digital external device, refer to the figure
as shown below.
STB(SET-TOP BOX) SETUP
When connecting with a D-sub 15 pin cable
Connect the RGB output of the digital set-top
box to the
RRGGBB IINN ((PPCC//DDTTVV))
jack on the set.
Connect the audio outputs of the set-top box
to the
AAUUDDIIOO ((RRGGBB//DDVVII))
jack on the set.
Turn on the digital set-top box. (Refer to the
owner’s manual for the digital set-top box.)
Select
RR GGBB
input source with using the
II NN PPUUTT
button on the remote control.
(R) AUDIO (L)
RGB-DTV OUTPUT
CONTROL IN
REMOTE
RGB IN
RGB
(PC/DTV)
AUDIO
(RGB/DVI)
DD ii ggiitt aa ll
SS ee tt-- ttoopp
BBoo xx
When connecting with a HDMI cable
Connect the HDMI output of the digital settop box to the
HHDDMMII// DD VVII II NN
jack on the set.
Select
HHDDMMII// DDVVII
input source with using the
II NN PPUUTT
button on the remote control.
Turn on the digital set-top box. (Refer to the
owner’s manual for the digital set-top box.)
DD ii ggiittaa ll SS ee tt-- ttoopp BB oo xx
GG
Set can receive the video and audio signal simultaneously with using a HDMI cable.
GG
If the digital set-top box supports Auto HDMI function, output resolution of the digital set-top
box will be automatically set to 1280x720p.
GG
If the digital set-top box does not support Auto HDMI, you need to set the output resolution
appropriately. To get the best picture quality, adjust the output resolution of the digital set-top
box to 1280x720p.
AV IN 4
L/MONO
R
AUDIO
VIDEO
HDMI OUTPUT
( )
AUDIO
VIDEO
S-VIDEO
AV IN 3
HDMI/
DVI IN
RS-232C IN
(CONTROL
& SERVICE)
RGB IN
RGB
(PC/DTV)
AUDIO
(RGB/DVI)
CONTROL IN
REMOTE
COMPONENT IN
VIDEO
AUDIO
RGB IN
RGB
(PC/DTV)
NOTE
!
44
1
2
3
1
2
1
2
3
1
Page 24

CONNECTIONS & SETUP
23
STB(SET-TOP BOX) SETUP
When connecting with a component cable
Connect the video outputs (Y, P
B, PR) of the digital
set-top box to the
CC OOMMPPOONNEENN TT IINN VVIIDDEEOO
jacks
on the set.
Connect the audio output of the digital set-top box
to the
CC OOMMPPOONNEENN TT IINN AAUUDD II OO
jacks on the set.
Turn on the digital set-top box. (Refer to the owner’s
manual for the digital set-top box.)
Select
CC oomm ppoo nnee nntt
input source with using the
II NN PPUUTT
button on the remote control.
B
R
(R) AUDIO (L)
MONO
( )
AUDIO
VIDEO
S-VIDEO
AV IN 3
COMPONENTCOMPONENT IN
VIDEO
AUDIO
DD ii ggiittaa ll SS ee tt-- ttoopp BB oo xx
When connecting with a HDMI to DVI cable
GG
If the digital set-top box has a DVI output and no HDMI output, a separated audio connection
is necessary.
GG
If the digital set-top box supports Auto DVI function, the output resolution of the digital settop box will be automatically set to 1280x720p.
GG
If the digital set-top box does not support Auto DVI, you need to set the output resolution
appropriately. To get the best picture quality, adjust the output resolution of the digital settop box to 1280x720p.
(R) AUDIO (L)
DVI OUTPUT
COMPONENT IN
VIDEO
AUDIO
RGB IN
RGB
(PC/DTV)
HDMI/
DVI IN
RS-232C IN
(CONTROL
& SERVICE)
RGB IN
RGB
(PC/DTV)
AUDIO
(RGB/DVI)
CONTROL IN
REMOTE
DD ii ggiitt aa ll SS ee tt--tt oo pp
BBoo xx
Connect the DVI output of the digital set-top box to
the
HHDDMMII// DD VVII IINN
jack on the set.
Connect the audio outputs of the set-top box to the
AA UU DD IIOO ((RRGG BB//DDVVII))
jack on the set.
Turn on the digital set-top box. (Refer to the owner’s
manual for the digital set-top box.)
Select
HHDD MM II // DD VVII
input source with using the
II NN PPUUTT
button on the remote control.
NOTE
!
44
1
2
3
NOTE
!
1
1
2
2
44
1
2
3
Signal
480i/576i
480p/576p/720p/1080i
Component
Yes
Yes
RGB-DTV
No
Yes
HDMI-DTV
No
Yes
Page 25

CONNECTIONS & SETUP
24
CONNECTIONS & SETUP
PC SETUP
When connecting with a D-sub 15 pin cable
Connect the RGB output of the PC to the
RR GG BB IINN ((PPCC// DD TTVV))
jack on the set.
Connect the audio outputs of the PC to the
AA UU DD IIOO ((RRGG BB//DDVVII))
jack on the set.
Turn on the PC and the set.
Select
RR GGBB
input source with using the
II NN PPUUTT
button on the remote control.
When connecting with a HDMI to DVI cable
Connect the DVI output of the PC to the
HHDDMMII// DD VVII IINN
jack on the set.
Connect the audio outputs of the PC to the
AA UU DD IIOO ((RRGG BB//DDVVII))
jack on the set.
Turn on the PC and the set.
Select
HHDDMMII// DDVVII
input source with using the
II NN PPUUTT
button on the remote control.
GG
If the PC has a DVI output and no HDMI output, a separated audio connection is necessary.
GG
If the PC does not support Auto DVI, you need to set the output resolution appropriately. To
get the best picture quality, adjust the output resolution of PC graphics card's output resolution to 1024x768, 60Hz.
(R) AUDIO (L)
RGB-DTV OUTPUT
CONTROL IN
REMOTE
RGB IN
RGB
(PC/DTV)
AUDIO
(RGB/DVI)
PC
1
2
(R) AUDIO (L)
DVI OUTPUT
COMPONENT IN
VIDEO
AUDIO
RGB IN
RGB
(PC/DTV)
HDMI/
DVI IN
RS-232C IN
(CONTROL
& SERVICE)
RGB IN
RGB
(PC/DTV)
AUDIO
(RGB/DVI)
CONTROL IN
REMOTE
PC
1
2
■
This set provides Plug and Play capability, meaning that the PC adjusts automatically to the set's settings.
44
1
2
3
44
1
2
3
NOTE
!
Page 26

CONNECTIONS & SETUP
25
NOTE
!
G
To enjoy vivid picture and sound, connect a PC to
the set.
G
Avoid keeping a fixed image on the set’s screen for
a long period of time. The fixed image may
become permanently imprinted on the screen; use
a screen saver when possible.
G
Connect PC to the RGB (PC/DTV) or HDMI/DVI
port of the set; change the resolution output of
PC accordingly.
G
There might be noise according to some resolution, vertical pattern, contrast or brightness in PC
mode. Change the PC mode into another resolution or change the refresh rate into another rate
or adjust the brightness and contrast on the
menu until the picture is clean. If the refresh rate
of the PC graphic card can not be changed,
change the PC graphic card or consult it to the
manufacturer of the PC graphic card.
G
The synchronization input waveform for
Horizontal and Vertical frequencies are separate.
G
In 42PC1RR/50PC1RR models, we recommend
using 1024x768, 60Hz for the PC mode, they
provide the best picture quality.
G
In 37LC2RR/42LC2RR models, we recommend
using 1360x768, 60Hz for the PC mode, they
provide the best picture quality.
G
If the resolution of PC is over UXGA, there will be
no picture on the set.
G
Connect the signal cable from the monitor output
port of the PC to the RGB (PC/DTV) port of the
set or the signal cable from the HDMI output port
of the PC to the HDMI/DVI port on the set.
G
Connect the audio cable from the PC to the
Audio input on the set. (Audio cables are not
included with the set).
G
If using a sound card, adjust PC sound as required.
G
This set uses a VESA Plug and Play Solution. The
set provides EDID data to the PC system with a
DDC protocol. The PC adjusts automatically when
using this set.
G
DDC protocol is preset for RGB (Analog RGB),
HDMI (Digital RGB) mode.
G
If required, adjust the settings for Plug and Play
functionally.
G
If graphic card on the PC does not output analog
and digital RGB simultaneously, connect only one
of either RGB (PC/DTV) or HDMI/DVI to display
the PC on the set.
G
If graphic card on the PC does output analog and
digital RGB simultaneously, set the set to either
RGB or HDMI; (the other mode is set to Plug and
Play automatically by the set.)
G
DOS mode may not work depending on video
card if you use a HDMI to DVI cable.
G
When you use too long RGB-PC cable, there
might be a noise on the screen. We recommend
using under 5m of the cable. It provides the best
picture quality.
Page 27

CONNECTIONS & SETUP
26
CONNECTIONS & SETUP
31 . 4 6 8
37.861
31 . 4 6 9
37.927
31 . 4 6 9
35.000
37.861
37.500
43.269
31 . 5 0 0
37.799
39.375
31 . 5 0 0
37.799
39.375
35.156
37.879
48.077
46.875
53.674
49.725
48.363
56.476
60.023
68.677
47.70 0
47.70 0
54.348
63.995
47.776
70.09
85.08
70.08
85.03
59.94
66.66
72.80
75.00
85.00
60.00
70.00
75.00
60.00
70.00
75.00
56.25
60.31
72.18
75.00
85.06
74 . 55
60.00
70.06
75.02
85.00
60.00
60.00
60.05
70.01
59.87
Resolution
Horizontal Vertical
Frequency(KHz) Frequency(Hz)
640x350
Supported Display Resolution (RGB / HDMI mode)
(42PC1RR
*,
50PC1RR *)
720x400
640x480
848x480
800x600
852x480
832x624
1024x768
1360x768
1366x768
1152x864
1280x768
Supported Display Resolution (RGB / HDMI mode)
(37LC2RR
*,
42LC2RR *)
31 . 4 6 8
31 . 4 6 9
37.684
37.879
46.875
49.725
48.363
56.47
60.123
47.776
47.720
47.720
70.8
59.94
75.00
60.31
75.00
74 . 55
60.00
70.00
75.029
59.870
59.799
59.799
Resolution
Horizontal Vertical
Frequency(KHz) Frequency(Hz)
720x400
640x480
800x600
832x624
1280x768
1024x768
1360x768
1366x768
Page 28

BASIC OPERATION
27
BASIC OPERATION
TURNING THE SET ON
First, connect the power cord.
At this moment, the set switches to standby mode.
■
In standby mode to turn the set on, press the ,
IINNPPUUTT,PPRR
DD
//
EE
button on the set or
press the
PPOOWWEERR, IINNPPUUTT, MMUULLTTIIMMEEDDIIAA,PPRR
DD
//
EE
,
NNUUMM BBEERR
button on the remote control and then the set
will switch on.
MODE
INPUT
TV
DVD
VCR
AUDIO
P
IP
P
R
-
PIP PR +
S
W
A
P
PIP IN
PUT
STB
MENU
SIZE POSITION INDEX
SLEEP
FAV
I/II
PIP ARC
Q.VIEWLIST
OK
VOL PR
MULTIMEDIA
CABLE
HOLD
REVEAL
?
TIME
EXIT
MARK
LIV
E TV
TIME
SHIFT
TIME
SHIFT
MUTE
TEXT
POWER
Turning the set on
Press the
VVOOLL
DD
//
EE
button to adjust the volume.
If you want to switch the sound off, press the
MMUUTTEE
button.
You can cancel this function by pressing the
MMUU TTEE
,
VV OOLL
DD
//
EE
or
II // IIII
button.
Volume Adjustment
1
1
2
3
Page 29
BASIC OPERATION
28
BASIC OPERATION
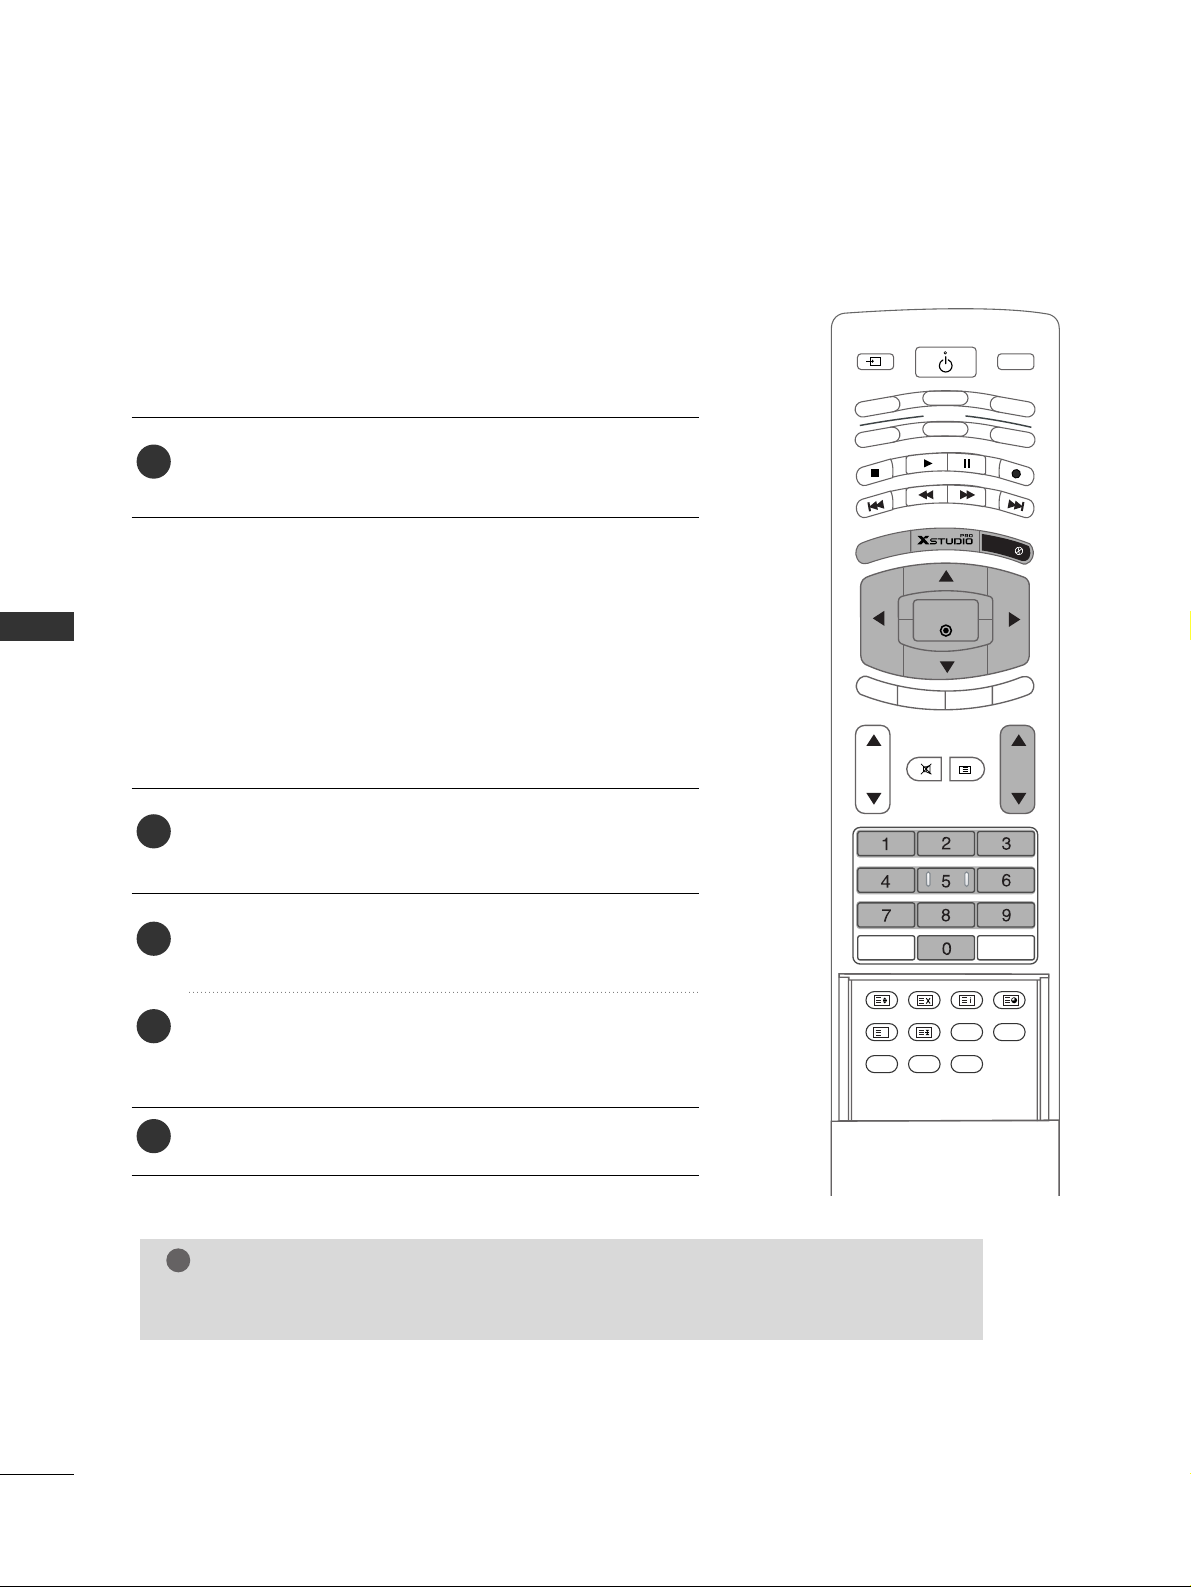
Press the
EEXX IITT
button to return to normal TV viewing.
TURNING THE SET ON
MODE
INPUT
TV
DVD
VCR
AUDIO
P
IP
P
R
-
PIP PR +
S
W
A
P
PIP IN
PU
T
STB
MENU
SIZE POSITION INDEX
SLEEP
FAV
I/II
PIP ARC
Q.VIEWLIST
OK
VOL PR
MULTIMEDIA
CABLE
HOLD
REVEAL
?
TIME
EXIT
MARK
LIVE TV
TIME
SHIFT
TIME
SHIFT
POWER
MUTE
TEXT
Press the
PPRR
DD
//
EE
or NUMBER button to select a pro-
gramme number.
Programme selection
NOTE
!
GG
If you intend to be away on vacation, disconnect the power plug from wall power outlet.
1
Press the
MMEENNUU
button and then use
DD
//
EE
button to select
the SPECIAL menu.
Press the GGbutton and then use
DD
//
EE
button to select
LL aanngguuaaggee
.
Press the
GG
button and then use
DD
//
EE
button to select
your desired language. From this point on, the on-screen
menus will be shown in the language of your choice.
On-Screen Menu Language Selection (option)
--
The menus can be shown on the screen in the selected language.
First select your language.
1
2
3
4
Page 30
SPECIAL FUNCTIONS
29
SPECIAL FUNCTIONS
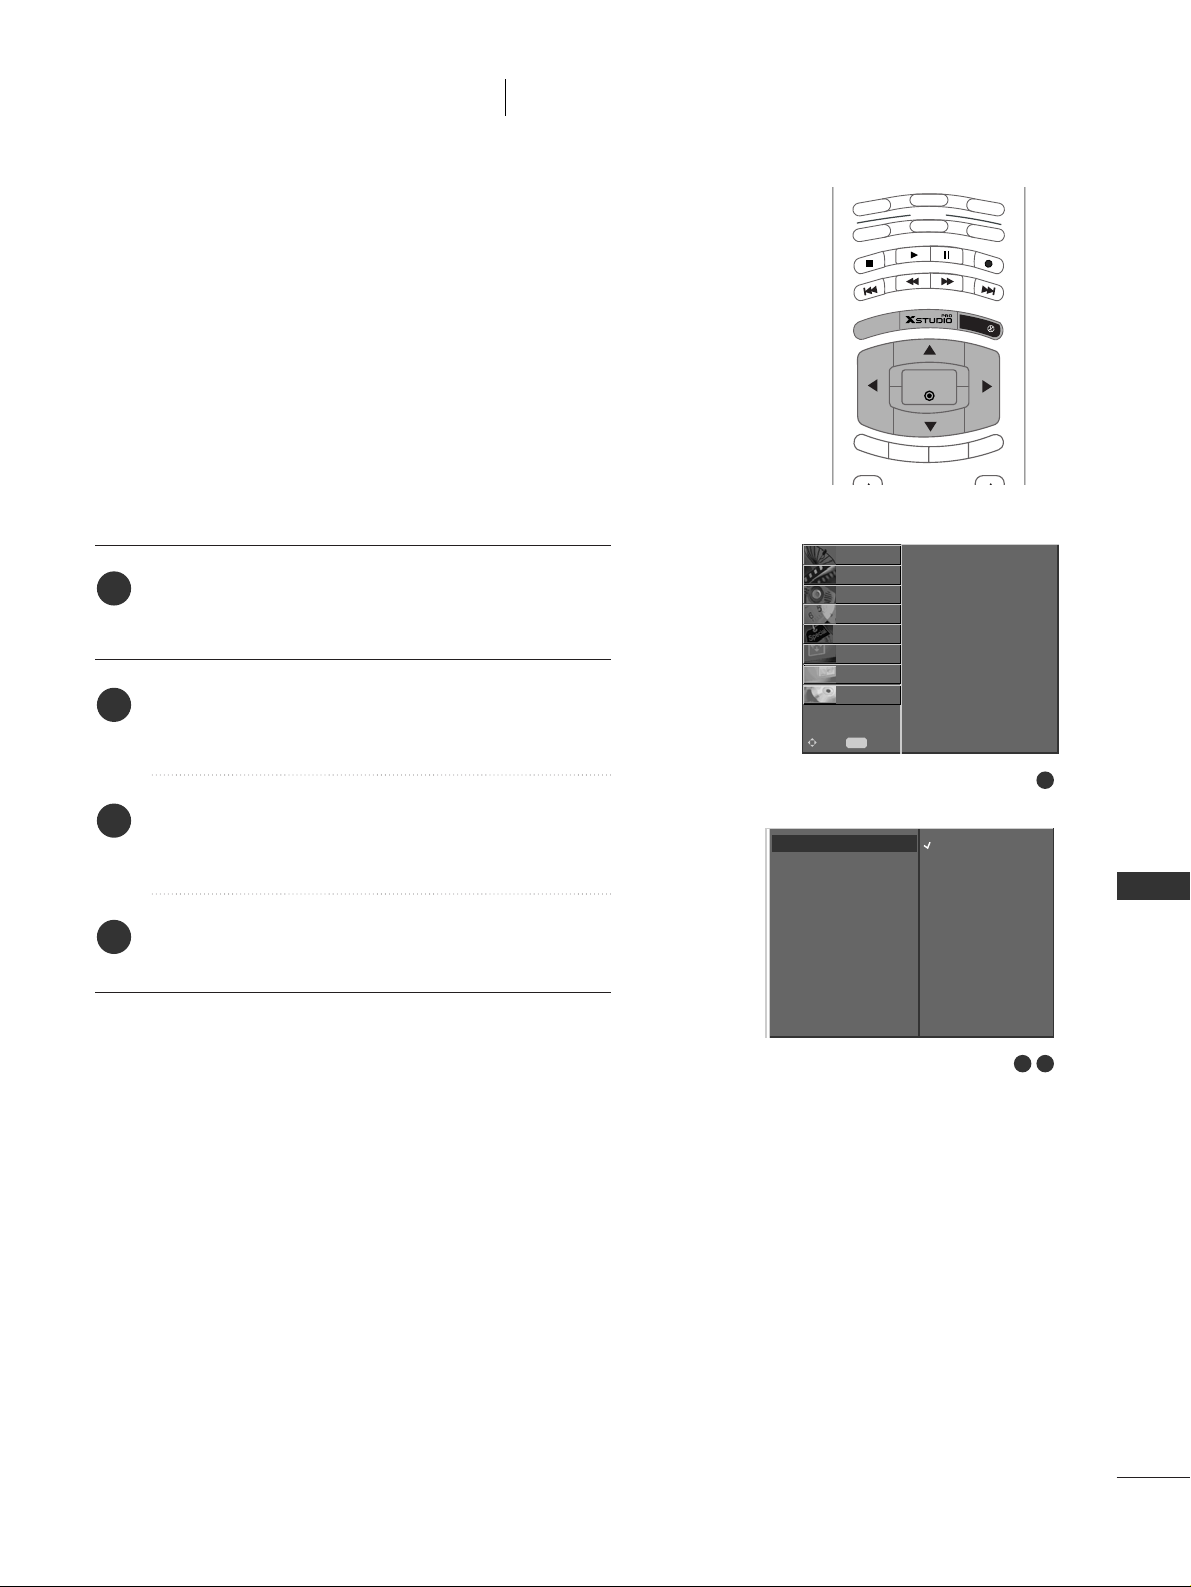
DVR (Digital Video Recorder
)
TIMESHIFT
- This function allows the unit to automatically record
live TV and make it available for reviewing at any time.
- With Timeshift turned on, you may pause and rewind
normal TV viewing at any time without missing any of the
live broadcast.
Press the
MMEENNUU
button and then use
DD / EE
button
to select the
DDVVRR
menu.
Press the
GG
button and then use
DD / EE
button to
select the
TTiimmeesshhiifftt
.
Press the
GG
button and then use
DD / EE
button to
select
OOnn
or
OOffff
.
Press the EXIT button to return to normal TV viewing.
2
3
4
1
1
2 3
MODE
TV
DVD
V
C
R
A
U
D
IO
PIP P
R -
PIP PR +
SWAP
P
IP IN
PU
T
S
T
B
M
E
N
U
OK
CABLE
EXIT
MARK
LIVE TV
TIME
SHIFT
TIME
SHIFT
Timeshift
Recorded TV
Manual Recording
Scheduled List
Video Quality
Format Hard Disk
STATION
O
PICTURE
O
SOUND
O
TIME
O
SPECIAL
O
SCREEN
O
PIP/DW
O
DVR{
Menu
MENU
Move
On
Off
Timeshift
Recorded TV
Manual Recording
Scheduled List
Video Quality
Format Hard Disk
Timeshift
GG
Page 31
SPECIAL FUNCTIONS
30
SPECIAL FUNCTIONS
DVR (Digital Video Recorder
)
PROGRESSING THE TIMESHIFT FUNCTION
After selecting the
TTiimmeesshhiifftt OOnn
, press the
OOKK
button.
■
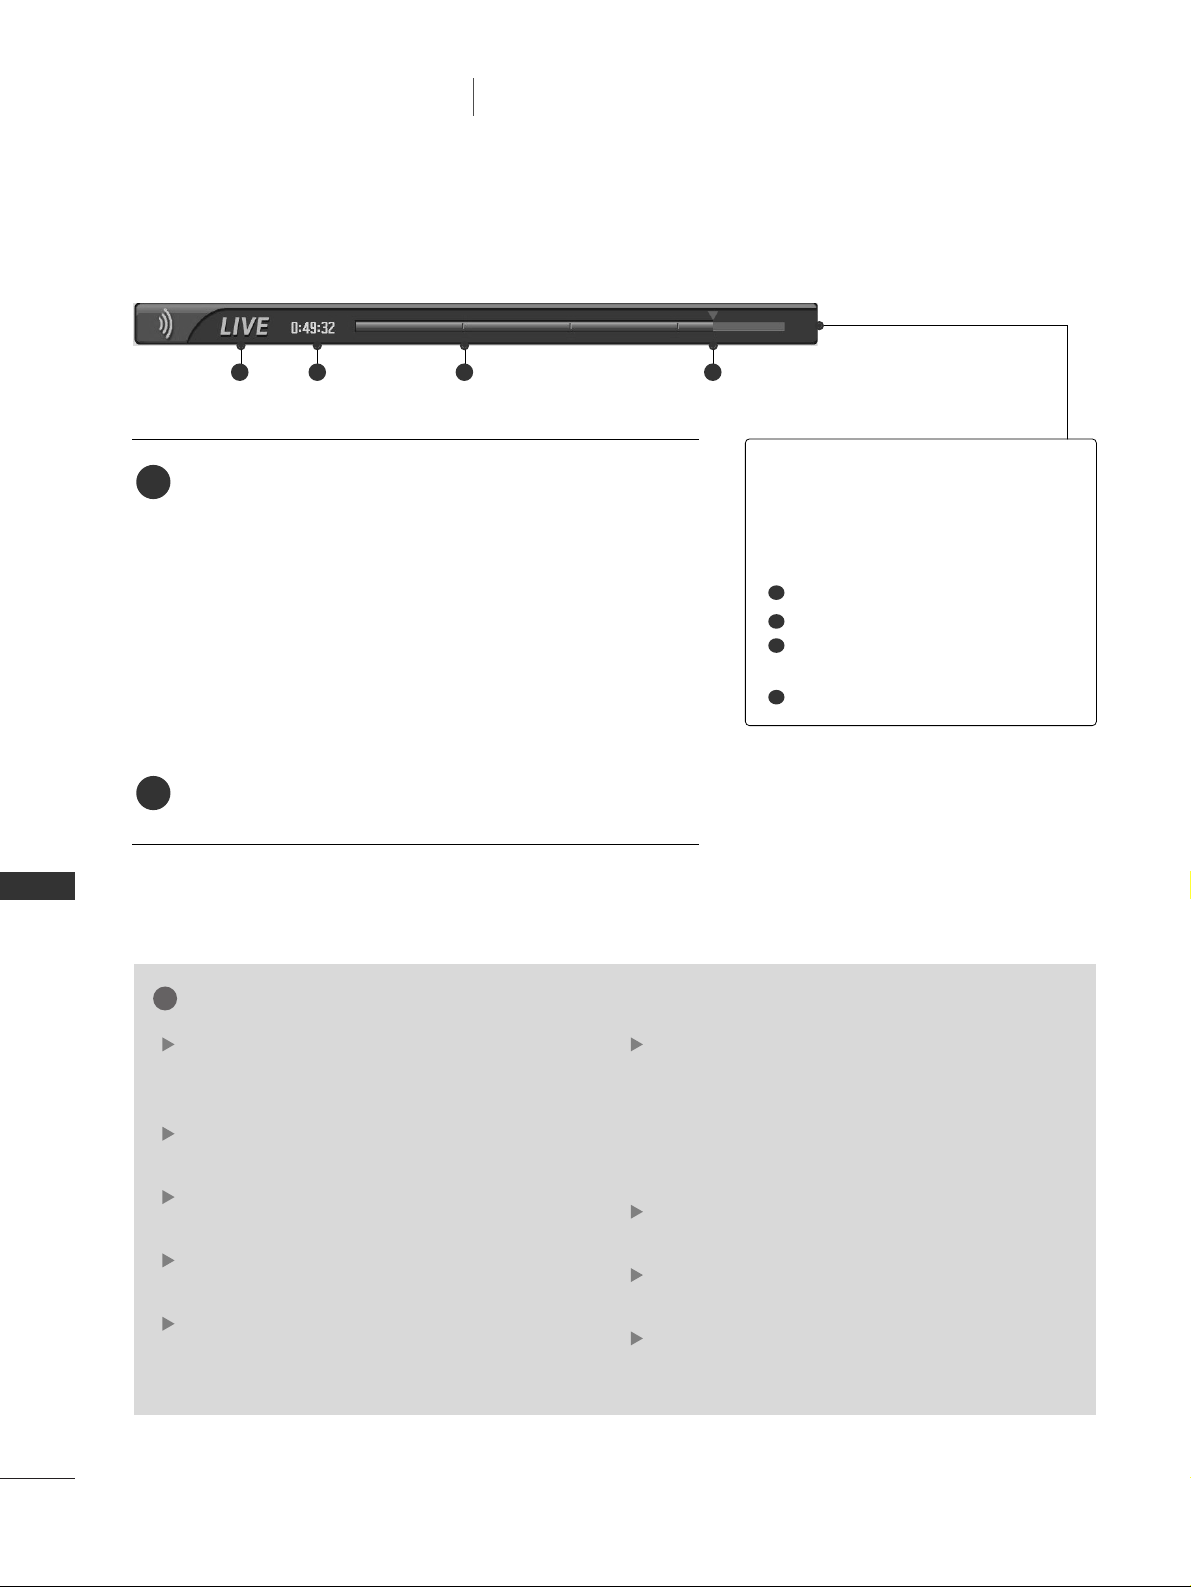
As soon as Timeshift starts, a progress bar indicating the
current recording status is displayed in the bottom of the
screen.
■
Press the
EEXXIITT
button to hide the ‘Progress Bar’ or press
the
OOKK
button to display the 'Progress Bar'.
■
This function is preserved even change a programme on
progressing the Timeshift.
When finishing the Timeshift function, enter the option
menu and turn
TTiimmeesshhiifftt OOffff
.
NOTE
!
DVR (Digital Video Recorder): A device which
records and plays broadcast program contents
onto a hard disk in set or SET TOP BOX.
In order to save hard-disk space, nothing is saved
when there is no signal.
The total storage space of the hard-disk is 80 GB.
4 GB minimum is reserved for Timeshift.
When turning power on, it may take up to a maximum of 3 minutes to initialize the HDD.
The Recording function will not initiate for a
copy-protected program.
Because an analog broadcast is transfered to a
digital signal, video that contains rapid movement may show "cross stripes". This happens
when the analog signal is compressed and then
restored in the digital signal. The unit will
attempt to reduce this excessive picture noise.
When using the PIP/DW, POP mode, Timeshift is
stopped.
Timeshift is available in TV, AV1, AV2, S-Video2,
AV3, AV4 mode.
Timeshift is not available for Audio only channels.
2
1
TThhee ‘‘PPrroo ggrreessss BBaarr’’??
This function indicates a possible DVR reshowing
section ,a current on-screen and real live broad-
casting position.
Status of current displayed video.
C
urrent save time.
15 minute intervals from Timeshift start time.
(Total - one hour).
Indicates current Timeshift position.
1
2
3
4
1 2 3 4
Page 32
SPECIAL FUNCTIONS
31
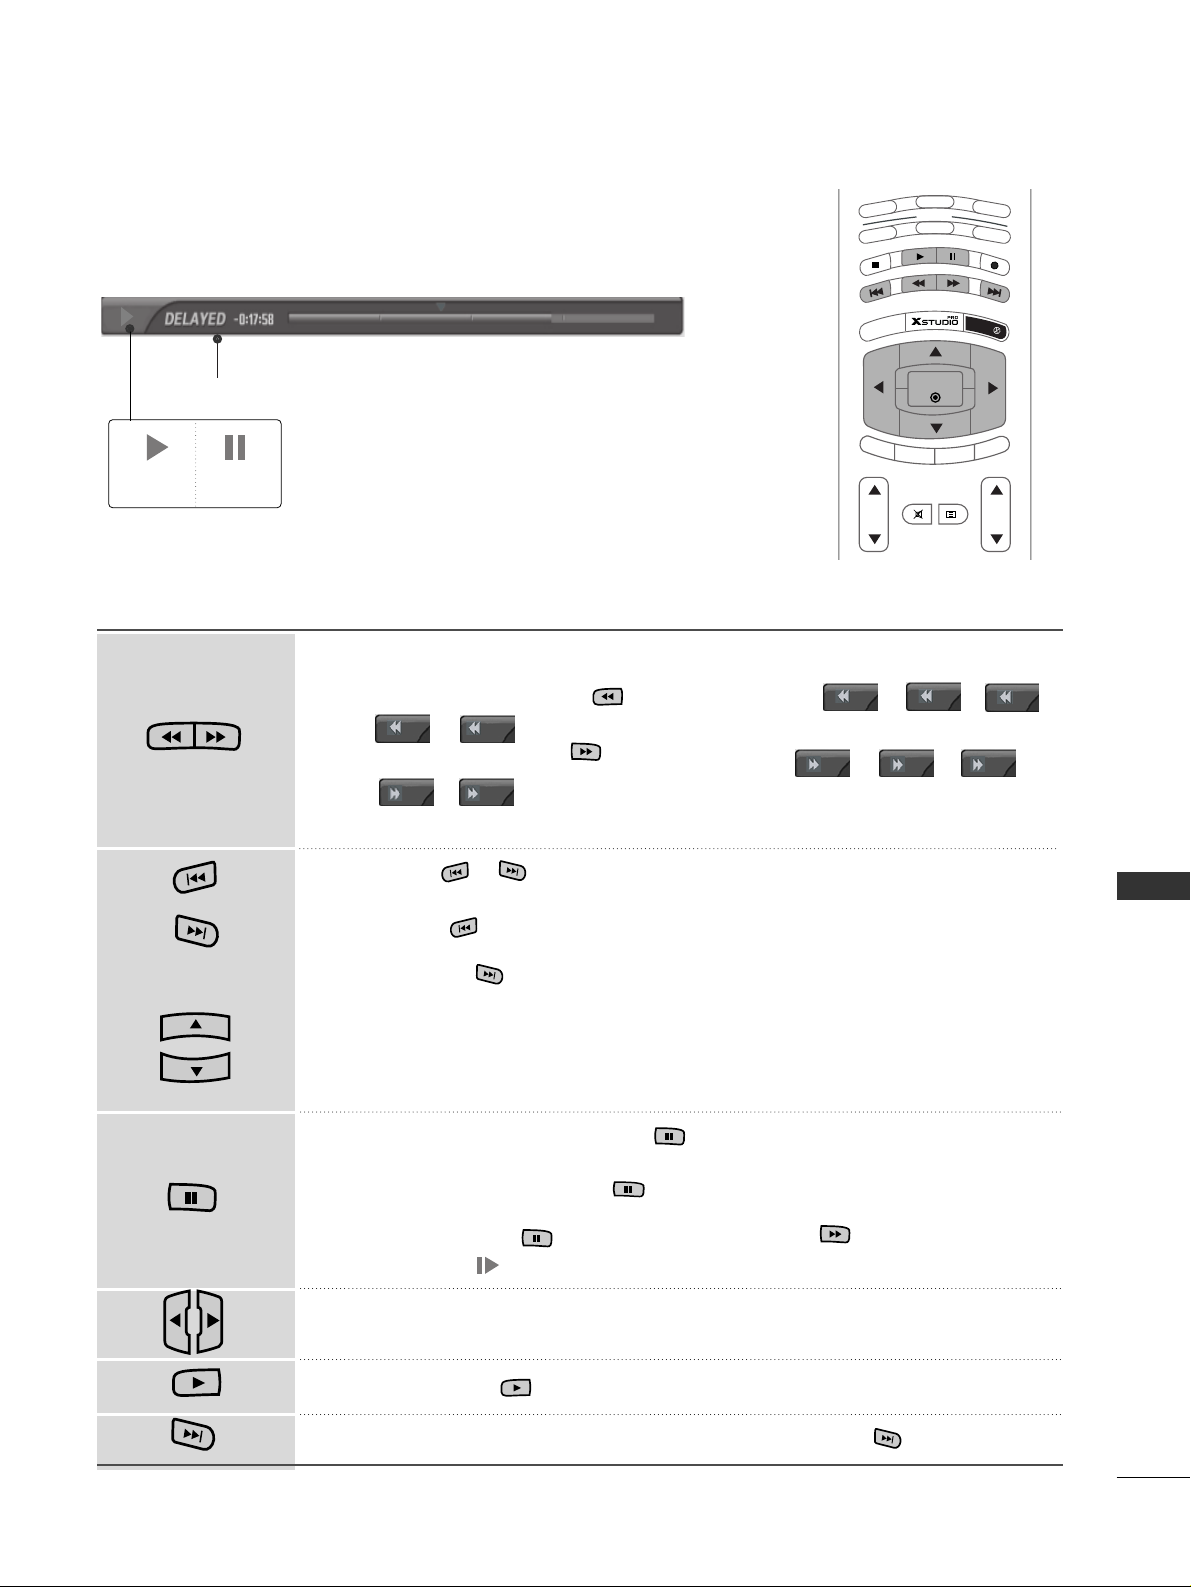
Progressing the Timeshift function, play
- When in timeshift mode, the following options are available.
Indicates that the current broadcast and displayed video differ.
When playing,
repeatedly, press the
RR EE WW
(( ))
button to speed up -> ->
-> -> .
repeatedly, press the
FF FF
(( ))
button to speed up -> ->
-> -> .
■
Pressing these buttons repeatedly increases the fast forward/reverse speed.
Press the or button to move back and forth within the current program.
■
Press the button to jump to the beginning of the programme.
■
Pressing the button to jump to the end of the programme.
Press the
DD
button to jump about 20 seconds forward.
■
Pressing the
EE
button to jump about 8 seconds backward.
During playback, press the
PPaauussee
(( ))
button.
■
Still screen is displayed.
■
Repetedly press the
PPaauussee
(( ))
button to advance frame by frame.
■
Press the
PPaauussee
(( ))
button and then use the
FF FF (( ))
button for slow
motion (the icon is displayed.)
■
When using the FFor
GG
button during playback a cursor indicating the posi-
tion can be viewed on the screen.
Press the
PPLL AAYY
(( ))
button to return to normal playback.
If you want to return to the current live broadcast, press the button.
L
IV
E
T
M
A
R
K
L
IV
E
T
V
L
IV
E
T
V
M
A
R
K
Using the remote control
You can shift playback to any point within the recorded program
Play Pause
x2
x10
x50
x100
x5
x10
x50
x100
x2
x5
LIVE TV
MODE
TV
DVD
V
C
R
A
U
D
IO
P
IP
PR
-
PIP PR +
SWAP
P
IP IN
PU
T
S
T
B
M
E
N
U
OK
VOL PR
CABLE
EXIT
MARK
LIVE TV
TIME
SHIFT
TIME
SHIFT
MUTE
TEXT
MARK
LIVE TV
TIME
SHIFT
TIME
SHIFT
Page 33
SPECIAL FUNCTIONS
32
SPECIAL FUNCTIONS
DVR (Digital Video Recorder
)
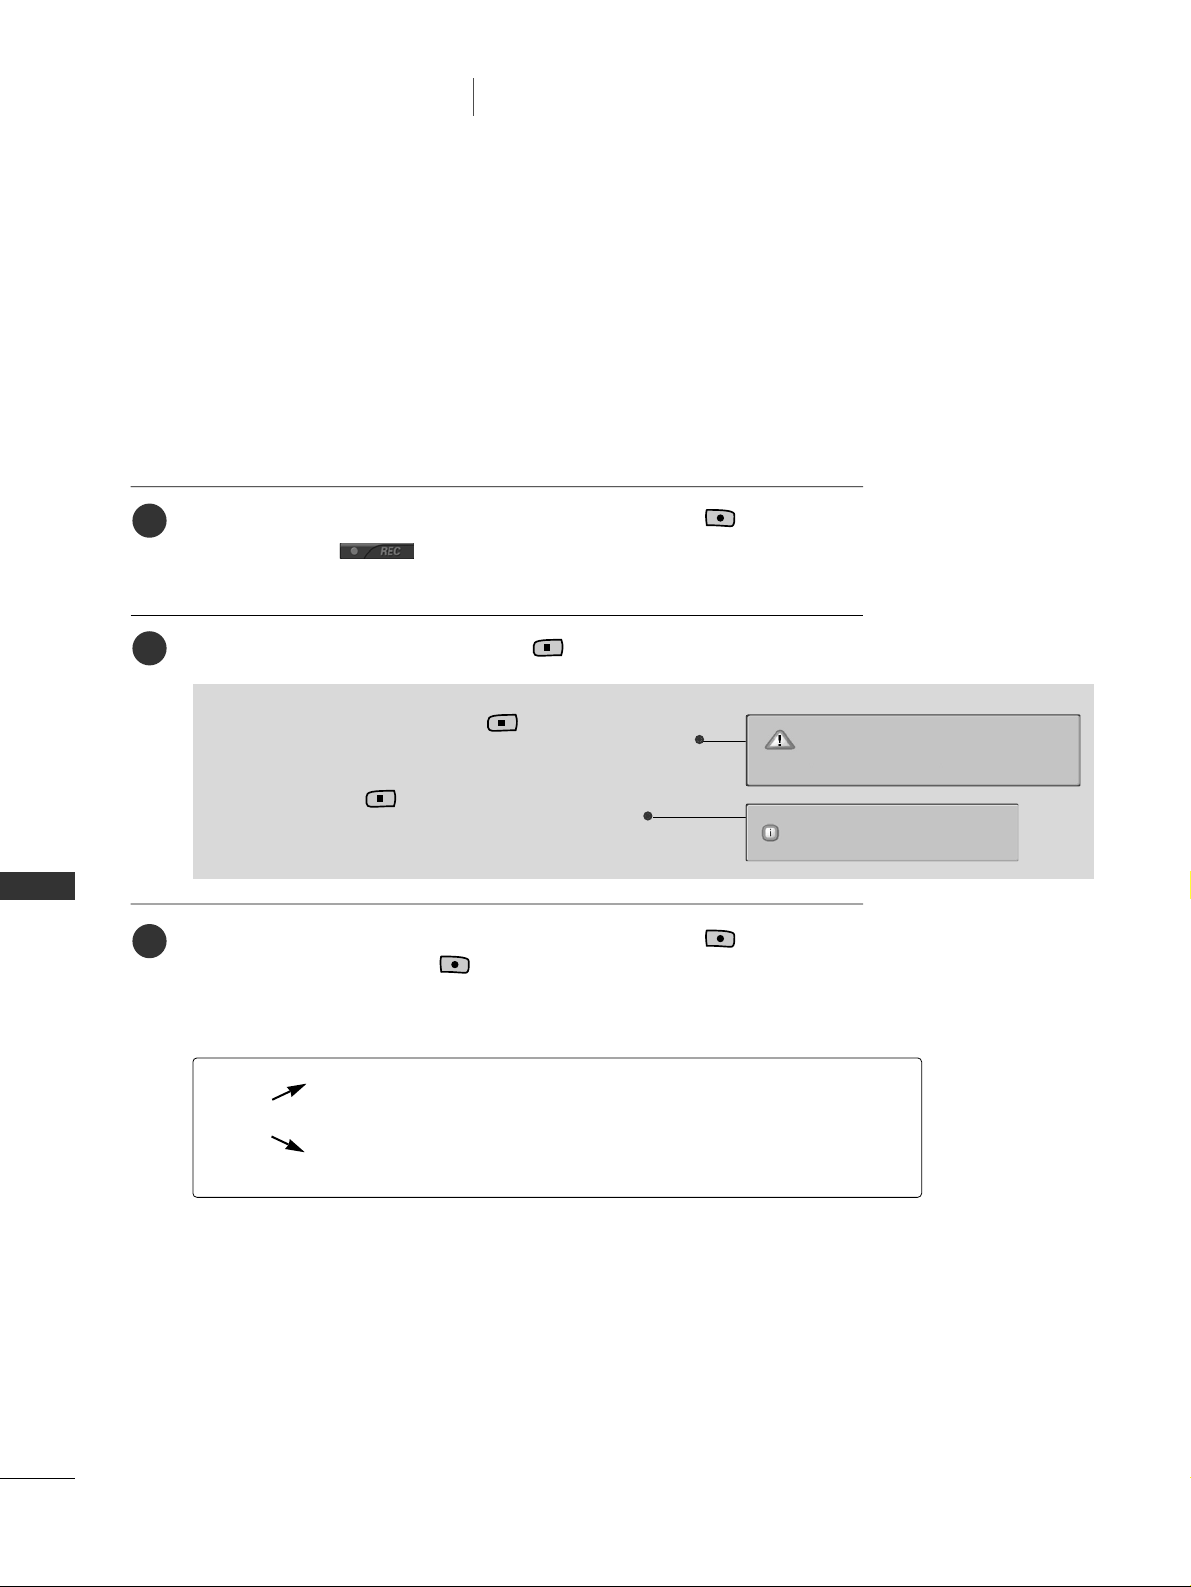
Select the programme you wish to record and then press the button.
During recording is displayed. Use this feature to record up to 2
hours of programming.
If you want to stop recording, press the button.
You can increase or decrease recording time by pressing the button while
recording. After pressing the button, press the
FF
or
GG
buttons repeatedly to increase or decrease the recording time. Each time you
press
FF
or GGbutton the recording duration changes as shown below.
RECORDING
Instant Record
- Use this function to record the program you are watching on the main screen.
This function records the currently displayed programme.
++1100mmii nn-->> ++2200mm iinn-->> ++3300mm iinn-->> ++4400mm iinn-->> ++5500mm iinn-->> ++6600mm iinn
--1100mmii nn
--
>> --2200mm iinn-->> --3300mm iinn-->> --4400mm i
inn-->> --5500mm iinn-->> --6600mm iinn
NNoo CChhaannggee
■
While recording, if you press the button less than 10
seconds after recording started, this message is displayed.
■
If you press the button more than 10 seconds
after recording started, this message is displayed.
2
3
1
Recording is completed.
Recording is not completed.
Recording time must exceed 10 seconds.
Page 34
SPECIAL FUNCTIONS
33
NOTE
!
When recording, if the available storage space
becomes low, the recording will be automatically
stopped.
Recordings of less than 10 seconds will not be
saved.
To save disk space while recording broadcasts, no
data will be saved if there is no signal.
The recording function will not initiate for a
copy-protected program.
The displayed time may differ slightly from the
actual time.
In there is no signal or a film source is being
viewed, the displayed time may differ slightly
from the actual time.
Timeshift recording is not possible with copyprotected programs.
When a poor quality external source is recorded
(old VHS tape for example) the quality of the
recording will not be as good as it could be.
Programmes are stored separately according to
the colour system that they are using. e.g.
PAL/NTSC.
The extra recording time added to existing setting equals
the final recording time.
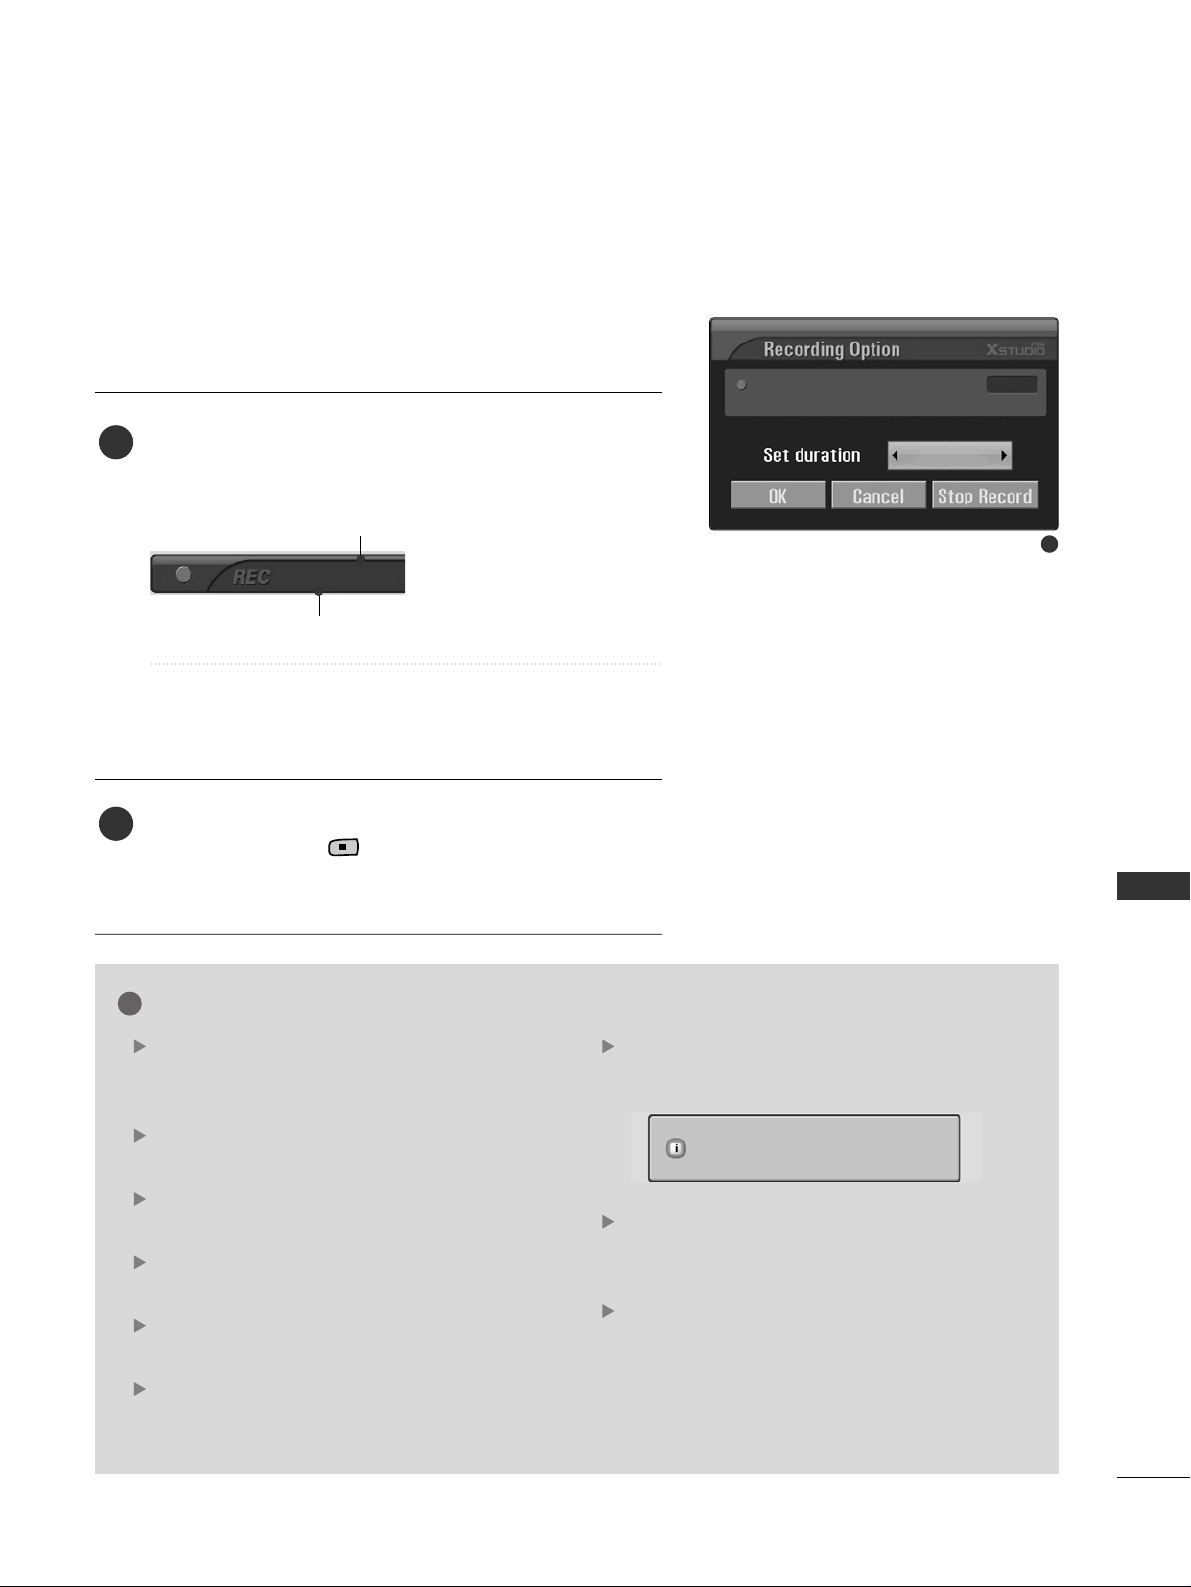
After adjusting the recording time, select
OOKK
. The Status
bar will be displayed.
■
Press the
EEXXIITT
button to hide the Status bar. Press the
OOKK
button to display the Status bar.
Recording stops when the selected duration is reached or
when you press the button.
Although recording has stopped, the Timeshift feature
remains active.
Elapsed recording time
Total recording duration
4
5
3
Stop recording due to copy protection.
00:00
Recording time
00:00~02:00 (0 min recorded)
No change
0:00 / 2:00
Page 35
SPECIAL FUNCTIONS
34
SPECIAL FUNCTIONS
DVR (Digital Video Recorder
)
Analog AV1 AV2 S-Video2 AV3 AV4
Analog 0 0 0 0 0 0
AV1 0 0 0 0 0 0
AV2 0 0 0 x 0 0
S-Video2 0 0 x 0 0 0
AV3 0 0 0 0 0 0
AV4 0 0 0 0 0 0
Component 0 0 0 0 0 0
RGB 0 0 0 0 0 0
HDMI/DVI 0 0 0 0 0 0
Record
Watching
WATCHING & RECORD
screen being recorded
Watching & Record Input
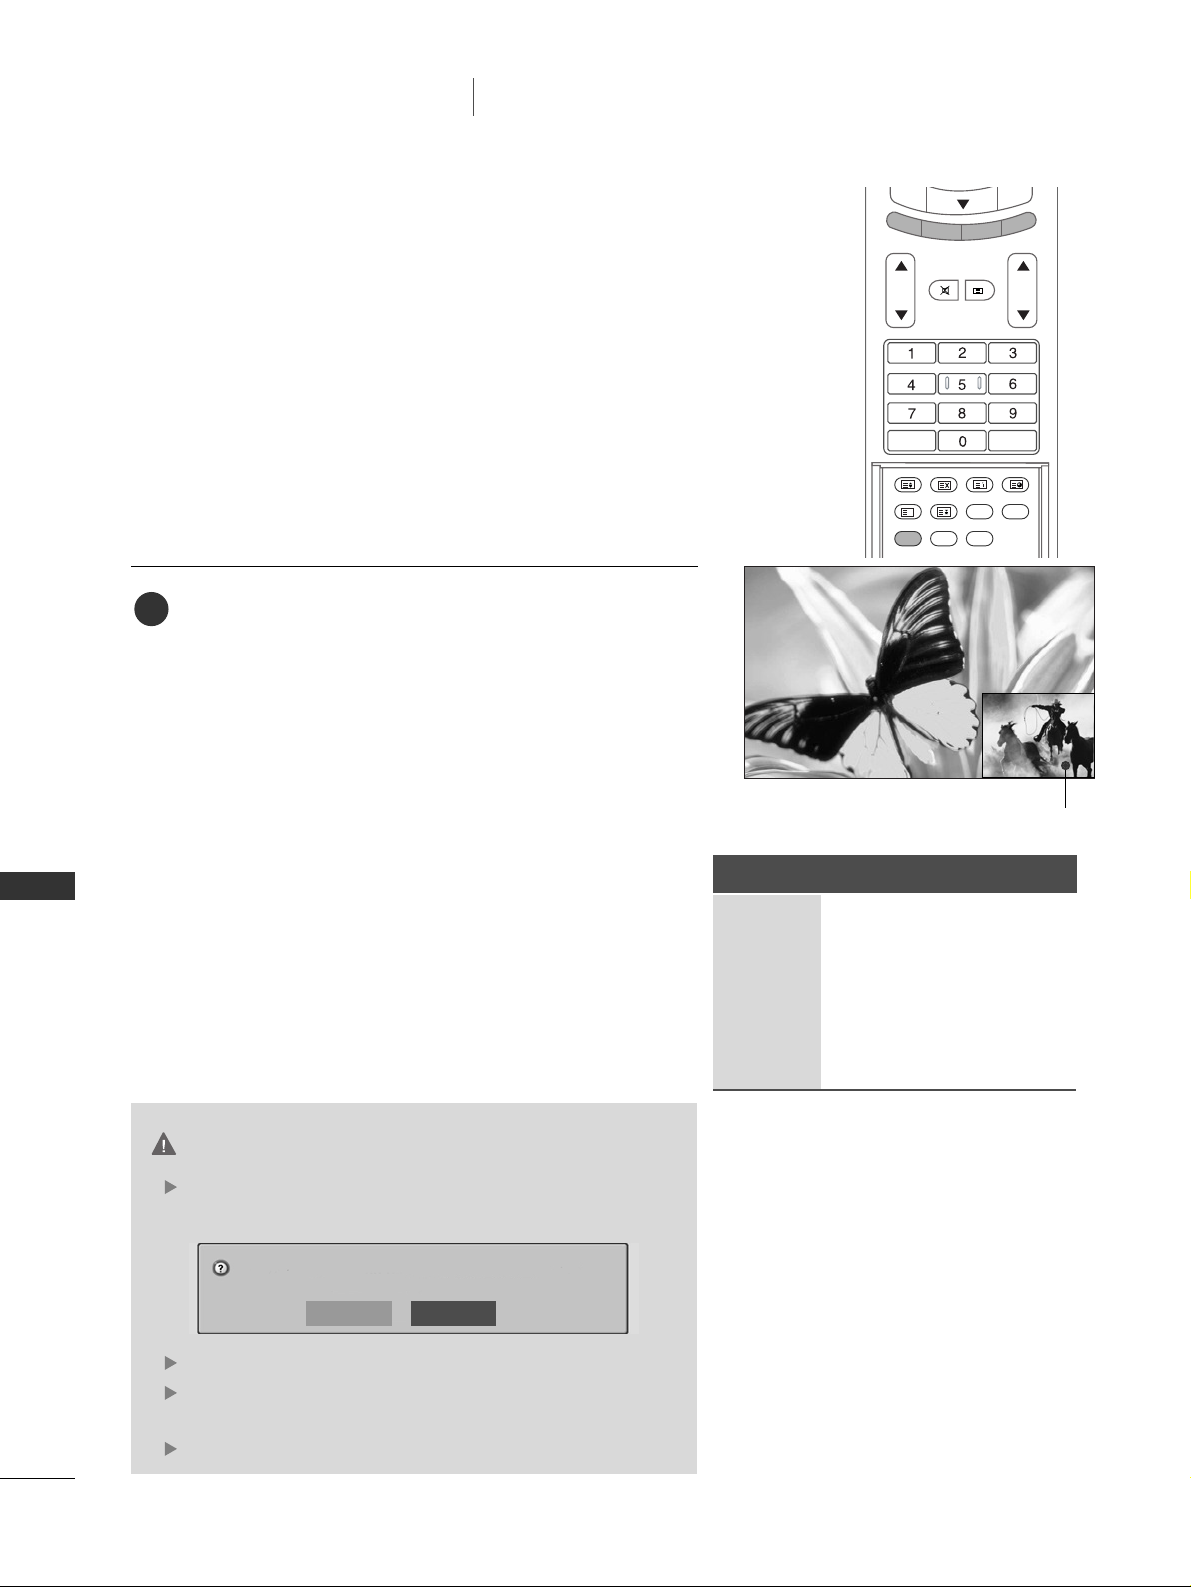
- While recording, you can change programmes or inputs without disturbing the recording. The broadcast being recorded
can be shown in the lower-right corner of the main screen.
After starting an Instant Record or Reserved Record,
change the programme or input.
■
You can check the show being recorded in the lower-right
corner the main screen (as shown below).
■
Press the
PPIIPP
button to hide or show the program being
recorded.
■
Press the
SSWWAAPP
button to return to the program being
recorded in Watching & Record.
■
When changed to the programme recorded in Watching &
Record, the screen is changed to Instant Record state or
Reserved Record state.
1
PIP PR
-
PIP PR +
SWAP
PIP
INP
UT
SIZE POSITION INDEX
SLEEP
FAV
I/II
PIP ARC
Q.VIEWLIST
VOL PR
HOLD
REVEAL
?
TIME
SHIFT
SHIFT
MUTE
TEXT
CAUTION
If you turn the power off on recording, this message is
displayed as shown below.
If you selects No, recording stops and then power is off.
If you selects Yes, recording continues and the power is
turned off.
If you press the EXIT button to disappear this message.
Powering off while recording.
Continue recording?
Yes No
Page 36
SPECIAL FUNCTIONS
35
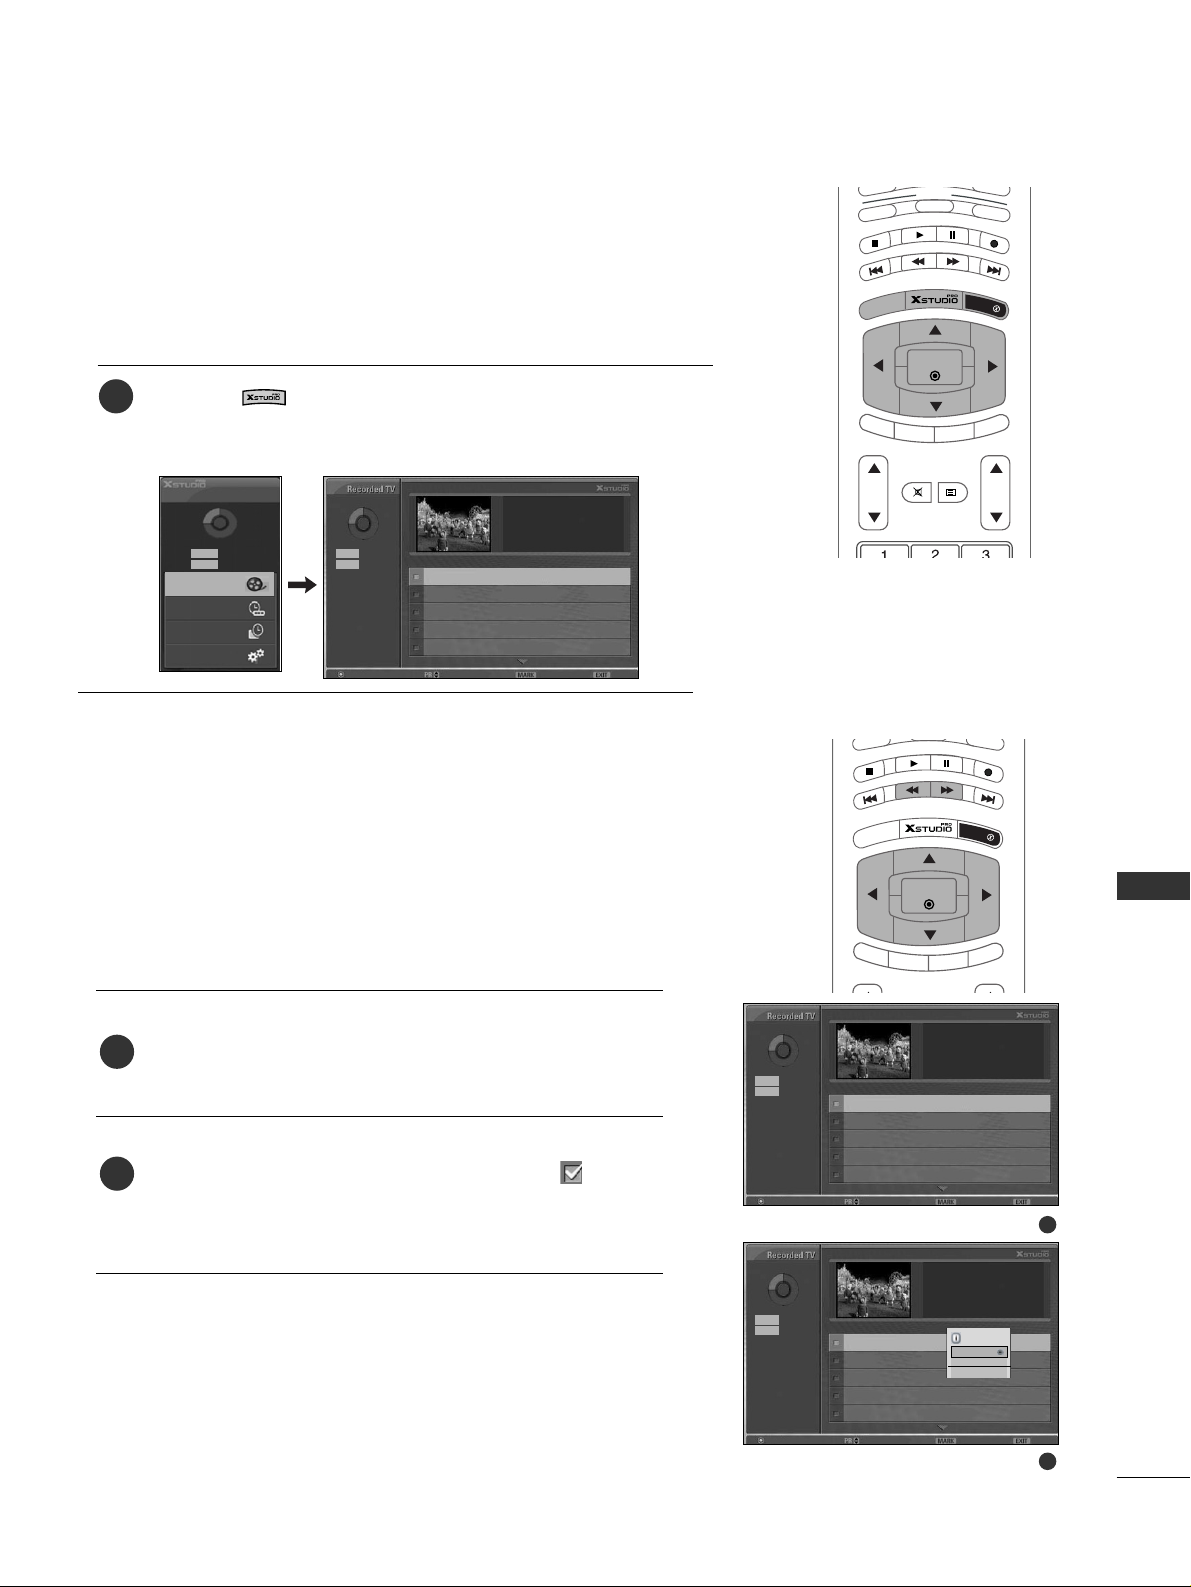
RECORDED TV
- You can view the recorded program list at a glance.
- This function is also available in DVR menu.
Press the button to display
HHOOMMEE
menu.
Use the
DD
or EEbutton to select
RReeccoorrddeedd TTVV
and then use
the
OOKK
or
GG
button.
1
Use the
DD
or
EE
button for page up/down navigation.
Use the
MMAARRKK
button to delete from the list. A is dis-
played next to the thumbnail photo if an item is marked.
RECORDED PROGRAM SELECTION AND POPUP MENU
- The thumbnail recorded list is shown above.
2
1
1
2
A
U
D
IO
PIP PR -
PIP PR +
SWAP
PIP
IN
PU
T
S
T
B
M
E
N
U
OK
EXIT
MARK
LIVE TV
TIME
SHIFT
TIME
SHIFT
MODE
TV
V
C
R
A
U
D
IO
PIP P
R
-
PIP PR +
SWAP
P
IP IN
PU
T
S
T
B
M
E
N
U
OK
VOL PR
CABLE
EXIT
MARK
LIVE TV
TIME
SHIFT
TIME
SHIFT
MUTE
TEXT
Home
Free Space
3h 19m
High
Normal
5h 24m
Free Space
3h 19m
High
Normal
5h 24m
Manual Rec.
Recorded TV
Scheduled List
TV Menu
Input : TV 19
Date : Sun.Jan 1 2006
Duration : 1 min
Quality : High
Page 1/2 0 marked
No Title TV 19 Sun.Jan 1 02:47
No Title TV 19 Sun.Jan 1 02:46
No Title TV 53 Sun.Jan 1 00:23
No Title TV 53 Sun.Jan 1 00:18
No Title TV 58 Sun.Jan 1 00:04
Popup Menu Move page Mark Exit
Free Space
3h 19m
High
Normal
5h 24m
Input : TV 19
Date : Sun.Jan 1 2006
Duration : 1 min
Quality : High
Page 1/2 0 marked
No Title TV 19 Sun.Jan 1 02:47
No Title TV 19 Sun.Jan 1 02:46
No Title TV 53 Sun.Jan 1 00:23
No Title TV 53 Sun.Jan 1 00:18
No Title TV 58 Sun.Jan 1 00:04
Popup Menu Move page Mark Exit
Free Space
3h 19m
High
Normal
5h 24m
Input : TV 19
Date : Sun.Jan 1 2006
Duration : 1 min
Quality : High
Page 1/2 0 marked
No Title TV 19 Sun.Jan 1 02:47
No Title TV 19 Sun.Jan 1 02:46
No Title TV 53 Sun.Jan 1 00:23
No Title TV 53 Sun.Jan 1 00:18
No Title TV 58 Sun.Jan 1 00:04
Popup Menu Move page Mark Exit
Unmark All
Delete
Cancel
1 marked
Page 37
SPECIAL FUNCTIONS
36
SPECIAL FUNCTIONS
DVR (Digital Video Recorder
)
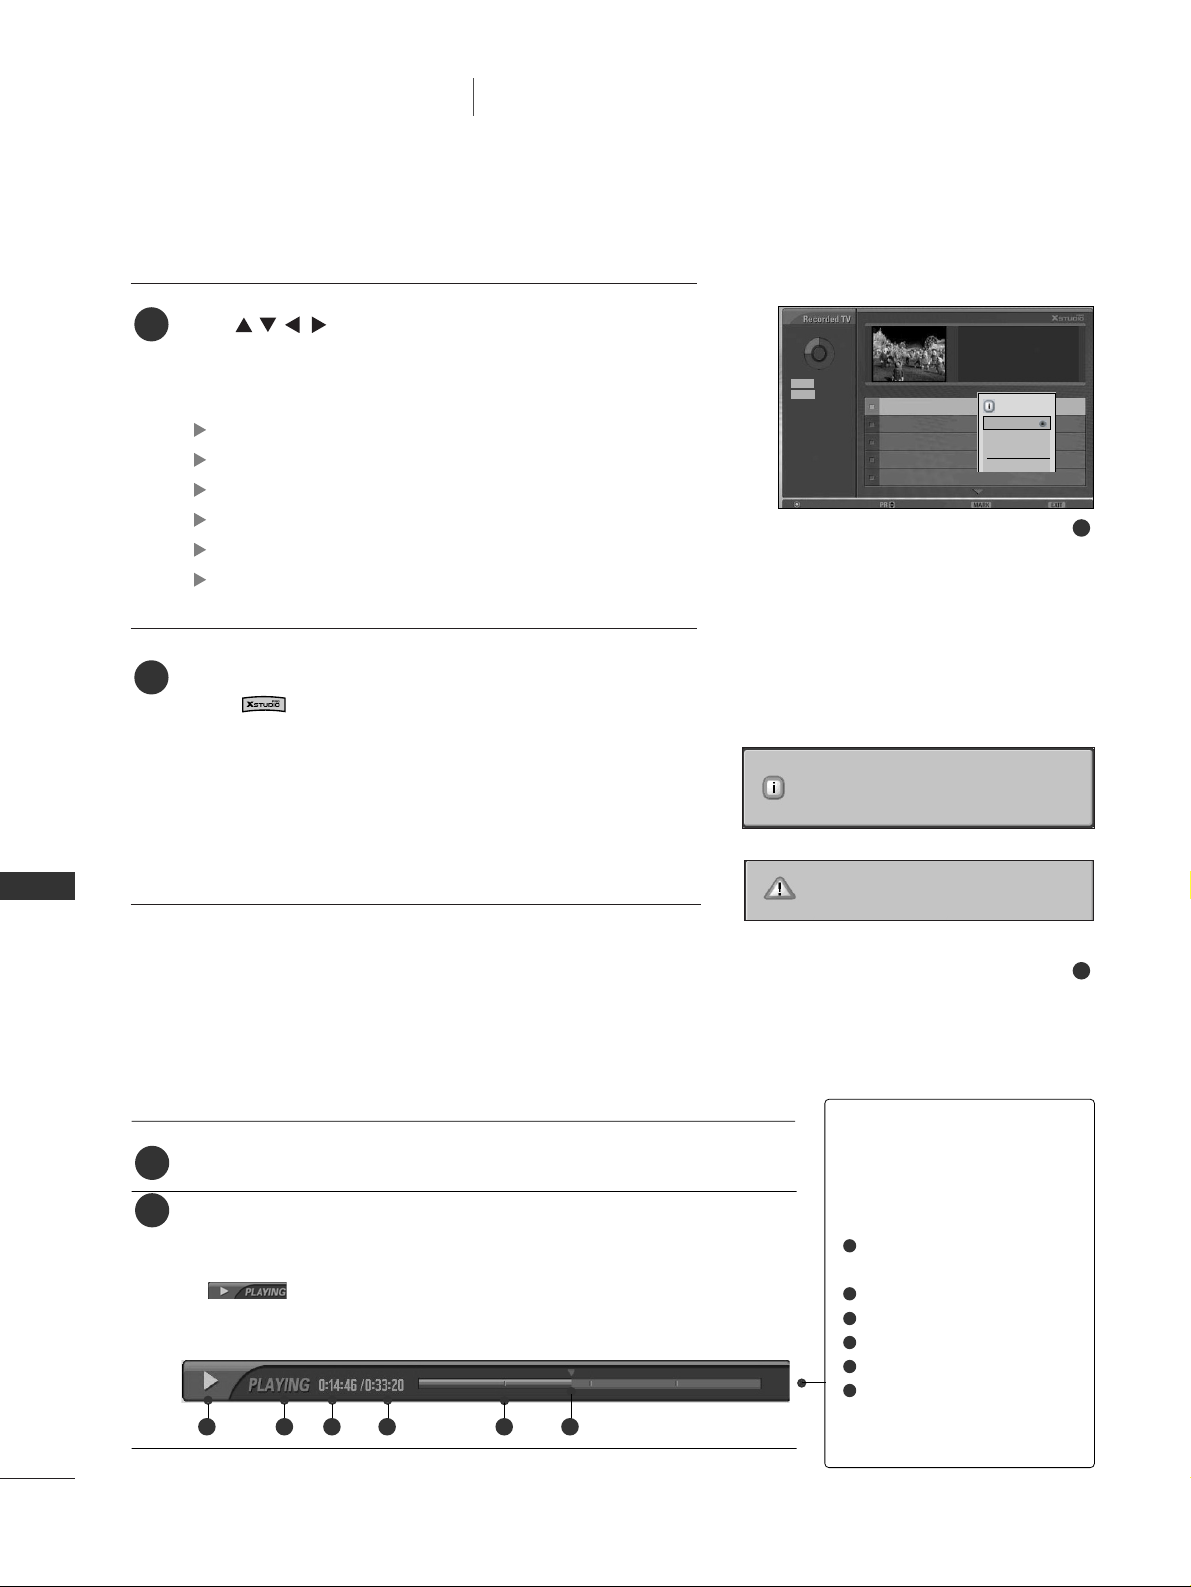
■
If the HDD has a problem performing a recording related
function, this message is displayed.
■
If the temperature is below zero (0°), a warning message is
displayed and you will not be able to use the DVR functions.
Use button to navigate the appropriate thumbnail photo, then press the
OOKK
button to open the Pop-up
Menu.
Repeatedly, press
EEXXIITT
button to return to TV viewing or
press button to return to the
HHoommee
menu.
PPllaayy
: Begin playback of the selected recording.
MMaarrkk AAllll
: mark all recordings on the screen.
UUnnmmaarrkk AAllll
: Change marked recordings to unmarked recordings.
DDeelleettee
: Delete the selected recording.
RReennaammee
: Edit the recorded program title.
CCaanncceell
: Close the Pop-up Menu.
4
3
3
4
PLAYING RECORDED PROGRAMS
- You can play the selected program in the recorded program list.
Play a recorded program.
While playing, You will see a playback screen as shown below.
■
Initially, an icon showing the current playback mode is displayed
.
Press the
OOKK
button to display the progress bar
■
To stop displaying the recorded programs icon, press the
EEXXIITT
button.
TThhee ‘‘PPrrooggrreessss BBaarr’’??
This function indicates a possible DVR
reshowing section ,a current on-screen
and real on-broadcasting position, a
section of section-recording.
Indicates movement of recorded
program.
Indicates status of recorded program.
Indicates elasped playback time.
Indicates total playback time.
Indicates a quarter of program runtime.
Indicates current playback position.
2
1
Hard disk initialisation is in progress.
Cannot operate DVR at low temperature.
Free Space
3h 19m
High
Normal
5h 24m
Input : TV 19
Date : Sun.Jan 1 2006
Duration : 1 min
Quality : High
Page 1/2 0 marked
No Title TV 19 Sun.Jan 1 02:47
No Title TV 19 Sun.Jan 1 02:46
No Title TV 53 Sun.Jan 1 00:23
No Title TV 53 Sun.Jan 1 00:18
No Title TV 58 Sun.Jan 1 00:04
Popup Menu Move page Mark Exit
Play
Mark All
Delete
Rename
Cancel
TV 19
02:47~02:48
1
2
3
4
5
6
1 2 3 4 5 6
Page 38
SPECIAL FUNCTIONS
37
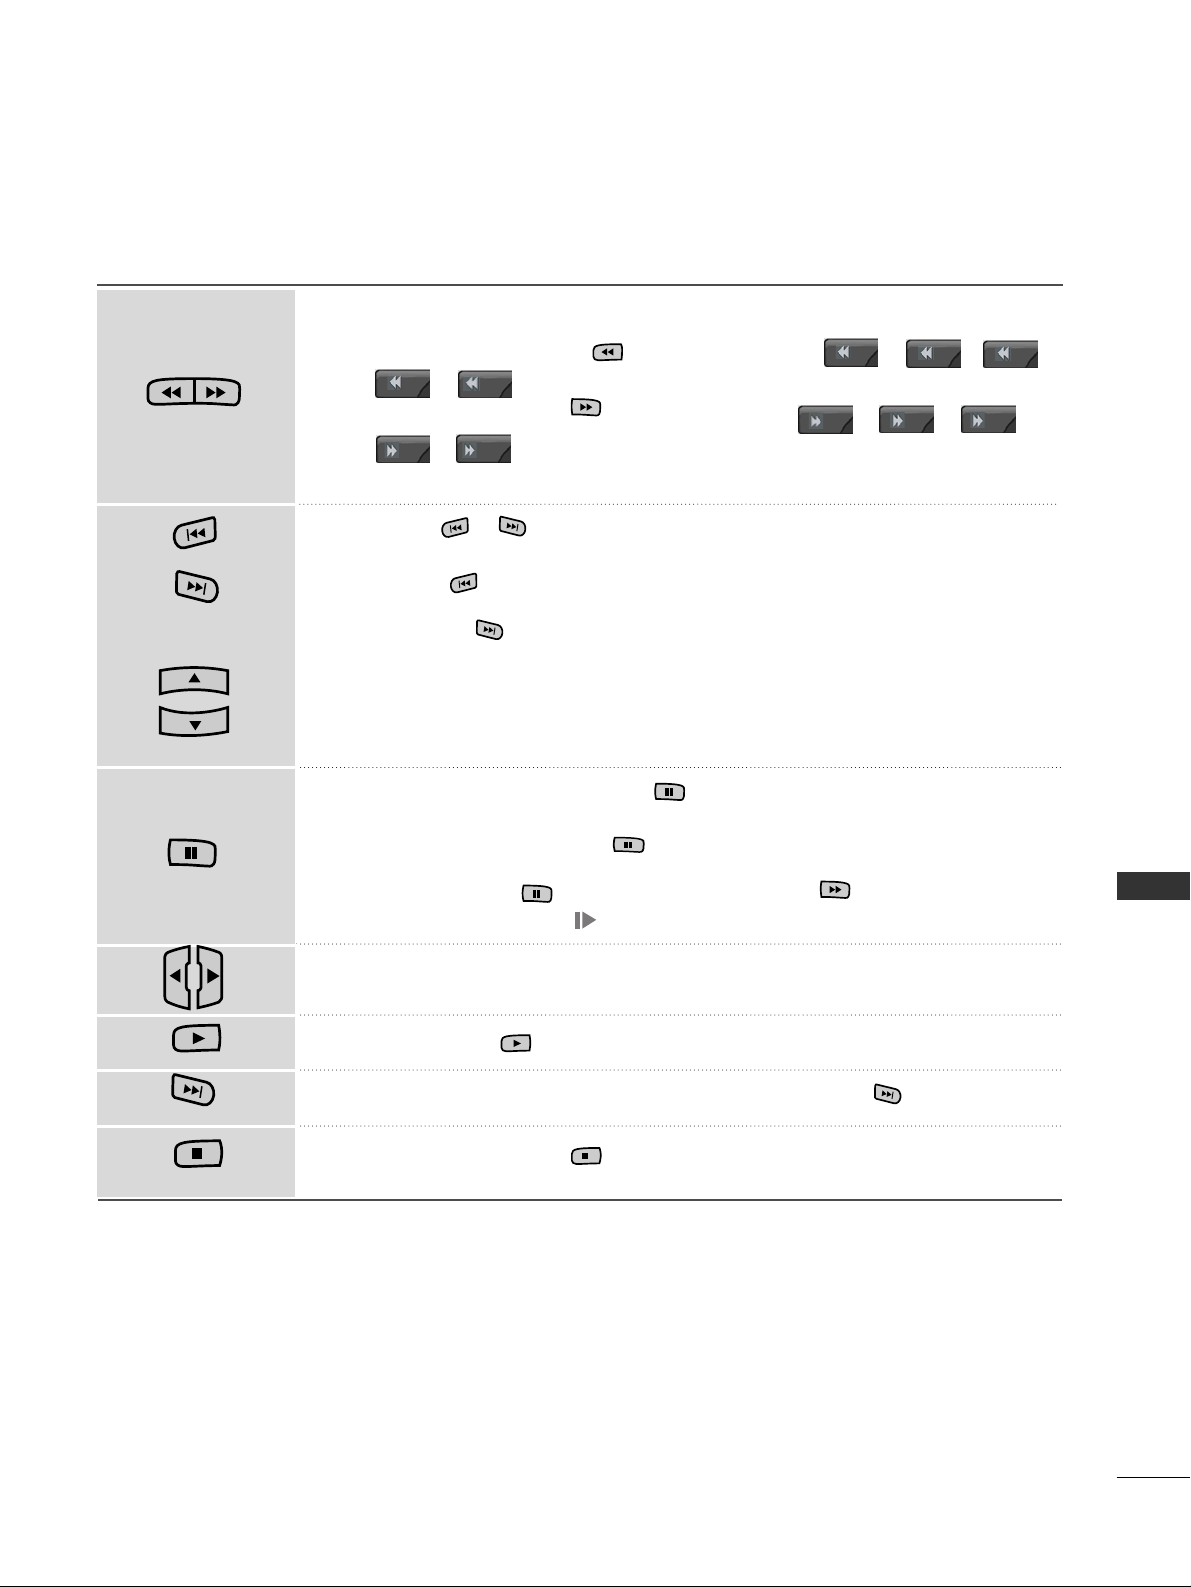
When playing,
repeatedly, press the
RR EE WW
(( ))
button to speed up -> ->
-> -> .
repeatedly, press the
FF FF
(( ))
button to speed up -> ->
-> -> .
■
Pressing these buttons repeatedly increases the fast forward/reverse speed.
Press the or button to move back and forth within the current program.
■
Press the button to jump at the front of the programme.
■
Pressing the button to jump at the end of the programme.
Press the
DD
button to jump about 20 seconds forward.
■
Pressing the
EE
button to jump about 8 seconds backward.
During playback, press the
PPaauussee
(( ))
button.
■
Still screen is displayed.
■
Repetedly press the
PPaauussee
(( ))
button to advance frame by frame.
■
Press the
PPaauussee
(( ))
button and then use the
FF FF (( ))
button for slow
motion (as showing the .)
■
When using the FFor
GG
button during playback the cursor can be viewed on
the screen.
Press the
PPLL AAYY
(( ))
button to return to normal playback.
If you want to return to the current live broadcast, press the button.
■
If you press the
SSTTOO PP(( ))
button, you can watch set.
L
IV
E
T
M
A
R
K
L
IV
E
T
V
L
IV
E
T
V
M
A
R
K
USING THE REMOTE CONTROL
You can shift playback to any point within playing the recorded program.
x2
x10
x50
x100
x5
x10
x50
x100
x2
x5
LIVE TV
LIVE TV
MARK
TIME
SHIFT
TIME
SHIFT
Page 39
SPECIAL FUNCTIONS
38
SPECIAL FUNCTIONS
DVR (Digital Video Recorder
)
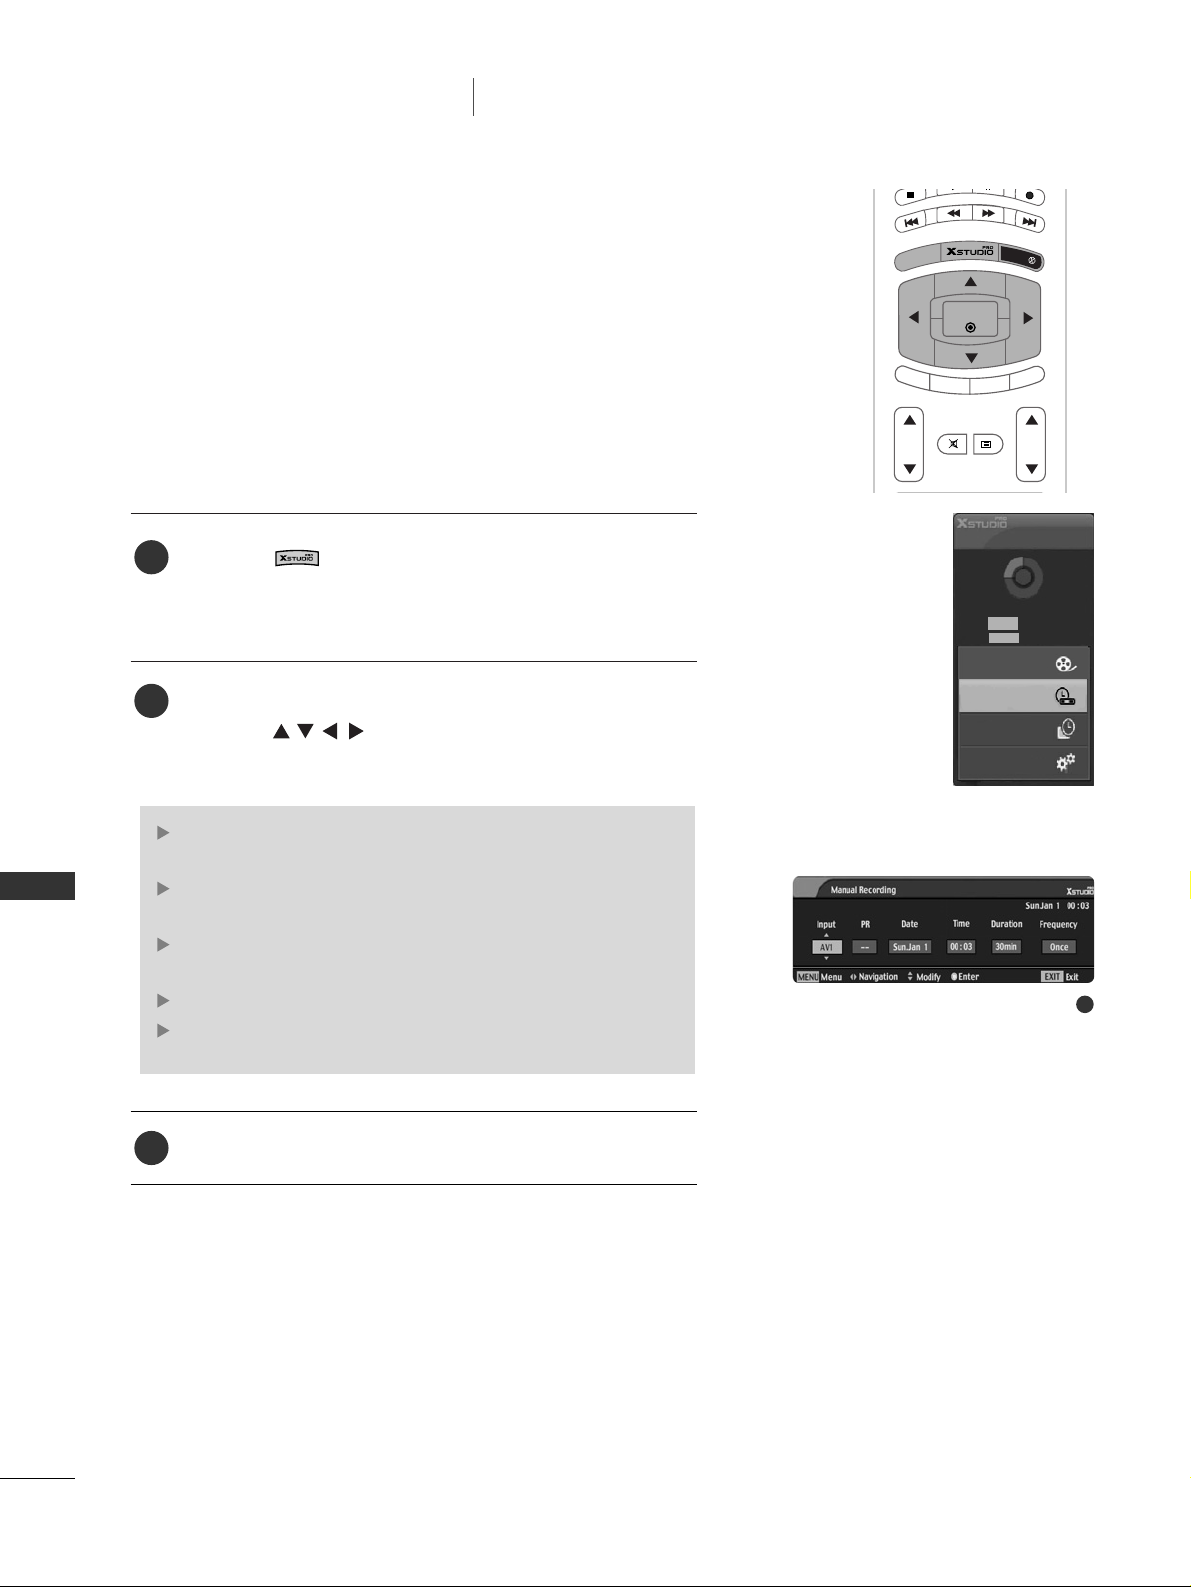
MANUAL RECORDING
-
This function is easy to register to reserved recording.
-
This function is available to use in DVR menu.
-
When Manual Recording, it’s stored the default sound of the
set.
Press the button to display
HHoomm ee
menu. Use the
DD
or EEbutton to select the
MMaannuuaall RReecc
and then use
the
OO KK
or
GG
button.
MMaannuuaall RReecc
screen is displayed as shown below.
Use the button to set the
II nnppuu tt,PPRR,DDaa tt ee
,
TT ii mmee,DDuurraa ttiioonn,FF rr ee qquueennccyy
.
After setting the
MMaannuuaall RReecc
, press the
OO KK
button.
II nn ppuutt
: Select the input source from the TV, AV1, AV2,
S-Video2, AV3, AV4.
PPRR
: Select either the current programme or a scanned
programme.
DDaa tt ee
: You can select a date up to one month in the
future.
TTiimmee //DDuurraattiioonn
: Ensure you have set correctly.
FF rr ee qquueenncc yy
: Choose among Once, Daily and Weekly.
2
3
1
2
Home
Free Space
3h 19m
High
Normal
5h 24m
Manual Rec.
Recorded TV
Scheduled List
TV Menu
PIP P
R
-
PIP PR +
SWAP
P
IP IN
PU
T
M
E
N
U
OK
VOL PR
EXIT
MARK
LIVE TV
TIME
SHIFT
TIME
SHIFT
MUTE
TEXT
Page 40
SPECIAL FUNCTIONS
39
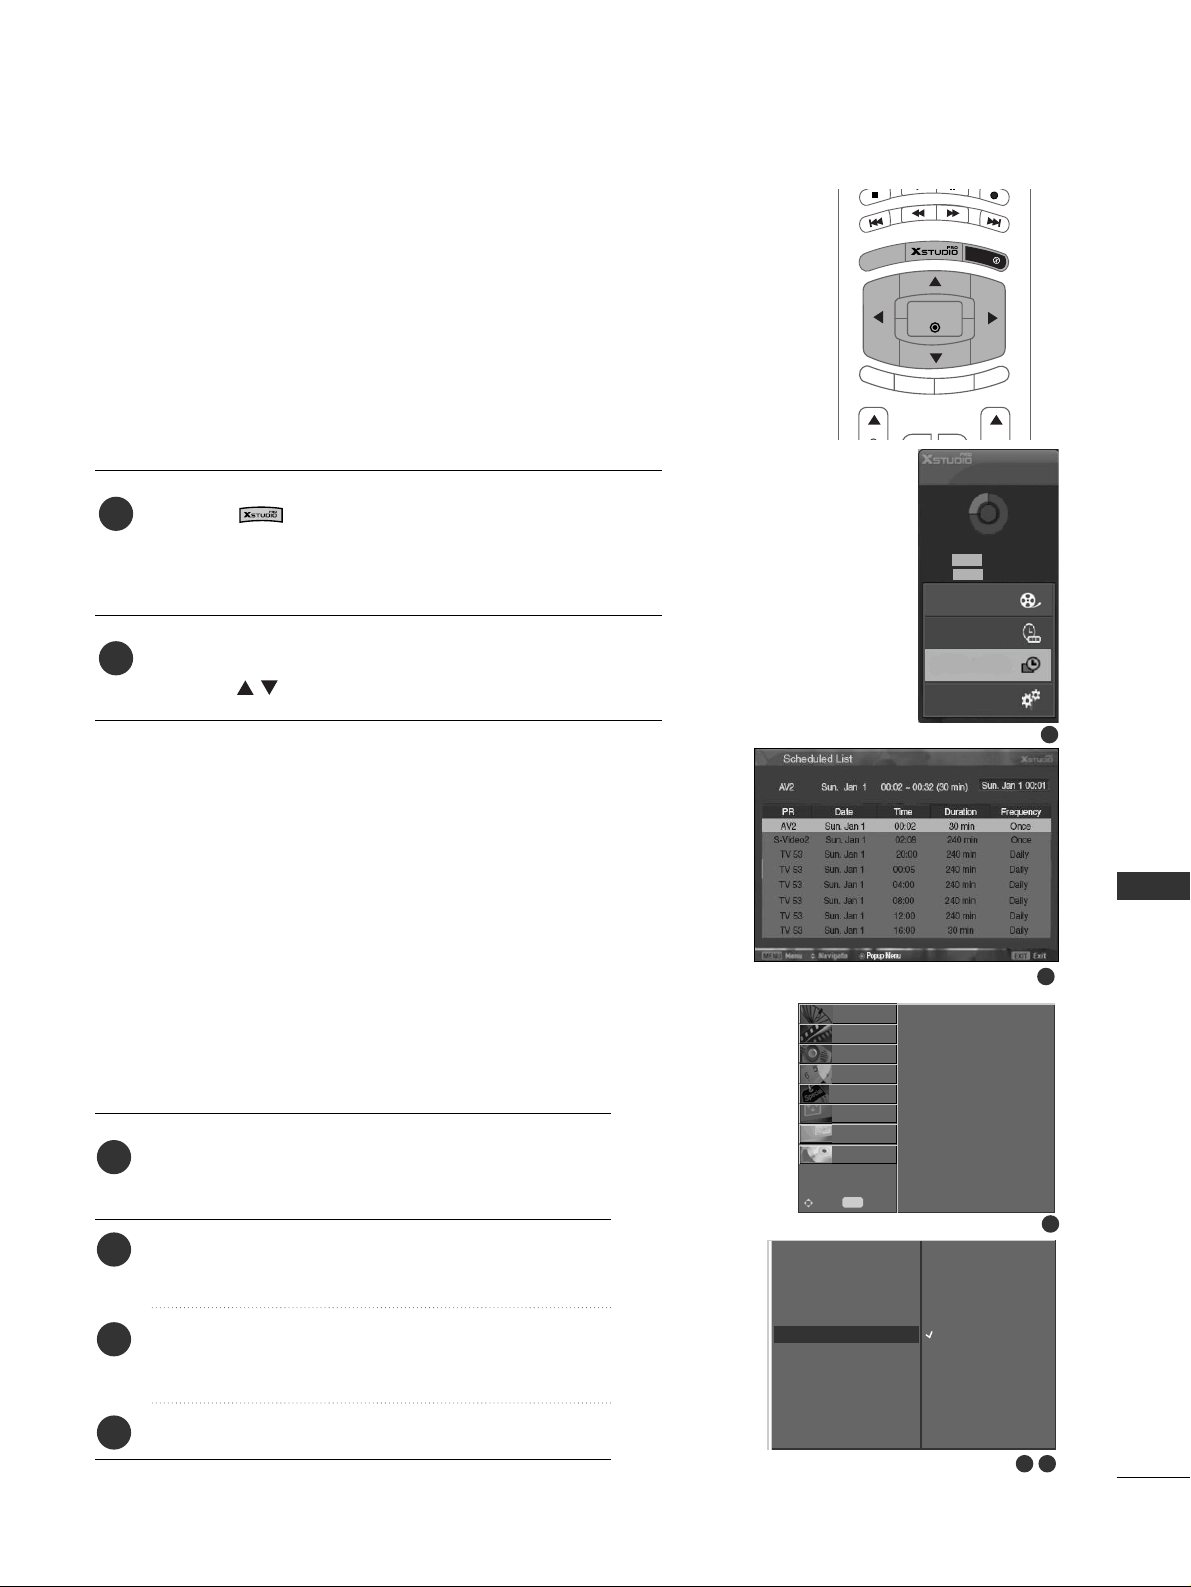
SCHEDULED LIST
-
You can store up to 8 programmes.
-
This function is available to use in DVR menu.
Press the button to display
HHoommee
menu. Use the
DD
or EEbutton to select the
SScchheedduulleedd LLiisstt
and then use
the
OOKK
or
GG
button.
SScchheedduulleedd LLiisstt
screen is displayed as shown below.
Use the button to select recorded programme.
2
1
2
Press the
MMEENNUU
button and then use
DD / EE
button
to select the
DDVVRR
menu.
Press the
GG
button and then use
DD / EE
button to
select Video Quality.
Press the
GG
button and then use
DD / EE
button to
select
HHiigghh
or
NNoorrmmaall
.
Press the EXIT button to return to normal TV viewing.
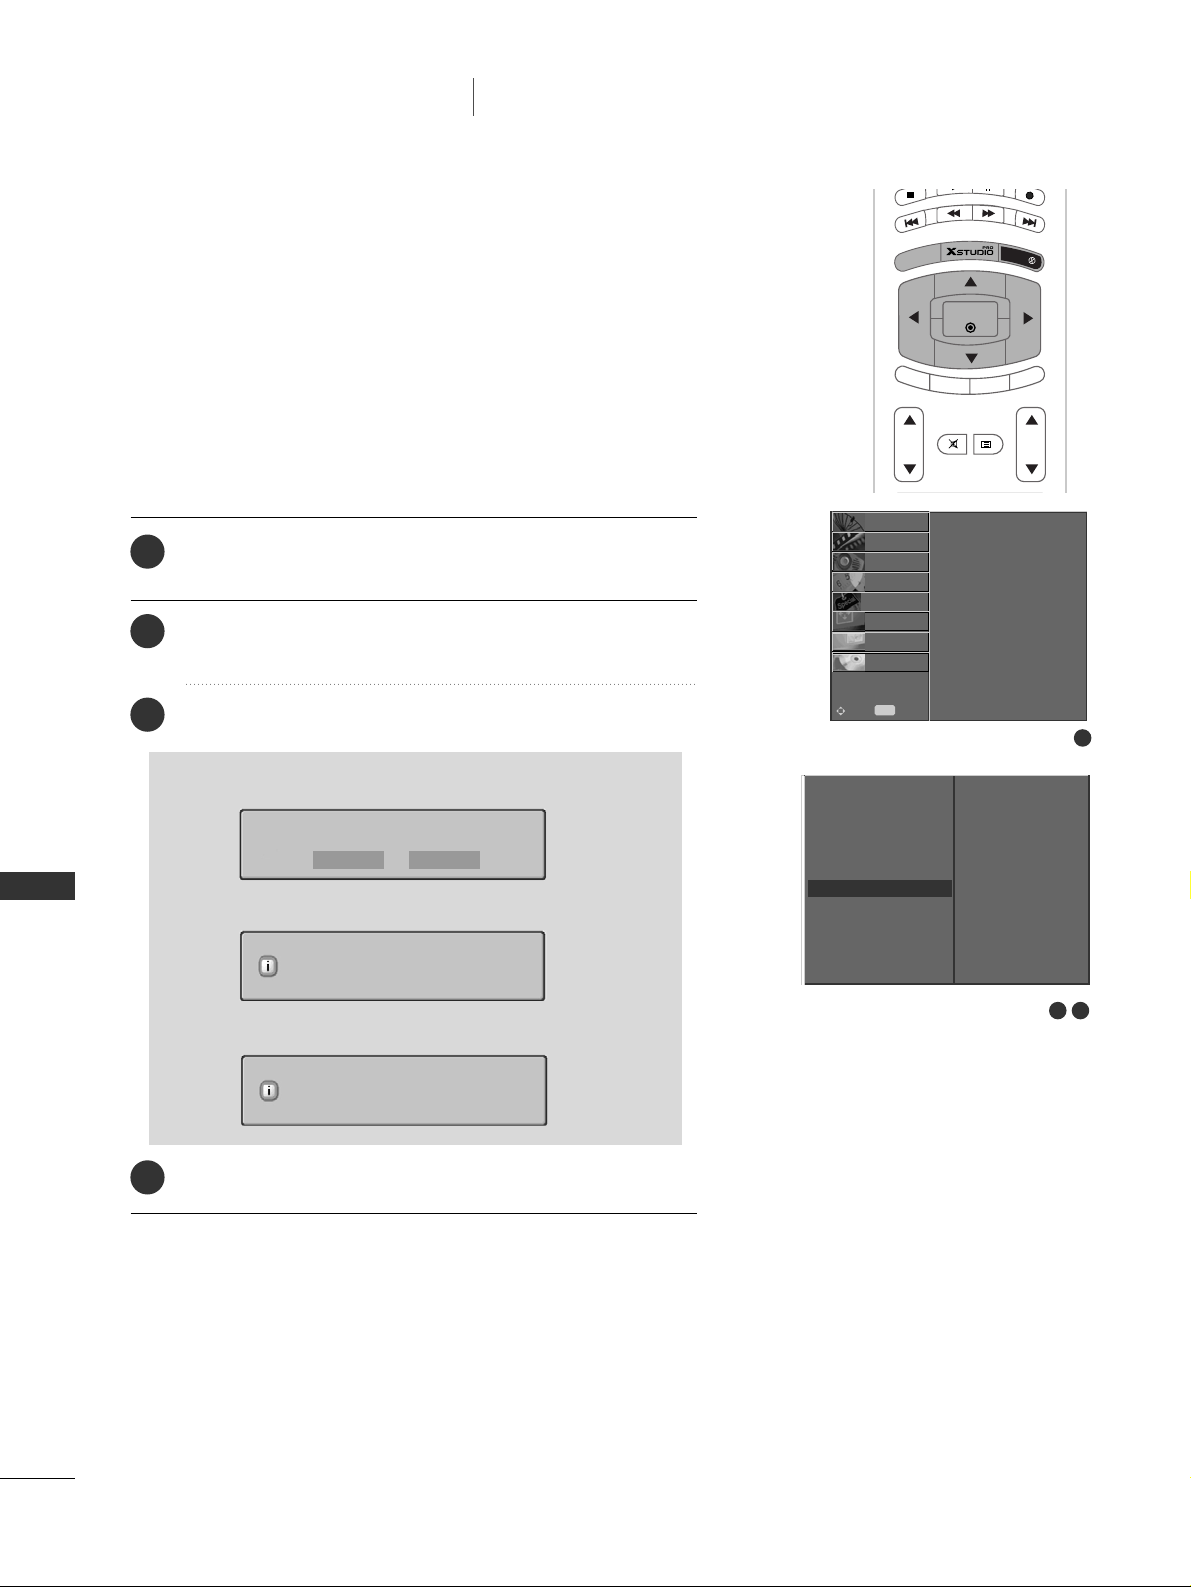
2
3
4
1
2 3
Timeshift
Recorded TV
Manual Recording
Scheduled List
Video Quality
Format Hard Disk
STATION
O
PICTURE
O
SOUND
O
TIME
O
SPECIAL
O
SCREEN
O
PIP/DW
O
DVR{
Menu
MENU
Move
High
Normal
Timeshift
Recorded TV
Manual Recording
Scheduled List
Video Quality
Format Hard Disk
Video Quality
GG
- This function is not available while a recording is taking place.
VIDEO QUALITY
1
1
Home
Free Space
3h 19m
High
Normal
5h 24m
Manual Rec.
Recorded TV
Scheduled List
TV Menu
PIP P
R
-
PIP PR +
SWAP
P
IP IN
PU
T
M
E
N
U
OK
EXIT
MARK
LIVE TV
TIME
SHIFT
TIME
SHIFT
Page 41
SPECIAL FUNCTIONS
40
2 3
To set
Timeshift
Recorded TV
Manual Recording
Scheduled List
Video Quality
Format hard disk
Format Hard Disk
GG
Press the
MMEENNUU
button and then use
DD / EE
button to
select the
DDVVRR
menu.
Press the
GG
button and then use
DD / EE
button to select
Format Hard Disk.
Press the
GG
button to start Format Hard Disk.
Press the EXIT button to return to normal TV viewing.
FORMAT HARD DISK
1
2
3
4
Timeshift
Recorded TV
Manual Recording
Scheduled List
Video Quality
Format Hard Disk
STATION
O
PICTURE
O
SOUND
O
TIME
O
SPECIAL
O
SCREEN
O
PIP/DW
O
DVR{
Menu
MENU
Move
1
■
if you press the GGbutton, this message is displayed.
■
if you select Yes, this message is displayed.
■
When completing, this message is displayed.
SPECIAL FUNCTIONS
DVR (Digital Video Recorder
)
Hard disk formatting is in progress.
Do you want to format HDD?
Hard disk formatting completed.
Yes No
PIP PR -
PIP PR +
SWAP
P
IP IN
PU
T
M
E
N
U
OK
VOL PR
EXIT
MARK
LIVE TV
TIME
SHIFT
TIME
SHIFT
MUTE
TEXT
Page 42
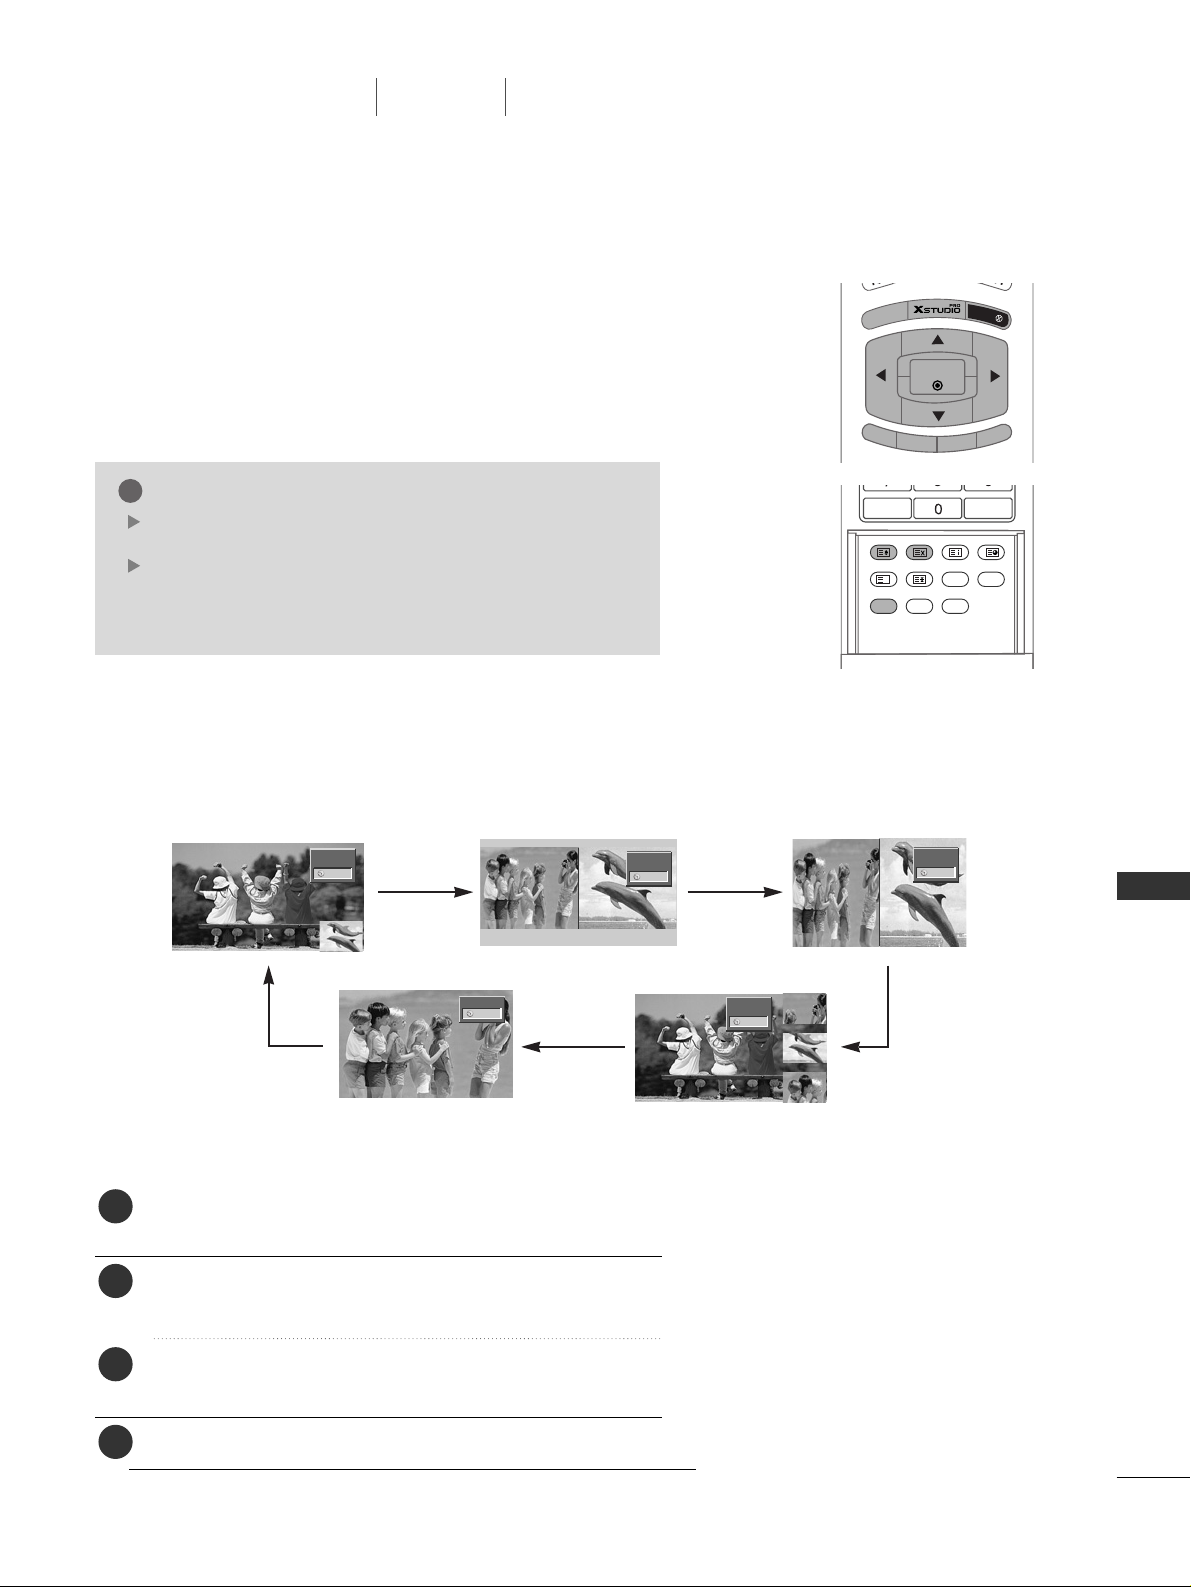
SPECIAL FUNCTIONS
41
NOTE
!
When the sub picture size is 1/2 of the main picture,
the picture quality may decrease.
The motion of the sub picture can be unnatural because the
set displays full screen by synchronizing the main picture
source when the refresh rate between the main picture
source and the sub picture source is different in PIP mode.
PIP P
R -
PIP PR +
SWAP
P
IP IN
PUT
M
E
N
U
OK
EXIT
MARK
LIVE TV
TIME
SHIFT
TIME
SHIFT
SIZE POSITION INDEX
SLEEP
FAV
I/II
PIP ARC
Q.VIEWLIST
HOLD
REVEAL
?
TIME
PIP (PICTURE-IN-PICTURE) FEATURE
WATCHING PIP
Press the PIP button to access the sub picture.
Each press of PIP changes the PIP options as shown below.
PIP lets you view 2 different inputs (sources) on your set screen
at the same time. One source will be large, and the other
source will show a smaller inset image.
It’s not available to use this function in TELETEXT mode.
Twin Picture mode splits the screen into two images, allowing
two picture sources to be shown on the set screen at the same
time. Each source is given half the screen.
When recording or playing, it’s not available to use this function.
RGB
AV1
10:30
RGB
AV1
10:30
RGB
AV1
10:30
RGB
C 05 1
10:30
RGB
10:30
PIP Mode
PIP Off POP Mode
DW1 Mode DW2 Mode
SPECIAL FUNCTIONS
PIP / POP / Twin Picture
Press the
MMEENNUU
button and then
DD
//
EE
button to select
the PIP/DW menu.
Press the
GG
button and then
DD
//
EE
button to select
PIP Transparency.
Press the
GG
button and then
FF
//
GG
button to adjust PIP
transparency.
Press the
EEXXIITT
button to return to normal TV viewing.
ADJUSTING PIP TRANSPARENCY (PIP MODE ONLY)
1
2
3
4
Page 43
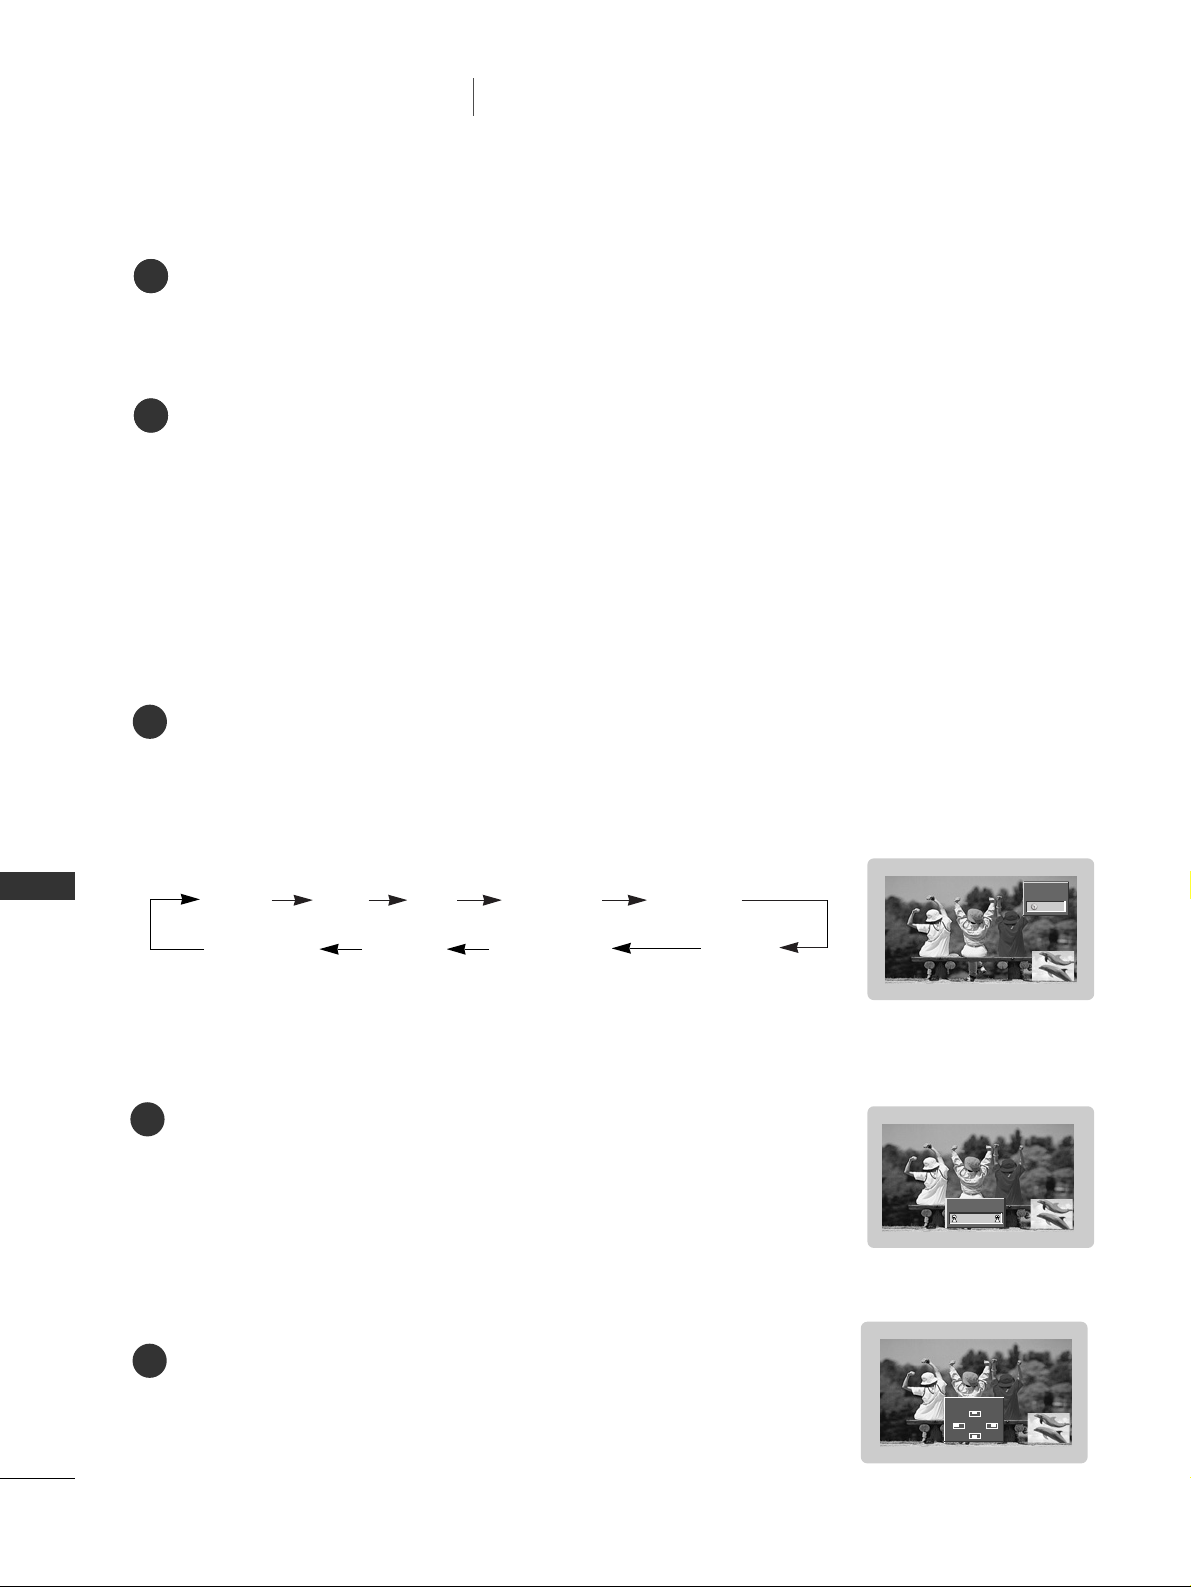
SPECIAL FUNCTIONS
42
SPECIAL FUNCTIONS
PIP / POP / Twin Picture
SELECTING AN INPUT SIGNAL SOURCE FOR THE PIP
Press the
PPIIPP IINNPPUUTT
button to select the input source for the sub picture.
■
In some models, when the sub picture quality get poor for sub picture, select Auto, PAL, SECAM or NTSC
in PIP System menu.
■
Each press of
PPIIPP IINNPPUUTT
button is pressed, each input source for the sub picture is displayed as
shown below.
SUB PICTURE SIZE ADJUSTMENT (PIP MODE ONLY)
Press the
SSIIZZEE
button and then FF/ GGbutton to adjust the sub picture size.
■
With
SSIIZZEE
button in DW1, DW2 modes, main and sub picture is adjusted
simultaneously. With
SSIIZZEE
button in PIP mode, sub picture is adjusted.
MOVING THE PIP (PIP MODE ONLY)
Press the
PPOOSSIITT IIOONN
button.
■
Repeatedly press the
DD/ EE
or FF/ GGbutton until desired position is
achieved. The sub picture moves up/down or left/right.
TV
AV1 AV2 S-Video2
ComponentRGBHDMI/DVI
AV 3
AV 4
1
1
1
RGB
AV1
10:30
Win. size
FF GG
Win. position
DD
FF GG
EE
11
PROGRAMME SELECTION FOR SUB PICTURE
Press the PIP PR +/- button to select a programme for the sub picture.
ADJUSTING THE SCREEN FOR THE PIP
In TV or AV modes for the main picture and RGB[PC] for the sub picture,
you can use Auto config and Manual config to adjust the screen of the sub
picture.
■
In TV or AV modes for main picture and HDMI[DTV] or Component
480p, 576p, 720p, 1080i for the sub picture, you can use Manual config
to adjust the screen of the sub picture.
1
1
Page 44
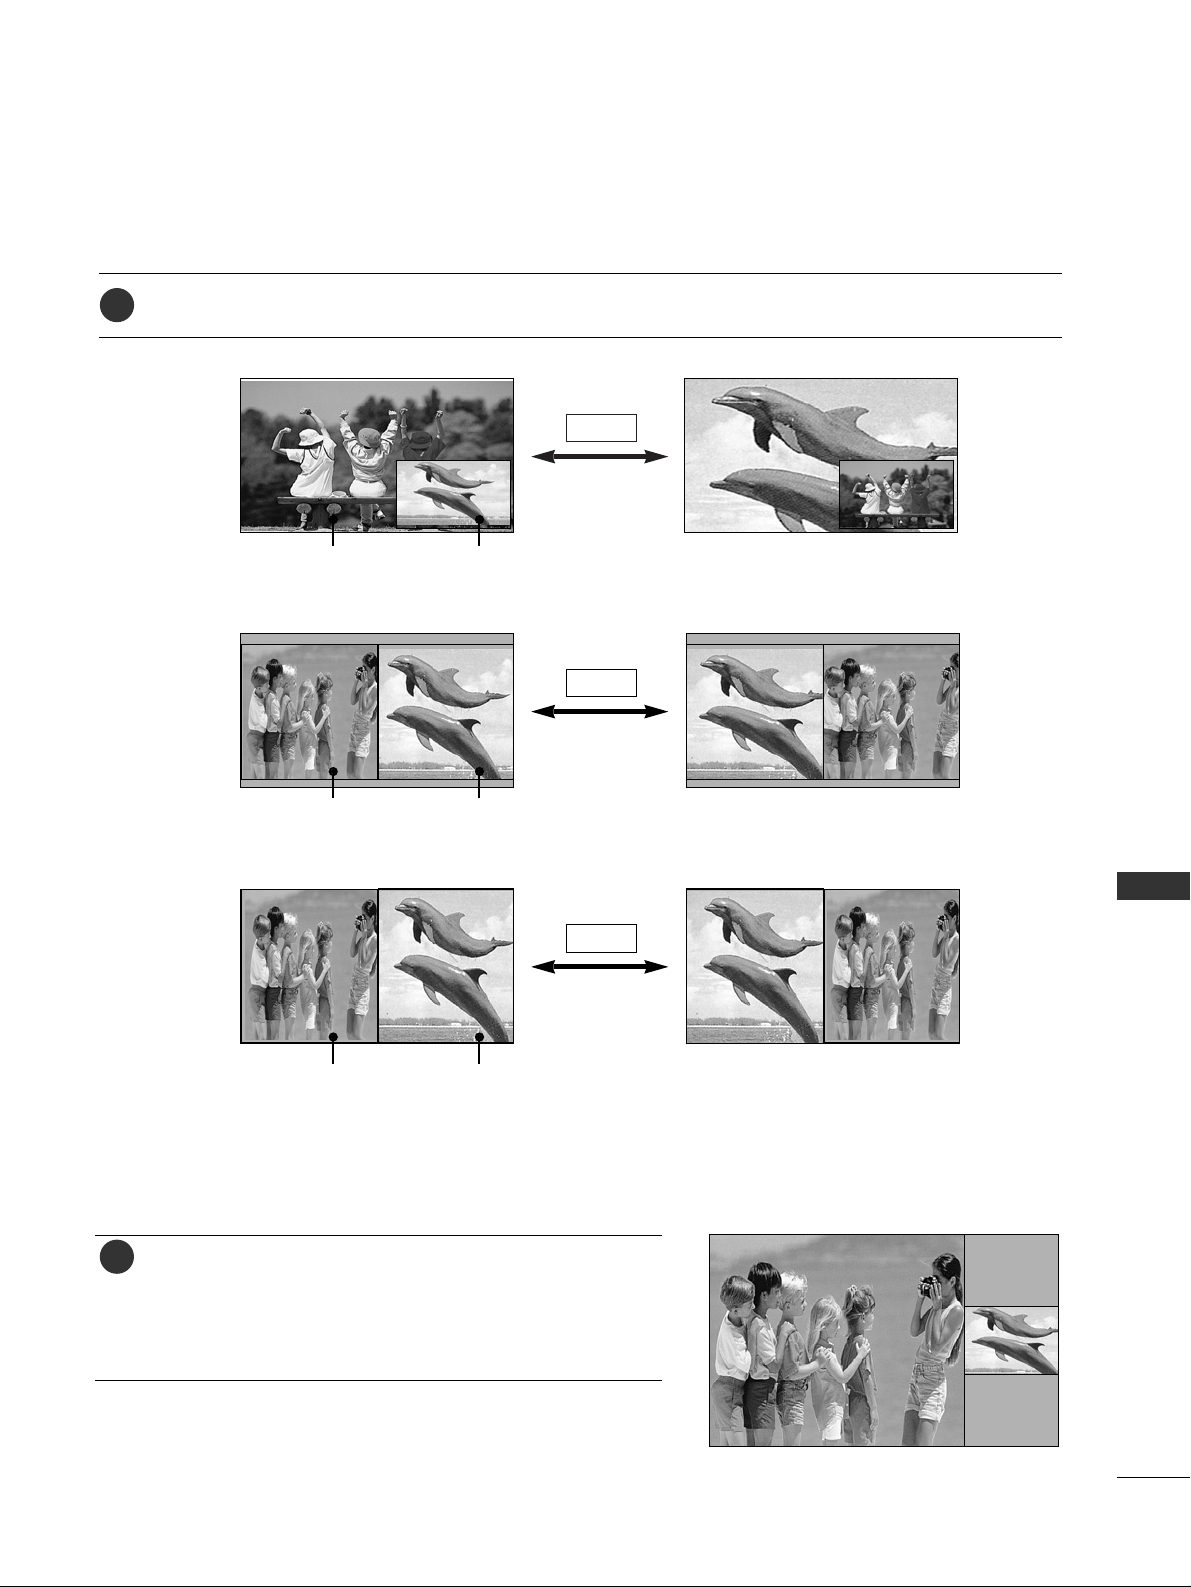
SPECIAL FUNCTIONS
43
POP (PICTURE-OUT-OF-PICTURE: CHANNEL SCAN)
Use POP to search the programmes of all the memorized
channels one-by-one on the 3 PIP screen display, (while
the main picture source remains the current programme).
The pictures of all the programmed channels are searched
with the 3 POP screen.
1
SWAPPING BETWEEN MAIN AND SUB PICTURES
Press the
SSWWAAPP
button to exchange the main and sub pictures.
PP II PP
SWAP
DD WW 11
SWAP
DD WW 22
SWAP
Main Picture Sub Picture
Main Picture Sub Picture
Main Picture Sub Picture
1
Page 45
SPECIAL FUNCTIONS
44
Press the
TT EE XX TT
button to switch to teletext. The initial page or last page appears on the screen.
Two page numbers, TV station name, date and time are displayed on the screen headline. The first page
number indicates your selection, while the second shows the current page displayed.
Press the
TT EE XX TT
button to switch off teletext. The previous mode reappears.
- Teletext (or TOP text) is an optional function, therefore only the set with the teletext system can receive the
teletext broadcast.
- Teletext is a free service broadcast by most TV stations which gives up-to-the-minute information on news,
weather, television programmes, share prices and many other topics.
- The teletext decoder of this set can support the SIMPLE, TOP and FASTEXT systems. SIMPLE (standard teletext) consists of a number of pages which are selected by directly entering the corresponding page number. TOP
and FASTEXT are more modern methods allowing quick and easy selection of teletext information.
SWITCH ON/OFF
SPECIAL FUNCTIONS
Teletext
Press the
MMEENNUU
button and then use
DD
//
EE
button to select the SPECIAL menu.
Press the
GG
button and then use
DD
//
EE
button to select Language .
Press the
GG
button and then use GGbutton to select Teletext Language .
Press the
DD
//
EE
button to select the required language.
Press the
EEXXIITT
button to return to normal TV viewing.
TELETEXT LANGUAGE SELECTION (OPTION)
NOTE
!
a. Please select your local teletext language.
b. If the local language is not selected, teletext may not appear correctly on the screen.
c. This feature is not available in all countries.
1
1
5
2
3
4
Page 46

SPECIAL FUNCTIONS
45
TOP TEXT (OPTION)
- The user guide displays four fields-red, green, yellow and blue at the bottom of the screen. The yellow field
denotes the next group and the blue field indicates the next block.
AA
BB lloocc kk // gg rr oouupp // ppaaggee ss ee lleecc tt iioonn
With the blue button you can progress from block to block.
Use the yellow button to proceed to the next group with automatic overflow to the next block.
With the green button you can proceed to the next existing page with automatic overflow to the next
group.
■
Alternatively the PRDDbutton can be used.
The red button permits you to return to the previous selection. Alternatively the PR
EE
button can be used.
AA
DDiirreecc tt ppaaggee sseell ee ccttii oonn
Corresponding to the SIMPLE teletext mode, you can select a page by entering it as a three digit number
using the NUMBER buttons in TOP mode.
FASTEXT
- The teletext pages are colour coded along the bottom of the screen and are selected by pressing the corresponding coloured button.
AA
PPaaggee sseelleeccttiioo nn
Press the button to select the index page.
You can select the pages which are colour coded along the bottom line with the same coloured buttons.
Corresponding to the SIMPLE teletext mode, you can select a page by entering its three digit page number
with the NUMBER buttons in FASTEXT mode.
The PR
DD//EE
button can be used to select the preceding or following page.
i
AA
Page selection
Enter the desired page number as a three digit number with the NUMBER buttons. If during selection you
press a wrong number, you must complete the three digit number and then re-enter the correct page number.
The
PPRR
DD
//
EE
button can be used to select the preceding or following page.
SIMPLE TEXT (OPTION)
1
1
2
3
4
1
2
3
4
1
2
Page 47

SPECIAL FUNCTIONS
46
SPECIAL TELETEXT FUNCTIONS
REVEAL
Press this button to display concealed information, such as solutions
of riddles or puzzles.
Press this button again to remove the information from the display.
SIZE
Selects double height text.
Press this button to enlarge the top half of the page.
Press this button again to enlarge the bottom half of the page.
Press this button again to return to the normal display.
UPDATE
Displays the TV picture on the screen while waiting for the new teletext page.
Press this button to view the updated teletext page.
HOLD
Stops the automatic page change which will occur if a teletext page
consists of 2 or more sub pages. The number of sub pages and the
sub page displayed is, usually, shown on the screen below the time.
When this button is pressed the stop symbol is displayed at the top
left-hand corner of the screen and the automatic page change is inhibited.
To continue press this button again.
TIME
This button has two functions:
a) When viewing a TV programme, press this button to display the time
at the top right hand corner of the screen. Press this button again to
remove the display.
b) In teletext mode, press this button to select a sub page number. The
sub page number is displayed at the bottom of the screen. To hold or
change the sub page, press the RED/ GREEN or
PPRRDD//
EE
buttons.
Press this button again to exit this function.
SPECIAL FUNCTIONS
Teletext
Page 48
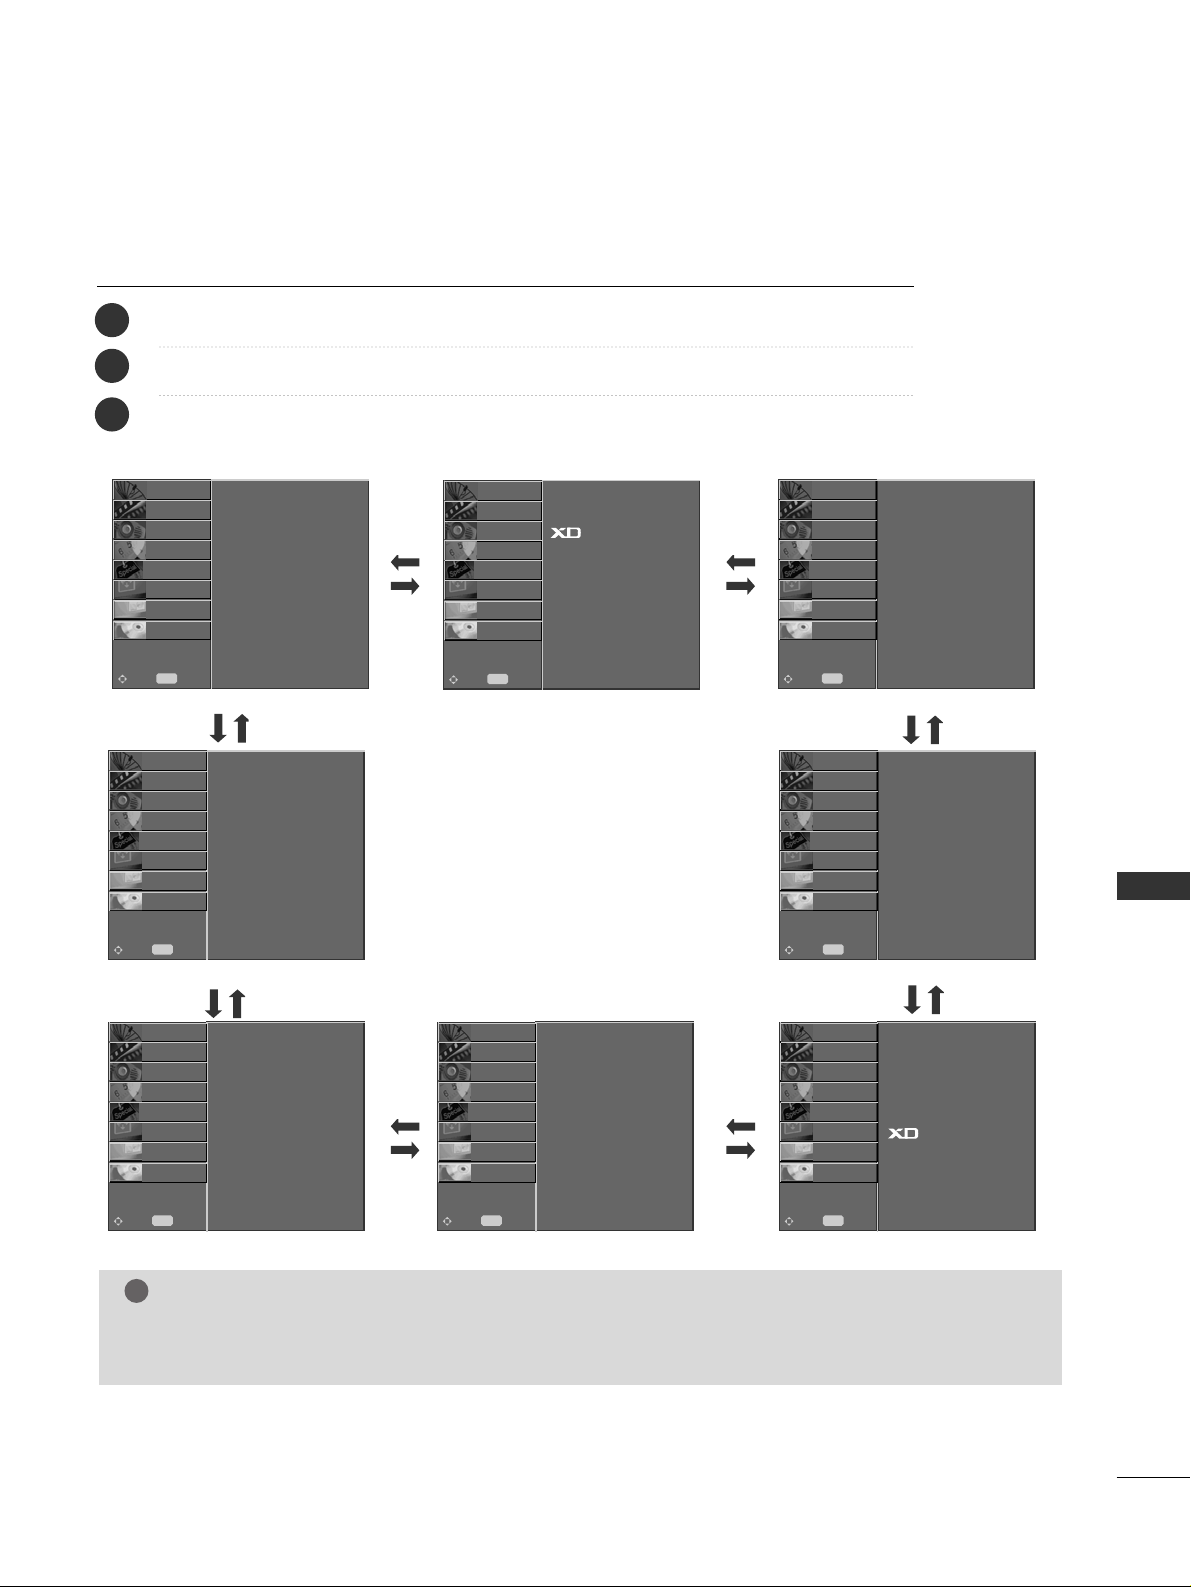
TV MENU
47
TV MENU
SS OOUUNNDD mmee nnuu
TTII MMEE mm ee nnuu
SS CCRR EEEENN mm ee nnuu
SS PPEE CCII AALL mmeennuu
Press the
MMEENNUU
button and then
DD/ EE
button to display each menu.
Press the
GG
button and then
DD/ EE
button to select a menu item.
Change the setting of an item in the sub or pull-down menu with
F / G button.
You can move to the higher level menu by pressing the
OO KK
or
MMEENNUU
button.
ON SCREEN MENUS SELECTION AND ADJUSTMENT
Your set's OSD (On Screen Display)may differ slightly from what is shown in this manual.
NOTE
!
a. In the teletext mode, menus are not displayed.
b. When playing back a recorded programme; Station, PIP/DW menu items will be unavailable.
1
2
3
PP IICCTTUURREE mmeenn uu
Auto programme
Manual programme
Programme edit
Favourite programme
STATION
{
PICTURE
O
SOUND
O
TIME
O
SPECIAL
O
SCREEN
O
PIP/DW
O
DVR
O
PP IIPP //DDWW mmeenn uu
DD VVRR mm ee nnuu
SS TTAATT IIOO NN mmeenn uu
Menu
MENU
Move
PSM
CSM
ACM
Contrast 100
Brightness 50
Colour 50
Sharpness 50
Tint 0
STATION
O
PICTURE{
SOUND
O
TIME
O
SPECIAL
O
SCREEN
O
PIP/DW
O
DVR
O
Menu
MENU
Move
Clock
Off time
On time
Auto sleep
STATION
O
PICTURE
O
SOUND
O
TIME{
SPECIAL
O
SCREEN
O
PIP/DW
O
DVR
O
Menu
MENU
Move
Language
Child lock
ISM Method
Low power
Set ID
Demo
STATION
O
PICTURE
O
SOUND
O
TIME
O
SPECIAL{
SCREEN
O
PIP/DW
O
DVR
O
Menu
MENU
Move
Auto config.
Manual config.
XGA Mode
ARC
Cinema
NR
Reset
STATION
O
PICTURE
O
SOUND
O
TIME
O
SPECIAL
O
SCREEN{
PIP/DW
O
DVR
O
Menu
MENU
Move
Input
DW
PIP
PIP Input
Win.size
Win.position
PIP Transparency
PIP System
STATION
O
PICTURE
O
SOUND
O
TIME
O
SPECIAL
O
SCREEN
O
PIP/DW{
DVR
O
Menu
MENU
Move
Timeshift
Recorded TV
Manual Recording
Scheduled List
Video Quality
Format Hard Disk
STATION
O
PICTURE
O
SOUND
O
TIME
O
SPECIAL
O
SCREEN
O
PIP/DW
O
DVR{
Menu
MENU
Move
SSM
AVL
Balance 0
Treble 50
Bass 50
TV Speaker
STATION
O
PICTURE
O
SOUND{
TIME
O
SPECIAL
O
SCREEN
O
PIP/DW
O
DVR
O
Menu
MENU
Move
Page 49
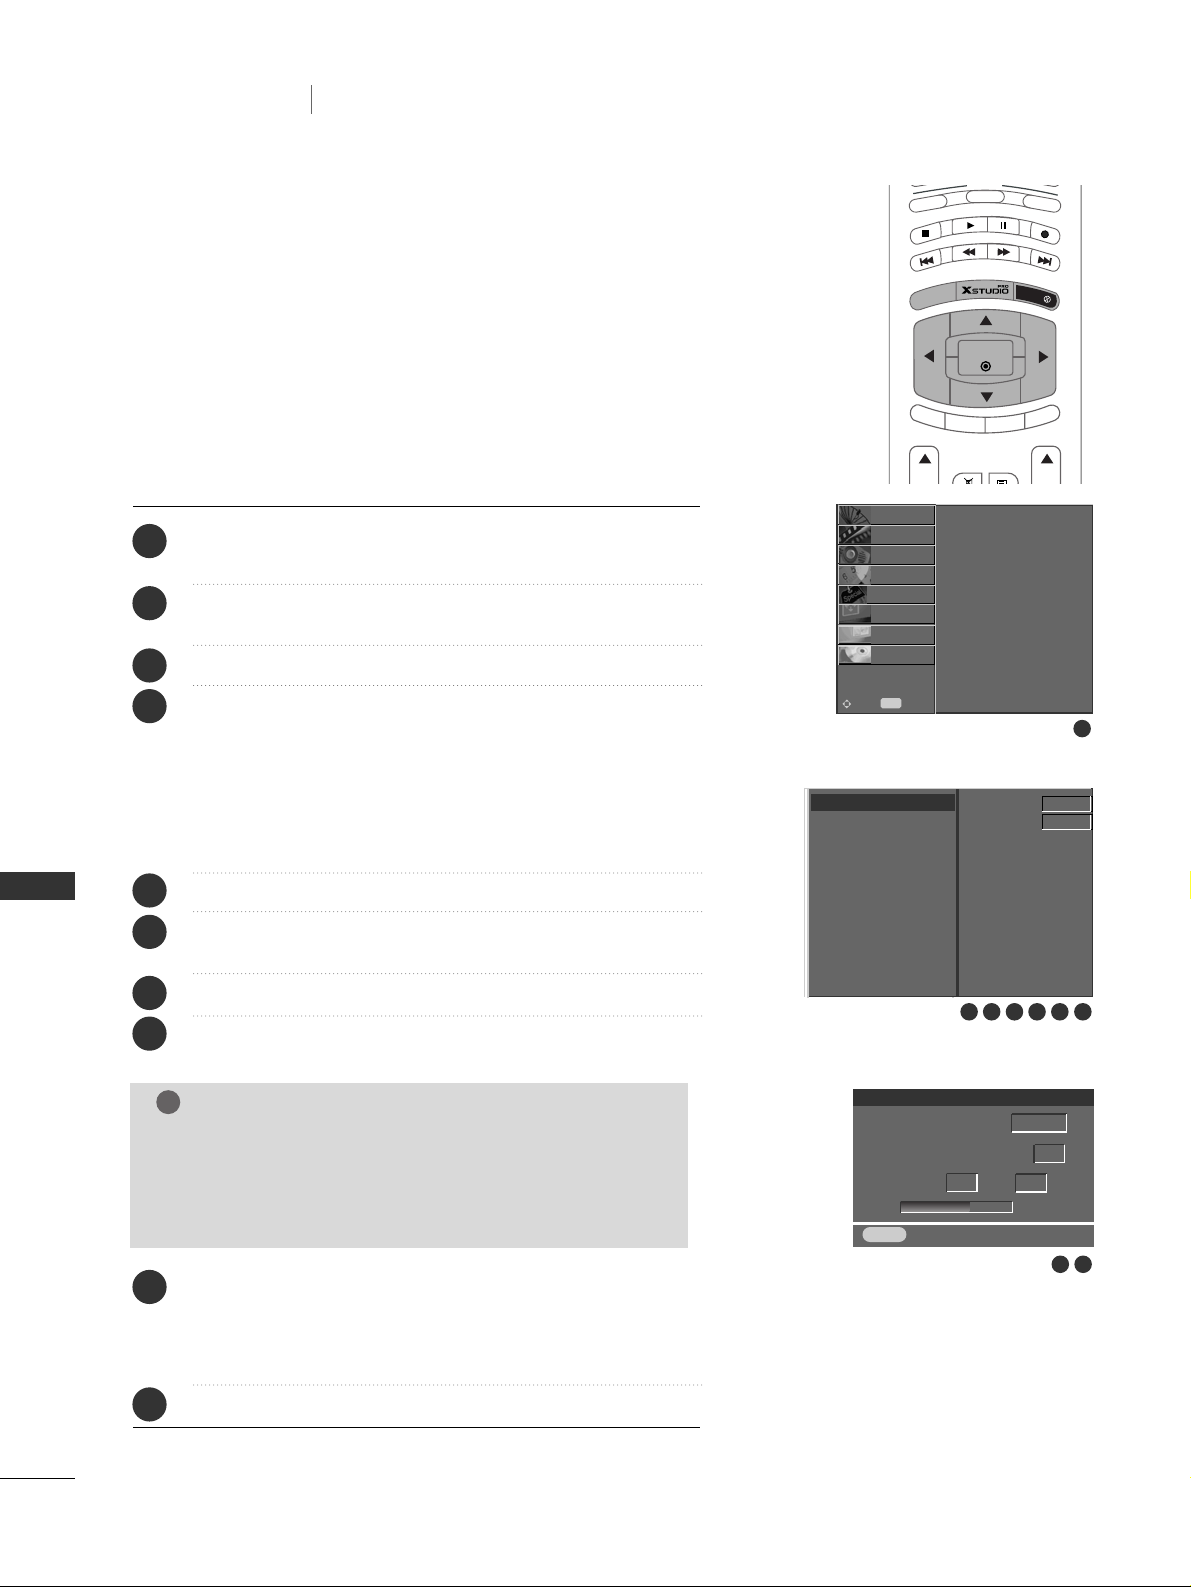
TV MENU
48
AUTO PROGRAMME TUNING
MODE
A
U
D
IO
PIP
PR -
PIP PR +
SWAP
P
IP
IN
P
UT
S
T
B
M
E
N
U
OK
CABLE
EXIT
MARK
LIVE TV
TIME
SHIFT
TIME
SHIFT
- All stations that can be received are stored by this method. It is recommended
that you use auto programme during installation of this set.
- This function is not available when recording a programme.
Press the
MMEENNUU
button and then
DD
//
EE
button to select the
STATION menu.
Press the
GG
button and then
DD
//
EE
button to select Auto
programme.
Press the
GG
button to select System.
Select a TV system with the
FF
//
GG
button;
L : SECAM L/L’ (option)
BG : PAL B/G, SECAM B/G (Europe / East Europe /
Asia / New Zealand / M.East / Africa /Australia)
I : PAL I/II (U.K. / Ireland / Hong Kong / South Africa)
DK : PAL D/K, SECAM D/K (East Europe / China / Africa / CIS)
M : (USA / Korea / Philippines) (option)
Press the
EE
button to select Storage from.
Select the beginning programme number with the
FF
//
GG
button or NUMBER buttons on the Storage from menu.
Press the
EE
button to select Start.
Press the
GG
button to begin auto programming.
All receivable stations are stored.
To stop auto programming, press the
MMEENNUU
button.
When auto programming is completed, the Programme edit
menu appears on the screen. See the ‘Programme edit’ section
to edit the stored programme.
Press the EXIT button to return to normal TV viewing.
System BG
Storage from 1
Start
C 05Name
Auto programme
M
System
65
5
%
Storage
Stop
Menu
1
2
3
4
5
6
7
8
9
10
1
72 3 4 5 6
8 9
NOTE
!
In some models, the station name is stored for stations which
broadcast VPS (Video Programme Service), PDC (Programme
Delivery Control) or TELETEXT data. If no station name can be
assigned to a station, the channel number is assigned and stored
as C (V/UHF 01-69) or S (Cable 01-47), followed by a number.
Auto programme
Manual programme
Programme edit
Favourite programme
STATION
{
PICTURE
O
SOUND
O
TIME
O
SPECIAL
O
SCREEN
O
PIP/DW
O
DVR
O
Menu
MENU
Move
Auto programme
GG
Manual programme
Programme edit
Favourite programme
Auto programme
GG
TV MENU
Setting up TV stations
Page 50
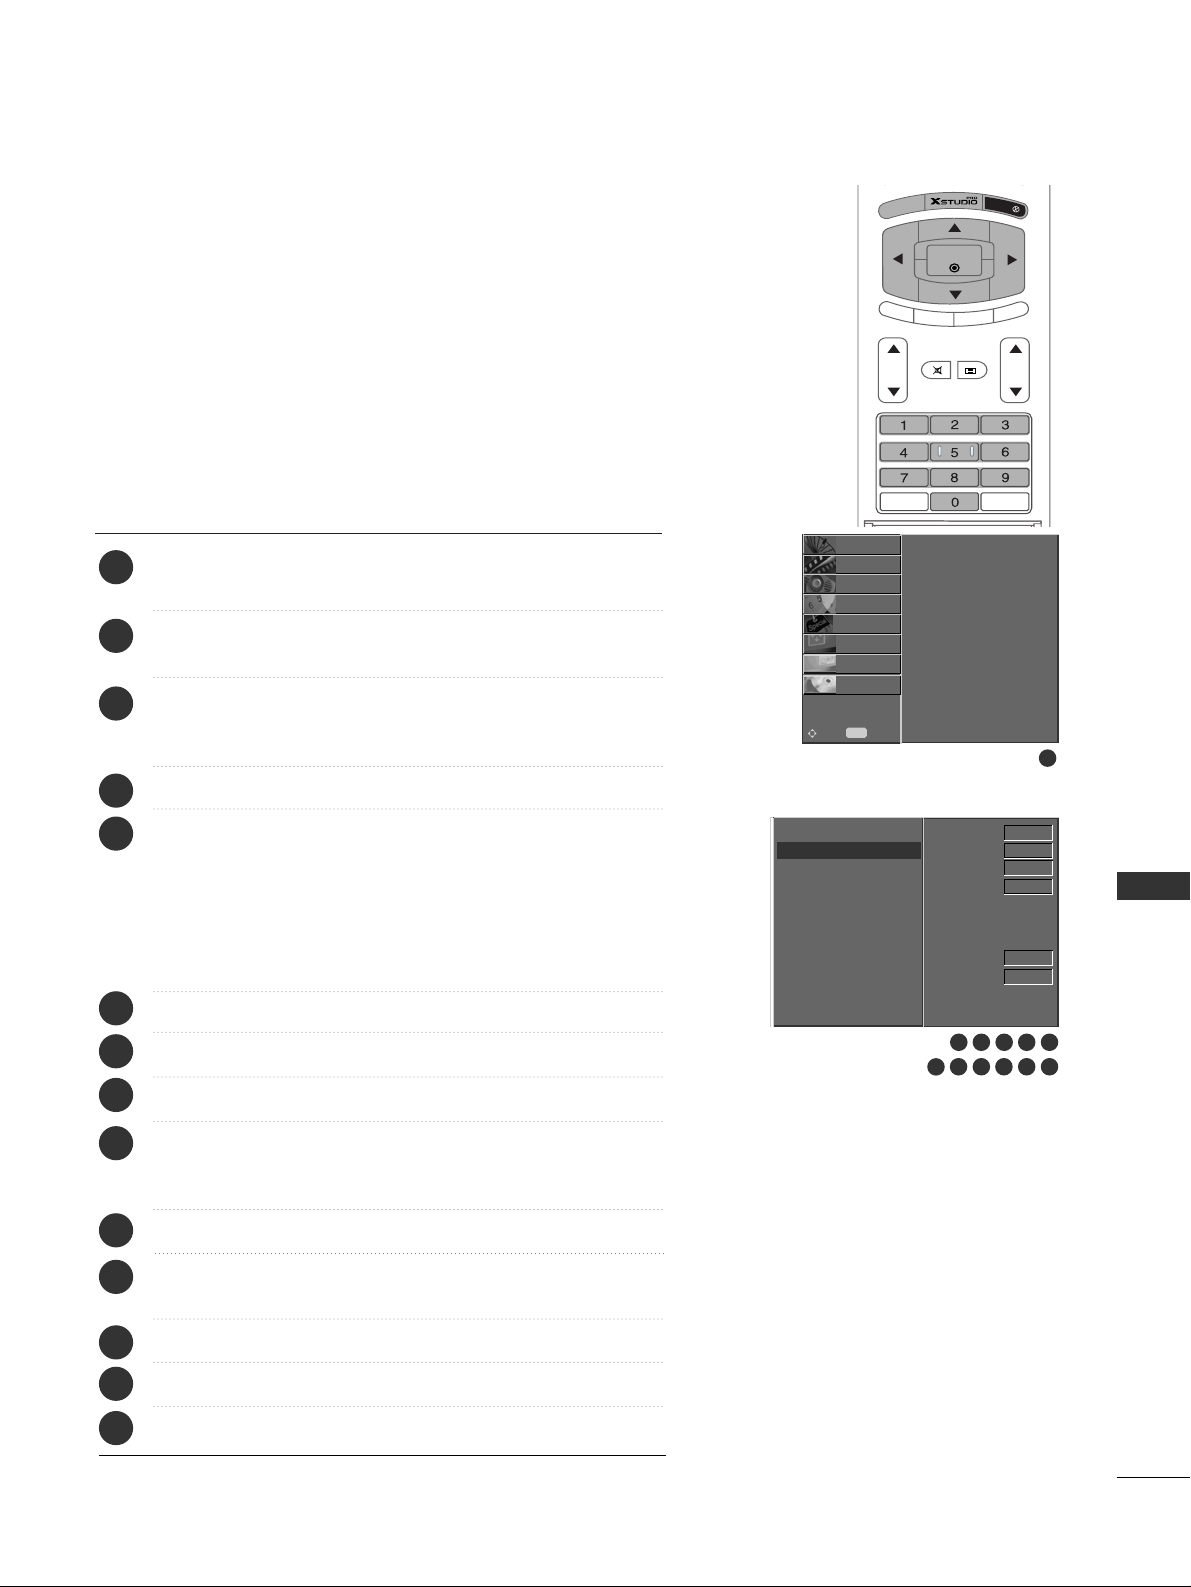
TV MENU
49
MANUAL PROGRAMME TUNING
- Manual programme lets you manually tune and arrange the stations
in whatever order you desire. Also you can assign a station name with
five characters to each programme number.
- It’s not available to use this function in Timeshift
On mode.
- It’s not available to use this function on recording programme.
Storage 5
System BG
Band
V/UHF
Channel 5
Fine
Search
Name
C 05
Booster Off
1
2
3
4
5
6
7
8
9
10
11
12
13
14
Press the
MMEENNUU
button and then
DD
//
EE
button to select
the STATION menu.
Press the GGbutton and then
DD
//
EE
button to select
Manual programme.
Press theGGbutton to select Storage. Select the desired
programme number with the
FF
//
GG
button or NUMBER
buttons on the Storage menu.
Press the
EE
button to select System.
Select a TV system with the
FF
//
GG
button;
L : SECAM L/L’ (option)
BG : PAL B/G, SECAM B/G (Europe / East Europe /
Asia / New Zealand / M.East / Africa /Australia)
I : PAL I/II (U.K. / Ireland / Hong Kong / South Africa)
DK : PAL D/K, SECAM D/K (East Europe / China / Africa / CIS)
M : (USA / Korea / Philippines) (option)
Press the
EE
button to select Band.
Press the
FF
//
GG
button to select V/UHF or Cable as required.
Press the
EE
button to select Channel.
You can select the desired channel number with the
FF
//
GG
button or NUMBER buttons. If possible, select the channel
number directly with the number buttons.
Press the
EE
button to select Search.
Press the
FF
//
GG
button to commence searching. If a station
is found the search will stop.
Press the
OO KK
button to store it.
To store another station, repeat steps 33to
11 22
.
Press the EXIT button to return to normal TV viewing.
7
2 3 4 5 6
8 9
10 11 12
1
Auto programme
Manual programme
Programme edit
Favourite programme
STATION
{
PICTURE
O
SOUND
O
TIME
O
SPECIAL
O
SCREEN
O
PIP/DW
O
DVR
O
Menu
MENU
Move
Auto programme
Manual programme
Programme edit
Favourite programme
Manual programme
GG
PIP PR
-
PIP PR
+
S
W
A
P
PIP IN
PU
T
MENU
Q.VIEWLIST
OK
VOL PR
EXIT
LIVE
TV
TIME
SHIFT
TIME
SHIFT
MUTE
TEXT
Page 51
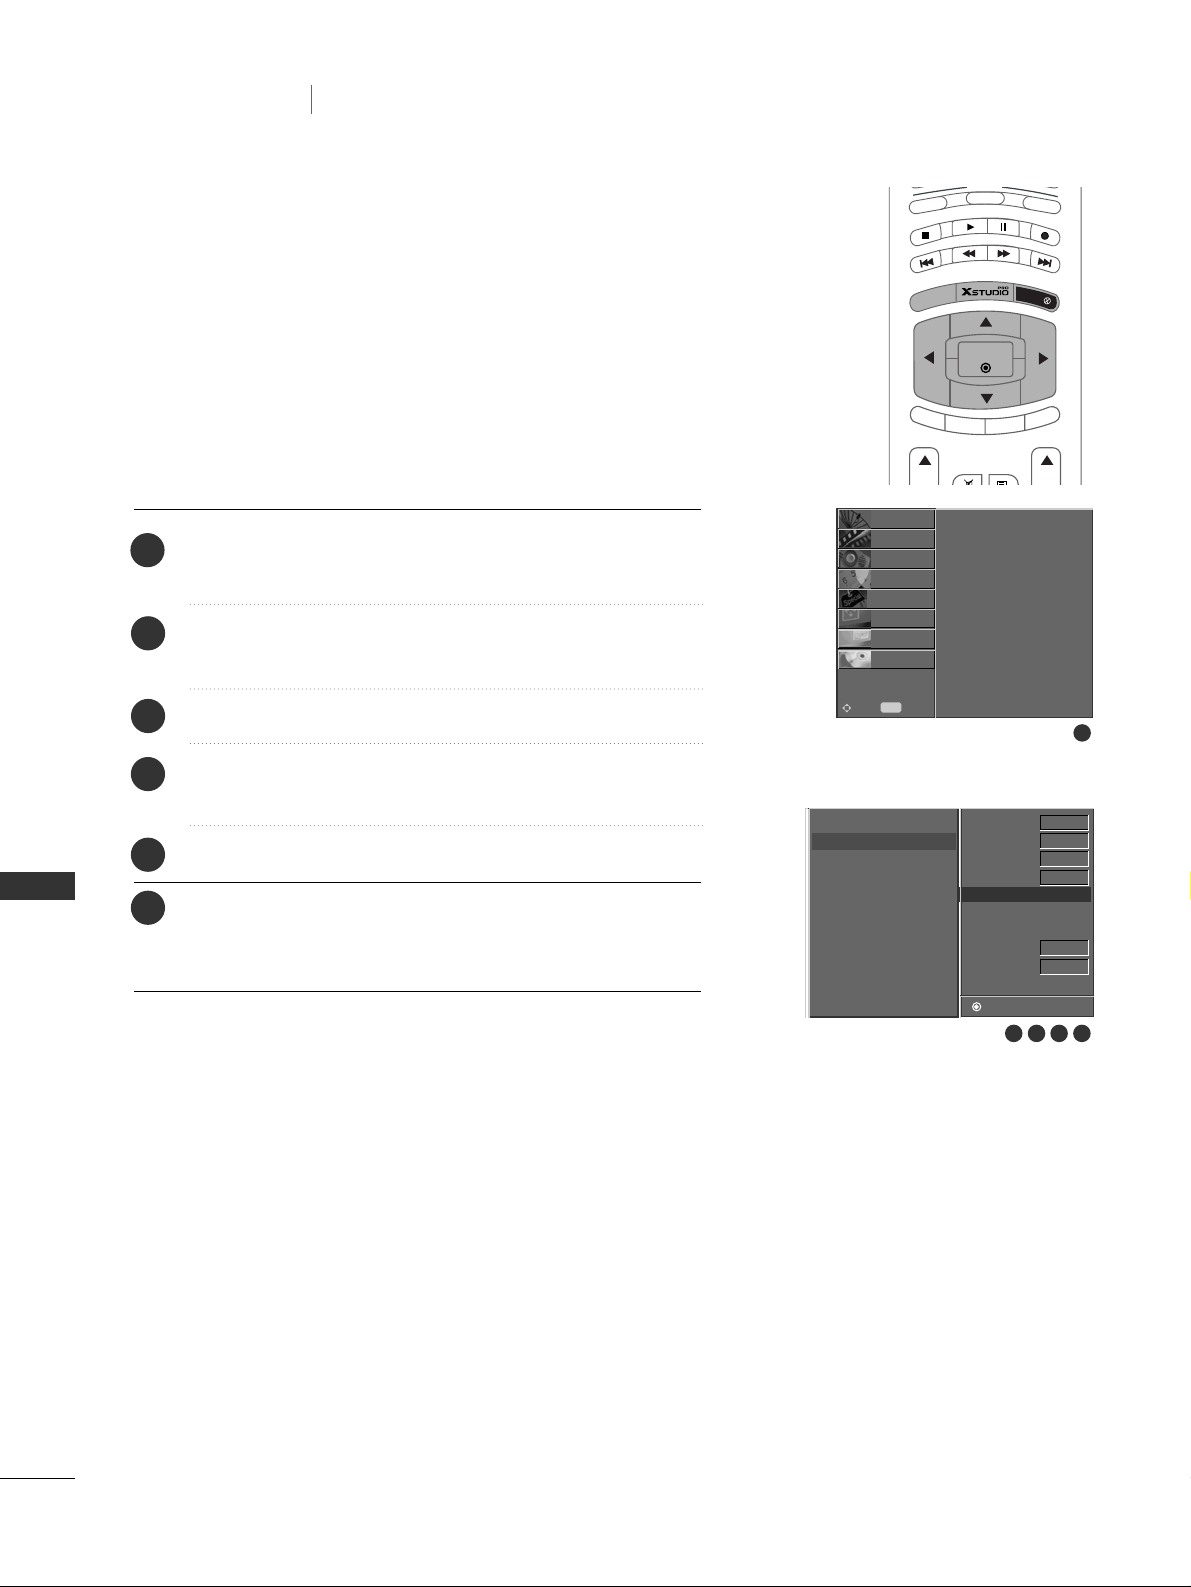
TV MENU
50
TV MENU
Setting up TV stations
FINE TUNING
- Normally fine tuning is only necessary if reception is poor.
Press the
MMEENNUU
button and then
DD
//
EE
button to select the
STATION menu.
Press the
GG
button and then
DD
//
EE
button to select Manual
programme.
Press the
GG
button and then
DD
//
EE
button to select Fine.
Press the
FF
//
GG
button to to fine tune for the best picture
and sound.
Press the OK button.
Press the EXIT button to return to normal TV viewing.
The finely tuned programme will be indicated by yellow
number during programme selection.
Storage 5
System BG
Band V/UHF
Channel 5
Fine FG
Search
Name
C 05
Booster Off
Store
1
2
3
4
5
6
2 3 4 5
1
Auto programme
Manual programme
Programme edit
Favourite programme
STATION
{
PICTURE
O
SOUND
O
TIME
O
SPECIAL
O
SCREEN
O
PIP/DW
O
DVR
O
Menu
MENU
Move
Auto programme
Manual programme
Programme edit
Favourite programme
Manual programme
MODE
A
U
D
IO
PIP PR -
PIP PR +
SWAP
PIP IN
P
UT
S
T
B
M
E
N
U
OK
CABLE
EXIT
MARK
LIVE TV
TIME
SHIFT
TIME
SHIFT
Page 52
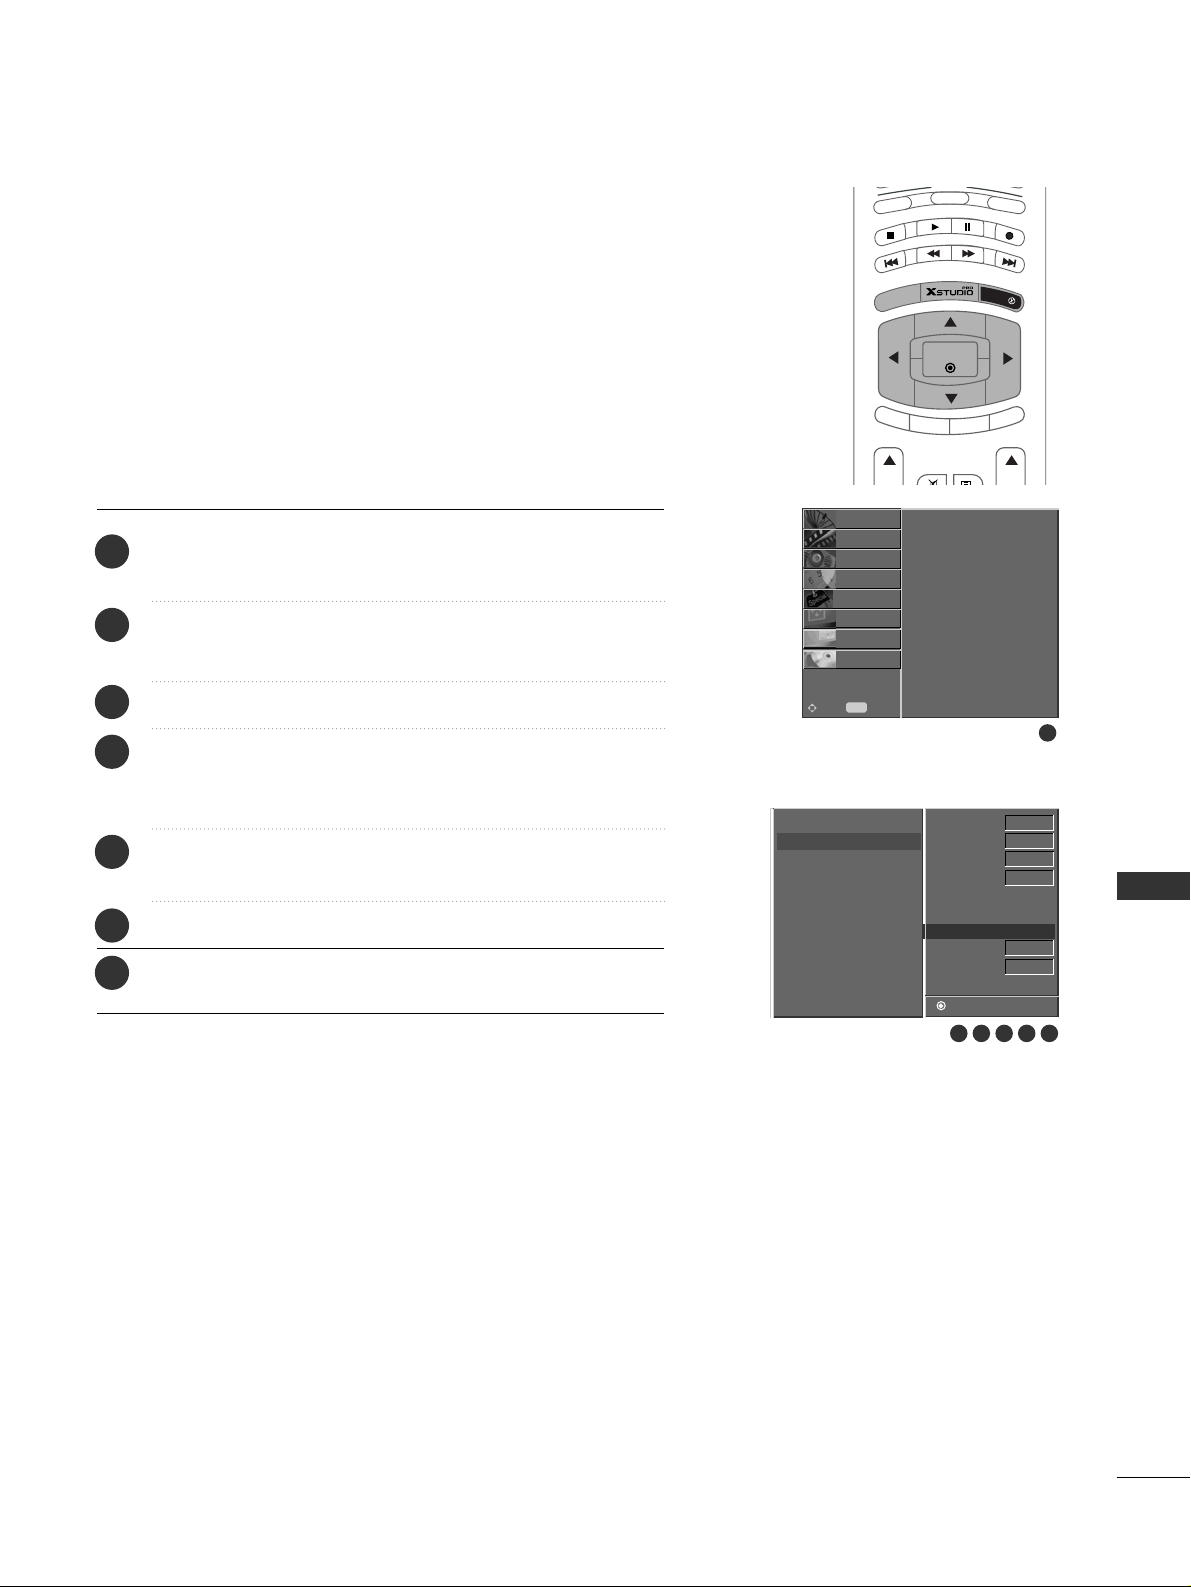
TV MENU
51
ASSIGNING A STATION NAME
- You can assign a station name with five characters to each programme number.
Press the
MMEENNUU
button and then
DD
//
EE
button to select the
STATION menu.
Press the GGbutton and then
DD
//
EE
button to select Manual
programme.
Press the
GG
button to display the Name menu.
Press the
DD
button. You can use a blank, +, -, the alphabet
A to Z and the numeric 0 to 9.
With the
EE
button you can select in the opposite direction.
Select the next position by pressing the
GG
button and then
take your choice of the second character, and so on.
Press the OK button in twice.
Press the EXIT button to return to normal TV viewing.
1
2
3
4
5
6
7
1
Auto programme
Manual programme
Programme edit
Favourite programme
STATION
{
PICTURE
O
SOUND
O
TIME
O
SPECIAL
O
SCREEN
O
PIP/DW
O
DVR
O
Menu
MENU
Move
Storage 5
System BG
Band
V/UHF
Channel 5
Fine
Search
Name G
+C 05
Booster Off
Store G Edit
2 3 4 5 6
Auto programme
Manual programme
Programme edit
Favourite programme
Manual programme
MODE
A
U
D
IO
PIP
PR
-
PIP PR +
SWAP
PIP IN
P
U
T
S
T
B
M
E
N
U
OK
CABLE
EXIT
MARK
LIVE TV
TIME
SHIFT
TIME
SHIFT
Page 53
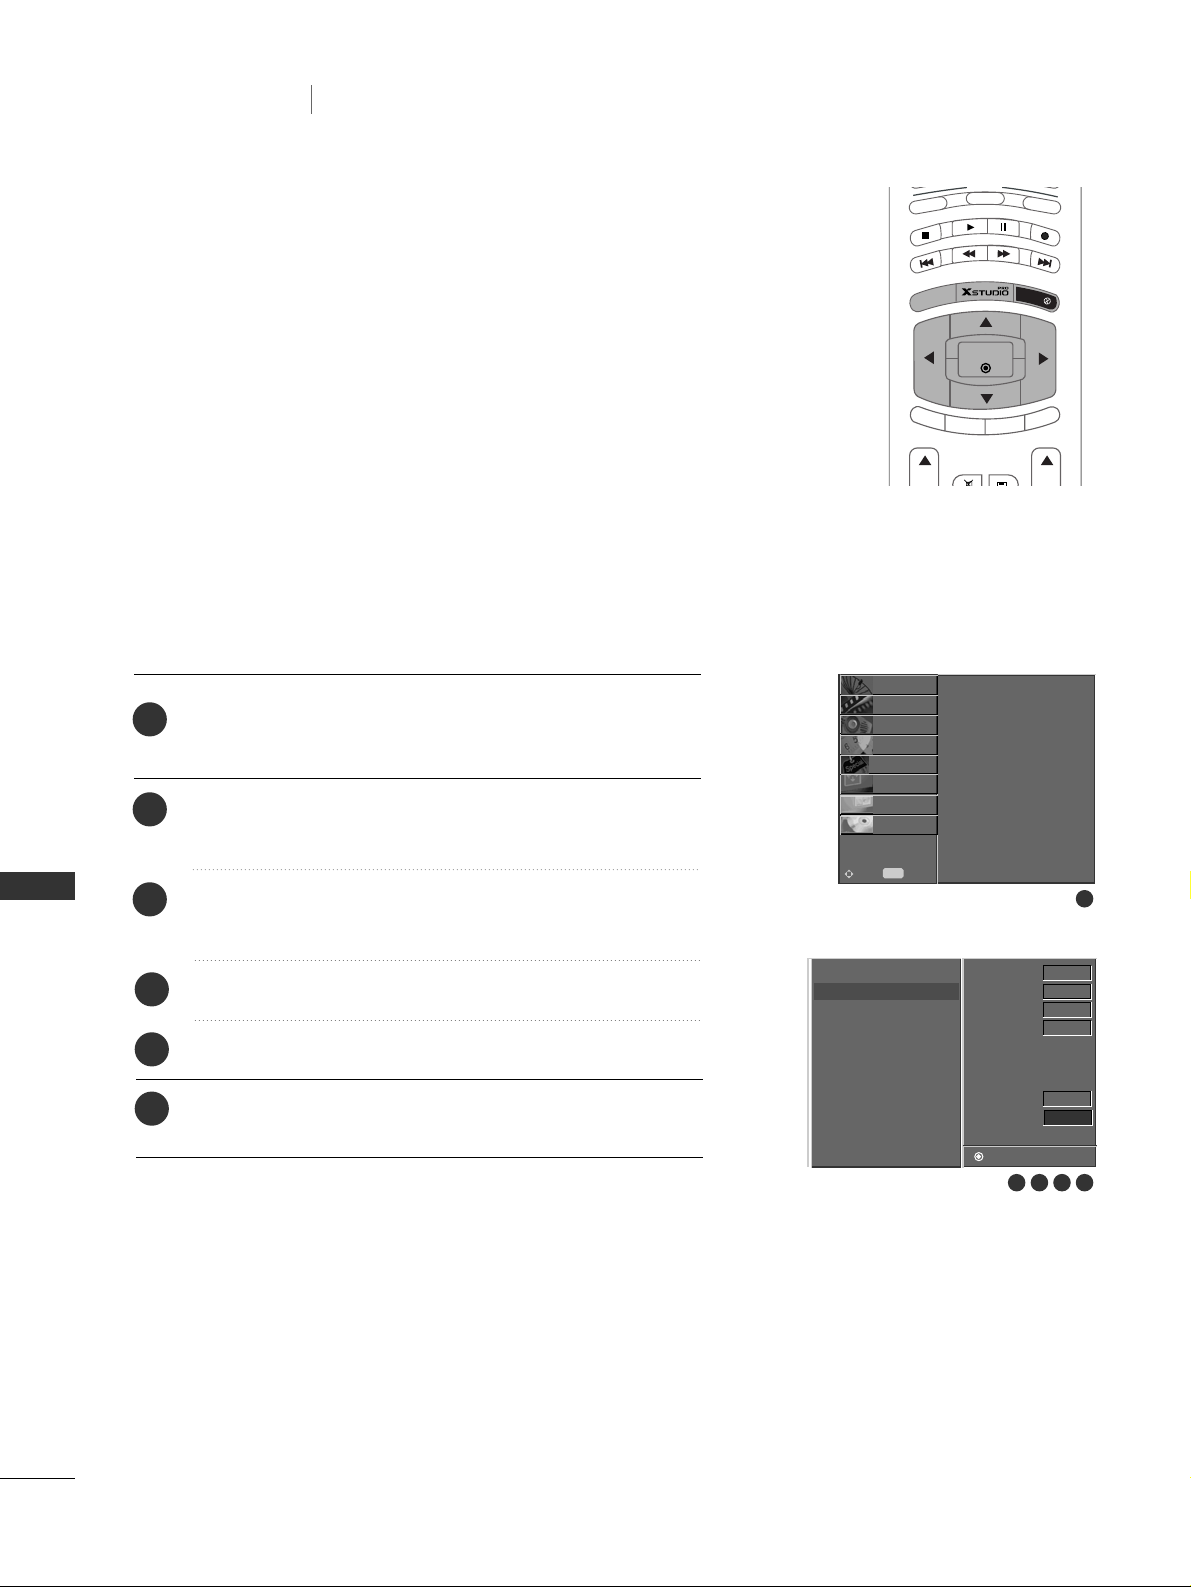
TV MENU
52
TV MENU
Setting up TV stations
TV MENU
Setting up TV stations
- In some models,
BBoooosstteerr
is an optional function. Only a set
with
BBoooosstteerr
can perform this function.
- If the reception is poor at the fringe area of TV signal, select
BBoooosstteerr
to
OOnn
.
BOOSTER (OPTION)
Press the
MMEENNUU
button and then
DD
//
EE
button to select the
STATION menu.
Press the
GG
button and then
DD
//
EE
button to select Manual
programme.
Press the
GG
button and then use
DD
//
EE
button to select
Booster.
Press the
FF/ GG
button to select On or Off.
Press the OK button.
Press the EXIT button to return to normal TV viewing.
1
2
3
4
5
6
2 3
1
4 5
Auto programme
Manual programme
Programme edit
Favourite programme
STATION
{
PICTURE
O
SOUND
O
TIME
O
SPECIAL
O
SCREEN
O
PIP/DW
O
DVR
O
Menu
MENU
Move
Store
Auto programme
Manual programme
Programme edit
Favourite programme
Manual programme
Storage 5
System BG
Band V/UHF
Channel 5
Fine
Search
Name
+ C 05
Booster FG Off
MODE
A
U
D
IO
P
IP PR
-
PIP PR +
SWAP
P
IP
IN
PU
T
S
T
B
M
E
N
U
OK
CABLE
EXIT
MARK
LIVE TV
TIME
SHIFT
TIME
SHIFT
Page 54
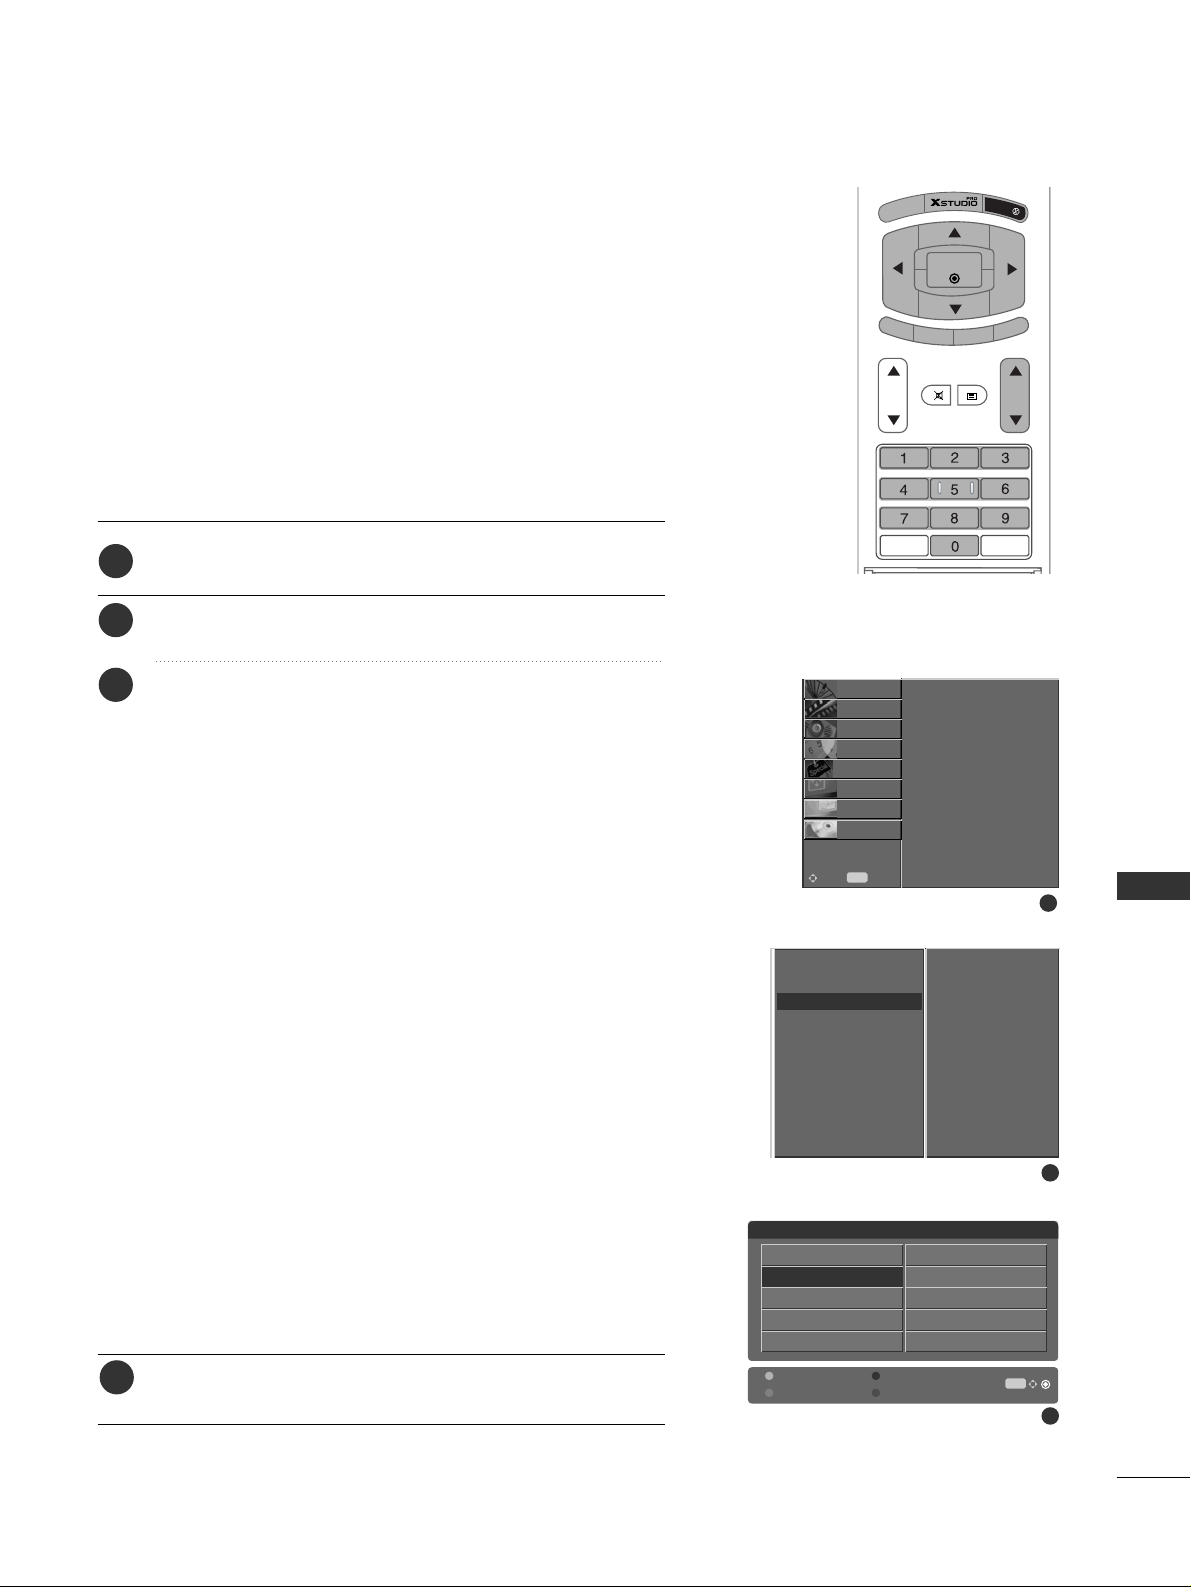
TV MENU
53
- This function enables you to delete or skip the stored programmes.
Also you can move some stations to other programme numbers or
copy a blank station data into the selected programme number.
- It’s not available to use this function on recording programme.
PROGRAMME EDIT
Press the
MMEENNUU
button and then
DD
//
EE
button to select the
STATION menu.
Press the
GG
button and then
DD
//
EE
button to select
Programme edit.
Press the GGbutton to display the
Programme edit menu.
AA
DDeelleettiinngg aa pprrooggrraammmmee
1.Select a programme to be deleted with the
DD
// EE//
FF
//
GG
button.
2.Press the RED button twice.
The selected programme is deleted, all the following
programmes are shifted up one position.
AA
CCooppyyiinngg aa pprrooggrraammmmee
1.Select a programme to be copied with the
DD
// EE//
FF
//
GG
button.
2.Press the GREEN button.
All the following programmes are shifted down one position.
AA
MMoovviinngg aa pprrooggrraammmmee
1.Select a programme to be moved with the
DD
// EE//
FF
//
GG
button.
2.Press the YELLOW button.
3.Move the programme to the desired programme number
with the
DD
// EE//
FF
//
GG
button.
4.Press the YELLOW button again to release this function.
AA
SSkkiippppiinngg aa pprrooggrraammmmee nnuummbbeerr
1.Select a programme number to be skipped with the
DD
//
EE
//
FF
//
GG
button.
2.Press the BLUE button. The skipped programme turns to blue.
3.Press the BLUE button again to release the skipped programme.
When a programme number is skipped it means that you
will be unable to select it using the PR
DD
//
EE
button dur
ing normal TV viewing. If you want to select the skipped
programme, directly enter the programme number with the
NUMBER buttons or select it in the programme edit or
table menu.
Press the EXIT button to return to normal TV viewing.
0 C 02
1 + C 04
2 C 05
3 C 06
4 S 14
6 S 15
7 S 16
8 S 17
9 S 18
10 S 19
Programme edit
Delete
Move
Copy
Skip
1
2
3
4
3
1
Auto programme
Manual programme
Programme edit
Favourite programme
STATION
{
PICTURE
O
SOUND
O
TIME
O
SPECIAL
O
SCREEN
O
PIP/DW
O
DVR
O
Menu
MENU
Move
2
Auto programme
Manual programme
Programme edit
Favourite programme
Programme edit
GG
To set
Menu
E
TV
OK
SWAP
TEXT
EXIT
TIME
SHIFT
IP
P
U
N
E
M
TIME
SHIFT
PIP
PR -
PIP PR +
VOL PR
MUTE
UT
INP
Q.VIEWLIST
Page 55
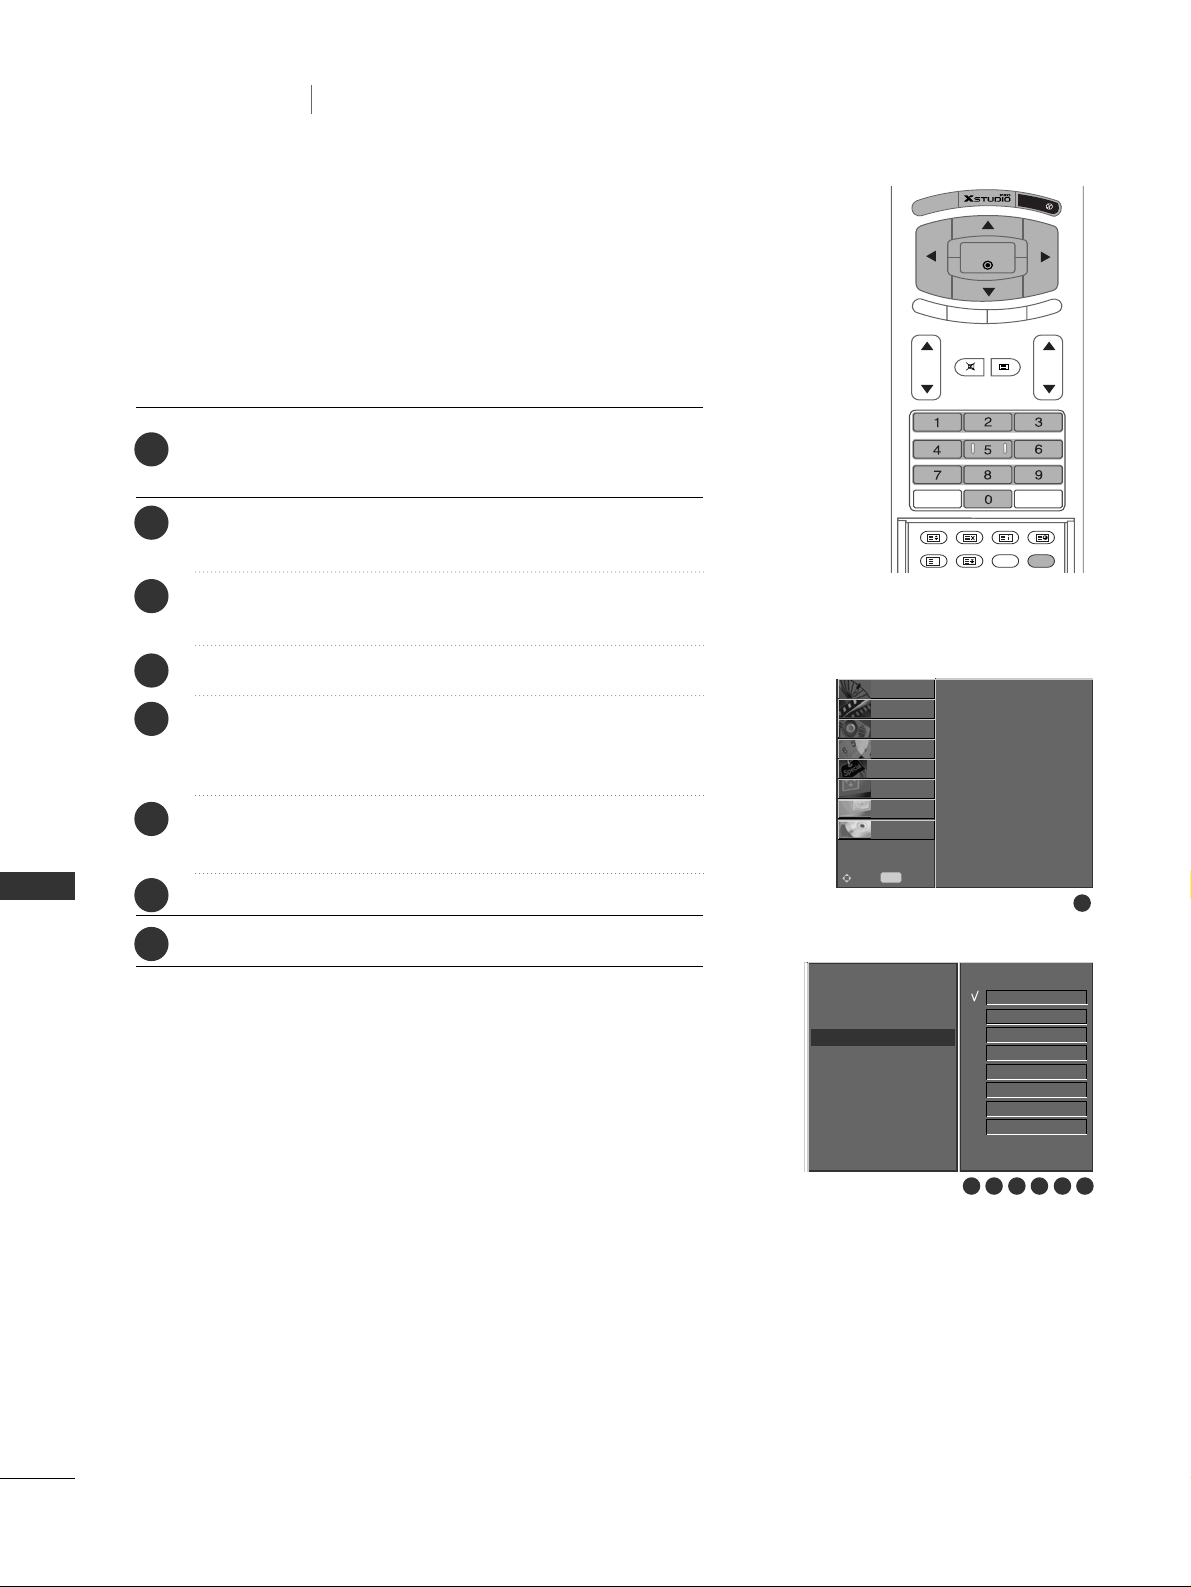
TV MENU
54
Setting up TV stations
TV MENU
Press the
MMEENNUU
button and then
DD
//
EE
button to select
the STATION menu.
Press the
GG
button and then
DD
//
EE
button to select
Favourite programme.
Press the
GG
button to display the Favourite programme
menu.
Press the
DD
//
EE
button to select - - - - - - -.
Select a desired programme with the
FF
//
GG
button or
NUMBER buttons. Any number under 10 is entered with a
numeric ‘0’ (or ‘00’) in front of it, i.e.‘05’ (or ‘005’) for 5.
To store another programme, repeat steps 4 to 5.
You can store up to 8 programmes.
Press the OK button.
Press the EXIT button to return to normal TV viewing.
This function lets you select your favourite programmes directly.
Repeatedly press the
FFAA VV
button to select stored favourite pro-
grammes.
FAVOURITE PROGRAMME
1
2
3
4
5
6
7
8
1
Auto programme
Manual programme
Programme edit
Favourite programme
STATION
{
PICTURE
O
SOUND
O
TIME
O
SPECIAL
O
SCREEN
O
PIP/DW
O
DVR
O
Menu
MENU
Move
Auto programme
Manual programme
Programme edit
Favourite programme
Favourite programme
GG
0 C 02
- - - - - - -
- - - - - - -
- - - - - - -
- - - - - - -
- - - - - - -
- - - - - - -
- - - - - - -
2 3 4 5 6 7
PIP PR -
PIP PR +
S
W
A
P
P
IP
IN
P
UT
MENU
SIZE POSITION INDEX
SLEEP
FAV
Q.VIEWLIST
OK
VOL PR
HOLD
REVEAL
?
TIME
EXIT
TV
TIME
SHIFT
TIME
SHIFT
MUTE
TEXT
Page 56
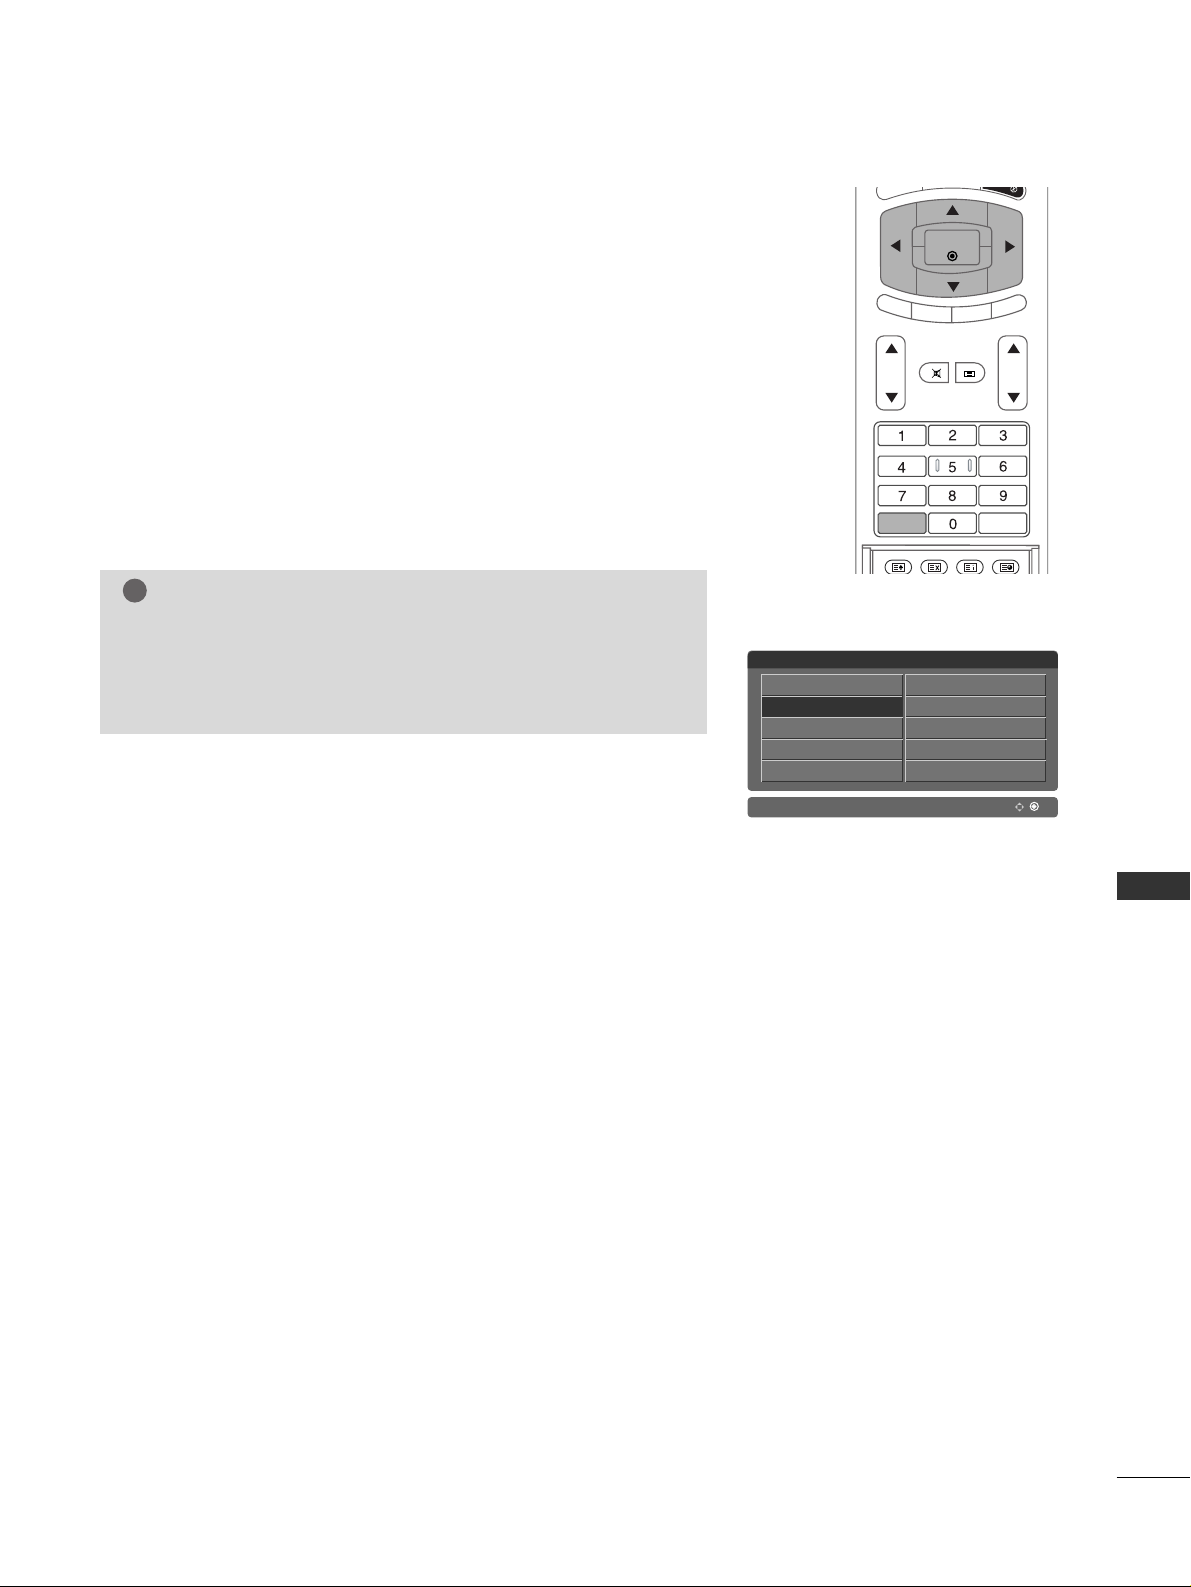
TV MENU
55
-
You can check the programmes stored in the memory by
displaying the programme table.
CALLING THE PROGRAMME TABLE
AA
DDiissppllaa yyiinngg pprrooggrraa mmmm ee ttaabbll ee
Press the
LL IISSTT
button to display the Programme table menu.
The programme table appears on the screen.
AA
SSeelleeccttii nngg aa pprrooggrraa mmmm ee iinn tthhee pprroo ggrr aa mmmmee tt aa bbll ee
Select a programme with the
DD
//
EE
//
FF
//
GG
button.
Then press the
OO KK
button.
The set switches to the chosen programme number.
AA
PPaaggii nngg tthhrroouugghh aa pprrooggrraa mmmm ee ttaabbll ee
There are 10 programme table pages in which contain 100 programmes.
Pressing the
DD
//
EE
//
FF
//
GG
button repeatedly turns the pages.
Press the
LL IISSTT
button to return to normal TV viewing.
NOTE
!
a. You may find some blue highlighted programmes shown. They
have been set up in the programme edit mode.
b. Some programmes with the channel number shown in the pro-
gramme table indicate there is no station name assigned.
0 C 02
1 C 04
2 C 05
3 C 06
4 S 14
6 S 15
7 S 16
8 S 17
9 S 18
10 S 19
Programme list
M
E
N
XIT
OK
SWAP
TEXT
Q.VIEWLIST
TIME
SHIFT
IP IN
P
TIME
TIME
SHIFT
P
IP PR -
PIP PR +
VOL PR
MUTE
SIZE POSITION INDEX
T
U
P
Page 57
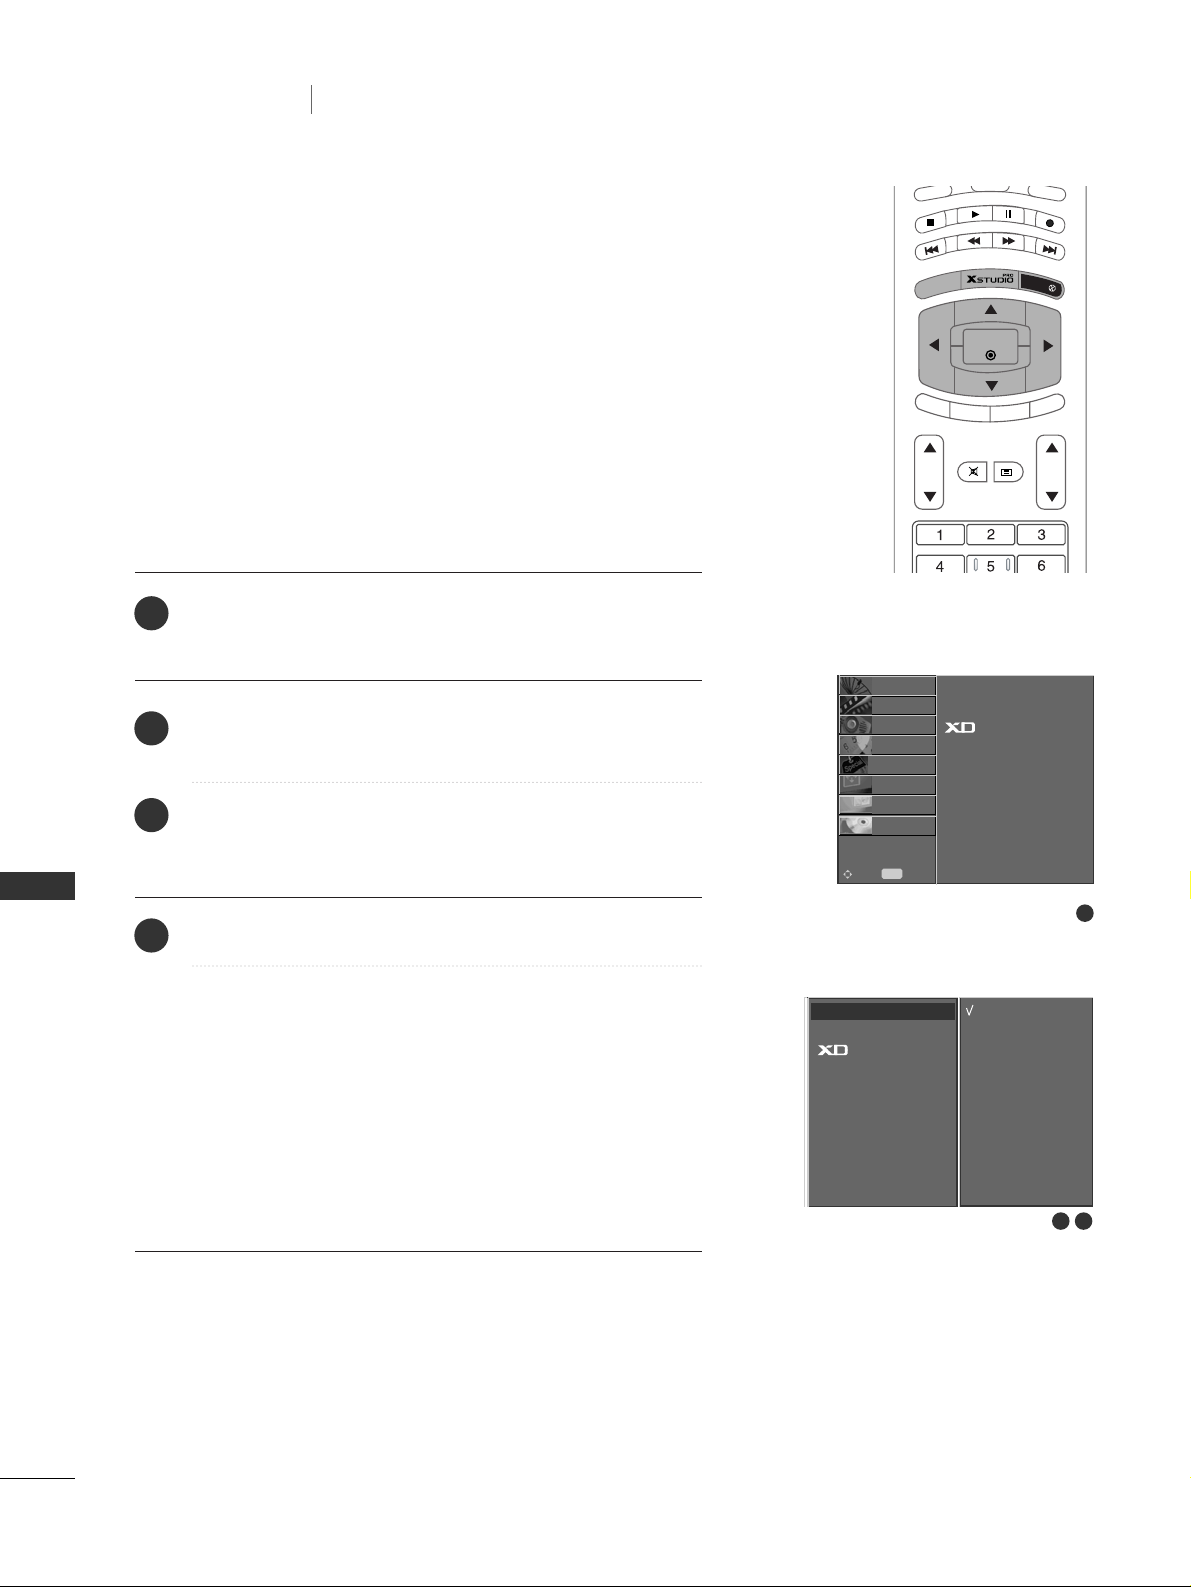
TV MENU
56
TV MENU
Picture Menu Options
PSM (PICTURE STATUS MEMORY)
Press the
MMEENN UU
button and then
DD
//
EE
button to select
the PICTURE menu.
Press the GGbutton and then
DD
//
EE
button to select PSM.
Press the
GG
button and then
DD
//
EE
button to select
Dynamic, Standard, Mild or User.
Press the EXIT button to return to normal TV viewing.
AA
This function adjusts the set to the best picture appearance.
Select the preset value in the PSM menu based on the
programme category.
AA
When adjusting picture options (contrast, brightness, colour,
sharpness and tint (NTSC input only)) manually,
PSM
is
automatically changed to
User
.
AA
Picture options
DDyynnaamm iicc
,,
SSttaannddaarrdd,, MM iilldd
and
UU sseerr
are preset and programmed for good picture quality at the
factory and cannot be changed.
1
2
3
4
1
PSM
CSM
ACM
Contrast 100
Brightness 50
Colour 50
Sharpness 50
Tint 0
STATION
O
PICTURE{
SOUND
O
TIME
O
SPECIAL
O
SCREEN
O
PIP/DW
O
DVR
O
Menu
MENU
Move
PSM
CSM
ACM
Contrast 100
Brightness 50
Colour 50
Sharpness 50
Tint 0
PSM
GG
Dynamic
Standard
Mild
User
2 3
A
U
D
IO
P
IP
P
R -
PIP PR +
SWAP
PIP INP
U
T
S
T
B
M
E
N
U
OK
VOL PR
CABLE
EXIT
MARK
LIVE TV
TIME
SHIFT
TIME
SHIFT
MUTE
TEXT
Page 58
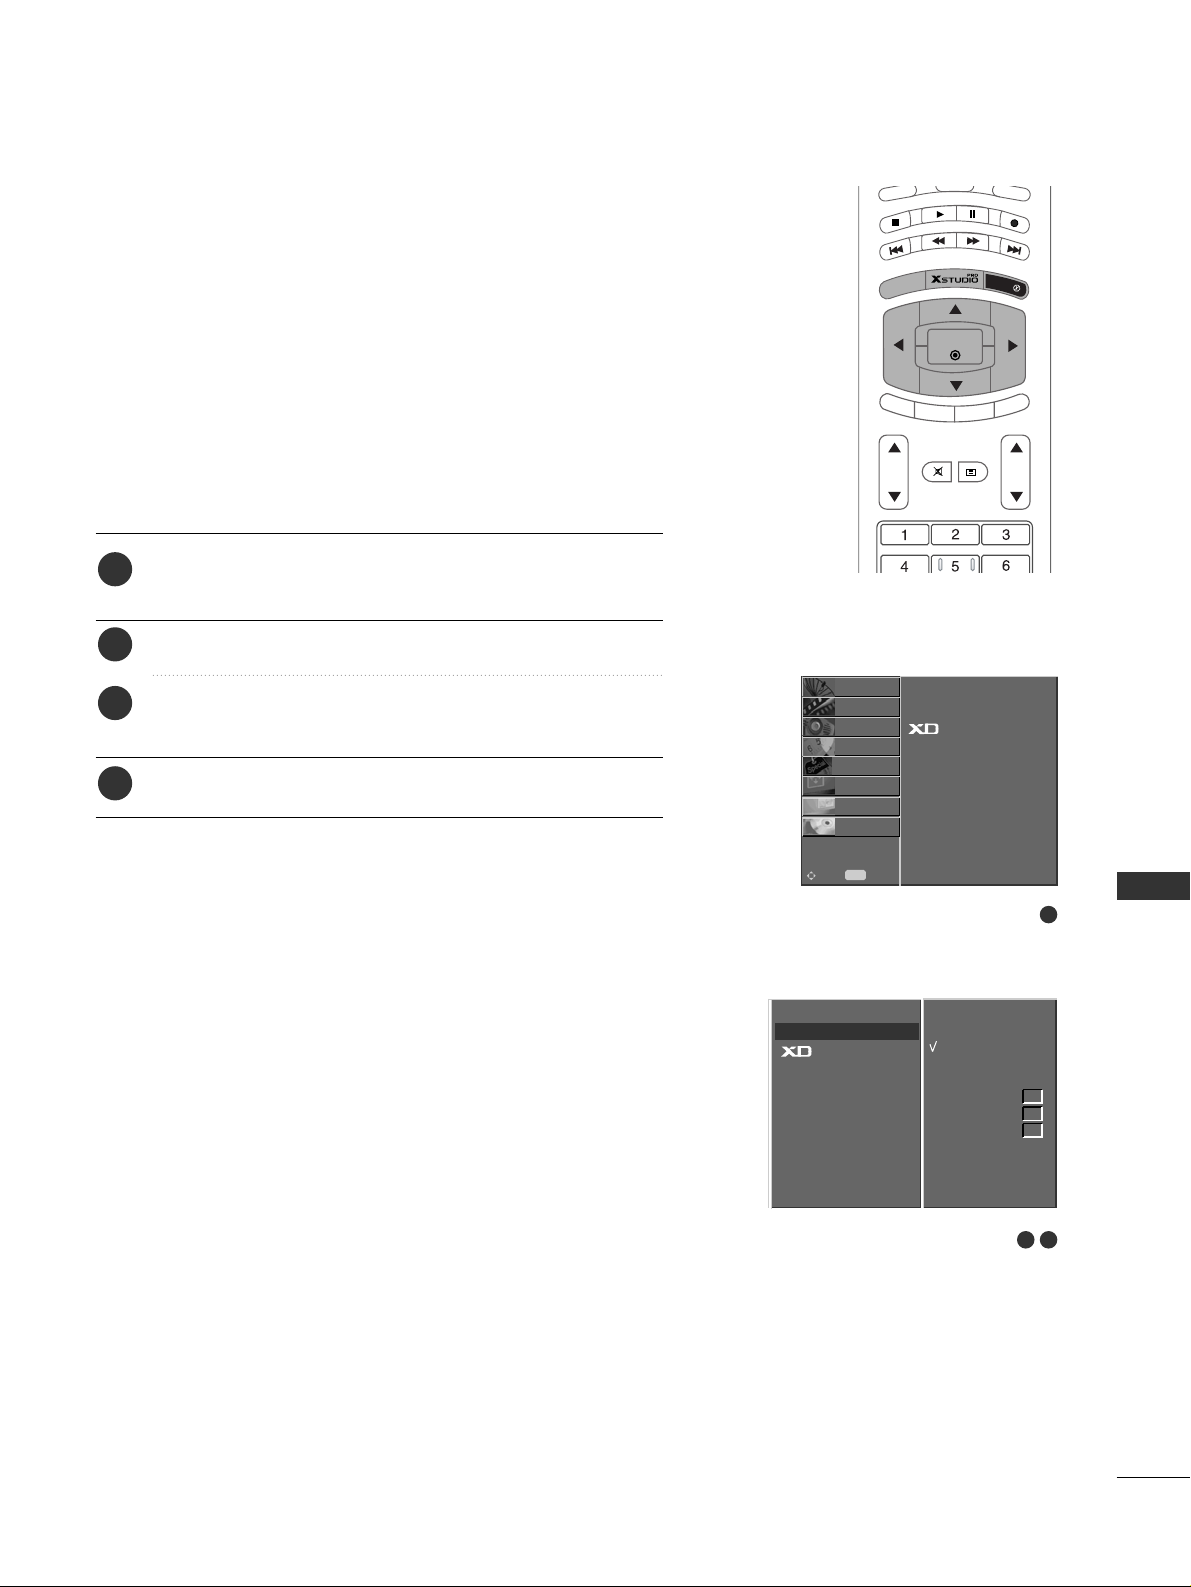
TV MENU
57
CSM (COLOUR STATUS MEMORY)
- To initialize values (reset to default settings), select the
NNoorrmmaall
option.
- When adjusting colour temperature options (red, green, or
blue) manually, CSM automatically changes to
UUsseerr
.
- Choose one of three automatic colour adjustments. Set to warm
to enhance hotter colours such as red, or set to cool to see less
intense colours with more blue.
Press the
MMEENNUU
button and then
DD
//
EE
button to select
the PICTURE menu.
Press the
GG
button and then
DD
//
EE
button to select CSM.
Press the
GG
button and then use
DD
//
EE
button to select
the desired colour temperature.
Press the EXIT button to return to normal TV viewing.
1
2
3
4
2 3
1
PSM
CSM
ACM
Contrast 100
Brightness 50
Colour 50
Sharpness 50
Tint 0
STATION
O
PICTURE{
SOUND
O
TIME
O
SPECIAL
O
SCREEN
O
PIP/DW
O
DVR
O
Menu
MENU
Move
PSM
CSM
ACM
Contrast 100
Brightness 50
Colour 50
Sharpness 50
Tint 0
CSM
GG
Cool
Normal
Warm
User
Red
Green
Blue
0
0
0
A
U
D
IO
P
IP
P
R -
PIP PR +
SWAP
PIP INP
U
T
S
T
B
M
E
N
U
OK
VOL PR
CABLE
EXIT
MARK
LIVE TV
TIME
SHIFT
TIME
SHIFT
MUTE
TEXT
Page 59
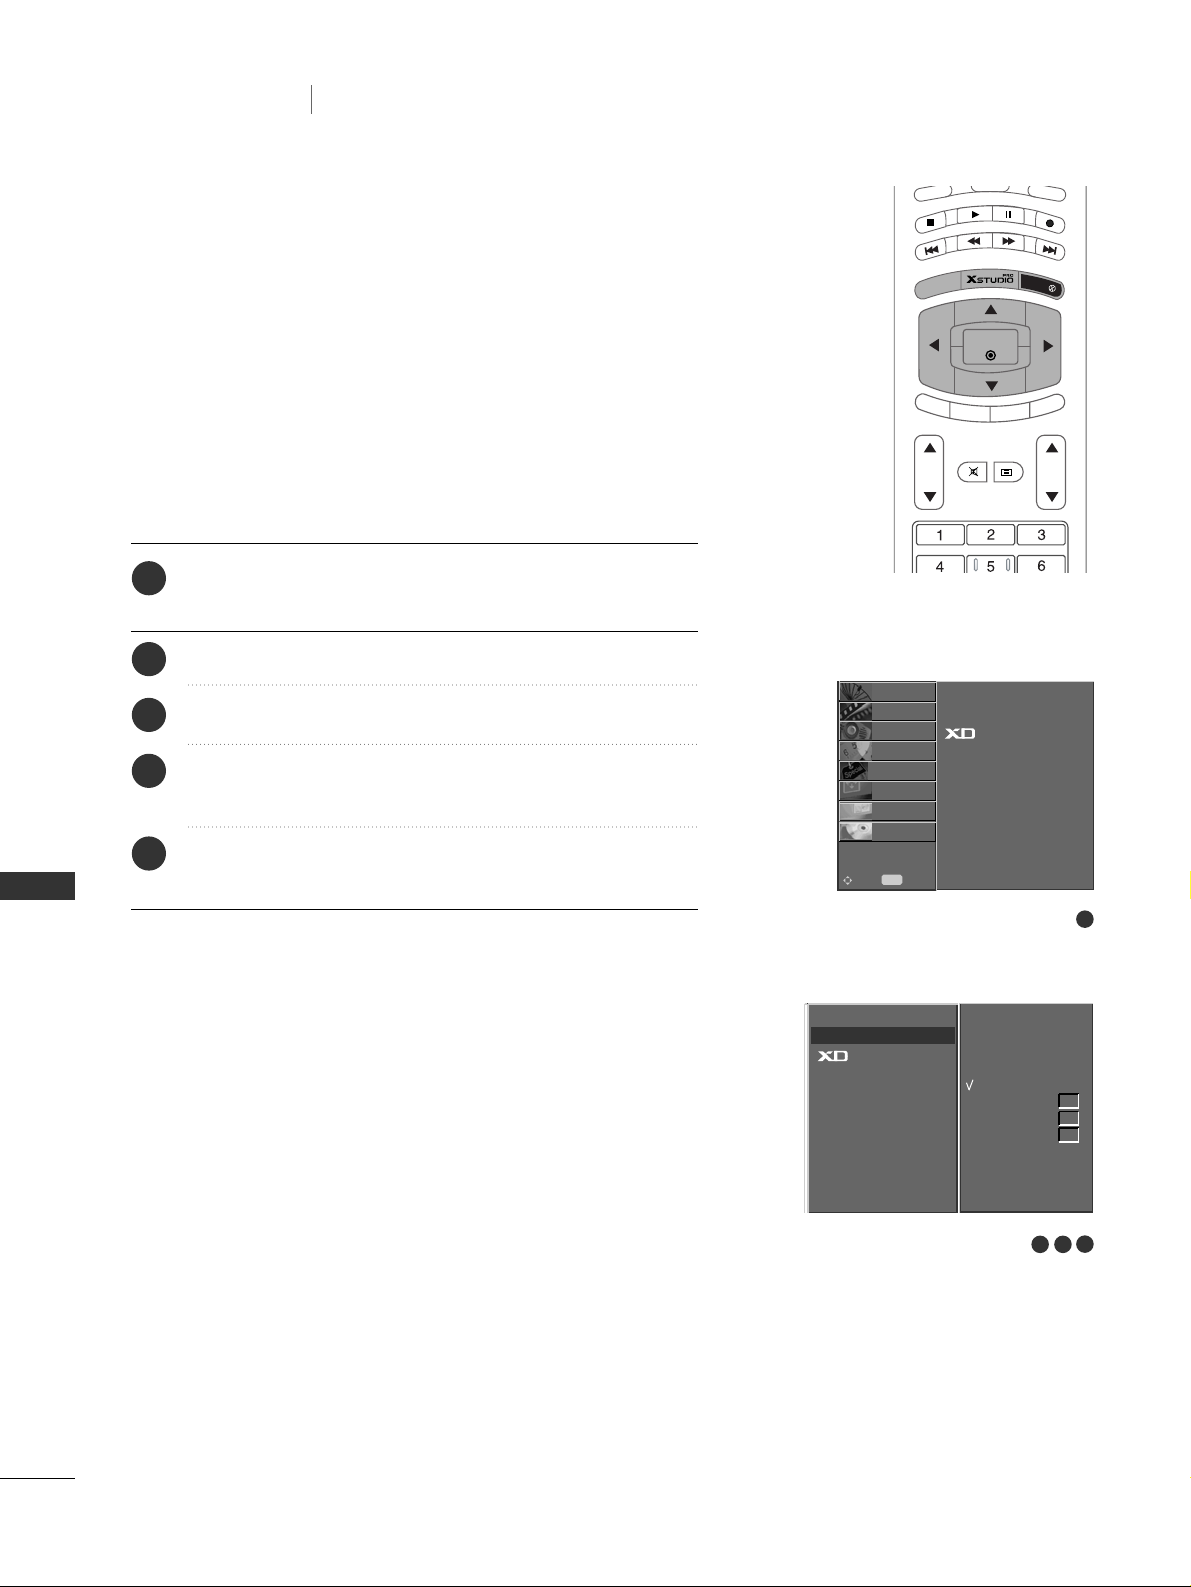
TV MENU
58
TV MENU
Picture Menu Options
- You can adjust red, green, blue to any colour temperature you
prefer.
MANUAL COLOUR TEMPERATURE CONTROL (CSM - USER OPTION)
Press the
MMEENNUU
button and then
DD
//
EE
button to select
the PICTURE menu.
Press the
GG
button and then
DD
//
EE
button to select CSM.
Press the
GG
button and then
DD
//
EE
button to select User.
Press the
GG
button and then use
DD
//
EE/ FF/ GG
button to
make appropriate adjustments.
Press the EXIT button to return to normal TV viewing.
1
2
3
4
5
2 3
1
4
PSM
CSM
ACM
Contrast 100
Brightness 50
Colour 50
Sharpness 50
Tint 0
STATION
O
PICTURE{
SOUND
O
TIME
O
SPECIAL
O
SCREEN
O
PIP/DW
O
DVR
O
Menu
MENU
Move
PSM
CSM
ACM
Contrast 100
Brightness 50
Colour 50
Sharpness 50
Tint 0
CSM
GG
Cool
Normal
Warm
User
Red
Green
Blue
0
0
0
A
U
D
IO
PIP
PR
-
PIP PR +
SWAP
P
IP
IN
PU
T
S
T
B
M
E
N
U
OK
VOL PR
CABLE
EXIT
MARK
LIVE TV
TIME
SHIFT
TIME
SHIFT
MUTE
TEXT
Page 60
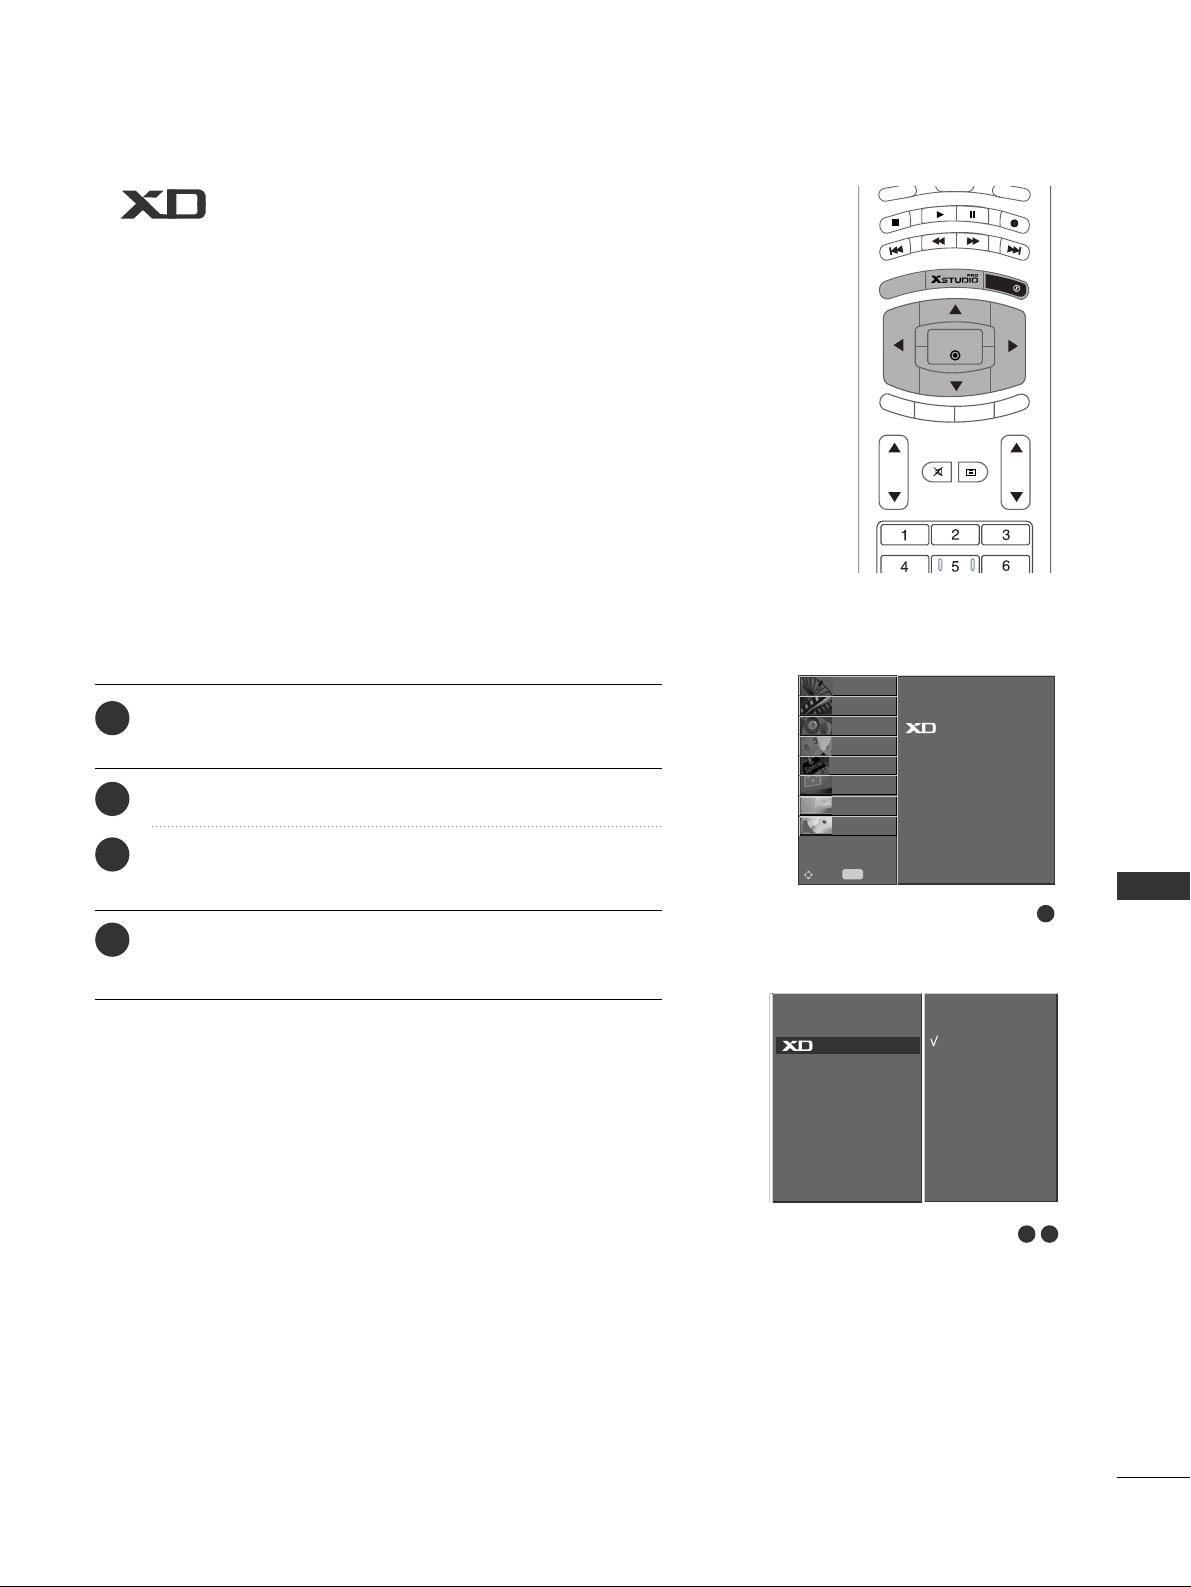
TV MENU
59
Press the
MMEENNUU
button and then
DD
//
EE
button to select
the PICTURE menu.
Press the
GG
button and then
DD
//
EE
button to select XD.
Press the
GG
button and then
DD
//
EE
button to select
On or Off.
Press the EXIT button to return to normal TV viewing.
- XD is LG Electronic's unique picture improving technology to
display a real HD source through an advanced digital signal
processing algorithm.
- You can enjoy the vivid and hi-definition picture with LG’s
Excellent Digital Reality processor technology.
- It’s not available to use this function in RGB[PC] or HDMI[PC]
modes.
- When selecting picture options (Dynamic, Standard and
Mild) in PICTURE menu, XD is automatically changed to On.
FUNCTION
1
2
3
4
1
PSM
CSM
ACM
Contrast 100
Brightness 50
Colour 50
Sharpness 50
Tint 0
STATION
O
PICTURE{
SOUND
O
TIME
O
SPECIAL
O
SCREEN
O
PIP/DW
O
DVR
O
Menu
MENU
Move
2 3
PSM
CSM
ACM
Contrast 100
Brightness 50
Colour 50
Sharpness 50
Tint 0
On
Off
GG
A
U
D
IO
PIP
PR
-
PIP PR +
SWAP
P
IP
IN
PU
T
S
T
B
M
E
N
U
OK
VOL PR
CABLE
EXIT
MARK
LIVE TV
TIME
SHIFT
TIME
SHIFT
MUTE
TEXT
Page 61
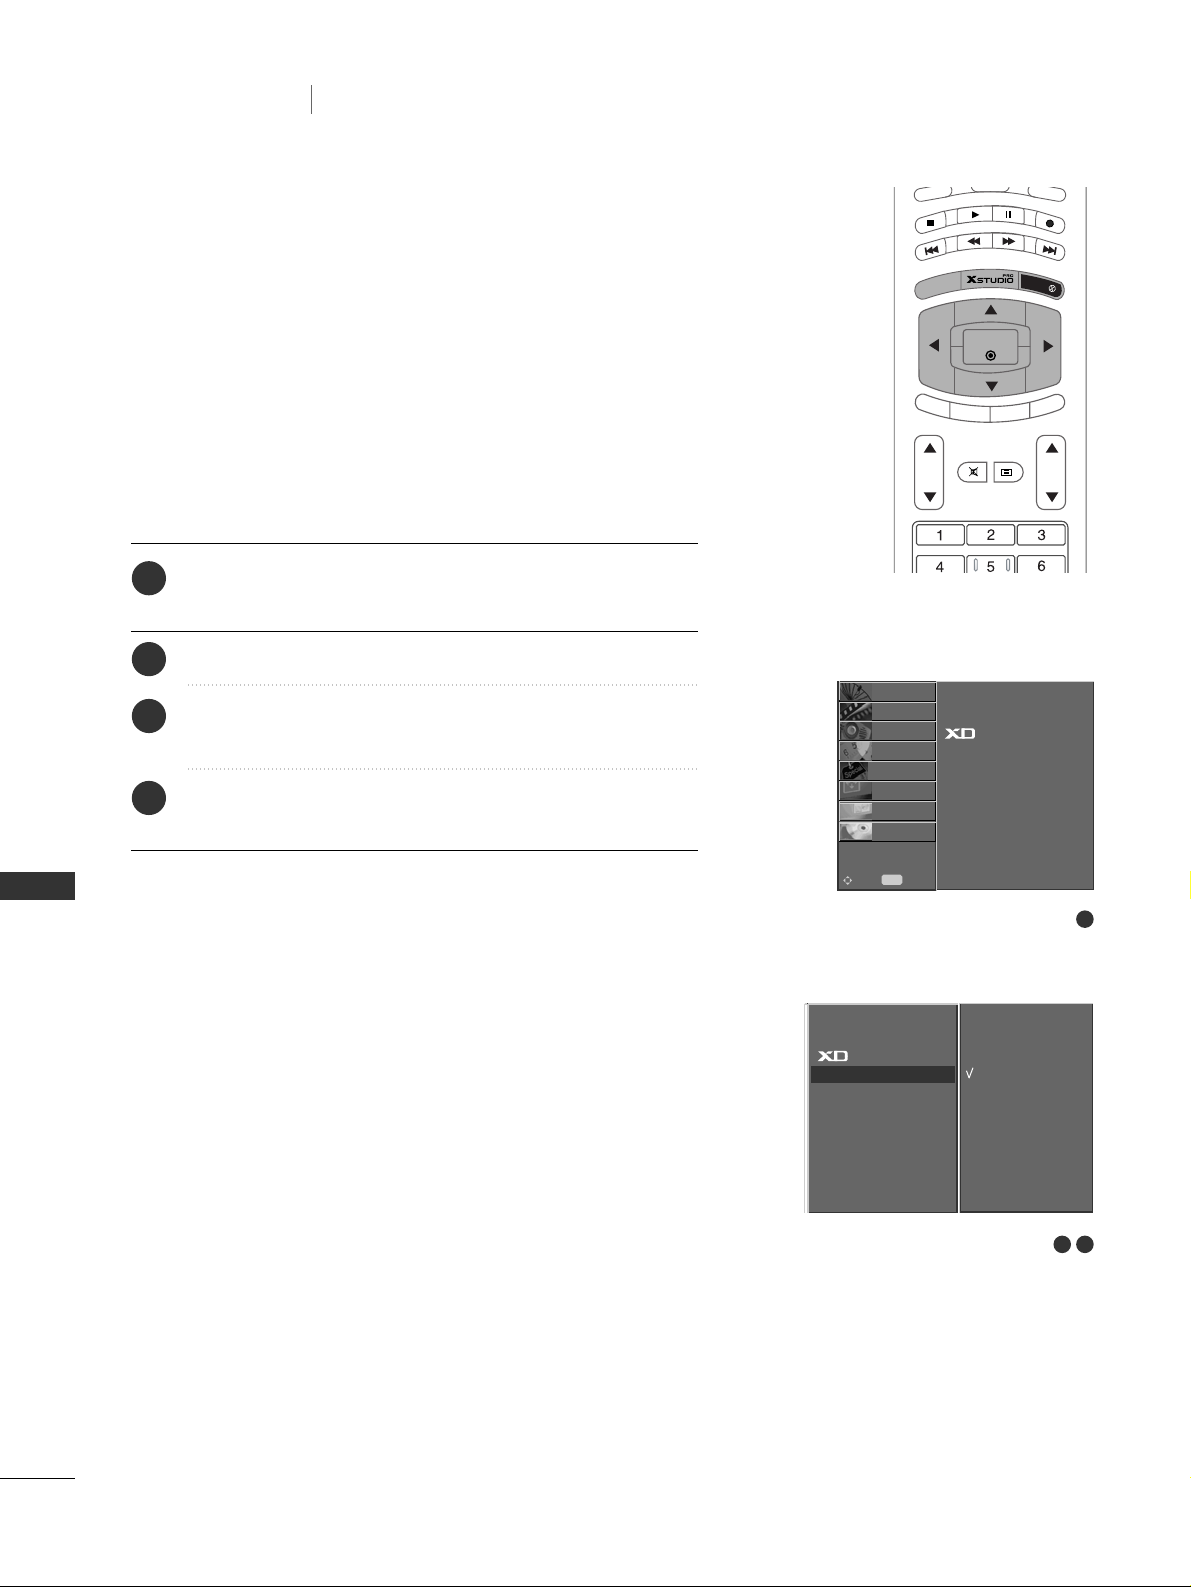
TV MENU
60
TV MENU
Picture Menu Options
- When the set is connected to external equipment with the
sRGB function, the colour difference is adjusted the equal
image of each other.
- This function works in the following mode : RGB[PC],
HDMI[PC].
sRGB FUNCTION
Press the
MMEENNUU
button and then
DD
//
EE
button to select
the PICTURE menu.
Press the
GG
button and then
DD
//
EE
button to select sRGB.
Press the
GG
button and then
DD
//
EE
button to select On
or Off.
Press the EXIT button to return to normal TV viewing.
1
2
3
4
2 3
1
PSM
CSM
sRGB
Contrast 100
Brightness 50
STATION
O
PICTURE{
SOUND
O
TIME
O
SPECIAL
O
SCREEN
O
PIP/DW
O
DVR
O
Menu
MENU
Move
PSM
CSM
sRGB
Contrast 100
Brightness 50
sRGB
GG
On
Off
A
U
D
IO
PIP P
R
-
PIP PR +
SWAP
P
IP IN
PU
T
S
T
B
M
E
N
U
OK
VOL PR
CABLE
EXIT
MARK
LIVE TV
TIME
SHIFT
TIME
SHIFT
MUTE
TEXT
Page 62
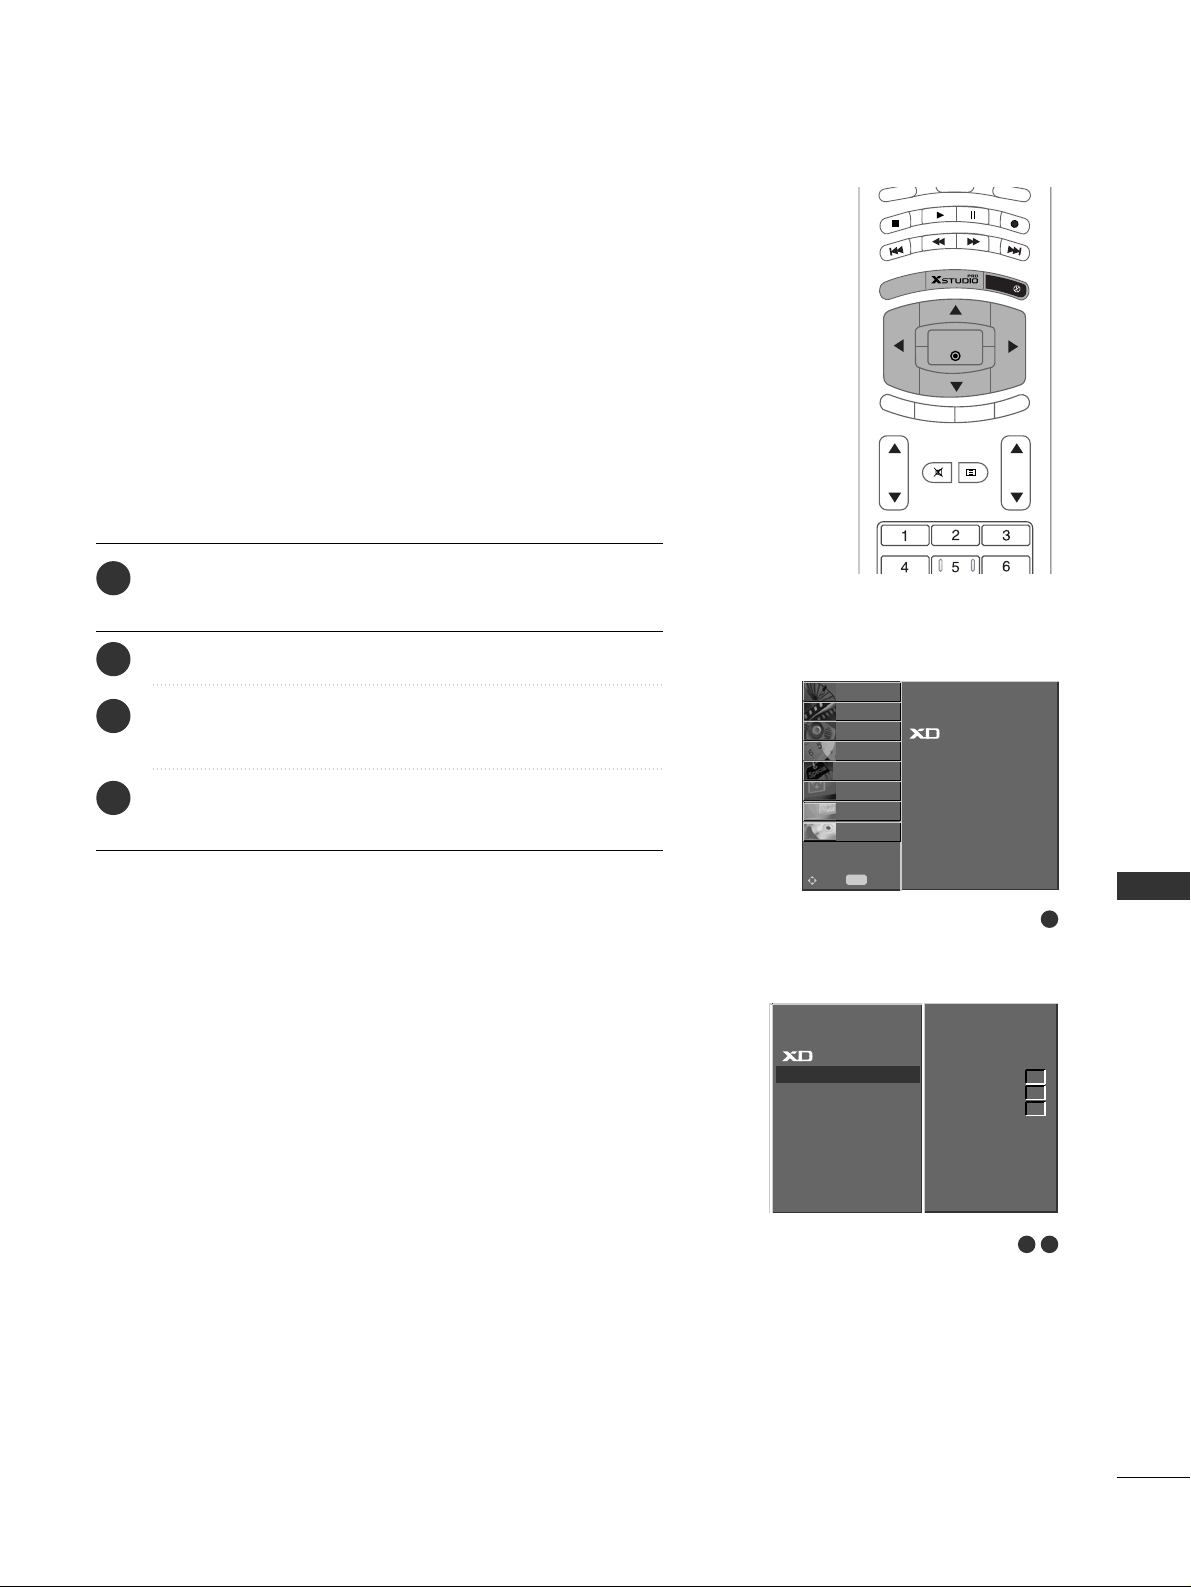
TV MENU
61
- Adjust the ACM to select the desired skin colour option.
- This function works in the following mode:
TV, AV1, AV2, S-Video2, AV3, AV4, COMPONENT,
RGB[DTV], HDMI[DTV].
- It’s not available to use this function in XD Off mode.
ACM (ACTIVE COLOUR MANAGEMENT)
Press the
MMEENNUU
button and then
DD
//
EE
button to select
the PICTURE menu.
Press the
GG
button and then
DD
//
EE
button to select ACM.
Press the
GG
button and then use
FF
//
GG
button to make
appropriate adjustments.
Press the EXIT button to return to normal TV viewing.
1
2
3
4
2 3
1
PSM
CSM
ACM
Contrast 100
Brightness 50
Colour 50
Sharpness 50
Tint 0
STATION
O
PICTURE{
SOUND
O
TIME
O
SPECIAL
O
SCREEN
O
PIP/DW
O
DVR
O
Menu
MENU
Move
PSM
CSM
ACM
Contrast 100
Brightness 50
Colour 50
Sharpness 50
Tint 0
ACM
GG
Fleshtone
Greentone
Bluetone
0
0
0
A
U
D
IO
PIP PR
-
PIP PR +
SWAP
PIP
IN
PUT
S
T
B
M
E
N
U
OK
VOL PR
CABLE
EXIT
MARK
LIVE TV
TIME
SHIFT
TIME
SHIFT
MUTE
TEXT
Page 63
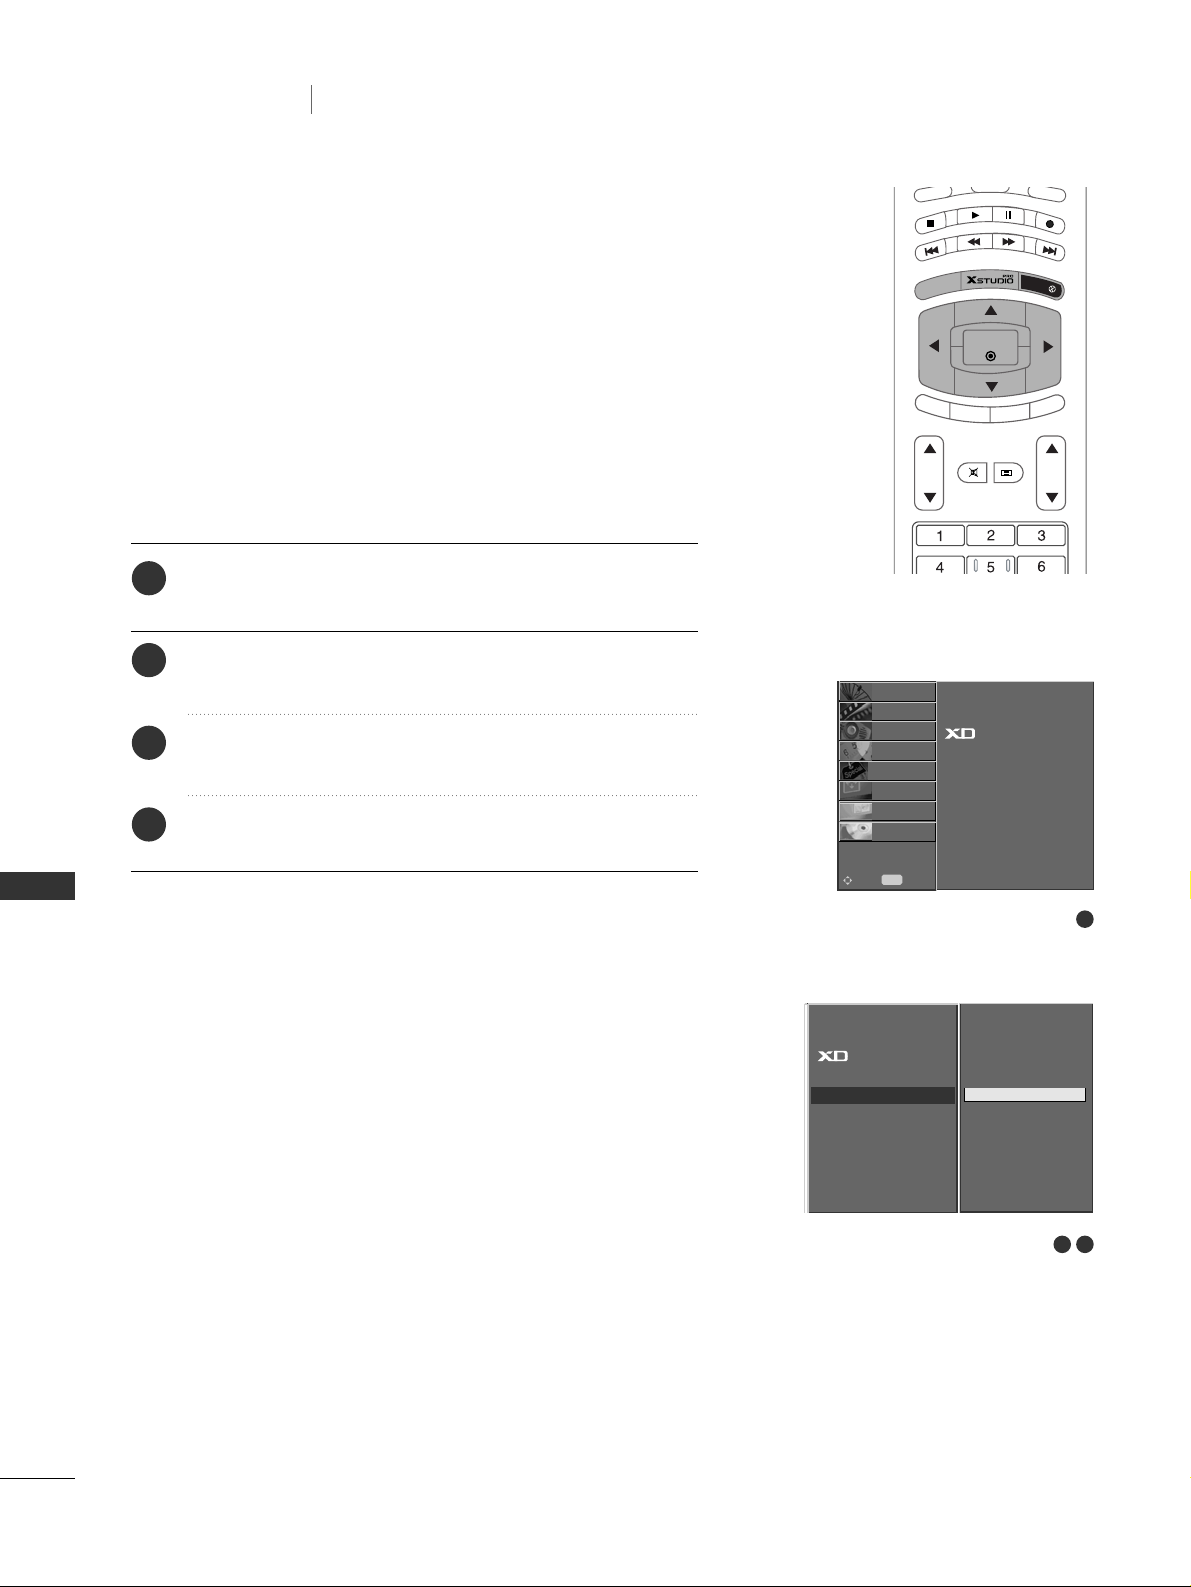
TV MENU
62
- You can adjust picture contrast, brightness, colour, sharpness
and tint (NTSC input only) to the levels you prefer.
- It’s not available to use colour, sharpness function in
RGB[PC], HDMI[PC] mode.
- In the broadcasting system PAL/SECAM, the picture item Tint
doesn’t work.
MANUAL PICTURE CONTROL
Press the
MMEENNUU
button and then
DD
//
EE
button to select
the PICTURE menu.
Press the
GG
button and then use
DD
//
EE
button to select
the desired picture option.
Press the
GG
button and then use
FF
//
GG
button to make
appropriate adjustments.
Press the EXIT button to return to normal TV viewing.
1
2
3
4
2 3
1
PSM
CSM
ACM
Contrast 100
Brightness 50
Colour 50
Sharpness 50
Tint 0
STATION
O
PICTURE{
SOUND
O
TIME
O
SPECIAL
O
SCREEN
O
PIP/DW
O
DVR
O
Menu
MENU
Move
PSM
CSM
ACM
Contrast 100
Brightness 50
Colour 50
Sharpness 50
Tint 0
Contrast 100
GG
TV MENU
Picture Menu Options
A
U
D
IO
PIP
PR
-
PIP PR +
SWAP
P
IP
IN
PU
T
S
T
B
M
E
N
U
OK
VOL PR
CABLE
EXIT
MARK
LIVE TV
TIME
SHIFT
TIME
SHIFT
MUTE
TEXT
Page 64
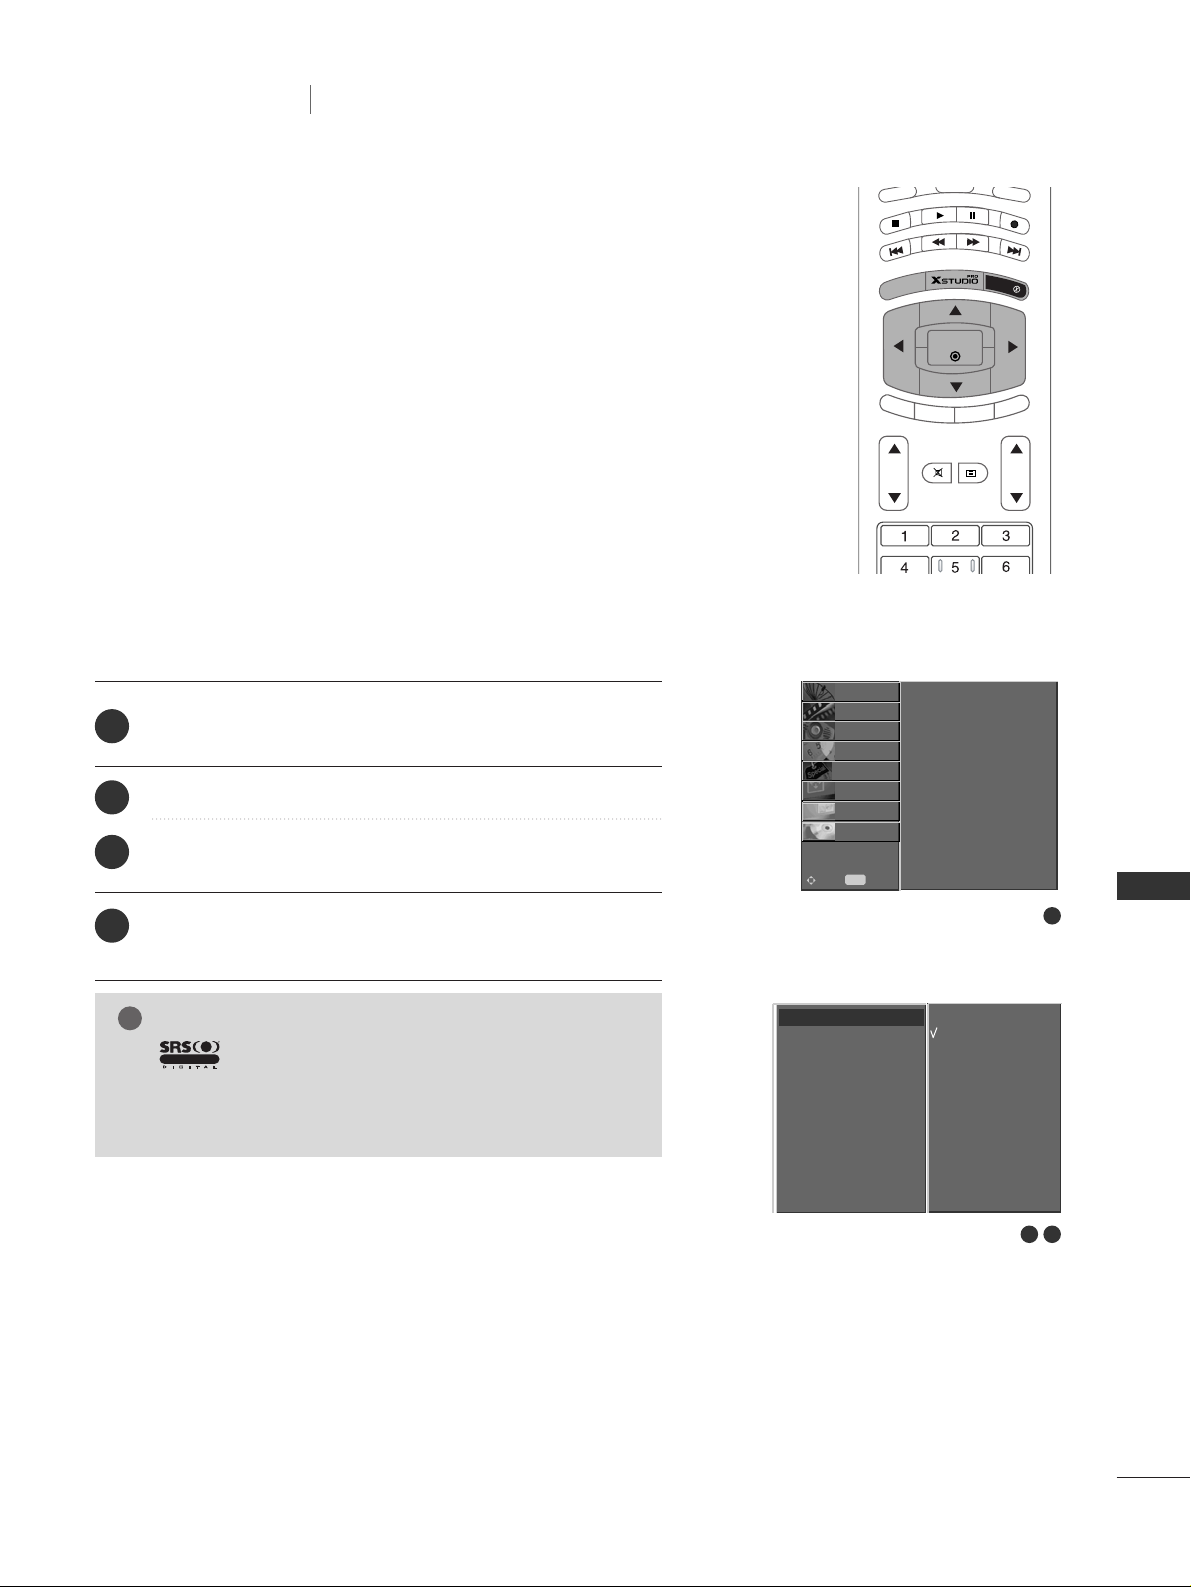
TV MENU
63
TV MENU
Sound Menu Options
SSM (SOUND STATUS MEMORY)
- This function lets you enjoy the best sound without any special
adjustment because the set automatically selects the appropriate sound option based on the program content.
- When adjusting sound options (treble and bass) manually,
SSM is automatically changed to User.
- The sound SRS TSXT, Flat, Music, Movie and Sports are programmed for good sound reproduction at the factory and cannot be changed.
Press the
MMEENNUU
button and then
DD
//
EE
button to select
the SOUND menu.
Press the
GG
button and then
DD
//
EE
button to select SSM.
Press the
GG
button and then
DD
//
EE
button to select SRS
TSXT
, Flat, Music, Movie, Sports or User.
Press the
EEXXIITT
button to return to normal TV viewing.
1
2
3
4
1
2 3
SSM
AVL
Balance 0
Treble 50
Bass 50
TV Speaker
SSM
GG
NOTE
!
a. is a trademark of SRS Labs, Inc.
b. TruSurround XT technology is incorporated under license
from SRS Labs, Inc.
R
TruSurround XT
SSM
AVL
Balance 0
Treble 50
Bass 50
TV Speaker
STATION
O
PICTURE
O
SOUND{
TIME
O
SPECIAL
O
SCREEN
O
PIP/DW
O
DVR
O
Menu
MENU
Move
SRS TSXT
Flat
Music
Movie
Sports
User
A
U
D
IO
PIP
PR
-
PIP PR +
SWAP
PIP INP
UT
S
T
B
M
E
N
U
OK
VOL PR
CABLE
EXIT
MARK
LIVE TV
TIME
SHIFT
TIME
SHIFT
MUTE
TEXT
Page 65
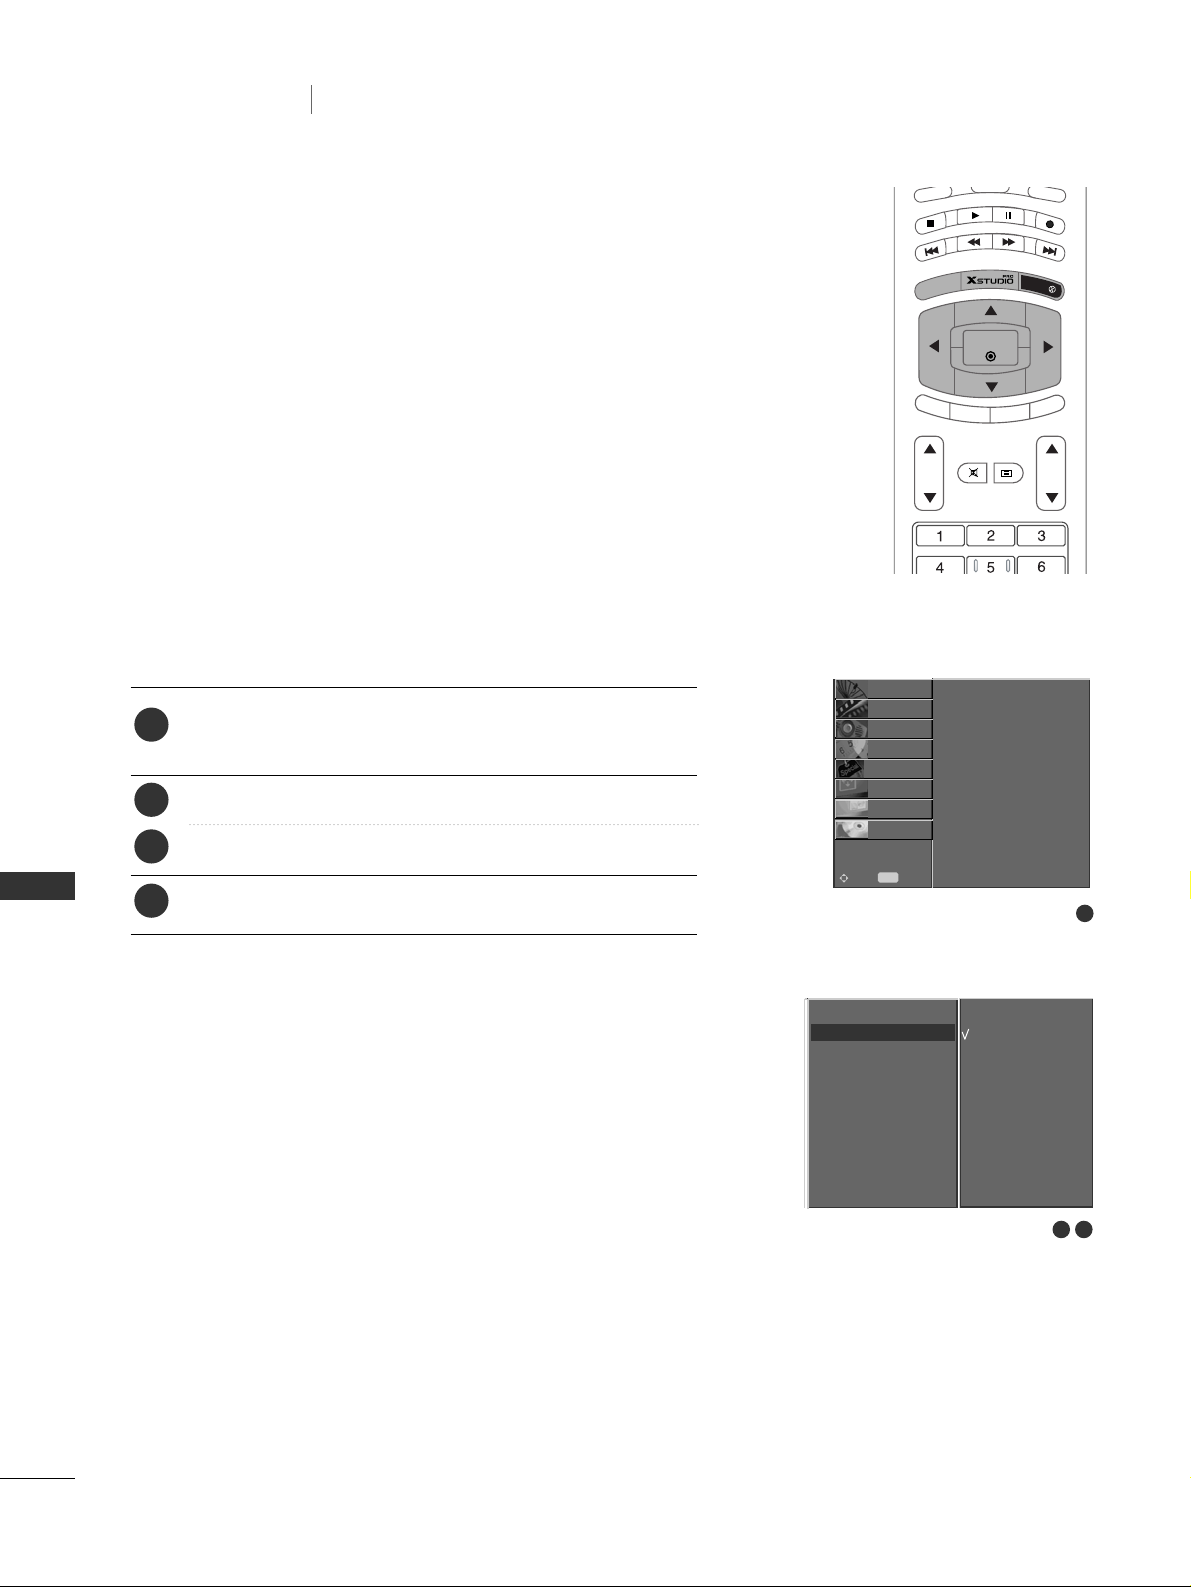
TV MENU
64
TV MENU
Sound Menu Options
Press the
MMEENNUU
button and then
DD
//
EE
button to select
the SOUND menu.
Press the
GG
button and then
DD
//
EE
button to select AVL.
Press the
GG
button and then
DD
//
EE
button to select On or Off.
Press the
EEXXIITT
button to return to normal TV viewing.
- AVL automatically keeps on an equal volume level even if you
change programmes.
AVL (AUTO VOLUME LEVELER)
1
2
3
4
2 3
SSM
AVL
Balance 0
Treble 50
Bass 50
TV Speaker
AVL
GG
On
Off
1
SSM
AVL
Balance 0
Treble 50
Bass 50
TV Speaker
STATION
O
PICTURE
O
SOUND{
TIME
O
SPECIAL
O
SCREEN
O
PIP/DW
O
DVR
O
Menu
MENU
Move
A
U
D
IO
PIP
PR
-
PIP PR +
SWAP
PIP IN
P
UT
S
T
B
M
E
N
U
OK
VOL PR
CABLE
EXIT
MARK
LIVE TV
TIME
SHIFT
TIME
SHIFT
MUTE
TEXT
Page 66
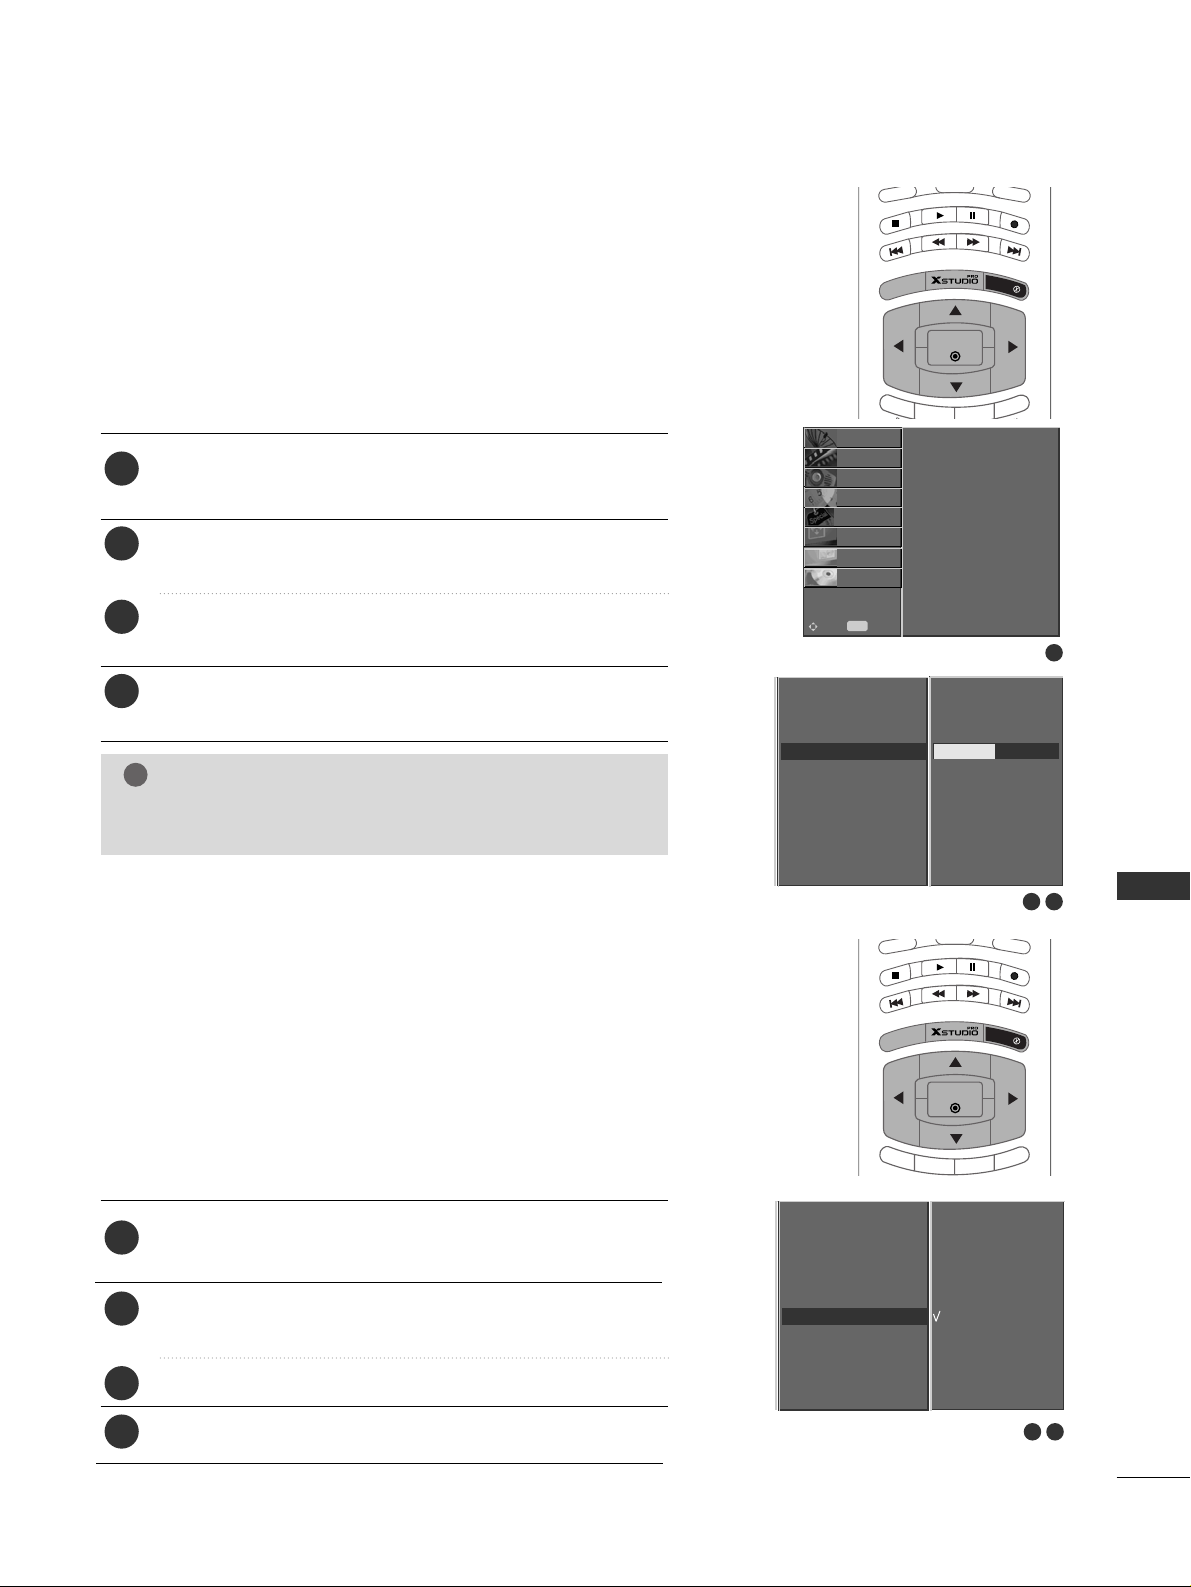
TV MENU
65
Press the
MMEENNUU
button and then
DD
//
EE
button to select
the SOUND menu.
Press the
GG
button and then
DD
//
EE
button to select TV
Speaker.
Press the
GG
button and then
DD
//
EE
button to select On or Off.
Press the
EEXXIITT
button to return to normal TV viewing.
You can adjust the internal speaker status.
In AV1, AV2, S-Video2, AV3, AV4, COMPONENT, RGB and
HDMI/DVI with HDMI to DVI cable, TV speaker and/or variable
audio can be outputted even though there is no video signal.
If you want to use your external hi-fi stereo system, turn off
the internal speakers of the set.
TV SPEAKER
1
2
3
4
Press the
MMEENNUU
button and then
DD
//
EE
button to select
the SOUND menu.
Press the GGbutton and then use
DD
//
EE
button to select
the desired sound item.
Press the
GG
button and then use
FF
//
GG
button to make
appropriate adjustments.
Press the
EEXXIITT
button to return to normal TV viewing.
ADJUSTING SOUND CONTROL
1
2
3
4
NOTE
!
a. Treble or Bass aren’t suitable for use with SRS TSXT.
1
SSM
AVL
Balance 0
Treble 50
Bass 50
TV Speaker
STATION
O
PICTURE
O
SOUND{
TIME
O
SPECIAL
O
SCREEN
O
PIP/DW
O
DVR
O
Menu
MENU
Move
2 3
SSM
AVL
Balance 0
Treble 50
Bass 50
TV Speaker
Treble 50
GG
2 3
SSM
AVL
Balance 0
Treble 50
Bass 50
TV Speaker
TV Speaker
GG
On
Off
CABLE
PR
CABLE
IO
D
U
A
MARK
U
N
E
M
TIME
SHIFT
EXIT
OK
S
LIVE TV
TIME
SHIFT
T
B
PIP
D
U
A
E
M
TIME
SHIFT
IO
U
N
OK
MARK
EXIT
S
LIVE TV
TIME
SHIFT
T
B
T
U
P
Page 67
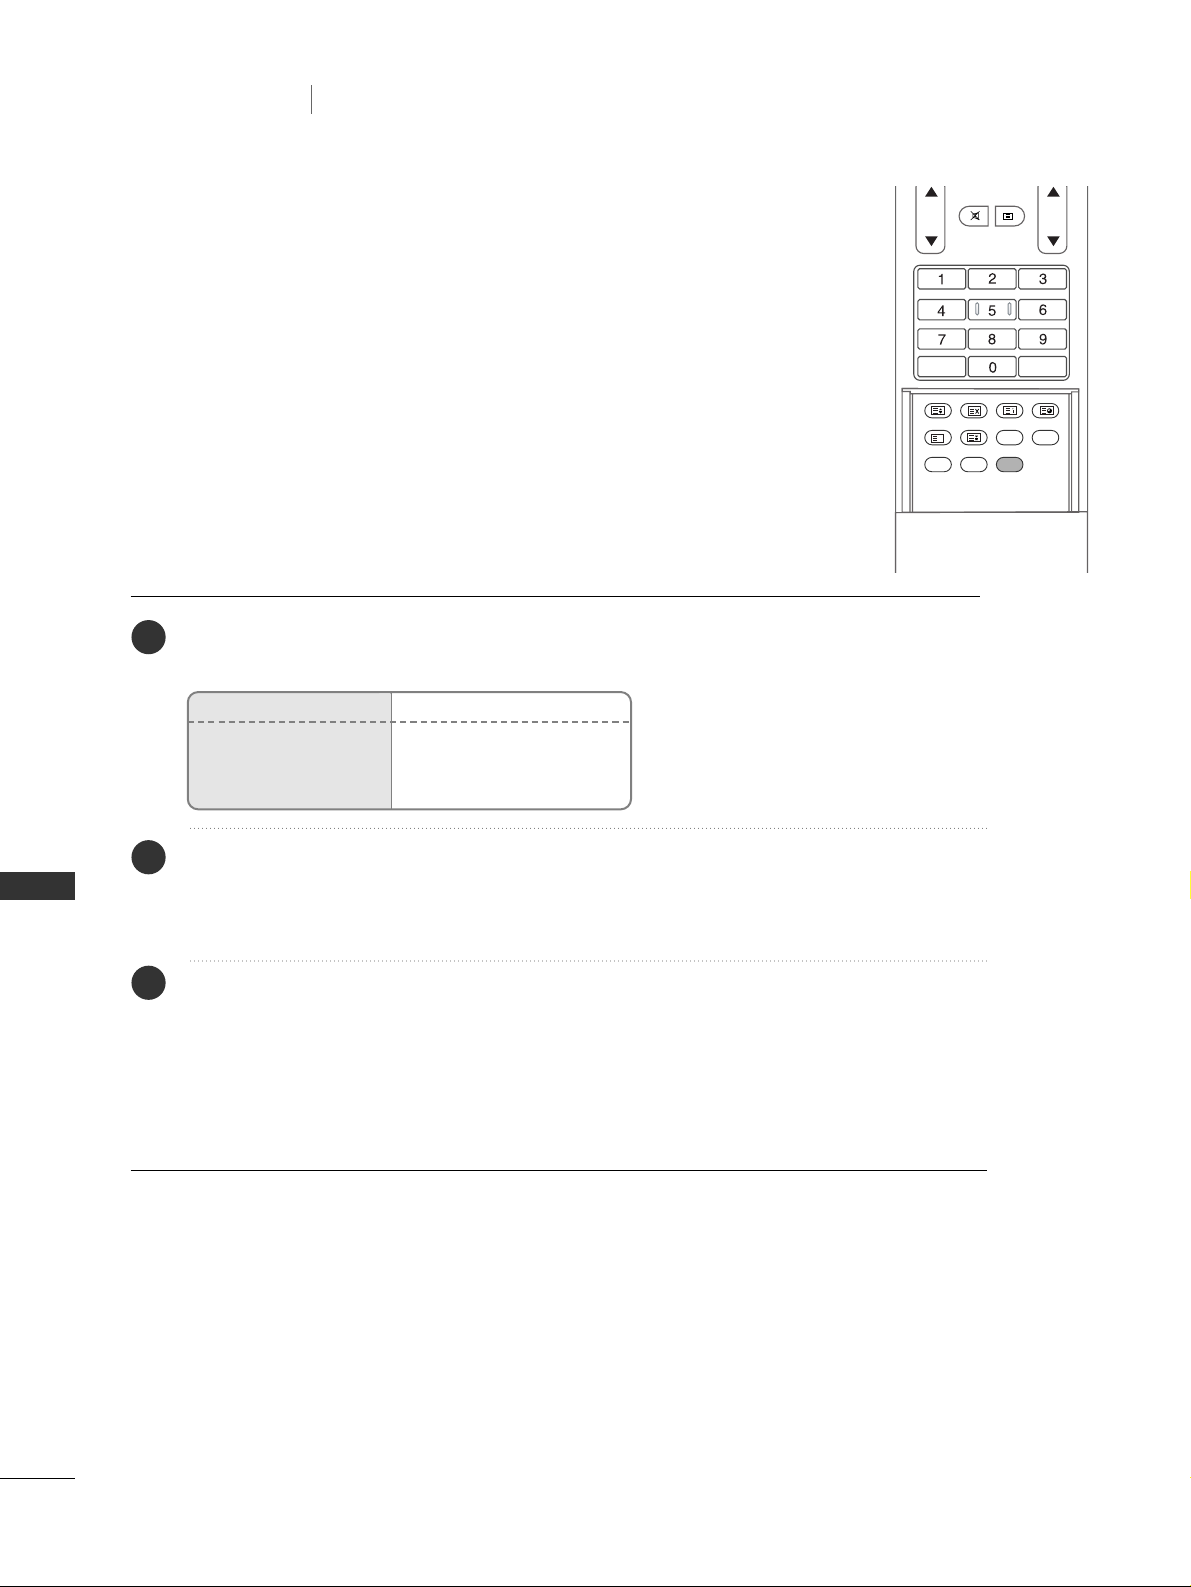
TV MENU
66
TV MENU
Sound Menu Options
On Screen Display
Press the I/II button to received broadcast state.
Mono sound selection
In stereo reception if the stereo signal is weak, you can switch to mono by pressing the I/II
button twice. In mono reception the depth of sound is improved. To switch back to stereo,
press the I/II button twice again.
Language selection for dual language broadcast
If a programme received in two languages (dual language), you can switch to DUAL I,
DUAL II or DUAL I+II by pressing the I/II button repeatedly.
• DUAL I sends the primary broadcast language to the loudspeakers.
• DUAL II sends the secondary broadcast language to the loudspeakers.
• DUAL I+II sends a separate language to each loudspeaker.
STEREO/DUAL RECEPTION
- When a programme is selected, the sound information for the
station appears after the programme number and station name
disappear.
1
2
3
Broadcast
Mono
Stereo
Dual
On Screen Display
MONO
STEREO
DUAL I
SIZE POSITION INDEX
SLEEP
FAV
I/II
PIP ARC
Q.VIEWLIST
VOL PR
HOLD
REVEAL
?
TIME
MUTE
TEXT
Page 68

TV MENU
67
When NICAM mono is received, you can select NICAM MONO or FM MONO.
When NICAM stereo is received, you can select NICAM STEREO or FM MONO. If the
stereo signal is weak, switch to FM mono.
When NICAM dual is received, you can select NICAM DUAL I, NICAM DUAL II, NICAM
DUAL I + II, or MONO. When FM mono is selected the display MONO appears on the
screen.
NICAM RECEPTION (OPTION)
If the set is equipped with the receiver for NICAM reception, the high quality NICAM
(Near Instantaneous Companding Audio Multiplex) digital sound can be received.
Sound output can be selected according to the type of received broadcast as follows by pressing the
II// IIII
button repeatedly.
SOUND OUTPUT SELECTION
- In AV, Component, RGB or HDMI/DVI mode, you can select output sound for the left and right
loudspeakers.
Repeatedly press the I/II button to select the sound output.
•
L+R : Audio signal from audio L input is sent to left loud-speaker and audio signal from
audio R input is sent to right loud-speaker.
• L+L : Audio signal from audio L input is sent to left and right loud-speakers.
•
R+R : Audio signal from audio R input is sent to left and right loud-speakers.
1
2
3
Page 69
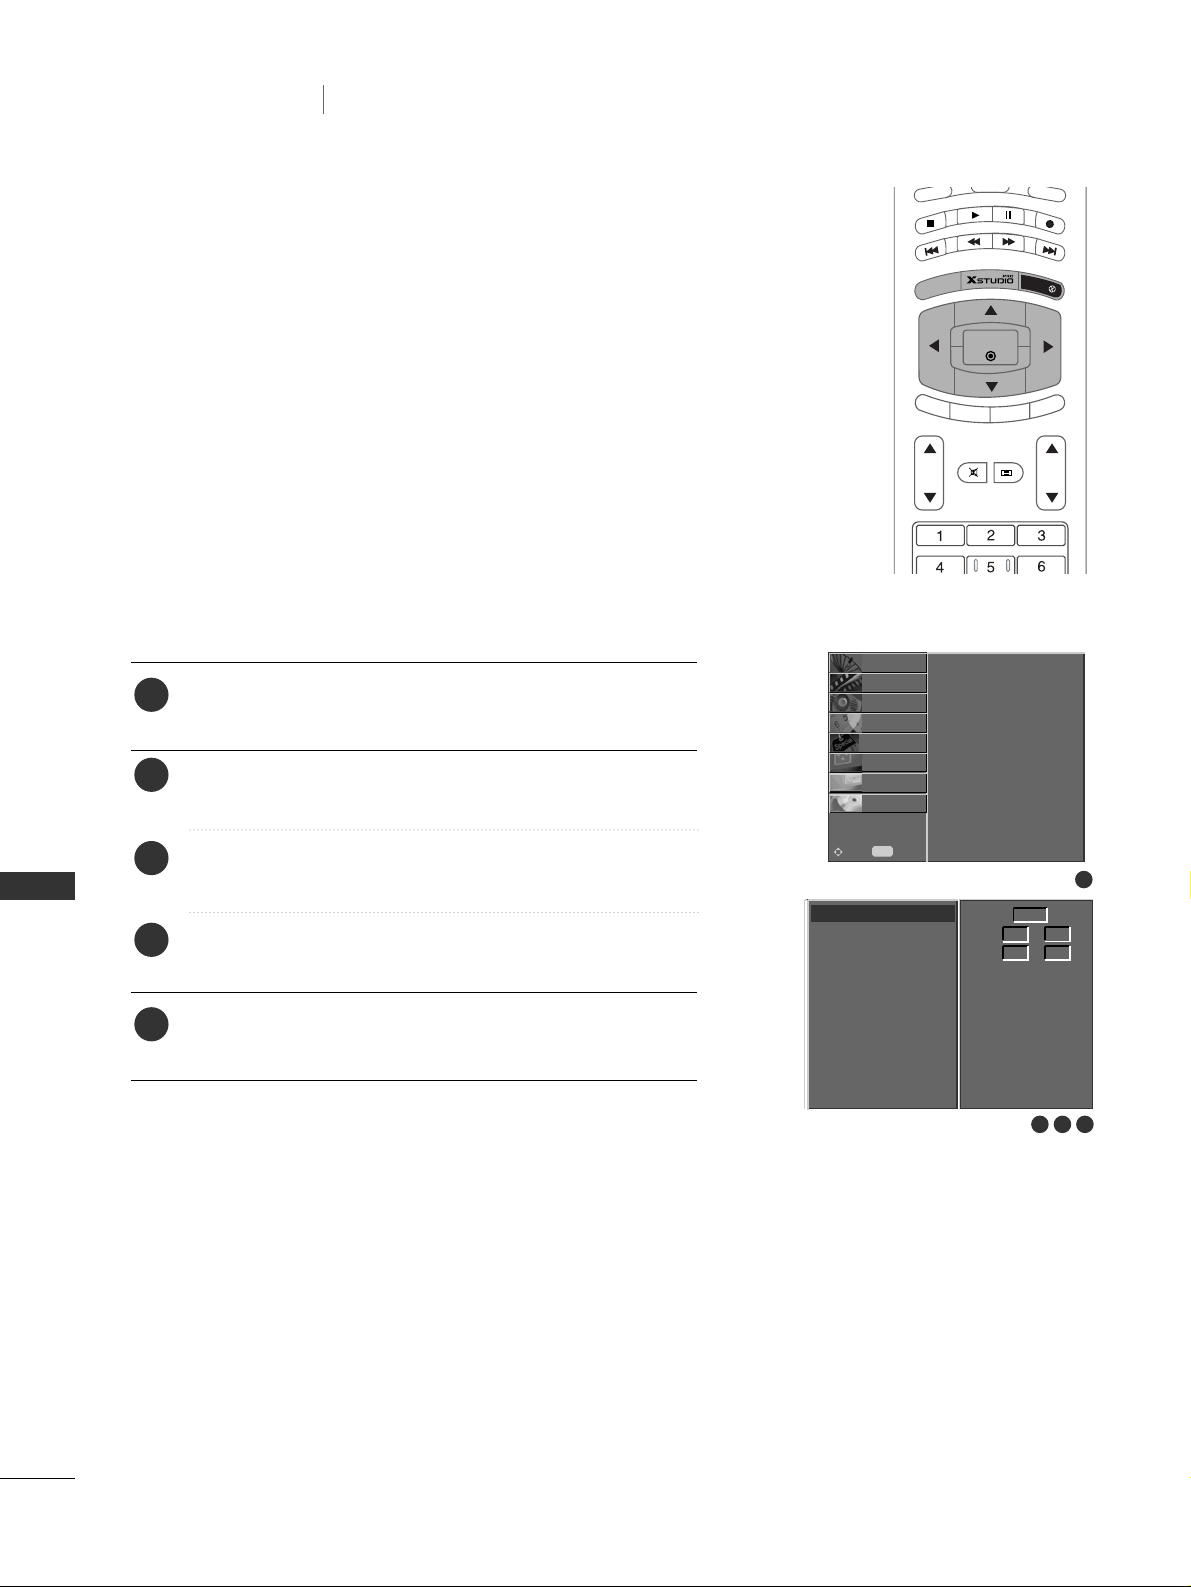
TV MENU
68
TV MENU
Time Menu Options
Press the MENU button and then use
DD
//
EE
button to
select the TIME menu.
Press the
GG
button and then use
DD
//
EE
button to select
Clock.
Press the
GG
button and then use
DD
//
EE
button to adjust
the hour.
Press the
GG
button and then use
DD
//
EE
button to adjust
the minute.
Press the
EEXXIITT
button to return to normal TV viewing.
- If current time setting is erased by a power failure or the set
is unplugged, reset the clock.
SETTING THE CLOCK
1
2
3
4
5
1
2 3 4
Clock
Off time
On time
Auto sleep
Clock
GG
Clock
Off time
On time
Auto sleep
STATION
O
PICTURE
O
SOUND
O
TIME{
SPECIAL
O
SCREEN
O
PIP/DW
O
DVR
O
Menu
MENU
Move
Year
2006
Date /
1 1
Time :
00 03
A
U
D
IO
PIP
PR -
PIP PR +
SWAP
P
IP
INP
UT
S
T
B
M
E
N
U
OK
VOL PR
CABLE
EXIT
MARK
LIVE TV
TIME
SHIFT
TIME
SHIFT
MUTE
TEXT
Page 70
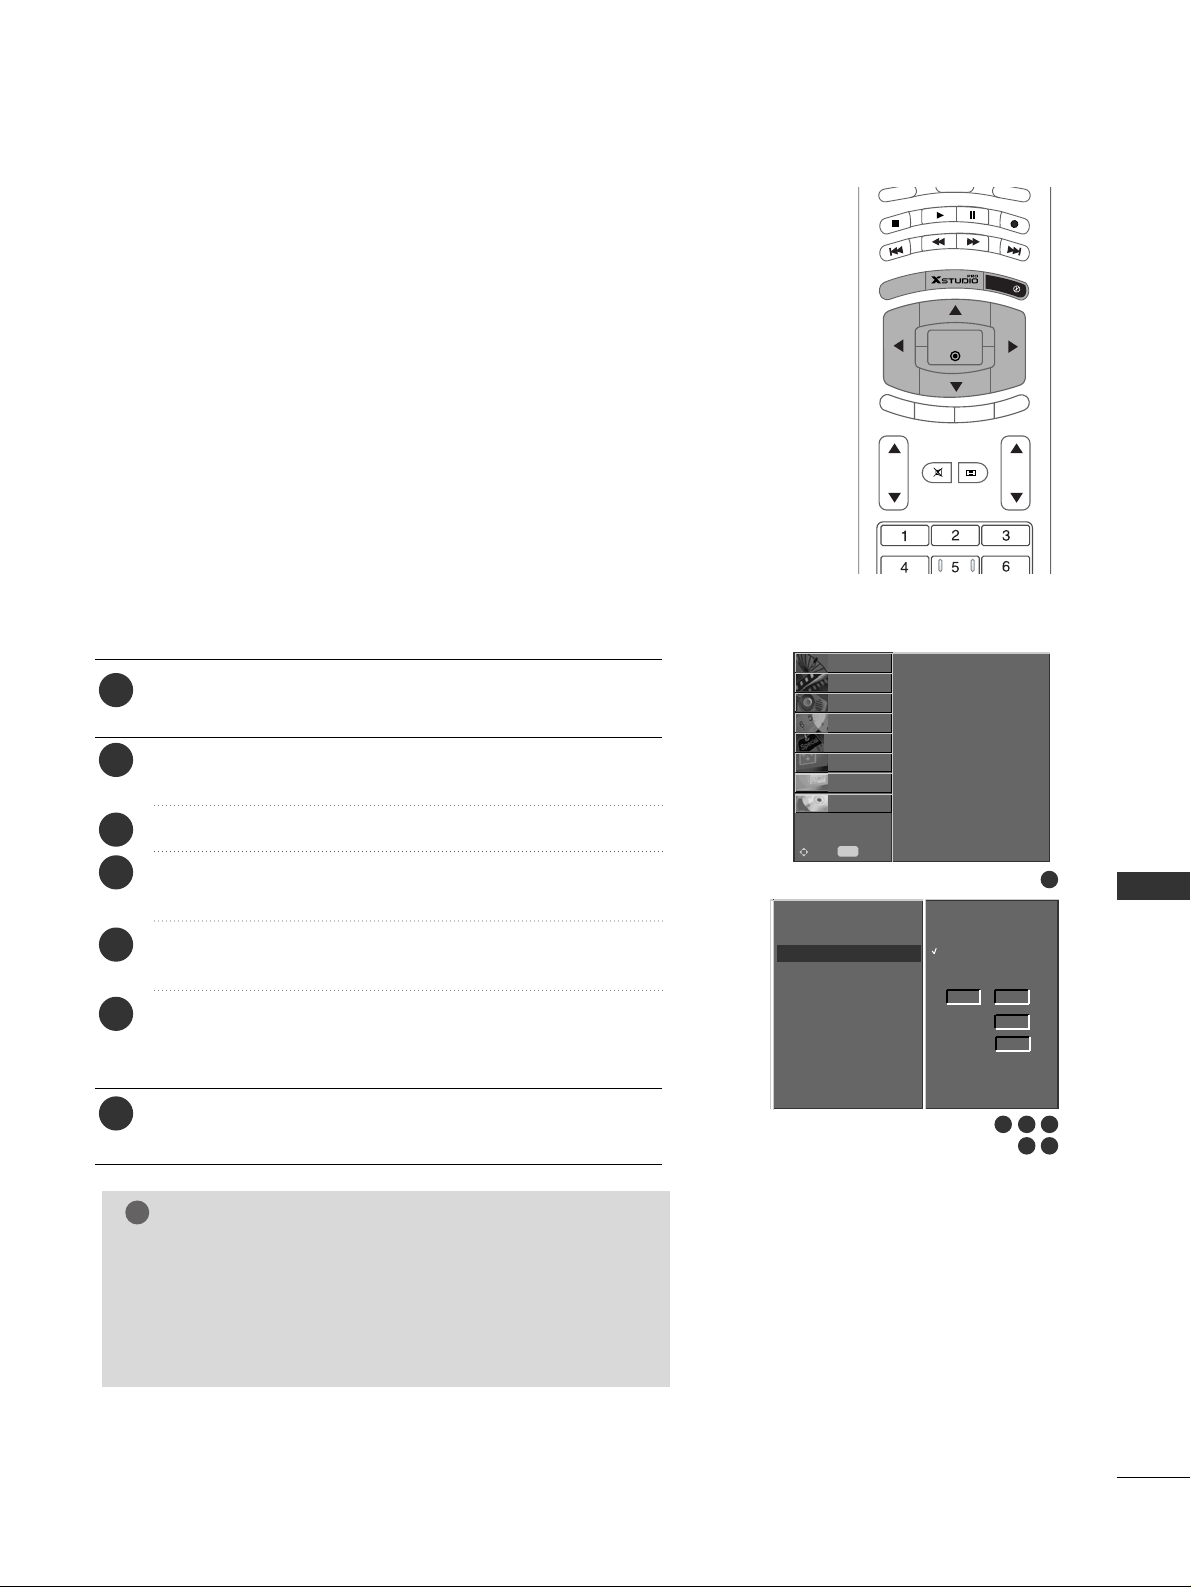
TV MENU
69
Press the MENU button and then use
DD
//
EE
button to
select the TIME menu.
Press the
GG
button and then use
DD
//
EE
button to select
Off time or On time.
Press the
GG
button and then use
DD
//
EE
button to select On.
Press the
GG
button and then use
DD
//
EE
button to adjust
the hour.
Press the
GG
button and then use
DD
//
EE
button to adjust
the minute.
Only On time function; Press the
GG
button and then use
DD
//
EE
button to adjust programme number or volume
level.
Press the
EEXXIITT
button to return to normal TV viewing.
- Time function operates only if current time has been already set.
- Off Time function overrides On Time function if they are set to the same time.
- The set must be in standby mode for the On Time to work.
SETTING THE ON/OFF TIME
1
2
3
4
5
6
7
1
32 4
5 6
Clock
Off time
On time
Auto sleep
On time
GG
Clock
Off time
On time
Auto sleep
STATION
O
PICTURE
O
SOUND
O
TIME{
SPECIAL
O
SCREEN
O
PIP/DW
O
DVR
O
Menu
MENU
Move
:
12 00
30
1
NOTE
!
a. To cancel Off/On time function. Press the
DD
//
EE
button
to select Off in step 3.
b. Two hours after the set is switched on by the On time
function it will automatically switch back to standby mode
unless a button has been pressed.
On
Off
Vol.
Programme
A
U
D
IO
PIP
PR -
PIP PR +
SWAP
P
IP
IN
P
U
T
S
T
B
M
E
N
U
OK
VOL PR
CABLE
EXIT
MARK
LIVE TV
TIME
SHIFT
TIME
SHIFT
MUTE
TEXT
Page 71
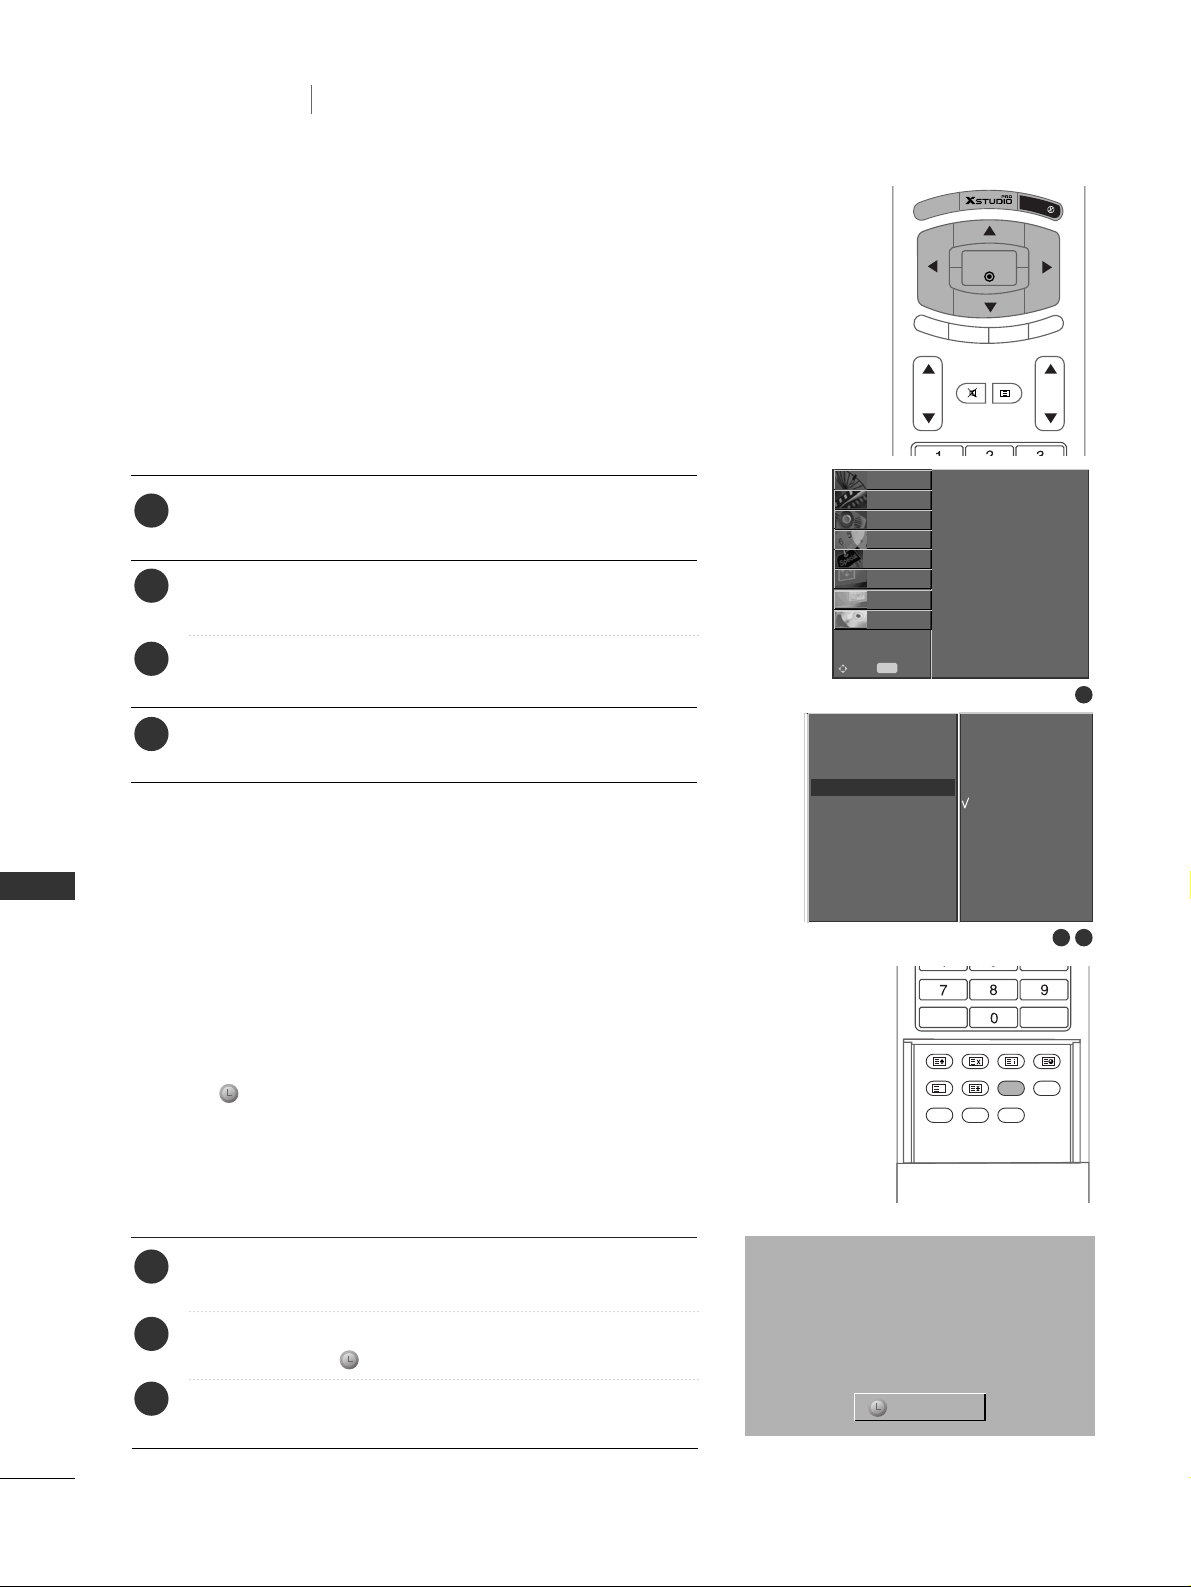
TV MENU
70
To check the remaining sleep timer, press the SLEEP button
once.
To cancel the sleep timer, repeatedly press the SLEEP button
until the display --- Min appears.
If you turn the set off after setting the sleep timer, the setting
will be erased.
- Sleep timer turns the set off at the preset time.
- Press the SLEEP button to select the number of minutes. The
display
--- Min
will appear on the screen, followed by
10,
20, 30, 60, 90, 120, 180
and
240
minutes.
The timer begins to count down from the number of minutes
selected.
SLEEP TIMER
1
2
3
Press the MENU button and then use
DD
//
EE
button to
select the TIME menu.
Press the GGbutton and then use
DD
//
EE
button to select
Auto sleep.
Press the
GG
button and then use
DD
//
EE
button to select
On or Off.
Press the
EEXXIITT
button to return to normal TV viewing.
If set to on and there is no input signal, the set turns off
automatically after 10 minutes.
AUTO SLEEP
1
2
3
4
1
Clock
Off time
On time
Auto sleep
STATION
O
PICTURE
O
SOUND
O
TIME{
SPECIAL
O
SCREEN
O
PIP/DW
O
DVR
O
Menu
MENU
Move
2 3
Clock
Off time
On time
Auto sleep
Auto sleep
GG
On
Off
------ Min
TV MENU
Time Menu Options
PIP PR
-
PIP PR +
SWAP
P
IP IN
PU
T
M
E
N
U
OK
VOL PR
EXIT
TV
TIME
SHIFT
TIME
SHIFT
MUTE
TEXT
SIZE POSITION INDEX
SLEEP
FAV
I/II
PIP ARC
Q.VIEWLIST
HOLD
REVEAL
?
TIME
z
z
z
z
z
z
Page 72
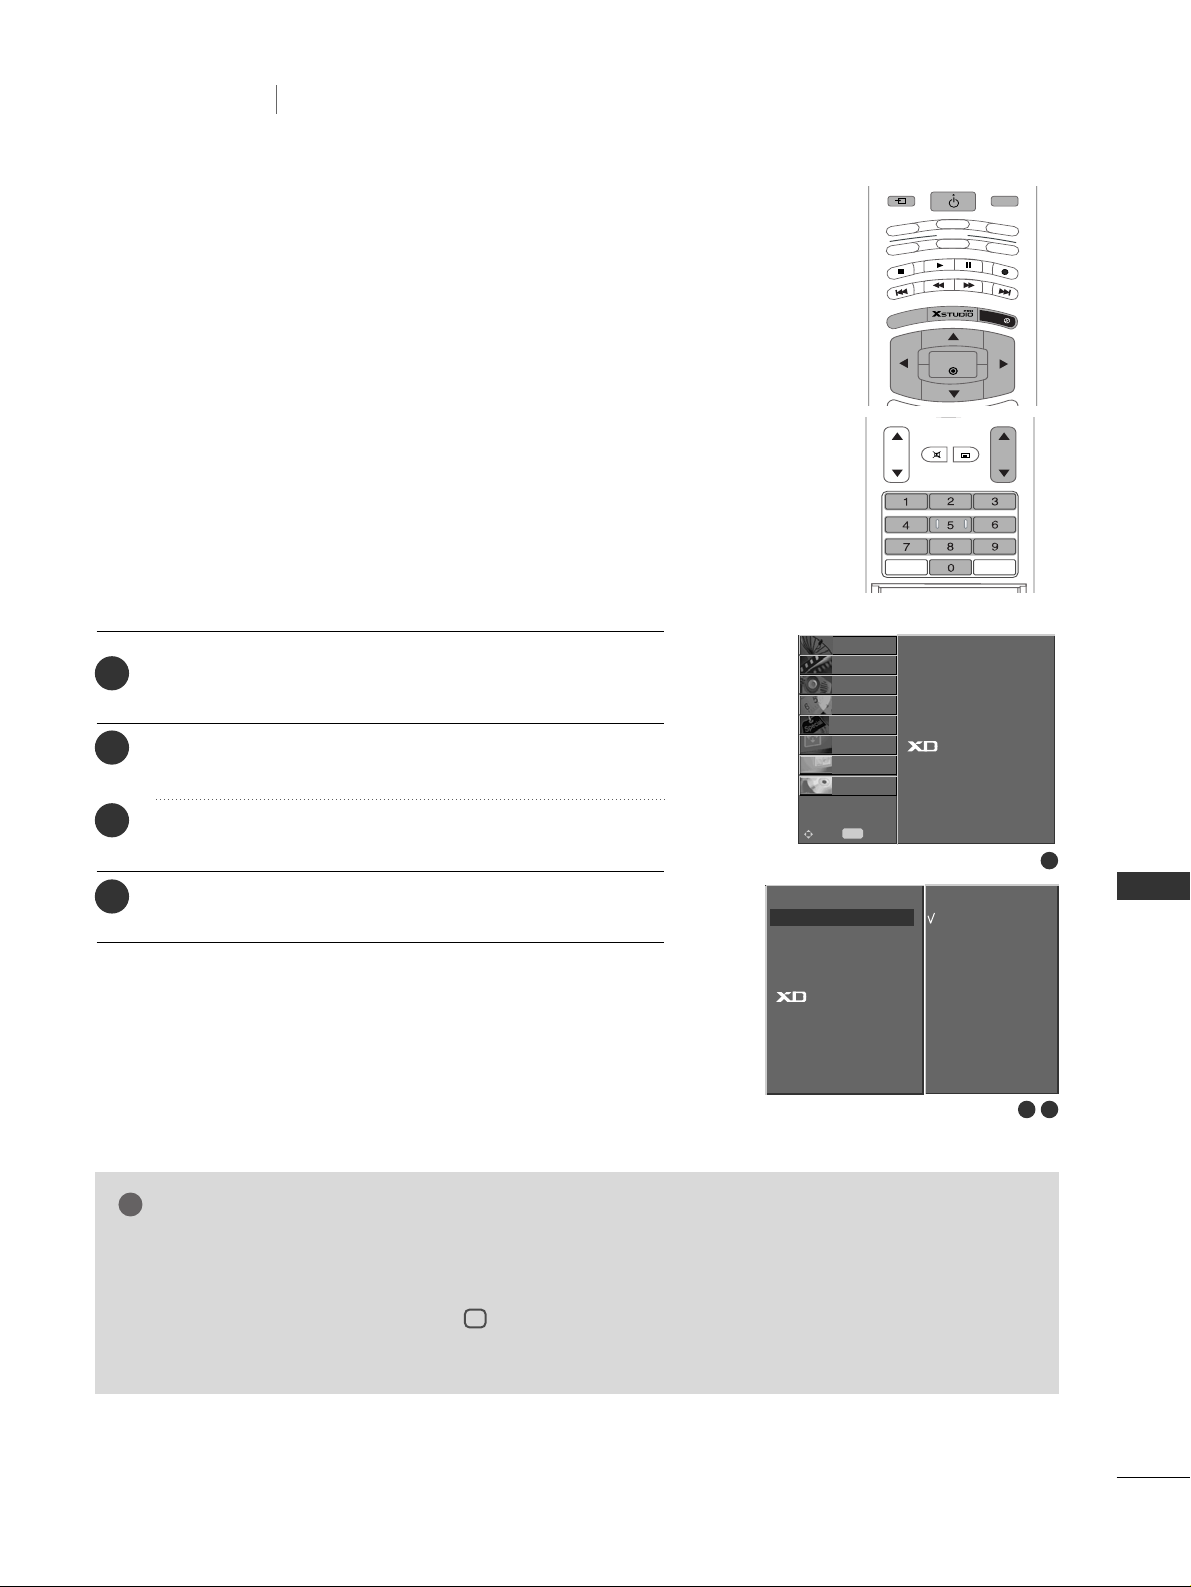
TV MENU
71
1
2 3
On
Off
TV MENU
Special Menu Options
- The set can be set so that the remote control handset is
needed to control it.
- This feature can be used to prevent unauthorized viewing.
Press the MENU button and then use
DD
//
EE
button to
select the SPECIAL menu.
Press the GGbutton and then use
DD
//
EE
button to select
Child lock.
Press the
GG
button and then use
DD
//
EE
button to select
On or Off.
Press the
EEXXIITT
button to return to normal TV viewing.
CHILD LOCK
NOTE
!
1
2
3
4
Language
Child lock
ISM Method
Low power
Set ID
Demo
STATION
O
PICTURE
O
SOUND
O
TIME
O
SPECIAL{
SCREEN
O
PIP/DW
O
DVR
O
Menu
MENU
Move
Language
Child lock
ISM Method
Low power
Set ID
Demo
Child lock
GG
MODE
INPUT
T
V
DVD
VCR
AUDIO
STB
MENU
OK
MULTIMEDIA
CABLE
E
X
IT
M
A
R
K
L
IV
E
T
V
TIME
SHIFT
TIME
SHIFT
POWER
P
R
-
P
IP
P
R
+
SW
AP
P
IP
IN
Q.VIEWLIST
VOL PR
MUTE
TEXT
- The set is programmed to remember which option it was last set to even if you turn the set off.
- In Child lock ‘on’, if the set is turned off, press the
r/I, INPUT, PR
DD
//
EE
button on the set or
POWER, INPUT, MULTIMEDIA, PR
DD
//
EE
or NUMBER buttons on the remote control.
- With the Child lock on, the display ‘ i Child lock on’ appears on the screen if any button on the front
panel is pressed while viewing the set.
Page 73
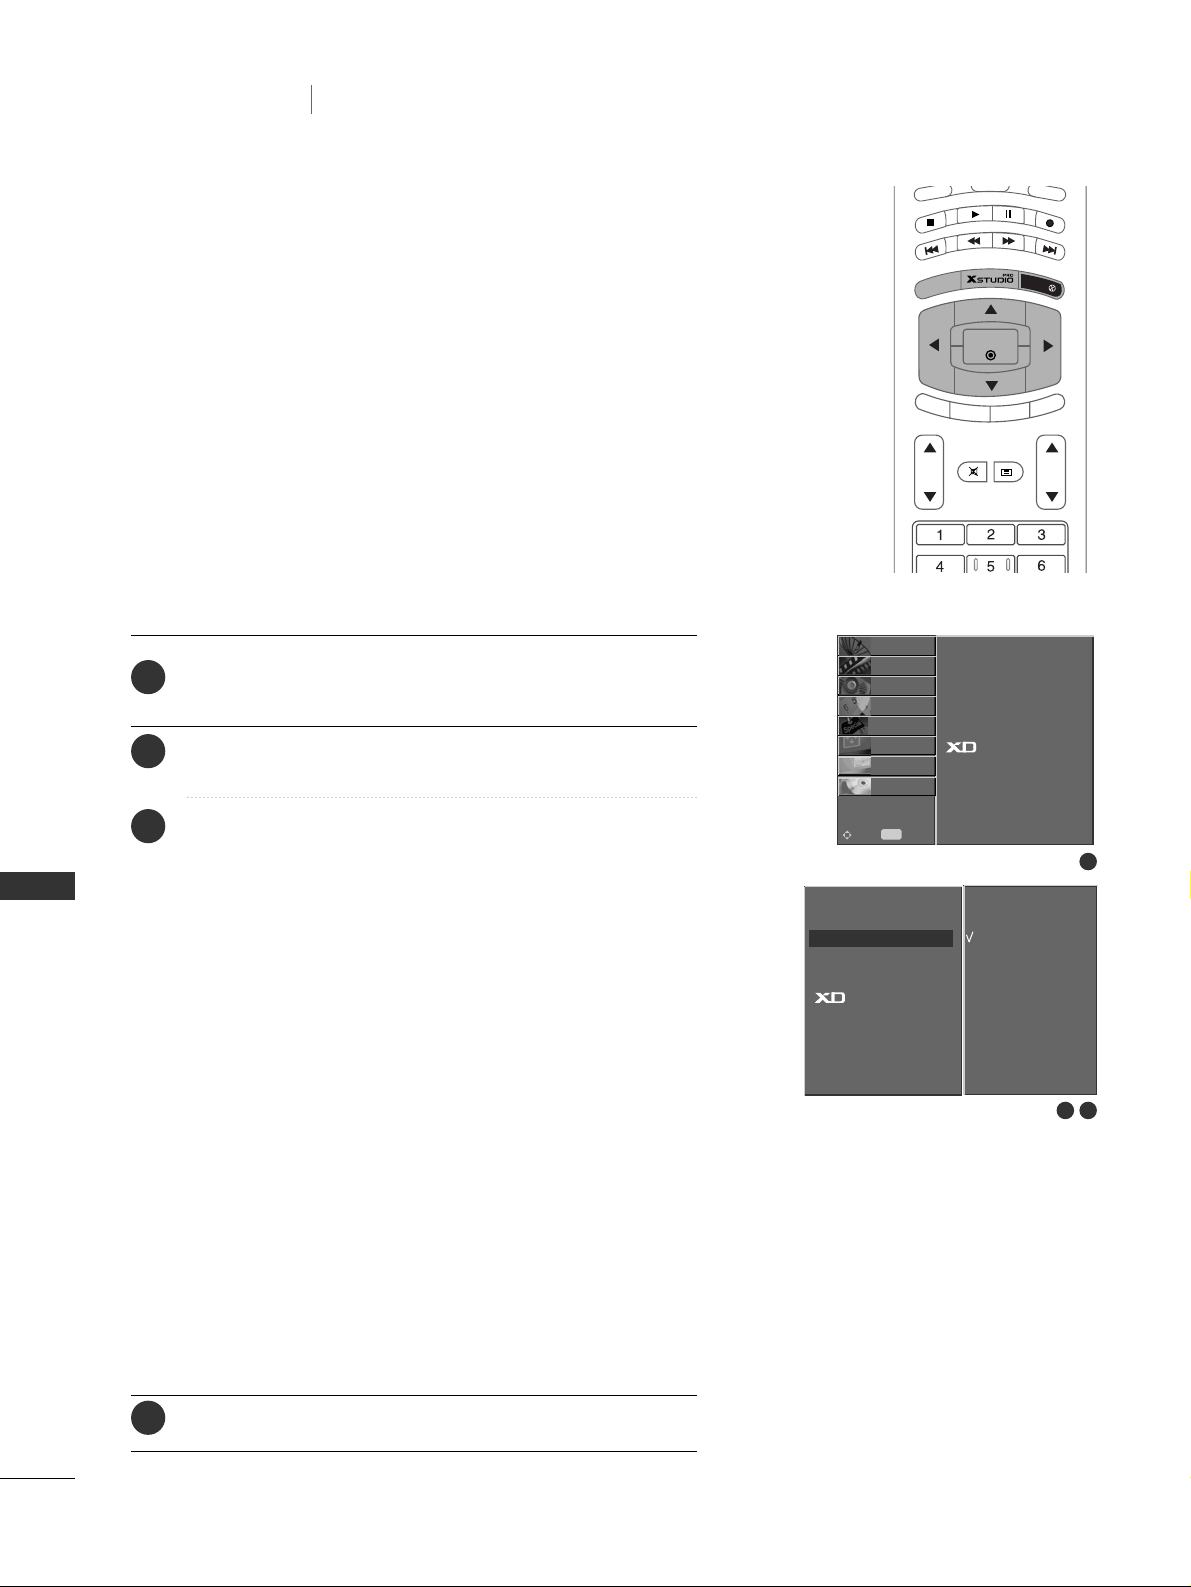
TV MENU
72
TV MENU
Special Menu Options
Press the MENU button and then use
DD
//
EE
button to
select the SPECIAL menu.
Press the
GG
button and then
DD
//
EE
button to select ISM
Method.
Press the
GG
button and then
DD
//
EE
button to select
either Normal, White wash, Orbiter or Inversion. If
you don’t need to set this function, set Normal.
• White wash :
White Wash removes permanent images from the screen.
Note: An excessive permanent image may be impossible
to clear entirely with White Wash.
• Orbiter :
Orbiter may help prevent ghost images. However, it is
best not to allow any fixed image to remain on the
screen. To avoid a permanent image on the screen, the
screen will move every 2 minutes.
• Inversion :
This is the function to invert the panel colour of the
screen. The panel colour is automatically inverted every
30 minutes.
• Normal :
When input signal is constantly static or temperature is
high, brightnest level will be decrase automatically for
image sticking minimalization.
Press the
EEXXIITT
button to return to normal TV viewing.
- A frozen of still picture from a PC/video game displayed on the
screen for prolonged periods will result in a ghost image remaining even when you change the image. Avoid allowing a fixed
image to remain on the set's screen for a long period of time.
- It’s not available to use this function in LCD TV models.
ISM (IMAGE STICKING MINIMIZATION) METHOD
1
2
3
4
1
2 3
Normal
White wash
Orbiter
Inversion
Language
Child lock
ISM Method
Low power
Set ID
Demo
STATION
O
PICTURE
O
SOUND
O
TIME
O
SPECIAL{
SCREEN
O
PIP/DW
O
DVR
O
Menu
MENU
Move
Language
Child lock
ISM Method
Low power
Set ID
Demo
ISM Method
GG
A
U
D
IO
PIP
PR -
PIP PR +
SWAP
P
IP
INP
UT
S
T
B
M
E
N
U
OK
VOL PR
CABLE
EXIT
MARK
LIVE TV
TIME
SHIFT
TIME
SHIFT
MUTE
TEXT
Page 74
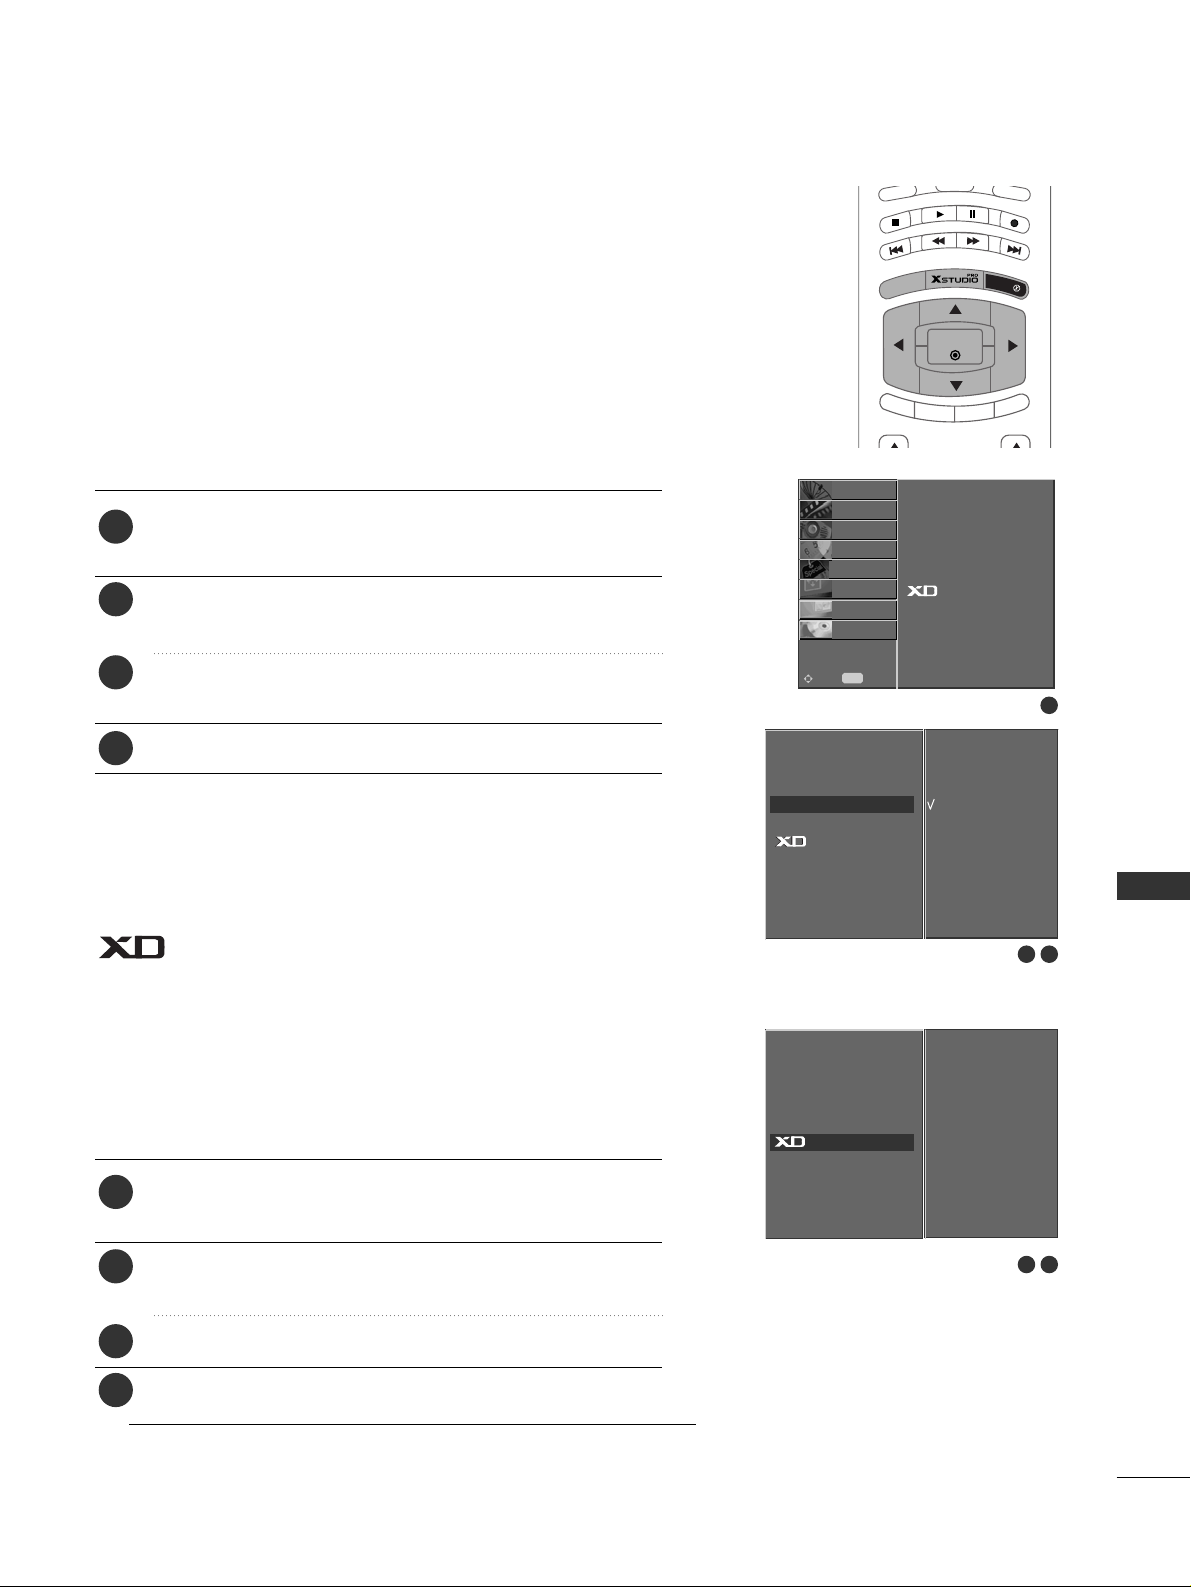
TV MENU
73
LOW POWER
- This is the function to reduce the power consumption of the set.
-
It’s not available to use this function in LCD TV models.
Press the MENU button and then use
DD
//
EE
button to
select the SPECIAL menu.
Press the GGbutton and then use
DD
//
EE
button to select
Low power.
Press the
GG
button and then use
DD
//
EE
button to select
On or Off.
Press the
EEXXIITT
button to return to normal TV viewing.
- Use it to see the difference between XD Demo on and XD
Demo off.
- It’s not available to use this function in RGB[PC], HDMI[PC]
mode.
Press the MENU button and then use
DD
//
EE
button to
select the SPECIAL menu.
Press the GGbutton and then use
DD
//
EE
button to select
XD Demo.
Press the
GG
button to begin XD Demo.
To stop XD Demo, press the MENU or EXIT button.
2 3
1
2
3
4
1
2
3
4
1
2 3
Language
Child lock
ISM Method
Low power
Set ID
Demo
STATION
O
PICTURE
O
SOUND
O
TIME
O
SPECIAL{
SCREEN
O
PIP/DW
O
DVR
O
Menu
MENU
Move
On
Off
Language
Child lock
ISM Method
Low power
Set ID
Demo
DEMO
On
Off
Language
Child lock
ISM Method
Low Power
Set ID
Demo
Low Power
GG
Low power
GG
To Start
Language
Child lock
ISM Method
Low Power
Set ID
Demo
Demo
GG
A
U
D
IO
PIP
PR -
PIP PR +
SWAP
P
IP
IN
P
U
T
S
T
B
M
E
N
U
OK
CABLE
EXIT
MARK
LIVE TV
TIME
SHIFT
TIME
SHIFT
Page 75
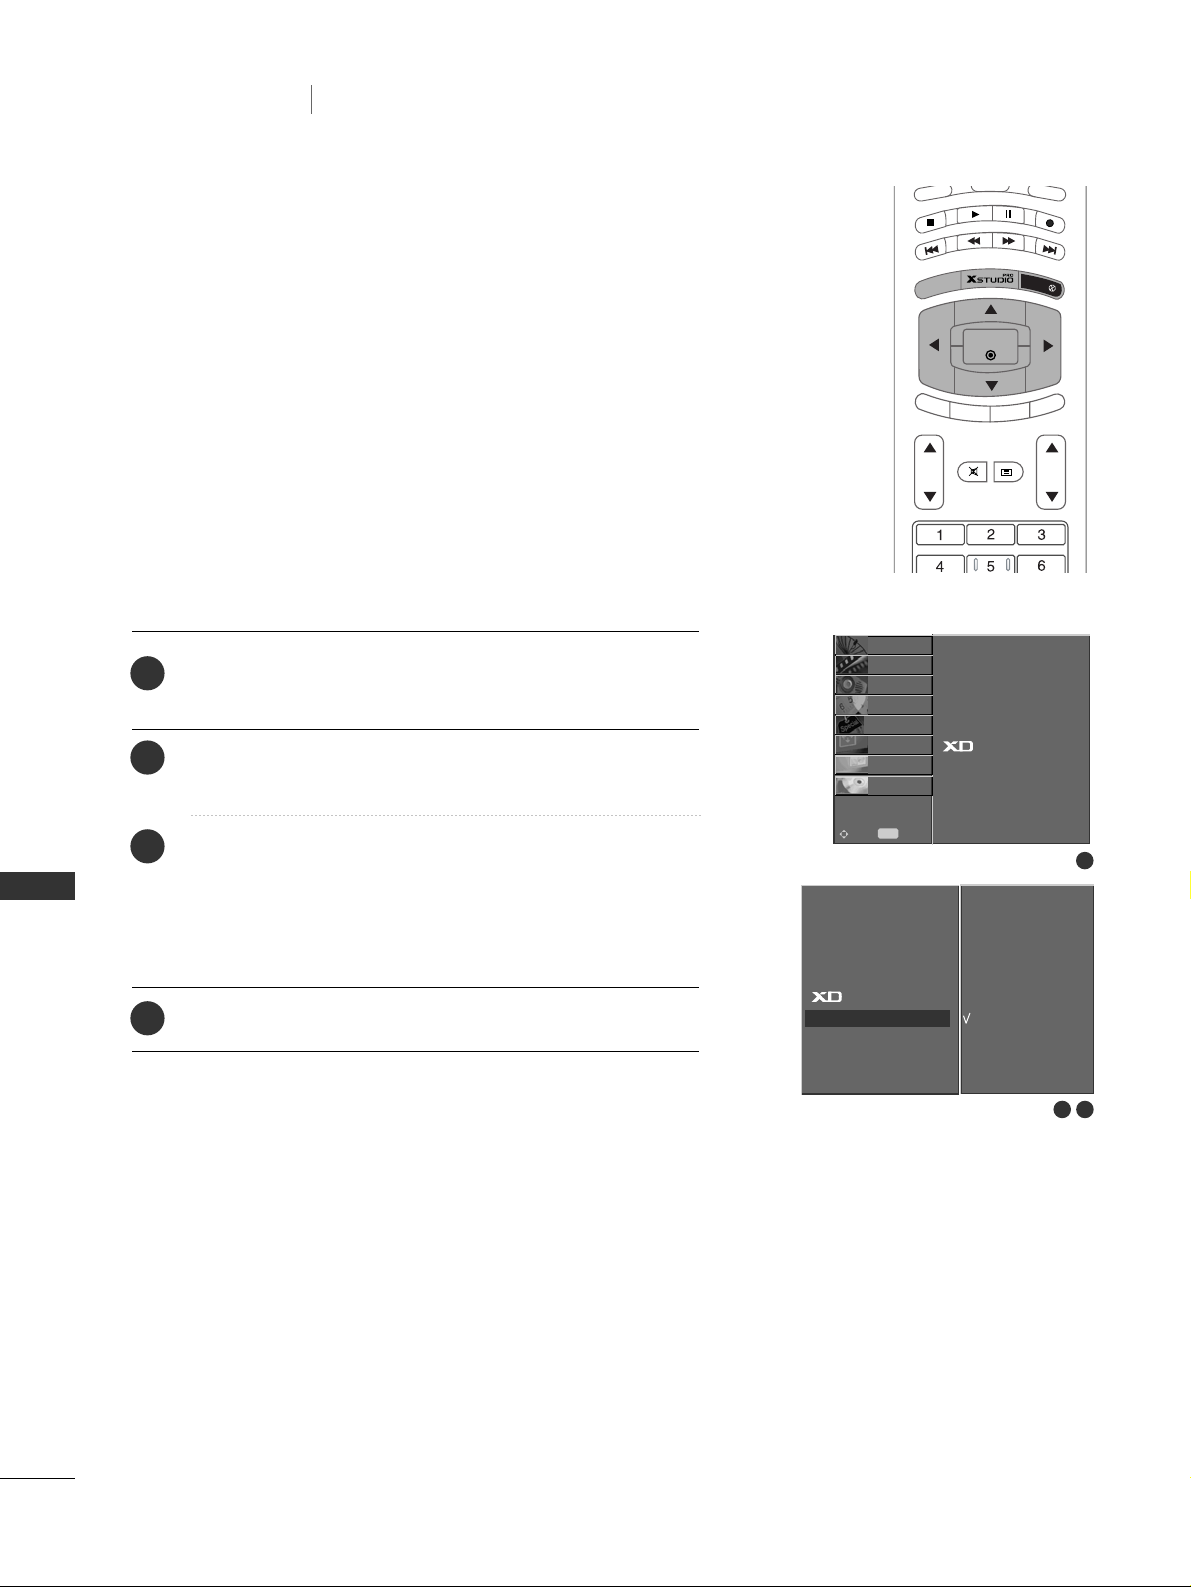
TV MENU
74
1
2 3
On
Off
- You can switch FRONT DISPLAY on or off.
Press the MENU button and then use
DD
//
EE
button to
select the SPECIAL menu.
Press the
GG
button and then use
DD
//
EE
button to select
Index.
Press the
GG
button and then use
DD
//
EE
button to select
On or Off.
When you select On mode, The FRONT DISPLAY illuminates
brightly.
Press the
EEXXIITT
button to return to normal TV viewing.
INDEX (OPTION)
1
2
3
4
Language
Child lock
ISM Method
Low power
Set ID
Demo
Index
STATION
O
PICTURE
O
SOUND
O
TIME
O
SPECIAL{
SCREEN
O
PIP/DW
O
DVR
O
Menu
MENU
Move
Language
Child lock
ISM Method
Low power
Set ID
Demo
Index
Index
GG
TV MENU
Special Menu Options
A
U
D
IO
P
IP
P
R -
PIP PR +
SWAP
PIP INP
U
T
S
T
B
M
E
N
U
OK
VOL PR
CABLE
EXIT
MARK
LIVE TV
TIME
SHIFT
TIME
SHIFT
MUTE
TEXT
Page 76
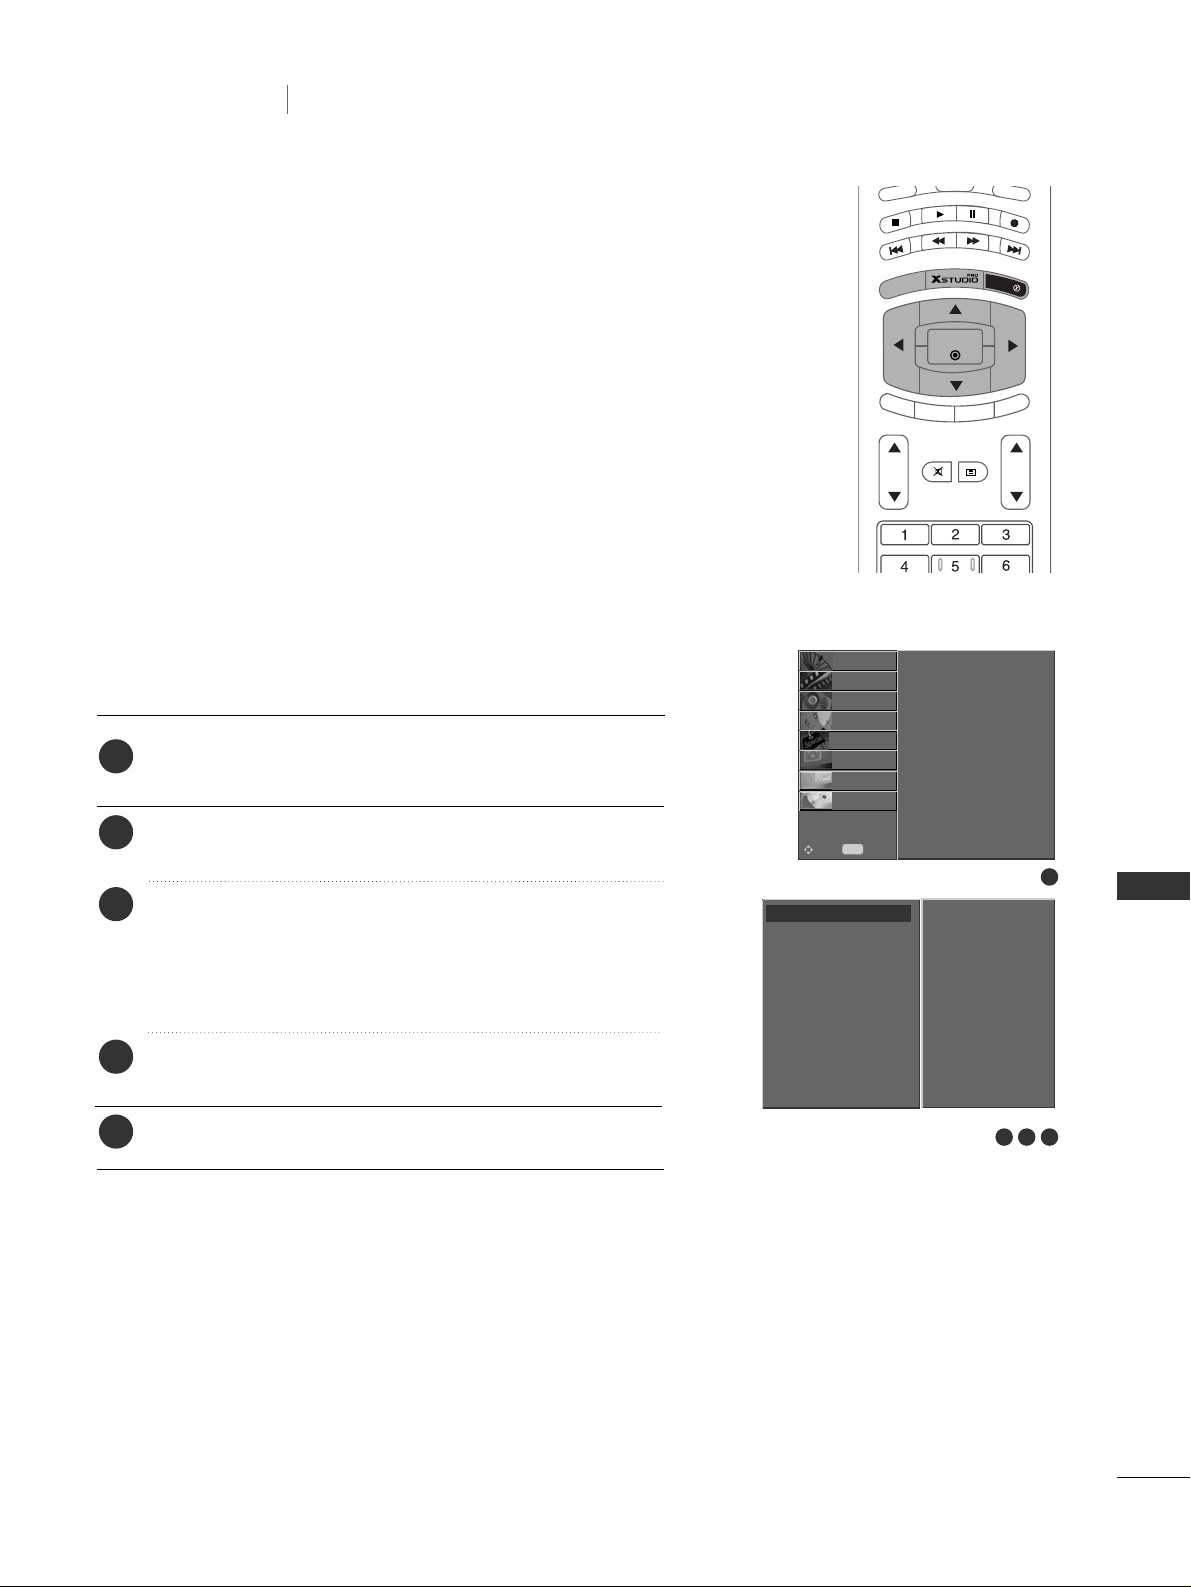
75
TV MENU
TV MENU
Screen Menu Options
Press the MENU button and then use
DD/ EE
button to
select the SCREEN menu.
Press the GGbutton and then use
DD/ EE
button to select
Auto config.
Press the
GG
button to start Auto config..
• When Auto config. has finished, OK will be shown on screen.
• If the position of the image is still not correct, try Auto
adjustment again.
If picture needs to be adjusted more after Auto adjustment
in RGB (PC), you can adjust the Manual config..
Press the
EEXXIITT
button to return to normal TV viewing.
- Automatically adjusts picture position and minimizes image
shaking.
- Although the image is still not correct, your set is functioning
properly but needs further adjustment.
- The Auto config. functions don’t need to be run for
HDMI/DVI mode.
- This function works in the following mode : RGB[PC]
- This function is for the automatic adjustment of the screen
position, clock, and phase. The displayed image will disappear
for a few seconds while the auto configuration is in progress.
AUTO CONFIG.
1
2
3
4
5
1
4
2 3
Auto config.
Manual config.
XGA Mode
ARC
Cinema
NR
Reset
STATION
O
PICTURE
O
SOUND
O
TIME
O
SPECIAL
O
SCREEN{
PIP/DW
O
DVR
O
Menu
MENU
Move
Auto config.
Manual config.
XGA Mode
ARC
Cinema
NR
Reset
Auto config.
GG
To set
A
U
D
IO
P
IP
P
R -
PIP PR +
SWAP
PIP INP
U
T
S
T
B
M
E
N
U
OK
VOL PR
CABLE
EXIT
MARK
LIVE TV
TIME
SHIFT
TIME
SHIFT
MUTE
TEXT
Page 77
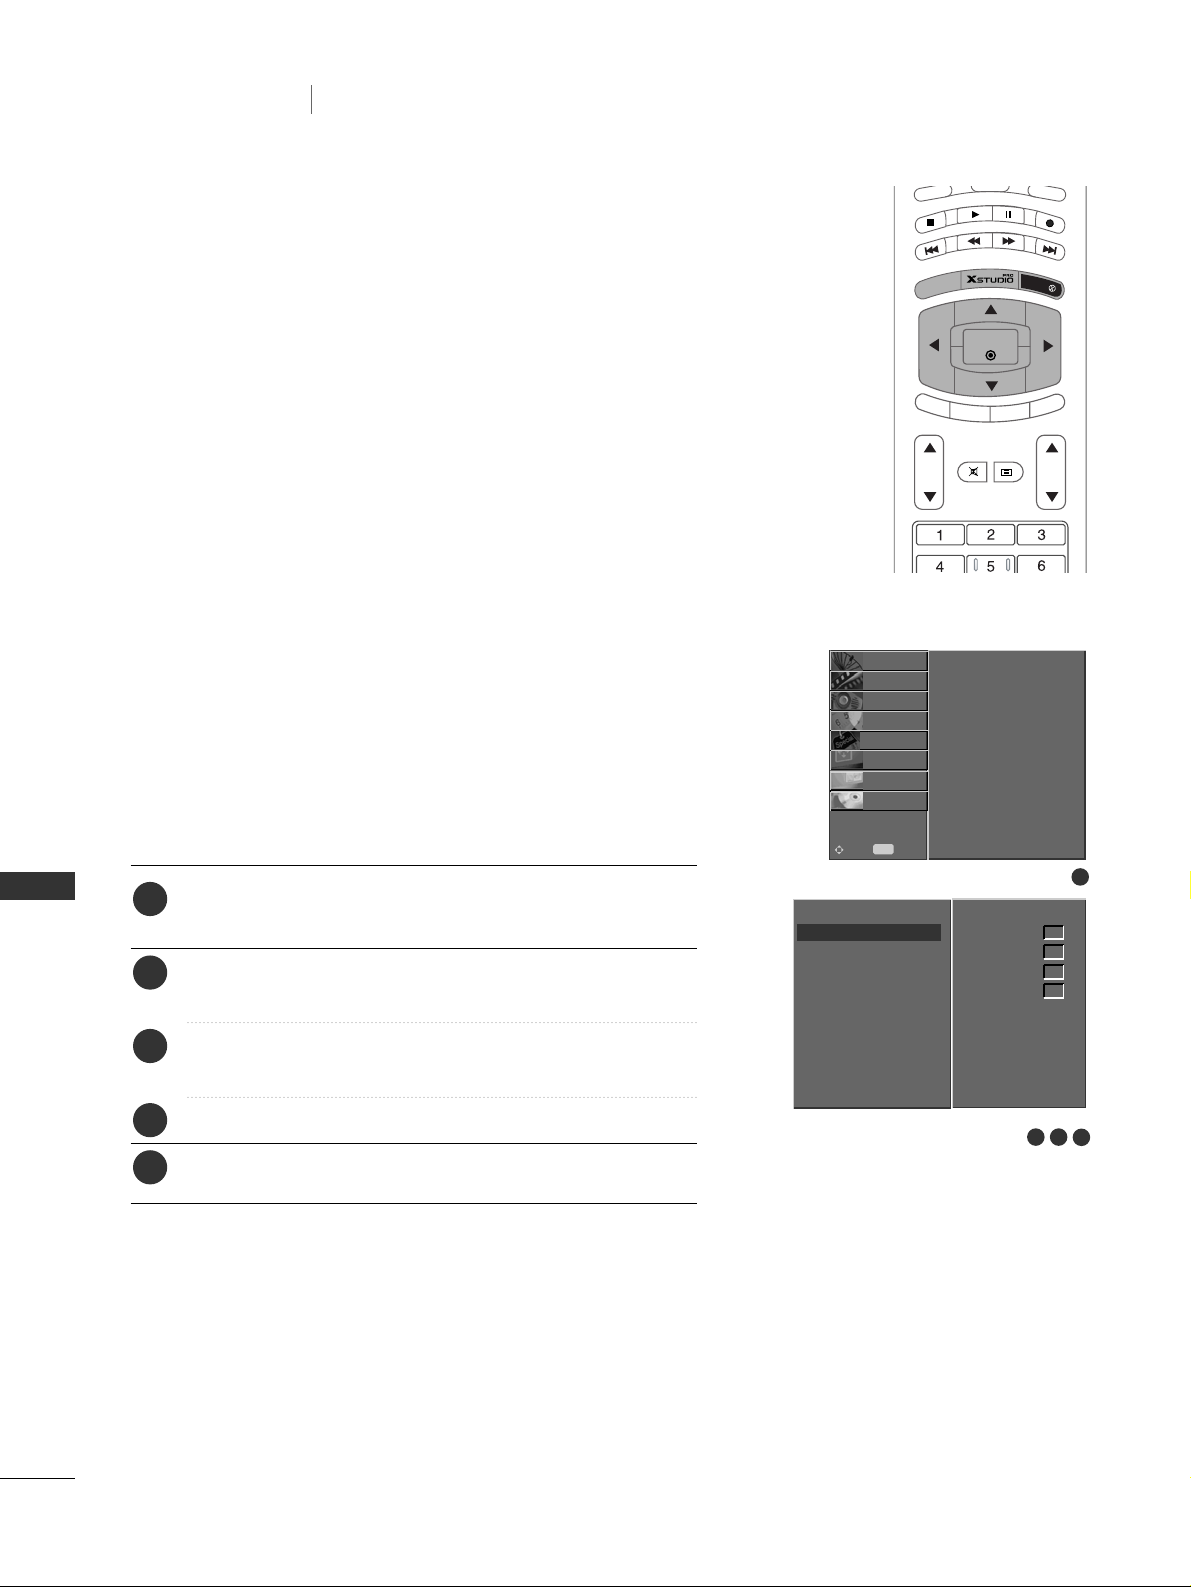
76
TV MENU
Screen Menu Options
TV MENU
MANUAL CONFIG.
- If the picture isn’t clear after auto adjustment and especially if characters are still trembling, adjust the picture
phase manually.
- To correct the screen size, adjust Clock.
- This function works in the following mode:
RGB[PC], RGB[DTV], HDMI[DTV], COMPONENT[DTV]
mode only
- It’s not available to use Phase, Clock function in RGB[DTV],
HDMI[DTV], COMPONENT[DTV] mode.
MM iinnii GGlloossssaarr yy
CClloocckk
This function is to minimize any vertical bars or stripes
visible on the screen background. And the horizontal
screen size will also change.
PPhh aassee
This function allows you to remove any horizontal
noise and clear or sharpen the image of characters.
Press the MENU button and then
DD/ EE
button to select
the SCREEN menu.
Press the GGbutton and then
DD/ EE
button to select
Manual config..
Press the
GG
button and then
DD/ EE
button to select Phase,
Clock, H-Position or V-Position.
Press the
FF/ GG
button to make appropriate adjustments.
Press the
EEXXIITT
button to return to normal TV viewing.
1
2
3
4
5
1
2 3
Auto config.
Manual config.
XGA Mode
ARC
Cinema
NR
Reset
STATION
O
PICTURE
O
SOUND
O
TIME
O
SPECIAL
O
SCREEN{
PIP/DW
O
DVR
O
Menu
MENU
Move
Auto config.
Manual config.
XGA Mode
ARC
Cinema
NR
Reset
Manual config.
GG
Phase
Clock
H-Position
V-Position
0
0
0
0
4
A
U
D
IO
PIP PR
-
PIP PR +
SWAP
PIP
IN
P
U
T
S
T
B
M
E
N
U
OK
VOL PR
CABLE
EXIT
MARK
LIVE TV
TIME
SHIFT
TIME
SHIFT
MUTE
TEXT
Page 78
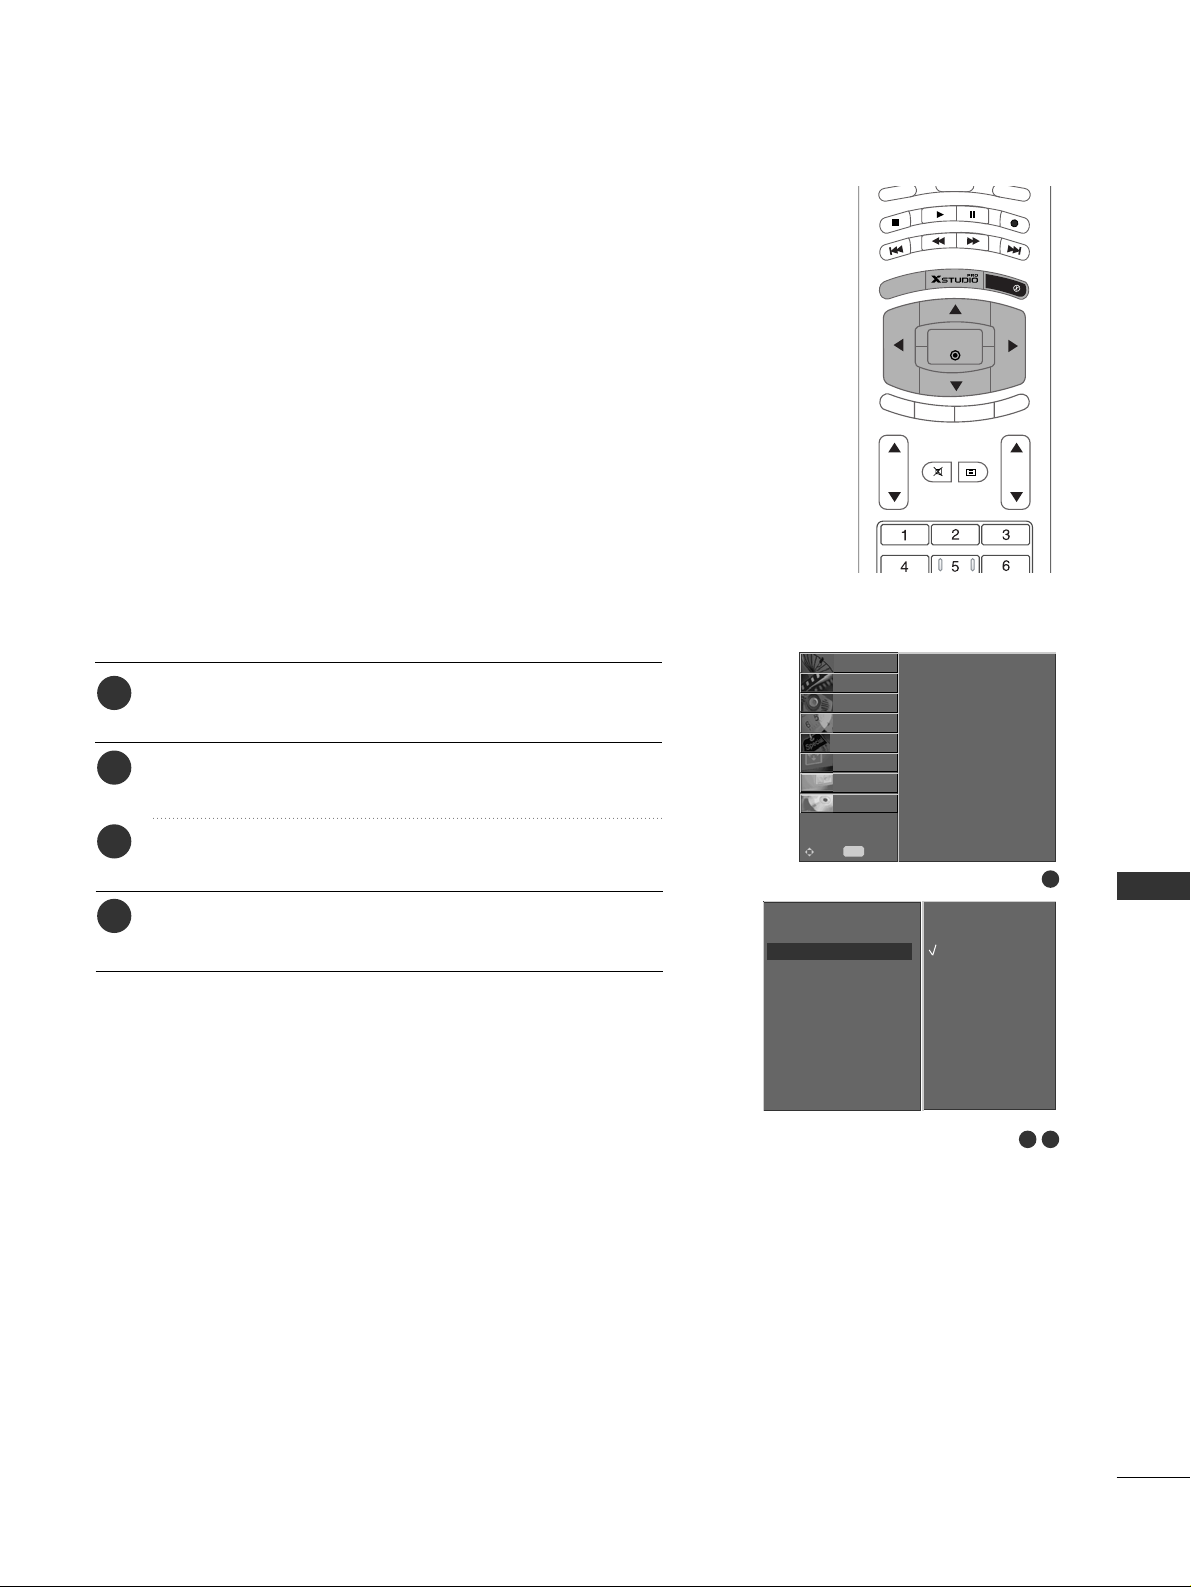
77
TV MENU
- To see a normal picture, match the resolution of RGB mode
and selection of VGA/XGA mode.
- In some models, it’s not available for selecting VGA mode.
- This function works in the following mode : RGB[PC]
Press the MENU button and then use
DD
//
EE
button to
select the SCREEN menu.
Press the
GG
button and then use
DD
//
EE
button to select
XGA Mode (VGA Mode).
Press the
GG
button and then use
DD
//
EE
button to select
the desired XGA/VGA resolution.
Press the
EEXXIITT
button to return to normal TV viewing.
SELECTING WIDE XGA/VGA MODE
1
2
3
4
1
2 3
Auto config.
Manual config.
XGA Mode
ARC
Cinema
NR
Reset
STATION
O
PICTURE
O
SOUND
O
TIME
O
SPECIAL
O
SCREEN{
PIP/DW
O
DVR
O
Menu
MENU
Move
Auto config.
Manual config.
XGA Mode
ARC
Cinema
NR
Reset
XGA Mode
GG
1024x768
1280x768
1360x768
1366x768
A
U
D
IO
PIP PR
-
PIP PR +
SWAP
PIP
INP
U
T
S
T
B
M
E
N
U
OK
VOL PR
CABLE
EXIT
MARK
LIVE TV
TIME
SHIFT
TIME
SHIFT
MUTE
TEXT
Page 79
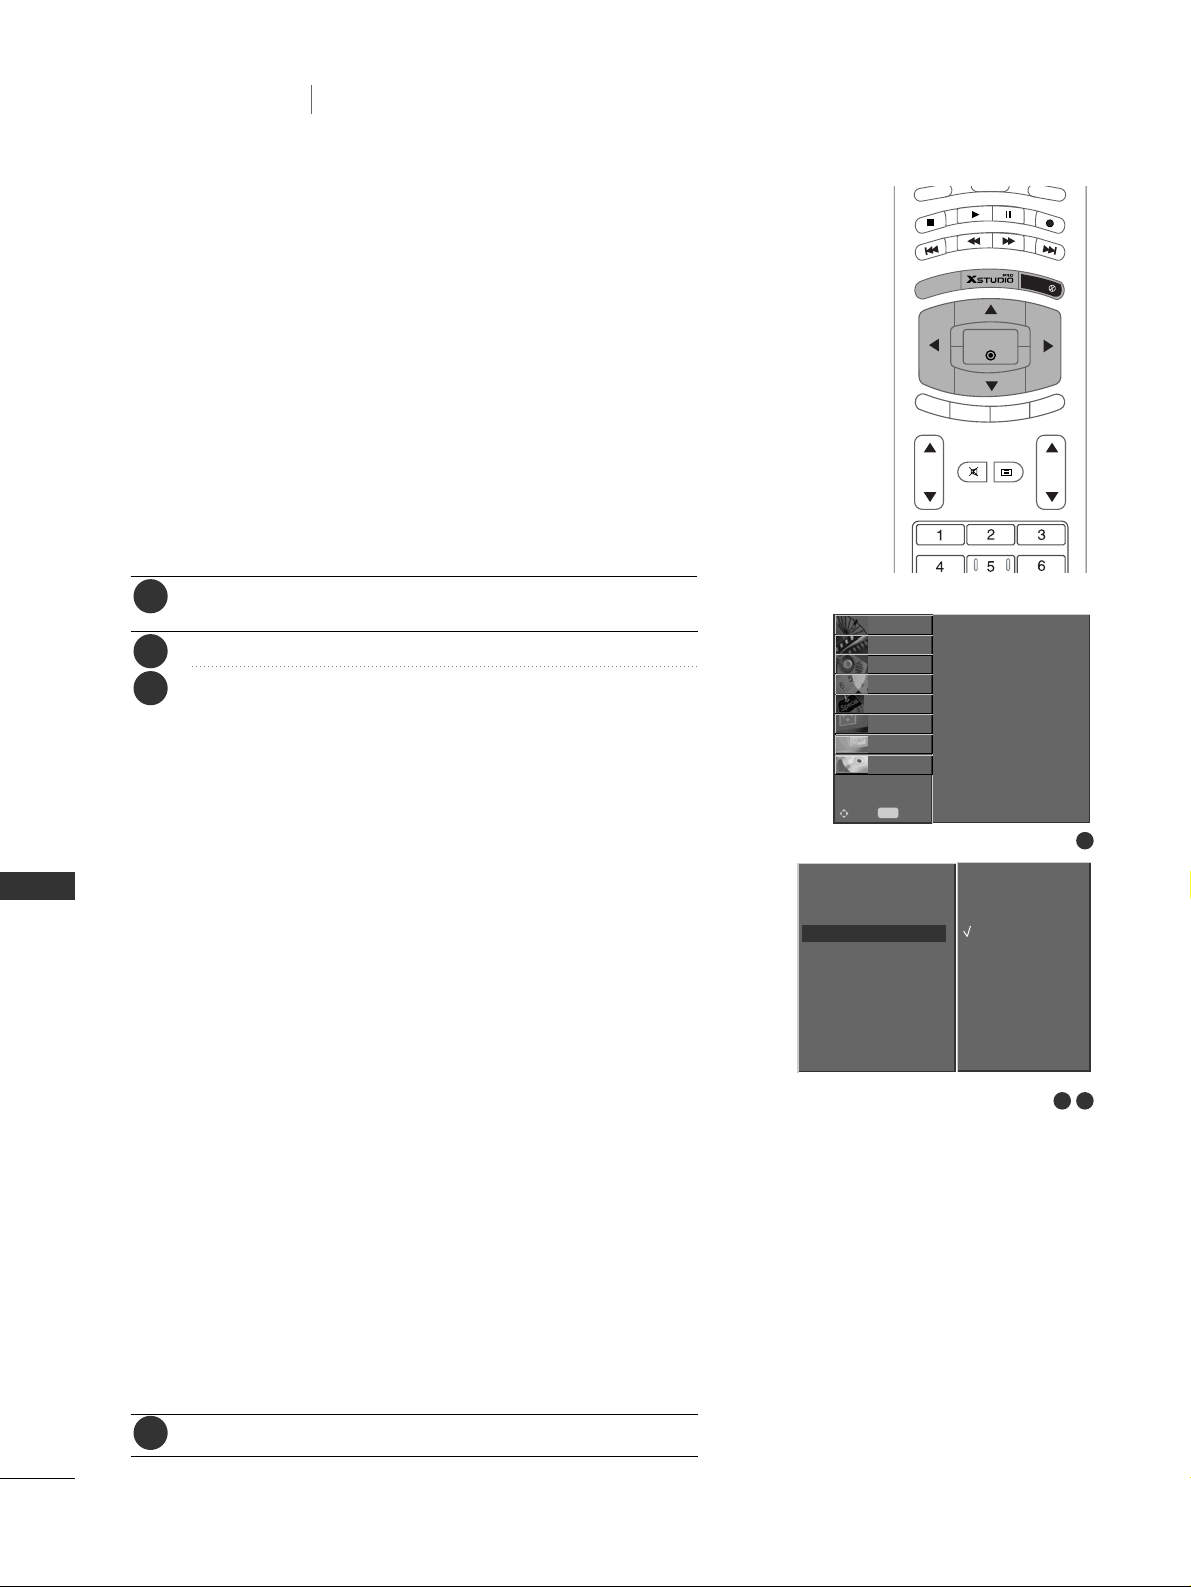
78
TV MENU
Screen Menu Options
TV MENU
1
2 3
Auto config.
Manual config.
XGA Mode
ARC
Cinema
NR
Reset
STATION
O
PICTURE
O
SOUND
O
TIME
O
SPECIAL
O
SCREEN{
PIP/DW
O
DVR
O
Menu
MENU
Move
Auto config.
Manual config.
XGA Mode
ARC
Cinema
NR
Reset
ARC
GG
Spectacle
Full
Original
4:3
16:9
14:9
Zoom
Press the MENU button and then
DD/ EE
button to select
the SCREEN menu.
Press the
GG
button and then use
DD/ EE
button to select ARC.
Press the
GG
button and then use
DD/ EE
button to select
Spectacle, Full (option), Original, 4:3, 16:9 (Wide),
14:9 or Zoom.
• Spectacle
When your set receives the wide screen signal, when selected
it will adjust the picture horizontally, in non-linear proportion,
to fill the entire screen.
• Full (option)
When your set receives the wide screen signal, when selected it
will adjust the picture horizontally or vertically, in a linear pro
portion, to fill the entire screen fully.
• Original
When your set receives the wide screen signal, it will be
automatically changed to the picture format to be sent.
• 4:3
Following selection will lead you to view a picture with an
original 4:3 aspect ratio, with gray bars appearing at both
the left and right sides.
• 16:9 (Wide)
Following selection will lead you to adjust the picture
horizontally, in a linear proportion, to fill the entire
screen (useful for viewing 4:3 formatted DVDs).
• 14:9
You can enjoy the picture format of 14:9 or general set
programme through the 14:9 mode.
The screen 14:9 is viewed just like that the screen 4:3 is
magnified to the left / right.
• Zoom
Following selection will lead you to view the picture without
any alternation, while filling the entire screen. However, the
top and bottom portions of the picture will be cropped.
Press the
EEXXIITT
button to return to normal TV viewing.
- You can watch the screen in various picture formats; Spectacle,
Full (option), Original, 4:3, 16:9 (Wide), 14:9 and Zoom.
- If a fixed image is displayed on the screen for a long time,
that fixed image may become imprinted on the screen and
remain visible.
- You can only select 4:3 and 16:9 (Wide) in RGB[PC], HDMI[PC]
mode only.
- You can only select 4:3, 16:9 (Wide) and Zoom in RGB[DTV],
HDMI[DTV], Component [DTV] mode only.
- You can only select Spectacle, Full, 4:3, 16:9 (Wide), 14:9
and Zoom in Component [480i/576i] mode only.
- It might be uncomfortable in full mode. Then change into
other mode.
- You can adjust the enlarge proportion using
DD
//
EE
button.
- This function works in the following signal.
SETTING PICTURE FORMAT
1
2
3
4
A
U
D
IO
PIP
PR
-
PIP PR +
SWAP
P
IP
IN
PU
T
S
T
B
M
E
N
U
OK
VOL PR
CABLE
EXIT
MARK
LIVE TV
TIME
SHIFT
TIME
SHIFT
MUTE
TEXT
Page 80
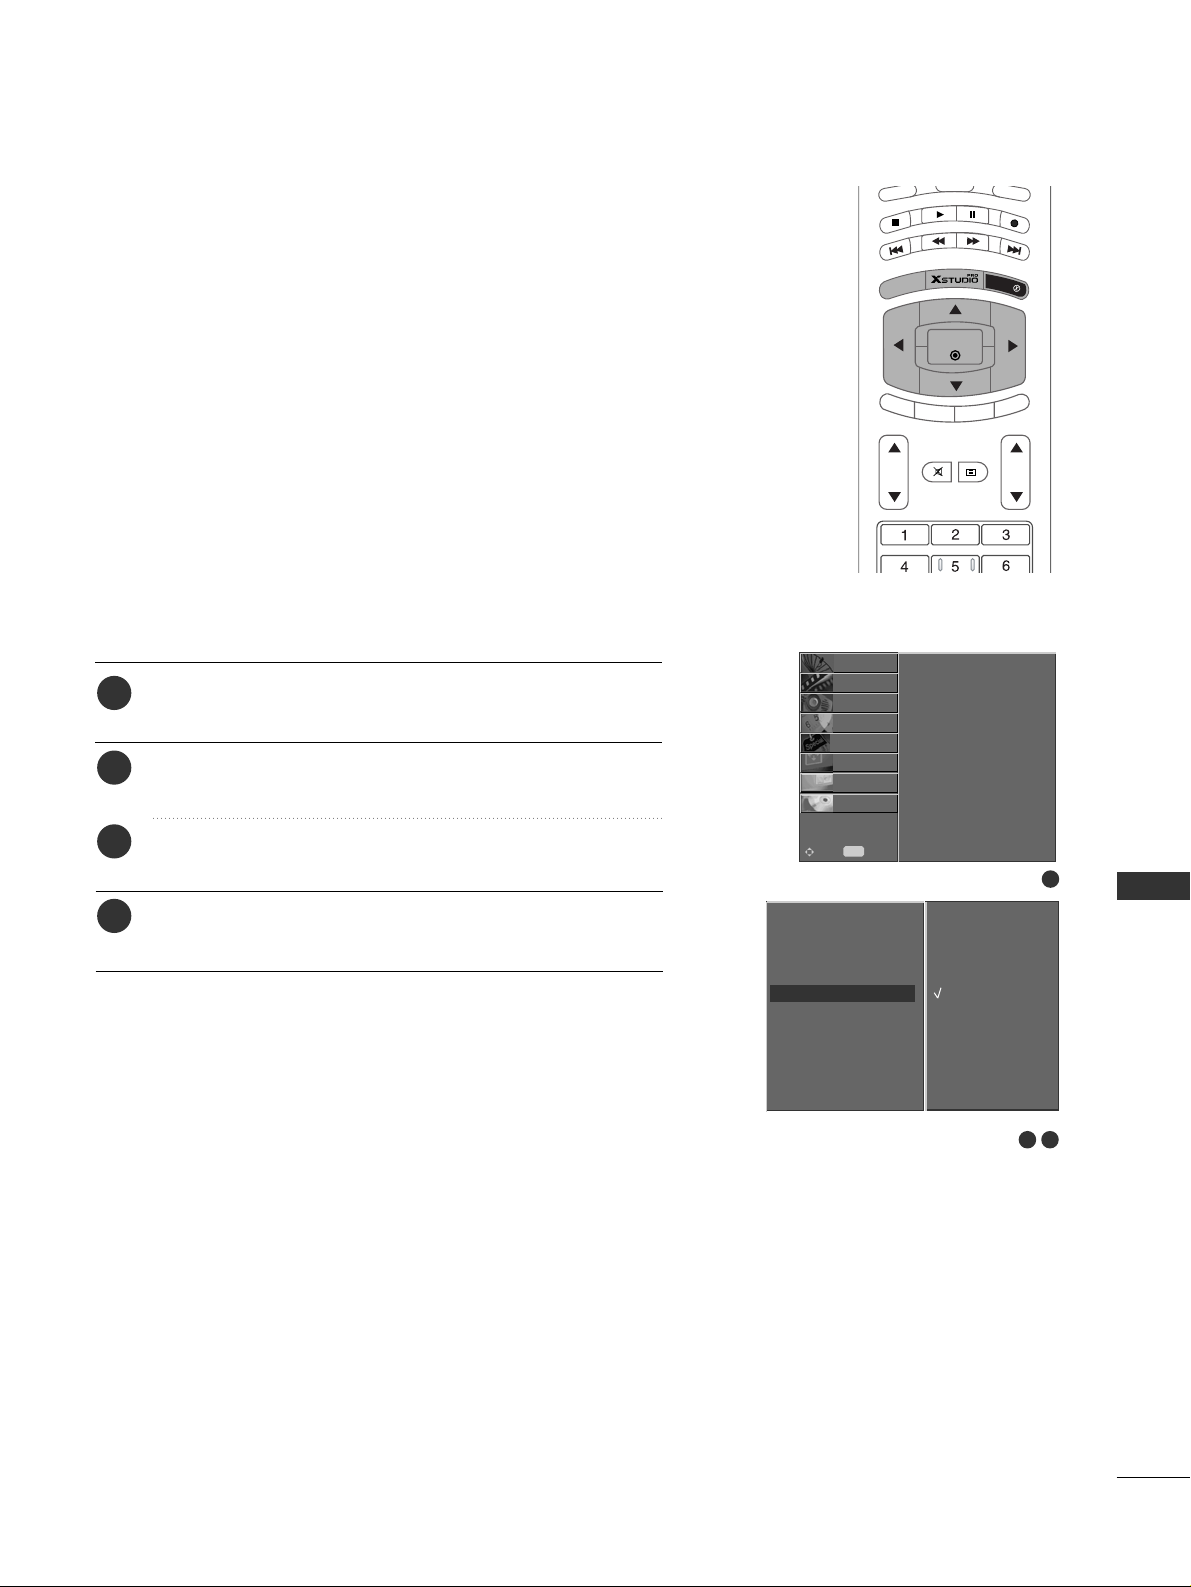
79
TV MENU
2 3
Auto config.
Manual config.
XGA Mode
ARC
Cinema
NR
Reset
Cinema
GG On
Off
- When you watch the movie, this function adjusts the set to
the best picture appearance.
- This function works in the following mode: TV, AV1, AV2,
S-VIDEO2, AV3, AV4 or COMPONENT (480i/576i).
Press the MENU button and then
DD
//
EE
button to select
the SCREEN menu.
Press the
GG
button and then use
DD
//
EE
button to select
Cinema.
Press the
GG
button and then use
DD
//
EE
button to select
On or Off.
Press the
EEXXIITT
button to return to normal TV viewing.
CINEMA
1
2
3
4
1
Auto config.
Manual config.
XGA Mode
ARC
Cinema
NR
Reset
STATION
O
PICTURE
O
SOUND
O
TIME
O
SPECIAL
O
SCREEN{
PIP/DW
O
DVR
O
Menu
MENU
Move
A
U
D
IO
PIP
PR
-
PIP PR +
SWAP
P
IP
IN
PU
T
S
T
B
M
E
N
U
OK
VOL PR
CABLE
EXIT
MARK
LIVE TV
TIME
SHIFT
TIME
SHIFT
MUTE
TEXT
Page 81
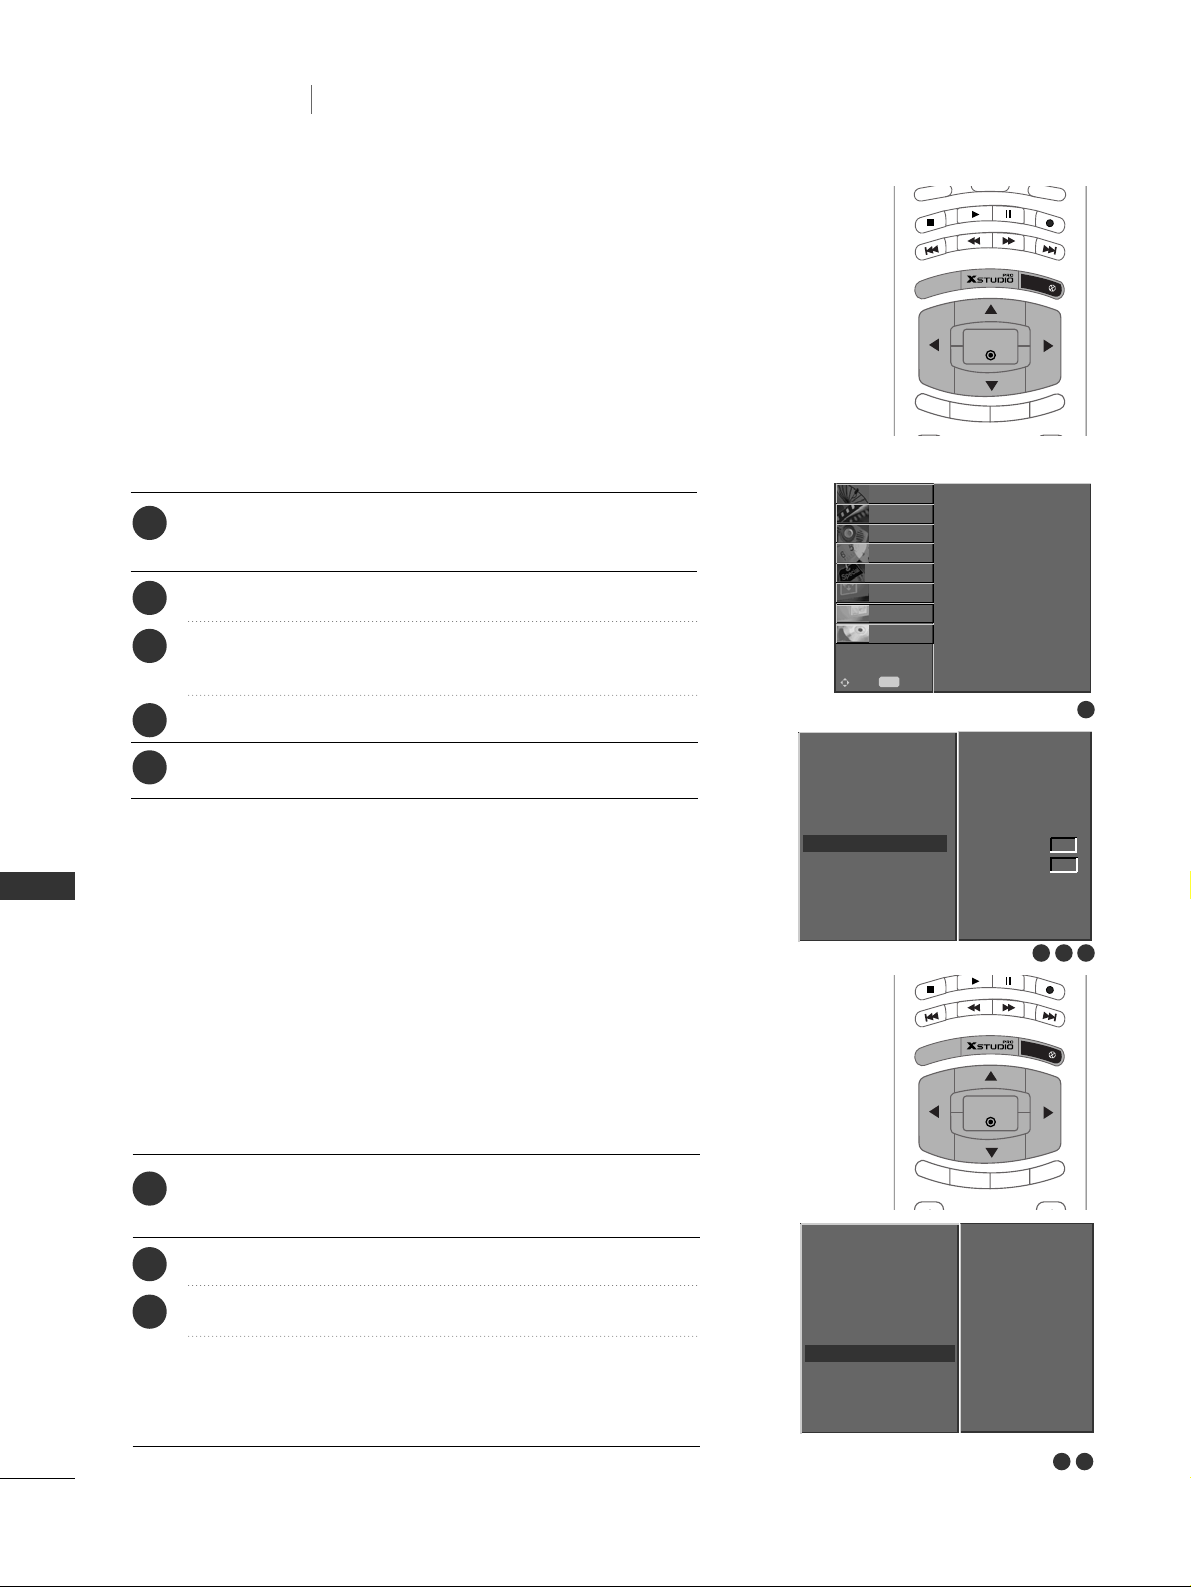
80
TV MENU
- You can select 3D NR or MPEG NR to reduce the picture
noise which may appear on the screen during watching the set.
- This function is not available for use in RGB[PC], HDMI[PC]
mode.
- 3D NR is not available for use in RGB, HDMI and
Component[DTV] mode.
Press the MENU button and then use
DD
//
EE
button to
select the SCREEN menu.
Press the
GG
button and then use
DD
//
EE
button to select NR.
Press the
GG
button and then use
DD
//
EE
button to select
3D NR or MPEG NR.
Press the
FF
//
GG
button to make appropriate adjustments.
Press the
EEXXIITT
button to return to normal TV viewing.
NR (NOISE REDUCTION)
1
2
3
4
5
- This function operates in current mode.
- To initialize the adjusted values.
Press the MENU button and then use
DD
//
EE
button to
select the SCREEN menu.
Press the
GG
button and then
DD
//
EE
button to select Reset.
Press the
GG
button.
• You can initialize Phase, Clock, H-Position, V-Position,
Position, Win. size, Win. position, PIP Transparency and
sub picture size of twin picture.
INITIALIZING (RESET TO ORIGINAL FACTORY SETTINGS)
1
2
3
1
2 3 4
Auto config.
Manual config.
XGA Mode
ARC
Cinema
NR
Reset
STATION
O
PICTURE
O
SOUND
O
TIME
O
SPECIAL
O
SCREEN{
PIP/DW
O
DVR
O
Menu
MENU
Move
Auto config.
Manual config.
XGA Mode
ARC
Cinema
NR
Reset
NR
GG
2 3
Auto config.
Manual config.
XGA Mode
ARC
Cinema
NR
Reset
Reset
GG
To set
3D NR
MPEG NR
0
0
TV MENU
Screen Menu Options
A
U
D
IO
P
IP
P
R -
PIP PR +
SWAP
PIP INP
U
T
S
T
B
M
E
N
U
OK
CABLE
EXIT
MARK
LIVE TV
TIME
SHIFT
TIME
SHIFT
PIP PR
-
PIP PR +
SWAP
PIP IN
P
U
T
M
E
N
U
OK
EXIT
MARK
LIVE TV
TIME
SHIFT
TIME
SHIFT
Page 82

APPENDIX
81
APPENDIX
PROGRAMMING THE REMOTE
Programming a code into a remote mode
To find out whether your remote can operate the device without programming, turn on the device such as
a VCR and press the corresponding mode button on the remote.
After that, press the POWER button. If the device is turned off then it responds properly and the remote
need not to be programmed. If not, the remote should be programmed to operate the device. The pro
gramming procedures are explained below.
Press the MENU and MUTE button continuously at the same time for 2 seconds, the current selected
device button will be illuminated.
If you don't press any button for 20 seconds, the light on the mode button will be turned off. In that case,
you have to repeat from step 2.
Enter code numbers using the number button on the remote by referring the code table on the following
pages. When pressing the button, the light blinks at a time. If the device turned off, the programming is
successful.
Press the MENU button to store the code. After blinking twice, this code is stored.
Test the remote functions to see if the device responds properly. If not, repeat from step 2.
The remote is a multi-brand or a universal remote. It can be programmed to operate most remote-controllable devices of other manufacturers.
Note that the remote may not control all models of other brands.
1
2
3
4
5
Page 83
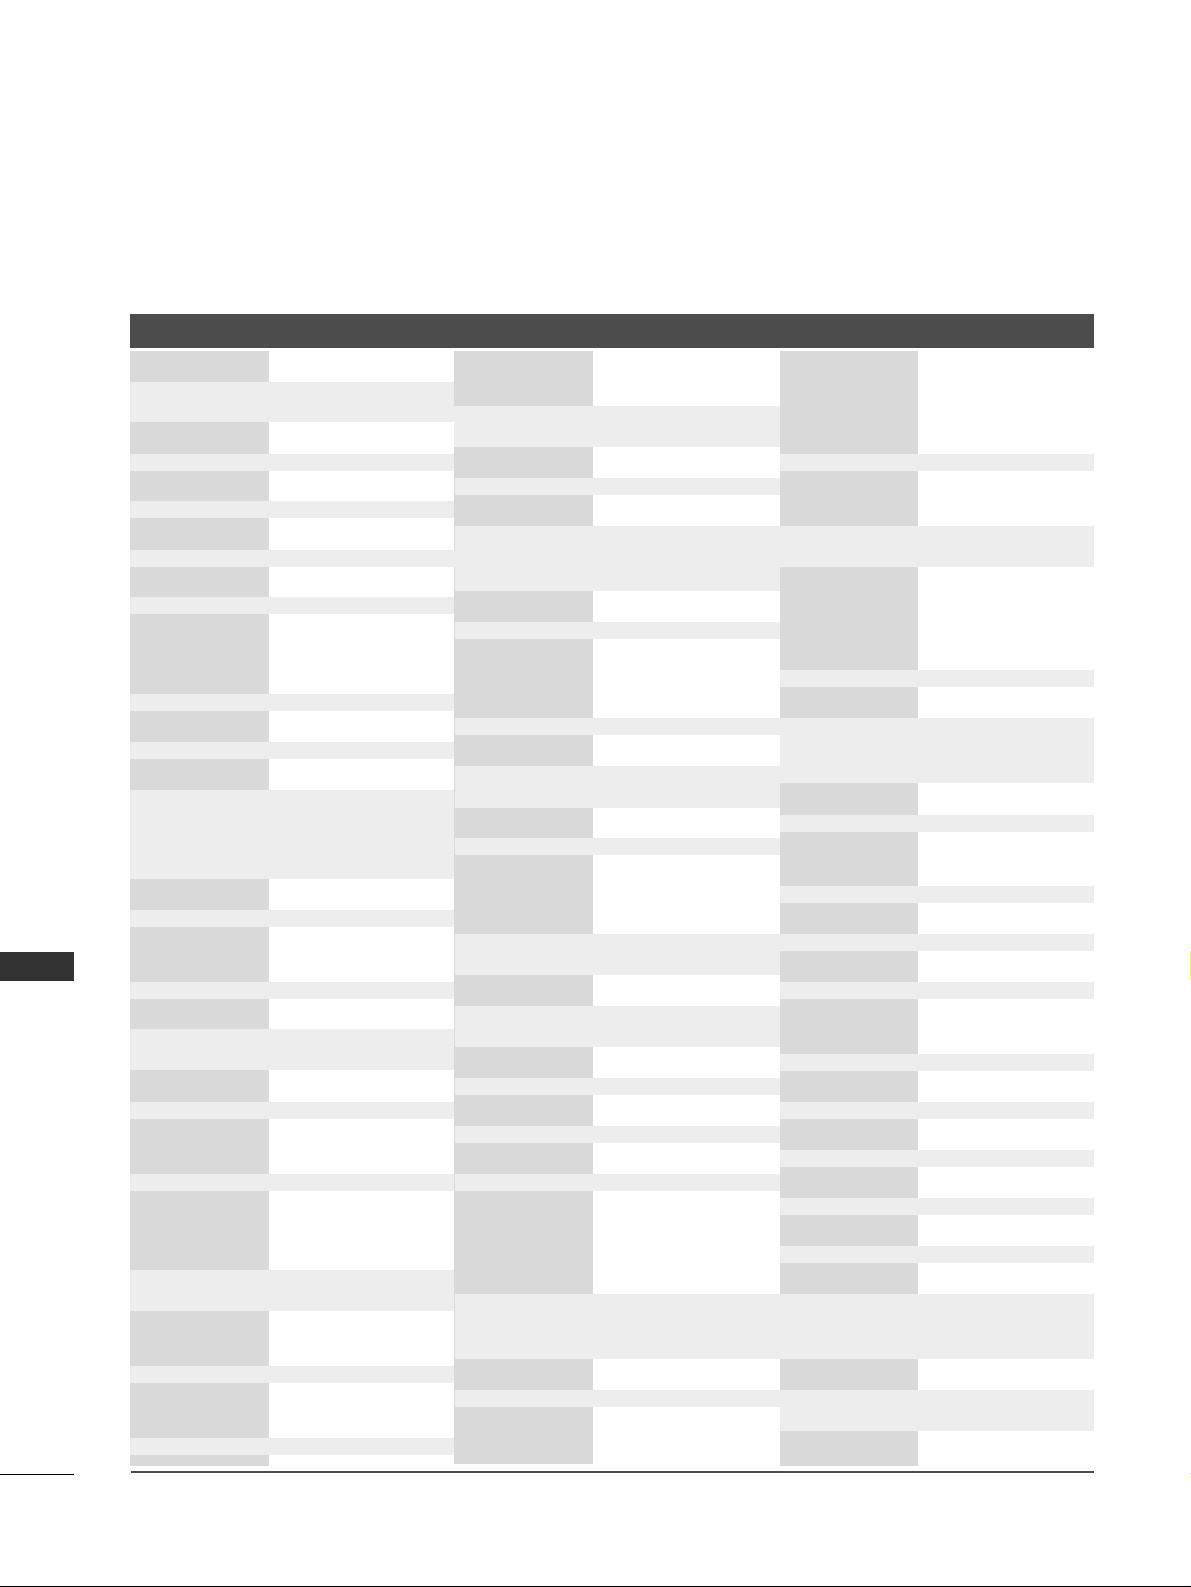
APPENDIX
82
APPENDIX
PROGRAMMING CODES
VCRs
Brand Codes Brand Codes Brand Codes
AIWA 034
AKAI 016 043 046 124
12 5 14 6
AMPRO 072
ANAM 031 033 103
AUDIO DYNAMICS
012 02 3 0 39 0 43
BROKSONIC 035 037 129
CANON 028 031 033
CAPEHART 108
CRAIG 003 040 135
CURTIS MATHES 031 033 041
DAEWOO 005 007 010 064
0 6 5 10 8 110 111
112 11 6 11 7 119
DAYTRON 108
DBX 012 023 039 043
DYNATECH 034 053
ELECTROHOME 059
EMERSON 006 017 025 027
029 031 034 035
036 037 046 101
12 9 131 13 8 153
FISHER 003 008 009 010
FUNAI 034
GE 031 033 063 072
10 7 10 9 14 4 14 7
GO VIDEO 132 136
HARMAN KARDON 012 045
HITACHI 004 018 026 034
043 063 137 150
INSTANTREPLAY 031 033
JCL 031 033
JCPENNY 012 013 015 033
040 066 101
JENSEN 043
JVC 012 031 033 043
048 050 055 060
13 0 15 0 15 2
KEN WOO D 014 034 039 043
047 048
LG (GOLDSTAR) 001 012 013 020
101 10 6 114 12 3
LLOYD 034
LXI 003 009 013 014
017 03 4 101 106
MAGIN 040
MAGNAVOX 031 033 034 041
067 068
MARANTZ 012 031 033 067
069
MARTA 101
MATSUI 027 030
MEI 031 033
MEMOREX 003 010 014 031
033 034 053 072
101 10 2 134 139
MGA 0 45 0 46 059
MINOLTA 013 020
MITSUBISHI 013 020 045 046
049 051 059 061
151
MTC 034 040
MULTITECH 024 034
NEC 012 023 039 043
048
NORDMENDE 043
OPTONICA 053 054
PANASONIC 066 070 074 083
13 3 14 0 1 4 5
PENTAX 013 020 031 033
063
PHILCO 031 034 067
PHILIPS 031 033 034 054
067 071 101
PILOT 101
PIONEER 013 021 048
PORTLAND 108
PULSAR 072
QUARTZ 011 014
QU ASA R 033 0 66 075 145
RCA 013 020 033 034
040 041 062 063
10 7 10 9 14 0 14 4
14 5 14 7
REALISTIC 003 008 010 014
031 033 034 040
053 054 101
RICO 058
RUNCO 148
SALORA 014
SAMSUNG 032 040 102 104
10 5 10 7 10 9 112
113 11 5 12 0 12 2
12 5
SANSUI 022 043 048 135
SANYO 003 007 010 014
10 2 13 4
SCOTT 017 037 112 129
131
SEARS 003 008 009 010
013 014 017 02 0
031 042 073 081
101
SHARP 031 054 149
SHINTOM 024
SONY 003 009 031 052
056 057 058 076
077 078 149
SOUNDESIGN 034
STS 013
SYLVANIA 031 033 034 059
067
SYMPHONIC 034
TANDY 010 034
TATUNG 039 043
TEAC 034 039 043
TECHNICS 031 033 070
TEKNIKA 019 031 033 034
101
THOMAS 034
TMK 006
TOSHIBA 008 013 042 047
059 082 112 131
TOTEVISION 040 101
UNITECH 040
VECTOR RESEARCH
012
VICTOR 048
VIDEO CONCEPTS
012 03 4 0 46
VIDEOSONIC 040
WARDS 003 013 017 024
031 033 034 040
053 054 131
YAM AH A 012 034 039 0 43
ZENITH 034 048 056
058 072 080 101
Page 84

APPENDIX
83
APPENDIX
PROGRAMMING CODES
CATV
Brand Codes Brand Codes Brand Codes
ABC 003 004 039 042
046 052 053
AJIN 112
ANTRONIK 014
ARCHER 005 007 014 024
CABLE STAR 026
CENTURION 092
CENTURY 007
CITIZEN 007
COLOUR VOICE 065 090
COMBANO 080 081
COMTRONICS 019 030
DIAMOND 023
EAGLE 020 030 040
EASTERN 057 062 066
ELECTRICORD 032
GE 072
GEMINI 008 022 025 054
GI 052 074
GOLDEN CHANNEL
030
HAMLIN 049 050 055
HITACHI 052 055
HOSPITALITY 070 077
JERROLD 002 003 004 008
009 010 052 069
074
LG (GOLDSTAR) 001 106 101 005
M-NET 037
MACOM 033
MAGNAVOX 010 012 064 079
MEMOREX 100
MOVIE TIME 028 032
NSC 015 028 038 071
073
OAK 016 031 037 053
PANASONIC 044 047
PARAGON 100
PHILIPS 006 012 013 020
065 085 090
PIONEER 034 051 052 063
076
POST NEWS WEEK
016
PRUCER 059
PTS 011 048 071 072
073 074
PULSAR 100
RCA 047
REGAL 049 050
REGENCY 057
REMBRANT 025
SAMSUNG 102 107 030 068
SCIENTIFIC ATLANTA 003 011041042
043 045 046
SHERITECH 022
SIGNAL 030
SIGNATURE 052
SL MARX 030
SPRUCER 047 078
STARCOM 002 004 008 009
STARGATE 008 030
TADIRAN 030
TAEKWANG 110
TAIHAN 105
TANDY 017
TEXSCAN 029
TOCOM 039 040 056
TOSHIBA 100
UNIKA 007 014 024
UNITED CABLE 004 053
UNIVERSAL 005 007 014 024
026 027 032 035
VIEWSTAR 012 015 018 086
087 088 089
ZENITH 100 114 060 093
Page 85
APPENDIX
84
APPENDIX
HDSTB
Brand Codes Brand Codes Brand Codes
Brand Codes Brand Codes Brand Codes
DVD
APEX DIGITAL 022
DENON 020 014
GE 005 006
HARMAN KARDON 027
JVC 012
LG 001 010 016 025
MAGNAVOX 013
MARANTZ 024
MITSUBISHI 002
NAD 023
ONKYO 008 017
PANASONIC 003 009
PHILIPS 013
PIONEER 004 026
PROCEED 021
PROSCAN 005 006
RCA 005 0 06
SAMSUNG 011 015
SONY 007
THOMPSON 005 006
TOSHIBA 019 008
YAMAHA 009 018
ZENITH 010 016 025
ALPHASTAR DSR
12 3
AMPLICA 050
BIRDVIEW 051 126 129
CHANNEL MASTER
013 014 015 018
036 055
CHAPARRAL 008 009 012 077
CI TOH 054
CURTIS MATHES 050 145
DRAKE 005 006 007 010
011 0 52 112 116
141
DX ANTENNA 024 046 056 076
ECHOSTAR 038 040 057 058
093 094 095 096
097 098 099 100
12 2
ELECTRO HOME 089
EUROPLUS 114
FUJITSU 017 021 022 027
13 3 134
GENERAL INSTRUMENT 003 004 016029
031 059 101
HITACHI 139 140
HOUSTON TRACKER 033 037 039 051
057 104
HUGHES 068
JANIEL 060 147
JERROLD 061
KATHREIN 108
LEGEND 057
LG 001
LUTRON 132
LUXOR 062 144
MACOM 010 059 063 064
065
MEMOREX 057
NEXTWAVE 028 124 125
NORSAT 069 070
PACE SKY SATELLITE 143
PANASONIC 060 142
PANSAT 121
PERSONAL CABLE 117
PHILIPS 071
PICO 105
PRESIDENT 019 102
PRIMESTAR 030 110 111
PROSAT 072
RCA 066 106
REALISTIC 043 074
SAMSUNG 123
SATELLITE SERVICE CO 028 035 047 057
085
SCIENTIFIC ATLANTA 032 138
SONY 103
STARCAST 041
SUPER GUIDE 020 124 125
TEECOM 023 026 075 087
088 090 107 130
13 7
TOSHIBA 002 127
UNIDEN 016 025 042 043
044 045 048 049
078 079 080 086
101 135 136
VIEWSTAR 115
WINEGARD 128 146
ZENITH 081 082 083 084
091 120
Page 86

APPENDIX
85
APPENDIX
PROGRAMMING CODES
Audio
Brand Codes Brand Codes Brand Codes
AIWA 014 028 070 096
12 5 12 9 13 9 22 9
230
AKAI 163
ANAM 003 014 017 023
059 106 189 216
217 2 35 23 6
BURMECTER 252
CARVER 086
CLARION 199
DAEWOO 027 053 060 084
10 2 14 8 19 8 2 21
DENON 015 075 130 143
FANTASIA 071
FINEARTS 022
FISHER 089 099
LG(GOLDSTAR) 001 021 024 029
087 107 108 110
19 0 191 19 2 210
211 212 2 39
HAITAI 034 035 188 222
HARMAN/KARDON 068
INKEL 037 058 062 069
078 079 095 121
12 2 14 9 15 0 151
15 2 153 15 4 155
15 7 158 15 9 16 0
18 9 20 7 2 2 2 2 2 4
225 226 227 243
247
JVC 004 013 141
K E C 18 5 18 6 18 7
KENWOOD 038 050 067 089
17 0 171 19 7 20 6
215 2 22
KOHEL 030
NAD 045 046
LOTTE 014 016 036 098
10 0 17 2 17 3 17 4
17 5 176 17 7 178
17 9 18 0 18 1 18 3
201 202 208 213
214 219 223 23 2
238 24 0
LXI 103
MAGNAVOX 111
MARANTZ 002 018 020 025
034 041 081 090
097 112
MCINTOSH 049
MCS 104
MEMOREX 107
NAD 046
ONKYO 013 040 041 047
048 056 057 132
13 3 14 0
OPTIMUS 158
PANASONIC 007 033 064 113
14 2 2 2 0 2 41 2 51
PENNEY 104
PHILIPS 026 112 143
PIONEER 039 042 043 063
065 091 093 094
115 1 2 3 1 2 7 2 5 0
QUASAR 113
RCA 080
RCX 092
REALISTIC 103 106
SAMSUNG 124 145 146 182
19 3 19 4 19 5 2 0 3
204 244 245 246
SANSUI 011 135 138 144
SANYO 019 083 234
SCOTT 106 186
SHARP 031 032 051 052
072 0 82 117 119
156 184 199 200
206 209
SHERWOOD 005 006 158
SONY 044 045 109 114
118 1 2 6 2 4 8 2 4 9
TAEKWANG 012 020 073 074
076 077 105 161
16 2 163 16 4 165
16 6 167 16 8 169
20 5 231 233 242
TEAC 010 085 106 136
18 5 18 7 2 3 7
TECHNICS 101 113 128 134
14 7 2 18
TOSHIBA 137
THE 061
VICTOR 088 131
WARDS 089
YAMA HA 054 055 066 092
19 9
Page 87
APPENDIX
86
APPENDIX
TROUBLESHOOTING CHECKLIST
TThhee ooppeerraattiioonn ddooeess nnoott wwoorrkk nnoorrmmaallllyy..
TThhee ooppeerraattiioonn ddooeess nnoott wwoorrkk nnoorrmmaallllyy..
No picture & No sound
No or poor colour
or poor picture
Poor reception on
some channels
Lines or streaks
in pictures
Horizontal/vertical bars
or picture shaking
Picture appears slowly
after switching on
The remote control
doesn’t work
Power is suddenly
turned off
■
Check to see if there is any object between the set and the remote
control causing an obstruction.
■
Are batteries installed with correct polarity (+ to +, - to -)?
■
Is the correct remote operating mode set: TV, VCR etc.?
■
Are the batteries flat?
■
Is the sleep timer set?
■
Check the power control settings. Power interrupted?
■
Auto off is activated and no signal is being received.
■
Check whether the set is turned on.
■
Try another programme. The problem may be with the broadcast.
■
Is the power cord inserted into a wall power outlet?
■
Check your antenna direction and/or location.
■
Test the wall power outlet, plug another set’s power cord into the outlet where
the set’s power cord was plugged in.
■
This is normal, the image is muted during the set startup process. Please contact
your service center if the picture has not appeared after five minutes.
■
Adjust Colour in the menu.
■
Keep a sufficient distance between the set and the VCR.
■
Try another programme. The problem may be with the broadcast.
■
Are the video cables installed properly?
■
Activate any function to restore the brightness of the picture.
■
Check for local interference such as an electrical appliance or power tool.
■
Station or cable set experiencing problems, tune to another station.
■
Station signal is weak, reorient antenna to receive weaker stations.
■
Check for sources of possible interference.
■
Check antenna (Change the direction of the antenna).
Page 88
APPENDIX
87
APPENDIX
TROUBLESHOOTING CHECKLIST
■
Press the VOL
DD
//
EE
button.
■
Sound muted? Press MUTE button.
■
Try another programme. The problem may be with the broadcast.
■
Are the audio cables installed properly?
■
Adjust Balance in menu option.
■
A change in ambient humidity or temperature may result in an unusual noise
when the set is turned on or off and does not indicate a fault with the set.
Picture OK & No sound
Unusual sound from
inside
the set
No output from one
of the speakers
TThheerree iiss aa pprroobblleemm iinn PPCC mmooddee.. ((OOnnllyy PPCC mmooddee aapppplliieedd))
■
Adjust resolution, horizontal frequency, or vertical frequency.
■
Check the input source.
■
Work the Auto configure or adjust clock, phase, or H/V position. (Option)
■
Check the signal cable.
■
Reinstall the PC video card.
The signal is out of range
Screen colour is unstable
or single colour
Vertical bar or stripe on
background &
Horizontal Noise &
Incorrect position
TThhee aauuddiioo ffuunnccttiioonn ddooeess nnoott wwoorrkk..
Page 89
APPENDIX
88
APPENDIX
MAINTENANCE
Early malfunctions can be prevented. Careful and regular cleaning can extend the lifetime of your new set. Be
sure to turn the power off and unplug the power cord before you begin any cleaning.
Cleaning the Screen
Here’s a great way to keep the dust off your screen for a while. Wet a soft cloth in a mixture of lukewarm
water and a little fabric softener or dish washing detergent. Wring the cloth until it’s almost dry, and then
use it to wipe the screen.
Make sure the excess water is off the screen, and then let it air-dry before you turn on your set.
Cleaning the Cabinet
■
To remove dirt or dust, wipe the cabinet with a soft, dry and lint-free cloth.
■
Please be sure not to use a wet cloth.
Extended Absence
If you expect to leave your set dormant for a long time (such as a vacation), it’s a good idea to unplug
the power cord to protect against possible damage from lightning or power surges.
CAUTION
1
2
Page 90
APPENDIX
89
APPENDIX
■
The specifications shown above may be changed without prior notice for quality improvement.
PRODUCT SPECIFICATIONS
AC100-240V~ 50/60Hz
310 W 450W
PAL/SECAM B/G/D/K, PAL I/II, SECAM L/L’
75 Ω
0 ~ 40°C / 32 ~ 104°F
Less than 80%
-20 ~ 60°C / -4 ~ 140°F
Less than 85%
Dimensions
(Width x Height x Depth)
Weight
Power requirement
Power consumption
Television System
External Antenna Impedance
Environment condition
with stand
without stand
including stand
excluding stand
Operating Temperature
Operating Humidity
Storage Temperature
Storage Humidity
1129.0 x 748.5 x 380.0 mm
44.5 x 29.5 x 15.0 inches
1129.0 x 695.0 x 108.9 mm
44.5 x 27.4 x 4.3 inches
29.1kg/64.2 lbs
25.6kg/56.5 lbs
1302.6 x 872 x 355.8 mm
51.2 x 34.3 x 14 inches
1302.6 x 810x 108.7 mm
51.2 x 31.8 x 4.3 inches
51.7 kg/114.0 lbs
42.9 kg/94.6 lbs
MODELS
42PC1RR
*
42PC1RR-ZL
50PC1RR
*
50PC1RR-ZL
Page 91
APPENDIX
90
APPENDIX
■
The specifications shown above may be changed without prior notice for quality improvement.
PRODUCT SPECIFICATIONS
AC100-240V~ 50/60Hz
200W 250W
PAL/SECAM B/G/D/K, PAL I/II, SECAM L/L’
75 Ω
0 ~ 40°C / 32 ~ 104°F
Less than 80%
-20 ~ 60°C / -4 ~ 140°F
Less than 85%
Dimensions
(Width x Height x Depth)
Weight
Power requirement
Power consumption
Television System
External Antenna Impedance
Environment condition
with stand
without stand
including stand
excluding stand
Operating Temperature
Operating Humidity
Storage Temperature
Storage Humidity
944.0 x 729 x 286 mm
37.1 x 28.7 x 11.2 inches
944.0 x 659.3 x 129.7 mm
37.1 x 26 x 5.1 inches
30.4 kg/67.0 lbs
25.9 kg /57.1 lbs
1054 x 813 x286 mm
41.4 x 32x 11.2 inches
1054 x 746 x 136.8mm
41.4 x 29.3 x 5.3 inches
42.3kg/93.2 lbs
35.7kg/78.7 lbs
42LC2R
*
42LC2R-ZH
MODELS
37LC2RR
*
37LC2RR-ZL
42LC2RR
*
42LC2RR-ZL
Page 92

 Loading...