

Page 1

OWNER’S MANUAL
LCD TV / LED LCD TV /
PLASMA TV
Please read this manual carefully before operating the
set and retain it for future reference.
www.lg.com
Page 2

ENGLISH
ENG
Page 3
LICENSES
LICENSES
3
Supported licenses may differ by model. For more information about licenses, visit
<Analog TV>
Manufactured under license from Dolby Laboratories. “Dolby” and the double-D
symbol are trademarks of Dolby Laboratories.
<Digital TV>
Manufactured under license from Dolby Laboratories. “Dolby” and the double-D
symbol are trademarks of Dolby Laboratories.
HDMI, the HDMI logo and High-Definition Multimedia Interface are trademarks or
registered trademarks of HDMI Licensing LLC.
ABOUT DIVX VIDEO: DivX® is a digital video format created by DivX, LLC, a
subsidiary of Rovi Corporation. This is an official DivX Certified® device that plays
DivX video. Visit www.divx.com for more information and software tools to convert
your files into DivX video.
ABOUT DIVX VIDEO-ON-DEMAND: This DivX Certified® device must be registered
in order to play purchased DivX Video-on-Demand (VOD) movies. To obtain your
registration code, locate the DivX VOD section in your device setup menu. Go to
vod.divx.com for more information on how to complete your registration.
www.lg.com.
ENGENGLISH
“DivX Certified® to play DivX® video up to HD 1080p, including premium content.”
“DivX®, DivX Certified® and associated logos are trademarks of Rovi Corporation
or its subsidiaries and are used under license.”
“Covered by one or more of the following U.S. patents :
7,295,673; 7,460,668; 7,515,710; 7,519,274”
Page 4

TABLE OF CONTENTS
4
TABLE OF CONTENTS
ENGLISH
ENG
3 LICENSES
4 TABLE OF CONTENTS
6 ASSEMBLING AND PREPAR-
ING
6 Unpacking
9 Separate purchase
9 Parts and buttons
20 Lifting and moving the TV
20 Setting up the TV
20 - Attaching the stand
24 - Not using the Desk Type Stand
25 - Mounting on a table
26 - Mounting on a wall
28 - Tidying cables
29 - Positioning your display
29 - Connection of TV
30 REMOTE CONTROL
33 WATCHING TV
33 Connecting an antenna
33 Turning the TV on for the first time
34 Watching TV
35 Managing programmes
35 - Automatically setting up programme
35 - Manually setting up programme (In
digital mode) (Only DTV)
36 - Manually setting up programme (In
analogue mode)
37 - Editing your programme list
39 - Selecting the programme list
41 EPG (Electronic Program Guide) (In digi-
tal mode)
41 - Switch on/off EPG
41 - Select a programme
42 - NOW/NEXT Guide Mode
42 - 8 Day Guide Mode
42 - Date Change Mode
42 - Extended Description Box
42 - Remind Setting Mode
42 - Schedule List Mode
43 MHEG (Multimedia and Hypermedia In-
formation coding Expert Group) (In digital
mode)
43 - Teletext Within Digital Service
43 - Teletext in Digital Service
44 - Switch on/off MHEG
44 - Select a programme
44 - Programme Listing Mode
44 - NOW/NEXT Guide Mode
45 Using additional options
45 - Adjusting aspect ratio
46 - Changing AV modes
46 - Using the input list
47 - Locking the buttons on the TV (Child
Lock)
48 Using the quick menu
49 Using customer Support.
49 - Testing Software Update
50 - Testing the Picture / Sound
50 - Using Signal Test
50 - Using the product or service information
51 3D IMAGING
51 3D Technology
52 - When Using 3D Glasses
52 - 3D Imaging Viewing Range
53 Watching 3D images
55 ENTERTAINMENT
55 - Connecting USB storage devices
56 - Browsing files
57 - Viewing movies
60 - Viewing photos
Page 5

TABLE OF CONTENTS
5
62 -Listeningtomusic
64 -DivX®VODGuide
65 CUSTOMIZING TV SETTINGS
65 Accessingmainmenus
66 Customizingsettings
66 -SETUPsettings
67 -PICTUREsettings
73 -AUDIOsettings
76 -TIMEsettings
77 -LOCKsettings
78 -OPTIONsettings
80 MAKING CONNECTIONS
81 Connectionoverview
82 ConnectingtoaHDreceiver,DVD,or
VCRplayer
82 -HDMIconnection
82 -DVItoHDMIconnection
82 -Componentconnection
83 -Compositeconnection
84 ConnectingtoaPC
84 -HDMIconnection
85 -DVItoHDMIconnection
85 -RGBConnection
86 Connectingtoanaudiosystem
86 -Digitalopticalaudioconnection
87 -Headphoneconnection
87 -SpeakeroutputSetup
87 ConnectingtoaUSB
88 SIMPLINKconnection
88 -ActivatingtheSIMPLINKfeature
90 -Pageselection
90 SpecialTeletextFunction
91 MAINTENANCE
91 CleaningyourTV
91 -Screenandframe
91 -Cabinetandstand
91 -Powercord
91 Preventing“Imageburn”or“Burn-in”on
yourTVscreen
92 TROUBLESHOOTING
94 SPECIFICATIONS
103 IR CODES
ENGENGLISH
104 EXTERNAL CONTROL DEVICE
SETUP
104 RS-232CSetup
104 Typeofconnector;
D-Sub9-PinMale
104 RS-232CConfigurations
105 CommunicationParameters
105 Commandreferencelist
106 Transmission/ReceivingProtocol
111 OPEN SOURCE LICENSE
111 Opensourcesoftwarenotice
89 TELETEXT
89 SwitchOn/Off
89 SimpleText
89 -Pageselection
89 TopText
89 -Block/Group/PageSelection
89 -DirectPageSelection
90 Fastext
Page 6
ASSEMBLING AND PREPARING
6
ASSEMBLING AND PREPARING
Unpacking
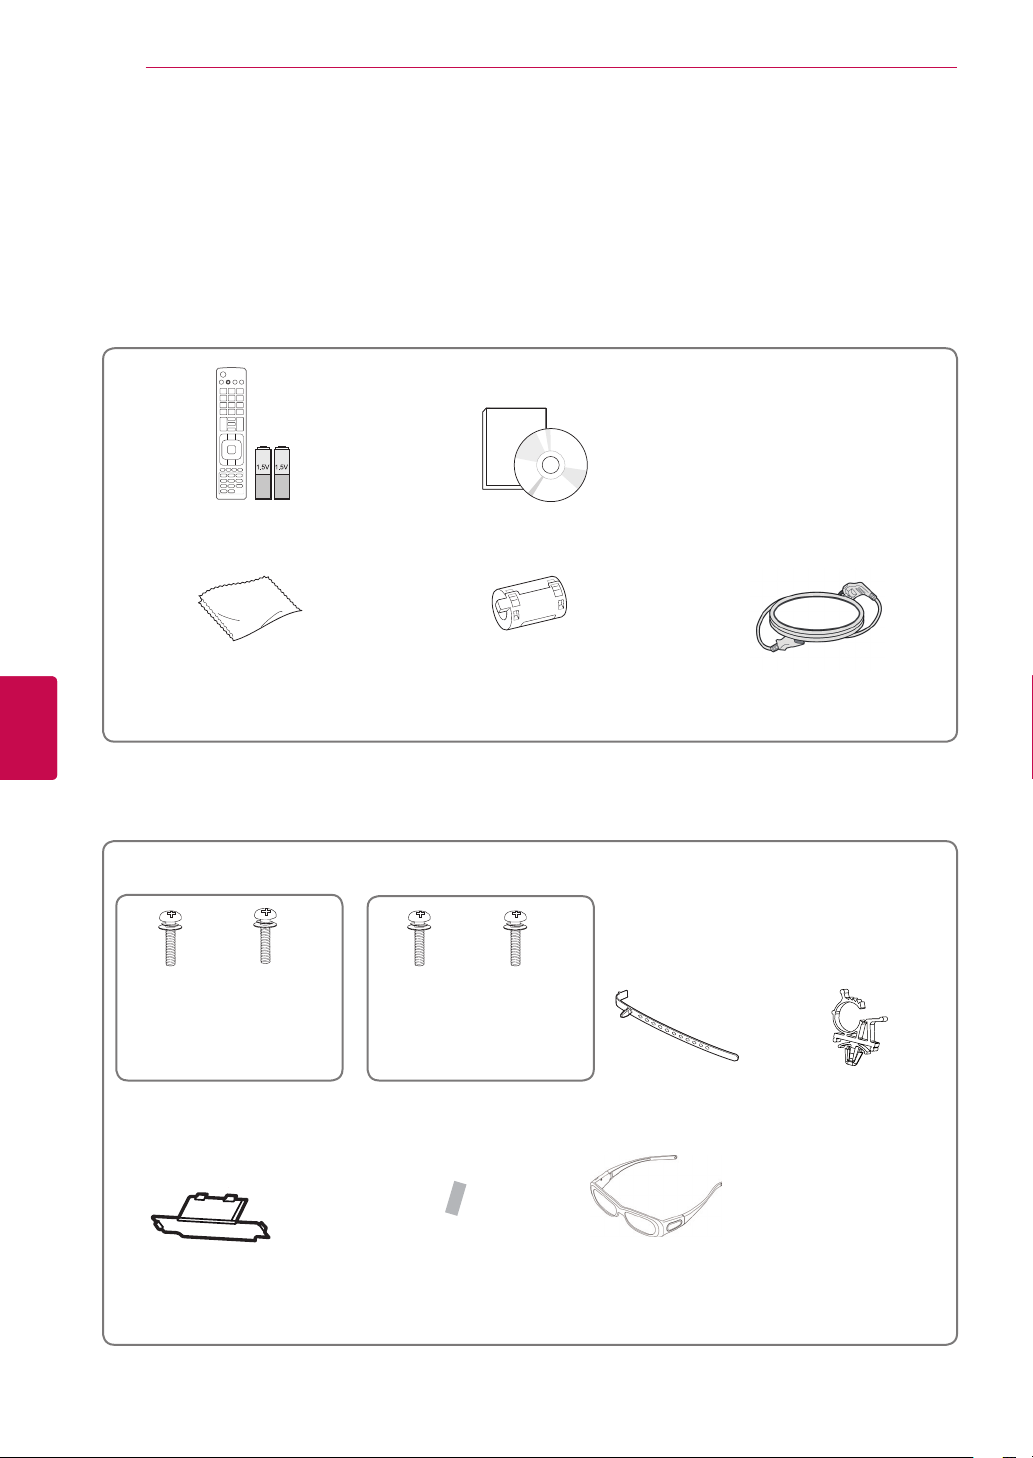
Check your product box for the following items. If there are any missing accessories, contact the local
dealer where you purchased your product.
The illustrations in this manual may differ from the actual product and item.
Remote control and batteries(AAA) Owner’s manual
ENGLISH
ENG
Polishing cloth1 (This item is not
included for all models.)
1 Gently wipe the spots on the cabinet with the polishing cloth.
Only Plasma TV
x 4
M4 x 26 M5 x 14.5
(Except for 60PV25**,
60PZ55**)
Protection cover
x 3
Screw for assembly
Ferrite core
(This item is not included for all
M4 x 28
(Only 60PV25**,
60PZ55**)
Protection cover
tape
(Depending on model)
models.)
x 4
x 3
M5 x 24
(AG-S250 : Depending on model)
Power Cord(This item is not included
Cable Holder
3D Glasses
(This item is not included for all
models.)
for all models.)
1
Power Cord holder
Page 7
ASSEMBLING AND PREPARING
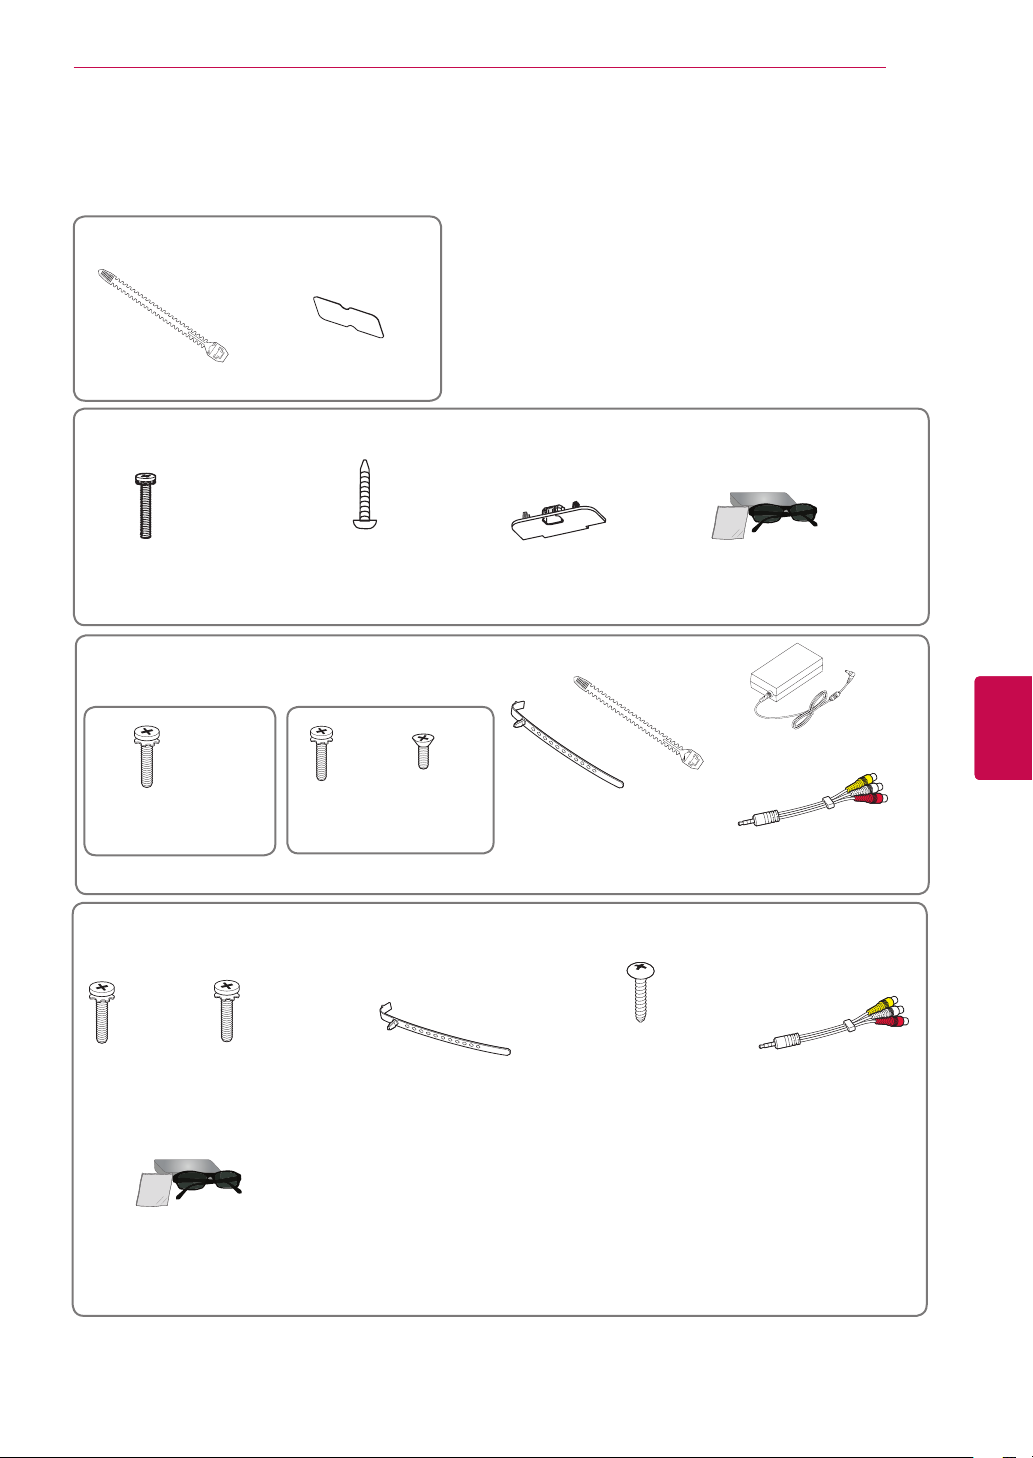
Only 22LK33**
Cable Holder Protection cover
Only 26/32LK33**, 32/42LK43**, 42/47/55LK53**, 32/37/42/47LK45**, 47LK95**
x 8
7
(M4x20)
Screw for assembly Screw for fixing Protection cover
(Except for 47/55LK53**,
47LK45**, 47LK95**)
(Only 47LK95**)
FPR 3D Glasses
1
Only 19/22/26LV25**, 22/26LV55** , 26LV30**
x 2
M4x16
(Except for 26LV30**)
Screw for assembly
x 2
M4x12
(Only 26LV30**)
M3x8
x 4
or
Cable holder
(Depending on model)
(This item is not included for
all models.)
DC Adapter
Composite gender cable
(Except for 26LV30**)
Only 32LV25**, 32/37/42/47/55LV35**, 32LV30**, 32/42LV34**, 32/42/47/55LW45**, 42/47LW54**,
32/42LV33**
x 8
M4 x 14
(Only 32LV25**)
Screw for assembly
x 8
M4 x 12
(Except for 32LV25**)
(This item is not included for
Cable holder
(Depending on model)
all models.)
(Only 32LV25**, 32/37LV35**,
32LV34**, 32LW45**, 32LV30**,
32LV33**)
Screw for fixing
Composite gender cable
(Except for 32LV30**,
32/42LV34**,
32/42LV33**)
ENGENGLISH
(Only 32/42/47/55LW45**,
42/47LW54**)
FPR 3D Glasses
1 The number of 3D glasses may differ depending on the country.
1
Page 8
ASSEMBLING AND PREPARING
8
CAUTION
Do not use any pirated items to ensure the safety and product life span.
Any damages or injuries by using pirated items are not covered by the warranty.
NOTE
The items supplied with your product may vary depending on the model.
Product specifications or contents of this manual may be changed without prior notice due to
upgrade of product functions.
Image shown may differ from your TV.
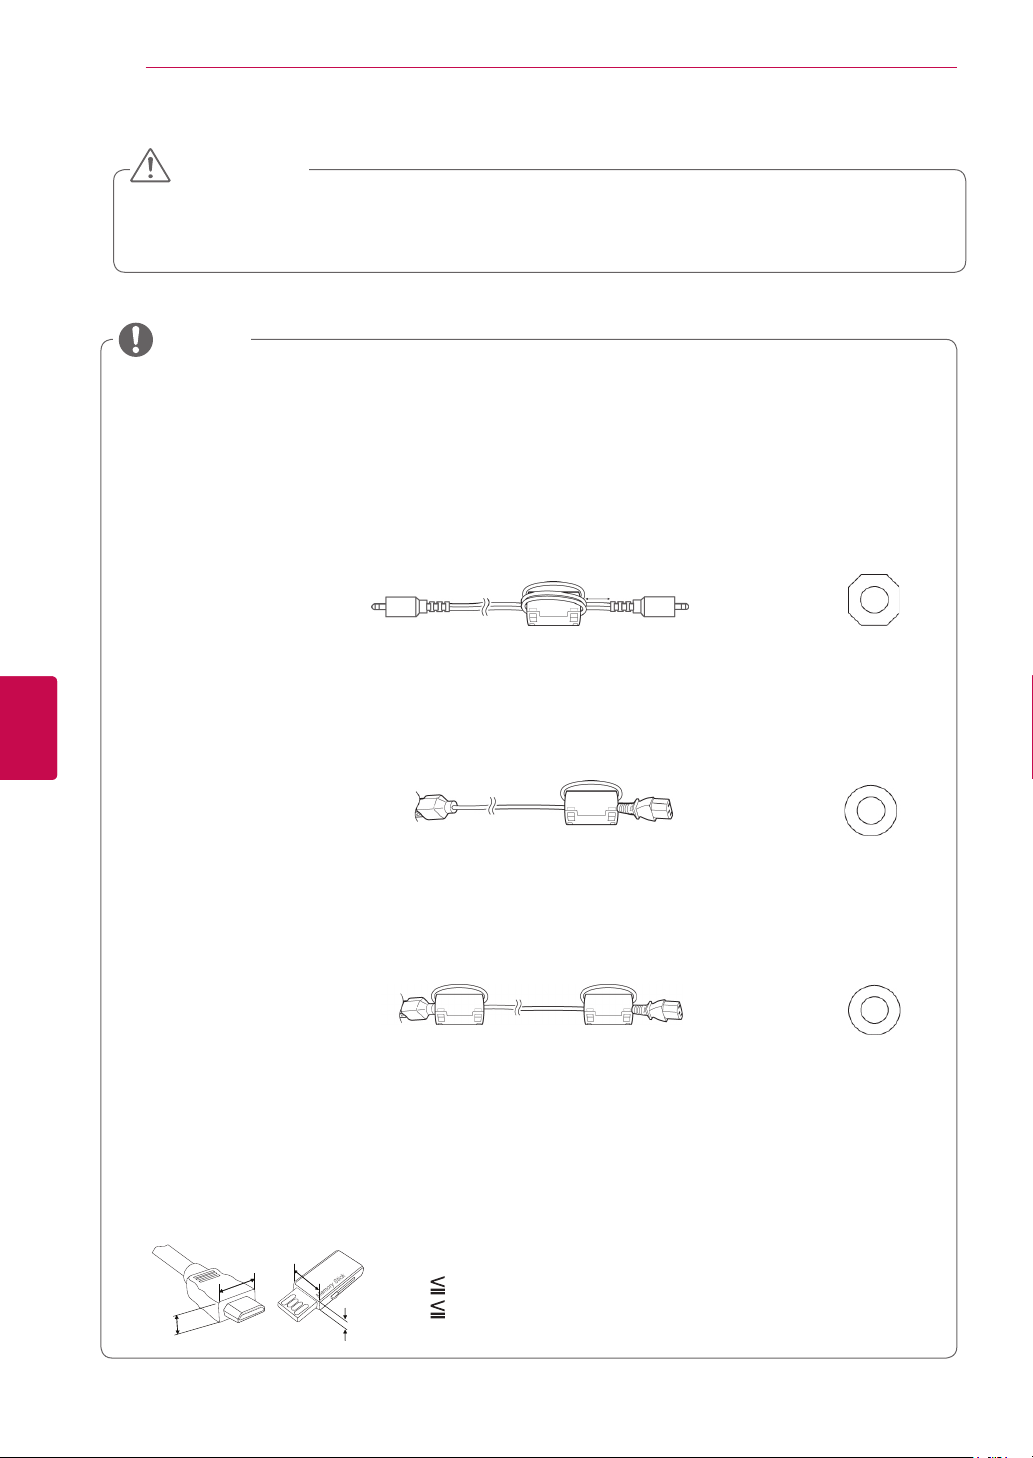
How to use the ferrite core (Depending on model)
1 Use the ferrite core to reduce the electromagnetic interference in the PC audio cable.
Wind the PC audio cable on the ferrite core thrice. Place the ferrite core close to the TV.
ENGLISH
ENG
[to an External device]
[Figure 1]
10 mm(+ / - 5 mm)
[to the TV]
[Cross Section of
Ferrite Core]
2 Use the ferrite core to reduce the electromagnetic interference in the power cable.
Wind the power cable on the ferrite core once. Place the ferrite core close to the TV.
[to a wall plug] [to the TV]
[Figure 2]
[Cross Section of
Ferrite Core]
3 Use the ferrite core to reduce the electromagnetic interference in the power cable.
Wind the power cable on the ferrite core once. Place the ferrite core close to the TV and a wall plug.
[to a wall plug]
[Figure 3]
[to the TV]
[Cross Section of
Ferrite Core]
- If there is one ferrite core, follow as shown in Figure 1.
- If there are two ferrite cores, follow as shown in Figures 1 and 2.
- If there are three ferrite cores, follow as shown in Figures 1 and 3.
For an optimal connection, HDMI cables and USB devices should have bezels less than 10 mm
thick and 18 mm width.(Except for Plasma TV, 22/26/32LK33**, 32/42LK43**, 42/47/55LK53**,
47LK95**)
B
A
B
A
*A 10 mm
*B
18 mm
Page 9
ASSEMBLING AND PREPARING
Separate purchase
Separate purchase items can be changed or modified for quality improvement without any notification.
Contact your dealer for buying these items.
These devices only work with compatible LG Plasma TV, LED LCD TV or LCD TV.
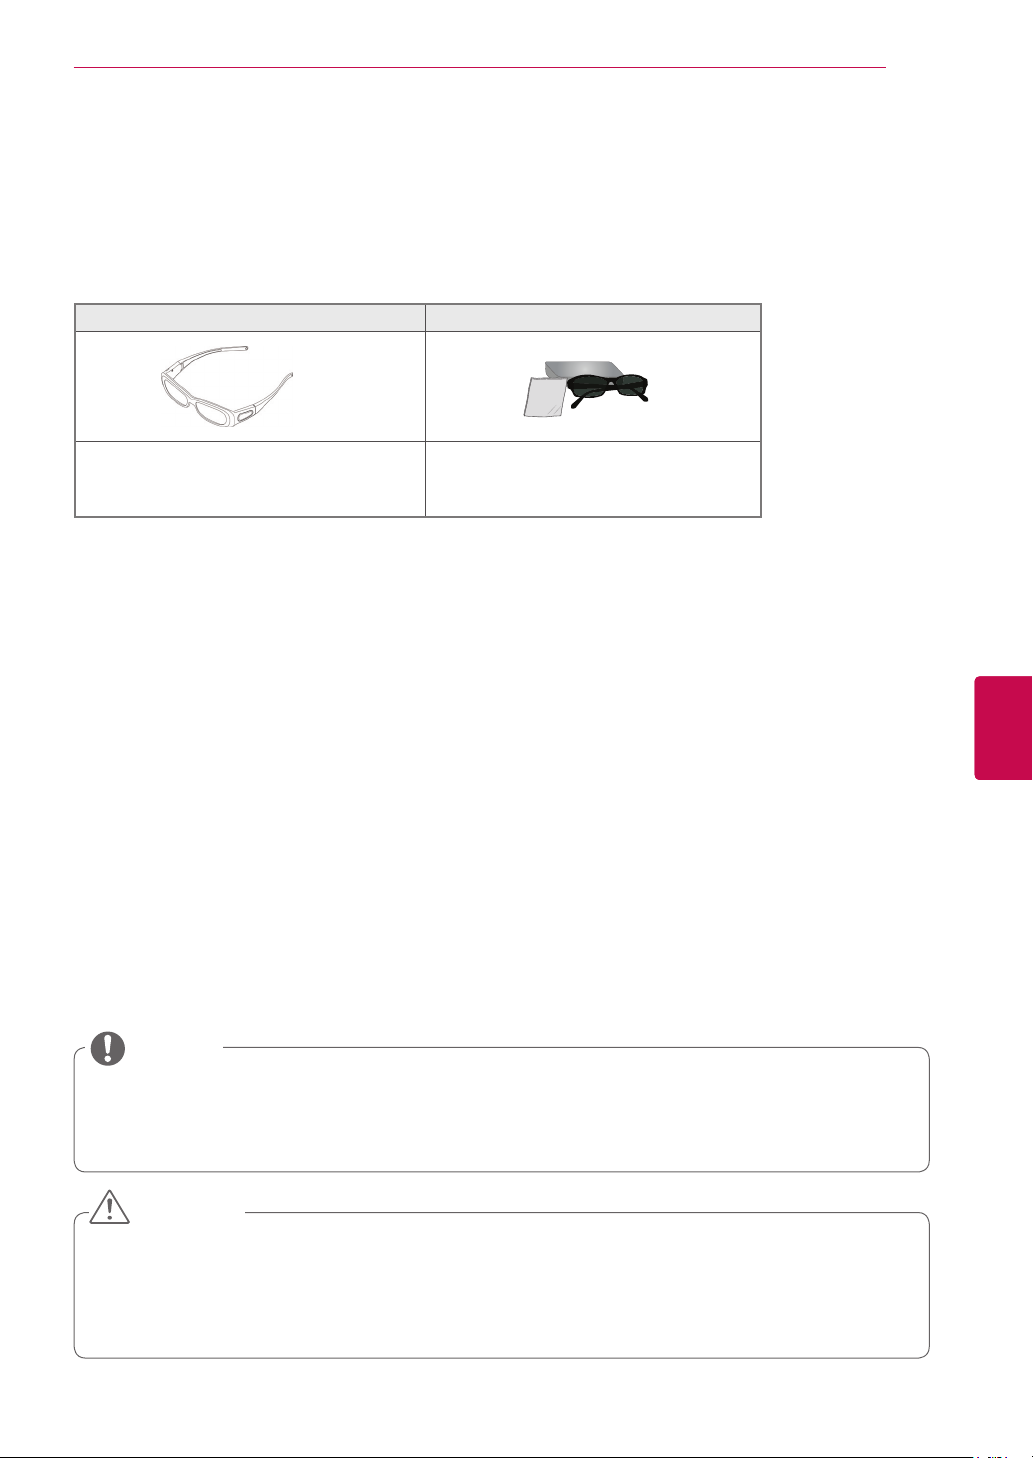
Only Plasma TV Only LCD / LED LCD TV
9
3D Glasses
(AG-S230, AG-S250, AG-S270 : Only 3D
Models)
1 The model name or design may be changed depending on the upgrade of product functions,
manufacturer's circumstances or policies.
FPR 3D Glasses
(AG-F2** : Only 3D Models)
1
Parts and buttons
NOTE
ENGENGLISH
The TV can be placed in standby mode in order to reduce the power consumption. And the TV
should be turned off if it will not be watched for some time, as this will reduce energy consumption.
The energy consumed during use can be significantly reduced if the level of brightness of the
picture is reduced, and this will reduce the overall running cost.
CAUTION
Do not step on the glass stand or subject it to any impact. It may break, causing possible injury
from fragments of glass, or the TV may fall.
Do not drag the TV. The floor or the product may be damaged.
Some models have a thin film attached on to the screen and this must not be removed.
Page 10
ASSEMBLING AND PREPARING
10
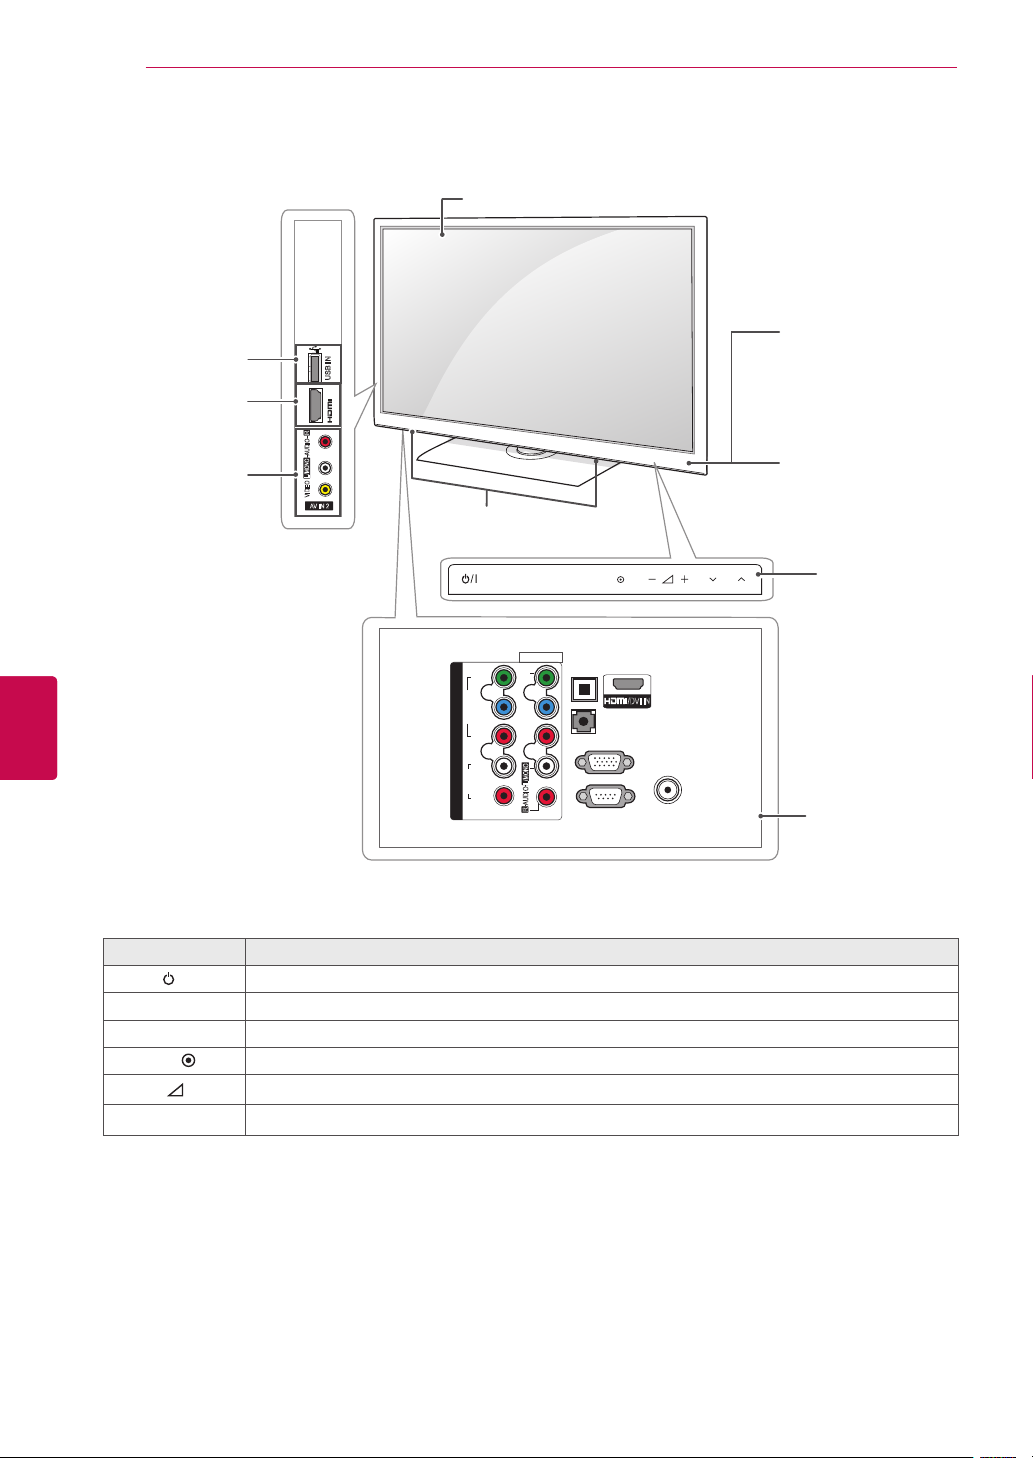
Image shown may differ from your TV.
ENGLISH
ENG
Only 50/60PV25**, 42/50PT25**
USB input
USB IN
R
AUDIO
L/MONO
VIDEO
AV IN 2
IN 2
HDMI IN
AV (Audio and
Video) IN
Screen
Speakers
INPUT
Y
B
P
VIDEO
R
P
AV IN 1
VIDEO
HOME OK
OPTICAL
DIGITAL
AUDIO OUT
AUDIO IN
(RGB/DVI)
/DVI IN
Remote control and
intelligent
1
sensors
Power indicator
Red – In Standby
mode
Off – TV turns on
P
1
Touch buttons
2
COMPONENT IN
AUDIO
L
R
1
L/MONO
AUDIO
R
2
RGB IN (PC)
RS-232C IN
(CONTROL & SERVICE)
ANTENNA
IN
Connection panel
(See p.80)
Button Description
/I Turns the power on or off
INPUT Changes the input source
HOME Accesses the main menus, or saves your input and exits the menus
Selects the highlighted menu option or confirms an input
Adjusts the volume level
Scrolls through the saved programmes
-
OK
v
+
P
^
1 Intelligent sensor - Adjusts the image quality corresponding to the surrounding environment.
2 Touch Button - You can use the desired button function by touching.
Page 11
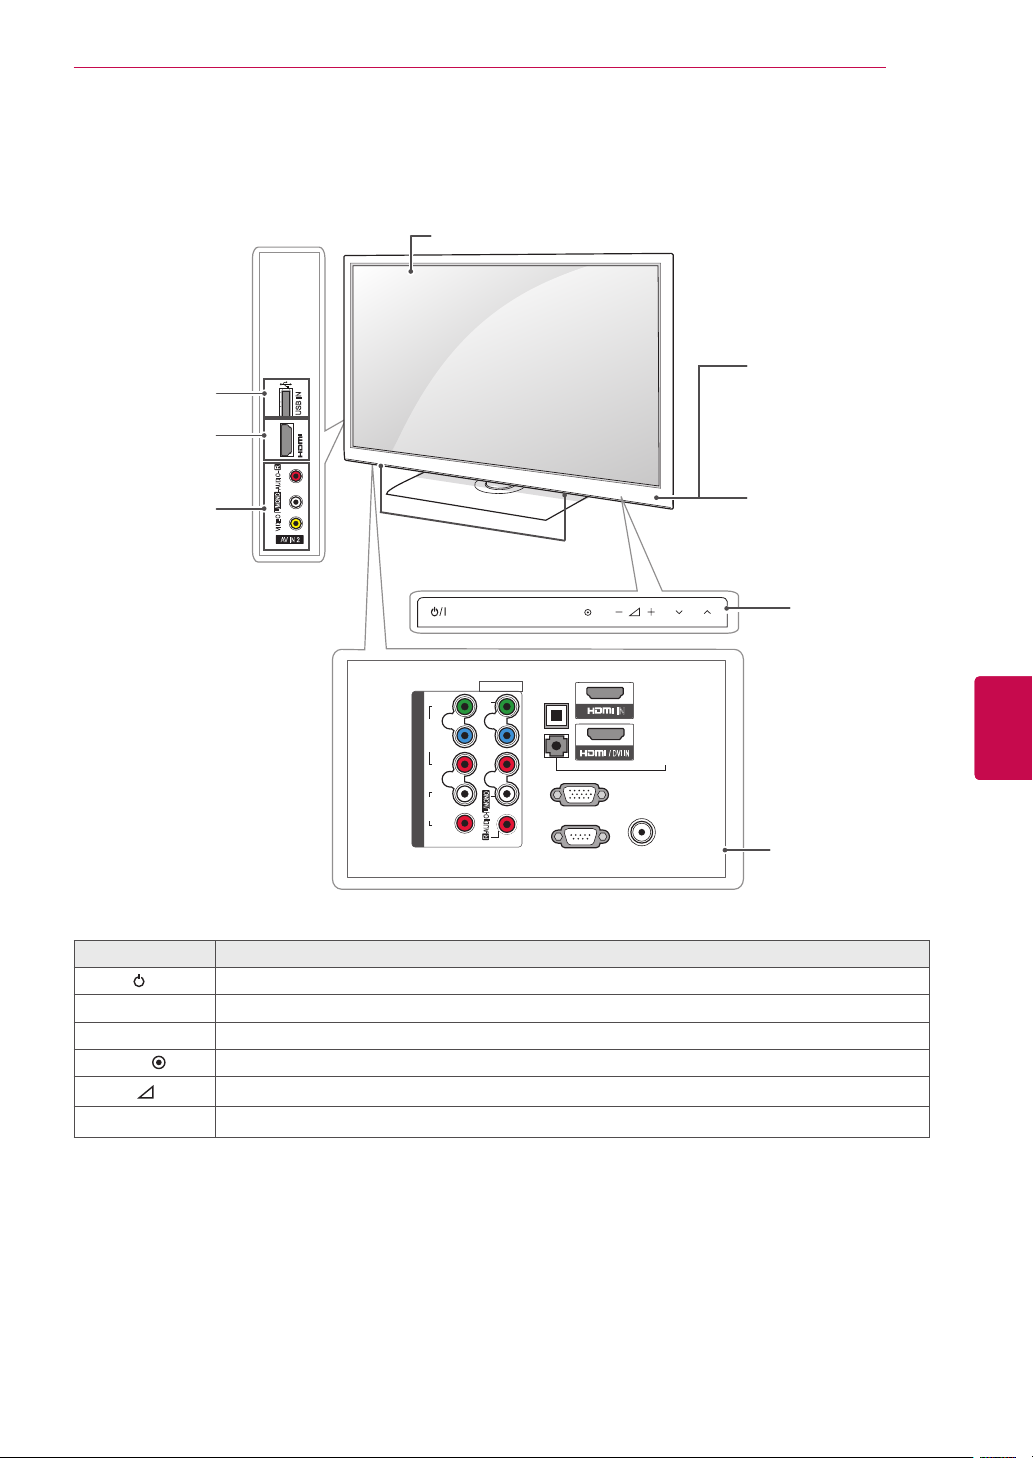
Image shown may differ from your TV.
Only 42/50PW35**, 42/50PW45**, 50/60PZ55**, 42/50PT35**
Screen
ASSEMBLING AND PREPARING
11
USB input
HDMI IN
AV (Audio and
Video) IN
R
AUDIO
L/MONO
VIDEO
AV IN 2
USB IN
IN 3
Speakers
Y
B
P
VIDEO
R
P
COMPONENT IN
L
AUDIO
R
1
INPUT
AV IN 1
VIDEO
L/MONO
AUDIO
R
HOME OK
2
OPTICAL
DIGITAL
AUDIO OUT
RGB IN (PC)
RS-232C IN
(CONTROL & SERVICE)
Remote control and
intelligent
1
sensors
Power indicator
Red – In Standby
mode
Off – TV turns on
P
2
IN
1
AUDIO IN
(RGB/DVI)
ANTENNA
IN
Touch buttons
Connection panel
2
ENGENGLISH
(See p.80)
Button Description
/I Turns the power on or off
INPUT Changes the input source
HOME Accesses the main menus, or saves your input and exits the menus
Selects the highlighted menu option or confirms an input
Adjusts the volume level
Scrolls through the saved programmes
-
OK
v
+
P
^
1 Intelligent sensor - Adjusts the image quality corresponding to the surrounding environment.
2 Touch Button - You can use the desired button function by touching.
Page 12
ASSEMBLING AND PREPARING
12
Image shown may differ from your TV.
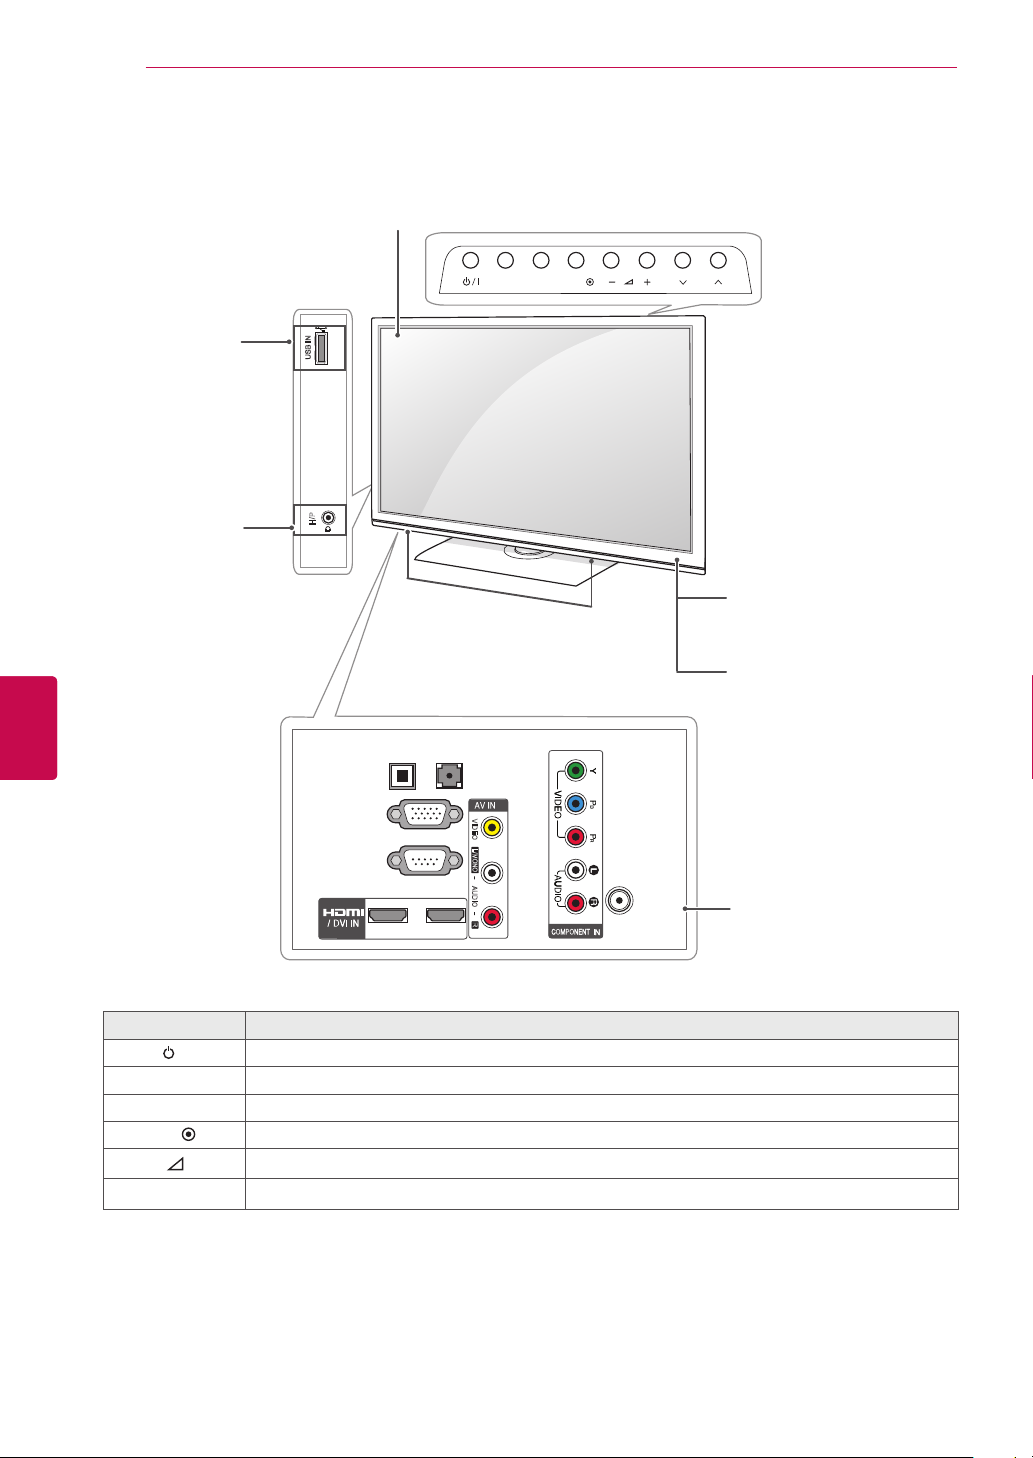
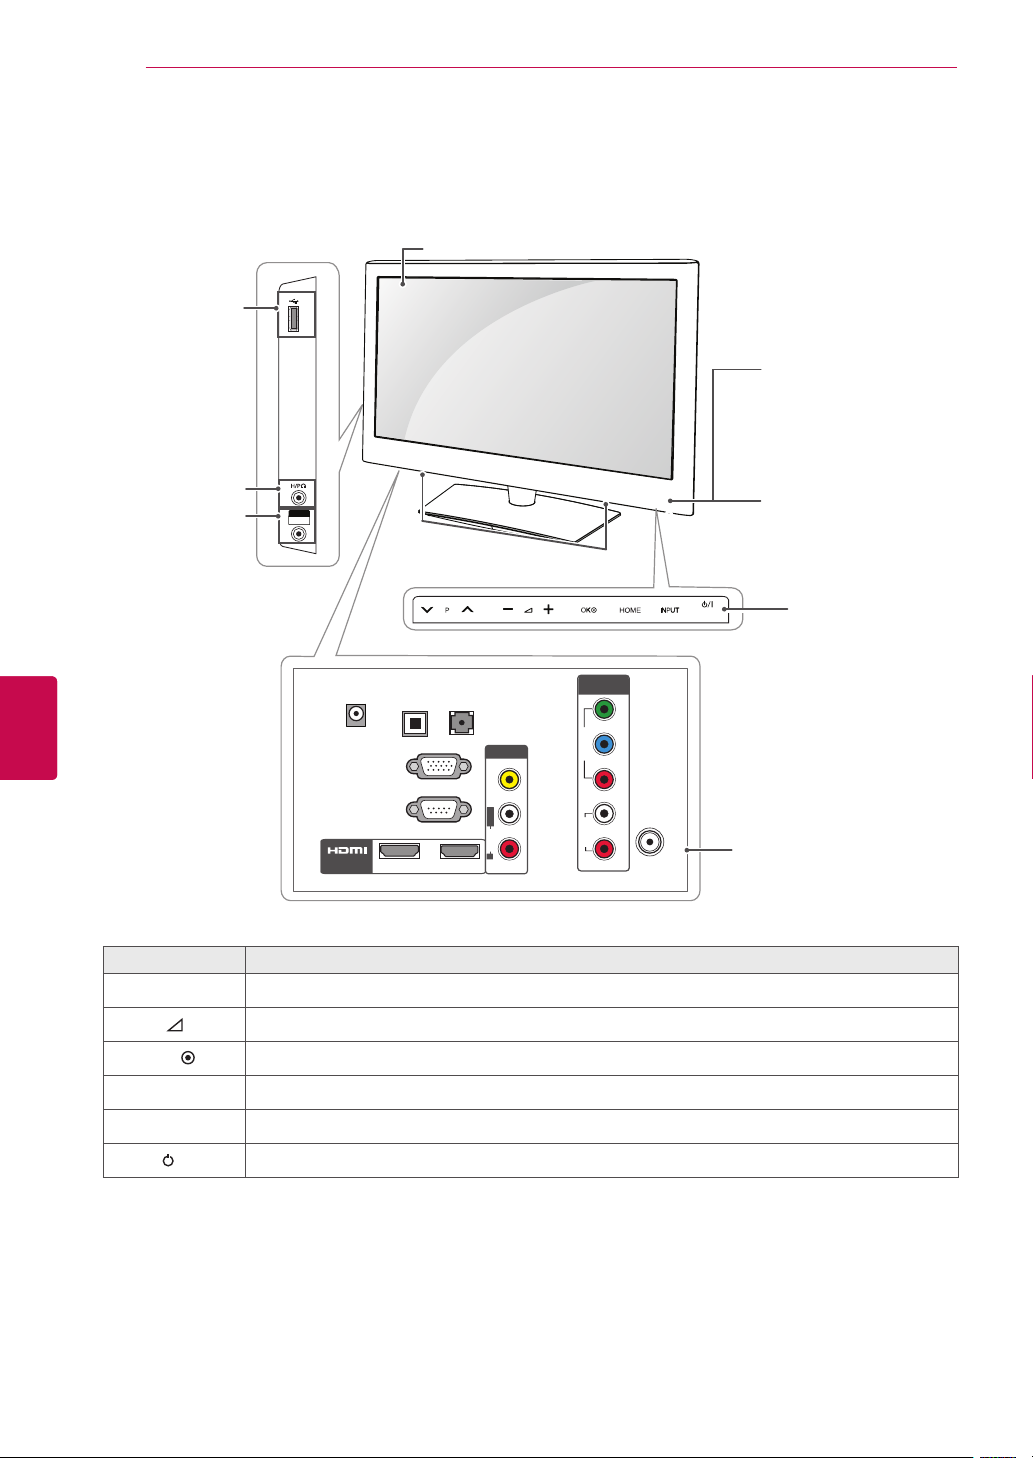
Only 22LK33**
Screen
ENGLISH
ENG
USB input
Headphone
Socket
USB IN
H/P
R
INPUT HOME
R
Speakers
OK
P
Remote control
Power Indicator
(Can be adjusted using
the Power Indicator in the
OPTION menu.)
OPTICAL
(RGB/DVI)
DIGITAL
AUDIO IN
AUDIO OUT
RGB IN (PC)
VIDEO
L/MONO
1
RS-232C IN
(CONTROL & SERVICE)
AUDIO
R
1
2
ANTENNA/
CABLE IN
Button Description
/I Turns the power on or off
INPUT Changes the input source
HOME Accesses the main menus, or saves your input and exits the menus
Selects the highlighted menu option or confirms an input
Adjusts the volume level
Scrolls through the saved programmes
-
OK
v
+
P
^
Connection panel
(See p.80)
Page 13
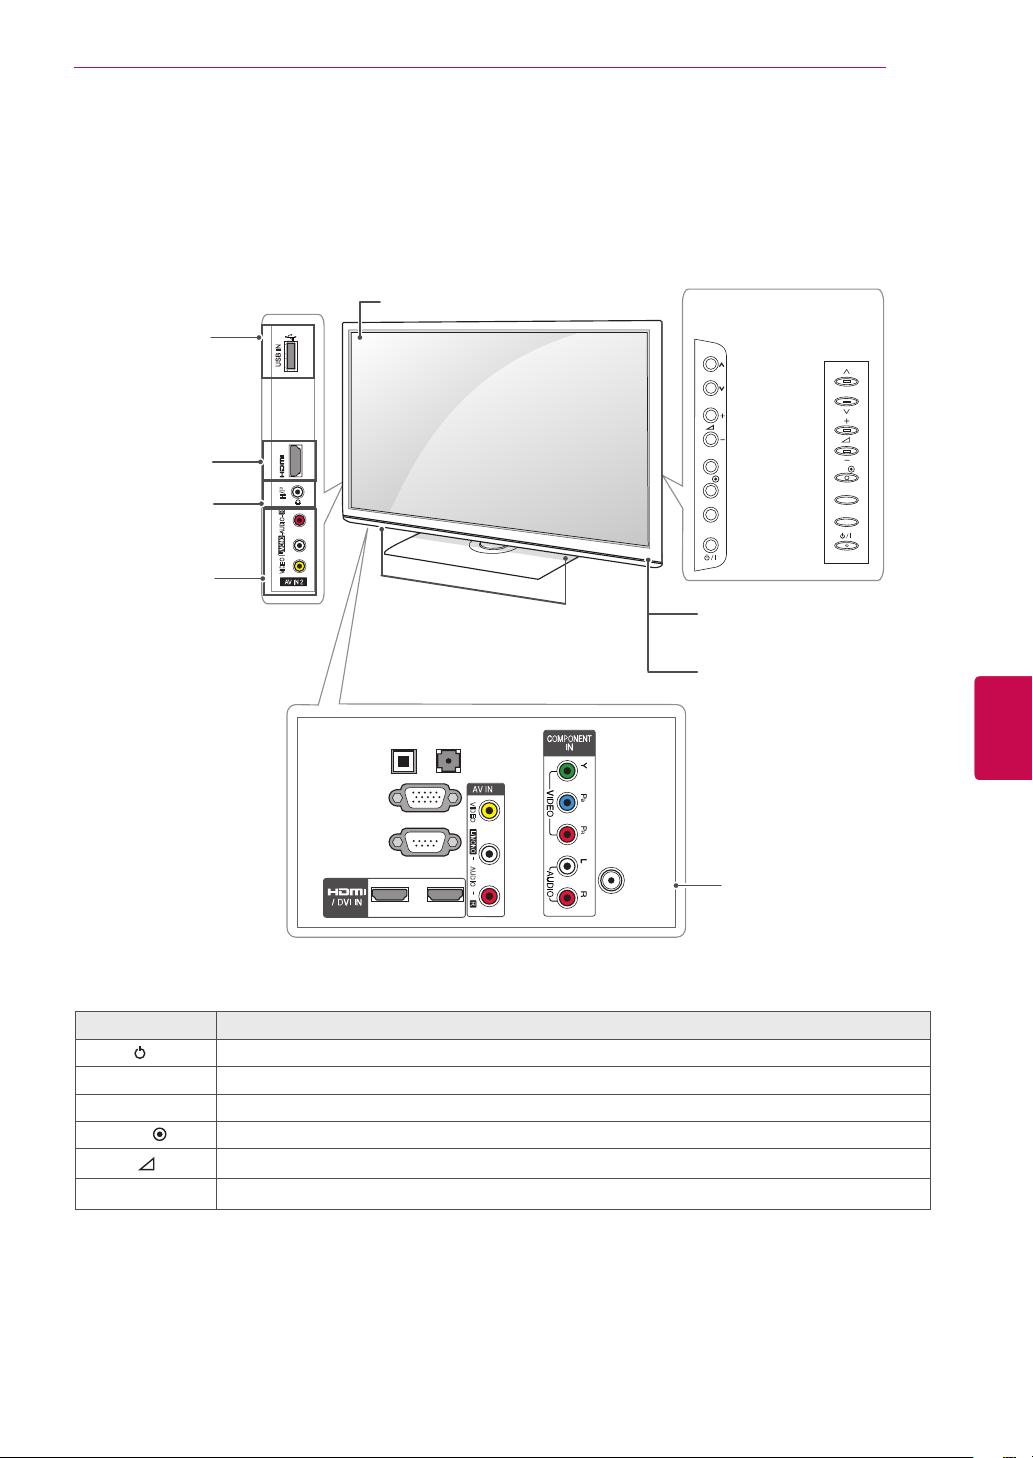
Image shown may differ from your TV.
Only 26/32LK33**, 32/42LK43**
ASSEMBLING AND PREPARING
13
USB input
HDMI IN
Headphone
Socket
AV (Audio and
Video) IN
USB IN
IN 3
H/P
R
AUDIO
L/MONO
VIDEO
AV IN 2
Screen
R
Speakers
(Only
26/32LK33**)
P
OK
HOME
INPUT
(Only
32/42LK43**)
Remote control
P
OK
HOME
INPUT
Power Indicator
(Can be adjusted using
ENGENGLISH
OPTICAL
AUDIO OUT
RS-232C IN
2
DIGITAL
RGB IN (PC)
(CONTROL & SERVICE)
AUDIO IN
(RGB/DVI)
1
VIDEO
L/MONO
AUDIO
R
the Power Indicator in the
OPTION menu.)
1
ANTENNA/
CABLE IN
Connection panel
(See p.80)
Button Description
/I Turns the power on or off
INPUT Changes the input source
HOME Accesses the main menus, or saves your input and exits the menus
Selects the highlighted menu option or confirms an input
Adjusts the volume level
Scrolls through the saved programmes
-
OK
v
+
P
^
Page 14

ASSEMBLING AND PREPARING
14
Image shown may differ from your TV.
Only 42/47/55LK53**, 47LK95**
Screen
ENGLISH
ENG
USB input
HDMI IN
Headphone
Socket
AV (Audio and
Video) IN
USB IN
IN 3
R
AUDIO
L/MONO
VIDEO
AV IN 2
P
OK
HOME
R
Speakers
INPUT
Remote control and
intelligent
1
sensors
Power Indicator
(Can be adjusted using
the Power Indicator in the
OPTION menu.)
AV IN 1
VIDEO
L/MONO
AUDIO
R
COMPONENT IN
Y
VIDEO
P
B
P
R
L
AUDIO
R
2
1
ANTENNA /
CABLE IN
Connection panel
(See p.80)
/ DVI IN
OPTICAL DIGITAL
AUDIO OUT
RGB IN (PC)
RS-232C IN
2
(RGB/DVI)
AUDIO IN
(CONTROL & SERVICE)
1
Button Description
/I Turns the power on or off
INPUT Changes the input source
HOME Accesses the main menus, or saves your input and exits the menus
Selects the highlighted menu option or confirms an input
Adjusts the volume level
Scrolls through the saved programmes
-
OK
v
+
P
^
1 Intelligent sensor - Adjusts the image quality corresponding to the surrounding environment.
Page 15

Image shown may differ from your TV.
Only 32/37/42/47LK45**
ASSEMBLING AND PREPARING
15
32/37/42/47LK455C)
(Only
5
32/37/42/47LK455C)
No. Description
1
USB input
2
HDMI IN
3
Headphone Socket
AV (Audio and Video)
4
IN
5
SPEAKER OUT
1
USB IN
IN 3
2
3
SPEAKE R OUT
R
AUDIO
4
L/MONO
VIDEO
AV IN 2
(Except for
USB IN
IN 3
R
AUDIO
L/MONO
VIDEO
AV IN 2
Screen
Remote control and
intelligent
R
1
sensors
Power Indicator
(Can be adjusted using
the Power Indicator in the
Speakers
OPTION menu.)
Touch buttons
2
ENGENGLISH
AUDIO IN
DIGITAL
OPTICAL
(RGB/DVI)
AUDIO OUT
1
(CONTROL & SERVICE)
1
VIDEO
L/MONO
AUDIO
R
ANTENNA/
CABLE IN
Connection panel
(See p.80)
RGB IN (PC)
RS-232C IN
2
Button Description
/I Turns the power on or off
INPUT Changes the input source
HOME Accesses the main menus, or saves your input and exits the menus
Selects the highlighted menu option or confirms an input
Adjusts the volume level
Scrolls through the saved programmes
-
OK
v
+
P
^
1 Intelligent sensor - Adjusts the image quality corresponding to the surrounding environment.
2 Touch Button - You can use the desired button function by touching.
Page 16
ASSEMBLING AND PREPARING
16
Image shown may differ from your TV.
Only 19/22/26LV25**
Screen
ENGLISH
ENG
USB input
Headphone
Socket
AV (Audio and
Video) IN
AV IN 2
VIDEO / AUDIO
USB IN
DC-IN
/ DVI IN
Speakers
OPTICAL
DIGITAL
(RGB/DVI)
AUDIO OUT
AUDIO IN
RGB IN (PC)
RS-232C IN(CONTROL & SERVICE)
2
1
AV IN 1
VIDEO
L/MONO
AUDIO
R
COMPONENT
IN
Y
VIDEO
P
B
P
R
L
AUDIO
R
ANTENNA/
CABLE IN
Remote control and
intelligent
1
sensors
Power Indicator
(Can be adjusted using
the Power Indicator in the
OPTION menu.)
Touch buttons
Connection panel
(See p.80)
2
Button Description
v
-
OK
P
^
+
Scrolls through the saved programmes
Adjusts the volume level
Selects the highlighted menu option or confirms an input
HOME Accesses the main menus, or saves your input and exits the menus
INPUT Changes the input source
/I Turns the power on or off
1 Intelligent sensor - Adjusts the image quality corresponding to the surrounding environment.
2 Touch Button - You can use the desired button function by touching.
Page 17
ASSEMBLING AND PREPARING
USB IN
IN 3
VIDEO / AUDIO
AV IN 2
OPTICAL
DIGITAL
AUDIO OUT
AUDIO IN
(RGB/DVI)
RGB IN (PC)
RS-232C IN
(CONTROL & SERVICE)
L/MONO
R
AUDIO
VIDEO
2
1
12
1
ANTENNA/
CABLE IN
OPTICAL
DIGITAL
AUDIO OUT
AUDIO IN
(RGB/DVI)
RGB IN (PC)
RS-232C IN
(CONTROL & SERVICE)
L/MONO
R
AUDIO
VIDEO
2
1
12
ANTENNA/
CABLE IN
P
HOME
INPUT
OK
USB IN
P
OK
INPUT
HOME
Image shown may differ from your TV.
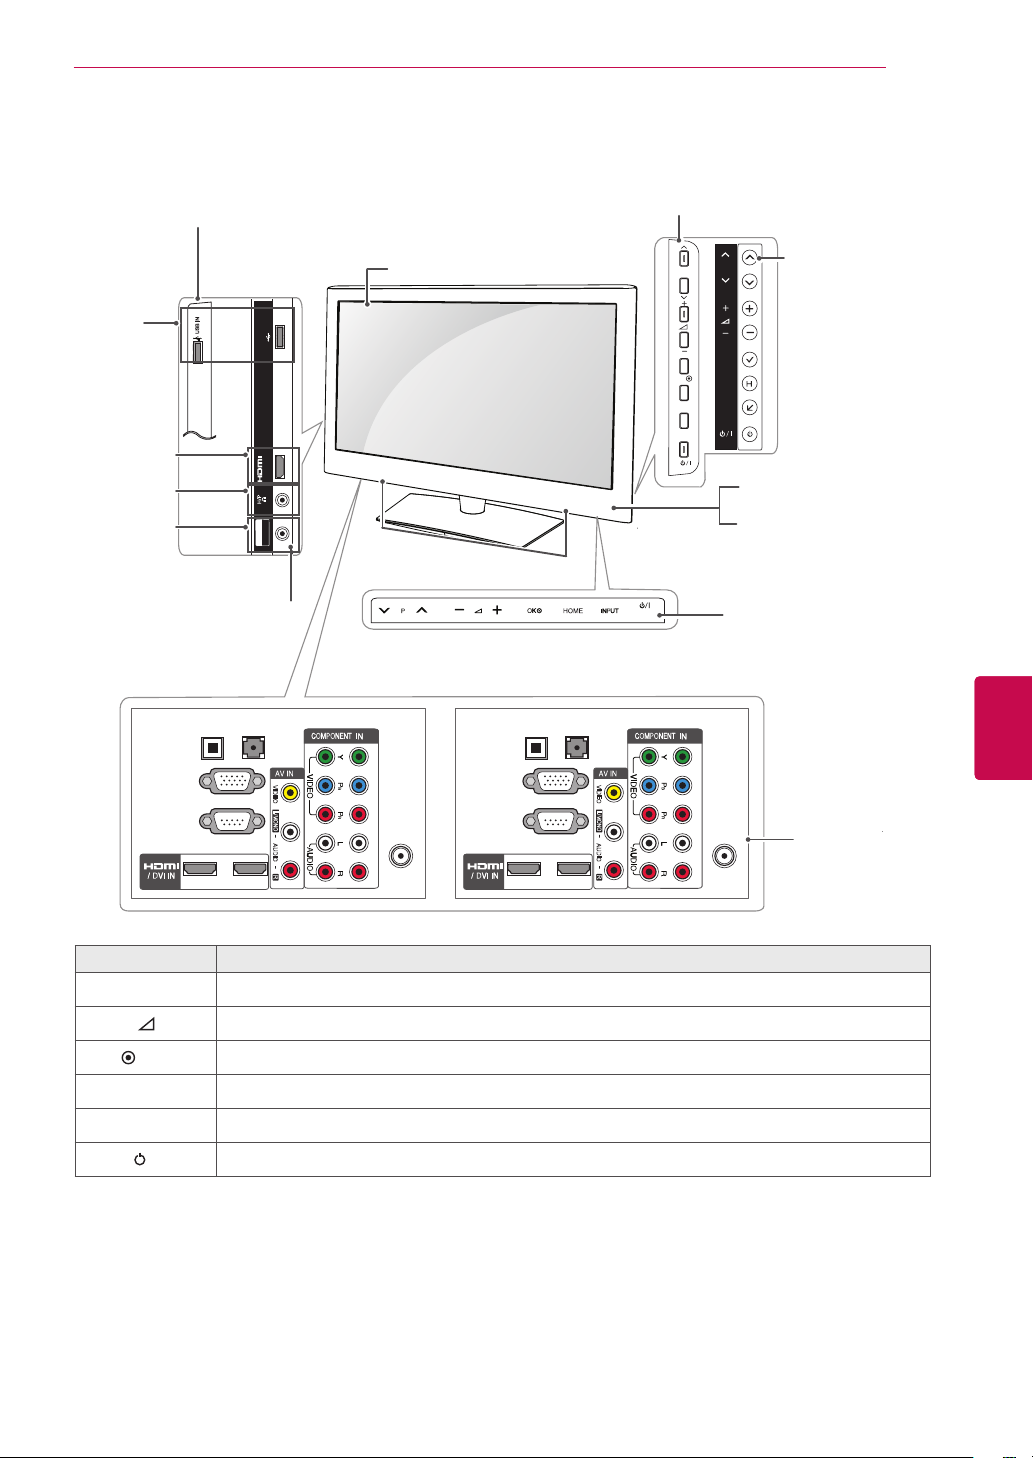
Only 32LV25**, 32/37/42/47/55LV35**, 32/42LV34**, 32/42/47/55LW45**, 42/47LW54**, 32/42LV33**
(Only
(Only 32/42LV34**, 32/42LV33**)
32/42LV34**, 32/42LV33**)
Screen
(Only
42/47LW54**)
USB input
HDMI IN
Headphone
Socket
AV (Audio and
Video) IN
(Except for
Speakers
32/42LV34**,
32/42LV33**)
Remote control and
intelligent
Power Indicator
(Can be adjusted using
the Power Indicator in the
OPTION menu.)
Touch buttons
(Except for 32/42LV34**,
32/42LV33**
42/47LW54**)
1
sensors
2
17
ENGENGLISH
Connection panel
(See p.80)
or
OK
Button Description
v
P
^
+
-
or
OK Selects the highlighted menu option or confirms an input
Scrolls through the saved programmes
Adjusts the volume level
HOME Accesses the main menus, or saves your input and exits the menus
INPUT Changes the input source
/I Turns the power on or off
1 Intelligent sensor - Adjusts the image quality corresponding to the surrounding environment.
2 Touch Button - You can use the desired button function by touching.
Page 18

ASSEMBLING AND PREPARING
18
Image shown may differ from your TV.
ENGLISH
ENG
Only 22/26LV55**
USB input
Headphone
Socket
AV (Audio and
Video) IN
USB IN
AV IN 2
VIDEO / AUDIO
DC-IN
RGB IN (PC)
RS-232C IN
(CONTROL & SERVICE)
2 1
OPTICAL
DIGITAL
AUDIO OUT
Screen
Speakers
AUDIO IN
(RGB/DVI)
VIDEO
L/MONO
AUDIO
R
ANTENNA/
CABLE IN
Remote control and
intelligent
1
sensors
Power Indicator
(Can be adjusted using
the Power Indicator in
the OPTION menu.)
Touch buttons
Connection panel
(See p.80)
2
Button Description
Scrolls through the saved programmes
Adjusts the volume level
Selects the highlighted menu option or confirms an input
Accesses the main menus, or saves your input and exits the menus
Changes the input source
/I Turns the power on or off
1 Intelligent sensor - Adjusts the image quality corresponding to the surrounding environment.
2 Touch Button - You can use the desired button function by touching.
Page 19

Image shown may differ from your TV.
Only 26/32LV30**
Speakers
Screen
ASSEMBLING AND PREPARING
19
HDMI IN
IN 3
R
USB input
USB IN
AUDIO IN
DC-IN
RGB IN (PC)
RS-232C IN
2 1
OPTICAL
DIGITAL
AUDIO OUT
(RGB/DVI)
VIDEO
L/MONO
AUDIO
R
ANTENNA/
CABLE IN
(Except for
32LV30**)
(CONTROL & SERVICE)
Button Description
v
P
^
+
-
OK
HOME Accesses the main menus, or saves your input and exits the menus
INPUT Changes the input source
/I Turns the power on or off
Scrolls through the saved programmes
Adjusts the volume level
Selects the highlighted menu option or confirms an input
OK
HOME
INPUT
Remote control and
intelligent
1
sensors
Power Indicator
(Can be adjusted using
the Power Indicator in the
OPTION menu.)
Connection panel
(See p.80)
ENGENGLISH
1 Intelligent sensor - Adjusts the image quality corresponding to the surrounding environment.
Page 20

ASSEMBLING AND PREPARING
20
ENGLISH
ENG
Lifting and moving the TV
When moving or lifting the TV, read the following to
prevent the TV from being scratched or damaged
and for safe transportation regardless of its type
and size.
CAUTION
Avoid touching the screen at all times, as
this may result in damage on the screen
or some of the pixels used to create
images.
It is recommended to move the TV in the box
or packing material that the TV originally came
in.
Before moving or lifting the TV, disconnect the
power cord and all cables.
When holding the TV, the screen should face
away from you to avoid damage.
Setting up the TV
Image shown may differ from your TV.
Put your TV on a pedestal stand and mount the TV
on a table or wall.
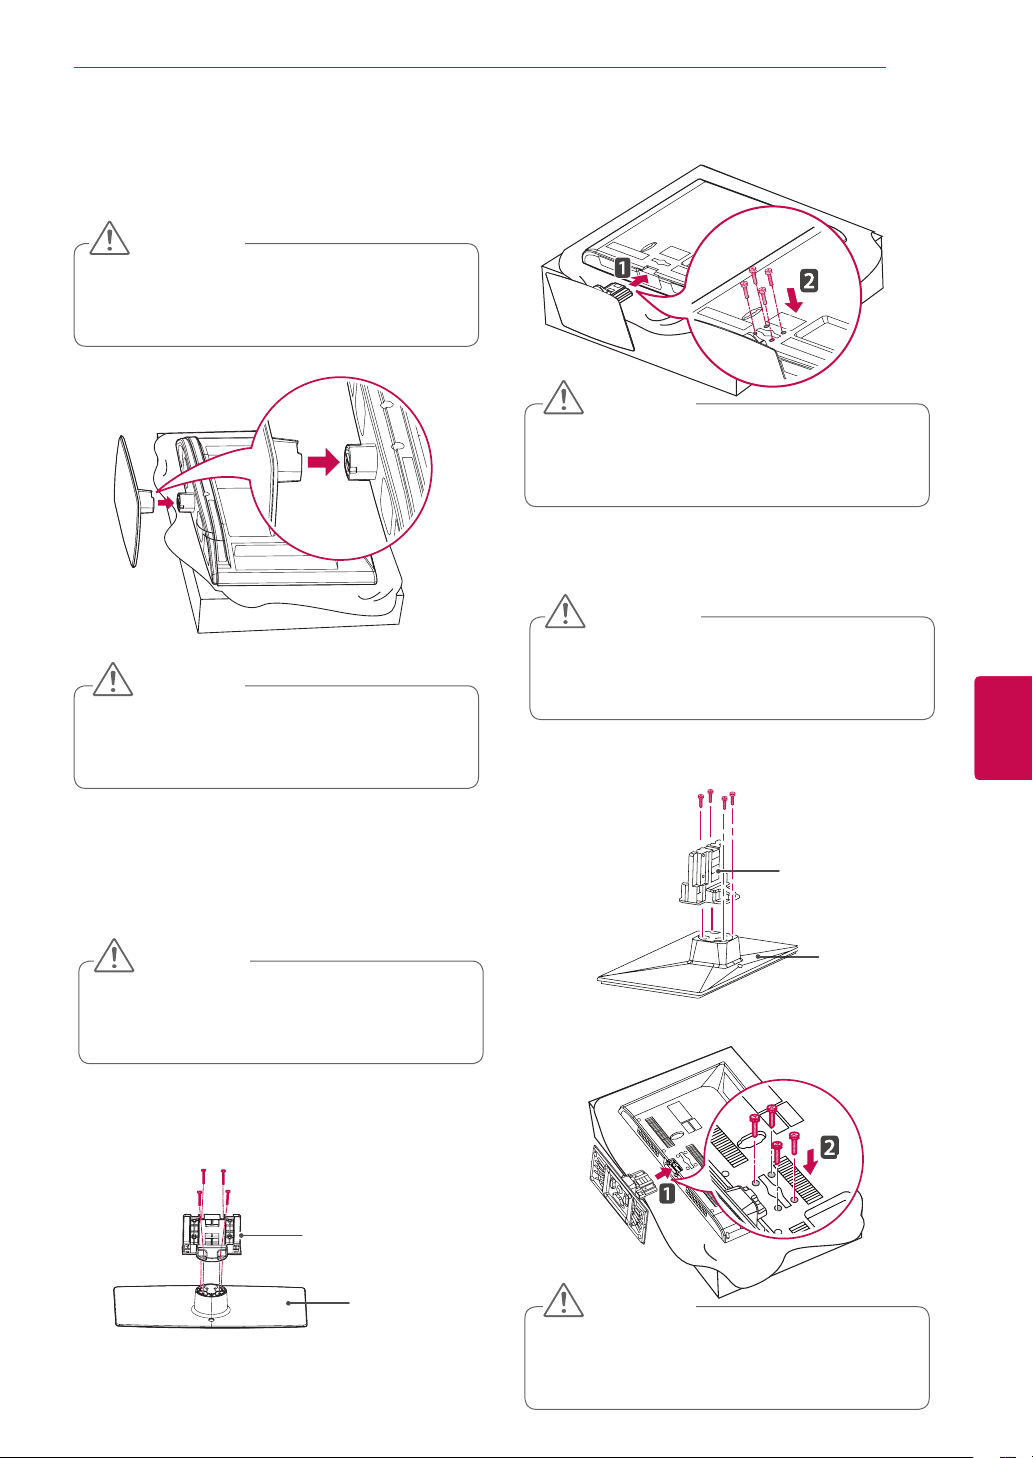
Attaching the stand
Only Plasma TV
Lay the TV with the screen side down on a flat
1
surface.
CAUTION
Lay a foam mat or soft protective cloth
on the surface to protect the screen from
damage. Make sure no objects press
against the screen.
Assemble the parts of the Stand Body with the
2
Stand Base of the TV.
Stand Body
Stand Base
Hold the top and bottom of the TV frame firmly.
Make sure not to hold the transparent part,
speaker, or speaker grill area.
When transporting a large TV, there should be
at least 2 people.
When transporting the TV by hand, hold the
TV as shown in the following illustration.
When transporting the TV, do not expose the
TV to jolts or excessive vibration.
When transporting the TV, keep the TV
upright, never turn the TV on its side or tilt
towards the left or right.
3 Secure the TV and the stand with the 4 screws.
Make sure to assemble the front and rear side
of the stand.
Front
Rear
CAUTION
Tighten the screws firmly to prevent
the TV from tilting forward. Do not over
tighten.
Page 21
ASSEMBLING AND PREPARING
21
Only 22LK33**
Lay the TV with the screen side down on a flat
1
surface.
CAUTION
Lay a foam mat or soft protective cloth
on the surface to protect the screen from
damage.
Assemble the TV as shown.
2
CAUTION
Tighten the screws firmly to prevent
the TV from tilting forward. Do not over
tighten.
3 Secure the TV and the stand with the 4 screws.
CAUTION
Tighten the screws firmly to prevent
the TV from tilting forward. Do not over
tighten.
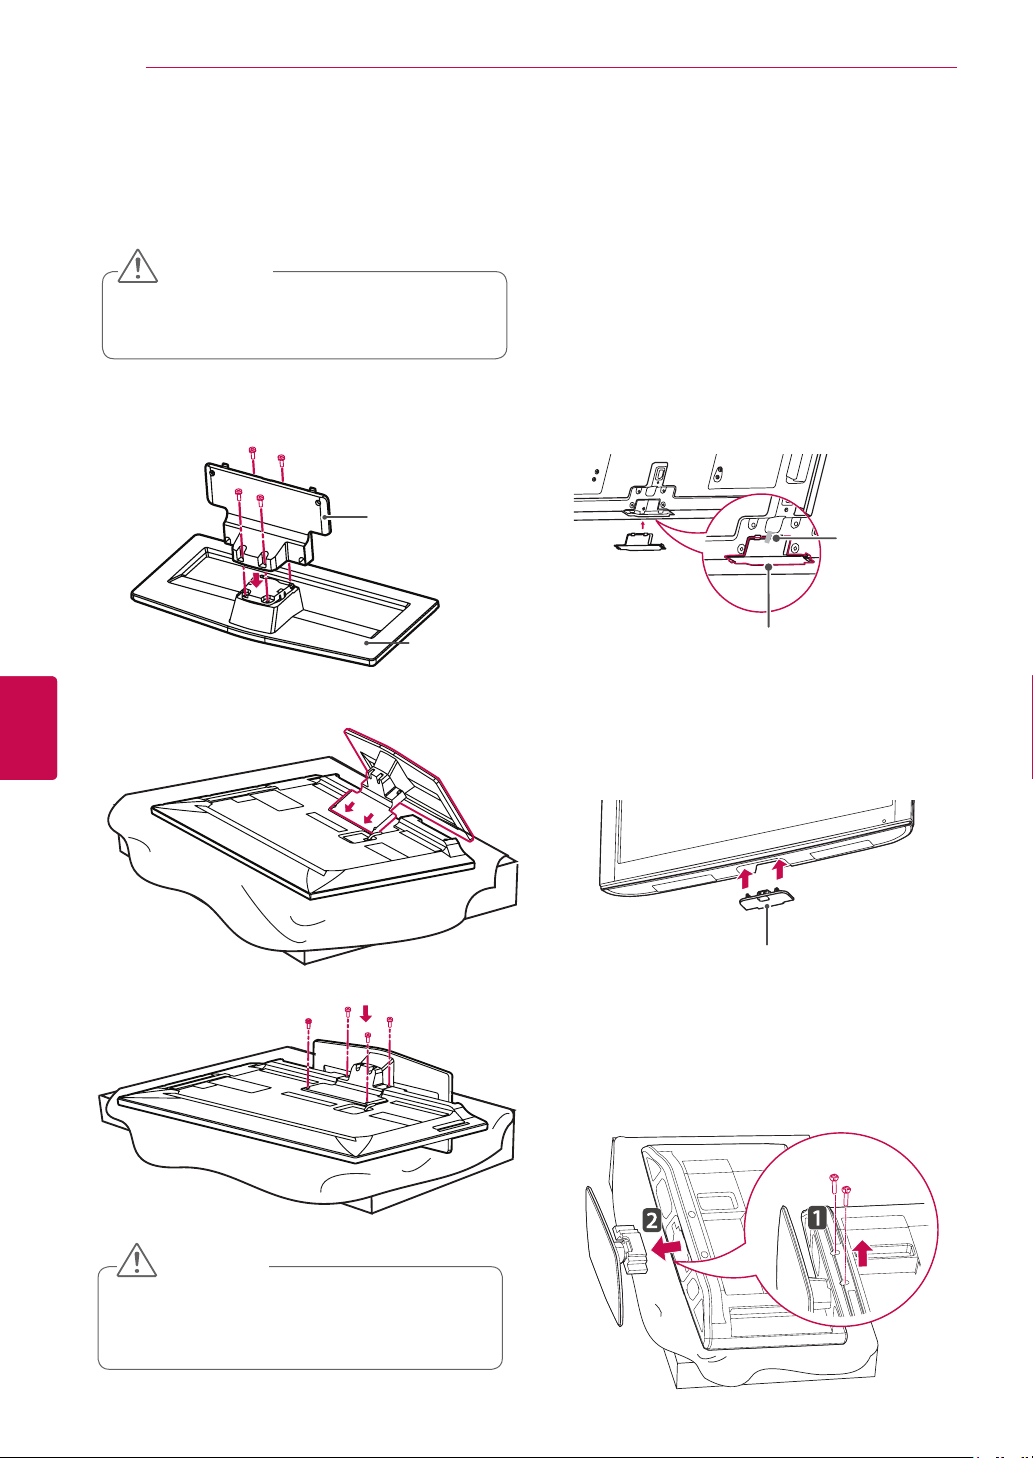
Only 32/37/42/47LK45**
Lay the TV with the screen side down on a flat
1
surface.
CAUTION
Lay a foam mat or soft protective cloth
on the surface to protect the screen from
damage.
Assemble the parts of the Stand Body with the
2
Stand Base of the TV.
ENGENGLISH
Only 26/32LK33**, 32/42LK43**, 42/47/55LK53**,
47LK95**
Lay the TV with the screen side down on a flat
1
surface.
CAUTION
Lay a foam mat or soft protective cloth
on the surface to protect the screen from
damage.
Assemble the parts of the Stand Body with the
2
Stand Base of the TV.
Stand Body
Stand Base
Stand Body
Stand Base
3 Secure the TV and the stand with the 4 screws.
CAUTION
Tighten the screws firmly to prevent
the TV from tilting forward. Do not over
tighten.
Page 22
ASSEMBLING AND PREPARING
22
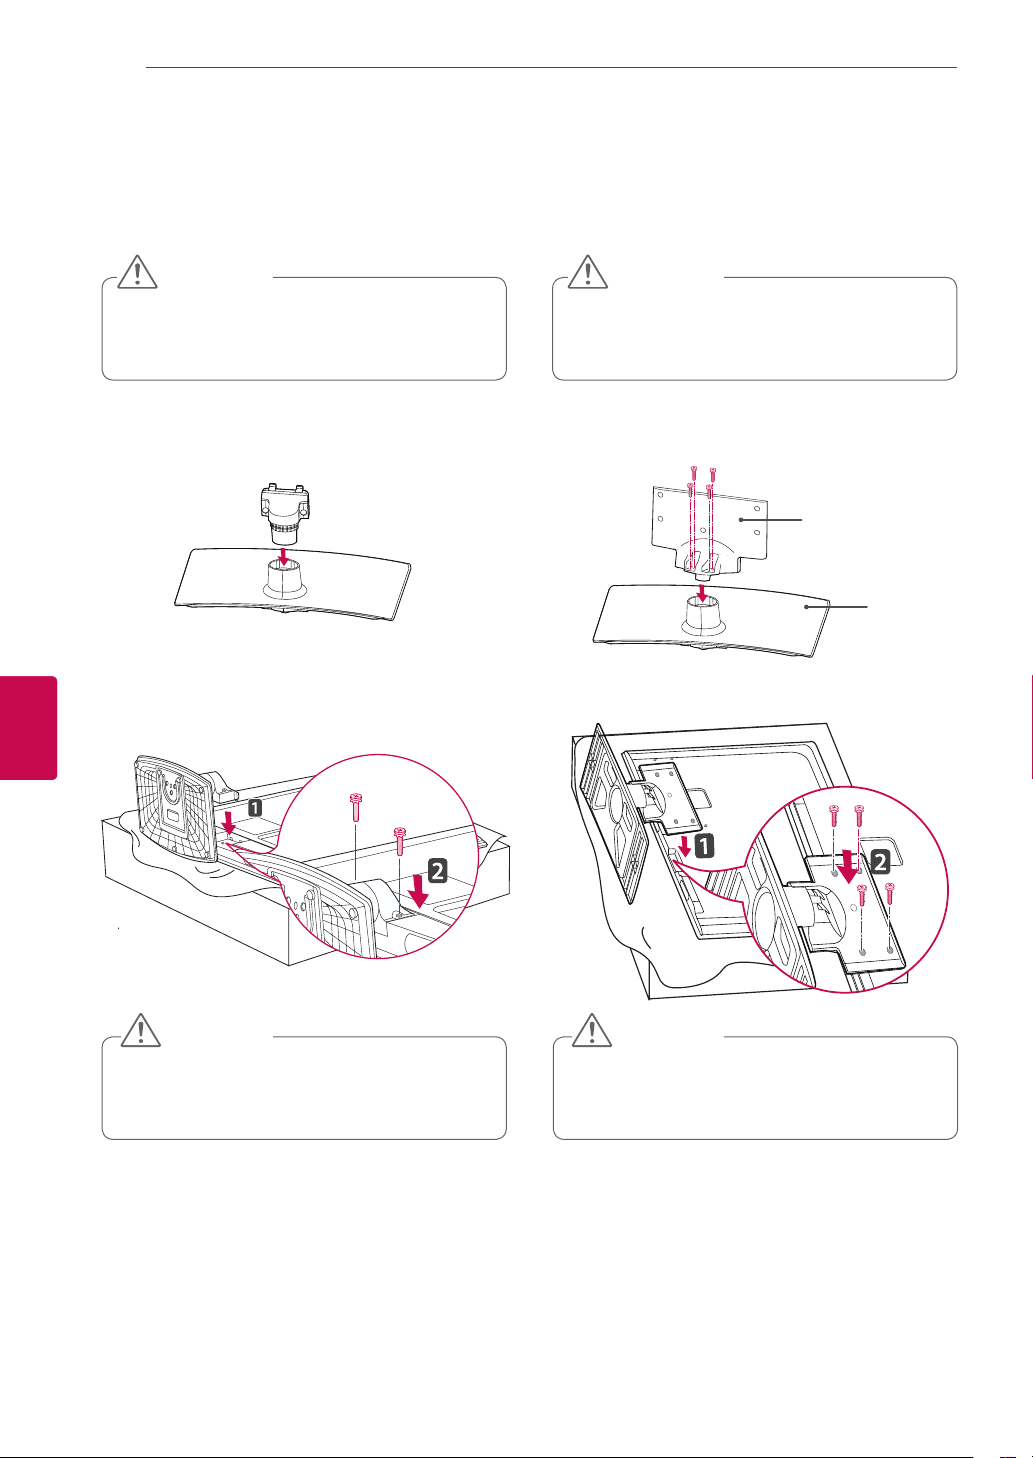
Only 32LV25**Only 19/22/26LV25**, 22/26LV55**
ENGLISH
ENG
Lay the TV with the screen side down on a flat
1
surface.
CAUTION
Lay a foam mat or soft protective cloth
on the surface to protect the screen from
damage.
Assemble the parts of the Stand Body with the
2
Stand Base of the TV.
Lay the TV with the screen side down on a flat
1
surface.
CAUTION
Lay a foam mat or soft protective cloth
on the surface to protect the screen from
damage.
Assemble the parts of the Stand Body with the
2
Stand Base of the TV.
Stand Body
Stand Base
3 Secure the TV and the stand with the 4 screws.3 Secure the TV and the stand with the 2 screws.
CAUTION
Tighten the screws firmly to prevent
the TV from tilting forward. Do not over
tighten.
CAUTION
Tighten the screws firmly to prevent
the TV from tilting forward. Do not over
tighten.
Page 23

ASSEMBLING AND PREPARING
23
Only 32/37/42/47/55LV35**, 32LV30**,
32/42LV34**, 32/42/47/55LW45**, 32/42LV33**
Lay the TV with the screen side down on a flat
1
surface.
CAUTION
Lay a foam mat or soft protective cloth
on the surface to protect the screen from
damage.
Assemble the parts of the Stand Body with the
2
Stand Base of the TV.
Except for
32LV30**
Only
32LV30**
Stand Body
Stand Base
Stand Body
Stand Base
Only 26LV30**
Lay the TV with the screen side down on a flat
1
surface.
CAUTION
Lay a foam mat or soft protective cloth
on the surface to protect the screen from
damage.
Assemble the parts of the Stand Body with the
2
Stand Base of the TV.
Stand Body
Stand Base
(M3x8)
ENGENGLISH
3 Secure the TV and the stand with the 4 screws.
Except for
32LV30**
Only
32LV30**
CAUTION
Tighten the screws firmly to prevent
the TV from tilting forward. Do not over
tighten.
3 Secure the TV and the stand with the 2 screws.
(M4x12)
CAUTION
Tighten the screws firmly to prevent
the TV from tilting forward. Do not over
tighten.
Page 24
ASSEMBLING AND PREPARING
24
ENGLISH
ENG
Only 42/47LW54**
Lay the TV with the screen side down on a flat
1
surface.
CAUTION
Lay a foam mat or soft protective cloth on the
surface to protect the screen from damage.
Assemble the parts of the
2
Stand Base
of the TV.
Stand Body
Stand Body
with the
Stand Base
3 Assemble the TV as shown.
Not using the Desk Type Stand
Image shown may differ from your TV.
Only Plasma TV
Push the supplied protection cover into the
opening at the bottom of the TV until it locks in
place.
Attach the protection cover tape.
- This will protect the opening from
accumulating dust and dirt.
- When installing the wall mounting bracket,
use the Protection cover.
Protection
cover tape
Protection cover
Only 26/32LK33**, 32/42LK43**,
32/37/42/47LK45**, 42/47/55LK53**, 47LK95**
Push the supplied protection cover into the
1
opening at the bottom of the TV until clicking
sound.
4 Secure the TV and the stand with the 4 screws.
CAUTION
Tighten the screws firmly to prevent
the TV from tilting forward. Do not over
tighten.
Protection cover
Only 22LK33**
Lay the TV with the screen side down on a flat
1
surface.
Remove the 2 screws and pull the stand away
2
from the TV.
Page 25
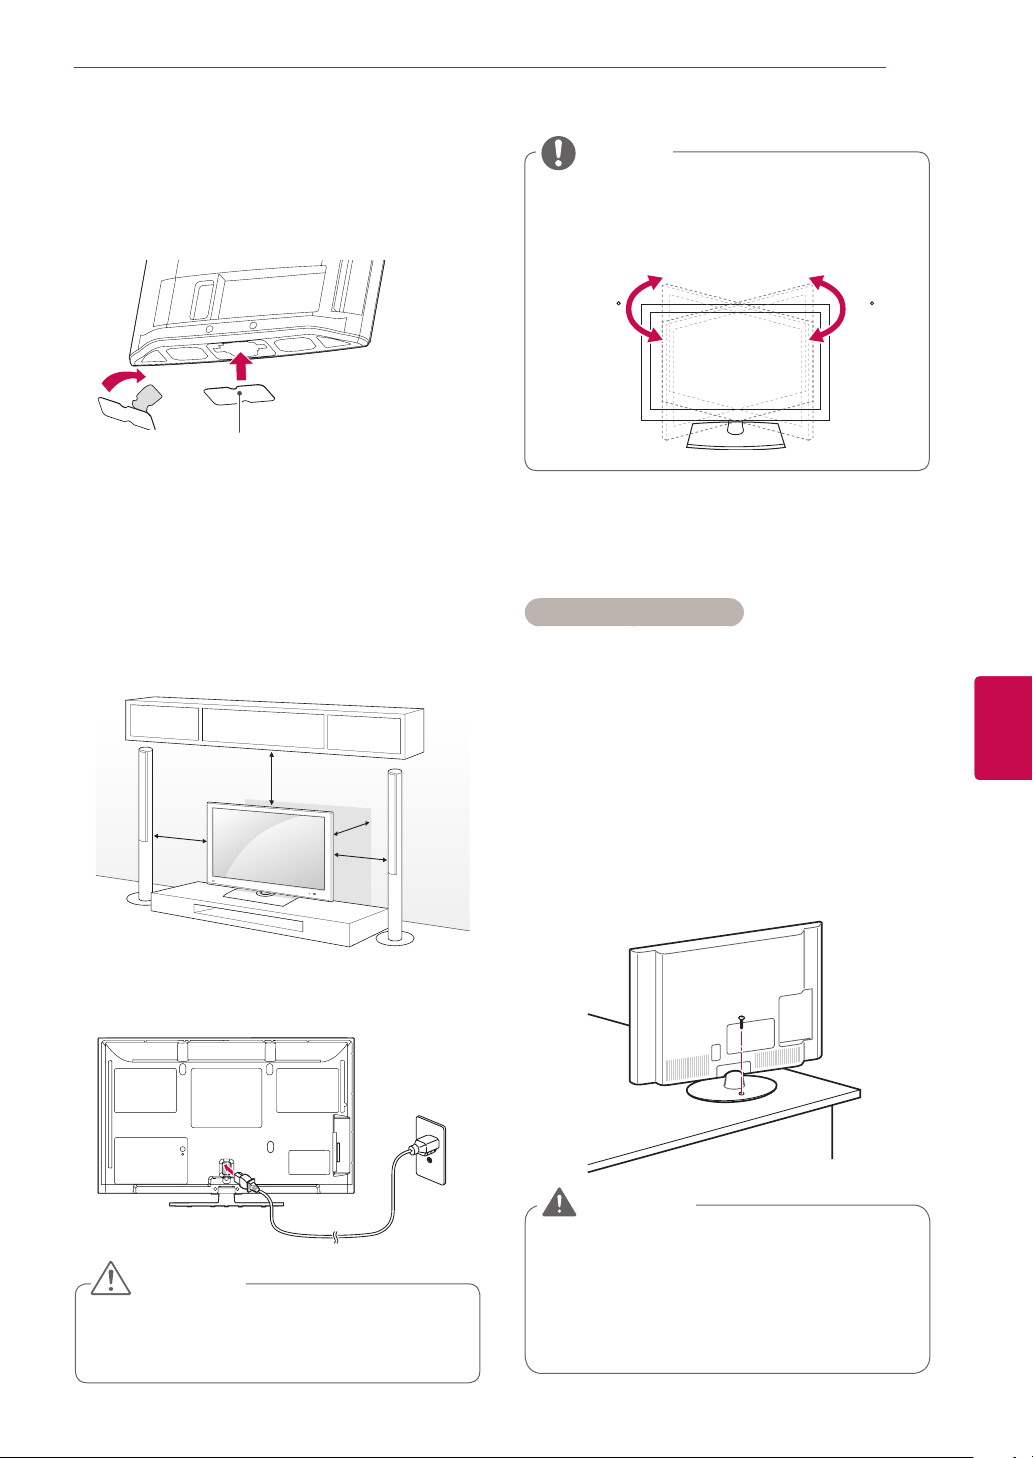
Push the supplied protection cover into the
3
opening at the bottom of the TV until it locks in
place.
This will protect the opening from accumulating
dust and dirt.
Protection cover
Mounting on a table
Image shown may differ from your TV.
Lift and tilt the TV into its upright position on a
1
table.
- Leave a 10 cm (minimum) space from the
wall for proper ventilation.
10 cm
ASSEMBLING AND PREPARING
25
NOTE
(Except for 22LK33**, 19/22/26LV25**,
22/26LV55**, 26LV30**)
Swivel 20 degrees to the left or right and
adjust the angle of the TV to suit your view.
2020
Securing the TV to a table
Image shown may differ from your TV.
This feature is not available for all models.
Only 26/32LK33**, 32/42LK43**,
42LK53**,32/37/42LK45**, 32LV25**, 32/37LV35**,
32LV34**, 32LW45**, 32LV30**, 32LV33**
ENGENGLISH
10 cm
Connect the power cord to a wall outlet.
2
10 cm
10 cm
CAUTION
Do not place the TV near or on sources
of heat, as this may result in fire or other
damage.
Fix the TV to a table to prevent from tilting forward,
damage, and potential injury.
Mount the TV on a table, and then insert and
tighten the supplied screw on the rear of the stand.
WARNING
To prevent TV from falling over, the TV
should be securely attached to the floor/
wall per installation instructions. Tipping,
shaking, or rocking the TV may cause
injury.
Page 26

ASSEMBLING AND PREPARING
26
ENGLISH
ENG
Securing the TV to a wall
Image shown may differ from your TV.
This feature is not available for all models.
Insert and tighten the eye-bolts, or TV brackets
1
and bolts on the back of the TV.
- If there are bolts inserted at the eye-bolts
position, remove the bolts first.
Mount the wall brackets with the bolts to the
2
wall.
Match the location of the wall bracket and the
eye-bolts on the rear of the TV.
Connect the eye-bolts and wall brackets tightly
3
with a sturdy rope.
Make sure to keep the rope horizontal with the
flat surface.
CAUTION
Using the Kensington security system
Image shown may differ from your TV.
This feature is not available for all models.
The Kensington security system connector is
located at the rear of the TV. For more information
of installation and using, refer to the manual
provided with the Kensington security system or
visit
http://www.kensington.com.
Connect the Kensington security system cable
between the TV and a table.
Mounting on a wall
Attach a wall mount bracket at the rear of the TV
carefully and install the wall mount bracket on a
solid wall perpendicular to the floor. When you
attach the TV to other building materials, please
contact qualified personnel.
Make sure that children do not climb on
or hang on the TV.
NOTE
Use a platform or cabinet that is strong
and large enough to support the TV
securely.
LG recommends that wall mounting be performed
by a qualified professional installer.
10 cm
10 cm
10 cm
10 cm
Page 27

ASSEMBLING AND PREPARING
27
Separate purchase(Wall Mounting Bracket)
Make sure to use screws and wall mount
bracket that meet the VESA standard. Standard
dimensions for the wall mount kits are described in
the following table.
Model 42/50PT25**
VESA (A x B) 400 x 400 600 x 400
Standard screw M6 M8
Number of screws 4 4
Wall mount
bracket
Model 22LK33**
VESA (A x B) 100 x 100 200 x 100
Standard screw M4 M4
Number of screws 4 4
Wall mount
bracket
50PV25**
42/50PW35**
42/50PW45**
42/50PT35**
50PZ55**
PSW400B,
PSW400BG
19/22/26LV25**
22/26LV55**
26LV30**
LSW100B, LSW100BG
60PV25**
60PZ55**
PSW600B,
PSW600BG
26/32LK33**
32LK43**
32LK45**
32LV25**
32LV35**
32LV30**
32LV34**
32LV33**
32LW45**
Model 42LV34**
VESA (A x B) 400 x 400
Standard screw M6
Number of screws 4
Wall mount
bracket
42LV33**
42/47LW54**
LSW400BX,
LSW400BXG
CAUTION
Disconnect the power first, and then
move or install the TV. Otherwise electric
shock may occur.
If you install the TV on a ceiling or slanted
wall, it may fall and result in severe injury.
Use an authorized LG wall mount bracket
and contact the local dealer or qualified
personnel.
Do not over tighten the screws as this
may cause damage to the TV and void
your warranty.
Use the screws and wall mount bracket
that meet the VESA standard. Any
damages or injuries by misuse or using
an improper accessory are not covered
by the warranty.
ENGENGLISH
Model 42LK43**
VESA (A x B) 200 x 200 400 x 400
Standard screw M6 M6
Number of screws 4 4
Wall mount
bracket
37/42/47LK45**
42/47LK53**
37LV35**
47LK95**
LSW200B,
LSW200BG
42/47/55LV35**
42/47/55LW45**
55LK53**
LSW400B,
LSW400BG
NOTE
Use the screws that are listed on the
VESA standard screw specifications.
The wall mount kit includes an installation
manual and necessary parts.
The length of screws may differ
depending on the wall mount. Make sure
to use the proper length.
For more information, refer to the manual
supplied with the wall mount bracket.
Page 28
ASSEMBLING AND PREPARING
28
ENGLISH
ENG
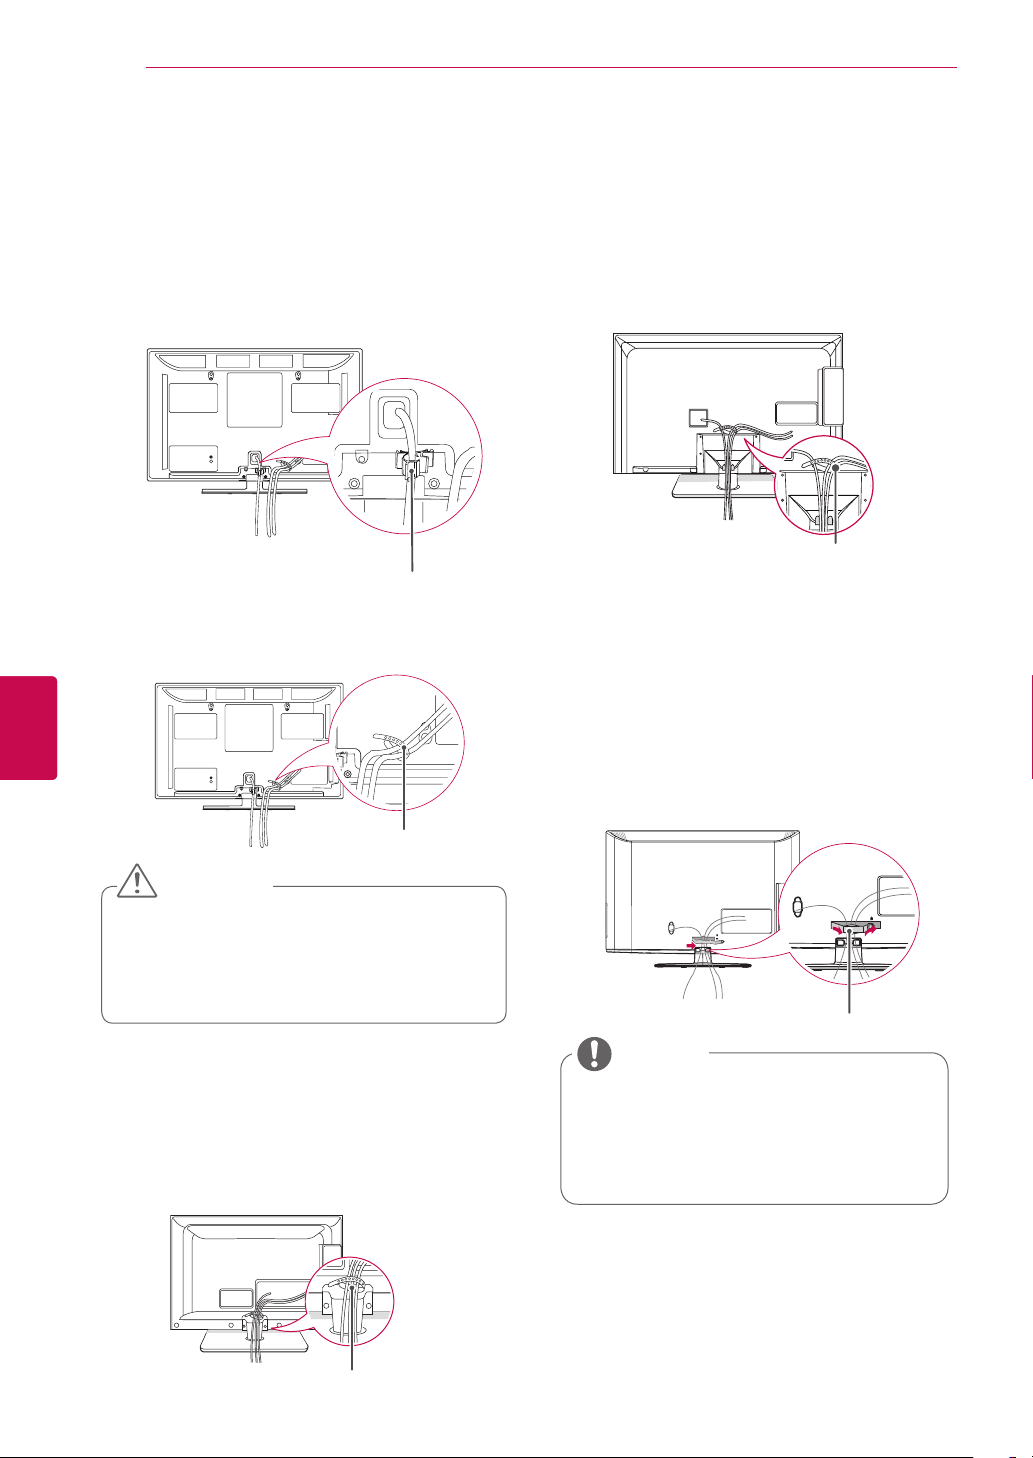
Tidying cables
Image shown may differ from your TV.
Only Plasma TV
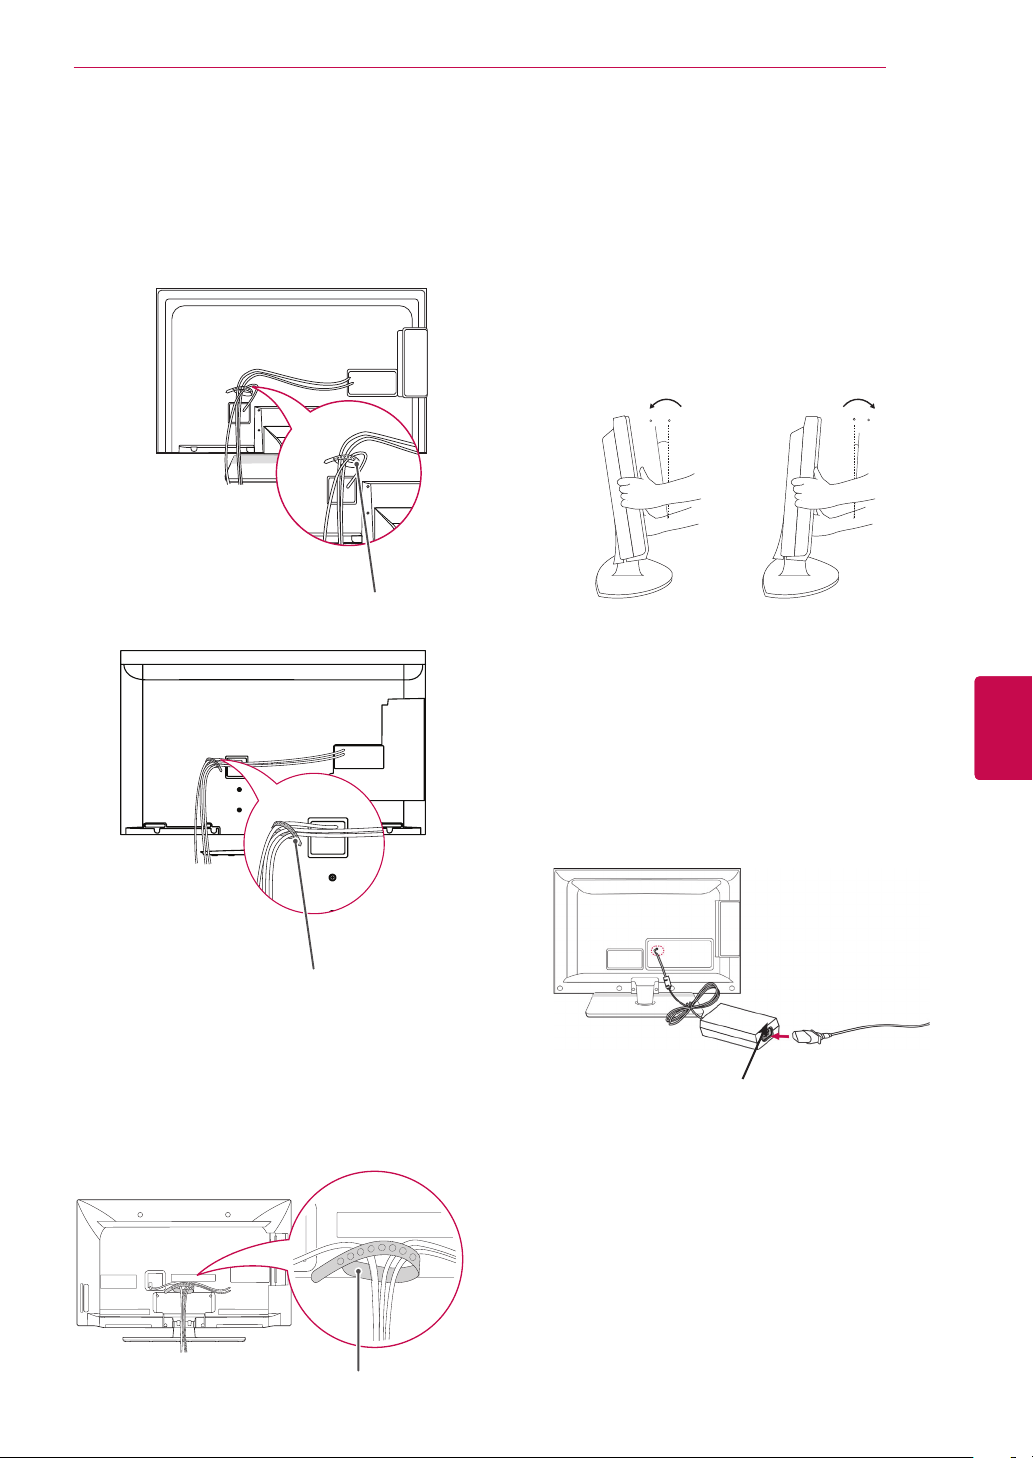
1 Install the Power Cord Holder and Power
Cord. It will help prevent the power cable from
being removed by accident.
Power Cord Holder
2 Gather and bind the cables with the Cable
Holder.
Only 26LV30**
After connecting the cables as necessary,
1
install Cable Holder as shown and bundle the
cables.
Cable holder
Only 26/32LK33**, 32/42LK43**,
32/37/42/47LK45**, 42/47/55LK53**, 47LK95**
Gather and bind the cables with the cable
1
management clip.
Cable Holder
CAUTION
Do not move the TV by holding the Cable
Holder & Power Cord Holder, as the
Cable holders may break, and injuries
and damage to the TV may occur.
Only 22LK33**, 19/22/26LV25**, 22/26LV55**
After connecting the cables as necessary,
1
install Cable Holder as shown and bundle the
cables.
Fix the cable management clip firmly to the TV.
2
Cable Management Clip
NOTE
Do not move the TV by holding the
cable management clip, as the cable
management clip may break, and injuries
and damage to the TV may occur.
Cable Holder
Page 29
ASSEMBLING AND PREPARING
29
Only 32LV25**, 32/37/42/47/55LV35**, 32LV30**,
32/42LV34**, 32/42/47/55LW45**, 32/42LV33**
Gather and bind the cables with the Cable
1
Holder on the TV back cover.
Cable Holder
or
Positioning your display
Image shown may differ from your TV.
Only 22LK33**
Adjust the position of the panel in various ways for
maximum comfort.
• Tilt range
0
0
12
3
Connection of TV
ENGENGLISH
Cable Holder
Only 42/47LW54**
Gather and bind the cables with the Cable
1
Holder on the TV back cover.
Image shown may differ from your TV.
Only 19/22/26LV25
Connect the antenna cable to the antenna
1
input port on the TV.
Connect the DC adapter plug to the power
2
input jack on the TV.
Connect the power cord to the DC adapter first,
3
then plug the power cord into the wall power
outlet.
22/26LV55
**,
DC Adapter
26LV30**
**,
Cable Holder
Page 30
REMOTE CONTROL
30
REMOTE CONTROL
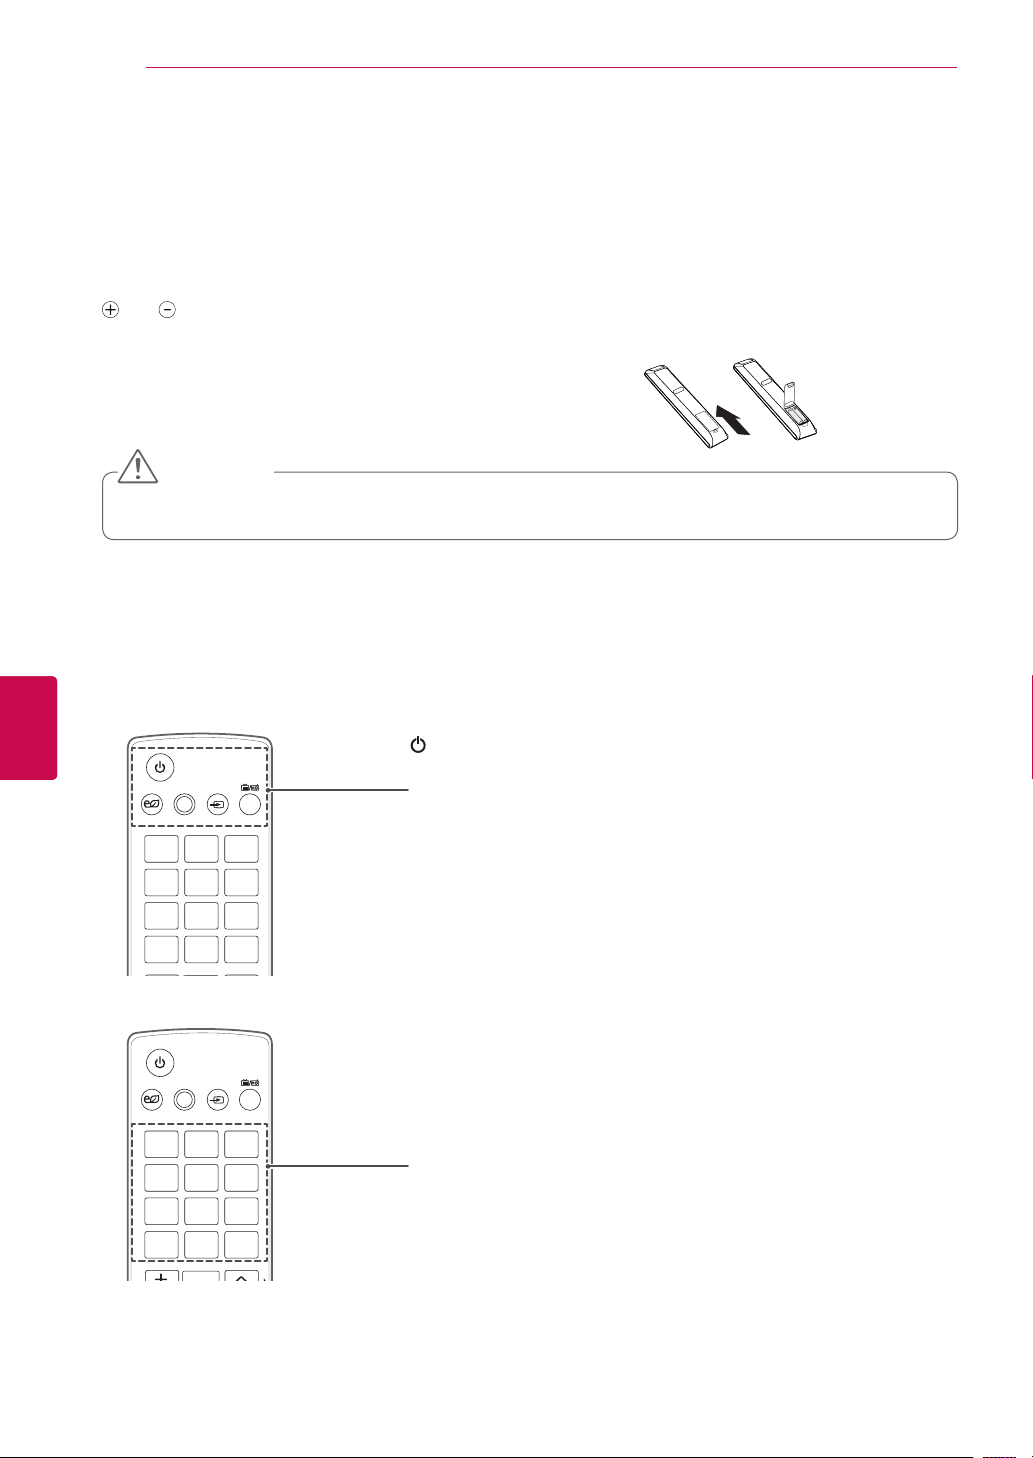
The descriptions in this manual are based on the buttons on the remote control.
Please read this manual carefully and use the TV correctly.
To replace batteries, open the battery cover, replace batteries (1.5 V AAA) matching
and ends to the label inside the compartment, and close the battery cover. Be
sure to point the remote control toward the remote control sensor on the TV.
To remove the batteries, perform the installation actions in reverse.
CAUTION
Do not mix old and new batteries, as this may damage the remote control.
Image shown may differ from your TV.
In Analogue TV and in some countries, some remote control keys may not work.
ENGLISH
ENG
AV MODE INPUT
ENERGY
SAVING
1 2 3
4 5 6
7 809
LIST
MARK
AV MODE INPUT
ENERGY
SAVING
1 2 3
4 5 6
7 809
LIST
MARK
TV/
RAD
Q.VIEW
TV/
RAD
Q.VIEW
(POWER)
Turns the TV on or off.
ENERGY SAVING (See p.67)
Adjusts the brightness of the screen to reduce energy consumption
AV MODE (See p.46)
Selects an AV mode
INPUT (See p.46)
Changes the input source; Turns the TV on.
TV/RAD
Selects Radio, TV and DTV programme.
Number buttons
Enters numbers.
LIST (See p.39)
Accesses the saved programme list.
Q.VIEW
Returns to the previously viewed programme.
Page 31
AV MODE INPUT
TV/
RAD
ENERGY
1 2 3
4 5 6
7 809
LIST
Q.VIEW
SAVING
GUIDE
AV MODE INPUT
TV/
RAD
ENERGY
1 2 3
4 5 6
7 809
LIST
Q.VIEW
SAVING
AV MODE INPUT
TV/
RAD
ENERGY
1 2 3
4 5 6
7 809
LIST
Q.VIEW
FAV
RATIO
MUTE
MARK
P
P
A
G
E
SAVING
GUIDE
MARK
FAV
RATIO
MUTE
Home
MARK
FAV
MUTE
Home
REMOTE CONTROL
31
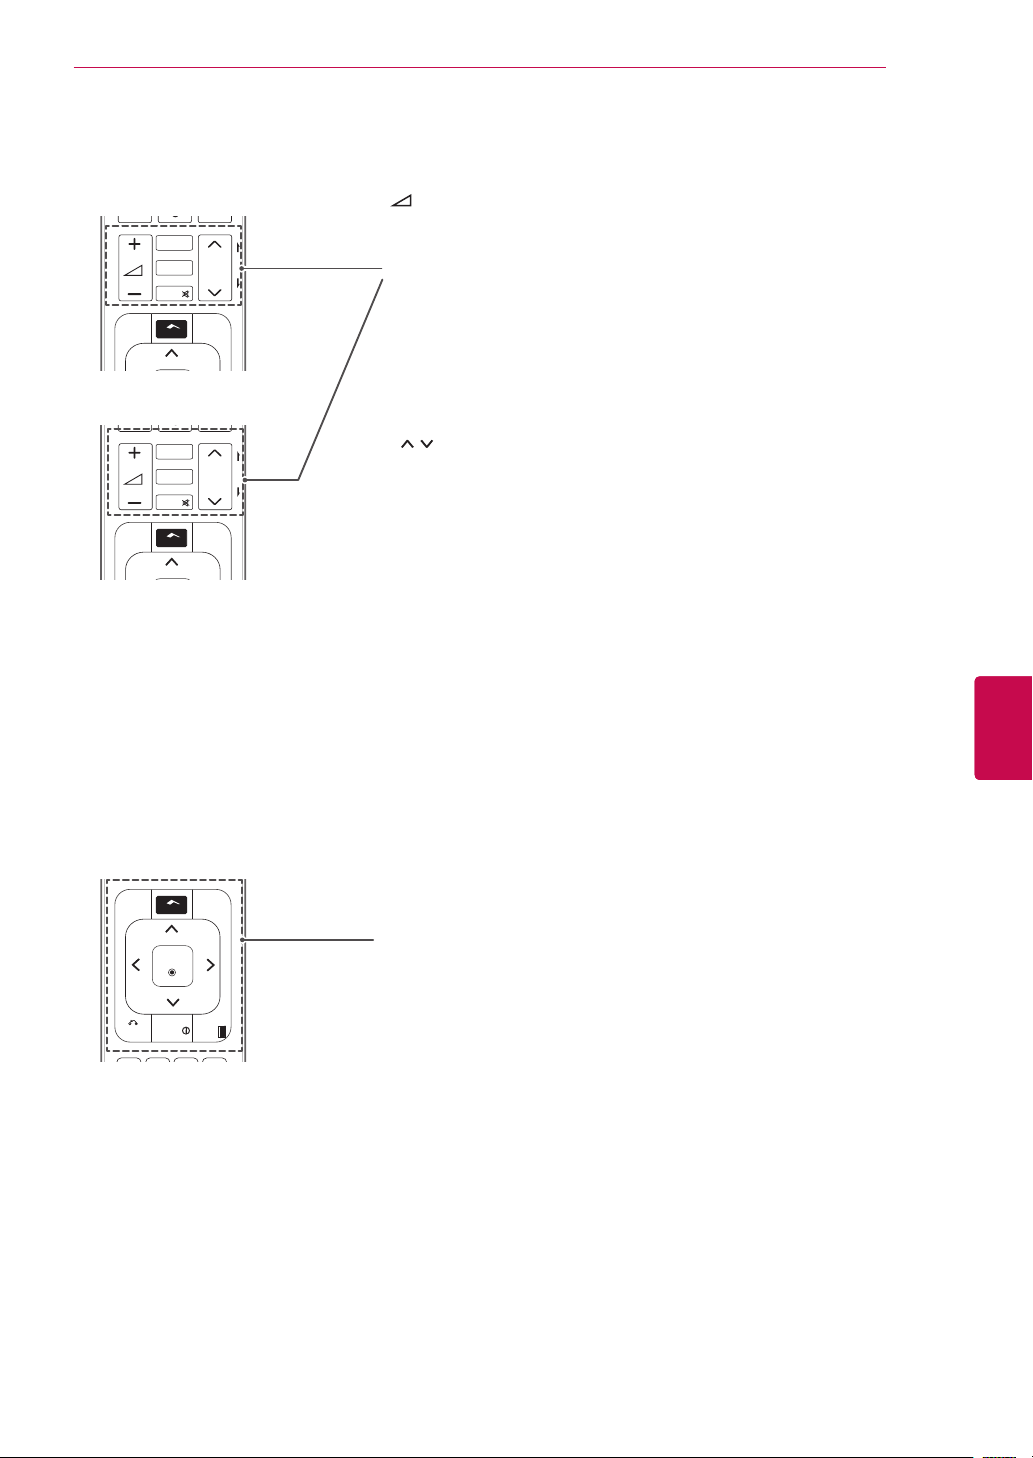
+ -
Adjusts the volume level.
MARK
P
A
G
P
E
Selects a menu or option.
FAV (See p.40)
Accesses your favourite programme list
Q.MENU
3D(See p.51)(Only 3D Models)
Used for viewing 3D video.
RATIO (See p.45)
Resizes an image
MUTE
Mutes all sounds.
P
P
A
3D
G
P
E
Scrolls through the saved programmes.
PAGE
Moves to the previous or next screen.
Q.MENU
GUIDE
BACK
ENGENGLISH
Q.MENU
Home
OK
INFO
EXIT
GUIDE
Shows programme guide.
Home
Accesses the main menus, or saves your input and exit the menus.
Q. MENU (See p.48)
Accesses the quick menus
Navigation buttons (up/down/left/right)
Scrolls through menus or options.
OK
Selects menus or options and confirms your input.
BACK
Returns to the previous level.
INFO (See p.41)
Views the information of the current programme and screen.
EXIT
Clears all on-screen displays and return to TV viewing.
Page 32
ENGLISH
AV MODE INPUT
TV/
RAD
ENERGY
1 2 3
4 5 6
7 809
LIST
Q.VIEW
FAV
3D
MUTE
MARK
P
P
A
G
E
SAVING
BACK
EXIT
OK
GUIDE
Q.MENU
INFO
Home
3D SETTING
AV MODE INPUT
TV/
RAD
ENERGY
1 2 3
4 5 6
7 809
LIST
Q.VIEW
FAV
RATIO
MUTE
MARK
P
P
A
G
E
SAVING
BACK
EXIT
OK
GUIDE
Q.MENU
INFO
Home
AV MODE INPUT
TV/
RAD
ENERGY
1 2 3
4 5 6
7 809
LIST
Q.VIEW
FAV
RATIO
MUTE
MARK
P
P
A
G
E
SAVING
BACK
EXIT
OK
GUIDE
Q.MENU
INFO
Home
AV MODE INPUT
TV/
RAD
ENERGY
1 2 3
4 5 6
7 809
LIST
Q.VIEW
FAV
RATIO
MUTE
MARK
P
P
A
G
E
SAVING
BACK
EXIT
OK
GUIDE
Q.MENU
INFO
Home
AV MODE INPUT
TV/
RAD
ENERGY
1 2 3
4 5 6
7 809
LIST
Q.VIEW
FAV
3D
MUTE
MARK
P
P
A
G
E
SAVING
BACK
EXIT
OK
GUIDE
Q.MENU
INFO
3D SETTING
Home
AV MODE INPUT
TV/
RAD
ENERGY
1 2 3
4 5 6
7 809
LIST
Q.VIEW
FAV
RATIO
MUTE
MARK
P
P
A
G
E
SAVING
BACK
EXIT
OK
GUIDE
Q.MENU
INFO
Home
AV MODE INPUT
TV/
RAD
ENERGY
1 2 3
4 5 6
7 809
LIST
Q.VIEW
FAV
3D
MUTE
MARK
P
P
A
G
E
SAVING
BACK
EXIT
OK
GUIDE
Q.MENU
INFO
Home
AV MODE INPUT
TV/
RAD
ENERGY
1 2 3
4 5 6
7 809
LIST
Q.VIEW
FAV
RATIO
MUTE
MARK
P
P
A
G
E
SAVING
BACK
EXIT
OK
GUIDE
Q.MENU
INFO
Home
ENG
REMOTE CONTROL
32
RATIO
AD
RATIO
3D SETTING
FREEZE
FREEZE
FREEZE
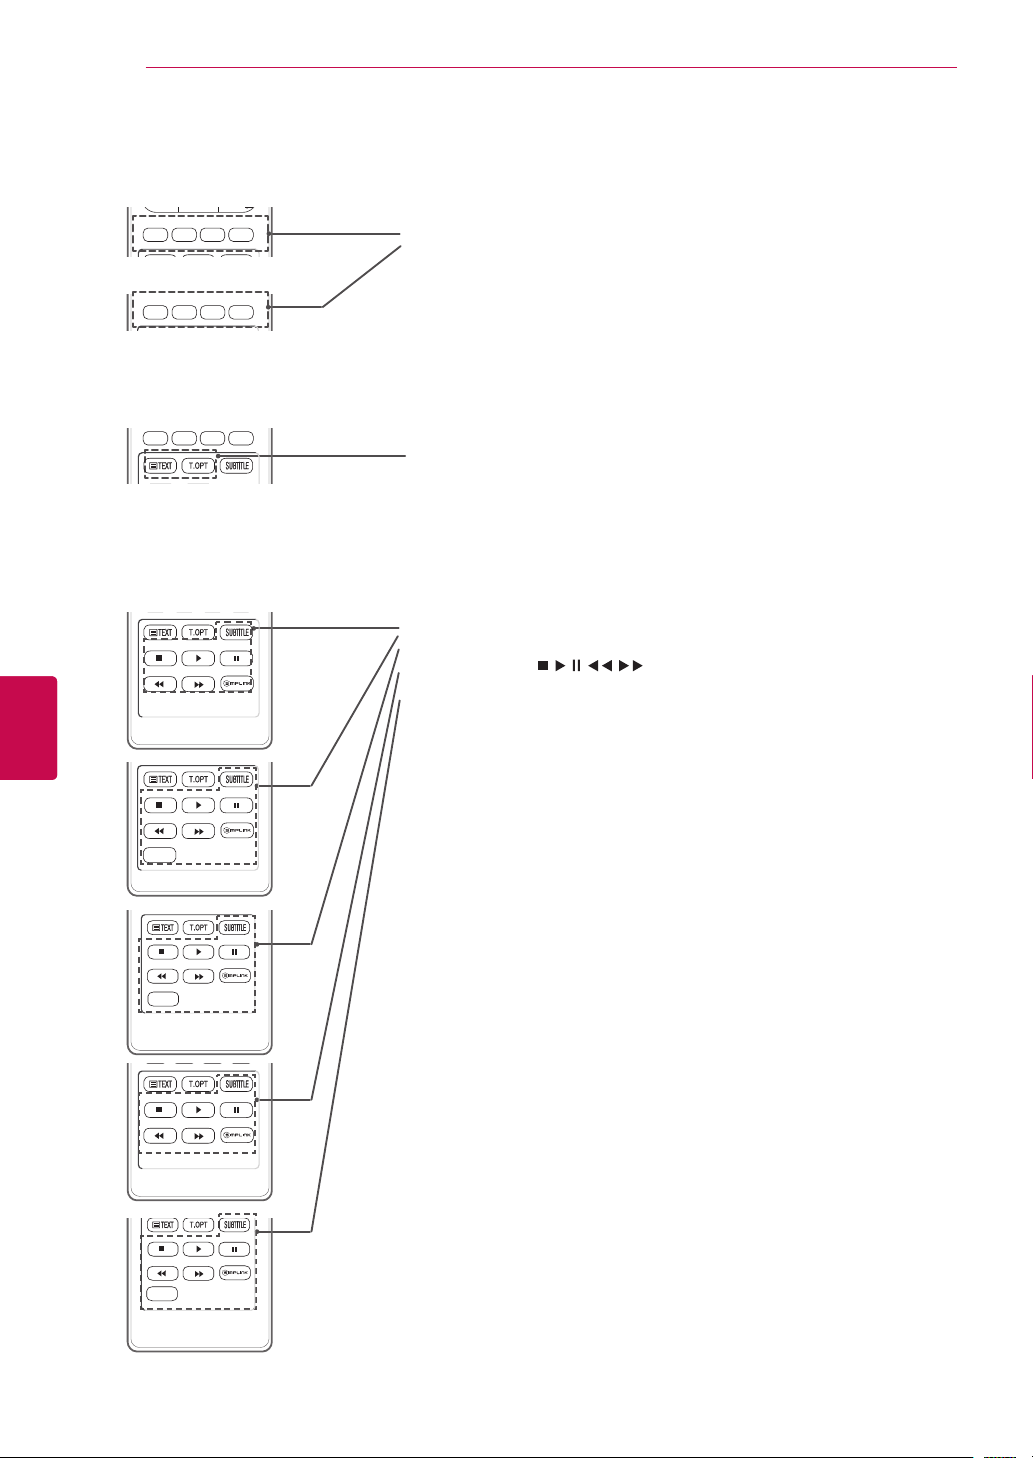
Coloured buttons
These buttons are used for teletext (on TELETEXT models only),
Programme edit.
3D SETTING(Only 3D Models)
Use this to view 3D video.
TELETEXT BUTTONS (See p.89)
These buttons are used for teletext.
For further details, see the ‘Teletext’ section.
SUBTITLE
Recalls your preferred subtitle in digital mode.
Control buttons(
, , , , )
Controls the MY MEDIA menus, or the SIMPLINK compatible devices
(USB,SIMPLINK).
FREEZE(Only Plasma TV)
Freezes the current frame while using the TV, AV, Component, RGB-PC, or
HDMI input source.
SIMPLINK (See p.88)
Accesses the AV devices connected to the TV;
Opens the SIMPLINK menu.
RATIO (See p.45)
Resizes an image
AD(Only 22/26LV55**)
Switches the Audio Description On or Off.
Page 33
WATCHING TV
33
WATCHING TV
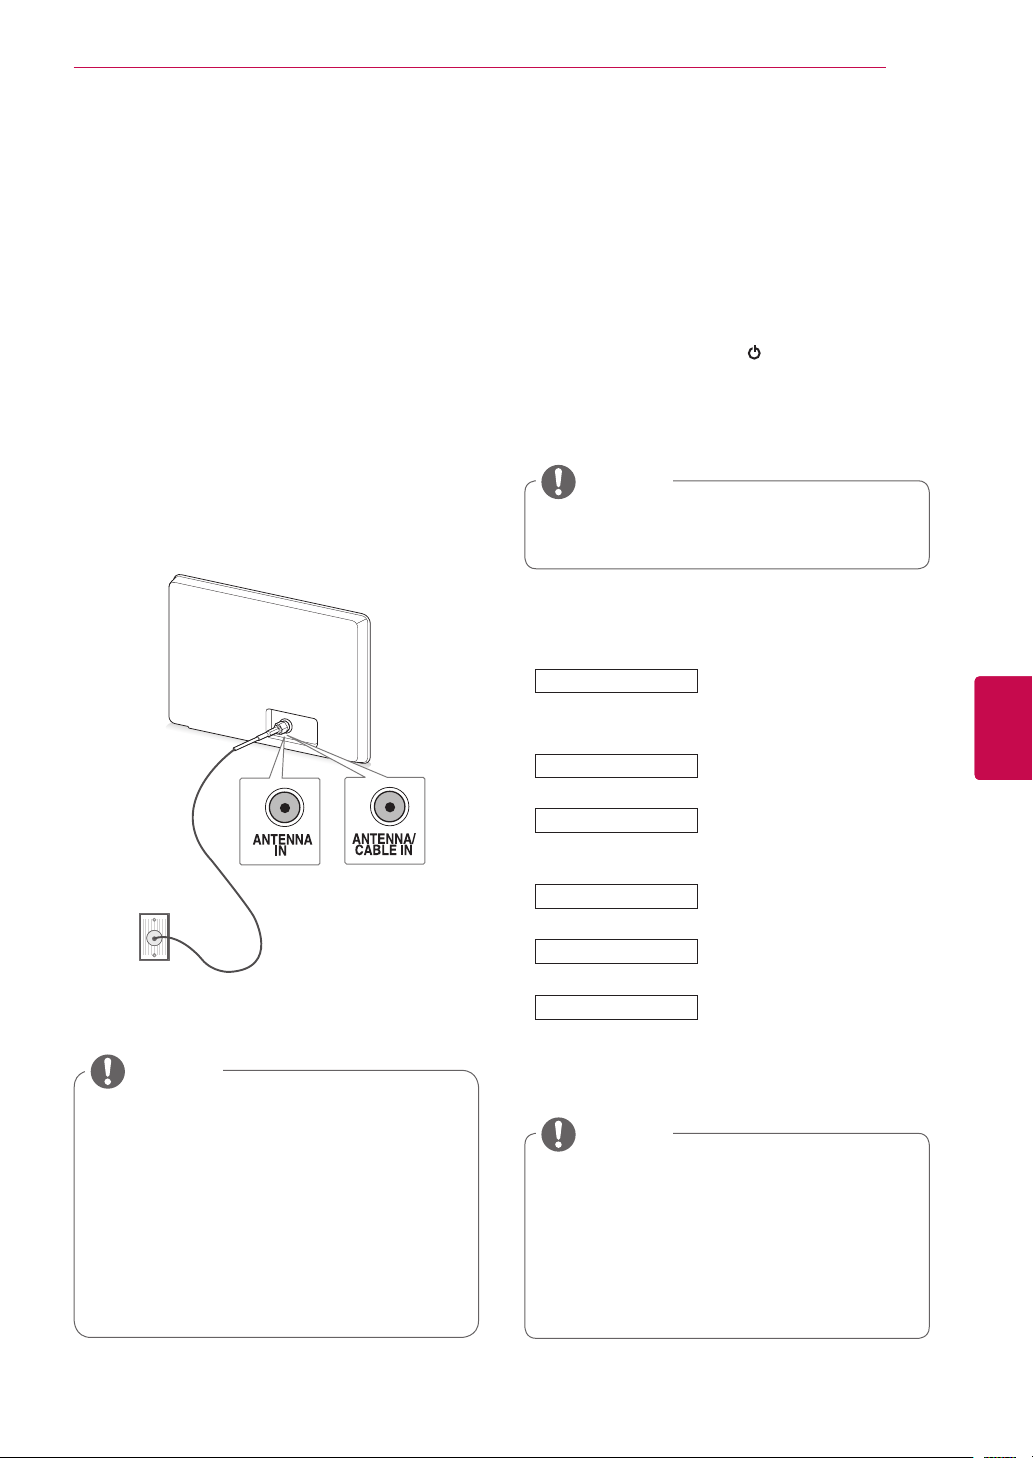
Connecting an antenna
Connect an antenna to watch TV while referring to
the following.
To prevent damage do not connect to the mains
outlet until all connections are made between the
devices.
Connect the TV to a wall antenna socket with an
RF cable (75 Ω).
Image shown may differ from your TV.
or
Wall Antenna
Socket
Turning the TV on for the first time
When you turn the TV on for the first time, the
Initial setting screen appears. Select a language
and customize the basic settings.
Connect the power cord to a power outlet.
1
In Standby mode, press
2
the TV on.
The Initial setting screen appears if you turn
the TV on for the first time.
NOTE
You can also access Factory Reset by
accessing OPTION in the main menus.
Follow the on-screen instructions to customize
3
your TV settings according to your preferences.
Language
Mode Setting
Power Indicator
Country
Time Zone
Auto Tuning
(POWER) to turn
Selects a language to display.
(Except for Australia, New
Zealand, Singapore, South
Africa),
Selects Home Use for the
Home environment.
Sets the power indicator.
(When you select Home Use
from the Mode Setting - only
LED LCD TV)
Selects a country to display.
(Only Australia, New Zealand)
Selects a Time Zone to
display.(Only Australia)
Scans and saves available
channels automatically.
ENGENGLISH
NOTE
Use a signal splitter to use more than 2
TVs.
If the image quality is poor, install a signal
amplifier properly to improve the image
quality.
If the image quality is poor with an
antenna connected, aim the antenna to
the correct direction.
An antenna cable and converter are not
supplied.
NOTE
DTV mode control buttons may not
function based on country broadcasting
circumstances. (Only DTV)
In country that Digital broadcasting
regulation isn’t fixed, some DTV function
may not work depending on digital
broadcasting circumstances. (Only DTV)
Page 34
WATCHING TV
34
ENGLISH
ENG
4 When the basic settings are complete,
press OK.
NOTE
If you do not complete the Initial setting, it
will appear whenever the TV turns on.
Disconnect the power cord from the
power outlet when you do not use the TV
for a long period of time.
5 To turn the TV off, press
(POWER) .
Watching TV
In Standby mode, press
1
the TV on.
Press INPUT and select Antenna.
2
To turn the TV off, press
3
The TV switches to Standby mode.
(POWER) to turn
(POWER) .
Page 35
WATCHING TV
35
Managing programmes
Automatically setting up programme
Use this to automatically find and store all available programmes.
When you start auto programming, all previously
stored service information will be deleted.
1 Press Home to access the main menus.
2 Press the Navigation buttons to scroll to
SETUP and press OK.
3 Press the Navigation buttons to scroll to
Auto Tuning and press OK.
4 Select Start to start automatic tuning.
The TV scans and saves available programmes automatically.
5 When you are finished, press EXIT.
When you return to the previous menu, press
BACK.
NOTE
If the TV scans a blocked programme, you
will be prompted to enter your password to
keep the programme scanned.
If you wish to keep on auto tuning select
Start using the Navigation buttons. Then,
press the OK button. Otherwise select
Close.
Automatic Numbering: Decide whether
to use the programme numbers as sent by
broadcasting stations for tuning. (Only DTV)
Manually setting up programme (In digital mode) (Only DTV)
Manual Tuning lets you manually add a programme to your programme list.
1 Press Home to access the Main menus.
2 Press the Navigation buttons to scroll to
SETUP and press OK.
3 Press the Navigation buttons to scroll to
Manual Tuning and press OK.
4 Press the Navigation buttons to scroll to DTV
and press OK.
5 Scroll through the programme types, and then
add or delete programmes.
6 When you are finished, press EXIT.
When you return to the previous menu, press
BACK.
ENGENGLISH
NOTE
If the TV scans a blocked programme, you
will be prompted to enter your password to
keep the programme scanned.
Page 36
WATCHING TV
36
ENGLISH
ENG
Manually setting up programme (In analogue mode)
Manual Tuning lets you manually tune and arrange
the stations in whatever order you desire.
1 Press Home to access the main menus.
2 Press the Navigation buttons to scroll to
SETUP and press OK.
3 Press the Navigation buttons to scroll to
Manual Tuning and press OK.
4 Press the Navigation buttons to scroll to
TV and press OK. (Only DTV)
5 Press the Navigation buttons or Number but-
tons to scroll to the desired programme Storage.
6 Press the Navigation buttons to scroll to
TV System. (Except for Australia)
7 Press the Navigation buttons to scroll to
V/UHF or Cable.
8 Press the Navigation buttons or Number but-
tons to scroll to the desired channel number.
9 Press the Navigation buttons to scroll and start
searching.
10 Press the Navigation buttons to scroll to
Store and press OK.
11 When you are finished, press EXIT.
When you return to the previous menu, press
BACK.
Assigning a station name
You can assign a station name with five characters
to each programme number.
1 Press Home to access the main menus.
2 Press the Navigation buttons to scroll to
SETUP and press OK.
3 Press the Navigation buttons to scroll to
Manual Tuning and press OK.
4 Press the Navigation buttons to scroll to
TV. (Only DTV)
5 Press the Navigation buttons to scroll to
Name and press OK.
6 Press the Navigation buttons to scroll Select
the position and make your choice of the second character, and so on. You can use an the
alphabet A to Z, the number 0 to 9, +/ -, and
blank and press OK.
7 Press the Navigation buttons to scroll to
Close and press OK.
8 Press the Navigation buttons to scroll to
Store and press OK
9 When you are finished, press EXIT.
When you return to the previous menu, press
BACK.
NOTE
If the TV scans a blocked programme, you
will be prompted to enter your password to
keep the programme scanned.
BG : PAL B/G (New Zealand / South Africa
/ Singapore / Indonesia / Israel / Malaysia /
Vietnam / Asia)
DK : PAL D/K (New Zealand / South Africa /
Singapore / Indonesia / Israel / Malaysia /
Vietnam / Asia)
I : PAL I/II (New Zealand / South Africa /
Singapore / Indonesia / Israel / Malaysia /
Vietnam / Asia)
B/B : Australia
M : NTSC-M (South Africa / Indonesia /
Israel / Malaysia / Vietnam / Asia)
To store another channel, repeat steps 6 to
10.
Page 37

WATCHING TV
37
Fine Tuning(Depending on model)
Normally fine tuning is only necessary if reception
is poor.
1 Press Home to access the main menus.
2 Press the Navigation buttons to scroll to
SETUP and press OK.
3 Press the Navigation buttons to scroll to
Manual Tuning and press OK.
4 Press the Navigation buttons to scroll to
TV. (Only DTV)
5 Press the Navigation buttons to scroll to
Fine.
6 Fine tune for the best picture and sound.
7 Press the Navigation buttons to scroll to
Store and press OK
8 When you are finished, press EXIT.
When you return to the previous menu, press
BACK.
Editing your programme list
When a programme number is skipped, it means
that you will be unable to select it using P
ton during TV viewing.
If you wish to select the skipped programme,
directly enter the programme number with the
NUMBER buttons or select it in the Programme
edit menu.
This function enables you to skip the stored programmes.
You can change the programme number using
“Move”function, if “Automatic Numbering” is unchecked when you start Auto Tuning (Only DTV).
1 Press Home to access the main menus.
2 Press the Navigation buttons to scroll to
SETUP and press OK.
3 Press the Navigation buttons to scroll to Pro-
gramme Edit and press OK.
4 Press the Navigation buttons to select a pro-
gramme to be stored or skipped.
5 When you are finished, press EXIT.
When you return to the previous menu, press
BACK.
v but-
^
ENGENGLISH
Page 38
WATCHING TV
38
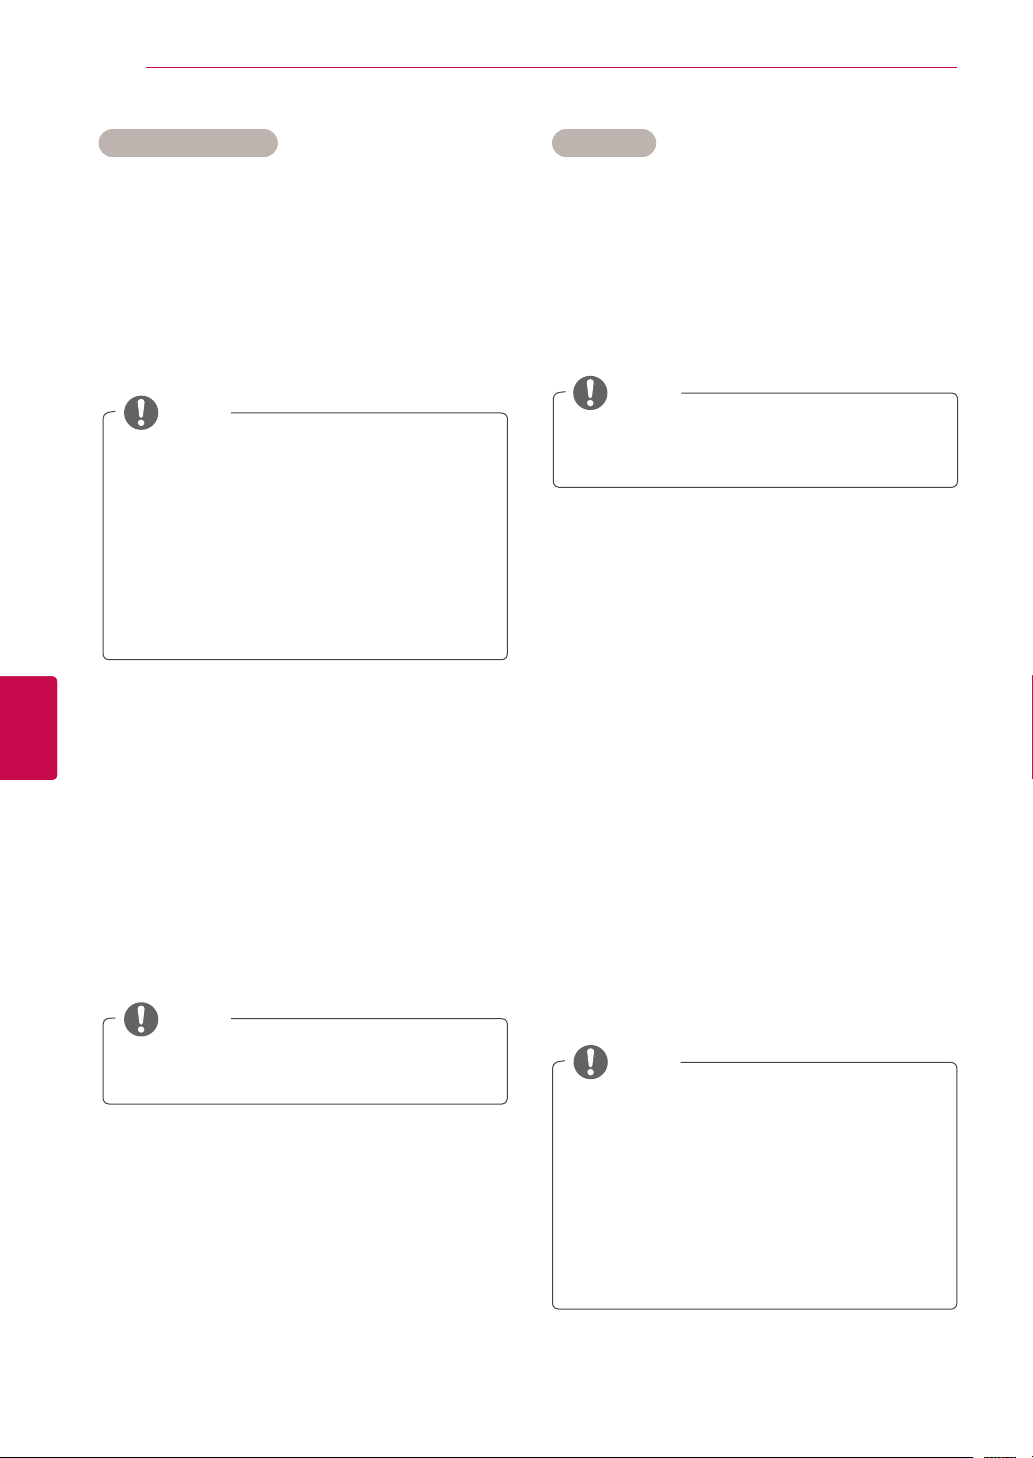
1 Press the Navigation buttons to scroll to select
2 Press Blue button to turn the programme
3 Press Blue button to release.
ENGLISH
ENG
In DTV/RADIO mode
Skipping a programme number
a programme number to be skipped.
number.
NOTE
When programmes are to be skipped, the
skipped programme shows in blue and these
programmes will not be selected by the P
v
buttons during TV viewing.
If you wish to select a skipped programme,
directly enter the programme number with
the NUMBER buttons or select it in the programme edit or EPG.
In TV mode
Deleting a programme
1 Press the Navigation buttons to scroll to select
a programme number to be deleted.
2 Press Red button to turn the programme
number.
NOTE
The selected programme is deleted, all the
following programmes are shifted up one.
^
Moving a programme
1 Press the Navigation buttons to scroll to select
a programme number to be moved.
2 Press the Green button to turn the programme
number and press the Navigation buttons.
Locking a programme number
1 Press the Navigation buttons to scroll to select
a programme number to be locked.
2 Press
3 Press
It can be registered as Lock programme
Yellow button
number.
Yellow button
to
turn the programme
to release.
NOTE
even when Lock System is turned Off.
3 Press Green button to release.
Skipping a programme number
1 Press the Navigation buttons to scroll to select
a programme number to be skipped.
2 Press Blue button to turn the programme
number.
3 Press Blue button to release.
NOTE
When programmes are to be skipped, the
skipped programme shows in blue and these
programmes will not be selected by the P
v
buttons during TV viewing.
If you wish to select a skipped programme,
directly enter the programme number with
the NUMBER buttons or select it in the programme edit.
^
Page 39
WATCHING TV
39
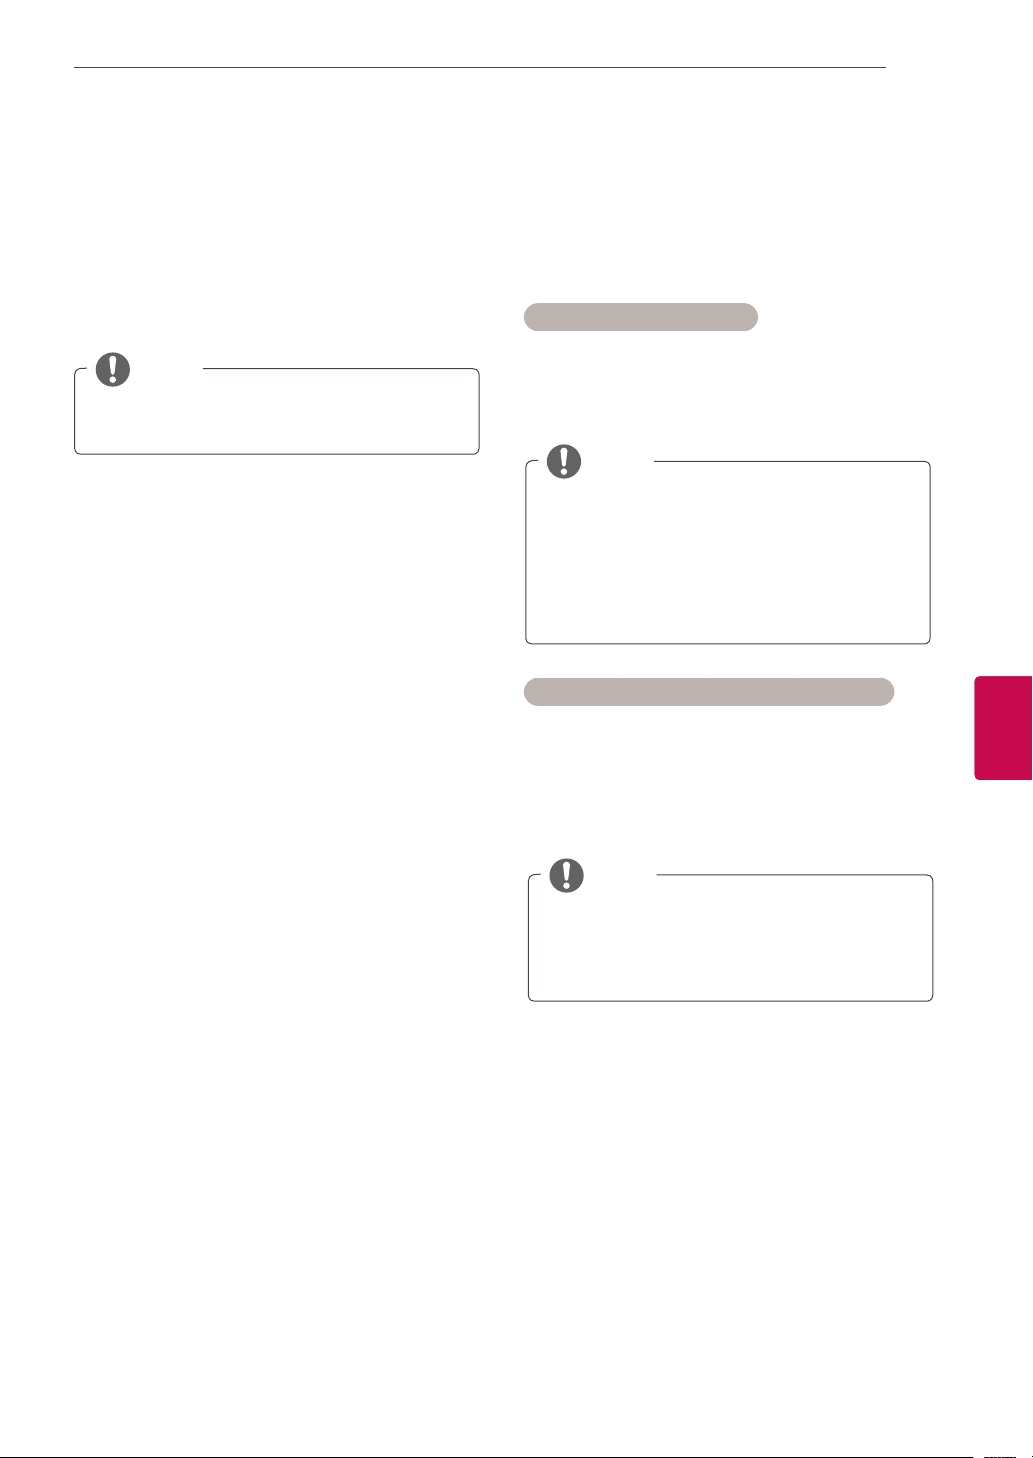
Locking a programme number
1 Press the Navigation buttons to scroll to select
a programme number to be locked.
2 Press
3 Press
number.
Yellow button
Yellow button
to
turn the programme
to release.
NOTE
It can be registered as Lock programme
even when Lock System is turned Off.
Selecting favourite programme
1 Press the Navigation buttons to scroll to select
your desired programme.
2
Press the FAV to add corresponding
programme to Favourite list of current Favourite
group.
Selecting the programme list
You can check which programmes are stored in
the memory by displaying the programme list.
Displaying programme LIST
1 Press LIST to access the Programme List.
2 Press Blue button to turn the programme edit.
NOTE
You may find some blue programmes. These
have been set up to be skipped by auto programming or in the programme edit mode.
Some programmes with the channel number
shown in the programme LIST indicate there
is no station name assigned.
Selecting a programme in the programme list
ENGENGLISH
3
Press FAV
Selecting favourite programme group
to release.
1 Press the Navigation buttons to scroll to select
your desired programme.
2
Press the Q.MENU to
where Favourite group can be changed.
display a pop-up window
3 Press the Navigation buttons to scroll to select
a Favourite group and press OK.
1 Press the Navigation buttons to select pro-
gramme.
2 Press OK to switch to the chosen programme
number.
NOTE
Press TV/RAD in Digital TV. (The mode will
be switched between TV, DTV, and Radio
from the programme you are currently
watching.)
Page 40
WATCHING TV
40
Paging through a programme list
ENGLISH
ENG
1 Press the P
v
buttons to turn the pages.
^
2 Press LIST to return normal TV viewing.
Displaying the favourite programme list
1 Press FAV to access the Favourite Programme
List.
2 When you are finished, press EXIT.
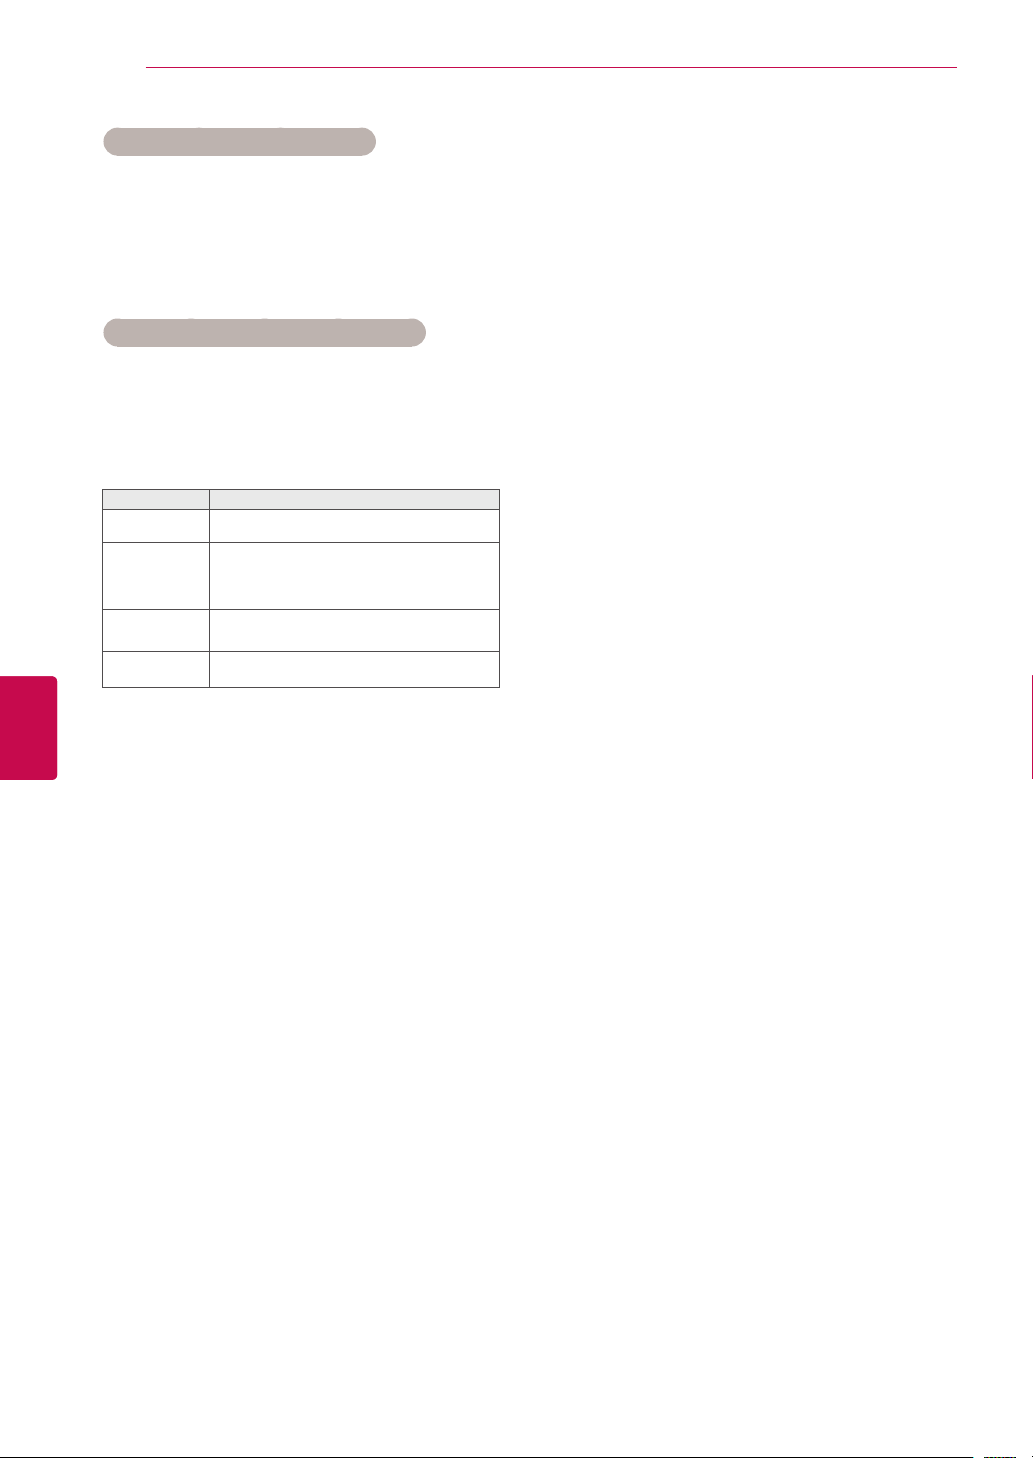
Button Description
Blue button
Yellow
button
OK Selects a programme to view
<
> Favourite group is changed.
Turn the programme edit.
Current channel is registered/
cancelled as preferred channel on
currently selected Group.
Page 41
WATCHING TV
41
EPG (Electronic Program Guide) (In digital mode)
This feature is disabled in New Zealand.
Image shown may differ from your TV.
This system has an Electronic Programme Guide
(EPG) to help your navigation through all the
possible viewing options.
The EPG supplies information such as programme listings, start and end times for all available services. In
addition, detailed information about the programme is
often available in the EPG (the availability and amount
of these programme details will vary, depending on the
particular broadcaster).
This function can be used only when the EPG information is broadcast by broadcasting companies.
The EPG displays the programme details for next 8
days.
You must set the Clock in the Time menu, before us-
ing EPG function.
►
►
Pr. Change
► Next
720p
...
Up
Down
Watch
HE-AAC
DTV 1 TV ONE
Good Morning
21:00 00:00 Show/Game Show
Sarah Bradley, Steve Gray and Brendon Pongia present the
latest in fashion, the arts, entertainment, lifestyle and cooking,
with regular and special guests.
Sarah Bradley, Steve Gray and Brendon Pongia present the
latest in fashion, the arts, entertainment, lifestyle and cooking,
with regular and special guests.
▼
16:9
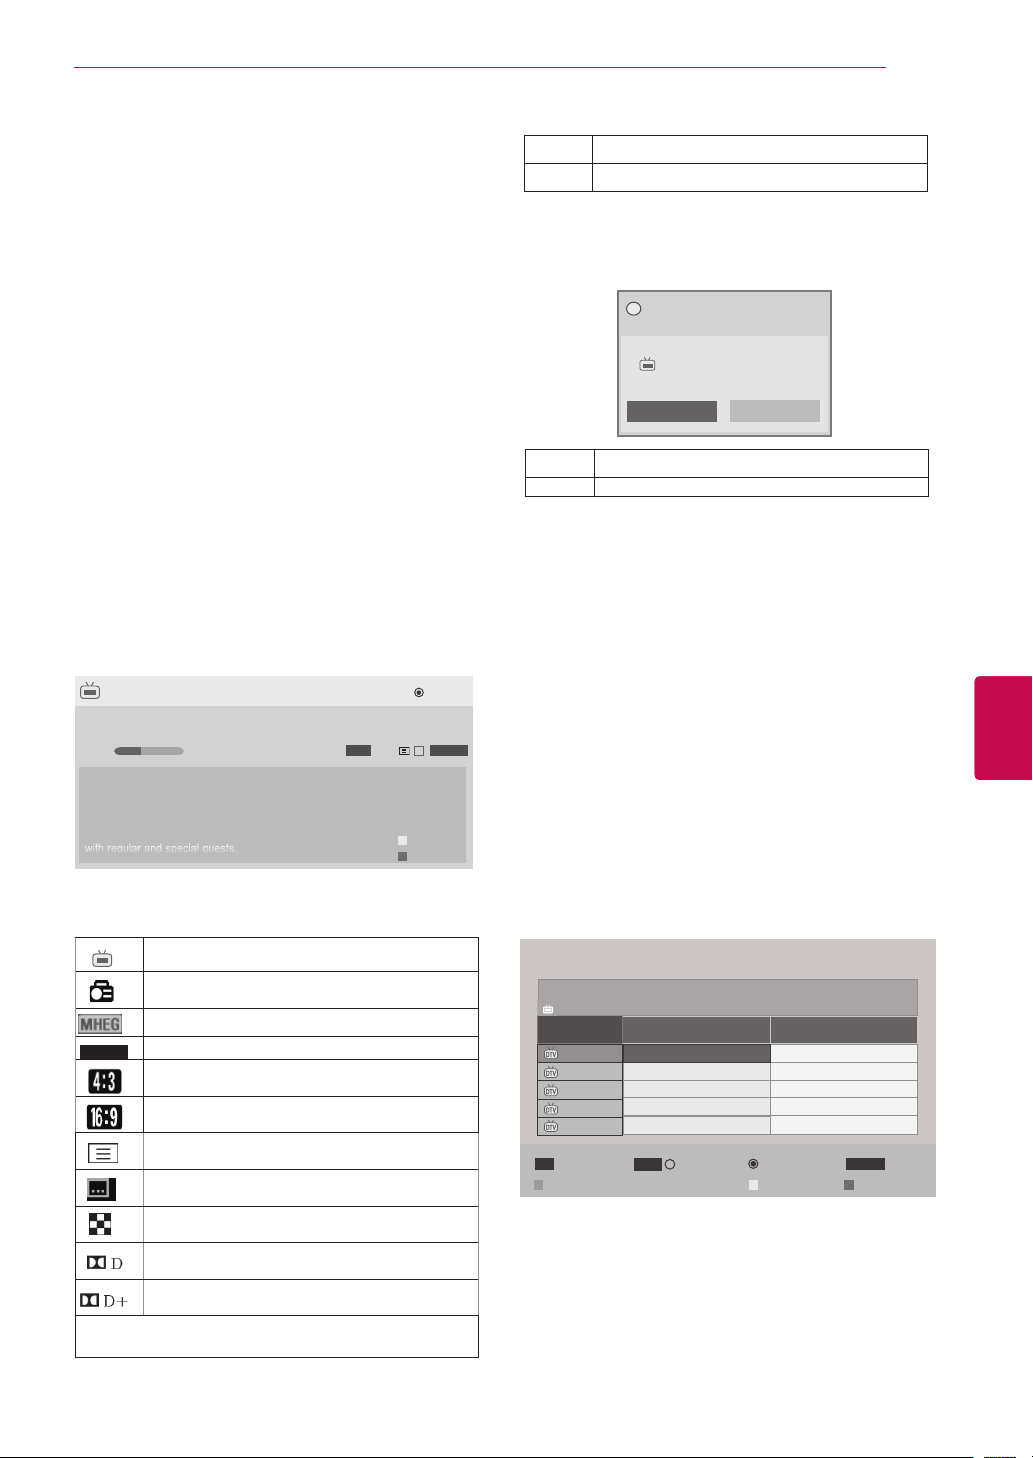
Press INFO to show current programme
information.
Displayed with a TV or DTV Programme.
Displayed with a Radio Programme.
Displayed with a MHEG Programme.
HE-AAC
Displayed with a HE-AAC Programme.
C
Aspect ratio of broadcasting programme.
Aspect ratio of broadcasting programme.
Displayed with a Teletext Programme.
Displayed with a Subtitle Programme.
> Shows next programme information.
Shows other programme information.
v
^
Do you want to set a reminder for the
?
selected
programme?
Bob The Builder Special
DTV 1 ABC TV Sydney
22 Dec. 2009 10:15~10:58
Yes No
OK A pop-up window for remind settings appear.
< > Select Timer Remind setting mode.
Switch on/off EPG
1 Press GUIDE to switch on or off EPG.
Select a programme
1 Press Navigation buttons or P
desired programme.
Programme Guide
That ’70s show
DTV 1 YLE TV1 25 Nov. 2008 09:45~10:15
ALL
FAV
Mode
1 YLE TV1
2 YLE TV2
4 TV..
5 YLE FST
6 CNN
Favourite
That ’70s show
Your World Today
Legenen om Den....
Naturtimmen
Lyssna
INFO
▲
NOW
i Information
v
to select
^
25 Nov. 2008 10:05
NEXT
Keno
World Business
Fantomen
Kritiskt
ABC
RADIOWatch/Schedule
TV/RAD
Manual Timer Schedule List
ENGENGLISH
Displayed with a Scramble Programme.
Displayed with a Dolby Digital Programme.
Displayed with a Dolby Digital PLUS
Programme.
576i/p, 720p, 1080i/p : Resolution of broadcasting programme
Page 42
WATCHING TV
42
ENGLISH
ENG
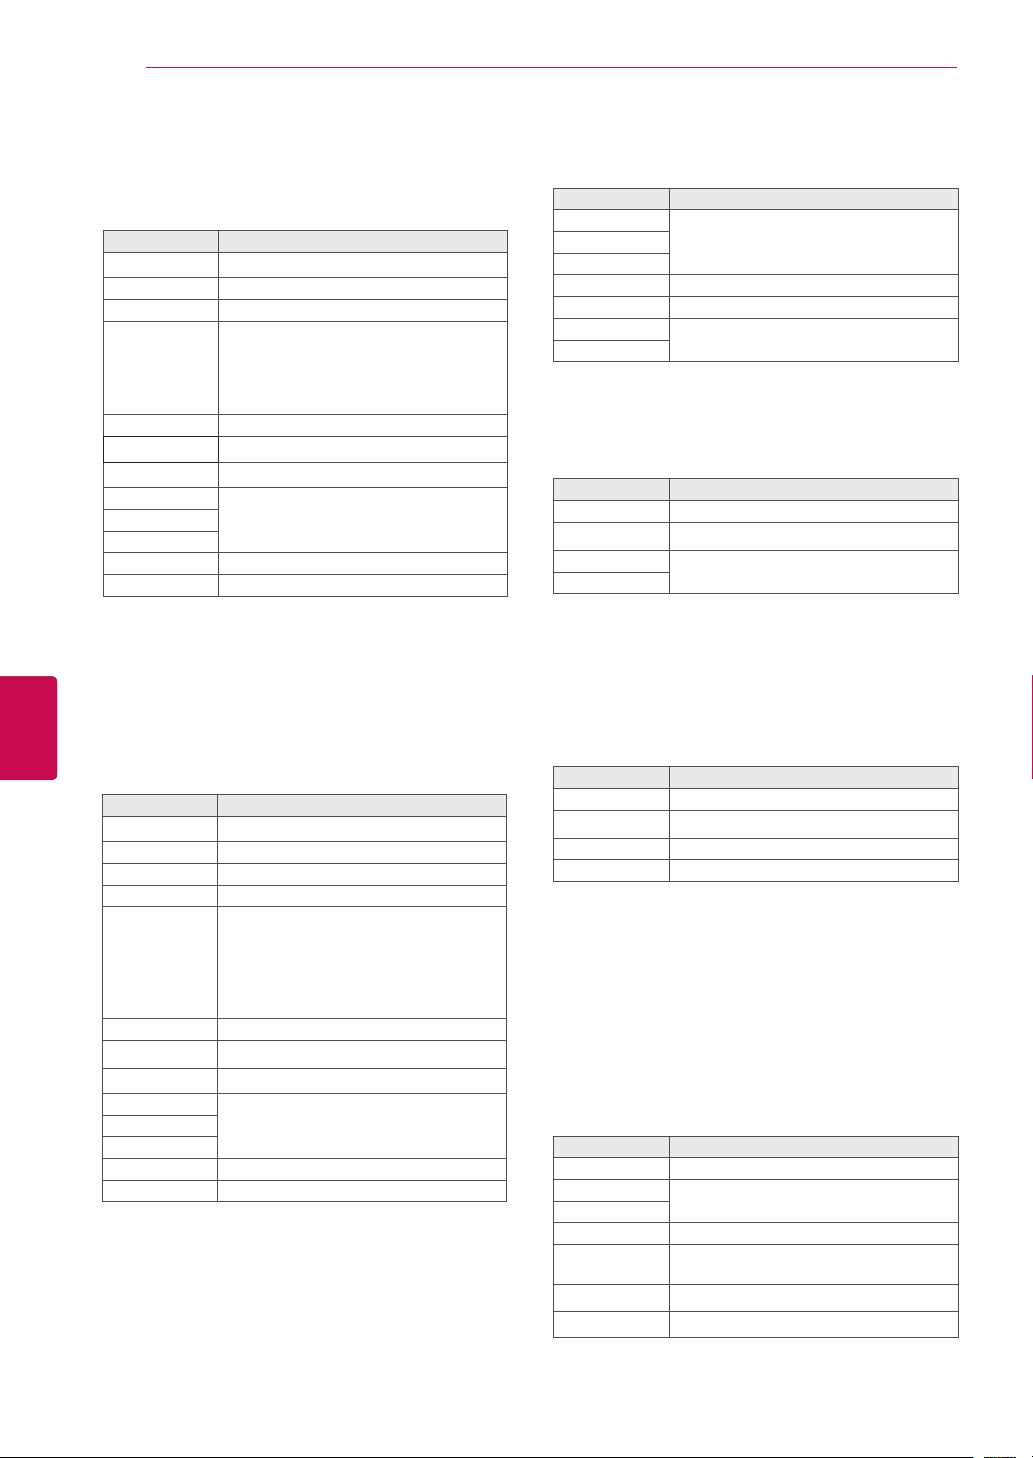
NOW/NEXT Guide Mode
You can view a programme being broadcasted and
one scheduled to follow.
Button Description
Red button Change EPG mode.
Yellow button Enter Manual Timer mode.
Blue button Enter Schedule List mode.
When ‘Now’ is selected, it is moved to
OK
< > Select NOW or NEXT Programme.
v
^
v
P
^
GUIDE
EXIT
TV/RAD Select DTV or RADIO Programme.
INFO Detail information on or off.
selected programme and EPG disappears
When ‘Next’ is selected, a reservation
pop-up window appears.
Select the Broadcast Programme.
Page Up/Down.
Switch off EPG.BACK
Date Change Mode
Button Description
Green button
Switch off Date setting mode.v
BACK
OK Change to the selected date.
< > Select a date.
GUIDE
EXIT
Switch off EPG.
Extended Description Box
Button Description
GUIDE The detail information on or off.
v
^
GUIDE
EXIT
Text Up/Down.
Switch off EPG.
8 Day Guide Mode
Button Description
Red button Change EPG mode.
Green button Enter Date setting mode.
Yellow button Enter Manual Timer mode.
Blue button Enter Schedule List mode.
When ‘Currently broadcasting programme is selected, it is moved to se-
OK
< > Select Programme.
v
^
v
P
^
GUIDE
EXIT
TV/RAD Select DTV or RADIO Programme.
INFO Detail information on or off.
lected programme and EPG disappears
When ‘Future broadcasting programme
is selected, a reservation pop-up window
appears.
Select the Broadcast Programme.
Page Up/Down.
Switch off EPG.BACK
Remind Setting Mode
Button Description
BACK Switch off Manual Timer mode.
v
^
< > Select Start Time or Programme.
OK Save Timer Remind.
Select Remind function setting.
Schedule List Mode
If you’ve created a schedule list, a scheduled programme is displayed at the scheduled time even
when you are watching a different programme at the
time.
Button Description
Yellow button Change to Manual Timer mode.
Blue button
GUIDE
BACK Switch off Schedule List.
OK
v
^
v
P
^
Change to Guide mode.
Select your desired Option (Modify/
Delete/Delete All).
Select programme.
Page Up/Down.
Page 43
WATCHING TV
43
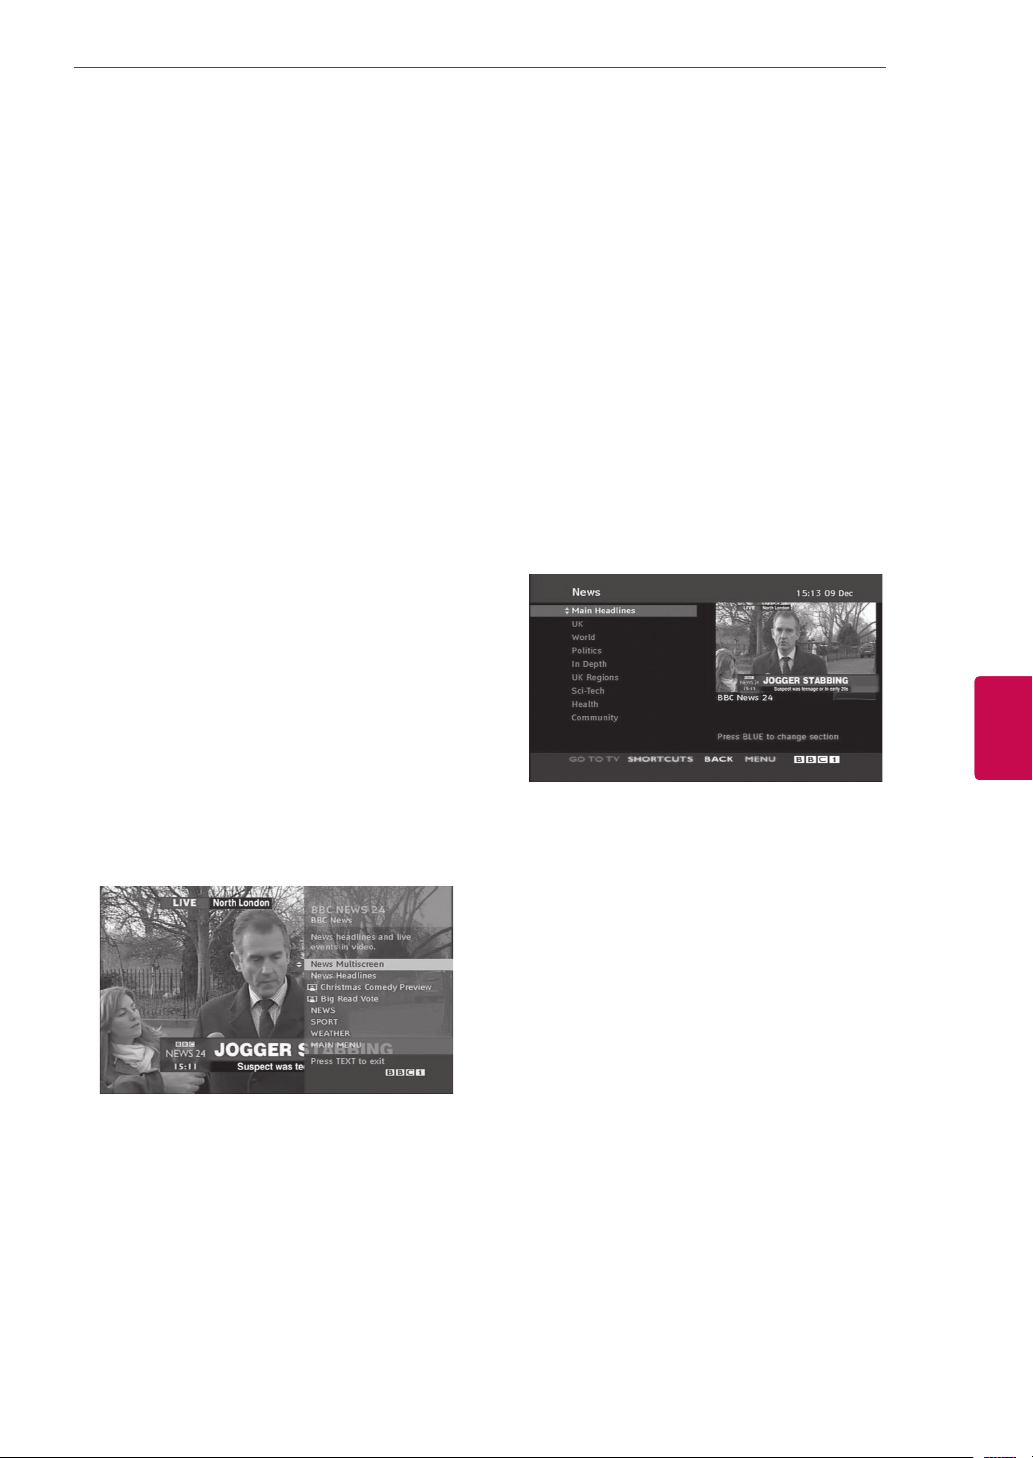
MHEG (Multimedia and Hypermedia Information coding Expert Group) (In digital mode)
This feature is not available for all country.
The TV gives you access to digital teletext which is
greatly improved in various aspects such as text,
graphics etc.
This digital teletext can access special digital teletext services and specific services which broadcast digital teletext.
Teletext Within Digital Service
1 Press the numeric or P
digital service which broadcasts digital teletext.
2 Follow the indications on digital teletext and
move onto the next step by pressing TEXT,
OK, Navigation buttons, RED, GREEN,
YELLOW, BLUE or NUMBER buttons and etc.
v
button to select a
^
Teletext in Digital Service
1 Press the numeric or P
a certain service which broadcasts digital
teletext.
2 Press the TEXT or coloured button to switch on
teletext.
3 Follow the indications on digital teletext and
move onto the next step by pressing OK,
Navigation buttons, RED, GREEN, YELLOW,
BLUE or NUMBER buttons and so on.
4 Press the TEXT or colour button to switch off
digital teletext and return to TV viewing.
Some services may allow you to access text
services by pressing the RED button.
v
button to select
^
ENGENGLISH
3 To change digital teletext service, select a dif-
ferent service by the numeric or P
^
v
button.
Page 44
WATCHING TV
44
ENGLISH
ENG
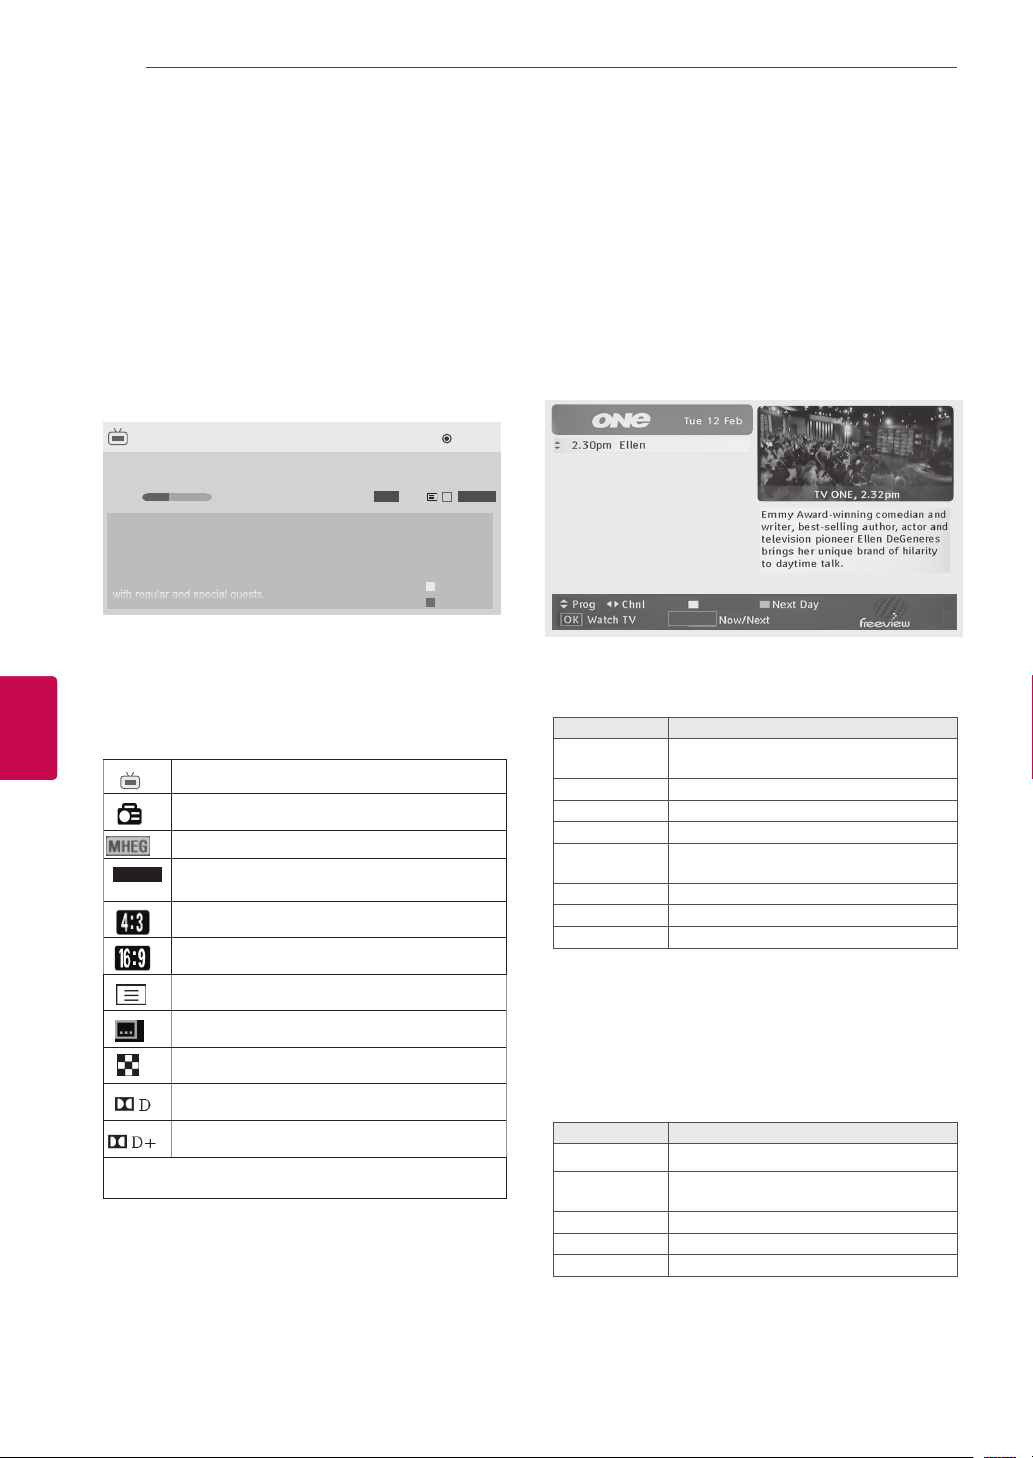
This feature is enabled only in New Zealand.
- In New Zealand, pressing the Guide key will
display MHEG EPG provided by New Zealand on the screen.
This system has an MHEG(Multimedia and hypermedia information coding expert group) to help
your navigation through all the possible viewing
options.
►
►
DTV 1 TV ONE
Good Morning
21:00 00:00 Show/Game Show
Sarah Bradley, Steve Gray and Brendon Pongia present the
latest in fashion, the arts, entertainment, lifestyle and cooking,
with regular and special guests.
Sarah Bradley, Steve Gray and Brendon Pongia present the
latest in fashion, the arts, entertainment, lifestyle and cooking,
with regular and special guests.
▼
Pr. Change
Press INFO to show current programme
information.
Displayed with a TV or DTV Programme.
Displayed with a Radio Programme.
Displayed with a MHEG Programme.
HE-AAC
Displayed with a HE-AAC Programme.
AC
Aspect ratio of broadcasting programme.
Aspect ratio of broadcasting programme.
16:9
► Next
720p
...
Watch
HE-AAC
Up
Down
Select a programme
1 Press Navigation buttons to preview the Broad-
cast Programme Information.
2 Press Navigation buttons to change to desired
channel.
3 Press OK to remove MHEG after moving to a
selected channel.
Next Week
EPG/Guide
Programme Listing Mode
Button Description
v
^
< > Select Channel.
Yellow button Change to Next Week or Previous Day.
Blue button Change to Next Day or Today.
OK
GUIDE Change to Now/Next mode.
BACK Switch off MHEG.
INFO Detail information on or off.
Select the Broadcast Programme
Information.
The MHEG will disappear after
moving to a selected channel.
Displayed with a Teletext Programme.
Displayed with a Subtitle Programme.
Displayed with a Scramble Programme.
Displayed with a Dolby Digital Programme.
Displayed with a Dolby Digital PLUS
Programme.
576i/p, 720p, 1080i/p : Resolution of broadcasting programme
Switch on/off MHEG
1 Press GUIDE to switch on or off MHEG.
NOW/NEXT Guide Mode
You can view a channel being broadcasted and
one scheduled to follow.
Button Description
v
^
OK
GUIDE Change to Listing mode.
BACK Switch off MHEG.
INFO Detail information on or off.
Select desired channel.
The MHEG will disappear after moving
to a selected channel.
Page 45
WATCHING TV
45
Using additional options
Adjusting aspect ratio
Resize an image to view at its optimal size by
pressing RATIO while you are watching TV.
NOTE
You can also change the image size by
pressing Q. MENU or accessing Aspect
Ratio in the Picture menus.
For Zoom Setting, select 14:9, Zoom
and Cinema Zoom in Ratio Menu.
After completing Zoom Setting, the display goes back to Q.Menu.
You can only select 4:3, 16:9 (Wide),
14:9, Zoom/Cinema Zoom in Component
mode.
You can only select 4:3, Original, 16:9
(Wide), 14:9, Zoom/Cinema Zoom in
HDMI mode.
You can only select 4:3, 16:9 (Wide) in
RGB-PC, HDMI-PC mode only.
In DTV/HDMI/Component (over 720p)
mode, Just Scan is available.
In DTV 576p mode, Just Scan is avail-
able in Australia/New Zealand only.
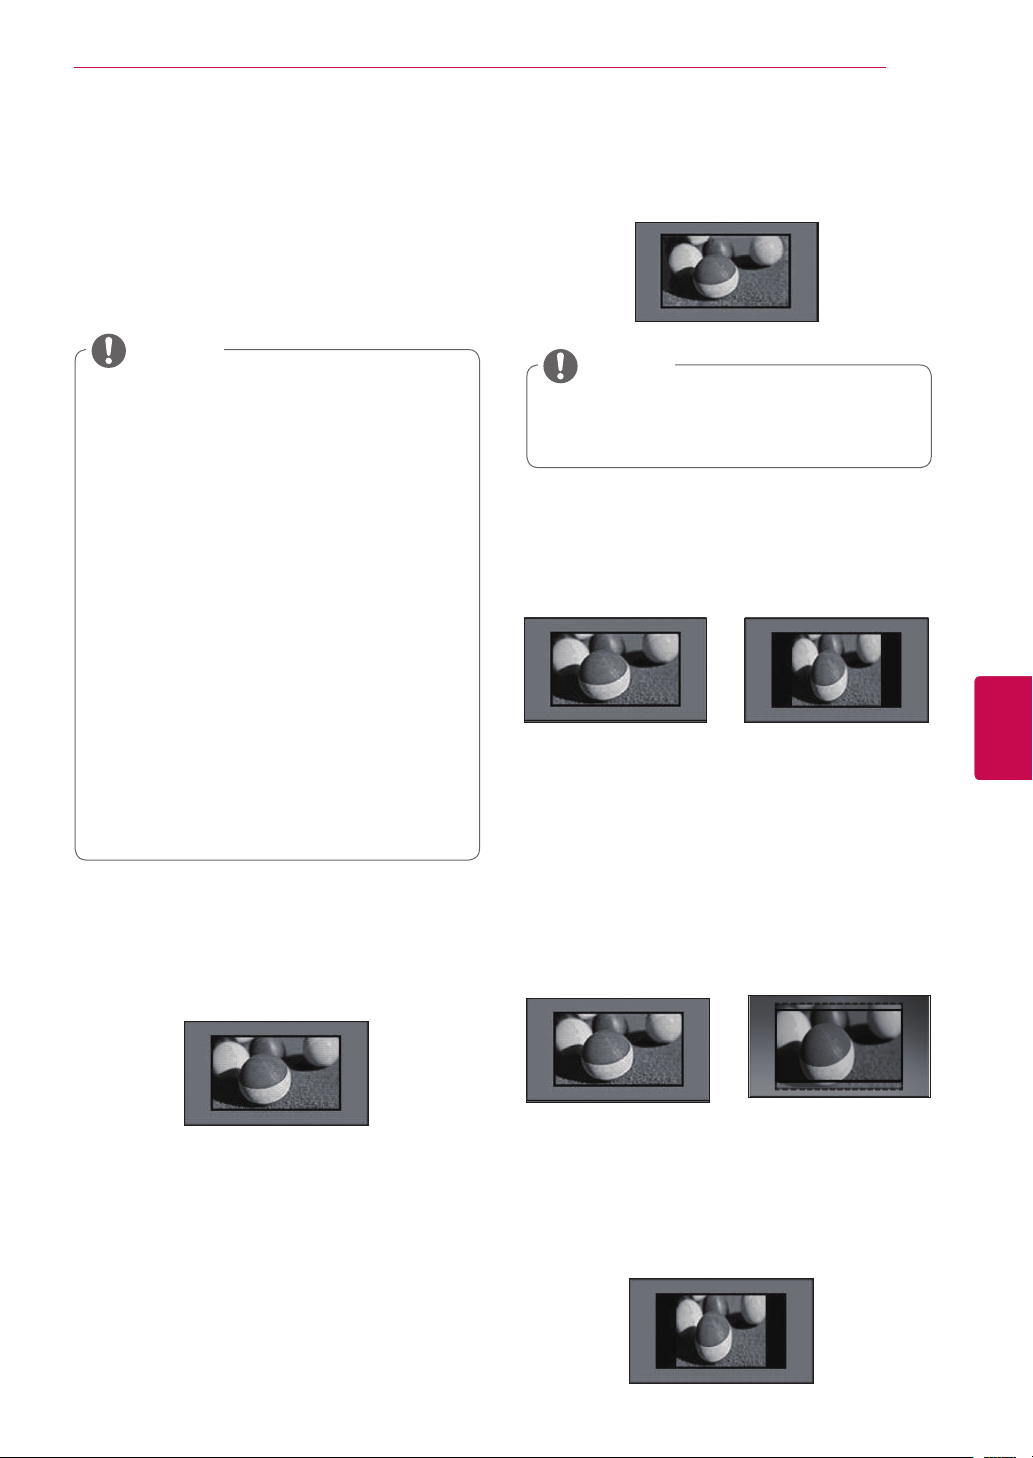
- Just Scan: Displays video images in the origi-
nal size without removing parts of the edge of
the image.
Just Scan
NOTE
If you select Just Scan, you may see
image noises at the edge of the original
signal.
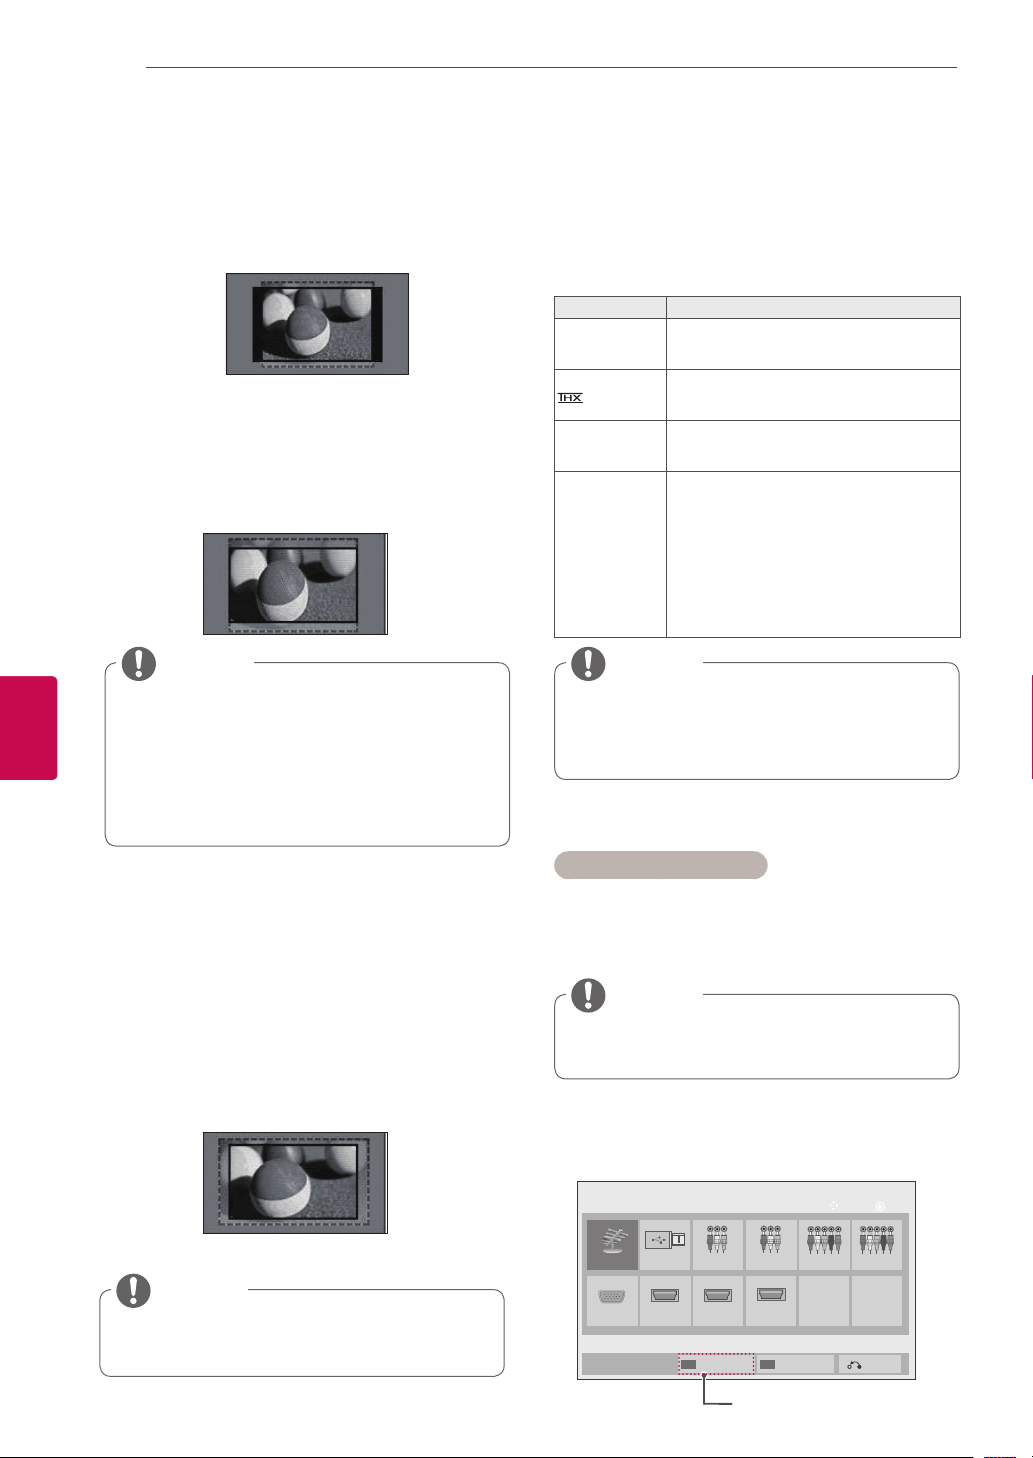
Original: When your TV receives a wide
-
screen signal it will automatically change to the
picture format broadcasted.
or
Original
Full Wide(Only DTV): When TV receives the
-
wide screen signal,it will let you adjust the
picture horizontally or vertically, in a linear
proportion,to fill the entire screen fully.
Original
ENGENGLISH
- 16:9: Resizes images to fit the screen width.
4:3 and 14:9 video is supported in full screen
without any video distortion through DTV
input.
Full Wide
or
Full Wide
- 4:3: Resizes images at the standard 4:3 with-
out distortion.
Page 46
WATCHING TV
46
14:9 : You can view a picture format of 14:9
-
or a general TV programme in the 14:9 mode.
The 14:9 screen is viewed in the same way as
in 4:3, but is moved to the up and down.
- Zoom: Enlarges an image to fit the screen
width. The top and bottom of the image may
not appear.
Changing AV modes
Each AV mode has the optimized image and sound
settings.
Press
AV MODE
appropriate mode.
Mode Description
Off Changes to the previously customized
Cinema or
Cinema
Sport Use the optimized image and sound
Game Use the optimized image and sound
repeatedly to select an
settings
Use the optimized image and sound
setting for the cinematic look
setting for dynamic action sports
setting for fast gaming
When playing a video game using
PlayStation or Xbox, it is recommended
to use the Game mode.
When in Game mode, functions related
to picture quality will be optimized
for playing games.
ENGLISH
ENG
NOTE
If you access, Aspect Ratio in the quick
menus,
- Press the Navigation buttons to stretch
an image vertically.
- Press the Navigation buttons to move
the zoom focus up or down.
- Cinema Zoom : Enlarges an image in the
cinemascope ratio, 2.35:1.
To change the ratio of the cinema zoom,
press the Navigation buttons and its range is
from 1 to 16.
To move the zoom focus up or down, press
the Navigation buttons.
NOTE
If you select Off in AV mode, the picture
and image which you initially set will be
selected.
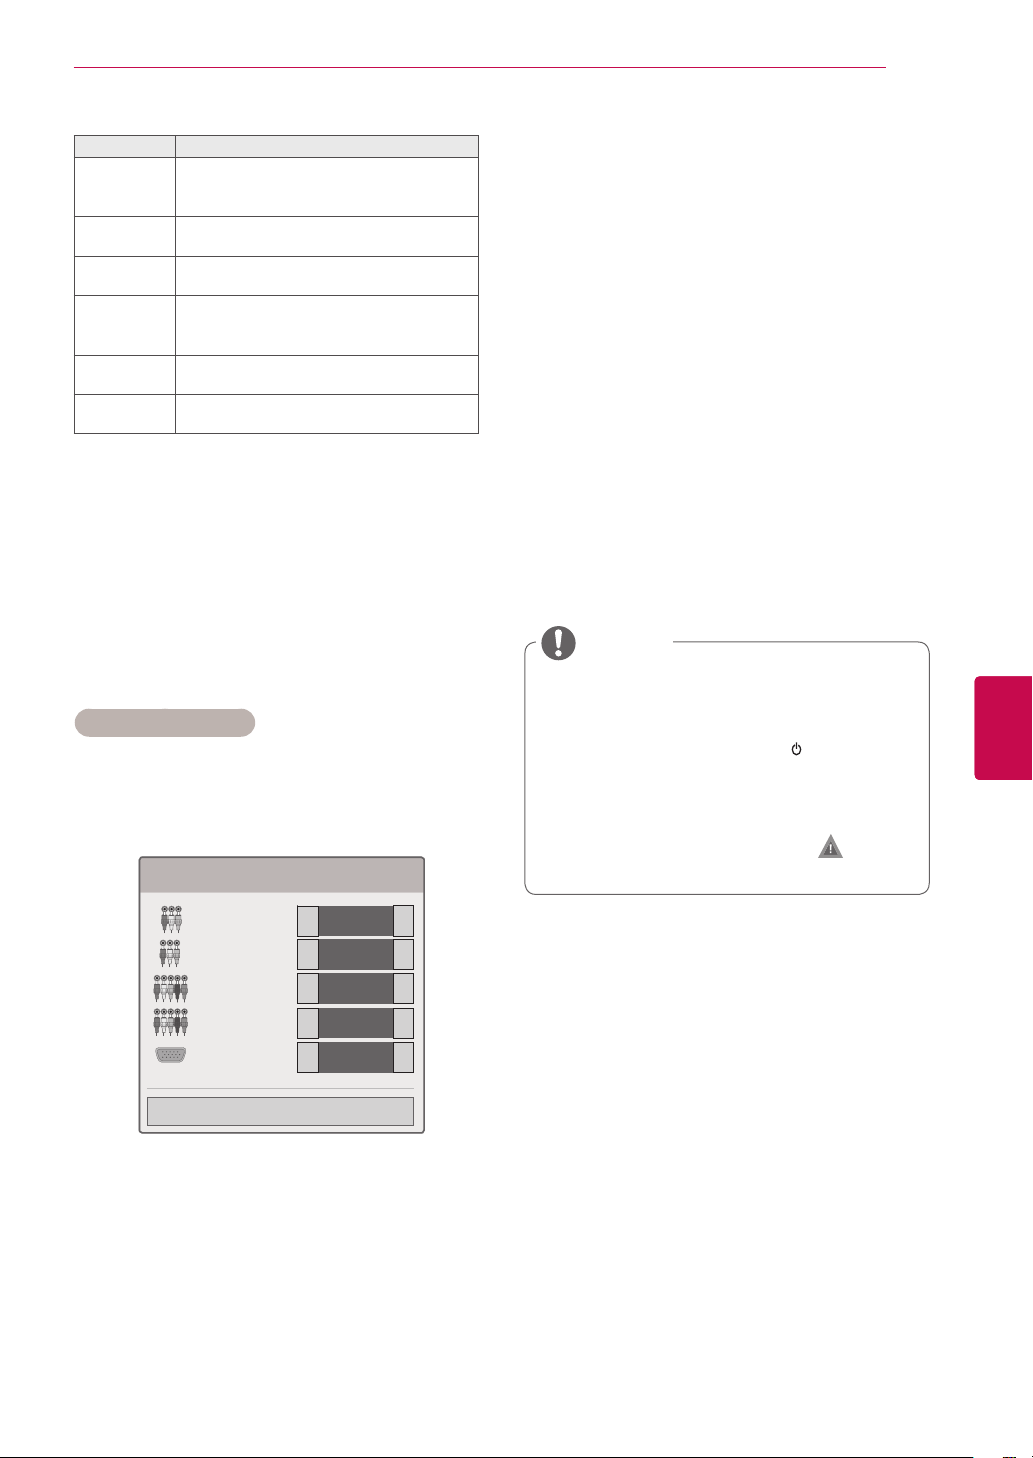
Using the input list
Selecting an input source
Press INPUT to access the input sources.
1
- The connected device displays on each input
source.
NOTE
You can also access the input source list
by selecting INPUT in the main menus.
Press Navigation buttons to scroll to one of the
2
input sources and press OK.
Image shown may differ from your TV.
Input List
Move
OK
NOTE
If you enlarge or reduce an image, the
image may be distorted.
Antenna USB
RGB
AV2 Component1 Component2
AV1
HDMI3
HDMI2HDMI1
SIMPLINK
Input Label
Exit
(Only LCD TV/LED LCD TV)
Page 47
WATCHING TV
INPUT
HOME OK
P
47
Input source Description
Antenna Select it when watching the TV. (Only
DTV : Select it when watching the DTV/
USB Select it when using USB depends on
AV Select it when watching the VCR or
Component Select it when using the DVD or the
RGB Select it when using PC depends on con-
HDMI Select it when using DVD, PC or Digital
TV/RADIO.)
connector.
external equipment.
Digital set-top box depends on connector.
nector.
set-top box depend on connector.
The connected input sources display in black
and the disconnected input sources in grey.
- To add an input label, press the Blue button.
You can easily identify a device connected to
each input source.
- To access the SIMPLINK, press the Red
button. If you select “SIMPLINK and On”, the
pop-up window for the HDMI input will not
display.(Only LCD TV/LED LCD TV)
Adding an Input label
Add a label to an input source so that you can
easily identify a device connected to each input
source.
Image shown may differ from your TV.
Input Label
Locking the buttons on the TV (Child Lock)
Lock the buttons on the TV to prevent any
unwanted operations or accidents by children.
Press Home to access the main menus.
1
Press the Navigation buttons to scroll to LOCK
2
and press OK.
Press Navigation buttons to scroll to
3
Key Lock and press OK.
Select On to activate the Key lock feature.
4
To deactivate the Key lock feature, select Off.
-
When you are finished, press EXIT.
5
When you return to the previous menu, press
BACK.
NOTE
The TV is programmed to remember the
last setting after you turn the TV off.
If you turn the TV off with the Key Lock
feature activated, press the
P
v or Number buttons on the remote
^
control.
If you press any button on the TV with
the Key lock feature activated,
Lock appears on the screen.
, INPUT,
Key
ENGENGLISH
AV1
AV2
Component1
Component2
RGB
Close
◄
◄
◄
◄
◄
▼
►
►
►
►
►
1 Press INPUT to access the input sources.
2 Press the Navigation buttons to scroll to one of
the input sources.
3 Press the Blue button.
4 Press the Navigation buttons to scroll to one of
the input labels and press OK.
When you are finished, press Close. When you
5
return to the previous menu, press BACK.
Page 48
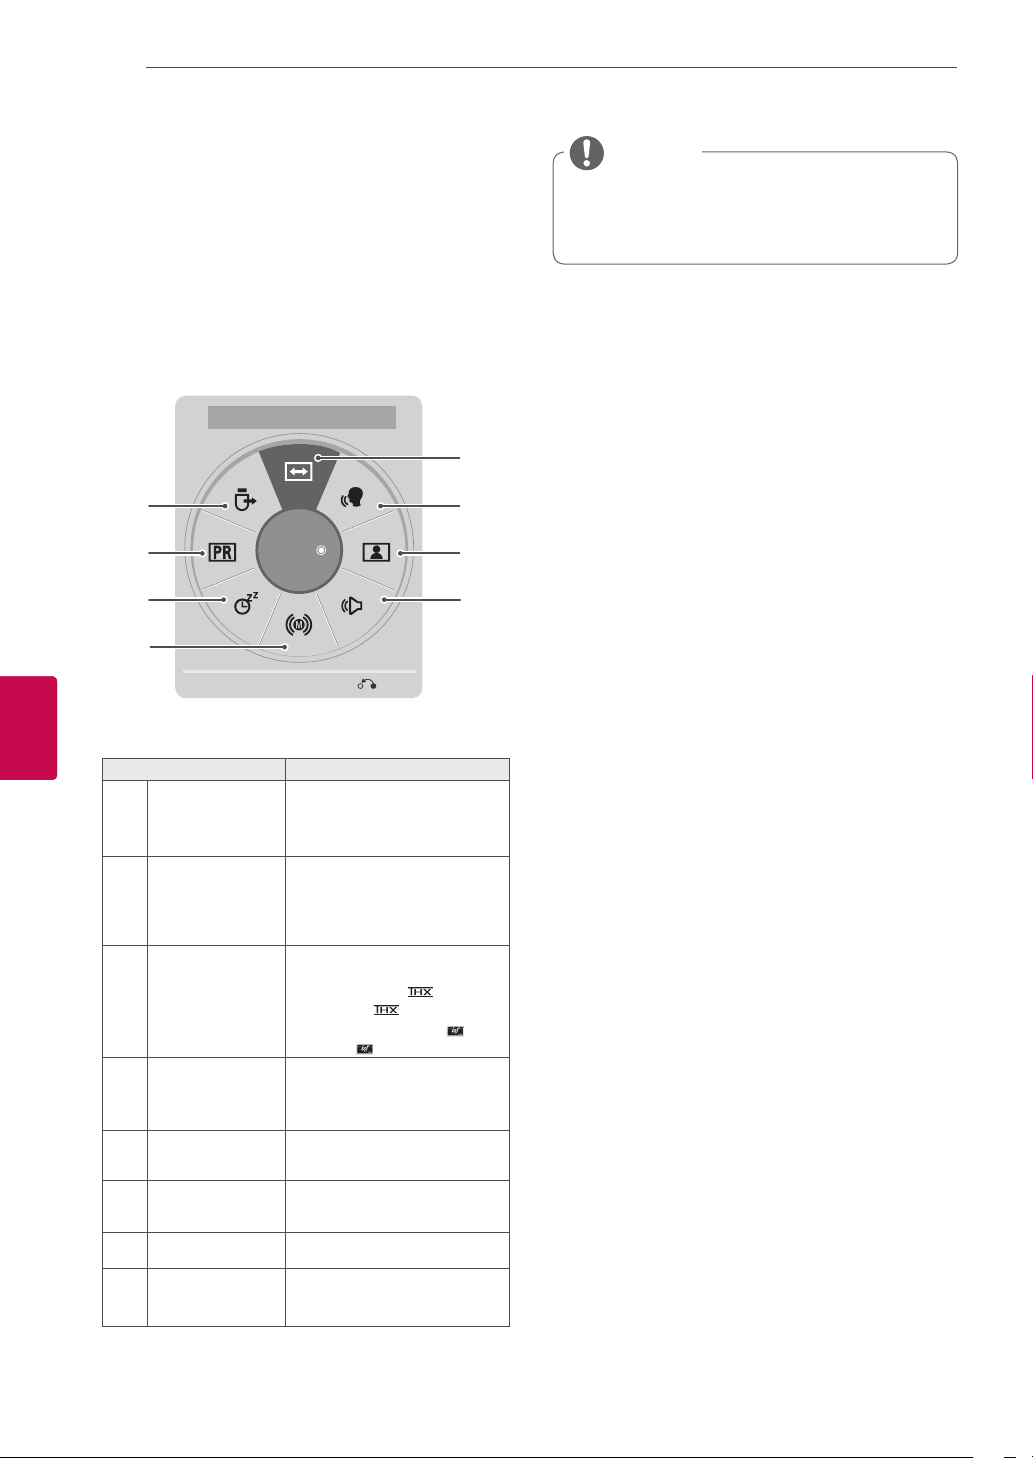
WATCHING TV
48
ENGLISH
ENG
Using the quick menu
Customize the frequently using menus.
Press Q. MENU to access the quick menus.
1
Press Navigation buttons to scroll through the
2
following menus and press OK.
Image shown may differ from your TV.
Aspect Ratio
8
7
6
5
◄
16:9
►
Exit
1
2
3
4
NOTE
The available menus and options may
differ from the input source that you are
using.
Press Navigation buttons to scroll to the option
3
you want.
When you are finished, press Q. MENU.
4
Menu Description
Aspect Ratio Changes the image size
1
Clear Voice II By differentiating the human
2
Picture Mode
3
(Depending on
model)
Sound Mode Changes the sound mode
4
Audio or
5
Audio Language
Sleep Timer Sets the length of time until
6
Skip Off/On Sets the Skip Off/On.
7
USB Device Ejects a USB device when a
8
(16:9, Just Scan, Original,
Full Wide, 4:3, 14:9, Zoom,
Cinema Zoom)
frequency range from others, it
helps users listen
to human voices better.
Changes the image mode
(Intelligent sensor, Vivid,
Standard, APS, Cinema
or Cinema, Bright Room,
Sport, Game, Photo,
Expert1, Expert2)
(Standard, Music, Cinema,
Sport, Game)
Changes the sound output.
the TV to turns off
USB device is connected
Page 49
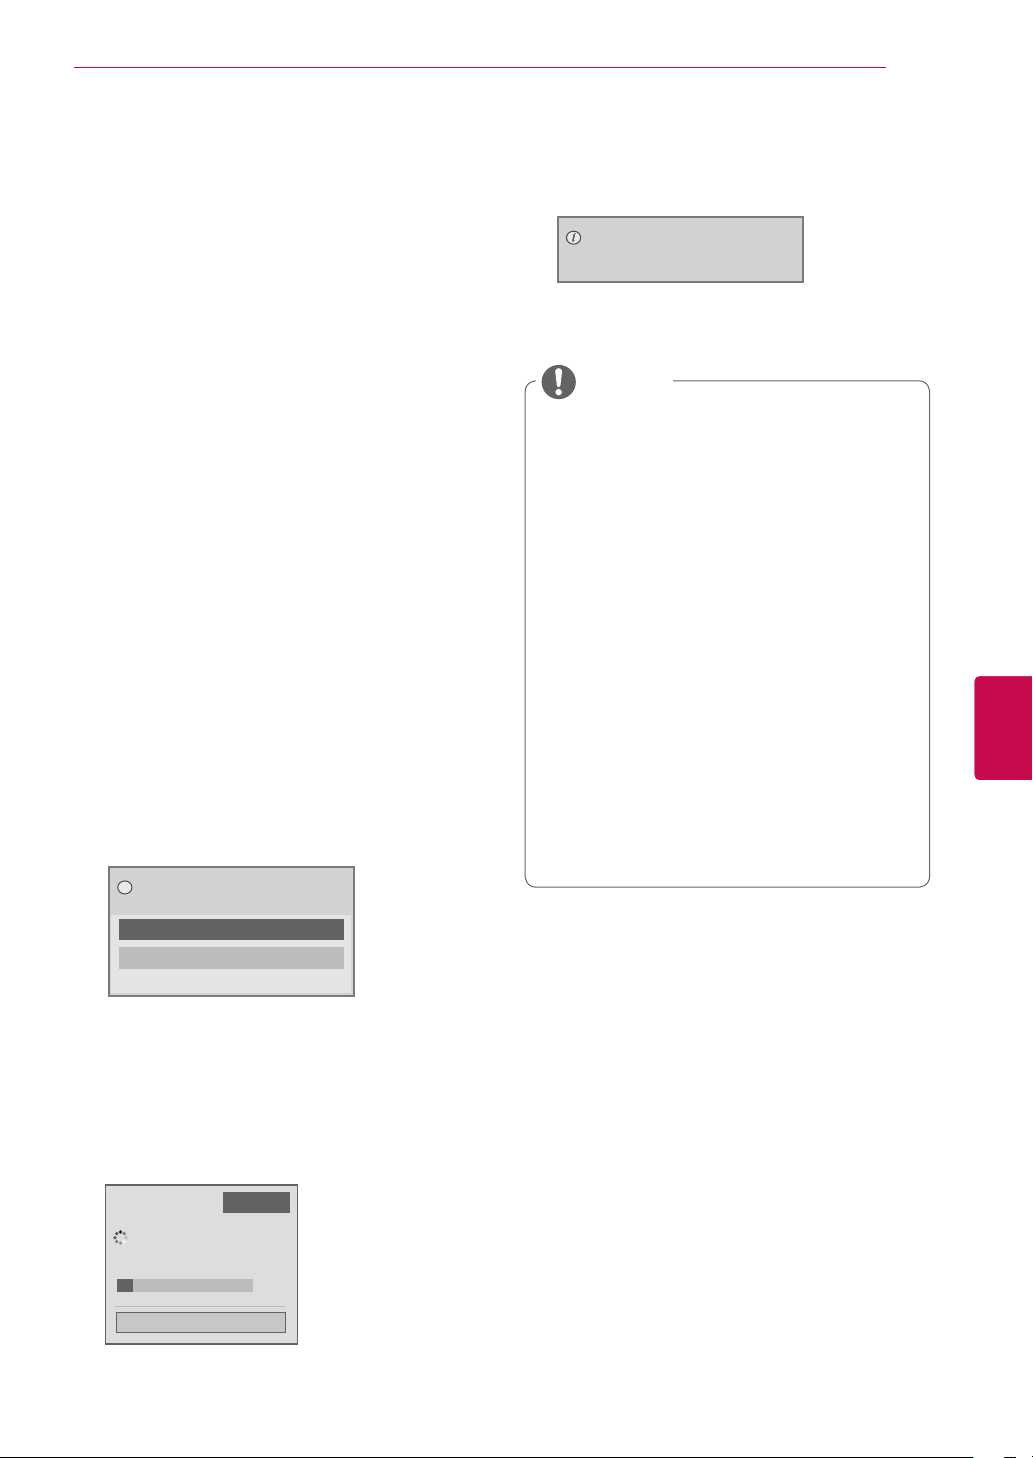
WATCHING TV
49
Using customer Support.
Testing Software Update
(Only DTV)
To download software through the digital terrestrial
broadcasting system.
1 Press Home to access the main menus.
2 Press the Red button to scroll Customer Sup-
port.
3 Press the Navigation buttons to scroll Soft-
ware Update.
4 Press the Navigation buttons to scroll to On
and press OK.
- If you select On, a user confirm message box
will be displayed to notify that new software is
found.
5 When you are finished, press EXIT.
When you return to the previous menu, press
BACK.
When setting “Software Update”
- Occasionally, a transmission of updated
digital software information will result in the
following menu on the TV screen.
- TV is restarted when download is
completed.
Rebooting now.
NOTE
During Progress of a Software Update,
please note the following:
- Power to the TV must not be interrupted.
- The antenna must not be disconnected.
- After Software Update, you can confirm
the updated software version in Software
Update menu.
- It may take hours to download the software,
so make sure that the power stays on
during the download.
- The software is downloaded only in
Standby mode or in MUX with Software
Update Service, and stops when the power
cord is unplugged or when viewing MUX
without Software Update Service.
- When you return to Standby mode or
MUX with Software Update Service, the
software download will resume from where
it stopped.
ENGENGLISH
Software update is available.
?
Would you like to download now?
Yes
No
- Simple Update : for current update stream
- Download starts when "Yes" is selected. At
this time, progressing pop-up window does
not display.
- Download progress status can be checked
from Software Update menu.
Software Update
Software downloading progress.
Ver. 00.00.01 ► Ver.00.01.00
◄ On ►
4%
Close
Page 50
WATCHING TV
50
ENGLISH
ENG
Testing the Picture / Sound
To execute picture and sound tests.
1 Press Home to access the main menus.
2 Press the Red button to scrolll to Customer
Support.
3 Press the Navigation buttons to scroll l to Pic-
ture Test or Sound Test.
4 Press the Navigation buttons to scroll to Yes
and press OK.
When you are finished, press EXIT. When you
5
return to the previous menu, press BACK.
Using Signal Test
(Only DTV)
To view information on the Manufacturer, Model/
Type, Serial Number and Software Version.
1 Press Home to access the main menus.
Using the product or service information
To check the product or service information
1 Press Home to access the main menus.
2 Press the Red button to scroll to Customer
Support.
3 Press the Navigation buttons to scroll Product/
Service Info..
You can check the various product/Service
infomation based on your model.
When you are finished, press EXIT. When you
4
return to the previous menu, press BACK.
2 Press the Red button to scroll Customer Sup-
port.
3 Press the Navigation buttons to scroll Signal
Test.
4 Press OK.
- Manufacturer, Model/Type, Software Version
and information of Channel.
When you are finished, press EXIT. When you
5
return to the previous menu, press BACK.
NOTE
This displays the information and signal
strength of the tuned *MUX.
This displays the signal information and
service name of the selected MUX.
(*MUX: A higher directory of channels in digital
broadcasting (a single MUX contains multiple
channels.))
Page 51
3D IMAGING
(Only 3D Models)
3D IMAGING
51
3D Technology
This TV can display in 3D via 3D broadcasting or
when the TV is connected to a compatible device,
such as a Blu-ray 3D Player. You need such a
device to watch the TV in 3D. The 3D TV displays
two separate pictures formatted for each eye. The
viewer needs to wear 3D glasses in order to see
these images in 3D format.
WARNING
We recommend that you maintain a dis-
tance of at least twice the screen diagonal length when watching 3D videos.
If you watch the 3D imaging too closely or
for a long period of time, it may harm your
eyesight.
Watching the TV or playing video games
that incorporate 3D imaging with the 3D
glasses for a long period of time can
cause drowsiness, headaches or fatigue
to you and/or your eyes. If you have a
headache, or otherwise feel fatigued or
drowsy, stop watching the TV and have
a rest.
Pregnant woman, seniors, persons with
heart problems or persons who experience frequent drowsiness should refrain
from watching 3D TV.
Some 3D imaging may cause you to
duck or dodge the image displayed in the
video. Therefore, it is best if you do not
watch 3D TV near fragile objects or near
any objects that can be knocked over
easily.
Please prevent children under the age of
5 from watching 3D TV. It may affect their
vision development.
Warning for photosensitization seizure:
Some viewers may experience a seizure
or epilepsy when exposed to certain factors, including flashing lights or images
in TV or video games. If you or anybody
from your family has a history of epilepsy
or seizure, please consult with your doctor before watching 3D TV.
Also certain symptoms can occur in
unspecified conditions without any previous history. If you experience any of the
following symptoms, immediately stop
watching the 3D imaging and consult a
doctor: dizziness or light-headedness ,
visual transition or altered vision, visual
or facial instability, such as eye or muscle
twitching, unconscious action, convulsion,
loss of conscience, confusion or disorientation, loss of directional sense, cramps,
or nausea. Parents should monitor their
children, including teenagers, for these
symptoms as they may be more sensitive
to the effects of watching 3D TV.
Risk of photosensitization seizure can be
reduced with the following actions.
» Take frequent breaks from watching 3D
TV.
» For those who have vision that is dif-
ferent in each eye, they should watch
the TV after taking vision correction
measures.
» Watch the TV so that your eyes are on
the same level as the 3D screen and
refrain from sitting too closely to the TV.
» Do not watch the 3D imaging when
tired or sick, and avoid watching the 3D
imaging for a long period of time.
» Do not wear the 3D glasses for any
other purpose than viewing 3D imaging
on a 3D TV.
» Some viewers may feel disoriented
after watching 3D TV. Therefore, after
you watch 3D TV, take a moment to regain awareness of your situation before
moving.
If 3D TV broadcast standard changes in
the future and it is not supported by this
TV set, you may need a separate device,
such as a set-top-box.
ENGENGLISH
Page 52
52
3D IMAGING
ENGLISH
ENG
NOTE
To watch the TV in 3D, you must put on
your 3D glasses. For best results, you
should wear LG Brand 3D glasses. The
3D imaging may not display properly
when using another brand of 3D glasses.
Please see the 3D glasses manual for instructions on how to use the 3D glasses.
After powering on the TV, a few seconds
may be needed for your TV to calibrate.
It may take a moment for you to see the
3D imaging if you look away from the TV
and then revert your eyes back to the 3D
program. (Only Plasma TV)
If there is an obstacle between the TV
and the 3D glasses, the 3D imaging may
not display properly. (Only Plasma TV)
Do not use the TV in close proximity
to other electronic equipments and RF
equipments. (Only Plasma TV)
When watching 2D images, it is recom-
mended to take off the 3D glasses. If you
watch 2D images with the 3D glasses on,
you may see distorted images.
The TV may flicker slightly if the 3D
imaging is displayed under fluorescent.
In such instances, It is recommened to
turn the lights off or to dim the lights.(Only
Plasma TV)
When Using 3D Glasses
CAUTION
3D glasses are sold separately. Refer
to the 3D glasses manual for operating
instructions.
Do not use the 3D glasses to replace
your corrective glasses, sunglasses or
protective goggles.
Do not store the 3D glasses in hot or cold
locations.
Do not drop objects onto the 3D glasses.
Do not drop or bend the glasses.
Since the lenses of the 3D glasses are
easily scratched, make sure to clean
only with a soft cloth. Shake off any dust
before using the cloth since the glasses
are easily scratched.
3D Imaging Viewing Range
(Only Plasma TV)
TV size, viewing angle & other circumstances may
change the viewing distance and the angle of view.
Viewing
Distance
Viewing
Angle
2 m - 10 m
120 º
(When the viewing distance is 2 m)
Page 53
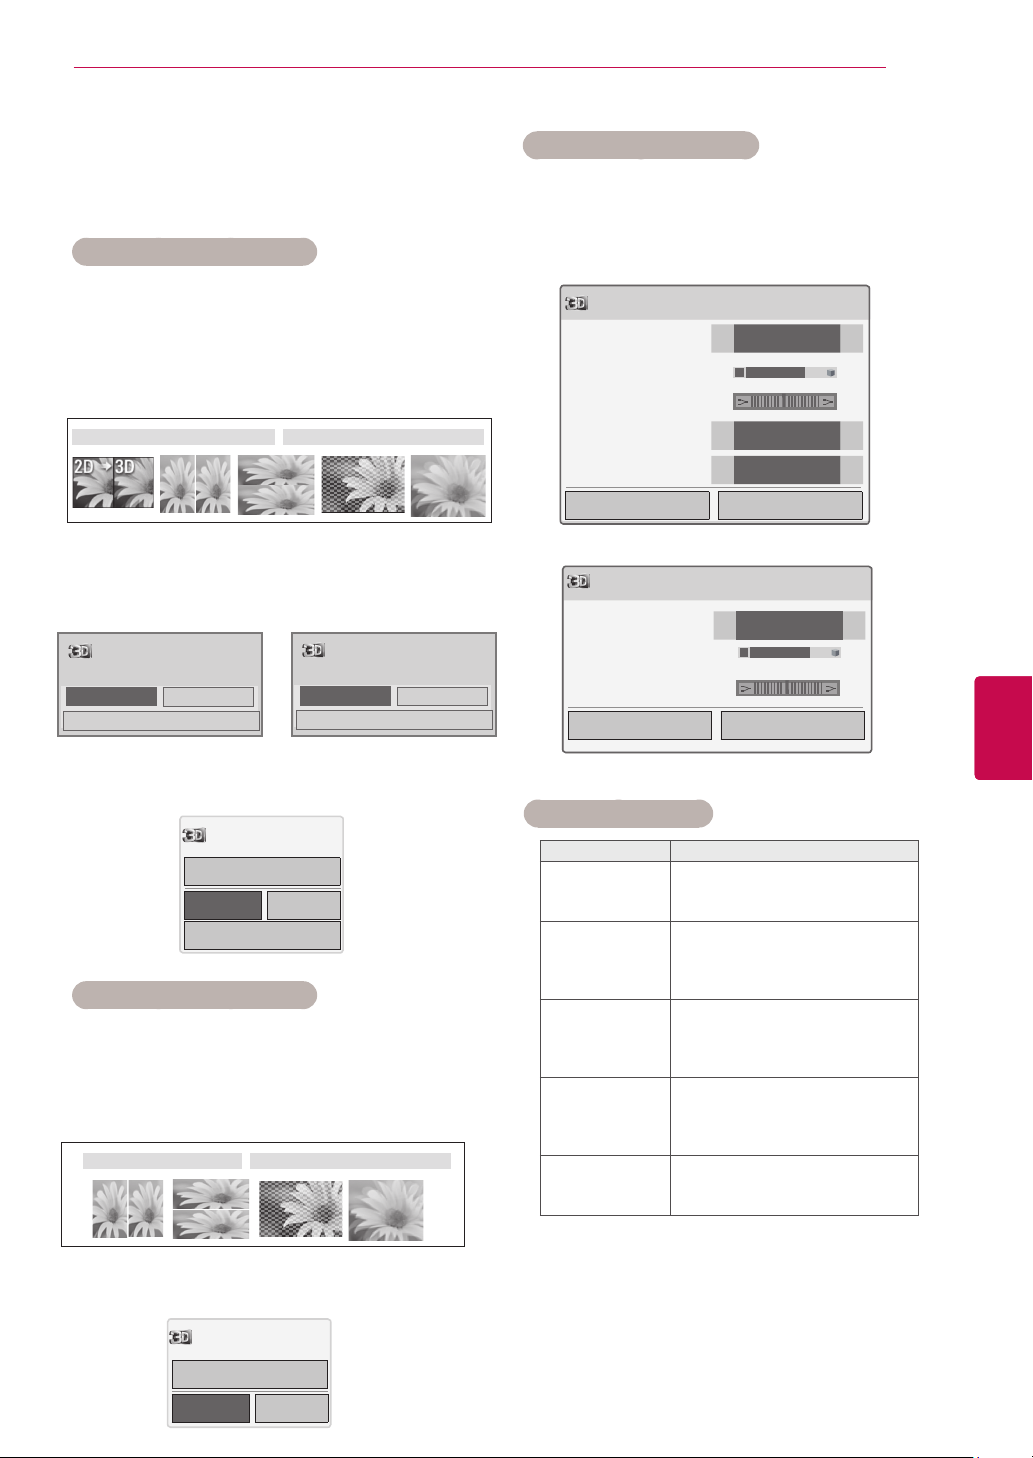
3D IMAGING
53
Watching 3D images
Image shown may differ from your TV.
View 3D mode for 3D images
1 Play the 3D video or select 3D channel.
(2D to 3D mode is available with all contents)
2 Press 3D and select same type in your dis-
played picture on the screen.
(Select type on "3D Video" tab)
3D Video 2D Video
* Notice : Turn on the 3D mode automatically for
HDMI input playing the 3D blueray titles.
3 Press OK on displayed information window.
Power on your 3D glasses and put them on.
Sit 2 meters from TV to enjoy the best 3D
view.
OK
ꔅ 3D Setting
Cancel
Put on 3D glasses.
Sit 2 meters from TV to enjoy the best 3D
view.
or
OK
ꔅ 3D Setting
Cancel
Using 3D quick menu option
1 Press 3D SETTING.
2 Use the following options while viewing 3D
imaging.
3D Setting
3D Picture Size
3D Depth 15
3D Viewpoint 0
3D Picture Balance
3D Picture Correction
OK End 3D video
3D Setting
3D Picture Correction
3D Depth 15
3D Viewpoint 0
OK End 3D video
◀
Just Scan
◀ ▶
◀ ▶
◀
◀
Off
Left/Right
or
◀
Left/Right
◀
◀ ▶
▶
▶
▶
▶
▶
ENGENGLISH
4 To turn off the 3D mode, press 3D and select
OK.
Turn off 3D Mode.
2D mode
OK Cancel
ꔅ 3D setting
View 2D mode for 3D images
1 Play the 3D video or select 3D channel.
2 Press 3D and select same type in your
displayed picture on the screen.
(Select type on "2D Video" tab)
3D Video 2D Video
3 To turn off the 2D mode, press 3D and select
OK.
Turn off 2D Mode.
(Depending on model)
Button Description
3D Picture Size
3D Depth
3D Viewpoint
3D Picture
Balance
3D Picture
Correction
Cuts off the outer edges of the
picture and stretch it to fit the full
screen in 3D mode.
Adjusts the distance between the
object and the background in the
picture to enhance the 3D effect
in 2D to 3D mode.
Brings the picture (including both
the object and background images) to the front or back to enhance the 3D effect in 3D mode.
Adjusts the colour and brightness difference between the right
and left sides of the picture in 3D
mode.
Changes the order of images
in the right and left sides of the
picture in 3D mode.
3D video
OK Cancel
Page 54
3D IMAGING
54
CAUTION
Some menus may not work while watching the TV in 3D.
If used 3D effect on the 2D source, 3D may not work.
The 3D imaging mode is disabled automatically when switching DTV channe ls, input source.
The screen may not be displayed properly if you view 2D DTV images in 3D imaging mode.
3D effect can be seen when 3D Mode is selected appropriately for the 3D input signal supplied to
the TV.
For *mpo files (3D camera files), the 3D imaging mode is enabled automatically.
3D may not be displayed properly for some PC graphics cards.
CAUTION
* For LCD TV/LED LCD TV
If you select 3D mode, “Power indicator” is turned off automatically.
While watching 3D imaging, you cannot adjust video/audio settings using the menu.
You can only choose “Standard → Cinema → Game” with the
control. AV Mode is set as Standard while playing in 3D.
If you’d like to play the BGM using *.mpo file(3D camera file), In advance, the contents path for
BGM should be set on full-sized photo view screen which isn’t *.mpo file(3D camera file).
Picture mode is set as Standard, Energy Saving Off if entering to 3D mode.
AV MODE
button on the remote
ENGLISH
ENG
Page 55
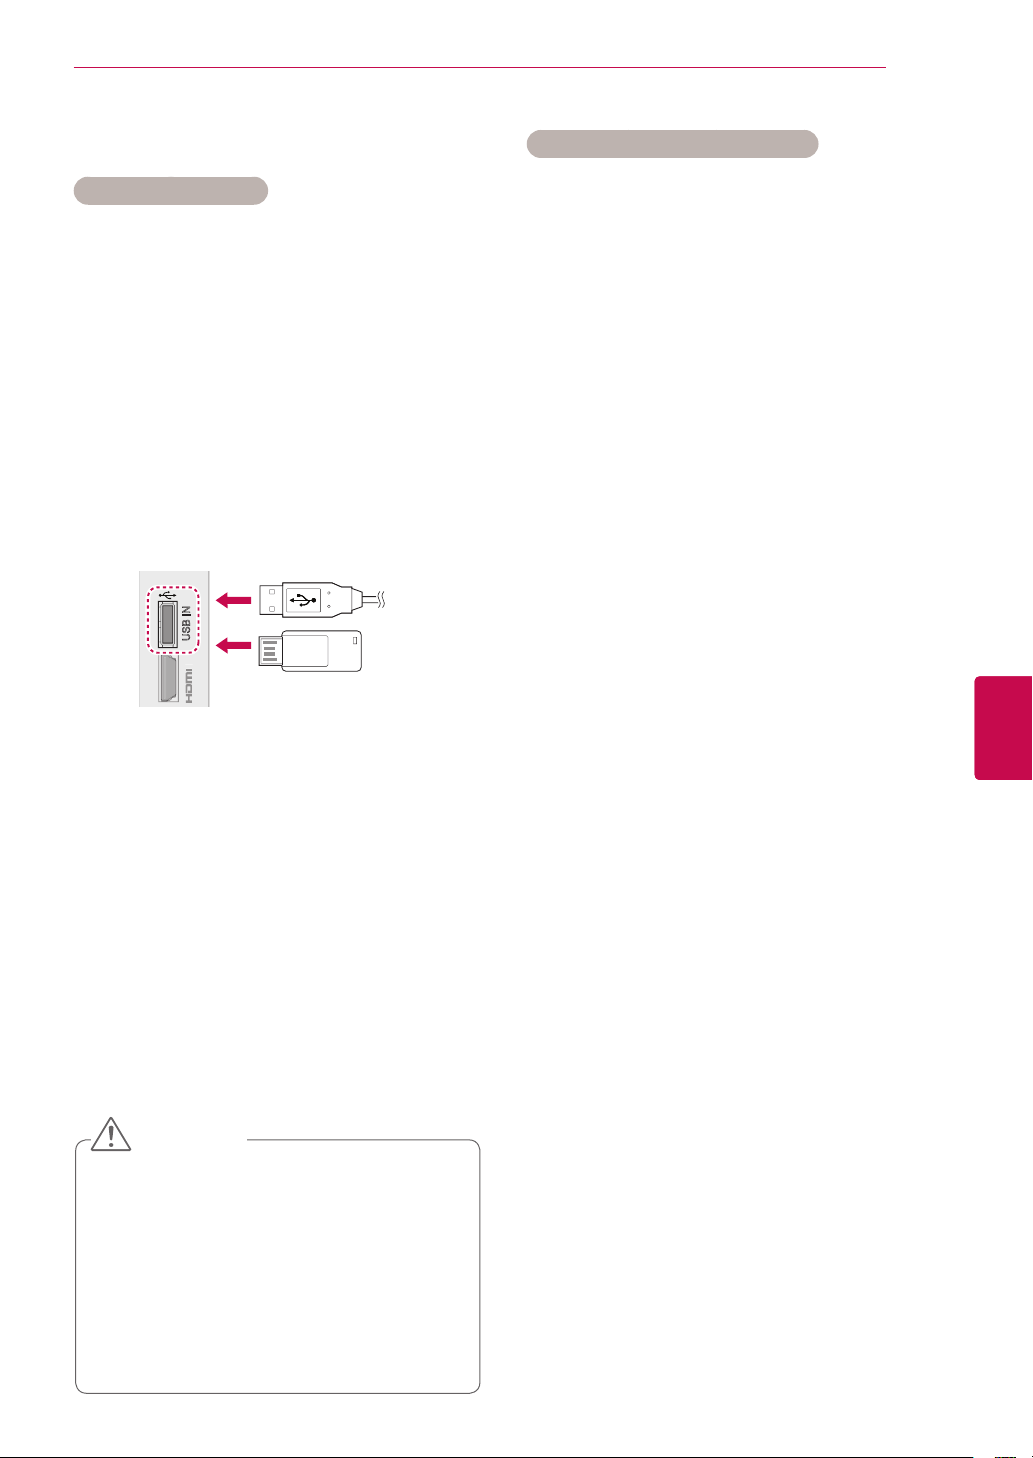
ENTERTAINMENT
55
ENTERTAINMENT
(Depending on model)
Image shown may differ from your TV.
Connecting USB storage devices
Connect USB storage devices such as a USB
flash memory, external hard drive to the TV and
use multimedia features (See "Browsing files" on
p.56).
Connect a USB flash memory or USB memory
card reader to the TV as shown on the following
illustration. The My media screen appears, “POP
UP MENU” will not be displayed while the OSD
including Menu, EPG or Schedule list is activated.
USB IN
IN 2
To disconnect a USB storage device,
make sure to end the connection properly to prevent damages to the TV or files.
1 Press Q.MENU to access the quick menus.
2 Press the Navigation buttons to scroll to USB
Device and press OK.
3 Press the Navigation buttons to scroll to Eject
and press OK.
4 Disconnect the USB storage device only when
the message says that it is safe to remove.
CAUTION
Do not turn the TV off or remove a USB
storage device while the USB storage
device is connected to the TV, as this
could result in loss of files or damage to
the USB storage device.
Back up your files saved on a USB stor-
age device frequently, as you may lose
or damage the files and this may be not
covered by the warranty.
or
Tips for using USB storage devices
Only a USB storage device is recognizable.
If the USB storage device is connected
through a USB hub, the device is not recognizable.
A USB storage device using an automatic
recognition programme may not be recognized.
A USB storage device which uses its own
driver may not be recognized.
The recognition speed of a USB storage
device may depend on each device.
Please do not turn off the TV or unplug the
USB device when the connected USB storage device is working. When such device is
suddenly separated or unplugged, the stored
files or the USB storage device may be damaged.
Please do not connect the USB storage
device which was artificially manoeuvred on
the PC. The device may cause the product to
malfunction or fail to be played. Never forget
to use only a USB storage device which has
normal music files, image files or movie files.
Please use only a USB storage device which
was formatted as a FAT32 file system, NTFS
file system provided with the Windows operating system. In case of a storage device
formatted as a different utility programme
which is not supported by Windows, it may
not be recognized.
Please connect power to a USB storage
device(over 0.5 A) which requires an external
power supply. If not, the device may not be
recognized.
Please connect a USB storage device with
the cable offered by the device maker.
Some USB storage devices may not be sup-
ported or operated smoothly.
File alignment method of USB storage
device is similar to Window XP and filename
can recognize up to 100 English characters.
Be sure to back up important files since data
stored in a USB memory device may be
damaged. We will not be responsible for any
data loss.
If the USB HDD does not have an external
power source, the USB device may not be
detected. So be sure to connect the external
power source.
- Please use a power adaptor for an external
ENGENGLISH
Page 56
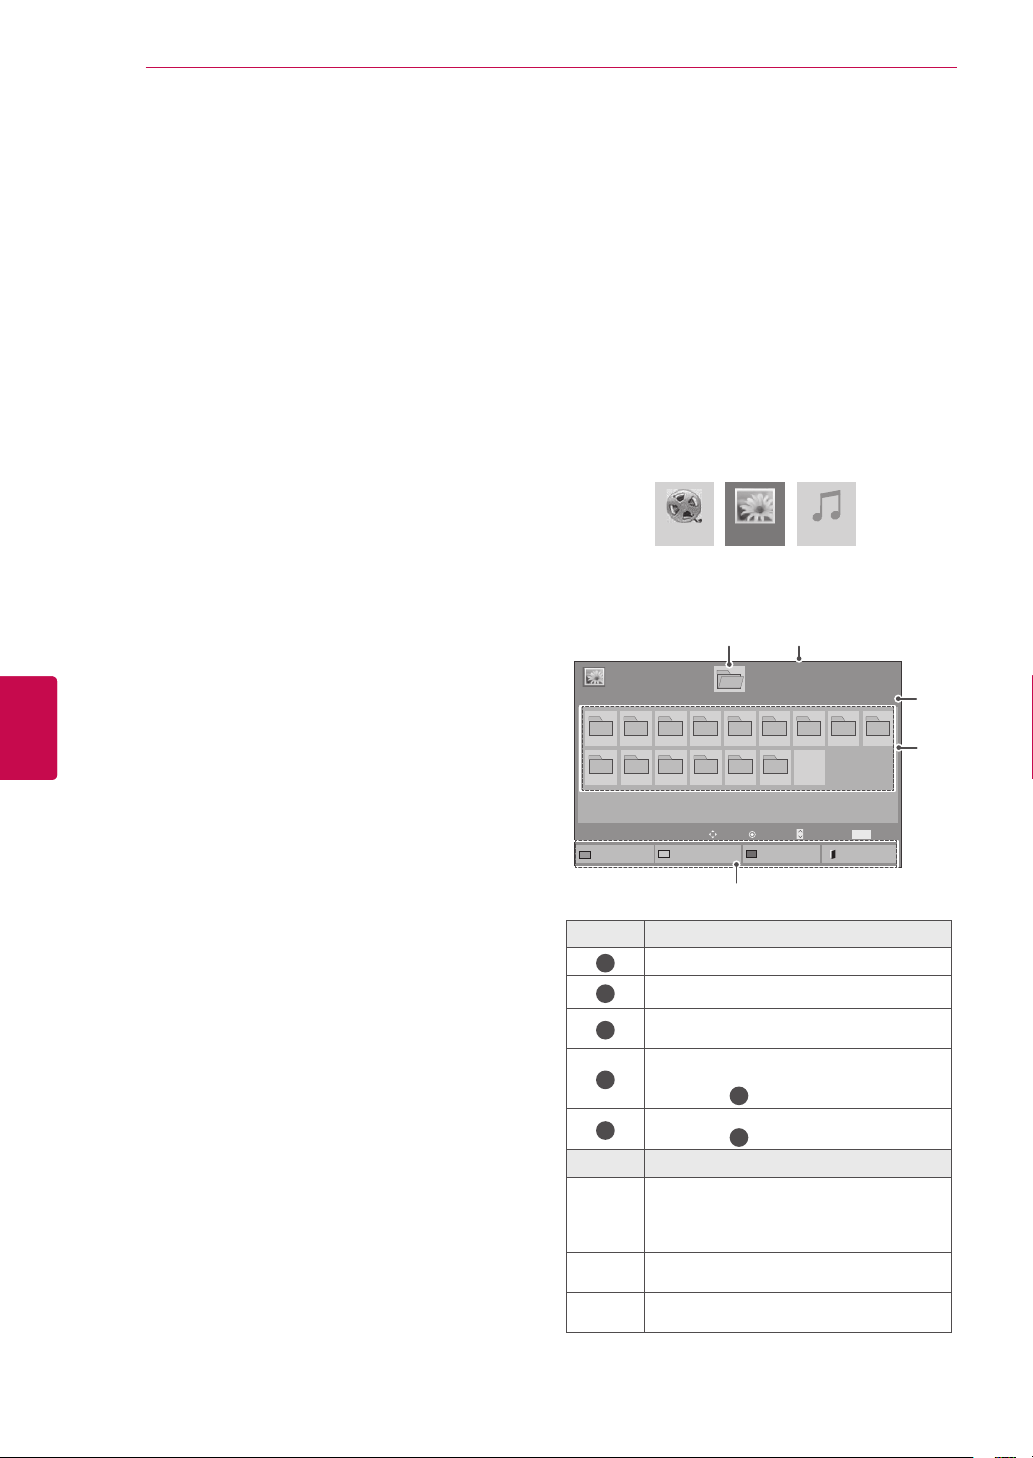
ENTERTAINMENT
56
ENGLISH
ENG
power source. We do not guarantee an USB
cable for an external power source.
If your USB memory device has multiple
partitions, or if you use a USB multi-card
reader, you can use up to 4 partitions or USB
memory devices.
If a USB memory device is connected to a
USB multi-card reader, its volume data may
not be detected.
If the USB memory device does not work
properly, disconnect and reconnect it.
How fast a USB memory device is detected
differs from device to device.
If the USB is connected in Standby Mode,
specific hard disk will automatically be
loaded when the TV is turned on.
The recommended capacity is 1 TB or less
for a USB external hard disk and 32 GB or
less for USB memory.
Any device with more than the recommended
capacity may not work properly.
If a USB external hard disk with a “Energy
Saving” function does not work, turn the
hard disk off and on again to make it work
properly.
USB storage devices below USB 2.0 are
supported as well. But they may not work
properly in the movie list.
Maximum of 999 folders or files can be rec-
ognized under one folder.
The file arrangement of the USB storage
device is similar to that of Windows XP and
supports up to 100 alphabetical characters.
If there are a lot of folders or files all within
one folder, the device may not be able to
access these properly.
Browsing files
Access the photo, music, or movie lists and browse
files.
Connect a USB storage device.
1
Press Home to scroll to main menus.
2
Press the Navigation buttons to scroll to My
3
Media and press OK.
Press Navigation buttons to scroll to PHOTO
4
LIST, MUSIC LIST, or MOVIE LIST and press
OK.
Movie List Music ListPhoto List
1
Photo List
USB External
001
002 003 004 005 006 007
010 011 012 013 014 015
To Music List
Drive1
Move
Change Numbers
3
No.
Moves to upper level folder
1
Current page/Total pages
2
Corresponding buttons on the
3
remote control
Current page/ total pages of
contents under the folder
4
focused on
Contents under the folder
5
focused on
Buttom
Green
button
Yellow
button
button
Repeatedly, press the GREEN button
to converted to
Music List->Movie List
>
Photo List
.
A method to view in 5 large thumbnail or
simple list.
Blue
Convert to Mark Mode.
2
Page 1/1
008
View
Page
Change
P
Mark Mode
Description
1
1
Description
Photo List->Music List
or
Movie List
MARK
Exit
Page 1/1
009
Mark
4
5
,
-
Page 57
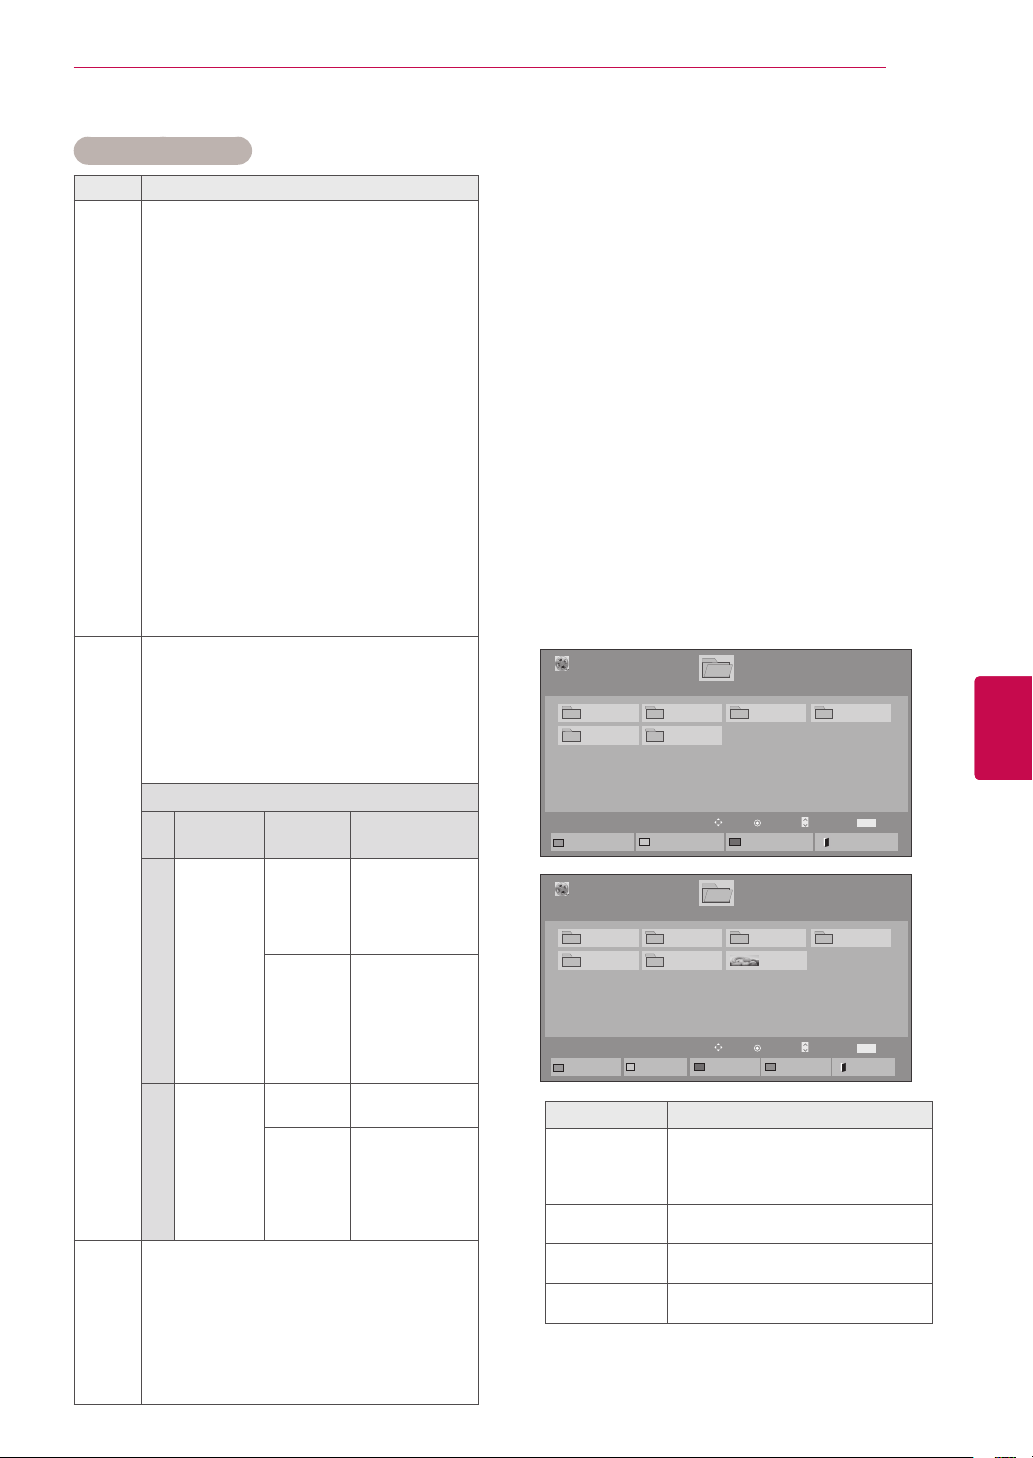
ENTERTAINMENT
57
Supported file format
Type Supported file format
Movie
Photo
Music
DAT,MPG,MPEG,VOB,AVI,DIVX,MP4,MKV,T
S,TRP,TP,ASF,WMV,FLV)
Movie(*.mpg/*.mpeg/*dat/*.ts/*.trp/*.tp/*.
vob/*.mp4/*.mov/*.mkv/*.divx/*.avi/*.asf/*.
wmv/*.flv/*.avi(motion-jpeg)/*.
mp4(motion-jpeg)/*.mkv(motion-jpeg))supporting file
Video format : DivX3.11, DivX4.12, DivX5.x,
DivX6, Xvid1.00, Xvid1.01, Xvid1.02,
Xvid1.03, Xvid1.10 beta-1/beta-2,
Mpeg-1, Mpeg-2, Mpeg-4, H.264/AVC, VC1,
JPEG, Sorenson H.263
Audio format : Dolby Digital, AAC, Mpeg,
MP3, LPCM, HE-AAC, ADPCM, WMA
Bit rate : within 32 kbps to 320 kbps(MP3)
External Subtitle format : *.smi/*.srt/*.sub
(MicroDVD,Subviewer1.0/2.0)/*.ass/*.ssa/*.
txt(TMPlayer)/*.psb(PowerDivX)
Internal Subtitle format : only, XSUB (It is
the subtitle format used in DivX6 files)
JPEG
Baseline : 64 x 64 to 15360 x 8640
Progressive : 64 x 64 to 1920 x 1440
You can play JPEG files only.
Non-supported files are displayed in the
form of predefined icon.
For 3D TV
File
Item Profile
Extensions
2D
jpeg
jpg
Supported
file format
jpe
Photo sizeMin: 64 x 64
3D
mpo Supported
file format
Photo size4:3 size: 3,648
MP3
Bit rate 32 to 320
Sampling rate MPEG1 Layer3 : 32 kHz,
44.1 kHz, 48 kHz
Sampling rate MPEG2 Layer3 : 16 kHz,
22.05 kHz, 24 kHz
Sampling rate MPEG2.5 Layer3 : 8 kHz,
11.025 kHz, 12 kHz
SOF0: baseline
SOF1: Extend
Sequential
SOF2:
Progressive
Max - Normal
Type: 15360
(W) x 8640 (H)
Progressive
Type: 1920 (W)
x 1440 (H)
mpo
x 2,736
2,592 x 1,944
2,048 x 1,536
3:2 size: 3,648
x 2,432
Viewing movies
Play video files on the TV. Your TV displays all of
the video files saved in a USB storage device or
shared folder on a PC.
1 Press the Navigation buttons to scroll to My
Media and press OK.
2 Press the Navigation buttons to scroll to Movie
List and press OK.
3 Select Drive1 to access the connected USB
storage device.
4 Press the Navigation buttons to scroll to a
folder you want and press OK.
5 Press the Navigation buttons to scroll to a file
you want and press OK.
003
Move
Play
Mark Mode
003
051. Apple_ ......
02:30:25
Move
Mark
Description
Page 1/1
P
Page 1/1
P
Exit Mark Mode
Page
Page
Change
Change
Page 1/1
004
Mark
MARK
Exit
Page 1/1
004
Mark
MARK
Exit
Movie List
USB External
001 002
005 006
To Photo List
Movie List
Mark Mode
USB External
001 002
005 006
Play Marked
Mark All
Menu
Play Marked
Mark All
Unmark All
Exit Mark Mode
Drive1
Change Numbers
Drive1
Unmark All
Play the selected movie file.
Once a movie file finishes playing,
the next selected one will be played
automatically.
Mark all movie files on the screen.
Deselect all marked movie files.
Exit the Mark Mode.
ENGENGLISH
Page 58
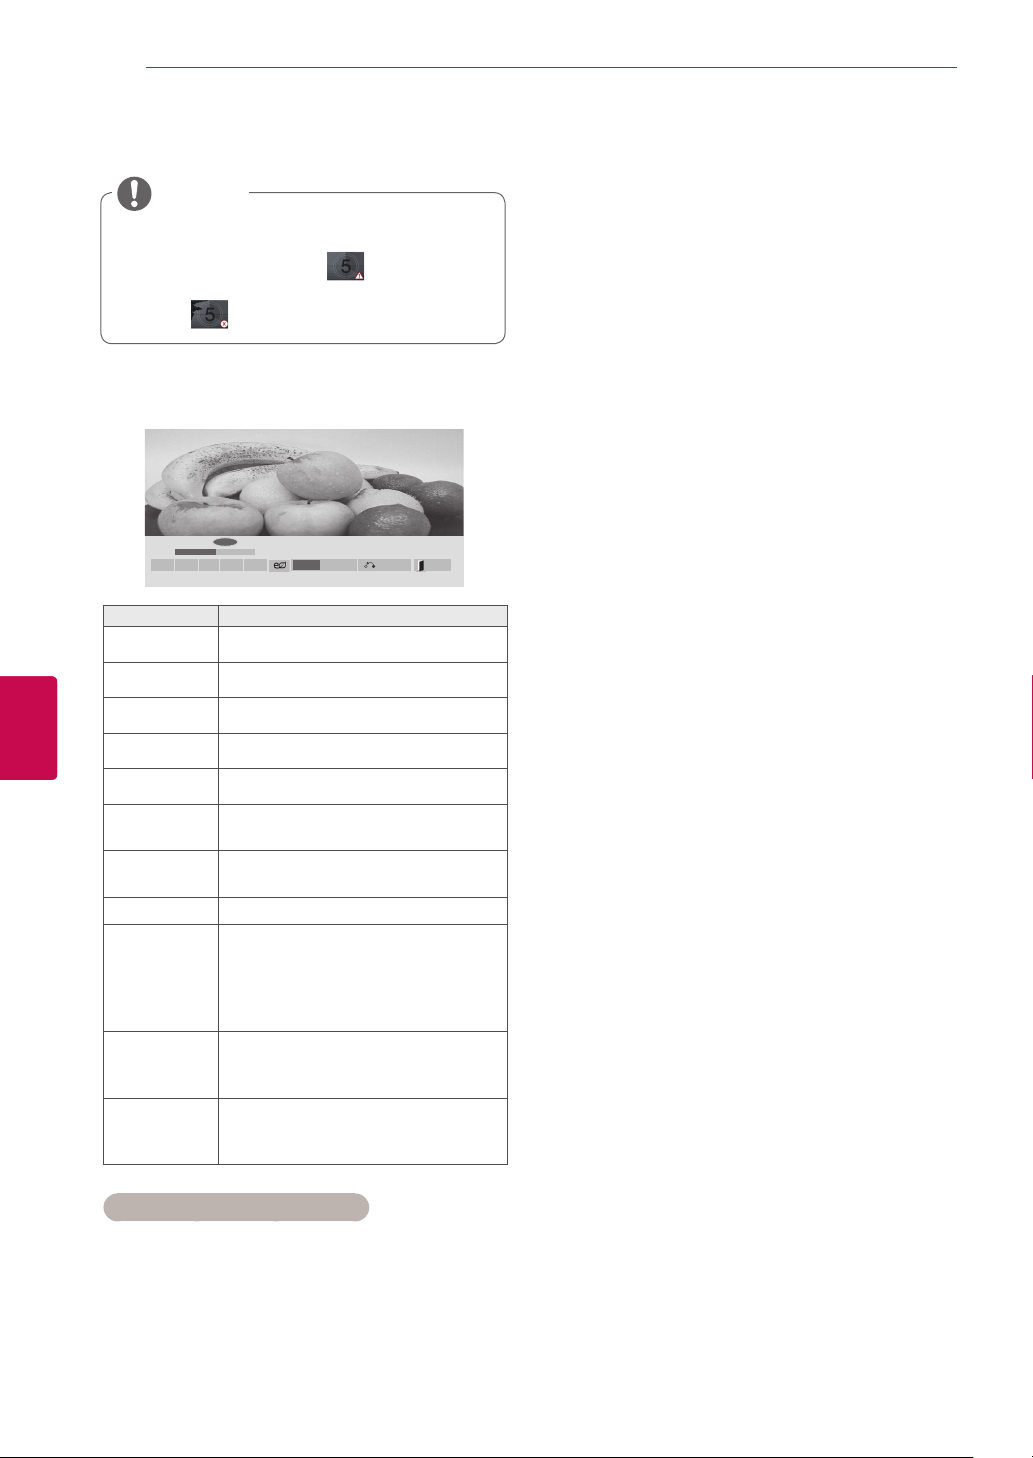
ENTERTAINMENT
58
ENGLISH
ENG
6 Play a movie.
NOTE
Non-supported files are displayed the pre-
view image by icon only
Abnormal files are displayed in the form of
bitmap
.
.
7 Control playback by using the following
buttons.
◄►
►
■
Button Description
r
s
t
v
w
Home or
Q.MENU
BACK
◄◄
►
II
Stops the playback
Plays a video
Pauses or resumes the playback
Scans backward in a file
Scans forward in a file
Show the Option menu.
Hide the menu on the full-sized
screen.
EXIT Return to normal TV viewing.
Skips to specific points in a file
during playback. The time of a
< >
specific point will appear on the
status bar. In some files, this function may not work properly.
ENERGY
SAVING
Press the ENERGY SAVING
button repeatedly to increase the
brightness of your screen.
Press the AV MODE button
AV MODE
repeatedly to select the desired
source.
Tips for using playing video files
Some user-created subtitles may not work
properly.
Some special characters are not supported
in subtitles.
HTML tags are not supported in subtitles.
Subtitles in languages other than the sup-
ported languages are not available.
►►
01:02:30 / 02:30:25
Q.MENU
Option
Hide Exit
Changing font and colour in subtitles is not
supported.
Subtitles in languages other than one speci-
fied are not supported.
Video files with subtitle files of 1 MB or larger
may not be played properly.
The screen may suffer temporary interrup-
tions (image stoppage, faster playback, etc.)
when the audio language is changed.
A damaged movie file may not be played
correctly, or some player functions may not
be usable.
Movie files produced with some encoders
may not be played correctly.
If the video and audio structure of recorded
file is not interleaved, either video or audio is
outputted.
HD videos with a maximum of
1920x1080@25/30P or 1280x720@50/60P
are supported, depending on the frame.
Videos with resolutions higher than
1920X1080@25/30P or 1280x720@50/60P
may not work properly depending on the
frame.
Movie files other than the specified types and
formats may not work properly.
Max bitrate of playable movie file is 20 Mbps.
(only, Motion JPEG : 10 Mbps)
We do not guarantee smooth playback of
profiles encoded level 4.1 or higher in H.264/
AVC.
DTS Audio codec is not supported.
A movie file more than 30 GB in file size is
not supported for playback.
A DivX movie file and its subtitle file must be
located in the same folder.
A video file name and its subtitle file name
must be identical for it to be displayed.
Playing a video via a USB connection that
doesn’t support high speed may not work
properly.
Files encoded with GMC(Global Motion
Compensation) and Qpel (Quarterpel Motion
Estimation) may not be played.
When you are watching the movie by Movie
List function, you can adjust an image by Energy Saving and AV Mode key on the remote
control. User setup for each image mode
does not operate.
Trick Mode does not support other functions
than
information.
Video file names that contain special charac-
if video files do not have index
w
ters may not be playable.
Page 59
ENTERTAINMENT
59
Video options
1 Press Q. MENU to access the Pop-Up menus.
2 Press the Navigation buttons to scroll to Set
Video Play., Set Video. or Set Audio. and
press OK.
NOTE
Option values changed in Movie List does
not affect Photo List and Music List.
Option value changed in Photo List and Mu-
sic List are changed likewise in Photo List
and Music List excluding Movie List.
When replaying the video file after stopping,
you can play from where it stopped previously.
When you select the Set Video Play,,
1 Press the Navigation buttons to scroll to show
the Picture Size, Audio Language, Subtitle
Language or Repeat.
2 Press the Navigation buttons to scroll to make
appropriate adjustments.
Menu Description
Picture Size Selects your desired picture
format during movie play.
Audio Language
Subtitle
Language
Language Activated for SMI subtitle and
Code Page Can select the font for subtitle.
Changes the Language Group of
the audio during movie play. Files
with a single audio track cannot
be selected.
Turn on/off the subtitle.
can select the language within the
subtitle.
When set to default, same font as
general menu will be used.
Sync Adjusts the time synchronisation
of the subtitle from -10 secs to
+10 secs by steps of 0.5 secs
during movie play.
Position Changes the position of the
subtitle either up or down during
movie play.
Size Selects your desired Subtitle size
during movie play.
Repeat Turn on/off repeat function of
movie playback. When turned
on, the file within the folder will
be played back repeatedly. Even
when the repeated playback
is turned off, it can run the playback if the file name is similar to
the previous file.
Subtitle Language
Latin1 English, French, Spanish,
Cyrillic Russian
Thai Thai
Hebrew Hebrew
Arabic Arab, Parsi, Krudish
Unicode(UTF-16)
Support Language
Portuguese, Malaysia,
Indonesia
Vietnamese language
NOTE
Only 10,000 of sync blocks can be supported
within the subtitle file.
When playing a video, you can adjust the
Picture Size by pressing the RATIO button.
ENGENGLISH
Page 60
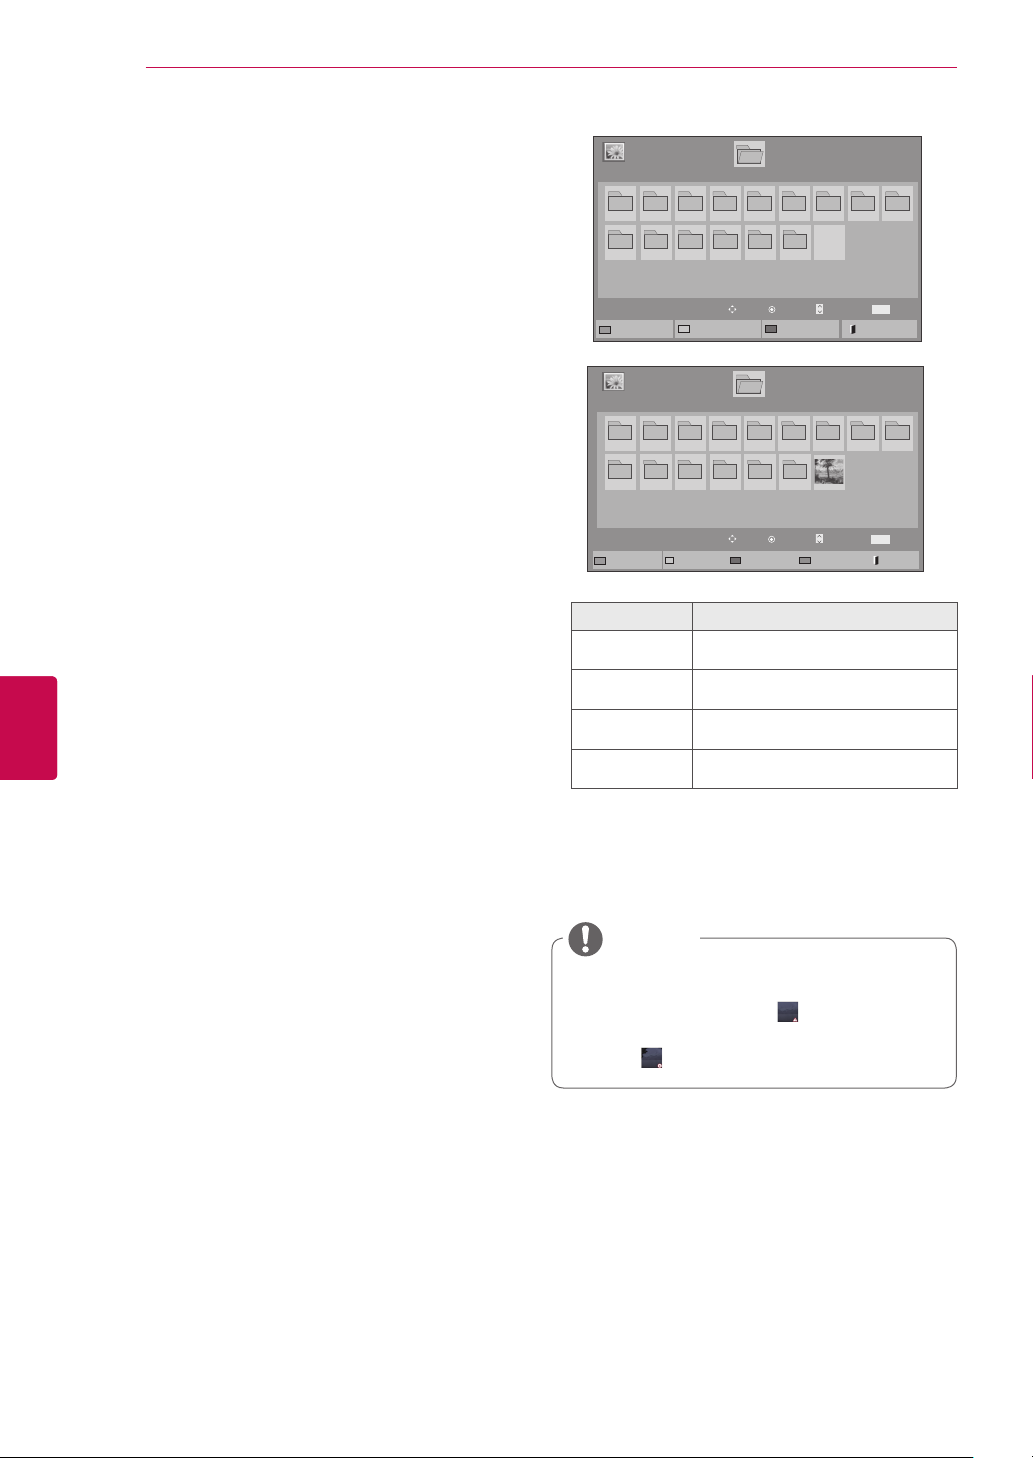
ENTERTAINMENT
60
ENGLISH
ENG
When you select the Set Video,
1 Press the Navigation buttons to scroll to make
appropriate adjustments. (See p.68)
When you select the Set Audio,
1 Press the Navigation buttons to scroll to show
the Sound Mode, Auto Volume, Clear Voice
II or Balance.
2 Press the Navigation buttons to scroll to make
appropriate adjustments. (See p.73)
Viewing photos
View
Mark Mode
Mark
Page 1/1
Page
P
Page 1/1
Page
P
Exit Mark Mode
Change
Change
008
MARK
Exit
008
MARK
Photo List
USB1 External
001
002 003 004 005 006 007
010 011 012 013 014 015
To Music List
Photo List
Mark Mode
USB External
001
002 003 004 005 006 007
010 011 012 013 014 015
View Marked
Mark All
Drive1
Move
Change Numbers
Drive1
Move
Unmark All
Menu Description
View Marked Display the selected photo file.
Mark All Mark all photo files on the screen.
Unmark All Deselect all marked photo files.
Exit Mark Mode Exit the Mark Mode.
Page 1/1
009
Mark
Page 1/1
009
Mark
Exit
View image files saved in a USB storage device
or shared folder on a PC through the network
connection. The displays on the screen may differ
from the model.
1 Press the Navigation buttons to scroll to My
Media and press OK.
2 Pressthe Navigation buttons to scroll to Photo
List and press OK.
3 Press the Navigation buttons to select Drive1
to access the connected USB storage device.
4 Press the Navigation buttons to scroll to a
folder you want and press OK.
5 Press the Navigation buttons to scroll to a file
you want and press OK.
6 View photos.
NOTE
Non-supported files are displayed the pre-
view image by icon only
Abnormal files are displayed in the form of
bitmap
.
.
Page 61
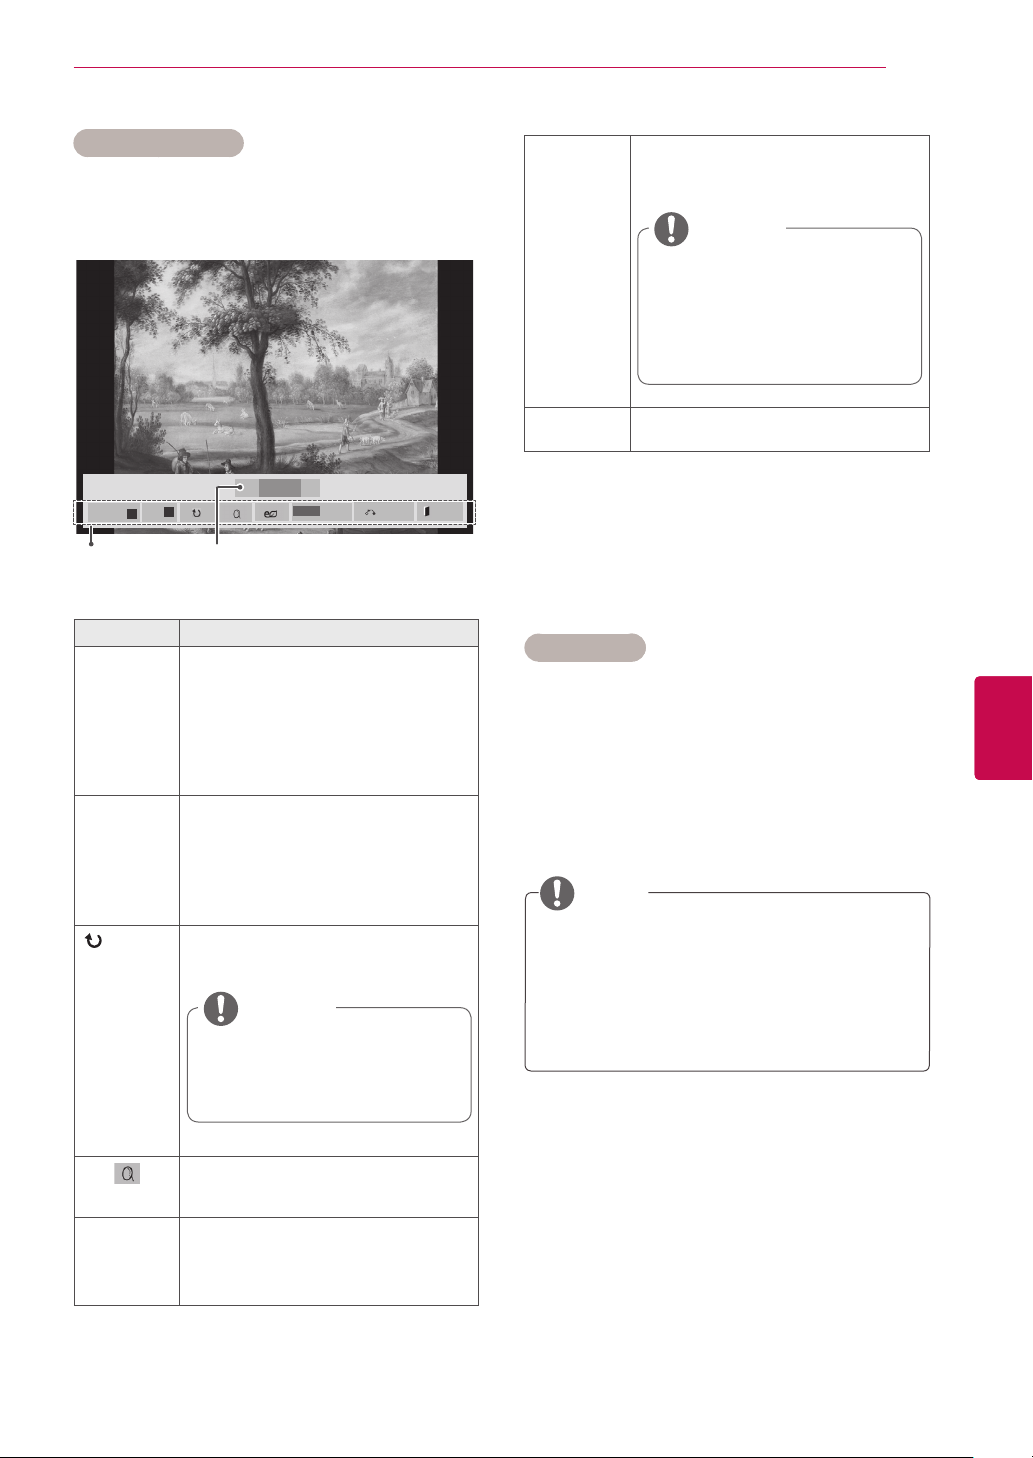
ENTERTAINMENT
61
Using photo options
Use the following options while viewing photos.
01_a.jpg
2008/12/10
1920 x 1080
479 KB
◄
◄ ►
2/13
Slideshow►BGM
■
Q.MENU
Option
Hide Exit
Number of selected photosOptions
Option Description
Slideshow Starts or stops a slideshow with
selected photos.
If there are no selected photos, all
photos saved in the current folder
display during a slideshow.
To set a slideshow speed, select
Option.
BGM Turns the background music on or
off. To set the background music
folder, select Option.
You can adjust Option by Q.MENU
or Home button on the remote
control.
(Rotate)
Rotates photos clockwise (90°,
180°, 270°, 360°).
NOTE
The supported photo size is
limited. You cannot rotate a
photo if the resolution of the
rotated width is larger than
the supported resolution size.
Option
Slide Speed: Selects a slideshow
speed (Fast, Medium, Slow).
BGM: Selects a music folder for the
background music.
NOTE
You cannot change the music
folder while the background
music is playing.
You can only select the MP3
folder saved on the device
that currently displays the
◄
photo.
Hide Hides the option window.
To display the options, press OK.
Photo options
1 Press Q. MENU or Home to show the Option
menus.
2 Press the Navigation buttons to scroll to Set
Photo View., Set Video. or Set Audio. and
press OK.
NOTE
Option values changed in Movie List does
not affect Photo List and Music List.
Option value changed in Photo List and Mu-
sic List are changed likewise in Photo List
and Music List excluding Movie List.
When you select the Set Photo View,
ENGENGLISH
ENERGY
SAVING
View the photo by zoom in 2, 4
times.
Press the ENERGY SAVING button
repeatedly to change the brightness
of your screen.
1 Press the Navigation buttons to scroll to select
Slide Speed or BGM..
2 Press the Navigation buttons to scroll to make
appropriate adjustments.
Page 62
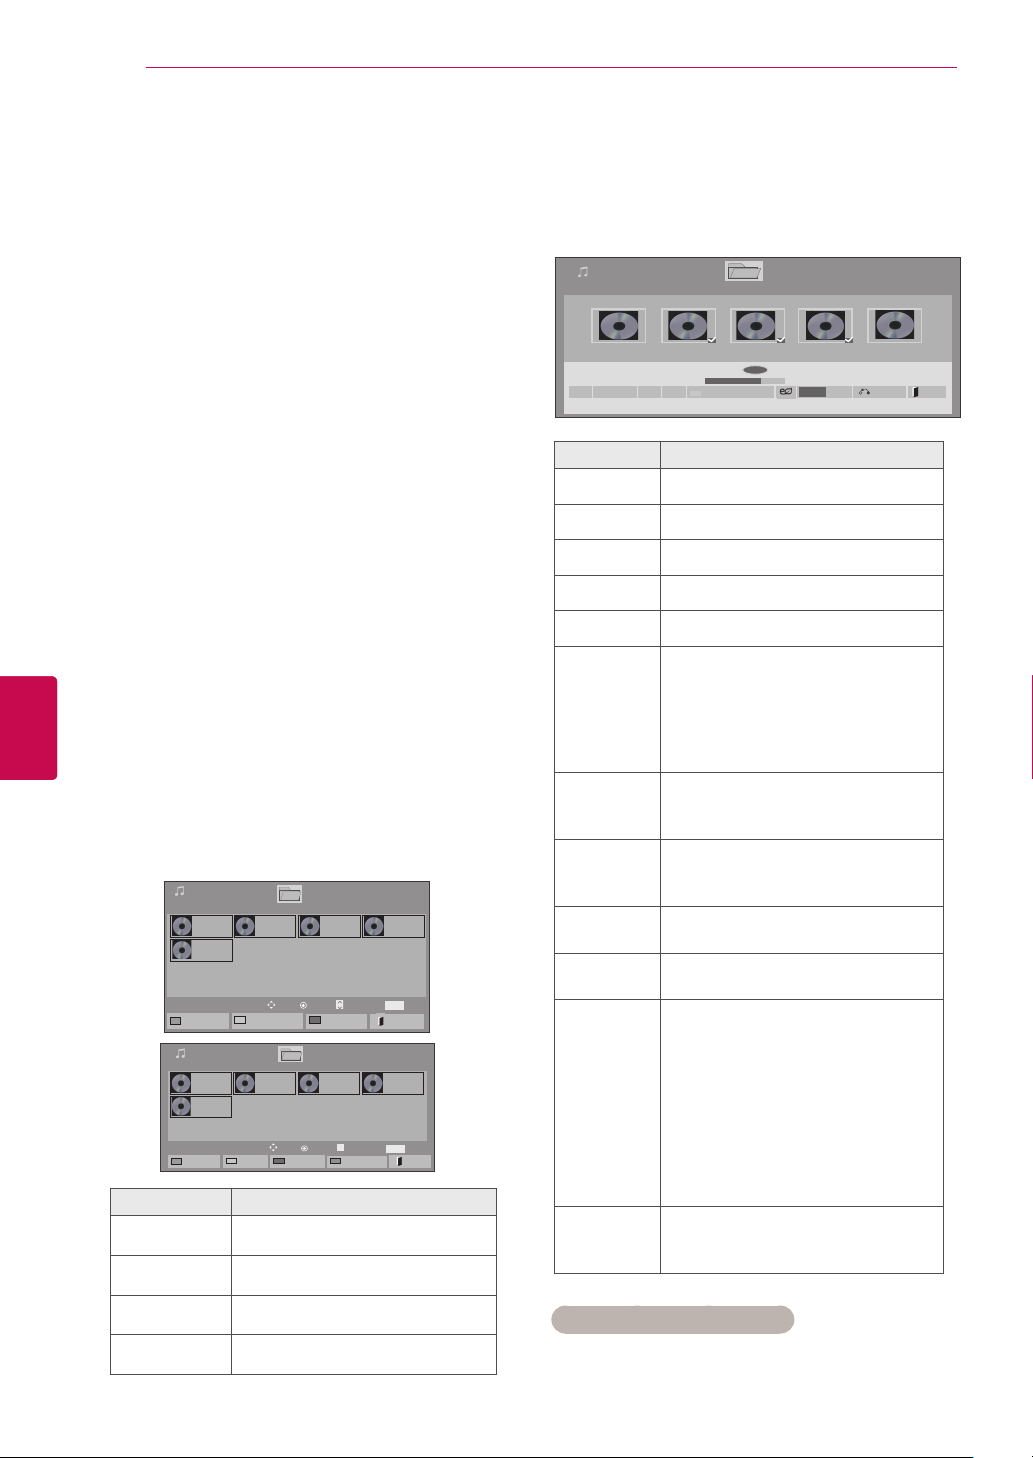
ENTERTAINMENT
62
ENGLISH
ENG
When you select the Set Video,
1 Press the Navigation buttons to scroll to make
appropriate adjustments. (See p.68)
When you select the Set Audio,,
1 Press the Navigation buttons to scroll to show
the Sound Mode, Auto Volume, Clear Voice
II or Balance.
2 Press the Navigation buttons to scroll to make
appropriate adjustments. (See p.73)
Listening to music
1 Press the Navigation buttons to scroll to My
Media and press OK.
2 Press the Navigation buttons to scroll to Music
List and press OK.
3 Press the Navigation buttons to select Drive1
to access the connected USB storage device.
4 Press the Navigation buttons to scroll to a
folder you want and press OK.
5 Press the Navigation buttons to scroll to a file
you want and press OK.
Move
Move
Drive1
Drive1
Unmark All
Play
Mark
Page 1/1
003. B03.mp3
00:00
P
Mark Mode
Page 1/1
003. B03.mp3
00:00
P
Page
Change
Page
Change
Exit Mark Mode
004. - B04.mp3
00:00
MARK
Exit
004. - B04.mp3
00:00
MARK
Page 1/1
Page 1/1
Mark
Mark
Exit
Music List
USB1 External
To Movie List
Music List
Mark Mode
USB External
Play Marked
001. - B01.mp3
00:00
005. - B05.mp3
00:00
001. - B01.mp3
00:00
005. - B05.mp3
00:00
002. -B02.mp3
00:00
Change Numbers
002. -B02.mp3
00:00
Mark All
Menu Description
Play Marked Display the selected music file.
Mark All Mark all music files on the screen.
6 Play music.
7 Control playback by using the following
buttons.
Music List
3 le(s) Marked
Drive1 Page 1/1
►
004. - B04.mp3
00:00
005. - B05.mp3
■
►
II
◄◄
005. - B05.mp3
00:00
►
►►
006. - B06.mp3
00:00
Play with Photo
◄►
Button Description
r
s
t
w
v
v or w
Stops playback
Plays a music file
Pauses or resumes playback
Skips to the next file
Skips to the previous file
When playing,
When you press the
the previous music file will be
played.
When you press the
the next music file will be played.
Green
button
Start playing the selected music
files and then move to the Photo
List.
ENERGY
SAVING
Press the ENERGY SAVING
button repeatedly to change the
brightness of your screen.
Home or
Q.MENU
Hide
Show the Option menu.
Hides the option window.
To display the options, press OK.
When you press the EXIT button
while the Music player is displayed, only the music will be
stopped and the player will not
EXIT
return to normal TV viewing.
When you press the EXIT button
while the music is stopped or
while the music player is hidden,
the player will return to normal TV
viewing.
When using the < > button during
< >
playback a cursor indicating the
position can be played.
Page 1/1
007. - B07.mp3
00:00
02:30 / 03:25
Q.MENU
Option
v button,
w button,
008. - B08.mp3
00:00
Hide Exit
Unmark All Deselect all marked music files.
Exit Mark Mode Exit the Mark Mode.
Tips for playing music files
This unit cannot support the ID3 Tag embed-
ded MP3 files.
Page 63
ENTERTAINMENT
63
NOTE
Non-supported files are displayed the pre-
view image by icon only
Abnormal files are displayed in the form of
bitmap
A damaged or corrupted music does not play
but displays 00:00 in playtime.
A music downloaded from a paid service with
copyright protection does not start but displays inappropriate information in playtime.
If you press OK,
is stopped.
The PLAY(
buttons on the remote control are also available in this mode.
You can use the
next music and the
previous music.
.
r buttons, screen saver
s), Pause(t), r , w, v
w button to select the
v button to select the
file name
002. B02.mp3
► 00:31 / 04:04
Time elapsed /Duration
.
Music options
1 Press Q. MENU to access the Pop-Up menus.
2 Press the Navigation buttons to scroll to Set
Audio Play. or Set Audio. and press OK.
NOTE
Option values changed in Movie List does
not affect Photo List and Music List.
Option value changed in Photo List and Mu-
sic List are changed likewise in Photo List
and Music List excluding Movie List.
When you select the Set Audio Play.,
ENGENGLISH
1 Press the Navigation buttons to scroll to select
the Repeat or Random.
2 Press the Navigation buttons to scroll to make
appropriate adjustments.
When you select the Set Audio,
1 Press the Navigation buttons to scroll to select
the Sound Mode, Auto Volume, Clear Voice
II or Balance.
2 Press the Navigation buttons to scroll to make
appropriate adjustments.(See p.73)
Page 64
ENTERTAINMENT
64
DivX® VOD Guide
ENGLISH
ENG
DivX® VOD Registration
In order to play purchased or rented DivX® VOD
contents, you should register your device with 10
digit DivX registration code from your device at
www.divx.com/vod.
1 Press Home to access the main menus.
2 Press the Navigation buttons to scroll to MY
MEDIA and press OK.
3 Press the Blue button.
4 Press the Navigation buttons to scroll to DivX
VOD Registration and press OK.
5 View the registration code of your TV.
6 When you are finished, press EXIT.
When you return to the previous menu, press
BACK.
You must register your device to
play DivX protected videos.
Registration code : **********
Register at http://vod.divx.com
Close
DivX® VOD Deregistration
You should deregister your device with 8 digit DivX
deregistration code from your device at www.divx.
com/vod.
# note:
Once the deregistration is executed, you must
register your device again to see DivX® VOD
contents.
1 Press Home to access the main menus.
2 Press the Navigation buttons to scroll to MY
MEDIA and press OK.
3 Press the Blue button.
4 Press the Navigation buttons to scroll to DivX
Deregistration and press OK.
5 Press the Navigation buttons to select Yes to
confirm.
Deregistration code :
Deregister at http://vod.divx.com
********
Continue with registration?
Yes No
NOTE
Movie files are supported as follows
Resolution : under 1920x1080 WxH pixels
Frame rate : under 30 frames/
sec(1920x1080), under 60 frames/
sec(under 1280x720)
Video Codec : MPEG 1, MPEG 2, MPEG
4, H.264/AVC, DivX 3.11, DivX 4.12,
DivX 5.x, DivX 6, Xvid 1.00, Xvid 1.01,
Xvid 1.02, Xvid 1.03, Xvid 1.10-beta1,
Xvid 1.10-beta2, JPEG, VC1, Sorenson
H.263/H.264.
6 When you are finished, press EXIT.
When you return to the previous menu, press
BACK.
Page 65
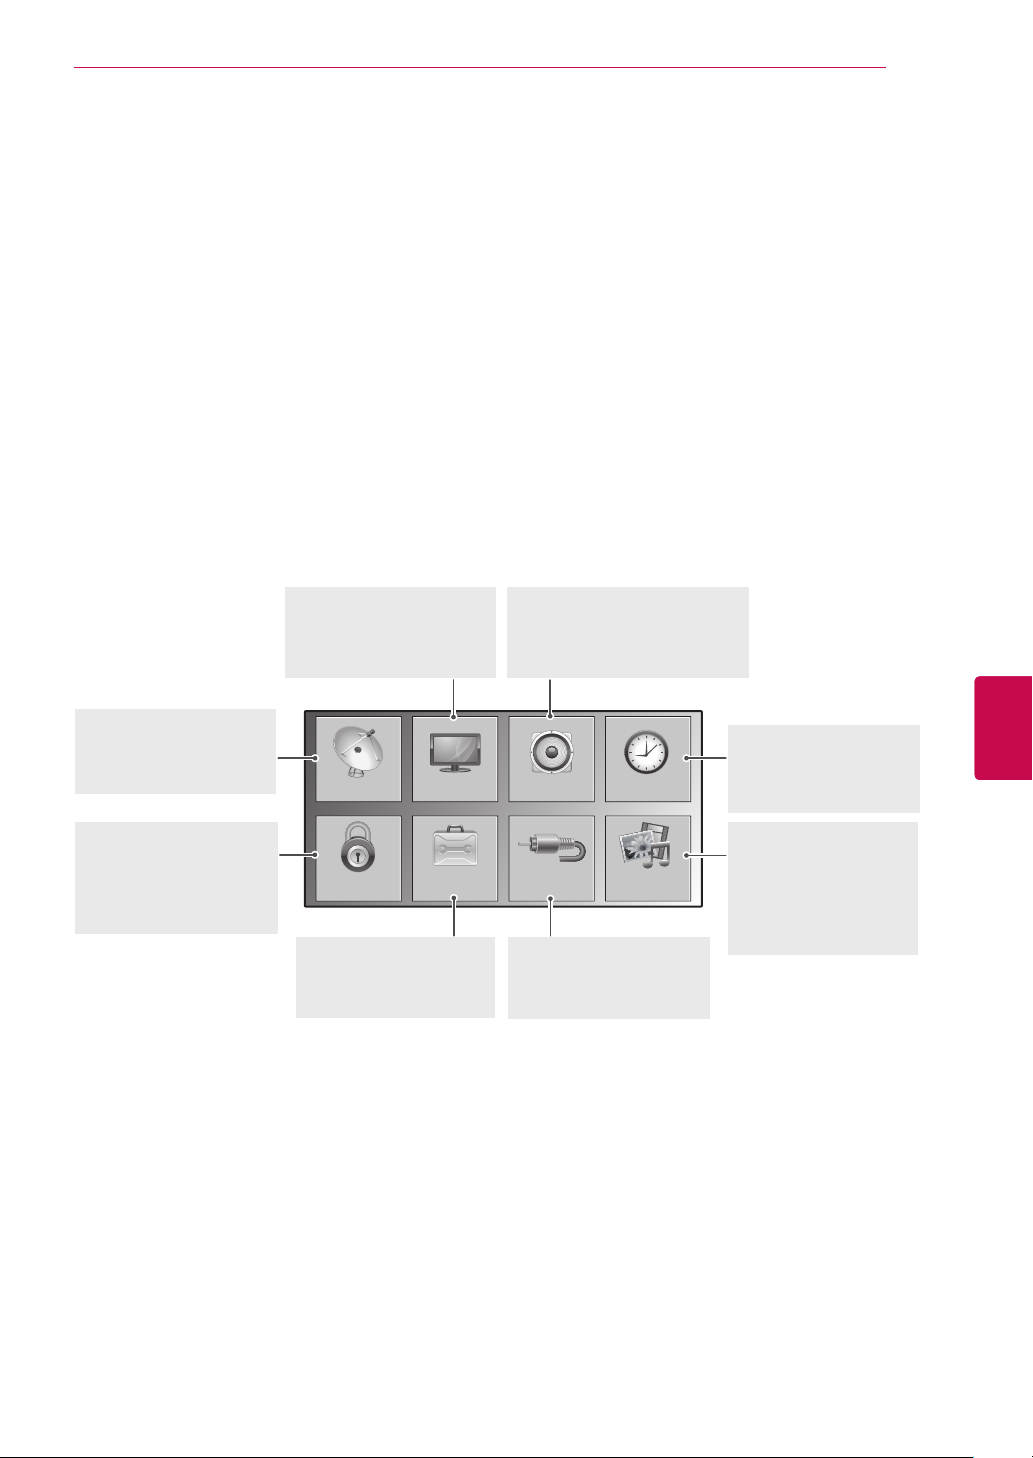
CUSTOMIZING SETTINGS
CUSTOMIZING TV SETTINGS
Accessing main menus
Press Home to access the main menus.
1
Press the Navigation buttons to scroll to one of the following menus and press OK.
2
Press Navigation buttons to scroll to the setting or option you want and press OK.
3
When you are finished, press EXIT.
4
65
SETUP (See p.66)
Sets up and edit
programmes
LOCK (See p.77)
Locks or unlocks
channels and
programmes
PICTURE (See p.67)
Adjusts the image size,
quality, or effect
PICTURESETUP TIMEAUDIO
OPTIONLOCK
OPTION (See p.78)
Customizes
the general settings
AUDIO (See p.73)
Adjusts the sound quality,
effect, or volume level
INPUT
INPUT (See p.46)
Views the input sources
with their labels
MY MEDIA
ENGENGLISH
TIME (See p.76)
Sets the time, date,
or Timer feature
MY MEDIA (See p.55)
Display and play
movie, photo and
music content stored
on your USB
Page 66
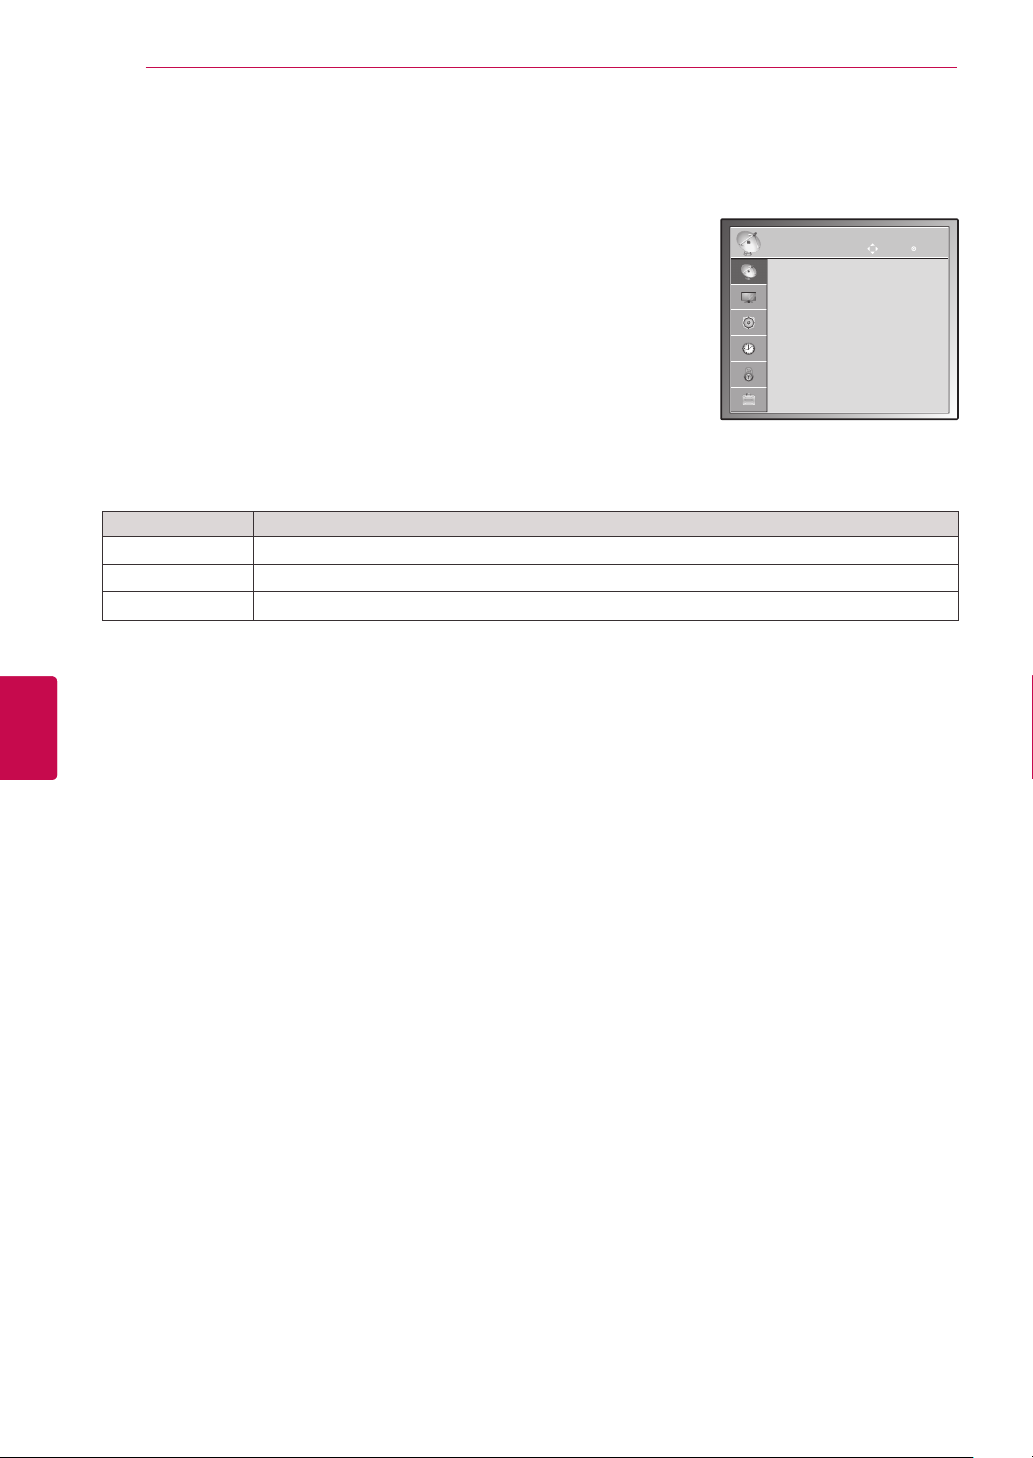
CUSTOMIZING SETTINGS
66
Customizing settings
Image shown may differ from your TV.
SETUP settings
1 Press Home to access the main menus.
2 Press the Navigation buttons to scroll to SETUP and press OK.
3 Press the Navigation buttons to scroll to the setting or option you
want and press OK.
- To return to the previous level, press BACK.
4 When you are finished, press EXIT.
The available programme settings are described in the following:
Setting Description
Auto Tuning Tunes and stores all available programmes through antennas or cable inputs (See p.35).
Manual Tuning Tunes and stores the programmes you want manually (See p.35).
Programme Edit Adds or deletes programmes on the programme (See p.37).
SETUP
● Auto Tuning
● Manual Tuning
● Programme Edit
Move
OK
ENGLISH
ENG
Page 67
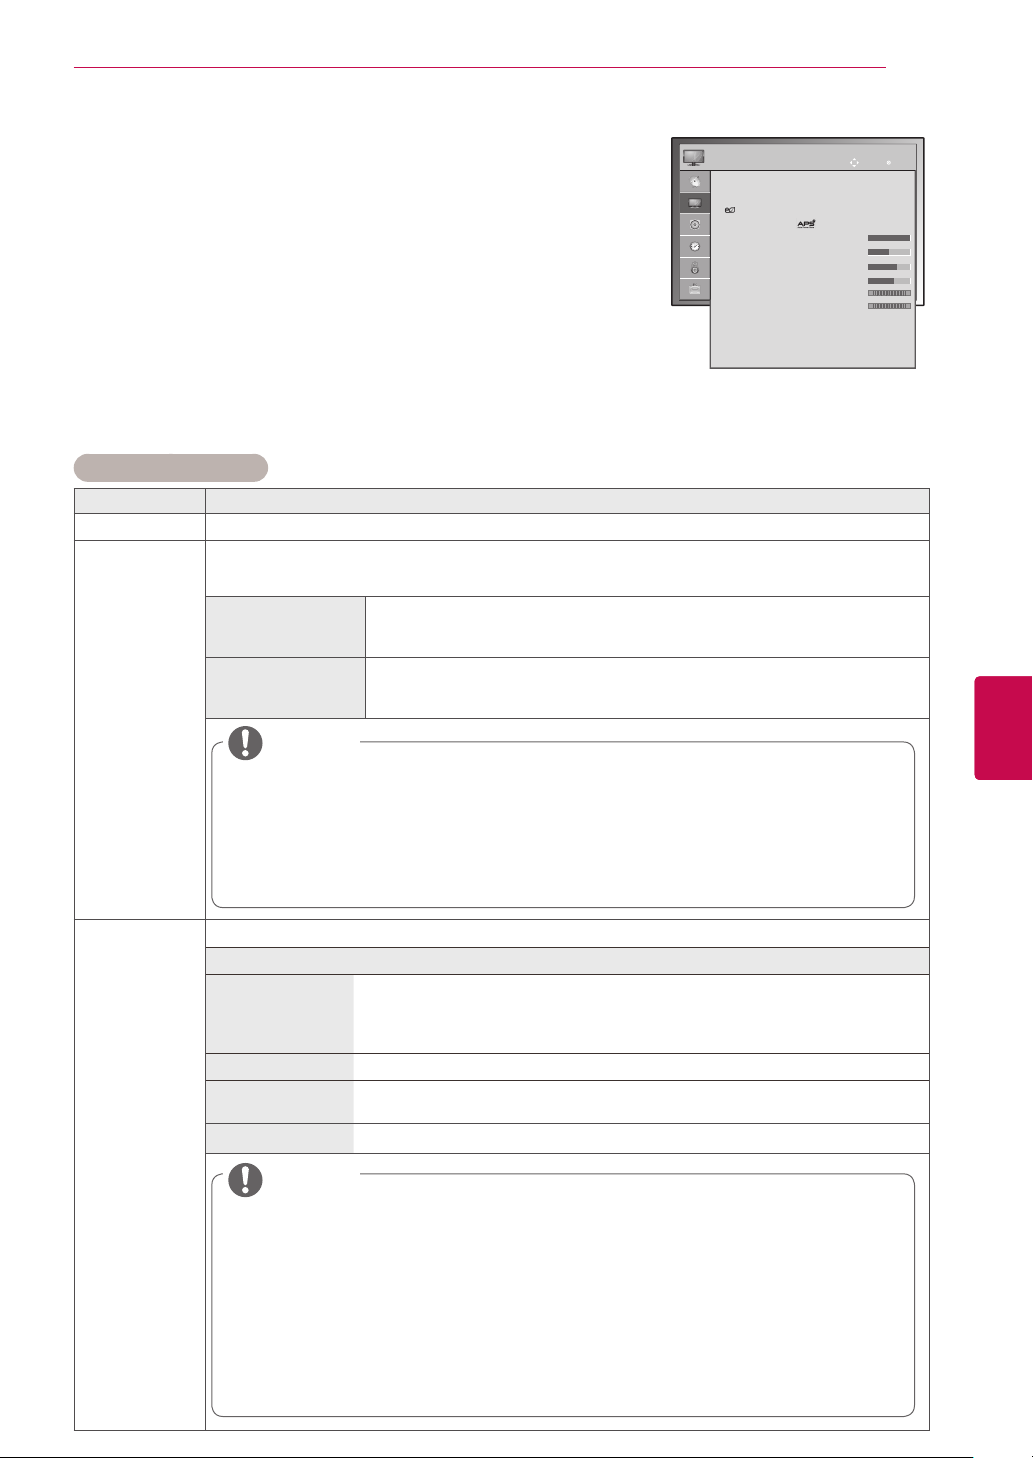
CUSTOMIZING SETTINGS
Image shown may differ from your TV.
67
PICTURE settings
1 Press Home to access the main menus.
2 Press the Navigation buttons to scroll to PICTURE and press
OK.
3 Press the Navigation buttons to scroll to the setting or option
you want and press OK.
PICTURE
● Aspect Ratio : 16:9
● Picture Wizard
● Energy Saving : Intelligent Sensor
● Picture Mode : Vivid
● Screen
● Contrast 100
● Brightness 50
● Sharpness 65
● Colour 60
● Tint 0
● Colour Temp. 0
● Advanced Control
● Picture Reset
- To return to the previous level, press BACK.
4 When you are finished, press EXIT.
The available picture settings are described in the following.
(Depending on model)
Setting Description
Aspect Ratio Changes the image size to view images at its optimal size (See p.45).
Picture Wizard Adjusts the image quality and calibrates the screen by following the on-screen instructions.
The customized options will be saved as Expert1 in the Picture Mode.
Standard
Mode to set standard picture quality.
(
Black Level, White Level, Tint, Colour, Horizontal Sharpness, Vertical
Sharpness, Backlight(Only LCD TV/LED LCD TV)
Preferred
Mode to set user preferred picture quality rather than standard picture.
(
Black Level, White Level, Tint, Colour, Sharpness, Dynamic Contrast,
Colour Temperature, Backlight(Only LCD TV/LED LCD TV))
NOTE
Move
OK
G
R
C
W
ENGENGLISH
If you stop the setting before the final stage, the changes will not be applied.
If you use Picture Wizard, the Energy saving feature will turn off automatically.
If the picture quality setting of Expert1 is changed, use the Picture Reset before entering
the Picture Wizard to reset the picture quality setting.
In RGB-PC/HDMI-PC/DVI-PC mode, the changed Colour, Tint and H/V Sharpness values
are not applied.
Energy Saving Reduces the power consumption by adjusting the screen brightness.
Option
Intelligent sensor
(Only Plasma TV)
or Auto (Only LCD
*This feature is not available for all models.
The most suitable brightness is automatically adjusted according to the surrounding conditions.
TV/LED LCD TV)
Off The Energy Saving is off
Minimum/Me-
Selects the brightness level.
dium/Maximum
Screen off The screen turns off in 3 seconds.
NOTE
When adjusting Energy Saving in MHEG mode, the Energy Saving setting is applied after
MHEG is finished.
When you select Screen Off, the screen will be turned off in 3 seconds and Screen Off will start.
Selecting ‘Screen Off’ while tuned to a radio station channel will reduce power consumption.
If you adjust “Energy Saving-Auto(Depending on model), Maximum”, Backlight feature will
not work. (LCD TV/LED LCD TV only)
If you adjust “Energy Saving-Intelligent Sensor”, Sharpness, Colour, Colour Temperature
feature will not work. (Plasma TV only)
When selecting Auto, Backlight is automatically adjusted through intelligent sensor according
to the surrounding condition when intelligent sensor is in the TV. (LCD TV/LED LCD TV only)
(Depending on model)
Page 68
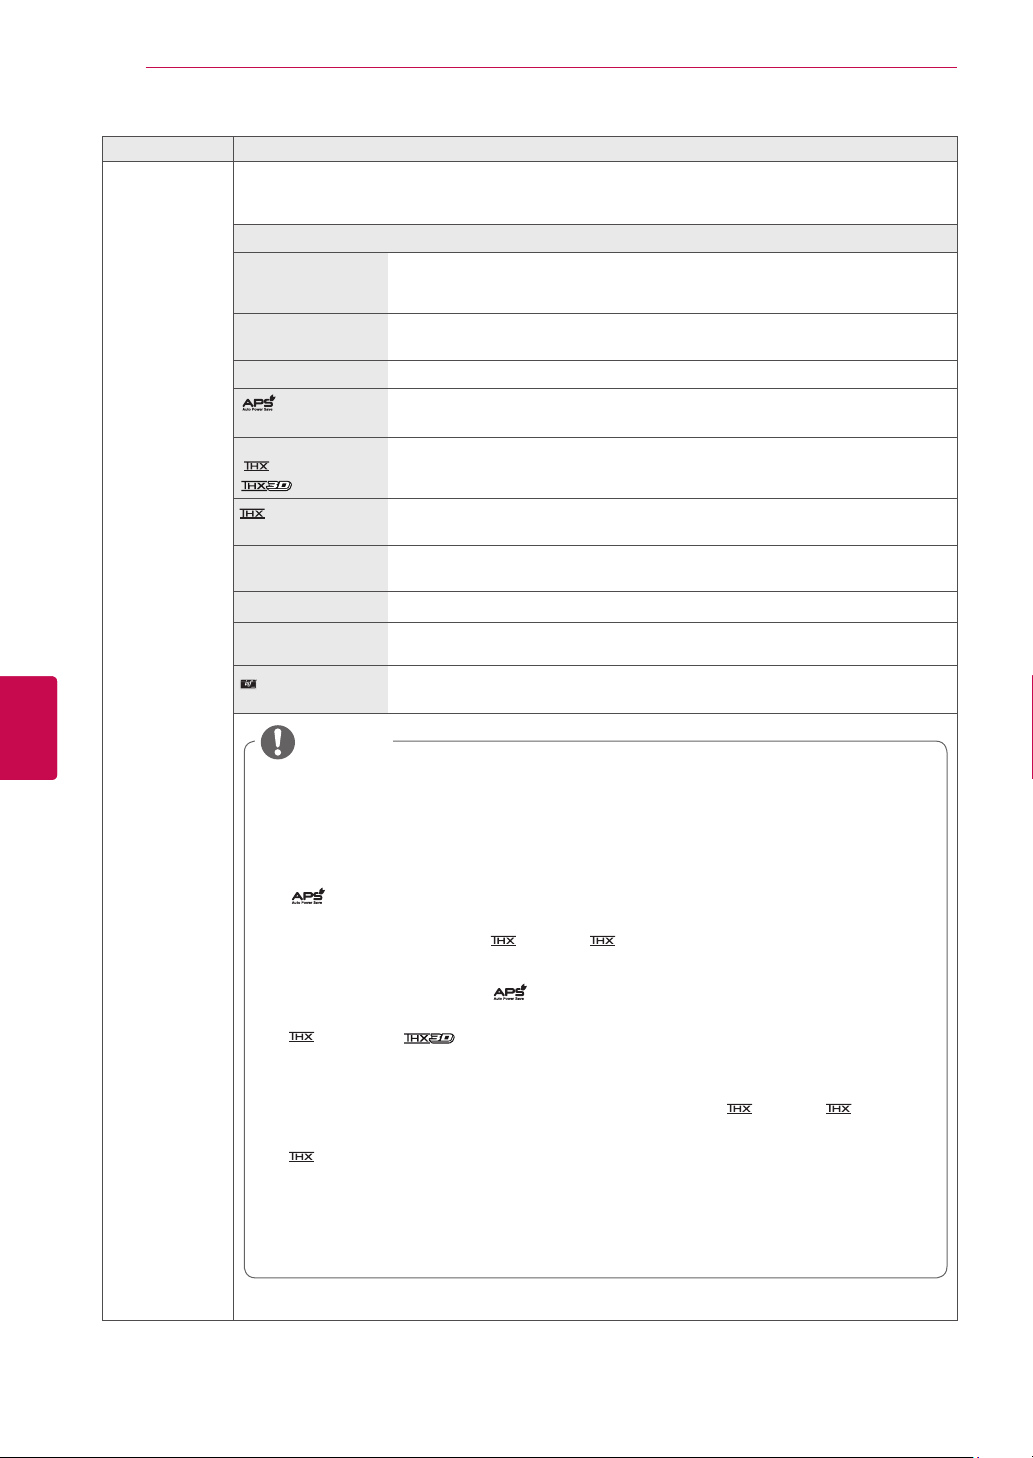
ENGLISH
ENG
CUSTOMIZING SETTINGS
68
Setting Description
Picture Mode Selects one of the preset image or customizes options in each mode for the best TV screen perform-
ance. You are also able to customize advanced options of each mode.
The available preset picture modes vary depending on the TV.
Mode
Intelligent sensor
(Only LCD TV/ LED
LCD TV)
Vivid Adjusts the video image for the retail environment by enhancing the contrast,
Standard Adjusts the image for the normal environment.
(Only Plasma TV)
Cinema or
Cinema or
Cinema
Bright Room
(Only Plasma TV)
Sport Optimizes the video image for high and dynamic actions by emphasizing
Game Optimizes the video image for a fast gaming screen such as PCs or games.
Photo (Depending
on model)
Expert
*This feature is not available for all models.
Adjusts picture according to the surrounding conditions.
brightness, colour, and sharpness.
Optimizes power consumption.
Optimizes the video image for a cinematic look to enjoy movies as if you are in
a movie theatre
*This feature is not available for all models.
This is the specification to optimize TV viewing in Bright Room.
primary colours such as white, grass, or sky blue.
Optimizes the still image like a photo file in USB mode.
» e.g.) when connecting the external device like a DSLR.
Adjusts the detailed video image settings for video experts as well as general
viewers.
NOTE
Picture Mode adjusts the TV for the best picture appearance. Select the preset value in the
Picture Mode menu based on the programme category.
When the Intelligent sensor function is on, the most suitable picture is automatically adjusted
according to the surrounding conditions.
You can also adjust Picture Mode in the Q. Menu.
(Auto Power Saving) : Maximize reducing the power consumption without hurting the
picture quality. (Only Plasma TV)
If you adjust “Picture Mode-
Sensor, Minimum, Medium, Maximum” feature will not work. (Only Plasma TV)
If you adjust “Picture Mode-
feature will not work. (Only Plasma TV)
Cinema or Cinema(Only Plasma TV) :This is cinema quality mode to provide
»
you the experience of watching a movie at home.The user will be able enjoy the best level of
satisfactory screen quality in any movie without any separate adjustments.Cinema expresses
the optimal screen quality when it is darkest. When selecting Cinema, Bright
Room Aspect ratio changes to Just scan.
» Cinema(Thomlinson Holman ’s Experiment)is the audio and video certification standard
of THX established by George Lucas,who directed the movie Star Wars,and Thomlinson.
This is the product to be certified in THX display area and guarantees screen quality that
exceeds the display standard specification in both hardware and software.
Cinema, Bright Room”, “Energy Saving-Intelligent
”, “Energy Saving-Off, Minimum, Medium, Maximum”
Page 69
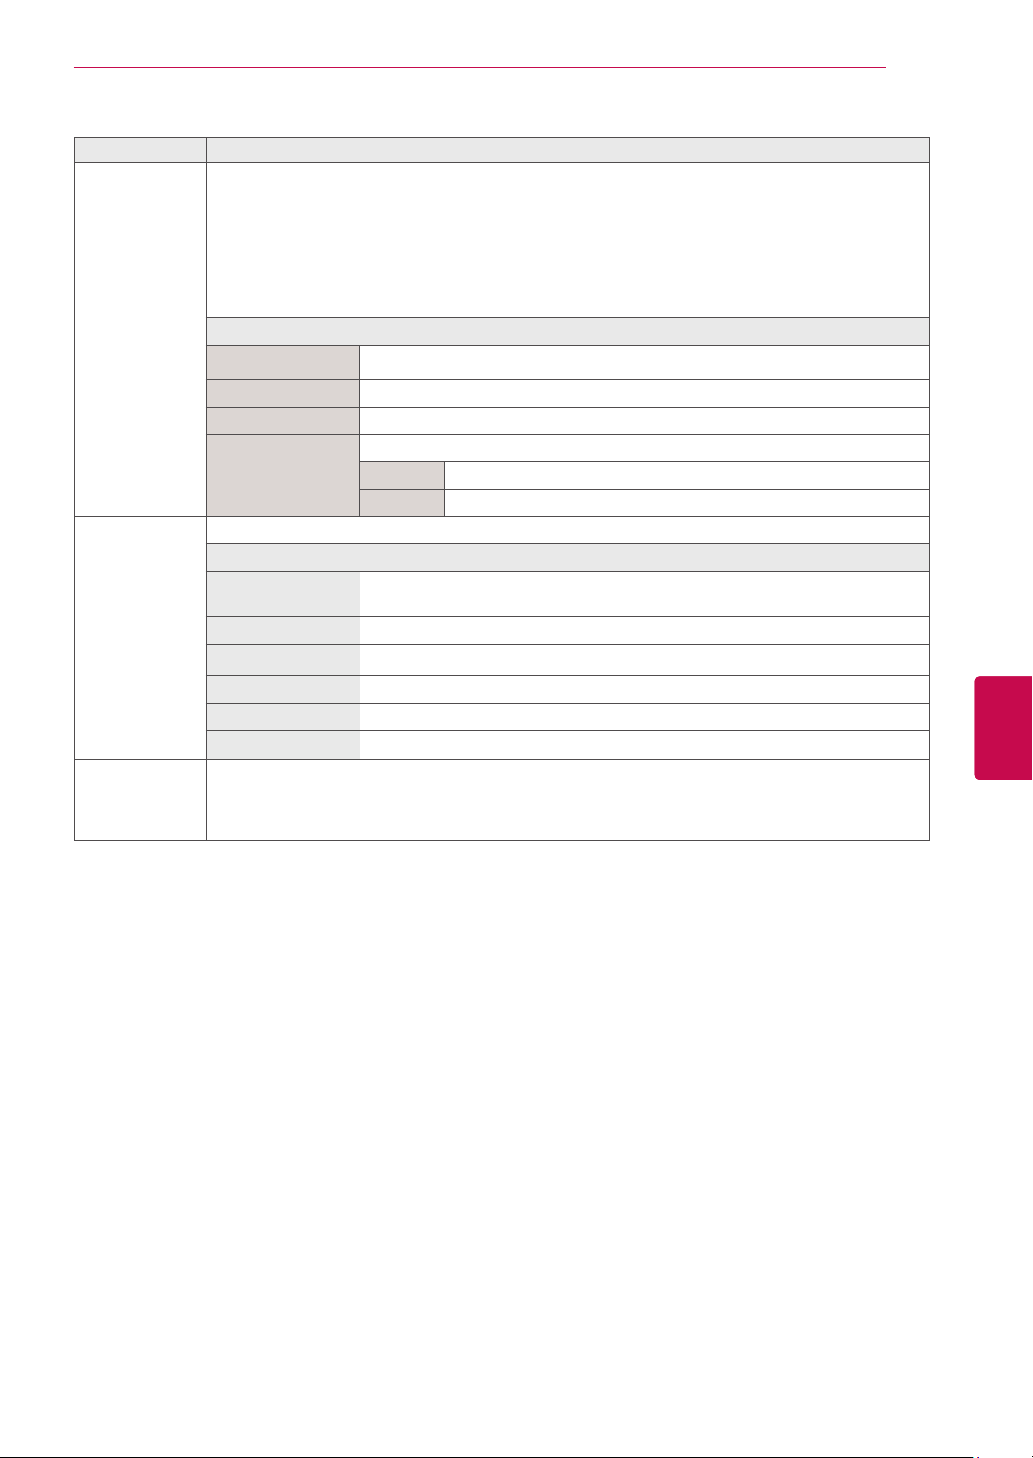
Setting Description
TruMotion
(Only LCD TV/
LED LCD TV)
SCREEN Customizes the PC display options.
LED Local Dimming (Only LCD
TV/LED LCD
TV)
*This feature is not available for all models.
It is used for the best picture quality without any motion blur or judder when you enter a quick image
or Film Source.
TruMotion works with all inputs except PC mode.
This feature is disabled in RGB-PC, HDMI-PC and MY MEDIA-Photo List mode.
If you enable “TruMotion”, noise may appear on the screen.
If this occurs, set “TruMotion” to “Off”.
If you select “Picture Mode-Game ”, set “TruMotion” to “Off”.
Option
High Provide smoother picture movement.
Low Provide smooth picture movement. Use this setting for standard use.
Off Turn off TruMotion Operation.
User User can adjust Judder and Blur level in TruMotion Operation, separately.
Judder Adjusts noise of the screen.
Blur Adjusts after-image of the screen.
Option
Resolution Selects a proper resolution when your PC uses.
Auto Configure Sets the TV to optimize the options automatically for the TV display.
Position Locates the image at the proper position.
Size Adjusts the image size.
Phase Eliminates horizontal streaking.
Reset Restores the options to the default setting.
*This feature is not available for all models.
After analysing the signal of the input video by areas of the screen, it adjusts the backlight to im-
prove the contrast ratio.
CUSTOMIZING SETTINGS
69
ENGENGLISH
Page 70
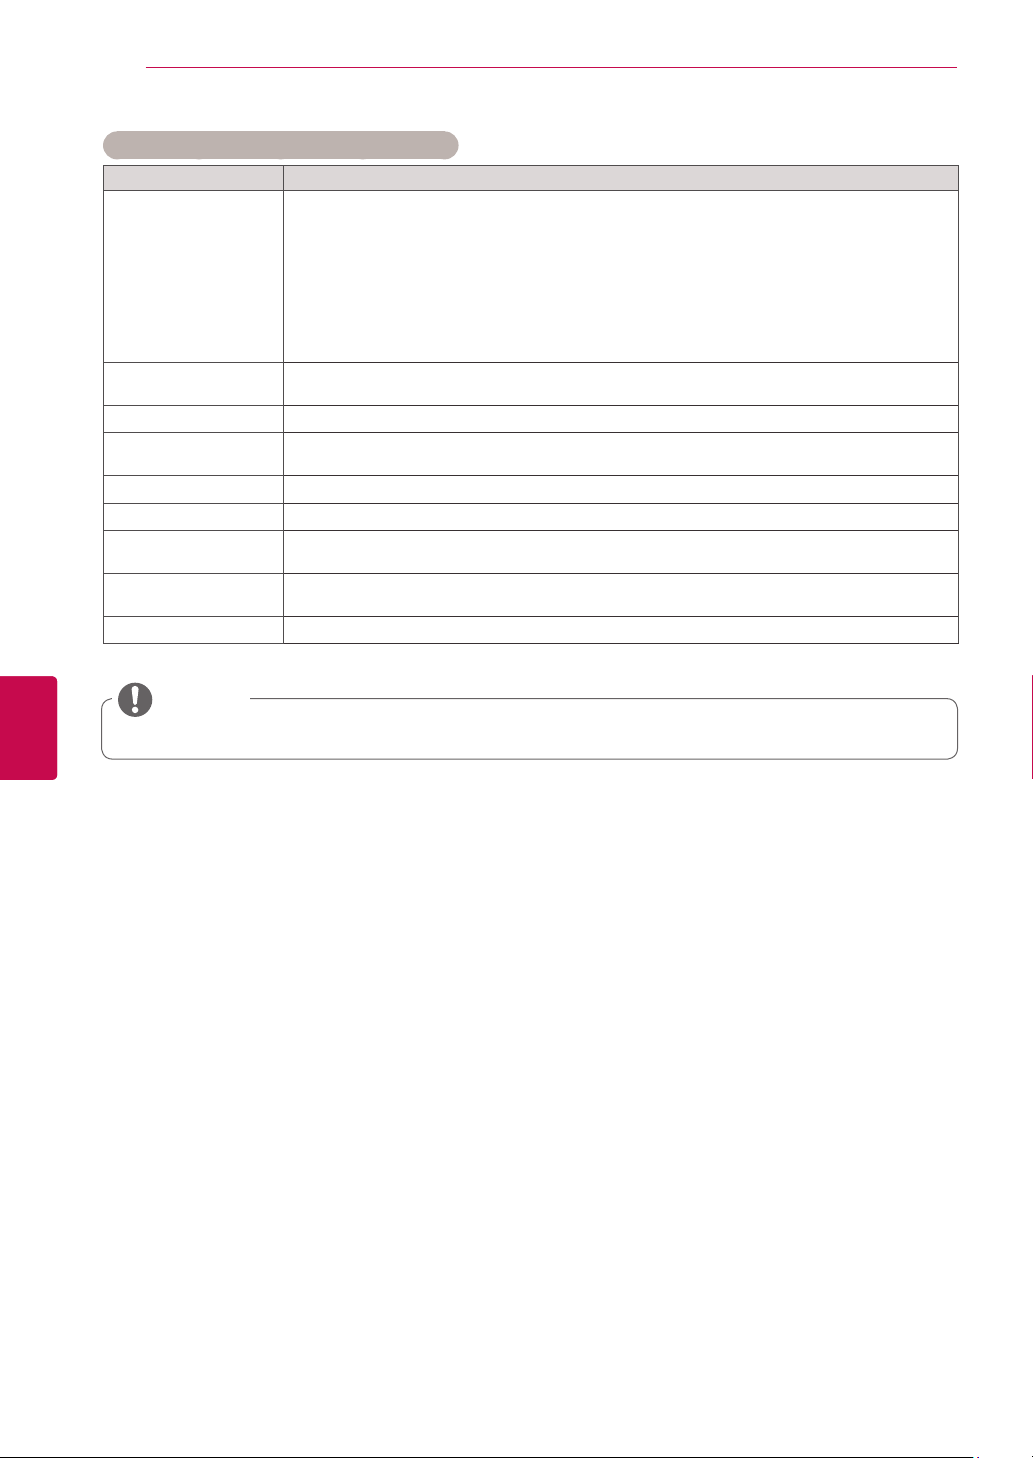
CUSTOMIZING SETTINGS
70
Basic image options (Depending on model)
Setting Description
Backlight
(Only LCD TV/LED
LCD TV)
Contrast Increases or decreases the gradient of the video signal. You may use Contrast when the
Brightness Adjusts the base level of the signal in the picture.
Sharpness Adjusts the level of crispness in the edges between the light and dark areas of the picture.
Colour Adjusts intensity of all colours.
Tint Adjusts the balance between red and green levels.
Colour Temp. Set to warm to enhance hotter colours such as red, or set to cool to enhance cooler colours
Advanced Control or
Expert Control
Picture Reset Restores the options of each mode to the factory default
Adjusts the brightness of the screen by controlling the LCD backlight. If you decrease the
brightness level, the screen becomes darker and the power consumption will be reduced without any video signal loss.
If you use the “Energy saving - Auto, Maximum””, Backlight will not be available.
Benefits of using Backlight
- The electricity consumption is reduced by up to 60 %.
- The black brightness is reduced. (As the black has greater depth, you can enjoy a
better quality definition.)
- You can adjust brightness with maintaining original signal resolution.
bright part of the picture is saturated.
The lower the level, the softer the image.
such as blue.
Customizes the advanced options
ENGLISH
ENG
NOTE
You cannot adjust colour, sharpness and tint in the RGB-PC/HDMI-PC mode.
Page 71
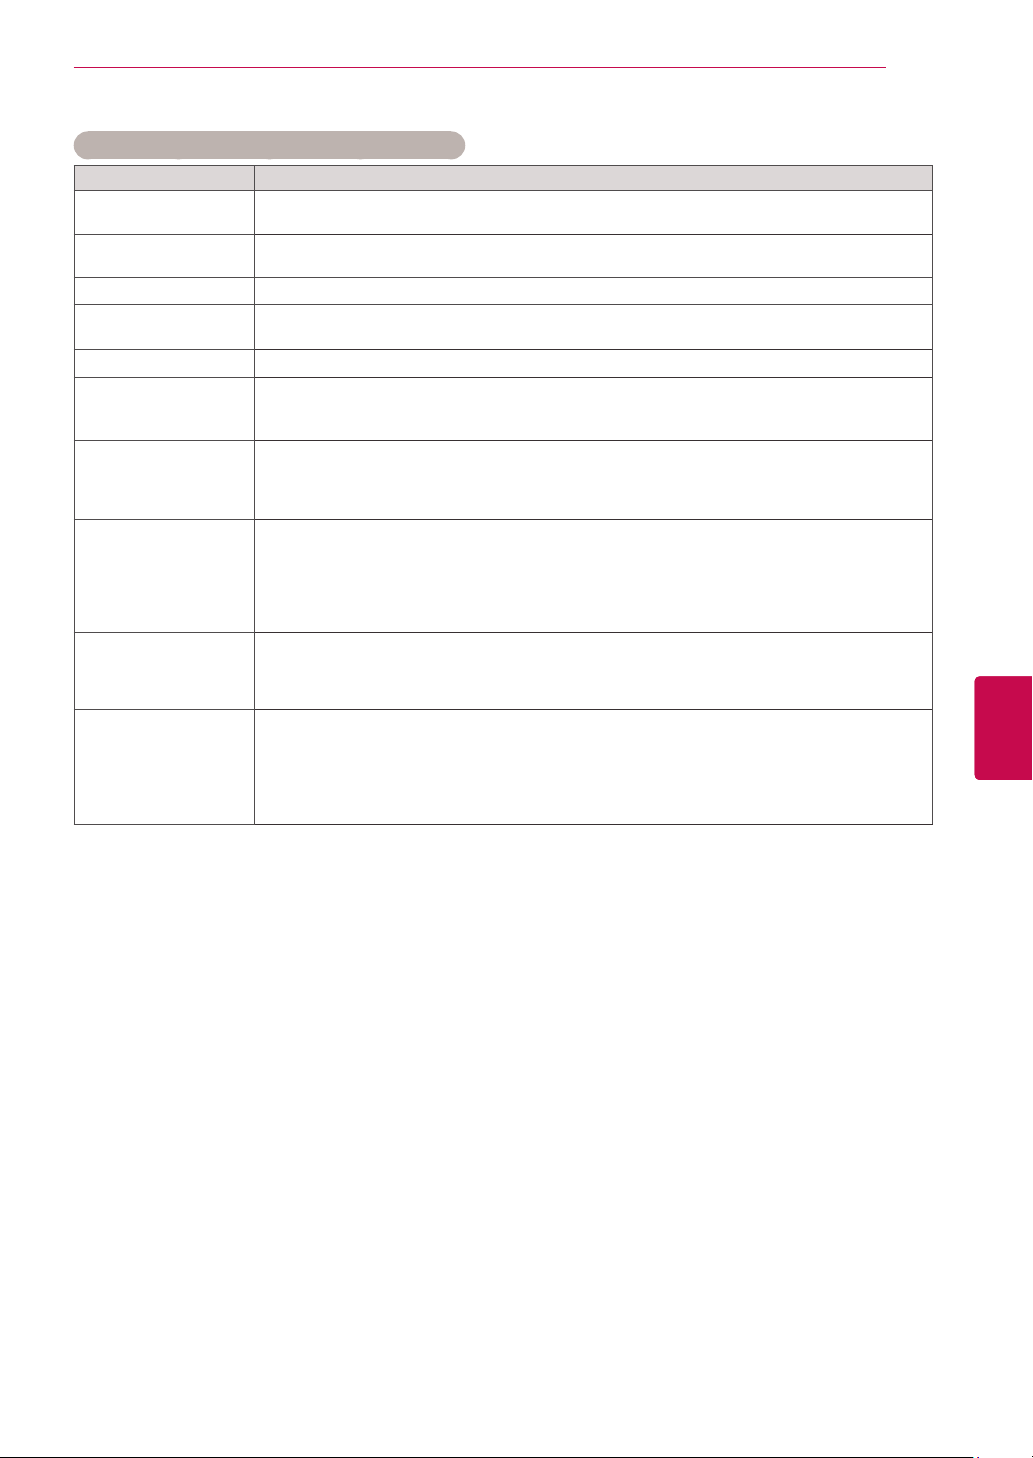
CUSTOMIZING SETTINGS
71
Advanced image options (Depending on model)
Setting Description
Dynamic Contrast Adjusts the contrast to keep it at the best level according to the brightness of the screen. The
Dynamic Colour Adjusts screen colours so that they look livelier, richer and clearer. This feature enhances hue,
Clear White Makes the white area of the screen brighter and clearer.
Skin Colour It detects the skin area of video and adjusts it to express a natural skin colour.
Noise Reduction Reduces screen noise without compromising video quality.
Digital Noise Reduction
picture is improved by making bright parts brighter and dark parts darker.
saturation and luminance so that red, blue and green white look more vivid.
Removes noise caused by compressing video.
Gamma You can adjust brightness of dark area and middle gray level area of the picture.
Black Level Sets black level of the screen to proper level. This function is available in the following modes:
Eye Care Adjusts the brightness of the screen to prevent the screen from being too bright. Dims ex-
Film Mode or Real
Cinema
Low: Make the dark and middle gray level areas brighter.
Medium: Express the original picture level.
High: Make the dark and middle gray level area darker.
AV (NTSC-M), HDMI, Component or USB(Only Plasma TV).
Low: The reflection of the screen gets darker.
High: The reflection of the screen gets brighter.
Auto : Sets black level of the screen to High or Low automatically according to the input
signal level.
tremely bright pictures.
This feature is disable in “Picture Mode-Vivid, Cinema, Expert1, Expert2, Intelligent
Sensor.”
Makes video clips recorded in film look more natural by eliminating judder effect.
DVD and Blu-ray movies are filmed at 24 frames per second (fps). With LG Real Cinema,
every frame is consistently processed 5 times in 1/24 of a second producing 120 fps with
TruMotion or 2 times in 1/24 of a second producing 48 fps without TruMotion, thus totally
eliminating the judder effect.
This function can also work when TruMotion is off.
ENGENGLISH
Page 72
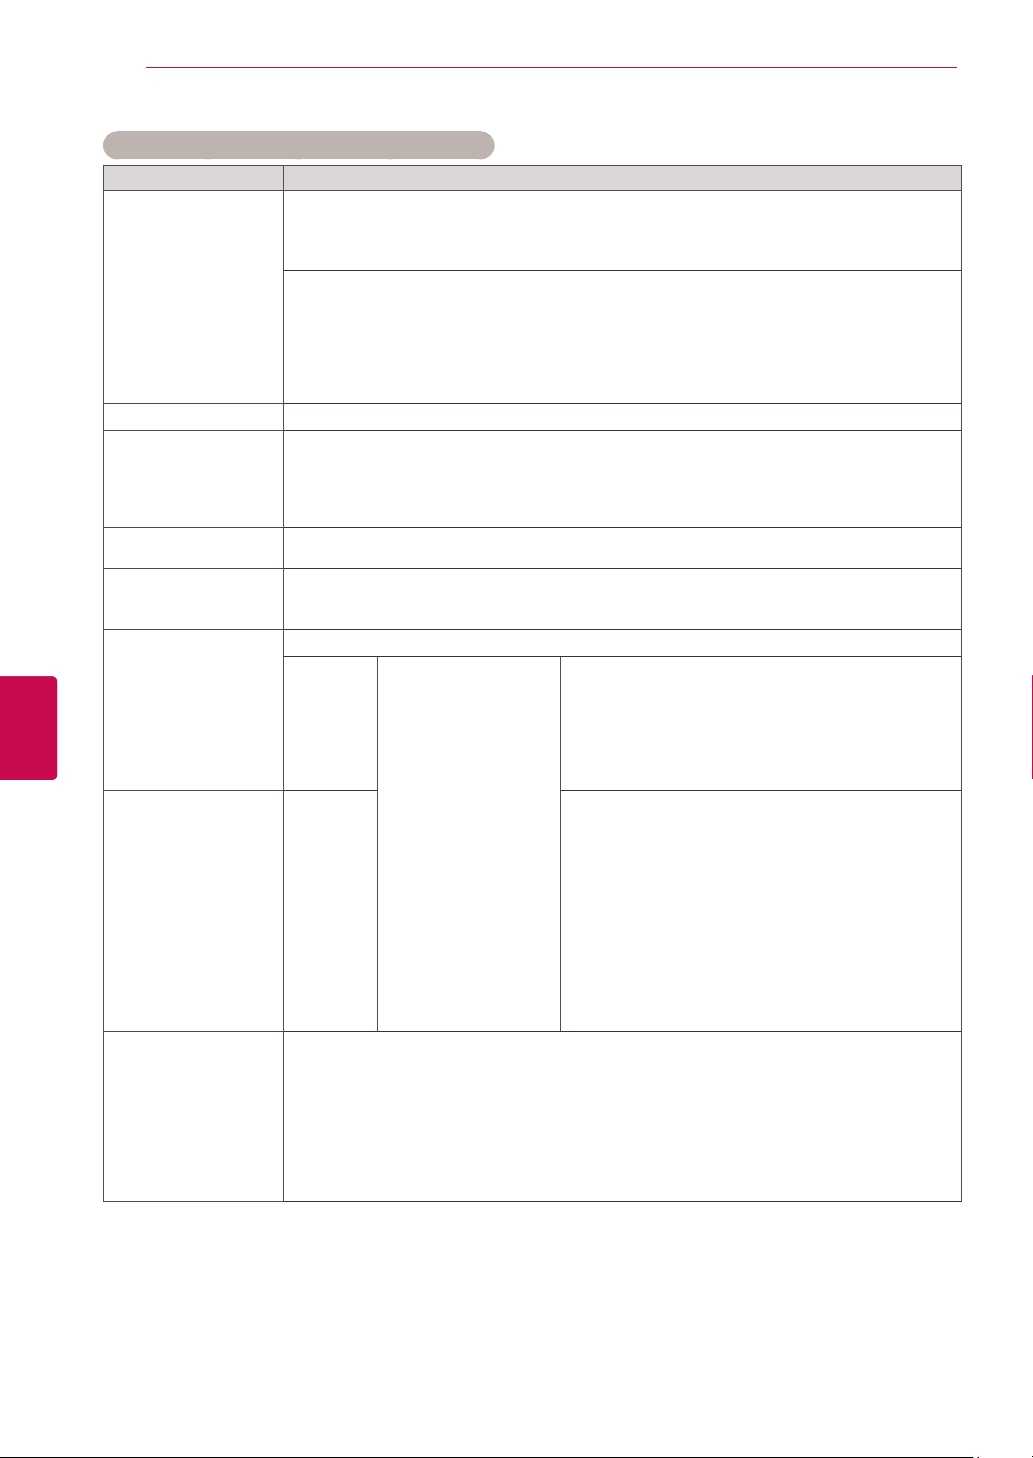
ENGLISH
ENG
CUSTOMIZING SETTINGS
72
Advanced image options (Depending on model)
Setting Description
Colour Gamut Advanced Control
Edge Enhancer Shows clearer and distinctive yet natural edges of the video.
xvYCC
(available in Cinema
and Expert mode)
Colour Filter This is the function to filter the specific colours of the video.
Expert Pattern
(available in Expert
modes)
Colour Temperature Adjusts the overall colour of the screen by changing the white baseline.
Colour Manage
System
Maximizes the utilization of colour to increase colour quality.
Standard: Displays standard set of colours.
Wide: Increase number of colours used.
Expert Control
Displays colour domain of the signal.
Standard: Displays standard set of colours.
Wide: Increase number of colours used.
EBU: Mode to display EBU standard colour area.
SMPTE: Mode to display SMPTE standard colour area.
BT709: Mode to display BT709 standard colour area.
*This feature is not available for all models.
This is produces richer colours.
This feature represents rich colours as much as a conventional video signal.
This function is enabled in “Picture mode - Cinema, Expert” when xvYCC signal is inputted
through HDMI.
You can use the RGB filter to set colour saturation and hue accurately.
This is the pattern used for expert adjustment
This function is enabled in “Picture Mode - Expert” when you watch DTV.
Plasma TV a. Method : 2 Points
Pattern: Inner, Outer
Red/Green/Blue
Contrast, Red/Green/
Blue Brightness: The
adjustment range is
-50 to +50.
LCD TV/
LED LCD
TV
As the tool used by the experts to make adjustments by using the test patterns, this does not
affect other colours but can be used to selectively adjust the 6 colour areas (Red/Green/Blue/
Yellow/Cyan/Magenta).
Colour difference may not be distinctive even when you make the adjustments for the general
video.
Adjusts Red/Green/Blue/Yellow/Cyan, Magenta.
Red/Green/Blue/Yellow/Cyan, Magenta Colour: The adjustment range is -30 - +30.
Red/Green/Blue/Yellow/Cyan, Magenta Tint: The adjustment range is -30 - +30.
This feature is disable in RGB-PC and HDMI-PC mode.
b. Method : 20 Point IRE
IRE (Institute of Radio Engineers) is the unit to
display the size of the video signal and can be set
among 5, 10, 15 - 100 Plasma TV. You can adjust
Red, Green or Blue according to each setting.
Red/Green/Blue: The adjustment range is -50 - +50.
c. Apply to all inputs
b. Method : 10 Point IRE
Pattern: Inner, Outer
IRE (Institute of Radio Engineers) is the unit to
display the size of the video signal and can be set
among 10, 20, 30 - 100. You can adjust Red, Green
or Blue according to each setting.
Luminance: This function displays calculated lumi-
nance value for 2.2 gamma. You can input luminance value you want at 100 IRE, than the target
luminance value for 2.2 gamma is displayed at every
10 steps from 10 IRE to 90 IRE.
Red/Green/Blue: The adjustment range is -50 - +50.
c. Apply to all inputs
Page 73
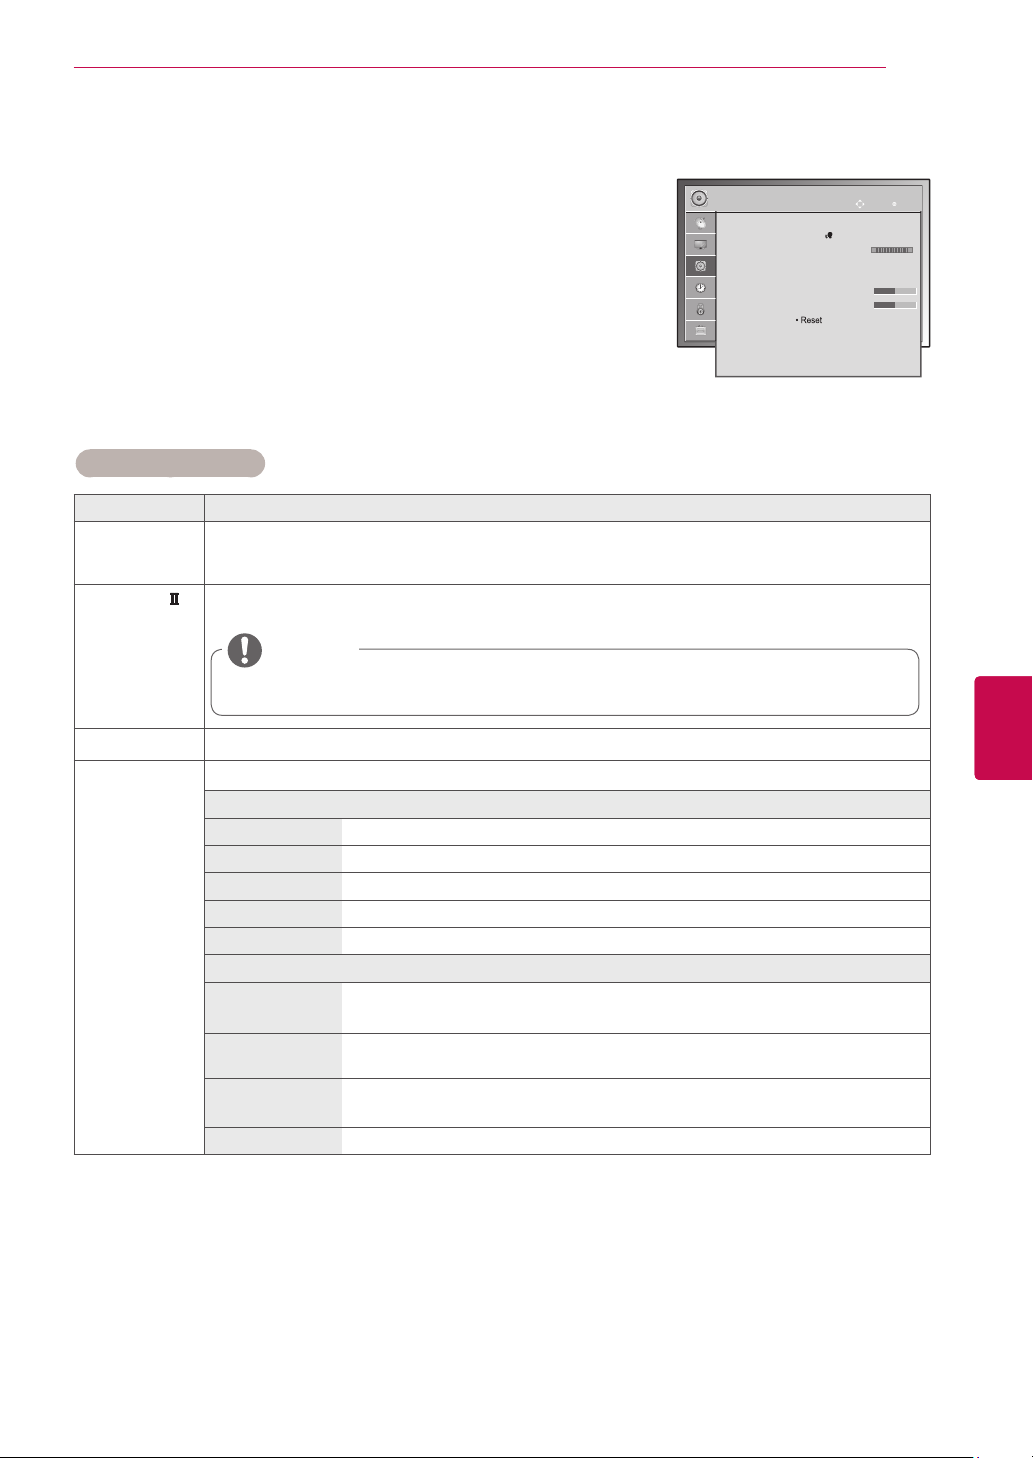
AUDIO settings
CUSTOMIZING SETTINGS
Image shown may differ from your TV.
73
Press Home to access the main menus.
1
Press the Navigation buttons to scroll to AUDIO and press OK.
2
Press the Navigation buttons to scroll to the setting or option you want
3
and press OK.
- To return to the previous level, press BACK.
When you are finished, press EXIT.
4
AUDIO
● Auto Volume : Off
● Clear Voice II : Off 3
● Balance 0
● Sound Mode : Standard
• Infinite Surround : Off
• Treble 50
• Bass 50
• Reset
● Digital Audio Out : PCM
● TV Speaker : On
● DTV Audio Setting : Auto
The available audio settings are described in the following.
(Depending on model)
Setting Description
Auto Volume Activates the Auto Volume feature to keep the volume level consistent whenever you change
channels. The volume level may not be consistent due to different signal conditions of broadcasting
stations.
Clear Voice
Sets whether to enhance human voice clarity. You can adjust the level of clarity when you set this
feature on.
NOTE
If you select “On” for Clear Voice II, Infinite Surround feature will not work.
Select levels from ‘-6’ to ’+6’.
Balance Adjust balance between the left and right speakers according to your room environment.
Sound Mode Selects one of the preset sound modes or customizes options in each mode.
Mode
Standard Select when you want standard-quality sound.
Music Select when you listen to music.
Cinema Select when you watch movies.
Sport Select when you watch sports events.
Game Select when you play games.
Option
Infinite Surround Infinite Surround is a patented LG proprietary sound processing technology that
strives immersive 5.1 surround sound impression with front two loudspeakers.
Treble Controls the dominant sounds in the output. When you turn up the treble, it will
increase the output to the higher frequency range.
Bass Controls the softer sounds in the output. When you turn up the bass, it will
increase the output to the lower frequency range.
Reset Resets the sound mode to the default setting.
Move
OK
R
L
ENGENGLISH
Page 74
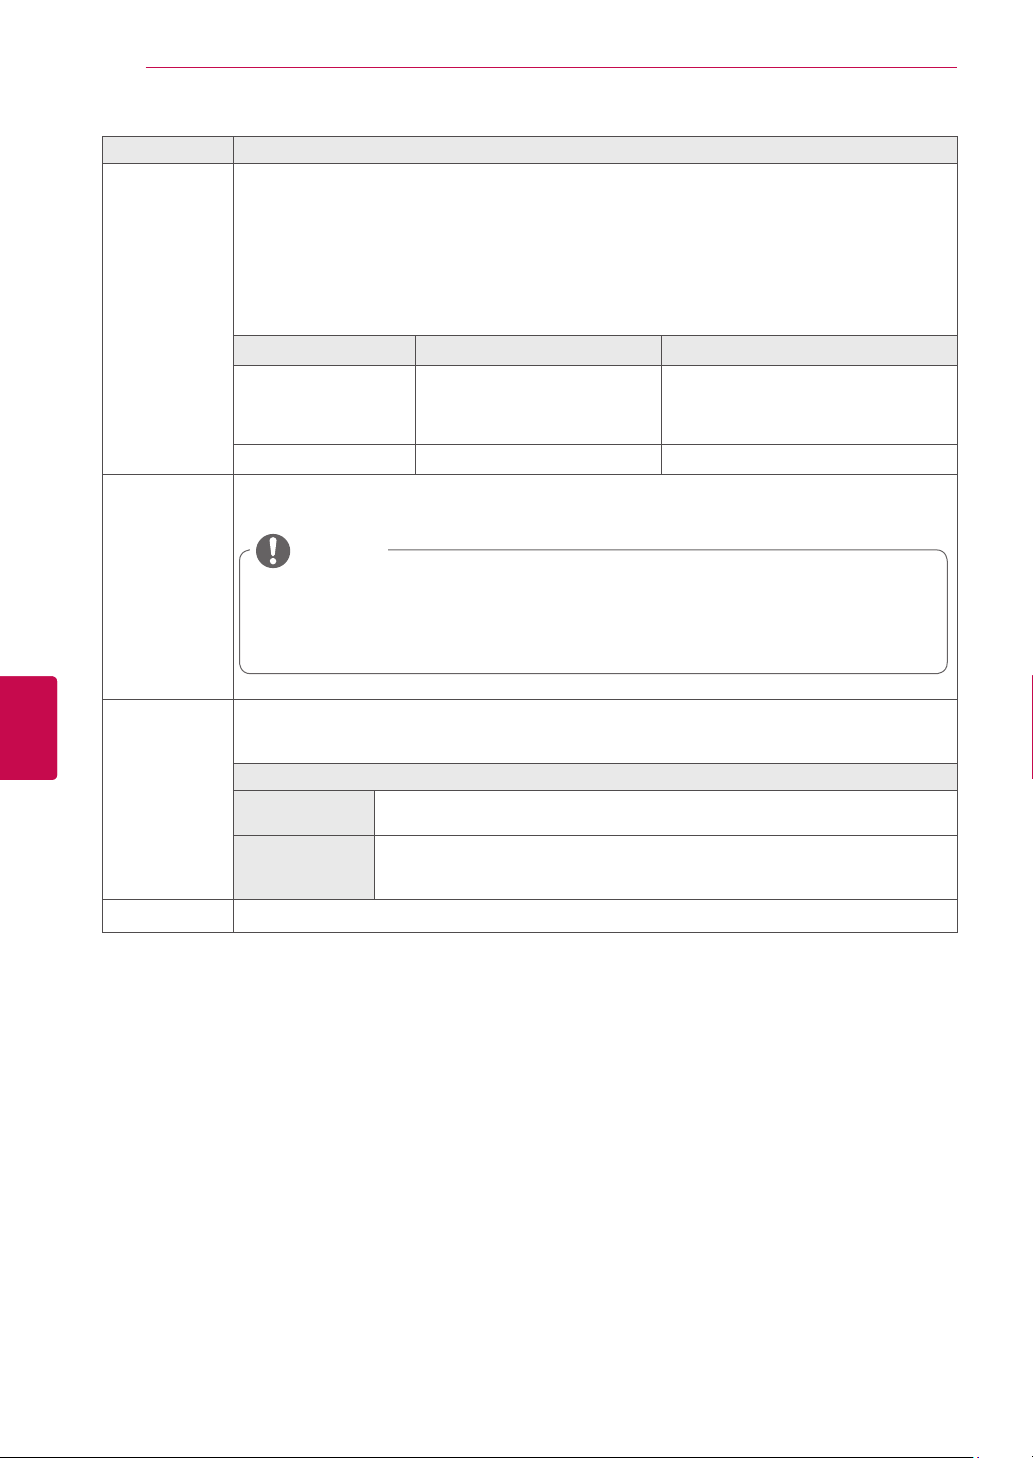
CUSTOMIZING SETTINGS
74
Setting Description
Digital Audio
Out
TV Speaker Turns on the internal speaker of the TV when using an external Hi-Fi system. You can use the TV
It is possible to use in DTV, HDMI, DivX mode.
This function allows you to select your preferred Digital Audio Output.
When Dolby Digital is available, selecting Auto in the Digital Audio Out menu will set SPDIF(Sony
Philips Digital InterFace) output to Dolby Digital.
If Auto is selected in the digital audio out menu when Dolby Digital is not available, SPDIF output will
be PCM(Pulse-code modulation).
Even if both Dolby Digital and Audio language have been set in a channel which broadcast Dolby
Digital Audio, only Dolby Digital will be played.
Item Audio Input Digital Audio output
Auto
PCM
speaker as an audio output device even if there is no video input.
MPEG
Dolby Digital
Dolby Digital Plus
HE-AAC
All PCM
PCM
Dolby Digital
Dolby Digital
Dolby Digital
NOTE
When the TV speaker is turned off while the Simplink home theatre is operating, the sound
output automatically switches to the Home theatre speaker, but when the TV speaker is
turned on, the sound output the TV speaker.
Some menus in AUDIO are disabled when TV Speaker is set to Off.
ENGLISH
ENG
DTV Audio Setting (In digital
mode only)
When different audio types exist in an input signal, this function allows you to select the audio type
you want.
Mode
Auto Automatically outputs in the order HE-AAC > Dolby Digital+ > Dolby Digital >
HE-AAC, Dolby
Digital+, Dolby
Digital, MPEG
MPEG.
Allows users to select the audio type they want.
ex) If MPEG is selected, MPEG is always outputted.
If MPEG is not supported, another audio type is set in that order.
See "Audio Language" on p.78
Page 75
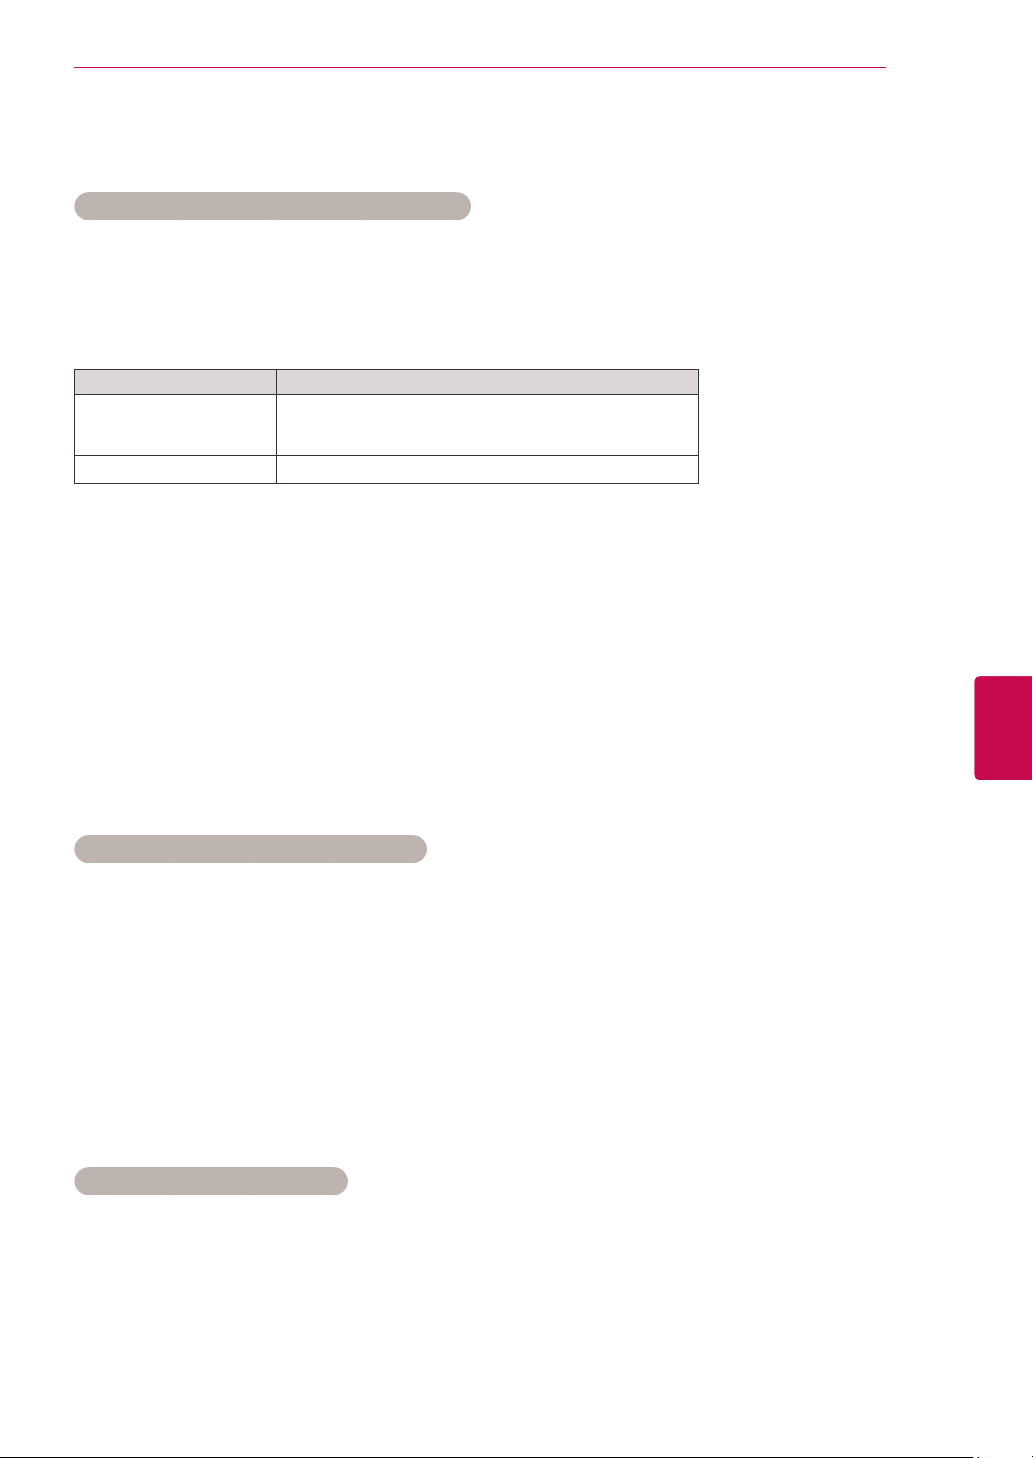
CUSTOMIZING SETTINGS
This feature may not be applied based on country broadcasting circumstance.
Stereo/Dual Reception (In Analogue Mode Only)
When a programme is selected, the sound information for the station appears with the programme
number and station name.
1 Press Q. MENU and press the Navigation to access the Audio or Audio Language and press OK.
2 Press the Navigation button to scroll to sound output and press OK.
Broadcast On Screen Display
Mono
Stereo
Dual
NICAM NICAM
Mono sound selection
If the stereo signal is weak in stereo reception, you can switch to mono. In mono reception, the clarity of
sound is improved.
Language selection for dual language broadcast
If a programme can be received in two languages (dual language), you can switch to DUAL I,
DUAL II or DUAL I+II.
DUAL I Sends the primary broadcast language to the loudspeakers.
DUAL I I Sends the secondary broadcast language to the loudspeakers.
DUAL I+I I Sends a separate language to each loudspeaker.
MONO
STEREO
DUAL I , DUAL II , DUAL I + II
75
ENGENGLISH
Nicam Reception (In Analogue Mode Only)
If the TV is equipped with a receiver for NICAM reception, high quality NICAM (Near Instantaneous
Companding Audio Multiplex) digital sound can be received.
Sound output can be selected according to the type of broadcast received.
1 When NICAM mono is received, you can select NICAM MONO or FM MONO.
2 When NICAM stereo is received, you can select NICAM STEREO or FM MONO.
If the stereo signal is weak, switch to FM MONO.
3 When NICAM dual is received, you can select NICAM DUAL I, NICAM DUAL II or NICAM DUAL I+II or
FM MONO.
Speaker Sound Output Selection
In AV, Component, RGB and HDMI mode, you can select output sound for the left and right loudspeakers.
Select the sound output.
L+R: Audio signal from audio L input is sent to the left loudspeaker and audio signal from audio R input is
sent to the right loudspeaker.
L+L: Audio signal from audio L input is sent to left and right loudspeakers.
R+R: Audio signal from audio R input is sent to left and right loudspeakers.
Page 76
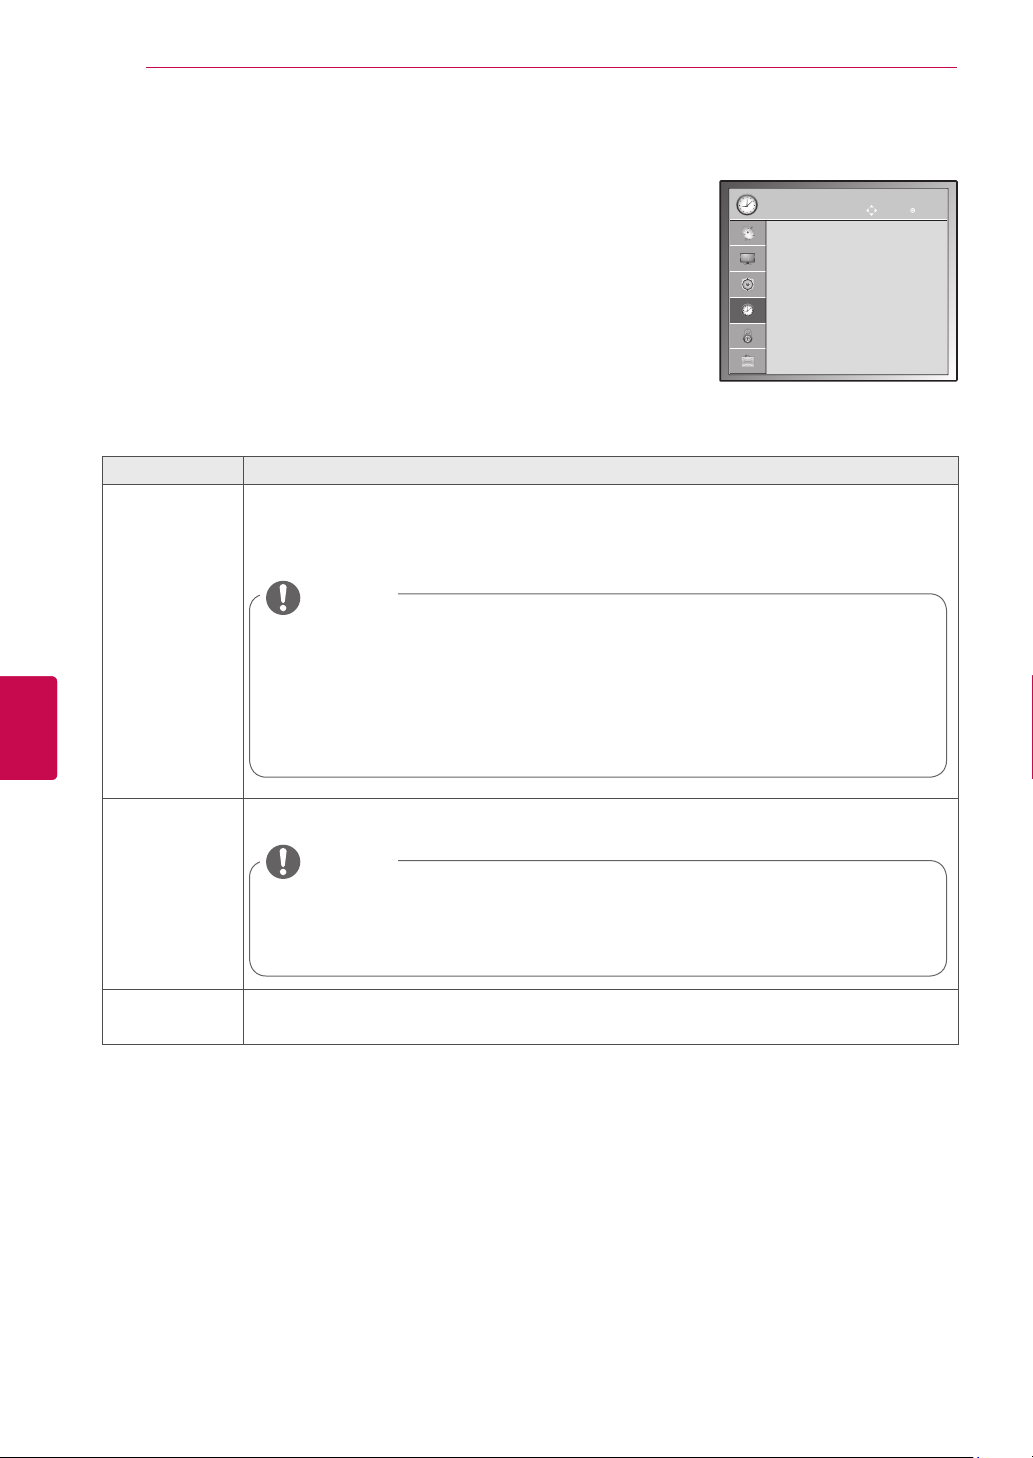
CUSTOMIZING SETTINGS
76
ENGLISH
ENG
TIME settings
Image shown may differ from your TV.
1 Press Home to access the main menus.
2 Press the Navigation buttons to scroll to TIME and press OK.
3 Press the Navigation buttons to scroll to the setting or option you want
and press OK.
- To return to the previous level, press BACK.
4 When you are finished, press EXIT.
The available time settings are described in the following
Setting Description
Clock
Sets the time, date, time zone and daylight-saving time feature.
The time will be set automatically according to a digital channel signal which includes time
information provided by the broadcasting station. If not, set the time and date manually.
Time Zone is enabled only in Australia, Indonesia and Israel only.
NOTE
< Only Australia > When you select a Time Zone city, the TV time is set by the time offset
information based on Time Zone and GMT (Greenwich Mean Time) which is received with
the broadcast signal and the time is set automatically by a digital signal.
<Only Indonesia, Israel> GMT (Greenwich Mean Time) which is received with the
broadcast signal and the time is set automatically by a digital signal.
When if the city name in Time Zone is changed into offset, you can change time by 1 hour.
Time Zone menu can be changed in Auto mode.
TIME
● Clock
● Off Time : Off
● On Time : Off
● Sleep Timer : Off
Move
OK
Off Time/On
Time
Sets the time to turn on or off the TV automatically. To use this function, you should set the current
time and date in advance.
NOTE
If you do not press any button within 2 hours after the TV turns on by the On Time
feature, the TV enters the Standby mode automatically.(Except for 22/26/32LK335C,
32/37/42/47/55LV355C 32/37/42/47LK455C)
If you set both Off time and On time features to the same time, the Off time feature
overrides the On time feature.
Sleep Timer Sets the length of time until the TV to turns off. When you turn the TV off and turn it on again, the
Sleep timer feature will be set to off.
Page 77
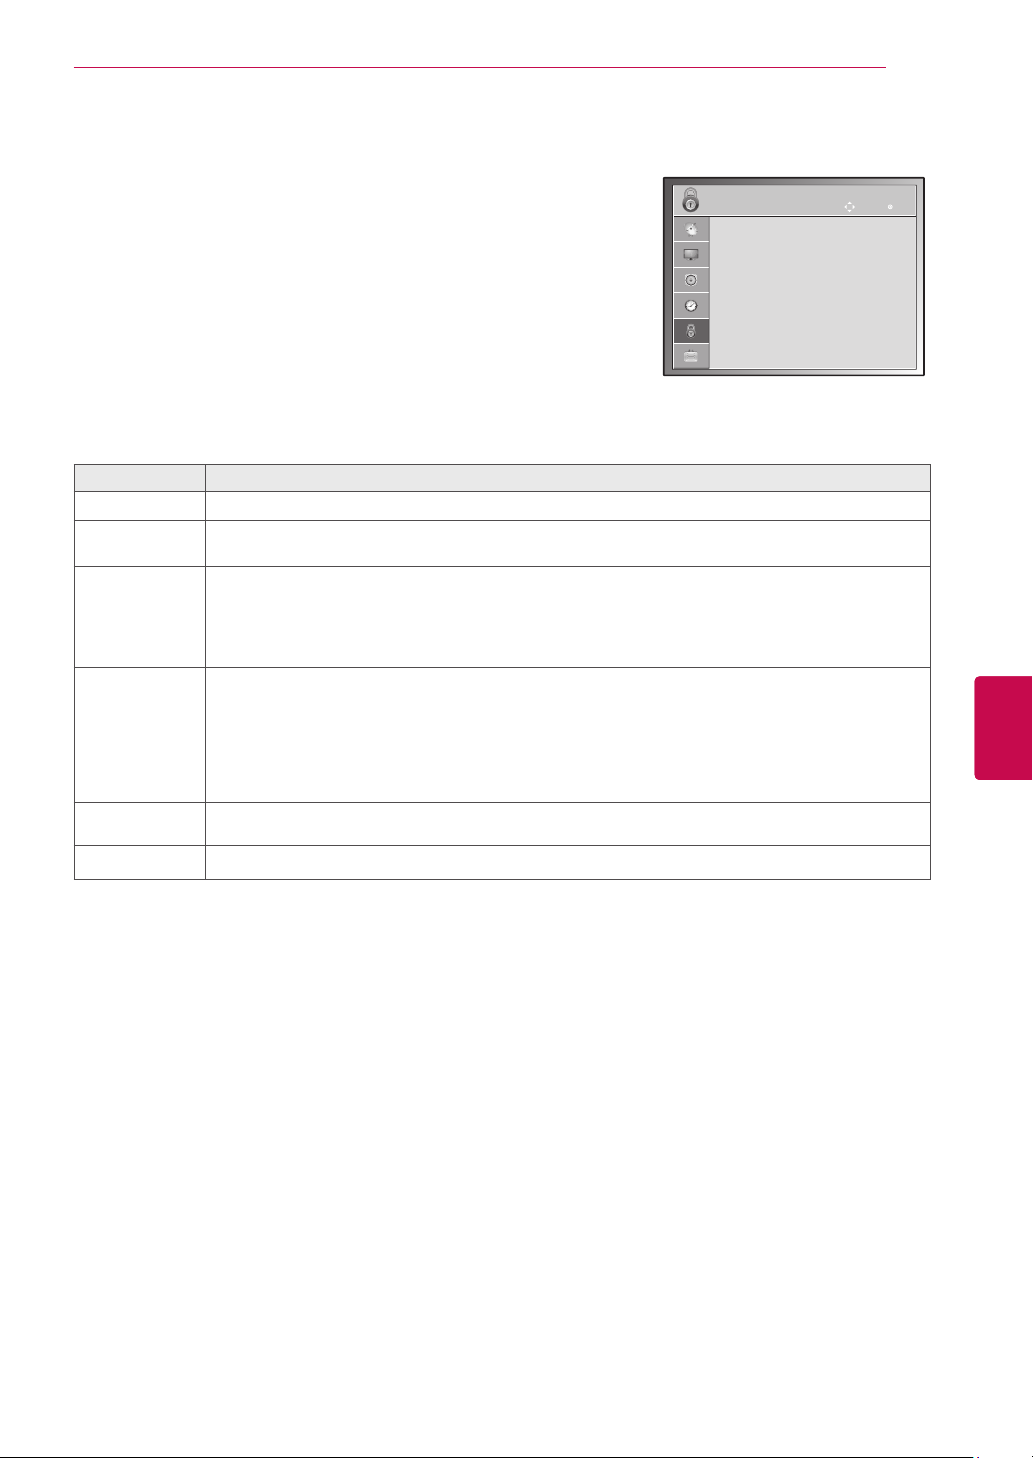
LOCK settings
CUSTOMIZING SETTINGS
Image shown may differ from your TV.
77
1 Press Home to access the main menus.
2 Press the Navigation buttons to scroll to LOCK and press OK.
3 Press the Navigation buttons to scroll to the setting or option you
want and press OK.
- To return to the previous level, press BACK.
4 When you are finished, press EXIT.
The available lock settings are described in the following.
Setting Description
Lock System Activates or deactivates the lock system.
Set Password Changes the 4-digit password. The default PIN is “0 0 0 0”.
Block
Programme
Parental
Guidance
(In Digital mode
only)
Input Block Block the input sources.
Key Lock Locks or unlocks the buttons on the TV.
If you forget your password, press ‘0’, ‘3’,‘2’, ‘5’ on the remote control handset.
Blocks the programmes that contain inappropriate contents for children by pressing the Green
button. The Lock icon appears in front of the blocked programmes. The programmes can be selected
but the screen blank and the audio is muted.
To watch a locked channel, enter the password.
It is available to use this function in Lock System ”On”
This function operates according to information from the broadcasting station. Therefore if the signal
has incorrect information, this function does not operate.
A password is required to gain access to this menu.
This set is programmed to remember which option it was last set to even if you switch the set off.
Prevents children from watching certain adult’s TV programmes, according to the ratings limit set.
Enter a password to watch a blocked programme.
Rating differs by country.
It is available to use this function in Lock System ”On”
LOCK
● Set Password
● Lock System : Off
● Block Programme
●
● Input Block
● Key Lock : Off
Parental Guidance : Blocking Off
Move
OK
ENGENGLISH
Page 78
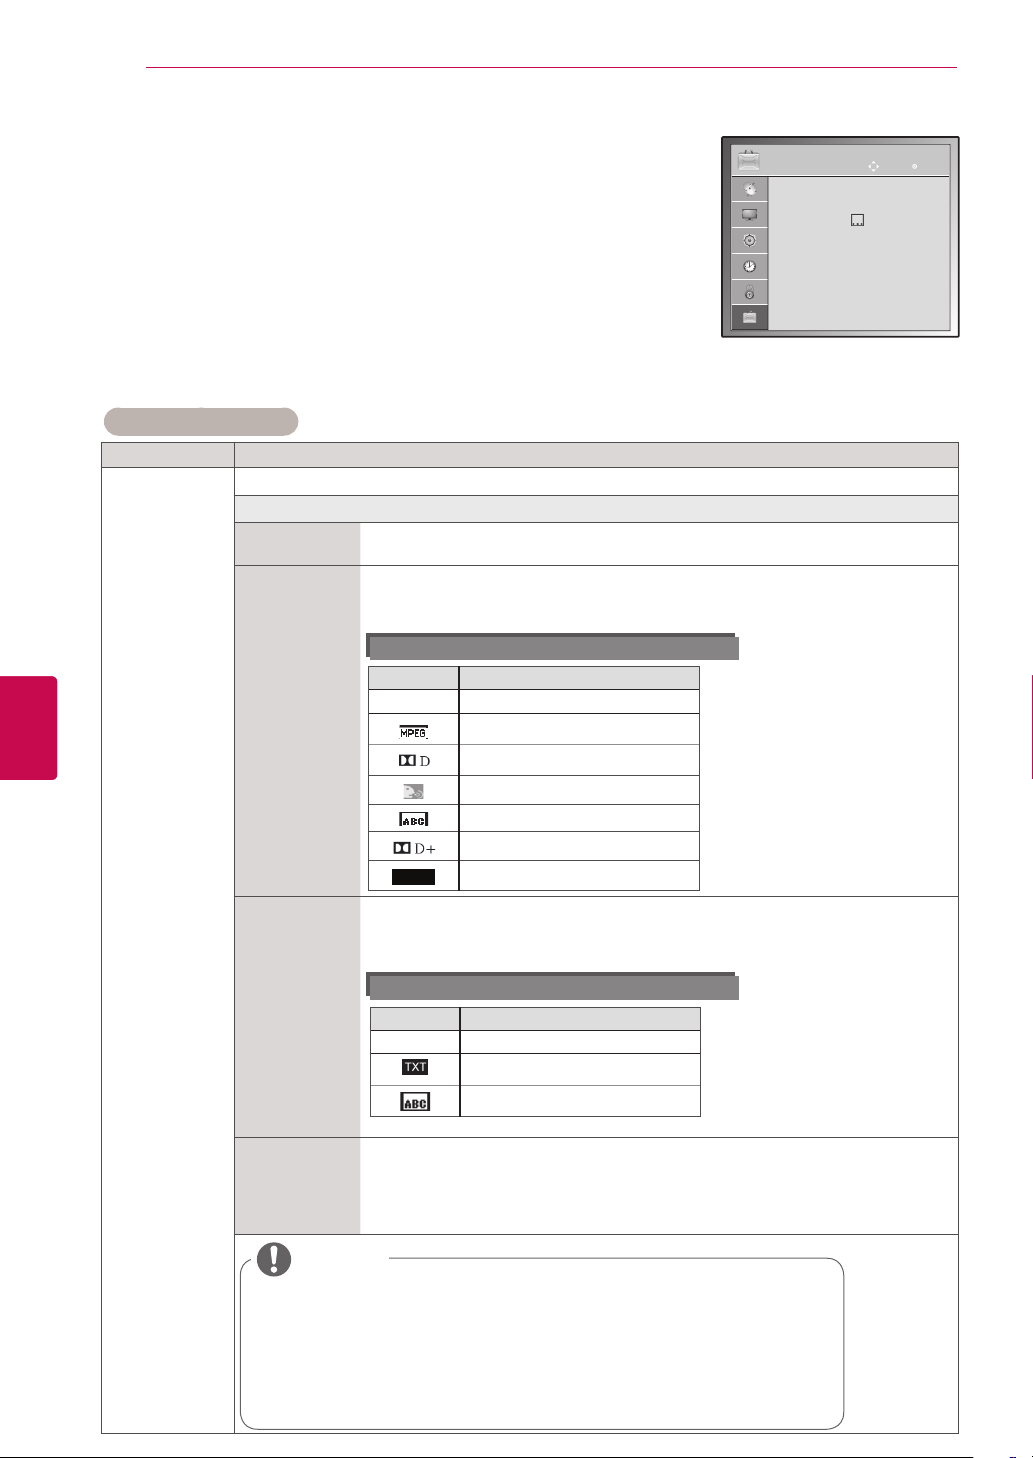
CUSTOMIZING SETTINGS
HE-AAC
78
Image shown may differ from your TV.
ENGLISH
ENG
OPTION settings
1 Press Home to access the main menus.
2 Press the Navigation buttons to scroll to OPTION and press OK.
3 Press the Navigation buttons to scroll to the setting or option you
want and press OK.
- To return to the previous level, press BACK.
4 When you are finished, press EXIT.
The available general settings are described in the following:
(Depending on model)
Setting Description
Language Selects a language for the display or audio.
Option
Menu Language
Audio Language
(In Digital mode
only)
Select your desired language.(Except for Australia, New Zealand, Singapore and
South Africa.)
The Audio function allows selection of a preferred language.
If audio data in a selected language is not broadcast, the default language audio
will be played.
Audio Language OSD Information
Display Status
N.A Not Available
MPEG Audio
Dolby Digital Audio
Audio for “Visual Impaired”
Audio for “Hearing Impaired”
Dolby Digital Plus Audio
HE-AAC Audio
OPTION
● Language(Language)
● Country : Australia
● Hard of Hearing( ) : Off
● ISM Method : Normal
● Factory Reset
● Set ID : 1
● Mode Setting : Home Use
Move
OK
Subtitle Language
(In Digital mode
Use the Subtitle function when two or more subtitle languages are broadcast. If
subtitle data in a selected language is not broadcast, the default language subtitle
will be displayed.
only)
Subtitle Language OSD Information
Display Status
N.A Not Available
Teletext Subtitle
Subtitle for “Hard of Hearing”
Text Language
(In Digital mode
only)
In Digital mode, use the Text language function when two or more Text languages
are broadcast. If teletext data in a selected language is not broadcast, the default
Text language will be displayed.
If you select the wrong local country, teletext may not appear correctly on the
screen and some problems may occur during teletext operation.
NOTE
When the languages you selected as the primary for Audio Language and
Subtitle Language and Text Language are not supported, you can select
language in secondary category (Only New Zealand).
The audio/subtitles can be displayed in a simpler form with 1 to 3 charac-
ters broadcast by the service provider.
When you select supplementary Audio (Audio for “Visual/Hearing Impaired”)
the TV may output a part of the Main audio.
Page 79
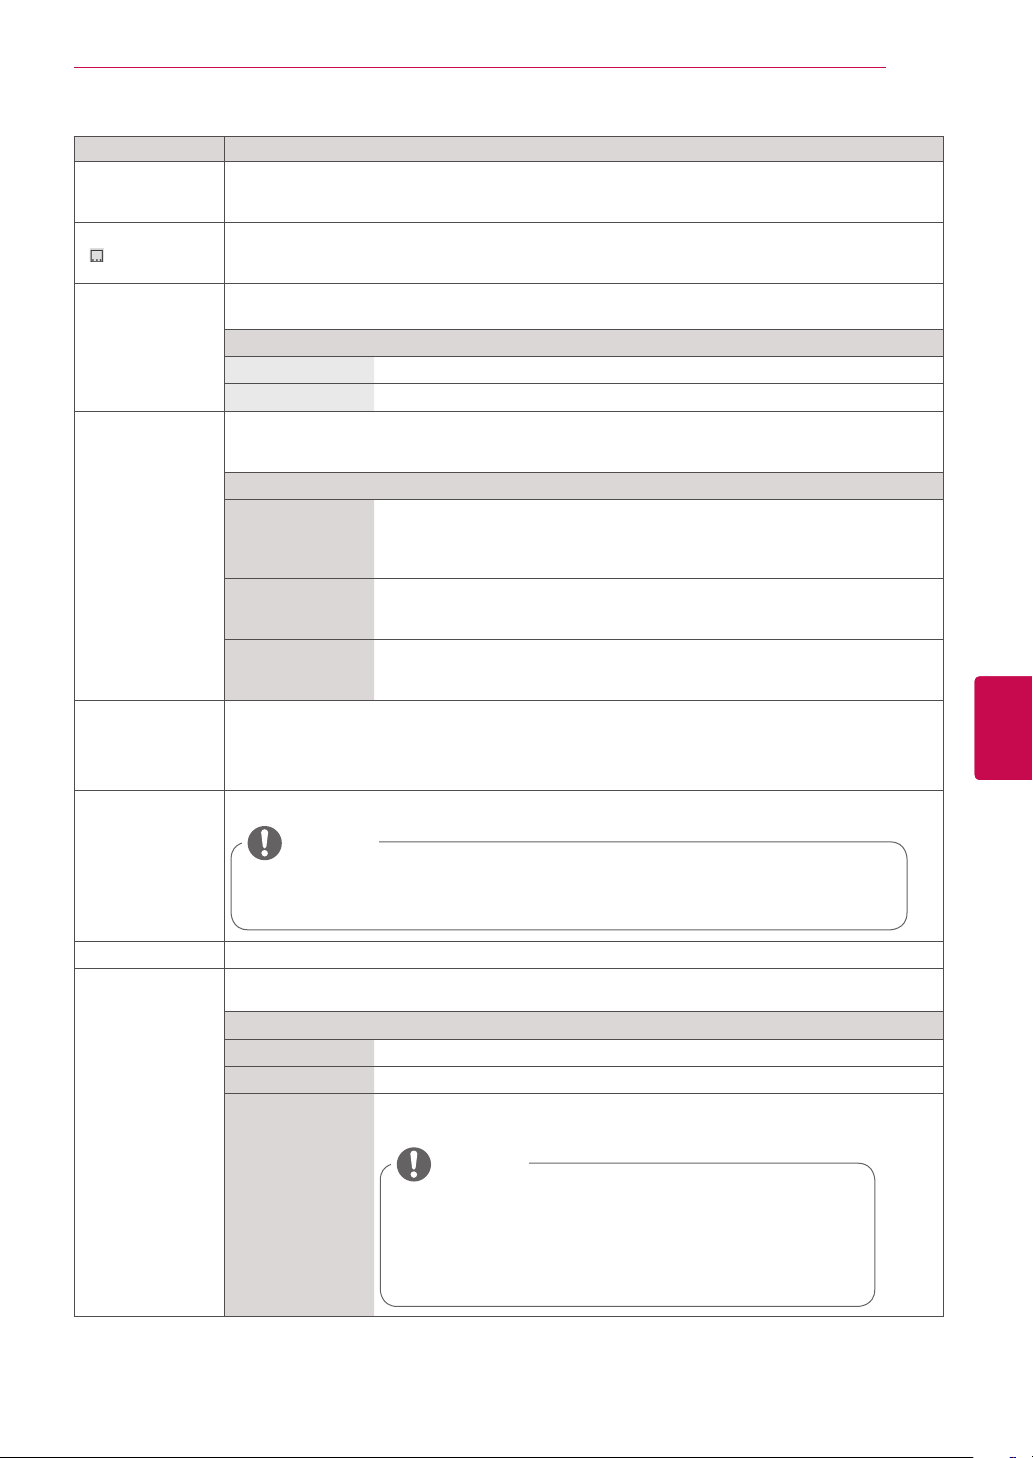
Setting Description
Country (Only
Australia & New
Zealand)
Hard of Hearing
) (In Digital
(
mode only)
Power Indicator
(Only LCD TV/LED
LCD TV)
ISM Method
(Only plasma TV)
Data Service
(This menu is enabled only in South
Africa, Malaysia.)
Selects a desired country.
This function is for the blind, and provides explanatory audio describing the current situation in a TV
programme in addition to the basic audio.
- It is only available to use Hard of Hearing on some TV stations in New Zealand.
Adjust the power/standby indicator light on the front of the TV.
If you select 3D mode, Power indicator is turned off automatically.
Option
Standby Light Set to turn on or off the indicator light in Standby mode.
Power Light Set to turn on or off the indicator light when you turn on the power.
A frozen or still picture displayed on the screen for prolonged periods will result in a ghost image
remaining even when you change the image. Avoid allowing a fixed image to remain on the screen
for prolonged periods.
Option
Orbiter Orbiter may help prevent ghost images. However, it is best not to allow any
fixed image to remain
on the screen. To avoid a permanent image on the screen, the screen will
move every 2 minutes.
Colour Wash The colour block with the screen moved a little and the white pattern are
alternately displayed. It is difficult to sense the afterimage occurred while the
temporary afterimage is removed and the colour pattern is operating.
White Wash White wash removes permanent images from the screen.
Note: An excessive permanent image may be impossible to clear entirely with
White Wash.
This function allow users to choose between MHEG (Digital Teletext) and Teletext if both exist at the
same time.
CUSTOMIZING SETTINGS
79
ENGENGLISH
Factory Reset This function initializes all settings.
NOTE
In Lock System “On”, if you forget your password, press ‘0’, ‘3’, ‘2’, ‘5’ on
the remote control handset.
Set ID Adds an ID to the connected devices
Mode Setting Default selection is “Home Use”. We recommend setting the TV to “Home Use” mode for the best
picture in your Home environment.
Option
Home Use Selects it for the Home environment.
Store Demo Selects it for the retail environment.
Demo Mode Sets to show special features of the TV. You can cancel the demo mode by
pressing any buttons except the Volume and Mute buttons.
NOTE
It is not possible to use Demo Mode in Home Use mode.
In Store Demo, Demo Mode is automatically set to On.
Once Demo Mode is set to Off in Store Demo, Demo Mode
does not run and only the screen is reset.
The screen is reset automatically after 5 minutes in Demo
Mode.
Page 80
MAKING CONNECTIONS
80
MAKING CONNECTIONS
Connect various external devices to the TV and switch input modes to select an external device. For more
information on external device’s connection, refer to the manual provided with each device.
Available external devices are: HD receivers, DVD players, VCRs, audio systems, USB storage devices,
PC, gaming devices, and other external devices.
NOTE
The external device connection may differ from the model.
Connect external devices to the TV regardless of the order of the TV port.
ENGLISH
ENG
Page 81
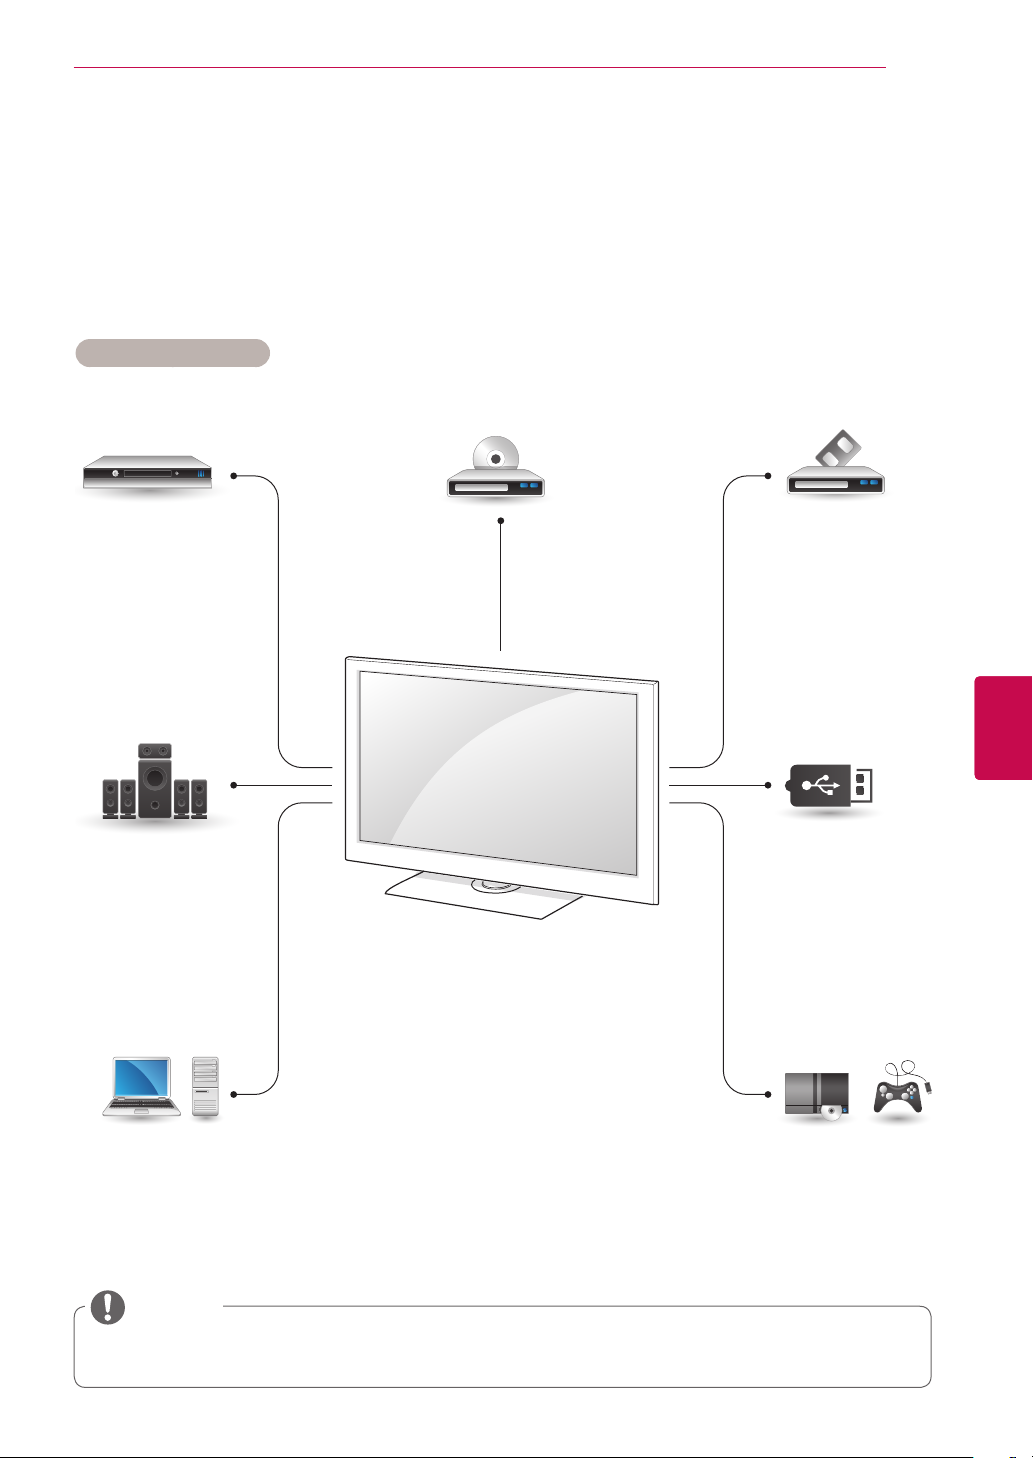
MAKING CONNECTIONS
Connection overview
Connect various external devices to the ports on the TV back panel.
Find an external device you want to connect to your TV as shown on the following illustration.
1
Check the connection type of the external device.
2
Go to the appropriate illustration and check the connection details.
3
(Depending on model)
HD Receiver DVD VCR
81
HDMI – See p.82
DVI – See p.82
Component – See p.82
Composite – See p.83
Speaker
Digital – See p.86
PC
HDMI – See p.82
DVI – .See p.82
Component – See p.82
Composite – See p.83
Composite – See p.83
ENGENGLISH
USB
Memory storage –
See p.87
Memory card reader
– See p.87
Gaming device
HDMI – See p.84
DVI – See p.85
RGB – See p.85
NOTE
If you connect a gaming device to the TV, use the cable supplied with the gaming device.
Refer to the external equipment's manual for operating instructions.
HDMI – See p.82
Component – See p.82
Composite – See p.83
Page 82
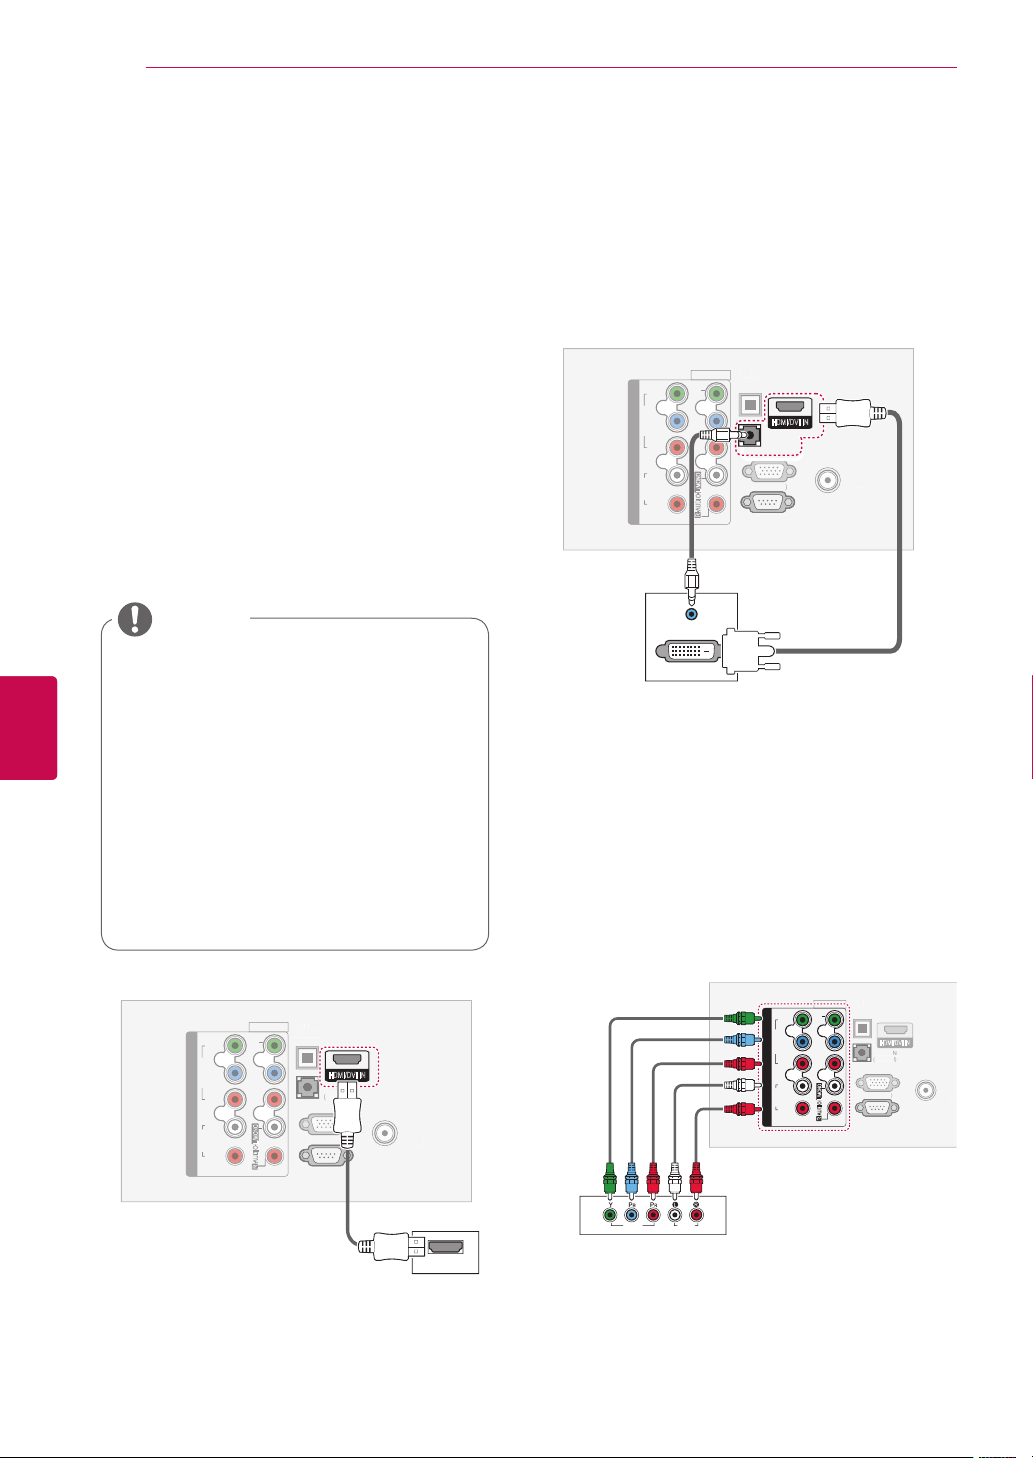
MAKING CONNECTIONS
AUDI
O I
N
(
R
GB/DV
I
)
O
CAL
T
AUDIO OUT
C
)
N
(CO
)
ANTENNA
O
C
D
IG
A
L
AUDIO OUT
RG
C
)
RS
N
(CO
)
ANTENNA
O
C
D
IG
A
L
AUDIO OUT
C
)
N
(CO
)
AUDI
O I
N
(
R
GB/DV
I
)
82
This section on MAKING CONNECTIONS
mainly uses diagrams for the 50/60PV25**
models.
Image shown may differ from your TV.
Connecting to a HD receiver, DVD, or VCR player
DVI to HDMI connection
Transmits the digital video signal from an external
device to the TV. Connect the external device and
the TV with the DVI-HDMI cable as shown in the
following illustration. To transmit an audio signal,
connect an audio cable.
ENGLISH
ENG
Connect a HD receiver, DVD, or VCR player to the
TV and select an appropriate input mode.
HDMI connection
Transmits the digital video and audio signals from
an external device to the TV. Connect the external
device and the TV with the HDMI cable as shown
in the following illustration.
NOTE
The TV can receive video and audio
signals simultaneously when using an
HDMI cable.
If the DVD does not support Auto HDMI,
you must set the output resolution
appropriately.
Check that your HDMI cable is High
Speed HDMI Cable. If the HDMI cables
are not High Speed HDMI Cable,
flickering or no screen display can result.
Please use the High Speed HDMI Cable.
AL
AV IN 1
VIDEO
L/MONO
AUDIO
R
IT
1
HDMI/DVI IN
AUDIO IN
(RGB/DVI)
B IN (P
2
-232C I
NTROL & SERVICE
IN
Y
B
P
VIDEO
R
P
COMPONENT IN
L
AUDIO
R
1
AUDIO OUT
DVI OUT
Component connection
Transmits the analogue video and audio signals
from an external device to the TV. Connect the
external device and the TV with the component
cable as shown in the following illustration.
AL
AV IN 1
AV IN 1
VIDEO
L/MONO
AUDIO
R
IGI
1
HDMI/DVI IN
RGB IN (P
2
RS-232C I
NTROL & SERVICE
IN
VIDEO
AUDIO
HDMI
Y
B
P
VIDEO
R
P
COMPONENT IN
L
AUDIO
R
1
Y
B
VIDEO
P
R
P
COMPONENT IN
L
AUDIO
R
IT
VIDEO
L/MONO
AUDIO
R
2
1
HDMI/DVI IN
RGB IN (P
RS-232C I
NTROL & SERVICE
1
IN
Page 83
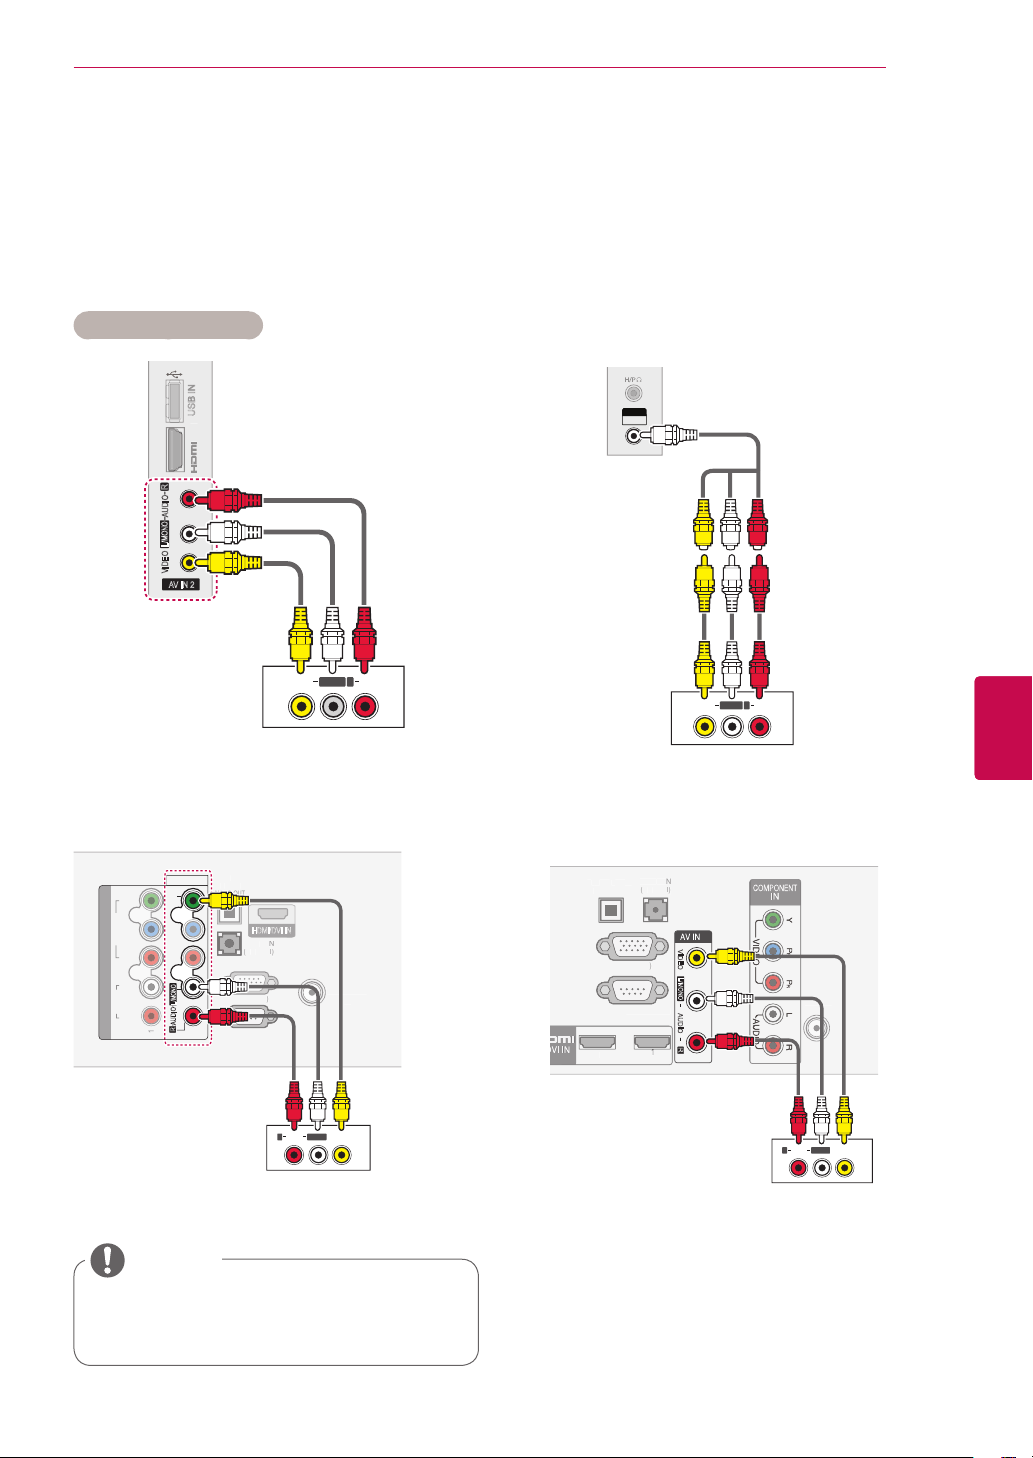
Composite connection
O
P
TI
C
IG
AUDIO OUT
RG
C
)
RS
N
(CO
)
ANTENNA
AUDI
O I
(
GB/DV
)
O
P
TI
C
D
T
A
L
AUDIO OU
AUDI
O I
N
(
G
B/DV
)
R
)
RS
N
(CO
)
1
A
/
C
Transmits the analogue video and audio signals
from an external device to the TV. Connect the
external device and the TV with the composite
cable as shown in the following illustration.
(Depending on model)
IN 2
R
AUDIO
L/MONO
VIDEO
AV IN 2
or
AV IN 2
VIDEO / AUDIO
MAKING CONNECTIONS
83
Only Plasma TV
AV IN 1
Y
VIDEO
B
VIDEO
P
R
P
COMPONENT IN
L
L/MONO
AUDIO
AUDIO
R
R
NOTE
AUDIOVIDEO
R
L(MONO)
AUDIOVIDEO
R
L(MONO)
AL
IT
1
HDMI/DVI IN
or
L(MONO)
IN
B IN (P
2
-232C I
NTROL & SERVICE
AUDIO VIDEO
R
AL
-232C I
IGI
T
GB IN (PC
NTROL & SERVICE
VIDEO
L/MONO
AUDIO
R
1
NTENNA
ABLE IN
AUDIO VIDEO
R
L(MONO)
ENGENGLISH
If you have a mono VCR, connect the
audio cable from the VCR to the
jack of the TV.
MONO
AUDIO L/
Page 84
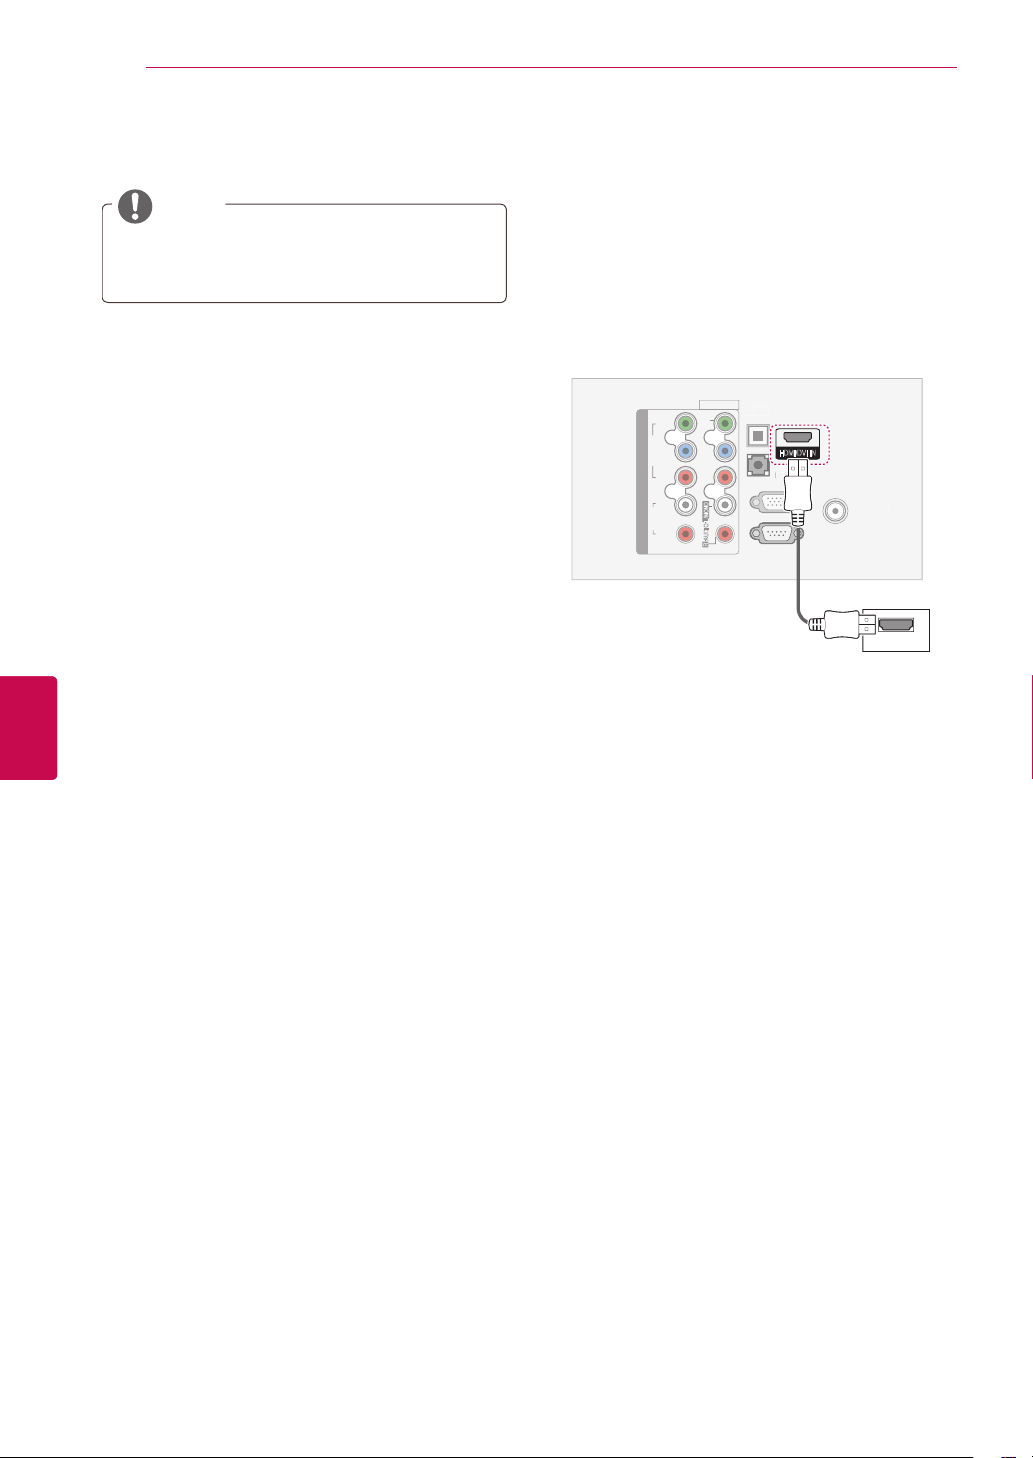
MAKING CONNECTIONS
AUDI
O I
N
(
R
GB/DV
I
)
O
P
TI
CAL
D
T
A
L
AUDIO OUT
C
)
N
(CO
)
84
ENGLISH
ENG
Connecting to a PC
NOTE
It is recommended to use the TV set with the
HDMI connection for the best image quality.
HDMI connection
Transmits the digital video and audio signals from
your PC to the TV. Connect the PC and the TV
with the HDMI cable as shown in the following
illustrations.
AV IN 1
VIDEO
L/MONO
AUDIO
R
IGI
1
HDMI/DVI IN
RGB IN (P
2
RS-232C I
NTROL & SERVICE
IN
HDMI
Y
B
P
VIDEO
R
P
COMPONENT IN
L
AUDIO
R
1
Page 85
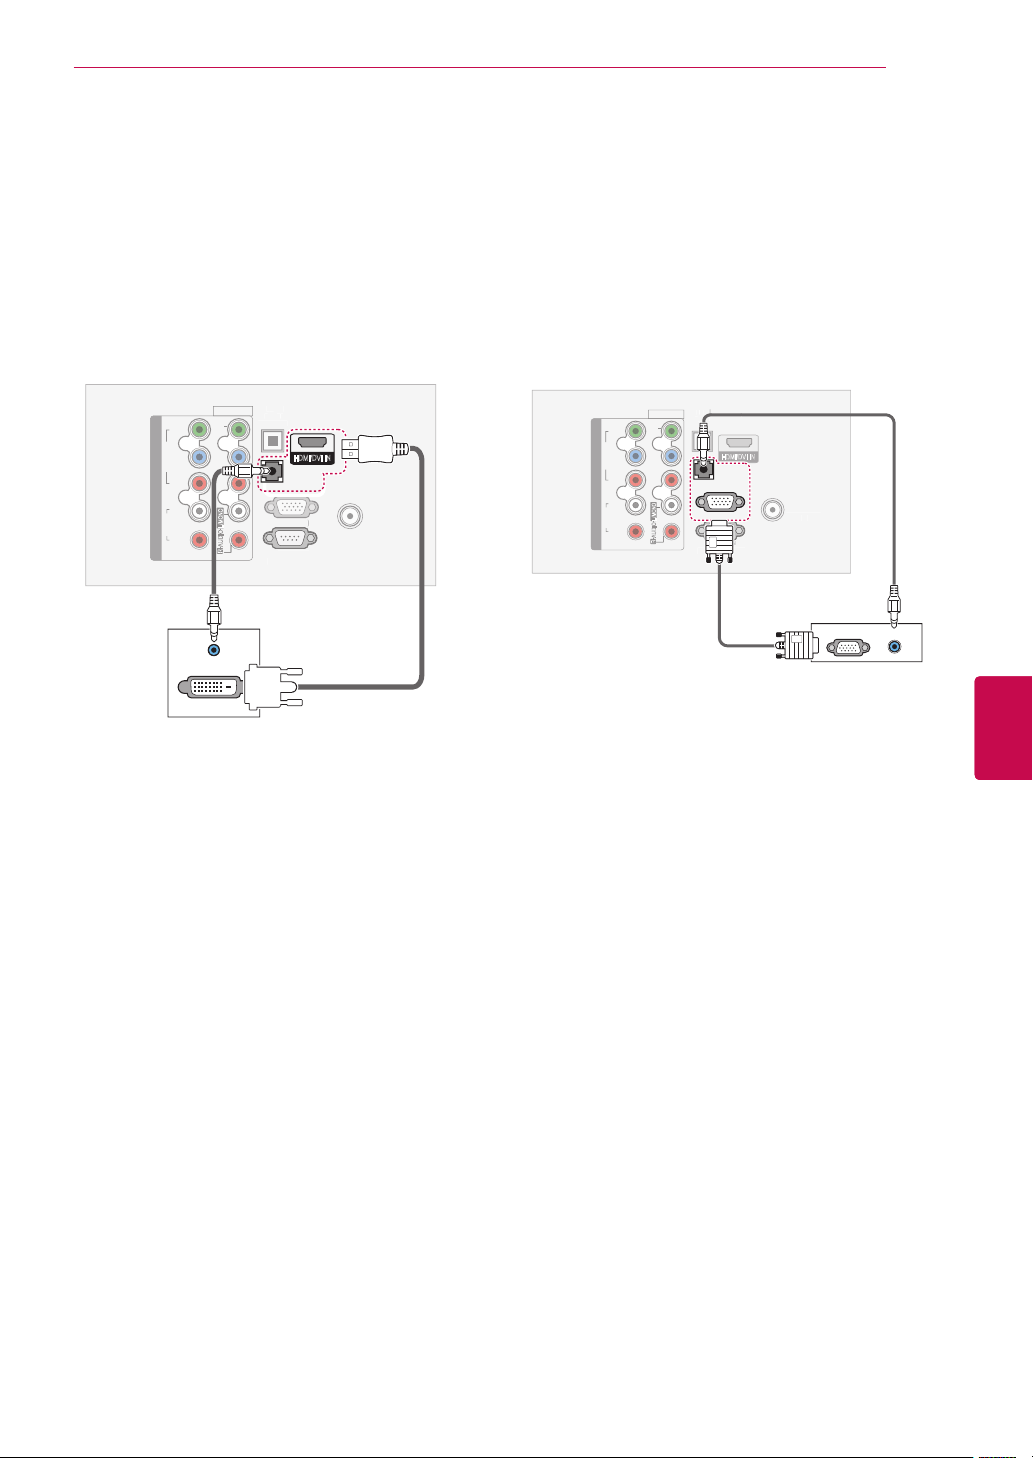
MAKING CONNECTIONS
O
P
TI
CAL
D
T
A
L
AUDIO OUT
RS-232C IN
(CO
)
ANTENNA
O
C
D
IG
A
L
AUDIO OUT
RG
C
)
RS
N
(CO
)
ANTENNA
85
DVI to HDMI connection
Transmits the digital video signal from your PC to
the TV. Connect the PC and the TV with the DVIHDMI cable as shown in the following illustration.
To transmit an audio signal, connect an audio
cable.
AL
AV IN 1
VIDEO
L/MONO
AUDIO
R
IT
1
HDMI/DVI IN
AUDIO IN
(RGB/DVI)
B IN (P
2
-232C I
NTROL & SERVICE
IN
Y
B
P
VIDEO
R
P
COMPONENT IN
L
AUDIO
R
1
AUDIO OUT
DVI OUT
RGB Connection
Transmits the analogue video signal from your
PC to the TV. Connect the PC and the TV with the
supplied D-sub 15 pin signal cable as shown in the
following illustrations. To transmit an audio signal,
connect an audio cable.
AV IN 1
Y
B
VIDEO
P
R
P
COMPONENT IN
L
AUDIO
R
IGI
VIDEO
L/MONO
AUDIO
R
1
2
HDMI/DVI IN
AUDIO IN
(RGB/DVI)
RGB IN (PC)
NTROL & SERVICE
1
IN
AUDIO OUT
RGB OUT (PC)
ENGENGLISH
Page 86
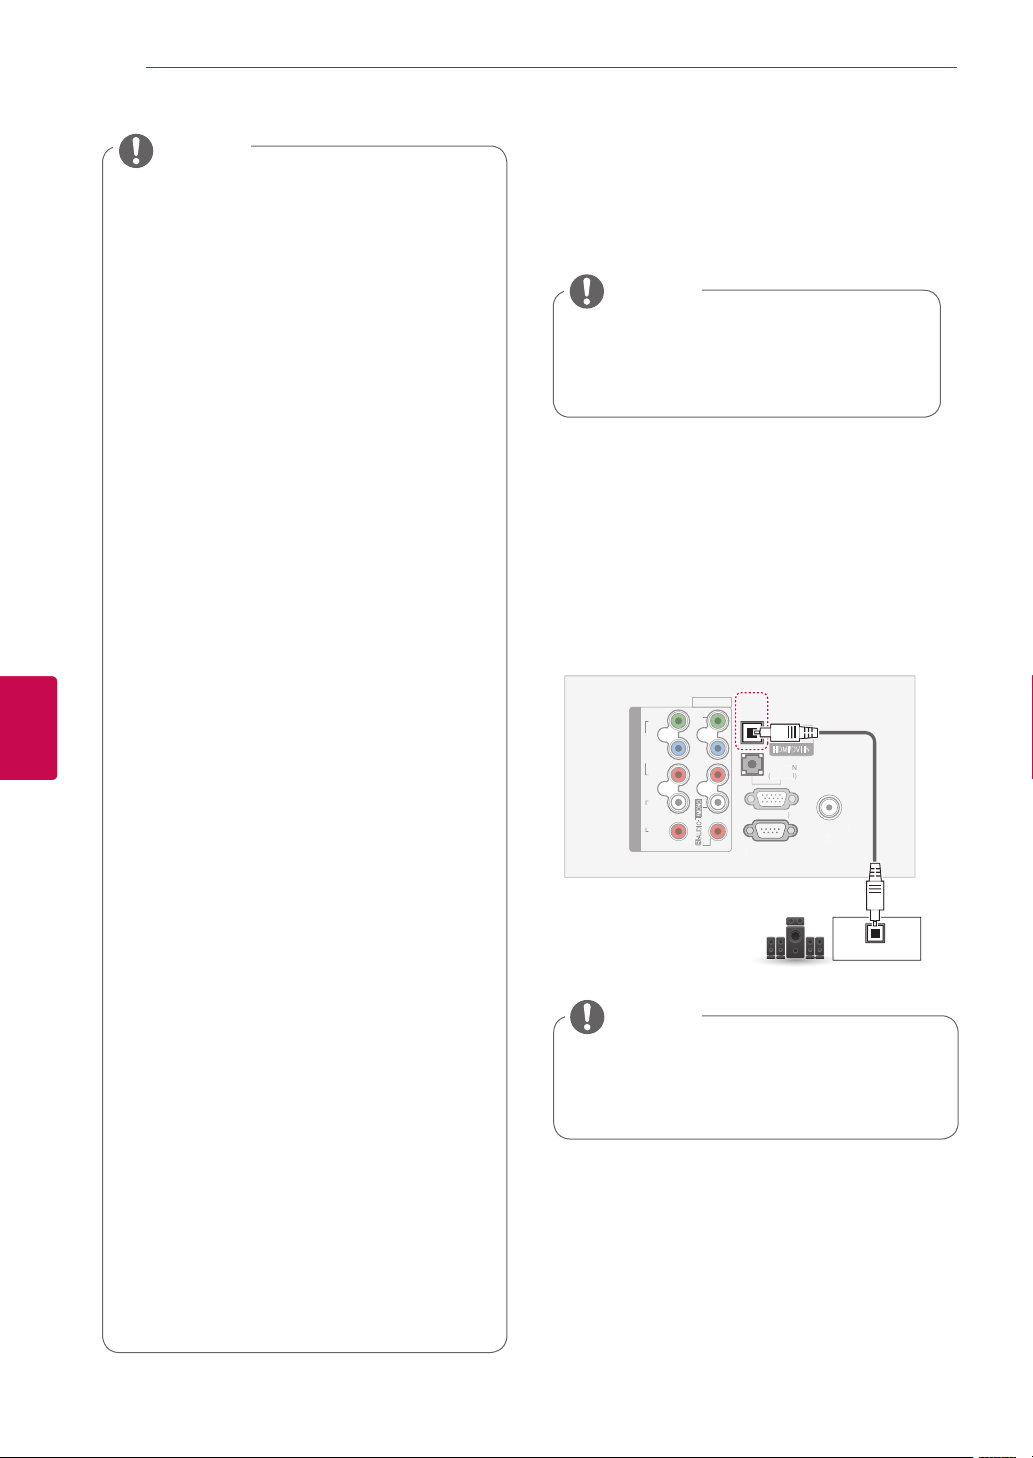
MAKING CONNECTIONS
RS
N
(CO
)
ANTENNA
RG
C
)
AUDI
O I
N
(
GB/DV
)
86
ENGLISH
ENG
NOTE
Avoid keeping a fixed image on the set’s
screen for prolonged periods of time. The
fixed image may become permanently
imprinted on the screen; use a screen
saver when possible.
There may be interference relating to
resolution, vertical pattern, contrast or
brightness in PC mode. Change the PC
mode to another resolution or change the
refresh rate to another rate or adjust the
brightness and contrast on the menu until
the picture is clear. If the refresh rate of
the PC graphic card cannot be changed,
change the PC graphic card or consult
the manufacturer of the PC graphic card.
The synchronization input waveform for
Horizontal and Vertical frequencies are
separate.
We recommend using 1920x1080,
60 Hz(Except for 42/50PT25**,
42/50PW35**, 42/50PW45**,
42/50PT35**, 22/26/32LK33**,
19/22/26/32LV25**, 26/32LV30**,
32LV33**), 1360x768, 60 Hz(Only
22/26/32LK33**, 19/22/26/32LV25**,
26/32LV30**, 32LV33**), 1024x768, 60
Hz(Only 42/50PT25**, 42/50PW35**,
42/50PW45**, 42/50PT35**) for the PC
mode, this should provide the best picture
quality.
Connect the signal cable from the monitor
output port of the PC to the RGB (PC)
port of the TV or the signal cable from the
HDMI output port of the PC to the HDMI
IN (or HDMI/DVI IN) port on the TV.
Connect the audio cable from the PC to
the Audio input on the TV. (Audio cables
are not included with the TV).
If using a sound card, adjust PC sound
as required.
If the graphic card on the PC does
not output analogue and digital RGB
simultaneously, connect only one of
either RGB or HDMI IN (or HDMI/DVI IN)
to display the PC output on the TV.
DOS mode may not work depending on
the video card if you use an HDMI to DVI
cable.
If you use too long an RGB-PC cable,
there may be interference on the screen.
We recommend using under 5m of cable.
This provides the best picture quality.
Connecting to an audio system
Use an external audio system instead of the builtin speaker.
NOTE
If you use an external audio device
instead of the built-in speaker, set the TV
speaker feature to off (See p.74).
Digital optical audio connection
Transmits the digital audio signal from the TV to an
external device. Connect the external device and
the TV with the optical audio cable as shown in the
following illustration.
OPTICAL
AV IN 1
VIDEO
L/MONO
AUDIO
R
DIGITAL
AUDIO OUT
1
HDMI/DVI IN
B IN (P
2
-232C I
NTROL & SERVICE
IN
OPTICAL
AUDIO IN
Y
B
VIDEO
P
R
P
COMPONENT IN
L
AUDIO
R
1
NOTE
Do not look into the optical output port.
Looking at the laser beam may damage
your vision.
Page 87
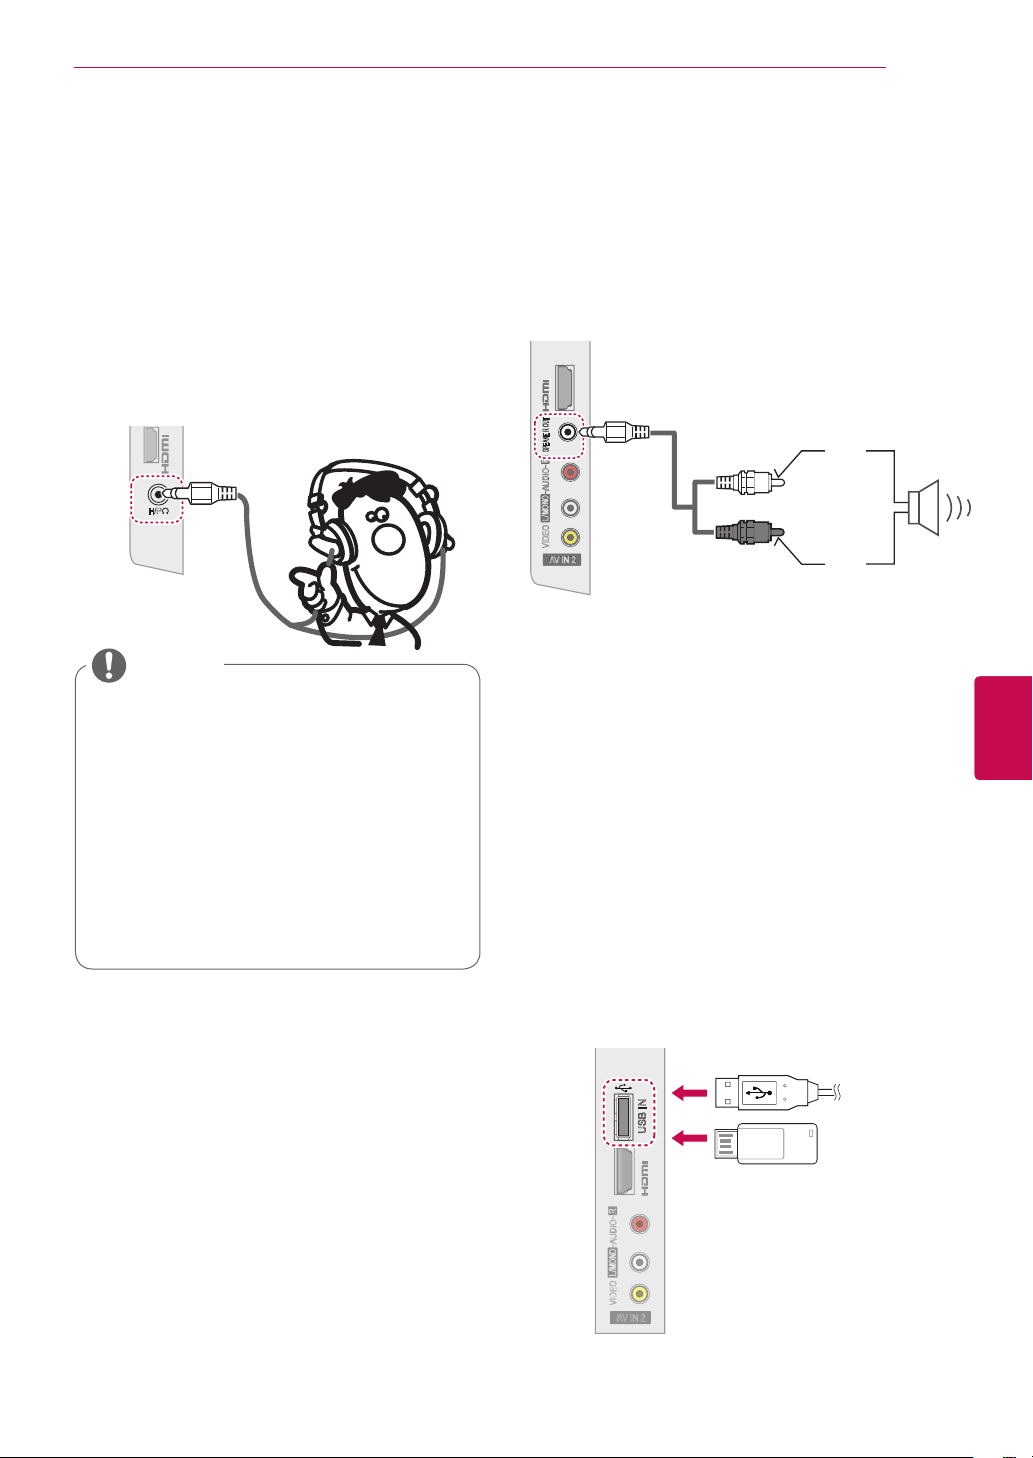
MAKING CONNECTIONS
USB IN
3
AUDIO
A
AUDIO
A
B IN
N
3
87
Headphone connection
This feature is not available for all models.
(Except for Plasma TV, 32/42LV34**, 26/32LV30**,
32/37/42/47LK455C, 32/42LV33**)
Transmits the headphone signal from the TV to
an external device. Connect the external device
and the TV with the headphone as shown on the
following illustration.
H/P
NOTE
AUDIO menu items are disabled when
connecting a headphone.
When changing AV MODE with a
headphone connected, the change is
applied to video but not to audio.
Optical Digital Audio Out is not available
when connecting a headphone.
Headphone impedance: 16 Ω
Max audio output of headphone: 10 mW
to 15 mW
Headphone jack size: 0.35 cm
Speaker output Setup
This feature is not available for all models.
(Only 32/37/42/47LK455C)
Connect the external speaker to the SPEAKER
OUT(STEREO) jack on the TV.
IN 3
IN
SPEAKE R OUT
R
AUDIO
L/MONO
VIDEO
AV IN 2
LEFT
RIGHT
Connecting to a USB
Connect a USB storage device such as s USB
flash memory, external hard drive, a USB memory
card reader to the TV and access the My media
menu to use various multimedia files. See
"Connecting USB storage devices" on p.55 and see
"Browsing files" on p.56 .
ENGENGLISH
USB IN
IN 2
R
or
Page 88
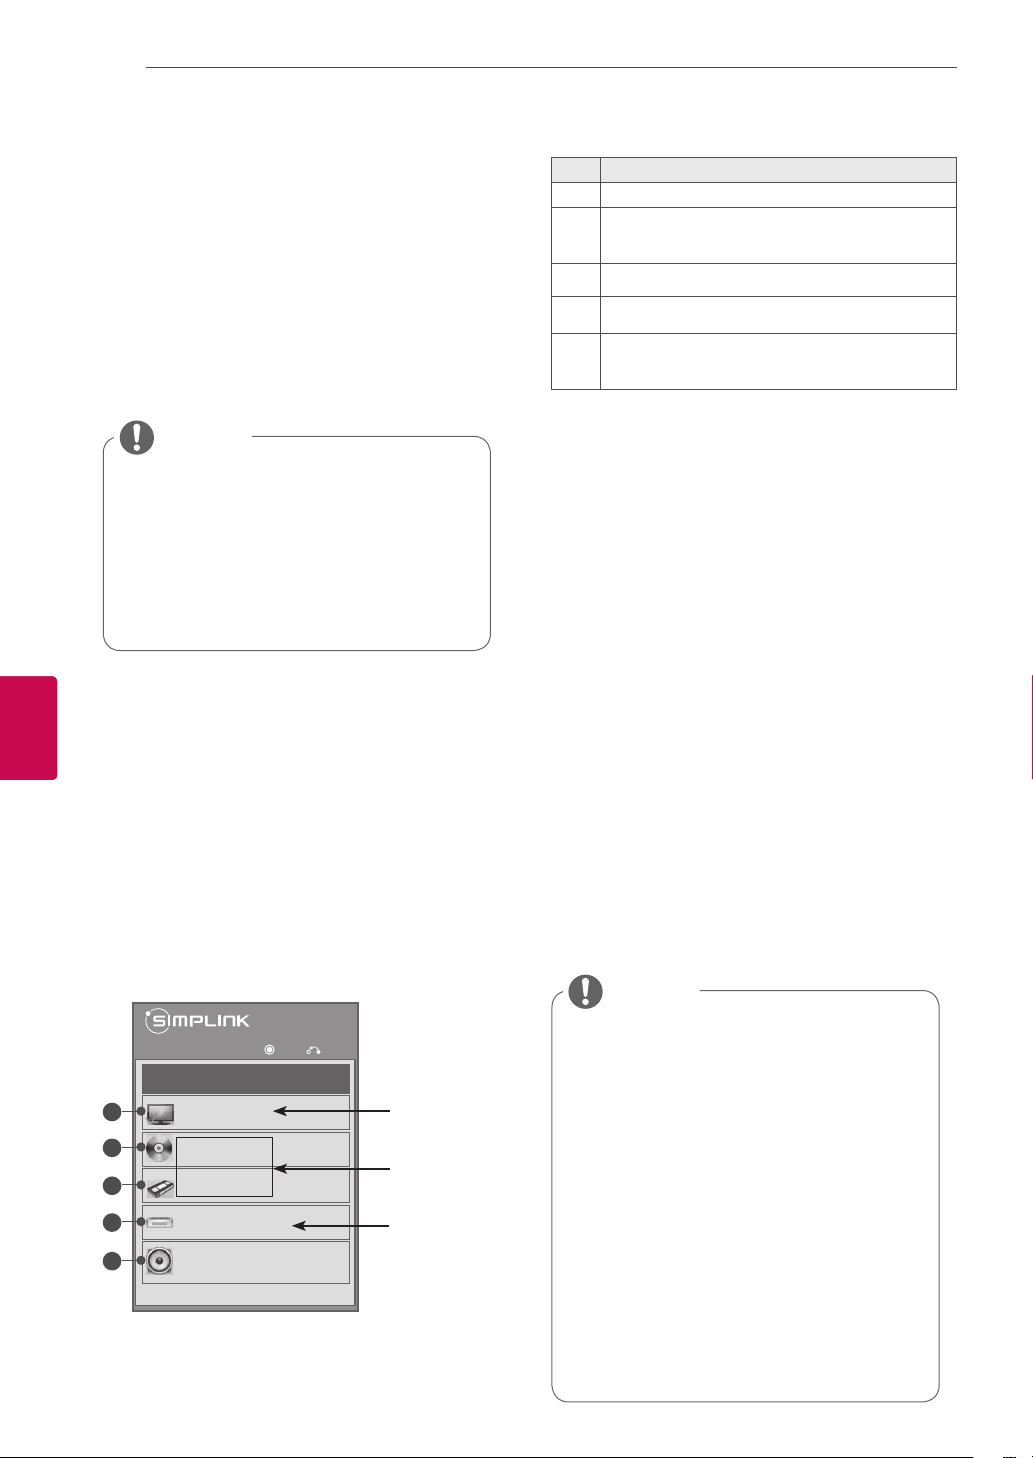
MAKING CONNECTIONS
88
ENGLISH
ENG
SIMPLINK connection
Use the TV remote control to play and control the
AV device connected with the HDMI cable through
HDMI-CEC. Your TV only works with the devices
that support HDMI-CEC.
Connect one end of the HDMI cable to the HDMI/
DVI IN or HDMI IN terminal on the rear of the TV
and the other end to the SIMPLINK device.
NOTE
If the connected device does not support
HDMI-CEC, the SIMPLINK feature is
unavailable.
To operate SIMPLINK, an High Speed
HDMI Cable with *CEC function should
be used. (*CEC: Consumer Electronics
Control).
Activating the SIMPLINK feature
Press SIMPINK to access the SIMPLINK
1
menus.
Press the Navigation buttons to scroll to On.
2
Press the Navigation buttons to scroll to one of
3
the devices and press OK.
Image shown may differ from your TV.
No. Description
Displays the previously viewed TV channel.
1
Plays discs. When multiple discs are available,
the title of the disc appears at the bottom of the
2
screen.
Controls the connected VCR.
3
HDD recordings playback: Controls the recording
4
stored in HDD.
Audio out to Home theatre speaker or Audio out
to TV: Changes the audio output between Home
5
theatre speaker and TV speaker.
- A check mark appears in front of the selected
device.
- Available devices display in a bright colour.
- Unavailable devices display in grey.
4 Control the selected AV device.
- Direct Play: After connecting AV devices to
the TV, you can directly control the devices
and play media without additional settings.
- Select AV device: Enables you to select one
of the AV devices connected to the TV.
- Disc playback: Control connected AV de-
vices by pressing the Navigation buttons,
►, ▀, l l, ◄◄
- Power off all devices: When you power off
the TV, all connected devices are turned off.
- Switch audio-out: Offers an easy way to
switch audio-out.
- Sync Power on: When the equipment with
SIMPLINK function connected HDMI terminal
starts to play, The TV will automatically turn
on.
NOTE
and
►► buttons.
OK,
◄ On ►
1
2
3
4
5
Watch TV
DISC
VCR
HDD Recorder
VCR
Speaker
If you change the input source by
Exit
OK
pressing INPUT, the progressing function
of the SIMPLINK device will stop.
If you select a device that has the
Selected Device
When a device is
connected (displayed
in bright colour)
When device is
not connected
(displayed in gray)
Home theatre feature, the sound output
automatically switches to the Home
theatre speaker and the TV speaker turns
off.
If a connected SIMPLINK Home theatre
system does not play the audio from the
TV, connect the DIGITAL AUDIO OUT
terminal on the rear of the TV to the
DIGITAL AUDIO IN terminal on the back
of the SIMPLINK device with an optical
cable.
Page 89

TELETEXT
TELETEXT
89
This feature is not available in all countries.
Teletext is a free service broadcast by most TV
stations which gives up to the minute information
on news, weather, television programmes, share
prices and many other topics.
The teletext decoder of this TV can support the
SIMPLE, TOP and FASTEXT systems. SIMPLE
(standard teletext) consists of a number of pages
which are selected by directly entering the corresponding page number. TOP and FASTEXT are
more modern methods allowing quick and easy
selection of teletext information.
Switch On/Off
Press the TEXT button to switch to teletext. The
initial page or last page appears on the screen.
Two page numbers, TV station name, date and
time are displayed on the screen headline. The
first page number indicates your selection, while
the second shows the current page displayed.
Press the TEXT button to switch off teletext. The
previous mode reappears.
Simple Text
Page selection
1 Enter the desired page number as a three-digit
number with the NUMBER buttons. If during
selection you press a wrong number, you must
complete the three-digit number and then reenter the correct page number.
2 The P
previous or next page.
v button can be used to select the
^
Top Text
The user guide displays four fields-red, green,
yellow and blue at the bottom of the screen. The
yellow field denotes the next group and the blue
field indicates the next block.
Block / Group / Page Selection
1 With the blue button you can progress from
block to block.
ENGENGLISH
2 Use the yellow button to proceed to the next
group with automatic overflow to the next
block.
3 With the green button you can proceed to the
next existing page with automatic overflow to
the next group.
4 Alternatively, the P
The RED button permits you to return to previous selection. Alternatively, the P v button can
be used.
button can be used.
^
Direct Page Selection
As with SIMPLE teletext mode, you can select a
page by entering it as a three digit number using
the NUMBER buttons in TOP mode.
Page 90
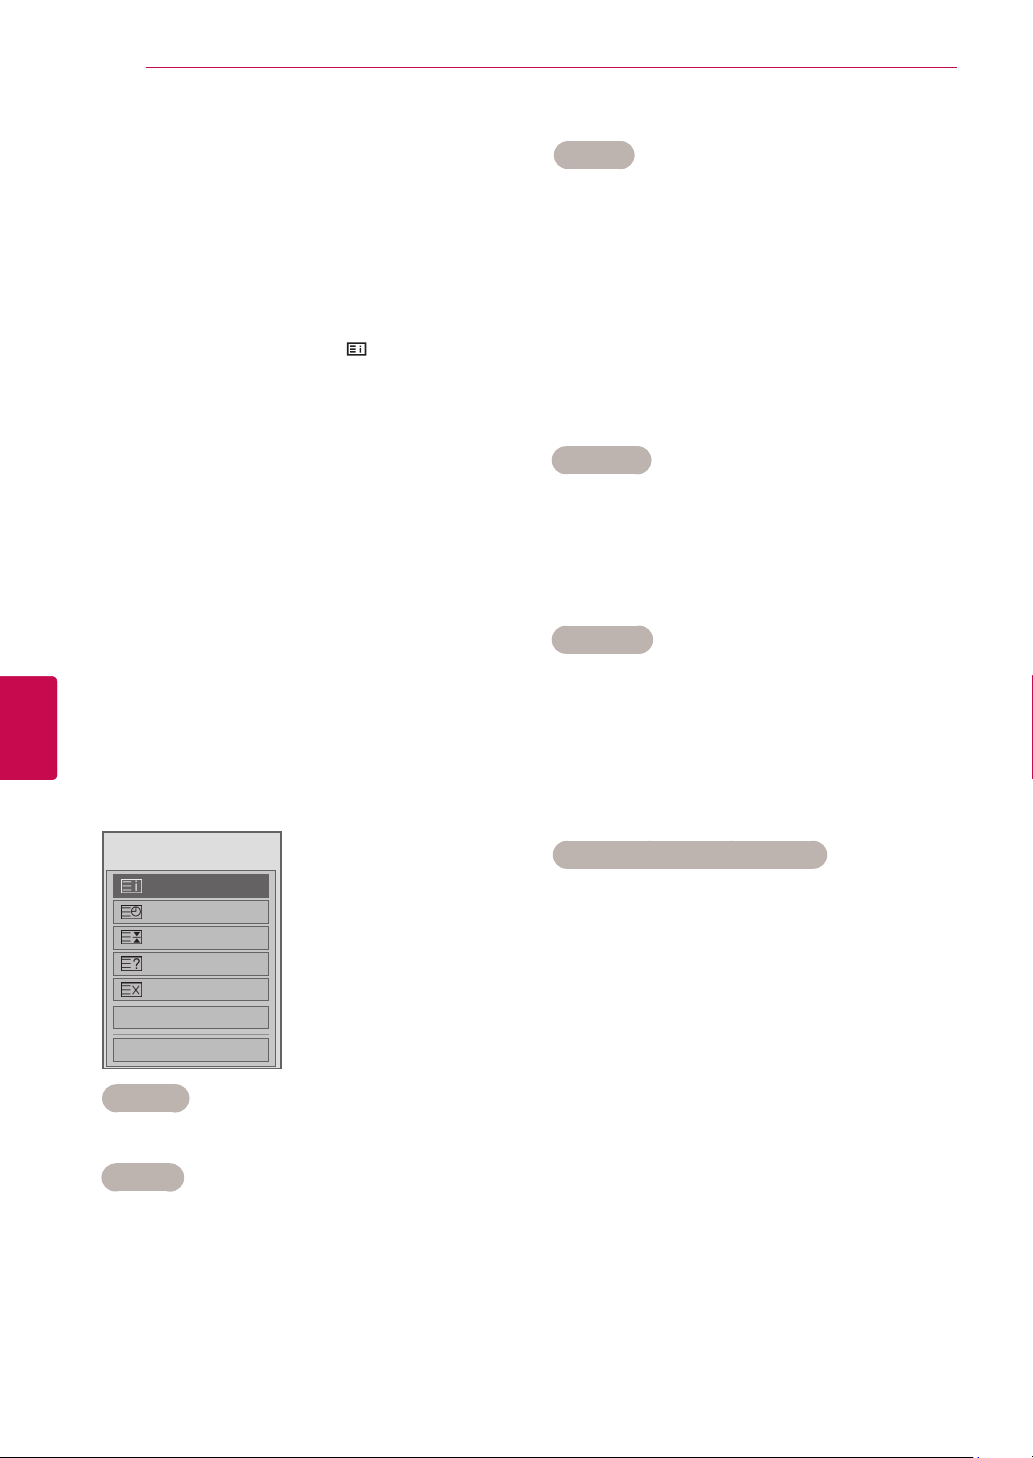
90
TELETEXT
ENGLISH
ENG
Fastext
The teletext pages are colour coded along the bottom of the screen and are selected by pressing the
corresponding coloured button.
Page selection
1 Press the T.OPT button and then use the
Navigation button to select
the index page.
2 You can select the pages which are colour
coded along the bottom line with corresponding
coloured buttons.
3 AS with SIMPLE teletext mode, you can select
a page by entering its three digit page number
with the NUMBER buttons in FASTEXT mode.
4 The P
preceding or following page.
v button can be used to select the
^
menu. Display
Special Teletext Function
(Depending on model)
Press the T. OPT button and then use Navigation
buttons to select the Text Option menu.
Image shown may differ from your TV.
ꕀ Hold
Stops the automatic page change which will
occur if a teletext page consists of 2 or more
sub pages.
The number of sub pages and the sub page
displayed is, usually, shown on the screen
below the time. When this menu is selected the
stop symbol is displayed at the top left-hand
corner of the screen and the automatic page
change is inactive.
ꔽ Reveal
Select this menu to display concealed information, such as solutions to riddles or puzzles.
ꔼ
Update
Displays the TV picture on the screen while
waiting for a new teletext page. The display
will appear at the top left hand corner of the
screen. When the updated page is available
then display will change to the page number.
Select this menu again to view the updated
teletext page.
Text Option
Index
Time
Hold
Reveal
Update
Language
Close
ꔻ
Index
Select the each index page.
ꔾ Time
When viewing a TV programme, select this
menu to display the time at the top right hand
corner of the screen.
In the teletext mode, press this button to select
a sub page number. The sub page number
is displayed at the bottom of the screen. To
hold or change the sub page, press the RED/
GREEN, < > or NUMBER buttons.
Language(Depending on model)
In digital mode, Displays the currently available
language information and you can change the
desired Teletext language.
Page 91
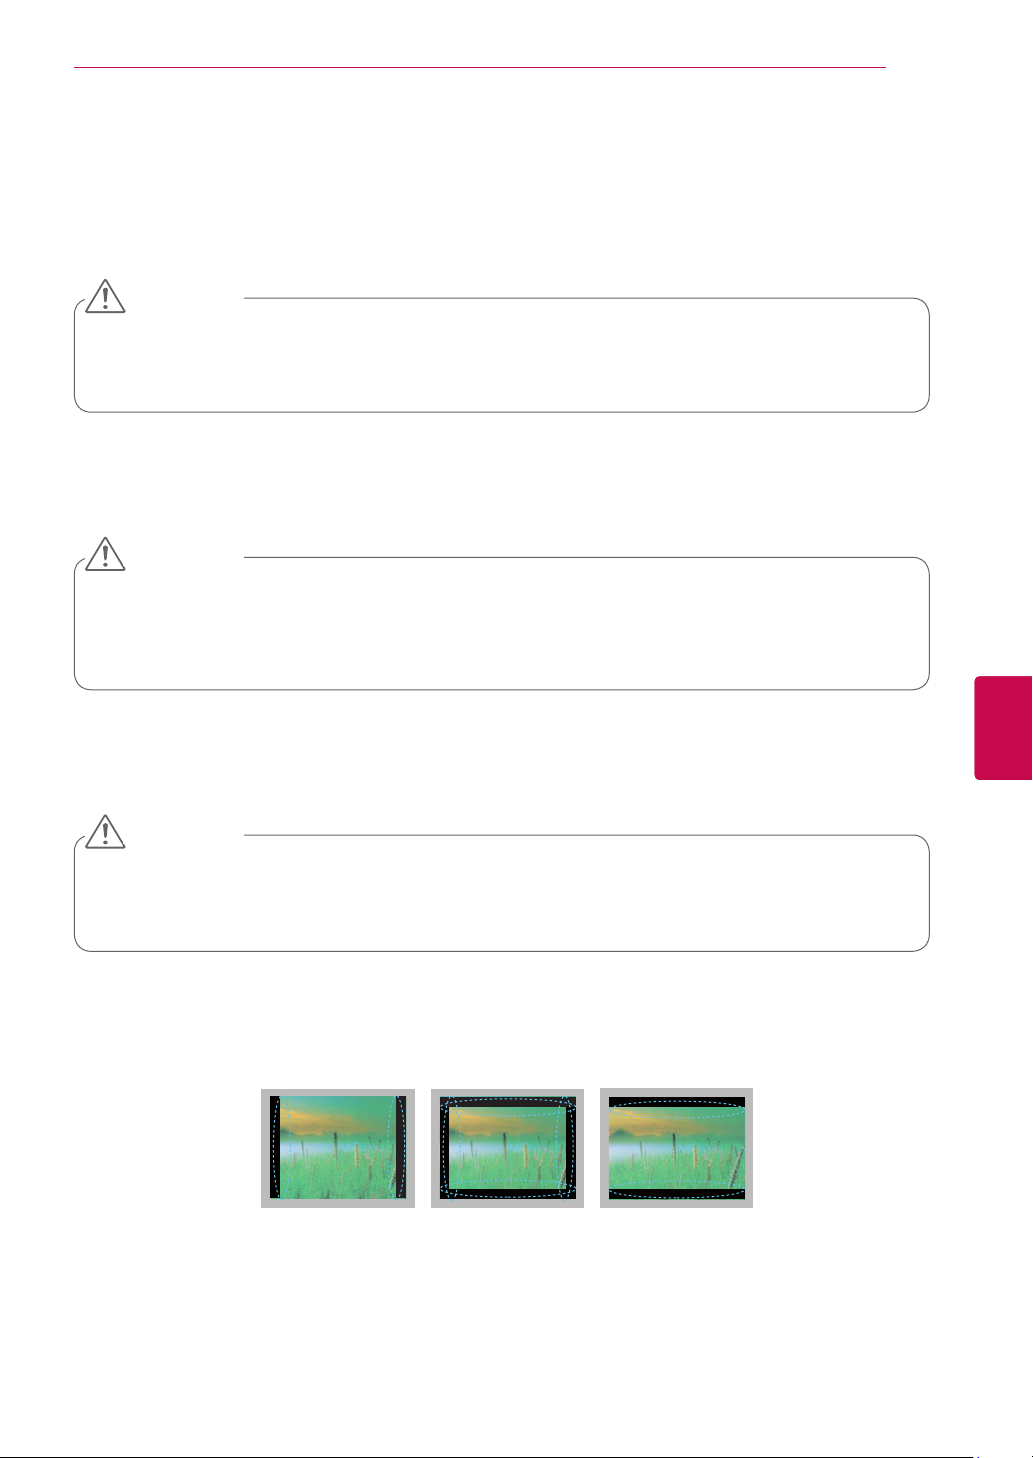
MAINTENANCE
91
MAINTENANCE
Update and clean your TV regularly to keep the best performance and to extend the product lifespan.
Cleaning your TV
CAUTION
Make sure to turn the power off and disconnect the power cord and all other cables first.
When the TV is left unattended and unused for a long time, disconnect the power cord from the wall
outlet to prevent possible damage from lightning or power surges.
Screen and frame
To remove dust or light dirt, wipe the surface with a dry, clean, and soft cloth.
To remove major dirt, wipe the surface with a soft cloth dampened in clean water or a diluted mild detergent.
Then wipe immediately with a dry cloth.
CAUTION
Do not push, rub, or hit the surface with your fingernail or a sharp object, as this may result in
scratches on the screen and image distortions.
Do not use any chemicals, such as waxes, benzene, alcohol, thinners, insecticides, air fresheners,
lubricants, as these may damage the screen’s finish and cause discolouration.
Cabinet and stand
To remove dust or light dirt, wipe the cabinet with a dry, clean, and soft cloth.
To remove major dirt, wipe the cabinet with a soft cloth dampened in a clean water or water containing a
small amount of mild detergent. Then wipe immediately with a dry cloth.
CAUTION
Do not spray liquid onto the surface. If water enters the TV, it may result in fire, electric shock, or
malfunction.
Do not use any chemicals as this may deteriorate the surface.
Power cord
Remove the accumulated dust or dirt on the power cord regularly.
Preventing “Image burn” or “Burn-in” on your TV screen
If a fixed image displays on the TV screen for a long period of time, it will be imprinted and become
a permanent disfigurement on the screen. This is “image burn” or “burn-in” and not covered by the
warranty.
If the aspect ratio of the TV is set to 4:3 for a long period of time, image burn may occur on the
letterboxed area of the screen.
Avoid displaying a fixed image on the TV screen for a long period of time (2 or more hours for LCD,
1 or more hours for the Plasma TV) to prevent image burn.
ENGENGLISH
Page 92
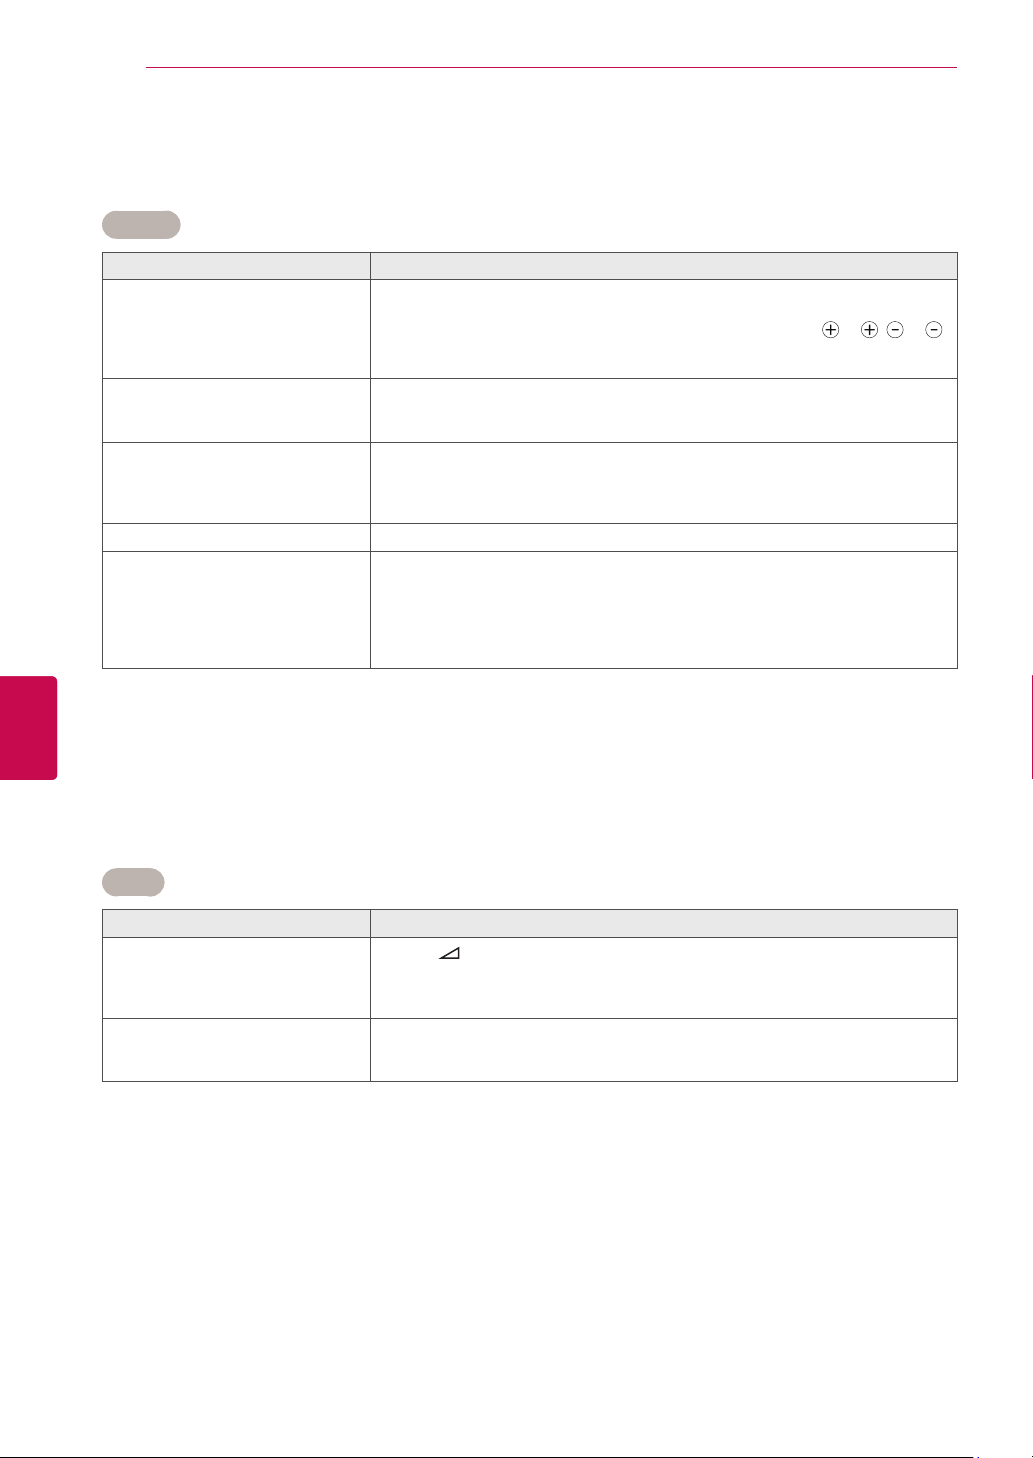
ENGLISH
ENG
TROUBLESHOOTING
92
TROUBLESHOOTING
General
Problem Resolution
Cannot control the TV with the
remote control.
No image display and no sound is
produced.
Image appears slowly when the TV
turns on.
Cannot connect external devices.
The TV turns off suddenly.
Check the remote control sensor on the product and try again.
Check if there is any obstacle between the product and the remote control.
Check if the batteries are still working and properly installed (
Check if the appropriate input mode such as TV or VCR is set for using the
remote control.
Check if the product is turned on.
Check if the power cord is connected to a wall outlet.
Check if there is a problem in the wall outlet by connecting other products.
The image is muted during the product start up process. This is normal. If the
image does not appear in a few minutes, unplug the TV for 30 seconds and try
again. If the image still does not appear, contact the authorized service centre
in your local area.
See "Connection overview" on p.81 and connect an external device.
Check the power control settings. The power supply may be interrupted.
Check if the Auto sleep feature is activated in the Time settings.
See "Sleep Timer" on p.76.
If there is no signal while the TV is on, the TV will turn off automatically after
15 minutes of inactivity.(Except for 22/26/32LK335C, 32/37/42/47/55LV355C,
32/37/42/47LK455C)
to , to ).
Audio
Problem Resolution
No sound is produced while images
are displaying.
One of the speakers produce noises
or does not produce sound.
Press
Check if the sound is muted by pressing MUTE.
Scroll to other channels. There may a problem with the broadcast.
Check if the audio cables are connected properly.
A change in ambient humidity or temperature may result in an unusual noise
when the product turns on or off.
There is no problem with your product.
+ or - button.
Page 93
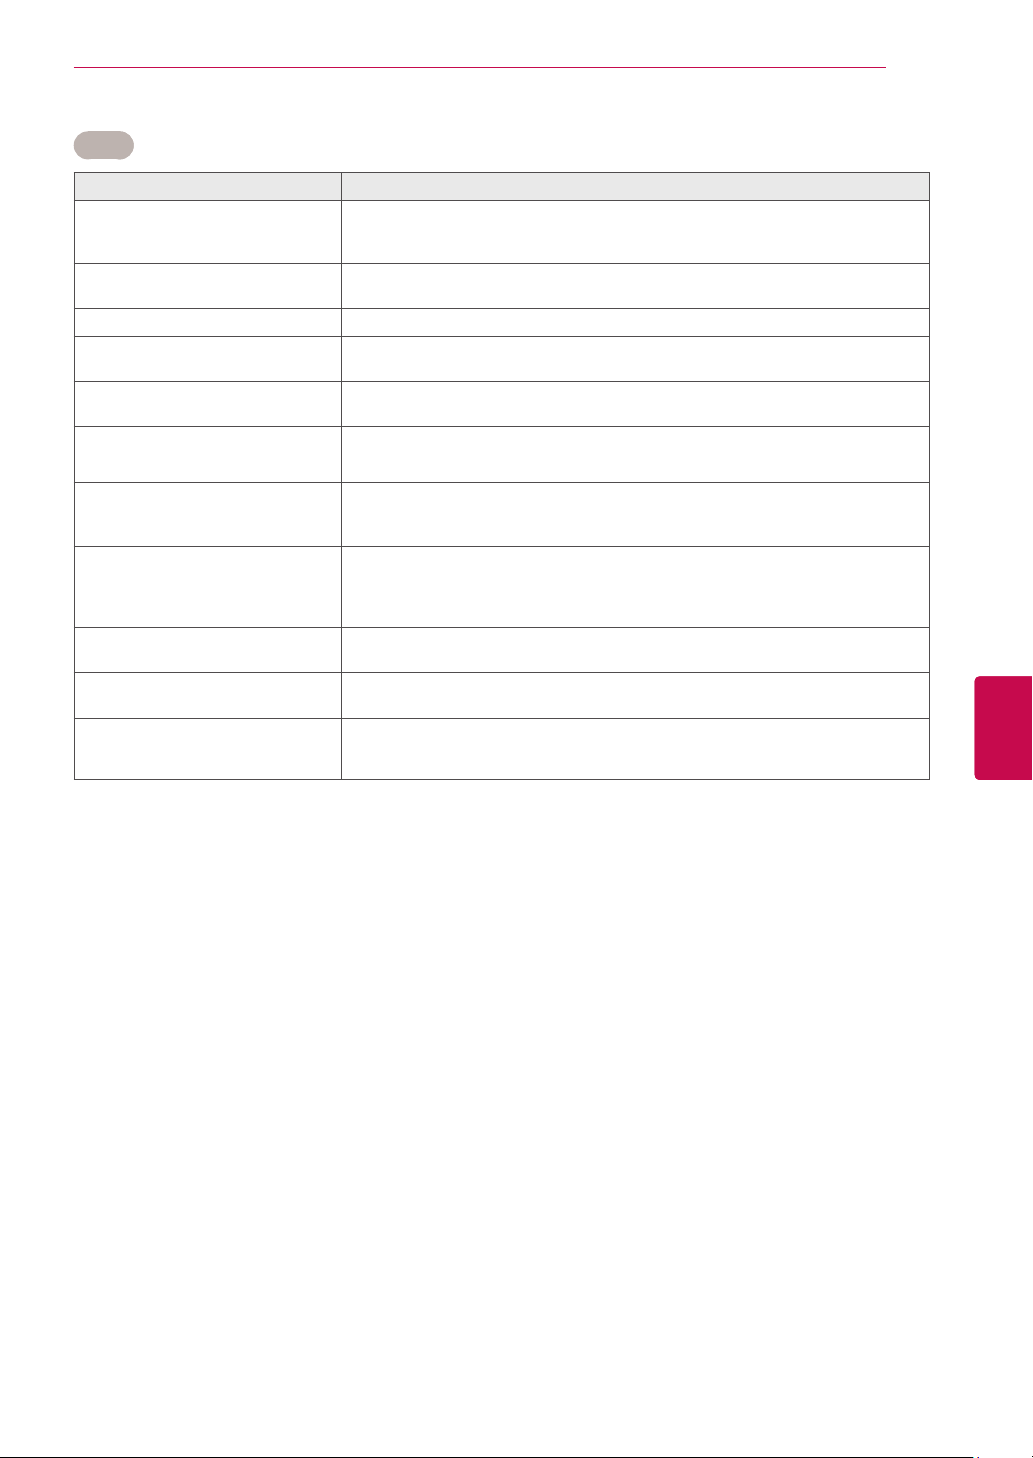
TROUBLESHOOTING
Video
Problem Resolution
An image displays in black and
white or the colour quality is poor.
Horizontal or vertical bars appears
or images blur
Lines or streaks appear on images
Afterimages (ghosts) appear when
the product turns off
The power is on but the screen
appears extremely dark.
“No Signal” appears on the screen.Check if the signal cable is connected between the TV and products properly.
Adjust the colour setting in the Picture menu (See p.67).
Keep a sufficient distance between this product and other electronic products.
Scroll to other channels. There may a problem with the broadcast.
Check if there are local interferences such as an electrical appliance or power
tool.
Check the antenna or aim the antenna to the proper direction.
Pixels may have been damaged from a fixed image displayed for a long time
(image burn). Use a screen saver to prevent the pixel damage on the screen.
Adjust the brightness and contrast in the Picture menu (See p.67).
Check the selected input source by pressing INPUT.
93
Black spots appear on the screen.
The display offset is wrong.
Thin lines appear in the background
of the screen.
Horizontal noises appear or
characters blur.
The reception on some channels is
poor
Several pixels in red, green, white, or black may appear on the screen that can
attribute to the characteristics of the panel.
This is normal.
Adjust the position setting in the Picture menu (See p.67).
Check if the video card resolution and frequency are supported by the product.
If the frequency is out of range, set to the recommended resolution using the
display settings on the external device.
Check the video cable connections.
Adjust the Phase setting in the Picture menu.
See "SCREEN" on p.69
Scroll to other channels. There may a problem with the broadcast.
The station signal may be weak. Aim the antenna to the proper direction.
Check if there is local interference such as an electrical appliance or power tool.
ENGENGLISH
Page 94
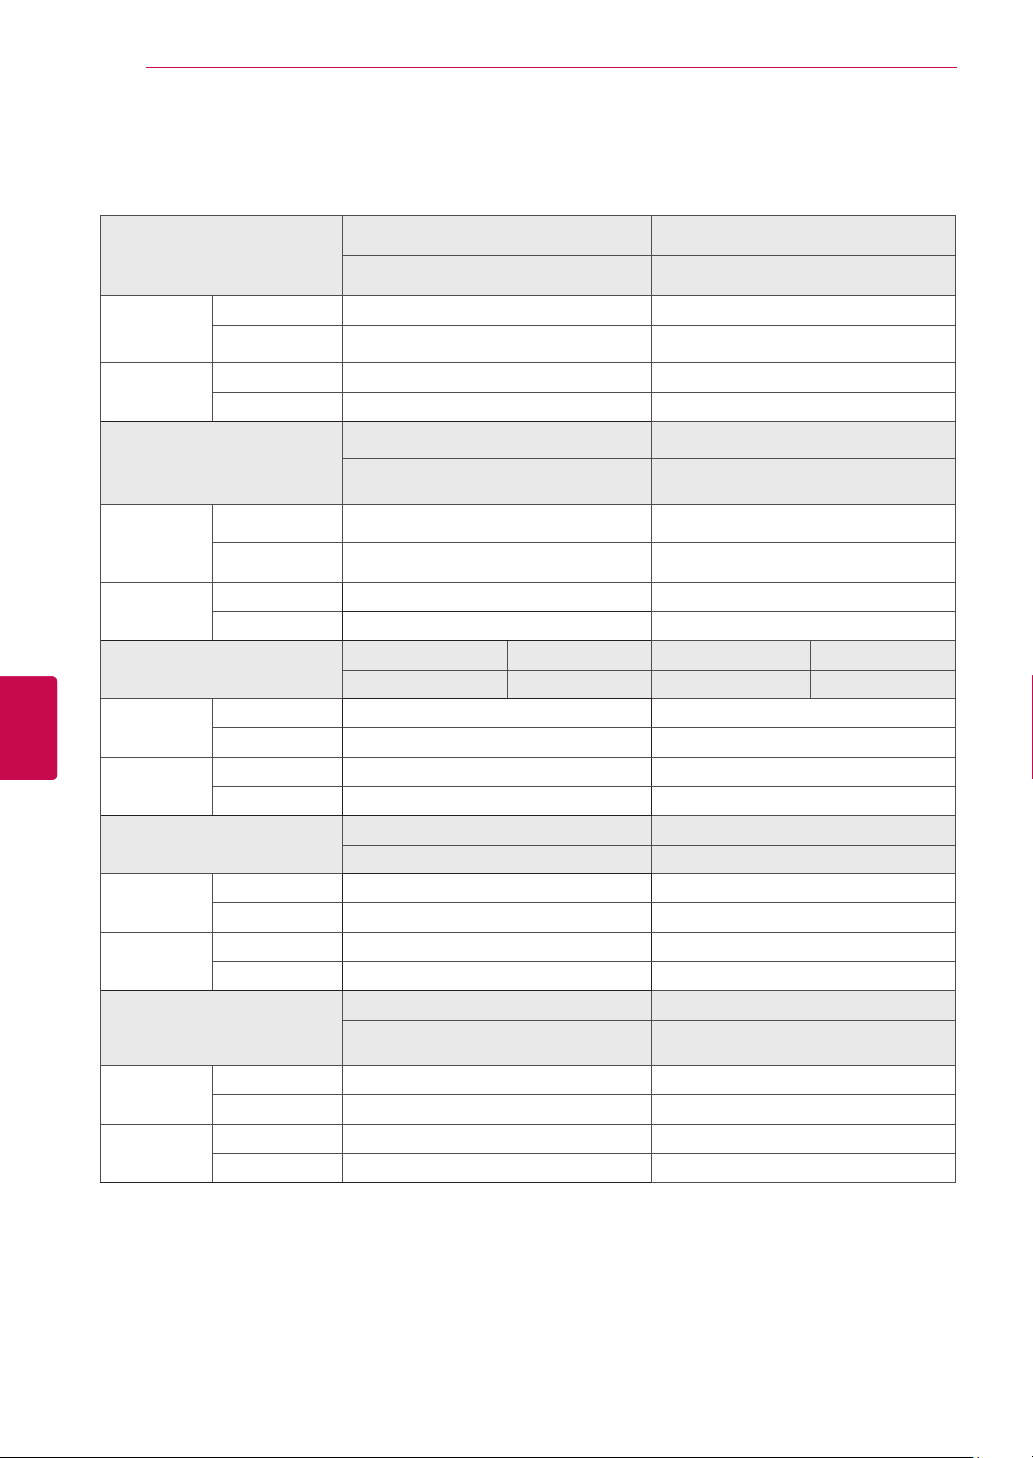
ENGLISH
ENG
SPECIFICATIONS
94
SPECIFICATIONS
42PT25** 50PT25**
MODELS
Dimensions
(W x H x D)
Weight With stand 21.4 kg 29.5 kg
Dimensions
(W x H x D)
Weight With stand 29.8kg 42.6 kg
Dimensions
(W x H x D)
Weight With stand 21.5 kg 29.6 kg
Dimensions
(W x H x D)
Weight With stand 21.5 kg 29.5 kg
Dimensions
(W x H x D)
Weight With stand 29.8 kg 42.6 kg
With stand 987.6 mm x 662.8 mm x 230.5 mm 1171.9 mm x 770.9 mm x 289.8 mm
Without stand 987.6 mm x 608.9 mm x 52.5 mm 1171.9 mm x 712.2 mm x 52.5 mm
Without stand 19.9 kg 27.2 kg
MODELS
With stand 1171.9 mm x 770.9 mm x 289.8 mm 1390.8 mm x 905.2 mm x 334.7 mm
Without stand 1171.9 mm x 712.2 mm x 52.5 mm 1390.8 mm x 835.5 mm x 52.5 mm
Without stand 27.5kg 38.5 kg
MODELS
With stand 991.8 mm x 667 mm x 230.5 mm 1176.1 mm x 774.7 mm x 289.8 mm
Without stand 991.8 mm x 613.8 mm x 52.5 mm 1176.1 mm x 716.5 mm x 52.5 mm
Without stand 20.0 kg 27.3 kg
MODELS
With stand 984 mm x 662.7 mm x 230.5 mm 1168.7 mm x 768.3 mm x 289.7 mm
Without stand 984 mm x 608.9 mm x 52.5 mm 1168.7 mm x 712.2 mm x 52.5 mm
Without stand 20.0 kg 27.2 kg
MODELS
With stand 1172.3 mm x 770.9 mm x 289.8 mm 1391.1 mm x 905.2 mm x 334.7 mm
Without stand 1172.3 mm x 712.2 mm x 52.5 mm 1391.1 mm x 835.5 mm x 52.5 mm
Without stand 27.5 kg 38.5 kg
42PW35** 42PT35** 50PW35** 50PT35**
42PW350-TA 42PT351-TE 50PW350-TA 50PT351-TE
42PW450-TA / 42PW450-TD 50PW450-TA / 50PW450-TD
42PT250-TA 50PT250-TA
50PV25** 60PV25**
50PV250-TA
50PV250-TB
42PW45** 50PW45**
50PZ55** 60PZ55**
50PZ550-TA
50PZ550-TC
60PV250-TA
60PV250-TB
60PZ550-TA
60PZ550-TC
Product specifications shown above may be changed without prior notice due to upgrade of product
functions.
For the power supply and power consumption, refer to the label attached to the product.
Page 95
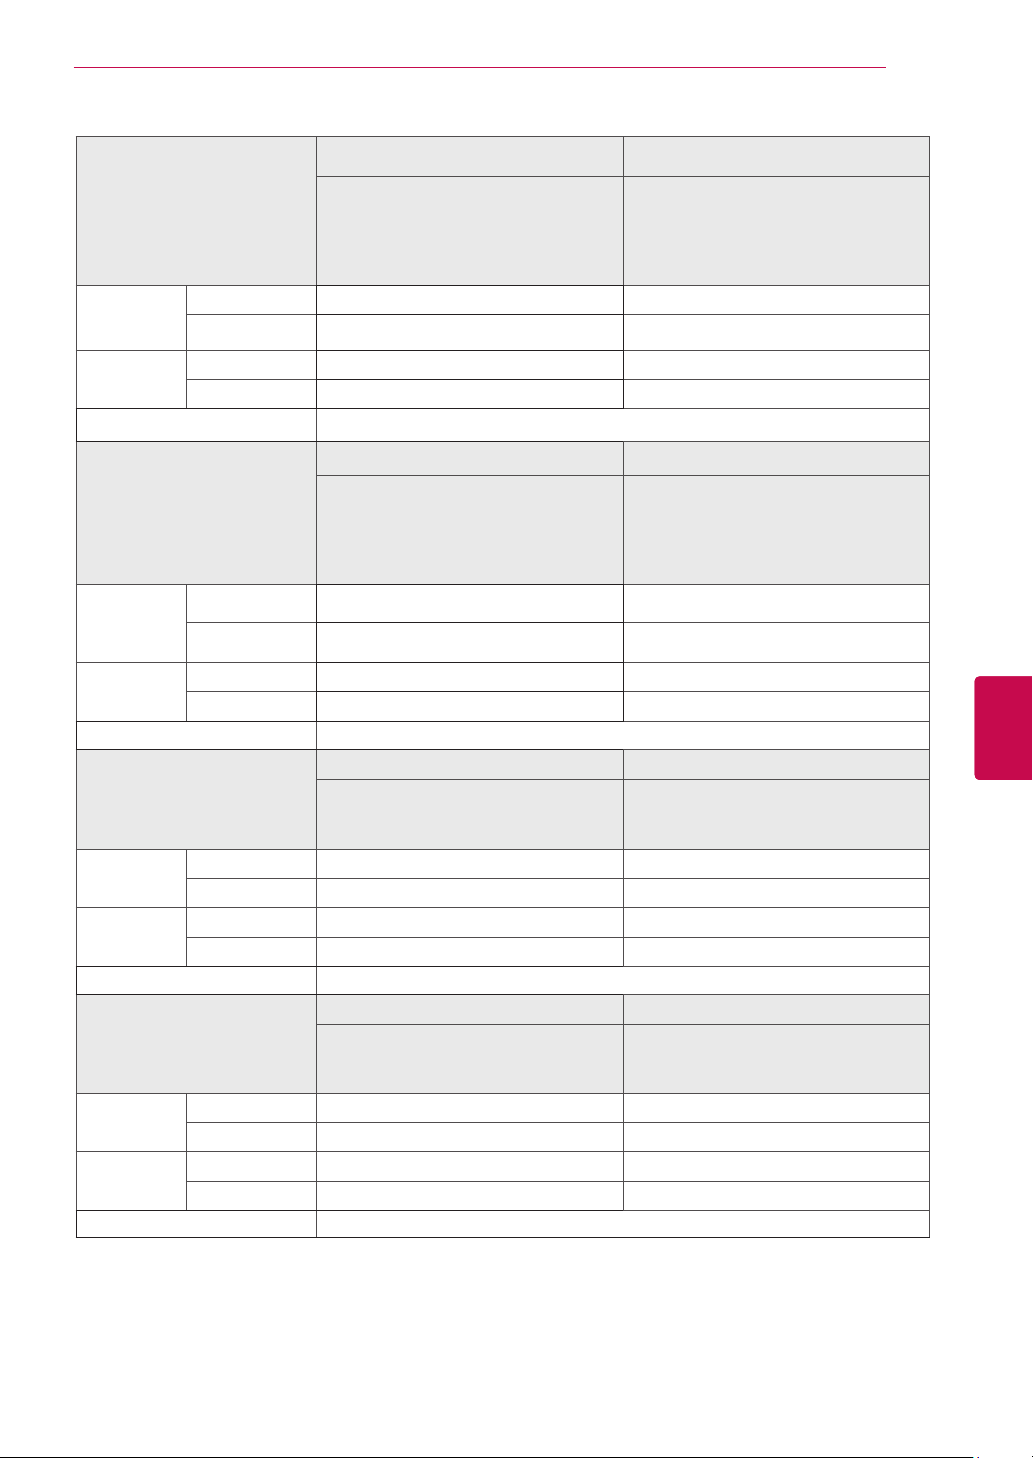
22LK33** 26LK33**
22LK330-TA / 22LK330-TH
MODELS
22LK335C-TB / 22LK335C-TH
Dimensions
(W x H x D)
Weight With stand 4.3 kg 7.6 kg
Power requirement AC 100-240 V~ 50 / 60 Hz
Dimensions
(W x H x D)
With stand 526.0 mm x 377.0 mm x 165 mm 663.0 mm x 484.0 mm x 207 mm
Without stand 526.0 mm x 331.0 mm x 65 mm 663.0 mm x 423.0 mm x 79.9 mm
Without stand 4.0 kg 6.5 kg
MODELS
32LK335C-TB / 32LK335C-TH
32LK330Y-TB / 32LK330Y-TH
With stand 800.0 mm x 565.0 mm x 207 mm 799.0 mm x 555.0 mm x 207.0 mm
Without stand 800.0 mm x 509.0 mm x 73.8 mm 799.0 mm x 516 mm x 73.5 mm
22LK330-TB
22LK332-TC / 22LK332-TJ
22LK330Y-TB
32LK33** 32LK43**
32LK330-TA / 32LK330-TH
32LK330-TB
32LK332-TC / 32LK332-TJ
26LK330-TA / 26LK330-TH
26LK332-TC / 26LK332-TJ
26LK335C-TB / 26LK335C-TH
26LK330Y-TB / 26LK330Y-TH
32LK430-TA / 32LK430-TH
32LK430Y-TB / 32LK430Y-TH
SPECIFICATIONS
26LK330-TB
32LK430-TB
95
Weight With stand 9.6 kg 9.6 kg
Without stand 8.6 kg 8.6 kg
Power requirement AC 100-240 V~ 50 / 60 Hz
42LK43** 42LK53**
MODELS
Dimensions
(W x H x D)
Weight With stand 15.4 kg 15.5 kg
Power requirement AC 100-240 V~ 50 / 60 Hz
Dimensions
(W x H x D)
Weight With stand 20.3 kg 33.0 kg
Power requirement AC 100-240 V~ 50 / 60 Hz
With stand 1023.0 mm x 685.0 mm x 261.0 mm 1024.0 mm x 685.0 mm x 261.0 mm
Without stand 1023.0 mm x 644 mm x 76.6 mm 1024.0 mm x 621.0 mm x 76.8 mm
Without stand 13.7 kg 13.9 kg
MODELS
With stand 1137.0 mm x 758.0 mm x 270.0 mm 1329.0 mm x 872.0 mm x 330.0 mm
Without stand 1137.0 mm x 685.0 mm x 76.8 mm 1329.0 mm x 796.0 mm x 96.5 mm
Without stand 18.3 kg 29.8 kg
42LK430-TA / 42LK430-TH
42LK430-TB
42LK430Y-TB / 42LK430Y-TH
47LK53** 55LK53**
47LK530-TA
47LK530-TC
47LK530Y-TC
ENGENGLISH
42LK530-TA
42LK530-TC
42LK530Y-TC
55LK530-TA
55LK530-TC
55LK530Y-TC
Product specifications shown above may be changed without prior notice due to upgrade of product
functions.
For the power supply and power consumption, refer to the label attached to the product.
Page 96
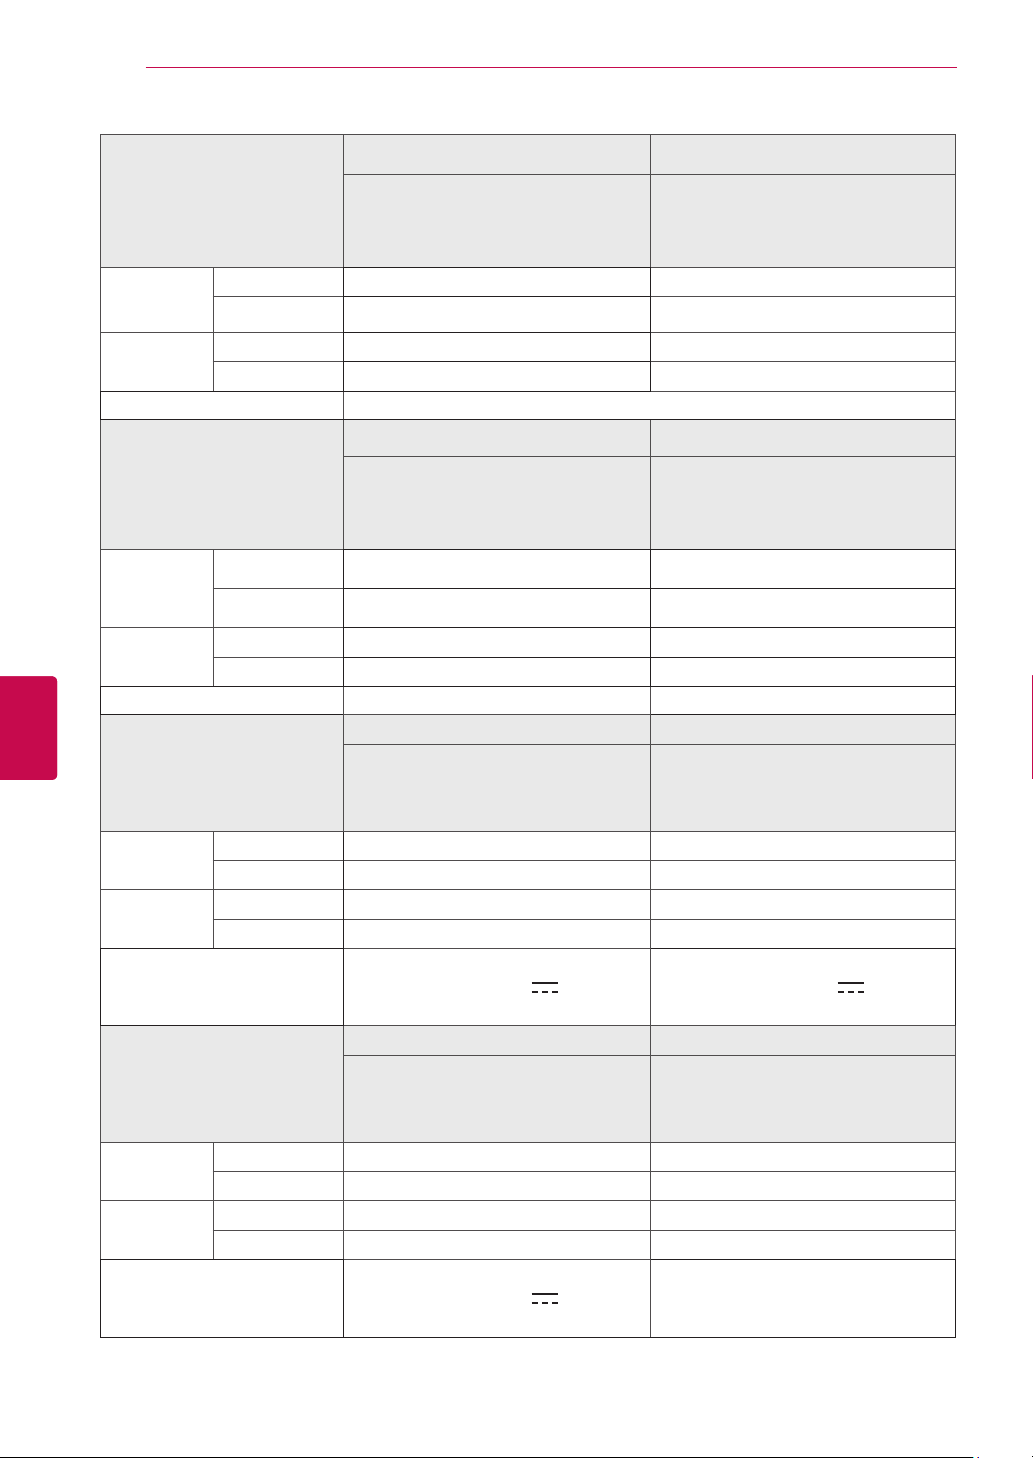
SPECIFICATIONS
96
32LK45** 37LK45**
MODELS
Dimensions
(W x H x D)
Weight With stand 9.6 kg 12.8 kg
Power requirement AC 100-240 V~ 50 / 60 Hz
Dimensions
(W x H x D)
With stand 795.0 mm x 568.0 mm x 207.0 mm 913.0 mm x 639.0 mm x 265.0 mm
Without stand 795.0 mm x 504.0 mm x 73.5 mm 913.0 mm x 571.0 mm x 77.4 mm
Without stand 8.5 kg 11.1 kg
MODELS
With stand 1019.0 mm x 698.0 mm x 265.0 mm 1132.0 mm x 762.0 mm x 265.0 mm
Without stand 1019.0 mm x 631.0 mm x 76.5 mm 1132.0 mm x 695.0 mm x 76.5 mm
32LK450-TA / 32LK450-TG
32LK452-TC / 32LK452-TJ
32LK455C-TA / 32LK455C-TH
32LK450Y-TA
42LK45** 47LK45**
42LK450-TA / 42LK450-TG
42LK452-TC / 42LK452-TJ
42LK455C-TA / 42LK455C-TH
42LK450Y-TA / 42LK450Y-TG
37LK450-TA / 37LK450-TG
37LK452-TC / 37LK452-TJ
37LK455C-TA / 37LK455C-TH
37LK450Y-TA / 37LK450Y-TG
47LK455C-TA / 47LK455C-TH
ENGLISH
ENG
Weight With stand 16.2 kg 19.0 kg
Without stand 14.5 kg 17.3 kg
Power requirement AC 100-240 V~ 50 / 60 Hz AC 100-240 V~ 50 / 60 Hz
19LV25** 22LV25**
MODELS
Dimensions
(W x H x D)
Weight With stand 2.7 kg 3.4 kg
Power requirement
Dimensions
(W x H x D)
Weight With stand 5.4 kg 11.5 kg
Power requirement
With stand 455.2 mm X 355 mm X 145.0 mm 526 mm X 396 mm X 145.0 mm
Without stand 455.2 mm X 313.1 mm X 40.9 mm 526 mm X 352 mm X 40.9 mm
Without stand 2.5 kg 3.2 kg
AC-DC adaptor : 24 V , 2.5 A /
MODELS
With stand 635.6 mm X 475 mm X 169 mm 777.0 mm X 552.0 mm X 216.0 mm
Without stand 635.6 mm X 413.5 mm X 40.9 mm 777.0 mm X 501.0 mm X 35.4 mm
Without stand 5.0 kg 10.7 kg
26LV2510-TB / 26LV2510-TH
26LV2530-TD / 26LV2530-TK
26LV251Y-TB / 26LV251Y-TH
AC-DC adaptor : 24 V , 2.5 A /
19LV2500-TA
19LV2530-TD
DC 24 V, 1.4 A
AC 100-240 V~ 50 / 60 Hz
26LV25** 32LV25**
26LV2500-TA
DC 24 V, 1.8 A
AC 100-240 V~ 50 / 60 Hz
22LV2510-TB / 22LV2510-TH
22LV2530-TD / 22LV2530-TK
AC-DC adaptor : 24 V , 2.5 A /
32LV2510-TB / 32LV2510-TH / 32LV2510-TJ
32LV2530-TD / 32LV2530-TK
32LV251Y-TB / 32LV251Y-TH
22LV2500-TA
22LV251Y-TB
DC 24 V, 1.7 A
AC 100-240 V~ 50 / 60 Hz
32LV2500-TA
AC 100-240 V~ 50 / 60 Hz
Product specifications shown above may be changed without prior notice due to upgrade of product
functions.
For the power supply and power consumption, refer to the label attached to the product.
Page 97
SPECIFICATIONS
97
MODELS
Dimensions
(W x H x D)
Weight With stand 5.9 kg 10.9 kg
Power requirement
Dimensions
(W x H x D)
Weight With stand 11.0 kg 14.8 kg
Power requirement AC 100-240 V~ 50 / 60 Hz
With stand 754 mm X 444 mm X 190 mm 885 mm x 526 mm x 205 mm
Without stand 754 mm X 393 mm X 34.0 mm 885 mm x 468 mm x 38.7 mm
Without stand 5.2 kg 9.6 kg
AC-DC adaptor : 24 V , 3.42 A /
MODELS
With stand 768.0 mm x 555.0 mm x 240.0 mm 1000.0 mm x 694.0 mm x 257.0 mm
Without stand 768.0 mm x 492.0 mm x 45.0 mm 1000.0 mm x 623.0 mm x 43.0 mm
Without stand 9.3 kg 12.4 kg
26LV30** 32LV30**
26LV3000-TA 32LV3000-TA
DC 24 V, 2.1 A
AC 100-240 V~ 50 / 60 Hz
32LV33** 42LV33**
32LV3300-TA
32LV3300-TG
AC 100-240 V~ 50 / 60 Hz
42LV3300-TA
42LV3300-TG
ENGENGLISH
Product specifications shown above may be changed without prior notice due to upgrade of product
functions.
For the power supply and power consumption, refer to the label attached to the product.
Page 98
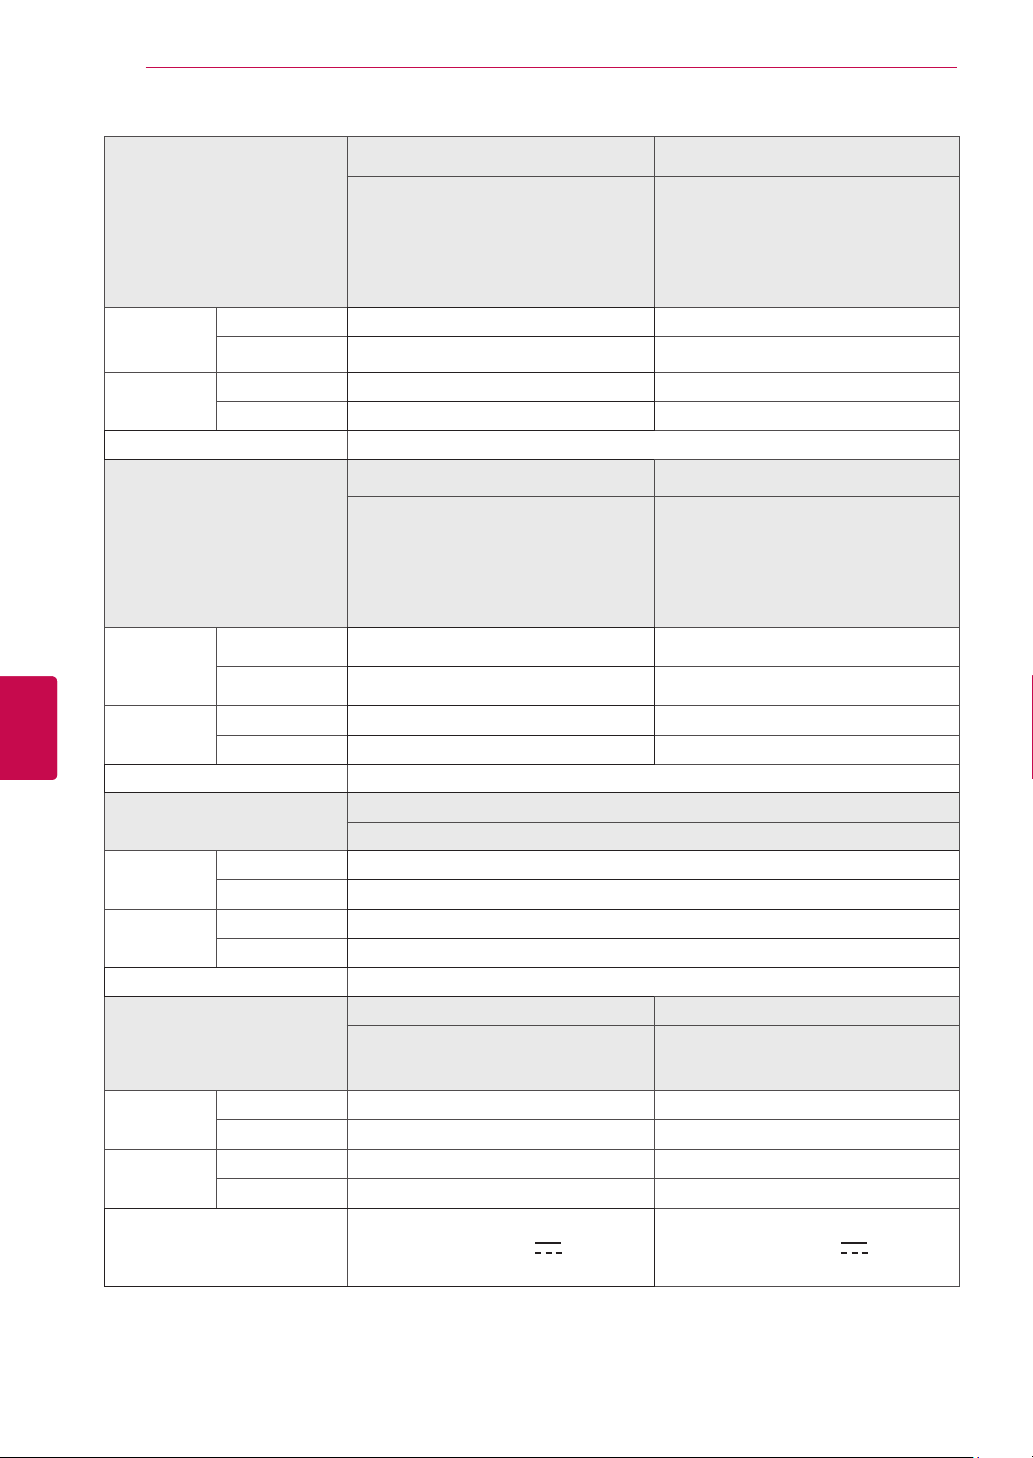
ENGLISH
ENG
SPECIFICATIONS
98
32LV35** 37LV35**
32LV3500-TA / 32LV3500-TG
MODELS
32LV3530-TD / 32LV3530-TK
32LV350Y-TA / 32LV350Y-TG
Dimensions
(W x H x D)
Weight With stand 11.4 kg 13.5 kg
Power requirement AC 100-240 V~ 50 / 60 Hz
Dimensions
(W x H x D)
Weight With stand 15.5 kg 20.9 kg
Power requirement AC 100-240 V~ 50 / 60 Hz
Dimensions
(W x H x D)
Weight With stand 25.5 kg
Power requirement AC 100-240 V~ 50 / 60 Hz
Dimensions
(W x H x D)
Weight With stand 3.2 kg 5.05 kg
Power requirement
With stand 764.0 mm x 545.0 mm x 240.0 mm 888.0 mm x 614.0 mm x 240.0 mm
Without stand 764.0 mm x 484.0 mm x 35.4 mm 888.0 mm x 553.0 mm x 35.4 mm
Without stand 9.6 kg 11.7 kg
42LV3500-TA / 42LV3500-TG
MODELS
42LV3530-TD / 42LV3530-TK
42LV350Y-TA / 42LV350Y-TG
With stand 998.0 mm x 684.0 mm x 256.0 mm 1108.0 mm x 746.0 mm x 256.0 mm
Without stand 998.0 mm x 615.0 mm x 30.4 mm 1108.0 mm x 677.0 mm x 30.4 mm
Without stand 13.3 kg 18.7 kg
MODELS
With stand 1286.0 mm x 847.0 mm x 338.0 mm
Without stand 1286.0 mm x 778.0 mm x 30.4 mm
Without stand 21.4 kg
MODELS
With stand 530 mm X 388 mm X 145 mm 640.0 mm X 474 mm X 178 mm
Without stand 530 mm X 340 mm X 31.3 mm 640.0 mm X 405.0 mm X 31.0 mm
Without stand 3.0 kg 4.4 kg
AC-DC adaptor : 24 V , 2.5 A /
32LV3500-TB
32LV3510-TB
32LV355C-TA
42LV35** 47LV35**
42LV3500-TB
42LV3510-TB
42LV355C-TA
55LV35**
55LV355C-TA
22LV55** 26LV55**
22LV5500-TB
22LV550Y-TB
22LV5500-TH
DC 24 V, 1.7 A
AC 100-240 V~ 50 / 60 Hz
37LV3500-TA / 37LV3500-TG
37LV3530-TD / 37LV3530-TK
37LV350Y-TA / 37LV350Y-TG
47LV3500-TA / 47LV3500-TG
47LV3530-TD / 47LV3530-TK
47LV350Y-TA / 47LV350Y-TG
AC-DC adaptor : 24 V , 2.5 A /
AC 100-240 V~ 50 / 60 Hz
37LV3500-TB
37LV3510-TB
37LV355C-TA
47LV3500-TB
47LV3510-TB
47LV355C-TA
26LV5500-TB
26LV550Y-TB
26LV5500-TH
DC 24 V, 2.1 A
Product specifications shown above may be changed without prior notice due to upgrade of product
functions.
For the power supply and power consumption, refer to the label attached to the product.
Page 99
SPECIFICATIONS
32LV34** 42LV34**
MODELS
Dimensions
(W x H x D)
Weight With stand 11.0 kg 14.8 kg
Power requirement AC 100-240 V~ 50 / 60 Hz
Dimensions
(W x H x D)
Weight With stand 10.0 kg 14.5 kg
Power requirement AC 100-240 V~ 50 / 60 Hz
Dimensions
(W x H x D)
Weight With stand 20.7 kg 26.2 kg
Power requirement AC 100-240 V~ 50 / 60 Hz
Dimensions
(W x H x D)
Weight With stand 16.6 kg 21.9 kg
Power requirement AC 100-240 V~ 50 / 60 Hz
Dimensions
(W x H x D)
Weight With stand 20.3 kg
Power requirement
With stand 768.0 mm x 555.0 mm x 240.0 mm 1000.0 mm x 694.0 mm x 257.0 mm
Without stand 768.0 mm x 492.0 mm x 45.0 mm 1000.0 mm x 623.0 mm x 43.0 mm
Without stand 9.3 kg 12.4 kg
MODELS
With stand 772.0 mm x 549.0 mm x 240.0 mm 1005.0 mm x 688.0 mm x 256.0 mm
Without stand 772.0 mm x 490.0 mm x 34.9 mm 1005.0 mm x 621.0 mm x 29.9 mm
Without stand 8.2 kg 12.3 kg
MODELS
With stand 1115.0 mm x 750.0 mm x 256.0 mm 1293.0 mm x 851.0 mm x 338.0 mm
Without stand 1115.0 mm x 683.0 mm x 29.9 mm 1293.0 mm x 785.0 mm x 29.9 mm
Without stand 18.5 kg 22.0 kg
MODELS
With stand 977.0 mm x 648.0 mm x 268.0 mm 1089.0 mm x 711.0 mm x 268.0 mm
Without stand 977.0 mm x 584.0 mm x 37.1 mm 1089.0 mm x 647.0 mm x 37.1 mm
Without stand 12.4 kg 17.7 kg
MODELS
With stand 1137.0 mm x 758.0 mm x 270.0 mm
Without stand 1137.0 mm x 685.0 mm x 76.8 mm
Without stand 18.3 kg
32LV3400-TA / 32LV3400-TG
32LV340Y-TA
32LW45** 42LW45**
32LW4500-TA
32LW450Y-TA
47LW45** 55LW45**
47LW4500-TA
47LW450Y-TA
42LW54** 47LW54**
42LW5400-
TA
47LK952-TC
AC 100-240 V~ 50 / 60 Hz
42LV3400-TA / 42LV3400-TG
47LK95**
47LK950-TA
42LV340Y-TA
42LW4500-TA
42LW450Y-TA
55LW4500-TA
55LW450Y-TA
47LW5400-
TA
Product specifications shown above may be changed without prior notice due to upgrade of product
functions.
For the power supply and power consumption, refer to the label attached to the product.
99
ENGENGLISH
Page 100
SPECIFICATIONS
100
ENGLISH
ENG
Environment condition
New Zealand, Singapore
Australia
Indonesia, Israel
South Africa
Veitnam, Malaysia
Operating Temperature
Operating Humidity
Storage Temperature
Storage Humidity
Television System
Programme Coverage
Television System
Programme Coverage
Television System
Programme Coverage
Television System
Programme Coverage
Television System
0 °C to 40 °C
Less than 80 %
-20 °C to 60 °C
Less than 85 %
Digital TV Analogue TV
DVB-T PAL/SECAM-B/G/D/K
BG : VHF/UHF 1 to 69, CATV 01 to 47
UHF 21 to 69
DVB-T PAL B/B
VHF 06 to 12,
UHF 27 to 69
DVB-T PAL/SECAM-B/G/D/K
UHF 21 to 69
DVB-T PAL/SECAM-B/G/D/K
VHF 4 to 11, 13
UHF 21 to 68
DVB-T PAL/SECAM-B/G/D/K
I : VHF/UHF 1 to 69, CATV 01 to 47
DK : VHF/UHF 1 to 69, CATV 01 to 47
B/B : VHF/UHF 0 to 75, CATV : 2 to 44
BG : VHF/UHF 1 to 69, CATV 01 to 47
I : VHF/UHF 1 to 69, CATV 01 to 47
DK : VHF/UHF 1 to 69, CATV 01 to 47
M : VHF/UHF 2 to 78, CATV 01 to 71
BG : VHF/UHF 1 to 69, CATV 01 to 47
I : VHF/UHF 1 to 69, CATV 01 to 47
DK : VHF/UHF 1 to 69, CATV 01 to 47
M : VHF/UHF 2 to 78, CATV 01 to 71
, PAL-I
, PAL-I, NTSC-M
, PAL-I, NTSC-M
, PAL-I, NTSC-M
BG : VHF/UHF 1 to 69, CATV 01 to 47
Iran
Analogue model
Programme Coverage
Television System
Programme Coverage
Television System
Programme Coverage
External Antenna
Impedance
VHF 6 to 12,
UHF 21 to 69
DVB-T PAL/SECAM-B/G/D/K
VHF 5 to 12,
UHF 21 to 69
- PAL/SECAM-B/G/D/K
-
75 Ω 75 Ω
I : VHF/UHF 1 to 69, CATV 01 to 47
DK : VHF/UHF 1 to 69, CATV 01 to 47
M : VHF/UHF 2 to 78, CATV 01 to 71
, PAL-I, NTSC-M
BG : VHF/UHF 1 to 69, CATV 01 to 47
I : VHF/UHF 1 to 69, CATV 01 to 47
DK : VHF/UHF 1 to 69, CATV 01 to 47
M : VHF/UHF 2 to 78, CATV 01 to 71
, PAL-I, NTSC-M
BG : VHF/UHF 1 to 69, CATV 01 to 47
I : VHF/UHF 1 to 69, CATV 01 to 47
DK : VHF/UHF 1 to 69, CATV 01 to 47
M : VHF/UHF 2 to 78, CATV 01 to 71
Product specifications shown above may be changed without prior notice due to upgrade of product
functions.
For the power supply and power consumption, refer to the label attached to the product.
 Loading...