

www.lg.com
Read Safety and Reference.
Magyar
Lásd: Biztonsági óvintézkedések
.
på produkten.
LK50*
TK43*
*MFL70360602*
(1801-REV00)
AAA
X 4
(M4 x 16)
28TK43*
32LK50*
43LK50*
1
2
A
B
3
4
For the power supply and power consumption, refer
to the label attached to the product.
Bitte lesen Sie Sicherheitshinweise und Referenzen!
Informationen zur Stromversorgung und zum Stromver-
Français
Ελληνικά
Slovenščina Preberite Varnostne informacije in napotki.
Hrvatski
Shqip
Македонски
brauch sind dem Etikett auf dem Gerät zu entnehmen.
.
Consultare la sezione Sicur
Per l'alimentazione e il consumo di energia, consultare
l'etichetta applicata sul prodotto.
Leer
Para obtener información acerca de la fuente de alimentación
y el consumo de energía, consulte la etiqueta del producto.
Consulte o manual de Segurança e Referência.
Lees Veiligheid en referentie
Informatie over de stroomvoorziening en het stroomverbruik vindt u op het label op het product.
Ανάγνωση
Για πληροφορίες σχετικά με την τροφοδοσία και την
κατανάλωση ενέργειας, δείτε την ετικέτα του προϊόντος.
Podatke o napajanju in porabi energije si oglejte na
nalepki izdelka.
Pročitajte Sigurnost i reference.
Informacije o napajanju i potrošnji energije potražite na
oznaci koja se nalazi na proizvodu.
Lexo Sigur
Për ushqimin me energji dhe konsumin e energjisë,
shih etiketën e ngjitur në produkt.
Pročitajte Sigurnost i upućivanje.
Informacije o napajanju električnom energijom i potrošnji električne
energije možete pronaći na naljepnici koja se nalazi na proizvodu.
Про
За напојувањето и потрошувачката на енергија, погледнете
ја етикетата која е прикачена на производот.
Ασφάλεια και Αναφορά.
.
riferiment
A tápellátásra és az áramfogyasztásra vonatkozó
adatok a készülékre ragasztott címkén találhatók.
Przeczytaj
Dokładne informacje o zasilaniu i zużyciu energii są
umieszczone na etykiecie znajdującej się na produkcie.
Česky
Slovenčina
Română
Български Прочетете Безопасност и справки.
Eesti
Lietuvių k.
Latviešu
Srpski
Norsk
Dansk
Suomi
Přečtěte si část Bezpečnost areference.
Informace onapájení apříkonu naleznete na štítku
připevněném kvýrobku.
Prečítajte si časť Bezpečnosť a odkazy.
Informácie o zdroji napájania a spotrebe elektrickej
energie nájdete na štítku pripojenom k zariadeniu.
Citiţi Siguranţă şi referinţe.
Pentru sursa de alimentare şi consumul de energie,
consultaţi eticheta ataşată pe produs.
Направете справка с етикета на продукта за
електрозахранването и консумацията на енергия.
Lugege jaotist Ohutus ja viited.
Toiteallika ja energiatarbe kohta saate teavet tootele
kinnitatud märgiselt.
Perskaitykite Saugumas ir nuorodos
Informacijos apie maitinimą ir energijos sąnaudas
rasite etiketėje ant gaminio.
Izlasiet Drošībai un uzziņai.
Informāciju par elektroenerģijas padevi un patēriņu
skatiet izstrādājumam pievienotajā etiķetē.
Pročitajte Bezbednost i informacije.
Da biste saznali informacije u vezi sa napajanjem i
potrošnjom energije, pogledajte oznaku na proizvodu.
Les Sikkerhet og referanse.
Hvis du vil ha informasjon om strømforsyning og strømforbruk, kan du se på etiketten som er festet på produktet.
Læs Sikkerhed og Reference.
Du kan få oplysninger om strømforsyning og strømforbrug på mærket, der sidder på produktet.
Lue Turvatoimet ja viittaukset.
Tietoja virtalähteestä ja virrankulutuksesta on laitteeseen
kiinnitetyssä tarrassa.
: Depending on model / Abhängig vom Modell / Selon le modèle / In base al modello / En función del modelo / Dependendo do modelo / Afhankelijk van het model /
Ανάλογα με το μοντέλο / Odvisno od modela / Típusfüggő / Zależnie od modelu / Závisí na modelu / V závislosti od modelu / În funcţie de model / В зависимост
от модела / Sõltub mudelist / Priklauso nuo modelio / Atkarībā no modeļa / U zavisnosti od modela / Ovisno o modelu / Në varësi të modelit / Ovisno o modelu / Во
зависност од моделот / Beroende på modell / Avhengig av modell / Afhængigt af modellen / Mallin mukaan /
För strömförsörjning och strömförbrukning, se etiketten

L/MONO AUDIO R
1
2
0
R
P
A
E
B
VIDEO/Y P
L/MONO AUDIO R
R
P
B
VIDEO/Y P
OPTICAL DIGITAL
AUDIO OUT
VIDEO AUDIO
VIDEO L/MONO AUDIO R
32LK500BPLA
43LK5000PLA
28TK430V-PZ
D
B
G
F
A
728 475 182.4 436 77.8 5.0 4.9
970 624 219.5 569 77.8 8.4 8.3
635 427 182.4 387 77.8 4.0 3.9
Power requirement
B C
D E F
C
AC 100-240 V ~ 50 / 60 Hz
F
G

OWNER’S MANUAL
Safety and Reference
LED TV*
* LG LED TV applies LCD screen with LED backlights.
Please read this manual carefully before operating your set and
retain it for future reference.
*MFL70360703*
(1801-REV00)
www.lg.com
Copyright ⓒ 2018 LG Electronics Inc. All Rights Reserved.
ENGLISH
Warning! Safety instructions
CAUTION
RISK OF ELECTRIC SHOCK
DO NOT OPEN
CAUTION: TO REDUCE THE RISK OF ELECTRIC SHOCK, DO NOT
REMOVE COVER (OR BACK). NO USER-SERVICEABLE PARTS INSIDE.
REFER TO QUALIFIED SERVICE PERSONNEL.
This symbol is intended to alert the user to the presence of
uninsulated “dangerous voltage” within the product’s
enclosure that may be of sucient magnitude to constitute a risk
of electric shock to persons.
This symbol is intended to alert the user to the presence of
important operating and maintenance (servicing)
instructions in the literature accompanying the appliance.
WARNING: TO REDUCE THE RISK OF FIRE AND ELECTRIC SHOCK, DO
NOT EXPOSE THIS PRODUCT TO RAIN OR MOISTURE.
• TO PREVENT THE SPREAD OF FIRE, KEEP CANDLES OR OTHER ITEMS
WITH OPEN FLAMES AWAY FROM THIS PRODUCT AT ALL TIMES.
• Do not place the TV and/or remote control in the following
environments:
- Keep the product away from direct sunlight.
- An area with high humidity such as a bathroom.
- Near any heat source such as stoves and other devices that
produce heat.
- Near kitchen counters or humidiers where they can easily be
exposed to steam or oil.
- An area exposed to rain or wind.
- Do not expose to dripping or splashing and do not place objects
lled with liquids, such as vases, cups, etc. on or over the
apparatus (e.g., on shelves above the unit).
- Near ammable objects such as gasoline or candles, or expose
the TV to direct air conditioning.
- Do not install in excessively dusty places.
Otherwise, this may result in re, electric shock, combustion/
explosion, malfunction or product deformation.
• Ventilation
- Install your TV where there is proper ventilation. Do not install in
a conned space such as a bookcase.
- Do not install the product on a carpet or cushion.
- Do not block or cover the product with cloth or other materials
while unit is plugged in.
• Take care not to touch the ventilation openings. When watching
the TV for a long period, the ventilation openings may become hot.
• Protect the power cord from physical or mechanical abuse, such as
being twisted, kinked, pinched, closed in a door, or walked upon.
Pay particular attention to plugs, wall outlets, and the point where
the cord exits the device.
• D o not move the TV whilst the Power cord is plugged in.
• D o not use a damaged or loosely tting power cord.
• B e sure do grasp the plug when unplugging the power cord. Do
not pull on the power cord to unplug the TV.
• D o not connect too many devices to the same AC power outlet as
this could result in re or electric shock.
• Disconnec ting the Device from the Main Power
- The power plug is the disconnecting device. In case of an
emergency, the power plug must remain readily accessible.
• D o not let your children climb or cling onto the TV. Otherwise, the
TV may fall over, which may cause serious injury.
• O utdoor Antenna Grounding (Can dier by country):
- If an outdoor antenna is installed, follow the precautions below.
An outdoor antenna system should not be located in the vicinity
of overhead power lines or other electric light or power circuits,
or where it can come in contact with such power lines or circuits
as death or serious injury can occur.
Be sure the antenna system is grounded to provide some
protection against voltage surges and built-up static charges.
Section 810 of the National Electrical Code (NEC) in the U.S.A.
provides information with respect to proper grounding of the
mast and supporting structure, grounding of the lead-in wire
to an antenna discharge unit, size of grounding conductors,
location of antenna discharge unit, connection to grounding
electrodes and requirements for the grounding electrode.
Antenna grounding according to the National Electrical Code,
ANSI/NFPA 70
2

ENGLISH
• Grounding (Except for devices which are not grounded.)
- TV with a three-prong grounded AC plug must be connected to
a three-prong grounded AC outlet. Ensure that you connect the
earth ground wire to prevent possible electric shock.
• Never touch this apparatus or antenna during a lightning storm.
You may be electrocuted.
• Make sure the power cord is connected securely to the TV and wall
socket if not secured damage to the Plug and socket may occur
and in extreme cases a re may break out.
• D o not insert metallic or inammable objects into the product. If a
foreign object is dropped into the product, unplug the power cord
and contact the customer service.
• D o not touch the end of the power cord while it is plugged in. You
may be electrocuted.
• If any of the following occur, unplug the product
immediately and contact your local customer service.
- The product has been damaged.
- If water or another substance enters the product (like an AC
adapter, power cord, or TV).
- If you smell smoke or other odors coming from the TV.
- When lightning storms or when unused for long periods of time.
Even the TV is turned o by remote control or button, AC power
source is connected to the unit if not unplugged in.
• D o not use high voltage electrical equipment near the TV (e.g., a
bug zapper). This may result in product malfunction.
• D o not attempt to modify this product in any way without written
authorization from LG Electronics. Accidental re or electric shock
can occur. Contact your local customer service for service or repair.
Unauthorized modication could void the user’s authority to
operate this product.
• Use only an authorized attachments / accessories approved by
LG Electronics. Otherwise, this may result in re, electric shock,
malfunction, or product damage.
• Never disassemble the AC adapter or power cord. This may result in
re or electric shock.
• Handle the adapter carefully to avoid dropping or striking it. An
impact could damage the adapter.
• To reduce the risk of re or electrical shock, do not touch the TV
with wet hands. If the power cord prongs are wet or covered with
dust, dry the power plug completely or wipe dust o.
• Batteries
- Store the accessories (battery, etc.) in a safe location out of the
reach of children.
- Do not short circuit, disassemble, or allow the batteries to
overheat. Do not dispose of batteries in a re. Batteries should
not be exposed to excessive heat.
• Moving
- When moving, make sure the product is turned o, unplugged,
and all cables have been removed. It may take 2 or more people
to carry larger TVs. Do not press or put stress on the front panel
of the TV. Otherwise, this may result in product damage, re
hazard or injury.
• Keep the packing anti-moisture material or vinyl packing out of
the reach of children.
• D o not allow an impact shock, any objects to fall into the product,
and do not drop anything onto the screen.
• D o not press strongly upon the panel with a hand or a sharp
object such as a nail, pencil, or pen, or make a scratch on it. It may
causedamage to screen.
• Cleaning
- When cleaning, unplug the power cord and wipe gently with a
soft/dry cloth. Do not spray water or other liquids directly on the
TV. Do not clean your TV with chemicals including glass cleaner,
any type of air freshener, insecticide, lubricants, wax (car,
industrial), abrasive, thinner, benzene, alcohol etc., which can
damage the product and/or its panel. Otherwise, this may result
in electric shock or product damage.
3

ENGLISH
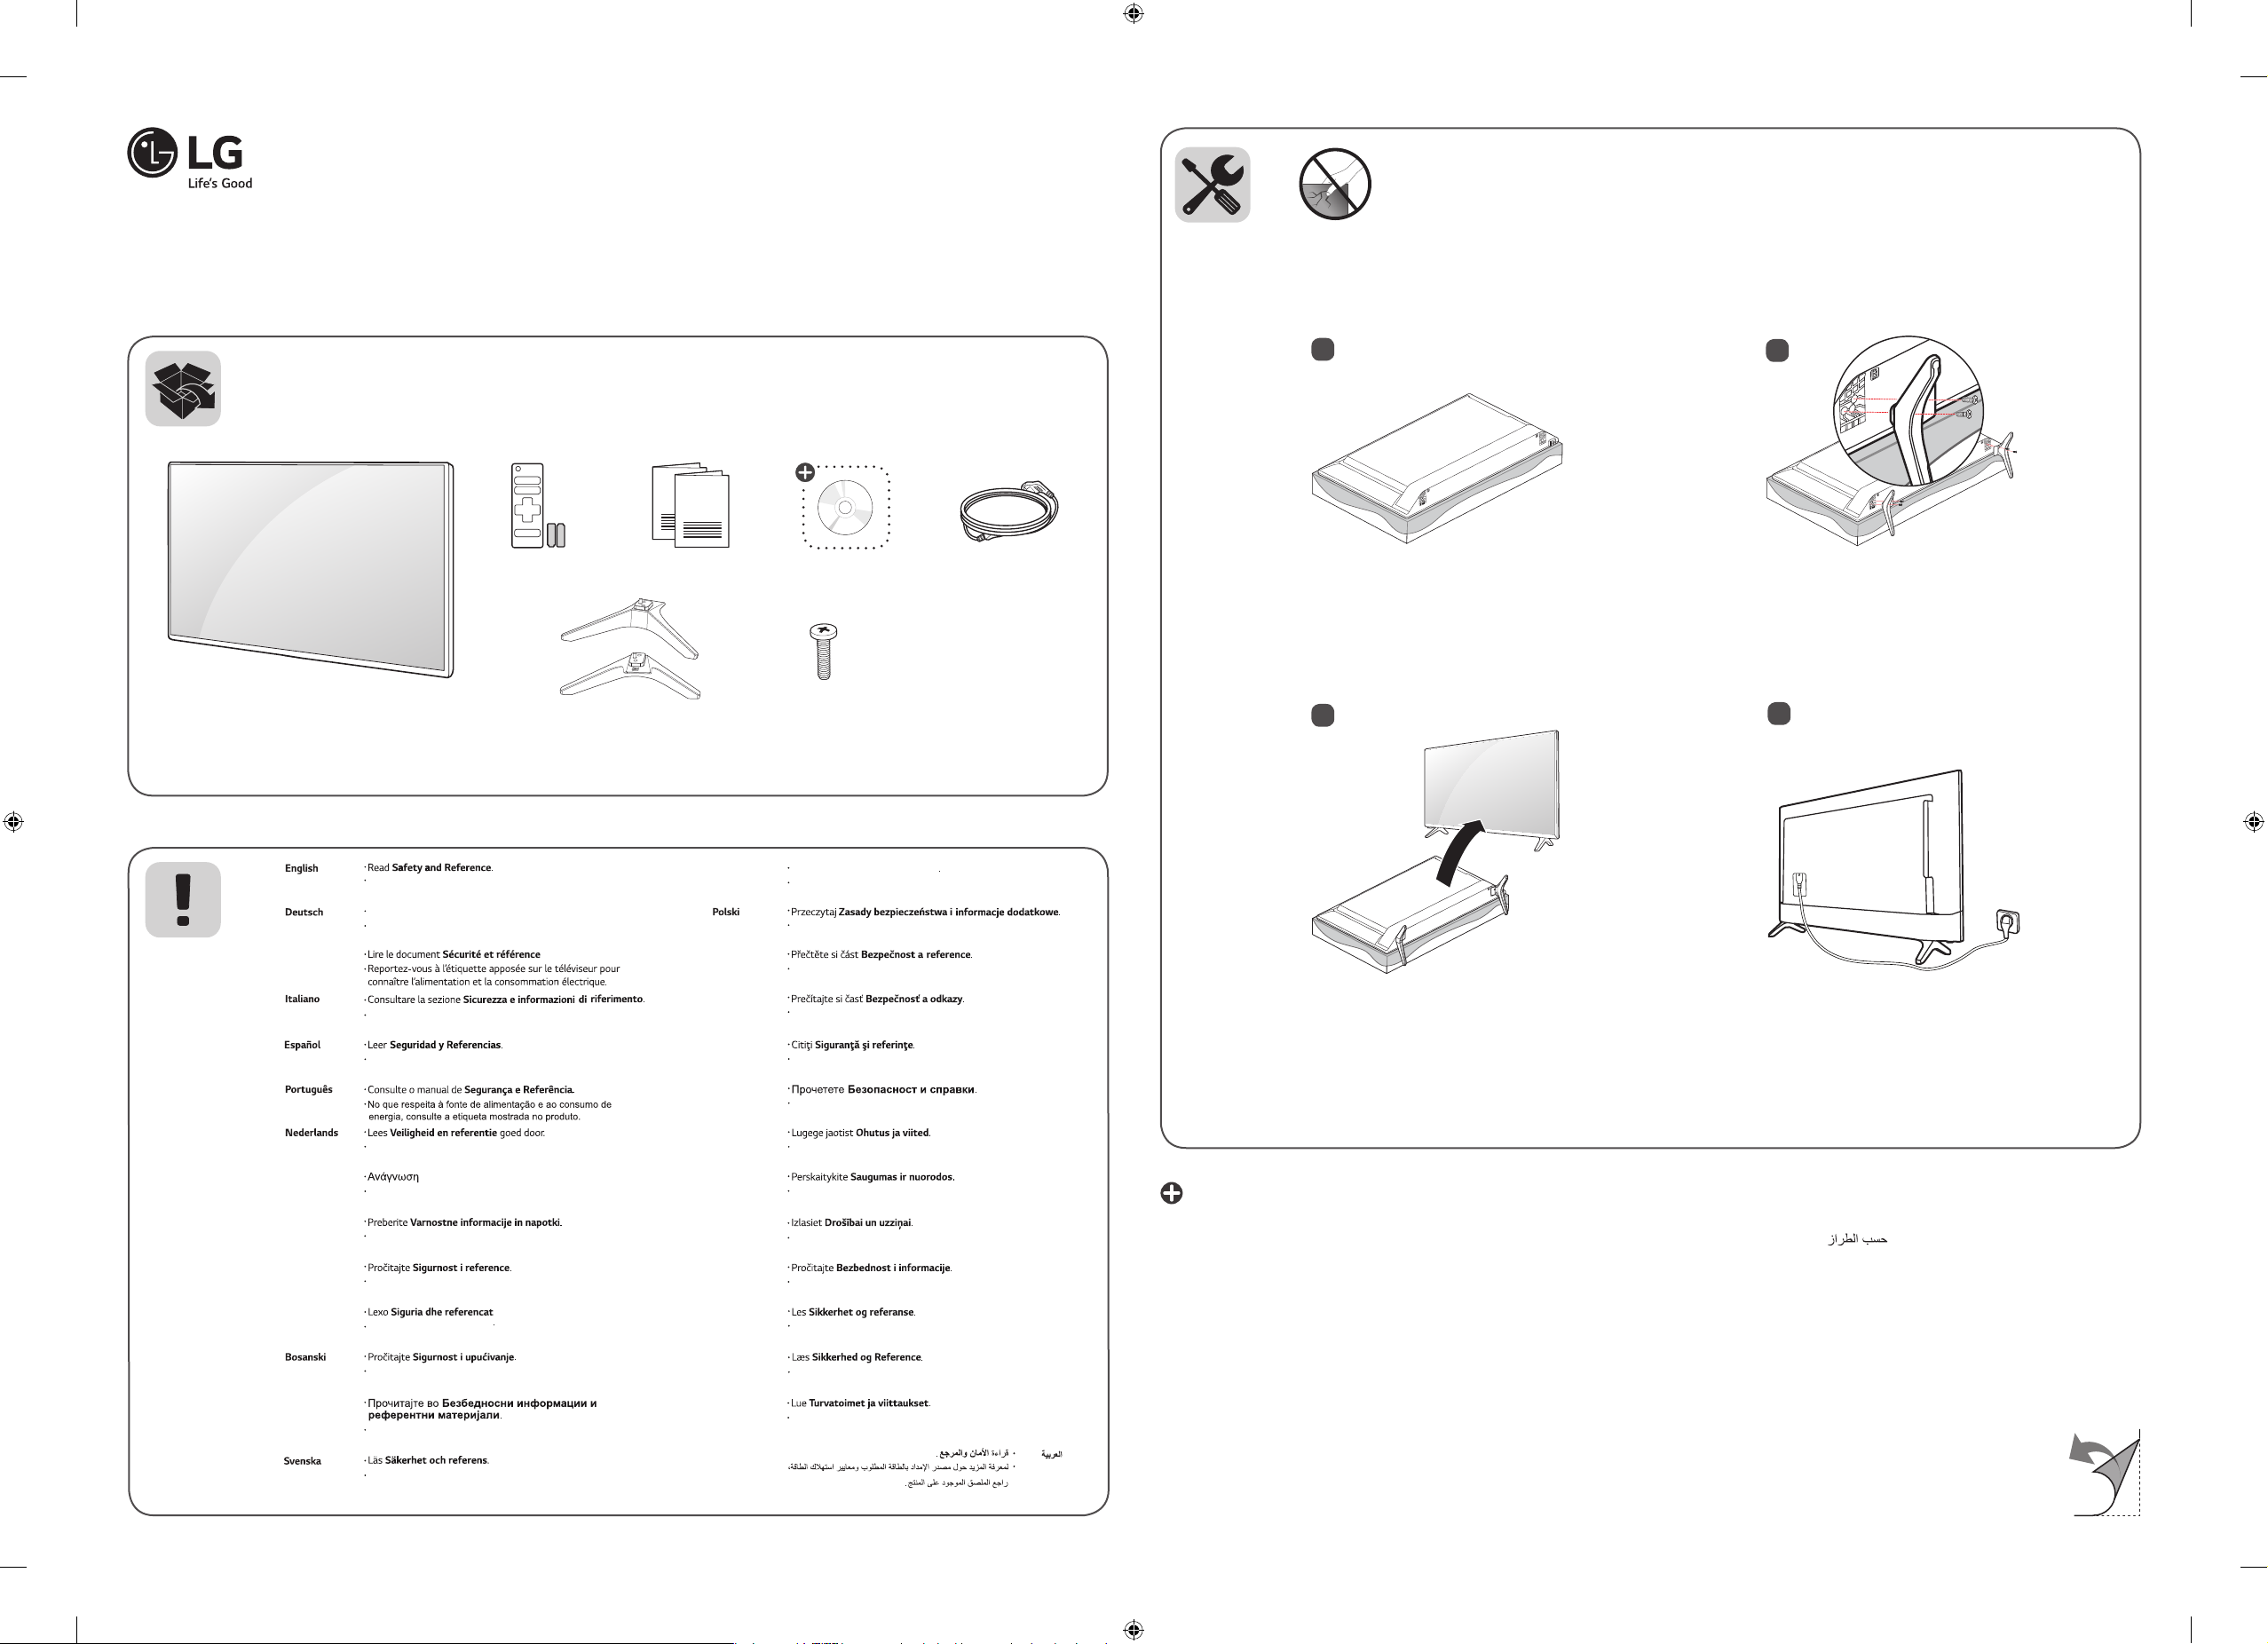
Preparing
A
A
A
B
Separate Purchase
• If the TV is turned on for the rst time after it was shipped from the
factory, initialization of the TV may take a few minutes.
• Image shown may dier from your TV.
• Your TV’s OSD (On Screen Display) may dier slightly from that
shown in this manual.
• The available menus and options may dier from the input source
or product model that you are using.
• New features may be added to this TV in the future.
• The device must be easily accessed to a location outlet near the
access. Some devices are not made by turning on / o button,
turning o the device and unplugging the power cord.
• The items supplied with your product may vary depending on the
model.
• Product specications or contents of this manual may be changed
without prior notice due to upgrade of product functions.
• For an optimal connection, HDMI cables and USB devices should
have bezels less than 10 mm thick and 18 mm width. Use an
extension cable that supports USB 2.0 if the USB cable or USB
memory stick does not t into your TV’s USB port.
B
B
• Use a cer tied cable with the HDMI logo attached.
• If you do not use a certied HDMI c able, the screen may not display
or a connection error may occur. (Recommended HDMI Cable Types)
- High-Speed HDMI®/TM Cable (3 m or less)
- High-Speed HDMI®/TM Cable with Ethernet (3 m or less)
• How to use the ferrite core (Depending on model)
- Use the ferrite core to reduce the electromagnetic interference in
the power cord. Wind the power cord on the ferrite core once.
[Wall side]
* A < 10 mm
* B < 18 mm
[TV side]
Separate purchase items can be changed or modied for quality
improvement without any notication. Contact your dealer to buy these
items. These devices only work with certain models.
The model name or design may be changed depending on the upgrade
of product functions, manufacturer’s circumstances or policies.
(Depending on model)
Wall Mounting Bracket
Make sure to use screws and wall mount bracket that meet the VESA
standard. Standard dimensions for the wall mount kits are described in
the following table.
Model 32LK50* 43LK50*
VESA (A x B) (mm) 100 x 100 200 x 200
Standard screw M4 M6
Number of screws 4 4
Wall mount bracket LSW140B
Model 28TK43*
VESA (A x B) (mm) 100 x 100
Standard screw M4
Number of screws 4
Wall mount bracket RW120
LSW240B
MSW240
10 cm (+ / -2 cm)
4

ENGLISH
Lifting and moving the TV
Please note the following advice to prevent the TV from being scratched
or damaged and for safe transportation regardless of its type and size.
• It is recommended to move the TV in the box or packing material
that the TV originally came in.
• B efore moving or lifting the TV, disconnect the power cord and
all cables.
• When holding the TV, the screen should face away from you to
avoid damage.
• Hold the side and bottom of the TV frame rmly. Make sure not to
hold the transparent part, speaker, or speaker grill area.
• Avoid touching the screen at all times, as this may result in
damage to the screen.
• Do not move the TV by holding the cable holders, as the
cable holders may break, and injuries and damage to the
TV may occur.
• When attaching the stand to the TV set, place the screen
facing down on a cushioned table or at surface to protect
the screen from scratches.
Mounting on the Table
1 Lift and tilt the TV into its upright position on a table.
• Leave a 10 cm (minimum) space from the wall for proper
ventilation.
10 cm
10 cm
10 cm
10 cm
10 cm
• When transpor ting a large TV, there should be at least 2 people.
• When transpor ting the TV by hand, hold the TV as shown in the
following illustration.
• When transpor ting the TV, do not expose the TV to jolts or
excessive vibration.
• When transpor ting the TV, keep the TV upright, never turn the TV
on its side or tilt towards the left or right.
• D o not apply excessive pressure to cause exing / bending of frame
chassis as it may damage screen.
• When handling the TV, be careful not to damage the protruding
buttons.
(Depending on model)
2 Connect the power cord to a wall outlet.
• Do not apply foreign substances (oils, lubricants, etc.) to
the screw parts when assembling the product. (Doing so
may damage the product.)
• If you install the TV on a stand, you need to take actions
to prevent the product from overturning. Otherwise, the
product may fall over, which may cause injury.
• Do not use any unapproved items to ensure the safety and
product life span.
• Any damage or injuries caused by using unapproved items
are not covered by the warranty.
• Make sure that the screws are inserted correctly and
fastened securely. (If they are not fastened securely
enough, the TV may tilt forward after being installed.)
Do not use too much force and over tighten the screws;
otherwise screw may be damaged and not tighten
correctly.
5

ENGLISH
Securing TV to the Wall
10 cm
10 cm
10 cm
10 cm
10 cm
(Depending on model)
1 Insert and tighten the eye-bolts, or TV brackets and bolts on the back
of the TV.
• If there are bolts inserted at the eye-bolts position, remove the
bolts rst.
2 Mount the wall brackets with the bolts to the wall. Match the
location of the wall bracket and the eye-bolts on the rear of the TV.
3 Connect the eye-bolts and wall brackets tightly with a sturdy rope.
Make sure to keep the rope horizontal with the at surface.
• Use a platform or cabinet that is strong and large enough to
support the TV securely.
• Brackets, bolts and ropes are not provided. You can obtain
additional accessories from your local dealer.
Mounting to the Wall
Attach an optional wall mount bracket at the rear of the TV carefully
and install the wall mount bracket on a solid wall perpendicular to
the oor. When you attach the TV to other building materials, please
contact qualied personnel. LG recommends that wall mounting be
performed by a qualied professional installer. We recommend the use
of LG’s wall mount bracket. LG’s wall mount bracket is easy to move with
cables connected. When you do not use LG’s wall mount bracket, please
use a wall mount bracket where the device is adequately secured to the
wall with enough space to allow connectivity to external devices. It is
advised to connect all the cables before installing xed wall mounts.
(Depending on model)
• Remove the stand before installing the TV on a wall mount
by performing the stand attachment in reverse.
• For more information of screws and wall mount bracket,
refer to the Separate Purchase.
• If you intend to mount the product to a wall, attach VESA
standard mounting interface (optional parts) to the back
of the product. When you install the set to use the wall
mounting bracket (optional parts), x it carefully so as
not to drop.
• When mounting a TV on the wall, make sure not to install
the TV by hanging the power and signal cables on the
back of the TV.
• Do not install this product on a wall if it could be exposed
to oil or oil mist. This may damage the product and cause
it to fall.
• Screw length from outer surface of back cover should be
under 8 mm. (Only 28TK43*)
Wall mount Pad
Back Cover
Wall mount Pad
Back Cover
Standard screw:
M4 x L10
Max. 8 mm
6

ENGLISH
Connections
Connect various external devices to the TV and switch input modes to
select an external device. For more information of external device’s
connection, refer to the manual provided with each device.
Antenna/Cable
Connect the TV to a wall antenna socket with an RF cable (75 Ω).
• Use a signal splitter to use more than 2 TVs.
• If the image qualit y is poor, install a signal amplier properly to
improve the image quality.
• If the image qualit y is poor with an antenna connected, try to
realign the antenna in the correct direction.
• An antenna cable and converter are not supplied.
Satellite dish
Connect the TV to a satellite dish to a satellite socket with a satellite RF
cable (75 Ω). (Depending on model)
CI module
View the encrypted (pay) services in digital TV mode. (Depending on
model)
• Check if the CI module is inser ted into the PCMCIA card slot in the
right direction. If the module is not inserted properly, this can
cause damage to the TV and the PCMCIA card slot.
• If the TV does not display any video and audio when CI+ CAM is
connected, please contact to the Terrestrial/Cable/Satellite Service
Operator.
Other connections
Connect your TV to external devices. For the best picture and audio
quality, connect the external device and the TV with the HDMI cable.
Some separate cable is not provided.
HDMI
• Suppor ted HDMI Audio format (Depending on model):
AC-3 (Max bit rate: 640 Kbps),
Dolby Digital / Dolby Digital Plus (32 kHz, 44.1 kHz, 48 kHz),
PCM (48 KHz, 44.1 KHz, 32 KHz)
USB
Some USB Hubs may not work. If a USB device connected using a USB
Hub is not detected, connect it to the USB port on the TV directly.
External Devices
Available external devices are: Blu-ray player, HD receivers, DVD players,
VCRs, audio systems, USB storage devices, PC, gaming devices, and
other external devices.
• The external device connection may dier from the model.
• Connect external devices to the TV regardless of the order of the
TV port.
• If you record a TV program on a Blu-ray/DVD recorder or VCR, make
sure to connect the TV signal input cable to the TV through a DVD
recorder or VCR. For more information of recording, refer to the
manual provided with the connected device.
• Refer to the external equipment’s manual for operating
instructions.
• If you connect a gaming device to the TV, use the cable supplied
with the gaming device.
• In PC mode, there may be noise associated with the resolution,
vertical pattern, contrast or brightness. If noise is present, change
the PC output to another resolution, change the refresh rate to
another rate or adjust the brightness and contrast on the PICTURE
menu until the picture is clear.
• In PC mode, some resolution settings may not work properly
depending on the graphics card.
• When connecting via a wired LAN, it is recommended to use a CAT
7 cable. (Only when port is provided.)
• D o not drop the product or let it fall over when connecting
external devices. Otherwise, this may result in injury or
damage to the product.
• When connecting ex ternal devices such as video game
consoles, make sure the connecting cables are long
enough. Otherwise, the product may fall over, which may
cause injury or damage the product.
7

ENGLISH
Using Button
Using Remote Control
You can simply operate the TV functions, using the button. (Depending
on model)
Basic functions
Power On / O (Press)
The descriptions in this manual are based on the buttons on the remote
control. Please read this manual carefully and use the TV correctly.
To replace batteries, open the battery cover, replace batteries
(1.5VAAA) matching the and ends to the label inside the
compartment, and close the battery cover. To remove the batteries,
perform the installation actions in reverse.
Make sure to point the remote control toward the remote control sensor
on the TV.
(Some buttons and services may not be provided depending on models
or regions.)
8

ENGLISH
(POWER) Turns the TV on or o.
Selects Radio, TV and DTV programme.
Recalls your preferred subtitle in digital mode.
Audio descriptions function will be enabled.
Resizes an image.
(INPUT) Changes the input source.
Number buttons Enters numbers.
Accesses the saved programme list.
Returns to the previously viewed programme.
Adjusts the volume level.
Accesses your favourite programme list.
Shows programme guide.
(MUTE) Mutes all sounds.
Scrolls through the saved programmes.
Moves to the previous or next screen.
Teletext buttons ( ) These buttons are used for
teletext.
(HOME) Accesses the Home menu.
(Settings) Accesses the Settings menu.
Accesses the Quick menus.
Navigation buttons (up/down/left/right) Scrolls through menus
or options.
Selects menus or options and conrms your input.
Returns to the previous level.
Clears on-screen displays and returns to TV viewing.
Views the information of the current programme and screen.
This function is not supported.
Control buttons ( ) Controls media contents.
These access special functions in some menus.
• D o not mix new batteries with old batteries. This may
cause the batteries to overheat and leak.
• Failure to match the correct polarities of the battery
may cause the battery to burst or leak, resulting in re,
personal injury, or ambient pollution.
• This apparatus uses batteries. In your community there
might be regulations that require you to dispose of these
batteries properly due to environmental considerations.
Please contact your local authorities for disposal or
recycling information.
• Batteries inside or inside the product shall not be exposed
to excessive heat such as sunshine, re or the like.
Settings
Automatically Setting Up Programme
(Settings) SETUP Auto Tuning
Automatically tunes the programmes.
• If Input Source is not connected properly, programme registration
may not work.
• Auto Tuning only nds programmes that are currently
broadcasting.
• If Lock System is turned on, a pop-up window will appear asking
for password.
To use Energy Saving feature
(Settings) PIC TURE Energy Saving
Reduces power consumption by adjusting screen brightness.
• O ff: Turns o the Energy Saving mode.
• Minimum / Medium / Maximum: Applies the pre-set Energy
Saving mode.
• S creen Off: Screen is turned o and only sound is played. Press
any button except Power button on the remote control to turn the
screen back on.
To select Picture Mode
(Settings) PIC TURE Picture Mode
Select the picture mode optimized for the viewing environment or the
programme.
• Vivid: Heightens contrast, brightness and sharpness to display
vivid images.
• Standard: D isplays images in standard levels of contrast,
brightness and sharpness.
• Ec o: The Energy Saver feature changes settings on the TV to reduce
power consumption.
• Cinema: D isplays the optimum picture for movie.
• S port: [Depending on model]
Optimizes the video image for high and dynamic actions by
emphasizing primary colours such as white, grass, or sky blue.
• G ame: Displays the optimum picture for game.
• D epending on input signal, available range of picture modes may
dier.
9
ENGLISH
Fine-tuning Picture Mode
(Settings) PIC TURE Picture Mode
This feature allows you to adjust the selected picture mode in detail.
• Backlight: Controls the level of screen brightness by adjusting the
backlight. The closer to 100, the brighter the screen.
• Contrast: Adjusts the contrast of the bright and dark areas of the
picture. The closer to 100, the higher the contrast.
• Brightness: Adjusts the overall screen brightness. The closer to
100, the brighter the screen.
• Sharpness: Adjusts the sharpness of the image. The closer to 50,
the sharper and clearer the image.
• Colour: Tones down or up the colours displayed on the screen. The
closer to 100, the deeper the colour.
• Tint: Adjusts the colour balance between red and green displayed
on the screen. The closer to Red 50, the more red the colour will be.
The closer to Green 50, the more green the colour will be.
• Colour Temp.: Adjusts the colour temperature from cold to warm.
• D epending on input signal or other picture settings, the range of
detailed items for adjustment may dier.
To set advanced control
(Settings) PIC TURE Picture Mode Advanced Control
Calibrates the screen for each picture mode or adjusts picture settings
for a special screen.
• D ynamic Contrast: Adjusts the contrast to the optimal level
according to the brightness of the image.
• D ynamic Colour: Adjusts colours to make the image appear in
more natural colours.
• G amma: Sets the gradation curve according to the output of
picture signal in relation to the input signal.
• D epending on input signal or other picture settings, the range of
detailed items for adjustment may dier.
To set additional picture options
(Settings) PIC TURE Picture Mode Picture Option
Adjusts detailed setting for images.
• Noise Reduc tion: Eliminates noise in the picture.
• MPEG Noise Reduc tion: Eliminates noise generated while
creating digital picture signals.
• Black Level: Adjusts the brightness and contrast of the screen
to suit the black level of the input picture by using the blackness
(black level) of the screen.
• Real Cinema: O ptimizes the screen for movie viewing.
• D epending on input signal or other picture settings, the range of
detailed items for adjustment may dier.
Resetting picture settings
(Settings) PIC TURE Picture Mode Picture Reset
Resets picture settings that the user customizes. Each picture mode is
reset. Select the picture mode you wish to reset.
To adjust Aspect Ratio
(Settings) PIC TURE Aspect Ratio
Selects the screen aspect ratio.
• 16:9: Displays an aspec t ratio of 16:9.
• Just S can: Displays video images in the original size without
removing parts of the edge of the image.
• In DTV, Component, HDMI, and DVI (over 720p) mode, Just Scan
is available.
• Original: Changes the aspec t ratio to 4:3 or 16:9 depending on the
input video signal.
• Full Wide: When TV receives the wide screen signal, it will let you
adjust the picture horizontally or vertically, in a linear proportion,
to ll the entire screen fully. 4:3 and 14:9 video is supported in full
screen without any video distortion through DTV input.
• In Analogue/DTV mode, Full Wide is available.
• 4:3: Displays an aspec t ratio of 4:3.
• 14:9: You can view a picture format of 14:9 or a general TV
programme in the 14:9 mode. The 14:9 screen is viewed in the
same way as in 4:3, but is moved up or down.
• Zoom: Resizes images to t the screen width. The top and bottom
parts of the image may be cut o.
10

ENGLISH
Selecting Sound Mode
(Settings) AUDIO Sound Mode
Adjusts TV audio to an optimal level based on a selected sound mode.
• Standard: O ptimizes the sound for all types of content.
• News : Boosts voice clarity from the TV.
• Music: [D epending on model] Optimizes the sound for music.
• Cinema: O ptimizes the sound for cinemas.
• S port: [Depending on model] Optimizes the sound for sports.
• G ame: Optimizes the sound for gameplay.
Using the Sound Eect function
(Settings) AUDIO Sound Effect
The user can select various sound eects.
• Treble: Controls the dominant sounds in the output.
• Bass: Controls the softer sounds in the output.
• Balance: Adjusts left/right audio balance.
• Reset: Initialize the applied eect under the Sound Eect menu.
Using the TV speakers
(Settings) AUDIO TV Speakers
[This feature is available only for models with built-in TV speakers.]
• On: Audio is played through the TV’s internal spearkers.
• O ff: Audio is played through the Optical Digital Output port only.
• In O ff mode, Sound Mode, Sound Effect and Auto Volume
function will be disabled.
Using Manual Tuning
(Settings) SETUP Manual Tuning
Adjusts programmes manually and saves the results.
For digital broadcasting, signal strength and signal quality can be
checked.
For analogue broadcasting, you can set up station names and use
ne tuning (except for Satellite mode). Normally ne tuning is only
necessary if reception is poor.
To set Auto Volume
(Settings) AUDIO Auto Volume
Sets Auto Volume to On. Varying volume output from programme to
programme is automatically adjusted for convenient TV watching when
clicking through dierent programme.
To use Digital Sound Out
(Settings) AUDIO Digital Sound Out
Sets up Digital Sound Out.
Item Audio Input Digital Audio Output
PCM All PCM
Auto
• Suppor ted DTV Audio:
MPEG,
Dolby Digital / Dolby Digital Plus (32 kHz, 44.1 kHz, 48 kHz),
HE-AAC
MPEG
Dolby Digital
PCM
Dolby Digital
Editing programmes
(Settings) SETUP Programme Edit
Edits the saved programmes.
Set as favourite programme, block/unblock programme, skip
programme etc. of the selected programme.
To select Programme mode
(Settings) SETUP Programme Mode
This function allows you to watch a tuned programme in Antenna,
Cable, Satellite mode.
• You can only watch programmes in the selected mode.
11

ENGLISH
About CI Information
(Settings) SETUP CI Information
[This feature is available on certain models only.]
• This function enables you to watch some encrypted services (pay
services).
• If you remove the CI Module, you cannot watch pay services.
• CI (Common Interface) functions may not be possible depending
upon the country broadcasting circumstances.
• When the module is inser ted into the CI slot, you can access the
module menu.
• To purchase a module and smart card, contact your dealer.
• When the TV is turned on after inserting a CI Module, you may not
have any video and audio output in scrambled programme. The
Smart Card may not be compatible with the CI module.
• When using a CAM(Conditional Access Module), please make sure
it meets fully the requirements of either DVB-CI or CI plus.
• An abnormal process of CAM(Conditional Access Module) may
cause a bad picture.
• [ This feature is available on certain models only.] If the TV does not
display any video and audio when CI+ CAM is connected, please
contact to the Terrestrial / Cable / Satellite Service Operator.
To set Cable DTV
(Settings) SETUP Cable DTV Setting
[If the Programme Mode is set to Cable]
• S ervice Operator: Select Service Operator.
• Channel Auto Update: This function allows you to automatically
update the channel.
To set Satellite
(Settings) SETUP Satellite Setting
[If the Programme Mode is set to Satellite]
You can add/delete/set the satellite you want
To set current time
(Settings) TIME Clock
Checks or changes the time while watching TV.
• Auto: Synchronizes the TV clock to the digital time information
sent by the TV station.
• Manual: S ets the time and date manually if the auto setup does
not correspond to the current time.
To set the TV to turn on and o automatically
(Settings) TIME Off Time / On Time
You can set the Power On/O time for the TV.
Select Off if you are not going to set Off Time / On Time.
• To use Off Time / On Time, set the current time correctly.
• Even when the On Time function is on, the TV will turn o
automatically in 120 minutes when no button is pressed within
that time.
To use Sleep Timer
(Settings) TIME Sleep Timer
Turns o the TV after a preset number of minutes.
To cancel the Sleep Timer, select Off.
To set Automatic Standby
(Settings) TIME Automatic Standby
[This function is available on certain models or in certain countries only]
If you do not press any button on the TV or remote control for a certain
period, the TV will automatically switch to standby mode.
• This function does not work on Store Mode or while software
update.
To edit Transponder
(Settings) SETUP Transponder Edit
[If the Programme Mode is set to Satellite]
You can add/modify/delete a transponder.
12

ENGLISH
To set password
(Settings) LOCK Set Password
Sets or changes the TV password.
• The initial password is set to ‘0000’.
• When France is selected for Country, password is not ‘0000’ but
‘1234’.
• When France is selected for Country, password cannot be set to
‘0000’.
To lock system
(Settings) LOCK Lock System
Permits only specic programmes by blocking programmes or external
input.
First set Lock System to On.
• Parental Guidance (Only DTV): This function operates according
to information from the broadcaster. Therefore if the signal has
incorrect information, this function does not operate. Prevents
children from watching certain adult TV programmes according
to the ratings limit set. Enter a password to watch a blocked
programme. Ratings dier by country.
• Input Block: Blocks the input sources.
To set Language
(Settings) OPTION Language(Language)
You can select the language of the menu displayed on the screen and
the digital sound broadcasting.
• Menu Language: S elects a language for the display text.
• Audio Language: [In D igital mode Only][The congurable items
dier depending on country.] Selects the desired language when
watching digital broadcasting containing several voice languages.
• S ubtitle Language: [In Digital mode Only] Use the Subtitle
function when two or more subtitle languages are broadcast.
• If subtitle data in a selected language is not broadcast, the
default language subtitle will be displayed.
• Text Language: [In Digital mode Only][The congurable items
dier depending on country.] Use the Text language function when
two or more Text languages are broadcast.
• If teletext data in a selected language is not broadcast, the
default Text language will be displayed.
• If you select the wrong local country, teletext may not appear
correctly on the screen and some problems may occur during
teletext operation.
To set the Location
(Settings) OPTION Country
[This feature is available in certain countries only.]
Sets the country that the TV uses.
TV settings are changed according to the broadcast environment of the
selected country.
• If the countr y setting is changed, the Auto Tuning information
screen may appear.
• In a countr y that Digital broadcasting regulation isn’t xed, some
DTV functions may not work depending on digital broadcasting
circumstances.
• If the countr y setting is set to “--”, European terrestrial digital
standard broadcasting programmes are available, but some DTV
functions may not work properly.
To select audio commentary or subtitles
(Settings) OPTION Disability Assistance
Audio commentary or subtitles are provided for those who are hard of
hearing or visually impaired.
• Hard of Hearing (ꔞ): This function is used for the hearing
impaired. If it is set to on, the subtitle is displayed by default.
• Audio Description: This function is for the blind, and
provides explanatory audio describing the current situation in
a TV programme in addition to the basic audio. When Audio
Description is selected On, basic audio and Audio Description are
provided only for those programmes that have Audio Description
included.
To set Subtitle
(Settings) OPTION Subtitle
View subtitles when the TV station provides subtitled programing.
Subtitle sets and changes subtitles to Off, On or Auto.
• O ff: Disable subtitle display.
• On: Enable subtitle display.
• Auto: Subtitle display automatically.
13

ENGLISH
To specify Factory Reset
(Settings) OPTION Factory Reset
All stored information is deleted and TV settings are reset.
TV turns itself o and back on, and all settings are reset.
• When Lock System is in place, a pop-up window appears and asks
for password.
• D o not turn o the power during initialization.
To change the TV Mode
(Settings) OPTION Mode Setting
Selects Home Mode or Store Mode.
When in use in home, please select Home Mode.
Store Mode is for store display.
To use My Media
(HOME) MY MEDIA All Media / Movie List / Photo List
/ Music List
Selects a le from the list. Displays the le that you choose.
Sets play related settings by checking option during disk playback.
To remove the USB device
USB Device
Select a USB storage device that you want to remove.
When you see a message that the USB device has been removed,
separate the device from the TV.
• Once a USB device has been selec ted for removal, it can no longer
be read. Remove the USB storage device and then re-connect it.
To obtain the source code
(Settings) OPTION LGE Open Source Software Notice
To display the open source licenses, that is contained in this product.
To update the software
(Settings) OPTION System info.
Selects USB Update, OAD Update or FW Version. The rmware will
download and install. Upon completion of the update, your LG TV will
restart.
• USB Update: Updates software via USB device.
• OAD Update: Selects On / Off to update the operation software
using the OAD (Over Air Download) Update.
Automatic update mode means TV will update software
automatically, when software was downloaded completed.
• FW Version: Checks the software version and Product/Service
information.
Using a USB storage device - warning
• If the USB storage device has a built-in auto recognition program
or uses its own driver, it may not work.
• Some USB storage devices may not work or may work incorrectly.
• Use only USB storage devices formatted with the Windows FAT32
or NTFS File System.
• For external USB HDDs, it is recommended that you use devices
with a rated voltage of less than 5 V and a rated current of less
than 500 mA.
• It is recommended that you use USB memory sticks of 32 GB or less
and USB HDDs of 2 TB or less.
• If a USB HDD with power-saving function does not work properly,
turn the power o and on. For more information, refer to the user
manual of the USB HDD.
• Data in the USB storage device can be damaged, so be sure to back
up important les to other devices. Data maintenance is the user’s
responsibility and the manufacturer is not responsible for data loss.
14

ENGLISH
My Media supporting le
• Maximum data transfer rate: 20 Mbps (Mega bit per second)
• Ex ternal supported subtitle formats: .srt (SubRip), .smi (SAMI),
.sub (SubViewer1, MicroDVD, DVDsubtitleSystem, SubIdx(Vobsub)),
.ass/.ssa (SubStation Alpha), .txt (Templayer)
1 SubViewer: Only support
Supported Video Formats
• Maximum: 1920 x 1080 @ 30p (Only Motion JPEG 640 x 480 @ 30p)
Extension Codec
.asf, .wmv
.avi, .xvid
.ts, .trp, .tp
.vob
.mp4, .mov
.mkv
.mpg, .mpeg
.dat
.v
Video VC-1 (WMV3, WVC1)
Audio WMA7,8,9 Standard
Video MPEG2, MPEG4 Part2, XviD, H.264/AVC
HE-AAC, LPCM, ADPCM, Dolby Digital
Audio
(AC3), MP3
Video H.264/AVC, MPEG2, HEVC
Audio MP3, Dolby Digital (AC3), AAC, HE-AAC
Video MPEG1, MPEG2
Audio Dolby Digital (AC3), DVD LPCM
Video MPEG4 Part2, XVID, H.264/AVC, HEVC
Audio AAC, MP3
Video MPEG2, MPEG4 Part2, H.264/AVC, HEVC
Audio HE-AAC, Dolby Digital (AC3), MP3, LPCM
MPEG1, MPEG2
Video
Audio Dolby Digital (AC3), LPCM
Video MPEG1
Audio MP2
Video Sorenson H.263, H.264/AVC
Audio MP3, AAC
Supported Audio Formats
Extension Item Info
Bit rate 32 Kbps - 320 Kbps
Sample freq. 8 kHz - 48 kHz
.mp3
.wma
Sample freq. 8 kHz - 48 kHz
Support
Support WMA
MPEG1 Layer2, MPEG1 Layer3, MPEG2,
MPEG2.5
Bit rate 4 Kbps - 320 Kbps
Supported Photo Formats
Extension Item Resolution
Available le
2D (jpeg)
Photo size
SOF0: Baseline,
SOF1: Extend Sequential,
type
SOF2: Progressive
Minimum: 64 x 64,
Maximum (Baseline Type):
8192 (W) x 8192 (H),
Maximum (Extend Sequential Type):
15360 (W) x 8640 (H),
Maximum (Progressive Type):
1024 (W) x 768 (H)
15

ENGLISH
Troubleshooting
Cannot control the TV with the remote control.
• Check the remote control sensor on the product and try again.
• Check if there is any obstacle between the product and the remote
control.
• Check if the batteries are still working and properly installed (
to , to ).
No image display and no sound is produced.
• Check if the product is turned on.
• Check if the power cord is connected to a wall outlet.
• Check if there is a problem in the wall outlet by connecting other
products.
The TV turns o suddenly.
• Check the power control settings. The power supply may be
interrupted.
• Check if the auto- o function is activated on the settings related
time.
• If there is no signal while the TV is on, the TV will turn o
automatically after 15 minutes of inactivity.
When connecting to the PC (HDMI), no signal is detected.
• Turn the TV o/on using the remote control.
• Reconnec t the HDMI cable.
• Restar t the PC with the TV on.
Abnormal Display
• If the product feels cold to the touch, there may be a small “icker”
when it is turned on. This is normal, there is nothing wrong with
product.
• This panel is an advanced product that contains millions of pixels.
You may see tiny black dots and/or brightly coloured dots (red, blue
or green) at a size of 1ppm on the panel. This does not indicate a
malfunction and does not aect the performance and reliability of
the product. This phenomenon also occurs in third-party products
and is not subject to exchange or refund.
• You may nd dierent brightness and color of the panel depending
on your viewing position(left/right/top/down).
This phenomenon occurs due to the characteristic of the panel.
It is not related with the product performance, and it is not
malfunction.
• Displaying a still image for a prolonged period of time may cause
image sticking. Avoid displaying a xed image on the TV screen for
a long period of time.
Generated Sound
• “Cracking” noise: A cracking noise that occurs when watching or
turning o the TV is generated by plastic thermal contraction due
to temperature and humidity. This noise is common for products
where thermal deformation is required.
• Electric al circuit humming/panel buzzing: A low level noise is
generated from a high-speed switching circuit, which supplies a
large amount of current to operate a product. It varies depending
on the product. This generated sound does not aect the
performance and reliability of the product.
16

ENGLISH
Specications
(Depending on country)
Television system
Broadcasting Specifications
Digital TV Analogue TV
DVB-T/T2
DVB-C
DVB-S/S2
DVB-S/S2 DVB-C DVB-T/T2
PAL B/G/I/D/K
SECAM L
Channel coverage
(Band)
Maximum number of
storable programmes
External antenna impedance 75 Ω
CI Module (W x H x D) 100.0 mm x 55.0 mm x 5.0 mm
Operating Temperature 0 °C to 40 °C
Operating Humidity Less than 80 %
Storage Temperature -20 °C to 60 °C
Storage Humidity Less than 85 %
950 ~ 2,150 MHz 46 ~ 890 MHz
4,000 1,100
Environment condition
VHF III: 174 ~ 230 MHz
UHF IV: 470 ~ 606 MHz
UHF V: 606 ~ 862 MHz
46 ~ 862 MHz
17

ENGLISH
HDMI-DTV supported mode
Resolution
640 x 480p
720 (1440) x 480i
720 x 480p
720 (1440) x 576i 15.63 50.00
720 x 576p 31.25 50.00
1280 x 720p
1920 x 1080i
1920 x 1080p
Horizontal
Frequency
(kHz)
31.47
31.50
15.73
15.75
31.47
31.50
44.96
45.00
37.50
33.72
33.75
28.13
67.43
67.50
56.25
26.97
27.00
33.72
33.75
HDMI-PC supported mode
Resolution
720 x 400 31.469 70.08
640 x 480 31.469 59.94
800 x 600 37.879 60.31
1024 x 768 48.363 60.00
1280 x 720 45.00 60.00
1360 x 768 47.712 60.015
1
1366 x 768
2
1280 x 1024
(FHD only)
2
1920 x 1080
(FHD only)
1 Only 28TK43*, 32LK50*
2 Only 43LK50*
Horizontal
Frequency
(kHz)
47.712 59.79
63.981 60.020
67.50 60.00
Vertical
Frequency
(Hz)
59.94
60.00
59.94
60.00
59.94
60.00
59.94
60.00
50.00
59.94
60.00
50.00
59.94
60.00
50.00
23.976
24.00
29.97
30.00
Vertical
Frequency
(Hz)
Component port connecting
information
Component ports on the TV Y P
Y P
Video output ports on DVD player
Signal Component
480i / 576i O
480p / 576p O
720p / 1080i O
1080p
Horizontal
Resolution
Frequency
720 (1440) x 480i
720 x 480p
720 (1440) x 576i 15.63 50.00
720 x 576p 31.25 50.00
1280 x 720p
1920 x 1080i
1920 x 1080p
Y B-Y R-Y
Y Cb Cr
Y Pb Pr
O
(Only 50 Hz / 60 Hz)
(kHz)
15.73
15.75
31.47
31.50
44.96
45.00
37.50
33.72
33.75
28.13
67.43
67.50
56.25
B
B
Vertical
Frequency
(Hz)
59.94
60.00
59.94
60.00
59.94
60.00
50.00
59.94
60.00
50.00
59.94
60.00
50.00
P
R
P
R
18

ENGLISH
Open Source Software
Notice Information
To obtain the source code under GPL, LGPL, MPL, and other open
source licenses, that is contained in this product, please visit http://
opensource.lge.com.
In addition to the source code, all referred license terms, warranty
disclaimers and copyright notices are available for download.
LG Electronics will also provide open source code to you on CD-ROM
for a charge covering the cost of performing such distribution (such
as the cost of media, shipping, and handling) upon email request to
opensource@lge.com.
This oer is valid for a period of three years after our last shipment of
this product. This oer is valid to anyone in receipt of this information.
Licenses
Supported licenses may dier by model.
Manufactured under license from Dolby Laboratories. Dolby, Dolby
Vision, Dolby Audio, Dolby Atmos, and the double-D symbol are
trademarks of Dolby Laboratories.
The terms HDMI and HDMI High-Denition Multimedia Interface,
and the HDMI Logo are trademarks or registered trademarks of
HDMI Licensing Administrator, Inc. in the United States and other
countries.
19

ENGLISH
20
 Loading...