

Page 1

Please read this manual carefully before operating your set and
retain it for future reference.
www.lg.com
Safety and Reference
OWNER’S MANUAL
LED Monitor*
* LG LED Monitors applies LCD Monitors
with LED backlights.
*MFL68662454*
P/NO : MFL68662454 (1506-REV00)
Printed in Korea
Page 2

ENGLISH
2
Safety instructions
Please read these safety precautions carefully
before using the product.
WARNING
Do not place the monitor and/or remote control
in the following environments:
tA location exposed to direct sunlight
tAn area with high humidity such as a
bathroom
tNear any heat source such as stoves and
other devices that produce heat
tNear kitchen counters or humidiers where
they can easily be exposed to steam or oil
tAn area exposed to rain or wind
tNear containers of water such as vases
Otherwise, this may result in re, electric
shock, malfunction or product deformation.
Do not place the product where it might be
exposed to dust. This may cause a re hazard.
Mains Plug is the monitor connecting/
disconnecting device to AC mains electric
supply.This plug must remain readily attached
and operable when monitor is in use.
Do not touch the power plug with wet hands.
Additionally, if the cord pin is wet or covered
with dust, dry the power plug completely or
wipe dust o. You may be electrocuted due to
excess moisture.
Make sure to connect Mains cable to compliant
AC mains socket with Grounded earth pin.
(Except for devices which are not grounded
on earth.) Otherwise possibility you may be
electrocuted or injured.
Insert power cable plug completely into wall
socket otherwise if not secured completely into
socket, re ignition may break out.
Ensure the power cord does not come into
contact with hot objects such as a heater. This
may cause a re or an electric shock hazard.
Do not place a heavy object, or the product
itself, on power cables. Otherwise, this may
result in re or electric shock.
Page 3

ENGLISH
3
When mounting monitor onto wall make sure
to neatly install and isolate cabling from rear of
monitor as to not create possibility of electric
shock /re hazard.
Do not plug too many electrical devices into a
single multiple electrical outlet. Otherwise, this
may result in re due to over-heating.
Do not drop the product or let it fall over when
connecting external devices. Otherwise, this
may result in injury or damage to the product.
Desiccant
Keep the anti-moisture packing material or
vinyl packing out of the reach of children.
Anti-moisture material is harmful if
swallowed. If swallowed by mistake, force
the patient to vomit and visit the nearest
hospital. Additionally, vinyl packing can cause
suocation. Keep it out of the reach of children.
Do not let your children climb or cling onto the
monitor. Otherwise, the monitor may fall over,
which may cause serious injury.
Dispose of used batteries carefully to ensure
that a small child does not consume them.
Please seek Doctor- Medical Attention
immediately if child consumes batteries.
Do not insert any metal objects/conductors
(like a metal chopstick/cutlery/screwdriver)
between power cable plug and input Wall
Socket while it is connected to the input
terminal on the wall. Additionally, do not touch
the power cable right after plugging into the
wall input terminal. You may be electrocuted.
(Depending on model)
Do not put or store inammable substances
near the product. There is a danger of
combustion/explosion or re due to careless
handling of the inammable substances.
Do not drop metallic objects such as coins,
hair pins, chopsticks or wire into the product,
or inammable objects such as paper and
matches. Children must pay particular
attention. Electrical shock, re or injury can
occur. If a foreign object is dropped into the
product, unplug the power cord and contact
the service centre.
Page 4

ENGLISH
4
Do not spray water on the product or scrub
with an inammable substance (thinner or
benzene). Fire or electric shock accident can
occur.
Do not allow any impact, shock or any objects
to fall into the unit, and do not drop anything
onto the screen. You may be injured or the
product can be damaged.
Never touch this product during a thunder or
lighting storm.
You may be electrocuted.
Never touch the wall outlet when there
is leakage of gas, open the windows and
ventilate. It may cause a re or a burn by a
spark.
Do not disassemble, repair or modify the
product at your own discretion. Fire or electric
shock accident can occur. Contact the service
centre for check, calibration or repair.
If any of the following occur, unplug the
product immediately and contact your local
service centre.
tThe product has been impacted by shock
tThe product has been damaged
tForeign objects have entered the product
tThe product produced smoke or a strange
smell
This may result in re or electric shock.
Unplug the monitor from AC mains wall socket
if you do not intend to use the monitor for a
long period of time. Accumulated dust can
cause re hazard and insulation deterioration
can cause electric leakage/shock/re.
Apparatus shall not be exposed to dripping or
splashing and no objects lled with liquids,
such as vases, shall be placed on the apparatus.
Do not install this product on a wall if it could
be exposed to oil or oil mist. This may damage
the product and cause it to fall.
If water enters or comes into contact with
monitor, power cord please disconnect
the power cord and contact service centre
immediately. Otherwise, this may result in
electric shock or re.
Page 5

ENGLISH
5
Only use an authorized power cord approved
by LG Electronics. Otherwise, this may result
in re, electric shock, malfunction or product
deformation.
Never Disassemble the power cord. This may
result in re or electric shock.
CAUTION
Do not install the product on places such as
unstable shelves or inclined surfaces. Also avoid
places where there is vibration or where the
product cannot be fully supported. Otherwise,
the product may fall or ip over, which may
cause injury or damage to the product.
If you install the monitor on a stand, you need
to take actions to prevent the product from
overturning. Otherwise, the product may fall
over, which may cause injury.
If you intend to mount the product to a wall,
attach VESA standard mounting interface
(optional parts) to the back of the product.
When you install the set to use the wall
mounting bracket (optional parts), x it
carefully so as not to drop.
Only use the attachments / accessories specied
by the manufacturer.
We recommend that you maintain a distance
of at least 2 to 7 times the diagonal screen size
when watching monitor. If you watch monitor
for a long period of time, this may cause blurred
vision.
Only use the specied type of battery. This could
cause damage to the remote control.
Do not mix new batteries with old batteries.
This may cause the batteries to overheat and
leak.
Batteries should not be exposed to excessive
heat. For example, keep away from direct
Sunlight , open replace and electric heaters .
Do not place non-rechargeable batteries in
charging device.
Make sure there are no objects between the
remote control and its sensor.
Signal from Remote Control can be interrupted
due to external/internal lighting eg Sunlight,
uorescent lighting. If this occurs turn o
lighting or darken viewing area.
Page 6

ENGLISH
6
When connecting external devices such as
video game consoles, make sure the connecting
cables are long enough. Otherwise, the product
may fall over, which may cause injury or
damage the product.
Do not turn the product On/O by pluggingin or unplugging the power plug to the wall
outlet. (Do not use the power plug for switch.)
It may cause mechanical failure or could give an
electric shock.
Please follow the installation instructions
below to prevent the product from overheating.
tThe distance between the product and the
wall should be more than 10cm.
tDo not install the product in a place with
no ventilation (e.g., on a bookshelf or in a
cupboard).
tDo not install the product on a carpet or
cushion.
tMake sure the air vent is not blocked by a
tablecloth or curtain.
Otherwise, this may result in re.
Take care not to touch the ventilation openings
when watching the monitor for long periods as
the ventilation openings may become hot. This
does not aect the operation or performance of
the product.
Periodically examine the cord of your appliance,
and if its appearance indicates damage or
deterioration, unplug it, discontinue use of the
appliance, and have the cord replaced with
an exact replacement part by an authorized
servicer.
Prevent dust collecting on the power plug pins
or outlet. This may cause a re hazard.
Protect the power cord from physical or
mechanical abuse, such as being twisted,
kinked, pinched, closed in a door, or walked
upon. Pay particular attention to plugs, wall
outlets, and the point where the cord exits the
appliance.
Do not press strongly upon the panel with a
hand or sharp object such as nail, pencil or pen,
or make a scratch on it, as it may causedamage
to screen.
Avoid touching the screen or holding your
nger(s) against it for long periods of time.
Doing so may produce some temporary or
permanent distortion/damage to screen.
Page 7

ENGLISH
7
When cleaning the product and its components,
unplug the power rst and wipe it with a soft
cloth. Applying excessive force may cause
scratches or discolouration. Do not spray with
water or wipe with a wet cloth. Never use glass
cleaner, car or industrial shiner, abrasives or
wax, benzene, alcohol etc., which can damage
the product and its panel. Otherwise, this may
result in re, electric shock or product damage
(deformation, corrosion or breakage).
As long as this unit is connected to the AC wall
outlet, it is not disconnected from the AC power
source even if you turn o this unit by SWITCH.
When unplugging the cable, grab the plug and
unplug it, by pulling at the plug.
Don’t pull at the cord to unplug the power
cord from the power board, as this could be
hazardous.
When moving the product, make sure you turn
the power o rst. Then, unplug the power
cables and all connecting cables.
The monitor set or power cord may be damaged,
which may create a re hazard or cause electric
shock.
When moving or unpacking the product,
work in pairs because the product is heavy.
Otherwise, this may result in injury.
Contact the service centre once a year to clean
the internal parts of the product.
Accumulated dust can cause mechanical failure.
Refer all servicing to qualied service
personnel. Servicing is required when the
apparatus has been damaged in any way, such
as power supply cord or plug is damaged, liquid
has been spilled or objects have fallen into the
apparatus, the apparatus has been exposed to
rain or moisture, does not operate normally, or
has been dropped.
If the product feels cold to the touch, there may
be a small “icker” when it is turned on. This is
normal, there is nothing wrong with product.
Page 8

ENGLISH
8
The panel is a high technology display product
with resolution of two million to six million pixels.
You may see tiny black dots and/or brightly
coloured dots (red, blue or green) at a size of
1ppm on the panel. This does not indicate a
malfunction and does not aect the performance
and reliability of the product.
This phenomenon also occurs in third-party
products and is not subject to exchange or refund.
You may nd dierent brightness and color of the
panel depending on your viewing position(left/
right/top/down).
This phenomenon occurs due to the characteristic
of the panel. It is not related with the product
performance, and it is not malfunction.
Displaying a still image (e.g., broadcasting
channel logo, on-screen menu, scene from a
video game) for a prolonged time may cause
damage to the screen, resulting in retention of
the image, which is known as image sticking.
The warranty does not cover the product for
image sticking.
Avoid displaying a xed image on your
monitor’s screen for a prolonged period (2
or more hours for LCD, 1 or more hours for
Plasma).
Also, if you watch the monitor at a ratio of 4:3
for a long time, image sticking may occur on
the borders of the panel.
This phenomenon also occurs in third-party
products and is not subject to exchange or
refund.
Generated sound
“Cracking” noise: A cracking noise that occurs
when watching or turning o the monitor
is generated by plastic thermal contraction
due to tempera-ture and humidity. This
noise is common for products where thermal
deformation is required. Electrical circuit
humming/panel buzzing: A low level noise is
generated from a high-speed switching circuit,
which supplies a large amount of current to
operate a product. It varies depending on the
product.
This generated sound does not aect the
performance and reliability of the product.
Do not use high voltage electrical goods near
the Monitor (e.g. electric mosquito-swatter).
This may result in product malfunction.
Preparing
NOTE
tImage shown may dier from your monitor.
tYour monitor’s OSD (On Screen Display)
may dier slightly from that shown in this
manual.
tThe available menus and options may dier
from the input source or product model that
you are using.
Page 9

ENGLISH
9
tNew features may be added to this monitor
in the future.
tThe monitor can be placed in standby mode
in order to reduce the power consumption.
And the monitor should be turned o if it
will not be watched for some time, as this
will reduce energy consumption.
tThe energy consumed during use can
be signicantly reduced if the level of
brightness of the picture is reduced, and this
will reduce the overall running cost.
tThe items supplied with your product may
vary depending on the model.
tProduct specications or contents of this
manual may be changed without prior
notice due to upgrade of product functions.
tFor an optimal connection, HDMI cables
and USB devices should have bezels less
than 10 mm thick and 18 mm width. Use an
extension cable that supports USB 2.0 if the
USB cable or USB memory stick does not t
into your monitor’s USB port.
A
B
A
B
*A
<
10 mm
*B
<
18 mm
tUse a certied cable with the HDMI logo
attached.
tIf you do not use a certied HDMI cable,
the screen may not display or a connection
error may occur. (Recommended HDMI cable
types)
- High-Speed HDMI®/
TM
Cable (3 m or less)
- High-Speed HDMI®/
TM
Cable with
Ethernet (3 m or less)
CAUTION
tDo not use any unapproved items to ensure
the safety and product life span.
tAny damage or injuries caused by using
unapproved items are not covered by the
warranty.
tSome models have a thin lm attached on to
the screen and this must not be removed.
tWhen attaching the stand to the Monitor
set, place the screen facing down on a
cushioned table or at surface to protect the
screen from scratches.
tMake sure that the screws are inserted
correctly and fastened securely. (If they are
not fastened securely enough, the Monitor
may tilt forward after being installed.) Do
not use too much force and over tighten the
screws; otherwise screw may be damaged
and not tighten correctly.
Separate purchase
Separate purchase items can be changed or
modied for quality improvement without any
notication.
Contact your dealer to buy these items.
These devices only work with certain models.
The model name or design may be changed
depending on the upgrade of product functions,
manufacturer’s circumstances or policies.
(Depending on model)
AN-VC5**
Smart camera
AN-MR500
Magic Remote
LG Audio Device AN-WF500
Wi-Fi/Bluetooth Dongle
* You can use the Magic Remote and LG Audio
Device(Wireless) only when you are using the
Wi-Fi/Bluetooth Dongle.
Page 10

ENGLISH
10
Maintenance
Cleaning your Monitor
Clean your monitor regularly to keep the
best performance and to extend the product
lifespan.
tMake sure to turn the power o and
disconnect the power cord and all other
cables rst.
tWhen the monitor is left unattended and
unused for a long time, disconnect the
power cord from the wall outlet to prevent
possible damage from lightning or power
surges.
Screen, frame, cabinet and
stand
To remove dust or light dirt, wipe the surface
with a dry, clean, and soft cloth.
To remove major dirt, wipe the surface with a
soft cloth dampened in clean water or a diluted
mild detergent. Then wipe immediately with a
dry cloth.
tAvoid touching the screen at all times, as
this may result in damage to the screen.
tDo not push, rub, or hit the screen surface
with your ngernail or a sharp object, as
this may result in scratches and image
distortions.
tDo not use any chemicals as this may
damage the product.
tDo not spray liquid onto the surface. If water
enters the monitor, it may result in re,
electric shock, or malfunction.
Power cord
Remove the accumulated dust or dirt on the
power cord regularly.
Lifting and moving
the Monitor
Please note the following advice to prevent the
monitor from being scratched or damaged and
for safe transportation regardless of its type and
size.
tIt is recommended to move the monitor in
the box or packing material that the monitor
originally came in.
tBefore moving or lifting the monitor,
disconnect the power cord and all cables.
tWhen holding the monitor, the screen
should face away from you to avoid damage.
tHold the top and bottom of the monitor
frame rmly. Make sure not to hold the
transparent part, speaker, or speaker grill
area.
tWhen transporting a large monitor, there
should be at least 2 people.
tWhen transporting the monitor by hand,
hold the monitor as shown in the following
illustration.
tWhen transporting the monitor, do not
expose the monitor to jolts or excessive
vibration.
Page 11

ENGLISH
11
tWhen transporting the monitor, keep the
monitor upright, never turn the monitor on
its side or tilt towards the left or right.
tDo not apply excessive pressure to cause
exing /bending of frame chassis as it may
damage screen.
tWhen handling the monitor, be careful not
to damage the protruding joystick button.
CAUTION
tAvoid touching the screen at all times, as
this may result in damage to the screen.
Using the joystick
button
(Image shown may dier from your monitor.)
You can simply operate the monitor functions,
pressing or moving the joystick button left or
right.
Joystick Button
Basic functions
Power On
When the monitor is
turned o, place your
nger on the joystick
button and press it
once and release it.
Power O
When the monitor is
turned on, place your
nger on the joystick
button and press it
once for a few seconds
and release it.
(However, if the Menu
button is on the screen,
pressing and holding
the joystick button will
let you exit the Menu.)
Volume
Control
If you place your nger
over the joystick button
and move it left or
right, you can adjust the
volume level you want.
Adjusting the menu
When the monitor is turned on, press the
joystick button one time. You can adjust the
Menu items moving the joystick button up,
down, left or right.
Turns the power o.
Clears on-screen displays and returns
to monitor viewing.
Changes the input source.
Accesses the main menu.
NOTE
tWhen your nger over the joystick button
and push it to the up, down, left or right, be
careful not to press the joystick button. If
you press the joystick button rst, you may
not be able to adjust the volume level.
Page 12

ENGLISH
12
Mounting on a table
1 Lift and tilt the monitor into its upright
position on a table.
tLeave a 10 cm (minimum) space from the
wall for proper ventilation.
10 cm
10 cm
10 cm
10 cm
10 cm
2 Connect the power cord to a wall outlet.
CAUTION
tDo not place the monitor near or on sources
of heat, as this may result in re or other
damage.
Using the kensington
security system
(This feature is not available for all models.)
tImage shown may dier from your monitor.
The Kensington security system connector is
located at the rear of the monitor. For more
information of installation and using, refer
to the manual provided with the Kensington
security system or visit http://www.kensington.
com. Connect the Kensington security system
cable between the monitor and a table.
Securing the Monitor
to a wall
(This feature is not available for all models.)
1 Insert and tighten the eye-bolts, or monitor
brackets and bolts on the back of the
monitor.
tIf there are bolts inserted at the eye-bolts
position, remove the bolts rst.
2 Mount the wall brackets with the bolts to
the wall.
Match the location of the wall bracket and
the eye-bolts on the rear of the monitor.
3 Connect the eye-bolts and wall brackets
tightly with a sturdy rope.
Make sure to keep the rope horizontal with
the at surface.
CAUTION
tMake sure that children do not climb on or
hang on the monitor.
NOTE
tUse a platform or cabinet that is strong
and large enough to support the monitor
securely.
tBrackets, bolts and ropes are not provided.
You can obtain additional accessories from
your local dealer.
Page 13

ENGLISH
13
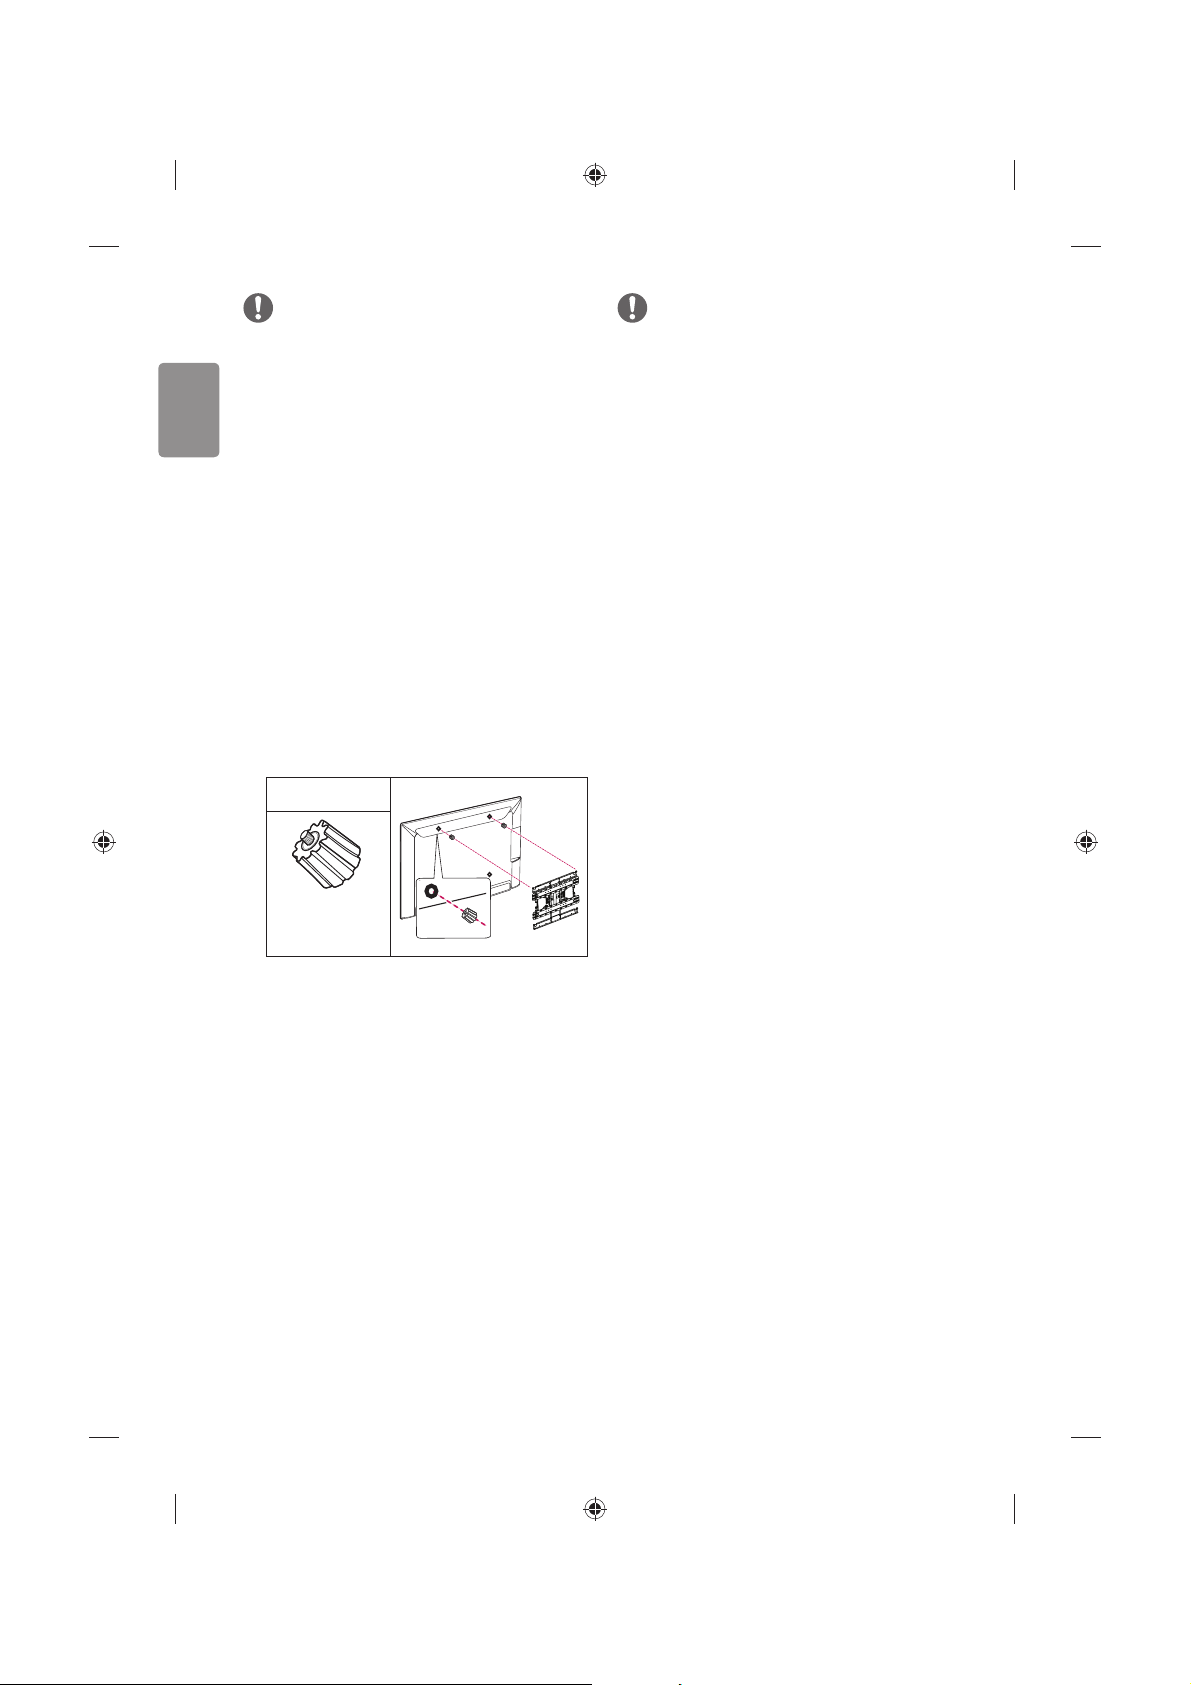
Mounting on a wall
Attach an optional wall mount bracket at the
rear of the monitor carefully and install the wall
mount bracket on a solid wall perpendicular to
the oor. When you attach the monitor to other
building materials, please contact qualied
personnel. LG recommends that wall mounting
be performed by a qualied professional
installer. We recommend the use of LG’s wall
mount bracket. LG’s wall mount bracket is easy
to move with cables connected. When you
do not use LG’s wall mount bracket, please
use a wall mount bracket where the device is
adequately secured to the wall with enough
space to allow connectivity to external devices.
It is advised to connect all the cables before
installing xed wall mounts.
10 cm
10 cm
10 cm
10 cm
Make sure to use screws and wall mount
bracket that meet the VESA standard. Standard
dimensions for the wall mount kits are
described in the following table.
Separate purchase (Wall
mounting bracket)
Model 32LF58** 42LF58**
VESA (mm) (A x B) 200 x 200 400 x 400
Standard screw M6 M6
Number of screws 4 4
Wall mount
bracket
LSW240B
MSW240
LSW440B
MSW240
A
B
CAUTION
tDisconnect the power rst, and then move
or install the monitor. Otherwise electric
shock may occur.
tRemove the stand before installing the
Monitor on a wall mount by performing the
stand attachment in reverse.
tIf you install the monitor on a ceiling or
slanted wall, it may fall and result in severe
injury. Use an authorised LG wall mount
and contact the local dealer or qualied
personnel.
tDo not over tighten the screws as this may
cause damage to the monitor and void your
warranty.
tUse the screws and wall mounts that meet
the VESA standard. Any damages or injuries
by misuse or using an improper accessory
are not covered by the warranty.
Page 14
ENGLISH
14
NOTE
tUse the screws that are listed on the VESA
standard screw specications.
tThe wall mount kit includes an installation
manual and necessary parts.
tThe wall mount bracket is not provided. You
can obtain additional accessories from your
local dealer.
tThe length of screws may dier depending
on the wall mount. Make sure to use the
proper length.
tFor more information, refer to the manual
supplied with the wall mount.
tWhen attaching a wall mounting bracket to
the monitor, insert the wall mount spacers
into the monitor wall mount holes to adjust
the vertical angle of the monitor. (Only when
the item of the following form is provided)
Provided Item
Wall Mount
Spacer
Connections
(notications)
Connect various external devices to the Monitor
and switch input modes to select an external
device. For more information of external
device’s connection, refer to the manual
provided with each device.
Available external devices are: HD receivers,
DVD players, VCRs, audio systems, USB storage
devices, PC, gaming devices, and other external
devices.
NOTE
tThis Monitor does not support HEVC codec.
tThe external device connection may dier
from the model.
tConnect external devices to the Monitor
regardless of the order of the Monitor port.
tRefer to the external equipment’s manual
for operating instructions.
tIf you connect a gaming device to the
Monitor, use the cable supplied with the
gaming device.
tIn PC mode, there may be noise associated
with the resolution, vertical pattern, contrast
or brightness. If noise is present, change
the PC output to another resolution, change
the refresh rate to another rate or adjust
the brightness and contrast on the PICTURE
menu until the picture is clear.
tIn PC mode, some resolution settings
may not work properly depending on the
graphics card.
USB Connection
Some USB Hubs may not work. If a USB device
connected through a USB Hub is not detected,
connect it directly to the USB port on the
monitor.
Other connections
Connect your Monitor to external devices. For
the best picture and audio quality, connect the
external device and the Monitor with the HDMI
cable. Some separate cable is not provided.
Page 15

ENGLISH
15
Remote control
The descriptions in this manual are based on the
buttons on the remote control.
Please read this manual carefully and use the
monitor correctly.
To replace batteries, open the battery cover,
replace batteries (1.5 V AAA) matching
the
and ends to the label inside the
compartment, and close the battery cover.
To remove the batteries, perform the
installation actions in reverse.
CAUTION
tDo not mix old and new batteries, as this
may damage the remote control.
Make sure to point the remote control toward
the remote control sensor on the monitor.
(Some buttons are not available.)
FAV
P
PAGE
A
B
A
(POWER) Turns the Monitor on or o.
This Button is not available.
Recalls your preferred subtitle in
digital mode. (Depending on model)
Accesses the quick menus.
Shows programme guide. (Depending
on model)
By Pressing AD button, audio descriptions
function will be enabled. (Depending on
model)
Changes the input source.
Number buttons Enters numbers.
Accesses the saved programme list.
(Depending on model)
(Space) Opens an empty space on the
screen keyboard.
Returns to the previously viewed
programme. (Depending on model)
B
Adjusts the volume level.
Accesses your favourite programme list.
(Depending on model)
Views the information of the current
programme and screen. (Depending on model)
Mutes all sounds.
Scrolls through the saved programmes.
Moves to the previous or next
screen. (Depending on model)
Accesses the main menus.
Accesses the Home menu.
Shows the list of Apps.
Page 16

ENGLISH
16
C
C
Teletext buttons ( / ) These
buttons are used for teletext. (Depending on
model)
Navigation buttons (up/down/left/right)
Scrolls through menus or options.
Selects menus or options and conrms
your input.
Returns to the previous level.
Clears on-screen displays and returns to
monitor viewing.
Selects the MHP monitor menu
source. (Depending on model)
Starts to record and displays record
menu. (Depending on model)
Control buttons (
) Controls
the Premium contents or SmartShare menus
or the SIMPLINK compatible devices (USB or
SIMPLINK).
Coloured buttons These access special
functions in some menus.
(
: Red, : Green, : Yellow, : Blue)
Licenses
Supported licenses may dier by model. For
more information about licenses, visit www.
lg.com.
Open source
software notice
information
To obtain the source code under GPL, LGPL,
MPL, and other open source licenses, that is
contained in this product, please visit http://
opensource.lge.com.
In addition to the source code, all referred
license terms, warranty disclaimers and
copyright notices are available for download.
LG Electronics will also provide open source
code to you on CD-ROM for a charge covering
the cost of performing such distribution (such
as the cost of media, shipping, and handling)
upon email request to opensource@lge.com.
This oer is valid for three (3) years from the
date on which you purchased the product.
Page 17

ENGLISH
17
External control
device setup
To obtain the external control device setup
information, please visit www.lg.com.
Troubleshooting
Cannot control the monitor with the remote
control.
tCheck the remote control sensor on the
product and try again.
tCheck if there is any obstacle between the
product and the remote control.
tCheck if the batteries are still working and
properly installed (
to , to ).
No image display and no sound is produced.
tCheck if the product is turned on.
tCheck if the power cord is connected to a
wall outlet.
tCheck if there is a problem in the wall outlet
by connecting other products.
The monitor turns o suddenly.
tCheck the power control settings. The power
supply may be interrupted.
tCheck if the
Automatic Standby
(Depending on model) / Sleep Timer / Off
Time
is activated in the TIME settings.
tIf there is no signal while the monitor is on,
the monitor will turn o automatically after
15 minutes of inactivity.
When connecting to the PC (HDMI), ‘No signal’
or ‘Invalid Format’ is displayed.
tTurn the monitor o/on using the remote
control.
tReconnect the HDMI cable.
tRestart the PC with the monitor on.
Specications
Wireless LAN module specication
tBecause band channel used by the country
could be dierent, the user can not change
or adjust the operating frequency and this
product is set for the regional frequency
table.
tThis device should be installed and operated
with minimum distance 20 cm between the
device and your body. And this phrase is for
the general statement for consideration of
user environment.
0197
Wireless LAN module (TWFM-B006D)
specification
Standard IEEE802.11a/b/g/n
Frequency
Range
2400 to 2483.5 MHz
5150 to 5250 MHz
5725 to 5850 MHz (for Non EU)
Output Power
(Max.)
802.11a: 11 dBm
802.11b: 14 dBm
802.11g: 10.5 dBm
802.11n - 2.4 GHz: 11 dBm
802.11n - 5 GHz: 12.5 dBm
Environment condition
Operating Temperature 0 °C to 40 °C
Operating Humidity Less than 80 %
Storage Temperature -20 °C to 60 °C
Storage Humidity Less than 85 %
Page 18

Record the model number and serial number of the monitor.
Refer to the label on the back cover and quote this
information to your dealer when requiring any service.
MODEL
SERIAL
Please contact LG First.
If you have any inquiries or comments, please contact LG customer
information centre.
LG Customer Information Centre
Country LG Service
Country LG Service
Österreich 0 810 144 131 Nederland 0900 543 5454
België 015 200 255 Norge 800 187 40
Luxembourg 0032 15 200255 Polska 801 54 54 54
Ȼɴɥɝɚɪɢɹ
07001 54 54 Portugal 808 78 54 54
ËFTL3FQ 810 555 810 3PN¡OJB 031 228 3542
Danmark 8088 5758 Slovensko 0850 111 154
Suomi 0800 0 54 54 &TQB°B 963 05 05 00
France
3220 dites LG ou tapez 54
Sverige 0770 54 54 54
Deutschland
01806 11 54 11
(0,20€ pro Anruf aus dem
Festnetz der DTAG; Mobilfunk:
max. 0,60€ pro Anruf.)
Schweiz 0848 543 543
ǼȜȜȐįĮ
801 11 200 900,
210 4800 564
United
Kingdom
0344 847 5454
Ɋɨɫɫɢɹ
8 800 200 7676
.BHZBSPST[H 06 40 54 54 54 Eesti 800 9990
Éire 01 686 9454
ɍɤɪɚɢɧɚ
0 800 303 000
Italia 199600099
Ʉɚɡɚɯɫɬɚɧ
8 8000 805 805,
2255(GSM)
Ȼɟɥɚɪɭɫɶ
8 820 0071 1111
Latvija 80200201
ɍɡɛɟɤɢɫɬDɧ
8 800 120 2222
Lietuva 880008081
Ʉɵɪɝɵɡɫɬɚɧ
0-800-805-8050
Türkiye 444 6 543 Slovenija 080 543 543
www.lg.com
Page 19

4FUJOJ[J¦BMðĝUðSNBEBOµODFCVLðMBWV[VM»UGFOEJLLBUMFPLVZVO
WFJMFSJEFCBĝWVSNBLJ¦JOTBLMBZðO
www.lg.com
(»WFOMJLWF3FGFSBOT
KULLANIM KILAVUZU
LED Monitör*
* LG LED Monitör, LED arka ışıkları olan
LCD ekranına sahiptir.
Page 20

2
TÜRKÇE
Güvenlik Talimatları
Lütfen ürünü kullanmadan önce bu güvenlik
önlemlerini dikkatlice okuyun.
UYARI
Monitörü ve/veya uzaktan kumandayı
aşağıdaki ortamlara yerleştirmeyin:
tDoğrudan güneş ışığına maruz kalan bir yer
tBanyo gibi yüksek oranda nem içeren bir
alan
tFırın gibi herhangi bir ısı kaynağının ya da
ısı üreten diğer aygıtların yakını
tÜrünün buhara ve yağa kolaylıkla maruz
kalabileceği mutfak tezgahları veya hava
nemlendiricilerin yakını
tYağmura veya rüzgara maruz kalan bir alan
tVazo gibi su içeren kapların yakını
Aksi halde yangın, elektrik çarpması, arıza veya
ürünün bozulması gibi durumlar yaşanabilir.
Ürünü toza maruz kalabileceği bir yere
yerleştirmeyin. Bu durum yangın tehlikesine
neden olabilir.
Şebeke şi, Monitörü AC elektrik şebekesine
bağlayan aygıttır. Bu ş, Monitör kullanılırken
takılı ve kullanılabilir olmalıdır.
Islak elle şe dokunmayın. Ayrıca kablo pimi
ıslaksa ya da tozlanmışsa şi iyice kurutun
veya üzerindeki tozu alın. Aşırı nem nedeniyle
elektrik çarpılabilirsiniz.
Şebeke şini Topraklamalı toprak pimi ile
uyumlu bir AC şebeke prizine bağladığınızdan
emin olun. (Topraklanmamış aygıtlar hariç.)
Aksi takdirde elektrik çarpılabilir veya
yaralanabilirsiniz.
Güç kablosunun şini duvar prizine iyice
yerleştirin, ş prize tamamen takılmazsa
yangın çıkabilir.
Güç kablosunu ısıtıcı gibi sıcak nesnelerle
temas ettirmeyin. Bu durum, yangına veya
elektrik çarpmasına neden olabilir.
Güç kablolarının üzerine ürün veya ağır bir
nesne koymayın. Aksi halde bu durum yangın
veya elektrik çarpması ile sonuçlanabilir.
Page 21

3
TÜRKÇE
Monitörü duvara monte ederken elektrik
çarpmasını/yangın tehlikesini önlemek için
Monitörün arkasından çıkan kabloları düzenli
bir şekilde topladığınızdan ve yalıttığınızdan
emin olun.
Tek bir çoklu elektrik prizine çok sayıda
elektrikli aygıt takmayın. Aksi halde bu durum
aşırı ısınmaya bağlı olarak yangına yol açabilir.
Ürünü düşürmeyin veya harici cihazlar
bağlarken ürünün düşmemesine dikkat edin.
Aksi halde bu durum yaralanmayla veya
ürünün zarar görmesiyle sonuçlanabilir.
Desiccant
Nem önleyici ambalaj malzemesini ya da vinil
ambalajı çocukların erişemeyeceği bir yerde
saklayın. Nem önleyici malzemenin yutulması
zararlıdır. Kazara yutulursa hastanın kusmasını
sağlayın ve en yakın hastaneye gidin. Ayrıca
vinil ambalaj boğulmaya neden olabilir.
Ambalajı çocukların erişemeyeceği bir yerde
saklayın.
Çocuklarınızın Monitörün üzerine çıkmasına
veya Monitöre asılmasına izin vermeyin.
Aksi halde Monitör düşebilir ve ciddi
yaralanmalara yol açabilir.
Küçük çocukların yutmaması için kullanılmış
pilleri çocukların erişemeyeceği bir yere atmaya
dikkat edin.
Çocuğun pilleri yutması halinde lütfen derhal
doktor yardımına ve tıbbi müdahaleye başvurun.
Güç kablosu şi duvar prizine bağlıyken güç
kablosu şi ile duvar prizi arasına metal bir
nesne/iletken (metal çubuk, çatal bıçak,
tornavida vb.) sokmayın. Ayrıca duvardaki
giriş terminaline taktıktan hemen sonra
güç kablosuna dokunmayın. Elektrik
çarpılabilirsiniz. (Modele bağlı olarak
değişkenlik gösterebilir)
Ürünün yakınlarında yanıcı maddeler
bulundurmayın veya saklamayın.
Yanıcı maddelerin dikkatsizce kullanılması
nedeniyle tutuşma/patlama veya yangın
tehlikesi oluşabilir.
Madeni para, metal toka, metal çubuk veya tel
gibi metal nesneleri ya da kağıt veya kibrit gibi
kolayca alev alabilen nesneleri ürünün içine
düşürmeyin. Çocuklar özellikle dikkat etmelidir.
Elektrik çarpması, yangın veya yaralanma gibi
durumlar oluşabilir. Ürünün içine yabancı bir
nesne düşerse güç kablosunu prizden çekin ve
servis merkeziyle irtibata geçin.
Page 22

4
TÜRKÇE
Ürünün üzerine su püskürtmeyin veya ürünü
alev alabilir maddelerle (tiner veya benzen)
silmeyin. Yangın veya elektrik çarpması kazaları
olabilir.
Üniteyi darbeye veya sarsıntıya maruz
bırakmayın ya da ünitenin içine ve
ekranına nesne düşürmeyin. Aksi takdirde
yaralanabilirsiniz veya ürün zarar görebilir.
Fırtınalı veya şimşekli havalarda bu ürüne
kesinlikle dokunmayın.
Elektrik çarpılabilirsiniz.
Gaz kaçağı olduğu zaman duvar prizine
kesinlikle dokunmayın ve camları açarak ortamı
havalandırın.
Aksi halde yangın çıkabilir veya kıvılcım
sıçramasına bağlı yanıklar oluşabilir.
Ürünü kendi başınıza sökmeyin, tamir veya tadil
etmeyin.
Yangın veya elektrik çarpması kazaları olabilir.
Kontrol, kalibrasyon veya onarım için servis
merkezi ile irtibata geçin.
Aşağıdaki durumlardan biri oluşursa derhal
ürünün şini çekin ve yerel servis merkezinizle
irtibata geçin.
tÜrün darbelerden etkilendiyse
tÜrün zarar gördüyse
tÜrünün içine yabancı nesneler girdiyse
tÜründen duman veya garip bir koku
çıkıyorsa
Bu durum yangın veya elektrik çarpması ile
sonuçlanabilir.
Monitörü uzun süre kullanmayacaksanız
Monitörün şini AC şebeke duvar prizinden
çekin. Biriken tozlar yangına neden olabilir ve
yalıtımın bozulması elektrik kaçağına/elektrik
çarpmasına/yangına yol açabilir.
Cihaz damlayan veya sıçrayan sıvılarla temas
etmemelidir ve vazo gibi içi su dolu nesneler
cihazın üzerine yerleştirilmemelidir.
Yağ veya yağ buharına maruz kalma ihtimali
bulunuyorsa ürünü duvara monte etmeyin;
bu durum ürünün hasar görmesine ya da
düşmesine neden olabilir.
Su veya başka bir madde ürünün (Güç kablosu,
Monitör) içine girerse güç kablosunu çıkarın ve
hemen servis merkezi ile irtibata geçin. Aksi
halde bu durum, yangın veya elektrik çarpması
ile sonuçlanabilir.
Page 23

5
TÜRKÇE
Yalnızca LG Electronics tarafından onaylanan
ve izin verilen güç kablosu kullanın. Aksi halde
yangın, elektrik çarpması, arıza veya ürün
bozulması gibi durumlar yaşanabilir.
Güç kablosunu asla parçalarına ayırmayın.
Bu durum, yangın veya elektrik çarpması ile
sonuçlanabilir.
DİKKAT
Ürünü dengesiz raf veya eğimli yüzeyler üzerine
kurmayın. Ayrıca ürünü, titreşimli olan ve
ürünün tam olarak desteklenmeyeceği yerlere
kurmaktan kaçının. Aksi halde ürün düşebilir
veya devrilebilir ve yaralanmaya ya da ürünün
zarar görmesine yol açabilir.
Monitörü bir ayaklığa kurarsanız ürünün aşırı
dönmesini önlemek için gerekli önlemleri
almanız gerekir. Aksi halde ürün düşebilir ve
yaralanmalara yol açabilir.
Ürünü duvara monte etmeyi düşünüyorsanız
ürünün arkasına VESA standart montaj aparatı
(isteğe bağlı parçalar) takın. Seti duvara montaj
braketine (isteğe bağlı parçalar) takarken
düşmeyecek şekilde dikkatlice sabitleyin.
Yalnızca üreticinin onayladığı bağlantıları /
aksesuarları kullanın.
Monitörü izlerken ekranın çapraz boyutunun
en az 2-7 katı kadar bir mesafe bırakmanızı
öneririz. Monitörü uzun süre seyretmek
görüşünüzün bulanıklaşmasına yol açabilir.
Yalnızca belirtilen türde pil kullanın. Aksi halde
uzaktan kumanda zarar görebilir.
Yeni pillerle eski pilleri bir arada kullanmayın.
Bu durum pillerin aşırı ısınmasına ve sızıntı
yapmasına neden olabilir.
Piller aşırı ısıya maruz bırakılmamalıdır.
Örneğin, doğrudan gelen güneş ışığından, açık
şömineden ve elektrikli ısıtıcılardan uzak tutun.
Şarj edilebilir olmayan pilleri şarj aygıtına
koymayın.
Uzaktan kumanda ile sensörü arasında bir
nesne bulunmamasına dikkat edin.
Uzaktan Kumandadan gelen sinyal, güneş ışığı,
oresan aydınlatma gibi dış/iç aydınlatma
nedeniyle kesintiye uğrayabilir. Bu durumda
ışığı kapatın veya görüntüleme alanını karartın.
Page 24

6
TÜRKÇE
Video oyun konsolu gibi harici aygıtlar
bağlarken bağlantı kablolarının yeterli
uzunlukta olmasına dikkat edin. Aksi halde
ürün düşebilir ve yaralanmaya ya da ürünün
zarar görmesine yol açabilir.
Ürünü, elektrik şini duvar prizine takarak
veya prizden çıkartarak açıp kapatmayın. (Açıp
kapatmak için şi kullanmayın.)
Bu durum mekanik arızaya veya elektrik
çarpmasına yol açabilir.
Ürünün aşırı ısınmasını önlemek için lütfen
aşağıdaki kurulum talimatlarını izleyin.
tÜrünle duvar arasındaki mesafe en az 10cm
olmalıdır.
tÜrünü havalandırması olmayan bir yere
kurmayın (örn., bir kitaplığa ya da dolaba).
tÜrünü halı veya minderin üzerine kurmayın.
tHavalandırma kapağının masa örtüsü veya
perdeyle kapanmamasına dikkat edin.
Aksi halde yangın çıkabilir.
Monitörü uzun süre izleyeceğiniz zaman
havalandırma açıklıkları ısınabileceğinden
havalandırma açıklıklarına dokunmamaya özen
gösterin. Bu durum ürünün çalışmasını veya
performansını etkilemez.
Cihazınızın kablosunu düzenli aralıklarla
inceleyin; kablonun görünümü hasara veya
bozulmaya işaret ediyorsa şi prizden çekin,
cihazı kullanmayın ve kablonun bir yetkili servis
personeli tarafından aynısıyla değiştirilmesini
sağlayın.
Elektrik şi pimlerinde veya prizde toz
birikmesini önleyin. Bu durum yangın
tehlikesine neden olabilir.
Elektrik kablosunu bükülme, dolanma, kıstırma,
kapıya sıkışma veya üzerine basılma gibi ziksel
veya mekanik zararlardan koruyun. Özellikle
şlere, duvar prizlerine ve kablonun cihazdan
çıktığı noktaya dikkat edin.
Ekrana zarar verebileceği için panele elinizle
veya tırnak, kurşun kalem ya da tükenmez
kalem gibi keskin bir nesneyle bastırmayın veya
üzerini çizmeyin.
Ekrana dokunmayın veya uzun süre
parmaklarınızla bastırmayın. Aksi takdirde
ekranda geçici veya kalıcı bozulma/hasar
oluşabilir.
Page 25

7
TÜRKÇE
Ürünü ve bileşenlerini temizlerken öncelikle
ürünü prizden çekin ve yumuşak bir bezle
silin. Aşırı kuvvet uygulamak çizilmelere veya
renk değişimine yol açabilir. Su püskürtmeyin
veya ıslak bezle silmeyin. Ürüne ve paneline
zarar verebilecek cam temizleyiciler, otomobil
parlatıcısı veya sanayi tipi parlatıcı, aşındırıcı
maddeler veya cila, benzen, alkol ve benzeri
maddeleri kesinlikle kullanmayın.
Aksi halde yangın çıkabilir, elektrik çarpabilir
veya ürün zarar görebilir (deformasyon, aşınma
veya kırılma).
Bu ünite AC duvar prizine bağlı olduğu sürece
üniteyi DÜĞMESİNDEN kapatsanız bile AC güç
kaynağı ile bağlantısı kesilmez.
Kabloyu çıkarırken şi tutun ve şten tutarak
prizden çekin.
Tehlikeli olabileceği için güç kablosunu prizden
çekerken kablodan tutup çekmeyin.
Ürünü taşırken öncelikle kapattığınızdan emin
olun. Ardından güç kablolarını ve tüm bağlantı
kablolarını çıkarın.
Monitör seti veya güç kablosu zarar görerek
yangın tehlikesine veya elektrik çarpmasına yol
açabilir.
Ürünü taşırken veya paketini açarken ürünün
ağır olması sebebiyle bir kişiden daha yardım
alın. Aksi halde yaralanabilirsiniz.
Ürünün iç kısımlarını temizlemek için yılda bir
kez servis merkezi ile irtibata geçin.
Biriken toz mekanik arızaya yol açabilir.
Tüm servis işlemlerinin kaliye servis personeli
tarafından yapılmasını sağlayın. Elektrik
kablosunun ya da şinin hasar görmesi, üzerine
sıvı dökülmesi ya da yabancı nesnelerin cihaza
girmesi, cihazın yağmur ya da neme maruz
kalması, normal çalışmaması veya bir yerden
düşmesi gibi cihazın hasar gördüğü tüm
durumlarda servis işlemi gereklidir.
Ürün dokunduğunuzda soğuksa açıldığında
küçük bir “titreşme” olabilir. Bu normal bir
durumdur ve ürünle ilgili bir sorun yoktur.
Page 26

8
TÜRKÇE
Panel, iki milyon ila altı milyon piksel çözünürlüğe
sahip yüksek teknolojili bir ekran ürünüdür.
Panelin üzerinde 1ppm boyutunda siyah ve/veya
parlak renkli küçük noktalar (kırmızı, mavi veya
yeşil) görebilirsiniz. Bu noktalar ürünün arızalı
olduğunu göstermez; ürünün performansını ve
güvenilirliğini etkilemez.
Bu durum üçüncü taraf ürünlerde de oluşmaktadır
ve ürün değişimi ya da para iadesine tabi değildir.
İzleme konumunuza (sol/sağ/yukarı/aşağı)
bağlı olarak panelin parlaklığında ve renginde
farklılıklar olduğunu görebilirsiniz.
Bu durum panelin özelliğine bağlı olarak oluşur.
Ürün performansıyla ilgisi yoktur ve arıza
değildir.
Hareketsiz görüntülerin (örn., kanal logosu,
ekran üstü menü, bir video oyunu sahnesi)
uzun süre görüntülenmesi, ekrana zarar vererek
görüntü yapışması adıyla bilinen görüntü
tutulmasına yol açabilir. Görüntü yapışması
garanti kapsamında değildir.
Monitörünüzün ekranında sabit bir görüntüyü
uzun süre (LCD için 2 saat veya daha
fazla, Plazma için 1 saat veya daha fazla)
görüntülemekten kaçının.
Ayrıca Monitörünüzü uzun süre boyunca 4:3
oranında izlerseniz panelin kenarlarında
görüntü yapışması oluşabilir.
Bu durum üçüncü taraf ürünlerde de
oluşmaktadır ve ürün değişimi ya da para
iadesine tabi değildir.
Oluşan Sesler
“Çatlama” sesi: Monitörü izlerken veya
kapatıldığında oluşan çatlama sesi, sıcaklık ve
neme bağlı olarak termal plastik kasılmasından
kaynaklanır. Bu ses, termal deformasyon
gerektiren ürünlerde yaygın olarak görülür.
Elektrik devresi uğultusu/panel cızırtısı: Ürünü
çalıştırmak için yüksek miktarda akım sağlayan
yüksek hızlı anahtar devresi düşük seviyeli bir
gürültüye sebep olur. Bu durum ürüne göre
değişir.
Oluşan ses ürünün performansını ve
güvenilirliğini etkilemez.
Monitör yakınında yüksek gerilimli elektrikli
ürünler (örn. sivrisinek öldürücü elektrikli raket)
kullanmayın.
Aksi takdirde ürün arızalanabilir.
Hazırlık
NOTE
tGösterilen şekil Monitörünüzden farklı
olabilir.
tMonitörünüzün OSD’si (Ekran Göstergesi) bu
kullanma kılavuzunda gösterilenlerden farklı
olabilir.
tMevcut menüler ve opsiyonlar kullanmakta
olduğunuz ürün modelinden ya da giriş
kaynağından farklı olabilir.
Page 27

9
TÜRKÇE
tGelecekte bu Monitöre yeni özellikler
eklenebilir.
tMonitör, güç tüketimini azaltmak için
bekleme moduna alınabilir. Monitör bir süre
izlenmeyecekse enerji tüketimini azaltmak
için kapatılmalıdır.
tGörüntü parlaklığı seviyesinin
düşürülmesiyle kullanım sırasında tüketilen
enerji miktarı önemli ölçüde azaltılabilir;
böylelikle genel çalıştırma maliyetini
düşürecektir.
tÜrününüzle birlikte verilen öğeler modele
göre değişiklik gösterebilir.
tÜrün özellikleri ya da bu kılavuzun içeriği,
ürün işlevlerinin yükseltilmesine bağlı olarak
önceden haber verilmeksizin değiştirilebilir.
tOptimum bağlantı için HDMI kabloları ve
USB aygıtları 10 mm kalınlıktan ve 18 mm
genişlikten daha az çıkıntıya sahip olmalıdır.
USB kablo veya USB taşınabilir bellek
Monitörünüzün USB bağlantı noktasına
uymazsa USB 2,0’ı destekleyen bir uzatma
kablosu kullanın.
A
B
A
B
*A
<
10 mm
*B
<
18 mm
tHDMI logolu onaylı bir kablo kullanın.
tOnaylı bir HDMI kablosu kullanmazsanız
ekrana görüntü gelmeyebilir veya bağlantı
hataları oluşabilir. (Önerilen HDMI kablo
tipleri)
- Yüksek Hızlı HDMI®/
TM
kablosu (3 metre
veya daha kısa)
- Ethernet destekli Yüksek Hızlı HDMI®/
TM
kablosu (3 metre veya daha kısa)
DİKKAT
tÜrün kullanım ömrü ve güvenliğiniz için
onaylanmamış öğeler kullanmayın.
tOnaylanmamış öğelerin kullanılmasından
kaynaklanan hasar ve yaralanmalar garanti
kapsamına girmez.
tBazı modellerde ekrana yapıştırılmış ince bir
lm bulunur ve bu lm sökülmemelidir.
tMonitör
setine ayaklığı takarken ekranı
çizilmelere karşı korumak için destekli bir
masaya veya düz bir yüzeye önü aşağı bakacak
şekilde yerleştirin.
tVidaların doğru bir şekilde yerleştirildiğinden
ve iyice sıkıldığından emin olun. (Vidalar
yeterince sıkılmadığında kurulumun ardından
Monitör
öne doğru eğilebilir.) Vidaları çok
fazla güç kullanarak sıkmayın; aksi takdirde
vida hasar görebilir ve doğru şekilde
sıkılmayabilir.
Ayrı satılan öğeler
Ayrı satılan öğeler haber verilmeksizin
değiştirilebilir veya kalitesinin artırılması
amacıyla üzerinde değişiklik yapılabilir.
Bu öğeleri satın almak için satıcınızla irtibata
geçin.
Bu cihazlar yalnızca belirli modellerle birlikte
çalışır.
Model adı veya tasarımı, ürün işlevlerinin
yükseltilmesine, üreticinin koşullarına veya
politikalarına bağlı olarak değiştirilebilir.
(Modele bağlı olarak değişkenlik gösterebilir)
AN-VC5**
Smart camera
AN-MR500
Sihirli Kumanda
LG Ses cihazı AN-WF500
Wi-Fi/Bluetooth Dongle’ı
* Sihirli Kumanda ve LG Ses Cihazını (Kablosuz)
yalnızca Wi-Fi/Bluetooth Dongle’ı kullanırken
kullanabilirsiniz.
Page 28

10
TÜRKÇE
Bakim
Monitörünüzü temizleme
Yüksek performansı korumak ve ürünün
kullanım ömrünü uzatmak için Monitörünüzü
düzenli olarak temizleyin.
tÖncelikle gücün kapandığından, güç kablosu
ve diğer tüm kabloların çıkarıldığından emin
olun.
tMonitör uzun süre kullanılmayacaksa olası
yıldırım ve voltaj dalgalanmalarından dolayı
hasar görmesini önlemek için güç kablosunu
duvar prizinden çıkarın.
Ekran, çerçeve, kabin ve
ayaklık
Tozu ve haf kirleri temizlemek için, yüzeyi
kuru, temiz ve yumuşak bir bezle silin.
Ağır kirleri temizlemek için, yüzeyi temiz su
veya haf deterjana batırılmış bir bezle silin.
Ardından hemen kuru bir bezle kurulayın.
tHasar görmesine yol açabileceğinden ekrana
hiçbir koşulda dokunmayın.
tEkranda çiziklere ve görüntü bozulmalarına
neden olabileceğinden dolayı, ekran
yüzeyine tırnağınızla veya sivri bir nesneyle
dokunmayın, bastırmayın ve vurmayın.
tYüzeye zarar verebileceğinden dolayı
herhangi bir kimyasal madde kullanmayın.
tYüzeye sıvı püskürtmeyin. Monitöre su
girmesi durumunda yangın, elektrik
çarpması ya da arıza meydana gelebilir.
Güç kablosu
Güç kablosunda biriken toz ve kirleri düzenli
olarak temizleyin.
Monitörün kaldırılması
ve taşınması
Monitörün çizilmesini veya zarar görmesini
önlemek ve tipinden ve boyutundan bağımsız
olarak güvenli şekilde taşımak için lütfen
aşağıdaki tavsiyeye uyun.
tMonitörün kutuda veya orijinal ambalaj
malzemesinde taşınması önerilir.
tMonitörü taşımadan veya kaldırmadan önce
güç kablosunu ve diğer tüm kabloları sökün.
tMonitörü tutarken hasar görmesini önlemek
amacıyla ekran size doğru bakmamalıdır.
tMonitör çerçevesinin alt ve üst kısmını sıkıca
tutun. Saydam kısımdan, hoparlör ya da
hoparlör ızgarası bölgesinden tutmadığınıza
emin olun.
tBüyük bir Monitör taşınırken en az 2 kişi
hazır bulunmalıdır.
tMonitör elde taşınırken aşağıdaki şekilde
gösterildiği gibi tutun.
tTaşıma esnasında Monitörü sarsmayın veya
aşırı titreşime maruz bırakmayın.
Page 29

11
TÜRKÇE
tTaşıma esnasında Monitörü dik tutun,
kesinlikle yan döndürmeyin ya da sola veya
sağa doğru yatırmayın.
tAşırı basınç uygulanması gövde çerçevesinin
katlanıp bükülmesine yol açabilir, bu durum
ekrana hasar verebilir.
tMonitörü tutarken çıkıntılı joystick
düğmesine zarar vermemeye dikkat edin.
DİKKAT
tHasar görmesine yol açabileceğinden ekrana
hiçbir koşulda dokunmayın.
Parçalar ve düğmeler
(Gösterilen şekil Monitörünüzden farklı olabilir.)
Joystick düğmesine basarak ya da düğmeyi sola
veya sağa hareket ettirerek Monitör işlevlerini
kolaylıkla kullanabilirsiniz.
Joystick düğmesi
Temel fonksiyonlar
Gücü
Açma
Monitör kapalıyken
parmağınızı joystick
düğmesinin üstüne koyun
ve düğmeye bir kez basıp
bırakın.
Gücü
Kapatma
Monitör açıkken
parmağınızı joystick
düğmesinin üstüne koyun
ve düğmeye bir kez birkaç
saniyeliğine basıp bırakın.
(Ayrıca Menu düğmesi
ekranda görünüyorken
joystick düğmesini basılı
tuttuğunuzda Menüden
çıkabilirsiniz.)
Ses
Seviyesi
Kontrolü
Parmağınızı joystick
düğmesinin üstüne koyup
düğmeyi sola veya sağa
hareket ettirirseniz ses
seviyesini istediğiniz gibi
ayarlayabilirsiniz.
Menüyü Ayarlama
Monitör açıkken joystick düğmesine bir kez
basın. Joystick düğmesini yukarı, aşağı, sola
veya sağa hareket ettirerek Menü öğelerini
ayarlayabilirsiniz.
Gücü kapatır.
Ekran göstergelerini silerek Monitörü
görüntülemeye geri döner.
Giriş kaynağını değiştirir.
Ana menüye erişim sağlar.
NOT
tParmağınızı joystick düğmesinin üstüne
koyup düğmeyi yukarı, aşağı, sola veya sağa
iterken joystick düğmesine basmamaya
dikkat edin. Önce joystick düğmesine
basarsanız ses seviyesini ayarlayamazsınız.
Page 30

12
TÜRKÇE
Masa üzerine montaj
1 Monitörü kaldırıp masa üzerinde dik konuma
getirin.
t Uygun havalandırma için duvarla arasında
10 cm (minimum) boşluk bırakın.
10 cm
10 cm
10 cm
10 cm
10 cm
2 Güç kablosunu prize takın.
DİKKAT
tYangına ya da başka hasarlara neden
olabileceğinden Monitörü ısı kaynaklarının
üzerine ya da yakınına yerleştirmeyin.
Kensington güvenlik
sisteminin kullanılması
(Bu özellik tüm modellerde mevcut değildir.)
tGösterilen şekil Monitörünüzden farklı
olabilir.
Kensington güvenlik sistemi konnektörü ürünün
arka tarafında yer alır. Kurulum ve kullanıma
ilişkin daha fazla bilgi için, Kensington güvenlik
sistemiyle birlikte verilen kılavuza bakın ya da
http://www.kensington.com adresini ziyaret
edin. Kensington güvenlik sistemi kablosunu
Monitör ve sehpa arasına bağlayın.
Monitörü duvara
sabitleme
(Bu özellik her modelde mevcut değildir.)
1 Delikli cıvataları ya da Monitör braketleri ve
cıvatalarını Monitörün arka tarafına takarak
sıkın.
tDelikli cıvataların konumunda takılı cıvata
varsa öncelikle bu cıvataları sökün.
2 Montaj braketlerini cıvatalarla duvara monte
edin.
Duvara montaj braketinin konumuyla
Monitörün arkasındaki delikli cıvataları
birbirine hizalayın.
3 Delikli cıvatalarla duvara montaj braketlerini
sağlam bir iple sıkıca bağlayın.
İpin düz yüzeyle yatay konumda kalmasını
sağlayın.
DİKKAT
tÇocukların Monitörün üzerine
çıkmamalarına veya Monitöre
asılmamalarına dikkat edin.
NOT
tMonitörü emniyetli bir şekilde destekleyecek
kadar büyük ve sağlam bir platform veya
kabin kullanın.
tBraket, cıvata ve ipler ürünle birlikte
verilmez. Yerel satıcınızdan ilave aksesuarlar
alabilirsiniz.
Page 31

13
TÜRKÇE
Duvara montaj
Monitörün arka tarafına dikkatli bir şekilde
isteğe bağlı bir duvara montaj braketi bağlayın
ve duvara montaj braketini zemine dik ve
sağlam bir duvara takın. Monitörü başka
yapı malzemelerine bağlamanız durumunda
lütfen yetkili personelle irtibata geçin. LG,
duvar montajının kaliye bir kurulum uzmanı
tarafından yapılmasını önerir. LG duvar montaj
braketini kullanmanızı öneriyoruz. LG’nin
duvar montaj braketi kablolar bağlı halde
kolayca taşınabilir. LG duvar montaj braketini
kullanmadığınızda lütfen yeterince güvenli
bir duvar montaj braketi kullandığınızdan ve
arkasında harici aygıt bağlantıları için yeterince
boşluk bıraktığınızdan emin olun. Sabit duvar
montaj arabirimlerini takmadan önce tüm
kabloları bağlamanız önerilir.
10 cm
10 cm
10 cm
10 cm
VESA standartlarını karşılayan duvara montaj
braketleri ve vidaları kullandığınızdan emin
olun. Duvar montaj kitlerinin standart ölçüleri
aşağıdaki tabloda belirtilmiştir.
Ayrı satılır (Duvara montaj
braketi)
Model 32LF58** 42LF58**
VESA (mm) (A x B) 200 x 200 400 x 400
Standart vida M6 M6
Vida sayısı 4 4
Duvara montaj
braketi
LSW240B
MSW240
LSW440B
MSW240
A
B
DİKKAT
tÖncelikle şi çekin, ardından Monitörü
taşıyın veya kurun. Aksi halde elektrik
çarpabilir.
tMonitörü’yi duvara monte etmeden önce,
ayaklık takma işlemini tersine doğru
gerçekleştirerek ayaklığı çıkarın.
tMonitörü tavana veya eğimli bir duvara
monte ederseniz Monitör düşerek ciddi
yaralanmalara yol açabilir. Onaylanmış bir
LG duvara montaj aparatı kullanın ve yerel
satıcınızla veya yetkili servis ile irtibata
geçin.
tMonitöre hasar verebileceğinden ve
garantinizin geçersiz kalmasına yol
açabileceğinden vidaları çok fazla sıkmayın.
tVESA standartlarını karşılayan vidaları ve
duvar montaj arabirimlerini kullanın. Hatalı
kullanım veya uygun olmayan aksesuarların
kullanılmasından kaynaklanan hasar ve
yaralanmalar garanti kapsamına girmez.
Page 32

14
TÜRKÇE
NOT
tVESA standart vida teknik özelliklerinde
belirtilen vidaları kullanın.
tDuvara montaj kiti, bir kurulum kılavuzunu
ve gerekli parçaları içerir.
tDuvara montaj braketi birlikte verilmez.
Yerel satıcınızdan ilave aksesuarlar
alabilirsiniz.
tVidaların boyları duvar montaj aparatına
göre değişiklik gösterebilir. Uygun boyda
vida kullandığınızdan emin olun.
tDaha fazla bilgi için duvara montaj
aparatıyla birlikte verilen kılavuza bakın.
tBir duvara montaj braketini monitöre
bağlarken Monitörün dikey açısını
ayarlayabilmek için duvara montaj
aralıklarını Monitör duvara montaj
deliklerine takın. (Bu durum parça aşağıdaki
gibi verildiğinde geçerlidir.)
Verilen parça
Duvara montaj
aralıkları
Bağlantılar
(bildirimler)
Monitor’ye çeşitli harici cihazlar bağlayın ve bir
harici cihaz seçmek için giriş modlarına geçin.
Harici cihaz bağlantısı hakkında daha fazla bilgi
için cihazlarla birlikte verilen kılavuza bakın.
Kullanılabilir harici cihazlar şunlardır: HD
alıcılar, DVD oynatıcılar, VCR cihazları, ses
sistemleri, USB depolama aygıtları, PC, oyun
cihazları ve diğer harici cihazlar.
NOT
tBu Monitör HEVC codec bileşenini
desteklemez.
tHarici cihaz bağlantısı modele göre
değişiklik gösterebilir.
tHarici cihazları Monitor’ye, Monitor bağlantı
noktalarını dikkate almaksızın bağlayın.
tKullanım talimatları için harici cihazın
kullanım kılavuzuna başvurun.
tMonitor’ye bir oyun cihazı bağlarsanız, oyun
cihazıyla birlikte verilen kabloyu kullanın.
tPC modunda, çözünürlük, dikey desen,
kontrast veya parlaklığa bağlı parazit
görülebilir. Parazit varsa PC çıkışını başka
bir çözünürlüğe ayarlayın, yenileme hızını
değiştirin veya net bir görüntü elde edene
kadar RESİM menüsünden parlaklık ve
kontrast ayarlarını değiştirin.
tPC modunda bazı çözünürlük ayarları grak
kartına bağlı olarak çalışmayabilir.
USB’ye bağlama
Bazı USB Hubları çalışmayabilir. USB Hub’ı ile
bağlanan bir USB aygıtı çalışmazsa, doğrudan
Monitör üzerindeki USB bağlantı noktasına
bağlayın.
Diğer bağlantılar
Monitor’nizi harici cihazlara bağlayın. En
iyi resim ve ses kalitesi için harici aygıtı ve
Monitor’yi HDMI kablosuyla bağlayın. Ayrı bir
kablo sağlanmaz.
Page 33

15
TÜRKÇE
Uzaktan kumanda
Bu kılavuzdaki açıklamalar uzaktan kumanda
üzerinde bulunan düğmeler temel alınarak
verilmiştir.
Lütfen bu kılavuzu dikkatlice okuyun ve
monitörü doğru şekilde kullanın.
Pilleri değiştirmek için pil kapağını açın, pilleri
(1,5 V AAA)
ve uçları pil yuvasındaki
etiketle eşleşecek şekilde değiştirin ve pil
kapağını kapatın.
Pilleri yerinden çıkarmak için pil takma
işlemlerini ters sıra ile yapın.
DİKKAT
tEski ve yeni pilleri birlikte kullanmayın, aksi
halde uzaktan kumanda hasar görebilir.
Uzaktan kumandayı Monitör üzerindeki uzaktan
kumanda sensörüne doğru tuttuğunuzdan emin
olun.
(Bazı düğmelerini kullanılamıyor.)
FAV
P
PAGE
A
B
A
(GÜÇ) Monitör’ü açar veya kapatır.
Bu fonksiyon şu an uygun değil.
Dijital modda tercih ettiğiniz
altyazıyı çağırır. (Modele bağlı olarak
değişkenlik gösterebilir)
Hızlı menülere erişim sağlar.
Program rehberini gösterir. (Modele
bağlı olarak değişkenlik gösterebilir)
AD düğmesine basıldığında ses tanımı
işlevini etkinleştirilir. (Modele bağlı olarak
değişkenlik gösterebilir)
Giriş kaynağını değiştirir.
Rakam düğmeleri Numaraları girer.
Kayıtlı program listesine erişim sağlar.
(Modele bağlı olarak değişkenlik gösterebilir)
(Boşluk) Ekran klavyesinde bir boşluk açar.
İzlediğiniz bir önceki programa döner.
(Modele bağlı olarak değişkenlik gösterebilir)
B
Ses seviyesini ayarlar.
Favori program listenize erişim sağlar.
(Modele bağlı olarak değişkenlik gösterebilir)
Mevcut program ve ekran bilgilerini
görüntüler. (Modele bağlı olarak değişkenlik
gösterebilir)
Tüm sesleri kapatır.
Kaydedilen programlar veya kanallar
arasında gezinmenizi sağlar.
Bir önceki veya bir sonraki ekrana
geçer. (Modele bağlı olarak değişkenlik
gösterebilir)
Ana menülere erişim sağlar.
Smart platformuna erişim sağlar.
Uygulamalar listesini gösterir.
Page 34

16
TÜRKÇE
C
C
Teletext düğmeleri ( / ) Bu
düğmeler teletext için kullanılır. (Modele bağlı
olarak değişkenlik gösterebilir)
Navigasyon düğmeleri (yukarı/aşağı/
sol/sağ) Menüler veya seçenekler arasında
gezinmenizi sağlar.
Menüleri ve seçenekleri belirler ve
girişinizi onaylar.
Önceki seviyeye döner.
Ekran göstergelerini silerek Monitörü
görüntülemeye geri döner.
MHP Monitör kaynağı menüsünü
seçer. (Modele bağlı olarak değişkenlik
gösterebilir)
Kaydı başlatır ve kayıt menüsünü
görüntüler. (Modele bağlı olarak değişkenlik
gösterebilir)
Kontrol düğmeleri (
)
Premium içeriği veya SmartShare menülerini
ya da SIMPLINK ile uyumlu aygıtları (USB veya
SIMPLINK) kontrol eder.
Renkli düğmeler Bu düğmeler bazı
menülerde bulunan özel işlevlere erişim sağlar.
( : Kırmızı, : Yeşil, : Sarı, : Mavi)
Lisanslar
Desteklenen lisanslar modele göre değişiklik
gösterebilir. Lisanslar hakkında daha fazla bilgi
için www.lg.com adresini ziyaret edin.
Açık kaynaklı
yazılım bildirimi
bilgileri
GPL, LGPL, MPL ve bu ürünün içerdiği diğer
açık kaynaklı lisanslar altında kaynak kodu elde
etmek için lütfen http://opensource.lge.com
adresini ziyaret edin.
Kaynak koduna ek olarak, adı geçen tüm lisans
koşulları, garanti feragatnameleri ve telif hakkı
bildirimleri indirilmek üzere mevcuttur.
LG Electronics, opensource@lge.com adresine
e-posta atarak talep etmeniz durumunda
dağıtım masraarı (medya, sevkiyat ve taşıma
ücretleri gibi) size ait olmak üzere ürünün
kaynak kodunu bir CD-ROM’a kayıtlı olarak da
gönderecektir. Bu teklif, ürünü satın aldığınız
tarihten itibaren üç (3) yıl süreyle geçerlidir.
Page 35

17
TÜRKÇE
Harici kontrol aygiti
kurulumu
Harici kontrol aygıtı kurulumu hakkında bilgi almak
için lütfen www.lg.com sayfasını ziyaret edin.
Sorun giderme
Monitör uzaktan kumandayla kontrol edilemiyor.
tÜrün üzerindeki uzaktan kumanda
sensörünü kontrol edin ve tekrar deneyin.
tÜrün ve uzaktan kumanda arasında engel
olup olmadığını kontrol edin.
tPillerin hala çalışır durumda olduğunu ve
düzgün takılıp takılmadığını kontrol edin
(pilin
ucu yuvanın ucuna, ucu ise
yuvanın
ucuna gelmelidir).
Görüntü ve ses gelmiyor.
tÜrünün açık olup olmadığını kontrol edin.
tGüç kablosunun bir duvar prizine bağlı olup
olmadığını kontrol edin.
tBaşka ürünler bağlayarak prizde bir sorun
olup olmadığını kontrol edin.
Monitör aniden kapanıyor.
tGüç kontrol ayarlarını gözden geçirin. Güç
kaynağı kesintiye uğramış olabilir.
tSAAT ayarlarında Otomatik Bekleme
(Modele bağlı olarak değişkenlik
gösterebilir) /
Uyuma Zamanı / Kapatma
Zamanı özelliğinin etkinleştirilip
etkinleştirilmediğini kontrol edin.
tMonitör açıkken sinyal yoksa 15 dakika sonra
Monitör otomatik olarak kapanacaktır.
PC’ye (HDMI) bağlandığında “Sinyal yok” veya
“Geçersiz Format” mesajı görüntüleniyor.
tUzaktan kumandayı kullanarak Monitörü
açıp kapatın.
tHDMI kablosunu yeniden bağlayın.
tMonitör açıkken PC’yi yeniden başlatın.
Teknik özellikler
Kablosuz LAN modülü teknik özellikleri
tÜlkede kullanılan bant kanalı farklı
olabileceği için, kullanıcı çalışma frekansını
değiştiremez veya ayarlayamaz ve bu
ürün bölgesel frekans tablosuna göre
ayarlanmıştır.
tBu cihaz, cihaz ve vücudunuz arasında en az
20 cm mesafe olacak şekilde monte edilmeli
ve çalıştırılmalıdır. Bu talimat, kullanıcı
ortamlarının dikkate alınması için genel bir
beyandır.
0197
Kablosuz LAN modülü (TWFM-B006D)
teknik özellikleri
Standart IEEE802.11a/b/g/n
Frekans
Aralığı
2400 - 2483,5 MHz
5150 - 5250 MHz
5725 - 5850 MHz (AB Dışındaki
Ülkeler İçin)
Çıkış Gücü
(Maks.)
802.11a: 11 dBm
802.11b: 14 dBm
802.11g: 10,5 dBm
802.11n - 2,4 GHz: 11 dBm
802.11n - 5 GHz: 12,5 dBm
Çevresel koşullar
Çalışma Sıcaklığı 0 °C - 40 °C
Çalışma Nemi %80’den daha az
Saklama Sıcaklığı -20 °C - 60 °C
Saklama Nemi %85’den daha az
Page 36

18
TÜRKÇE
Çevresel blgler
WEEE
Eski cihazınızın atılması
1. Tüm elektrik ve elektronik ürünler hükümetin veya mahalli
yetkililerin gösterdiği toplama tesislerine atılmalıdır.
2. Eski cihazınızın uygun biçimde atılması çevreye ve insan
sağlına zararlı potansiyel negatif sonuçları önler.
3. Eski cihazınızın atılmasıyla ilgili daha detaylı bilgi almak için
lütfen mahalli yetkililerle, katı atık servisiyle ya da ürünü
aldığınız mağaza ile irtibata geçiniz.
4. EEE Yönetmeliğine uygundur.
Pl
Pb
1. Bu sembol pillerin %0,0005 oranında civa, %0,002
oranında kad- miyum veya %0,004 oranında
kurşun içermesi durumunda cıva (Hg), kadmiyum
(Cd) veya kurşun (Pb) kimyasal sembolleri ile bir
arada bulunabilir.
2. Tüm piller ve akümülatörler, normal atıl çöplerden ayrı olarak, hükümet veya
yerel idareler tarafından belirlenmiş olan toplama merkezlerinde atılmalıdır.
3. Bu tip kullanılmış pil/akümülatörlerin doğru olarak atılması hem çevreye
hem de hayvan ve insan sağlığına verilebilecek potansiyel olumsuz sonuçları
önleyecektir.
4. Kullanılmış pillerinizin/akümülatörlerinizin atılması ile ilgili olarak,
bulunduğunuz yerdeki belediye, çöp atım hizmeti veren kuruluşlara veya
ürünü satın aldığınız yerlere başvurabilirsiniz.
Page 37

19
TÜRKÇE
Kullanım süresi 10 yıldır. (Ürünün fonksiyonlarını yerine getirebilmesi için
gerekli yedek parça temin süresi).
NAKLİYE VE TAŞIMA SIRASINDA DİKKAT EDİLMESİ GEREKENLER
1- Cihazın şini prizden çıkarınız
2- Taşıma sırasında ekranı düşürmeyin, sarsmayarak darbe görmesini
önleyiniz.
3- Ürünü normal kullanma konumunda taşıyınız, mümkünse orjinal
malzemesiyle paketleyerek taşıyın.
4- Taşıma sırasında cihazın üstüne ağır bir şey koymayınız.
5- Mümkünse iki kişi taşıyınız.
6- Kesinlikle cihazınızı panel üzerine yatırmayınız.
ENERJİ TASARRUF BİLGİLERİ
1- Ürünü kullanmadığınız sürede kapalı tutun
2- Uzun süre kullanmayacaksınız cihazın şini muhakkak çıkarın
3- Kısa aralıklarda cihazınızı stand-by konumunda bırakabilirsiniz
LG ELECTRONICS TİCARET A.Ş.
Kaptanpaşa Mah. Piyalepaşa Bulvarı No : 73
Ortadoğu Plaza Kat : 7
Şişli - İstanbul - Turkey
Tel: (0 212) 314 52 52
Fax: (0 212) 222 61 44
Page 38

20
TÜRKÇE
Yetkili Servisler
Değerli Müşterimiz,
LG Çağrı Yönetim Merkezi 444 6 543 (LGE) no.lu telefon numarası ile, 7
gün / 24 saat hizmet vermektedir (Saat 20:00 ile 09:00 saatleri arasında
otomatik kayıt sistemi ile). Bu saatler dışında aradığınızda adınızı,
soyadınızı ve telefon numaranızı alan kodu ile bıraktığınızda ilk mesai
saatinde sizinle irtibata geçilecektir. Doğrudan bu numarayı çevirerek
size en yakın Yetkili Servis telefonunu alabilir veya arzu ettiğiniz hizmeti
talep edebilirsiniz.
Çağrı Merkezi
444 6 543 (LGE)
ÇAĞRI MERKEZİMİZİ SABİT TELEFONLARDAN
VEYA CEP TELEFONLARINDAN ALAN KODU
ÇEVİRMEKSİZİN ARAYABİLİRSİNİZ.
Page 39

21
TÜRKÇE
GARANTİ ŞARTLARI
1. Garanti süresi, malın teslim tarihinden itibaren başlar ve 2 Yıldır.
2. Malın bütün parçaları dahil olmak üzere tamamı rmamızın garantisi
kapsamındadır.
3. Malın garanti süresi içerisinde arızalanması durumunda, tamirde geçen
süre garanti süresine eklenir. Malın tamir süresi en fazla 20 iş günüdür. Bu
süre, mala ilişkin arızanın servis istasyonuna, servis istasyonunun olmaması
durumunda, malın satıcısı, bayii, acentası, temsilciliği, ithalatcısı veya
imalatçısından-üreticisinden birisine bildirim tarihinden itibaren başlar.
Sanayi malının arızasının 10 iş günü içerisinde giderilmemesi halinde,
imalatçı-üretici veya ithalatçı; malın tamiri tamamlanıncaya kadar, benzer özelliklere sahip başka bir malını tüketicinin kullanımına tahsis etmek
zorundadır.
4. Malın garanti süresi içerisinde, gerek malzeme ve işçilik, gerekse mon-
taj hatalarından dolayı arızalanması halinde, işçilik masrafı, değiştirilen
parça bedeli ya da başka herhangi bir ad altında hiçbir ücret talep
etmeksizin tamiri yapılacaktır.
5. Garanti belgesi ile ilgili olarak çıkabilecek sorunlar için T.C. Gümrük
ve Ticaret Bakanlığı, Tüketicinin Korunması ve Piyasa Gözetim Genel
Müdürlüğü’ne başvurulabilir.
6. Malın ayıplı olduğunun anlaşılması durumunda tüketici; Satılanı geri
vermeye hazır olduğunu bildirerek sözleşmeden dönme;
- Satılanı alıkoyup ayıp oranında satış bedelinden indirim isteme,
- Aşırı bir masraf gerektirmediği takdirde, bütün masraarı satıcıya ait
olmak üzere satılanın ücretsiz onarılmasını isteme,
- İmkân varsa, satılanın ayıpsız bir misli ile değiştirilmesini isteme, seçim-
lik haklarından birini kullanabilir. Satıcı, tüketicinin tercih ettiği bu talebi
yerine getirmekle yükümlüdür. Ücretsiz onarım veya malın ayıpsız misli
ile değiştirilmesi hakları üretici veya ithalatçıya karşı da kullanılabilir. Bu
hakların yerine getirilmesi konusunda satıcı, üretici ve ithalatçı müteselsilen sorumludur.
Page 40

22
TÜRKÇE
Üretici veya ithalatçı, malın kendisi tarafından piyasaya sürülmesinden
sonra ayıbın doğduğunu ispat ettiği takdirde sorumlu tutulmaz. Ücretsiz
onarım veya malın ayıpsız misli ile değiştirilmesinin satıcı için orantısız
güçlükleri beraberinde getirecek olması hâlinde tüketici, sözleşmeden
dönme veya ayıp oranında bedelden indirim haklarından birini kullanabilir. Orantısızlığın tayininde malın ayıpsız değeri, ayıbın önemi ve
diğer seçimlik haklara başvurmanın tüketici açısından sorun teşkil edip
etmeyeceği gibi hususlar dikkate alınır. Ücretsiz onarım veya malın ayıpsız
misli ile değiştirilmesi haklarından birinin seçilmesi durumunda bu
talebin satıcıya, üreticiye veya ithalatçıya yöneltilmesinden itibaren azami
yirmi iş günü. Ancak, bu Kanunun 58 inci maddesi uyarınca çıkarılan
yönetmelik eki listede yer alan mallara ilişkin, tüketicinin ücretsiz onarım
talebi, yönetmelikte belirlenen azami tamir süresi içinde yerine getirilir.
Aksi hâlde tüketici diğer seçimlik haklarını kullanmakta serbestir. Tüketicinin sözleşmeden dönme veya ayıp oranında bedelden indirim hakkını
seçtiği durumlarda, ödemiş olduğu bedelin tümü veya bedelden yapılan
indirim tutarı derhal tüketiciye iade edilir. Seçimlik hakların kullanılması
nedeniyle ortaya çıkan tüm masraar, tüketicinin seçtiği hakkı yerine
getiren tarafça karşılanır. Tüketici bu seçimlik haklarından biri ile birlikte
11/1/2011 tarihli ve 6098 sayılı Türk Borçlar Kanunu hükümleri uyarınca
tazminat da talep edebilir.
7. Kullanım hatalarına ilişkin bilgi.
- Tüketicinin malı tanıtma ve kullanma kılavuzunda yer alan hususlara
aykırı olarak kullanmasından kaynaklanan arızalar garanti kapsamı
dışındadır. Arızalarda kullanım hatasının bulunup bulunmadığının,
yetkili servis istasyonları, yetkili servis istasyonunun mevcut olmaması
halinde sırasıyla; malın satıcısı, ithalatçısı veya üreticisinden birisi
tarafından mala ilişkin azami tamir süresi ferisinde düzenlenen raporla
belirlenmesi ve bu raporun bir nüshasının tüketiciye verilmesi zorunludur.
8. Arızalarda kullanım hatasının bulunup bulunmadığının, yetkili ser-
vis istasyonları, yetkili servis istasyonunun mevcut olmaması halinde
sırasıyla; malın satıcısı, ithalatçısı veya üreticisinden birisi tarafından
mala ilişkin azami tamir süresi içerisinde düzenlenen rapora ilişkin
olarak bilirkişi tarafından tespit yapılması talebiyle uyuşmazlığın parasal
değerini dikkate alarak tüketici hakem heyetine veya tüketici mahkemesine başvurabilir.
Ürünün kurulumunun yetkili servis tarafından yapılması önerilir.
Page 41

23
TÜRKÇE
Servisler zaman zaman değişebileceği için Çağrı Merkezi ile aradığınız
servisi teyid edebilirsiniz.
SERVİS İSTASYONLARI GÖSTERİR LİSTE
ŞEHİR İLÇE SERVİS İSMİ TELEFON ADRES
İSTANBUL/Asya KOZYATAĞI ECE ELEKTRONİK
SAN.İÇ VE DIŞ TİC.
LTD.ŞTİ.
0216 359 19 52-0 216
386 90 66-0216 385
75 63-0216 359 23 23
ATATÜRK CADDESİ
N:55/5 ERENKÖY
İSTANBUL/Asya ÜMRANİYE-
ALTUNİZADE
MTV ELEKTRONİK
SAN. VE TİC. LTD.
ŞTİ.
"ümraniye:0 216
3655420
üsküdar:0 216 343 52
42"
Şerifali mah. Alptekin
Cad N:73/a Ümraniye
BURSA ULUDAĞ
ELEKTRONİK ALİ
ÖZDEMİR
0 224 224 06 68-0224
223 94 17
ŞEHREKÜSTÜ MAH.
DEĞIRMEN SOK.
NO:7 HALICIOĞLU İŞ
HANI NO:46
İZMİR KARŞIYAKA MERKEZİ
ELEKTRONİK
0 232 365 09 05 Üçok Mahallesi
Zübeyde Hanım
Caddesi No: 110/A
Bahriye
İZMİR BUCA TEKNİK ELEKTRONİK
- RAŞİT ŞEN
0 232 448 19 91-0
232 438 65 97
347 SOKAK NO:101-D
ADNAN KAHVECI
CD.BUCA-IZMIR
MANİSA AKHİSAR MEHMET BALABAN
- BALABAN
ELEKTRONİK
0236 232 11 89-0236
413 1363-0236
Kethuda mah. 22 sk
no 20
KIRIKKALE MERKEZ KARDEŞLER
ELEKTRONİK-ALİ ŞIH
GAÇKA
0 318 224 47 42 GÜZELTEPE MAH.
CELALATİK CAD.
NO:4/B
ANTALYA MANAVGAT TEVFİK FİKRET
OLCAY - OLCAY
ELEKTRONİK
0 242 746 76 03 YUKARI PAZARCI
MAH. MEHMET AKIF
CAD. 4072 SK. NO:5
ANTALYA ALANYA İSMAİL ŞENGÖZ-
ŞENGÖZ
ELEKTRONİK
0 242 512 37 85 SARAY MAH.
MEHMET ÇAVUŞ SK.
CEBI APT. NO:5/A
alanya
Page 42

24
TÜRKÇE
SERVİS İSTASYONLARI GÖSTERİR LİSTE
ŞEHİR İLÇE SERVİS İSMİ TELEFON ADRES
ANTALYA VİZYON
ELEKTRONİKMEHMET ÖZDEMİR
0 242 316 51 61-0242
316 22 85
ŞIRINYALI MAH. 1486
SOK.MEHMET
HAMURLU APT.NO.
16/1
ANTALYA YILDIRIM
ELEKTRONİK
TİCARET SANAYİ
LTD.ŞTİ.
0 242 244 02 42 KIŞLA MAH. 35.SK.
NO:24 (UYSAL İŞ
MERKEZİ) ANTALYA
MUĞLA ORTACA BİRCAN
ELEKTRONİK ABDULLAH BİRCAN
0 252 282 25 17 CUMHURİYET CAD.
NO:137 ORTACA
DENİZLİ
CEZAYİRLİ
ELEKTRONİK-M.EROL
CEZAYİRLİ
0 258 262 13 13- 0
258 261 83 83
HALK CD.NO 80-E
KAYAN APT
ADANA DATA ELEKTRONİK
BİLGİSAYAR
PAZARLAMA VE
TİCARET - MURAT
YEŞİLDAĞ
0 322 456 25 72 - 0
322 234 65 43
REŞATBEY MAH.
CUMHURIYET
CADDESI NO:5/A
KOCAELİ MERKEZ ANIT ELEKTRONİK
NAZMİ AYDOĞAN
"0 262 325 46
67-0262 321 90
90-0262 324 71 71-0
262 323 94 77-0 262
323 73 56-0 262 323
73 57
"
KADIKÖY MAH.
ATATÜRK BULVARI
NO:29/A
ANKARA KEÇİÖREN GÜNEŞ ELEKTRONİK
EMİN GENÇOĞLU
0 312 359 62 32 ANADOLU BLV 2 CD
ATB İŞ MERKEZİ I BLK
NO.240 MACUNKÖY /
ANKARA
ANKARA ÇANKAYA ONUR ELEKTRONİK
EŞYA SAN. TİC. LTD.
ŞTİ.
0 312 442 04 42 HOŞDERE CD. HALIT
ZIYA SK. NO:4/A
Page 43

25
TÜRKÇE
SERVİS İSTASYONLARI GÖSTERİR LİSTE
ŞEHİR İLÇE SERVİS İSMİ TELEFON ADRES
ANKARA KEÇİÖREN TÜDEŞ ELEKTRONİK
TURİZM TİC. SAN.
LTD.ŞTİ.
0 312 357 08 08- 0
312 357 36 26
BEŞIKTAŞ SK.
NO:28/C
ANKARA AKDERE-MAMAK YİĞİTLER
ELEKTRONİK ALPER TÜRKAY
0 312 367 64 64-0312
367 67 66
MEHMET ALİ ALTUN
CAD. NO: 13/B
AKDERE
MERSİN ÖZEMEK
ELEKTRONİK TAAH.
TİC.VE SAN.LTD.ŞTİ.
324 326 30 09/326 30
09/326 30 88
GÜVEN EVLER
MAH.1937 SK.25/A
FORUM İŞ MERKEZİ
KUZEYİ MEDİ MARKT
ARKASI OTOPARK
ÇIKIŞ KARŞISI
GAZİANTEP ÜNAL ŞENSÖYLER
ELEKTRONİK
SANAYİ VE TİCARET
LİMİTED ŞİRKETİ
"0 342 215 15 78-0
342 215 75 79-0342
215 1222
0342 215 1223
"
DEGİRMİÇEM MAH.
İMAM HÜSEYİN
İNCİOGLU CAD.
NO;17/A
KAHRAMANMARAŞ
GÜNGÖR
ELEKTRONİK-ERDAL
GÜNGÖR
0 344 223 46 00 HAYRULLAH MAH.
MALIK EJDER CAD.
ARIKAN SITESI B
BLOK NO 24/C
KAYSERİ KOCASİNAN MIZRAK
ELEKTRONİKMEHMET MIZRAK
0 352 233 65 85 MIMAR SİNAN MAH
SUSURLUK SOK
N65/A KOCASİNAN
DİYARBAKIR
MAHSUM
US-TELEVİZYON
HASTANESİ
0 412 224 39 79 KURT ISMAILPAŞA 7.
SOK. GENÇKALAN
APT. ALTI NO:9
ŞANLIURFA CELAL BAYER-BAYER
ELEKTRONİK
0 414 312 15 16 MARDIN YOLU CD.
TICARET LISESI KAR.
ABUZEROĞULLARI
APT.8/C
ADIYAMAN RIFAT ERDİNÇ-
TEKNİK ELEKTRONİK
0 416 216 12 62 GÖLEBATMAZ CD.
NO:32/A
Page 44

26
TÜRKÇE
SERVİS İSTASYONLARI GÖSTERİR LİSTE
ŞEHİR İLÇE SERVİS İSMİ TELEFON ADRES
MALATYA TAYFUN ALİ ÖZBEK-
TAYFUN
ELEKTRONİK
0 422 325 96 96 KANALBOYU KERNEK
CAMII KARŞISI
MISTOGLU APT ALTI
NO.9 A-B
ELAZIĞ SUAT HARDALAÇ
GRUP ELEKTRONİK
0 424 237 27 80 İZZET PAŞA CAD
HACITEFİK EFENDİ
SOK N:16
ERZURUM ERZURUM
ELEKTRONİK
TİCARET SANAYİ
LİMİTED ŞİRKETİ
0 442 214 05 82-0
442 213 83 81
ŞERIF EFENDI CAD.
ŞAIR NEFI
İLKÖĞRETIM OKULU
KARŞISI NO.136
AŞAĞI YONCALIK
İSTANBUL/Asya KAVACIK EGE ELEKTRONİK 0 216 332 18 73 -0
216 413 45 57-0 216
413 57 80
ÇİFTLİK CAD. NO:21
KAVACIK
İSTANBUL/Avrupa BAĞCILAR RA - TEL
ELEKTRONİK
0 212 434 43 23 SANCAKTEPE MAH.
FATİH CAD. 8 / 4 SOK.
NO:2
İSTANBUL/Avrupa ŞİŞLİ ULUDAĞ
ELEKTRONİK-CEMİL
ULUDAĞ
0 212 240 76 78-0
212 246 72 83
19. MAYIS MH. 19.
MAYIS CD. NO:19
İSTANBUL/Asya KARTAL GÜVEN ELEKTRONİK 0 216 374 28 61-0
216 374 16 85
YUKARI MH KIZILAY
BULVARI NO : 42
TOPRAKYOL KARTAL
BOLU MURAT ELEKTRONİK 0 374 217 98 12-0
374 217 04 10
İZZET BAYSAL CAD.
NO:201/A MERKEZ
BOLU
ORDU MERKEZ JAPON ELEKTRONİK 0 452 225 38 88 YENİ MAH
KAHRAMAN SAĞRA
CAD NO:77/A ORDU
SAKARYA ÖNER ELEK. 0 264 271 93 98 CUMHURİYET MAH.
YAKIN SOK N:10/A
Page 45

27
TÜRKÇE
SERVİS İSTASYONLARI GÖSTERİR LİSTE
ŞEHİR İLÇE SERVİS İSMİ TELEFON ADRES
SİVAS MERKEZ CAN ELEKTRONİK 0 346 223 00 15 KAZANCILAR CD
AKBULUT APT.NO:6/A
ADANA
ELEKTROTEKNİK
0322 352 08 10-0322
352 08 04
SUCUZADE MAH.
SAYDAM CAD.
NO:122
MUĞLA BODRUM SİNYAL
ELEKTRONİK-EROL
ÖNEL
0 252 358 69 06 CUMHURİYET CAD.
NO:22 BODRUM
ANKARA
KIZILCAHAMAM
KONCA ELEKTRONİK 0312 736 11 03 AKÇAY MAH.
GENÇLİK CAD
ALİKELEŞ APT
NO:22/A
ISPARTA SET ELEKTRONİK 0 246 212 05 01 İSMETPAŞA
CD.(ÇARŞI POLİS
KARAKOLU ÜZERİ)
NO:28
MUĞLA BODRUM SERİN ELEKTRONİK 0 252 313 48 12 UMURCA MAH.
ÜÇKUYULAR CAD.
NO:44/B BODRUM
BATMAN PİLATİN
ELEKTRONİK
0 488 214 13 65 MEYDAN MAH.
GÜLİSTAN CADDESİ
NO :69
ANKARA
ŞEREFLİKOÇHİSAR
BURAK ELEKTRONİK 0 312 687 79 79 SARIKAYA MH.
ANKARA CD. ADALAR
SK. No.5/A
KIRKLARELİ MERKEZ ULAŞIM
ELEKTRONİK
0 288 212 69 92-0
288 212 69 93
KARACAİBRAHİM
MAH. CUMHURİYET
CAD. NO:97
İSTANBUL/Avrupa 4. LEVENT-
ÇELİKTEPE
EVSER ELEKTRONİK 0 212 284 51 61-444
06 79
KUBİLAY CAD.NO.15
ÇELİKTEPE
Page 46

28
TÜRKÇE
SERVİS İSTASYONLARI GÖSTERİR LİSTE
ŞEHİR İLÇE SERVİS İSMİ TELEFON ADRES
İSTANBUL/Avrupa
GAZİOSMANPAŞA
BAYGOP
ELEKTRONİK
0 212 537 25 25- 0
212 537 26 66- 0212
649 56 56
YENİDOĞAN MH.
GÖÇMENLER SK.
NO:80
G.OSMANPAŞA
MANİSA SALİHLİ AR-GE ELEKTRONİK 0 236 714 50 54 CUMHURİYET MH.
339 SK. NO:25/A
SALİHLİ
BURSA PROSİM
ELEKTRONİK SERVİS
HİZMETLERİ LTD
0 224 221 57 83- 221
82 48
ŞEHREKÜSTÜ MAH.
OKUL SK NO:8
OSMANGAZİ
UŞAK NURSEY
ELEKTRONİK
0 276 223 97 16-227
47 17
İSLİCE MH. AVCILAR
SK NO:3/A
HATAY KUMLU BAŞKARLAR TEKNİK 0 326 461 25 28 GÖKÇEOĞLU MAH
n:20
İSTANBUL/Avrupa FATİH PROTEL
ELEKTRONİK
0 212 534 80 05 HOCA ÜVEYZ MH.
KOCASİNAN CD.
NO:43/AFATİH
SAMSUN SAMSUN
ELEKTRONİK
0 362 231 03 13 BAHÇELI EVLER MAH.
YÜZYIL BULV. NO:273
NEVŞEHİR MERKEZ OZ PAL ELEKTRONIK 0 384 213 23 96 TEMMUZ MAH.M
PARMAKSIZ CAD.
İSTANBUL/Avrupa PERPA PERPA MERKEZ
SERVİS (DSC)
0 212 210 87 97 PERPA TİCARET
MERKEZİ A BLOK
KAT-2 No:9-0006
OKMEYDANI-ŞİŞLİ /
İSTANBUL
ADANA HAS ELEKTRONİK 0 322 458 15 24-0
322 454 13 97
KURTULUŞ MH.64010
SK. RUHİ ÇAMURDAN
APT. NO:11 SEYHAN
ADANA
Page 47

29
TÜRKÇE
SERVİS İSTASYONLARI GÖSTERİR LİSTE
ŞEHİR İLÇE SERVİS İSMİ TELEFON ADRES
MERSİN LCD ELEKTRONİK 0 324 358 29 48-0
324 359 4533
FATIH MAH. GMK.
BULV. ÖZKAN APT.
ALTI 43/D
(BORANLAR SERVİS
KARŞISI)
İSTANBUL/Asya PENDİK MURAT ELEKTRONİK 0 216 396 04 20 FEVZİ ÇAKMAK CAD.
BARBAROS SOK.NO:9
KAYNARCA / PENDİK
AĞRI
DOĞUBEYAZIT
ÖZKAN ELEKTRONİK 0 472 312 82 07 AĞRI CAD. NO: 73
AYDIN MERKEZ ALAÇAM
ELEKTRONİK
0 256 226 12 11 7 EYLÜL MAH.
MEHMET AKİF ERSOY
CAD. NO : 48
KONYA MERKEZ KONTEK SOGUTMA
ISITMA
0 332 245 00 80 Kumköprü Mah fetih
cad n299 A-B Karatay
RİZE MERKEZ VİZYON İLETİŞİM-
MUSTAFA ÖZGÜN
VE ORTAKLARI
0 464 225 0001 MAREŞAL FEVZİ
ÇAKMAK CAD. NO . 9
/ 6
MANİSA ALAŞEHİR YAŞAR MORAY -
NET ELEKTRONİK
0 236 653 17 19 BEŞ EYLÜL MAH.
KURTULUŞ CAD. NO .
75
ALAŞEHİR
ADIYAMAN KAHTA YASİN BOZAN -
ELEKTRİKLİ EV
ALETLERİ
HASTANESİ
0 416 725 99 89 FATİH MAH. ZAFER
CAD. NO: 20-B
KAHTA
ISPARTA YALVAÇ SET ELEKTRONİK 0246 441 4787 Pazar Aşağı Mah Yeşil
Çınar Bulvarı N84/B
Page 48

.POJUµSśOJONPEFMLPEVOVWFTFSJOVNBSBTðOðOPUFEJO
"SLBCµM»NEFCVMVOBOFUJLFUUFLJOVNBSBZðSFGFSBOT
BMðOWFIFSIBOHJCJSTFSWJTUBMFCJOEFCVMVONBLJ¦JOCV
OVNBSBZðTBUðOBMEðÞðOð[CBZJZFJMFUJO
MODEL
4&3ï
ïMLµODF-(JMFJMFUJĝJNFHF¦JO
5»NTPSVWFHµS»ĝMFSJOJ[J¦JOM»UGFO-(.»ĝUFSJ#JMHJ.FSLF[JJMFJMFUJĝJNFHF¦JO
-(.»ĝUFSJ#JMHJ.FSLF[J
Ülke
Servisi Ülke Servisi
Österreich 0 810 144 131 Nederland 0900 543 5454
België 015 200 255 Norge 800 187 40
Luxembourg 0032 15 200255 Polska 801 54 54 54
Ȼɴɥɝɚɪɢɹ
07001 54 54 Portugal 808 78 54 54
ËFTL3FQ 810 555 810 3PN¡OJB 031 228 3542
Danmark 8088 5758 Slovensko 0850 111 154
Suomi 0800 0 54 54 &TQB°B 963 05 05 00
France
EJUFT-(PVUBQF[
Sverige 0770 54 54 54
Deutschland
01806 11 54 11
ŨQSP"OSVGBVT
EFN'FTUOFU[EFS%5"(
.PCJMGVOLNBYŨ
QSP"OSVG
Schweiz 0848 543 543
ǼȜȜȐįĮ
801 11 200 900,
210 4800 564
United Kingdom
0344 847 5454
Ɋɨɫɫɢɹ
8 800 200 7676
.BHZBSPST[H 06 40 54 54 54 Eesti 800 9990
Éire 01 686 9454
ɍɤɪɚɢɧɚ
0 800 303 000
Italia 199600099
Ʉɚɡɚɯɫɬɚɧ
8 8000 805 805,
(4.
Ȼɟɥɚɪɭɫɶ
8 820 0071 1111
Latvija 80200201
ɍɡɛɟɤɢɫɬDɧ
8 800 120 2222
Lietuva 880008081
Ʉɵɪɝɵɡɫɬɚɧ
0-800-805-8050
Türkiye 444 6 543 Slovenija 080 543 543
www.lg.com
 Loading...