

LG 29WR30MR Owner's Manual

www.lg.com
OWNER’S MANUAL
MONITOR SIGNAGE
29WR30MR
Please read this manual carefully before operating the your set and
retain it for future reference.
MONITOR SIGNAGE MODELS

2
ENG
ENGLISH
CONTENTS
CONTENTS
3 LICENSES
4 ASSEMBLING AND
PREPARING
4 Accessories
5 Parts and buttons
6 STORAGE METHOD FOR PANEL
PROTECTION
6 - Correct Method
6 - Incorrect Method
7 Using the IR Receiver
8 Mounting on a wall
9 REMOTE CONTROL
11 USING THE MONITOR
11 Connecting to a PC
12 - DVI connection
12 - Display Port connection
13 - HDMI connection
13 - IR Receiver connection
14 - LAN connection
15 Daisy Chain Monitors
15 - DP Cable
16 Using additional options
16 - Adjusting aspect ratio
17 ENTERTAINMENT
17 - Connecting to a wired network
19 CUSTOMIZING SETTINGS
19 Menu Settings
20 - Ratio Settings
21 - Func. Settings
22 - PIP settings
24 - Picture
25 - Color
26 - Settings
28 - Time
29 - Network
30 TROUBLESHOOTING
32 SPECIFICATIONS
35 CONTROLLING THE
MULTIPLE PRODUCT
35 Connecting the cable
35 RS-232C Configurations
35 Communication Parameter
36 Command Reference List
37 Transmission / Receiving Protocol

ENGLISH
3
LICENSES
LICENSES
Supported licenses may differ by model. For more information of the licenses, visit www.lg.com.
The terms HDMI and HDMI High-Definition Multimedia Interface, and the
HDMI logo are trademarks or registered trademarks of HDMI Licensing LLC
in the United States and other countries.
4
ENG
ENGLISH
ASSEMBLING AND PREPARING
ASSEMBLING AND PREPARING
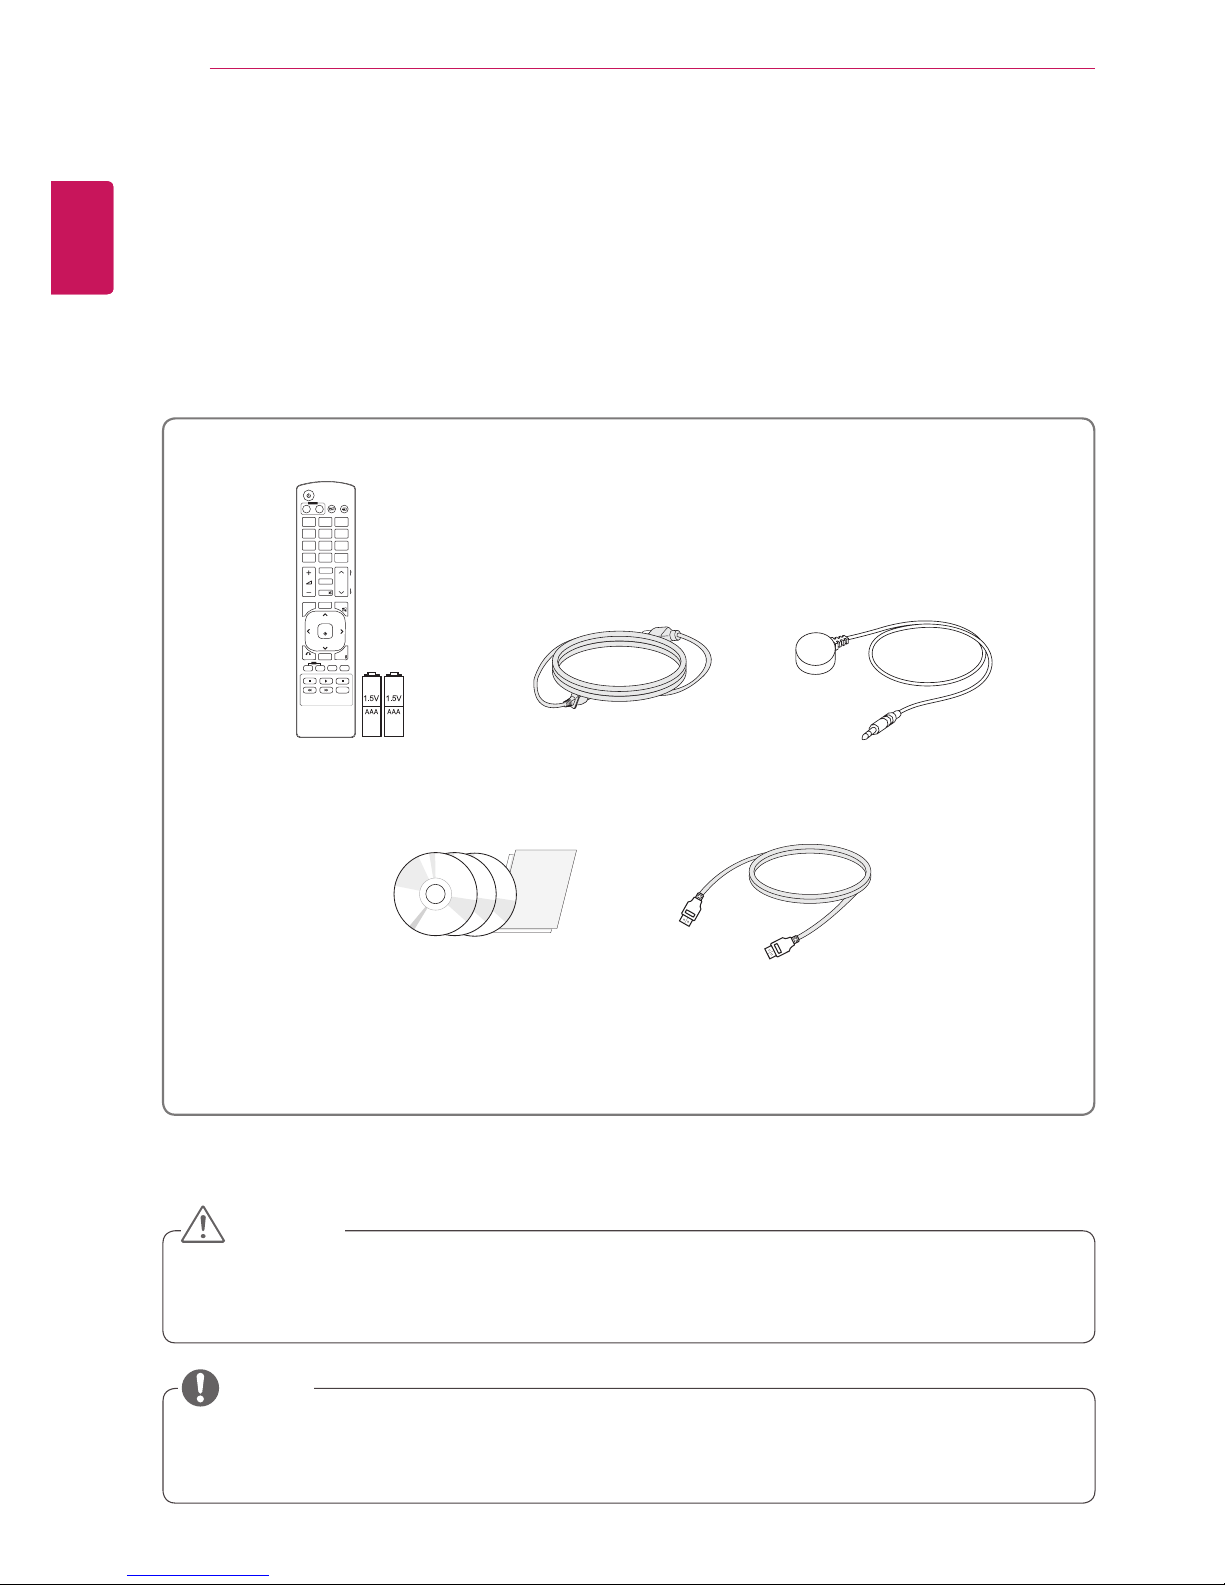
Accessories
Check your product box for the following items. If there are any missing accessories, contact the local
dealer where you purchased your product. The illustrations in this manual may differ from the actual product
and accessories.
y
Do not use any unapproved or counterfeit parts or accessories to ensure the safety and product life
span.
y
Any damages or injuries by using pirated items are not covered by the warranty.
y
The accessories supplied with your product may vary depending on the model.
y
Product specifications or contents in this manual may be changed without prior notice due to upgrade
of product functions.
Remote control and Batteries Power Cord
CD(Owner's Manual,
SuperSign Program/Owner's
Manual)/ Card
HDMI Cable
CAUTION
NOTE
P
A
G
E
INPUT
ENERGY
SAVING
MARK
ARC
ON
OFF
. , !ABCDEF
GHIJKLMNO
PQRSTUV
1/a/A
- * #
WXYZ
CLEAR
MONITOR
PSM
AUTO
MUTE
BRIGHT
NESS
MENU
POWER
OK
S.MENU
ID
BACK
TILE
ON
OFF
EXIT
IR Receiver

5
ENG
ENGLISH
ASSEMBLING AND PREPARING
Parts and buttons
Screen Buttons/ Screen Marks
Connection panel
Screen Marks Description
INPUT Changes the input source.
MENU Accesses the main menus, or saves your input and exits the menus.
Adjust the up and down.
Adjusts the volume level.
AUTO/SET Displays the current signal and mode.
/ I
Turns the power on or off.
6
ENG
ENGLISH
ASSEMBLING AND PREPARING
Correct Method Incorrect Method
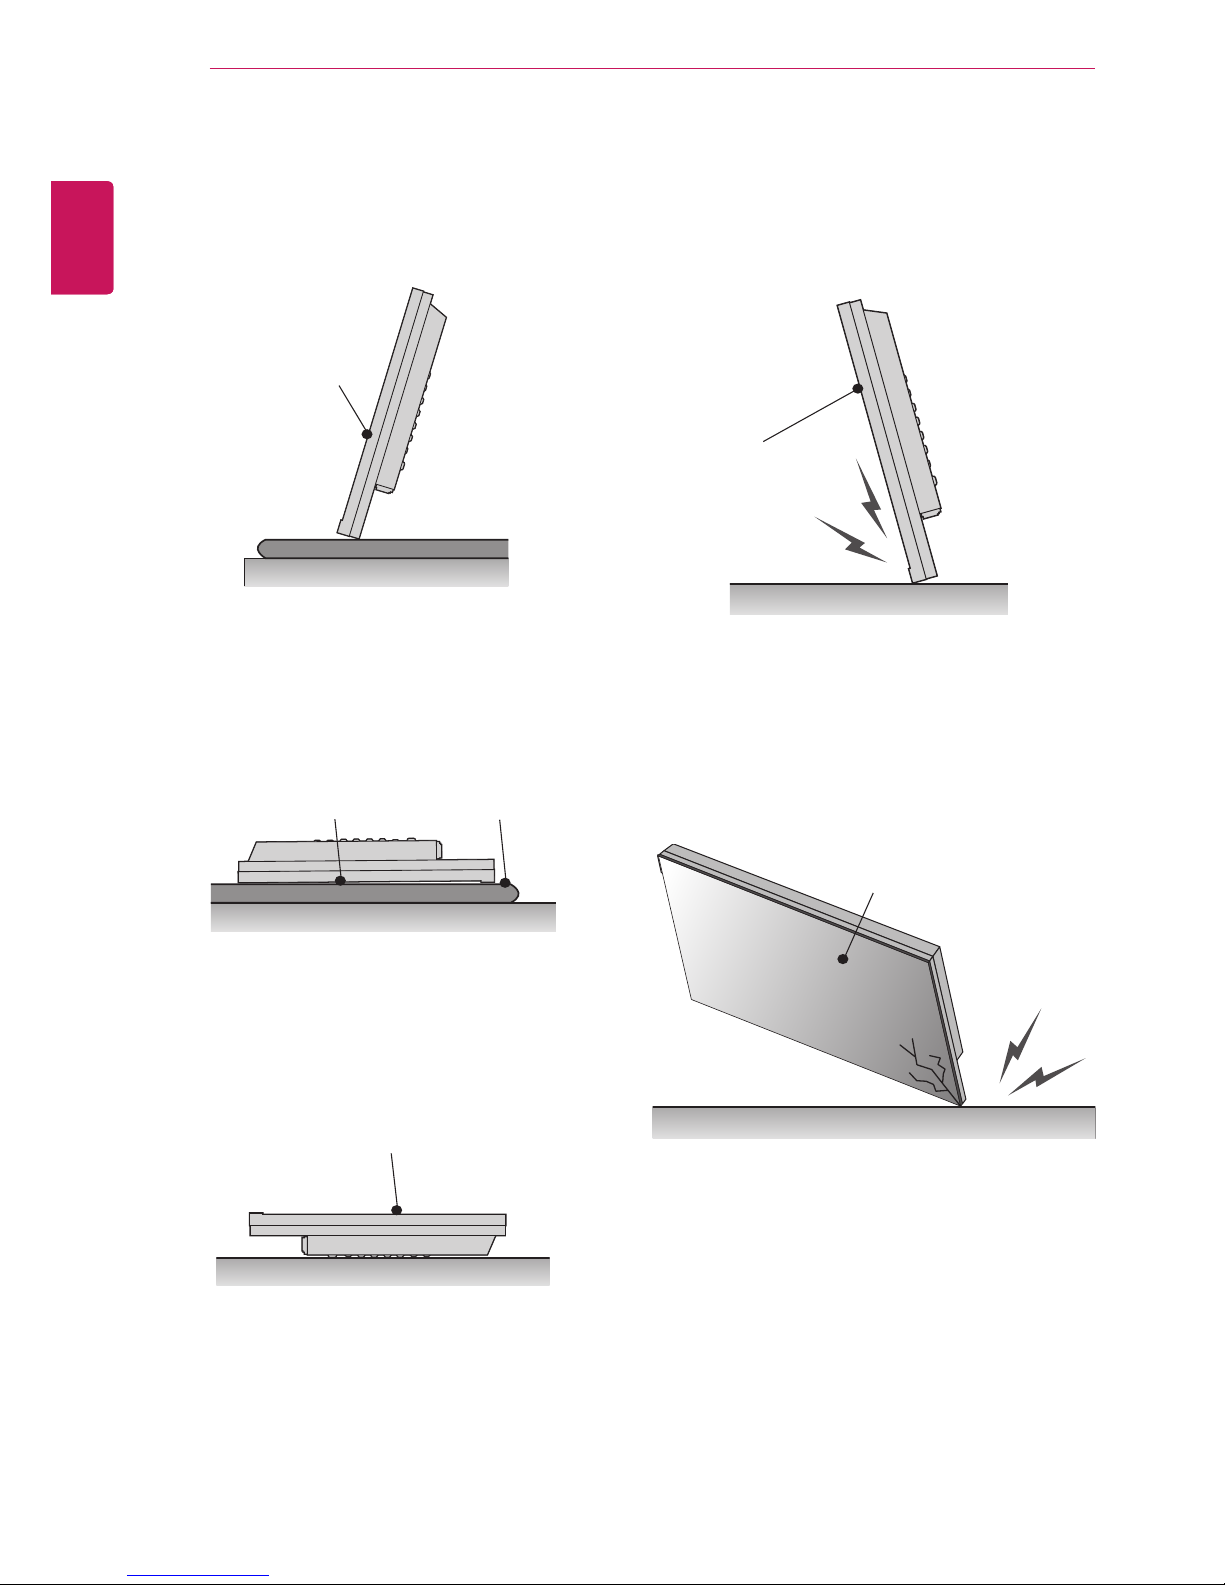
STORAGE METHOD FOR PANEL PROTECTION
If the product needs to be set upright, hold both
sides of the product, and tilt backward carefully
for. Do not let the panel not to touch the floor.
When laying down the product, lay a cushion on a
flat floor. Put the product on it with the panel of
the product facing down.
If there is not a cushion available, ensure the floor is
clean and then lay the product down carefully with the
panel facing either upward or downward.
At this time,
be careful for objects not to fall on the panel.
If the product is tilted onto the bezel, the bottom of
the panel may be damaged.
If the product is tilted onto the edge of the panel,
the panel may be damaged.
Panel
Panel
Panel
Panel
Panel
Cushion
7
ENG
ENGLISH
ASSEMBLING AND PREPARING
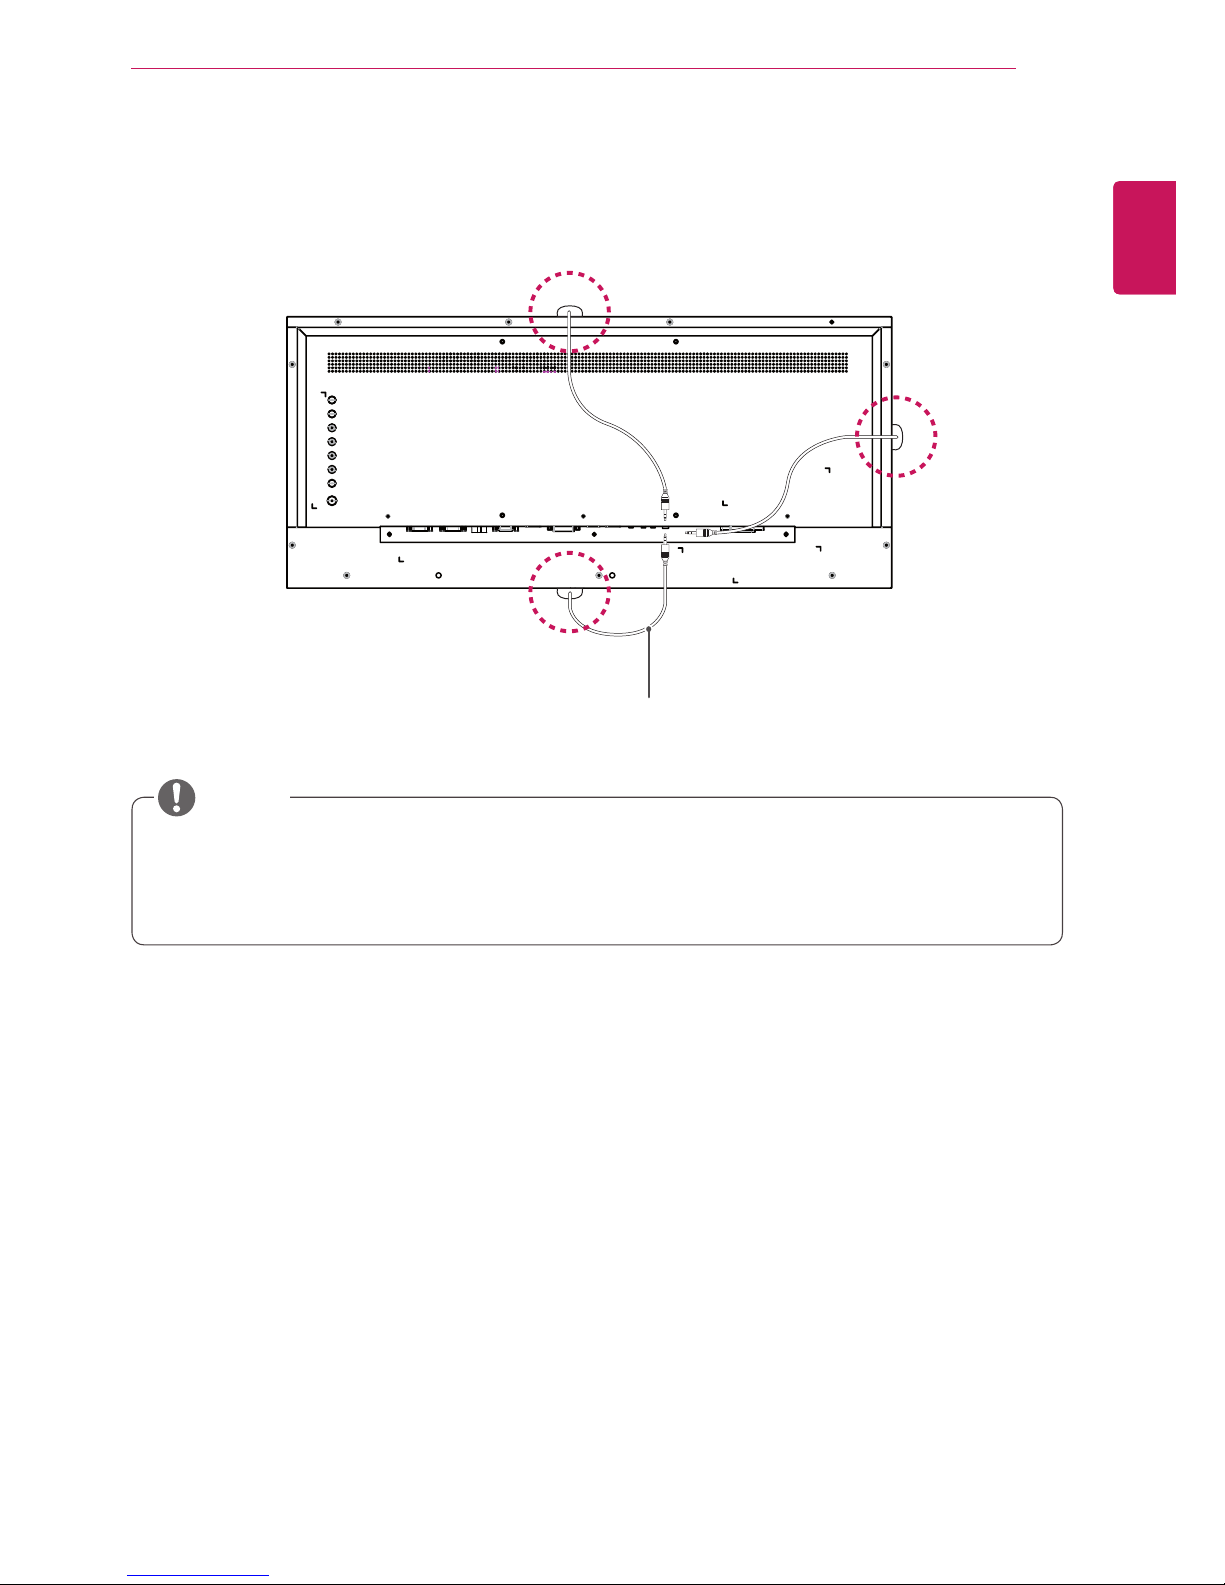
Using the IR Receiver
This allows a remote control sensor to be placed in a custom location.
y
The IR receiver is made with a magnet. You can attach the IR receiver on the side, top, or bottom
of the product.
y
It may fall down if exposed to external shock.
NOTE
IR Receiver cable

8
ENG
ENGLISH
ASSEMBLING AND PREPARING
Mounting on a wall
For proper ventilation, allow a clearance of 10
cm on each side and from the wall. Detailed
installation instructions are available from your
dealer, see the optional Tilt Wall Mounting Bracket
Installation and Setup Guide.
10 cm
10 cm
10 cm
10 cm
10 cm
To install the monitor to a wall, attach a wall mounting bracket (optional) to the back of the monitor.
Make sure that the wall mounting bracket is securely
fixed to the monitor and to the wall.
1 Use the screws and wall mounting bracket that
comply with the VESA standard.
2 Screws which are longer than the standard
length may damage the inside of the monitor.
3 A non-VESA standard screw may damage the
product and cause the monitor to fall. LG Electronics is not liable for any accidents relating to
the use of non-standard screws.
4 The monitor is VESA standard compliant.
5 Use it according to the VESA standard as speci-
fied below.
y
784.8 mm or less
* Fastening screw: Diameter 4.0 mm x Pitch 0.7
mm x Length 10 mm
y
Unplug the power cord before moving or installing the monitor to avoid electric shocks.
y
Installing the monitor on the ceiling or on a
slanted wall may result in the monitor falling
off, which could lead to injury. Please use
the genuine LG wall mounting bracket. For
more information, contact your local retail
store or a qualified installer.
y
Applying excessive force when fastening
screws may cause damage to the monitor. Damage caused in this way will not be
covered by the product warranty.
y
Use the wall mounting bracket and screws
that conform to the VESA standard. Damage caused by the use or misuse of inappropriate components will not be covered
by the product warranty.
y
Installing a monitor lengthwise may damage
the pixels on the screen.
y
To prevent injury, this apparatus must be
securely attached to the wall in accordance
with the installation instructions. (This only
pertains to Australia and New Zealand.)
CAUTION
y
The wall mount kit includes the installation
guide and all necessary parts.
y
The wall mounting bracket is optional. The
accessories can be purchased at your local
retail store.
y
The length of the screw may differ for each
wall mounting bracket. Ensure the correct
length screw is used.
y
For more information, please refer to the
user manual for the wall mounting bracket.
NOTE
y
Installing a monitor lengthwise may damage
the pixels on the screen.
CAUTION

9
ENG
ENGLISH
REMOTE CONTROL
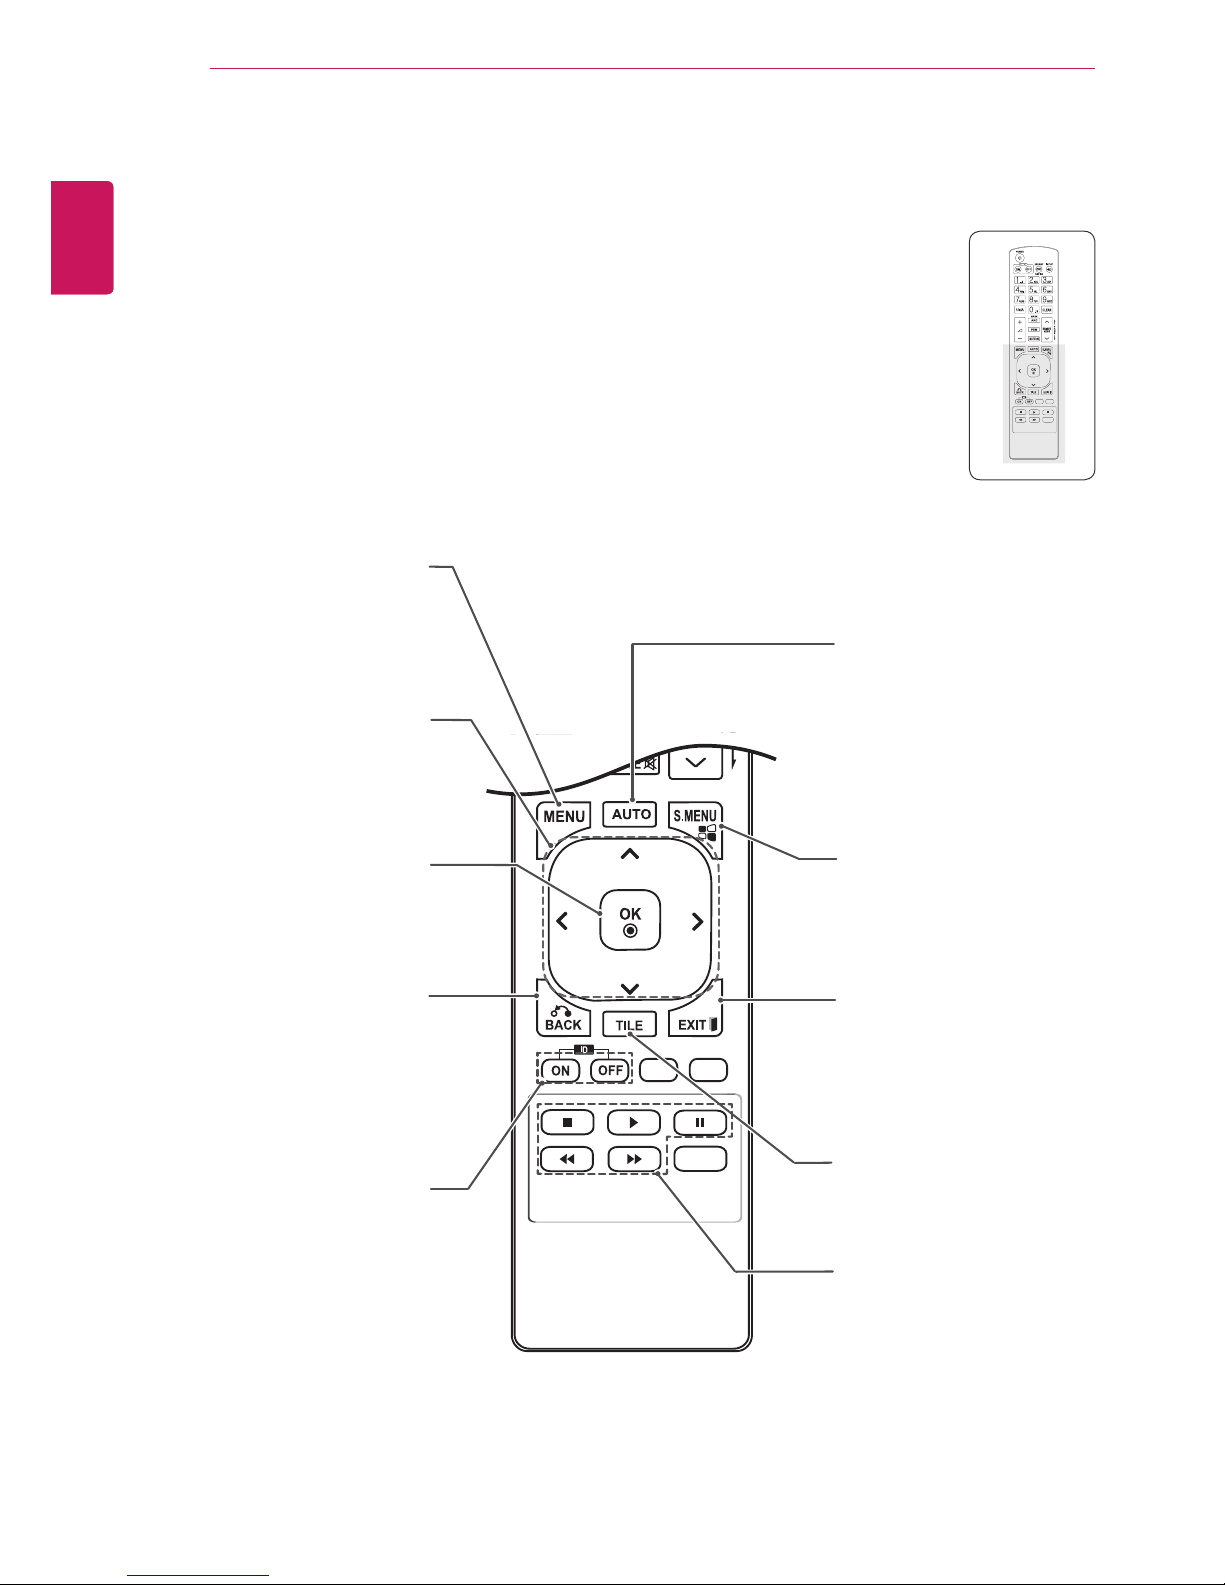
REMOTE CONTROL
(POWER)
Turns the Monitor on or off.
MONITOR ON / OFF
Turn off the monitor and then
turn it back on.
1/a/A Button
This button selection is not
applicable.
CLEAR
This button selection is not
applicable.
The descriptions in this manual are based on the buttons of the remote control. Please read this manual
carefully and use the Monitor correctly.
To replace batteries, open the battery cover, replace batteries (1.5 V AAA) matching and ends to the
label inside the compartment, and close the battery cover.
To remove the batteries, perform the installation actions in reverse.
CAUTION
y
Do not mix old and new batteries, as this
may damage the remote control.
y
Make sure to point the remote control at the
remote control sensor on the Monitor.
ARC
Selects the Aspect Ratio Mode.
(It may not work depending on
the model.)
MARK
This button selection is not
applicable.
PSM
Selects the Picture Status
Mode.
MUTE
Mutes all sounds.
Volume Up / Down
Adjusts the volume level.
ENERGY SAVING
Adjusts the brightness of
the screen to reduce energy
consumption.
INPUT
Selects the input mode.
Number and Alphabet buttons
Enters numbers.
The alphabet selection is not
applicable.
BRIGHTNESS Key
Adjust the brightness by
pressing the Up and Down
buttons on the remote control.
10
ENG
ENGLISH
REMOTE CONTROL
S.MENU
(SuperSign Menu Key)
This button selection is not
applicable.
EXIT
Clears all on-screen displays
and returns to Monitor
viewing from any menu.
TILE
Selects the TILE Mode.
(It may not work depending
on the model.)
MENU (See p.19)
Accesses the main menus
or saves your input and exit
menus.
USB Menu control buttons
This button selection is not
applicable.
Navigation buttons
Scrolls through menus or
options.
OK
Selects menus or options and
confirms your input.
BACK
Allows the user to move back
one step.
ID ON/OFF
This button selection is not
applicable.
AUTO
This button selection is not
applicable.
11
ENG
ENGLISH
USING THE MONITOR
USING THE MONITOR
Connecting to a PC
Your Monitor supports the Plug & Play* feature.
* Plug & Play: This is the function that allows a PC to use the monitor without installing a driver.
NOTE
y
Connect the signal input cable and tighten it by turning the screws clockwise.
y
Do not press the screen with your finger for a long time as this may result in
temporary distortion on the screen.
y
Avoid displaying a fixed image on the screen for a long period of time to
prevent image burn. Use a screensaver if possible.
y
It is recommended to use the Monitor with the HDMI connection for the best image quality.
y
Use a shielded signal interface cable, such as DVI/HDMI cable, with a ferrite core to maintain standard
compliance for the product.
y
If you turn the Monitor on when the set becomes cold, the screen may flicker. This is normal.
y
Some red, green, or blue spots may appear on the screen. This is normal.
CAUTION
12
ENG
ENGLISH
USING THE MONITOR
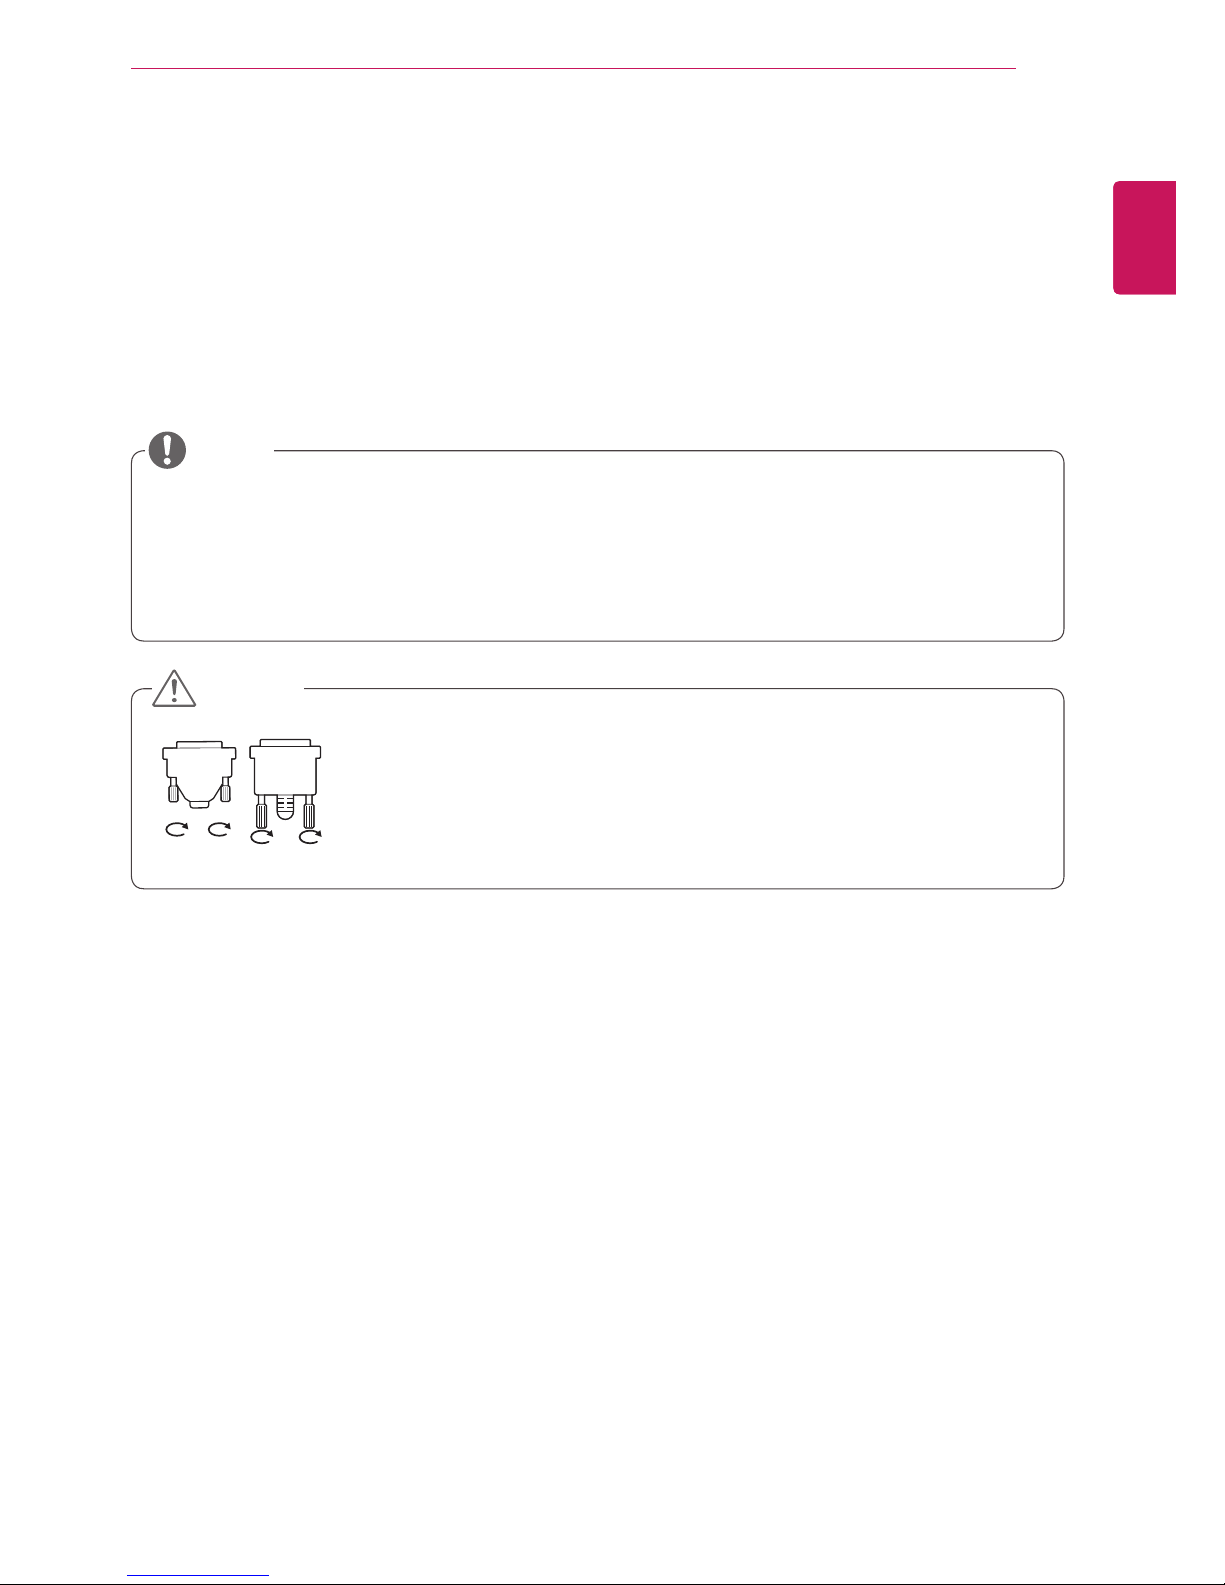
DVI connection
Transmits digital video signals to the monitor. Connect the monitor using the DVI cable as illustrated
below. Select the DVI input after connecting. To
transmit an audio signal, connect additional audio
cables.
Display Port connection
Transmits the digital video and audio signals from
your PC to the Monitor. Connect the PC and the
Monitor with the Display Port cable as shown in
the following illustrations.
(not included) (not included)
Back of the Product Back of the Product
PC
DIV OUT AUDIO OUT
13
ENG
ENGLISH
USING THE MONITOR
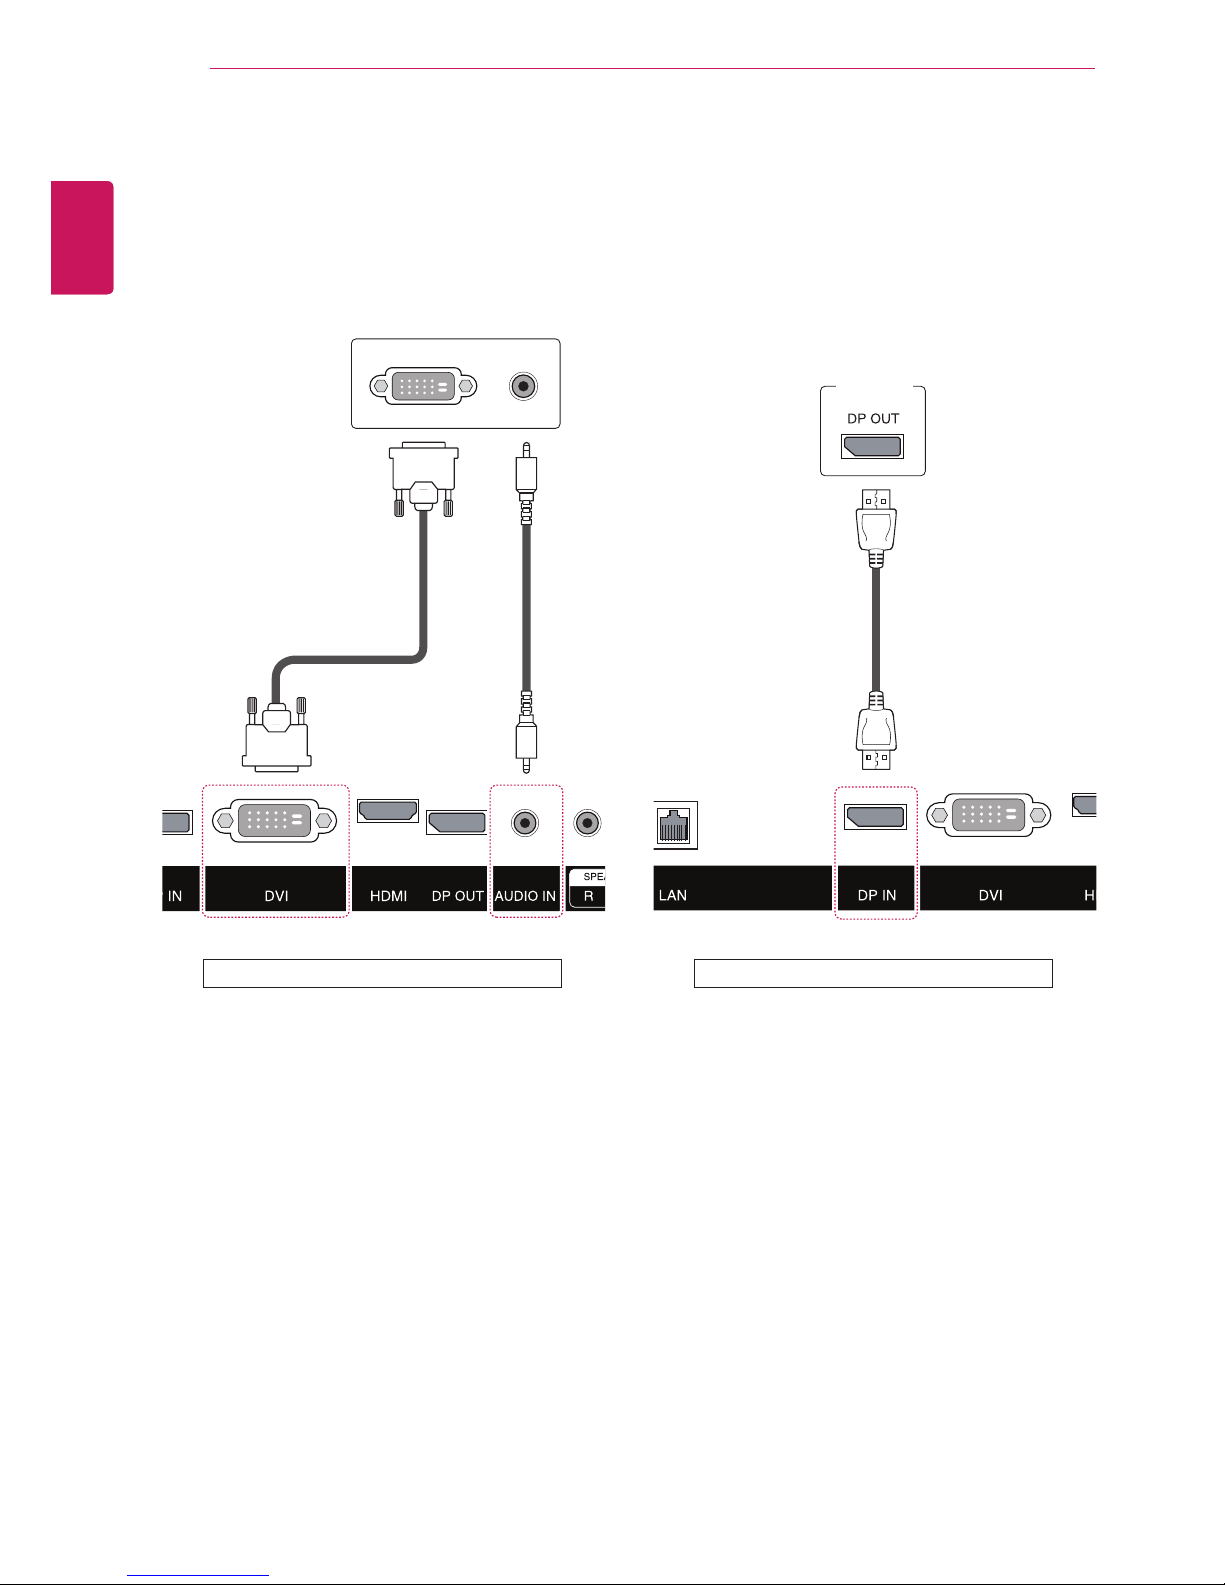
IR Receiver connection
Allows the use of a wired remote or IR receiver
extension.
y
Make sure the power cable is disconnected.
NOTE
Back of the Product
y
Use a High Speed HDMI™ cable.
y
High Speed HDMI™ cables transmit an HD
signal up to 1080p and higher.
y
Please check your PC settings if you cannot
hear any sound in HDMI mode. Some PCs
require you to manually change the default
audio output to HDMI.
NOTE
HDMI connection
Transmits the digital video and audio signals from
your PC and A/V devices to the monitor. Connect
your PC and AV device to the monitor with the
HDMI cable as illustrated below.
(not included) (not included)
Back of the Product

14
ENG
ENGLISH
USING THE MONITOR
LAN connection
A
Using a router(Switch)
Monitor
PC
LAN
Switch
Monitor
Network
PC
LAN
B
Using the Internet.
 Loading...