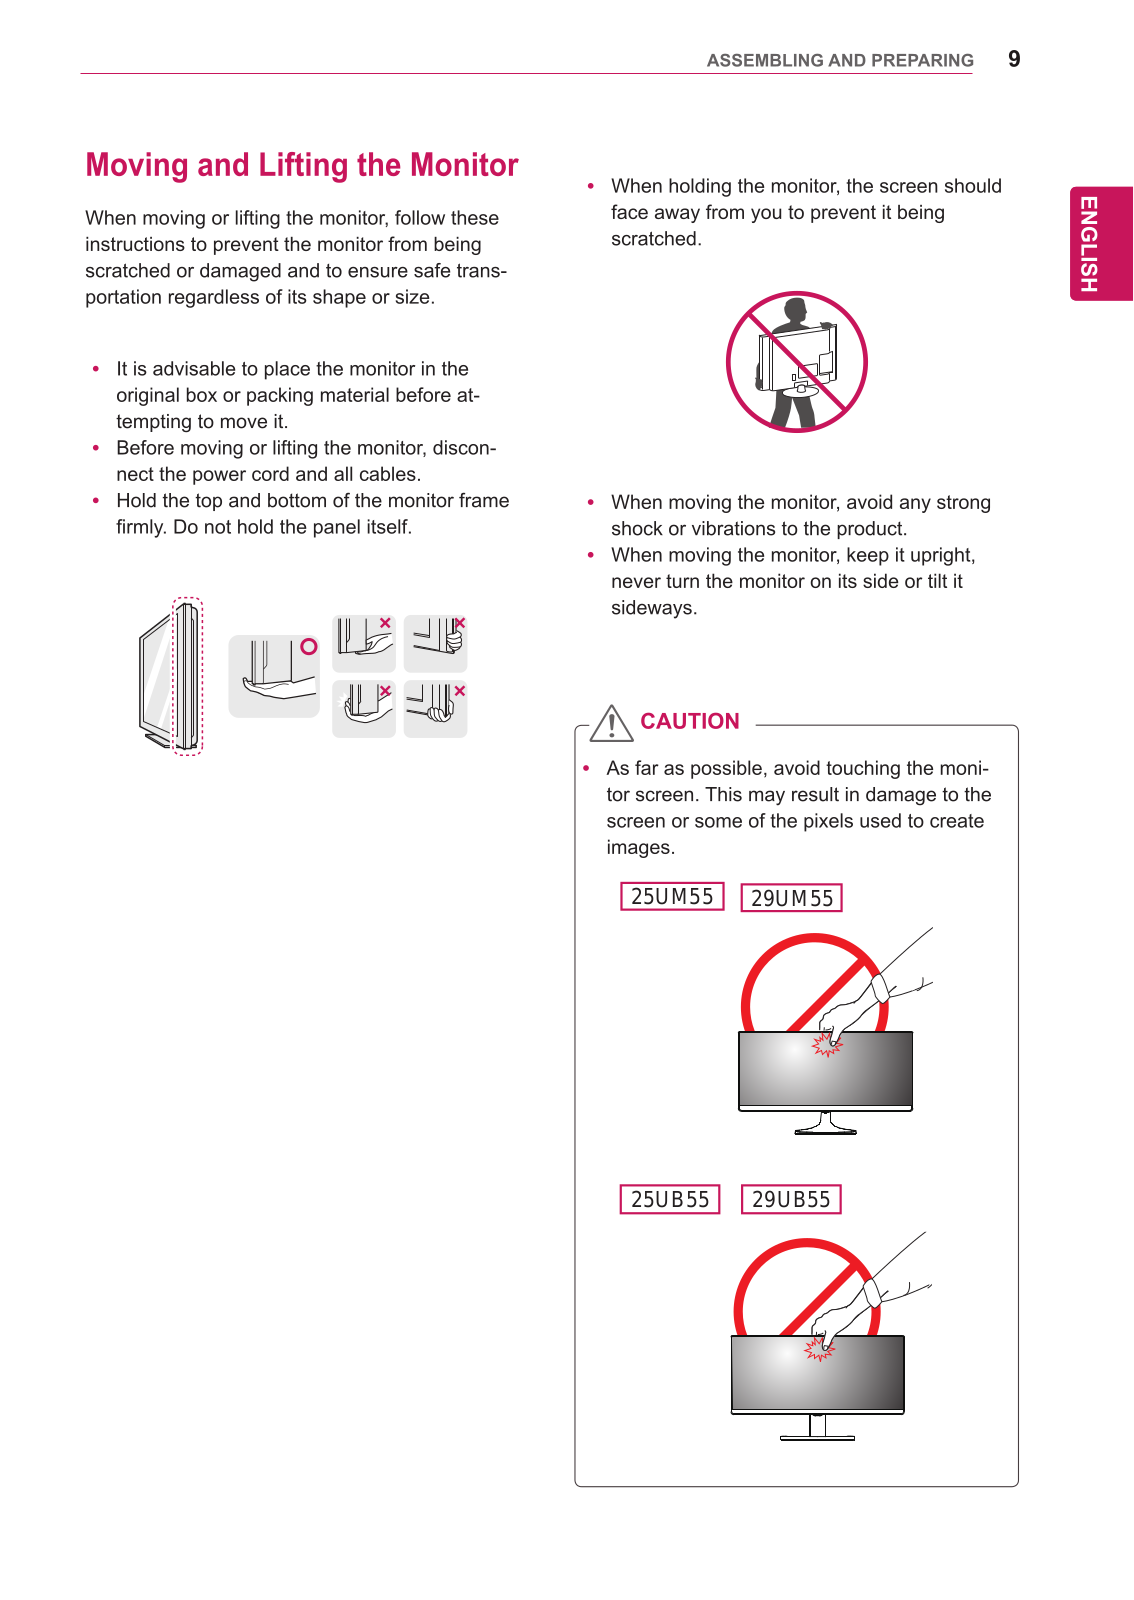
LG 29UM55-P User guide

<![if ! IE]>

<![endif]>(1*/,6+

2ZQHU V 0DQXDO

,36 /(' 021,725

/(' 021,725

3OHDVH UHDG WKH VDIHW\ LQIRUPDWLRQ FDUHIXOO\ EHIRUH XVLQJ WKH

SURGXFW

,36 /(' 0RQLWRU /(' 0RQLWRU 0RGHO /LVW5805 80558%5 8%5

ZZZ OJ FRP

<![if ! IE]>

<![endif]>(1*/,6+

&RQWHQWV

&217(176


/,&(16(

$66(0%/,1*$1'


35(3$5,1*


3URGXFW &RPSRQHQWV


&RPSRQHQW DQG %XWWRQ 'HVFULSWLRQ


0RYLQJ DQG /LIWLQJ WKH 0RQLWRU


,QVWDOOLQJ WKH 0RQLWRU


$VVHPEOLQJ WKH VWDQG EDVH


8VLQJ WKH FDEOH KROGHU


'HWDFKLQJ WKH VWDQG EDVH


,QVWDOOLQJ RQWR D WDEOH


$GMXVWLQJ WKH VWDQG KHLJKW


$GMXVWLQJ WKH DQJOH


3LYRW IHDWXUH


8VLQJ WKH .HQVLQJWRQ ORFN


,QVWDOOLQJ WKH ZDOO PRXQW SODWH


,QVWDOOLQJ WR D ZDOO

86,1* 7+( 021,725

&RQQHFWLQJ WR D 3&

'LVSOD\3RUW FRQQHFWLRQ+'0, FRQQHFWLRQ

&RQQHFWLQJ WR $9 'HYLFHV+'0, FRQQHFWLRQ

&RQQHFWLQJ WR ([WHUQDO 'HYLFHV+HDGSKRQH SRUW FRQQHFWLRQ

&86720,=,1* 6(77,1*6

$FWLYDWLQJ WKH 0DLQ 0HQX&XVWRPL]LQJ VHWWLQJV


0HQX 6HWWLQJV


(DV\ FRQWURO


)XQFWLRQ


3%3


6FUHHQ


6HWWLQJV


5HVHW


5HDGHU 6HWWLQJV

7528%/(6+227,1*

63(&,),&$7,216

)DFWRU\ VXSSRUW PRGH3UHVHW 0RGH +'0, 3& 'LVSOD\3RUW

+'0, 7LPLQJ 9LGHR6 3RZHU ,QGLFDWRU

3523(5 326785(

3URSHU 3RVWXUH IRU 8VLQJ WKH 0RQLWRU

,167$//,1* /* 021,725

62)7:$5(

/,&(16(

/,&(16(

(DFK PRGHO KDV GLIIHUHQW OLFHQVHV 9LVLW ZZZ OJ FRP IRU PRUH LQIRUPDWLRQ RQ WKH OLFHQVH

7KH WHUPV +'0, DQG +'0, +LJK 'HILQLWLRQ 0XOWLPHGLD ,QWHUIDFH DQG WKH +'0, ORJR DUH WUDGHPDUNV RU UHJLVWHUHG WUDGHPDUNV RI +'0, /LFHQVLQJ //& LQ WKH 8QLWHG 6WDWHV DQG RWKHU FRXQWULHV

9(6$ 9(6$ ORJR 'LVSOD\ 3RUW &RPSOLDQFH /RJR DQG 'LVSOD\ 3RUW &RPSOLDQFH /RJR IRU GXDO PRGH VRXUFH DUH DOO UHJLVWHUHG WUDGHPDUNV RI WKH 9LGHR (OHFWURQLFV 6WDQGDUGV $VVRFLDWLRQ

<![if ! IE]>

<![endif]>(1*/,6+

LG 29UM55-P User guide

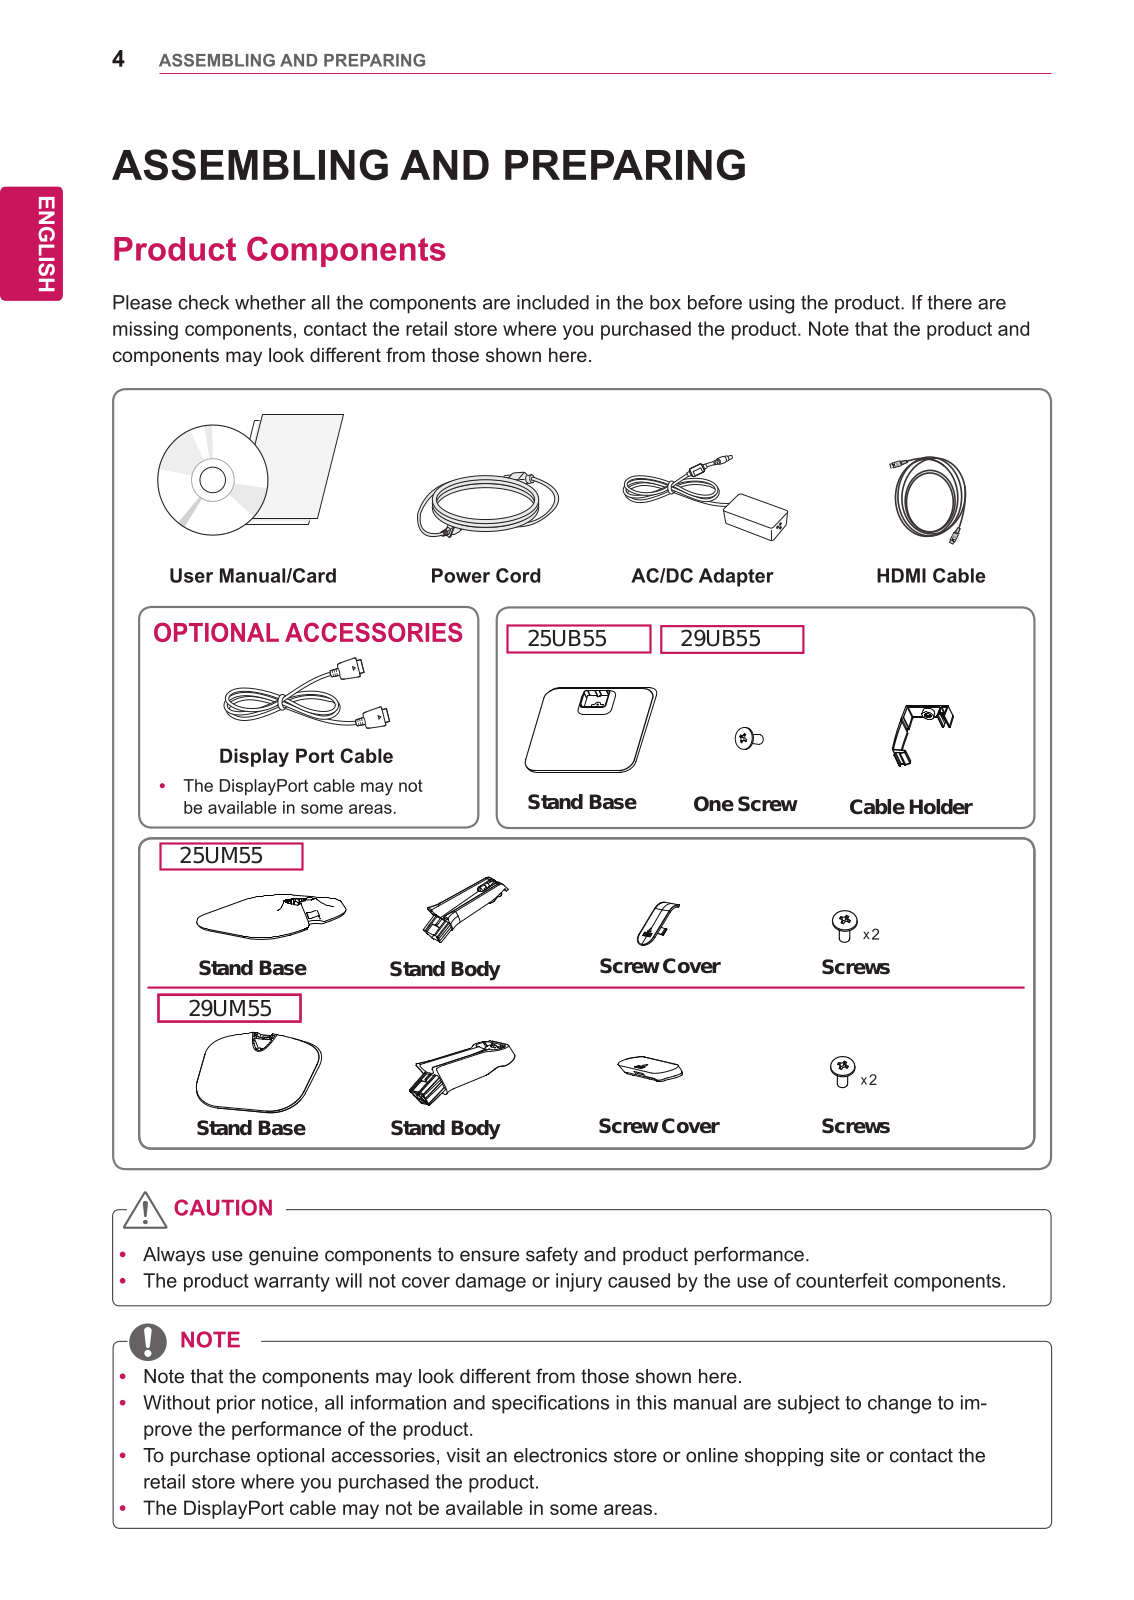
25UB55 29UB55

Stand Base

One Screw

Cable Holder

25UM55

Stand Base

Stand Body

Screw Cover

Screws

29UM55

Stand Base

Stand Body

Screw Cover

Screws

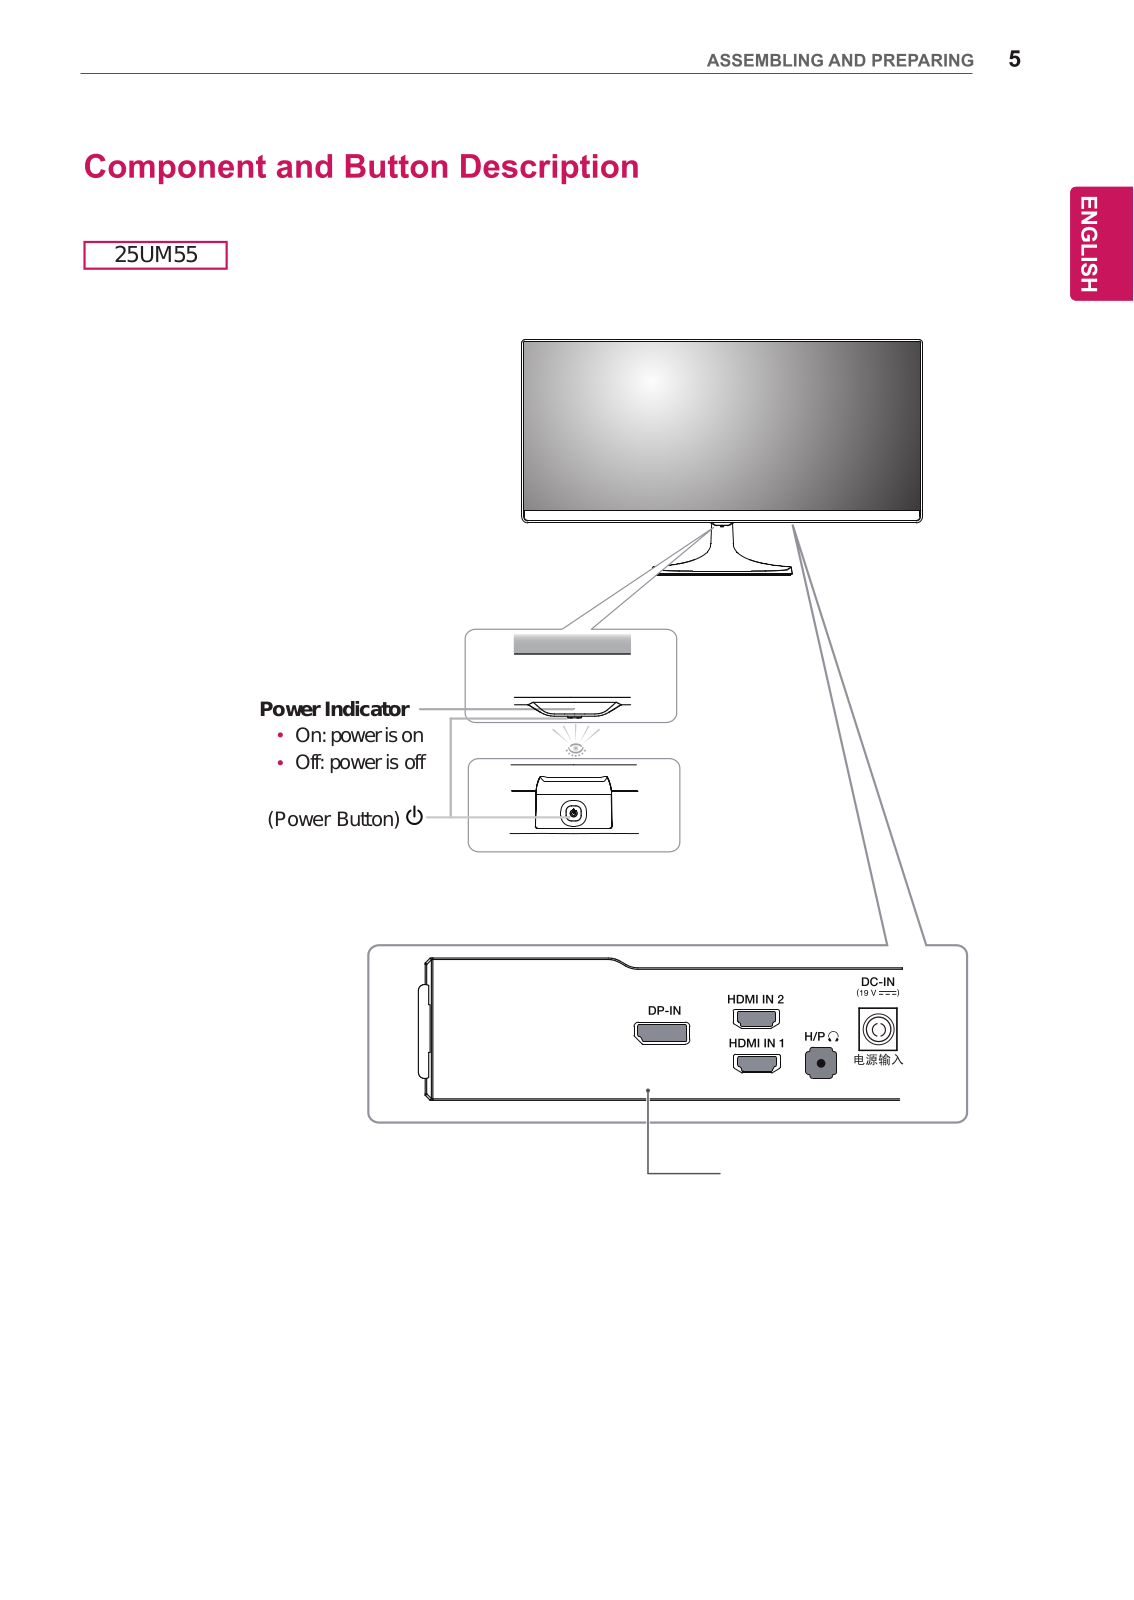
25UM55

Power Indicator

On: power is on Off: power is off

(Power Button)

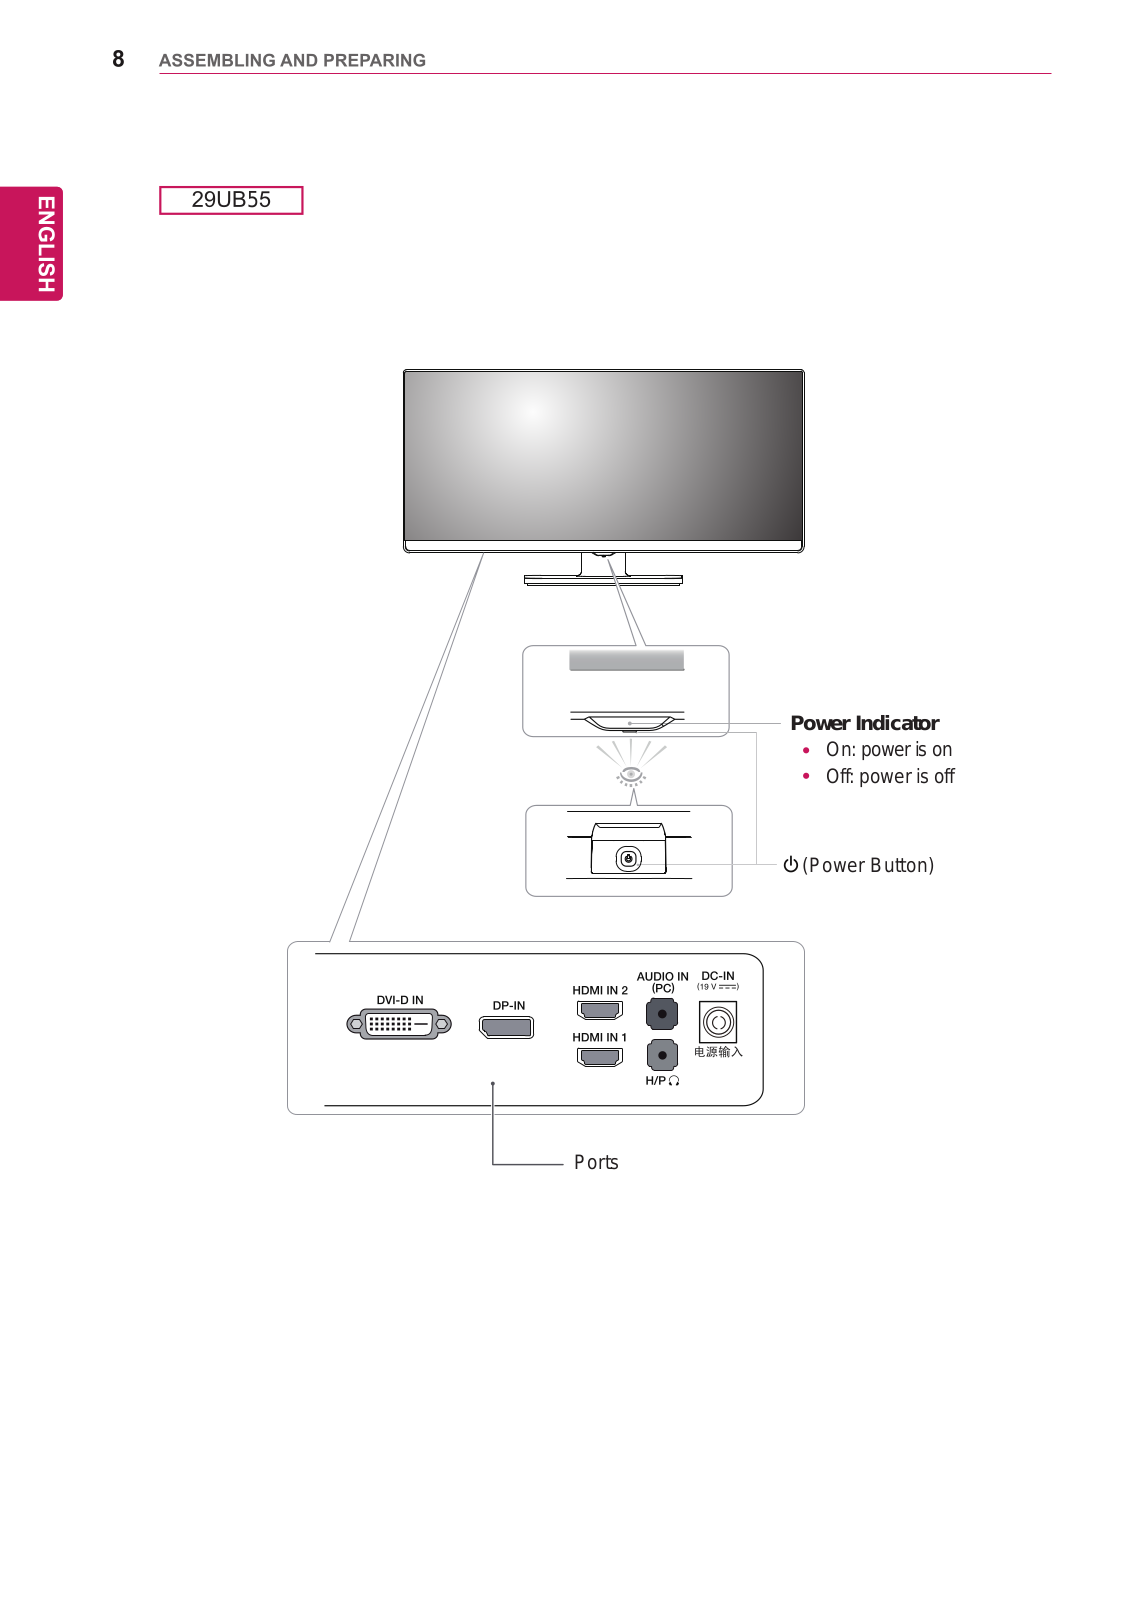
29UM55

Power Indicator

On: power is on

Off: power is off

(Power Button)

Ports

55

5

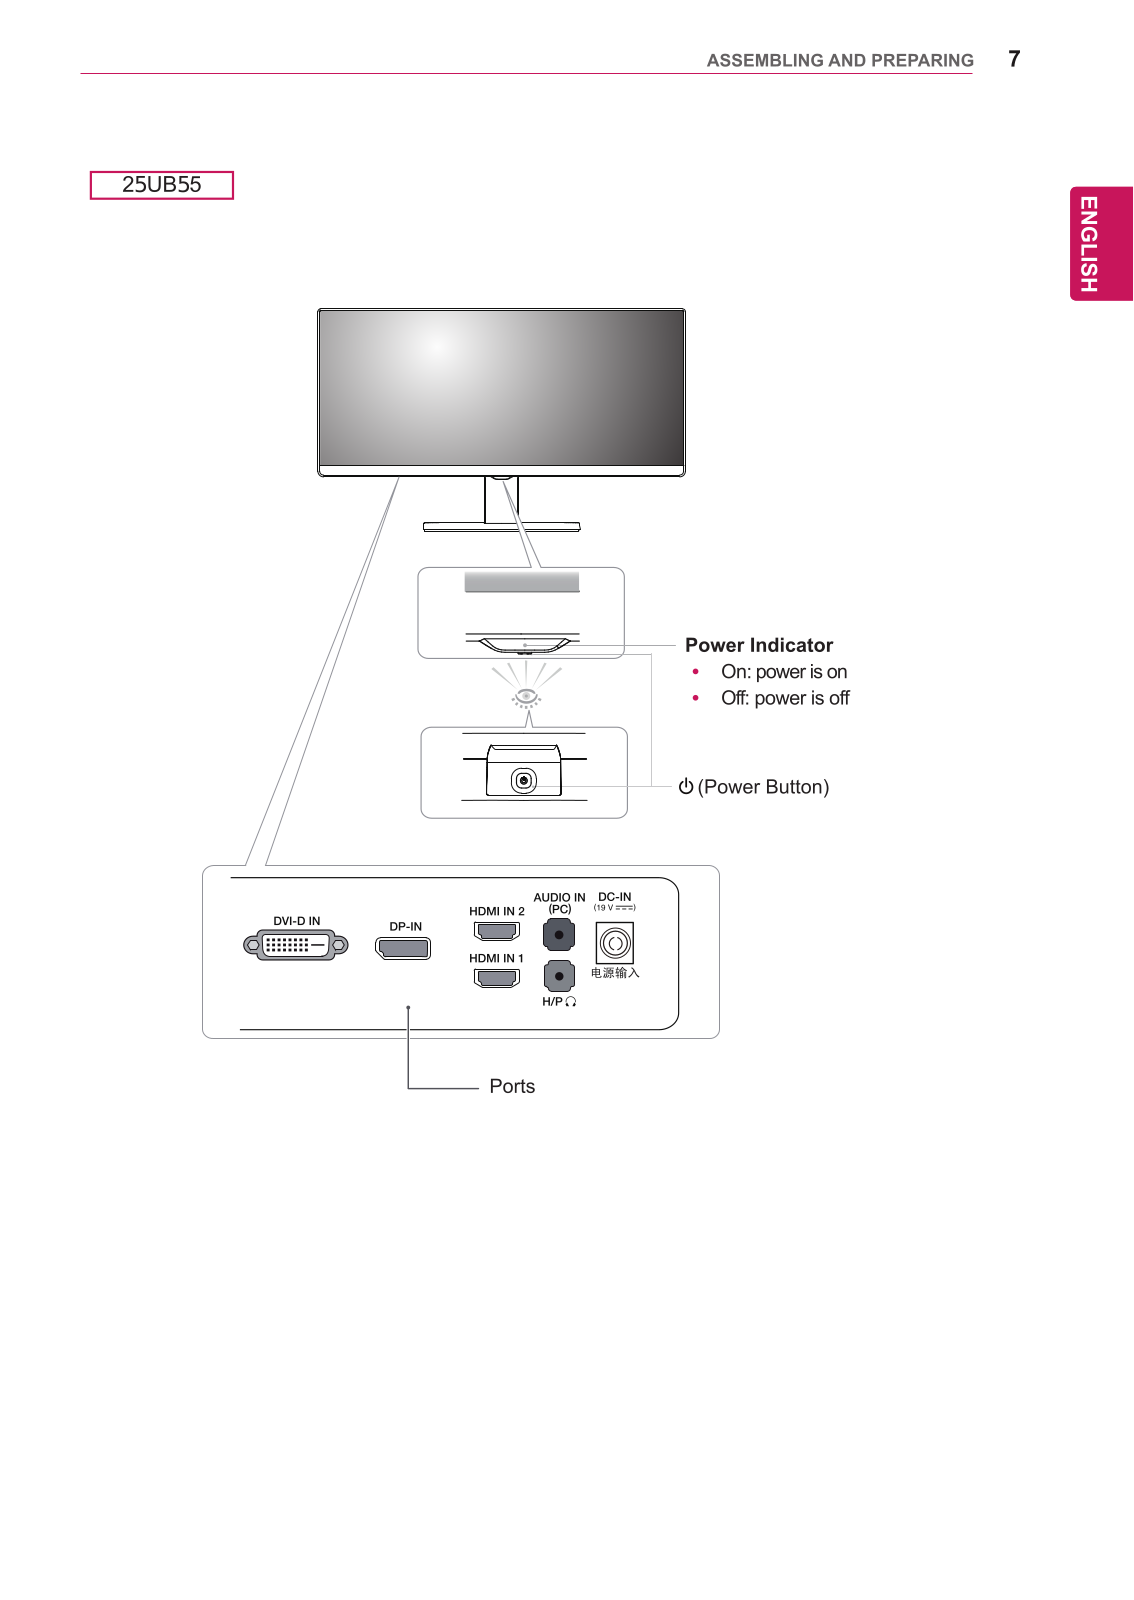
Power Indicator

On: power is on

Off: power is off

(Power Button)

Ports

25UM55 29UM55

25UB55 29UB55

10

Installing the Monitor

Assembling the stand base

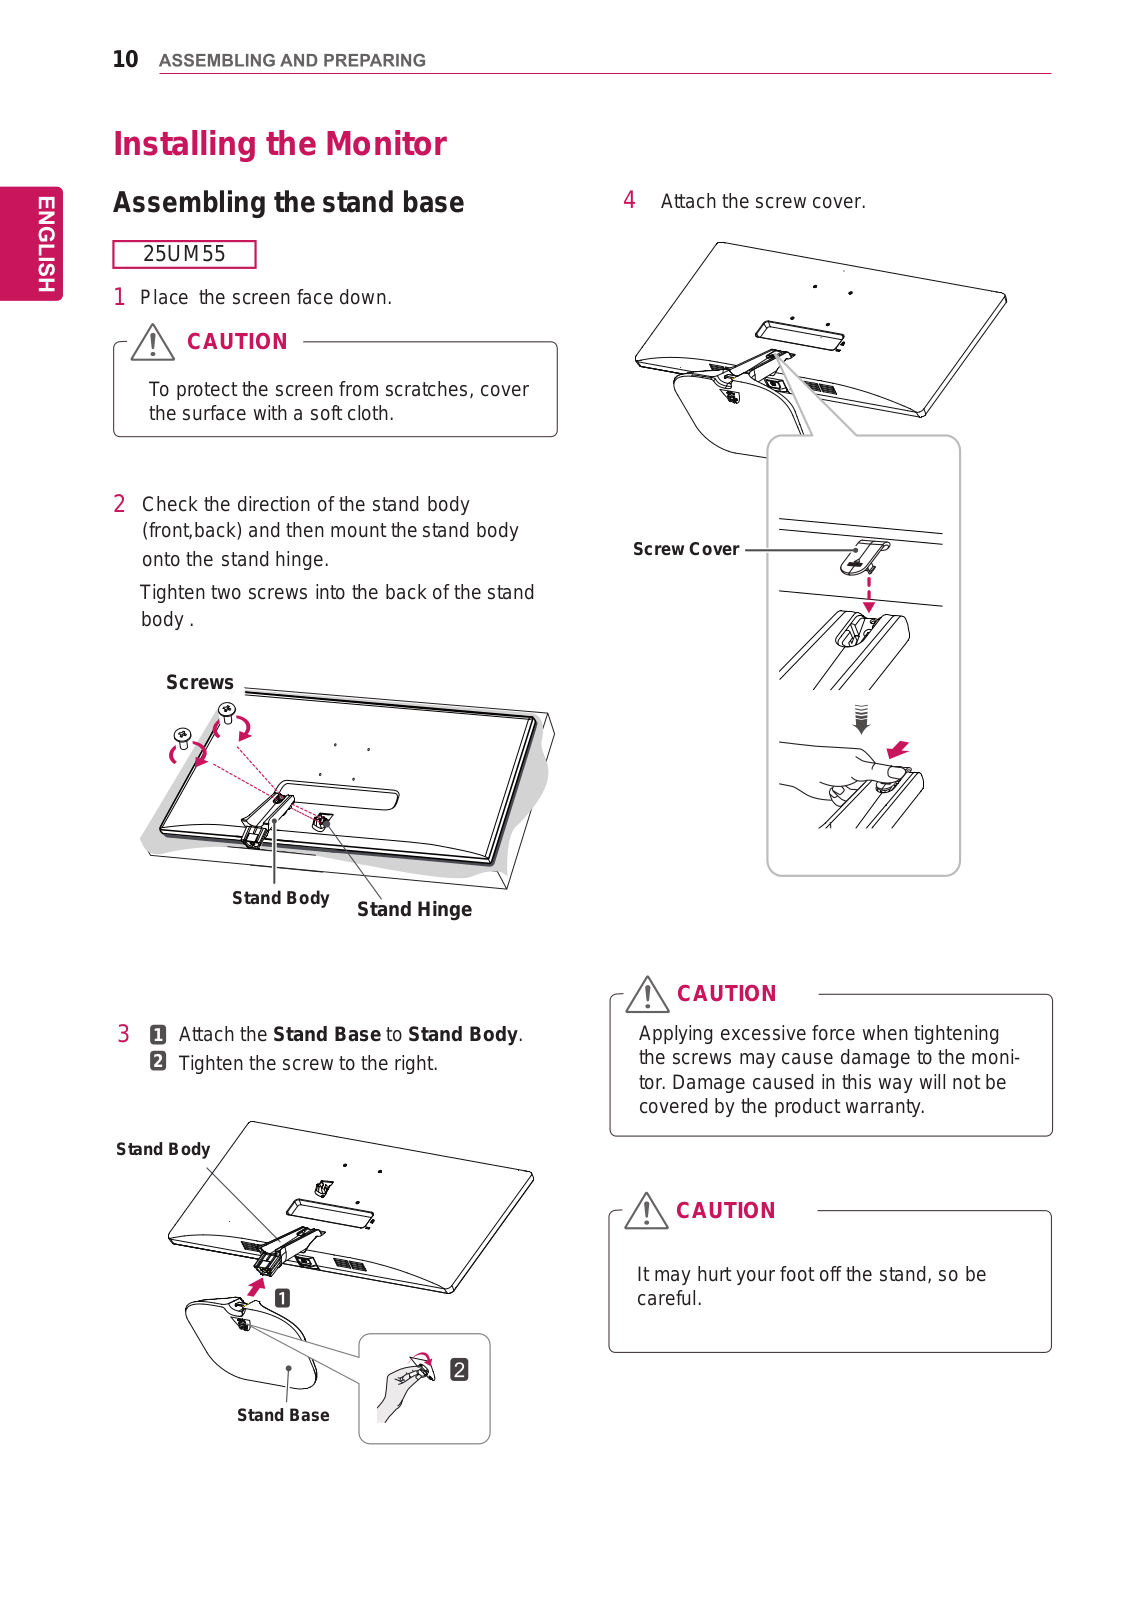
25UM55

1 Place the screen face down.

CAUTION

To protect the screen from scratches, cover the surface with a soft cloth.

2Check the direction of the stand body (front,back) and then mount the stand body onto the stand hinge.

Tighten two screws into the back of the stand body .

Screws

4 Attach the screw cover.

Screw Cover

Stand Body

Stand Hinge


31 Attach the Stand Base to Stand Body.

2 Tighten the screw to the right.

Stand Body

CAUTION

Applying excessive force when tightening the screws may cause damage to the monitor. Damage caused in this way will not be covered by the product warranty.

CAUTION

It may hurt your foot off the stand, so be careful.

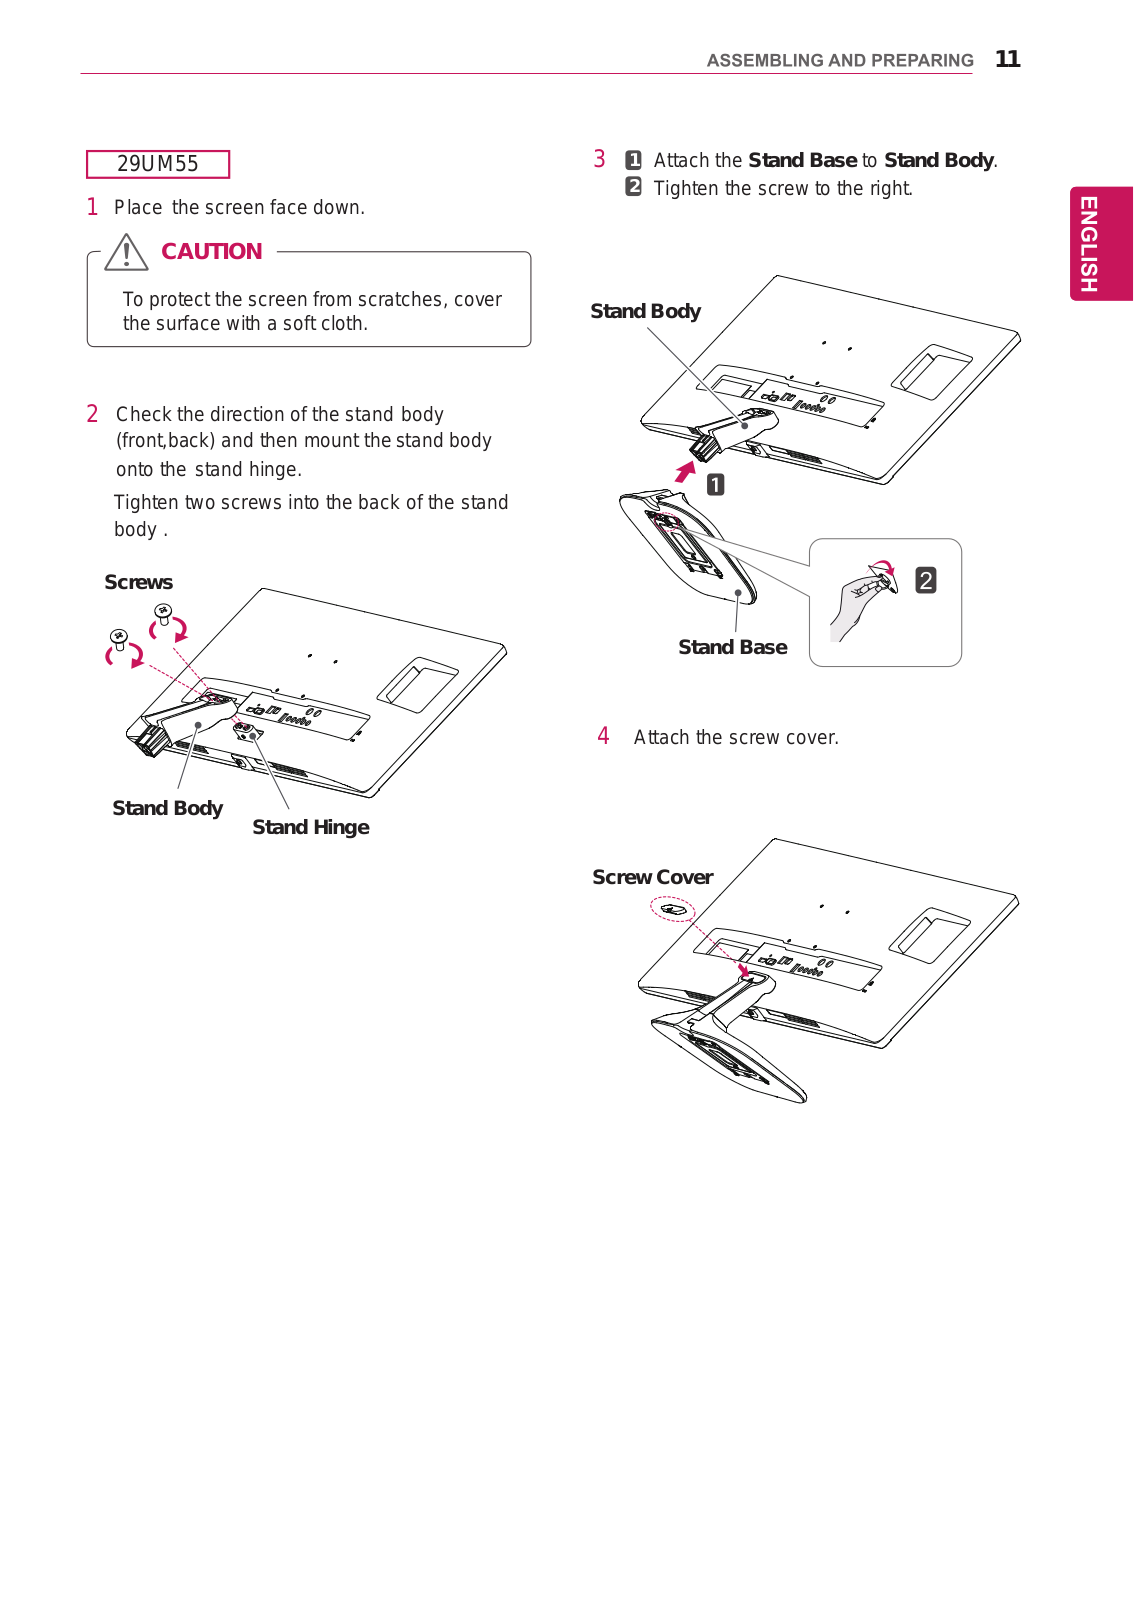
29UM55

1 Place the screen face down.

CAUTION

To protect the screen from scratches, cover the surface with a soft cloth.

2Check the direction of the stand body (front,back) and then mount the stand body onto the stand hinge.

Tighten two screws into the back of the stand body .

Screws

Stand Body

Stand Hinge

11

31 Attach the Stand Base to Stand Body.

2 Tighten the screw to the right.

Stand Body

Stand Base

4 Attach the screw cover.

Screw Cover

12

5

B5

B5

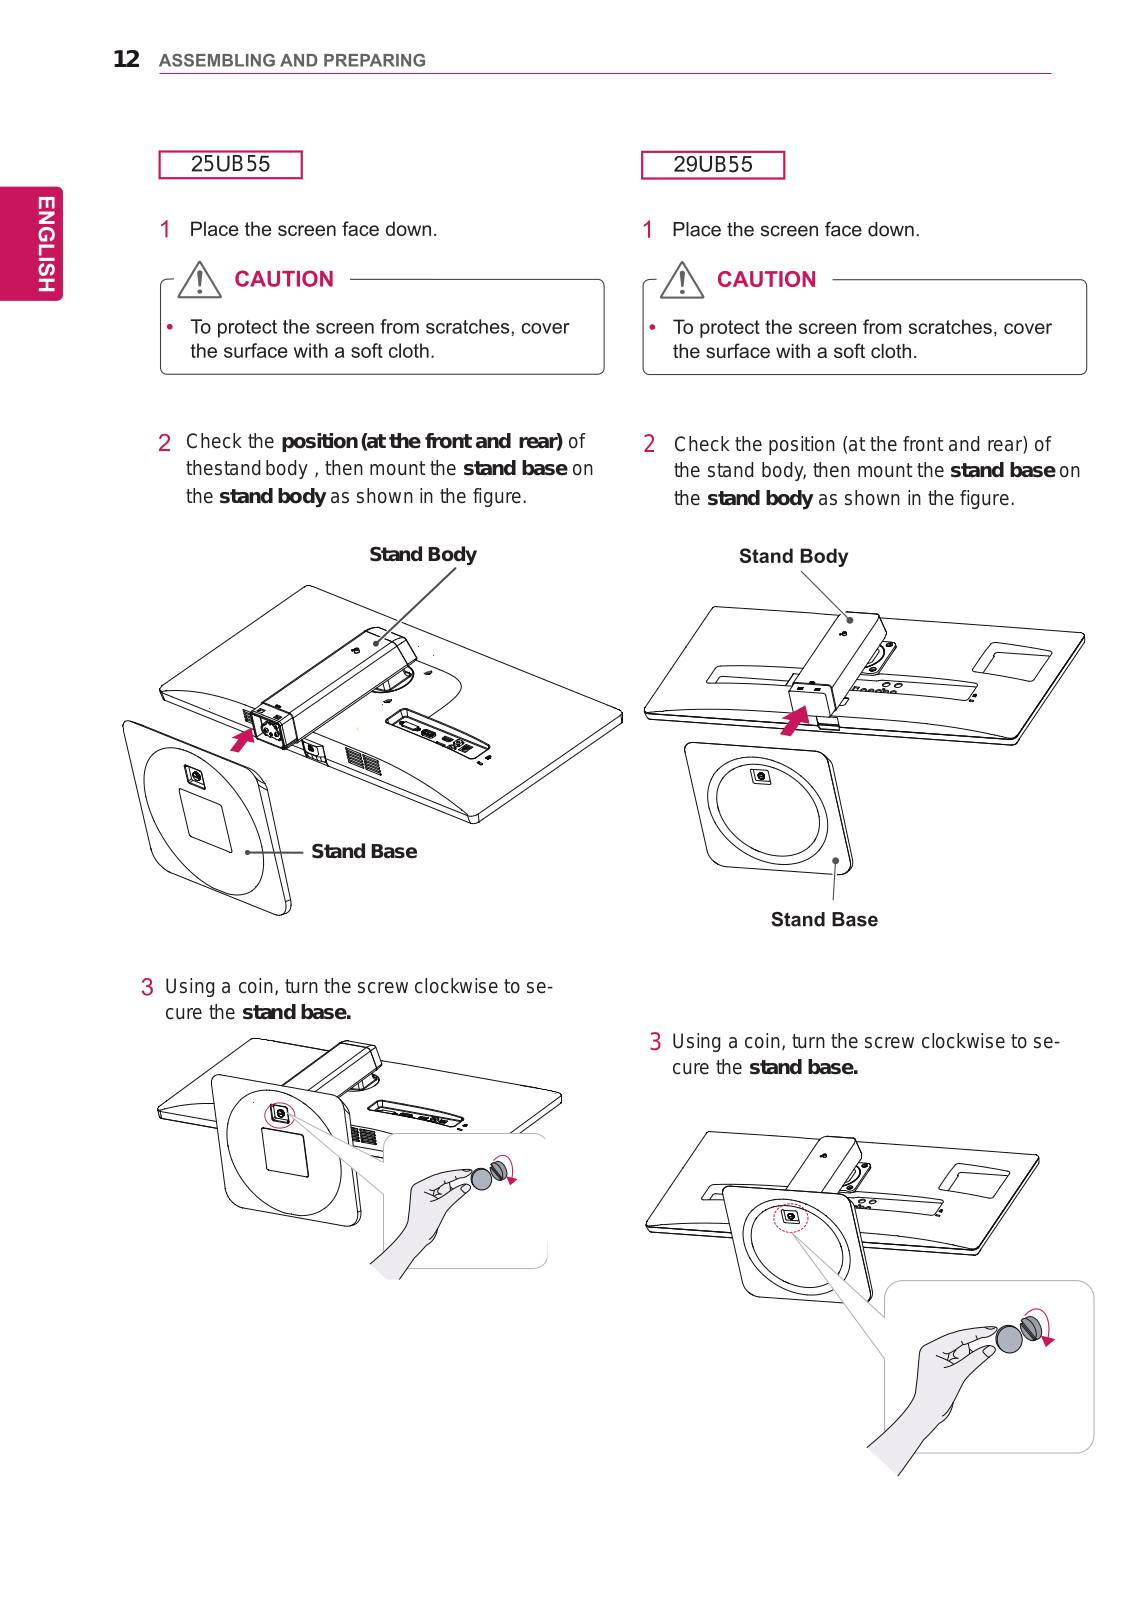
Check the position (at the front and rear) of thestand body , then mount the stand base on the stand body as shown in the figure.

Stand Body

Stand Base

2Check the position (at the front and rear) of the stand body, then mount the stand base on the stand body as shown in the figure.

Using a coin, turn the screw clockwise to secure the stand base.

3 Using a coin, turn the screw clockwise to secure the stand base.

13

25UM55

25UB55

1

Fix the Knob (Cable holder) to the


Hole(Stand body).

2

Use one screw to fix the Cable Holder and


monitor set.

3

Close the Cable holder.

29UM55

29UB55

1

Fix the Knob (Cable holder) to the


Hole(Stand body).

2

Use one screw to fix the Cable Holder and


monitor set.

3

Close the Cable holder.

14

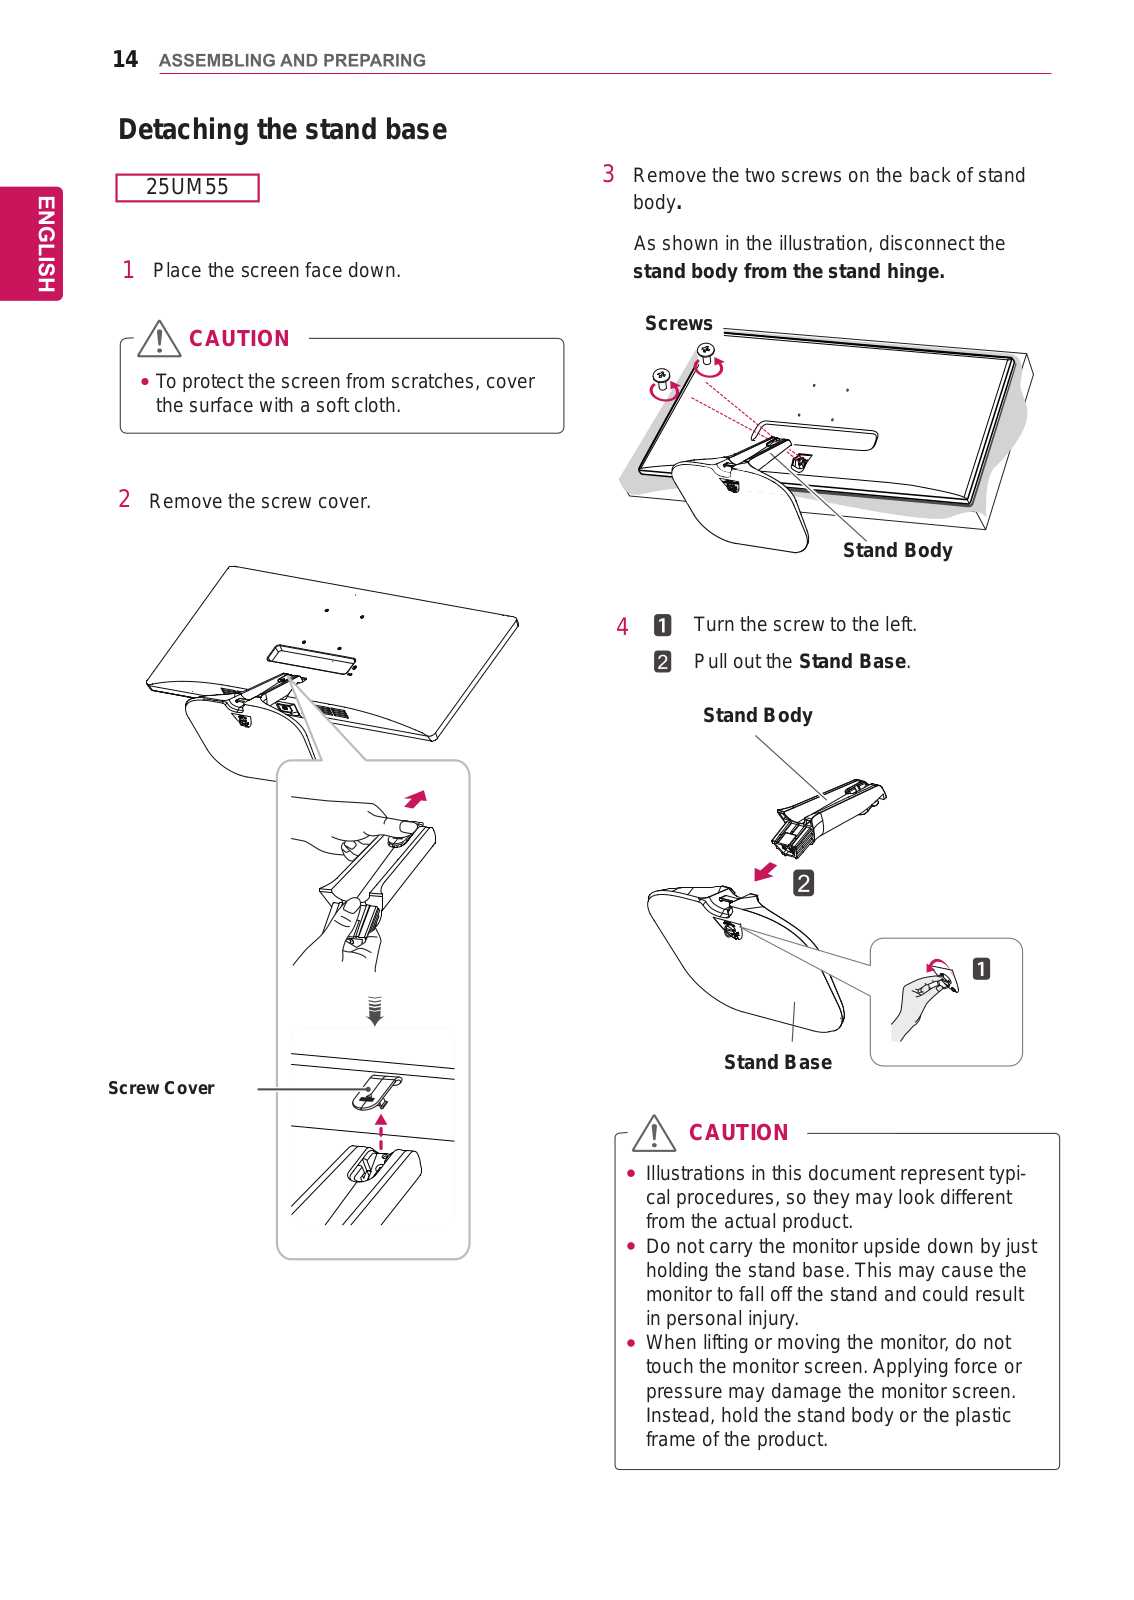
Detaching the stand base

25UM55

1 Place the screen face down.

CAUTION

To protect the screen from scratches, cover the surface with a soft cloth.

2 Remove the screw cover.

Screw Cover

3Remove the two screws on the back of stand body.

As shown in the illustration, disconnect the stand body from the stand hinge.

Screws

Stand Body

4

Turn the screw to the left.

Pull out the Stand Base.

Stand Body

CAUTION

Illustrations in this document represent typical procedures, so they may look different from the actual product.

Do not carry the monitor upside down by just holding the stand base. This may cause the monitor to fall off the stand and could result in personal injury.

When lifting or moving the monitor, do not touch the monitor screen. Applying force or pressure may damage the monitor screen. Instead, hold the stand body or the plastic frame of the product.

15

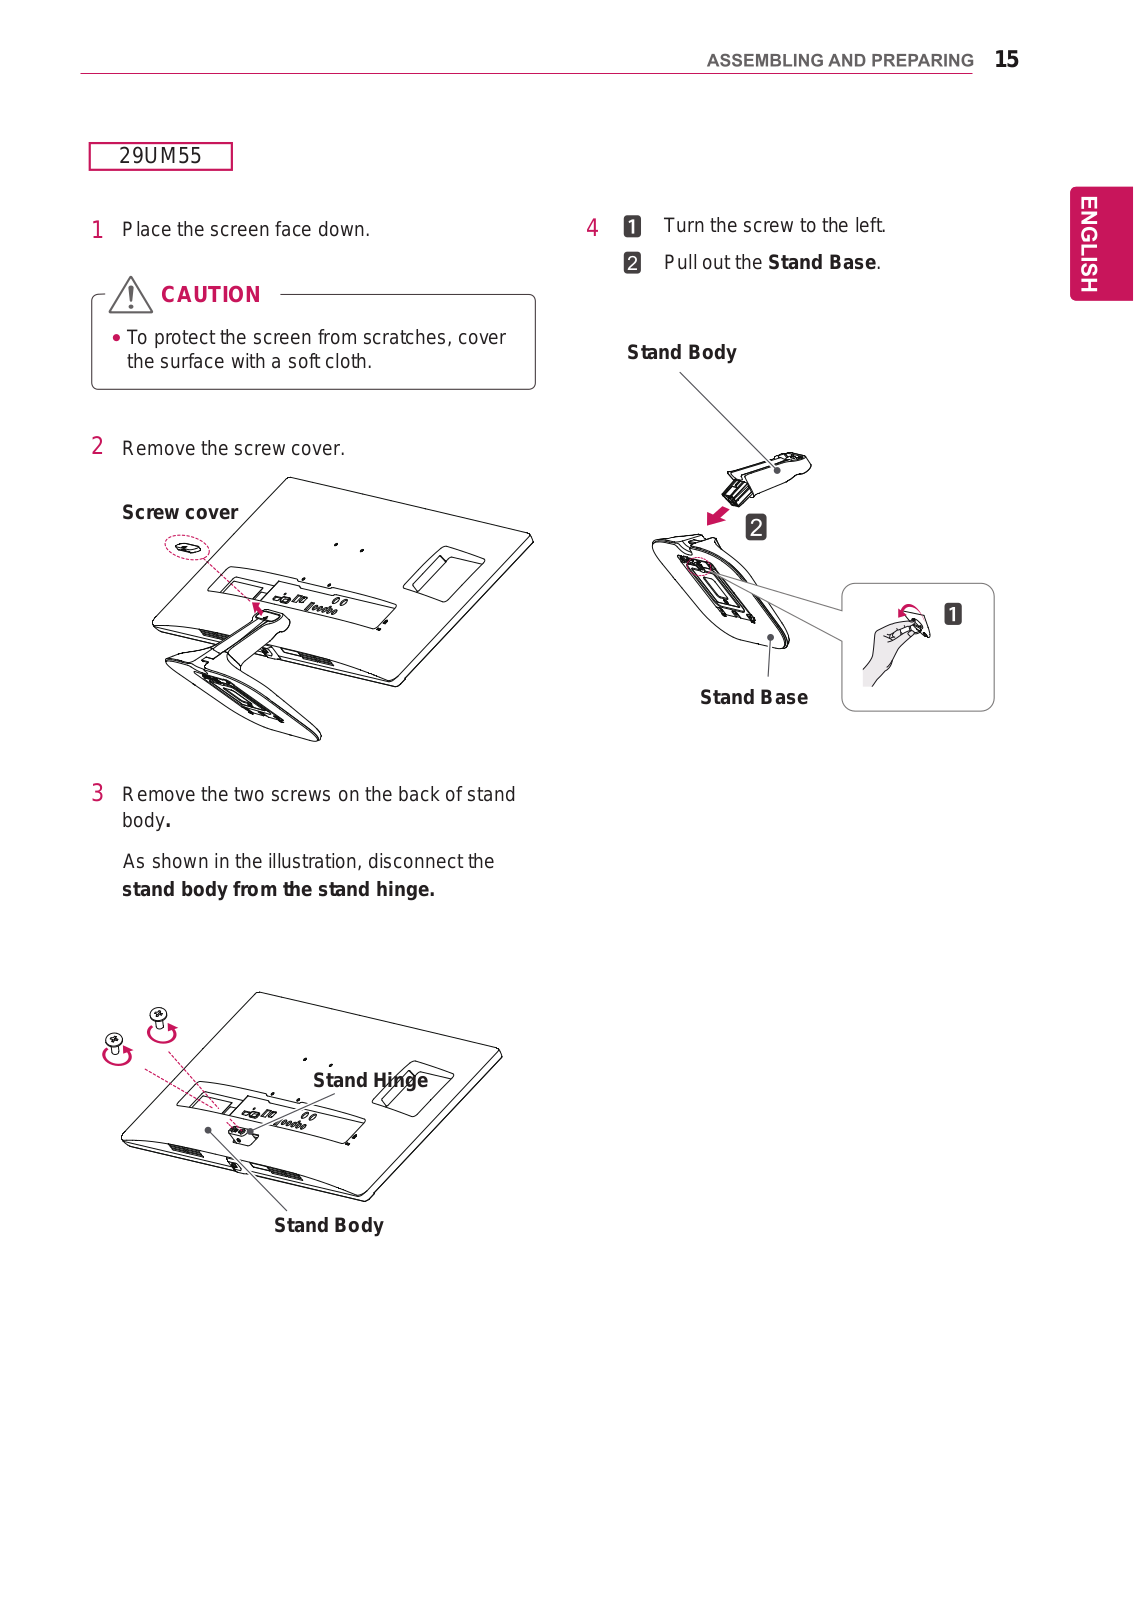
29UM55

1 Place the screen face down. 4 Turn the screw to the left.

Pull out the Stand Base.

CAUTION

To protect the screen from scratches, cover

Stand Body

the surface with a soft cloth.


2 Remove the screw cover.

Screw cover

3Remove the two screws on the back of stand body.

As shown in the illustration, disconnect the stand body from the stand hinge.

Stand Hinge

Stand Body

Loading...
+ 33 hidden pages