


ESPENGLISH
Guides on Using Product Functions
(Windows,Mac)
Please read this manual carefully before operating your set and
retain it for future reference.
P/NO : MFL68001202(1308-REV01)
Printed in Korea
www.lg.com

ENGLISH
ESP
2
Guides on Using Product Functions (Windows)
System Requirements for Graphics Cards
Interface OS
DVI-D HDMI DP Win XP Win Vista Win 7 Win 8 Mac
OOO
No constraintsAMD
2560 x 1080
Graphics Card
Intel HD3000 or higher O O O
HD54XX/HD64XX/
HD77XX or higher
NVIDIA GeForce 300 or higher O O O
Precautions for Changing Resolution
Failing to set the video card to the recommended (optimal) resolution may result in blurred text, a dimmed screen, a
truncated display area, or misalignment of the display.
The configuration procedure may differ depending on your computer and/or operating system. Also, some video
cards may not support certain resolutions. If this is the case, contact the manufacturer of the computer or video
card for assistance.
Some video cards may not support 2560x1080 resolution. It is recommended to use a video card that supports
2560 x 1080 resolution. Even when you set the resolution to 2560 x 1080 on your PC, the actual PC output may
not support the resolution. Press the OK button on the monitor to check the current resolution of your PC. (Shown
on the OSD at the top right of the monitor screen.)
CAUTION
The setting method can vary depending on the computer and the O/S. You may not be able to select certain
resolutions depending on the video card performance. In such cases, please refer to the user's manual of the
computer and/or video card.
[Windows XP]
1
2
<STEP 1> <STEP 2> <STEP 3>
Move the mouse pointer to an
1
empty area on the Windows screen
(with no icons or task bars) and
click the right mouse button.
When the pop-up menu appears,
2
click the "Property".
3
4
Choose the "Settings" menu
3
and select an optimal resolution.
(2560x1080)
Click the [Apply] button to
4
complete resolution setting.
Select the [Advanced] button.
5
Select the [Monitor] tab and set
6
the vertical frequency to 60Hz in the
"Refresh Rate" column.
Click the [Apply] button to
7
complete optimal frequency setting.
6
5
7
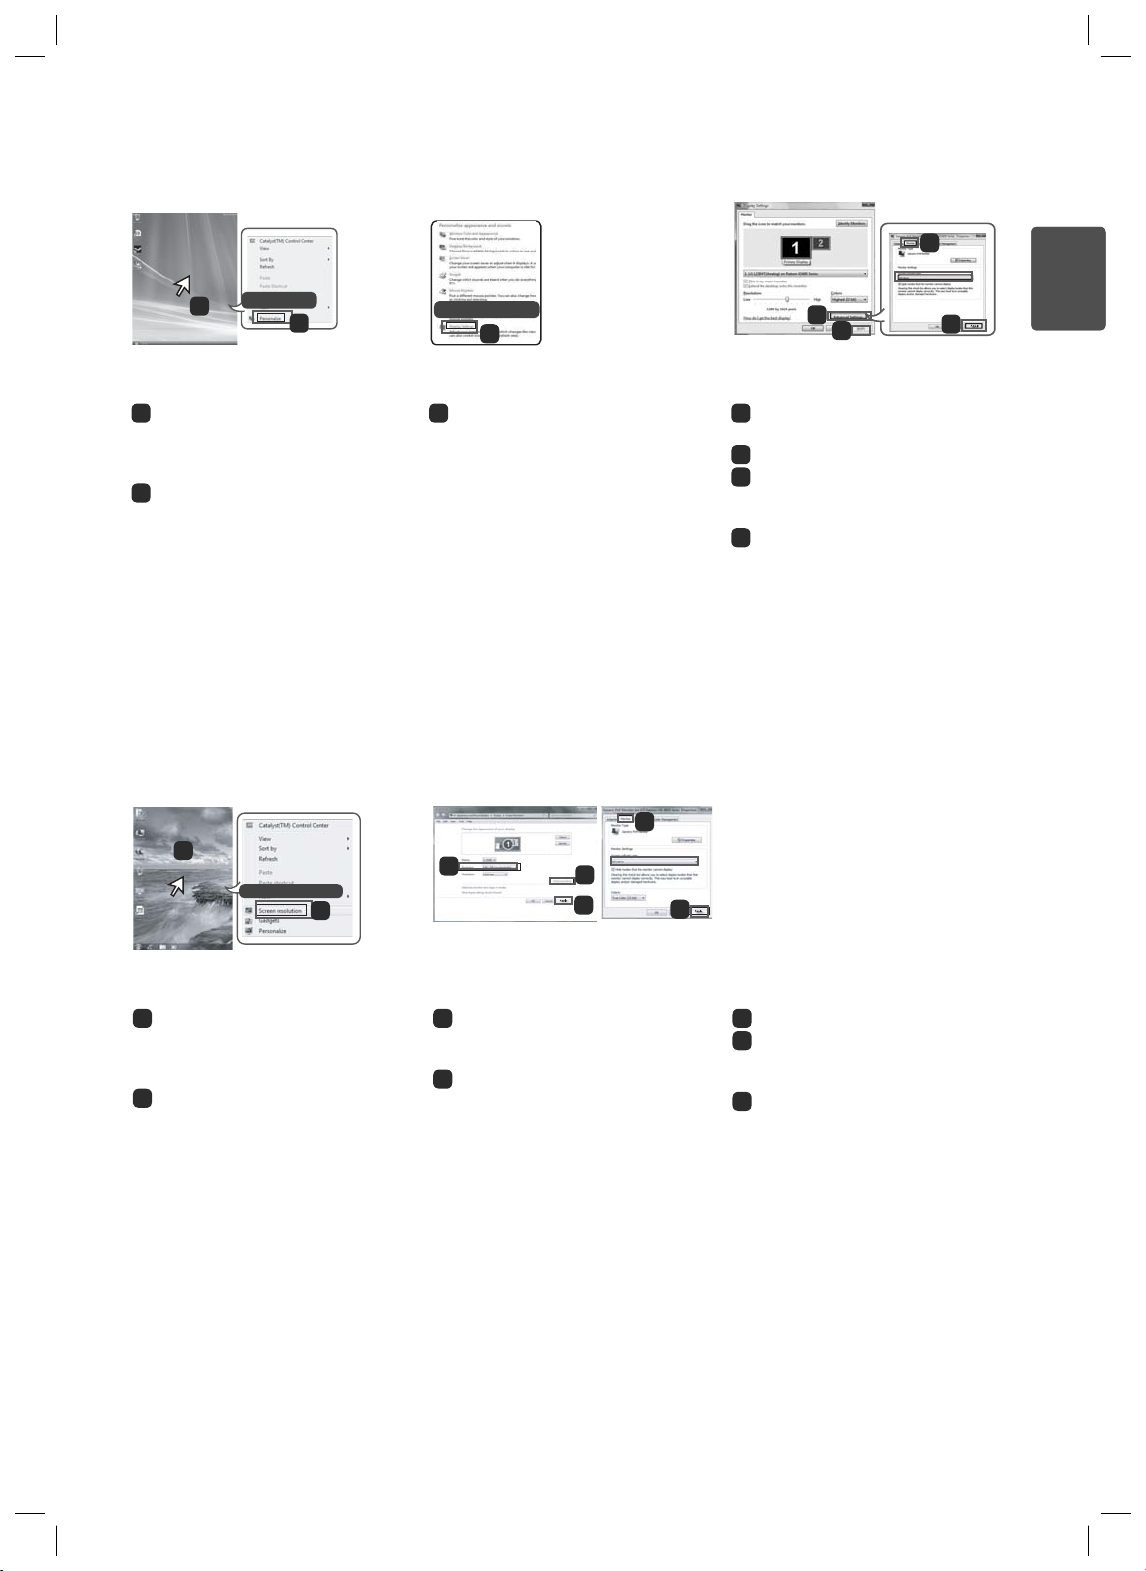
[Windows Vista]
3
Personalize
1
2
<STEP 1>
Move the mouse pointer to an
1
empty area on the Windows screen
(with no icons or task bars) and
click the right mouse button.
When the pop-up menu
2
appears, click the "Personalize".
[Windows 7,Windows 8]
1
Screen resolution
2
Display Settings
3
Choose the "Display Settings"
3
menu and select an optimal
resolution.(2560x1080)
3
5
4
6
5
4
7
ESPENGLISH
<STEP 3><STEP 2>
Click the [Apply] button to
4
complete resolution setting.
Select the [Advanced] button.
5
Select the [Monitor] tab and set
6
the vertical frequency to 60Hz in the
"Refresh Rate" column.
Click the [Apply] button to
7
complete optimal frequency setting.
6
7
<STEP 1> <STEP 2> <STEP 3>
Move the mouse pointer to an
1
empty area on the Windows screen
(with no icons or task bars) and
click the right mouse button.
When the pop-up menu appears,
2
click the "Screen resolution".
Choose the "Settings" menu
3
and select an optimal resolution.
(2560x1080)
Click the [Apply] button to
4
complete resolution setting.
Select the [Advanced] button.
5
Select the [Monitor] tab and set
6
the vertical frequency to 60Hz in the
"Refresh Rate" column.
Click the [Apply] button to
7
complete optimal frequency setting.
ENGLISH
笹築耉擕
笑襪湭梡
訚笽
ESP
4
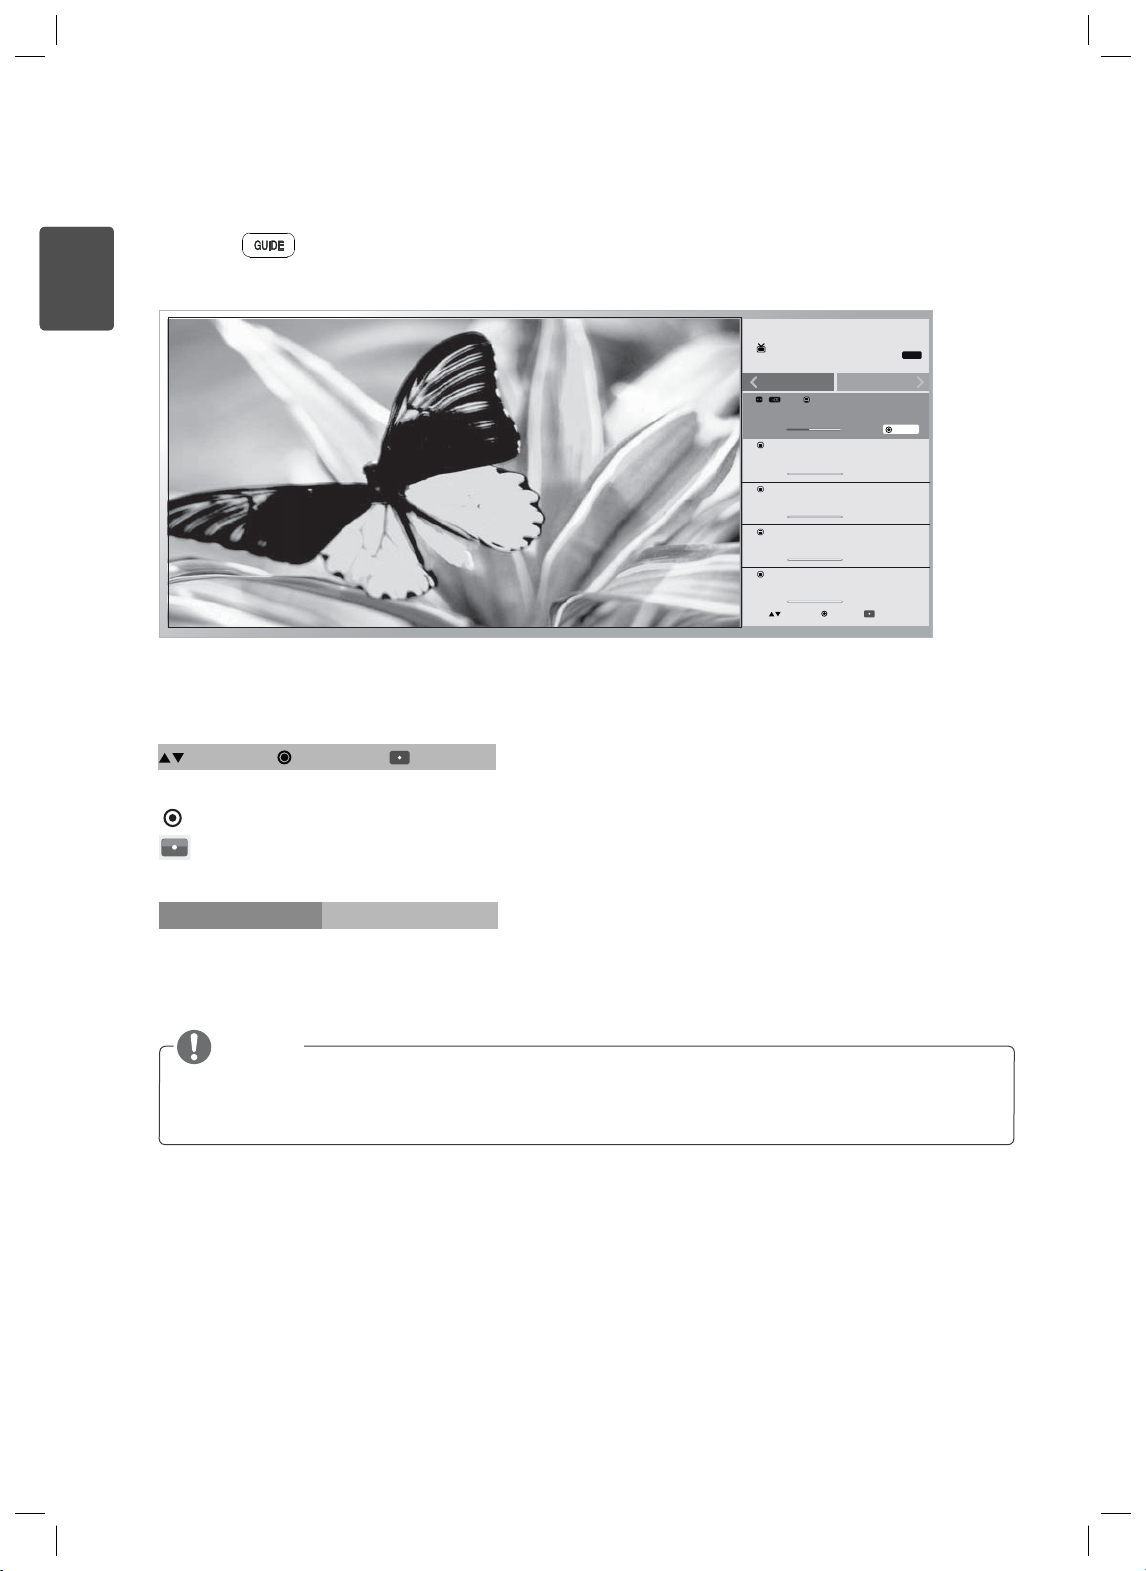
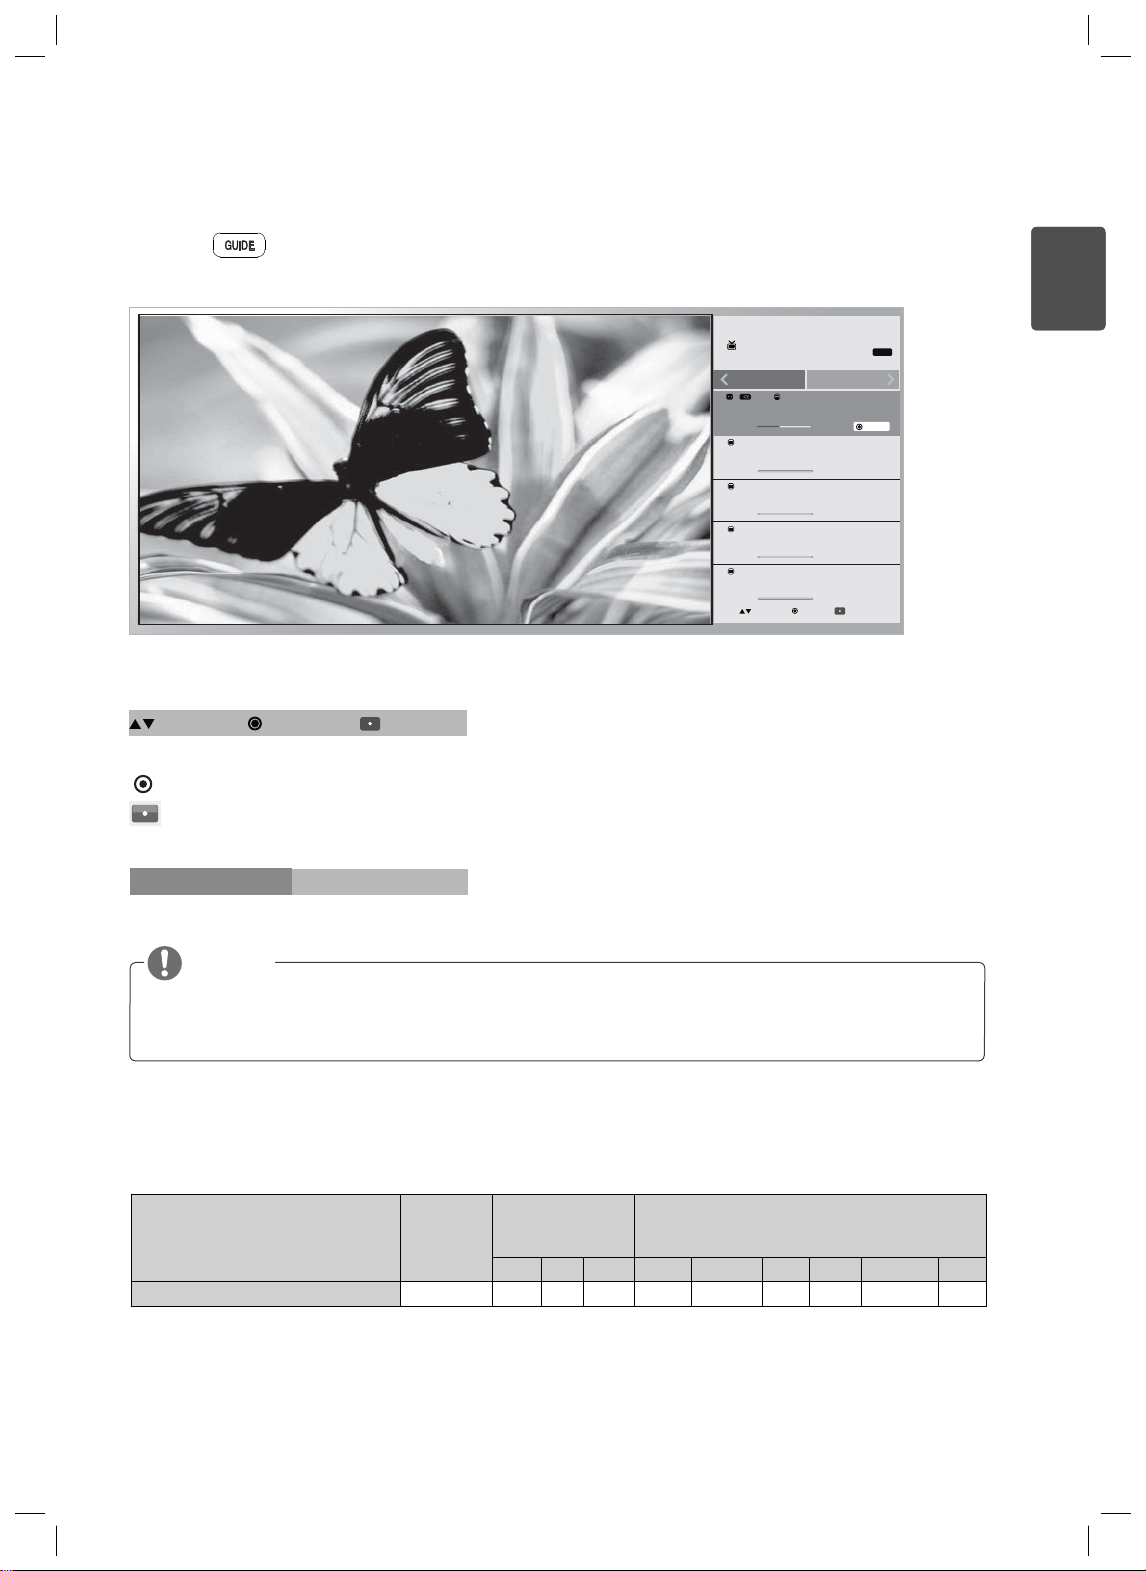
Using the Program Guide Function
Press the
* Press the "Info" key in the countries where the Guide button is not available.
button on the remote control.
PM 3:41
PM 3:56
PM 4:17
PM 4:25
PM 4:41
TV
Schedule
%
#
$
%
&
J
Move
"
Other channels
PM 3:56
PM 4:17
PM 4:25
PM 4:41
PM 4:57
OK
All
MONO
Watch
Confirm the channel information.
Move
OK
You can move up or down by using the ▲ and▼ buttons.
Using the buttons, you can select the Watch or Remind functions.
Displays the program guide for all of the channels.
be available.
Schedule
Other channels
or for all channels.
All
* Depending on your country, this function may not
You can check the channel information for the current channel
NOTE
It is possible to switch channels while operating the information display and, if the channel is changed,
the information will then be updated to display the next channel instead.

LG Software Introduction/System Requirements
5
Installation
Software
Screen Split Optional O X O O O O O 10.7 / 10.8 X
Monitor Driver Optional O O O O O O O X X
Auto Resolution
(for 29EA73,29EB73 and 29MA73 only)
- Screen Split: Automatically splits the monitor screen into the desired layouts.
- Auto Resolution
connected to the PC in PBP mode.
* The software listed above can be installed using the CD provided with the product or downloaded from the LG Electronics website.
* Graphics card: It is recommended to use a graphics card that supports 2560 x 1080 resolution.
(for 29EA73,29EB73 and 29MA73 only)
Priority
(required/
optional)
Required O O O X X O O X X
Supported Interface Supported OS
DVI DP HDMI Win XP Win Vista Win 7 Win 8 Mac Linux
: Automatically switches to the optimal resolution when the monitor is
Driver
- Installation priority (required/optional): Optional
- Usage: The resolution and frequency are adjusted for the monitor.
How to Install
- Installing with the CD provided
: Insert the user manual CD provided in the product box into the PC's CD drive and install the program.
- Downloading from the LG Electronics website
: Visit the LG Electronics website → CUSTOMER SERVICES → DOWNLOADS → Drivers/Software → Select your product and model
→ Install the software
ESPENGLISH

6
Screen Split (MONITOR Screen Split Software)
ENGLISH
ESP
- Installation priority (required/optional): Optional
- Usage: Automatically splits the monitor screen into desired
layouts (2 sections, 3 sections, or 4 sections).
How to Install
- Installing with the CD provided
: Insert the user manual CD provided in the product box into
the PC's CD drive and install the LG Monitor Software.
On the Select Options window, select Screen Split and
continue.
- Downloading from the LG Electronics website
: Visit the LG Electronics website → CUSTOMER SERVICES
→ DOWNLOADS → Drivers/Software → Select your product
and model → Install the software
Check "I accept the terms of the agreement" on the License
Agreement screen and then click on the [Next] button.
How to Use
* For details on using the software, refer to the program's Help.
1. Click on the tray icon at the bottom right of the PC screen.
2. Select a screen layout.
When the installation is complete, restart the system.
How to Run
1
Double-click on the shortcut icon on the desktop, or
2
Click on the tray icon at the bottom right of the PC screen.
1
2
3. The screen split layout is applied.
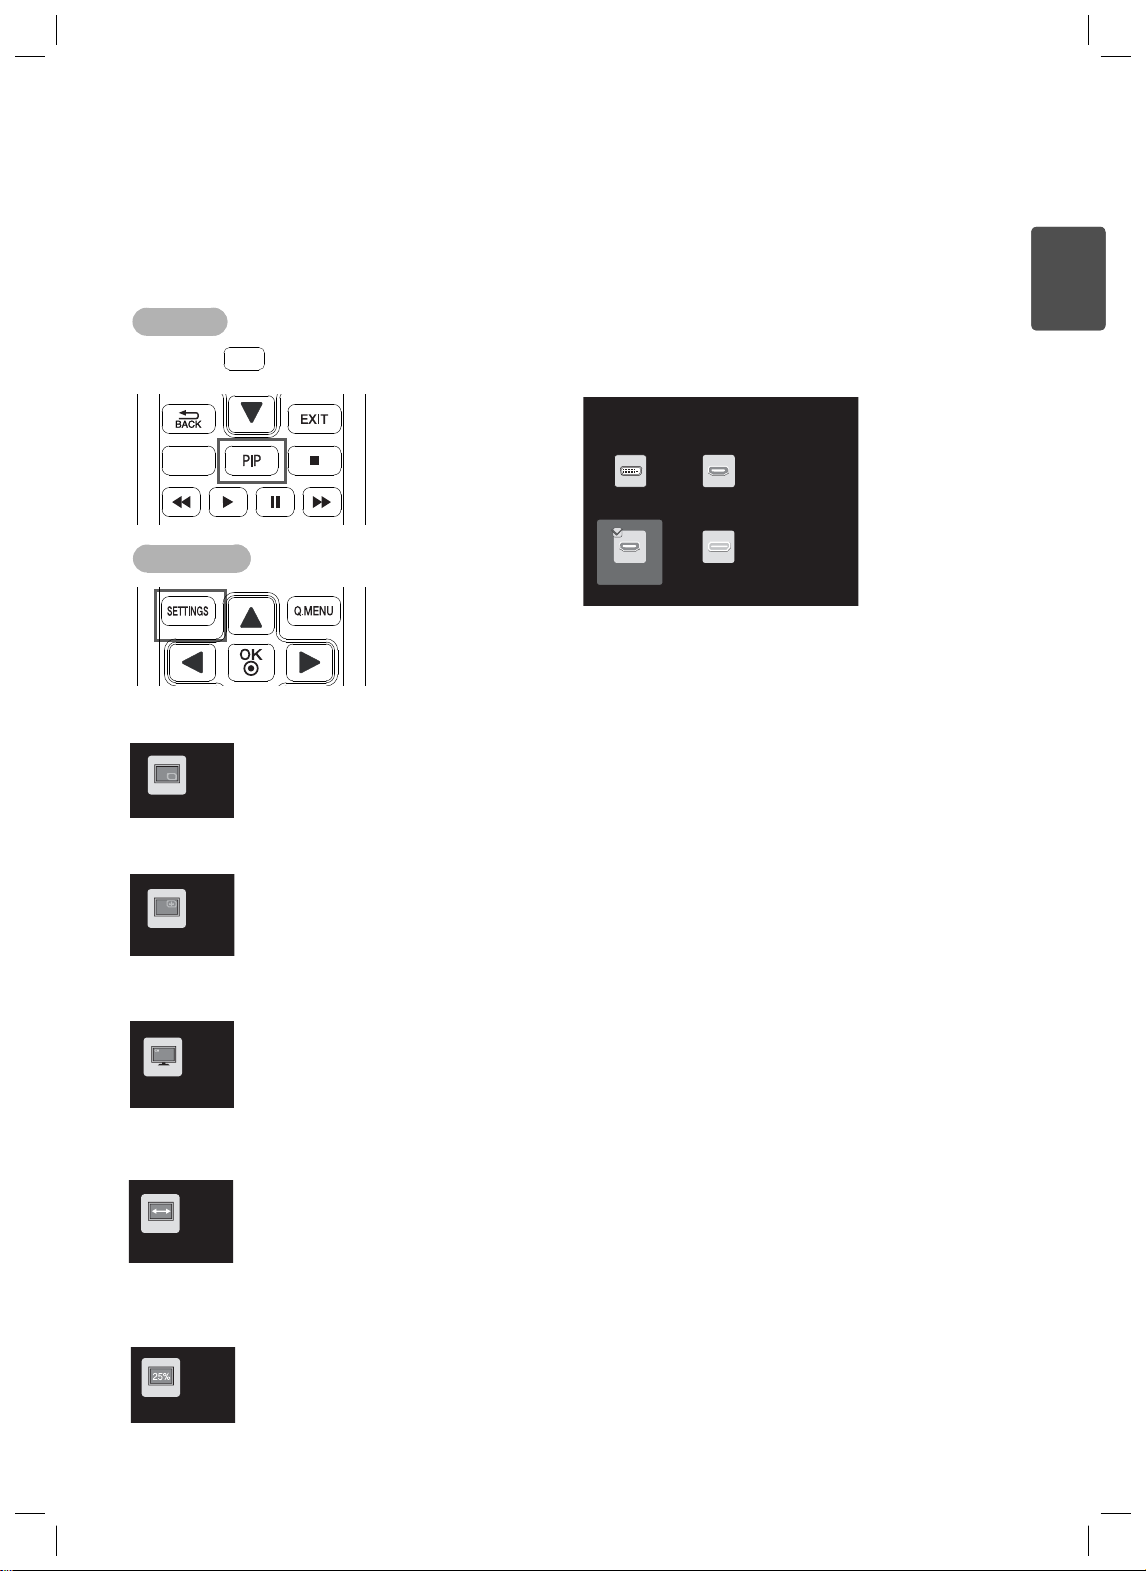
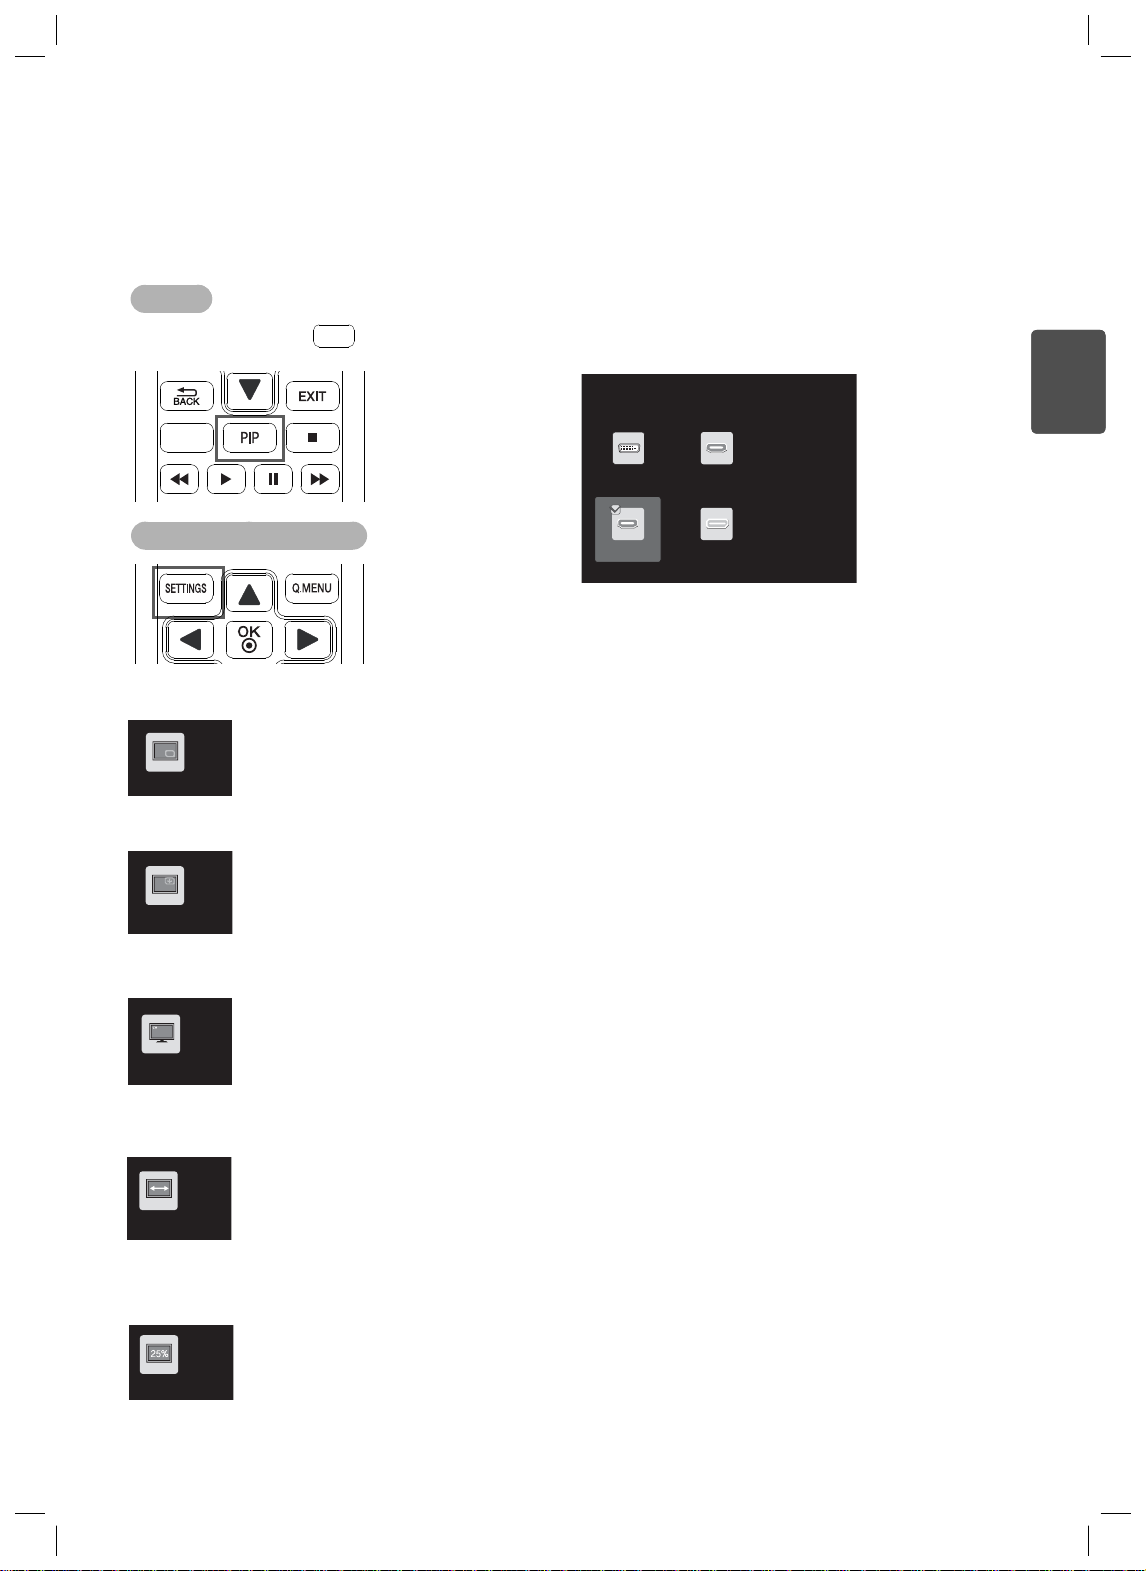
Using PIP
3,3
笑襪湭梡
忉蝽瓩篚
摝必懵
訚笽
5$7,2
7
- Usage: The input for each device is simultaneously displayed on the monitor screen.
* If the Main Input is TV, component, or AV, then the PIP function is not available.
How to Run
1.
Press the
3,3
button on the remote control.
2. Select an input to use as the sub screen.
Sub Input
5$7,2
PIP SIZE
Setting the PIP
PIP SETTINGS
DVI HDMI1
HDMI2/MHL
DisplayPort
■ Position: Set the PIP position.
1 Press the PIP Settings button on the remote control and then select "Position."
2 Select the desired position using the arrow keys and then press the OK button.
Position
* Activate when the size is not PIP Balanced.
ESPENGLISH
■ Size: Set the PIP screen size.
1 Press the PIP Settings button on the remote control and then select "Size."
2 Select the desired size using the arrow keys.
Ratio
■ Audio-input: Select an audio output device.
1 Press the PIP Settings button on the remote control and then select "Audio-input."
2 Select the desired audio input using the arrow keys.
Audio-input
■ Ratio: Set the PIP sub screen ratio.
1 Press the PIP Settings button on the remote control and then select "Ratio."
2 Select the desired position using the arrow keys and then press the OK button.
Ratio
* Activate when the size is PIP Balanced.
■ Transparency: Set the transparency of the PIP window.
1 Press the PIP Settings button on the remote control and then select "Transparency."
2 Select the desired position using the arrow keys and then press the OK button.
Transparency
* Activate when the size is not PIP Balanced.
8
Guides on Using Product Functions (Mac)
ENGLISH
ESP
System Requirements for Graphics Cards
Graphics Card
Intel HD3000 or higher O O O
2560 x 1080
NVIDIA GeForce 300 or higher O O O
* For HDMI connections, you may be required to enforce custom settings from the graphics card control panel or update to the latest
graphics card driver.
* Support settings are subject to change
HD54XX/HD64XX/HD77XX
or higher
.
Interface OS
DVI-D HDMI DP Win XP Win Vista Win 7 Win 8 Mac
OOO
No constraintsAMD
Precautions for Changing Resolution
Failing to set the video card to the recommended (optimal) resolution may result in blurred text, a dimmed screen, a
truncated display area, or misalignment of the display.
The configuration procedure may differ depending on your computer and/or operating system. Also, some video
cards may not support certain resolutions. If this is the case, contact the manufacturer of the computer or video
card for assistance.
Some video cards may not support 2560x1080 resolution. It is recommended to use a video card that supports
2560 x 1080 resolution. Even when you set the resolution to 2560 x 1080 on your PC, the actual PC output may
not support the resolution. Press the OK button on the monitor to check the current resolution of your PC. (Shown
on the OSD at the top right of the monitor screen.)
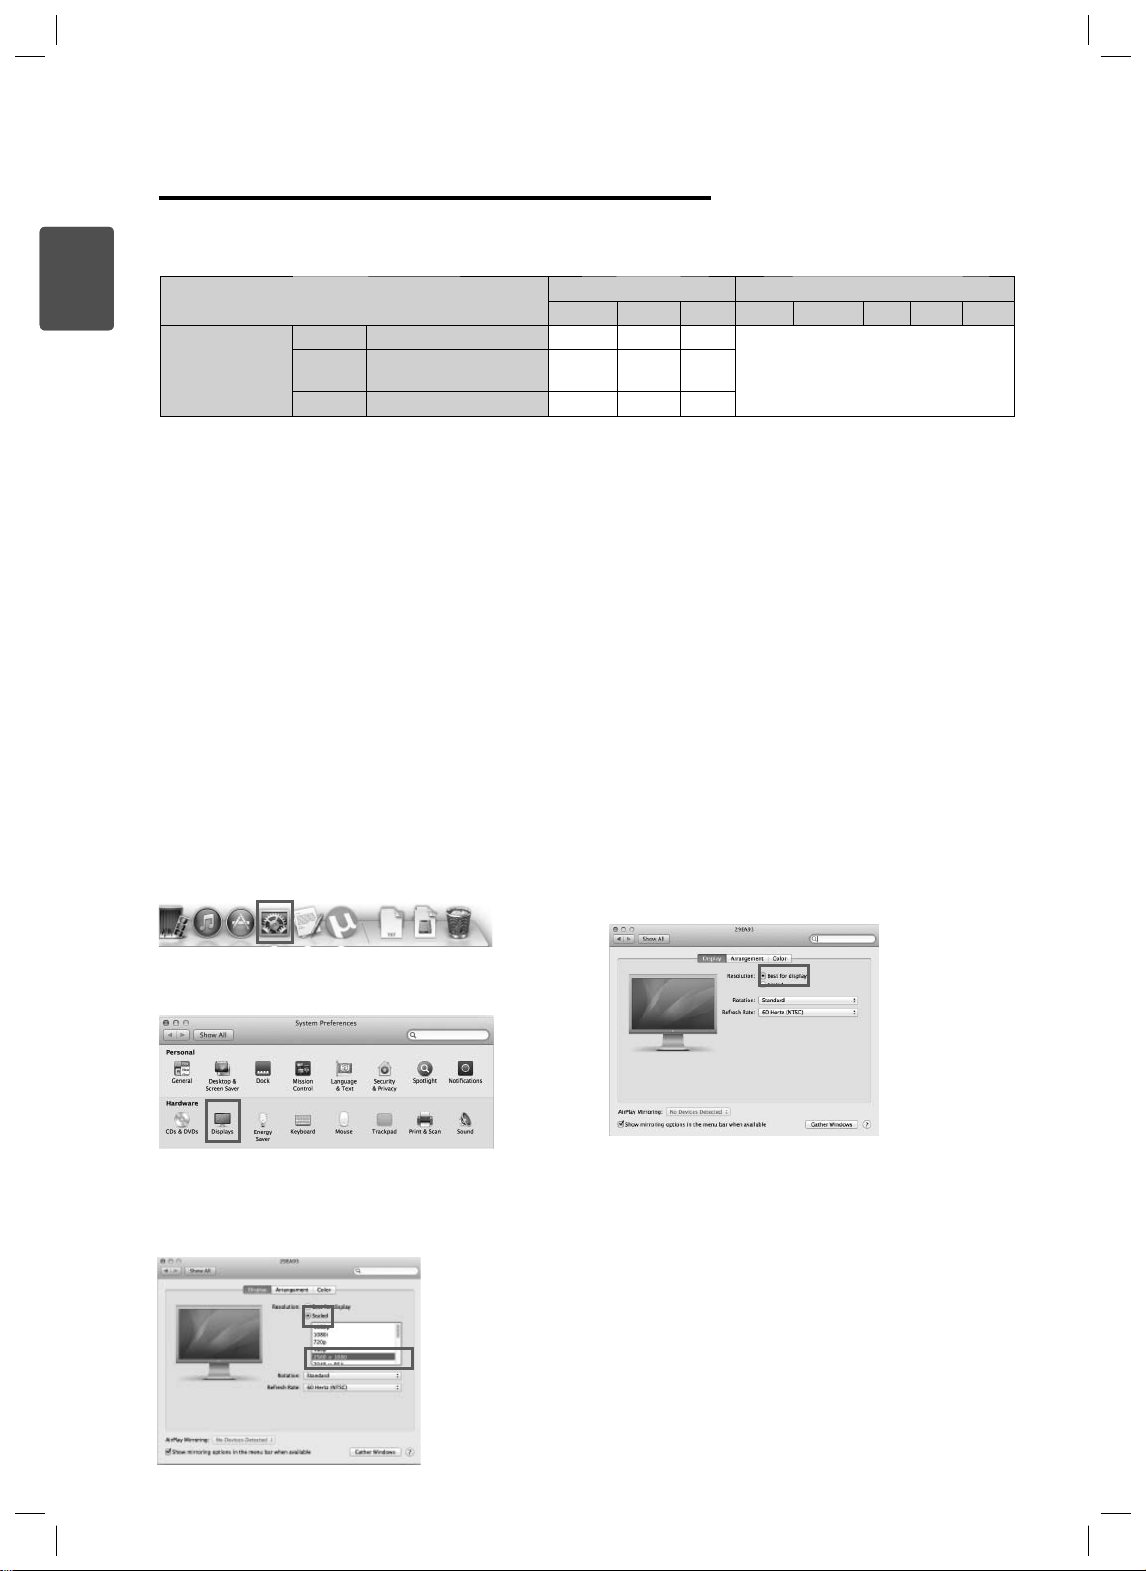
[Mac]
<Step 1>
1. On the Doc bar, click on the System Preferences icon.
<Step 3>
4. In the Display tab, select Best for display. The display is now
set to the recommended resolution (2560 x 1080).
2. When the System Preferences window opens, select
“Display.”
<Step 2>
3. Select Scaled and select a desired resolution and a refresh
rate. Settings are now complete.
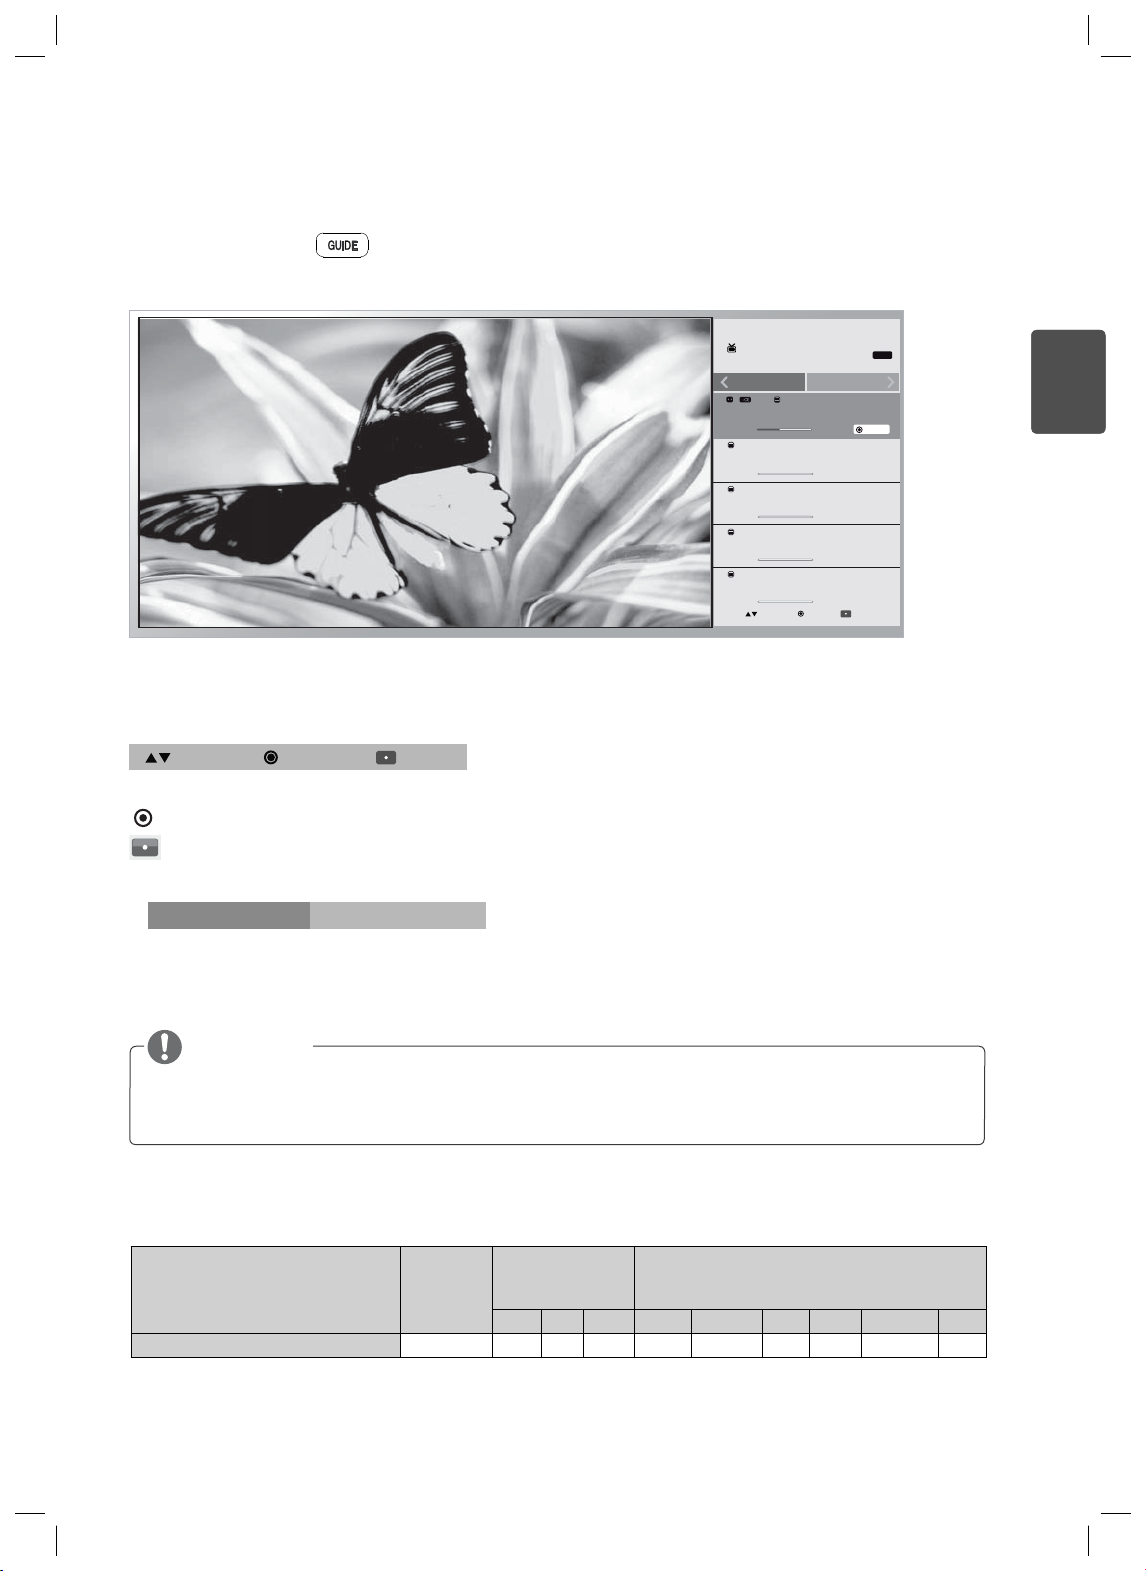
Using the Program Guide Function
笹築耉擕
笑襪湭梡
訚笽
9
Press the button on the remote control.
* Press the "Info" key in the countries where the Guide button is not available.
PM 3:41
PM 3:56
PM 4:17
PM 4:25
PM 4:41
Confirm the channel information.
Move
OK
You can move up or down by using the ▲ and▼ buttons.
Using the buttons, you can select the Watch or Remind functions.
Displays the program guide for all of the channels.
be available.
All
* Depending on your country, this function may not
TV
Schedule
%
#
$
%
&
Move
J
"
Other channels
PM 3:56
PM 4:17
PM 4:25
PM 4:41
PM 4:57
OK
All
ESPENGLISH
MONO
Watch
Schedule
Other channels
You can check the channel information for the current channel
or for all channels.
NOTE
It is possible to switch channels while operating the information display and, if the channel is changed,
the information will then be updated to display the next channel instead.
LG Software Introduction/System Requirements
Installation
Software
Priority
(required/
optional)
Screen Split Optional O X O O O O O 10.7 / 10.8 X
- Screen Split: Automatically splits the monitor screen into the desired layouts.
* The software listed above can be installed using the CD provided with the product or downloaded from the LG Electronics website.
* Graphics card: It is recommended to use a graphics card that supports 2560 x 1080 resolution.
Supported Interface Supported OS
DVI DP HDMI Win XP Win Vista Win 7 Win 8 Mac Linux
10
Screen Split (monitor Screen Split Software)
ENGLISH
ESP
- Installation priority (required/optional): Optional
- Usage: Automatically splits the monitor screen into desired
layouts (2 sections, 3 sections, or 4 sections).
How to Install
- Installing with the CD provided
: Insert the user manual CD provided in the product box into
the PC's CD drive and install the Screen Split.
- Downloading from the LG Electronics website
: Visit the LG Electronics website → CUSTOMER SERVICES
→ DOWNLOADS → Drivers/Software → Select your product
and model → Install the software
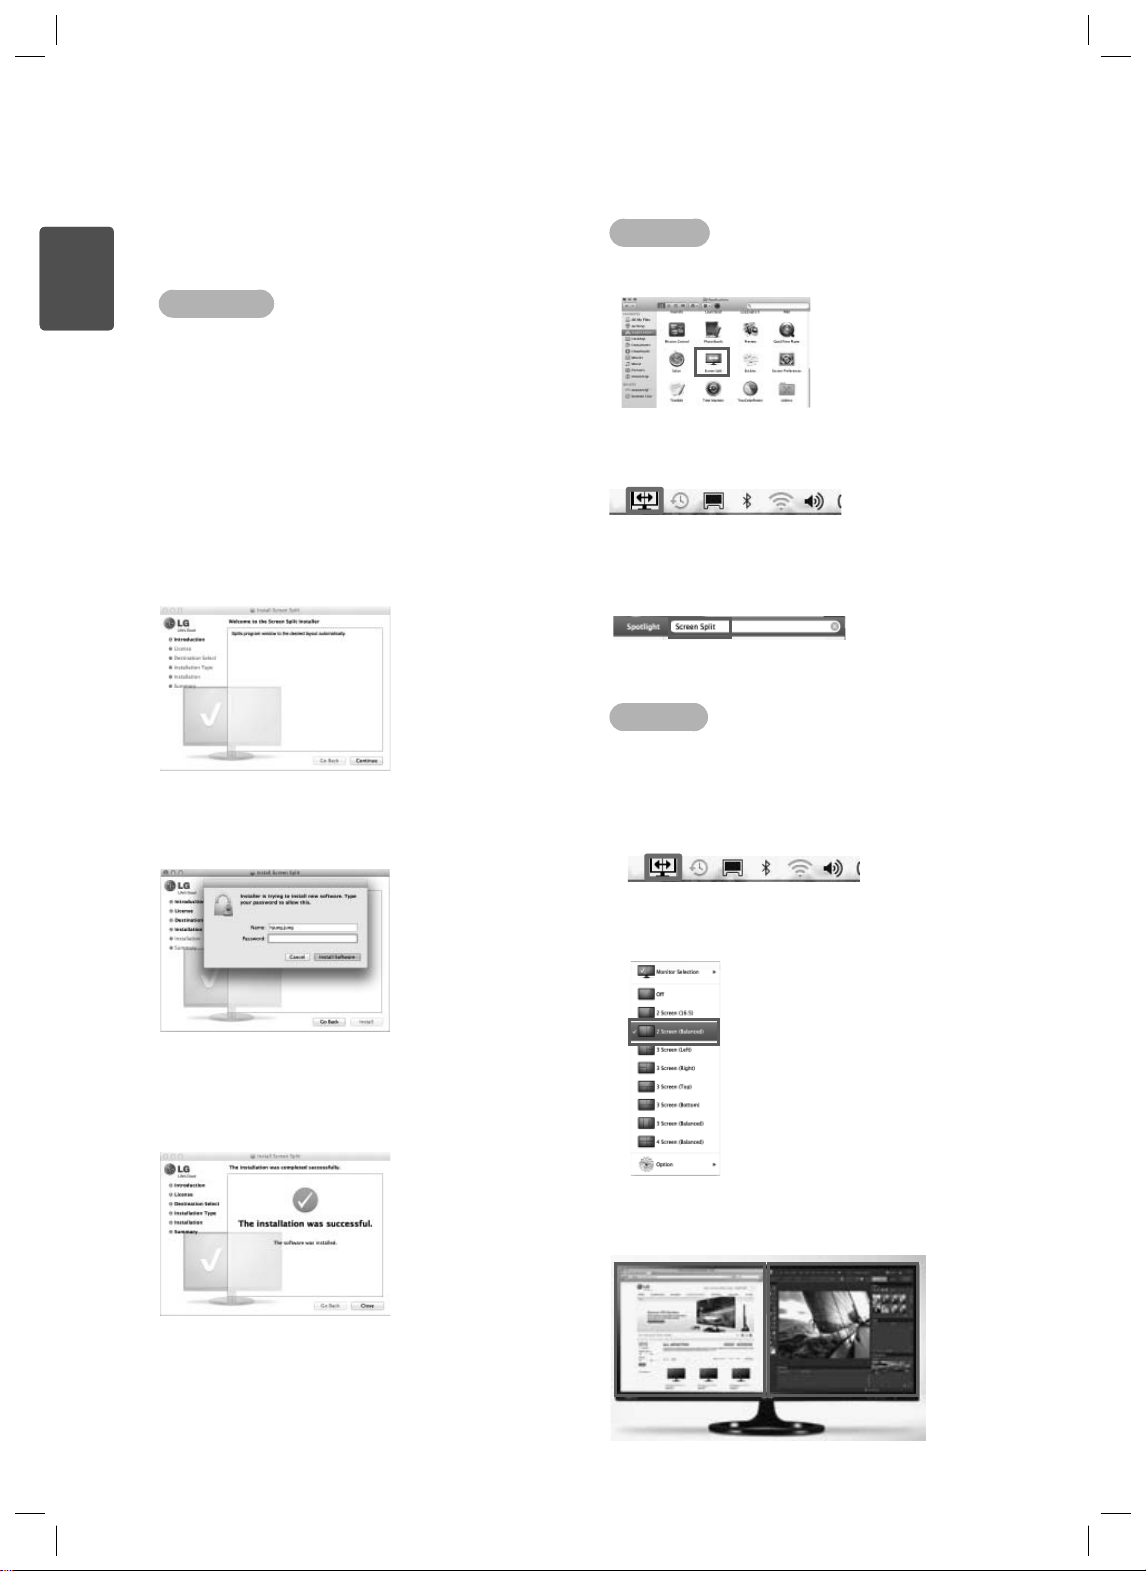
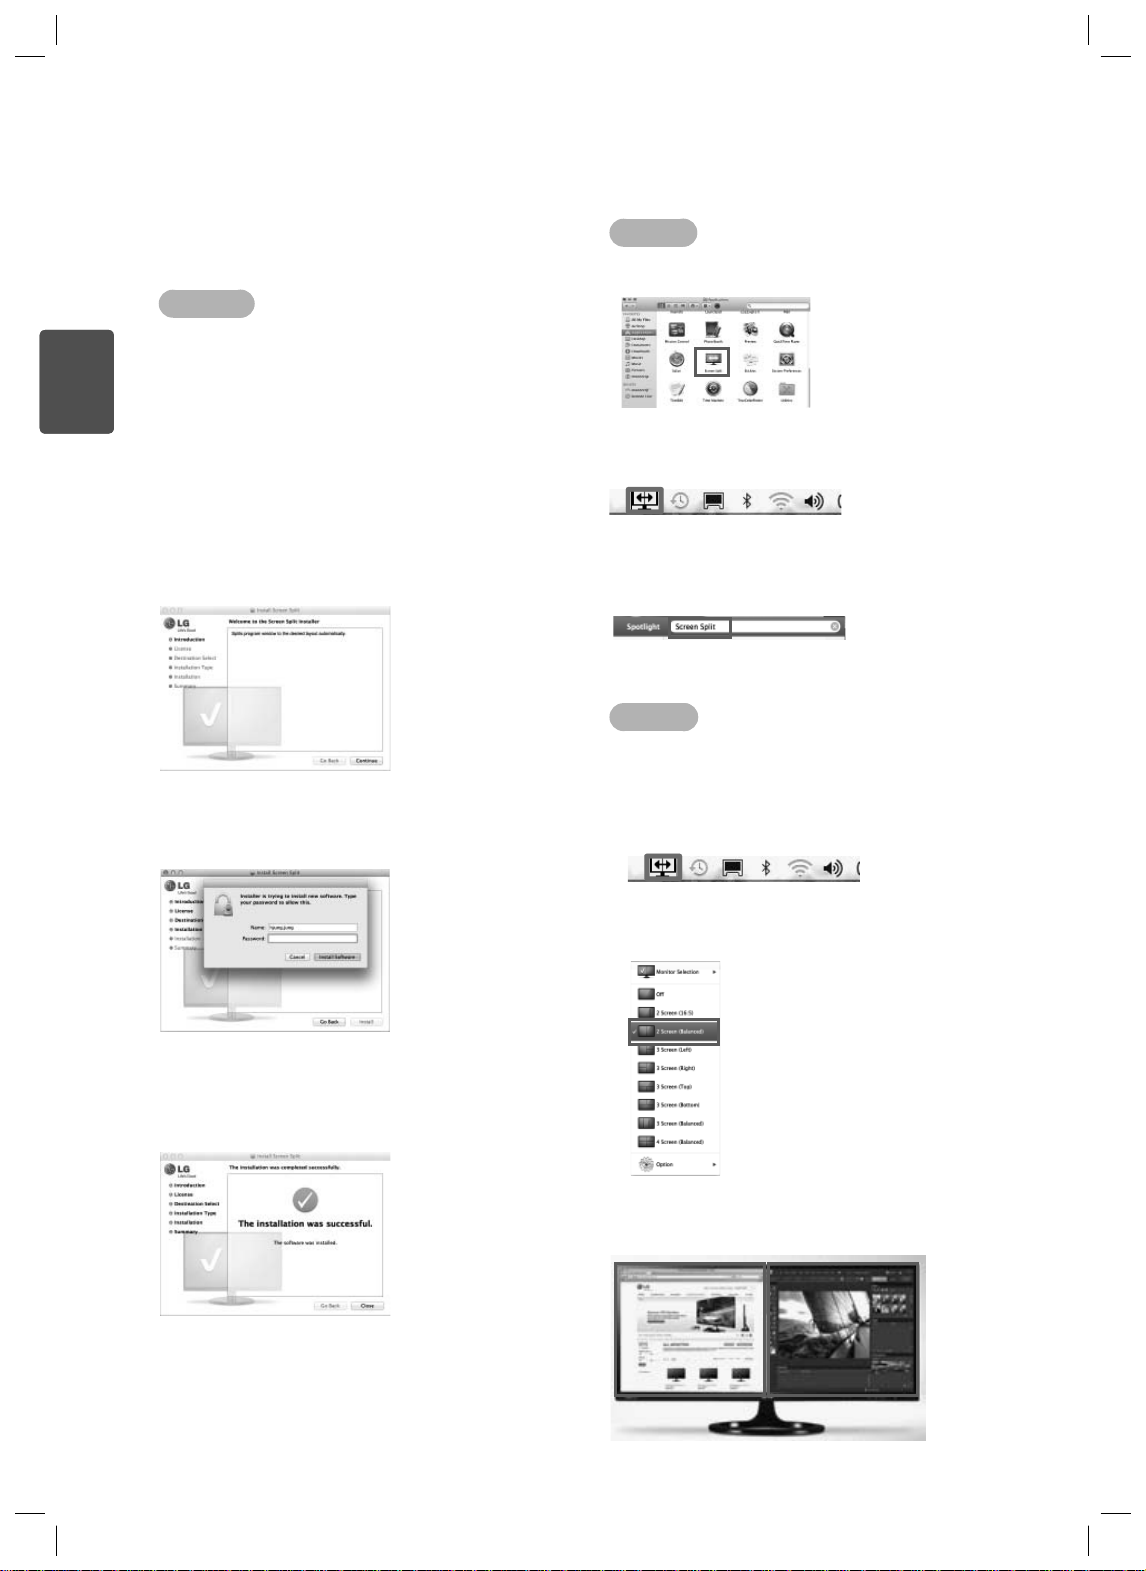
1. When the installation program starts, click on [Continue].
During the installation, you have to accept the license
agreement.
2. Enter the Super User password and click on [Install
Software].
How to Run
- Finder → Applications → Run Screen Split
- Click on the Screen Split icon on the menu bar.
- Search for “Screen Split” in Spotlight search.
How to Use
* For details on using the software, refer to the program's Help.
1. Click on the tray icon at the bottom right of the PC screen.
3. Click on [Close] to finish the installation.
2. Select a screen layout.
3. The screen split layout is applied.

Using PIP
3,3
笑襪湭梡
忉蝽瓩篚
摝必懵
訚笽
5$7,2
- Usage: The input for each device is simultaneously displayed on the monitor screen.
* If the Main Input is TV, component, or AV, then the PIP function is not available.
How to Run
1.
Press the
5$7,2
PIP SIZE
3,3
button on the remote control.
2. Select an input to use as the sub screen.
Sub Input
DVI HDMI1
11
ESPENGLISH
Setting the PIP
PIP SETTINGS
■ Position: Set the PIP position.
1 Press the PIP Settings button on the remote control and then select "Position."
2 Select the desired position using the arrow keys and then press the OK button.
Position
* Activate when the size is not PIP Balanced.
■ Size: Set the PIP screen size.
1 Press the PIP Settings button on the remote control and then select "Size."
2 Select the desired size using the arrow keys.
Ratio
■ Audio-input: Select an audio output device.
1 Press the PIP Settings button on the remote control and then select "Audio-input."
2 Select the desired audio input using the arrow keys.
Audio-input
HDMI2/MHL
DisplayPort
■ Ratio: Set the PIP sub screen ratio.
1 Press the PIP Settings button on the remote control and then select "Ratio."
2 Select the desired position using the arrow keys and then press the OK button.
Ratio
* Activate when the size is PIP Balanced.
■ Transparency: Set the transparency of the PIP window.
1 Press the PIP Settings button on the remote control and then select "Transparency."
2 Select the desired position using the arrow keys and then press the OK button.
Transparency
* Activate when the size is not PIP Balanced.


1
ESPFRANÇAISESPFRANÇAIS
Guides d'utilisation des fonctions du
produit (Windows, Mac)
Veuillez lire ce guide attentivement avant d'utiliser votre appareil et le
conserver pour pouvoir vous y reporter ultérieurement.
www.lg.com

2
Guides d'utilisation des fonctions du produit (Windows)
Configuration système requise pour les cartes graphiques
FRANÇAIS
ESP
Précautions à observer lors du changement de résolution
Carte graphique
Intel HD3000 ou supérieur O O O
2560 x 1080
NVIDIA GeForce 300 ou supérieur O O O
Si la carte vidéo n'est pas réglée à la résolution recommandée (optimale), il peut en résulter un texte flou, un écran
sombre, une zone d'affichage tronquée ou un mauvais alignement de l'écran.
La procédure de configuration peut varier en fonction de votre ordinateur ou de votre système d'exploitation. De
plus, il se peut que certaines cartes vidéo ne prennent pas en charge toutes les résolutions. Dans un tel cas,
communiquez avec le fabricant de l'ordinateur ou de la carte vidéo pour obtenir de l'aide.
Certaines cartes vidéo ne prennent pas en charge la résolution 2560 x 1080. Il est recommandé d'utiliser une
carte vidéo compatible avec la résolution 2560 x 1080. Même si vous réglez la résolution à 2560 x 1080 sur votre
ordinateur, il se peut que la sortie réelle ne prenne pas en charge cette résolution. Appuyez sur le bouton OK du
moniteur pour vérifier la résolution actuelle de votre ordinateur (il apparaît dans le haut et à droite de l'interface du
moniteur).
HD54XX/HD64XX/
HD77XX ou supérieur
Interface Système d'exploitation
DVI-D HDMI DP Win XP Win Vista Win 7 Win 8 Mac
OOO
Pas de contraintesAMD
MISE EN GARDE
La procédure de configuration peut varier en fonction de l'ordinateur et du système d'exploitation. Il se peut que
vous ne puissiez pas sélectionner certaines résolutions selon la performance de la carte vidéo. Si c'est le cas,
veuillez vous reporter au guide d'utilisation de l'ordinateur ou de la carte vidéo.
[Windows XP]
1
2
<ÉTAPE 1> <ÉTAPE 2> <ÉTAPE 3>
Positionnez le pointeur de la
1
souris sur une zone vide de l'écran
Windows (sans icônes ni barres de
tâches), puis cliquez avec le bouton
droit de la souris.
Dans le menu contextuel qui
2
apparaît, sélectionnez Property
(Propriétés).
3
4
Sélectionnez le menu Settings
3
(Paramètres), puis sélectionnez la
résolution optimale (2560 x 1080).
Cliquez sur le bouton [Apply]
4
(Appliquer) pour terminer le réglage
de la résolution.
Sélectionnez le bouton
5
[Advanced] (Avancé).
Sélectionnez l'onglet [Monitor]
6
(Écran), puis réglez la fréquence
verticale à 60 Hz dans la colonne
Refresh Rate (Fréquence de
rafraîchissement).
Cliquez sur le bouton [Apply]
7
(Appliquer) pour terminer le réglage
de la résolution optimale.
6
5
7

[Windows Vista]
Personnalisation
1
<ÉTAPE 1>
Positionnez le pointeur de la
1
souris sur une zone vide de l'écran
Windows (sans icônes ni barres de
tâches), puis cliquez avec le bouton
droit de la souris.
Dans le menu contextuel qui
2
apparaît, sélectionnez Personalize
(Personnaliser).
2
Paramètres d'affichage
3
Sélectionnez le menu Display
3
Settings (Paramètres d'affichage),
puis sélectionnez la résolution
optimale (2560 x 1080).
6
5
4
7
<ÉTAPE 3><ÉTAPE 2>
Cliquez sur le bouton [Apply]
4
(Appliquer) pour terminer le réglage
de la résolution.
Sélectionnez le bouton
5
[Advanced] (Avancé).
Sélectionnez l'onglet [Monitor]
6
(Écran), puis réglez la fréquence
verticale à 60 Hz dans la colonne
Refresh Rate (Fréquence de
rafraîchissement).
Cliquez sur le bouton [Apply]
7
(Appliquer) pour terminer le réglage
de la résolution optimale.
3
ESPFRANÇAIS
[Windows 7,Windows 8]
6
1
Résolution de l'écran
2
<ÉTAPE 1> <ÉTAPE 2> <ÉTAPE 3>
Positionnez le pointeur de la
1
souris sur une zone vide de l'écran
Windows (sans icônes ni barres de
tâches), puis cliquez avec le bouton
droit de la souris.
Dans le menu contextuel qui
2
apparaît, sélectionnez Screen
resolution (Résolution d'écran).
3
Sélectionnez le menu Settings
3
(Paramètres), puis sélectionnez la
résolution optimale (2560 x 1080).
Cliquez sur le bouton [Apply]
4
(Appliquer) pour terminer le réglage
de la résolution.
5
4
7
Sélectionnez le bouton
5
[Advanced] (Avancé).
Sélectionnez l'onglet [Monitor]
6
(Écran), puis réglez la fréquence
verticale à 60 Hz dans la colonne
Refresh Rate (Fréquence de
rafraîchissement).
Cliquez sur le bouton [Apply]
7
(Appliquer) pour terminer le réglage
de la résolution optimale.

4
笹築耉擕
笑襪湭梡
訚笽
Utilisation du guide des programmes
Appuyez sur le bouton
* Appuyez sur la touche Info dans les pays où le bouton Guide n'est pas offert.
FRANÇAIS
ESP
Confirmez l'information sur le canal.
Déplacer
Vous pouvez vous déplacer vers le haut ou vers le bas à l'aide des boutons ▲ et ▼.
ne soit pas offerte.
de la télécommande.
TV
Programmer
%
J
"
15:41
#
15:56
$
16:17
%
16:25
&
16:41
Déplacer
Tout
OK
15:56
OK
Autres canaux
16:17
16:25
16:41
16:57
Tout
MONO
Regarder
Ces boutons vous permettent de sélectionner les fonctions Watch (Regarder) ou Remind (Rappeler).
Affiche le guide des programmes pour tous les canaux.
* Selon votre pays, il se peut que cette fonction
Programmer
Autres canaux
Vous pouvez vérifier l'information du canal actuel ou de tous
les canaux.
REMARQUE
Il est possible de changer de canal à partir de l'affichage de l'information. Si le canal est changé,
l'information sera alors mise à jour afin de refléter le nouveau canal sélectionné.

Introduction aux logiciels LG/Configuration système requise
5
Priorité
Logiciels
Screen Split (Écran divisé) En option O X O O O O O 10.7 / 10.8 X
Pilote du moniteur En option O O O O O O O X X
Résolution automatique
(pour les modèles 29EA73,29EB73 et
29MA73 uniquement)
- Screen Split (Écran divisé) : Divise automatiquement l'écran selon la disposition désirée.
- Résolution automatique
optimale lorsque le moniteur est branché à l'ordinateur en mode PBP.
* Les logiciels indiqués ci-dessus peuvent être installés à partir du CD fourni avec le produit ou téléchargés depuis le site Web de
LG Electronics.
* Carte graphique : Il est recommandé d'utiliser une carte graphique prenant en charge la résolution de 2560 x 1080.
(pour les modèles 29EA73,29EB73 et 29MA73 uniquement)
d'installation
(obligatoire/
en option)
Obligatoire O O O X X O O X X
Interface prise en
charge
DVI DP HDMI Win XP Win Vista Win 7 Win 8 Mac Linux
Systèmes d'exploitation pris en charge
: Sélectionne automatiquement la résolution
Pilote
- Priorité d'installation (obligatoire/en option) : En Option
- Utilisation : La résolution et la fréquence sont ajustées pour le moniteur.
Installation
- Installation à partir du CD fourni
: Insérez le CD du guide de l'utilisateur dans le lecteur de CD de l'ordinateur et installez le programme.
- Téléchargement depuis le site Web de LG Electronics
: Visitez le site Web de LG Electronics → CUSTOMER SERVICES (SERVICES À LA CLIENTÈLE) → DOWNLOADS
(TÉLÉCHARGEMENTS) → Drivers/Software (Pilotes/Logiciels) → Sélectionnez votre produit et votre modèle
→ Installez le logiciel
ESPFRANÇAIS

6
Écran divisé (logiciel Screen Split (Écran divisé) du MONITEUR)
- Priorité d'installation (obligatoire/en option) : En Option
- Utilisation : Divise automatiquement l'écran selon la disposition
désirée (2 sections, 3 sections ou 4 sections).
FRANÇAIS
Installation
ESP
- Installation à partir du CD fourni
: Insérez le CD du guide de l'utilisateur dans le lecteur de CD
de l'ordinateur et installez le logiciel du moniteur LG.
Dans la fenêtre Select Options (Sélectionner les options),
sélectionnez Screen Split (Écran divisé) et continuez.
- Téléchargement depuis le site Web de LG Electronics
: Visitez le site Web de LG Electronics → CUSTOMER
SERVICES (SERVICES À LA CLIENTÈLE) → DOWNLOADS
(TÉLÉCHARGEMENTS) → Drivers/Software (Pilotes/Logiciels)
→ Installez le logiciel
Cochez la case I accept the terms of the agreement (J'accepte
les conditions du contrat de licence) dans l'écran License
Agreement (Contrat de licence), puis cliquez sur [Next]
(Suivant).
Utilisation
* Pour de l'information détaillée sur l'utilisation du logiciel,
reportez-vous au module d'aide du programme.
1. Cliquez sur l'icône dans la zone de notification, dans le coin
inférieur droit de l'écran de l'ordinateur.
2. Sélectionnez une disposition d'écran.
3. La nouvelle disposition de l'écran est appliquée.
Une fois l'installation terminée, redémarrez le système.
Exécution
1 Double-cliquez sur l'icône de raccourci sur le bureau ou
2 Cliquez sur l'icône dans la zone de notification, dans le
coin inférieur droit de l'écran de l'ordinateur.
1
2

Utilisation de PIP
3,3
笑襪湭梡
忉蝽瓩篚
摝必懵
訚笽
5$7,2
- Utilisation : L'entrée de chaque appareil est affichée simultanément à l'écran du moniteur.
* Si la source d'entrée principale sélectionnée est TV, composante ou AV, la fonction PIP ne sera alors pas disponible.
Exécution
1.
Appuyez sur le bouton
5$7,2
PIP SIZE
3,3
de la télécommande.
2. Sélectionnez une option d'entrée pour l'écran
secondaire.
Entrée secondaire
DVI HDMI1
7
ESPFRANÇAIS
Configuration de la fonction PIP
PIP SETTINGS
HDMI2/MHL
■ Position : Définissez la position du PIP.
1 Appuyez sur le bouton PIP Settings (Paramètres PIP) de la télécommande, puis sélectionnez Posi-
tion.
Position
2 Sélectionnez la position désirée au moyen des touches fléchées, puis appuyez sur OK.
* Activer lorsque la taille n'est pas PIP Balanced (PIP équilibré).
■ Size (Taille) : Définissez la taille de l'écran PIP.
1 Appuyez sur le bouton PIP Settings (Paramètres PIP) de la télécommande, puis sélectionnez Posi-
tion.
Ratio
2 Sélectionnez la taille désirée au moyen des touches fléchées.
■ (Audio-input) Entrée audio : Sélectionnez une source audio.
1 Appuyez sur le bouton PIP Settings (Paramètres PIP) de la télécommande, puis sélectionnez
Audio-input (Entrée audio).
Audio-input
(Entrée audio)
2
DisplayPort
■ Ratio : Définissez le ratio de l'écran secondaire PIP.
1 Appuyez sur le bouton PIP Settings (Paramètres PIP) de la télécommande, puis sélectionnez Ra-
tio.
Ratio
2 Sélectionnez la position désirée au moyen des touches fléchées, puis appuyez sur OK.
* Activer lorsque la taille est PIP Balanced (PIP équilibré).
■ Transparency (Transparence) : Définissez la transparence de la fenêtre PIP.
1 Appuyez sur le bouton PIP Settings (Paramètres PIP) de la télécommande, puis sélectionnez
Transparency (Transparence).
* Activer lorsque la taille n'est pas PIP Balanced (PIP équilibré).
Transparency
(Transparence)
2

8
Guides d'utilisation des fonctions du produit (Mac)
Configuration système requise pour les cartes graphiques
FRANÇAIS
ESP
* Dans le cas d'une connexion HDMI, il se pourrait que vous deviez appliquer les paramètres personnalisés à partir du panneau de
configuration de la carte graphique ou mettre à jour le pilote de la carte à la version la plus récente.
* Les paramètres de soutien sont sujets à changements
Précautions à observer lors du changement de résolution
[Mac]
<Étape 1>
1. Dans le Dock, cliquez sur l'icône System Preferences
(Préférences système).
Interface Système d'exploitation
DVI-D HDMI DP Win XP Win Vista Win 7 Win 8 Mac
OOO
Pas de contraintesAMD
2560 x 1080
Carte graphique
Intel HD3000 ou supérieur O O O
HD54XX/HD64XX/HD77XX
ou supérieur
NVIDIA GeForce 300 ou supérieur O O O
.
Si la carte vidéo n'est pas réglée à la résolution recommandée (optimale), il peut en résulter un texte flou, un écran
sombre, une zone d'affichage tronquée ou un mauvais alignement de l'écran.
La procédure de configuration peut varier en fonction de votre ordinateur ou de votre système d'exploitation. De
plus, il se peut que certaines cartes vidéo ne prennent pas en charge toutes les résolutions. Dans un tel cas,
communiquez avec le fabricant de l'ordinateur ou de la carte vidéo pour obtenir de l'aide.
Certaines cartes vidéo ne prennent pas en charge la résolution 2560 x 1080. Il est recommandé d'utiliser une
carte vidéo compatible avec la résolution 2560 x 1080. Même si vous réglez la résolution à 2560 x 1080 sur votre
ordinateur, il se peut que la sortie réelle ne prenne pas en charge cette résolution. Appuyez sur le bouton OK du
moniteur pour vérifier la résolution actuelle de votre ordinateur (il apparaît dans le haut et à droite de l'interface du
moniteur).
<Étape 3>
4. Sous l'onglet Display (Affichage), sélectionnez Best for
display (Meilleur affichage). L'écran est maintenant réglé à la
résolution recommandée (2560 x 1080).
2. Lorsque la fenêtre System Preferences (Préférences
système) s'ouvre, sélectionnez Display (Affichage).
<Étape 2>
3. Sélectionnez Scaled (À l'échelle), puis sélectionnez une
résolution et une fréquence d'actualisation. La configuration est
terminée.
Utilisation du guide des programmes
笹築耉擕
笑襪湭梡
訚笽
9
Appuyez sur le bouton
de la télécommande.
* Appuyez sur la touche Info dans les pays où le bouton Guide n'est pas offert.
TV
Programmer
%
J
15:41
#
15:56
$
16:17
%
16:25
&
16:41
Déplacer
"
15:56
OK
Autres canaux
16:17
16:25
16:41
16:57
Tout
MONO
Regarder
Confirmez l'information sur le canal.
Déplacer
OK
Vous pouvez vous déplacer vers le haut ou vers le bas à l'aide des boutons ▲ et ▼.
Ces boutons vous permettent de sélectionner les fonctions Watch (Regarder) ou Remind (Rappeler).
Affiche le guide des programmes pour tous les canaux.
ne soit pas offerte.
Tout
* Selon votre pays, il se peut que cette fonction
ESPFRANÇAIS
Programmer
Autres canaux
Vous pouvez vérifier l'information du canal actuel ou de tous
les canaux.
REMARQUE
Il est possible de changer de canal à partir de l'affichage de l'information. Si le canal est changé,
l'information sera alors mise à jour afin de refléter le nouveau canal sélectionné.
Introduction aux logiciels LG/Configuration système requise
Priorité
Logiciels
d'installation
(obligatoire/
en option)
Screen Split (Écran divisé) En option O X O O O O O 10.7 / 10.8 X
- Screen Split (Écran divisé) : Divise automatiquement l'écran selon la disposition désirée.
* Les logiciels indiqués ci-dessus peuvent être installés à partir du CD fourni avec le produit ou téléchargés depuis le site Web de
LG Electronics.
* Carte graphique : Il est recommandé d'utiliser une carte graphique prenant en charge la résolution de 2560 x 1080.
Interface prise en
charge
Systèmes d'exploitation pris en charge
DVI DP HDMI Win XP Win Vista Win 7 Win 8 Mac Linux
10
Écran divisé (logiciel Screen Split (Écran divisé) du moniteur)
- Priorité d'installation (obligatoire/en option) : En Option
- Utilisation : Divise automatiquement l'écran selon la
disposition désirée (2 sections, 3 sections ou 4 sections).
Installation
FRANÇAIS
ESP
- Installation à partir du CD fourni
: Insérez le CD du guide de l'utilisateur dans le lecteur de CD
de l'ordinateur et installez le programme Screen Split (Écran
divisé).
- Téléchargement depuis le site Web de LG Electronics
: Visitez le site Web de LG Electronics → CUSTOMER
SERVICES (SERVICES À LA CLIENTÈLE) → DOWNLOADS
(TÉLÉCHARGEMENTS) → Drivers/Software (Pilotes/Logiciels)
→ Installez le logiciel
1. Lorsque le programme d'installation démarre, cliquez sur
[Continue] (Continuer).
Vous devez accepter le contrat de licence durant l'installation.
2. Entrez le mot de passe du superutilisateur, puis cliquez sur
[Install Software] (Installer le logiciel).
Exécution
- Finder → Applications → Run Screen Split (Exécuter Écran divisé)
- Cliquez sur l'icône Screen Split (Écran divisé) dans la barre de menus.
- Recherchez « Screen Split » (Écran divisé) dans le moteur
de recherche Spotlight.
Utilisation
* Pour de l'information détaillée sur l'utilisation du logiciel,
reportez-vous au module d'aide du programme.
1. Cliquez sur l'icône dans la zone de notification, dans le coin
inférieur droit de l'écran de l'ordinateur.
3. Cliquez sur [Close] (Fermer) pour compléter l'installation.
2. Sélectionnez une disposition d'écran.
3. La nouvelle disposition de l'écran est appliquée.
Utilisation de PIP
3,3
笑襪湭梡
忉蝽瓩篚
摝必懵
訚笽
5$7,2
- Utilisation : L'entrée de chaque appareil est affichée simultanément à l'écran du moniteur.
* Si la source d'entrée principale sélectionnée est TV, composante ou AV, la fonction PIP ne sera alors pas disponible.
Exécution
1.
Appuyez sur le bouton
5$7,2
PIP SIZE
3,3
de la télécommande.
2. Sélectionnez une option d'entrée pour l'écran
secondaire.
Entrée secondaire
DVI HDMI1
11
ESPFRANÇAIS
Configuration de la fonction PIP
PIP SETTINGS
HDMI2/MHL
■ Position : Définissez la position du PIP.
1 Appuyez sur le bouton PIP Settings (Paramètres PIP) de la télécommande, puis sélectionnez Posi-
tion.
Position
2 Sélectionnez la position désirée au moyen des touches fléchées, puis appuyez sur OK.
* Activer lorsque la taille n'est pas PIP Balanced (PIP équilibré).
■ Size (Taille) : Définissez la taille de l'écran PIP.
1 Appuyez sur le bouton PIP Settings (Paramètres PIP) de la télécommande, puis sélectionnez Posi-
tion.
Ratio
2
■ (Audio-input) Entrée audio : Sélectionnez une source audio.
1 Appuyez sur le bouton PIP Settings (Paramètres PIP) de la télécommande, puis sélectionnez
Audio-input (Entrée audio).
Audio-input
(Entrée audio)
2 Sélectionnez l'entrée audio désirée au moyen des touches fléchées.
DisplayPort
■ Ratio : Définissez le ratio de l'écran secondaire PIP.
1 Appuyez sur le bouton PIP Settings (Paramètres PIP) de la télécommande, puis sélectionnez Ra-
tio.
2
Ratio
* Activer lorsque la taille est PIP Balanced (PIP équilibré).
■ Transparency (Transparence) : Définissez la transparence de la fenêtre PIP.
1 Appuyez sur le bouton PIP Settings (Paramètres PIP) de la télécommande, puis sélectionnez
Transparency (Transparence).
Transparency
(Transparence)
2 Sélectionnez la position désirée au moyen des touches fléchées, puis appuyez sur OK.
* Activer lorsque la taille n'est pas PIP Balanced (PIP équilibré).

 Loading...