

Page 1

Colour Television
OWNER’S MANUAL
Please read this manual carefully before operating your set.
Retain it for future reference.
Record model number and serial number of the set.
See the label attached on the back cover and quote this information to your dealer when you require service.
Model number :
Serial number :
Page 2

Contents
2
Power
This set operates on an AC mains supply, the voltage is as indicated on the label on the back cover.
Never apply DC power to the set. In the event of
thunderstorms or powercuts, please pull out the
aerial and mains plugs.
DISCONNECTING DEVICE FROM MAINS
Mains plug is the disconnecting device. The plug
must remain readily operable
Warning
To prevent fire or shock hazard, do not expose the
set to rain or moisture.
Do not place anything containing liquid on top of
the set, this may cause a fire or could give an
electric shock.
Service
Never remove the back cover of the set as this
can expose you to very high voltage and other
hazards. If the set does not operate properly,
unplug it and call your dealer.
Aerial
Connect the aerial cable to the socket on the back
cover. For the best reception an outdoor aerial
should be used.
Location
Position your set so that no bright light or sunlight
falls directly onto the screen. Care should be
taken not to expose the set to any unnecessary
vibration, moisture, dust or heat. Also ensure that
the set is placed in a position to allow a free flow
of air. Do not cover the ventilation openings on the
back cover.
Note:
To remove dirt or fingerprint on the surface of your
TV, please rub with a line-free cloth supplied in
the accessory.Do not pose too much pressure in
cleaning so as to prevent any risk of damage to
the product.
Installation
Connection of external equipment
You can connect additional equipment, such as
VCRs, camcorders etc. to your set.What is shown
here may
be somewhat different from your set.
Aerial socket
1. Connect the RF out socket of the VCR to the
aerial socket on the back of the set.
2. Connect the aerial cable to the RF aerial in
socket of the VCR.
3. Store the VCR channel on a desired programme number using the ‘Manual programme tuning’ section.
4. Select the programme number where the
VCR channel is stored.
5. Press the PLAY button on the VCR.
Audio/Video in/out sockets (option)
1. Connect the audio/video out sockets of the VCR
to audio/video in sockets of the set and in sockets of the VCR to RF OUT sockets of the set.
2. If the VCR is connected to the AV sockets on
the set, press the TV/AV button to select AV 1 ,
AV 2 or AV 3 .
3. Press the PLAY button on the VCR.
The VCR playback picture appears on the screen.
You can also record programmes received by the
TV on video tape via audio/video out sockets.
Note : If you have a mono VCR, connect the
audio cable from the VCR to the AUDIO L/MONO
socket of the set.
Euro scart socket (option)
1. Connect the Euro scart socket of the VCR to
the Euro scart socket of the set.
2. Press the PLAY button on the VCR.
If your VCR outputs a switching voltage when
connected to Euro scart socket, the set will
switch to AV 1 mode automatically. But if you
want to keep on watching TV mode, press the
DD / EE
or NUMBER buttons.
Otherwise press the TV/AV button on the
remote control handset to select
AV 1 The
VCR playback picture appears on the screen.
You can also record programmes received by the
TV on video tape.
Note : Signal type RGB, i.e. the signals red, green
and blue can only be selected for the Euro scart
socket. These signals are transmitted, for example, by a pay TV decoder, game machine or photo
CD unit, etc.
Component in sockets (option)
1. Connect the COMPONENT video output
sockets (Y Cb Cr, Y Pb Pr or Y B-Y R-Y) of the
COMPONENT (480i) to the COMPONENT
INPUT sockets (Y P
B PR) on the set.
2. Connect the audio cable from the COMPONENT to AUDIO IN sockets of AV I N2.
3. Press the TV/AV button to select
COMPONENT.
4. Press the PLAY button on the COMPONENT.
The COMPONENT playback picture appears
on the screen.
Installation.........................................................2
Connection of external equipment..................2
Location and function of controls...................3
Basic operation.................................................4
On screen menus..............................................4
Setting up TV stations......................................5
Picture adjustment............................................6
Sound adjustment.............................................7
Time setting.......................................................8
Other functions.................................................8
USB mode..........................................................9
PIP operation (option)....................................14
Teletext (option)..............................................14
Troubleshooting check list............................15
Page 3
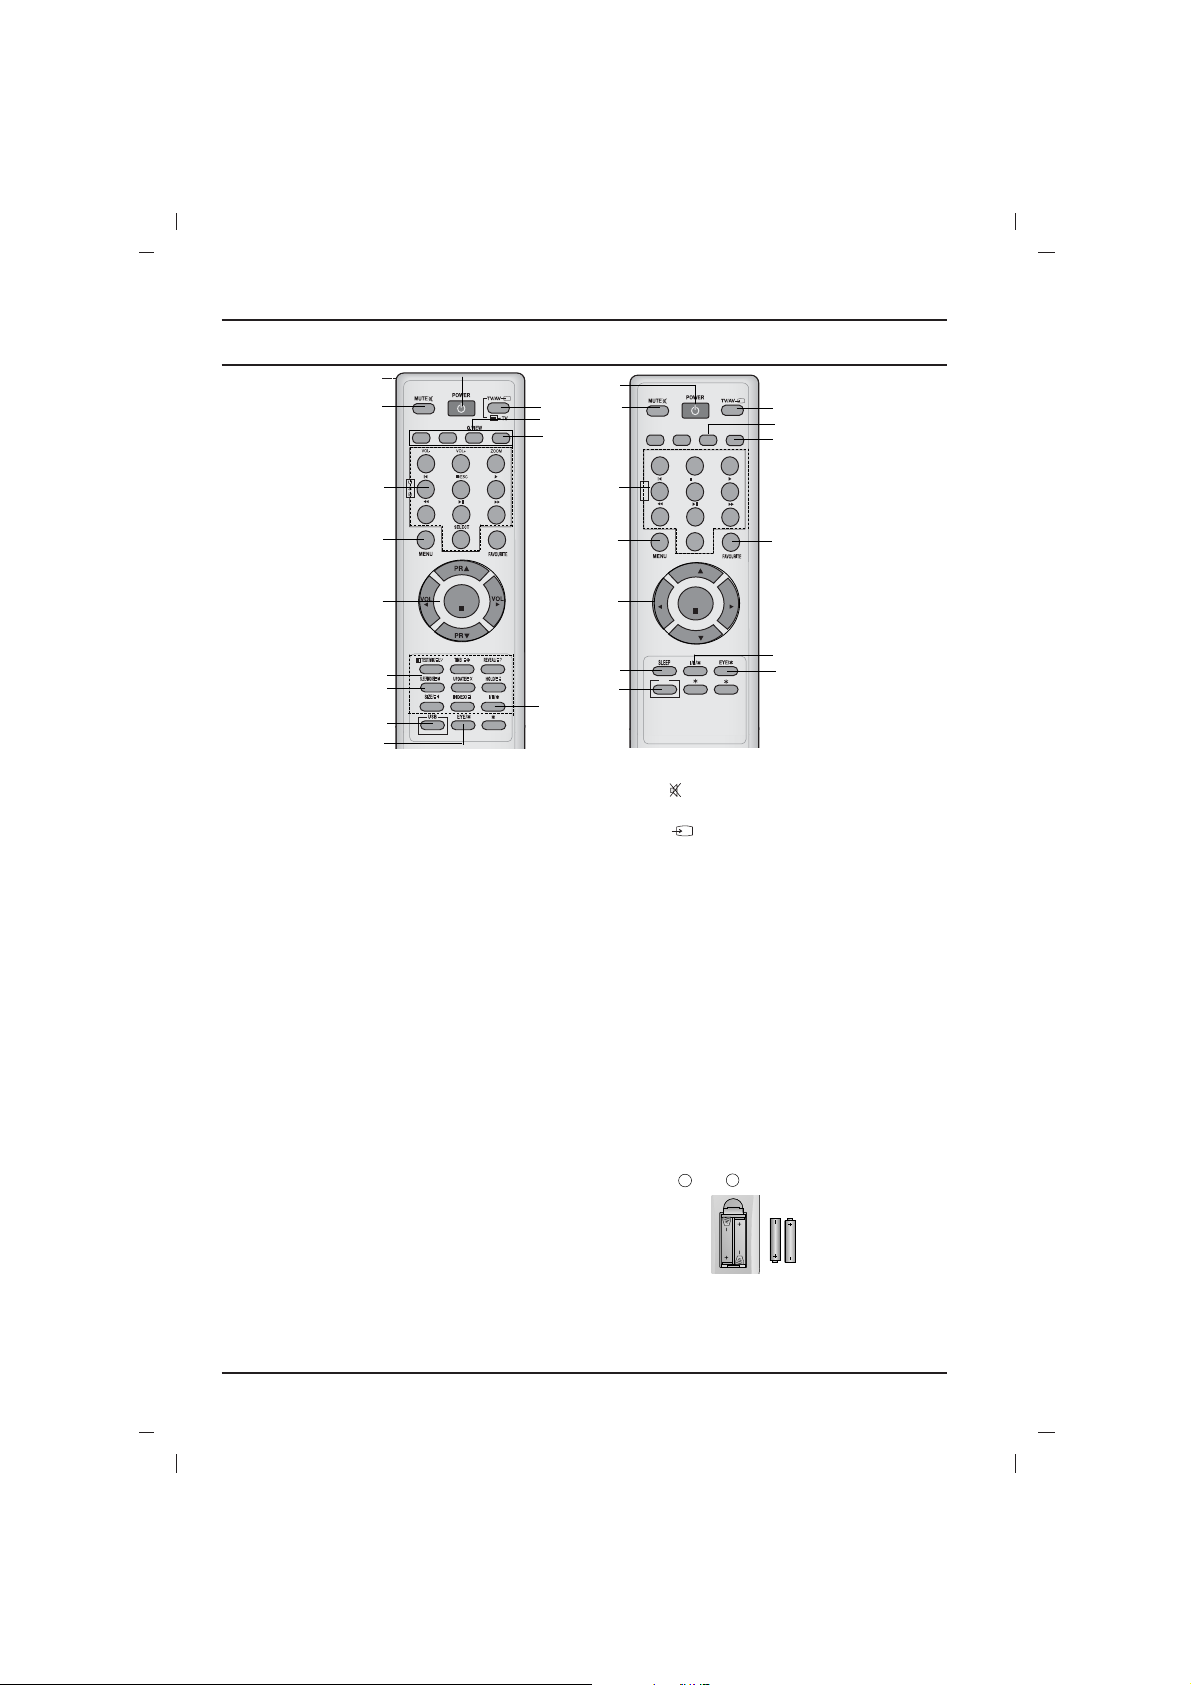
Location and function of controls
3
All the functions can be controlled with the remote
control handset. Some functions can also be adjusted with the buttons on the front panel of the set.
Remote control handset
Before you use the remote control handset,
please install the batteries. See the next page.
1. POWER
switches the set on from standby or off to standby.
2. NUMBER BUTTONS
Switches the set on from standby or directly select a number.
USB SELECT BUTTONS
Oprate USB function.
3. MENU
To display on-screen or exit from USB mode .
Other local key is not available in USB mode.
4.
DD / EE
(Programme Up/Down)
selects a programme or a menu item.
switches the set on from standby.
scans programmes automatically.
FF / GG
(Volume Up/Down)
adjusts the volume.
adjusts menu settings.
OK
accepts your selection or displays the current mode.
5. TELETEXT BUTTONS (option)
These buttons are used for teletext.
For further details, see the ‘Teletext’ section.
6.
SLEEP
sets the sleep timer.
7. USB BUTTON
Select the USB mode.
8. FAVOURITE
selects a favorite programme.
9.
EYE/
*
(option)
switches the eye function on or off.
10. MUTE
switches the sound on or off.
11. TV/AV
selects TV or AV mode.
switches the set on from standby.
exits the Teletext mode.
12.
I/II/
*
s
elects the language during dual language broad-
cast.
selects the sound output (option).
13. Q.VIEW (or YELLOW)
returns to the previously viewed programme.
14.
LIST (or BLUE)
displays the programme table.
COLOURED BUTTONS : These buttons are
used for teletext (only TELETEXT models) or programme edit.
Battery installation
The remote control handset is powered by two AAA
type batteries. To load the batteries, turn the remote
control handset over and open the battery compartment. Install two batteries as indicated by the polarity symbols ( and ) marked inside the compartment.
Note : To avoid damage from possible battery leakage, remove the batteries if you do not plan to use the
remote control handset for an extended period of
time.
+
-
123
4
5
6
7
8
9
0
LIST
OK
1
2
3
4
6
12
11
14
13
9
10
(With TELETEXT / Without PIP)
5
7
123
4
5
6
7
8
9
0
USB
U
S
B
SELECT
VOL+
VOL-
ZOOM
/ESC
Q.VIEW
LIST
PR
PR
VOL
VOL
OK
4
1
3
2
8
12
13
11
14
6
9
10
7
(Without TELETEXT / PIP)
Page 4

4
Location and function of controls
MAIN POWER (ON/OFF)
switches the set on or off.
POWER/STANDBY INDICATOR
illuminates brightly when the set is in standby
mode.dims when the set is switched on.
REMOTE CONTROL SENSOR
Note : Only use the supplied remote control
handset. (When you use others, they will not
be able to function.)
MENU
selects a menu.
OK
accepts your selection or displays the current
mode.
FF / GG
(Volume Down/Up)
adjusts the volume.
adjusts menu settings.
DD / EE
(Programme Up/Down)
selects a programme or a menu item.
switches the set on from standby.
AUDIO/VIDEO/USB IN SOCKETS (AV
IN3)(option)
Connect the audio/video/USB out sockets of
external equipment to these sockets.
Note :
Shown is a simplified representation of front
or side panel. What is shown here may be
somewhat different from your set or can not
be supplied on your area.
The dialogue between you and your set takes
place on screen with an operator menu. The buttons required for the operating steps are also displayed.
Menu selection
1. Press the MENU button and then
DD / EE
but-
ton to display each menu.
2. Press the
GG
button and then
DD / EE
button to
select a menu item.
3. Press the
GG
button to display the sub menu or
the pull-down menu.
4. Change the setting of an item in the sub or
pull-down menu with the
FF / GG
or
DD / EE
.
You can move to the higher level menu with
the OK or
FF
button and to move to the lower
level menu press the
GG
button.
Note :
a. In the teletext mode, menus are not displayed.
b. In some models, the
Normal/Turbo search
will not display, only the Start will display in the
Auto programme menu.
c. In some models, Tilt, Booster or Degauss
will not display.
d. On some models, the Language, X-WAVE
will not display.
Basic operation
On and off
1. Press the main power button to switch the set on.
2. If the set is in standby mode, press the
POWER,
DD / EE
, TV/AV or NUMBER buttons on
the remote control handset to switch it on fully.
3. Press the POWER button on the remote con-
trol handset.
The set reverts to standby mode.
4. Press the main power button again to switch
the set off.
Note : If, while the set is switched on, the mains
plug is disconnected the set will switch to standby
or power on when the mains plug is replaced in
the mains power socket.
Programme selection
You can select a programme number with the
DD
/
EE
or NUMBER buttons.
Volume adjustment
Press the
FF / GG
button to adjust the volume.
Q.VIEW (or YELLOW)
Press the Q.View (or YELLOW) button to view
the last programme you were watching.
Mute function
Press the MUTE button. The sound is switched off
and the display Wappears.
You can cancel it by pressing the MUTE,
FF / GG
,
I/II/*(option), button.
On screen language selection
The menu can be displayed on the screen in
desired language. First select your language.
1. Press the MENU button and then
DD / EE
but-
ton to select the Special menu.
2. Press the GGbutton to select Language.
3. Press the GGbutton and then
DD / EE
button to
select your desired language.
All the on screen displays will appear in the
selected language.
Press the OK or
FF
button to select the Special menu.
4. Repeatedly press the MENU button to return
to normal TV viewing.
On screen menus
Page 5

5
Setting up TV stations
Auto programme tuning
All stations that can be received are stored by this
method. It is recommended that you use auto programme during installation of this set.
System :
BG :(Asia/NewZealand/ M.East/Africa/Australia)
I :(Hong Kong/South Africa)
DK :(East Europe/China/Africa/CIS)
L :(SECAM L/L’ (France) (option)
M : (USA/Korea/Philippines) (option)
Note :
a.
Turbo search is faster than Normal search
and in some models, these searches will automatically store all receivable stations.
b. If the programmed station has poor quality
and sound, select the system again in the
Manual programme menu.
Manual programme tuning
Manual programme lets you manually tune and
arrange the stations in whatever order you desire.
Also you can assign a station name with five characters to each programme number.
Booster (option)
If the reception is poor at the fringe area of the TV
signal, select Booster to On.
Fine tuning
Normally fine tuning is only necessary if reception
is poor.The finely tuned programme will be indi
cated by yellow number during programme selection.
or
TV programme
AutoOprogramme {
Manual
O
programme {
Program me
O
edit {
FavouriteOprogramme
{
()O}{OOKOMENU
0OOARO1DOOO5OOSO69
O1OOCO03OOO6OOSO17
O2OOCO12OOO7OOSO22
O3OOSO66OOO8OOCO09
O4OOSO67OOO9OOCO11
DeleteOOOOCopy
MoveOOOOOOSkip
O0OOCO03
Picture menu
Station menu
PSM {
XD {
Contrast {
Brightness {
Colour {
Sharpness {
()O}{OOKOMENU
Sound menu
()O}{OOKOMENU
Special menu
()O}{OOKOMENU
Time menu
()O}{OOKOMENU
Storage {
System {
Channel {
Fine {
Search {
Name {
()O}{OOKOMENU
()}{OOKOMENU
Storage {
Station
Picture
Sound
Time
Special
Manual programme
Programme edit
2
SSM {
Turbo oSound {
AVL {
Balance {
X-WAVE {
Clock {
Offotime {
Onotime {
Autoosleep {
Language {
Input {
Childolock {
Degauss {
On screen menus
System {
StorageO from {
NormalO search {
TurboO search {
()O}{OOKOMENU
System {
Auto programme
BG
I
DK
L
56n Ca05
Favourite programme
56n Ca05
Auto
O
programme {
Manual
O
programme {
Program meOedit {
FavouriteOprogramme
{
}{O0_9O()OOKOMENU
BG
I
DK
M
Page 6

Note: Picture menu options are not available for
the RGB input source.
PSM (Picture Status Memory)
The picture Dynamic, Standard, Mild and
Game are programmed for good picture repro-
duction at the factory and cannot be changed.
XD
You can enjoy the vivid and hi-definition picture
with LG’s excellent Digital Reality processor technology.
Eye (option)
In some models, the set will automatically adjust
the picture according to the surrounding conditions. This will enable you to enjoy the most suitable picture according to the surroundings.
Press the EYE/*button to switch the eye function
on or off.
When the eye function is on, the most suitable picture is automatically adjusted according to the surrounding conditions.
At this time the display in green does not
appear continuously but the display in yellow appears each time the picture condition
changes.
Note :
a. The eye function is automatically switched off.
b. EYE function is not available for RGB input
source.
Picture adjustment
You can adjust picture Contrast, Brightness,
Colour intensity, Sharpness and tint (NTSC
input only) to the levels you prefer.
Setting up TV stations
6
Picture adjustment
Programme edit
This function enables you to delete or skip the
stored programmes. You can also move some
stations to other programme numbers or insert a
blank station data into the selected programme
number.
Deleting a programme
1. Select a programme to be deleted with the
DD
/
EE
or
FF / GG
button.
2. Press the RED button twice.
The selected programme is deleted, and all the
following programmes are shifted up one position.
Copying a programme
1. Select a programme to be copied with the
DD / EE
or
FF / GG
button.
2. Press the GREEN button.
All the following programmes are shifted down
one position.
Moving a programme
1. Select a programme to be moved with the
DD
/
EE
or
FF / GG
button.
2. Press the YELLOW button.
3. Move the programme to the desired programme number with the
DD / EE
or
FF / GG
but-
ton.
4. Press the YELLOW button again to release
this function.
Skipping a programme number
1. Select a programme number to be skipped with
the
DD / EE
or
FF / GG
button.
2. Press the BLUE button. The skipped programme turns to blue.
3. Press the BLUE button again to release the
skipped programme. When a programme
number is skipped it means that you will be
unable to select it using the
DD / EE
button during normal TV viewing. If you want to select
the skipped programme, directly enter the programme number with the NUMBER buttons or
select it in the programme edit or table menu.
Repeatedly press the MENU button to return to
normal TV viewing.
Favourite programme
This function lets you select your favourite programmes directly.
Calling the programme table
You can check the programmes stored in the
memory by displaying the programme table.
Note :
a. You may find some blue programmes. They
have been set up to be skipped by auto programming or in the programme edit mode.
b. Some programmes with the channel number
shown in the programme table indicate there
is no station name assigned.
Off
Page 7

7
Sound adjustment
SSM (Sound Status Memory)
You can select your preferred sound setting; Flat,
Music, Movie or Sports and you can also adjust
the sound frequency of equalizer.
Sound Frequency Adjustment
Press the
GG
button in User to display the
User sub menu.
The sound
Flat, Music, Movie and Sports are
programmed for good sound reproduction at the
factory and cannot be changed.
Turbo sound selection
When this function is on, the sound will be more
emphasized and amplified than normal sound.
Sound adjustment
You can adjust balance, AVL (Auto Volume
Leveler), AVL automatically keeps on an equal
volume level even if you change programmes.
The Turbo sound creates an all around sound as
in a concert hall.
X-WAVE (Wireless Sound) (option)
You can also listen to the sound through the FM
receiver.
Note:
a. If the reception is poor or weak, select a dif-
ferent frequency.
b. For best results, there should be no more
than 5m (16.4ft) between the TV and FM
Receiver.
c. In certain areas, the FM transmitter ability
may be weak, such as near a broadcast
tower.
d. The reception sensitivity may depend on the
kinds of receiver (FM radio).
Sound output selection
In AV mode, you can select output sound for the
left and right loudspeakers.
Repeatedly press the I/II/
*
button to select the
sound output.
L+R :Audio signal from audio L input is sent to left
loud-speaker and audio signal from audio R
input is sent to right loud-speaker.
L+L :Audio signal from audio L input is sent to left
and right loud-speakers.
R+R:Audio signal from audio R input is sent to
left and right loud-speakers.
Stereo/Dual reception
When a programme is selected, the sound information for the station appears after the programme number and station name disappear.
Mono sound selection
In stereo reception if the stereo signal is weak,
you can switch to mono by pressing the I/II/
*
button twice. In mono reception the depth of sound is
improved. To switch back to stereo, press the
I/II/
*
button twice again.
Language selection for dual language broadcast
If a programme is received in two languages (dual
language), you can switch to
DUAL I, DUAL II or
DUAL I+II by pressing the I/II/
*
button repeatedly.
DUAL I sends the primary broadcast language to
the loudspeakers.
DUAL II sends the secondary broadcast lan-
guage to the loudspeakers.
DUAL I+II sends a separate language to each
loudspeaker.
NICAM reception (option)
If your set is equipped with the receiver for NICAM
reception, the high quality NICAM (Near
Instantaneous Companding Audio Multiplex) digital sound can be received.
Sound output can be selected according to the
type of received broadcast by pressing the I/II/
*
button repeatedly.
1. When NICAM mono is received, you can
select
NICAM MONO or FM MONO.
2. When NICAM stereo is received, you can
select
NICAM STEREO or FM MONO. If the
stereo signal is weak, switch to FM mono.
3. When NICAM dual is received, you can select
NICAM DUAL I, NICAM DUAL II or
NICAM DUAL I+II or MONO. When FM
mono is selected the display
MONO appears
on the screen.
()O}{OOKOMENU
0.1O0.5O1.5O5.0O10OkHz
Broadcast
Mono
Stereo
Dual
On Screen Display
MONO
STEREO
DUAL I
Page 8

Other functions
TV and AV modes
AV mode is used when a video cassette recorder
(VCR), or other equipment is connected to the set.
Note : When a VCR is connected via the aerial
socket the set is used in TV mode. See the
‘Connection of external equipment’ section.
AV1 : VCR connected to the Euro scart socket or AV I N 1 sockets on the set
AV2 : VCR connected to the AV IN 2 sockets
on the set.
COMPONENT : DVD Player connected to the
COMPONENT sockets on the set (option)
Alternatively you can select the TV or AV mode by
pressing the TV/AV button.
In AV mode, to return to TV mode, press the
DD
/
EE
or NUMBER buttons.
Auto AV switching (option)
If your VCR outputs switching voltage when it is
switched to playback with the VCR connected to the
Euro scart socket. The set is automatically switched
to
AV1 mode when an AV signal is input. But if you
want to keep on watching TV mode, press the
DD
/
EE
or NUMBER buttons. Press the TV/AV button to
return to AV modes.
Child lock
The TV can be set so that the remote control handset is needed to control it. This feature can be used
to prevent unauthorized viewing.
With the lock on, the display
Child lock on
appears on the screen if any button on the front
panel is pressed while viewing the TV.
Blue back (option)
If you select On on the Blue back pull-down
menu, the blue background appears on the
screen when there is no or poor signal.
Tilt (option)
The TV picture may tilt to the left or right if the TV
set moves to another position. This function can
be used to compensate the tilt.
Degaussing (option)
Due to the super large Tube in the set. The colour
purity of the picture may be affected by other
magnetic influences such as speakers. Stripes
may appear on the screen or there may be colour
patches.
Note : If you cannot adjust the screen condition
by degaussing, try it again after about 4 minutes.
Sleep timer
You don’t have to remember to switch the set off
before you go to sleep. The sleep timer automatically switches the set to standby after the preset
time elapses.
Repeatedly press the SLEEP button to select the
number of minutes. The display
rr
- - - will appear
on the screen, followed by 10, 20, 30, 60, 90, 120,
180 and 240. The timer begins to count down from
the number of minutes selected.
Note :
a. To view the remaining sleep time, press the
SLEEP button once.
b. To cancel the sleep time, repeatedly press the
SLEEP button until the display
rr
- - -
appears.
c. When you switch the set off, the set releases
the preset sleep time.
8
Setting the On/Off timer
By using this function, the set automatically
switches on or off at a preset time. You must set
the time correctly before using the on/off time
function.
Note :
a.
On time works only in standby mode.
b. To view the remaining on/off time, select the
Time menu.
c. When you switch the main power off, the
Clock is reset .
Auto sleep
If you select On on the Auto sleep pull-down
menu, the set will automatically switch itself to
standby mode approximately ten minutes after a
TV station stops broadcasting.
Time Setting
Page 9

USB MODE
9
USB connection
Connect the USB port of USB memory to the
USB port on the side of the TV.
After connecting the USB IN jacks, press the
USB button.
Removing the USB device from TV
1. Return to main menu and press STOP( /ESC)
twice.
2. Remove the USB device from TV.
- When you plug a USB then press the USB but-
ton, the below screens will be displayed.
- Enter into USB mode
1.Press “USB”key on remote control.
2.Slecte“USB” on the main menu
special mode
- Exit from the “USB”mode
1.Press “USB”or “MENU”in USB mode .
2.Press local key “MENU”in USB mode.
Notes :
1. Don’t extract the USB device while
operating.Music files (MP3), image files
(JPG),AVI files and Game files(SMF) can be
played.
2. This unit can not use a USB HUB.
3. Recommended USB device and file system.
- Connecting USB device should comply with
USB 2.0 specifications.
- Compatible with : FAT16, FAT32
(Recommend FAT32 for USB over 2GB)
- Only use USB memory stick recommended.
4. Devices which require additional program
installation may cause identification or data
reading problem.
5. In case of a USB HDD, make sure to connect
an auxiliary power to the USB HDD for proper
operation. 1 primary partitions of a drive is
supported. If there is an extension partition, it
will not be supported.
6. Digital cameras and mobile phones are not
supported.
7. Unsupported or damaged AVI, JPG , MP3 or
SMF files can cause errors. Do not try to
change the file extension of unsupported file
types to the file extension of supported file
types.
8. This device codec is hardware codec so the
supportable file format and codec can not be
updated by firmware upgrade.
9. Entry into USB mode can be activated or de-
activated by USB key on the remote controller.
10.If you make entry back into USB mode after
switching to RF while playing USB media,
music and movie will be paused. For play,
press GII key to continue to play.
11.Customers should note that permission is
required in order to download MP3 or movie
files from internet. Our company has no right
to grant such permission.Permission should
always be sought from the copyright owner.
USB
USB
Language {
Input {
Childolock {
Degauss {
USB {
ON
()O}
{
OOKOMENU
Special
USB
OK
Page 10

PHOTO SETUP
Select the Effect
-The picture display effect for the slide show.
-The playing mode of some files in special format
is from top to bottom.
1. Press the USB button and then use
F / G
button to select the Setup.
2. Press the OK button to enter the Setup menu.
3. Press the
D / E button to select the PHOTO
SETUP.
4. Press the G and then use D / E button to
select EFFECT.
5. Press the G and then use D / E button to
select the desired Effect.
6. Press the USB button to exit or press the
/ESC button to return to the USB menu.
Select the Frequency
-The picture display interval for the slide show.
1. Press the USB button and then use F / G
button to select the Setup.
2. Press the OK button to enter the Setup menu.
3. Press the D / E button to select the PHOTO
SETUP.
4. Press the G and then use D / E button to
select FREQUENCY.
5. Press the G and then use D / E button to
select the Frequency.
6. Press the USB button to exit or press the
/ESC button to return to the USB menu.
OK
OK
OK
FREQUENCY
MUSIC
PLAY MODE
RANDOM
WIPE BOTTOM
WIPE LEFT
WIPE RIGHT
LEFT TOP
PHOTO SETUP
EFFECT
Select the SUBTITLE LANG
- The menus can be shown on the screen in the
selected language. First select your language.
- When selecting SUBTITLE LANG,it will only
display in English.But subtitle can display in the
language which you selected.
1. Press the USB button and then use
FF / GG
button to select the Setup.
2. Press the OK button to enter the Setup menu.
3. Press the
DD / EE
button to select the SYSTEM
SETUP.
4. Press the
GG
and then use
DD / EE
button to
select SUBTITLE LANG.
5. Press the GGand then use
DD / EE
button to
select the desired language.
6. Press the USB button to exit or press the
/ESC button to return to the USB menu.
Press the Menu button to return to the TV
menu.
Select the S/W Version
1. Press the USB button and then use
FF / GG
button to select the Setup.
2. Press the OK button to enter the Setup menu.
3. Press the
DD / EE
button to select the SYSTEM
SETUP.
4. Press the GGand then use
DD / EE
button to
select S/W VERSION.
5. Press the
GG
.
6. Press the USB button to exit or press the
/ESC button to return to the USB menu.
Press the Menu button to return to the TV
menu.
Select the Default
- Use the Default option to initialize the adjusted
settings.
1. Press the USB button and then use
FF / GG
button to select the Setup.
2. Press the OK button to enter the Setup menu.
3. Press the
DD / EE
button to select the SYSTEM
SETUP.
4. Press the GGand then use
DD / EE
button to
select DEFAULT.
5. Press the GG.
6. Press the USB button to exit or press the
/ESC button to return to the USB menu.
Press the Menu button to return to the TV
menu.
SYSTEM SETUP
10
OK
OK
OK
S/W VERSION
DEFAULT
ENGLISH
FRENCH
ARABIC
URDU
FARSI
SYSTEM SETUP
SUBTITLE LANG
OK
/ESC
/ESC
Page 11

11
Select the Music
- You can turn on or off the background music
when playing the photograph mode.
- The background music is from USB memory.
1. Press the USB button and then use F / G
button to select the Setup.
2. Press the OK button to enter the Setup menu.
3. Press the D / E button to select the PHOTO
SETUP.
4. Press the G and then use D / E button to
select MUSIC.
5. Press the G and then use
D / E button to
select ON or OFF.
6. Press the USB button to exit or press the
/ESC button to return to the USB menu.
Select the Play Mode
-You can select your desired playback mode in
the slide shows.
1. Press the USB button and then use
F / G
button to select the Setup.
2. Press the OK button to enter the Setup menu.
3. Press the D / E button to select the PHOTO
SETUP.
4. Press the G and then use D / E button to
select PLAY MODE.
5. Press the G and then use
D / E button to
select NORMAL or RANDOM.
6. Press the USB button to exit or press the
/ESC button to return to the USB menu.
PHOTO SETUP
MOVIE Media
OK
OK
OK
EFFECT
FREQUENCY
PLAY MODE
ON
OFF
PHOTO SETUP
MUSIC
Select the MOVIE, MUSIC or PHOTO Media
- When you plug a USB or press the
USB button, the below screens will be
displayed.
1. Press
F / G button to select Movie,
Music or Photo.
2. Press the OK button to enter the
Movie, Music or Photo media.
3. Press the USB button to exit.
Movie File Playing Operation
1. Press the USB button and then use
F /G button to select the Movie.
2. Press the OK button.
3. Press the
D / E / F / G button to select
folder and desired movie file.
4. Press the
GII (alternative play) or
OK (single play) button. Then the
movie starts.
5. Press the USB button to exit or press
/ESC button to stop or return to
the USB main menu.
Using the remote control
To increase or decrease volume level for the
Movie.
Press the button to jump previous Movie.
Press the button to jump next Movie.
.
Stop movie playing or move to the movie file list
menu.
Still screen is displayed. (When playing movie)
Play movie in sequence (at movie list)
Press the button to rewind.
Press the button to fast forward.
Show the Information of movie. (when playing movie)
Play movie selected by cursor. (at movie list)
ON/OFF or Select subtitle
Notes:
1.Movie (AVI)file compatibility with this player is
limited as follows :
-Available resolution of AVI file is under
720x480(576)pixel.
-If video codec is not supportable, "UNSUP
PORTED FORMAT"OSD will be displayed in
the file list menu.
-If sound codec is not supportable, Video may
display but "UNSUPPORTED FORMAT" OSD
will be displayed with no sound.
-If sound has no data stream,
"NO SOUND"OSD will be displayed on the screen.
-If the number of the screen frame is over 30
per 1 second, this device may not operate normally.
2.Supportable Subtitle format: srt, sri, smi, txt,
ssa,ass, sub, psb
3.Supportable movie file extension: “.DAT”,
“.AVI”, “.MP4”, “.MPG”
4.Supportable video codec: MPEG1(VCD 1.0,
1.1,2.0, SVCD),MPEG4 ASP or Compatible codecs
OK
<K_OTHERS>
K_OTHERS
J_SUB T
I_CONT
H_VIDE_1
OTH_01_1.AVI
OTH_02_1.AVI
/ESC
/ESC
VOL.-
1
4
7
OK
SELECT
VOL.+
2
6
/ESC
5
8
9
0
4
6
7
9
Page 12

12
MUSIC Media
MP3 File Playing Operation
- Purchased MP3/music files may contain copy
right restrictions.
1. Press the USB button and then use
F / G button to select the Music.
2. Press the OK button.
3. Press the D / E / F / G button to select
folder and desired music file.
4. Press the GII (alternative play) or
OK (single play)button. Then the
music starts.
5. Press the USB button to exit or press the
/ESC button to stop or return to the USB
menu.
Using the remote control
Notes :
1. MP3 compatibility with this player is limited as follows:
- Sampling frequency :within 8 -48 KHz
- Bit rate :32 -384 Kbps, Support all variable bit rates
- TV can not read an MP3 file that has a file
extension other than “.mp3”
- File name should have a maximum of 8
letters and must incorporate an .mp3 extension.
- Total number of files on the USB memory
device should be less than 1200.
2.This TV mp3 player requires mp3 files to meet
certain technical standards (ISO/IEC
111723,ISO/IEC 13818-3.2)in order to achieve
optimal playback quality.
3.There are many different types of MP3
encoders and these require certain pre-existing
conditions above to ensure compatible play back.
4.The navigation key can be shifted only up and
down during MP3 file play and cannot switch to
other folder.
5.In order to play a file in other folder, stop the
file being played, and move cursor to another folder.
6.In case of VBR(Variable Bit Rate)MP3,
estimated playing time may not correct as
actual playing.
To increase or decrease volume level
for the Music.
Press the button to jump previous music.
Press the button to jump next music.
Moved the Folders in menu. (at music list)
Stop playing music. (when playing music)
Press the button to jump backforward.
Press the button to jump forward.
To pause playback.(when playing music)
Play music in sequence (at music list)
Play music selected by cursor.
OK
<G-AUDIO>
D-FILE
AUD -1A.MP3
AUD -1B.MP3
AUD -1C.MP3
AUD -3A.MP3
AUD -3B.MP3
PHOTO Media
JPEG File Viewing Options
- When you select Photo in entry menu, you will
now see a screen filled with thumbnail photo
media.
1. Press the USB button and then use
F / G
button to select the Photo.
2. Press the OK button.
3. Press the D / E / F / G button to select
photo file.
4. Press the OK button for 1 picture display
and press 8 for slide show.
5. Press the USB button to exit or press the
/ESC button to stop slide show or return to
thumbnail file list, USB main menu.
Slide Show
1. Press the D / E / F / G button to select
JPEG file and then press the button. Slide
show starts.
2. You can choose the slide show effect,
frequency and play mode in the USB Setup.
3. Press the GII button to pause the current
image.
4. Press the USB button to exit or press the
/ESC button to stop slide show return to the
USB menu.
OK
OK
OK
K-REA-1. JPG 81K 720x576
1. K-REA-1<81K>
2. A-NLTM-<154K>
3. B-RED<43K>
4. K-REA-1 <81K>
5. A-NLTM-1<154K>
6. B-RED <43K>
G-AUDIO
ENTER
/ESC/ESC
VOL.+
VOL.-
2
1
4
6
/ESC
5
9
7
8
OK
4
6
7
9
/ESC
8
Page 13

13
Still picture
Press the D/E / F/G button to select JPEG file
then press the OK button. Selected still picture
display starts.
Using the remote control
Notes :
1.JPEG compatibility with this player is limited as
follows :
- Depending upon the size and the number of
JPEG files,it could take a long time for TV to
read the USB memory's contents. If you don't
see an on screen display after several
minutes,some of the files maybe too largereduce the resolution of the JPEG files to less
than 2M pixels as 2760x2048 resolution.
- The total number of files and folders on the
USB memory device should be less than 1200.
- File name without ".jpg" extension will not be
able to read by this TV jpeg decoder. Even
though the files are shown as JPEG image files
in Windows Explorer.
- Cause of Photo character, Progressive JPEG is
always scanned “WIPETOP” regardless of
Photo Effect.
To increase or decrease volume level for the
Music.(When selecting the turn-on of back
ground music when playing the photograph
mode.)
To select the previous or next page. (at thumbnail mode)
To jump to the previous or next photo(at one photo display)
Move to main menu from thumbnail mode.
These keys (FF&RW) are not available in photo
mode.
To enlarge or reduce the image 2, 3 or 4
times. (at one photo display)
1.Zoom mode
To scroll left, right, up and down.
2.Still picture display mode
VOL+:Rotate 90 (Clockwise)
VOL- : Rotate-90 (Counter-clokwise)
CH+:Upside down&vice versa
CH-:Mirror imgame&versa
PHOTO Media
GAME Media
GAME File Playing Operation
1. Press the USB button and then use D / E /
F / G button to select the Game.
2. Press the OK button.
3. Press the D / E / F / G button to select
folder and desired game file.
4. Press the G (alternative play) or OK(single
play)button.Then the game starts.
5. Press the USB button to exit or press the
/ESC button to stop or return to the USB
menu.
Using the remote control
To increase or decrease volume level for the
game.
Press the button to jump previous Game.
Press the button to jump next Game.
Stop game playing or move to the game file list menu.
Play game in sequence (at game list)
Play game seleced by cursor.
To confirm(when playing game)
To select left,right,up,down
(when playing game)
Note:
-You can download the game file from
www.gamefortv.com.The downloaded files are
compressed files, so please decompress files
and then put them in usb before using them.
-If the files under the folder in USB exceed 5
floors,maybe you can’t open game files.
OK
OK
< 2005 >
2006
BADBOY.SMF
BALLOON.SMF
CATRUN.SMF
DRAGON.SMF
FOODRAIN.SMF
BELLGIR.SMF
2005
2007
OK
VOL.+
VOL.-
2
1
4
6
/ESC
5
9
7
ZOOM
3
CH
VOL
VOL
CH
VOL.+
VOL.-
2
1
4
6
/ESC
5
4
6
OK
OK
8
CH
VOL
VOL
CH
/ESC
Page 14

Teletext (or TOP text) is an optional function,
therefore only a set with the teletext system can
receive the teletext broadcast.
Teletext is a free service broadcast by most TV
stations which gives up-to-the-minute information
on news, weather, television programmes, share
prices and many other topics.
The teletext decoder of this TV can support the
SIMPLE, TOP and FASTEXT systems. SIMPLE
(standard teletext) consists of a number of pages
which are selected by directly entering the corresponding page number. TOP and FASTEXT are
more modern methods allowing quick and easy
selection of teletext information.
Switch on/off
Press the TEXT button to switch to teletext.
The initial page or last page appears on the
screen.
Two page numbers, TV station name, date and
time are displayed on the screen headline. The
first page number indicates your selection, while
the second shows the current page displayed.
Press the TEXTor TV/AV button to switch off teletext. The previous mode reappears.
SIMPLE text
Page selection
1. Enter the desired page number as a three
digit number with the NUMBER buttons. If
during selection you press a wrong number,
you must complete the three digit number and
then re-enter the correct page number.
2. The
DD / EE
button can be used to select the
preceding or following page.
Programming a colour button in LIST mode
(option)
Press the button to switch to LIST mode.
Four teletext page numbers of your choice can be
colour coded and easily selected by pressing the
corresponding coloured button on the remote
control handset.
1. Press a coloured button.
2. Using the NUMBER buttons, select the page
you wish to programme.
3. Press the OK button. Then the selected page
is stored as the selected page number with
blinking once. From now on, you can select
this page with the same coloured button.
4. The three other coloured buttons are programmed in the same way.
Teletext (option)
PIP operation (option)
Option :
PIP (Picture in Picture) displays a picture within a
picture.
On and off
Press the PIP button to switch on the sub picture.
Press this button again to switch it off.
Input mode selection for sub picture
Press the INPUT button to select the input mode
for the sub picture.
Swapping between main and sub pictures
Press the SWAP button to exchange the main
and sub pictures.
Programme selection for sub picture
Press the PR +/- buttons to select a programme
for the sub picture. (In some models, the sub pic-
ture programme selection is available when the
sub picture is TV mode.)
Sub picture size
Repeatedly press the SIZE button to select the
desired sub picture size. The sub picture appears
as below.
Note : When the sub picture size is 1/2 of the
main picture, the picture quality might get poor.
Sub picture freeze
Press the STILL button to freeze motion of the
sub picture.
Press this button again to restore motion.
Sub picture position change
Press the POSITION button repeatedly until
desired position is achieved. The sub picture
moves clockwise.
Programme number
AV 1
AV 2
COMPONENT
(option)
14
1/16 size of the main picture
1/9 size
1/2 size (
option)
M
Page 15

TOP text (option)
The user guide displays four fields-red, green, yellow and blue at the bottom of the screen. The yellow field denotes the next group and the blue field
indicates the next block.
Block / group / page selection
1. With the blue button you can progress from
block to block.
2. Use the yellow button to proceed to the next
group with automatic overflow to the next
block.
3. With the green button you can proceed to the
next existing page with automatic overflow to
the next group.
Alternatively the
DD
button can be used.
4. The red button permits to return to previous
selection. Alternatively the
EE
button can be
used.
Direct page selection
Corresponding to the SIMPLE teletext mode, you
can select a page by entering it as a three digit
number using the NUMBER buttons in TOP mode.
FASTEXT
The teletext pages are colour coded along the bottom of the screen and are selected by pressing
the corresponding coloured button.
Page selection
1. Press the button to select the index page.
2. You can select the pages which are colour
coded along the bottom line with the same
coloured buttons.
3. Corresponding to the SIMPLE teletext mode,
you can select a page by entering its three
digit page number with the NUMBER buttons
in FASTEXT mode.
4. The
DD / EE
button can be used to select the
preceding or following page.
Special teletext functions
REVEAL
Press this button to display concealed information, such as solutions of riddles or puzzles.
Press this button again to remove the information
from the display.
SIZE
Selects double height text.
Press this button to enlarge the top half of the
page.
Press this button again to enlarge the bottom half
of the page.
Press this button again to return to the normal display.
UPDATE
Displays the TV picture on the screen while waiting
for the new teletext page. The display will
appear at the top left hand corner of the screen. When
the updated page is available then the display
will change to the page number. Press this button to
view the updated teletext page.
HOLD
Stops the automatic page change which will occur
if a teletext page consists of 2 or more sub pages.
The number of sub pages and the sub page displayed is, usually, shown on the screen below the
time. When this button is pressed the stop symbol
is displayed at the top left-hand corner of the
screen and the automatic page change is inhibited.
To continue press this button again.
MIX
Displays the teletext pages superimposed on the
TV picture.
To switch the TV picture off press this button
again.
TIME
When viewing a TV programme, press this button
to display the time at the top right hand corner of
the screen. Press this button again to remove the
display. In the teletext mode, press this button to
select a sub page number. The sub page number
is displayed at the bottom of the screen. To hold or
change the sub page, press the RED/GREEN,
DD
/
EE
or NUMBER buttons. Press again to exit this
function.
Teletext (option)
15
i
Page 16

Troubleshooting check list
Symptoms
No picture, no sound
Sound OK, poor picture
Picture OK, poor sound
Picture blurred
Lines or streaks in picture
Poor reception on some channels
No colour
Poor colour
Remote control does not work
The mains plug-(plugged in and
switched on)
Is the TV switched on
Try another channel (weak signal)
Check aerial (plugged into TV?)
Check aerial (broken lead?)
Check aerial
Check for local interference
Adjust contrast
Adjust brightness
Adjust colour
Adjust volume
Check the batteries in remote control
Check Audio/Video sockets (VCR only)
Check these items and try to
adjust these
 Loading...