

LG 25870, 25850 User Manual
Owner's Manual
Manuel de l’usager
DEHUMIDIFIER
DESHUMIDIFICATEUR
Sears Canada Inc. Toronto,M5B 2B8
www.sears.ca
ENGLISH FRANÇAIS
®
Model, Modèle 25850 50 Pint Low Temp
25870 70 Pint Low Temp

- 2 -
TABLE OF CONTENTS
WARRANTY
TABLE OF CONTENTS ................................2
WARRANTY..................................................2
SAFETY INSTRUCTIONS ............................3
ELECTRICAL REQUIREMENTS ..................4
INSTALLING YOUR DEHUMIDIFIER
..............5
Defrost Control Function ..........................5
CHOOSING THE PROPER LOCATION .......5
AUTOMATIC SHUT OFF ..............................5
OPERATION .................................................6
Features ...................................................6
Control Panel ...........................................7
OPTIONS FOR DISPOSING
OF COLLECTED WATER.............................8
MAINTENANCE ............................................9
Grille and case .........................................9
Air filter .....................................................9
General cleaning......................................9
Water bucket cleaning..............................9
Cleaning inside the unit..........................10
TROUBLESHOOTING ................................11
MASTER PROTECTION AGREEMENTS
...23
SERVICE NUMBERS....................Back cover
One Year Limited Warranty
When installed, operated and maintained according to all instructions supplied with the product, if this appliance fails
due to a defect in material and workmanship within one year from the date of purchase, call 1-800-4-MY-HOME® to
arrange for free repair.
Five Year Limited Warranty on Sealed Refrigerant System
For five years from the date of purchase, when this product is installed, operated and maintained according to all supplied
instructions, the sealed refrigerant system will be repaired free of charge if it is defective in material or workmanship.
This warranty covers only defects in material and workmanship. Sears will NOT pay for:
1. Expendable items that can wear out from normal use, including but not limited to filters, belts, light bulbs, and bags.
Customer’s sole and exclusive remedy under this limited warranty shall be product repair as provided herein. Implied
warranties, including warranties of merchantability or fitness for a particular purpose, are limited to one year or the shortest
period allowed by law. Sears shall not be liable for incidental or consequential damages. Some states and provinces do not
all
ow the exclusion or limitation of incidental or consequential damages, or limitation on the duration of implied warranties of
merchantability or fitness, so these exclusions or limitations may not apply to you.
Sears, Roebuck and Co., Hoffman Estates, IL 60179
FRANÇAIS ..................................................12
All warranty coverage applies for only 90 days from the date of purchase if this product is ever used for other than private
family purposes.
2. A service technician to instruct the user in correct product installation, operation or maintenance.
3. A service technician to clean or maintain this product.
4. Damage to or failure of this product if it is not installed, operated or maintained according to the all instructions suppl ied
with the product.
5. Damage to or failure of this product resulting from accident, abuse, misuse or use for other than its intended purpose.
6. Damage to or failure of this product caused by the use of detergents, cleaners, chemicals or utensils other than those
recommended in all instructions supplied with the product.
7. Damage to or failure of parts or systems resulting from unauthorized modifications made to this product.
Disclaimer of implied warranties; limitation of remedies
This warranty applies only while this appliance is used in the United States or Canada.
This warranty gives you specific legal rights, and you may also have other rights which vary from state to state.
Sears Canada Inc., Toronto, Ontario, Canada M5B 2B8

- 3 -
ENGLISHENGLISH
SAFETY INSTRUCTIONS
IMPORTANT SAFETY INSTRUCTIONS
To reduce the risk of fire, electric shock or injury when using your dehumidifier, the following
safety precautions must be followed:
• Do not place the power cord near a heater.
It may cause fire and electric shock.
• Do not use the power cord near flammable gas
or combustibles such as gasoline, benzene,
thinner, etc.
It may cause explosion or fire.
• Do not disassemble or modify products.
It may cause electric shock and failure.
• Plug in the power cord properly.
Otherwise, it may cause electric shock or fire.
• Do not operate or stop the unit by inserting or
pulling out the power plug.
It may cause electric shock or fire.
• Do not damage the power cord or use an
unspecified power cord.
It may cause electric shock or fire.
• Do not modify power cord length.
It may cause electric shock or fire.
• Do not share the outlet with other appliances.
It may cause electric shock or fire.
• Always plug into a grounded outlet.
Not grounding unit may cause electric shock.
• Unplug the unit if strange sounds, odors, or
smoke come from it.
Unplugging the unit may avoid electric shock or fire
hazard.
• Do not use the socket if it is loose or damaged.
It may cause fire and electric shock.
• Do not operate with wet hands or in damp
environment.
It may cause electric shock.
• Ventilate before operating defumidifier when
gas goes out.
It may cause explosion, fire, and burn.
• Do not clean the dehumidifier with water.
Water may enter the unit and degrade the insulation. It
may cause an electric shock.
• Unplug unit before cleaning the unit.
Since the fan rotates at high speed during operation, it
may cause injury.
• If water enters the product, turn off the
dehumidifier's power switch, then unplug the
unit. Contact service for repair.
It will cause machine failure or electric shock.
• Do not block the inlet or outlet.
It may cause failure of appliance or performance
deterioration.
• Hold the plug by the head when taking it out.
Otherwise, it may cause electric shock and damage.
• Turn off the main power switch when not using
the dehumidifier for a long time.
Turning off the unit will save on energy costs.
• Make sure the dehumidifier is the correct size
for the area you want to dehumidify.
It is not designed to dehumidify the entire house.
• Install the dehumidifier properly only on a floor.
For proper operation, your dehumidifier should be
installed only on a floor.
• Close all doors, windows and other outside
openings to the room.
The dehumidifier must be operated in an enclosed area
to be most effective.
• When removing the filter be aware that some
metal parts may have sharp edges.
Sharp edges may cause injury.
• Use a soft cloth to clean. Do not use wax,
thinner, or a strong detergent.
The appearance of the dehumidifier may deteriorate,
change color, or develop surface flaws.
• Be sure to replace the bucket properly after
emptying to prevent water from collecting on
the floor.
Otherwise, it will cause property damage.
• May not operate if the room temperature is
below 42˚F(6˚C).
Low temperatures could cause coils to frost.
• Do not put a pet or house plant where it will be
exposed to direct air flow.
This could injure the pet or plant.
• Do not use the water collected in the bucket for
drinking purposes.
It is not sanitary and could cause illness or personal
injury.
• Insert the filter securely. Clean it every two
weeks.
Operation without filters will cause unit failure.
• Do not allow children to play with this product.
- 4 -
OBSERVE ALL LOCAL CODES AND
ORDINANCES.
DO NOT, UNDER ANY CIRCUMSTANCES,
REMOVE THE POWER SUPPLY CORD
GROUND PRONG.
ELECTRICAL GROUND IS REQUIRED ON
THIS APPLIANCE.
A 115-volt 60 Hz, AC only, 15A fused and
properly grounded electrical supply is required.
A time delay fuse or time delay circuit breaker
is recommended. Use a dedicated circuit,
serving only this appliance.
DO NOT USE AN EXTENSION CORD.
RECOMMENDED GROUNDING METHOD
For your personal safety, this appliance must
be grounded. This appliance has a power
supply cord with a 3-prong grounding plug. To
minimize possible shock hazard, the cord must
be plugged into a mating grounding type wall
receptacle and grounded in accordance with
the National Electrical Code (ANSI/NFPA 70)
latest edition and all local codes and
ordinances. If a mating wall receptacle is not
available, it is the personal responsibility and
obligation of the customer to have a properly
grounded 3-prong wall receptacle installed by a
qualified electrician.
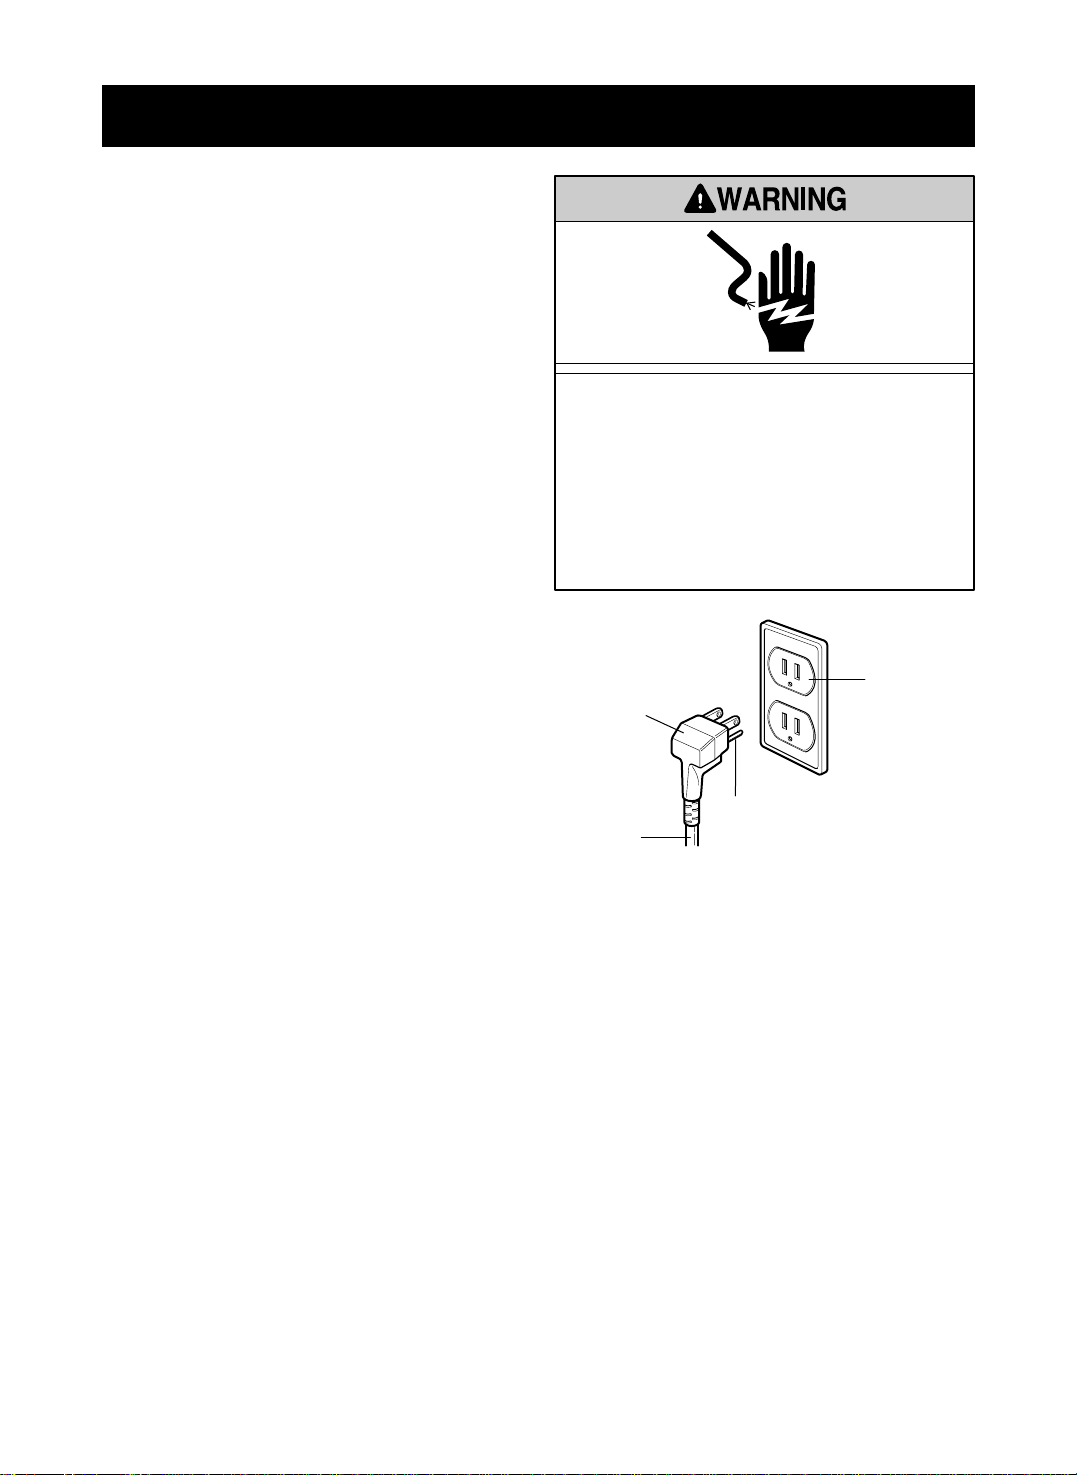
Electrical Shock Hazard
Plug into a grounded 3 prong outlet.
Do not remove ground prong.
Do not use an adapter.
Do not use an extension cord.
Failure to follow these instructions can result
in death, fire, or electrical shock.
ELECTRICAL REQUIREMENTS
3-prong
grounding
plug
Ground
prong
Power
supply
cord
3-prong
grounding
type wall
receptacle
- 5 -
ENGLISHENGLISH
INSTALLING YOUR DEHUMIDIFIER
AUTOMATIC SHUT OFF
• When the bucket is full, or when the bucket is not in the proper position, the Bucket Full light turns on
and the unit automatically shuts off.
Also, when bucket is out of position, the unit will beep 3 times.
• The bucket must be replaced in the proper position for the dehumidifier to work. The light will
be on and the dehumidifier will not run if the bucket is not in the proper position.
• The dehumidifier will shut off once the desired humidity setting is reached.
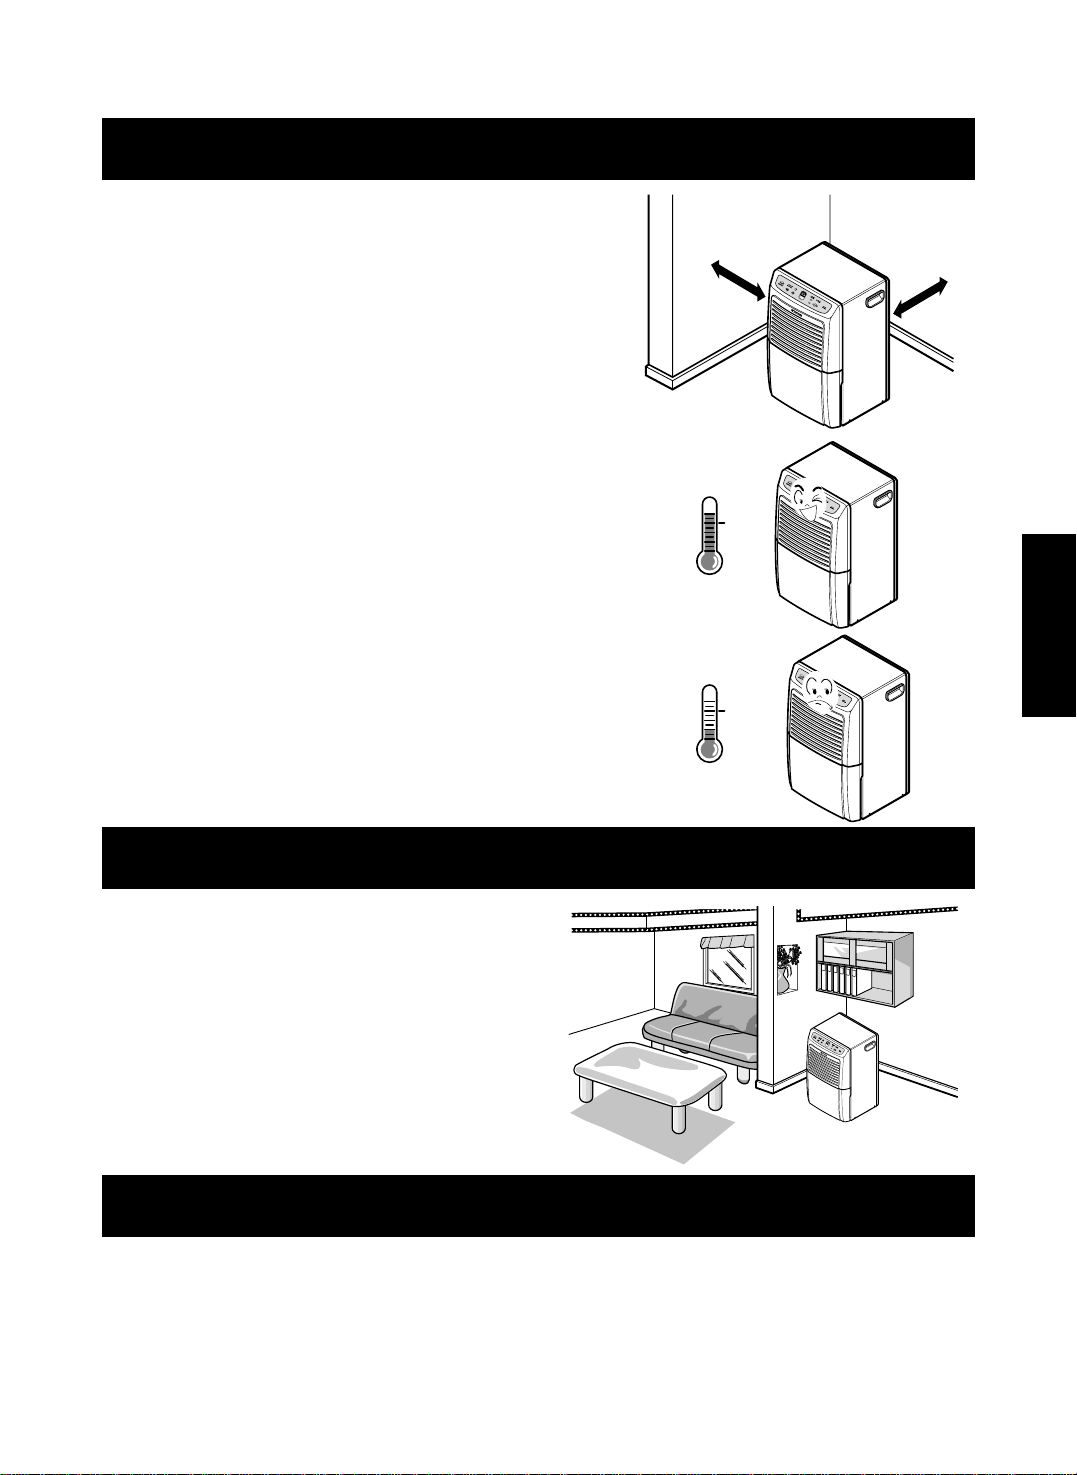
• Use the dehumidifier in a basement to help
prevent moisture damage.
• Use the dehumidifier in cooking, laundry,
bathing, and dishwashing areas that have
excessive moisture.
• Use the dehumidifier to prevent moisture
damage anywhere books or valuables are
stored.
•
• Install the dehumidifier on a level floor strong enough to
support the unit with a full bucket of water.
•
• For best performance, allow at least 12-18 inches of air
space on all sides of the unit for good air circulation
Keep all outside doors, windows,and other openings closed
•
when operating the dehumidifier. Humid outdoor air will add
to the unit's work load.
•
• For maximum efficiency,install your dehumidifier in an
area where the temperature wil not fall below
• At temperature below 42°F(6°C) ,(floor level) the
evaporator coils will becomes covered with frost,
reducing dehumidification performance.
Defrost Operation
The dehumidifier has a built-in defrost control
senses frost built up on the evaporator coils.During
defrost the compressor off,keeping the fan on to
defrost the coils.
42°F(6°C).
12~18"
12~18"
42˚F
(6˚C)
42˚F
(6˚C)
CHOOSING THE PROPER LOCATION
- 6 -
OPERATION
FEATURES
To reduce the risk of fire, electric shock, or injury to persons, read the important SAFETY
instructions section before operating this appliance.
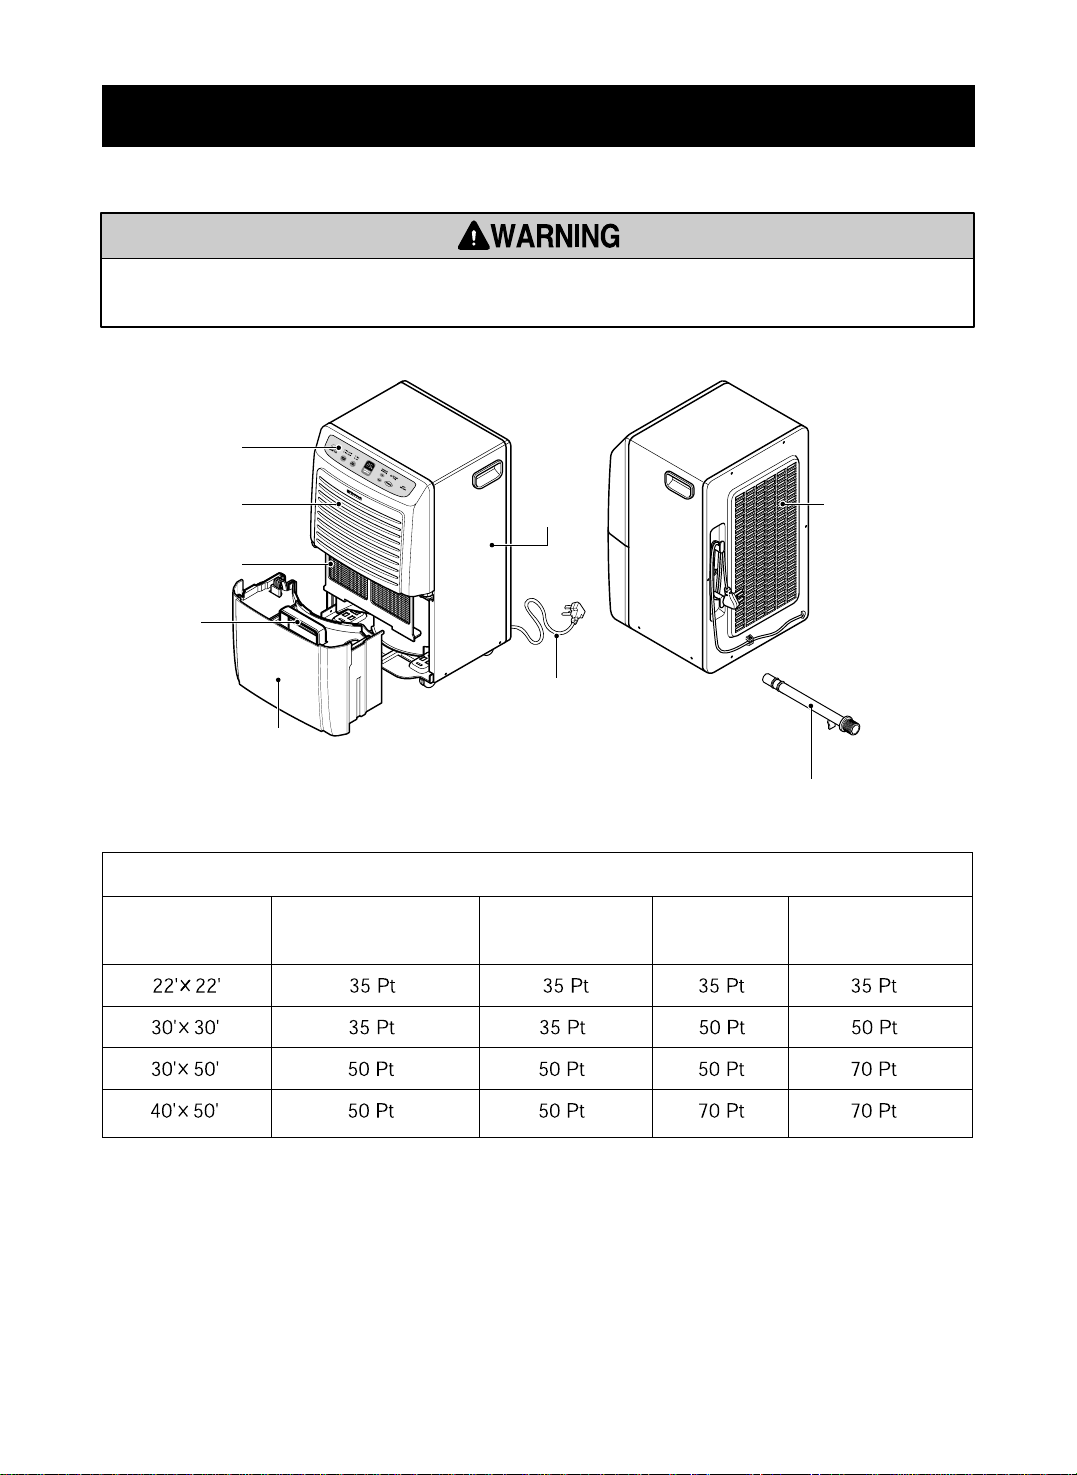
Power cord
Cabinet
Control panel
Rear Grille
Front Grille
Air Filter
Water bucket
Handle
(Optional) Drain Hose Connector
Room Size Moderately Very Wet Extremely
(sq-ft) Damp Damp Wet
SELECTION GUIDE
- 7 -
ENGLISH
OPERATION
HUMIDITY
SETTING
HUMIDITY
SETTING
AUTO
RESTART
AUTO
RESTART
76
543 2 1
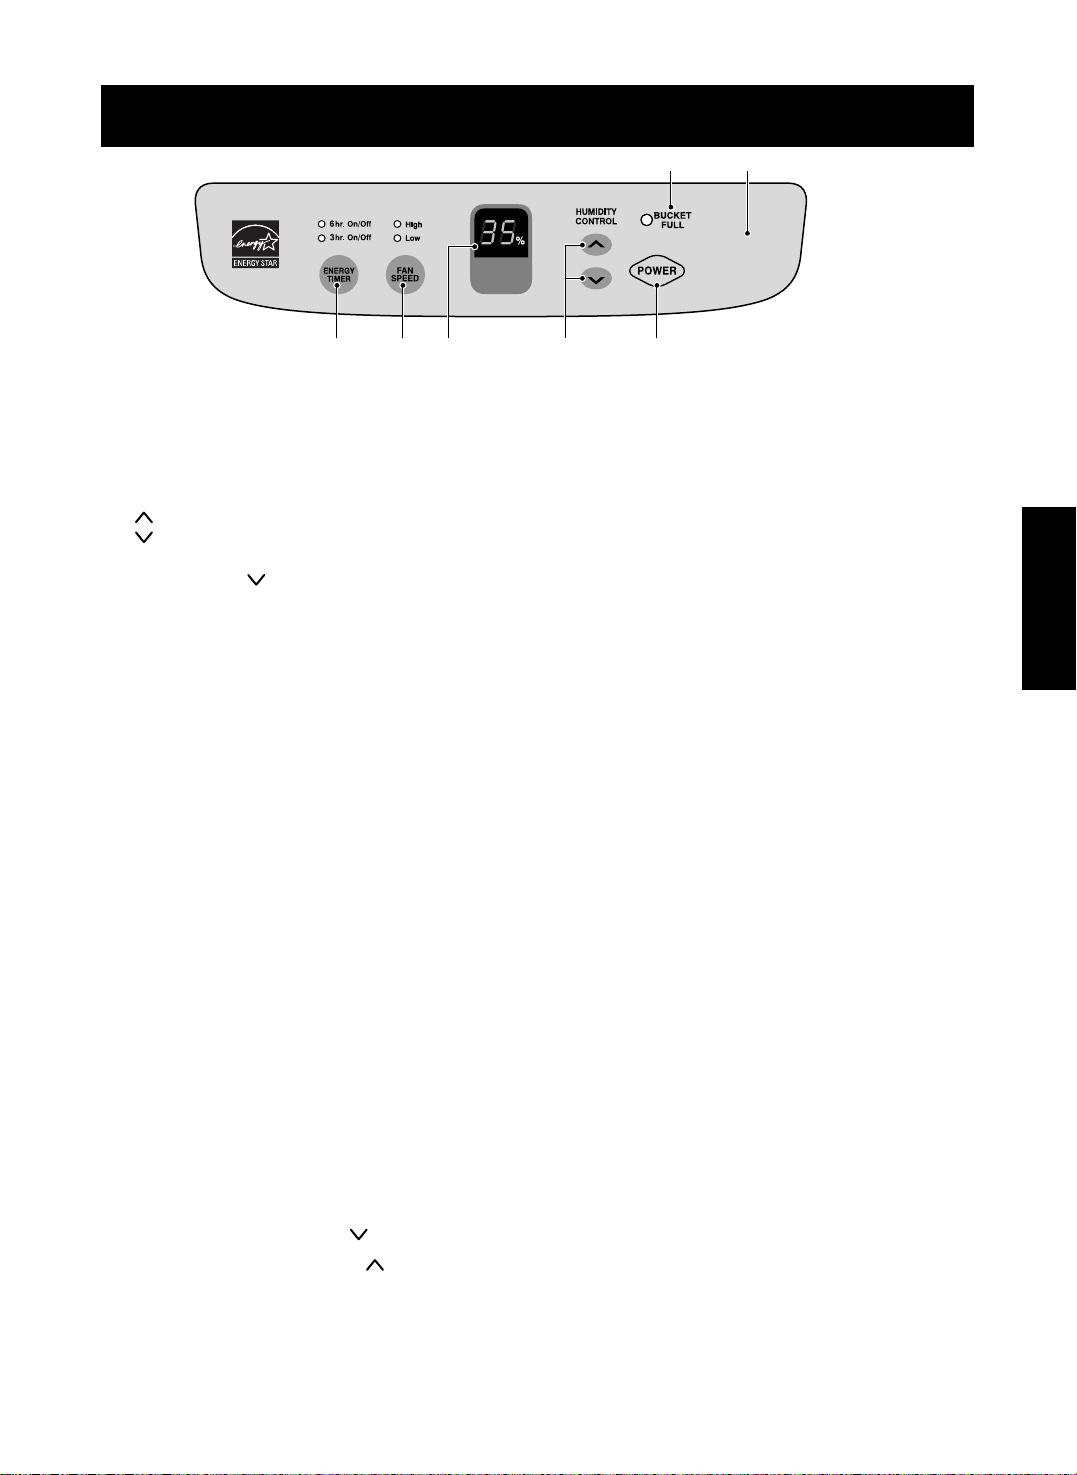
CONTROL PANEL
1. POWER key
Pressing this key once turns the dehumidifier "ON" and pressing again turns the dehumidifier "OFF".
2. HUMIDITY CONTROL keys
Press to select the desired humidity setting.
• : Used to raise the desired humidity setting.
• : Used to lower the desired humidity setting.
• The desired humidity can be selected within a range of 35% to 70% Relative Humidity in increments of 5%.
• If you press the key once again at 35% Relative Humidity, continuous "On" mode is selected and "On" appears in
the display window. In "On" mode the unit operates continuously, regardless of humidity conditions.
3. HUMIDITY SETTING display
Displays the selected humidity setting.
4. FAN SPEED key
Press to set the fan speed as "High" or "Low".
• Pressing this key changes the fan speed from High → Low → High.
• The selected fan speed is indicated by indicator lights marked "High" and "Low".
5. ENERGY TIMER key
Press to select timed operation cycle.
• Pressing this key selects EITHER THE 3 OR 6 HOUR TIMER MODE. The Timer indicator light will shift from 3 hour
On/Off to 6 hour On/Off. The unit will run for either 3 or 6 hours, and then shut off completely for 3 or 6 hours. The
cycle repeats until you change the setting. To turn off the ENERGY TIMER function, press key until indicator lights
are both "Off".
• If ENERGY TIMER function is not selected, unit operates until desired humidity setting is reached.
6. BUCKET FULL Indicator
This light glows when the bucket is full and needs to be emptied. It also glows when the bucket is not properly
positioned. When bucket full indicator light glows, the compressor and fan will turn "OFF".
7. AUTO RESTART
• The Auto Restart function automatically restarts your dehumidifier once power is restored. The fan will immediately
begin to run for approximately 3 minutes, and the unit will operate at the previous humidity setting. After 3 minutes,
the compressor may also start based on the humidity conditions in the room. Once the target humidity setting is
reached, the fan and compressor will shut off.
TO OPERATE THE DEHUMIDIFIER:
1. Plug the power cord into the electrical outlet. Press the POWER key.
2. Set the Humidity control anywhere between 35% to 70% for normal operation.
• For less humidity, press the HUMIDITY CONTROL key.
• For higher humidity, press the HUMIDITY CONTROL key.
3. Press the ENERGY TIMER key if desired, to set the amount of time for which you want the unit to cycle On and Off.
The time can be set for 3 hours or 6 hours.
4. If you want to change the fan speed, press the FAN SPEED key. Each time the FAN SPEED key is pressed the fan
speed changes from High → Low → High.
5. Press the POWER key to stop the unit manually.
OPTIONS FOR DISPOSING OF COLLECTED WATER
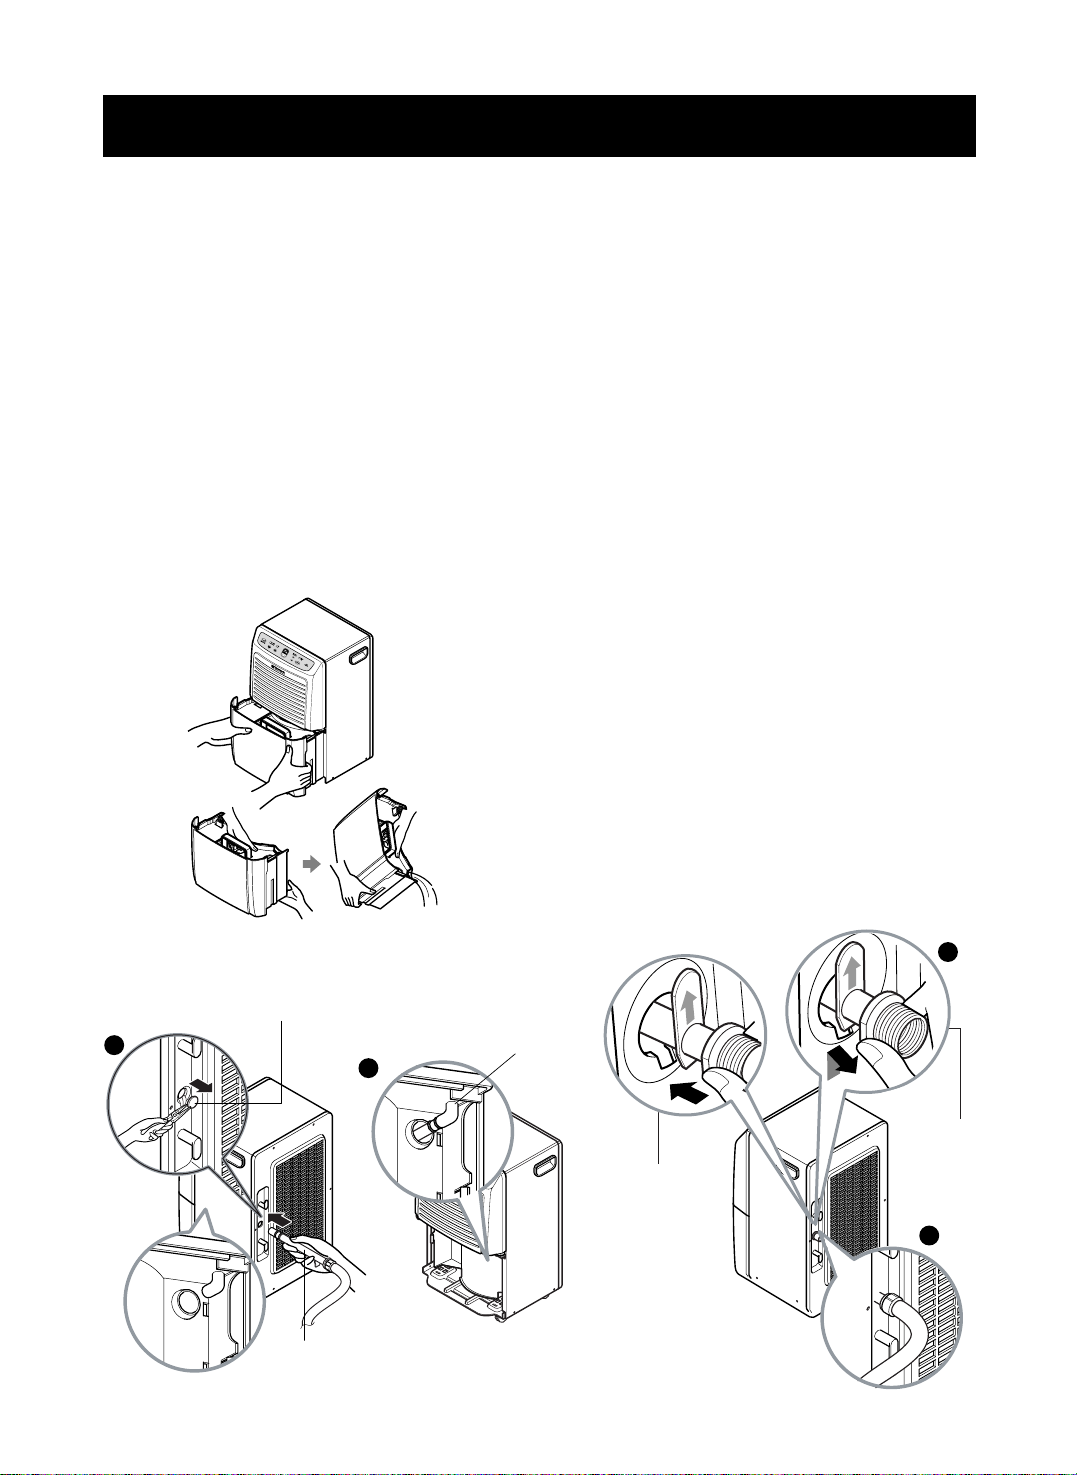
EMPTYING THE BUCKET
MANUALLY
1. When the bucket is full, slide it out by
grasping the handle and emptying it into a
large sink or tub, and then replace it
properly. See Figure 1.
2. Empty the bucket when the indicator light
turns on.
3. Do not remove the bucket while the
dehumidifier is operating.
Moving the bucket can cause water to drop
on the base pan or the floor.
4. Carry the bucket by supporting it from the
bottom as well as by the handle.
Carrying by only the handle may cause the
handle or bucket cover to break.
USING A GARDEN HOSE
You have the option of attaching a garden hose
to your dehumidifier to drain water later than
using the water bucket.
The empty water bucket must still be installed
for the dehumidifier to operate.
Attach hose prior to initial operation.
First, remove the drain hole cover on the rear
grille. Use needlenose pliers to pull the drain
hole cover out. Figure 2.
Next, connect a garden hose to the threaded
end of the drain hose connection, being careful
not to overtighten the hose.
Slide out the bucket. Look into the dehumidifier
drain hole on the rear grill. You will see the
stem that the drain hose connector fits into.
Push the connector firmly into the stem.
Make sure that the garden hose is not bent or
kinked. The hose should lie flat from the
dehumidifier to the drain.
When not in use, the drain hose connector can
be stored in the water bucket.
Lift the cover off the water bucket and place the
connector into the V shape grooves directly
below the bucket handle.
An optional drain hose (#9181) is available for
purchase through Sears Retail stores.
Figure 1
2
2
DRAIN HOLE COVER
1
2
(OPTIONAL)
DRAIN HOSE
CONNECTOR
3
2
TAKE OUT
INSERT
4
(OPTIONAL)
DRAIN HOSE
CONNECTOR
Figure 2
- 8 -
 Loading...