

Page 1

LCD TV
OWNER’S MANUAL
LCD TV MODELS
22LF15R
26LF15R
32LF15R
Please read this manual carefully before operating your
TV.
Retain it for future reference.
Record model number and serial number of the TV.
Refer to the label on the back cover and quote this
information.
To your dealer when requiring any service.
ENGLISH
Page 2

Page 3
1
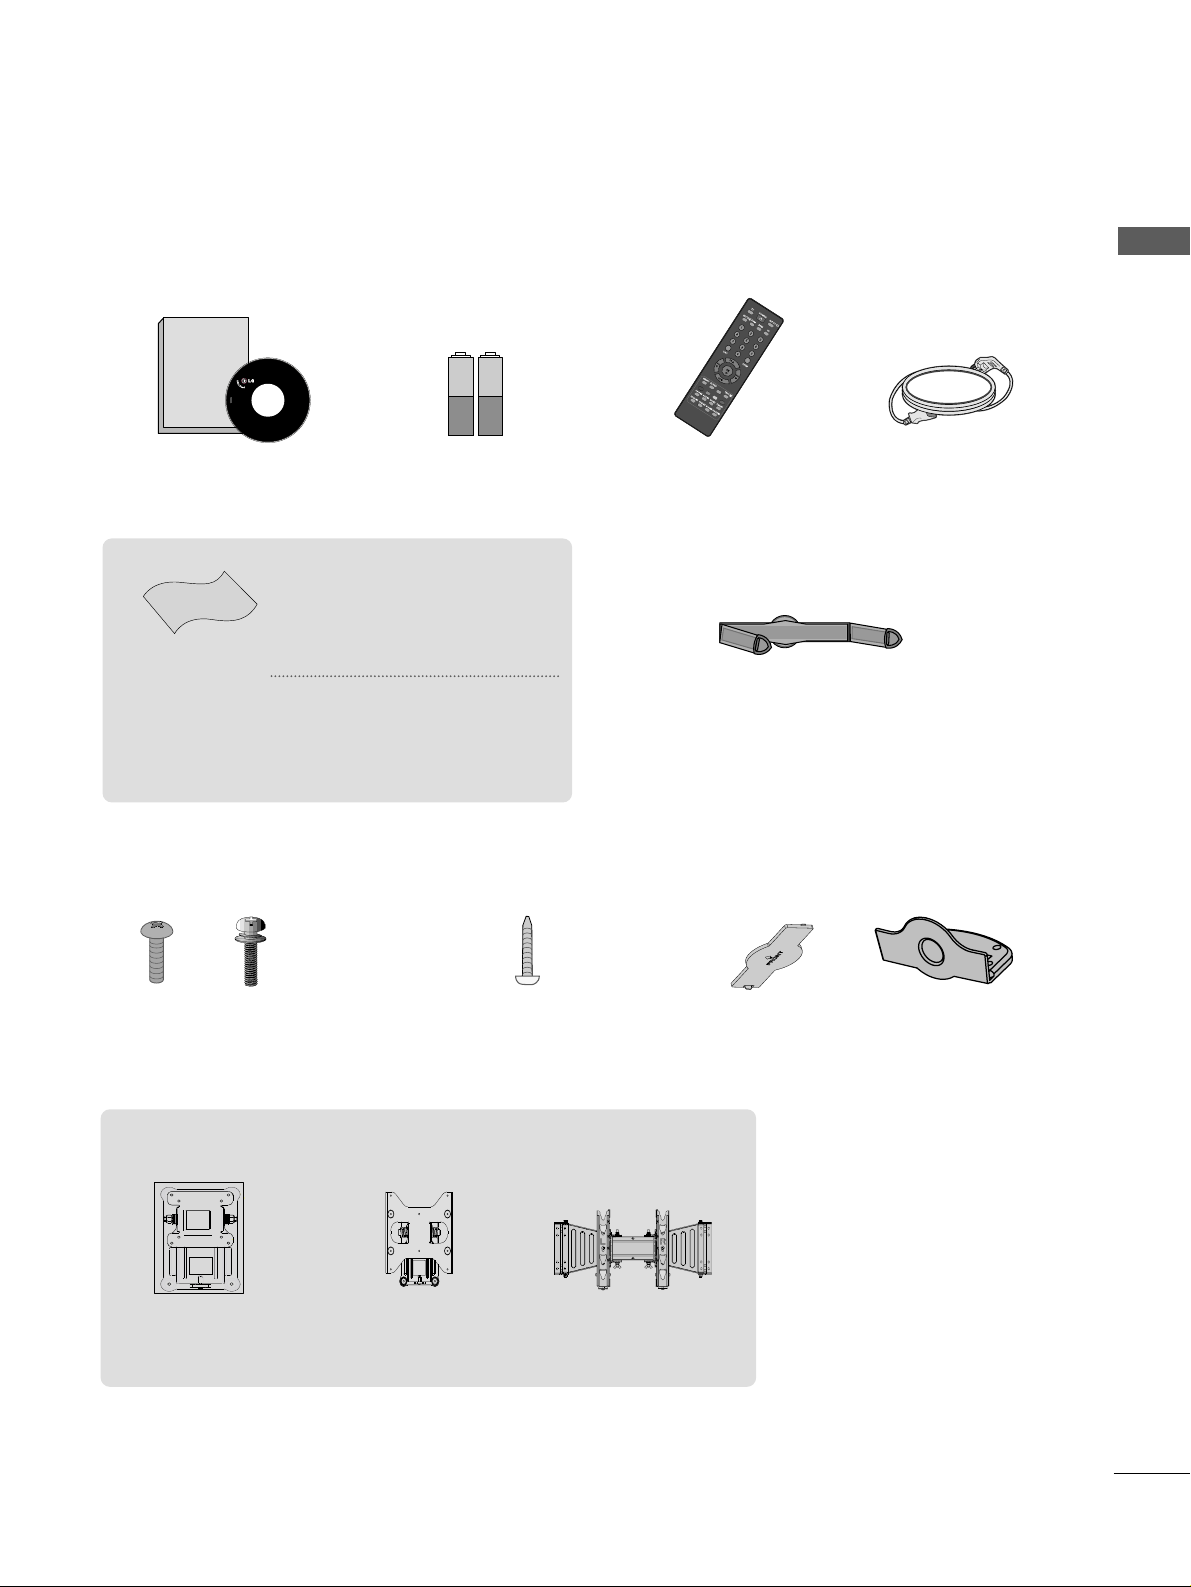
Ensure that the following accessories are included with your TV. If an accessory is missing, please contact the
dealer where you purchased the product.
■
Image shown may differ from your TV.
Owner's
Manual
Owner’s manual
Owner’s Manual Batteries
Power Cord
Polishing Cloth
Polishing cloth for use
on the screen
This feature is not
available
for all models.
*Lightly wipe any stains or
fingerprints on the surface
of the TV with the polishing
cloth.
Do not use excessive force.
This may cause scratching or
discolouration.
Bolts for stand assembly
(Refer to p.7)
(Except for 22LF15R)
x 4 x 4
Screw for stand fixing
(Refer to p. 8)
(Except for 22LF15R)
ACCESSORIES
RA
TIO
Remote Control
Cable Management Clip
(Refer to p. 10)
(Only 22LF15R)
Protection Cover
(Refer to p. 13)
or
Wall Mounting Bracket(Separate purchase)
AW-47LG30M
(Only 32LF15R)
(Only 22LF15R)
RW120
(Only 26LF15R)
RW230
ACCESSORIES
Page 4

Picture Size (Aspect Ratio)Control .........................41
Preset Picture Settings
- Picture Mode-Preset............................................43
- Auto Colour Tone Control(Cool/Medium/Warm)
44
Manual Picture Adjustment
- Picture Mode-User Option................................45
- Colour Tone - User Option...............................46
-
Picture Improvement Technology
...................47
Advanced - Gamma......................................................48
Advanced - Film Mode ................................................49
Advanced - Black(Darkness) Level...........................50
Advanced - Eye Care ...................................................51
Picture Reset..................................................................52
Power Indicator ............................................................53
Factory Reset.................................................................54
Remote Control Key Functions..................................28
Turning on the TV....................................................... 30
Programme Selection ................................................. 30
Volume Adjustment......................................................30
On Screen Menus Selection and Adjustment.......31
PICTURE CONTROL
WATCHING TV / PROGRAMME CONTROL
AACCCCEESSSSOORRIIEESS
.....................................................1
2
CONTENTS
CONTENTS
Front Panel Controls................................................... 4
Back Panel Information .............................................. 5
Stand Installation..........................................................7
Careful Installation Adivice
. . . . . . . . . . . . . . . . . . . .9
Back Cover for Wire Arrangement......................... 10
Swivel Stand................................................................ 11
Positioning your display ............................................11
Kensington Security System ....................................11
Desktop Pedestal Installation................................. 12
Wall Mount: Horizontal installation....................... 12
Not using the desk-type stand................................13
Antenna Connection ................................................ 14
PREPARATION
EXTERNAL EQUIPMENT SETUP
HD Receiver Setup .......................................................15
DVD Setup..................................................................... 17
VCR Setup ..................................................................... 19
Headphone SETUP.......................................................21
Other A/V Source Setup .......................................... 22
External Stereo Setup..................................................23
AV Output Setup ........................................................ 24
Screen Setup ................................................................26
Auto Programme Tuning............................................ 32
Manual Programme Tuning ....................................... 33
Fine Tuning .....................................................................34
Assigning a Station Name ..........................................35
Booster............................................................................36
Programme Edit ........................................................... 37
Favourite Programme.................................................. 38
Selecting the Programme List .................................. 39
Key lock ......................................................................... 40
Page 5

SOUND & LANGUAGE CONTROL
Auto Volume Leveler ....................................................55
Preset Sound Settings - Sound Mode ....................56
Sound Setting Adjustment - User Mode ...............57
Balance ............................................................................58
TV Speakers On/Off Setup .......................................59
Selecting Audio Out ....................................................60
I/II
- Stereo/Dual Reception....................................... 61
- NICAM Reception ....................................................... 62
- Speaker Sound Output Selection.................... 62
On-Screen Menu Language Selection
...................... 63
3
CONTENTS
APPENDIX
Troubleshooting ............................................................71
Maintenance .................................................................73
Product Specifications ................................................74
IR Codes ....................................................................... 75
TIME SETTING
Clock Setup .....................................................................64
Auto On/Off Timer Setting .........................................65
Sleep Timer Setting .......................................................66
Auto Shut-off Setting...................................................67
TELETEXT
Switch On/Off .............................................................68
SIMPLE Text ...................................................................68
TOP Text .........................................................................69
FASTEXT .........................................................................69
Special Teletext Functions..........................................70
Page 6
4
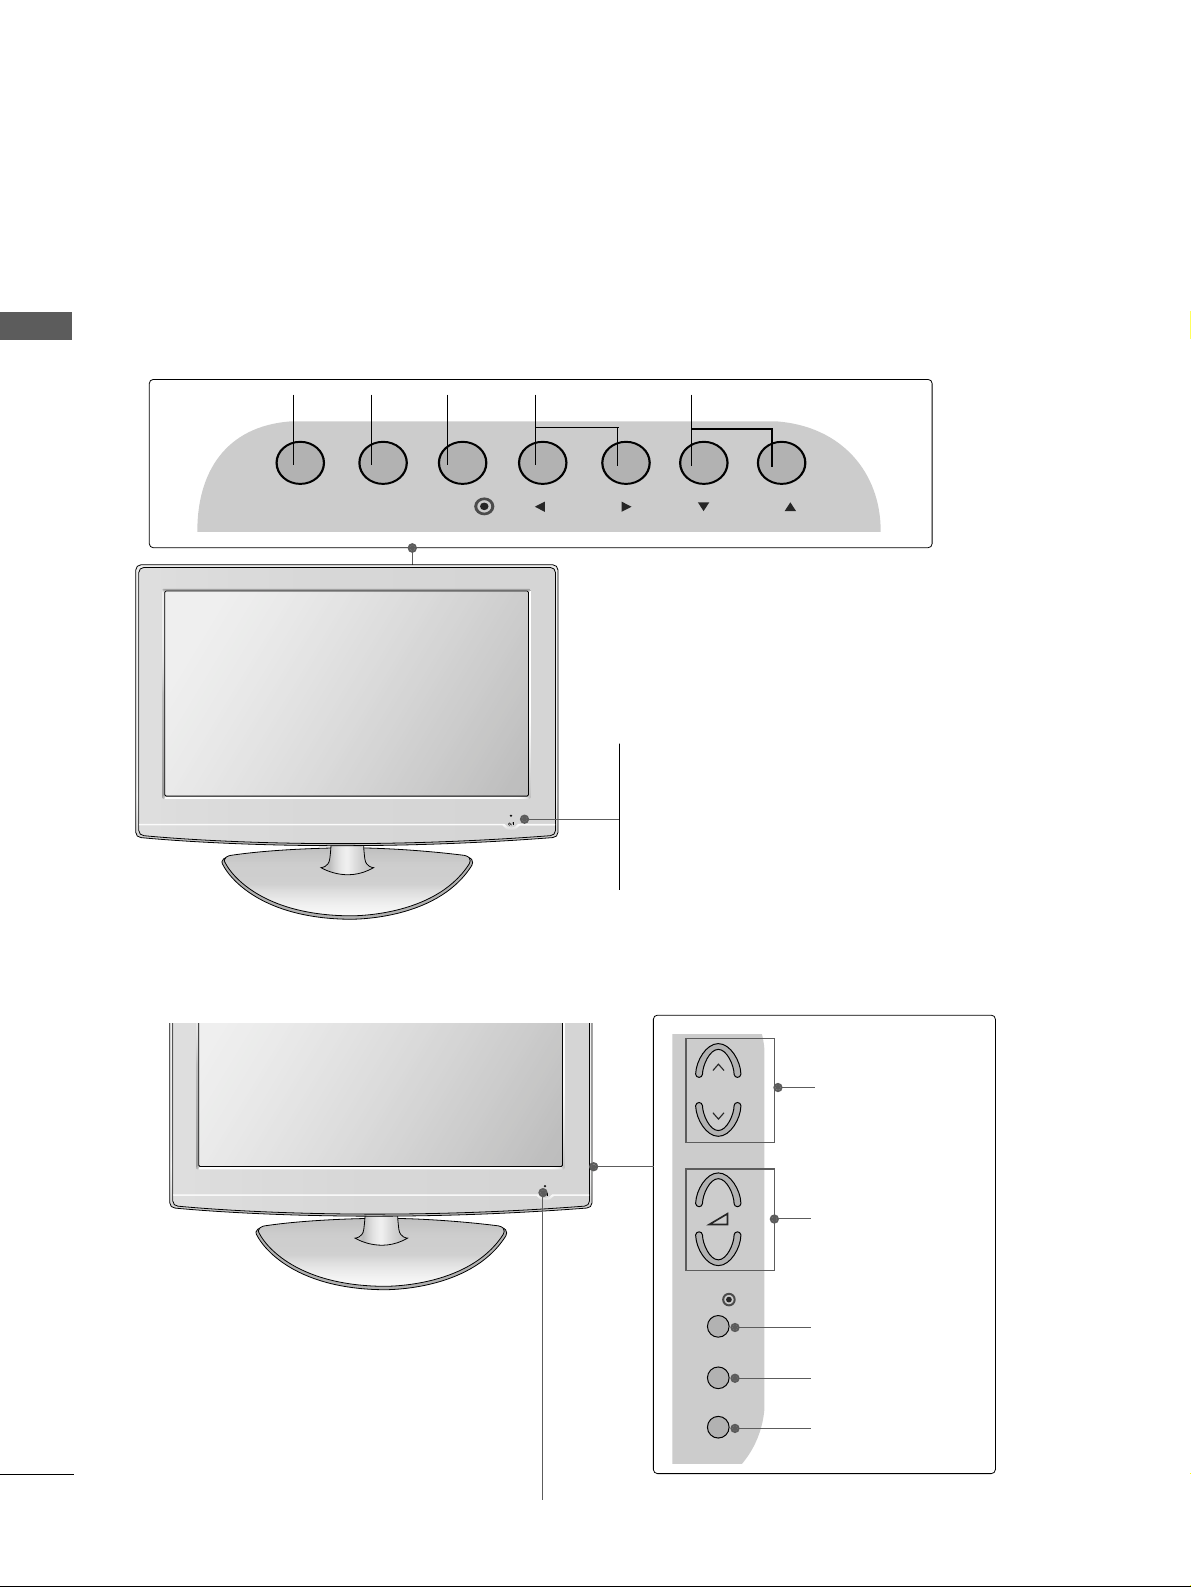
FRONT PANEL CONTROLS
PREPARATION
PREPARATION
■
This is a simplified representation of the front panel. Image shown may differ from your TV.
■
If your product has a protection film attached, remove the film and then wipe the product with a polishing
cloth.
PROGRAMMEVOLUME
MENU
OK
INPUT
22LF15R
26/32LF15R
POWER
Remote Control Sensor
Power/Standby Indicator
• illuminates red in standby mode.
• illuminates blue when the TV is switched on.
POWER
Remote Control Sensor
Power/Standby Indicator
• illuminates red in standby mode.
• illuminates blue when the TV is switched on.
Note: You can adjust
PPoowweerr IInnddiiccaattoorr
in
the
OPTION menu.
P
MENU
INPUT
OK
+
-
PROGRAMME
VOLUME
OK
MENU
INPUT
INPUT MENU PRVOLOK
Page 7
5
PREPARATION
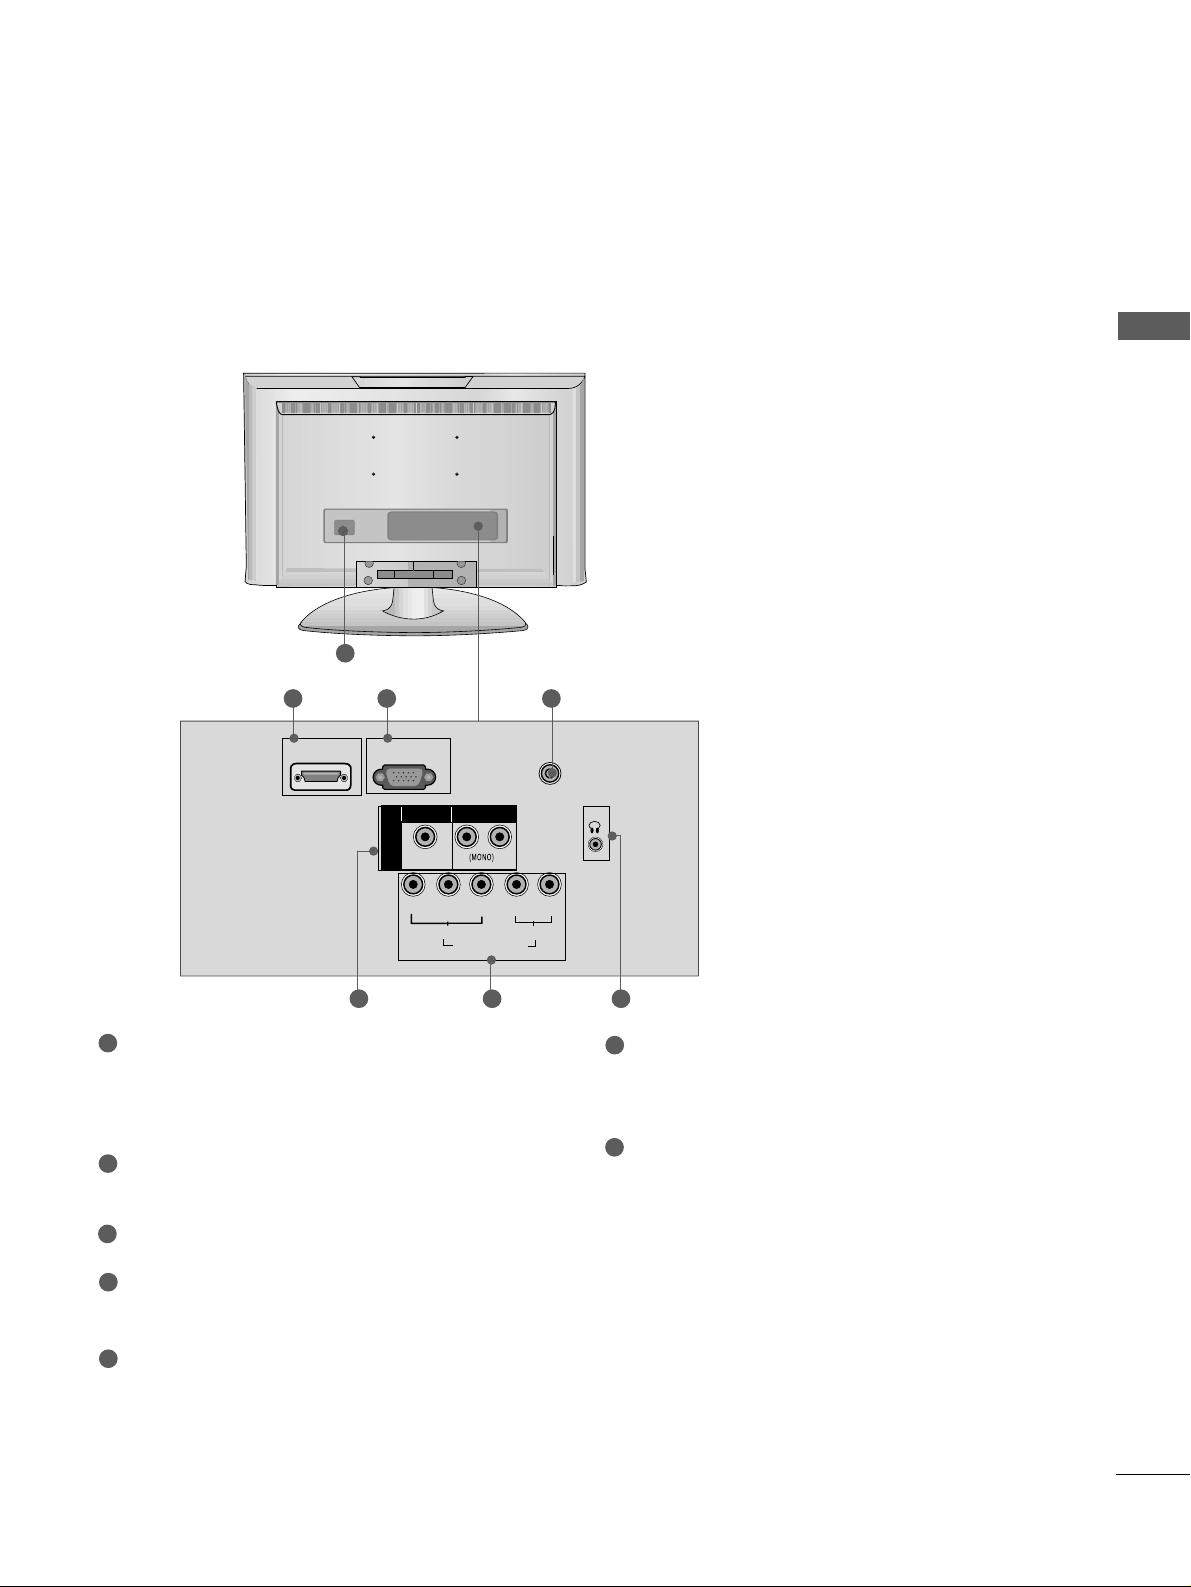
BACK PANEL INFORMATION
A
Image shown may differ from your TV.
1
SERVICE ONLY
L
R
Y
PBPRLR
VIDEO
COMPONENT IN
AUDIO
HDMI IN
H/P
ANTENNA IN
AV IN
VIDEO
AUDIO
Power Cord Socket
This TV operates on an AC power. The voltage is
indicated on the Specifications page. Never
attempt to operate the TV on DC power.
HDMI Input
Connect a HDMI signal to HDMI IN.
SERVICE ONLY PORT
Antenna Input
Connect RF antenna to this jack.
Audio/Video Input (AV IN)
Connect audio/video output from an external
device to these jacks.
Component Input
Connect a component video/audio device to
these jacks.
Headphone Input
Plug the headphone into the headphone socket.
1
2
3
4
5
6
7
2 43
22LF15R
5 6 7
Page 8
6
PREPARATION
PREPARATION
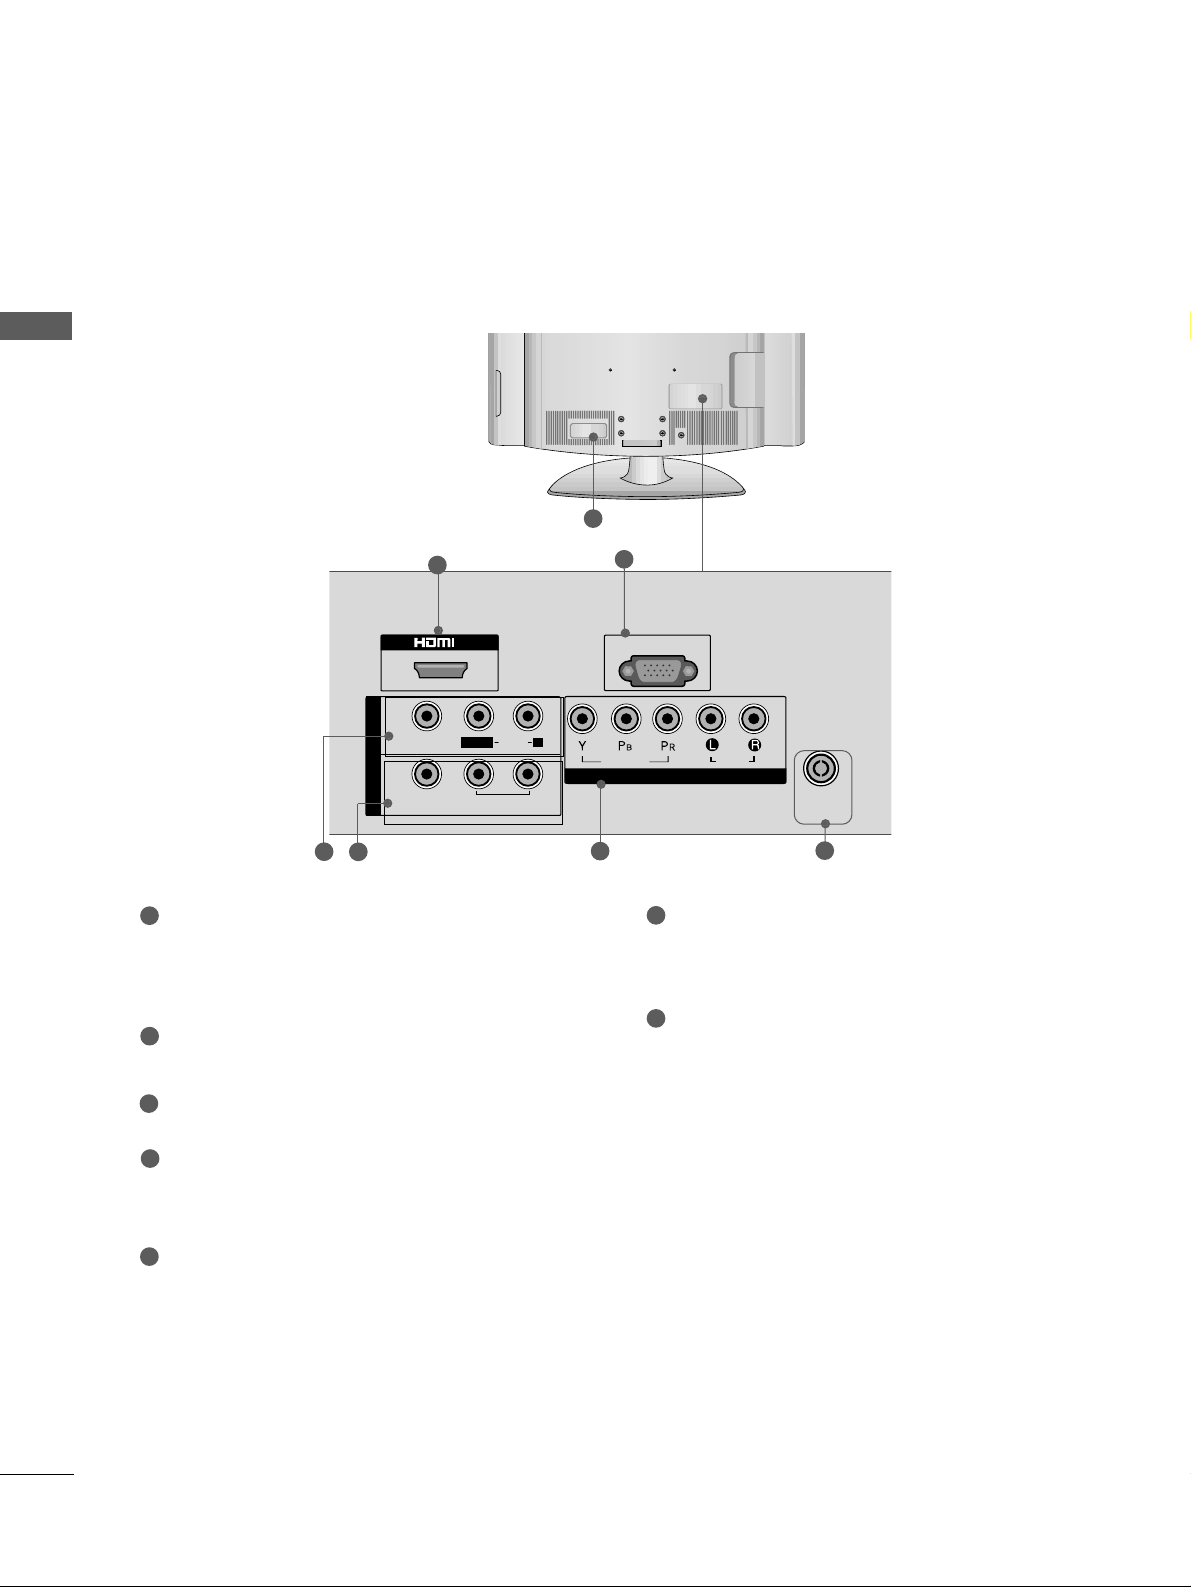
26/32LF15R
1
IN IN
SERVICE ONLY
COMPONENT INCOMPONENT IN
AUDIO
VIDEO
AUDIOAUDIO
ANTENNA
IN
AV
VIDEOVIDEO
IN
OUT
VARIABLE VARIABLE
AUDIO OUTAUDIO OUT
L( MONO)
R
3
2
6
4
Power Cord Socket
This TV operates on an AC power. The voltage is
indicated on the Specifications page. Never
attempt to operate the TV on DC power.
HDMI Input
Connect a HDMI signal to HDMI IN.
SERVICE ONLY PORT
Audio/Video Input (AV IN)
Connect audio/video output from an external
device to these jacks.
AV Output
Connect second TV or monitor to the AV OUT
socket on the
TV.
Variable Audio Output
Connect an external amplifier or add a subwoofer
to your surround sound system.
Component Input
Connect a component video/audio device to
these jacks.
Antenna Input
Connect RF antenna to this jack.
1
2
3
4
5
6
7
5
7
Page 9
7
PREPARATION
■
Image shown may differ from your TV
■
When assembling the desk type stand, check whether the bolt is fully tightened. (If not tightened fully, thep
roduct can tilt forward after the product installation.) If you tighten the bolt with excessive force, the boltcan
deviate from abrasion of the tightening part of the bolt.
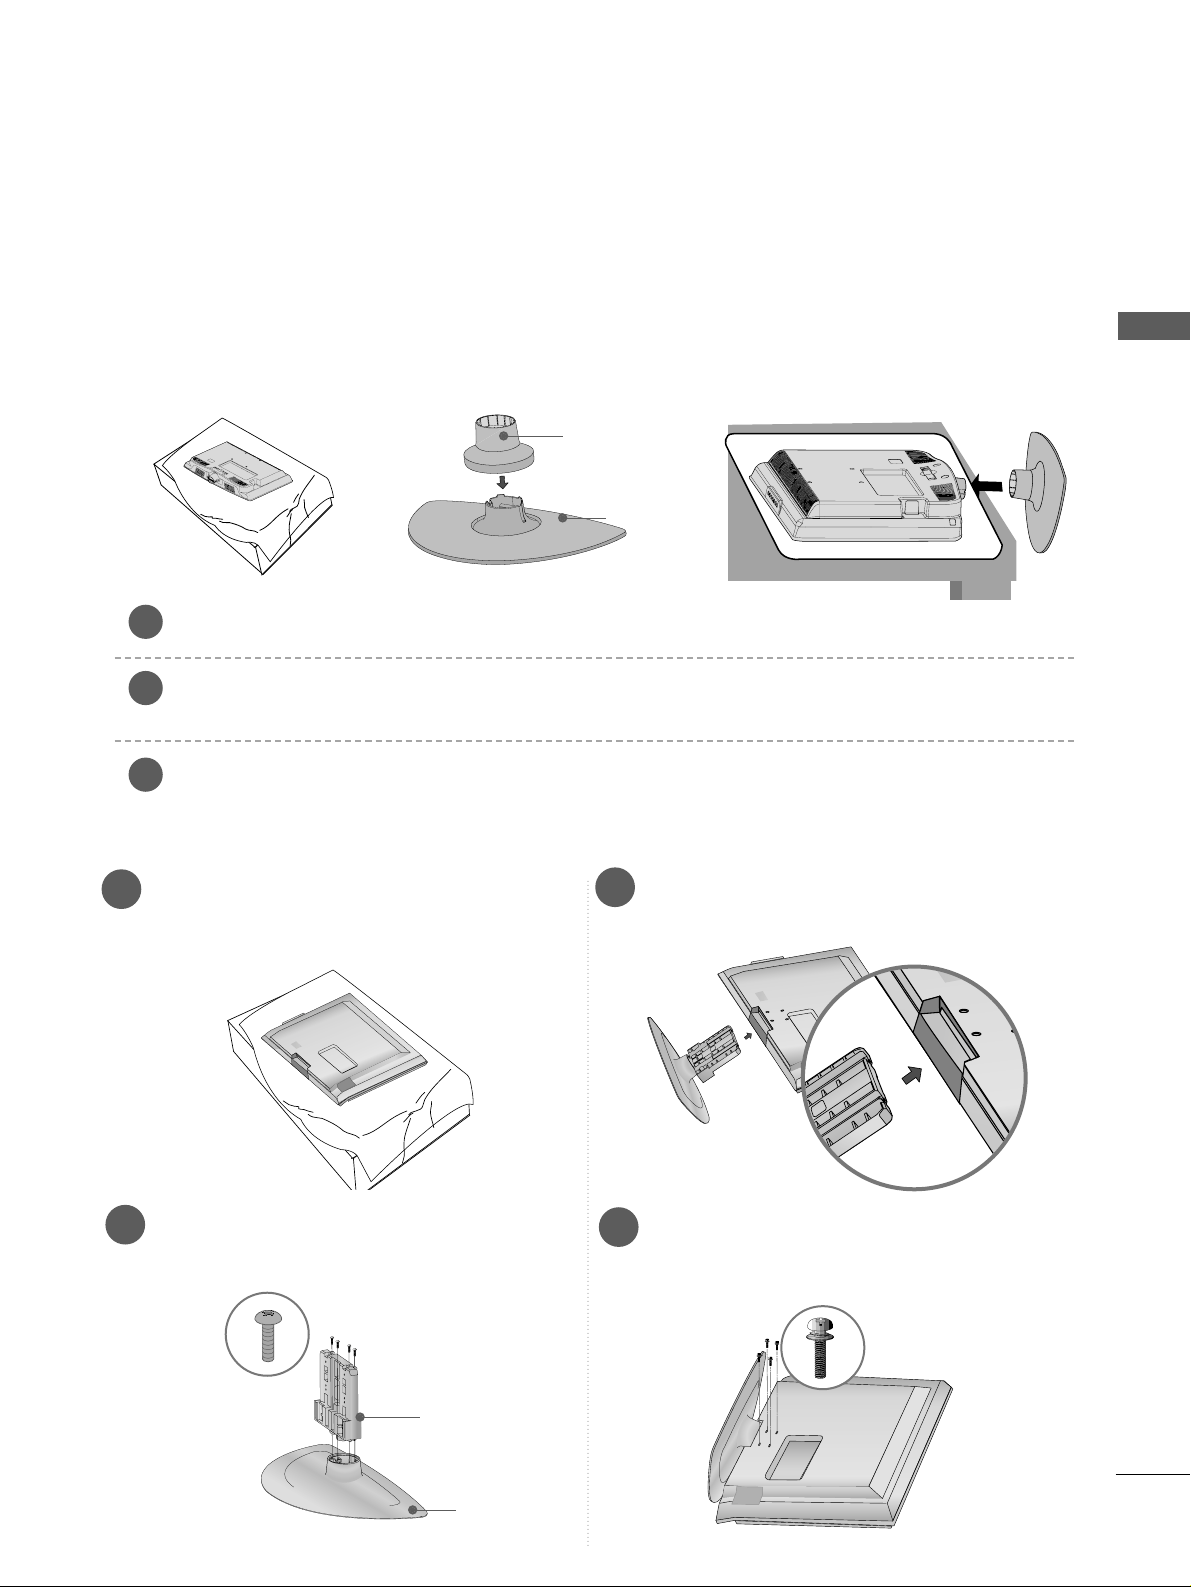
STAND INSTALLATION
22LF15R
Carefully place the TV screen side down on a cushioned surface to protect the screen from damage.
Assemble the parts of the
SSttaanndd BBooddyy
with
SSttaanndd BBaass ee
of the TV. Insert the
SSttaanndd BBooddyy
into a
SSttaanndd BBaassee
until clicking sound.
Assemble the TV as shown.
1
2
3
Stand Body
Stand Base
1
3
4
Carefully place the TV screen side down on a
cushioned surface to protect the screen from
damage.
2
Assemble the parts of the
SSttaann dd BB ooddyy
with
the
SSttaann dd BB aass ee
of the TV.
Assemble the TV as shown.
Fix the 4 bolts securely using the holes in the
back of the TV.
26/32LF15R
Stand Body
Stand Base
Page 10
8
PREPARATION
PREPARATION
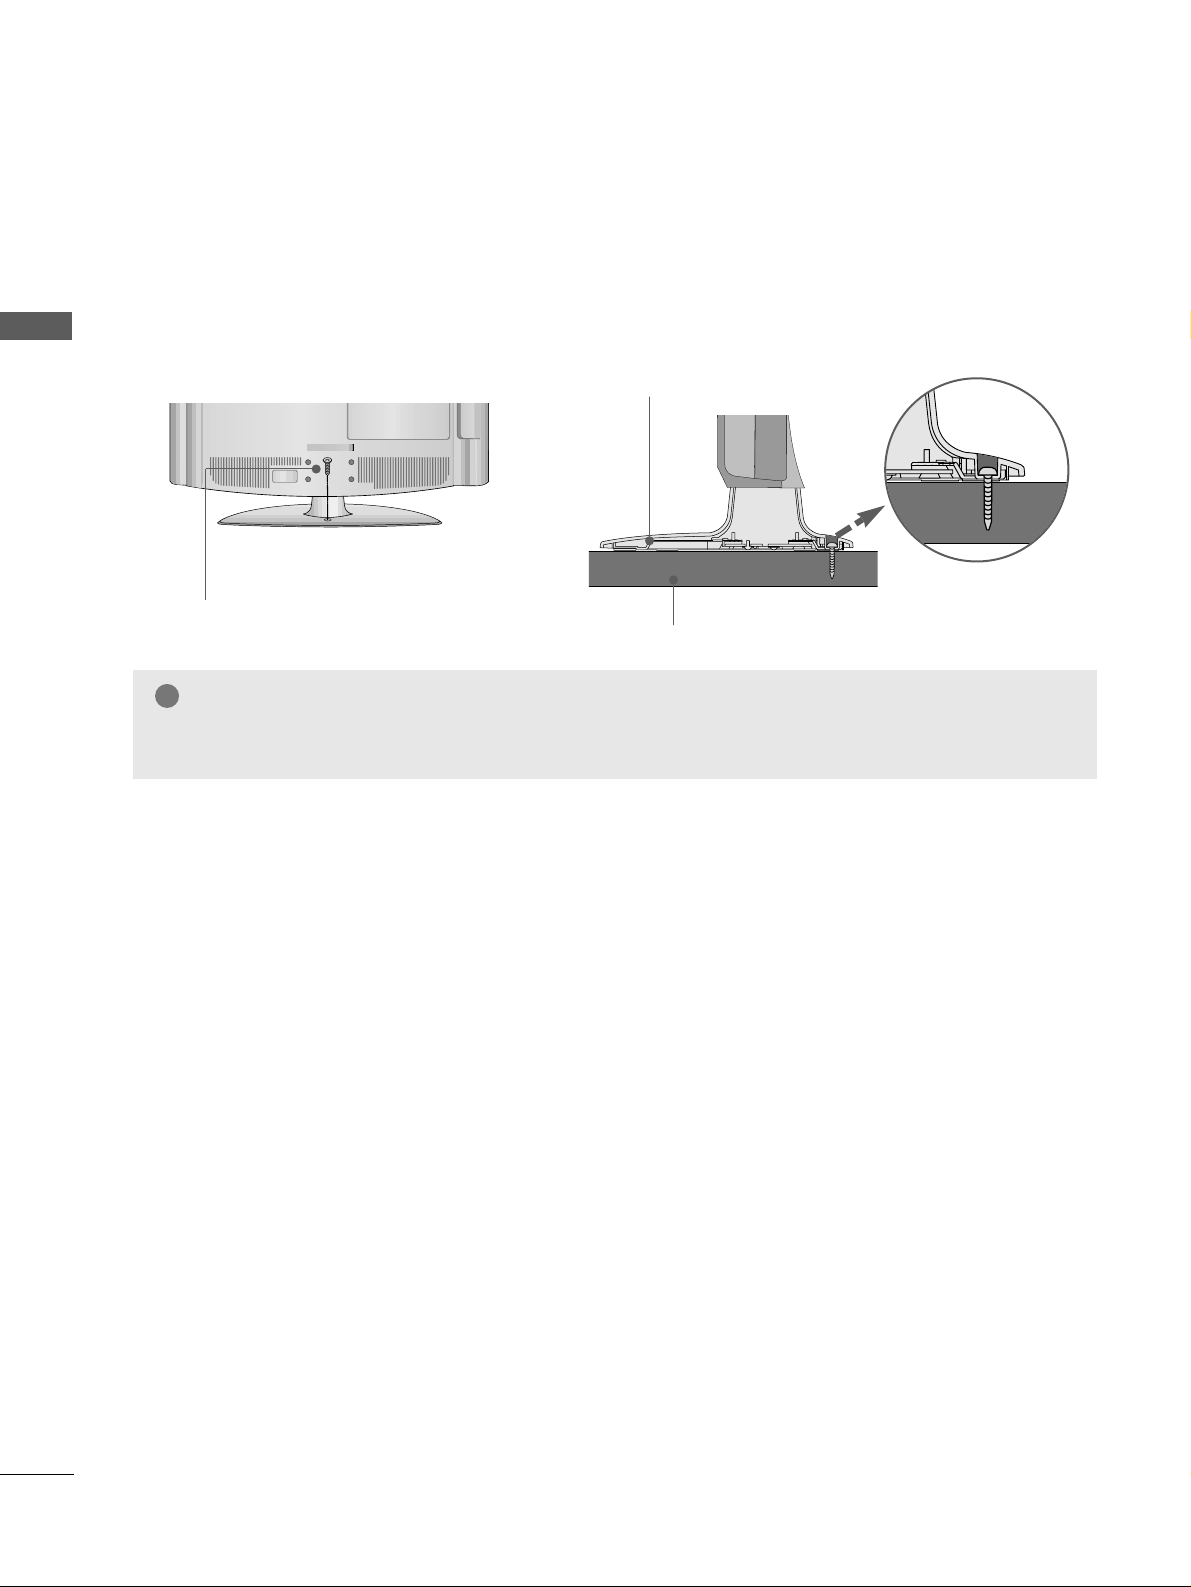
Attaching the TV to a desk (Except for 22LF15R)
The TV must be attached to desk so it cannot be pulled in a forward/backward direction, potentially causing
injury or damaging the product. Use only an attached screw.
1-Screw
(provided as parts of the product)
Desk
Stand
WARNING
!
GG
To prevent TV from falling over, the TV should be securely attached to the floor/wall per installation
instructions. Tipping, shaking, or rocking the machine may cause injury.
Page 11
9
PREPARATION
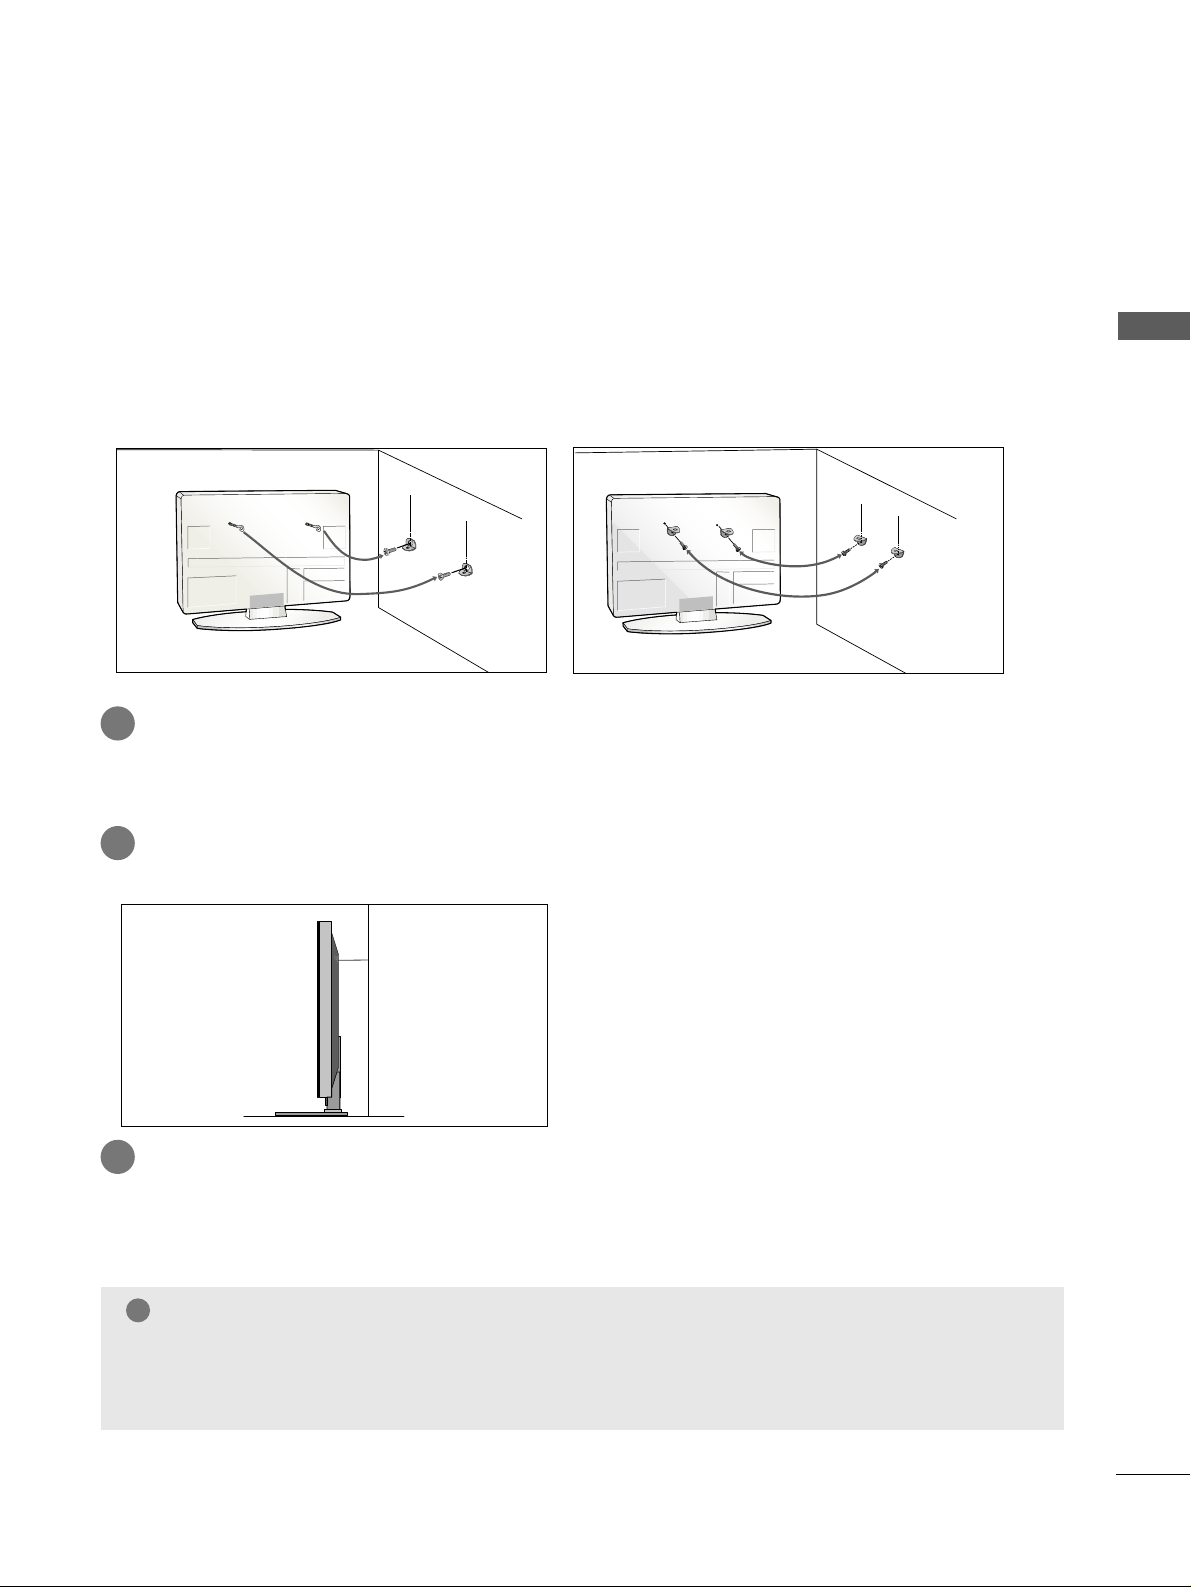
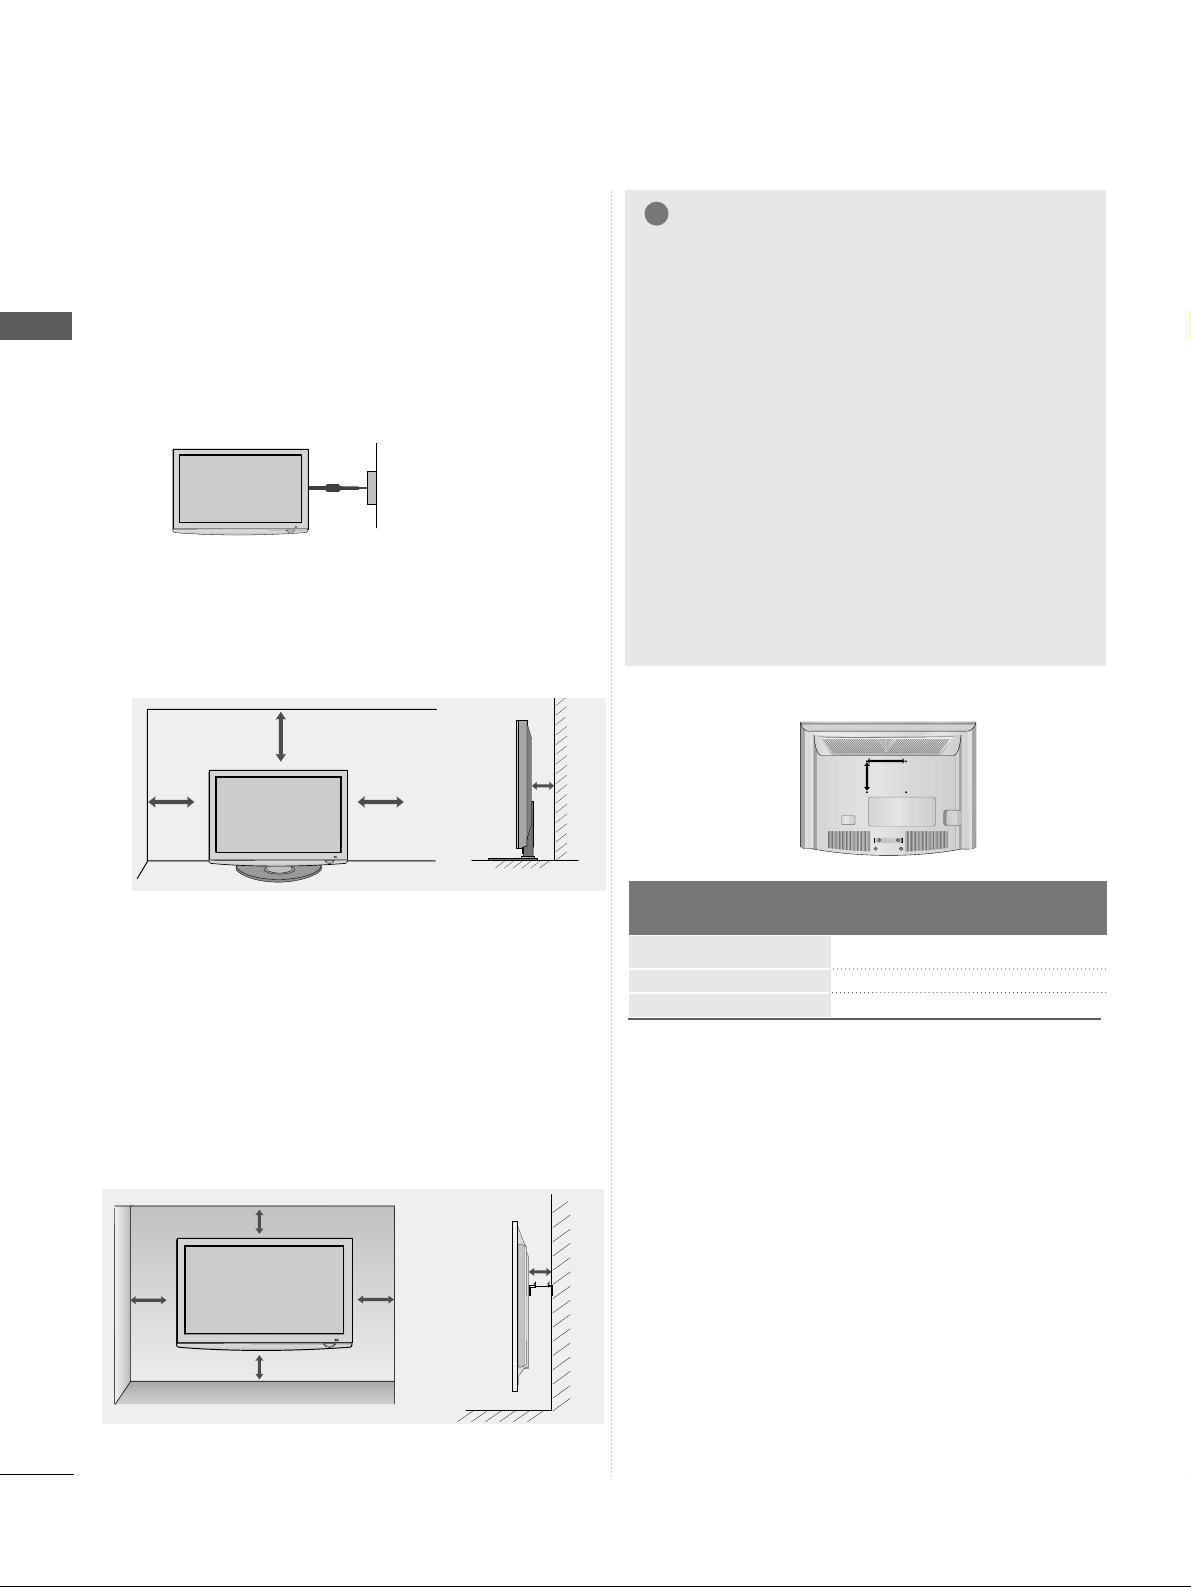
CAREFUL INSTALLATION ADVICE
A
You should purchase necessary components to fix the TV safety and secure to the wall from a hardware supplier.
A
Position the TV close to the wall to avoid the possibility of it falling when pushed.
A
The instructions shown below are a safer way to set up the TV, by fixing it to the wall, avoiding the possibility
of it falling forwards if pulled. This will prevent the TV from falling forward and causing injury. This will also prevent the TV from damage. Ensure that children do not climb or hang from the TV.
NOTE
!
G
When moving the TV undo the cords first.
G
Use a platform or cabinet strong and large enough to support the size and weight of the TV.
G
To use the TV safely make sure that the height of the bracket on the wall and on the TV is the same.
3
1
2
Use the eye-bolts or TV brackets/bolts to fix the product to the wall as shown in the picture.
(If your TV has bolts in the eyebolts, loosen then bolts.)
* Insert the eye-bolts or TV brackets/bolts and tighten them securely in the upper holes.
Secure the wall brackets with the bolts on the wall. Match the height of the bracket that is mounted on the
wall.
3
Use a sturdy rope or wire to tie the product for alignment. It is safer to tie the rope so it becomes horizontal between the wall and the product.
2
1
2
1
Page 12
10
PREPARATION
PREPARATION
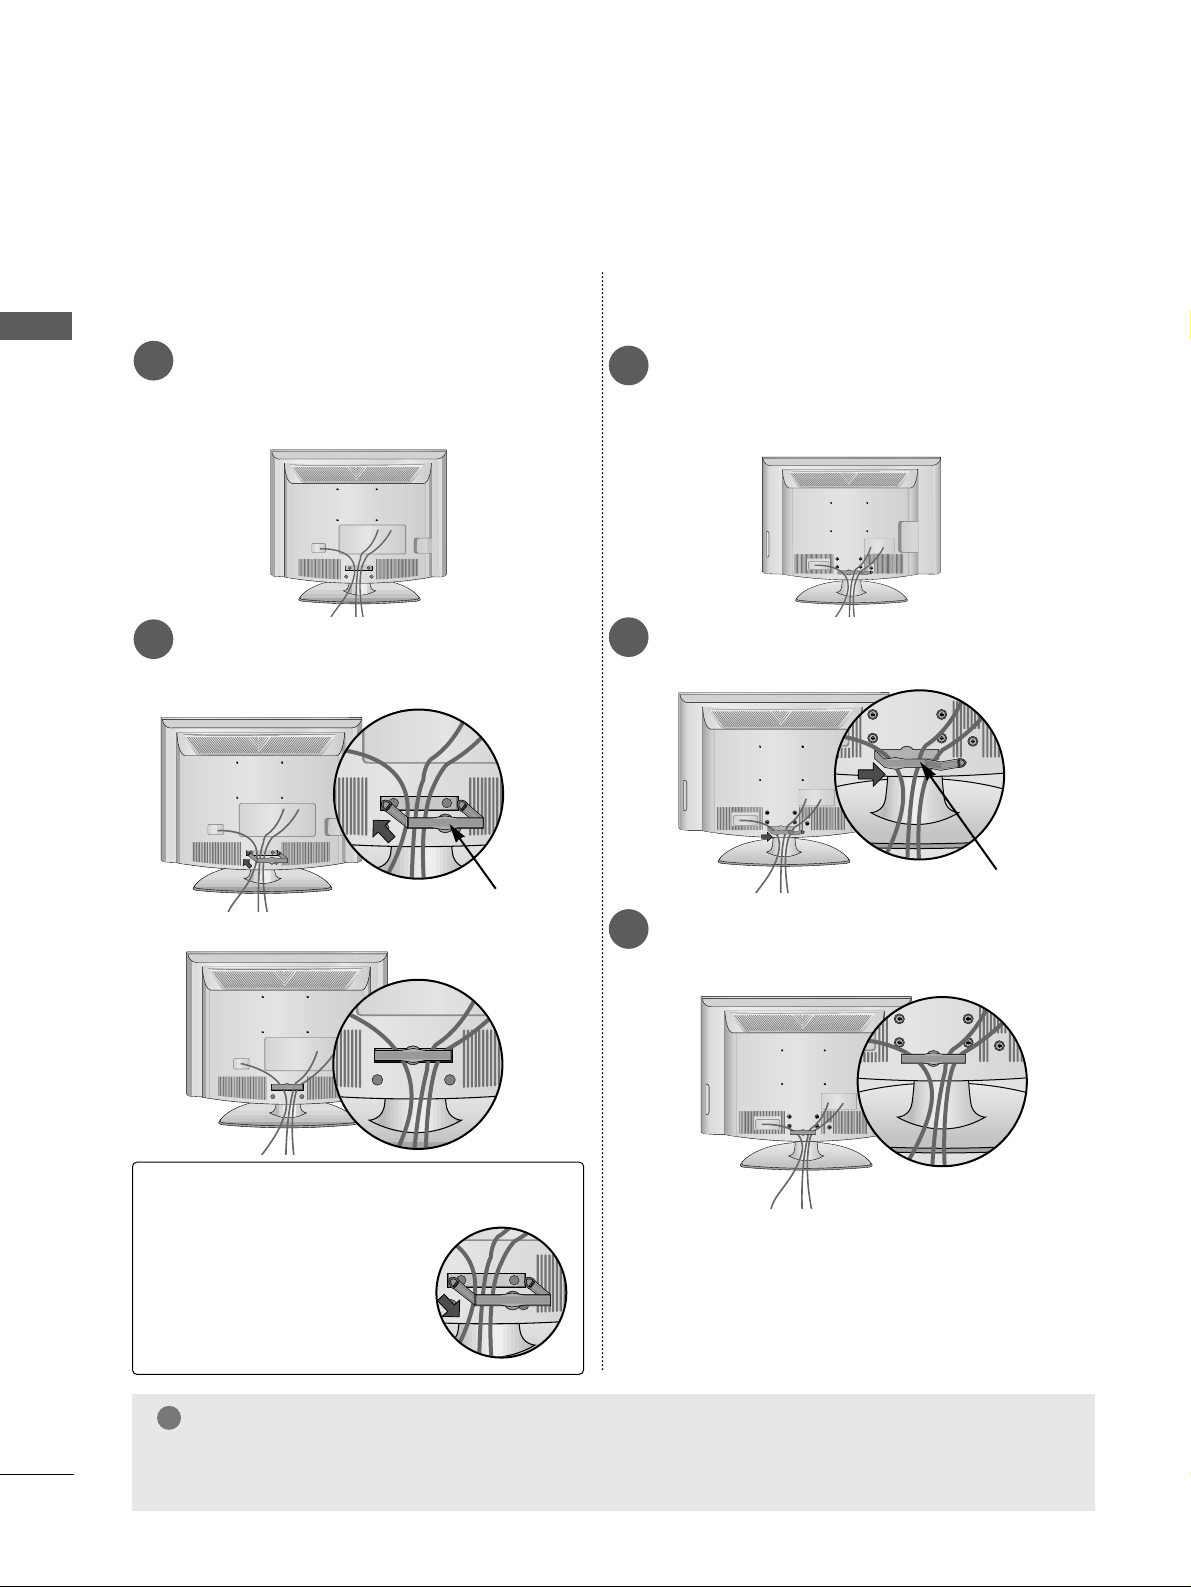
BACK COVER FOR WIRE ARRANGEMENT
■
Here shown may be somewhat different from your TV.
Connect the cables as necessary.
To connect additional equipment, see the
External Equipment Setup section of the
manual.
1
Install the
CCAABB LLEE MMAANNAAGG EEMMEENNTT CCLLIIPP
as
shown.
2
CABLE MANAGEMENT CLIP
NOTE
!
GG
Do not use the CABLE MANAGEMENT CLIP to lift the TV.
- If the TV is dropped, you may be injured or the TV may be damaged.
How to remove the CABLE MANAGEMENT CLIP
GG
Hold the CABLE MANAGE-
MENT CLIP with both hands
and pull it backward.
22LF15R
26/32LF15R
Connect the cables as necessary.
To connect additional equipment, see the
External Equipment Setup section of the
manual.
1
Open the
CCAABBLLEE MM AANNAAGGEEMMEE NN TT CCLL II PP
as
shown and manage the cables.
2
CABLE MANAGEMENT CLIP
Fit the
CCAABBLLEE MM AANNAAGGEEMMEE NN TT CCLL II PP
as
shown.
3
Page 13

11
PREPARATION
SWIVEL STAND
(Except for 22LF15R)
After installing the TV, you can adjust the TV manually
to the left or right direction by 20 degrees to suit your
viewing position.
POSITIONING YOUR DISPLAY (Only 22LF15R)
■
Image shown may differ from your TV.
■
Adjust the position of the panel in various ways for
maximum comfort.
• Tilt range
12
1.5
3
1.5
KENSINGTON SECURITY SYSTEM
(This feature is not available for all models.)
The TV is equipped with a Kensington Security System connector on the back panel. Connect the Kensington
Security System cable as shown below.
For the detailed installation and use of the Kensington Security System, refer to the user’s guide provided with
the Kensington Security System.
For further information, contact http://www.kensington.com, the internet homepage of the Kensington
company. Kensington sells security systems for expensive electronic equipment such as notebook PCs and LCD
projectors.
NOTE
- The Kensington Security System is an optional accessory.
NOTES
a. If the TV feels cold to the touch, there may be a small “flicker”
when when it is turned on.
This is normal, there is nothing wrong with TV.
b. Some minute dot defects may be visible on the screen, appear-
ing as tiny red, green, or blue spots. However, they have no
adverse effect on the monitor's performance.
c. Avoid touching the LCD screen or holding your finger(s)
against it for long periods of time.
Doing so may produce some temporary distortion effects on
the screen.
Page 14
12
PREPARATION
PREPARATION
4 inches
4 inches
4 inches
4 inches
DESKTOP PEDESTAL INSTALLATION
For adequate ventilation allow a clearance of 4”
(10cm) all around the TV.
A
The TV can be installed in various ways such as on
a wall, or on a desktop etc.
A
The TV is designed to be mounted horizontally.
Power Supply
Circuit breaker
EARTHING
Ensure that you connect the earth wire to prevent
possible electric shock. If grounding methods are not
possible, have a qualified electrician install a separate
circuit breaker.
Do not try to earth the TV by connecting it to telephone wires, lightening rods or gas pipes.
WALL MOUNT: HORIZONTAL INSTALLATION
A
We recommend the use of a LG Brand wall mounting
bracket when mounting the TV to a wall.
A
We recommend that you purchase a wall mounting
bracket which supports VESA standard.
A
LG recommends that wall mounting be performed by a
qualified professional installer.
NOTE
!
G Should Install wall mount on a solid wall perpendicular to
the floor.
G Should use a special wall mount, if you want to install it to
ceiling or slanted wall.
G The surface that wall mount is to be mounted on should
be of sufficient strength to support the weight of TV set;
e.g. concrete, natural rock, brick and hollow block.
G Installing screw type and length depends on the wall
mount used. Further information, refer to the instructions
included with the mount.
G LG is not liable for any accidents or damage to property or
TV due to incorrect installation:
- Where a non-compliant VESA wall mount is used.
- Incorrect fastening of screws to surface which may cause
TV to fall and cause personal injury.
- Not following the recommended Installation method.
4 inches
4 inches
4 inches
4 inches
4 inches
Model
VESA
(A *B)
Standard
Screw
Quantity
22LF15R
26LF15R
32 LF 15 R
100 * 10 0
200 * 10 0
200 * 10 0
M4
M4
M4
4
4
4
AA
BB
Page 15
13
PREPARATION
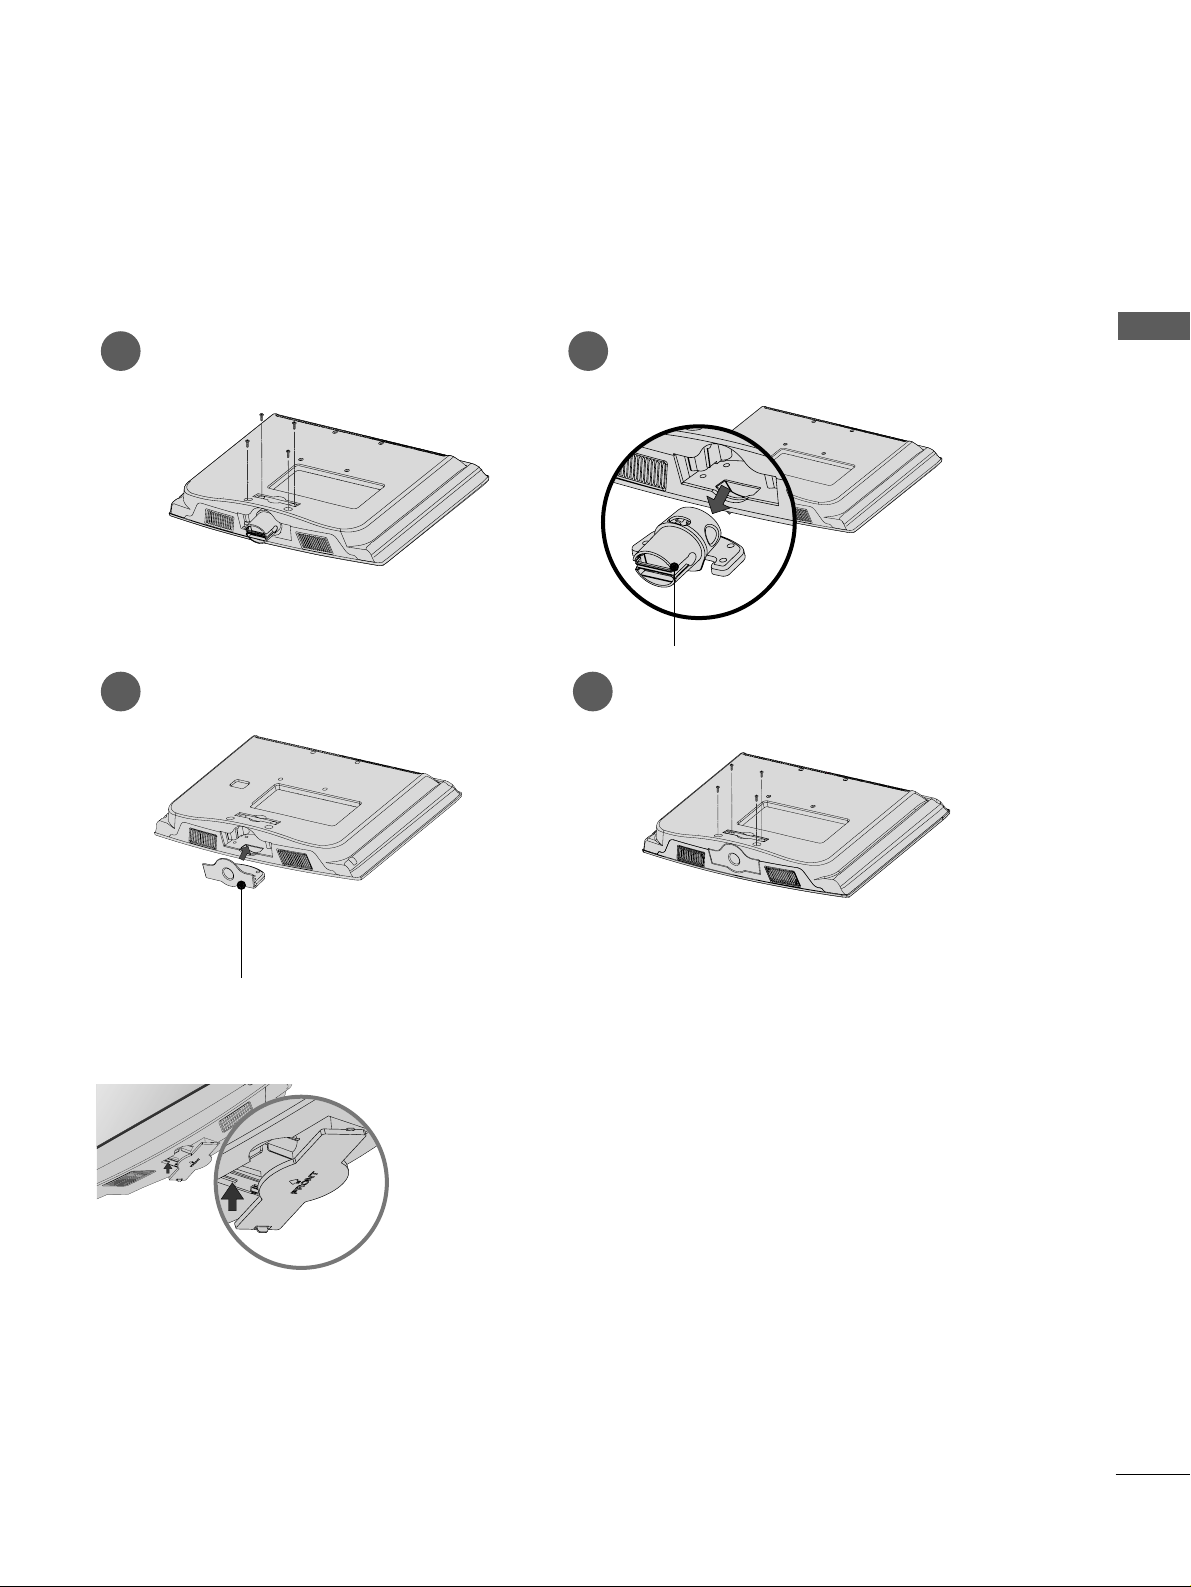
When installing the wall-mounted unit, use the protection cover.
NOT USING THE DESK-TYPE STAND
22LF15R
Loose the bolts from TV.
1
Pull the
HH II NN GGEE BB OODD YY
backward.
2
Insert the
PPRR OOTT EECCTTIIOONN CCOO VVEERR
into
the TV.
3
Fix the 4 bolts securely using the holes in
the back of the TV.
4
PPRR OOTT EECCTTIIOONN CC OOVV EERR
HH II NN GGEE BB OODD YY
26/32LF15R
Insert the PROTECTION COVER into the TV
until clicking sound.
Page 16
14
PREPARATION
PREPARATION
RGB IN
ANTENNA
IN
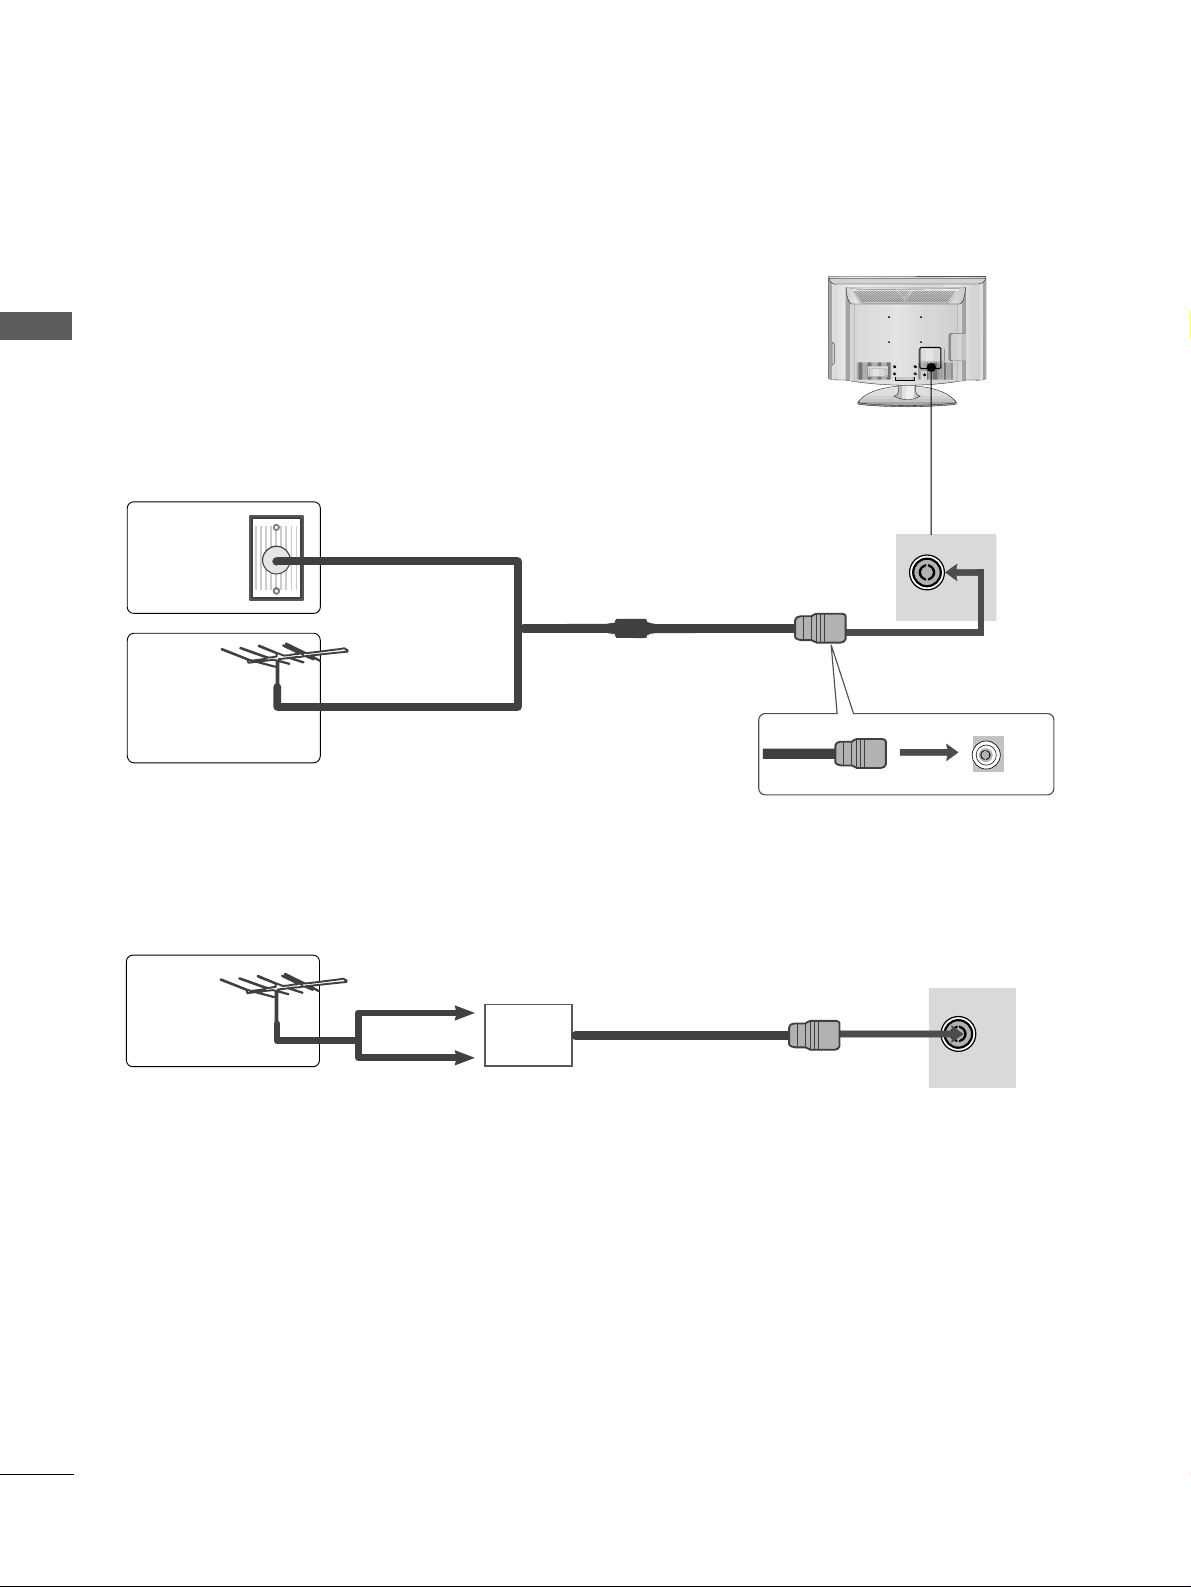
ANTENNA CONNECTION
■
For optimum picture quality, adjust
antenna direction.
■
An antenna cable and converter are
not supplied.
■
To prevent damage do not connect to the mains outlet until all connections are made between the devices.
RGB IN
ANTENNA
IN
Multi-family Dwellings/Apartments
(Connect to wall antenna socket)
Single-family Dwellings /Houses
(Connect to wall jack for outdoor antenna)
Outdoor
Antenna
Wall
Antenna
Socket
RF Coaxial Wire (75 ohm)
Antenna
UHF
Signal
Amplifier
VHF
■
In poor signal areas, to achieve better picture quality it may be necessary to install a signal amplifier to the
antenna as shown above.
■
If signal needs to be split for two TVs,use an antenna signal splitter for connection.
Page 17
15
EXTERNAL EQUIPMENT SETUP
EXTERNAL EQUIPMENT SETUP
■
To avoid damaging any equipment, never plug in any power cords until you have finished connecting all equipment.
■
Image shown may differ from your TV.
L/MONO
R
AUDIO
VIDEO
VARIABLE AUDIO OUT
HDMI IN HDMI DVI IN
HDMI/DVI IN
1
COMPONENT IN
VIDEO
AUDIO
1 2
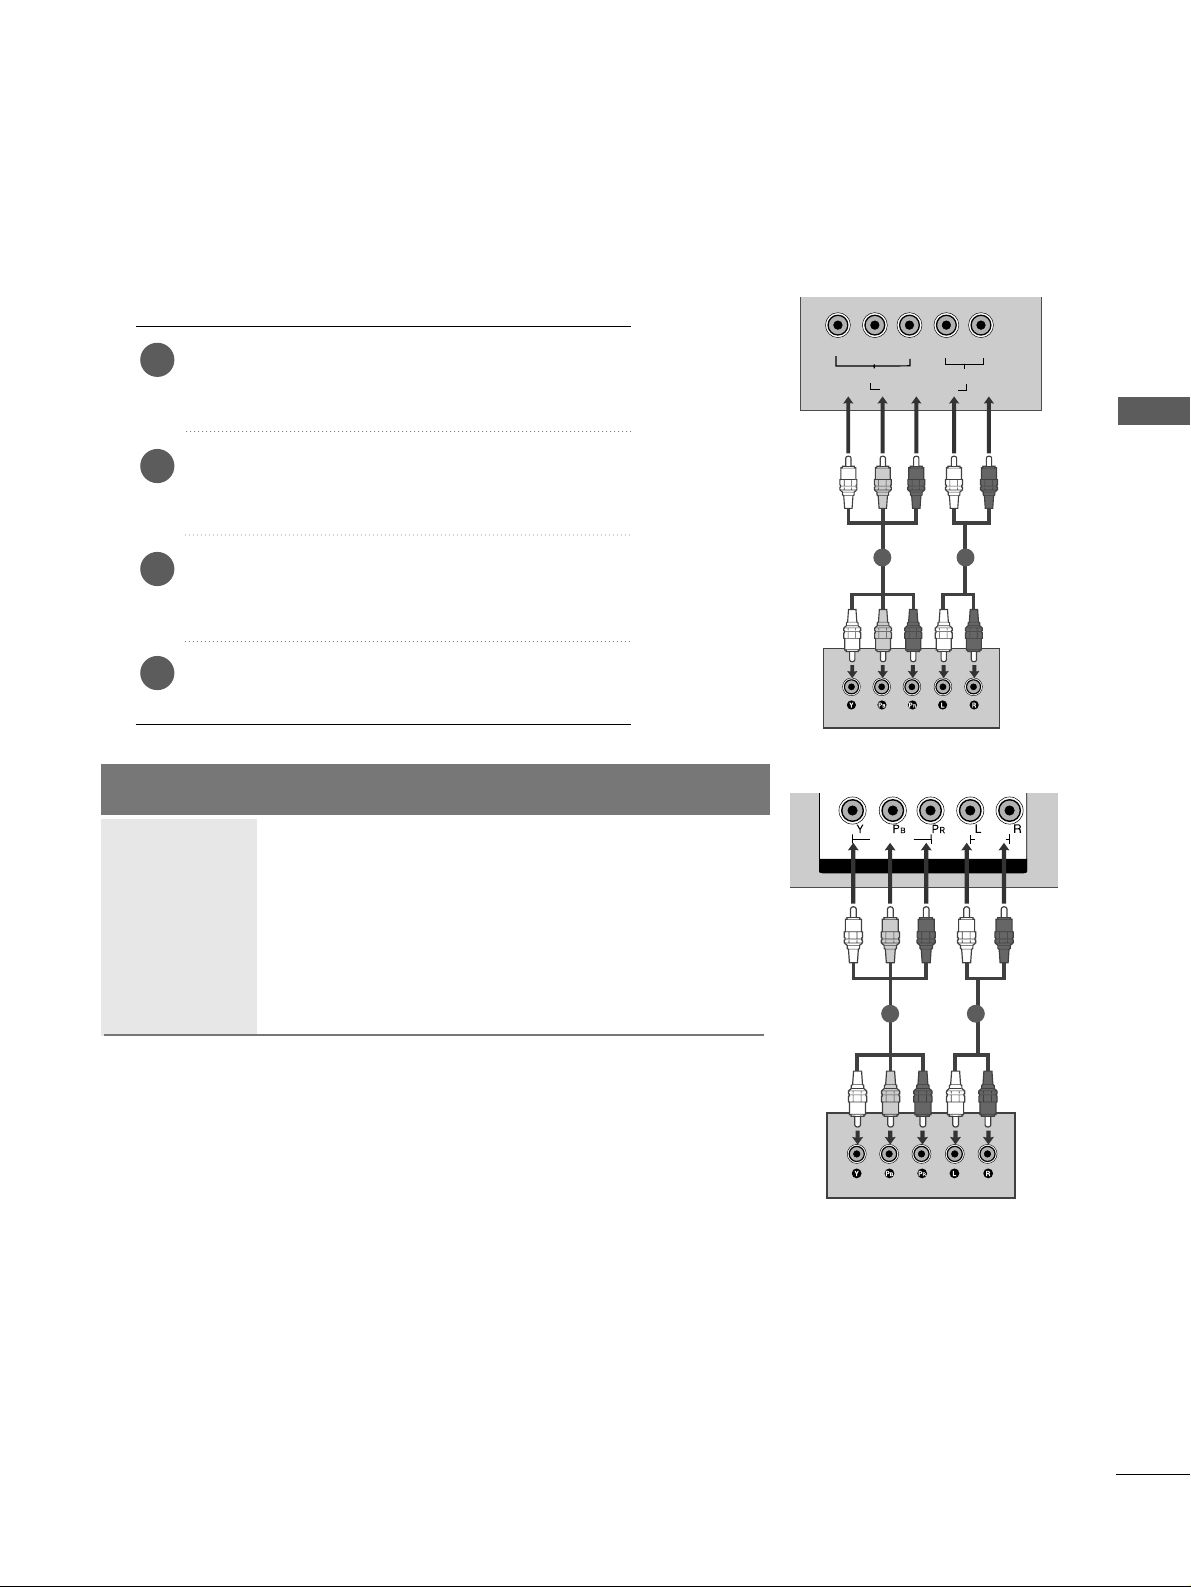
HD RECEIVER SETUP
Connecting with a component cable
Connect the video outputs (Y, PB, P
R
)
of the digi-
tal set-top box to the
CCOOMMPP OONNEENNTT II NN VVIIDDEEOO
jacks on the TV.
Connect the audio output of the digital set-top
box to the
CCOOMMPP OONNEENNTT II NN AAUUDDIIOO
jacks on
the TV.
Turn on the digital set-top box.
(
Refer to the owner’s manual for the digital set-top
box.
)
Select
CCoomm ppoonn eenntt
input source using the
IINN PP UUTT
button on the remote control.
2
3
4
1
Signal
480i/576i
480p/576p
720p/1080i
1080p
Component
Yes
Yes
Yes
Yes
(Only 50Hz, 60Hz)
HDMI
No
Yes
Yes
Yes
(22LF15R- Only 50Hz, 60Hz)
(26/32LF15R Only 24Hz, 30Hz, 50Hz, 60Hz)
Y
PBPRLR
VIDEO
COMPONENT IN
AUDIO
1 2
22LF15R
26/32LF15R
Page 18
16
EXTERNAL EQUIPMENT SETUP
EXTERNAL EQUIPMENT SETUP
L/MONO
R
AUDIOAUDIO
VIDEOVIDEO
AV
IN
OUT
VARIABLE
AUDIO OUT
L/ MONO
R
AUDIO
VIDEO
VARIABLE AUDIO OUT
HDMI IN HDMI DVI IN
HDMI/DVI IN
1
IN IN
1
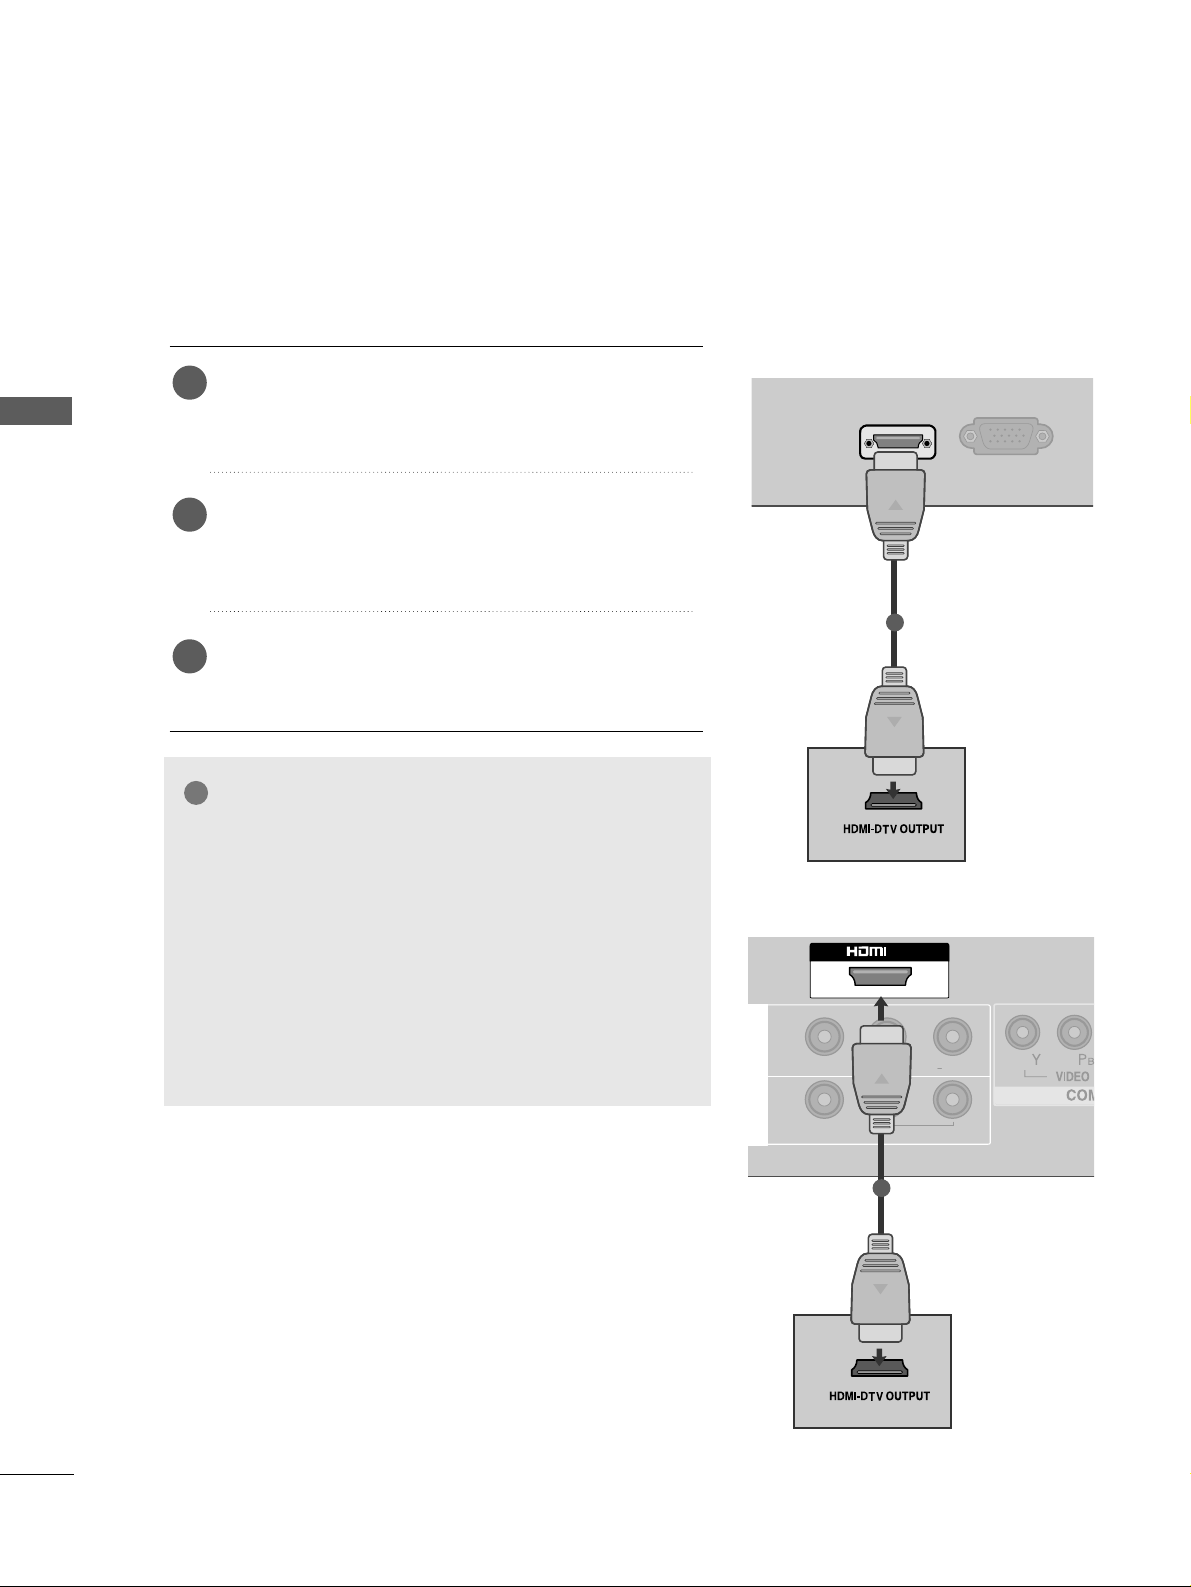
Connecting a set-top box with a HDMI cable
Connect the HDMI output of the digital set-top box to the
HHDDMMII IINN
jack on the TV.
Select
HHDDMMII
input source using the
IINN PPUU TT
button on
the remote control.
Turn on the digital set-top box.
(
Refer to the owner’s manual for the digital set-top box.
)
2
3
1
GG
TV can receive the video and audio signal simultaneously
with using a HDMI cable.
GG
If the digital set-top box supports Auto HDMI function,
the output resolution of the source device will be automatically TV to 1280x720p.
GG
If the digital set-top box player does not support Auto
HDMI, you need to TV the output resolution appropriately.
To get the best picture quality, adjust the output resolution of the source device to 1280x720p .
NOTE
!
HDMI IN
SERVICE ONLY
1
22LF15R
26/32LF15R
Page 19
17
EXTERNAL EQUIPMENT SETUP
COMPONENT IN
VIDEO
AUDIO
1 2
DVD SETUP
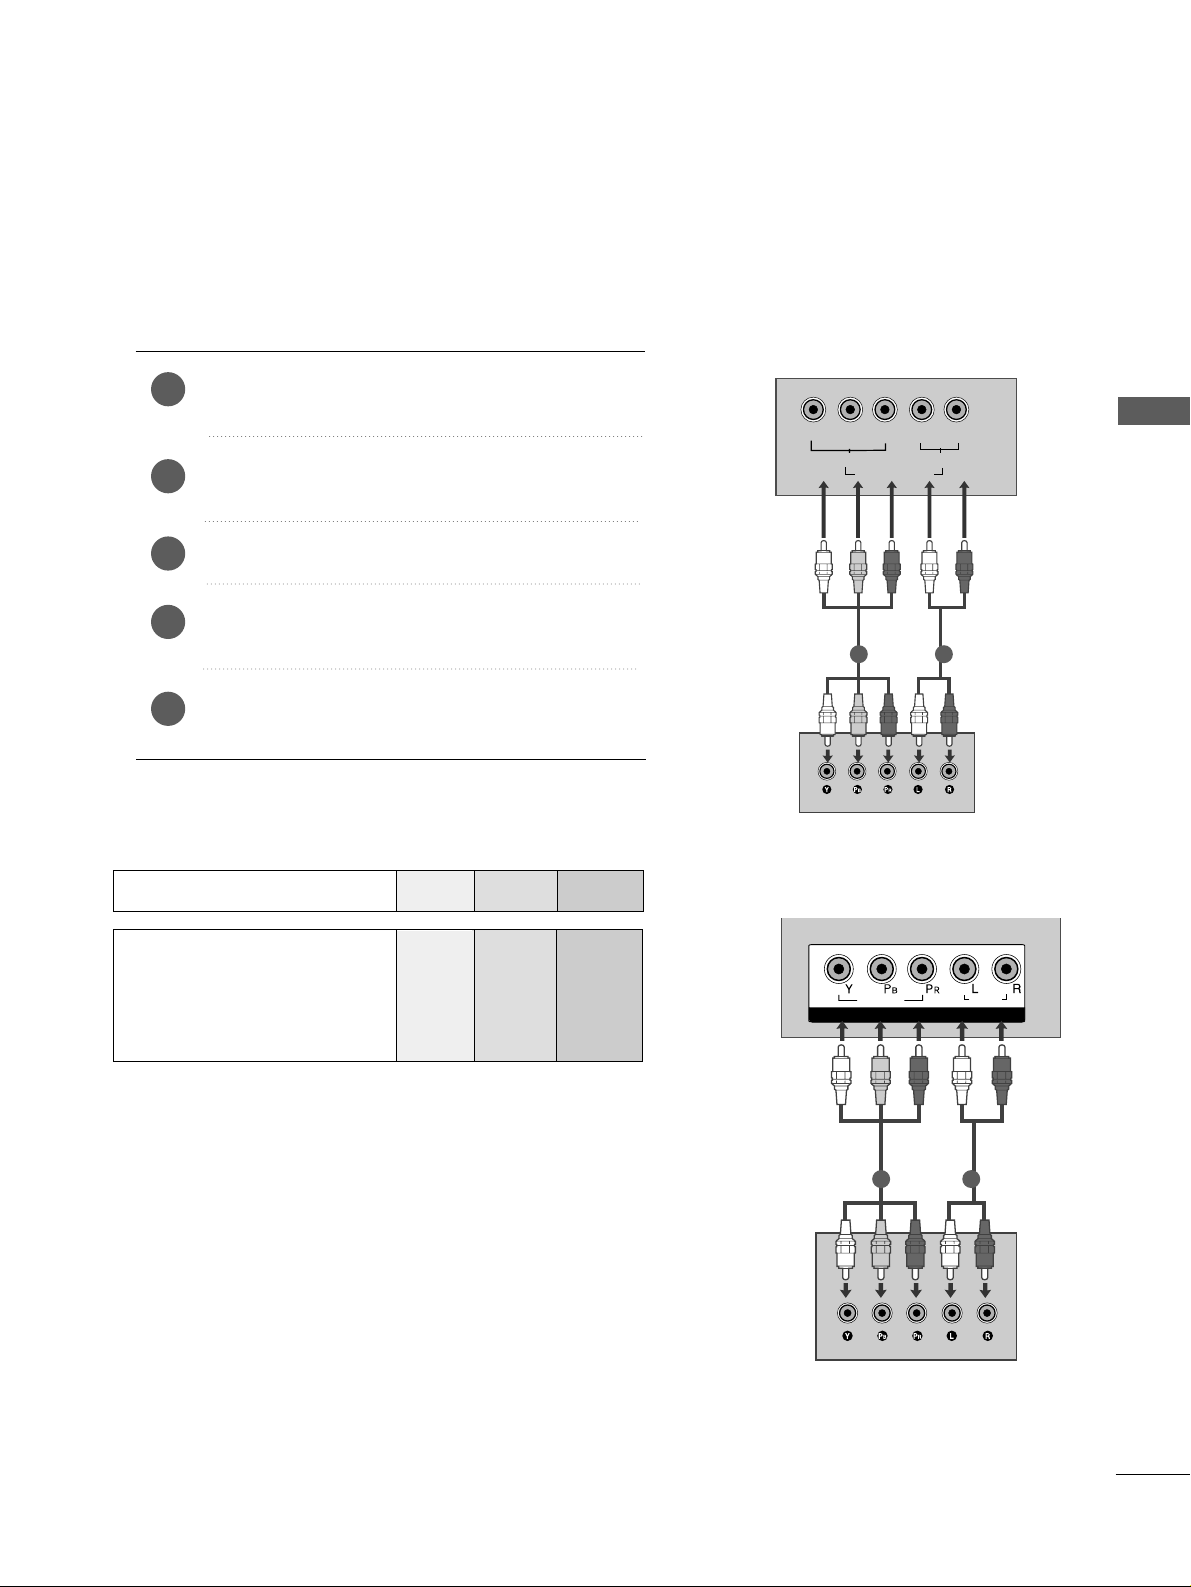
Connecting with a component cable
Component Input ports
To achieve better picture quality, connect a DVD player to
the component input ports as shown below.
Component ports on the TV
YPBP
R
Video output ports
on DVD player
Y
Y
Y
Y
P
B
B-Y
Cb
Pb
P
R
R-Y
Cr
Pr
Connect the video outputs (Y, PB, P
R
)
of the DVD to
the
CCOOMMPPOONNEENNTT IINN VVIIDDEEOO
jacks on the TV.
Connect the audio outputs of the DVD to the
CCOOMMPP OONNEENNTT II NN AAUUDDIIOO
jacks on the TV.
Turn on the DVD player, insert a DVD.
Select
CCoomm ppoonn eenntt
input source using the
IINN PPUU TT
button on the remote control.
Refer to the DVD player's manual for operating
instructions.
2
3
4
5
1
Y
PBPRLR
VIDEO
COMPONENT IN
AUDIO
1 2
22LF15R
26/32LF15R
Page 20
18
EXTERNAL EQUIPMENT SETUP
EXTERNAL EQUIPMENT SETUP
IN IN
HDMI IN HDMI DVI IN
AV IN 2
L/MONO
AUDIOAUDIO
VIDEOVIDEO
IN
OUT
VARIABLE
AUDIO OUT
R
1
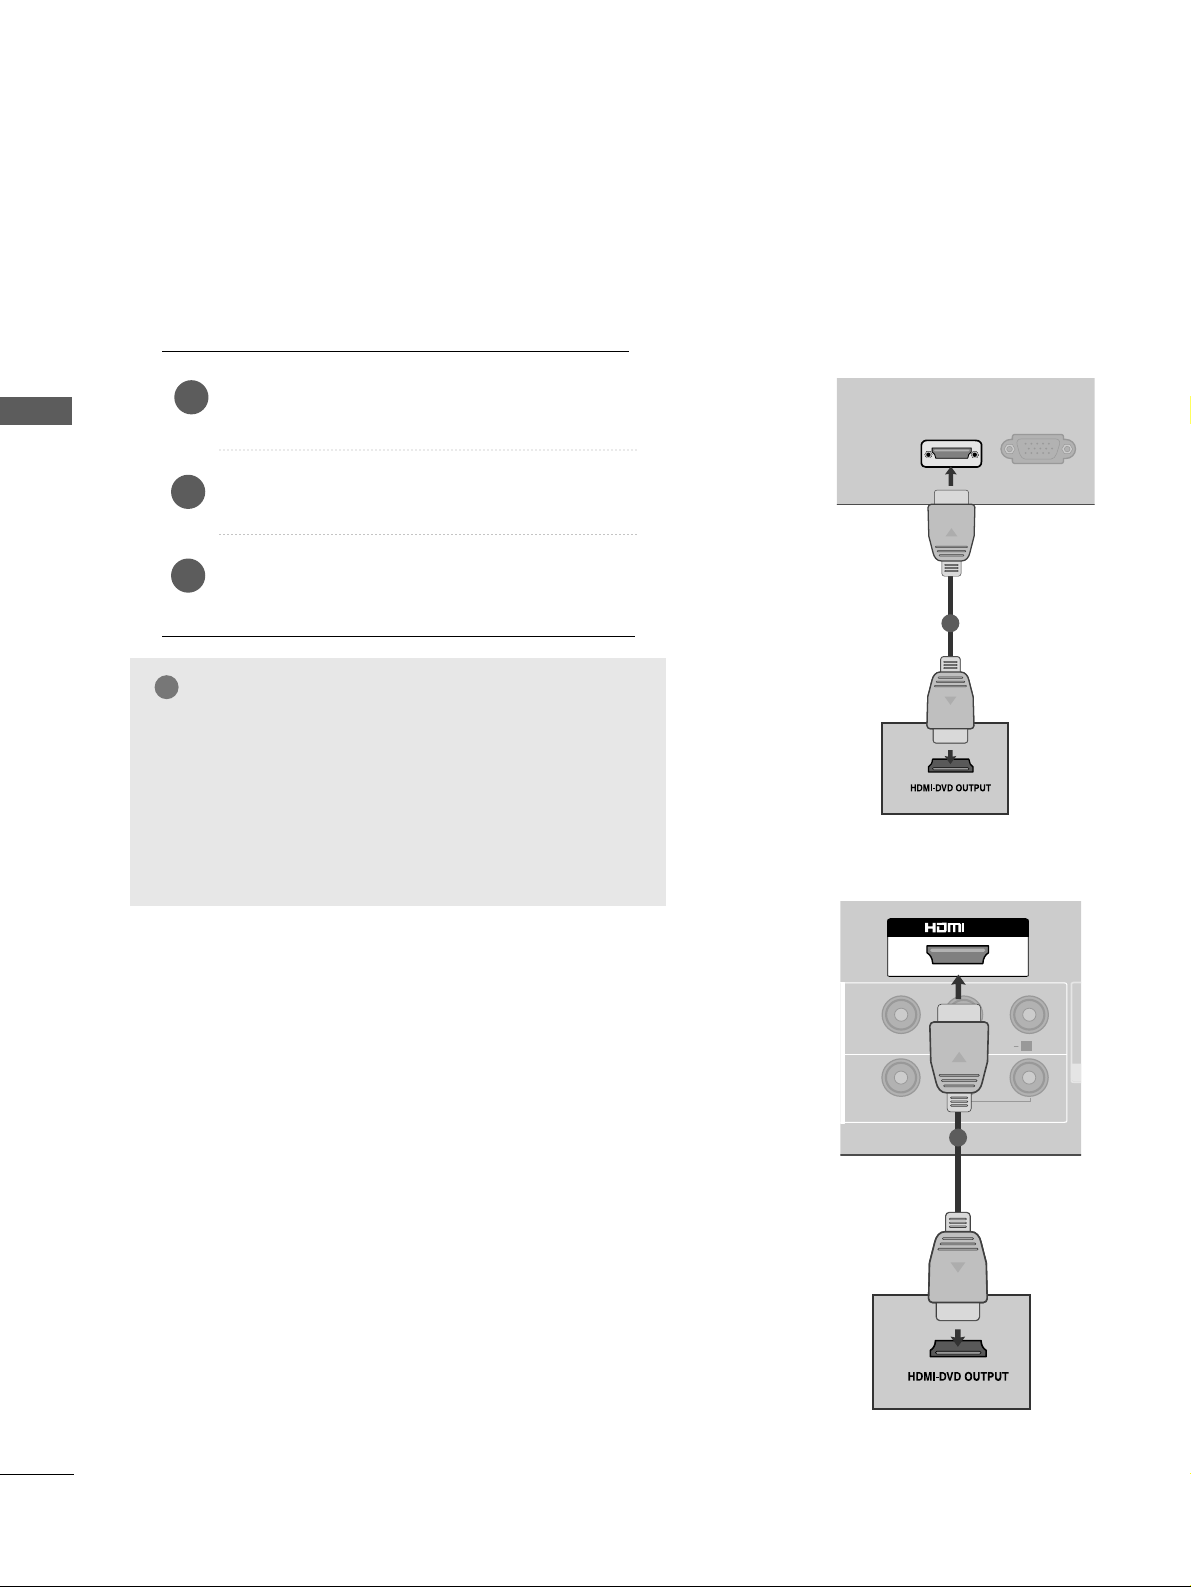
Connecting with a HDMI cable
Connect the HDMI output of the DVD to the
HH DDMMII IINN
jack on the TV.
Select
HHDDMMII
input source using the
IINN PPUU TT
button on the remote control.
Refer to the DVD player's manual for operating
instructions.
1
GG
The TV can receive video and audio signals simultaneously when using a HDMI cable.
GG
If the DVD player supports Auto HDMI function, the output resolution of the source device will be automatically
TV to 1280x720p.
GG
If the DVD player does not support Auto HDMI, you
must TV the output resolution appropriately.
To get the best picture quality, adjust the output resolution of the source device to 1280x720p.
NOTE
!
2
3
HDMI IN HDMI DVI IN
AV IN 2
L/MONO
R
AUDIO
VIDEO
HDMI IN
SERVICE ONLY
1
22LF15R
26/32LF15R
Page 21
19
EXTERNAL EQUIPMENT SETUP
VCR SETUP
■
To avoid picture noise (interference), allow adequate distance between the VCR and TV.
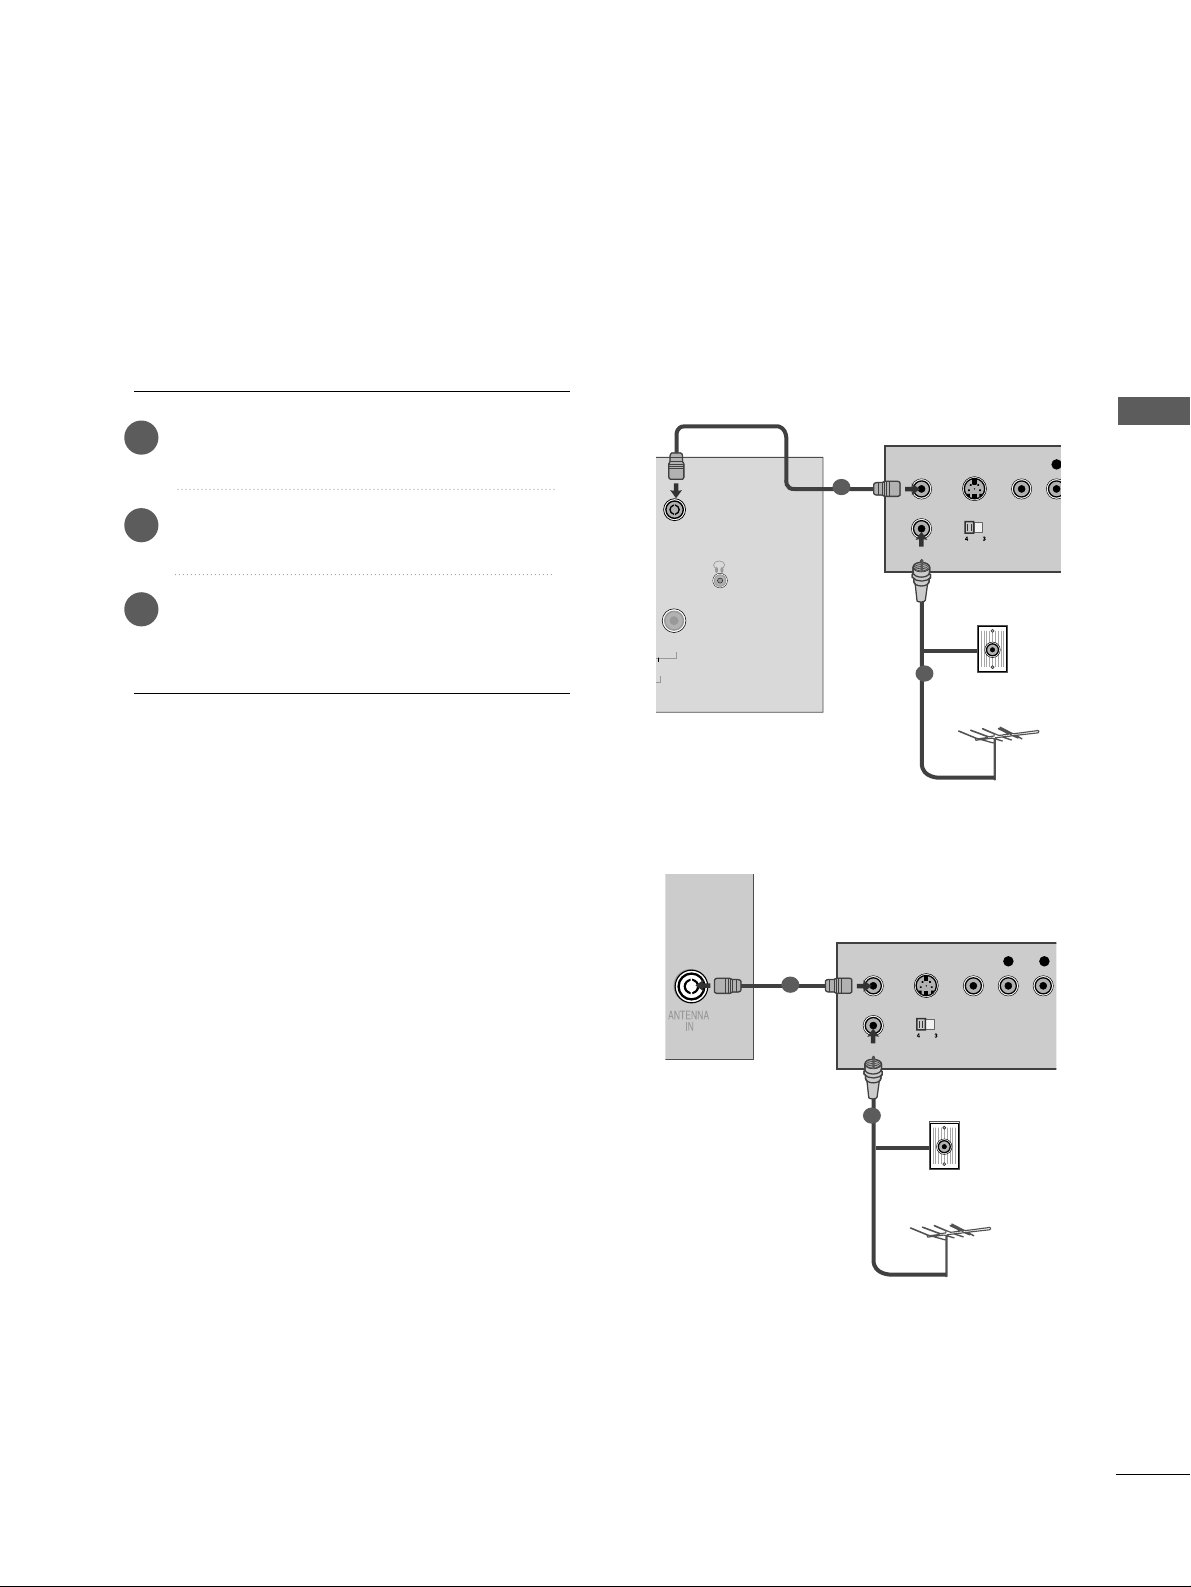
Connect the
AANNTT OOUUTT
socket of the VCR
to the
AANNTTEENNNNAA IINN
socket on the TV.
Connect the antenna cable to the
AANNTT IINN
socket of the VCR.
Press the
PPLL AAYY
button on the VCR and
match the appropriate programme between
the TV and VCR for viewing.
2
3
1
ANTENNA
IN
OUTPUT
SWITCH
ANT IN
R
S-VIDEO VIDEO
ANT OUT
L
Wall Jack
Antenna
Connecting with a RF cable
1
2
R
DIO
H/P
ANTENNA IN
OUTPUT
SWITCH
ANT IN
S-VIDEO VIDEO
ANT OUT
L
Wall Jack
Antenna
1
2
22LF15R
26/32LF15R
Page 22
20
EXTERNAL EQUIPMENT SETUP
EXTERNAL EQUIPMENT SETUP
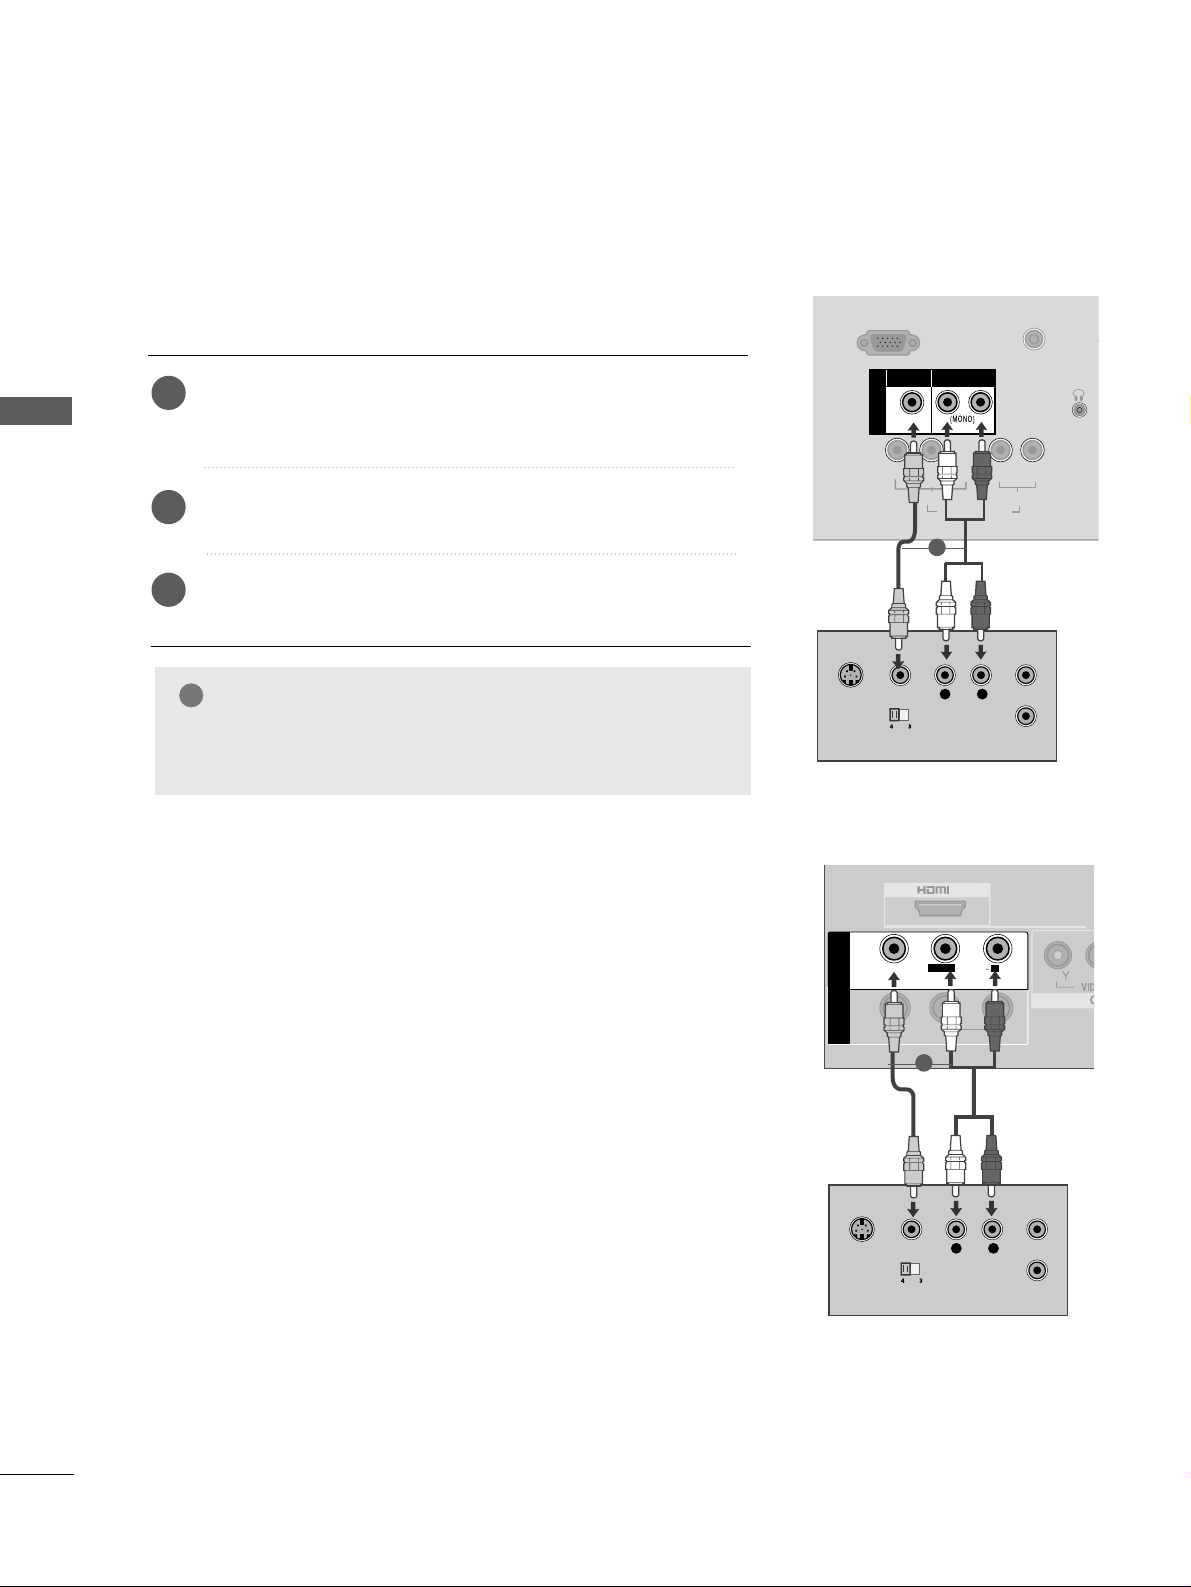
Connecting with a RCA cable
Connect the
AAUUDDII OO/VV II DDEE OO
jacks between TV and VCR.
Match the jack colours (Video = yellow, Audio Left = white, and
Audio Right = red)
Insert a video tape into the VCR and press PLAY on the VCR.
(
Refer to the VCR owner’s manual.
)
Select
AA VV
input source using the
IINN PPUU TT
button on the
remote control.
1
2
3
GG
If you have a mono VCR, connect the audio cable from the VCR
to the
AAUUDD II OO LL //MM OONN OO
jack of the TV.
NOTE
!
L/MONO
R
AUDIO
VIDEO
VIDEO
L
R
AUDIO
HDMI IN HDMI DVI IN
IN
L
R
S-VIDEO
VIDEO
OUTPUT
SWITCH
ANT IN
ANT OUT
AV
IN
OUT
VARIABLEARIABLE
AUDIO OUTAUDIO OUT
R
AUDIOAUDIO
VIDEOVIDEO
L/MONO
L
R
S-VIDEO
VIDEO
OUTPUT
SWITCH
ANT IN
ANT OUT
SERVICE ONLY
L
R
Y
PBPRLR
VIDEO
COMPONENT IN
AUDIO
H/P
ANTENNA
AV IN
VIDEO
AUDIO
1
1
22LF15R
26/32LF15R
Page 23
21
EXTERNAL EQUIPMENT SETUP
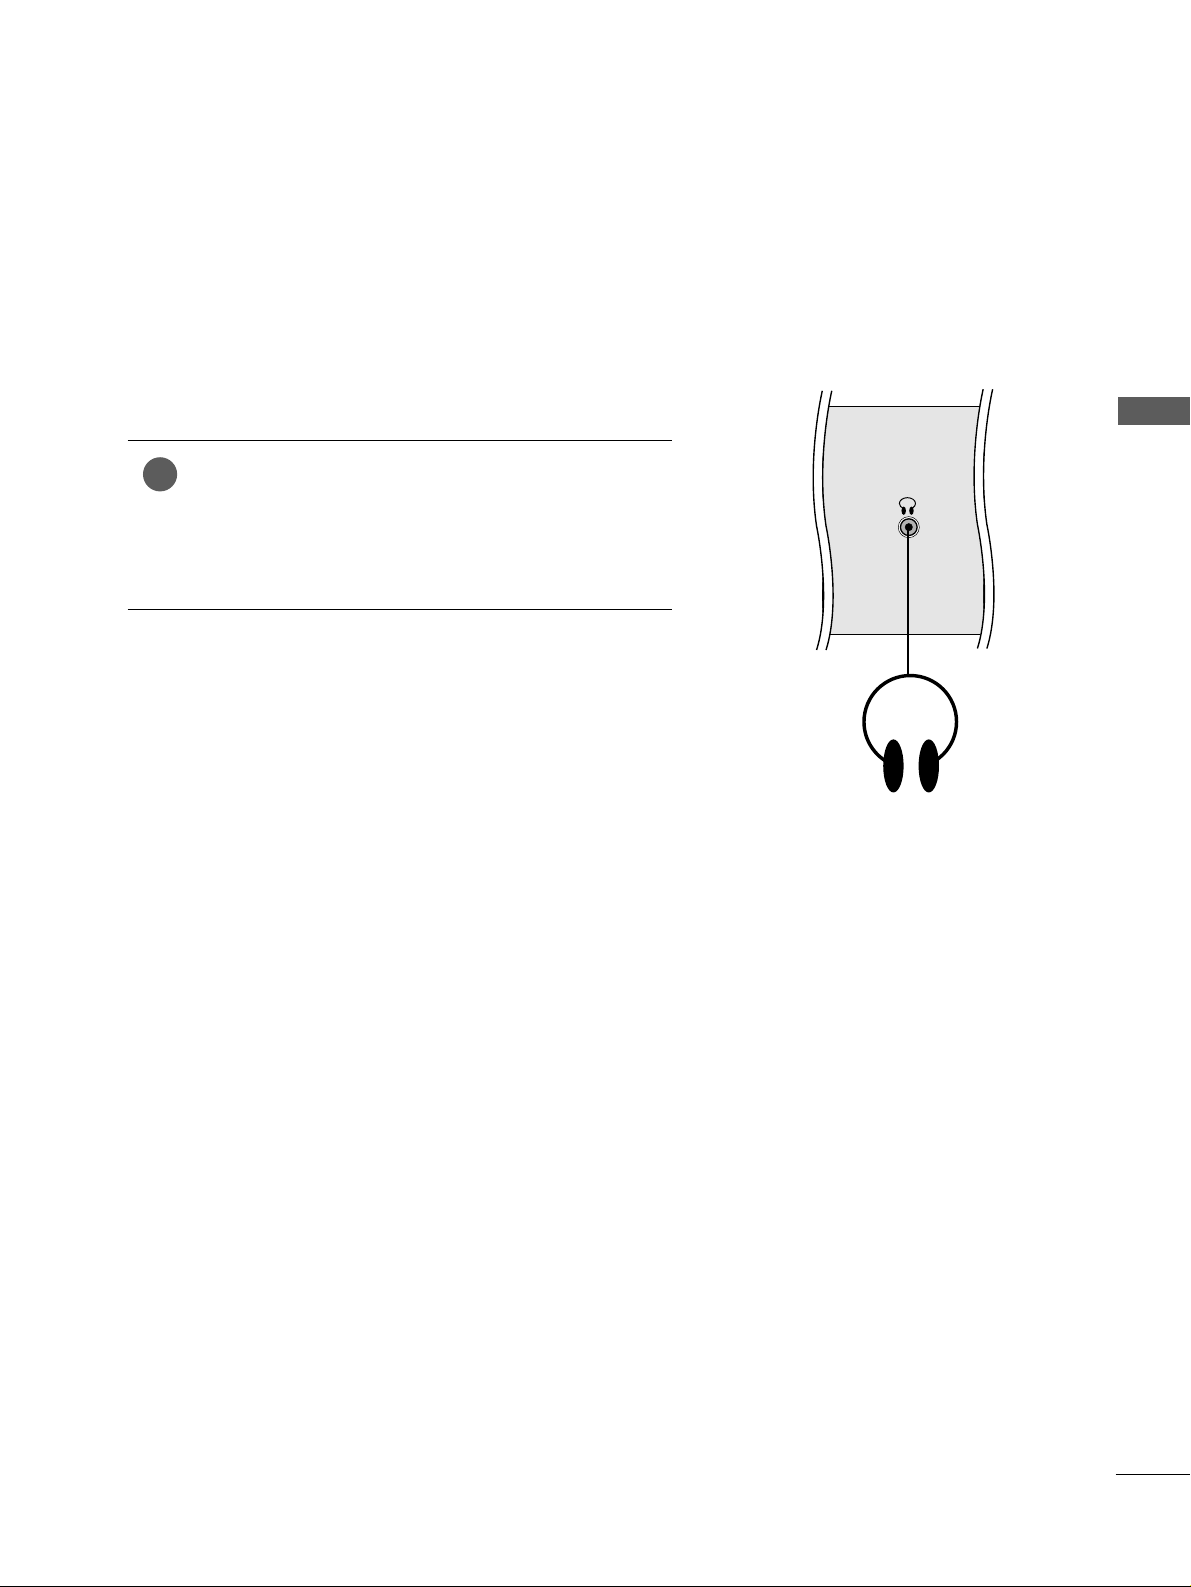
HEADPHONE SETUP
(
Only
22LF15R)
When connecting with a Headphone cable
Insert the headphone plug to the headphone socket of the
set. You can listen to the sound through the headphone. To
adjust the head-phone volume, press the
FF
//
GG
button. If
you press the MUTE button, the sound from the headphone is switched off.
1
H/P
Page 24
22
EXTERNAL EQUIPMENT SETUP
EXTERNAL EQUIPMENT SETUP
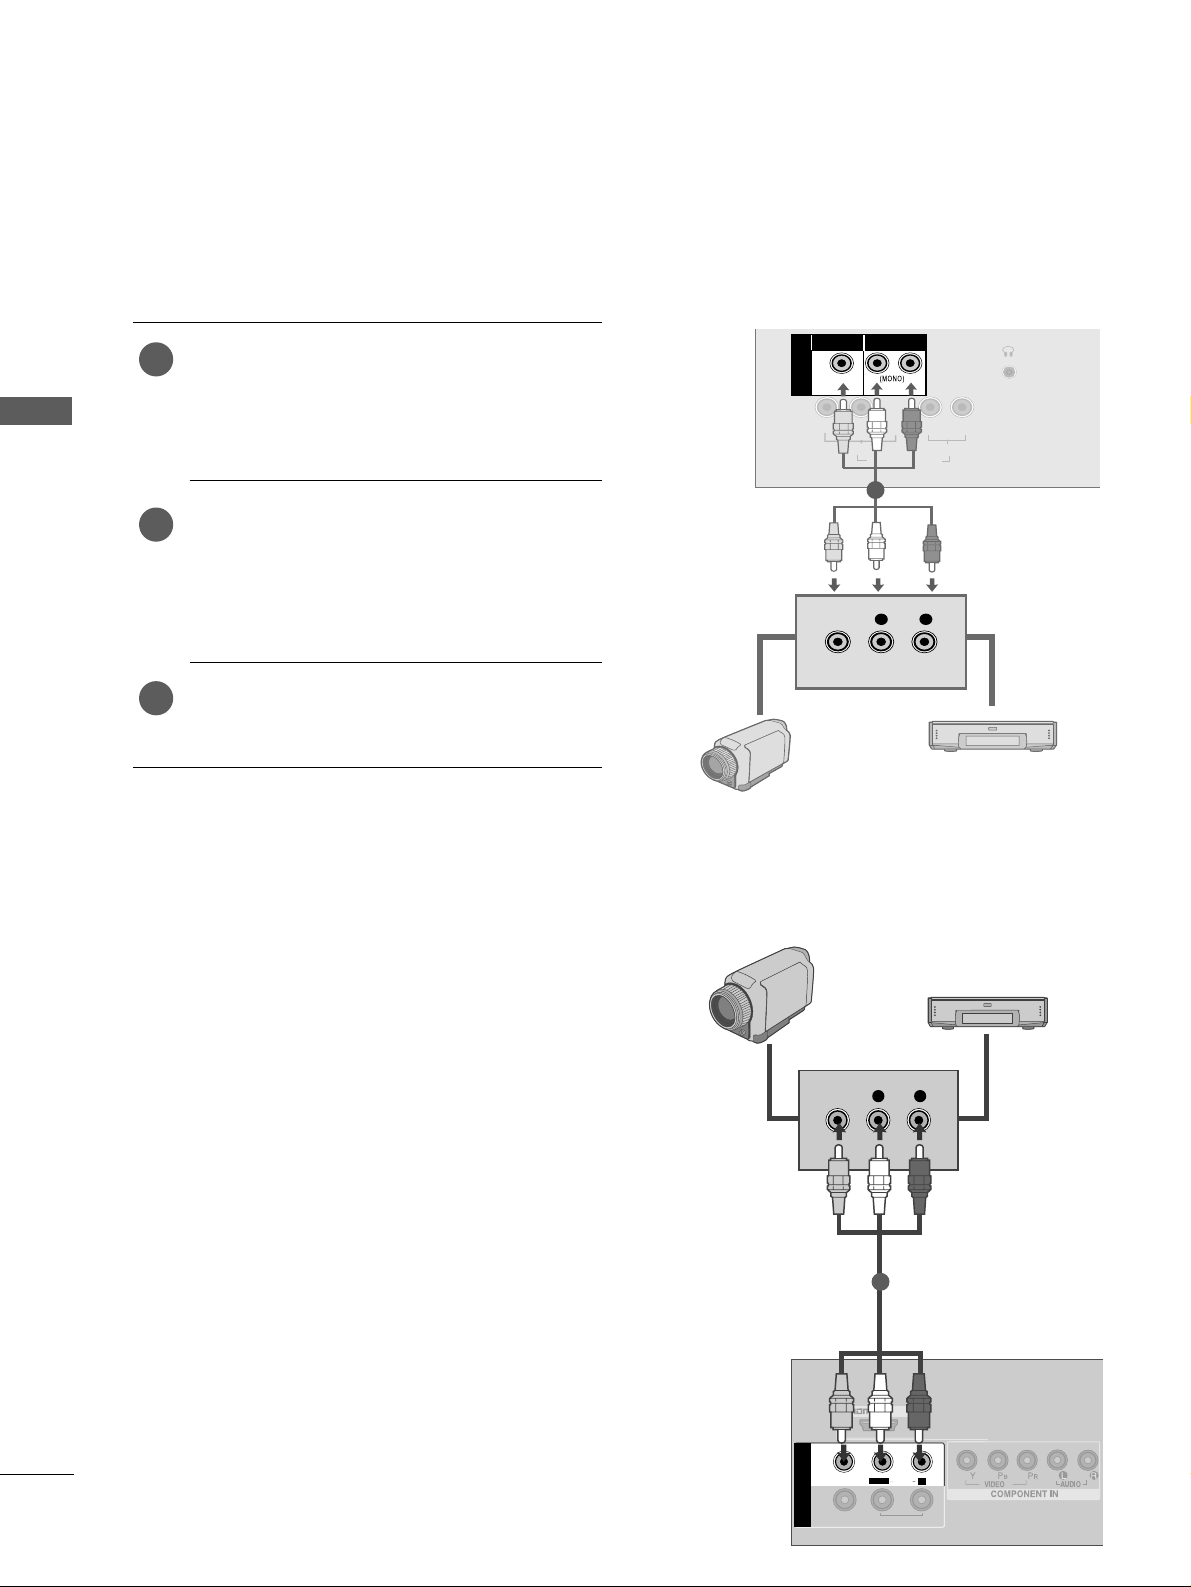
OTHER A/V SOURCE SETUP
Connect the
AAUUDDII OO/VV II DDEE OO
jacks between TV
and external equipment. Match the jack colours
.
(
Video = yellow, Audio Left = white, and Audio Right
= red
)
Select
AA VV
input source using the
IINN PPUU TT
button
on the remote control.
If connected to
AAVV IINN
, select
AA VV
input source.
Operate the corresponding external equipment.
Refer to external equipment operating guide.
1
2
3
/DVI IN
AUDIOAUDIO
VIDEOVIDEO
IN
OUT
VARIABLEARIABLE
AUDIO OUTAUDIO OUT
L R
VIDEO
L/MONO
R
AV
Camcorder
Video Game Set
1
Y
PBPRL R
VIDEO
COMPONENT IN
AUDIO
H/P
L R
VIDEO
AV IN
VIDEO
AUDIO
L
R
Camcorder
Video Game Set
1
22LF15R
26/32LF15R
Page 25

23
EXTERNAL EQUIPMENT SETUP
EXTERNAL STEREO SETUP
(Except for 22LF15R)
GG
When connecting with external audio equipments, such as
amplifiers or speakers, please turn the TV speakers off.
(
GG
pp..55 99
)
GG
Select
VV aa rrii aabbllee OOuutt
in
AAuuddiioo
menu to connect the
VVAARR II AABB LL EE AAUUDD II OO OOUUTT
jacks.(
GG
pp..66 00
)
NOTE
!
Use to connected either an external amplifier, or add a subwoofer to your surround sound system.
Connect the input jack of the stereo amplifier to the
VVAARR II AABBLLEE AAUUDDII OO OOUU TT
jacks on the TV.
Set up your speakers through your analog stereo
amplifier, according to the instructions provided with
the amplifier.
2
1
L/MONO
R
AUDIO
VIDEO
VARIABLE
AUDIO OUT
L/L/MONOMONO
R
AUDIOAUDIO
VIDEOVIDEO
AV
IN 1
OUT
VARIABLE
AUDIO OUT
11
Page 26

24
EXTERNAL EQUIPMENT SETUP
EXTERNAL EQUIPMENT SETUP
AV OUTPUT SETUP
(Except for 22LF15R)
The TV has a special signal output capability which allows you
to hook up the second TV or monitor.
Connect the second TV or monitor to the TV’s
AAVV OOUUTT
jacks.
See the Operating Manual of the second TV or monitor
for further details regarding that device’s input settings.
GG
Component, RGB, HDMI input sources cannot be used for
AV out.
GG
We recommend to use the AV OUT jacks for VCR recording.
NOTE
!
2
1
L/L/MONOMONO
R
AUDIOAUDIO
VIDEOVIDEO
AV
IN 1
OUT
VARIABLE ARIABLE
AUDIO OUTAUDIO OUT
L R
S-VIDEO
VIDEO
1
Page 27

25
EXTERNAL EQUIPMENT SETUP
31.47 59.94
31.5 60.00
31.25 50.00
44.96 59.94
45 60 .00
37.50 50.00
28.125 50.00
33.72 59.94
33.75 60.00
56.25 50.00
67.432 59 . 9 4
67.5 60. 00
27 24
33.75 30.00
Resolution
720x480
720x576
1280x720
1920x1080i
1920x1080p
HDMI-DTV mode
Horizontal Vertical
Frequency(kHz) Frequency(Hz)
26/32LF15R
Supported Display Resolution
31.47 59.94
31.50 60.00
31.25 50.00
37.5 50 . 00
44.96 59.94
45.00 60.00
33.72 59.94
33.75 60.00
28.125 50.00
56.252 50
67.432 59.94
67.5 60. 00
Resolution
720x480
720x576
1280x720
1920x1080i
1920x1080p
HDMI-DTV mode
Horizontal Vertical
Frequency(kHz) Frequency(Hz)
22LF15R
Page 28

26
EXTERNAL EQUIPMENT SETUP
EXTERNAL EQUIPMENT SETUP
If the picture is not clear and especially if characters are still trembling, adjust the picture phase manually.
Press the
MMEE NNUU
button and then use
DD
//
EE
button to
select the
PPii cc ttuurree
menu.
Press the
GG
button and then use
DD
//
EE
button to select
SSccrr eeeenn
.
Press the
GG
button and then use
DD
//
EE
button to select
MMaannuu aall CCoonn ffiigg..
.
Press the
GG
button and then use
DD
//
EE
button to select
HH --PP oossii ttiioonn
or
VV-- PP oossii ttiioonn
.
Press the
FF
//
GG
button to make appropriate adjustments.
Press the
MMEENNUU
button to move to the previous menu
screen.
1
2
3
4
5
6
Manual Configure (Adjustment for screen Position)
3 4 5
SCREEN SETUP
1
Picture Mode
Colour Temperature
XD
Advanced
Aspect Ratio
Picture Reset
Screen
Picture
2
Picture
Picture Mode
Colour Temperature
XD
Advanced
Aspect Ratio
Picture Reset
Screen
To Set
Screen G
Screen
Manual Config.
Reset
H-Position 50
V-Position 50
Manual Config. G
DEF G OK MENU
DEF G OK MENU
DEF G OK MENU
Page 29

27
EXTERNAL EQUIPMENT SETUP
This function operates in current mode.
To initialize the adjusted value
Press the MENU button and then use
DD
//
EE
button to
select the
PPiicc ttuurree
menu.
Press the GGbutton and then use
DD
//
EE
button to select
SSccrr eeeenn
.
Press the
GG
button and then use
DD
//
EE
button to select
RR eess eett
.
Press the
GG
button.
Press the
MMEENNUU
button to move to the previous menu
screen.
1
2
3
4
5
Initializing
(Reset to original factory settings)
3 4
1
Picture Mode
Colour Temperature
XD
Advanced
Aspect Ratio
Picture Reset
Screen
Picture
2
Picture
Picture Mode
Colour Temperature
XD
Advanced
Aspect Ratio
Picture Reset
Screen
To Set
Screen G
Screen
Manual Config.
Reset
To Set
Reset G
DEF G OK MENU
DEF G OK MENU
DEF G OK MENU
Page 30

WATCHING TV / PROGRAMME CONTROL
WATCHING TV / PROGRAMME CONTROL
28
REMOTE CONTROL KEY FUNCTIONS
When using the remote control, aim it at the remote control sensor on the TV.
RATIO
POWER
TV
INPUT
Switches the set on from standby or off to standby.
Returns to the TV viewing from any mode.
Switches the set on from standby.
If you press the button once, the input source OSD will
appear on screen as shown. Press the
DD/ EE
button and
then OK button to select the desired input source.
MUTE
PSM
SSM
I/II
Switches the sound on or off.
Recalls your preferred picture setting.
Recalls your preferred sound setting.
Selects the sound output. (
GG
pp..66 11
)
0~9 number
button
Selects a programme.
Selects numbered items in a menu.
Switches the set on from standby.
LIST
Q.VIEW
Displays the programme table.
Returns to the previously viewed programme.
Page 31

WATCHING TV / PROGRAMME CONTROL
29
RATIO
THUMBSTICK
(Up/Down/Left/
Right)
OK
Allows you to navigate the on-screen menus and adjust
the system settings to your preference.
Adjusts the volume.
Selects a programme.
Switches the set on from standby. (Up/Down)
Accepts your selection or displays the current mode.
MENU
SLEEP
RATIO
Selects a menu.
Sets the sleep timer.
Selects your desired picture format.(
GG
pp..44 11
)
Coloured
buttons
TELETEXT
BUTTONS
These buttons are used for teletext (only
TTEELLEE TTEEXX TT
models) or
PPrroogg rr aamm mmee eeddii tt
.
These buttons are used for teletext.
For further details, see the ‘Teletext’ section. (
GG
pp..66 88
)
Installing Batteries
■
Open the battery compartment cover on the back side and install the
batteries matching correct polarity (+with +,-with -).
■
Install two 1.5V AAA batteries. Don’t mix old or used batteries with
new ones.
■
Close cover.
Page 32

WATCHING TV / PROGRAMME CONTROL
WATCHING TV / PROGRAMME CONTROL
30
Press the
F
//
G
button to adjust the volume.
If you wish to switch the sound off, press the
MMUUTT EE
button.
You can cancel the Mute function by pressing the
MMUUTT EE
,
F
//
G
button.
PROGRAMME SELECTION
TURNING ON THE TV
When your TV is turned on, you will be able to use its features.
Firstly, connect the power cord correctly.
At this stage, the TV switches to standby mode.
■
In standby mode to turn TV on, press the ,
IINN PPUU TT,PPRR DD// EE(( oo rr PP
//
))
button on the TV or press the
PPOOWWEERR, TT VV, IINN PPUU TT
,
DD
//
EE
,
NNUUMMBBEERR(( 00~99))
but-
tons on the remote control and the TV will switch on.
1
VOLUME ADJUSTMENT
Press the
DD
//
EE
or
NNUUMMBBEERR
buttons to select a programme number.
2
3
1
1
Installation Guide
Note:
a. It will automatically disappear after approx. 40 seconds unless a button is pressed.
b. “In -Store” mode is only for shop display and not for general customer use.
c. "Home” mode is the optimal setting for home environments, and is the TV's default mode.
d. "In-Store" mode is the optimal setting for store environments. If a user modifies image quality data,
“In- Store” mode initializes the product to the image quality set by us after a certain period of time.
e. The mode (Home, In- Store) can be changed by executing Factory Reset in the Option menu.
If the OSD (On Screen Display) is displayed on the screen after turning on the TV, you can adjust the
LLaann gg uuaaggee, LLooccaatt iioonn,, AAuuttoo TTuunniinngg
.
Page 33

DEF G OK MENU
WATCHING TV / PROGRAMME CONTROL
31
ON SCREEN MENUS SELECTION AND ADJUSTMENT
Press the
MMEE NNUU
button and then D
//
EE
button to display each menu.
Press the
G button and then D
//
EE
button to select a menu item.
Change the setting of an item in the sub or pull-down menu with
F
//
G button.
You can move to a higher level menu by pressing the
OO KK
button.
Your TV's OSD (On Screen Display) may differ slightly from that shown in this manual.
NOTE
!
a. The OSD (On Screen Display) function enables you to adjust the screen status conveniently since it
provides graphical presentation.
b. In this manual, the OSD (On Screen Display) may be different from your TV’s because it is just
example to help the TV operation.
c. In the teletext mode, menus are not displayed.
Setup MENU
Picture MENU
Audio MENU
Time MENU
Option MENU
1
2
3
Clock
Off Time
On Time
Sleep Timer
Auto Sleep
Time
Auto Tuning
Manual Tuning
Programme Edit
Favourite Programme
Setup
Sound Mode
Auto Volume
Balance 0
TV Speaker
Audio Out
Audio
Language
Key Lock
Power Indicator
Factory Reset
Option
Picture Mode
Colour Temperature
XD
Advanced
Aspect Ratio
Picture Reset
Screen
Picture
Except for 22LF15R
Except for 22LF15R
DEF G OK MENU
DEF G OK MENU
DEF G OK MENU
DEF G OK MENU
Page 34

WATCHING TV / PROGRAMME CONTROL
WATCHING TV / PROGRAMME CONTROL
32
Press the
MMEENNUU
button and then
DD
//
EE
button to select the
SSeettuupp
menu.
Press the
GG
button and then
DD
//
EE
button to select
AAuuttoo
TTuunniinngg
.
Press the
GG
button and then
DD
//
EE
button to select
SSyysstteemm
.
Press the
DD
//
EE
button to select a TV system menu;
BG: PAL B/G, SECAM B/G (Europe / East Europe / Asia /
NewZealand / M.East / Africa / Australia)
I : PAL I/II (U.K. / Ireland / Hong Kong / South Africa)
DK: PAL D/K, SECAM D/K (East Europe / China / Africa / CIS)
M : (USA / Korea / Philippines)
Press the
DD
//
EE
button to select
SSttoorraaggee FFrroomm
.
Press the
FF
//
GG
button or NUMBER buttons to select the ini-
tial programme number. If you use NUMBER buttons, any
number under 10 is entered with a numeric ‘0’ in front of it,
i.e.‘
0055
’ for 5.
Press the
DD
//
EE
button to select
SSeeaarrcchh
.
Press the
GG
button to begin auto tuning.
All receivable stations are stored.
To stop auto tuning, press the
MMEE NNUU
button.
When auto tuning is complete, the Programme edit menu
appears on the screen. See the Programme edit section to edit
the stored programme.
Press the
MMEENNUU
button to move to the previous menu
screen.
1
2
3
4
5
6
7
8
9
Up to 100 TV stations can be stored by programme numbers (0 to 99). Once you
have preset the stations, you will be able to use the
DD
//
EE
or NUMBER buttons to
scan the stations you have programmed.
Stations can be tuned using automatic or manual modes.
All stations which can be received are stored by this method. It is
recommended that you use Auto tuning during installation of this TV.
AUTO PROGRAMME TUNING
Auto Tuning
System
Storage From
Search
System G
2
Setup
Auto Tuning
Manual Tuning
Programme Edit
Favourite Programme
To Set
Auto Tuning G
3 4 5 6
7
8
Auto Tuning
C 05 BG
5 35%
BG
I
DK
M
1
Auto Tuning
Manual Tuning
Programme Edit
Favourite Programme
Setup
DEF G OK MENU
DEF G OK MENU
DEF G OK MENU
Page 35

WATCHING TV / PROGRAMME CONTROL
33
MANUAL PROGRAMME TUNING
Press the
MMEE NNUU
button and then
DD
//
EE
button to select
the
SSeettuu pp
menu.
Press the
GG
button and then
DD
//
EE
button to select
MMaannuu aall TTuu nniinngg
.
Press the
GG
button and then
DD
//
EE
button to select
SSttoorraaggee
.
Press the
FF
//
GG
button or NUMBER buttons to select the
desired programme number (0 to 99). If you use NUMBER
buttons, any number under 10 is entered with a numeric ‘0’
in front of it, i.e. ‘
00 55
’ for 5.
Press the
DD
//
EE
button to select
SSyy sstteemm
.
Press the
DD
//
EE
button to select a TV system menu;
BG: PAL B/G, SECAM B/G (Europe / East Europe / Asia /
NewZealand / M.East / Africa / Australia)
I : PAL I/II (U.K. / Ireland / Hong Kong / South Africa)
DK : PAL D/K, SECAM D/K (East Europe / China / Africa / CIS)
M : (USA / Korea / Philippines)
Press the
DD
//
EE
button to select
BB aann dd
.
Press the
GG
button and then
DD
//
EE
button to select
VV //UUHH FF
or
CCaa bbllee
.
Press the
DD
//
EE
button to select
CChhaannnn eell
.
You can select the desired programme number with the
FF
//
GG
button or NUMBER buttons. If possible, select the programme number directly with the number buttons. Any
number under 10 is entered with a numeric ‘0’ in front of it,
i.e. ‘
00 55
’ for 5.
Press the
DD
//
EE
button to select
SSee aarrcchh
.
Press the
FF
//
GG
button to commence searching. If a sta-
tion is found the search will stop.
Press the
OO KK
button to store it.
To store another station, repeat steps 33to
11 33
.
Press the
MMEENNUU
button to move to the previous menu
screen.
Manual programme lets you manually tune and arrange the stations
in whatever order you desire.
1
2
3
4
5
6
7
8
9
10
11
12
13
14
15
73 4 5 6
8 9
10 11 12
1
Auto Tuning
Manual Tuning
Programme Edit
Favourite Programme
Setup
2
Setup
Auto Tuning
Manual Tuning
Programme Edit
Favourite Programme
To Set
Manual Tuning G
Manual Tuning
Storage
System
Band
Channel
Fine
Search
Name
Booster
Storage G
1
DEF G OK MENU
DEF G OK MENU
DEF G OK MENU
Page 36

WATCHING TV / PROGRAMME CONTROL
WATCHING TV / PROGRAMME CONTROL
34
FINE TUNING
Press the
MMEE NNUU
button and then
DD
//
EE
button to select
the
SSeettuupp
menu.
Press the
GG
button and then
DD
//
EE
button to select
MMaannuu aall TTuu nniinngg
.
Press the GGbutton and then
DD
//
EE
button to select
FF iinn ee
.
Press the
GG
button and then
FF
//
GG
button to fine tune for
the best picture and sound.
Press the
OO KK
button to store it.
Press the
MMEENNUU
button to move to the previous menu
screen.
1
2
3
4
5
6
Normally fine tuning is only necessary if reception is poor.
3 4 5
1
Auto Tuning
Manual Tuning
Programme Edit
Favourite Programme
Setup
2
Setup
Auto Tuning
Manual Tuning
Programme Edit
Favourite Programme
To Set
Manual Tuning G
Manual Tuning
Storage
System
Band
Channel
Fine
Search
Name
Booster
Fine G
F / G
DEF G OK MENU
DEF G OK MENU
DEF G OK MENU
Page 37

WATCHING TV / PROGRAMME CONTROL
35
ASSIGNING A STATION NAME
You can assign a station name up to five characters to each programme number.
Press the
MMEE NNUU
button and then
DD
//
EE
button to select
the
SSeettuupp
menu.
Press the
GG
button and then
DD
//
EE
button to select
MMaannuu aall TTuu nniinngg
.
Press the GGbutton and then
DD
//
EE
button to select
NNaa mm ee
.
Press the
GG
button and then
DD
//
EE
button. You can use a
blank, ++, --, the number 00to 99and the alphabet AAto ZZ.
Press the
FF
//
GG
button to select the position and make
your choice of the second character, and so on.
Press the
OO KK
button to store it.
Press the
MMEE NNUU
button to move to the previous menu
screen.
1
2
3
4
5
6
7
3 4 5 6
1
Auto Tuning
Manual Tuning
Programme Edit
Favourite Programme
Setup
2
Setup
Auto Tuning
Manual Tuning
Programme Edit
Favourite Programme
To Set
Manual Tuning G
Manual Tuning
Storage
System
Band
Channel
Fine
Search
Name
Booster
Name G
- - - - -
DEF G OK MENU
DEF G OK MENU
DEF G OK MENU
Page 38

WATCHING TV / PROGRAMME CONTROL
WATCHING TV / PROGRAMME CONTROL
36
In some models,
BBooooss tt eerr
is an optional function. Only a set
with
BBooooss tt eerr
can perform this function.
If reception is poor select
BBooooss tteerr
to On.
When the signal is strong, select “Off ”.
BOOSTER
Press the
MMEE NN UU
button and then
DD
//
EE
button to select
the
SSee tt uupp
menu.
Press the
GG
button and then
DD
//
EE
button to select
MMaannuu aall TTuu nniinngg
.
Press the
GG
button and then use
DD
//
EE
button to select
BBoooosstt eerr
.
Press the
GG
button and then use
DD
//
EE
button to select
OO nnorOOff ff
.
Press the
MMEENNUU
button to move to the previous menu
screen.
1
2
3
4
5
3 4 5
1
Auto Tuning
Manual Tuning
Programme Edit
Favourite Programme
Setup
2
Setup
Auto Tuning
Manual Tuning
Programme Edit
Favourite Programme
To Set
Manual Tuning G
Manual Tuning
Storage
System
Band
Channel
Fine
Search
Name
Booster
Booster G
Off
On
DEF G OK MENU
DEF G OK MENU
DEF G OK MENU
Page 39

WATCHING TV / PROGRAMME CONTROL
37
PROGRAMME EDIT
This function enables you to delete or skip stored programmes.
Also you can move some stations to other programme numbers
or copy a blank station data into the selected programme number.
Press the
MMEE NNUU
button and then
DD
//
EE
button to select
the
SSeettuupp
menu.
Press the
GG
button and then
DD
//
EE
button to select
PPrroogg rr aamm mmee EEddiitt
.
Press the GGbutton to display the
Programme edit menu.
AA
DDeelleettiinngg aa pprrooggrraammmmee
1.Select a programme to be deleted with the
DD
//
EE
//
FF
//
GG
button.
2.Press the RED button twice.
The selected programme is deleted, all the following
programmes are shifted up one position.
AA
CCooppyyiinngg aa pprrooggrraammmmee
1.Select a programme to be copied with the
DD
//
EE
//
FF
//
GG
button.
2.Press the GREEN button.
All the following programmes are shifted down one position.
AA
MMoovviinngg aa pprrooggrraammmmee
1.Select a programme to be moved with the
DD
//
EE
//
FF
//
GG
button.
2.Press the YELLOW button.
3.Move the programme to the desired programme number with
the
DD
//
EE
//
FF
//
GG
button.
4.Press the YELLOW button again to release this function.
AA
SSkkiippppiinngg aa pprrooggrraammmmee nnuummbbeerr
1.Select a programme number to be skipped with the
DD
//
EE
//
FF
//
GG
button.
2.Press the BLUE button. The skipped programme turns to blue.
3.Press the BLUE button again to release the skipped programme.
When a programme number is skipped it means that you will
be unable to select it using the
DD
//
EE
button during normal
TV viewing. If you wish to select the skipped programme,
directly enter the programme number with the NUMBER buttons or select it in the programme edit or table menu.
Press the
MMEENNUU
button to move to the previous menu
screen.
1
2
3
4
3
Programme Edit
Delete
Move
Copy
Skip
0C03 5S69
1 BLN 03 6 S 17
2 C 12 7 S 22
3 S 66 8 C 09
4 S 67 9 C 11
1
Auto Tuning
Manual Tuning
Programme Edit
Favourite Programme
Setup
2
Setup
Auto Tuning
Manual Tuning
Programme Edit
Favourite Programme
To Set
Programme Edit G
DEF G OK MENU
DEF G OK MENU
Page 40

WATCHING TV / PROGRAMME CONTROL
WATCHING TV / PROGRAMME CONTROL
38
FAVOURITE PROGRAMME
Press the
MMEENNUU
button and then
DD
//
EE
button to select the
SSeettuupp
menu.
Press the
GG
button and then
DD
//
EE
button to select
FFaavvoouurriittee PPrrooggrraammmmee
.
Press the
GG
button.
Press the
DD
//
EE
button to select - - - - - - -.
Select a desired programme with the
FF
//
GG
button or NUMBER buttons. Any number under 10 is entered with a numeric
‘0’in front of it, i.e.‘
0055
’ for 5.
To store another programme, repeat steps
44
to 55.
You can store up to 8 programmes.
Press the
MMEENNUU
button to move to the previous menu
screen.
This function lets you select your favourite programmes directly.
Repeatedly press the YELLOW button to select stored favourite
programmes.
1
2
3
4
5
6
7
1
2 3 4 5
Auto Tuning
Manual Tuning
Programme Edit
Favourite Programme
Setup
Setup
Auto Tuning
Manual Tuning
Programme Edit
Favourite Programme
-- -----
-- -----
-- -----
-- -----
-- -----
-- -----
-- -----
-- -----
Favourite Programme G
DEF G OK MENU
DEF G OK MENU
Page 41

WATCHING TV / PROGRAMME CONTROL
39
SELECTING THE PROGRAMME LIST
You can check which programmes are stored in the memory by displaying the programme list.
AA
DDiiss pp llaayyiinngg pprroo ggrraa mmmmee lliisstt
Press the
LLIISSTT
button to display the Programme
list
menu.
The programme
list
appears on the screen.
One programme
list
contains ten programmes as shown.
AA
SSeellee ccttiinn gg aa pprroo ggrr aammmmee iinn tt hhee pprroogg rraa mmmm ee lliisstt
Select a programme with the
DD
//
EE
//
FF
//
GG
button.
Then press the
OO KK
button. The TV switches to the chosen
programme number.
AA
PPaaggiinngg tthhrr oo uugghh aa pprrooggrraa mmmmee lliisstt
There are 10 programme table pages in which contain 100 pro
grammes. Pressing the
DD
//
EE
//
FF
//
GG
button repeatedly turns the
pages.
Press the
LLII SS TT
button to return to normal TV viewing.
NOTE
!
a. You may find some blue programmes. They have been set up
to be skipped by auto programming or in the programme edit
mode.
b. Some programmes with the channel number shown in the
programme list indicate there is no station name assigned.
Programme List
0C03 5S69
1 BLN 03 6 S 17
2 C 12 7 S 22
3 S 66 8 C 09
4 S 67 9 C 11
Page 42

WATCHING TV / PROGRAMME CONTROL
WATCHING TV / PROGRAMME CONTROL
40
KEY LOCK
NOTE
!
GG
In
KKeeyy LL oo cc kk ‘OO nn
’, if the TV is turned off, press the
rr // II,IINNPP UUTT,PPRR DD//
EE
button on the TV or
PPOO WWEERR, IINNPP UUTT, TT VV
,
DD
//
EE
or NUMBER buttons on the remote control.
GG
With the
KKeeyy LL oocc kk OO nn
, the display ‘
KK eeyy LLoocc kk OOnn
’ appears on the screen if any button on the front
panel is pressed while viewing the TV.
The TV can be set so that the remote control is needed to control it.
This feature can be used to prevent unauthorized viewing.
This TV is programmed to remember which option it was last
set to even if you turn the TV off.
Press the
MMEE NNUU
button and then
DD
//
EE
button to select
the
OO pptt iioonn
menu.
Press the
GG
button and then
DD
//
EE
button to select
KKee yy
LLoocc kk
.
Press the
GG
button and then
DD
//
EE
button to select
OO nn
or
OO ff ff
.
Press the
MMEENNUU
button to move to the previous menu
screen.
1
2
3
4
32
Option
Language
Key Lock
Factory Reset
Key Lock G Off
On
1
Language
Key Lock
Factory Reset
Option
DEF G OK MENU
DEF G OK MENU
Page 43

PICTURE CONTROL
PICTURE CONTROL
41
PICTURE SIZE (ASPECT RATIO)CONTROL
You can watch the screen in various picture formats;
1166:: 99 ,, OOrriiggiinn aall, 44:: 33, 1144 :: 99
,
ZZoooomm11//22
and
JJuusstt SS cc aann
(Except for 22LF15R).
If a fixed image is displayed on the screen for a long time, that fixed image may
become imprinted on the screen and remain visible.
You can adjust the enlarge proportion using
DD EE
button.
This function works in the following signal.
•
1166 ::99
The following selection will allow you to adjust the
picture horizontally, in linear proportion, to fill the
entire screen(useful for viewing 4:3 formatted
DVDs).
•
OO rr iigg iinnaall
When your TV receives a wide screen signal it will
automatically change to the picture format to be
broadcast.
•
44::33
The following selection will allow you to view a picture with an original 4:3 aspect ration, grey bars
will appear on both the left and right hand of the
screen.
•
1144::99
You can view a picture format of 14:9 or a general TV
programme in the 14:9 mode. The 14:9 screen is
viewed in the same way as in 4:3, but is magnified to
the left and right.
You can adjust
AAssppeecctt RRaattiioo
in the
PPiiccttuurree
menu.
1
16:9
Original
4:3
14:9
DE
Page 44

PICTURE CONTROL
42
•
ZZoooomm11
The following selection will allow you to view
the picture without any alteration, while filling
the entire screen. However, the top and bottom of the picture will be cropped.
•
ZZoooomm22
Choose Zoom 2 when you wish the picture to
be altered, both horizontally extended and
vertically cropped. The picture adopting a
compromise between alteration and screen
converage.
•
JJuusstt SS ccaann
Following Selection will lead to you view the
picture of best quality without loss of original
picture in high resolution image.
NOTE
!
GG
You can only select 4:3,16:9 (Wide) in Component, HDMI mode.
GG
In HDMI/Component (over 720p)mode, Just Scan(Except for 22LF15R) is available.
PICTURE CONTROL
Just Scan
Zooml
DE
Zoom2
DE
Page 45

PICTURE CONTROL
43
PRESET PICTURE SETTINGS
Picture Mode adjusts the TV for the best picture appearance. Select the
preset value in the
PPii cctt uu rr ee MMooddee
menu based on the programme
category.
Vivid, Standard, Cinema, Sport and Game are programmed for optimum picture reproduction at the factory and cannot be changed.
Press the
MMEE NNUU
button and then
DD
//
EE
button to select
the
PPiicc ttuurree
menu.
Press the
GG
button and then
DD
//
EE
button to select
PPii cctt uu rr ee MMooddee
.
Press the
GG
button and then
DD
//
EE
button to select
VViivviidd,,
SSttaannddaarrdd,, CCiinneemmaa,, SSppoorrtt,, GGaammee,, UUsseerr11
or
UUsseerr 22
.
Press the
MMEENNUU
button to move to the previous menu
screen.
Picture Mode-Preset
1
2
3
4
1
32
Picture
Picture Mode
Colour Temperature
XD
Advanced
Aspect Ratio
Picture Reset
Screen
Picture Mode G
Vivid
Standard
Cinema
Sport
Game
User1
User2
Picture Mode
Colour Temperature
XD
Advanced
Aspect Ratio
Picture Reset
Screen
Picture
DEF G OK MENU
DEF G OK MENU
Page 46

PICTURE CONTROL
44
To initialize values (reset to default settings), select the Cool
option.
Choose one of three automatic colour adjustments. Set to
warm to enhance hotter colours such as red, or set to cool to
see less intense colours with more blue.
This menu is activated after selecting “User1” or “User2” in the
Picture Mode.
Press the
MMEE NNUU
button and then
DD
//
EE
button to select
the
PPiicc ttuurree
menu.
Press the
GG
button and then
DD
//
EE
button to select
CCoolloouurr TTeemmppeerraattuu rr ee
.
Press the GGbutton and then
DD
//
EE
button to select
either
CCoo ooll, MMee dd iiuumm, WW aa rr mm
or
UU sseerr
.
Press the
MMEENNUU
button to move to the previous menu
screen.
1
2
3
4
Auto Colour Tone Control(Cool/Medium/Warm)
1
32
Picture Mode
Colour Temperature
XD
Advanced
Aspect Ratio
Picture Reset
Screen
Picture
Picture
Picture Mode
Colour Temperature
XD
Advanced
Aspect Ratio
Picture Reset
Screen
Colour Temperature G
Cool
Medium
Warm
User
PICTURE CONTROL
DEF G OK MENU
DEF G OK MENU
Page 47

PICTURE CONTROL
45
MANUAL PICTURE ADJUSTMENT
Press the
MMEE NNUU
button and then
DD
//
EE
button to select
the
PPiicc ttuurree
menu.
Press the GGbutton and then
DD
//
EE
button to select
PPii cctt uu rr ee MMooddee
.
Press the
GG
button and then
DD
//
EE
button to select
UU sseerr11
or
UU sseerr22
.
Press the
GG
button and then
DD
//
EE
button to select the
desired picture option (
BB aacckk llii gghhtt, CCoonn tt rr aasstt
,
BB rr iigghh tt nn eess ss, CCoolloouu rr, SShhaarr ppnnee ssss
and
TT iinn tt
).
Press the
FF
//
GG
button to make appropriate adjustments.
Press the
MMEENNUU
button to move to the previous menu
screen.
Picture Mode-User Option
BBaacckkll iigghh tt
To control the brightness of the screen, adjust
the brightness of LCD panel.
CCoonnttrraasstt
Adjusts the difference between light and dark
levels in the picture.
BBrriigghhttnn eess ss
Increases or decreases the amount of white in
the picture.
CCooll oouu rr
Adjusts intensity of all colours.
SShhaa rrppnn eessss
Adjusts the level of crispness in the edges
between the light and dark areas of the picture.
The lower the level, the softer the image.
TTiinntt
Adjusts the balance between red and green
levels.
1
2
3
4
5
6
54
User1
Backlight 100
Contrast
Brightness 50
Colour 70
Sharpness 70
Tint 0
Contrast 100 G
Contrast 100 F
G
E
E
1
32
Picture
Picture Mode
Colour Temperature
XD
Advanced
Aspect Ratio
Picture Reset
Screen
Picture Mode G
Vivid
Standard
Cinema
Sport
Game
User1
User2
Picture Mode
Colour Temperature
XD
Advanced
Aspect Ratio
Picture Reset
Screen
Picture
DEF G OK MENU
DEF G OK MENU
DEF G OK MENU
Page 48

PICTURE CONTROL
46
To adjust red, green, blue to any colour temperature you prefer.
This menu is activated after selecting “User1” or “User2” in the
Picture Mode.
Colour Tone - User Option
Press the
MMEE NNUU
button and then
DD
//
EE
button to select
the
PPiicc ttuurree
menu.
Press the
GG
button and then
DD
//
EE
button to select
CCoolloouurr TTeemmppeerraattuu rr ee
.
Press theGGbutton and then
DD
//
EE
button to select
UU sseerr
.
Press the
GG
button and then
DD
//
EE
button to select
RR eedd
,
GG rr eeeenn
or
BB lluu ee
.
Press the
FF
//
GG
button to make appropriate adjustments.
Press the
MMEENNUU
button to move to the previous menu
screen.
1
2
3
4
5
6
1
32
Picture
Picture Mode
Colour Temperature
XD
Advanced
Aspect Ratio
Picture Reset
Screen
Colour Temperature G
Cool
Medium
Warm
User
54
Red +30
Green 0
Blue 0
Red +30 G
User
Red +30 F
G
E
E
Picture Mode
Colour Temperature
XD
Advanced
Aspect Ratio
Picture Reset
Screen
Picture
PICTURE CONTROL
DEF G OK MENU
DEF G OK MENU
DEF G OK MENU
Page 49

PICTURE CONTROL
47
- PICTURE IMPROVEMENT TECHNOLOGY
Press the MENU button and then
DD
//
EE
button to select
the
PPiicc ttuurree
menu.
Press the
GG
button and then
DD
//
EE
button to select
XXDD
.
Press the
GG
button and then
DD
//
EE
button to select
AAuuttoo
or
MMaann uu aall
.
Press the
MMEENNUU
button to move to the previous menu
screen.
* Manual Selection
Press theGGbutton and then
DD
//
EE
button to select
XXDD
CCoonn ttrraa sstt,, XXDD CCoolloouurr
or
XXDD NNRR
.
Press the
GG
button and then
DD
//
EE
button to select
OO ff ff
,
LLooww
or
HH iigg hh
.
Select
OO ff ff,LLooww,HH iigg hh
or
AAddaapptt iivvee
(Only
XXDD NNRR
).
Press the
MMEENNUU
button to move to the previous menu
screen.
XD is LG electronic's unique picture improving technology to
display a real HD source through an advanced digital signal processing algorithm.
This menu is activated after selecting “
UU ssee rr 11
” or “
UU ssee rr 22
” in
the Picture Mode.
AA
XXDD CC oonn ttrraa sstt ::
Optimises the contract automatically
according to the brightness of the reflection.
AA
XXDD CC oolloouurr ::
Adjusts the colour of the reflection auto-
matically to reproduce as close as possible to
natural colours.
AA
XXDD NNRR
: Removes interference up to the point where it
does not damage the original picture.
1
2
3
4
1
2
3
1
32
Picture
Picture Mode
Colour Temperature
XD
Advanced
Aspect Ratio
Picture Reset
Screen
XD G
Auto
Manual
Manual
XD Contrast
G
XD Colour
XD NR
XD Contrast G
Off
Low
High
21
Picture Mode
Colour Temperature
XD
Advanced
Aspect Ratio
Picture Reset
Screen
Picture
Page 50

PICTURE CONTROL
48
ADVANCED - GAMMA
High gamma values display whitish images and low gamma
values display high contrast images.
Press the
MMEE NNUU
button and then
DD
//
EE
button to select
the
PPiicc ttuurree
menu.
Press the
GG
button and then
DD
//
EE
button to select
AAddvvaanncceedd
.
Press the
GG
button and then
DD
//
EE
button to select
GGaammmmaa
.
Press the
GG
button and then
DD
//
EE
button to select
LLooww,,
MMeeddiiuumm
or
HHiigghh..
Press the
MMEENNUU
button to move to the previous menu
screen.
1
2
3
4
5
32
Picture
Picture Mode
Colour Temperature
XD
Advanced
Aspect Ratio
Picture Reset
Screen
Advanced G
To Set
4
Gamma
Film Mode
Black Level
Gamma G
Advanced
Low
Medium
High
1
Picture Mode
Colour Temperature
XD
Advanced
Aspect Ratio
Picture Reset
Screen
Picture
PICTURE CONTROL
DEF G OK MENU
DEF G OK MENU
DEF G OK MENU
Page 51

PICTURE CONTROL
49
ADVANCED -
Film Mode
Press the
MMEE NNUU
button and then
DD
//
EE
button to select
the
PPiicc tt uurree
menu.
Press the GGbutton and then
DD
//
EE
button to select
AAddvv aann cc eedd
.
Press the
GG
button and then
DD
//
EE
button to select
FF iillmm
MMooddee
.
Press the GGbutton and then
DD
//
EE
button to select
OO nn
or
OO ff ff
.
Press the
MMEENNUU
button to move to the previous menu
screen.
1
2
3
4
5
32
Picture
Picture Mode
Colour Temperature
XD
Advanced
Aspect Ratio
Picture Reset
Screen
Advanced G
To Set
1
Picture Mode
Colour Temperature
XD
Advanced
Aspect Ratio
Picture Reset
Screen
Picture
4
Gamma
Film Mode
Black Level
Film Mode G
Advanced
Off
On
To set the TV up for the best picture quality for viewing films.
This menu is activated after selecting “Analog TV”, “AV” and
“Component”(480i/576i) mode in the INPUT.
DEF G OK MENU
DEF G OK MENU
DEF G OK MENU
Page 52

PICTURE CONTROL
50
ADVANCED - BLACK(DARKNESS) LEVEL
When you view a film this function adjust the TV to best picture
quality. Adjusting the contrast and the brightness of the screen
using the black level of the screen.
This function works in the following mode:
RF(NTSC-M), AV(NTSC-M, NTSC-4.43), COMPONENT or
HDMI.
Press the
MMEE NNUU
button and then
DD
//
EE
button to select
the
PPiicc tt uurree
menu.
Press the
GG
button and then
DD
//
EE
button to select
AAddvv aann cc eedd
.
Press the GGbutton and then
DD
//
EE
button to select
BB llaacc kk
LLeevv eell
.
Press the
GG
button and then
DD
//
EE
button to select
LLoo ww
or
HH iigg hh..
AA
LLoo ww
::
The reflection of the screen gets darker.
AA
HH iigg hh
::
The reflection of the screen gets brighter.
Press the
MMEENNUU
button to move to the previous menu
screen.
1
2
3
4
5
32
Picture
Picture Mode
Colour Temperature
XD
Advanced
Aspect Ratio
Picture Reset
Screen
Advanced G
To Set
4
Gamma
Film Mode
Black Level
Black Level G
Advanced
Low
High
1
Picture Mode
Colour Temperature
XD
Advanced
Aspect Ratio
Picture Reset
Screen
Picture
PICTURE CONTROL
DEF G OK MENU
DEF G OK MENU
DEF G OK MENU
Page 53

PICTURE CONTROL
51
ADVANCED -
Eye Care
(
Except for 22LF15R
)
This feature is not available for all models.
It helps you adjust brightness when the screen is too
bright to prevent dazzling.
When selecting Picture Mode (Standard, Game, Sport,
User1 and User2), you can operate this function.
Press the
MMEE NNUU
button and then
DD
//
EE
button to select
the
PPiicc tt uurree
menu.
Press the
GG
button and then
DD
//
EE
button to select
AAddvv aann cc eedd
.
Press the
GG
button and then
DD
//
EE
button to select
EE yyee
CCaa rree
.
Press the
GG
button and then
DD
//
EE
button to select
OO nn
or
OO ff ff..
Press the
MMEE NNUU
button to move to the previous menu
screen.
1
2
3
4
5
32
Picture
Picture Mode
Colour Temperature
XD
Advanced
Aspect Ratio
Picture Reset
Screen
Advanced G
To Set
4
Gamma
Film Mode
Black Level
Eye Care
Eye Care G
Advanced
Off
On
1
Picture Mode
Colour Temperature
XD
Advanced
Aspect Ratio
Picture Reset
Screen
Picture
DEF G OK MENU
DEF G OK MENU
DEF G OK MENU
Page 54

PICTURE CONTROL
52
PICTURE RESET
Press the
MMEE NNUU
button and then
DD
//
EE
button to select
the
PPiicc ttuurree
menu.
Press the
GG
button and then
DD
//
EE
button to select
PPiicc ttuurree RR eess eett
.
Press the
GG
button to initialize the adjusted value.
Press the
MMEENNUU
button to move to the previous menu
screen.
Returns to the default factory setting for Picture Mode, Colour
Temperature, XD, Advanced, Aspect Ratio.
1
2
3
4
32
Picture
Picture Mode
Colour Temperature
XD
Advanced
Aspect Ratio
Picture Reset
Screen
Picture Reset G
To Set
1
Picture Mode
Colour Temperature
XD
Advanced
Aspect Ratio
Picture Reset
Screen
Picture
PICTURE CONTROL
DEF G OK MENU
DEF G OK MENU
Page 55

PICTURE CONTROL
53
POWER INDICATOR
(
Except for 22LF15R
)
It helps you adjust the brightness of moving LED when power is
turned on.
Press the
MMEE NNUU
button and then
DD
//
EE
button to
select the
OO pptt iioonn
menu.
Press the
GG
button and then
DD
//
EE
button to select
PPoowweerr IInnddiiccaattoorr
.
Press the
GG
button and then
DD
//
EE
button to select
either
SSttaann ddbbyy LL iigghh tt
or
PPoowweerr LLiigghhtt
.
Press the
GG
button and then
DD
//
EE
button to select
OO nn
or
OO ffff ..
Press the
MMEE NNUU
button to move to the previous menu
screen.
1
2
3
4
5
1
32
Option
Language
Key Lock
Power Indicator
Factory Reset
Power Indicator G
To set
Language
Key Lock
Power Indicator
Factory Reset
Option
DEF G OK MENU
DEF G OK MENU
4
Standby Light
Power Light
Standby Light G
Power Indicator
Off
On
DEF G OK MENU
Page 56

PICTURE CONTROL
54
PICTURE CONTROL
Use to quickly reset all the menu options to their original
factory preset values.
This function deletes all TV programmes.
3
2
Option
Language
Key Lock
Factory Reset
Factory Reset G
1
To set
FACTORY RESET
Press the
MMEE NNUU
button and then
DD
//
EE
button to
select the
OO pptt iioonn
menu.
Press the
GG
button and then
DD
//
EE
button to select
FF aacctt oorryy RReess eett
.
Press the
GG
button and then
FF
//
GG
button to select
YY eess
or
NN oo
.
Press the
MMEE NNUU
button to move to the previous menu
screen.
1
2
3
4
Factory Reset
Yes
No
Language
Key Lock
Factory Reset
Option
DEF G OK MENU
DEF G OK MENU
Page 57

SOUND & LANGUAGE CONTROL
55
SOUND & LANGUAGE CONTROL
1
AUTO VOLUME LEVELER
Press the
MMEE NNUU
button and then
DD
//
EE
button to select
the
AAuuddiioo
menu.
Press the
GG
button and then
DD
//
EE
button to select
AAuuttoo
VV oolluumm ee
.
Press theGGbutton and then
DD
//
EE
button to select
OO nn
or
OO ff ff
.
Press the
MMEENNUU
button to move to the previous menu
screen.
Auto Volume automatically remains on the same level of volume
if you change programmes.
1
2
3
4
32
Audio
Sound Mode
Auto Volume
Balance 0
Auto Volume G
Off
On
Sound Mode
Auto Volume
Balance 0
Audio
DEF G OK MENU
DEF G OK MENU
Page 58

SOUND & LANGUAGE CONTROL
56
SOUND & LANGUAGE CONTROL
PRESET SOUND SETTINGS-SOUND MODE
You can select your preferred sound setting; SRS TSXT(
Except for
22LF15R)
, Clear Voice(
Except for 22LF15R)
, Standard, Music,
Cinema, Sport or Game and you can also adjust the frequency
of the equalizer.
Sound Mode lets you enjoy the best sound without any Special
adjustment as the TV sets the appropriate sound options based
on the programme content.
SSRRSS TTSSXXTT
(
Except for 22LF15R)
,
CCll eeaa rr VV ooii ccee
(
Except for
22LF15R)
,
SSttaa nn ddaarrdd, MMuussii cc, CCiinn eemm aa, SSppoo rr tt
and
GG aamm ee
are
preset for optimum sound quality at the factory and are not
adjustable.
Press the
MMEE NNUU
button and then
DD
//
EE
button to select
the
AAuuddiioo
menu.
Press the
GG
button and then
DD
//
EE
button to select
SSoouunn dd MMooddee
.
Press the
GG
button and then
DD
//
EE
button to select
SSRRSS
TT SS XXTT
(
Except for 22LF15R)
,
CCllee aarr VVooiicc ee
(
Except for
22LF15R)
,
SSttaann dd aa rrdd, MMuu ss iicc, CCiinneemm aa, SSppoorrtt,, GGaammee
or
UU sseerr
.
Press the
MMEENNUU
button to move to the previous menu
screen.
1
2
3
4
1
32
Audio
Sound Mode
Auto Volume
Balance 0
Sound Mode G
SRS TSXT
Clear Voice
Standard
Music
Cinema
Sport
Game
User
Sound Mode
Auto Volume
Balance 0
Audio
Except for 22LF15R
GG
is a trademark of SRS Labs, Inc.
GG
TruSurround XT technology is incorporated under license from SRS Labs, Inc.
DEF G OK MENU
DEF G OK MENU
Page 59

SOUND & LANGUAGE CONTROL
57
3 42
SOUND SETTING ADJUSTMENT -USER MODE
Press the
MMEE NNUU
button and then
DD
//
EE
button to select
the
AAuuddiioo
menu.
Press the
GG
button and then
DD
//
EE
button to select
SSoouunn dd MMooddee
.
Press the
GG
button and then
DD
//
EE
button to select
UU ss eerr
.
Press the
GG
button.
Select a frequency band by pressing the
FF
//
GG
button.
Set the desired sound level with the
DD
//
EE
button.
Press the
MMEENNUU
button to move to the previous menu
screen.
Adjusting the audio equalizer.
1
2
3
4
5
6
5
1
Audio
Sound Mode
Auto Volume
Balance 0
Sound Mode G
SRS TSXT
Clear Voice
Standard
Music
Cinema
Sport
Game
User
Sound Mode
Auto Volume
Balance 0
Audio
User
0.1 0.5 1.5 5.0 10 kHz
Except for 22LF15R
DEF G OK MENU
DEF G OK MENU
Page 60

SOUND & LANGUAGE CONTROL
58
SOUND & LANGUAGE CONTROL
BALANCE
You can adjust the sound balance of the speakers to the preferred levels.
Press the
MMEE NNUU
button and then
DD
//
EE
button to select
the
AAuuddiioo
menu.
Press the
GG
button and then
DD
//
EE
button to select
BB aallaa nnccee
.
Press the
GG
button and then
FF
//
GG
button to make
desired adjustment.
Press the
MMEENNUU
button to move to the previous menu
screen.
1
2
3
4
1
32
Audio
Sound Mode
Auto Volume
Balance 0
Balance 0 G
Sound Mode
Auto Volume
Balance 0
Audio
DEF G OK MENU
DEF G OK MENU
Page 61

SOUND & LANGUAGE CONTROL
59
1
Audio
Sound Mode
Auto Volume
Balance 0
TV Speaker
Audio Out
TV Speaker G
Off
On
2 3
TV SPEAKERS ON/OFF SETUP
(
Except for 22LF15R)
You can adjust the internal speaker status.
In TV, AV, COMPONENT and HDMI mode, internal speaker
audio can be operational even though there is no video signal.
If you wish to use an external hi-fi system, turn off the TV
internal speakers.
Press the
MMEE NNUU
button and then
DD
//
EE
button to select
the
AAuuddiioo
menu.
Press the
GG
button and then
DD
//
EE
button to select
TT VV
SSpp eeaa kk eerr
.
Press the
GG
button and then
DD
//
EE
button to select
OO nn
or
OO ff ff
.
Press the
MMEE NNUU
button to move to the previous menu
screen.
1
2
3
4
Sound Mode
Auto Volume
Balance 0
TV Speaker
Audio Out
Audio
DEF G OK MENU
DEF G OK MENU
Page 62

SOUND & LANGUAGE CONTROL
60
SOUND & LANGUAGE CONTROL
SELECTING AUDIO OUT(
Except for 22LF15R)
Select
MMoonniittoorr OOuu tt
or
VV aa rrii aabbllee oo uutt
to connect the audio outputs.
1
Audio
Sound Mode
Auto Volume
Balance 0
TV Speaker
Audio Out
Audio Out G
Monitor Out
Variable Out
2 3
Press the
MMEE NNUU
button and then
DD
//
EE
button to select
the
AAuuddiioo
menu.
Press the
GG
button and then
DD
//
EE
button to select
AA uuddiioo OOuu tt
.
Press the
GG
button and then
DD
//
EE
button to select
MMoonniittoorr OOuu tt
or
VV aa rrii aabbllee OOuutt
.
Press the
MMEE NNUU
button to move to the previous menu
screen.
1
2
3
4
Sound Mode
Auto Volume
Balance 0
TV Speaker
Audio Out
Audio
DEF G OK MENU
DEF G OK MENU
Page 63

SOUND & LANGUAGE CONTROL
61
I/II
AA
MMoo nn oo ssoouunndd ssee ll eeccttii oonn
If the stereo signal is weak in stereo reception, you can switch to mono. In mono reception, the clarity of
sound is improved. To switch back to stereo.
AA
LLaa nn gguu aaggee sseelleeccttii oonn ffoorr dduu aall llaanngg uu aaggee bbrrooaa ddccaass tt
If a programme can be received in two languages (dual language), you can switch to DUAL I, DUAL II or DUAL
I+II.
DDUUAALL II
Sends the primary broadcast language to the loudspeakers.
DDUUAALL II II
Sends the secondary broadcast language to the loudspeakers.
DDUUAALL II++ IIII
Sends a separate language to each loudspeaker.
BBrr ooaaddccaass tt
Mono
Stereo
Dual
OO nn SS ccrree ee nn DDiiss ppll aa yy
MMOO NN OO
SS TT EERREEOO
DDUUAALL II,, DD UU AA LL IIII,, DD UU AALL II++ II II
Stereo/Dual Reception
When a programme is selected, the sound information for the station appears with the programme number
and station name.
Press the
II//IIII
button to select the
MMuullttii AAuu ddiioo
menu.
1
Page 64

SOUND & LANGUAGE CONTROL
62
SOUND & LANGUAGE CONTROL
NICAM Reception
When NICAM mono is received, you can select
NNII CCAAMM MMOONNOO
or
FF MM MMOO NNOO
.
When NICAM stereo is received, you can select
NNII CCAAMM SS TTEERREEOO
or
FF MM MMOO NNOO
.
If the stereo signal is weak, switch to
FF MM MMOO NNOO
.
When NICAM dual is received, you can select
NNII CCAAMM DDUUAALL II, NNII CCAAMM DDUUAALL II II
or
NNII CCAAMM DDUUAALL II++IIII
or
FF MM MM OONN OO
.
If the TV is equipped with a receiver for NICAM reception, high quality NICAM (Near Instantaneous
Companding Audio Multiplex) digital sound can be received.
Sound output can be selected according to the type of broadcast received.
Speaker Sound Output Selection
In AV, Component and HDMI mode, you can select output sound for the left and right loudspeakers.
Select the sound output.
LL++RR::
Audio signal from audio L input is sent to the left loudspeaker and audio signal from audio
R input is sent to the right loudspeaker.
LL++LL::
Audio signal from audio L input is sent to left and right loudspeakers.
RR++ RR ::
Audio signal from audio R input is sent to left and right loudspeakers.
1
2
3
Page 65

SOUND & LANGUAGE CONTROL
63
ON-SCREEN MENU LANGUAGE SELECTION
The menus can be shown on the screen in the selected language. First select
your language.
Press the
MMEE NNUU
button and then use
DD
//
EE
button to select the
OO pptt iioonn
menu.
Press the
GG
button and then use
DD
//
EE
button to select
LLaanngguuaaggee
.
Press the
GG
button and then use
DD
//
EE
//
FF
//
GG
button to select your
desired language.
Press the
OO KK
button
Press the
MMEENNUU
button to move to the previous menu screen.
1
2
3
4
5
Page 66

TIME SETTING
64
TIME SETTING
CLOCK SETUP
Press the
MMEE NNUU
button and then
DD
//
EE
button to select
the
TT iimm ee
menu.
Press the
GG
button and then
DD
//
EE
button to select
CClloocckk
.
Press the
GG
button and then
DD
//
EE
button to set the hour.
Press the
GG
button and then
DD
//
EE
button to set the
minute.
Press the
MMEENNUU
button to move to the previous menu
screen.
You must set the time correctly before using on/off timer function.
If current time setting is erased by a power failure or the TV is
unplugged, reset the clock.
1
2
3
4
5
1
3 42
Time
Clock
Off Time
On Time
Sleep Timer
Auto Sleep
Clock G
- - : - -
Clock
Off Time
On Time
Sleep Timer
Auto Sleep
Time
DEF G OK MENU
DEF G OK MENU
Page 67

TIME SETTING
65
AUTO ON/OFF TIMER SETTING
Press the
MMEE NNUU
button and then
DD
//
EE
button to select
the
TT iimm ee
menu.
Press the
GG
button and then
DD
//
EE
button to select
OO nn/OO ff ff TT iimmee
.
• To cancel
OO nn/OO ff ff TT iimmee
function, select
OO ff ff
.
Press the
GG
button and then
DD
//
EE
button to set the hour.
Press the
GG
button and then
DD
//
EE
button to set the
minutes.
FF oorr OOnn TTiimm ee ffuunnccttiioonn oonn llyy
•
PPrrooggrraamm mmee
: Press the
GG
button and then
DD
//
EE
button
to select the programme.
•
VV oolluumm ee
: Press the
GG
button and then
DD
//
EE
button to
adjust volume level at switch-on.
Press the
MMEENNUU
button to move to the previous menu
screen.
The Off time function automatically switches the TV to standby
at a preset time.
Two hours after the TV is switched on by the on time function it
will automatically switch back to standby mode unless a button
has been pressed.
Once the on time/off time is set, these functions operate daily at
the preset time.
The Off time function overrides the On timer function if both are
set to the same time.
The TV must be in standby mode for the On timer to work.
1
2
3
4
5
6
1
54
4
32
32
Clock
Off Time
On Time
Sleep Timer
Auto Sleep
Time
Time
Clock
Off Time
On Time
Sleep Timer
Auto Sleep
Off Time G
- - : - Off
Time
Clock
Off Time
On Time
Sleep Timer
Auto Sleep
On Time G
- - : - PR 1
Vol. 30
On
DEF G OK MENU
DEF G OK MENU
DEF G OK MENU
Page 68

TIME SETTING
66
TIME SETTING
SLEEP TIMER SETTING
You do not have to remember to switch the TV off before you
go to sleep. The sleep timer automatically switches the TV to
standby after the preset time has elapsed.
NOTE
!
GG
When you switch the TV off, the TV releases the preset sleep time.
1
4
32
Press the
MMEE NNUU
button and then
DD
//
EE
button to select
the
TT iimm ee
menu.
Press the
GG
button and then
DD
//
EE
button to select
SSlleeeepp
TTiimmeerr
.
Press the
GG
button and then
DD
//
EE
button to set the
minute.
Press the
MMEENNUU
button to move to the previous menu
screen.
1
2
3
4
Clock
Off Time
On Time
Sleep Timer
Auto Sleep
Time
Time
Clock
Off Time
On Time
Sleep Timer
Auto Sleep
Sleep Timer G
Off
DEF G OK MENU
DEF G OK MENU
Page 69

TIME SETTING
67
AUTO SHUT-OFF SETTING
If the TV set is switched on and there is no input signal, it will
switch off automatically after 10 minutes.
Press the
MMEE NNUU
button and then
DD
//
EE
button to select
the
TT iimm ee
menu.
Press the
GG
button and then
DD
//
EE
button to select
AAuuttoo
SSlleeeepp
.
Press the GGbutton and then
DD
//
EE
button to select
OO nn
or
OO ff ff
.
Press the
MMEENNUU
button to move to the previous menu screen.
1
2
3
4
2 3
1
Clock
Off Time
On Time
Sleep Timer
Auto Sleep
Time
Time
Clock
Off Time
On Time
Sleep Timer
Auto Sleep
Auto Sleep G
Off
On
DEF G OK MENU
DEF G OK MENU
Page 70

TELETEXT
68
TELETEXT
Press the
TT EEXXTT
button to switch to teletext. The initial page or last page viewed appears on the screen.
Two page numbers, TV station name, date and time are displayed on the screen headline. The first page number
indicates your selection, while the second shows the current page displayed.
Press the
TT EEXXTT
button to switch off teletext. The previous mode reappears.
SWITCH ON/OFF
AA
Page selection
Enter the desired page number as a three digit number with the NUMBER buttons. If during selection you
press a wrong number, you must complete the three digit number and then re-enter the correct page number.
The
DD
//
EE
button can be used to select the preceding or following page.
PPrroogg rraammmmiinngg aa ccoolloouurr bb uuttttoonn iinn LLIISSTT mmooddee
If the TV is in SIMPLE text, TOP text or FASTEXT mode, press the button to switch to LIST mode.
Four teletext page numbers of your choice can be colour coded and easily selected by pressing the corresponding
coloured button on the remote control handset.
Press a coloured button.
Using the NUMBER buttons, select the page you wish to programme.
Press the
OO KK
button. The selected page is stored as the selected page number, blinking once to confirm this.
From now on, you can select this page with the same coloured button.
The three other coloured buttons are programmed in this way.
SIMPLE TEXT
1
2
TThhiiss ffee aattuurree iiss nnoo tt aavv aaiillaabbll ee iinn aall ll cc oouunnttrriieess ..
Teletext is a free service broadcast by most TV stations which gives up-to-the-minute information on news,
weather, television programmes, share prices and many other topics.
The teletext decoder of this TV can support the SIMPLE, TOP and FASTEXT systems. SIMPLE (standard teletext) consists of a number of pages which are selected by directly entering the corresponding page number.
TOP and FASTEXT are more modern methods allowing quick and easy selection of teletext information.
M
1
2
3
4
Page 71

TELETEXT
69
TOP TEXT
The user guide displays four fields-red, green, yellow and blue at the bottom of the screen. The yellow field
denotes the next group and the blue field indicates the next block.
AA
Block / group / page selection
With the blue button you can progress from block to block.
Use the yellow button to proceed to the next group with automatic overflow to the next block.
With the green button you can proceed to the next existing page with automatic overflow to the next group.
Alternatively the
DD
button can be used.
The red button return to the previous selection. Alternatively the
EE
button can be used.
AA
Direct page selection
As with SIMPLE teletext mode, you can select a page by entering it as a three digit number using the NUMBER
buttons in TOP mode.
44
1
2
3
FASTEXT
The teletext pages are colour coded along the bottom of the screen and are selected by pressing the corresponding coloured button.
AA
Page selection
Press the button to select the index page.
You can select the pages which are colour coded along the bottom line with corresponding coloured buttons.
As with SIMPLE teletext mode, you can select a page by entering its three digit page number with the NUMBER
buttons in FASTEXT mode.
The
DD
//
EE
button can be used to select the preceding or following page.
i
44
1
2
3
Page 72

TELETEXT
70
TELETEXT
SPECIAL TELETEXT FUNCTIONS
AA
TT IIMMEE
When viewing a TV programme, press this button to display the time at the top
right hand corner of the screen. Press this button again to remove the display.
In the teletext mode, press this button to select a sub page number. The sub
page number is displayed at the bottom of the screen. To hold or change the
sub page, press the RED/GREEN,
DD
//
EE
or NUMBER buttons.
Press again to exit this function.
AA
SSII ZZEE
Selects double height text.
Press this button to enlarge the top half of the page.
Press this button again to enlarge the bottom half of the page.
Press this button again to return to the normal display.
AA
UU PP DDAA TTEE
Displays the TV picture on the screen while waiting for a new teletext page. The
display will appear at the top left hand corner of the screen. When the updated
page is available then display will change to the page number. Press this button
again to view the updated teletext page.
AA
RR EEVVEE AALL
Press this button to display concealed information, such as solutions to riddles
or puzzles.
Press this button again to remove the information from the display.
AA
IINN DDEEXX
Select the each index page.
AA
HH OOLL DD
Stops the automatic page change which will occur if a teletext page consists of
2 or more sub pages. The number of sub pages and the sub page displayed is,
usually, shown on the screen below the time. When this button is pressed the
stop symbol is displayed at the top left-hand corner of the screen and the automatic page change is inactive. To continue press this button again.
?
AA
MMII XX
Displays the teletext pages superimposed on the TV picture.
To switch the TV picture off press this button again.
■
Press the
TT.. OOPPTT
button and then use
DD EE
button to select the
TTeexxtt OOppttiioonn
menu.
i
Page 73

APPENDIX
71
APPENDIX
TROUBLESHOOTING
TThh ee vviiddee oo ffuunnccttiioonn dd ooeess nnoott wwoorr kk..
NNoo pp iiccttuu rr ee &&
NNoo ssoouu nn dd
NNoo oo rr ppoooorr cc oolloouurr
oorr ppoooorr pp iiccttuu rree
PPoooorr rreecc eeppttii oonn oo nn
ssoomm ee cchh aannnnee llss
LLii nneess oorr ssttrreeaakkss iinn
ppii ccttuurreess
HHoorriizzoonnttaall//vveerrttiiccaall
bbaarrss oorr ppiiccttuurree sshhaakkiinngg
PPii cc tt uurree aappppeeaarr ss ss llooww--
ll yy aafftteerr sswwiittcchh iinngg oonn
■
Check whether the TV is switched on.
■
Try another channel. The problem may be with the broadcast.
■
Is the power cord inserted correctly into the mains?
■
Check your antenna direction and/or location.
■
Test the mains outlet by plugging another TV into the same outlet.
■
This is normal, the image is muted during the TV startup process. Please contact your
service center, if the picture has not appeared after five minutes.
■
Adjust Colour in menu option.
■
Allow a sufficient distance between the TV and the VCR.
■
Try another channel. The problem may be with the broadcast.
■
Are the video cables installed properly?
■
Activate any function to restore the brightness of the picture.
■
Check for local interference such as an electrical appliance or power tool.
■
Station or cable channel experiencing problems, tune to another station.
■
Station signal is weak, reposition the antenna to receive weaker stations.
■
Check for sources of possible interference.
■
Check antenna (Change the position of the antenna).
TThh ee TTVV ddooeess nnoott ooppeerraattee pprrooppeerrllyy
TThh ee rr eemmoottee ccoonn tt rr ooll
ddooeess nnoott wwoorrkk
PPoowwee rr iiss ss uuddddeennllyy
ttuurr nneedd oo ffff
■
Check to see if there is any object between the TV and the remote control causing an obstruction.
■
Are batteries installed with correct polarity (+ to +, - to -)?
■
Correct remote operating mode set: TV, STB, DVD etc.?
■
Install new batteries.
■
Is the sleep time set?
■
Check the power control settings. Has the Power supply been interrupted.
■
Is Auto sleep activated on this station.
Page 74

APPENDIX
72
APPENDIX
PPii cctt uu rr ee OOKK &&
NNoo ssoouu nn dd
UU nn uussuuaall ssoouunn dd ff rr oomm
iinnssiiddee tthhee TTVV
NNoo oo uuttppuutt ffrroomm oonn ee
ooff tthhee ssppeeaakkeerrss
TThh ee aauuddiioo ffuu nn ccttiioonn ddooeess nnoott wwoorr kk..
■
Press the
VV OOLL
button.
■
Sound muted? Press
MMUUTTEE
button.
■
Try another channel. The problem may be with the broadcast.
■
Are the audio cables installed properly?
■
Adjust Balance in menu option.
■
A change in ambient humidity or temperature may result in an unusual noise when
the TV is switched on or off and does not indicate a fault with the TV.
TThh eerree iiss aa pprroobbllee mm iinn PPIICCTT UURREE ss eettttiinnggss..
■
It means that the TV is currently set to
IInn SSttoorr ee
mode.
To switch to
HH oo mmee
mode you should do the followings:
From the TV Menu, choose
OO pptt ii oonn
->
FF aacctt oorryy RReess eett
->
YY eess
(wait for a
few seconds for the TV to download again) -> Choose
LLaanngguuaaggee
-> Choose
HH oo mmee
-> Press
OO KK
button -> OSD "
WW EELLCCOOMMEE
" appears -> Press
OO KK
button.
Program search will begin automatically (You can stop the search by pressing
the
MMEE NNUU
button). Now you have completed switching to the Home mode.
WW hheenn tt hh ee uusseerr
cchhaannggee ss tthh ee ppiiccttuurree
sseettttiinngg ss ,, tthhee TTVV
aa uutt oommaatt iiccaall llyy
ccoonnvveerr tt ss bbaacc kk ttoo tthhee
iinnii tt iiaall sseettttii nn ggss aafftteerr
aa cc eerrttaaiinn pp eerr iioodd ooff
ttii mm ee..
Page 75

APPENDIX
73
MAINTENANCE
Early malfunctions can be prevented. Careful and regular cleaning can prolong the life of your new TV.
Caution: Be sure to swith the power off and unplug the power cord before you begin any cleaning.
Cleaning the Screen
A good way to keep the dust off your screen for a while is to wet a soft cloth in a mixture of lukewarm
water and a little fabric softener or dish washing detergent. Wring the cloth until it’s almost dry, and then
use it to wipe the screen.
Ensure there is no excess water on the screen. Allow any water or dampness to evaporate before switching on.
Cleaning the Cabinet
■
To remove dirt or dust, wipe the cabinet with a soft, dry, lint-free cloth.
■
Do not to use a wet cloth.
Extended Absence
GG
If you expect to leave your TV dormant for prolonged periods (such as a holiday), unplug the power
cord to protect against possible damage from lightning or power surges.
CAUTION
1
2
Page 76

APPENDIX
74
APPENDIX
PRODUCT SPECIFICATIONS
■
The specifications shown above may be changed without prior notice for quality improvement.
MODELS
Dimensions
(Width x Height x Depth)
Weight
Operating Temperature
Operating Humidity
Storage Temperature
Storage Humidity
Environment condition
Power requirement
Television System
Programme Coverage
External Antenna Impedance
PAL/SECAM B/G/D/K, PAL I/II, NTSC-M
VHF: NZ1~E21, UHF: E21
~ E69, CATV: S1 ~ S20, HYPER: S21 ~ S47
75 Ω
0 ~ 40°C / 32 ~ 104°F
Less than 80%
-20 ~ 60°C / -4 ~ 140°F
Less than 85%
with stand
without stand
with stand
without stand
Dimensions
(Width x Height x Depth)
Weight
Power requirement
with stand
without stand
with stand
without stand
522.2 x 431.5 x 189 mm
20.6 x 16.9 x 7.4 inches
522.2 x 384.2 x 69 mm
20.6 x 15.1 x 2.7 inches
5.6 kg / 12.3 lbs
5.34 kg / 11.7 lbs
AC100-240V~ 50/60Hz
22LF15R-TA
22LF15R-LA
663.3 x 508.2 x 227.3 mm
26.1 x 20 x 8.9 inches
663.3 x 449.8 x 80 mm
26.1 x 17.7 x 3.1 inches
10.1 kg / 22.2 lbs
8.6 kg / 18.9 lbs
AC100-240V~ 50/60Hz
26LF15R-TA
26LF15R-LA
MODELS
801.7 x 604.2 x 227.3 mm
31.5 x 23.8 x 8.9 inches
801.7 x 544.1 x 79 mm
31.5 x 21.4 x 3.1 inches
13.35 kg / 29.4 lbs
11.85 kg / 26.1 lbs
AC100-240V~ 50/60Hz
22LF15R
26LF15R
32LF15R
32LF15R-TA
32LF15R-LA
Page 77

APPENDIX
75
IR CODES
A
Configuration of frame
1st frame
Repeat frame
A
Lead code
A
Repeat code
A
BB iitt dd eessccrriippttii oonn
A
FF rr aammee iinn tt eerrvv aall :: TTff
The waveform is transmitted as long as a key is depressed.
C0 C1 C2 C3 C4 C5 C6 C7 C0 C1 C2 C3 C4 C5 C6 C7 D0 D1 D2 D3 D4 D5 D6 D7 D0 D1 D2 D3 D4 D5 D6 D7
Lead code Low custom code High custom code Data code Data code
Repeat code
Tf
4.5 ms
9 ms
2.25 ms
9 ms
0.55 ms
0.56 ms
1.12 ms
0.56 ms
2.24 ms
Tf Tf
Tf=108ms @455KHz
Bit ”0” Bit ”1”
1. How to Connect
A
Connect your wired remote control to the Remote Control port on the TV.
2. Remote Control IR Codes
A
Output waveform
Single pulse, modulated with 37.917KHz signal at 455KHz
T1
Tc
Carrier frequency
FCAR = 1/TC = fOSC/12
Duty ratio = T1/TC = 1/3
Page 78

APPENDIX
76
Code
Function Note
(Hexa)
Code
Function Note
(Hexa)
0B INPUT R/C Button
08 POWER R/C Button (Power On/Off)
43 MENU R/C Button
44 OK R/C Button
72 RED R/C Button
71 GREEN R/C Button
63 YELLOW R/C Button
61 BLUE R/C Button
02 VOL
G
R/C Button
03 VOL
F
R/C Button
00 PR
DD
R/C Button
01 PR
EE
R/C Button
4D PSM R/C Button
52 SSM R/C Button
0A I/II R/C Button
0E SLEEP R/C Button
22 MODE R/C Button
24 MIX R/C Button
26 TIME R/C Button
2A REVEAL R/C Button
62 UPDATE R/C Button
64 SIZE R/C Button
65 HOLD R/C Button
70 INDEX R/C Button
0F TV R/C Button
09 MUTE R/C Button
53 LIST R/C Button
10 ~ 19 Number Key 0 ~ 9 R/C Button
1A Q.VIEW R/C Button
20 TEXT R/C Button
79 RATIO R/C Button
APPENDIX
Page 79

APPENDIX
77
Page 80

 Loading...