

Page 1
COLOR TV
SERVICE MANUAL
CAUTION
BEFORE SERVICING THE CHASSIS,
READ THE SAFETY PRECAUTIONS IN THIS MANUAL.
CHASSIS : CW81A
MODEL : 21FU3RL
21FU3RL-T3
website:http://biz.LGservice.com
Internal Use Only
Page 2

- 2 -
LGE Internal Use OnlyCopyright © 2008 LG Electronics. Inc. All right reserved.
Only for training and service purposes
CONTENTS
Contents ....................................................................................................2
Safety Precautions....................................................................................3
Specifications............................................................................................4
Adjustment Instructions...........................................................................5
Trouble Shooting ......................................................................................8
Block Diagram.........................................................................................13
Exploded View.........................................................................................14
Exploded View Parts List .......................................................................15
Replacement Parts List ..........................................................................16
SVC. Sheet...................................................................................................
Page 3
- 3 -
LGE Internal Use OnlyCopyright © 2008 LG Electronics. Inc. All right reserved.
Only for training and service purposes
SAFETY PRECAUTIONS
Many electrical and mechanical parts in this chassis have special safety-related characteristics. These parts are identified by in the
Schematic Diagram and Replacement Parts List.
It is essential that these special safety parts should be replaced with the same components as recommended in this manual to prevent
X-RADIATION, Shock, Fire, or other Hazards.
Do not modify the original design without permission of manufacturer.
General Guidance
An isolation Transformer should always be used during the
servicing of a receiver whose chassis is not isolated from the AC
power line. Use a transformer of adequate power rating as this
protects the technician from accidents resulting in personal injury
from electrical shocks.
It will also protect the receiver and it's components from being
damaged by accidental shorts of the circuitry that may be
inadvertently introduced during the service operation.
If any fuse (or Fusible Resistor) in this TV receiver is blown,
replace it with the specified.
When replacing a high wattage resistor (Oxide Metal Film Resistor,
over 1W), keep the resistor 10mm away from PCB.
Keep wires away from high voltage or high temperature parts.
Due to high vacuum and large surface area of picture tube,
extreme care should be used in handling the Picture Tube. Do
not lift the Picture tube by it's Neck.
X-RAY Radiation
Warning:
To determine the presence of high voltage, use an accurate high
impedance HV meter.
Adjust brightness, color, contrast controls to minimum.
Measure the high voltage.
The meter reading should indicate
23.5 ± 1.5KV: 14-19 inch, 26 ± 1.5KV: 19-21 inch,
29.0 ± 1.5KV: 25-29 inch, 30.0 ± 1.5KV: 32 inch
If the meter indication is out of tolerance, immediate service and
correction is required to prevent the possibility of premature
component failure.
Before returning the receiver to the customer,
always perform an AC leakage current check on the exposed
metallic parts of the cabinet, such as antennas, terminals, etc., to
be sure the set is safe to operate without damage of electrical
shock.
Leakage Current Cold Check(Antenna Cold Check)
With the instrument AC plug removed from AC source, connect an
electrical jumper across the two AC plug prongs. Place the AC
switch in the on position, connect one lead of ohm-meter to the AC
plug prongs tied together and touch other ohm-meter lead in turn to
each exposed metallic parts such as antenna terminals, phone
jacks, etc.
If the exposed metallic part has a return path to the chassis, the
measured resistance should be between 1MΩ and 5.2MΩ.
When the exposed metal has no return path to the chassis the
reading must be infinite.
An other abnormality exists that must be corrected before the
receiver is returned to the customer.
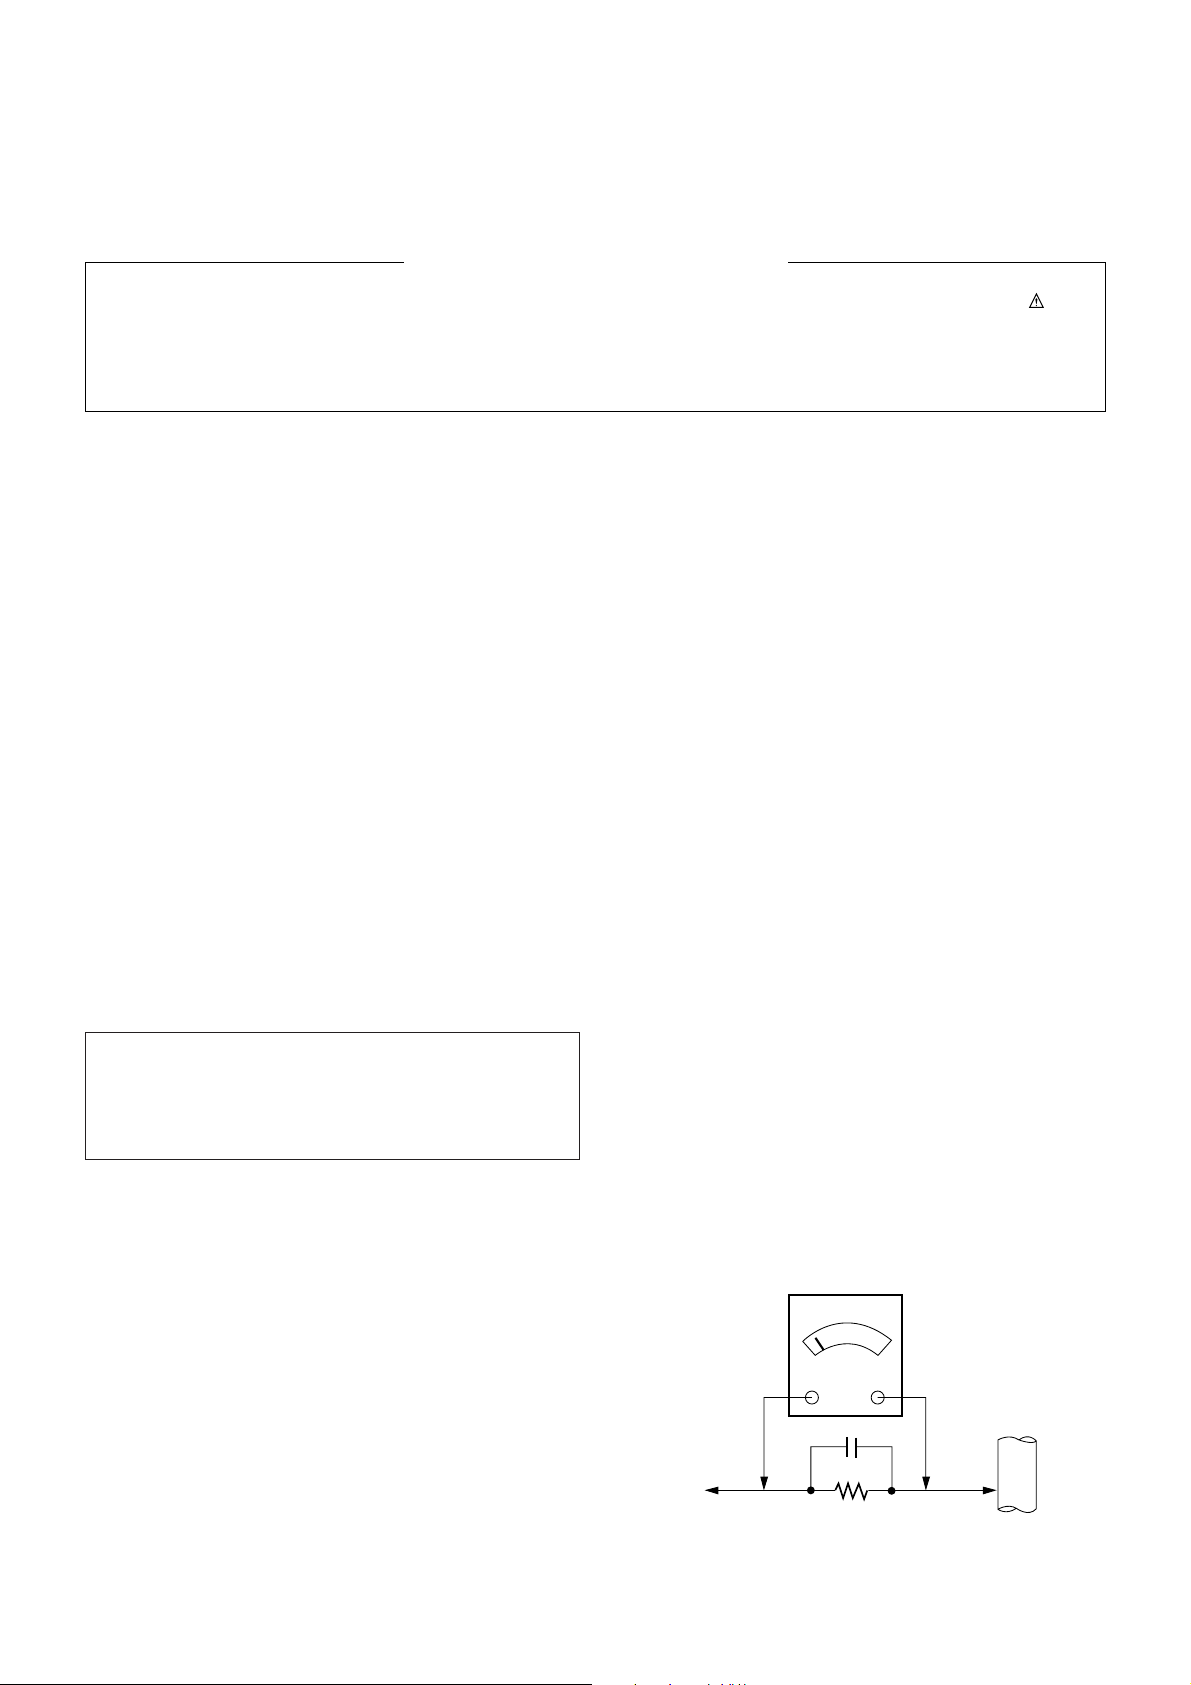
Leakage Current Hot Check (See below Figure)
Plug the AC cord directly into the AC outlet.
Do not use a line Isolation Transformer during this check.
Connect 1.5K/10watt resistor in parallel with a 0.15uF capacitor
between a known good earth ground (Water Pipe, Conduit, etc.)
and the exposed metallic parts.
Measure the AC voltage across the resistor using AC voltmeter
with 1000 ohms/volt or more sensitivity.
Reverse plug the AC cord into the AC outlet and repeat AC voltage
measurements for each exposed metallic part. Any voltage
measured must not exceed 0.75 volt RMS which is corresponds to
0.5mA.
In case any measurement is out of the limits specified, there is
possibility of shock hazard and the set must be checked and
repaired before it is returned to the customer.
Leakage Current Hot Check circuit
The source of X-RAY RADIATION in this TV receiver is the High
Voltage Section and the Picture Tube.
For continued X-RAY RADIATION protection, the replacement
tube must be the same type tube as specified in the
Replacement Parts List.
IMPORTANT SAFETY NOTICE
0.15uF
To Instrument's
exposed
METALLIC PARTS
AC Volt-meter
Good Earth Ground
such as WATER PIPE,
CONDUIT etc.
1.5 Kohm/10W
Page 4
- 4 -
LGE Internal Use OnlyCopyright © 2008 LG Electronics. Inc. All right reserved.
Only for training and service purposes
SPECIFICATIONS
Note : Specification and others are subject to change without notice for improvement.
1. Scope
This specification is applied to the CW81A Chassis.
2. Test and Inspection Method
1) performance : LGE TV test method followed.
2) Demanded other specification
- Safety: CB Spec.(EN60065)
- EMC: CE Spec.(EN55020,EN55013)
3. Test Condition
Each part is tested as below without special appiontment
1) Temperature : 20
± 5°C(77 ± 9°F), CST : 40 ± 5°C
2) Relative Humidity : 65
± 10%
3) Power Voltage : Standard input voltage 220V, 50/60Hz
* Standard Voltage of each products is marked by models.
4) Specification and performance of each parts are followed
each drawing and specification by part number in
accordance with B.O.M.
5) The receiver must be operated for about 20 minutes prior to
the adjustment.
Item Specification Remark
Receiving System PAL BG,DK,I / NTSC M(AV3.58/4.43) China/ Indonesia/ Thai/ Vietnam
PAL BG,DK,I / NTSC M(AV3.58/4.43) CIS
SECAM DK
PAL BG,DK,I / NTSC M(AV3.58/4.43) Asia/ Middle East/ Africa
SECAM BG,DK,L
Available Channel VHF : E2 ~ E12
UHF : E21 ~ E69
CATV : S1 ~ S20
HYPER : S21 ~ S41
Input Voltage 220V~, 50/60Hz East Asia
100-240V~, 50/60Hz Others
Market China, Indonesia, Thai, Vietnam, Asia/Africa
Screen Size 14 ~ 21 inch (Flat / Conventional)
21” Super slim/ultra slim
Aspect Ratio 4:3
Display Method CRT
Tuning System FVS
Operating Environment 1) Temp : 0 ~ 40 deg
2) Humidity : ~ 85 %
Storage Environment 3) Temp : -20 ~ 60 deg
4) Humidity : ~ 90 %
4. General Specification
Page 5
- 5 -
LGE Internal Use OnlyCopyright © 2008 LG Electronics. Inc. All right reserved.
Only for training and service purposes
1. Application Object
These adjustment instructions are applicable to CW81A/B
Chassis.
2. Notes
(1) Because this is a cold chassis, it is not necessary to use
an isolation transformer. However,operating it using a
transformer between the power supply line and chassis
input to prevent electric shock and to protect the test
instrument.
(2)All adjustments must be done in correct sequence.
However, for better productivity, it can be changed in a prepermitted range.
(3) Environment conditions: If not specified, it must be done in
following conditions.
1) Temperature: 25±5°C
2) Humidity : 65±10%
(4) AC Voltage : 100-240V ±10%, 50/60Hz
(5) If not specified, the receiver must be operated for more
than 20 minutes prior to the adjustment.
(6) Signal: Received the standard color signal. (65dB±1dBuV)
PAL/SECAM : LG standard signal means the digital pattern
PAL_EU 05CH
(7) If not specified, APC ON is APC CLEAR(DYNAMIC).
3. AGC Voltage Adjustment
3-1. Necessary Instrument
: Digital Multi meter : 1 set
- Max Input Current : Over 1A/ Max Input Voltage : 500Vdc
- Measurement Range : 10mV-100mVdc/ Accuracy : 0.03%
3-2. Adjustment Preparation
1) Input in the 75Ω cable 65dB(±1dB) LG standard signal.
2) Connect the multi-meter to J105(AGC Check Marking)
3-3. Adjustment
(1) Press the “INSTART” key of factory remote control and
select “VP0 (RF AGC)” adjustment mode.
(2) Press the VOL +/-(
F/G)Key until the multi-meter shows
reading as shown below.
(3) CAUTION : Since the signal strength can be easily
changed by the condition of signal cable , you
need to check the signal strength frequently in
order to prevent misadjustment.
4. Screen Voltage Adjustment
4-1. Adjustment (Use factory remote control)
(1) Input in the 75Ω cable LG standard signal (Digital
Pattern,480NC)
(2) Press the “ADJ” key of factory remote control once to make
the TV set display horizontal line.
(3) Turn the screen volume on the FBT clockwise until the
horizontal line is visible and turn it counterclockwise until
horizontal line faintly visible.
(Exit screen voltage adjustment by press “Enter(
A)” key of
factory remote control.)
5. Purity and Convergence Adjustment
5-1. Purity Adjustment
(1) Adjustment Preparation
1) Receive Red Raster Pattern for purity adjustment.(51ch)
2) Demagnetize the CPT and Cabinet with a degaussing
coil.
(2) Adjustment
1) Pre-adjust the static convergence (STC) with the 4 and
6pole magnet.
2) If the horizontal Line is inline with CPT Mark,2-Pole
magnet should direct 3-9 o’clock direction
3) If not,direct 2-Pole magnet handle toward 6-12 o’clock
direction and adjust the Horizontal Line to fall onto the
mark opening the magnet at an angle.
4) Push the DY(deflection yoke) all the way to the CPT
funnel.
5) Turn the purity magnet(2-pole magnet) so that the
“green” color portion of left side and the “blue” color
portion on the right side have equal amount of
color.
6) Pull the DY slowly backward and fix it when the whole
screen becomes red. (The specified torque for fixing DY
screw should be 10Kg/cm.)
5-2. Convergency Adjustment
(1) Necessary Instrument
1) Degaussing Coil
2) Convergency fixing instrument (special tools)
(2) Adjustment Preparation
1) Operate the unit at the least 15 minutes before
adjustment.
2) Using degaussing coil,remove the stains on CPT &
Cabinet.
3) Received the Cross Hatch Pattern for Convergence
(09ch).
4) Let the Contrast in normal luminance level.
ADJUSTMENT INSTRUCTIONS
G R B
G R B
R
G R B
<Fig. 1>
<Fig. 2>
Page 6

- 6 -
LGE Internal Use OnlyCopyright © 2008 LG Electronics. Inc. All right reserved.
Only for training and service purposes
(3) Static Convergence (STC) Adjustment
1) Receive Cross Hatch Pattern (09CH).
2) Before adjusting Static Convergence(STC),adjust the
focus first seeing to it that the WHITE color picture
quality is sharp enough.
3) Converge the RED vertical line and BLUE vertical line in
unity(same line) by changing the angle between the 2
tabs of 4-pole magnet.
4) Converge the RED horizontal and BLUE horizontal line
unity(same line) by turning the 2 tabs of the 4-pole
magnet. At this time,do not change the angle between
the 2 tabs.
5) Converge the R,G,B vertical line in unity(same line) by
changing the angle between the 2 tabs of the 6-pole
magnet.
6) Converge the R,G,B horizontal line in unity(same line) by
turning the 2 tabs of the 6-pole magnet. At this time, do
not change the angle between the 2 tabs.
(4) Dynamic Convergence (DYC) Adjustment
1) Y-Axis Adjustment : Ad j u s t convergence of Y-axis
(vertical) by moving the deflection
yoke(DY) left and right.
2) X-axis Adjustment : Adj u s t convergence of X-axis
(horizontal) by moving the deflection
yoke(DY) up and down.
6. White Balance Adjustment
6-1. Necessary Instrument
(1) Au to White B a l ance Meter (Low/High light Pattern
generator)
(2) CRT Color Analyzer, CA-100 : 1set
(3) Factory Remote Control
6-2. Adjustment Preparation
: Prior to this adjustment, the Screen Voltage adjustment
should be finished.
6-3. Auto Adjustment
(1) Adjust the using Auto White Balance Meter.
(2) Enter CPU OFF mode by press the “IN-START” &”MUTE”
key of factory remote control in turn before adjustment.
Exit CPU OFF mode by press the “MUTE” key of factory
remote control after adjustment finished.
* In case there is excess RED color at screen voltage
adjustment, adjust it using “Volume -(
G)”Key of factory
remote control until the RED color disappear.
6-4. Manual Adjustment
(1) Adjust using white Balance meter and factory remote
controller.
(2) Enter into adjustment mode by pressing the INSTART key
of factory remote control.
(3) Use the CH
D, CHE Key to choose adjustment item.
(4) Use the VOL
F, VOLG Key to change item data.
(5) Adjustment Procedure
1) Make the picture luminance 45Ft-L by change the
“CONTRAST” and “BRIGHTNESS”.
2) Adjust X data of high light with R DRIVE and Y data of
high light with B DRIVE to have color temperature as
shown below.
3) Make the picture luminance 4.5Ft-L by change the
“CONTRAST” and “BRIGHTNESS”.
4) Adjust X data of low light with R BIAS and Y data of low
light with B BIAS to have color temperature as shown
below.
5) Repeat steps a~d until both low and high light have
same reading as shown below.
7. Focus Voltage Adjustment
This adjustment must be done after operating the TV set
receiver sufficiently.
7-1. Adjustment Preparation
Received the LG standard pattern (PAL : Digital Pattern,
480NC, 13CH, NTSC : Crosshatch pattern, Ch.09 ) and set
the picture condition on “APC ON” (CLEAR) mode.
7-2. Adjustment
Turn the focus volume on the FBT upper direction to have the
best focus vertical line (figure 1.(a)) and horizontal line (figure
1.(b)) as shown below.
8. SUB-BRIGHTNESS Adjustment
This adjustment must be done after the White balance
Adjustment.
8-1. Adjustment preparation
(1).NTSC
- Received LG standard Mono scope pattern (CH14).
- Set the picture condition on “APC ON” (CLEAR) mode.
(2). PAL
- Received PAL B/G 5CH pattern.
- Set the picture condition on “PSM ON” (DYNAMIC) mode.
MARKET COLOR TEMPERATURE X-AXIS Y-AXIS REMARK
ALL 13000 268 ± 5 273 ± 5
[ f i gur e 1- PAL]
(a)
(b)
[figure 1- NTSC]
Page 7

- 7 -
LGE Internal Use OnlyCopyright © 2008 LG Electronics. Inc. All right reserved.
Only for training and service purposes
8-2 Adjustment
(1) Press the “ADJ” key of the factory remote control twice to
enter to “SUB-BRIGHTNESS” adjustment mode.
(2) PAL MODEL : Change the Sub-Brightness data by
pressing the VOL
F,VOLG KEY so that the 1th, 2th Black
Level in gray scale of PAL B/G 05CH pattern have a little
bit of difference. (See figure 2)
8-3. Sub-Tint Adjustment
This adjustment has to be done only if the picture has bad tint
otherwise, it can be omitted if the picture has good tint.
(1) Received LG standard pattern signal (SMPTE, 2CH).
(2) Set the picture condition on “APC ON” (CLEAR) mode.
(3) Press the “ADJ” key of the factory remote control three
times to enter to “SUB-TINT” adjustment mode.
(4). Change the Sub-Tint data by pressing the VOL¢∏,VOL¢∫
Key until the upper and lower CYAN color becomes same
color.
9. Deflection setting data adjustment
These adjustment will be done by Auto Adjustment
Equipment.
For manual adjustment, it is also possible by the following
procedure.
9-1. Adjustment Preparation
(1) Deflection setting data adjustment can be done only with
remote control.
(2) Press the “INSTART” Key on the factory remote control
continuously to enter to Deflection Adjustment mode.
(3) Press the CH
D, EKey to select adjustment item.
(4) Press the VOL
F, G Key to change the data.
9-2. Adjustment
(1) Horizontal Position Adjustment
Select SVC02 (H-POS) and adjust so that the left and right
vertical line are symmetrical as possible.
(2) Vertical Position Adjustment
Select SVC02 (V-POS) and adjust so that the horizontal
center line coincide with geometric horizontal center of the
CPT.
(3) Vertical Size Adjustment
Select SVC02 (VA) and adjust so that the middle circle of
the Digital Pattern (480NC, 13CH) coincide with the
effective screen of CPT.
9-3. Adjustment (21” Super Slim, Ultra S/S Model)
(1) Vertical Position Adjustment
Select SVC02(V-POS) and adjust so that the horizontal
center line coincide with geometric horizontal center of the
CPT.
(2) Vertical Linearity Adjustment.
Select SVC02(V-LIN) and adjust so that the size of the
upper circle is alike with the one of the lower circle at LG
standard pattern signal (PAL : EU05CH, NTSC : 13CH).
(3) Vertical Size Adjustment.
1) NTSC :Select SVC02(VA) and adjust so that the middle
circle of the Digital Pattern (480NC, 13CH) coincide with
the effective screen of CPT.
2) PAL : Select SVC02(VA) and adjust so that the middle
circle of the Digital Pattern (PAL B/G 5CH) has 6~7mm
gaps from the effective screen of CPT.
(4) Horizontal Position Adjustment
Select SVC02(H-POS) and adjust so that the left and right
vertical line are symmetrical as possible.
(5) Horizontal Size Adjustment
Select SVC02(EW WIDTH) and adjust so that the outer line
of the left, right and the remotest grid will correspond to the
effective boundary surface.(The remotest grid, NTSC:
within 2.5 ~ 3.0 column, PAL: within 0 ~ 25%)
(6) Parabola Adjustment
Select SVC02 (EW PARAB) and adjust so that the vertical
line of the remotest grid at the left or right side of the screen
will be parallel to the vertical line of the center of screen
(7) Trapezoidal Adjustment
Select SVC02(EW TRAPE) and adjust so that the width of
the upper part of screen is alike with the one of the lower
part of screen.
(8) EW UPCOR/ LOCOR Adjustment
Select SVC02(EW UPCOR, EW LOCOR) and adjust so
that the vertical line in the four corners become straight
line.
(9) BOW Adjustment
Select SVC02(HP BOW) and adjust so that the vertical line
in the four corners become straight line.
[Fig.2] PAL B/G 05CH signal
1th VS 2th
BLACK LEVEL have a little bit of difference.
(In case of VIETNAM MODEL 2th VS 3th)
Page 8

- 8 -
TROUBLE SHOOTING
LGE Internal Use OnlyCopyright © 2008 LG Electronics. Inc. All right reserved.
Only for training and service purposes
1. TV FUNCTIONAL
2 TU/IF SECTION
J512, J544
Page 9

- 9 -
LGE Internal Use OnlyCopyright © 2008 LG Electronics. Inc. All right reserved.
Only for training and service purposes
3. VIDEO PROCESSING
Maneuver defectiveness
Maneuver defectiveness
In case of influx NOISE
- R/C is not operate
Maneuver defectiveness
J624, J625, C603, C604, C609,
C610, R605, R616, R611, R612
, J509
Q241,R247
No color
1, 2, 5
56, 57
52, 54
35, 36, 40
50~54
46~48
4, 9, 20, 24,
49, 62
17~23
LV762xx
4. SMPS PRIMARY
DB801(TS4805G),
DB802(D5SB60)
IC810(STR-W6553A(MONO)), (STR-W6554A(STEREO))
C852, R808, ZD851
Page 10

- 10 -
LGE Internal Use OnlyCopyright © 2008 LG Electronics. Inc. All right reserved.
Only for training and service purposes
5. SMPS SECONDARY SECTION
DB801(TS4805G),
DB802(D5SB60)
IC810(STR-W6553A(MONO)), (STR-W6554A(STEREO))
C852, R808, ZD851
6. VERTICAL SECTION
, STV9326
Page 11

- 11 -
LGE Internal Use OnlyCopyright © 2008 LG Electronics. Inc. All right reserved.
Only for training and service purposes
7. HORIZONTAL SECTION
L402, L403, L404, C401, C402, C412
8. SOUND PROCESSING SECTION
(LV762xx)
(LC75024/LA72702)
Page 12

- 12 -
LGE Internal Use OnlyCopyright © 2008 LG Electronics. Inc. All right reserved.
Only for training and service purposes
9. CPT DRIVE SECTION
8
D902
D902
Page 13

- 13 -
BLOCK DIAGRAM
LGE Internal Use OnlyCopyright © 2008 LG Electronics. Inc. All right reserved.
Only for training and service purposes
LA7621 3
LA76213
DVD
(FLAT OPT.)
DVD
(FLAT OPT.)
CPT DRIVECPT DRIVE
FBT
185V
AFC
ABL
HEATER
B+
HDT
Collector
AV1(V/ R/ L)-IN
USOC
H/ P AV-IN
AUDIO B+
B+
(110/ 115V)
(17V/11V)
SMPS
TRANS
SPK.
Front-AV(2)
SCLSDA
EXT
Vid eo-i n
RGB
OUT
TUNER
V_DY
VERTI CAL AMP
STV9 32 6
Rear_AV( 1 )
( PHONE)
Rear_AV( 1 )
( PHONE)
IC02
EEPROM
24C04/16
V-O UT
H-OUT
SPK.
10.5V
Y(G) /C r( R) / Cb( B)
SDA
SCL
LC75024E
A2/ NICAM
MONO
SOUND AMP
LA42101
MONO
SOUND AMP
LA42101
AC
INPUT
(100~240V)
STEREO,
Sou nd Max
SOUND AMP.
LA42102(N)
STEREO,
Sou nd Max
SOUND AMP.
LA42102(N)
R61 0
5V
Option Part
IIC Bus Line
(Mono)
ML-OUT
31
22
17
5 46~48
STEREO
( ~ A43L)
MONO
( ~ A43K )
12
9
3
9
8
10
2
6
24V
1
ST-BY
TRANS
(1W Opt)
57 56 64
9V
From
IC804
IC804
9V REG
IC04
ST-5V REG
9v
From
IC804
IC661
5V
5.1V
IC751LA72730
(STEREO Opt)
IC751 LA72730
(STEREO Opt)
JA01
HIC291
Game Pack(Game Opt)
HIC291
Game Pack(Game Opt)
4,5,6 8 7
From USOC
Video(Game)
Audio( Gam e)
JA02
54
SIF
out
IF
3,611 1 4 7
AV2(V/ R/ L)-I N
2 5 9
LA72702
BTSC
IC701
LIN-TV
RIN-TV
21
1920
R/ L Ou t
L-OUT
R-OUT
SAW
SAW
5
9 10
IF IN
Z102
10 11 13
14
15
12
SIF IN
3261
V-O UT (M ono )
18
17 18
2 7
50
Ext R/ L
IN
49
RGB
9V
SCLSDA
27 26
33V
ST-5V
9v
From
IC804
9v
From
IC804
ST-5v
From
IC04
9v
From
IC804
9v
From
IC804
ST-5v
From
IC04
19
9 24199 24
H-Vc c
5V
VDD
3.3V
Vc c
5V
H-Vc c
5V
VDD
3.3V
Vc c
5V
9v
From
IC804
14
SOUND
5V
SOUND
5V
R62 0
7.5V
R62 0
7.5V
IC803
5V
IC803
5V
Q402
MD1803
IC401
TDA8145
IC301
V-in
FBP in
EW OUT
L401
Vc c
16
EW-OUT
EW IN
5v
From
IC803
62
IF
5V
SDA
SCL
23
24
SCLSDA
51
SPK L/ R
OUT
SCART
SCART
R, G, B
8 33
FB
AV ID
21
TV IN(ST)
M_R/L OUT(ST)
Mon ito r V OUT(ST)
Page 14

- 14 -
LGE Internal Use OnlyCopyright © LG Electronics. Inc. All right reserved.
Only for training and service purposes
EXPLODED VIEW
170
300
112
120
530
531
532
520
101
104
600
400
150
174
320
330
331
370
360
380
390
590
591
Many electrical and mechanical parts in this chassis have special safety-related characteristics. These
parts are identified by in the Schematic Diagram and EXPLODED VIEW.
It is essential that these special safety parts should be replaced with the same components as
recommended in this manual to prevent X-RADIATION, Shock, Fire, or other Hazards.
Do not modify the original design without permission of manufacturer.
IMPORTANT SAFETY NOTICE
Page 15

Copyright © 2007 LG Electronics. Inc. All right reserved.
Only for training and service purposes
LGE Internal Use Only
PUMP-UP
V-IN
VCC
PUMP
GND
V-OUT
STAGE
V-REF
O/
-UP
CEM
INOUT
GNDS
V-DY
H-DY
WARINNG BEFORESERVICING THIS CHASSIS, READ 'X-RA Y
RADIATION PRECAUTION,' `SAFETY PRECAUTION' AND PRODUCT
SAFETY NOTICE IN THIS MANUAL
CAUTION : THE MARKS IN THE SCHEMATIC DIAGRAM AND THE PARTS LIST DESIGNATE
COMPONENTS WHICH HAVE SPECIAL CHARACTERISTICS FOR SAFETY, AND SHOULD
BE REPLACED ONLY WHICH TYPES IDENTICAL TO THOSE IN THE ORIGINAL CIRCUIT OR
SPECIFIED IN THE PARTS LIST. BEFORE REPLACING ANY OF THESE COMPONENTS,READ
CAREFULLY THE PRODUCT SAFETY NOTICE IN THIS MANUAL.
DO NOT DEGRADE THE SAFETY OF THE RECEIVER THROUGH IMPROPER SERVICING.
A0
A1
A2
GND SDA
SCL
TEST
VCC
KS
SAW
I.RE F
GND
OUT
Vcc
EW
SIZE
Y
Cb
Cr
STEREO
PLL
PILOT
PLL
PILOT
PILOT
LEVEL DET
CANCELLER
REGUL
ATOR
MODE
OUT
MATRIX
-6dB
L-R
DEMOD
SAP
DEMOD
SAP BPF
SIF DEMOD
LPF
SAP
DET
ST/SAP
SW
LPF
LPF dbx processor
Offset
Cancell
SYSTEM
CONTROL
I2C
DECODE
Control
ST
SAP
Spectral
RMS DE T
Address
MUTE
L-R/SAP
MUTE
L+R
R-OUT
R-IN
L-OUT
L-IN
B
D/S
GR
FB
V-OUT
V-IN
5
4
2
1
8
6
7
3
10
9
11
12
Ripple
Filter
+OUT2
-OUT2
+OUT1
-OUT1
Input AMP
Out AMP
Out AMP
Vcc Standby
IN1
PREGND
MUTE
IN2
Input AMP
Power
GND
TIMER
0
RESET
ADC
V DET
R
I/O
RESET
G
PORT 1
B
RAM
RST
FS
I
XTSEL
CPU
CPU CLOCK
CORE
VDD3
BASE
TIMER
ROM
OSD
DATA
VDD5
BUS
CLOCK
CVBS
CLOCK
VS
PET_IN
CONTROL
AFT
C_SYNC
HS
POWER_IN
PORT 0
I/ O
TEXT
TELE
PLL
BUS
HS
VS
ABL
ACL
DRIVE/CUT-OFF
OSDSWOSD
CONTRAST
OSD
CONTRAST
BRIGHT
HOR
C/D
1/25 6
HOR
VCO
AFC1
HOR
OUT
PHASE
SHIFTER
FBP
HOR
VCC
AFC2
VER
RAMP
VER
C/D
SEP
VER
SYNC
SEP
E/W
APC1VXO
VCOAPC2 DDS
FSC
(EHT)
1CHIP
VDD
IF
AGC
AGC
RF
SPLL BPF
DET
900K
AMP
VIF
DET
SOUND
DET
VIDEO
AMP
VIDEO
TRAP
VCO
AMP
FM
DET
FM LIM
AMP
BPF
MATRIX
RGB
CLAMP
COLOR
TINT
COLOR
CLAMP
DC ADJ
SW
SEOAM
DECODER
CLMP
PAL SW
DEMODCREST
BS
SGSHARP
DL
BPF
SW
V/Y
ADCYC SW
TRAP
CLMP
SW
VIDEO
DC
VOL
SW
SW
TONE
RGB SW
EXT
CONTRAST
EXT RGB
DRIVE
CUT-O F F
SW
IF
NC
30V
NC
5V
SDA
SCL
CS
NC
AGC
16bit DAC
(MONAURAL)
SRC
(STEREO)
16bit DA C
(A2/DQPSK)
DEMODULATOR
DECODER
NICAM
ADC
PGA(AGC)+10bit
IIC
PLL
OSCILATOR
AMP
98.304MHz
18.432MHz
8
14
13
9
12
11
10
1
2
5
7
REG
BUFF
MODE
SELECT
DET
ALC
ALC
6dB
BUFF
BUFF
BUFF
INOUT
GNDS
LG
DSGD. CHKD.
TITLEUNIT
DWG NO.
SCALE Date
mm
APPD.
SCL
SDA
EW
GAME/FM_DATA
GAME_CLK/FM_CLK
SPK_L
MUTE
EYE
MUTE
EW
POWER/FM_CE
IR
FRONT/SIDE-R
REAR-R
REAR-L
FRONT/SIDE-L
SPK_R
REAR-L
SIDE-R
SIDE-L
SIDE-V
FRONT-V
FRONT-L
REAR-L
VER-OUT
HOR-OUT
FBP
B-OUT
G-OUT
R-OUT
ABL
R-OUT
G-OUT
B-OUT
VIF_IN2
SDA
SCL
SDA
IR
SDA
SCL
TV-R
VIF_IN1
REAR-R
MNT_L-OUT
MNT_R-OUT
FB_IN
AV1-ID
DVD-Y/G_IN
DVD-Cb/B_IN
RESET
HOR-OUT
RF_AGC
MNT_L-OUT
EXT_R-IN
EXT_V-IN
TV-L
TV-R
GAME_ID//FM_CE
GAME_DATA/FM_DATA
EYE
DOWNLOAD
DOWNLOAD_CLK
DOWNLOAD_DATA
GAME_CLK/FM_CLK
DVD-Cr/R_IN
REAR-V
MNT_V-OUT
HS
FBP
HS
VS
FRONT/SIDE-V
DVD-Cb/B_IN
FB_IN
DVD-Cr/R_IN
DVD-Y/G_IN
FB_OUT
DVD-Cr/R
DVD-Y / G
DVD-Cb/B
FRONT/SIDE_L
EHT
NICAM_RESET
VIF_IN2
FRONT-R
REAR-V
RESET
NICAM_RESET
FM_ON_OFF
DEGAUSS
ABNORMAL
SCL
SDA
AV1_ID/DOWNLOAD_DATA
DEGAUSS/FM_ON_OFF/USB_SW/DOWNLOAD
KEY
SPK-L
SPK-R
VIF_IN1
RF_AGC
FRONT/SIDE-V
SCL
SDA
EXT_V-IN
SDA
SCL
MNT_L-OUT
REAR-V
FRONT/SIDE-V
REAR-V
POWER/FM_CE
EHT
POWER/FM _CE
VER-OUT
VS
ABNORMAL
POWER/FM_CE
DVD-Y/G
DVD-Cr/R
DVD-Cb/B
SIF_OUT
PAL/NTSC
SIF_OUT
MNT_R-OUT
MNT_V-OUT
FB_OUT
TV-L
EXT_L-IN
EXT_R-IN
KEY
EXT_L-IN
ABL
IR
SCL
GID/SW/DL
POWER
TV-R
TV-L
TO DG COIL
P802
1
2
STV9326
IC301
1234567
D815
TVR06J
RL801
6920VB1001E
100
R906
1.6/2W (RF )
FR401
30K(RN)
R311
0.1u F
C210
560
R524
3.9K
R510
100uF
10V
C28
1N4148
D405*
2.7K
R307
P6
330uF
10V
C108
18K
R108
0.01uF
C534
1N4148
D902
4.7K
R803
1N4148
D403
1.5K/0.5 W
R919
1N4148
D603
3.3K
R501
1.5/0.5W
R310
100
R562
470p
C229*
75
R100*
47
R401
0.5W
1.0/0.5W
(RF)
R303
100K
R150
0.1uF
50V
C527
P01
123
C607*
10uF
16V
T/W
L212
100
R564
470P/500V
C303
P119
1
2
3
4
5
0.47uF
50V
C524
220
R516
P601
1
2
3
10K
R60
0.01
C548*
1uF
50V
C760
0.01uF
C510
680
R72
1N4148
D604
T/W
R614
1000uF
16V
C850
1K
R565
470p
C225*
1N4005
D302
T4AL250V
F801
470P
C233
100
J554
1000uF
16V
C826
1uF
50V
C757
ABL
0.1u F
50V
C517
0.05/0.5 W
(RP)
FR501
MONO
J636
100uF
10V
C518
C51
82P
123A
FB905*
0.1u F
C506
100
R505
150
R404
180/2W
(RS)
R315
T/W
L904
100
J509
470p
C222*
P201
1
2
3
4
5
6
R66
3.3K
0.01u F
C633
P703
1
2
3
100uF
10V
C833
T/W
L903
C295
10uF
16V
1000P
C107
T802
6200JB8008G
150-06 T
T804
150-F06T
1
2
3
4
BF421
Q403
10K
R618
12K
R522
4.43MHz
X501
0.047uF
MYL
C533
1N4148
D501
(10u)
J/W
L216
390
R922
1/7W
R801
75
R252
CHOKE
82uH
L802
4.7uF
50V
C415
470uF
35V
C309
125-022R
FB801
620/0.5W
R302*
1.5K
R409
1.6K
R18
CH+(PR+)
SW16
220
R69
T/W
L901
470p
C223*
2UH
FB201
1500P
C516
100
R506
1.2K
R17
560P/2KV
C417
2SC6092(SS/ULTRA)
2SC6093(Normal/FLAT)
Q402
47K/2W
(RS)
R804
T/W
L211
SK901
KIA78R09API
IC804
12
3
4
C56*
330P
VOL-
SW13
P602
1
2
3
4
75
R250
P02A
1
2
345
1/2W
150
R236
100K
R109
1000P/1KV
C813
CK
C605
47uF
16V
RU3AMV
D813
10uF
16V
C756
L-HP
18K(RN)
R301
18K/2W
(RS)
R912
C26
330uF
10V
0.1uF
C211
CH-(PR-)
SW15
T/W
L224
HIC291
12345
678
470K
R858
0.5
P401
1
2
3
4
4.7uF
250V
C901
10.5V
10uF
25V
C407
9.1V
ZD502*
0.68uF
50V
C312
680
R531
1.2/0.5W(SS CPT)*
FR932*
SW801(SUB:SW1801)
1N4148
D805
0.01uF
C767*
T/W
L225
P902
1
2
3
4
5
6
7
8
9
C2330-Y
Q901
47uF
16V
C308
75
R249
5.1V
ZD804*
0.01uF
C764
4.7u F
50V
C242
(PHONE)
JA01
23
4567
1
PC17L1
IC802
124
3
(RC)
8.2M/0.5 W
R814
510
R530
RU3AMV
D826
1.5K/0.5W
R920
39/2W
RS
R132
T/W
L221
100K
R408
GAME-VIDEO
0.01uF
C806*
470P
C231
T/W
L902
P03A
123
4
100
R760
270P
C902
GAME-AUDIO
1000uF
35V
C831
0.05/0.5 W
(RP)
FR825
4.7u F
250V
C540
15K
R312
16V
10uF
C201
Q672
2SC5343
(MPP)
153/2.0K V
C414
10K
R410
CPT EARTH
P910
1
10u
L230
C103 M
Q301
103
C538*
(PP)
223/200V
C514
AFC
75K
R705
4.7K
R58
0.1uF
C212
33K/0.5W
(RS)
R110
P101
123
75K
R706
VD801
TVR621D
P1
1K
R154
18K
R617
3900uF
MYL
C301
300
R513
36K(RN)
R518
100
510
R523
100uF
10V
C409
1/2W
150
R235
1N4148
D847
Q10
C3198Y
P801
AC-IN
1
2
100uF
10V
C853
100
J501
100uF
10V
C511
1000P
C805
1kV
P902-1
1
2
3
4
5
Q845
C5343Y
1
2
3
330
R504
9.1V
ZD504*
240K
R420
22K(RN)
R512
0.1uF
C612
100V
9.1V
ZD503*
0.01u
C855 *
100
R921
10K
R607
1K
R615
36K
R552
10uF
16V
C763
C30
0.01
123A
FB805*
1uF
50V
C759
100
R916
4.7K
R831*
470P
C234
2.2M/0.5 W
R902
1.8K
R908
0.05/0.5W
(RP)
FR301
100
R761
1.0/0.5W
(RF)
R304
100P
C130*
10UH
L502
C102M
Q813
R-HP
L-SPK
330uF
450V
C803
0.01uF
C535
5.1V
ZD102
SFAF504G
D824
0.033u F
MYL
C17
620
R20
100uF
35V
C307
270P
C904
2K
R616
D2SB60 (Normal/FLAT)
DB801
TS4B05G(ULTRA/SSlim)
DB802
2K
R612
12K(RN)
R519
1N4003
D901*
75
R251
0.47u F
50V
C531
CK
470P/1KV
C821
KIA78L05BP
IC04
1
2
3
4.7K
R82
510
R553
103
C106*
10UH
L217
1N4148
D303
82K
R306
100K
R22
100UF
10V
C832*
10uF
16V
C110
T/W
L223
TV/VIDEO(MENU)
SW11
163-051F(3P)
TH801
TH802
163-054D(2P)
1.2/2W
(RF)
FR403
4.7K
R23
75
R211
0.1u F
50V
C702
1000P
C294
43K
R308
T/W
L222
C2330-Y
Q902
390
R905
1N4148
D601
CPT
1uF
50V
C762
0.01u
C601*
VOL+
SW14
220P
C236
1M
R42
MENU(OK)
SW12
10UH
L218
1N4148
D602
470P
C232
1uF
50V
C761
100K
R11
K7260M(PAL)
Z111
M1971M(NTSC)
1
2
3
4
5
15K
R554
P5
BA282
D111
33V
ZD103
12K(RN)
R305
EBJ34806701
T402
1
2
3
4
6
5
7
8
9
10
P902-2
1
2
3
4
10K/0.5W
(RS)
R550
2.0K/0.5 W
R403
220P
C237
470p
C226*
0.1u F
275V
C802
T/W
L3
EU1ZV
D804*
A1266
Q601
08/02/29
17:01:33
CW81A.cir/001.sht
220
R65
100
R41
47K/2W
(RS)
R805
1200P/2KV
C908
0.1u F
50V
C704
2.2u F
50V
C16
2.2
R604
T/W
L213
2200P/4KV
C843
0.1uF
MYL
C314
0.22u F
MYL
C310
100K
R621*
100uF
10V
C40
10K/0.5 W
R407
180V
47K
R826
(CK)
470P/1KV
C812
680
R1
120
R555
390
R915
4.7K
R825
100P
C131*
1uF
50V
C313
18K/2W
(RS)
R923
3.9K
R509
2.2K
R113
5.6/2W
(RS)
R620
4.7K
R21
2200uF
25V
C311
270P
C907
22K(RN)
R313
220uF
160V
C814
220
R514
100uF
16V
C766
TVR06J
D505
220uF
10V
C246
0.33uF
50V
C15
C3228
Q401
56K/0.5 W
R547
CK
470P/500V
C404
75
R226
9.1V
ZD412*
10000pF
C322
0.01uF
C20
1000P
C804
1kV
82K
R423
2.2K
R112
C2330-Y
Q903
10uF
16V
C765
1N4148
D502*
J617
560
R19
39
R515
0.01uF
C507
1uF
50V
C758
4.7uF
50V
C243
3.9K
R508
4.7K
R111
TVR06J
D301
125-022 R
L804
LED
LD11
21
100uF
160V
C835
0.047uF
MYL
C306
470P
C235
39K
R502
220P
C541
1uF
50V
C504
300
R421
4.7K
R832
1.5K/0.5 W
R918
100uF
10V
C526
J637
*
C523
100uF
16V
IC02
24C04/24C16
1
2
3
45
6
7
8
0.01uF
C101
8.2/0.5W
R873
100
R563
10u
L231
10uF
50V
C103
30K
R532
330uF
25V
C602
18K/2W
(RS)
R917
100
R507
T/W
R556
10uF
100V
C408
750
R16
220K
C215*
R-SPK
100P
C19
C50
82P
*
560
R535
KIA7805API
IC803
1
2
3
J116
T/W
4.43MHz TRAP
Z601
0.01uF
C116
PA01
123
151-C02B
H-DRIVE
T403
123
4
FRONT AV
JA02
0.01uF
MYL
C432
1N4148
D411
620
R462
330
R463
1K
R461
3.9K
R460
100K
R459
6mH
L401
26.5u H
L402
334/400 V
C412
273/630 V
C406
RS4FS
D406
RU4AM
D407
20K
R455
6.8K
R309
IC401
TDA8145
1
2
3
45
6
7
8
1K/1W(RS)
R416
120K
R456
5.1K
R414
2.7K/2W
(RS)
R406
2.7K/2W(RS )
R316
C551*
0.068uF
MYL
C305*
22uF
50V
C509
3.0K/2 W
(RS)
R402*
J106
C5343
Q16
J117
T/W
0.02/0.5W
(RP)
FR816
15K
R451
1K
R450
5.6K
R517
39K
R457
0.047u F
MYL
C434
473/630 V
C401
450uH
L404
334/400V
C402
1.6mH
L403
1K
R845
J811
T/W
4.7K(RN)
R844
1K
R841
9.1V
ZD851
39K
R843
0.022uF
MYL
C818
47
R840
Q801
C5343
3.9K
R835
47uF
10V
C828
91K(RN)
R815
91K(RN)
R816
30K(RN)
R842
KA431
Q840
1uF
250V
C847
T/W
R884
0.022u F
C502
330
R537
C512*
1K
R13
2.2u F
50V
C13
JA01
(DVD)
0.1uF
C613
2.2
R601
2K
R611
2.2
R603
4.7uF
50V
C603
ST
J611
C608
2.2uF
50V
2.2
R602
100
R609
2K
R605
C611
47uF
25V
0.1uF
C614
0.018uF
MYL
C609
0.1uF
C606
0.018uF
MYL
C604
4.7uF
50V
C610
100
J517
9V
9V
9V
9V
9V
9V
S-Vcc
S-Vcc
5V_1
5V_1
5V_1
5V_1
5V_2
30V
30V
J13
T/W
ST-5 V
ST-5V
ST-5V
ST-5V
ST-5V
100K
R622*
9V
620
R528
J227
T/W
5V_1
ST-5V
50V
1uF
C648
50V
4.7uF
C676
22uF
50V
C681
LA72702
IC605
123456789
101112 13
1415161718192021222324
1uF
50V
C666
1uF
50V
C638
1uF
50V
C670
2.2uF
50V
C657
47uF
10V
C691
10uF
50V
C675
10uF
50V
C672
4.7uF
50V
C656
4.7uF
50V
C654
22uF
50V
C682
4.7uF
50V
C642
0.1uF
C645
0.1uF
C678
100
R666
100
R665
4.7K
R678
10UH
L604
5V_1
JA01
(FULL SCART)
1
2
3
4
5
6
789
10
11
121314
15
16
17
18
192021
100
R503
75
R203
100
R202
100K
R207
240K
R208
1uF
50V
C22
IC601
100
R542
100
R543
R250
T/W
100
R561
100uF
10V
C521
1uF
50V
C675
1uF
50V
C672
39K
R539*
P551B
@value
10
987654321
P551A
@value
10
987654321
J568
T/W
J222
T/W
J224
T/W
J225
T/W
J226
T/W
R415
T/W
330P
C688
330P
C687
2.2uF
50V
C683
0.1uF
C633
0.1uF
C631
560K
R667
5V_1
0.1uF
C673*
5V_1
0.01uF
C632*
0.01u F
C630*
47uF
10V
C681
0.01uF
C684
0.01uF
C668*
47uF
10V
C685*
0.01uF
C662*
0.01uF
C661
0.01uF
C680
0.01uF
C645*
0.01u F
C631
1.5V
3.3V
1.5V
0.1uF
C635
47uF
10V
C670
0.1uF
C634
0.1u F
C665
0.1u F
C667
47uF
10V
C666
T/W
R631
12pF
CC
C689
12pF
CC
C690
18.432MHz
X661
1M
R630
SIF
SIF
10k
R668
100
R666
100
R665
10K
R661*
10K
R664*
330p
C653
1K
R662
1k
R633
4.7uF
50V
C672
4700p
C687
4.7uF
50V
C675
4700p
C688
1k
R632
Z602
4.5MHz
1
3
2
J721*
T/W
P211A
1
2
3
4
IC810
W6553A(MONO)
W6554A(STEREO)
1
2
3
4
5
6
7
220
1/2W
R838
6.8K
R807
30
R810
J842
T/W
D845
UF4005
22uF
50V
C840
0.1u F
50V
C841
0.01uF
MYL
C852
1000pF
1.6KV
C817
221/2KV
C859*
?
C807*
?
C808*
125-022K
FB810
125-022K
FB844
J843
T/W
75K
R839
39K(RN)
R806
3300pF
MYL
C842
15V
ZD846
5.6K
R808
IC501
LV762xx
EXT-R_IN1EXT-L_IN
2
INT-V_IN
3
VCC[5V]4Video/Chroma/Vertical
EXT-V_IN5NC/MONI-R
6
YC-Y7YC-C[FB_IN]
8
1CHIP_VDD[3.3V]
9
DVD-Y[G_IN]
10
CR_IN[R_IN]
11
4.43MHz
12
CB_IN[B_IN]
13
APC-FILTER14Chroma
FSC[EHT]
15EW16
VEROUT
17
V-RAMP
18
VCO_IREF
19
HOR_VCC[5V]
20
AFC-FILTER21Horizontal
HOR_OUT
22
FBP23CPU_VDD[ST-5V]24FILT25CPU_VDD226P0027P0128P0229P1330P1431P15
32
FM_OUT[MONI-L]
64
FM-FILTER
63
IF_VCC[5V]
62
VIDEO_OUT/SVO
61
VIF_AGC
60
APC-FILTER
59
RF_AGC
58
VIF_IN157VIF_IN2
56
IF_GND55
SIF_OUT
54
APC-FILTER
53
SIF
SIF_IN
52
SPK-R_OUT51SPK-L_OUT
50
RGB_VCC[9.0V]
49
R_OUT
48
G_OUT47B_OUT
46
ABL
45
1CHIP_GND
44
CPU_GND43FILTSLC
42
RESET
41
P0740P0639P0538P0437P0336P1735P1634P11
33
4.7uF
50V
C280
??
C845*
TU101
6700MF0018A(CIS)
6700MF0018B(PAL)
6700NFNS11E(KOREA)
6700NFNS11F(NTSC FR TYPE)
6700NFNS11G(NTSC PHONE TYPE)
6700NFNS11H(NTSC DIN TYPE)
100uF
10V
C636
100uF
10V
C615
1.5V REG.
IC606
1
2
3
3.3V
1.5V
10K
R541
2200P/500 V
CK
C421
330/0.5W
R441
J403
T/W
0.1u F
50V
C677
5V_2
5V_1
5V_1
5V_1
T/W
R853
J413
T/W
0.022uF
50V
C574
0.01u F
?
1000p
C549*
330K
R538*
100
R511
1.2UH
L528
5.1M
R684
2.2M
R654
0.1uF
C664
C114*
0.1uF
J830
T/W
J402
T/W
J303
T/W
J306
T/W
J301
T/W
J401
T/W
60uH
L405*
?
L406*
J404*
T/W
J814
T/W
0.1uF
275V
C816
123A
FB817*
?
C839
J810
T/W
6322A00030A
TH803*
J906T/ W
J903
T/W
J905
T/W
1N4003
D903
J907
T/W
J620
T/W
?
C627*
J607
T/W
30P
C552*
IC651
LC75024E
AVDD331AOUTR
2
AVSS3LRVREF4AVDD335NC6AOUTL7AVDD338VRT9VCOM
10
VRB
11
SIF2
12
AVSS
13
AVDD33
14
AVDD33
15
AVSS
16
AVDD15
17
AVSS
18
XVSS
19
XIN
20
XOUT
21
AVDD3342MRVREF
41
AVSS
40NC39
AVDD3338TESTB137TESTB0
36
TEST
35NC34NC33NC32NC31
IOVSS
30
IOVDD33
29
RSTB
28
SDA27SCL
26SA25
DVDD15
24
DVSS
23
XVDD33
22
5V_1
J720
T/W
J705
T/W
J281
T/W
J704
T/W
T/W
J673
T/W
J703
T/W
J641
T/W
J652
T/W
J642
1K
R6331KR632
T/W
J651
T/W
J643T/W
J653
T/W
J672
J527
T/W
T/W
R40
T/W
J562
J519
T/W
T/W
J508
J112
T/W
T/W
J111
10UH
L663
J633*
T/W
10UH
L662
T/W
R654
T/W
J645
T/W
J641
T/W
J648
T/W
J642
T/W
J647
47uF
10V
C650
J22
T/W
J23
T/W
T/W
J525
J555
T/W
J541
T/W
T/W
J109
4.7uH
L503
T/W
J101
T/W
J558
T/W
J552
T/W
J201
T/W
J557
T/W
J507
0.01uF
C562*
0.01uF
C563*
0.01uF
C564*
0.01 8
MYL
C542*
0.1
(PP)
C545
?
R521*
T/W
J524
T/W
J560
9.1V
ZD407*
T/W
J513
T/W
J528
T/W
J532
T/W
J504
4.7K
R566
T/W
J706
T/W
J707
T/W
R701
T/W
J521
T/W
R704
T/W
J503
T/W
J506
T/W
J24
T/W
J522
T/W
J559
0.01uF
C29
T/W
J542
T/W
J702
T/W
J625
T/W
J624
T/W
J515
T/W
J512
T/W
J544
T/W
J546
J535
T/W
0.01u F
C528*
T/W
J537
T/W
J543
T/W
J520
T/W
J510
T/W
J567
J286
T/W
J564
T/W
J520
T/W
J563
T/W
T/W
C283
J285
T/W
T/W
J282
T/W
J292
T/W
J287
T/W
J288
T/W
J549
J637
T/W
T/W
J289
T/W
J290
J553
T/WT/ W
R536
T/W
J283
T/W
J284
J291
T/W
J286
T/W
100
J534
T/W
R567
T/W
J281
T/W
R711
J534
T/W
J638
T/W
J646
T/W
100uF
10V
C857*
3.3V REG.
IC603
1
2
3
J551
T/W
J804
T/W
J709
T/W
510
R247
A1266
Q241
T/W
J280
T/W
J687
T/W
J672
T/W
J550
T/W
R780
T/W
J565* T/W
J818
0.1uF
C283
10uH
L501
100
J511
T/W
J540
J556
T/W
J526
T/W
47K
R318
5V_1
J819
T/W
J634
T/W
J523
T/W
J664*
T/W
33/2W
(RS)
R610*
100uF
10V
C699*
J665
T/W
5.1V
ZD601*
0.33uF
C630
100pF
C639
T/W
J646
10UH
L665
T/W
J650
J647
T/W
3.3V
47uF
10V
C691*
47uF
10V
C692*
10UH
L664
125-022R
FB601
T/W
J110
J3
T/W
2.7K/2W
(RS)
R405
33pF/
10pF
C520
33pF
C503
33pF
C546
75K
R222
75K
R221
T/W
R223
J826
T/W
J626
T/W
J635
T/W
J601
T/W
J102*
T/W
0.01uF
C105
390
R105
0.01uF
C104
22
R104
1.2K
R103
100
R101
0.82
L102
0.01uF
C115
C3197
Q101
3.6K
R102
47uF
16V
C111
9V
J405
T/W
TVR06J
D304
470uF
10V
C525
C102M
Q502
C102M
Q111
CP12
0.01uF
16V
CP13
0.01uF
16V
LP05
10uH
LP03
10uH
CP07
0.01u F
50V
RP10
1K
1/10 W
5%
CP20
47uF
10V
RP09
1K
1/10W
5%
ICP03
S1117-18PIC
1
GND
2
OUTPUT3INPUT
P551B
35238-1010
123456789
10
CP30
47uF
10V
LP04
10uH
CP04
47pF
50V
CP34
0.1u F
50V
RP14101/10W
5%
RP13101/10W
5%
CP19
0.01uF
50V
CP25
47uF
10V
RP28
10
1/10W
5%
QP02
2SC3875S
E
B
C
ICP04
KA75270Z
2
G
3O1
I
QP01
2SC3875S
E
B
C
CP33
0.1uF
50V
CP08
47uF
10V
CP31
0.01uF
50V
CP18
47pF
50V
LP06
10uH
CP35
0.1u F
50V
RP11
100
1/10W
5%
CP10
330uF
10V
CP05
47pF
50V
35238-1010
P552B
123456789
10
CP29
0.01uF
50V
CP27
0.01uF
50V
RP30
1K
1/10W
5%
CP01
22pF
50V
RP03
100
5%
1/6W
CP23
0.01uF
50V
RP31
22K
1/10W
5%
CP28
47uF
10V
ICP02
S1117-33PIC
1
GND
2
OUTPUT3INPUT
RP01
220
1/6W
5%
CP11
0.01uF
16V
RP17
10
1/10W
5%
RP12101/10W
5%
CP06
47pF
50V
XP01
20.25MHz
RP15
10K
1/10W
5%
ICP01
PVP9390A-QG-A1
1
XOUT
2
XIN
3
VSS18_14VDD18_1
5
GPO0
6
SEL
7
OUT38OUT29OUT1
10
VSS33DAC11VDD33DAC
12
FSW
13
IN3
14
IN2
15
IN1
16
VDD18ADC
17
VSS18ADC
18
CVBS1
19
TEST
20
CVBS2
21
TM
22
CVBS3
23
CVBS424VSS33ADC25VDD33ADC26YIN27UIN28VIN29RESET30VDD18_231VSS18_232POR33GPO2
34
I2C1
35
I2C2
36
SDA
37
SCL
38
INTR
39
VDD33PAD
40
VSS33PAD
41
VSP
42
HSP
43
GPO1
44
CLKOUT
CP32
47uF
10V
CP16
47pF
50V
RP08
100
1/10W
5%
CP02
22pF
50V
LP02
10uH
CP17
47pF
50V
CP21
47uF
10V
RP02
220
1/6W
5%
RP05
1K
1/10W
5% CP03
47pF
50V
RP04
100
1/6W
5%
LP01
10uH
RP06
100
1/6W
5%
CP36
0.1uF
50V
RP34
1K
1/10W
5%
RP33
1K
1/10W
5%
RP07
22K
1/10W
5%
0.1
MYL
C515*
100p
C245*
0.1uF
C529
R904
R913
C2330-Y
Q904
R706
T/W
R711
T/W
R317*
J864
T/W
J841
T/W
J825
T/W
J822
T/W
J820
T/W
J812
T/W
T803
61709MC016D
J813
T/W
J801
T/W
J802
T/W
J803
T/W
J808
T/W
J806
T/W
J807
T/W
J809
T/W
T/W
J712
J708
T/W
T/W
J690
T/W
J698
T/W
J667
J656
T/W
J602
T/W
J621
T/W
J622
T/W
J623
ST
J605
T/W
J108
T/W
J606
J604
T/W
T/W
J609
100
J516
T/W
J518
J409
T/W
J220
T/W
J221
T/W
J223
T/W
J151
J6
LA72730
IC751
LIN-11LIN-22LIN-33RIN-14RIN-25RIN-36VIN-1
7
VCC
8
VIN-2
9
GND
10
VIN- 3
11
R_MONITOR
12
L_MONITOR16SCL13SDA14NC15ALC_FILT17VIDEO_OUT18AUDIO_R_OUT19AUDIO_L_OUT20VIN-TV21BIAS_FILTER22RIN-TV23LIN-T V
24
A1275Y
Q103
30K
R114
C102M
Q104
T/W
J203
J502
T/W
KIA78R05API
IC806
12
3
4
J829
T/W
J828
T/W
T/W
R811
2200uF
25V
C838
TVR06J
D806
125-022 R
FB808
470P/500 V
C836
CK
180/2W
(RS)
R314
T/W
J539
100pF
C532
1K
R606
T/W
J293
9V
TH402*
300ohm
TH401*
300ohm
SCREEN
5V
510(14")
FOCUS
*
180V
*
26V
GAME/FM DATA
V2
D
GAME ID/FM CE
L2
G
G
G
R2
Option
MONO:330/0.5W
NC
GND
W/O HP
SDA
11
SCL
12
CPT BOARD
MONO
<L-IN>
10
<R-IN>
<V-OUT>
Headphone
<L-OUT>
14
<B+ : 115V>
STEREO:510/0.5 W
13
<MONO 4PIN OPT.>
OCP
GND
180V
HEATER
MONO OPTION
9V
B
EBY41778501
G
* : OPTION
R
2.2/0.5W(LG CPT)
H-GND
<SCHEMATIC DIAGRAM OF CW-81A>
'07.05.08
CIRCUIT DIAGRAM
CW-81A CHASSIS
IN
(CK)
FOCUS
180V
SCREEN
COLD
AFC
HOT
C
ABL
C3229(21" )
26V
D833*
<R-OUT>
HEATER
<V-IN>
COL
12V
C3229(21")
BK
OUT
GK
<EYE OPT.>
HEATER
RK
GND
B
H-GND
DEG OPTION
RU2AMV
HEATER
C3229(21" )
HOT
V-NECK
9V
270P(14" )
B
VIDEO/NC
390P(14")
G
GND
390P(14")
R
AUDIO/FM ON_OFF
510(14")
ANODE(HV)
GAME/FM CLK/IR
510(14")
KEY
A
VERSION 1.11 2008.02.26
POWER
HEADPHONE R V
(MONO)
L
PAL
NTSC
HV
INNER
112V
??
3.00V
CH-/PR-
VOLTAGE
0.81 V
0V
2.48 V
<KEY MATRIX>
CH+/PR+
1.88VMENU/OK
VOL+/VOL+
T-SOUND
NT/PAL
T-PICTURE
TV_VIDEO/MENU 1.34V
??
VOL-/VOL-
<DVD_R-IN>
<DVD_L-IN>
LA42101 (10W MONO MAX)
LA42102N(15W+15W MAX)
<PAL>
ABNNORMAL
<NICAM/A2 OPT.>
<DOWNLOAD OPT.>
BTSC
<AV STEREO OPT.>
<NTSC>
W/TEXT W/O TEXT
NTSC
PAL
NICAM/A2
<SIDE A/V OPT>.
<MONO>
<STEREO>
<MONO OPT.>
<MONO OPT.>
<MONO 4P,W/SCART OPT.>
<W/O SCART,PIP>
<W/SCART,PIP>
<GAME, FM TX OPT.>
<STEREO,W/O SCART OPT.>
<W/O PIP>
FB-IN
Cb-IN
Y-IN
Cr-IN
GND
5V
R-OUT
G-OUT
B-OUT
FB-OUT
SDA
SCL
VS
HS
GND
GND
GND
TV_VIDEO
AV1
AV2
<PIP OPT.>
<W/PIP OPT.>
<W/PIP OPT.>
<IC VERSION>
BPF
Slave Address=0x38
<W/O BPF OPT.>
<W/FM TX OPT.>
MNT_R
MNT_L
GND
GND
D
NC
S/GND
VIN
SS/ADJ
FB
BD
MONO :IC810(W6553A), R806(RN ???)
STEREO:IC810(W6554A), R806(RN 39K)
MODE INPUT
VIN1 REAR
VIN2 FRONT/SIDE
VIN3 GAME
VIN-T V RF
MONO
LV76210
LV76220
LV76230
PAL/NT
SOUNDIC
SYSTEM
PAL/NT/SECAM
COMB
EW
TXT
Surround
A2+NICAMBTSC
LV76211
LV76221
LV76231
LV76233
LV76212
LV76222
LV76213
LV76232
LV76223
LC75024
LA72702N
AV-ST
RF-ST
IC
*ASSEMBLE SUSOC(AV/ST)IC WITH RF/ST IC FOR RF-ST MODEL
PAL/NT/SECAM
PAL/NT/SECAM
PAL/NT
PAL/NT/SECAM
PAL/NT/SECAM
PAL/NT
PAL/NT/SECAM
PAL/NT
PAL/NT/SECAM
PAL/NT/SECAM
A2/NICAM
BTSC
X
X
X
X
X
X
X
X
X
X
X
X
X
X
X
X
X
X
X
X
X
X
X
X
X
X
X
X
X
X
X
X
X
X
LA42102L(10W+10W MAX)
<STEREO OPT.>
<SS/ULTRA OPT.>
<FLAT,Normal OPT. >
<SS/ULTRA OPT.>
<FLAT,Normal OPT.><SS OPT. ><ULTRA OPT.>
B+
<MONO/AV ST OPT.>
GND
GND
IR
KEY
POWER
ST-5V
GND
EYE
GND
9V
NC
<MONO/AV ST OPT.>
<W/O RELAY>
<W/O NICAM>
<NICAM>
W/O ST-BY 1W
W/ NICAM
W/O ST-BY 1W
B+
S-Vcc
10.5 V
???V
GND
S-GND
GND
COLD
GND
<RF ST>
<MONO/
AV ST OPT.>
<MONO/AV ST>
<PRE AMP OPT.>
<MUTE OPT.>
Slave Address=0x80
VCD Slave Address=0xBA
EEPROM Slave Address=0xA0
TUNER Slave Address=0xC0
Slave Address=0x92
AV1
GND
AV2
GND
GNDRFSCL
SDLVSHS
FB0RI5VROBO
GOBIGND
FBI
GI
CPT BOARD
PIP BOARD
NARROW RANGE OPT.
<W/O ST-BY 1W OPT>
<W/ST-BY 1W OPT>
W/ST-BY 1W
=>Initial model: 21"ULTRA S/S(21FU1R) .
Page 16

May, 2008
Printed in KoreaP/NO : MFL41322905
 Loading...