

LG 19LS4R Series, 22LS4R Series, 17LS5R Series, 20LS5R Series Owner's Manual

담 당 관리자
MODEL
BRAND
Printing Specification
1. Trim Size (Format) : 148mm x 210 mm
2. Printing Colors
• Cover : 1 COLOR (BLACK)
• Inside : 1 COLOR (BLACK)
3. Stock (Paper)
• Cover : Coated paper , S/W 150 g/㎡
• Inside : Uncoated paper , 백상지 60 g/㎡
4. Printing Method : Off-set
5. Bindery : Perfect bind
6. Language : English / German / French / Italian / Spanish / Portuguese
/ Netherlands / Greek / Hungarian/ Polish/ Czech/ Slovak/ Romanian/ Bulgarian
/ Swedish/ Norwegian/ Finnish/ Danish/ Estonia/ Lith uania/ Latvia/Slovenian (22)
7. Number of pages : 316
Model Description
Part No.
2.
User’s Guide Specification
1.
User’s Guide Specification
Changes
4.
REV.
NO.
MM/DD/YY
SIGNATURE
CHANGE NO.
CHANGE CONTENTS
2
3
4
5
7
6
SUFFIX
SHIN HJ
07.01.31
LG
MFL33997808
(0707-REV03)
KIM JONG OK
07.01.31
(1) Origin Notification
* LGEIN : Printed in Indonesia * LGEWA : Printed in U.K.
* LGESP : Printed in Brazil * LGEMX : Printed in Mexico
* LGEND : Printed in China * LGEIL : Printed in India
8
9
Special Instructions3.
Product Name
17/20LS5R
19/22LS4R
EU
17/20LS5R-ZA
19/22LS4R-ZA
1
This part contain Eco-hazardous substances (Pb, Cd, Hg, Cr6+, PBB, PBDE, etc.) within LG standard level,
Details should be followed Eco-SCM management standard[LG(56)-A-2524].
Especially, Part should be followed and controlled the followin g specification.
(1)Eco-hazardous substances test report should be submitted when Part certification test and First Mass Production.
(2) Especially, Don’t use or contain lead(Pb) and cadmium(Cd) in ink.
Notes
03/06/06
SHIN.H.J.
S7-74340
Amended Polish Language
04/25/07
SHIN.H.J.
S7-80786
Amended Stand installation
07/23/07
Hwang MG
S7-88619
Added model for 20LS5RC-ZA and Weight.
Pagination sheet
Pagination sheet
P/NO. MFL33997808
Total pages : 316 pages
Blank
1
….
9
Common part
Blank
1
…9
LG(EN)
LG(GE)
LG(FR)
Rear cover
Rear cover
Rear cover
LG(IT)
Rear cover
LG(SP)
Rear cover
LG(PO)
Rear cover
LG(NE)
Rear cover
LG(GR)
Rear cover
10
Blank
1
….
9
Blank
1
….
9
Blank
1
…. 9
Blank
1
…. 9
Blank
1
…. 9
Blank
1
…. 9
10
10
10
10
10
10
LG(EN)
P/no
Blank
I
….
Front cover
LG(EN)
Front cover
Multi part
LG(GE)
LG(FR)
LG(IT)
Front cover
Front cover
Front cover
LG(SP)
Front cover
LG(PO)
Front cover
LG(NE)
Front cover
LG(GR)
Front cover
LG(HU)
Front cover
11
11
11
11
11
11
11
10 11
IV VIV
….

Pagination sheet
Pagination sheet
P/NO. MFL33997808
Total pages : 316 pages
Blank
1
….
9
Blank
1
…9
LG(HU)
LG(PL)
LG(CZ)
Rear cover
Rear cover
Rear cover
LG(SK)
Rear cover
LG(RO)
Rear cover
LG(BU)
Rear cover
LG(SW)
Rear cover
LG(NO)
Rear cover
10
Blank
1
….
9
Blank
1
….
9
Blank
1
…. 9
Blank
1
…. 9
Blank
1
…. 9
Blank
1
…. 9
10
10
10
10
10
10
LG(PL)
LG(CZ)
LG(SK)
Front cover
Front cover
Front cover
LG(RO)
Front cover
LG(BU)
Front cover
LG(SW)
Front cover
LG(NO)
Front cover
LG(FI)
Front cover
11
11
11
11
11
11
11
10 11
Blank
1
…. 9 10
LG(DA)
Front cover
11
LG(FI)
Reart cover
Pagination sheet
Pagination sheet
P/NO. MFL33997808
Total pages : 316 pages
LG(SV)
Reart cover
Blank
1
….
9
Blank
1
…9
LG(DA)
LG(EE)
LG(LI)
Rear cover
Rear cover
Rear cover
LG(LA)
Rear cover
10
Blank
1
….
9
Blank
1
….
9
Blank
1
…. 9
10
10
10
LG(EE)
LG(LI)
LG(LA)
Front cover
Front cover
Front cover
LG(SV)
Front cover
11
11
11
11
10 11

An extended Owner’s Manual that contains information on the advanced features of these LG TV sets is located on the CD- ROM provided in an electronic
version.
To read these files, you will need to use a Personal Computer (PC) equipped
with a CD- ROM drive.
Please read this manual carefully before operating your set.
Retain it for future reference.
Record model number and serial number of the set.
See the label attached on the back cover and quote
this information to your dealer when you require service.
LCD TV
OWNER’S MANUAL
LCD TV MODELS
19LS4R
*
22LS4R
*
17LS5R
*
20LS5R
*
P/NO : MFL33997808 (0707-REV03)
Printed in Korea


I
PREPARATION
STAND INSTALLATION
1
Carefully place the product screen side down on a cushioned
surface that will protect product and screen from damage.
■
Here shown may be somewhat different from your TV.
3
Place the product stand on the product as shown.
17/20LS5R*
1
Carefully place the product screen side down on a cushioned
surface that will protect product and screen from damage.
19/22LS4R*
2
Assemble parts of stand body with
the product
of the stand.
Insert stand body into
the product
until clicking sound.
stand body
Hold the
hhiinnggee bbooddyy
and bend it upward.
2
Hinge Body
Insert the
ssttaanndd bbooddyy
into the product until clicking sound.
Stand Body
3
Assemble the parts of the
ssttaanndd bbooddyy
with
cc oovvee rr bbaassee
of the product.
4
Cover Base
II
PREPARATION
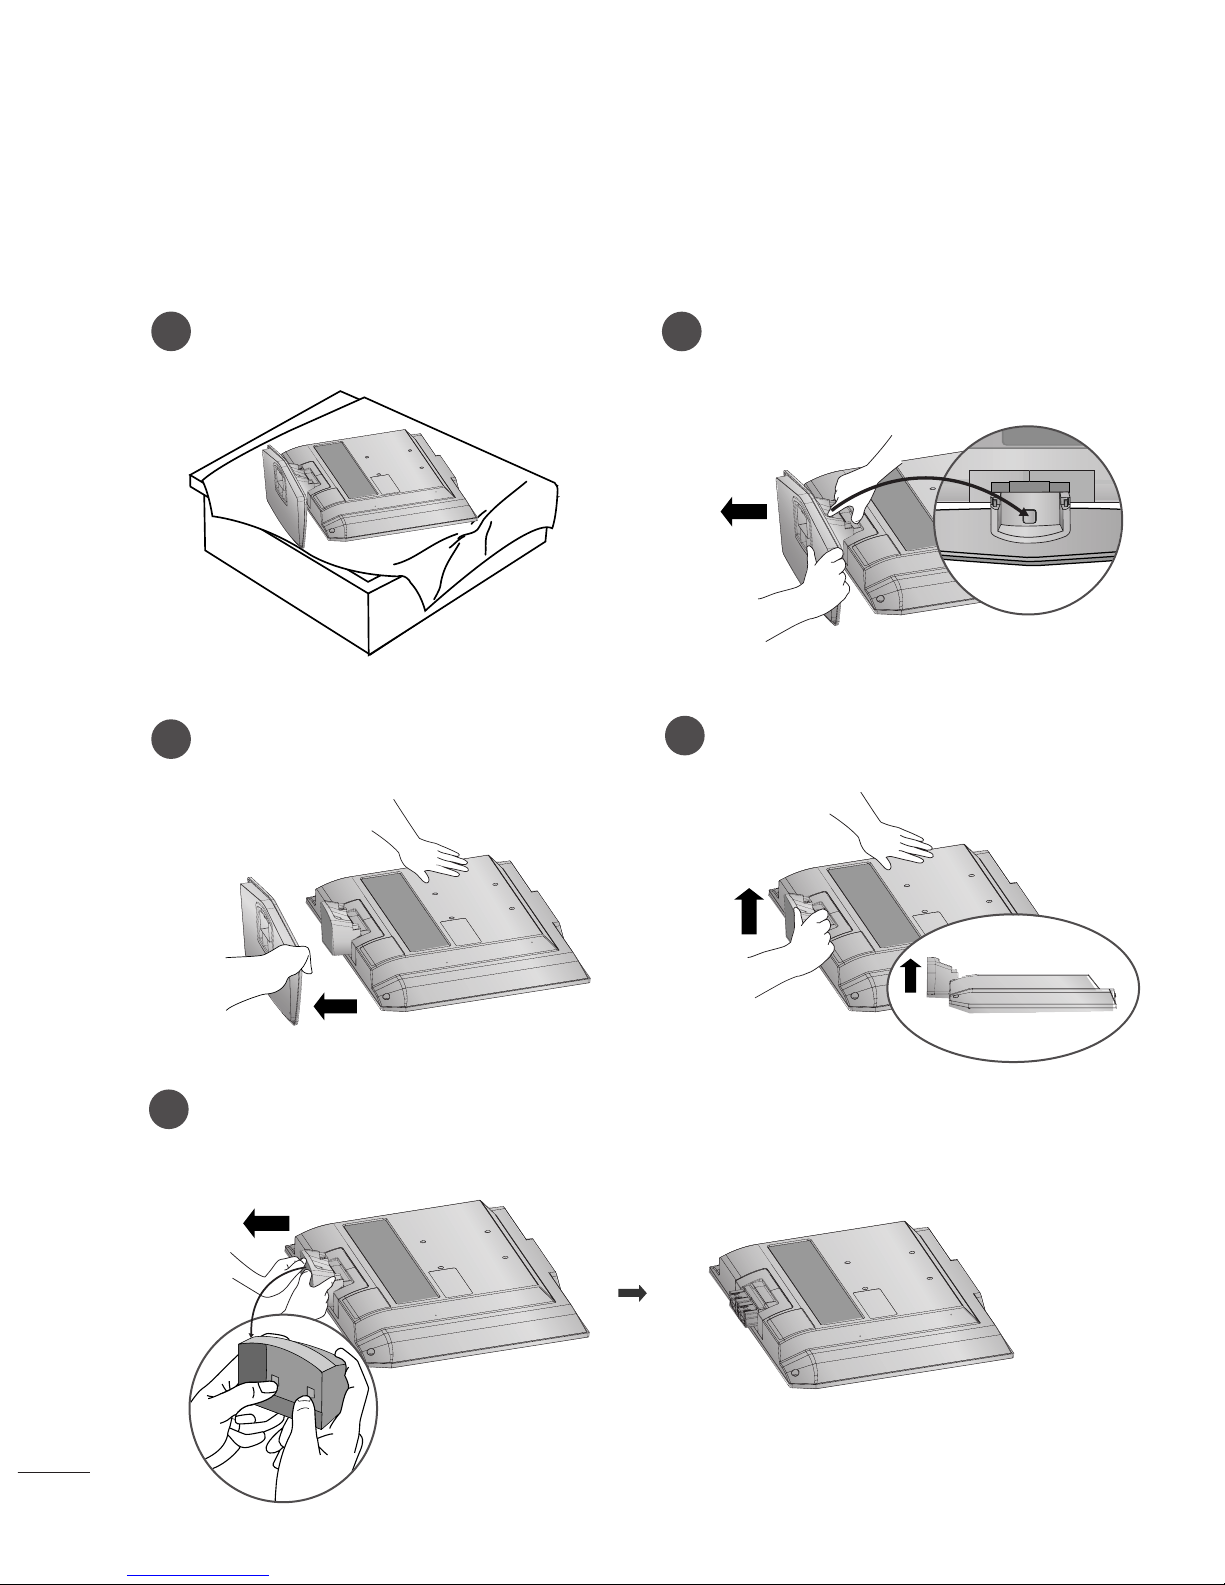
DETACHING STAND
1
2
3
Place the set with its front facing downward on a
cushion or soft cloth.
Pull cover base backward during pressing botton
on stand body.
Hold cover base and pull with shake it backward
to separate from stand body.
4
Hold the stand and bend it upward.
5
Pull stand body to separate from set during
pressing 2 latches.
■
Here shown may be somewhat different from your TV.
III
DESKTOP PEDESTAL INSTALLATION
For proper ventilation, allow a clearance of 4inches on each side from the wall.
WALL MOUNT: HORIZONTAL INSTALLATION
For proper ventilation, allow a clearance of 4" on each side and from the wall. Detailed installation
instructions are available from your dealer, see the optional Tilt Wall Mounting Bracket Installation and
Setup Guide.
4 inches
4 inches
4 inches 4 inches
4 inches
4 inches
4 inches4 inches
4 inches

IV
PREPARATION
FRONT PANEL CONTROLS
■
This is a simplified representation of the front panel. Here shown may be somewhat different from your TV.
■
If your product has a protection film attached, remove the film and then wipe the product with a polishing
cloth.
17LS5R*/ 20LS5R*
INPUT
MENU
VOL
PR
/I
OK
INPUT
MENU
VOL
PR
/I
OK
POWER
Button
INPUT
Button
MENU
ButtonOKButton
VOLUME
Buttons
Remote Control
Sensor
Power/Standby Indicator
• illuminates red in standby mode.
• illuminates green when the set is switched on.
17LS5R*
20LS5R*
19LS4R*/ 22LS4R*
INPUT
MENU
VOL
PR
/I
OK
Remote Control Sensor
Power/Standby Indicator
• illuminates red in standby mode.
• illuminates green when the set is
switched on.
VOLUME
Buttons
PROGRAMME
Buttons
PROGRAMME
Buttons
POWER
Button
INPUT
Button
MENU
ButtonOKButton
V
17LS5R* / 20LS5R*
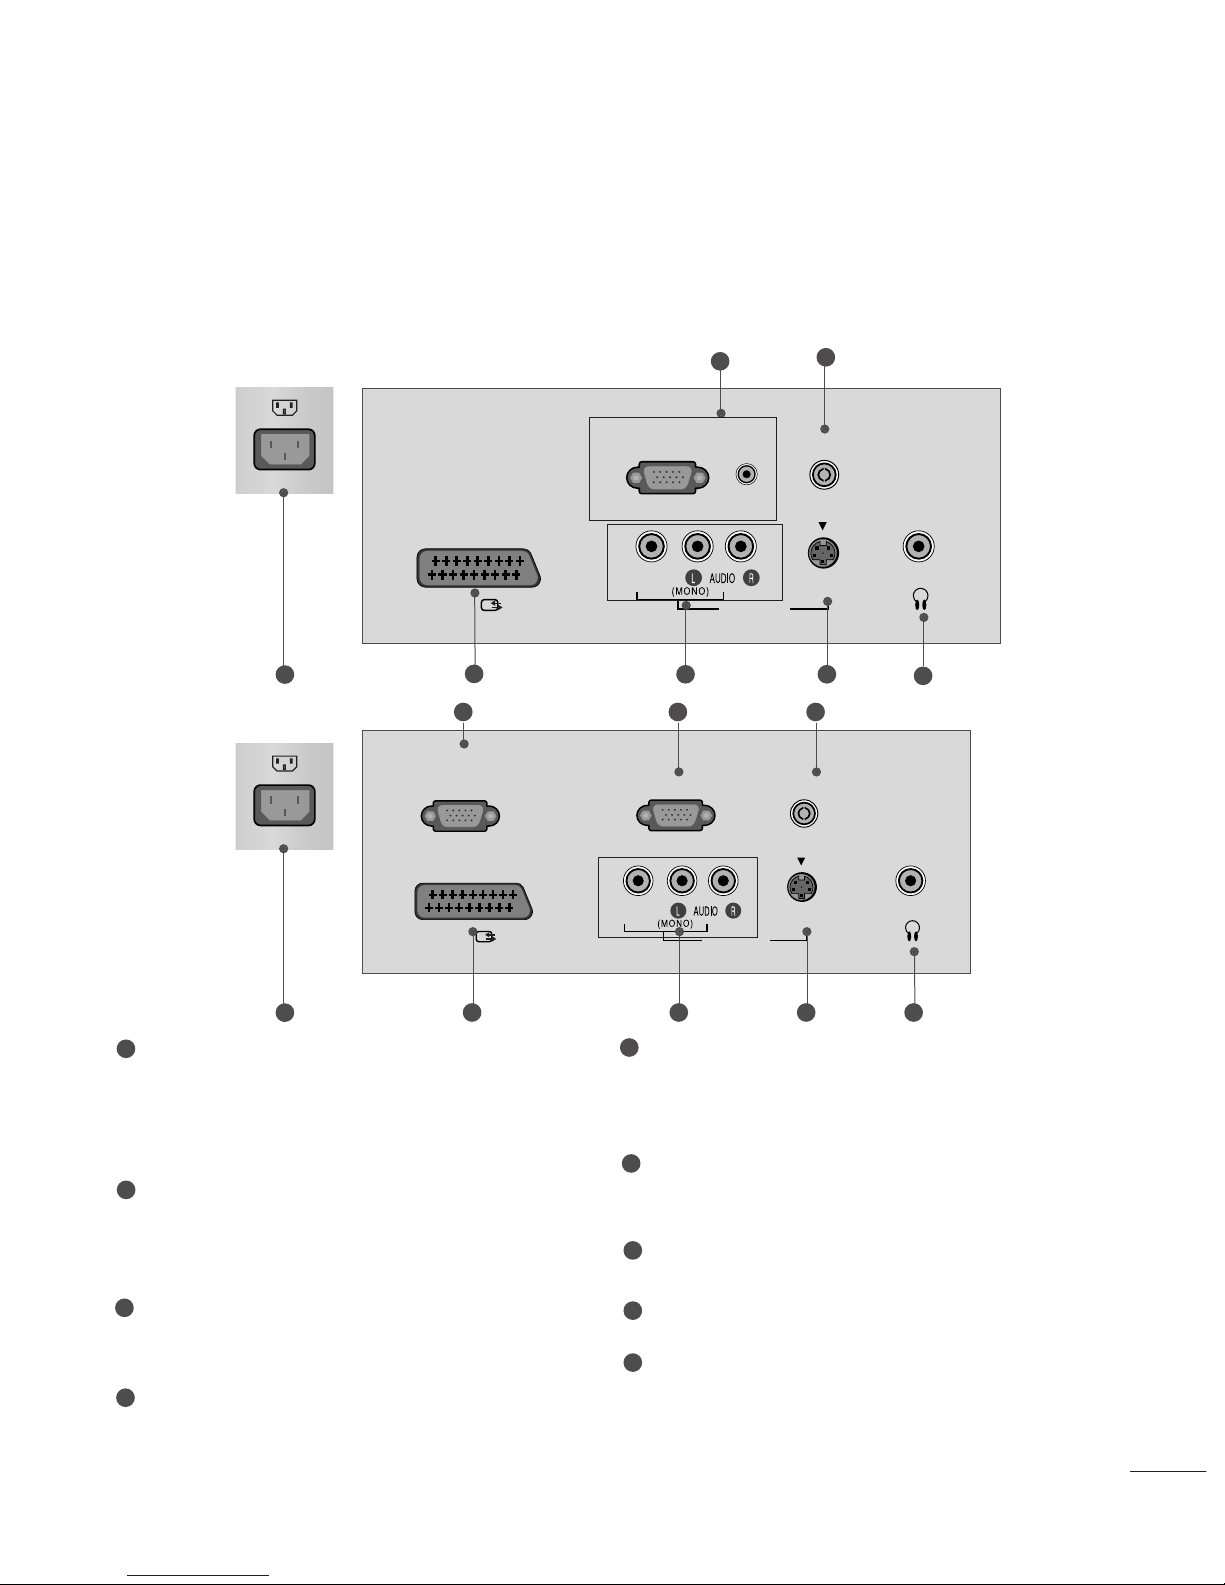
BACK PANEL INFORMATION
■
This is a simplified representation of the back panel. Here shown may be somewhat different from your TV.
H/P
RGB(PC/DTV) IN
ANTENNA IN
AUDIO
(RGB) IN
S-VIDEO
AV IN 2
VIDEO
AV 1
2
3
4
5 6
7
1
Power Cord Socket
This TV operates on an AC power. The voltage is
indicated on the Specifications page. Never
attempt to operate the TV on DC power.
RGB/Audio Input
Connect the monitor output from a PC/DTV to
the appropriate input port.
Antenna Input
Connect over-the-air signals to this jack.
Euro Scart Socket (AV1)
Connect scart socket input or output from an
external device to these jacks.
Audio/Video Input
Connect audio/video output from an external
device to these jacks.
S-Video Input
Connect S-Video out from an S-VIDEO device.
Headphone Input
SERVICE ONLY
RS-232C Input
(SERVICE ONLY)
(only 20LS5RC model)
Connect the serial port of the control devices
to the RS-232C jack.
1
2
3
4
5
6
7
8
9
17LS5R*
20LS5R*
1
H/P
ANTENNA IN
S-VIDEO
AV IN 2
VIDEO
AV 1
SERVICE ONLY
RS-232C
(SERVICE ONLY)
389
5 6 74
VI
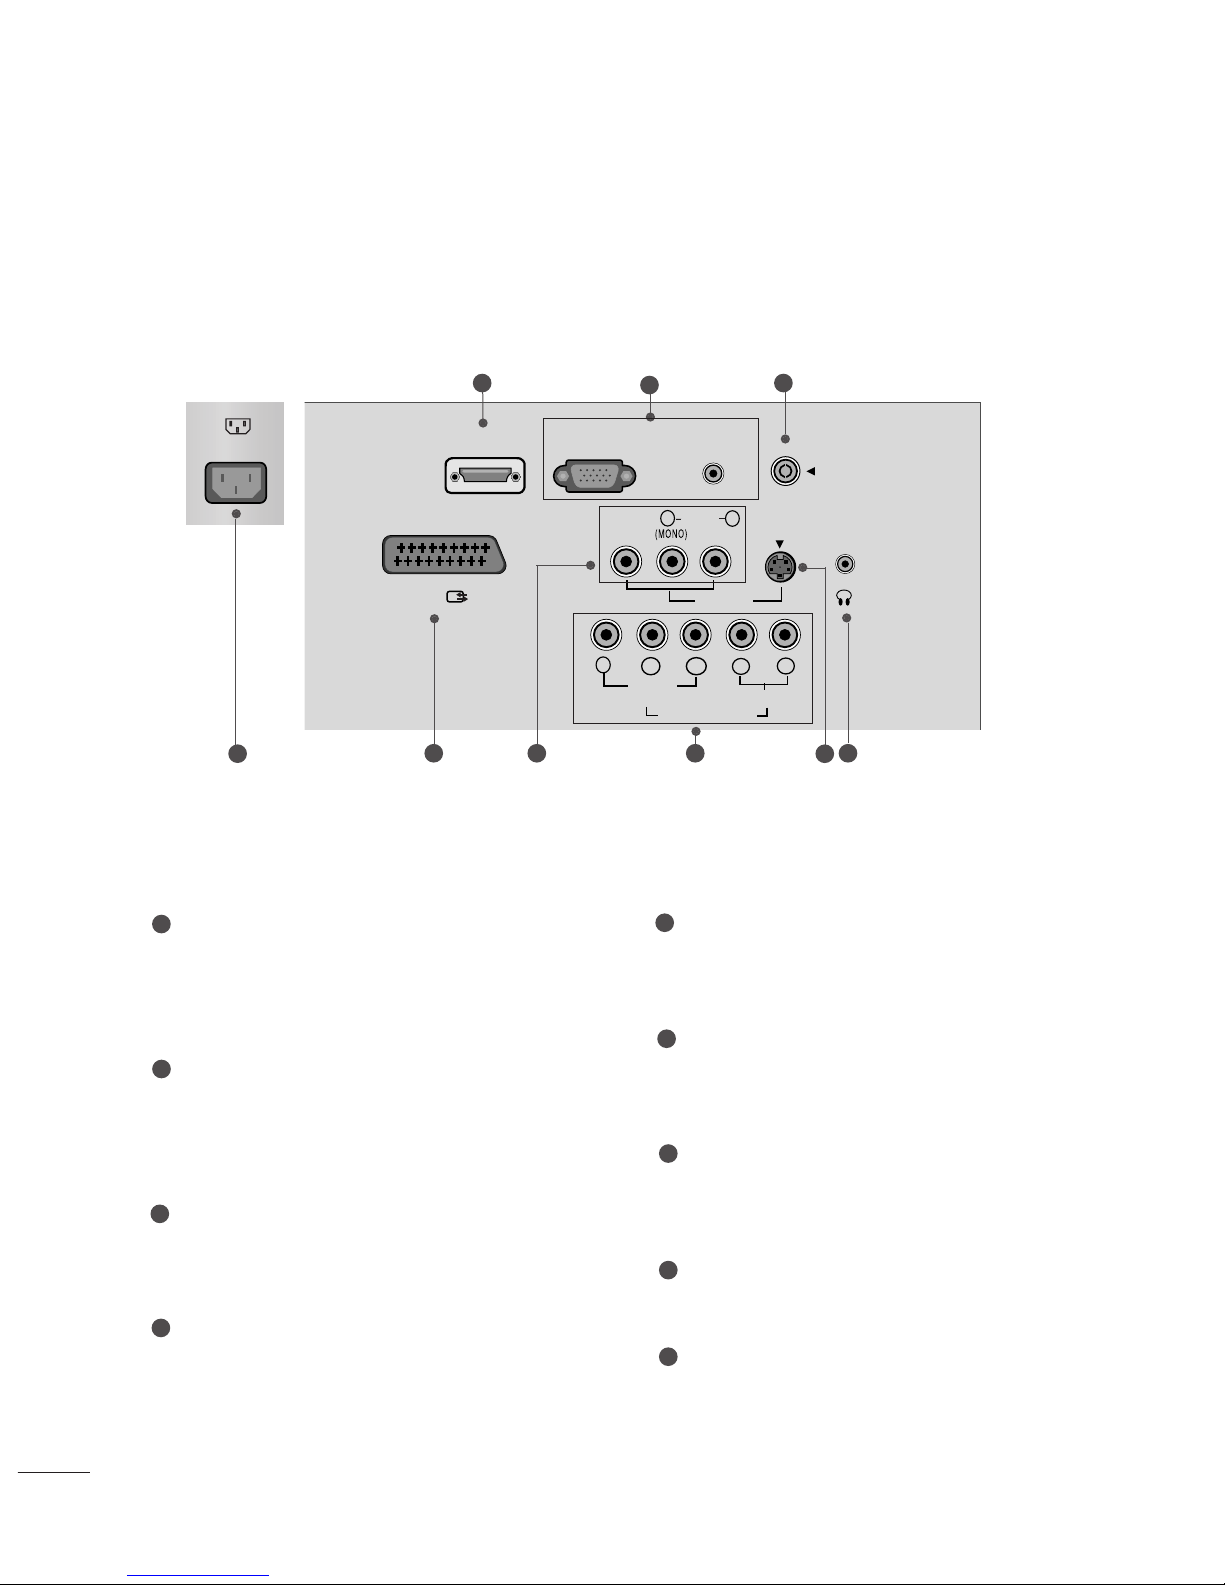
BACK PANEL INFORMATION
PREPARATION
19LS4R* / 22LS4R*
RGB (PC/DTV) IN
AV 1
S-VIDEO
AV IN 2
VIDEO
L
R
AUDIO
Y
PB
PR
LR
VIDEO
COMPONENT IN
AUDIO
HDMI/DVI IN
AUDIO
(RGB/DVI) IN
H/P
ANTENNA IN
2
3
4
5 96 7
Power Cord Socket
This TV operates on an AC power. The voltage is
indicated on the Specifications page. Never
attempt to operate the TV on DC power.
HDMI/DVI IN Input
Connect a HDMI signal to HDMI IN.
Or DVI(VIDEO)signal to HDMI/DVI port with DVI
to HDMI cable.
RGB/Audio Input
Connect the monitor output from a PC/DTV to
the appropriate input port.
Antenna Input
Connect over-the-air signals to this jack.
Euro Scart Socket (AV1)
Connect scart socket input or output from an
external device to these jacks.
Audio/Video Input
Connect audio/video output from an external
device to these jacks.
Component Input
Connect a component video/audio device to
these jacks.
S-Video Input
Connect S-Video out from an S-VIDEO device.
Headphone Input
1
2
3
4
5
6
7
8
9
8
1

An extended Owner’s Manual that contains information on the advanced features of these LG TV sets is located on the CD- ROM provided in an electronic
version.
To read these files, you will need to use a Personal Computer (PC) equipped
with a CD- ROM drive.
Please read this manual carefully before operating your set.
Retain it for future reference.
Record model number and serial number of the set.
See the label attached on the back cover and quote
this information to your dealer when you require service.
LCD TV
OWNER’S MANUAL
LCD TV MODELS
19LS4R
*
22LS4R
*
17LS5R
*
20LS5R
*

1
ENGLISH
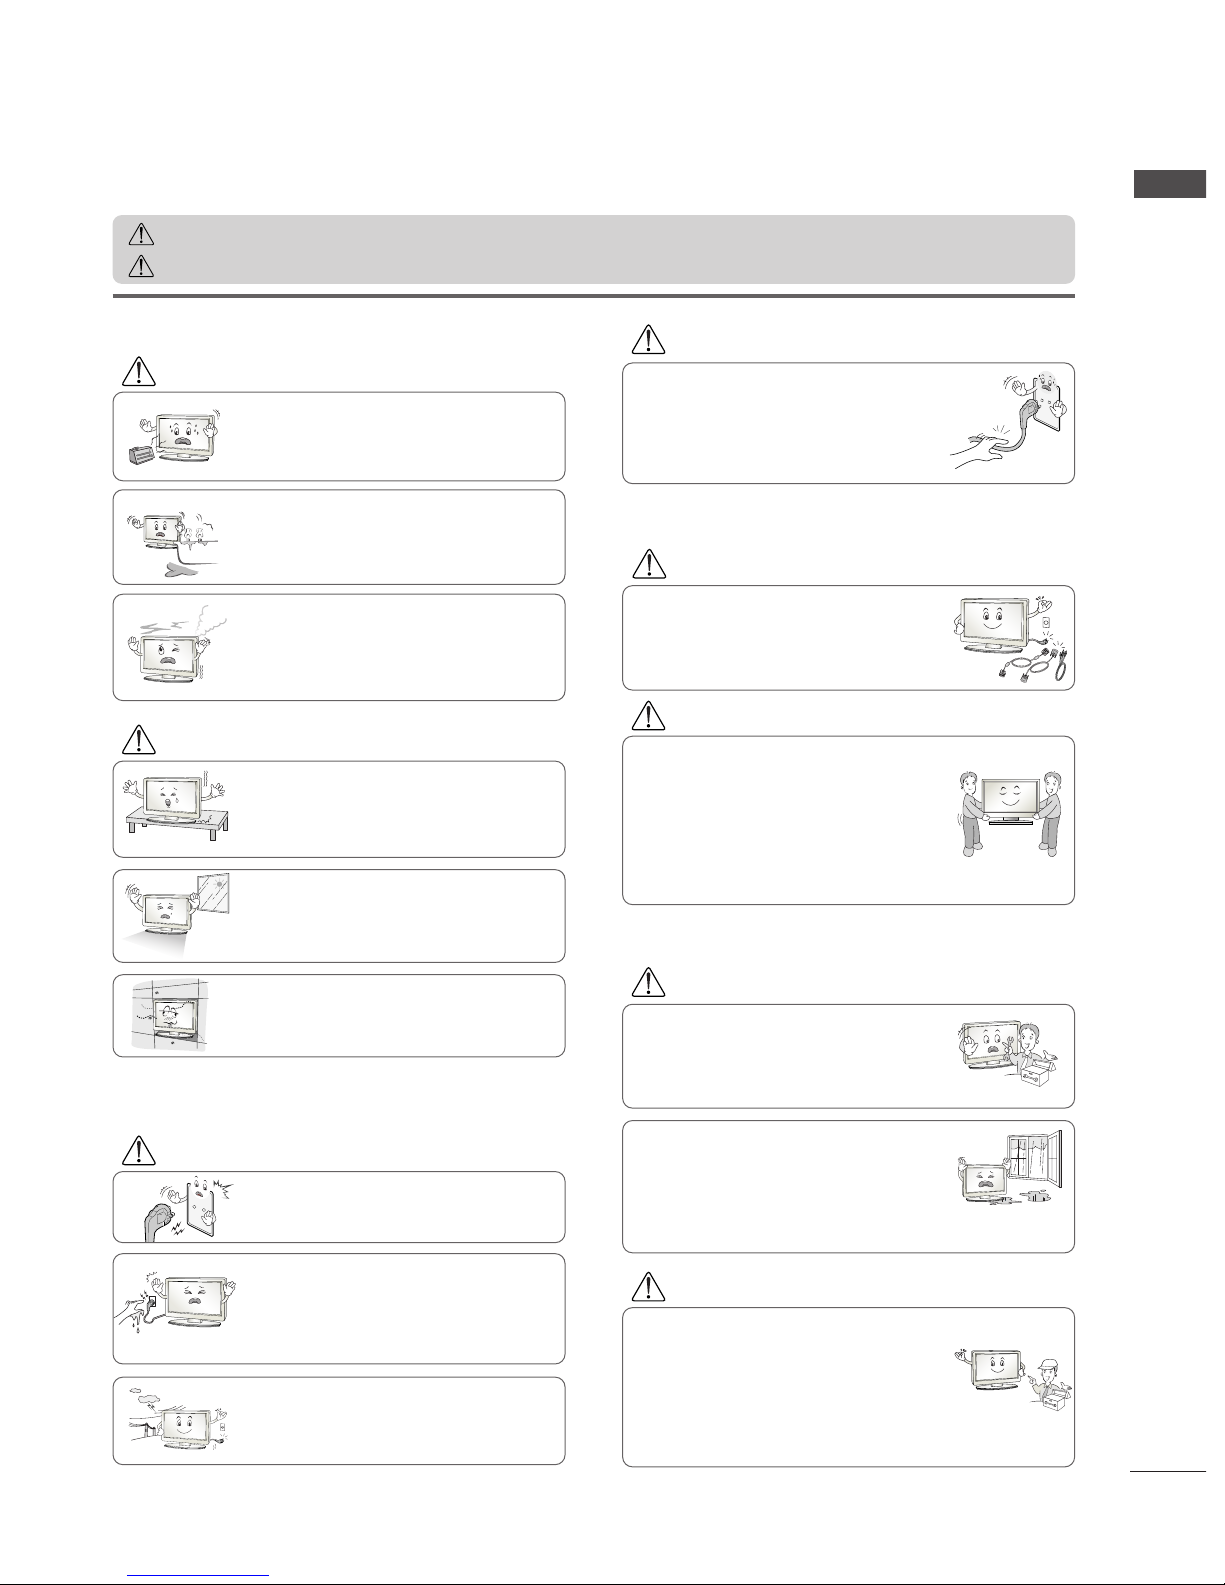
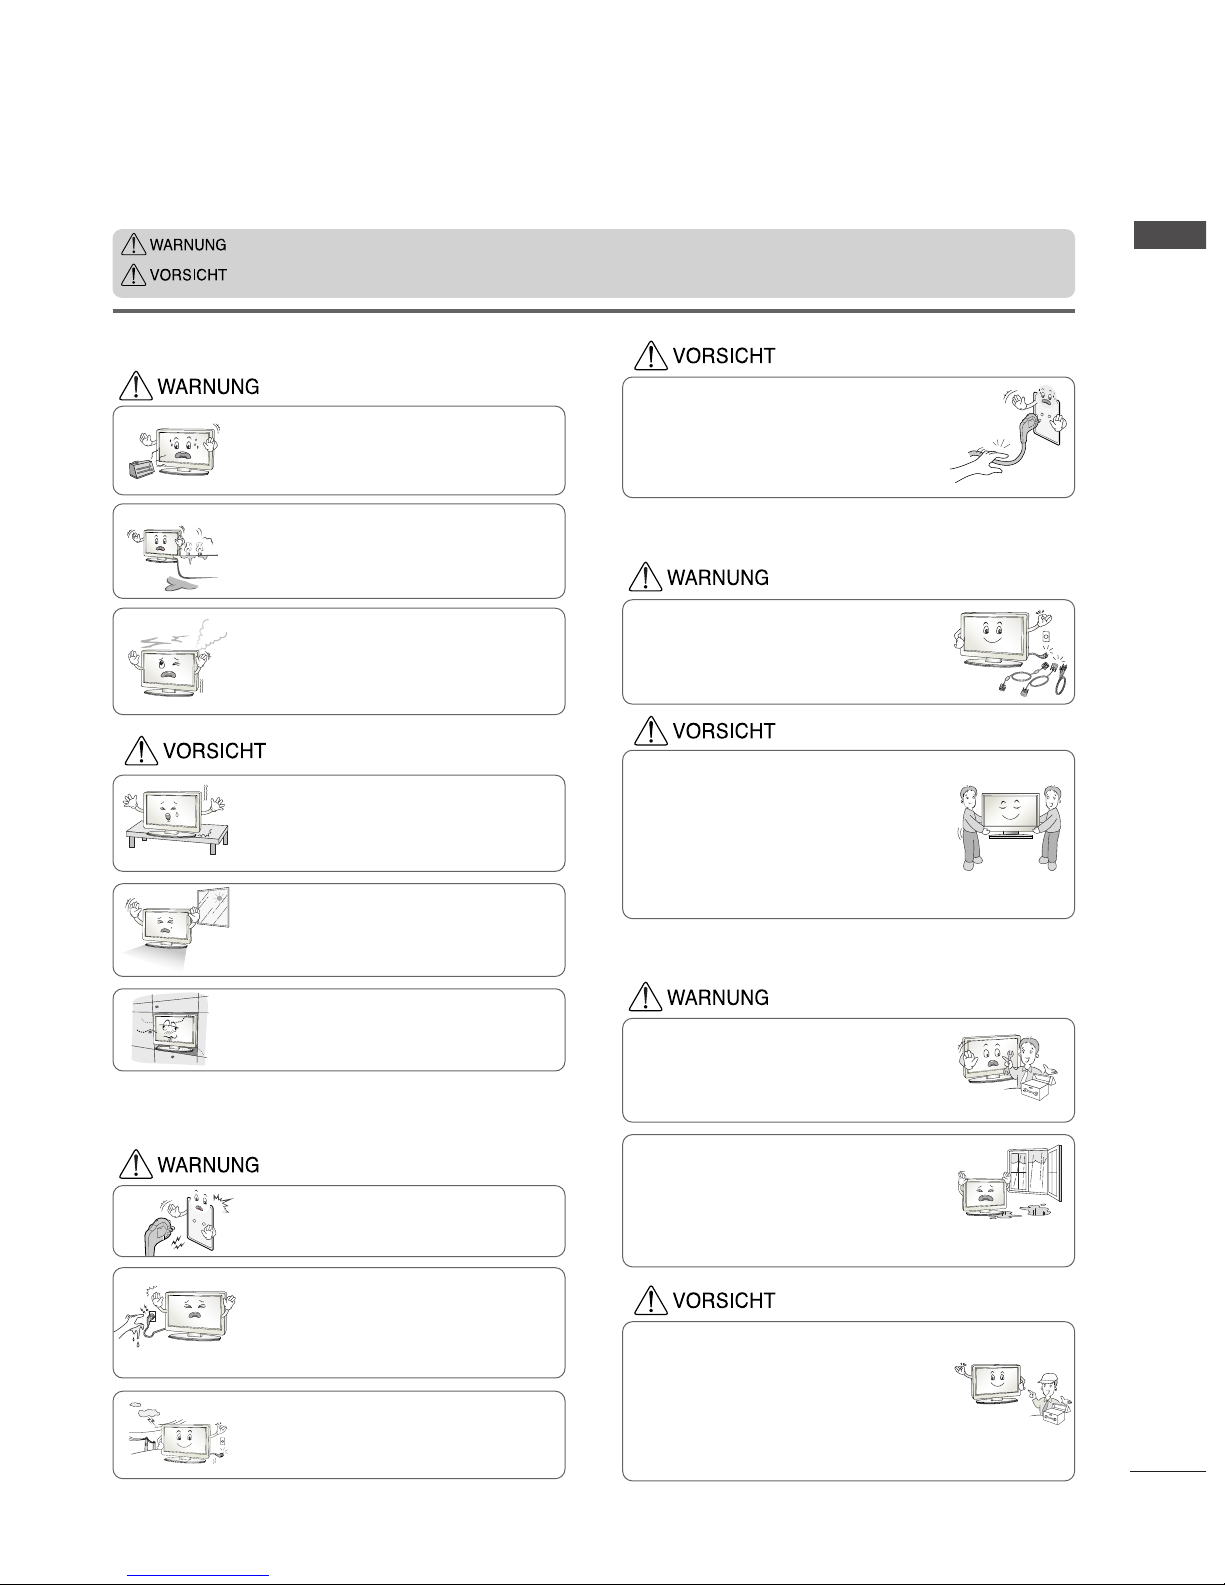
SAFETY INSTRUCTIONS
• Please read these safety precautions carefully before using the product.
• In this manual, illustrations shown may differ slightly from your product.
If these warning messages are ignored, you risk serious injury, accident or death.
If these caution messages are ignored, you risk injury or damage to the product.
PPrreeccaauuttiioonn iinn IInnssttaalllliinngg tthhee PPrroodduucctt
WARNING
WARNING
CAUTION
Keep away from heat sources like electrical heaters.
- Electrical shock, fire, malfunction or deformation may occur.
If you can smell smoke, or other odors, or hear a
strange sound; unplug the power cord and contact the
service center.
- If you continue to use without taking proper measures, electrical shock or fire can occur.
Do not use the product in a damp place such as a bathroom or any place where it is likely to get wet.
- This may cause a fire or could give an electric shock.
Install the product on a flat and stable place that
has no risk of dropping the product.
- If the product is dropped, you may be injured or the
product may be damaged.
Keep the product away from direct sunlight.
- The product could be damaged.
Do not place the product in a built-in installation
such as bookcase or cabinet.
- Ventilation required.
EElleeccttrriiccaall PPoowweerr RReellaatteedd PPrreeccaauuttiioonnss
Make sure to connect the power cable to an electrical
ground.
- You may be electrocuted or injured.
Do not touch the power plug with wet hands.
Additionally, it the cord pin is wet or covered with
dust, dry the power plug completely or wipe dust off.
- You may be electrocuted due to excess moisture.
During a thunder or lightning storm, unplug the
power cable or signal cable.
- You may be electrocuted or a fire could break out.
Protect the power cord from physical or mechanical
abuse, such as being twisted, kinked, pinched, closed in
a door, or walked upon. Pay particular attention to plugs,
wall outlets, and the point where the cord exits the
appliance.
PPrreeccaauuttiioonnss iinn MMoovviinngg tthhee PPrroodduucctt
Do not shock the product when moving it.
- You may be electrocuted or the product could be damaged.
Make the panel face forward and hold it with both
hands to move.
- If you drop the product, the damaged product could
cause an electric shock or fire. Contact the service center for repair.
Make sure to turn off the product.
Make sure to remove all cables before moving the
product.
- You may be electrocuted or the product could be damaged.
PPrreeccaauuttiioonnss iinn UUssiinngg tthhee PPrroodduucctt
Do not disassemble, repair or modify the product in
any way.
- Fire or electrocution could occur.
- Contact the service center for check, calibration or
repair.
To reduce the risk of fire or electric shock, do not
expose this apparatus to rain or moisture.
The apparatus should not be exposed to dripping
or splashing and no objects filled with liquids, such
as vases, should be placed on the apparatus.
Refer all servicing to qualified service personnel.
Servicing is required when the apparatus has been
damaged in any way, such as if power supply cords or
plugs have been damaged, liquid has been spilt, objects
have fallen in the product, the product has been
exposed to rain or moisture, the product does not
operate normally, or the product has been dropped.
WARNING
WARNING
CAUTION
CAUTION
CAUTION
CAUTION
WARNING

2
ENGLISH
5
1
2
3
4
6
5
7
8
9
[[wwiitthh AARRCC ]]
WATCHING TV / PROGRAMME CONTROL
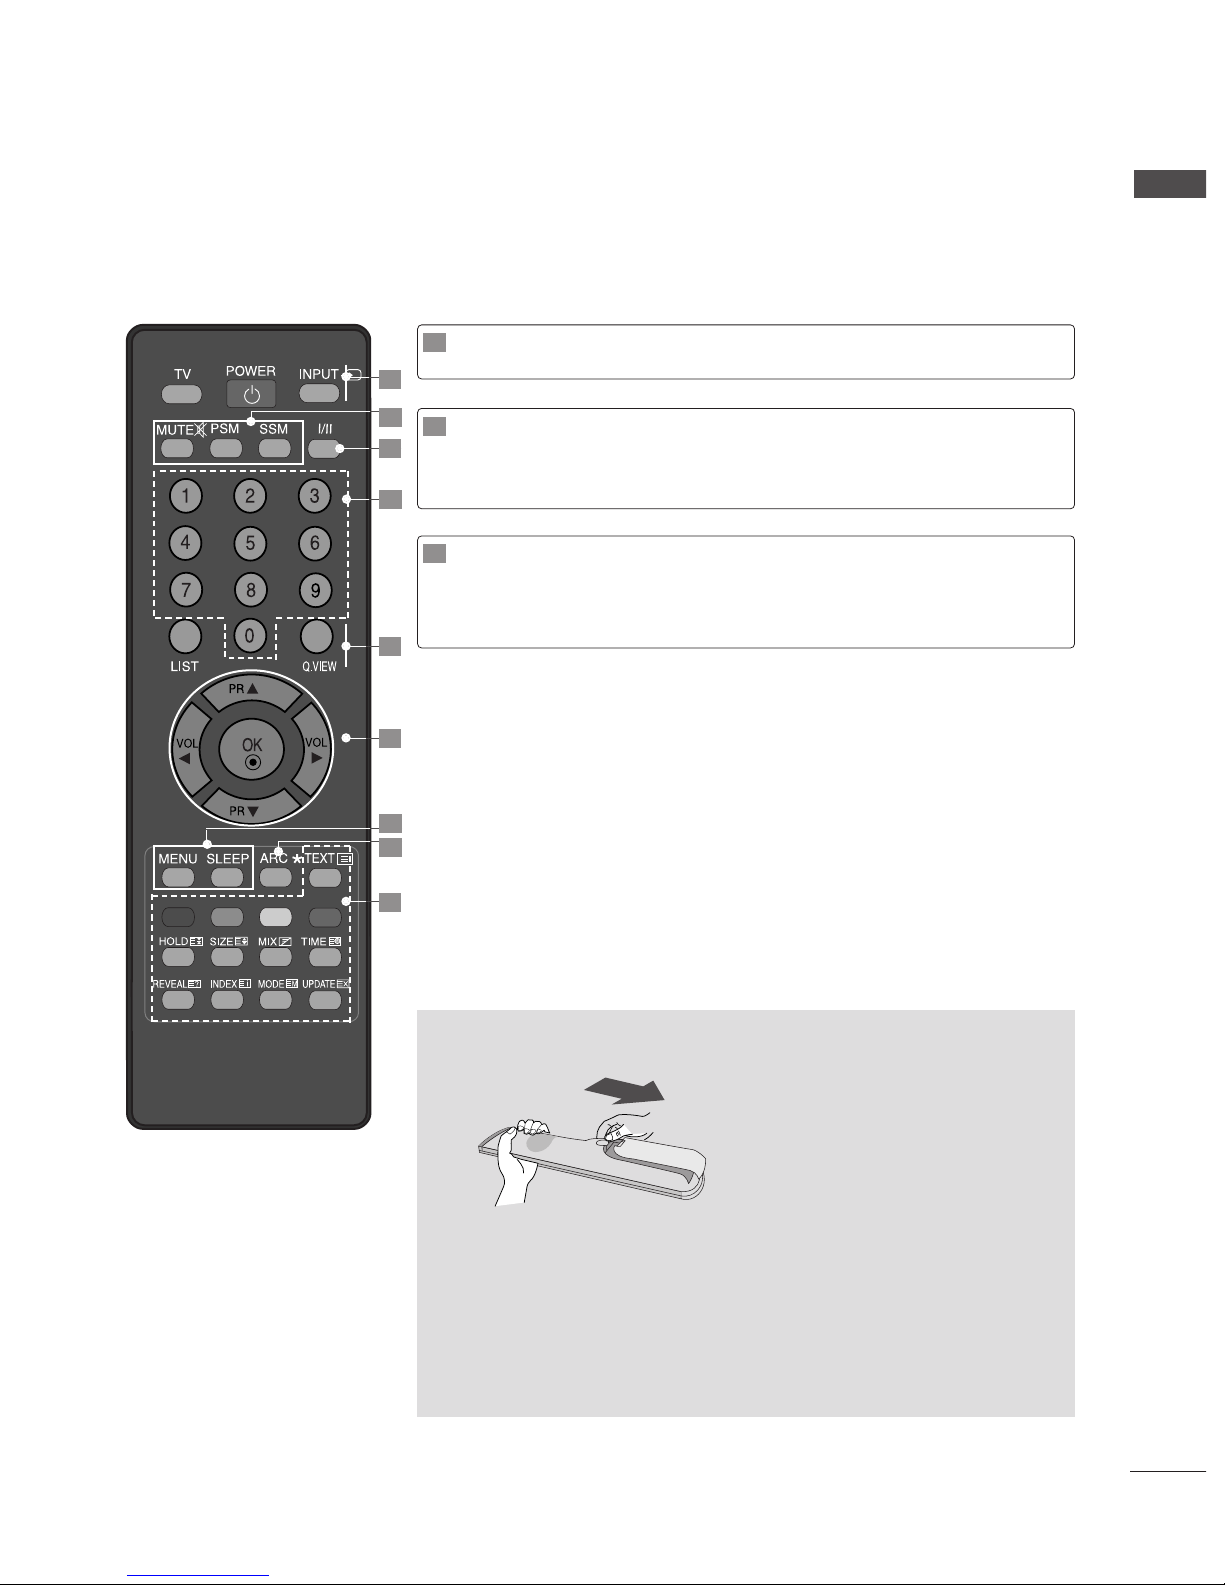
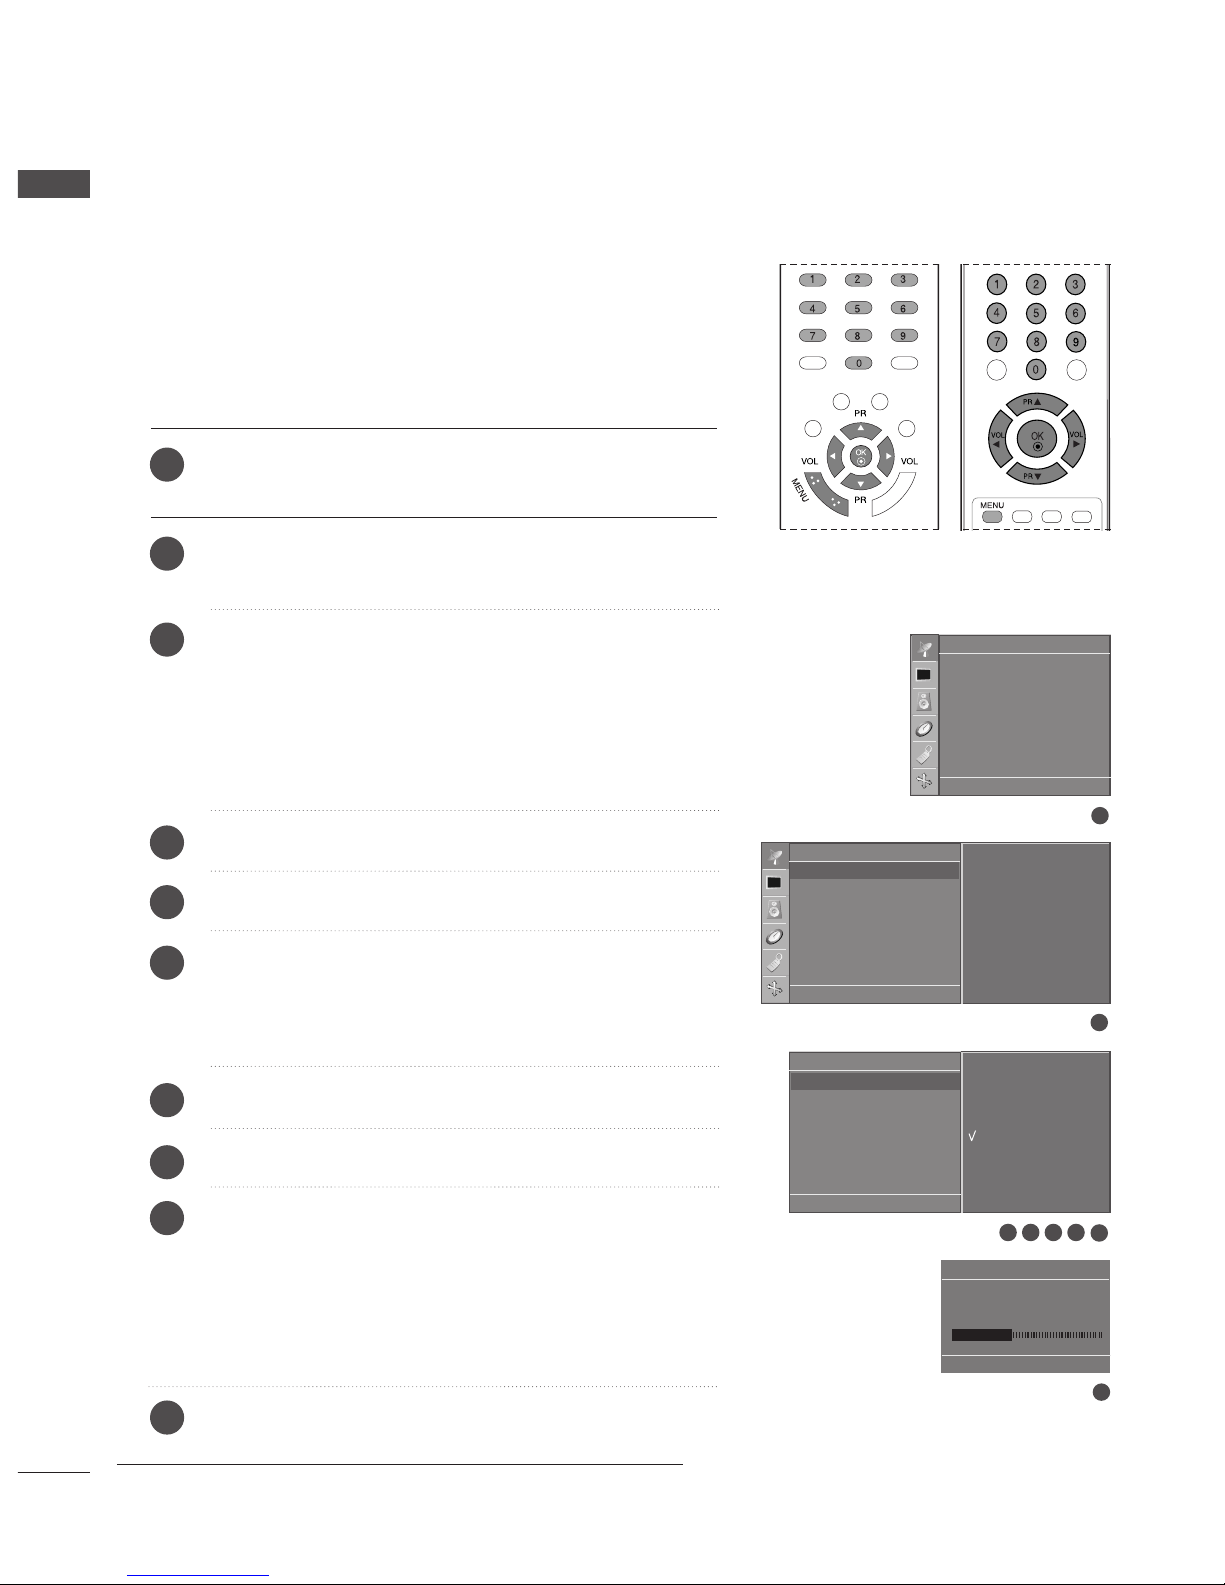
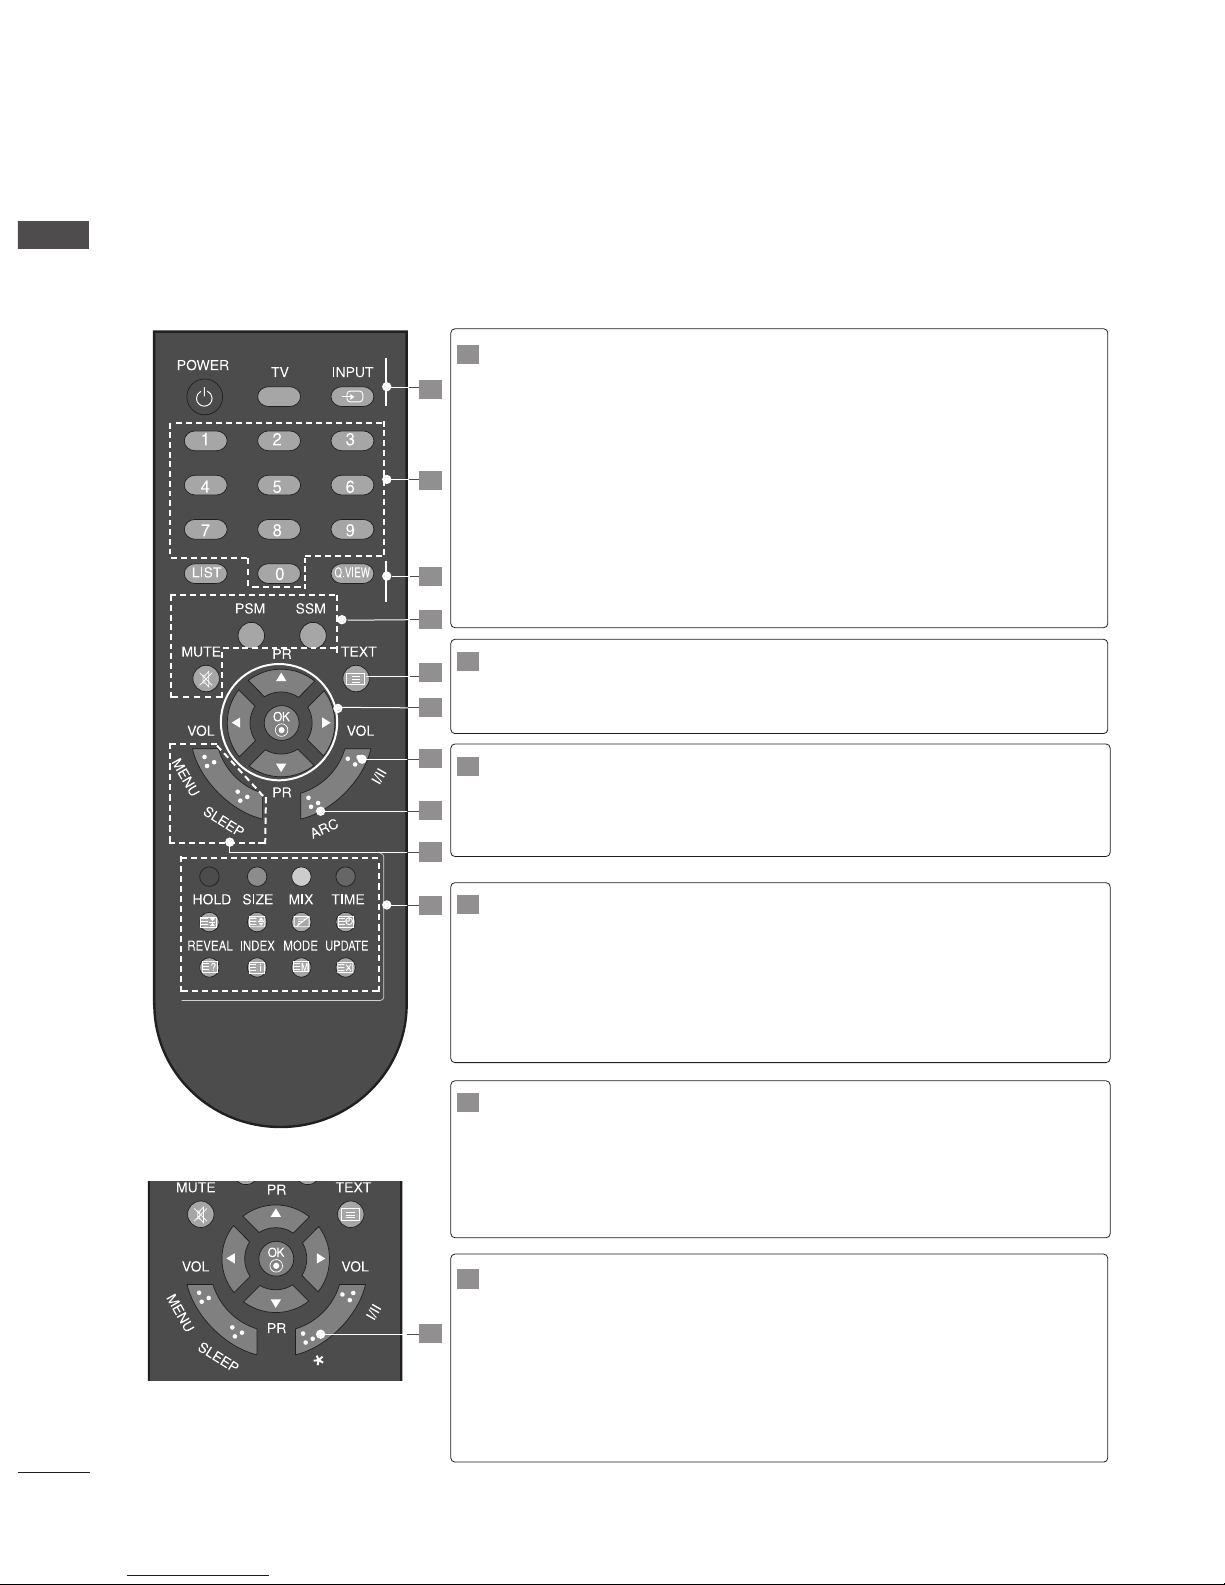
REMOTE CONTROL KEY FUNCTIONS
When using the remote control, aim it at the remote control sensor on the TV.
POWER
TV
INPUT
Switches the set on from standby or off to standby.
Returns to the TV viewing from any mode.
Switches the set on from standby.
If you press the button once, the input source OSD will
appear on screen as shown. Press the
DD/ EE
button and
then OK button to select the desired input source.
(19/22LS4R*:TV, AV1, AV2, Component, RGB, HDMI/DVI)
(17LS5R*:TV, AV1, AV2, RGB)(20LS5R*:TV, AV1, AV2)
0~9 number
button
Selects a programme.
Selects numbered items in a menu.
Switches the set on from standby.
LIST
Q.VIEW
Displays the programme table.
Returns to the previously viewed programme.
[[wwiitthhoouutt AARRCC]]
2
1
3
MUTE
PSM
SSM
Switches the sound on or off.
Recalls your preferred picture setting.
Recalls your preferred sound setting.
4
THUMBSTICK
(Up/Down/Left/
Right)
OK
Allows you to navigate the on-screen menus and adjust
the system settings to your preference.
Adjusts the volume.
Selects a programme.
Switches the set on from standby. (Up/Down)
Accepts your selection or displays the current mode.
Coloured
buttons
TELETEXT
BUTTONS
These buttons are used for teletext (only
TTEELLEETTEEXXTT
models) or
PPrrooggrraammmmee eeddiitt
.
These buttons are used for teletext.
For further details, see the ‘Teletext’ section.
6
5
8
3
ENGLISH
/
1
2
7
4
6
5
3
8
9
Installing Batteries
■
Open the battery compartment cover on the back side and install the
batteries matching correct polarity (+with +,-with -).
■
Install two 1.5V AAA batteries. Don’t mix old or used batteries with
new ones.
■
Close cover.
I/II
Selects the sound output.
7
ARC
*
Select your desired picture format.
No function
8
MENU
SLEEP
Selects a menu.
Sets the sleep timer.
9
4
ENGLISH
WATCHING TV / PROGRAMME CONTROL
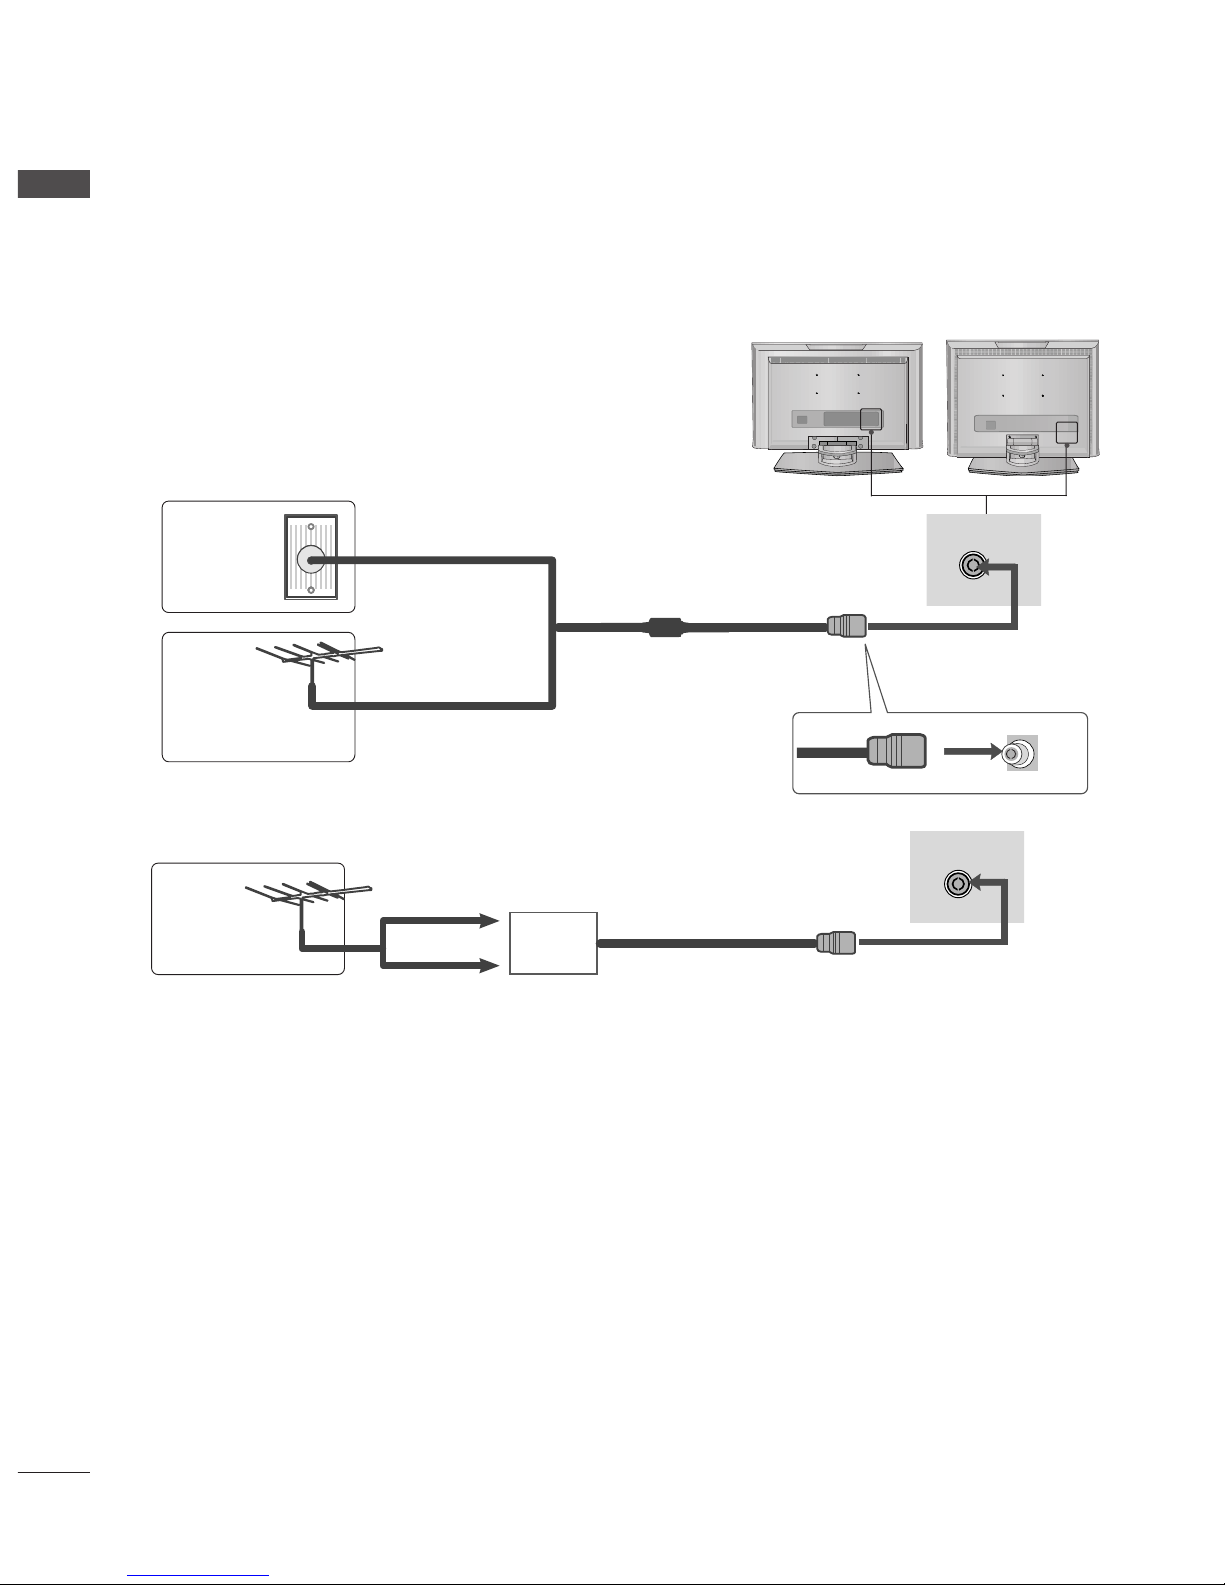
ANTENNA CONNECTION
ANTENNA IN
ANTENNA IN
■
For optimum picture quality, adjust antenna direction.
■
An antenna cable and converter are not supplied.
Multi-family Dwellings/Apartments
(Connect to wall antenna socket)
Single-family Dwellings /Houses
(Connect to wall jack for outdoor antenna)
Outdoor
Antenna
Wall
Antenna
Socket
RF Coaxial Wire (75 ohm)
Antenna
UHF
Signal
Amplifier
VHF
■
In poor signal areas,to get better picture quality, install a signal amplifier to the antenna as shown to the right.
■
If signal needs to be split for two TVs,use an antenna signal splitter for connection.
■
To prevent the equipment damage, never plug in any power cords until you have finished connecting all equipment.

5
ENGLISH
Press the
VVOOLL
F
//
G button to adjust the volume.
If you want to switch the sound off, press the
MMUUTTEE
button.
You can cancel the Mute function by pressing the
MMUUTTEE, VVOOLL
F
//
G
oorr II//IIII
button.
PROGRAMME SELECTION
TURNING ON THE TV
If your TV will be turned on, you will be able to use its features.
First, connect power cord correctly.
At this moment, the TV switches to standby mode.
■
In standby mode to turn TV on, press the ,
IINNPPUUTT, PP RR
DD
//
EE
,
button on the TV or press the
PPOO WWEERR, TT VV, IINNPPUUTT, PP RR
DD
//
EE
,
NNuummbbeerr((00~99 ))
button on the remote control and then the TV will
switch on.
1
VOLUME ADJUSTMENT
Press the
PP RR
DD
//
EE
or
NNUUMMBB EERR
buttons to select a programme number.
2
3
1
1

6
ENGLISH
WATCHING TV / PROGRAMME CONTROL
ON-SCREEN MENU LANGUAGE / COUNTRY SELECTION
Press the
DD
//
EE
// F//
G button and then,
OOKK
button to select your
desired language.
Press the
DD
//
EE
// F//
G button and then,
OOKK
button to select your
country.
Press the
MMEENNUU
button and then use
DD
//
EE
button to select the Special
menu.
Press the G button and then use
DD
//
EE
button to select Language.
The menus can be shown on the screen in the selected language.
Or, Press the
G button and then use
DD
//
EE
button to select Country.
Press the
G button and then use
DD
//
EE
button to select your desired lan-
guage or country.
Press the
OO KK
button.
Repeatedly press the
MMEENNUU
button to return to normal TV viewing.
1
2
3
4
5
Installation guide menu appears on TV screen when it is turned on for the first time.
1
2
* If you want to change Language/ Country selection
NOTE
!
GG
If you don’t finish set up
IInnssttaallllaattiioonn GGuuiiddee
by pressing
MMEENNUU
button or time out of OSD (On Screen Display) display, it will continuously
appear until completing set up whenever the set is turned on.
GG
If you select wrong local country, the teletext may not appear correctly
on the screen and some problem may happen during teletext operation.
GG
Hebrew is added to
CCoouunnttrryy
of
IInnssttaallllaattiioonn GGuuiiddee
according to the
countries which using Hebrew language.

7
ENGLISH
ON SCREEN MENUS SELECTION AND ADJUSTMENT
Press the
MMEENNUU
button and then
DD/ EE
button to display each menu.
Press the
GG
button and then
DD/ EE
button to select a menu item.
Change the setting of an item in the sub or pull-down menu with
F / G button.
You can move to the higher level menu by pressing the
OO KK
or
MMEENNUU
button.
Your TV's OSD (On Screen Display) may differ slightly from what is shown in this manual.
NOTE
!
a. The OSD (On Screen Display) function enables you to adjust the screen status conveniently since it pro-
vides graphical presentation.
b. In this manual, the OSD (On Screen Display) may be different from your TV’s because it is just example
to help the TV operation.
c. In the teletext mode, menus are not displayed
1
2
3
Station menu
Picture menu
Sound menu
Special menu
Time menu
Screen menu
*
:
19LS4R*, 22LS4R
*
Screen
DE FG
OK MENU
Auto config.
Manual config.
ARC*
Reset
Station
DE FG
OK MENU
Auto programme
Manual programme
Programme edit
Favourite programme
Picture
DE FG
OK MENU
PSM
CSM
*
Cinema*
Reset
Sound
DE FG
OK MENU
SSM
AVL
Balance 0
Time
DE F G
OK MENU
Clock
Off time
On time
Auto sleep
Special
DE FG
OK MENU
Language
Country
Child lock
XD Demo*
8
ENGLISH
WATCHING TV / PROGRAMME CONTROL
AUTO PROGRAMME TUNING
1
2
3 4 5 6
7
8
Press the
MMEENNUU
button and then
DD
//
EE
button to select the
Station menu.
Press the
GG
button and then
DD
//
EE
button to select Auto
programme.
Press the
GG
button. Select a TV system with the GGbutton and
then
DD
//
EE
button on the System menu;.
BG: PAL B/G, SECAM B/G (Europe/East Europe)
I : PAL I/II (U.K./Ireland)
DK: PAL D/K, SECAM D/K (East Europe)
L : SECAM L/L’ (France)
Press the
OOKK
button.
Press the
DD
//
EE
button to select Storage From.
Select the beginning programme number with the
FF
//
GG
but-
ton or NUMBER buttons on the
Storage From pull-down
menu. Any number under 10 is entered with a numeric ‘00’ in
front of it, i.e. ‘
0055
’ for 5.
Press the
OOKK
button.
Press the
DD
//
EE
button to select Search.
Press the
GG
button to begin auto tuning.
All receivable stations are stored.
To stop auto programming, press the
MMEENNUU
button.
When auto programming is completed, the Programme edit
menu appears on the screen. See the Programme edit section to
edit the stored programme.
Repeatedly press the
MMEENNUU
button to return to normal TV
viewing.
1
2
3
4
5
6
7
8
9
Up to 100 TV stations can be stored by programme numbers (0 to 99).
Once you have preset the stations, you will be able to use the PR
DD
//
EE
or NUMBER buttons to scan the stations you have programmed.
Stations can be tuned using automatic or manual modes.
All stations that can be received are stored by this method. It is recommended that you use auto programme during installation of this set.
Station
DE FG
OK MENU
Auto programme
Manual programme
Programme edit
Favourite programme
Station
DE FG
OK MENU
Auto programme
DE FG
OK MENU
System G
Storage from
Search
BG
I
DK
L
Auto programme
C 05 BG
5 35%
MENU Stop
To set
Auto programme G
Manual programme
Programme edit
Favourite programme
10

9
ENGLISH
APPENDIX
MAINTENANCE
TO VIEW THE USER'S GUIDE ON THE CD-ROM
Early malfunctions can be prevented. Careful and regular cleaning can extend the amount of time you will
have your new TV. Be sure to turn the power off and unplug the power cord before you begin any cleaning.
Cleaning the Screen
Here’s a great way to keep the dust off your screen for a while. Wet a soft cloth in a mixture of lukewarm
water and a little fabric softener or dish washing detergent. Wring the cloth until it’s almost dry, and then
use it to wipe the screen.
Make sure the excess water is off the screen, and then let it air-dry before you turn on your TV.
Cleaning the Cabinet
■
To remove dirt or dust, wipe the cabinet with a soft, dry, lint-free cloth.
■
Please be sure not to use a wet cloth.
Extended Absence
If you expect to leave your TV dormant for a long time (such as a vacation), it’s a good idea to unplug
the power cord to protect against possible damage from lightning or power surges.
CAUTION
1
2
To view the User's guide on the CD-ROM, Adobe Acrobat Reader must be installed on your PC.
The "ACRORD" folder on the CD-ROM contains the installation program for Acrobat Reader.
If you want to install Acrobat Reader, Open "My Computer" Open the folder "LG" Open the folder "ACRORD"
double-click your language.
TToo vviieeww tthhee UUsseerr''ss gguuiiddee
The User's guide files are included in the supplied CD-ROM.
Load the supplied CD-ROM into the CD-ROM drive of your PC.
After a while, the web page of the CD-ROM will open automatically.(Windows users only)
If the web page does not appear automatically, open the User's guide file directly.
Open "My computer" Open the folder "LG" Double click the "index.htm" file.
10
ENGLISH
APPENDIX
TROUBLESHOOTING
TThhee vviiddeeoo ffuunnccttiioonn ddooeess nnoott wwoorrkk..
NNoo ppiiccttuurree &&
NNoo ssoouunndd
NNoo oorr ppoooorr ccoolloorr
oorr ppoooorr ppiiccttuurree
PPoooorr rreecceeppttiioonn oonn
ssoommee cchhaannnneellss
LLiinneess oorr ssttrreeaakkss iinn ppiiccttuurreess
HHoorriizzoonnttaall//vveerrttiiccaall
bbaarrss oorr ppiiccttuurree sshhaakkiinngg
PPiiccttuurree aappppeeaarrss ssllooww--
llyy aafftteerr ssww iittcchhiinngg oonn
■
Check whether the product is turned on.
■
Try another channel. The problem may be with the broadcast.
■
Is the power cord inserted into wall power outlet?
■
Check your antenna direction and/or location.
■
Test the wall power outlet, plug another product’s power cord into the outlet where the
product’s power cord was plugged in.
■
This is normal, the image is muted during the product startup process. Please contact
your service center, if the picture has not appeared after five minutes.
■
Adjust Color in menu option.
■
Keep a sufficient distance between the product and the VCR.
■
Try another channel. The problem may be with the broadcast.
■
Are the video cables installed properly?
■
Activate any function to restore the brightness of the picture.
■
Check for local interference such as an electrical appliance or power tool.
■
Station or cable product experiencing problems, tune to another station.
■
Station signal is weak, reorient antenna to receive weaker station.
■
Check for sources of possible interference.
■
Check antenna (Change the direction of the antenna).
TThhee ooppeerraattiioonn ddooeess nnoott wwoorrkk nnoorrmmaallllyy..
TThhee rreemmoottee ccoonnttrrooll
ddooeessnn’’tt wwoorrkk
PPoowweerr iiss ssuuddddeennllyy
ttuurrnneedd ooffff
■
Check to see if there is any object between the product and the remote control
causing obstruction.
■
Are batteries installed with correct polarity (+ to +, - to -)?
■
Correct remote operating mode set: TV, VCR etc.?
■
Install new batteries.
■
Is the sleep timer set?
■
Check the power control settings. Power interrupted
■
No broadcast on station tuned with Auto off activated.
11
ENGLISH
PPiiccttuurree OOKK &&
NNoo ssoouunndd
UUnnuussuuaall ssoouunndd ffrroomm
iinnssiiddee tthhee pprroodduucctt
NNoo oouuttppuutt ffrroomm oonnee
ooff tthhee ssppeeaakkeerrss
TThhee aauuddiioo ffuunnccttiioonn ddooeess nnoott wwoorrkk..
■
Press the
VVOOLL ((oorr VVoolluummee))
button.
■
Sound muted? Press
MMUUTTEE
button.
■
Try another channel. The problem may be with the broadcast.
■
Are the audio cables installed properly?
■
Adjust Balance in menu option.
■
A change in ambient humidity or temperature may result in an unusual noise when
the product is turned on or off and does not indicate a fault with the product.
WEIGHT
■
The specifications shown above may be changed without prior notice for quality improvement.
Weight
with stand
without stand
17LS5R
*
17LS5R-ZA
20LS5R
*
20LS5R-ZA
20LS5RC-ZA
19LS4R
*
19LS4R-ZA
22LS4R
*
22LS4R-ZA
MODELS
4.4kg / 9.7 lbs
4.1kg / 9.1 lbs
6.8 kg / 15.0 lbs
6.4kg / 14.1 lbs
5.1 kg / 11.3 lbs
4.6 kg / 10.2 lbs
5.8kg / 12.8 lbs
5.2 kg / 11.5 lbs


Ein ausführlicheres Benutzerhandbuch mit erweiterten Funktionen dieser LG TVGeräte befindet sich auf der CD-ROM.
Um es lesen zu können, müssen Sie die Dateien auf einem Personal Computer
(PC) mit CD-ROM-Laufwerk öffnen.
Bitte lesen Sie vor Inbetriebnahme dieses Handbuch sorgfältig
durch.
Bewahren Sie die Anleitung für spätere Fragen sorgfältig auf.
Tragen Sie Modell- und Seriennummer des Gerätes hier ein.
Sie finden die Angaben auf dem Typenschild an der Rückwand
des Gerätes. Teilen Sie Ihrem Kundendienst die Nummern mit,
wenn Sie Hilfe benötigen.
LCD TV
BBeeddiieennuunnggssaannlleeiittuunngg
LCD TV-MODELLE
19LS4R
*
22LS4R
*
17LS5R
*
20LS5R
*

1
DEUTSCH
• Lesen Sie diese Sicherheitsmaßnahmen vor der ersten Verwendung des Produkts sorgfältig durch.
• Die Abbildungen in diesem Handbuch können vom tatsächlichen Aussehen Ihres Produkts abweichen, da sie lediglich
zur Verdeutlichung der Bestimmungen dienen.
Wenn Sie eine Warnmeldung ignorieren, kann es zu ernsthaften Verletzungen oder zu Unfällen und Todesfällen kommen.
Wenn Sie eine zur Vorsicht mahnende Meldung ignorieren, kann es zu leichten Verletzungen kommen oder das
Produkt kann beschädigt werden.
Vorsichtsmaßnahme bei der Installation des
Produkts
Halten Sie sich von Wärmequellen wie elektrischen
Heizungen fern.
- Es kann zu Stromschlägen, Feuer, Fehlfunktionen oder
Deformationen kommen.
Wenn es nach Rauch riecht, andere Gerüche wahrzunehmen
oder merkwürdige Geräusche zu hören sind, unterbrechen Sie
die Stromversorgung und kontaktieren Sie den Service.
- Wenn Sie weiterarbeiten, ohne die erforderlichen Maßnahmen zu treffen, kann es zu Stromschlägen oder Feuer kommen.
Verwenden Sie das Produkt nicht an feuchten Orten (z. B.
Badezimmer) oder an Stellen, an denen es nass werden
könnte.
- Dadurch kann es zu Bränden oder zu Stromschlägen kommen.
Installieren Sie das Produkt auf einer ebenen und stabilen Fläche, damit das Produkt nicht herunterfallen
kann.
- Falls das Produkt zu Boden fällt, könnten Sie verletzt oder das
Produkt könnte beschädigt werden.
Setzen Sie das Produkt nicht direktem Sonnenlicht
aus.
- Das Produkt könnte beschädigt werden.
Stellen Sie das Produkt nicht an Orten wie in
Bücherregalen oder Racks auf.
- Das Produkt muss gut belüftet sein.
Strombezogene Sicherheitsmaßnahmen
Vergewissern Sie sich, dass das Stromkabel an den
Erdungsstrom angeschlossen ist.
- Ansonsten könnten Sie einen Stromschlag erleiden oder verletzt
werden.
Berühren Sie den Netzstecker nicht mit nassen Händen. Falls
der Kontakt nass oder mit Staub bedeckt ist, trocknen Sie den
Netzstecker vollständig oder reinigen Sie ihn von Staub.
- Ansonsten könnten Sie durch Restfeuchtigkeit einen Stromschlag
erleiden.
Stecken Sie bei Gewittern das Strom- bzw. das
Signalkabel aus.
- Ansonsten könnten Sie einen Stromschlag erleiden oder
es könnte ein Feuer ausbrechen.
Schützen Sie das Stromkabel vor physikalischer oder
mechanischer Beeinträchtigung (Verdrehen, Knicken,
Einklemmen oder Darauftreten).
Achten Sie hierbei besonders auf Stecker, Steckdosen
und diejenigen Stellen, an denen das Kabel aus dem
Gerät herausführt.
Vorsichtsmaßnahme beim Bewegen des Produkts
Vermeiden Sie Erschütterungen beim Bewegen des
Produkts.
- Ansonsten könnten Sie einen Stromschlag erleiden oder das
Produkt könnte beschädigt werden.
Achten Sie darauf, dass der Monitor nach vorne zeigt und
halten Sie ihn zum Bewegen mit beiden Händen fest.
- Wenn Sie das Produkt fallen lassen, könnten Sie durch das
beschädigte Gerät einen Stromschlag erleiden oder es könnte
ein Brand verursacht werden. Wenden Sie sich bezüglich
Reparaturen an den Service.
Vergewissern Sie sich, dass das Produkt ausgeschaltet ist.
Vergewissern Sie sich, dass alle Kabel entfernt wurden,
bevor das Produkt bewegt wird.
- Ansonsten könnten Sie einen Stromschlag erleiden oder
das Produkt könnte beschädigt werden.
Vorsichtsmaßnahme beim Verwenden des Produkts
Demontieren Sie das Produkt nicht und führen Sie
Reparaturen und Änderungen nicht selbst durch.
- Feuer und Stromschläge können die Folge sein.
- Wenden Sie sich an den Service, wenn das Gerät überprüft,
kalibriert oder repariert werden soll.
Um das Brand- oder Stromschlagrisiko zu senken, darf das
Gerät nicht Regen oder Feuchtigkeit ausgesetzt werden.
Das Gerät darf nicht tropfendem oder spritzendem Wasser
ausgesetzt sein und es sollten keine mit Flüssigkeiten gefüllten Behälter (z. B. Vasen) auf dem Gerät abgestellt werden.
Überlassen Sie alle Servicearbeiten qualifizierten
Servicemitarbeitern. Servicearbeiten sind erforderlich, wenn
das Gerät in irgendeiner Form beschädigt wurde (z. B.:
Netzkabel oder -stecker ist beschädigt, Flüssigkeiten oder
Objekte sind in das Geräteinnere gelangt, Gerät war Regen
oder Feuchtigkeit ausgesetzt, normale Funktionsweise ist
gestört, Gerät wurde fallengelassen).
SICHERHEITSBESTIMMUNGEN
2
DEUTSCH
FERNSEHEN/PROGRAMMSTEUERUNG
5
1
2
3
4
6
5
7
8
9
[Mit ARC]
TASTENFUNKTIONEN DER FERNBEDIENUNG
Richten Sie die Fernbedienung bei Betätigung auf den Fernbedienungssensor des Fernsehgerätes.
POWER
TV
INPUT
Schaltet das Gerät aus dem Standby Ein oder in den
Standby Aus.
Rückkehr in den TV-Modus aus sämtlichen anderen Modi.
Schaltet das Gerät aus dem Standby-Modus ein.
Wenn Sie diese Taste einmal drücken, wird das OSD-Menü
“Signalquelle ”wie unten angezeigt. Drücken Sie
DD/ EE
und
dann OK, um die gewünschte Eingangsquelle
(19/22LS4R*:TV, AV1, AV2, Component, RGB, HDMI/DVI)
(17LS5R*:TV, AV1, AV2, RGB)(20LS5R*:TV, AV1, AV2)
auszuwählen.
Zahlentasten
0-9
Wählt ein Programm aus.
Wählt einen Menüpunkt aus, der mit einer Zahl versehen ist.
Schaltet das Gerät aus dem Standby-Modus ein.
LIST
Q.VIEW
Senderliste aufrufen.
Zu dem zuletzt gesehenen Programm zurückkehren.
[Ohne ARC]
2
1
3
MUTE
PSM
(Bild Status
Speicher)
SSM
(Klangmuster
einstellen)
Ton ein- bzw. ausschalten. (Stummschaltung)
Gespeicherte Bildeinstellungen aufrufen.
Gespeicherte Toneinstellungen aufrufen.
4
TASTENFELD
(nach oben/
unten)
OOKK
Ermöglicht die Navigation in den On-Screen-Menüs und
die individuelle Anpassung der Systemeinstellungen.
Regelt die Lautstärke.
Wählt ein Programm aus.
Schaltet das Gerät aus dem Bereitschaftsmodus ein
(Auf/Ab).
Bestätigt Ihre Auswahl oder zeigt den aktuellen Modus an.
FARBTASTEN
VIDEOTEXT-
TASTEN
Diese Tasten werden für Videotext (nur bei VIDEOTEXTModellen) oder für die Funktion "Senderliste ordnen" verwendet.
Diese Tasten werden für Videotext verwendet.
Weitere Informationen finden Sie im Abschnitt ‘Videotext’.
6
5
8
 Loading...