

Page 1
1
Wireless LCD TV
User’s Guide
(15LW1R/15LW1RA)
Please read the “Safety Precautions” section carefully to use this product properly
Page 2
2
Major Functions of Wireless LCD TV
Wireless TV Function
* Wireless transmission unit enables you to watch TV in a place where there is no
antenna/cable connection available in a convenient location.
Media Player Function
* When connected to your PC, you can play back pictures, music files or video.
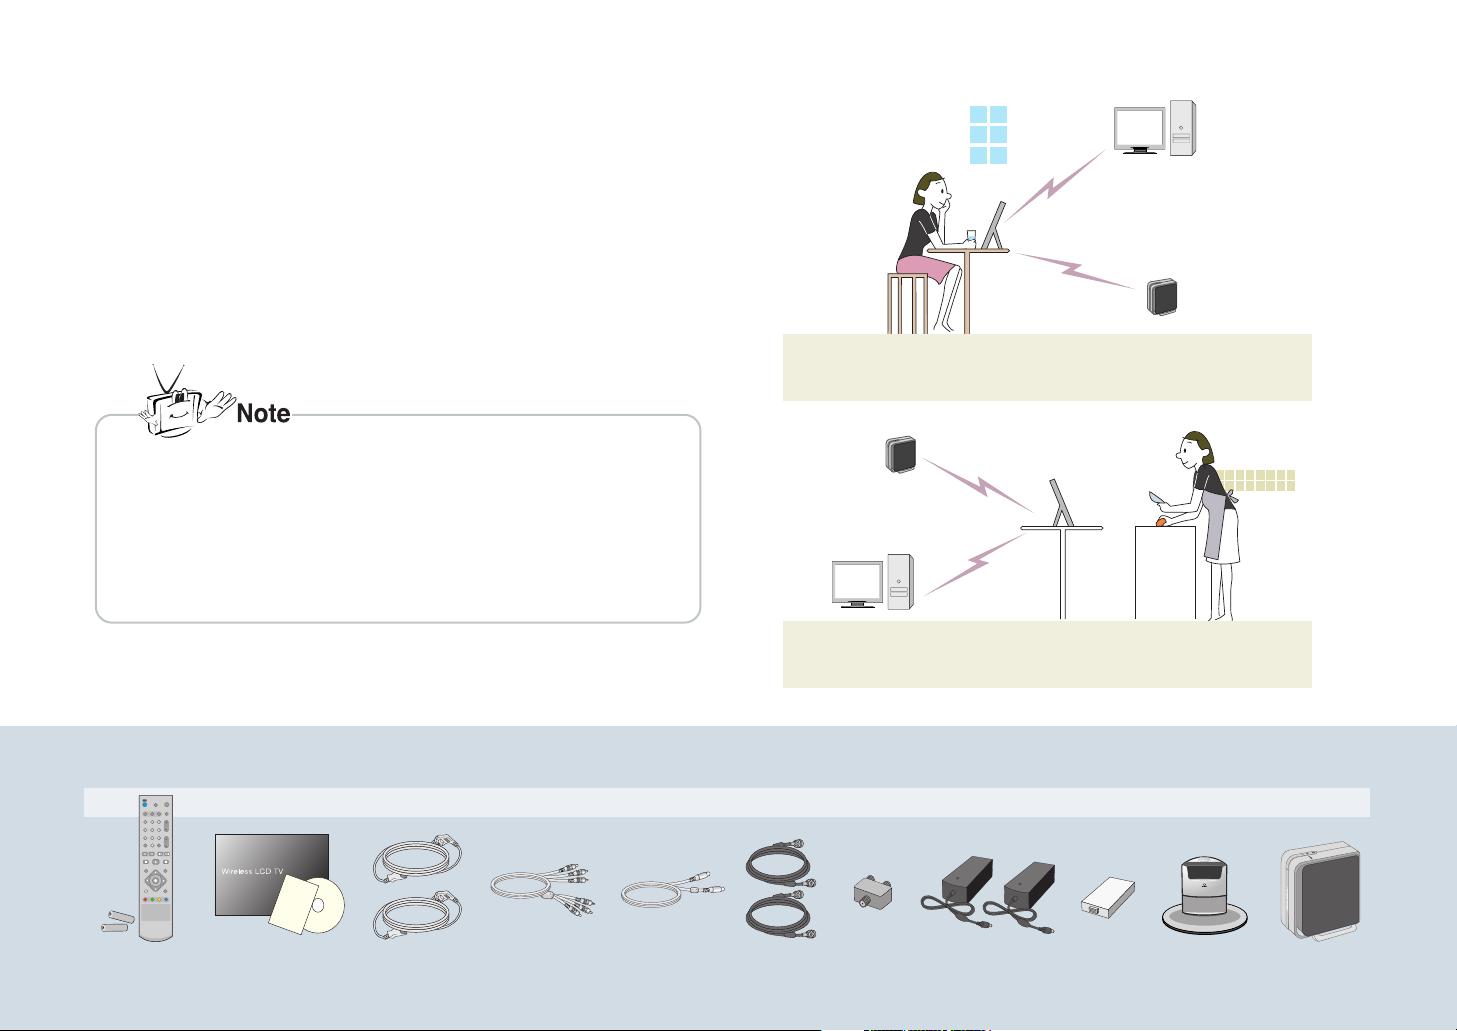
Thank you purchasing LG product. Please check whether the following accessories are included in the wireless TV package.
* Actual wireless TV and its accessories may look differently.
* The maximum usage distance is 35m; limited by obstacles or other interference
to the wireless network.
* A mosaic screen may appear if network connection is poor, since broadcasting
is converted to the MPEG format before transmitted wirelessly.
* Connection quality can be affected by other devices that transmit radio waves.
* There is approximately a 1.5 second delay between the signal source and the
display.
P
O
W
E
R
P
O
W
E
R
Wireless TV
Max. 35m
PC
Wireless transmission unit
Wireless
transmission unit
Wireless TV
Max. 35m
PC
Wireless TV Accessories
Remote Control
and Batteries
(AAA x2)
User’s Guide,
Software, and other
cards.
2 Power cords
RCA cable S-video cable
2 Antenna
cables
Distributor
(cable splitter)
2 DC adaptors TV battery
pack
Mounting stand
(only use with
15LW1R )
Wireless
transmission unit
Page 3

3
/ Contents
04
22
28
Before you Use
Warning
Safety Information
SAR(Specific Absorption Rates) Information
Safety instructions
Safety Precautions
Name and Functions of Wireless TV Parts
Front/Upper view of the wireless TV:
Adjustment buttons
Rear view of the wireless TV/ wireless transmission unit
Watching the wireless TV using the mounting tstand
(Only use with 15LW1R)
Wireless TV Battery pack
Installing a battery pack
Remote Control
Connection and Usage
Power Connection
Connecting the Antenna
Connecting more than 2 TV Sets
Connecting VCR/DVD
Connecting Cable TV Converter
Connecting External Devices like a Camcorder
Adjustment when Using the Wireless TV
Watching the Wireless TV
Language Selection
On-screen Menus Language Selection
Programming the Channels
Memorizing all broadcasting channels
Memorizing or clearing the specific channels
Setting Favorite Channels
Watching the selected channel only
Adjusting the Picture
Adjusting the picture automatically
Adjusting contrast
Adjusting brightness
Adjusting depth of color
Adjusting sharpness
Adjusting tint
04
05
06
07
09
16
16
17
18
19
19
20
22
23
24
25
26
27
28
29
29
30
30
30
31
31
32
32
32
33
33
34
34
43
62
Adfusting Sound
Adjusting best sound automatically
Using the SAP (Secondary Audio Program) function
AVL (Auto Volume Leveler)
Adjusting sound balance
Special Menu Options
Selecting the Input Signal
Watching the Program with Caption Text
Settings the Captions
Closed Captions
Setting the Sleep Timer
Setting the key lock
Parental Lock Options
Setting the lock function
Changing the password setting
Using Media Browser
Using Media Browser
Setting the wireless network (Setting method 1)
Setting the wireless network in the Computer
Installing the “Media Library” Server in you computer
Setting Wireless Network (Setting method 2)
Using Media Library Manager
Viewing Pictures
Playing Musics
Playing Movies
Changing Settings
Note
Check before reporting malfunction
Product Specification
35
35
35
36
36
37
37
37
38
39
40
40
41
41
41
43
43
45
47
50
53
54
56
59
61
62
66
Contents
Page 4

4
Before you Use
Warning
NOTE TO CABLE/TV INSTALLER:
This reminder is provided to call the CATV system installer’s attention to Article 820-40 of the National Electric Code (U.S.A.).
The code provides guidelines for proper grounding and, in particular, specifies that the cable ground shall be connected to the grounding system of the building, as
close to the point of the cable entry as practical.
REGULATORY INFORMATION
This equipment has been tested and found to comply with the limits for a Class B digital device, pursuant to Part 15 of the FCC Rules. These limits are designed to
provide reasonable protection against harmful interference in a residential installation. This equipment generates, uses and can radiate radio frequency energy and,
if not installed and used in accordance with the instructions, may cause harmful interference to radio communications.
However, there is no guarantee that interference will not occur in a particular installation. If this equipment does cause harmful interference to radio or television
reception, which can be determined by turning the equipment off and on, the user is encouraged to try to correct the interference by one or more of the following
measures:
- Reorient or relocate the receiving antenna.
- Increase the separation between the equipment and receiver.
- Connect the equipment into an outlet on a circuit different from that to which the receiver is connected.
- Consult the dealer or an experienced radio/TV technician for help.
Any changes or modifications not expressly approved by the party responsible for compliance could void the user’s authority to operate the equipment.
CAUTION:
Do not attempt to modify this product in any way without written authorization from LG Electronics Corporation.
Unauthorized modification could void the user’s authority to operate this product.
U.S.A. only ------------------------------------------------
COMPLIANCE:
The responsible party for this product’s compliance is:
LG Electronics U.S.A., Inc.
1000 Sylvan Avenue, Englewood Cliffs, NJ 07632
Phone: 1-201-816-2000
http://www.lgusa.com
-----------------------------------------------------------------
Page 5
5
Safety Information
SAFETY INFORMATION FOR FIXED WIRELESS TERMINALS
POTENTIALLY EXPLOSIVE ATMOSPHERES
Turn your TV OFF when in any area with a potentially explosive atmosphere and obey all signs and instructions. Sparks in such areas could cause an explosion or fire
resulting in bodily injury or even death.
INTERFERENCE TO MEDICAL DIVICES
Certain electronic equipment may be shielded against RF signal from you wireless TV. (Pacemakers, Hearing Aids, and so on) Turn your TV OFF in health care facilities
when any regulations posted in these areas instruct you to do so.
RF signals may affect improperly installed or inadequately shielded electronic system in motor vehicles.
EXPOSURE TO RF ENERGY
Use only the supplied or an approved replacement antenna.
Do not touch the antenna unnecessarily when the TV is in use.
SAFETY INFORMATION FOR RF EXPOSURE
BODY WORN OPERATION
This device was tested for typical body-worn operations with the back of the TV kept 15 mm. from the body. To maintain compliance with FCC RF exposure requirements,
use only belt-clips, holsters or similar accessories that maintain a 15 mm.
Separation distance between the user’s body and the back of the TV, including the antenna. The use of belt-clips, holsters and similar accessories should not contain
metallic components in its assembly. The use of accessories that do not satisfy these requirements may not comply with FCC RF exposure requirements, and should be
avoided.
Page 6

6
Before you Use
SAR (Specific Absorption Rates) Information
THIS MODEL TV MEETS THE GOVERNMENT’S
REQUIREMENTS FOR EXPOSURE TO RADIO WAVES.
Your wireless TV is a radio transmitter and receiver. It is designed and manufactured not to exceed the emission limits for exposure to
radiofrequency (RF) energy set by the Federal Communications Commission of the U.S. Government. These limits are part of comprehensive
guidelines and establish permitted levels of RF energy for the general population. The guidelines are based on standards that were developed by
independent scientific organizations through periodic and thorough evaluation of scientific studies. The standards include a substantial safety margin
designed to assure the safety of all persons, regardless of age and health. The exposure standard for wireless TV employs a unit of measurement
known as the Specific Absorption Rate, or SAR. The SAR limit set by the FCC is 1.6 W/kg. *Tests for SAR are conducted with the TV transmitting at its
highest certified power level in all tested frequency bands. Although the SAR is determined at the highest certified power level, the actual SAR level of
the TV while operating can be well below the maximum value. This is because the TV is designed to operate at multiple power levels so as to use
only the power required to reach the network. In general, the closer you are to a wireless base station antenna, the lower the power output. Before a
TV model is available for sale to the public, it must be tested and certified to the FCC that it does not exceed the limit established by the government
adopted requirement for safe exposure. The tests are performed in positions and locations (e.g., at the ear and worn on the body) as required by the
FCC for each model. The highest SAR value for this model when tested for use when worn on the body, as described in this user guide, is 0.094 W/Kg
(Wireless Transmission Unit), 0.200 W/Kg(Wireless TV). (Body-worn measurements differ among models, depending upon available accessories and
FCC requirements). While there may be differences between the SAR levels of various and at various positions, they all meet the government
requirement for safe exposure. The FCC has granted an Equipment Authorization for this model with all reported SAR levels evaluated as in complince
with the FCC RF exposure guidelines. SAR information on this model is on file with the FCC and can be found under the Display Grant section of
http://www.fcc.gov/ oet/fccid after searching on FCC ID: BEJ15LW1T(Wireless Transmission Unit), BEJ15LW1R(Wireless TV).
Additional information on Specific Absorption Rates (SAR) can be found on the Cellular Telecommunications Industry Association (CTIA) web-site at
http://www.wow-com.com.
* In the United States and Canada, the SAR limit for mobile TV used by the public is 1.6 watts/kg (W/kg) averaged over one gram of tissue.
The standard incorporates a sub-stantial margin of safety to give additional protection for the public and to account for any variations in measurements.
Page 7

7
Safety instructions
WARNING:
To reduce the risk of fire or electric shock, DO NOT expose this apparatus to rain or moisture.
Apparatus shall not be exposed to dripping or splashing and no objects filled with liquids, such as vases, shall be placed on the apparatus.
IMPORTANT SAFETY INSTRUCTIONS
1. Read these instructions.
2. Keep these instructions.
3. Heed all warnings.
4. Follow all instructions.
5. Do not use this apparatus near water.
6. Clean only with a dry cloth.
7. Do not block any of the ventilation openings. Install in accordance with the manufacturer’s instructions.
8. Do not install near any heat sources such as radiators, heat registers, stoves, or other apparatus (including amplifiers) that produce heat.
9. Do not defeat the safety purpose of the polarized or grounding type plug. A polarized plug has two blades with one wider than the other. A grounding type plug has
two blades and a third grounding prong. The wide blade or the third prong is provided for your safety. When the provided plug does not fit into your outlet, consult an
electrician for replacement of the obsolete outlet.
10. Protect the power cord from being walked on or pinched particularly at plugs, convenience receptacles, and the point where they exit from the apparatus.
11. Only use the attachments / accessories specified by the manufacturer.
12. Use only with a cart, stand, tripod, bracket, or table specified by the manufacturer, or sold with the apparatus.
When a cart is used, use caution when moving the cart / apparatus combination to avoid injury from tip-over.
Page 8
8
Before you Use
Safety instructions continued
13. Unplug this apparatus during lightning storms or when unused for long periods of time.
14. Refer all servicing to qualified service personnel. Servicing is required when the apparatus has been damaged in anyway, such as power supply cord or plug is
damaged, liquid has been spilled or objects have fallen into the apparatus, the apparatus has been exposed to rain or moisture, does not operate normally, or has been
dropped.
On Disposal
a. The fluorescent lamp used in this product contains a small amount of mercury.
b. Do not dispose of this product with general household waste.
Disposal of this product must be carried out in accordance to the regulations of your local authority.
FCC Compliance Information
This device complies with Part 15 of FCC Rules.
Operation is subject to the following two conditions:
(1) This device may not cause harmful interference, and
(2) This device must accept any interference received.
Including interference that may cause undesired operation.
Page 9
9
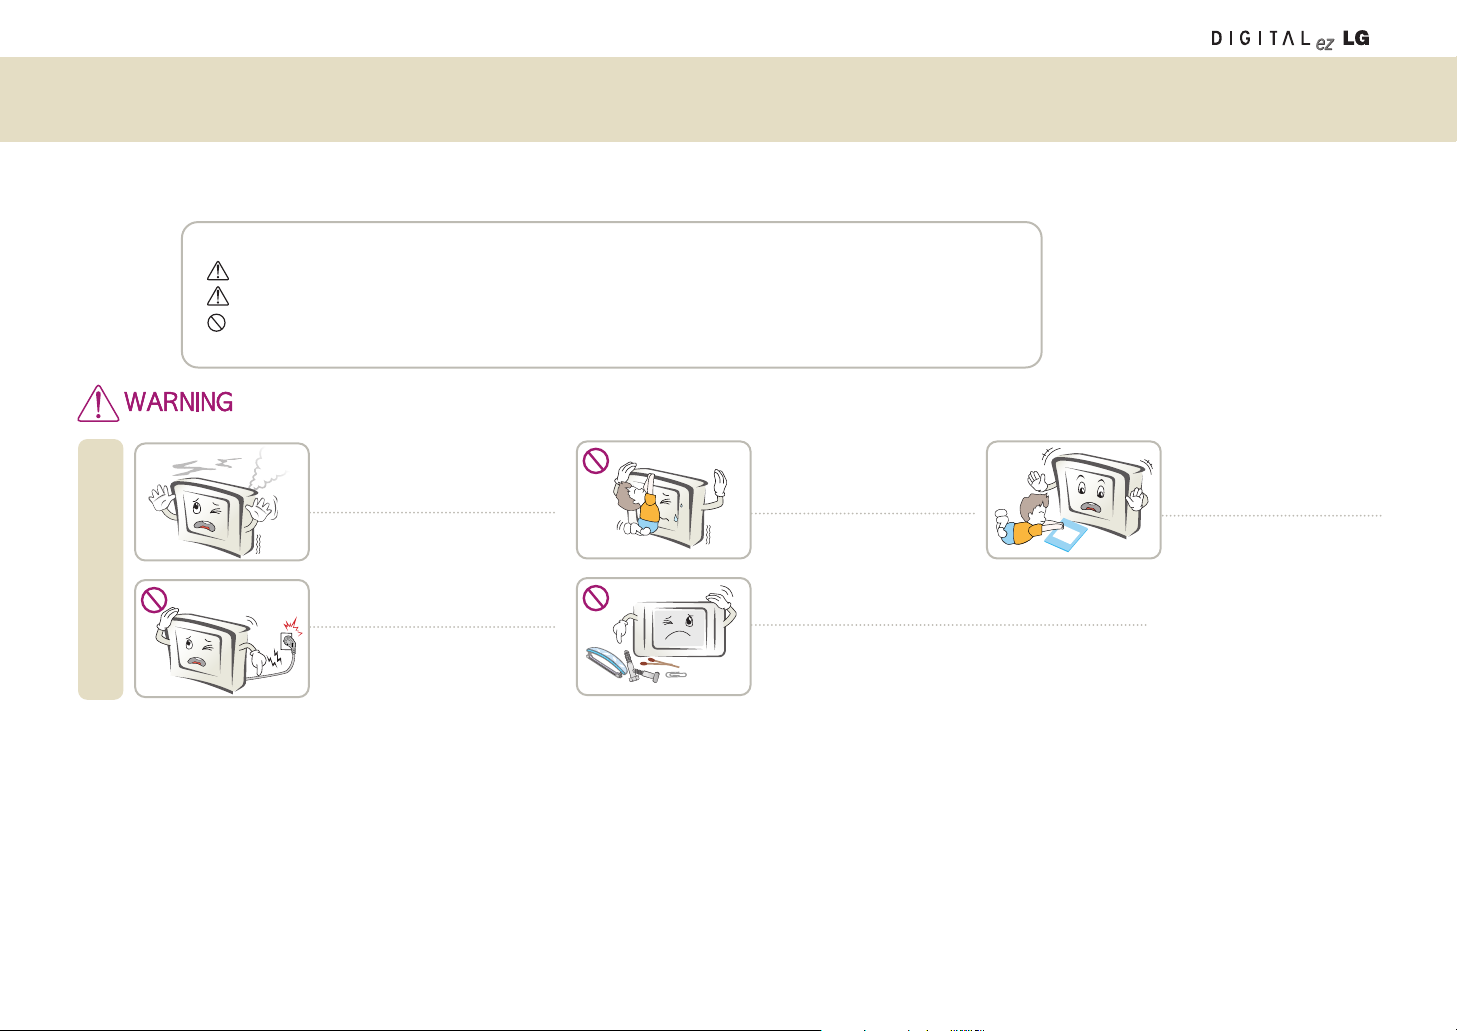
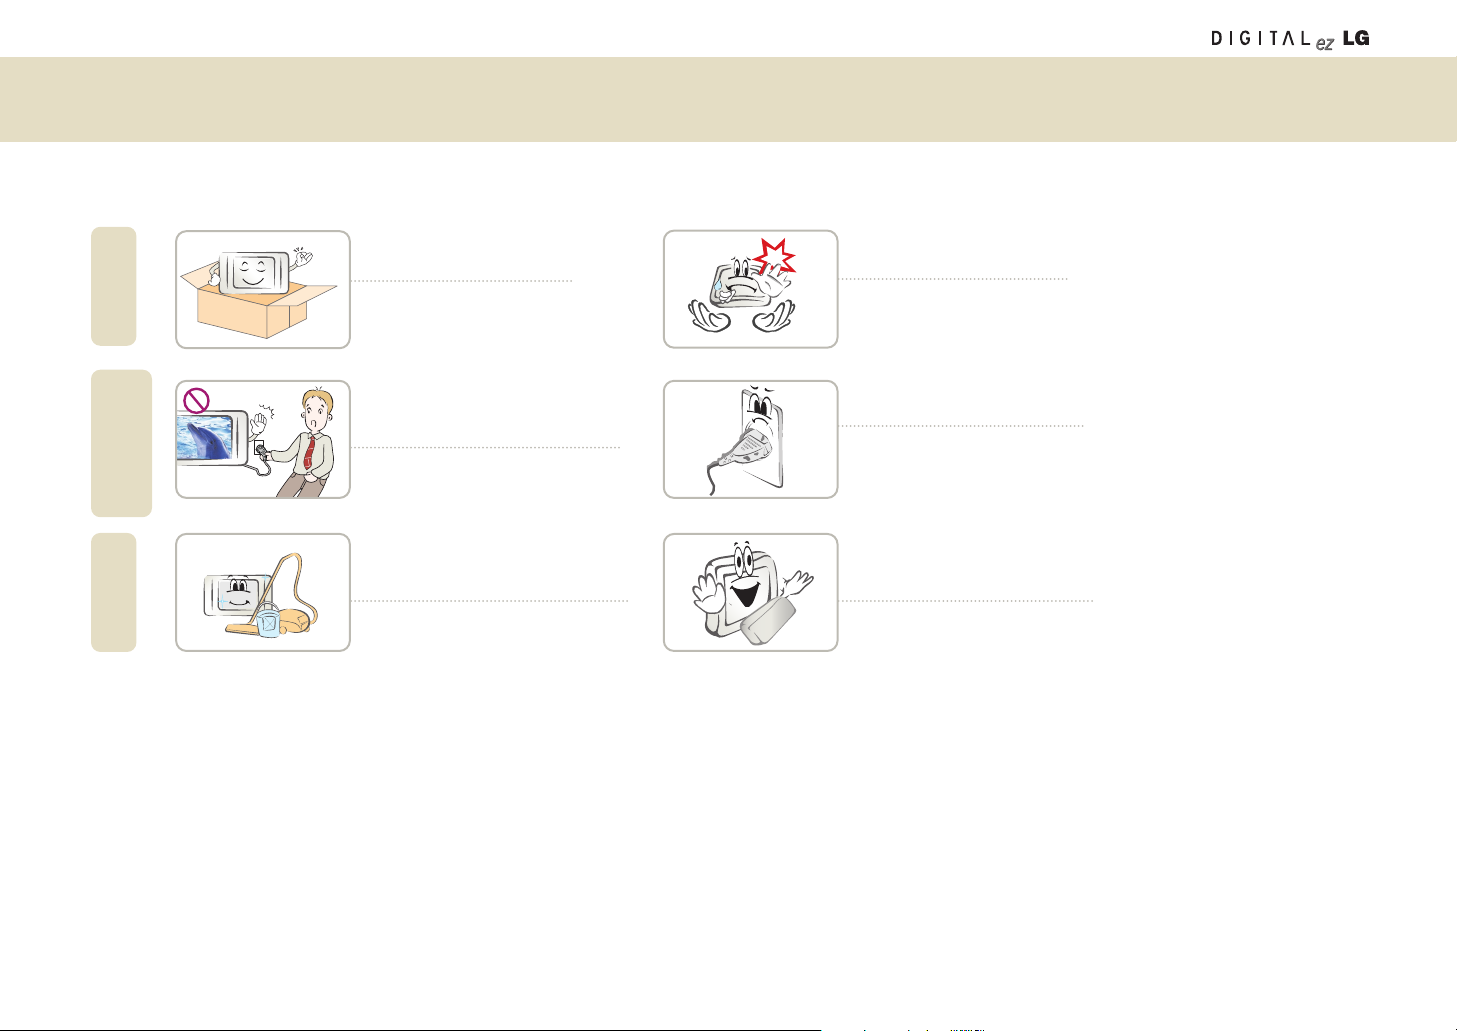
Safety Precautions
The following safety precautions are provided to prevent an unexpected accident or damage, through safe and accurate usage of the product.
Safety precautions can be grouped into “Warning” and “Caution” and have the following meaning.
Warning: if instruction is ignored or violated, you can be seriously injured or even killed.
Caution: If instruction is ignored or violated, you can be slightly injured or the product can be damaged.
Prohibited: You must not do the thing described after this symbol.
If smoke, strange sounds, or a bad
smell emanates from the product,
unplug and contact a service center.
You can receive an electric shock or a fire
can break out.
if instruction is ignored or violated, you can be seriously injured or even killed.
• Please keep this User’s Guide at the place where everybody can easily access, after reading this User’s Guide.
Installation
Take care in placements of cables; do
not cross walking paths.
If somebody is caught by the cord and
collapses, he can receive an electric shock
or be injured, or the product can be
damaged
Do not put heavy objects on the
TV or let children or pets crawl
on the TV.
Warn the children against injury by
collapsing or falling down.
Do not insert any metallic object such as coin, hairpin, etc.
or combustible object. Also warn children not to do so.
You could receive an electric shock or it could cause a fire. If
any foreign object is inserted, unplug the power cord and contact a service center.
Keep anti-moisture packages,
bags, and other packing materials out of reach of children.
If swallowed by mistake, induce
vomiting and consult a doctor
immediately.
Page 10
10
Before you Use
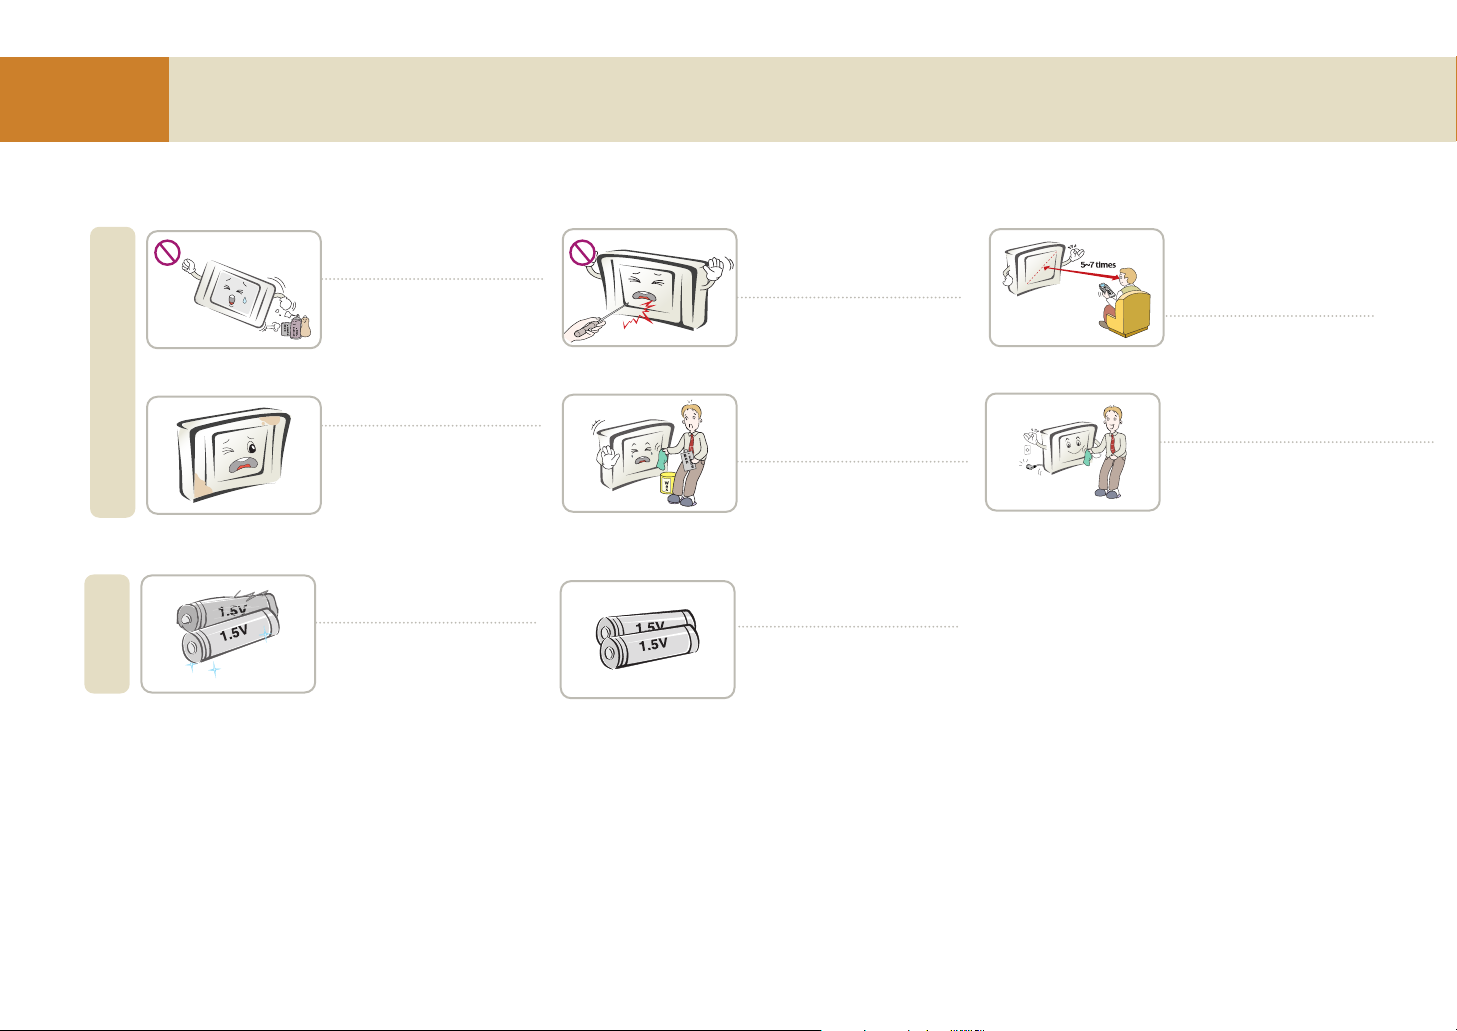
Safety Precautions
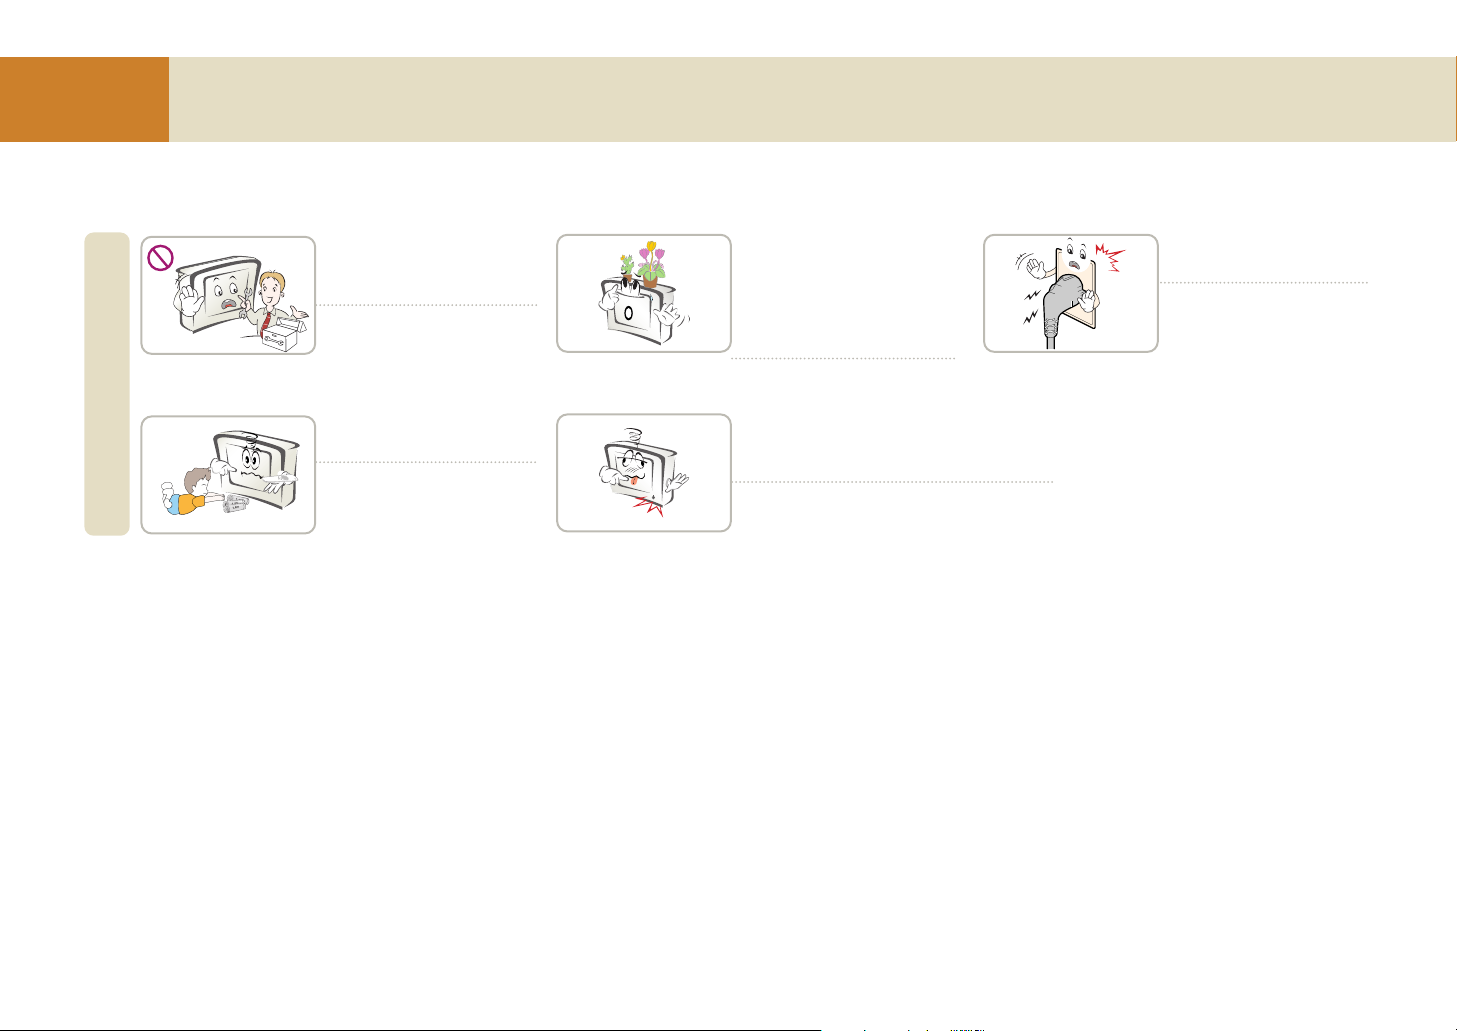
Only a qualified technician
should disassemble, repair or
modify the product.
You could receive an electric shock
or it could cause a fire.
Usage
Keep the remote batteries out
of reach of children.
If a child swallows the battery,
consult a doctor immediately.
Do not put a fluid container such
as flower vase, flowerpot, cup,
cosmetics or medical supplies as
well as decorations or candles on
the wireless TV or wireless transmission unit.
You could receive an electric shock or
it could cause a fire.
Do not use the product while it has defects like no
video or no sound. Turn the product off, unplug it,
and contact a service center.
You could receive an electric shock or it could cause a
fire.
If you detect a gas leakage, do
not touch the TV or turn it.
It could cause a fire.
Page 11
11
Safety Precautions
Ensure the power cable is connected properly to the grounded power
outlet.
You could receive an electric
shock.
Power Related Precautions
Do not use several devices at the
same time when using a power
strip. Use a grounded power strip
designed for computers.
A fire may break out due to
overheating.
Use the specified rated voltage.
The wireless TV can be damaged,
or you can be injured.
Do not touch the power plug with
wet hands. If the power connector
is wet or covered with dust, dry it
completely or scrub it off before
use.
You could receive an electric
shock.
Firmly plug in the power plug so
that it does not shake.
A plug not connected firmly is a
fire hazard.
Hold the plug with your hand when
pulling out the power cable. Do not
bend the cord with excessive force,
or put a heavy object on it.
An electric wire can be damaged, which
can cause an electric shock or a fire.
Unplug the product when not in
use for a long time.
The product can be covered
with dust, which can cause
electric leakage, electric shock
or fire due to heating, ignition or
worn-out insulation.
Do not insert any conductive
material into the opening of the
power cable.
You could receive an electric
shock.
CAUTION concerning the Power Cord
Most appliances recommend they be placed upon a dedicated circuit; that is, a single outlet circuit which powers only that appliance and has no additional outlets or ranch
circuits. Check the specification page of this owner's manual to be certain.
Do not overload wall outlets. Overloaded wall outlets, loose or damaged Wall outlets,extension cords,frayed power cords, or damaged or cracked wire insulation are dangerous. Any of these conditions could result in electric shock or fire. Periodically examine the cord of your appliance,and if its appearance indicates damage or deterioration,
unplug it, discontinue use of the appliance, and have the cord replaced with an exact replacement part by an authorized servicer.
Protect the power cord from physical or mechanical abuse, such as being twisted, kinked, pinched, closed in a door, or walked upon.
Pay particular attention to plugs, wall outlets,and the point where the cord exits the appliance.
Page 12
12
Before you Use
Safety Precautions
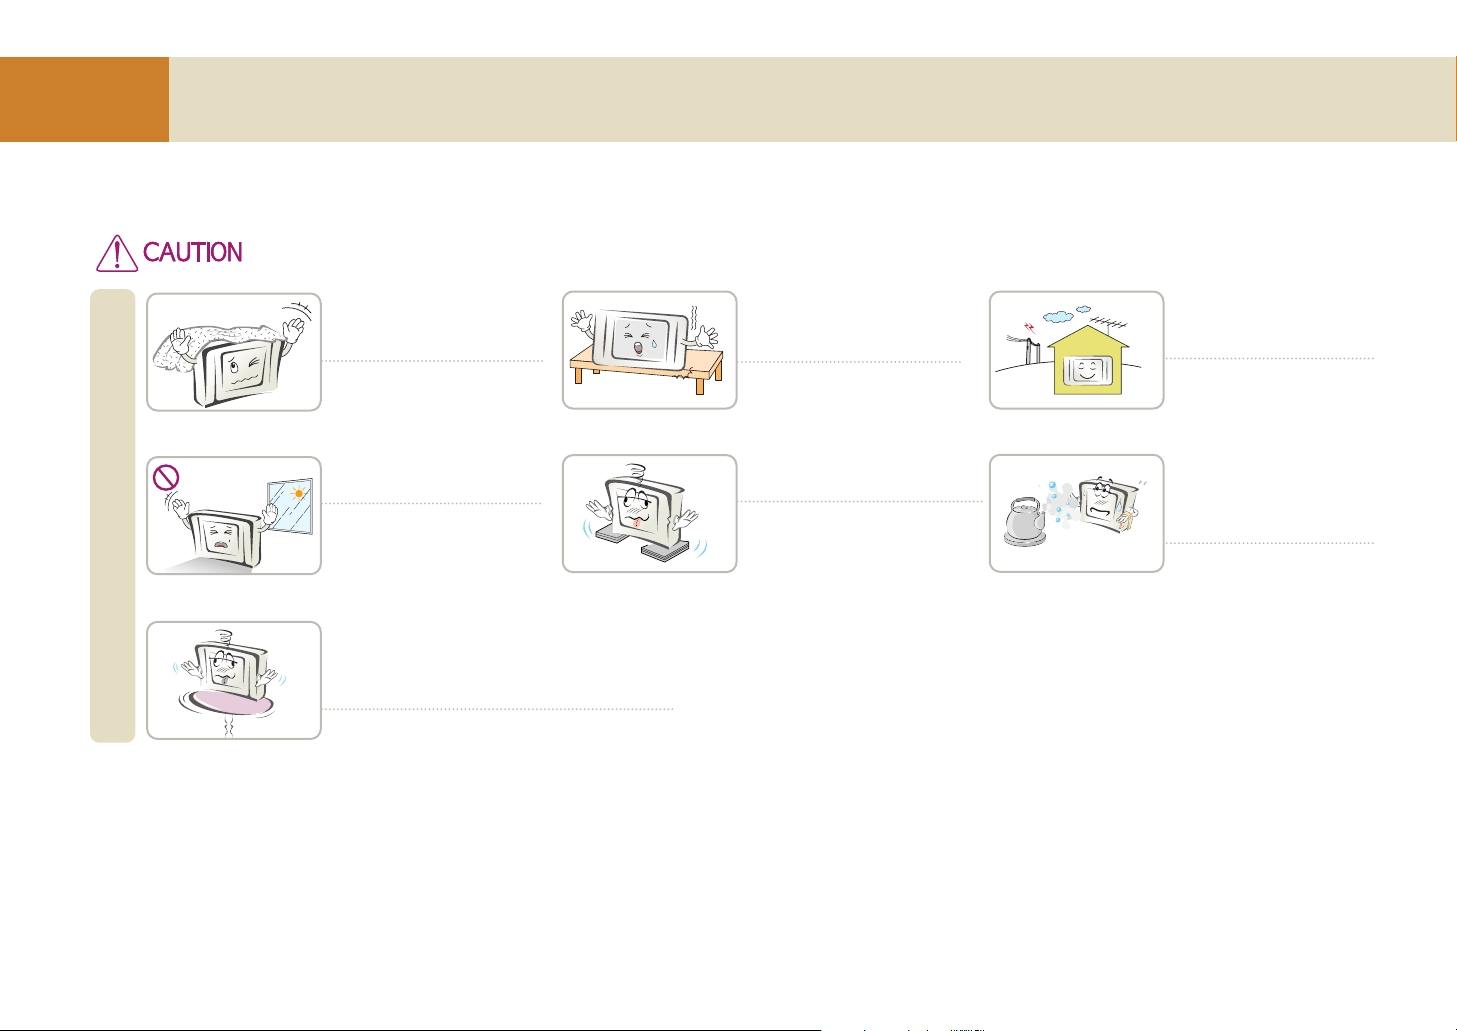
Ensure that ventilation openings are not blocked by a tablecloth, curtain or similar material.
The product could be damaged due
to the internal temperature rising or
it could cause a fire.
Installation
Do not install the product in
direct sunlight.
The product could be damaged
or a fire can break out.
Install the product on a flat and
stable surface that has no risk of
moving or collapsing.
If the product falls you can be
injured or the product could be
broken.
Do not install the product on an
unstable and vibrating surface.
The product could fall or be turned
over, which could cause injury.
When installing in an entertainment center or on a
shelf, ensure that the front of the product is not
projecting out beyond the front of the cabinet or
shelf.
The centre of gravity can be unbalanced, which
could cause an injury or breakdown of the product.
Install the product in a place
free of electromagnetic
interference.
Do not install the product where
it may have direct contact with
oil or moisture – such as beside
a kitchen table or a humidifier.
You could receive an electric
shock or it could cause a fire.
If instruction is ignored or violated, you can be slightly injured or the product can be damaged.
Page 13
13
Do not throw away the original
packing and box.
Use the package box when
moving the product.
Movement
Power Related
Precautions
Cleaning
Do not unplug the power cord while
the device is on and the battery is not
mounted.
The product could be damaged by
electric shock.
Do not drop or bang the device
when carrying or transporting.
You could be injured or the product
could be damaged.
If the power plug or the outlet is
covered with dust, clean it.
It could cause a fire.
Unplug the power cable, the signal
cable, and the battery before cleaning
the product.
You could receive an electric shock or
it could cause a fire.
Consult with customer service or a
service center about cleaning once a
year.
A fire can break out or the product is broken or if you don’t clean the product.
Safety precautions
Page 14
14
Before you Use
Safety Precautions
Do not use or store flammable
materials close to the product.
It could cause a fire.
Usage
Always keep the product clean.
Do not press or scratch the panel
with sharp objects (nail, pencil, or
pen).
A panel can be easily damaged or
broken.
Use a mild lens cleaner to clean
the screen. (Do not use benzene,
thinner, or alcohol.)
The product can be deformed.
Unplug the power cord and wipe with a
soft cloth instead of a wet cloth.
If water infiltrates through a crevice it
could cause an electric shock accident
or product breakdown.
Viewing distance from the product should be about 5 ~ 7 times
of the diagonal distance of the
screen.
Your vision can be impaired if
you watch the TV too closely
for a long time.
Others
Do not use a battery that is not
designated by the manufacturer.
Do not mix new and old
batteries.
It could cause the batteries to
leak.
Page 15
15
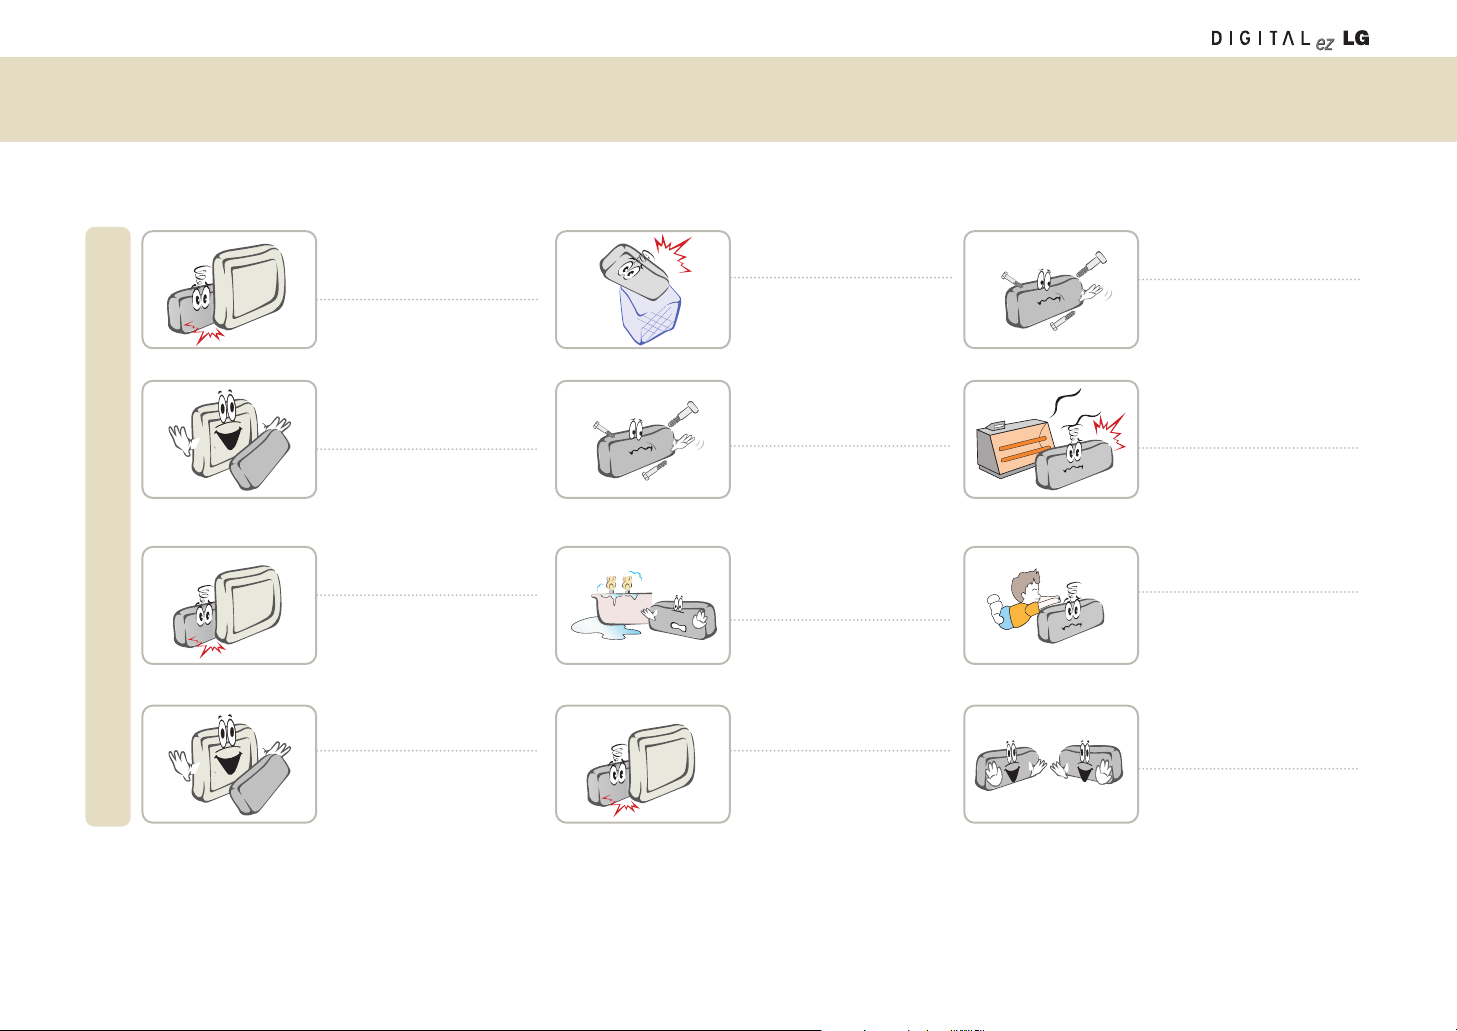
Safety Precautions
Do not charge the battery pack
using another power supply
device or circuit.
The battery pack can be
damaged.
Battery pack
Only use a battery pack
approved and certified by LG
Electronics.
There is a risk of an explosion
or a fire.
Be careful the battery pack
terminals do not short circuit.
There is a risk of an explosion.
Ensure that the battery pack is
firmly inserted.
There is a risk of an explosion
or a fire.
Do not throw away the used
battery pack carelessly.
There is a risk of an explosion
or a fire. Disposal method can
be different for each country or
region.
Use the proper disposal method.
Do not keep the battery pack
close to a metallic object like a
key or a clip.
The battery pack could be damaged, it could cause a fire, or
you could be burned due to
rapid temperature rising by
over-current.
Do not store high temperature
(over 60 degrees) or humidity
area.
There is a risk of an explosion
or a fire.
Handle the battery pack with
care since it contains lithium.
There is a risk of an explosion
or a fire.
Do not throw or disassemble
the battery pack.
There is a risk of a fire or an
explosion due to a damaged
battery pack.
Do not store the product near a
heat-generating item like a
heater.
It could cause a fire or the
product could be damaged.
Keep out of reach of the
children.
Children could be injured or the
product could be broken.
Use the same type of battery
pack when replacing with a new
one.
Page 16

16
Before you Use
Name and Functions of Wireless TV Parts
Front view of wireless TV: Adjustment buttons
Upper view of the wireless TV: Adjustment buttons
4
98765
3
2
1
10
1
5
6
7
8
9
10
2
3
4
Network status LED
Battery status LED
Power/Standby
indicator
Remote controller sensor
Power button
TV/AV button
Menu button
ENTER button
Volume button
Channel button
Shows the status of the wireless transmission unit
in the system or connection to the computer.
Shows the battery status of the system. For more
details, see page 19.
Shows blue color under normal operation.
Brightness becomes dimmer as time goes by.
Press the button to turn on and press again to turn off.
Each time you press this button, the signal will be switched in the
following order.
Shows/Hides the OSD (On Screen Display) menu screen while the
wireless TV is on.
Displays the channel/battery information while the wireless TV is on. Or,
you will save the wireless TV adjustment settings.
Adjusts the volume.
Adjusts the channel.
TV -> Video -> S-Video
Page 17
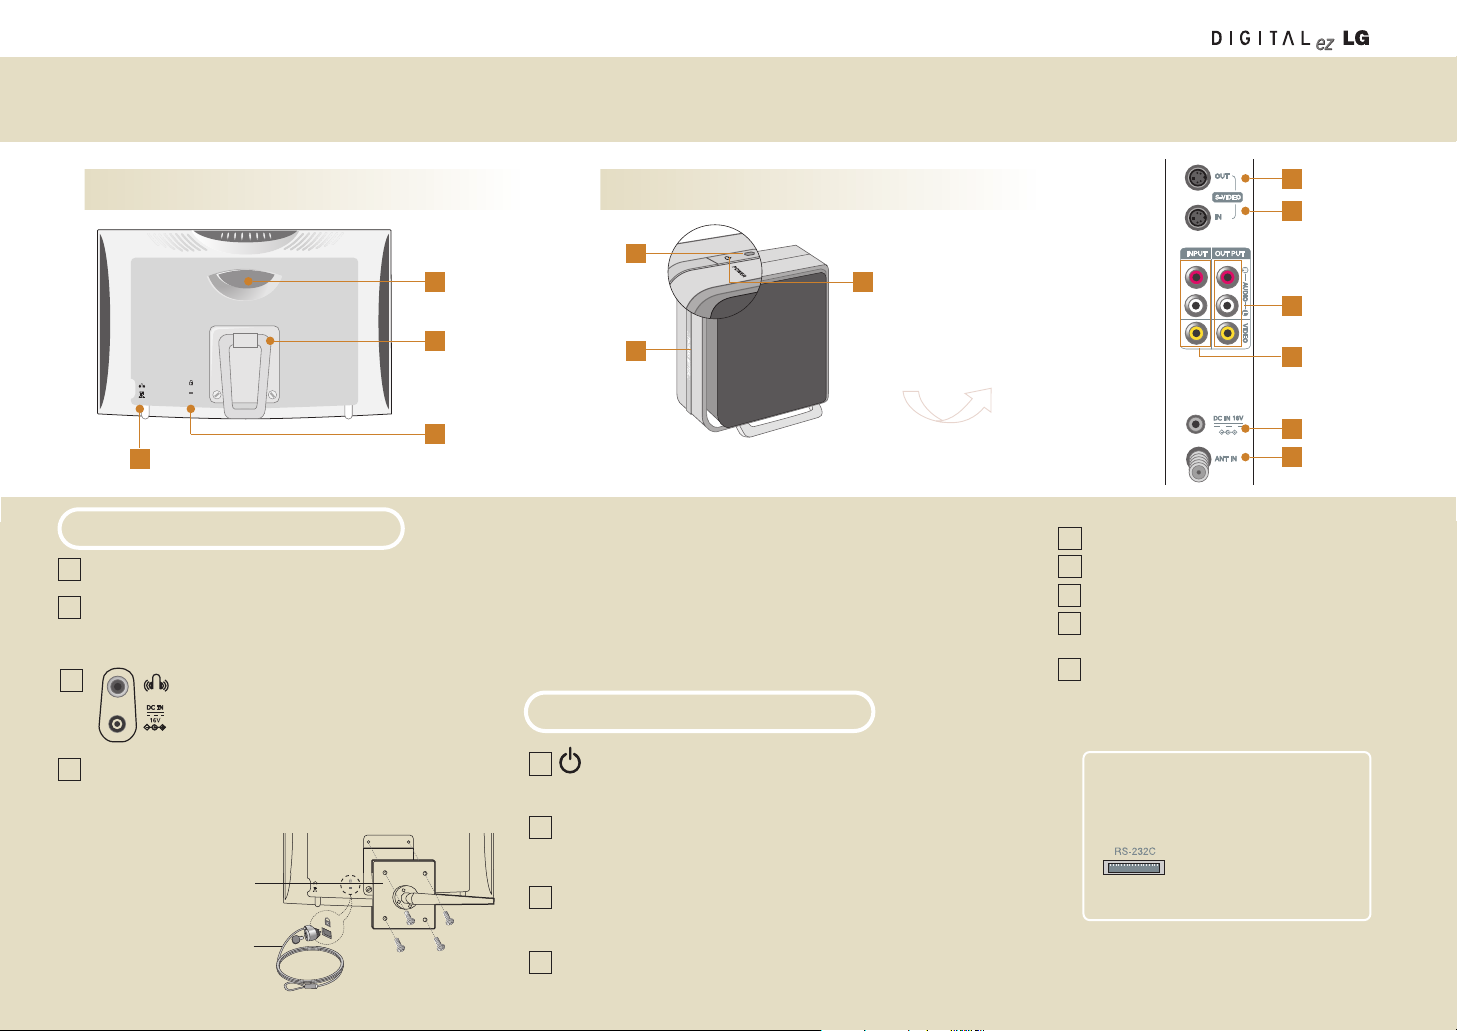
Name and Functions of Wireless TV Parts
17
Rear view of the wireless TV Wireless transmission unit
1
4
2
4
3
1
2
4
3
5
8
9
6
7
Rear view of
the transmission unit
Handle
Stand
You can insert a battery by separating a stand. Or you
can connect to the VESA standard counterparty
object by separating a stand. (See the below figure)
Theft prevention locking device
This device is used to prevent theft by connecting the
locking cable (optional). See the below figure.
Headphone/Earphone
DC adaptor port
Connect to the power
VESA standard
counterparty object
Stand and wall mounting
type (Not included)
Theft prevention locking device
(Not included)
Rear view of the wireless TV
Wireless Transmission Unit
1
2
3
4
5
6
Power Button Press the button to turn on and press
again to turn off.
Power/
Standby indicator
Network status
indicator
Shows the power status of the wireless
transmission unit. Red during normal operation and yellow while in standby mode.
Wireless TV connection indicator. Blue
when a network connection has been
established with wireless TV.
S-video output port
2
3
1
RS-232C
(Bottom of the wireless
TV, bottom of the wireless
transmission unit)
S-video input port
AV output port
AV input port
DC adaptor port
Connect to the adaptor.
Antenna input port
Connect ot an antenna or cable TV connection.
7
8
9
Theft prevention locking device
- This TV is equipped with a Kensington Security System connector on
the back panel. The Kensington Security System is an optional
accessory. For further information, visit
http://www.kensington.com.
Kensington sells security systems for expensive electronic equipment
such as notebook PCs and LCD projectors.
- The Kensington Security System is an optional accessory.
Service port. Only to be
used by a qualified
servicer.
Page 18
18
Before you Use
Wireless TV stand
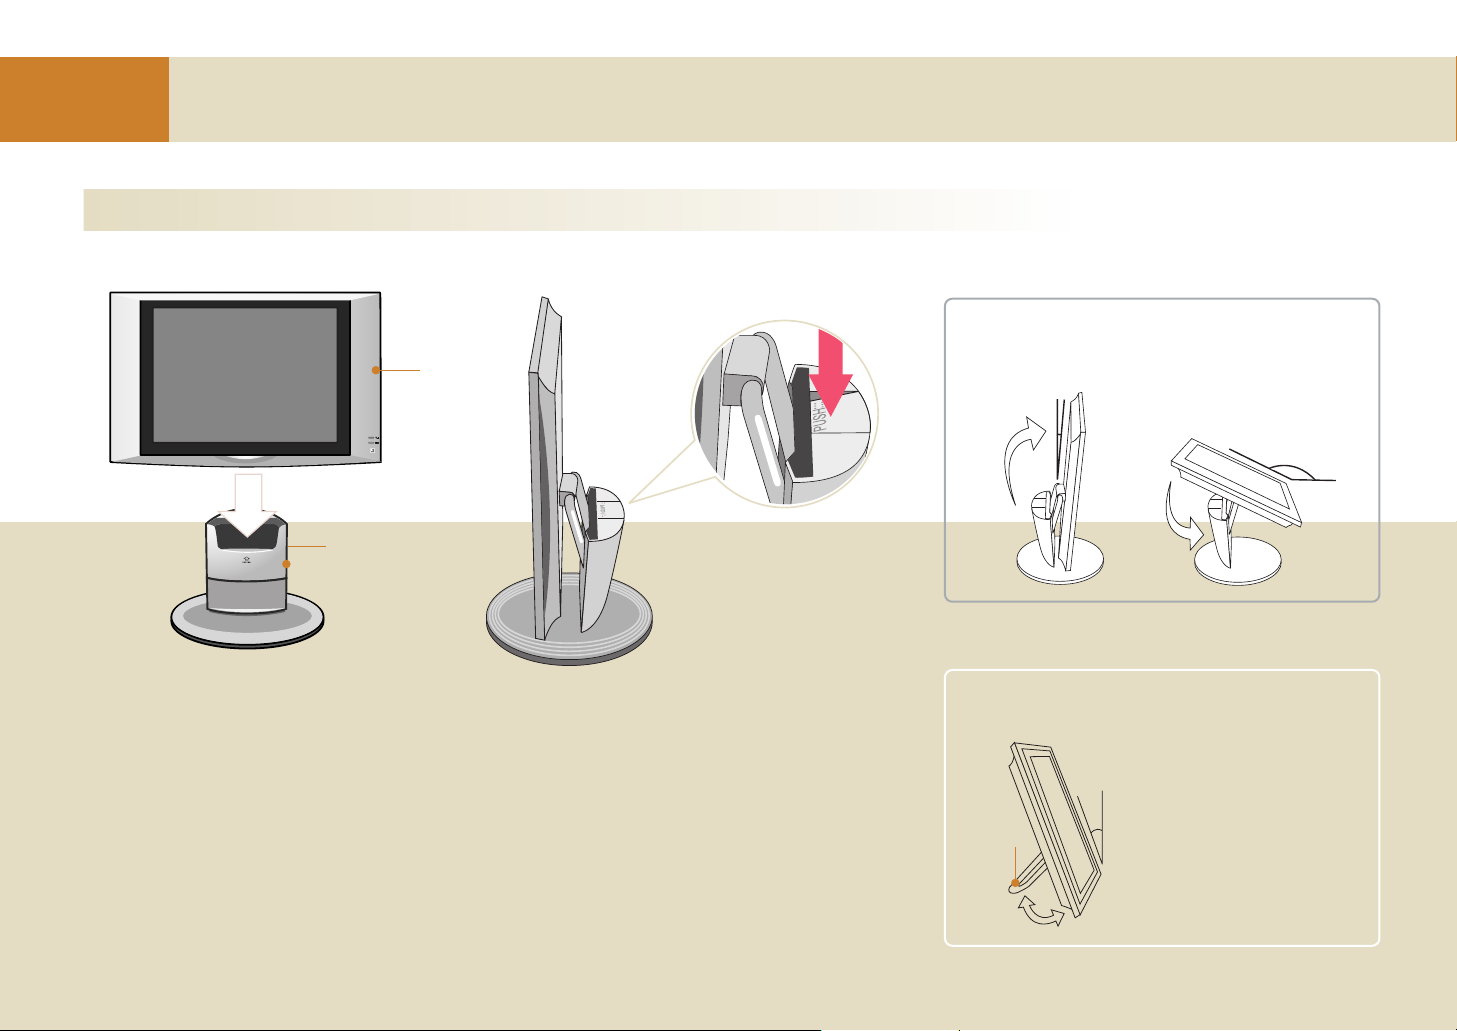
Watching the wireless TV using the mounting stand (Only use with 15LW1R)
1
2
Front view Side View
Wireless
TV
Mounting stand
(Applicable for
15LW1R model only)
Lift up the wireless TV while
holding down the “Push” button
to separate.
You can watch the wireless TV at any angle using the mounting type stand.
Unfold the wireless TV stand and put it on the mounting stand.
If the stand is not fixed properly, the stand can be separated and broken down.
Press the TV until you hear a “click” sound to fix it in place firmly.
10°~35°
TV stand.
Adjust the angle of the stand as shown below.
Be careful because the stand
can be broken if you apply
excessive force while the
stand is unfolded.
When watching the wireless TV using the wireless
TV stand.
When watching the wireless TV using the mounting stand
155°
-5°
Page 19
19
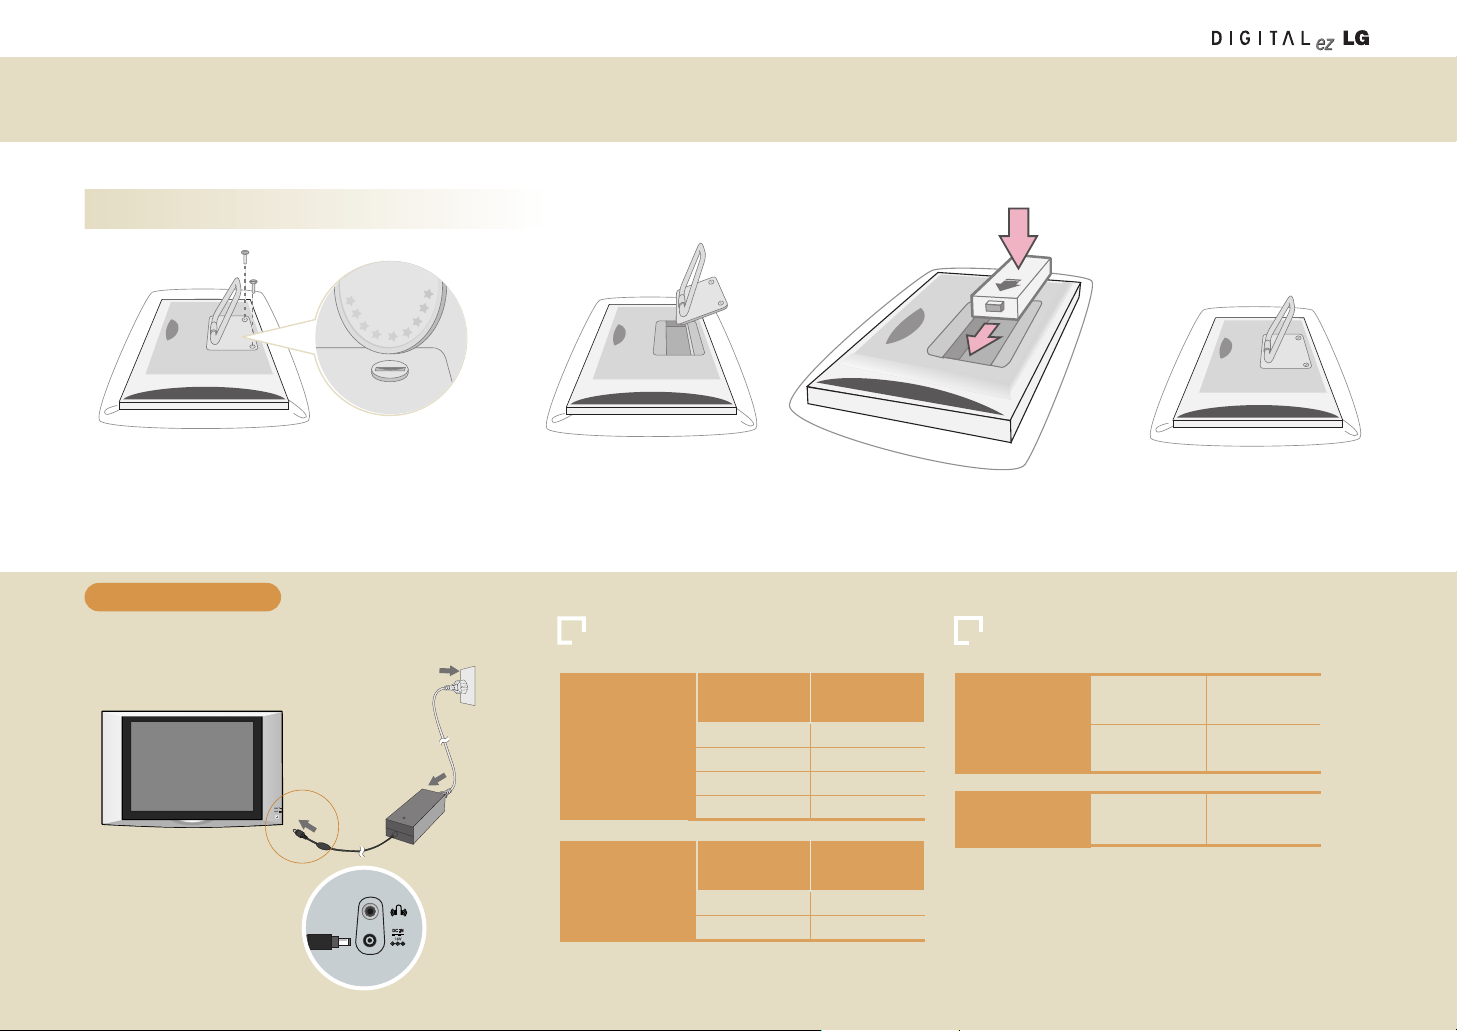
Installing a battery pack
12
34
Cover the floor with soft cloth or a cushion. Place the
wireless TV face down and unfold the TV’s stand.
Unscrew the screws at both sides as shown in the figure.
You can use a coin or a screwdriver to loosen the
screws.
1. Connect the DC adaptor to the wireless TV.
2. Connect the power cord to the DC adaptor and then,
connect to the power supply.
Front of the wireless TV
DC adaptor
Power cord
Side of the
wireless TV
Separate the wireless TV stand.
Insert the battery pack down into the
battery pack holder (1), then slide it left (2).
Replace the cover and screws
after installing the battery pack.
* The maximum battery pack usage time can differ according
to the usage temperature or usage duration.
* If the battery pack is not used for a long time, it can be dis-
charged. In this case, charge the battery pack first before use.
Wireless TV Battery pack
1
2
To charge the battery
Battery pack Status LED Battery pack Charging and Maximum Usage time
When using the
battery pack
(DC adaptor is
not connected)
Remaining
Amount (%)
30 ~ 100
10 ~ 30
Under 10
0
Green
Yellow
Yellow (blinking)
off
Status LED
Color
When charging
the battery pack
(DC adaptor is
connected)
Charging
Amount (%)
Under 97
Over 98
Yellow
Green
Status LED
Color
When charging
the battery pack
(DC adaptor is
connected)
If TV is off
If TV is on
Max. 4 hours
Max. 6 hours
Maximum battery
pack usage time
If TV is on Max. 3 hours
Page 20
20
Before you Use
Remote Control
How to change the batteries
Slide the battery cover downward to open
it. Then, insert the batteries (1.5V, 2 AAA
type alkaline batteries) to the (+) and (-)
direction as marked inside the remote
control battery holder. Then,close the
cover.
• Put used batteries into a recycling bin.
POWER
TV/AV
Each time you press the button, TV -> Video -> S-Video will
be displayed sequentially.
SLEEP
TV will be automatically turned off after a certain amount of time.
Set the time duration you want by pressing this button repeatedly.
CC
See page 37.
NUMBER buttons
* No function
TV/MEDIA
Use this button to use the Media Browser in the TV, or vice
versa.
FLASHBK
Use this button to select the previous channel.
SURF
See page 31.
CH/PAGE
TV: Changes the channel.
Media Browser: Moves the list page by page.
VOL
Use this button to adjust the volume.
MUTE
Use this button to suppress the sound from the speaker.
Media handling buttons
Used in the Media Browser.
MENU
TV: Adjusts the TV functions.
Media Browser: Moves to the setting screen.
Moves to the previous menu in the Menu screen.
MOVE/SELECT buttons
TV: Changes TV/AV settings.
Media Browser: Moves the list.
HOME
Media Browser: Moves to the home screen.
EXIT
TV: Hides the Menu screen.
Media Browser: Stops the slide show.
MARK
Media Browser: Selects the list or cancels list selection.
1 8
14
15
16
17
18
9
10
11
12
13
2
3
4
5
6
7
1
2
3
4
5
6
7
8
9
10
13
14 17
18
15
16
11
12
Page 21

21
19
20
21
22
Remote Control
TV/AVTV/AV
TV/MEDIATV/MEDIA
SLEEPSLEEP
CCCC FLASHBKFLASHBK SURFSURF
Point the remote towards the remote
control sensor of the wireless TV and
use it within about 7 meters.
EZ VIDEO
TV: Adjusts the screen status to your preference. (See page 32)
Media Browser: Arranges the list.
EZ AUDIO
TV: Adjust the audio status to your preference. (See page 35)
Media Browser: Selects multiple files.
Media Browser: Starts the slide show, Plays back the music file randomly, Shows/Hides the movie caption.
AUDIO
Each time you press the button, Mono -> Stereo -> SAP will be displayed sequentially. (See page 35)
Media Browser: Plays back the music file repetitively.
19
20
22
21
Page 22

22
Connection and
Usage
Power Connection
Connecting the electric power to the wireless TV Connecting the electric power to the wireless transmission unit
Connect the power as shown in the following figure to use the wireless TV.
Wireless TV
DC adaptor
Power cord
Wireless
transmission unit
DC adaptor
POWER
Power cord
Antenna cable
Page 23

23
Connecting the Antenna
- For optimum picture quality, adjust antenna direction.
Connecting to an Inside Antenna Setup
- Typical wall antenna jack used in apartment buildings, connect the antenna cable as
shown below.
(Use the correct type of antenna cable for the type of wall antenna jack.)
- If you have a 75Ω round cable, insert the bronze wire and then tighten the connection nut. If you have a 300Ω flat wire, connect the twisted wire to the antenna converter and then
connect the converter to the antenna jack on the TV.
- If using 75Ω round cable, do not bend the bronze wire. It may cause poor picture quality.
Apartment Buildings
- You can enjoy a better quality screen in a weak radio reception area if you install a radio amplifier (booster).
- If you have difficulty in installing the antenna, consult a specialized antenna dealer or the sales shop you
purchased the antenna from.
- Do not attach the wireless transmission unit to the wall.
- If you find a mosaic pattern on the screen or the screen is not displayed properly due to poor
network connection, set the front side of the wireless transmission unit to face towards the
wireless TV.
Wall Connection Jack
Turn clockwise to tighten.
Bronze Wire
75
Ω Round Cable
300
Ω Flat Wire
Antenna Jack
Antenna
Converter
Connecting to an Outdoor Antenna Setup
- This type of antenna is commonly used in single family dwellings.
Single Family Home
VHF
Antenna
Turn clockwise to tighten.
75
Ω Round Cable
300
Ω Flat Wire
Antenna Jack
Antenna
Converter
Wireless transmission unit
Front
(Commercial product)
Antenna
input port
Radio
amplifier
Antenna cable (Not included)
Necessary Connection Cable
Page 24

24
Connection and
Usage
Connecting more than 2 TV Sets
- Connect the connection port with the same color.
- Use the S-Video connection instead of Composite Video (RCA Cables) when available for better quality.
- If the input only supports mono, only the left (white) channel needs to connected.
Connecting antenna
cables using the distributor.
Rear view of other
external device
Other TV
Wireless
transmission unit
Other TV
Rear view of other
external device
Wireless
transmission unit
Other TV
1
Connecting with RCA cables.
2
Connecting with S-Video cables
3
- If you connect more than 2 TV sets, the image quality may deteriorate.
- Do not attach the wireless transmission unit to the wall.
- If you find a mosaic pattern on the screen or the screen is not displayed properly due to poor network
connection, set the front side of the wireless transmission unit to face towards the wireless TV.
Wireless transmission unit
Front
Necessary Connection Cables
RCA cable
S-Video cable
Antenna cable (Not included)
Antenna cable
Wireless
transmission
unit
Antenna
cable
(Output) (Output)
(Input)
Distributor
Antenna
cable
Page 25

25
Connecting VCR/DVD
- Connect the connection port with the same color when connecting the wireless transmission unit to the
external device.
- Use the S-Video connection instead of Composite Video (RCA Cables) when available for better quality.
- If the input only supports mono, only the left (white) channel needs to connected.
- An after image can occur when stantionary objects (text, logo, etc) remain on the screen for a long period.
Turn on the wireless TV and select channel #3 or #4
using the TV remote control.
Watching TV through
S-Video connection
Watching TV through
Composite Video connection
Watching TV through
antenna connection
Wireless
transmission unit
VCR/DVD
Connection port on the wall
Antenna cable
Direct connection
1
Press the TV/AV button on the remote control and
select the Video Input.
Insert a tape into the video player and press the PLAY
button.
2
- Do not attach the wireless transmission unit to the wall.
- If you find a mosaic pattern on the screen or the screen is not displayed properly due to poor network connection,
set the front side of the wireless transmission unit to face towards the wireless TV.
- You can also play back the video in TV channel #3 or #4. However, the selected channel number should be identical
to channel switch selection at the rear side of the video.
- While in Video input mode, press the
CH (+, -) button, SURF or FLASHBK button to return to TV mode.
Wireless transmission unit
Front
Necessary Connection Cables
RCA cable
S-Video cable
Antenna cable (Not included)
Connecting with antenna cables
Connecting with Composite Video or S-Video
Page 26

26
Connection and
Usage
Connecting a Cable TV Converter
- Do not attach the wireless transmission unit to the wall.
- If you find a mosaic pattern on the screen or the screen is not displayed properly due to poor network connection,
set the front side of the wireless transmission unit to face towards the wireless TV.
- Follow the instructions from the local CATV service provider for more details on the CATV connection usage.
Wireless transmission unit
Front
Necessary Connection Cables
RCA cable
S-Video cable
Antenna cable (Not included)
- Connect the connection port with the same color when connecting the wireless transmission unit to the external device.
- To watch the cable TV, you should subscribe to the local CATV broadcasting service provider and install the converter separately.
When connection with
Composite Video
When connecting with the antenna
Press the TV/AV button on the
remote control and select Video
Input.
1
Select the channel you want using the
converter remote control.
2
How to use
Set the exclusive channel selection
switch of the converter to channel #3
or #4.
1
Set the TV channel number to the
same as converters channels selection
switch.
2
Select the channel you want using the
converter remote control.
3
How to use
Watching TV
through Composite
Video connection
Watching TV through
antenna connection
CATV
port
Converter
Wireless
transmission unit
Converter
Page 27
27
- Do not attach the wireless transmission unit to the wall.
- If you find a mosaic pattern on the screen or the screen is not displayed properly due to poor network
connection, set the front side of the wireless transmission unit to face towards the wireless TV.
- Screen display delay can occur, depending on the network connections status.
Wireless transmission unit
Front
Necessary Connection Cables
RCA cable
- Connect the connection port with the same color when connecting the wireless transmission unit to the external device.
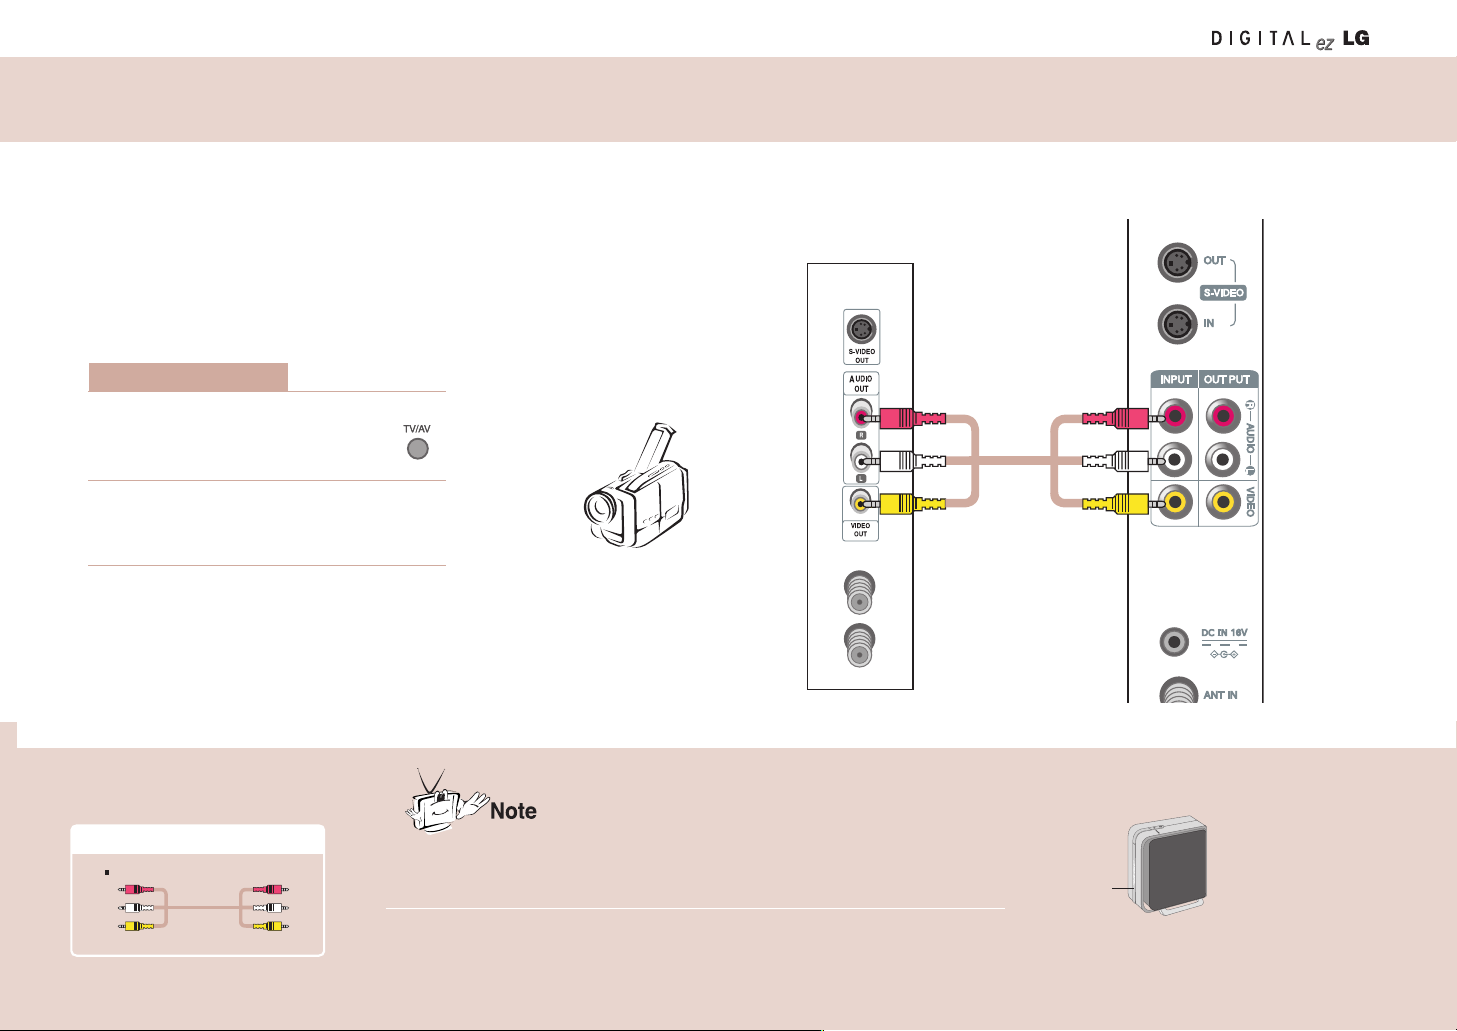
Press the TV/AV button on the
remote control and select
Video Input.
1
Start the Video input device.
2
How to use
Rear view of other
external device
Camcorder
Wireless transmission unit
RCA cable
Connecting External Devices like a Camcorder
Page 28

28
Adjustment when Using
the Wireless TV
Watching the Wireless TV
Watching the wireless TV
Watching the wireless TV in the Media Browser
Press the POWER button on the remote control to watch the wireless TV.
1) Move to the Watching TV menu to watch TV in the Media Browser.
2) Press the TV/MEDIA button on the remote control to watch TV.
Channel display
Remaining battery
amount display
Press the button on
the remote control to
display the remaining
battery amount.
Remaining battery display
Media Browser Home screenshot.
1
2
Move to the Watching TV menu using and buttons and press the button.
TV screenshot
N/A
Image Description
Battery is not inserted.
Very low
Approx. 20% left.
Approx. 50% left.
Approx. 80% left.
Approx. 100%
2
Page 29

Language Selection
Move to
[Special].
Select your
desired language.
Press the
button.
Select
[Special].
Move to
[Language].
3
12
Press the EXIT button to hide the menu screen.
Press the MENU button to move to the previous menu screen.
On-screen Menus Language Selection
The menus can be shown on the screen in the selected language.
29
EXIT
Input
Caption/Text
Captions
Sleep Timer
Key Lock
Language
GG
English
FranÇais
MENU
Special
Page 30

Adjustment when Using
the Wireless TV
Programming the Channels
Move to
[Channel].
Run
[Ez Scan].
Select
[Ez Scan].
Select
[
Channel].
Move to
[Channel].
Change the
channel.
Press the EXIT button to hide the menu screen.
Press the MENU button to move to the previous menu screen.
Memorize or
clear the
selected channel.
Press
the button.
Select
[
Channel].
Move to
[Manual Prog.].
Move to
[Ez Scan].
1
3
2
Memorizing all broadcasting channels Memorizing or clearing the specific channels
3
12
30
• If the CATV channel is duplicated with the public TV, the CATV channel will be selected. Each time you
press the number button (0 ~ 9) for channel selection, CATV-public channel selection will be toggled.
• Press the or Exit button while running [Ez Scan] to stop channel setting. Then, the channel(s)
scanned at that time point will be memorized.
EXIT
Ez Scan
GG
Manual Prog.
Favorite Ch.
To Start
MENU
Channel
EXIT
Ez Scan
Manual Prog.
GG
Favorite Ch.
TV8
Memory
MENU
Channel
Page 31

Watching the selected channel only
Move to
[Channel].
Set the
channel.
Press the
button.
Select the
channel you want.
* Set other channels using the same method.
Select
[Channel].
Move to
[Favorite Ch.]
Press the
button.
Use the Favorite Ch. function to create your favorite channel list.
• You can set up to 6 channels that you prefer.
1
3
2
Press the EXIT button to hide the menu screen.
Press the MENU button to move to the previous menu screen.
Setting Favorite Channels
If you want to watch your favorite channels
only, press the SURF button.
• Each time you press the button, the selected
favorite channel will be displayed sequentially.
31
EXIT
Ez Scan
Manual Prog.
Favorite Ch.
GG
To Start
MENU
Channel
MENU
EXIT
Favorite Ch.
------
------
------
------
------
------
Page 32

Adjustment when Using
the Wireless TV
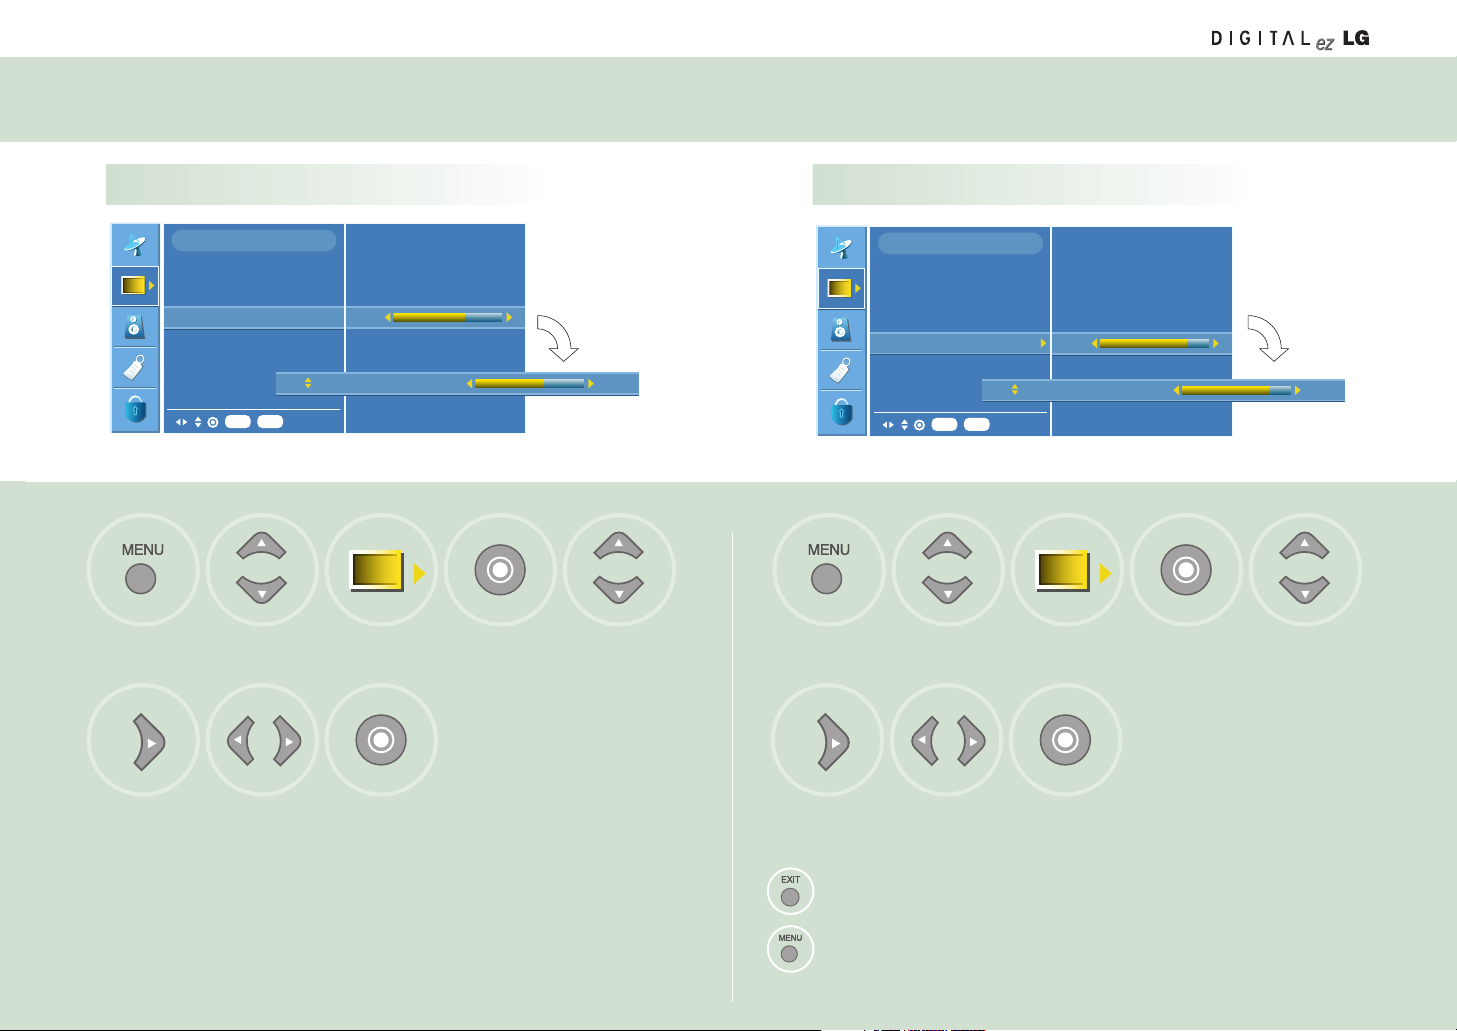
Adjusting the Picture
Adjusting the picture automatically Adjusting contrast
This function automatically adjusts the picture so that you can enjoy the
optimal picture quality depending on the TV usage environment.
Move to
[Picture].
Press the
button.
Select the state
you want.
Select
[Picture].
Move to
[
Picture].
Adjust contrast
you want.
Press the EXIT button to hide the menu screen.
Press the MENU button to move to the previous menu screen.
Press the
button.
Select
[
Picture].
Move to
[Contrast].
Move to
[
Ez Video].
1
3
2
3
12
Press the EZ VIDEO button.
• Press the EZ VIDEO button
to adjust the screen to your
preference.
32
EXIT
Ez Video
GG
Contrast
Brightness
Color
Sharpness
Tint
User
Night
Optimum
Clear
Soft
MENU
Picture
EXIT
Ez Video
Contrast
GG
Brightness
Color
Sharpness
Tint
MENU
Picture
Contrast 70
70
• User: Select this option to watch the TV with the picture setting that you or others have adjusted.
• Night: Suitable for dark area.
• Optimum: Most natural picture setting.
• Clear: Provides clear picture.
• Soft: Provides soft picture.
Page 33
Adjusting the Picture
Adjusting brightness Adjusting depth of color
Move to
[Picture].
Press the
button.
Adjust brightness
you want.
Select
[Picture].
Move to
[Picture].
Adjust color
you want.
Press the EXITbutton to hide the menu screen.
Press the MENU button to move to the previous menu screen.
Press the
button.
Select
[
Picture].
Move to
[Color].
Move to
[Brightness].
1
3
2
3
12
33
EXIT
Ez Video
Contrast
Brightness
GG
Color
Sharpness
Tint
MENU
Picture
Brightness
50
50
EXIT
Ez Video
Contrast
Brightness
Color
GG
Sharpness
Tint
MENU
Picture
Color
50
50
Page 34

Adjusting the Picture
Adjustment when Using
the Wireless TV
Adjusting sharpness Adjusting tint
Move to
[Picture].
Press the
button.
Adjust shapness
you want.
Select
[Picture].
Move to
[Picture].
Adjust tint
you want.
Press the EXIT button to hide the menu screen.
Press the MENU button to move to the previous menu screen.
Press the
button.
Select
[
Picture].
Move to
[Tint].
Move to
[Sharpness].
1
3
2
3
12
34
EXIT
Ez Video
Contrast
Brightness
Color
Sharpness
GG
Tint
MENU
Picture
Sarpness 50
50
EXIT
Ez Video
Contrast
Brightness
Color
Sharpness
Tint
GG
MENU
Picture
Tint
0
0
Page 35

Adjustment when
Using the Wireless TV
35
Adjusting Sound
Adjusting best sound automatically
Using the SAP (Secondary Audio Program) function
This function automatically adjusts sound according to the type of the
picture you’re watching so that you can enjoy the best sound quality.
Move to
[
Sound].
Press the
button.
Select the sound
state you want.
• User: Select this option to use the user-defined sound settings.
• Flat: Most natural sound settings.
• Movie: You can enjoy the magnificent sound.
• Music: You can enjoy the live original sound without change.
• Sports: Select this option when watching a sports program.
• The TV can receive MTS stereo programs and any SAP (Secondary Audio Program) that
accompanies the stereo program, if the broadcaster transmits an additional sound signal as
well as the original one.
• Mono: The primary language is heard from left and right speakers. Signal mode is mono.
• Stereo: The primary language is heard from left and right speakers. Signal mode is stereo.
• SAP: The secondary audio program is heard from left and right speakers.
Select
[Sound].
Move to
[Sound].
Select the sound
state you want
Press the
button.
Select
[
Sound].
Move to
[Stereo Mode].
Move to
[Ez Audio].
1
3
2
3
12
Press the EZ AUDIO button.
• Press the EZ AUDIO button
to select the sound state to
your preference.
Press the AUDIO button.
• Each time you press the
AUDIO button, Mono->
Stereo-> SAP will be dis-
played sequentially.
EXIT
Ez Audio
GG
Stereo Mode
AVL
Balance
MENU
Sound
User
GG
Flat
Movie
Music
Sports
EXIT
Ez Audio
Stereo Mode
GG
AVL
Balance
MENU
Sound
Mono
Stereo
SAP
MENU
EXIT
Equalizer
Page 36

36
Adjustment when
Using the Wireless TV
Adjusting Sound
AVL (Auto Volume Leveler) Adjusting sound balance
AVL maintains an equal volume level automatically even if the
channel is changed.
Adjust the sound balance you want.
Move to
[
Sound].
Press the
button.
Select
[
On] or [Off].
Select
[
Sound].
Move to
[Sound].
Adjust the sound
balance you want.
Press the
button.
Select
[
Sound].
Move to
[Balance].
Move to
[AVL].
1
3
2
3
12
Press the EXIT button to hide the menu screen.
Press the MENU button to move to the previous menu screen.
EXIT
Ez Audio
Stereo Mode
AVL
GG
Balance
MENU
Sound
EXIT
Ez Audio
Stereo Mode
AVL
Balance
GG
MENU
Sound
On
Off
R23
Page 37

37
Special Menu Options
Selecting the Input Signal Watching the Program with Caption Text
Move to
[Special].
Press the
button.
Select the input
signal you want.
Select
[Special].
Move to
[Special].
Select the function
you want.
Press the
button.
Select
[
Special].
Move to
[Caption/Text].
Move to
[Input].
1
3
2
3
12
• CAPTION
The term for the words that scroll across the bottom of the TV screen;
usually the audio portion of the program provided for the hearing impaired.
• TEXT
The term for the words that appear in a large black frame and almost cover the
entire screen; usually messages provided by the broadcaster.
Press the EXIT button to hide the menu screen.
Press the MENU button to move to the previous menu screen.
Press the TV/AV button.
• Each time you press the
TV/AV button, the input signal will be changed sequentially.
EXIT
Input
GG
Caption/Text
Captions
Sleep Timer
Key Lock
Language
MENU
Special
TV
Video
S-Video
EXIT
Input
Caption/Text
GG
Captions
Sleep Timer
Key Lock
Language
MENU
Special
CC1
CC2
CC3
CC4
TEXT1
TEXT2
TEXT3
TEXT4
Page 38

Adjustment when
Using the Wireless TV
Special Menu Options
Setting the Captions
Move to
[Special].
Select the option
you want.
Press the
button.
Select
[Special].
Move to
[Captions].
1
3
2
Press the EXIT button to hide the menu screen.
Press the MENU button to move to the previous menu screen.
Press the CC button
• Use the CC button repeatedly to select
Caption Off, Mute or On.
• Mute shows the selected captions option (if available on program)
when the TV sound is muted.
38
EXIT
Input
Caption/Text
Captions
GG
Sleep Timer
Key Lock
Language
MENU
Special
On
Mute
Off
Page 39

39
Special Menu Options
Closed captioning is a process which converts the audio portion of a television
program into written words which then appear as sub-titles on the television screen.
Closed captions allow viewers to read the dialogue and narration of television programs.
Captions are the subtitles of the dialogue and narration of
television programs. For prerecorded programs, program
dialogue can be arranged into captions in advance. Its
possible to caption a live program by using a process
called real-time captioning, which creates captions
instantly.
Real-time captioning is normally done by professional
reporters using a machine shorthand system and computer for translation into English.
Captioning is an effective system for the hearing-impaired, and it can also aid in
teaching language skills.
• The picture above shows a typical caption.
• Not all TV broadcasts include closed caption signals.
• Sometimes TV stations broadcast four different caption signals on the same channel.
By selecting From CC 1 to CC 4 , you can choose which signal you view. CC 1 is
usually the signal with the captions, while Another mode might show demonstration or
programming information.
• Your TV might not receive caption signals normally in the following situations.
1. Poor reception conditions are encountered:
• IGNITION:
Picture may flutter, drift, suffer from black spots, or horizontal streaking.
Usually caused by interference from automobile ignition systems, neon
lamps, electrical drills, and other electrical appli-ances.
• GHOSTS:
Ghosts are caused when the TV signal splits and follows two paths.
One is the direct path and the other is reflected off tall buildings, hills or
other objects. Changing the direction or position of the antenna may
improve reception.
• SNOW:
If your receiver is located at the weak, fringe area of a TV signal, your
picture may be marred by small dots. It may be necessary to install a
special antenna to improve the picture.
2. An old, bad, or illegally recorded tape is being played.
3. Strong, random signals from a car or airplane interfere with the TV signal.
4. The signal from the antenna is weak.
5. The program wasn’t captioned when it was produced, transmitted, or taped.
Closed Captions
FOLLOW ME
Using Closed Captions
Caption Tips
Page 40

Adjustment when
Using the Wireless TV
Special Menu Options
Setting the sleep timer
Move to
[Special].
Press the
button.
Set the
sleep reservation time
you want.
Select
[Special].
Move to
[Special].
Select
[
On] or [Off].
Press the
button.
Select
[
Special].
Move to
[Key Lock].
Move to
[Sleep Timer].
1
3
2
3
12
Press the EXIT button to hide the menu screen.
Press the MENU button to move to the previous menu screen.
Press the SLEEP button.
• Each time you press the
SLEEP button, the setting
time will be changed.
Menu can be different according to the selected input signal.
The TV will be automatically turned off after the setting period of time.
Setting the key lock
Disables the keypad on the TV.
40
• If you don’t press the SLEEP button and wait for a while when the Sleep Timer is displayed on the
screen, the Sleep Timer display will disappear and the sleep reservation time will be set.
• To check the remaining sleep reservation time after setting the Sleep Timer, press the SLEEP button once only.
• If you turn off the TV after setting the Sleep Timer, it will be cleared.
• This function will be disabled in the Media Browser.
EXIT
Input
Caption/Text
Captions
Sleep Timer
GG
Key Lock
Language
MENU
Special
Off
10 min.
20 min.
30 min.
60 min.
90 min.
120 min.
180 min.
240 min.
EXIT
Input
Caption/Text
Captions
Sleep Timer
Key Lock
GG
Language
MENU
Special
On
Off
Page 41

41
Parental Lock Options
Setting the lock function Changing the password setting
Move to
[Lock].
Select
[
On] or [Off].
Press the
button.
Move to
[Lock].
Select
[
Lock].
Move to
[Lock].
Move to
[
Set Password].
Input new
password.
Input the password
again for confirmation.
Select
[
Lock].
Input the
password.
Input the
password.
1
34
2
3
12
• If Lock is already set, enter the password requested.
• The TV is set with the initial password "0-0-0-0".
• MPAA: Select the ratings defined by the Motion Picture Association of America.
• TV Rating
- Age Block: Select the age rating.
- Content Block: Select the content rating
• Aux. Block: Set locking on the input source of the external devices connected to the TV set.
• Canadian: Select the ratings defined by the Canadian rating regulation.
You can set the locking status for the program audience ratings
received from the broadcasting service provider.
EXIT
Lock
GG
Set Password
MPAA
TV Rating
Aux. Block
Canadian
MENU
Lock
EXIT
Lock
Set Password
GG
MPAA
TV Rating
Aux. Block
Canadian
MENU
Lock
On
Off
MENU
EXIT
Lock
Code
New
Confirm
Page 42

42
Adjustment when
Using the Wireless TV
Parental Lock Options
Parental Control can be used to block specific channels, ratings and other viewing
sources.
The Parental Control Function (V-Chip) is used to block program viewing based on the
ratings sent by the broadcast station. The default setting is to allow all programs to be
viewed. Viewing can be blocked by the type of program and by the categories chosen
to be blocked. It is also possible to block all program viewing for a time period. To use
this function, the following must be set :
1. Ratings and categories to be blocked.
2. Set a password
3. Enable the lock
V-Chip rating and categories
Rating guidelines are provided by broadcast stations. Most television programs and
television movies can be blocked by TV Rating and/or Individual Categories. Movies
that have been shown at the theaters or direct-to-video movies use the Movie Rating
System (MPAA) only.
For Movies previously shown in theaters :
Movie Ratings :
• Unblocked
• G and Above (general audience)
• PG and Above (parental guidance suggested)
• PG-13 and Above (13 years and older)
• R and above (restricted)
• NC-17 and Above (18 years and older)
• X (adult)
If you set PG-13 and Above: G and PG movies will be available , PG-13, R, NC-17
and X will be blocked.
For Television programs including made-for-TV movies:
General TV Ratings:
• Unblocked
• TV-G and Above (general audience) (individual categories do not apply)
• TV-PG and Above (parental guidance suggested)
• TV-14 and Above (14 years and older)
• TV-MA (mature audience)
Children TV Ratings:
• Unblocked
• TV-Y and Above (youth) (individual content categories do not apply)
• TV-Y7 (youth, 7 years and up)
Content Categories:
• Dialog - sexual dialogue (applies to TV-PG and Above, TV-14)
• Language - adult language (applies to TV-PG and Above)
• Sex scenes - sexual situations (applies to TV-PG and Above, TV-14 and Above,
TV-MA)
• Violence (applies to TV-PG and Above, TV-14 and Above, TV-MA)
• F Violence - fantasy violence (applies only to TV-Y7)
• No Rating (blocks all viewing)
For Canadian English/French language rating system:
Canadian English language rating system:
• C & Above (Children)
• C8+ (8 years and older)
• G & Above (General programming. Suitable for all audiences.)
• PG & Above (Parental guidance suggested)
• 14+ (Viewer 14 years and older)
• 18+ (Adult programming)
Canadian French language rating system:
• G & Above (General)
• 8 ans+ (8 years and older)
• 13 ans+ (13 years and older)
• 16 ans+ (16 years and older)
• 18 ans+ (Adults only)
Page 43

Using Media Browser
43
Using Media Browser
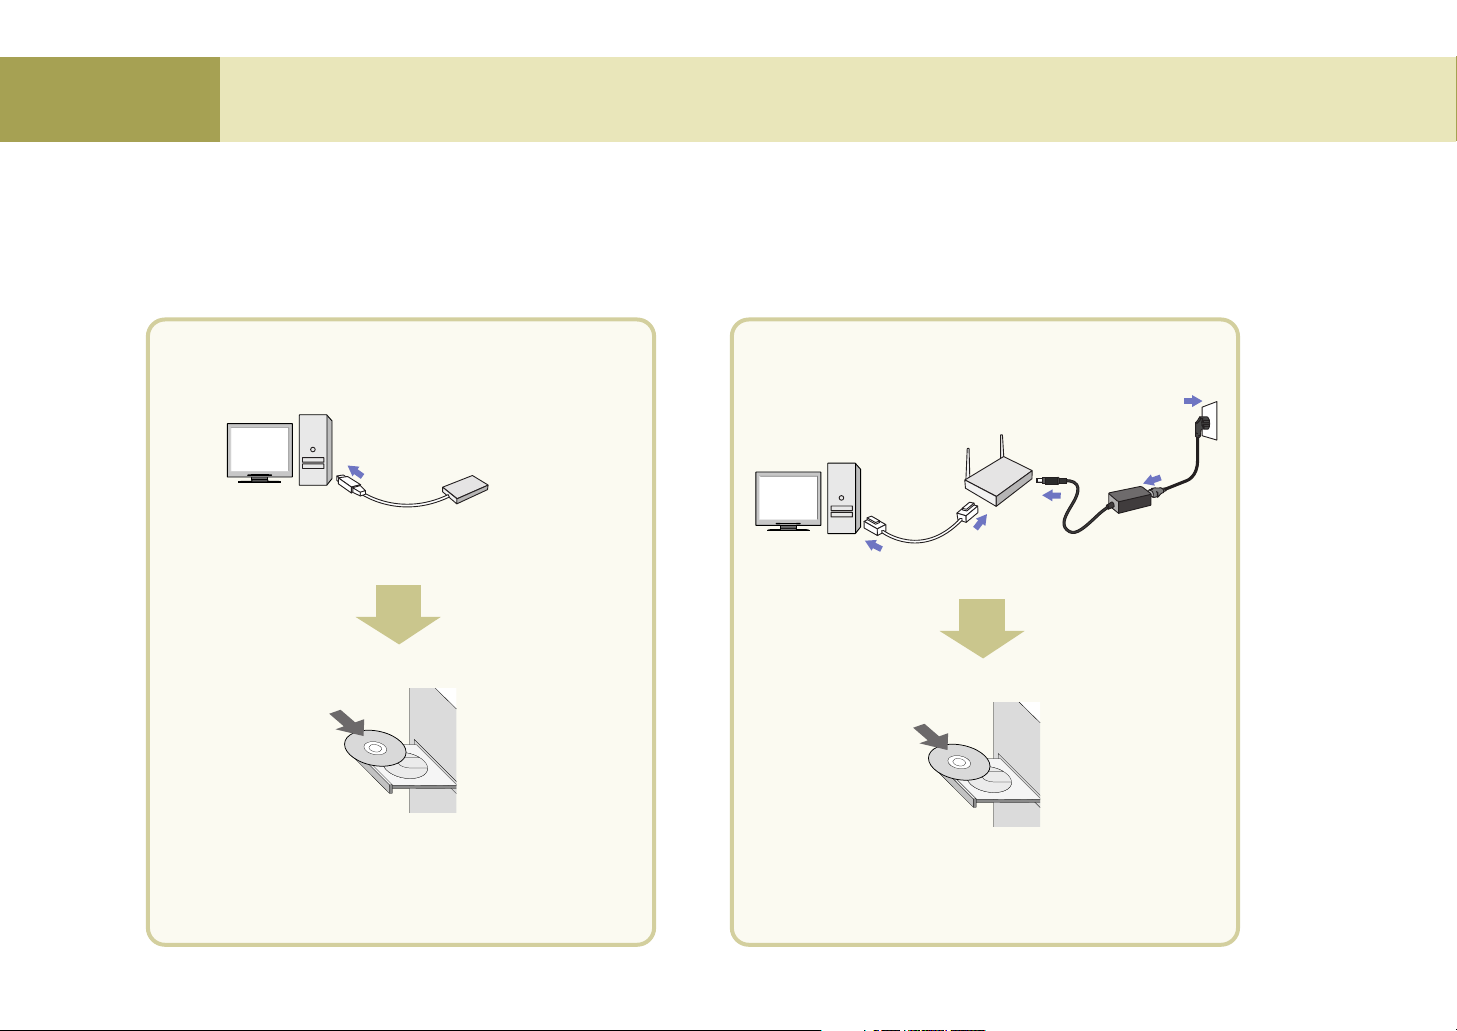
Setting the wireless network
To use the Media Browser on your wireless TV, you will first need to configure your computer network and install the Media Library software.
If your computer does not have a wireless LAN card, one will need to be purchased and installed.
You should purchase the wireless LAN card (or Access Point(AP)) separately
802.11g adaptor (or 802.11g Access Point(AP)) that complies with Wi-Fi.
You cannot use the
802.11a wireless LAN card (or, 802.11a Access Point(AP)) for this wireless TV.
We recommend that you use the USB type adaptor that is easy to configure, or the wireless LAN card that runs in 802.11g only.
Setting method 1
1
Connect the power to the wireless TV.
Wireless TV
DC power adaptor
2
Turn on the wireless TV.
Switch to the ‘Media Browser’
by pressing TV/MEDIA button.
'SERVER FINDING' or 'SEARCH FAILURE' window
will appear on the TV screen as shown in the figure.
Do not click the [OK] on the screen but take the
following steps.
Upper side of the wireless TV Remote control Remote control
or
or
Power cord
Setting method 1
Setting method 2
There are two methods for setting the wireless network.
If you use the wireless LAN card for the first time, take the steps described in the ‘Setting method 1’.
If you’re familiar with wireless LAN card use, take the steps described in the ‘Setting method 2’. (See page 50)
Page 44
44
Using Media Browser
Using Media Browser
If the computer to install the Media Library is not equipped with the wireless LAN card (or, Access Point(AP)), install it first.
* Ensure to read the User’s Manual provided by the vendor of the wireless LAN card (or, Access Point(AP)) to learn about how to install the wireless LAN card.
* For the wireless LAN card (or, Access Point(AP)) that supports both
802.11b and 802.11g, set the adaptor to run in 802.11g only. <See the User’s Manual of the
wireless LAN card (or, Access Point(AP))> If you mix
11g and 11 b when using the adaptor, link speed will drop.
3
When using the wireless LAN card
Wireless LAN card-
Not included
Computer
• Install the wireless LAN card driver files after installing
it. Once the driver is successfully installed, go to step
‘Setting the wireless network in the computer’.
Computer
When using the Access Point(AP)
Network cable
DC adaptor
Computer
• Install the Access Point(AP) driver files after installing
it. Once the driver is successfully installed, go to step
‘Setting the wireless network in the computer’.
Computer
Access Point(AP)
- Not included
4.
4.
Power cord
Page 45

45
Using Media Browser
* Set the computer SSID (Network name), WEP key, and connection mode as follows by referring to the User’s Manual for the wireless LAN card (or,
Access Point(AP)) that you purchased.
4
When using the wireless LAN card
When setting is complete, do not turn off the wireless TV but
install the Media Library as described in step 5.
SSID (network name)
* Set to “LGMB” (Case-sensitive)
Set WEP key as ‘Not in Use’.
Set the Connection Mode
as ‘Networking between computers
(Ad-hoc or peer-to-peer)’
Setting Internet protocol TCP/IP
Choose one of the following two setting methods.
u ‘Obtain an IP address automatically’
Performance can drop when connecting the computer to the
wireless TV through wireless connection – up to 2 minutes
delay.
u ‘Use the following IP address (manual)’ (recommended)
IP address:
169.254.XXX.XXX (Input any number between 1
and 254 for XXX.) e.g., 169.254.45.200
Subnet mask: 255.255.0.0
Gateway: Do not input any IP.
1
2
3
4
When using the Access Point(AP)
1) Setting the Access Point(AP)
SSID (Network name)
• Use the existing SSID(network name) without change, or input new
SSID(nerwork name) (case-sensitive) to use. e.g., LGMEDIA
Set WEP key
as ‘Not in Use’.
Setting Internet protocol TCP/IP
• Set the Access Point(AP) IP address as 192.168.0.1 and subnet mask as
255.255.255.0.
• If Access Point(AP) provides the DHCP Server function, activate it. (recommended)
• Connect the Access Point(AP) to the computer using the Ethernet cable.
Setting Internet protocol TCP/IP
Choose one of the following two setting methods.
•
‘Obtain an IP address automatically’
If you have activated the DHCP Server function when setting the Access
Point(AP), select the ‘Obtain an IP address automatically’ option.
•
‘Use the following IP address (manual)’ (recommended)
Set as follows if you have not activated the DHCP Server function when
setting the Access Point(AP) or the Access Point(AP) does not provide it.
IP address: 192.168.XXX.XXX (Input any number between 2 and 254 for
XXX.) e.g., 192.168.0.200
Subnet mask: 255.255.255.0
Gateway: 192.168.0.1.
To be continued on the next page.
1
2
3
1
*Make sure to read the User’s Manual of the Access Point(AP) provided by the
vendor before setting the Access Point(AP).
2) Setting the computer
Setting the wireless network in the computer
Page 46

46
Using Media Browser
Using Media Browser
Set only when you use the Access Point(AP)
Take the following setting steps when Access Point(AP) setting is complete.
or
The setting screen will appear.
* Your wireless TV IP Address may be different from the one described in
this manual.
Press the [OK] in the 'SERVER FINDING' or 'SEARCH FAILURE' window on the TV screen, using the remote
control button.
Move to ‘Select Network’ field using the and button on the remote
control.
Find the SSID(network name) you have set in the computer using the and
button on the remote control, and press the button. e.g., LGMEDIA
u
If you select the ‘Obtain an IP address automatically’ option, select ‘Automatic’.
If you select automatic network setting, the IP Address, Subnet mask and Gateway
will not appear in the wireless TV. (No setting is required.)
u
If you select the ‘Use the following IP address’ option, select ‘Manual’ and set the
fourth column of the IP Address different from the Access Point
(AP)
and the
computer. If you set the same address, it will not run.
e.g., Wireless TV: 192.198.0.110, Access Point: 192.168.0.1, Computer: 192.168.0.200
Subnet Mask: Set the same value with the Access Point
(AP)
. e.g., 255. 255. 255. 0
Gateway: Input the IP address set in the Access Point
(AP)
. e.g., 192.168.0.1
Press the button on the remote control.
When the Network Setting Confirmation window appears,
press the button on the remote control.
When the Find Media Server window appears as shown
left, insert the Media Library Installation CD into the
computer.
Page 47

47
Using Media Browser
Once the ‘Media Library’ program is installed in your computer, you can view the picture or play back music or movie by connecting the wireless TV to the Media Browser.
You should install the program first to use the Media Browser in the wireless TV.
56 7
Computer
• Insert the installation CD into the
CD-ROM drive. Wait until the
installation message appears.
• When the Install Media Library window appears,
select the language (English/Korean) and click
the [OK].
• If the installation window does not appear
automatically, double click the ‘setup.exe’ file in
the CD manually.
• When installation is ready to proceed, click the [Next] button.
Windows 98
Windows 98SE
Windows ME
Windows 2000
Windows XP
* Wireless LAN card should have the Access Point(AP) or NIC (Network Interface Card) that
supports 802.11g.
* Wireless LAN card should comply with Wi-Fi.
OS CPU RAM Hard Disk USB
Pentium III
600MHz or
faster
128Mb or
more
1Gb or more USB 2.0
support
* Wireless LAN card should have the Access Point(AP) or NIC (Network Interface Card)
that supports 802.11g.
* Wireless LAN card should comply with Wi-Fi.
Windows XP
OS CPU RAM Hard Disk USB
Pentium IV
1.5GHz or
faster
128Mb or
more
40Gb or more
USB 2.0
support
At your computer : Installing the ‘Media Library’ Server in you computer
Minimum PC requirement for installation
Recommended PC specification
Page 48

Using Media Browser
Using Media Browser
•
Create a folder to install the Media Library.
•
Click the [Next] to create the ‘LG Media Library’ folder
under the ‘C:\Program Files’ folder automatically.
•
When the question window
appears, click the
[Yes] to run
the Media Library.
• When you run the Media Library, the Select
Network Interface window will appear. Select the
wireless network adaptor you have installed and
click the
[Select].
When the
‘Media Library Manager’ window
appears, share the folder you want. (See page 53)
When the program is successfully installed, the
initial screen of
‘Home Media’ will appear on the
wireless TV.
• The program icon will appear on the Windows Task Bar.
•
If you want to install the program at
other folder, click the
[Browse] and
specify the folder.
•
Installation of the Media Library is complete.
•
Click the [Finish] to complete installation.
Deleting the Media Library program
8
10
9
Select
Click
1. Select Start > All Programs > LG Media Library > Uninstall
to uninstall the Media Library.
* When system rebooting selection message appears,
select the option you want and click the
[Finish].
2. You can also delete the Media Library program by
selecting My Computer > Control Panel > All or Remove
Programs.
48
Page 49

49
Using Media Browser
11
When using the Wireless LAN card When using the Access Point (AP)
•
When the program is successfully installed,
the initial screen of ‘
Home Media’ will appear
on the wireless TV.
Press the button on the remote control when the
‘SEARCH
SERVER LIST’
window appears on the TV screen.
•
When the program is successfully installed as
described above, the initial screen of
‘Home
Media’
will appear on the wireless TV.
The IP address of the computer installed with the
Media Browser will be displayed on the Select
Media Server window.
If it matches with the computer’s IP Address, press
the button.
If not, find the matching IP Address using the
and button on the remote control and, press
the button.
Page 50

50
Using Media Browser
Using Media Browser
1
2
3
If you’re familiar with wireless LAN card setting, configure the wireless network of the computer and the wireless
TV by referring to the following section.
Connect the power of the wireless TV.
Wireless TV
DC adaptor
Power cord
Turn on the wireless TV.
Upper side of the wireless TV
Remote control
Switch to the ‘Media Browser’
pressing TV/MEDIA button.
Remote control
or
The 'SERVER FINDING' or 'SEARCH FAILURE' window
will appear on the TV screen as shown in the figure.
Press the
[OK] using the remote control button.
The Setting window will appear. The setting details are as follows.
1. SSID (network name): LGMEDIA
2. WEP key: Not In Use
3. Operation mode: ad-hoc
4. Internet Protocol TCP/IP: Obtain an IP address automatically
To change the settings, take the following steps.
(For your reference, the computer should have been turned on, and the wireless LAN card(or, the Access Point(AP)) also should have
been configured in advance in the computer.)
Move to ‘Select Network’ using the and button on the remote control.
Select the SSID (network name) set in the computer or the Access Point(AP) using the and button on the remote control.
Press the button on the remote control when setting is complete.
or
Setting method 2
Page 51

51
3
4
5
Move to WEP key using the and key on the remote control.
If you have set the WEP key in the computer (or, the Access Point(AP)), you should set the same WEP key in the
wireless TV.
(If not, you don’t have to set the WEP key in the wireless TV.)
Select ‘64 bits’ if the WEP key is 5 or 10 digit long. Or, select ‘128 bits’ if it is 13 or 26 digits. Then, press the
button on the remote control.
Input the WEP key when the virtual keyboard appears.
Press the [OK] on the virtual keyboard using the remote control button when setting is completed. For your
reference, WEP key setting can slow down performance.
Move to the Network section using the and button on the remote control.
Select whether you want to set the IP Address automatically or manually.
Select ‘Automatic’ if you select the ‘Obtain an IP address automatically’ option for IP Address setting in the
computer. Otherwise (manual setting), input IP Address, Subnet Mask and Gateway using the number buttons on
the remote control.
Set the fourth column of the IP Address different from the computer. If you set the same address, it will not run
e.g., Computer: 192.168.0.200, wireless TV: 192.168.0.110
Press the button on the remote control.
Press the button on the remote control when the Network Setting Confirmation Window appears.
Virtual keyboard
Input the number or the character you want by pressing
the buttons on the remote control.
Using Media Browser
Page 52

52
Using Media Browser
Using Media Browser
6
7
8
When network setting is complete, the ‘SEARCH SERVER’ window will appear as shown left.
Press the button on the remote control to cancel. Do not then configure other items but install the
Media Library in the computer. (See page 47.)
The
‘SEARCH SERVER LIST’ window will appear if the Media Browser is successfully installed.
Press the button. Then, the IP address of the computer installed with the Media Browser will be displayed.
If it matches with the computer’s IP address, press the button.
If not, find the matching IP address using the and button on the remote control and, press the button.
The Home screen of the Media Browser will appear and setting will be completed.
When Media Library installation is complete, run ‘LG Media Library Agent’. Then, the ‘Select Network Interface’ window will appear.
Specify the wireless LAN card adaptor you have installed.
• Run LG Media Library
Agent.
• Specify the wireless LAN card (or, Access Point(AP))
and click the [Select].
• Share the folder to share when the ‘Media Library
Manager’ window appear. (See next page)
If the IP Address of the computer does not appear in the Select Media Server window, the wireless LAN
card (or, Access Point(AP)) setting must be incorrect or the Media Library is not installed properly. In this
case, check whether the wireless (or, Access Point(AP)) setting of the computer matches with that of the
wireless TV, or the Media Library is properly installed.
Select
Click
Page 53

Using Media Browser
Using Media Library Manager
Once the Media Library program is installed in your computer, you can view the picture or play back music or movie by connecting the wireless TV to the Media Browser.
Pictures, music files and movie files should have been shared using the Media Library Manager to view the picture or play back music or movie stored in the computer.
1
• Double click the Media Library
icon on the Desktop window to
start the program.
To start with a different method,
1. Select Start > All Programs > LG Media Library > LG Media Library Manager to use the
Media Library Manager program.
2. Click the right mouse button to use the Media
Library Manager.
• Once the program is started, the Media
Library icon will be activated in the
Windows Task Bar.
Click with the right mouse button to start
the Media Library Manager.
2
2
5
3
1
4
Menu selection button
Picture: Manages picture file share folder.
Music: Manages music file share folder.
Movie: Manages movie file share folder.
Playlist: Manages the playlist. (See page 57)
Windows Explorer
You can find the folder to add to the Shared folder (4).
You cannot move the local disc drive to the Shared folder.
e.g., C or D drive.
Select/Delete/Information button
Select: Adds the selected folder to the Shared folder.
Delete: Deletes the selected folder from the Shared folder.
Information: Shows the property information on the selected
folder or file.
Shared folder
You can check and use the folder added in the
Shared folder in the wireless TV.
File view
You can check the file(s) in the selected folder.
1
2
3
4
5
At your computer
53
Page 54

Using Media Browser
Viewing Pictures
You can view the images or the pictures in the folder shared by the Media Server. (See page 53 – Sharing files in the Media Server)
1
2
Moving up Select the icon using the movement buttons on the remote
control to move to the upper folder.
Preview You can preview the pictures in the folder. The image will
appear if the picture does not contain the preview information.
Page Up You can move up/down the list by page using the CH/PAGE
/Down button on the remote control.
Arrange List You can arrange the name of the folder or picture files by
ascending/descending order using the EZ VIDEO button
on the remote control.
Back to You can move to the home screen using the HOME
‘Home Media’ button on the remote control.
1
2
3
4
5
Home Media
screen
Viewings the images in the folder
The wireless TV supports the following picture file formats.
Supported format : *.jpeg, *.jpg
Select the image to view using the movement buttons
on the remote control.
Selection button:
Press the
STOP button or EXIT button to move
back to the picture list.
Movement buttons
Play back the music file. (See page 56.)
Move to the ‘Picture’ menu and view the picture after returning to the ‘Home Media’
screen.
(You can adjust the sound volume at any menu – ‘Music’ menu, ‘Home Media’ or
‘Picture’ menu, using the VOL button.)
To stop music playback, return to the ‘Home Media’ and move to the ‘Music’ menu.
Press the STOP button to stop music playback.
Viewing pictures
Viewing pictures while listening to the music
1
2
1
2
3
At the wireless TV : Viewing Pictures
File arrangement will be disabled during music playback.
54
Page 55

55
Viewing Pictures
Viewing the slide show
1
View page You can display current page as well as all pages. (Current page/All pages)
View file name You can check the file name of the picture.
Rotate You can rotate the selected picture for viewing.
button on the remote control: Rotate the left picture.
button on the remote control: Rotate the right picture.
View previous / You can display the picture previous/next to the current picture.
next picture Remote Control button: Displays the picture previous to the currently
selected picture.
Remote Control button: Displays the picture next to the currently
selected picture.
Stop Use STOP or EXIT button to return to the View Picture List screen.
Hide Hides the status bar at the bottom. Select the button repetitively to show the status
bar again.
Select the image to view using the MARK button.
* To select consecutive files at a time
.
Click at the beginning of the selected pictures!
Click at the end of the selected pictures!
Press the Start Slide Show button.
* If you press this button when no picture is selected, all
files will be included in a slide show.
Selection button: Selection cancel button:
The selected files will be displayed as a slide show with the preset speed.
(Use the Setting menu to change slide show speed! See page 61.)
Press the
STOP or EXIT button to stop playing a slide show.
* If you don’t press the
STOP button, the slide show will continue repeatedly.
1
2
3
4
5
6
Picture list
2 53 4 6
13
4
2
Page 56

Using Media Browser
Playing Musics
Select the music file to play back and press the
button or
PLAY button.
* Use the MARK button to select multiple files.
* Selecting several consecutive files at a time:
Selection button: Selection cancel button:
Press the button to play back the previous music
file, or the button to play back the next one.
* The title color will be changed to light blue.
Click!
Click!
Playing musics
Playing back previous/next music file
You can play back the music files in the folder shared by the Media Server. (See page 53 – Sharing files in the Media Server)
Moving up Select the icon using the movement buttons on the remote
control to move to the upper folder.
Page Up You can move up/down the list by page using the CH/PAGE
/Down button on the remote control.
Arrange List You can arrange the name of the folder or picture files by
ascending/descending order using the EZ VIDEO button on
the remote control.
Back to You can move to the home screen using the HOME
‘Home Media’ button on the remote control.
1
2
3
4
Playing back the music files in the folder
The wireless TV supports the following music file formats.
Supported format : MPEG1 Layer I, II, III (*.mpa, *.mp3)
Home Media
screen
File arrangement and MARK
button will be disabled during
music playback.
If you press the
HOME button
during playback, the selected music
file will be played back instead.
You cannot move from the Home
screen to the Setting screen during
music playback.
At the wireless TV : Playing musics
56
Page 57

Playing Music
Playing music using a playlist
You can create a playlist that contains your favorite music and use it on the wireless TV. (See next page)
Stop/Pause
STOP: Press the STOP button to stop playback of
the current music file.
PAUSE: Press the PAUSE button to temporarily
stop music playback. To resume playback,
press the PLAY button.
Repeat/Clear
Press the AUDIO button to play back several music
files in the playlist or selected file repetitively.
For repeated playback
Random/Clear
Press the button to play back the music files randomly.
For random playback
At the wireless TV
At your computer
57
Page 58

Using Media Library
Playing music
1
You can create a playlist that contains your favorite music and use it on the wireless TV. (See next page)
Select the
[Playlist] icon.
Click the
[New]
button in the
Playlist window.
A new playlist
will be created.
1. Select a [PLAYLIST].
2. Select the music file to play
back.
3. Click the
[Select] button.
The music file is added to the playlist.
Click the
[Save] button to save it.
(The file will be saved in My Computer -> C: -> Program Files -> LG
Media Library -> Playlist by default.)
You can add the contents of the
selected playlist to the currently
edited playlist.
Select a folder in the
Shared folder.
Then, the music file
list will be displayed at
the bottom section.
(No folder will appear
if no folder is shared in
the Music menu.)
If the folder is not
shared, click the [File
Search] button and
select the folder to
share.
* You can add the
music files in the
Shared folder only
to the playlist.
2
3
4
5
You can save the selected list in a
playlist as a different file name.
At computer : Creating a playlist
- You must not omit the file extension
(*.pls) when naming a playlist file.
- File extensions other than the specified
one (*.pls) are not supported.
58
1
2
3
Page 59

59
Playing Movies
Select the movie file to play back and press the
button or PLAY button.
* Use the MARK button to select multiple files.
* Selecting several consecutive files at a time:
Selection button: Selection cancel button :
Press the STOP button to move to the View Movie
List window during playback.
* When playback is finished, the View Movie List window
will be automatically displayed.
* If you exit to the Home screen and return while playing
back the movie file or playback is stopped.
If you select the movie file that was being played, the
‘WHERE TO PLAY’ window will appear.
(Some format does not display this window.)
Previous Position: Resumes playback from the interrupted
position.
Initial Position: Starts from the beginning.
Click!
Click!
Playing back the movie
You can play back the video files in the folder shared by the Media Server. (See page 53 – Sharing files in the Media Server)
Moving up
Select the icon using the movement buttons on the remote control to move to
the upper folder.
Page Up/Down
You can move up/down the list by page using the CH/PAGE button on the
remote control.
Arrange List
You can arrange the name of the folder or movie files by ascending/descending
order using the EZ VIDEO button on the remote control.
Back to ‘Home Media’
You can move to the home screen using the HOME button on the remote control.
Caption setting
You can change the caption/text setting in the movie list screen using the button
on the remote control. Press the button on the remote control to hide/show (toggle)
the caption/text while playing back the movie file.
1
2
3
4
5
View movie list
Supported format: MPEG-1 VCD, MPEG-2 (SD class),
WMV9 (SD class), AVI.
* For more details, see the next page.
1
2
Home Media
screen
Video may be lost when playing the
movie or executing FF/REW,
depending on the network condition.
At the wireless TV : Playing Movies
Page 60

Using Media Library
Playing movies
Playing previous/next movie file
Stop/Pause
FF/REWIND
1 42
3
View file name You can check the name of the movie file.
View file property You can check the movie file format.
Sound amplification You can amplify the sound by properly adjusting the
default value.
(Press the AUDIO button on the remote control.)
X1: Default volume, X2: 2 times, X3: 3 times
View file playback time You can check the file playback time and all playback
time.
Press the button to play back the previous movie file, or press the
button to play back the next one.
STOP: Press the STOP button to stop playback of the current file.
PAUSE: Press the PAUSE button to temporarily stop playback.
To resume playback, press the
PLAY button.
Moves the playback position of the current movie file forward or backward by
certain interval.
FF : Moves forward as much as 2% of the entire file playback length
(based on 1 hour).
REWIND : Moves backward as much as 2% of the entire file playback
length (based on 1 hour).
* Movement position can differ according to the file size.
(Not available for some formats)
1
2
3
4
The wireless TV supports the following movie file formats.
• MPEG-1 VCD (*.mpg, *.mpe, *.mpeg, *.dat, *.m1v)
• MPEG-2 (SD class) (*.mpg, *.mpe, *.mpeg, *.vob,
*.m2v)
• WMV9 (SD class) (*.wmv)
• AVI (*.avi)
Audio codec
- MPEG1 Layer I, II, III
- Dolby Digital (AC3)
- DTS
- Windows Media Audio (WMA9)
Video codec
- MPEG-4 (1/2/3)
- Divx 3.11/4/5
- XVID
- WMV9
Supported sub-title file format
• Sami (*.smi)
* The sub-title name must
be same as that of the
movie file to be displayed
the sub-title on the TV.
60
Page 61

61
Changing Settings
Brightness
SlideShow
Browse From
Select Network
WEP key
Network
Select Media
Server
Adjusts brightness of the screen. Larger values make the screen brighter.
Adjusts the slide show interval.
Slow (15 seconds) -> Normal (10 seconds) -> Fast (5 seconds)
Press the button after setting.
Selects the screen when the TV/MEDIA button is pressed on the remote control.
Home: Home screen appears when switching from TV to Media Browser.
Last mode: Starts from the last screen used.
Press the button after setting.
Changes or selects the SSID(network name) of the wireless LAN card (or Access Point(AP)).
Select the wireless network ID to change using the left/right button on the remote control.
Encryption for security. Assigns the WEP key (password) for wireless LAN card (or Access Point(AP))
setting.
Not in Use: WEP key will not be used.
64bit/128bit: If you apply 64 bits or 128 bits and press the button, the virtual keyboard screen
(5-1) will appear and lets you enter the password.
Sets the IP Address, Subnet Mask, and Gateway.
Manual: You should manually input IP Address, Subnet mask and Gateway value.
Automatic: IP Address, Subnet mask and Gateway value will be automatically filled in by the DHCP
server. (Nothing will appear on the Setting window.)
Specify the computer that contains the media files to use.
When the Setting Confirmation window appear after setting, press the button.
* If you press the HOME button on the remote control when changing the Select Network, WEP key and Network, the
‘SEARCH FAILURE’ windows appear if you select Exit from the Setting menu. Press the button again to enter into the
Setting menu again.
1
2
3
4
5
6
7
1
2
3
4
7
5-1
Virtual keyboard
Input the number or the character you
want, using the movement buttons on
the remote control.
5
6
Changing Settings
Page 62

Note
Check before reporting malfunction
62
When suspecting a malfunction, check again if the following occur. It may not necessarily be a malfunction.
Abnormal Adjustment
Symptoms
Screen appears a little late after turning the wireless TV on.
Screen appears but no sound is
heard.
Remote control does not work.
Vertical and horizontal lines as well as
net pattern appear on the screen
instantly, and the screen shakes.
Sreen of all channels or the specific
channel is overlapped or the line
Color is not displaying properly.
A strange sound is heard from the
wireless TV.
This phenomenon occurs because of image elimination processing to hide the image noise on the screen when
the power is turned on. It is not a malfunction.
The screen may appear a little late depending on the network status.
Check the program of other broadcasting service provider.
Press the Volume Up button among Volume Up/Down button.
Check whether there is any obstacle between remote control and wireless TV.
Check whether the battery is inserted with correct polarity.
The battery can be used up. Replace two batteries with new one. (Page 20)
Caused by strong electromagnetic interference from a high-frequency electric device or other TV. Possibly
caused by a cordless phone, hair dryer, electric drill, etc.
Adjust the direction. i.e., Re-orient the antenna to the broadcasting station.
Check the program of other broadcasting service provider.
Select the color and adjust it using the Volume Up button. (Page 33)
“Snapping sound” before and after watching TV originates from surrounding environment change because of the
characteristics of the plastic products. It is not a malfunction.
Take the following measures
Q
A
A
A
A
A
A
A
A
A
A
A
A
Q
Q
Q
Q
Q
Q
Page 63
When suspecting a malfunction, check again if the following occur. It may not necessarily be a malfunction.
Check before reporting malfunction
Symptoms
Nothing appears on the screen.
No sound is heard.
The screen becomes darker when I
separate a DC adapter while the battery is mounted.
The screen blinks when setting the
screen automatically.
Check whether the battery or the DC adaptor is connected.
If you find that the battery power LED flashes in yellow color when you press the power button, the remaining
battery amount is insufficient. Connect the DC adaptor in this case.
Screen brightness is automatically adjusted for power saving. If the DC adaptor is connected, the previous setting will be restored.
Take the following measures
Q
A
A
A
A
A
A
A
A
Screen brightness is adjusted twice at the time of automatic screen adjustment. It is not a malfunction.
A
Adjust the volume.
Check whether the ‘Mute’ function is set in the Volume setting menu.
If no sound is heard from the headset, check whether the headset jack is properly connected to the wireless TV.
If the headset is equipped with the volume control function, sound balance setting in the wireless TV may not
work properly.
When listening to the music from the wireless TV through the computer, music playback can be interrupted from
time to time depending on the wireless network environment.
Q
Q
Q
Abnormal Adjustment
63
Page 64

64
Note
Check before reporting malfunction
When suspecting a malfunction, check again if the following occur. It may not necessarily be a malfunction.
Symptoms Take the following measures
When I use the Media Browser,
the “Check the PC status first. If
you want to change the settings,
press the button.” message
appears.
Check whether the network setting (SSID(network name), WEP key and so on) is correct in the wireless TV.
Check whether the computer is turned on.
Check whether the program (Media Library) is properly installed in the computer.
Check whether the wireless LAN card (or, Access Point (AP)) is installed properly and it can be used.
Check whether the distance from wireless TV and computer is too far away.
Check whether the Media Library is allocated to the wireless LAN card (or, Access Point(AP)).
Check whether the ‘Turn off HDD’ option is set on in the power saving mode of the computer.
Check the wireless Access Point(AP) setting. If the SSID(network name) is in the hiding mode, it cannot be used.
Q
A
A
A
A
A
A
A
A
Check whether the SSID(network name) in ‘Select Network’ of the
wireless TV setting is identical to that of the computer wireless network.
If it is different, set the SSID(network name) of the wireless TV as
that of the computer. (See page 46)
The SSID(network name) in ‘Select Network’ of the wireless TV setting is set to LGMEDIA by default. But, it can be changed using the
wireless network SSID(network name) set in the computer.
At this time, the wireless LAN card (or, Access Point(AP)) setting in
the computer should be ‘Network between Computers’ (Ad-hoc or
peer-to-peer). See the wireless LAN card (or, Access Point(AP))
user’s manual.
If the wireless LAN card (or, Access Point(AP) is not allocated, run
“Re-start the service with a different IP” and select the network installed with
the wireless LAN card (or, Access Point(AP)) and then activate the service.
Abnormal Adjustment
Page 65

65
Check again if the following phenomenon occurs, which you presume that it is malfunction. It may not be malfunction indeed.
Symptoms Take the following measures
TV screen display is interrupted from
time to time, or not displayed properly.
Check whether the power of the transmission unit is turned on.
First, check whether the power LED in the transmission unit flashes in red color. Then, move the location of the
transmission unit to the center of the house or the position where you watch the TV most frequently.
Check whether the distance from wireless TV and computer is too far away.
Reception sensitivity differs according to the direction of the wireless TV and wireless
transmission unit. Turn the front side of the wireless transmission unit towards the wireless TV.
Reception sensitivity of the wireless TV also depends on the direction. Find the optimal
direction and location inside the house and install the wireless TV.
Do not attach the wireless transmission unit on the bookshelf or the wall to extend the wireless
network coverage.
If the TV is turned on properly but not the TV broadcasting, check TV antenna connection and set the channel using
the
[Ez Scan] function. (See page 30.)
Q
A
A
A
A
A
A
A
Wireless transmission unit
Front
Check before reporting malfunction
Abnormal Adjustment
Page 66

66
Note
Product Specification
The product specification is subject to change without notice for product improvement.
Display Device
Television Standard
Receiving Channel
Input Connector
Power
Power Consumption
External Antenna Impedance
Sound Output
External Port
Dimension
Size
(Width x Length x Height)
Weight
(excluding package)
Wireless TV (4.0 Kg)
Wireless Transmission Unit (1.6 Kg)
15
LCD Panel
NTSC
VHF 2~13 channels, UHF 14~69 channels, CATV 01~125 channels
S-Video, Video, TV
Wireless TV: DC 16V 3.0A
Wireless Transmission Unit: DC 16V 1.0A
Wireless TV: 40W
Wireless Transmission Unit: 15W
75
Ω
1.5W+1.5W
See pages 23~27.
Battery: 0.4 Kg
Wireless TV (4.0 Kg) + Mounting type stand (1.0 Kg)
454 mm 454 mm
380 mm
201 mm
57 mm
303 mm
245 mm
56 mm
110 mm
228 mm
243 mm
Page 67

67
MEMO
Page 68

 Loading...