

Page 1

Page 2

The Quick Guide is not intended as a substitute for your
OWNER’S MANUAL
the
OWNER’S MANUAL
will have a better understanding of your vehicle’s capabilities
Contents
Pictorial Index ............................................ ................................................................................. 3
Hybrid System
Hybrid System....................................................................................................................................11
For safe use
Floor Mat Installation.....................................................................................................................14
Entering and Exiting
Keys......................................................................................................................................................15
Smart Access System with Push-button Start.................................................................... 17
When Driving
Front Seats.........................................................................................................................................18
Power (Ignition) Switch................................................................................................................19
EV Drive Mode ..............................................................................................................................22
Hybrid Transmission.....................................................................................................................23
Turn Signal Lever...........................................................................................................................26
Parking Brake..................................................................................................................................27
Brake Hold .......................................................................................................................................29
Multi-information Display.......................................................................................................... 30
Head-up Display............................................................................................................................33
Headlight Switch............................................................................................................................36
AHB (Automatic High Beam)..................................................................................................37
Fog Light Switch.............................................................................................................................39
Windshield Wipers and Washer.............................................................................................40
Rear Window Wiper and Washer .........................................................................................42
and limitations.
. We strongly encourage you to review
and supplementary manuals so you
1
Page 3

Driving Comfort
*: These features may be operated by Starting Voice Control (See P.64)
Energy Monitor/Consumption Screen............................................................................... 43
Basic Operation of Multimedia System ..............................................................................46
Navigation
Connecting a Smartphone or Communication Device
Basic Operation of Audio System
Lexus Climate Concierge...........................................................................................................61
Automatic Air Conditioning System
Interior features
Starting Voice Control
Connecting to the USB Port....................................................................................................68
Garage Door Opener................................................................................................................ 69
Safety Connect
Safety Connect ...............................................................................................................................74
Remote Connect............................................................................................................................76
Service Connect.............................................................................................................................77
Opening and Closing
Door Locks ...................................................................................................................................... 78
Back Door.........................................................................................................................................79
Fuel Tank Cap ................................................................................................................................ 82
What to do if...
List of Warning/Indicator Lights.............................................................................................83
If the electronic key does not operate properly............................................................... 87
If the hybrid system will not start .............................................................................................89
*......................................................................................................................................47
*..............................................51
*......................................................................................56
*.................................................................................. 62
* ............................................................................................................64
Depending on specifications, the vehicle shown in the illustration may
differ from your vehicle in terms of equipment.
2
Page 4
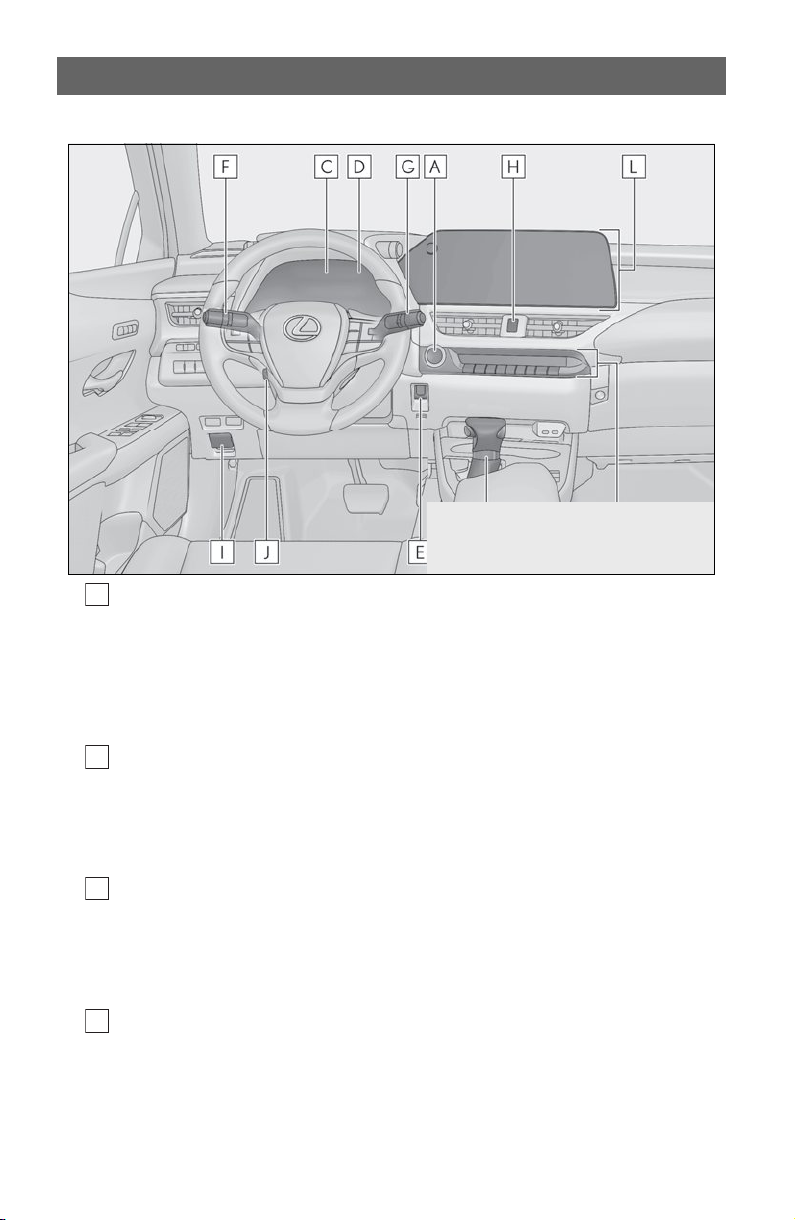
Pictorial Index
■Instrument panel
Power switch .............................................. ................................................................. P.19
A
Starting the hybrid system/changing the mode ...............................................P.19, 20
Emergency stop of the hybrid system ..........................................................................P.21
When the hybrid system will not start.........................................................................P.88
Warning messages
1
*
Shift lever ............................................................................. ....................................... P.23
B
Changing the shift position...............................................................................................P.23
Precautions against towing
When the shift lever does not move*
Meters*
C
Reading the meters/adjusting the instrument panel lights*
Warning lights/indicator lights......................................................................................P.83
When the warning lights come on
Multi-information display ...................................................................................... P.30
D
Display......................................................................................................................................P.30
Energy monitor......................................................................................................................P.43
When the warning messages are displayed
3
1
1
*
1
1
1
*
1
*
Page 5

Parking brake switch ............................................................................................... P.27
E
H
Applying/releasing..............................................................................................................P.27
1
Precautions against winter season
Warning buzzer/message*
Turn signal lever........................................................................................................ P.26
F
*
1
Headlight switch ........................................ ............................................................... P.36
Headlights/parking lights/tail lights/license plate lights/
daytime running lights ........................................................................................................P.36
AHB (Automatic High Beam)........................................................................................P.37
Fog lights
Windshield wiper and washer switch ................................................................. P.40
G
2
*
............................................................................................................................P.39
Rear window wiper and washer switch .............................................................. P.42
Usage...............................................................................................................................P.40, 42
1
Adding washer fluid
*
Headlight cleaners*2.........................................................................................................P.40
Warning messages
Emergency flasher switch*
Hood lock release lever*
I
Tilt and telescopic steering control switch*
J
release lever
Adjustment*
Driving position memory*
1
*
1
1
1, 2
/tilt and telescopic steering lock
1, 2
*
1
1, 2
Air conditioning system .......................................................................................... P.62
K
Usage........................................................................................................................................P.63
Rear window defogger......................................................................................................P.62
Audio system.......... .................................................................................................... P.56
L
1
*
: Refer to “OWNER’S MANUAL”.
2
*
: If equipped
4
Page 6
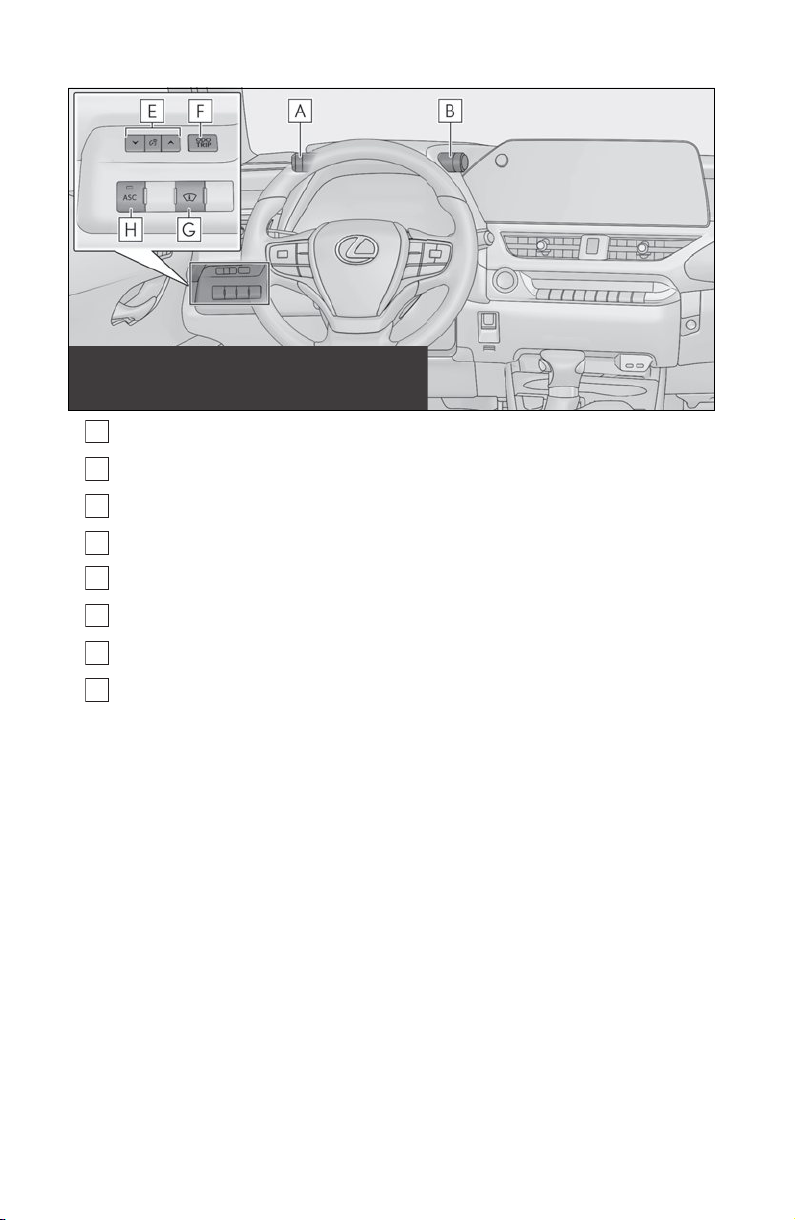
■Switches
E
VSC off switch*
A
Driving mode select switch*
B
Power back door switch*2.................................................................................... P.79
C
Fuel filler door opener switch ............................................................................... P.82
D
1
Instrument panel light control switches
“ODO TRIP” switch*
F
Head-up display switch*2...................................................................................... P.33
G
ASC switch
H
1
*
: Refer to “OWNER’S MANUAL”.
2
*
: If equipped
1, 2
*
1
1
1
*
5
Page 7
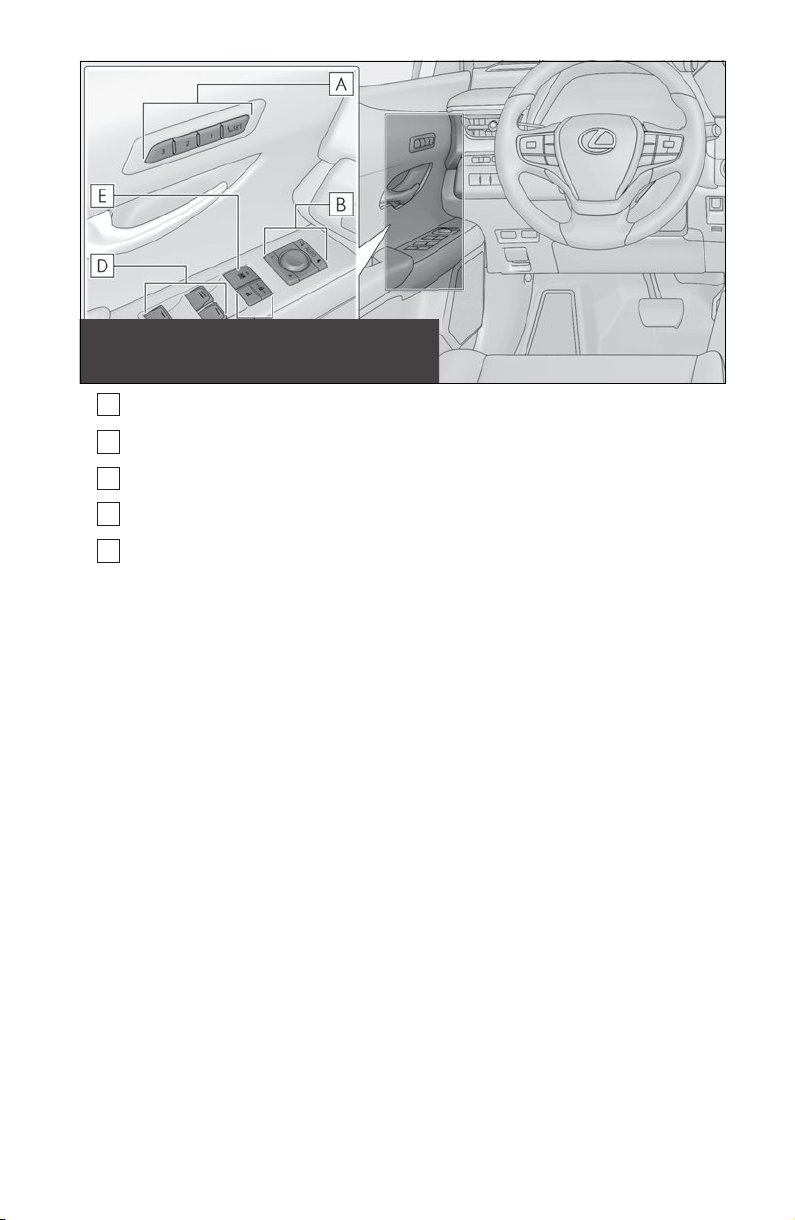
Driving position memory switches*
D
A
Outside rear view mirror switches*
B
Door lock switches................................................................................................... P.78
C
Power window switches
Window lock switch*
E
1
*
: If equipped
2
*
: Refer to “OWNER’S MANUAL”.
1, 2
2
2
*
2
6
Page 8
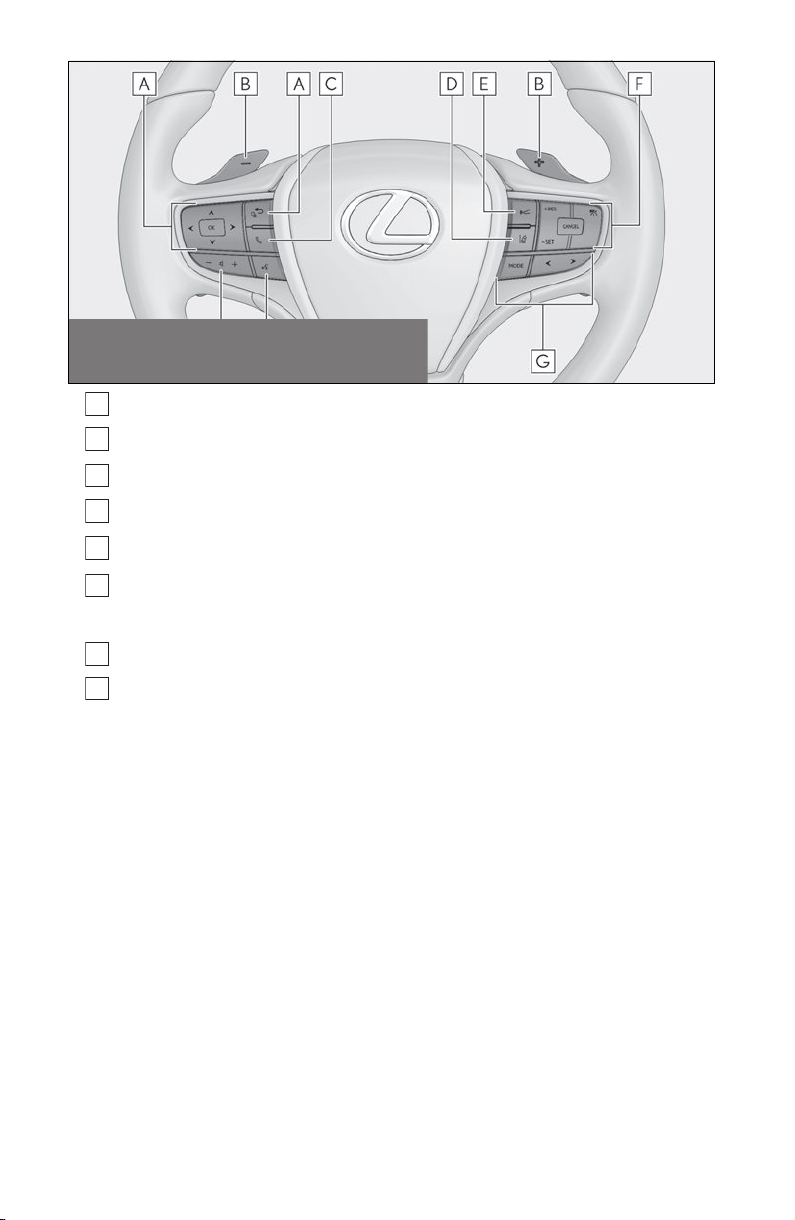
Meter control switches .......................................................................................... P.32
D
A
Paddle shift switches
B
TEL switch .................................................................................... ............................... P.53
C
*
LTA (Lane Tracing Assist) switch
Vehicle-to-vehicle distance switch*
E
Cruise control switches*
F
Dynamic radar cruise control with full-speed range*
Audio remote control switches ............................................................................ P.56
G
Talk switch .................................................................................................................. P.53
H
1
*
: If equipped
2
*
: Refer to “OWNER’S MANUAL”.
1
................................................................................... P.24, 25
2
*
2
2
2
7
Page 9
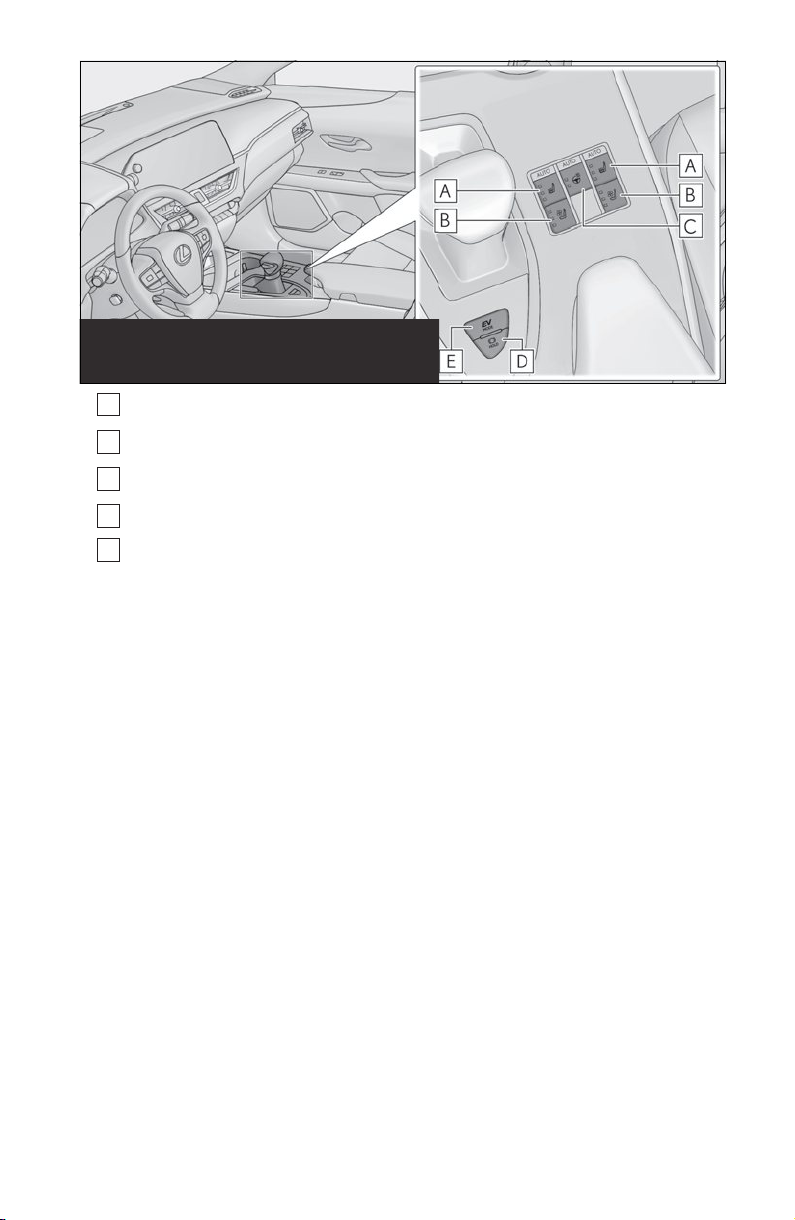
Seat heater switches*
A
Seat ventilator switches*
B
Heated steering wheel switch*
C
Brake hold switch ................................................................................................ .....P.29
D
EV drive mode switch .............................................................................................. P.22
E
1
*
: If equipped
2
*
: Refer to “OWNER’S MANUAL”.
1, 2
1, 2
1, 2
8
Page 10
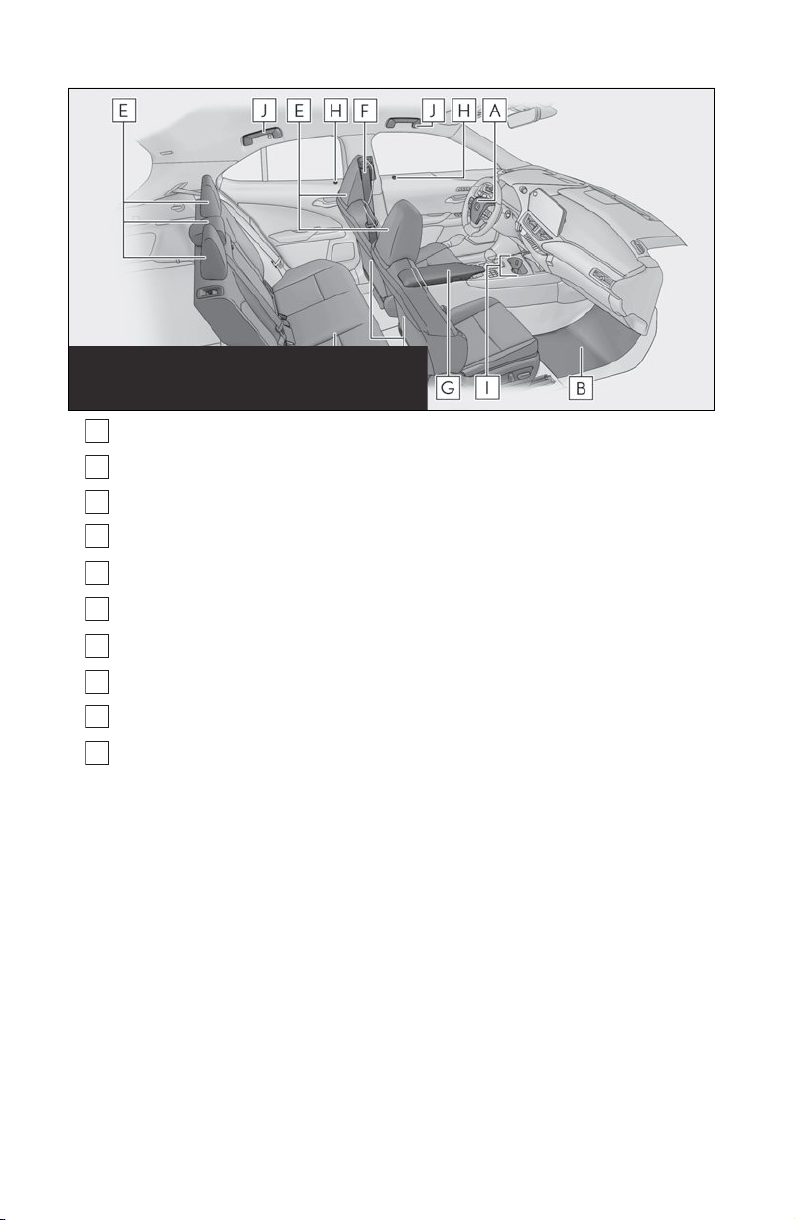
■Interior
A
B
I
J
SRS airbags*
Floor mats .................................................................................................................... P.14
Front seats .......................................................... .................................................. ....... P.18
C
Rear seats
D
Head restraints*
E
Seat belts*
F
Console box*
G
*
Inside lock buttons ................................................................................................... P.78
H
Cup holder
Assist grips*
: Refer to “OWNER’S MANUAL”.
*
9
*
Page 11
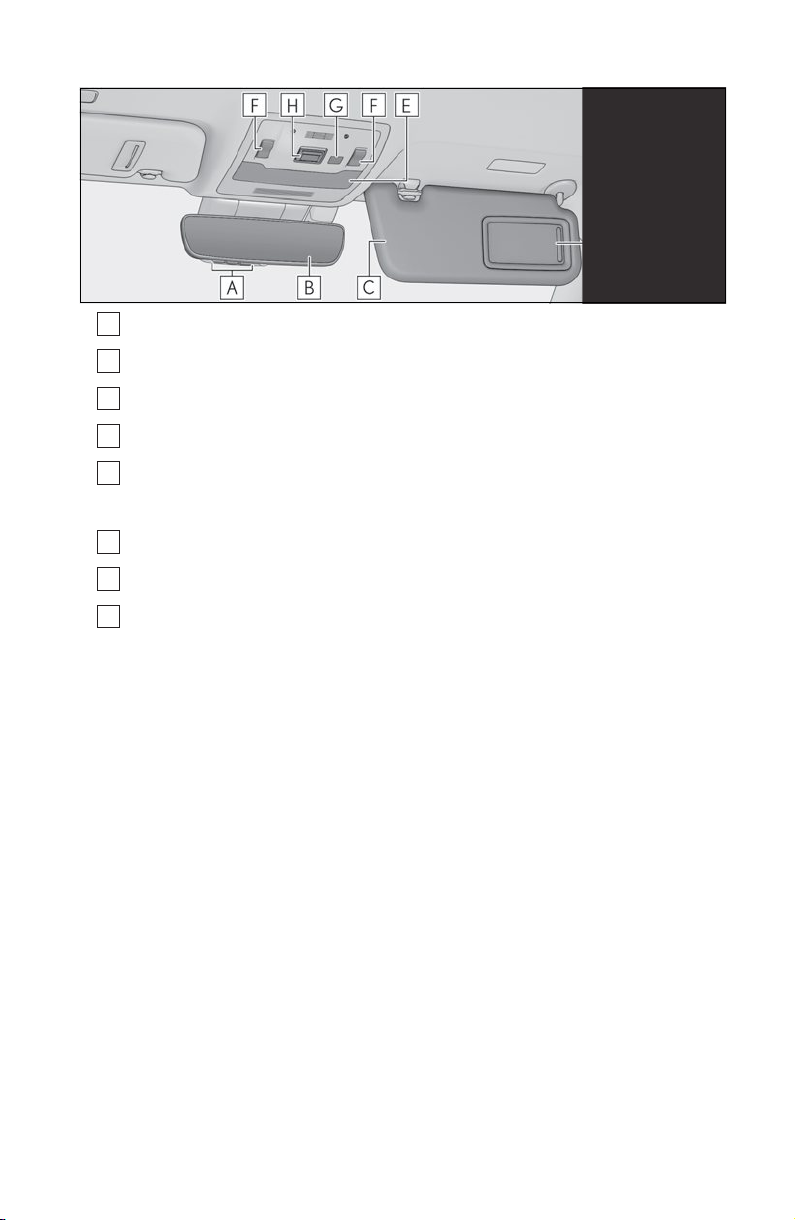
■ Ceiling
C
E
Garage door opener buttons*1............................................................................ P.69
A
1, 2
2
*
2
Inside rear view mirror
B
Sun visors*
Vanity mirrors*
D
Interior light*
Personal lights*
Moon roof switches*
F
Door-linked interior light switch*
G
“SOS” button*1......................................................................................................... P.74
H
1
*
: If equipped
2
*
: Refer to “OWNER’S MANUAL”.
3
*
: The illustration shows the front, but they are also equipped in the rear.
2
2
2, 3
2
10
Page 12
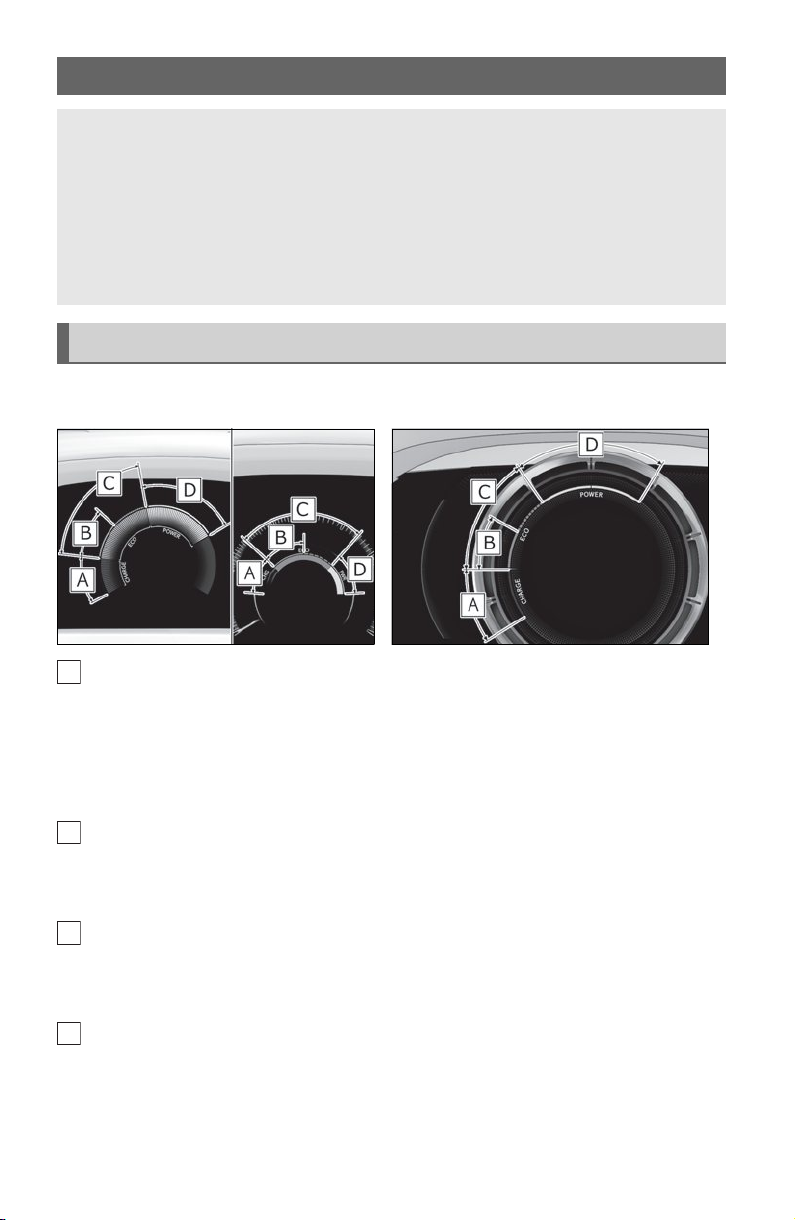
Hybrid System
A
B
C
D
Your vehicle is a Hybrid Electric Vehicle. It has characteristics different from conventional
vehicles. Be sure you are closely familiar with the characteristics of your vehicle, and
operate it with care.
The hybrid system combines the use of a gasoline engine and an electric motor (traction
motor) according to driving conditions, improving fuel efficiency and reducing exhaust
emissions.
For details, refer to the “OWNER’S MANUAL”.
Hybrid System Indicator
Except F SPORT models F SPORT models
Charge area
Shows regeneration
battery (traction battery).
* status. Regenerated energy will be used to charge the hybrid
*: When used in this manual, regeneration refers to the conversion of energy created by
the movement of the vehicle into electrical energy.
Hybrid Eco area
Shows that gasoline engine power is not being used very often.
The gasoline engine will automatically stop and restart under various conditions.
Eco area
Shows that the vehicle is being driven in an Eco-friendly manner.
By keeping the bar display within Eco area, more Eco-friendly driving can be achieved.
Power area
Shows that an Eco-friendly driving range is being exceeded (during full power driving
etc.)
11
Page 13

Hybrid battery (traction battery) charge
If the shift lever is in N, the hybrid battery (traction battery) will not be charged even when
the engine is running. Therefore, if the vehicle is left with the shift lever in N for a certain
amount of time, the hybrid battery (traction battery) will discharge, and this may result in the
vehicle not being able to start.
Regenerative braking
In the following situations, kinetic energy is converted to electric energy and deceleration
force can be obtained in conjunction with the recharging of the hybrid battery (traction battery).
● The accelerator pedal is released while driving with the shift lever in D or S.
● The brake pedal is depressed while driving with the shift lever in D or S.
Sounds and vibrations specific to a Hybrid Electric Vehicle
There may be no engine sound or vibration even though the vehicle is able to move with the
“READY” indicator is illuminated. For safety, apply the parking brake and make sure to shift
the shift lever to P when parked.
The following sounds or vibrations may occur when the hybrid system is operating and are
not a malfunction:
● Motor sounds may be heard from the engine compartment.
● Sounds may be heard from the hybrid battery (traction battery) behind the rear seats
when the hybrid system starts or stops.
● Relay operating sounds such as a snap or soft clank will be emitted from the hybrid battery (traction battery), behind the rear seats, when the hybrid system is started or
stopped.
● Sounds from the hybrid system may be heard when the back door is open.
● Sounds may be heard from the hybrid transmission when the gasoline engine starts or
stops, when driving at low speeds, or during idling.
● Engine sounds may be heard when accelerating sharply.
● Sounds may be heard due to regenerative braking when the brake pedal is depressed or
as the accelerator pedal is released.
● Vibration may be felt when the gasoline engine starts or stops.
● Cooling fan sounds may be heard from the air intake vent under the right side of the rear
seat.
12
Page 14
Running out of fuel
When the vehicle has run out of fuel and the hybrid system cannot be started, refuel the
vehicle with at least enough gasoline to make the low fuel level warning light go off. If there is
only a small amount of fuel, the hybrid system may not be able to start. (The standard amount
of fuel is about 1.8 gal. [7.0 L, 1.5 Imp.gal.], when the vehicle is on a level surface. This value
may vary when the vehicle is on a slope. Add extra fuel when the vehicle is inclined.)
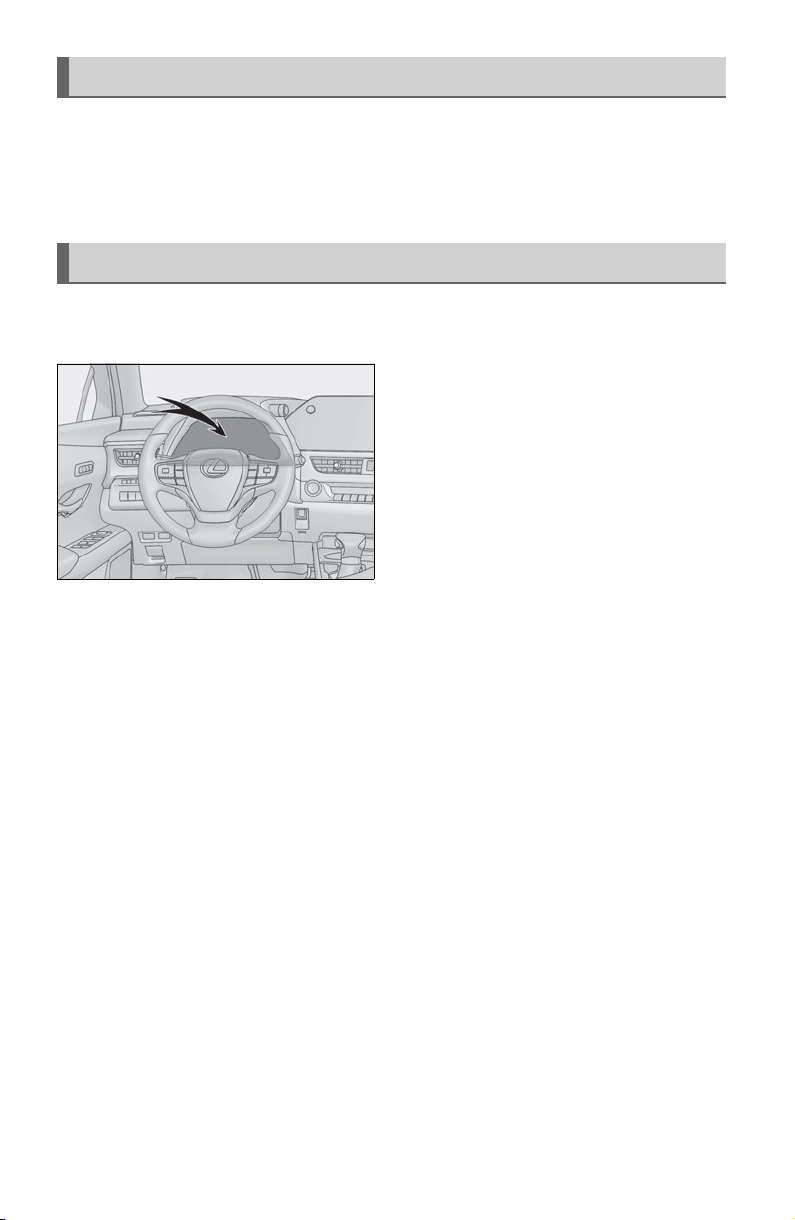
Hybrid warning message
A message is automatically displayed when a malfunction occurs in the hybrid system or an
improper operation is attempted.
If a warning message is shown on the multiinformation display, read the message and
follow the instructions.
13
Page 15

Floor Mat Installation
A
Use only floor mats designed specifically for vehicles of the same model and model year
as your vehicle. Fix them securely in place onto the carpet.
1 Insert the retaining hooks (clips) into
the floor mat eyelets.
2 Turn the upper knob of each retaining
hook (clip) to secure the floor mats in
place.
Always align the marks .
The shape of the retaining hooks (clips) may differ from that shown in the illustration.
14
Page 16
Keys
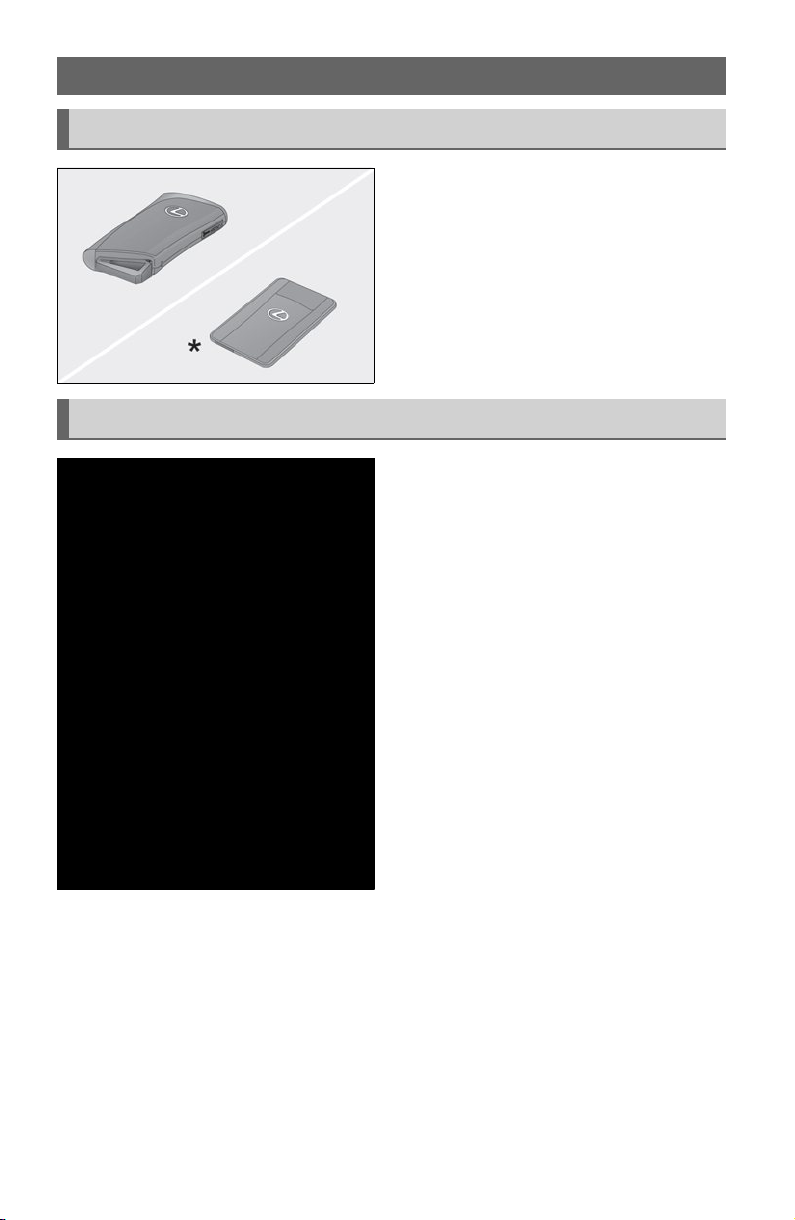
Electronic key
Mechanical key
● Smart access system with push-button
start (P.17)
● Wireless remote control
*: If equipped
To take out the mechanical key, push the
release button and take the key out.
The mechanical key can only be inserted in
one direction, as the key only has grooves
on one side. If the key cannot be inserted in
a lock cylinder, turn it over and re-attempt
to insert it.
After using the mechanical key, store it in
the electronic key. Carry the mechanical
key together with the electronic key. If the
electronic key battery is depleted or the
entry function does not operate properly,
you will need the mechanical key.
15
Page 17

Wireless remote control
Locks all the doors
A
Unlocks all the doors
B
Opens the windows and moon roof
C
Opens and closes the power back
D
1
*
door
Sounds the alarm
E
1
*
: If equipped
2
*
: This setting must be customized at your
Lexus dealer.
1, 2
*
16
Page 18

Smart Access System with Push-button Start
The following operations can be performed simply by carrying the electronic key on your
person, for example in your pocket. The driver should always carry the electronic key.
For details on starting the hybrid system, see page 19.
Unlocking and locking the doors from the outside
1 Grip the driver’s door handle to unlock
the door. Holding the driver’s door
handle for approximately 2 seconds
unlocks all the doors. Grip the front
passenger door handle to unlock all
the doors.
Make sure to touch the sensor on the
back of the handle.
The doors cannot be unlocked for
3 seconds after the doors are locked.
*: The door unlock settings can be
2 Touch the lock sensor (the indentation on the upper part of the front door handle) to
lock all the doors.
Check that the door is securely locked.
*
changed.
Unlocking and locking the back door from the outside
1 Locks all the doors
Check that the door is securely locked.
2 Unlocks all the doors
The doors cannot be unlocked for 3
seconds after the doors are locked.
For details on what to do when the electronic key does not operate properly, see page 87.
17
Page 19

Front Seats
Adjustment procedure
Seat position adjustment switch
A
Seat cushion (front) angle adjustment
B
switch
Seatback angle adjustment switch
C
Vertical height adjustment switch
D
Lumbar support adjustment switch (for
E
driver’s side)
18
Page 20

Power (Ignition) Switch
Performing the following operations when carrying the electronic key on your person
starts the hybrid system or changes power switch modes.
Starting the hybrid system
1 Press the parking brake switch to
check that the parking brake is set.
(P.27)
Parking brake indicator will come on.
2 Check that the shift lever is in P
3 Firmly depress the brake pedal.
and a message will be displayed
on the multi-information display. If it is
not displayed, the hybrid system cannot be started.
4 Press the power switch shortly and firmly.
When operating the power switch, one short, firm press is enough. It is not necessary to
press and hold the switch.
If the “READY” indicator turns on, the hybrid system will operate normally.
Continue depressing the brake pedal until the “READY” indicator is illuminated.
The hybrid system can be started from any power switch mode.
5 Check that the “READY” indicator is illuminated.
The vehicle will not move when the “READY” indicator is off.
19
Page 21

Stopping the hybrid system
1 Stop the vehicle completely.
2 Set the parking brake (P.27), and shift the shift lever to P. (P.23)
3 Press the power switch.
4 Release the brake pedal and check that “ACCESSORY” or “IGNITION ON” is not
shown on the meter.
Changing power switch modes
Modes can be changed by pressing the power switch with the brake pedal released. (The
mode changes each time the switch is pressed.)
1 OFF*
The emergency flashers can be used.
2 ACC
Some electrical components such as
the audio system can be used.
“ACCESSORY” will be displayed on
the meter.
3 ON
All electrical components can be used.
“IGNITION ON” will be displayed on
the meter.
*: If the shift lever is in a position other than
P when turning off the hybrid system, the
power switch will be turned to ACC, not
to OFF.
20
Page 22

If your vehicle has to be stopped in an emergency
Only in an emergency, such as if it becomes impossible to stop the vehicle in the normal way,
stop the vehicle using the following procedure:
1 Steadily step on the brake pedal with both feet and firmly depress it.
Do not pump the brake pedal repeatedly as this will increase the effort required to slow
the vehicle.
2 Shift the shift lever to N.
If the shift lever is shifted to N
3 After slowing down, stop the vehicle in a safe place by the road.
4 Stop the hybrid system.
If the shift lever cannot be shifted to N
3 Keep depressing the brake pedal with both feet to reduce vehicle speed as much as
possible.
4 To stop the hybrid system, press and
hold the power switch for 2 consecutive seconds or more, or press it briefly
3 times or more in succession.
5 Stop the vehicle in a safe place by the road.
21
Page 23

EV Drive Mode
In EV drive mode, electric power is supplied by the hybrid battery (traction battery), and
only the electric motor (traction motor) is used to drive the vehicle.
Turns EV drive mode on/off
When EV drive mode is turned on, the EV
drive mode indicator will come on. Pressing
the switch when in EV drive mode will
return the vehicle to normal driving (using
the gasoline engine and electric motor
[traction motor]).
22
Page 24
Hybrid Transmission
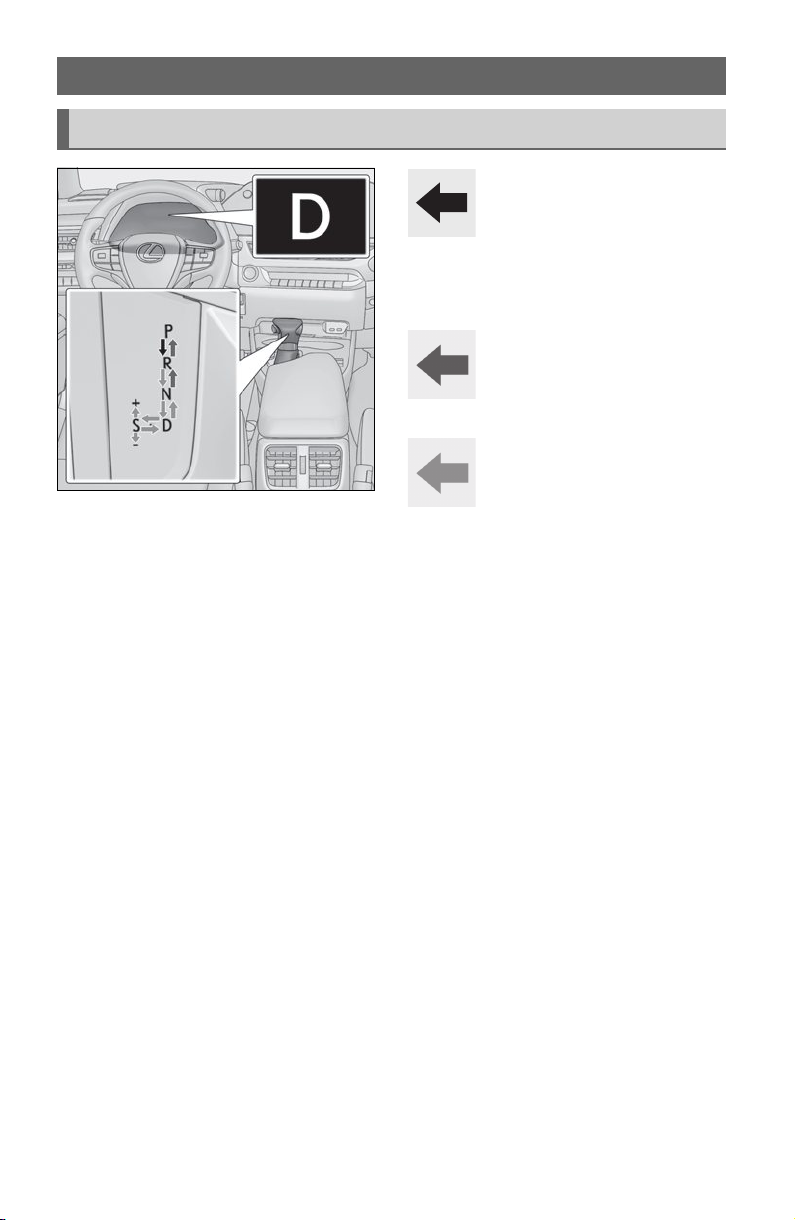
Shifting the shift lever
While the power switch is in ON
and the brake pedal depressed
shift lever while pushing the shift release
button on the shift knob.
Shift the shift lever while pushing
the shift release button on the shift knob.
Shift the shift lever normally.
When shifting the shift lever between P and D, make sure that the vehicle is completely
stopped and the brake pedal is depressed.
*, shift the
*: For the vehicle be able to be shifted from P, the brake pedal must be depressed before
the shift release button is pushed. If the shift release button is pushed first, the shift lock
will not be released.
23
Page 25

Shift position purpose and functions
Shift position Objective or function
P Parking the vehicle/starting the hybrid system
R Reversing
N Neutral (Condition in which the power is not transmitted)
D Normal driving*
S S mode driving*2 (P.25)
1
*
: To improve fuel efficiency and reduce noise, shift the shift lever to D for normal driving.
2
*
: By selecting shift ranges using S mode, you can control accelerating force and engine
braking force.
1
Selecting shift ranges in the D position (vehicles with paddle shift
switches)
To drive using temporary shift range selection, operate the “-” or “+” paddle shift switch
when driving with the shift lever in D.
When the “-” paddle shift switch is operated, the shift range switches to a range that enables
engine braking force that is suitable to driving conditions. When the “+” paddle shift switch is
operated, the shift range switches to a range that is one range higher than the current range.
1 Upshifting
2 Downshifting
The selected shift range, from D1 to D6, will
be displayed in the meter.
To return to normal D position driving, the
“+” paddle shift switch must be held down
for a period of time.
Meter display Function
A gear in the range between D1 and the selected shift range is
D2 - D6
D1 Setting the shift range at D1
automatically chosen depending on vehicle speed and driving
conditions
24
Page 26

Changing shift ranges in the S position
To enter S mode, shift the shift lever to S. Shift ranges can be selected by operating the shift
lever or paddle shift switches (if equipped).
1 Upshifting
2 Downshifting
The selected shift range, from S1 to S6, will
be displayed in the meter.
The initial shift range in S mode is 4.
■ Shift ranges and their functions
● You can choose from 6 levels of accelerating force and engine braking force.
● A lower shift range will provide greater accelerating force and engine braking force
than a higher shift range, and the engine revolutions will also increase.
25
Page 27

Turn Signal Lever
1 Right turn
2 Lane change to the right (move the
lever partway and release it)
The right hand signals will flash 3 times.
3 Lane change to the left (move the lever
partway and release it)
The left hand signals will flash 3 times.
4 Left turn
26
Page 28

Parking Brake
A
B
The parking brake can be set or released automatically or manually.
Using the manual mode
The parking brake can be set and released manually.
U.S.A.
Canada
1 Push the switch to set the parking
brake
The parking brake indicator light will
turn on.
Press and hold the parking brake
switch if an emergency occurs and it is
necessary to operate the parking
brake while driving.
2 Pull the switch to release the parking
brake
• Operate the parking brake switch
while depressing the brake pedal.
• Using the parking brake automatic
release function, the parking brake
can be released by depressing the
accelerator pedal. When using this
function, slowly depress the accelerator pedal.
Make sure that the parking brake indicator light turn off.
27
Page 29

Turning the automatic mode on
In automatic mode, the parking brake can be set or released automatically according to shift
lever operation. Also, even in automatic mode, the parking brake can be set or released
manually.
While the vehicle is stopped, press and hold
the parking brake switch until a message is
shown on the multi-information display
When the automatic mode is turned on, the
parking brake operates as follows.
● When the shift lever is shifted from P, the
parking brake will be released, and the
parking brake indicator light will turn off.
● When the shift lever is shifted to P, the
parking brake will be set, and the parking brake indicator light will turn on.
Operate the shift lever with the vehicle stopped and the brake pedal depressed.
Turning the automatic mode off
While the vehicle is stopped, pull and hold
the parking brake switch until a message is
shown on the multi-information display
28
Page 30

Brake Hold
A
B
The brake hold system keeps the brake applied when the shift lever is in D, S or N with the
system on and the brake pedal has been depressed to stop the vehicle. The system
releases the brake when the accelerator pedal is depressed with the shift lever in D or S to
allow smooth start off.
Turns the brake hold system on
The brake hold standby indicator comes
on. While the system is holding the brake,
the brake hold operated indicator
comes on.
29
Page 31
Multi-information Display
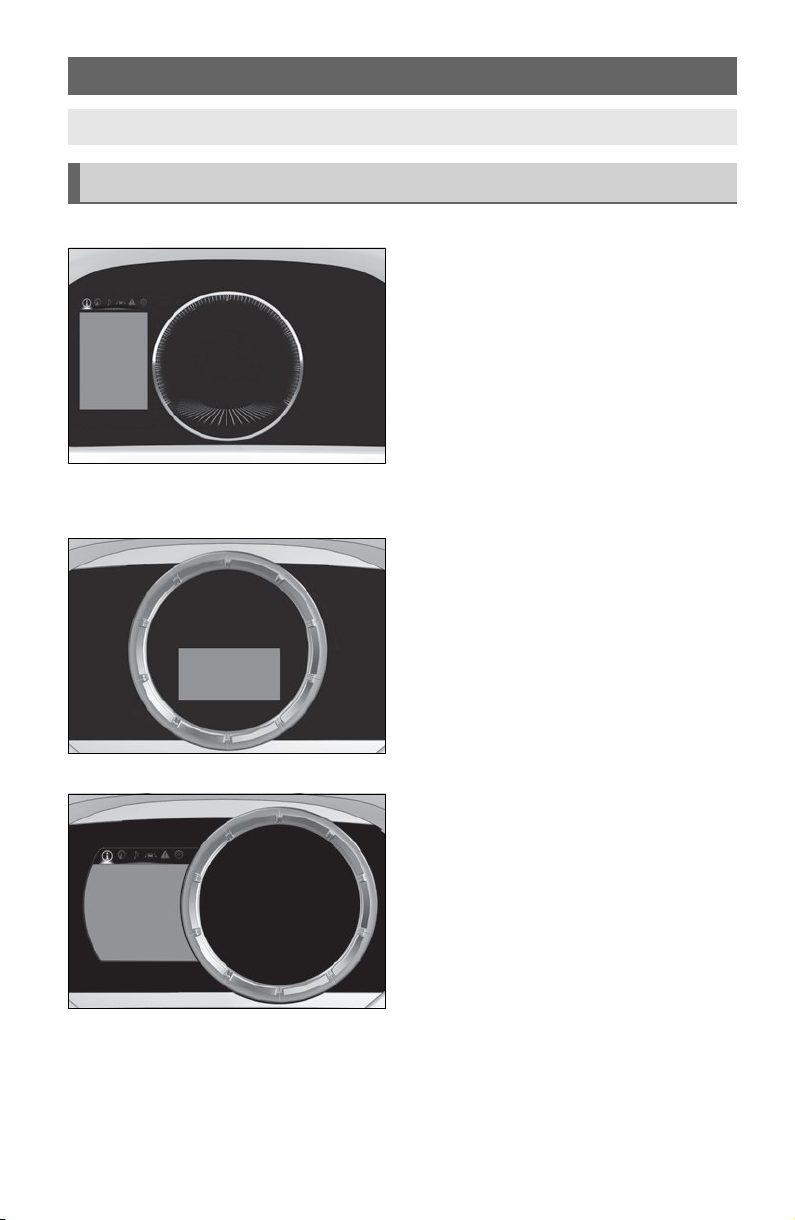
The multi-information display presents the driver with a variety of vehicle data.
Display and menu icons
■ Display (except F SPORT models)
By selecting menu icons on the multi-information display, a variety of driving-related
information can be displayed.
The multi-information display can also be
used to change display settings and other
vehicle settings.
Warning or suggestion/advice pop-up displays are also displayed in certain situations.
■ Display (F SPORT models)
When the main meter is in the center position
The multi-information display presents the
driver with a variety of driving-related information.
Warning or suggestion/advice pop-up displays are also displayed in certain situations.
When the main meter is in the side position
By selecting menu icons on the multi-information display, a variety of driving-related
information can be displayed.
The multi-information display can also be
used to change display settings and other
vehicle settings.
Warning or suggestion/advice pop-up displays are also displayed in certain situations.
30
Page 32

■Menu icons
The menu icons will be displayed by pressing or of the meter control switches.
F SPORT models: The menu icons can be displayed when the main meter is in the side position.
Driving information display
Select to display various drive data.
Navigation system-linked display (if equipped)
Select to display the following navigation system-linked information.
• Route guidance to destination
• Compass display
Audio system-linked display
Select to enable selection of an audio source or track on the meter using the
meter control switches.
Driving support system information display
Select to display the operational status of the following systems:
• LTA (Lane Tracing Assist)
• Dynamic radar cruise control with full-speed range
• RSA (Road Sign Assist) (if equipped)
Warning message display
Select to display warning messages and measures to be taken if a malfunction is
detected.
Settings display
Select to change the meter display settings
31
Page 33

Changing the meter display
/ : Select menu icons
A
/ : Change displayed content,
scroll up/down the screen or move the
cursor up/down
Press: Enter/Set
B
Press and hold: Reset
Move the main meter
C
previous screen
Call sending/receiving and history display
D
Linked with the hands-free system, sending or receiving call is displayed. For details
regarding the hands-free system, refer to the “MULTIMEDIA OWNER’S MANUAL”.
* or return to the
*:F SPORT models
32
Page 34
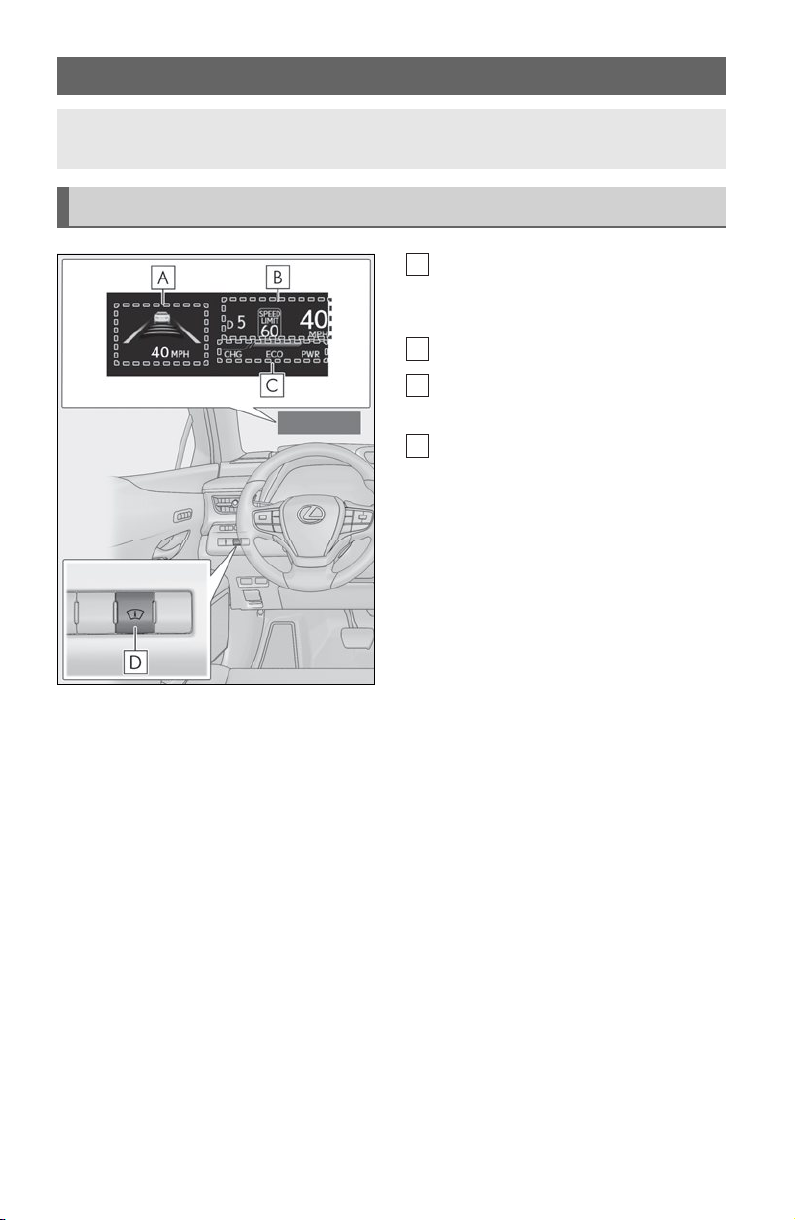
Head-up Display (if equipped)
ABC
D
The head-up display projects a variety of driving-related information and the operating
state of the driving support systems on the windshield.
System components
Driving support system display area
Navigation system-linked display area
(if equipped)
Driving information display area
Hybrid System Indicator/tachometer
display area
Head-up display switch
Illustrations used in this text are intended as
examples, and may differ from the image
that is actually displayed by the head-up display.
33
Page 35

Using the head-up display
■ Enabling/disabling the head-up display
Press the head-up display switch.
■ Changing settings of the head-up display
The following settings can be changed on of the multi-information display. For details,
refer to the “OWNER’S MANUAL”.
● Brightness and vertical position of the head-up display
Select to adjust the brightness or vertical position of the head-up display.
● Hybrid System Indicator/tachometer
Select to display the Hybrid System Indicator, tachometer or no content.
● Display content
Select to enable/disable the following items:
• Route guidance to destination/street name
• Driving support system display
• Compass (heading-up display)
• Audio system operation status
● Display angle
Select to adjust the angle of the head-up display.
1
*
: To set this item, select on the multi-information display, select “Vehicle Settings” and
select “HUD”.
2
*
: Make sure to enable this display when using the driving support systems
1
*
1
*
1
*
2
*
34
Page 36

Hybrid System Indicator/tachometer display area
A
B
C
D
■Hybrid System Indicator
Charge area
Hybrid Eco area
Eco area
Power area
Displayed content is the same as that
displayed on the meter (Hybrid System
Indicator). For details, refer to P.11.
■Tachometer
Displays the engine speed in revolutions per minute.
The head-up display may seem dark or hard to see when viewed through sunglasses,
especially polarized sunglasses. Adjust the brightness of the head-up display or remove
your sunglasses.
35
Page 37

Headlight Switch
Turning on the high beam headlights
U.S.A.
A
Canada
B
1 The side marker, parking, tail,
license plate, instrument panel lights,
and daytime running lights turn on.
2 The headlights and all the lights
listed above (except daytime running
lights) turn on.
3 The headlights, daytime running
lights and all the lights listed above turn
on and off automatically.
4 (U.S.A.) Off
1 With the headlights on, push the lever
away from you to turn on the high
beams.
Pull the lever toward you to the center
position to turn the high beams off.
2 Pull the lever toward you and release it
to flash the high beams once.
You can flash the high beams with the
headlights on or off.
36
Page 38
AHB (Automatic High Beam)
The Automatic High Beam uses a front camera located behind the upper portion of the
windshield to assess the brightness of the lights of vehicles ahead, streetlights, etc., and
automatically turns the high beams on or off as necessary.
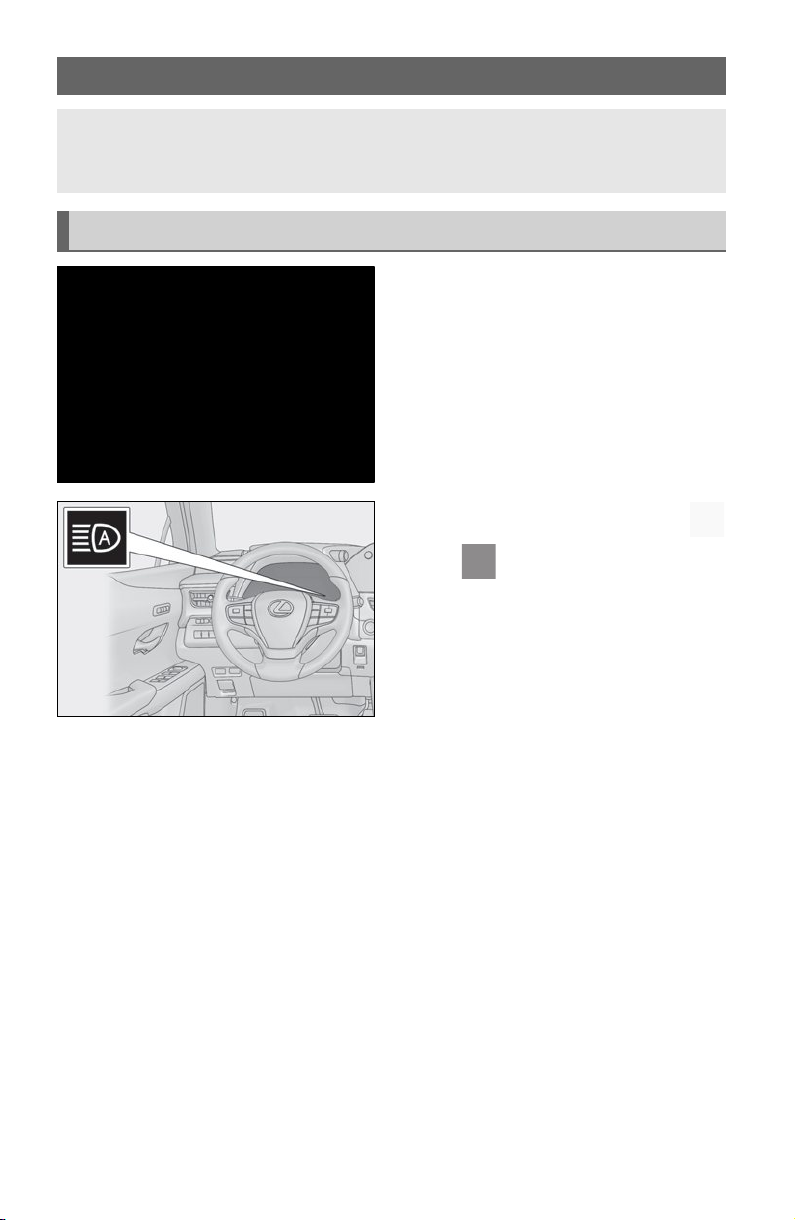
Activating the Automatic High Beam
1 Press the Automatic High Beam
switch.
2 Turn the headlight switch to the
or position.
The Automatic High Beam indicator
will come on when the system is operating.
37
Page 39

Turning the high beams on/off manually
■ Switching to the high beams
■ Switching to the low beams
■ Temporarily switching to the low beams
Push the lever away from you.
The Automatic High Beam indicator will
turn off and the high beam indicator will
turn on.
Pull the lever to its original position to activate the Automatic High Beam system
again.
Press the Automatic High Beam switch.
The Automatic High Beam indicator will
turn off.
Press the switch to activate the Automatic
High Beam system again.
Pull the lever toward you and then return it
to its original position.
The high beams are on while the lever is
pulled toward you, however, after the lever
is returned to its original position, the low
beams remain on for a certain amount of
time. Afterwards, the Automatic High
Beam will be activated again.
38
Page 40

Fog Light Switch (if equipped)
When in difficult driving conditions, such as in rain and fog, turn on the fog lights to secure
front visibility.
Turning on the fog light
1 *1 or *2 Turns the fog
lights off
2
1
*
2
*
Turns the fog lights on
:For the U.S.A.
:For Canada
39
Page 41

Windshield Wipers and Washer
Intermittent windshield wipers with interval adjuster
1 *1 or *2 Off
2
ation
3 *
ation
4 *
ation
5 *
ation
1
*
:For the U.S.A.
2
*
:For Canada
Wiper intervals can be adjusted when intermittent operation is selected.
6 Increases the intermittent windshield
wiper frequency
7 Decreases the intermittent windshield
wiper frequency
1
*
or *2 Intermittent oper-
1
or *2 Low speed oper-
1
or *2 High speed oper-
1
or *2 Temporary oper-
8 Washer/wiper dual operation
Pulling the lever operates the wipers
and washer.
The wipers will automatically operate a
couple of times after the washer
squirts.
Vehicles with headlight cleaners: When the power switch is in ON and the headlights are
on, if the lever is pulled, the headlight cleaners will operate once. After this, the headlight
cleaners will operate every 5th time the lever is pulled.
40
Page 42
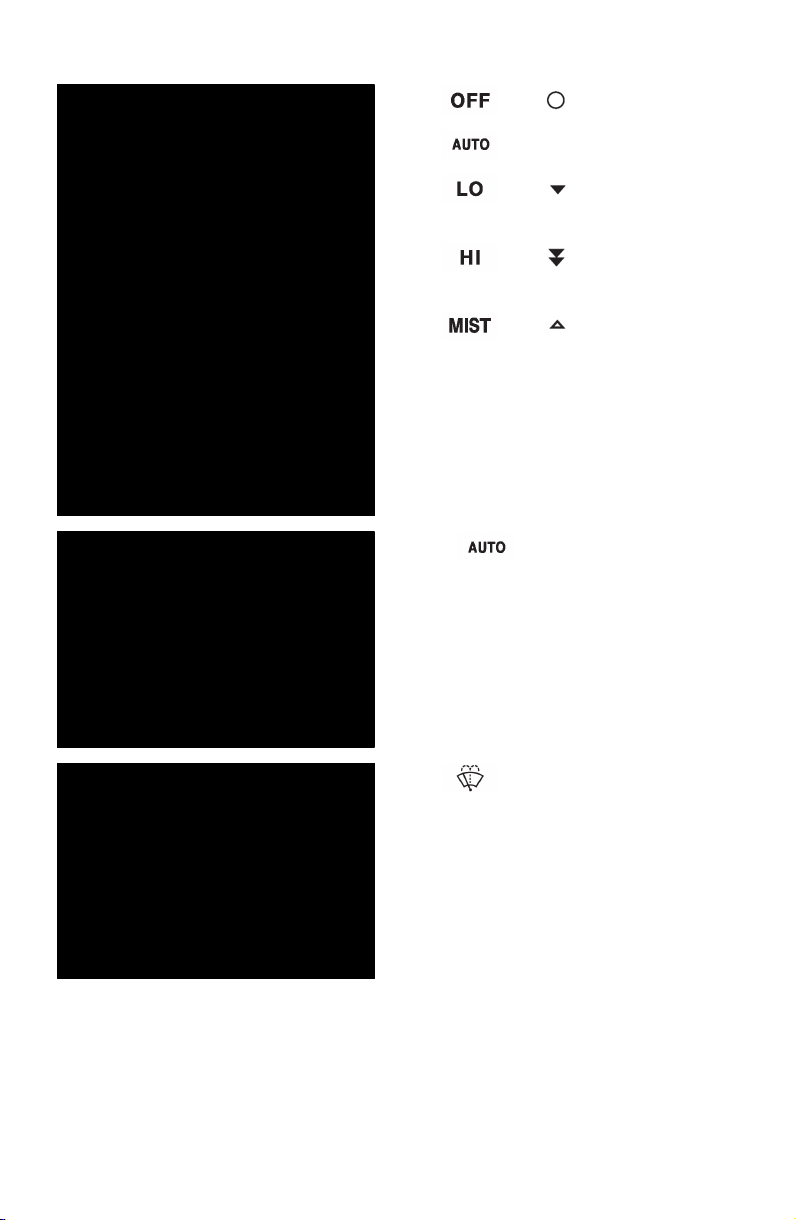
Rain-sensing windshield wipers
1 *
1
or *2 Off
2 *
3 *
ation
4 *
ation
5 *
ation
1
*
:For the U.S.A.
2
*
:For Canada
When is selected, the sensor sensitivity can be adjusted by turning the switch
ring.
1
Rain-sensing operation
1
or *2 Low speed oper-
1
or *2 High speed oper-
1
or *2 Temporary oper-
6 Increases the sensitivity
7 Decreases the sensitivity
8 Washer/wiper dual operation
Pulling the lever operates the wipers
and washer.
The wipers will automatically operate a
couple of times after the washer
squirts.
(After operating several times, the wipers operate once more time after a
short delay to prevent dripping. However, the dripping prevention does not
operate while the vehicle is moving.)
Vehicles with headlight cleaners: When the power switch is in ON and the headlights are
on, if the lever is pulled, the headlight cleaners will operate once. After this, the headlight
cleaners will operate every 5th time the lever is pulled.
41
Page 43

Rear Window Wiper and Washer
1 *
2 *
operation
3 *
1
*
:For the U.S.A.
2
*
:For Canada
1
or *2 Off
1
or *2 Intermittent
1
or *2 Normal operation
4 Washer/wiper dual operation
Pushing the lever operates the wiper
and washer.
The wiper will automatically operate a
couple of times after the washer
squirts.
42
Page 44

Energy Monitor/Consumption Screen
A
B
C
The status of your hybrid system and fuel consumption information can be displayed on
the multi-information display and Center Display. For details, refer to the “OWNER’S
MANUAL”.
Energy monitor
■Displaying procedure
Multi-information display
Press or of the meter control switches and select , and then press or to
select the energy monitor display.
Center Display
1 Select on the main menu.
2 Select “Energy flow”.
■Reading the display
The arrows will appear in accordance with the energy flow. When there is no energy flow,
arrows will not be displayed.
The color of the arrows will change as follows
Blue: When the hybrid battery (traction battery) is regenerated or charged.
Yellow
1
*
/Orange*2: When the hybrid battery (traction battery) is in use.
Red: When the gasoline engine is in use.
1
*
: Multi-information display
2
*
:Center Display
Multi-information display
43
The image shows all the arrows as an example. The actual display will vary depending
on conditions.
Gasoline engine
Hybrid battery (traction battery)
Tires
Page 45
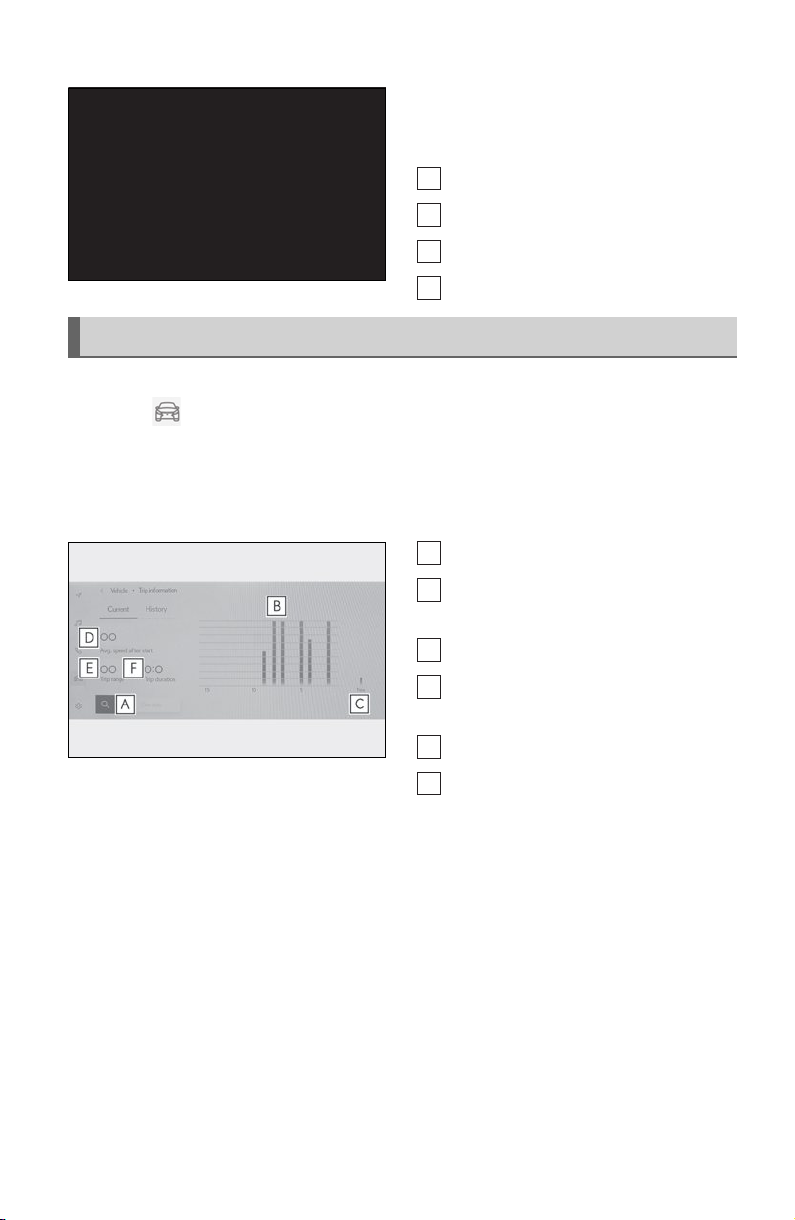
Center Display
Current screen
■ Display procedure
1
Select on the main menu.
2 Select “Trip information”.
3 Select “Current”.
■ Display
The image shows all the arrows as an example. The actual display will vary depending
on conditions.
Gasoline engine
A
Electric motor (traction motor)
B
Hybrid battery (traction battery)
C
Front tires
D
Resetting the history data
A
Fuel consumption in the past 15 min-
B
utes
Current fuel consumption
C
Average veh icle speed since the hybrid
D
system was started.
Trip range
E
Elapsed time since the hybrid system
F
was started.
44
Page 46
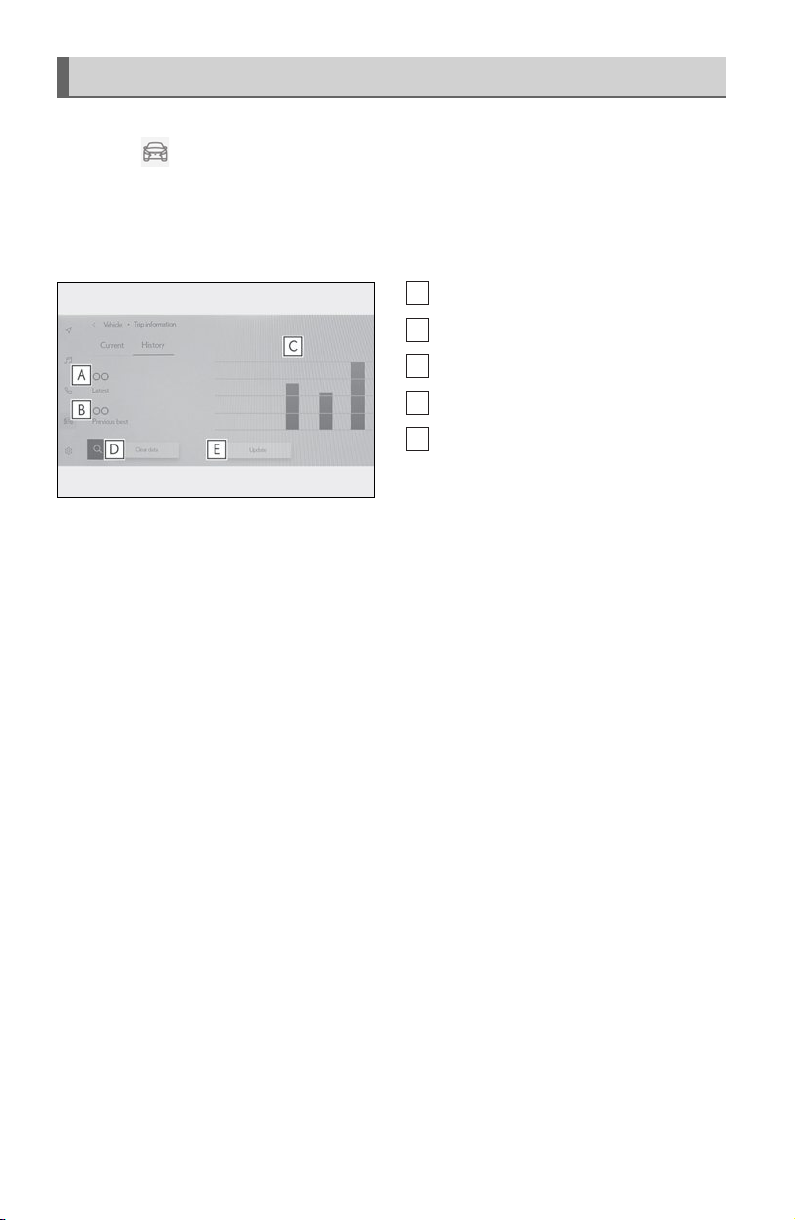
History screen
A
B
C
D
E
■Display procedure
1
Select on the main menu.
2 Select “Trip information”.
3 Select “History”.
■Display
Latest fuel consumption
Best recorded fuel consumption
Previous fuel consumption record
Resetting the history data
Updating the latest fuel consumption
data
45
Page 47

Basic Operation of Multimedia System
Map scrolling operation
The map can be moved and a touched point can be set as the center of the map screen.
■ Flick/drag operation
The map screen can be moved by touching,
dragging or flicking it.
Touch [Recenter] to return to the center of
the map to the current position.
■ Touch and hold operation
If a desired point on the map screen is touched and held, the full route map screen to the
selected point will be displayed.
1 Touch and hold the desired point.
2 Full route map screen will be displayed
for the selected point.
46
Page 48

Navigation (if equipped)
The navigation system indicates your present position and assists in locating a desired destination.
Destination search screen
■Searching for a destination using the keyboard
A destination can be searched for by entering keywords.
1 Touch [ ] or [ ] on the map screen.
2 Touch [ ].
3 Select [Navigation].
4 Enter characters using the keyboard.
5 Touch [Go].
6 Touch the desired item from the list.
47
Page 49

■ Searching for a destination by category
A destination can be searched for from a list of categories.
1 Touch [] or [] on the map screen.
2 Touch [Destinations].
3 Touch the desired search method.
[Home]: Touch to set the registered
home as the destination. A point must
be registered as home before using
this function.
[Work]: Touch to set the registered
workplace as the destination. A point
must be registered as a workplace
before using this function.
[Favorites]: Touch to set a registered favorite as the destination. A point must be registered as a favorite before using this function.
[Recents]: Touch to set a destination from the destination history as the destination.
[Sent to car]: Sent to car enables customer to send a destination or POI to the vehicle
from Lexus app.
[Parking]: Touch to search for a nearby parking lot to set as a destination.
[Fuel]: Touch to search for a fuel station to set as a destination.
[Food]: Touch to search for a restaurant to set as a destination.
[Hospitals]: Touch to search for a hospital to set as a destination.
When setting a business as a destination, if your estimated time of arrival is outside of
business hours or near closing time, a notification asking to confirm the destination will
be displayed.
*
*
*: Home and Work must be added via Lexus app.
48
Page 50

4 Touch the desired destination from the list.
Editing the favorites list
The favorites list can be edited.
1 Touch [ ] or [ ] on the map screen.
2 Touch [Destinations].
3 Touch [Favorites].
5 Touch [Save].
Editing the destination history
The destination history can be edited.
1 Touch [ ] or [ ] on the map screen.
2 Touch [Destinations].
3 Touch [Recents].
4 Touch [ ].
Touch [ ] to delete a favorite.
The favorites list editing screen will be
displayed.
5 Touch [Save].
49
4 Touch [ ].
The destination history editing screen
will be displayed.
Touch [ ] to delete a destination history item.
Page 51

■ Searching for a destination using voice controls
1
Touch [] or [] on the map screen.
2 Say the keyword you wish to use for the
search.
3 Touch or use voice command for desired result from list.
50
Page 52

Connecting a Smartphone or Communication Device
Registering a Bluetooth® device from the multimedia system
A cellular phone or portable device must be registered in order to use hands-free calling or
®
Bluetooth
nected each time the multimedia system is started.
When Apple CarPlay or Android Auto is connected via USB, the device will be automatically registered.
If no Bluetooth
pressing and holding the [ ] switch on the steering.
1 Touch [ ] from the main menu.
2 Touch [Bluetooth & Devices].
3 Touch [Add another device].
audio. Once registration is complete, Bluetooth® will automatically be con-
®
device is connected, the registration screen can also be displayed by
● If no device is registered, proceed to Procedure
4.
● While a device is connected to the multimedia system, the confirmation screen for disconnecting the device may be displayed. Disconnect the device to perform registration.
4 Touch [Search for devices].
5 Touch the device to register from the main area.
®
● The Bluetooth
● Certain models of Bluetooth
certain screen is displayed on the Bluetooth
instruction manual for details.
address may be displayed instead of the device name.
®
devices may not be displayed in the device list, unless a
®
device. Refer to the Bluetooth® device’s
51
Page 53

6 Check that the displayed PIN code matches the PIN code displayed on the
Bluetooth
● Some Bluetooth
● You may be prompted to install the Lexus Application on your phone. Please follow the
displayed instruction.
● Primary device settings may be displayed. Perform the operation according to the
screen guidance.
● The Apple CarPlay or Android Auto settings may be displayed. The Apple CarPlay or
Android Auto screen will be displayed if the use of either is enabled.
● A message indicating that connection is complete is displayed, and the name of the registered Bluetooth
● If an operation failed screen is displayed, follow the operation instructions on the screen.
■ Registering from a Bluetooth
If the Bluetooth® device cannot be found by searching with the multimedia system, register
by searching for the multimedia system from the Bluetooth
®
device, and then touch [OK].
®
devices may need to be operated to complete registration.
®
device is displayed in the sub menu.
®
device
®
device.
1 Touch [ ] from the main menu.
2 Touch [Bluetooth & Devices].
3 Touch [Add another device].
● If no device is registered, proceed to Procedure
4.
● While a device is connected to the multimedia system, the confirmation screen for disconnecting the device may be displayed. Disconnect the device to perform registration.
4 Register the multimedia system from
the Bluetooth
● Perform the operation according to the
operating procedure of the Bluetooth
device.
● Be sure to display this Bluetooth
nection screen before performing regis-
tration on the Bluetooth
®
device to be used.
®
device.
®
con-
®
52
Page 54
5 Check that the displayed PIN code matches the PIN code displayed on the
Bluetooth
● Some Bluetooth
● You may be prompted to install the Lexus Application on your phone. Please follow the
displayed instruction.
● Primary device settings may be displayed. Perform the operation according to the
screen guidance.
● The Apple CarPlay or Android Auto settings may be displayed. The Apple CarPlay or
Android Auto screen will be displayed if the use of either is enabled.
● A message indicating that connection is complete is displayed, and the name of the registered Bluetooth
● If an operation failed screen is displayed, follow the operation instructions on the screen.
®
device, and then touch [OK].
®
devices may need to be operated to complete registration.
®
device is displayed in the sub menu.
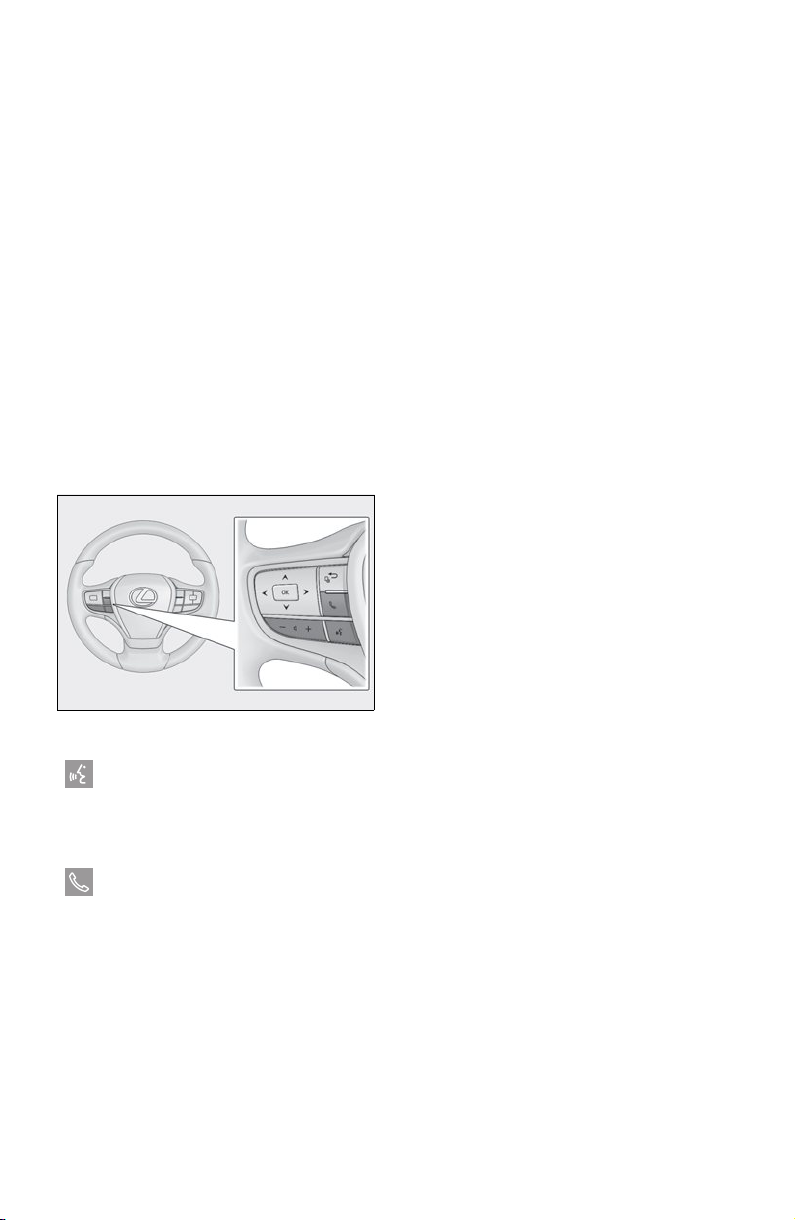
■Operating with the steering switches
Some hands-free call functions can be operated from the steering switches, such as receiving or making calls. The steering switch functions change depending on the status of the
multimedia system.
● Operate the switches as necessary.
[+] switch
Increases the ringtone volume or receiver
volume.
Press and hold to adjust continuously.
[-] switch
Decreases the ringtone volume or receiver
volume.
Press and hold to adjust continuously.
[] switch
Calls can be made using voice command.
To end Intelligent Assistant, press and hold the talk switch.
[] switch
• While a call cannot be made, displays call history screen or phone menu.
• Makes a call.
• While making a call or during a call, ends the call.
• While receiving a call or during call waiting, answers the call.
53
Page 55

Making calls from call history
Calls can be made to phone numbers that have been recorded in the call history as outgoing or incoming calls.
1 Touch [ ] from the main menu.
2 Touch [Recents].
3 Select the contact.
● For phone numbers that are not registered in the contact, the phone number
will be displayed as it is.
4 Touch the desired phone number.
Making calls from the favorites list
Make a call from your favorites list.
1 Touch [ ] from the main menu.
2 Touch [Favorites].
3 Select the person you want to call from
your favorites list.
4 Touch the desired phone number.
54
Page 56

Making calls from contacts
Make a call from the contacts registered on the multimedia system.
1 Touch [ ] from the main menu.
2 Touch [Contacts].
3 Select a contact.
4 Touch the desired phone number.
Answering calls
When there is an incoming call, the incoming call sounds and the incoming call screen or
incoming call notification is displayed.
1 Answer the call by doing one of the fol-
lowing.
● Touch [ ].
● Press the [ ] switch on the steering.
Making calls from the message function
Hands-free calls can be made using the message function.
1 Touch the blue number to make a call.
● Consecutive numbers may be recognized as phone numbers. In addition, some phone
numbers, such as phone numbers from other countries, may not be recognized.
55
Page 57

Basic Operation of Audio System
Changing the audio source
Source can be changed to radio, USB, etc.
1 Touch [ ] from the main menu.
2 Touch [Sources].
3 Touch the source you wish to select.
Listening to the radio
Switch to your preferred frequency or service and listen to the radio.
1 Touch [ ] from the main menu.
2 Touch [Sources].
3 Touch [Radio].
4 Select the station selection method or service as necessary.
[Favorites]: Select a broadcasting station from those registered as favorites.
[Tune]: Select the broadcasting station by entering a frequency with the numeric keypad.
[FM Radio]: Switches to FM mode. The FM station list, the 3 most recently listened stations, and the receivable FM broadcasting stations are displayed.
[AM Radio]: Switches to AM mode. The AM station list, the 3 most recently listened
stations, and the receivable AM broadcasting stations are displayed.
[SiriusXM]: Switches to SiriusXM Radio mode. Displays [For You] and contents/Super
Categories/[All channels]/[Listening History]. (This function is not made available in
some countries or areas)
5 Select the broadcasting station from the station list or genre.
56
Page 58

6 Operate the radio that is being received as necessary.
● Operating AM/FM from the screen
[Ch]: Touch [ ] or [ ] to search for the receivable broadcasting stations. Touch
and hold to jump to the next frequency with available radio signal. When released, the
broadcasting station closest to that position with the best reception sensitivity is
selected automatically.
[Scan]: SEEK UP and output the audio of the detected station for 10 sec. This is
repeated.
[ ]: Displayed when Multicast CH is supported in FM mode. Touch to display
the SPS channel list. The mode can be changed to the displayed SPS channel list.
[ ]: Registers the currently received broadcasting station in favorites. When registered, touch to cancel.
Preset buttons of sub menu: Receives the selected broadcasting station.
57
Page 59
● Operating SiriusXM Radio from the screen
(This function is not made available in some countries or areas)
[Ch]: Touch [ ] or [ ] to search for the receivable channels. Touch and hold to
switch channels. When released, the current channel is received.
[ ]/[ ]: Fast rewind or fast forward the radio cache. Touch and hold to jump to the
start or end of the buffer.
[ ]: Pause the radio cache.
[ ]: Play the radio cache.
[Related]: Displays content related to the received channel.
[Notify me]: Select an artist or song, or both an artist and song, to receive a notification
when the corresponding broadcast starts. (When receiving a regular channel) Select a
sports team to receive a notification when the corresponding broadcast starts. (When
receiving a sport channel)
[ ]: Registers the currently received channel in favorites. When registered, touch to
cancel.
Preset buttons of sub menu: Receive the registered channels.
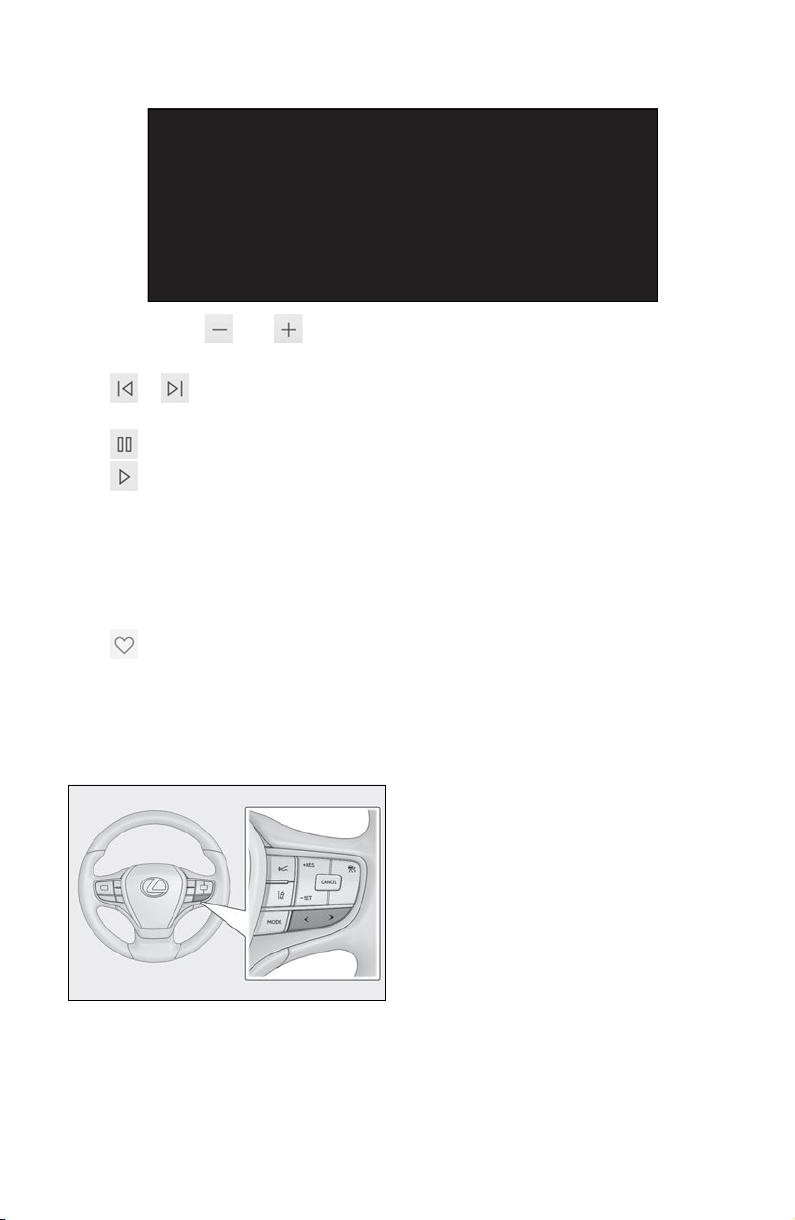
● Operating with the steering switches
[<]/[>]switches
•AM/FM
Switch the frequencies or broadcasting stations registered in the preset buttons in
order.
Press and hold to switch frequencies. When
released, the broadcasting station closest to
that position with the best reception sensitivity is selected automatically.
• SiriusXM Radio
Switch the channels registered in the preset buttons in order.
Press and hold to switch channels. When released, the channel closest to that position
with the best reception sensitivity is selected automatically.
58
Page 60

Playing iPod/iPhone
Play back music files on an iPod or iPhone connected to the USB port. When an iPod or
iPhone is connected, a button with the device’s name is displayed on the source selection
screen. This may not be displayed for some devices.
Connect an iPod or iPhone.
1 Touch [ ] from the main menu.
2 Touch [Sources].
3 Touch the device name or [USB].
4 Operate the iPod or iPhone that is playing as necessary.
● Perform operations from the screen
59
[ ]: Performs shuffle playback. Each touch switches the shuffle setting.
[ ]: Plays the currently playing track from the beginning. When at the start of the
track, the previous track will play from the beginning.
Touch and hold to fast rewind. Release to start playback from that position.
[ ]: Pauses playback.
[]: Plays.
[ ]: Switches the tracks. Touch and hold to fast forward. Release to start playback
from that position.
*
Page 61
[ ]: Performs repeat playback. Each touch switches the repeat setting.*
[Browse]: Displays the playback mode in the sub menu. Tracks can be selected from a
list sorted by artist, album, song, playlist, genre, Podcast, composer, audiobook, or
radio.
[Shuffle play] is displayed when playing a track selected from the list. Touch this to
return to the playback screen and perform shuffle playback.
*: The order in which shuffle or repeat settings switch depends on the connected device.
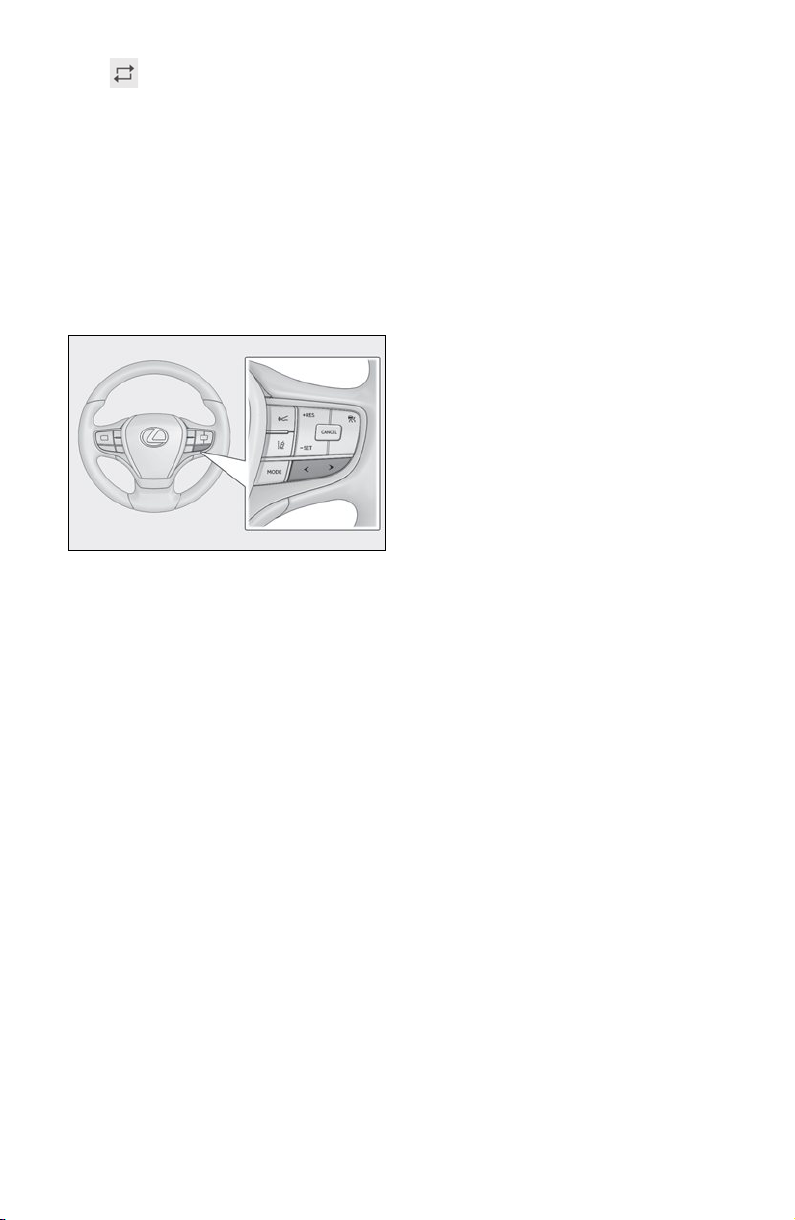
● Operating with the steering switches
[<]/[>]switches
Switches the tracks.
Press and hold to fast forward or fast
rewind. Release to start playback from that
position.
60
Page 62

Lexus Climate Concierge
The seat heaters (if equipped), seat ventilators (if equipped) and heated steering wheel (if
equipped) are each automatically controlled according to the set temperature of the air
conditioning system, the outside and cabin temperature, etc. Lexus Climate Concierge
allows a comfortable condition to be maintained without adjusting each system.
Turning on Lexus Climate Concierge
1 Select in the main menu on the Center Display.
2 Select “Climate”.
If the option screen is displayed, select “Front”.
3 Select “Climate concierge”.
The indicator on the air conditioning control screen illuminates, and the automatic air conditioning system, seat heaters and ventilators (if equipped), and heated steering wheel (if
equipped) operate in automatic mode.
If any of the system is operated manually, the indicator turns off. However, all other functions
continue to operate in automatic mode.
61
Page 63
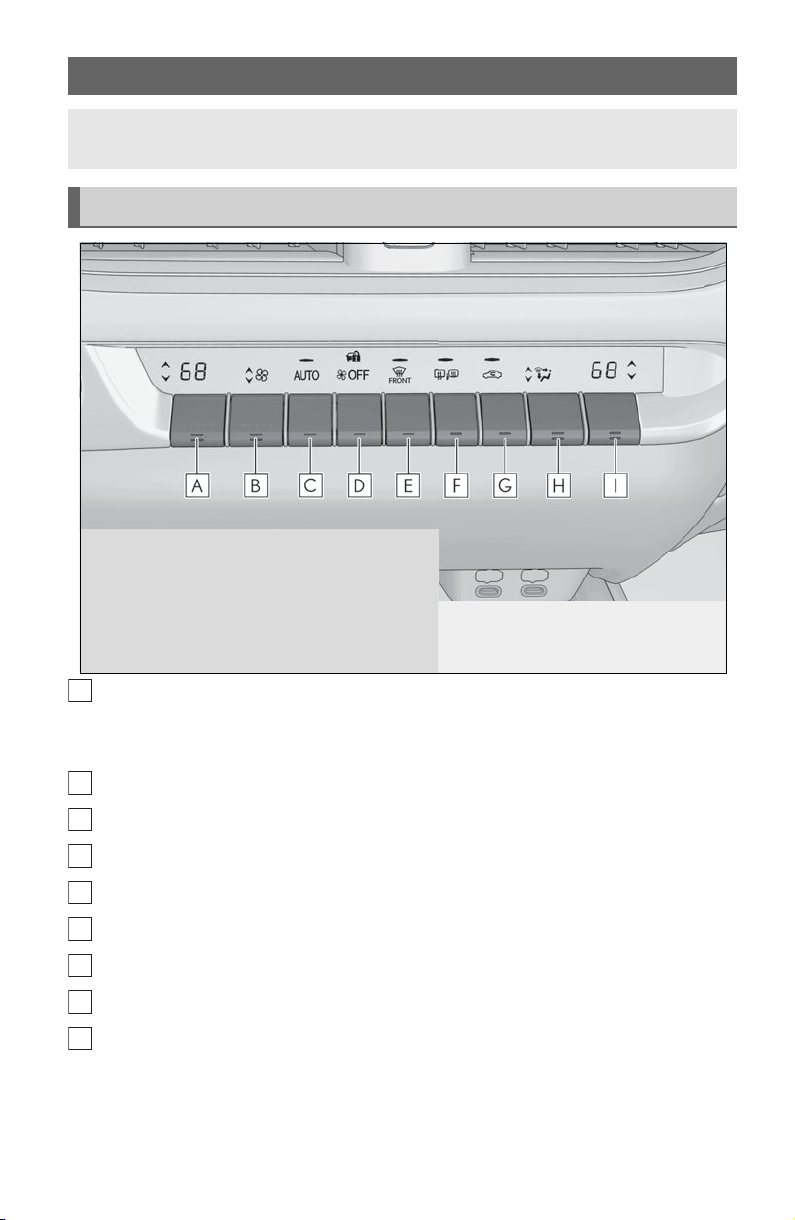
Automatic Air Conditioning System
The air conditioning system can be operated using the air conditioning control panel and
air conditioning control screen on the Center Display (P.63).
Air conditioning controls
Left-hand side temperature control switch
A
Operate the temperature control switch upwards to increase the temperature and
downwards to decrease the temperature.
Fan speed control switch
B
Automatic mode switch
C
Off switch
D
Windshield defogger switch
E
Rear window and outside rear view mirror defoggers switch
F
Outside/recirculated air mode switch
G
Airflow mode control switch
H
Right-hand side temperature control switch
I
Operate the temperature control switch upwards to increase the temperature and
downwards to decrease the temperature.
62
Page 64
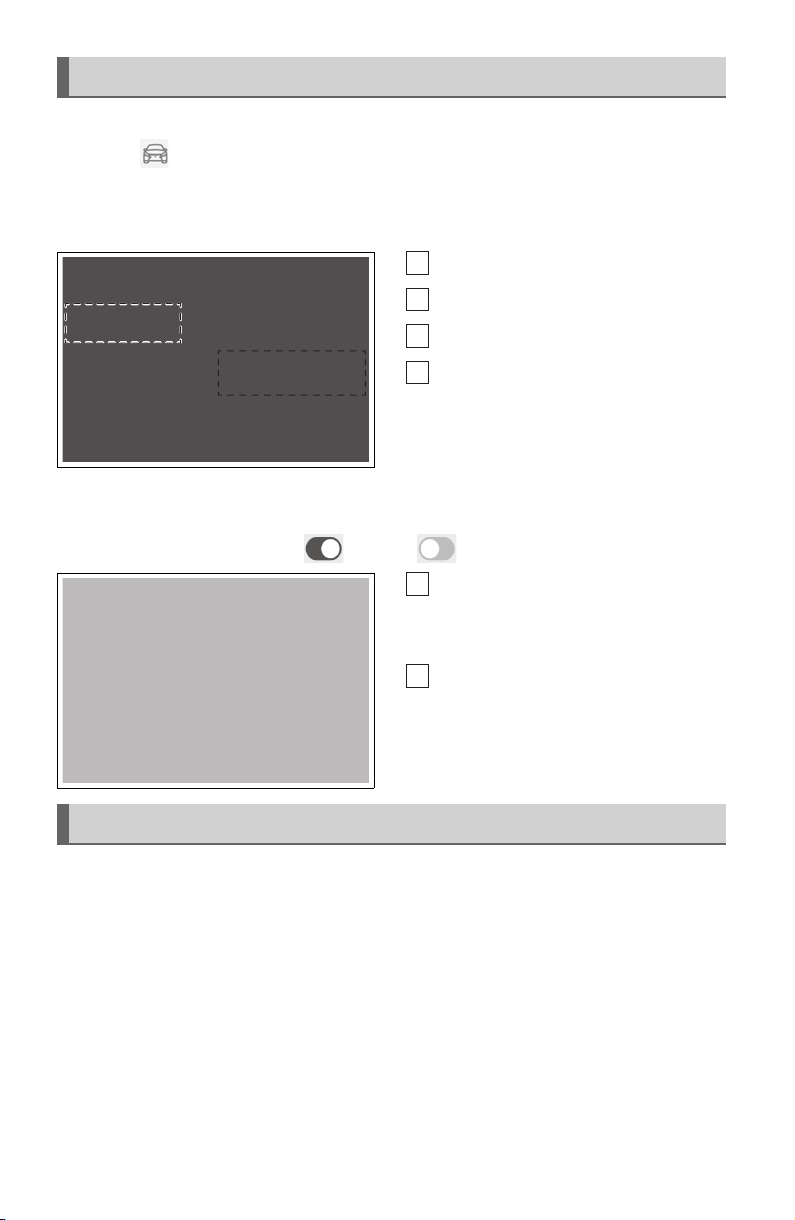
Air conditioning control screen
A
BCD
A
B
■Air conditioning control screen
1
Select in the main menu on the Center Display.
2 Select “Climate”.
If the option screen is displayed, select “Front”.
Sub menu
Select the air flow mode
Turn the function on/off
Fan speed level display
■Option screen
Select “Options” on the air conditioning control screen.
The functions can be switched (on) and (off).
Set eco air conditioning mode
Air conditioning and heater output is
limited to prioritize fuel economy.
Using automatic mode
1 Press the automatic mode switch.
2 Adjust the temperature setting.
3 To stop the operation, press the off switch.
63
Prevent ice from building up on the
windshield and wiper blades (Windshield wiper de-icer) (if equipped)
Page 65
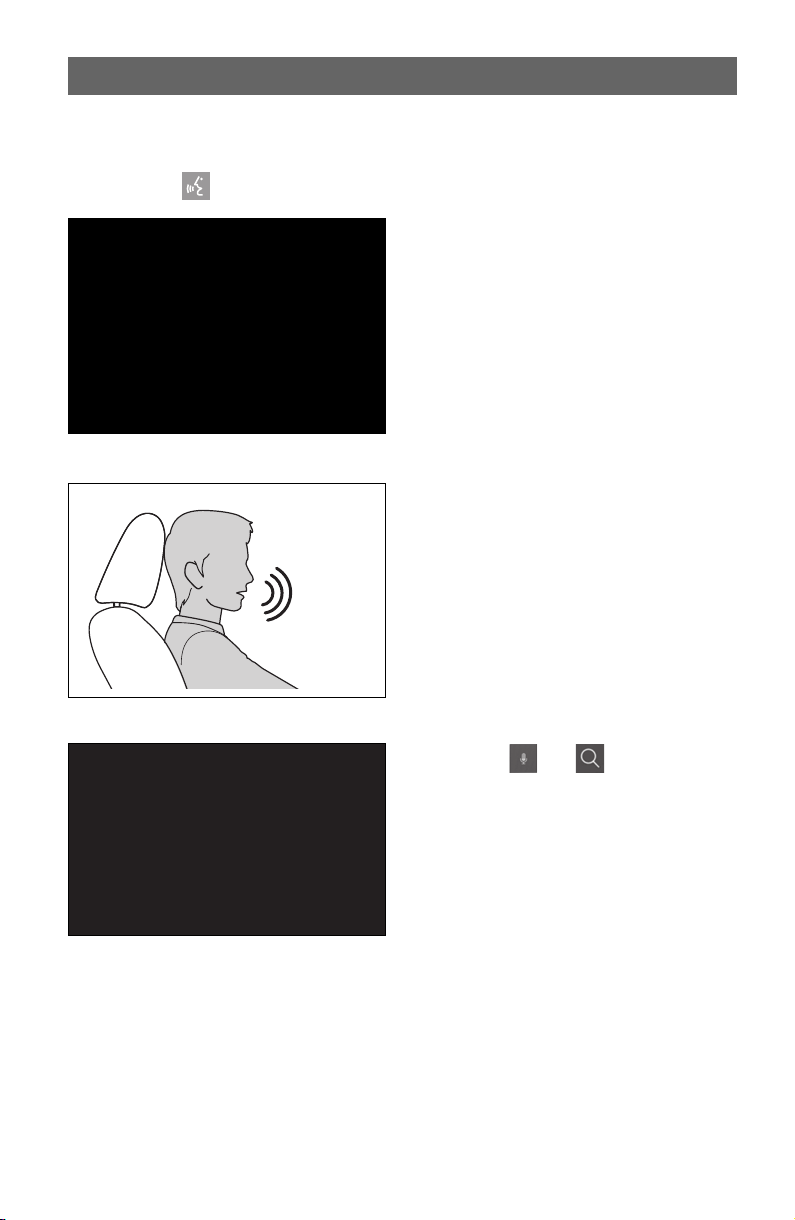
Starting Voice Control
Voice control can be started by any of the following operations:
■ Press the talk switch
1
Press the [ ] switch (talk switch) on the steering.
■ Say the wake word
Say “Hey Lexus”.
1
● The wake word can be turned on or off.
● The wake word can be used and then
immediately issue a voice command.
Example: “Hey Lexus” “Take me to an
Italian restaurant.”
■ Touch the microphone button
1
Touch [ ] or [ ] on the screen.
64
Page 66

Function list
The following tables list frequently used commands for each function category.
● The functions available may vary according to the system installed.
● Items with subscription will require Intelligent Assistant functionality.
■Common
Action Example voice command Subscription
Shows list of general
commands
Stops the current conversation and re-starts
at the beginning
Cancels the voice con-
trol system
“Help” No
“Start over” No
“Cancel” No
■Navigation
Intelligent Assistant system enables navigation voice search. This allows you with variety of
features such as searching a point of interest (POI), navigate to an address as well as discovering new POIs.
Function Example voice command Subscription
“Take me to <location category/business name>”
“Take me to <an Italian restaurant>”
Destination search
Map control
Route information “Cancel trip” Yes
“Take me to <6565 Headquarters drive Plano
“Take me to <address>”
TX>”
“Take me home”
“Take me to work”
“Map zoom in”
“Map zoom out”
Yes
Yes
65
Telematics “Call destination assist” No
Page 67

■ Multimedia control
Allows you to engage in a dialog with the Intelligent Assistant to complete various multimedia tasks via voice input.
Function Example voice command Subscription
Radio
Media
Media Streaming
“Play <artist/album/song/genre/playlist>”
“Tune to 99.5 FM”
“Tune to Rock on FM”
“Tune to channel 2 on SiriusXM”
“Mute audio”
“Next”
“Previous”
“Play <Frank Sinatra>”
No
No
Yes
■ Hands-free phone operation
Allows you to engage in a dialog with the Intelligent Assistant to complete various tasks via
voice input, such as making a phone call to a contact, or calling Destination Assist.
Function Example voice command Subscription
“Call <John Smith>”
Phone call
Message
“Dial <555 212 1212>”
“Call back”
“Redial”
“Send message to <John Smith>”
“Read message”
No
No
■ Screen display switching
Allows you to easily change to various function screen by voice.
Function Example voice command Subscription
Navigation “Show map” Yes
Phone “Show recent calls” No
Multimedia “Show the FM station list” No
Settings “Show display settings” No
66
Page 68

■Vehicle device control
Allows you to easily change a vehicle setting or activate a function by voice.
Function Example voice command Subscription
Climate
“Turn on the air conditioner”
“Set the temperature to <70> degrees”
“Turn the fan speed up”
No
■Notifications
Offers notifications based on user preferences, vehicle geolocation and learned behavior.
Each service can be set to On/Off from the Lexus app.
Function Detail Subscription
POI suggestion
(Navigation)
Low fuel reminder
(Navigation)
Parking suggestions near destination Yes
Automatically notifies user of low fuel level. If
applicable, provides POI list nearby (ahead) or
along route and allows user to select and navigate
by touch.
Yes
67
Page 69

Connecting to the USB Port
Connect a device such as smartphone or portable player.
1 Open the console box and connect the USB cable to the terminal.
When connecting a USB flash drive, connect it directly to the USB port.
68
Page 70
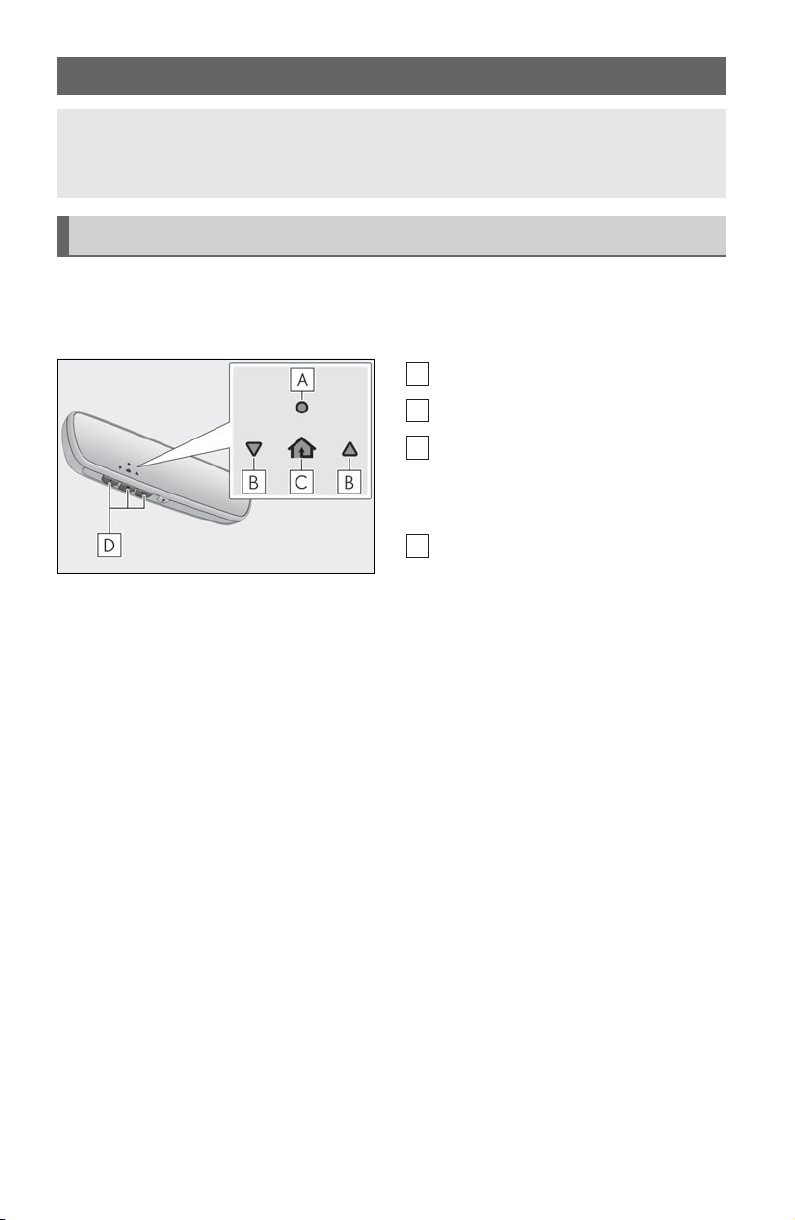
Garage Door Opener (if equipped)
A
B
C
D
The garage door opener can be programmed using the HomeLink® to operate garage
doors, gates, entry doors, door locks, home lighting systems, security systems, and other
devices.
System components
The HomeLink® wireless control system in your vehicle has 3 buttons which can be programmed to operate 3 different devices. Refer to the programming methods on the following pages to determine the method which is appropriate for the device.
®
HomeLink
Garage door operation indicators
HomeLink
Illuminates while HomeLink
ating.
Buttons
indicator light
®
icon
®
is oper-
■Before programming HomeLink
®
● During programming, it is possible that garage doors, gates, or other devices may operate. For this reason, make sure that people and objects are clear of the garage door or
other devices to prevent injury or other potential harm.
● It is recommended that a new battery be placed in the remote control transmitter for
more accurate programming.
● Garage door opener motors manufactured after 1995 may be equipped with rolling
code protection. If this is the case, you may need a stepladder or other sturdy, safe device
to reach the “Learn” or “Smart” button on the garage door opener motor.
69
Page 71

■ HomeLink
®
programming procedure
The programming procedures can also be found at the following URL.
Website: www.homelink.com/lexus
The word “QR Code” is registered trademark of DENSO WAVE INCORPORATED in
Japan and other countries.
For support, contact customer support at the following.
Help Line: 1-800-355-3515
70
Page 72
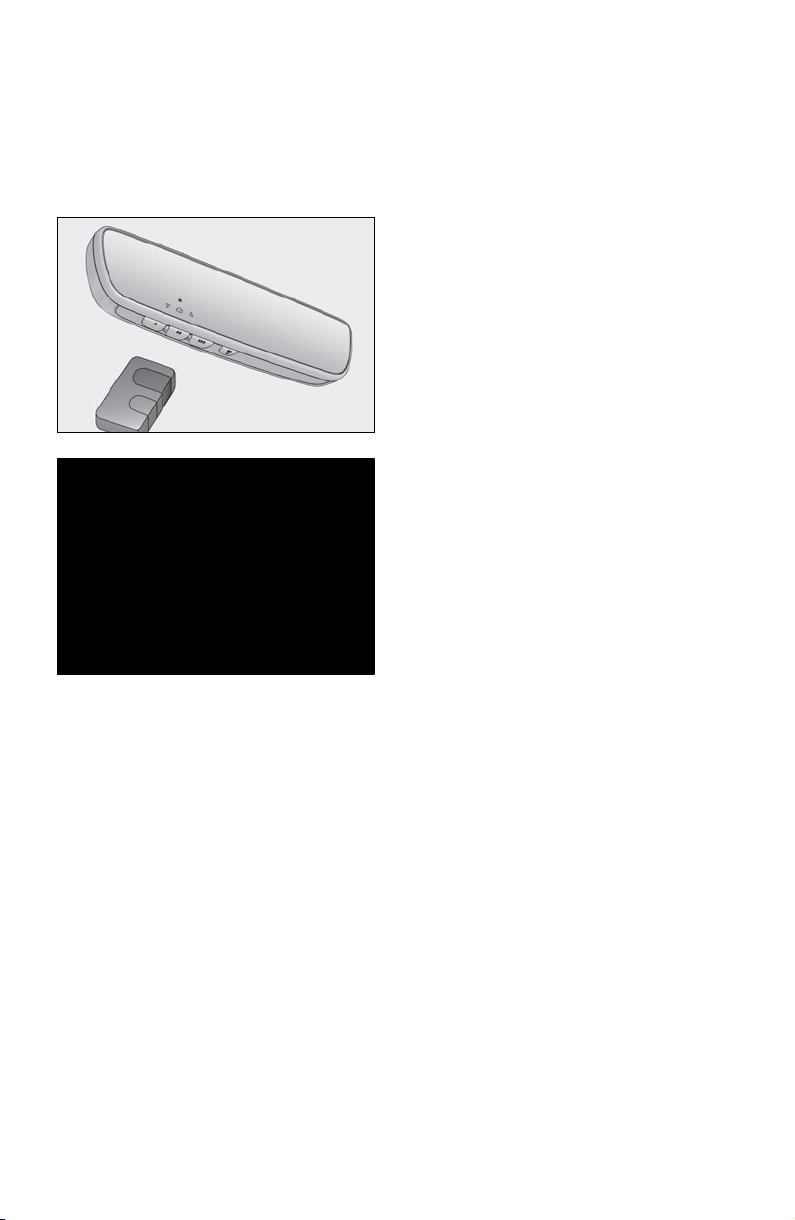
■Programming HomeLink
®
Steps 1 through 3 must be performed within 60 seconds, otherwise the indicator light will
stop flashing and programming will not be able to be completed.
1 Press and release the HomeLink
HomeLink
®
indicator light flashes (orange).
®
button you want to program and check that the
2 Point the remote control transmitter
for the device at the rear view mirror,
1 to 3 in. (25 to 75 mm) from the
®
HomeLink
Keep the HomeLink
buttons.
®
indicator light in
view while programming.
3 Program a device.
Programming a device other than an entry gate (for U.S.A. owners)
Press and hold the remote control transmitter button until the HomeLink
®
indicator light
changes from slowly flashing orange to rapidly flashing green (rolling code) or continuously
lit green (fixed code), then release the button.
Programming an entry gate (for U.S.A. owners)/Programming a device in the Cana-
dian market
Press and release the remote control transmitter button at 2 second intervals, repeatedly,
®
until the HomeLink
indicator light changes from slowly flashing (orange) to rapidly flashing
(green) (rolling code) or continuously lit (green) (fixed code).
71
Page 73
4 Test the HomeLink
®
operation by pressing the newly programmed button and observ-
ing the indicator light:
● Indicator light illuminates: Programming of a fixed code device has completed. The
garage door or other device should operate when a HomeLink
®
button is pressed
and released.
● Indicator light flashes rapidly: The garage door opener motor or other device is
equipped with a rolling code. To complete programming, firmly press and hold the
®
HomeLink
button for 2 seconds then release it.
● If the garage door or other device does not operate, proceed to “Programming a
rolling code system”.
5 Repeat the steps above to program another device for any of the remaining
HomeLink
®
buttons.
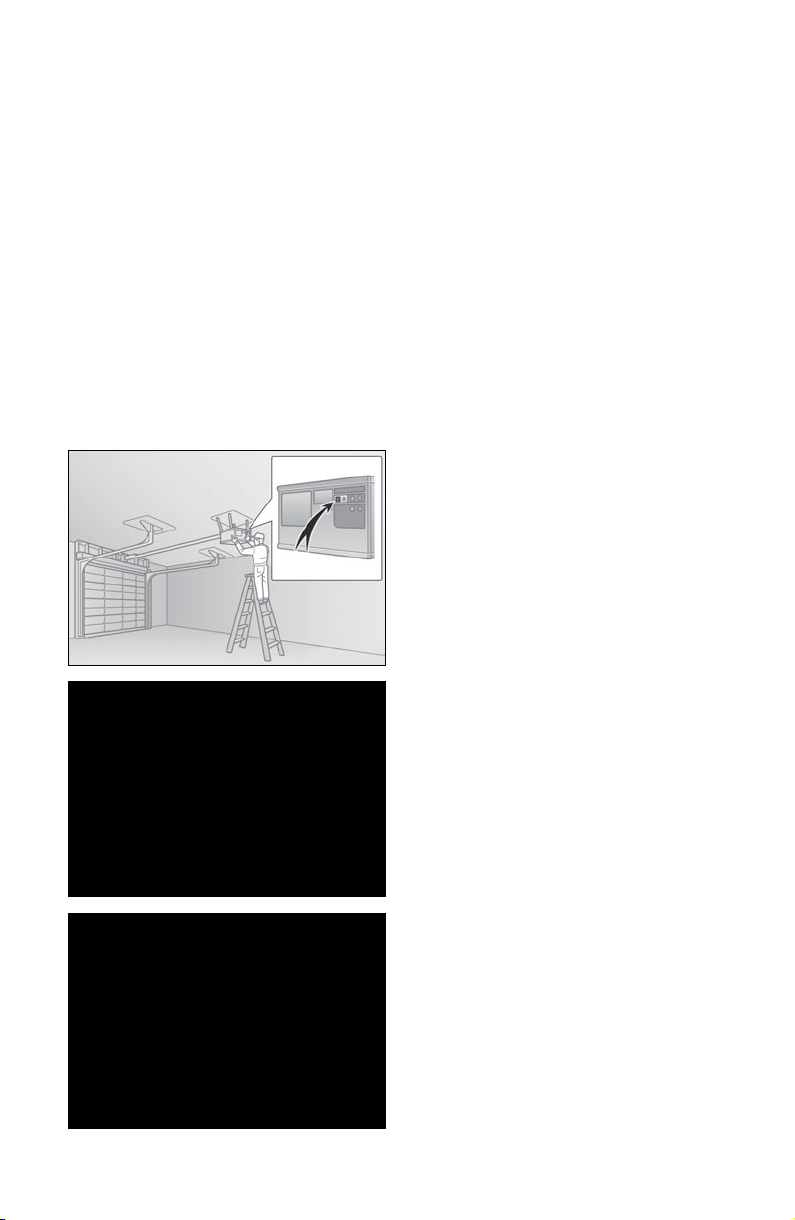
■ Programming a rolling code system
2 or more people may be necessary to complete rolling code programming.
1 Locate the “Learn” or “Smart” button
on the garage door opener motor in
the garage.
This button can usually be found where
the hanging antenna wire is attached to
the unit. The name and color of the button may vary by manufacturer. Refer to
the owner’s manual supplied with the
garage door opener motor for details.
2 Press and release the “Learn” or
“Smart” button.
Perform
performing
3 within 30 seconds after
2.
3 Press and hold the desired
HomeLink
for 2 seconds and release it. Repeat
this sequence (press/hold/release) up
to 3 times to complete programming.
If the garage door opener motor oper-
ates when the HomeLink
pressed, the garage door opener
motor recognizes the HomeLink
nal.
®
button (inside the vehicle)
®
button is
®
sig-
72
Page 74

■Enabling 2-way communication with a garage door (only available for compat-
ible devices)
When enabled, 2-way communication allows you to check the status of the opening and
closing of a garage door through indicators in your vehicle.
2-way communication is only available if the garage door opener motor used is a compatible device. (To check device compatibility, refer to www.homelink.com.)
1 Within 5 seconds after programming the garage door opener has been completed, if
the garage door opener motor is trained to HomeLink
indicators will flash rapidly (green) and the light on the garage door opener motor will
blink twice, indicating that 2-way communication is enabled.
If the indicators do not flash, perform
2 and 3 within the first 10 presses of the HomeLink
button after programming has been completed.
2 Press a programmed HomeLink
3 Within 1 minute of pressing the HomeLink
®
button to operate a garage door.
®
button, after the garage door operation
has stopped, press the “Learn” or “Smart” button on the garage door opener motor.
Within 5 seconds of the establishment of 2-way communication with the garage door
opener, both garage door operation indicators in the vehicle will flash rapidly (green)
and the light on the garage door opener motor will blink twice, indicating that 2-way
communication is enabled.
■Reprogramming a single HomeLink
®
button
When the following procedure is performed, buttons which already have devices registered
to them can be overwritten:
1 With one hand, press and hold the desired HomeLink
2 When the HomeLink
HomeLink
for the HomeLink
®
button and perform “Programming HomeLink®” 1 (it takes 20 seconds
®
indicator starts flashing (orange), continue to hold the
®
indicator to start flashing).
®
, both garage door operation
®
button.
®
Operating HomeLink
Press the appropriate HomeLink
73
®
®
button. The HomeLink® indicator light should turn on.
Page 75
Safety Connect (if equipped)
Safety Connect is a subscription-based telematics service that uses Global Positioning
System (GPS) data and embedded cellular technology to provide safety and security features to subscribers. Safety Connect is supported by Lexus’ designated response center,
which operates 24 hours per day, 7 days per week.
Safety Connect service is available by subscription on select, telematics hardwareequipped vehicles.
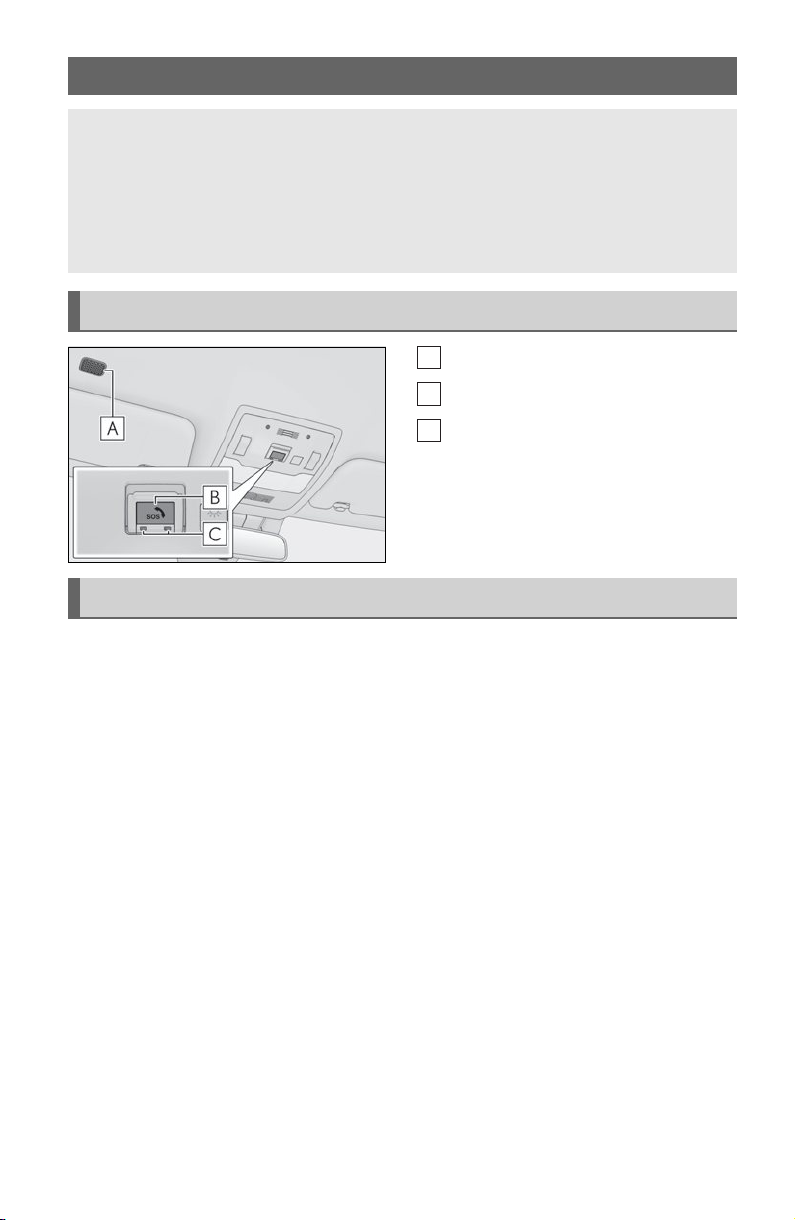
System components
Microphone
A
“SOS” button
B
LED light indicators
C
Services
Subscribers have the following Safety Connect services available:
● Automatic Collision Notification
In case of either airbag deployment or severe rear-end collision, the system is designed
to automatically call the response center. The responding agent receives the vehicle’s
location and attempts to speak with the vehicle occupants to assess the level of emergency. If the occupants are unable to communicate, the agent automatically treats the
call as an emergency, contacts the nearest emergency services provider to describe the
situation, and requests that assistance be sent to the location.
74
Page 76

● Stolen Vehicle Location
If your vehicle is stolen, Safety Connect can work with local authorities to assist them in
locating and recovering the vehicle. After filing a police report, call the Safety Connect
response center at 1-800-25-LEXUS (1-800-255-3987) in the United States, 1-877539-8777 in Puerto Rico or 1-800-265-3987 in Canada, and follow the prompts for
Safety Connect to initiate this service.
In addition to assisting law enforcement with recovery of a stolen vehicle, Safety-Connect-equipped vehicle location data may, under certain circumstances, be shared with
third parties to locate your vehicle. Further information is available at Lexus.com.
● Emergency Assistance Button (“SOS”)
In the event of an emergency on the road, push the “SOS” button to reach the Safety
Connect response center. The answering agent will determine your vehicle’s location,
assess the emergency, and dispatch the necessary assistance required.
If you accidentally press the “SOS” button, tell the response-center agent that you are
not experiencing an emergency.
● Enhanced Roadside Assistance
Enhanced Roadside Assistance adds GPS data to the already included warranty-based
Lexus roadside service.
Subscribers can press the “SOS” button to reach a Safety Connect response-center
agent, who can help with a wide range of needs, such as: towing, flat tire, fuel delivery, etc.
For a description of the Roadside Assistance services and their limitations, please see the
Safety Connect Terms and Conditions, which are available at Lexus.com.
Subscription
After you have signed the Telematics Subscription Service Agreement and are enrolled,
you can begin receiving services.
A variety of subscription terms is available for purchase. Contact your Lexus dealer, call the
following or push the “SOS” button in your vehicle for further subscription details.
● The United States
1-800-25-LEXUS (1-800-255-3987)
● Canada
1-800-26-LEXUS (1-800-265-3987)
● Puerto Rico
1-877-539-8777
75
Page 77

Remote Connect (if equipped)
The functionality of Remote Connect and Service Connect are made possible by the use
of a DCM and a smartphone.
For details about these services, refer to https://www.lexus.com
Remote Connect subscription
Remote Connect is a smartphone application that lets you view and remotely control certain aspects of your vehicle.
.
76
Page 78

Service Connect (if equipped)
Service Connect uses DCM to collect and transmit vehicle data that allows Lexus to provide:
● Vehicle Health Report (VHR) (Safety Recalls, Service Campaigns, Current Vehicle
Alerts, Required Maintenance, and Vehicle Condition Status)
● Maintenance Notifications
● Vehicle Alert Notifications
77
Page 79

Door Locks
The vehicle can be locked and unlocked using the entry function, wireless remote control
or door lock switches.
For details about the entry function or wireless remote control, refer to P.16, 17.
Unlocking and locking the doors from the inside
■ Door lock switches (to lock/unlock)
Locks all the doors
1
2 Unlocks all the doors
■ Inside lock buttons (to lock)
Push down the inside lock button to lock the
door.
■ Inside door handles (to unlock)
For the front doors
Pull the handle to unlock and open the
door.
When the door is unlocked, the inside
lock button will pop up.
For the rear doors
Pull the handle to unlock the door. Pull
the handle a second time to open the
door.
When the door is unlocked, the inside
lock button will pop up.
78
Page 80

Back Door
Opening the back door from the outside (vehicles without power back
door)
Raise the back door while pressing up the
back door opener switch.
Opening/closing the back door (vehicles with power back door)
■From the inside
Press the switch for 1 second.
A buzzer sounds and the back door automatically opens and closes.
79
Page 81

■ From the outside
Wireless remote control
P.16
Power back door opener switch
● Open
● Close
When the back door is unlocked: Press the
back door opener switch.
When the back door is locked: While carrying the electronic key on your person, press
the back door opener switch.
A buzzer sounds and the back door automatically opens.
Press the switch.
A buzzer sounds and the back door automatically closes.
● Close the back door and lock all doors (close & lock function)
Press the switch.
A different buzzer than the normal one will
sound and the power back door will begin
closing automatically. When the power
back door is closed, all of the doors will lock
simultaneously and operation signals will
indicate that all of the doors have been
locked.
80
Page 82

■Opening/closing the back door using the Hands Free Power Back Door
ABC
A
B
While carrying an electronic key, stand within the smart access system with push-but-
1
ton start operation range, approximately 19.7 to 27.6 in. (50 to 70 cm) from the rear
bumper.
Kick sensor
Hands Free Power Back Door operation detection area
Smart access system with push-button
start operation detection area
2 Perform a kick operation by moving your foot to within approximately 3.9 in. (10 cm) of
the rear bumper, and then pulling your foot back after the buzzer sounds.
Kick sensor
Hands Free Power Back Door operation detection area
3 When the kick sensor detects that your foot is pulled back, a buzzer will sound and the
back door will automatically fully open/close.
81
Page 83

Fuel Tank Cap
Before refueling the vehicle
● Turn the power switch off and ensure that all the doors and windows are closed.
● Confirm the type of fuel.
Opening the fuel tank cap
1 Press the opener switch.
The fuel filler door will open within
about 10 seconds of the switch being
pressed. Before refueling is possible, a
message will be shown on the multiinformation display in the instrument
cluster to indicate the progress of the
fuel filler door opener.
2 Turn the fuel tank cap slowly and
remove it, then put it into the holder on
the fuel filler door.
Closing the fuel tank cap
After refueling, turn the fuel tank cap until
you hear a click. Once the cap is released, it
will turn slightly in the opposite direction.
82
Page 84
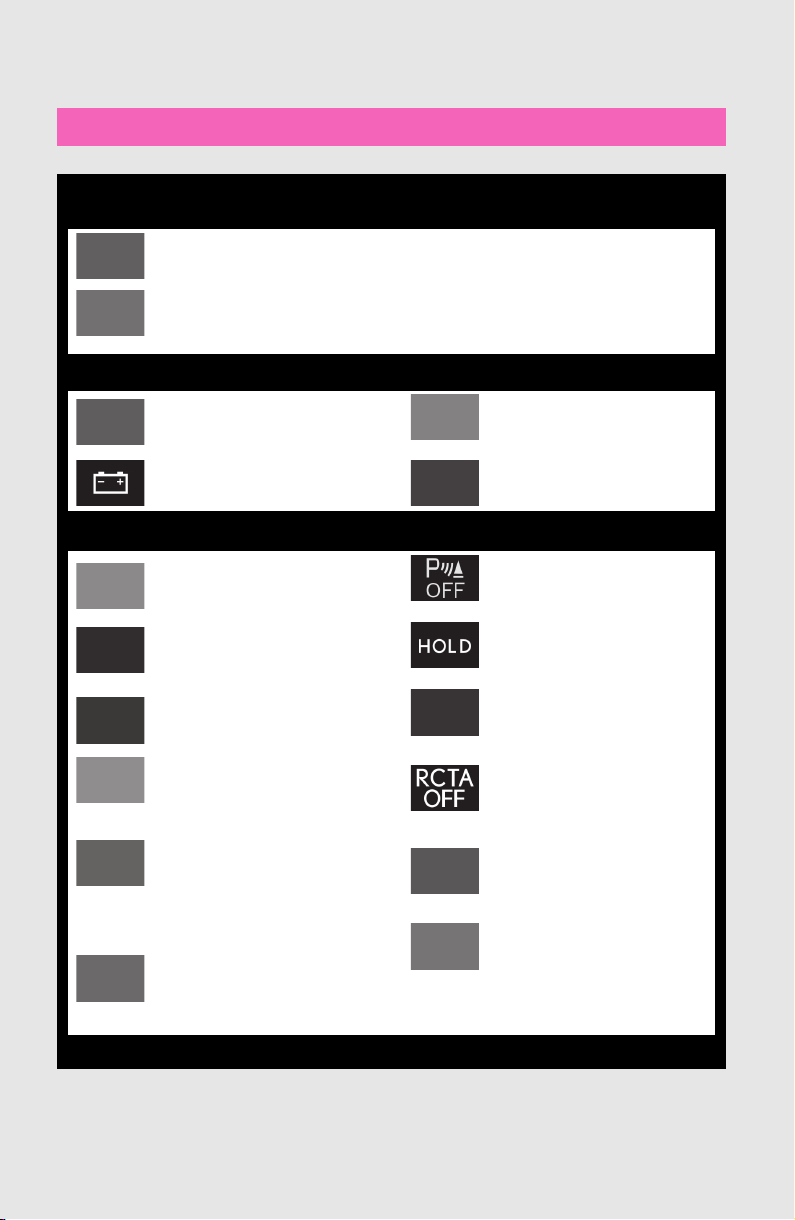
What to do if...
List of Warning/Indicator Lights
Immediately stop the vehicle in a safe place and contact your Lexus dealer. Continuing to drive the vehicle may be dangerous.
(U.S.A.)
Brake system warning light
(Canada)
(Red)
Immediately stop the vehicle in a safe place and contact your Lexus dealer.
Low engine oil pressure warning light
Charging system warning light
Have the vehicle inspected by your Lexus dealer immediately.
(U.S.A.)
(Canada)
Malfunction
indicator lamp
(Red or
yellow)
(Flashes or
illuminates)
SRS warning light
(U.S.A.)
ABS warning light
(Canada)
Electric power steering
system warning light
(Flashes)
(Flashes)
(Yellow)
(Flashes)
Intuitive parking assist OFF
indicator (if equipped)
Brake hold operated indicator
Brake system warning light
RCTA OFF indicator (if
equipped)
PKSB OFF indicator (if
PCS warning light
(Flashes)
equipped)
Tire pressure warning light
Slip indicator
(Blinking
and then
continu-
ously on)
For further information, refer to the “OWNER’S MANUAL”.
83
Page 85
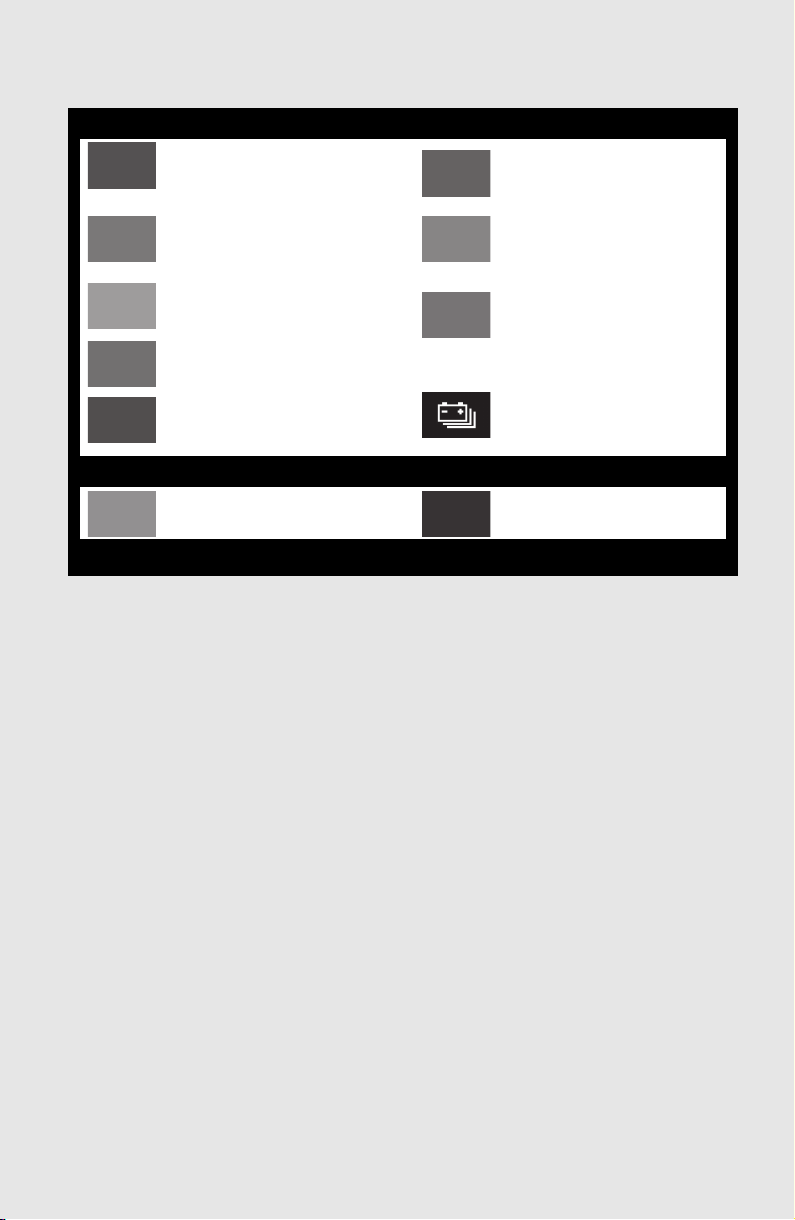
What to do if...
Follow the correction procedures.
(Flashes)
(U.S.A.)
(Canada)
(Flashes)
Inappropriate pedal
operation warning light
Low fuel level warning light
Driver’s and front passenger’s
seat belt reminder light
Stop and check.
High coolant temperature
warning light
For further information, refer to the “OWNER’S MANUAL”.
Parking brake
indicator
(Orange)
(Illuminates
without
blinking)
(Orange )
Rear passengers’ seat belt
reminder lights
LTA indicator
Tire pressure warning light*
Low traction battery charge
warning light
Hybrid system overheat warning light
84
Page 86
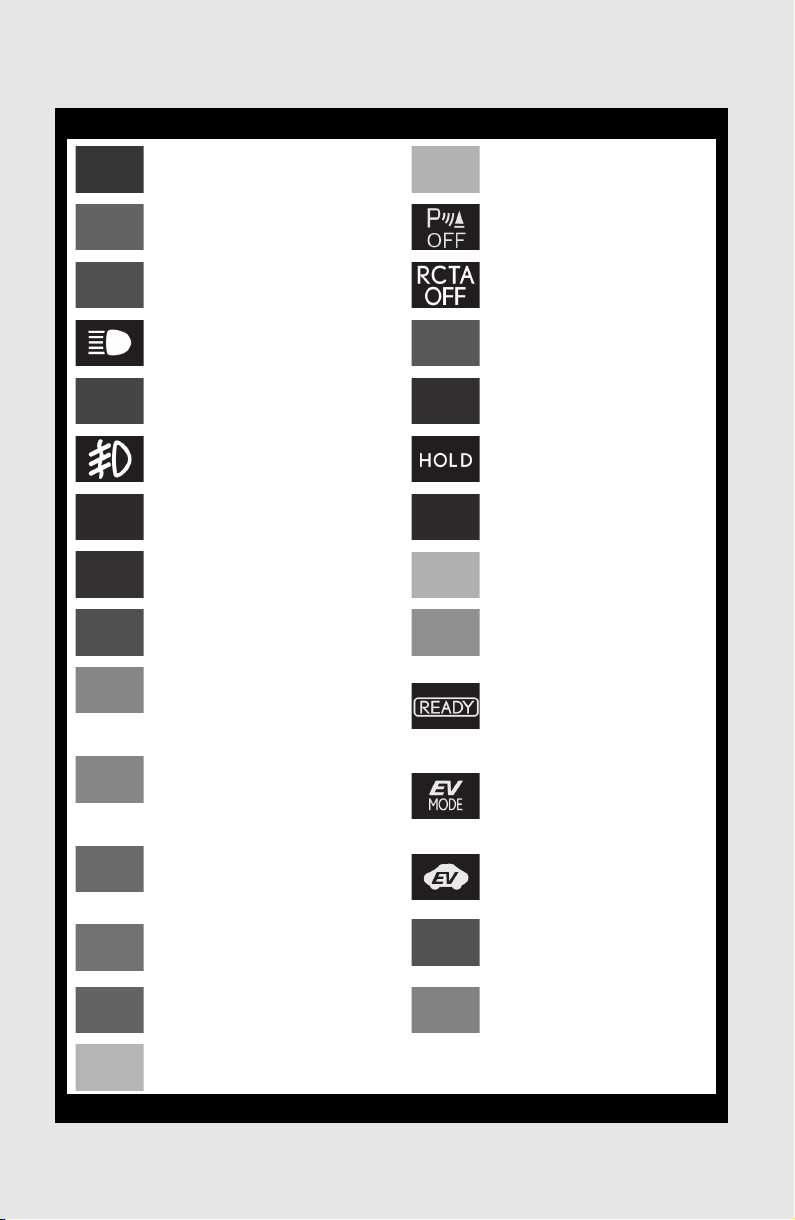
What to do if...
See the “OWNER’S MANUAL”
Turn signal indicator BSM indicator (if equipped)
(White or
green)
Headlight indicator (U.S.A.)
Tail light indicator (Canada)
Headlight high beam indicator
Automatic High Beam
indicator
Fog light indicator (if
equipped)
Intuitive parking assist OFF
indicator (if equipped)
RCTA OFF indicator (if
equipped)
PKSB OFF indicator (if
equipped)
Brake hold standby indicator
Brake hold operated
indicator
Cruise control indicator Security indicator
Dynamic radar cruise control
indicator
Cruise control “SET” indicator
Smart access system with
push-button start indicator
Low outside temperature
indicator
LTA indicator “READY” indicator
85
(Flashes in
orange)
(Flashes)
LTA indicator EV drive mode indicator
Slip indicator EV indicator
VSC OFF indicator
(U.S.A.)
Parking brake
indicator
PCS warning light
(Canada)
BSM outside rear view mirror
indicators (if equipped)
For further information, refer to the “OWNER’S MANUAL”.
Page 87
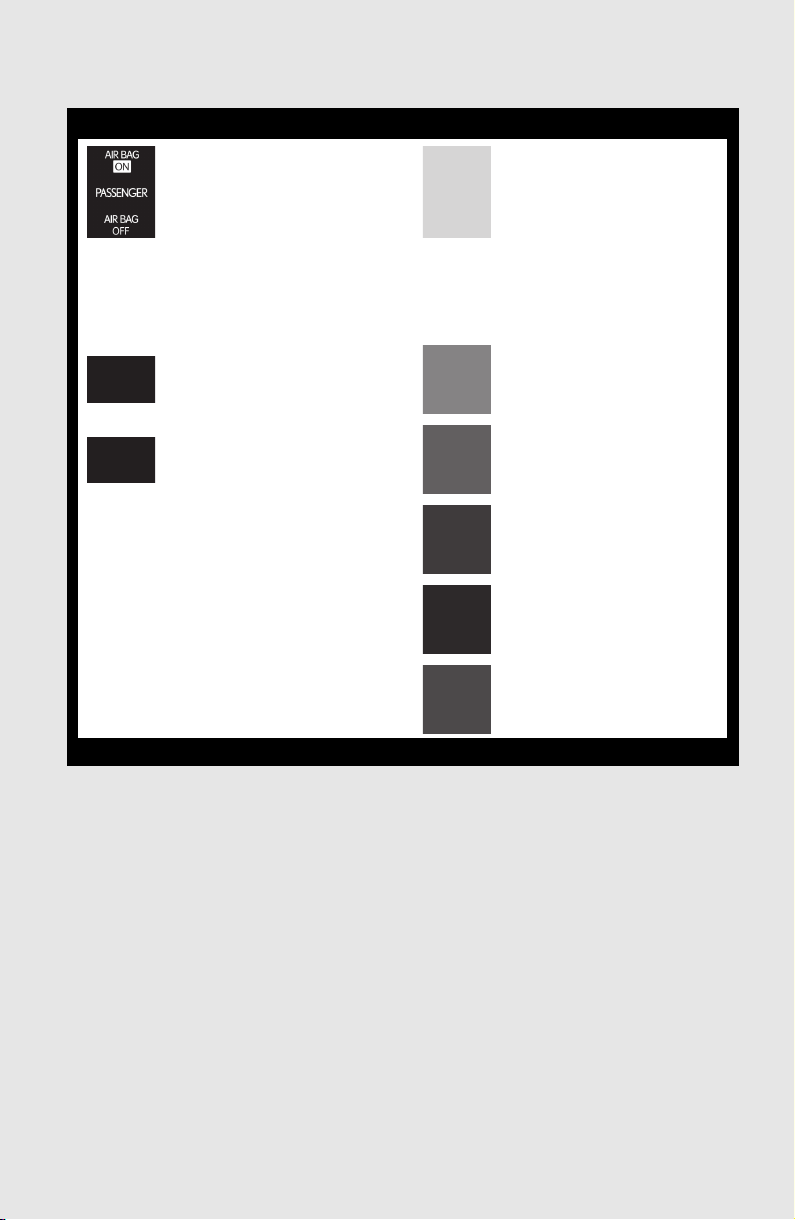
What to do if...
See the “OWNER’S MANUAL”
(U.S.A.)
“AIR BAG ON/OFF” indicator
(Canada)
“AIR BAG ON/OFF” indicator
● Drive mode indicators
Except F SPORT models F SPORT models
Eco drive mode indicator
Custom mode indicator
(if equipped)
Sport mode indicator Eco drive mode indicator
Sport mode indicator
(if equipped)
Sport S mode indicator
(if equipped)
Sport S+ mode indicator
(if equipped)
For further information, refer to the “OWNER’S MANUAL”.
*: It also comes on due to natural causes such as natural air leaks and tire inflation pressure
changes caused by temperature. Adjust the tire inflation pressure to the specified level.
The light will turn off after a few minutes. In case the light does not turn off even if the tire
inflation pressure is adjusted, have the system checked by your Lexus dealer.
86
Page 88

What to do if...
If the electronic key does not operate properly
Locking and unlocking the door
■Unlocking the door
Insert the mechanical key while pulling
1
on the driver’s door handle.
2 Unlock the door.
3 Remove the key, return the handle, and then pull the handle again.
■Locking the door
With the door open, push down the
1
inside lock button.
2 Close the door.
87
Page 89
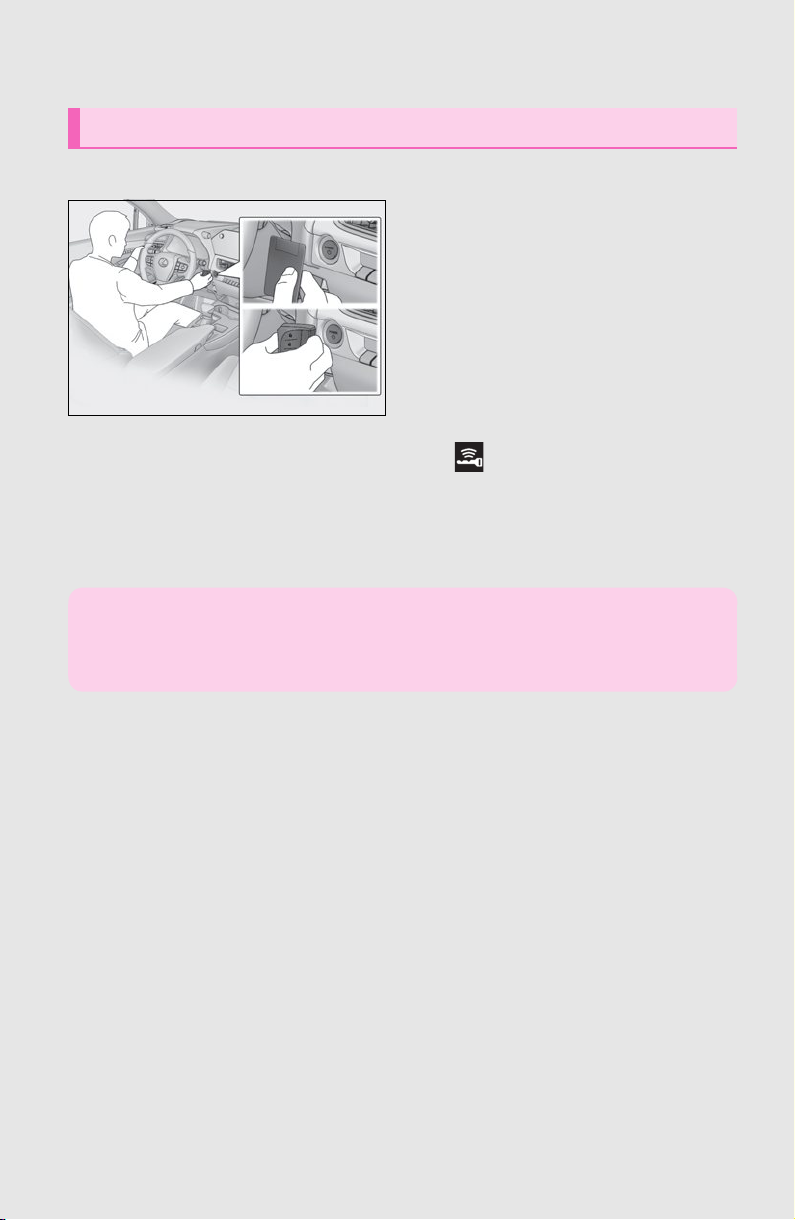
What to do if...
Starting the hybrid system
1 Ensure that the shift lever is in P and depress the brake pedal.
2 Touch the Lexus emblem side of the
electronic key to the power switch.
When the electronic key is detected, a
buzzer sounds and the power switch
will turn to ON.
When the smart access system with
push-button start is deactivated in customization setting, the power switch
will turn to ACC.
3 Firmly depress the brake pedal and check that is shown on the multi-information
display.
4 Press the power switch.
In the event that the hybrid system still cannot be started, contact your Lexus dealer.
Replace the battery with a new one. For instructions on replacing the battery, refer to the
“OWNER’S MANUAL”.
If you need further assistance, contact your Lexus dealer.
88
Page 90

What to do if...
Brake pedal
If the hybrid system will not start
Make sure that the correct operating procedures have been followed.
Make sure that the brake pedal is firmly
depressed when attempting to start the
hybrid system. (P.19)
If the hybrid system still does not start, see the “OWNER’S MANUAL” for more information or contact your Lexus dealer.
89
Page 91

Your Lexus dealer
Your Lexus dealer will provide quality maintenance and any other assistance
you may require.
If there is not a Lexus dealer near you, please call the following number:
■U.S. OWNERS
●In the U.S. mainland or Canada:
Lexus Roadside Assistance
1-800-25-LEXUS or 1-800-255-3987 (Toll-Free)
●In Hawaii:
Servco Automotive Roadside Assistance/Customer Services
1-800-25-LEXUS or 1-800-255-3987 (Toll-Free)
■CANADIAN OWNERS
●In Canada or the U.S. mainland:
Lexus Roadside Assistance/Customer Service
1-800-26-LEXUS or 1-800-265-3987 (Toll-Free)
Please access our websites for further information.
●The U.S. mainland: www.lexus.com
●Hawaii: www.servcolexus.com
●Canada: www.lexus.ca
©2022 TOYOTA MOTOR CORPORATION
All rights reserved. This material may not be reproduced or copied, in whole or in part,
without the written permission of Toyota Motor Corporation.
90
Page 92

 Loading...