


Odyssey 2019

2019
OWNER’S MANUAL
Event Data Recorders
This vehicle is equipped with an event data recorder (EDR).
The main purpose of an EDR is to record, in certain crash or near
crash-like situations, such as an air bag deployment or hitting a
road obstacle, data that will assist in understanding how a vehicle’s
systems performed. The EDR is designed to record data related
to vehicle dynamics and safety systems for a short period of
time, typically 30 seconds or less. The EDR in this vehicle is
designed to record such data as:
• How various systems in your vehicle were operating;
• Whether or not the driver and passenger safety belts were
buckled/fastened;
3
WARNING
California Proposition 65 Warning
Operating, servicing and maintaining a
passenger vehicle or off-highway motor
vehicle can expose you to chemicals including
engine exhaust, carbon monoxide,
phthalates, and lead, which are known to the
State of California to cause cancer and birth
defects or other reproductive harm. To
minimize exposure, avoid breathing exhaust,
do not idle the engine except as necessary,
service your vehicle in a well-ventilated area
and wear gloves or wash your hands
frequently when servicing your vehicle. For
more information go to
www.P65Warnings.ca.gov/passenger-vehicle
.
• How far (if at all) the driver was depressing the accelerator
and/or brake pedal; and,
• How fast the vehicle was traveling.
These data can help provide a better understanding of the
circumstances in which crashes and injuries occur. NOTE: EDR data
are recorded by your vehicle only if a non-trivial crash situation
occurs; no data are recorded by the EDR under normal driving
conditions and no personal data (e.g., name, gender, age, and
crash location) are recorded. However, other parties, such as law
enforcement, could combine the EDR data with the type of
personally identifying data routinely acquired during a crash
investigation.
To read data recorded by an EDR, special equipment is required,
and access to the vehicle or the EDR is needed. In addition to the
vehicle manufacturer, other parties, such as law enforcement, that
have the special equipment, can read the information if they have
access to the vehicle or the EDR.
The data belongs to the vehicle owner and may not be accessed by
anyone else except as legally required or with the permission of the
vehicle owner.
Service Diagnostic Recorders
This vehicle is equipped with service-related devices that record
information about powertrain performance. The data can be used
to verify emissions law requirements and/or help technicians
diagnose and solve service problems. It may also be combined with
data from other sources for research purposes, but it remains
confidential. Some diagnostic and maintenance information is
uploaded to Honda upon vehicle start up.

California Perchlorate Contamination Prevention Act
The airbags, seat belt tensioners, and CR type batteries in this
vehicle may contain perchlorate materials - special handling may
apply. See www.dtsc.ca.gov/hazardouswaste/perchlorate/
As you read this manual, you will find information that is preceded
by a symbol. This information is intended to help you avoid
damage to your vehicle, other property, or the environment.
Software End User License Agreement
Your vehicle comes equipped with software, which is governed by
the End User License Agreement in Owner’s Manual, and which
contains a binding arbitration clause. Please refer to the End User
License Agreement for the terms and conditions governing your
use of the installed software, as well as the applications, services,
functions, and content provided through the software. Your use of
the installed software will serve as your consent to the terms and
conditions of the End User License Agreement.
You may opt out within 30 days of your initial use of the Software
by sending a signed, written notice to HONDA at American Honda
Motor Co., Inc. Honda Automobile Customer Services Mail Stop
100-5E-8A, 1919 Torrance Blvd. Torrance, CA 90501-2746.
Privacy Notice
This vehicle may share location and usage information. To manage
this setting, visit www.hondalink.com/vehicle-data-choices.
A Few Words About Safety
Your safety, and the safety of others, is very important. And
operating this vehicle safely is an important responsibility.
NOTICE
To help you make informed decisions about safety, we have
provided operating procedures and other information on labels and
in this manual. This information alerts you to potential hazards that
could hurt you or others.
Of course, it is not practical or possible to warn you about all the
hazards associated with operating or maintaining your vehicle. You
must use your own good judgment.
You will find this important safety information in a variety of forms,
including:
● Safety Labels - on the vehicle.
● Safety Messages - preceded by a safety alert symbol
3 and
one of three signal words: DANGER, WARNING, or CAUTION.
These signal words mean:
● Safety Headings - such as Important Safety Precautions.
● Safety Section - such as Safe Driving.
● Instructions - how to use this vehicle correctly and safely.
This entire book is filled with important safety information - please
read it carefully.
3DANGER
You WILL be KILLED or SERIOUSLY HURT if
you don’t follow instructions.
3WARNING
You CAN be KILLED or SERIOUSLY HURT if
you don’t follow instructions.
3CAUTION
You CAN be HURT if you don’t follow
instructions.

Contents
This owner’s manual should be considered a permanent part of the
vehicle and should remain with the vehicle when it is sold.
This owner’s manual covers all models of your vehicle. You may find
descriptions of equipment and features that are not on your
particular model.
Images throughout this owner’s manual (including the front cover)
represent features and equipment that are available on some, but
not all, models. Your particular model may not have some of these
features.
This owner’s manual is for vehicles sold in the United States and
Canada.
The information and specifications included in this publication were
in effect at the time of approval for printing. Honda Motor Co., Ltd.
reserves the right, however, to discontinue or change specifications
or design at any time without notice and without incurring any
obligation.
2 Safe Driving P. 33
For Safe Driving P. 34 Seat Belts P. 38 Airbags P. 47
2 Instrument Panel P. 83
Indicators P. 84 Gauges and Displays P. 119
2 Controls P. 141
Clock P. 142 Locking and Unlocking the Doors P. 144
Security System P. 179 Opening and Closing the Windows P. 182
Adjusting the Mirrors P. 206 Adjusting the Seats P. 209
2 Features P. 259
Audio System P. 260 Audio System Basic Operation P. 267, 285
Blu-ray/DVD Rear Entertainment System
*
P. 396
CabinWatch
TM*
P. 523 CabinTalk
TM*
P. 524
2 Driving P. 525
Before Driving P. 526 Towing a Trailer P. 532
Multi-View Rear Camera P. 630 Refueling P. 632
2 Maintenance P. 637
Before Performing Maintenance P. 638 Maintenance Minder
TM
P. 641
Checking and Maintaining Wiper Blades P. 671
Remote Control and Wireless Headphone Care
*
P. 687
2 Handling the Unexpected P. 699
Tools P. 700 If a Tire Goes Flat P. 701
Indicator, Coming On/Blinking P. 718 Fuses P. 724
When You Cannot Open the Tailgate P. 733
2 Information P. 739
Specifications P. 740 Identification Numbers P. 742
Warranty Coverages P. 748 Authorized Manuals P. 750
Contents
Child Safety P. 62 Exhaust Gas Hazard P. 80 Safety Labels P. 81
Opening and Closing the Tailgate P. 159 Opening and Closing the Sliding Doors P. 170
Opening and Closing the Moonroof
*
P. 185 Operating the Switches Around the Steering Wheel P. 186
Interior Lights/Interior Convenience Items P. 225 Climate Control System P. 248, 252
Audio Error Messages P. 367 General Information on the Audio System P. 372
Customized Features P. 445 HomeLink® Universal Transceiver
*
P. 470 Bluetooth® HandsFreeLink® P. 473, 498
When Driving P. 538 Braking P. 602 Parking Your Vehicle P. 619
Fuel Economy and CO
2
Emissions P. 635
Maintenance Under the Hood P. 647 Replacing Light Bulbs P. 660
Checking and Maintaining Tires P. 675 Battery P. 684 Remote Transmitter Care P. 686
Climate Control System Maintenance P. 689 Cleaning P. 690 Accessories and Modifications P. 696
Engine Does Not Start P. 710 Jump Starting P. 713 Overheating P. 715
Emergency Towing P. 731 When You Cannot Unlock the Fuel Fill Door P. 732
When You Cannot Close the Power Sliding Doors
*
P. 735 Refueling P. 736
Devices that Emit Radio Waves P. 743 Reporting Safety Defects P. 745 Emissions Testing P. 746
Customer Service Information P. 751
Quick Reference Guide
P. 4
Safe Driving
P. 33
Instrument Panel
P. 83
Controls
P. 141
Features
P. 259
Driving
P. 525
Maintenance
P. 637
Handling the Unexpected
P. 699
Information
P. 739
Index
P. 752
4
Quick Reference Guide
Quick Reference Guide
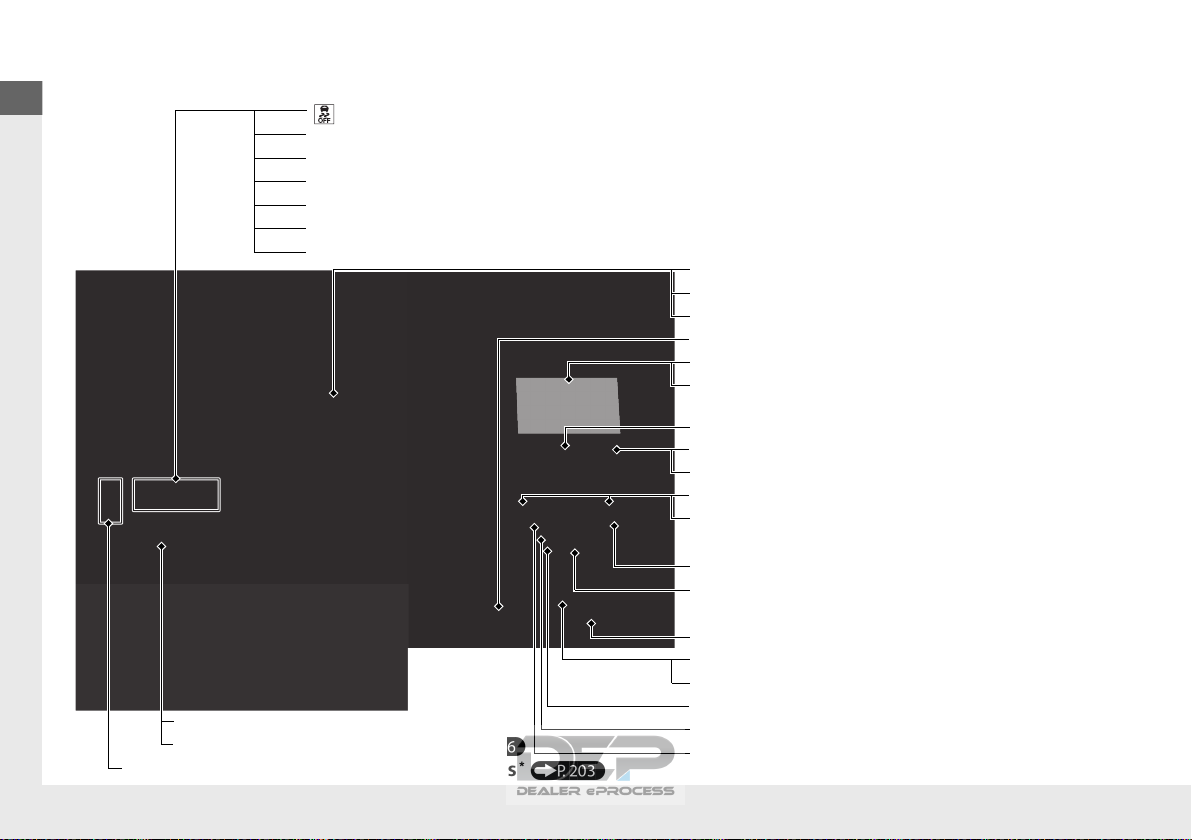
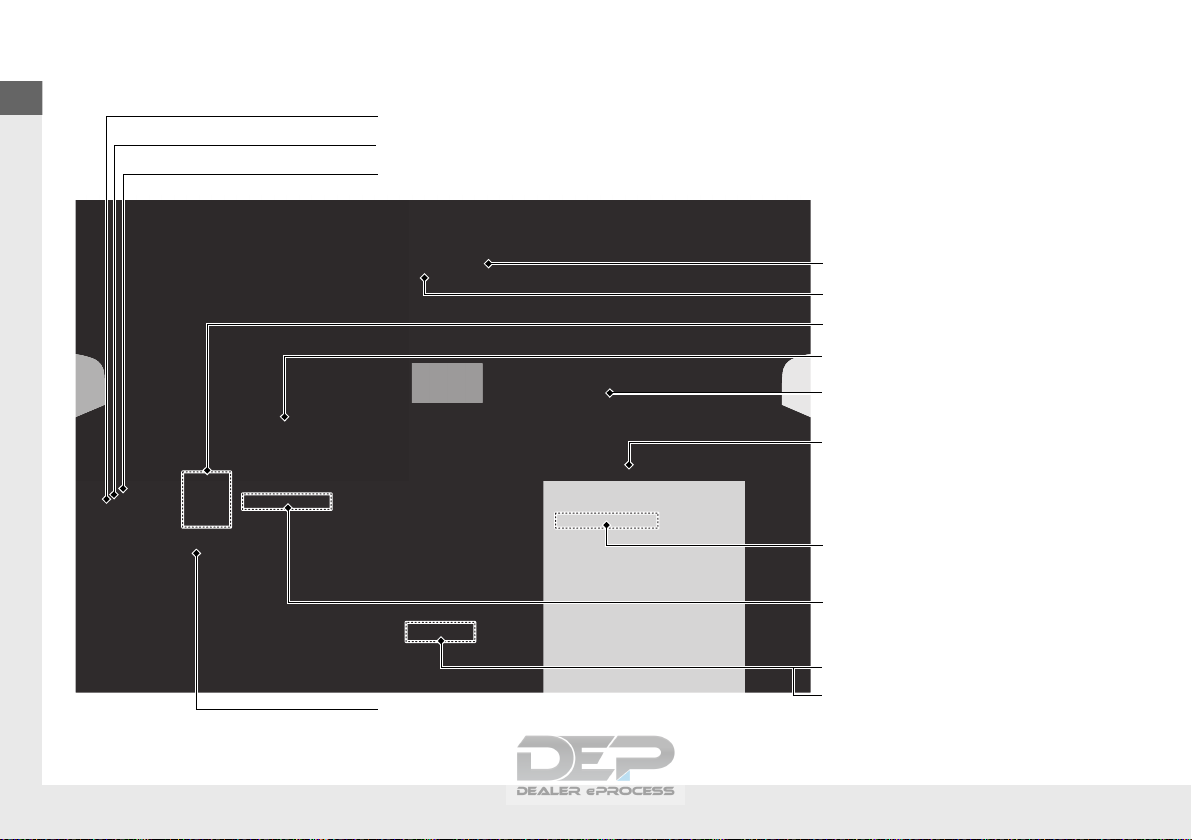
Visual Index
❙ (Vehicle Stability Assist® (VSA®) System OFF) Button (P592)
❙ Road Departure Mitigation (RDM) Button
*
(P580)
❙ Power Sliding Door Switch
*
(P173, 174)
❙ Climate Control System (P248)
❙ Driving Position Memory System Buttons
*
(P203)
❙ Accessory Power Socket (P233)
❙ Power Tailgate Button
*
(P163)
❙ Parking Sensor System Switch
*
(P622)
❙ Collision Mitigation Braking System
TM
(CMBS
TM
) OFF Button
*
(P613)
❙ Heated Windshield Button
*
(P202)
❙
Electric Parking Brake Switch
(P602)
❙
Automatic Brake Hold Button
(P606)
❙ Shift Button
Automatic Transmission
(P546)
❙ ECON Button (P559)
❙ SNOW Button (P560)
❙ Auto Idle Stop OFF Button
*
(P554)
❙ Hazard Warning Button
❙ AC Power Outlet
*
(P235)
❙ System Indicators (P84)
❙ Gauges (P119)
❙ Driver Information Interface (P120)
❙ Audio System (P260)
❙ Navigation System
*
() See Navigation System Manual
❙ Rear Defogger (P201)
❙ Heated Mirror Button
*
(P201)
❙ Seat Heater Switches
*
(P242)
❙ Seat Heater and Seat Ventilation
Switches
*
(P243)
❙ Center Pocket
*
(P230)
❙
Blu-ray/DVD Rear Entertainment System
*
(P396)
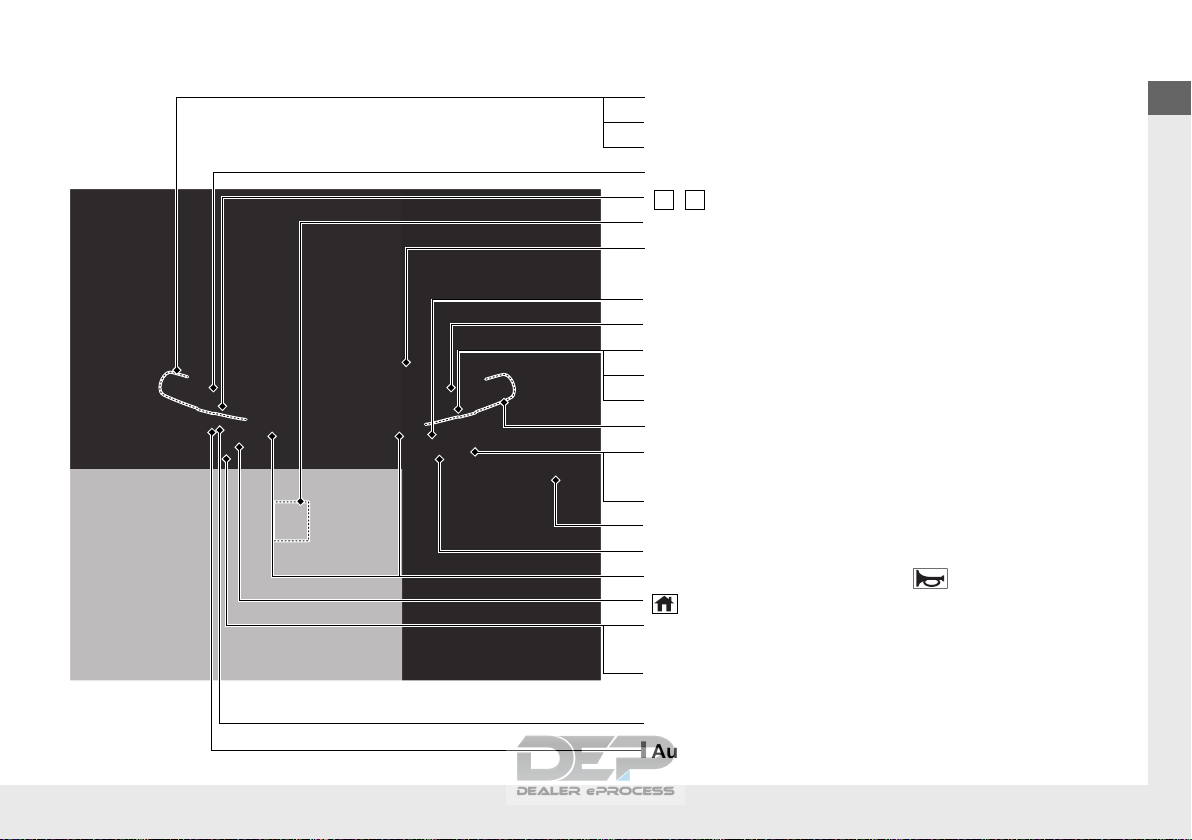
5
Quick Reference Guide
❙ Navigation System Voice Control Buttons
*
() See Navigation System Manual
❙ Audio Remote Control Buttons (P264)
❙ Steering Wheel Adjustments (P205)
❙ Brightness Control (P200)
❙ ENTER Button (P122)
❙ / Button (P122)
3
4
❙ Headlights/Turn Signals (P189)
❙ LaneWatch
TM*
(P600)
❙ Fog Lights
*
(P192)
❙ Bluetooth® HandsFreeLink® System
Buttons
(P473, 498)
❙ Paddle Shifter (Shift down) (P553)
❙ Heated Steering Wheel Button
*
(P241)
❙ Paddle Shifter (Shift up) (P553)
❙ Adaptive Cruise Control (ACC) Buttons
*
(P567)
❙ Interval Button
*
(P573)
❙ Cruise Control Buttons
*
(P561)
❙ ENGINE START/STOP Button (P186)
❙ MAIN Button
*
(P567, 585)
❙ Wipers/Washers (P197)
❙ Lane Keeping Assist System (LKAS) Button
*
(P585)
❙ CRUISE Button
*
(P561)
❙ (home) Button (P122, 265)
❙ Horn (Press an area around .)
* Not available on all models
Visual Index
6
Quick Reference Guide
❙ Door Mirror Controls (P207)
❙ Master Door Lock Switch (P156)
❙ Hood Release Handle (P648)
❙ Power Window Switches (P182)
❙ Rearview Mirror (P206)
❙ Driver Side Fuse Box (P726)
❙ Glove Box (P227)
❙ Driver’s Front Airbag (P50)
❙ Passenger’s Knee Airbag
(P54)
❙ Driver’s Knee Airbag (P54)
❙ Auxiliary Input Jack (P262)
❙ USB Port (P261)
❙ Passenger’s Front Airbag
(P50)
❙ HomeLink® Buttons
*
(P471)
7
Quick Reference Guide
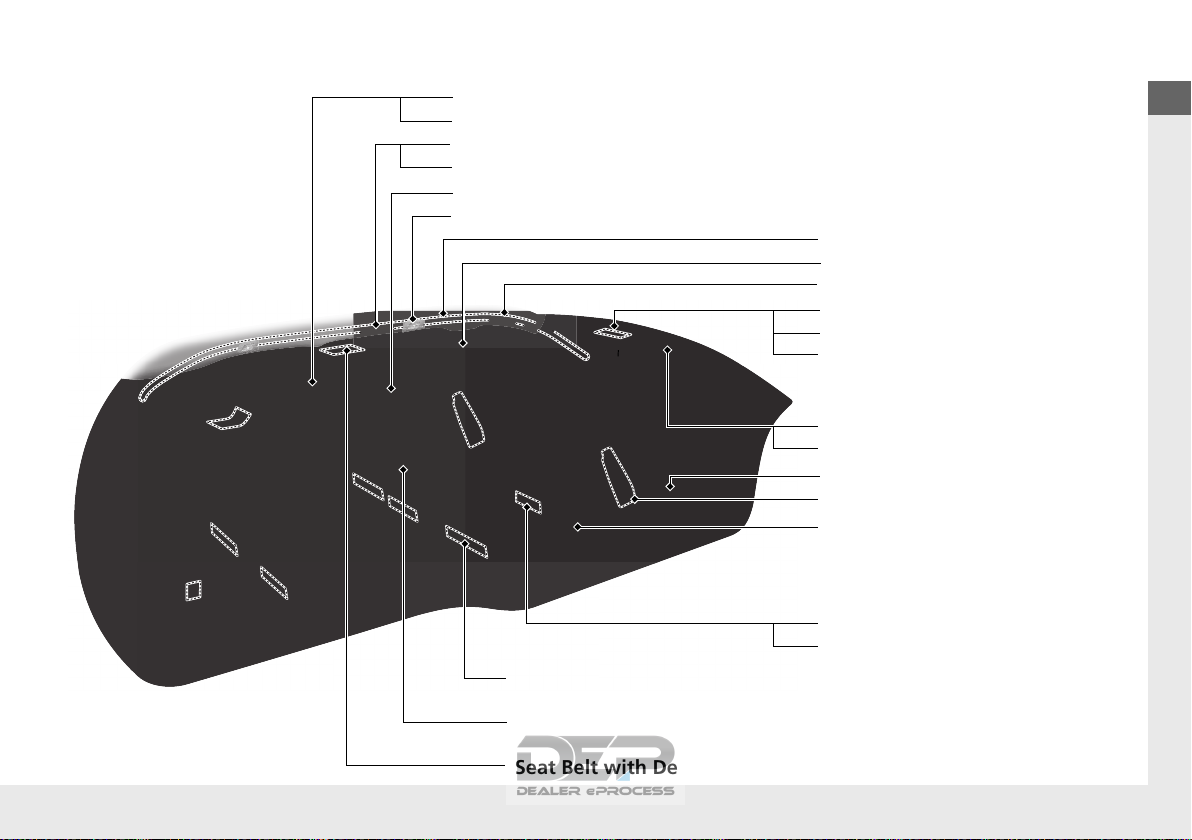
❙ Seat Belts (P38)
❙ Seat Belt to Secure a Child Seat (P74)
❙ Seat Belt (Installing a Child Seat) (P72)
❙ Side Curtain Airbags (P58)
❙ Front Seat (P209)
❙ Second Row Multi-Functional Center Seat
*
(P216, 218)
❙ Grab Handle
❙ Sun Visors
❙ Vanity Mirrors
❙ Side Airbags (P56)
❙ Second Row Seat (P216)
❙ HDMI
TM
Port
*
(P399)
❙ USB Port
*
(P261)
❙ LATCH to Secure a Child Seat (P67)
❙ Coat Hooks (P238)
❙ Integrated Sunshades
*
(P244)
❙ Map Lights (P226)
❙ Sunglasses Holder (P240)
❙ Moonroof Switch
*
(P185)
❙ Map Lights (P226)
❙ Grab Handle
❙ Seat Belt with Detachable Anchor (P43)
* Not available on all models
Visual Index
8
Quick Reference Guide
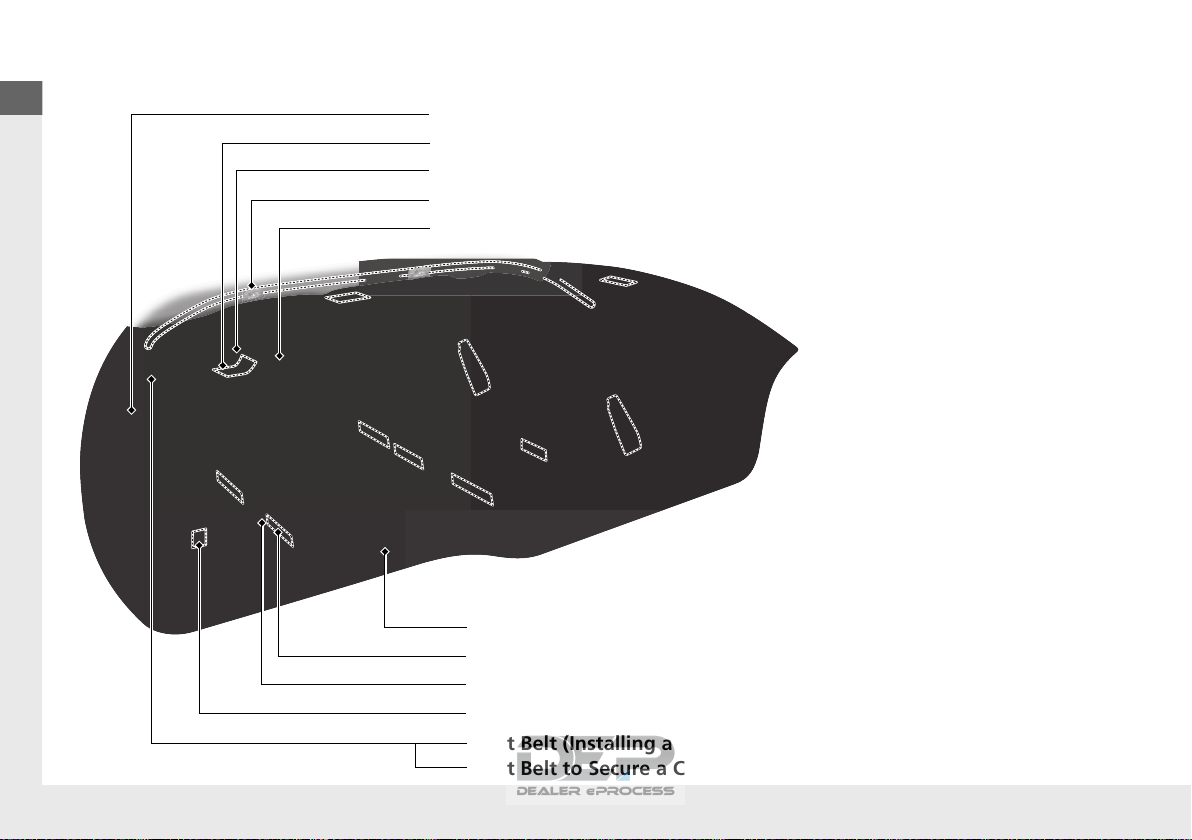
❙ Accessory Power Socket
*
(P233)
❙ Third Row Seat (P221)
❙ Folding the One-Motion Third Row Stowing Magic Seat® (P222)
❙ Integrated Sunshades
*
(P244)
❙ HondaVAC
TM*
(P245)
❙ Map Lights (P226)
❙ LATCH to Secure a Child Seat (P67)
❙ Accessory Power Socket (P233)
❙ Seat Belt (Installing a Child Seat) (P72)
❙ Seat Belt to Secure a Child Seat (P74)
❙ Seat Belt with Detachable Anchor (P43)

9
Quick Reference Guide
❙ Maintenance Under the Hood (P647)
❙ Windshield Wipers (P197, 671)
❙ Power Door Mirrors (P207)
❙ Fog Lights
*
(P192, 663)
❙ How to Refuel (P633)
❙ Multi-View Rear Camera (P630)
❙ Opening/Closing the Tailgate (P159)
❙ Back-Up Lights (P669)
❙ Opening/Closing the Sliding Doors (P170)
❙ Taillights (P669)
❙ Tailgate Outer Handle (P164)
❙ Brake Lights (P667)
❙ Rear Side Marker/Taillights (P667)
❙ Rear Turn Signal Lights (P667)
❙ High-Mount Brake Light (P670)
❙ Headlights (P189, 660)
❙ Front Side Marker Lights (P189, 666)
❙ Front Turn Signal/Parking Lights
*
(P189, 665)
❙ Tires (P675, 701)
❙ Side Turn Signal Lights
*
(P189, 666)
❙ Daytime Running Lights/Parking Lights
*
(P193, 664)
❙ Front Turn Signal Lights
*
(P189, 665)
❙ Rear License Plate Light (P670)
❙ Door Lock/Unlock Control (P147)
* Not available on all models
10
Quick Reference Guide
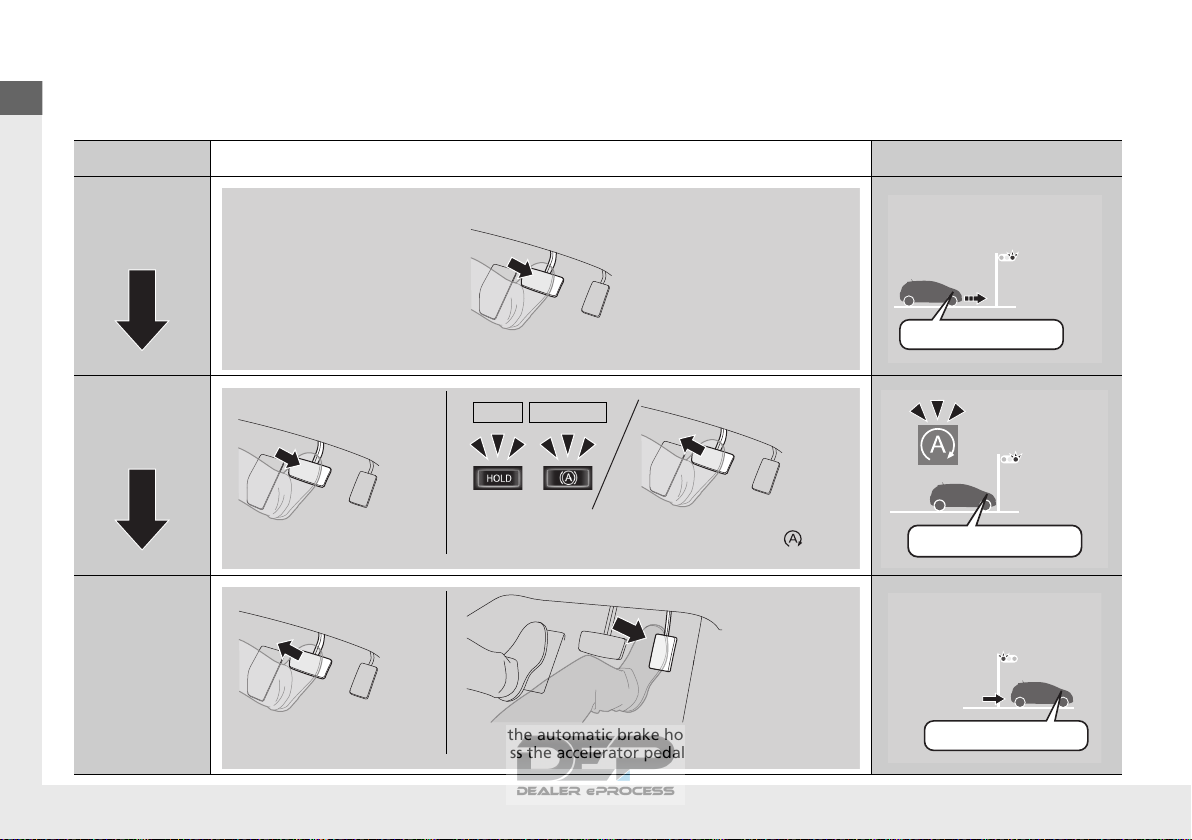
Auto Idle Stop Function
*
To improve fuel economy, the engine stops and then restarts as detailed below. When Auto Idle Stop is on, the Auto Idle Stop indicator
(green) comes on. (P 554)
At Automatic transmission Engine status
Deceleration
Stop
Start-up
Stop the vehicle and depress the brake pedal.
On
Keep the brake pedal
depressed.
With the automatic brake hold system activated,
you can release the brake pedal when the
indicator comes on.
U.S. Canada
Off
Release the brake pedal. With the automatic brake hold system activated,
depress the accelerator pedal.
Restarting
11
Quick Reference Guide
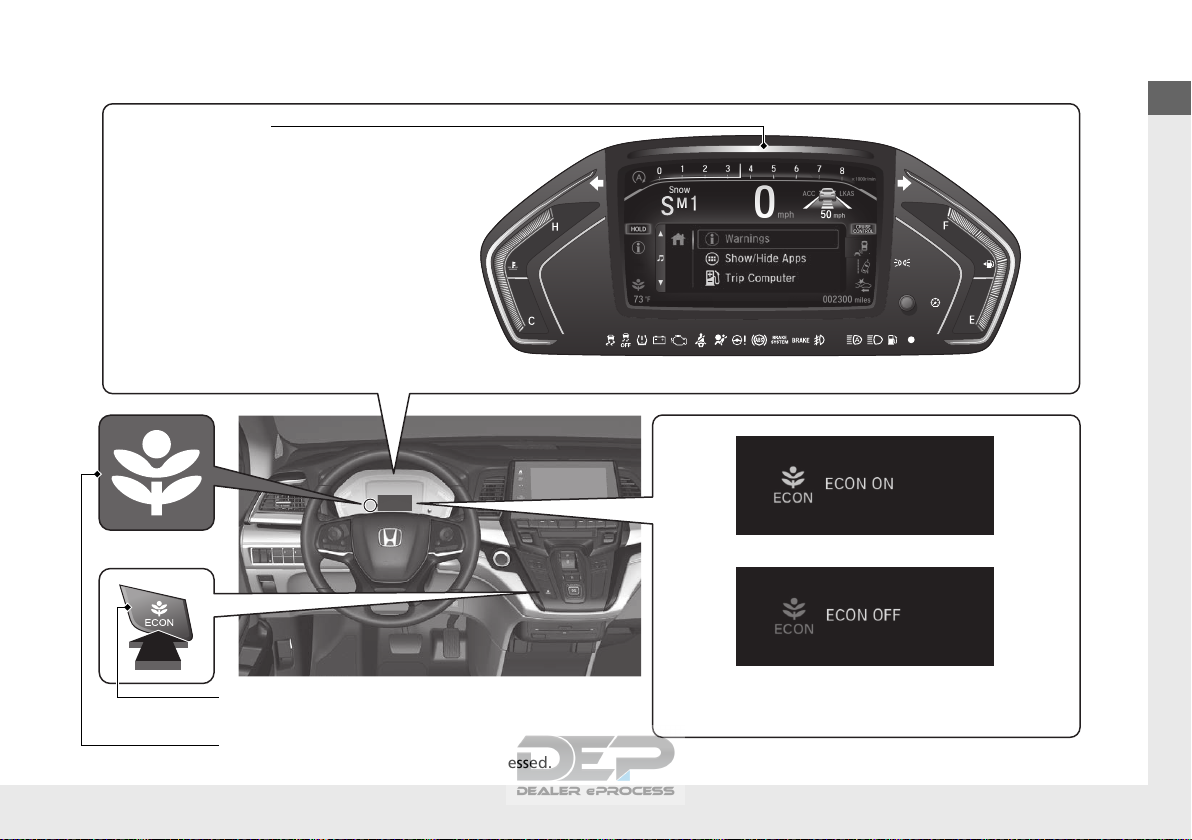
Eco Assist® System (P 559)
Ambient Meter
The color of the ambient meter changes to
green to indicate that the vehicle is being
driven in a fuel efficient manner.
ECON Button (P 559)
Helps maximize fuel economy.
ECON Mode Indicator (P 94)
Comes on when the ECON button is pressed.
The message is displayed for a few seconds when the
ECON button is pressed.
* Not available on all models
12
Quick Reference Guide
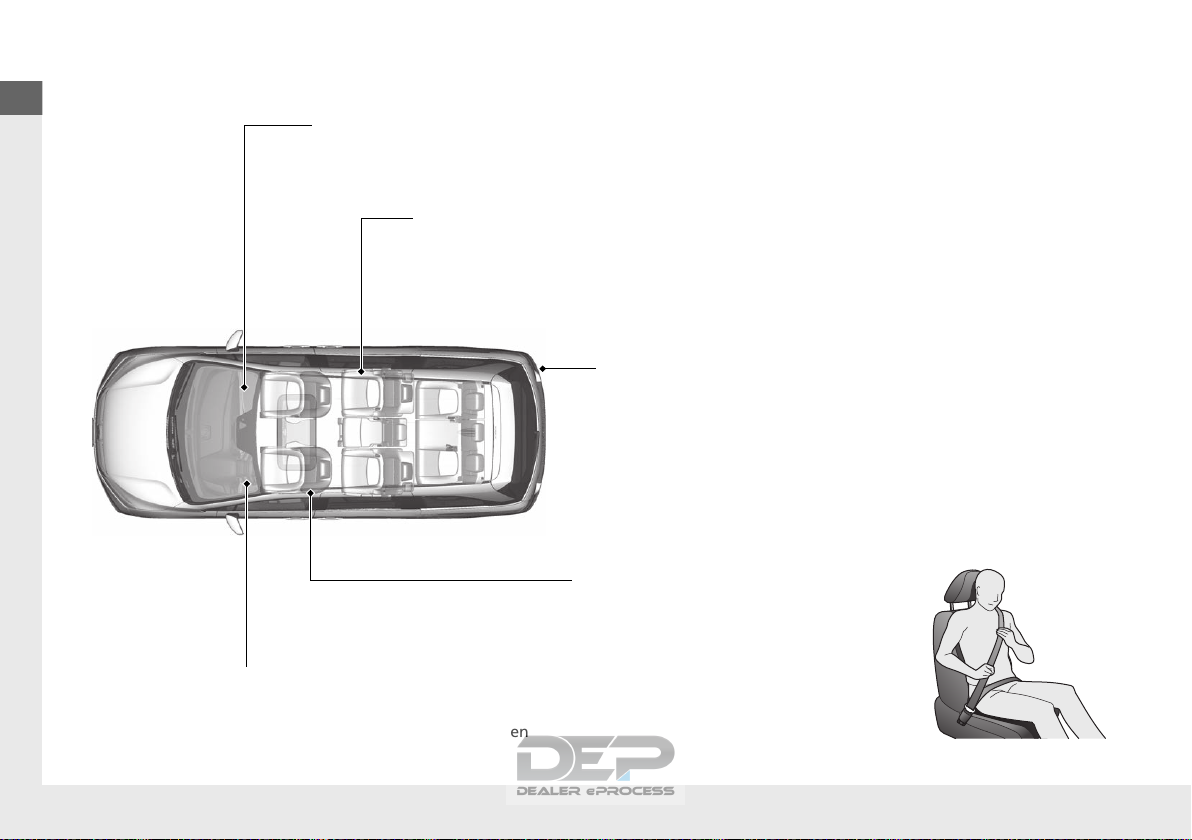
Safe Driving (P33)
Airbags (P47)
● Your vehicle is fitted with airbags to help protect you and
your passengers during a moderate-to-severe collision.
Child Safety (P62)
● All children 12 and younger should be seated in the rear seat.
● Smaller children should be properly restrained in a forward-facing child seat.
● Infants must be properly restrained in a rear-facing child seat.
Exhaust Gas Hazard (P80)
● Your vehicle emits dangerous exhaust gases that contain carbon
monoxide. Do not run the engine in confined spaces where
carbon monoxide gas can accumulate.
Before Driving Checklist (P37)
● Before driving, check that the front seats, head
restraints, steering wheel, and mirrors have been
properly adjusted.
Seat Belts (P38)
● Fasten your seat belt and sit upright well
back in the seat.
● Check that your passengers are wearing
their seat belts correctly.
Fasten your lap belt as
low as possible.

13
Quick Reference Guide
Instrument Panel (P83)
System Indicators
Malfunction Indicator
Lamp
Charging System
Indicator
Anti-lock Brake System
(ABS) Indicator
Vehicle Stability Assist®
(VSA®) System
Indicator
VSA® OFF Indicator
Low Tire Pressure/
TPMS Indicator
Immobilizer System Indicator/
Security System Alarm Indicator
Lights Indicators
Lights On Indicator
High Beam Indicator
Fog Light Indicator
*
Lane Keeping Assist
System (LKAS)
Indicator (Green/
Amber)
*
Seat Belt Reminder
Indicator
System Indicators
Econ Mode Indicator
System Message
Indicator
Parking Brake and
Brake System Indicator
(Red)
Supplemental
Restraint System
Indicator
Driver Information Interface
CRUISE MAIN
Indicator
*
Tachometer
M (Sequential mode) Indicator/
Sequential Mode Gear Selection
Indicator
Speedometer
Fuel GaugeGear Position Indicator/
Transmission System
Indicator
Auto Idle Stop System
Indicator (Amber)
*
/
Auto Idle Stop
Indicator (Green)
*
Gauges (P119)/Driver Information Interface (P120)/System
Indicators
(P84)
Automatic Brake Hold
Indicator
Adaptive Cruise
Control (ACC)
Indicator (Green/
Amber)
*
Turn Signal and
Hazard Warning
Indicators
Electric Power Steering
(EPS) System Indicator
Blind spot information
System Indicator
*
CRUISE CONTROL
Indicator
*
Temperature Gauge
Parking Brake and
Brake System Indicator
(Amber)
U.S.
Canada
U.S.
Canada
System Indicators
U.S.
Canada
Low Fuel Indicator
Automatic Brake Hold
System Indicator
Auto High-Beam
Indicator
*
Snow Mode Indicator
Normal Mode
Indicator
Road Departure
Mitigation (RDM)
Indicator
*
Collision Mitigation
Braking System
TM
(CMBS
TM
) Indicator
*
* Not available on all models
14
Quick Reference Guide
Controls (P141)
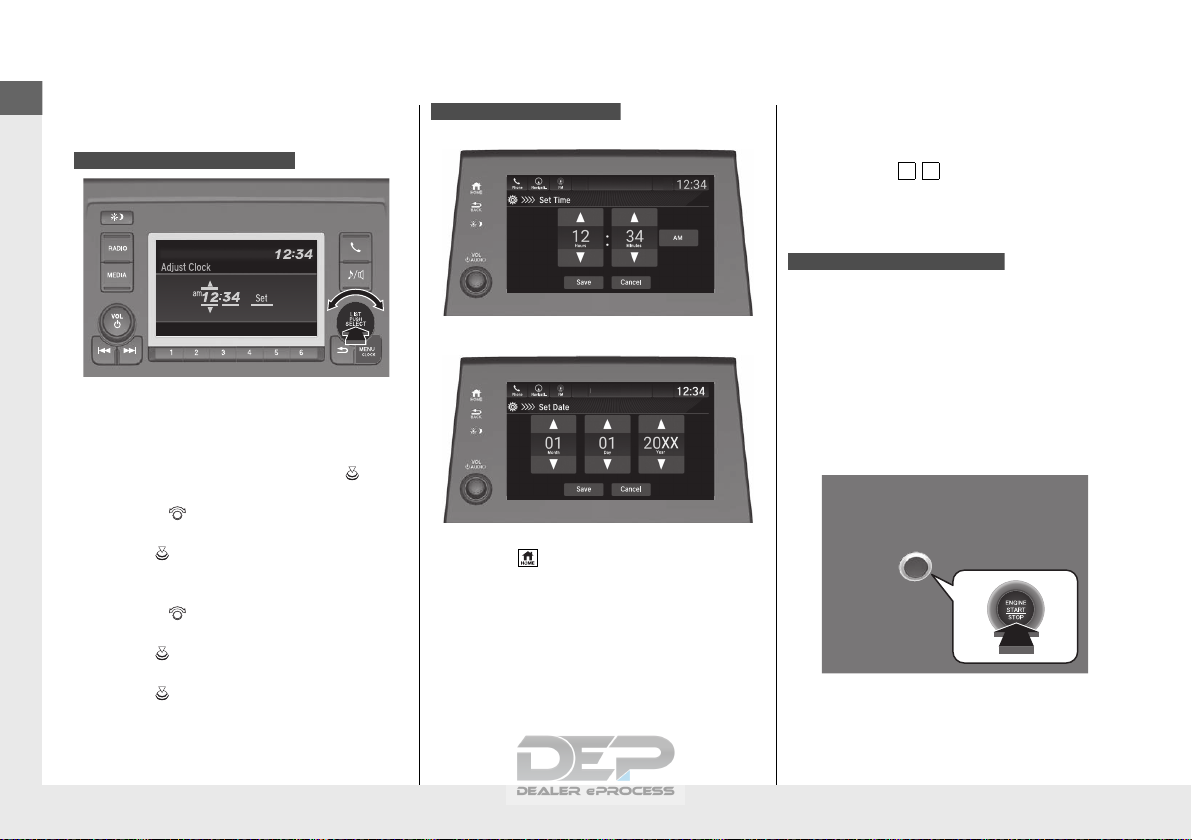
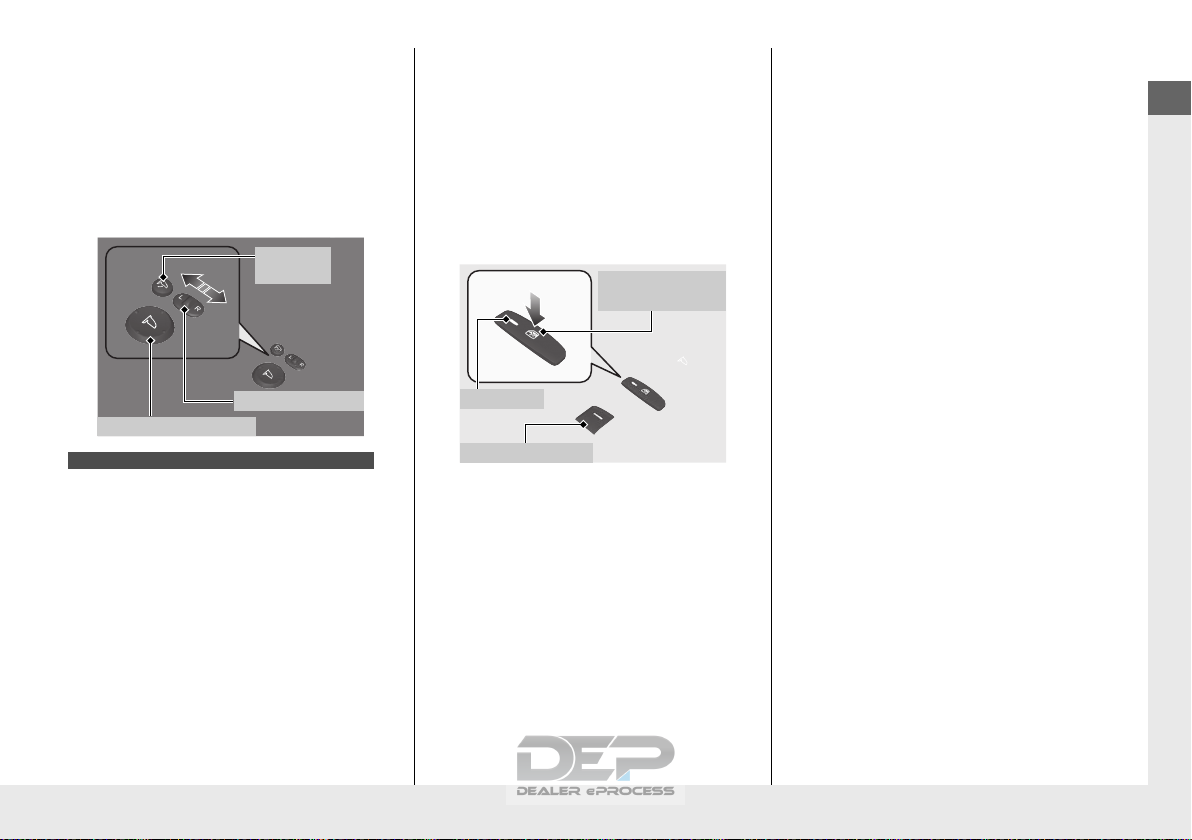
Clock (P142)
a Press and hold the MENU/CLOCK
button for two seconds.
b Select Adjust Clock, then press .
c Rotate to adjust the hours.
d Press to switch to minute
adjustment.
e Rotate to adjust the minutes.
f Press to switch to Set.
g Press to complete clock adjustment.
Models with color audio system
To adjust time
To adjust date
a Select , then select Settings.
b Select System, then Date & Time.
c Select Set Date & Time.
d Select Automatic Date & Time, then
select OFF.
Models with Display Audio
Set Date
Blu-Ray
Save
Month
Day
Year
XX
Cancel
Phone Navigati.. FM
12:34
e Select Set Date or Set Time.
f Adjust the dates, hours and minutes by
selecting / .
g Select Save to set the time.
The navigation system receives signals from
GPS satellites, updating the clock
automatically.
ENGINE START/STOP
Button
(P186)
Press the button to change the vehicle’s
power mode.
3
4
Models with navigation system
15
Quick Reference Guide
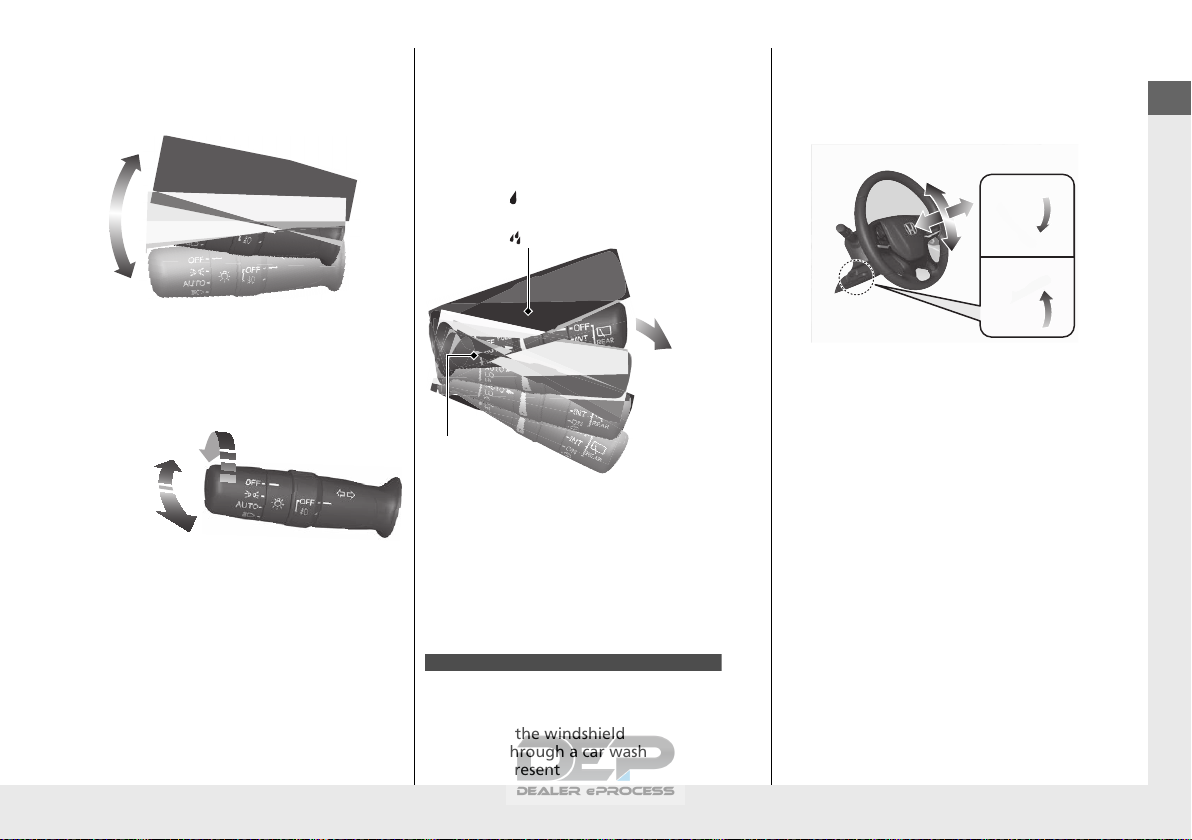
Turn Signals (P189)
Lights (P189)
Turn Signal Control Lever
Right
Left
Light Control Switches
Low Beam
High Beam
Flashing
Wipers and Washers
(P197)
*1:Models with automatic intermittent
wipers
*2:Models without automatic intermittent
wipers
AUTO should always be turned OFF before
the following situation in order to prevent
severe damage to the wiper system:
● Cleaning the windshield
● Driving through a car wash
● No rain present
Wiper/Washer Control Lever
Adjustment Ring
(-: Low sensitivity
*1
(- : Lower speed, fewer sweeps
*2
(+: High sensitivity
*1
(+ : Higher speed, more sweeps
*2
MIST
OFF
AUTO
*1
: Wiper speed varies automatically
INT
*2
: Low speed with intermittent
LO: Low speed wipe
HI: High speed wipe
Pull toward
you to spray
washer fluid.
Models with automatic intermittent wipers
Steering Wheel (P205)
● To adjust, push the adjustment lever
down, adjust to the desired position, then
pull up the lever back in place.
16
Quick Reference Guide
Unlocking the Front
Doors from the Inside
(P155)
● Pull either front door inner handle to
unlock and open it at the same time.
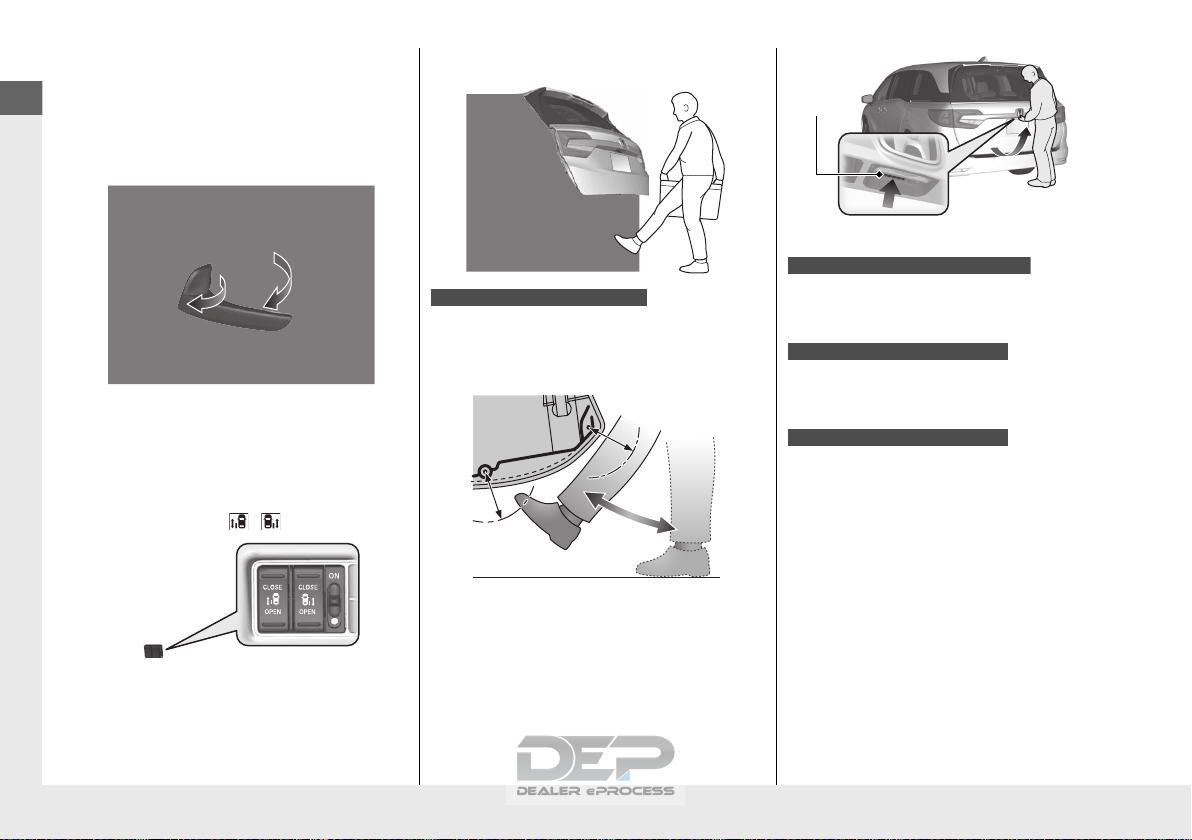
Power Sliding Door
*
(P172)
● When the main switch is ON, the power
sliding door opens and closes
automatically when you press OPEN or
CLOSE side of the / switch.
Tailgate (P159)
Raise and lower your foot (in a kicking
motion) under the center of the rear
bumper to open or close the tailgate with
the remote on you.
Models with Hands Free Access
● With all the doors unlocked, press the
tailgate outer handle and lift open the
tailgate.
● Press the tailgate outer handle to unlock
and open the tailgate when you carry the
remote.
● Press the power tailgate button on the
instrument panel or the remote to open
and close the power tailgate.
● Press the tailgate inner button to close
the power tailgate.
Tailgate
Outer
Handle
Models without smart entry system
Models with smart entry system
Models with the power tailgate
17
Quick Reference Guide
Power Door Mirrors
(P207)
● With the power mode in ON, move the
selector switch to L or R.
● Push the appropriate edge of the
adjustment switch to adjust the mirror.
● Press the folding button
*
to fold the door
mirrors in and out.
● Place the selector switch in the L or R
position to use the reverse tilt door mirror
feature.
Selector Switch
Adjustment Switch
Folding
Button
*
Models with driving position memory system
Power Windows (P182)
● With the power mode in ON, open and
close the power windows.
● If the power window lock button is in the
off position, each passenger’s window
can be opened and closed with its own
switch.
● If the power window lock button is in the
on position (indicator is on), each
passenger’s window switch is disabled.
Power Window
Lock Button
Window Switch
Indicator
* Not available on all models
18
Quick Reference Guide
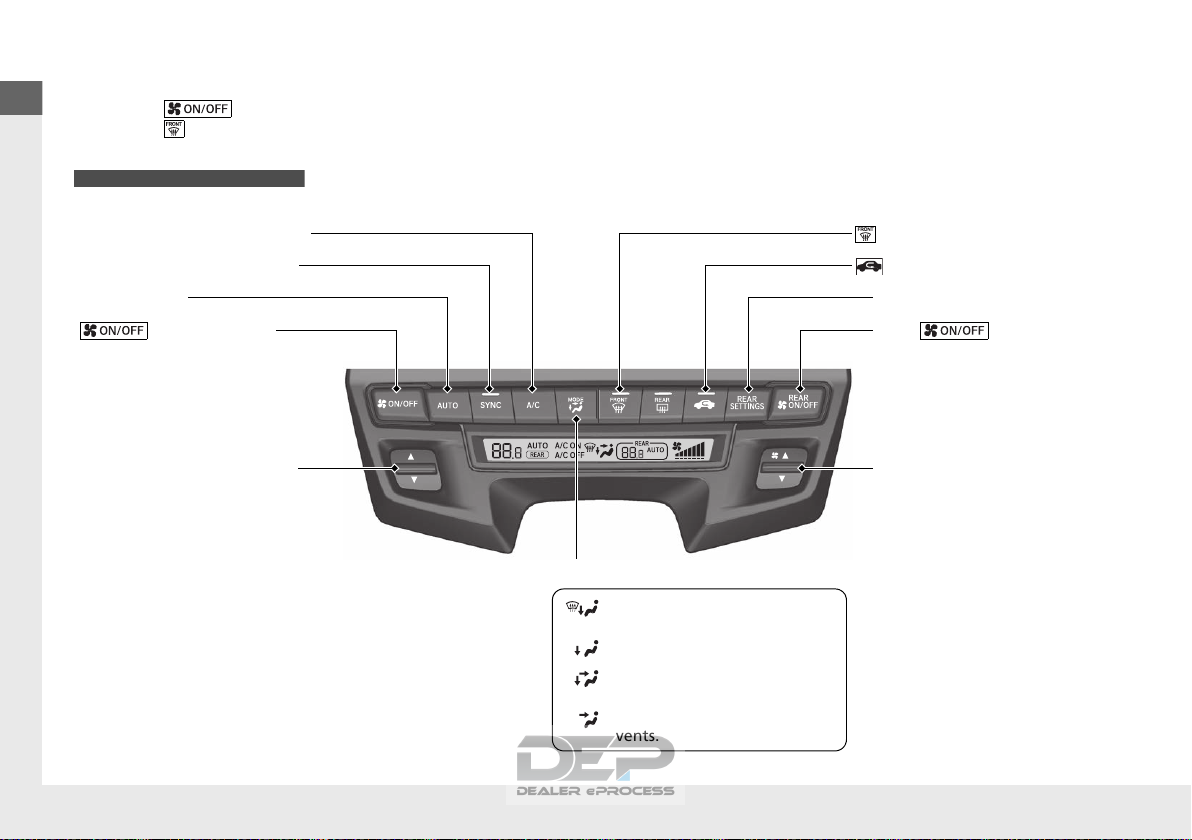
Climate Control System (P248)
● Press the AUTO button to activate the climate control system.
● Press the button to turn the system on or off.
● Press the button to defrost the windshield.
Dual-zone climate control system
Air flows from floor and
windshield defroster vents.
Air flows from floor vents.
Air flows from floor and
dashboard vents.
Air flows from dashboard
vents.
A/C (Air Conditioning) Button
MODE Control Button
SYNC (Synchronized) Button
AUTO Button
(On/Off) Button
Temperature Control Switch
(Windshield Defroster) Button
(Recirculation) Button
REAR SETTINGS Button
REAR Button
Fan Control Switch
19
Quick Reference Guide
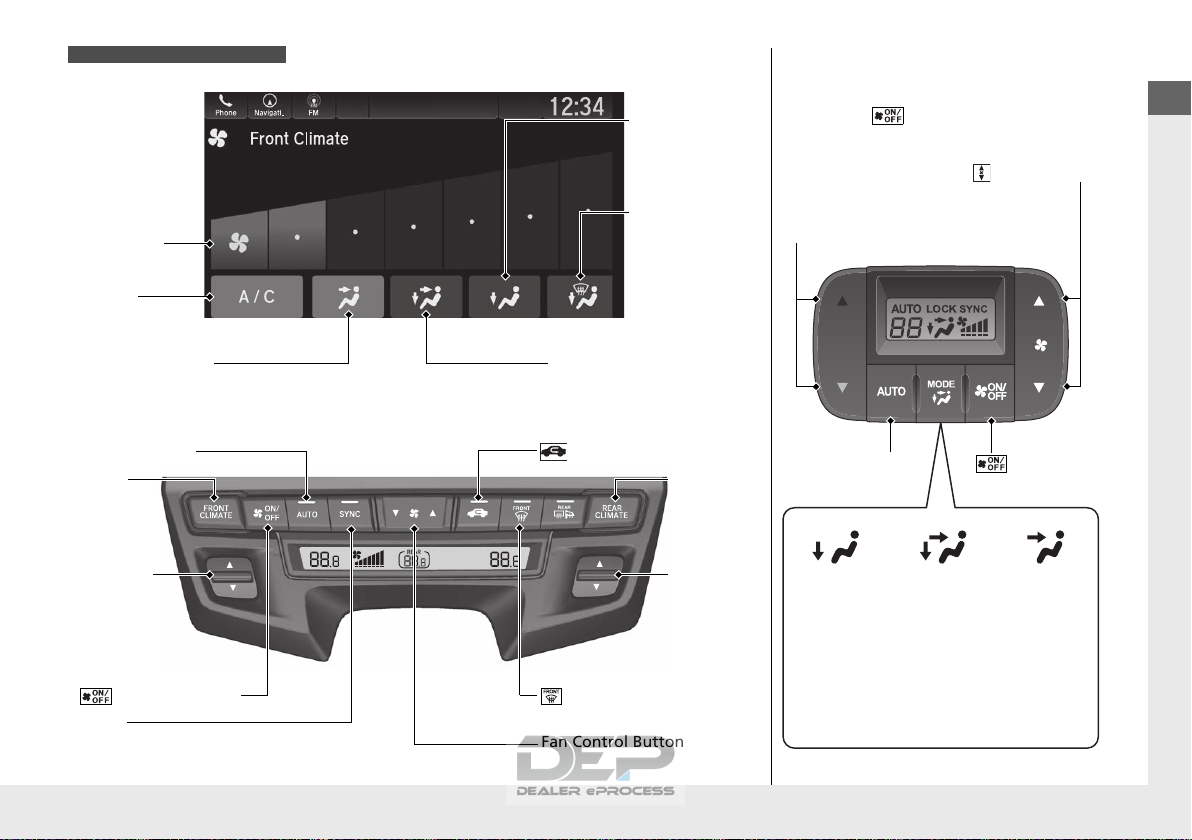
Tri-zone climate control system
Fan Control Button
(Windshield Defroster)
Button
A/C (Air
Conditioning)
Icon
(Recirculation) Button
Passenger’s
Side
Temperature
Control
Switch
AUTO Button
Driver’s Side
Temperature
Control
Switch
Mode Control Icon
(Air flows from
dashboard vents)
SYNC
(Synchronized) Button
(On/Off) Button
FRONT
CLIMATE
Button
REAR
CLIMATE
Button
Fan Control
Icon
Mode Control
Icon (Air flows
from floor
vents)
Mode Control
Icon (Air flows
from floor and
windshield
defroster vents)
Mode Control Icon (Air
flows from floor and
dashboard vents)
Rear Climate Control Panel
*
● Press the AUTO button to activate the
rear climate control system.
● Press the button to turn the system
on or off.
Rear Passenger
Compartment
Temperature
Control Buttons
(Fan Control)
Button
Air flows
from the
rear floor
vents.
Airflow is
divided
between the
rear floor
vents and
rear ceiling
vents.
Air flows
from the
rear ceiling
vents.
(On/Off)
Button
AUTO Button
* Not available on all models

20
Quick Reference Guide
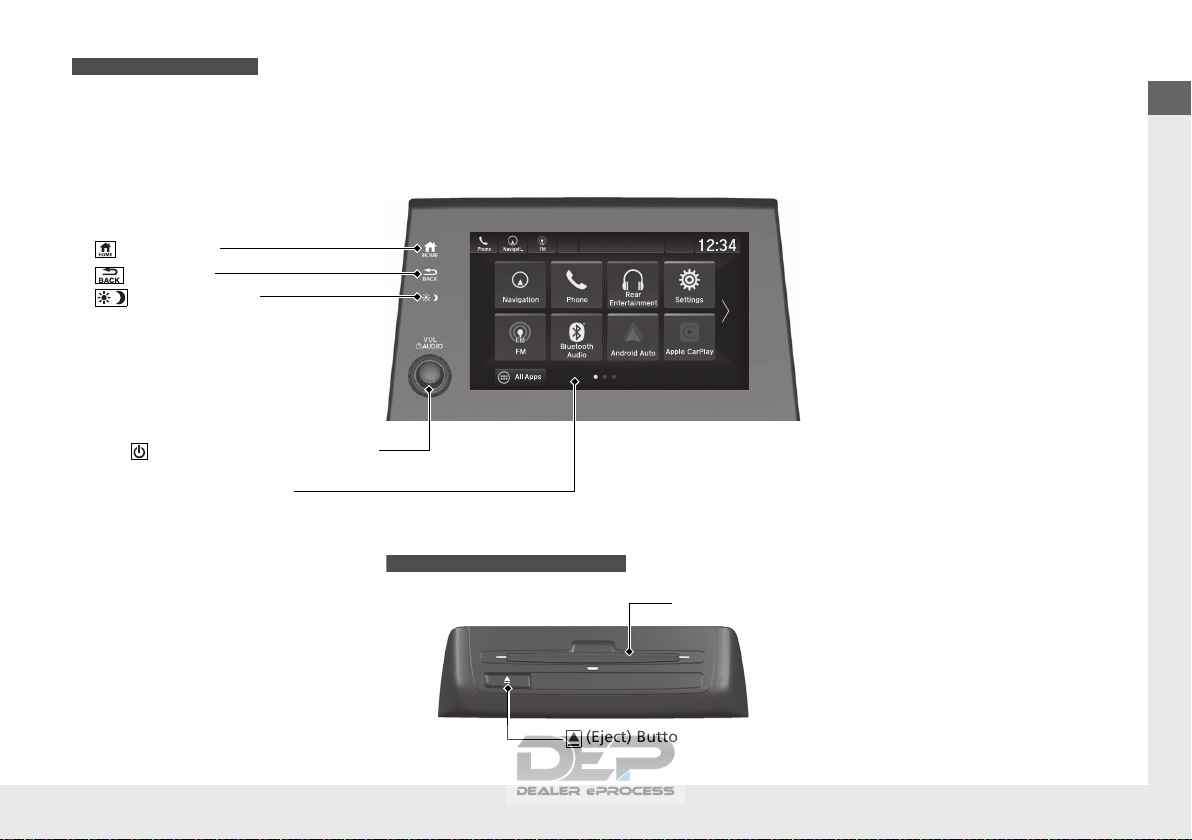
Features (P259)
Audio System (P260)
MENU/CLOCK Button
Selector Knob
(Day/Night) Button
(Back) Button
(Sound) Button
VOL / (Volume/Power)
Knob
Preset Buttons (1-6)
(Phone) Button
RADIO Button
/
(Seek/Skip) Buttons
MEDIA Button
Audio/Information Screen
(P 267)
Models with color audio system
21
Quick Reference Guide
VOL/ AUDIO (Volume/Power) Knob
(Home) Icon
(Back) Icon
(Day/Night) Icon
Audio/Information Screen
(P 285)
For navigation system operation () See the Navigation System Manual
Models with Display Audio
(Eject) Button
Disc Slot
Models with Blu-ray
TM
or CD player
22
Quick Reference Guide
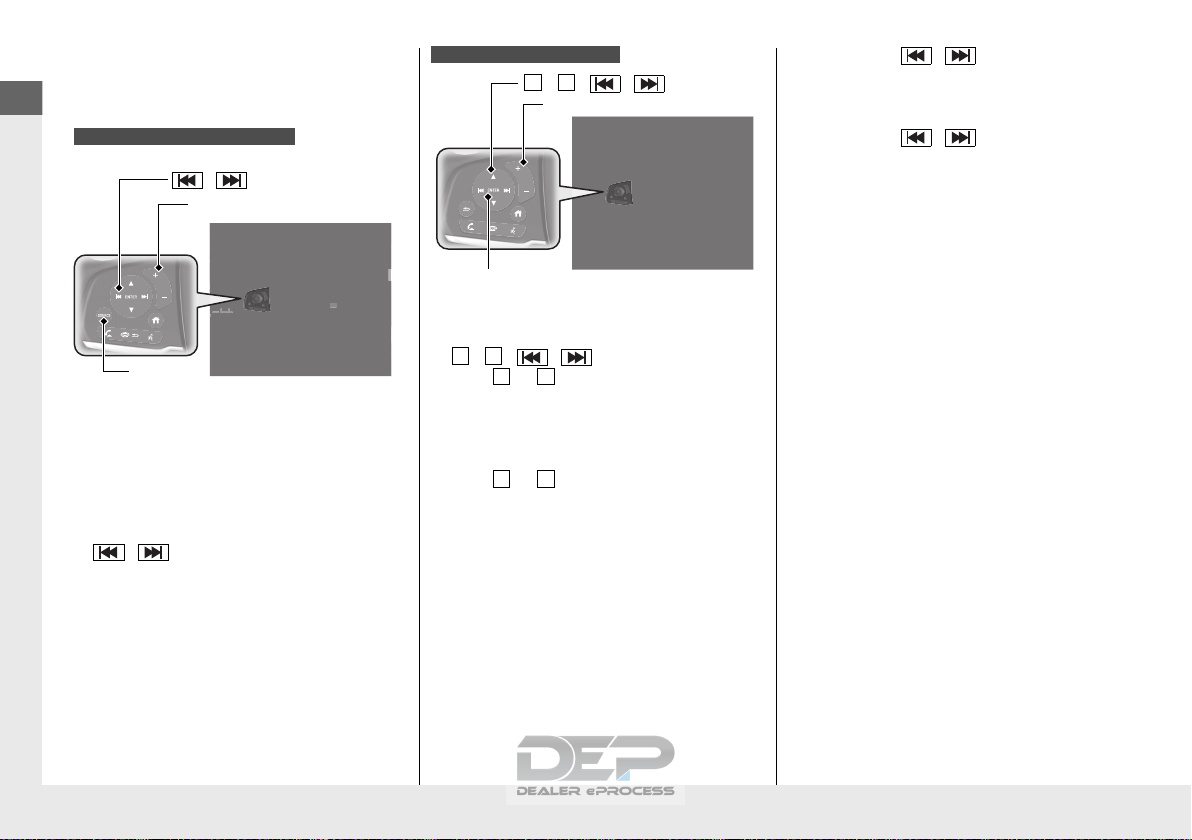
Audio Remote Controls
(P264)
●
(+ / (- Bar
Press to adjust the volume up/down.
● SOURCE Button
Press to change the audio mode:
FM1/FM2/AM/USB/iPod/
Bluetooth® Audio/AUX
● / Buttons
Radio: Press to change the preset station.
Press and hold to select the next or
previous strong station.
USB device/Bluetooth® Audio:
Press to skip to the beginning of
the next song or return to the
beginning of the current song.
Press and hold to change a folder.
Models with color audio system
(+ / (- Bar
SOURCE
Button
/ Buttons
● (+ / (- Bar
Press to adjust the volume up/down.
● / / / /ENTER Buttons
Press or to select Now Playing on
the home screen of the driver
information interface, and then press the
ENTER button.
Press or to cycle through the audio
mode as follows:
Android Auto/Apple CarPlay/SiriusXM®
*
/
Rear Entertainment
*
/AUX Input/AM/
Bluetooth® Audio/Social Playlist/FM/My
Honda Music/USB/iPod/CD
*
Models with Display Audio
ENTER Button
/ / / Buttons
3
4
(+ / (- Bar
3
4
3
4
3
4
Radio: Press / to change the
preset station.
CD
*
/USB device/My Honda Music/
Bluetooth® Audio:
Press / to skip to the
beginning of the next song or
return to the beginning of the
current song.
23
Quick Reference Guide
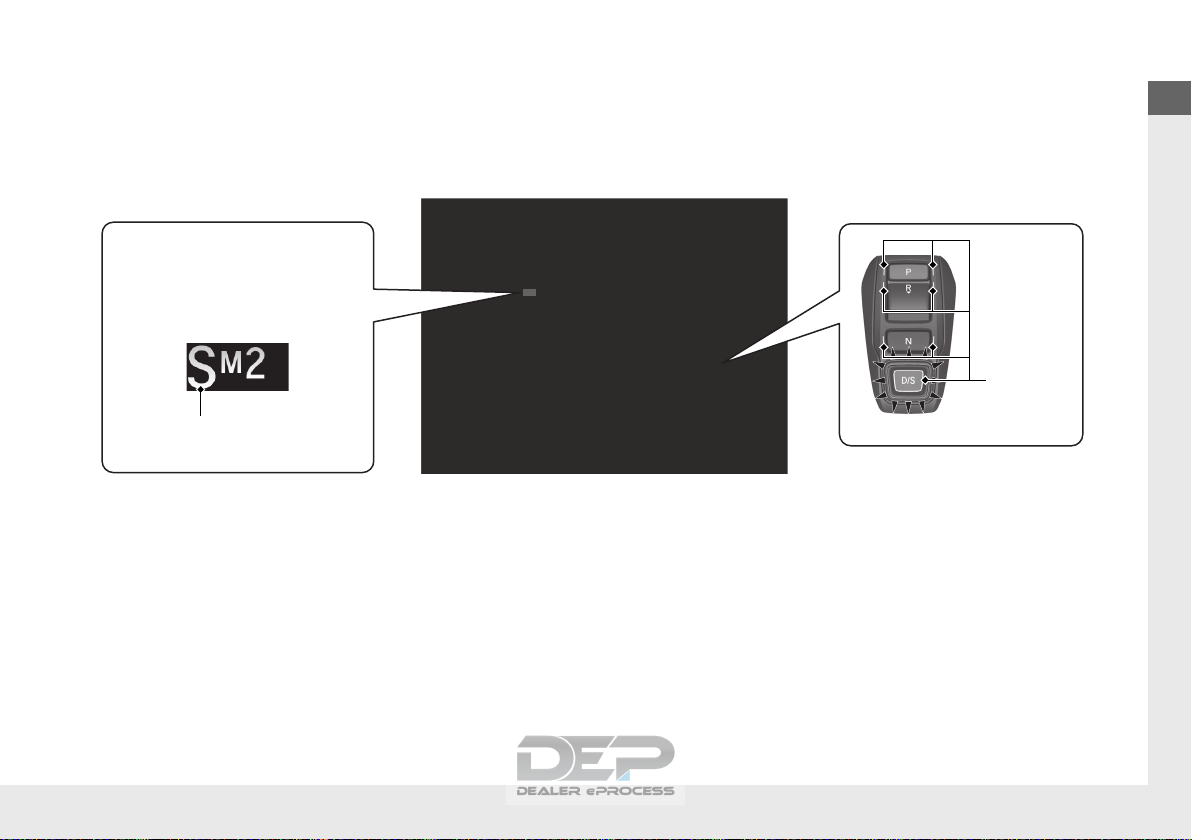
Driving (P 525)
Gear Position Indicator
Shift
Button
Indicator
Automatic Transmission (P 546)
● Always depress the brake pedal before selecting
(P or changing the gear position from (P .
● Select
(P and depress the brake pedal when starting the engine.
● Gear selection
Gear Position Indicator
The gear position indicator and
the shift button indicator
indicate the current gear
selection.
* Not available on all models

24
Quick Reference Guide
Park
Press the
(P button.
Used when parking or before turn off or start the engine.
Transmission is locked.
Reverse
Pull back the
(R button.
Used when reversing.
Neutral
Press the
(N button.
Transmission is not locked.
Drive/S Position
Each time you press the button, the mode switches
between Drive and S Position mode.
●
Normal driving (gears change between1st and 9th
automatically)
●
Normal driving (gears change between1st and 10th
automatically)
●
Temporarily driving in the sequential mode
●
Automatically changing gears between 1st and 7th (7th gear
is used only at high speed)
●
Automatically changing gears between 1st and 8th (8th gear
is used only at high speed)
●
Driving in the sequential mode
D/S
Drive
Except ELITE and TOURING grade models
ELITE and TOURING grade models
All models
S Position
Except ELITE and TOURING grade models
ELITE and TOURING grade models
All models
25
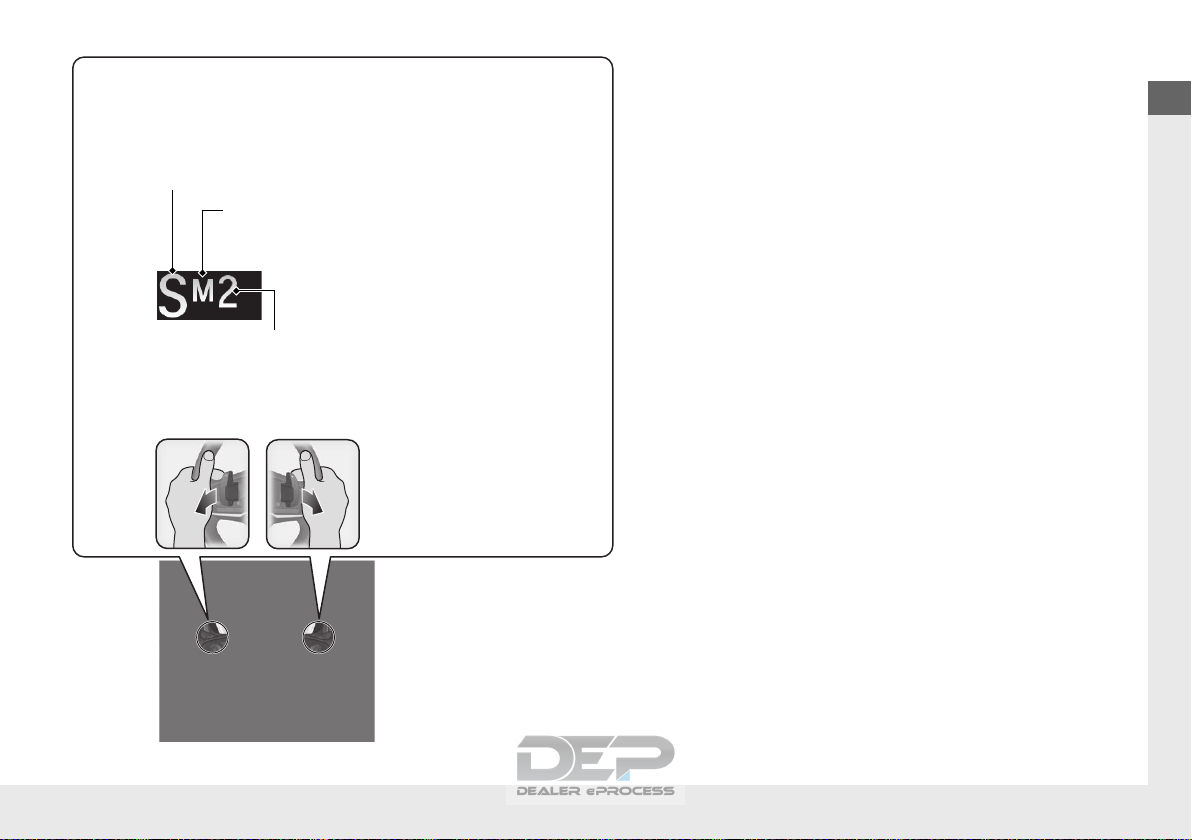
Quick Reference Guide
M (sequential
mode)
Indicator
Gear Position Indicator
Shift Down (-
Paddle Shifter
Shift Up
(+
Paddle Shifter
Paddle Shifters (P 553)
● Paddle shifters allow you to shift gears much like a manual
transmission (1st through 9th
*
or 10th
*
). This is useful for engine
braking.
● D-paddle shift mode: The
transmission will shift back to
automatic mode once the
system detects that the vehicle
is cruising.
● Sequential mode gear
selection: Holds the selected
gear, and the M (sequential
mode) indicator comes on.
● The sequential mode gear
selection is shown in the
instrument panel.
Sequential Mode Gear
Selection Indicator
* Not available on all models
26
Quick Reference Guide
VSA® On and Off (P592)
● The Vehicle Stability Assist® (VSA®) system
helps stabilize the vehicle during
cornering, and helps maintain traction
while accelerating on loose or slippery
road surfaces.
● VSA® comes on automatically every time
you start the engine.
● To partially disable or fully restore VSA®
function, press and hold the button until
you hear a beep.
Cruise Control
*
(P 561)
● Cruise control allows you to maintain a
set speed without keeping your foot on
the accelerator pedal.
● To use cruise control, press the CRUISE
button, then press the –/SET button once
you have achieved the desired speed
(above 25 mph or 40 km/h).
CMBS
TM
On and Off
*
(P 613)
● When a possible collision is likely
unavoidable, the CMBS
TM
can help you to
reduce the vehicle speed and the severity
of the collision.
● The CMBS
TM
is turned on every time you
start the engine.
● To turn the CMBS
TM
on or off, press and
hold the button until you hear a beep.
Tire Pressure Monitoring System (TPMS) with Tire
Fill Assist
(P 594, 722)
● The TPMS monitors tire pressure.
● TPMS is turned on automatically every time you start the engine.
● TPMS fill assist provides audible and visual guidance during tire pressure adjustment.
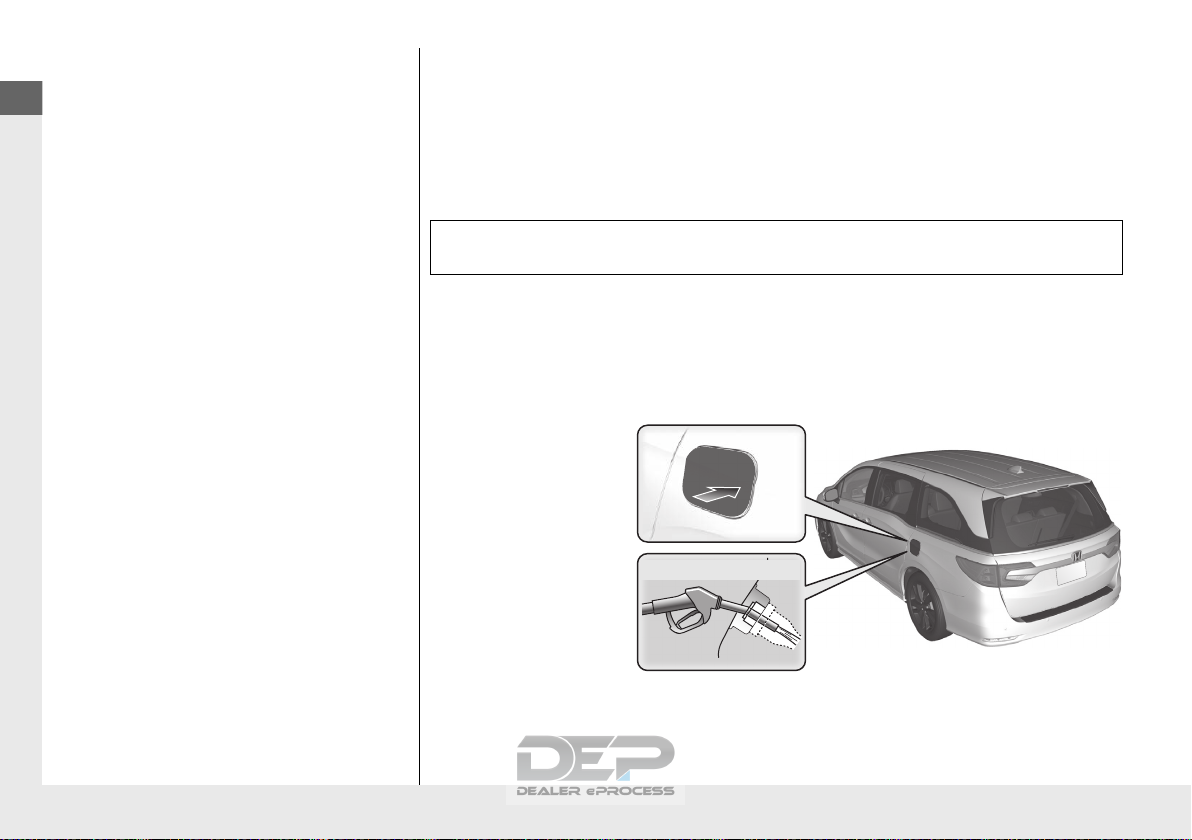
Refueling (P 632)
Fuel recommendation: Unleaded gasoline, pump octane number 87 or higher
Fuel tank capacity: 19.5 US gal (73.8 L)
a Unlock the driver’s
door.
2 Locking/Unlocking
the Doors from the
Inside (P 154)
b Press firmly and then
release the area
indicated by the
arrow to release the
fuel filler door.
c After refueling, wait
for about five
seconds before
removing the filler
nozzle.
Wait for five seconds

27
Quick Reference Guide
Honda Sensing®
*
Honda Sensing® is a driver support system
which employs the use of two distinctly
different kinds of sensors, a radar sensor
located in the front grille and a front sensor
camera mounted to the interior side of the
windshield, behind the rear view mirror.
Front Sensor
Camera
The camera is located
behind the rearview
mirror.
Radar Sensor
The radar sensor is
in the front grille.
Adaptive Cruise Control
(ACC)
(P566)
Helps maintain a constant vehicle speed and
a set following interval behind a vehicle
detected ahead of yours, without you
having to keep your foot on the brake or
the accelerator.
Road Departure
Mitigation (RDM) System
(P 578)
Alerts and helps to assist you when the
system detects a possibility of your vehicle
unintentionally crossing over detected lane
markings.
Lane Keeping Assist
System (LKAS)
(P 583)
Provides steering input to help keep the
vehicle in the middle of a detected lane and
provides tactile and visual alerts if the
vehicle is detected drifting out of its lane.
Collision Mitigation
Braking System
TM
(CMBS
TM
) (P 610)
Can assist you when there is a possibility of
your vehicle colliding with a vehicle or a
pedestrian detected in front of yours. The
CMBS
TM
is designed to alert you when a
potential collision is determined, as well as
to reduce your vehicle speed to help
minimize collision severity when a collision is
deemed unavoidable.
* Not available on all models

28
Quick Reference Guide
Maintenance (P637)
Under the Hood (P647)
● Check engine oil, engine coolant, and window washer fluid. Add
when necessary.
● Check brake fluid.
● Check the battery condition monthly.
a Pull the hood release handle under the corner of the dashboard.
b Locate the hood latch lever, pull it up, and then raise the hood.
Once you have raised the hood slightly, you can release the lever.
c When finished, close the hood and make sure it is firmly locked in
place.
Lights (P660)
● Inspect all lights regularly.
Wiper Blades (P671)
● Replace blades if they leave
streaks across the windshield.
Tires (P675)
● Inspect tires and wheels
regularly.
● Check tire pressures
regularly.
● Install snow tires for winter
driving.
 Loading...