

Page 1
Quick guide
Basic function
Navigation system
• Giving guidance for the route quickly
• Information to be read before operation
• Setting initial settings before operation
• Connecting the Bluetooth
• Operating the map screen
• Searching the map
• Activating the route guidance
®
device
1
2
3
Audio/visual
system
Voice command
system
Information
Peripheral
monitoring system
Phone
Lexus Enform
Index
• Listening to the radio
• Enjoying music and video
• Operating the voice command system
• Operating the weather information screen
• Checking the situation around the vehicle
• Operating the phone
(Hands-free system for cellular phones)
• Operating the Lexus Enform
• Search alphabetically
4
5
6
7
8
9
LS500_LS500h_Navi_OM50F66U_(U)
Page 2
2
TABLE OF CONTENTS
Introduction .......................................................5
Reading this manual.......................................7
1
Quick guide
1-1. Basic function
Display and operation switches
................................................................12
Remote Touch....................................14
Menu screen .......................................16
Status icon........................................... 18
“Setup” screen.................................. 20
Information screen ...........................21
1-2. Navigation operation
Operating the map screen...........22
Guiding the route ............................23
Registering home.............................24
2
Basic function
2-1. Basic information before opera-
tion
Initial screen........................................26
How to use the Remote Touch
...............................................................27
Operating the screen.................... 30
Using side display ............................32
Entering letters and numbers/list
screen operation .......................... 34
Linking multi-information display
and the system............................... 37
2-2. Connectivity settings
Registering/Connecting a
Bluetooth
Setting Bluetooth
Wi-Fi® Hotspot............................... 49
2-3. Other settings
®
device....................... 38
®
details ...........42
General settings...............................53
Voice settings....................................57
Vehicle settings ............................... 58
3
Navigation system
3-1. Basic operation
Navigation ..........................................62
Map screen operation...................64
Map screen information ...............67
Traffic information ...........................70
3-2. Destination search
Destination search operation .....72
Starting route guidance ................79
3-3. Route guidance
Route guidance screen ................ 83
Typical voice guidance prompts
............................................................. 86
Editing route ......................................87
3-4. Setup
Navigation settings ........................ 89
Detailed navigation settings........94
Traffic settings ...................................97
Use of information accumulated by
navigation system ....................... 101
3-5. Tips for the navigation system
GPS (Global Positioning System)
........................................................... 102
Map database version and covered
area.................................................. 104
4
Audio/visual system
4-1. Basic operation
Quick reference............................ 106
Some basics .................................... 107
LS500_LS500h_Navi_OM50F66U_(U)
Page 3
TABLE OF CONTENTS
3
4-2. Radio operation
AM/FM/SiriusXM (SXM) radio
............................................................. 112
Internet radio ..................................120
4-3. Media operation
CD........................................................ 121
DVD.................................................... 123
USB memory .................................. 125
iPod..................................................... 127
Bluetooth
®
audio.......................... 129
AUX ................................................... 132
4-4. Audio/visual remote controls
Steering switches .........................134
Rear Multi Operation Panel..... 135
4-5. Setup
Audio settings................................. 139
4-6. Tips for operating the audio/visual
system
Operating information................ 145
4-7. Rear seat entertainment system
features
Rear seat entertainment system
features...........................................158
Some basics..................................... 160
4-8. Rear seat entertainment system
operation
AM/FM/SXM radio.................... 167
CD....................................................... 168
Video CD......................................... 169
DVD (DVD video and AVCHD
™
disc)................................................... 171
Blu-ray Disc™ (BD-Video and
BDAV)............................................ 176
USB memory ...................................181
iPod.....................................................183
Bluetooth
®
audio.......................... 184
SD card ............................................. 185
External devices ............................190
Rear-DLNA.................................... 190
Rear-Miracast™............................ 193
4-9. Rear seat entertainment system
settings
Rear seat entertainment system
settings ........................................... 195
4-10. Tips for operating rear seat enter-
tainment system
Operating information ...............198
5
Voice command system
5-1. Voice command system operation
Voice command system ........... 230
Natural language understanding
.......................................................... 233
Command list ................................ 233
5-2. Mobile Assistant operation
Mobile Assistant........................... 238
6
Information
6-1. Information display
Receiving weather information
...........................................................242
Data services settings .................244
7
Peripheral monitoring system
7-1. Lexus parking assist monitor
Lexus parking assist monitor... 246
Estimated course line display mode
.......................................................... 249
Parking assist guide line display
mode ..............................................250
1
2
3
4
5
6
7
8
9
LS500_LS500h_Navi_OM50F66U_(U)
Page 4
4
TABLE OF CONTENTS
Distance guide line display mode
............................................................ 251
Lexus parking assist monitor pre-
cautions .........................................252
Things you should know............ 256
7-2. Panoramic view monitor
Panoramic view monitor...........258
Checking around the vehicle
........................................................... 264
Checking the front and around the
vehicle............................................ 265
Checking the sides of the vehicle
........................................................... 268
Checking the rear and around the
vehicle............................................ 273
When folding the outside rear view
mirrors ........................................... 279
Magnifying function ....................280
Customizing the panoramic view
monitor ...........................................281
Panoramic view monitor precau-
tions................................................. 282
Things you should know............. 291
8
Phone
®
Bluetooth
phone
message function...................... 307
8-2. Setup
Phone settings.................................312
8-3. What to do if...
Troubleshooting.............................321
9
Lexus Enform
9-1. Lexus Enform overview
Functional overview.................... 326
Type A: Function achieved by using
a smart phone or DCM.......... 327
Type B: Function achieved by using
DCM and the system.............. 330
Type C: Function achieved by using
DCM............................................... 331
Type D: Function achieved by using
DCM and a smart phone....... 333
9-2. Lexus Enform operation
Lexus Enform App Suite 2.0 .. 335
Lexus Enform Destinations...... 338
9-3. Setup
Lexus Enform App Suite 2.0 set-
tings ................................................ 340
8-1. Phone operation (Hands-free sys-
tem for cellular phones)
Quick reference........................... 296
Some basics.................................... 297
Placing a call using the Bluetooth
hands-free system.....................300
Receiving a call using the
Bluetooth
®
hands-free
system ............................................303
Talking on the Bluetooth
®
hands-free system.....................304
LS500_LS500h_Navi_OM50F66U_(U)
Index
Alphabetical Index ...................... 342
®
Page 5

5
Introduction
Navigation and multimedia system
owner’s manual
This manual explains the operation of
the system. Please read this manual
carefully to ensure proper use. Keep
this manual in your vehicle at all times.
The screens shown in this manual may
differ from the actual screen of the system depending on availability of functions, Lexus Enform subscription
status, and map data available at the
time this manual was produced.
The screens in this manual will also differ if the screen theme settings have
been changed. (Theme setting:
→P.53)
In some situations when changing
between screens, it may take longer
than normal for the screen to change,
the screen may be blank momentarily
or noise may be displayed.
Please be aware that the content of this
manual may be different from the system in some cases, such as when the
system’s software is updated.
Navigation system (with navigation
function)
The navigation system is one of the
most technologically advanced vehicle accessories ever developed. The
system receives satellite signals from
the Global Positioning System (GPS)
operated by the U.S. Department of
Defense. Using these signals and other
vehicle sensors, the system indicates
your present position and assists in
locating a desired destination.
The navigation system is designed to
select efficient routes from your present starting location to your destination. The system is also designed to
direct you to a destination that is unfamiliar to you in an efficient manner. The
system uses AISIN AW maps. The calculated routes may not be the shortest
nor the least traffic congested. Your
own personal local knowledge or
“short cut” may at times be faster than
the calculated routes.
The navigation system’s database
includes Point of Interest categories to
allow you to easily select destinations
such as restaurants and hotels. If a destination is not in the database, you can
enter the street address close to it and
the system will guide you there.
The system will provide both a visual
map and audio instructions. The audio
instructions will announce the distance
remaining and the direction to turn in
when approaching an intersection.
These voice instructions will help you
keep your eyes on the road and are
timed to provide enough time to allow
you to maneuver, change lanes or slow
down.
Please be aware that all current vehicle
navigation systems have certain limitations that may affect their ability to perform properly. The accuracy of the
vehicle’s position depends on satellite
conditions, road configuration, vehicle
condition or other circumstances. For
LS500_LS500h_Navi_OM50F66U_(U)
Page 6

6
more information on the limitations of
the system, refer to page 102.
TOYOTA MOTOR
CORPORATION
12.3 inch display
Free/Open Source Software Information
This product contains Free/Open
Source Software (FOSS).
The license information and/or the
source code of such FOSS can be
found at the following URL.
http://www.globaldenso.com/en/open
source/ivi/toyota/
LS500_LS500h_Navi_OM50F66U_(U)
Page 7
Reading this manual
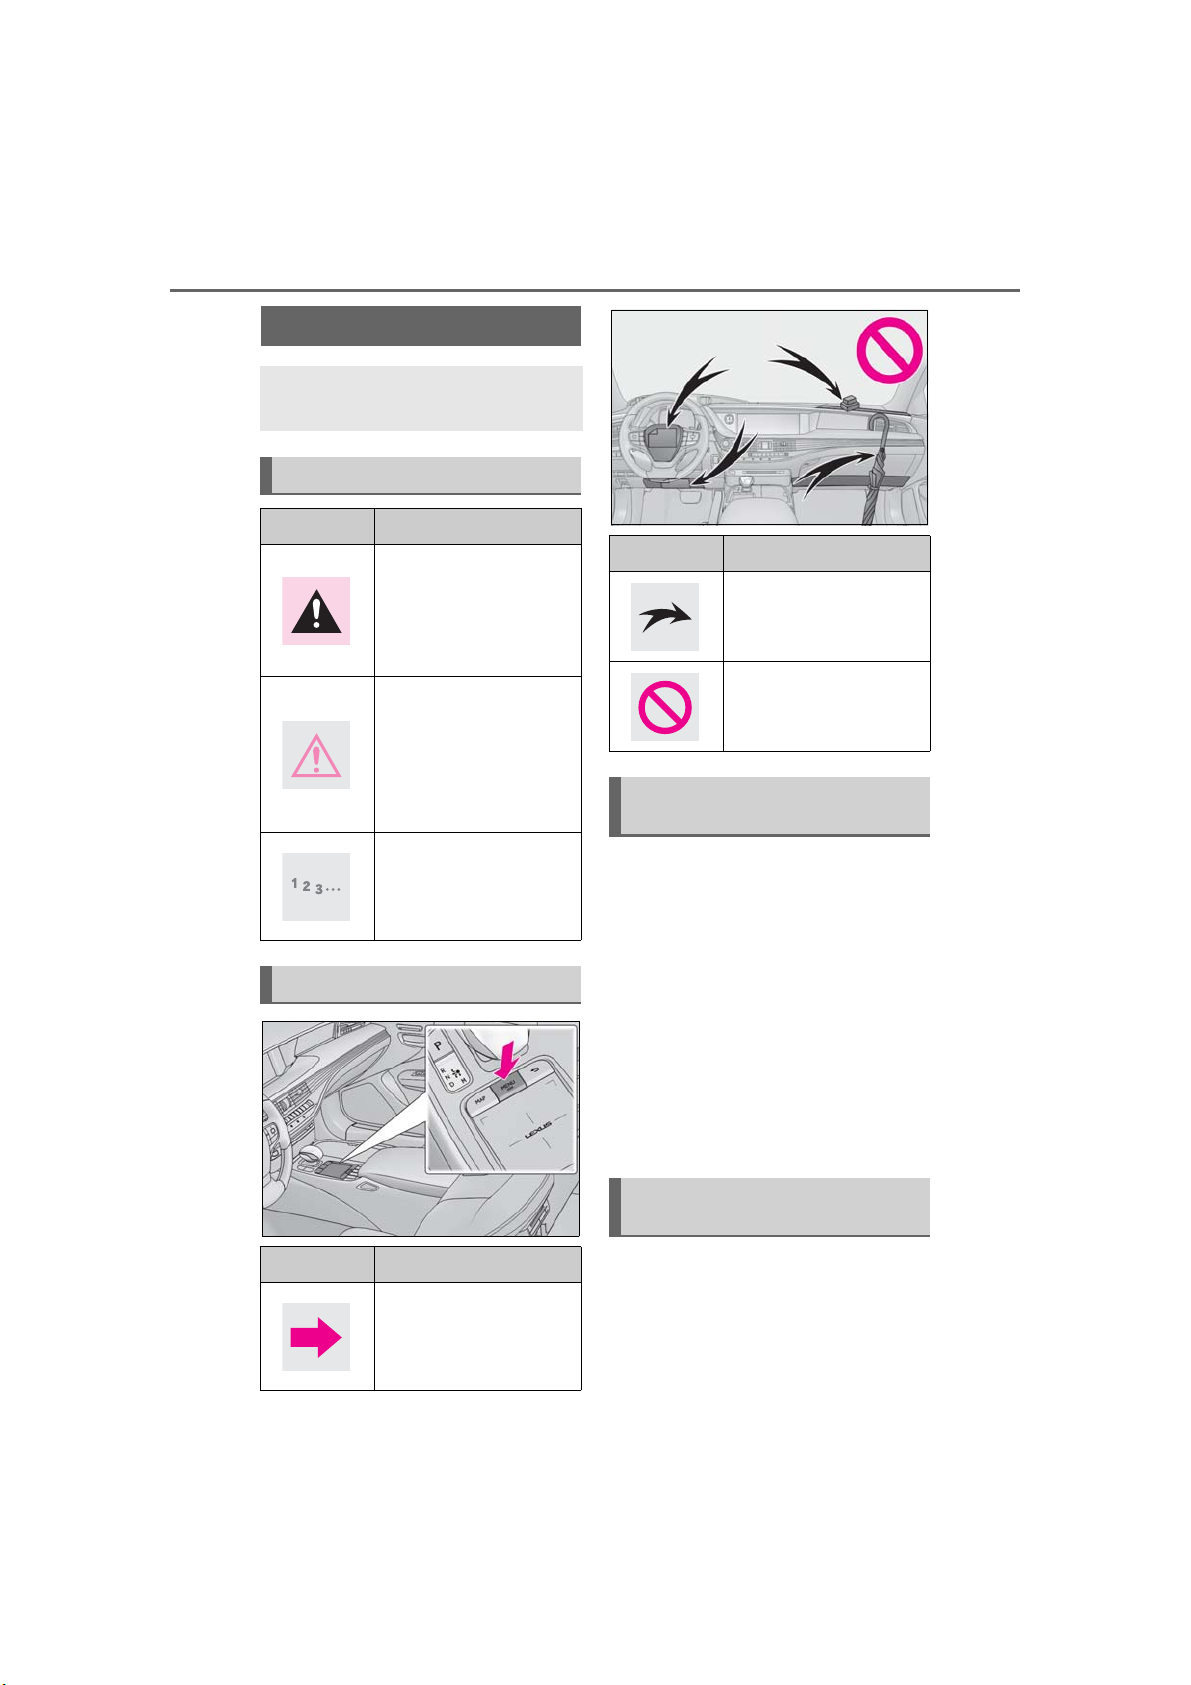
Explains symbols used in this manual
Symbols in this manual
Symbols Meanings
WARNING:
Explains something that, if
not obeyed, could cause
death or serious injury to
people.
NOTICE:
Explains something that, if
not obeyed, could cause
damage to or a malfunction in the vehicle or its
equipment.
Indicates operating or
working procedures. Follow the steps in numerical
order.
Symbols in illustrations
Symbols Meanings
Indicates the component
or position being
explained.
Means Do not, Do not do
this, or Do not let this happen.
Different writing styles for gasoline
and hybrid vehicles
Information for hybrid vehicles is written in brackets next to the information
for gasoline vehicles.
Example
Turn the engine switch
*2
switch>
to IGNITION ON mode
*1
<power
*1
<ON mode>*2.
*1
: LS500
*2
: LS500h
7
Symbols Meanings
Indicates the action (pushing, turning, etc.) used to
operate switches and
other devices.
LS500_LS500h_Navi_OM50F66U_(U)
Safety instruction (without navigation
function)
To use this system in the safest possible
manner, follow all the safety tips shown
below.
Do not use any feature of this system to
the extent it becomes a distraction and
Page 8
8
WARNING
WARNING
prevents safe driving. The first priority
while driving should always be the safe
operation of the vehicle. While driving,
be sure to observe all traffic regulations.
Prior to the actual use of this system,
learn how to use it and become thoroughly familiar with it. Read the entire
manual to make sure you understand
the system. Do not allow other people
to use this system until they have read
and understood the instructions in this
manual.
For your safety, some functions may
become inoperable when driving.
Unavailable screen buttons are
dimmed.
● For safety, the driver should not oper-
ate the system while he/she is driving.
Insufficient attention to the road and
traffic may cause an accident.
Safety instruction (with navigation
function)
To use this system in the safest possible
manner, follow all the safety tips shown
below.
This system is intended to assist in
reaching the destination and, if used
properly, can do so. The driver is solely
responsible for the safe operation of
your vehicle and the safety of your passengers.
Do not use any feature of this system to
the extent it becomes a distraction and
prevents safe driving. The first priority
while driving should always be the safe
operation of the vehicle. While driving,
be sure to observe all traffic regulations.
Prior to the actual use of this system,
learn how to use it and become thoroughly familiar with it. Read the entire
manual to make sure you understand
the system. Do not allow other people
to use this system until they have read
and understood the instructions in this
manual.
For your safety, some functions may
become inoperable when driving.
Unavailable screen buttons are
dimmed.
● For safety, the driver should not oper-
ate the navigation system while he/she
is driving. Insufficient attention to the
road and traffic may cause an accident.
● While driving, be sure to obey the traf-
fic regulations and maintain awareness
of the road conditions. If a traffic sign
on the road has been changed, route
guidance may not have the updated
information such as the direction of a
one way street.
While driving, listen to the voice
instructions as much as possible and
glance at the screen briefly and only
when it is safe. However, do not totally
rely on voice guidance. Use it just for
reference. If the system cannot determine the current position correctly,
there is a possibility of incorrect, late,
or non-voice guidance.
The data in the system may occasionally be incomplete. Road conditions,
including driving restrictions (no left
LS500_LS500h_Navi_OM50F66U_(U)
Page 9

turns, street closures, etc.) frequently
change. Therefore, before following
any instructions from the system, look
to see whether the instruction can be
done safely and legally.
This system cannot warn about such
things as the safety of an area, condition of streets, and availability of emergency services. If unsure about the
safety of an area, do not drive into it.
Under no circumstances is this system
a substitute for the driver’s personal
judgement.
Use this system only in locations where
it is legal to do so. Some states/provinces may have laws prohibiting the use
of video and navigation screens next to
the driver.
9
LS500_LS500h_Navi_OM50F66U_(U)
Page 10

10
LS500_LS500h_Navi_OM50F66U_(U)
Page 11

11
Quick guide
.
1-1. Basic function
Display and operation switches
.............................................................12
Remote Touch.................................14
Menu screen ................................... 16
Status icon........................................ 18
“Setup” screen............................... 20
Information screen ........................21
1-2. Navigation operation
Operating the map screen........22
Guiding the route ........................ 23
Registering home..........................24
1
1
Quick guide
LS500_LS500h_Navi_OM50F66U_(U)
Page 12
12
A
B
C
D
E
F
G
H
1-1.Basic function
1-1. Basic function
Display and operation switches
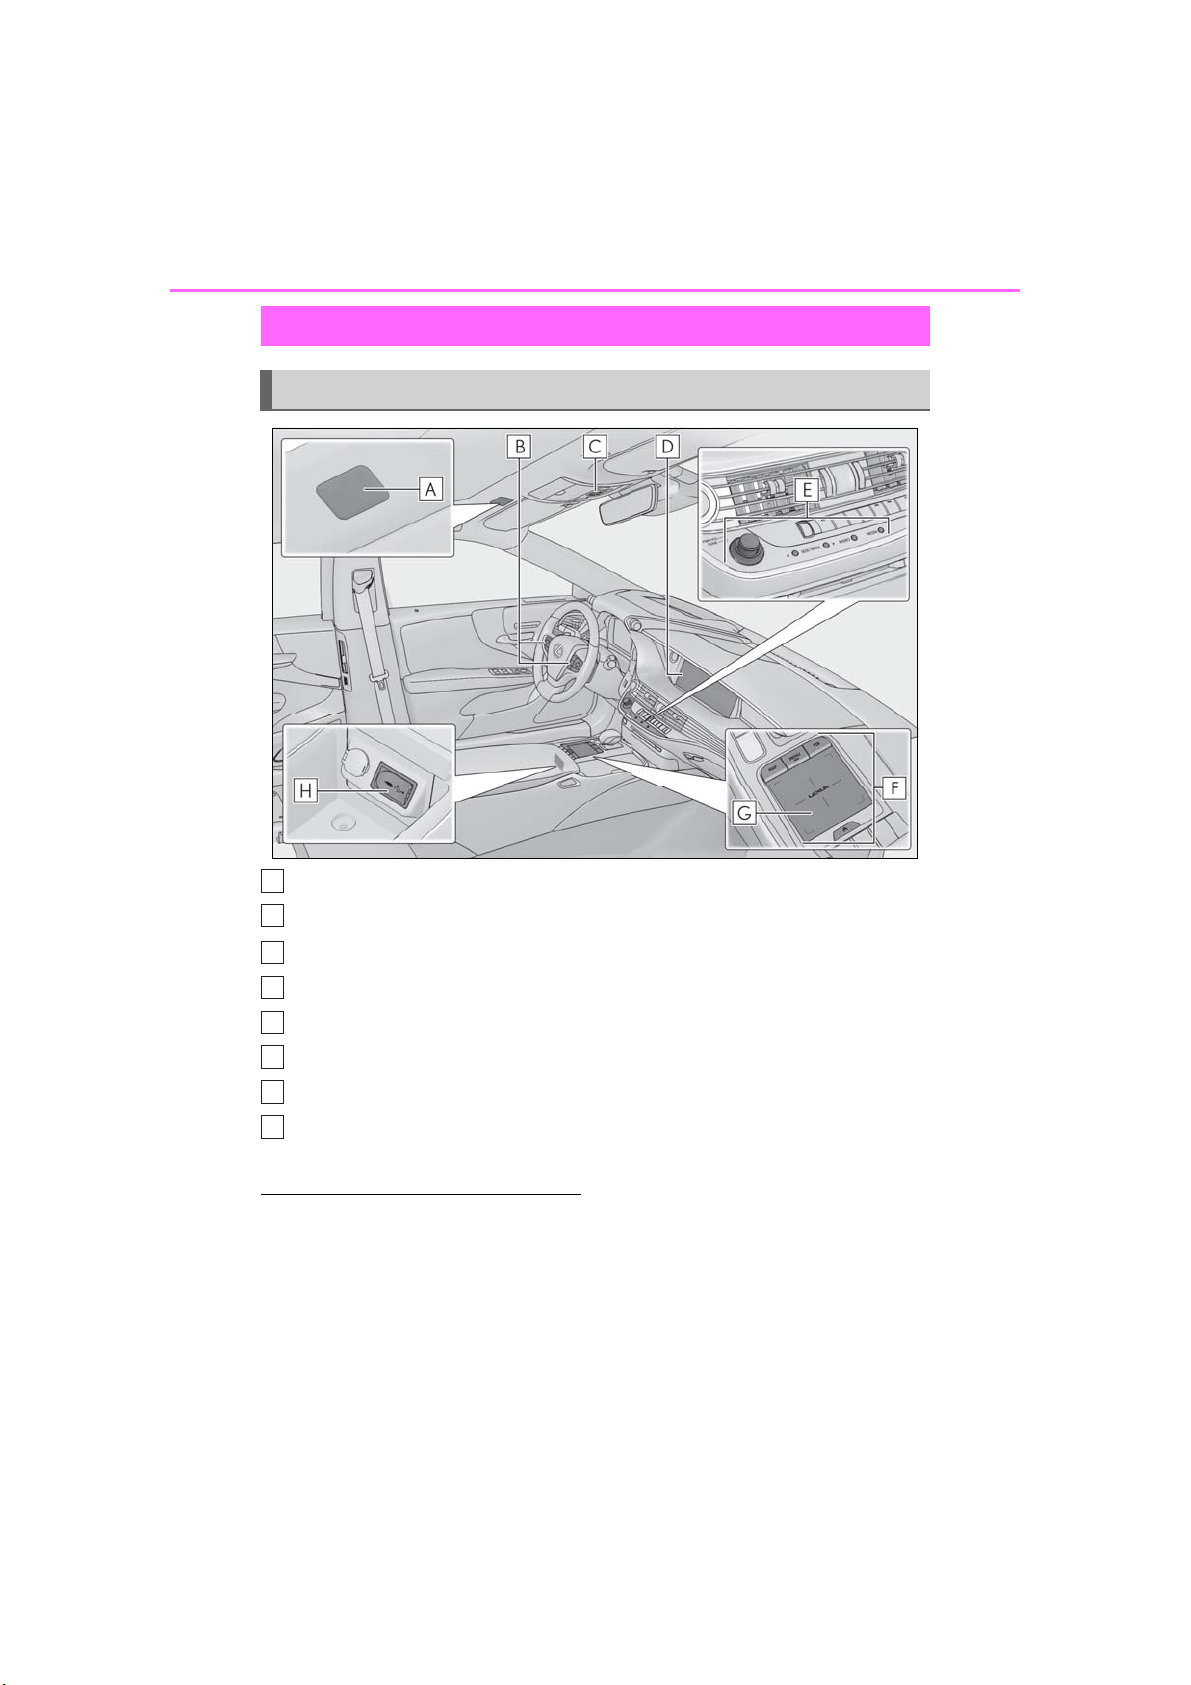
Names of each part
Microphone (→P.230, 298)
Steering switches (→P.134, 230, 298)
“SOS” button
*
Display
Audio control switch (→P.106)
Remote Touch (→P.14)
Touchpad (→P.27)
USB/AUX port (→P.108)
*
: If equipped. Refer to the “OWNER’S MANUAL”.
● When the temperature is -4 °F (-20°C)
or less, the system may not operate.
● When the LCD screen is viewed at an
angle, it looks lighter or darker.
● When light from the sun or another
external light source strikes the screen,
the screen is difficult to see.
● When wearing sunglasses with polarized
lenses, the screen looks lighter or darker.
LS500_LS500h_Navi_OM50F66U_(U)
Page 13
WARNING
● For safety reasons, drivers should
NOTICE
avoid performing operations as much
as possible while driving. Performing
operations while driving may cause the
driver to mistakenly operate the steering wheel, which may lead to an accident. Stop the vehicle before using.
Furthermore, avoid looking at the
screen as much as possible while driving.
● Always follow the actual traffic regula-
tions and drive according to the road
conditions. Routes displayed by the
destination guidance may include
routes where the vehicle is prohibited
from entering due to changes to speed
limit signs and routes where the road is
too narrow to pass through.
● To prevent the 12-volt battery from
becoming fully depleted, do not use
the Remote Touch for long periods of
time while the engine/hybrid system is
turned off.
1-1. Basic function
13
1
Quick guide
LS500_LS500h_Navi_OM50F66U_(U)
Page 14
14
A
BCD
E
1-1. Basic function
Remote Touch
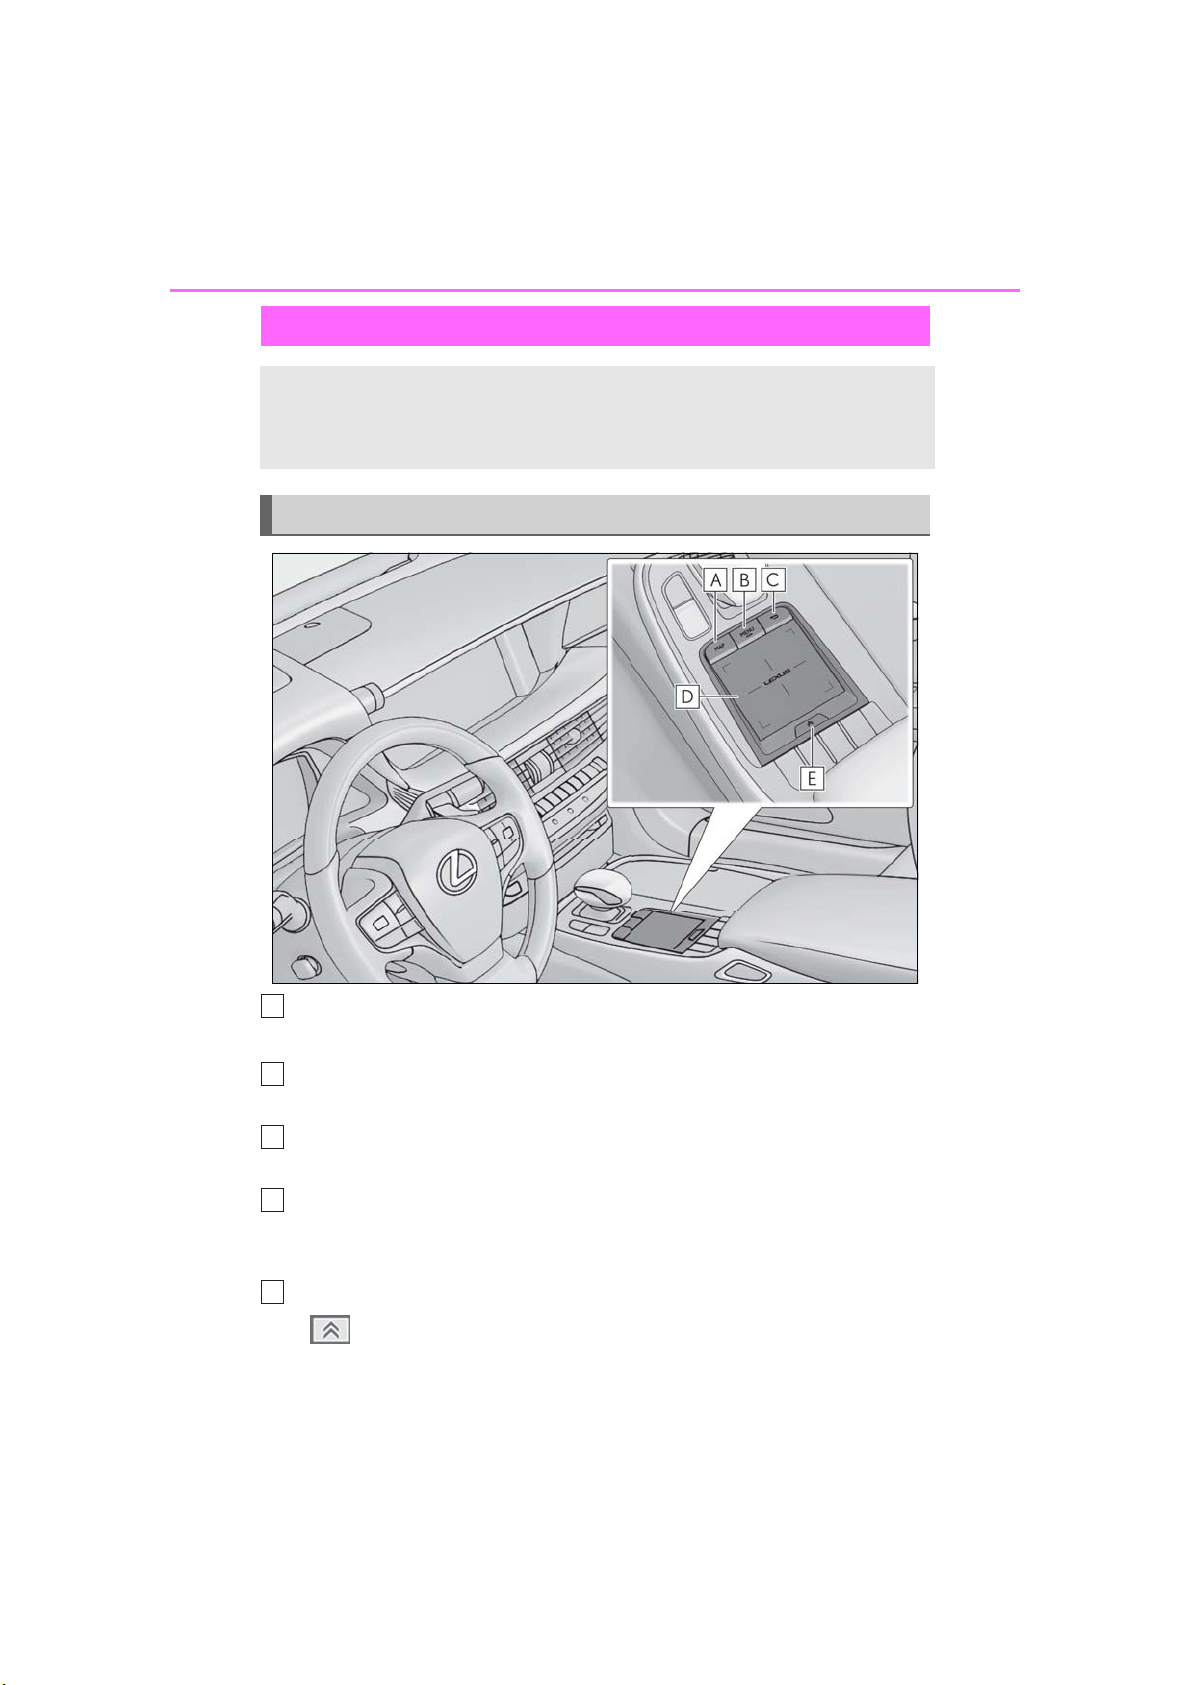
The system is primarily operated by the Remote Touch.
Remote Touch is the name for the device that includes the “MAP” button,
“MENU” button, back button, touchpad and sub function button.
Names and operations of each part
“MAP” button
Press to display the current location* or the compass mode screen. (→P.62, 64)
“MENU” button
Press to display the menu screen. (→P.16)
Back button
Press to display the previous screen. (→P.27)
Touchpad
Operate to select/confirm a button on the screen. (→P.27)
Operate to scroll list screens and enlarge/shrink the map.
Sub function button
When is displayed on the screen, a function screen assigned to the screen can be displayed. (→P.15)
LS500_LS500h_Navi_OM50F66U_(U)
*
(→P.29)
Page 15
*
: With navigation function
1-1. Basic function
15
1
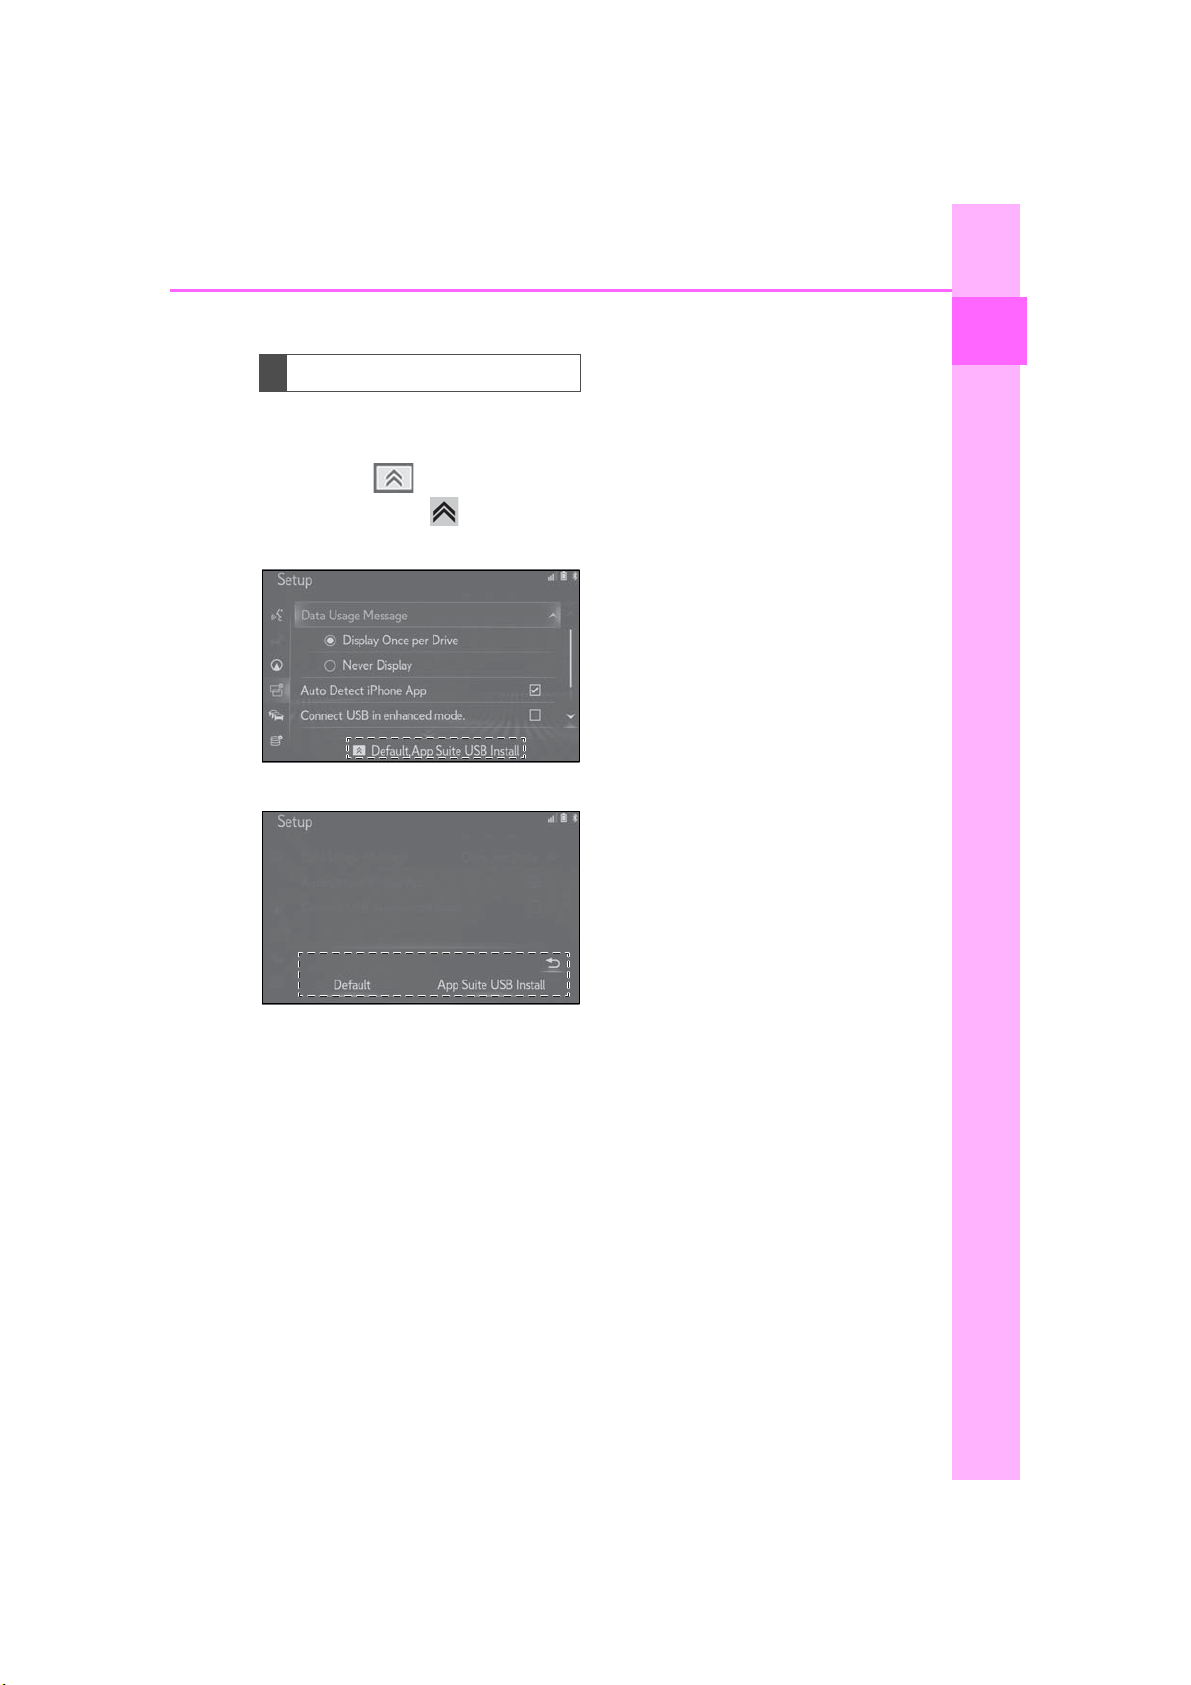
Using the sub function button
Optional functions assigned to the
screen can be operated.
1 When the is displayed on the
screen, press the button on the
Remote Touch.
2 Select the desired item.
Quick guide
LS500_LS500h_Navi_OM50F66U_(U)
Page 16
16
A
B
C
D
E
F
G
H
1-1. Basic function
Menu screen
Menu screen operation
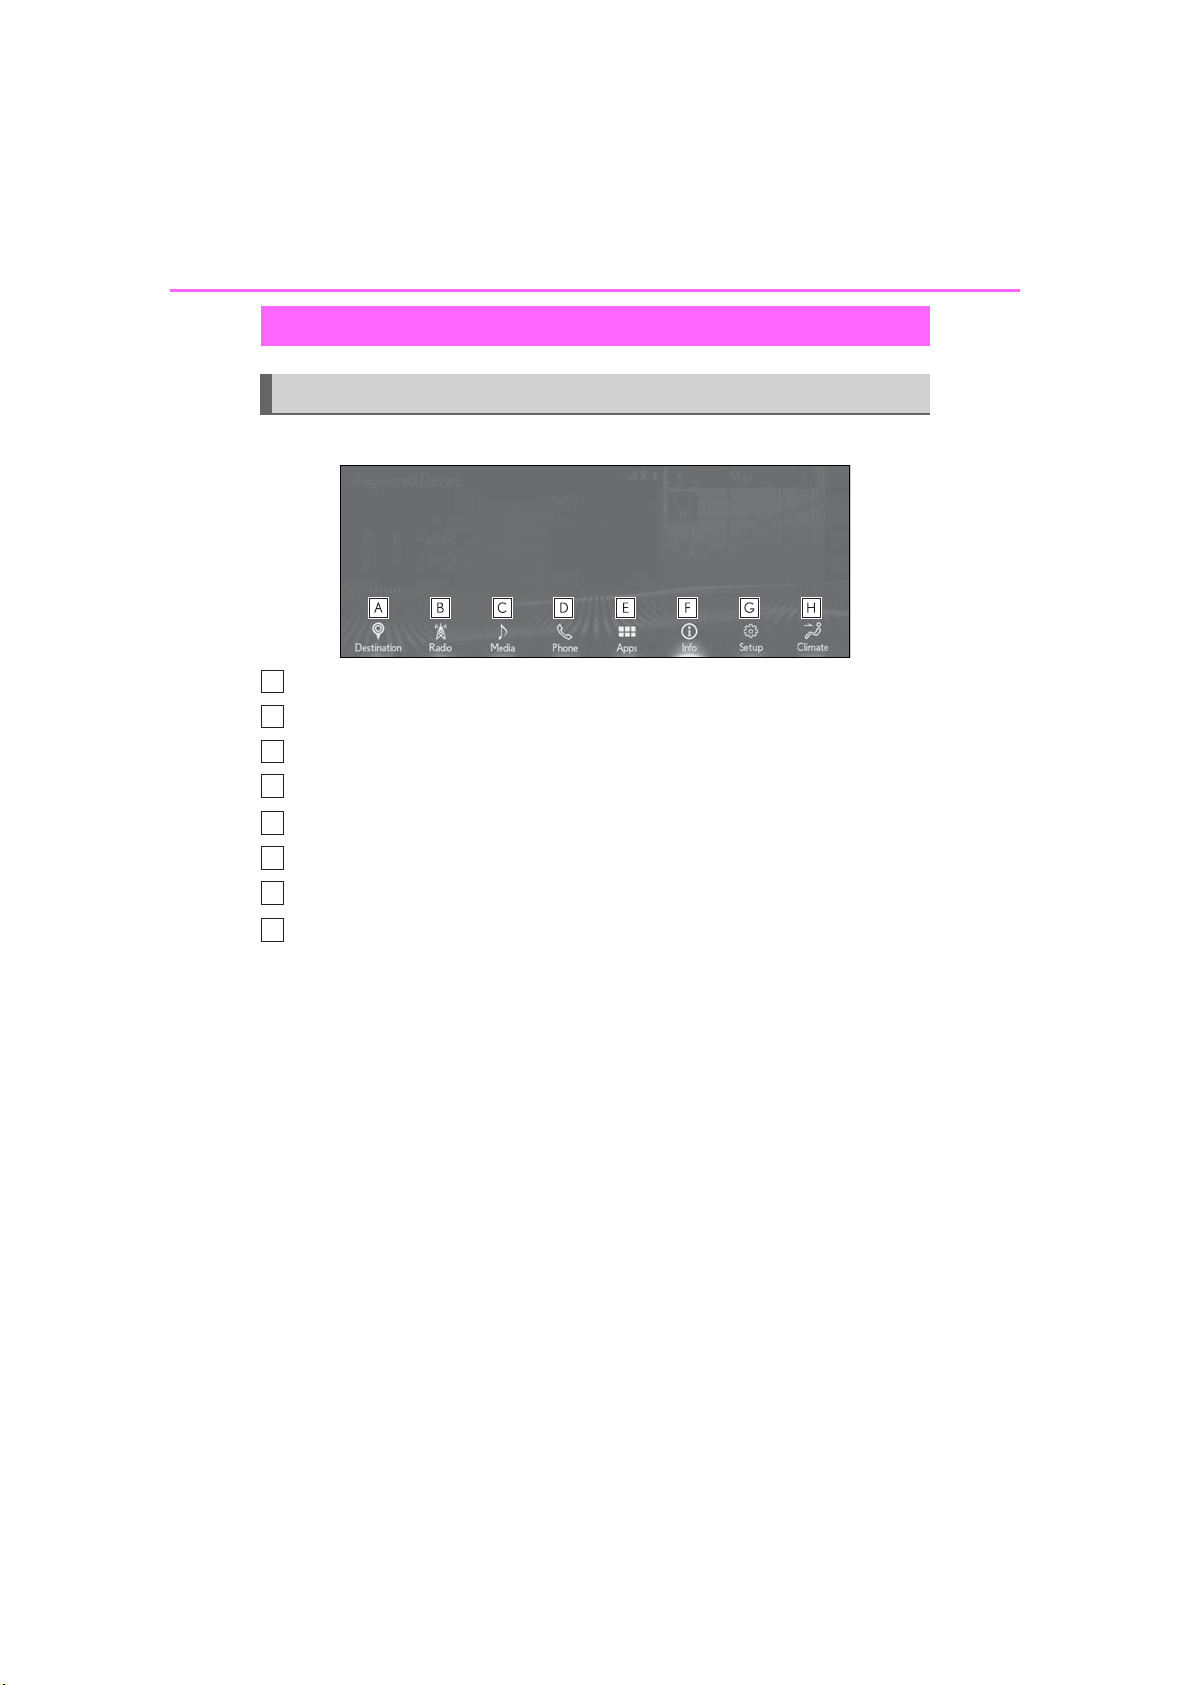
Press the “MENU” button on the Remote Touch to display the menu screen.
*1
Select to display the destination screen.
Select to display the radio control screen. (→P.106)
Select to display the media control screen. (→P.106)
Select to display the hands-free control screen. (→P.296)
Select to display the “Apps” screen.
(→P.72)
*2
(→P.335)
Select to display the information screen. (→P.21)
Select to display the “Setup” screen. (→P.20)
Select to display the air conditioning control screen.
*1
:With navigation function
*2
: This function is not made available in some countries or areas.
*3
: Refer to the “OWNER’S MANUAL”
*3
LS500_LS500h_Navi_OM50F66U_(U)
Page 17

1-1. Basic function
A
17
How to use “On cursor shortcut”
Moving the cursor over a switch on the menu screen causes shortcut switches to
display for that switch.
The shortcut switches can be used to perform operation procedures more quickly.
On cursor shortcut
1
Quick guide
LS500_LS500h_Navi_OM50F66U_(U)
Page 18
18
A
B
C
D
EFG
1-1. Basic function
Status icon
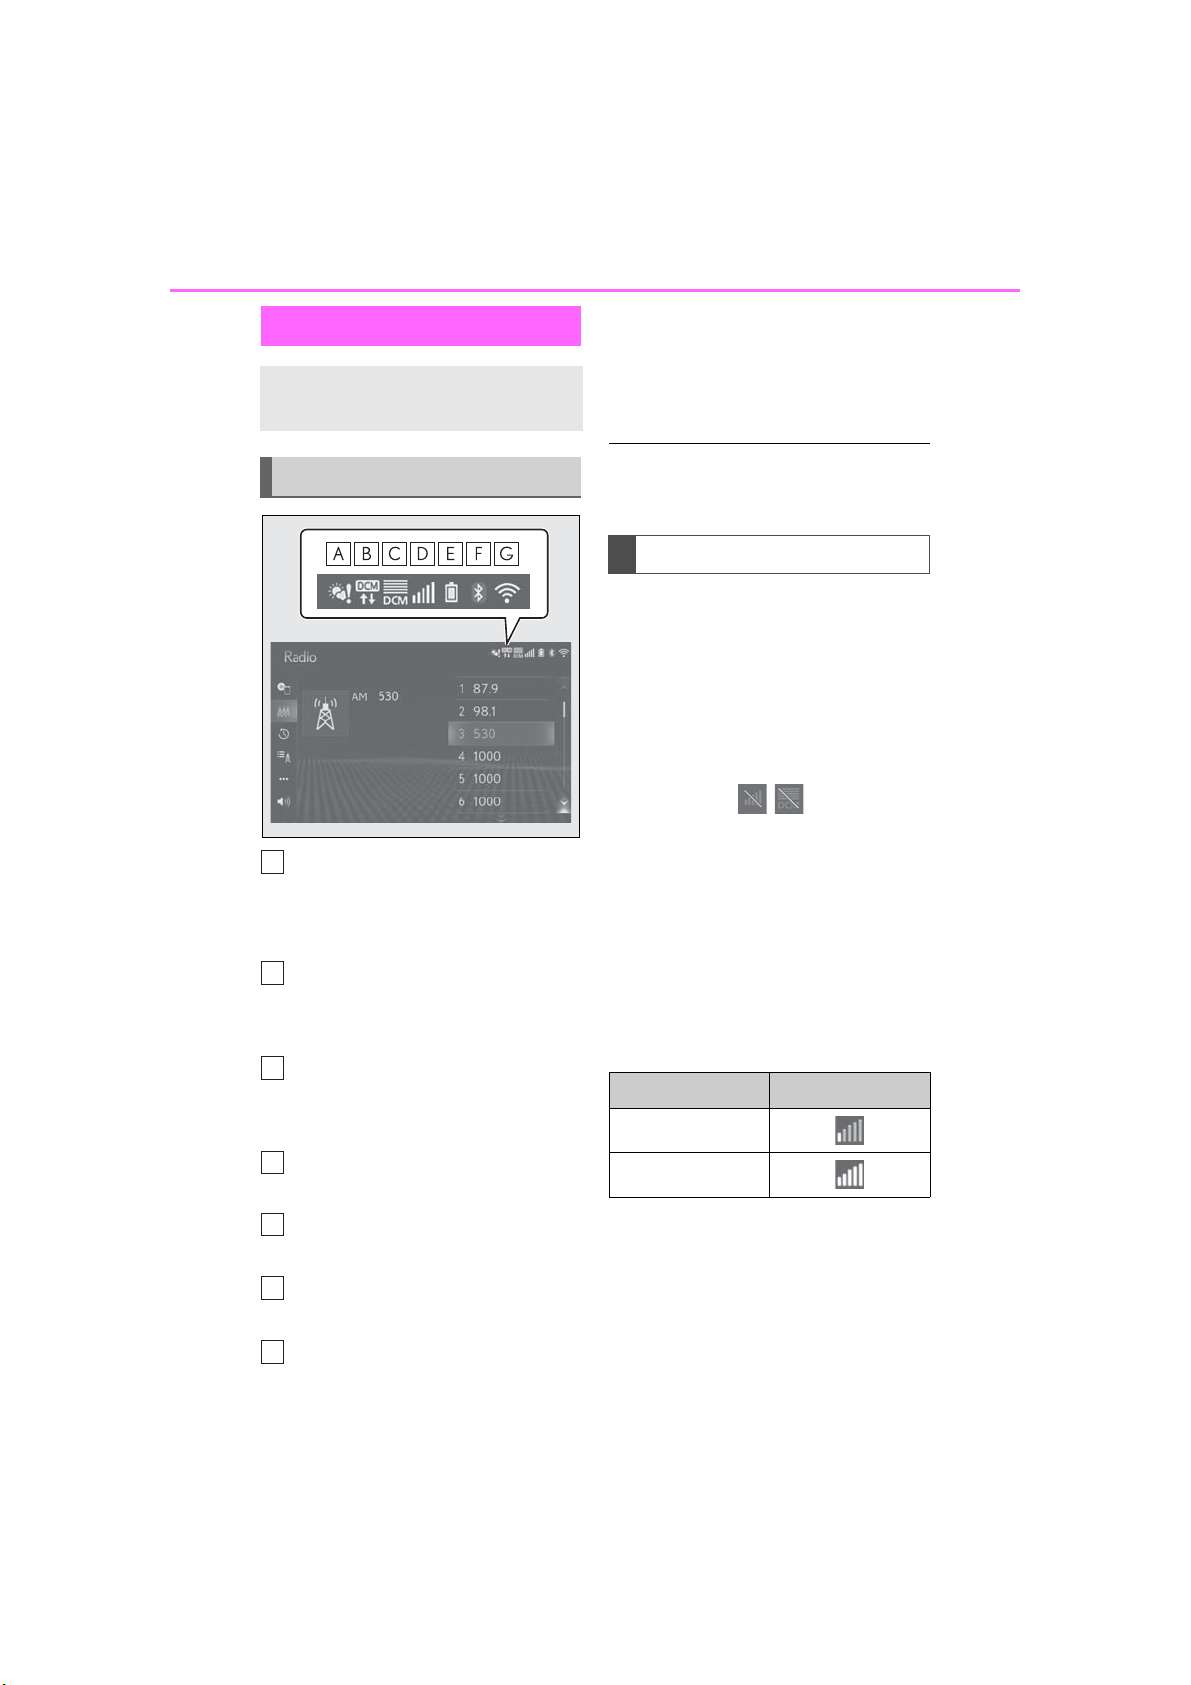
Status icons are displayed at the top
of the screen.
*2
play
(→P.49)
*1
: With navigation function
*2
: This function is not made available in
some countries or areas.
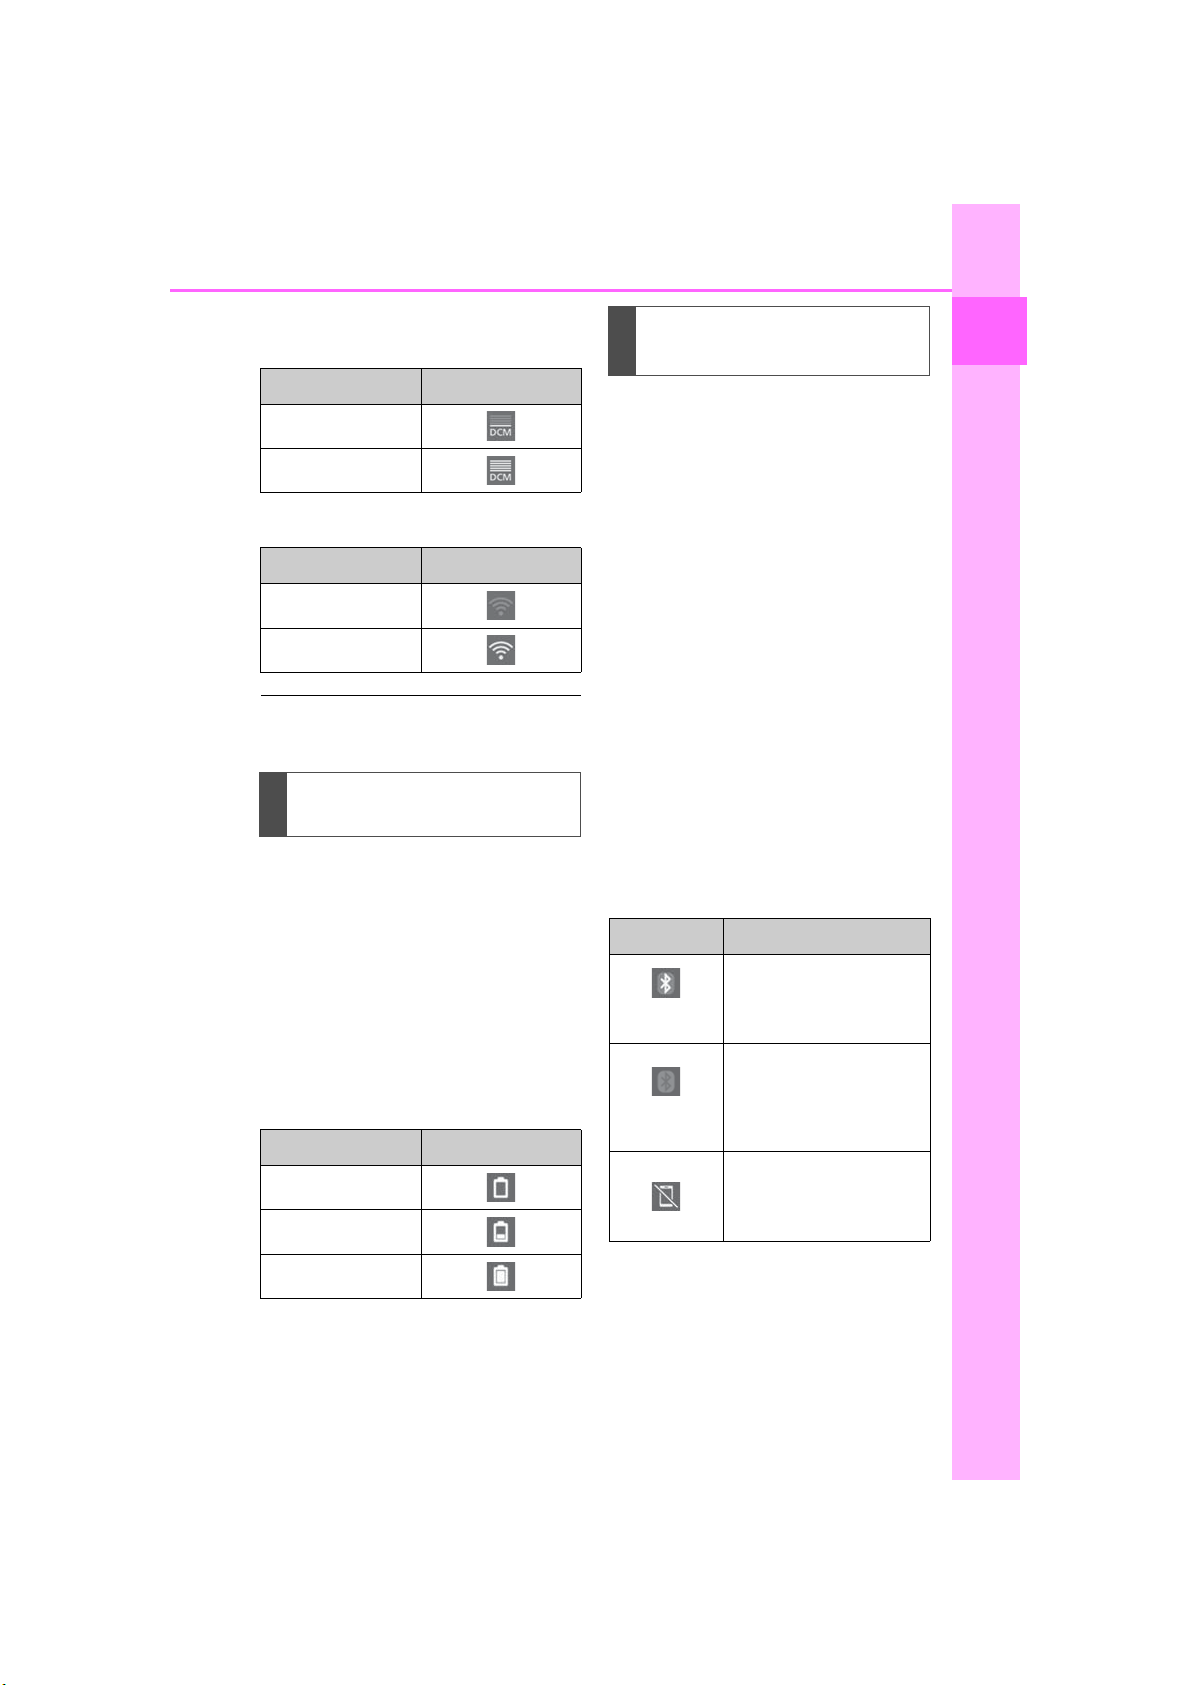
Status icon explanation
Weather alert display*1 (→P.242)
• Select to display important weather information for the current location or along the
route.
Indicate during data communication performed via Data Communi-
cation Module (DCM)
The reception level of Data Communication Module (DCM) dis-
*2
play
(→P.18)
*2
● The number of status icons that can be
displayed differs depending on the displayed screen.
Reception level display
The level of reception does not always
correspond with the level displayed on
the cellular phone. The level of reception may not be displayed depending
on the phone you have.
When the cellular phone is out of the
service area or in a place inaccessible
by radio waves, / is displayed.
“Rm” is displayed when receiving in a
roaming area. While roaming, display
“Rm” top-left on the icon.
The receiving area may not be displayed depending on the type of
Bluetooth
While connected with cellular
®
phone you have.
phone
Level Indicators
Poor
The reception level of the con-
Excellent
nected phone display (→P.18)
Remaining battery charge display
(→P.19)
Bluetooth
®
phone connection
condition display (→P.19)
®
Wi-Fi
LS500_LS500h_Navi_OM50F66U_(U)
connection condition dis-
Page 19
1-1. Basic function
19
While using Data Communication
Module (DCM)
Level Indicators
Poor
Excellent
While using Wi-Fi
Level Indicators
No connection
Connected
● When Wi-Fi
displayed.
®
®
Hotspot
Hotspot is off, no item is
Remaining battery charge display
The amount displayed does not always
correspond with the amount displayed
on the Bluetooth
®
device.
The amount of battery charge left may
not be displayed depending on the
type of the Bluetooth
®
device con-
nected.
This system does not have a charging
function.
Remaining charge Indicators
Empty
Low
Bluetooth® connection condition
display
An antenna for the Bluetooth
®
connection is built into the instrument
panel.
The condition of the Bluetooth
®
connection may deteriorate and the system may not function when a
Bluetooth
®
phone is used in the fol-
lowing conditions and/or places:
The cellular phone is obstructed by
certain objects (such as when it is
behind the seat or in the glove box or
console box).
The cellular phone is touching or is
covered with metal materials.
Leave the Bluetooth
®
phone in a place
where the condition of the Bluetooth
connection is good.
Indicators Conditions
Indicates that the condition
®
(Blue)
(Gray)
of the Bluetooth
tion is good.
While in this condition,
sound quality during
phone calls may deteriorate.
Indicates that the cellular
phone is not connected via
Bluetooth
connec-
®
.
®
1
Quick guide
Full
LS500_LS500h_Navi_OM50F66U_(U)
Page 20
20
A
B
C
DEF
G
H
I
J
K
1-1. Basic function
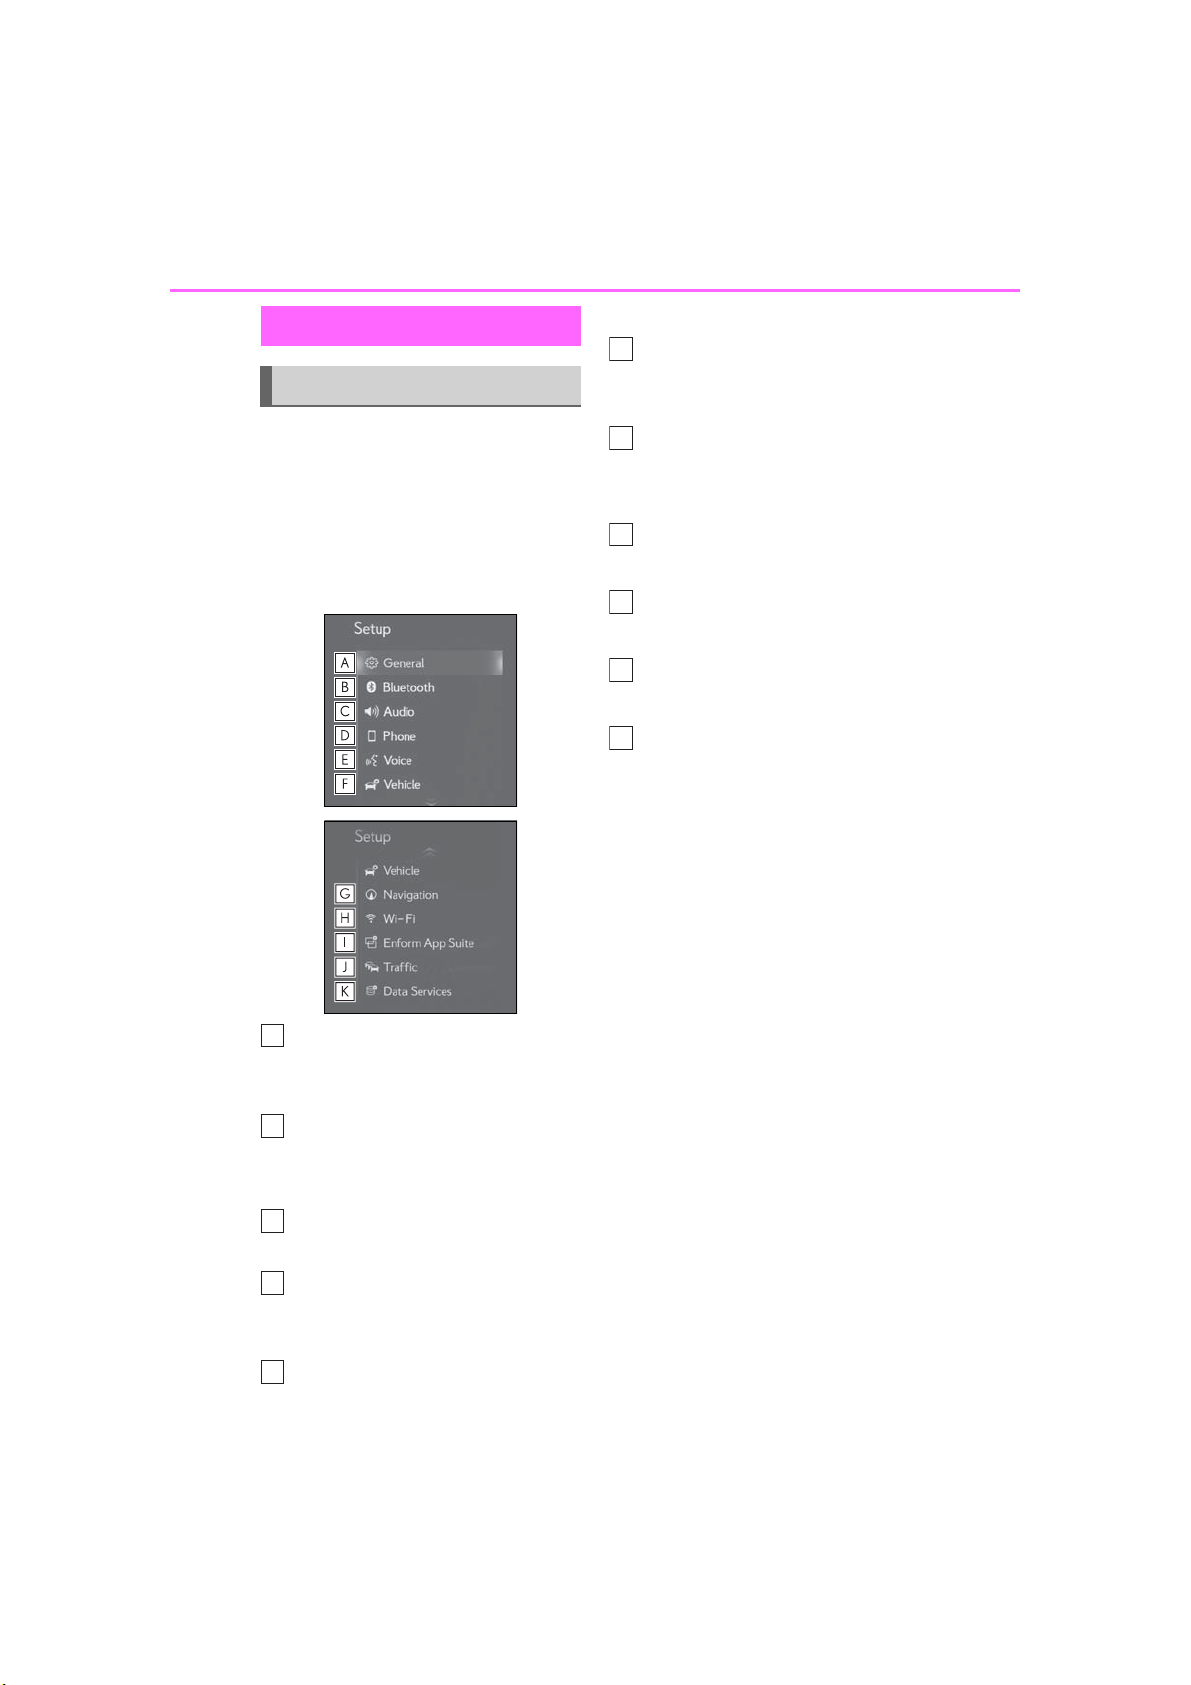
“Setup” screen
“Setup” screen
The “Setup” screen can be reached by
the following methods:
1 Press the “MENU” button on the
Remote Touch.
2 Select “Setup”.
3 Select the desired item.
(→P.57)
Select to set vehicle information
such as maintenance information.
(→P.58)
Select to set memory points (home,
favorites entries, areas to avoid),
navigation details.
Select to set Wi-Fi
settings.
*2
(→P.50)
*1
(→P.89)
®
connection
Select to set Lexus Enform App
Suite 2.0 settings.
*2
(→P.340)
Select to set traffic information set-
*1, 2
tings.
(→P.97)
Select to set data services set-
*1, 2
tings.
*1
: With navigation function
*2
: This function is not made available in
some countries or areas.
(→P.244)
Select to change the selected language, operation sound, etc.
(→P.53)
Select to set Bluetooth
and Bluetooth
®
®
device
system settings.
(→P.42)
Select to set audio settings.
(→P.139)
Select to set the phone sound, contacts, message settings, etc.
(→P.312)
Select to set the voice settings.
LS500_LS500h_Navi_OM50F66U_(U)
Page 21
1-1. Basic function
A
B
C
D
E
21
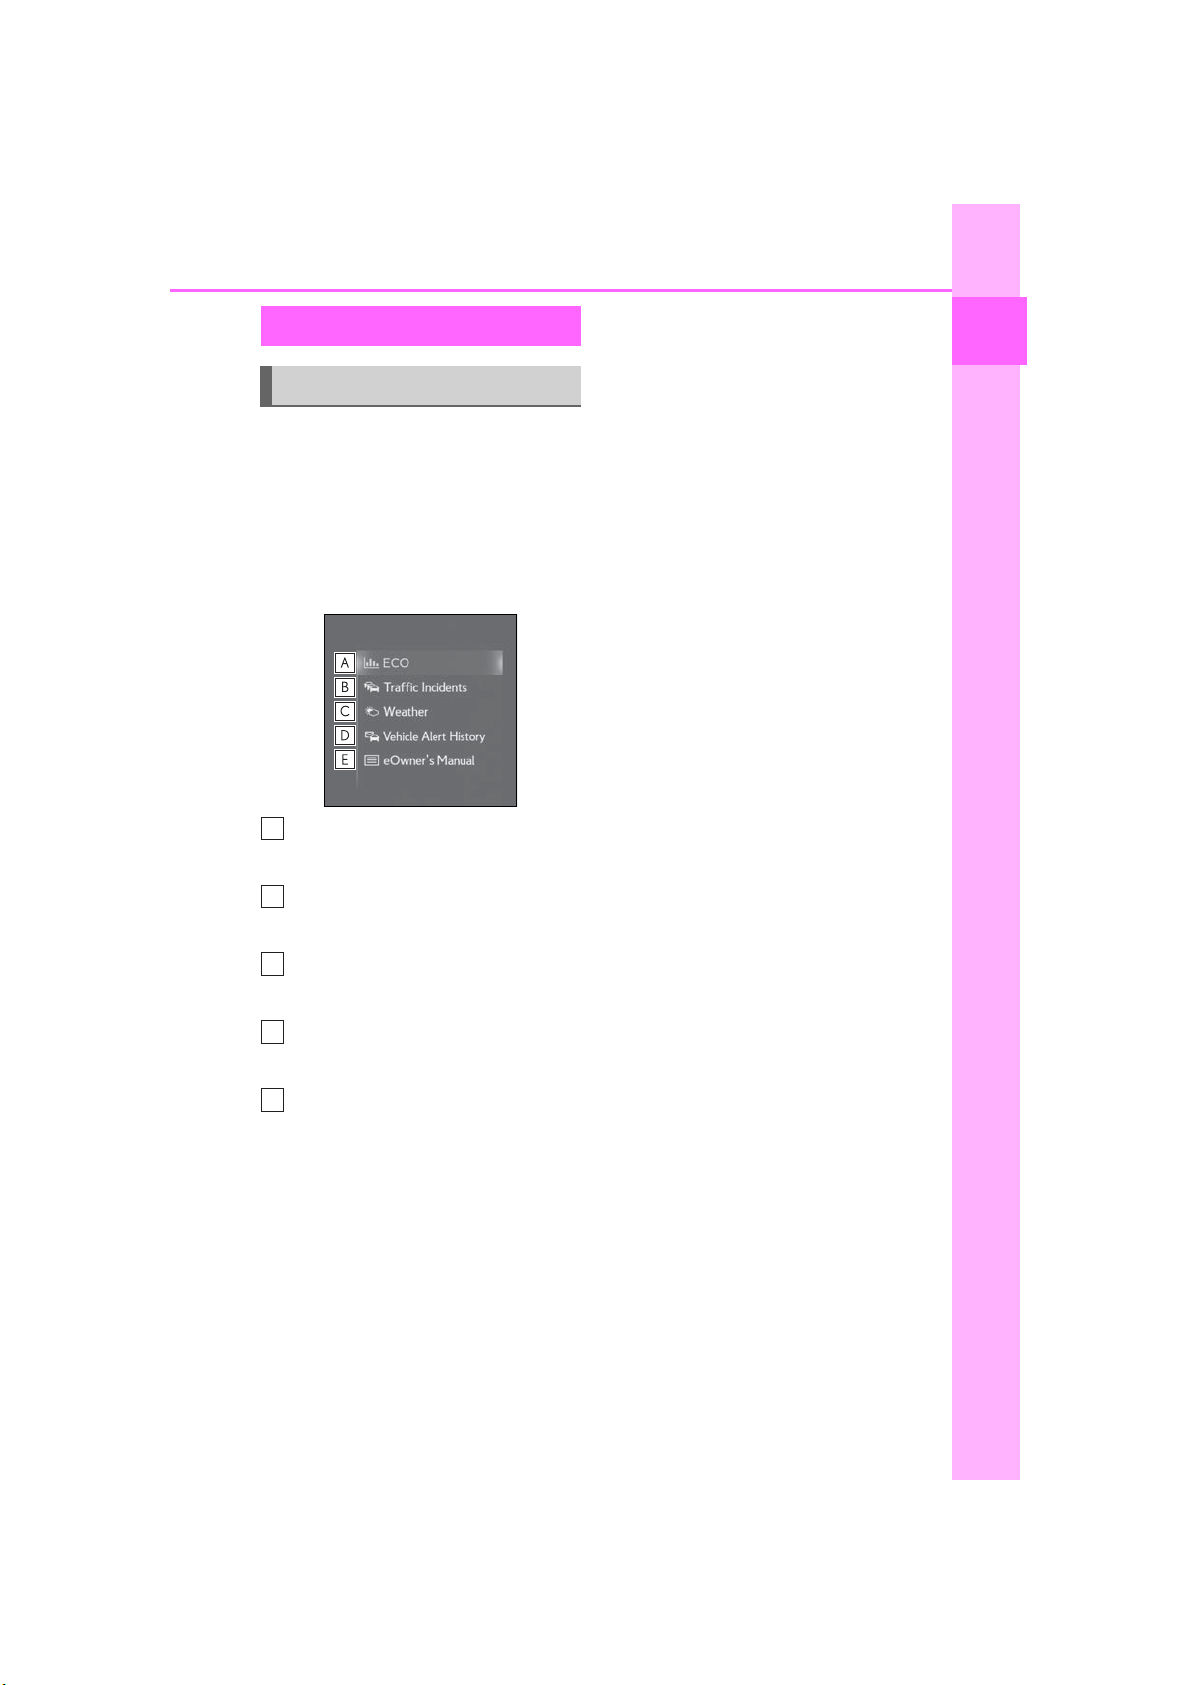
Information screen
Information screen
The information screen can be
reached by the following methods:
1 Press the “MENU” button on the
Remote Touch.
2 Select “Info”.
3 Select the desired item.
Select to display the energy moni-
*1
tor
or fuel consumption screen.
Select to display traffic informa-
*3, 4
tion.
(→P.70)
1
Quick guide
*2
Select to display weather informa-
*3
tion.
(→P.242)
Select to display the vehicle alert
*3, 4
history.
Select to display the “eOwner’s
Manual” screen.
*1
: Vehicles with hybrid system
*2
: Refer to the “OWNER’S MANUAL”
*3
:With navigation function
*4
: This function is not made available in
some countries or areas.
*5
: Refer to the “eOwner’s Manual”
LS500_LS500h_Navi_OM50F66U_(U)
*5
Page 22
22
1-2.Navigation operation
1-2. Navigation operation
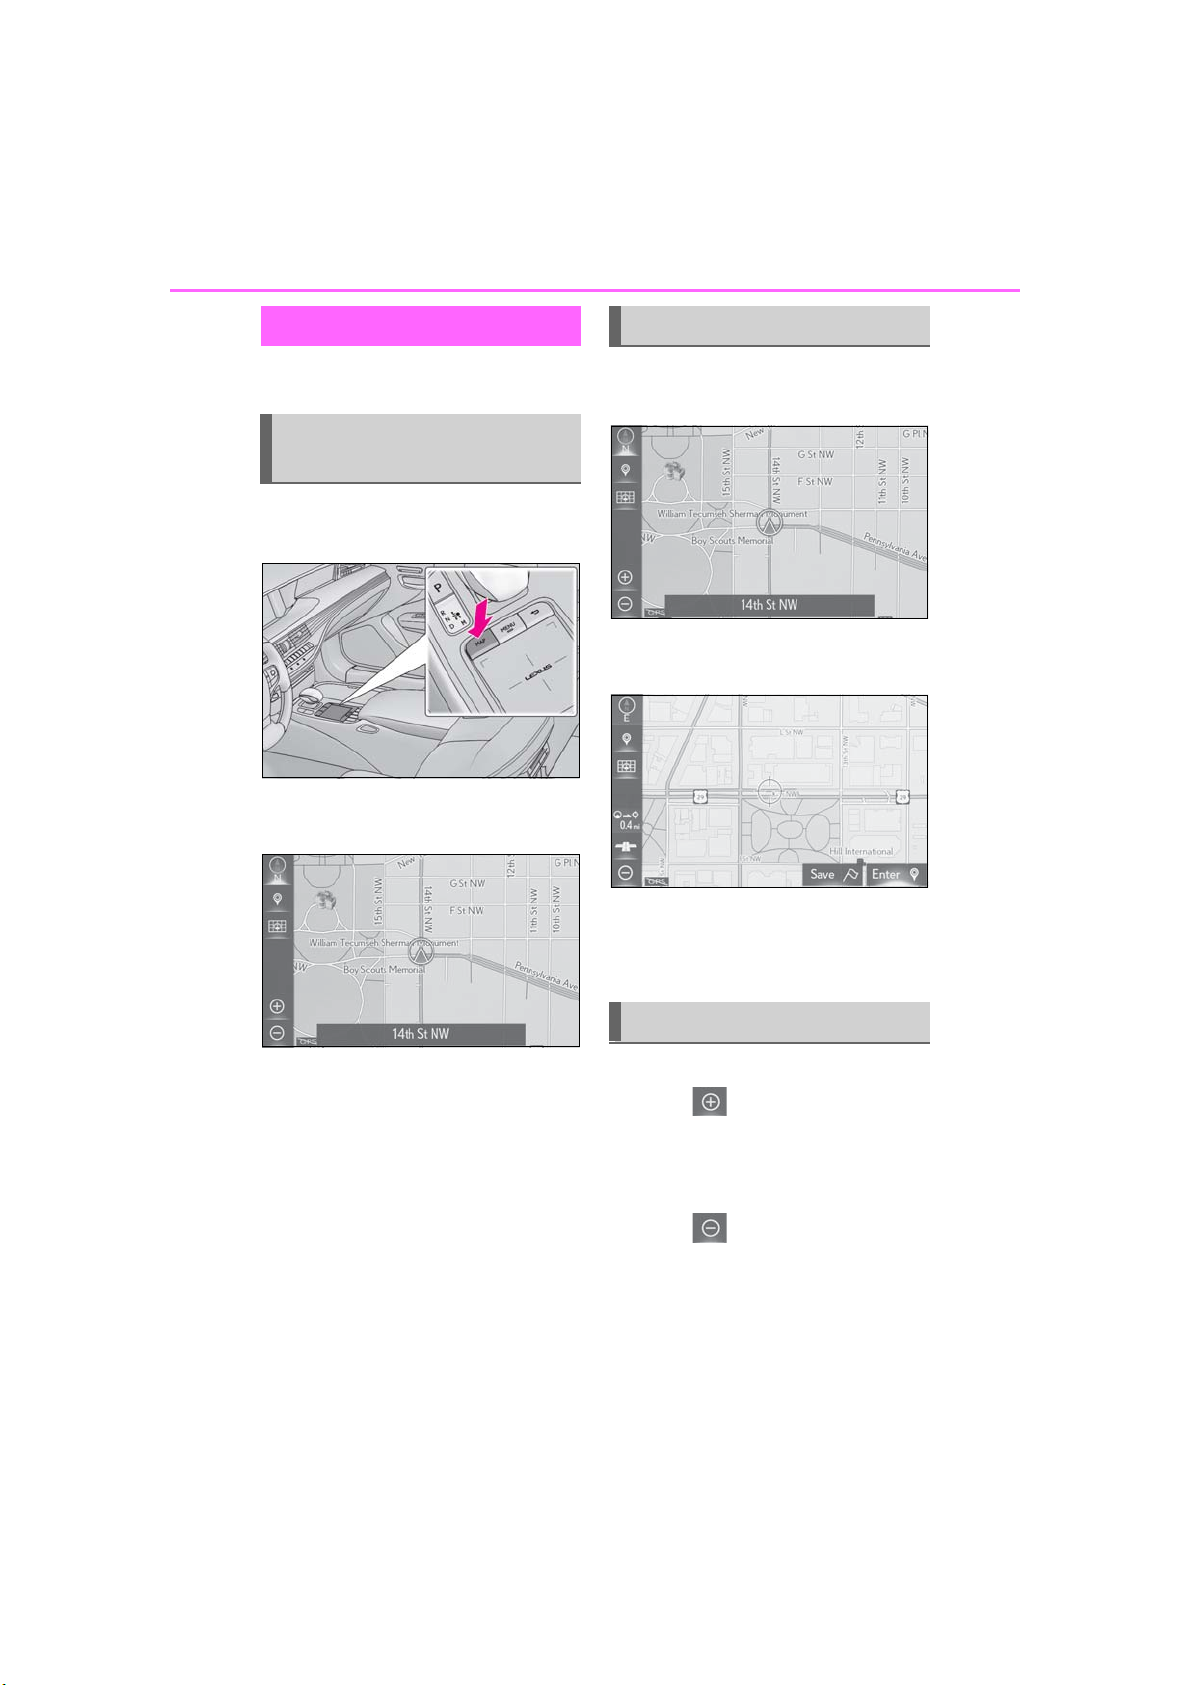
Operating the map screen
*
Moving the map screen
*
: With navigation function
Displaying the current position
of the vehicle on the map screen
1 Press the “MAP” button on the
Remote Touch.
The current position of the vehicle is
displayed on the map screen.
1 Select the desired point on the map
screen.
Move the desired point on the cen-
ter of the map screen.
Press the “MAP” button on the
Remote Touch to return to the current position.
■ Displaying the map screen
The following operations can also be
performed.
Changing the map direction
(→P.65)
Displaying 3D map (→P.65)
Changing the map color (→P.94)
Displaying the micro city map
(→P.64)
LS500_LS500h_Navi_OM50F66U_(U)
Zooming in/out the map
■ Zooming in the map
1 Select or pinch out on the
touchpad of the Remote Touch.
(→P.64)
■ Zooming out the map
1 Select or pinch in on the
touchpad of the Remote Touch.
(→P.64)
Page 23
1-2. Navigation operation
23
Guiding the route
*
: With navigation function
*
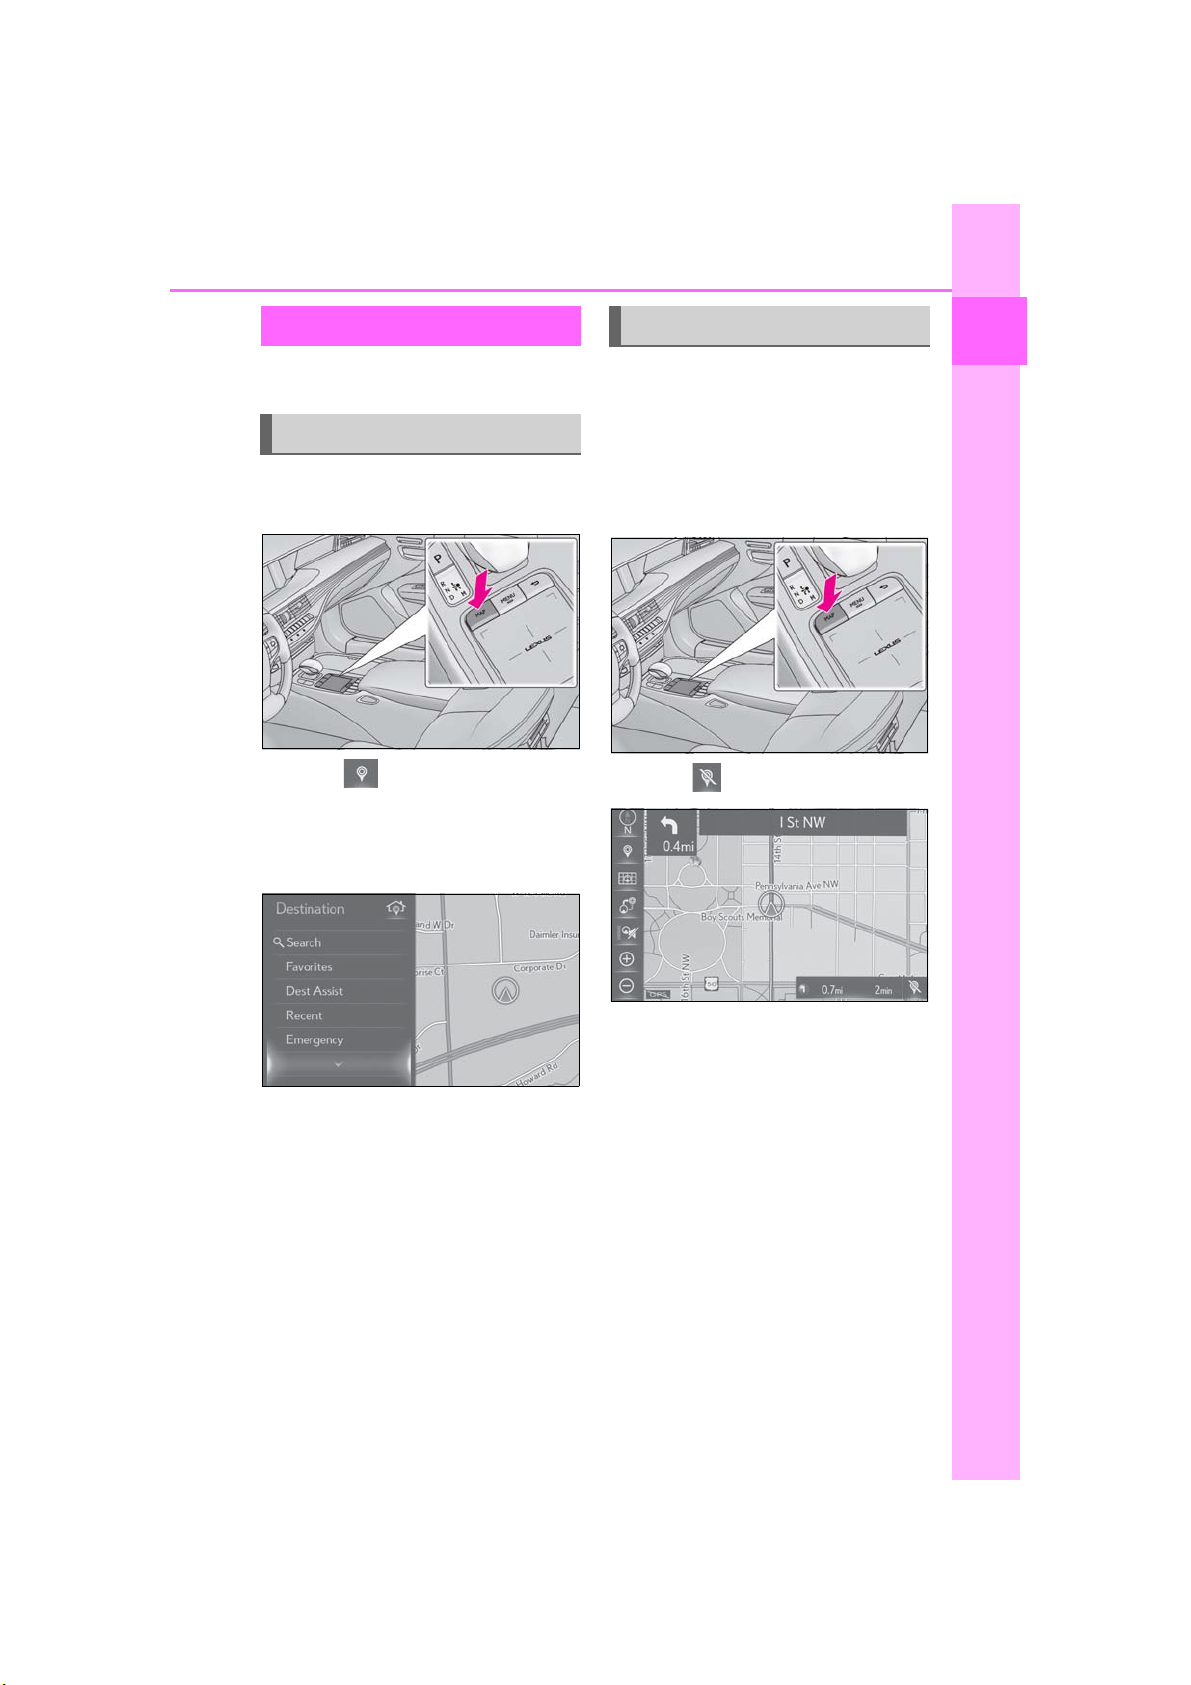
Setting the destination
1 Press the “MAP” button on the
Remote Touch.
2 Select .
3 There are different kinds of meth-
ods to search for a destination.
(→P.72)
Deleting destinations
When route guidance is no longer
necessary, such as when you know the
rest of the route to your destination, the
destination can be deleted.
1 Press the “MAP” button on the
Remote Touch.
2 Select .
1
Quick guide
4 Select “Go”.
Check that the route overview is
displayed. (→P.80)
5 Select “OK”.
Selecting routes other than the one
recommended (→P.80)
Guidance to the destination is dis-
played on the screen and can be
heard via voice guidance.
LS500_LS500h_Navi_OM50F66U_(U)
3 Select “Yes” when the confirmation
screen appears.
When more than 1 destination has
been set, a list will be displayed on
the screen. Select the item(s) to be
deleted.
Page 24
24
1-2. Navigation operation
Registering home
*
: With navigation function
*
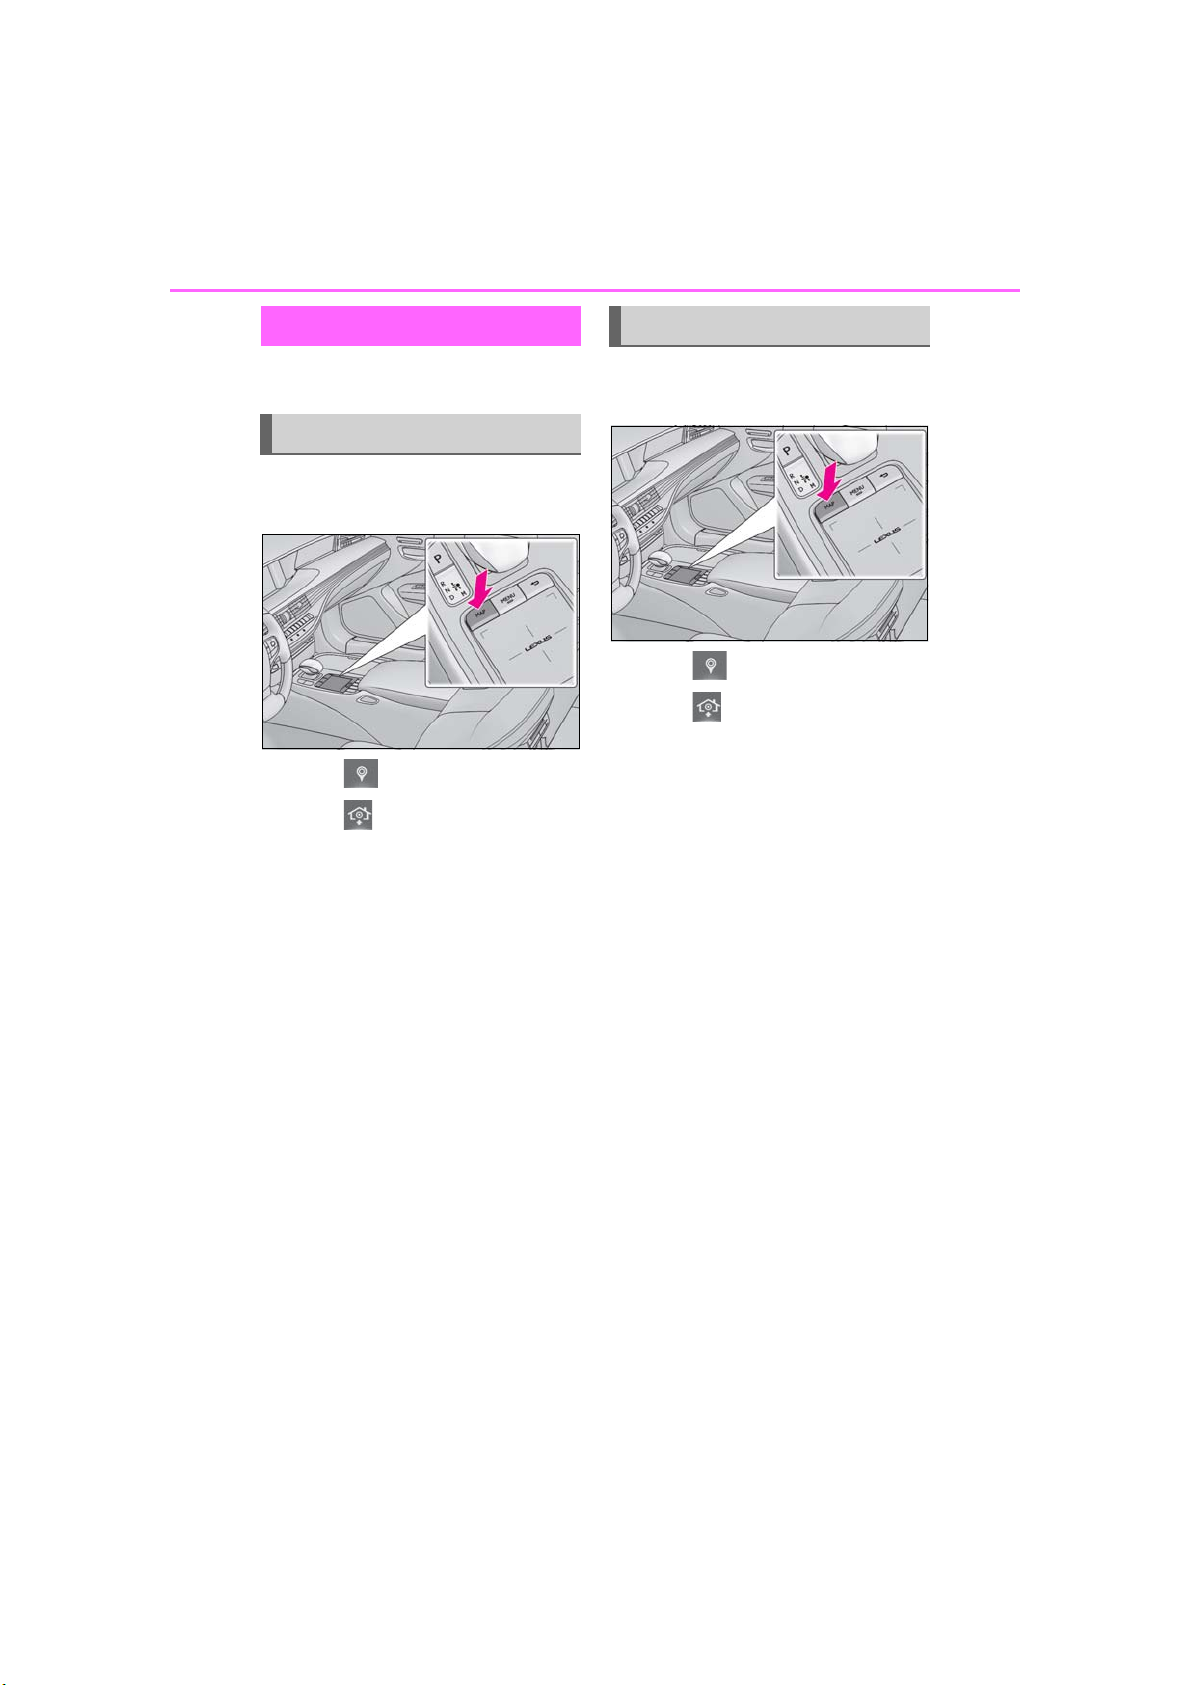
Registering home
1 Press the “MAP” button on the
Remote Touch.
2 Select .
3 Select .
4 Select “Yes”.
5 There are different kinds of meth-
ods to search for your home.
(→P.72)
Setting home as the destination
1 Press the “MAP” button on the
Remote Touch.
2 Select .
3 Select .
4 Select “OK”.
Selecting routes other than the one
recommended (→P.80)
Guidance to the destination is dis-
played on the screen and can be
heard via voice guidance.
6 Select “OK”.
Registration of home is complete.
• Registering home in a different way
→P.89
• Editing the name, location and icon
→P.89
• Setting home as the destination
→P.73
LS500_LS500h_Navi_OM50F66U_(U)
Page 25

25
Basic function
.
2-1. Basic information before opera-
tion
Initial screen.................................... 26
How to use the Remote Touch
............................................................27
Operating the screen................. 30
Using side display ........................ 32
Entering letters and numbers/list
screen operation ....................... 34
Linking multi-information display
and the system............................ 37
2-2. Connectivity settings
Registering/Connecting a
Bluetooth
Setting Bluetooth
Wi-Fi
2-3. Other settings
General settings........................... 53
Voice settings ................................ 57
Vehicle settings............................. 58
®
device.................... 38
®
details ........42
®
Hotspot............................ 49
2
2
Basic function
LS500_LS500h_Navi_OM50F66U_(U)
Page 26
26
WARNING
2-1.Basic information before oper ation
2-1. Basic information before operation
Initial screen
To register maintenance informa-
tion: →P.58
When the engine switch <power
switch> is turned to ACCESSORY
or IGNITION ON mode <ON
mode>, the initial screen will be displayed and the system will begin
operating.
Caution screen
After a few seconds, the caution
screen will be displayed.
Waiting about 5 seconds or selecting
“Continue” switches to the last displayed screen.
● When the vehicle is stopped with the
engine running <hybrid system operating>, always apply the parking brake
for safety.
Maintenance information
*
If is selected, the registered
phone number can be called.
Restarting the system
When system response is extremely
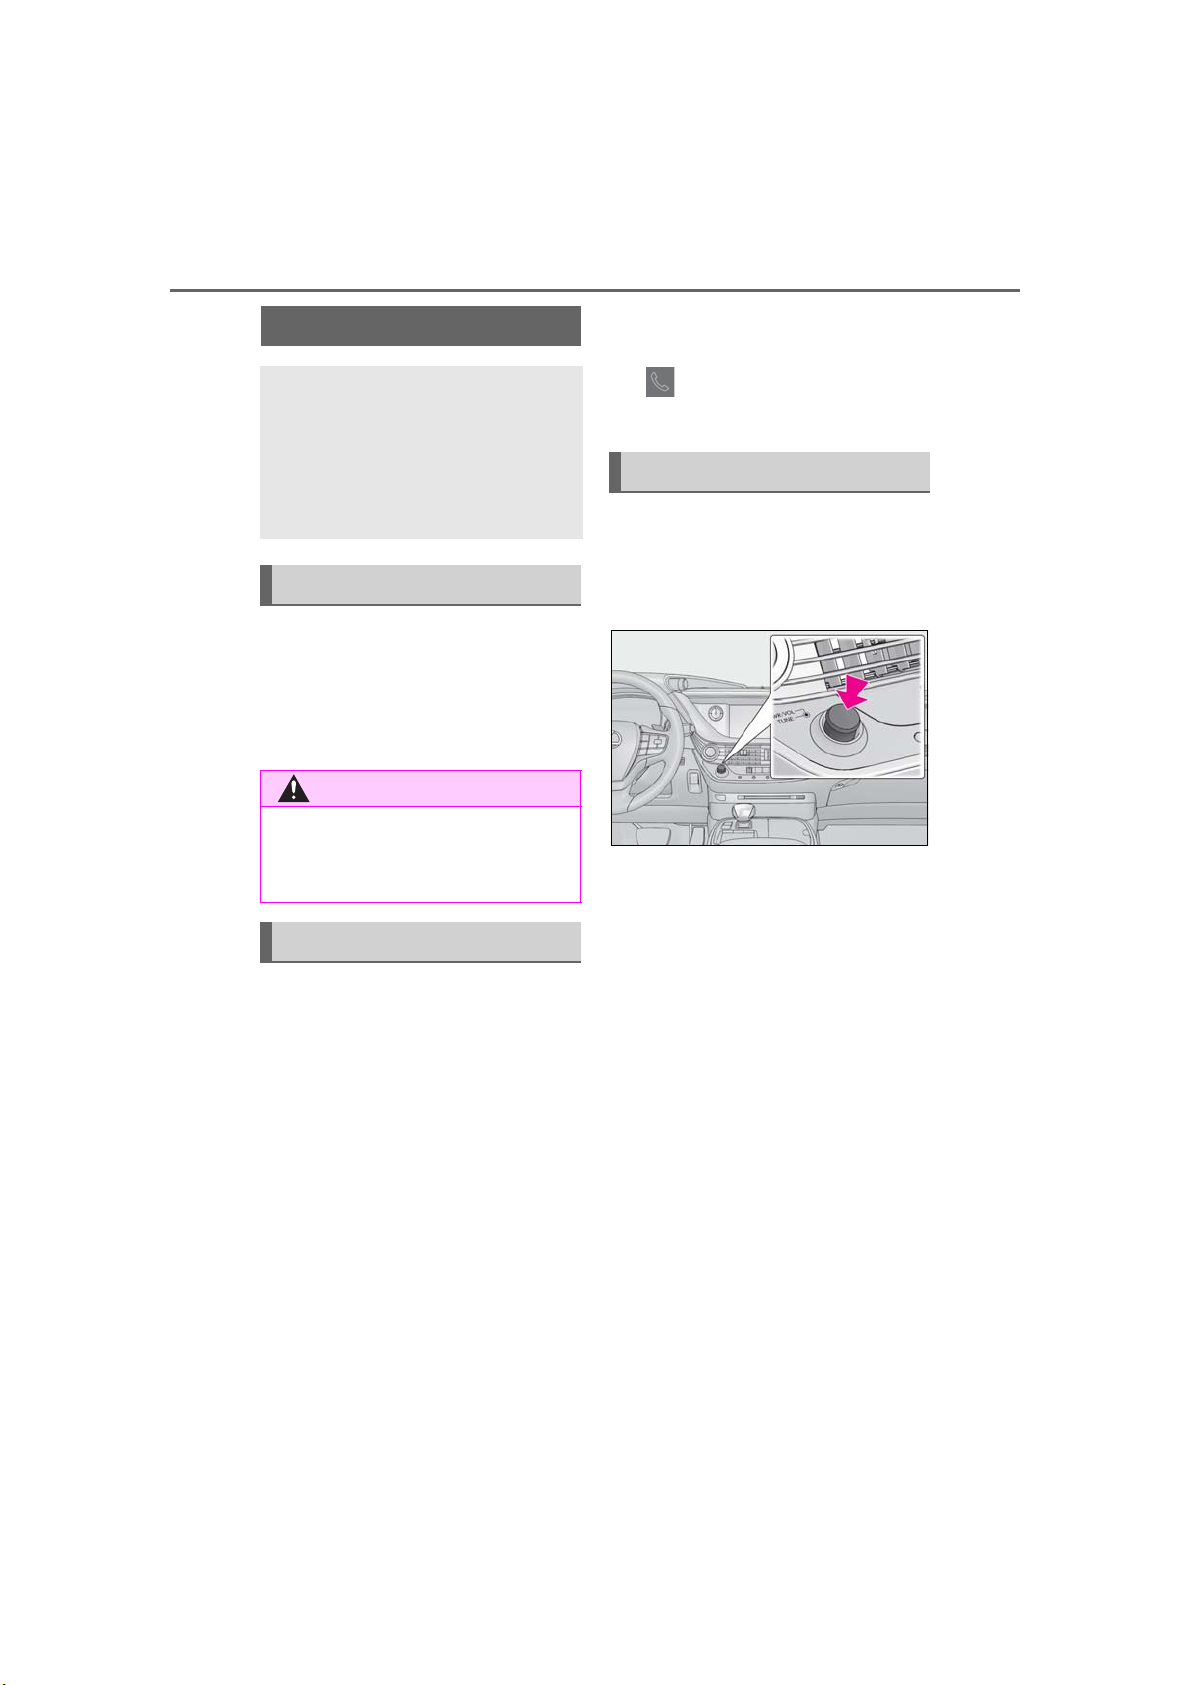
slow, the system can be restarted.
1 Press and hold the “PWR/VOL”
knob for 3 seconds or more.
*
: With navigation function
This system reminds users when to
replace certain parts or components
and shows dealer information (if registered) on the screen.
When the vehicle reaches a previously
set driving distance or date specified
for a scheduled maintenance check,
the maintenance remainder screen will
be displayed when the system is turned
on.
To prevent this screen from being
displayed again, select “Do Not Tell
Me Again”.
LS500_LS500h_Navi_OM50F66U_(U)
Page 27
2-1. Basic information before operation
27
How to use the Remote
Touch
This system can be operated by the
Remote Touch when the engine
switch <power switch> is in ACCESSORY or IGNITION ON mode
<ON mode>.
Touchpad operation
1 Use the touchpad of the Remote
Touch to select the desired button
on the screen.
2 The buttons on the screen can be
selected by either depressing or
double tapping on the touchpad.
Once a button has been selected,
the screen will change.
When the pointer moves close to a
button, it will automatically snap to
that button and the Remote Touch
feedback force (vibration) is generated by the touchpad.
This feedback force can be
adjusted. (→P.53)
Press the “MENU” button on the
Remote Touch to display the menu
screen. (→P.16)
The map
*
or compass screen can be
displayed by pressing the “MAP”
button on the Remote Touch.
(→P.64)
Press the button on the
Remote Touch to return to the previous screen.
*
: With navigation function
● Perform touchpad operations using a fin-
ger. Do not use nails or other objects like
pens, etc.
● Perform pointer movement operations
using only one finger. The pointer cannot
be operated by using more than one finger.
● When water or other foreign materials
are on the touchpad, a malfunction may
occur. In those cases, wipe off the water
or foreign materials and wait about 30
seconds before operating the touchpad.
● In the following cases, there is a possibility
that the touchpad may not react normally:
• When wearing gloves, etc.
• When operated with a wet hand.
• When a film, paint-like substance, etc., is
on the touchpad.
• When water or other foreign matter is on
the touchpad.
• Near a TV tower, electrical power plant,
gas station, large display, airport or other
facility that generates strong radio waves
or electrical noise.
• When wireless devices, such as portable
radios and mobile phones are nearby.
• When the following metal items are
placed on the touchpad:
2
Basic function
LS500_LS500h_Navi_OM50F66U_(U)
Page 28
28
NOTICE
2-1. Basic information before operation
Coins
Keys
Metal parts of a wallet or purse
A card in which aluminum foil, etc., is
attached
A box of cigarettes that uses aluminum
foil
Disposable hand warmers
Media such as CD/DVDs, USB cables,
etc.
• When the temperature is -4 °F (-20°C)
or less
● If a hand or object was placed on the
touchpad when the engine switch <power
switch> is in ACCESSORY or IGNITION ON mode <ON mode>, the touchpad may not react normally. In those
cases, remove what was set on the touchpad and operate it after waiting about 30
seconds. If there still no reaction, turn off
the engine switch <power switch> and
then turn it to ACCESSORY or IGNITION ON mode <ON mode> again.
● Clean the touchpad frequently, as the
reaction of the touch operation may
worsen if the touchpad is dirty. In order to
prevent malfunctions when cleaning the
touchpad, turn the engine switch <power
switch> off.
● Setting for the touchpad, such as move-
ment speed of the pointer, can be
changed. (→P.53)
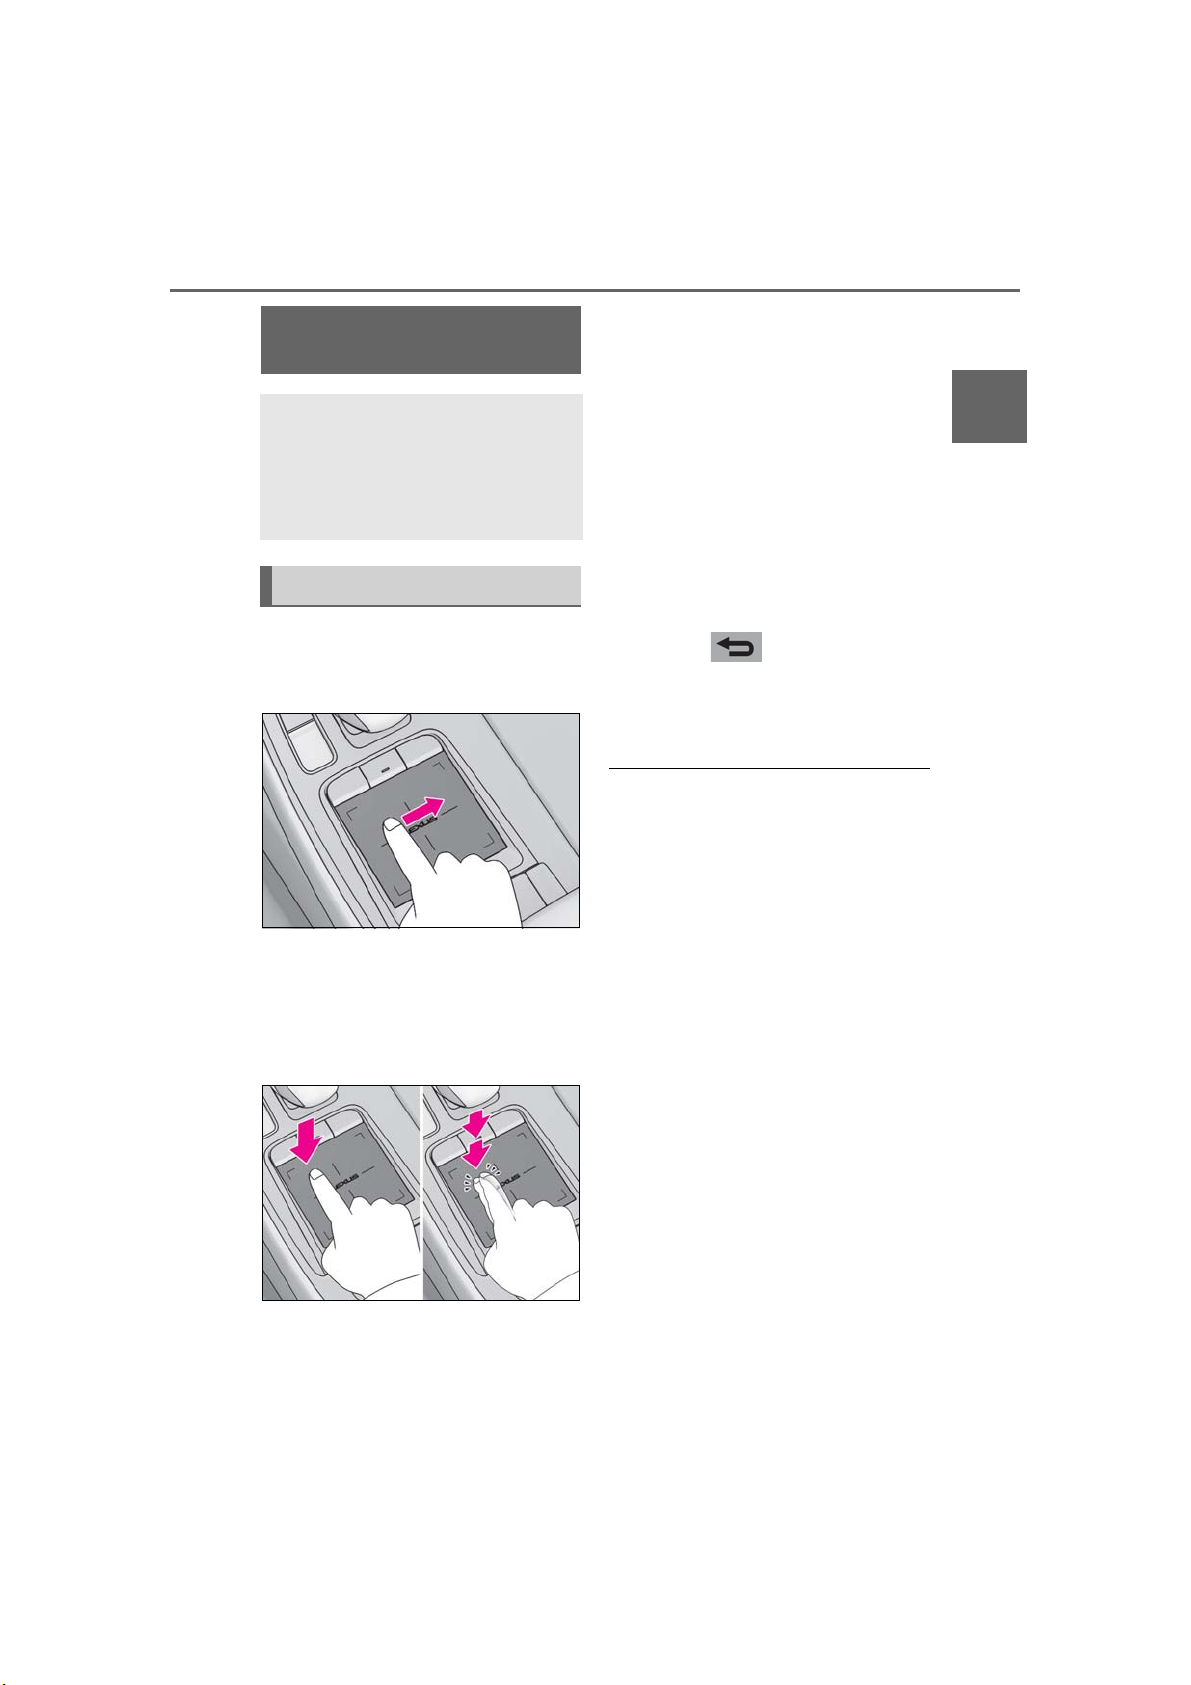
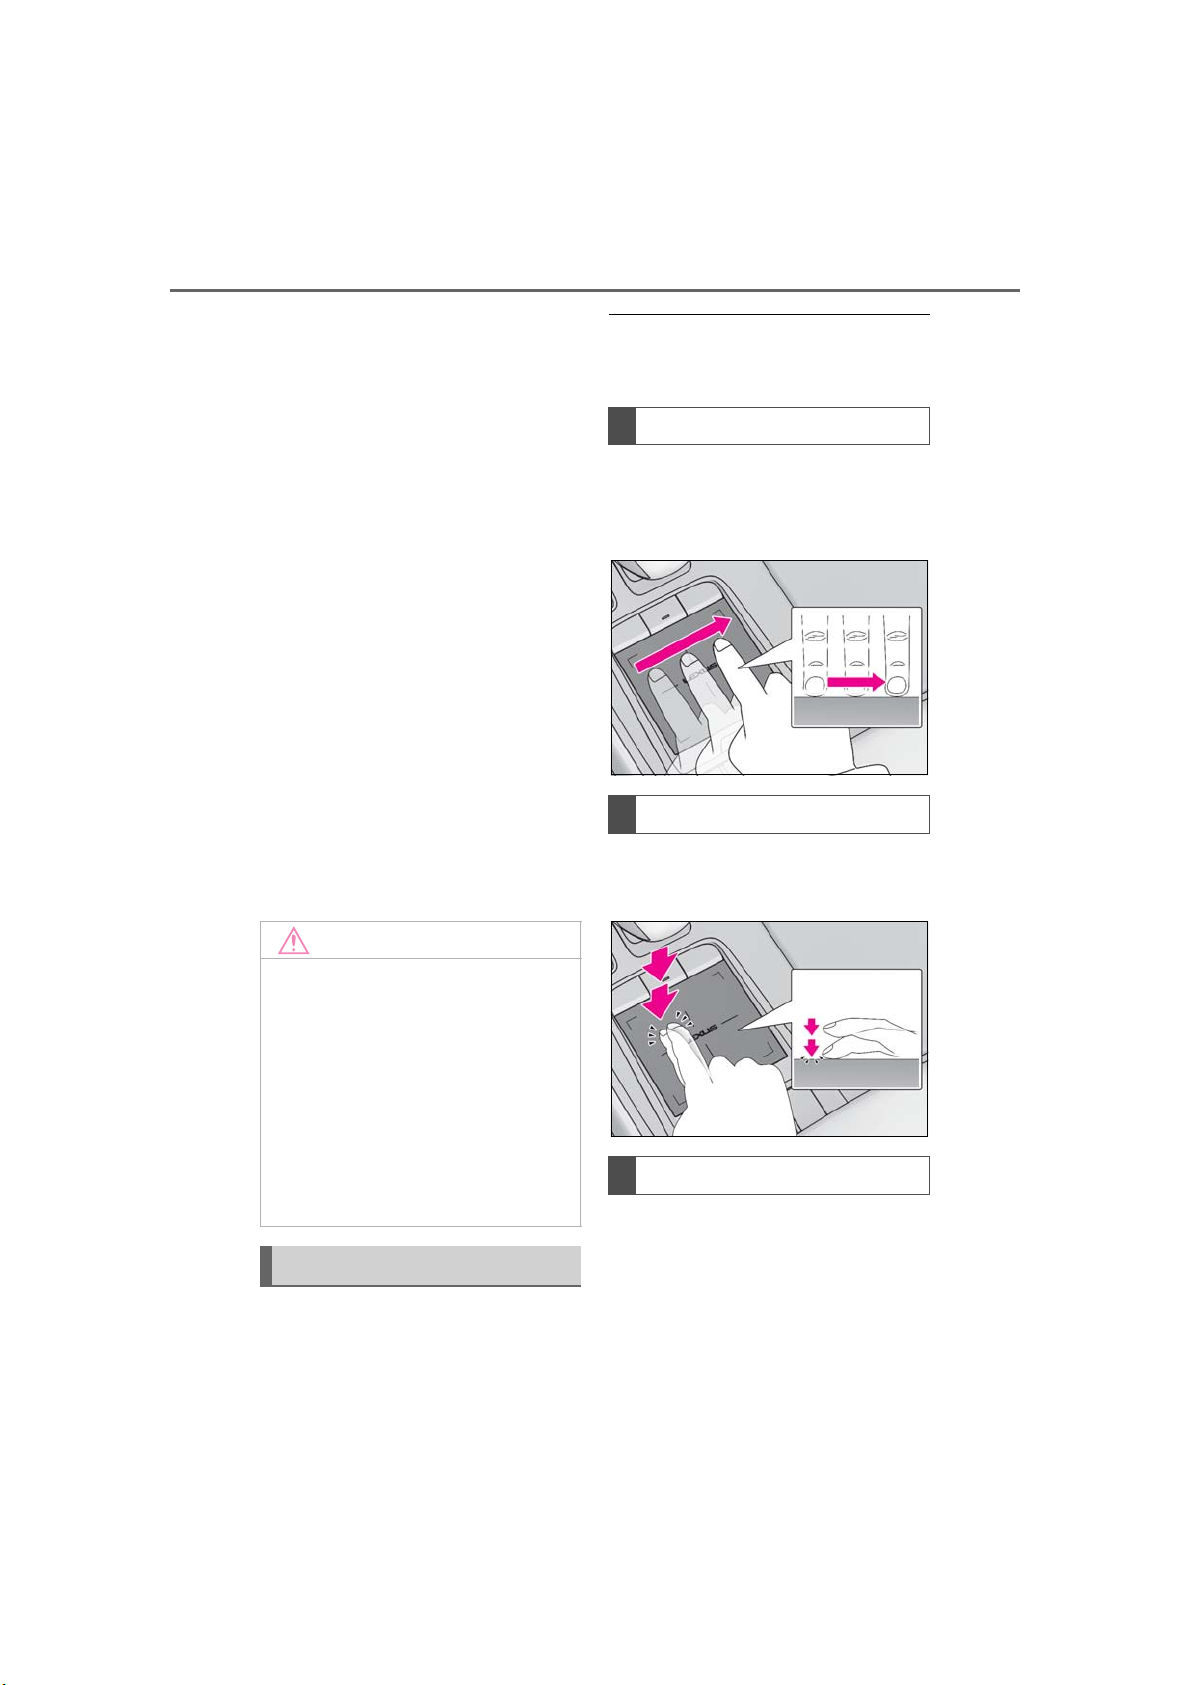
Trace
Trace the pad surface while maintaining contact with the touchpad.
Moving the cursor and the pointer.
Double tap
Tap the touchpad twice, quickly.
Selecting the button on the screen.
● Do not allow the Remote Touch to
come into contact with food, liquid,
stickers or lit cigarettes as doing so
may cause damage.
● Do not subject the Remote Touch to
excessive pressure or strong impact as
doing so may cause damage.
● Do not push the touchpad with a
strong force or use a sharp pointed
object to operate the pad, as it is possible to cause damage.
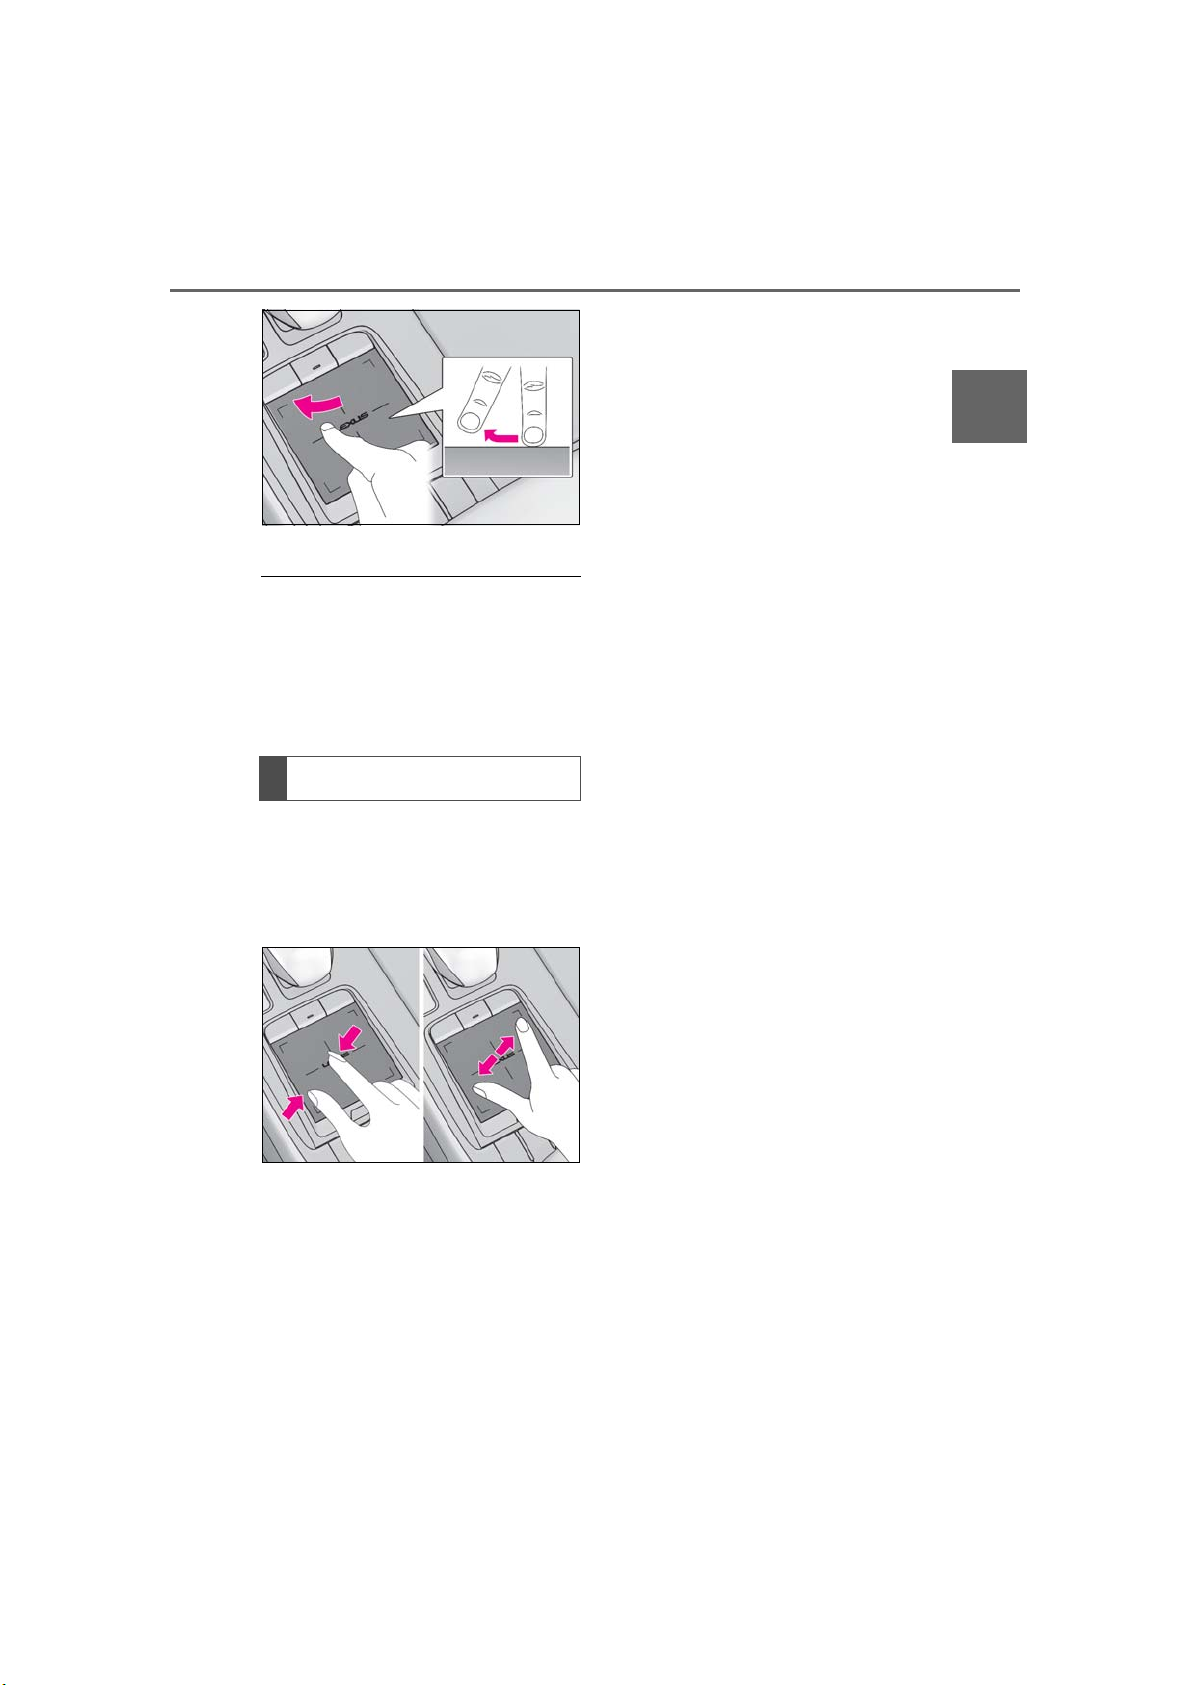
Touchpad gestures
Operations are performed by touching
the touchpad with your finger.
LS500_LS500h_Navi_OM50F66U_(U)
Flick
Quick and long movement along the
touchpad with your finger.
Moving the list screen or map
*
screen.
Page 29
2-1. Basic information before operation
*
: With navigation function
● With navigation function: To move the
map, “Map Flick” on the detailed navigation settings is required to be “On”.
(→P.94)
● The behavior of the flick operation differs
depending on whether the vehicle is in
motion or parked.
29
2
Basic function
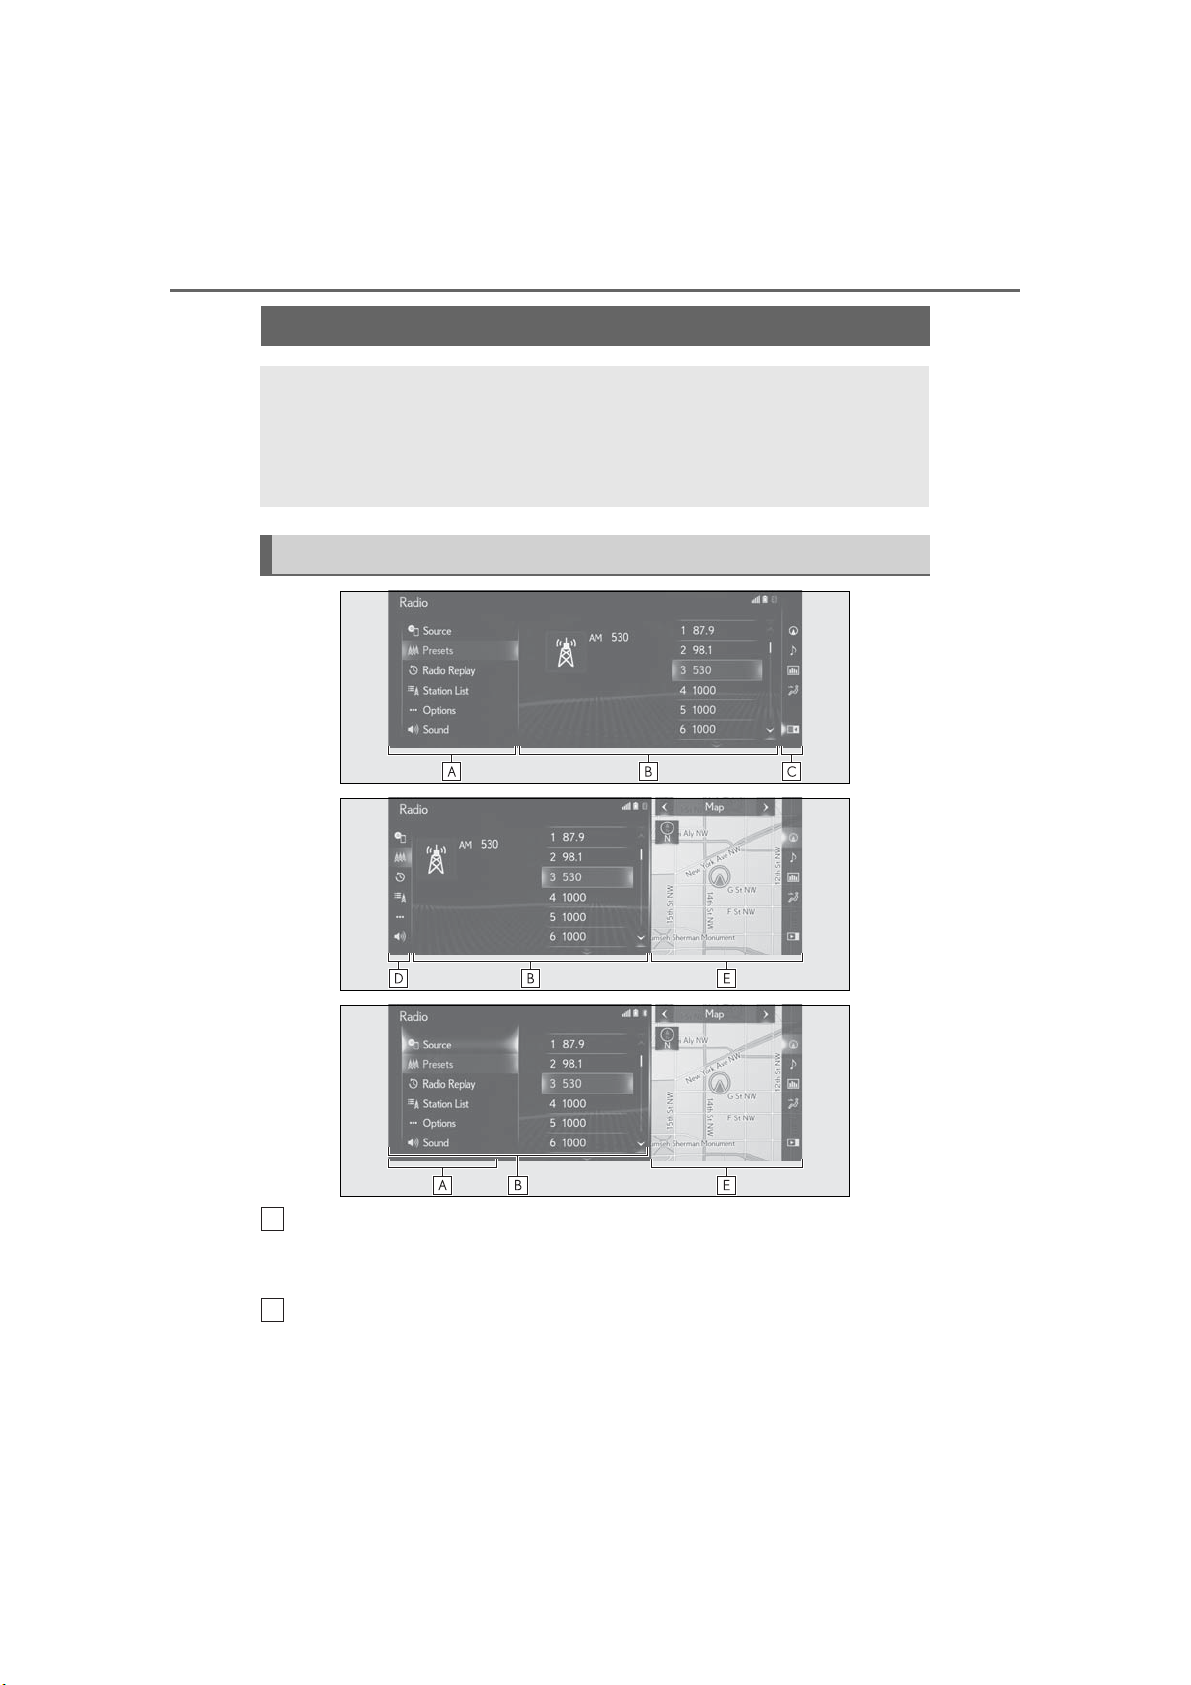
Pinch in/Pinch out
*
: With navigation function
*
Slide fingers toward each other or
apart on the touchpad.
Changing the scale of the map.
LS500_LS500h_Navi_OM50F66U_(U)
Page 30
30
A
B
2-1. Basic information before operation
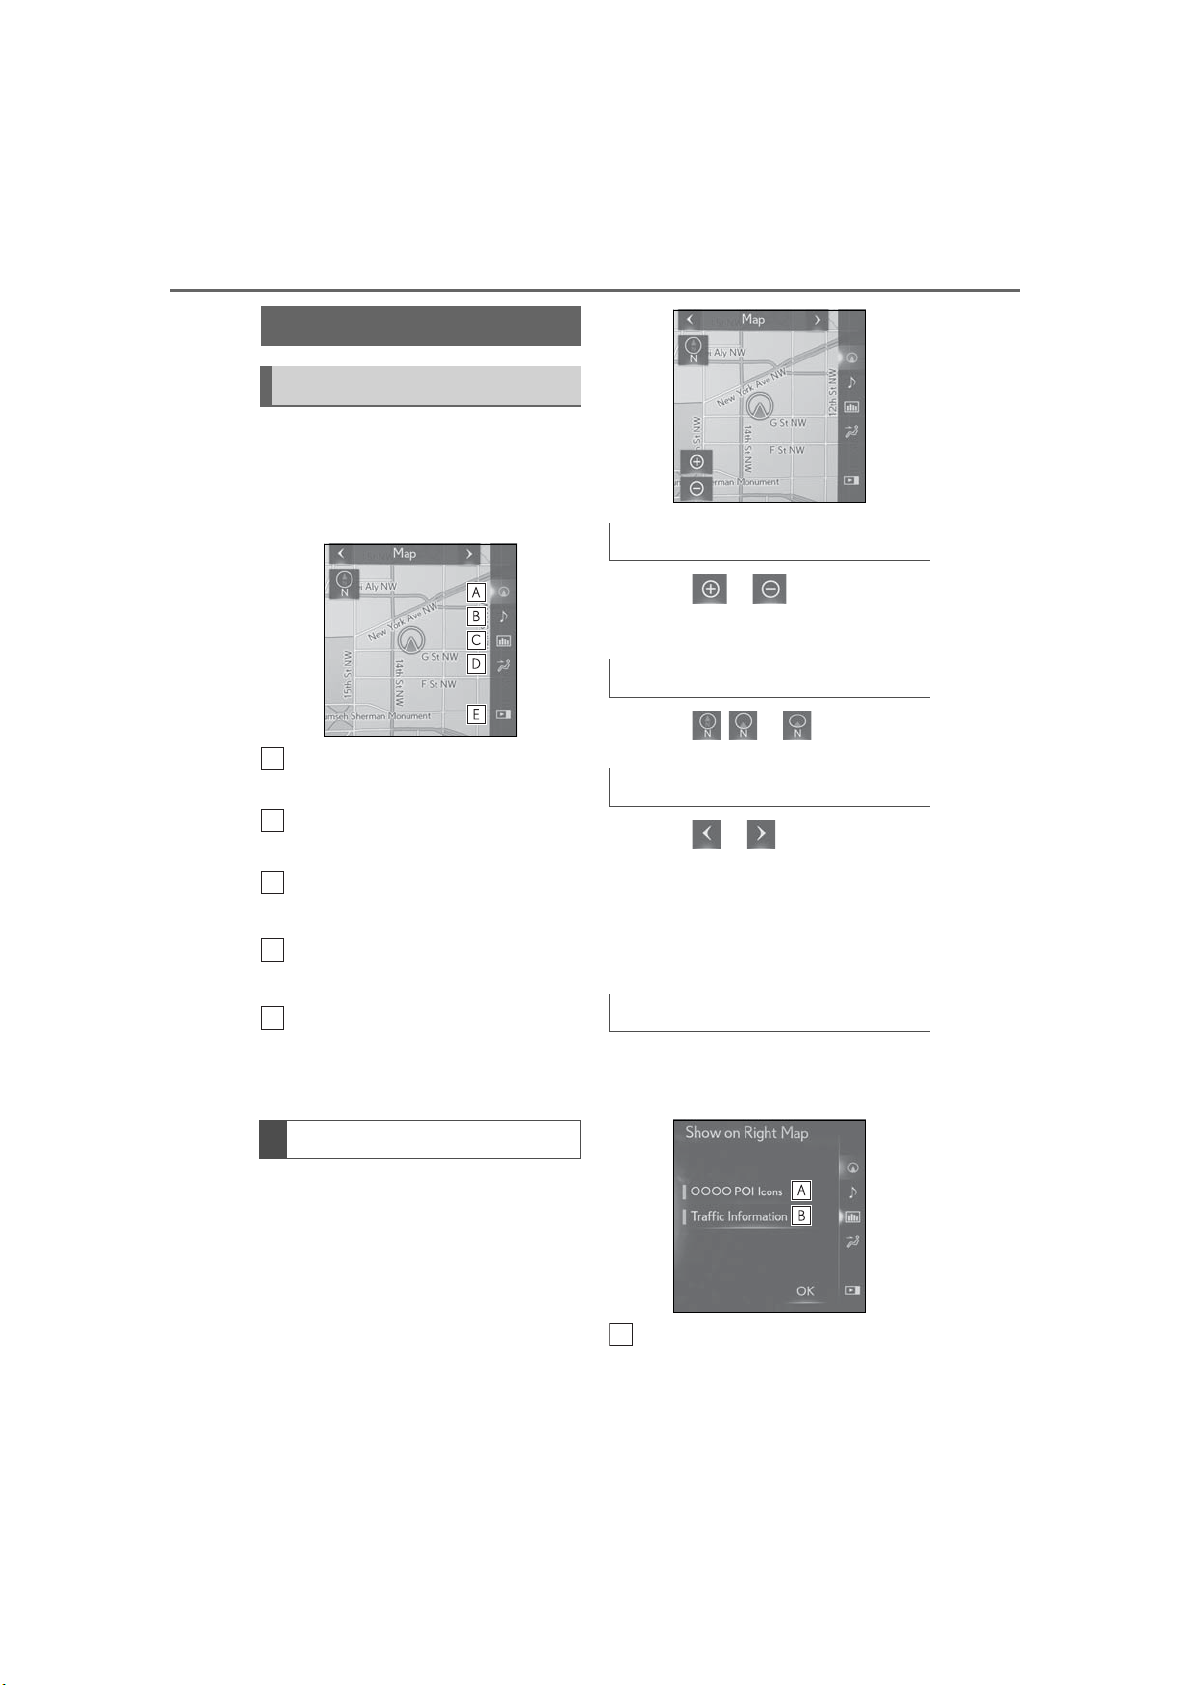
Operating the screen
The screen can be operated in full screen or split-screen mode.
Split-screen mode can display different information side-by-side.
When the split-screen is displayed, it is necessary to select the screen you
wish to operate.
Names and operations of each part
Sub menu
Selecting the sub menu item switches the information displayed on the main display.
The displayed items differ according to the function.
Main display
For details about the functions and operation of the main display, refer to the respective
section.
LS500_LS500h_Navi_OM50F66U_(U)
Page 31

2-1. Basic information before operation
C
D
E
Side display icon
The side menu can be displayed by moving the cursor over an icon and selecting the
desired screen.
Sub menu icon
Move the cursor over an icon to display its sub menu.
Side display
The following functions can be displayed and operated on the side display.
• Navigation system
•Audio (→
P.33)
• Vehicle information
• Air conditioning
*1
:With navigation function
*2
: Refer to the “OWNER’S MANUAL”
*1
(→P.32)
*2
*2
31
2
Basic function
LS500_LS500h_Navi_OM50F66U_(U)
Page 32
32
A
B
C
D
E
A
2-1. Basic information before operation
Using side display
Switching the side display
To change the screen displayed on the
side display, use the screen buttons on
the right side of the display.
1 Select the desired button.
Select to display the navigation
screen. (→P.32)
Map scale
1 Select or to change the
scale of the map screen.
Orientation of the map
1 Select , or .
Switching the map mode
Select to display the audio control
screen. (→P.33)
Select to display the vehicle information screen.
*
Select to display the air conditioning control screen.
*
Select to hide/show the side display.
*
: Refer to the “OWNER’S MANUAL”
Navigation system
A map* or a compass with information
about the current position can be displayed.
*
: With navigation function
1 Select or to change the
map mode.
For details about the map mode,
refer to “Switching the map mode
on the side display”. (→P.68)
Editing map
1 Select any point on the side map.
2 Select the desired item.
Select to display POI icons.
(→P.67)
LS500_LS500h_Navi_OM50F66U_(U)
Page 33
Select to show traffic information.
B
A
B
C
ABC
D
(→P.70)
2-1. Basic information before operation
33
Audio/visual system
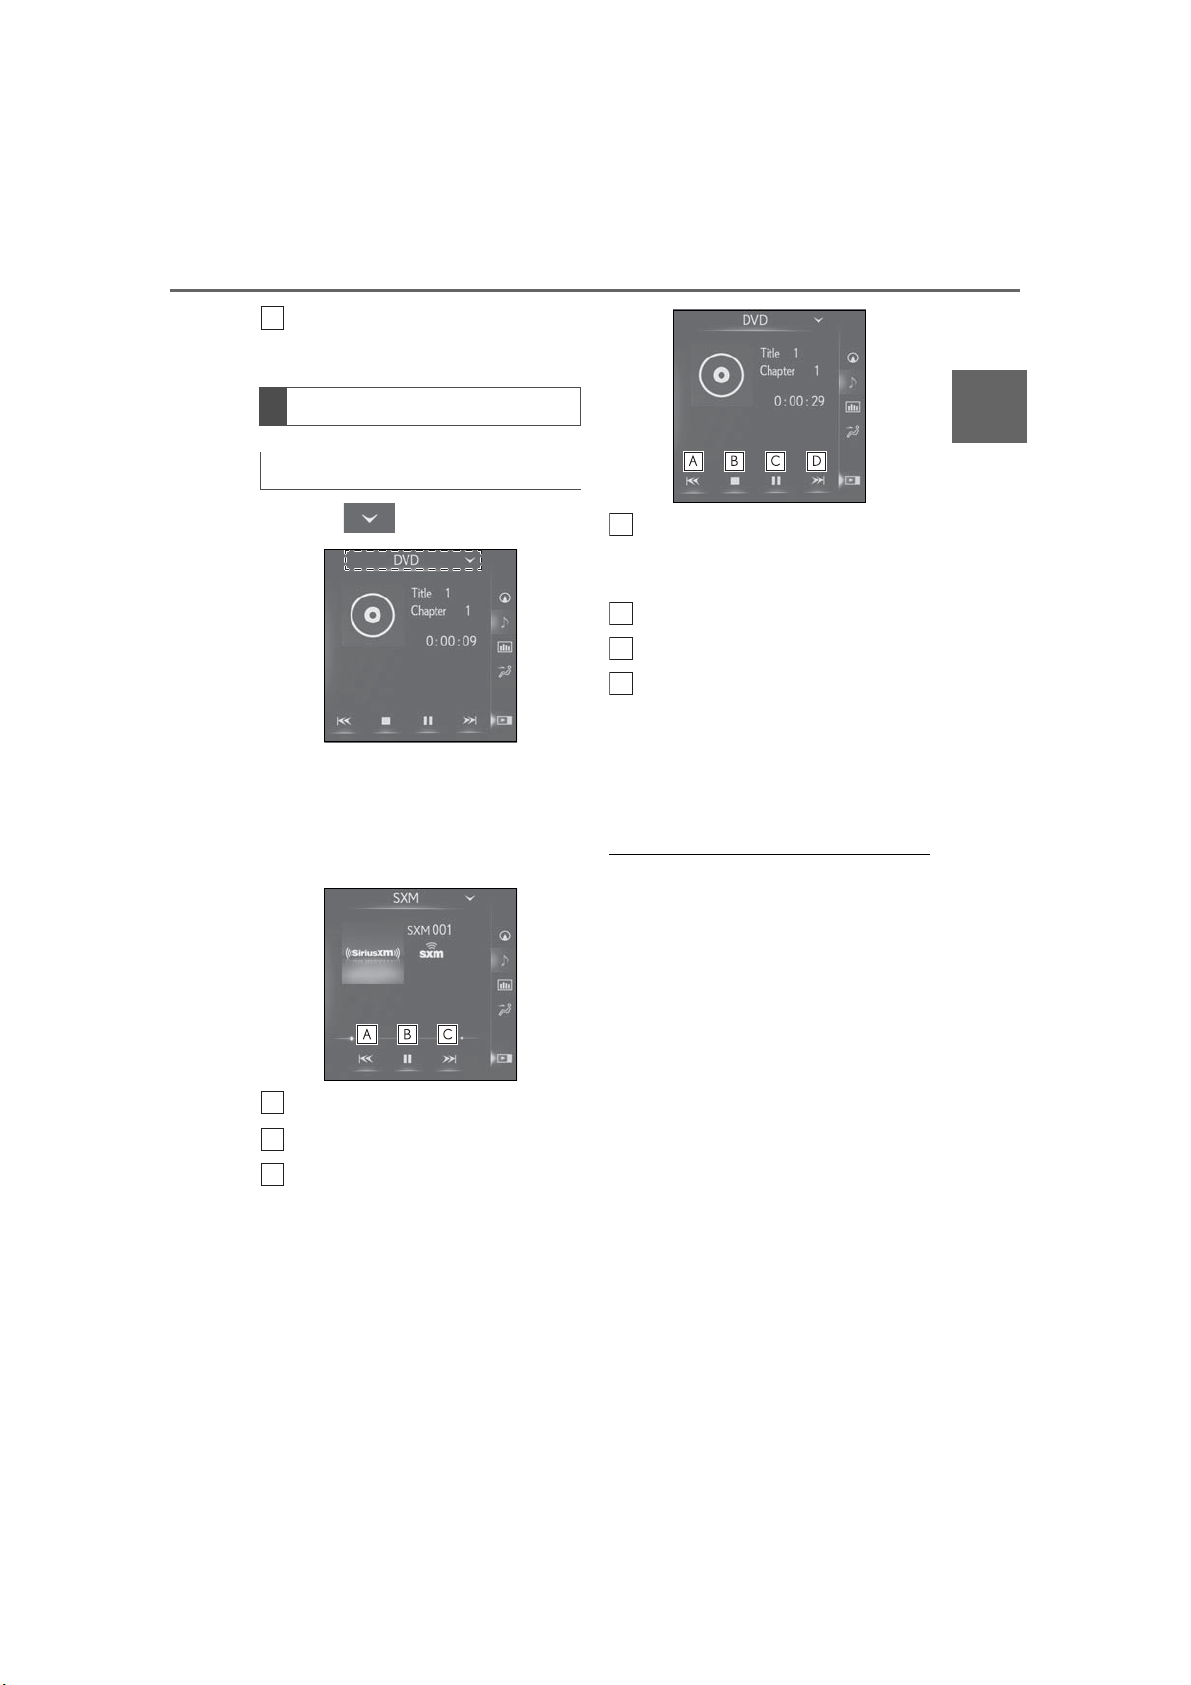
Switching modes
1 Select .
2 Select the desired source.
■ Radio operation
On the side display, preset stations can
be selected.
2
Basic function
Select to change the chapter/track/file.
Select and hold to fast rewind.
Select to stop the video screen.
Select to play/pause.
Select to change the chapter/track/file.
During playback: Select and hold to
fast forward.
During a pause: Select and hold to
slow forward.
● Depending on the audio source, some
functions may not be available.
Select to skips backward 2 minutes.
Select to play/pause.
*
Select to skips forward 2 minutes.
*
: Cache radio
■ Media operation
Operations such as selecting a chapter, file or track are carried out on the
screen.
LS500_LS500h_Navi_OM50F66U_(U)
Page 34
34
A
B
C
D
E
F
G
HIJ
2-1. Basic information before operation
Entering letters and numbers/list screen operation
Entering letters and numbers
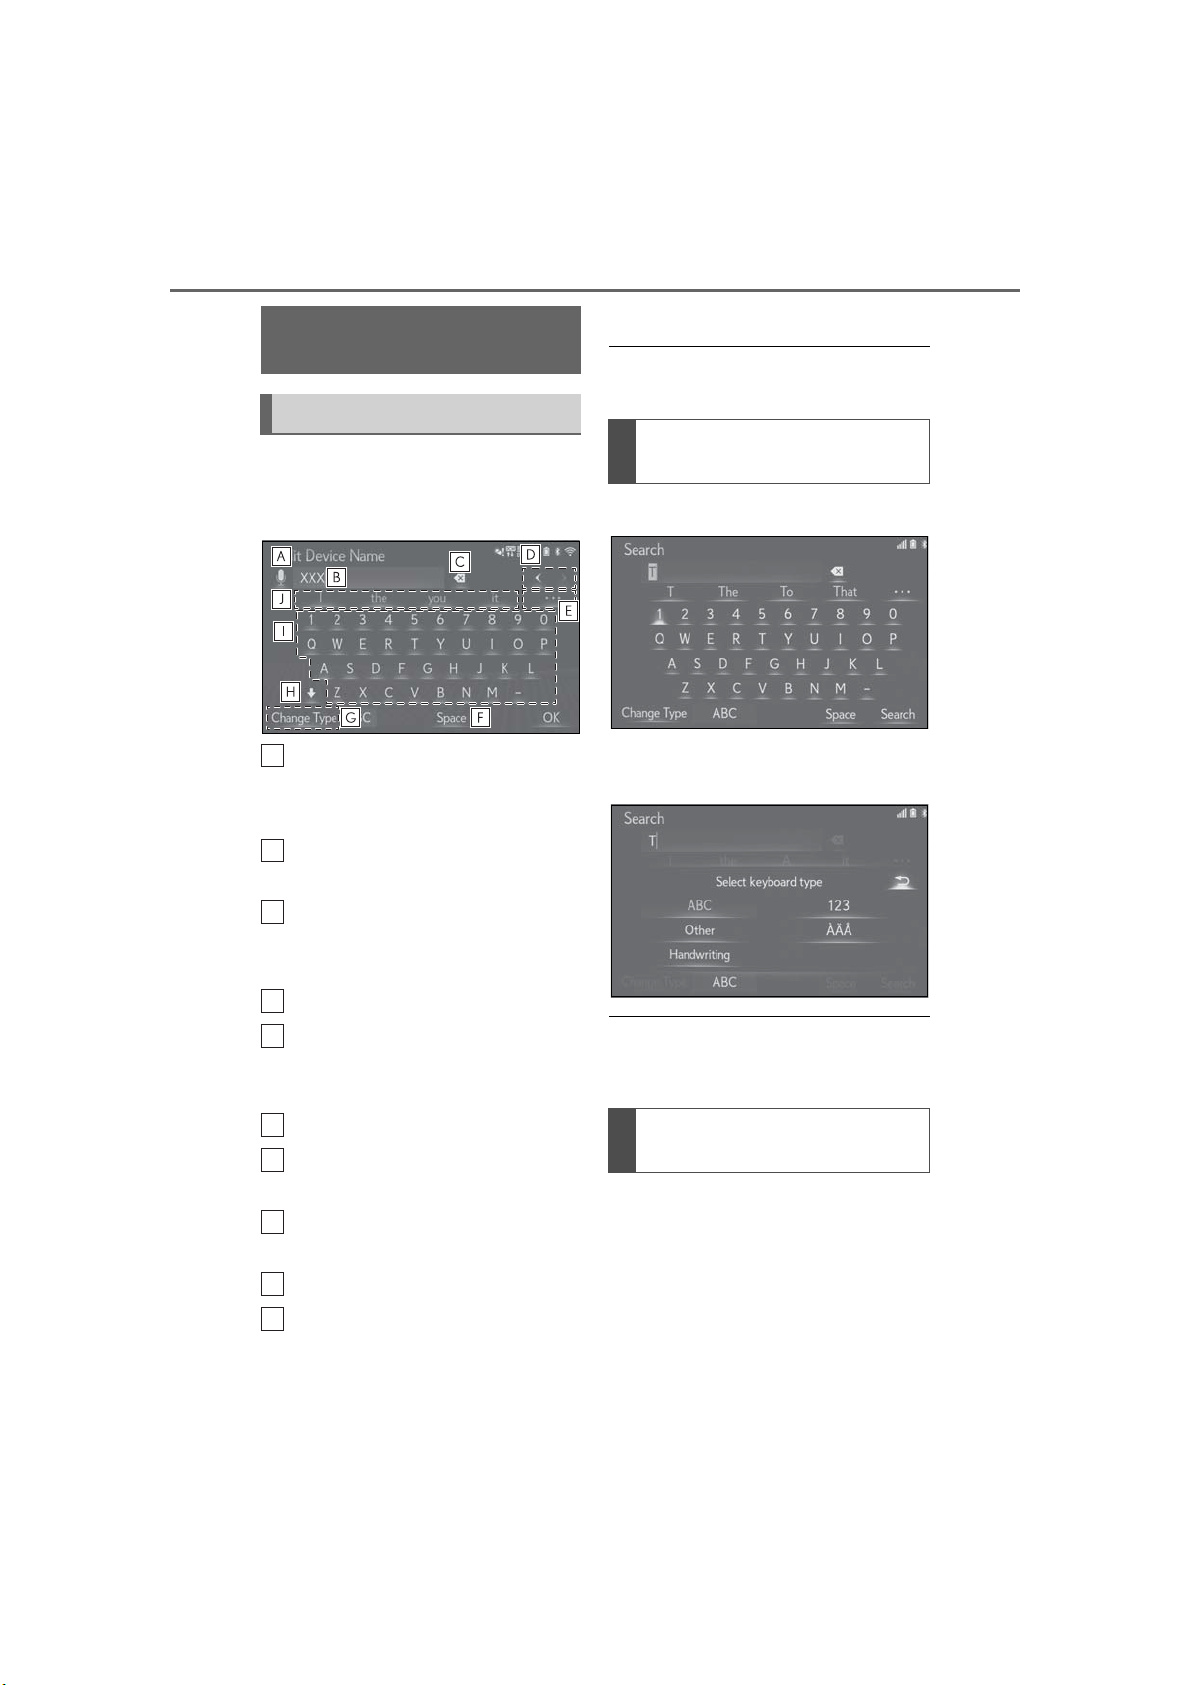
When searching by an address, name,
etc., or entering data, letters and numbers can be entered via the screen.
*
: With navigation function
● Keyboard layout can be changed.
(→P.53)
Changing character and keyboard type
1 Select “Change Type”.
When this icon is displayed, select
to enable the dictation function.
*
(English only) (→P.232)
Text field. Entered character(s) will
be displayed.
Select to erase one character.
Select and hold to continue erasing
characters.
Select to move the cursor.
Select to display a list of predictive
text candidates when there is more
than one. (→P.34)
Select to make a space on cursor.
Select to change character and
keyboard types. (→P.34)
Select to enter characters in lower
case or in upper case.
Select to enter desired characters.
Select to display predictive text
candidates for entered text.
(→P.34)
2 Select the desired character and
keyboard.
● Depending on the screen being dis-
played, it may not possible to change keyboard characters.
Select to display predictive text
candidates
When text is input, the system predicts
the text that may complete the currently unconfirmed text and displays
predictive replacement candidates
that match the beginning of the text.
1 Input text.
LS500_LS500h_Navi_OM50F66U_(U)
Page 35
2-1. Basic information before operation
A
B
C
A
B
35
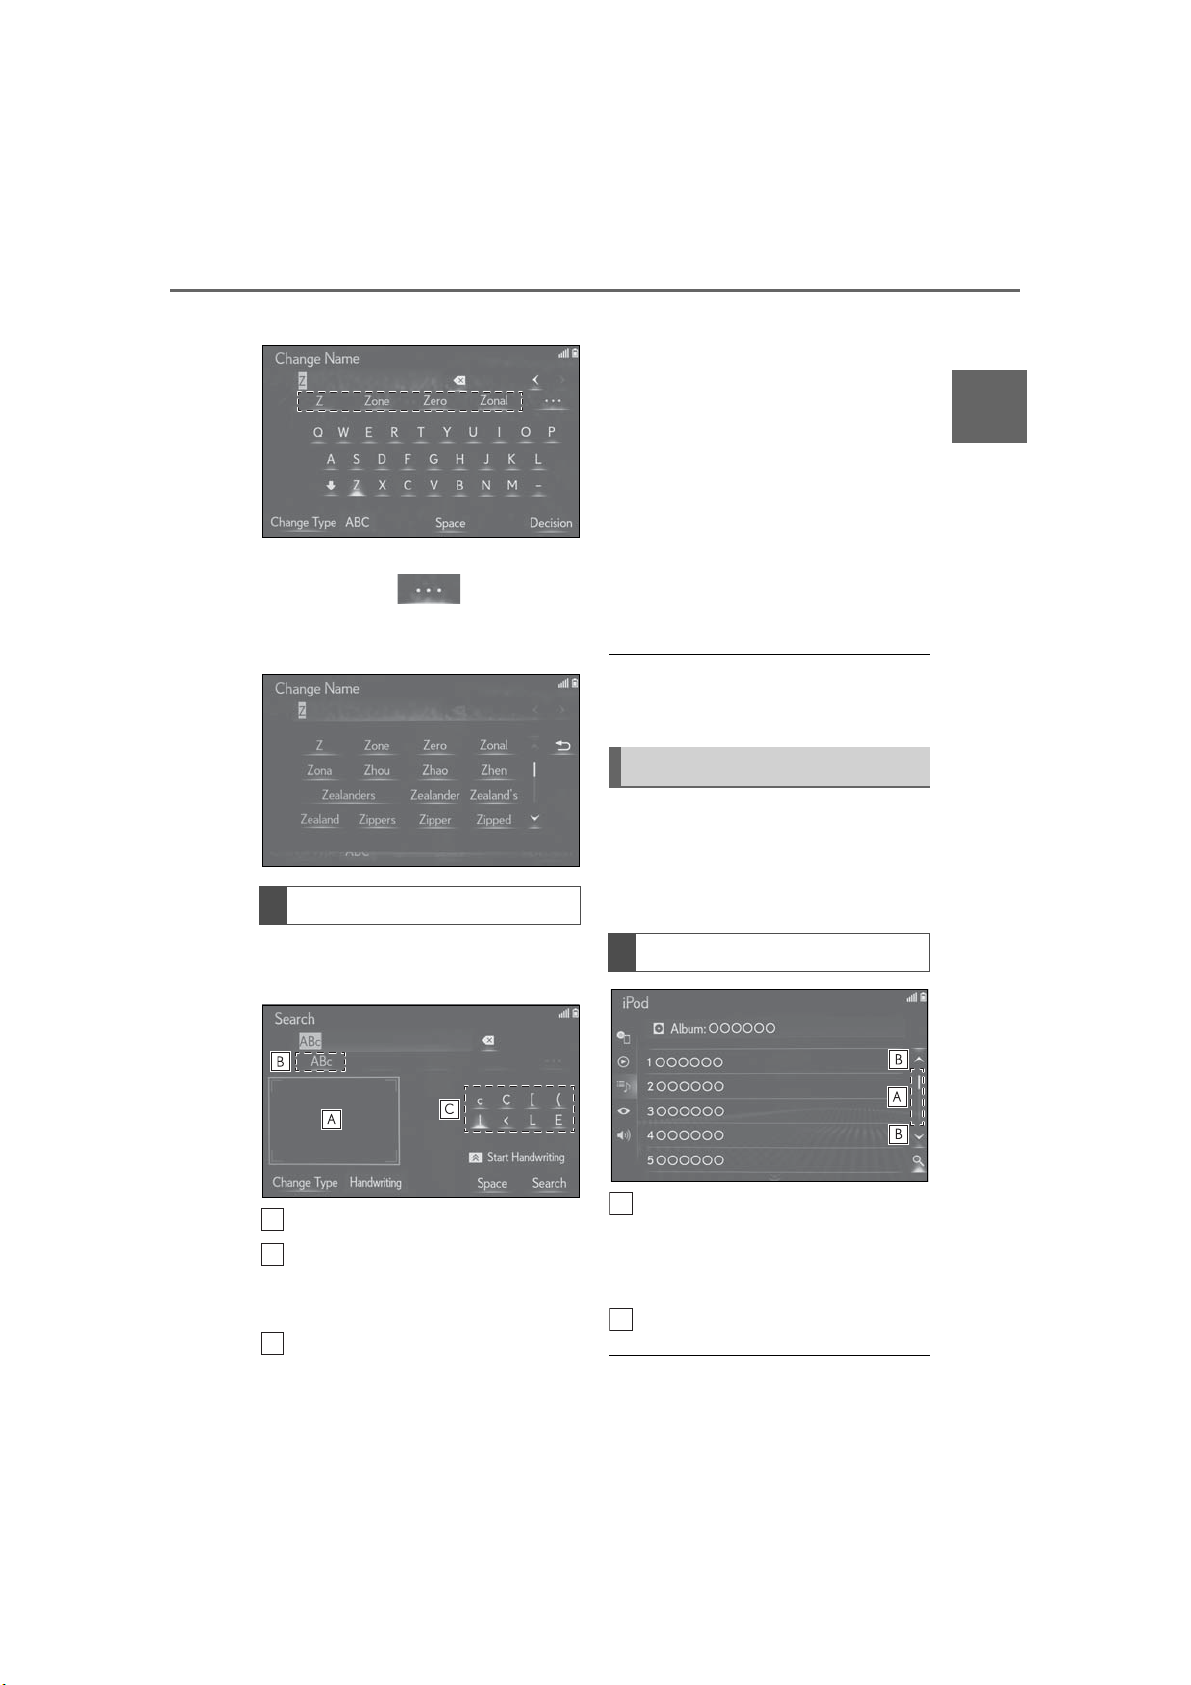
2 Select the desired candidate.
To select a candidate that is not dis-
played, select , and then
select the desired predictive
replacement candidate.
Hand writing method
desired character.
Depending on the input screen and
conditions, the following operations
can be performed.
• Back space: Draw a straight line from
the bottom right to the bottom left.
• Space: Draw a line from the top left to
the bottom left and then continue to the
bottom right at a right angle.
• Line Break: Draw a line from the top
right to the bottom right and then continue to the bottom left at a right angle.
● To deselect the handwriting input range,
press the touchpad of the Remote Touch
or sub function button.
List screen
The list screen may be displayed after
entering characters. When a list is displayed, use the appropriate screen
button to scroll through the list.
2
Basic function
Characters can be entered by hand
writing.
Write the characters to be entered.
Select the candidate character that
corresponds to the entered hand
written character.
Select the candidate character that
is displayed to enter the next
Scrolling list screen
Select this part to scroll the list by
operating the scroll bar.
To release scrolling the list, select
the scroll bar again.
Select to scroll the list.
● With navigation function: Matching items
LS500_LS500h_Navi_OM50F66U_(U)
Page 36
36
2-1. Basic information before operation
from the database are listed even if the
entered address or name is incomplete.
● With navigation function: The list will be
displayed automatically if the maximum
number of characters is entered or
matching items can be displayed on a single list screen.
● With navigation function: The number of
matching items is shown on the right side
of the screen. If the number of matching
items is more than 999, the system displays “***” on the screen.
● With navigation function: It can be per-
formed even if the “Map Flick” is set to
“Off”. (→P.94)
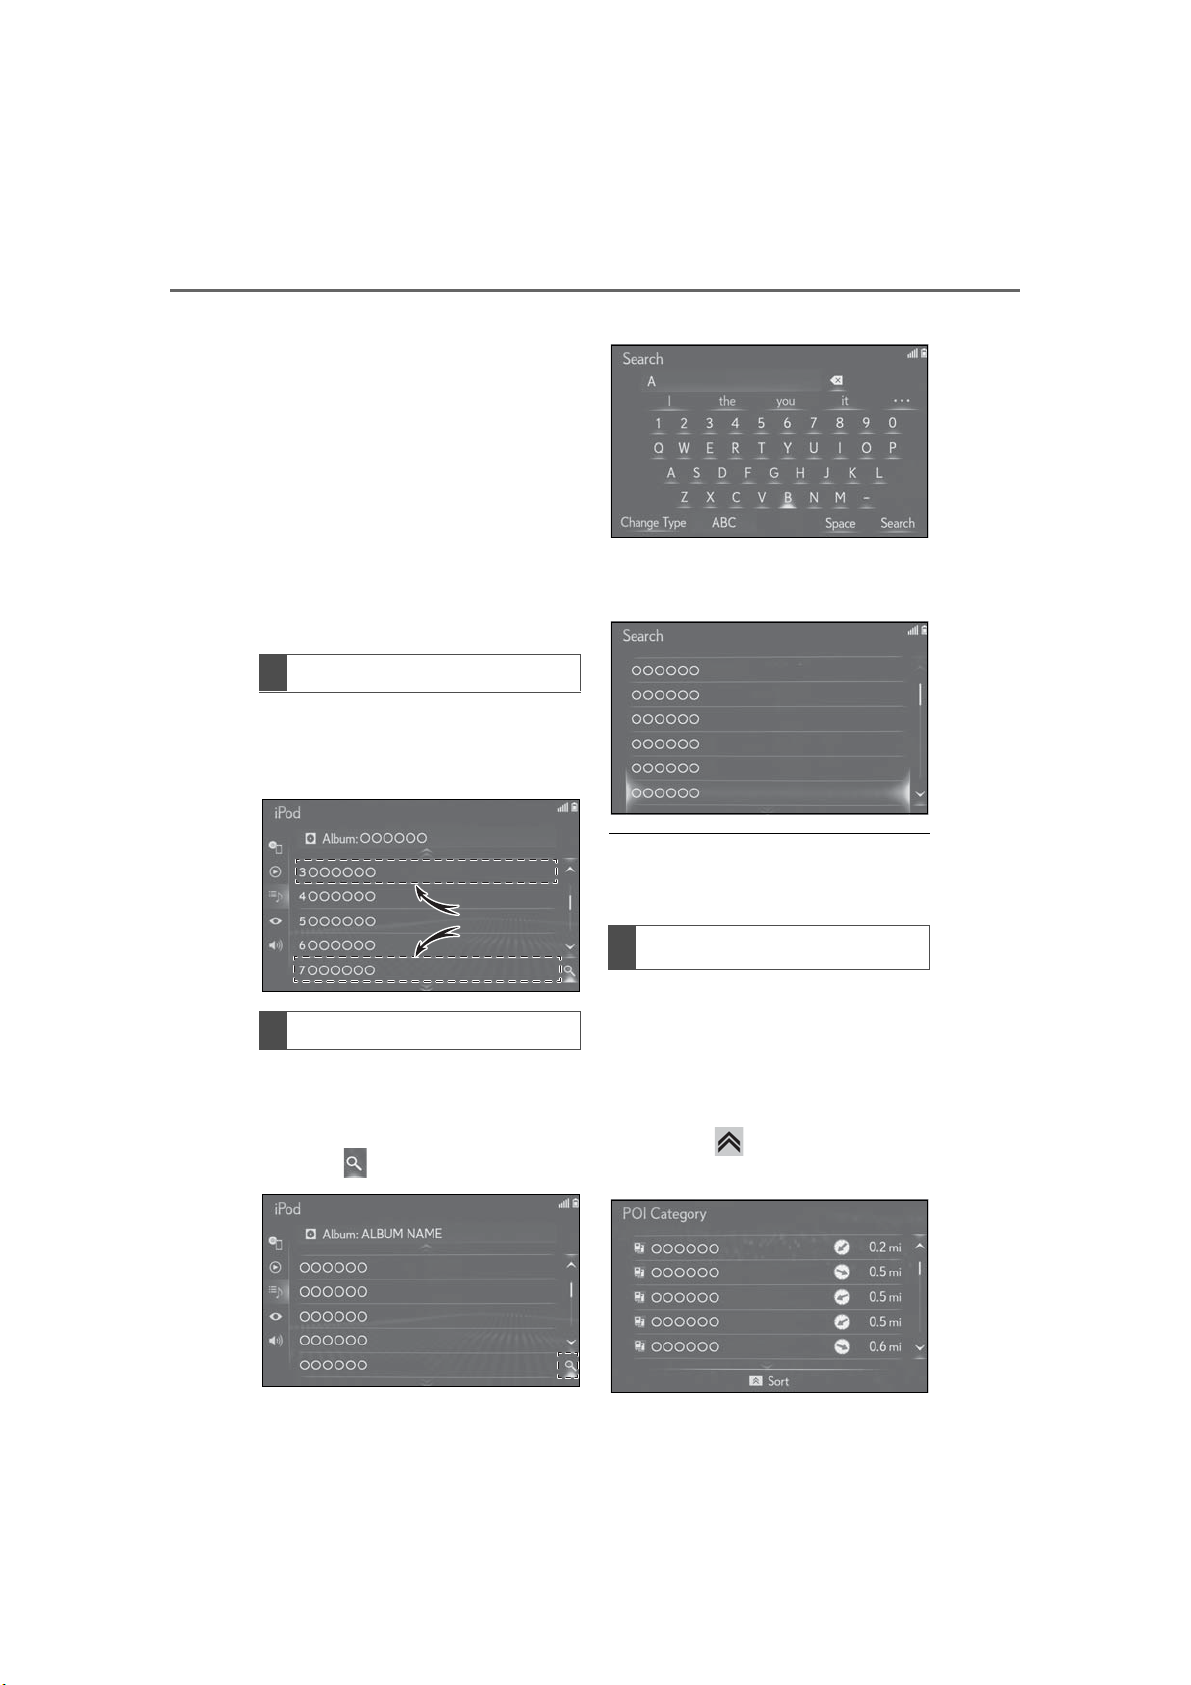
List screen flick operation
The list can be scrolled by flick operation when the cursor is over the top or
bottom part of the list.
2 Input text.
3 Select “Search”.
4 The list is displayed.
● When text is input, a candidate list of
items to search for is displayed on the
side screen.
Searching a list
Items are displayed in the list with the
most similar results of the search at the
top.
1 Select .
Sorting
*
: With navigation function
*
The order of a list displayed on the
screen can be sorted in the order of
distance from the current location,
date, category, etc.
1 Press the button on the Remote
Touch.
LS500_LS500h_Navi_OM50F66U_(U)
Page 37

2-1. Basic information before operation
37
2 Select the desired sorting criteria.
Linking multi-information
display and the system
The following functions of the system are linked with the multi-information display in the instrument
cluster:
Audio
Phone
etc.
These functions can be operated
using multi-information display
control switches on the steering
wheel. For details, refer to
“OWNER’S MANUAL”.
2
Basic function
LS500_LS500h_Navi_OM50F66U_(U)
Page 38
38
2-2.Connectivity settings
2-2. Connectivity settings
Registering/Connecting a
Bluetooth® device
To use the hands-free system, it is
necessary to register a Bluetooth
phone with the system.
Once the phone has been registered, it is possible to use the
hands-free system.
This operation cannot be performed while driving.
Registering a Bluetooth® phone
for the first time
■ Registering from the system
®
1 Turn the Bluetooth
setting of your cellular phone on.
This function is not available when
Bluetooth
®
connection setting of
your cellular phone is set to off.
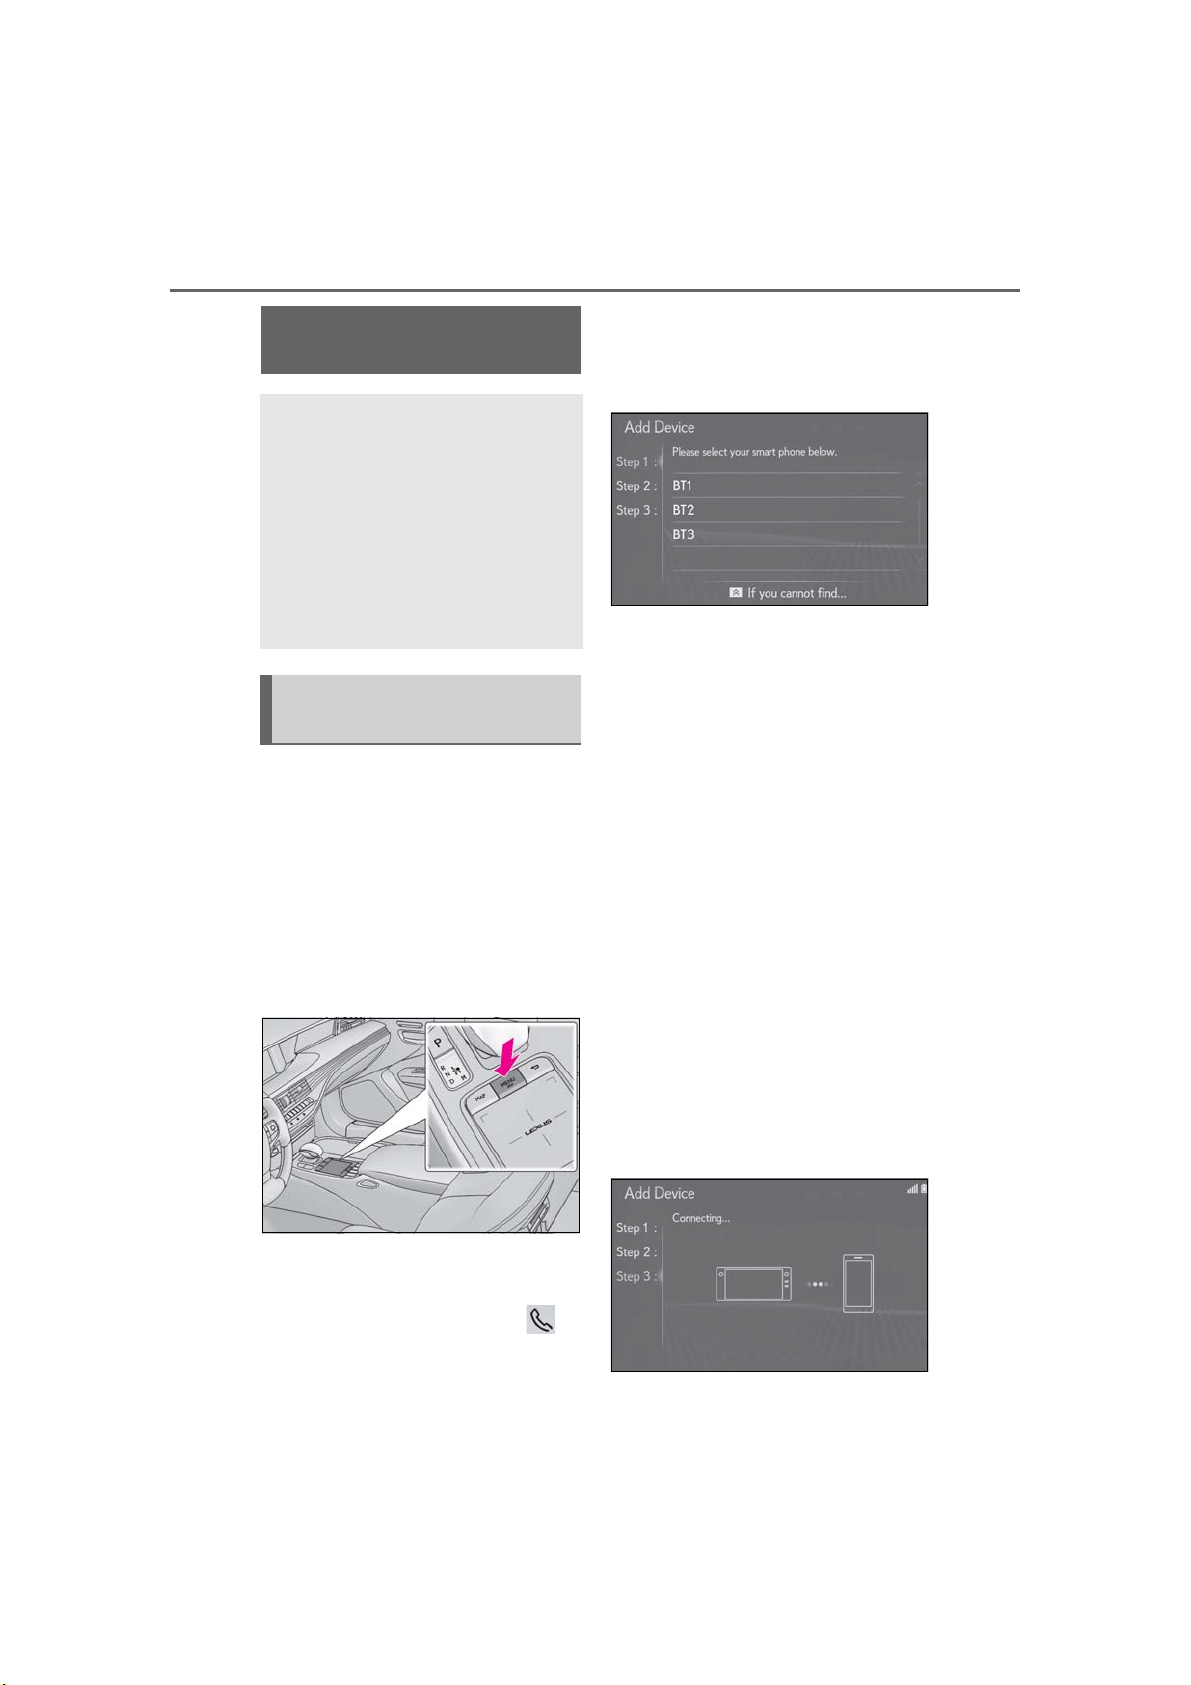
2 Press the “MENU” button on the
Remote Touch.
connection
4 Select “Yes” to register a phone.
5 Select the desired Bluetooth
®
device.
®
6 Register the Bluetooth
using your Bluetooth
®
device
®
device.
For details about operating the
®
Bluetooth
device, see the manual
that comes with it.
A PIN code is not required for SSP
(Secure Simple Pairing) compatible
Bluetooth
the type of Bluetooth
®
devices. Depending on
®
device being
connected, a message confirming
registration may be displayed on the
Bluetooth
®
device’s screen.
Respond and operate the
Bluetooth
®
device according to the
confirmation message.
3 Select “Phone”.
Operations up to this point can also
be performed by pressing the
switch on the steering wheel.
LS500_LS500h_Navi_OM50F66U_(U)
7 Check that the following screen is
displayed, indicating pairing was
successful.
Page 39
2-2. Connectivity settings
39
The system is connecting to the reg-
istered device.
At this stage, the Bluetooth
®
func-
tions are not yet available.
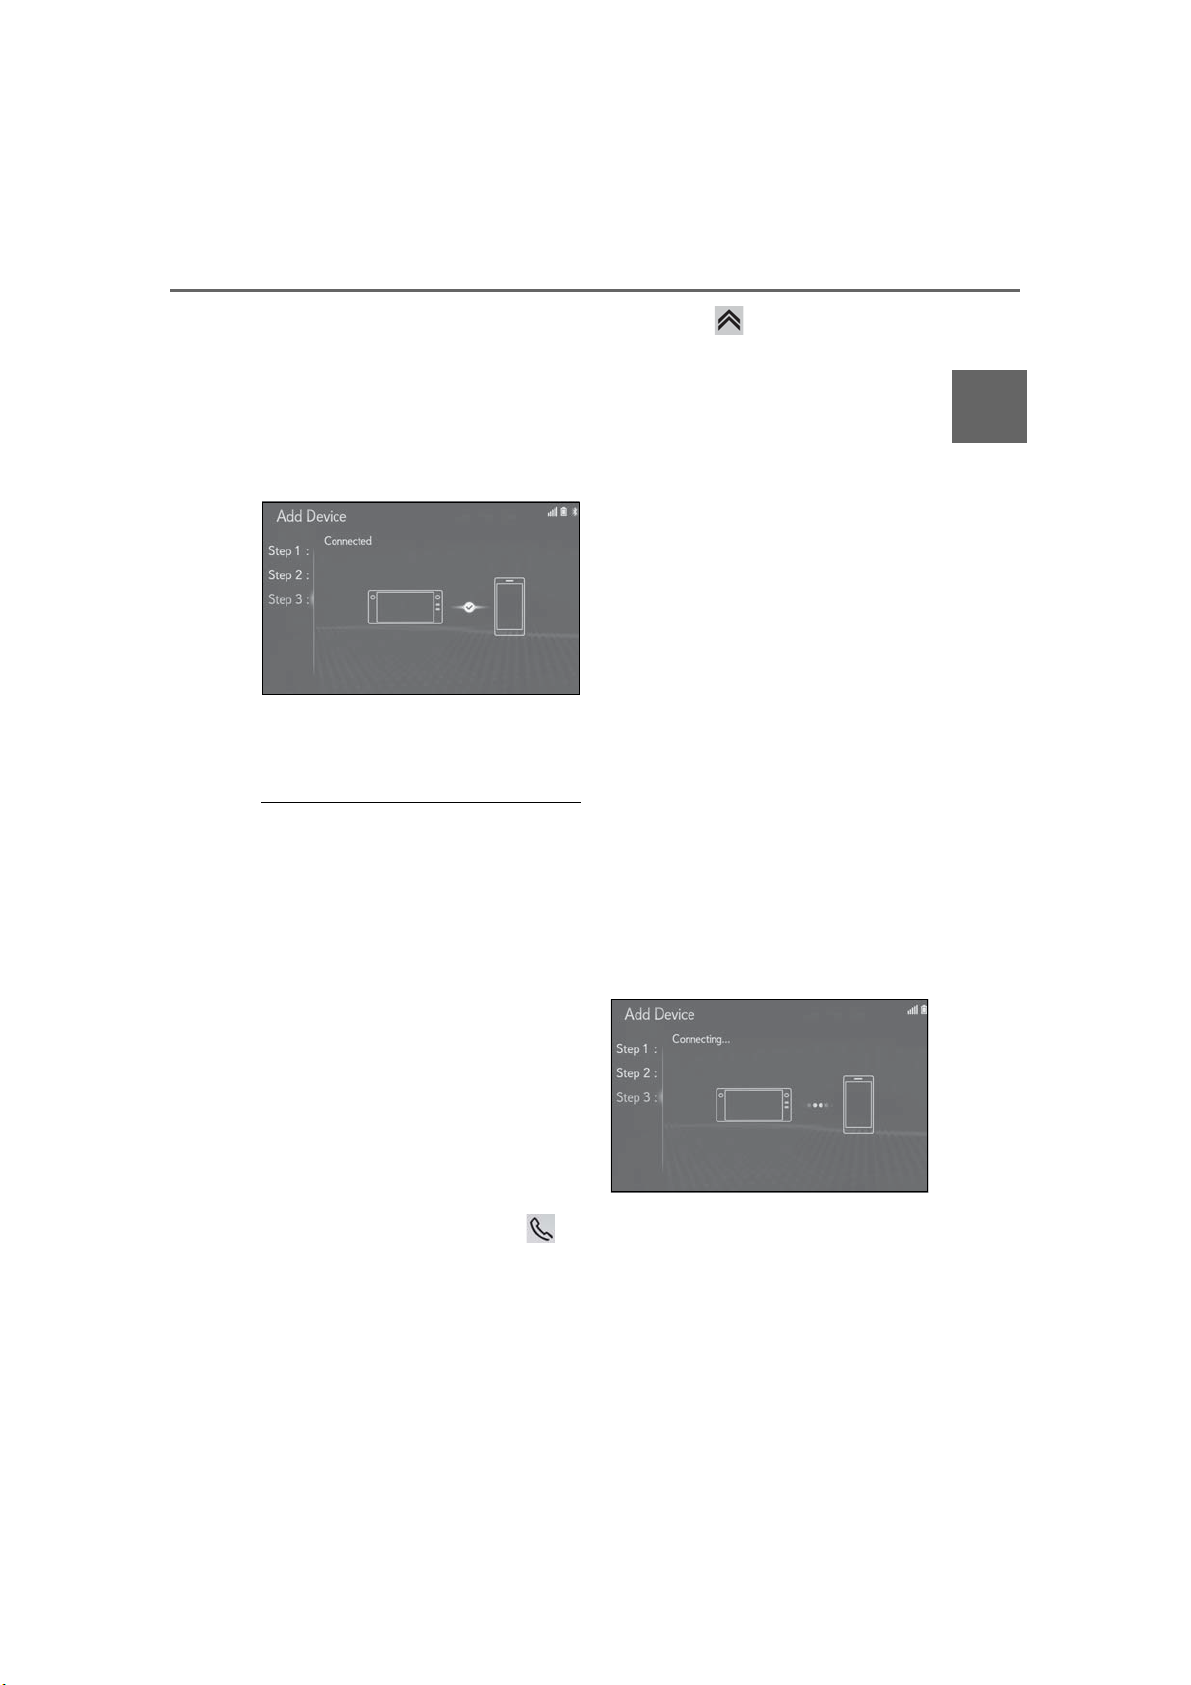
8 Check that “Connected” is dis-
played and registration is complete.
If an error message is displayed, fol-
low the guidance on the screen to
try again.
● If a cellular phone does not operate prop-
erly after being connected, turn the cellular phone off and on and then connect it
again.
4 Press the button on the Remote
Touch to select “If you cannot find…”
on the bottom of the screen.
5 Select “Register from Phone”.
6 Register the Bluetooth
using your Bluetooth
®
device
®
device.
For details about operating the
®
Bluetooth
device, see the manual
that comes with it.
A PIN code is not required for SSP
(Secure Simple Pairing) compatible
Bluetooth
the type of Bluetooth
®
devices. Depending on
®
device being
connected, a message confirming
registration may be displayed on the
Bluetooth
®
device’s screen.
Respond and operate the
Bluetooth
®
device according to the
confirmation message.
2
Basic function
■ Registering from phone
When registering from the system is
failed, or the phone name doesn’t
appear on the registering screen, need
to connect the Bluetooth
®
phone
manually.
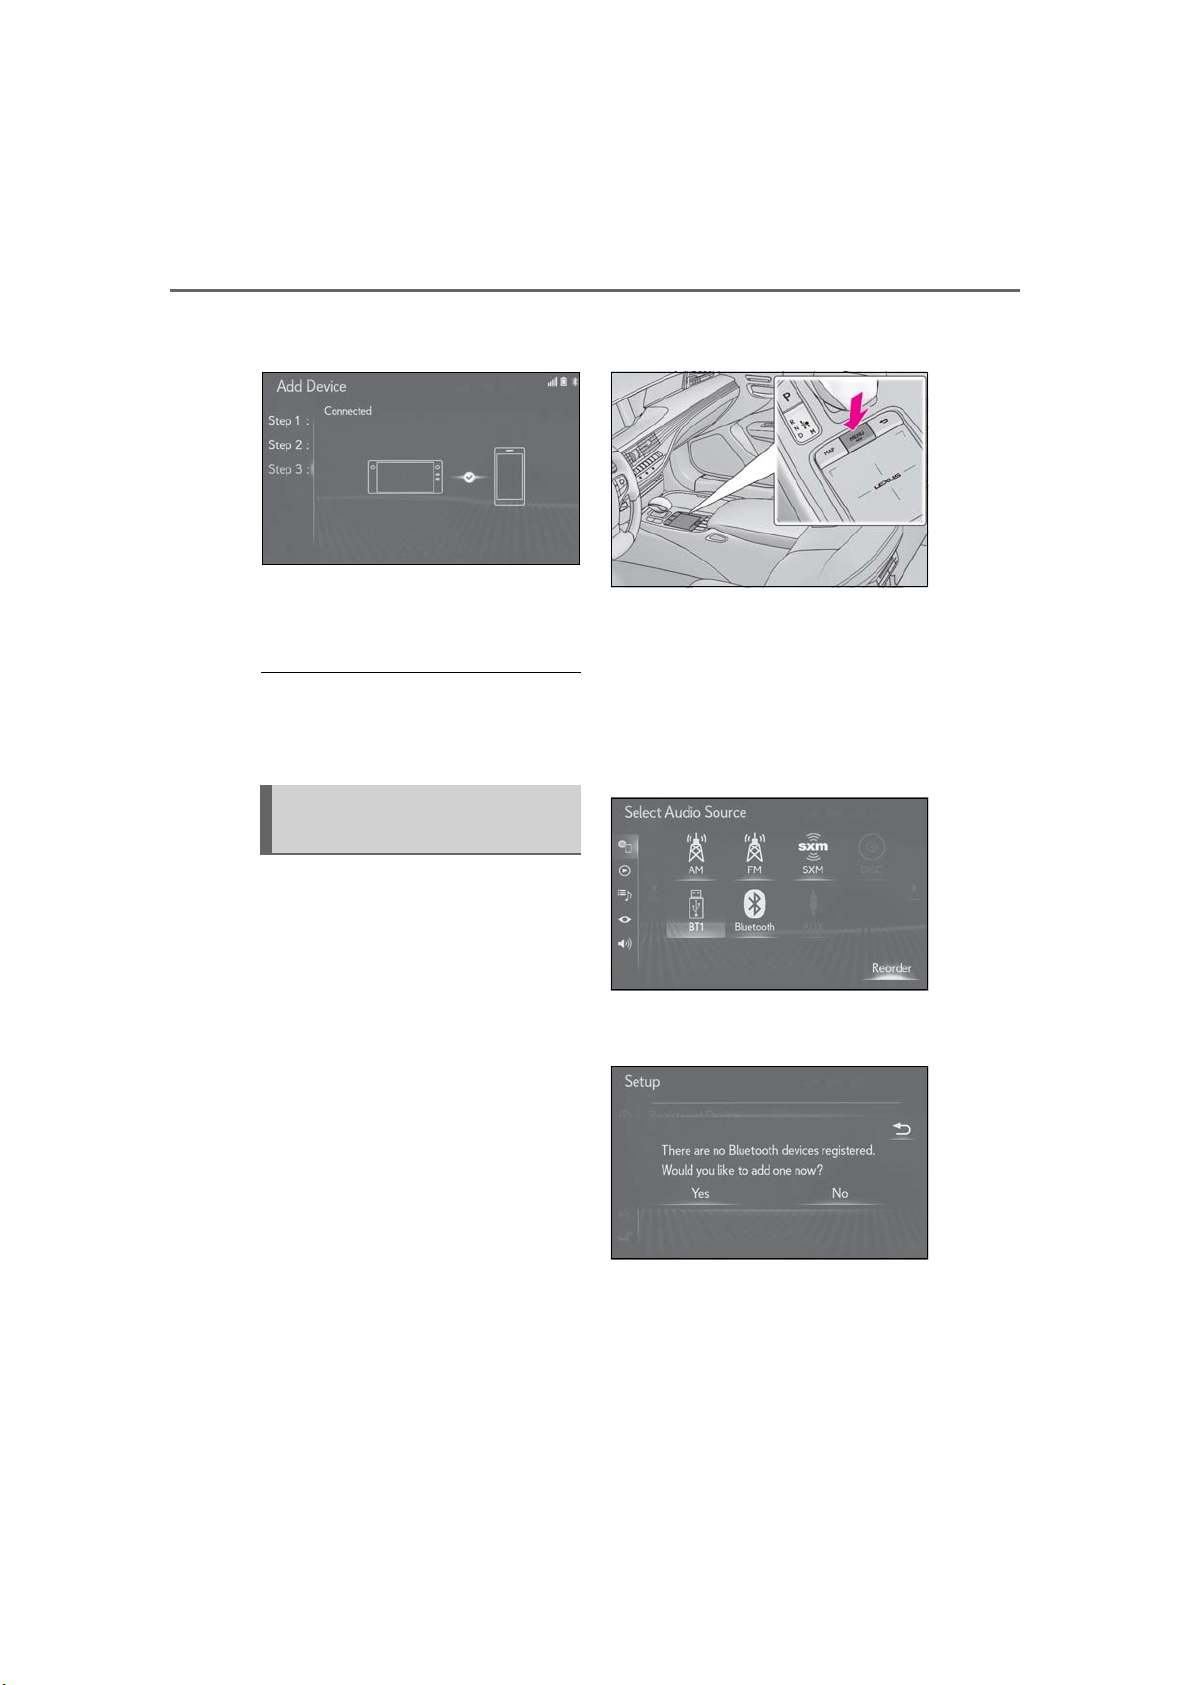
1 Press the “MENU” button on the
Remote Touch.
2 Select “Phone”.
Operations up to this point can also
be performed by pressing the
switch on the steering wheel.
3 Select “Yes” to register a phone.
7 Check that the following screen is
displayed, indicating pairing was
successful.
The registered device is connecting
to the system.
At this stage, the Bluetooth
®
func-
tions are not yet available.
LS500_LS500h_Navi_OM50F66U_(U)
Page 40
40
2-2. Connectivity settings
8 Check that “Connected” is dis-
played and registration is complete.
If an error message is displayed, fol-
low the guidance on the screen to
try again.
● If a cellular phone does not operate prop-
erly after being connected, turn the cellular phone off and on and then connect it
again.
Registering a Bluetooth® audio
player for the first time
To use the Bluetooth® audio, it is necessary to register an audio player with
the system.
2 Press the “MENU” button on the
Remote Touch.
3 Select “Media”.
4 Select “Source” on the sub menu.
5 Select “Bluetooth
*
: The Bluetooth® word mark and logos
are registered trademarks owned by
Bluetooth SIG, Inc.
*
”.
Once the player has been registered, it
is possible to use the Bluetooth
audio.
This operation cannot be performed
while driving.
For details about registering a
Bluetooth
1 Turn the Bluetooth
®
device: →P.44
®
connection
setting of your audio player on.
This function is not available when
the Bluetooth
®
connection setting
of your audio player is set to off.
LS500_LS500h_Navi_OM50F66U_(U)
®
6 Select “Yes” to register an audio
player.
7 Follow the steps in “Registering a
Bluetooth
®
phone for the first time”
from step 5. (→P.38)
Page 41
2-2. Connectivity settings
41
Profiles
This system supports the following services.
■ Bluetooth
Ver. 2.0 (Recommended: Ver. 4.1
+EDR)
■ Profiles
HFP (Hands Free Profile) Ver. 1.0
(Recommended: Ver. 1.7)
• This is a profile to allow hands-free
phone calls using a cellular phone or
head set. It has outgoing and incoming
call functions.
OPP (Object Push Profile) Ver. 1.1
(Recommended: Ver. 1.2)
• This is a profile to transfer contacts data.
PBAP (Phone Book Access Profile)
Ver. 1.0 (Recommended: Ver. 1.2)
• This is a profile to transfer phonebook
data.
MAP (Message Access Profile)
Recommended: Ver. 1.2
• This is a profile to use phone message
functions.
SPP (Serial Port Profile) Recom-
mended: Ver. 1.2
• This is a profile to use the “Lexus Enform”
function.
A2DP (Advanced Audio Distribu-
tion Profile) Ver. 1.0 (Recommended: Ver. 1.3)
• This is a profile to transmit stereo audio
or high quality sound to the audio system.
AVRCP (Audio/Video Remote
Control Profile) Ver. 1.0 (Recom-
®
Core Specification
mended: Ver. 1.6)
• This is a profile to allow remote control
the A/V equipment.
● This system is not guaranteed to operate
with all Bluetooth
● If your cellular phone does not support
HFP, registering the Bluetooth
or using OPP, PBAP, MAP or SPP profiles individually will not be possible.
● If the connected Bluetooth
sion is older than recommended or
incompatible, the Bluetooth
function may not work properly.
● Refer to
http://www.lexus.com/MobileLink
approved Bluetooth
tem.
● Certification
Bluetooth is a registered trademark of
Bluetooth SIG, Inc.
®
devices.
®
device ver-
®
device
®
phones for this sys-
®
phone
to find
2
Basic function
LS500_LS500h_Navi_OM50F66U_(U)
Page 42
42
A
B
C
D
2-2. Connectivity settings
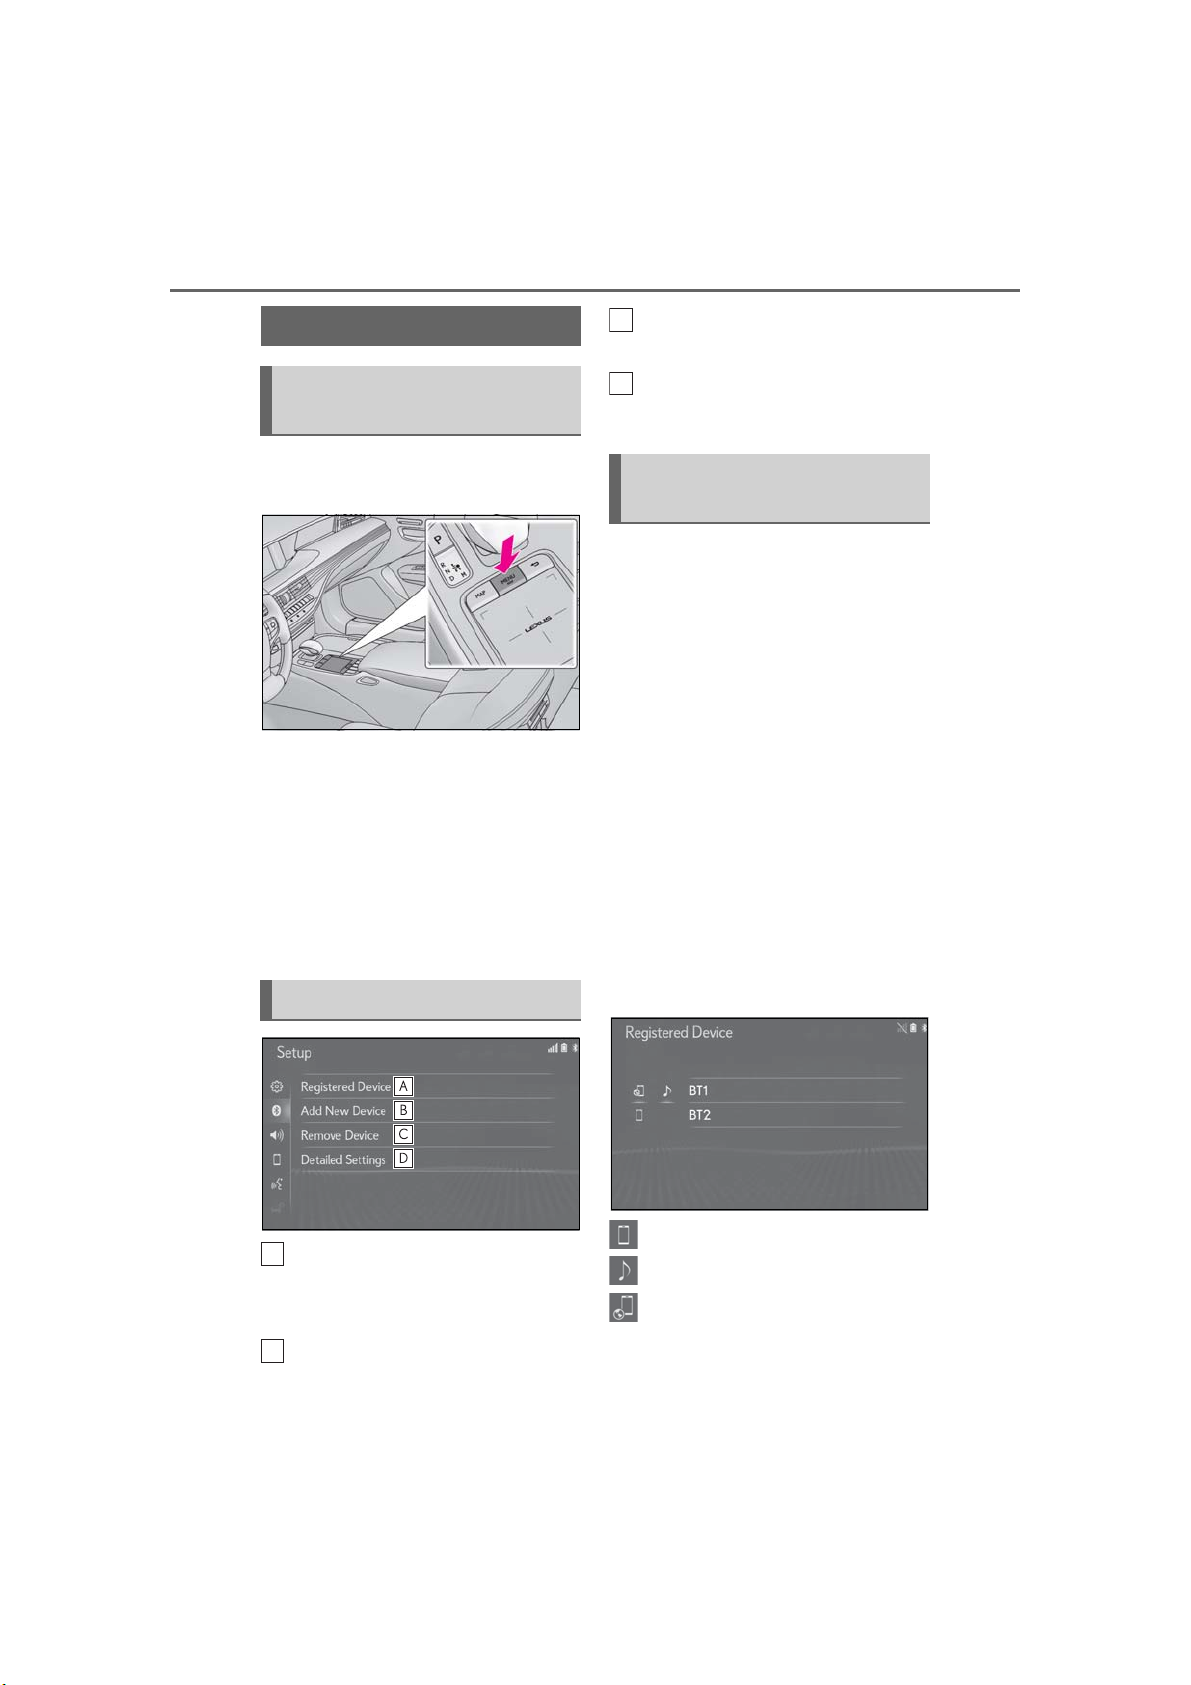
Setting Bluetooth® details
Displaying the Bluetooth® setup
screen
1 Press the “MENU” button on the
Remote Touch.
2 Select “Setup”.
3 Select “Bluetooth
menu.
*
: The Bluetooth® word mark and logos
are registered trademarks owned by
Bluetooth SIG, Inc.
4 Select the desired item to be set.
*
” on the sub
Deleting a Bluetooth
®
device
(→P.45)
Setting the Bluetooth
®
system
(→P.46)
Connecting a Bluetooth®
device
Up to 5 Bluetooth
(HFP) and audio players (AVP)) can be
registered.
If more than 1 Bluetooth
been registered, select which device to
connect to.
1 Display the Bluetooth
screen:
“MENU” button → “Setup” →
“Bluetooth
*
: The Bluetooth® word mark and logos
are registered trademarks owned by
Bluetooth SIG, Inc.
2 Select “Registered Device”.
®
devices (Phones
*
”
®
device has
®
setup
Bluetooth® setup screen
Connecting a Bluetooth
and editing the Bluetooth
information (→P.42, 45)
Registering a Bluetooth
(→P.44)
LS500_LS500h_Navi_OM50F66U_(U)
®
device
®
®
device
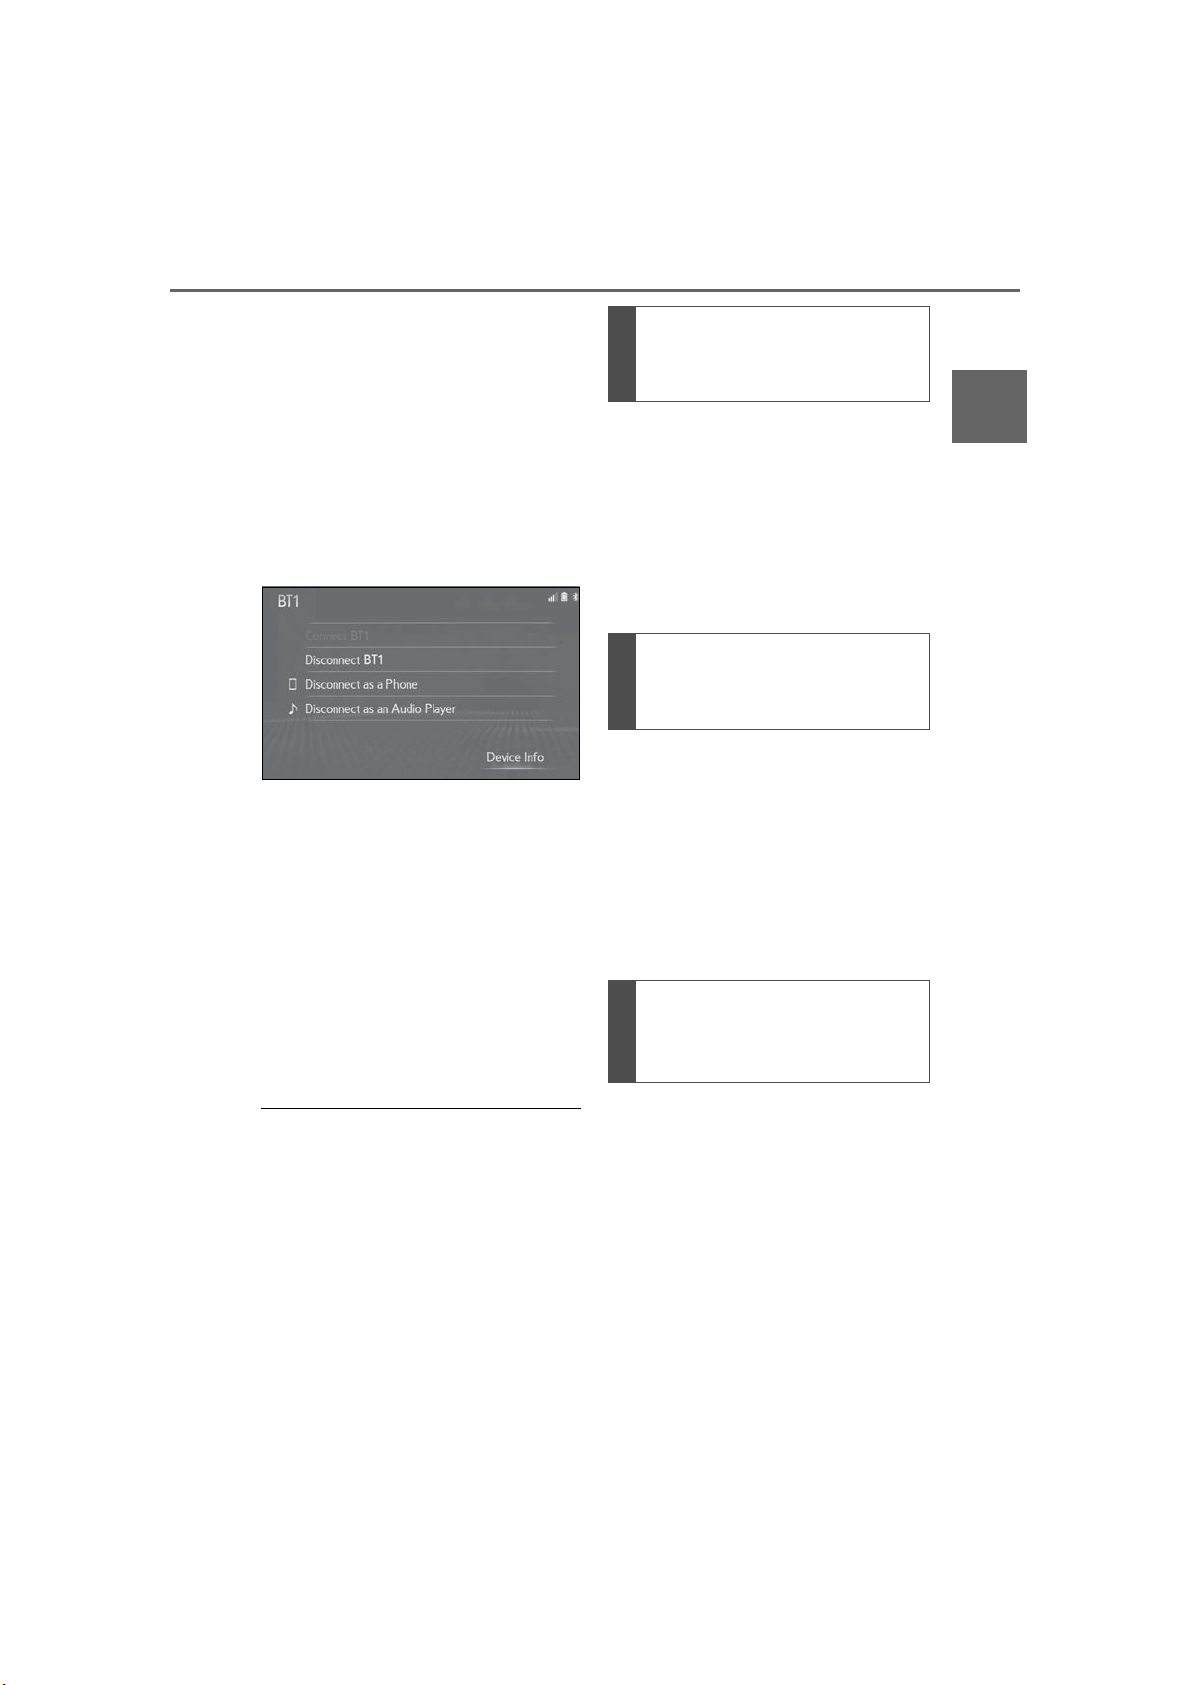
3 Select the device to be connected.
: Phone
: Audio player
device
: Phone/“Lexus Enform” service
The profile icon for a currently con-
nected device will be displayed in
Page 43
2-2. Connectivity settings
43
color.
Selecting a profile icon which is not
currently connected will switch the
connection to the function.
If the desired Bluetooth
®
device is
not on the list, select “Add New
Device” to register the device.
(→P.44)
4 Select the desired connection.
When another Bluetooth
®
device is
connected
To disconnect the Bluetooth
®
device, select “Yes”.
5 Check that a confirmation screen is
displayed when the connection is
complete.
If an error message is displayed, fol-
low the guidance on the screen to
try again.
● It may take time if the device connection
is carried out during Bluetooth
playback.
● Depending on the type of Bluetooth
device being connected, it may be necessary to perform additional steps on the
device.
● When disconnecting a Bluetooth
device, it is recommended to disconnect
using the system.
®
audio
®
®
Connecting a Bluetooth® device
in a different way (from phone
setup screen)
1 Press the “MENU” button on the
Remote Touch.
2 Select “Setup”.
3 Select “Phone” on the sub menu.
4 Select “Connect Phone”.
5 Select the device to be connected.
®
Connecting a Bluetooth
device
in a different way (from phone
screen)
1 Press the “MENU” button on the
Remote Touch.
2 Select “Phone”.
3 Select “Select Device” on the sub
menu.
4 Select desired device name from
the list.
®
Connecting a Bluetooth
device
in a different way (from
®
Bluetooth
audio screen)
1 Press the “MENU” button on the
Remote Touch.
2 Select “Media”.
3 Select “Source” on the sub menu.
4 Select “Bluetooth
*
: The Bluetooth® word mark and logos
are registered trademarks owned by
Bluetooth SIG, Inc.
*
”.
5 Select “Connect”.
2
Basic function
LS500_LS500h_Navi_OM50F66U_(U)
Page 44

44
2-2. Connectivity settings
6 Select desired device name from
the list.
■ Auto connection mode
To turn auto connection mode on, set
“Bluetooth
Leave the Bluetooth
*
Power” to on. (→P.46)
®
device in a location where the connection can be
established.
*
: The Bluetooth® word mark and logos
are registered trademarks owned by
Bluetooth SIG, Inc.
When the engine switch <power
switch> is in ACCESSORY or
IGNITION ON mode <ON mode>,
the system searches for a nearby
registered device.
The system will connect with the
registered device that was last connected, if it is nearby. When automatic connection priority is set to on
and there is more than one regis-
tered Bluetooth
®
phone available,
the system will automatically connect to the Bluetooth
®
phone with
the highest priority. (→P.46)
■ Connecting manually
When the auto connection has failed
*
or “Bluetooth
necessary to connect the Bluetooth
Power” is turned off, it is
®
device manually.
*
: The Bluetooth® word mark and logos
are registered trademarks owned by
Bluetooth SIG, Inc.
1 Display the Bluetooth® setup
screen:
“Bluetooth
*
: The Bluetooth® word mark and logos
are registered trademarks owned by
Bluetooth SIG, Inc.
*
”
2 Follow the steps in “Connecting a
Bluetooth
®
device” from step 2.
(→P.42)
■ Reconnecting the Bluetooth
phone
If a Bluetooth
®
phone is disconnected
due to poor reception from the
Bluetooth
®
network when the engine
switch <power switch> is in ACCESSORY or IGNITION ON mode <ON
mode>, the system automatically
reconnects the Bluetooth
Registering a Bluetooth® device
®
Up to 5 Bluetooth
registered.
Bluetooth
®
compatible phones (HFP)
and audio players (AVP) can be registered simultaneously.
This operation cannot be performed
while driving.
1 Display the Bluetooth
screen:
“MENU” button → “Setup” →
“Bluetooth
*
: The Bluetooth® word mark and logos
are registered trademarks owned by
Bluetooth SIG, Inc.
2 Select “Add New Device”.
devices can be
*
”
®
phone.
®
setup
®
“MENU” button → “Setup” →
LS500_LS500h_Navi_OM50F66U_(U)
Page 45
2-2. Connectivity settings
45
When another Bluetooth
®
device is
connected
To disconnect the Bluetooth
®
device, select “Yes”.
When 5 Bluetooth
®
devices have
already been registered
A registered device needs to be
replaced. Select “Yes”, and select
the device to be replaced.
3 Follow the steps in “Registering a
Bluetooth
®
phone for the first time”
from step 5. (→P.38)
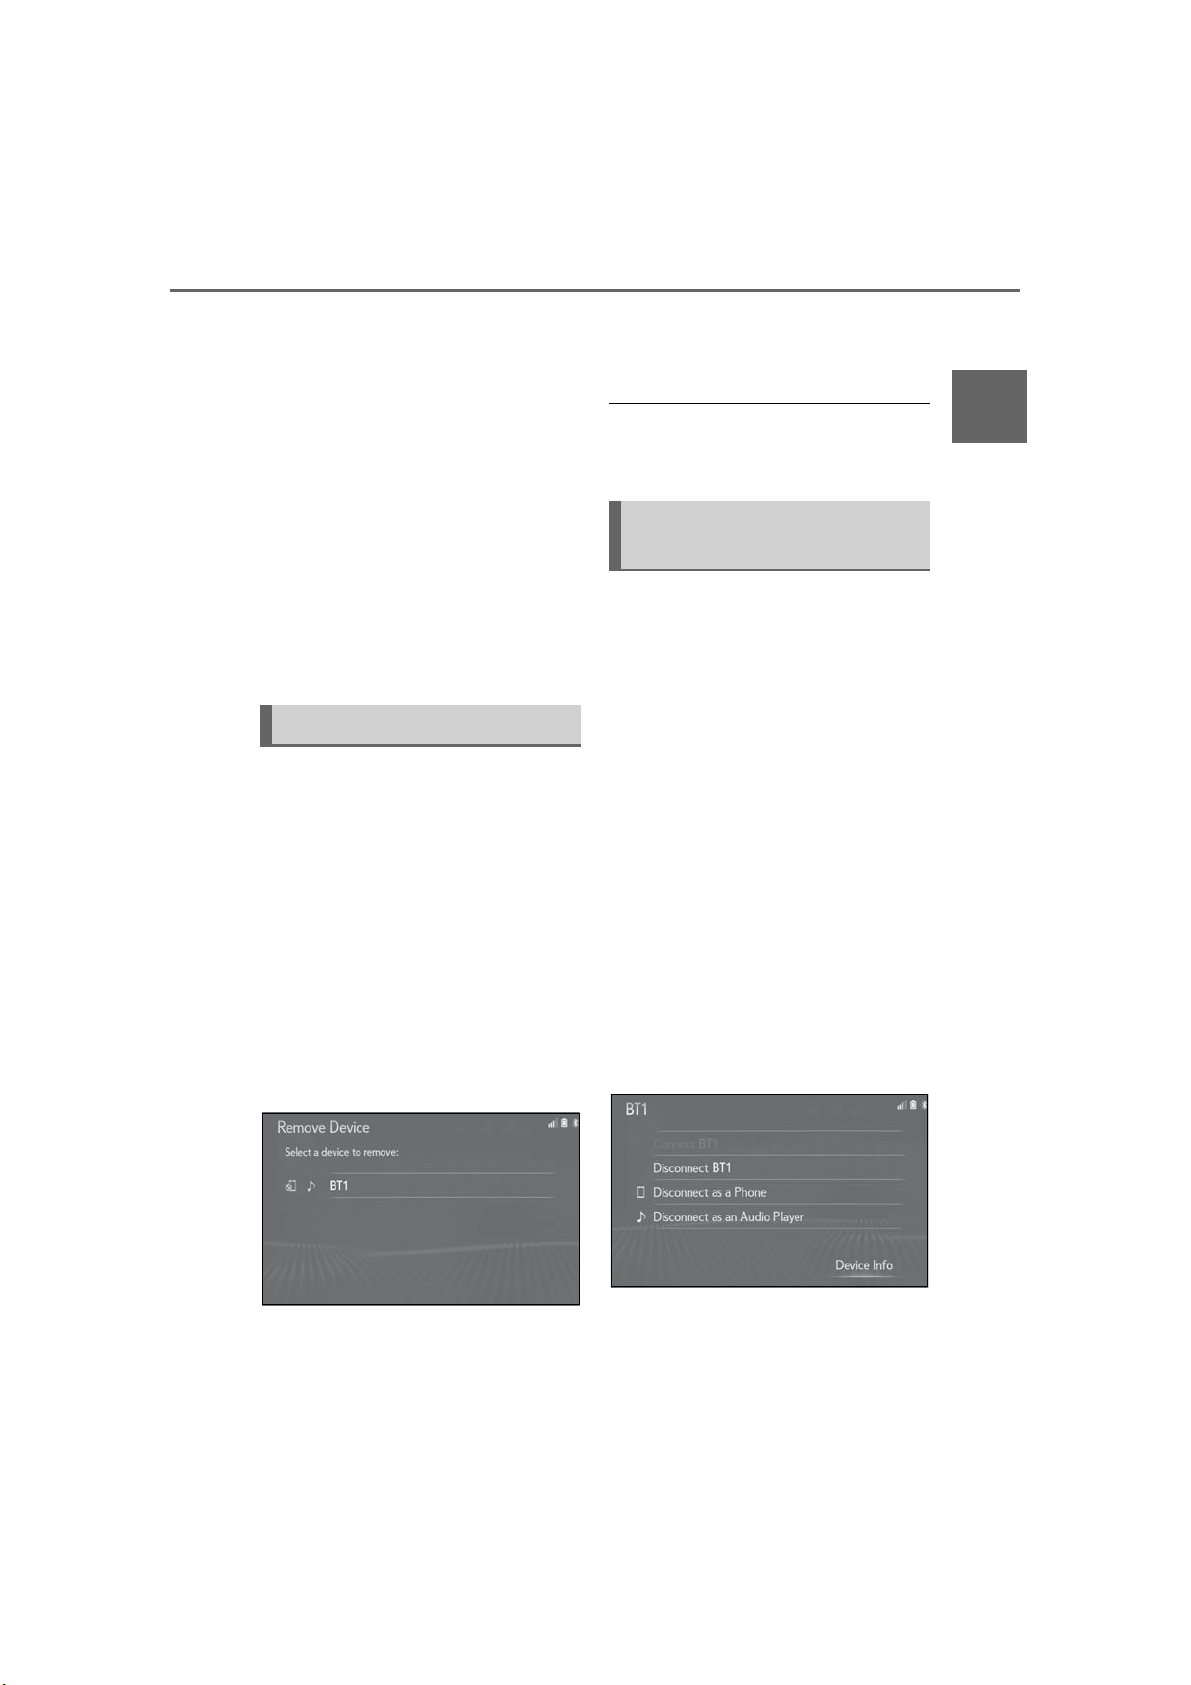
Deleting a Bluetooth® device
This operation cannot be performed
while driving.
1 Display the Bluetooth
screen:
“MENU” button → “Setup” →
“Bluetooth
*
: The Bluetooth® word mark and logos
are registered trademarks owned by
Bluetooth SIG, Inc.
*
”
2 Select “Remove Device”.
3 Select the desired device.
®
setup
5 Check that a confirmation screen is
displayed when the operation is
complete.
● When deleting a Bluetooth
contact data will be deleted at the same
time.
®
phone, the
Editing the Bluetooth® device
information
The Bluetooth® device’s information
can be displayed on the screen. The
displayed information can be edited.
This operation cannot be performed
while driving.
1 Display the Bluetooth
screen:
“MENU” button → “Setup” →
“Bluetooth
*
: The Bluetooth® word mark and logos
are registered trademarks owned by
Bluetooth SIG, Inc.
*
”
2 Select “Registered Device”.
3 Select the desired device to be
edited.
4 Select “Device Info”.
®
setup
2
Basic function
4 Select “Yes” when the confirmation
screen appears.
LS500_LS500h_Navi_OM50F66U_(U)
Page 46
46
A
BCD
E
F
2-2. Connectivity settings
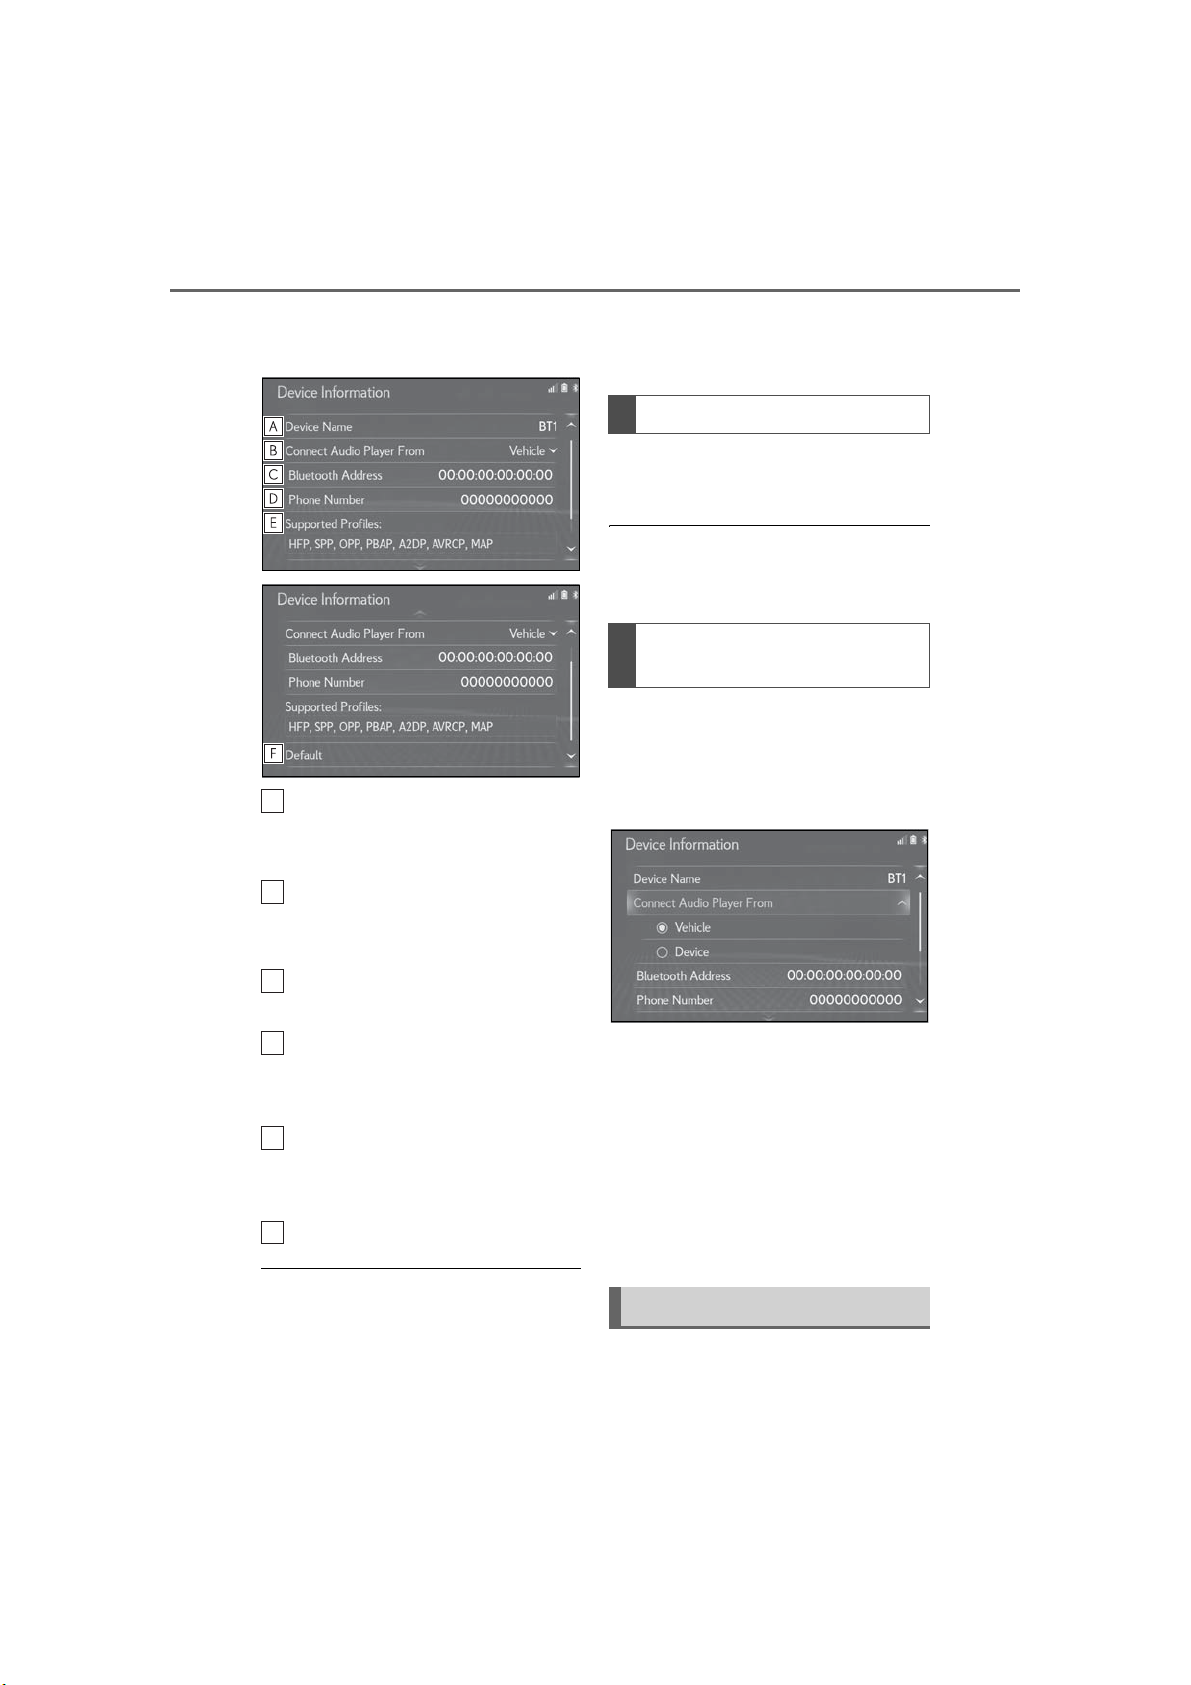
5 Confirm and change the
Bluetooth
The name of the Bluetooth
®
device information.
®
is displayed. It can be changed to a
desired name. (→P.46)
Select to set the Bluetooth
player connection method.
(→P.46)
device
®
audio
● Depending on the type of Bluetooth
phone, some information may not be displayed.
®
Changing a device name
1 Select “Device Name”.
2 Enter the name and select “OK”.
● Even if the device name is changed, the
name registered in your Bluetooth
device does not change.
®
Setting audio player connection
method
1 Select “Connect Audio Player
From”.
2 Select the desired connection
method.
Device address is unique to the
device and cannot be changed.
Phone number is unique to the
Bluetooth
®
phone and cannot be
changed.
Compatibility profile is unique to
the Bluetooth
®
device and cannot
be changed.
Select to reset all setup items.
● If 2 Bluetooth
tered with the same device name, the
devices can be distinguished referring to
the device’s address.
LS500_LS500h_Navi_OM50F66U_(U)
®
devices have been regis-
“Vehicle”: Select to connect the audio
player from the vehicle's audio system.
“Device”: Select to connect the vehicle's
audio system from the audio player.
Depending on the audio player, the
“Vehicle” or “Device” connection
method may be best. As such, refer
to the manual that comes with the
audio player.
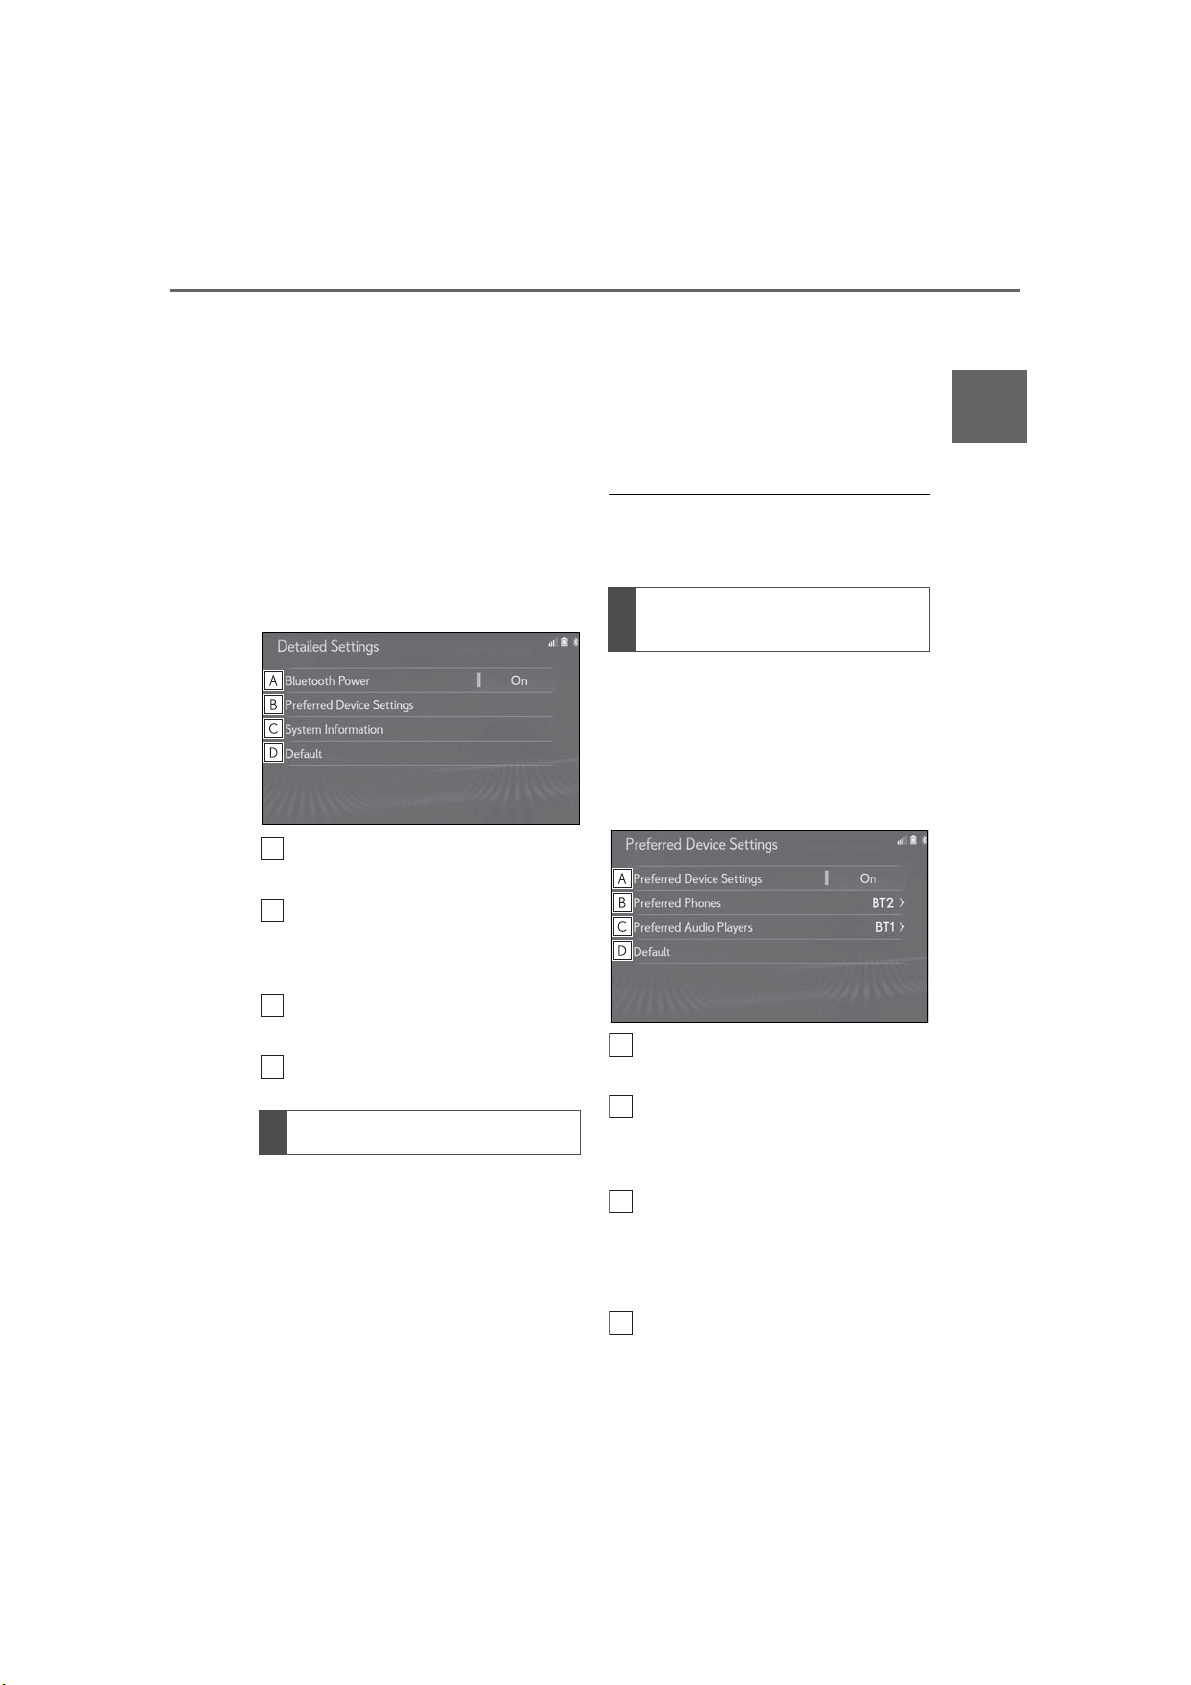
“Detailed Settings” screen
The Bluetooth
®
settings can be con-
Page 47
2-2. Connectivity settings
A
B
C
D
A
B
C
D
47
firmed and changed.
®
1 Display the Bluetooth
setup
screen:
“MENU” button → “Setup” →
“Bluetooth
*
: The Bluetooth® word mark and logos
are registered trademarks owned by
Bluetooth SIG, Inc.
*
”
2 Select “Detailed Settings”.
3 Select the desired item to be set.
®
Select to set Bluetooth
connec-
tion on/off. (→P.47)
®
The Bluetooth
device is disconnected, and the system will not connect
to it next time.
*
: The Bluetooth® word mark and logos
are registered trademarks owned by
Bluetooth SIG, Inc.
● While driving, the auto connection state
can be changed from off to on, but cannot be changed from on to off.
Setting automatic connection
priority
The automatic connection priority of
the registered Bluetooth
®
devices can
be changed.
1 Select “Preferred Device Settings”.
2 Select the desired item to be set.
2
Basic function
Select to change the automatic
connection priority of the regis-
tered Bluetooth
®
devices. (→P.47)
Select to edit the system information. (→P.48)
Select to reset all setup items.
Changing “Bluetooth
1 Select “Bluetooth
When “Bluetooth
The Bluetooth
*
Power” is on:
®
device is automatically
*
*
Power”.
Power”
connected when the engine switch
<power switch> is in ACCESSORY or
IGNITION ON mode <ON mode>.
When “Bluetooth
*
Power” is off:
Select to set automatic connection
priority on/off.
Select to change the automatic
connection priority of the regis-
tered Bluetooth
®
phones. (→P.48)
Select to change the automatic
connection priority of the regis-
tered Bluetooth
®
audio players.
(→P.48)
Select to reset all setup items.
LS500_LS500h_Navi_OM50F66U_(U)
Page 48
48
A
B
CDE
F
G
2-2. Connectivity settings
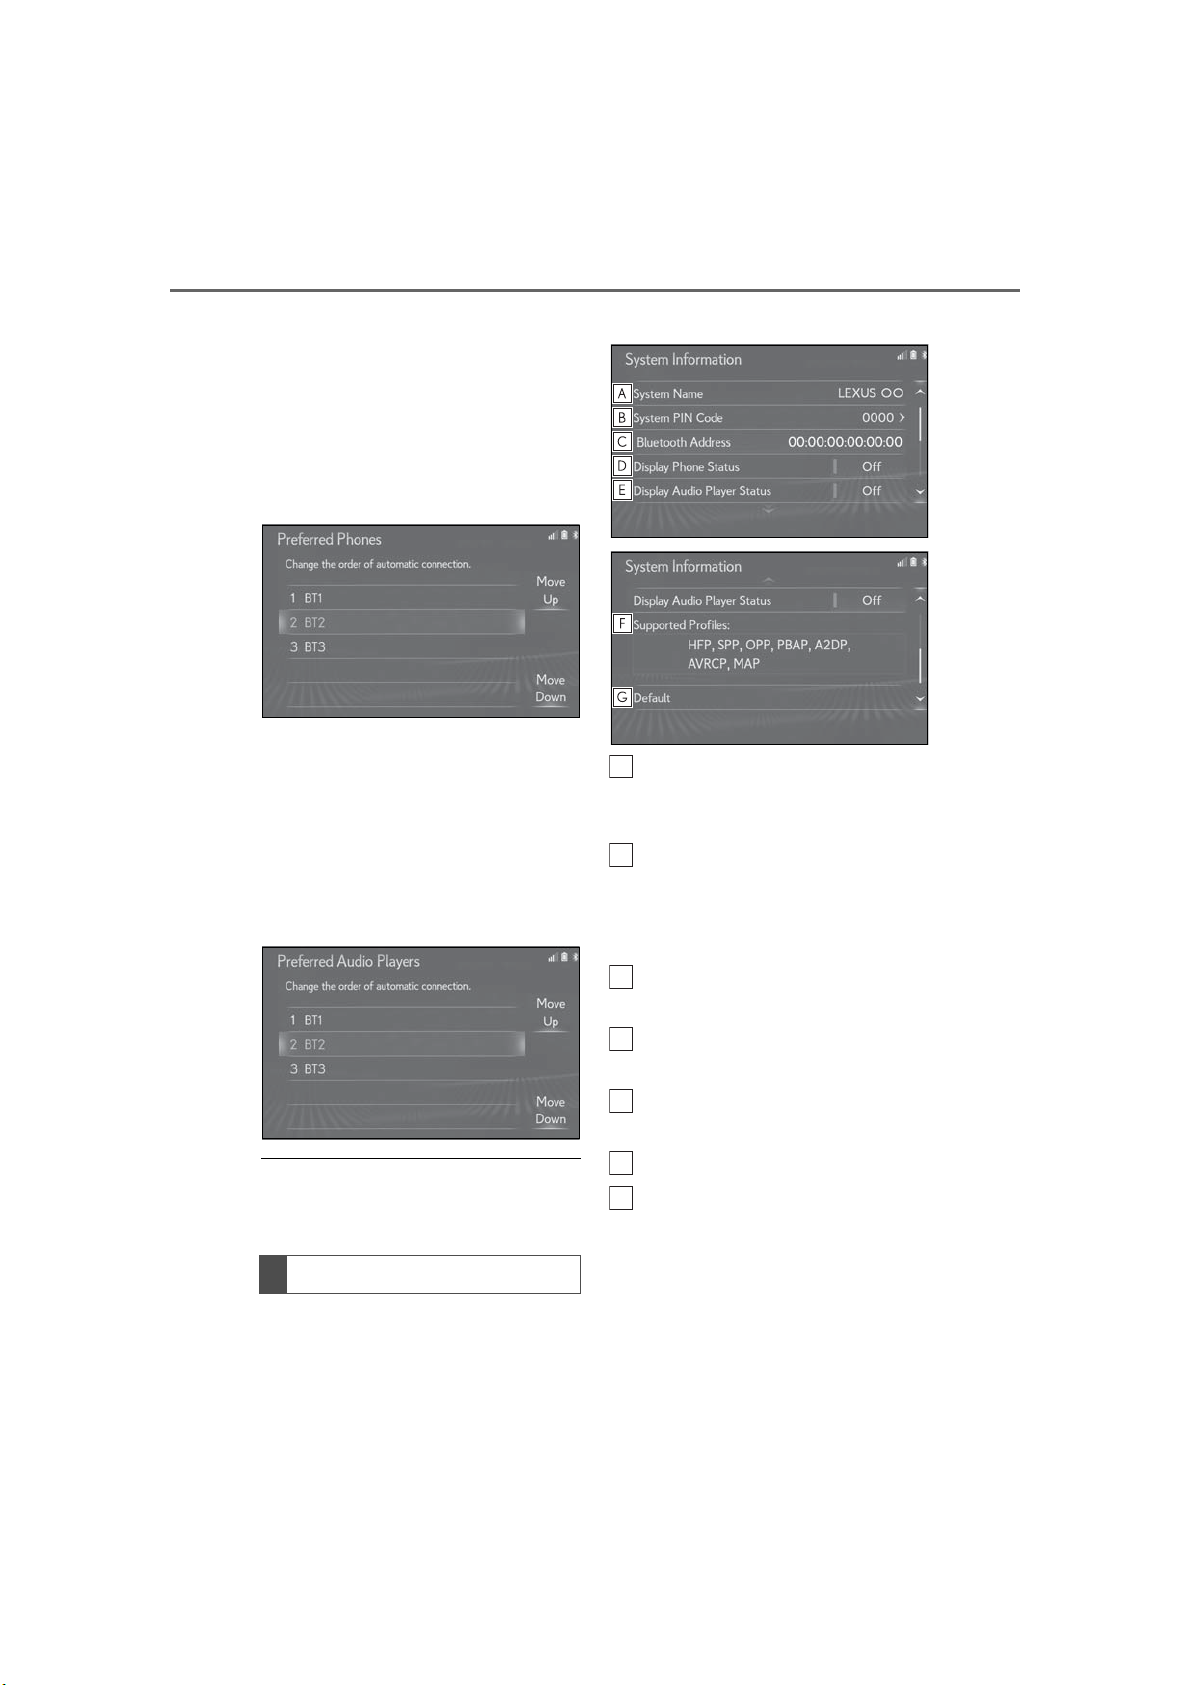
■ Changing phone automatic con-
nection priority
1 Select “Preferred Phones”.
2 Select the desired Bluetooth
®
device and select “Move Up” or
“Move Down” to change the preferred order.
■ Changing audio player automatic
connection priority
1 Select “Preferred Audio Players”.
2 Select the desired Bluetooth
®
device and select “Move Up” or
“Move Down” to change the preferred order.
2 Select the desired item to be set.
Displays system name. Can be
changed to a desired name.
(→P.48)
PIN code used when the
Bluetooth
®
device was registered.
Can be changed to a desired code.
(→P.48)
● A newly registered Bluetooth
will automatically be given the highest
automatic connection priority.
®
Editing the system information
1 Select “System Information”.
LS500_LS500h_Navi_OM50F66U_(U)
device
Device address is unique to the
device and cannot be changed.
Select to set the connection status
display of the phone on/off.
Select to set the connection status
display of the audio player on/off.
Compatibility profile of the system
Select to reset all setup items.
■ Editing the system name
1 Select “System Name”.
2 Enter a name and select “OK”.
■ Editing the PIN code
1 Select “System PIN Code”.
Page 49

2-2. Connectivity settings
49
2 Enter a PIN code and select “OK”.
Wi-Fi® Hotspot
By connecting a device to the vehicle via Wi-Fi
®
, it can access the
internet through the DCM.
To use this function, a Wi-Fi®
Hotspot service subscription
from Verizon Wireless is required.
Contact your Lexus dealer for
details.
This function is not made available
in some countries or areas.
Connecting a device to the
in-vehicle access point
Searching for and connecting a
device to the vehicle access point
®
1 Enable the Wi-Fi
tion. (→P.50)
Hotspot func-
2
Basic function
2 Disable the “Hide Access Point”
function. (→P.50)
3 Search for the vehicle access point
using the device you wish to connect.
For details about operating the
device, refer to the documentation
which came with it.
4 Operate the device to connect it to
the vehicle access point.
To check the vehicle access point
password, check “Password”.
(→P.50)
● Hints for connecting to the vehicle via
LS500_LS500h_Navi_OM50F66U_(U)
Page 50
50
A
B
C
D
E
F
G
2-2. Connectivity settings
®
can be displayed. (→P.50)
Wi-Fi
Connecting a device to the
in-vehicle access point using the
access point name (SSID)
1 Enable the Wi-Fi® Hotspot func-
tion. (→P.50)
2 Enable the “Hide Access Point”
function. (→P.49)
3 Enter the access point name (SSID)
into the device you wish to connect
and connect it.
To check the vehicle access point
password, check “Password”.
(→P.50)
The security settings on the device
must be the same as that displayed
for “Security”. (→P.50)
For details about operating the
device, refer to the documentation
which came with it.
*
: Wi-Fi is a registered mark of the Wi-Fi
®
Alliance
.
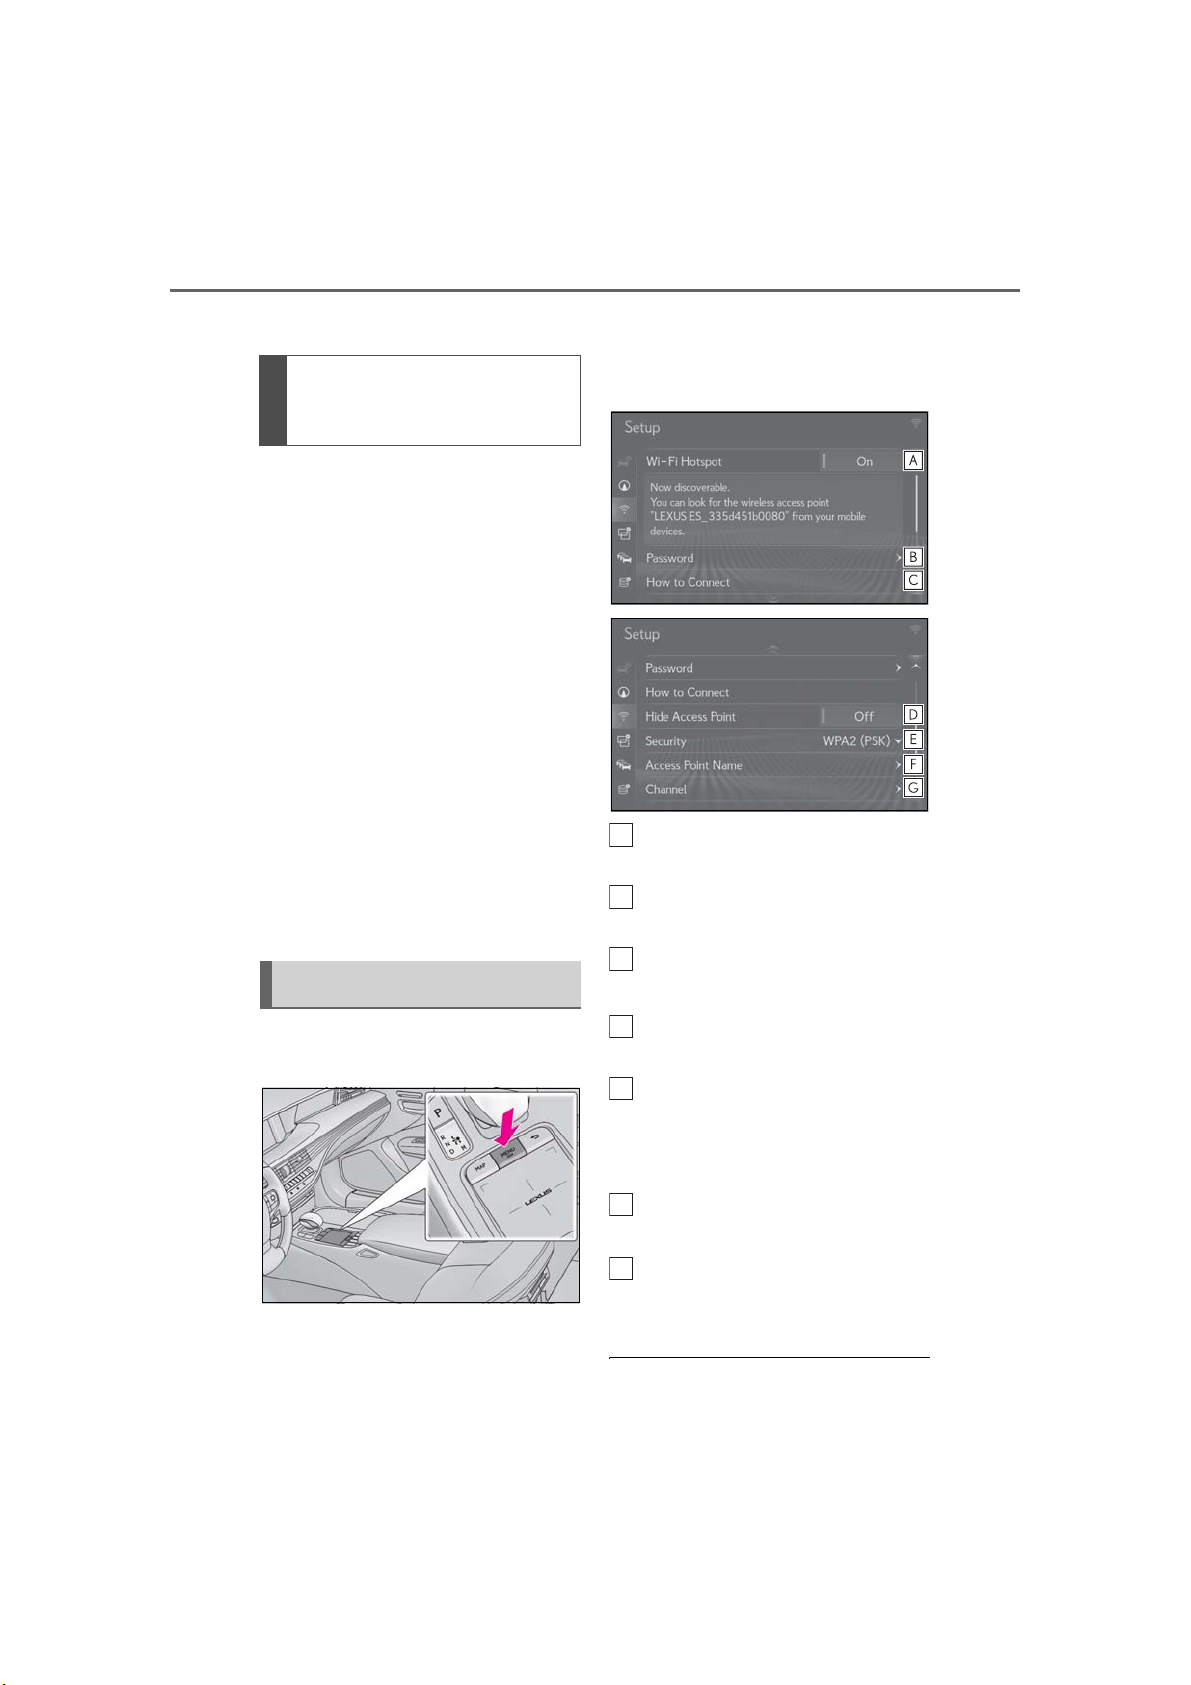
4 Select the desired item to be set.
Select to enable/disable the Wi-Fi
Hotspot function. (→P.51)
Select to check/change the access
point password. (→P.51)
®
Changing the Wi-Fi® settings
1 Press the “MENU” button on the
Remote Touch.
2 Select “Setup”.
3 Select “Wi-Fi
LS500_LS500h_Navi_OM50F66U_(U)
*
” on the sub menu.
Select to display hints for connecting to the vehicle via Wi-Fi
®
.
Select to make the access point
searchable/unsearchable.
Select to check/change the security protocol of the access point (for
authentication and encryption).
(→P.51)
Select to change the access point
name (SSID). (→P.51)
Select to change the Wi-Fi
®
con-
nection channel (within the
2.4GHz frequency band). (→P.51)
● If any settings have been changed, it will
Page 51
2-2. Connectivity settings
ABC
A
51
be necessary to reset the Wi-Fi® system
to complete the changes. To reset the
®
Wi-Fi
system, select “Yes” on the
pop-up displayed after changing the settings.
Enabling/disabling the Wi-Fi
®
hotspot function
When the Wi-Fi® Hotspot function is
enabled, the system checks for a valid
Hotspot service subscription.
If a Hotspot service subscription has
not been started, start the App Suite
application to activate the service subscription. (If the App Suite application
has not been installed, install the application.)
Contact your Lexus dealer for details
about the App Suite application.
Checking/changing the password
Changing the password
1 Select “Change Password”.
2 Enter the desired password and
select “OK”.
The password must be at least 8
characters long.
The password with non-ASCII can-
not be used.
Changing the security protocol
1 Select “Security”.
2 Select the desired security proto-
col.
Changing the access point name
(SSID)
1 Select “Access Point Name”.
2 Enter the desired access point
name (SSID) and select “OK”.
2
Basic function
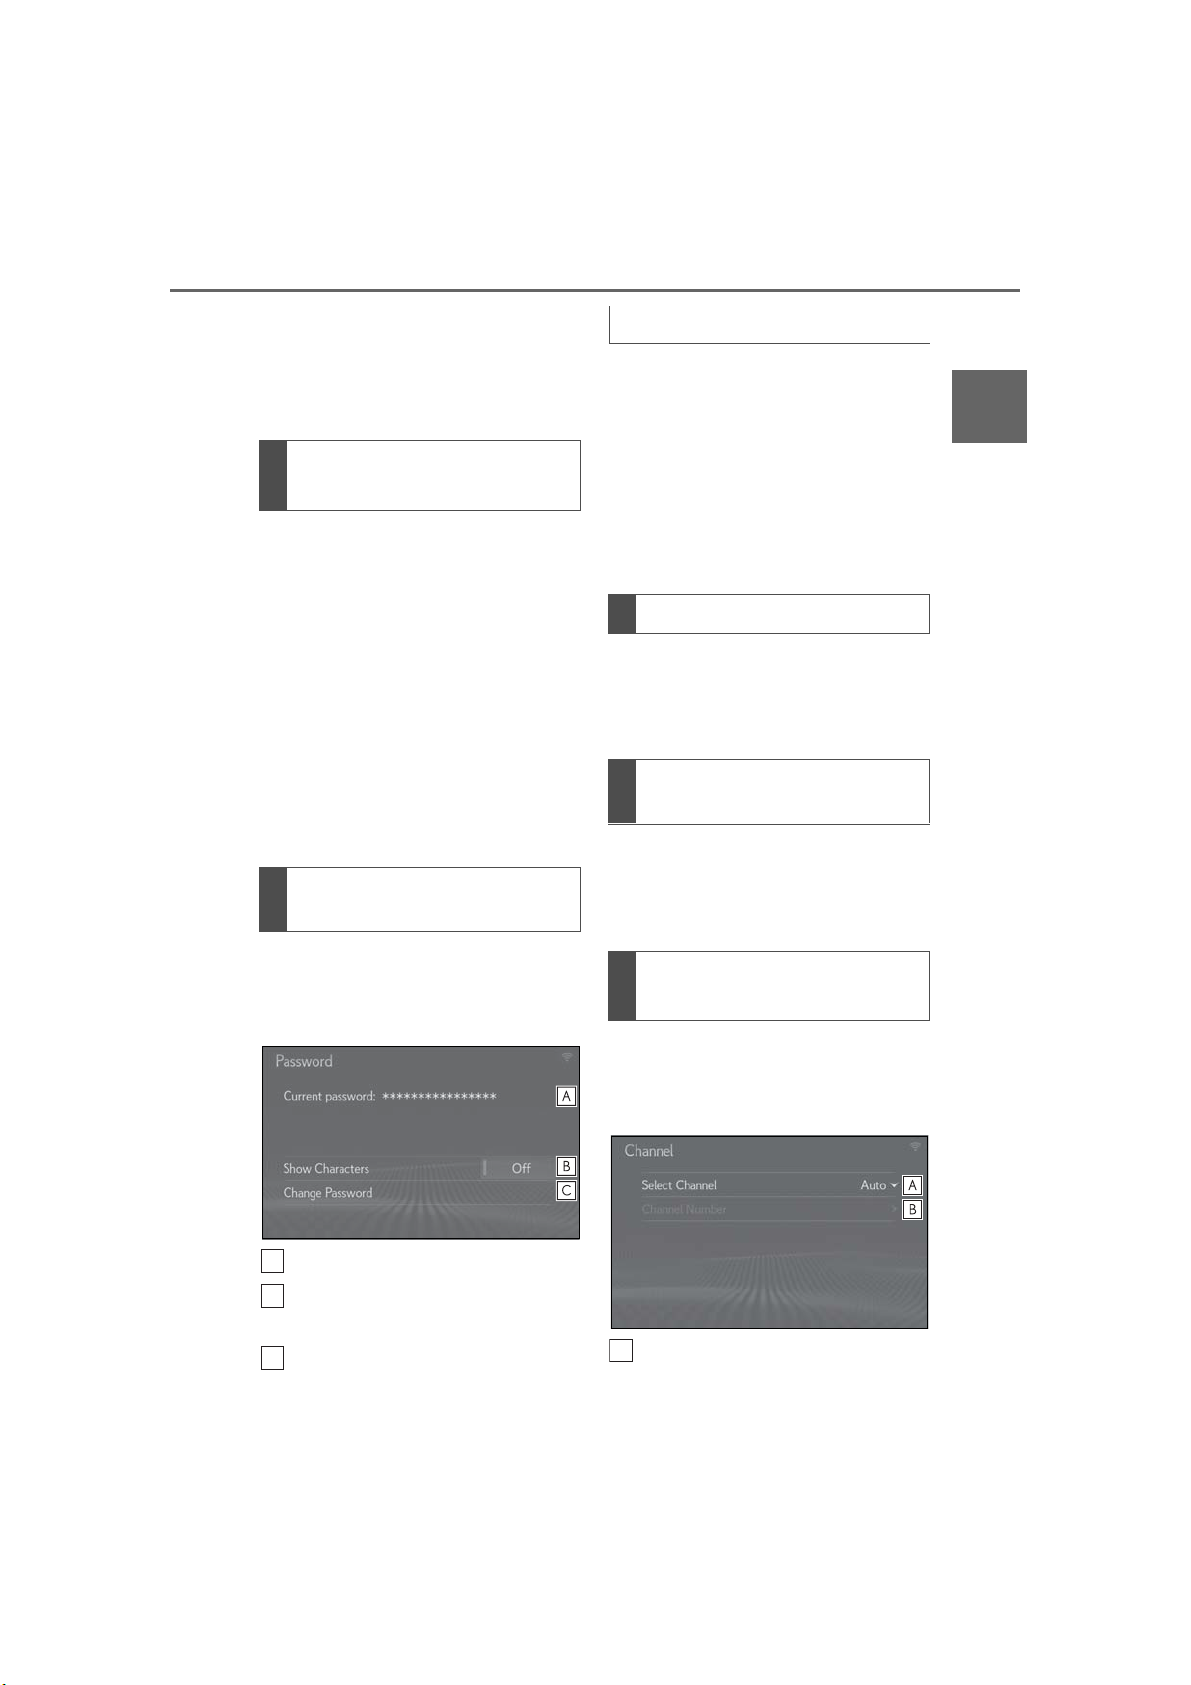
1 Select “Password”.
2 Check that the following screen is
displayed.
Displays the password
Select to display/hide the entered
password.
Select to change the password.
®
Selecting a Wi-Fi
connection
channel
1 Select “Channel”.
2 Check that the following screen is
displayed.
Select to change the channel selection to automatic/manual.
LS500_LS500h_Navi_OM50F66U_(U)
Page 52
52
WARNING
B
2-2. Connectivity settings
When “Manual” is selected, select
to change the channel.
Changing the channel
1 Set “Select Channel” to “Manual”.
2 Select “Channel Number”.
3 Enter the desired channel number
and select “OK”.
Channels 1 through 11 can be
selected.
Wi-Fi® function operating hints
● If a connected device is taken out of the
®
Wi-Fi
connection area, the connection
will be severed.
● If the vehicle is driven out of the cellular
communication coverage area, connecting to the internet via the Wi-Fi
will not be possible.
● If a Bluetooth
device is connected using the Wi-Fi
Hotspot function, the communication
speed may decrease.
● Depending on the environment in which
the access point is used, the communication speed may be low or communication
may not be possible.
● Use Wi-Fi
and legal to do so.
®
device is used while a
®
devices only when safe
®
Hotspot
®
● Your audio unit is fitted with Wi-Fi
antennas. People with implantable cardiac pacemakers, cardiac resynchronization therapy-pacemakers or
implantable cardioverter defibrillators
should maintain a reasonable distance
between themselves and the Wi-Fi
antennas.
The radio waves may affect the operation of such devices.
● Before using Wi-Fi
any electrical medical device other
than implantable cardiac pacemakers,
cardiac resynchronization therapy-pacemakers or implantable cardioverter defibrillators should consult
the manufacturer of the device for
information about its operation under
the influence of radio waves.
Radio waves could have unexpected
effects on the operation of such medical devices.
®
devices, users of
®
®
Conditions displayed with Wi-Fi®
icon
The condition of Wi-Fi® connection
appears on the right upper side of the
screen. (→P.18)
Specifications
Communication standards
802.11b
802.11g
802.11n (2.4GHz)
Security
WPA™
WPA2™
• WPA and WPA2 are registered mark of
®
the Wi-Fi Alliance
.
LS500_LS500h_Navi_OM50F66U_(U)
Page 53
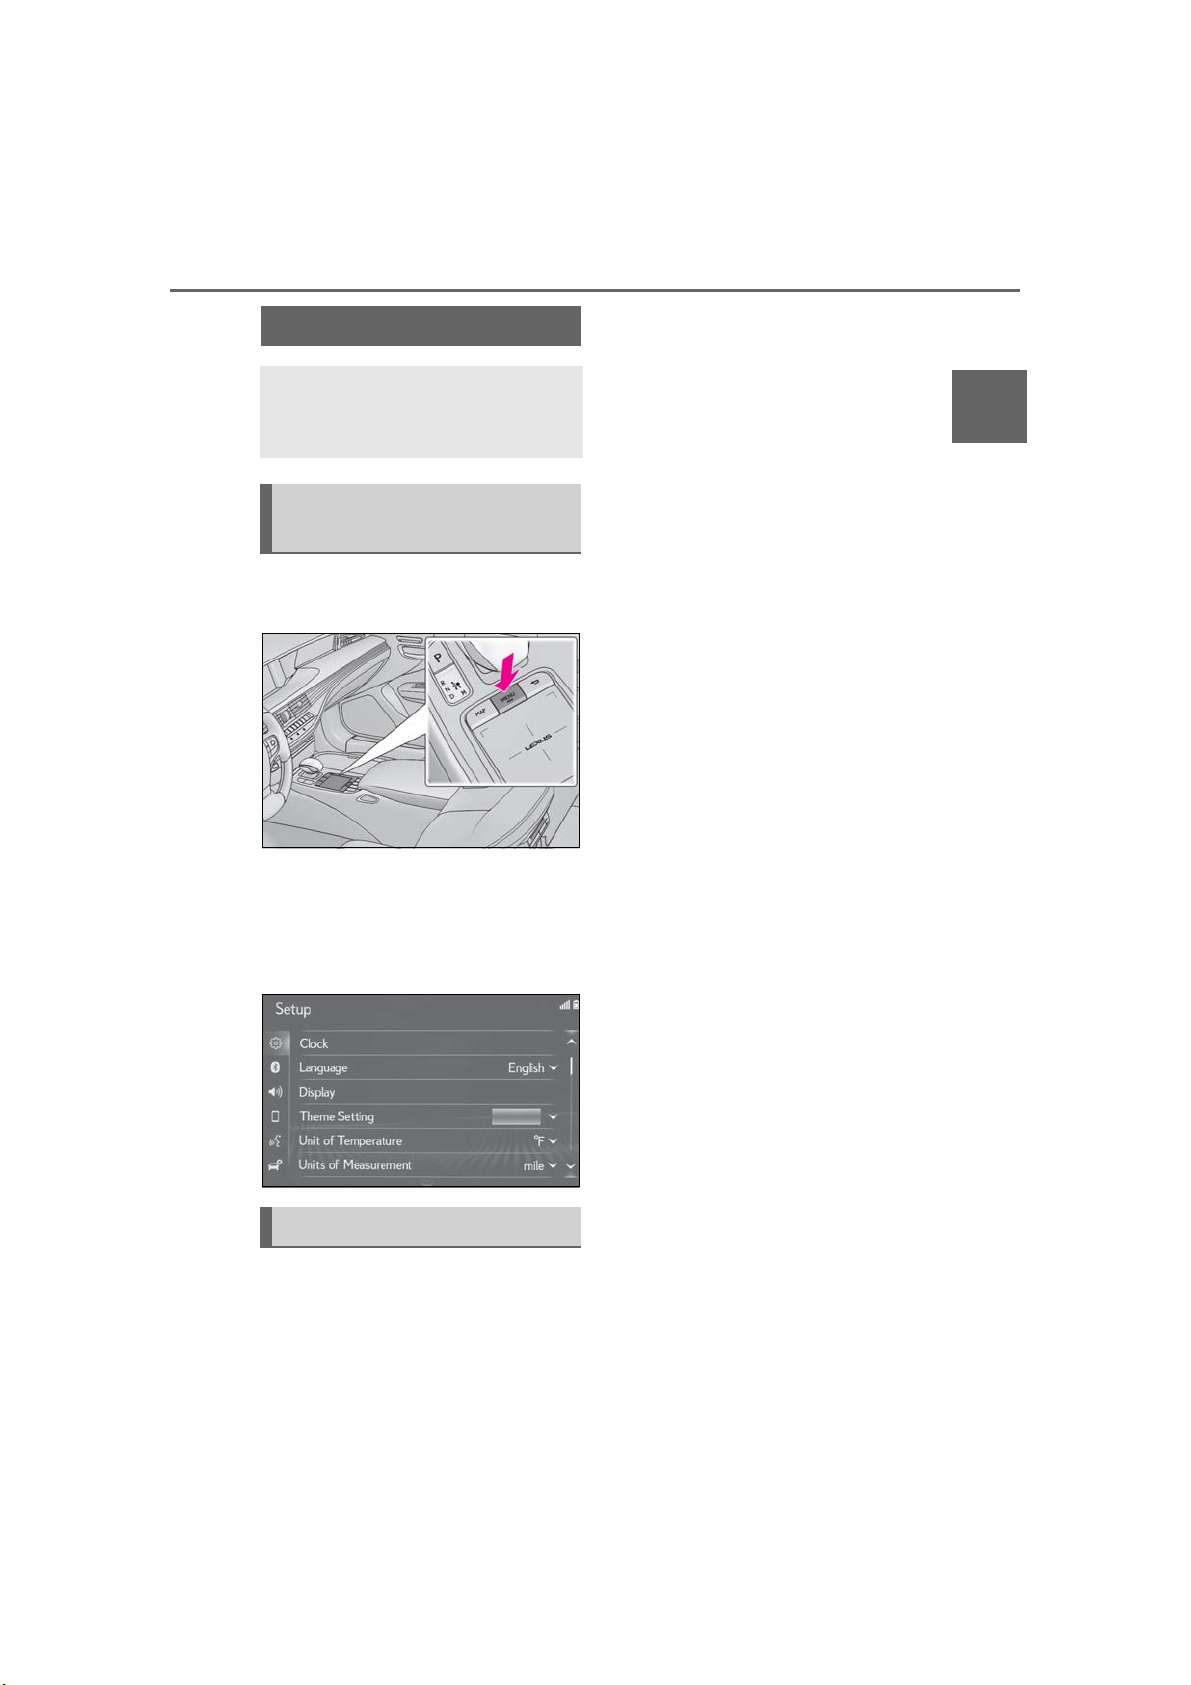
2-3.Other settings
General settings
Settings are available for automatic
screen change, operation sounds,
etc.
Displaying the general settings
screen
1 Press the “MENU” button on the
Remote Touch.
2 Select “Setup”.
If the general settings screen is not
displayed, select “General”.
3 Select the desired items to be set.
General settings screen
“Clock”
Select to change the time zone, set the
daylight saving time on/off and set the
automatic adjustment of the clock on/off.
(→P.54)
2-3. Other settings
“Language”
Select to change the language.
“Display”
Select to adjust the contrast and brightness
of the screens, turn the screen off, etc.
(→P.55)
“Theme Setting”
Select to change the screen theme setting.
“Unit of Temperature”
Select to change the unit of temperature.
*
“Units of Measurement”
Select to change the unit of measure for
*
distance
“Auto Change to Screen”
Select to set automatic screen changes
from the audio/air conditioning control
screen to the map screen to on/off. When
set to on, the screen will automatically
return to the map screen from the audio/air
conditioning control screen after 20 seconds.
/fuel consumption.
*
“Selection Sound”
Select to set the selection sounds on/off.
“Pointer Sound”
Select to set the pointer sounds on/off.
“Error Sound”
Select to set the error sounds on/off.
“Pointer Sound Volume”
Select to adjust the pointer sound volume.
“Feedback Force”
Select to adjust the level of the haptic feedback force (vibration) to the touchpad,
when selecting a screen button.
“Cursor Speed”
Select to adjust the pointer speed.
53
2
Basic function
LS500_LS500h_Navi_OM50F66U_(U)
Page 54
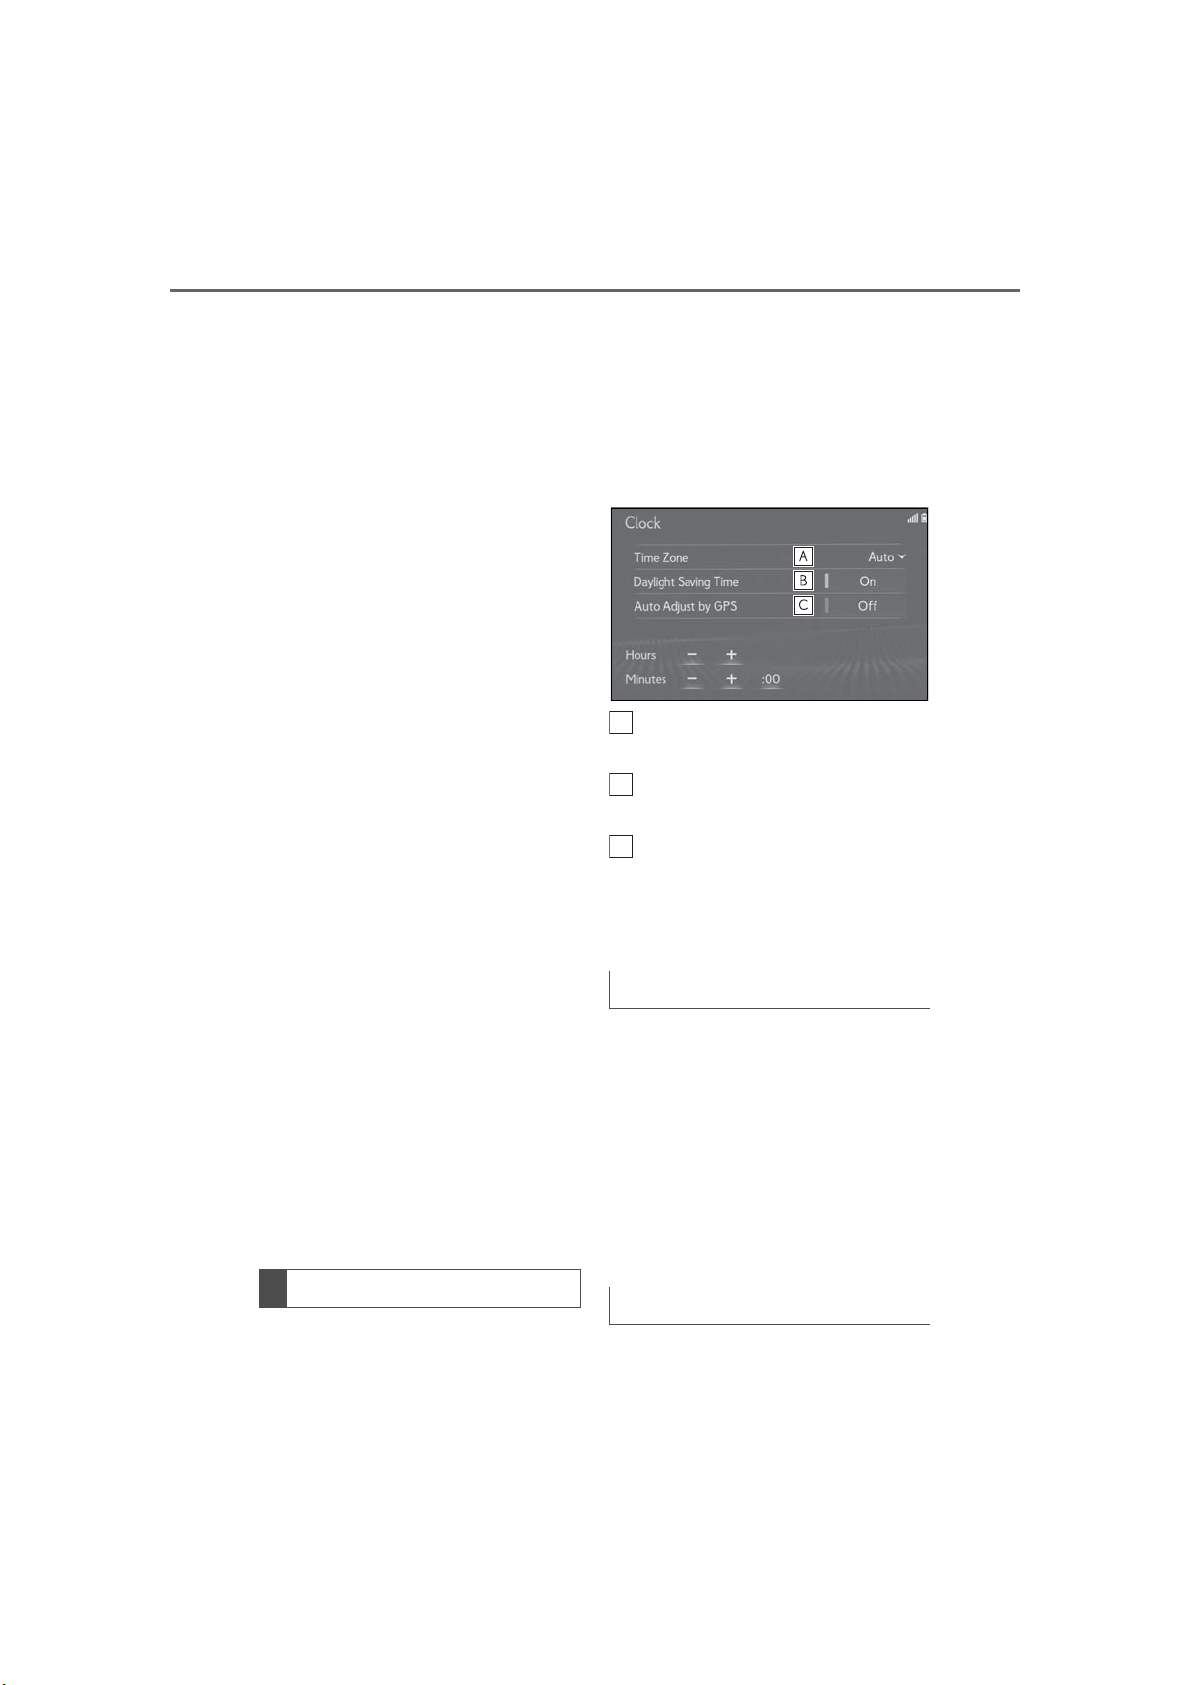
54
A
B
C
2-3. Other settings
“Multi-Touch Command”
Select to set the multi-touch command
on/off.
“Keyboard Layout”
Select to change the keyboard layout.
“Delete Keyboard History”
Select to delete the keyboard history.
“Memorize Keyboard History”
Select to set the memorize keyboard history on/off.
“Delete Search History”
Select to delete the search history.
“Delete Personal Data”
Select to delete personal data. (→P.56)
“Software Update”
Select to update software versions. For
details, contact your Lexus dealer.
“Software Update Setting”
Select to set software update setting.
(→P.56)
*
“Gracenote Database Update”
Select to update “Gracenote” database
versions. For details, contact your Lexus
dealer.
“Software Information”
Select to display the software information.
Notices related to third party software
used in this product are enlisted. (This
includes instructions for obtaining such
software, where applicable.)
*
: With navigation function
automatic time adjustment on/off.
1 Display the general settings screen:
“MENU” button → “Setup” →
“General”
2 Select “Clock”.
3 Select the desired items to be set.
Select to change the time zone.
(→P.54)
Select to set daylight saving time
on/off.
Select to set automatic adjustment
of the clock by GPS on/off. When
set to off, the clock can be manually
adjusted. (→P.54)
Setting the time zone
1 Select “Time Zone”.
2 Select the desired time zone.
If “Auto” is selected, the time zone is
selected automatically by current
vehicle position.
If “Other” is selected, the zone can
be adjusted manually. Select “+” or
“-” to adjust the time zone.
Clock settings
Manual clock setting
Used for changing the time zone and
setting of daylight saving time and
When “Auto Adjust by GPS” is turned
“Off”, the clock can be manually
LS500_LS500h_Navi_OM50F66U_(U)
Page 55
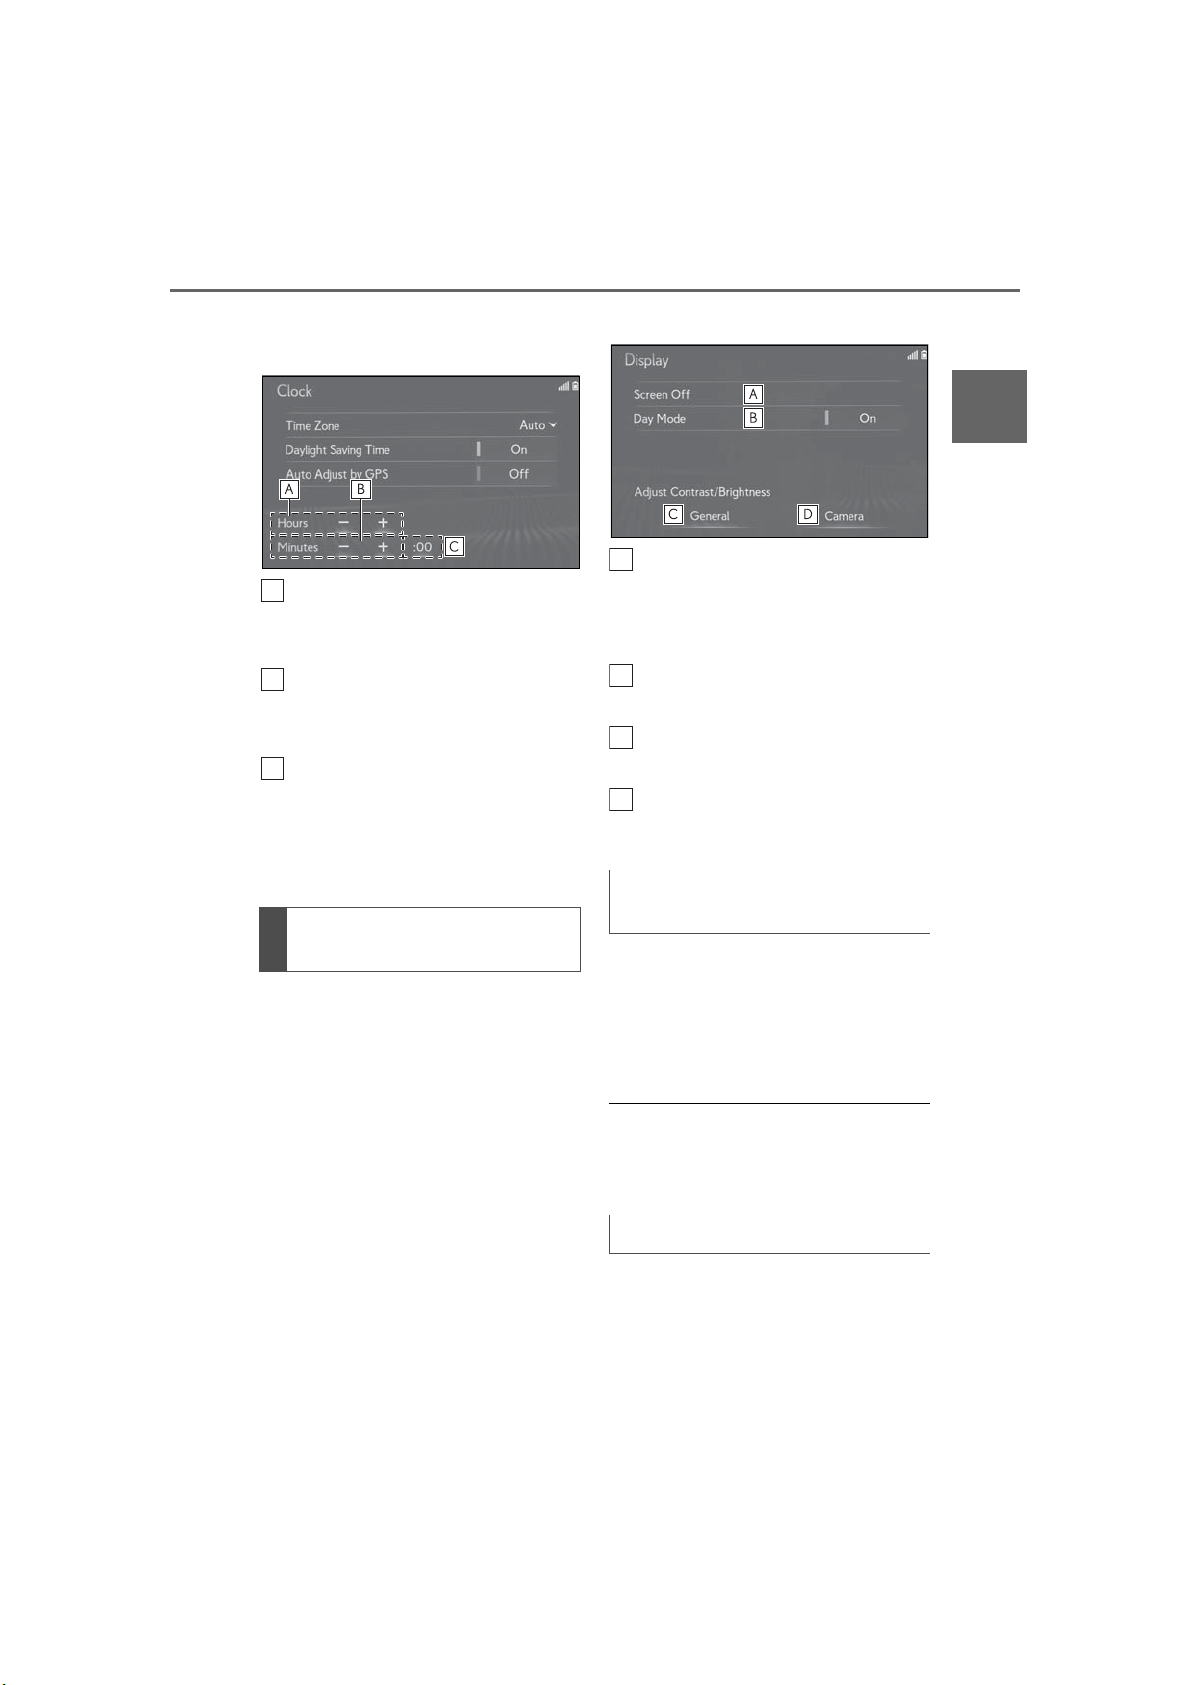
2-3. Other settings
A
B
C
A
BCD
55
adjusted.
1 Select the desired item.
Select “+” to set the time forward
one hour and “-” to set the time
back one hour.
Select “+” to set the time forward
one minute and “-” to set the time
back one minute.
Select to round to the nearest hour.
e.g.
1:00 to 1:29 → 1:00
1:30 to 1:59 → 2:00
Display settings (screen adjustment)
The contrast and brightness of the
screen display and the image of the
camera display can be adjusted. The
screen can also be turned off, and/or
changed to either day or night mode.
(For information regarding
audio/visual screen adjustment:
→P.110)
1 Display the general settings screen:
“MENU” button → “Setup” →
“General”
2 Select “Display”.
3 Select the desired items to be set.
2
Basic function
Select to turn the screen off. To turn
it on, press any button on the audio
control switch or on the Remote
Touch.
Select to turn day mode on/off.
(→P.55)
Select to adjust the screen display.
(→P.55)
Select to adjust the camera display.
(→P.55)
Changing between day and night
mode
Depending on the position of the headlight switch, the screen changes to day
or night mode. This feature is available
when the headlight is switched on.
1 Select “Day Mode”.
● If the screen is set to day mode with the
headlight switch turned on, this condition
is memorized even with the engine
<hybrid system> turned off.
Adjusting the contrast/brightness
The contrast and brightness of the
screen can be adjusted according to
the brightness of your surroundings.
1 Select “General” or “Camera”.
LS500_LS500h_Navi_OM50F66U_(U)
Page 56
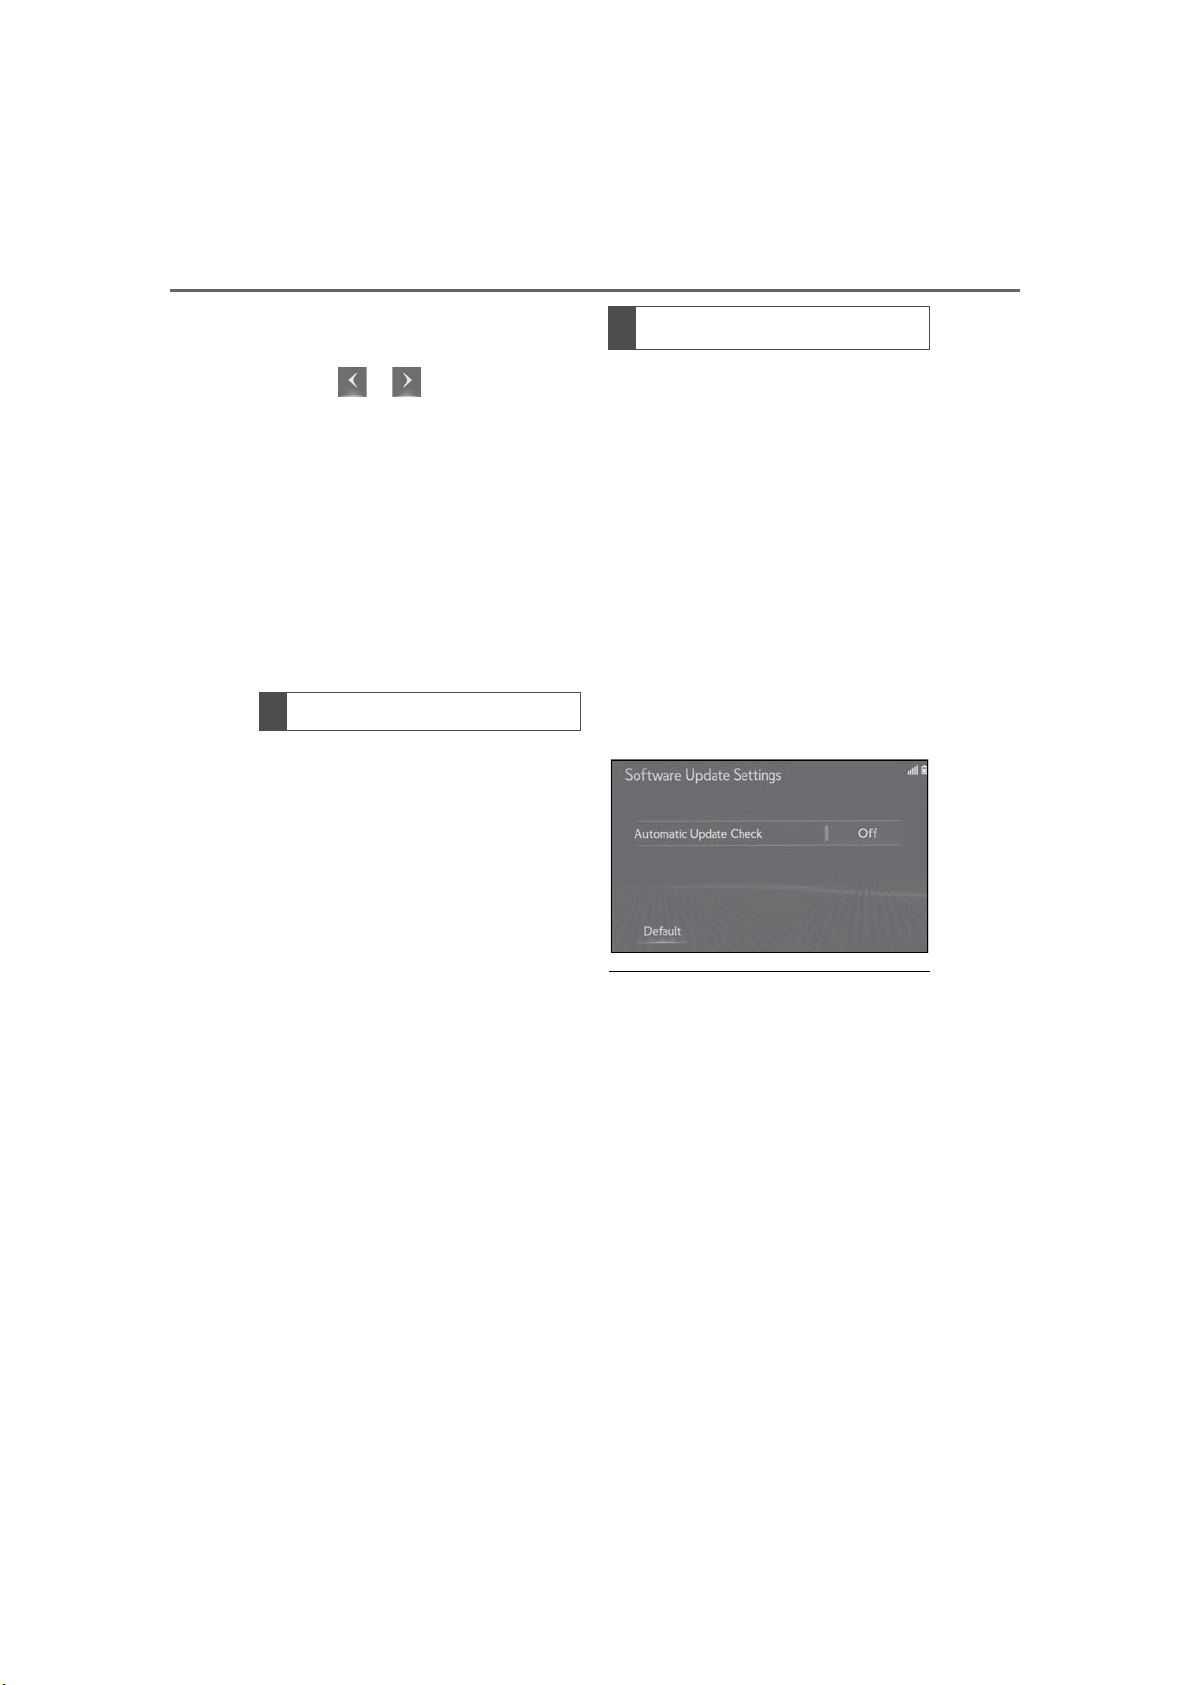
56
2-3. Other settings
2 Select the desired item.
“Display (General)” screen only:
Select or to select the
desired display.
•“Contrast”
“+”: Select to strengthen the contrast of the
screen.
“-”: Select to weaken the contrast of the
screen.
•“Brightness”
“+”: Select to brighten the screen.
“-”: Select to darken the screen.
Deleting personal data
Registered or changed personal settings will be deleted or returned to
their default conditions.
1 Display the general settings screen:
“MENU” button → “Setup” →
“General”
Software update settings
*
: With navigation function
*
When the automatic update check
function is enabled, if a software
update is available from the Lexus
Enform center, a message will be displayed.
1 Display the general settings screen:
“MENU” button → “Setup” →
“General”
2 Select “Software Update Setting”.
3 Select “Automatic Update Check”
to enable/disable the automatic
update check function.
2 Select “Delete Personal Data”.
3 Select “Delete”.
4 Select “Yes” when the confirmation
screen appears.
Examples of settings that can be returned
to their default conditions:
General settings
Navigation settings
*
Audio settings
Phone settings
Lexus Enform App Suite 2.0 set-
tings
etc.
*
: With navigation function
● When software update information is dis-
played, contact your Lexus dealer.
LS500_LS500h_Navi_OM50F66U_(U)
Page 57
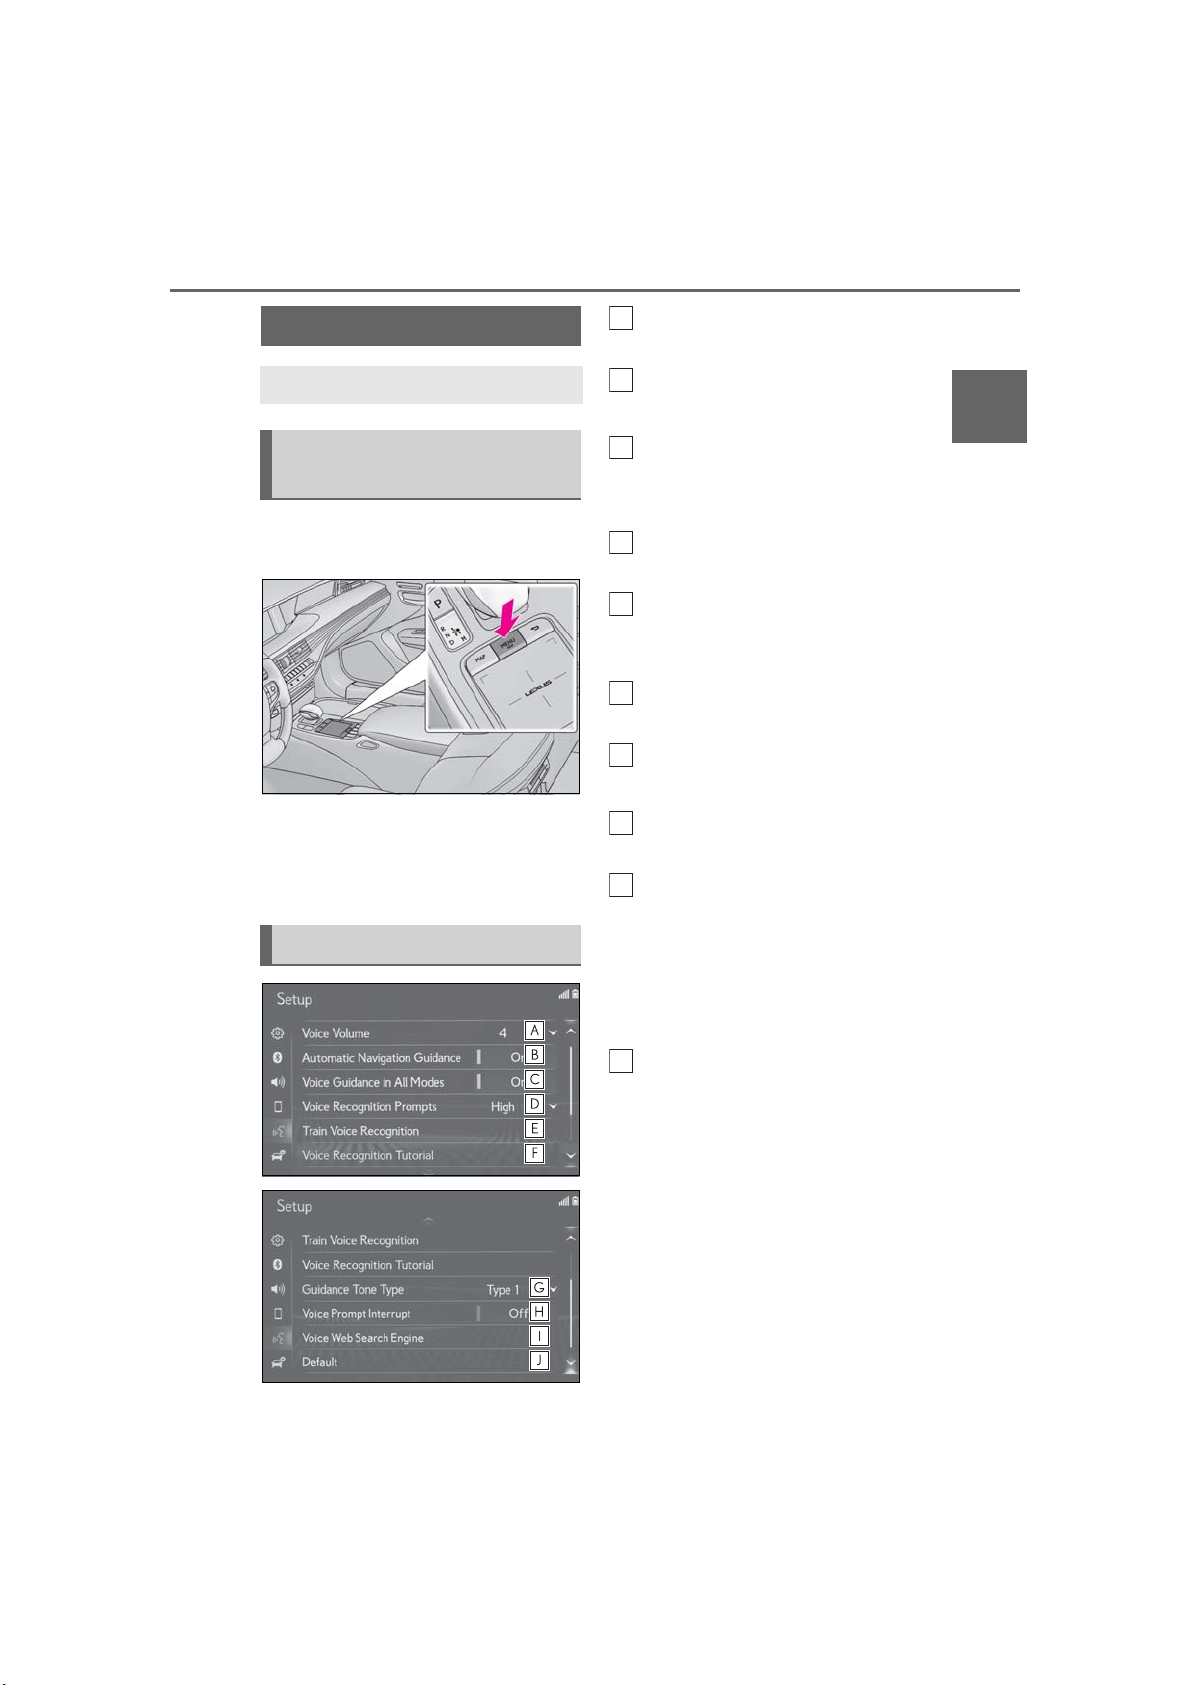
2-3. Other settings
A
B
CDE
F
G
H
I
J
57
Voice settings
Voice volume, etc. can be set.
Displaying the voice settings
screen
1 Press the “MENU” button on the
Remote Touch.
2 Select “Setup”.
3 Select “Voice” on the sub menu.
4 Select the desired items to be set.
Voice settings screen
Select to adjust the volume of voice
guidance.
Select to set the voice guidance
during route guidance on/off.
*
Select to set the voice guidance
during audio/visual and/or air con-
ditioning system use on/off.
*
Select to set the voice recognition
prompts.
Select to train voice recognition.
The voice command system adapt
the user accent.
Select to start the voice recognition
tutorial.
Select to set the beep sound of navigation guidance.
*
Select to set the voice prompt
interrupt on/off.
Select to set the web search
engine. The search engines are
Lexus Enform App Suite 2.0 applications. This item is displayed when
two or more POI search applica-
tions are installed.
*
(→P.340)
2
Basic function
LS500_LS500h_Navi_OM50F66U_(U)
Select to reset all setup items.
*
: With navigation function
Page 58
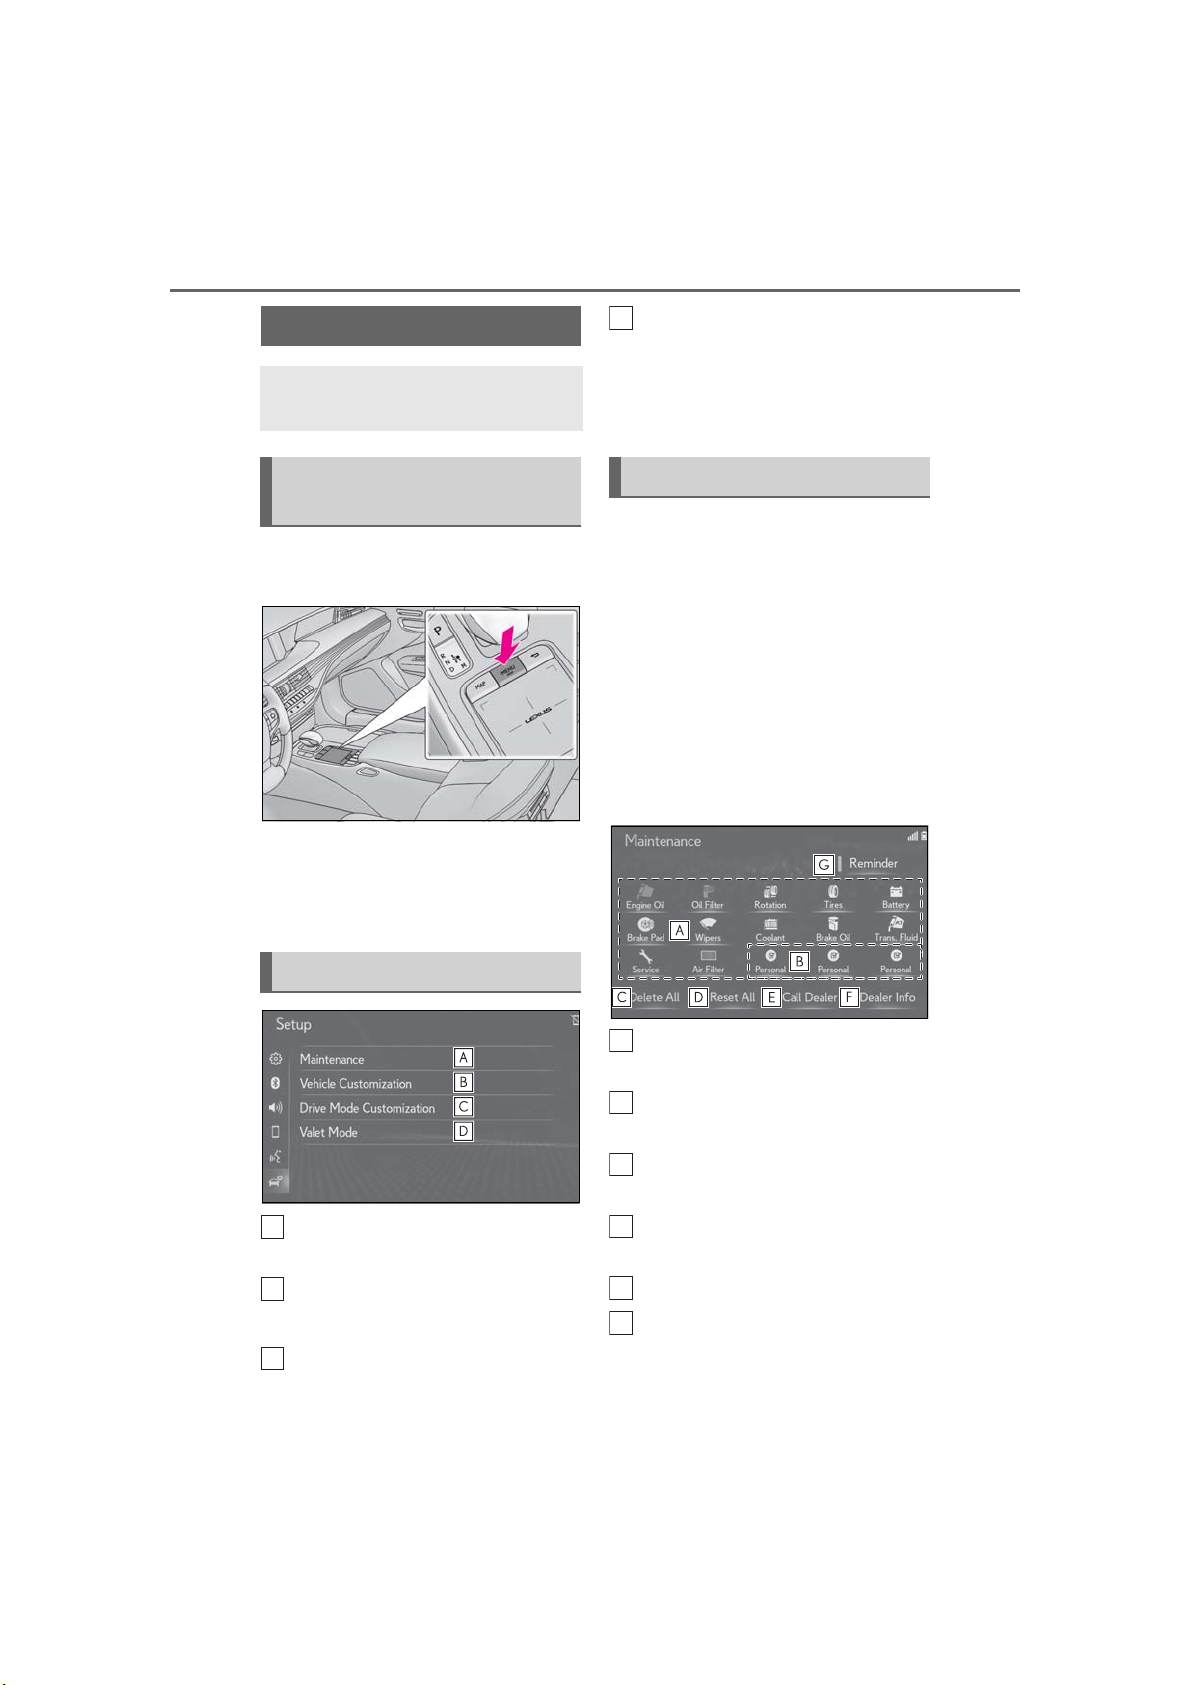
58
A
B
C
D
A
B
C
DEF
2-3. Other settings
Vehicle settings
Settings are available for maintenance, vehicle customization, etc.
Displaying the vehicle settings
screen
1 Press the “MENU” button on the
Remote Touch.
2 Select “Setup”.
3 Select “Vehicle” on the sub menu.
Select to set valet mode. (→P.60)
*1
: With navigation function
*2
: Refer to the “OWNER’S MANUAL”
*3
: If equipped
Maintenance
*
: With navigation function
*
When the system is turned on, the
maintenance reminder screen displays
when it is time to replace a part or certain components. (→P.26)
1 Display the vehicle settings screen:
“MENU” button → “Setup” →
“Vehicle”
2 Select “Maintenance”.
3 Select the desired item.
4 Select the desired items to be set.
Vehicle settings screen
Select to set maintenance.
(→P.58)
Select to set vehicle customiza-
*2
tion.
Select to set driving mode.
*1
*2, 3
Select to set a reminder for a part
or component. (→P.59)
Select to add a reminder other than
the provided ones.
Select to cancel all reminders
which have been entered.
Select to reset all reminders which
have expired.
Select to call the registered dealer.
Select to register/edit dealer information. (→P.59)
LS500_LS500h_Navi_OM50F66U_(U)
Page 59
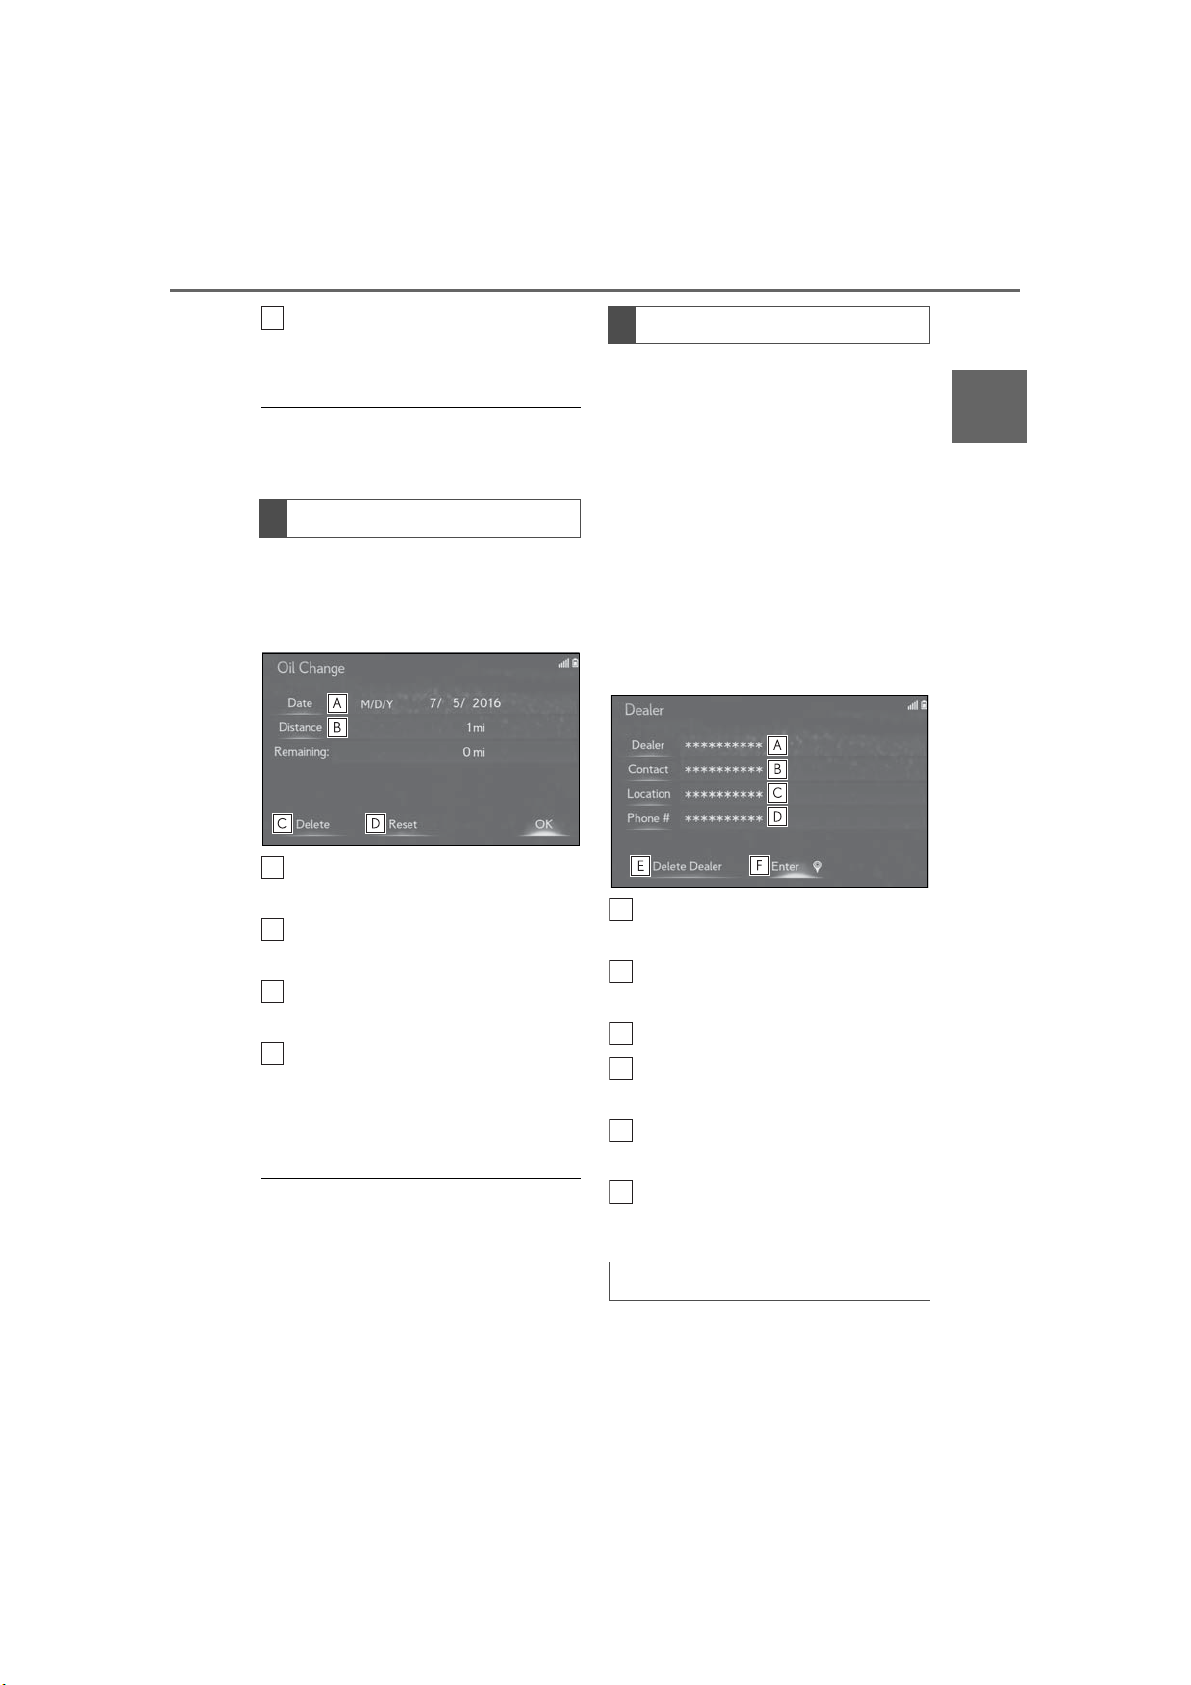
2-3. Other settings
GABCD
A
B
C
D
E
F
59
The system is set to give maintenance information with the maintenance reminder screen. (→P.26)
● When the vehicle needs to be serviced,
the screen button color will change to
orange.
Maintenance information setting
1 Select the desired part or compo-
nent screen button.
2 Set the conditions.
Select to enter the next maintenance date.
Select to enter the driving distance
until the next maintenance check.
Select to cancel the conditions
which have been entered.
Select to reset the conditions which
have expired.
3 Select “OK” after entering the con-
ditions.
Dealer setting
Dealer information can be registered
in the system. With dealer information
registered, route guidance to the
dealer is available.
1 Select “Set Dealer”.
2 Select the desired item to search
for the location. (→P.72)
The editing dealer screen appears
after setting the location.
3 Select the desired items to be
edited.
Select to enter the name of a
dealer. (→P.59)
Select to enter the name of a dealer
member. (→P.59)
Select to set the location. (→P.60)
Select to enter the phone number.
(→P.60)
Select to delete the dealer information displayed on the screen.
2
Basic function
● For scheduled maintenance information,
refer to “Warranty and Service Guide”,
“Owner’s Manual Supplement” or
“Scheduled Maintenance”.
● Depending on driving or road conditions,
the actual date and distance that maintenance should be performed may differ
from the stored date and distance in the
system.
LS500_LS500h_Navi_OM50F66U_(U)
Select to set the displayed dealer as
a destination. (→P.79)
Editing dealer or contact name
1 Select “Dealer” or “Contact”.
2 Enter the name and select “OK”.
Page 60
60
2-3. Other settings
Editing the location
1 Select “Location”.
2 Scroll the map to the desired point
(→P.66) and select “Enter”.
Editing phone number
1 Select “Phone #”.
2 Enter the phone number and select
“OK”.
Setting the valet mode
The security system can be set to on by
entering a security code (4-digit number).
When set to on, the system will
become inoperative once the electrical power source is disconnected until
the security code is entered.
1 Display the vehicle settings screen:
● If the 4-digit personal code is forgotten,
please contact your Lexus dealer.
If the valet mode has been activated
1 Enter the 4-digit personal code and
select “OK”.
● If an incorrect security code (4-digit
number) is entered 6 times, the system
will not accept another security code
(4-digit number) for 10 minutes.
“MENU” button → “Setup” →
“Vehicle”
2 Select “Valet Mode”.
3 Enter the 4-digit personal code and
select “OK”.
4 Enter the same 4-digit personal
code again and select “OK”.
The system will request that you
input the security code again to
confirm that you remember it correctly.
When valet mode activates, the sys-
tem stops and a security code
(4-digit number) standby screen is
displayed.
LS500_LS500h_Navi_OM50F66U_(U)
Page 61

61
Navigation system
.
3-1. Basic operation
Navigation....................................... 62
Map screen operation ............... 64
Map screen information............ 67
Traffic information........................ 70
3-2. Destination search
Destination search operation
............................................................72
Starting route guidance............. 79
3-3. Route guidance
Route guidance screen.............. 83
Typical voice guidance prompts
........................................................... 86
Editing route................................... 87
3-4. Setup
Navigation settings...................... 89
Detailed navigation settings ....94
Traffic settings................................ 97
Use of information accumulated
by navigation system............... 101
3-5. Tips for the navigation system
GPS (Global Positioning System)
......................................................... 102
Map database version and cov-
ered area ....................................104
3
3
Navigation system
LS500_LS500h_Navi_OM50F66U_(U)
Page 62
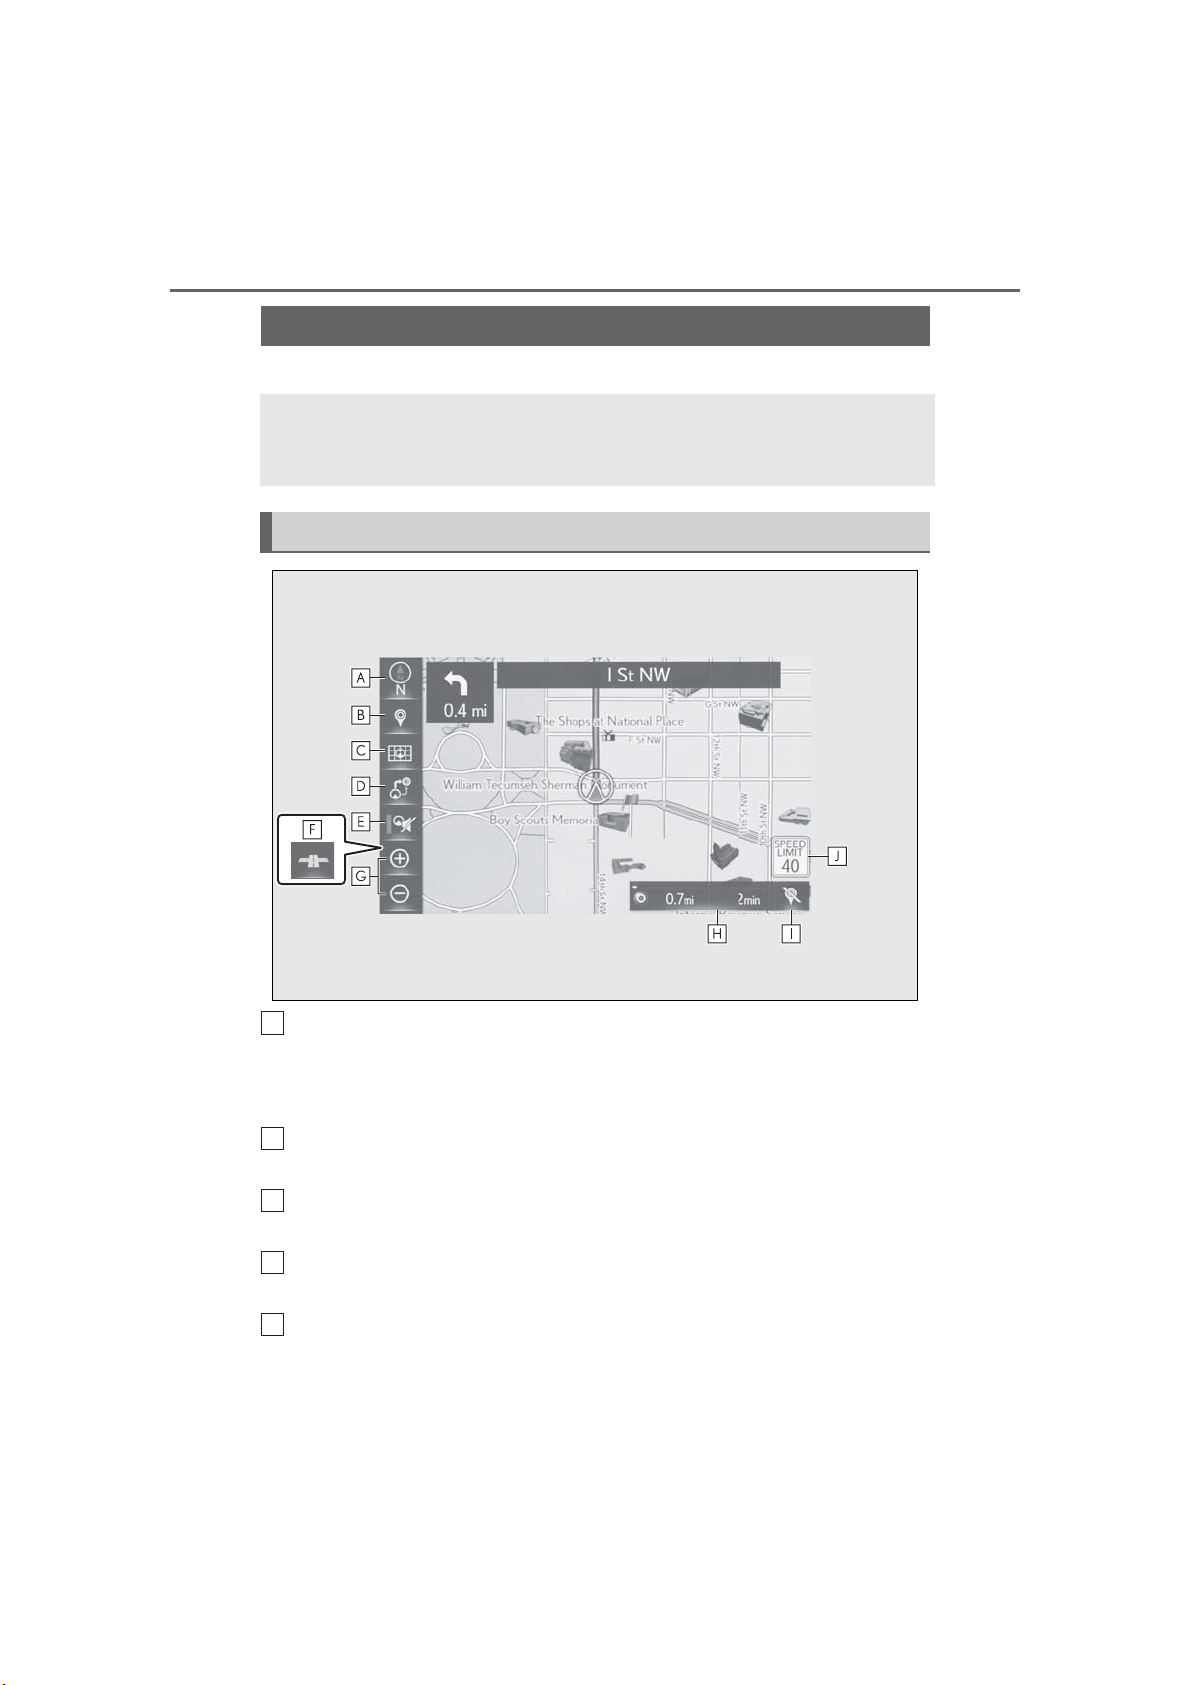
62
A
B
C
D
E
3-1.Basic operation
Navigation
*
: With navigation function
3-1. Basic operation
*
The navigation system indicates your present position and assists in locating a
desired destination. To display the map screen, press the “MAP” button on the
Remote Touch.
Map screen overview
2D north up, 2D heading up or 3D heading up symbol (→P.65)
Indicates whether the map orientation is set to north-up or heading-up. The letter(s) under this symbol indicate the vehicle’s heading direction (e.g. N for
north). In 3D map, only a heading-up view is available.
Destination button (→P.72)
Select to display the destination screen.
Map options button (→P.67)
Select to display the map options screen.
Route options button (→P.87)
Select to display the route options screen.
Mute button
Select to mute the voice guidance.
LS500_LS500h_Navi_OM50F66U_(U)
Page 63
3-1. Basic operation
FGH
I
J
Micro city map button (→P.64)
Select to display the micro city map screen.
Zoom in/out button (→P.64)
Select to magnify or reduce the map scale. When either button is selected, the
map scale indicator bar appears at the bottom of the screen.
63
Route information bar (→P.83)
Displays the distance with the estimated travel time/arrival time to the destination. The route information bar fills from left to right as the vehicle progresses
on the route.
Delete destination button (→P.23)
Select to delete destinations.
Speed limit icon (→P.67)
Indicates the speed limit on the current road. The display of the speed limit icon
can be set to on/off.
● When the vehicle is not receiving GPS
signals, such as when driving in a tunnel,
will be displayed at the bot-
tom left corner of the screen.
● Certain screen buttons on the map
screen will disappear several seconds
after stop operating the Remote Touch.
This setting can be changed so that all the
screen buttons will always be displayed.
(→P.94)
● Press the “MAP” button on the Remote
Touch to display the address of the current position on the map screen or repeat
voice guidance.
3
Navigation system
LS500_LS500h_Navi_OM50F66U_(U)
Page 64
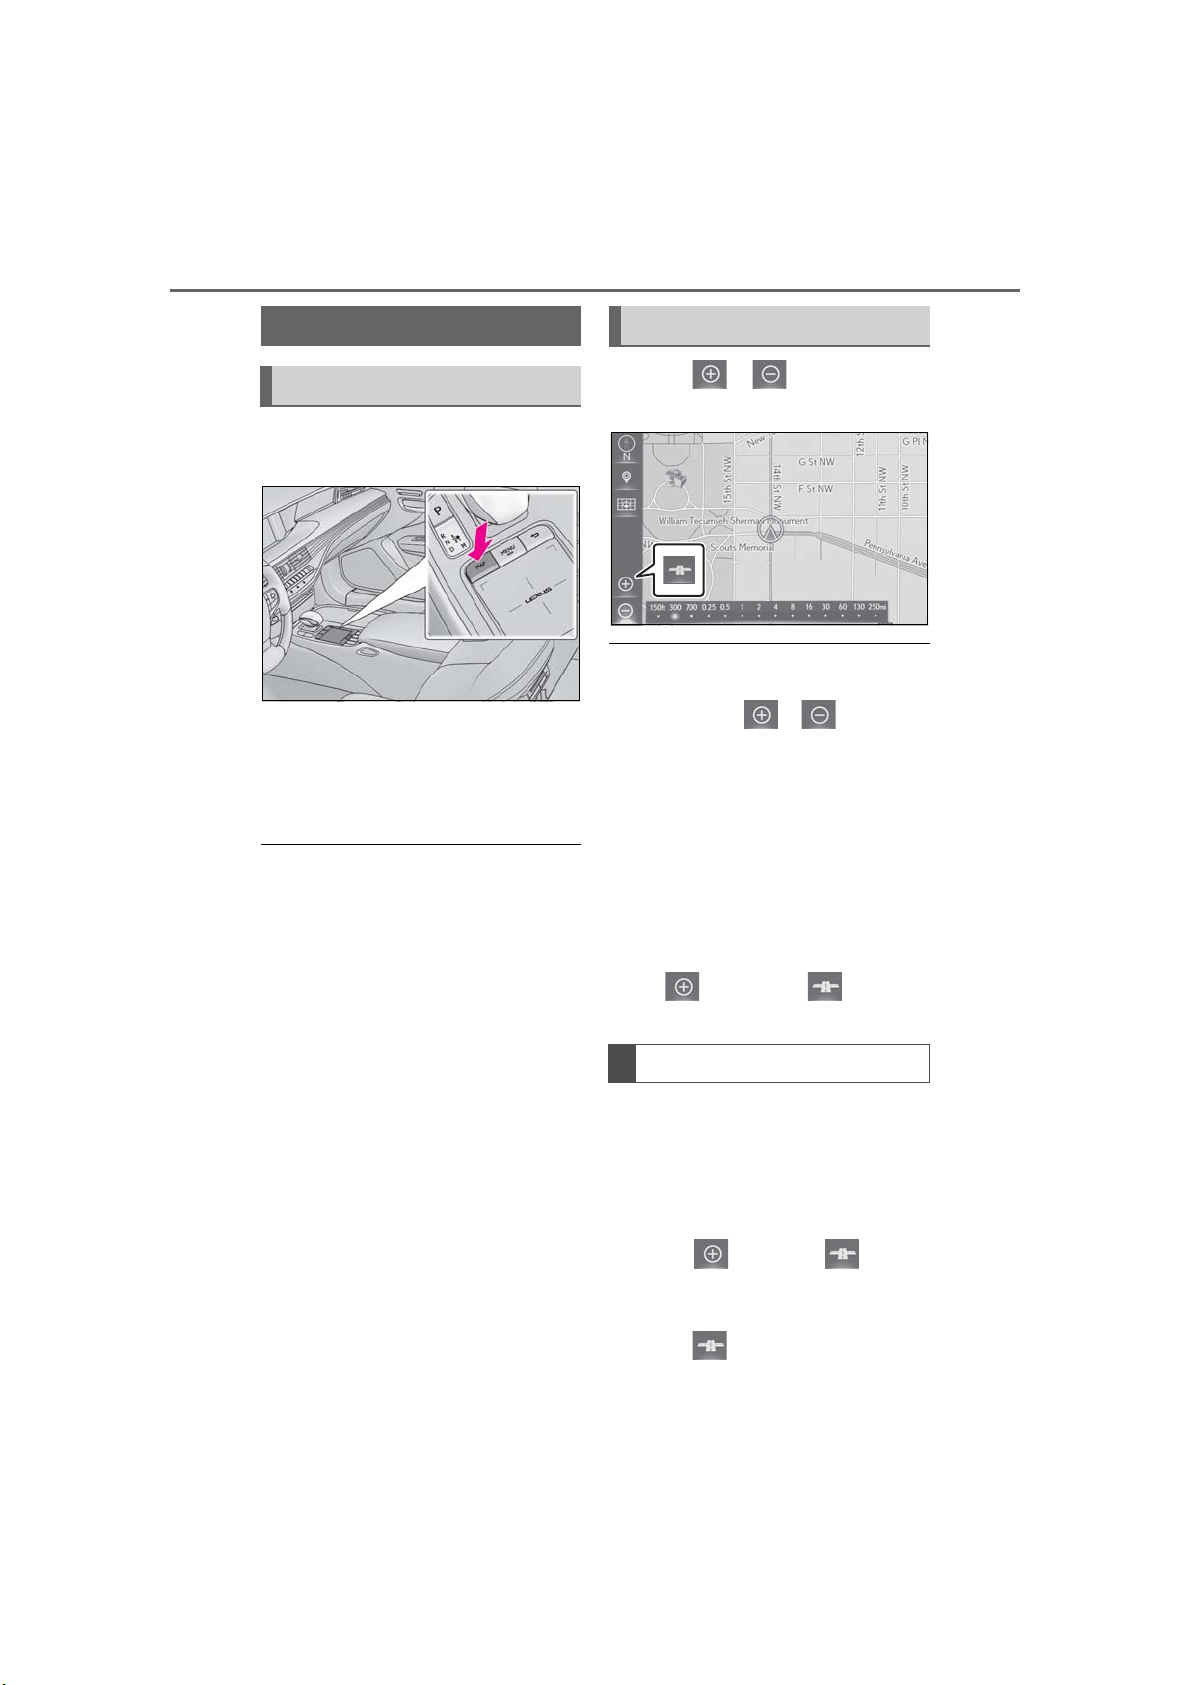
64
3-1. Basic operation
Map screen operation
Current position display
1 Press the “MAP” button on the
Remote Touch.
2 Check that the current position
map is displayed.
To correct the current position man-
ually: →P.96
● While driving, the current position mark
is fixed on the screen and the map moves.
● The current position is automatically set
as the vehicle receives signals from the
GPS (Global Positioning System). If the
current position is not correct, it is automatically corrected after the vehicle
receives signals from the GPS.
● After the 12-volt battery disconnection,
or on a new vehicle, the current position
may not be correct. As soon as the system receives signals from the GPS, the
correct current position is displayed.
Map scale
1 Select or to change the
scale of the map screen.
● The scale indicator bar appears at the
bottom of the screen.
● Select and hold or to continue
changing the scale of the map screen.
● The scale of the map screen can also be
changed by selecting the scale bar
directly. This function is not available
while driving.
● The scale of the map screen can be
changed on the touchpad of the Remote
Touch with your finger.
Pinch out on the touchpad to zoom in and
pinch in to zoom out. (→P.29)
● In areas where a micro city map is avail-
able, will change to when the
map screen is set to the smallest scale.
Micro city map
For areas covered by the micro city
map (some major cities), a micro city
map on a scale of 75 ft. (25 m) can be
selected.
LS500_LS500h_Navi_OM50F66U_(U)
When the map is scaled down to 150
ft. (50 m), changes to and
can be selected to display the micro
city map.
1 Select on the map screen.
Page 65
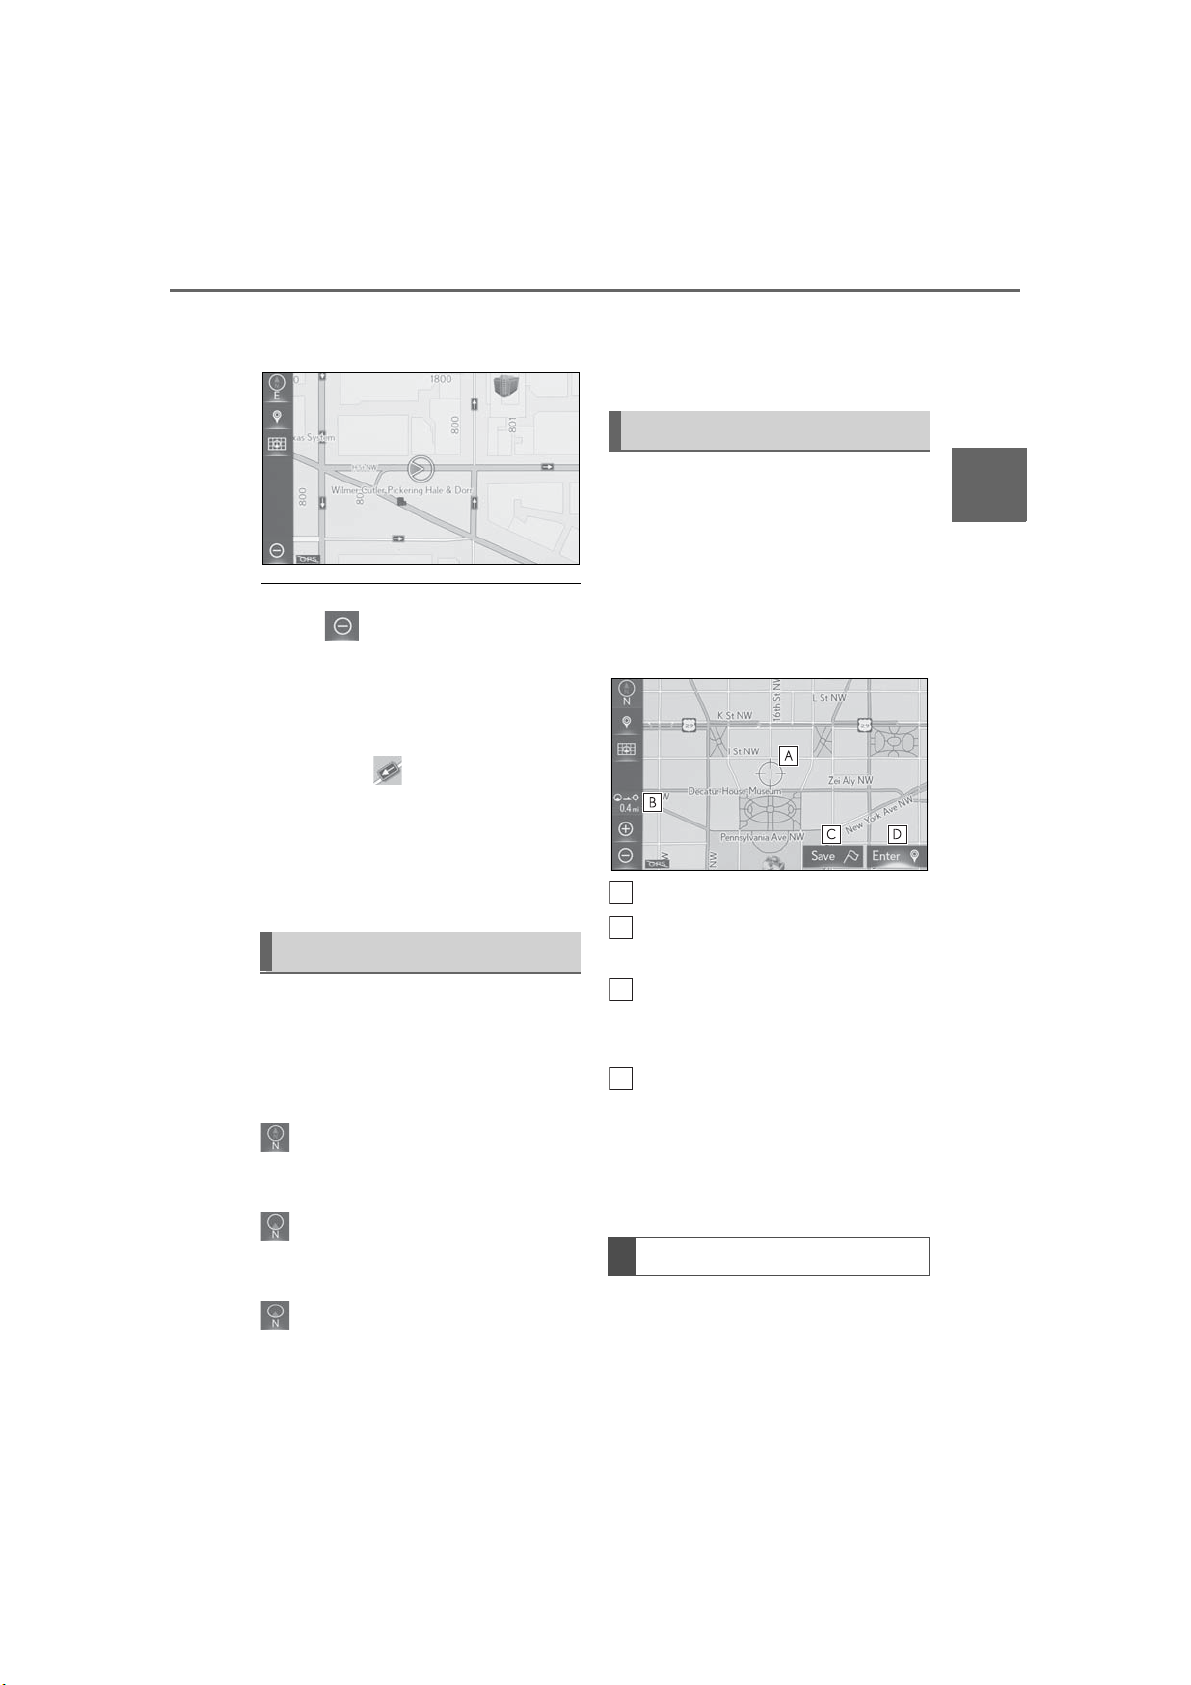
3-1. Basic operation
A
B
C
D
65
2 Check that the micro city map is
displayed.
● To return to the normal map display,
select .
● If the map or the current position is
moved to the area which is not covered
by the micro city map, the screen scale
automatically changes to 150 ft. (50 m).
● On the micro city map, a one way street is
displayed by .
● Scrolling the micro city map is not avail-
able while driving.
● Certification
Building micro cities in the database were
created and provided by HERE.
Orientation of the map
The letter(s) under this symbol indi-
cate the vehicle’s heading direction
(e.g. N for north).
Map scroll operation
The map can be scrolled to view locations that are different than your current position.
1 Select the desired point on the map
screen.
Move the desired point on the cen-
ter of the map screen.
Cursor mark
Distance from the current position
to the cursor mark
3
Navigation system
The orientation of the map can be
changed between 2D north-up, 2D
heading-up and 3D heading-up by
selecting the orientation symbol displayed at the top left of the screen.
: North-up symbol
Regardless of the direction of vehicle
travel, north is always up.
: Heading-up symbol
The direction of vehicle travel is always
up.
: 3D Heading-up symbol
The direction of vehicle travel is always
up.
LS500_LS500h_Navi_OM50F66U_(U)
Select to register as a memory
point. To change the icon, name,
etc.: →P.89
Select to set as a destination.
(→P.79)
Press the “MAP” button on the
Remote Touch to return to the current position.
Flick scroll operation
The map screen can be moved to drag
or flick the touchpad on the Remote
Touch. To activate drag/flick operation,
“Map Flick” is required to be “On”.
Page 66
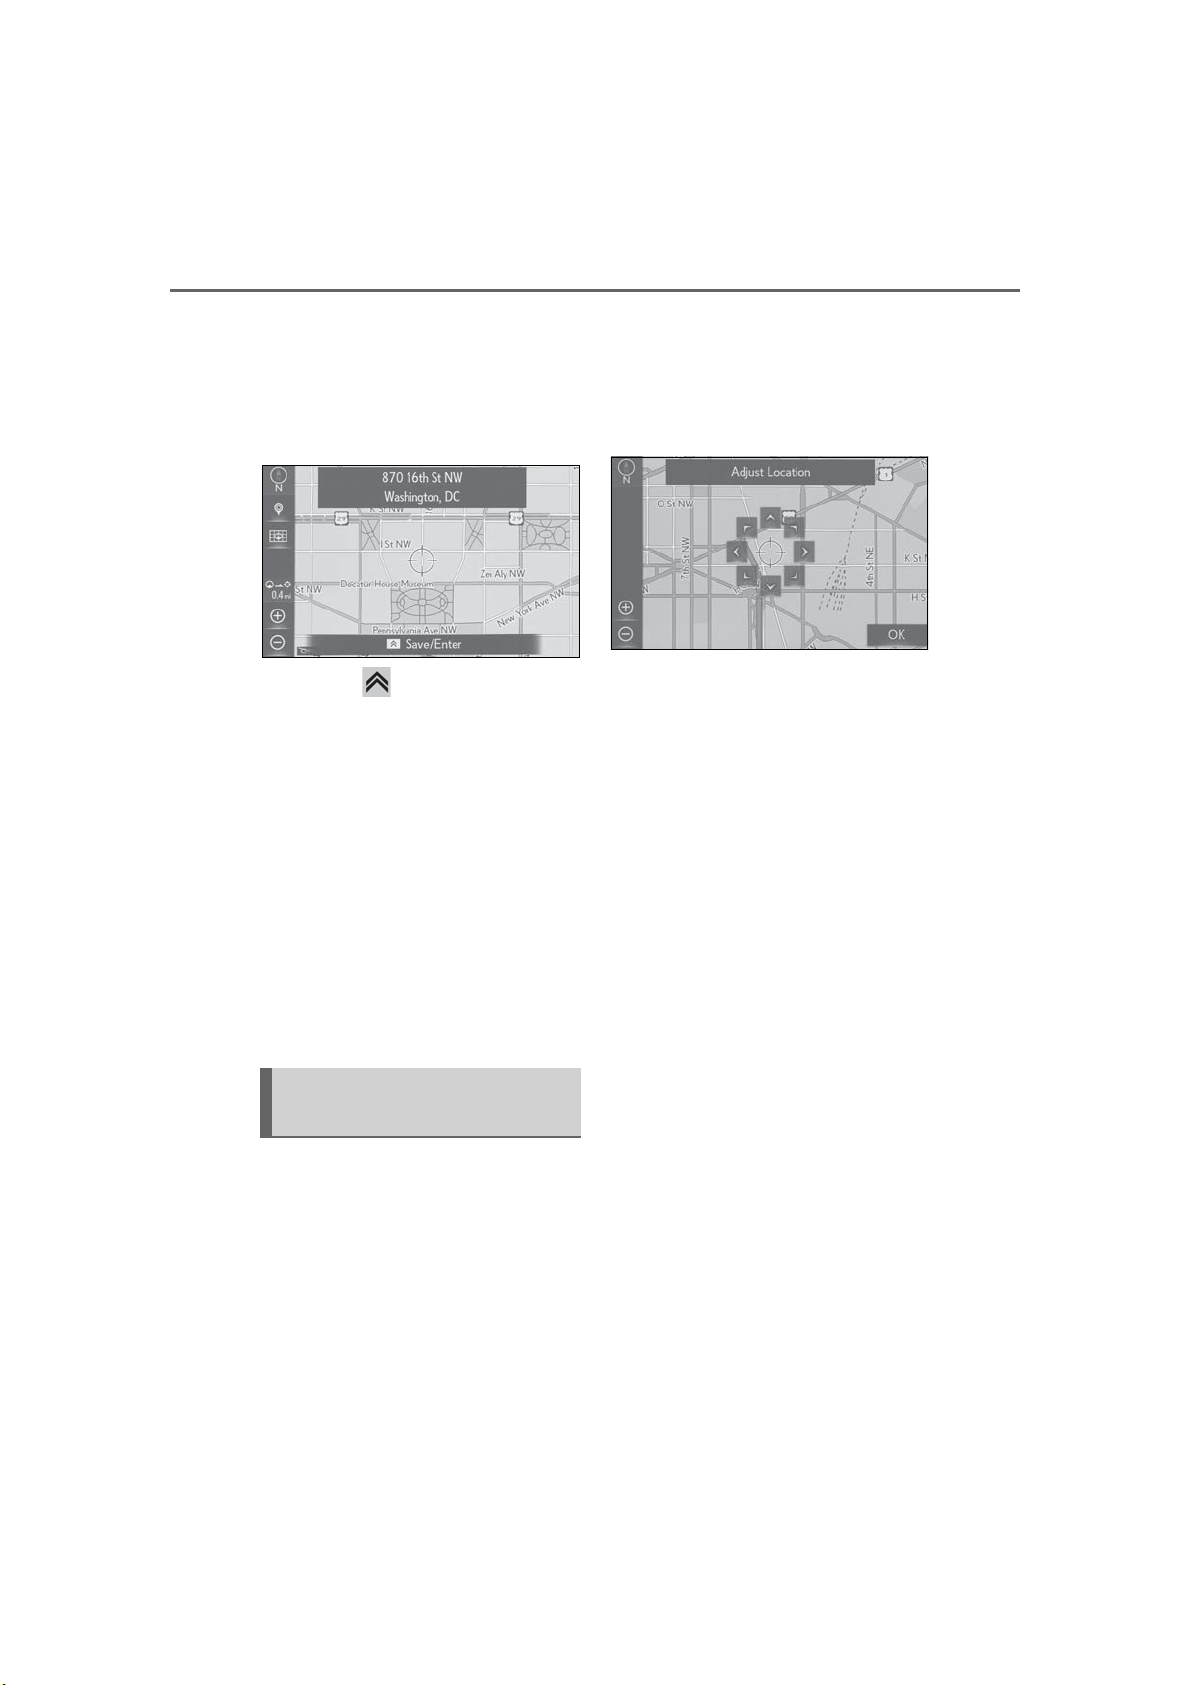
66
3-1. Basic operation
(→P.94)
1 Select the desired point on the map
screen.
2 Use flick or drag operations on the
touchpad to scroll the map.
Press the button on the Remote
Touch. The following buttons can be
displayed.
“Save”: Select to register as a memory
point. To change the icon, name, etc.:
→P.89
“Enter”: Select to set as a destination.
“Go”: Select to delete the existing destination(s) and set a new one.
“Add to Route”: Select to add a destination.
Press the touchpad again, the
switches on the display can be
selected.
tion mark manually on the calibration screen (→P.96)
1 Select one of the 8 directional
arrows to move the cursor to the
desired point and then select “OK”.
Adjusting location in small increments
The cursor location can be adjusted in
small increments. 8 directional arrows
may appear in the following cases.
• When “Adjust Location” is selected
on the map screen
• When changing the location of
memory points on the editing
screen (→P.89, 90, 92)
• When adjusting the current posi-
LS500_LS500h_Navi_OM50F66U_(U)
Page 67
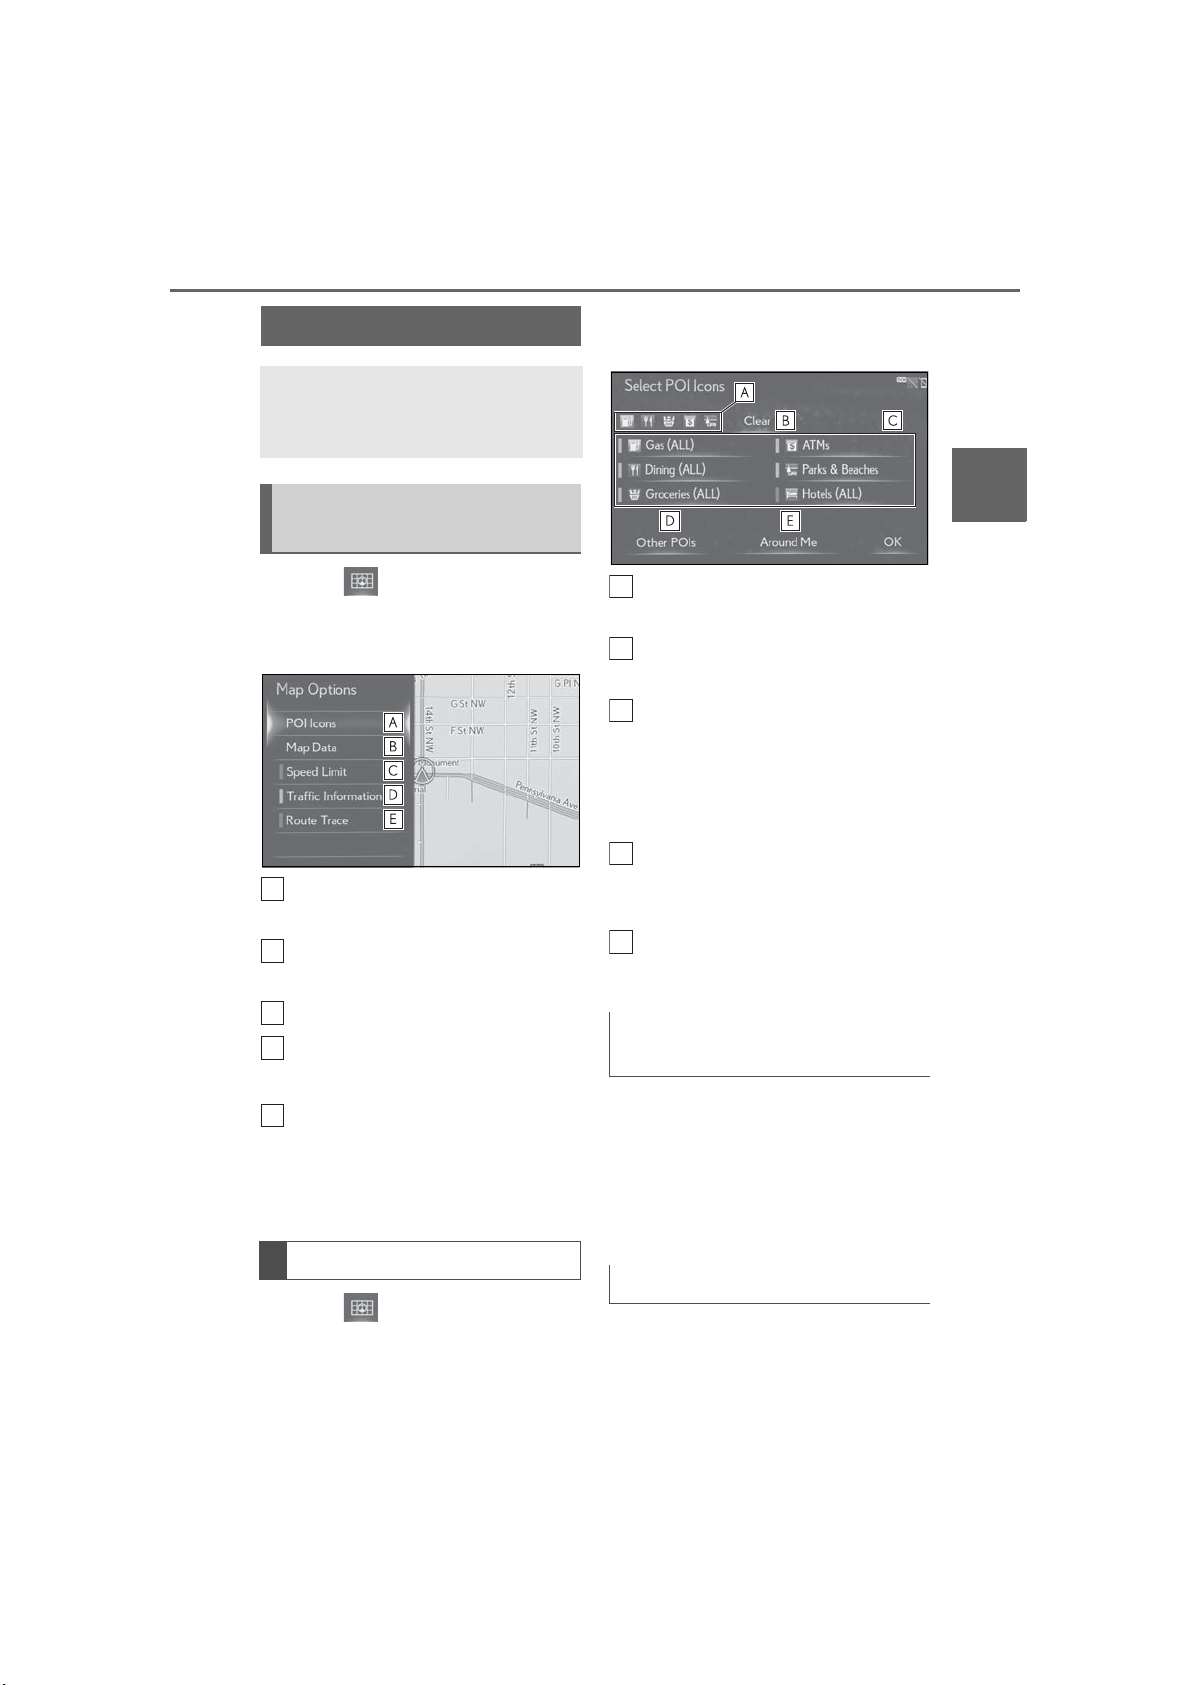
3-1. Basic operation
A
B
C
D
E
A
B
C
D
E
67
Map screen information
Information such as POI icons,
route trace, speed limit, etc. can be
displayed on the map screen.
Displaying the map options
screen
1 Select on the map screen.
2 Select the desired items to be dis-
played.
Select to select or change POI
icons. (→P.67)
Select to display the map version
and coverage area. (→P.104)
3 Select the desired POI category
and select “OK”.
3
Navigation system
Displays up to 5 selected POI
icons on the map screen.
Select to cancel the selected POI
icons.
Displays up to 6 POI icons as
favorite POI categories. (→P.95) If
a POI category is selected to be
displayed on the map, its icon will
be displayed above.
Select to display other POI categories if the desired POIs cannot be
found on the screen.
Select to search for the nearest
POIs. (→P.67)
Select to display speed limit icon.
Select to display traffic informa-
*
tion.
(→P.70)
Select to display route trace.
(→P.68)
*
: This function is not made available in
some countries or areas.
Selecting the POI icons
1 Select on the map screen.
2 Select “POI Icons”.
LS500_LS500h_Navi_OM50F66U_(U)
Selecting other POI icons to be displayed
1 Select “Other POIs”.
2 Select the desired POI categories
and select “OK”.
“List All Categories”: Select to display
all POI categories.
Displaying the local POI list
POIs that are within 20 miles (32 km)
of the current position will be listed
from among the selected categories.
Page 68
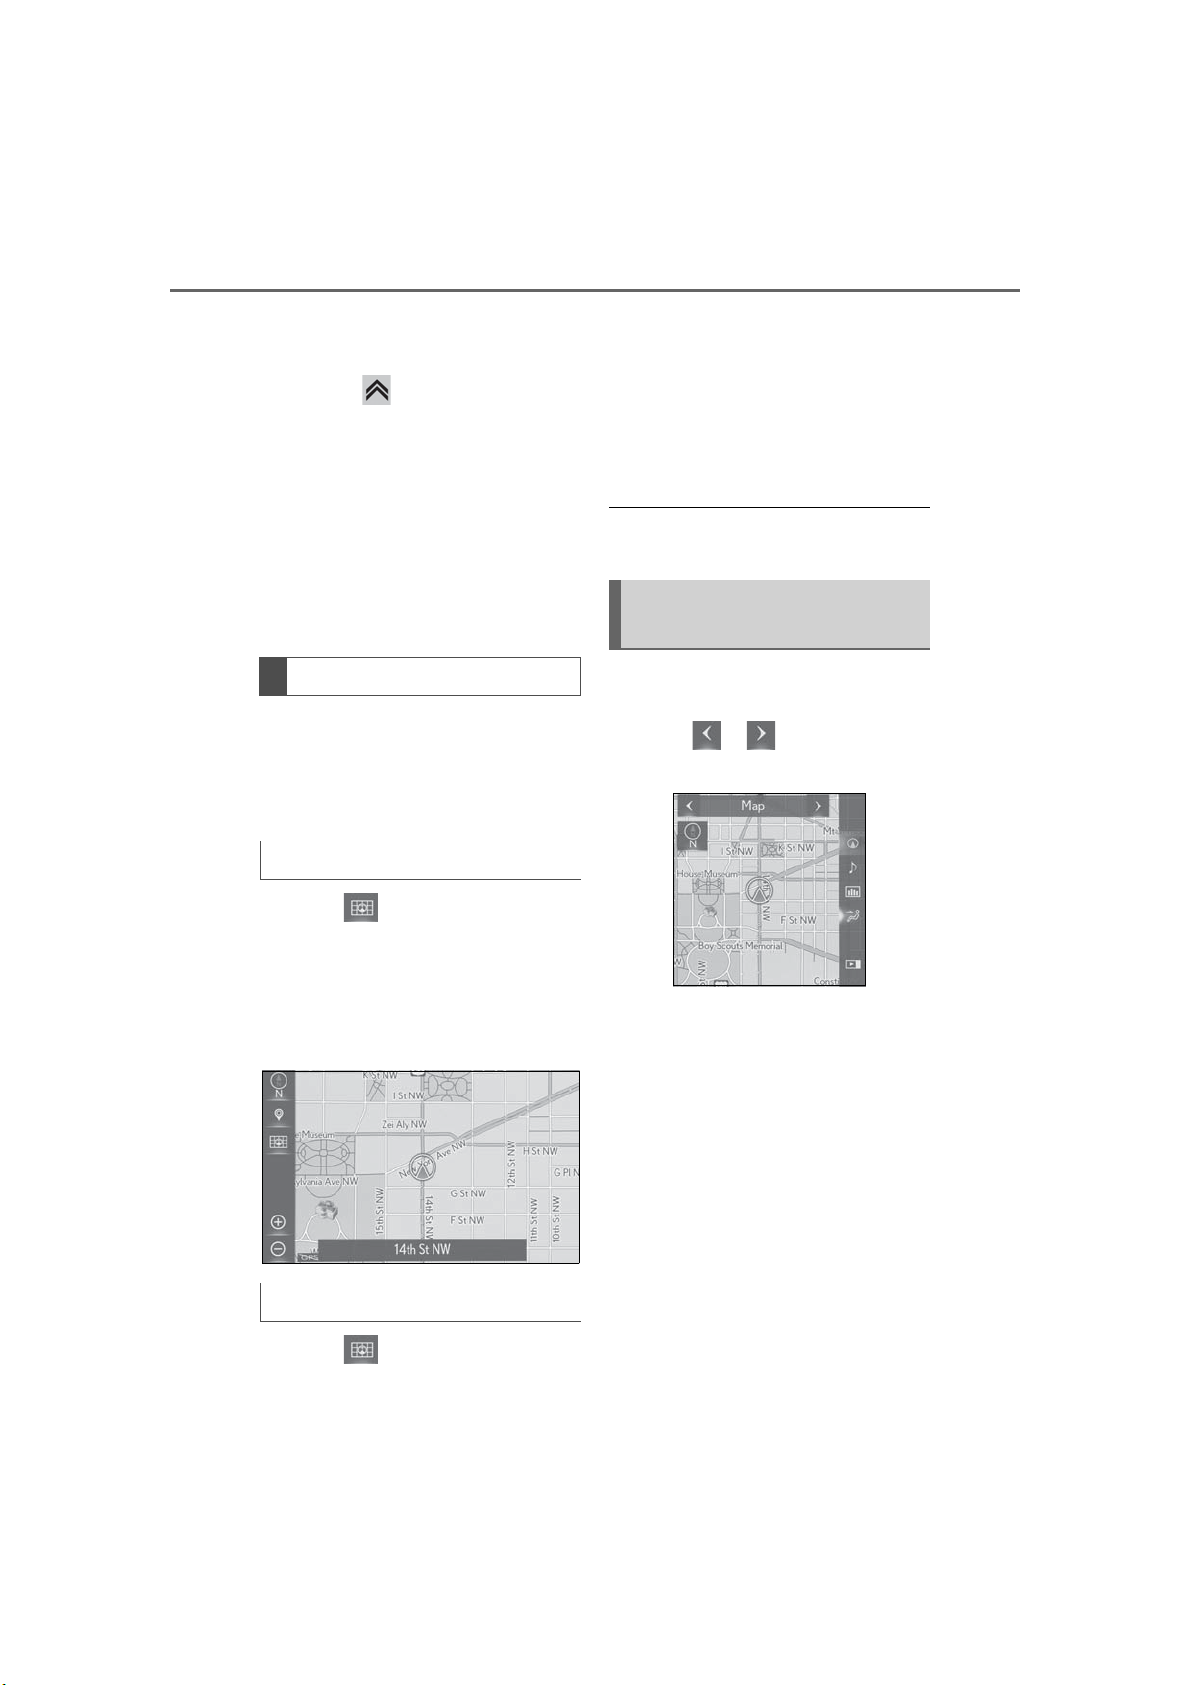
68
3-1. Basic operation
1 Select “Around Me”.
2 Select the desired POI.
Press the button on the Remote
Touch. The following buttons can be
displayed.
“Near Here”: Select to search for POIs
near the current position.
“Along My Route”: Select to search for
POIs along the route.
3 Check that the selected POI is dis-
played on the map screen.
Route trace
The traveled route can be stored and
retraced on the map screen. This feature is available when the map scale is
30 miles (50 km) or less.
Start recording the route trace
2 Select “Route Trace” again.
3 A confirmation screen will be dis-
played.
“Yes”: Select to keep the recorded route
trace.
“No”: Select to erase the recorded route
trace.
● The traveled route can be stored up to
approximately 621 miles (1000 km).
Switching the map mode on the
side display
The map mode on the side display can
be changed.
1 Select or to change the
map mode.
1 Select on the map screen.
2 Select “Route Trace”.
The route trace starts.
3 Check that the traveled line is dis-
played.
Stop recording the route trace
1 Select on the map screen.
“Map”: Display the single map screen.
“Compass”: Display the compass
mode screen. (→P.69)
“Freeway Exit List”: Display the freeway
exit list screen. (→P.84)
“Turn List”: Display the turn list screen.
(→P.86)
“Turn-by-Turn Arrow”: Display the
turn-by-turn arrow screen. (→P.86)
Depending on the conditions, cer-
tain screen configuration buttons
cannot be selected.
LS500_LS500h_Navi_OM50F66U_(U)
Page 69
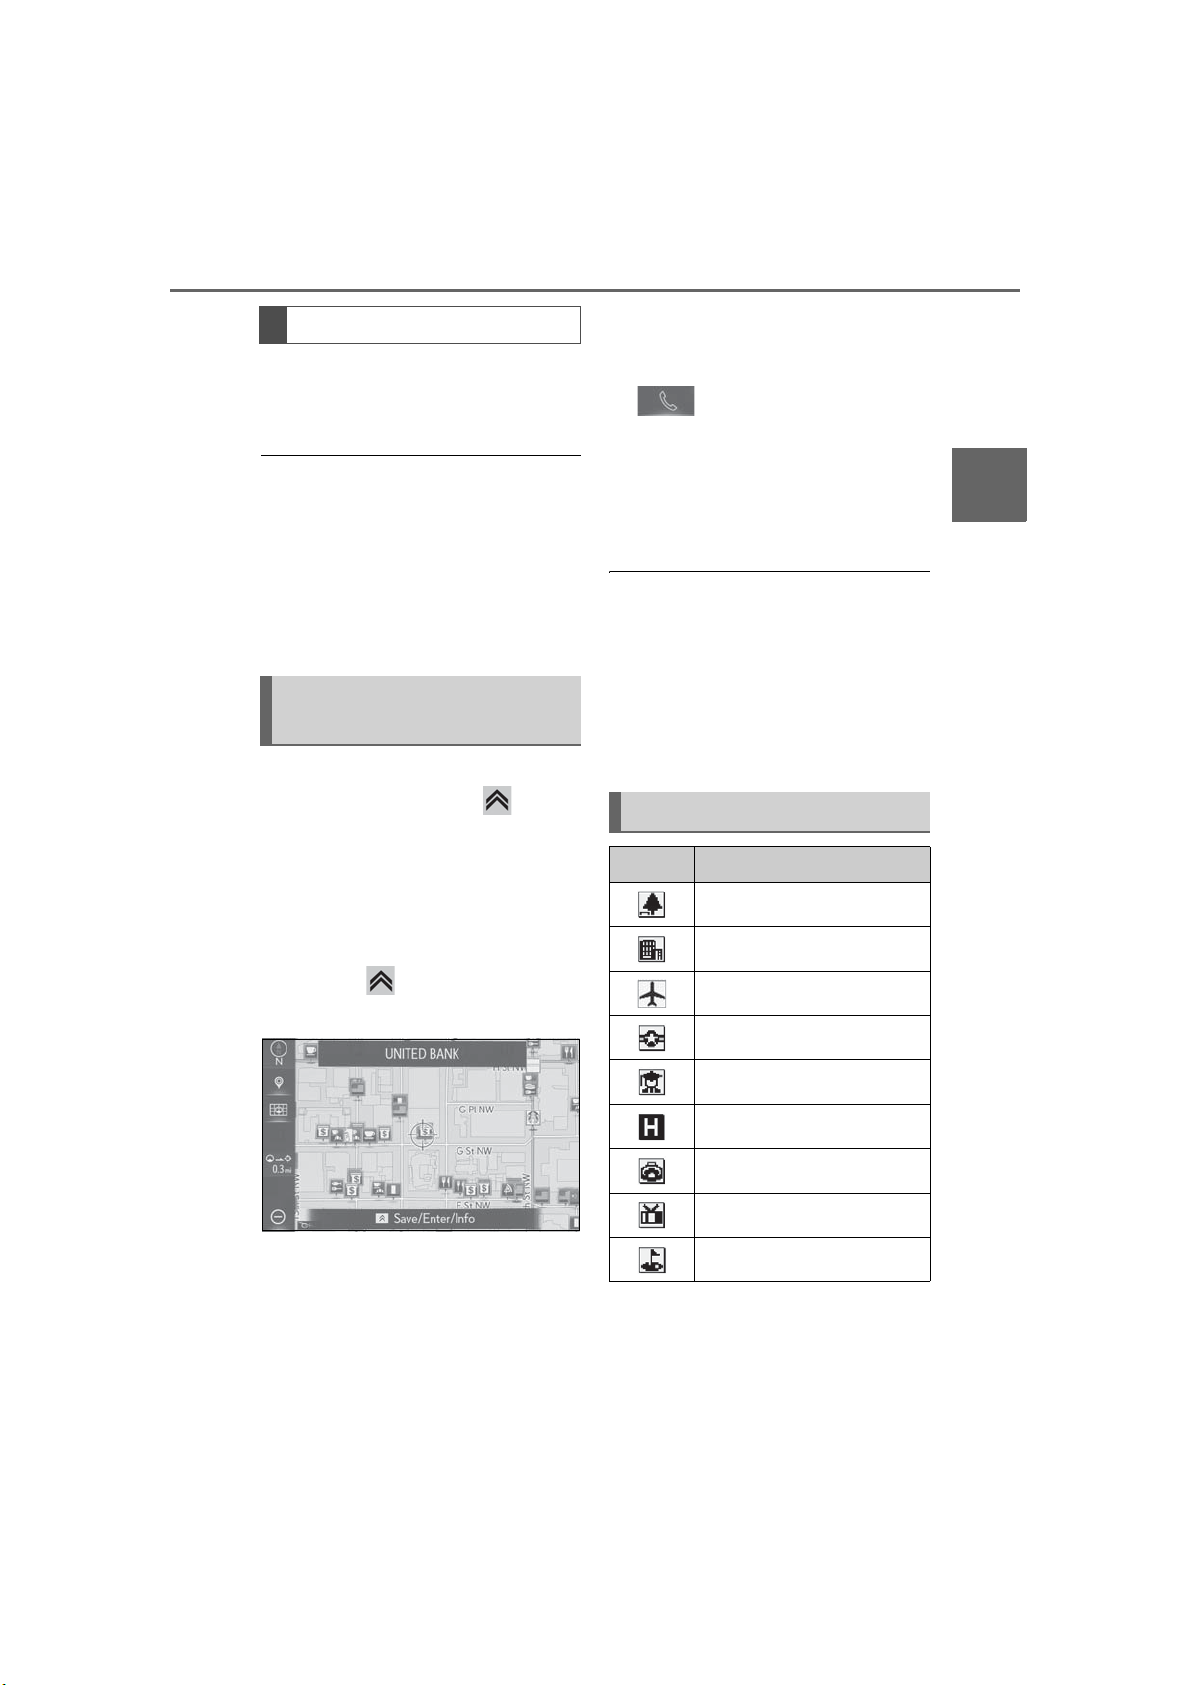
3-1. Basic operation
69
Compass
Information about the destination, current position and a compass is displayed on the screen.
● The destination mark is displayed in the
direction of the destination. When driving, refer to the longitude and latitude
coordinates, and the compass, to make
sure that the vehicle is headed in the
direction of the destination.
● When the vehicle travels out of the cov-
erage area, the guidance screen changes
to the whole compass mode screen.
Displaying information about the
icon where the cursor is set
When the cursor is placed over an icon
on the map screen, and the button
on the Remote Touch is pressed, the
name of icon is displayed. If “Info”
appears on the bottom of the name,
detailed information can be displayed.
1 Place the cursor over an icon.
name, etc.: →P.89
“Go” / “Enter”: Select to set as a
destination.
: Select to call the registered number.
“Delete”: Select to delete destination or memory point.
“Edit”: Select to display the edit
memory point screen.
● Even when traffic information is not cur-
rently being received, traffic information
and “Info” will be displayed for a while
after traffic information has been
received.
● In some situations, calls to a POI may
automatically change to an international
call or may not be possible as a domestic
call.
Standard map icons
Icon Name
Park/Recreation
Business facility
3
Navigation system
2 Press the button on the Remote
Touch.
3 Select “Info”.
4 Check that the information screen
is displayed.
“Save”: Select to register as a memory point. To change the icon,
LS500_LS500h_Navi_OM50F66U_(U)
Airport
Military
University
Hospital
Stadium
Shopping
Golf course
Page 70
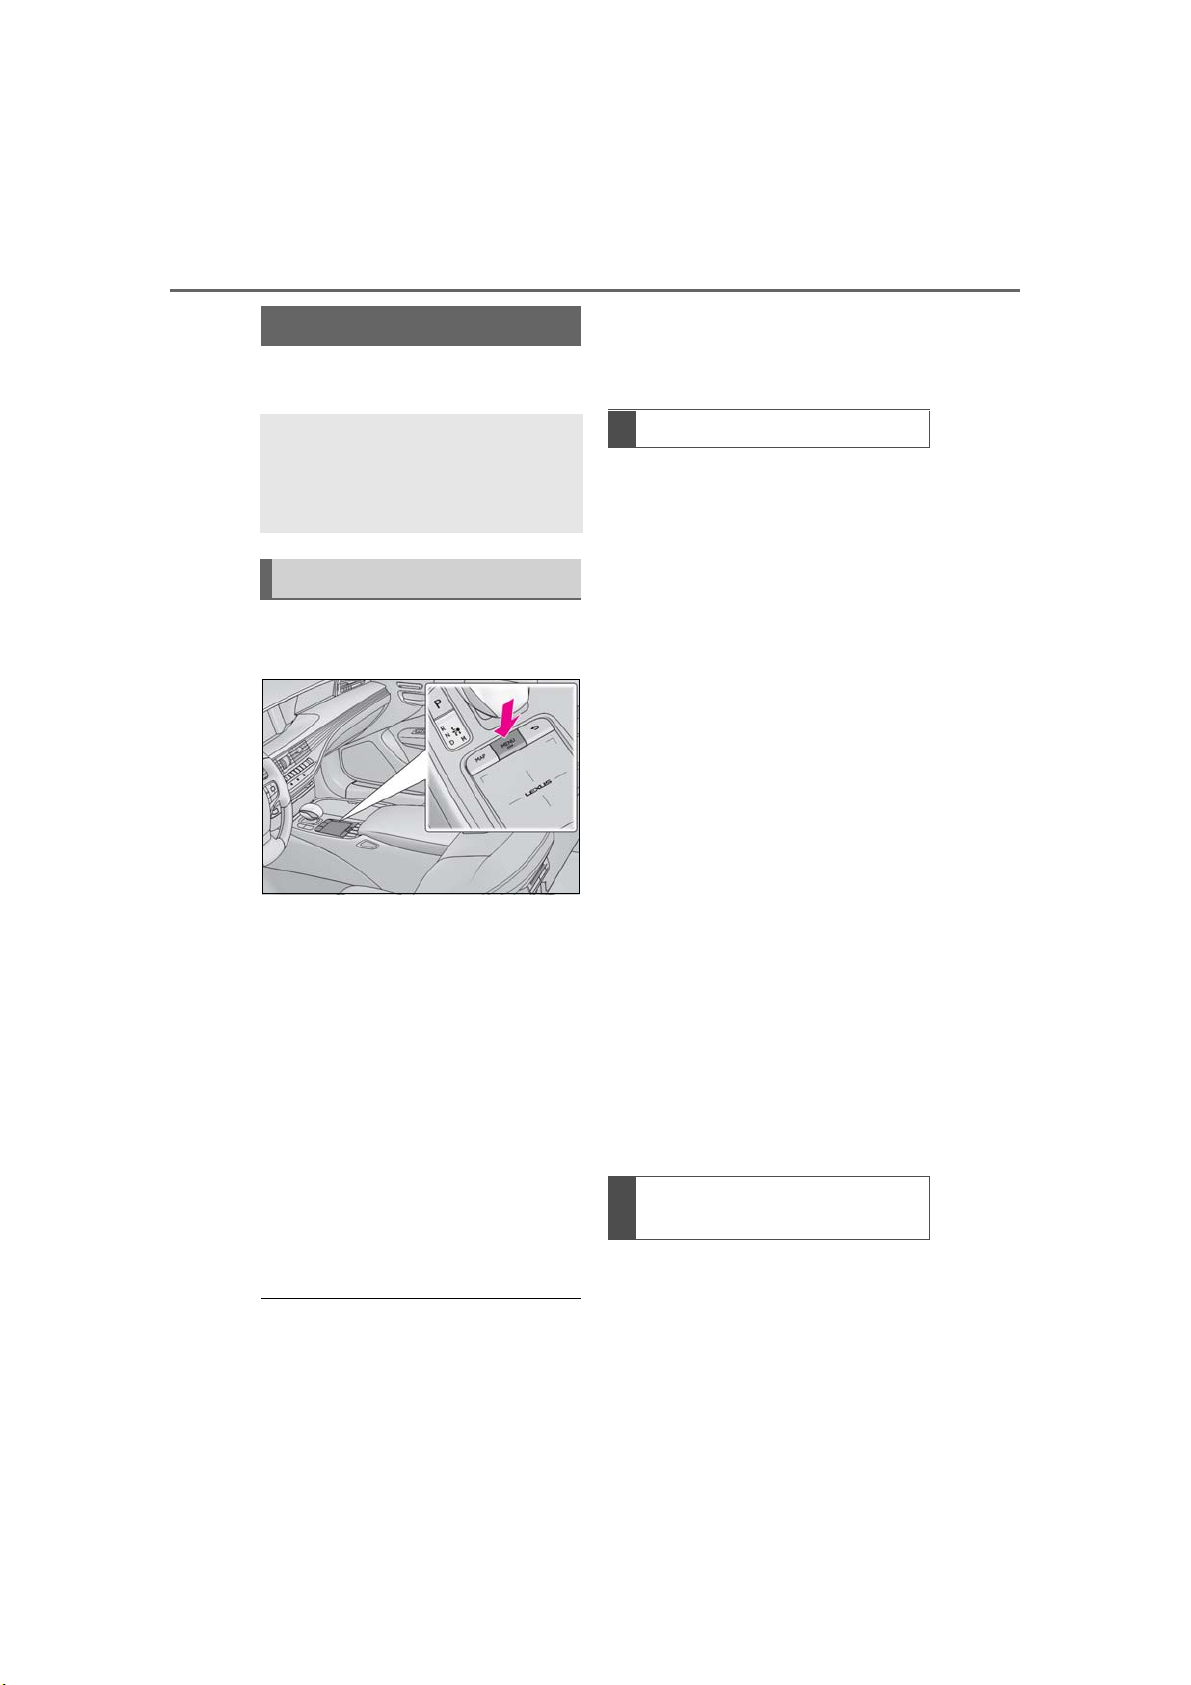
70
3-1. Basic operation
Traffic information
*
: This function is not made available in
some countries or areas.
*
Traffic data can be received via HD
Radio broadcast or via DCM to display traffic information on the map
screen.
Displaying the traffic screen
1 Press the “MENU” button on the
Remote Touch.
2 Select “Info”.
3 Select “Traffic Incidents”.
4 Select the desired item.
“Traffic Events on Current Road”: Select to
display traffic information for the current
road. (→P.70)
“Traffic Events on Current Route”: Select to
display traffic information for the set route.
(→P.70)
“Traffic Events Nearby”: Select to display
nearby traffic information. (→P.70)
“Predictive Traffic Map”: Select to display a
map with predictive traffic data. (→P.70)
“My Traffic Routes”: Select to display traffic
along the saved routes. (→P.71)
● If a large amount of information is being
received, it may take longer than normal
for the information to be displayed on the
screen.
● If traffic information cannot be received
because the vehicle is outside of HD
Radio coverage area, it may still be able
to be received using DCM. (→P.244)
Displaying traffic information
A list of current traffic information can
be displayed along with information on
the location of each incident.
1 Display the traffic incidents screen:
“MENU” button → “Info” → “Traffic
Incidents”
2 Select “Traffic Events on Current
Road”, “Traffic Events on Current
Route” or “Traffic Events Nearby”.
3 Select the desired traffic informa-
tion.
When “Traffic Events Nearby” is
selected, depending on whether the
traffic flow information is
enabled/disabled, the following will
be displayed:
When enabled: Traffic event and congestion information
When disabled: Traffic event information
only
4 Check that the traffic information is
displayed.
“Detail”: Select to display detailed traffic
information.
Displaying predictive traffic
information
A map with predictive traffic data can
be displayed.
1 Display the traffic incidents screen:
“MENU” button → “Info” → “Traffic
LS500_LS500h_Navi_OM50F66U_(U)
Page 71
3-1. Basic operation
71
Incidents”
2 Select “Predictive Traffic Map”.
3 Scroll the map to the desired point
(→P.65) and set the time of predictive traffic information.
The time of the predictive traffic
information can be changed in
15-minute intervals up to +45 minutes.
“+”: Moves the time forward 15 minutes.
“-”: Moves the time back 15 minutes.
My traffic routes
Traffic information along the saved
routes can be displayed. To use this
function, it is necessary to register a
route. (→P.97)
1 Display the traffic incidents screen:
“MENU” button → “Info” → “Traffic
Incidents”
“Detail”: Select to display detailed traffic
information.
Displaying traffic information on
the map
1 Select on the map screen.
2 Select “Traffic Information”.
3 Check that the traffic information is
displayed.
● The icons indicate traffic incidents such
as construction, accidents, etc. Select an
icon to hear more detail by voice.
● The arrows indicate the flow of traffic. The
color changes depending on the speed.
3
Navigation system
2 Select “My Traffic Routes”.
If map data has been updated, a
confirmation screen will be displayed. Select “OK” or “Do Not Tell
Me Again”.
3 Select the desired route.
“Options”: Select to add, edit or delete
personal routes.
If routes have not been registered
yet, a confirmation screen will be
displayed. Select “Yes” to register
the route.
4 Select the desired traffic informa-
tion.
5 Check that the traffic information is
displayed.
LS500_LS500h_Navi_OM50F66U_(U)
Page 72
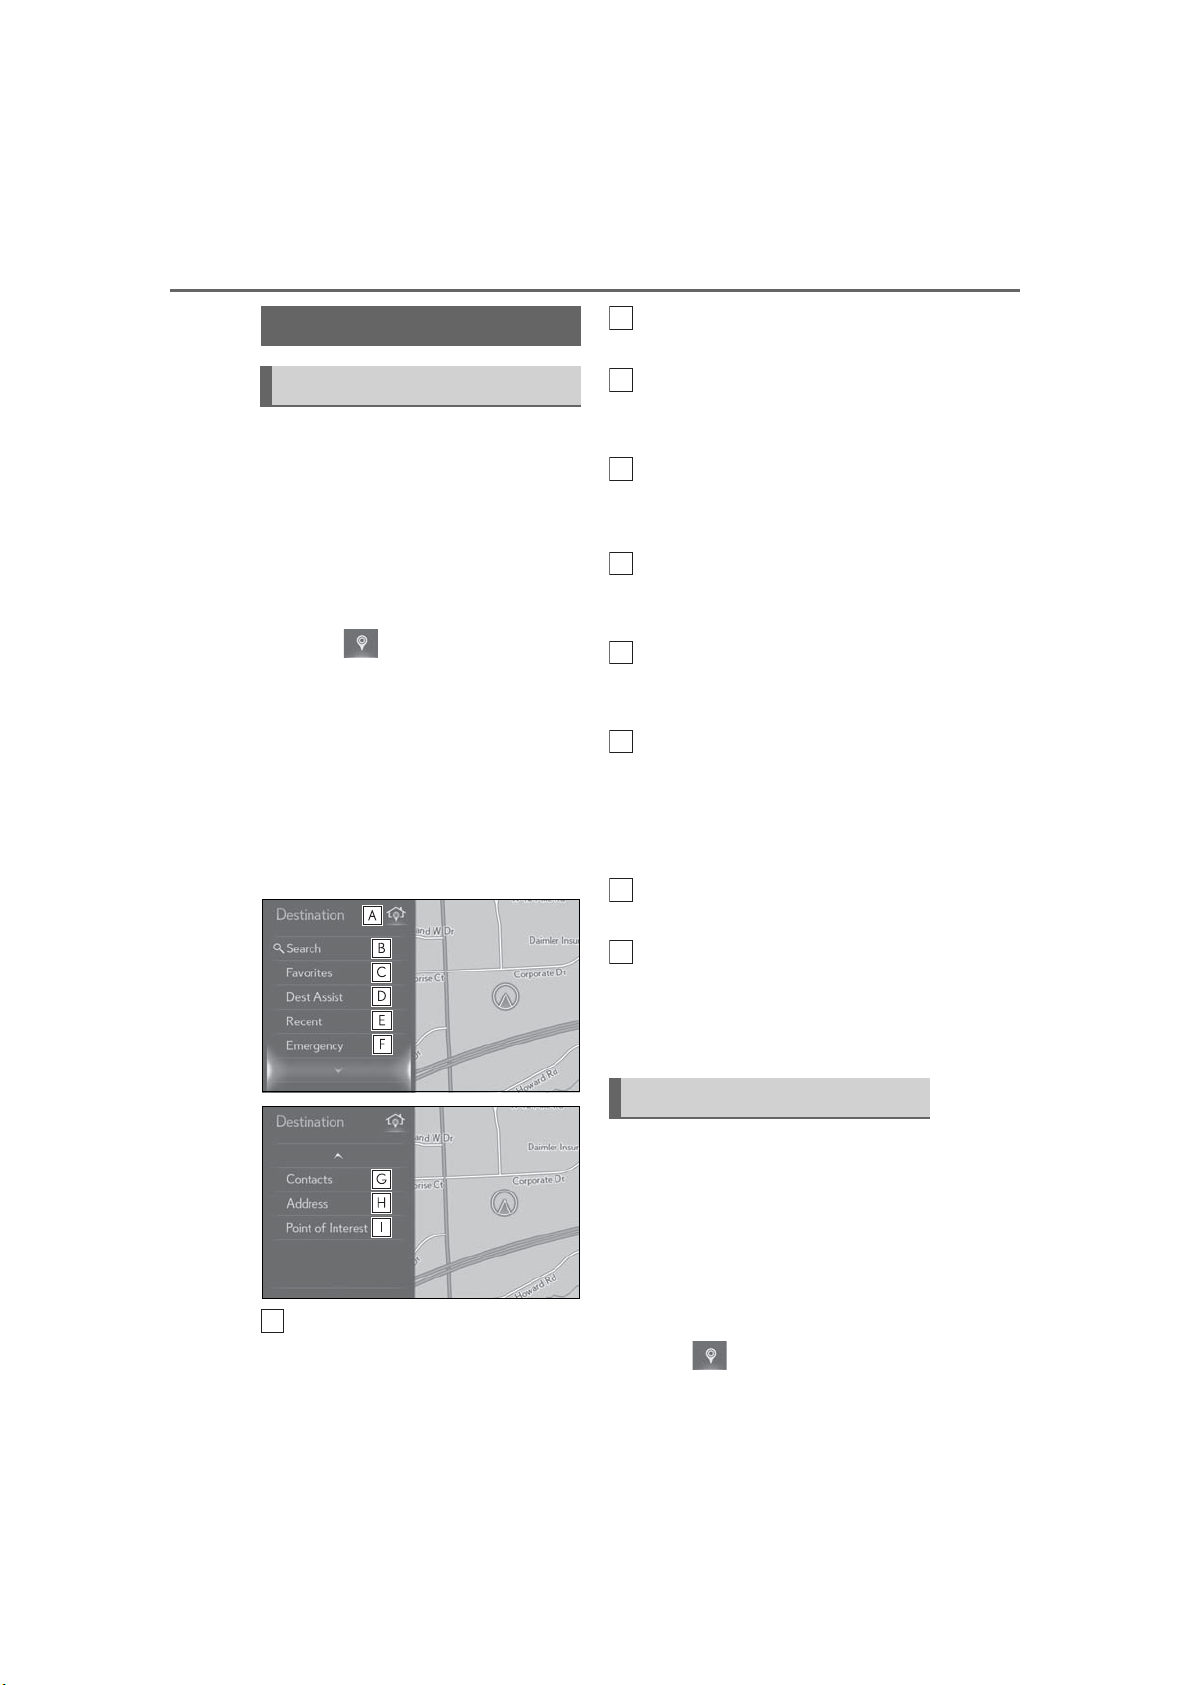
72
A
BCD
E
F
G
H
I
3-2.Destination search
3-2. Destination search
Destination search operation
Select to search for a destination by
entering keywords. (→P.73)
Destination search screen
The destination screen enables to
search for a destination. The destination screen can be reached by the following methods:
■ From the map screen
1 Press the “MAP” button on the
Remote Touch.
2 Select .
3 Follow the steps in “From the menu
screen” from step 3. (→P.72)
■ From the menu screen
1 Press the “MENU” button on the
Remote Touch.
2 Select “Destination”.
3 Select the desired search method.
Select to search for a destination
from a registered entry in “Favorites”. (→P.73)
Select to search for a destination
via the Lexus response center.
(→P.338)
Select to search for a destination
from recent set destinations.
(→P.74)
Select to search for a destination
from emergency service points.
(→P.74)
Select to search for a destination
from contact data which had been
transferred to the system from a
registered Bluetooth
®
phone.
(→P.74)
Select to search for a destination by
address. (→P.75)
Select to search for a destination by
point of interest. (→P.76)
*
: This function is not made available in
some countries or areas.
*
Selecting search area
The selected state (province) can be
changed to set a destination from a different state (province) by using
“Address” or “Point of Interest”.
■ From the map screen
1 Press the “MAP” button on the
Select to set a destination by home.
(→P.73)
LS500_LS500h_Navi_OM50F66U_(U)
Remote Touch.
2 Select .
Page 73
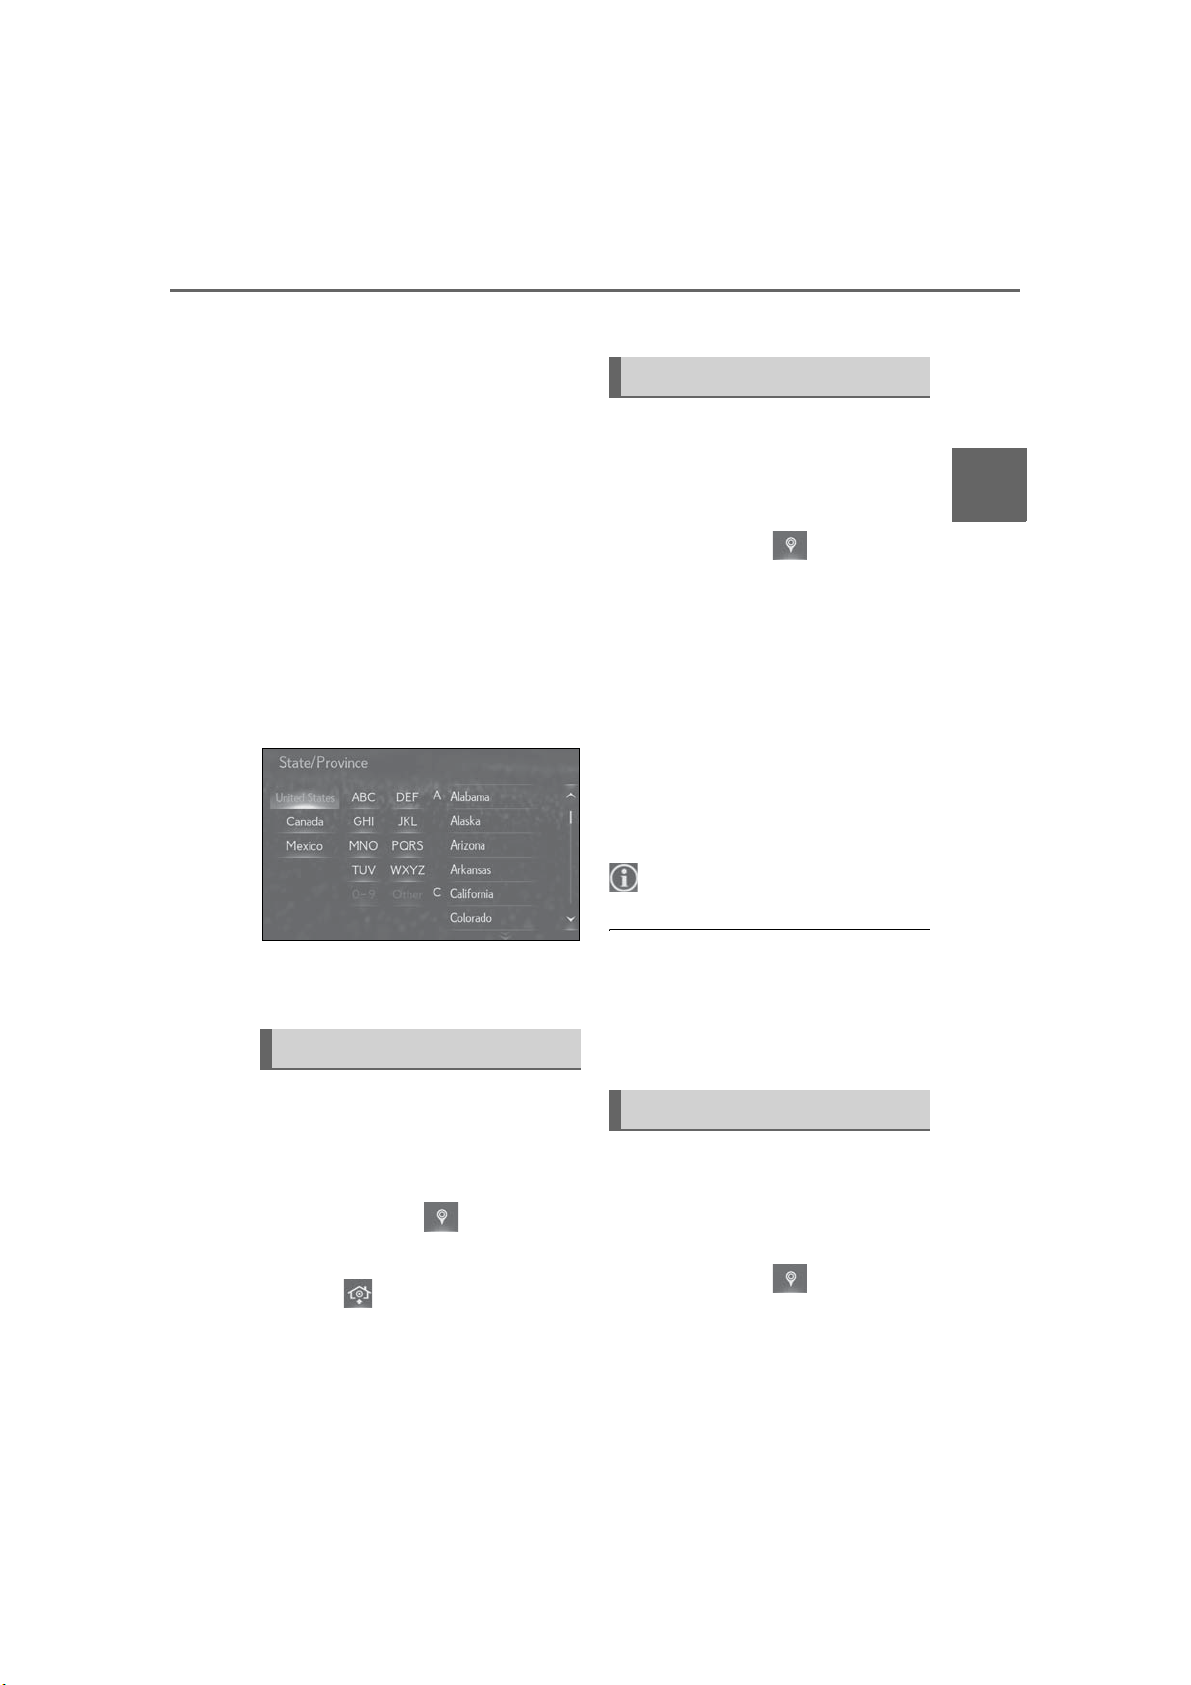
3-2. Destination search
73
3 Follow the steps in “From the menu
screen” from step 3. (→P.73)
■ From the menu screen
1 Press the “MENU” button on the
Remote Touch.
2 Select “Destination”.
3 Select “Address” or “Point of Inter-
est”.
4 Select “Select State/Province” or
“Change State/Province”.
If a state (province) has not been
selected yet, “Select State/Province” is displayed.
5 Select the desired state (province).
overview is displayed. (→P.80)
Searching by keyword
The destination can be searched by
entering various keywords.
1 Display the destination search
screen by either operation:
“MAP” button →
“MENU” button → “Destination”
2 Select “Search”.
3 Enter characters on the keyboard.
When entering characters, if a list of
predicted destinations is displayed
on the side display, a destination can
be selected from the list.
4 Select “Search”.
5 Select the desired item from the list.
: Select to display updated information
about the selected entry.
3
Navigation system
To change countries, select “United
States”, “Canada” or “Mexico”.
Setting home as destination
To use this function, it is necessary to
register a home address. (→P.89)
1 Display the destination search
screen by either operation:
“MAP” button →
“MENU” button → “Destination”
2 Select .
The navigation system performs a
search for the route and the route
● To search for a facility name using multi-
ple search words, put a space between
each word.
● Search results may differ depending on
the Lexus Enform subscription status and
communication status.
Searching by favorites list
To use this function, it is necessary to
register an favorites list entry. (→P.90)
1 Display the destination search
screen by either operation:
“MAP” button →
“MENU” button → “Destination”
2 Select “Favorites”.
LS500_LS500h_Navi_OM50F66U_(U)
Page 74
74
3-2. Destination search
3 Select the desired favorites list
entry.
Searching by Destination Assist
*
: This function is not made available in
some countries or areas.
A Destination Assist operator can
search for a destination. You can
request a specific business, address, or
ask for help locating your desired destination. (→P.338)
1 Display the destination search
screen by either operation:
“MAP” button →
“MENU” button → “Destination”
2 Select “Dest Assist”.
Searching by recent destinations
1 Display the destination search
screen by either operation:
Deleting recent destinations
1 Select “Delete Recent Destina-
*
tions”.
2 Select the desired recent destina-
tion(s) to be deleted.
Press the button on the Remote
Touch. The following button can be
displayed.
“Delete All Recent Destinations”: Select to
delete all destinations on the list.
3 Select “Yes” when the confirmation
screen appears.
Searching by emergency
1 Display the destination search
screen by either operation:
“MAP” button →
“MENU” button → “Destination”
2 Select “Emergency”.
“MAP” button →
“MENU” button → “Destination”
2 Select “Recent”.
3 Select the desired destination.
Press the button on the Remote
Touch. The following button can be
displayed.
“Delete Recent Destinations”: Select to
delete the recent destination. (→P.74)
● Up to 100 previously set destinations are
displayed on the screen.
3 Select the desired emergency cat-
egory.
4 Select the desired destination.
● The navigation system does not guide in
areas where route guidance is unavailable. (→P.102)
Searching by contact
To use this function, it is necessary to
have contact data which had been
transferred to the system from a regis-
tered Bluetooth
1 Display the destination search
screen by either operation:
®
phone. (→P.301)
LS500_LS500h_Navi_OM50F66U_(U)
Page 75
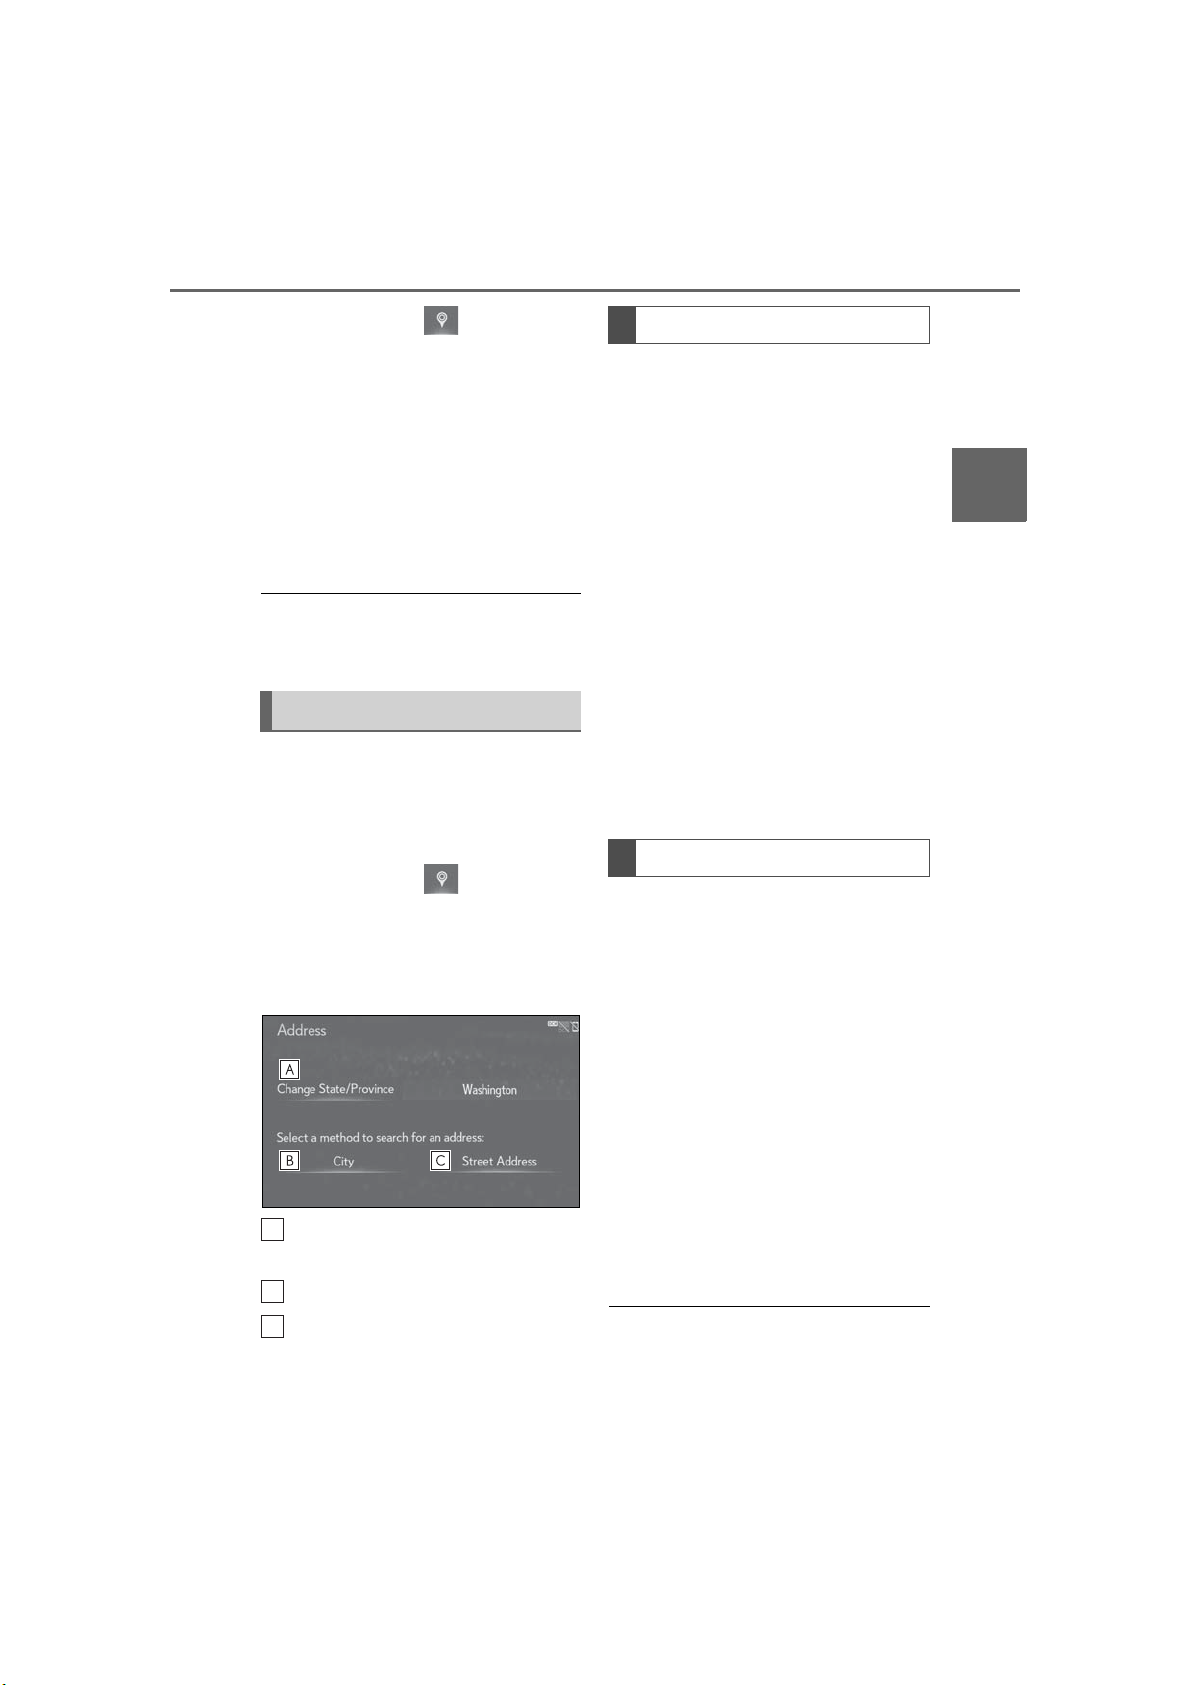
3-2. Destination search
A
B
C
75
“MAP” button →
“MENU” button → “Destination”
2 Select “Contacts”.
3 Select the desired contact.
4 Select “Addresses”.
5 Select the desired address.
6 Follow the steps in “Searching by
keyword” from step 4. (→P.73)
● This function may not be available
depending on the type of Bluetooth
phone.
®
Searching by address
There are 2 methods to search for a
destination by address.
1 Display the destination search
screen by either operation:
“MAP” button →
“MENU” button → “Destination”
2 Select “Address”.
3 Select the desired search method.
Searching by city
1 Select “City”.
2 Enter a city name and select
“Search”.
“Last 5 Cities”: Select the desired city
name from the list of the last 5 cities.
3 Select the desired city name.
4 Enter a street name and select
“Search”.
5 Select the desired street name.
6 Enter a house number and select
“Search”.
If multiple locations with the same
address exist, the address list screen
will be displayed. Select the desired
address.
Searching by street address
1 Select “Street Address”.
2 Enter a house number and select
“Search”.
3 Enter a street name and select
“Search”.
3
Navigation system
Select to change the search area.
(→P.72)
Select to search by city. (→P.75)
Select to search by street address.
(→P.75)
LS500_LS500h_Navi_OM50F66U_(U)
4 Select the desired street name.
5 Enter a city name and select
“Search”.
6 Select the desired city name.
If multiple locations with the same
address exist, the address list screen
will be displayed. Select the desired
address.
● A street name can be searched using
only the body part of its name.
For example: S WESTERN AVE
Page 76
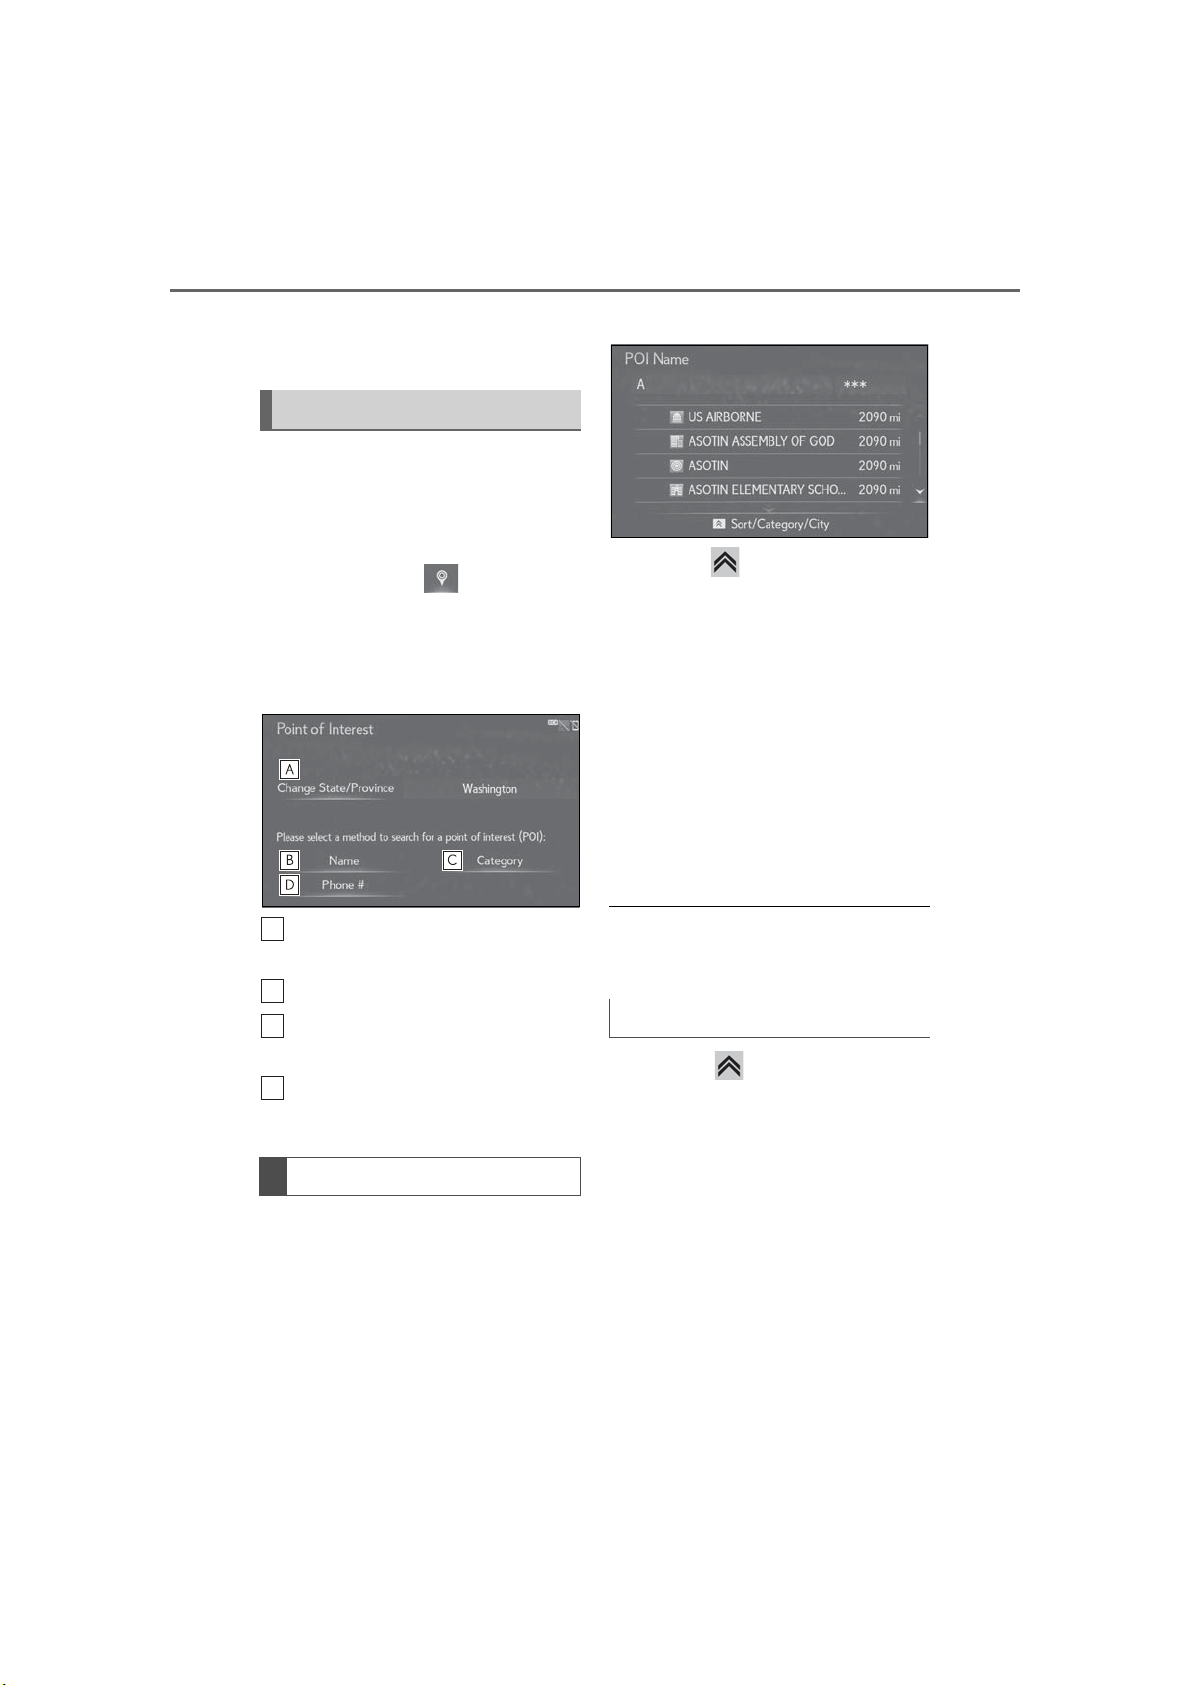
76
A
B
C
D
3-2. Destination search
• A search can be performed by entering
“S WESTERN AVE”, “WESTERN AVE”
or “WESTERN”.
Searching by point of interest
There are 3 methods to search for a
destination by Points of Interest.
1 Display the destination search
screen by either operation:
“MAP” button →
“MENU” button → “Destination”
2 Select “Point of Interest”.
3 Select the desired search method.
3 Select the desired POI.
Press the button on the Remote
Touch. The following buttons can be
displayed.
“Change POI category”: Select to search
for POI from the category list. (→P.77)
“Enter a city name”: Select to search for
POI in the desired city. (→P.76)
When entering the name of a spe-
cific POI, and there are 2 or more
sites with the same name, the list
screen will be displayed. Select the
desired POI.
Select to change the search area.
(→P.72)
Select to search by name. (→P.76)
Select to search by category.
(→P.77)
Select to search by phone number.
(→P.77)
Searching by name
1 Select “Name”.
2 Enter a POI name and select
“Search”.
● To search for a facility name using multi-
ple search words, put a space between
each word.
Selecting a city to search
1 Press the button on the Remote
Touch.
2 Select “Enter a city name”.
3 Enter a city name and select
“Search”.
“Any City”: Select to cancel the city setting.
4 Select the desired city name.
5 Select the desired POI.
LS500_LS500h_Navi_OM50F66U_(U)
Page 77
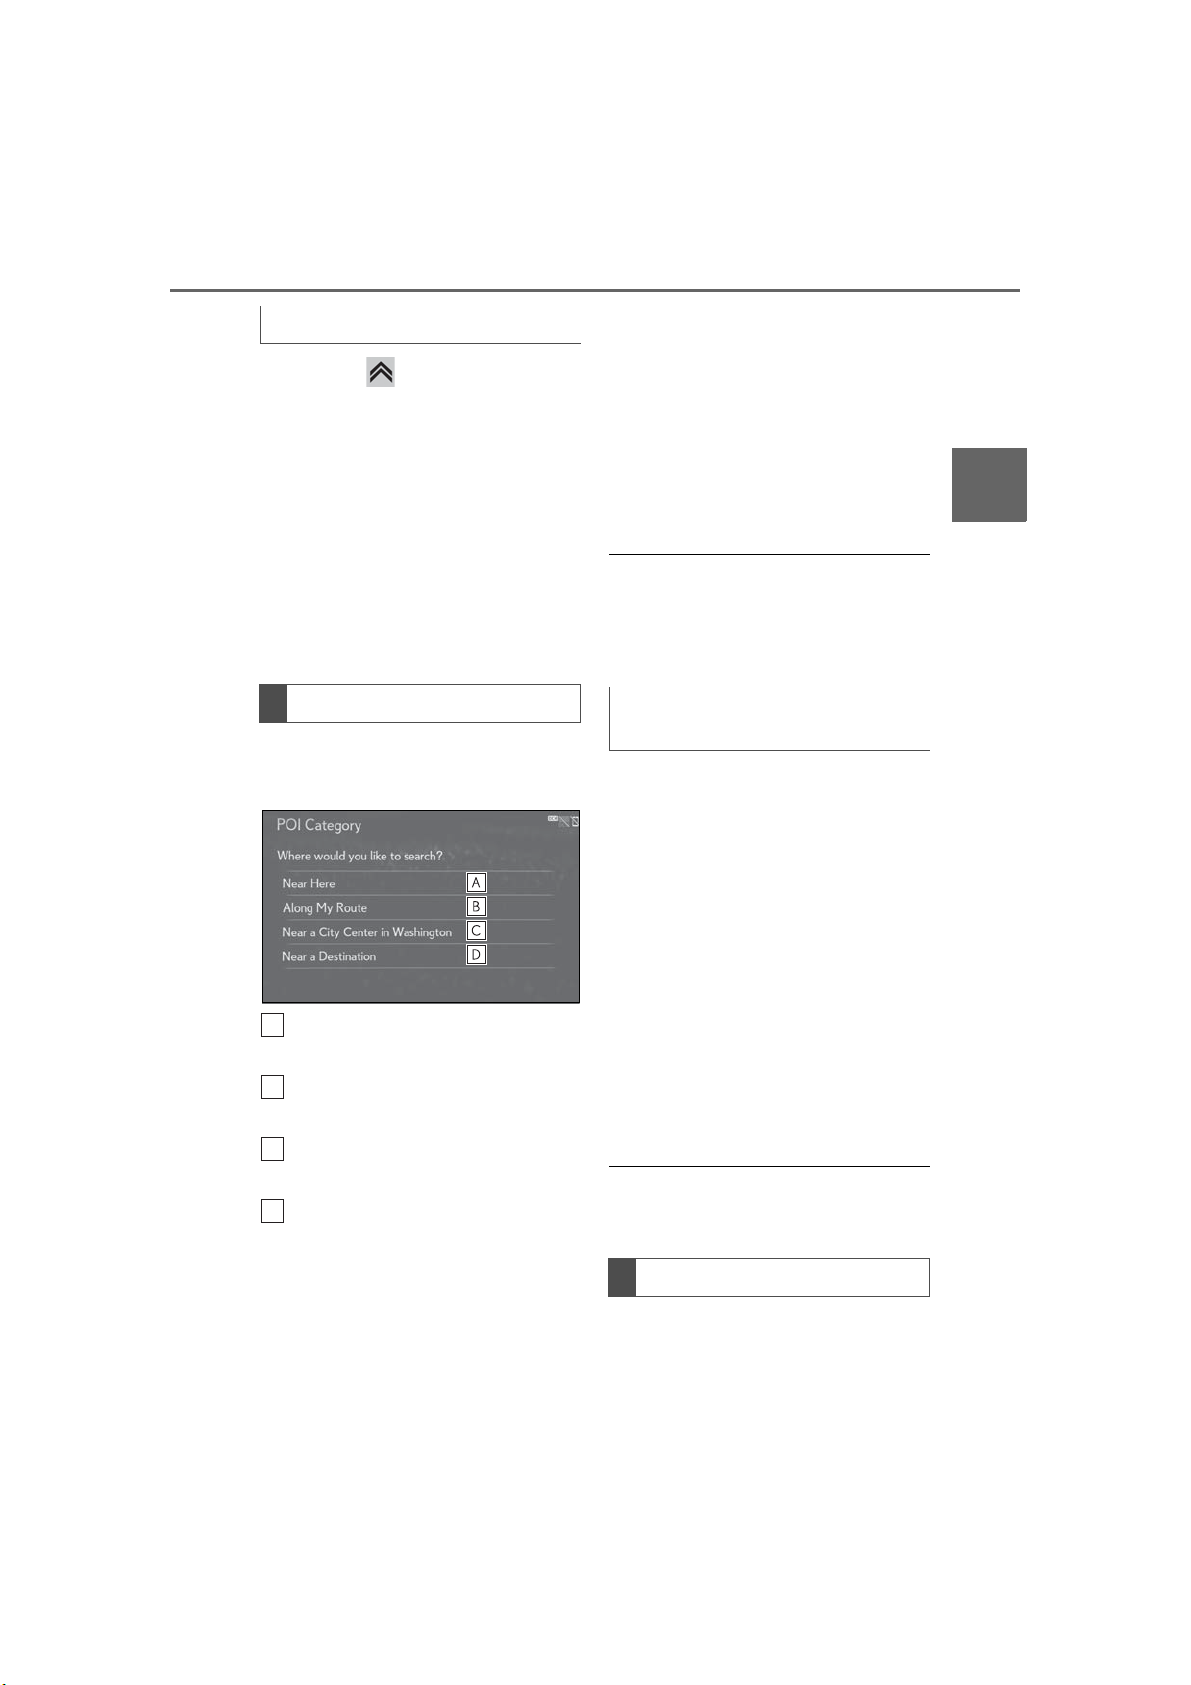
3-2. Destination search
A
B
C
D
77
Selecting from the categories
1 Press the button on the Remote
Touch.
2 Select “Change POI category”.
3 Select the desired category.
If there is more than 1 result for the
selected category, a detailed list will
be displayed.
“List All Categories”: Select to display all
POI categories.
4 Select the desired POI.
Searching by category
1 Select “Category”.
2 Select the desired search point.
If there is more than 1 result for the
selected category, a detailed list will
be displayed.
“List All Categories”: Select to display all
POI categories.
“Favorite POI Categories”: Select to use
the 6 POIs that have been previously set.
(→P.95)
4 Select the desired POI.
● The names of POIs located within
approximately 200 miles (320 km) from
the selected search point can be displayed. They are displayed up to 200
names.
When “Near a City Center in XX*”
is selected
1 Select “Near a City Center in
*
XX
”.
2 Enter a city name and select
“Search”.
“Last 5 Cities”: Select the desired city
name from the list of the last 5 cities.
3 Select the desired city name.
3
Navigation system
Select to search for POIs near your
current position.
Select to search for POIs along the
set route.
Select to search for POIs near a
specific city center. (→P.77)
Select to search for POIs near a
destination. When more than 1 destination has been set, a list will be
displayed on the screen. Select the
desired destination.
3 Select the desired POI category.
LS500_LS500h_Navi_OM50F66U_(U)
4 Select “OK” when the city center
map screen is displayed.
5 Follow the steps in “Searching by
category” from step 3. (→P.77)
*
: XX represents the selected search area
name.
● If the navigation system has never been
used, selecting the city name from “Last 5
Cities” will not be available.
Searching by phone number
1 Select “Phone #”.
Page 78
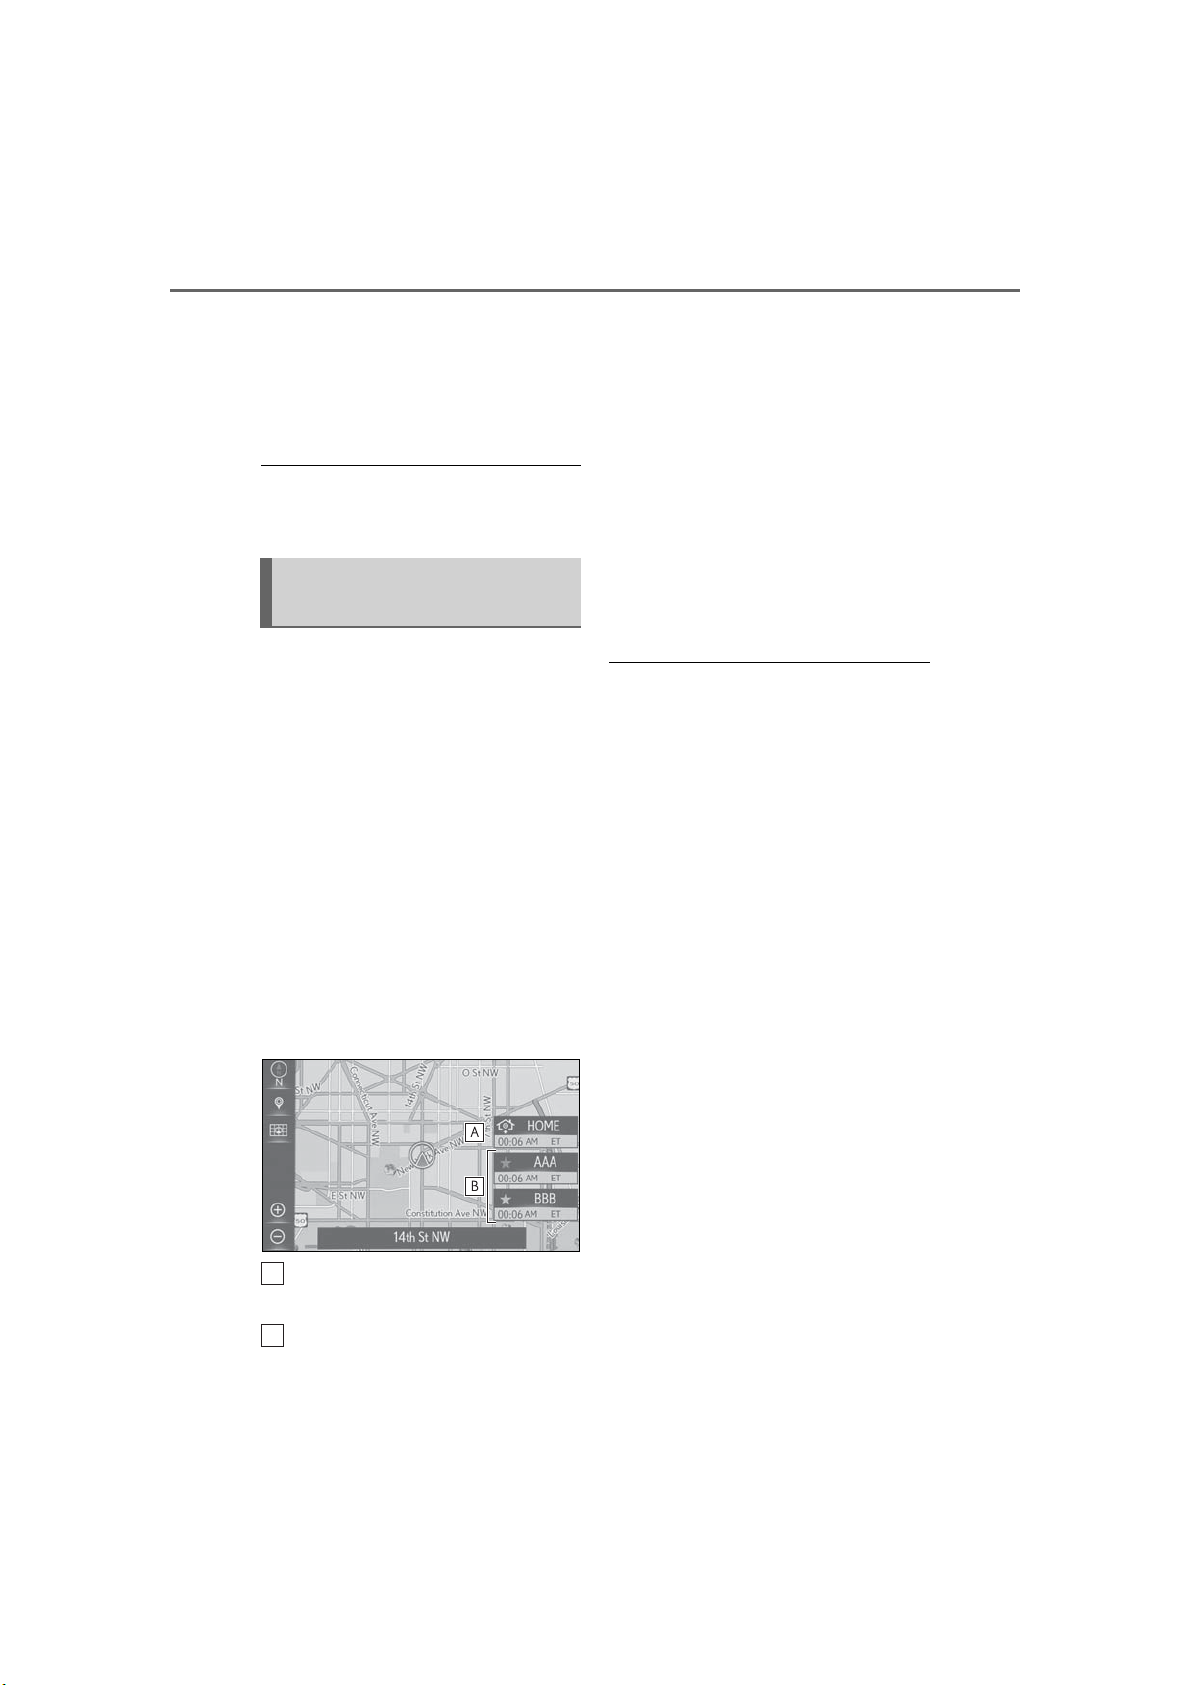
78
A
B
3-2. Destination search
2 Enter a phone number and select
“OK”.
If multiple locations with the same
phone number exist, the list screen
will be displayed.
● If there is no match for the entered phone
number, a list of identical numbers with
different area codes will be displayed.
One-touch setting home/favorite as a destination
To use this function, it is necessary to
register a home and/or a favorite location. Up to 2 favorites can be registered as preset destinations. (→P.89,
90)
To set the home or a preset destination
as the destination, select the corresponding button.
1 Turn the engine switch <power
switch> to ACCESSORY or IGNITION ON mode <ON mode>.
can be registered as preset destinations.)
The estimated time of arrival to the
registered home and preset destinations from the current position will
be displayed.
If the home or a preset destination
has not been registered, “Save
Home” or “Save Favorite” will be
displayed, respectively. To register a
home or preset destination, select
the corresponding button.
● When the destination is very close to the
current position, “Nearby” will be displayed.
● The one-touch buttons for home and
favorites will disappear after the vehicle
has been driven for a while.
● The color of the estimated arrival time
indicator may change depending on the
traffic information received.
● This function is available when “Auto-
matic Destination List Info” is set to on.
(→P.94)
2 Press the “MAP” button on the
Remote Touch.
3 Select the desired item.
Select to set the registered home as
the destination.
Select to set a registered favorite as
the destination. (Up to 2 favorites
LS500_LS500h_Navi_OM50F66U_(U)
Page 79
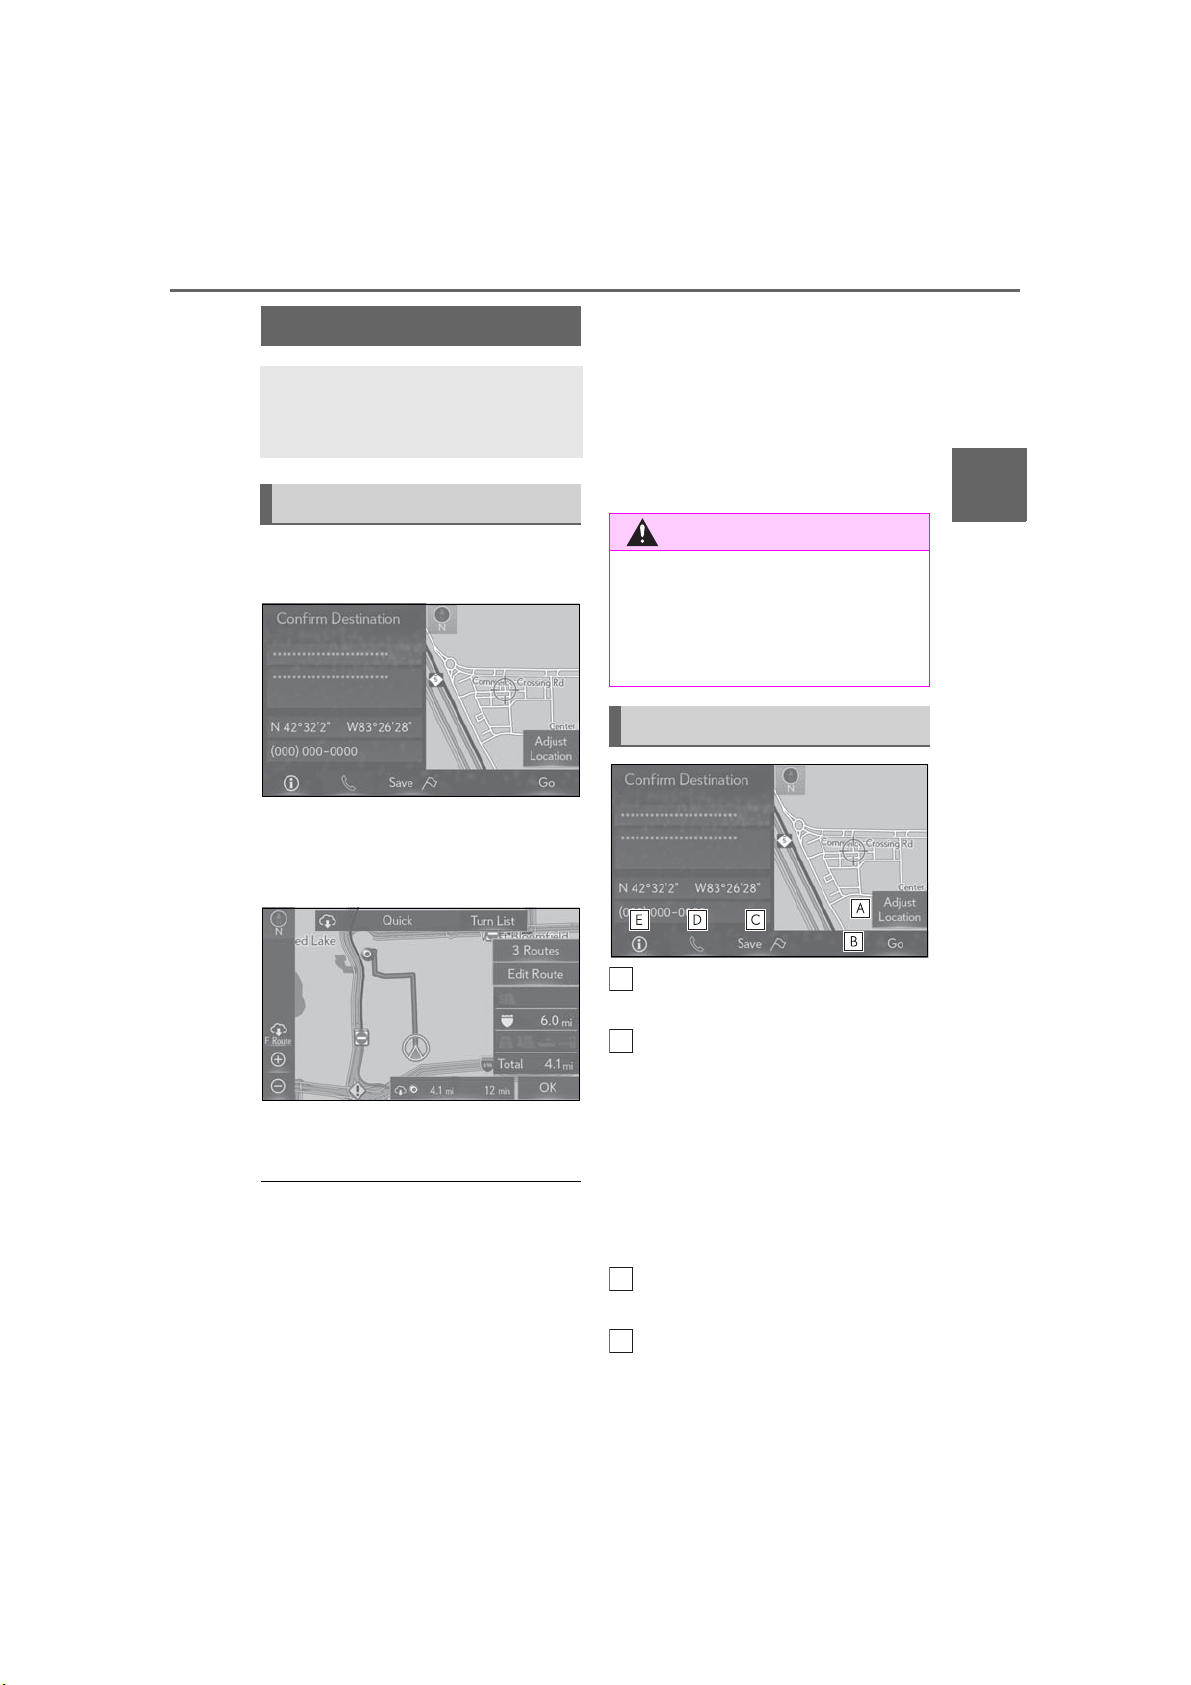
3-2. Destination search
WARNING
A
B
C
D
79
Starting route guidance
When the destination is set, the
confirm destination screen will be
displayed.
Starting route guidance
1 Select “Go” on the confirm destina-
tion screen.
For details about this screen: →P.79
2 Select “OK” on the route overview
screen.
with a scale more than 0.5 mile (800 m),
the map scale changes to 0.5 mile (800
m) automatically. If this occurs, set the
destination again.
● If a destination that is not located on a
road is set, the vehicle will be guided to
the point on a road nearest to the destination. The road nearest to the selected
point is set as the destination.
● Be sure to obey traffic regulations and
keep road conditions in mind while
driving. If a traffic sign on the road has
been changed, the route guidance
may not indicate such changed information.
Confirm destination screen
3
Navigation system
For details about this screen:
→P.80
● The route for returning may not be the
same as that for going.
● The route guidance to the destination
may not be the shortest route or a route
without traffic congestion.
● Route guidance may not be available if
there is no road data for the specified
location.
● When setting the destination on a map
LS500_LS500h_Navi_OM50F66U_(U)
Select to adjust the position in
smaller increments. (→P.66)
Select to search for the route.
(→P.79)
• If a destination has already been set, “Go
Directly” and “Add to Route” will be displayed.
“Go Directly”: Select to delete the existing
destination(s) and set a new one.
“Add to Route”: Select to add a destination
to the current route.
Select to register as a memory
point.
Select to call the registered number.
Page 80
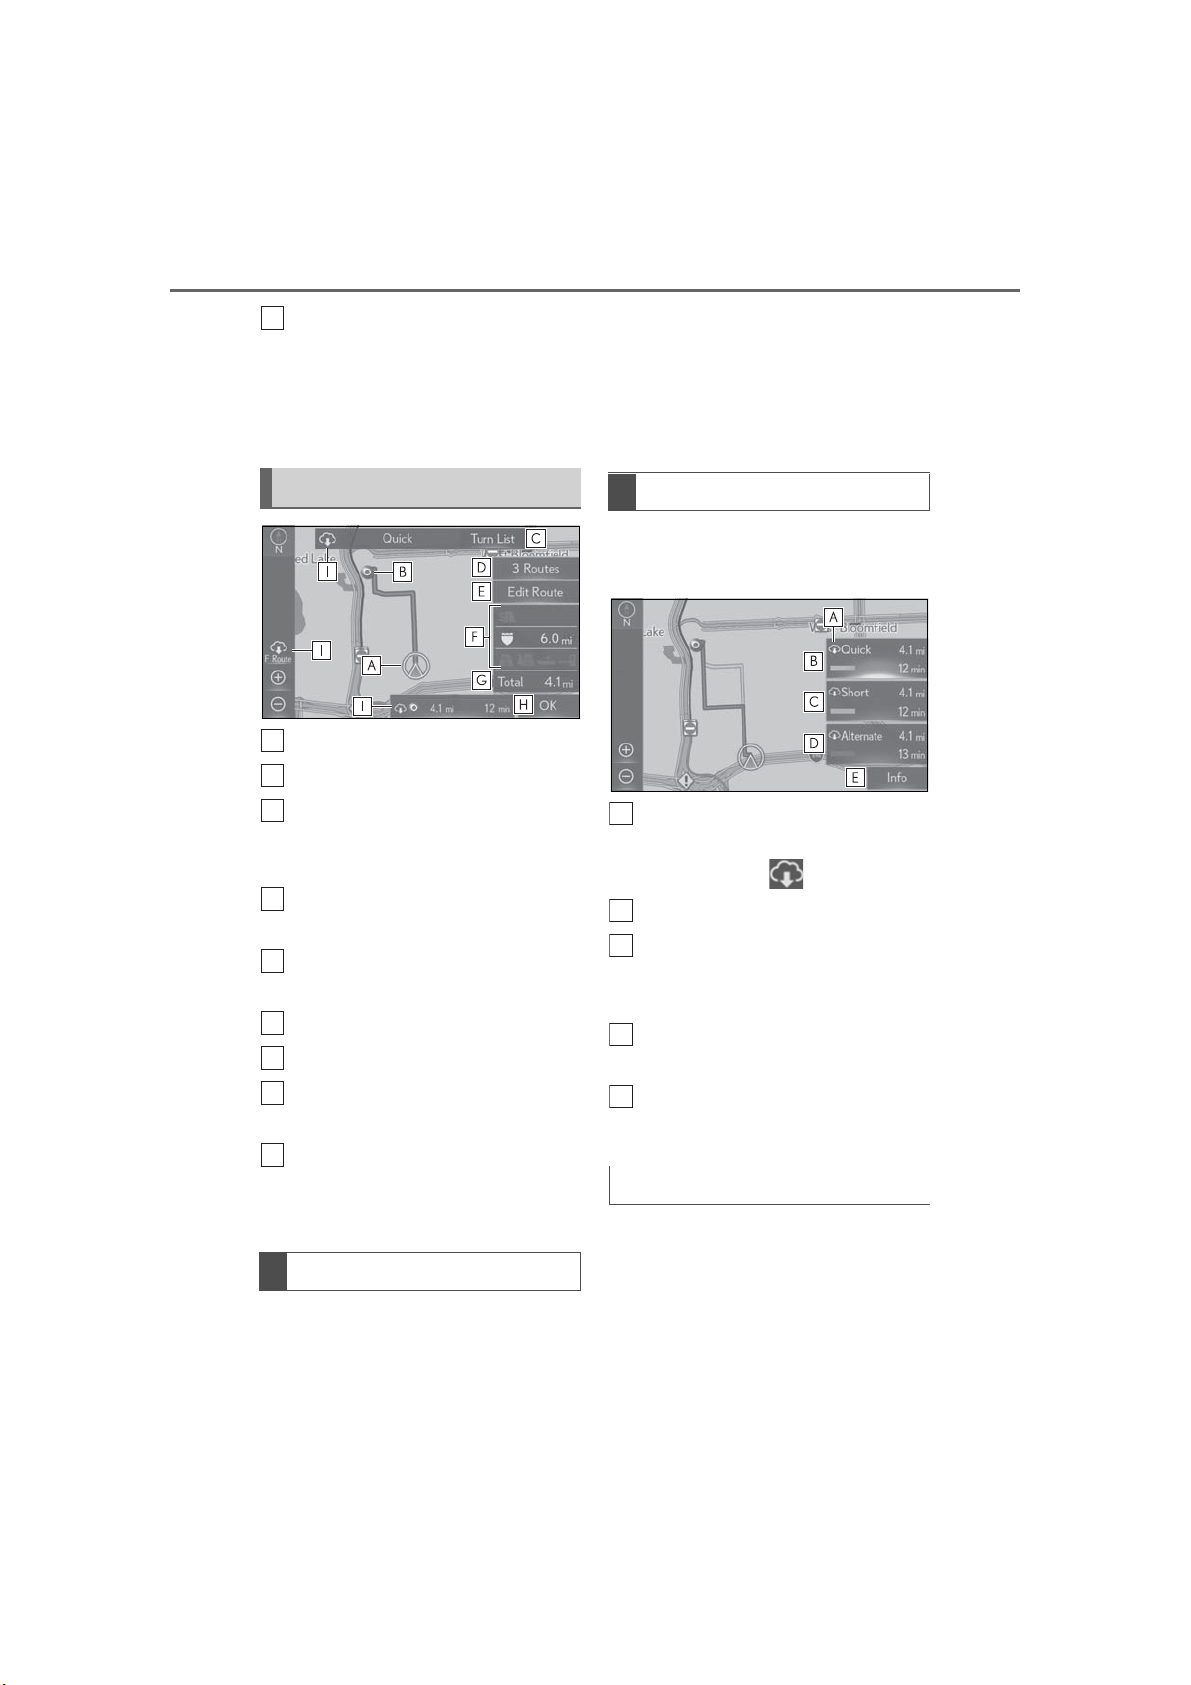
80
E
A
B
C
DEF
G
H
I
A
B
C
D
E
3-2. Destination search
Select to update information about
the selected entry.*
*
: This function is displayed only when
there is information from the Lexus
Enform center. (→P.73)
Route overview screen
Current position
Destination point
Select to display a list of the turns
required to reach the destination.
(→P.81)
Select the desired route from 3
possible routes. (→P.80)
Select to change the route.
(→P.81)
Type of route and its distance
Distance of the entire route
Select to start guidance. Select and
hold to start demo mode. (→P.80)
Displayed when the route displayed is from the Lexus Enform
center. (→P.82)
1 Select and hold “OK” on the route
overview screen until a beep
sounds.
Press the “MAP” button on the
Remote Touch to end demo mode.
3 routes selection
1 Select “3 Routes”.
2 Select the desired route.
Displayed when the route displayed is available from the Lexus
Enform center. ( )
Select to display the quickest route.
Select to display the route that is
the shortest distance to the set destination.
Select to display the alternative
route.
Select to display the information
about the 3 routes. (→P.80)
Displaying 3 routes information
1 Select “Info”.
Starting demo mode
Before starting the route guidance, the
demonstration of the route guidance
can be viewed.
LS500_LS500h_Navi_OM50F66U_(U)
Page 81
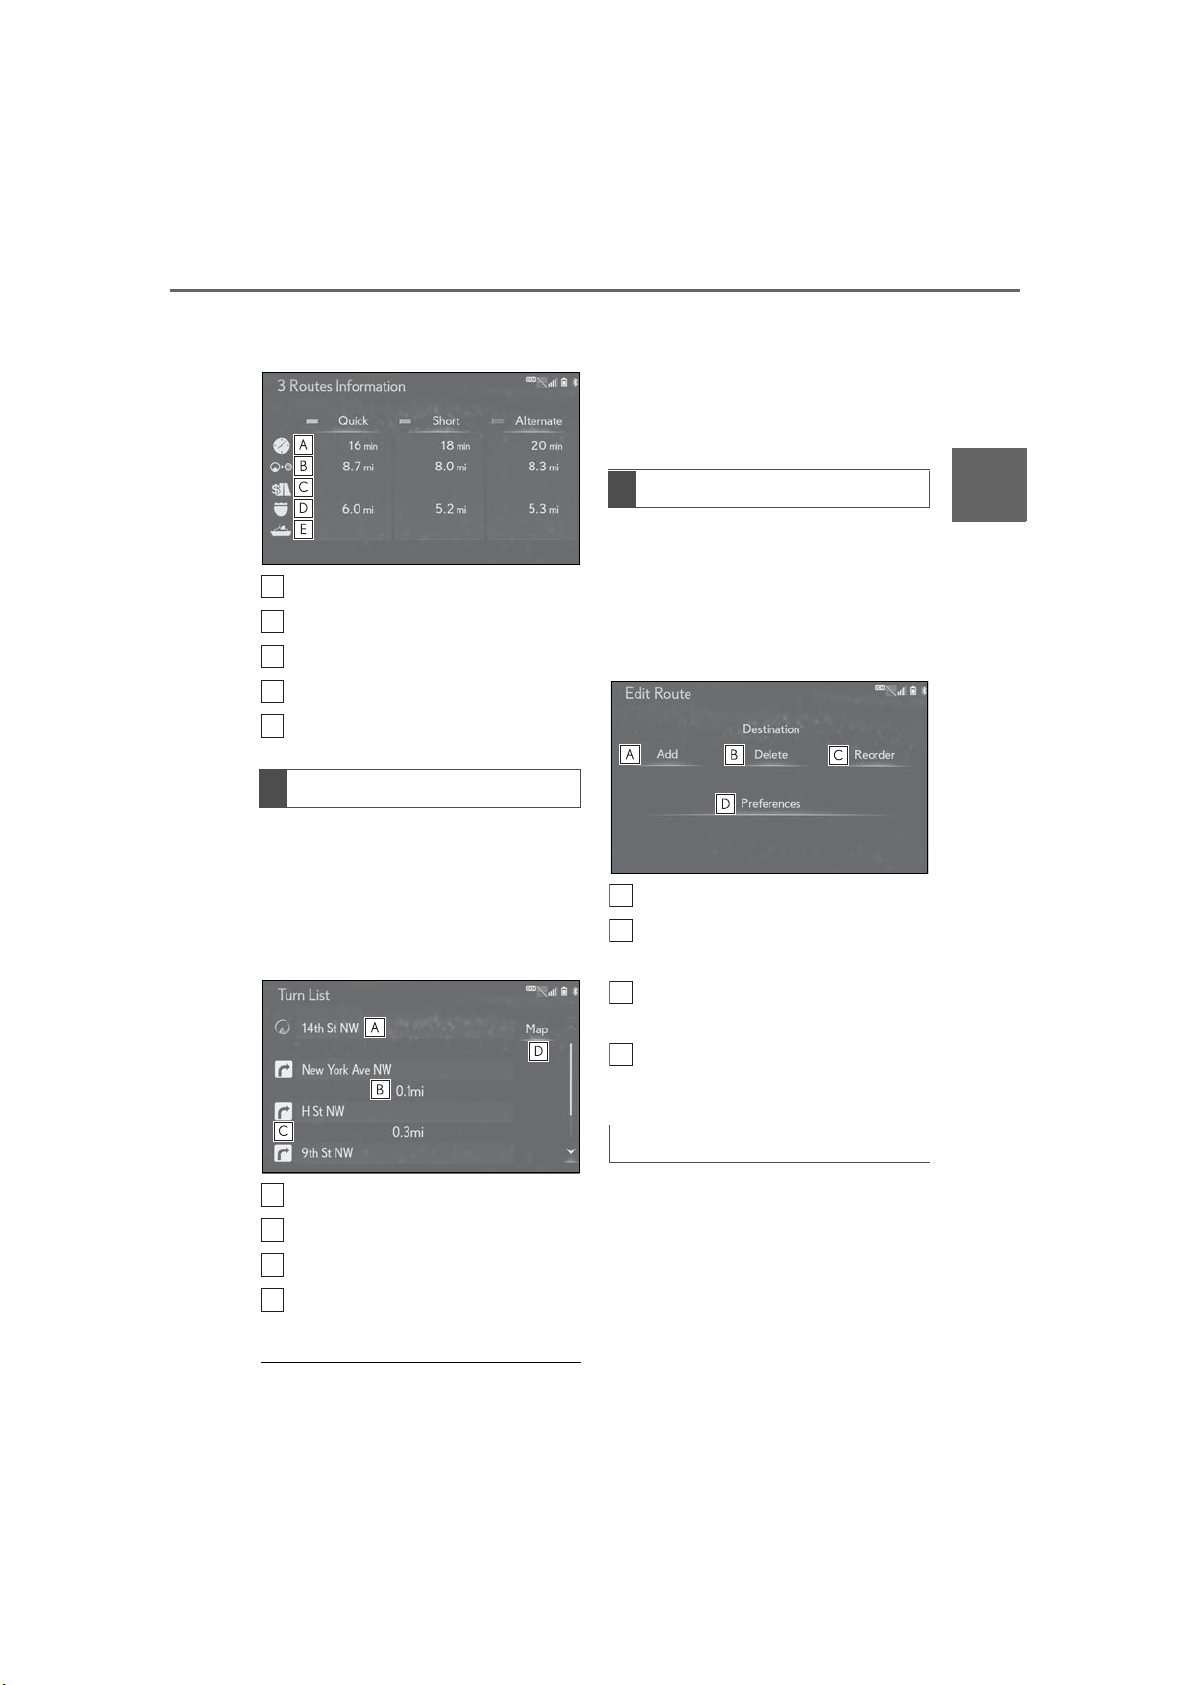
3-2. Destination search
A
B
C
DEA
B
C
D
A
B
C
D
81
2 Check that the 3 routes informa-
tion screen is displayed.
Time necessary for the entire trip
Distance of the entire trip
Distance of the toll road
Distance of the freeway
Distance of the ferry trip
Displaying turn list
A list of turn information from the current position to the destination can be
displayed.
1 Select “Turn List”.
2 Check that the turn list is displayed.
appear on the list. If a road changes its
name without requiring a turn (such as on
a street that runs through 2 or more cities), the name change will not appear on
the list. The street names will be displayed
in order from the starting point, along
with the distance to the next turn.
Editing route
Destinations can be added, reordered
or deleted, and conditions for the route
to the destination can be changed.
1 Select “Edit Route”.
2 Select the desired item.
Select to add destinations. (→P.81)
Select to delete destinations.
(→P.82)
3
Navigation system
Current position
Distance to the next turn
Turn direction at the intersection
Select to display the map of the
selected point.
● Not all road names on the route may
LS500_LS500h_Navi_OM50F66U_(U)
Select to reorder destinations.
(→P.87)
Select to set route preferences.
(→P.87)
Adding destinations
When the vehicle is stopped
1 Select “Add”.
2 Search for an additional destination
in the same way as a destination
search. (→P.72)
Up to 5 destinations can be set.
Page 82

82
3-2. Destination search
3 Select “Add Destination Here” at
the position in the route which you
want to add the destination.
While driving
1 Select “Add”.
2 Search for an additional destination
in the same way as a destination
search. (→P.72)
Up to 5 destinations can be set.
3 Select “Beginning” or “End”.
Deleting destinations
1 Select “Delete”.
2 Select “Yes” when the confirmation
screen appears.
If more than 1 destination has been
set, select the destination(s) to be
deleted. (The system will recalculate
route(s) to the remaining set destination(s).)
Press the button on the Remote
Touch. The following button can be
displayed.
“Delete All”: Select to delete all destinations on the list.
A route from the Lexus Enform
center
*
: This function is not made available in
When starting route guidance or
rerouting, a route can be provided
automatically by the Lexus Enform
center. This function is available when
dynamic route setting is enabled.
(→P.94)
*
some countries or areas.
LS500_LS500h_Navi_OM50F66U_(U)
Page 83
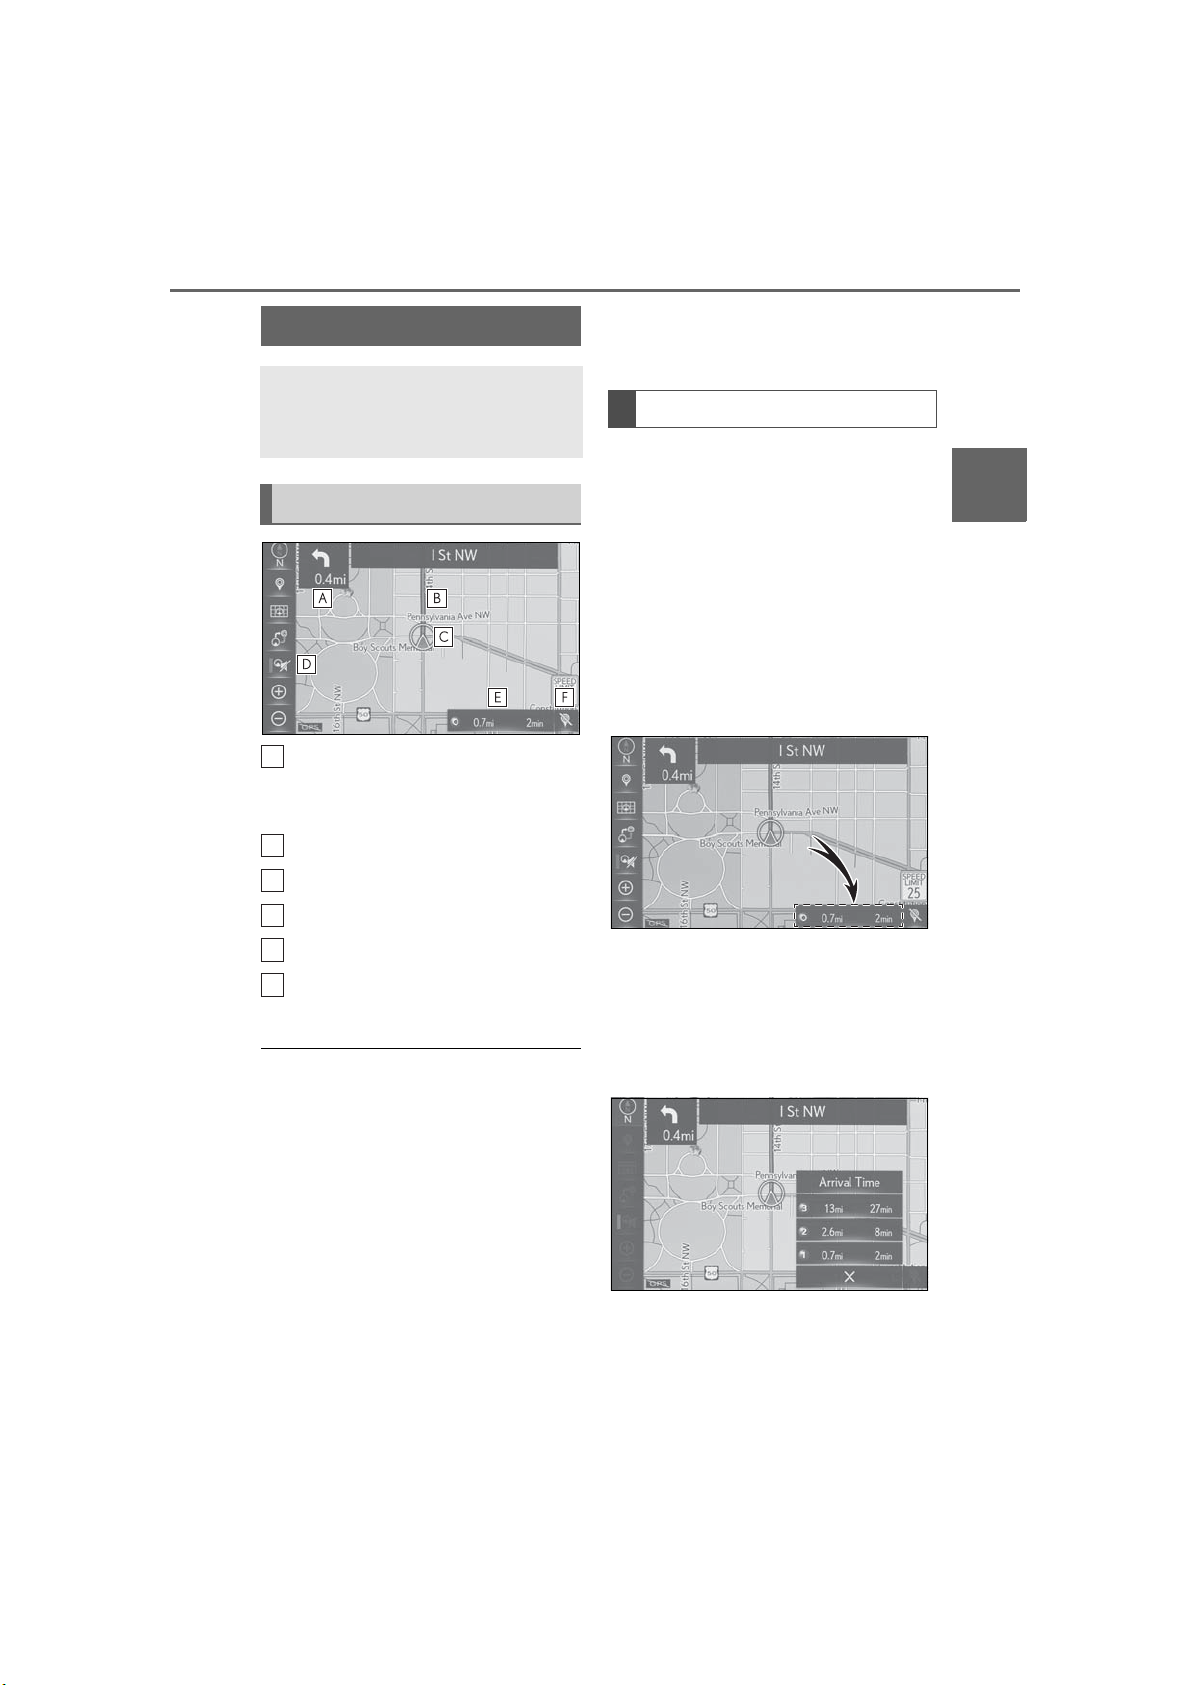
3-3.Route guidance
A
B
C
D
E
F
Route guidance screen
During the route guidance, various
types of guidance screens can be
displayed depending on conditions.
Screen for route guidance
Distance to the next turn and an
arrow indicating the turning direction
Guidance route
3-3. Route guidance
head-up display is set to on, turn-by-turn
guidance arrows will be displayed on the
windshield.
Distance and time to destination
When the vehicle is on the guidance
route, the route information bar displays the distance with the estimated
travel/arrival time to the destination.
When the set destination is 1
1 Select the route information bar to
change the display of the route
information bar between the estimated travel time and the estimated arrival time.
83
3
Navigation system
Current position
Select to mute the voice guidance.
Route information
Select to delete destinations.
(→P.23)
● If the vehicle goes off the guidance route,
the route will be recalculated.
● For some areas, the roads have not been
completely digitized in our database. For
this reason, the route guidance may
select a road that should not be traveled
on.
● When arriving at the set destination, the
destination name will be displayed on the
upper part of the screen.
● When the automatic zoom function is
enabled, the map will automatically
change to a detailed map as the vehicle
approaches a guidance point. (→P.94)
● Vehicle with head-up display: When the
When the set destinations are more
than 1
1 Select the route information bar.
2 Check that the list of the distance
and time is displayed.
By selecting one of the number but-
tons, the desired route information
is displayed.
LS500_LS500h_Navi_OM50F66U_(U)
Page 84
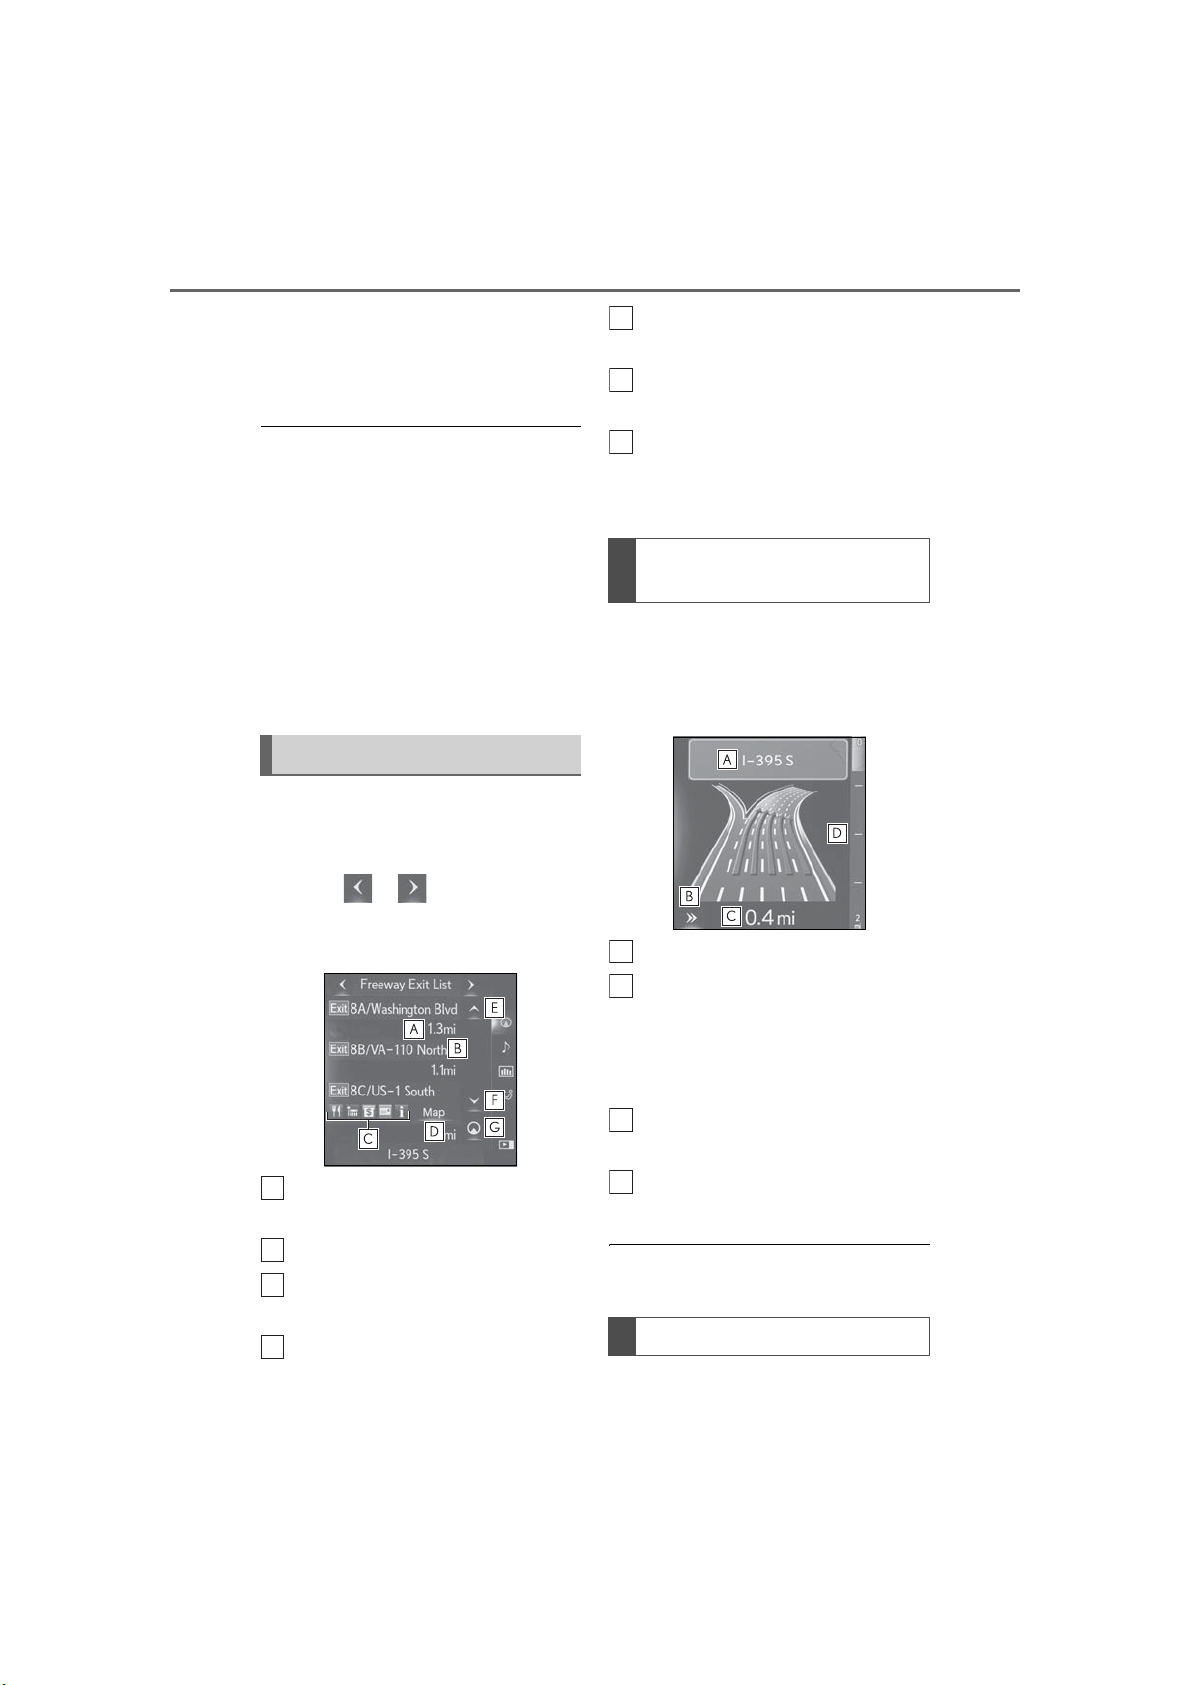
84
A
B
C
D
EFG
A
B
C
D
3-3. Route guidance
“Arrival Time”: Select to display the estimated arrival time.
“Time to Dest.”: Select to display the estimated travel time.
● When the vehicle is on the guidance
route, the distance measured along the
route is displayed. Travel time and arrival
time are calculated based on the average
speed of the specified speed limits and
current traffic information.
● When the vehicle gets off the guidance
route, the arrow facing the destination is
displayed instead of the estimated
travel/arrival time.
● The route information bar fills from left to
right as the vehicle progresses along the
route.
During freeway driving
During freeway driving, the freeway
information screen can be displayed
on the side display.
1 Select or to display the
“Freeway Exit List” screen on the
side display.
Select to scroll to farther freeway
exits/rest areas.
Select to scroll to closer freeway
exits/rest areas.
Select to display the nearest freeway exits/rest areas from the current position.
When approaching freeway exit
or junction
When the vehicle approaches an exit
or junction, the freeway guidance
screen will be displayed on the side display.
Next exit or junction name
Distance from the current position
to the freeway exit/rest area
Name of the freeway exit/rest area
POIs that are close to a freeway
exit
Select to display the selected map
of the exit vicinity.
LS500_LS500h_Navi_OM50F66U_(U)
Select to hide the freeway guidance
screen.
• To return to the freeway guidance
screen, press the “MAP” button on the
Remote Touch.
Distance from the current position
to the exit or junction
Remaining distance bar to the guidance point
● This function is available when “Intersec-
tion Zoom Map” is set to on. (→P.94)
When approaching tollgate
When the vehicle approaches a toll-
Page 85
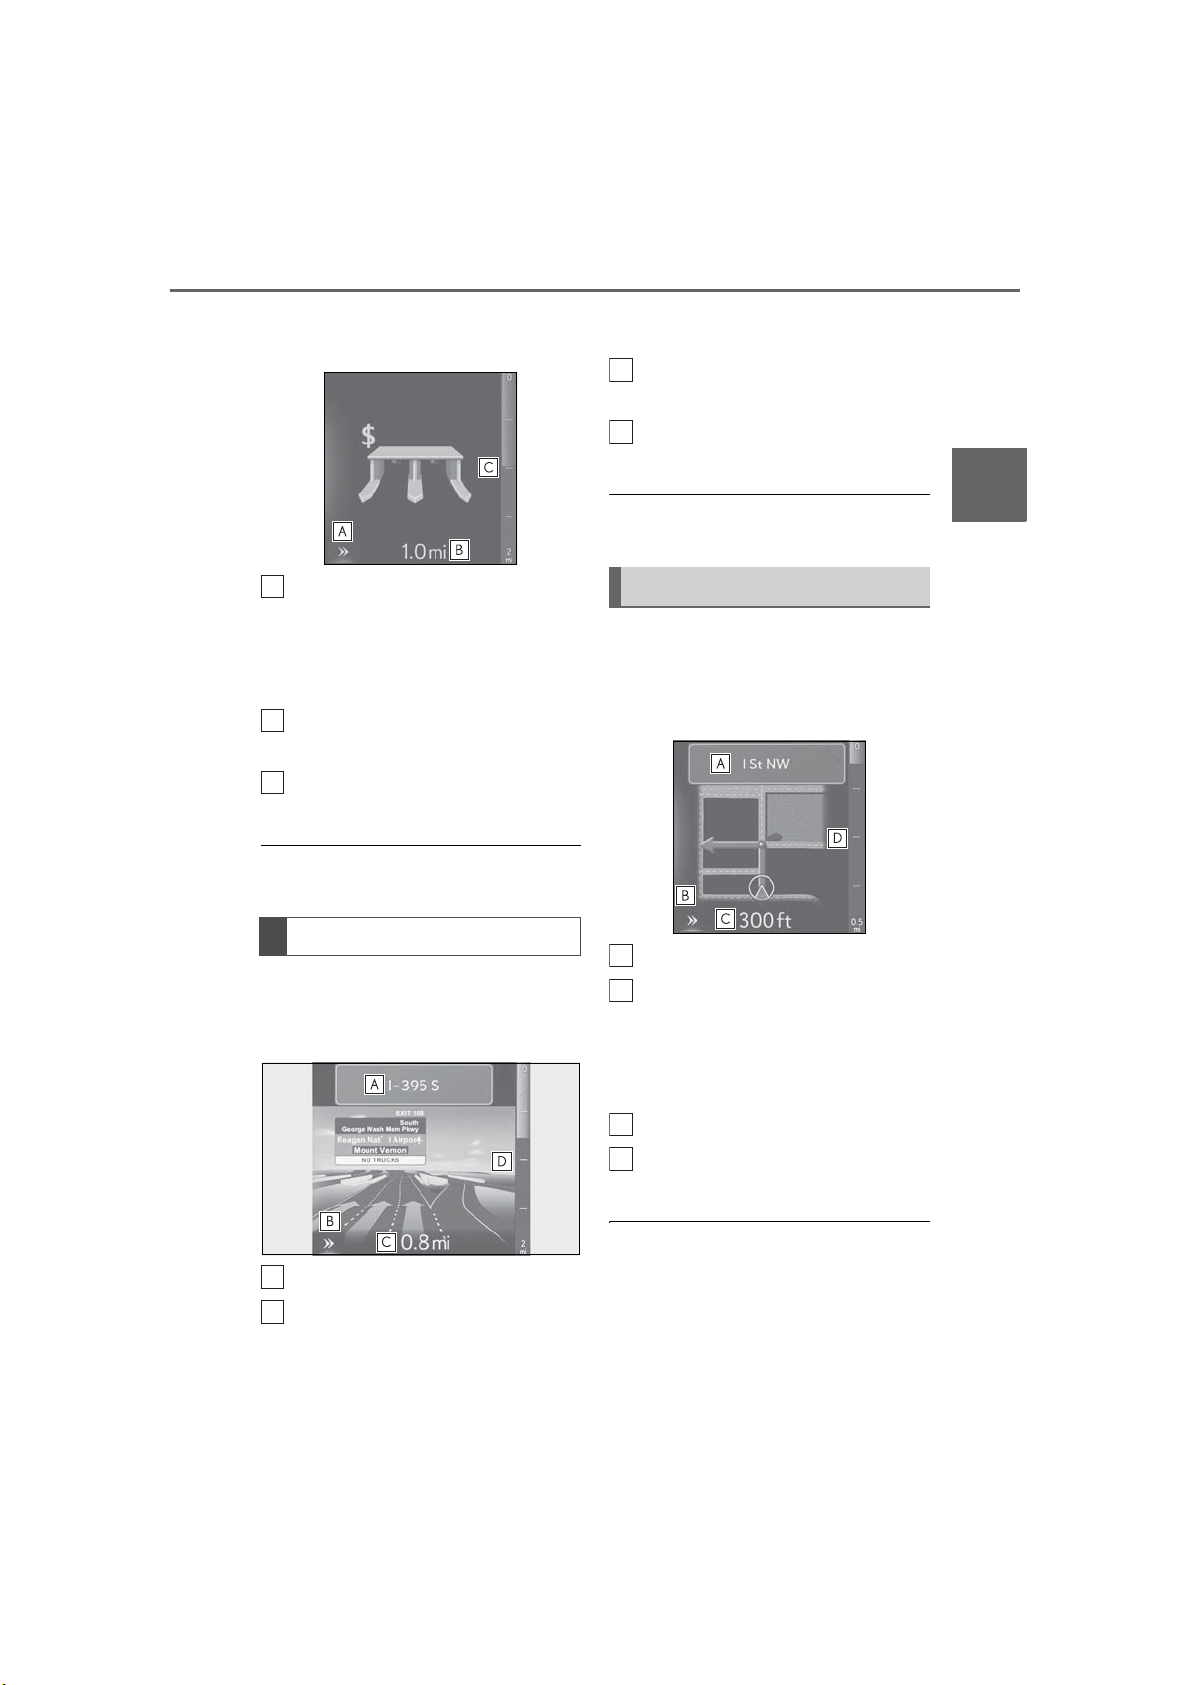
3-3. Route guidance
A
B
C
A
B
C
D
A
B
C
D
85
gate, the tollgate view will be displayed
on the side display.
Select to hide the tollgate guidance
screen.
• To return to the tollgate guidance
screen, press the “MAP” button on the
Remote Touch.
Distance from the current position
to the tollgate
Remaining distance bar to the guidance point
● This function is available when “Intersec-
tion Zoom Map” is set to on. (→P.94)
view, press the “MAP” button on the
Remote Touch.
Distance from the current position
to the next junction
Remaining distance bar to the guidance point
● This function is available when “Intersec-
tion Zoom Map” is set to on. (→P.94)
When approaching intersection
When the vehicle approaches an intersection, the intersection guidance
screen will be displayed on the side display.
3
Navigation system
When approaching junction
When the vehicle approaches a junction, the junction view with signage will
be displayed on the side display.
Next junction or street name
Select to hide the real freeway junction view.
• To return to the real freeway junction
Next street name
Select to hide the intersection guidance screen.
• To return to the intersection guidance
screen, press the “MAP” button on the
Remote Touch.
Distance to the intersection
Remaining distance bar to the guidance point
● This function is available when “Intersec-
tion Zoom Map” is set to on. (→P.94)
LS500_LS500h_Navi_OM50F66U_(U)
Page 86
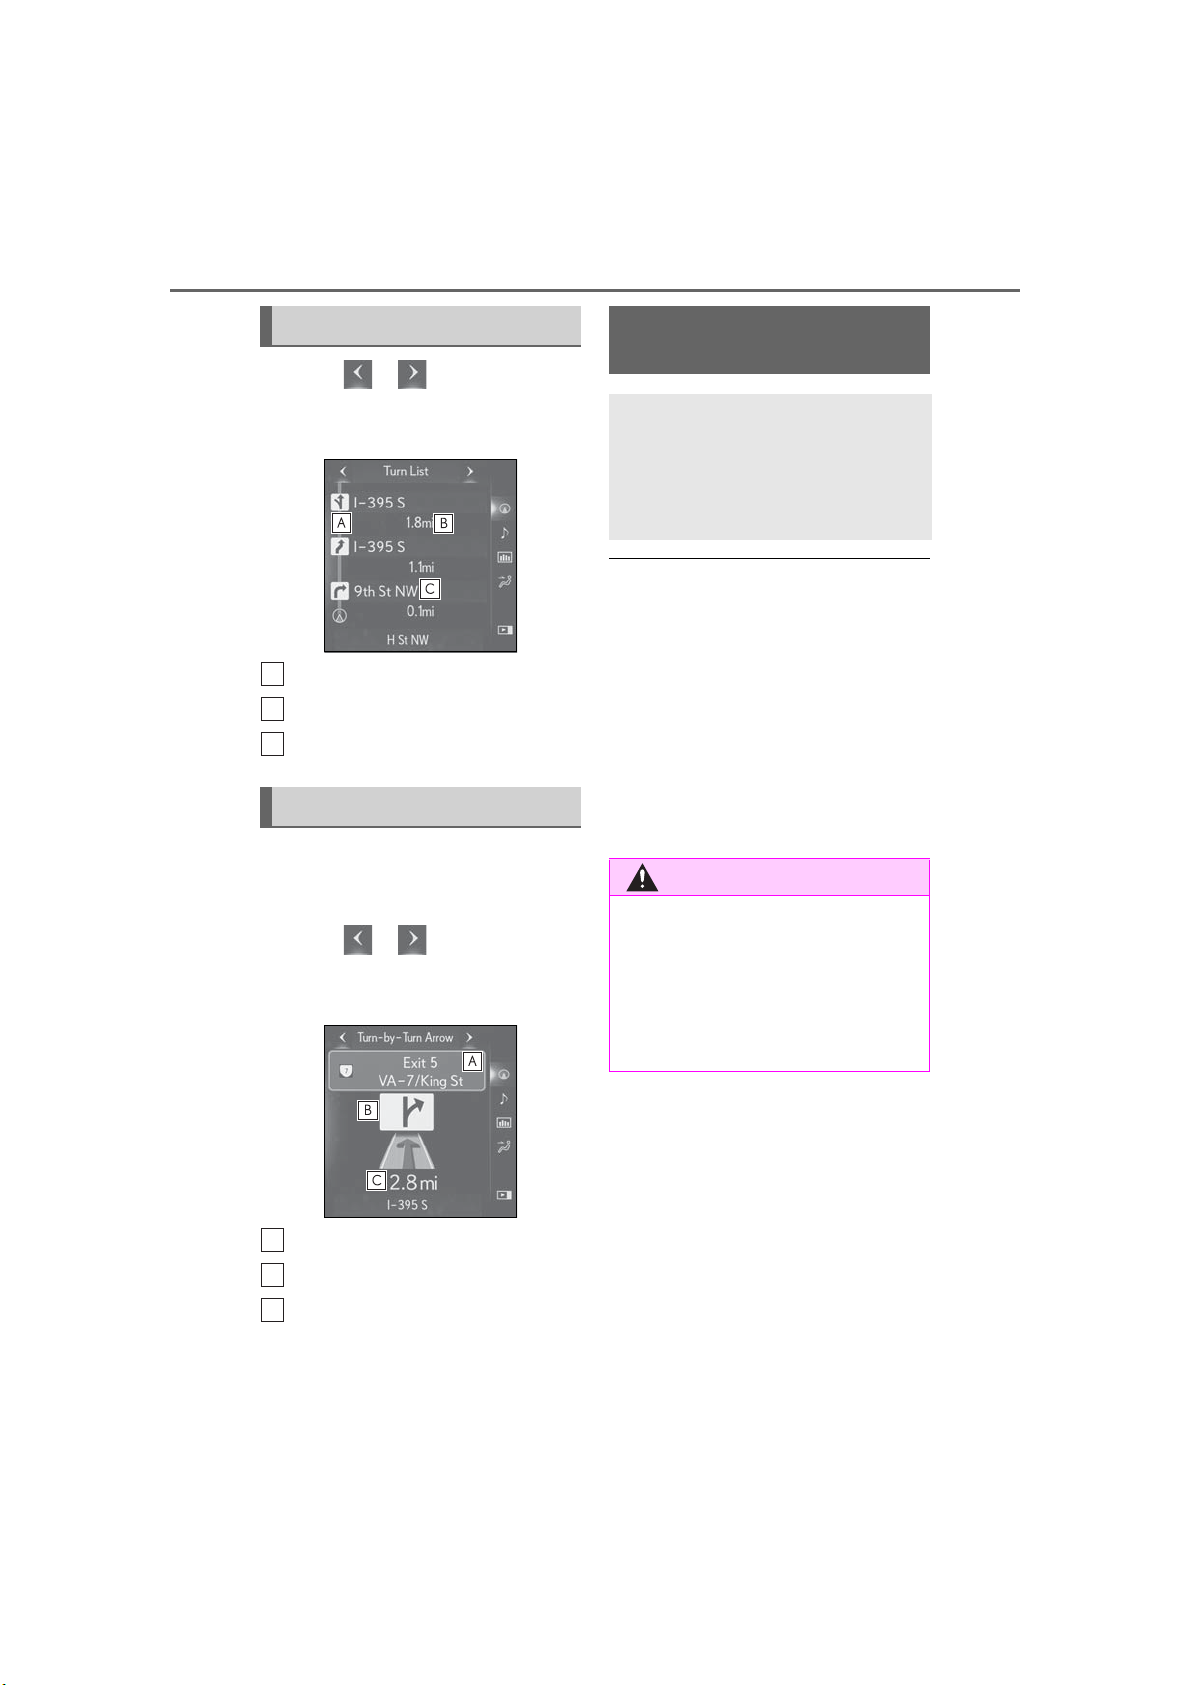
86
A
B
C
A
B
C
WARNING
3-3. Route guidance
Turn list screen
1 Select or to display the
“Turn List” screen on the side display.
Turn direction
Distance between turns
Next street or destination name
Turn-by-turn arrow screen
On this screen, information about the
next turn on the guidance route can be
displayed on the side display.
1 Select or to display the
“Turn-by-Turn Arrow” screen on the
side display.
Typical voice guidance
prompts
As the vehicle approaches an intersection, or point, where maneuvering the vehicle is necessary, the
system’s voice guidance will provide various messages.
● If a voice guidance command cannot be
heard, press the “MAP” button on the
Remote Touch.
● To adjust the voice guidance volume:
→P.57
● To mute the voice guidance: →P.83
● Voice guidance may be made early or
late.
● If the system cannot determine the cur-
rent position correctly, you may not hear
voice guidance or may not see the magnified intersection on the screen.
● Be sure to obey the traffic regulations
and keep the road condition in mind
especially when you are driving on IPD
roads (roads that are not completely
digitized in our database). The route
guidance may not have the updated
information such as the direction of a
one way street.
Exit number or street name
Turn direction
Distance to the next turn
LS500_LS500h_Navi_OM50F66U_(U)
Page 87
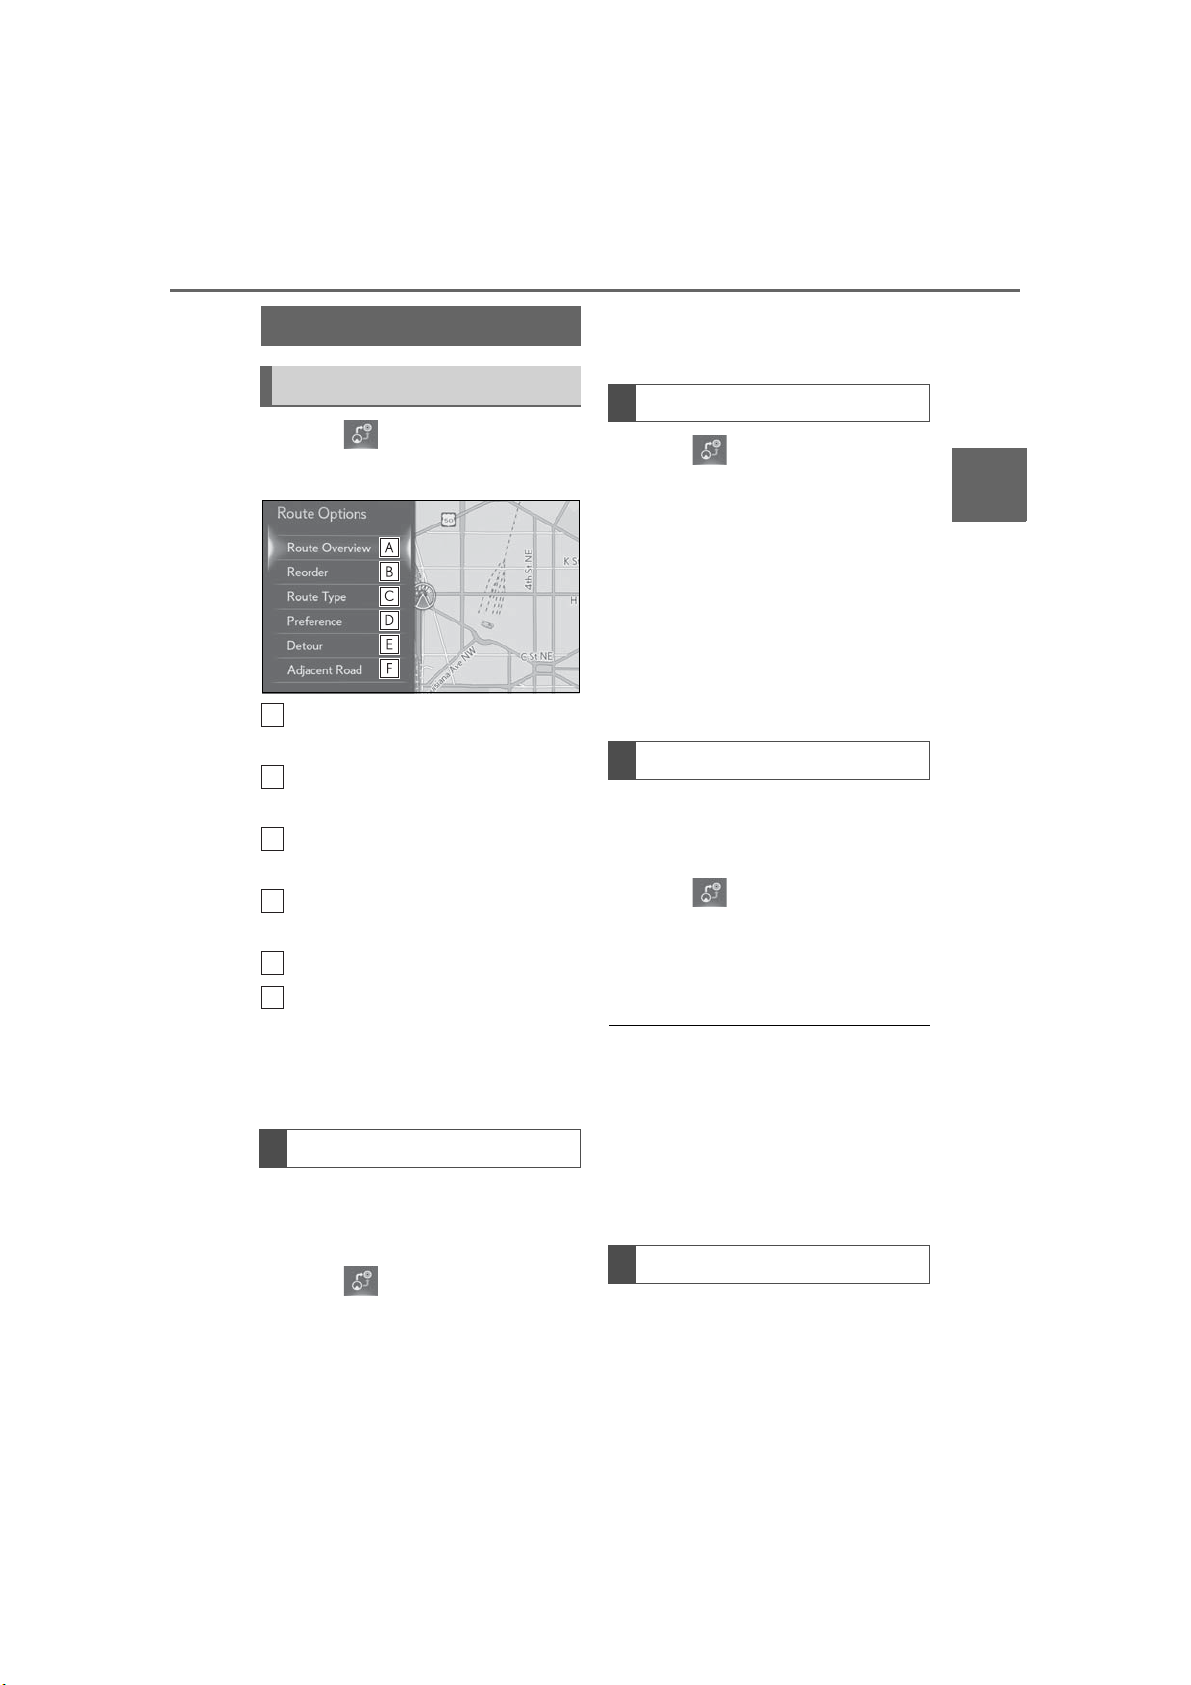
3-3. Route guidance
A
B
C
D
E
F
87
Editing route
Displaying the edit route screen
1 Select on the map screen.
2 Select the desired item to be set.
Select to display the overview of
the entire route. (→P.80)
Select to reorder destinations.
(→P.87)
Select to change route type.
(→P.87)
Select to set route preferences.
(→P.87)
to change the arrival order. Then
select “OK”.
Selecting route type
1 Select on the map screen.
2 Select “Route Type”.
3 Select the desired route type.
The entire route from the starting
point to the destination is displayed.
(→P.80)
During driving, the route guidance
starts after selecting the desired
route type.
Setting route preferences
The conditions to determine the route
can be selected from various choices
such as freeways, toll roads, ferries, etc.
1 Select on the map screen.
2 Select “Preference”.
3
Navigation system
Select to set detours. (→P.87)
Select to start from adjacent road.
(→P.88)
3 Check that the route overview is
displayed. (→P.80)
Reordering destinations
When more than 1 destination has
been set, the arrival order of the destinations can be changed.
1 Select on the map screen.
2 Select “Reorder”.
3 Select the desired destination and
select “Move Up” or “Move Down”
LS500_LS500h_Navi_OM50F66U_(U)
3 Select the desired route prefer-
ences and select “OK”.
● Even if the “Freeways” route preference is
turned off, the route may not be able to
avoid freeways in some cases.
● If the calculated route includes a trip by
ferry, the route guidance shows a sea
route. After traveling by ferry, the current
position may be incorrect. Upon reception of GPS signals, it is automatically
corrected.
Detour setting
During the route guidance, the route
can be changed to detour around a
section of the route where a delay is
Page 88
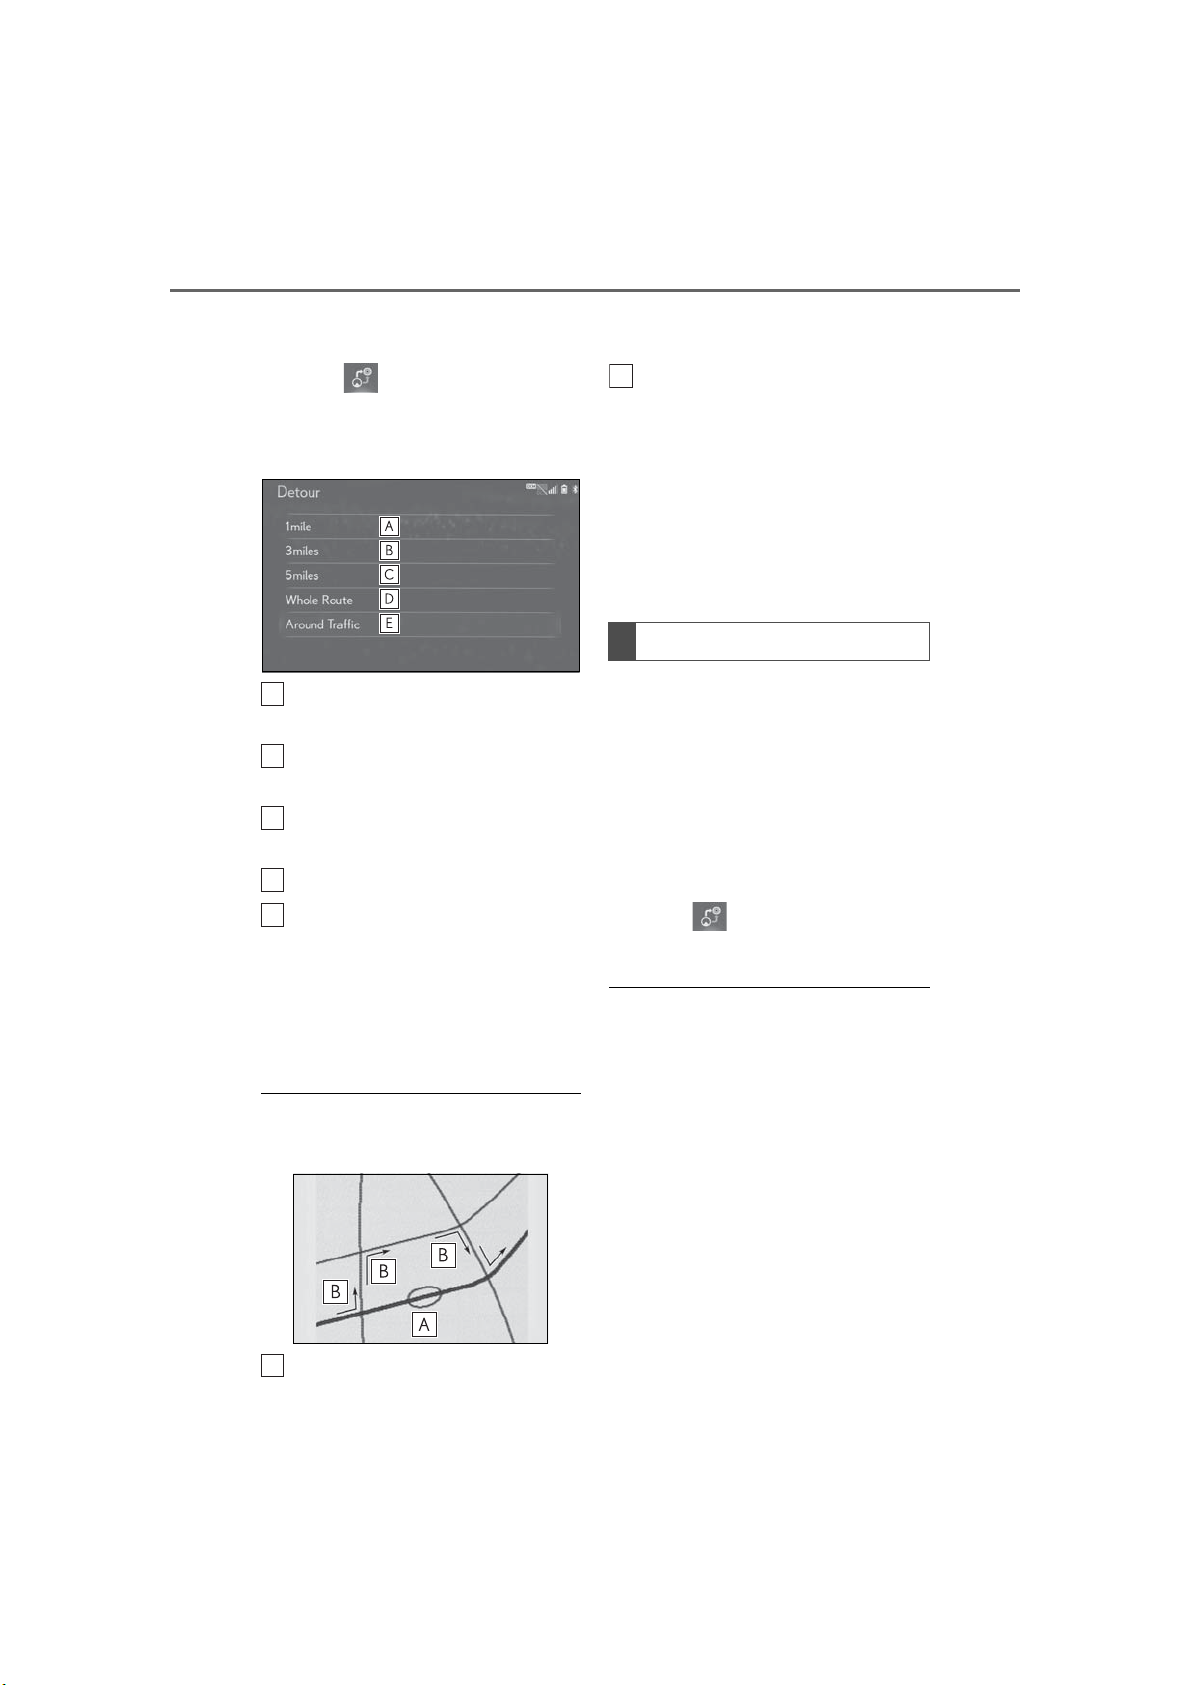
88
A
B
C
D
E
A
B
3-3. Route guidance
caused by road repairs, an accident,
etc.
1 Select on the map screen.
2 Select “Detour”.
3 Select the desired detour distance.
Select to detour within 1 mile of the
current position.
Select to detour within 3 miles of
the current position.
Select to detour within 5 miles of
the current position.
Select to detour on the entire route.
traffic jam caused by road repairs, an
accident, etc.
This route indicates the detour suggested by the system.
● When the vehicle is on a freeway, the
detour distance selections are 5, 15 and
25 miles (or 5, 15 and 25 km if units are
in km).
● The system may not be able to calculate a
detour route depending on the selected
distance and surrounding road conditions.
Adjacent road
When a freeway and a surface road
run in parallel, the system may show
the guidance route going on the freeway while driving on the surface road,
or vice versa.
If this happens, you can instantly
choose the adjacent road for the route
guidance.
Select to make the system search
for the route based on traffic congestion information received from
traffic information.
*
: This function is not made available in
some countries or areas.
● This picture shows an example of how the
system would guide around a delay
caused by a traffic jam.
This position indicates the location of a
*
(→P.70)
1 Select on the map screen.
2 Select “Adjacent Road”.
● When there is no adjacent road, this
screen button will not be displayed.
LS500_LS500h_Navi_OM50F66U_(U)
Page 89
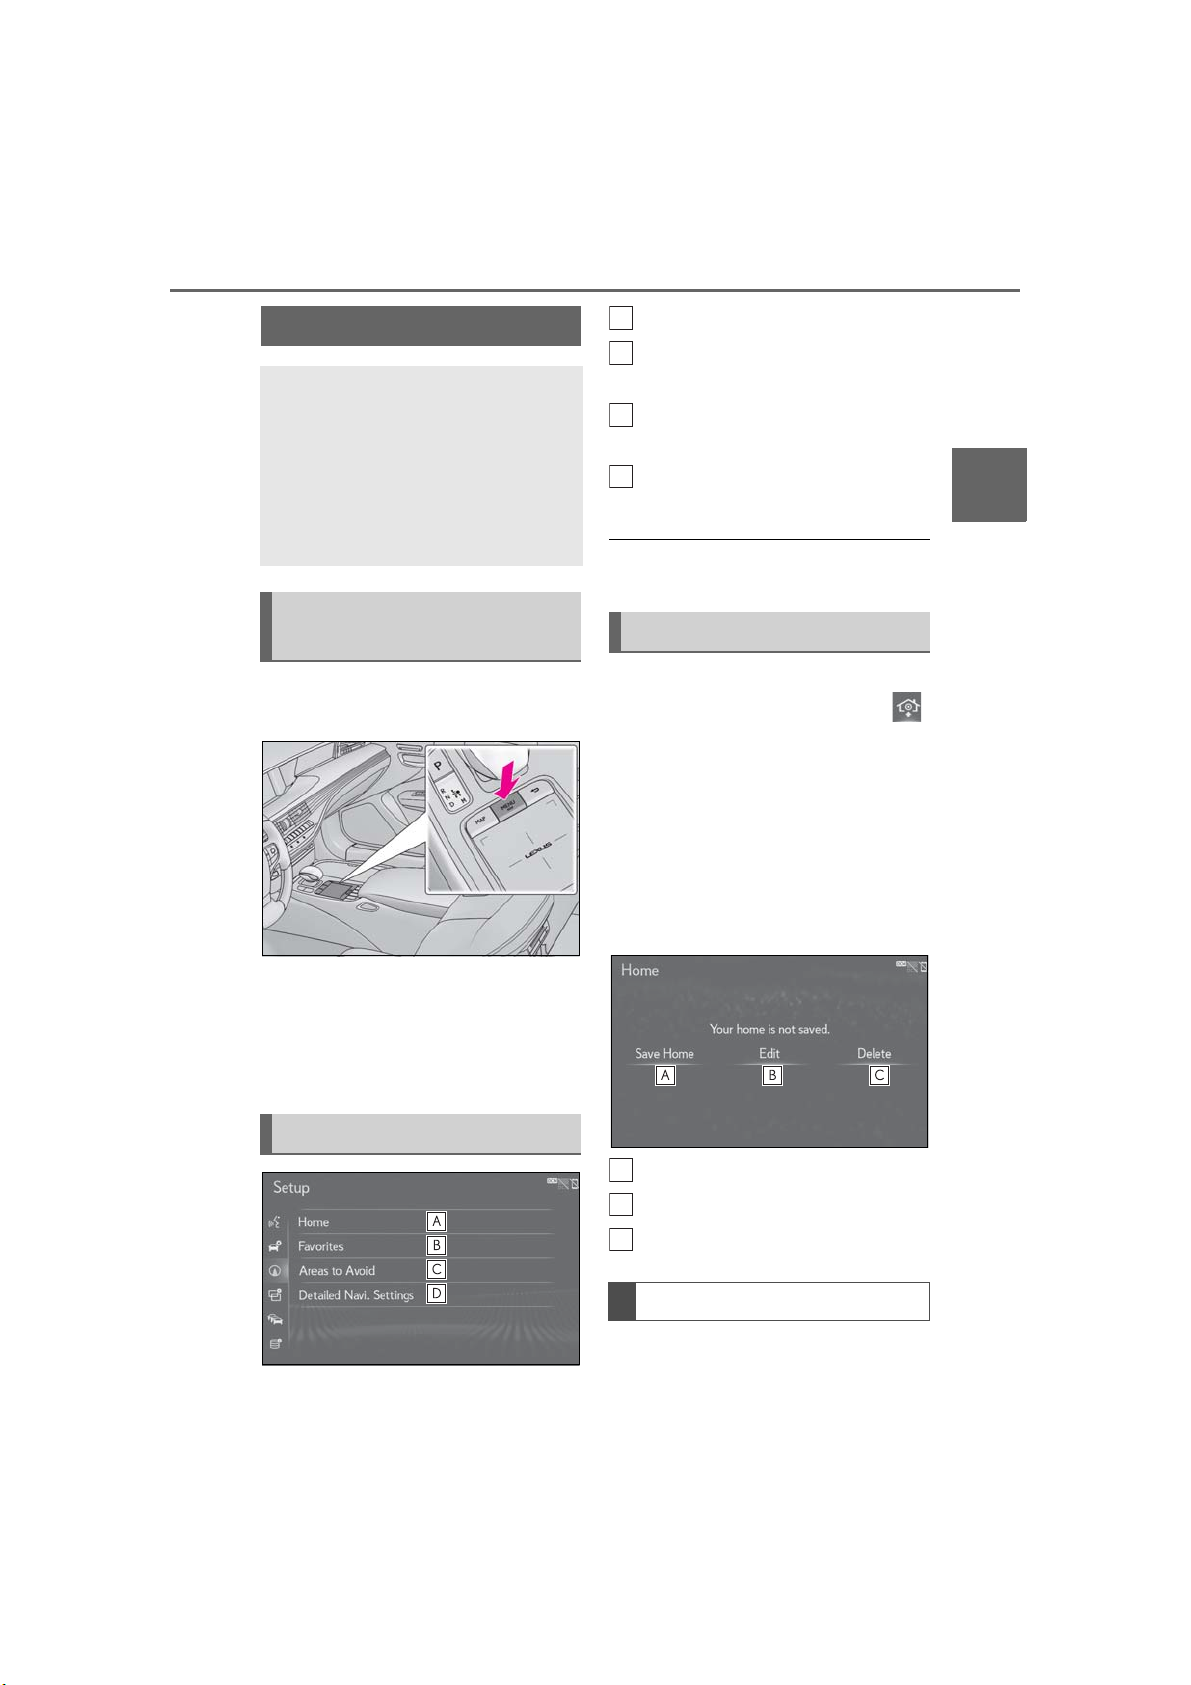
3-4.Setup
A
B
CDABC
Navigation settings
Home, favorites list entries, areas
to avoid can be set as memory
points. The registered points can be
used as the destinations. (→P.72)
Registered areas to avoid, will be
avoided when the system searches
for a route.
3-4. Setup
Select to set home. (→P.89)
Select to set the favorites list.
(→P.90)
Select to set areas to avoid.
(→P.92)
Select to set detailed navigation
settings. (→P.94)
● When “Useful Navi. Information Set-
tings” is displayed on the screen: →P.101
89
3
Navigation system
Displaying navigation settings
screen
1 Press the “MENU” button on the
Remote Touch.
2 Select “Setup”.
3 Select “Navigation” on the sub
menu.
4 Select the desired item to be set.
Navigation settings screen
Setting up home
If home has been registered, that information can be recalled by selecting
on the destination screen. (→P.72)
1 Display the navigation settings
screen:
“MENU” button → “Setup” →
“Navigation”
2 Select “Home”.
3 Select the desired item to be set.
Select to register home. (→P.89)
Select to edit home. (→P.90)
Select to delete home. (→P.90)
Registering home
1 Select “Save Home”.
LS500_LS500h_Navi_OM50F66U_(U)
Page 90
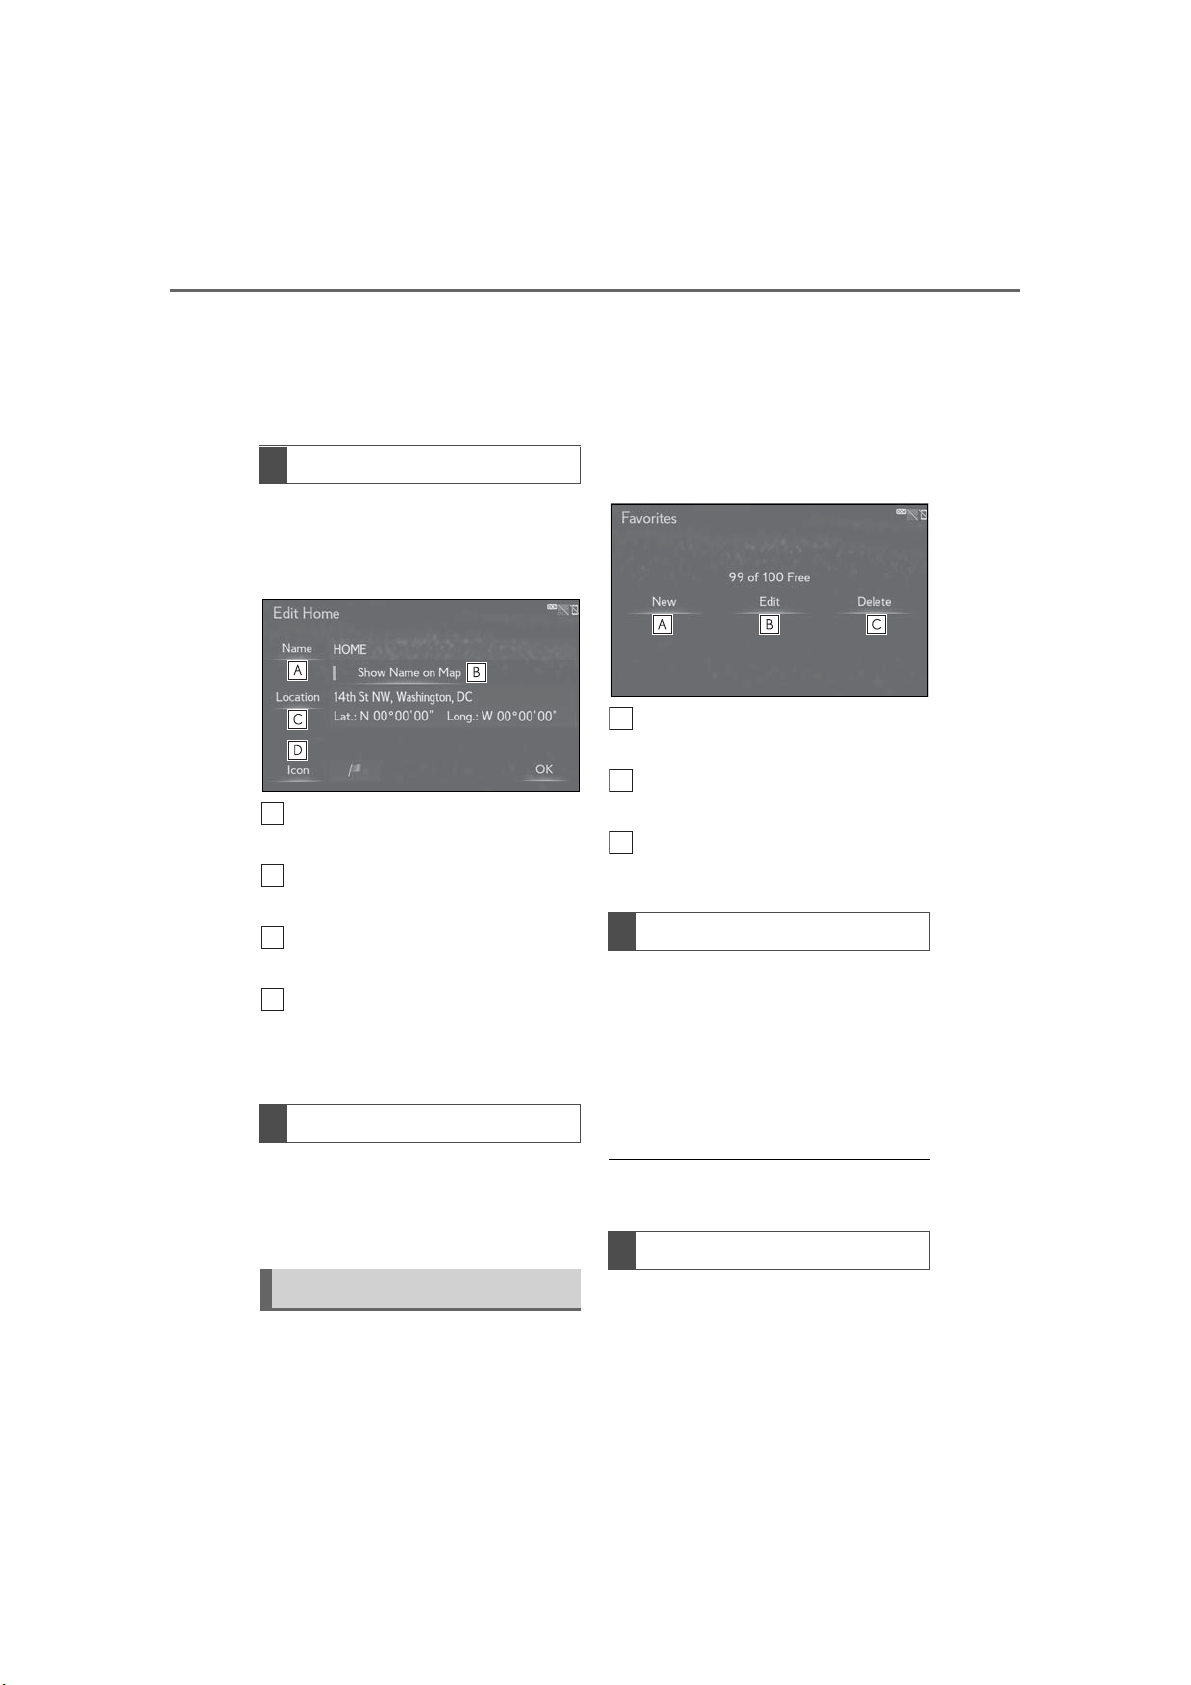
90
A
B
C
D
A
B
C
3-4. Setup
2 Select the desired item to search
for the location. (→P.72)
3 Select “OK” when the editing home
screen appears.
Editing home
1 Select “Edit”.
2 Select the desired item to be
edited.
Select to edit the home name.
(→P.91)
Select to set display of the home
name on/off.
Select to edit location information.
(→P.91)
Select to change the icon to be displayed on the map screen. (→P.91)
3 Select “OK”.
Deleting home
1 Display the navigation settings
screen:
“MENU” button → “Setup” →
“Navigation”
2 Select “Favorites”.
3 Select the desired item.
Select to register favorites list
entries. (→P.90)
Select to edit favorites list entries.
(→P.90)
Select to delete favorites list
entries. (→P.92)
Registering favorites list entries
1 Select “New”.
2 Select the desired item to search
for the location. (→P.72)
3 Select “OK” when the editing
favorites list screen appears.
(→P.90)
1 Select “Delete”.
2 Select “Yes” when the confirmation
● Up to 100 favorites list entries can be
registered.
screen appears.
Editing favorites list entries
Setting up favorites list
Points on the map can be registered.
The icon, name, location and/or phone
number of a registered favorites list
entry can be edited.
1 Select “Edit”.
LS500_LS500h_Navi_OM50F66U_(U)
Page 91
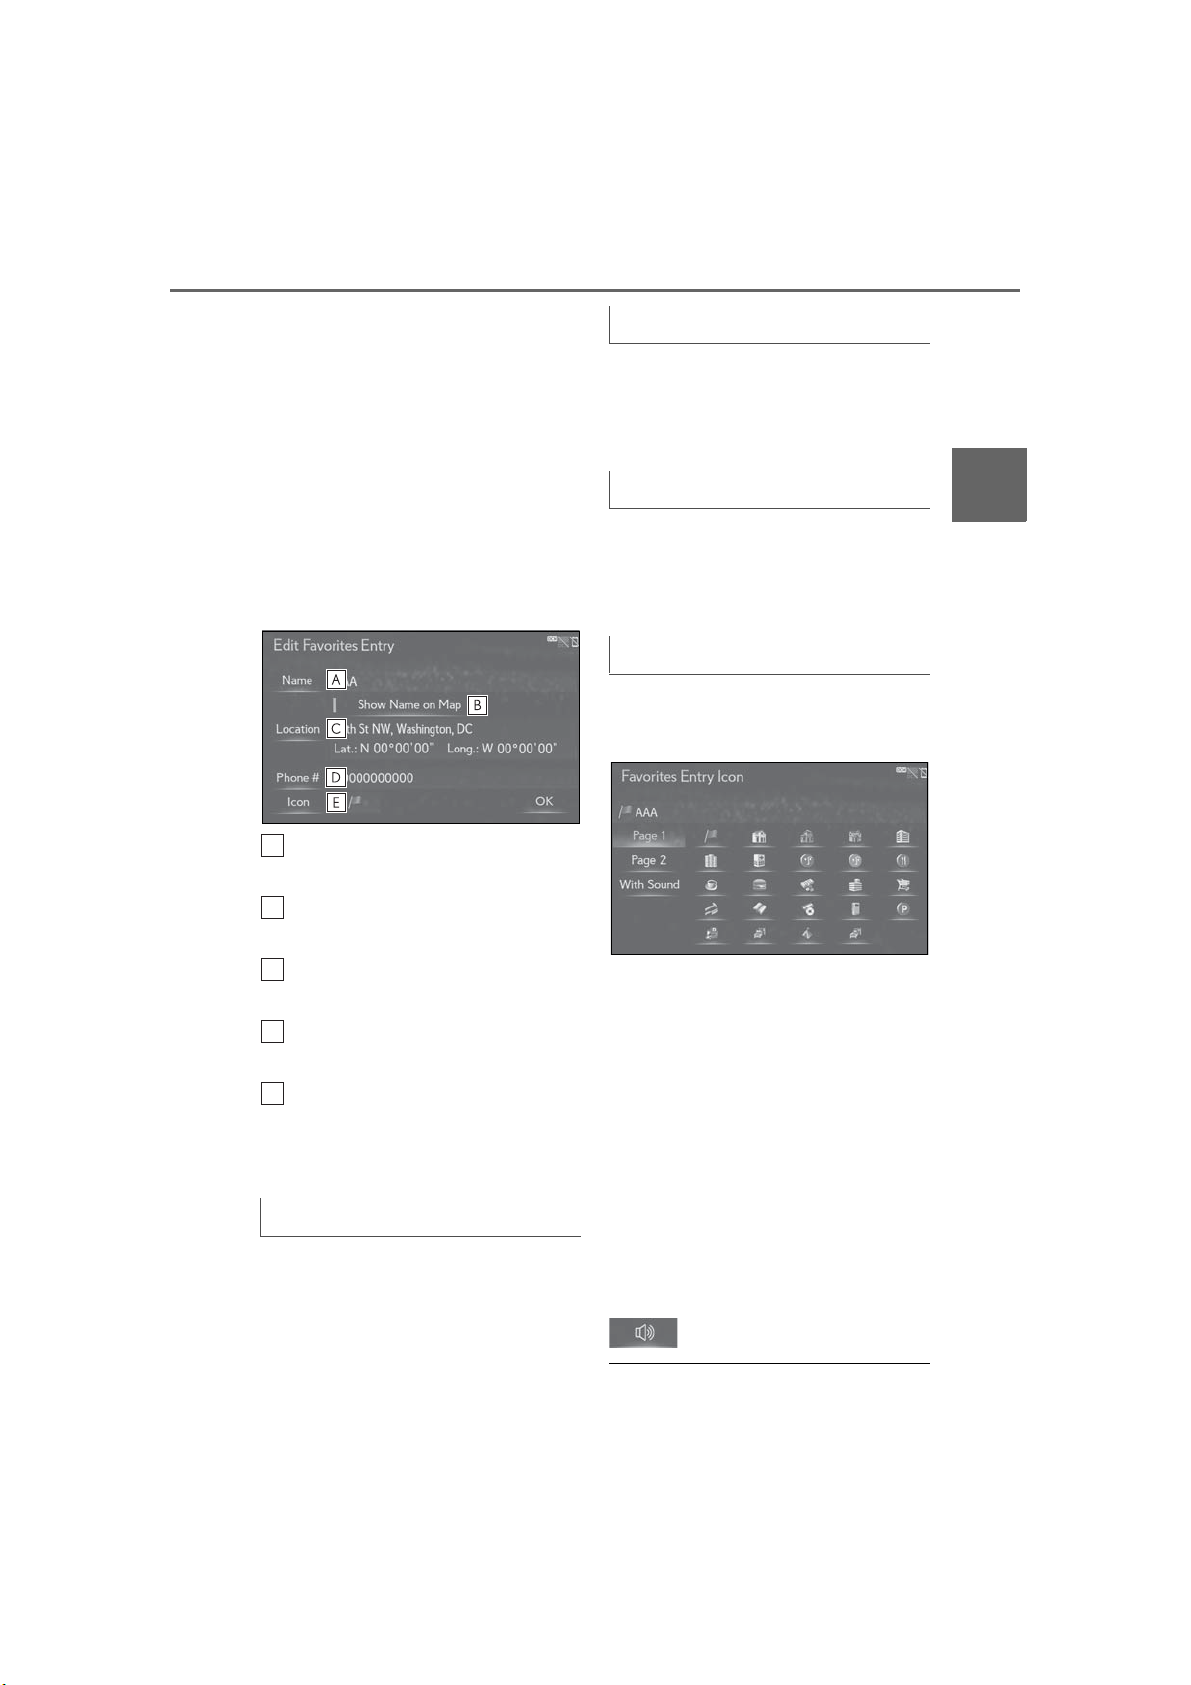
3-4. Setup
A
B
C
D
E
91
2 Select the desired favorites list
entry.
Each time a star icon is selected, its
color will change. Colored star
icons indicate that the favorite is
registered to the corresponding
preset destination button. Up to 2
entries can be registered as quick
favorite destinations. (→P.78)
3 Select the desired item to be
edited.
Select to edit the favorites list entry
name. (→P.91)
Changing the location
1 Select “Location”.
2 Scroll the map to the desired point
(→P.66) and select “OK”.
Changing phone number
1 Select “Phone #”.
2 Enter the phone number and select
“OK”.
Changing the icon
1 Select “Icon”.
2 Select the desired icon.
3
Navigation system
Select to set display of the favorites
list entry name on/off.
Select to edit location information.
(→P.91)
Select to edit the phone number.
(→P.91)
Select to change the icon to be displayed on the map screen. (→P.91)
4 Select “OK”.
Changing the name
1 Select “Name”.
2 Enter a name and select “OK”.
“Page 1”/“Page 2”: Select to change
pages.
“With Sound”: Select the desired icons with
sound
■ When “With Sound” is selected
A sound for some favorites list entries
can be set. When the vehicle
approaches the location of the favorites list entry, the selected sound will be
heard.
1 Select “With Sound”.
2 Select the desired sound icon.
: Select to play the sound.
● When “Bell (with Direction)” is selected,
LS500_LS500h_Navi_OM50F66U_(U)
Page 92
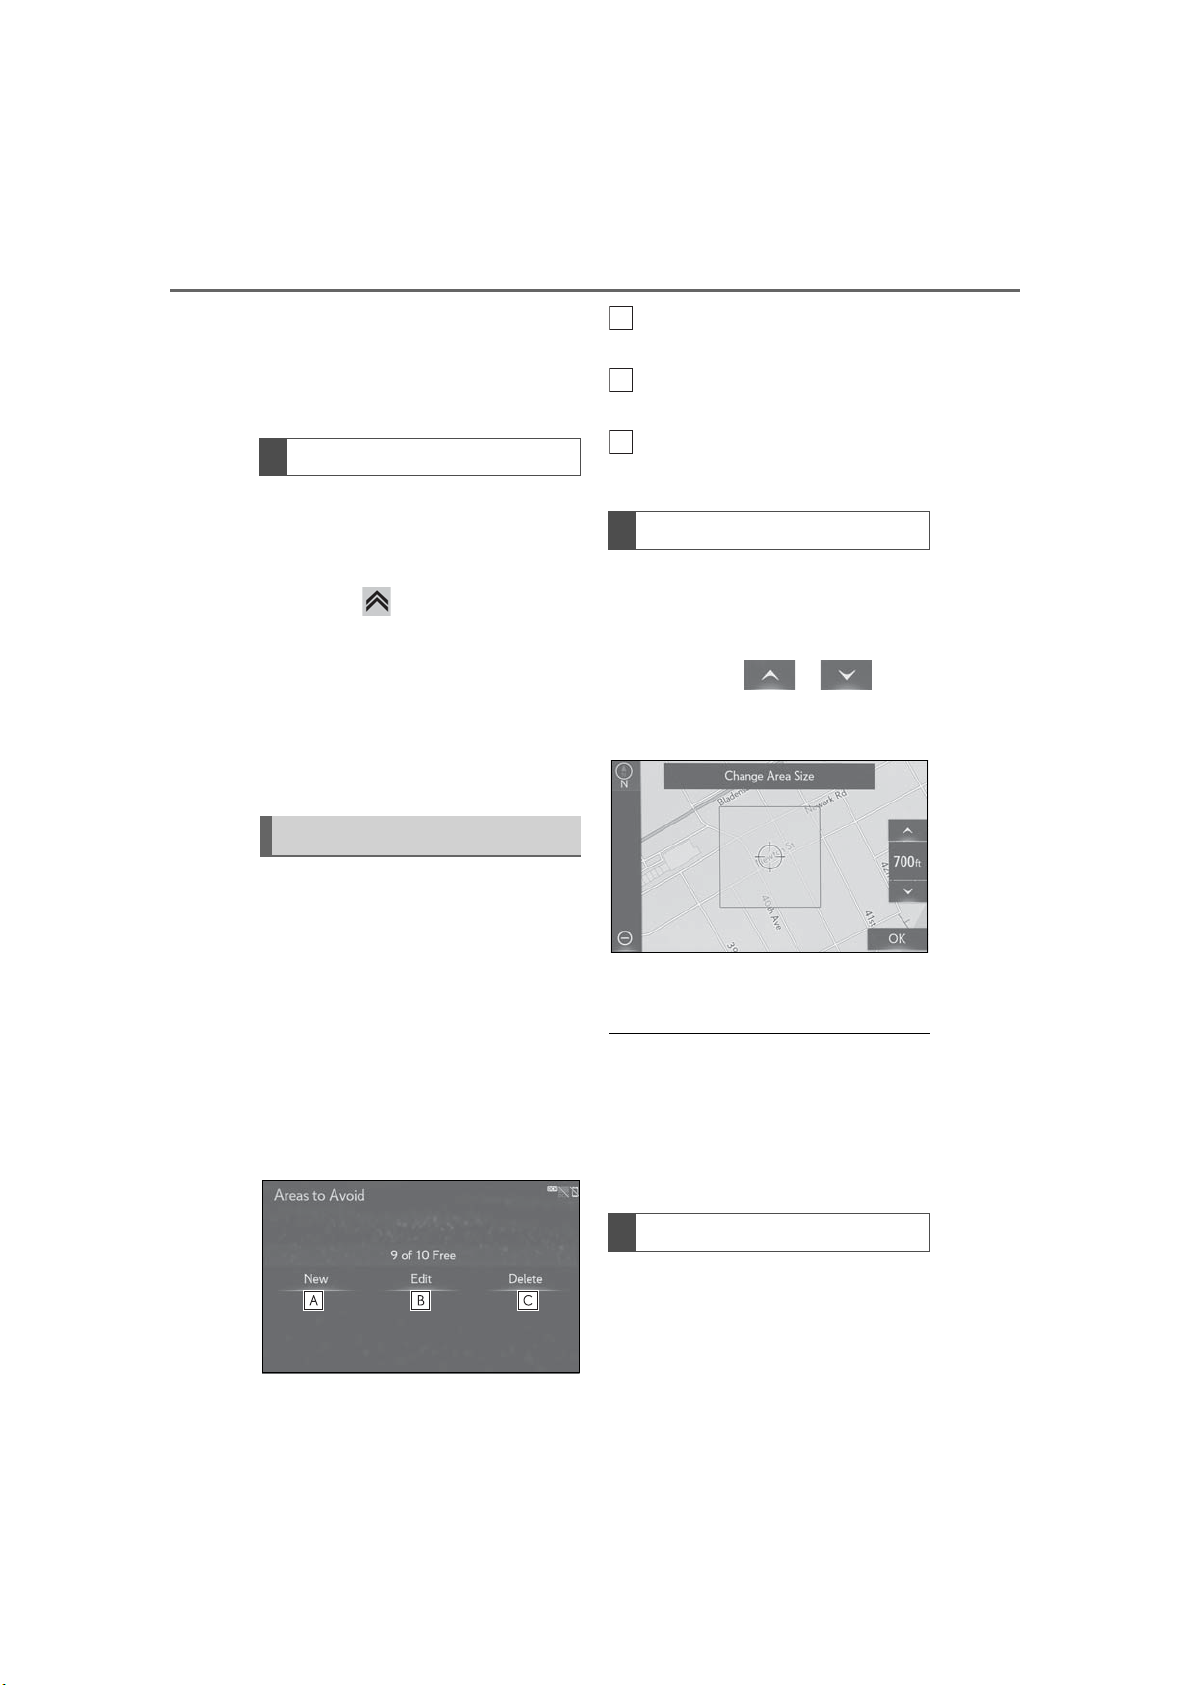
92
ABC
3-4. Setup
select an arrow to adjust the direction
and select “OK”.
● The bell sounds only when the vehicle
approaches this point in the direction that
has been set.
Deleting favorites list entries
1 Select “Delete”.
2 Select the desired item to be
deleted.
Press the button on the Remote
Touch. The following button can be
displayed.
“Delete All”: Select to delete all destinations on the list.
3 Select “Yes” when the confirmation
screen appears.
Setting up areas to avoid
Areas to be avoided because of traffic
jams, construction work or other reasons can be registered as “Areas to
Avoid”.
1 Display the navigation settings
screen:
“MENU” button → “Setup” →
“Navigation”
2 Select “Areas to Avoid”.
3 Select the desired item.
Select to register areas to avoid.
(→P.92)
Select to edit areas to avoid.
(→P.92)
Select to delete areas to avoid.
(→P.93)
Registering areas to avoid
1 Select “New”.
2 Select the desired item to search
for the location. (→P.72)
3 Select either or to
change the size of the area to be
avoided and select “OK”.
4 Select “OK” when the area to avoid
screen appears.
● If a destination is entered in the area to
avoid or the route calculation cannot be
made without running through the area
to avoid, a route passing through the area
to be avoided may be shown.
● Up to 10 locations can be registered as
points/areas to avoid.
Editing areas to avoid
The name, location and/or area size of
a registered area can be edited.
1 Select “Edit”.
2 Select the desired area.
LS500_LS500h_Navi_OM50F66U_(U)
Page 93
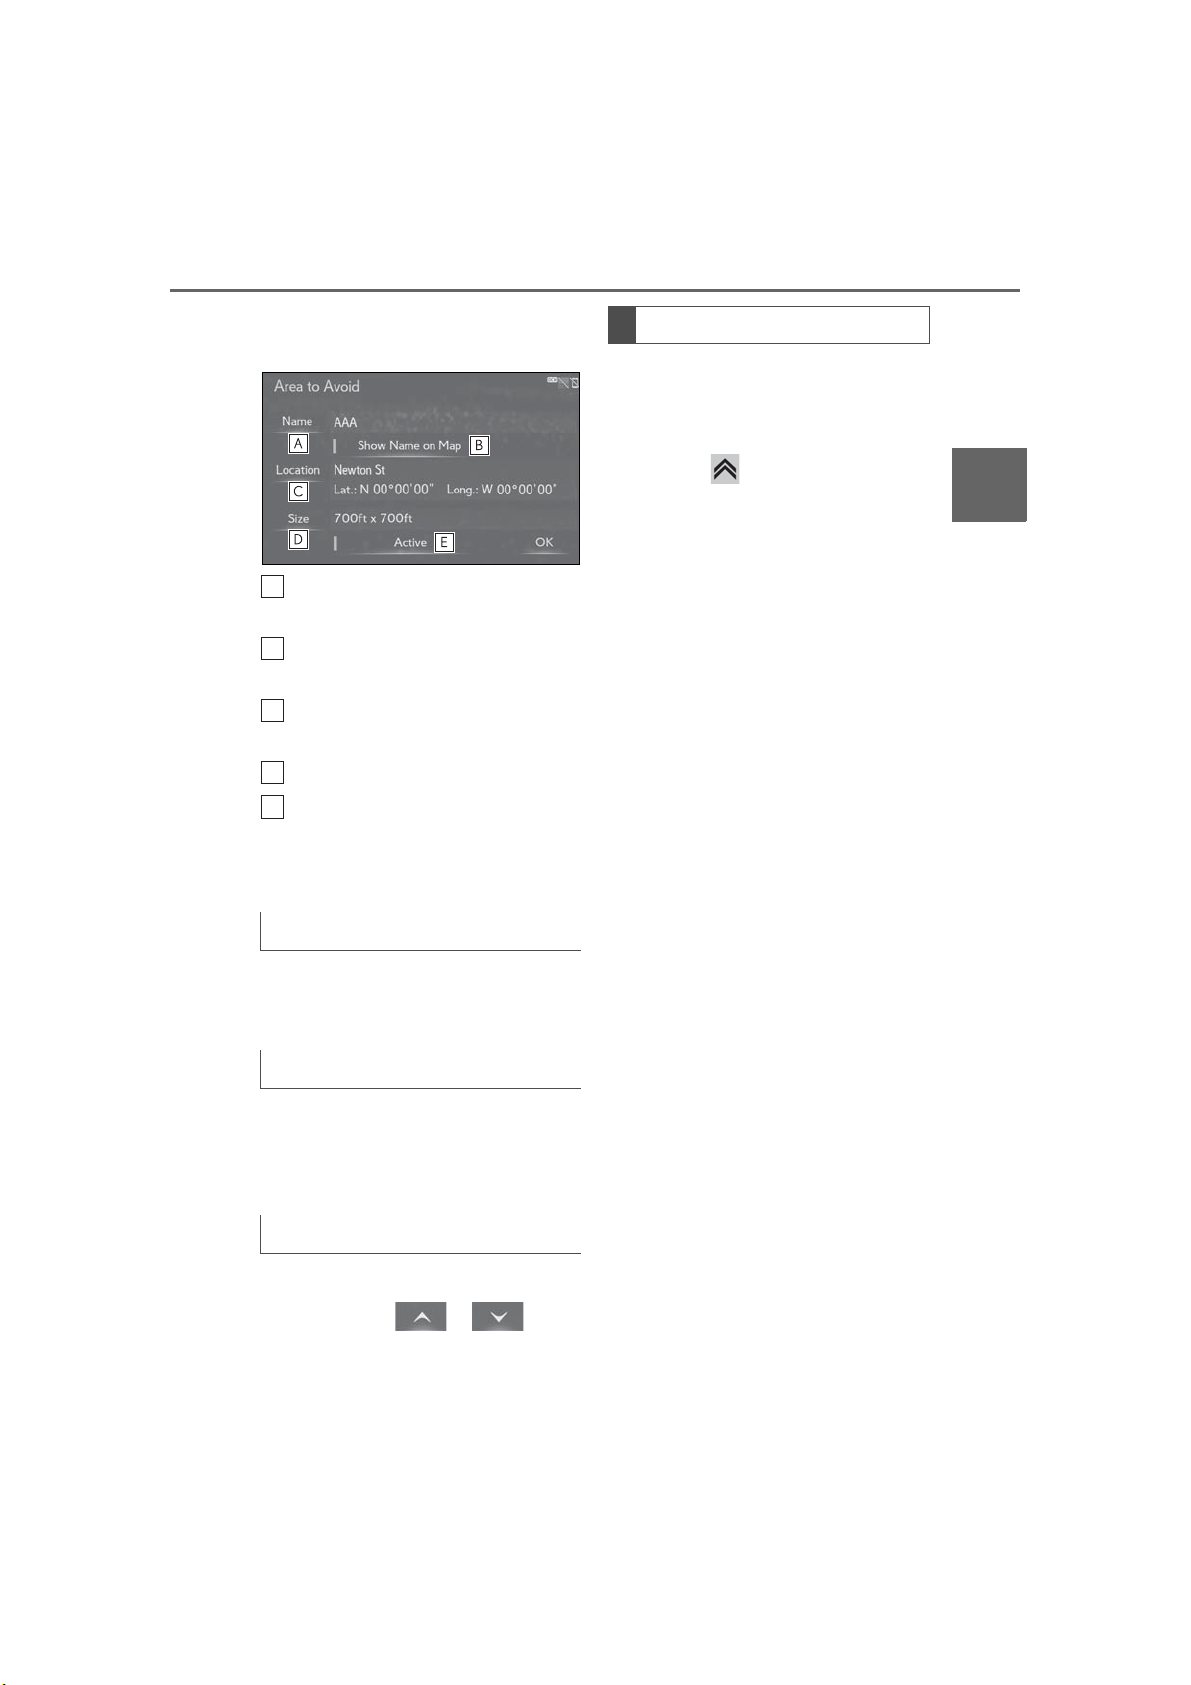
3-4. Setup
A
BCD
E
93
3 Select the desired item to be
edited.
Select to edit the name of the area
to avoid. (→P.93)
Select to set display of the area to
avoid name on/off.
Select to edit area location.
(→P.93)
Select to edit area size. (→P.93)
Select to set the area to avoid function on/off.
4 Select “OK”.
Deleting areas to avoid
1 Select “Delete”.
2 Select the desired area to be
deleted.
Press the button on the Remote
Touch. The following button can be
displayed.
“Delete All”: Select to delete all destinations on the list.
3 Select “Yes” when the confirmation
screen appears.
3
Navigation system
Changing the name
1 Select “Name”.
2 Enter a name and select “OK”.
Changing the location
1 Select “Location”.
2 Scroll the map to the desired point
(→P.66) and select “OK”.
Changing the area size
1 Select “Size”.
2 Select either or to
change the size of the area to be
avoided and select “OK”.
LS500_LS500h_Navi_OM50F66U_(U)
Page 94
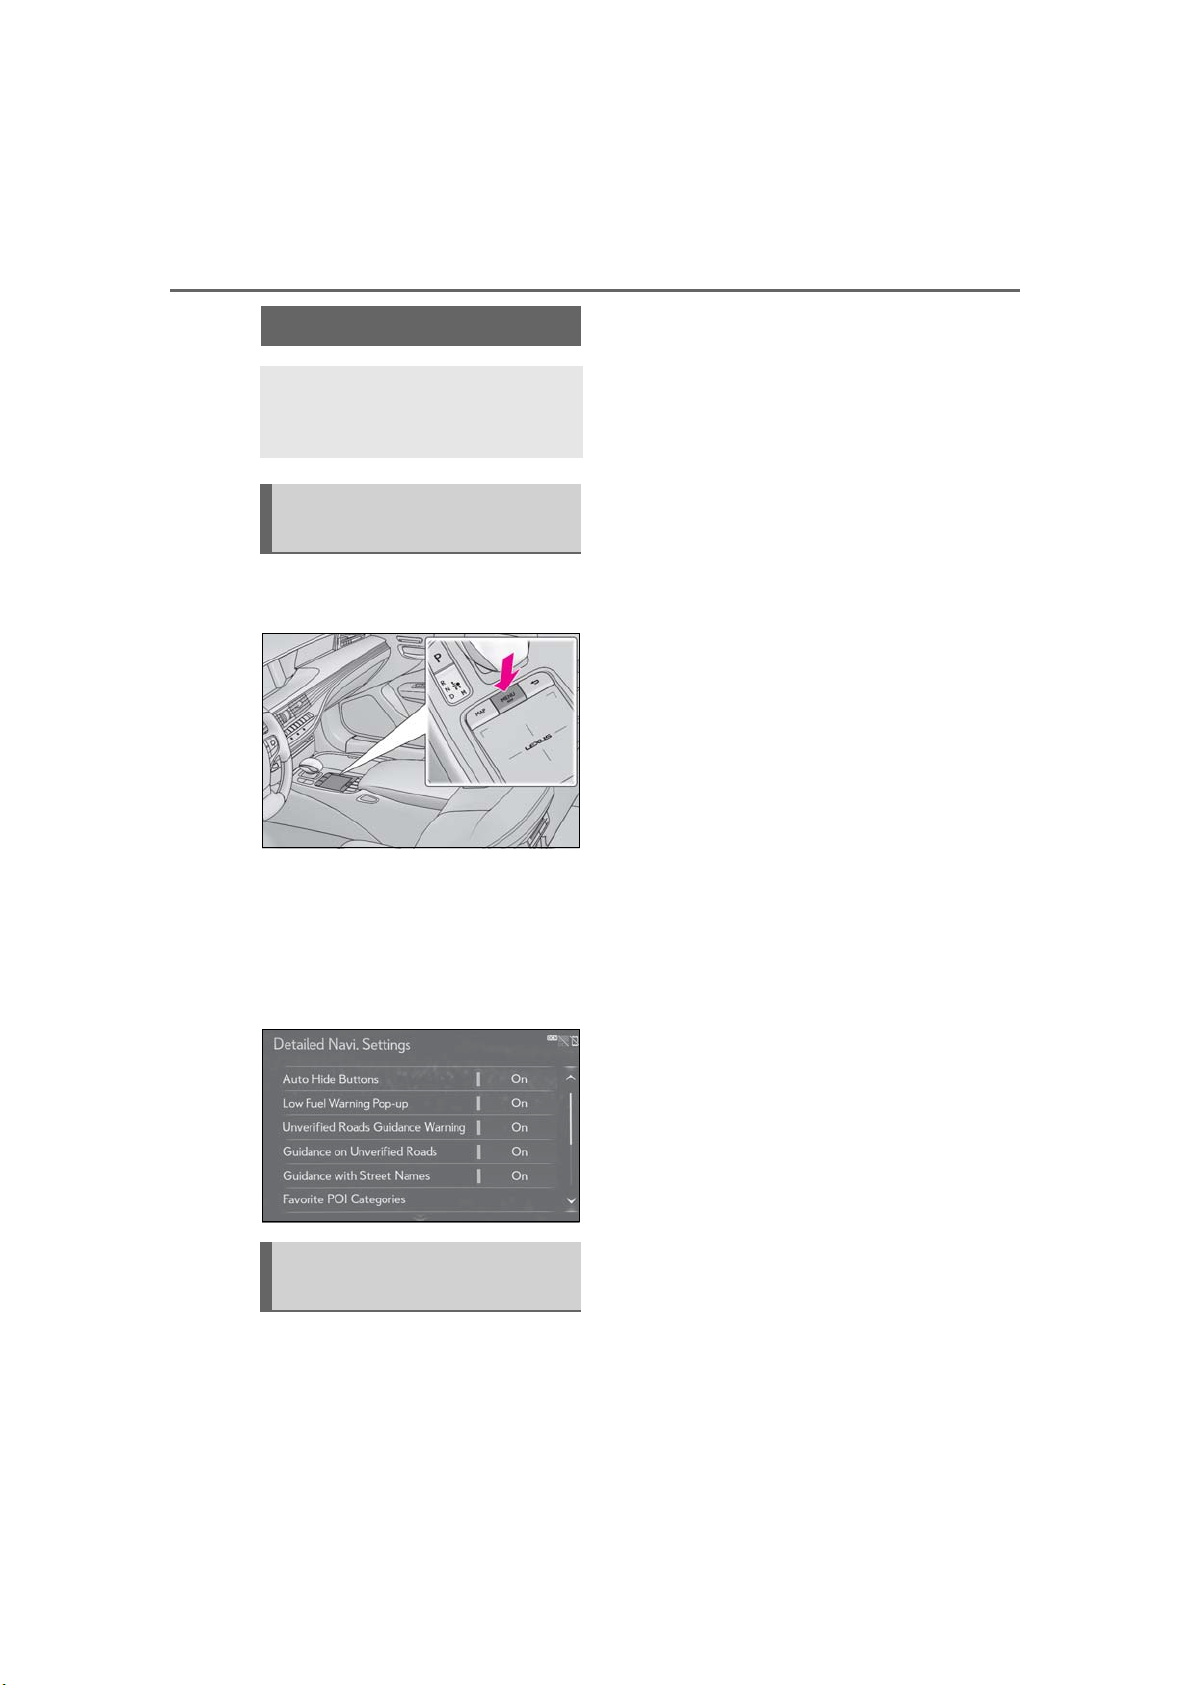
94
3-4. Setup
Detailed navigation settings
Settings are available for auto hide
buttons, favorite POI categories,
low fuel warning, etc.
Displaying the detailed navigation settings screen
1 Press the “MENU” button on the
Remote Touch.
2 Select “Setup”.
3 Select “Navigation” on the sub
menu.
4 Select “Detailed Navi. Settings”.
5 Select the desired items to be set.
Detailed navigation settings
screen
“Auto Hide Buttons”
Select to set the automatic screen button
hiding function on/off. When set to on, certain screen buttons on the map screen will
disappear several seconds after the
Remote Touch has been operated. When
set to off, all the screen buttons will always
be displayed.
“Low Fuel Warning Pop-up”
Select to set display of low fuel warning
on/off. (→P.95)
“Unverified Roads Guidance Warn-
ing”
Select to set unverified roads guidance
warning on/off.
“Guidance on Unverified Roads”
Select to set IPD road (roads that are not
completely digitized in our database) guidance on/off.
“Guidance with Street Names”
Select to set the voice guidance for the
next street name on/off.
“Favorite POI Categories”
Select to set favorite POI categories that
are used for POI selection to display on the
map screen. (→P.95)
“Calibration”
Select to adjust the current position mark
manually or to adjust miscalculation of the
distance caused by tire replacement.
(→P.96)
“Adaptive Route”
Select to enable/disable adaptive routes.
When enabled, the system will provide frequently used routes.
“Reset Adaptive Route”
Select to erase adaptive route data.
“Automatic Destination List Info”
Select to set automatic destination list
information on/off. When set to on, the
LS500_LS500h_Navi_OM50F66U_(U)
Page 95
3-4. Setup
95
estimated time of arrival to the registered
home and preset destinations from the current position will be displayed.
“Intersection Zoom Map”
Select to set display of a guidance screen
on/off.
“Automatic Zoom”
Select to set automatic zoom function
on/off. When it is enabled, as the vehicle
approaches a guidance point, the map will
change to a detailed map automatically.
“State border guidance”
Select to set cross-border guidance on/off.
“Map Color Customization”
Select to set the map display color.
“Map Animation”
Select to set map animation on/off.
“Map Flick”
Select to set drag/flick operation on the
map screen on/off. (→P.65)
“Dynamic Route”
Select to enable/disable routes sourced
from the Lexus Enform center. (→P.82)
*
“Restore the default settings”
Select to reset all setup items.
*
: This function is not made available in
some countries or areas.
2 Select “Low Fuel Warning Pop-up”.
Each time the button is selected,
“On” and “Off” are switched.
Searching gas station in low fuel
warning
A nearby gas station can be selected
as a destination when the fuel level is
low.
1 Select “Yes” when the low fuel
warning appears.
2 Select the desired nearby gas sta-
tion.
3 Select “Enter” to set as a destina-
tion.
“Info”: Select to display gas station information. (→P.69)
Favorite POI categories (Select
POI icons)
Up to 6 POI icons, which are used for
selecting POIs on the map screen, can
be selected as favorites.
1 Display the detailed navigation set-
tings screen:
“MENU” button → “Setup” →
“Navigation” → “Detailed Navi. Settings”
3
Navigation system
Low fuel warning
When the fuel level is low, a warning
message will pop up on the screen.
1 Display the detailed navigation set-
tings screen:
“MENU” button → “Setup” →
“Navigation” → “Detailed Navi. Settings”
LS500_LS500h_Navi_OM50F66U_(U)
2 Select “Favorite POI Categories”.
Page 96
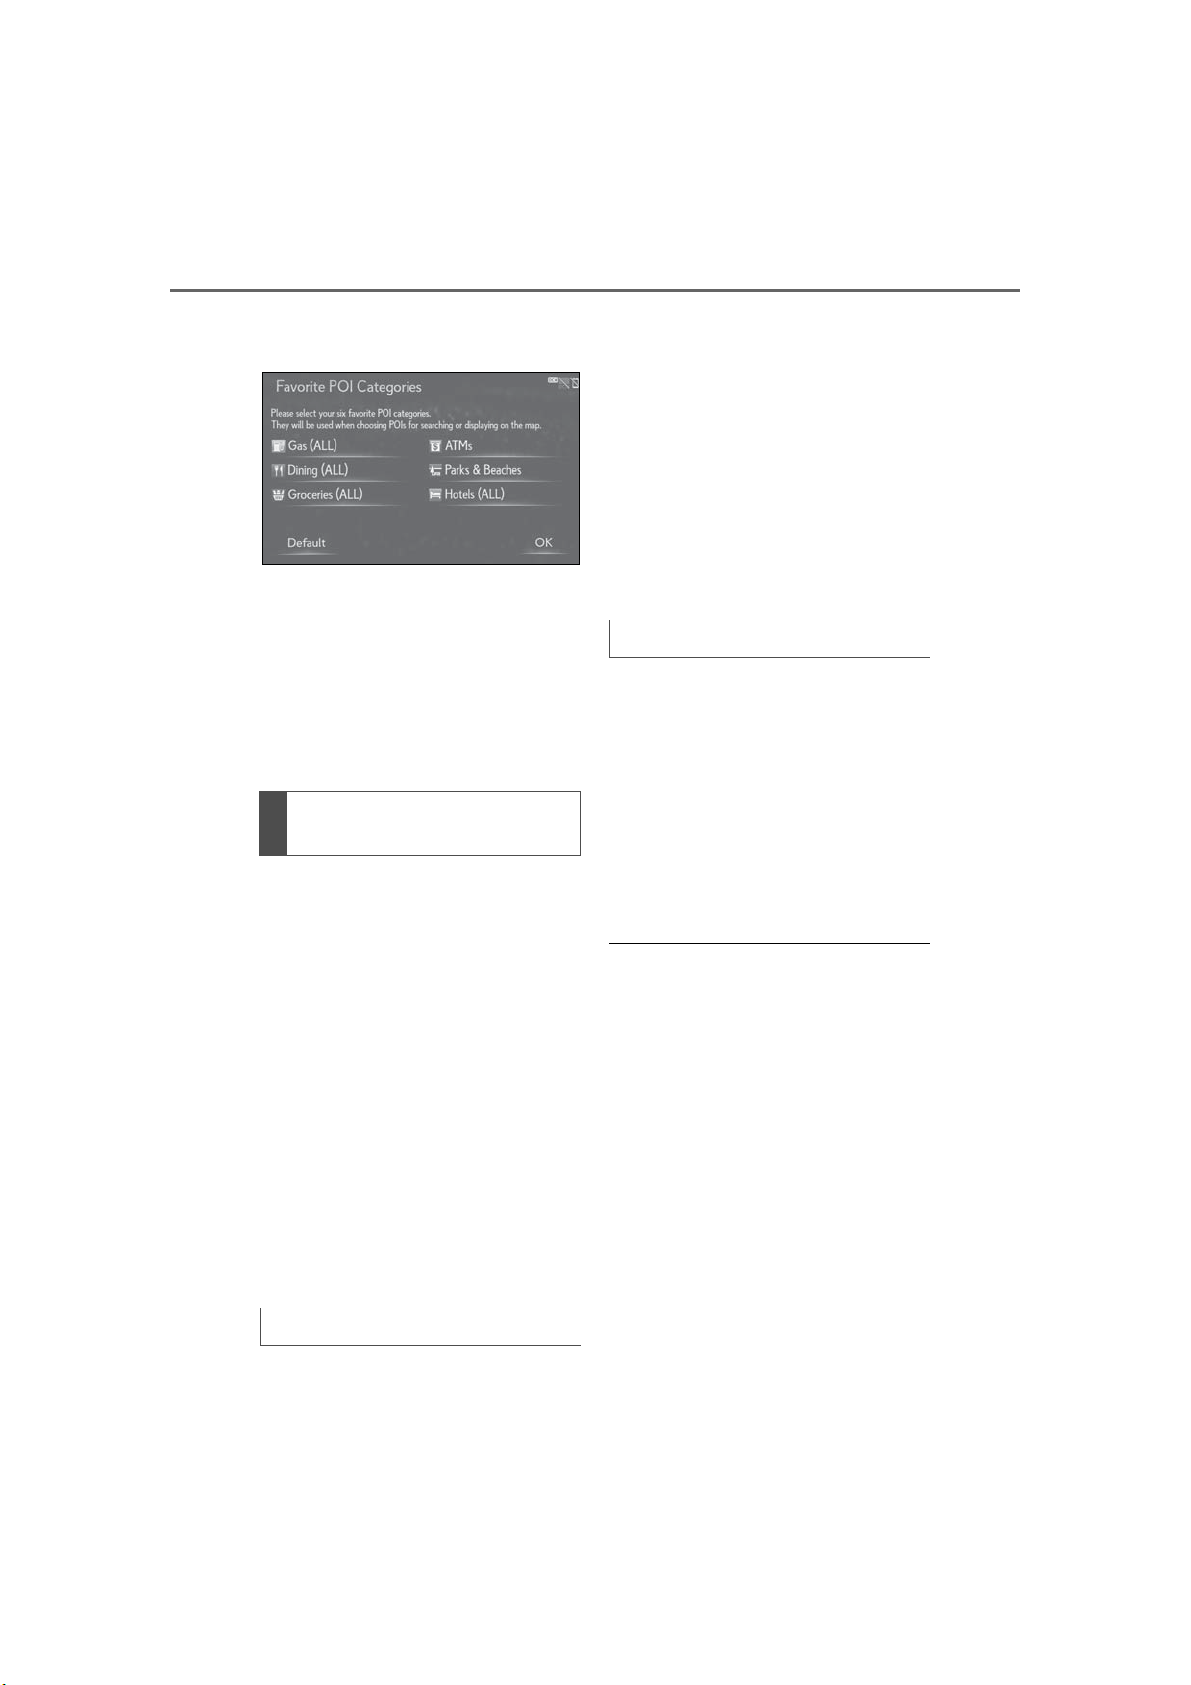
96
3-4. Setup
3 Select the desired category to be
changed.
“Default”: Select to set the default categories.
4 Select the desired POI category.
“List All Categories”: Select to display all
POI categories.
5 Select the desired POI icon.
6 Select “OK”.
Current position/Tire change
calibration
The current position mark can be
adjusted manually. Miscalculation of
the distance caused by tire replacement can also be adjusted.
1 Display the detailed navigation set-
tings screen:
mark will be automatically corrected
by GPS signals. If GPS reception is
poor due to location, the current position mark can be adjusted manually.
1 Select “Position/Direction”.
2 Scroll the map to the desired point
(→P.65) and select “OK”.
3 Select an arrow to adjust the direc-
tion of the current position mark
and select “OK”.
Tire change calibration
The tire change calibration function will
be used when replacing the tires. This
function will adjust miscalculation
caused by the circumference difference between the old and new tires.
1 Select “Tire Change”.
The message appears and the quick
distance calibration starts automatically.
● If this procedure is not performed when
the tires are replaced, the current position mark may be incorrectly displayed.
“MENU” button → “Setup” →
“Navigation” → “Detailed Navi. Settings”
2 Select “Calibration”.
3 Select the desired item.
For additional information on the
accuracy of a current position:
→P.102
Position/Direction calibration
When driving, the current position
LS500_LS500h_Navi_OM50F66U_(U)
Page 97
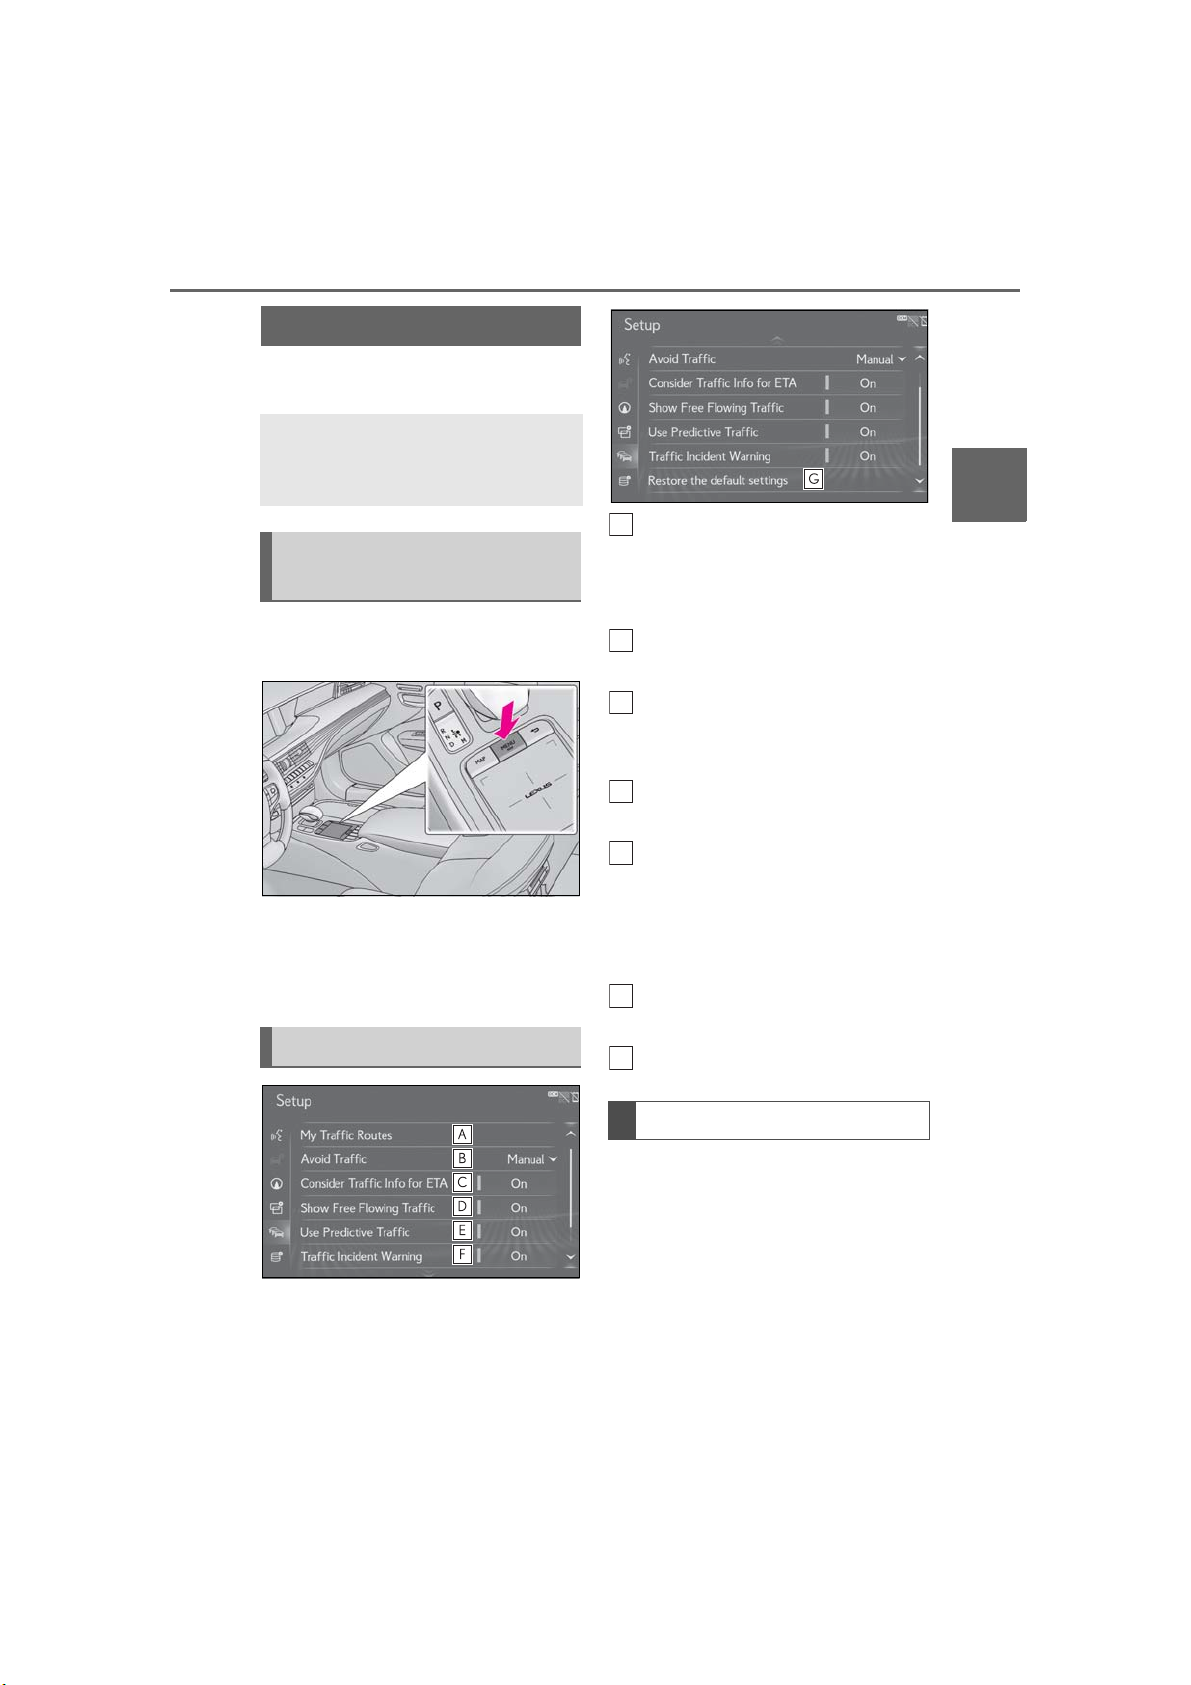
3-4. Setup
A
B
C
D
E
F
G
97
Traffic settings
*
: This function is not made available in
some countries or areas.
*
Traffic information such as traffic
congestion or traffic incident warnings can be made available.
Displaying the traffic settings
screen
1 Press the “MENU” button on the
Remote Touch.
2 Select “Setup”.
3 Select “Traffic” on the sub menu.
4 Select the desired items to be set.
Screen for traffic settings
Select to set specific routes (such
as frequently used routes) on which
you wish to receive traffic information. (→P.97)
Select to set the avoid traffic function auto/manual. (→P.100)
Select to set the usage of traffic
information for the estimated
arrival time on/off.
Select to set the display of an arrow
of free flowing traffic on/off.
Select to set to on/off whether to
consider the predictive traffic information (→P.70) with estimated
arrival time and detoured route
search.
Select to set traffic incident voice
warning on/off.
Select to reset all setup items.
3
Navigation system
My traffic routes
Specific routes (such as frequently
used routes) on which you wish to
receive traffic information can be registered as “My Traffic Routes”. A route
is set by defining a start point and end
point, and can be adjusted by setting
up to 2 preferred roads.
1 Display the traffic settings screen:
LS500_LS500h_Navi_OM50F66U_(U)
Page 98
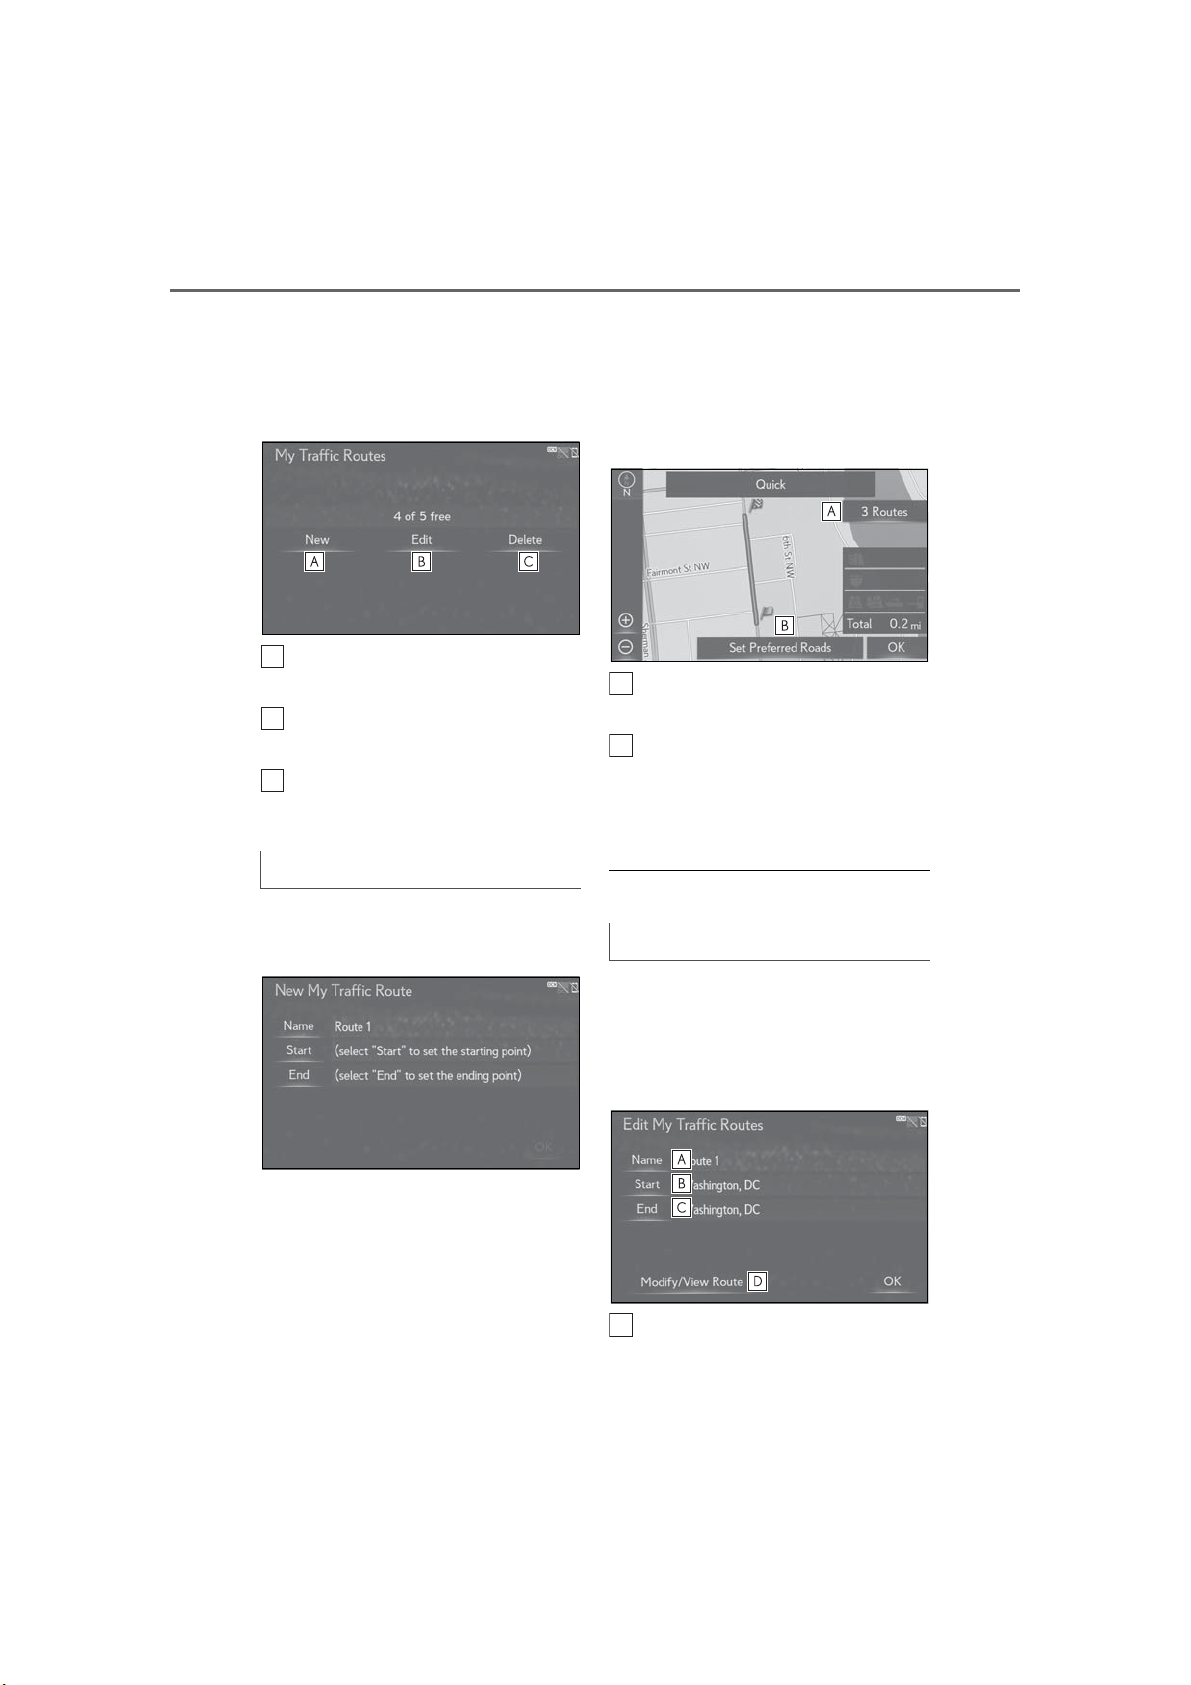
98
ABC
A
B
A
3-4. Setup
“MENU” button → “Setup” →
“Traffic”
2 Select “My Traffic Routes”.
3 Select the desired item.
Select to register personal routes.
(→P.98)
Select to edit personal routes.
(→P.98)
Select to delete personal routes.
(→P.99)
Registering personal routes
1 Select “New”.
2 Select “Name”.
7 Select the desired item to search
for the location. (→P.72)
8 Select “OK”.
9 Confirm the route overview dis-
played.
Select the desired route from 3
possible routes. (→P.80)
Select to modify the route. The
routes can be adjusted by setting
preferred roads. (→P.99)
10 Select “OK”.
● Up to 5 routes can be registered.
Editing personal routes
3 Enter the name and select “OK”.
4 Select “Start”.
5 Select the desired item to search
for the location. (→P.72)
6 Select “End”.
LS500_LS500h_Navi_OM50F66U_(U)
1 Select “Edit”.
2 Select the desired traffic route.
3 Select the desired item to be
edited.
Select to edit the name of the personal route. (→P.98)
Page 99
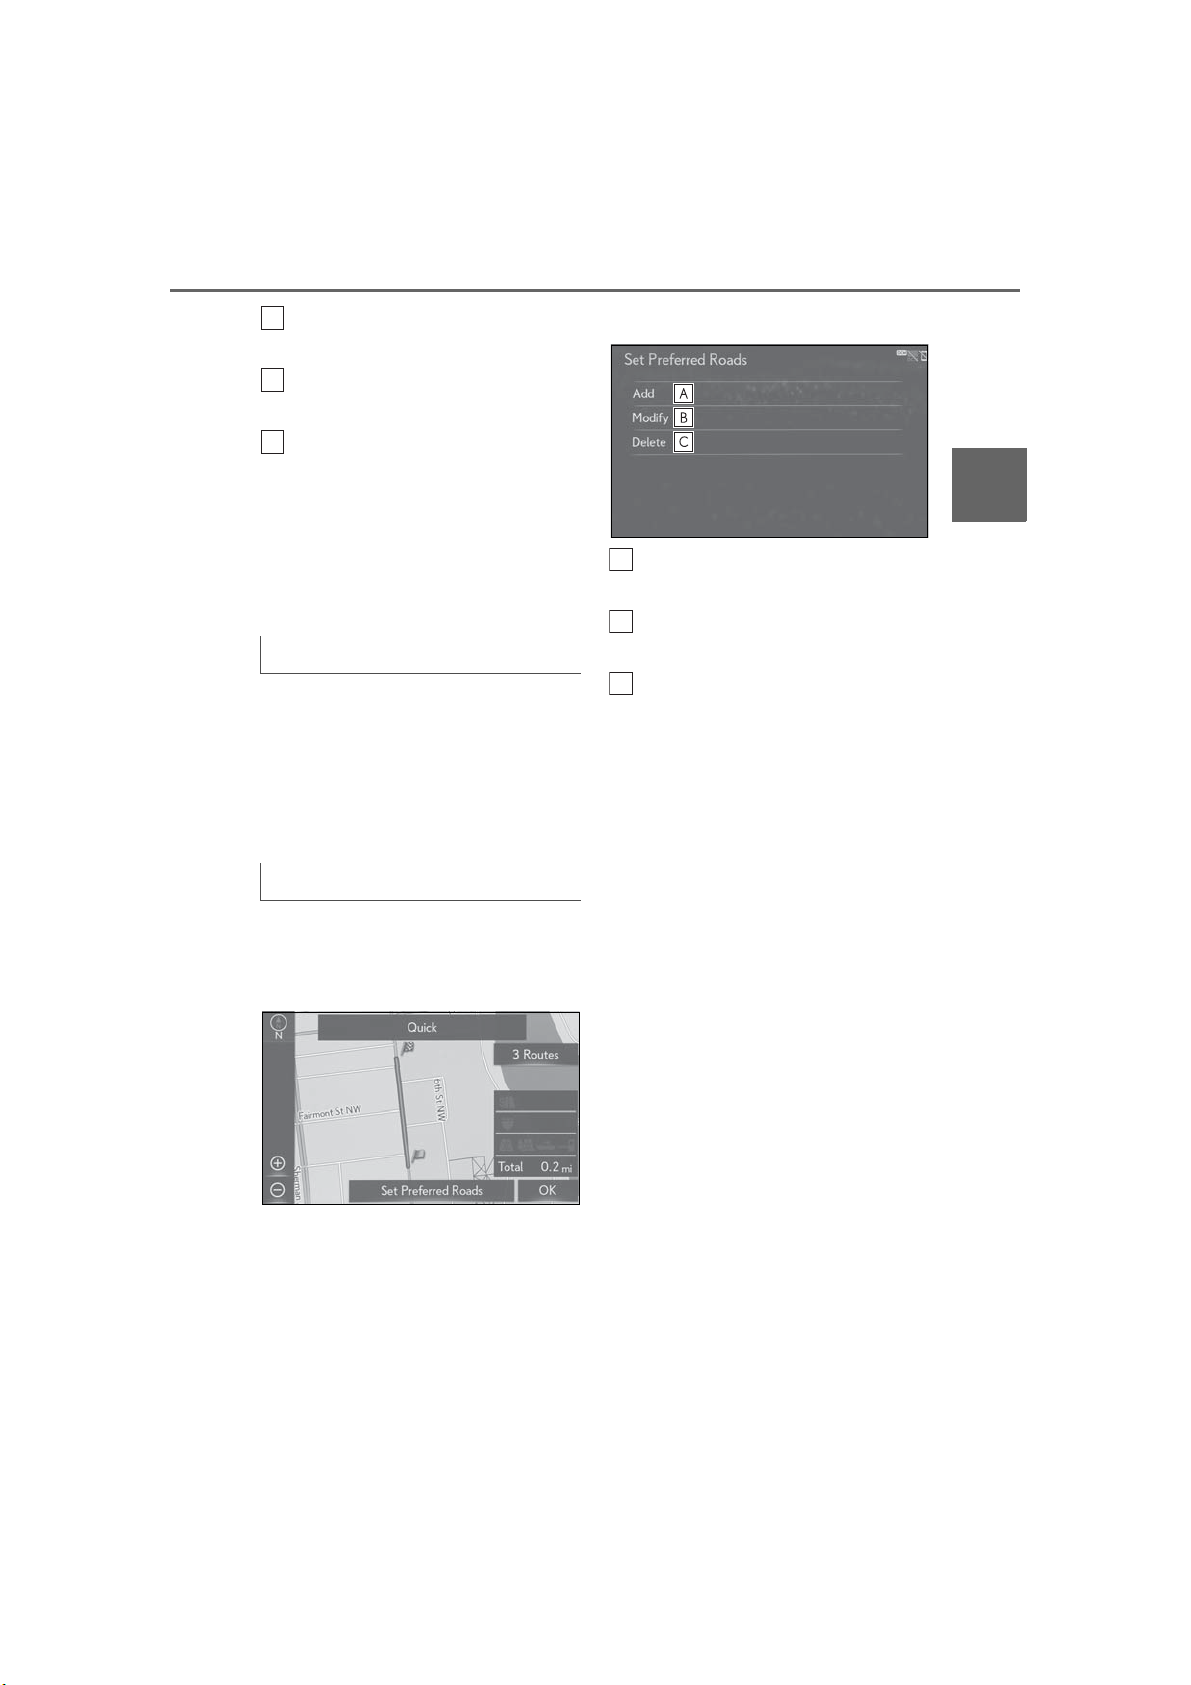
3-4. Setup
BCD
A
B
C
99
Select to edit start location.
(→P.98)
Select to edit end location.
(→P.98)
Select to see and modify the entire
route. (→P.99)
4 Select “OK”.
5 Follow the steps in “Registering
personal routes” from step 9.
(→P.98)
Deleting personal routes
1 Select “Delete”.
2 Select the desired traffic route to
be deleted and select “Delete”.
3 Select “Yes” when the confirmation
screen appears.
Setting preferred roads
“My Traffic Routes” can be adjusted by
setting up to 2 preferred roads.
1 Select “Set Preferred Roads”.
2 Select the desired item.
3
Navigation system
Select to add preferred roads.
(→P.99)
Select to modify preferred roads.
(→P.99)
Select to delete preferred roads.
(→P.100)
■ Adding preferred roads
1 Select “Add”.
2 Scroll the map to the desired point
(→P.65) and select “OK”.
3 Select “OK” to use this road.
“Next”: Select to change road.
Available only when 1 preferred
road is set
4 Select “Add Here” for the desired
location.
LS500_LS500h_Navi_OM50F66U_(U)
If a preferred road is already set, a
second preferred road can be
added anywhere between the start
point, the end point and the existing
preferred road.
■ Modifying preferred roads
1 Select “Modify”.
2 Select the desired preferred road
to be modified if 2 preferred roads
have been set.
Page 100
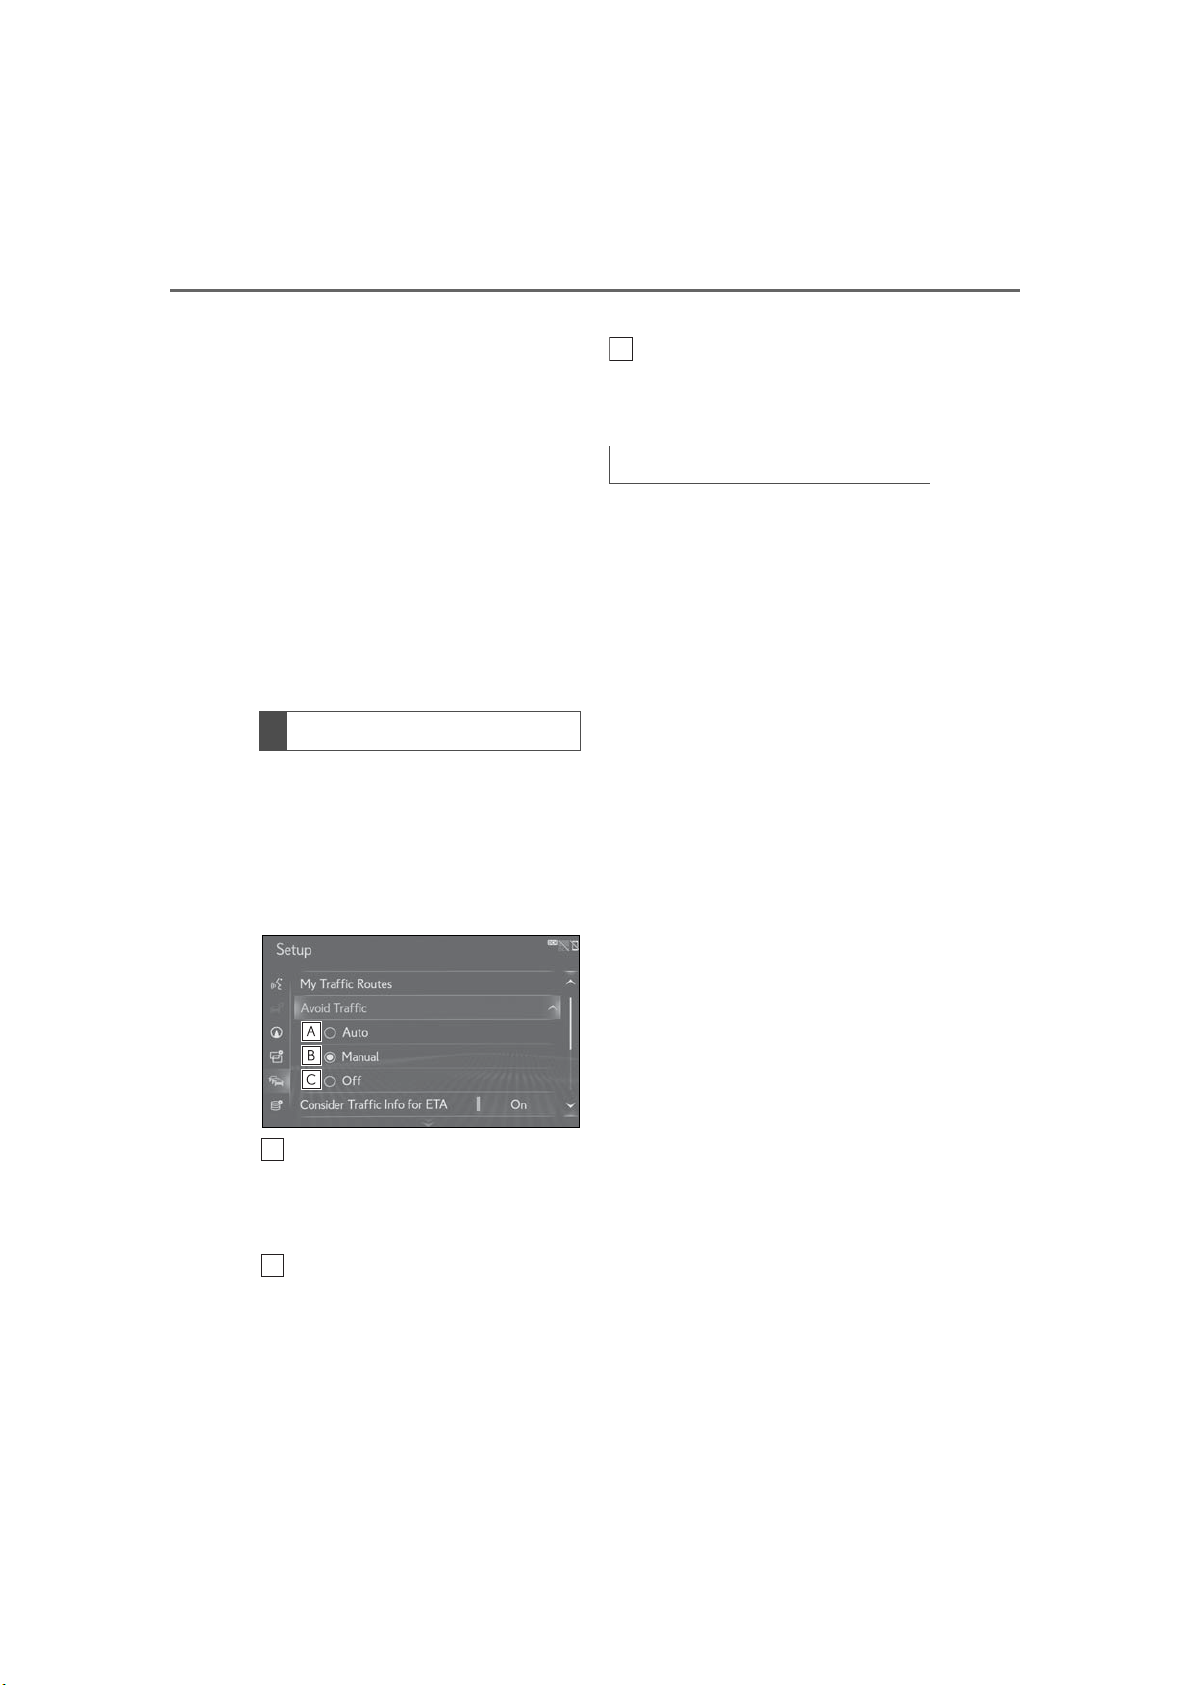
100
A
B
C
3-4. Setup
3 Scroll the map to the desired point
(→P.65) and select “OK”.
4 Select “OK” to use this road.
“Next”: Select to change road.
■ Deleting preferred roads
1 Select “Delete”.
2 Select the desired preferred road
to be deleted if 2 preferred roads
have been set.
“Delete All”: Select to delete all preferred
roads on the list.
3 Select “Yes” when the confirmation
screen appears.
Avoid traffic
1 Display the traffic settings screen:
“MENU” button → “Setup” →
“Traffic”
2 Select “Avoid Traffic”.
you wish to reroute.
Select to not reroute when congestion information for the guidance
route has been received.
Changing the route manually
When the navigation system calculates
a new route, a confirmation screen will
be displayed.
1 Select the desired item.
“Yes”: Select to start route guidance
using the new route.
“View Map”: Select to confirm the new
route and current route on the map.
“No”: Select to continue the current
route guidance.
3 Select the desired item.
Select to automatically change
routes when congestion information of the guidance route has been
received.
Select to select manually whether
or not to change routes when congestion information of the guidance
route has been received. In this
mode, a screen will appear to ask if
LS500_LS500h_Navi_OM50F66U_(U)
 Loading...