

Page 1
Customizing Your Lexus
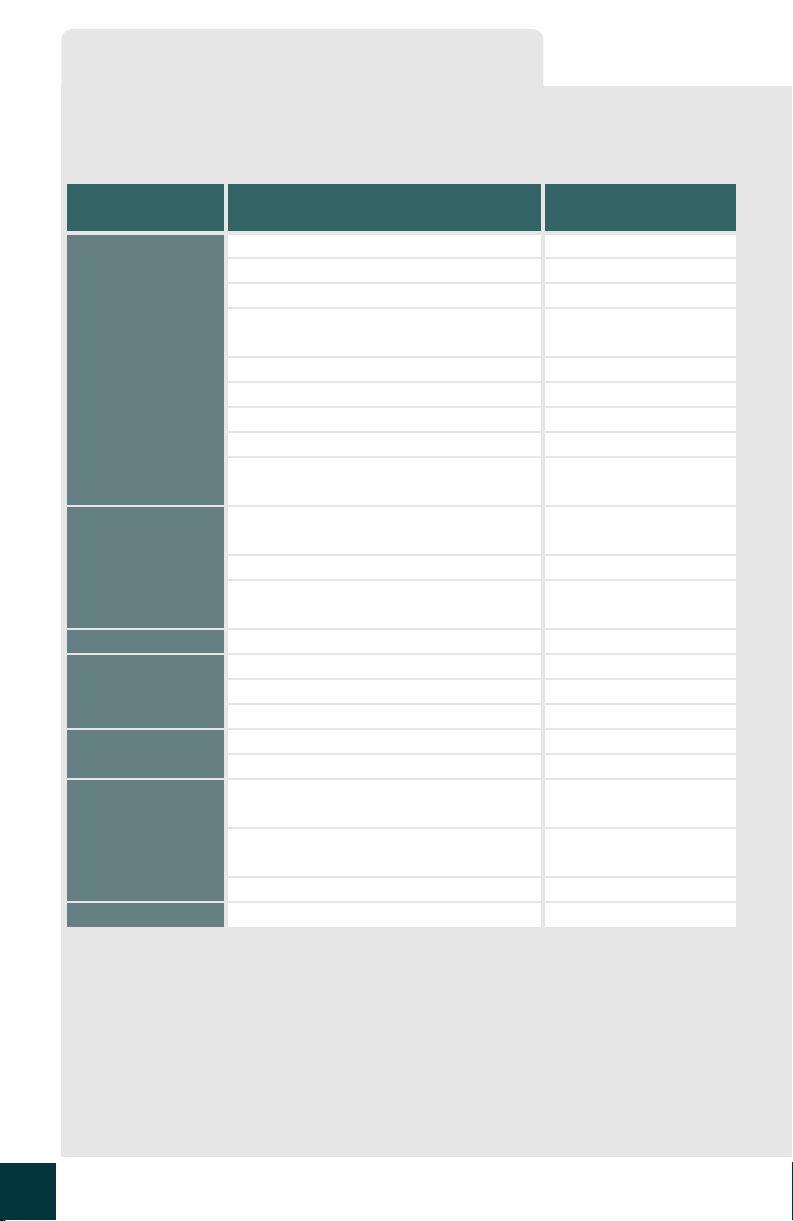
Your vehicle includes a variety of electronic features that can be personalized to your preferences. Programming these preferences requires specialized equipment and may be performed by an authorized Lexus dealership.
Setting
Item Description
Wireless remote
control
Remote control operation Enable/Disable
Lights flash when operation is complete Enable/Disable
(default setting at left)
Open door warning function Enable/Disable
Automatic door locking function if a
30 sec/60 sec
door is not opened after being unlocked
Trunk opening function Enable/Disable
Unlocking the trunk Ask your Lexus dealer
Unlocking the doors Ask your Lexus dealer
Panic button alarm function Enable/Disable
Link with power window/
Enable/Disable
moon roof operation
Door lock Unlocking the vehicle using a
Ask your Lexus dealer
mechanical key
Auto door lock Ask your Lexus dealer
Link with power window/
Enable/Disable
moon roof operation
Alarm Horn Enable/Disable
Illuminated entry
system
Illumination period 15 sec/7 sec/30 sec
Synchronize with door unlock Enable/Disable
Footlights Enable/Disable
Headlights
("AUTO" mode)
Windshield wiper
operation
Illumination period Standard/Longer
Sensor sensitivity Desired levers
Switch to intermittent operation when
Enable/Disable
the vehicle is stopped.
After using the washer, wipers make
another single wipe following a delay
Enable/ Disable/
Adjust interval
Rain-sensing wiper mode Rain-sensing/Interval
Steering Column Automatic tilt-away function Enable/Disable
67
Page 2

Your Lexus dealer
Your Lexus dealer will provide quality maintenance and any other assistance
you may require.
If there is not a Lexus dealer near you, please call the following number:
nU.S . OWNE RS
lIn the U.S. mainland or Canada:
Lexus Roadside Assistance
1-800-25-LEXUS or 1-800-255-3987 (Toll-Free)
lIn Hawaii:
Servco Automotive Roadside Assistance/Customer Services
1-800-25-LEXUS or 1-800-255-3987 (Toll-Free)
nCANADIAN OWNERS
lIn Canada or the U.S. mainland:
Lexus Roadside Assistance/Customer Service
1-800-26-LEXUS or 1-800-265-3987 (Toll-Free)
Entering and Exiting
Before Driving When Driving
Night Driving
Rain and
Driving Comfort
Opening and Closing
What to do if ...
Please access our websites for further information.
lThe U.S. mainland: www.lexus.com
lHawaii: www.servcolexus.com
lCanada : www.lexus.ca
©2 005 TOYOTA MOTO R CORP ORATI ON
All rights reserved. This material may not be reproduced or copied, in whole or in part, without the written permission of Toyota Motor Corporation.
Yo u r L e x u s
68
Customizing
Page 3
What to do if ...
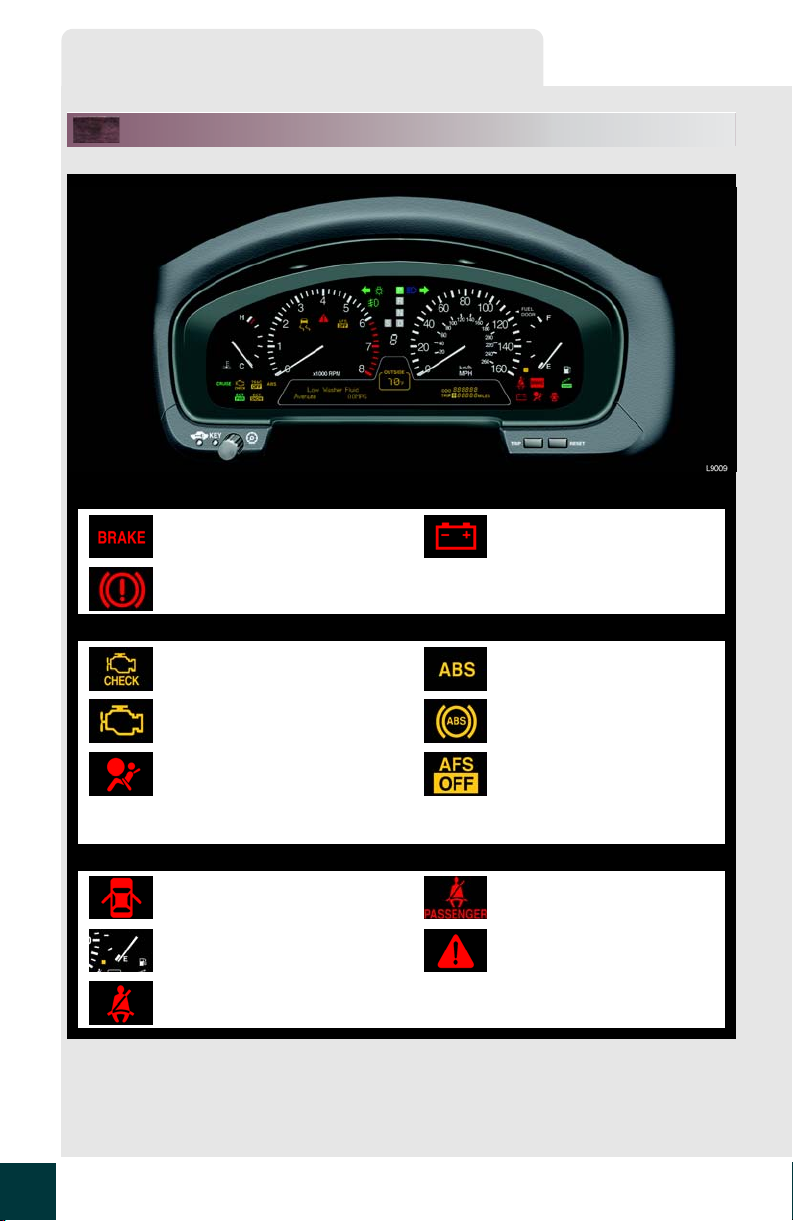
If the following warning lights comes on . . .
Stop the vehicle immediately
Brake system warning light
(U.S.A.)
Brake system warning light
(Canada)
Have the vehicle checked at Lexus dealer immediately
Malfunction indicator lamp
(U.S.A.)
Malfunction indicator lamp
(Canada)
SRS warning light
Have the malfunction repaived immediately
Open door warning light
Discharge warning light
ABS & brake assist warning
light (U.S.A.)
ABS & brake assist warning
light (Canada)
Automatic hedlight leveling
system/Adaptive front
lighting sytem warning light
(when flashing)
Front passenger’s seat belt
reminder light
59
Low fuel level warning light Master warning light
Driver’s seat belt reminder
light
Page 4
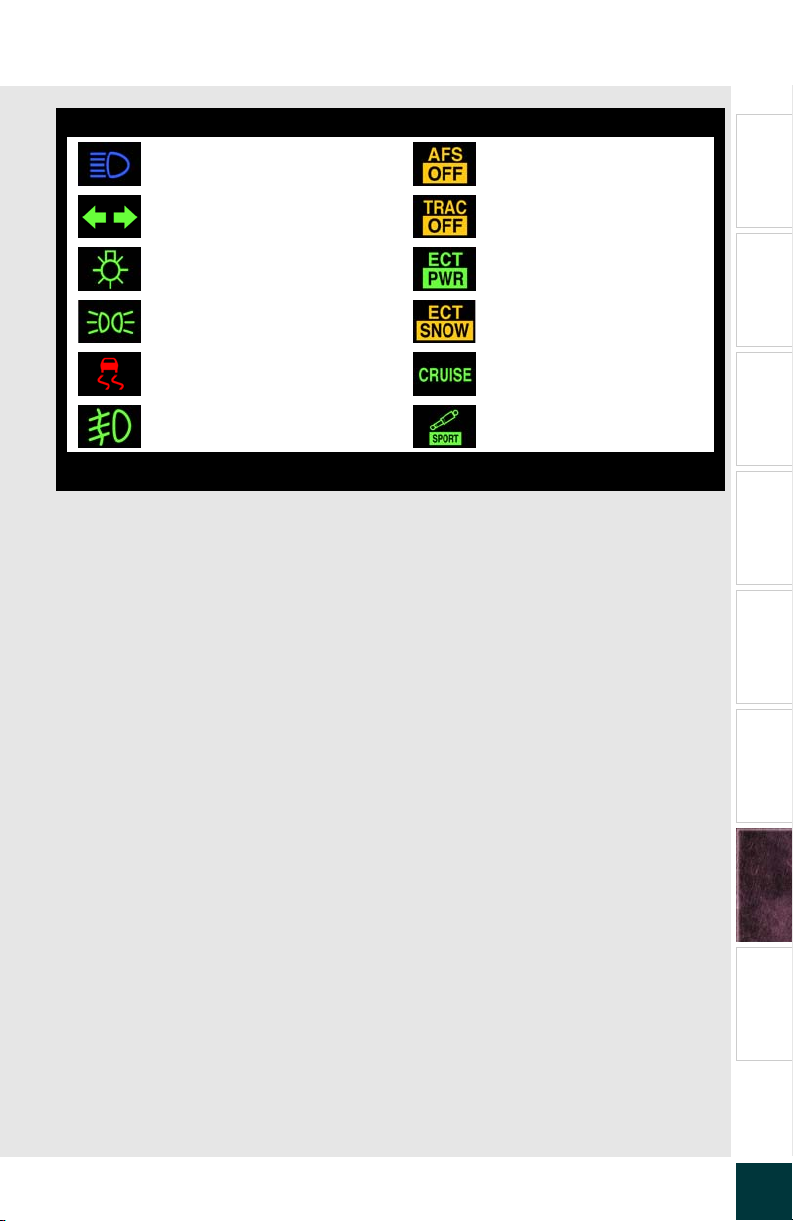
See the owner’s manual
Headlight high beam
indicator light
Turn signal indicator light TRAC off indicator light
Tail light indicator light
Tail light indicator light
Slip indicator light Cruise control indicator light
Front fog light indicator light Damping mode indicator light
(U.S.A.)
(Canada)
Entering and Exiting
AFS off indicator light
Before Driving When Driving
ETC PWR indicator light
ETC SNOW indicator light
For further information , refer to the owner’s manual.
Night Driving
Rain and
Driving Comfort
Opening and Closing
What to do if ...
Customizing
Yo u r L e x u s
60
Page 5
What to do if ...
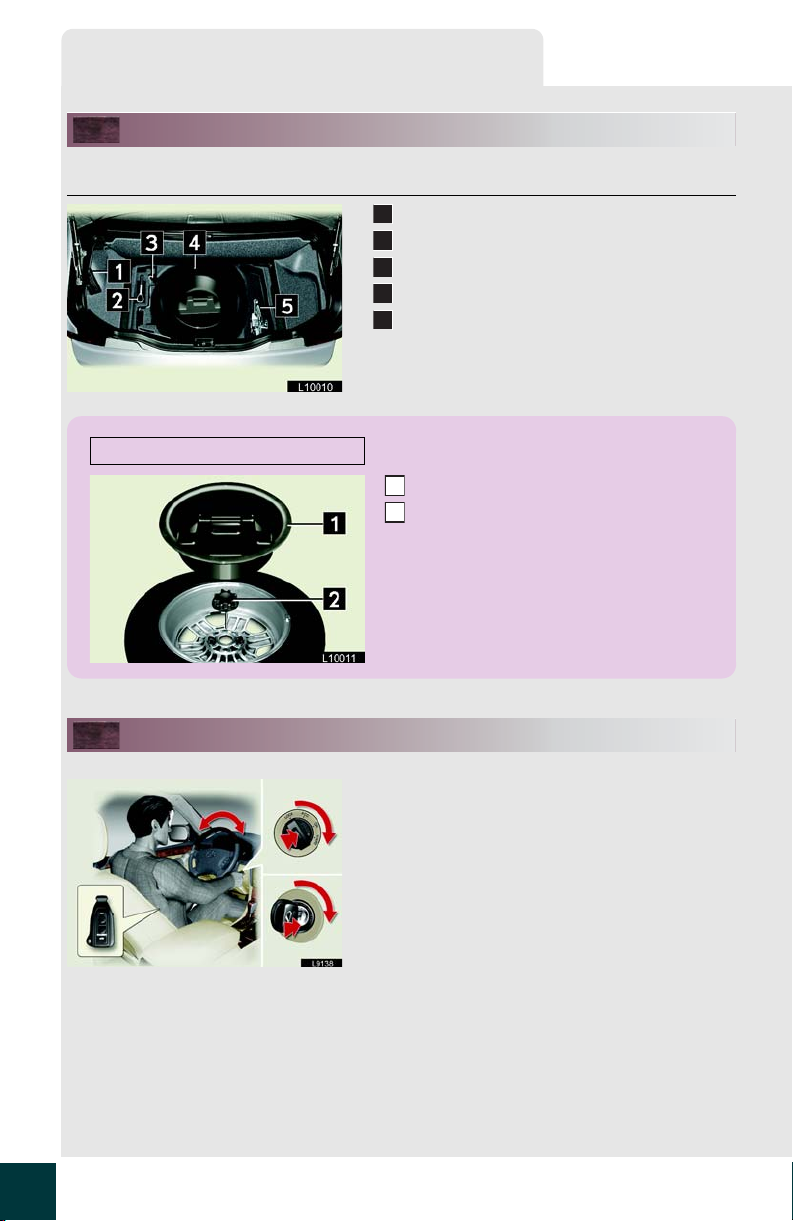
Location of Emergency Equipment
n Jack, tools, and spare tire
Removing the spare tire
Tool box
1
Towing eyelet
2
Jack handle
3
Spare tire
4
Jack
5
Remove the spare tire cover.
1
Loosen the bolt and remove the spare tire.
2
If the ignition switch does not turn easily. . .
Turn the ignition switch while lightly moving the
steering wheel from left to right.
61
Page 6
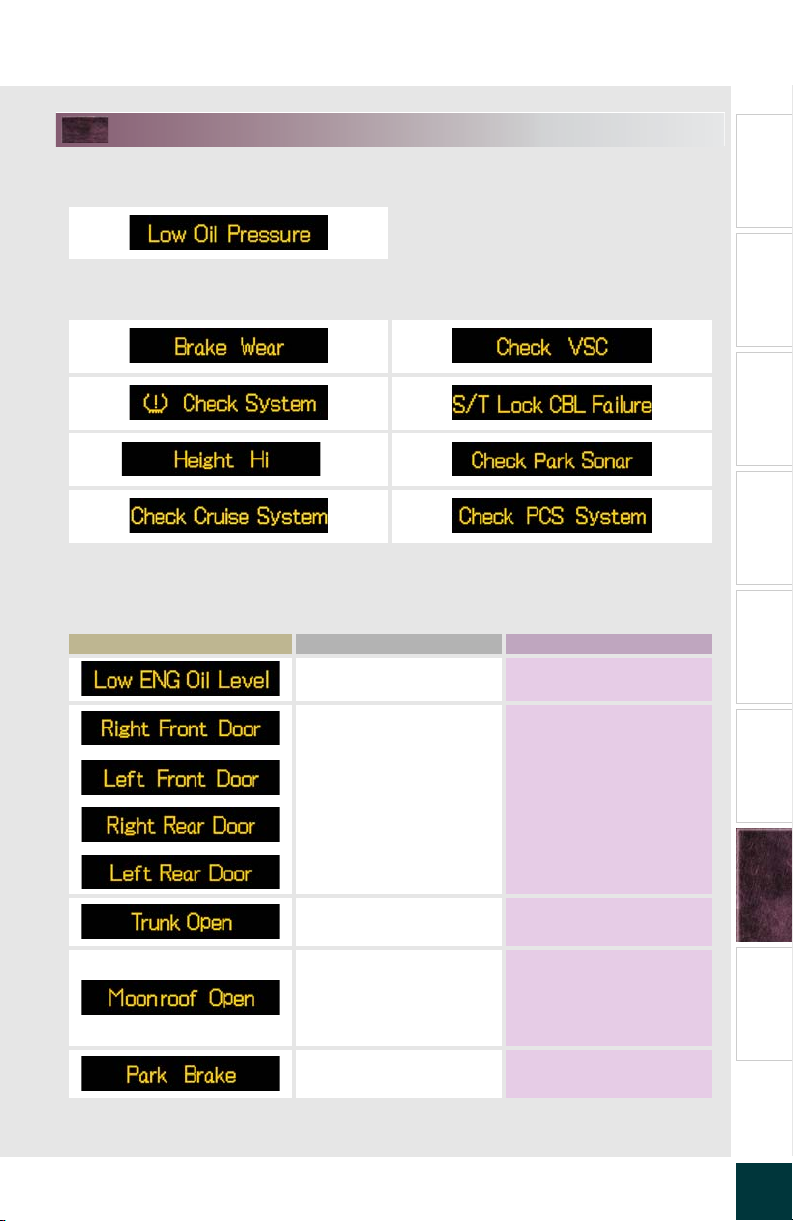
If a warning message appears. . .
Stop the vehicle immediately
Have the vehicle checked at your Lexus dealer as soon as possible
*
*: When the master warning light comes on and buzzer sounds.
Correct immediately
Message Cause Solution
Low level of engine oil. Fill the engine oil
Door is not fully closed.
Check that all the doors
are closed
Entering and Exiting
Before Driving When Driving
Night Driving
Rain and
Driving Comfort
Opening and Closing
Trunk-lid is not fully
closed.
If the driver’s door is
opened with the ignition
switch turned off and the
moon roof is left open.
Parking brake is not
released.
Check that the trunk-lid is
closed
Close the moon roof
when you leave your vehicle.
Release the parking
brake.
What to do if ...
Yo u r L e x u s
62
Customizing
Page 7
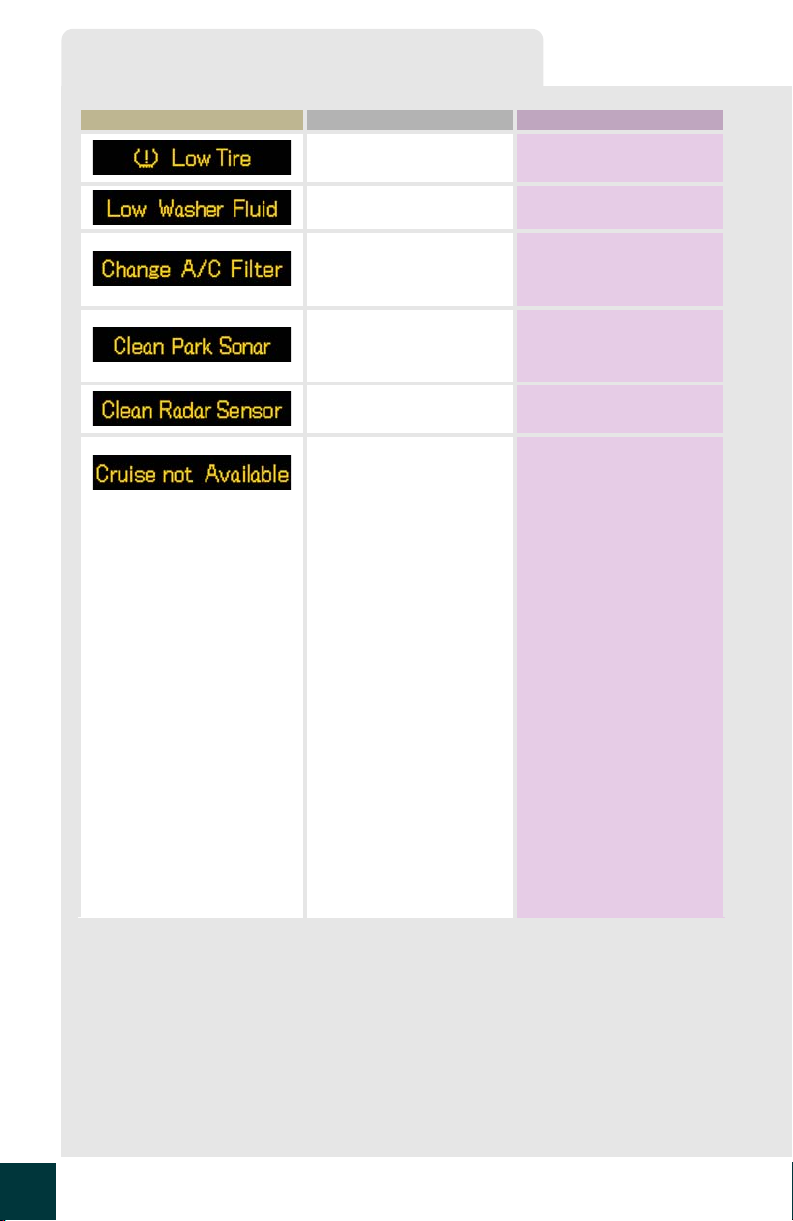
What to do if ...
Message Cause Solution
Low level of tire inflation
pressure.
Adjust the tire inflation to
the specified pressure.
Low level of washer fluid. Fill the washer fluid tank.
Air conditioning filter is
clogged enough to
require replacement.
Foreign matter (ice, snow,
mud, etc.,) has adhered to
the sonar.
Foreign matter has
adhered to the sensor.
• Measurement is difficult
in adverse weather conditions.
•Driving pattern selector
is in SNOW mode
Dynamic radar cruise
control -
• The wipers are at HI
speed with the AUTO
position selected.
Dynamic laser cruise control -
• Wipers are at HI or
LOW speed with the
AUTO position
selected.
• Direct sunlight from the
front.
Change the air conditioning filter.
Remove the foreign matter or deice the sonar.
Clean the sensor and try
setting again.
Change the driving pattern selector to Normal or
Powe r mode.
Stop or switch wipers to
Low or Intermittent position.
Stop or switch wipers to
Intermittent position
63
Page 8
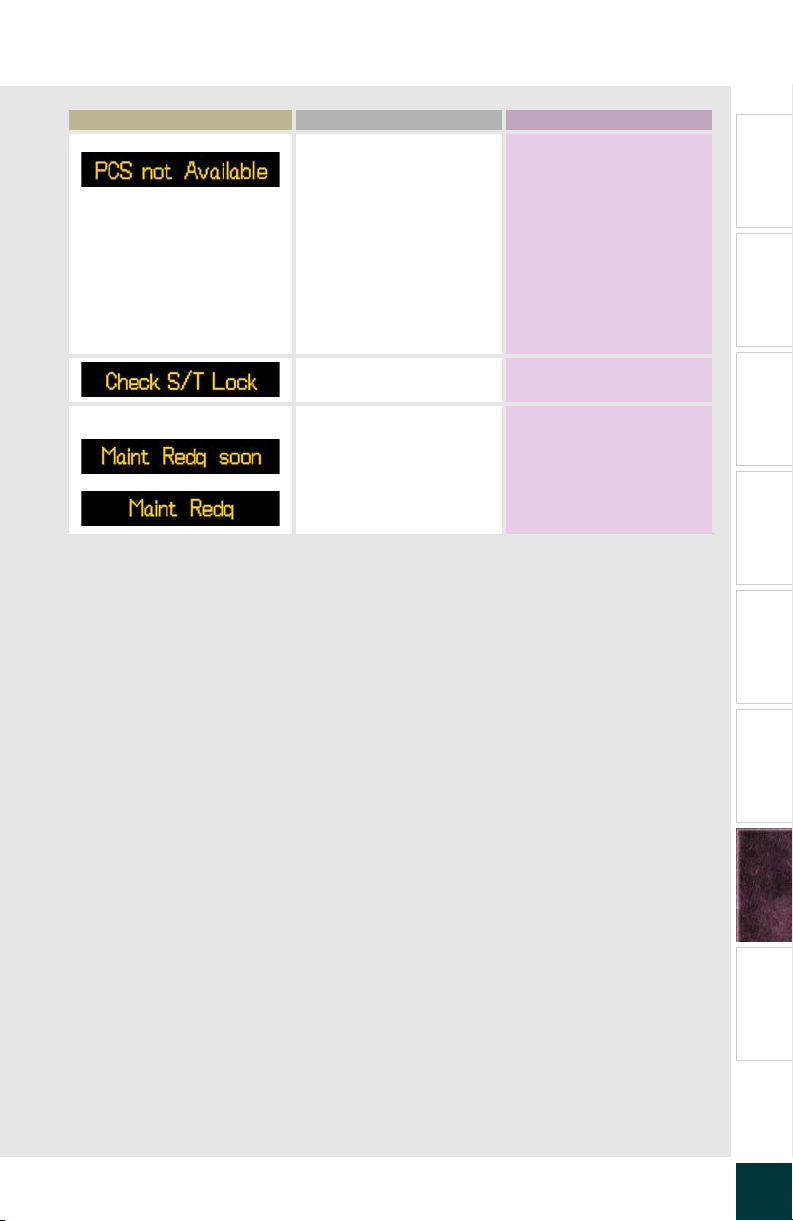
Message Cause Solution
(U.S.A. only)
• The millimeter radar
sensor or the grill cover
Clean the sensor cover
with a soft cloth.
is dirty.
• System turned off for
overheat protection
Wait for a while for the
system to reactivate.
because pre-collision
seat belts have activated
repeatedly within a short
time.
Steering lock engaged. (→P. 6 1 )
The engine oil should be
replaced soon.
The engine oil needs to be
replaced.
Replace the engine oil as
soon as possible.
For further information, refer to the owner’s manual.
Entering and Exiting
Before Driving When Driving
Night Driving
Rain and
Driving Comfort
Opening and Closing
What to do if ...
Yo u r L e x u s
64
Customizing
Page 9
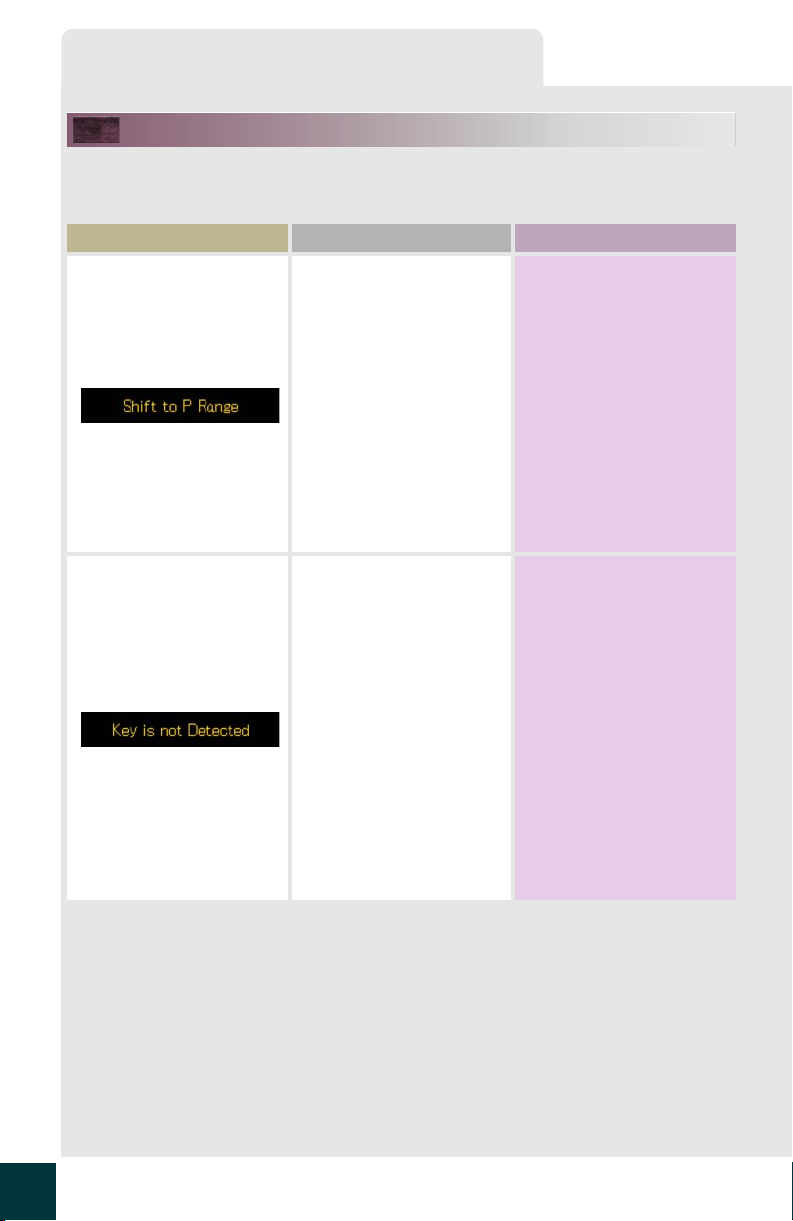
What to do if ...
Smart access system filure warnings
The vehicle will issue a message certain conditions, such as forgetting master key in the vehicle or carrying it away from the vehicle with the engine running.
Probl em Cause Solution
• Opening the driver’s
door with the ignition
switch on or with the
selector lever in a position other than “P”
• Closing the driver’s door
while carrying the master key outside of the
vehicle with the ignition
switch on or the selector
lever in a position other
than “P”
• Pressing the door lock
button while carrying the
master key outside of the
vehicle with the ignistion
switch on.
• Pressing the door lock
button with the master
key still in the vehicle and
the ignition switch turned
off.
• Closing a passenger's
door with the ignition
switch on and the master
key outside of the vehicle
The shift lever is in the “P”
position
l The ignition switch is
turned off
l You are carrying the
master key with you
65
Page 10

Probl em Cause Solution
An attempt is made to use
a key that does not match
the vehicle
Always carry the master
key when starting the
engine
Entering and Exiting
Master key battery is low
Replace the master key
battery
For further information, refer to the owner’s manual.
Before Driving When Driving
Night Driving
Rain and
Driving Comfort
Opening and Closing
What to do if ...
Yo u r L e x u s
66
Customizing
Page 11
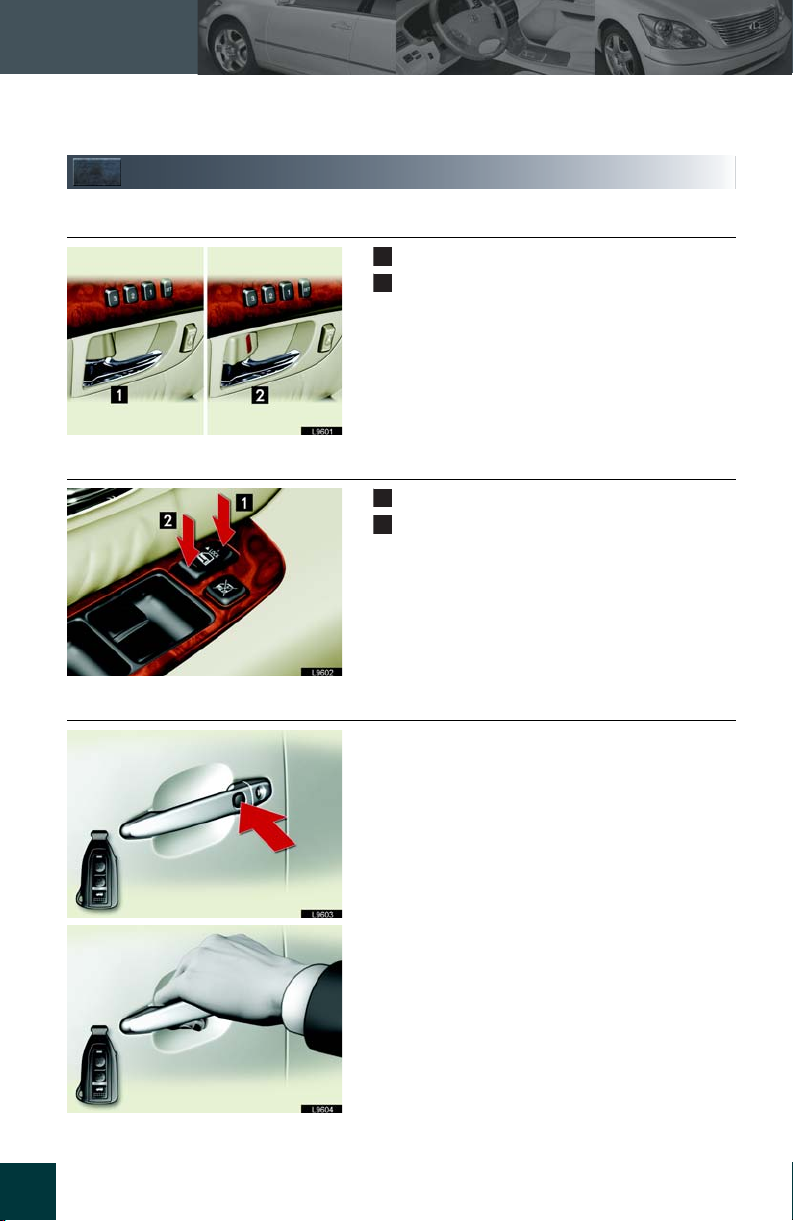
Topic 6
Opening and Closing
Doors
n Using the lock button
n Using the power door lock switch
1
2
1
2
Lock
Unlock
Lock
Unlock
n Using the smart access function (if eqipped)
53
Lock
Unlock
Page 12
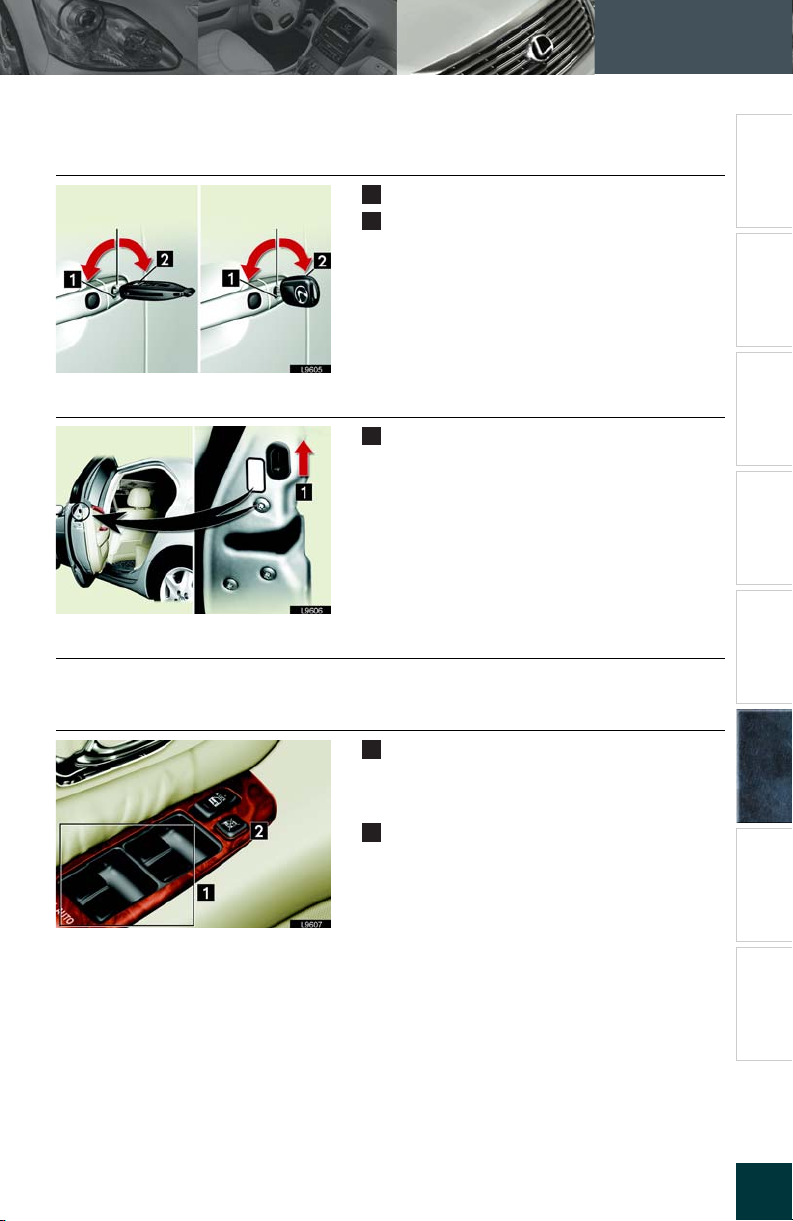
n Using the mechanical key
Ty pe A Ty pe B
n Child door protectors
Use this function whenever small children are in the vehicle.
Opening and Closing
Lock
1
Unlock
2
Lock
1
Turning the knob to the “LOCK” position
prevents the rear door from being opened
from the inside.
Use this function whenever small children
are in the vehicle.
Topic 6
Entering and Exiting
Before Driving When Driving
Night Driving
Driving Comfort
Rain and
n Door closer (if equipped)
If any door is partially latched, it will close automatically.
n Po wer Wi nd ows
Pow er window switches
1
To lower the window, push the switch
down.To raise the window, pull the switch up.
Window lock switch
2
When the window lock switch is pressed in,
only the driver's window can be raised or
lowered.
Fully lifting pulling or pressing the power window switch make the window open fully or lower fully automatically.
Opening and Closing
What to do if ...
Yo u r L e x u s
54
Customizing
Page 13
Topic 6
Opening and Closing
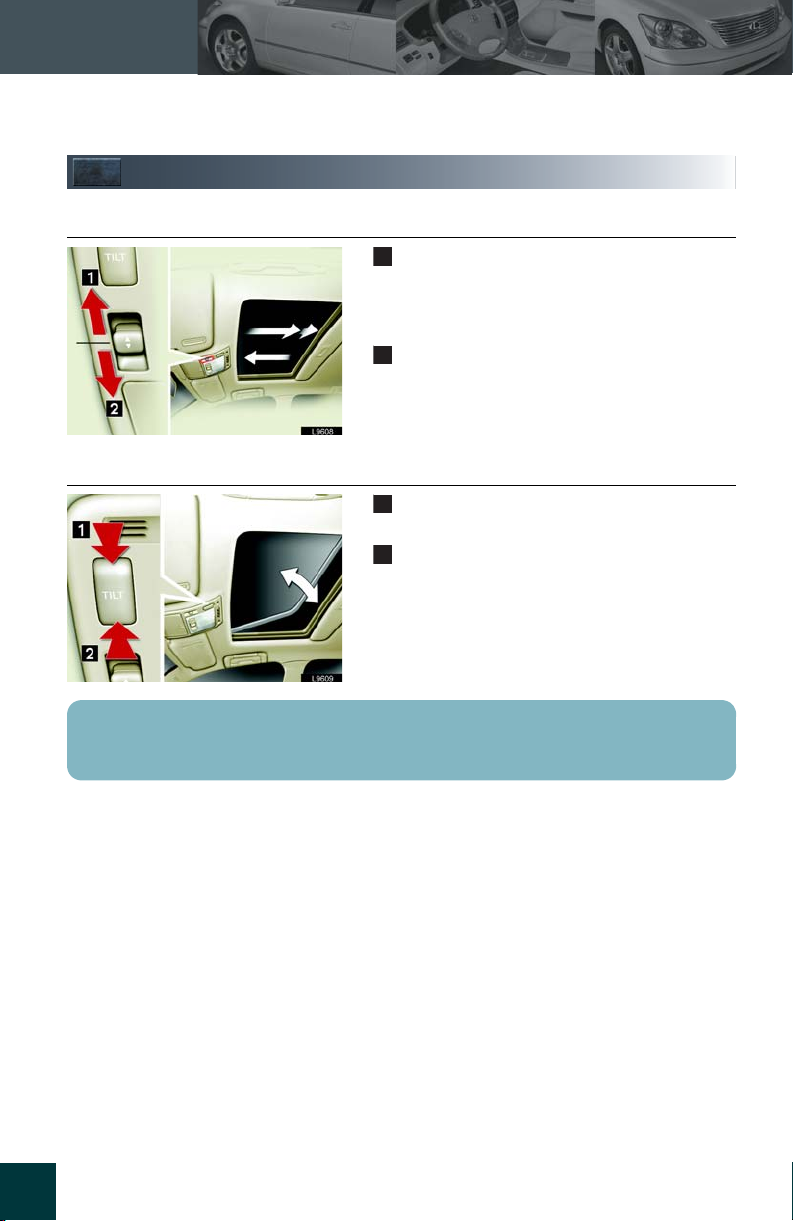
Moon Roof
n Opening and closing
n Ti lt
Pushing the “OPEN” button for about 1 sec-
1
ond causes the moon roof to open and stop
about 3 cm(1 in.) from the fully opened position. Push again to open completely.
Push and hold the “CLOSE” button for about
2
1 second to close completely.
To tilt up the moon roof, push and hold the
1
“UP” button for about 1 second.
To lower the moon roof, push and hold the
2
“CLOSE” button for about 1 second.
To open the moonroof partially, push the switch in the opposite direction when the desired position is reached.
55
Page 14

Fuel Tank Cap
Opening and Closing
Pull the fuel filler door opener.
Remove the cap by slowly turning it counterclockwise.
The removed cap can be stored on the fuel filler
door.
Use premium (91 octane or higher) unleaded
gasoline.
Topic 6
Entering and Exiting
Before Driving When Driving
Night Driving
Driving Comfort
Rain and
The display indicates that the fuel filler door is on the left side of the vehicle.
Opening and Closing
What to do if ...
Yo u r L e x u s
56
Customizing
Page 15
Topic 6
Opening and Closing
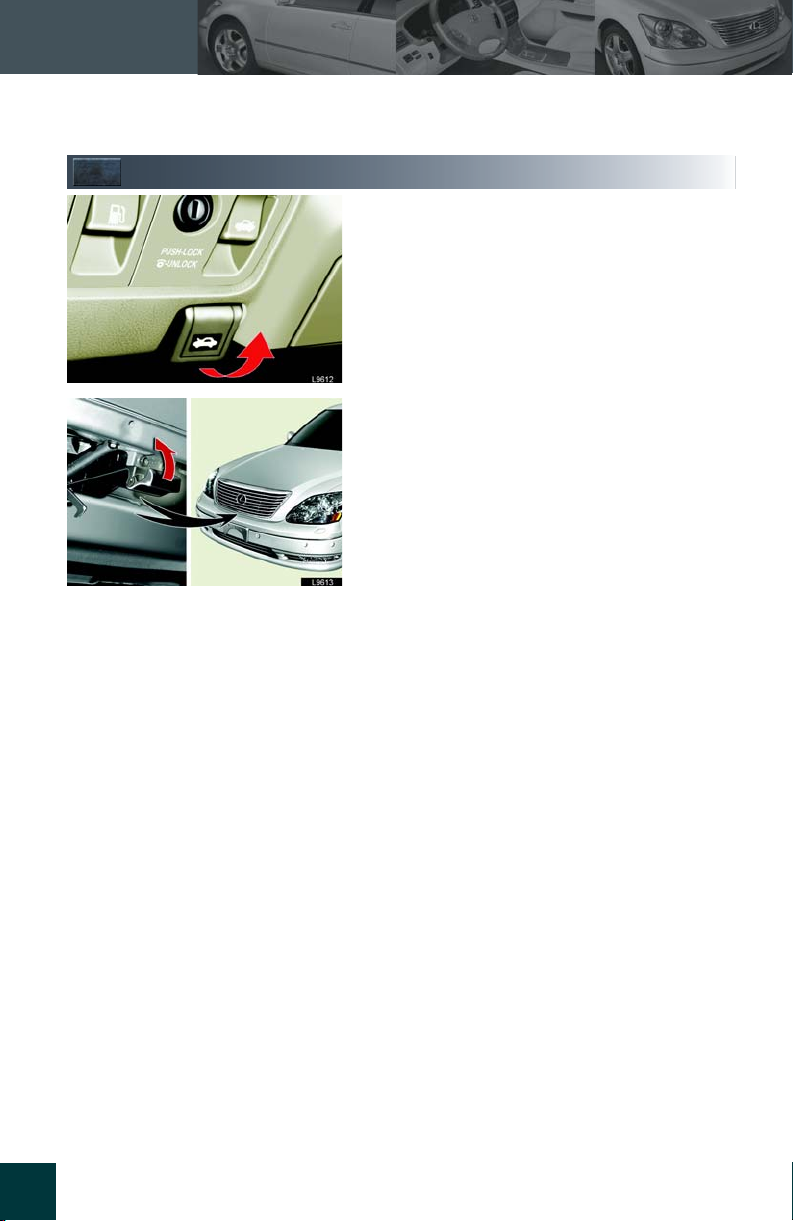
Hood
Pull the hood lock release lever under the instrument panel.
Inserting your fingers under the hood, push up the
auxiliary catch lever and lift.
57
Page 16
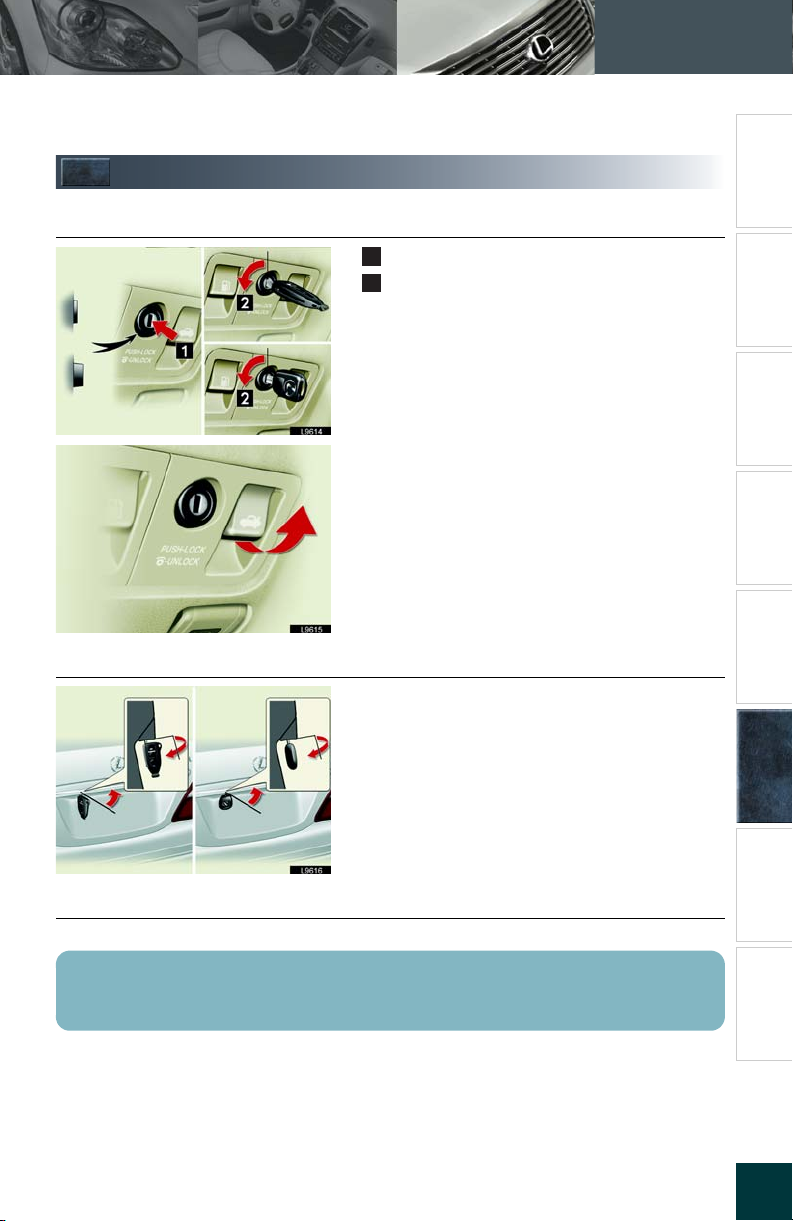
Tr u nk
Topic 6
Opening and Closing
Entering and Exiting
n Trunk lid opener switch
Off (inactivate)
On (activate)
n Mechanical key
Ty pe A Ty pe B
Make sure the main switch is on.
1
To activate the insert the masterkey and turn
2
it to the left.
Pull the lever to open the trunk.
Turn the key clockwise to open.
Only the master key can be used to open the
trunk.
Before Driving When Driving
Night Driving
Rain and
Driving Comfort
Opening and Closing
n Trunk lid closer
If the trunk lid is partially latched, it will close automatically.
The trunk can also be opened with the smart access system and the wireless remote control. See pages 8 and 9.
What to do if ...
Yo u r L e x u s
58
Customizing
Page 17

Topic 6
Opening and Closing
Doors........................................................................ 53
Moon Roof .............................................................. 55
Fuel Tank Cap........................................................ 56
Hood ......................................................................... 57
Trunk......................................................................... 58
Page 18
Topic 5
Driving Comfort
Audio System
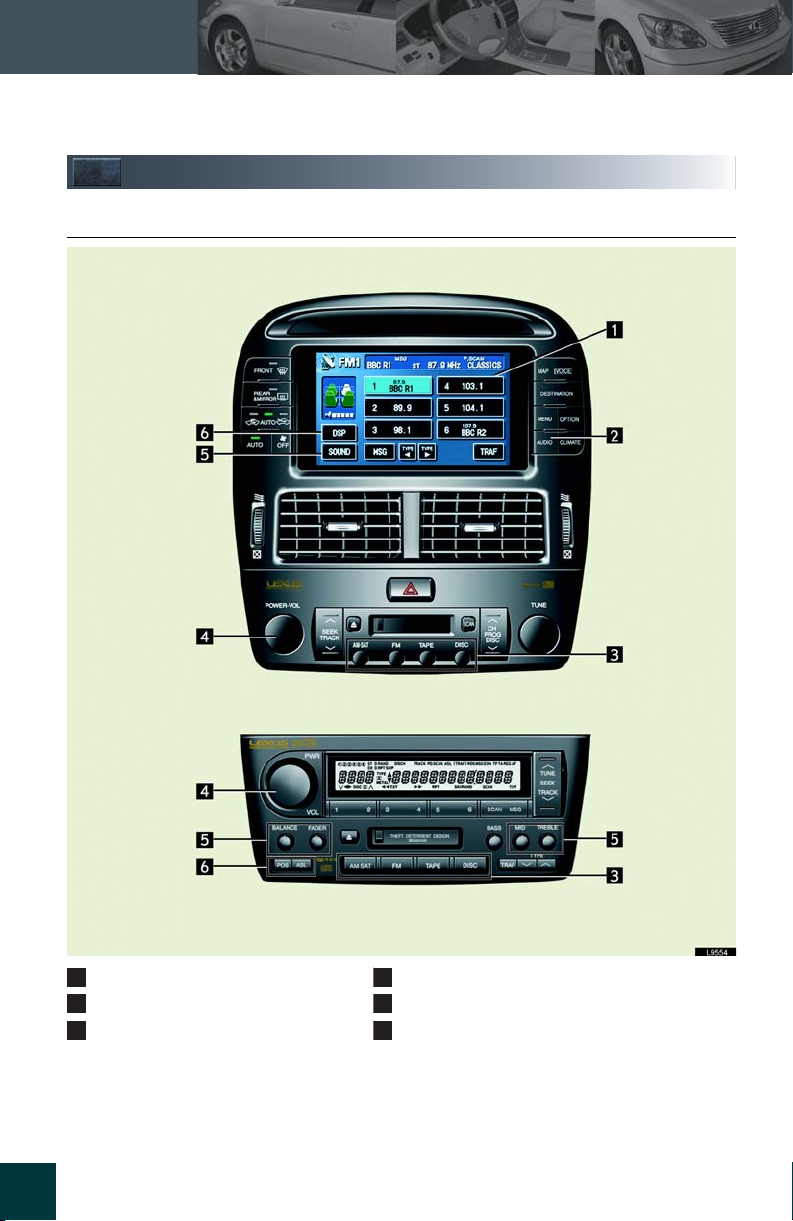
n Basic Operation
With Navigation System
39
Function switch display
1
Changes screen display
2
Mode selectors
3
Without Navigation System
4
5
6
Power ON/OFF, volume adjustmen t
Adjusts sound quality
Adjusts sound level
Page 19
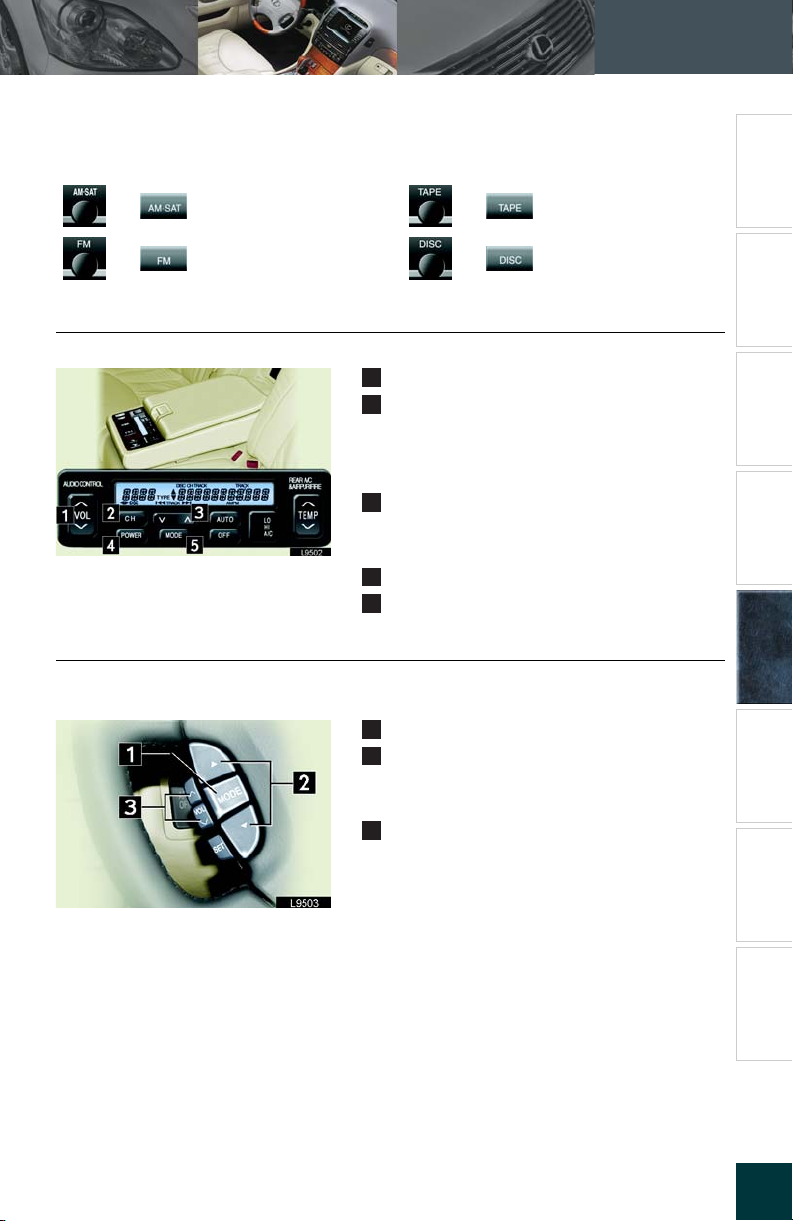
•Switching modes
or
or
Radio mode
(AM, satellite radio)
Radio mode
(FM)
n Rear switches
Some audio features can be controlled from the rear seat.
Volume adjustment
1
Radio mode: Selects radio station
2
Tape mode: Selects other side of cassette
CD mode: Selects desired CD
Radio mode: tuner
3
Tape mode: fast forward / rewind
CD mode: Selects desired track or disc
Power ON / OFF
4
Mode Selector / Child lock
5
or Tape mode
or CD mode
tape
Topic 5
Driving Comfort
Entering and Exiting
Before Driving When Driving
Night Driving
Driving Comfort
Rain and
n Audio remote control (steering switches)
It is possible to operate the audio system without removing your hands from the steering wheel.
Switch modes
1
RADIO mode: select station / tuner
2
TAPE m ode : fas t fo rwa rd / rewi nd
CD mode: select disc or track
Volume adjustment
3
Opening and Closing
What to do if ...
Yo u r L e x u s
40
Customizing
Page 20
Topic 5
Driving Comfort
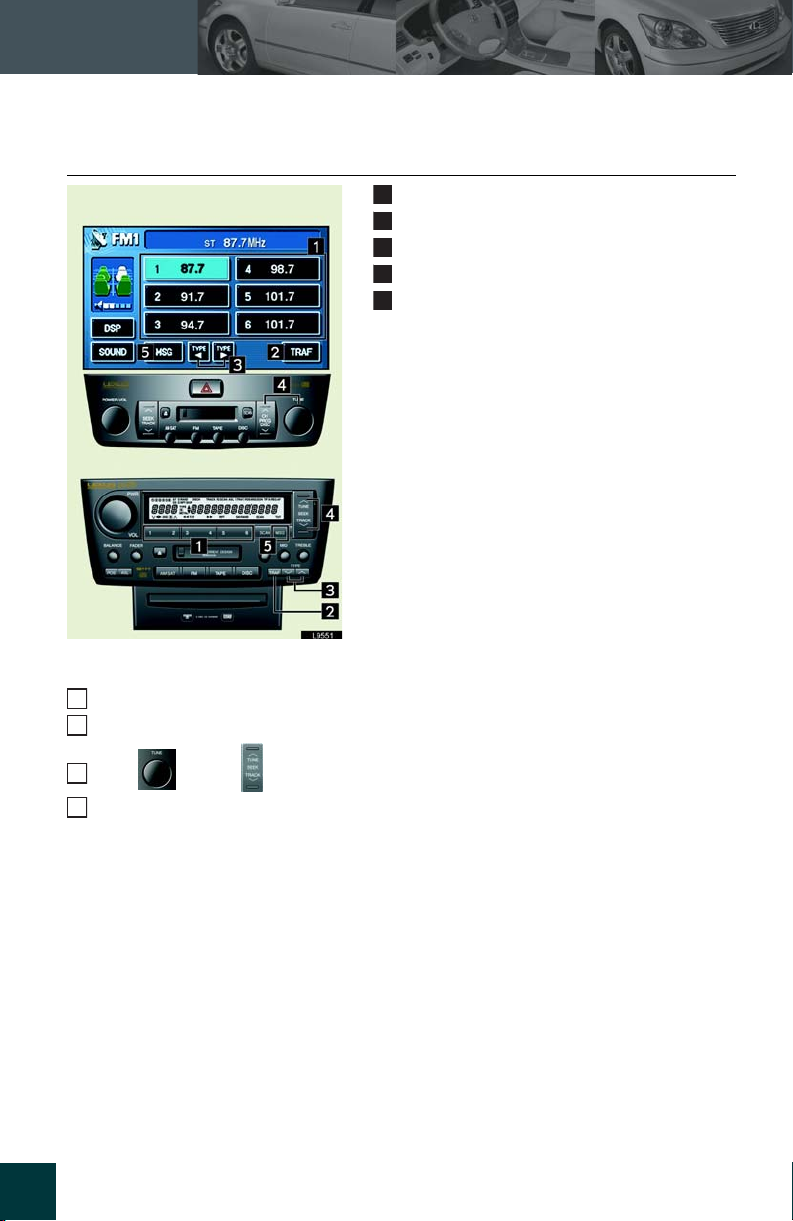
n Radio mode
With Navigation System
Without Navigation System
Enter or select preset stations
1
Receive traffic information
2
Display - radio text messages
3
Tu n i n g
4
Receive radio text messages
5
• Entering station presets
Turn the power on
1
Switch to radio modes
2
Turn or push to select the desired station
3
Hold down one of the buttons “1” through “6” until you hear a beep.
4
41
Page 21
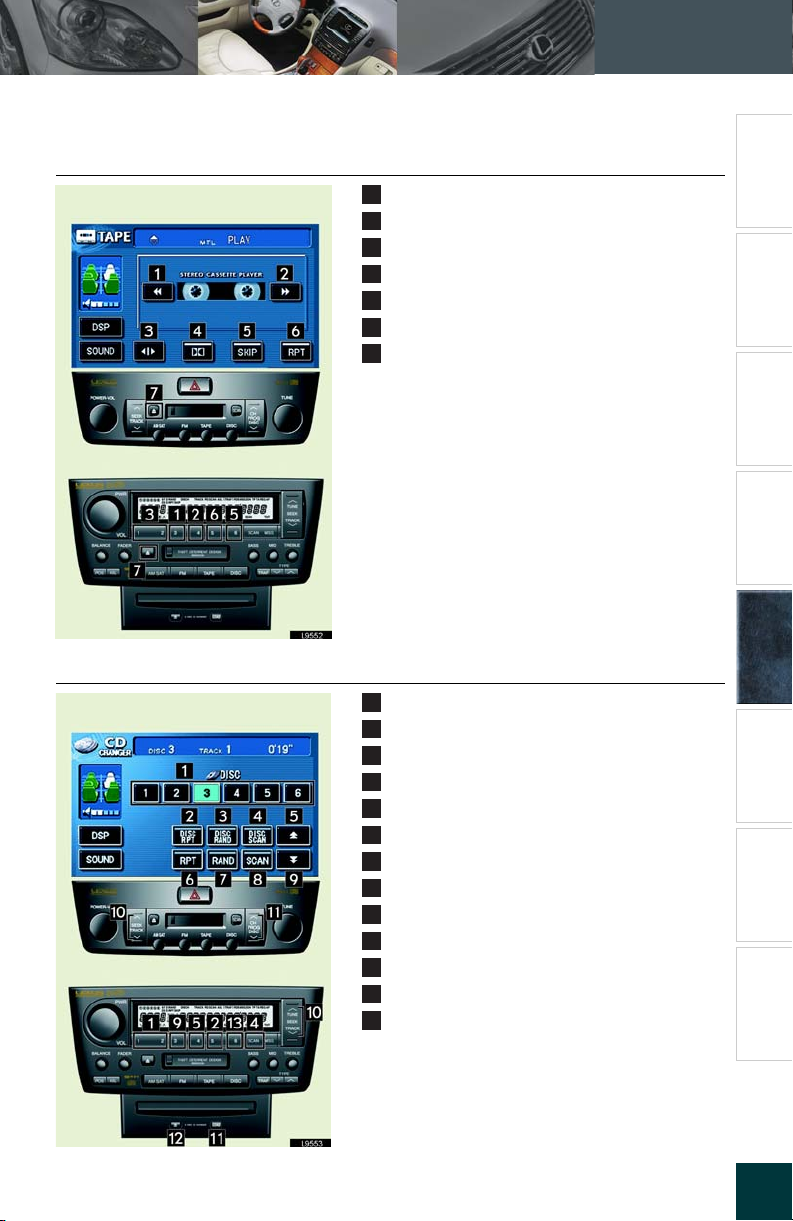
n Ta p e mo d e
With Navigation System
Without Navigation System
Rewin d
1
Fast foward
2
Reverse playback direction
3
DOLBY NR ON/OFF
4
Skip to next track
5
Repeat current track
6
Eject
7
Topic 5
Driving Comfort
Entering and Exiting
Before Driving When Driving
Night Driving
Driving Comfort
Rain and
n CD mode
With Navigation System
Without Navigation System
Select disc
1
Repeat current disc
2
Random playback (all discs)
3
Play beginning of the first track of each disc
4
Fast forward
5
Repeat current track
6
Random playback (current disc only)
7
Play beginning of each track on current disc
8
Rewin d
9
Select track
10
Load disc
11
Eject
12
Rondom playback
13
Opening and Closing
What to do if ...
Yo u r L e x u s
42
Customizing
Page 22
Topic 5
Driving Comfort
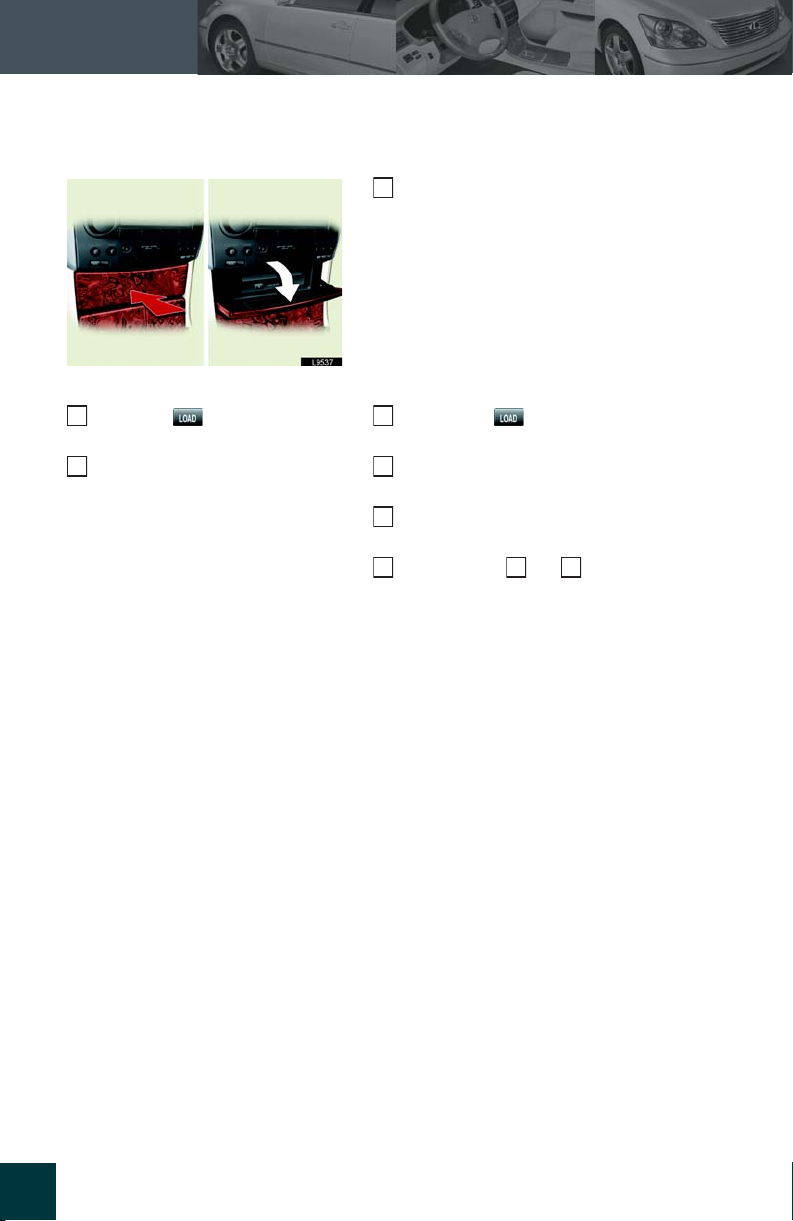
•Loading CD(s)
Open the CD door
1
• Loading a single CD
Press the button.
2
“WAIT” appears on the display.
When the “WAIT” display
3
changes to “LOAD”, insert the
disc.
• Loading multiple CDs
Hold down until you hear a beep.
2
“WAIT” appears on the display.
When the “WAIT” display changes to
3
“LOAD”, insert one disc.
Once the disc is inserted, “WAIT” appears
4
again on the display.
Repeat steps and .
5 3 4
43
Page 23
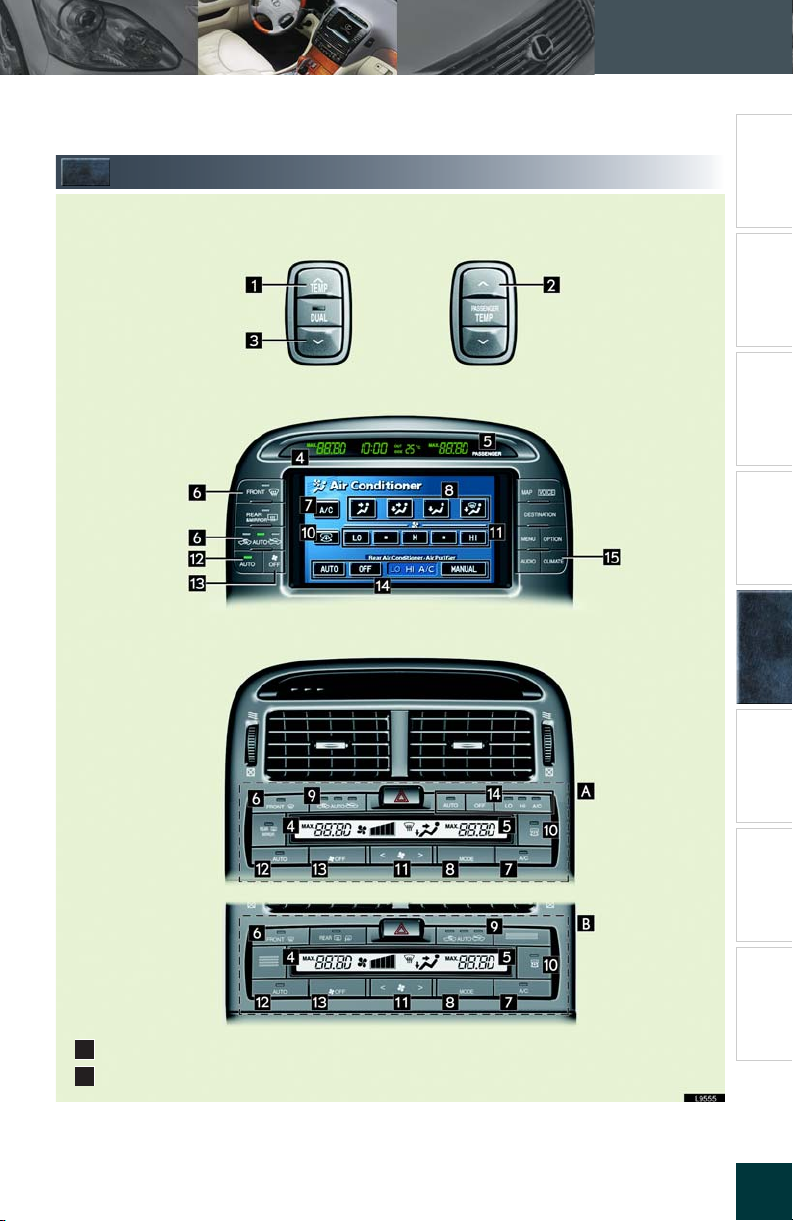
Climate Control
With Navigation System
Topic 5
Driving Comfort
Entering and Exiting
Before Driving When Driving
Night Driving
Driving Comfort
Rain and
Without Navigation System
With rear air conditioning control
A
Without rear air conditioning control
B
Opening and Closing
What to do if ...
Yo u r L e x u s
44
Customizing
Page 24
Topic 5
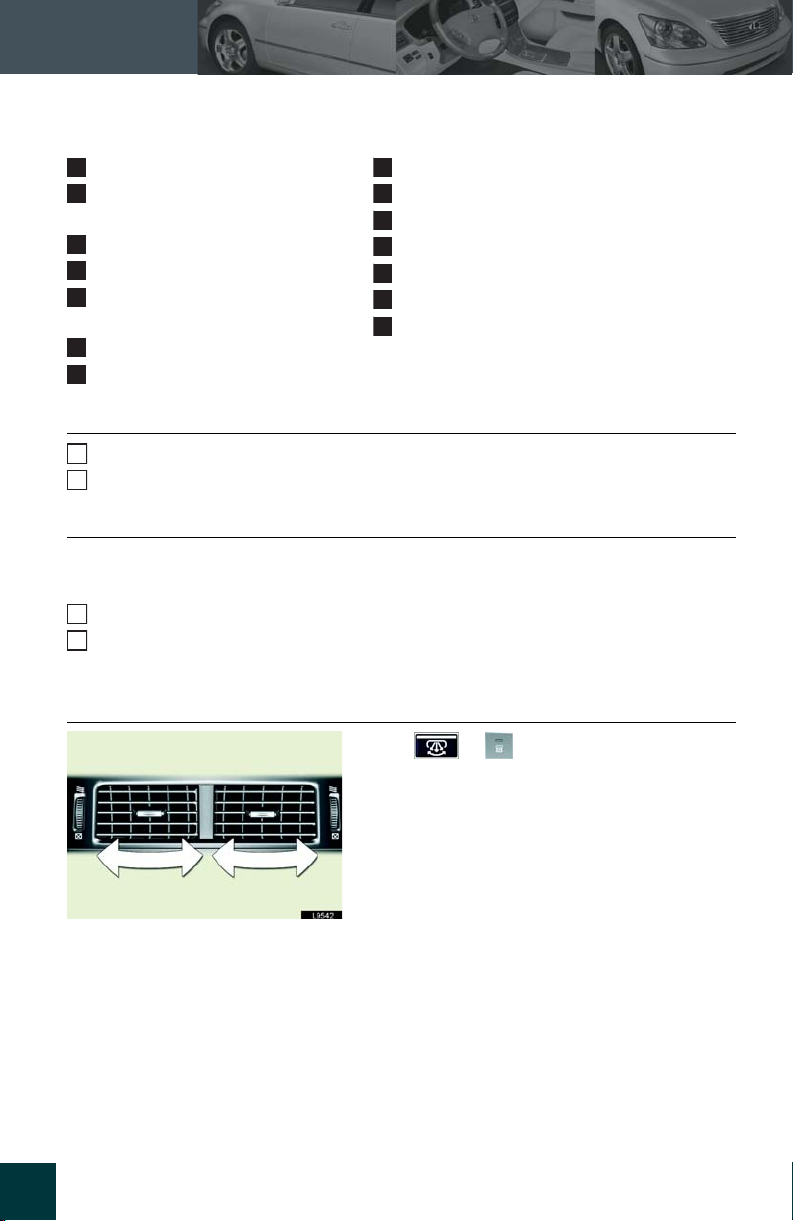
Driving Comfort
Drivers side temperature control
1
Passengers side temperature
2
control
Switch to “DUAL” mode
3
Driver side temperature display
4
Passenger side temperature dis-
5
play
Wind shield defog / defrost
6
“A /C ” sw i t ch
7
Air flow controls
8
Air intake controls
9
Swing center vent
10
Fan speed controls
11
Switch to “AUTO” mode
12
“OFF” button
13
Rear air conditioning control switches (if
14
equipped)
n “A U T O ” m o d e
Push the “AUTO” button.
1
Adjust the temperature with the “TEMP” buttons.
2
n “DUAL” mode
In “DUAL” mode, driver and passenger side temperature settings can be controlled separately.
Push the “DUAL” button.
1
Adjust the driver side temperature with the “TEMP” buttons, and the passenger side
2
temperature with the “PASSENGER TEMP” buttons.
n Swinging the center vents
45
Push or .
Pushing the “DUAL” button changes movement of the vanes when no passengers in the
front seat.
Page 25
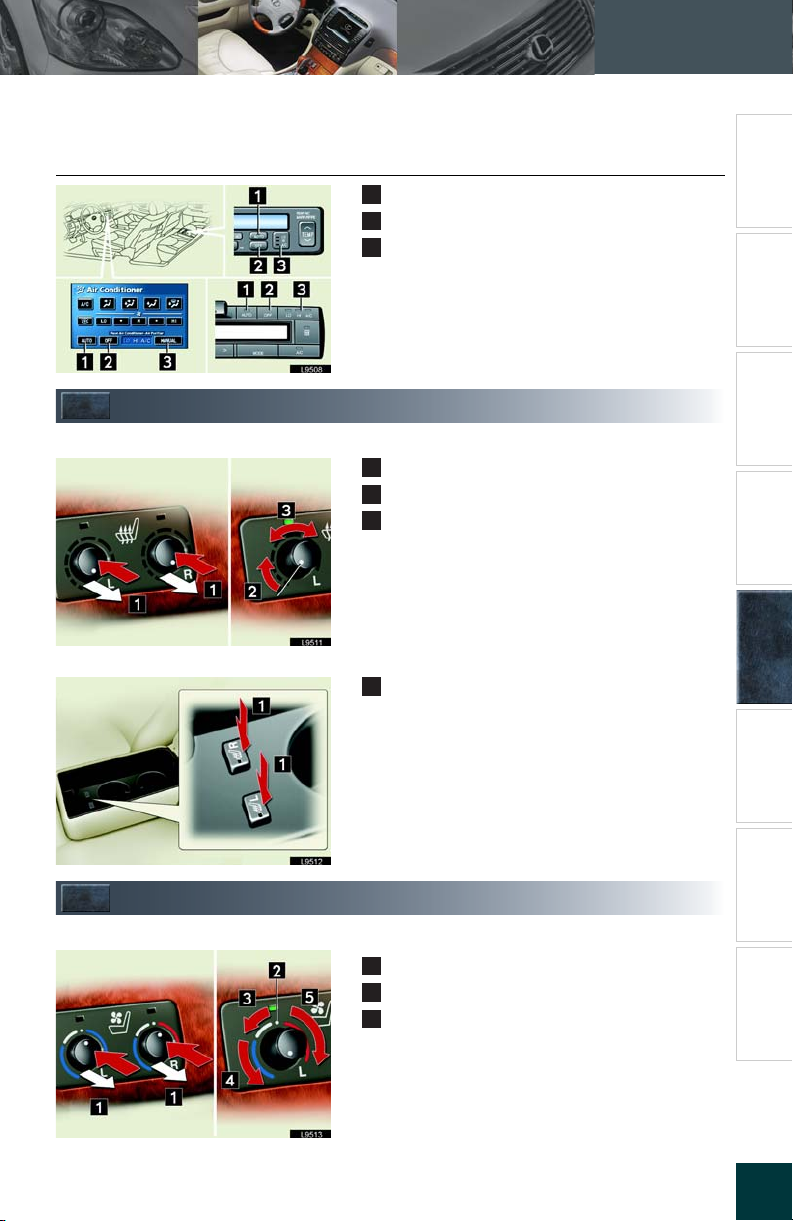
n Rear air conditioning controls (if equipped)
Switch to “AUTO” mode
1
“OFF” button
2
Change air flow mode
3
Seat Heater Switches
Front seats
Activate / inactivate
1
Tu rn on
2
Adjusting
3
Topic 5
Driving Comfort
Entering and Exiting
Before Driving When Driving
Night Driving
Driving Comfort
Rain and
Rear seats
Climate Control Seat Switches
Front seats
ON / OFF
1
Push the button.
Activate / inactivate
1
Tu rn on
2
Adjusting
3
Opening and Closing
What to do if ...
Yo u r L e x u s
46
Customizing
Page 26
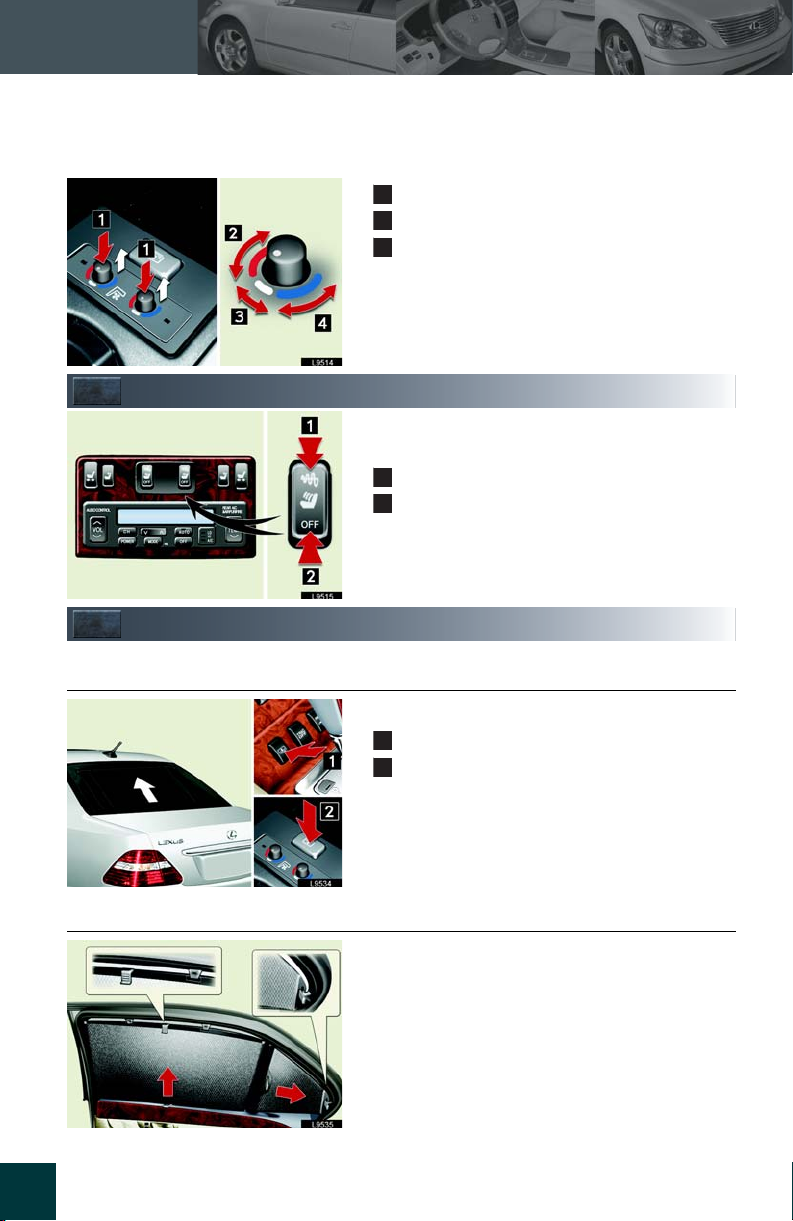
Topic 5
Driving Comfort
Rear seats
Refleshing Rear Seat Switches
Activate / inactivate
1
Tu rn on
2
Adjusting
3
Built-in lumbar vibrators reduce lumber fatigue
for the occupant.
ON / changes vibration speed
1
OFF
2
Sun Shades
n Rear electric sun shade
n Manual sun shade (if equipped)
47
Raise or lower, push the button.
From front
1
From rear
2
Pull the tab and hook.
Page 27
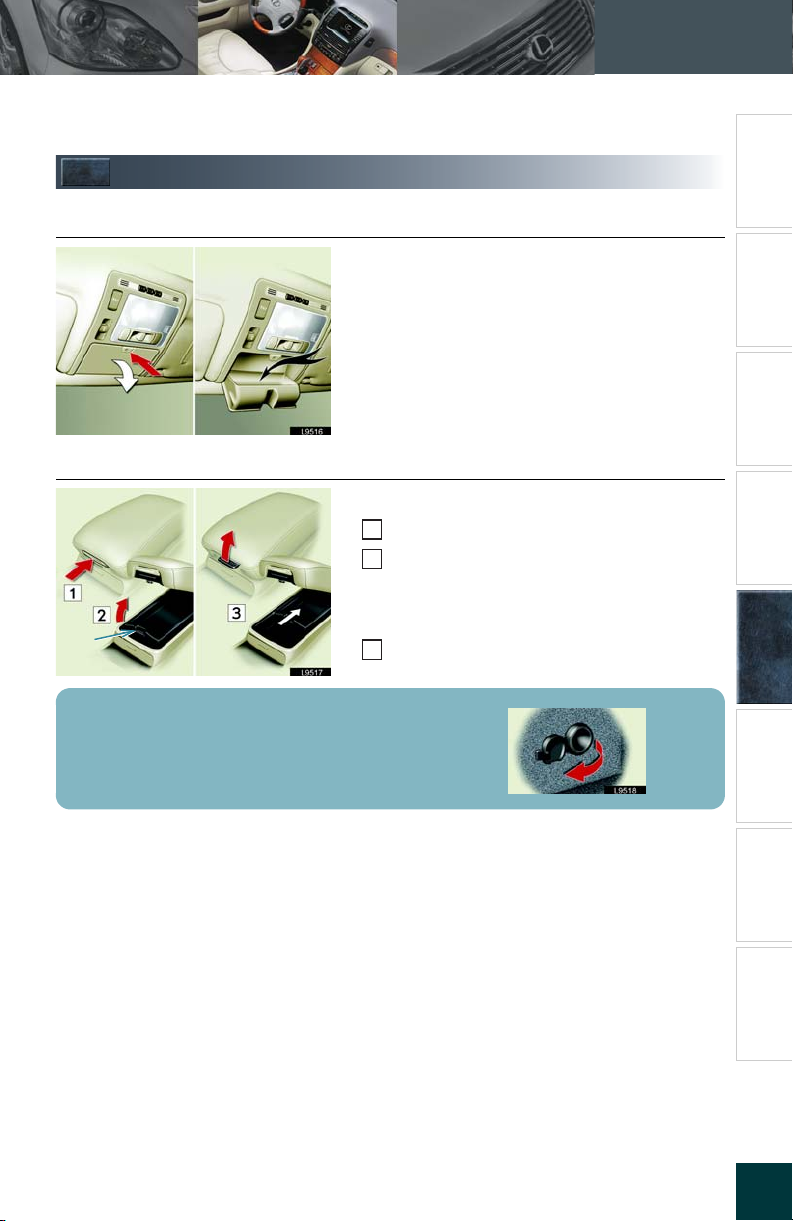
Console Boxes
Topic 5
Driving Comfort
Entering and Exiting
n Over bead console box
Push the lid gently to open and close.
n Rear console box
Upper box
Push the tab to release the lock.
1
Lift the armrest to open.
2
Lower box
Lock
release button
There is an accessory 10 A / 12 V power outlet located inside the rear consol box.
Push the lockrelease button and side open.
3
Before Driving When Driving
Night Driving
Rain and
Driving Comfort
Opening and Closing
What to do if ...
Yo u r L e x u s
48
Customizing
Page 28
Topic 5
Driving Comfort
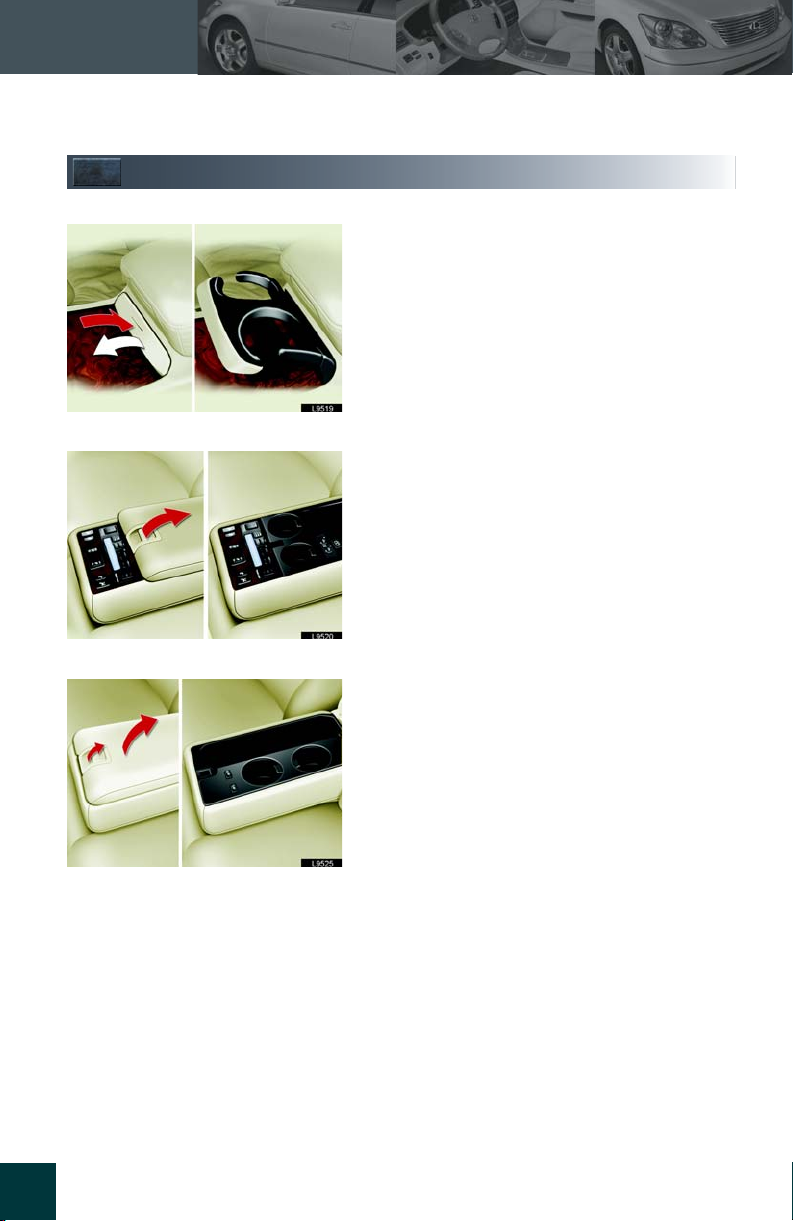
Cup Holders
Front
Rear (With powered seats)
Push the cup holder gently to extend.
Release the lock and lift the armrest.
Rear (with manual seats)
49
Page 29
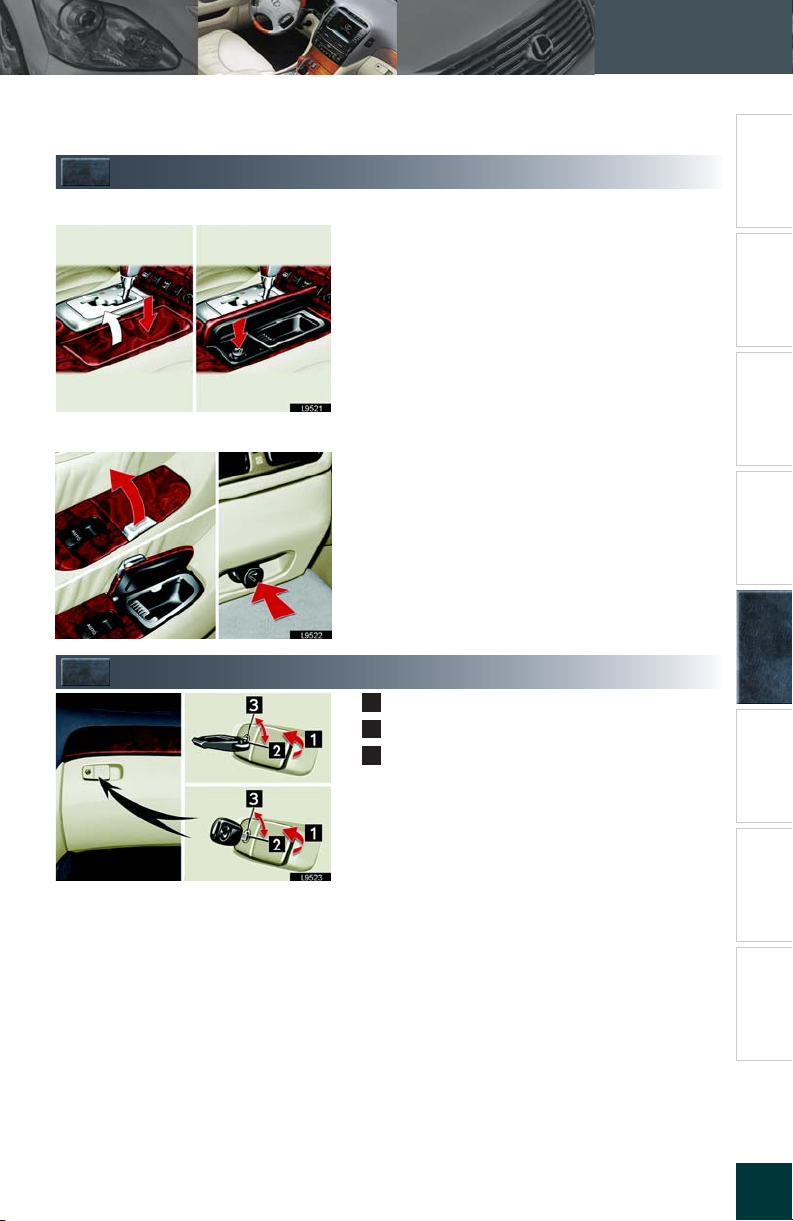
Cigarette Lighter and Ashtray
Front
To remove the ashtray, raise the lid and pull it out.
Rear
To remove the ashtray, raise the lid and pull it out.
Topic 5
Driving Comfort
Entering and Exiting
Before Driving When Driving
Night Driving
Driving Comfort
Rain and
Glove Box
1
2
3
Open
Lock
Unlock
Opening and Closing
What to do if ...
Yo u r L e x u s
50
Customizing
Page 30
Topic 5
Driving Comfort
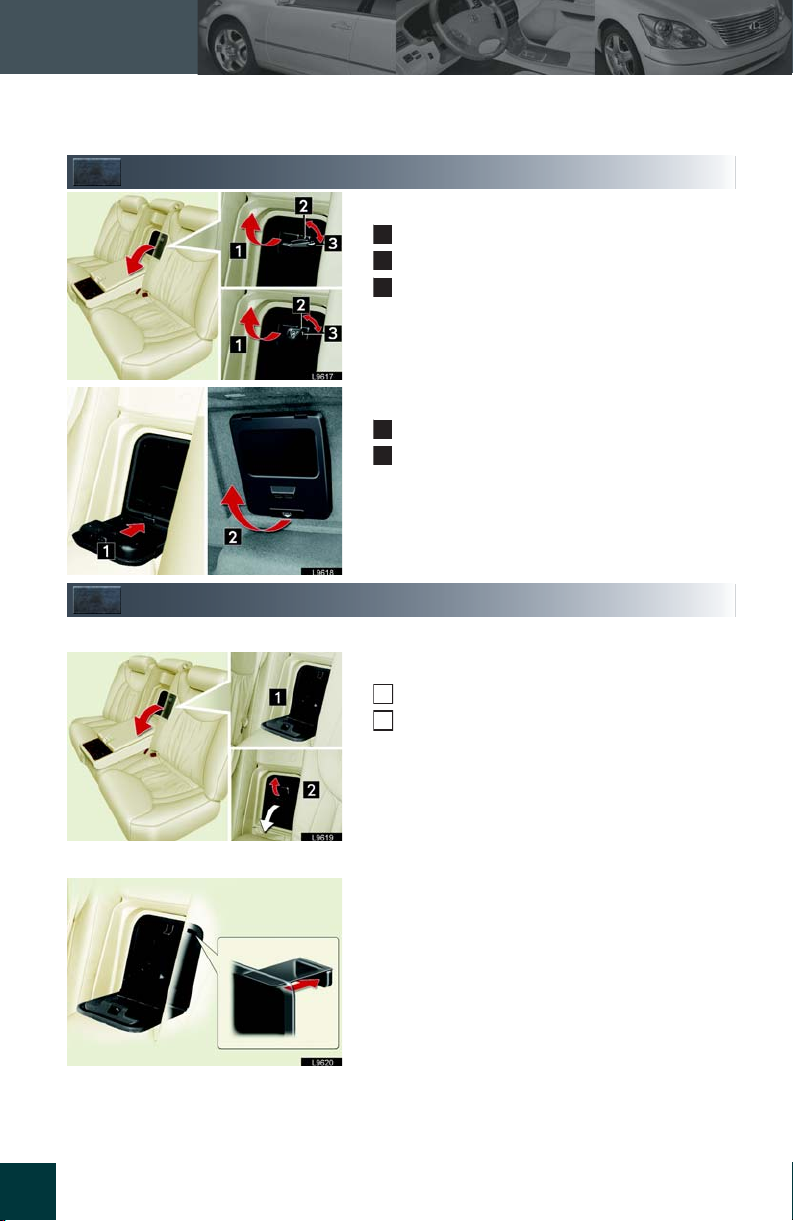
Trunk Storage Extension
Pull down the armrest in the rear seat.
Open
1
Lock
2
Unlock
3
Open the inner lid
From Passenger compartment side
1
From truck side
2
Cool Box
Keeps canned drinks cool whenever the rear air conditioning system is on.
Pull down the armrest in the rear seat.
To use as luggage compartment
Close the cool air intake lid to turn off the cool box system.
51
Open the inner lid.
1
Pull the lever to open.
2
Close the cool air intake lid to turn off the cool
box system.
Page 31
Topic 5
Driving Comfort
Audio System ......................................................... 39
Climate Control.................................................... 44
Seat Heater Switches.......................................... 46
Climate Control Seat Switches ....................... 46
Refleshing Rear Seat Switches ........................ 47
Sun Shades ............................................................. 47
Console Boxes....................................................... 48
Cup Holders........................................................... 49
Cigarette Lighter and Ashtray ......................... 50
Glove Box ............................................................... 50
Trunk Storage Extension..................................... 51
Cool Box................................................................... 51
Page 32
Topic 4
Rain and Night Driving
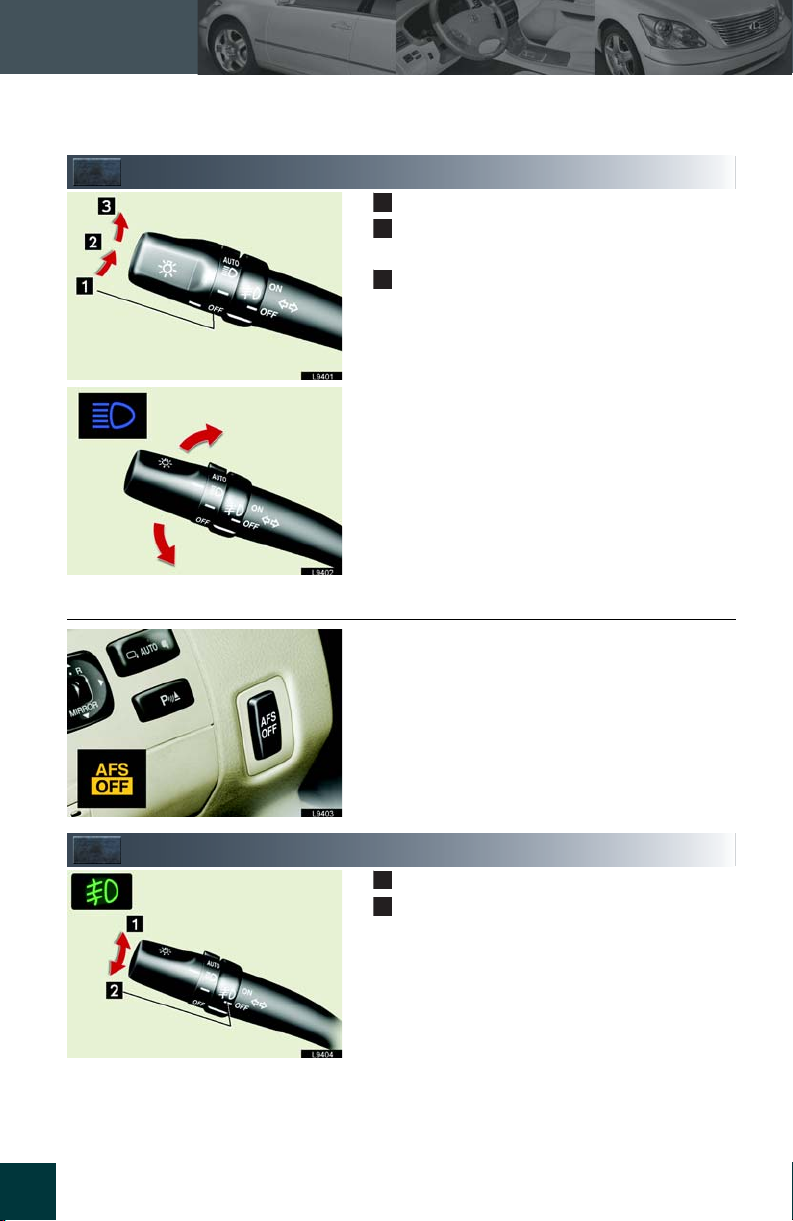
Headlights
n Adaptive Front Lighting System (AFS)
Parking lights, license plate lights, tail lights
1
Parking lights, license plate lights, tail lights,
2
and headlights
Headlights come on automatically according
3
to the surrounding light level
Push the lever forward to activate the high beams.
Pull and hold the lever to temporarily activate the
high beams.
The headlights are set to automatically move left
or right to match the turning angle of the vehicle.
Press the “AFS OFF” button to cancel the system.
The indicator light comes on when the system is
off.
35
Fog Lights
On
1
Off
2
Page 33
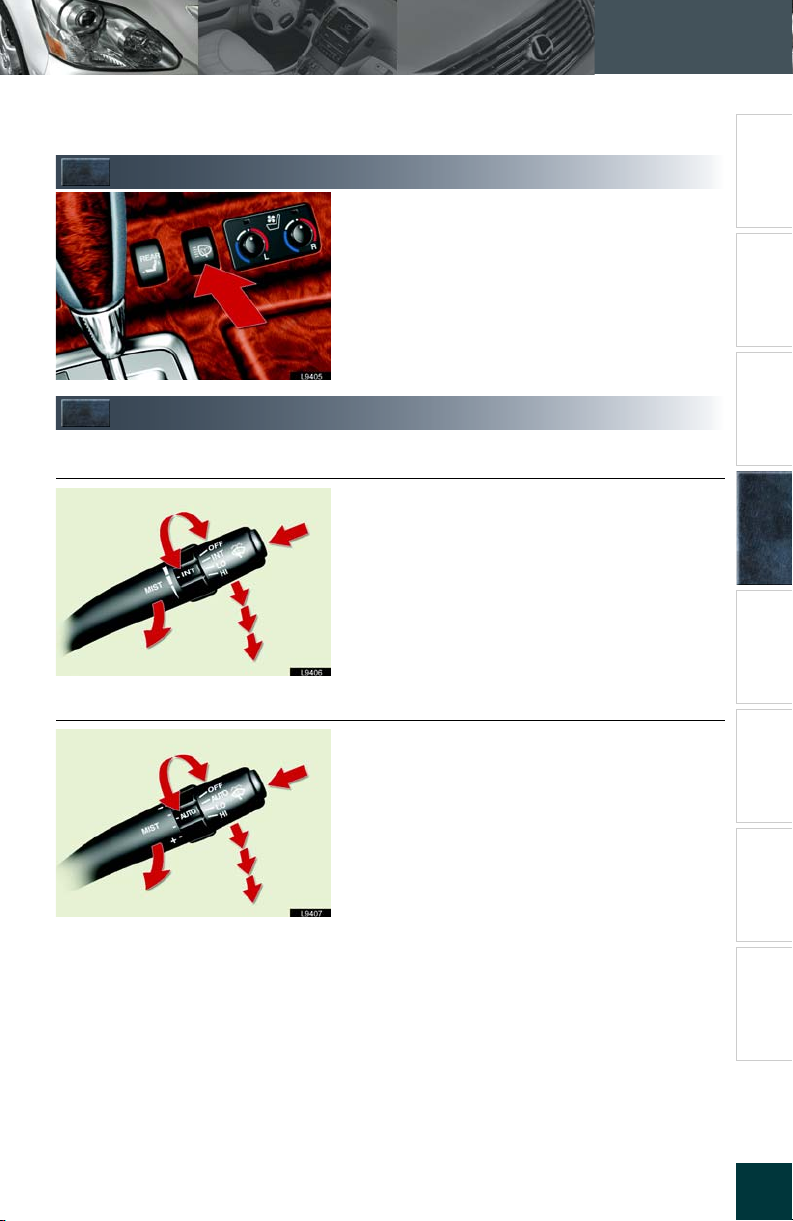
Headlight Cleaner
Can be used when the headlights are on.
Windshield Wipers and Washers
Topic 4
Rain and Night Driving
Entering and Exiting
Before Driving When Driving
n Variable intermittent wipers
INT
LO
HI
MIST
n Rain-sensing windshield wipers
AUTO
LO
HI
MIST
“MIST” Single wipe
“INT” Intermittent operation (interval can be
adjusted by twisting the knob)
“LO” Low speed operation
“HI” High speed operation
Push the button to spray washer fluid.
“MIST” Single wipe
“A U T O ” Automatic operation (sensitivity can be
adjusted by twisting the knob)
“LO” Low speed operation
“HI” High speed operation
Push the button to spray washer fluid.
Night Driving
Rain and
Driving Comfort
Opening and Closing
What to do if ...
Customizing
Yo u r L e x u s
36
Page 34
Topic 4
Rain and Night Driving
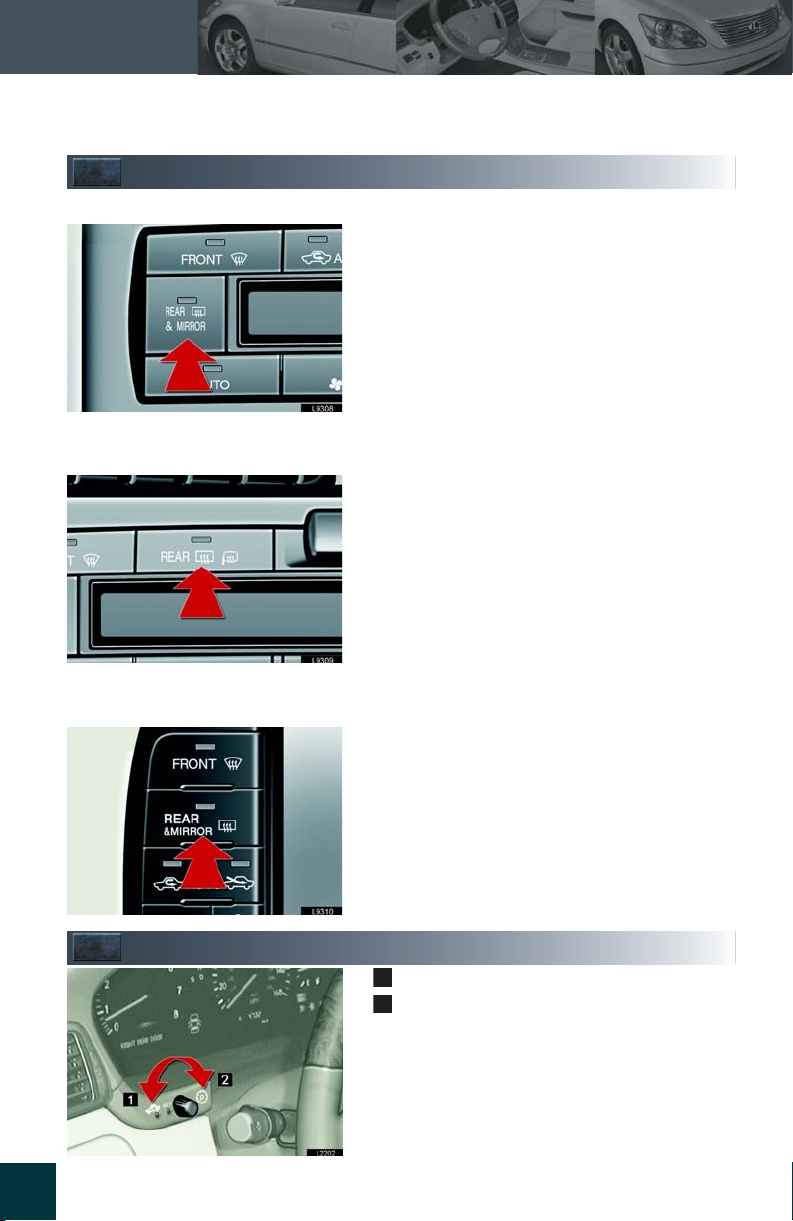
Rear Window and Outside Mirror Defoggers
Vehicles with Rear Air Conditioning
Vehicles without Rear Air Conditioning
Press the switch to defog the outside mirrors and
rear window.
Press again to cancel.
Vehicles with Navigation System
Instrument Panel Light Control
37
To b ri gh te n
1
To d im
2
Page 35
Topic 4
Rain and Night
Driving
Headlights............................................................... 35
Fog Lights ................................................................ 35
Headlight Cleaner ............................................... 36
Windshield Wipers and Washers .................... 36
Rear Window and Outside Mirror
Defoggers ............................................................... 37
Instrument Panel Light Control ....................... 37
Page 36
Topic 3
When Driving
Starting
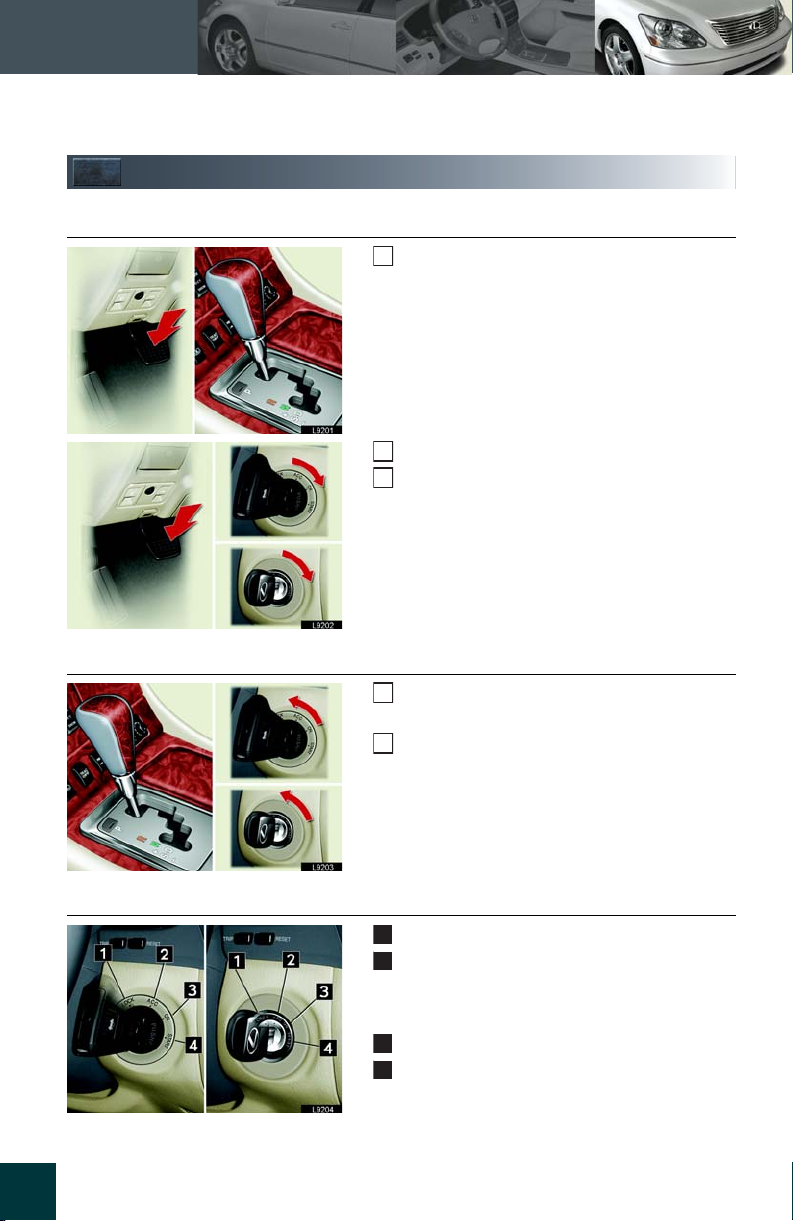
n Starting the engine
Make sure the parking brake is engaged and
1
the selector lever is in “P”.
Depress the brake pedal.
2
Push the ignition switch and turn to START
3
position.
n Turning the engine off
n Ignition switch
23
Depress the brake pedal and move the
1
selector lever to “P”.
Turn the ignition switch to ACC or OFF posi-
2
tion.
LOC K
1
ACC
2
The audio system and other accessories
can be used.
ON
3
START
4
Page 37
Automatic Transmission
Topic 3
When Driving
Entering and Exiting
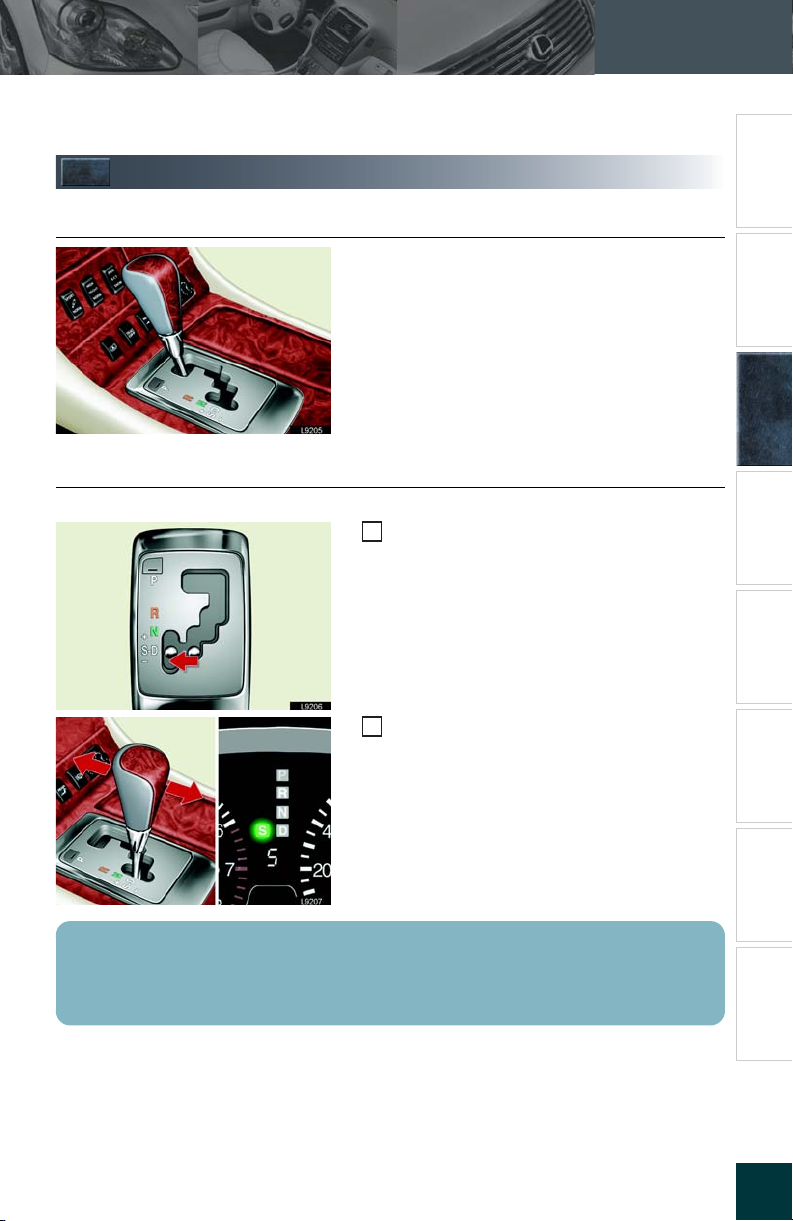
n Shift range positions
P Parking and engine starting
R Reverse position
N Neutral position
D Normal driving position
S Sequential mode driving
Switching out of “P” mode can only be performed
while the brake pedal is depressed.
n Sequential mode
Sequential mode allows the driver to select gears based on driving conditions.
Move the shift lever to the “S” position
1
Upshifting :move the lever to the “+” side
2
Downshifting :move the lever to the “-” side
st
1
through 6th gear can be selected.
Before Driving When Driving
Night Driving
Rain and
Driving Comfort
Opening and Closing
The selected shift range is displayed on the
instrument cluster.
NOTE: Downshifting increases power going uphil, or increases engine braking going downhill or stopping. During normal driving conditions, always drive in “D” position for best fuel economy.
What to do if ...
Yo u r L e x u s
24
Customizing
Page 38
Topic 3
When Driving
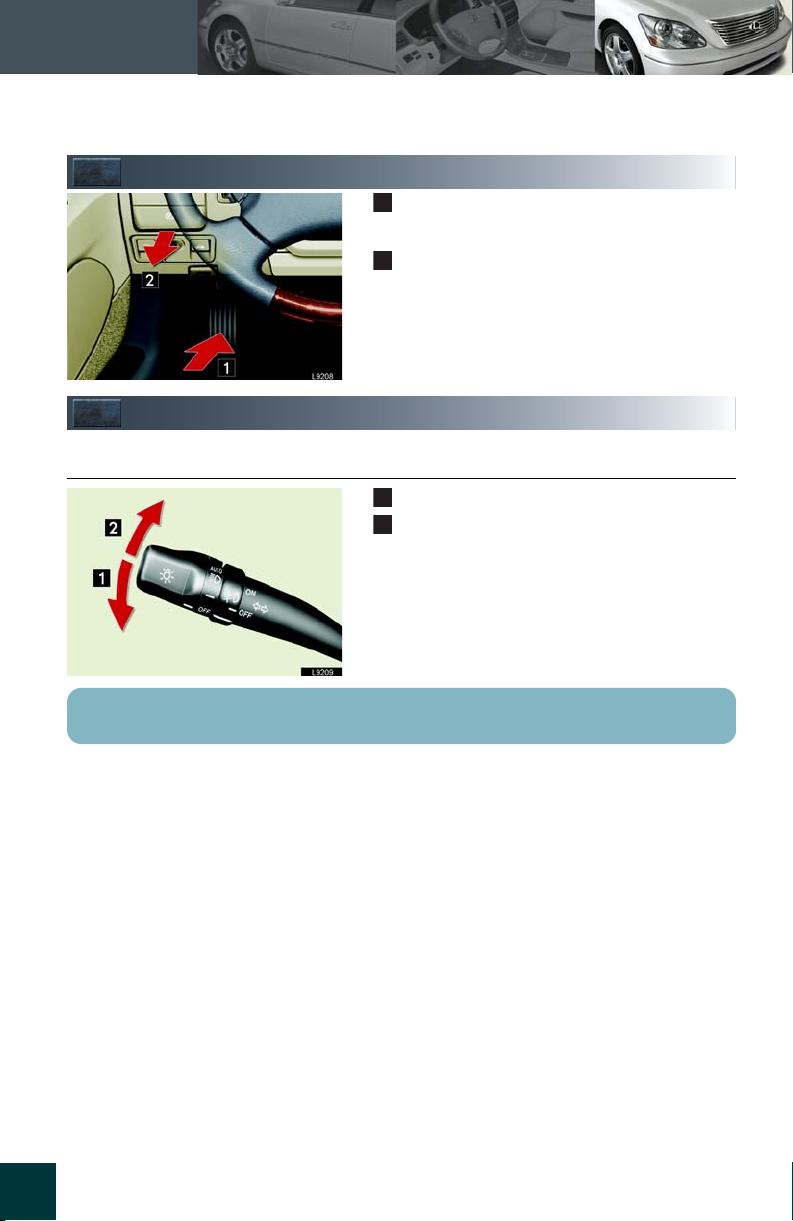
Parking Brake
Turn Sig na l Lever
n Signalling right and left turns
Set
1
Firmly depress the brake pedal.
Release
2
Pull the lever.
Left turn
1
Right turn
2
Lane changes can be signaled by moving and holding the lever partway.
25
Page 39
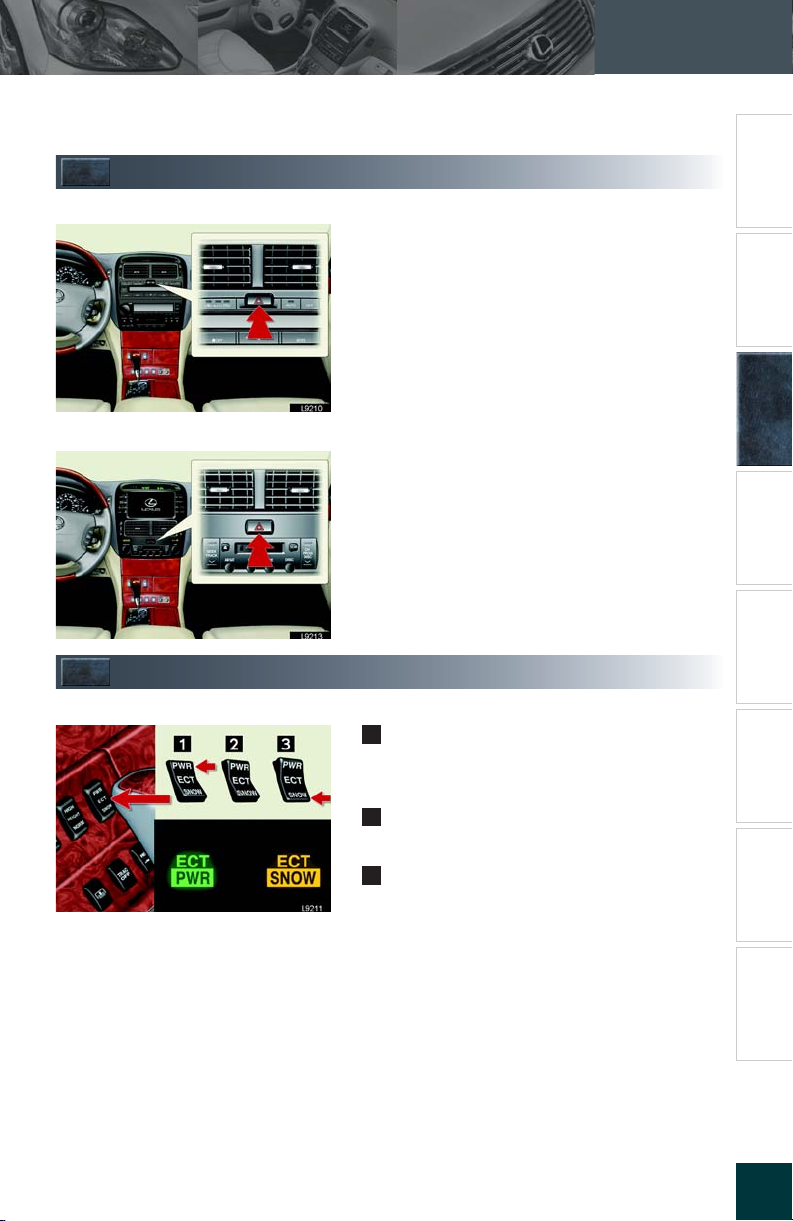
Emergency Flasher Switch
Vehicles without navigation system
Vehicles equipped with navigation system
When Driving
All the turn signal lights will flash.
The emergency flashers will work even when the
engine is off.
Topic 3
Entering and Exiting
Before Driving When Driving
Night Driving
Driving Comfort
Rain and
ECT Switch
Use to select a mode suitable to driving and road conditions.
“Power” mode
1
For more powerful acceleration and sporty
driving.
“Normal” mode
2
For ordinary driving.
“Snow” mode
3
For slippery road surfaces and slower
acceleration.
The indicator light comes on when in “Power” or
“Snow” mode.
Opening and Closing
What to do if ...
Yo u r L e x u s
26
Customizing
Page 40
Topic 3
When Driving
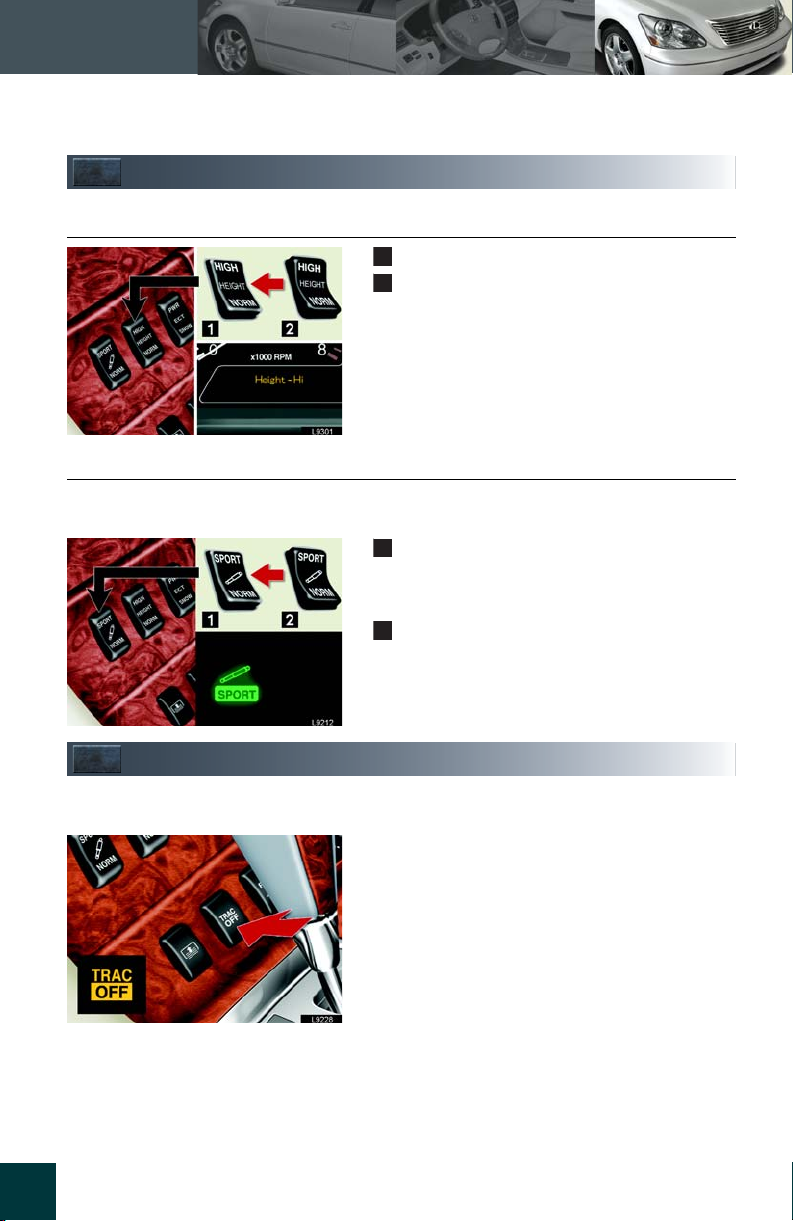
Electronic Modulated Air Suspension
n Vehicle height adjustment
High
1
Normal
2
n Damping mode selection
Adjusts the damping effect on the shock absorbers to provide either a sportier (firmer) or more comfortable (softer) ride.
“Sports” mode
1
For driving at high speeds or on winding
roads.
2
The indicator light comes on when in “Sports”
mode.
Traction Control Off Mode
This switch turns off the traction control system.
Use this function if the wheels get stuck in snow, mud, etc.
Pressing the “TRAC OFF” switch disables the
traction control function and causes the indicator
light to come on.
Press the switch again to turn the system back on.
27
“Normal” mode
For ordinary driving.
Page 41
When Driving
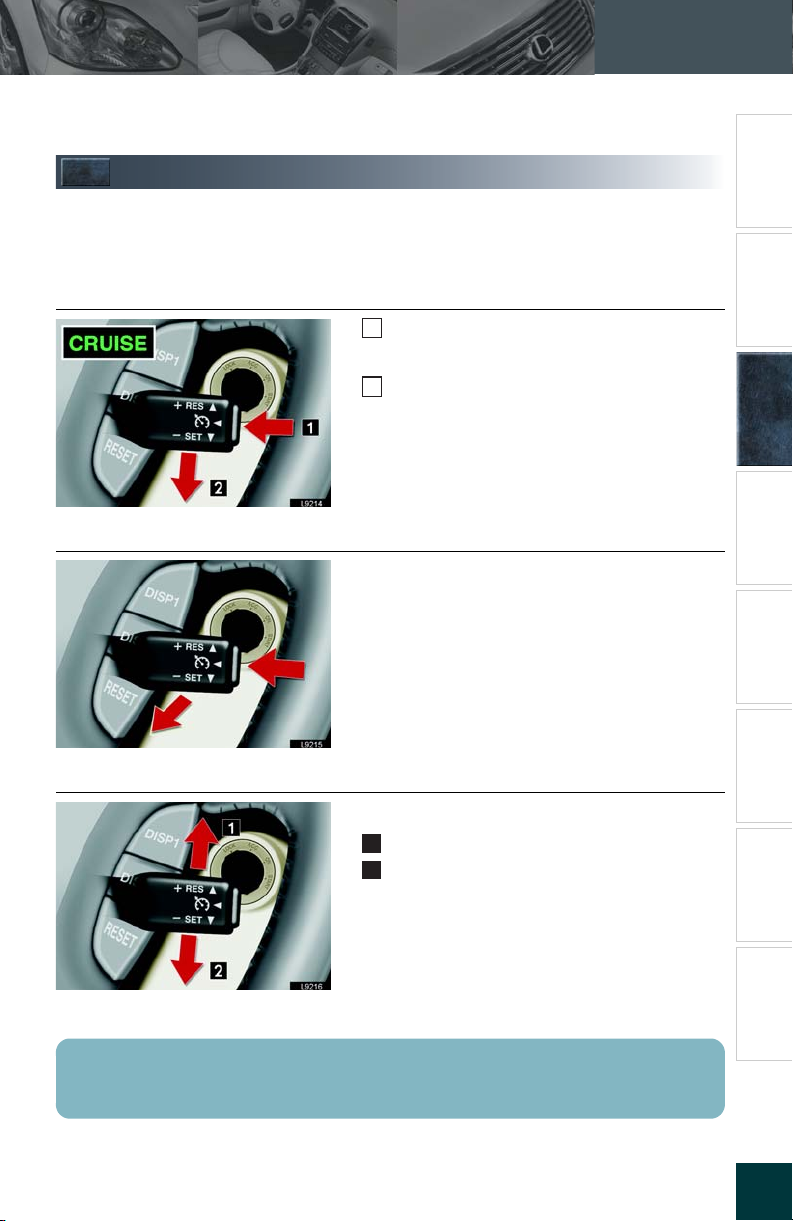
Cruise Control
The cruise control allows the vehicle to be driven at a fixed speed without using the accelerator pedal.
Use for highway driving or when traveling at the same speed for long periods of time.
n Setting the speed
Push the “ON-OFF” button
1
The system will turn on.
Push the lever down while traveling at the
2
desired speed
This sets the vehicle at that speed.
n Canceling the cruise control
Pull the lever to temporarily cancel the preset
speed.
Push the “ON-OFF” button to turn the system off.
Topic 3
Entering and Exiting
Before Driving When Driving
Night Driving
Driving Comfort
Rain and
n Resetting the speed
Using the lever
To increase speed :raise the lever
1
To de c re as e s pe ed :lower the lever
2
Release the lever when the desired speed is
reached.
Using the acceleration/brake pedal
Push the lever down after accelerating/
decelerating to the desired speed.
Depressing the brake pedal cancels the preset speed. To return to the preset speed raise the lever.
Opening and Closing
What to do if ...
Yo u r L e x u s
28
Customizing
Page 42
Topic 3
When Driving
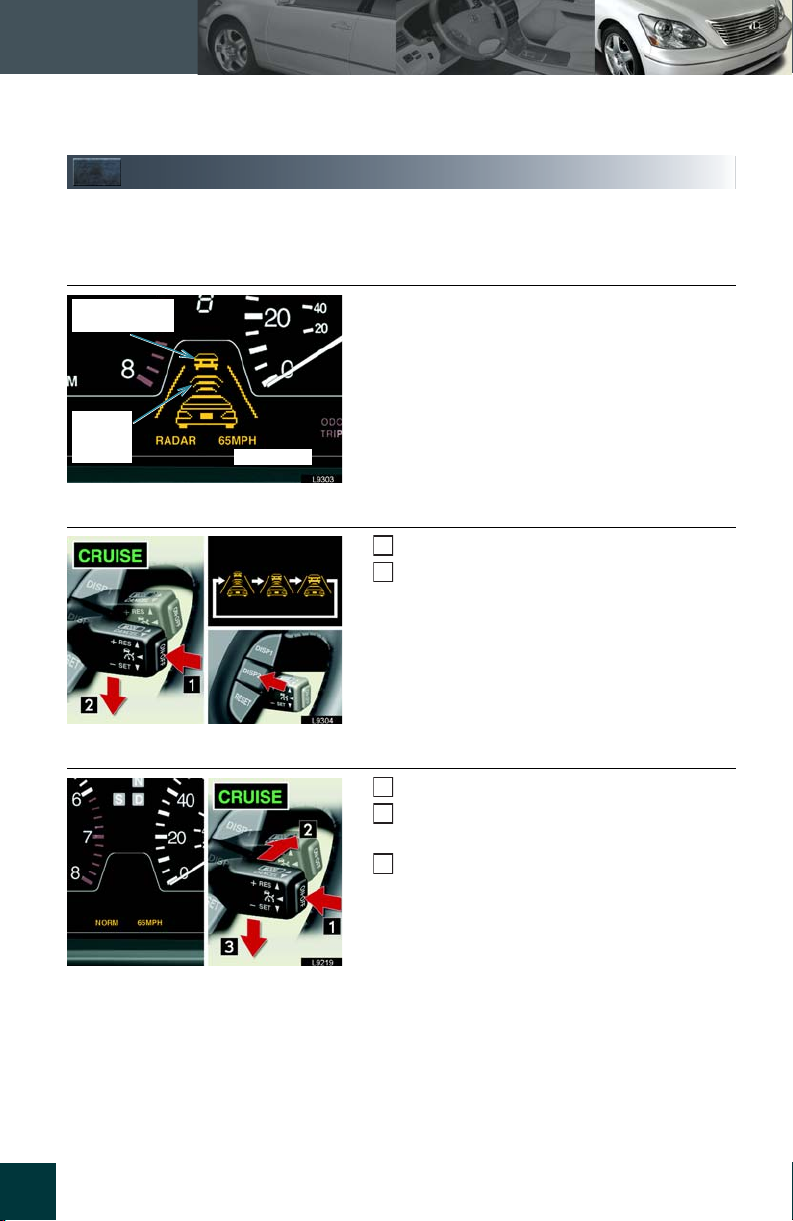
Dynamic Radar/Laser Cruise Control
Choose between vehicle-to-vehicle distance control mode and conventional (fixed speed) cruise control mode.
n Display indicator
Vehicle detected
ahead
Ve h ic l e t o
vehicle
distance
Preset speed
n Vehicle distance control mode
The multi-information display indicates the various cruise control settings.
Push the “ON-OFF” button
1
Push the lever down while traveling at the
2
desired speed.
One of three vehicle distance can be selected
using the “DISP2” button.
n Conventional (fixed speed) cruise control mode
1
2
3
29
Push the “ON-OFF” button
Push the lever forward and hold for approx. 1
second.
Push the lever down when traveling at the
desired speed.
Page 43
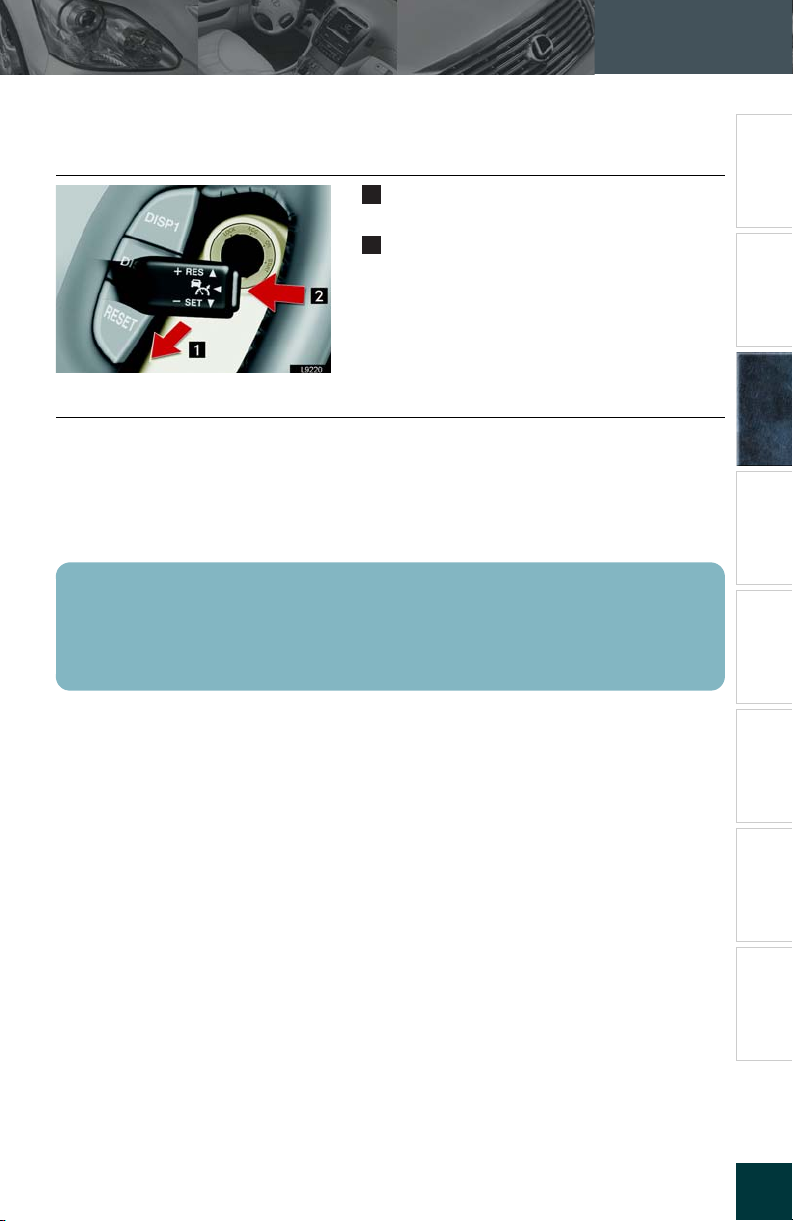
n Canceling
n Resetting the speed
When Driving
Pull the lever to temporarily cancel the pre-
1
set speed.
Push the “ON-OFF” button to turn the sys-
2
tem off.
Topic 3
Entering and Exiting
Before Driving When Driving
Using the lever
To increase speed :raise the lever
To decrease speed :lower the lever
Using the acceleration/brake pedal
Push the lever down after accelerating/decelerating to the desired speed.
Depressing the brake pedal cancels the preset speed. To return to the preset speed, raise
the lever.
When traveling in vehicle distance control mode and there is no vehicle detected ahead,
the preset cruising speed is maintained.
Night Driving
Rain and
Driving Comfort
Opening and Closing
What to do if ...
Customizing
Yo u r L e x u s
30
Page 44
Topic 3
When Driving
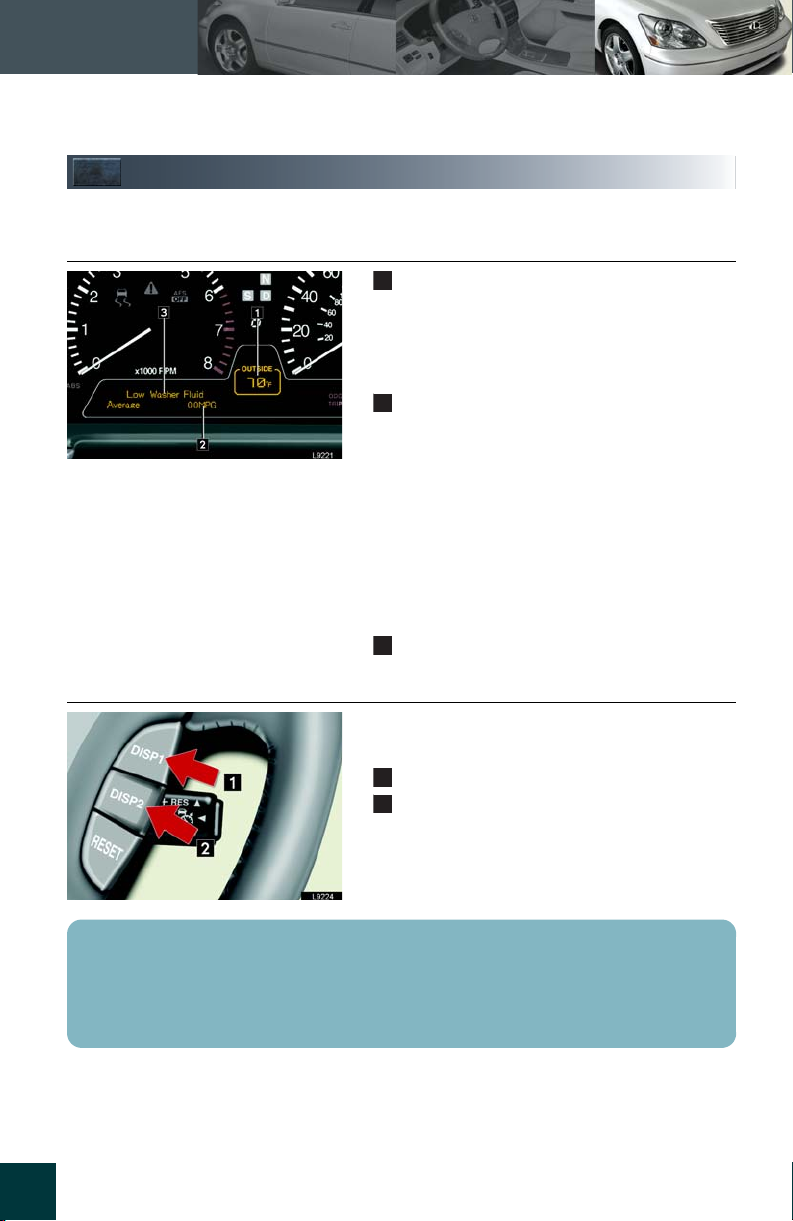
Multi-information Disply
The following information concerning your vehicle is displayed.
n Display information
Graphic information
1
• Outside temperature display
• Compass display (if equipped)
• Dynamic radar/laser cruise control
• Lexus Park assist system
Cruise information
2
• Available driving distance
• Average fuel consumption
• Current fuel consumption
• Average fuel consumption after being refueling
• Driving distance after being refueled
•Elapsed time
• Average vehicle speed
•Blank
Warn in g me ss ag e
3
n Changing display information
The display changes each time the button is
pressed.
Changes cruise information
1
Changes graphic information*
2
* Push and hold for 1 to 2 second.
When using the Lexus park assist system or dynamic radar cruise control, the appropriate
display is shown on the screen.
Any problems (malfunctions) arising in the vehicle’s systems are indicated on the warning
display.
31
Page 45
When Driving
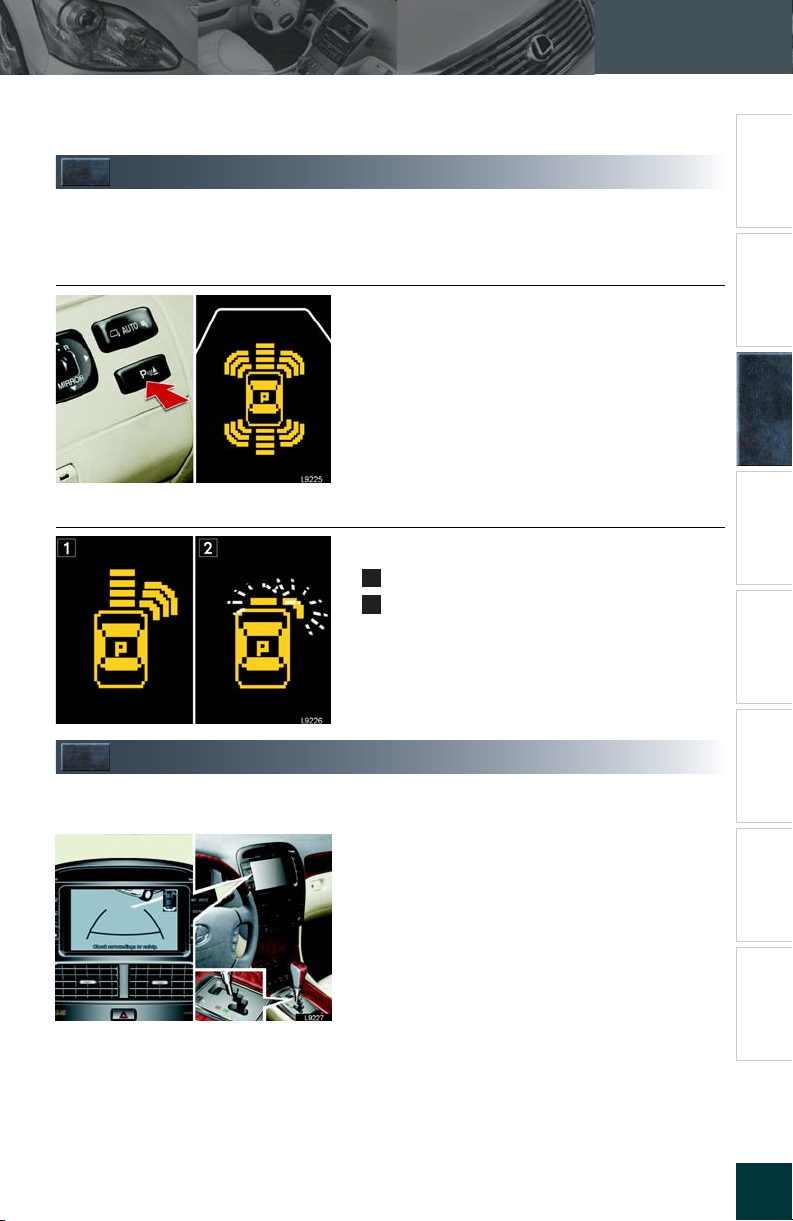
Lexus Park Assist System
This system uses a screen display and alarm to inform the driver of obstacles near the vehicle when parking or driving at low speed.
n Turning the system on and off
Press the Lexus park assist switch.
The indicator light will come on.
n Screen display
Distance to the obstacle is shown number of bars.
1.0 ft. (37.5 cm) or more
1
0.8 ft. (25 cm) or less
2
Indicator bar flashes
Topic 3
Entering and Exiting
Before Driving When Driving
Night Driving
Driving Comfort
Rain and
Rear View Monitor
The rear view monitor assists the driver when backing up or parking by displaying an image of the rear of the vehicle.
Information is displayed when the selector lever is
in the “R” position.
Opening and Closing
What to do if ...
Yo u r L e x u s
32
Customizing
Page 46

Topic 3
When Driving
33
Page 47
Topic 3
When Driving
Starting .................................................................... 23
Automatic Transmission ..................................... 24
Parking Brake ........................................................ 25
Turn Signal Lever.................................................. 25
Emergency Flasher Switch ................................ 26
ECT Switch ............................................................. 26
Electronic Modulated Air Suspension .......... 27
Traction Control Off Mode............................... 27
Cruise Control ...................................................... 28
Dynamic Radar/Laser Cruise Control.......... 29
Multi-information Disply ..................................... 31
Lexus Park Assist System ................................... 32
Rear View Monitor .............................................. 32
Page 48
Topic 2
Before Driving
Front Seats
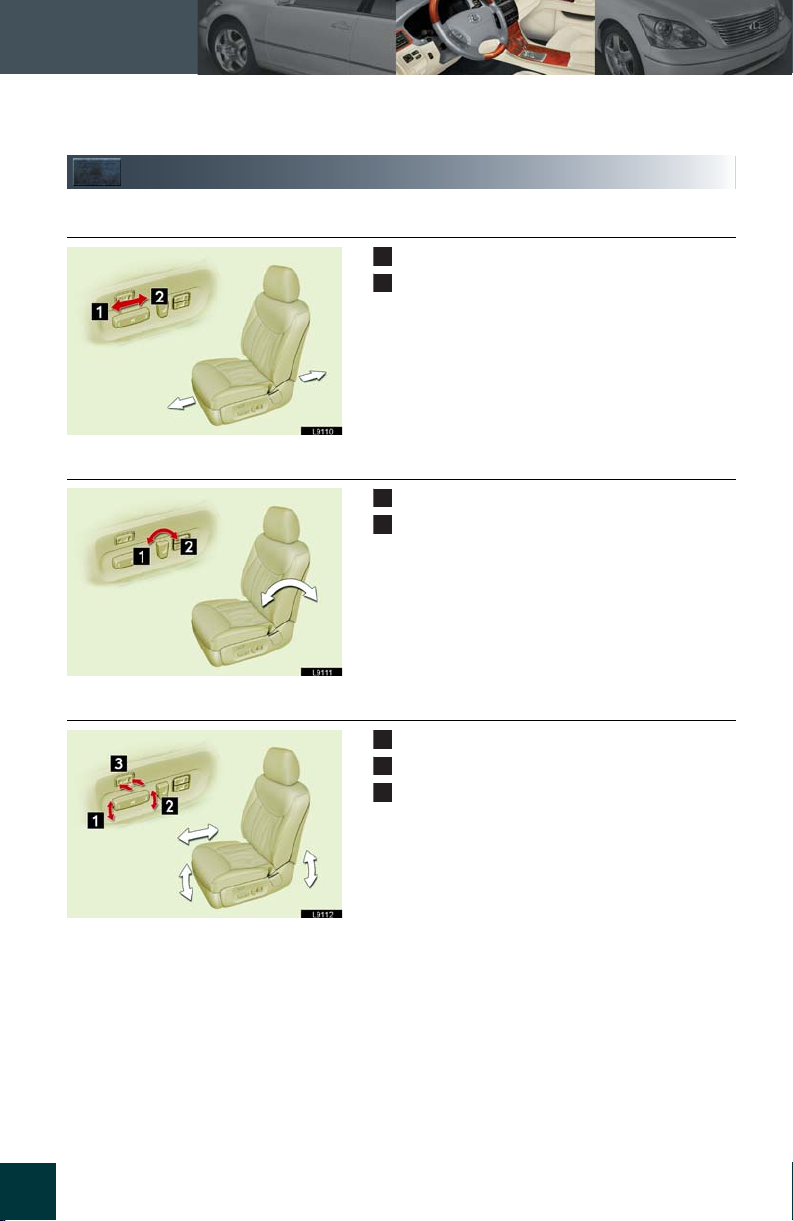
n Adjusting seat position
n Adjusting seatback angle
Moves seat forward
1
Moves seat back
2
Drivers seat only:
Headrestraint moves upward and downward when the seat moves forward and
backwards.
Incline
1
Recline
2
n Adjusting the seat cushion
13
Raises and lowers the front of the cushion
1
Raises and lowers the entire seat
2
Adjusts the cushion length (driver’s seat only)
3
Page 49
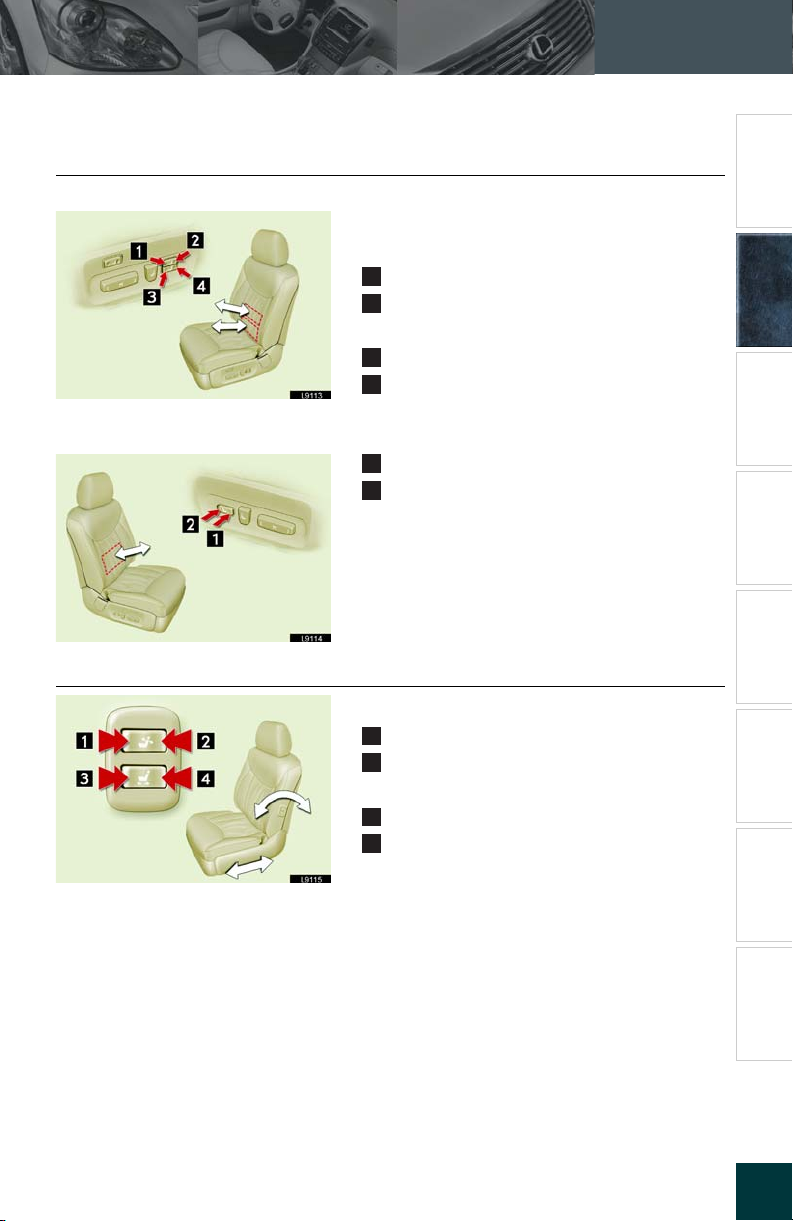
n Adjusting firmness
Driver’s seat
Passenger’s seat
The lumbar support can be adjusted.
Upper portion
Firmer
1
Softer
2
Lower portion
Firmer
3
Softer
4
Firmer
1
Softer
2
Topic 2
Before Driving
Entering and Exiting
Before Driving When Driving
Night Driving
Driving Comfort
Rain and
n Adjusting the front passenger’s seat from the driver’s side
Seat back angle
Incline
1
Recline
2
Seat position
Moves seat forward
3
Moves seat backward
4
Opening and Closing
What to do if ...
Customizing
Yo u r L e x u s
14
Page 50
Topic 2
Before Driving
Rear Seats
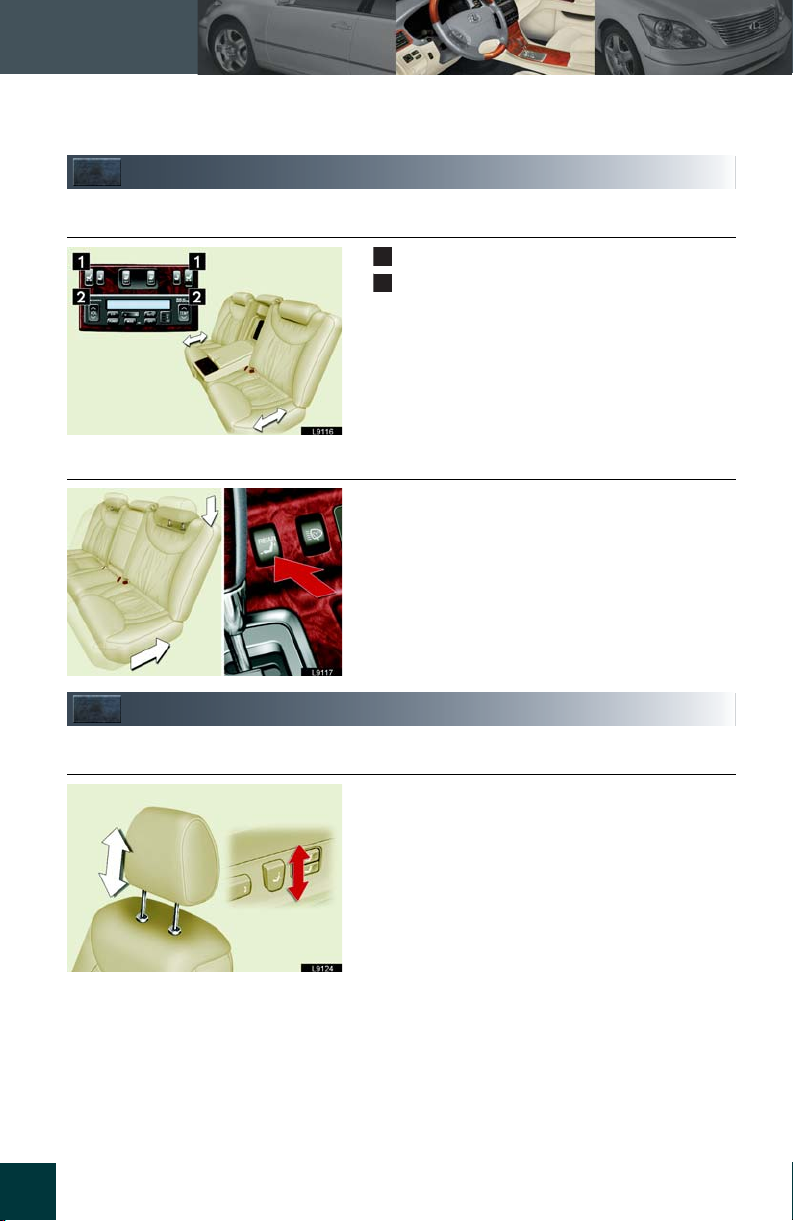
n Adjusting seat position
Moves seat forward
1
Moves seat backward
2
n Returning the rear seats and rear head restraints from the front seats
The rear seats move backward and the rear head
restraints move downward while the switch is
being pushed.
Head Restraints
n Height adjustment for the front seat
15
Move the control switch in the desired direction.
Page 51
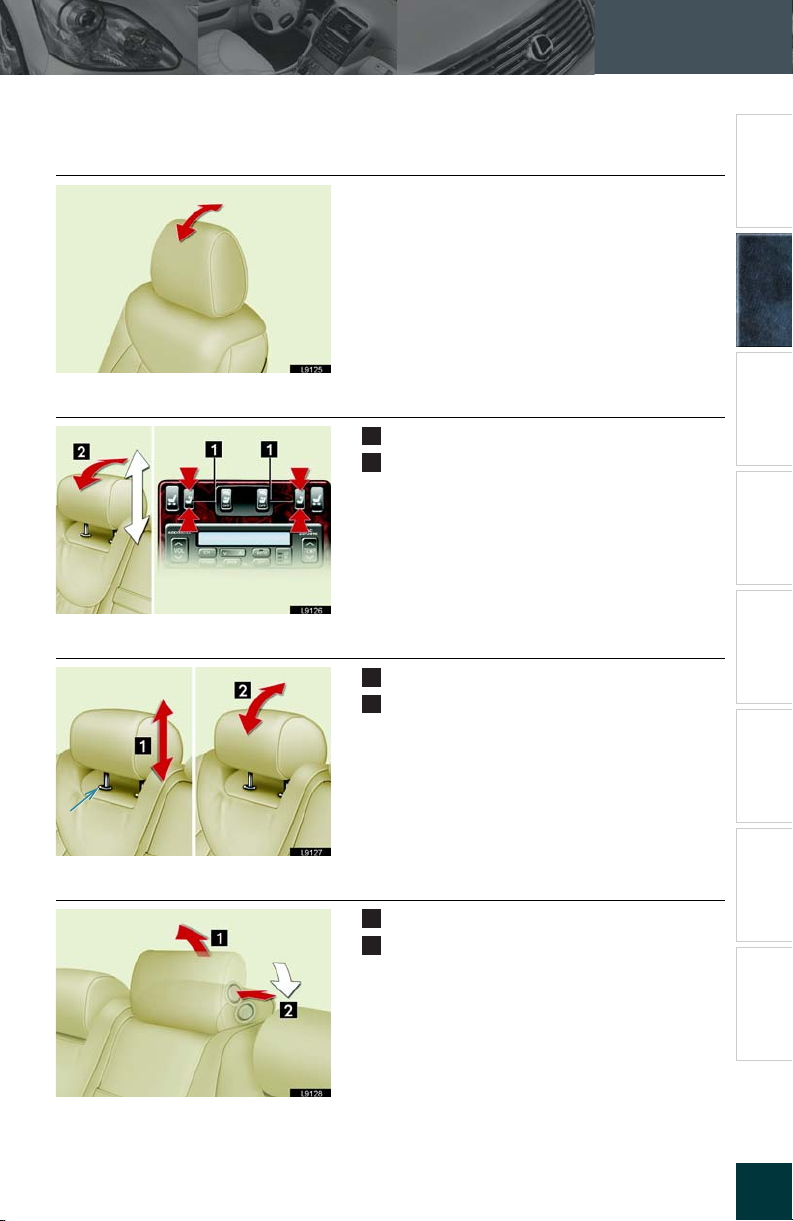
n Angle adjustment for the front seat
Move Forward and backward.
n Out board rear seats (powered type)
1
2
Height adjustment
Angle adjustment
Topic 2
Before Driving
Entering and Exiting
Before Driving When Driving
Night Driving
Driving Comfort
Rain and
n Outboard rear seats (manual type)
Lock release
button
n Center rear seat
Height adjustment
1
Angle adjustment
2
Push and hold the lock release button when
lowering.
Pull on the top to raise.
1
Push the button to return.
2
Opening and Closing
What to do if ...
Customizing
Yo u r L e x u s
16
Page 52
Topic 2
Before Driving
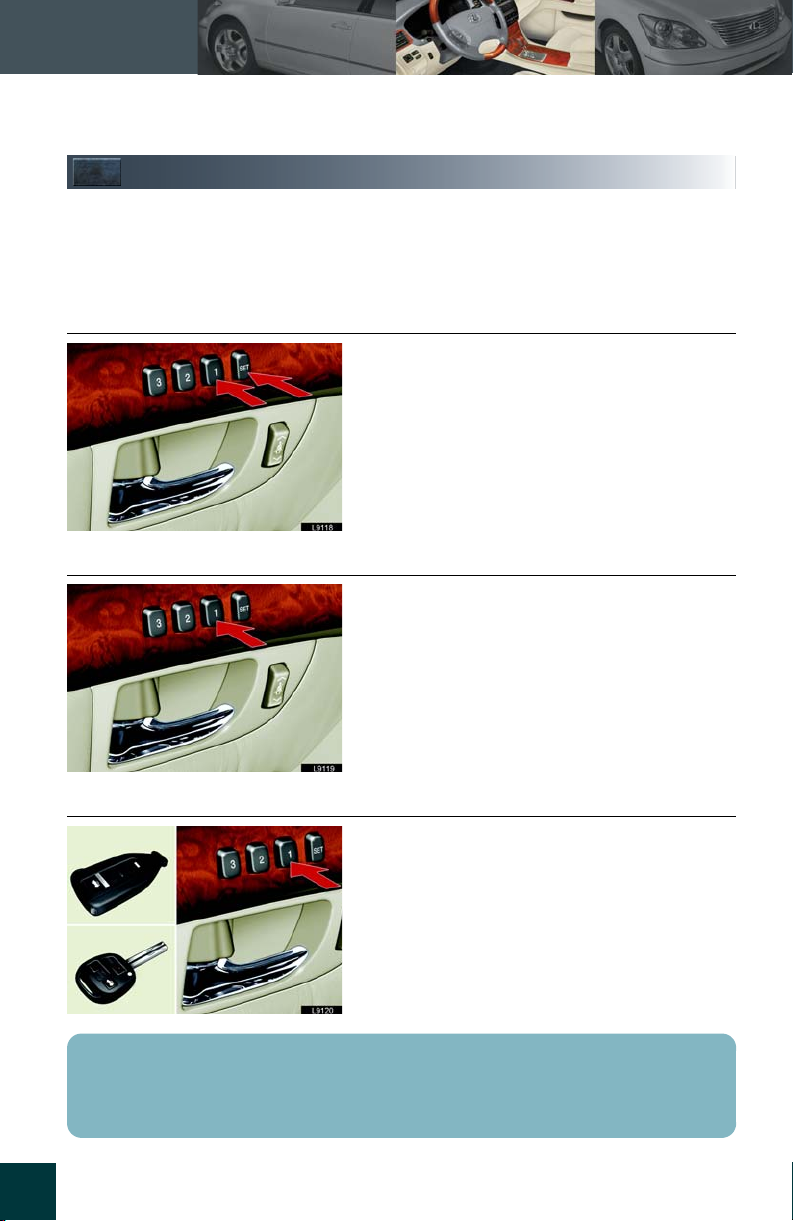
Seat Position Memory System
With the push of a button, you can adjust the seats to a set customized position.
The steering column and outside rear view mirrors are adjusted along with the driver’s
seat.
Positions can be conveniently recorded for drivers and frequent passengers.
n Setting positions for the front seats
While holding down the SET button, push and
hold one of the memory buttons (1, 2, or 3) until
you hear a beep.
n Recalling positions for the front seats
Push one of the memory buttons (1, 2, or 3).
n Linking with the electronic key (Driver’s seat only)
While holding down the desired memory button,
push and hold either the LOCK or UNLOCK
button on the wireless remote control until you
hear a beep.
Linking with the key causes the seat to be adjusted when the doors are opened using either
the smart access function or the wireless remote control. The steering column and outside
rear view mirrors are adjusted when the ignition switch is turned to the ON position.
17
Page 53
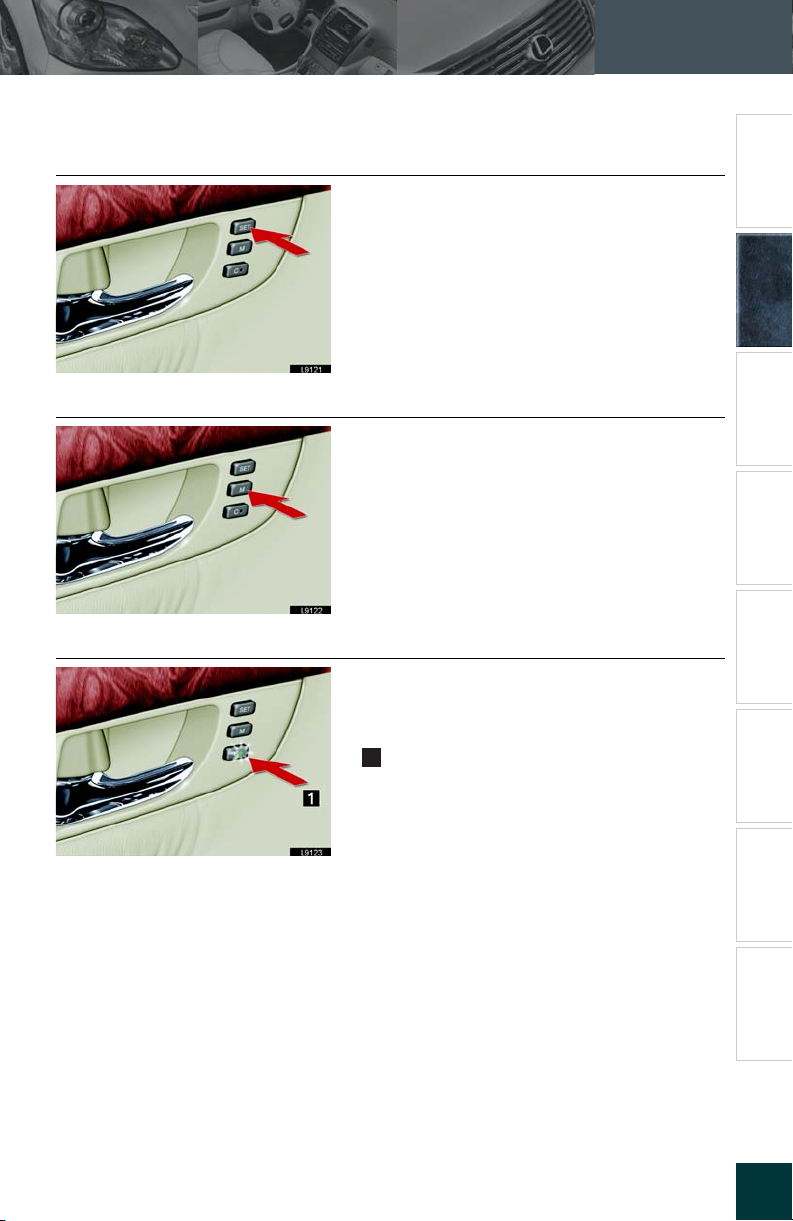
n Setting positions for the rear seats
Push and hold the “SET” button until you hear a
beep.
n Recalling positions for the rear seats
Keep pressing the “M” button until a beep sounds.
Topic 2
Before Driving
Entering and Exiting
Before Driving When Driving
Night Driving
Driving Comfort
Rain and
n Door opening linked seat sliding function for rear seats
The rear seat automatically moves backward
when the rear door is opened if the seat is
adjusted to a forward position.
Cancel
1
Push the “C” button again will reactivate.
Opening and Closing
What to do if ...
Customizing
Yo u r L e x u s
18
Page 54
Topic 2
Before Driving
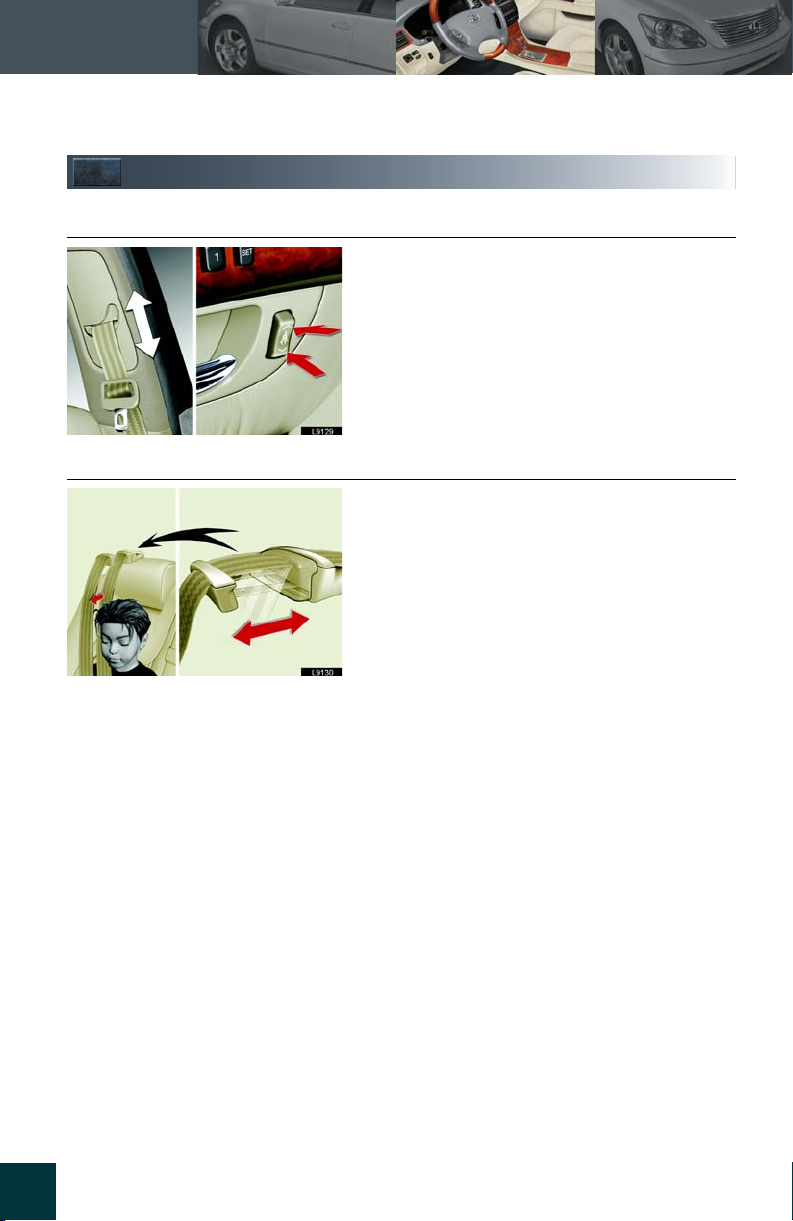
Seatbelts
n Adjusting shoulder strap height (Front seats only)
Press the control switch in the desired direction.
n Seat belt comfort guide (Outboard rear seats only)
Slide the comfort guide forward if the seatbelt
comes in contact with a passenger’s face.
19
Page 55
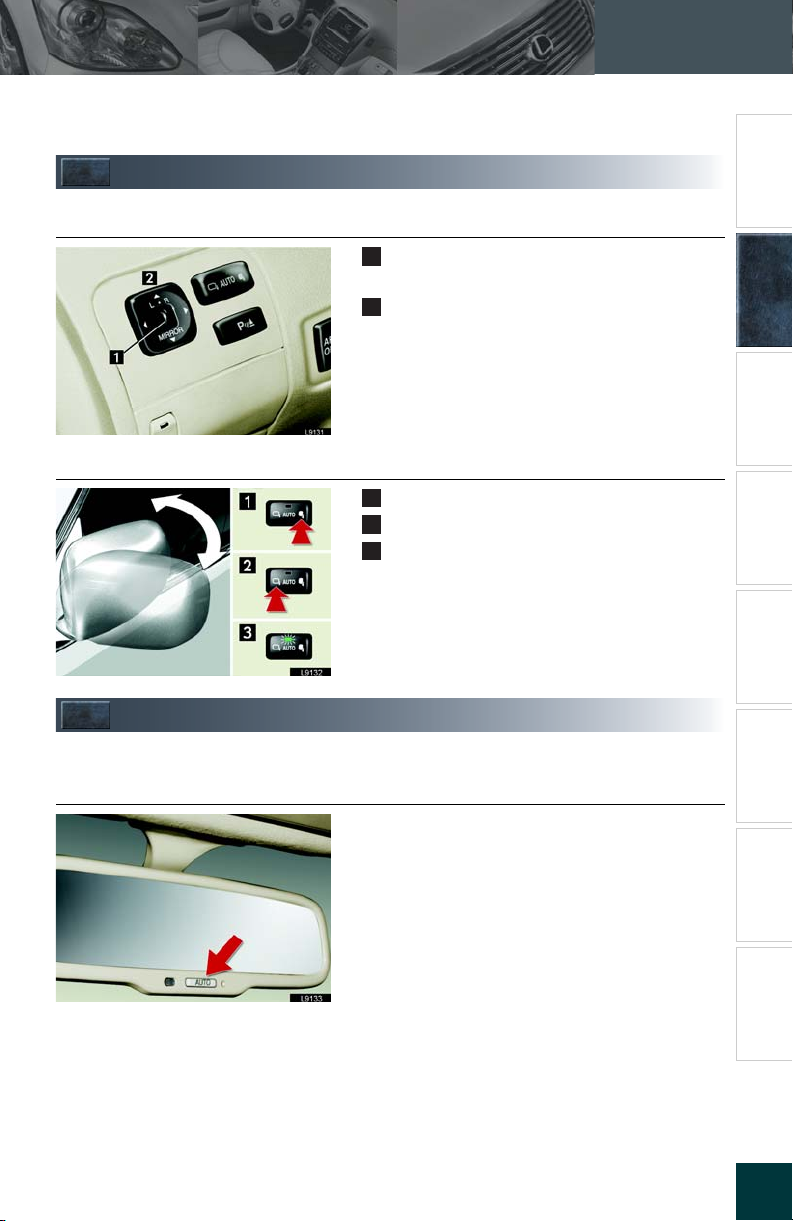
Outside Rear View Mirrors
Topic 2
Before Driving
Entering and Exiting
n Adjustment
Use the master switch to select which mirror
1
to adjust (L or R).
Adjust the angle using the control switch.
2
Auto tilt:
Move selector to “R” or “L” Mirrors automatically
tilt down when shifting into reverse. To deactivate,
move selector to middle position.
n Folding rear view mirrors
Folds the mirror
1
Extends the mirror
2
Automatic
3
Anti-glare Inside Rear View Mirror
The auto-dimming function reduces glare from the headlights of vehicles behind you.
n Setting AUTO mode
Push the AUTO button.
The indicator light comes on when AUTO mode
is selected.
Before Driving When Driving
Night Driving
Rain and
Driving Comfort
Opening and Closing
What to do if ...
Yo u r L e x u s
20
Customizing
Page 56
Topic 2
Before Driving
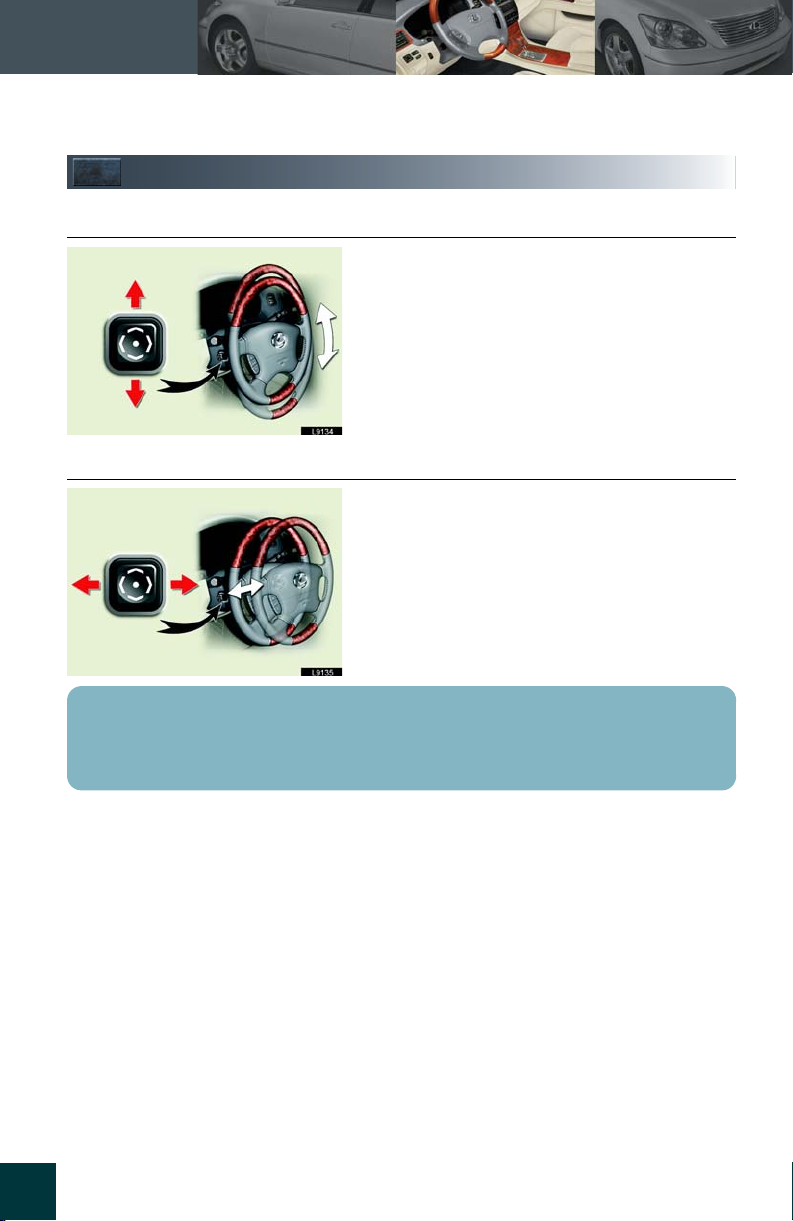
Steering Column
n Raising and lowering
n Forward / back
When the ignition switch is off, the steering column moves to provide easy exit and entry.
When the ignition switch is turned on, the steering column returns to its previously set position.
21
Page 57
Topic 2
Before Driving
Front Seats............................................................... 13
Rear Seats................................................................ 15
Head Restraints ..................................................... 15
Seat Position Memory System .......................... 17
Seatbelts................................................................... 19
Outside Rear View Mirrors .............................. 20
Anti-glare Inside Rear View Mirror................ 20
Steering Column ................................................... 21
Page 58
Topic 1
Entering and Exiting
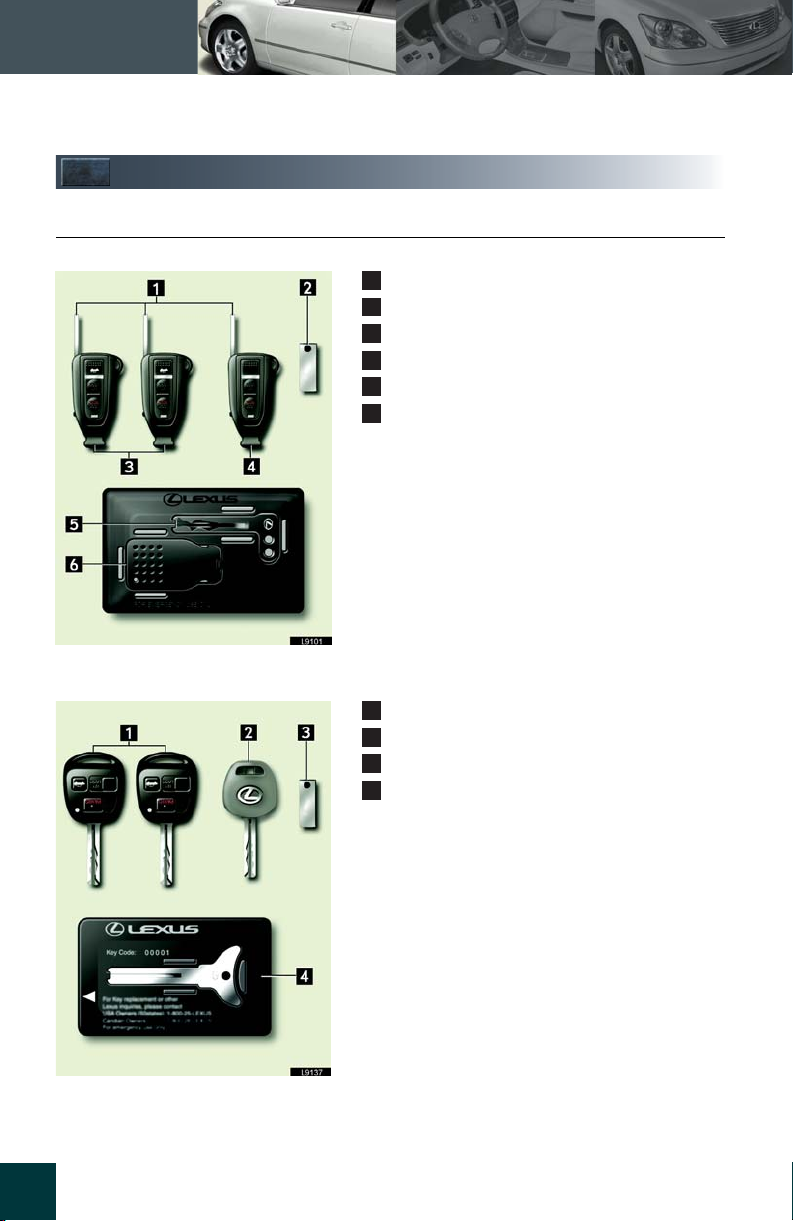
Keys
n Ke ys
Vehicles equipped with smart access system (Type A)
1
2
3
4
5
6
Mechanical keys
Key number plate
Master keys
Val et ke y
Mechanical flat key
Engine start flat key
Vehicles not equipped with smart access system (Type B)
Master keys (black)
1
Val et ke ys ( gr ay)
2
Key number plate
3
Flat key
4
7
Page 59
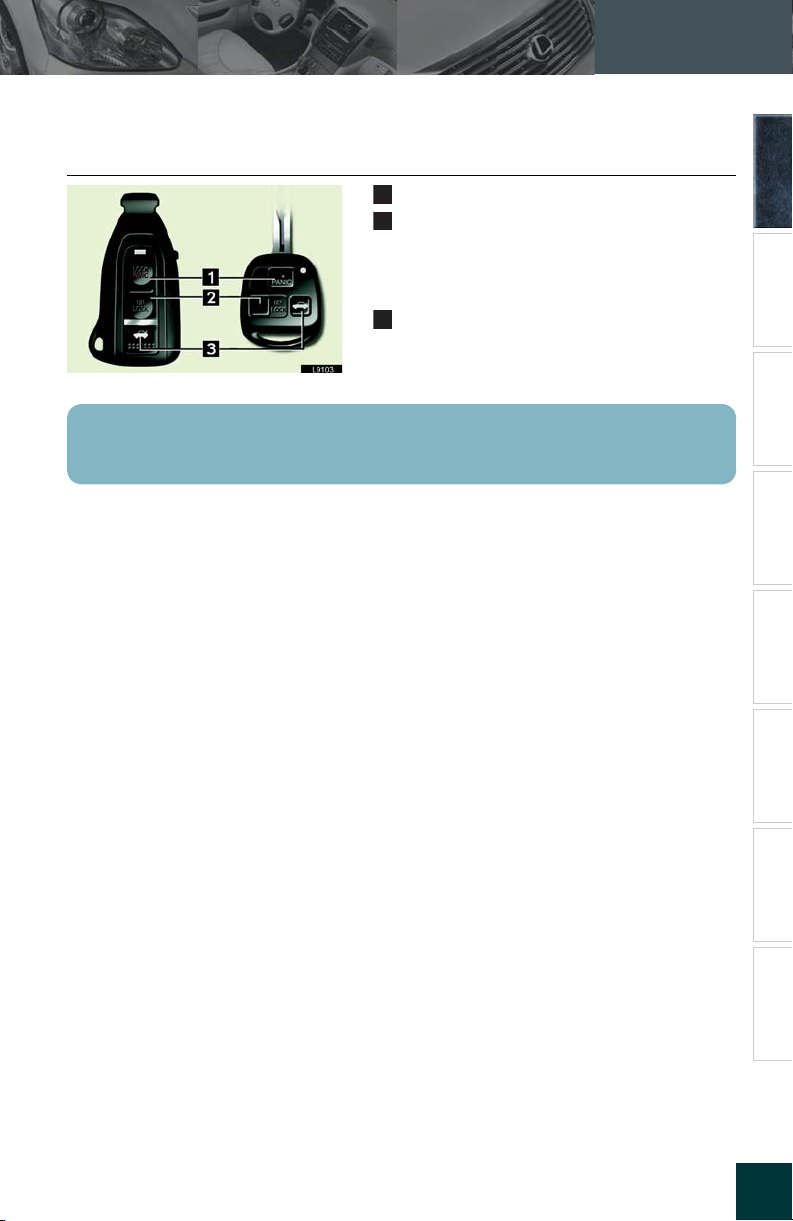
n Wireless remote control
Lock button: Locks doors
1
Unlock button: Unlocks doors
2
Push the button unlocks the driver’s door.
Push it again within 3 seconds unlocks all the
doors.
Trunk button: Unlocks trunk
3
Keep the button pushed for about 1 second.
Holding down the LOCK button will sound an alarm.
Holding down the UNLOCK button will open the windows and moon roof.
Topic 1
Entering and Exiting
Entering and Exiting
Before Driving When Driving
Night Driving
Rain and
Driving Comfort
Opening and Closing
What to do if ...
Customizing
Yo u r L e x u s
8
Page 60
Topic 1
Entering and Exiting
Smart Access System
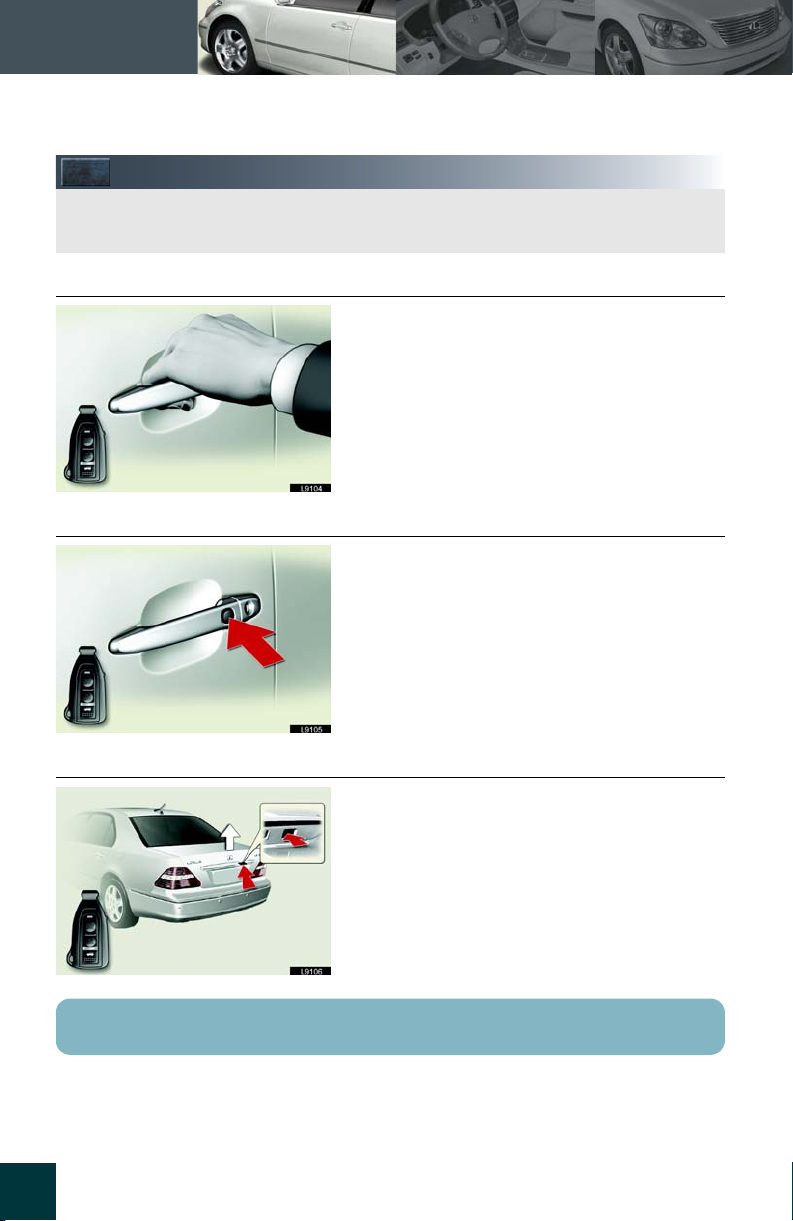
If the key is in your bag or pocket, it is not necessary to take it out in order to get in and out of
the vehicle.
n Entering the vehicle
Grasp the handle to unlock the door.
n Leaving the vehicle
Push the door lock button to lock the door.
n Opening the trunk
Push the trunk release button to unlock the trunk.
The mechanical key can also be used to lock and unlock the doors.
9
Page 61
Theft Deterrent System
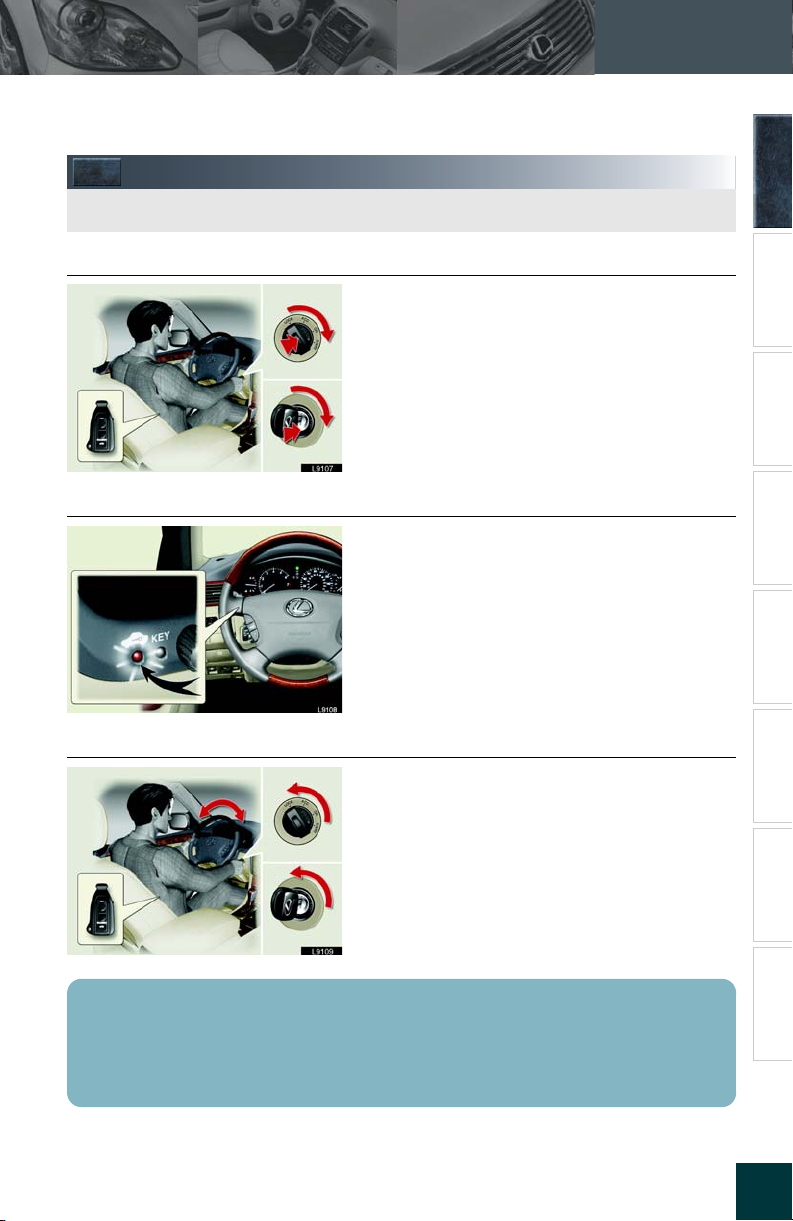
This system is designed to help protect your vehicle from theft.
n Engine immobilizer
This system only allows the engine to start if a registered key is used.
This deters theft caused by the use of unauthorized keys.
n Alarm
Forcibly unlocking the doors, trunk, or hood without the key or wireless remote control causes the
horn to blow and the exterior lights to flash, alerting those in the surrounding area.
Topic 1
Entering and Exiting
Entering and Exiting
Before Driving When Driving
Night Driving
Rain and
Driving Comfort
n Steering lock
The steering wheel is locked when the ignition
switch is turned to OFF position.
If the security indicator light is flashing when you leave the vehicle, the engine immobilizer
and alarm are set.
To stop the alarm, unlock the doors or trunk with the key or wireless remote control or turn
the ignition switch to the ON position.
Opening and Closing
What to do if ...
Customizing
Yo u r L e x u s
10
Page 62

Topic 1
Entering and Exiting
11
Page 63
Topic 1
Entering and Exiting
Keys ............................................................................. 7
Smart Access System ............................................. 9
Theft Deterrent System ....................................... 10
Page 64
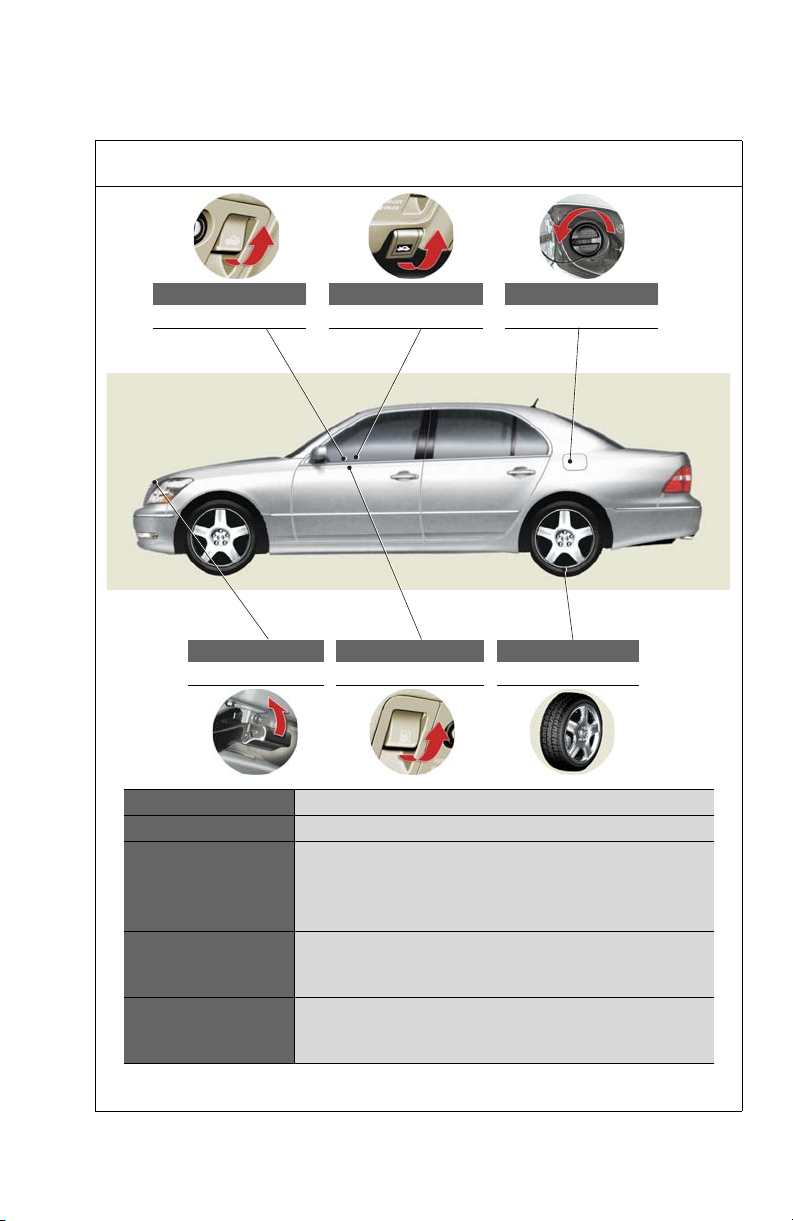
GAS STATION INFORMATION
Trunk opener
P. 1 9
Auxiliary catch lever
P. 2 6 0
Hood lock release lever
P. 2 6 0
Fuel filler door opener
P. 5 1
Fuel filler door
P. 5 1
Tire inflation pressure
P. 2 8 3
Fuel tank capacity 22.2 gal. (84 L, 18.5 lmp.gal.)
Fuel type Unleaded gasoline only P.373
psi (kPa, kgf/cm2 or bar)
Cold tire inflation
pressure
P225/55R17 95H 32 (220, 2.2)
245/45R18 96W 33 (230, 2.3) P.283
245/45R18 96V 33 (230, 2.3)
Engine oil capacity
(Drain and refill)
With filler 5.4 (5.1, 4.5)
Without filler 4.8 (4.5, 4.0)
qt. (L, Imp.qt.)
Toyota Genuine Motor Oil or equivalent
Engine oil type
Oil grade: ILSAC multigrade engine oil P.263
Recommended oil viscosity: SAE-5W-30
402
Page 65

Index
Alphabetical index ................ 392
What to do if............................ 400
391
Page 66
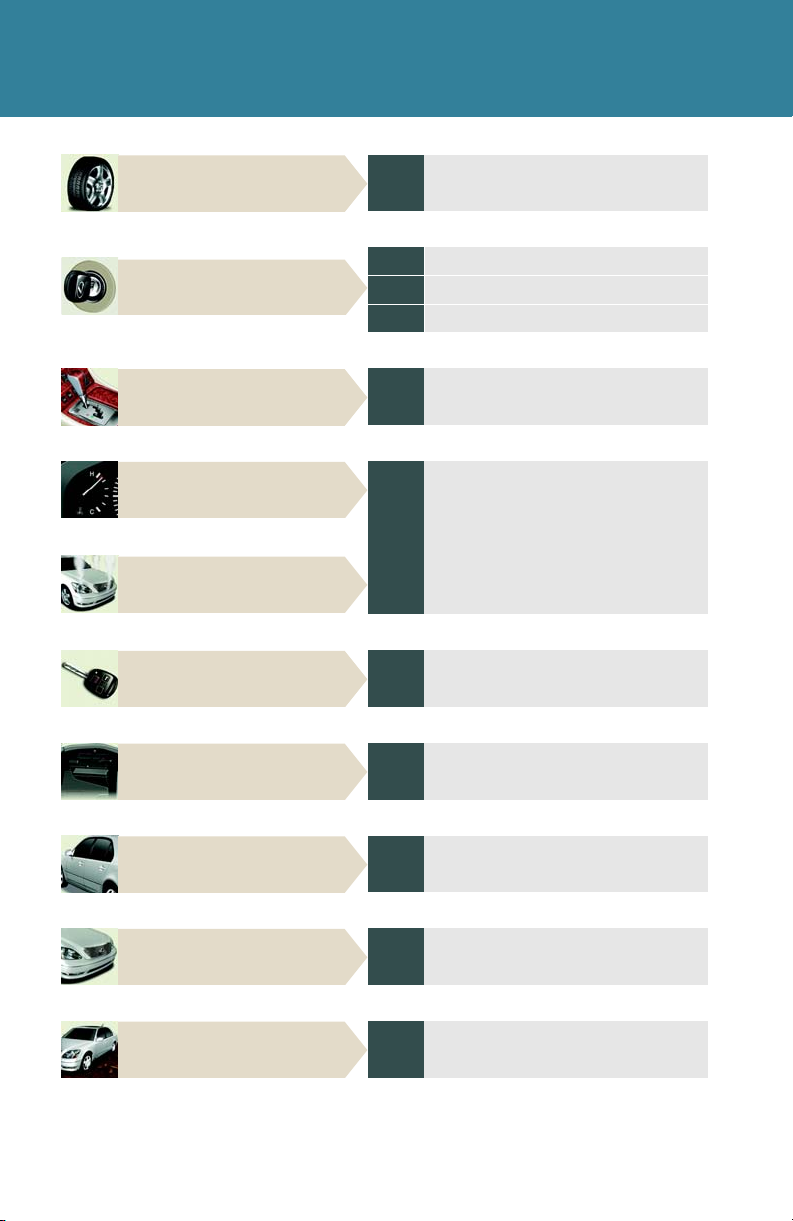
What to do if...
What to do if...
A tire punctures
The engine does not start
The transmission selector lever
cannot be moved out
The engine coolant temperature
gauge enters the red zone
Steam can be seen coming
from under the hood
You lose your key
The battery is discharged
P. 3 47
If you have a flat tire
P. 3 5 3
If the engine will not start
P. 5 4
Engine immobilizer system
P. 3 5 6
If the vehicle has a discharged battery
If the transmission selector lever cannot
P. 3 5 4
be shifted from P
P. 3 5 9
If your vehicle overheats
P. 3 5 5
If you lose your keys
If the vehicle has a discharged
P. 3 5 6
battery
400
The doors cannot be locked
The horn begins to sound
The vehicle is stuck in mud
or sand
P. 1 5
Doors
P. 5 5
Alarm
P. 3 6 1
If the vehicle becomes stuck
Page 67
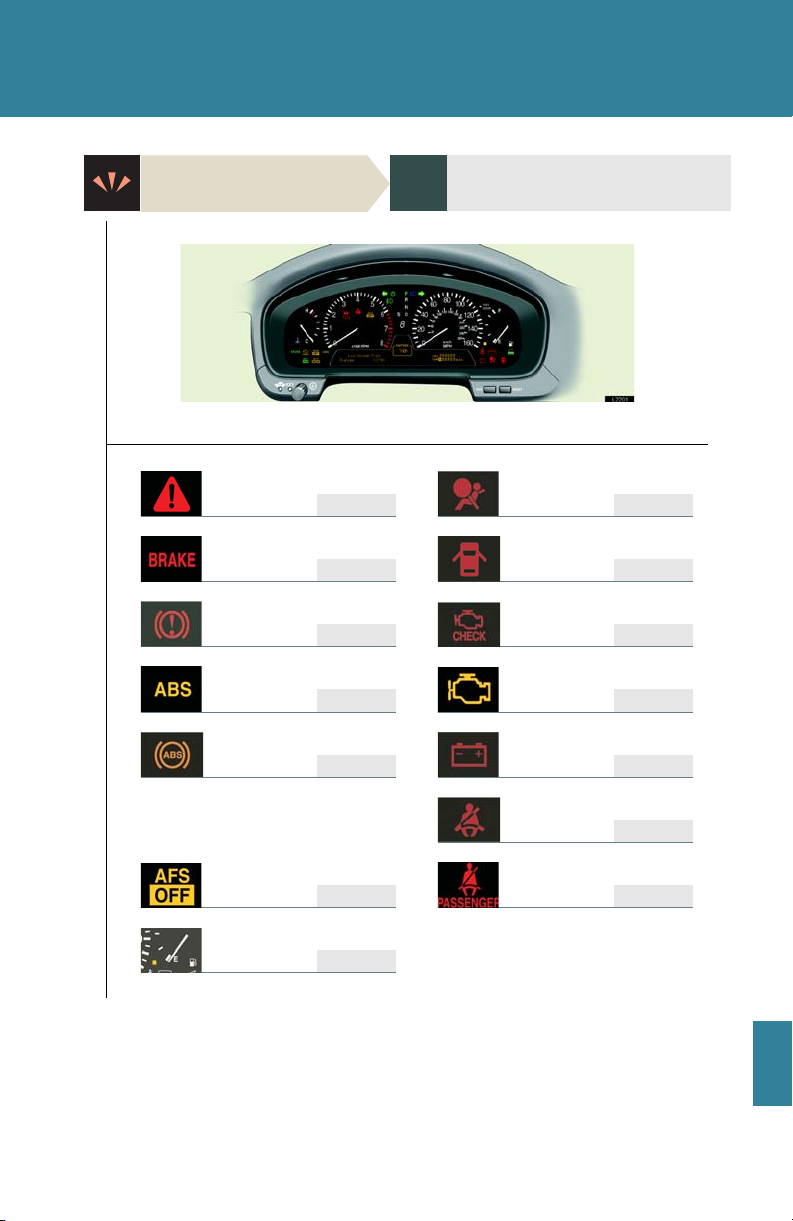
The warning light or
SRS
O
ABS
ABS
indicator light comes on
nWarning lights
P. 3 2 8
If a warning light
turns on
Master
warning light
P. 3 3 2 P. 3 3 0
Brake system warning
light (U.S.A)
P. 3 2 8 P. 3 3 1
Brake system warning
light (Canada)
P. 3 2 8 P.3 3 0
warning light
(U.S.A)
P. 3 3 0 P.3 3 0
warning light
(Canada)
P. 3 3 0 P. 3 2 9
Automatic headlight
leveling system and
adaptive front lighting
system warning
light
P. 3 3 0 P. 3 3 2
Low fuel level warning
light
P. 3 3 1
warning light
pen door
warning light
Malfunction indicator
lamp (U.S.A)
Malfunction indicator
lamp (Canada)
Discharge warning light
Driver’s seat belt reminder
light
P. 3 3 1
Front passenger’s seat belt
reminder light
401
Page 68

Alphabetical index
Alphabetical index
A
A/C ............................................................. 162
ABS
ABS ........................................................... 140
Warning light.......................................330
Adaptive front lighting system
Adaptive front lighting system ........112
Warning light.......................................330
Air conditioning system
Automatic air conditioning
system....................................................162
Air conditioning filters .....................289
Rear air conditioning .........................172
Airbags
Airbag operating conditions........... 62
Airbag precautions
for your child .......................................66
Airbag warning light ........................330
Curtain shield air bag operating
conditions.............................................. 62
Curtain shield airbag
precautions ..........................................66
General airbag precautions ...........66
Locations of airbags.............................. 61
Modification and disposal
of airbags................................................72
Side airbag
operating conditions ....................... 62
Side airbag precautions .................... 69
Alarm ............................................................55
AM/FM radio...........................................176
Anti-lock brake system
Anti-lock brake system.................... 140
Warning light.......................................330
Ashtrays.......................................................211
Audio system
Antenna.................................................... 176
Cassette player ....................................182
CD changer...........................................185
Optimal use .............................................191
Radio ......................................................... 176
Rear controller...................................... 193
Steering switch .....................................195
Auto anti-glare mirror........................... 42
Automatic air conditioning
system ......................................................162
Automatic headlight leveling
system
Automatic headlight leveling
system...................................................... 112
Warning light.......................................330
Automatic light control
system .........................................................111
Automatic transmission
Automatic transmission ....................98
Auxiliary boxes......................................205
B
Back-up lights
Replacing light bulbs......................... 314
Wattage.................................................. 372
Battery
Checking................................................ 273
If the battery is discharged ...........356
Preparing and checking
before winter...................................... 149
Brake
Brake assist system............................ 140
Fluid...........................................................270
Parking brake........................................ 102
Warning light/buzzer..................... 328
Brake lights
Wattage.................................................. 372
392
Page 69

Alphabetical index
C
Card holder.............................................207
Care
Exterior....................................................244
Interior......................................................247
Cargo capacity .......................................145
Cargo net hooks ................................... 227
Casette player.........................................182
CD changer .............................................185
Chains.........................................................150
Charging system warning light ...... 329
Child restraint system
Booster seats, definition.....................73
Booster seats, installation.................80
Convertible seats, definition ............73
Convertible seats, installation .........79
Infant seats, definition ..........................73
Infant seats, installation........................ 77
Installing CRS with
lower anchorages ............................83
Installing CRS with seat belts ..........77
Installing CRS with top straps........ 82
Child safety
Airbag precautions ............................. 66
Child restraint system .........................73
How your child should
wear the seat belt...............................37
Installing child restraints.....................76
Power window lock switch .............45
Power window precautions.............47
Removed Wireless remote control
battery precautions...................... 295
Seat belt comfort guide..................... 35
Seat belt extender precautions .....38
Seat belt precautions.......................... 38
Seat heater precautions...................218
Trunk............................................................. 19
Child-protectors........................................16
Cigarette lighter..................................... 213
Cleaning
Exterior....................................................244
Interior .....................................................247
Climate control
seat switches........................................ 220
Clock .......................................................... 210
Coat hooks.............................................. 223
Coin box...................................................203
Compass ..................................................238
Condenser ..............................................269
Console box ...........................................202
Cool box...................................................229
Cruise control ......................................... 126
Cruise information ................................ 107
Cup holder ..............................................204
Curtain shield airbags............................60
Customizable features .......................384
D
Daytime running light system ..............111
Defogger
Rear window defogger.................... 170
Dimensions..............................................364
Discharge warning light.....................329
Do-it-yourself maintenance .............256
Door closer ..................................................17
Door courtesy lights
Wattage.................................................. 372
Doors
Door lock....................................................15
Side mirrors .............................................43
Driver's seat belt reminder light ......331
Driving
Correct position................................... 58
Procedures ..............................................86
393
Page 70

Alphabetical index
Driving position memory...................... 25
Dynamic radar/laser
cruise control ....................................... 129
E
ECT
Pattern select switch .........................99
Electronically modulated
air suspension ...................................... 138
Engine
Compartment .....................................262
Hood........................................................260
How to start the engine..................... 94
If your vehicle will not start............353
Ignition switch......................................... 94
Malfunction indicator lamp...........330
Engine coolant
Capacity................................................. 367
Checking...............................................268
Preparing and checking
before winter......................................149
Engine coolant temperature
gauge....................................................... 103
Engine immobilizer system..................54
Engine oil
Capacity.................................................366
Checking............................................... 263
Preparing and checking
before winter......................................149
Event data recorder ............................326
F
First-aid kit net........................................ 227
Fog lights
Switch ..........................................................113
Wattage.................................................. 372
Floor lights ................................................ 198
Floor mats................................................ 224
Fluid
Brake........................................................270
Power steering....................................272
Washer.................................................... 277
Front passenger's seat belt
reminder light ..................................... 332
Front seats
Adjustment ...............................................22
Fuel
Capacity ................................................366
Fuel gauge..............................................103
Information ............................................373
Low fuel level warning light ...........331
Refueling..................................................... 51
Fuel filler door.............................................51
Fuel pump shut off system................. 325
Fuses
Blade ...................................................... 298
Cartridge...............................................309
G
Gas station information .....................402
Garage door opener.......................... 232
Gauge and meter.................................. 103
Glove box................................................ 202
Glove compartment light
Wattage.................................................. 372
Graphic information ............................ 109
H
Head restraints
Adjusting..................................................... 31
Headlight aim............................................ 311
Headlight cleaner.................................... 117
Headlights
Operation.................................................110
394
Page 71

Alphabetical index
Switch......................................................... 110
Wattage ..................................................372
Heaters
Seat heaters............................................ 218
Side mirror................................................43
High mounted stop light
Replacing bulbs.................................... 314
Wattage ..................................................372
Hood ......................................................... 260
I
I/M test ..................................................... 255
Ignition
Keys................................................................. 2
Switch..........................................................94
Ignition switch light................................198
Illuminated entry system .....................198
In case of an emergency
If the battery runs out.......................356
If you cannot shift automatic
transmission selector lever .......354
If you have a flat tire...........................347
If you lose your keys ........................355
If your vehicle becomes
stuck .......................................................361
If your vehicle needs to
be towed............................................ 320
If your vehicle overheats................ 359
If your vehicle will not start............353
If you think something is
wrong................................................... 324
Indicator lights.........................................105
Initializing your lexus........................... 387
Inside rear view mirror........................... 42
Interior light ..............................................199
J
Jack
Positioning the jack.............................261
Replacing the wheel.........................287
Jack handle.............................................. 347
Jump starting............................................. 353
K
Key reminder buzzer .............................. 15
Keys
Flat key........................................................95
If you lose your keys........................ 355
Ignition switch.........................................94
Key number .................................................2
Keys .................................................................2
Mechanical key...................................295
Replacing battery...............................295
Wireless remote control.....................12
Knee airbag..................................................61
L
Lexus park assist system
Lexus park assist system...................118
Warning message.............................334
License plate lights
Wattage.................................................. 372
Light bulbs
Replacing................................................ 314
Wattage.................................................. 372
Lights
Fog lights switch.................................... 113
Headlights switch..................................110
Interior light switch...............................20
Personal light switch........................ 200
Replacing light bulbs......................... 313
Turn signal lever ....................................101
Vanity lights ......................................... 209
Wattage.................................................. 372
395
Page 72

Alphabetical index
Load limits................................................. 148
Luggage net............................................ 227
M
Maintenance
Do-it-yourself maintenance.........256
General maintenance..................... 252
Maintenance data..............................364
Maintenance requirements..........250
Meter
Instrument panel light
control................................................... 104
Meters ...................................................... 103
Mirrors
Auto anti-glare mirror.........................42
Side mirror heaters.............................170
Side mirrors............................................. 43
Vanity mirrors......................................209
Moon roof...................................................48
Multi-information display
Cruise information..............................107
Graphic information......................... 109
Warning messages ..........................334
Driving position memory ..................25
Outside temperature
display ......................................................216
Overhead console
Box ..........................................................203
Overhead lights
Wattage ................................................ 372
P
Parking lights
Switch..........................................................110
Wattage.................................................. 372
Parking brake.......................................... 102
Penlight..................................................... 230
Personal lights
Switch......................................................200
Wattage.................................................. 372
Power outlet .............................................214
Power steering fluid .............................272
Power windows........................................ 45
Pre-collision system
Per-collision system........................... 143
Warning message............................ 334
O
Odometer..................................................... 103
Oil
Engine oil...............................................263
Open door warning
light/buzzer .......................................... 331
Opener
Fuel filler door...........................................51
Hood........................................................260
Trunk............................................................. 19
Outer foot light .......................................198
Outside rear view mirrors
Adjusting and folding .........................43
396
R
Radiator.................................................... 269
Radio............................................................176
RDS .............................................................. 177
Rear air conditioning control.............172
Rear audio switches ............................. 185
Rear seat position memory ................. 29
Rear seats
Adjustment ...............................................23
Rear view monitor system ..................123
Rear window defogger ........................170
Refleshing rear seat switches.......... 222
Page 73

Alphabetical index
Replacing
Air conditioning filter....................... 289
Blade type fuses.................................298
Cartridge type fuses........................309
Light bulbs ..............................................313
Wireless remote control
battery.................................................. 295
S
Seat belts
Adjusting the belt ..................................34
Automatic Locking
Retractor (ALR).................................... 36
Child restraint system
installation..............................................73
Cleaning ................................................248
Emergency Locking
Retractor (ELR)................................. 36
How to wear your seat belt..............34
How your child should
wear the seat belt...............................37
Pregnant women,
proper seat belt use..........................37
Reminder light....................................... 331
Seat belt extenders.............................. 38
Seat belt pretensioners...................... 36
Seat heaters..............................................218
Seats
Cleaning ................................................248
Child seats/child restraint
system installation..............................76
Driving position memory ..................25
Head restraint ..........................................31
Properly sitting in the seat................ 58
Rear seat position memory..............29
Refleshing rear seat switches.......222
Seat adjustment ..................................... 22
Seat adjustment precautions........... 24
Seat heaters ...........................................218
Ventilated seats ..................................220
Selector lever ............................................98
Automatic transmission ....................98
If you cannot shift selector
lever.......................................................354
Service reminder indicators.............. 105
Shift lock system....................................354
Side airbags..................................................61
Side marker lights
Switch..........................................................110
Wattage.................................................. 372
Side mirror..................................................43
Adjusting and folding.......................... 43
Driving position memory..................25
Smart access system
Smart access system..............................5
Warning messages...........................334
Snow tires....................................................151
Spare tire.................................................. 347
Spark plug................................................ 367
Specifications .........................................364
Speedometer .......................................... 103
SRS airbag
SRS airbags..............................................60
Warning light .......................................334
Steering wheel
Adjusting ...................................................40
Audio switches.....................................195
Driving position memory..................25
Stop lights
Wattage.................................................. 372
Stuck
If your vehicle becomes stuck...... 361
397
Page 74

Alphabetical index
Sub key............................................................ 2
Sun shade (moon roof)..........................48
Sun shades
Rear power sunshade..................... 225
Manual sunshade ..............................225
Sun visors ................................................ 208
Switch
ECT pattern select...............................99
Fog light switch.......................................113
Ignition switch......................................... 94
Light switches......................................... 110
Power door lock switch......................15
Power window switch........................ 45
Window lock switch ...........................45
T
Tachometer.............................................. 103
Tail lights
Wattage.................................................. 372
Theft deterrent system
Alarm..........................................................55
Engine immobilizer
system..................................................... 54
Theft prevention labels ..........................57
Tire inflation pressure .........................283
Tires
Chains...................................................... 150
Checking............................................... 278
If you have a flat tire.......................... 347
Inflation pressure................................283
Information............................................376
Replacing............................................... 347
Rotating tires........................................ 278
Size ...........................................................370
Snow tires................................................. 151
Tools...........................................................347
Total load capacity................................ 148
Towing
Dinghy towing ......................................160
Emergency towing............................. 321
Trailer towing ........................................152
TRAC (traction control)
Traction control....................................140
Warning message............................ 334
Trip meter ................................................ 103
Trunk
Cool box ................................................229
Opener ....................................................... 19
Trunk-lid closer......................................20
Trunk storage extension................ 228
Trunk light
Wattage.................................................. 372
Turn signal lights
Replacing light bulbs......................... 314
Switch..........................................................101
Wattage.................................................. 372
U
Under-dash lights
Wattage.................................................. 372
V
Vanity lights
Vanity lights.......................................... 209
Wattage.................................................. 372
Vanity mirrors ........................................209
Vehicle identification number.........365
Vehicle load capacity .......................... 148
VSC (Vehicle Stability Control)
Vehicle stability control....................140
Warning message............................ 334
398
Page 75

W
Warning buzzers
Brake system....................................... 328
Key reminder.............................................17
Open door .............................................331
Shift range down................................. 100
Warning lights .......................................328
ABS..........................................................330
Adaptive front lighting
system..................................................330
Automatic headlight
leveling system................................330
Brake assist system ..........................328
Brake system....................................... 328
Discharge.............................................. 329
Malfunction indicator lamp ..........330
Low fuel level......................................... 331
Open door .............................................331
Pretensioners ......................................... 36
Seat belt reminder light.................... 331
SRS airbags..........................................330
VSC/TRAC......................................... 335
Warning messages.............................. 334
Washer
Checking................................................277
Preparing and checking
before winter......................................149
Switch..........................................................114
Washing and waxing ...........................244
Weight
Cargo capacity ....................................145
Load limits...............................................148
Weight.................................................... 364
Wheels ......................................................287
Window glasses........................................45
Window lock switch
(power window) ....................................45
Alphabetical index
Windows
Power windows.....................................45
Rear window defogger.................... 170
Washer ......................................................114
Windshield wipers...................................114
Winter driving tips................................. 149
Wireless remote control.........................12
399
Page 76

For US owners
7
Reporting safety defects for
US owners................................ 390
389
Page 77

Reporting safety defects for US owners
If you believe that your vehicle has a defect which could cause a crash or
could cause death or injury, you should immediately inform the National
Highway Traffic Safety Administration (NHTSA) in addition to notifying the
Lexus Division of Toyota Motor Sales, U.S.A., Inc. (Toll-free: 1-800-25LEXUS).
n If NHTSA receives similar complaints
It may open an investigation, and if it finds that a safety defect exists in a group of vehicles, it may order a recall and remedy campaign.
However, NHTSA cannot become involved in individual problems between you, your dealer, or the Lexus Division of Toyota Motor Sales, U.S.A., Inc.
n To contact NHTSA
You may either call the Auto Safety Hotline toll-free at 1-800-4249393 (or 366-0123 in Washington, D.C. area) or write to: NHTSA,
U.S. Department of Transportation, the Washington, D.C. 20590.
You can also obtain other information about motor vehicle safety from the Hotline.
390
Page 78

6-2. Owner’s customize
Customizable features
Your vehicle includes a variety of electronic features that can be personalized to your preferences. Programming these preferences requires specialized equipment and may be performed by an authorized Lexus dealership.
Item Function
Door unlock function
Wireless remote
control
(→P. 1 2 )
Door lock
(→P. 1 5 )
Open door warning function
(when locking the vehicle)
Automatic door locking function (if
a door is not opened after being
unlocked)
Operation indicator light ON OFF
Trunk unlock function Ask your Lexus dealer
Unlock function
Automatic door locking function
Default
setting
One push
unlocks
driver’s door;
second push
unlocks all
doors
ON OFF
30 seconds 60 seconds
One push
unlocks
driver’s door;
second push
unlocks all
doors
Shift position
detecting
automatic
door lock
function
After
customization
Ask your Lexus
dealer
Ask your Lexus
dealer
Speed detect-
ing automatic
door lock func-
tion
Shift position
and brake
pedal detecting automatic
door lock func-
tion
384
Page 79

6-2. Owner’s customize
Item Function
Ambient light sensor sensitivity Can be set to desired level
Automatic light
control system
(→P. 1 1 0 )
Time period before lights turn off (if
a door is opened and closed, and
ignition switch is in ACC or
LOC K)
Pow e r
windows
(→P. 4 5 )
Integrated door lock operation ON OFF
Integrated wireless remote con-
trol operation
Integrated door lock operation ON OFF
Integrated open/close operation
Moon roof
(→P. 4 8 )
with door key
Integrated wireless remote con-
trol operation
Integrated open/close operation
with wireless remote control
Operation when the doors are
Illumination
(→P. 1 9 8 )
Steering column
(→P. 4 0 )
unlocked
Time period before lights turn off 15 seconds
Automatic tilt-away function ON OFF
Operation indicator light (turn sig-
Alarm
(→P. 5 5 )
nal light)
Wireless remote control theft
deterrent buzzer
Default
setting
30 seconds
ON OFF
ON OFF
ON OFF
ON OFF
ON OFF
ON OFF
ON OFF
After
customization
OFF
60 seconds
90 seconds
7.5 se con ds
30 seconds
6
Vehicle specifications
385
Page 80

6-2. Owner’s customize
Item Function
Automatic shift from LO speed to
Win dsh iel d
wiper
(→P.114)
Lexus park assist
system
(→P.118)
intermittent when the vehicle is
stopped
Automatic wipe during mist operation
Beep when an obstacle is detected
approximately 3 ft. (1 m) from the
vehicle
Volume of beep Var iou s le ve ls
Default
setting
ON OFF
ON OFF
ON OFF
customization
After
386
Page 81

6-2. Owner’s customize
Initializing your Lexus
The following features must be initialized after certain maintenance is performed to ensure the system operates correctly.
Item Maintenance performed Reference
Powe r window
Moon roof
Tire pressure warning system
Engine oil maintenance
data
Air conditioning filter clogging data
Reconnected, replaced or
recharged battery.
Reconnected, replaced or
recharged battery.
Adjusted tire inflation
pressure, replaced tires or
wheels.
Changed engine oil. →P. 2 6 5
Replaced air conditioning
filters.
→P. 4 5
→P. 4 8
→P. 2 7 9
→P. 2 93
387
6
Vehicle specifications
Page 82

6-2. Owner’s customize
388
Page 83

6-1. Specifications
Maintenance data
Dimensions and weight
Overall length 197.4 in. (5015 mm)
Overall width 72.0 in. (1830 mm)
Overall height
- with electronically modulated air
suspension
- without electronically modulated
air suspension
Wheelbase 115.2 in. (2925 mm)
Tre a d
-Front
with electronically modulated air
suspension
without electronically modulated
air suspension
-Rear
with electronically modulated air
suspension
without electronically modulated
air suspension
Vehicle capacity weight (occupants + luggage)
Towing capacity (trailer weight +
cargo weight)
57.9 in. (1470 mm)*
58.7 in. (1490 mm)*
62.0 in. (1575 mm)
61.8 in. (1570 mm)
62.0 in. (1575 mm)
61.8 in. (1570 mm)
900 lb. (410 kg)
2000 lb. (907 kg)
*Unladen vehicle
364
Page 84
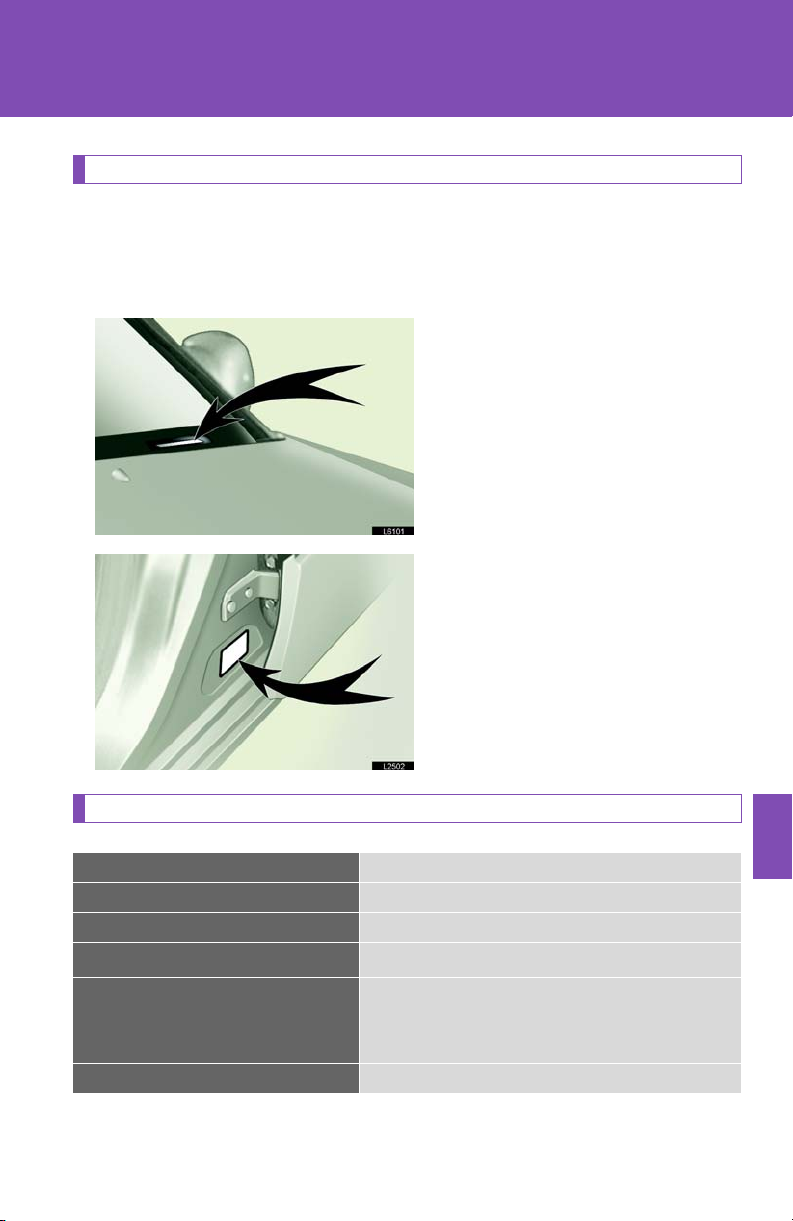
6-1. Specifications
Vehicle identification
The vehicle identification number (VIN) is the legal identifier for your vehicle. This is the primary identification number for your Lexus. It is used in registering the ownership of your vehicle.
This number is stamped on the top
left of the instrument panel.
This number is also on the Certification Label.
Engine
Model 3UZ-FE
Ty p e 8 cylinder V type, 4 cycle, gasoline
Bore and stroke 3.58 × 3.25 in. (91.0 × 82.5 mm)
Displacement
Valve clearance
(engine cold)
Intake exhaust
Drive belt tension Automatic adjustment
261.9 cu.in. (4293 cm3)
0.006 - 0.010 in. (0.15 - 0.25 mm)
0.010 - 0.014 in. (0.25 - 0.35 mm)
6
Vehicle specifications
365
Page 85
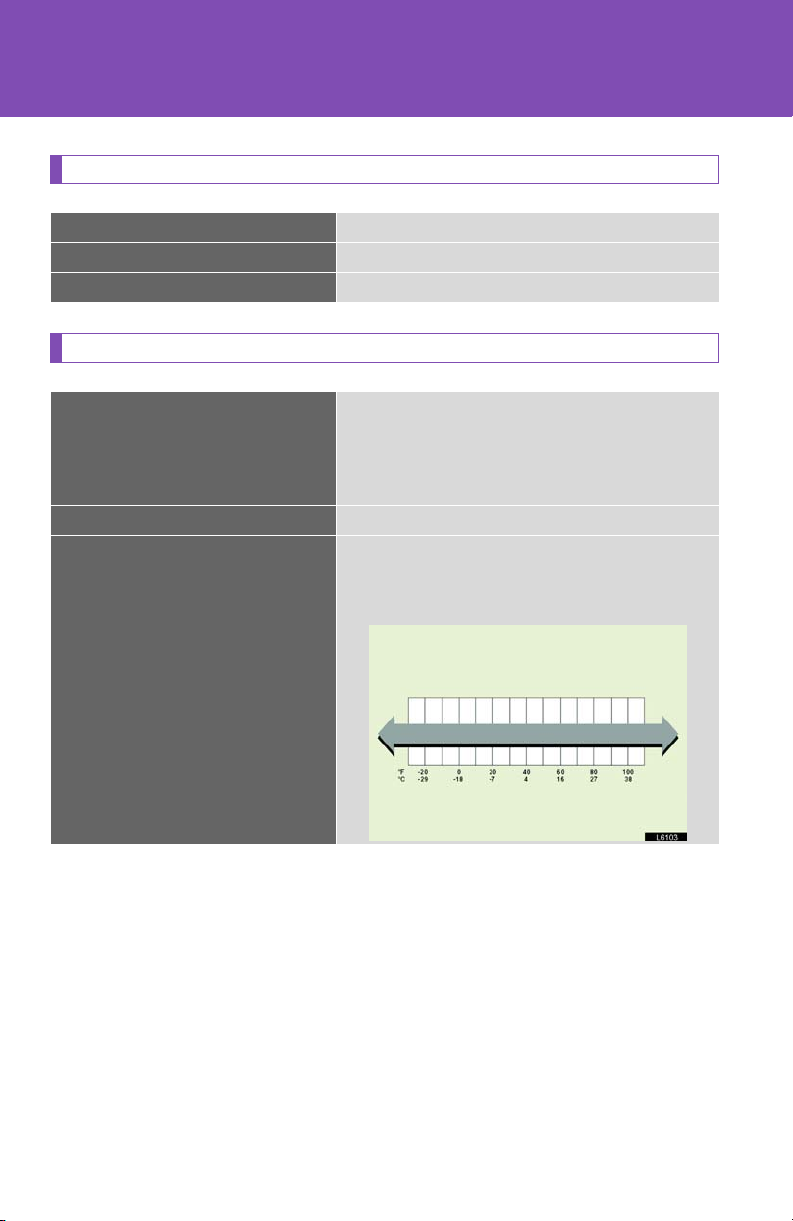
6-1. Specifications
Fuel
Fuel type Unleaded gasoline only
Octane rating 91 (Research octane number 96) or higher
Fuel tank capacity 22.2 gal. (84 L, 18.5 lmp.gal)
Lubrication system
Oil capacity
(drain and refill)
with filter
without filter
Oil grade ILSAC multigrade engine oil
5.4 qt. (5.1 L, 4.5 lmp.qt.)
4.8 qt. (4.5 L, 4.0 lmp.qt.)
Use Lexus approved “Toyota Genuine Motor Oil” or equivalent to satisfy the above grade and viscosity.
Recommended oil
viscosity
5W-30*
Temperature range anticipated before
next oil change
*5W-30 is an oil that provides optimal levels of fuel efficiency
Oil viscosity
• “5W” oils are for use in areas where the ambient temperature is -13°F (25°C) or above. “10W” oils are for areas where the ambient temperature is -4°F (-20°C) or above. Oils with smaller figures are better for
engine starting in cold weather and fuel efficiency.
• “XX-30” indicates oil viscosity. Oils with larger figures have better thermostability and are good for high-speed driving.
366
Page 86
Cooling system
Capacity 10.0 qt. (9.5 L, 8.4 lmp.qt.)
Use either of the following.
• “Toyota Super Long Life Coolant”
• Similar high quality ethylene glycol based
Coolant type
non-silicate, non-amine, non-nitrite, and
non-borate coolant with long-life hybrid
organic acid technology
Do not use plain water alone.
Ignition system
Spark plug
-Make DENSO SK20R11
NGK IFR6A11
- Gap 0.043 in. (1.1 mm)
6-1. Specifications
NOTICE
n Iridium-tipped spark plugs
Use only iridium-tipped spark plugs. Do not adjust gap when tuning engine.
6
Vehicle specifications
367
Page 87

6-1. Specifications
Electrical system
Battery
- Open voltage at
68°F (20°C):
12.7 V Fully charged
12.3 V Half charged
11.9 V Discharged
[Voltage checked 20 minutes after the key is
removed with all the lights turned off]
- Charging rates 5 A max.
Differential
Oil capacity 1.42 qt. (1.35 L, 1.19 lmp.qt.)
Hypoid gear oil API GL-5
Above 0°F(-18°C): SAE 90
Below 0°F(-18°C): SAE 80W or
SAE 80W-90
Toyota Genuine Differential
Synthetic gear oil
API GL-5 SAE 75W-90
or its equivalent
Oil type and
viscosity
Vehicles without synthetic oil information
label
Vehicles with
synthetic oil
information label*
368
Page 88

Automatic Transmission
6-1. Specifications
Fluid capacity
Drain and refill
Fluid type
1.8 qt. (1.7 L, 1.5 lmp.qt.)
Toyota Genuine ATF WS
(ATF JWS3324 or NWS9638)
Brakes
Pedal clearance *
Pedal free play 0.04 - 0.24 in. (1 - 6 mm)
Brake pad wear limit 0.04 in. (1.0 mm)
Parking brake lining wear limit 0.04 in. (1.0 mm)
Parking brake adjustment ** 5 - 7 clicks
Fluid type SAE J1703 or FMVSS No. 116 DOT 3
* Minimum pedal clearance when depressed with the force of 44 lbf. (196 N, 20
kgf ) with the engine running
** Parking brake adjustment when depressed with the force of 66.1 lb f. (294 N, 30
kgf )
2.8 in. (70 mm) Min.
Steering
Free play Less than 1.2 in. (30 mm)
Power steering fluid
Automatic transmission fluid DEXRON®II or
III
6
Vehicle specifications
369
Page 89

6-1. Specifications
Tires and wheels (Type A)
Tir e s ize P225/55R17 95H
Driving in normal conditions
32 psi (220 kPa, 2.2 kgf/cm
Driving in high speeds above 100 mph (160
Tire inflation pressure
(Recommended cold
tire inflation pressure)
km/h)
(in countries where such speeds are permitted
by law)
Add 3 psi (20 kPa, 0.2 kgf/cm
the front tires and rear tires. Never exceed
the maximum cold tire inflation pressure
molded on the tire sidewall.
Wheel size 17 × 7 1/2 JJ
Wheel nut torque 76 ft •lbf. (103 N•m, 10.5 kgf•m)
Tires and wheels (Type B)
2
or bar)
2
or bar) to
Tir e s ize 245/45R18 96W
Driving in normal conditions
33 psi (230 kPa, 2.3 kgf/cm
Driving in high speeds above 100 mph (160
Tire inflation pressure
(Recommended cold
tire inflation pressure)
km/h)
(in countries where such speeds are permitted
by law)
Add 6 psi (40 kPa, 0.4 kgf/cm
the front tires and rear tires. Never exceed
the maximum cold tire inflation pressure
molded on the tire sidewall.
Wheel size 18 × 7 1/2 JJ
Wheel nut torque 76 ft •lbf. (103 N•m, 10.5 kgf•m)
370
2
or bar)
2
or bar) to
Page 90

6-1. Specifications
Tires and wheels (Type C)
Tir e s ize P245/45R18 96V
Driving in normal conditions
33 psi (230 kPa, 2.3 kgf/cm
Driving in high speeds above 100 mph (160
Tire inflation pressure
(Recommended cold
tire inflation pressure)
km/h)
(in countries where such speeds are permitted
by law)
Add 6 psi (40 kPa, 0.4 kgf/cm
the front tires and rear tires. Never exceed
the maximum cold tire inflation pressure
molded on the tire sidewall.
Wheel size 18 × 7 1/2 JJ
Wheel nut torque 76 ft •lbf. (103 N•m, 10.5 kgf•m)
2
or bar)
2
or bar) to
371
6
Vehicle specifications
Page 91

6-1. Specifications
Light bulbs
Light Bulbs Bulb No. W Ty p e
Headlight (Low beam) ⎯ 35 B
Front turn signal light ⎯ 21 D
Headlight (High beam) 9005 60 A
Parking light ⎯ 5 D
Fog lights 9006 51 C
Exterior
Interior
Front side marker light ⎯ 5 D
Trunk light 194 3.8 D
High mounted stoplight ⎯ 21 D
Rear turn signal light ⎯ 21 D
Back-up light 921 16 D
License plate light ⎯ 5 D
Front personal lights ⎯ 8 F
Front vanity lights ⎯ 3 E
Rear vanity lights ⎯ 3 E
Interior lights ⎯ 8 E
Rear personal lights ⎯ 8 F
Door courtesy lights 194 3.8 D
A: HB3 halogen bulbs
B: D2S discharge bulbs
C: HB4 halogen bulbs
D: Wedge base bulbs
E: Double end bulbs
F: Single end bulbs
372
Page 92

6-1. Specifications
Fuel information
Your vehicle must use only unleaded gasoline. Select premium unleaded gasoline with an Octane Rating of 91 (Research Octane Number 96) or higher for optimum engine performance.
At minimum, the gasoline you use should meet the specifications of ASTM D4814 in the USA and CGSB 3.5-M93 in Canada.
n Fuel tank opening for unleaded gasoline
l To help prevent incorrect fueling, your Lexus has a fuel tank opening that will
only accept the special nozzle on unleaded fuel pumps.
l If premium fuel is not available, you may temporarily use unleaded gasoline with
an Octane Rating as low as 87 (Research Octane Number 91).
n If your engine knocks ...
l Consult your Lexus dealer. l You may occasionally notice light knocking for a short time while accelerating
or driving up hills. This is normal and there is no need for concern.
n Gasoline quality
In very few cases, driveability problems may be caused by the brand of gasoline you are using. If driveability problems persist, try changing the brand of gasoline. If this does not correct the problem, consult your Lexus dealer.
n Gasoline quality standards
l Automotive manufacturers in the US, Europe and Japan have developed a
specification for fuel quality called World-Wide Fuel Charter (WWFC) that is
expected to be applied worldwide.
l The WWFC consists of four categories that are based on required emission
levels. In the US, category 3 has been adopted.
l The WWFC improves air quality by lowering emissions in vehicle fleets, and
customer satisfaction through better vehicle performance.
6
Vehicle specifications
373
Page 93

6-1. Specifications
n Lexus recommends the use of gasoline containing detergent additives
l Lexus recommends the use of gasoline that contains detergent additives to
avoid build-up of engine deposits.
l All gasoline sold in the US contains detergent additives to clean and/or keep
clean intake systems.
n Lexus recommends the use of cleaner burning gasoline
Cleaner burning gasoline, including reformulated gasoline that contains oxygenates such as ethanol or MTBE (Methyl Tertiary Butyl Ether) is available in many
areas.
Lexus recommends the use of cleaner burning gasoline and appropriately blended
reformulated gasoline. These types of gasoline provide excellent vehicle performance, reduce vehicle emissions, and improve air quality.
n Lexus does not recommend blended gasoline
l Lexus allows the use of oxygenate blended gasoline where the oxygenate con-
tent is up to 10% ethanol or 15% MTBE.
l If you use gasohol in your Lexus, be sure that it has an octane rating no lower
than 87.
l Lexus DOES NOT recommend the use of gasoline containing methanol.
n Lexus does not recommend gasoline containing MMT
Some gasolines contain an octane enhancing additive called MMT (Methylcyclopentadienyl Manganese Tricarbonyl).
Lexus DOES NOT recommend the use of gasoline that contains MMT. If fuel containing MMT is used, your emission control system may be adversely affected.
The Malfunction Indicator Lamp on the instrument cluster may come on. If this happens, contact your Lexus dealer for service.
374
Page 94

6-1. Specifications
NOTICE
n Notice of gasoline quality
l Do not use leaded gasoline.
Leaded gasoline can cause damage to your vehicle’s three-way catalytic converters causing the emission control system to malfunction.
l Do not use gasohol other than stated above.
It will cause fuel system damage or vehicle performance problems.
l Use of unleaded fuel with an octane number or rating lower than stated above
will cause persistent heavy knocking.
If severe, this will lead to engine damage.
n Fuel-related poor driveability
If after using a different type of fuel, poor driveability is encountered (poor hot starting, vaporization, engine knocking, etc.), discontinue the use of that type of fuel.
n When refueling with gasohol
Take care not to spill gasohol: It may cause paint damage.
375
6
Vehicle specifications
Page 95
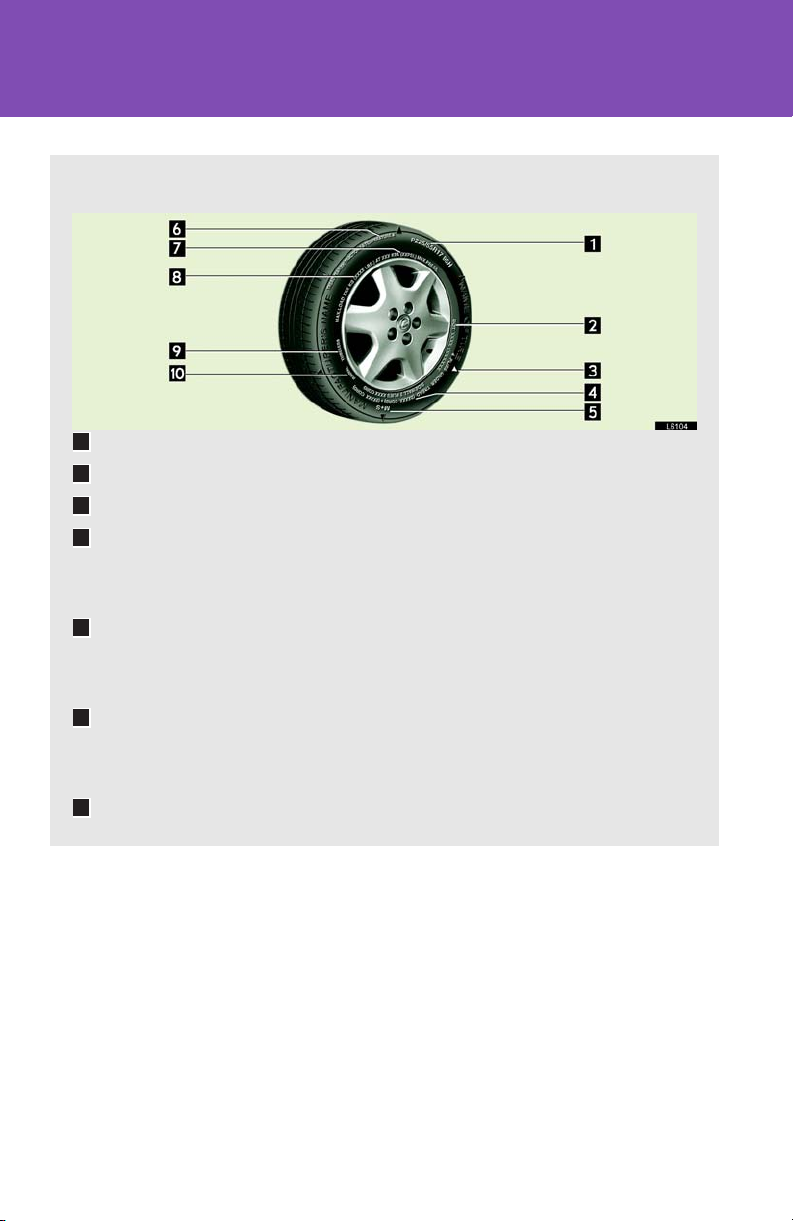
6-1. Specifications
Tire information
Ty p ic a l t i re s y m bo l s
1
Tire size (→P.377)
2
DOT and Tire Identification Number (TIN) (→P.377)
3
Location of tread wear indicators (→P. 2 78 )
4
Tire ply composition and materials
Plies are layers of rubber-coated parallel cords. Cords are the strands which form the plies in a tire.
5
Radial tires or bias-ply tires
A radial tire has “RADIAL” on the sidewall. A tire not marked “RADIAL” is a bias-ply tire.
6
“TUBELESS” or “TUBE TYPE”
A tubeless tire does not have a tube and air is directly filled in the tire. A tube type tire has a tube inside the tire and the tube maintains the air pressure.
7
Load limit at maximum cold tire inflation pressure (→P. 2 8 3 )
376
Page 96
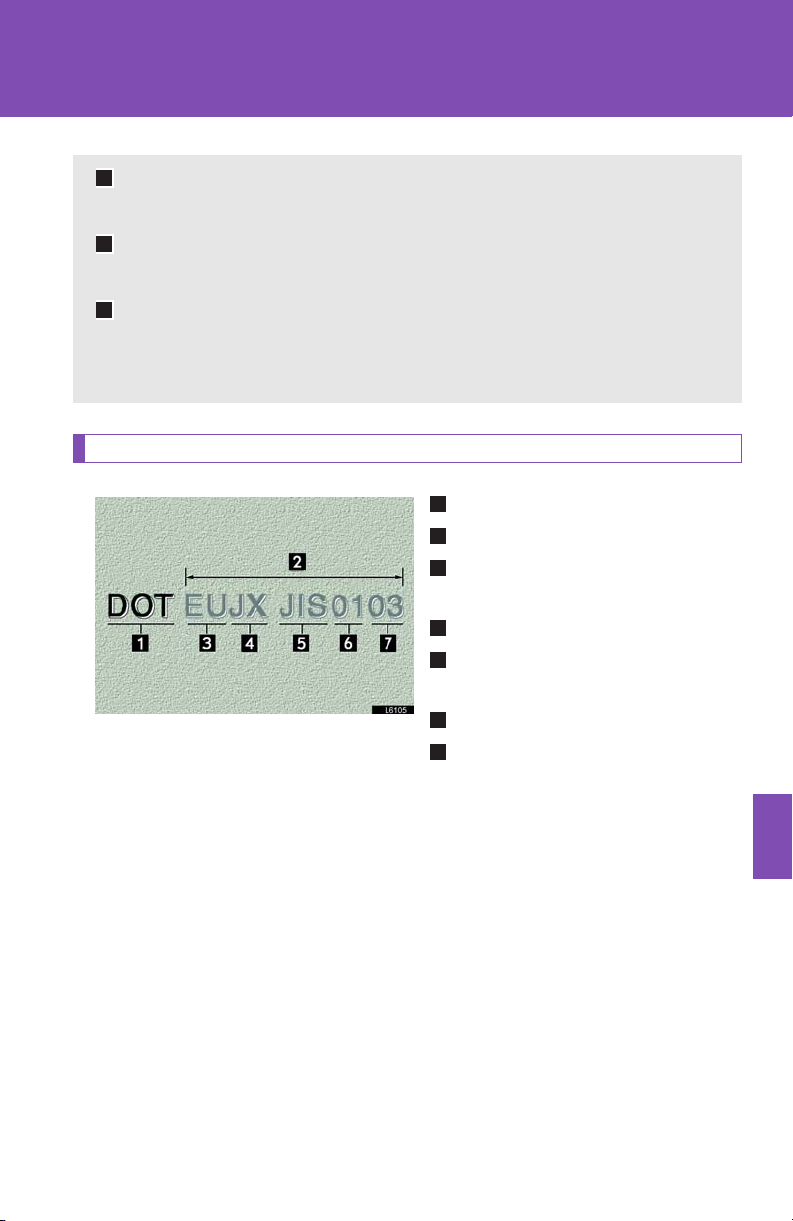
6-1. Specifications
8
Maximum cold tire inflation pressure (→P. 3 6 4 )
This means the pressure to which a tire may be inflated.
9
Uniform tire quality grading
For details, see “Uniform tire quality grading” that follows.
10
Summer tire or all season tire (→P. 3 7 9 )
An all season tire has “M+S” on the sidewall. A tire not marked “M+S” is a summer tire.
Typical DOT and tire identification number (TIN)
1
“DOT” symbol*
2
Tire Identification Number (TIN)
3
Tire manufacturer’s identification mark
4
Tire size code
5
Manufacturer’s optional tire
type code (3 or 4 letters)
6
Manufacturing week
7
Manufacturing year
* The “DOT” symbol certifies that
the tire conforms to applicable
Federal Motor Vehicle Safety
Standards.
377
6
Vehicle specifications
Page 97
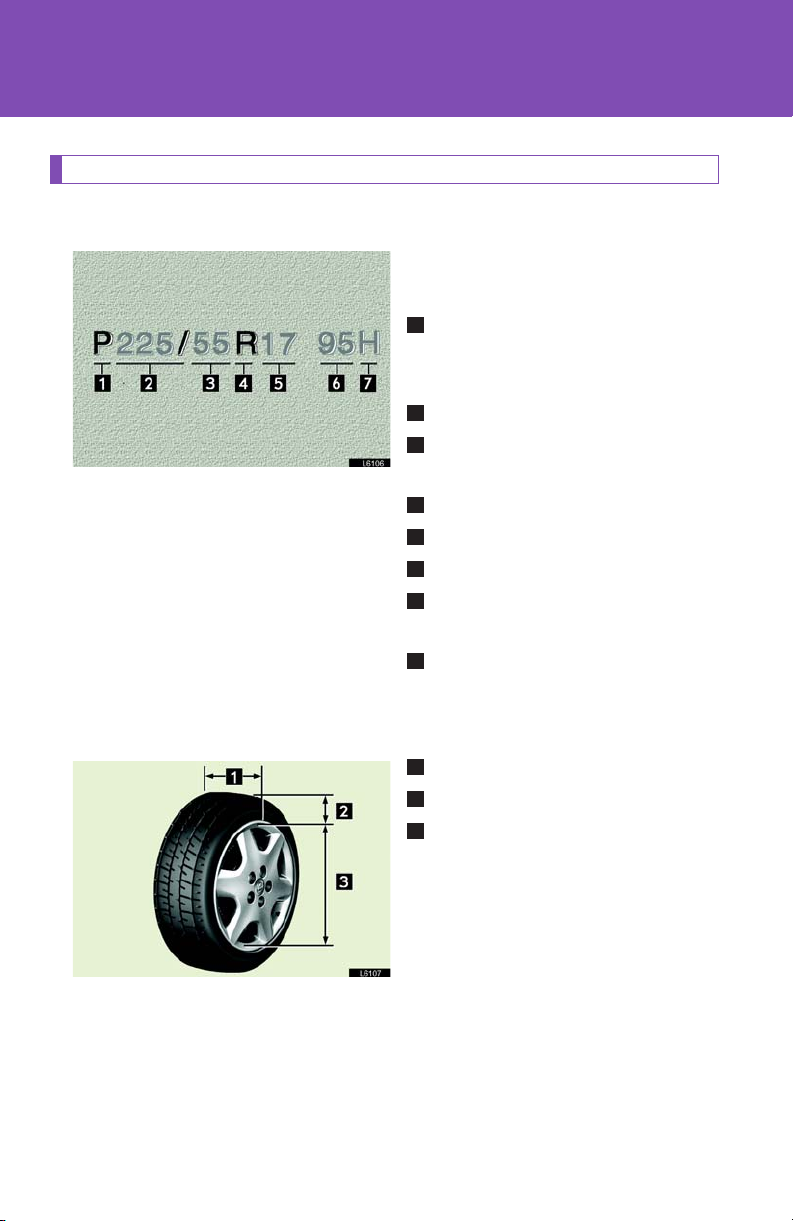
6-1. Specifications
Tire size
n Typical tire size information
The illustration indicates typical
tire size.
1
Tire use
(P = Passenger car, T = Temporary use)
2
Section width (in millimeters)
3
Aspect ratio
(tire height to section width)
4
Tire construction code
5
R = Radial, D = Diagonal
6
Wheel diameter (in inches)
7
Load index
(2 digits or 3 digits)
8
Speed symbol
(alphabet with one letter)
n Tire measurements
378
1
Section width
2
Tir e he igh t
3
Wheel diameter
Page 98
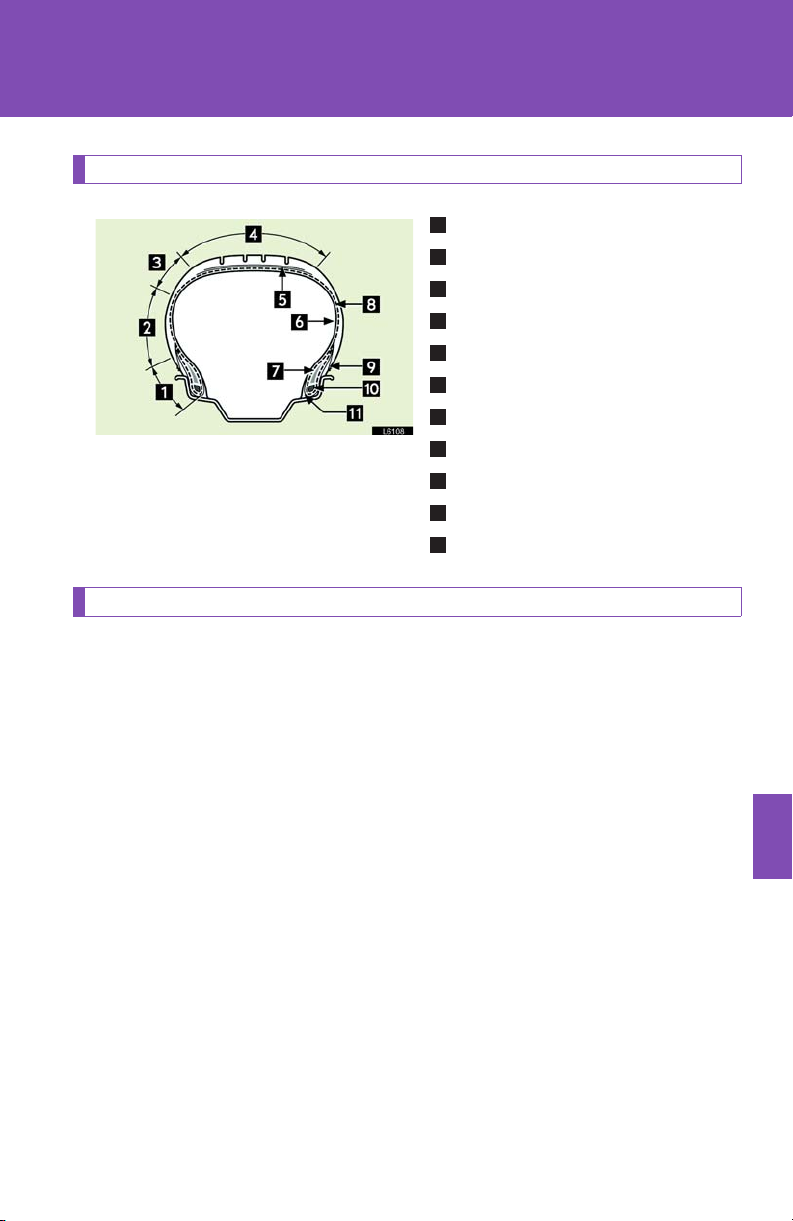
Tire section names
Uniform tire quality grading
1
Bead
2
Sidewall
3
Shoulder
4
Tread
5
Belt
6
Inner liner
7
Reinforcing rubber
8
Carcass
9
Rim lines
10
Bead wires
11
Chafer
6-1. Specifications
This information has been prepared in accordance with regulations
issued by the National Highway Traffic Safety Administration of the U.S.
Department of Transportation.
It provides the purchasers and/or prospective purchasers of Lexus vehicles with information on uniform tire quality grading.
Your Lexus dealer will help answer any questions you may have as you read this information.
n DOT quality grades
All passenger vehicle tires must conform to Federal Safety Requirements in addition to these grades. Quality grades can be found where
applicable on the tire sidewall between tread shoulder and maximum
section width.
For example: Tread wear 200 Traction AA Temperature A
379
6
Vehicle specifications
Page 99

6-1. Specifications
n Tread wear
The tread wear grade is a comparative rating based on the wear rate of
the tire when tested under controlled conditions on a specified government test course.
For example, a tire graded 150 would wear one and a half (1 - 1/2) times as
well on the government course as a tire graded 100.
The relative performance of tires depends upon the actual conditions of
their use, however, and may depart significantly from the norm due to variations in driving habits, service practices and differences in road characteristics and climate.
n Traction AA, A, B, C
The traction grades, from highest to lowest, are AA, A, B and C, and they represent the tire’s ability to stop on wet pavement as measured under controlled conditions on specified government test surfaces of asphalt and concrete.
A tire marked C may have poor traction performance.
Warning: The traction grade assigned to this tire is based on braking
(straight ahead) traction tests and does not include cornering (turning) traction.
380
Page 100

6-1. Specifications
n Temperature A, B, C
The temperature grades are A (the highest), B, and C, representing the tire’s resistance to the generation of heat and its ability to dissipate heat when tested under controlled conditions on a specified indoor laboratory test wheel.
Sustained high temperature can cause the material of the tire to degenerate
and reduce tire life, and excessive temperature can lead to sudden tire failure.
The grade C corresponds to a level of performance which all passenger car tires must meet under the Federal Motor Vehicle Safety Standard No. 109.
Grades B and A represent higher levels of performance on the laboratory test wheel than the minimum required by law.
Warning: The temperature grades for this tire are established for a tire that
is properly inflated and not overloaded.
Excessive speed, under inflation, or excessive loading, either separately or
in combination, can cause heat buildup and possible tire failure.
381
6
Vehicle specifications
 Loading...