

Page 1

SECTION 6 –
SERVICE PROCEDURES AND
SPECIFICATIONS
Body
Specifications 664. . . . . . . . . . . . . . . . . . . . . . . . . . . . . . . . . . . . . . . . . . . . . . . . . . . . . . . . . . . . . . . . . . . . .
Protecting your vehicle from corrosion 666. . . . . . . . . . . . . . . . . . . . . . . . . . . . . . . . . . . . . . . . . . . . . . . .
Washing and waxing 667. . . . . . . . . . . . . . . . . . . . . . . . . . . . . . . . . . . . . . . . . . . . . . . . . . . . . . . . . . . . . . . .
Cleaning the interior 670. . . . . . . . . . . . . . . . . . . . . . . . . . . . . . . . . . . . . . . . . . . . . . . . . . . . . . . . . . . . . . . .
Rain clearing mirrors 675. . . . . . . . . . . . . . . . . . . . . . . . . . . . . . . . . . . . . . . . . . . . . . . . . . . . . . . . . . . . . . .
5
663
Page 2

BODY
SPECIFICATIONS
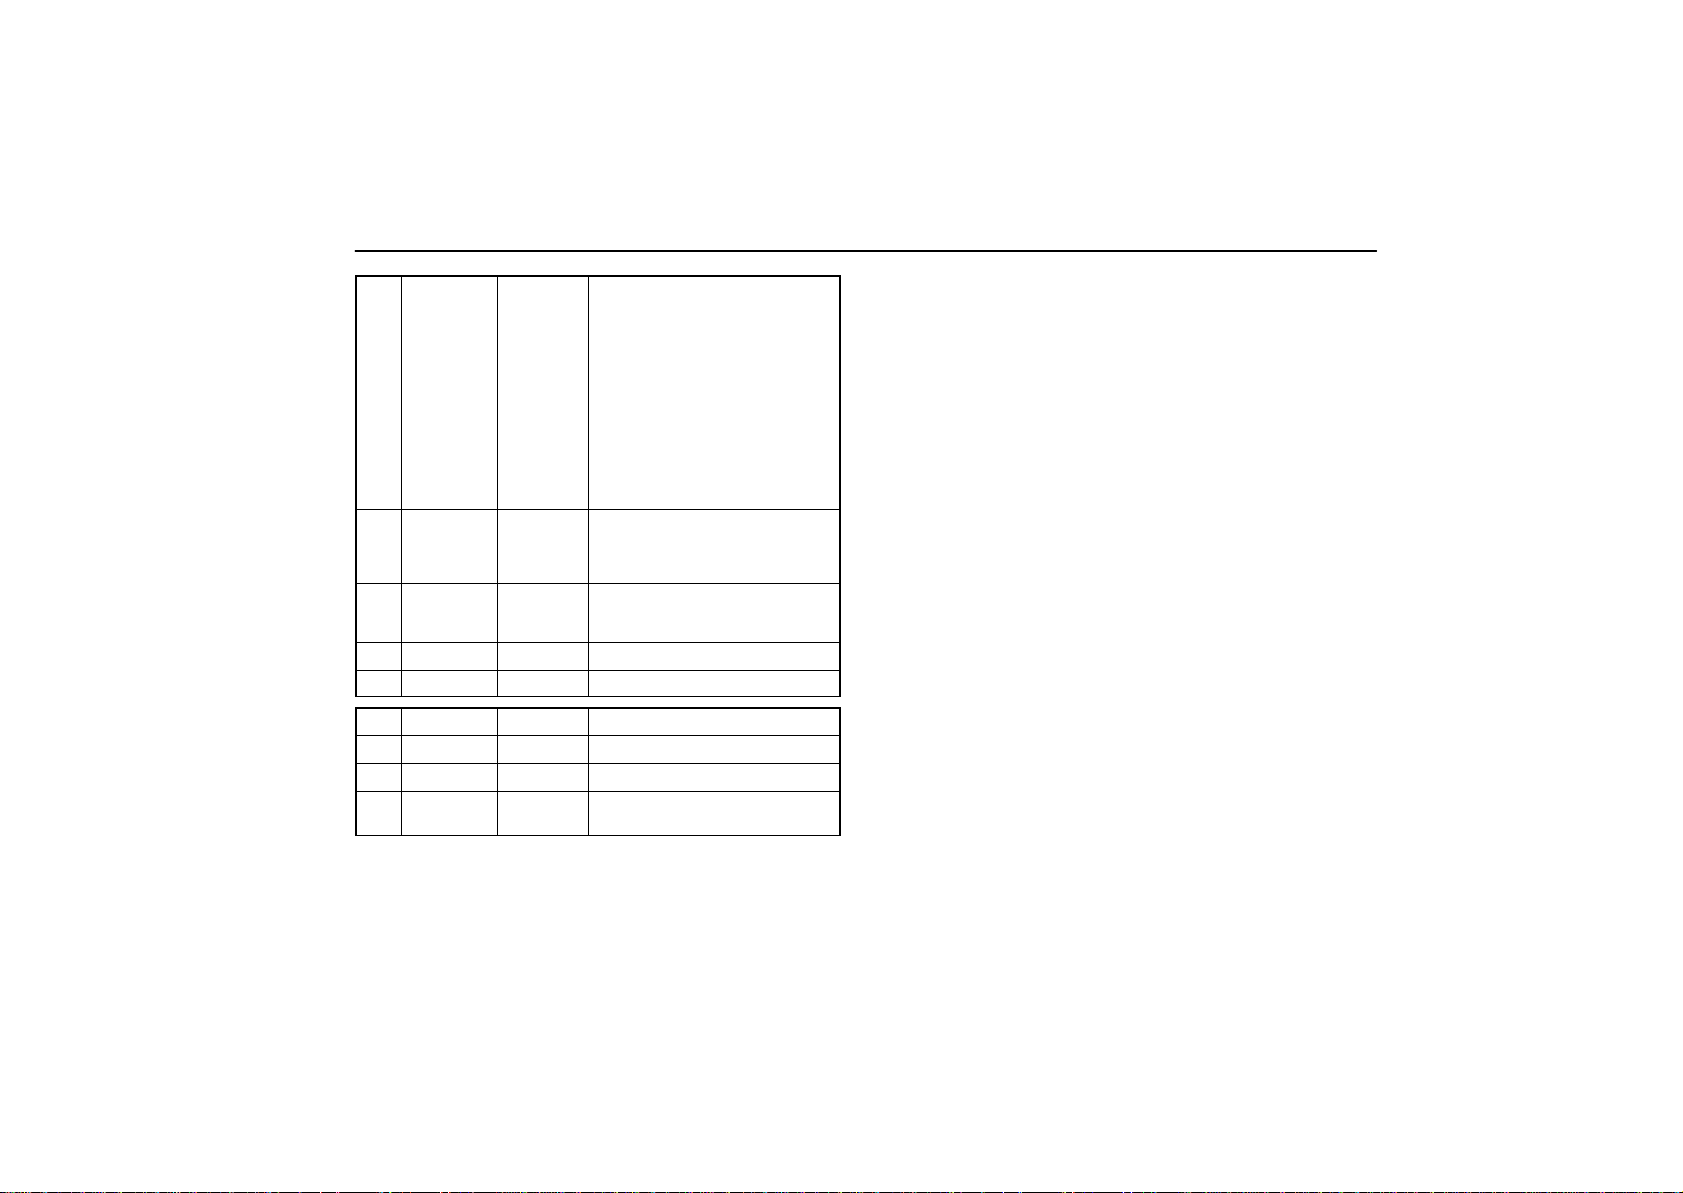
— DIMENSIONS AND WEIGHTS
Overall length
4780 mm (188.2 in.)
Overall width 1880 mm (74.0 in.)
Overall height*
1
1855 mm (73.0 in.)*
1895 mm (74.6 in.)*
Wheelbase 2790 mm (109.8 in.)
Tread — Front
— Rear
1585 mm (62.4 in.)
1585 mm (62.4 in.)
Vehicle capacity weight
(occupants + luggage)
With third seats
Without third seats
544 kg (1200 lb.)
454 kg (1000 lb.)
Towing capacity 2948 kg (6500 lb.)
*1: Unladen vehicle
*2: Without roof luggage carrier
*3: With roof luggage carrier
2
3
664
Page 3
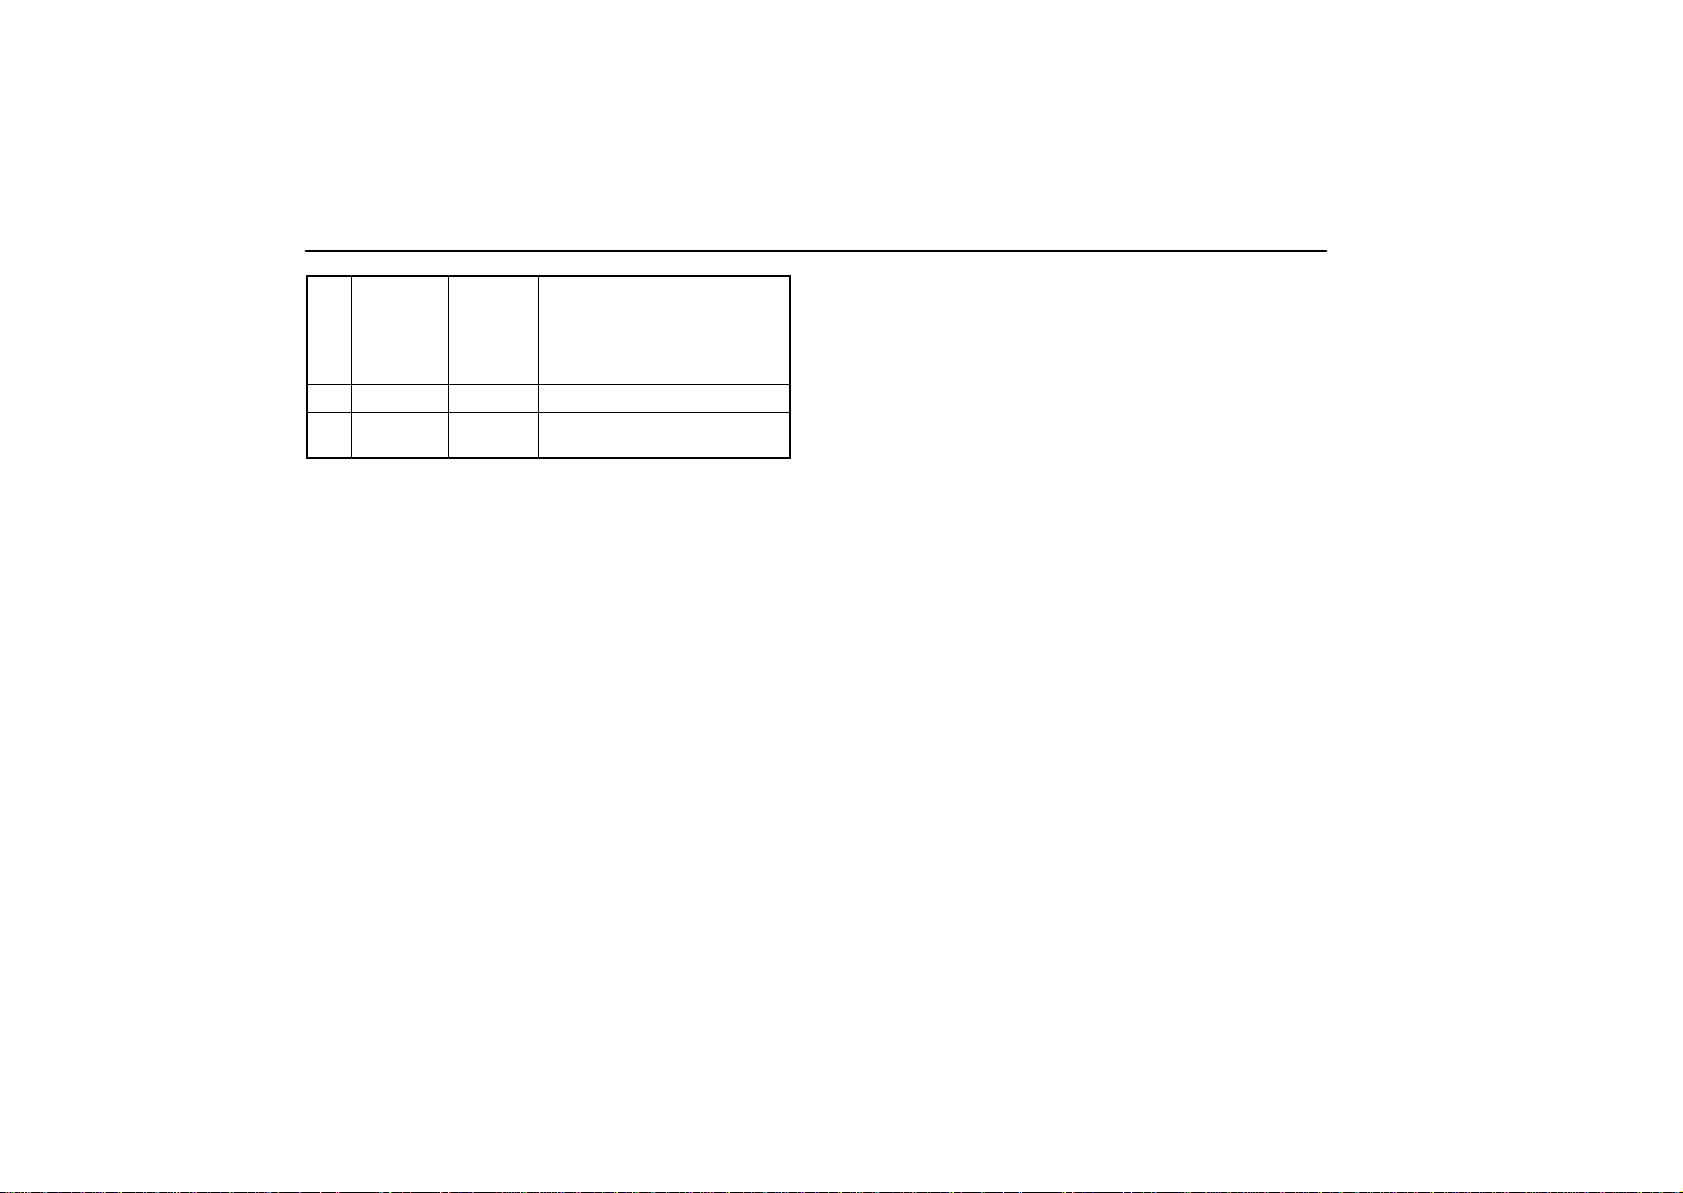
— FUEL TANK
BODY
Capacity
87 L (23 gal., 19.1 Imp. gal.)
665
Page 4

BODY
PROTECTING YOUR VEHICLE
FROM CORROSION
Proper care of your Lexus can help ensure long-term
corrosion prevention.
The most common causes of corrosion to your vehicle
are:
The accumulation of road salt, dirt and moisture in
hard-to-reach areas under the vehicle.
Chipping of paint or undercoating caused by minor
accidents or by stones and gravel.
The following conditions will cause or accelerate
corrosion of your vehicle, so it is important to keep your
vehicle, particularly the underside, as clean as possible
and to repair any damage to paint or protective coatings
as soon as possible.
The presence of road salt or dust control chemicals, salt in
the air near the sea coast, industrial air pollution.
High humidity, especially at temperatures just above
freezing point.
Certain parts of your vehicle are wet or damp for an
extended period of time, even though other parts of the
vehicle are dry.
Components of the vehicle which are prevented from
quick-drying due to lack of proper ventilation are exposed
to high ambient temperature.
To help prevent corrosion on your Lexus, follow these
guidelines:
Keep your vehicle clean by regular washing. In addition,
observe the following points.
If you drive on salted roads in the winter or if you live near
the ocean, you should hose off the undercarriage at least
once a month to minimize corrosion.
High pressure water or steam is effective for cleaning the
vehicle’s underside and wheel housings. Pay particular
attention to these areas as it is dif ficult to see all the mud and
dirt. It will do more harm than good to simply wet the mud
and debris without removing. The lower edge of doors,
rocker panels and frame members have drain holes which
should not be allowed to clog with dirt as trapped water in
these areas can cause corrosion.
Wash the underside of the vehicle thoroughly when winter
is over.
See “Washing and waxing” on page 667 for more tips.
Check the condition of your vehicle’s paint and trim. If you
find any chips or scratches in the paint, touch them up
immediately to prevent corrosion from starting. If the chips or
scratches have gone through the bare metal, have a qualified
body shop make the repair.
666
Page 5

BODY
Check the interior of your vehicle. Water and dirt can
accumulate under the floor mats and could cause corrosion.
Occasionally check under the mats to make sure the area is
dry. Be particularly careful when transporting chemicals,
cleansers, fertilizers, salt, etc. These should be transported in
proper containers. If a spill or leak should occur, immediately
clean and dry the area.
Use mud shields on your wheels. If you drive on salted or
gravel roads, mud shields help protect your vehicle. Full-size
shields, which come as near to the ground as possible, are the
best. We recommend that the fittings and the area where the
shields are installed be treated to resist corrosion. Your Lexus
dealer will be happy to assist in supplying and installing the
shields if they are recommended for your area.
Keep your vehicle in a well ventilated garage or a roofed
place. Do not park your vehicle in a damp, poorly
ventilated garage. If you wash your vehicle in the garage, or
if you drive it covered with water or snow, your garage may be
so damp as to cause corrosion. Even if your garage is heated,
a wet vehicle can corrode if the ventilation is poor.
WASHING AND WAXING
Washing your Lexus
Keep your vehicle clean by regular washing.
The following cases may cause weakness to the paint or
corrosion to the body and parts. W ash your vehicle as soon as
possible.
When driving in a coastal area
When driving on a road sprinkled with antifreeze
When exposed to coal tar, tree sap, bird droppings and
carcass of an insect
When driving in areas where there is a lot of smoke, soot,
dust, iron dust or chemical substances
When the vehicle becomes remarkably dirty with dust and
mud
Hand-washing your Lexus
Work in the shade and wait until the vehicle body is not
warm to the touch.
1. Rinse off loose dirt with a hose. Remove any mud or road
salt from the underside of the vehicle or the wheel wells.
2. Wash with a mild car-wash soap, mixed according to the
manufacturer’s instructions. Use a soft cotton mitt and keep it
wet by dipping it frequently into the wash water. Do not rub hard
— let the soap and water remove the dirt.
667
Page 6

BODY
Fuel filler door: Do not apply water (high-pressure car wash,
for example) at or near the fuel tank inlet with the fuel filler door
opened. If the water enters the air vent, you may experience
trouble with refueling or rough engine idling.
Plastic wheel ornaments: The plastic wheel ornaments are
damaged easily by organic substances. If any organic
substance splash an ornament, be sure to wash them off with
water and check if the ornament is damaged.
Aluminum wheels: Use only a mild soap or neutral detergent.
Plastic bumpers and side moldings: Wash carefully. Do not
scrub with abrasive cleaners. The bumper and side molding
faces are soft.
Exterior lights: Wash carefully. Do not use organic
substances or scrub them with a hard brush. This may damage
the surfaces of the lights.
Road tar: Remove with turpentine or cleaners that are marked
safe for painted surfaces.
3. Rinse thoroughly — dried soap can cause streaking. In hot
weather you may need to rinse each section right after you
wash it.
4. To prevent water spots, dry the vehicle using a clean soft
cotton towel. Do not rub or press hard — you might scratch the
paint.
668
Page 7

NOTICE
Do not use organic substances (gasoline, kerosene,
benzine or strong solvents), which may be toxic or
cause damage.
Do not scrub any part of the vehicle with a hard brush,
which may cause damage.
BODY
Automatic car wash
Your vehicle may be washed in an automatic car wash, but
remember that the paint can be scratched by some types of
brushes, unfiltered washing water, or the washing process
itself. Scratching reduces paint durability and gloss, especially
on darker colors. The manager of the car wash should be able
to advise you whether the process is safe for the paint on your
vehicle.
Waxing your Lexus
Polishing and waxing is recommended to maintain the
original beauty of your Lexus’ finish.
Apply wax once a month or if the vehicle surface does not repel
water well.
1. Always wash and dry the vehicle before you begin waxing,
even if you are using a combined cleaner and wax.
2. Use a good quality polish and wax. If the finish has become
extremely weathered, use a car-cleaning polish, followed by
a separate wax. Carefully follow the manufacturer’s
instructions and precautions. Be sure to polish and wax the
chrome trim as well as the paint.
3. Wax the vehicle again when water does not bead but
remains on the surface in large patches.
Exterior lights: Do not apply wax on the surfaces of the lights.
Wax may cause damage to the lenses. If you accidentally put
wax on the light surfaces, wipe or wash it off.
669
Page 8
BODY
CLEANING THE INTERIOR
CAUTION
Do not wash the vehicle floor with water, or allow water
to get onto the floor when cleaning the vehicle interior
or exterior. Water may get into audio components or
other electrical components above or under the floor
carpet (or mat) and cause a malfunction; and it may
cause body corrosion.
Leather-trimmed Interior
Remove dirt using a soft cloth dampened with 5% solution of
neutral detergent for wool. Th en t ho r oughly wipe off all traces
of detergent with a clean damp cloth.
After cleaning or whenever any part of the leather gets wet, dry
with a soft clean cloth. Allow the leather to dry in a ventilated
shaded area.
670
Page 9

NOTICE
If a stain should fail to come out with a neutral
detergent, apply a cleaner that does not contain an
organic solvent.
Never use organic substances such as benzine,
alcohol or gasoline, or alkaline or acid solutions for
cleaning the leather as these could cause
discoloring.
Use of a nylon brush or synthetic fiber cloth, etc. may
scratch the fine grained surface of the leather.
Mildew may de v elop on soiled leather upholstery . Be
especially careful to avoid oil spots. T ry to keep your
upholstery always clean.
Long exposure to direct sunlight may cause the
leather surface to harden and shrink. Keep your
vehicle in a shaded area, especially in the summer.
The interior of your vehicle is apt to heat up on hot
summer days, so avoid placing on the upholstery
items made of vinyl or plastic or containing wax as
these tend to stick to leather when warm.
Improper cleaning of the leather upholstery could
result in discoloration or staining.
BODY
671
Page 10
BODY
Non-leather Trim
(Part of door panels)
The non-leather trim may be easily cleaned with a mild
soap or detergent and water.
NOTICE
Do not use solvent, thinner, gasoline or window cleaner
on the interior.
First vacuum over the upholstery to remove loose dirt. Then,
using a sponge or soft cloth, apply the soap solution to the
synthetic leather. After allowing it to soak in for a few minutes
to loosen the dirt, remove the dirt and wipe off the soap with a
clean damp cloth. If all the dirt does not come off, repeat the
procedure. Commercial foaming-type cleaners are also
available which work well. Follow the manufacturer’s
instructions.
672
Page 11

BODY
Carpets, Windows and Seat Belts
Begin by vacuuming thoroughly to remove as much dirt as
possible. Several types of foam cleaners are available; some
are in aerosol cans and others are powders or liquids which
you mix with water to produce a foam. To shampoo the
carpets, use a sponge or brush to apply the foam. Rub in
overlapping circles. Do not apply water — the best results are
obtained by keeping the carpet as dry as possible. Read the
shampoo instructions and follow them closely.
The seat belts may be cleaned with mild soap and water or
with lukewarm water.
Use a cloth or sponge. As you are cleaning, check the belts for
excessive wear, fraying or cuts.
673
Page 12
BODY
NOTICE
Use a good foam-type shampoo to clean the carpets.
Do not use dye or bleach on the belts — it may
weaken them.
Do not use the belts until they become dry.
The windows may be cleaned with any household
window cleaner.
Do not apply detergent to or wet the automatic wiper
control sensor when cleaning the inside of the
windshield.
When cleaning the inside of the quarter and rear
windows, be careful not to scratch or damage the
wire antennas, heater wires or connectors.
674
Page 13
BODY
Air Conditioning Control Panel, Audio Panel,
Instrument Panel, Console Panel and
Switches
NOTICE
Do not use organic substances (solvents, kerosene,
alcohol, gasoline, etc.) or alkaline or acidic solutions.
These chemicals can cause discoloring, staining or
peeling of the surface.
If you use cleaners or polishing agents, make sure
their ingredients do not include the substances
mentioned above.
If you use a liquid car freshener, do not spill the liquid
onto the vehicle’s interior surfaces. It may contain
the ingredients mentioned above. Immediately clean
any spill using the method mentioned above.
If you have any questions about the cleaning of your
Lexus, your local Lexus dealer will be pleased to answer
them.
Use a soft damp cloth for cleaning.
Soak a clean soft cloth in water or lukewarm water then lightly
wipe off any dirt.
RAIN CLEARING MIRRORS
The rear view mirrors have been coated to produce a “rain
clearing” effect. This coating causes the raindrops to
spread, clearing the driver’s rear view when it rains.
It is sufficient to wash the mirrors with water for day to day care.
The rain clearing effect is reduced in drizzle and light rain.
In the following cases, the rain clearing effect will be reduced
temporarily, but will gradually recover.
After wiping dirt off the mirrors
When the mirrors fog up
675
Page 14

BODY
After waxing your vehicle in an automatic car wash After your vehicle has been parked for a long period in
underground parking lots, etc. where there is no direct
sunlight.
If you would like to restore the rain clearing effect to its normal
level immediately in the above cases, wash the mirrors with
neutral detergent, then rinse thoroughly.
676
Page 15
NOTICE
To maintain the rain clearing ability, and prevent the
mirrors from being scratched, observe the following
precautions.
Do not use any glass cleaners that contain
compounds.
If ice should jam the mirror, do not scrape the mirror.
Use a spray de-icer to free the mirror.
Wash off any wax stuck to the mirrors with neutral
detergent and rinse thoroughly as any wax on the
surface of the mirrors can cause the rain clearing
effect to be lost.
Do not use any water repellents as they can destroy
the rain clearing effect. If any repellent gets stuck on
the surface of the mirrors, wash it off with neutral
detergent, then rinse thoroughly.
BODY
677
Page 16

BODY
678
Page 17

SECTION 7
REPORTING SAFETY DEFECTS
FOR U.S. OWNERS
Reporting safety defects for U.S. owners
Reporting safety defects for U.S. owners 680. . . . . . . . . . . . . . . . . . . . . . . . . . . . . . . . . . . . . . . . . . . . . .
679
Page 18

REPORTING SAFETY DEFECTS
REPORTING SAFETY DEFECTS
FOR U.S. OWNERS
If you believe that your vehicle has a defect which
could cause a crash or could cause injury or death,
you should immediately inform the National
Highway Traffic Safety Administration (NHTSA) in
addition to notifying Toyota Motor Sales, U.S.A.,
Inc. (Toll-free: 1-800-25-LEXUS).
If NHTSA receives similar complaints, it may open
an investigation, and if it finds that a safety defect
exists in a group of vehicles, it may order a recall
and remedy campaign. However, NHTSA cannot
become involved in individual problems between
you, your dealer, or Toyota Motor Sales, U.S.A.,
Inc.
To contact NHTSA, you may either call the Auto
Safety Hotline toll- free at 1- 800- 424- 9393 (or
366-0123 in Washington, D.C. area) or write to:
NHTSA, U.S. Department of Transportation,
Washington, D.C. 20590. You can also obtain
other information about motor vehicle safety from
the Hotline.
680
Page 19

SECTION 6 –
SERVICE PROCEDURES AND
SPECIFICATIONS
Electrical components
Specifications 636. . . . . . . . . . . . . . . . . . . . . . . . . . . . . . . . . . . . . . . . . . . . . . . . . . . . . . . . . . . . . . . . . . . . .
Checking battery condition 645. . . . . . . . . . . . . . . . . . . . . . . . . . . . . . . . . . . . . . . . . . . . . . . . . . . . . . . . . .
Battery recharging precautions 650. . . . . . . . . . . . . . . . . . . . . . . . . . . . . . . . . . . . . . . . . . . . . . . . . . . . . . .
Checking and replacing the blade type fuses 651. . . . . . . . . . . . . . . . . . . . . . . . . . . . . . . . . . . . . . . . . . .
Checking the cartridge type fuses 653. . . . . . . . . . . . . . . . . . . . . . . . . . . . . . . . . . . . . . . . . . . . . . . . . . . .
Adding washer fluid 655. . . . . . . . . . . . . . . . . . . . . . . . . . . . . . . . . . . . . . . . . . . . . . . . . . . . . . . . . . . . . . . .
Replacing light bulbs 656. . . . . . . . . . . . . . . . . . . . . . . . . . . . . . . . . . . . . . . . . . . . . . . . . . . . . . . . . . . . . . .
4
635
Page 20
ELECTRICAL COMPONENTS
SPECIFICATIONS
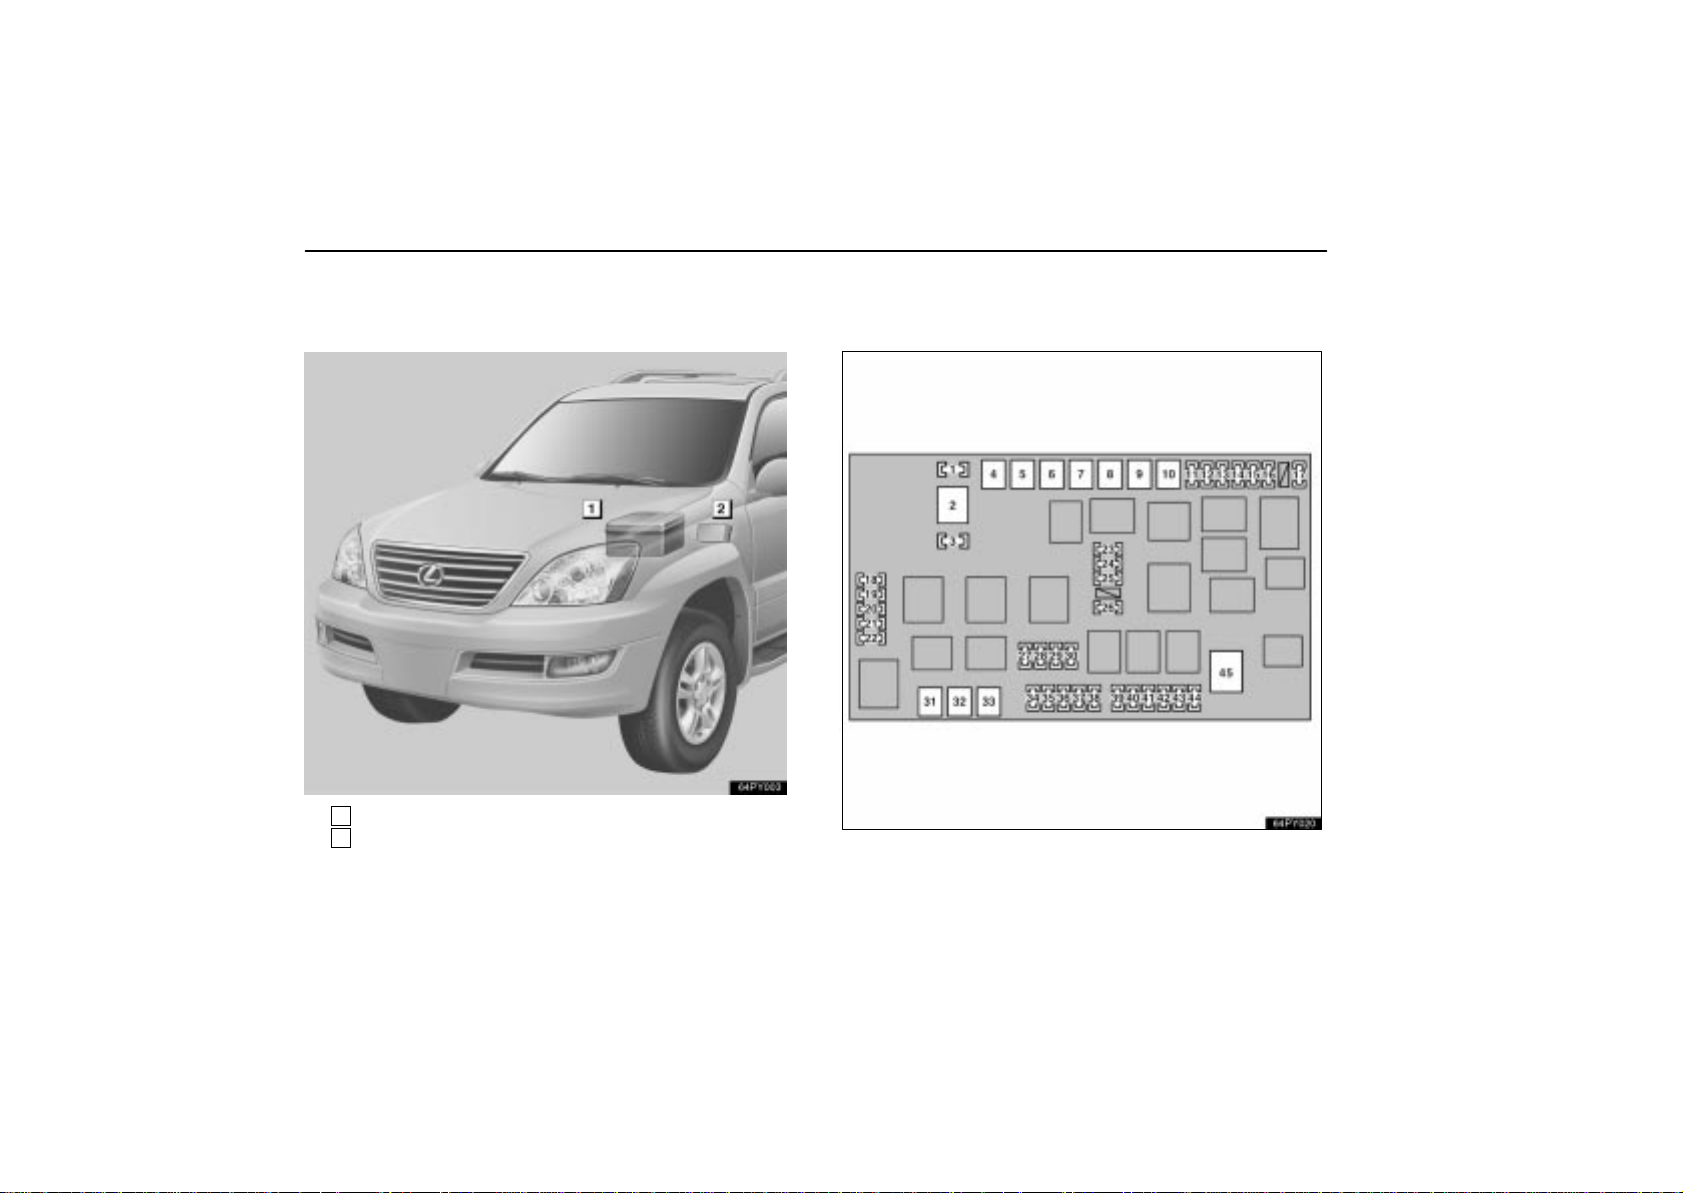
— FUSE LOCATIONS
— FUSES
636
64PY003
1
Engine compartment
2
Driver’s side instrument panel
Engine compartment
64PY020
Page 21
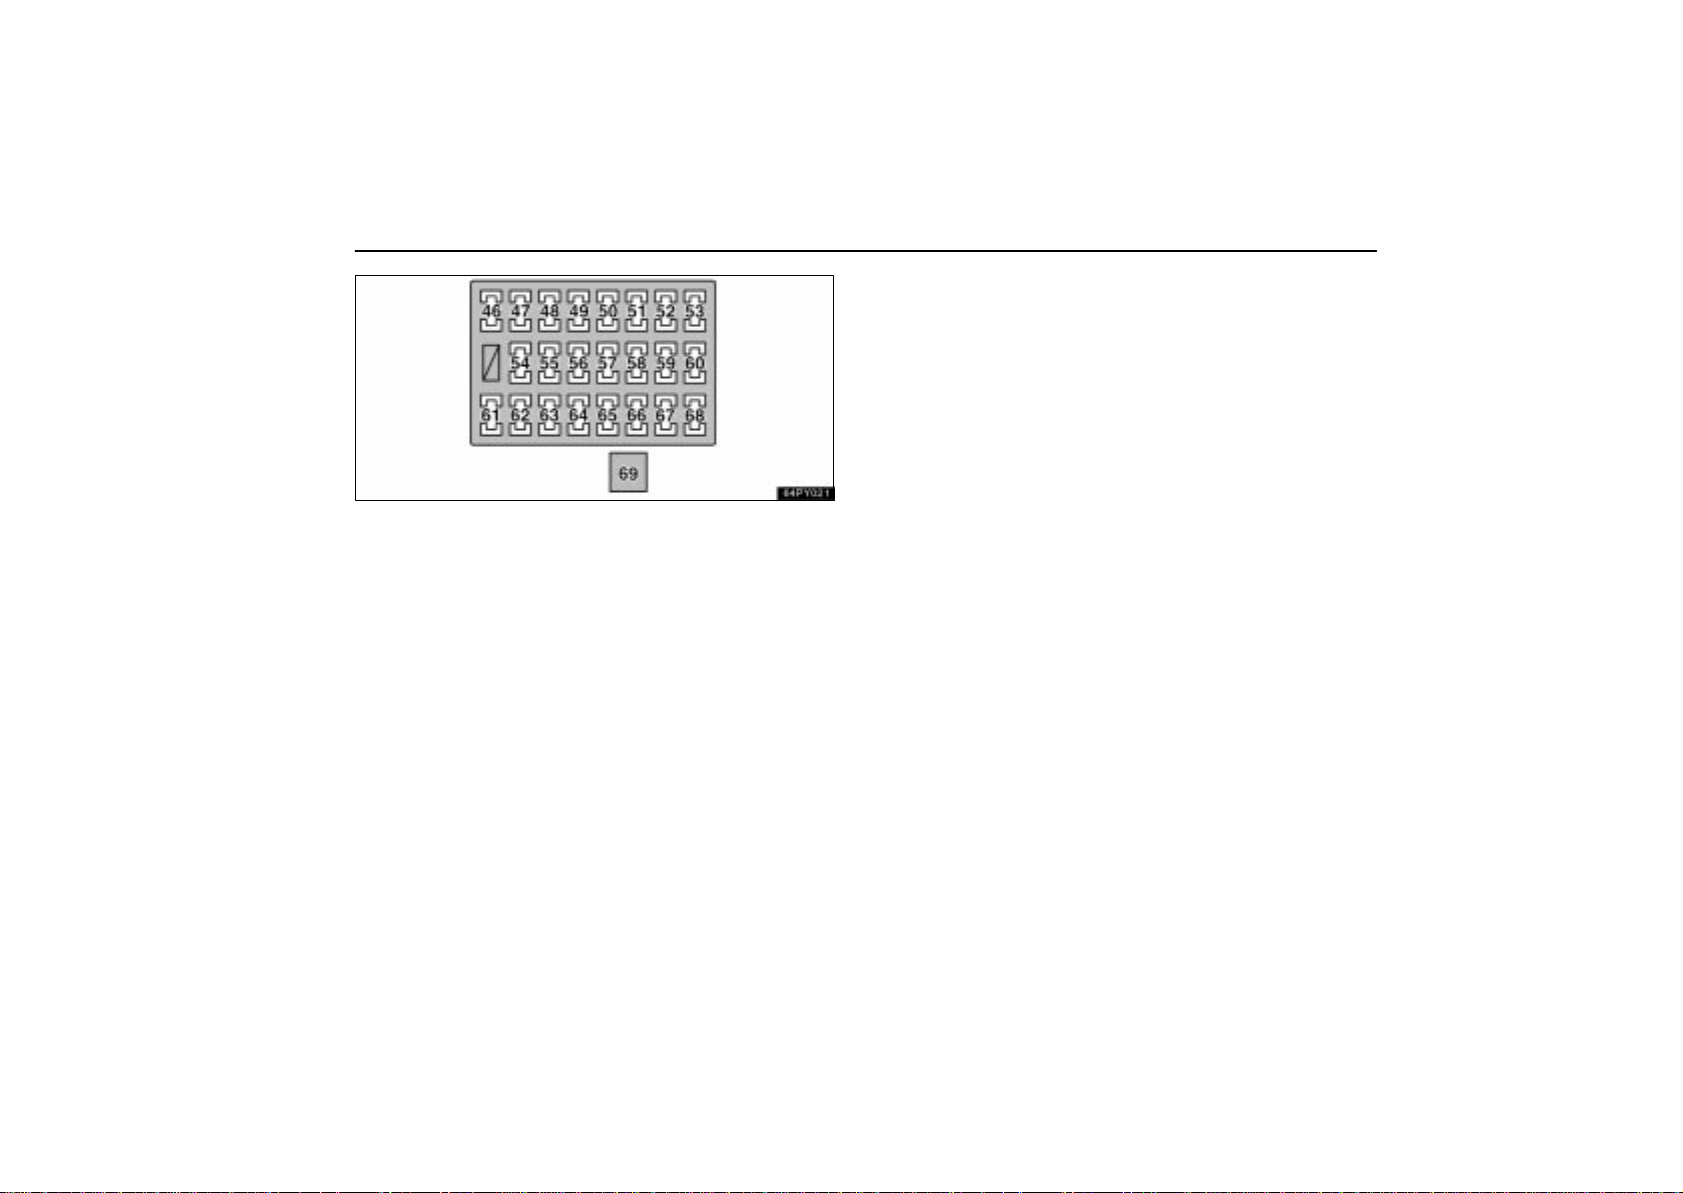
ELECTRICAL COMPONENTS
Driver’s side instrument panel
637
Page 22

ELECTRICAL COMPONENTS
No. FUSE AMPERE CIRCUIT
1 SPARE 10 Spare fuse
Charging system and all
components in “AM1”,
“HEATER”, “CDS FAN”, “FR
2 ALT 140
3 SPARE 15 Spare fuse
4 HEATER 50 Air conditioning system
5
6 AM1 50
7
8 J/B 50
9
10 TOWING 40 Trailer lights
No. FUSE AMPERE CIRCUIT
AIR
SUS
TOWING
BRK
BATT
CHG
50
30 Trailer brake controller
30 Trailer sub battery
FOG”, “DEFOG”, “AIR SUS”,
“AC INV”, “SEAT HEATER”,
“OBD”, “STOP”, “J/B”, “RR AC”,
“MIR HEATER”, “BATT CHG”,
“TOWING BRK” and “TOWING”
fuses
Rear height control air
suspension
All components in “ACC”, “CIG”,
“IG1”, “FR WIP-WSH”, “RR
WIP”, “RR WSH”, “DIFF”,
“ECU-IG”, “TEMS” and “STA”
fuses
All components in “P FR P/W”,
“P RR P/W”, “D RR P/W”, “D
P/SEAT”, “P P/SEAT”, “TAIL”,
“PANEL” and “POWER OR
TI&TE” fuses
638
Page 23

11 CDS FAN 20 Electric cooling fan
12 RR A/C 30 Rear air conditioning system
13
14 STOP 10
15 AC INV 15 Power outlet (115 VAC)
16 FR FOG 15 Front fog lights
17 OBD 7.5 On- board diagnosis system
18
19
No. FUSE AMPERE CIRCUIT
20
21
22 EFI NO.2 10
23
MIR
HEATER
HEAD
(LO RH)
HEAD
(LO LH)
HEAD
(HI RH)
HEAD
(HI LH)
HEATER
NO.2
10
10 Right-hand headlight (low beam)
10 Left-hand headlight (low beam)
10
10 Left-hand headlight (high beam)
7.5 Air conditioning system
Outside rear view mirror
defogger
Stop lights, high mounted
stoplight, shift lock control
system, vehicle stability control
system, electronic modulated
suspension, rear height control
air suspension, multiport fuel
injection system/sequential
multiport fuel injection system
Right-hand headlight (high
beam)
Multiport fuel injection
system/sequential multiport fuel
injection system
ELECTRICAL COMPONENTS
639
Page 24

ELECTRICAL COMPONENTS
24 DEFOG 30 Rear window defogger
AIRSUS
25
26
27 DOME 10
28
No. FUSE AMPERE CIRCUIT
29 ECU-B 10
30
31
32 AM2 30
NO.2
SEAT
HEATER
RADIO
NO.1
ECU-B
NO.2
ABS
MTR
10
20 Seat heaters
20
10 Theft deterrent system
40
640
Rear height control air
suspension
Ignition switch light, interior
lights, personal lights, foot
lights, running board lights,
door courtesy lights, inside
door handle lights,
multi- information display
Audio system, navigation
system
Multiplex communication
system, vehicle stability control
system, wireless remote
control system, inside rear
view mirror , air conditioning
system, electronic modulated
suspension, driving position
memory system, power
windows, moon roof, rear view
monitor system
Anti- lock brake system,
vehicle stability control system,
active traction control system,
brake assist system
Starting system, all components
in “IGN”, “SRS”, “GAUGE” and
“ST2” fuses
Page 25

ELECTRICAL COMPONENTS
33
No. FUSE AMPERE CIRCUIT
34 ALT-S 7.5 Charging system
35 MAYDAY 7.5 Lexus Link System
36 HORN 10 Horns
37
38 TRN-HAZ 15 Turn signal lights
39 ETCS 10 Electronic throttle control system
40 EFI 20
41 D FR P/W 20 Power window
42 DR/LCK 25 Power door lock
43 TOWING 30 Towing converter
44
45 A/PUMP 50
46 IGN 10
No. FUSE AMPERE CIRCUIT
ABS
SOL
A/F
HEATER
RADIO
NO.2
30
15 A/F sensor
30
Anti- lock brake system,
vehicle stability control system,
active traction control system,
brake assist system
Multiport fuel injection
system/sequential multiport fuel
injection system
Audio system, navigation
system
Multiport fuel injection
system/sequential multiport fuel
injection system
Multiport fuel injection
system/sequential multiport fuel
injection system, vehicle
stability control system
641
Page 26

ELECTRICAL COMPONENTS
47 SRS 10
48 GAUGE 7.5 Gauges and meters
49 ST2 7.5
50
51 TEMS 20
52 DIFF 20 Four-wheel drive system
53 RR WIP 15 Rear window wiper
54 D P/SEAT 30 Driver’s power seat
55 P P/SEAT 30 Front passenger’s power seat
56
57 IG1 NO.2 10
58 RR WSH 15 Rear window washer
No. FUSE AMPERE CIRCUIT
FR
WIP-WSH
PWR
OUTLET
30
15 Power outlet (12 VDC)
SRS airbag system, front
passenger occupant
classification system
Multiport fuel injection
system/sequential multiport fuel
injection system
Windshield wipers, windshield
washer
Electronic modulated
suspension
Rear air conditioning system,
inside rear view mirror, kinetic
dynamic suspension system
642
Page 27
Shift lock control system, power
windows, outside rear view
mirror defogger, anti-lock brake
system, active traction control
system, vehicle stability control
system, air conditioning system,
59 ECU-IG 10
60 IG1 10
61 STA 7.5
62 P FR P/W 20 Front passenger’s power window
63 P RR P/W 20 Rear right side power window
No. FUSE AMPERE CIRCUIT
64 D RR P/W 20 Rear left side power window
65 PANEL 10 Instrument panel lights
66 TAIL 10
navigation system, power
windows, moon roof, tilt and
telescopic steering,
multi- information display,
driving position memory
system, rear view monitor
system, tire pressure warning
system
Air conditioning system, back-up
lights, rear window defogger,
seat heaters, vehicle stability
control system
Multiport fuel injection
system/sequential multiport fuel
injection system
Parking lights, tail lights, license
plate lights, front fog lights
ELECTRICAL COMPONENTS
643
Page 28
ELECTRICAL COMPONENTS
Shift lock control system, power
outlets, outside rear view
67 ACC 7.5
68 CIG 10 Cigarette lighter
POWER
69
OR TI&TE
30
mirrors, audio system, navigation
system, power rear view mirrors,
multi- information display, rear
view monitor system
Power windows, moon roof, tilt
and telescopic steering
644
Page 29
CHECKING BATTERY CONDITION
Precautions
CAUTION
BATTERY PRECAUTIONS
The battery produces flammable and explosive
hydrogen gas.
Do not cause a spark by contacting the battery
terminals with tools.
Do not smoke or light a match near the battery.
The electrolyte contains poisonous and corrosive
sulfuric acid.
Avoid contact with eyes, skin or clothes.
Never inhale or swallow electrolyte.
Wear protective safety glasses when working near
the battery.
Keep children away from the battery.
EMERGENCY MEASURES
If electrolyte gets in your eyes, flush your eyes with
clean water f o r a t l east 15 minutes and get immediate
medical attention. If possible, continue to apply
water with a sponge or cloth while traveling to the
medical office.
ELECTRICAL COMPONENTS
645
Page 30

ELECTRICAL COMPONENTS
If electrolyte gets on your skin, thoroughly wash the
contacted area. If you feel a pain or burn, get medical
attention immediately.
If electrolyte gets on your clothes, there is a
possibility of its soaking through to your skin, so
immediately take off the exposed clothing and follow
the procedure above, if necessary.
If you accidentally to swallow electrolyte, drink a
large quantity of water or milk. Follow with milk of
magnesia, beaten raw egg or vegetable oil. Then go
immediately for emergency help.
646
Page 31

ELECTRICAL COMPONENTS
Checking battery exterior
1
Terminals
Check the battery for corroded or loose connections,
cracks, or loose hold-down clamps.
1. If the battery is corroded, wash it off with a solution of warm
water and baking soda. Coat the terminals with grease to
prevent further corrosion.
2. If the connections are loose, tighten the clamp bolts — but
do not overtighten.
3. Tighten the hold-down clamp only enough to keep the
battery firmly in place. Overtightening may damage the battery
case.
2
Hold-down clamp
647
Page 32

ELECTRICAL COMPONENTS
NOTICE
Make sure the engine and all accessories are turned
off before performing maintenance.
When checking the battery, remove the ground cable
first and reinstall it last.
Be careful not to cause a short circuit with tools.
Take care no solution gets into the battery when
washing it.
If the battery is disconnected or run down
The power windows and moon roof may not operate
automatically and the jam protection function will not function
correctly after you reconnect, replace or recharge the battery.
In any of these cases, you should normalize the power
windows and moon roof. To normalize the power windows an d
moon roof, see pages 50 and 121.
648
Checking battery condition
Check the battery condition by the indicator color.
1
BLUE — Good condition.
2
WHITE — Charging necessary. Have the battery
checked by your Lexus dealer.
3
RED — Have the battery checked by your Lexus dealer.
Page 33

NOTICE
Do not refill the battery with water.
ELECTRICAL COMPONENTS
649
Page 34

ELECTRICAL COMPONENTS
BATTERY RECHARGING
PRECAUTIONS
During recharging, the battery is producing hydrogen
gas.
Therefore, before recharging:
1. If recharging with the battery installed on the vehicle, be
sure to disconnect the ground cable.
2. Make sure the power switch on the recharger is off when
connecting the charger cables to the battery and when
disconnecting them.
NOTICE
Never recharge the battery while the engine is running.
Also, make sure all accessories are turned off.
CAUTION
Always charge the battery in an unconfined area. Do
not charge the battery in a garage or closed room
where there is not sufficient ventilation.
Only do a slow charge (5 A or less). Charging at a
quicker rate is dangerous. The battery may explode
causing personal injuries.
650
Page 35

CHECKING AND REPLACING THE
BLADE TYPE FUSES
The engine compartment fuse box is located under the left
side engine compartment cover. Before checking the
engine compartment fuses, remove the cover. (For
details, see “Removing the engine compartment covers”
on page 576.)
ELECTRICAL COMPONENTS
Driver’s side instrument panel
1. Turn the ignition switch off and open the fuse box lid.
Determine which fuse may be causing the problem. The lid of
the fuse box shows the name of the circuit for each fuse.
Engine compartment
1
Pull-out tool
2
Spare fuses
651
Page 36

ELECTRICAL COMPONENTS
2. Make sure the inoperative component is turned off. Pull
the suspected fuse straight out with the pull-out tool and
check it. If it has blown, push a new fuse into the clips.
652
Good
a. Look carefully at the fuse. If the thin wire is broken, the fuse
has blown. If you are not sure or if it is too dark to see, try
replacing the suspected fuse with one of the same value that
you know is good.
b. Only install a fuse with the amperage rating designated on
the fuse box lid.
If you do not have a spare fuse, in an emergency you can pull
out the “CIG”, “RADIO NO.1” or “SEA T HEATER” fuse, which
may be dispensable for normal driving, and use it if its
amperage rating is the same.
If you cannot use one of the same amperage, use one that is
lower, but as close to the rating as possible. If the amperage
is lower than that specified, the fuse might blow out again but
this does not indicate anything wrong. Be sure to get the
correct fuse as soon as possible and return the substitute to its
original clips.
Blown
Page 37

ELECTRICAL COMPONENTS
It is a good idea to purchase a set of spare fuses and keep them
in your vehicle for emergencies.
If the new fuse immediately blows out, there is a problem with
the electrical system. Have your Lexus dealer correct it as
soon as possible.
Y ou should normalize the power windows and moon roof if they
do not operate automatically or the jam protection function
does not operate correctly after replacing blown fuses. To
normalize the power windows and moon roof, see “Power
window switches” on page 48 and “Moon roof” on page 119.
CAUTION
Never use a fuse with a higher amperage rating, or any
other object, in place of a fuse. This may cause
extensive damage and possibly a fire.
CHECKING THE CARTRIDGE TYPE
FUSES
The engine compartment fuse box is located under the left
side engine compartment cover. Before checking the
engine compartment fuses, remove the cover. (For
details, see “Removing the engine compartment covers”
on page 576.)
Engine compartment
653
Page 38

ELECTRICAL COMPONENTS
If the headlights or other electrical components do not
work and the blade type fuses are O.K., check the
cartridge type fuses. If any of the cartridge type fuses are
blown, they must be replaced.
If there is an overload in the circuits from the battery, the fuses
are designed to blow before the entire wiring harness is
damaged.
CAUTION
Driver’s side instrument panel
Good
Blown
NOTICE
Before replacing the fuses, have the cause of electrical
overload determined and repaired by your Lexus dealer .
654
Always use a genuine Lexus fuse or equivalent for
replacement. Never install an ordinary wire — even for
a temporary fix. This may cause extensive damage and
possibly a fire.
Page 39

ELECTRICAL COMPONENTS
ADDING WASHER FLUID
NOTICE
Do not use engine antifreeze or any other substitute
because it may damage your vehicle’s paint.
If the washer tank becomes nearly empty, add washer
fluid.
You may use plain water as washer fluid. However, in cold
areas where temperatures range below the freezing point, use
washer fluid containing antifreeze. This product is available at
your Lexus dealer and most auto parts stores. Follow the
manufacturer’s directions for how much to mix with water.
655
Page 40

ELECTRICAL COMPONENTS
REPLACING LIGHT BULBS
The illustrations on the following pages show the locations of
light bulbs. If it is necessary to replace a bulb, take your vehicle
to your Lexus dealer as soon as possible. Use bulbs with the
bulb numbers and wattage ratings given in the table.
NOTICE
Only use a bulb of the listed type.
CAUTION
To prevent burning yourself, do not replace the light
bulbs while they are hot.
Halogen bulbs have pressurized gas inside and
require special handling. They can burst or shatter if
scratched or dropped. Hold a bulb only by its plastic
or metal case. Do not touch the glass part of a bulb
with bare hands.
656
Page 41

ELECTRICAL COMPONENTS
The inside of the lens of exterior lights such as headlights may
temporarily fog up when the lens becomes wet in the rain or in
a car wash. This is not a problem because the fogging is
caused by the temperature difference between the outside and
inside of the lens, just like the windshield fogs up in the rain.
However, if there is a large drop of water on the inside of the
lens, or if there is water pooled inside the light, contact your
Lexus dealer.
LIGHT LOCATION
657
Page 42

ELECTRICAL COMPONENTS
Light Bulbs Bulb No. W Type
1
Headlights (High beam) 9005 60 A
2
Headlights (Low beam) -- 55 B
3
Front side marker lights 168 5 C
4
Front turn signal lights 4157NAK 27/8 D
5
Parking lights 168 5 C
6
Fog lights -- 55 E
658
Page 43

Light Bulbs Bulb No. W Type
7
Running board lights 194 3.8 C
8
Rear turn signal lights 7440 21 C
9
Stop/tail lights 7443 21/5 C
10
Stop/tail and rear side
7443 21/5 C
marker lights
11
Back-up lights 7440 21 C
12
License plate lights 168 5 C
ELECTRICAL COMPONENTS
659
Page 44

ELECTRICAL COMPONENTS
Light Bulbs Bulb No. W Type
13
V anity lights -- 2 F
14
Personal lights -- 8 G
15
Interior lights -- 8 F
16
Door courtesy lights -- 3.8 G
17
Glove box light -- 1.2 C
660
Page 45

A: HB3 halogen bulbs
B: H11 halogen bulbs
C: Wedge base bulbs (clear)
D: Wedge base bulbs (amber)
E: H3 halogen bulbs
F: Double end bulbs
G: Single end bulbs
ELECTRICAL COMPONENTS
661
Page 46

ELECTRICAL COMPONENTS
662
Page 47

SECTION 6 –
SERVICE PROCEDURES AND
SPECIFICATIONS
Chassis
Specifications 604. . . . . . . . . . . . . . . . . . . . . . . . . . . . . . . . . . . . . . . . . . . . . . . . . . . . . . . . . . . . . . . . . . . . .
Checking brake fluid 608. . . . . . . . . . . . . . . . . . . . . . . . . . . . . . . . . . . . . . . . . . . . . . . . . . . . . . . . . . . . . . . .
Checking power steering fluid 609. . . . . . . . . . . . . . . . . . . . . . . . . . . . . . . . . . . . . . . . . . . . . . . . . . . . . . . .
Checking tire inflation pressure 611. . . . . . . . . . . . . . . . . . . . . . . . . . . . . . . . . . . . . . . . . . . . . . . . . . . . . . .
Tire information 615. . . . . . . . . . . . . . . . . . . . . . . . . . . . . . . . . . . . . . . . . . . . . . . . . . . . . . . . . . . . . . . . . . . .
Types of tires 624. . . . . . . . . . . . . . . . . . . . . . . . . . . . . . . . . . . . . . . . . . . . . . . . . . . . . . . . . . . . . . . . . . . . . .
Rotating tires 625. . . . . . . . . . . . . . . . . . . . . . . . . . . . . . . . . . . . . . . . . . . . . . . . . . . . . . . . . . . . . . . . . . . . . .
Checking and replacing tires 626. . . . . . . . . . . . . . . . . . . . . . . . . . . . . . . . . . . . . . . . . . . . . . . . . . . . . . . . .
Installing snow tires and chains 628. . . . . . . . . . . . . . . . . . . . . . . . . . . . . . . . . . . . . . . . . . . . . . . . . . . . . .
Replacing wheels 633. . . . . . . . . . . . . . . . . . . . . . . . . . . . . . . . . . . . . . . . . . . . . . . . . . . . . . . . . . . . . . . . . .
Aluminum wheel precautions 634. . . . . . . . . . . . . . . . . . . . . . . . . . . . . . . . . . . . . . . . . . . . . . . . . . . . . . . .
Suspension and chassis 634. . . . . . . . . . . . . . . . . . . . . . . . . . . . . . . . . . . . . . . . . . . . . . . . . . . . . . . . . . . .
3
603
Page 48

CHASSIS
SPECIFICATIONS
— DIFFERENTIAL
Oil capacity
Front
Rear
Oil type Hypoid gear oil API GL-5
Oil viscosity Above -18C (0F): SAE 90 or SAE 85W-90
— TRANSFER
Oil capacity
Oil type Hypoid gear oil API GL-5
Recommended oil viscosity SAE 75W-90
1.4 L (1.5 qt., 1.2 Imp. qt.)
3.1 L (3.3 qt., 2.7 Imp. qt.)
Below -18C (0F): SAE 80W or SAE 80W-90
1.4 L (1.5 qt., 1.2 Imp. qt.)
604
Page 49

— AUTOMATIC TRANSMISSION
Fluid capacity
Drain and refill
Fluid type Toyota Genuine ATF WS*
*: Change automatic transmission fluid only as necessary.
Generally, it is necessary to change automatic transmission
fluid only if your vehicle is driven under one of the Special
Operating Conditions listed in your “Owner’s Manual
Supplement/Scheduled Maintenance”. When changing the
automatic transmission fluid, use only “Toyota Genuine ATF
WS” (ATF JWS3324 or NWS9638) to aid in assuring optimum
transmission performance.
Up to 3.0 L (3.2 qt., 2.6 Imp. qt.)
CHASSIS
605
Page 50

CHASSIS
NOTICE
Using automatic transmission fluid other than “Toyota
Genuine ATF WS” may cause deterioration in shift
quality, locking up of your transmission accompanied
by vibration, and ultimately damage the automatic
transmission of your vehicle.
Please contact your Lexus dealer for further details.
— BRAKES
Pedal clearance
52 mm (2.0 in.) Min. *
Pedal free play 1 — 6 mm (0.04 — 0.24 in.)
Brake pad wear limit 1.0 mm (0.04 in.)
Parking brake lining wear limit 1.0 mm (0.04 in.)
Parking brake adjustment 5 — 7 clicks *
2
Fluid type SAE J1703 or FMVSS No. 116 DOT 3
*1: Minimum pedal clearance when depressed with the force of 490 N (50 kgf, 110 lbf) with the engine running
2
: Parking brake adjustment when pulled with the force of 196 N (20 kgf, 44 lbf)
*
1
606
Page 51

CHASSIS
— CHASSIS LUBRICATION
Propeller shafts
Spiders
Slide yoke
— STEERING
Free play
Power steering fluid Automatic transmission fluid DEXRONII or III
Lithium base chassis grease, NLGI No.2
Molybdenum-disulfide lithium base chassis grease, NLGI No.2 or
lithium base chassis grease, NLGI No.2
Less than 30 mm (1.2 in.)
— TIRES AND WHEELS
Tire size P265/65R17 110S
Tire inflation pressure
Recommended cold tire inflation
pressure
Front 220 kPa (2.2 kgf/cm2 or bar, 32 psi)
Rear 220 kPa (2.2 kgf/cm2 or bar, 32 psi)
Spare 220 kPa (2.2 kgf/cm2 or bar, 32 psi)
Wheel size 17 7 1/2 JJ
Wheel nut torque 112 N·m (11.5 kgf·m, 83 ft·lbf)
NOTE:
For complete information on tires (e.g. replacing tires or replacing wheels), see “Checking tire inflation pressure”
through “Aluminum wheel precautions” on pages 611 through 634.
607
Page 52

CHASSIS
CHECKING BRAKE FLUID
To check the fluid level, simply look at the see-through
reservoir. The level should be between the “MAX” and
“MIN” lines on the tank.
It is normal for the brake fluid level to go down slightly as the
brake pads wear or when the fluid level in the accumulator is
high.
If the reservoir needs frequent refilling, it may indicate a serious
mechanical problem.
If the level is low, add FMVSS No.1 16 DOT 3 or SAE J1703
brake fluid to the brake reservoir.
NOTICE
If you spill some of the fluid, be sure to wipe it off to
prevent it from damaging the parts or paintwork.
Refilling brake fluid:
1. Turn the ignition switch off.
2. Depress the brake pedal more than 20 times (until the brake
pedal resistance decreases and pedal travel increases).
3. Remove the reservoir cap by hand. Add brake fluid up to the
“MAX” line.
If you do not follow the procedure above, the reservoir may
overflow.
Use only newly opened brake fluid. Once opened, brake fluid
absorbs moisture from the air, and excess moisture can cause
a dangerous loss of braking efficiency.
CAUTION
Take care when filling the reservoir because brake fluid
can harm your hands or eyes. If fluid gets on your hands
or in your eyes, flush the affected area with clean water
immediately. If you still feel uncomfortable with your
hands or eyes, go to the doctor.
608
Page 53

CHECKING POWER STEERING
FLUID
The power steering fluid reservoir is located under the
right side engine compartment cover. Before checking
the power steering fluid, remove the cover. (For details,
see “Removing the engine compart covers” on page 576.)
CHASSIS
Check the fluid level, simply look at the see-through
reservoir. If necessary, add automatic transmission fluid
DEXRON
If the vehicle has been driven around 80 km/h (50 mph) for 20
minutes (a little more in frigid temperatures), the fluid is hot
(60C — 80C or 140F — 175F). You may also check the
level when the fluid is cold (about room temperature, 10C —
30C or 50F — 85F) if the engine has not been run for about
five hours.
II or III.
1
If cold O.K.
4
If hot add
Clean all dirt off the reservoir and look at the fluid level. If the
fluid is cold, the level should be in the “COLD” range. Similarly,
if it is hot, the fluid level should be in the “HOT” range. If the
level is at the l o w s i d e o f t h e appropriate range, add automatic
transmission fluid DEXRON
the range.
To remove the reservoir cap, turn it counterclockwise and lift
up. To reinstall it, turn it clockwise. After replacing the reservoir
cap, visually check the steering box case, vane pump and hose
connections for leaks or damage.
2
If cold add
II or III to bring the level within
3
If hot O.K.
609
Page 54

CHASSIS
CAUTION
The reservoir may be hot so be careful not to burn
yourself.
NOTICE
Avoid overfilling, or the power steering could be
damaged.
When adding the power steering fluid, avoid spilling
it. The generator under the power steering reservoir
could be damaged if fluid is spilled on it.
610
Page 55

CHASSIS
CHECKING TIRE INFLATION
PRESSURE
63PY025
The recommended cold tire inflation pressures,
tire sizes and the combined weight of occupants
and cargo (vehicle capacity weight) are described
on page 607 and 664. They are also described
on the tire and loading information label as
shown.
You should check the tire inflation pressure every two
weeks, or at least once a month. And do not forget
the spare!
The following instructions for checking tire
inflation pressure should be observed:
The pressure should be checked only when the
tires are cold. If your vehicle has been parked
for at least 3 hours and has not been driven for
more than 1.5 km or 1 mile since, you will get an
accurate cold tire inflation pressure reading.
If you cannot adjust the tire pressure when the
tires are cold, add 20 kPa (0.2 kgf/cm
psi) to 30 kPa (0.3 kgf/cm
to the front tires and rear tires than the cold tire
pressure, but never exceed the maximum cold tire
pressure molded on the tire sidewall.
2
or bar, 4.3 psi) more
2
or bar, 2.9
611
Page 56

CHASSIS
Always use a tire pressure gauge. The
appearance of a tire can be misleading. Besides,
tire inflation pressures that are even just a few
pounds off can degrade handling and ride.
Do not bleed or reduce tire inflation pressure
after driving. It is normal for the tire inflation
pressure to be higher after driving.
Never exceed the vehicle capacity weight.
Passengers and luggage weight should be located
so that the vehicle is balanced.
Inspection and adjustment procedure
1
Tire valve
2
Tire pressure gauge
1. Remove the tire valve cap.
2. Press the tip of the tire pressure gauge to the tire
valve.
3. Read the pressure using the graduations of the
gauge.
4. In case the tire inflation pressure is not within the
prescribed range, insert the compressed air from the
valve. In case of applying too much air, press the
center of the valve and release the air to adjust.
612
Page 57

5.After completing the tire inflation pressure
measurement and adjustment, apply soapy water to
the valve and check for leakage.
6. Install the tire valve cap.
If a gauge and air pump are not available, have your
vehicle checked by your Lexus dealer.
CAUTION
Be sure to reinstall the tire valve caps. Without
the valve caps, dirt or moisture could get into
the valve core and cause air leakage. If the caps
have been lost, have new ones put on as soon
as possible.
NOTICE
Use only the original valve cap. If any other
valve cap is used, it may corrode or melt and
become difficult or impossible to remove.
CHASSIS
613
Page 58

CHASSIS
Incorrect tire inflation pressure may waste fuel, reduce
the comfort of driving, reduce tire life and make your
vehicle less safe to drive.
If a tire frequently needs refilling, have it checked by
your Lexus dealer.
CAUTION
Keep your tires properly inflated. Otherwise, the
following conditions may occur and cause an
accident resulting in death or serious injuries.
Low tire pressure (underinflation) —
Excessive wear
Uneven wear
Poor handling
Possibility of blowouts from an overheated
tire
Poor sealing of the tire bead
Wheel deformation and/or tire separation
A greater possibility of tire damage from road
hazards
High tire pressure (overinflation) —
Poor handling
Excessive wear
Uneven wear
A greater possibility of tire damage from road
hazards
614
Page 59

Tire symbols
CHASSIS
TIRE INFORMATION
63PY018
The illustration indicates typical tire symbols.
615
Page 60

CHASSIS
1
Tire size: For details, see “Tire size” on page
617.
2
DOT and Tire Identification Number (TIN): For
details, see “DOT and Tire Identification Number
(TIN)” on page 617.
3
Location of the tread wear indicators: For
details, see “Checking and replacing tires” on
page 626.
4
Tire ply composition and materials: Plies mean
a layer of rubber-coated parallel cords. Cords
mean the strands forming the plies in the tire.
5
Radial tires or bias-ply tires: A radial tire has
“RADIAL” on the sidewall. A tire not marked with
“RADIAL” is a bias-ply tire.
6
“TUBELESS” or “TUBE TYPE”: A tubeless tire
does not have a tube inside the tire. A tube type
tire has a tube inside the tire and the tube
maintains the air pressure.
7
Load limit at maximum cold tire inflation
pressure: For details, see “Checking and
replacing tires” on page 626.
8
Maximum cold tire inflation pressure: This
means the pressure to which a tire may be
inflated. For details about recommended cold tire
inflation pressure, see “Specifications” on page
604.
9
Uniform tire quality grading: For details, see
“Uniform tire quality grading” that follows.
10
Summer tire or all season tire: An all season
tire has “M+S” on the sidewall. The tire not
marked with “M+S” is a summer tire. For details,
see “Types of tires” on page 624.
616
Page 61

CHASSIS
DOT and Tire Identification Number (TIN)
The illustration indicates typical DOT and Tire
Identification Number (TIN).
1
“DOT” symbol
2
Tire Identification Number (TIN)
3
Tire manufacturer’s identification mark
4
Tire size code
5
Manufacturer’s optional tire type code
(3 or 4 letters)
6
Manufacturing week
7
Manufacturing year
The “DOT” symbol certifies that the tire conforms to
applicable Federal Motor Vehicle Safety Standards.
Tire size
The illustration indicates typical tire size.
1
Tire use (P=Passenger car, T=Temporary
use)
2
Section width (in millimeters)
3
Aspect ratio (tire height to section width)
4
Tire construction code
(R=Radial, D=Diagonal)
5
Wheel diameter (in inches)
6
Load index (2 digits or 3 digits)
7
Speed symbol (alphabet with one letter)
617
Page 62

CHASSIS
1
Section width
2
Tire height
3
Wheel diameter
Name of each section of tire
1
Bead
2
Sidewall
3
Shoulder
4
Tread
5
Belt
6
Inner liner
7
Reinforcing rubber
8
Carcass
9
Rim lines
10
Bead wires
11
Chafer
618
Page 63

CHASSIS
Uniform tire quality grading
This information has been prepared in accordance
with regulations issued by the National Highway
Traffic Safety Administration of the U.S.
Department of Transportation. It provides the
purchasers and/or prospective purchasers of
Lexus vehicles with information on uniform tire
quality grading.
Your Lexus dealer will help answer any questions
you may have as you read this information.
DOT quality grades — All passenger car tires must
conform to Federal Safety Requirements in
addition to these grades. Quality grades can be
found where applicable on the tire sidewall
between tread shoulder and maximum section
width. For example: Treadwear 200 Traction AA
Temperature A
Treadwear — The treadwear grade is a comparative
rating based on the wear rate of the tire when tested
under controlled conditions on a specified government
test course. For example, a tire graded 150 would
wear one and a half (1 — 1/2) times as well on the
government course as a tire graded 100. The relative
performance of tires depends upon the actual
conditions of their use, however, and may depart
significantly from the norm due to variations in driving
habits, service practices and differences in road
characteristics and climate.
Traction AA, A, B, C — The traction grades, from
highest to lowest, are AA, A, B and C, and they
represent the tire’s ability to stop on wet pavement
as measured under controlled conditions on specified
government test surfaces of asphalt and concrete.
A tire marked C may have poor traction performance.
Warning: The traction grade assigned to this tire is
based on braking (straight ahead) traction tests and
does not include cornering (turning) traction.
619
Page 64

CHASSIS
Temperature A, B, C — The temperature grades are
A (the highest), B, and C, representing the tire’s
resistance to the generation of heat and its ability to
dissipate heat when tested under controlled conditions
on a specified indoor laboratory test wheel. Sustained
high temperature can cause the material of the tire
to degenerate and reduce tire life, and excessive
temperature can lead to sudden tire failure. The
grade C corresponds to a level of performance which
all passenger car tires must meet under the Federal
Motor Vehicle Safety Standard No. 109. Grades B
and A represent higher levels of performance on the
laboratory test wheel than the minimum required by
law.
Warning: The temperature grade for this tire
established for a tire that is properly inflated and not
overloaded. Excessive speed, underinflation, or
excessive loading, either separately or in combination,
can cause heat buildup and possible tire failure.
620
Page 65

CHASSIS
Glossary of tire terminology
Tire related term Meaning
Accessory weight the combined weight (in excess of those standard items which may be replaced)
of automatic transmission, power steering, power brakes, power windows, power
seats, radio, and heater, to the extent that these items are available as
factory-installed equipment (whether installed or not)
Cold tire inflation
pressure
Curb weight the weight of a motor vehicle with standard equipment including the maximum
Intended outboard
sidewall
Maximum inflation
pressure
tire inflation pressure when the vehicle has been parked for at least 3 hours or
more, or it has not been driven more than 1.5 km or 1 mile under that condition
capacity of fuel, oil, and coolant, and, if so equipped, air conditioning and
additional weight optional engine
(a) the sidewall that contains a whitewall, bears white lettering or bears
manufacturer, brand, and/or model name molding that is higher or deeper
than the same molding on the other sidewall of the tire, or
(b) the outward facing sidewall of an asymmetrical tire that has a particular side
that must always face outward when mounted on a vehicle
the maximum cold inflation pressure to which a tire may be inflated and it is
shown on the sidewall of the tire
Maximum loaded
vehicle weight
the sum of —
(a) curb weight;
(b) accessory weight;
(c) vehicle capacity weight; and
(d) production options weight
621
Page 66

CHASSIS
Tire related term Meaning
Normal occupant
weight
68 kg (150 lb.) times the number of occupants specified in the second column of
Table 1 that follows
Occupant distribution distribution of occupants in a vehicle as specified in the third column of Table 1
that follows
622
Production options
weight
the combined weight of those installed regular production options weighing over
2.3 kg (5 lb.) in excess of those standard items which they replace, not
previously considered in curb weight or accessory weight, including heavy duty
brakes, ride levelers, roof rack, heavy duty battery, and special trim
Recommended
cold tire inflation pressure recommended by a manufacturer
inflation pressure
Rim a metal support for a tire or a tire and tube assembly upon which the tire beads
are seated
Rim diameter (Wheel
nominal diameter of the bead seat
diameter)
Rim size designation rim diameter and width
Rim type designation the industry of manufacturer’s designation for a rim by style or code
Rim width nominal distance between rim flanges
Page 67

Tire related term Meaning
Vehicle capacity
weight
the rated cargo and luggage load plus 68 kg (150 lb.) times the vehicle’s
designated seating capacity
(Total load capacity)
Vehicle maximum
load on the tire
the load on an individual tire that is determined by distributing to each axle its
share of the maximum loaded vehicle weight and dividing by two
CHASSIS
Vehicle normal load
on the tire
the load on an individual tire that is determined by distributing to each axle its
share of the curb weight, accessory weight, and normal occupant weight
(distributed in accordance with Table 1 that follows) and dividing by two
Weather side
the surface area of the rim not covered by the inflated tire
Table 1 — Occupant loading and distribution for vehicle normal load for various designated seating
capacities
Designated seating capacity,
number of occupants
Vehicle normal load, number of
occupants
Occupant distribution in a
normally loaded vehicle
2 through 4 2 2 in front
5 through 10 3 2 in front, 1 in second seat
623
Page 68

CHASSIS
TYPES OF TIRES
Determine what kind of tires your vehicle is originally
equipped with.
1. Summer tires
Summer tires are high-speed capability tires best
suited to highway driving under dry conditions.
Since summer tires do not have the same traction
performance as snow tires, summer tires are
inadequate for driving on snow-covered or icy roads.
For driving on snow-covered or icy roads, we
recommend using snow tires. If installing snow tires,
be sure to replace all four tires.
2. All season tires
All season tires are designed to provide better traction
in snow and to be adequate for driving in most winter
conditions, as well as for use all year round.
All season tires, however, do not have adequate
traction performance compared with snow tires in
heavy or loose snow. Also, all season tires fall short
in acceleration and handling performance compared
with summer tires in highway driving.
The details about how to distinguish summer tires
from all season tires are described on page 615.
CAUTION
Do not mix summer and all season tires on
your vehicle as this can cause dangerous
handling characteristics, resulting in loss of
control.
Do not use tires other than the manufacturer’s
designated tires, and never mix tires or
wheels of the sizes different from the
originals.
624
Page 69

CHASSIS
ROTATING TIRES
To equalize tire wear and help extend tire life,
Lexus recommends that you rotate your tires
according to the maintenance schedule. (For
scheduled maintenance information, please refer
to the “Owner’s Manual Supplement/Scheduled
Maintenance”.) However, the most appropriate
timing for tire rotation may vary according to your
driving habits and road surface conditions.
The wheel assemblies must be rotated as illustrated
above.
When rotating tires, check for uneven wear and
damage. Abnormal wear is usually caused by
incorrect tire pressure, improper wheel alignment,
out-of-balance wheels, or severe braking.
Before storing radial, snow or studded tires, mark the
direction of rotation and be sure to install them in the
same direction when using them again. Tires should
be stored in a cool dry place.
625
Page 70

CHASSIS
CHECKING AND REPLACING TIRES
When to replace your tires
1
New tread
3
Worn tread
Replace the tires when the tread wear indicators
show. The location of the tread wear indicators
is shown by the marks such as “TWI” or “
marks, etc., molded on the sidewall of each tire.
2
Tread wear indicator
∆”
The tires on your Lexus have built-in tread wear
indicators to help you know when the tires need
replacement. When the tread depth wears to 1.6 mm
(0.06 in.) or less, the indicators will appear. If you
can see the indicators in two or more adjacent
grooves, the tire should be replaced.
The effectiveness of snow tires is lost if the tread
wears down below 4 mm (0.16 in.).
If you have tire damage such as cuts, splits,
cracks deep enough to expose the fabric, or
bulges indicating internal damage, the tire should
be replaced.
If a tire often goes flat or cannot be properly repaired
due to the size or location of a cut or other damage,
it should be replaced. If you are not sure, consult
with your Lexus dealer.
If air loss occurs while driving, do not continue driving.
Driving even a short distance can damage a tire
beyond repair.
Any tires which are over 6 years old must be
checked by a qualified technician even if damage
is not obvious.
Tires deteriorate with age even if they have never or
seldom been used.
626
Page 71

CHASSIS
This applies also to the spare tire and tires stored
for future use.
Tire selection
When replacing a tire, use a tire of the same size
and construction, and the same or greater load
capacity as the originally installed tires. Also, all
the tires must be the same brand and have the
same tread patterns.
Using any other size or type of tire may seriously
affect handling, ride, speedometer/odometer
calibration, ground clearance, and clearance between
the body and tires or snow chains.
Check that the maximum load of the replaced tire is
greater than 1/2 of the Gross Axle Weight Ratings
(GAWR) of either the front axle or the rear axle,
whichever is greater. As for the maximum load of
the tire, see the load limit at maximum cold tire
inflation pressure mentioned on the sidewall of the tire,
and as for the Gross Axle Weight Ratings (GAWR),
see the Certification Label. For details about
Certification Label and sidewall of the tire, see pages
573 and 615.
CAUTION
Observe the following instructions. Otherwise,
an accident may occur resulting in death or
serious injuries.
Do not mix radial, bias belted, or bias-ply tires
on your vehicle, as this may cause dangerous
handling characteristics resulting in loss of
control.
Do not use tires other than the manufacturer’s
recommended size, as this may cause
dangerous handling characteristics resulting
in loss of control.
Do not use tires of different brands, sizes,
construction or tread patterns, as this may
cause dangerous handling characteristics
resulting in loss of control.
627
Page 72

CHASSIS
INSTALLING SNOW TIRES AND
CHAINS
When to use snow tires or chains
Snow tires or chains are recommended when driving on
snow or ice.
On wet or dry roads, conventional or radial tires provide better
traction than snow or studded tires.
Snow tire selection
If you need snow tires, select tires of the same size,
construction and load capacity as the originally installed
tires. Also, all the tires must be the same brand and have
the same tread patterns.
Do not use tires other than stated above. Since your vehicle
has radial tires as original equipment, make sure your snow
tires also have radial construction. Do not install studded tires
without first checking local regulations for possible restrictions.
CAUTION
Observe the following instructions. Otherwise, an
accident may occur resulting in death or serious
injuries.
Do not use snow tires other than the manufacturer’s
recommended size, as this may cause dangerous
handling characteristics resulting in loss of control.
Do not use snow tires of different brands, sizes,
construction or tread patterns, as this may cause
dangerous handling characteristics resulting in loss
of control.
Snow tire installation
Snow tires should be installed on all wheels.
Installing snow tires on the rear wheels only can lead to an
excessive difference in road grip capability between the front
and rear tires which could cause loss of vehicle control.
CAUTION
Do not drive with the snow tires incorrectly inflated.
Never drive over 105 km/h (65 mph) with any type of
snow tires.
628
Page 73

CHASSIS
Tire chain selection
1
Side chain
Use the tire chains of correct size.
For P265/65R17 tires, use the following type chains.
A: Diameter of side chain 5.0 (0.20)
B: Width of side chain 18.0 (0.71)
C: Length of side chain 46.0 (1.81)
D: Width of cross chain 22.6 (0.89)
E: Length of cross chain 38.1 (1.5)
F: Diameter of cross chain 6.3 (0.25)
2
Cross chain
mm (in.)
Regulations regarding the use of tire chains vary
according to location or type of road. Always check local
regulations before installing chains.
629
Page 74

CHASSIS
NOTICE
If the wrong combination of tire and chain is used, the
chains could damage the vehicle body.
630
Page 75

CHASSIS
Chain installation
Install the chains on the rear tires as tightly as possible.
Do not use tire chains on the front tires. Retighten chains
after driving 0.5 — 1.0 km (1/4 — 1/2 mile).
When installing chains on your tires, carefully follow the
instructions of the chain manufacturer.
CAUTION
Do not exceed 50 km/h (30 mph) or the chain
manufacturer’s recommended speed limit,
whichever is lower.
Drive carefully avoiding bumps, holes, and sharp
turns, which may cause the vehicle to bounce.
Avoid sharp turns or locked-wheel braking, as use of
chains may adversely affect vehicle handling.
When driving with chains installed, be sure to drive
carefully . S l o w down before entering curves to avoid
losing control of the vehicle. Otherwise an accident
may occur.
631
Page 76

CHASSIS
NOTICE
When jacking up or installing tire chains, be sure to turn
off the rear height control air suspension with the
“HEIGHT CONTROL OFF” switch and stop the engine.
Otherwise, the vehicle height may change because of
the automatic leveling function resulting in accident.
632
Page 77

CHASSIS
REPLACING WHEELS
When to replace your wheels
If you have wheel damage such as bending, cracks or
heavy corrosion, the wheel should be replaced.
If you fail to replace a damaged wheel, the tire may slip off the
wheel or cause loss of handling control.
Replacement with used wheels is not recommended as they
may have been subjected to rough treatment or high mileage
and could fail without warning. Also, bent wheels which have
been straightened may have hidden structural damage and
therefore should not be used. Never use an inner tube in a
leaking wheel which is designed for a tubeless tire.
Wheel selection
When replacing wheels, care should be taken to ensure
that they are equivalent to those removed in load capacity,
diameter, rim width, and offset.
Correct replacement wheels are available at your Lexus
dealer.
A wheel of a different size or type may adversely affect
handling, wheel and bearing life, brake cooling,
speedometer/odometer calibration, stopping ability, headlight
aim, bumper height, vehicle ground clearance, and tire or snow
chain clearance to the body and chassis.
CAUTION
Observe the following instructions. Otherwise, an
accident may occur resulting in death or serious
injuries.
Do not use wheels other than the manufacturer’s
recommended size, as this may cause dangerous
handling characteristics resulting in loss of control.
Do not use wheels of different brands, sizes and
types, as this may cause dangerous handling
characteristics resulting in loss of control.
633
Page 78

CHASSIS
ALUMINUM WHEEL PRECAUTIONS
When installing aluminum wheels, check that the wheel nuts
are tight after driving your vehicle the first 1600 km (1000
miles).
If you have rotated, repaired, or changed your tires, check
that the wheel nuts are still tight after driving 1600 km (1000
miles).
When using tire chains, be careful not to damage the
aluminum wheels.
Use only Lexus wheel nuts and wrench designed for your
aluminum wheels.
When balancing your wheels, use only Lexus balance
weights or equivalent and a plastic or rubber hammer.
As with any wheel, periodically check your aluminum
wheels for damage. If damaged, replace immediately.
SUSPENSION AND CHASSIS
CAUTION
Do not modify the suspension/chassis with lift kits,
spacers, springs, etc. It can cause dangerous handling
characteristics, resulting in loss of control.
634
Page 79

SECTION 6 –
SERVICE PROCEDURES AND
SPECIFICATIONS
Engine
Specifications 585. . . . . . . . . . . . . . . . . . . . . . . . . . . . . . . . . . . . . . . . . . . . . . . . . . . . . . . . . . . . . . . . . . . . .
Fuel 589. . . . . . . . . . . . . . . . . . . . . . . . . . . . . . . . . . . . . . . . . . . . . . . . . . . . . . . . . . . . . . . . . . . . . . . . . . . . . .
Fuel pump shut off system 592. . . . . . . . . . . . . . . . . . . . . . . . . . . . . . . . . . . . . . . . . . . . . . . . . . . . . . . . . . .
Facts about engine oil consumption 592. . . . . . . . . . . . . . . . . . . . . . . . . . . . . . . . . . . . . . . . . . . . . . . . . . .
Used engine oil 593. . . . . . . . . . . . . . . . . . . . . . . . . . . . . . . . . . . . . . . . . . . . . . . . . . . . . . . . . . . . . . . . . . . .
Checking the engine oil level 594. . . . . . . . . . . . . . . . . . . . . . . . . . . . . . . . . . . . . . . . . . . . . . . . . . . . . . . . .
Checking the engine coolant level 599. . . . . . . . . . . . . . . . . . . . . . . . . . . . . . . . . . . . . . . . . . . . . . . . . . . .
Checking the radiator and condenser 601. . . . . . . . . . . . . . . . . . . . . . . . . . . . . . . . . . . . . . . . . . . . . . . . .
Spark plugs 602. . . . . . . . . . . . . . . . . . . . . . . . . . . . . . . . . . . . . . . . . . . . . . . . . . . . . . . . . . . . . . . . . . . . . . .
2
584
Page 80

SPECIFICATIONS
— GENERAL
Model
Type 8 cylinder V Type, 4 cycle, gasoline
Bore and stroke 94.0 84.0 mm (3.70 3.31 in.)
Displacement 4664 cm3 (284.5 cu. in.)
V alve clearance (engine cold)
Intake
Exhaust
Drive belt tension Automatic adjustment
2UZ-FE
0.15 — 0.25 mm (0.006 — 0.010 in.)
0.25 — 0.35 mm (0.010 — 0.014 in.)
ENGINE
585
Page 81

ENGINE
— LUBRICATION SYSTEM
Oil capacity
Drain and refill
with filter
without filter
Oil grade ILSAC multigrade engine oil
Recommended oil viscosity (SAE):
6.2 L (6.5 qt., 5.5 Imp. qt.)
5.7 L (6.0 qt., 5.0 Imp. qt.)
62Z002
Outside temperature
NOTE:
“Toyota Genuine Motor Oil” is used in your Lexus vehicle. Use Lexus approved “Toyota Genuine Motor Oil” or equivalent to satisfy
the above grade and viscosity. Please contact your Lexus dealer for further details.
586
Page 82

ENGINE
— COOLING SYSTEM
Capacity
Coolant type “Toyota Super Long Life Coolant” or similar high quality
NOTE:
“Toyota Super Long Life Coolant” is used in your Lexus vehicle at factory fill. In order to avoid technical problems, only use “Toyota
Super Long Life Coolant” or similar high quality ethylene glycol based non-silicate, non-amine, non-nitrite, and non-borate coolant
with long-life hybrid organic acid technology. (Coolant with long-life hybrid organic acid technology is a combination of low
phosphates and organic acids.) Please contact your Lexus dealer for further details.
— FUEL
Fuel type
Octane rating 91 (Research octane number 96) or higher
12.9 L (13.6 qt., 11.4 Imp. qt.)
ethylene glycol based non-silicate, non-amine, non-nitrite,
and non-borate coolant with long-life hybrid organic acid
technology (Coolant with long-life hybrid organic acid
technology is a combination of low phosphates and organic
acids.)
Do not use plain water alone.
Unleaded gasoline only
587
Page 83

ENGINE
— IGNITION SYSTEM
Spark plug — Make
DENSO
NGK
— Gap
— ELECTRICAL SYSTEM
Battery Open voltage at 20C (68F):
Charging rates
SK20R11
IFR6A11
1.1 mm (0.043 in.)
12.6 — 12.8 V Fully charged
12.2 — 12.4 V Half charged
11.8 — 12.0 V Discharged
[Voltage that is checked 20 minutes after the key is removed
with all the lights turned off]
5 A max.
588
Page 84

ENGINE
FUEL
Fuel type
Y our vehicle must use only unleaded gasoline.
To help prevent gas station mixups, your Lexus has a smaller
fuel tank opening. The special nozzle on pumps with unleaded
fuel will fit it, but the larger standard nozzle on pumps with
leaded gas will not.
NOTICE
Do not use leaded gasoline. Use of leaded gasoline will
cause the three-way catalytic converter to lose its
effectiveness and the emission control system to
function improperly. Also, this can increase
maintenance costs.
At a minimum, the gasoline you use should meet the
specifications of ASTM D4814 in the U.S.A. and CGSB
3.5-M93 in Canada.
589
Page 85

ENGINE
Octane rating
Premium unleaded gasoline with an Octane Rating of 91
(Research Octane Number 96) or higher required for
optimum engine performance. However, i f such premium
type cannot be obtained, you may use unleaded gasoline
with an Octane Rating as low as 87 (Research Octane
Number 91).
Use of unleaded fuel with an octane number or rating lower
than stated above will cause persistent heavy knocking. If
severe, this will lead to engine damage.
If your engine knocks...
If you detect heavy knocking even when using the
recommended fuel, or if you hear steady knocking while
holding a steady speed on level roads, consult your Lexus
dealer.
However, occasionally, you may notice light knocking for a
short time while accelerating or driving up hills. This is normal
and there is no need for concern.
Gasoline containing detergent additives
Lexus recommends the use of gasoline that contains
detergent additives to avoid build-up of engine deposits.
However, all gasoline sold in the U.S. contains detergent
additives to keep clean and/or clean intake systems.
Quality gasoline
Automotive manufacturers in the U.S., Europe and Japan
have developed a specification for quality fuel named
World-W ide Fuel Charter (WWFC) that is expected to be
applied world wide. The WWFC consists of four
categories that depend on required emission levels. In the
U.S., category 3 or 4 has been adopted. The WWFC
improves air quality by providing for better emissions in
vehicle fleets, and customer satisfaction through better
vehicle performance.
Cleaner burning gasoline
Cleaner burning gasoline, including reformulated
gasoline that contains oxygenates such as ethanol or
MTBE is available in many areas.
Lexus recommends the use of cleaner burning gasoline and
appropriately blended reformulated gasoline. These types of
gasoline provide excellent vehicle performance, reduce
vehicle emissions, and improve air quality.
590
Page 86

ENGINE
Oxygenates in gasoline
Lexus allows the use of oxygenate blended gasoline
where the oxygenate content is up to 10% ethanol or 15%
MTBE. If y o u use gasohol in your Lexus, be sure that it has
an octane rating no lower than 91.
Lexus does not recommend the use of gasoline containing
methanol.
Gasoline containing MMT
Some gasoline contain an octane enhancing additive
called MMT (Methylcyclopentadienyl Manganese
Tricarbonyl).
Lexus does not recommend the use of gasoline that contains
MMT. If fuel containing MMT is used, your emission control
system may be adversely affected. The Malfunction Indicator
Lamp on the instrument cluster may come on. If this happens,
contact your Lexus dealer for service.
NOTICE
Do not use gasohol other than stated above. It will
cause fuel system damage or vehicle performance
problems.
If drivability problems are encountered (poor hot
starting, vaporizing, engine knock, etc.), discontinue
its use.
Take care not to spill gasohol during refueling.
Gasohol may cause paint damage.
Gasoline quality
In a very few cases, you may experience driveability problems
caused by the particular gasoline that you are using. If you
continue to have unacceptable driveability, try changing
gasoline brands. If this does not rectify your problem, then
consult your Lexus dealer.
Fuel tank capacity
87 L (23 gal., 19.1 Imp. gal.)
591
Page 87

ENGINE
FUEL PUMP SHUT OFF SYSTEM
The fuel pump shut off system stops supplying fuel to the
engine to minimize the risk of fuel leakage when the engine
stalls or an airbag inflates upon collision. To restart the engine
after the fuel pump shut off system activates, turn the ignition
switch to “ACC” or “LOCK” once and start it.
CAUTION
Inspect the ground under the vehicle before restarting
the engine. If you find that liquid has leaked onto the
ground, it is the fuel system that has been damaged and
it is in need of repair. In this case, do not restart the
engine.
FACTS ABOUT ENGINE OIL
CONSUMPTION
Functions of engine oil
Engine oil has the primary function of lubricating and cooling
the inside of the engine, and plays a major role in maintaining
the engine in proper working order.
Engine oil consumption
It is normal that an engine should consume some engine
oil during normal engine operation. The causes of oil
consumption in a normal engine are as follows.
Oil is used to lubricate pistons, piston rings and cylinders.
A thin film of oil is left on the cylinder wall when a piston
moves downwards in the cylinder. High negative pressure
generated when the vehicle is decelerating sucks some of
this oil into the combustion chamber. This oil as well as
some part of the oil film left on the cylinder wall is burned by
the high temperature combustion gases during the
combustion process.
Oil is also used to lubricate the stems of the intake valves.
Some of this oil is sucked into the combustion chamber
together with the intake air and is burned along with the fuel.
High temperature exhaust gases also burn the oil used to
lubricate the exhaust valve stems.
592
Page 88

ENGINE
The amount of engine oil consumed depends on the
viscosity of the oil, the quality of the oil and the way the
vehicle is driven.
More oil is consumed by high-speed driving and frequent
acceleration and deceleration.
A new engine consumes more oil, since its pistons, piston rings
and cylinder walls have not become conditioned.
Oil consumption: Max. 1.0 L per 1000 km (1.1 qt./600 miles,
0.9 Imp. qt./600 miles)
When judging the amount of oil consumption, keep in
mind that the oil may have become diluted, making it
difficult to judge the true level accurately.
For example, if a vehicle is used for repeated short trips and
consumes a normal amount of oil, the dipstick may not show
any drop in the oil level at all, even after 1000 km (600 miles)
or more. This is because the oil is gradually becoming diluted
with fuel or moisture, making it appear that the oil level has not
changed.
The diluting ingredients evaporate out when the vehicle is then
driven at high speeds, as on an expressway , making it appear
that oil is excessively consumed after driving at high speeds.
NOTICE
Failure to check the oil level regularly could lead to
serious engine trouble due to insufficient oil.
Importance of engine oil level check
One of the most important points in proper vehicle
maintenance is to keep the engine oil at the optimum level so
that oil function will not be impaired. Therefore, it is essential
that the oil level be checked regularly. Lexus recommends that
the oil level be checked every time you refuel the vehicle.
For detailed information on oil level check, see “Checking the
engine oil level” described below.
USED ENGINE OIL
593
Page 89

ENGINE
CAUTION
Used engine oil contains potentially harmful
contaminants which may cause skin disorders such
as inflammation or skin cancer, so care should be
taken to avoid prolonged and repeated contact with
it. To remove used engine oil from your skin, wash
thoroughly with soap and water.
Dispose of used oil and used oil filters only in a safe
and acceptable manner. Do not dispose of used oil
and used oil filters in household trash, in sewers or
onto the ground. Call your Lexus dealer or a service
station for information concerning recycling or
disposal.
Do not leave used oil within the reach of children.
CHECKING THE ENGINE OIL LEVEL
With the engine at operating temperature and turned off,
check the oil level on the dipstick.
1. To get a correct reading, the vehicle should be on level
ground. After turning off the engine, wait a few minutes for the
oil to drain back into the bottom of the engine.
2. Pull the dipstick out, hold a rag under the end and wipe it
clean.
3. Reinsert the dipstick and push it in as far as it will go, or the
reading will not be correct.
594
Page 90

ENGINE
NOTICE
Be careful not to drop engine oil on the vehicle
components.
1
Add oil
2
O.K.
3
Too full
4. Pull the dipstick out and look at the oil level while holding a
4
rag under the end. If it is between the low level mark (
5
the full level mark (
), it is O.K.
) and
595
Page 91

ENGINE
If the oil level is below or only slightly above the low line,
add engine oil of the same type as already in the engine.
Remove the oil filler cap and add engine oil a little at a time,
checking the dipstick. We recommend that you use a funnel
when adding oil. The approximate quantity of oil needed to
raise the level between low line and full line on the dipstick is
indicated as follows:
1.5 L (1.6 qt., 1.3 Imp. qt.)
For the engine oil capacity , see “Specifications” on page 604.
When the level reaches within the correct range, return the filler
cap and turn the cap clockwise until you hear a click.
596
Page 92

NOTICE
Be careful not to spill engine oil on the vehicle
components.
Avoid overfilling, or the engine could be damaged.
Check the oil level on the dipstick once again after
adding the oil.
ENGINE
597
Page 93

ENGINE
Engine oil selection
“Toyota Genuine Motor Oil” is used in your Lexus vehicle. Use
Lexus approved “Toyota Genuine Motor Oil” or equivalent to
satisfy the following grade and viscosity.
Oil grade: ILSAC multigrade engine oil.
Recommended viscosity: SAE 5W-30
62Z002
Outside temperature
SAE 5W-30 is the best choice, for good fuel economy and
good starting in cold weather.
If SAE 5W-30 oil is not available, SAE 10W-30 may be
used. However, it should be replaced with SAE 5W-30 at
the next oil change.
Oil identification marks
The ILSAC (International Lubricant Standardization and
Approval Committee) Certification Mark is added to some oil
containers to help you select the oil you should use.
To ensure excellent lubrication performance for your engine,
“Toyota Genuine Motor Oil” is available, which has been
specifically tested and approved for all Lexus engines.
Please contact your Lexus dealer for further details about
“Toyota Genuine Motor Oil”.
598
Page 94

ENGINE
CHECKING THE ENGINE COOLANT
LEVEL
1
Reservoir cap
3
“L” (lower) line
Look at the see-through coolant reservoir when the
engine is cold. The coolant level is satisfactory if it is
between the “F” and “L” lines on the reservoir. If the level
is low, add the coolant. (For the coolant type, see “Coolant
type selection” described below.)
The coolant level in the reservoir will vary with engine
temperature. However, if the level is on or below the “L” line,
add coolant. Bring the level up to the “F” line.
2
“F” (upper) line
If the coolant level drops within a short time after replenishing,
there may be a leak in the system. Visually check the radiator,
hoses, engine coolant filler cap, radiator cap and drain cock
and water pump.
If you can find no leak, have your Lexus dealer test the radiator
cap pressure and check for leaks in the cooling system.
CAUTION
To prevent burning yourself, do not remove the radiator
cap when the engine is hot.
599
Page 95

ENGINE
Coolant type selection
Use of improper coolants may damage your engine cooling
system.
Only use “Toyota Super Long Life Coolant” or similar high
quality ethylene glycol based non- silicate, non- amine,
non- nitrite, and non- borate coolant with long- life hybrid
organic acid technology. (Coolant with long-life hybrid organic
acid technology is a combination of low phosphates and
organic acids.)
For the U.S.A. — “Toyota Super Long Life Coolant” is a mixture
of 50% coolant and 50% deionized water. This coolant
provides protection down to about -35C (-31F).
For Canada — “Toyota Super Long Life Coolant” is a mixture
of 55% coolant and 45% deionized water. This coolant
provides protection down to about -42C (-44F).
NOTICE
Do not use plain water alone.
600
Page 96

ENGINE
Lexus recommends “Toyota Super Long Life Coolant”, which
has been tested to ensure that it will not cause corrosion nor
result in malfunction of your engine coolant system with proper
usage. “Toyota Super Long Life Coolant” is formulated with
long- life hybrid organic acid technology and has been
specifically designed to avoid engine cooling system
malfunction on Lexus vehicles.
Please contact your Lexus dealer for further details.
CAUTION
To prevent burning yourself, be careful not to touch the
radiator or condenser when the engine is hot.
NOTICE
To prevent damage to the radiator and condenser, do
not perform the work by yourself.
CHECKING THE RADIATOR AND
CONDENSER
If either of the above parts are extremely dirty or you are not
sure of their condition, take your vehicle to a Lexus dealer.
601
Page 97

ENGINE
SPARK PLUGS
NOTICE
Use only iridium-tipped spark plugs. Do not adjust
gaps for engine performance or smooth drivability.
Your engine is fitted with iridium-tipped spark plugs.
602
Page 98

SECTION 6 –
SERVICE PROCEDURES AND
SPECIFICATIONS
Introduction
Vehicle identification 573. . . . . . . . . . . . . . . . . . . . . . . . . . . . . . . . . . . . . . . . . . . . . . . . . . . . . . . . . . . . . . . .
Theft prevention labels 574. . . . . . . . . . . . . . . . . . . . . . . . . . . . . . . . . . . . . . . . . . . . . . . . . . . . . . . . . . . . . .
Engine compartment overview 575. . . . . . . . . . . . . . . . . . . . . . . . . . . . . . . . . . . . . . . . . . . . . . . . . . . . . . .
Do-it-yourself service precautions 578. . . . . . . . . . . . . . . . . . . . . . . . . . . . . . . . . . . . . . . . . . . . . . . . . . .
Parts and tools 581. . . . . . . . . . . . . . . . . . . . . . . . . . . . . . . . . . . . . . . . . . . . . . . . . . . . . . . . . . . . . . . . . . . . .
1
572
Page 99

VEHICLE IDENTIFICATION
The vehicle identification number (VIN) is the legal
identifier for your vehicle. This number is on the left top
of the instrument panel and can be seen through the
windshield from outside.
This is the primary identification number for your Lexus. It is
used in registering the ownership of your vehicle.
INTRODUCTION
The vehicle identification number (VIN) is also on the
Certification Label.
The engine number is stamped on the engine block as
shown.
573
Page 100

INTRODUCTION
THEFT PREVENTION LABELS
(U.S.A. ONLY)
Your new vehicle carries theft prevention labels which are
approximately 56 mm (2.20 in.) by 16 mm (0.63 in.).
The purpose of these labels is to reduce the incidence of
vehicle thefts by facilitating the tracing and recovery of parts
from stolen vehicles. The label is designed so that once it is
applied to a surface, any attempt to remove it will result in
destroying the integrity of the label. Transferring these labels
intact from one part to another will be impossible.
574
 Loading...