

Page 1
1
When Driving
Topic 3
Entering and Exiting
Topic 1
Before Driving
Topic 2
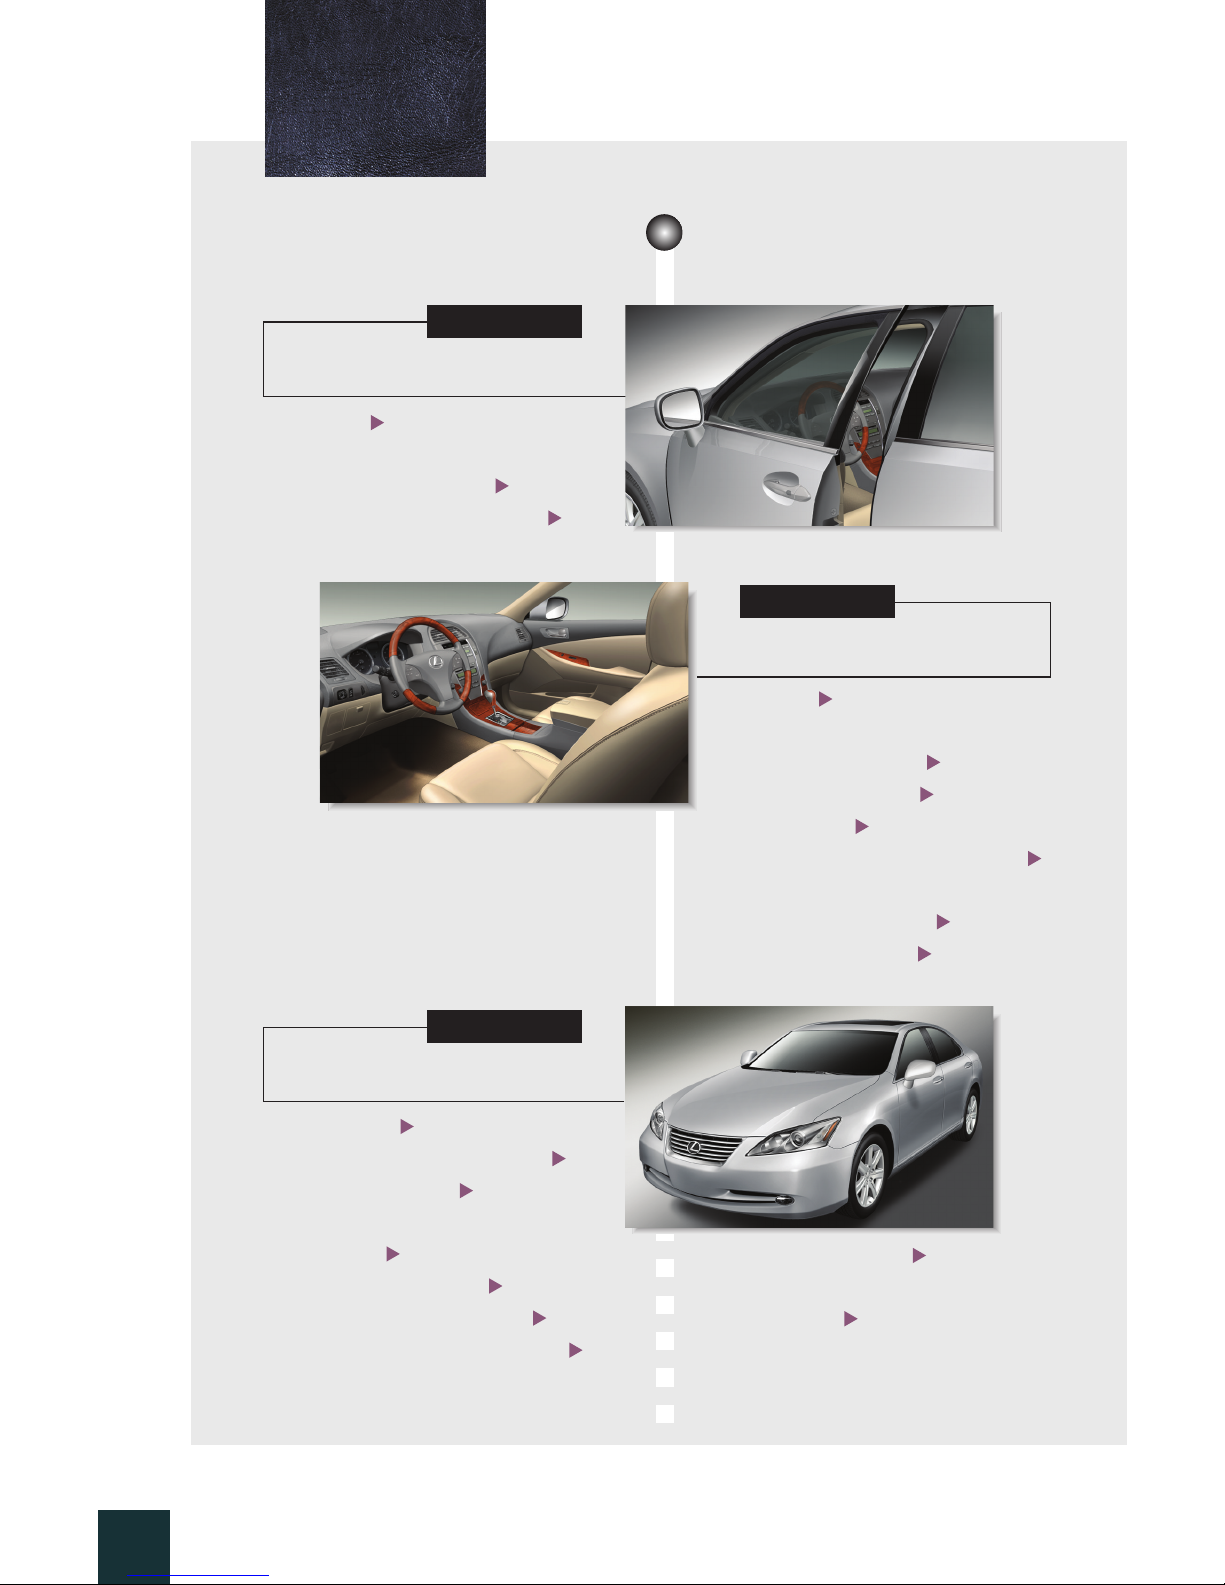
Overview
Contents
●Starting P.1 7
●Automatic Transmission P.18
●Parking Brake P.1 9
●Emergency Flasher
Switch P.1 9
●Tu rn S ig n al Le ve r P. 20
●Intuitive Parking Assist P.2 0
●Multi-information Display P. 21
●Keys P. 7
●Smart Access System with
Push-button Start P. 8
●Theft Deterrent System P.9
The Quick Guide is not intended as a substitute for your
Owner’s
Manual
. We strongly encourage you to review the
Owner’s
Manual
and supplementary manuals so you will have a better
understanding of your vehicle’s capabilities and limitations.
●Cruise Control P.2 2
●Dynamic Radar Cruise
Control P. 23
●Seats P.1 1
●Driving and Seat Position
Memory System P.1 2
●Head Restraints P.1 3
●Seatbelts P.1 3
●Outside Rear View Mirrors P.1 4
●Anti-glare Inside
Rear View Mirror P.14
●Steering Wheel P.1 5
Page 2
Entering and Exiting
Before Driving
When Driving
Rain and
Night Driving
Driving Comfort
Opening and Closing
What to do if ...
Customizing
Yo u r L e x u s
2
Driving Comfort
Topic 5
Opening and Closing
Topic 6
What to do if ...
Customizing Your Lexus
Responding to warning/indicator lights
and other problems that may arise.
A list of features that can be customized.
Rain and Night Driving
Topic 4
●Headlights P.25
●Fog Lights P.26
●Windshield Wipers and
Wa s h e r s P. 27
●Rear Window and Outside Rear
View Mirror Defoggers P.2 9
●
Instrument Panel Light
Control P.2 9
●Compass P.3 9
●Seat Heaters and Ventilators P.40
●Rear Sunshade P.4 0
●Trunk Storage Extension P.41
●Luggage Mat P.4 1
●Door Locks P.43
●Power Windows P.4 4
●Tr u n k P.4 4
●Fuel Tank Cap P.45
●Hood P.45
●Moon Roof P.4 6
●Audio System P. 31
●Air Conditioning System P.3 4
●Garage Door Opener P. 35
●Ashtrays P.37
●Glove Box P.3 7
●Auxiliary Box P.3 7
●Console Boxes P.38
●Interior Lights P.3 8
●Cup Holders P.3 9
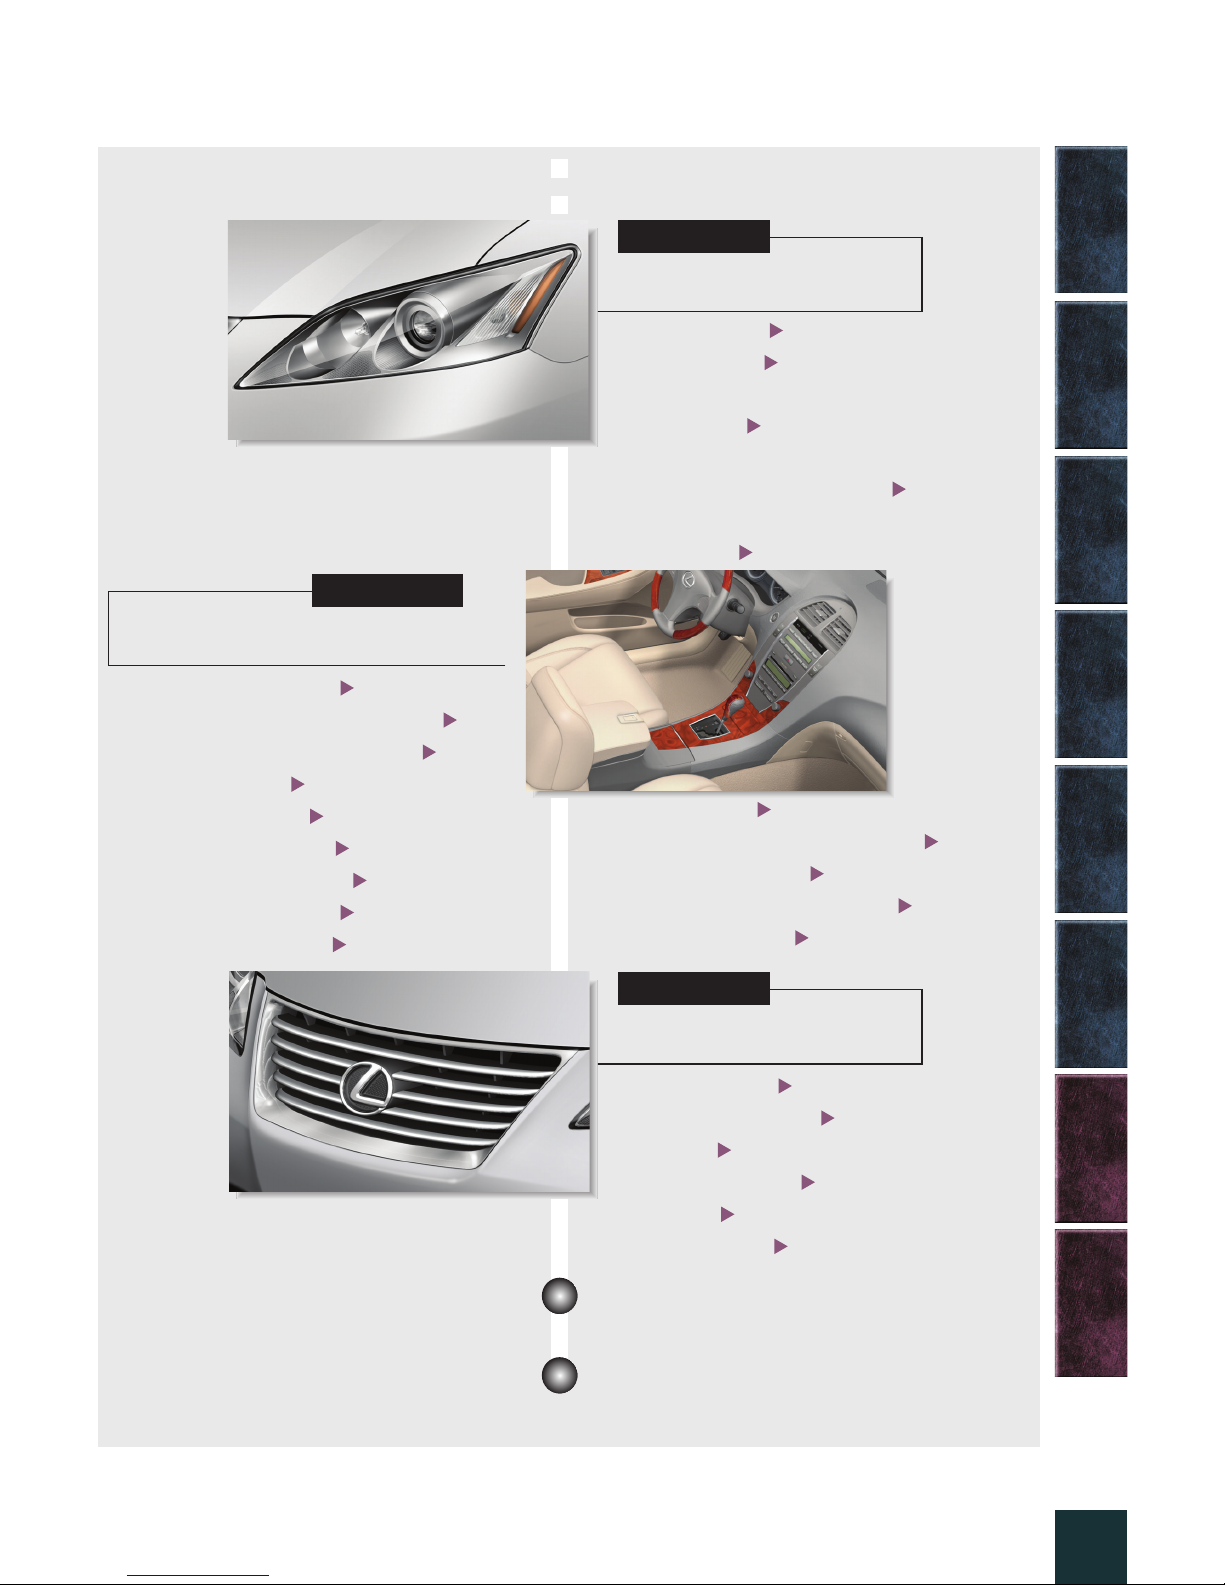
Depending on specifications, the vehicle shown in the illustration may
differ from your vehicle in terms of color and equipment.
Page 3
3
Overview
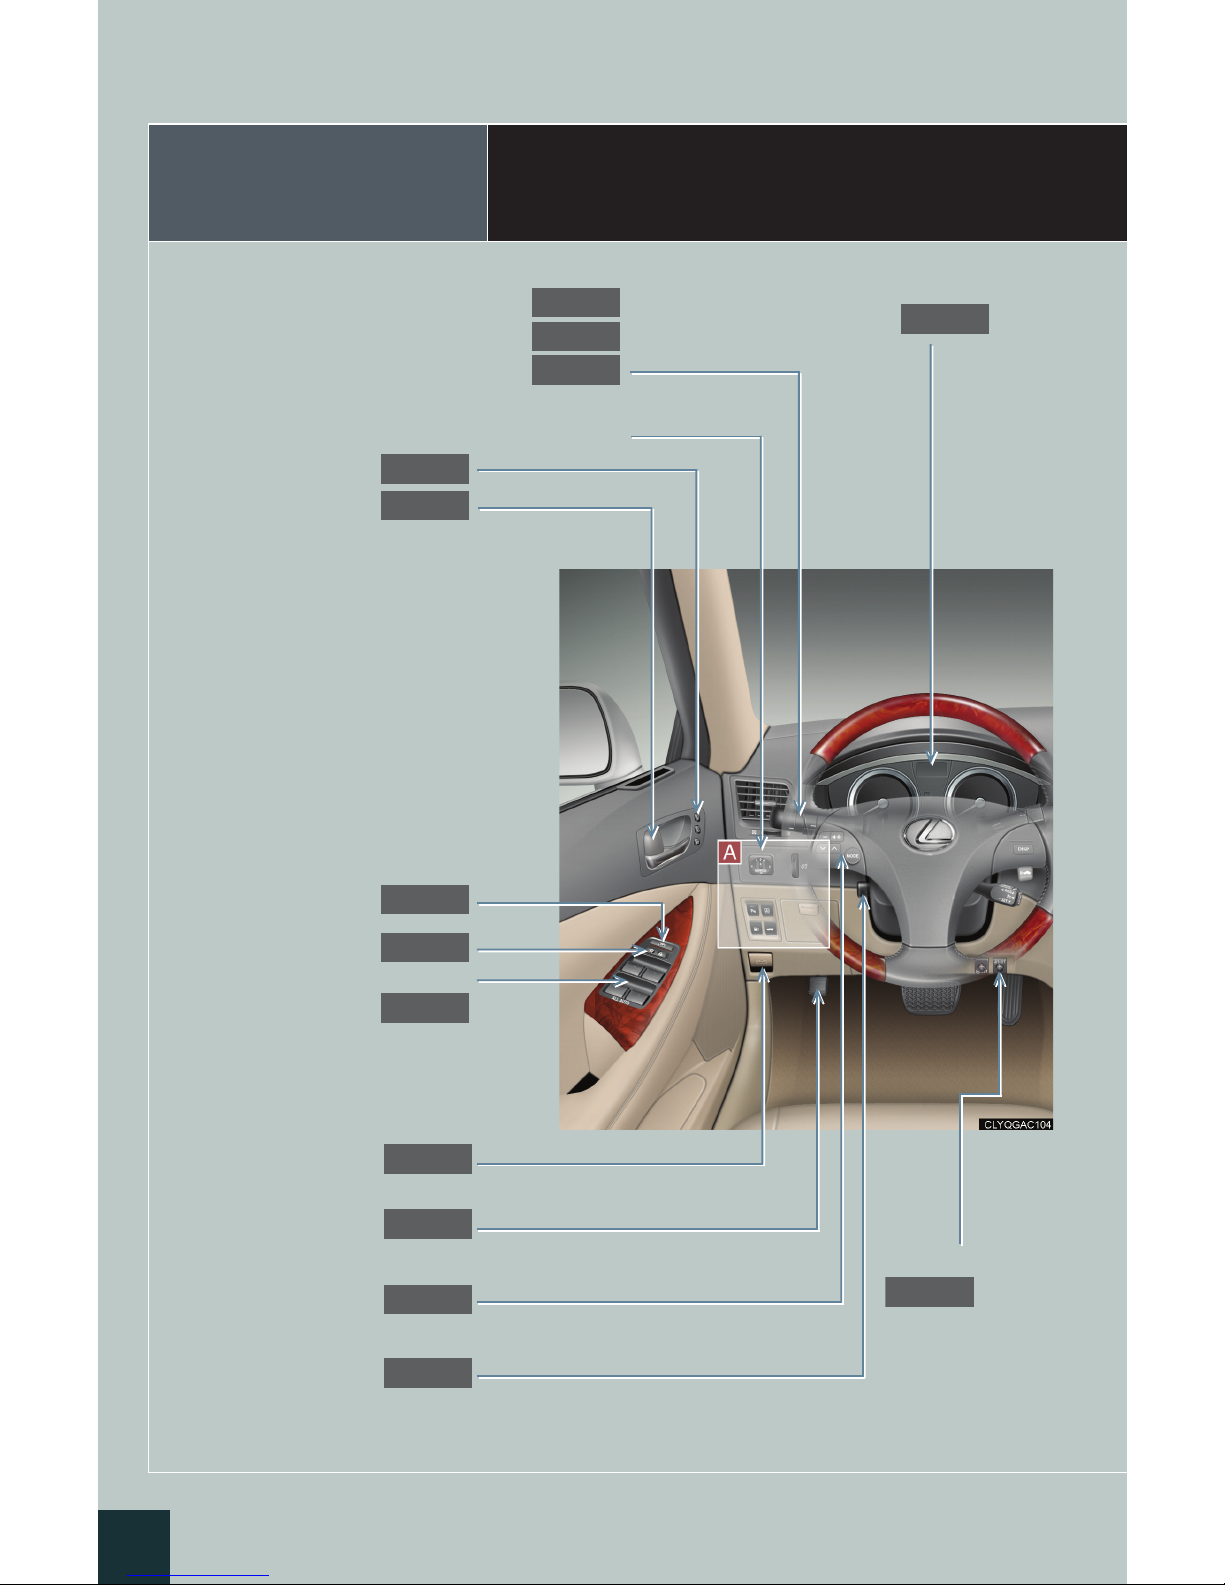
Instrument Panel
Headlight switch
Turn signal lever
Fog light switch
P.25
P.20
P.26
See P.5
Inside door lock button
P.43
Door lock switch
P.43
Power window switches
P.44
Hood lock release
lever
P.45
Parking brake pedal
P.19
Tilt and telescopic steering
control switch
P.15
Multi-information
display
P.21
Audio remote control
switches
P.33
Driving and seat position
memory switches
∗
P.12
Window lock switch
P.44
AFS OFF switch ∗
P.25
Page 4
4
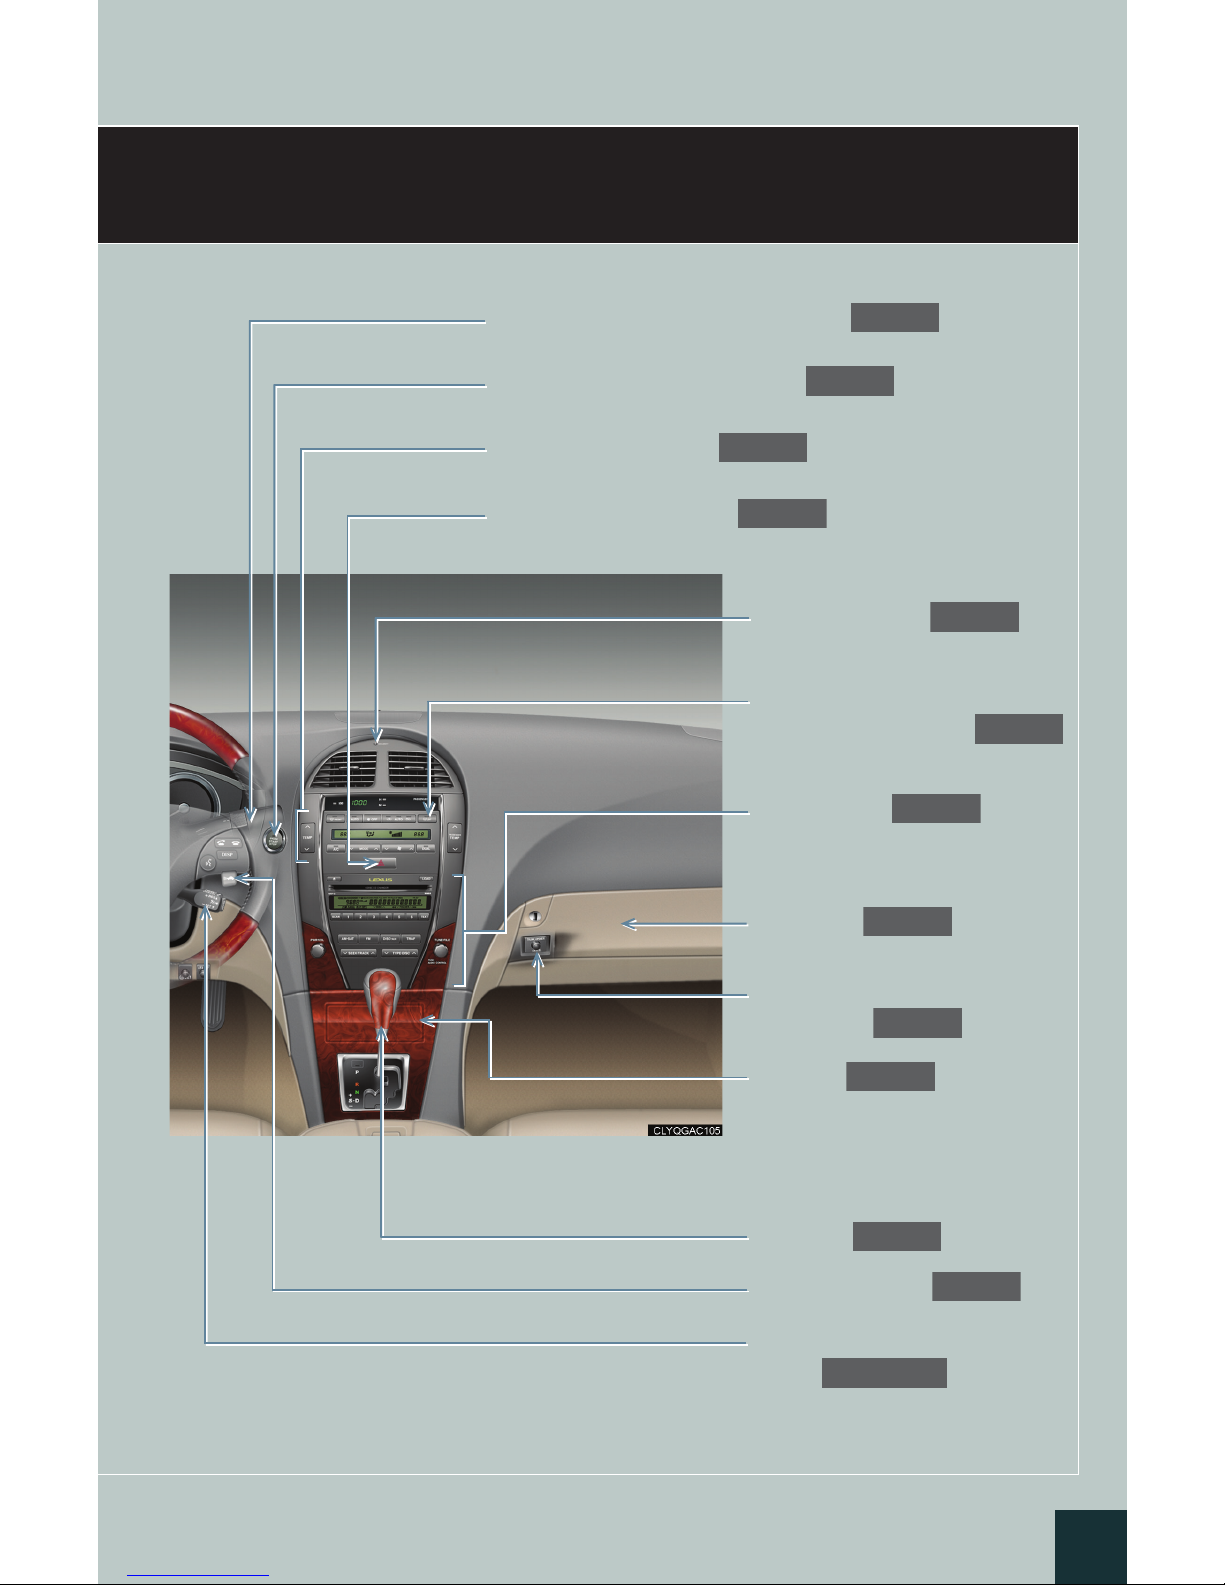
Windshield wipers and washer switch
P.27
“ENGINE START STOP” switch
P.17
Air conditioning system
P.34
Emergency flasher switch
P.19
Rear window and outside rear
view mirror defoggers
P.29
Security indicator
P.9
Audio system
P.31
Trunk opener
main switch
P.44
Automatic transmission
shift lever
P.18
Distance switch ∗
P.23
∗ : If equipped
Glove box
P.37
Cruise control
switch
P.22, 23
Ashtrays
P.37
Page 5
5
Overview
Instrument Panel
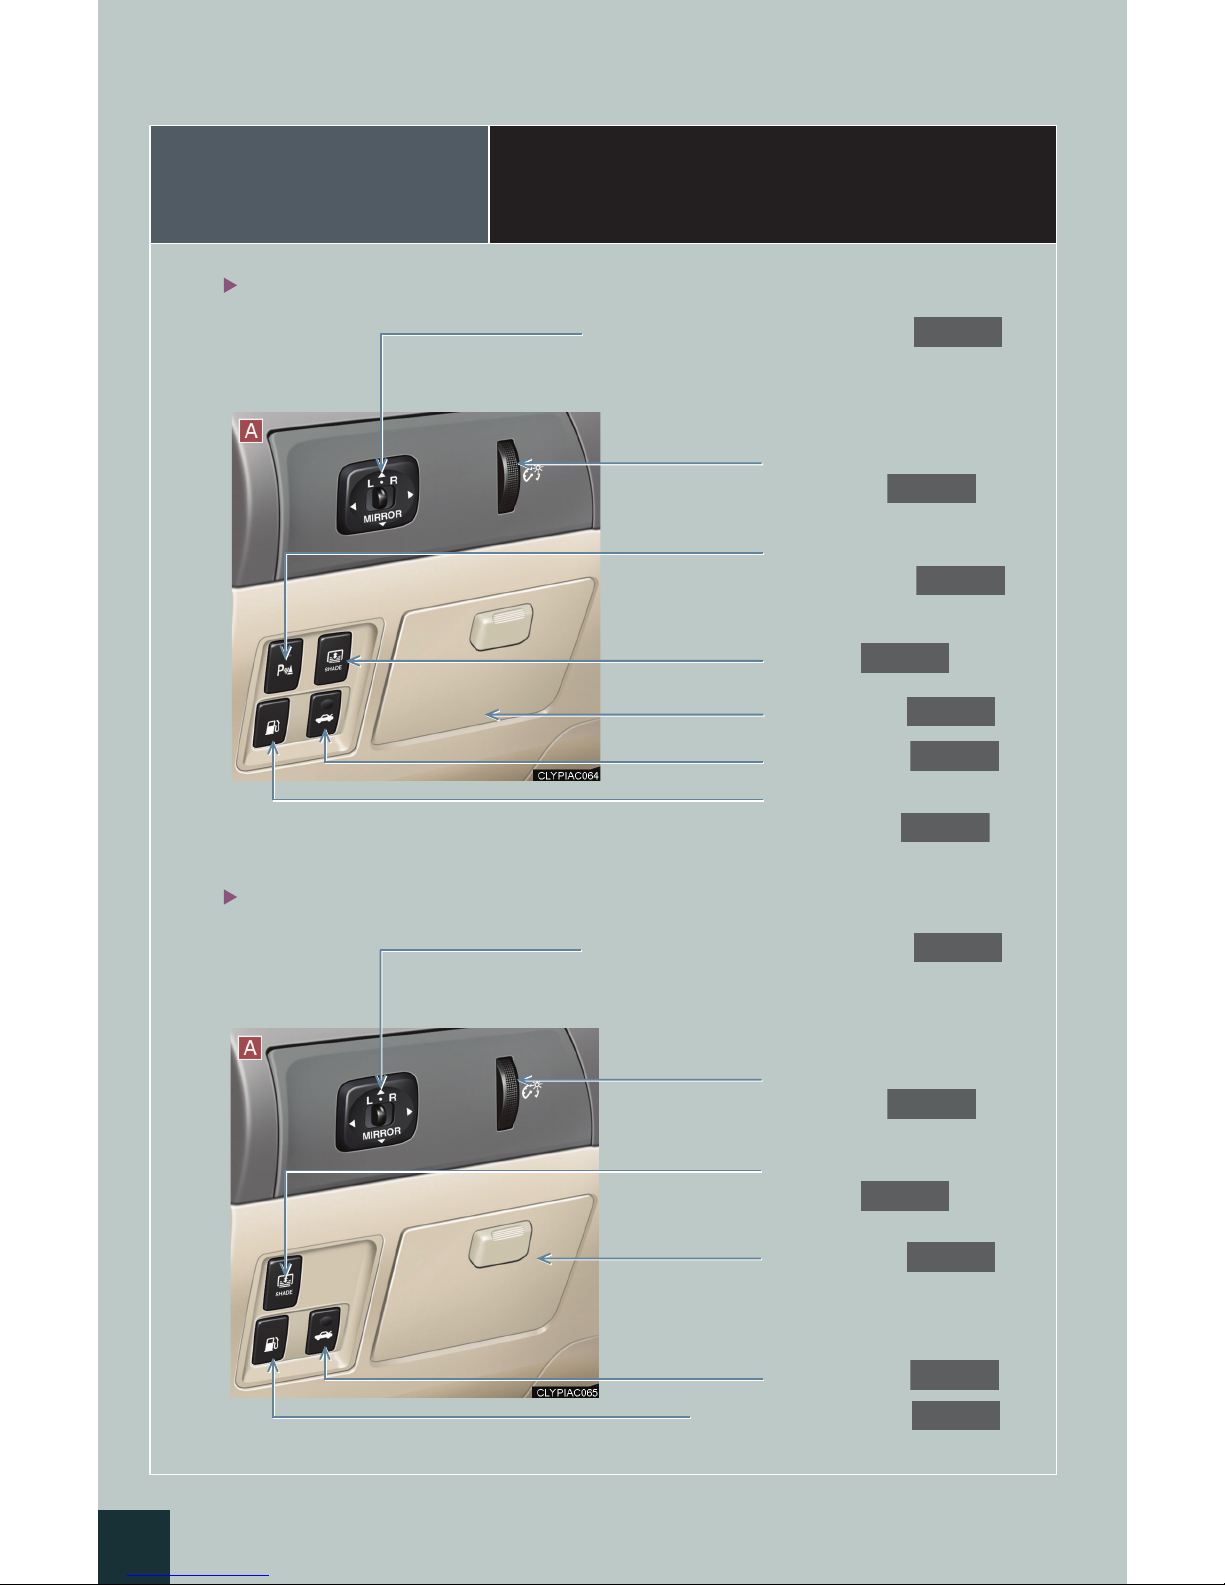
Outside rear view mirror switches
P.14
Instrument panel light
control dial
P.29
Rear sunshade
switch
∗
P.40
Trunk opener
P.44
∗ : If equipped
Type A
Type B
Fuel filler door opener
P.45
Outside rear view mirror switches
P.14
Instrument panel light
control dial
P.29
Rear sunshade
switch
∗
P.40
Auxiliary box
P.37
Trunk opener
P.44
Fuel filler
door opener
P.45
Auxiliary box
P.37
Intuitive parking
assist switch
∗
P.20
Page 6
Topic 1
Entering and Exiting
7
Keys
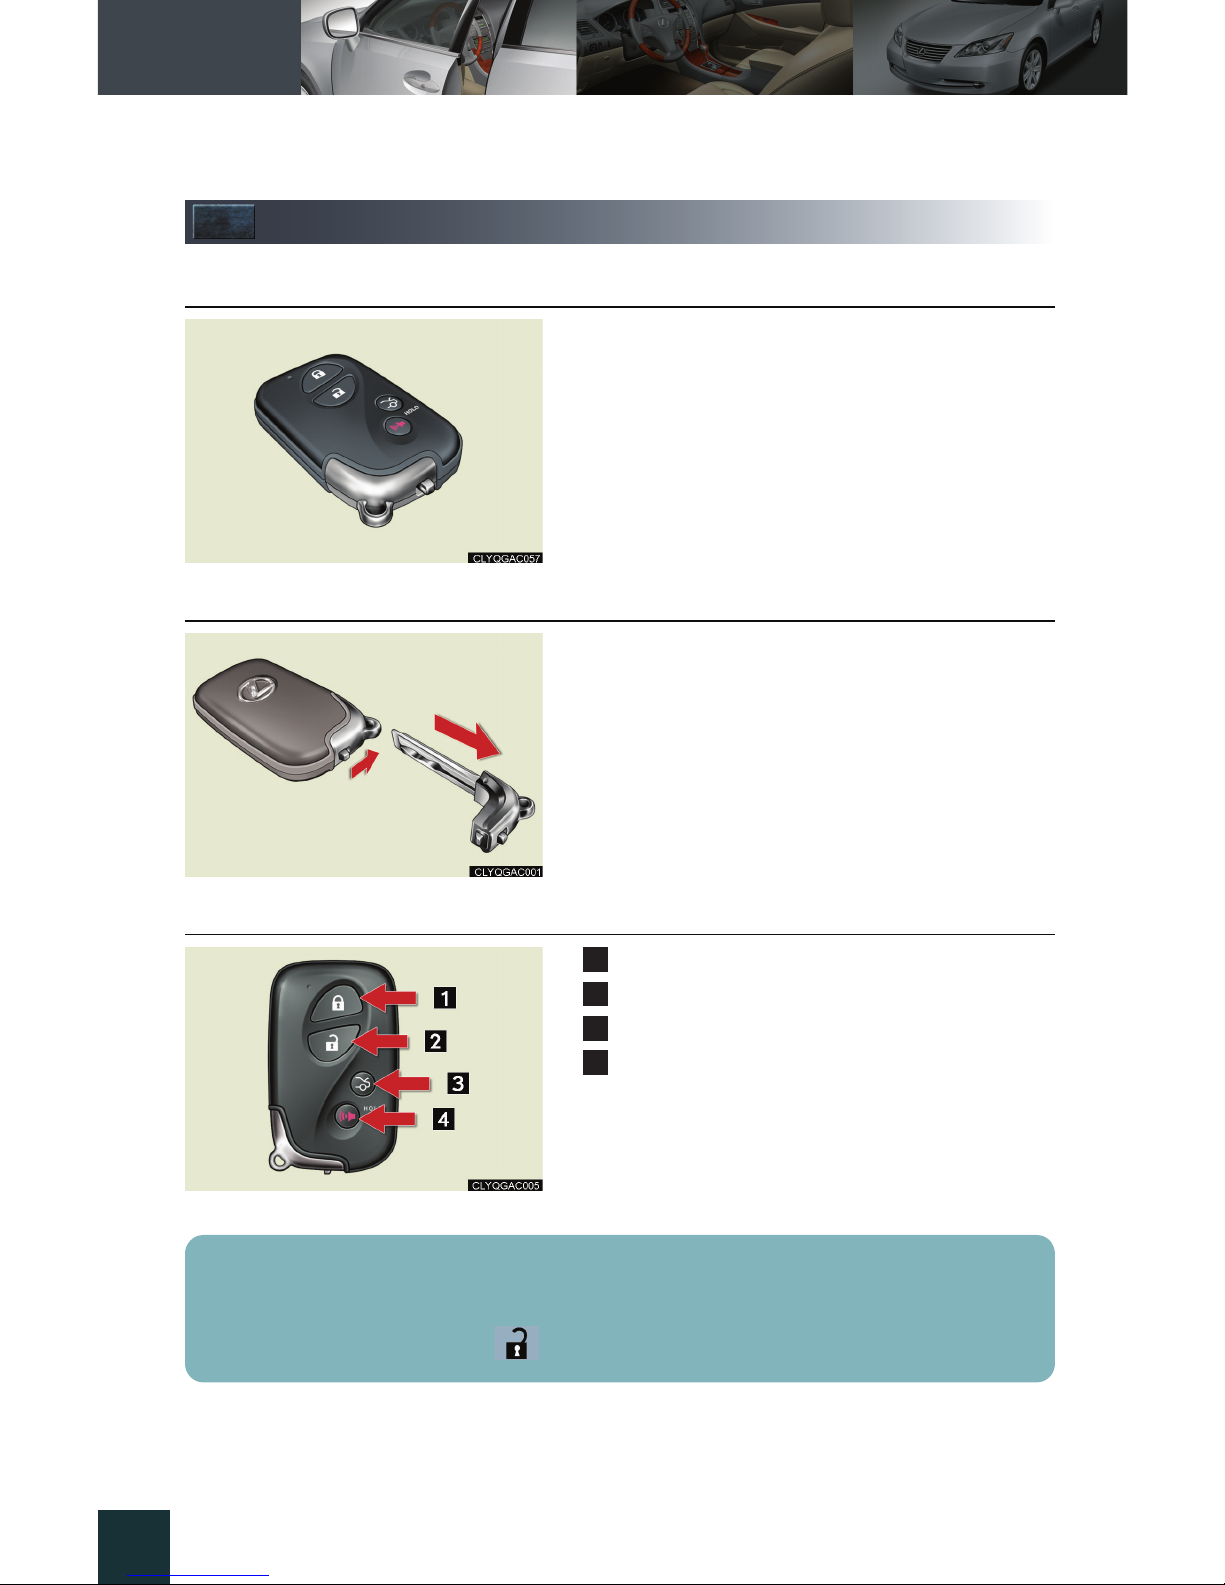
■ Electronic key
Smart access system with push-button start
(→P. 8, 17)
■ Mechanical key
● Locks and unlocks the doors
● Locks and unlocks the glove box
● Locks and unlocks the armrest door
The mechanical key is stored inside the electronic
key. To extract the key, release the latch and pull.
■ Wireless remote control
Locks the doors
Unlocks the doors
Opens the trunk
Sounds the alarm
Use the alarm to attract attention to the vehicle in order to help deter break-ins.
(To stop the alarm, push any button on the
wireless remote control.)
1
2
3
4
The wireless remote control can also be used to open the windows and moon roof (standard
type).
To do so, simply press and hold button.
Page 7
Topic 1
Entering and Exiting
8
Entering and Exiting
When Driving
Rain and
Night Driving
Driving Comfort
Opening and Closing
What to do if ...
Customizing
Yo u r L e x u s
Before Driving
Before Driving
Smart Access System with Push-button
Start
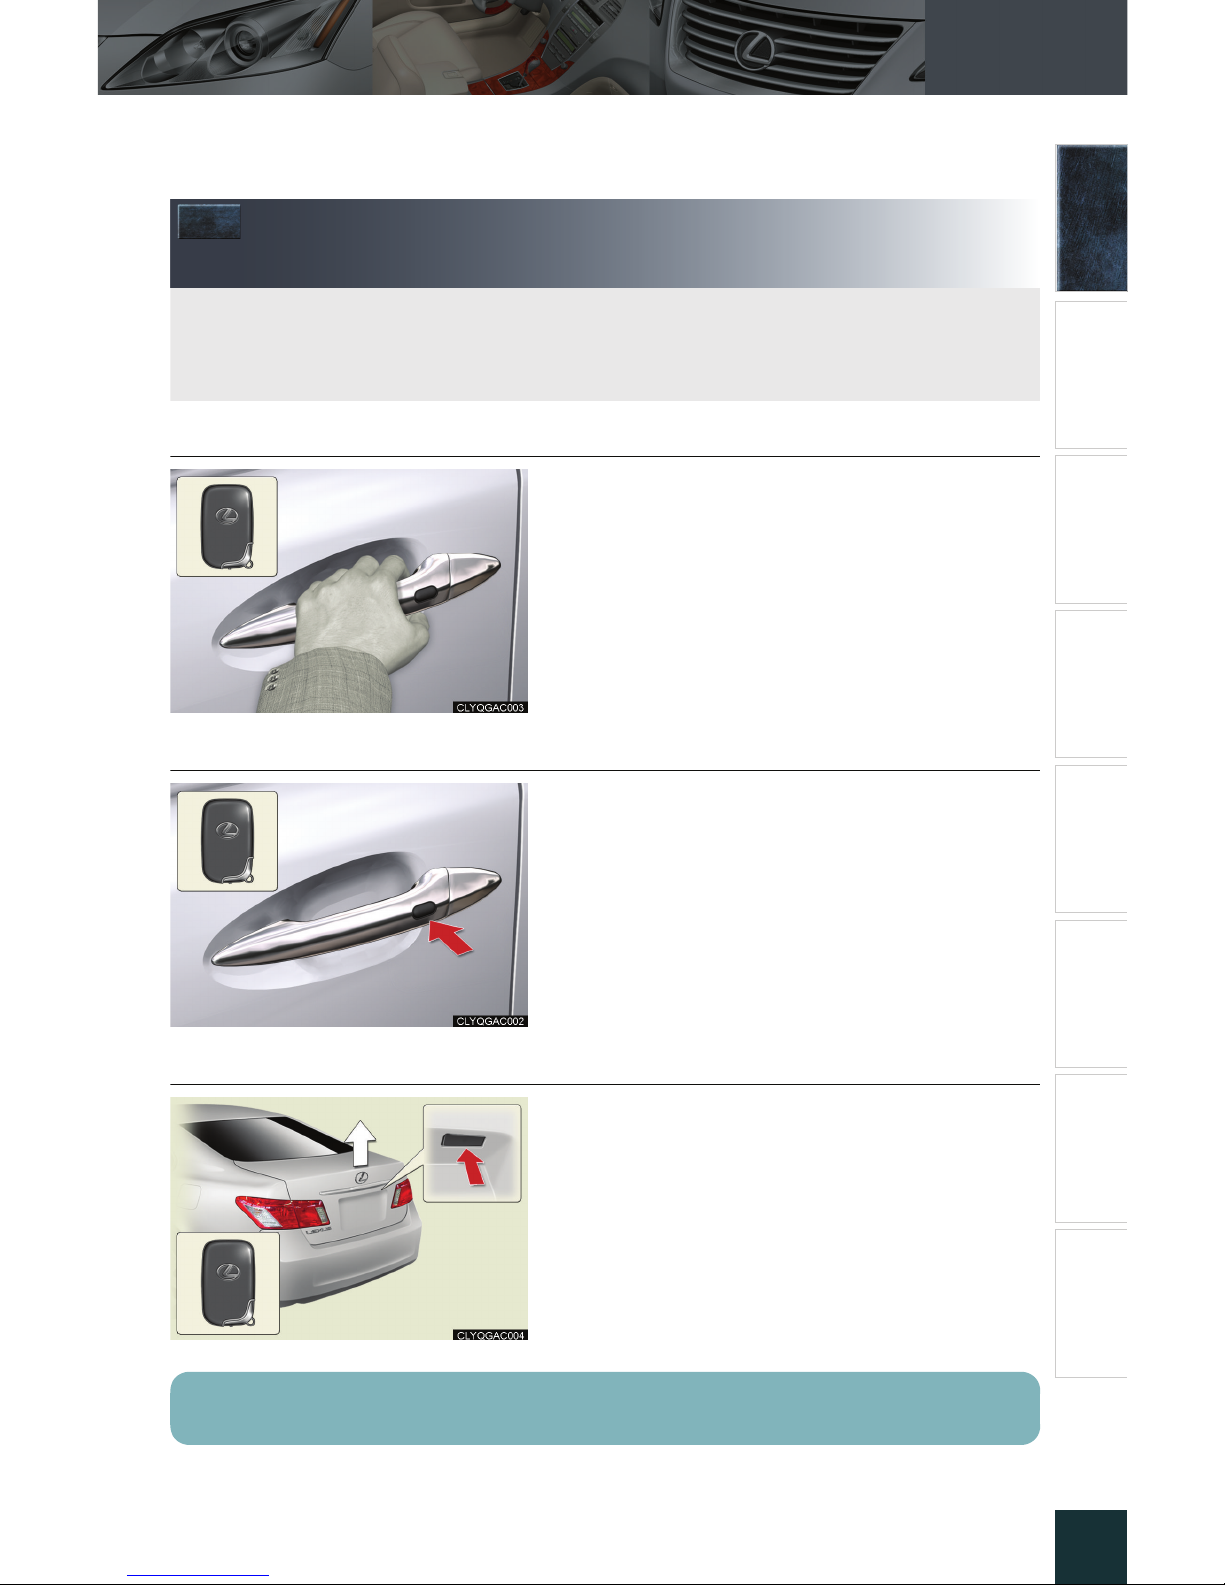
■ Entering the vehicle
To unlock the vehicle, simply grasp any of the
door handles.
■ Exiting the vehicle
To lock the vehicle, press the lock button on any of
the door handles.
To close the windows and the moon roof (standard
type), press and hold the lock button.
■ Opening the trunk
To open the trunk, press and hold the trunk
release button.
The smart access system with push-button start allows you to enter and exit the vehicle
or start the engine by simply carrying the electronic key in your pocket or bag.
For details on starting the engine, see page 17.
For details on what to do when the electronic key battery becomes discharged, see page 50.
Page 8
Topic 1
Entering and Exiting
9
Theft Deterrent System
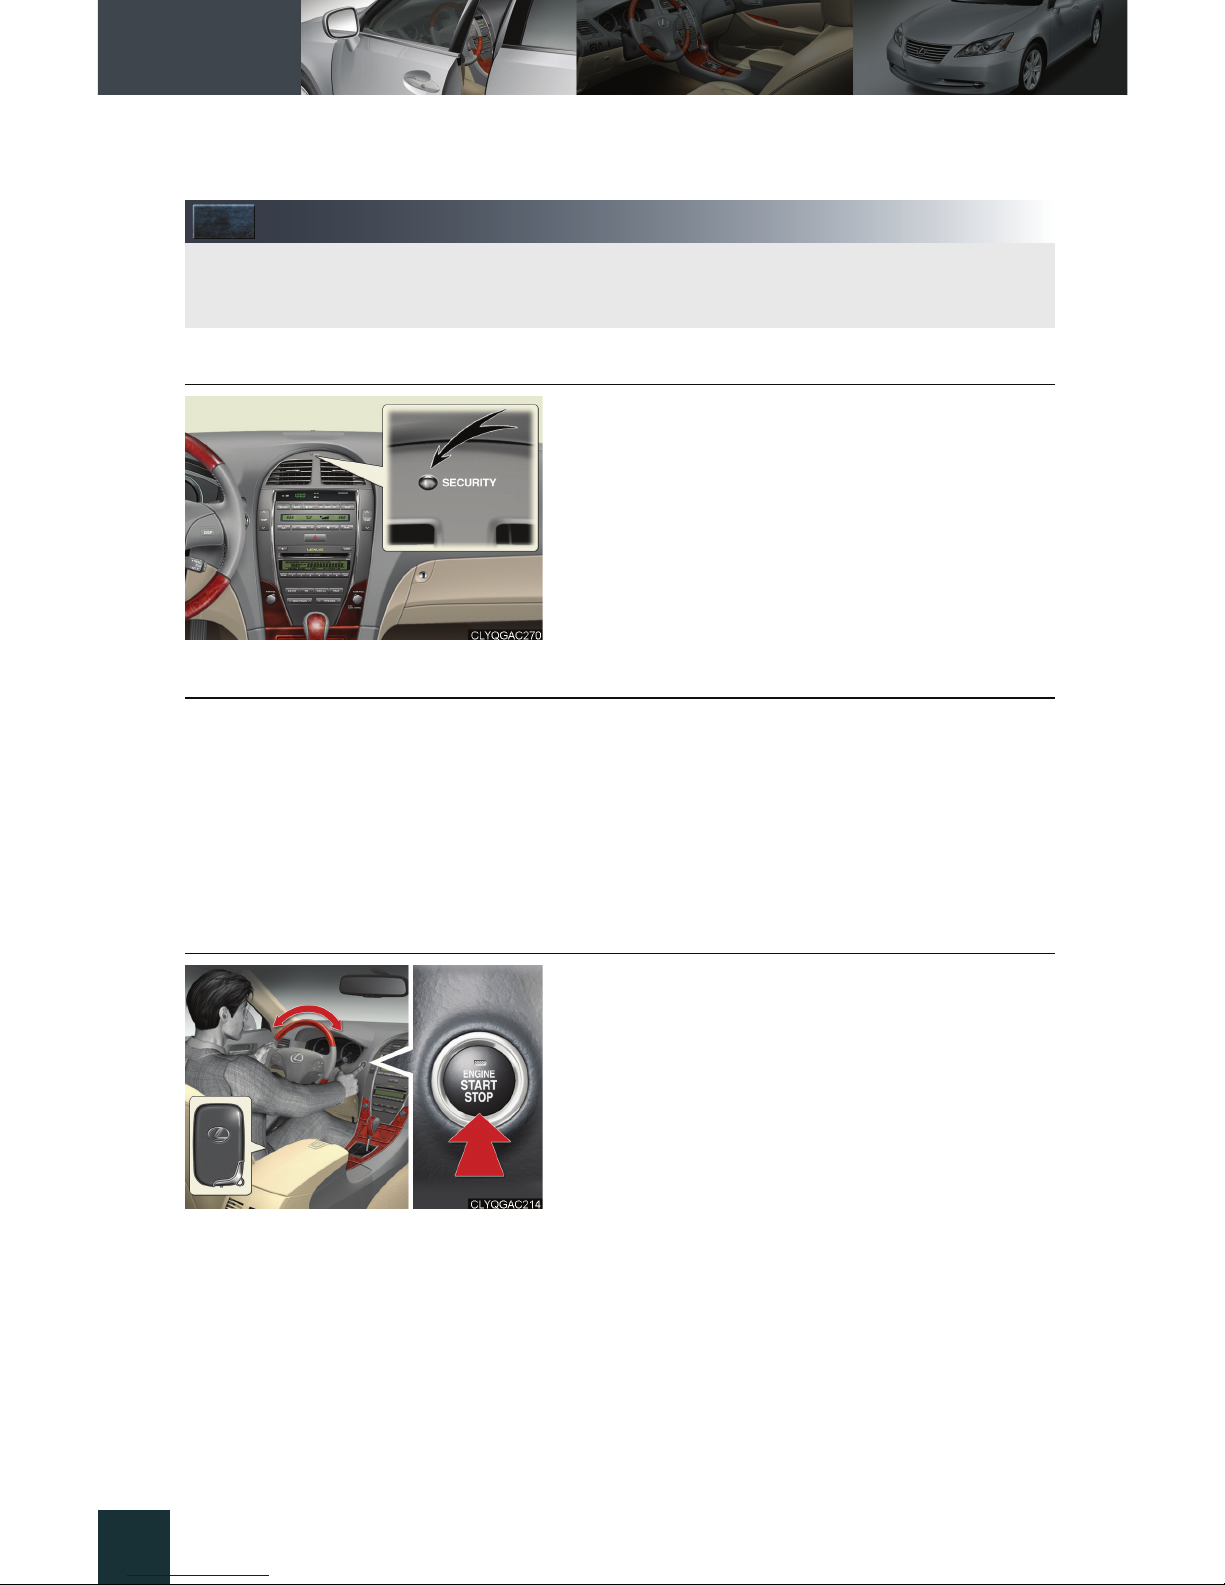
■ Engine immobilizer system
The engine immobilizer system prevents the
engine from being started in the event that an
attempt is made to start the vehicle using an
unregistered key.
The security indicator light flashes to indicate that
the system is set.
■ Alarm
The system sounds the alarm and flashes lights when forcible entry is detected.
To set the alarm: lock all the doors from outside the vehicle. The security indicator light
comes on to indicate that the alarm is in its preparation state. When the indicator light
begins to flash, the system is armed.
To deactivate or stop the alarm: start the engine, or unlock the doors or trunk using the
electronic key or the wireless remote control.
■ Steering lock
The steering wheel locks when the “ENGINE
START STOP” switch is in OFF.
To release the steering wheel lock, gently turn the
wheel left or right while pressing the “ENGINE
START STOP” switch.
The theft deterrent system includes the following features to help protect your vehicle from
theft.
Page 9
Topic 2
Before Driving
11
Seats
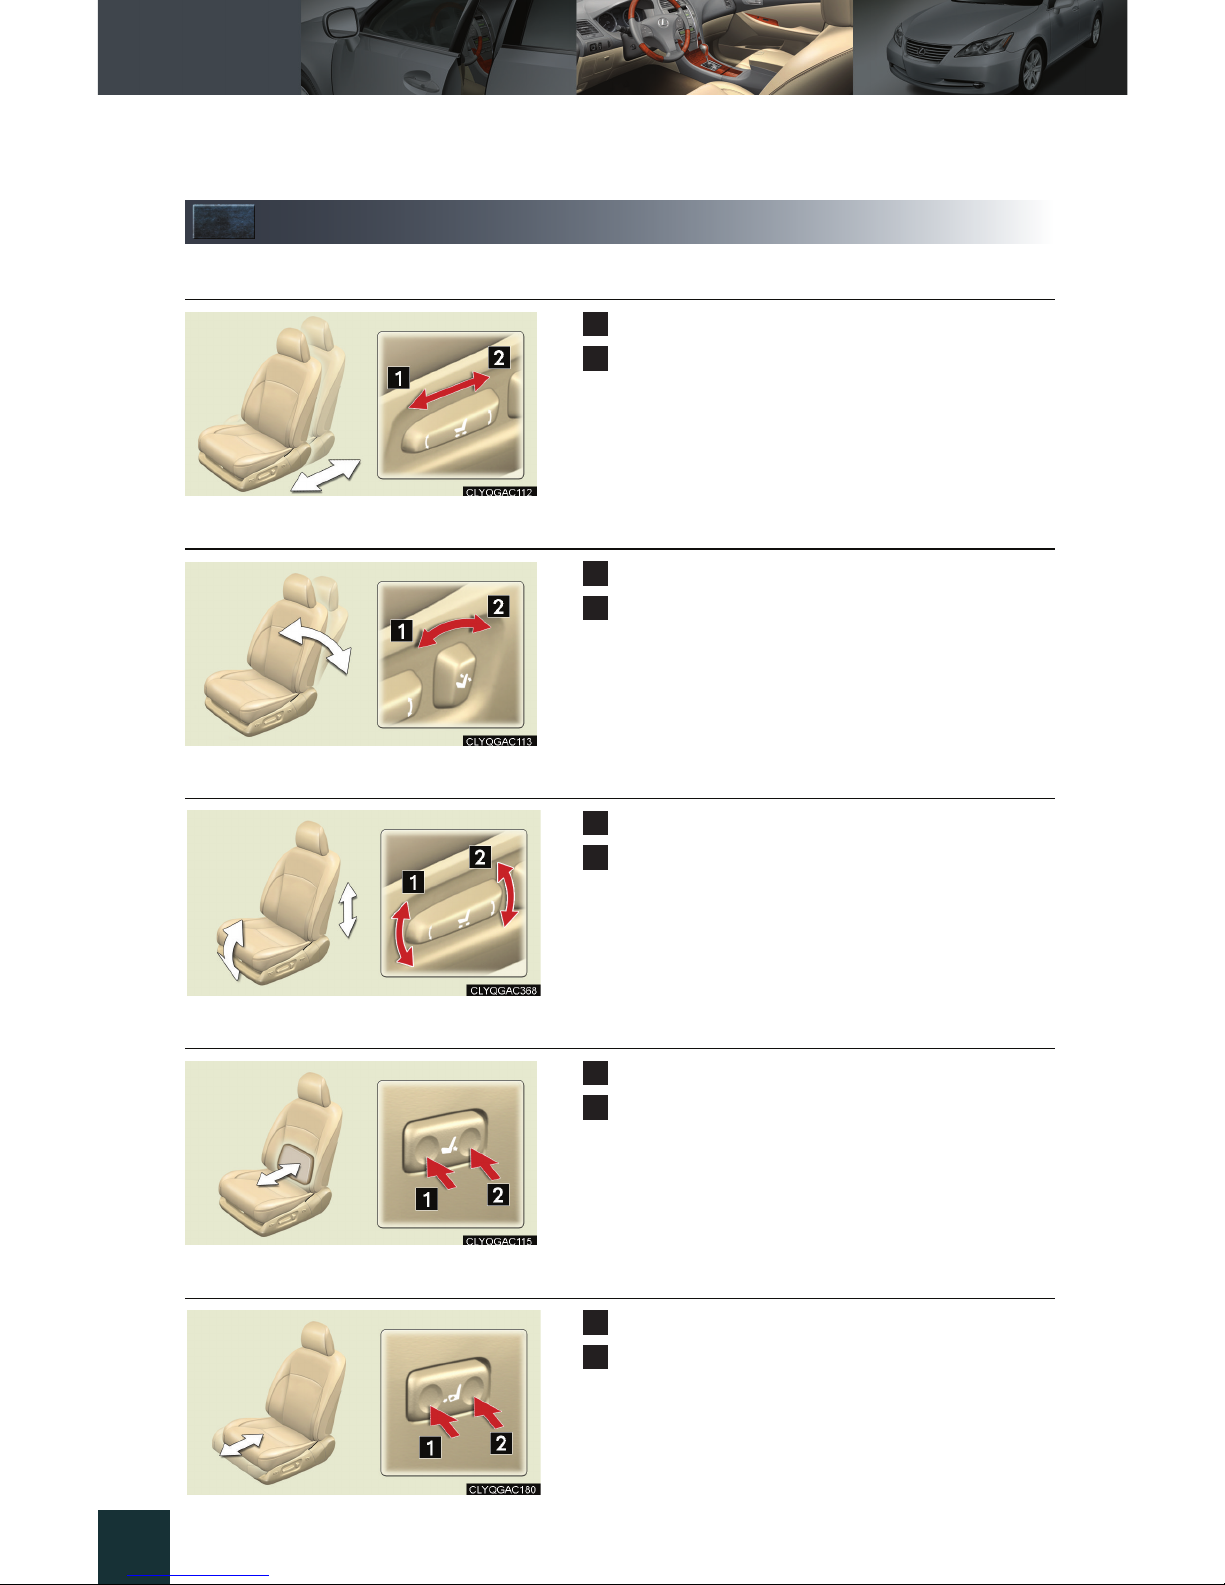
■ Adjusting seat position
Moves the seat forward
Moves the seat backward
■ Adjusting seatback angle
Tilts the seatback forward
Reclines the seatback
■ Adjusting the seat cushion
Raises and lowers the front of the cushion
Raises and lowers the entire seat
■ Adjusting the lumbar support
Firmer
Softer
■ Adjusting the seat cushion length (if equipped)
Longer
Shorter
1
2
1
2
1
2
1
2
1
2
Page 10
Topic 2
Before Driving
12
Entering and Exiting
Before Driving
When Driving
Rain and
Night Driving
Driving Comfort
Opening and Closing
What to do if ...
Customizing
Yo u r L e x u s
Driving and Seat Position Memory System (If Equipped)
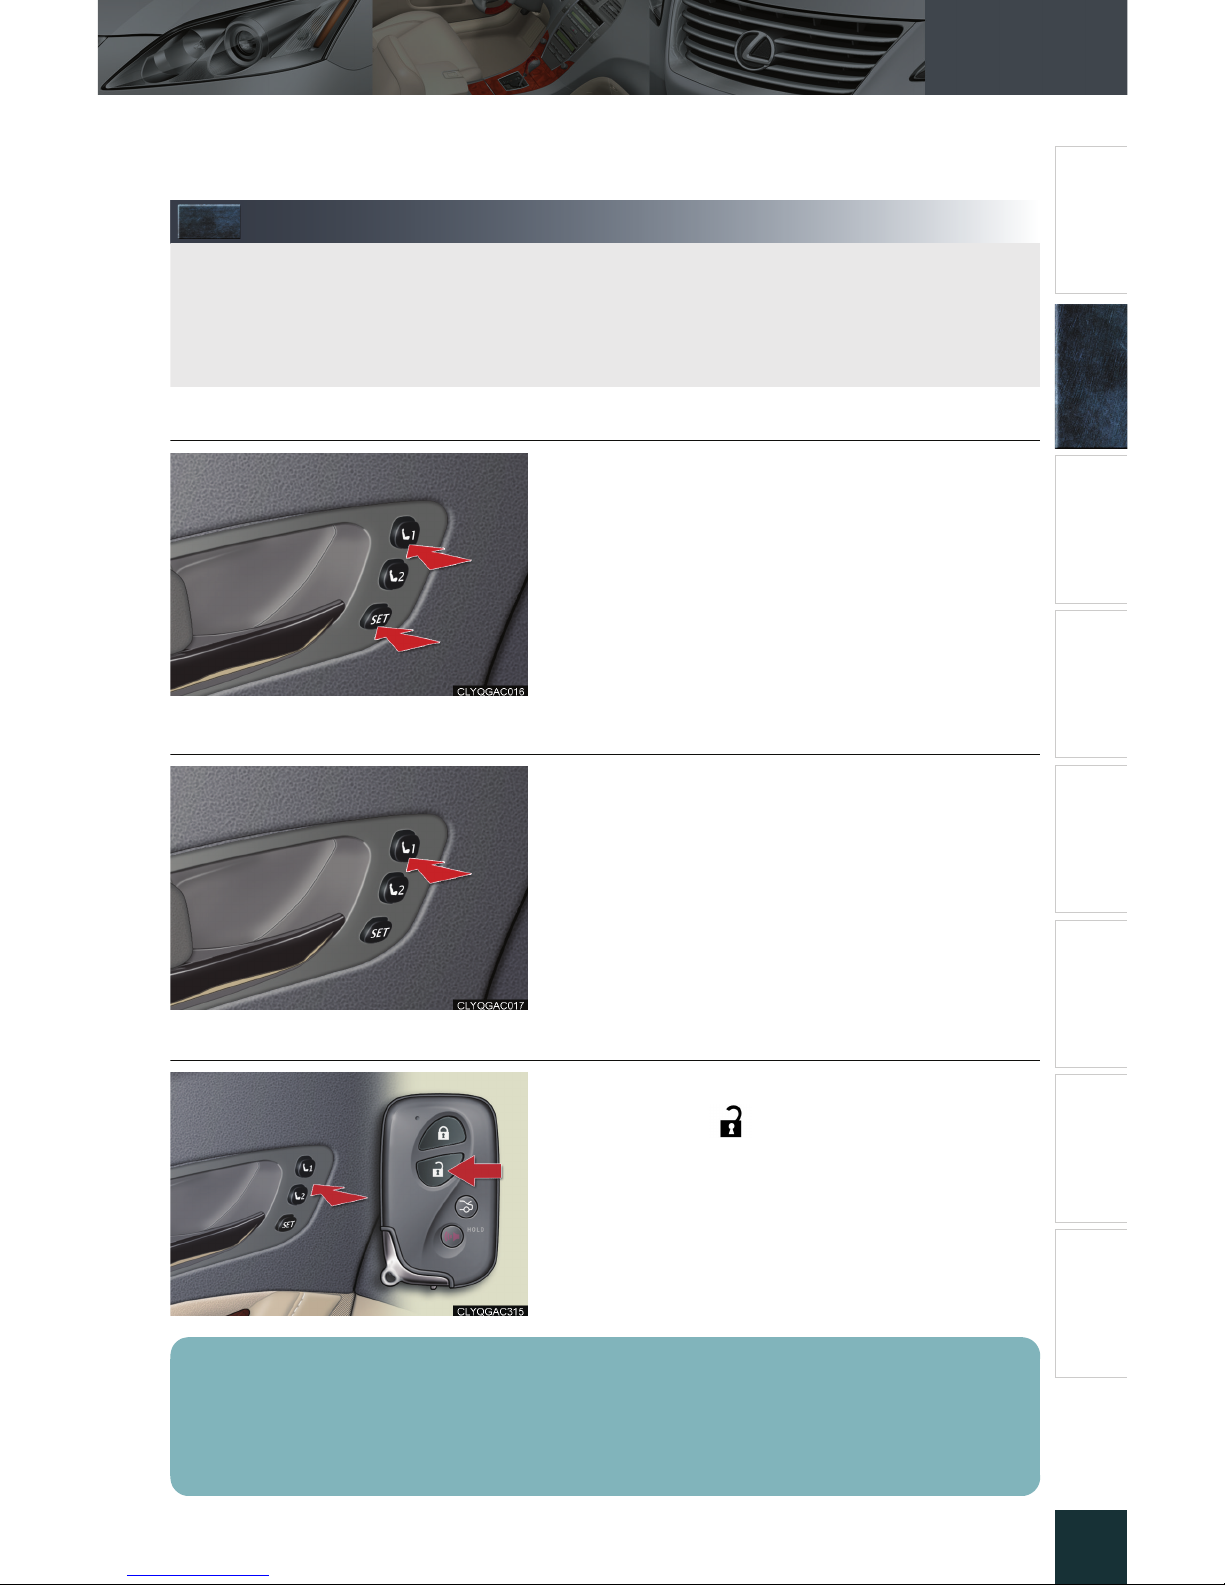
■ Setting memory positions
While holding down the SET button, press and
hold one of the memory buttons (1 or 2) until you
hear a beep.
The current position of the seat, as well as the
position of the steering wheel and the outside
rear view mirrors (for the driver's seat only) is
recorded.
■ Recalling memory positions
Press one of the memory buttons (1 or 2).
■ Linking driving position memory with door unlock operation (driver's seat only)
While holding down the desired memory button,
press and hold on the wireless remote control
until you hear a beep.
To prevent triggering of the alarm, open one of
the doors within 60 seconds after the beep is
heard.
The seats can be returned to a previously set position by simply pressing a button.
The position of the steering wheel and the outside rear view mirrors is adjusted along with the
driver's seat.
Positions can be conveniently recorded for the vehicle's primary drivers and passengers.
Linking driving position memory to the door unlock operation allows the memory position
to be recalled automatically when the driver's door is opened. (The linked function does not
operate if the driver's door is unlocked using the mechanical key or manually from inside
the vehicle.)
Page 11
Topic 2
Before Driving
13
Head Restraints
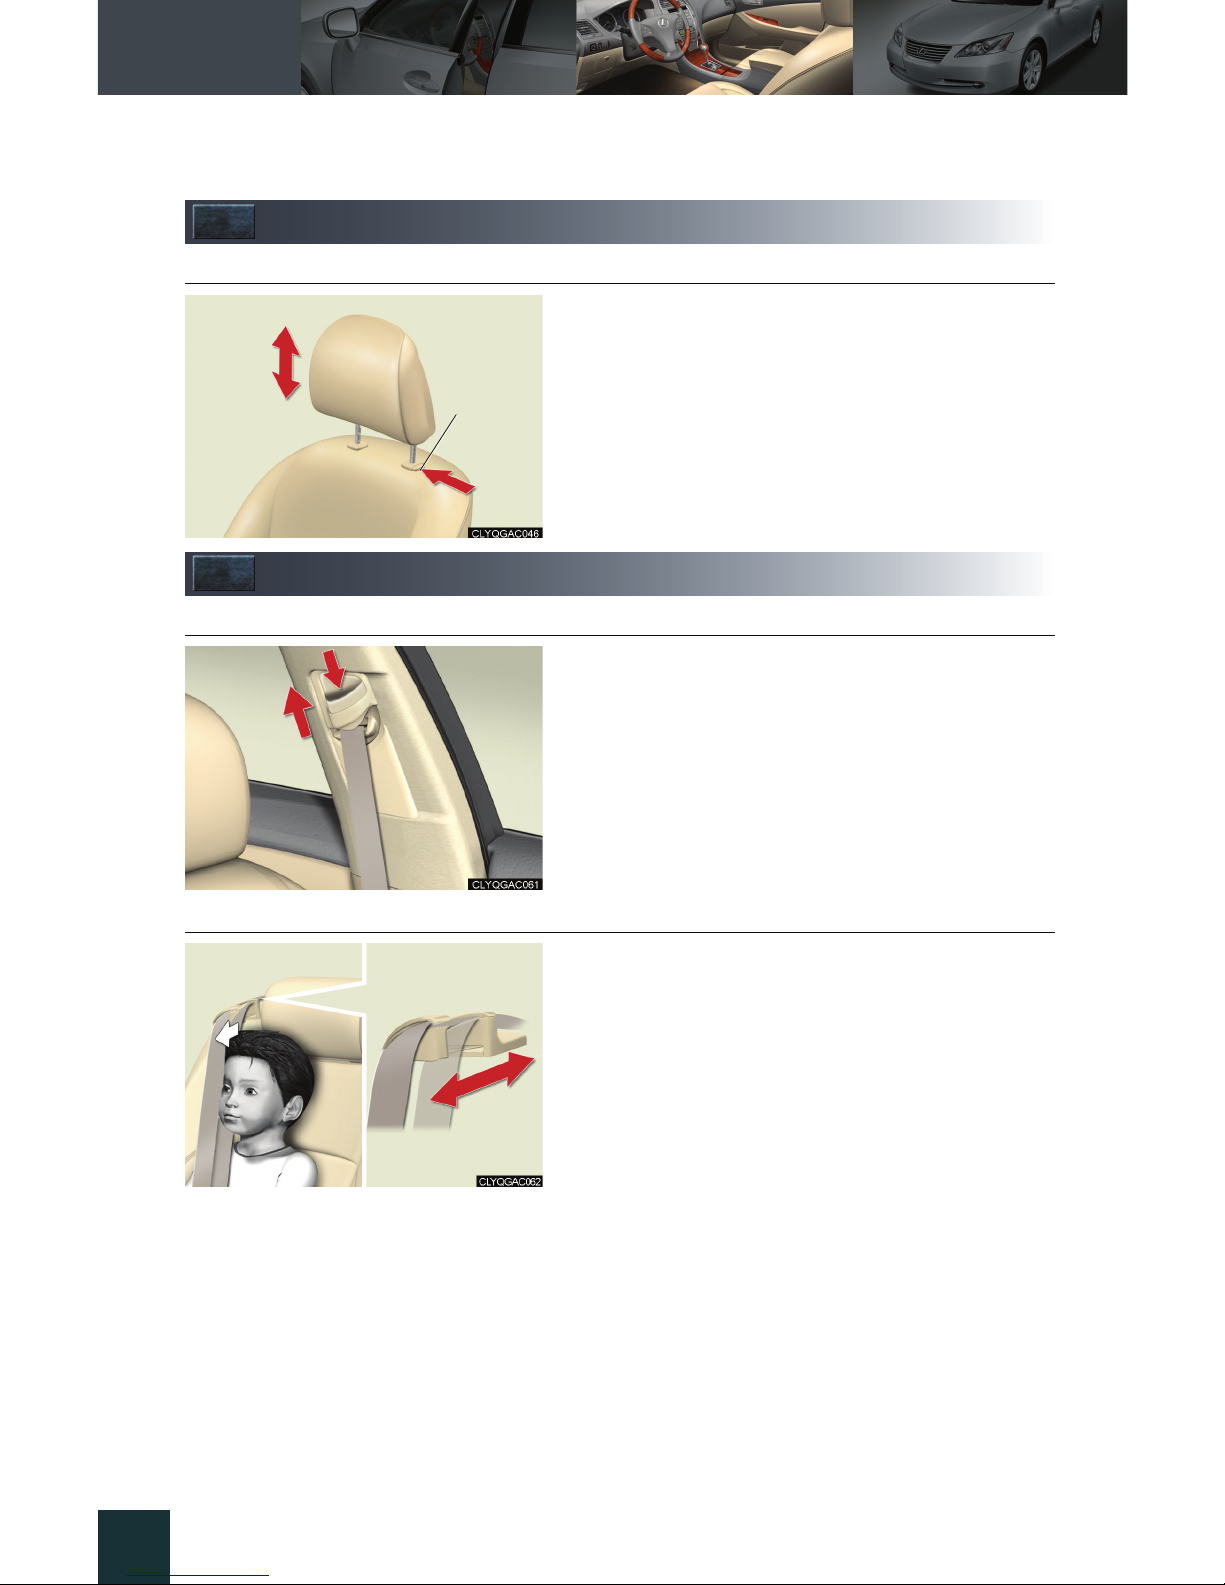
■ Height adjustment
To ra i se : pull the head restraint upward.
To lo we r : push the head restraint down while
pressing the lock release button.
Seatbelts
■ Adjusting shoulder belt height (front seats only)
To ra i se : pull the anchor upward.
To lo we r : depress the button and push the anchor
down.
■ Seatbelt comfort guides (outside rear seats only)
If the shoulder belt sits close to the neck, slide the
comfort guide forward.
Lock
release
button
Page 12
Topic 2
Before Driving
14
Entering and Exiting
Before Driving
When Driving
Rain and
Night Driving
Driving Comfort
Opening and Closing
What to do if ...
Customizing
Yo u r L e x u s
Outside Rear View Mirrors
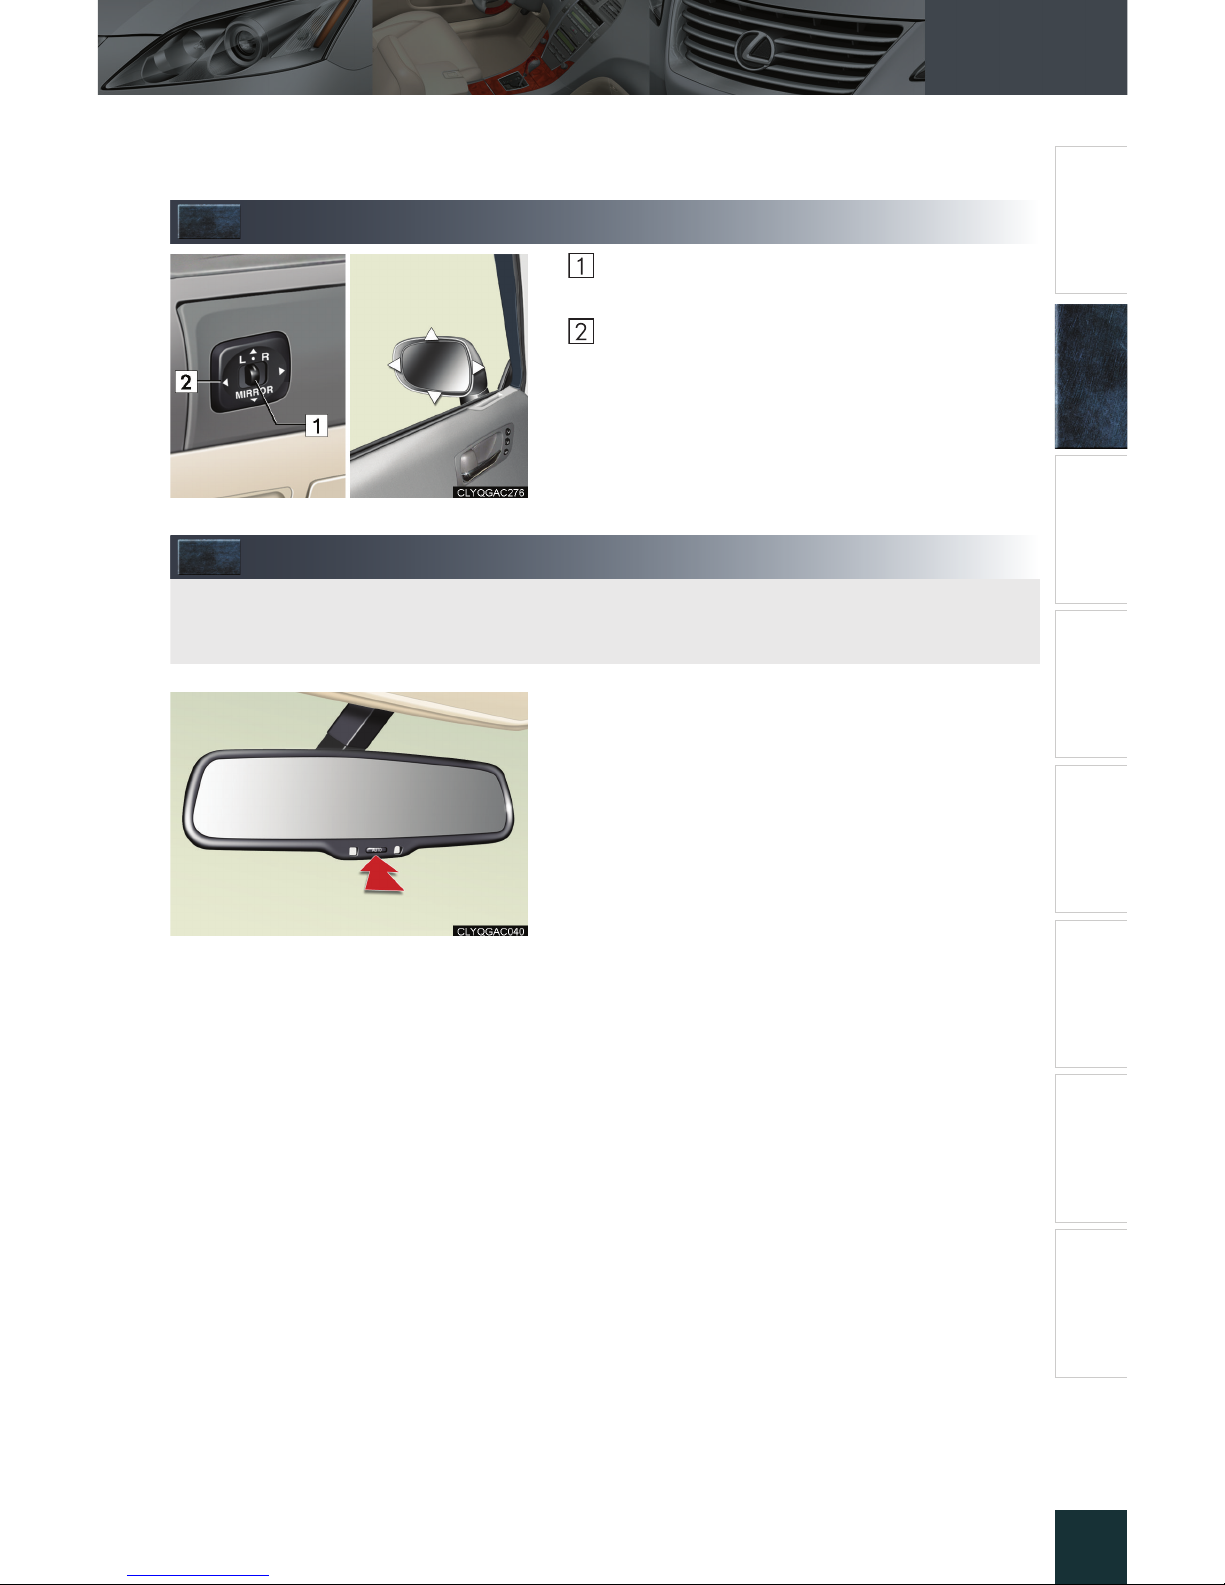
To select the mirror you wish to adjust (L or R),
use the master switch.
To adjust mirror angle, use the control switch.
On some models, the mirrors will automatically
angle downwards when the vehicle is reversing.
To disable this function, set the master switch in
the neutral position (between L and R).
Anti-glare Inside Rear View Mirror
To turn AUTO mode ON/OFF, press the AUTO
button.
The indicator comes on when AUTO mode is
turned ON.
When the inside rear view mirror is switched to
AUTO mode, the outside rear view mirrors are
also switched to the AUTO mode automatically.
The anti-glare mirror uses a sensor to detect light from vehicles behind and automatically
reduces glare.
Page 13
Topic 2
Before Driving
15
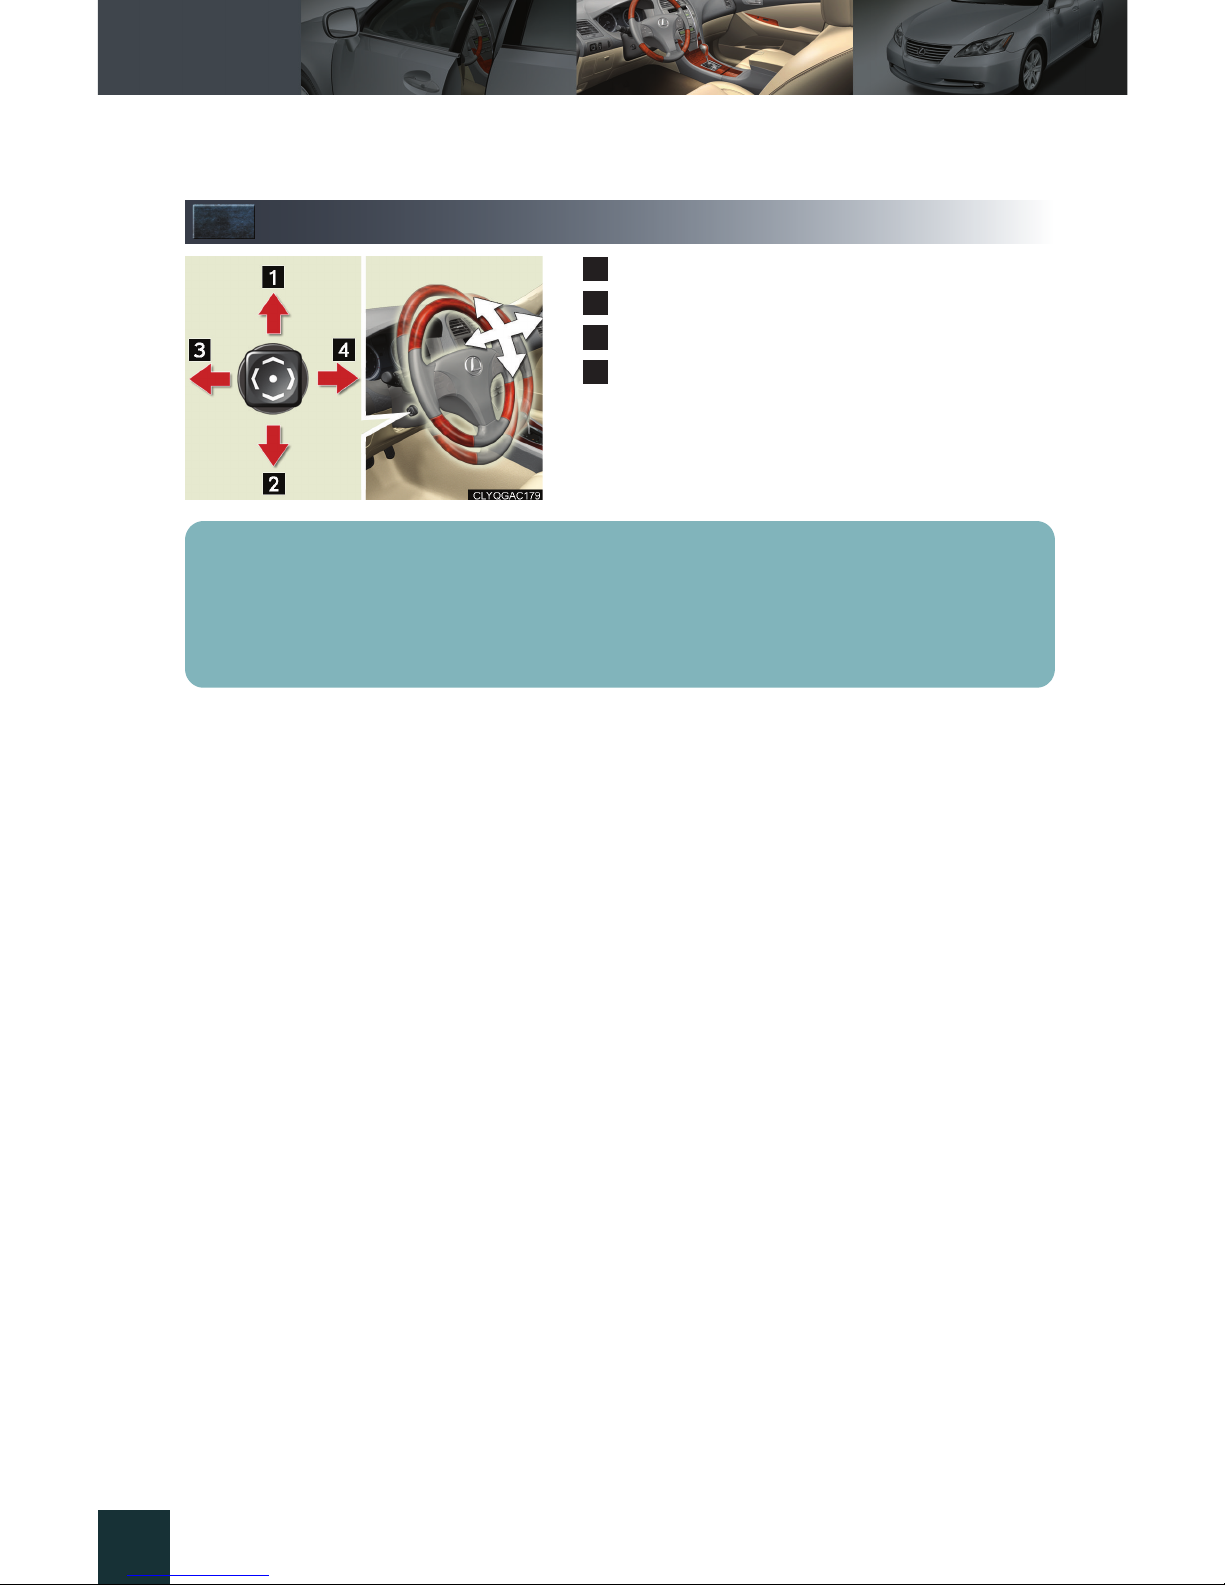
Steering Wheel
Up
Down
Away from the driver
Toward the driver
1
2
3
4
The steering wheel retracts automatically when the “ENGINE START STOP” switch is
turned OFF to allow for easy exit and entry. The steering wheel returns automatically to its
previously set position when the “ENGINE START STOP” switch is switched to ACCESSORY or IGNITION ON mode.
Page 14
Topic 3
When Driving
17
Starting
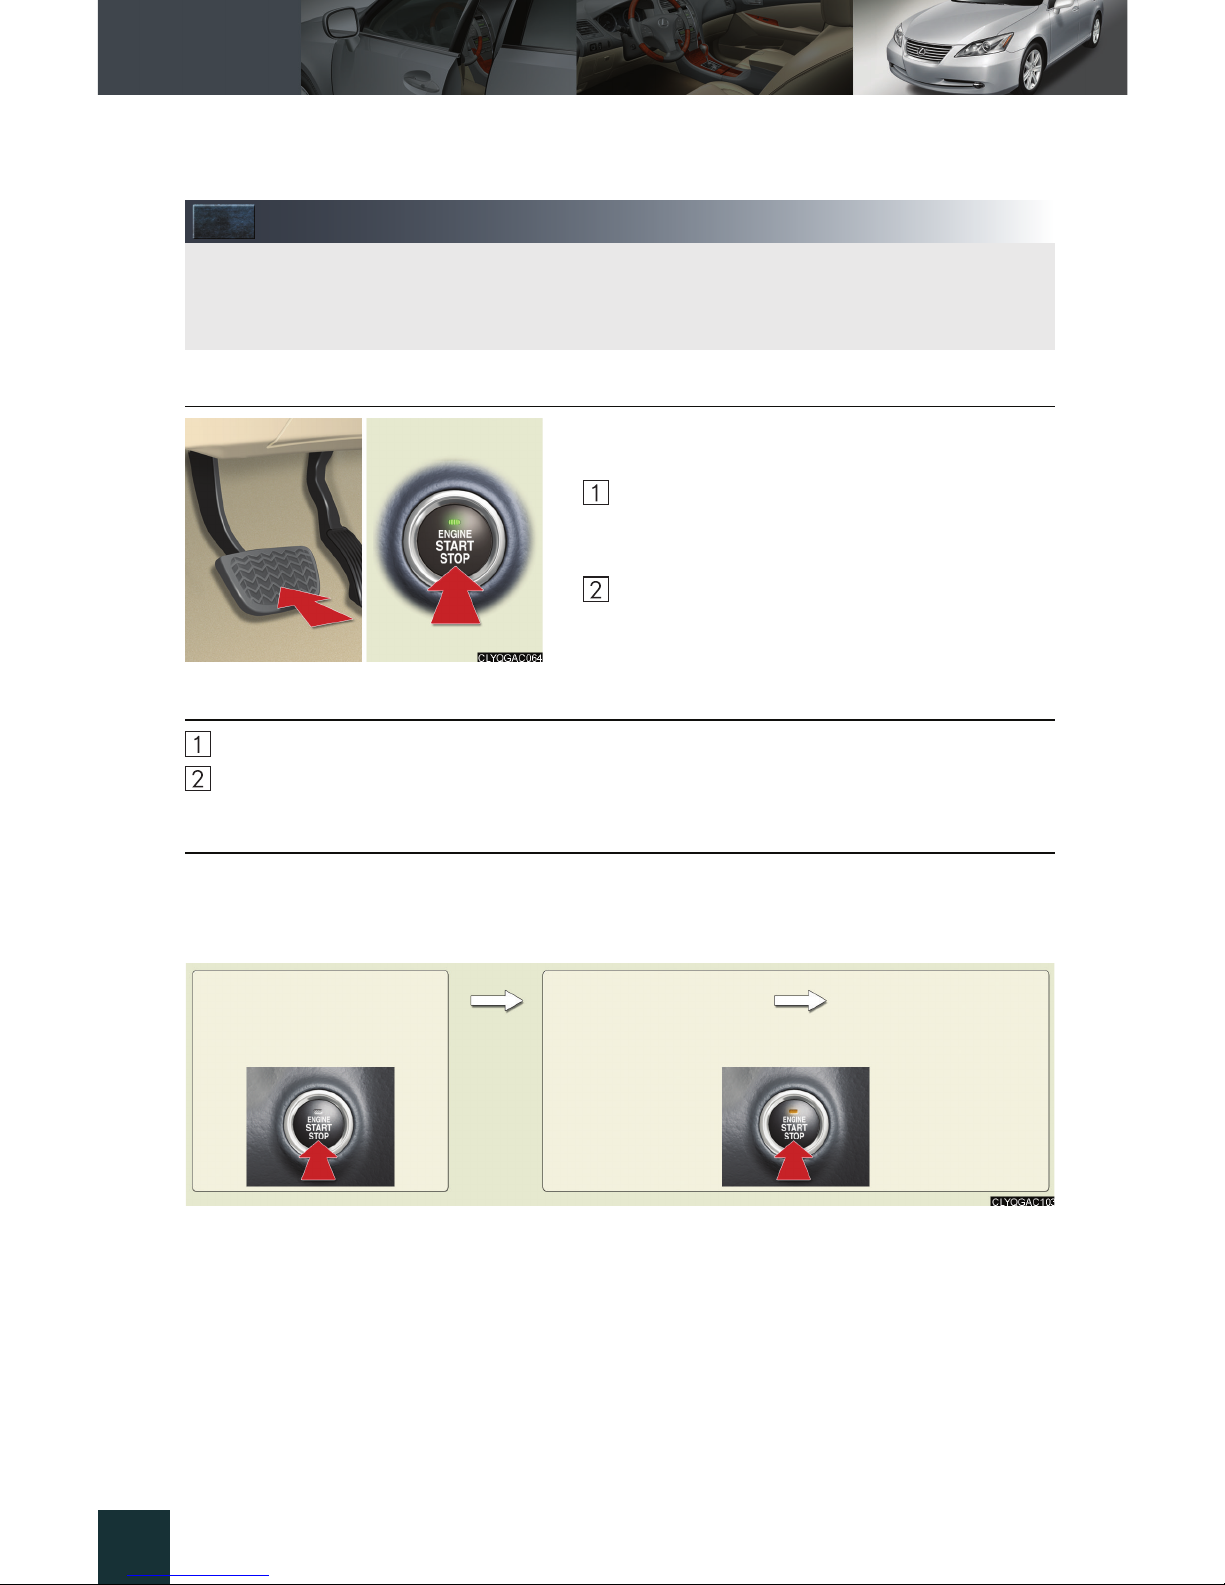
■ Starting the engine
Make sure the parking brake is engaged and the
shift lever is in P.
Depress the brake pedal.
The “ENGINE START STOP” switch indicator light turns green.
Press the “ENGINE START STOP” switch.
■ Stopping the engine
Engage the parking brake and shift the shift lever to P.
Press the “ENGINE START STOP” switch.
■ Changing power modes
To change power modes without turning on the engine, press the “ENGINE START STOP”
switch without depressing the brake pedal. The modes can be changed in the following
order:
With the electronic key on your person, the engine can be started by simply pressing the
“ENGINE START STOP” switch, while depressing the brake pedal.
(The mechanical key cannot be used to start the engine.)
ACCESSORY mode
IGNITION ON mode
(Indicator light: amber)
OFF
(Indicator light: off)
Page 15
Topic 3
When Driving
18
Entering and Exiting
Before DrivingBefore Driving
When DrivingWhen Driving
Rain and
Night Driving
Driving Comfort
Opening and Closing
What to do if ...
Customizing
Yo u r L e x u s
Automatic Transmission
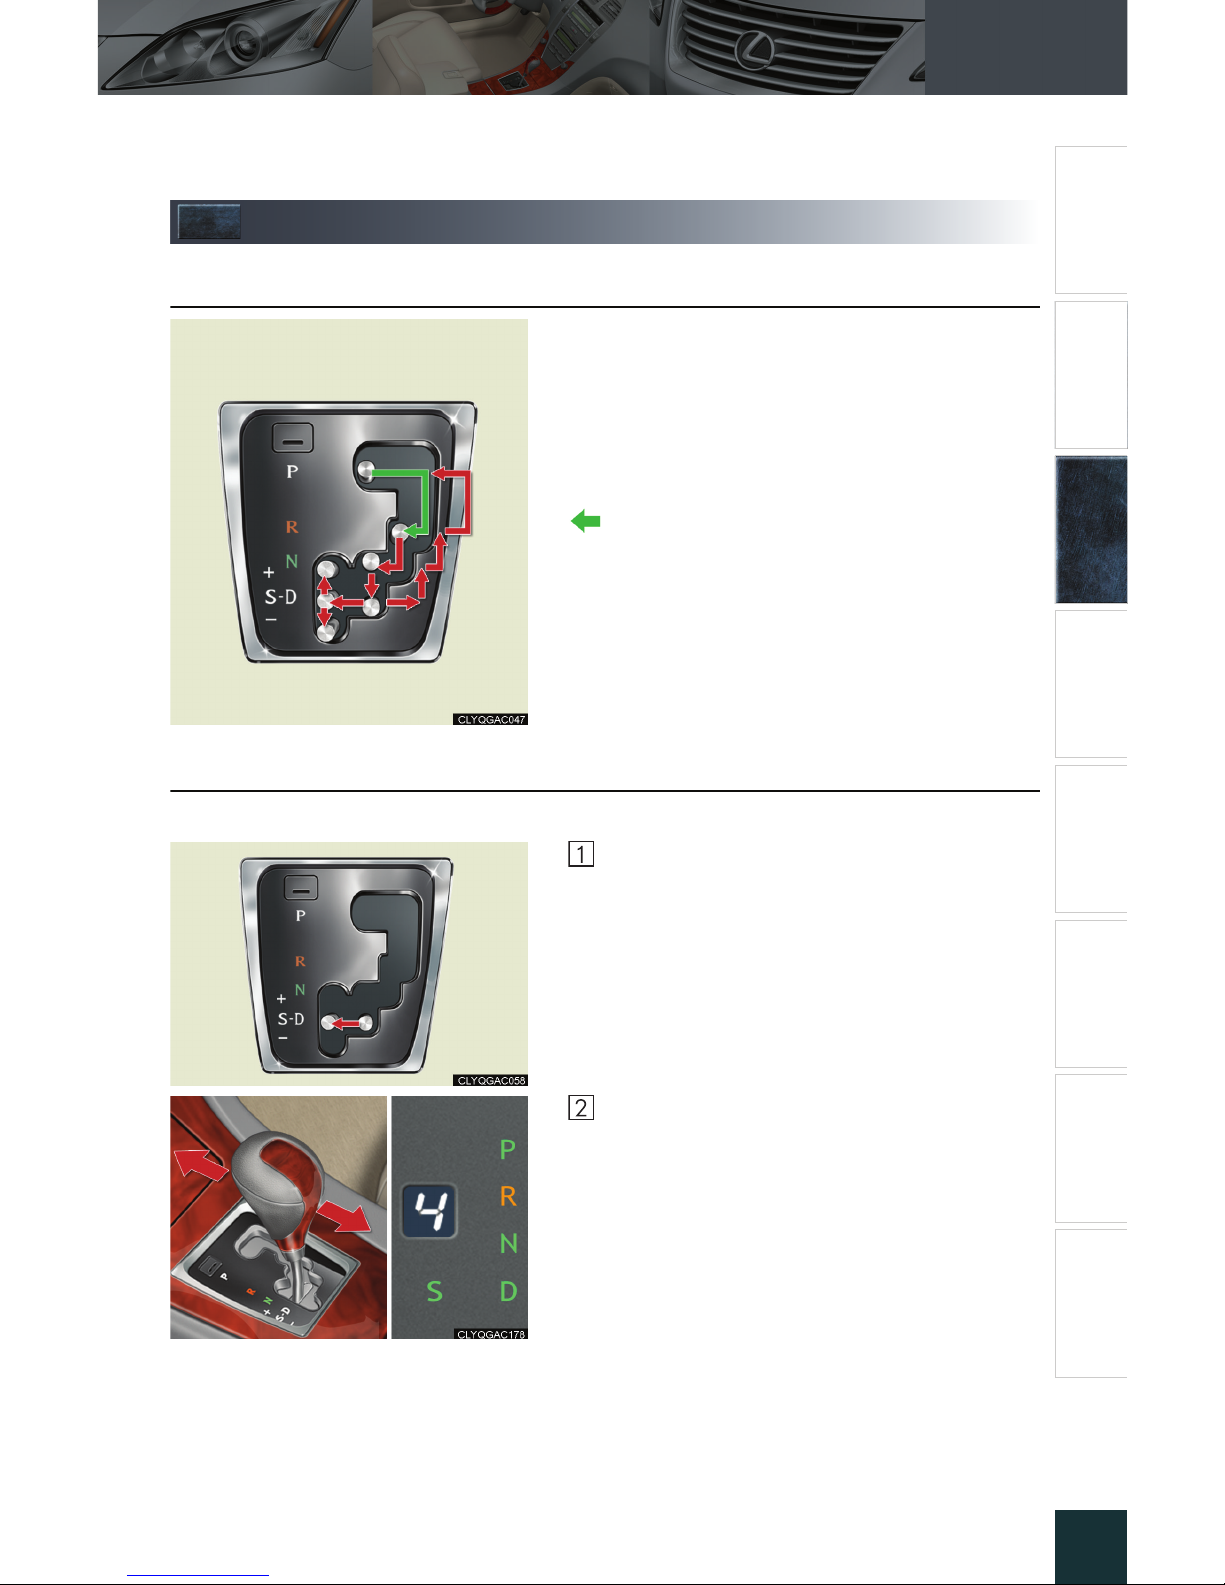
■ Shift positions
P Park
R Reverse
N Neutral (drive not engaged)
D Drive
S S mode
The vehicle can only be shifted out of P when
the “ENGINE START STOP” switch is in
IGNITION ON mode and the brake pedal is
depressed.
■ S mode
S mode allows the driver to select the shift range manually based on driving conditions.
Shift the shift lever to S.
To up s hi f t: shift the shift lever toward “+”.
To do w ns hi f t: shift the shift lever toward “-”.
The selected shift range is displayed on the
instrument cluster.
Page 16
Topic 3
When Driving
19
Parking Brake
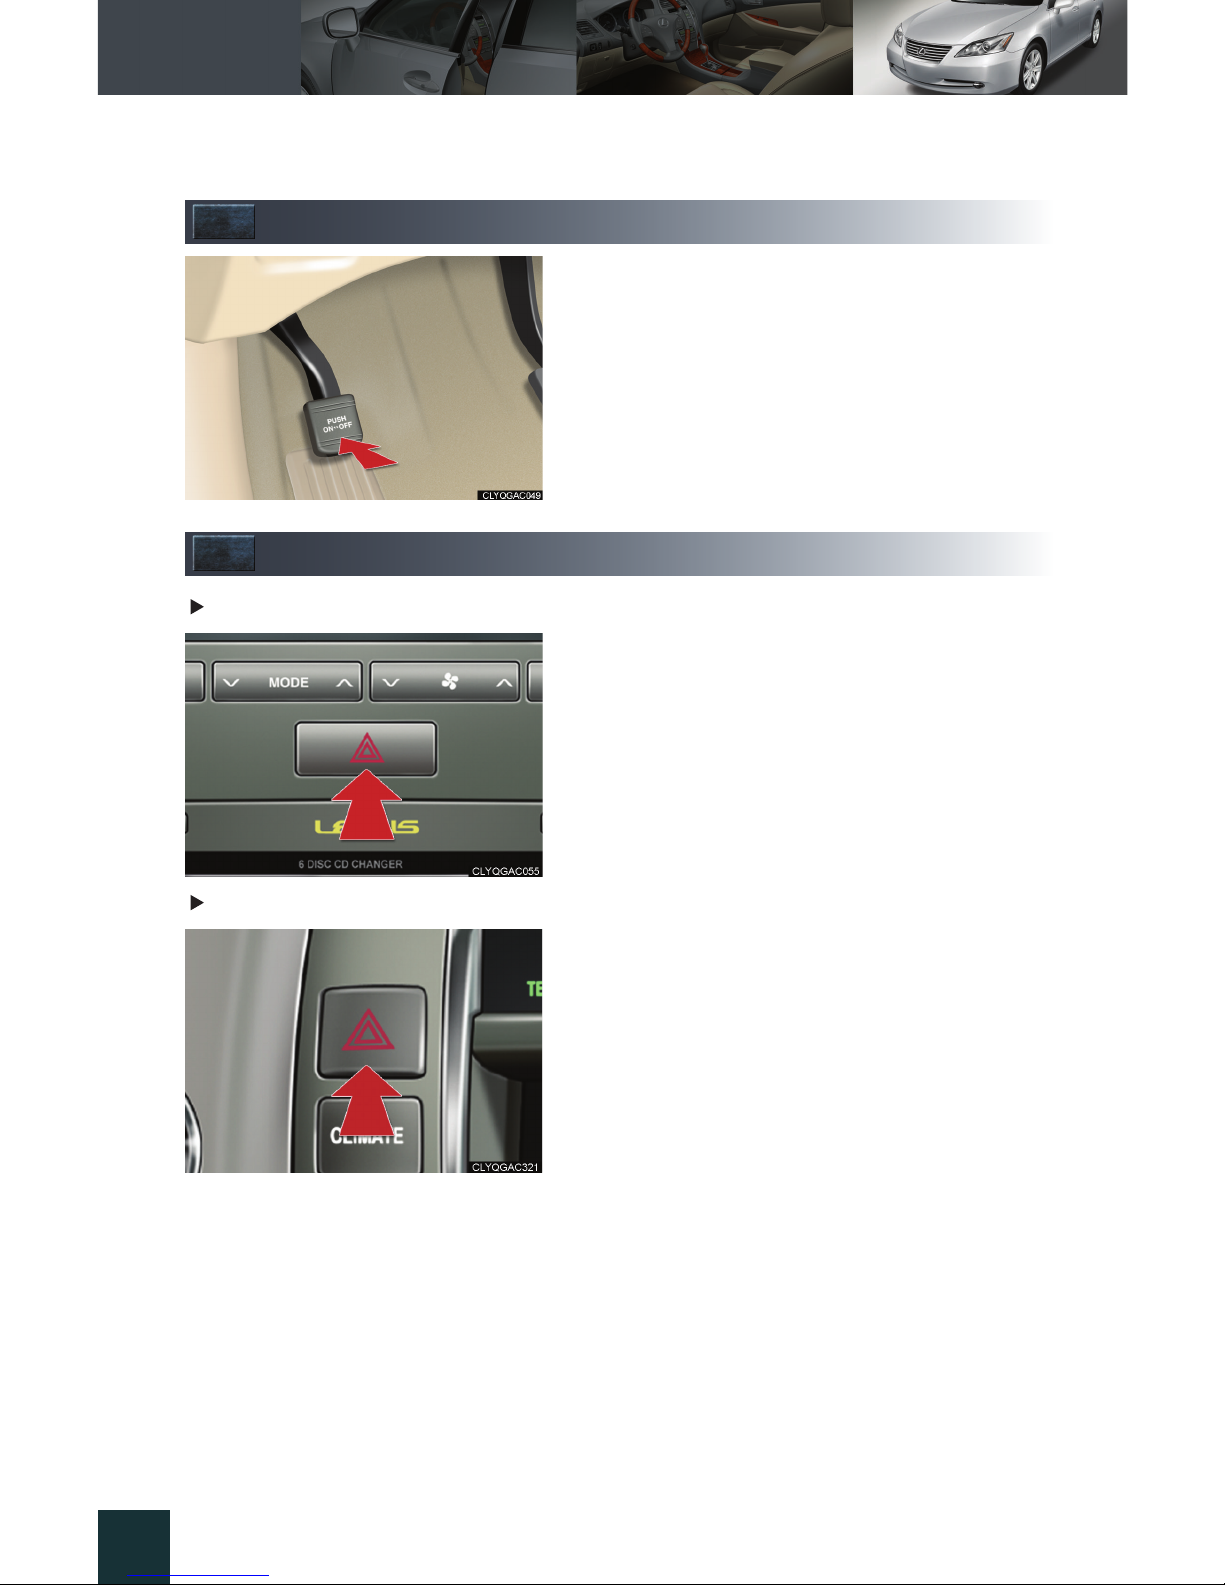
To set the parking brake: firmly depress the parking brake pedal.
To release the parking brake: depress the parking brake pedal again.
Emergency Flasher Switch
Without navigation system
Engaging the emergency flasher switch causes all
the turn signal lights to flash.
The emergency flashers can be operated even
when the “ENGINE START STOP” switch is OFF.
With navigation system
Page 17
Topic 3
When Driving
20
Entering and Exiting
Before DrivingBefore Driving
When DrivingWhen Driving
Rain and
Night Driving
Driving Comfort
Opening and Closing
What to do if ...
Customizing
Yo u r L e x u s
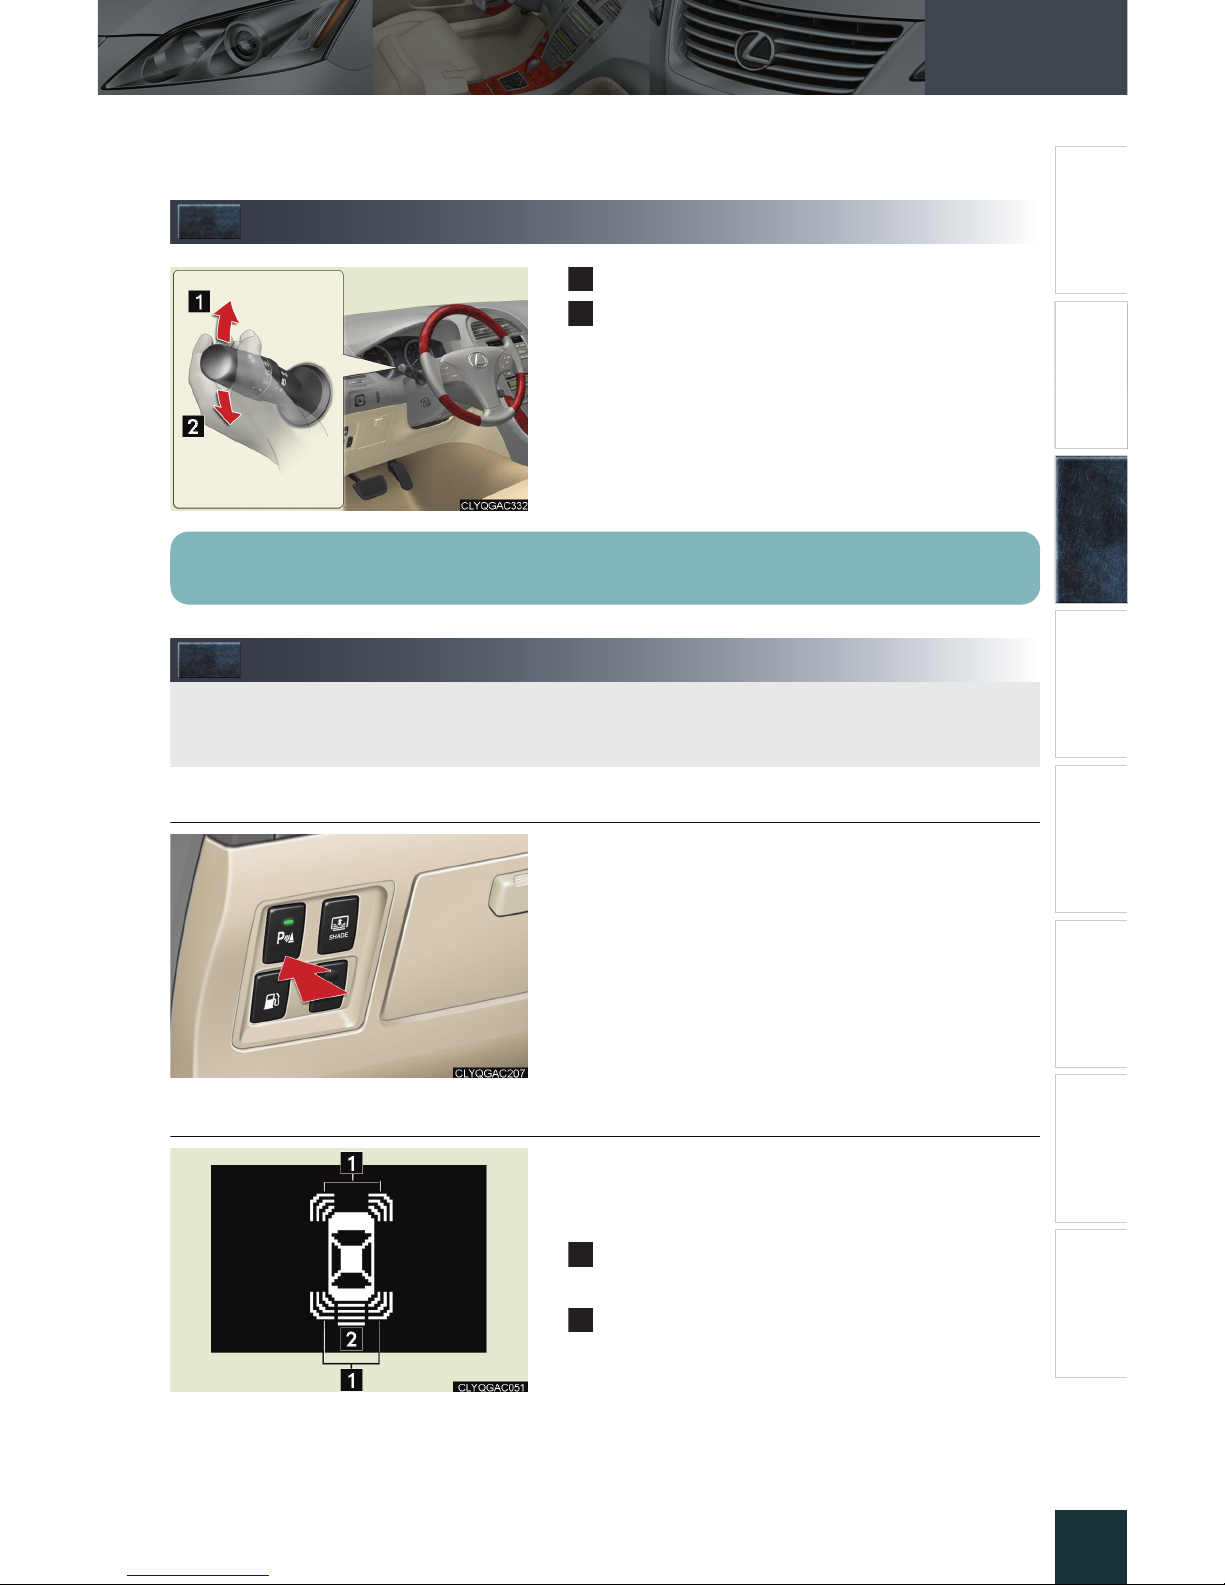
Turn Signal Lever
Right turn signal
Left turn signal
Intuitive Parking Assist (If Equipped)
■ Turning the system on and off
Press the switch.
When ON, an indicator on the switch comes on
to inform the driver that the function is operational.
■ Screen display
Sensors are used to detect obstacles near the
vehicle. The distance to a detected obstacle is
shown by the number of indicator bars.
Indicates obstacles detected by the corner
sensors
Indicates obstacles detected by the back sensors
1
2
To signal a lane change, move the lever partway and hold.
The system uses a screen display and buzzer to inform the driver of obstacles near the
vehicle when parking or driving at low speed.
1
2
Page 18
Topic 3
When Driving
21
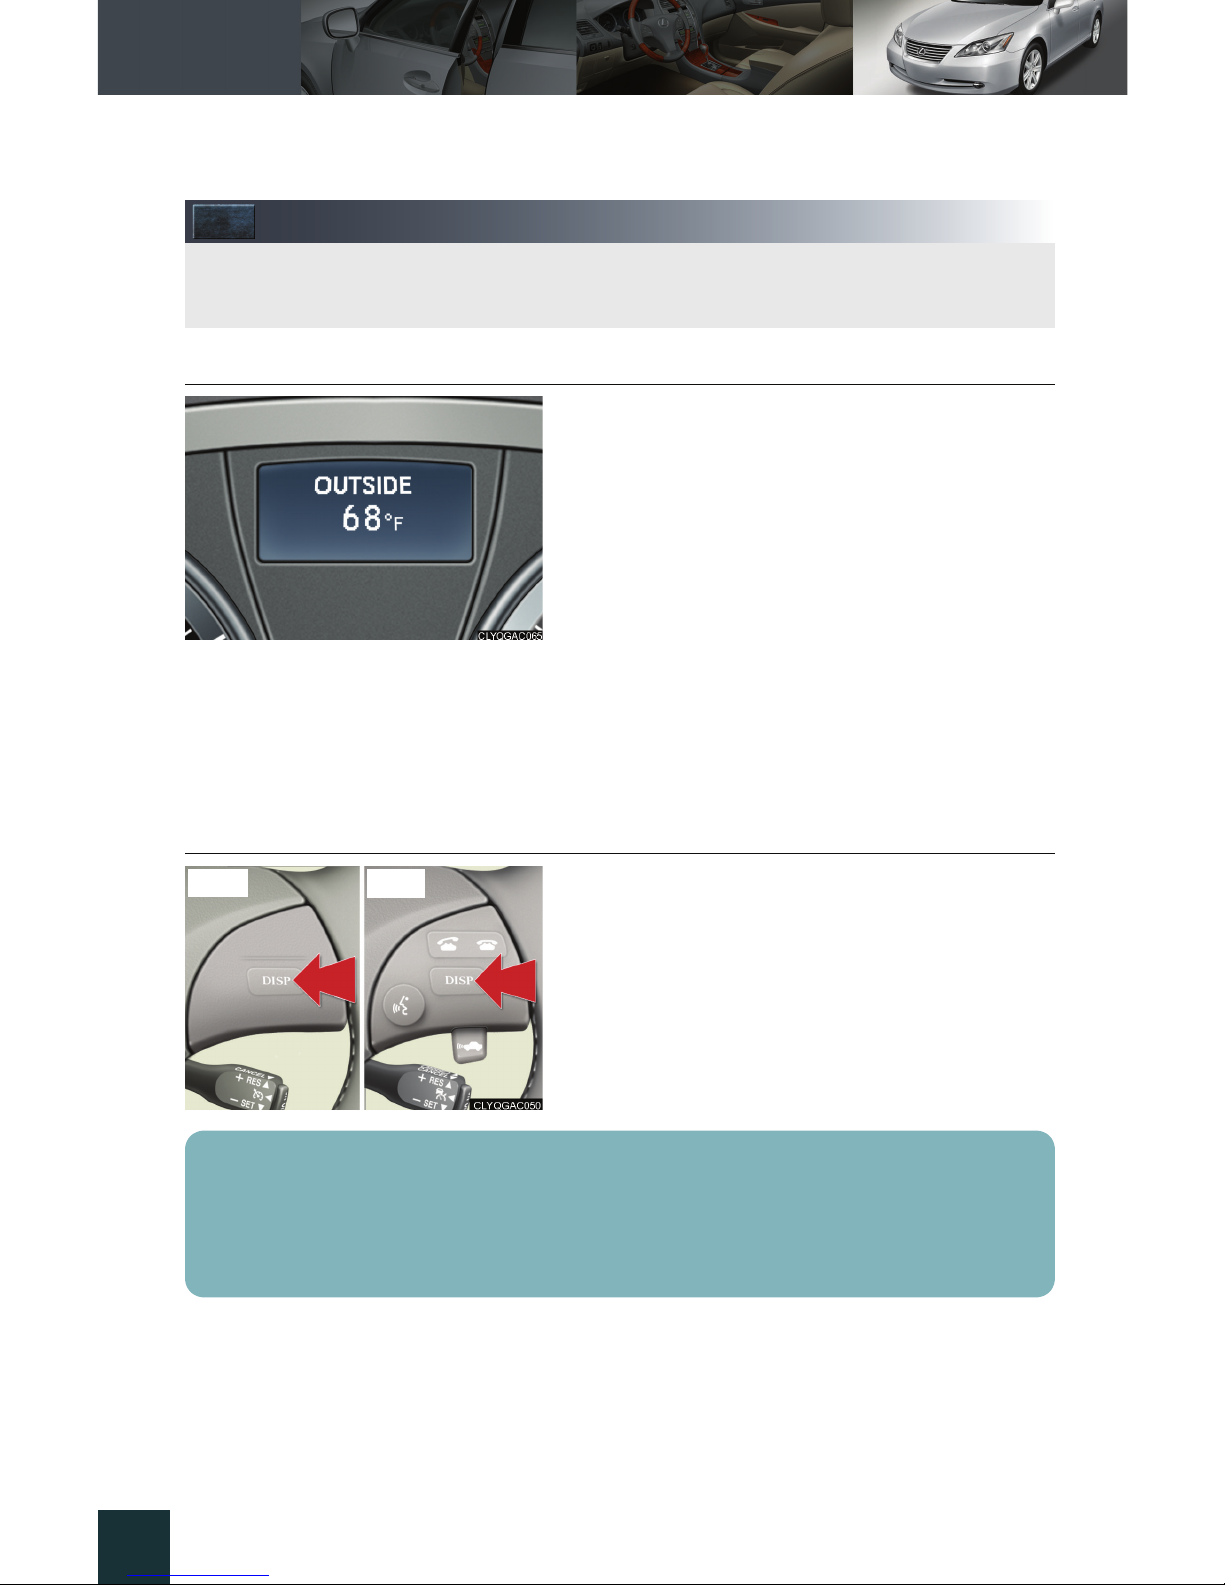
Multi-information Display
■ Display information
● Trip information
• Outside temperature
• Driving range
• Average fuel consumption
• Average fuel consumption after refueling
• Current fuel consumption
• Average vehicle speed
• Elapsed time
● Dynamic radar cruise control settings
(if equipped)
● Intuitive parking assist information
(if equipped)
● War nin g me ss ag es
■ Changing the display of trip information
Trip information items can be switched by pressing the DISP switch.
The multi-information display shows information about your vehicle, including the items
shown below.
Ty pe A
Ty pe B
■ When using the intuitive parking assist system or dynamic radar cruise control, the
appropriate display is shown on the screen.
■ In the event that a problem is detected in any of the vehicle's systems, a warning message is
shown on the multi-information display.
Page 19
Topic 3
When Driving
22
Entering and Exiting
Before DrivingBefore Driving
When DrivingWhen Driving
Rain and
Night Driving
Driving Comfort
Opening and Closing
What to do if ...
Customizing
Yo u r L e x u s
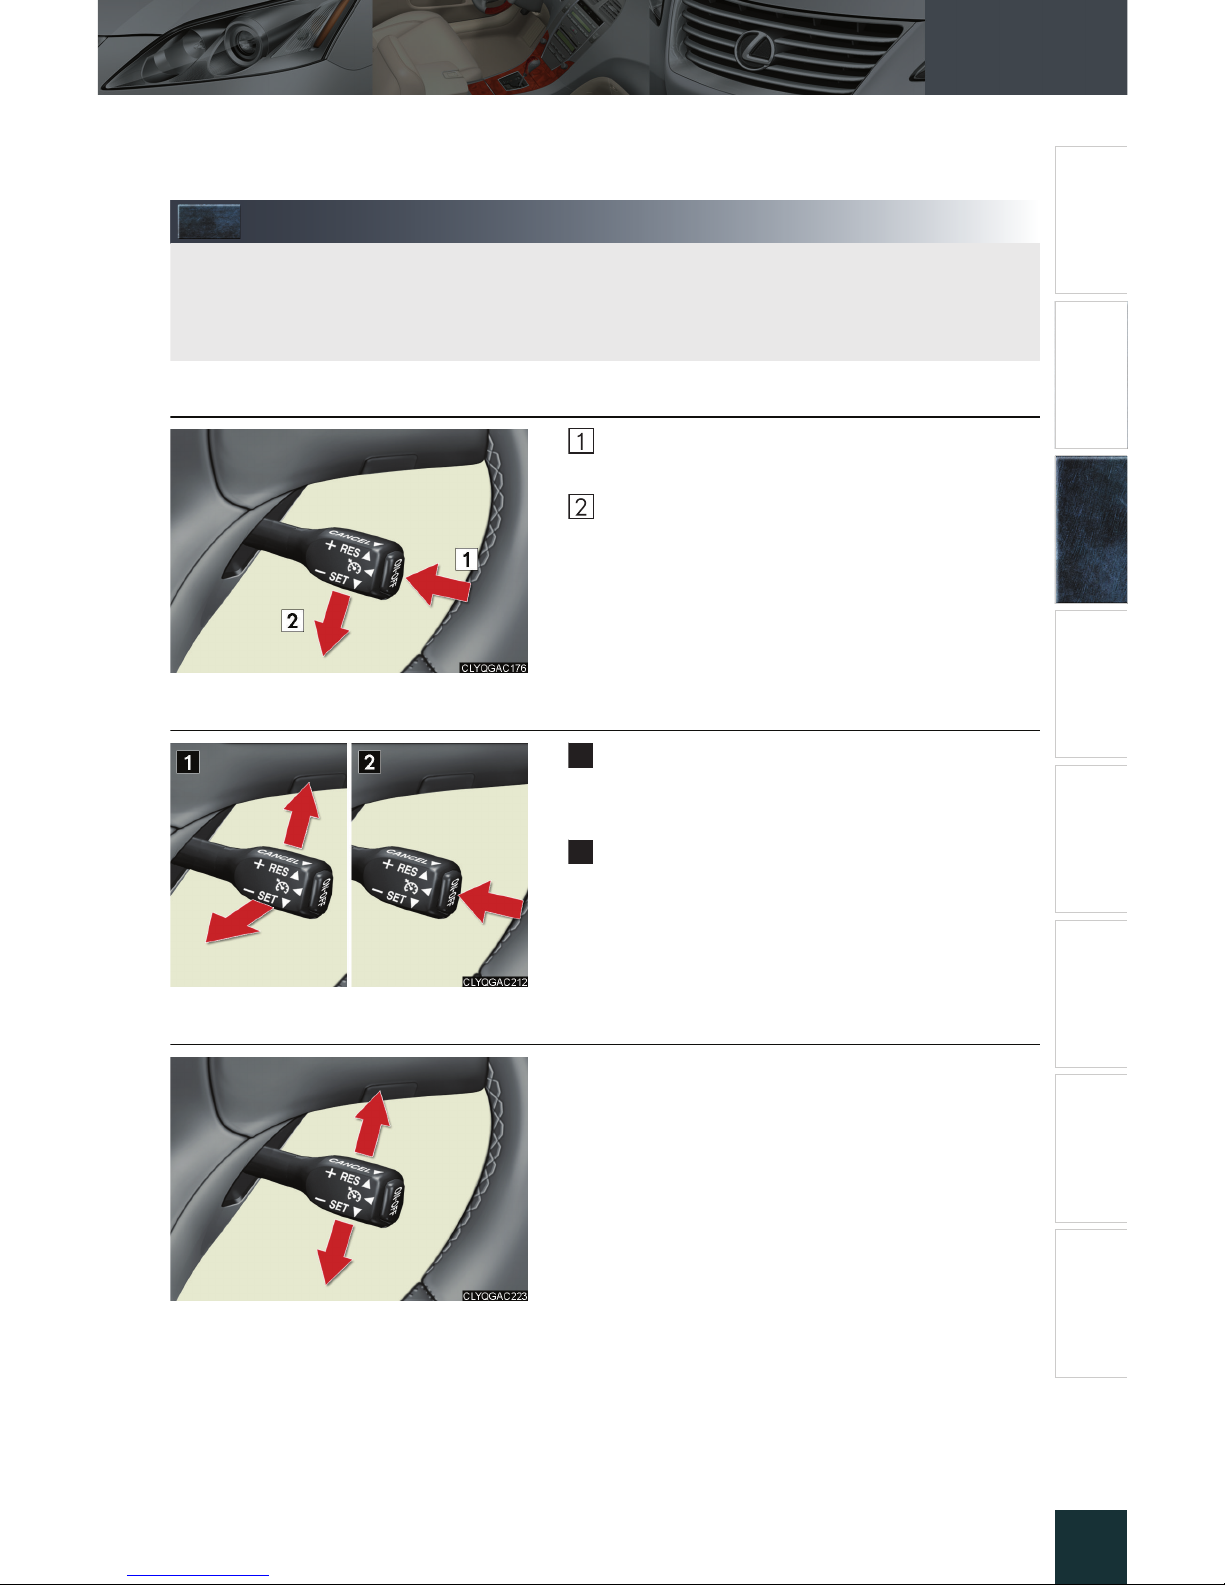
Cruise Control (If Equipped)
■ Setting the speed
Press the ON-OFF button.
The system will turn on.
Accelerate or decelerate to the desired
speed, and then push the lever down.
This sets the speed in the cruise control
memory.
■ Canceling
To temporarily cancel the cruise control, pull
the lever toward you. To resume the cruise
control, push the lever up.
To turn the system off, press the ON-OFF button.
■ Adjusting the speed setting
To in c re as e sp e ed : push the lever up.
To decrease speed: push the lever down.
Release the lever when the desired speed is
reached.
Cruise control allows the driver to maintain a constant speed without having to operate the
accelerator pedal.
Use for highway driving or when traveling at a constant speed for long periods of time.
1
2
Page 20
Topic 3
When Driving
23
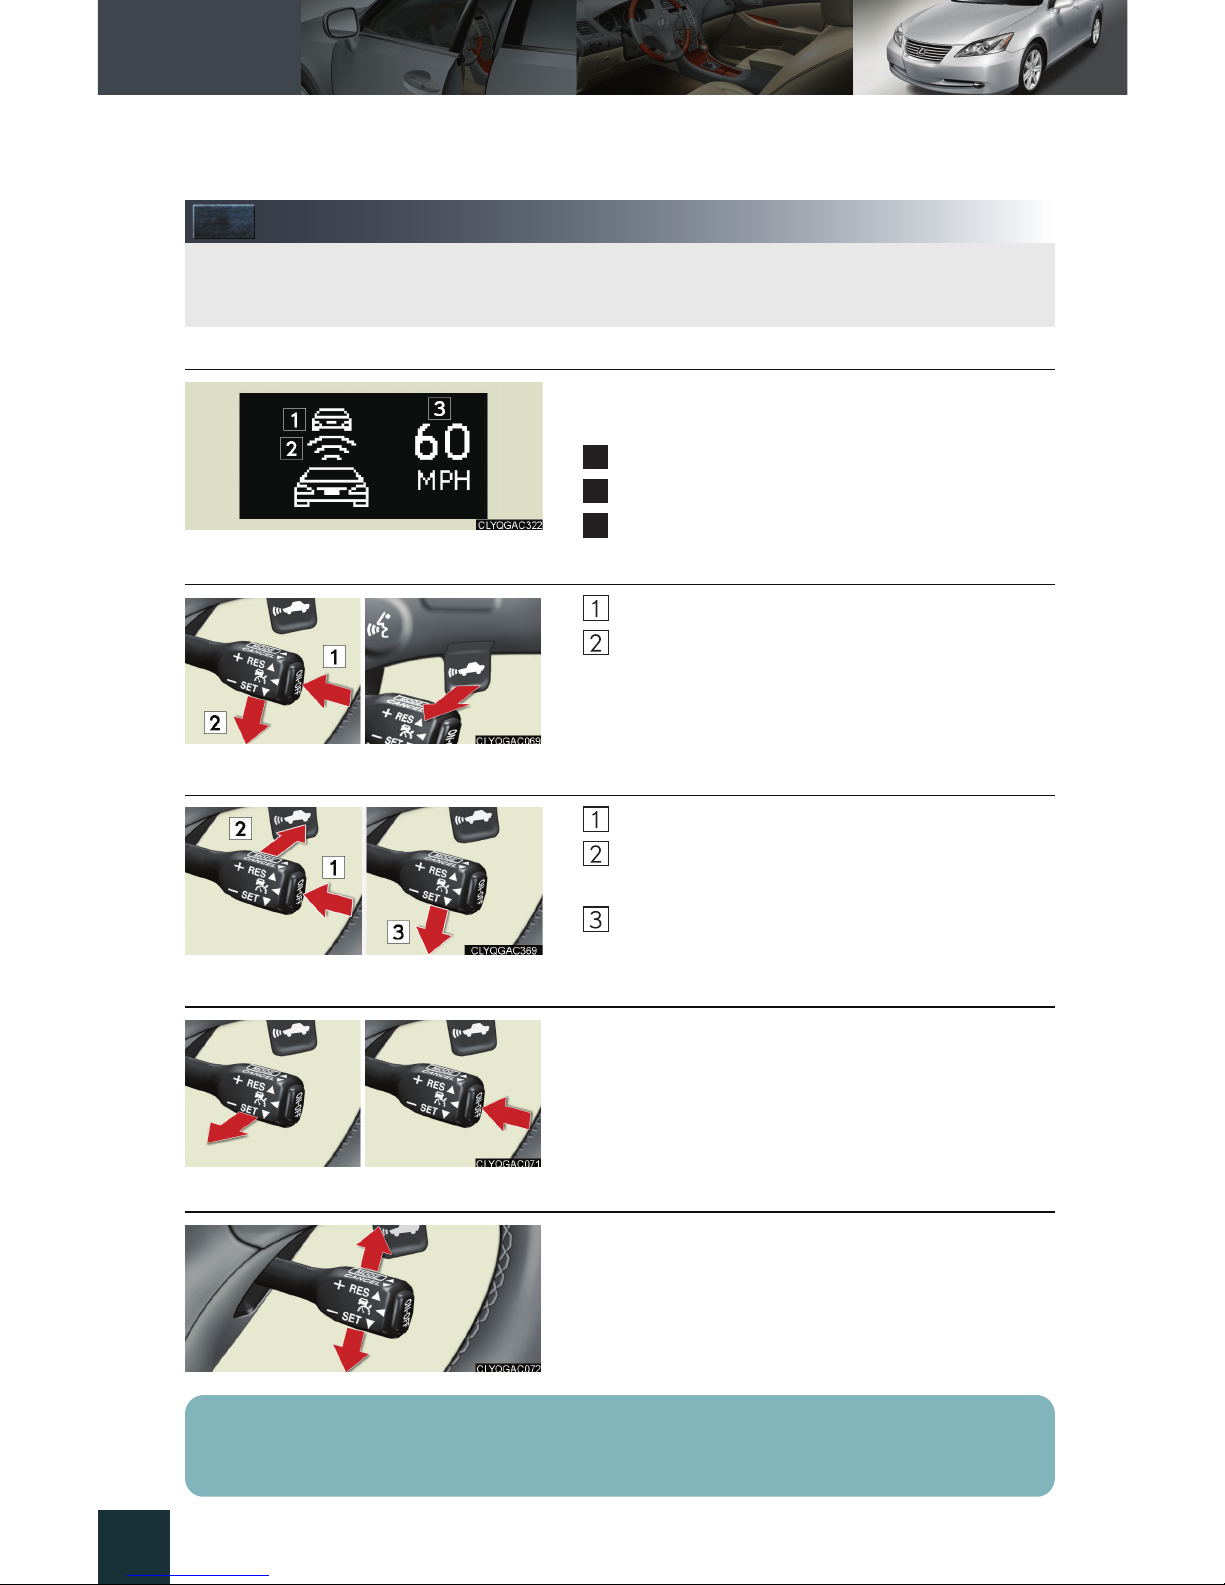
Dynamic Radar Cruise Control (If Equipped)
■ Cruise control display
Cruise control settings are shown on the multiinformation display.
Vehicle ahead indicator
Vehicle-to-vehicle distance
Preset speed
■ Vehicle-to-vehicle distance control mode
Press the ON-OFF button.
Accelerate or decelerate to the desired
speed, and then push the lever down.
Following distance can be adjusted using the
vehicle-to-vehicle distance control switch.
■ Conventional (constant speed) cruise control mode
Press the ON-OFF button.
Push the lever forward and hold for at least
one second.
Accelerate or decelerate to the desired
speed, and then push the lever down.
■ Canceling
To temporarily cancel the dynamic radar cruise
control, pull the lever.
To turn the system off, press the ON-OFF button.
■ Adjusting the speed setting
To increase speed: push the lever up.
To de c re as e sp e ed : push the lever down.
Release the lever when the desired speed is
reached.
Dynamic radar cruise control supplements conventional cruise control with a vehicle-tovehicle distance control mode.
1
2
3
The vehicle-to-vehicle distance control mode maintains the preset cruising speed as long
as no vehicle is detected ahead.
Page 21
Topic 4
Rain and Night Driving
25
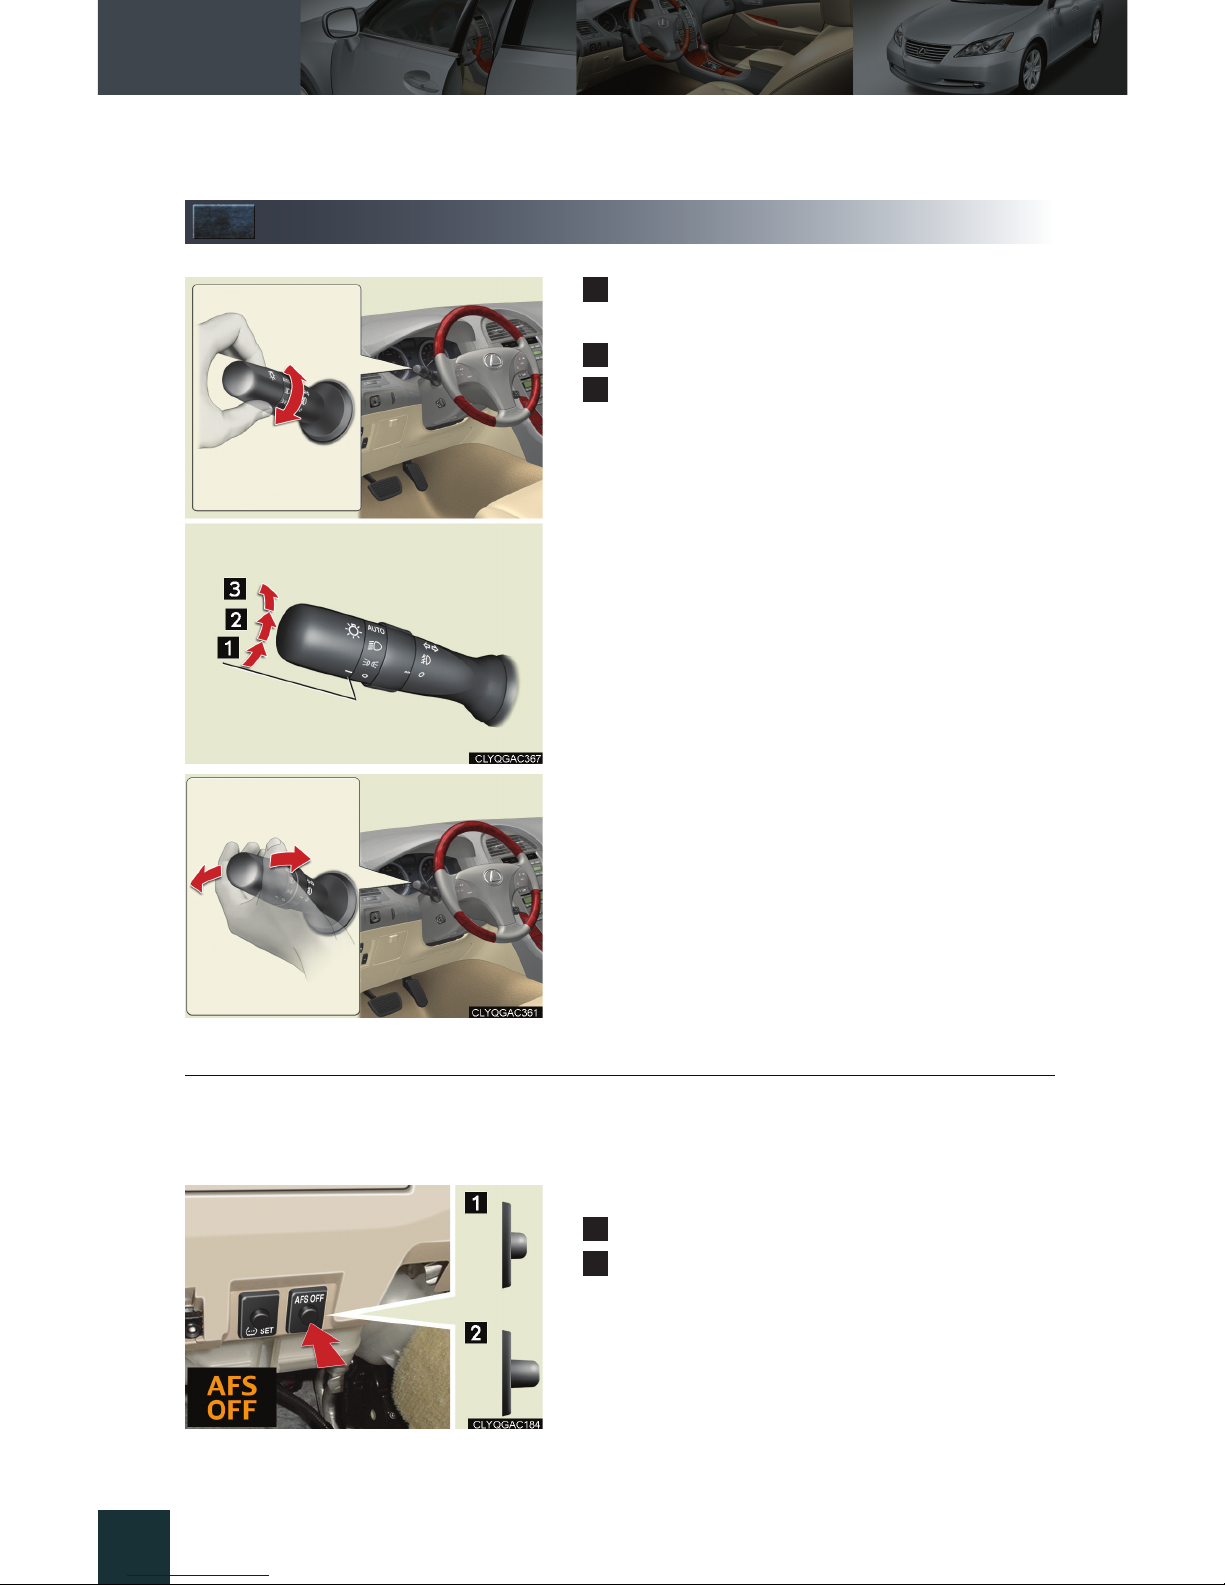
Headlights
The instrument panel, the side marker, parking,
tail and license plate lights turn on.
The headlights and all lights listed above turn on.
The headlights and parking lights turn on/off
automatically in accordance with ambient light
levels.
To engage the high beams, push the lever forward.
To flash the high beams, pull the lever and hold.
■ AFS (Adaptive Front-lighting System) (if equipped)
AFS improves visibility on curves by automatically adjusting the horizontal orientation of the
headlights in accordance with vehicle speed and the degree of the tire angle that are controlled by steering input.
To cancel the system, press the AFS OFF button.
OFF
ON
The indicator comes on when the system is off.
1
2
3
1
2
Page 22
Topic 4
Rain and Night Driving
26
Entering and Exiting
Before DrivingBefore Driving
When Driving
Rain and
Night Driving
Rain and
Night Driving
Driving Comfort
Opening and Closing
What to do if ...
Customizing
Yo u r L e x u s
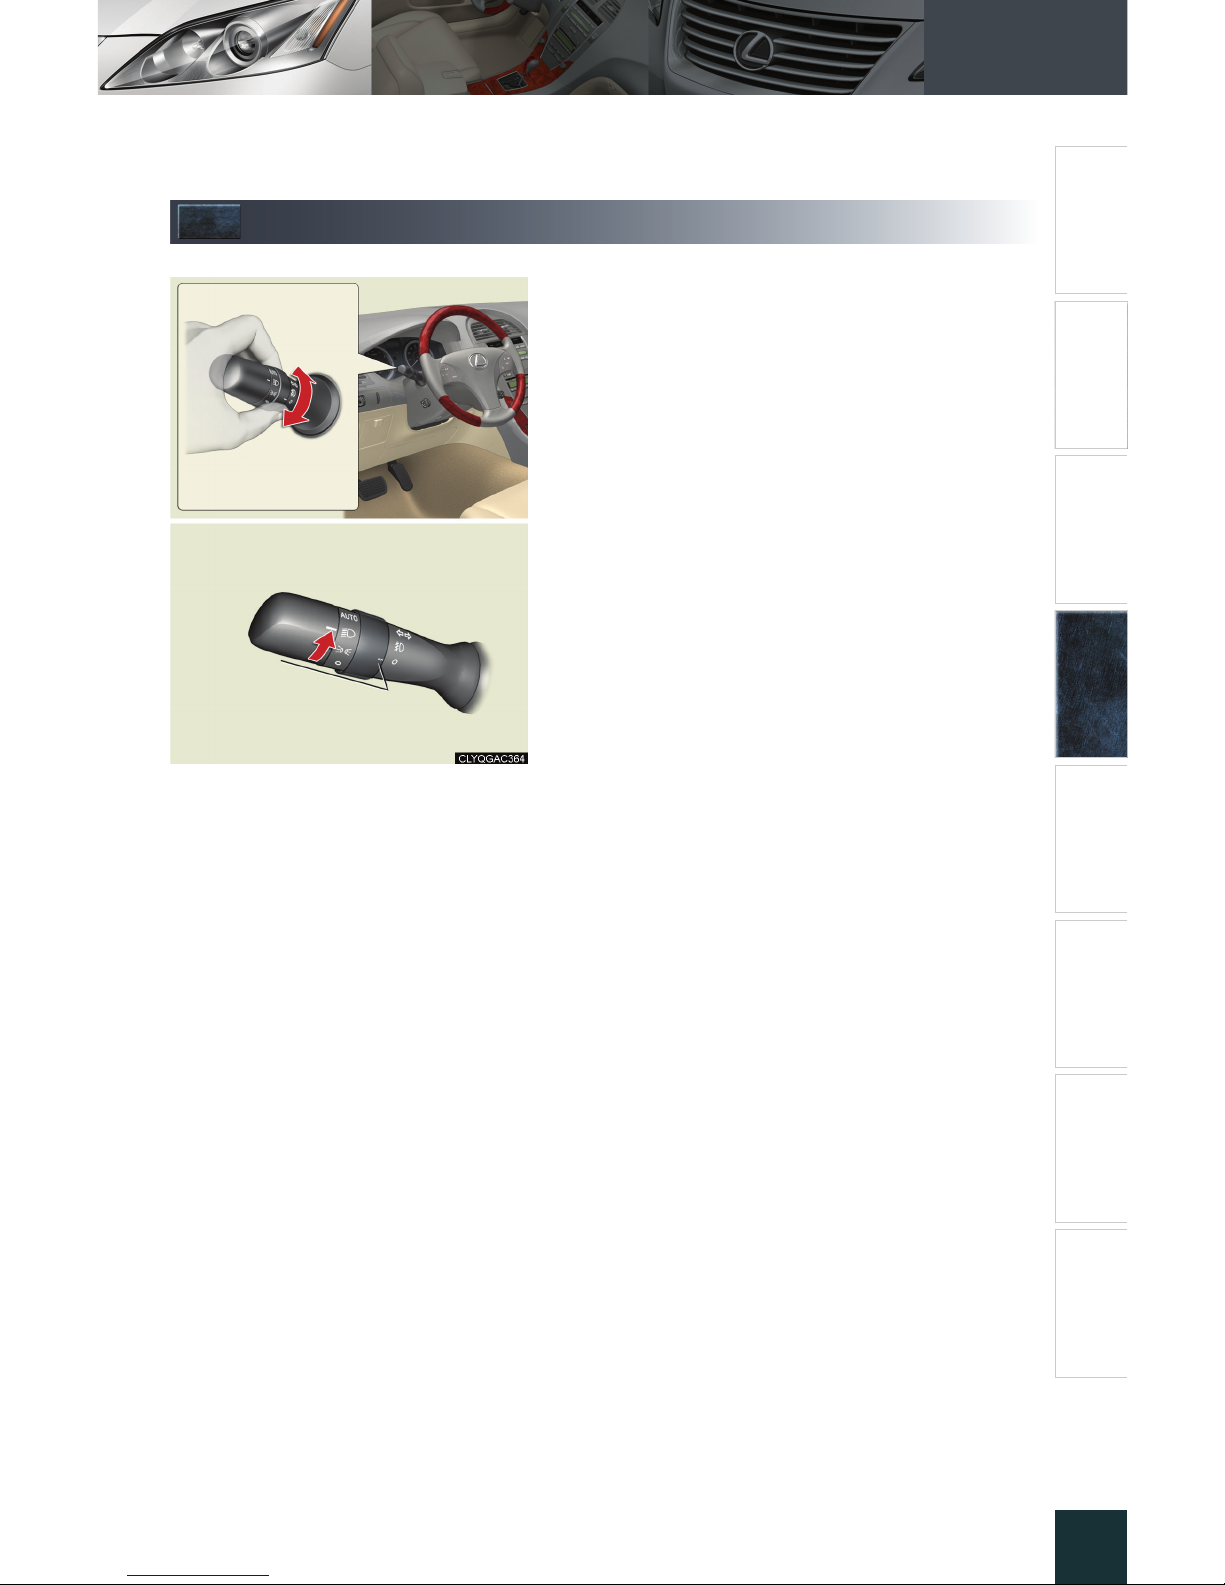
Fog Lights
The fog lights can be used only when the headlights (low beam) are on.
Page 23
Topic 4
Rain and Night Driving
27
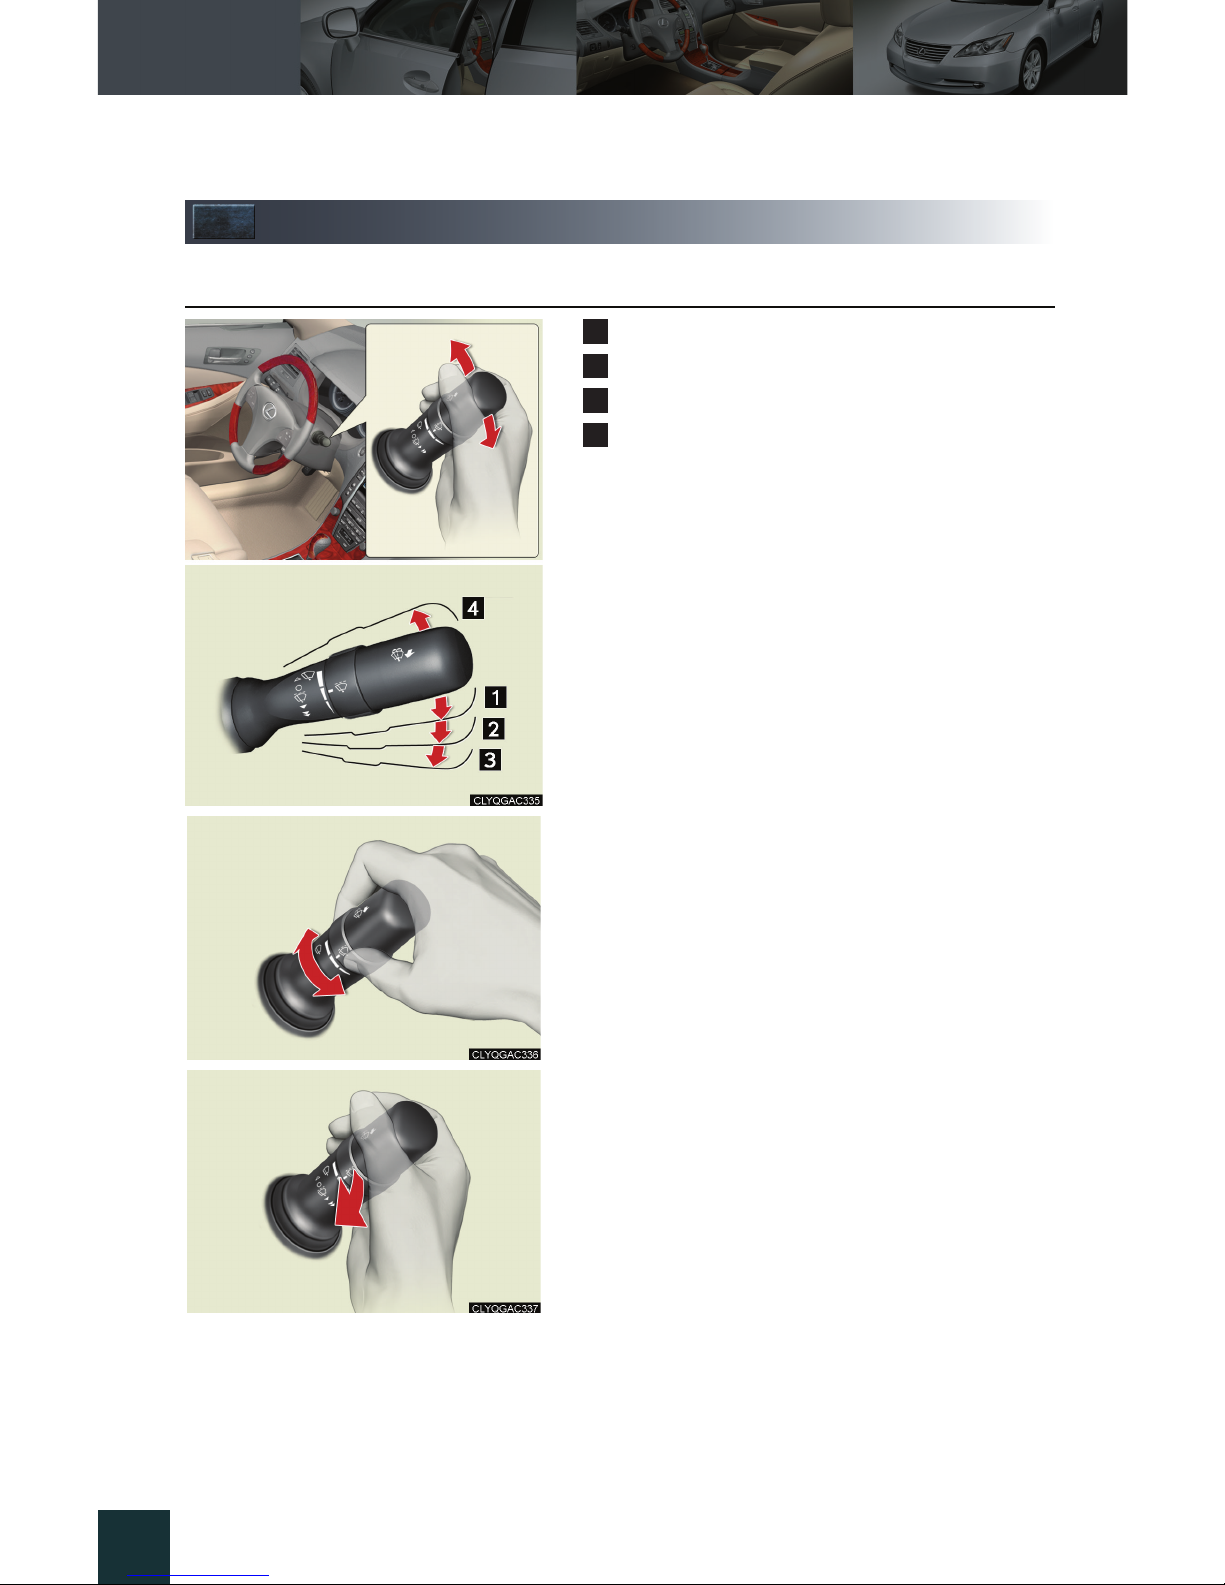
Windshield Wipers and Washer
■ Intermittent wiper with interval adjuster (if equipped)
Intermittent operation
Low speed
High speed
Single wipe
Intermittent operation: Wiper interval can be
adjusted by turning the band.
To spray washer fluid, pull the lever. The wipers
will operate automatically.
1
2
3
4
Page 24
Topic 4
Rain and Night Driving
28
Entering and Exiting
Before DrivingBefore Driving
When Driving
Rain and
Night Driving
Rain and
Night Driving
Driving Comfort
Opening and Closing
What to do if ...
Customizing
Yo u r L e x u s
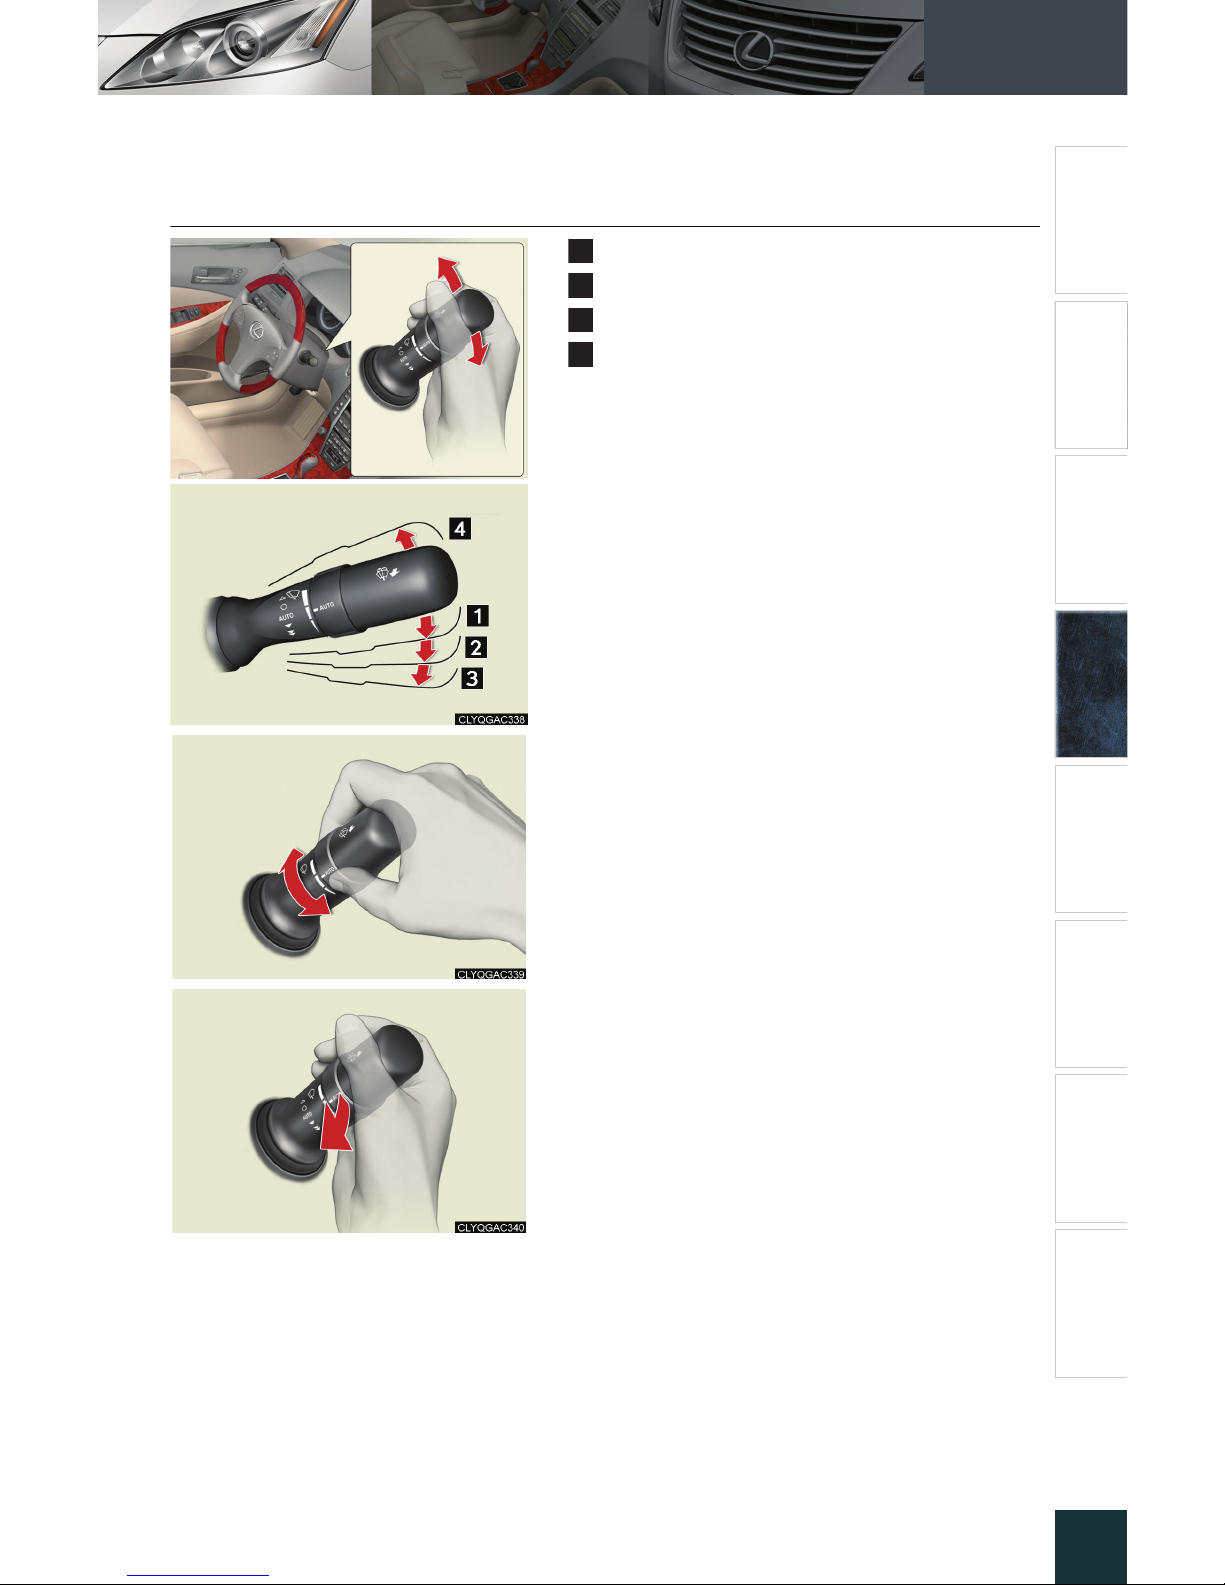
■ Rain-sensing windshield wipers (if equipped)
Automatic operation
Low speed
High speed
Single wipe
Automatic operation: Sensitivity can be adjusted
by turning the band.
To spray washer fluid, pull the lever. The wipers
will operate automatically.
1
2
3
4
Page 25
Topic 4
Rain and Night Driving
29
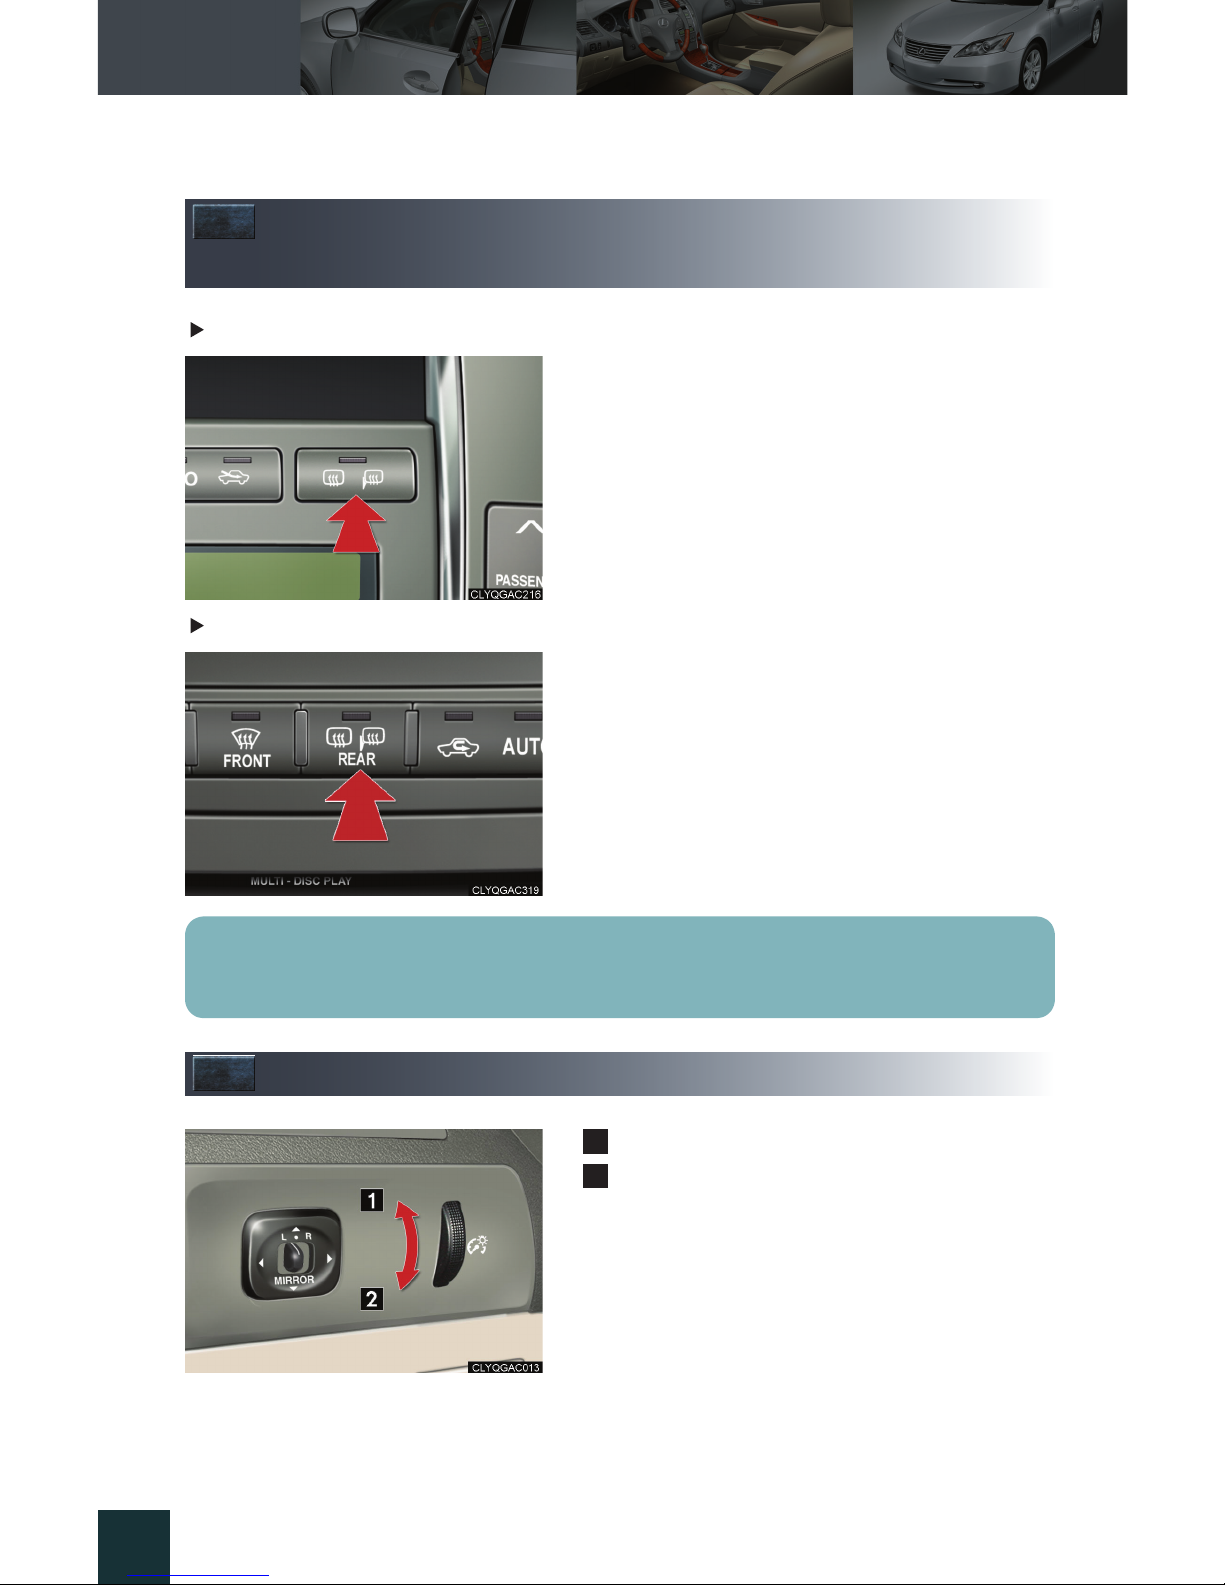
Rear Window and Outside Rear View
Mirror Defoggers
Without navigation system
To defog the rear window and the outside rear
view mirrors, press the button.
Press again to cancel.
With navigation system
Instrument Panel Light Control
To br i gh t en : turn the knob upward.
To di m : turn the knob downward.
When the headlight switch is turned to ON, the
brightness will be reduced slightly unless the control dial is turned fully on.
The system turns off automatically after 15 to 60 minutes. The operation time changes
according to the ambient temperature and vehicle speed.
1
2
Page 26
Topic 5
Driving Comfort
31
Audio System
With navigation system
Owners of models equipped with a navigation system should refer to the “Navigation System
Owner's Manual”.
Without navigation system
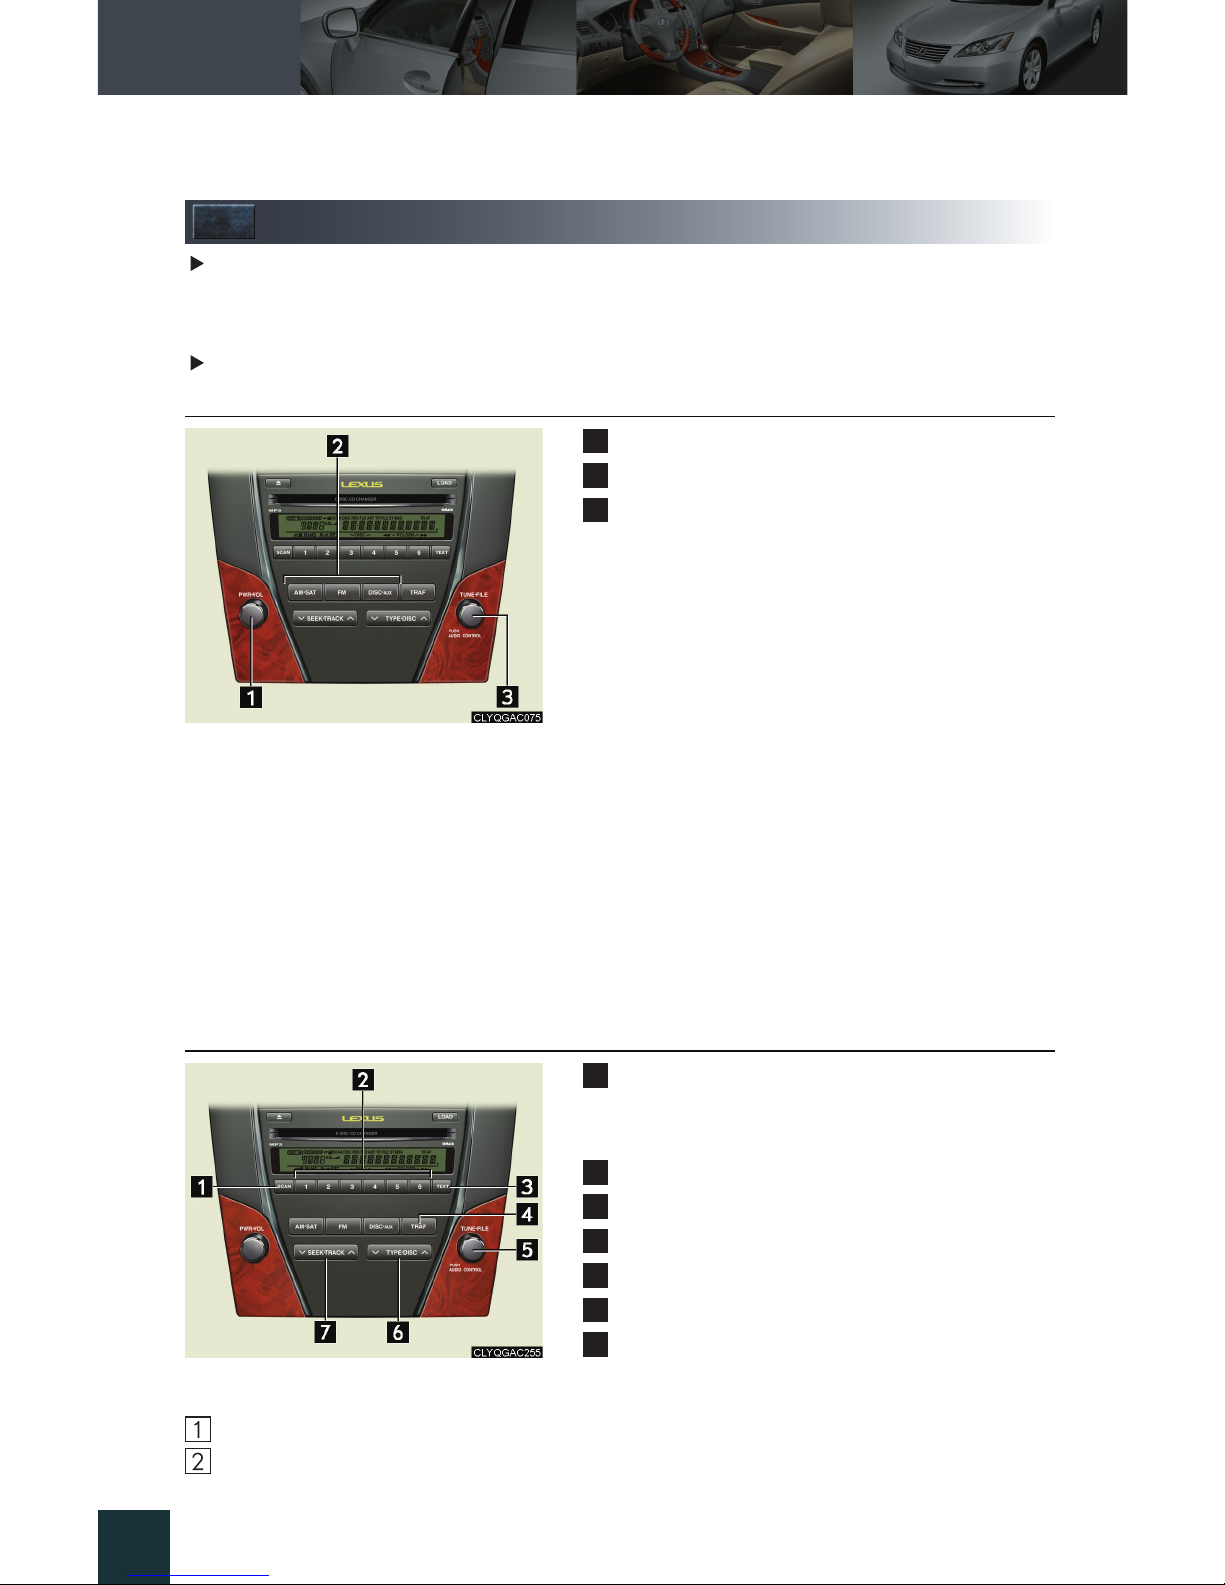
■ Basic operation
Po we r/Vo lu m e
Audio sources
Sound quality modes
Listening position
ASL (Automatic Sound Levelizer)
■ Audio sources
AM⋅SAT: AM radio/Satellite radio*
FM: FM radio
DISC
⋅AUX: CD player/Auxiliary audio device
*:
The optional Lexus genuine satellite tuner and antenna allows you to receive and play
XM
®
Satellite Radio broadcasts. (Subscription is required. For detailed information,
see the Owner’s Manual.)
■ Radio
Scan
All radio stations: press
Preset radio stations: press and hold
Station presets
Tex t m es sa ge s
Traffic information
Tu ne
RDS genre select
Seek
■ Entering station presets
Select the desired station by using the tune, the seek or the scan function.
Press and hold one of the preset buttons (1~6) until you hear a beep, indicating that the
station is set.
1
2
3
1
2
3
4
5
6
7
Page 27
Topic 5
Driving Comfort
32
Entering and Exiting
When Driving
Rain and
Night Driving
Driving ComfortDriving Comfort
Opening and Closing
What to do if ...
Customizing
Yo u r L e x u s
Before Driving
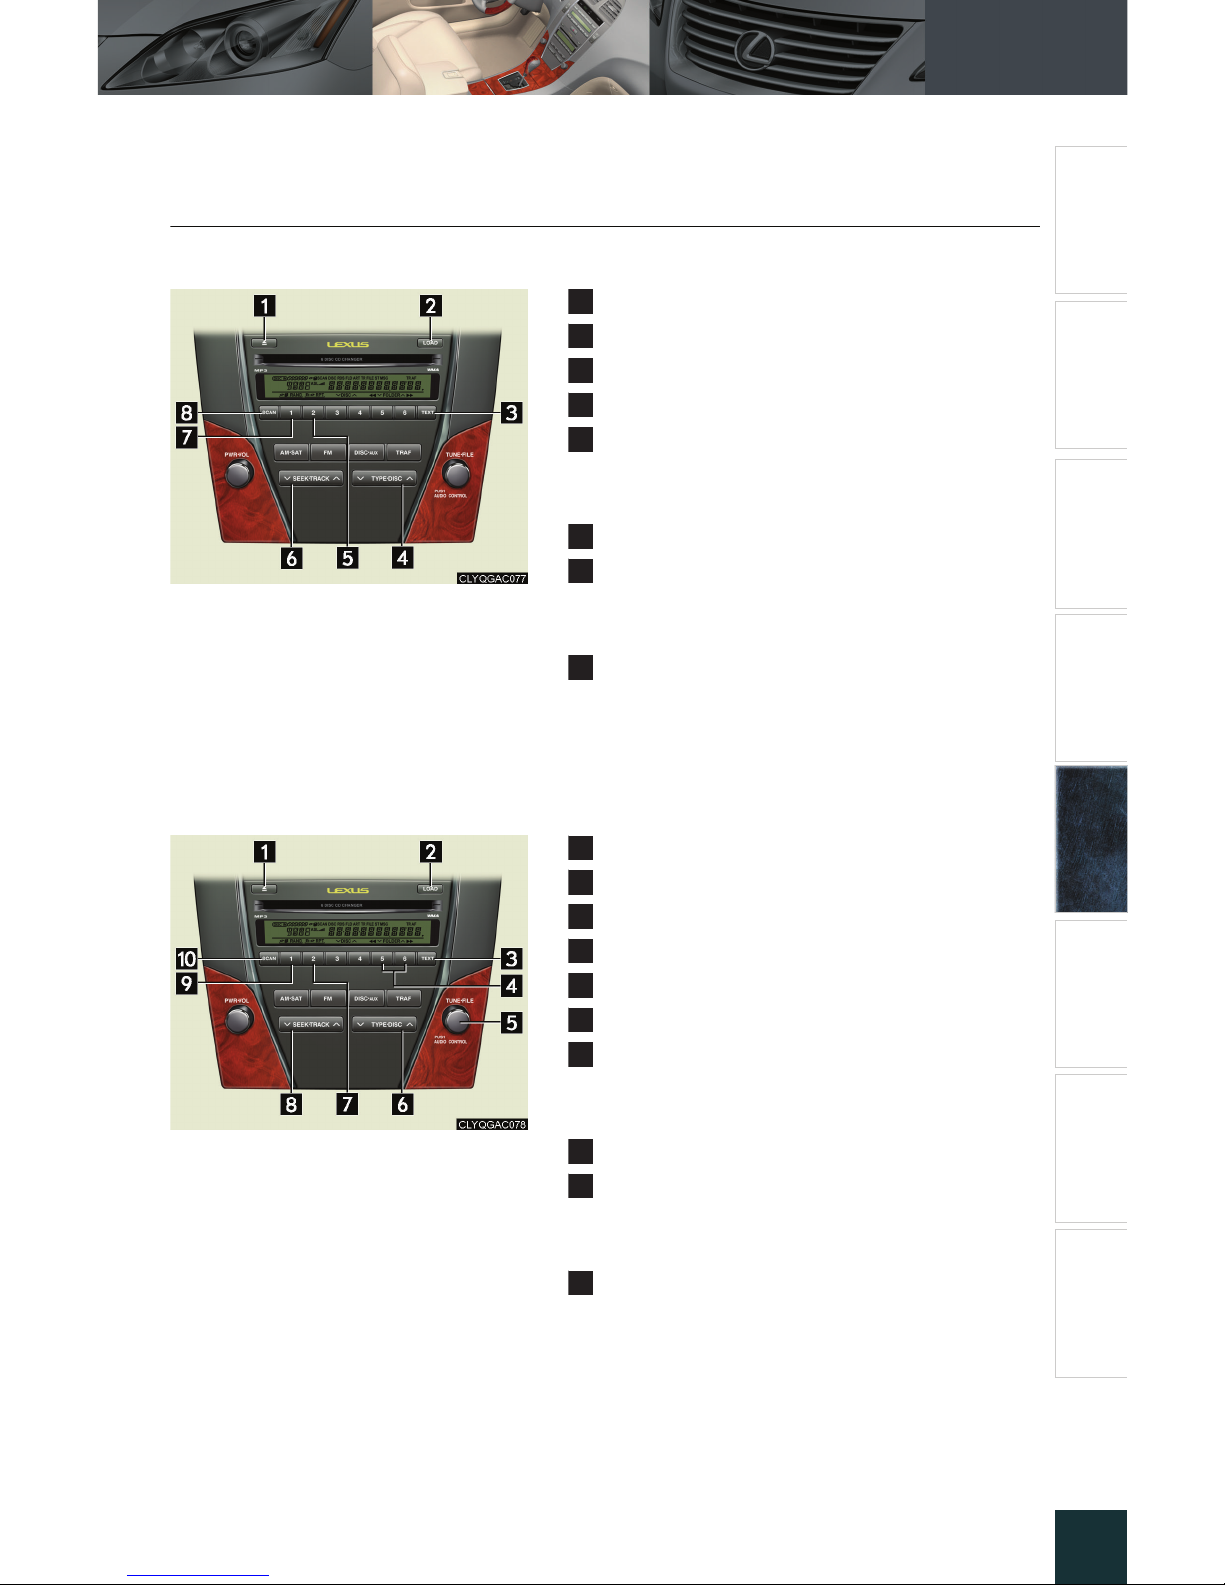
■ CD player
■
Playing an audio CD
Eject
CD load
Text information
CD select
Repeat
Current track: press
Current CD: press and hold
Track select/reverse/fast-forward
Random playback
Current CD: press
All CDs: press and hold
Scan
All tracks in current CD: press
First track of each CD: press and hold
■ Playing a CD with MP3/WMA files
Eject
CD load
Text information
Folder select
File select
CD select
Repeat
Current file: press
Current folders: press and hold
File select/reverse/fast-forward
Random playback
Current folder: press
Current CD: press and hold
Scan
All files in current folder: press
First file of each folder: press and hold
1
2
3
4
5
6
7
8
1
2
3
4
5
6
7
8
9
10
Page 28
Topic 5
Driving Comfort
33
■ Loading a CD
Press the LOAD button.
WAIT is shown on the display.
Insert a CD when the indicator on the slot turns from amber to green.
The display changes from WAIT to LOAD.
■ Loading multiple CDs
Press and hold the LOAD button until you hear a beep.
WAIT is shown on the display.
Insert a CD when the indicator on the slot turns from amber to green.
The display changes from WAIT to LOAD.
The indicator on the slot turns to amber when the CD is inserted.
Insert the next CD when the indicator on the slot turns from amber to green again.
Repeat the procedure for the remaining CDs.
To stop the operation, press the DISC
⋅AUX button.
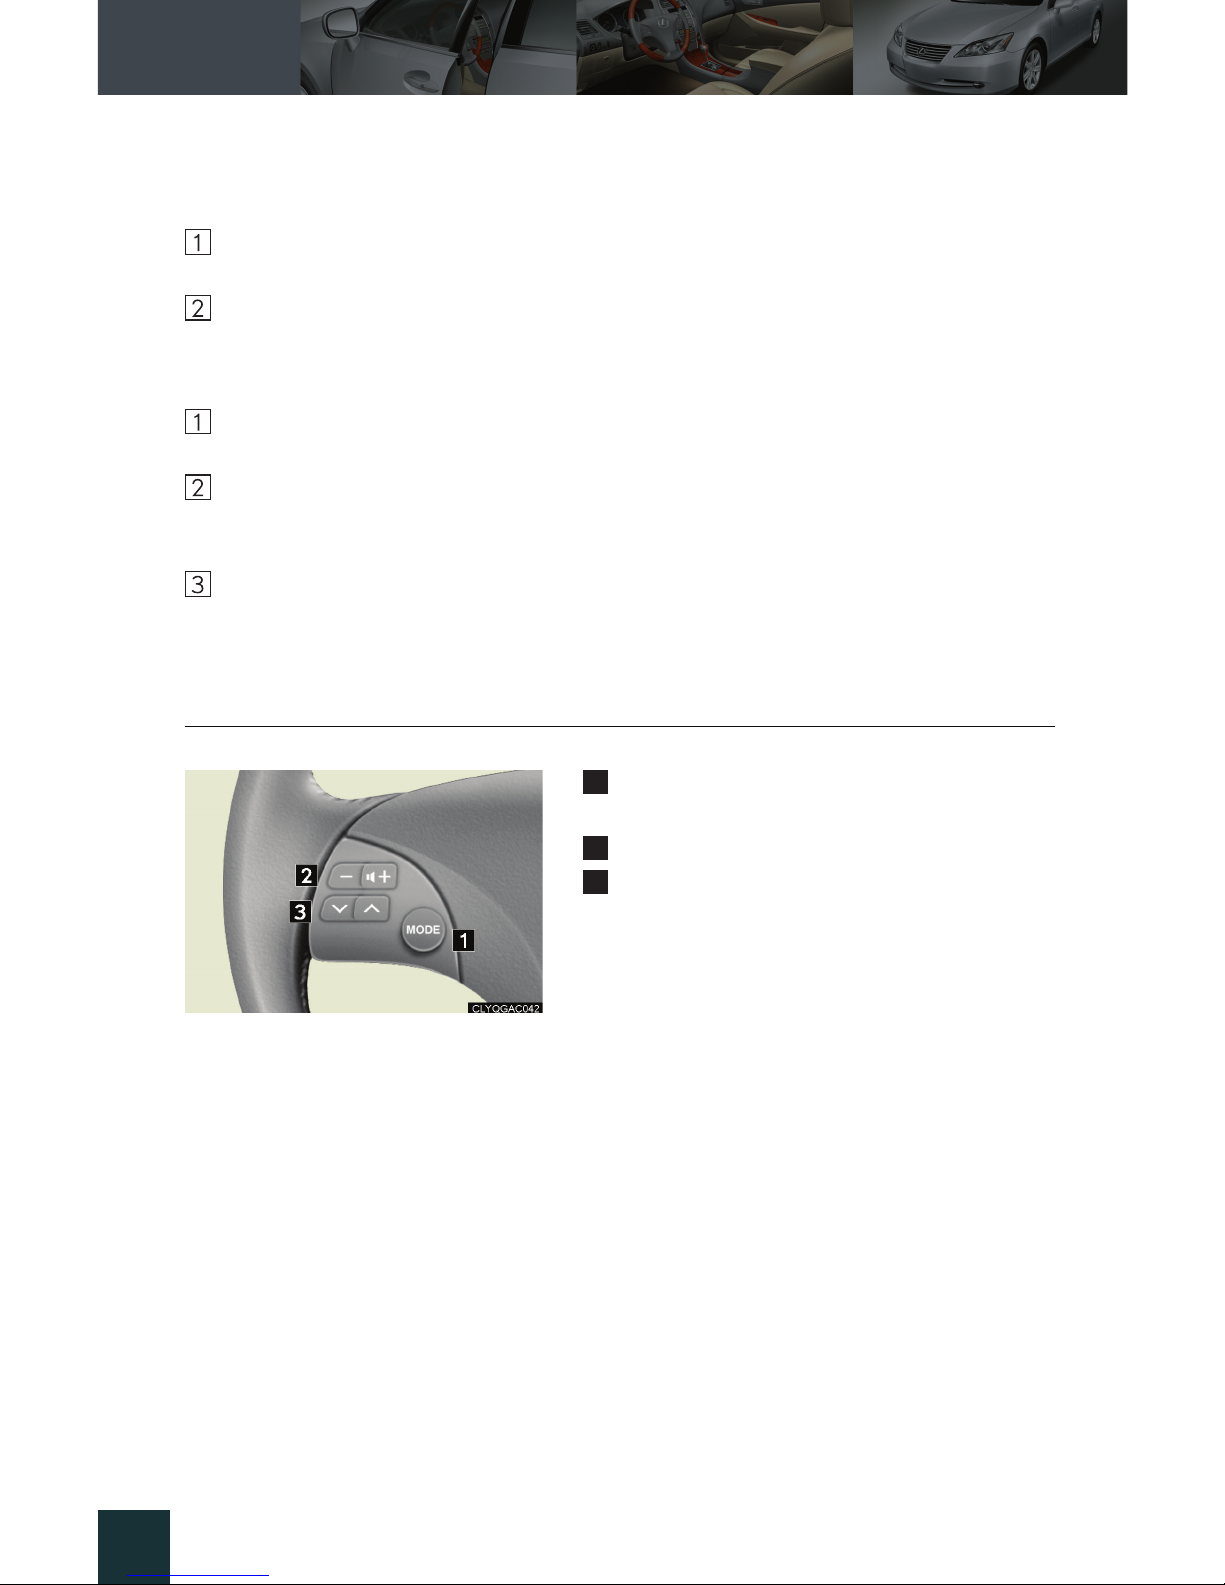
■ Remote control (steering wheel audio switches)
The audio system can be operated using the remote control located on the steering wheel.
Power on/change mode: press
Power off: press and hold
Vo l u m e
Audio source
Radio: radio tuner
CD: disc/track/file (MP3/WMA) select
1
2
3
Page 29
Topic 5
Driving Comfort
34
Entering and Exiting
When Driving
Rain and
Night Driving
Driving ComfortDriving Comfort
Opening and Closing
What to do if ...
Customizing
Yo u r L e x u s
Before Driving
Air Conditioning System
With navigation system
Owners of models equipped with a navigation system should refer to the “Navigation System
Owner's Manual”.
Without navigation system
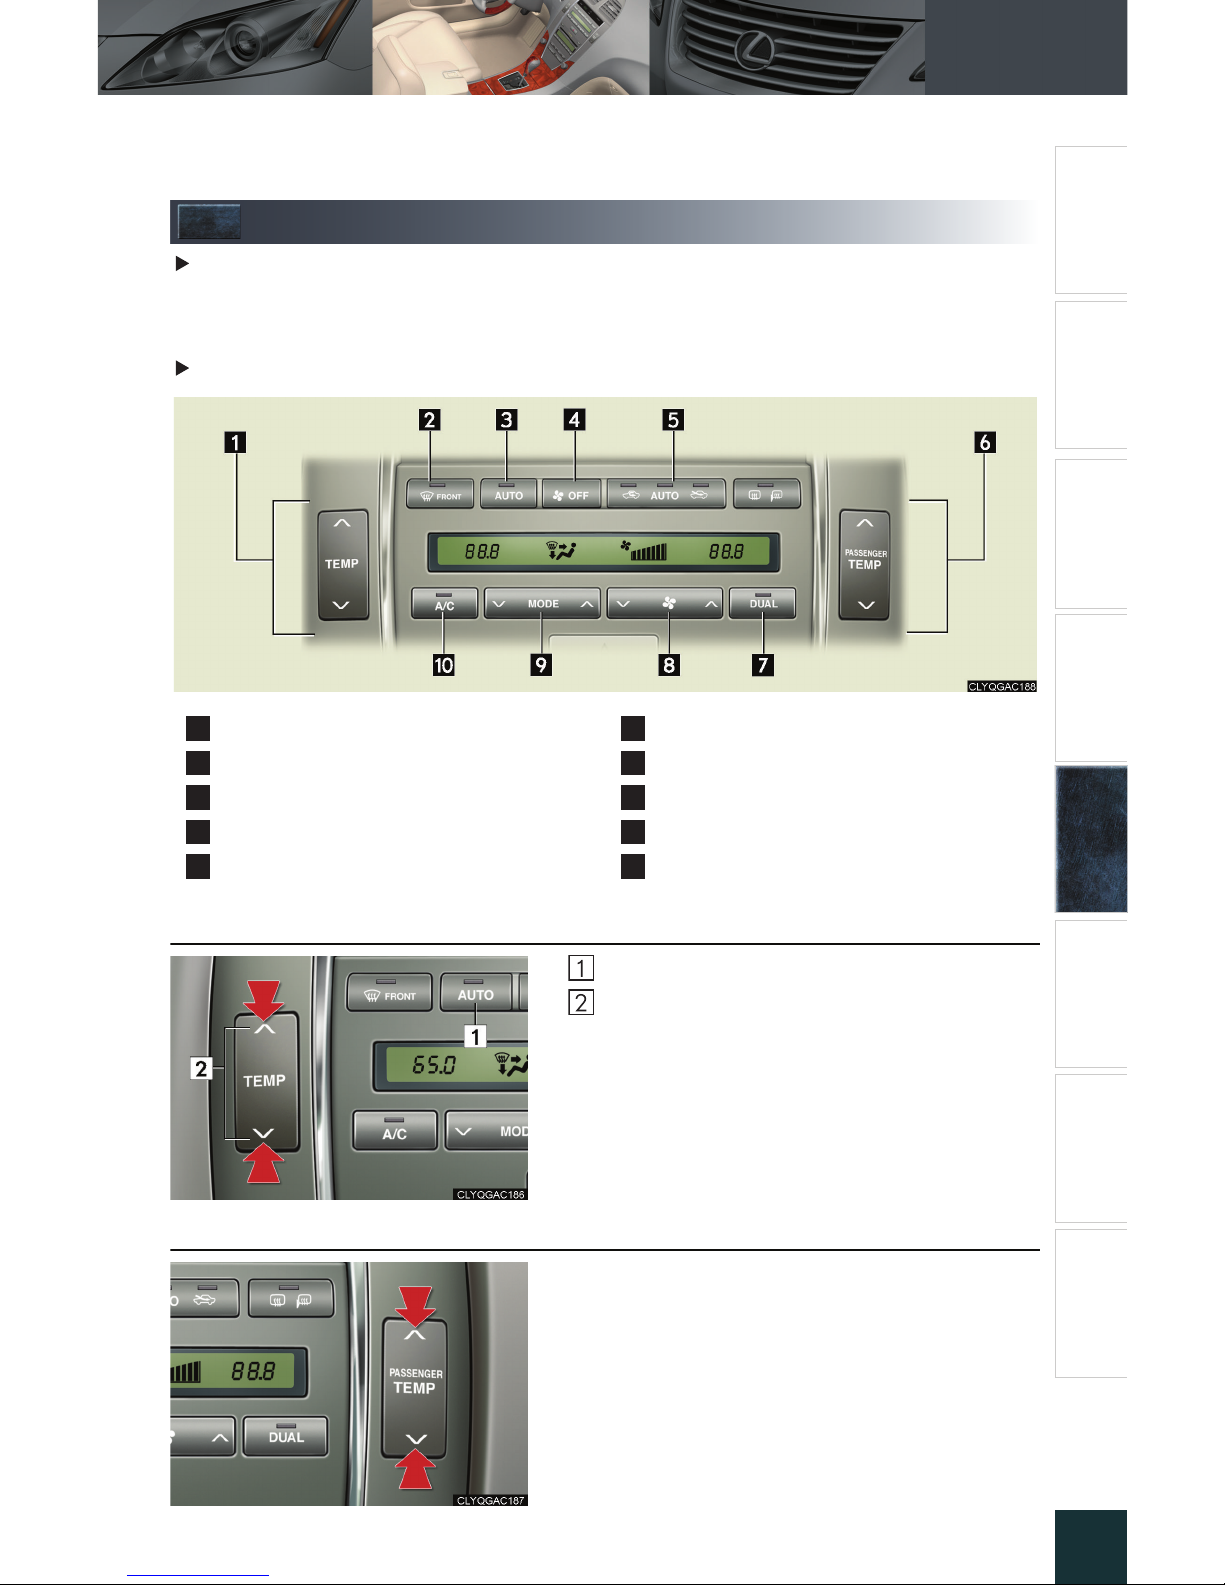
■ Using the automatic mode
Press the AUTO button.
Adjust the temperature using the TEMP but-
ton.
■ Adjusting the temperature in DUAL mode
In DUAL mode, driver and passenger side temperature settings can be adjusted separately.
Press the PASSENGER TEMP button to adjust the
temperature for the passenger side.
To cancel the DUAL mode, press the DUAL button.
Driver side temperature control
Windshield defog/defrost
Switch to automatic mode
OFF button
Outside air/recirculated air mode switch
Passenger side temperature control
Dual mode switch
Fan speed controls
Air flow controls
A/C switch
1
2
3
4
5
6
7
8
9
10
Page 30
Topic 5
Driving Comfort
35
Garage Door Opener
The garage door opener (HomeLink® Universal Transceiver) is manufactured under license
from HomeLink
®
.
The HomeLink
®
compatible transceiver in your
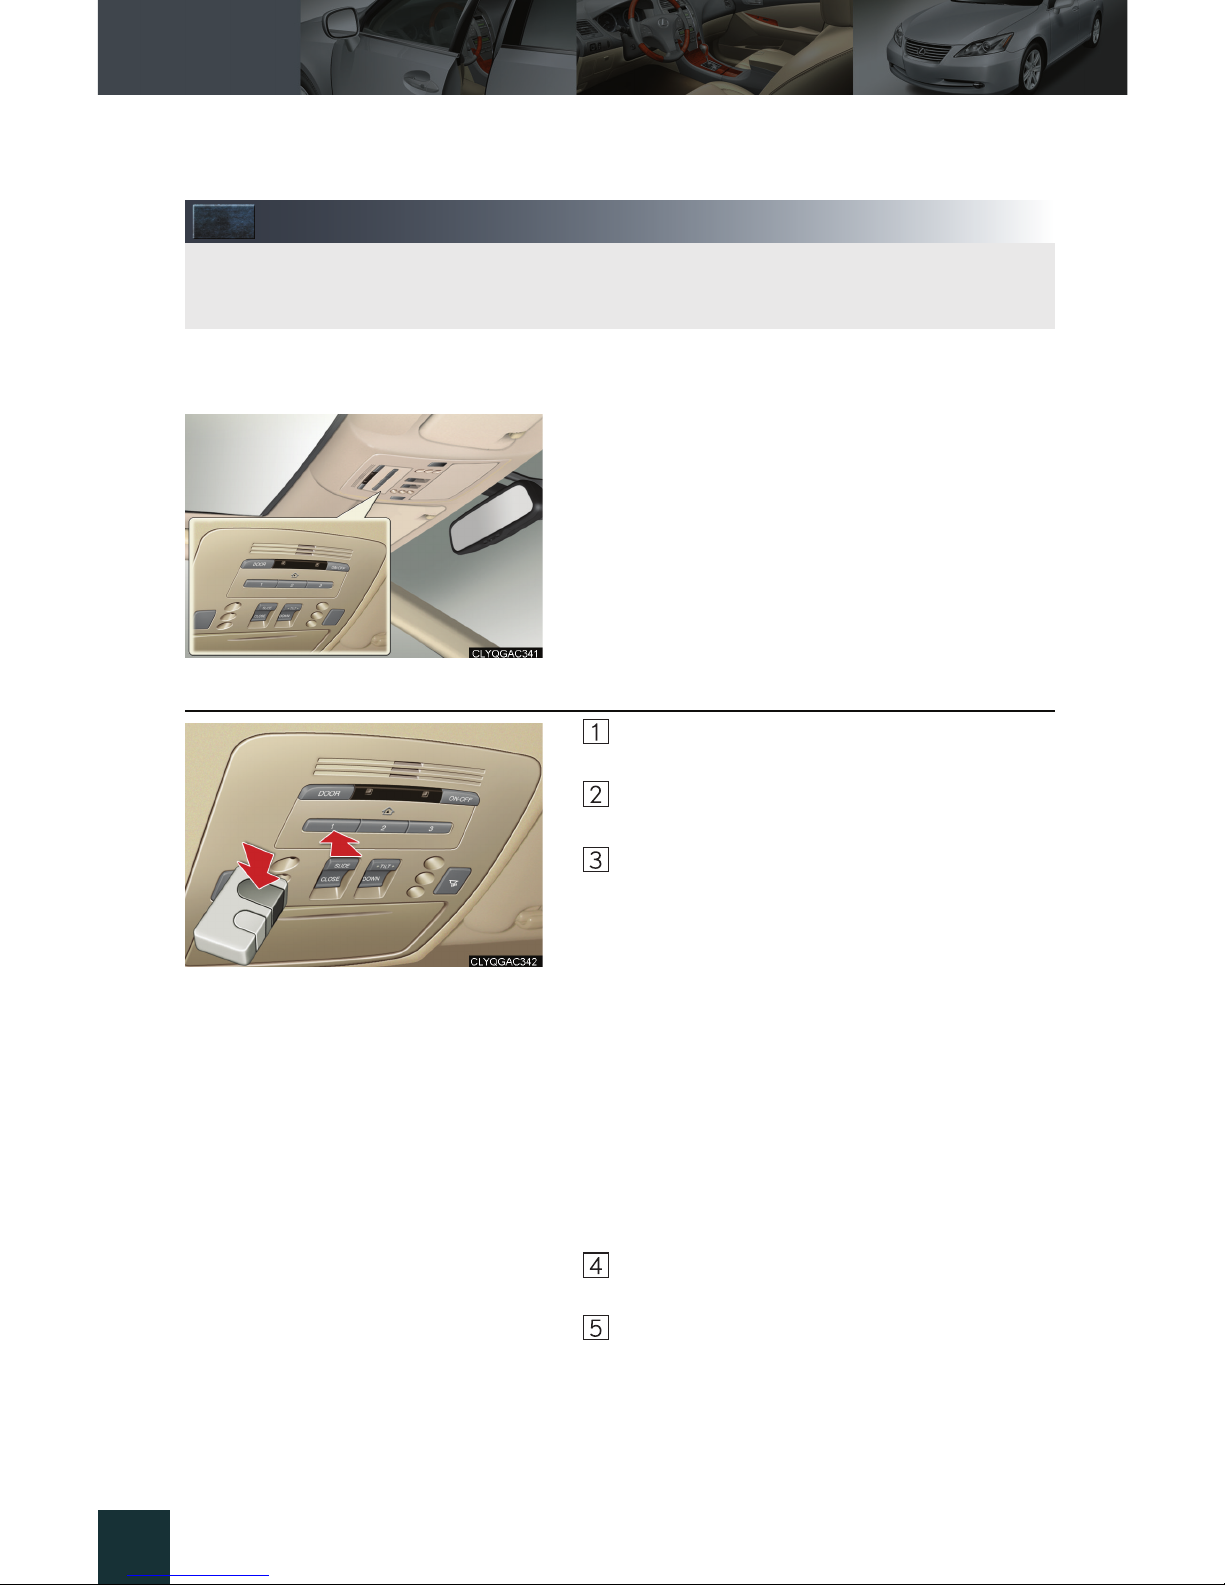
vehicle has 3 buttons which can be programmed
to operate 3 different devices.
■ Programming HomeLink
®
Hold your hand-held transmitter within 3
inches of the HomeLink
®
buttons.
Press and hold down the desired HomeLink
®
button.
For U.S.A. owners:
While pressing the HomeLink
®
button,
press and hold down the button on the handheld transmitter until the indicator light
changes from a slow to a rapid flash.
For Canadian owners:
While pressing the HomeLink
®
button,
repeatedly press and release (cycle) the button on the hand-held transmitter every 2
seconds until the indicator light changes
from a slow to a rapid flash.
If your garage door is of the rolling code type:
Press the training button on the motor-head unit
in your garage.
Press and hold the vehicle’s programmed
HomeLink
®
button for 2 seconds and release
it. Repeat this step once again.
If the door does not open, press and release
the same button once again.
The garage door opener can be programmed to operate garage doors, gates, entry
doors, door locks, home lighting systems, security systems, and other devices.
Page 31
Topic 5
Driving Comfort
36
Entering and Exiting
When Driving
Rain and
Night Driving
Driving ComfortDriving Comfort
Opening and Closing
What to do if ...
Customizing
Yo u r L e x u s
Before Driving
■ Programming other devices
For U.S.A. owners:
To program an entry gate, see the Owner's Manual.
To program other devices, contact your Lexus dealer.
For Canadian owners:
To program all other devices, follow the same procedure as for garage door programming.
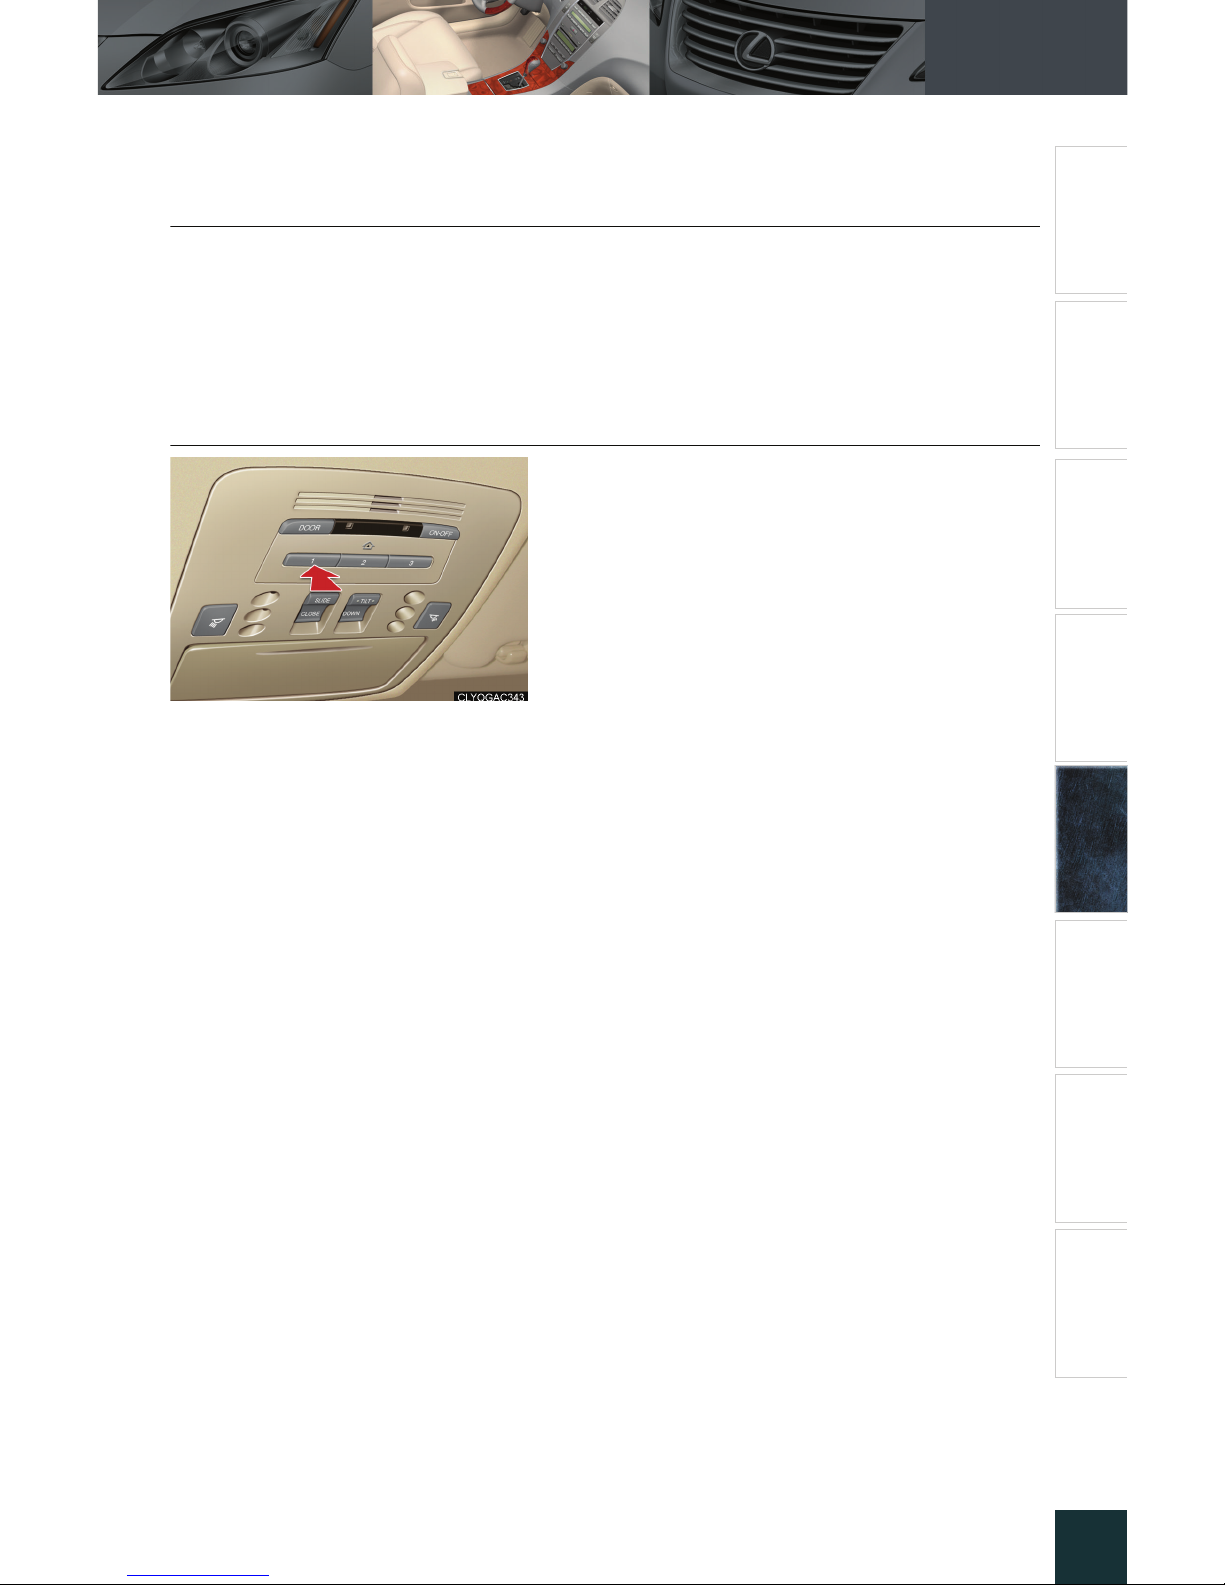
■ Operating HomeLink
®
Press the appropriate HomeLink® button.
The indicator light should come on.
Page 32
Topic 5
Driving Comfort
37
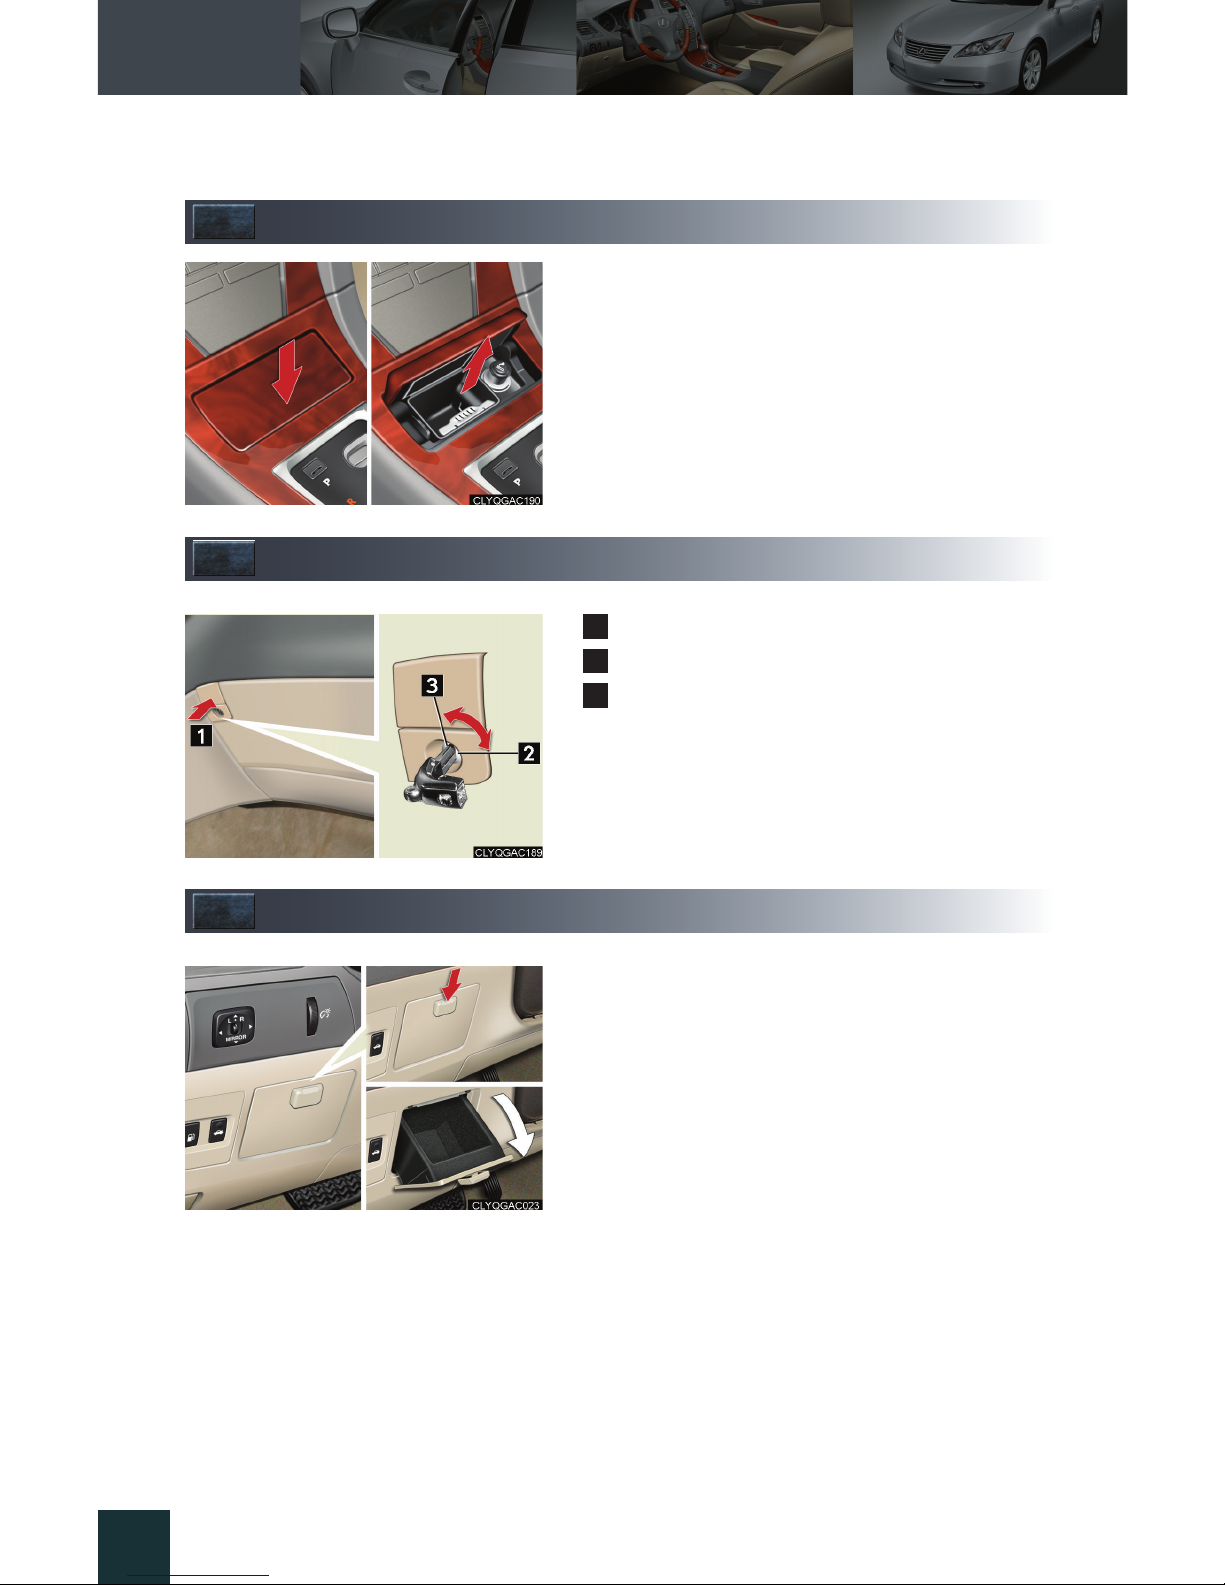
Ashtrays
To remove the ashtray, push the back part of the
lid and pull the ashtray upwards.
Glove Box
Open: press the button.
Lock
Unlock
The glove box can be locked and unlocked using
the mechanical key.
Auxiliary Box
To open, press down the knob.
1
2
3
Page 33
Topic 5
Driving Comfort
38
Entering and Exiting
When Driving
Rain and
Night Driving
Driving ComfortDriving Comfort
Opening and Closing
What to do if ...
Customizing
Yo u r L e x u s
Before Driving
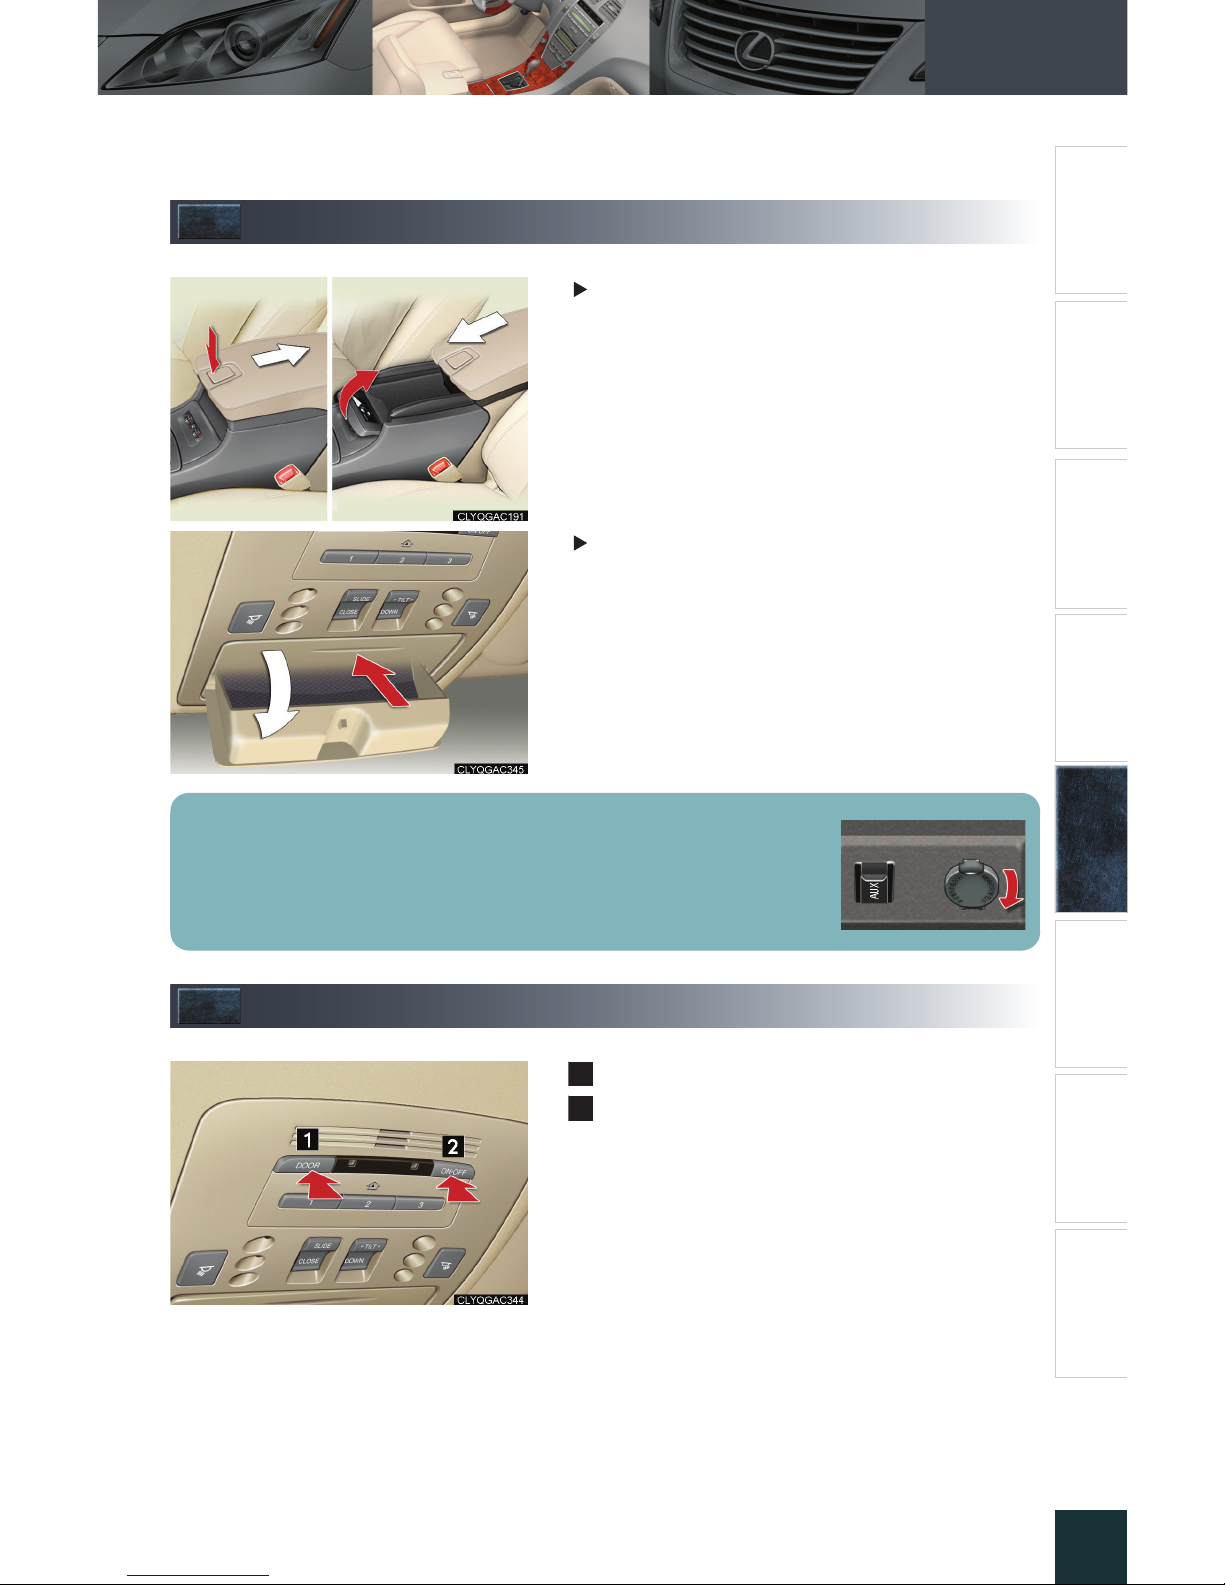
Console Boxes
Front
To open, press the button.
To close, pull up the lever.
Overhead console box
To open, press the lid.
Interior Lights
Door position ON/OFF
Front and rear interior lights ON/OFF
Pressing the switch also turns the front personal lights on/off.
There is a power outlet located in the front console box.
1
2
Page 34
Topic 5
Driving Comfort
39
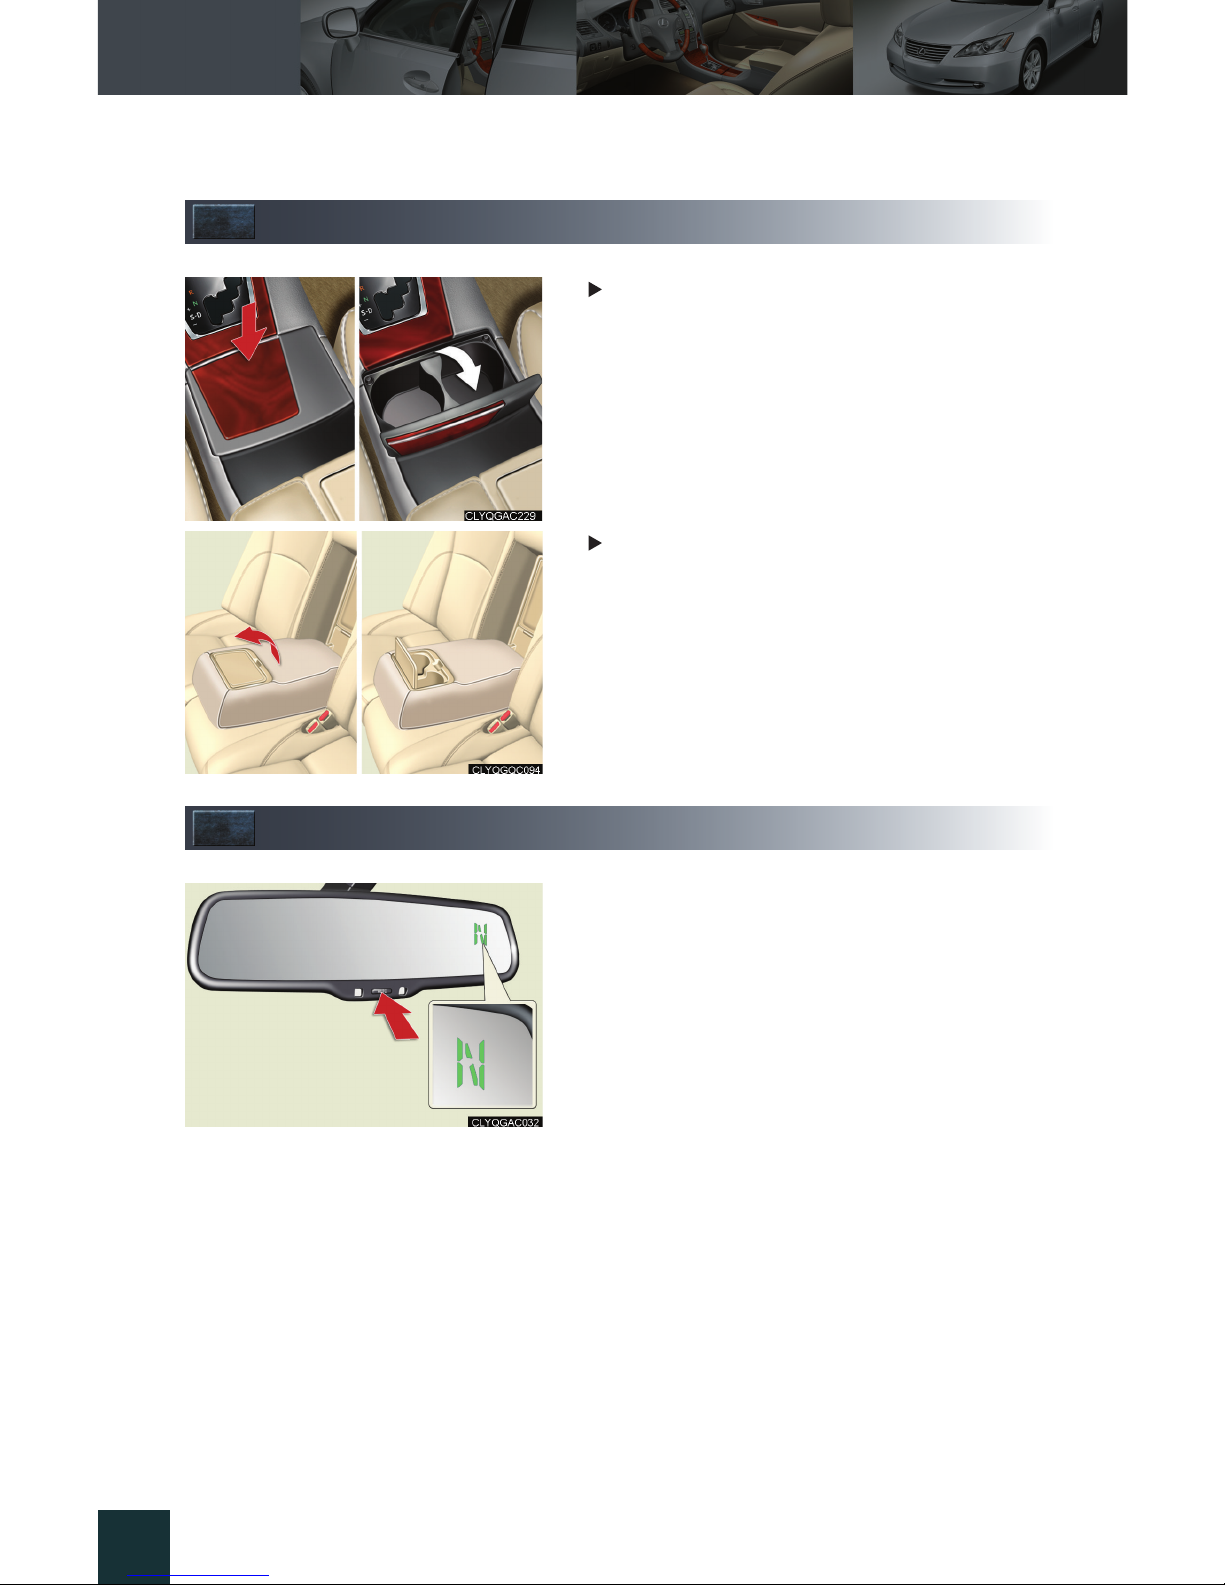
Cup Holders
Front
To open, press down on the front of the lid.
Rear
To open, pull up the knob.
Compass
To display the compass, press and hold the AUTO
button for 3 or more seconds.
To cancel the display, press and hold the AUTO
button again for 3 or more seconds.
Page 35
Topic 5
Driving Comfort
40
Entering and Exiting
When Driving
Rain and
Night Driving
Driving ComfortDriving Comfort
Opening and Closing
What to do if ...
Customizing
Yo u r L e x u s
Before Driving
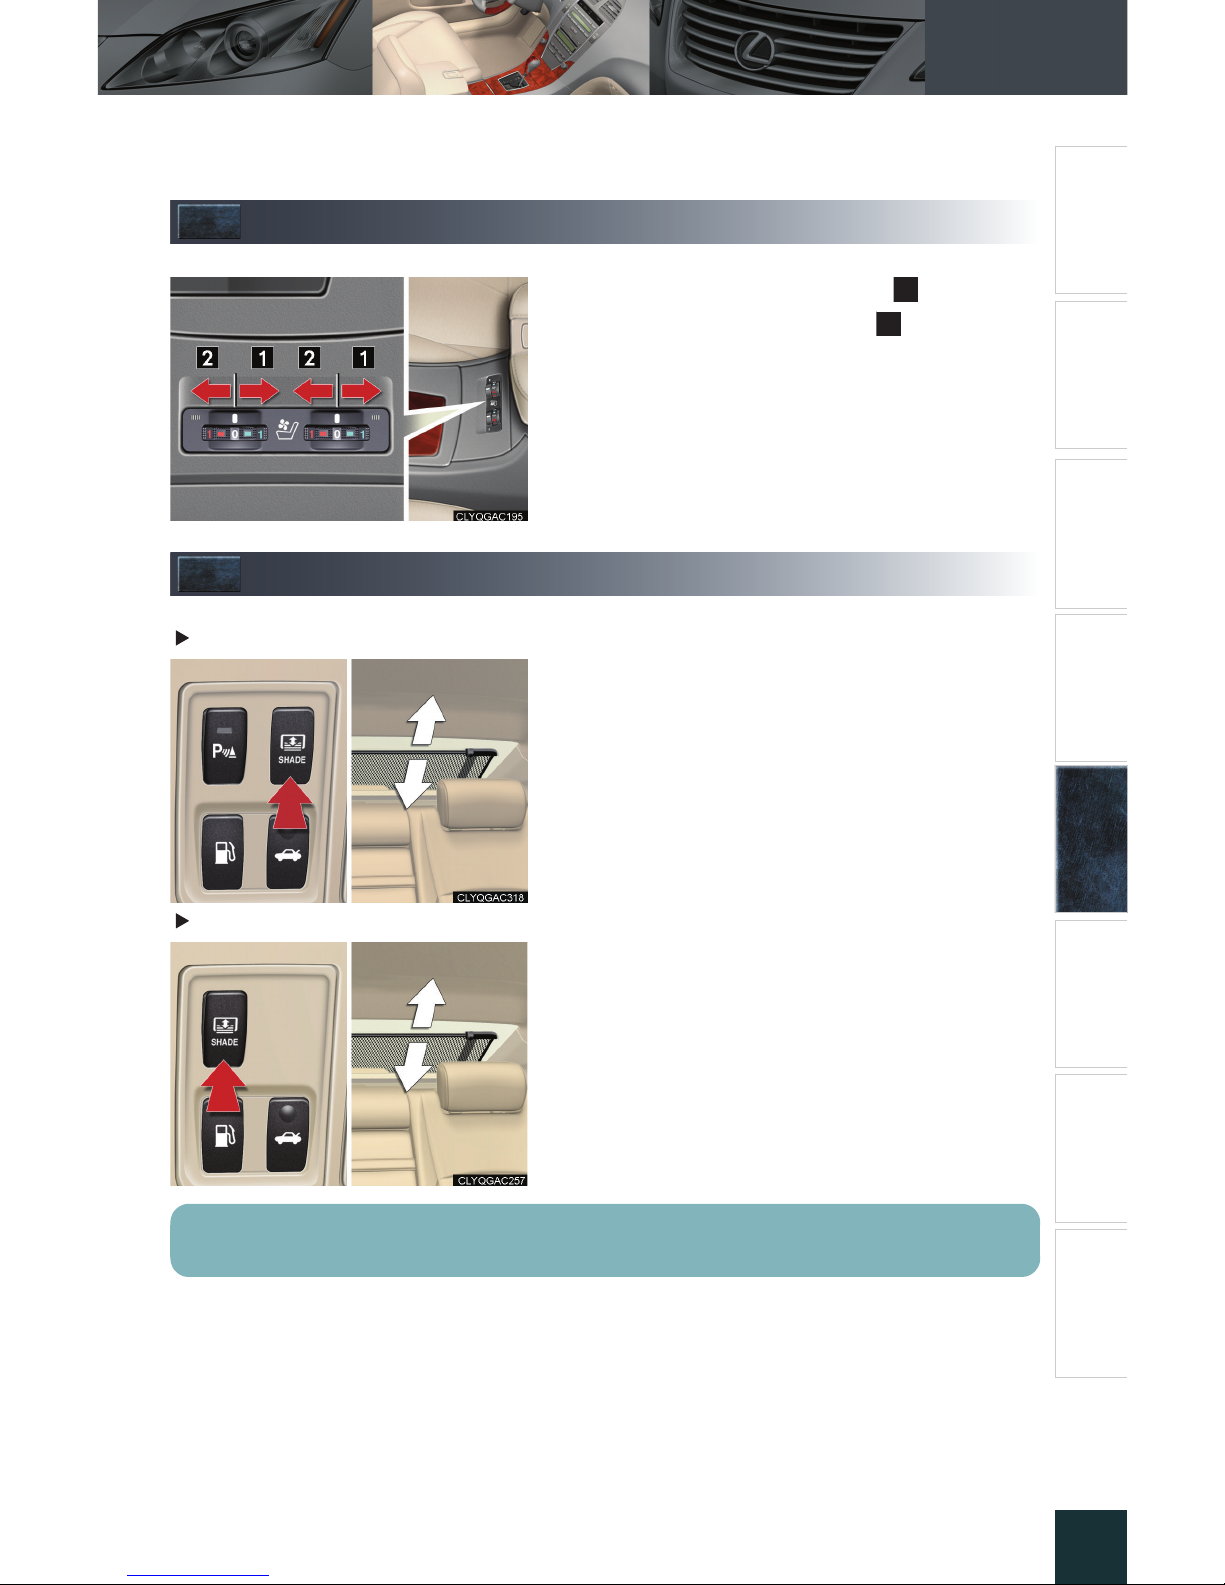
Seat Heaters and Ventilators (If Equipped)
Seat heaters: turn the dial toward .
Ventilators: turn the dial toward .
Rear Sunshade (If Equipped)
Ty pe A
To raise the rear sunshade, press the switch.
Press the switch again to lower it.
Ty pe B
1
2
The sunshade automatically lowers to ensure visibility when reversing.
Page 36
Topic 5
Driving Comfort
41
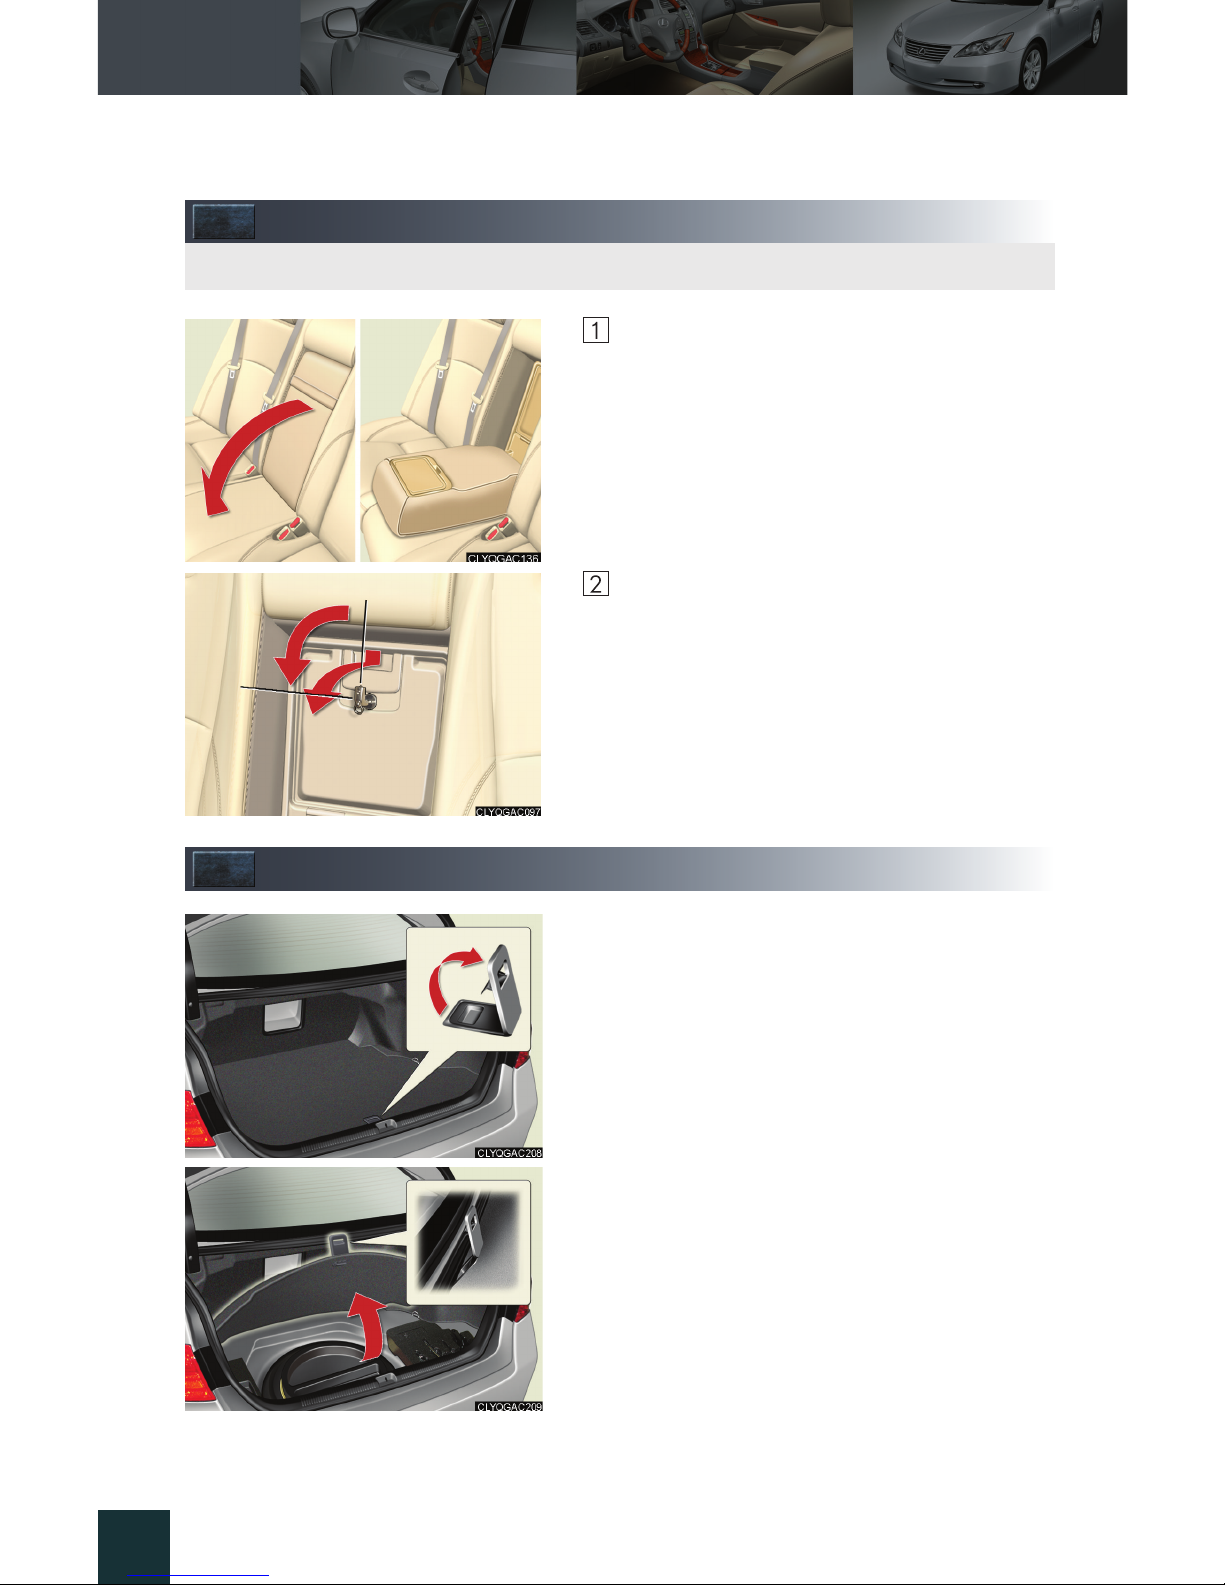
Trunk Storage Extension
Pull down the rear armrest.
Unlock the armrest door using the mechanical
key.
Luggage Mat
Pull the lever upwards when lifting the luggage
mat up.
The lever can be hooked on the edge of the trunk.
Longer items can be loaded in the vehicle by utilizing the trunk space and rear seat area.
Page 37
Topic 6
Opening and Closing
43
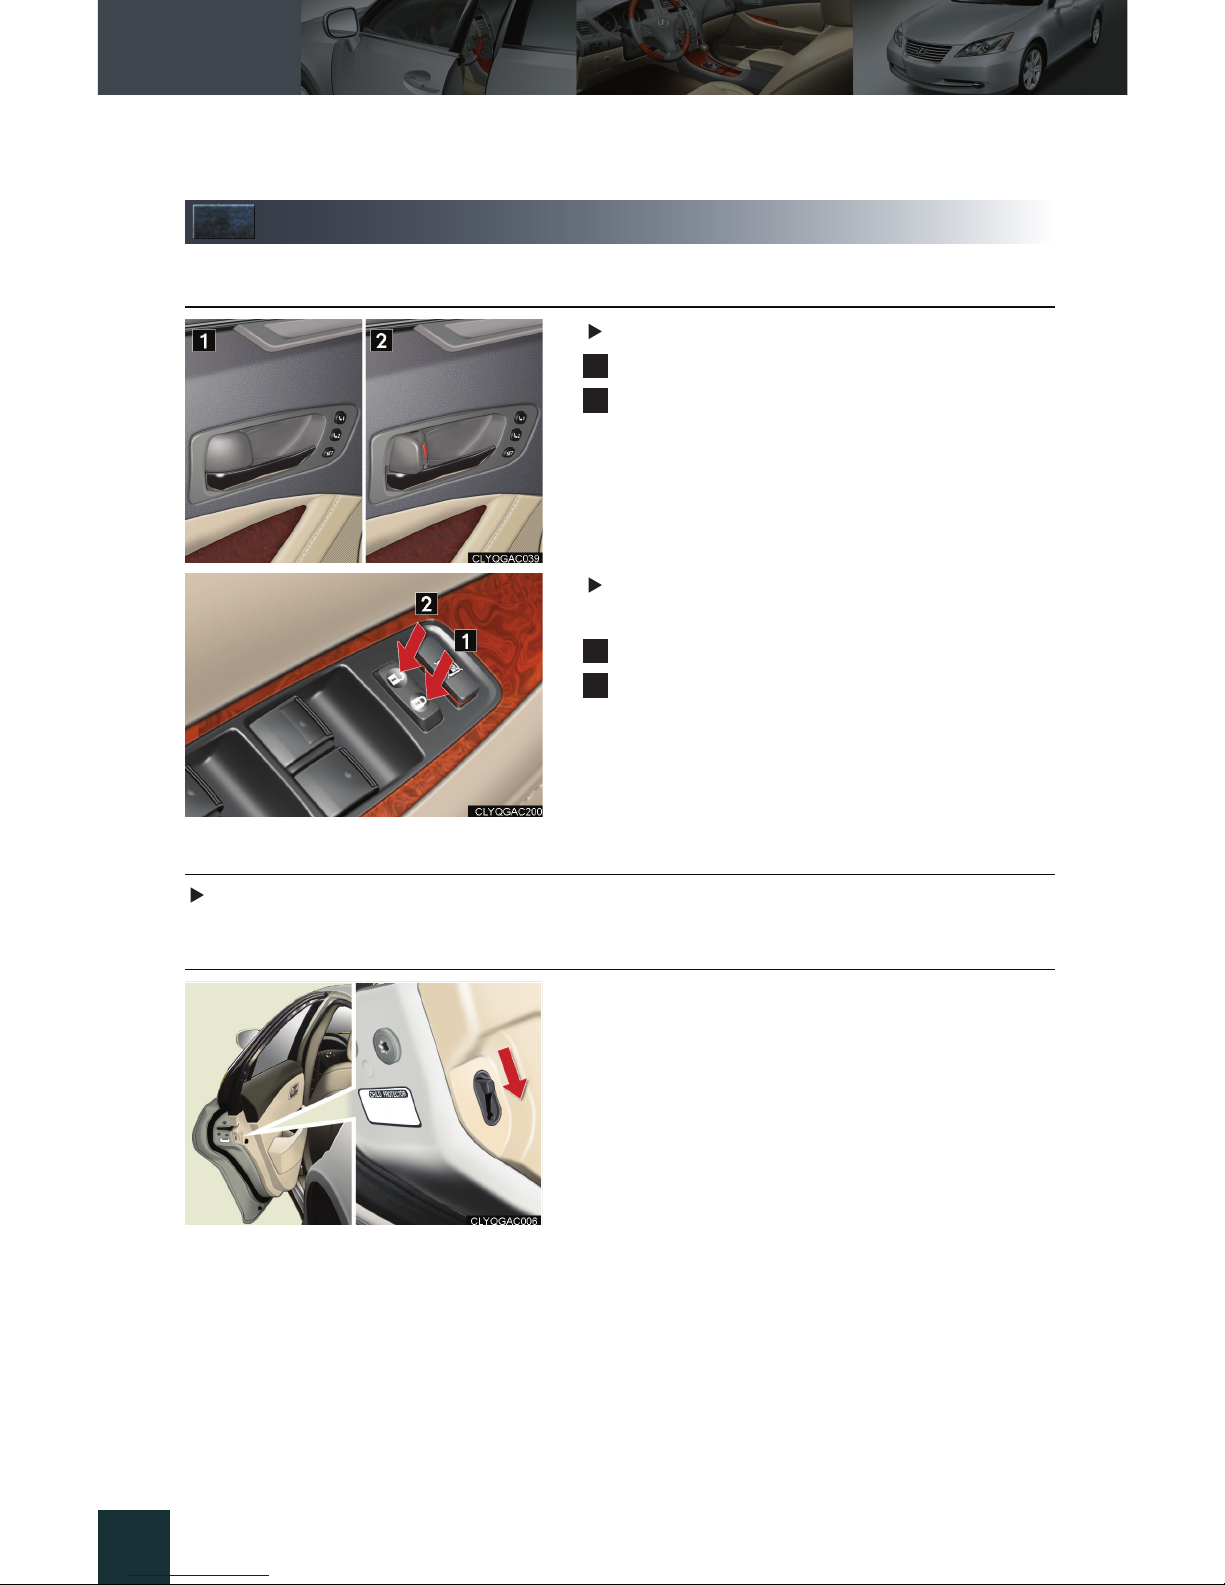
Door Locks
■ Locking the vehicle from inside
Inside lock button
Locks
Unlocks
Door lock switch
Operates all door locks.
Locks
Unlocks
■ Locking the vehicle from outside
Using the entry function or wireless remote control (→P.7 , 8 )
■ Rear door child-protector lock
Setting the switch to the LOCK position prevents
the rear doors from being opened from the inside.
Always set the child protector locks when children are seated in the rear seat.
1
2
1
2
Page 38
Topic 6
Opening and Closing
44
Entering and Exiting
Before DrivingBefore Driving
When Driving
Rain and
Night Driving
Driving Comfort
Opening and ClosingOpening and Closing
What to do if ...
Customizing
Yo u r L e x u s
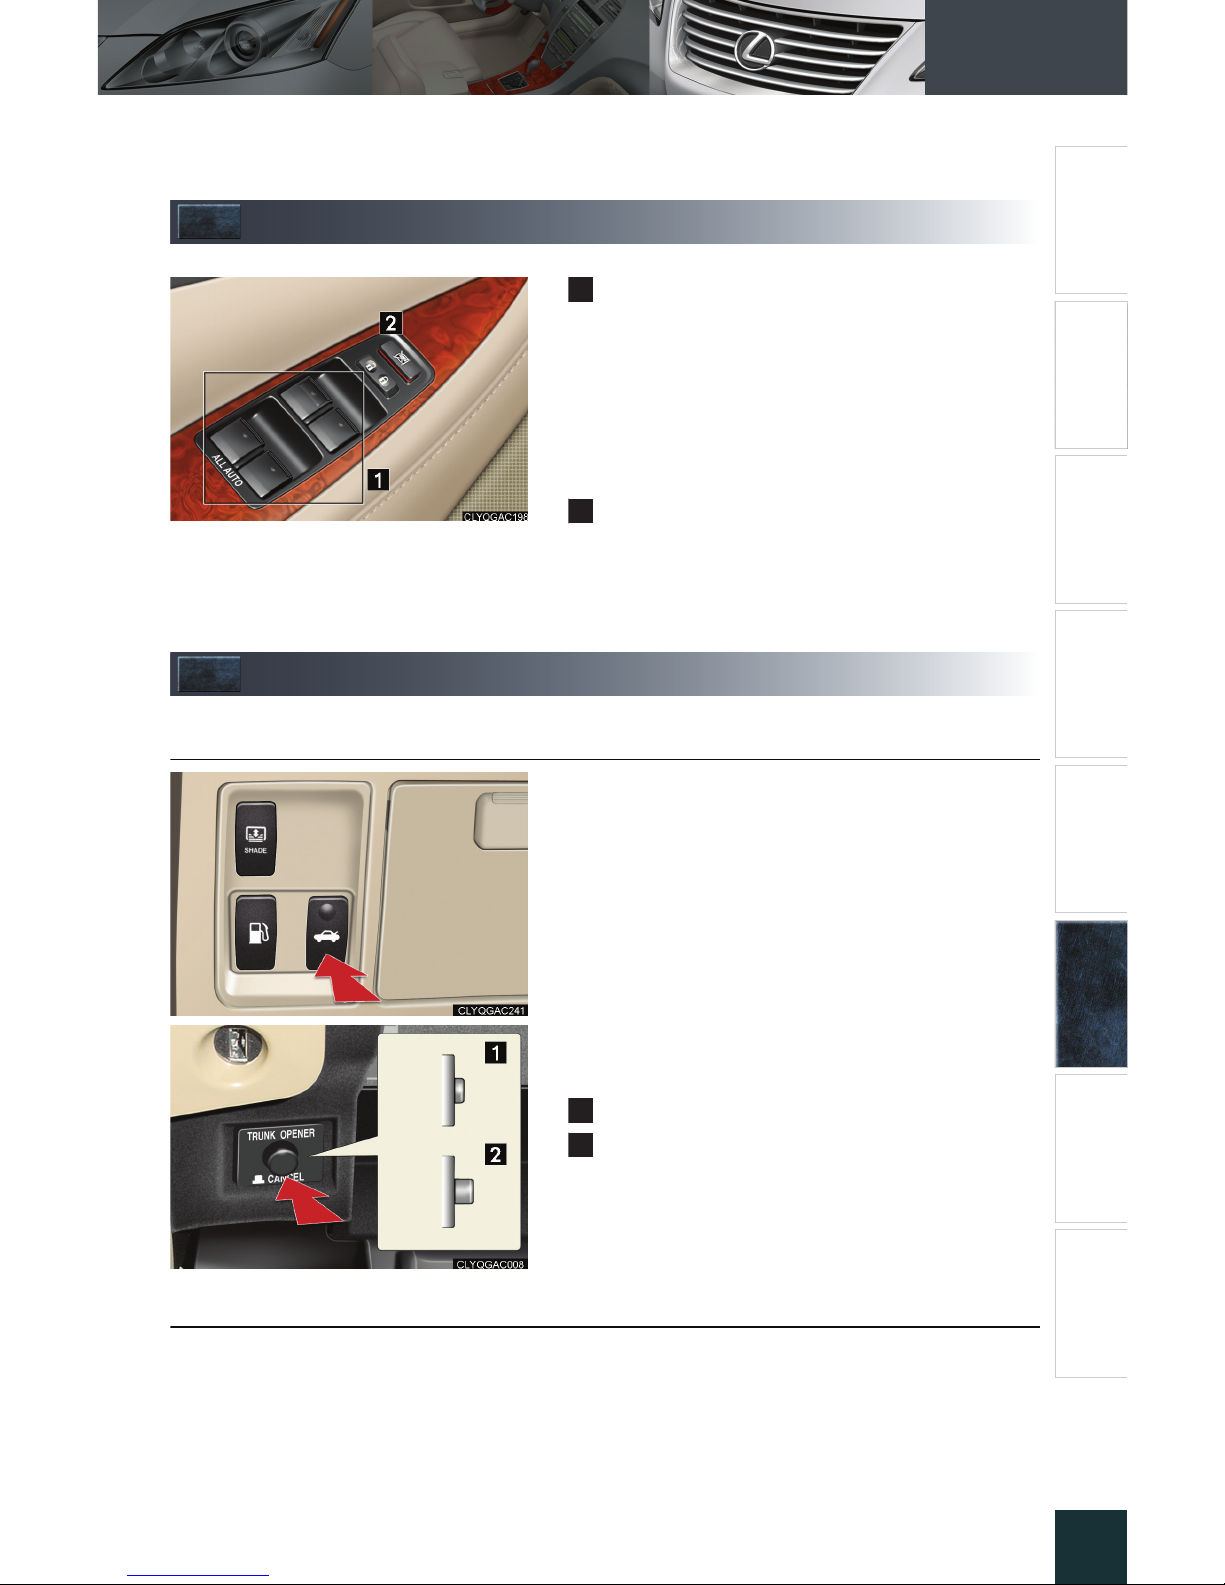
Power Windows
Power window sw itches
To op e n: press the switch.
To cl o se : pull the switch up.
Fully pulling up and releasing the switches
causes the windows to close fully. Fully
pressing down and releasing the switches
causes the windows to open fully.
Window lock switch
The window lock switch disables the operation of all windows other than the driver’s
door window.
Tr u nk
■ Trunk opener
To open the trunk from inside the cabin, simply
press the trunk opener.
To disable the trunk opener, turn OFF the main
switch in the glove box.
ON
OFF
When the trunk opener is disabled, the trunk cannot be opened using the wireless remote control
or the entry function.
■ Entry function and wireless remote control
→P.7 , 8
1
2
1
2
Page 39
Topic 6
Opening and Closing
45
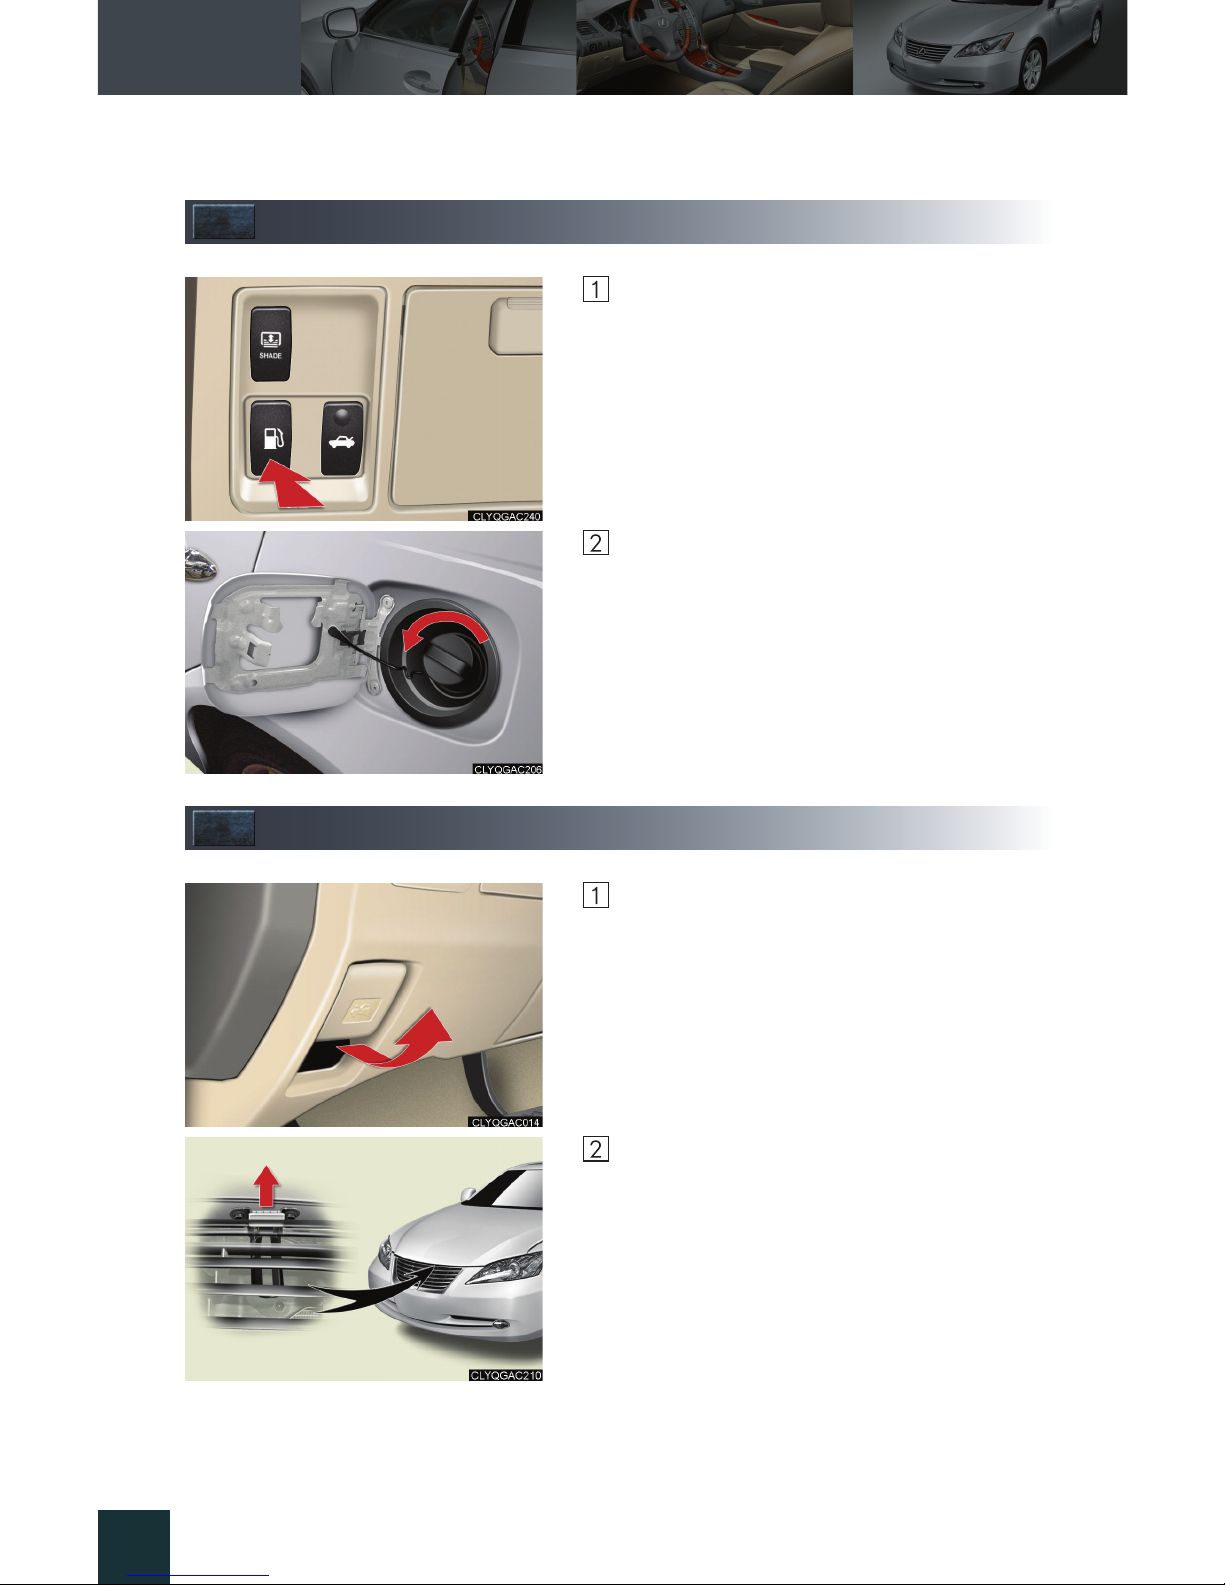
Fuel Tank Cap
Press the fuel filler door opener.
Slowly remove the cap by turning it counterclockwise.
After the cap is removed, it can be hung on the
inside of the fuel filler door.
Hood
Pull the hood release lever.
Insert your fingers under the hood, pull the
hood catch up and lift the hood.
Page 40
Topic 6
Opening and Closing
46
Entering and Exiting
Before DrivingBefore Driving
When Driving
Rain and
Night Driving
Driving Comfort
Opening and ClosingOpening and Closing
What to do if ...
Customizing
Yo u r L e x u s
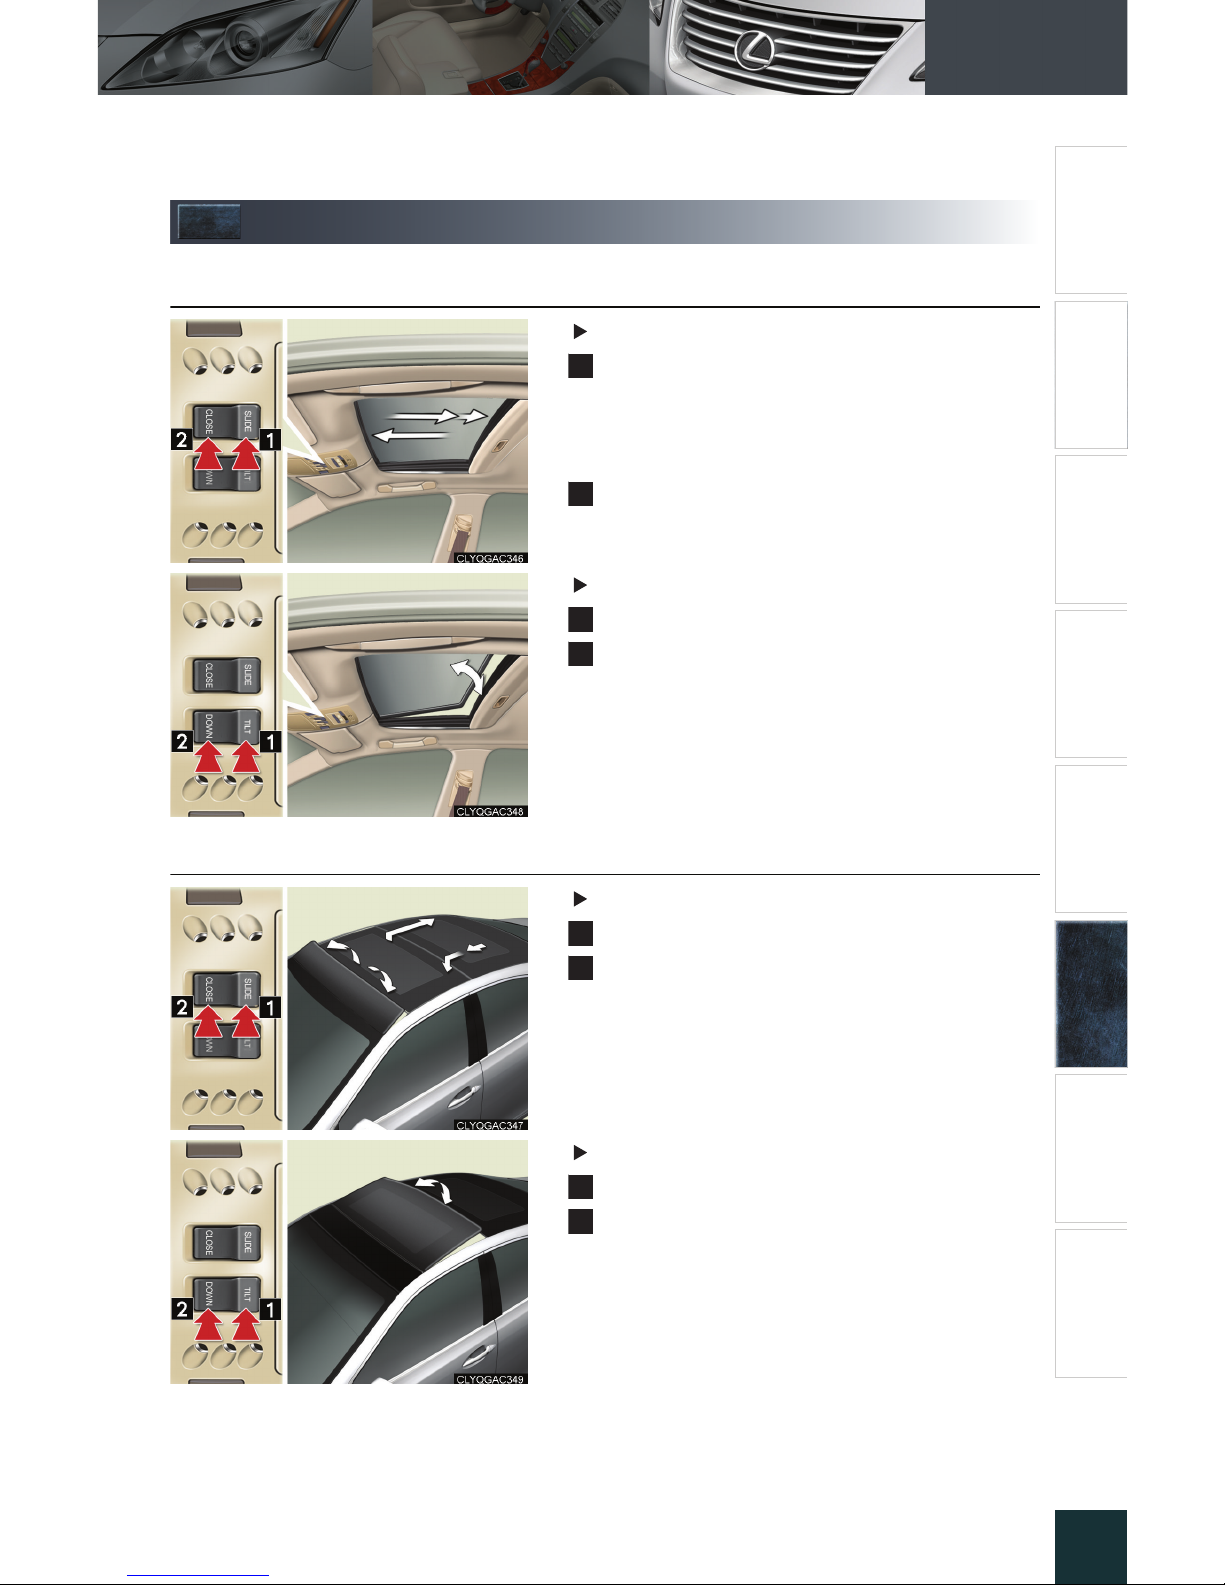
Moon Roof
■ Standard type
Opening and closing
Opens
The moon roof stops slightly before the fully
opened position.
To fully open, press the switch again.
Closes
Tilt up and down
Tilts up
Tilts down
■ Glass type
Opening and closing
Opens
Closes (press and hold)
The moon roof stops once.
To fully close, push and hold the switch again.
Tilt up and down
Tilts up
Tilts down (press and hold)
1
2
1
2
1
2
1
2
Page 41
What to do if ...
47
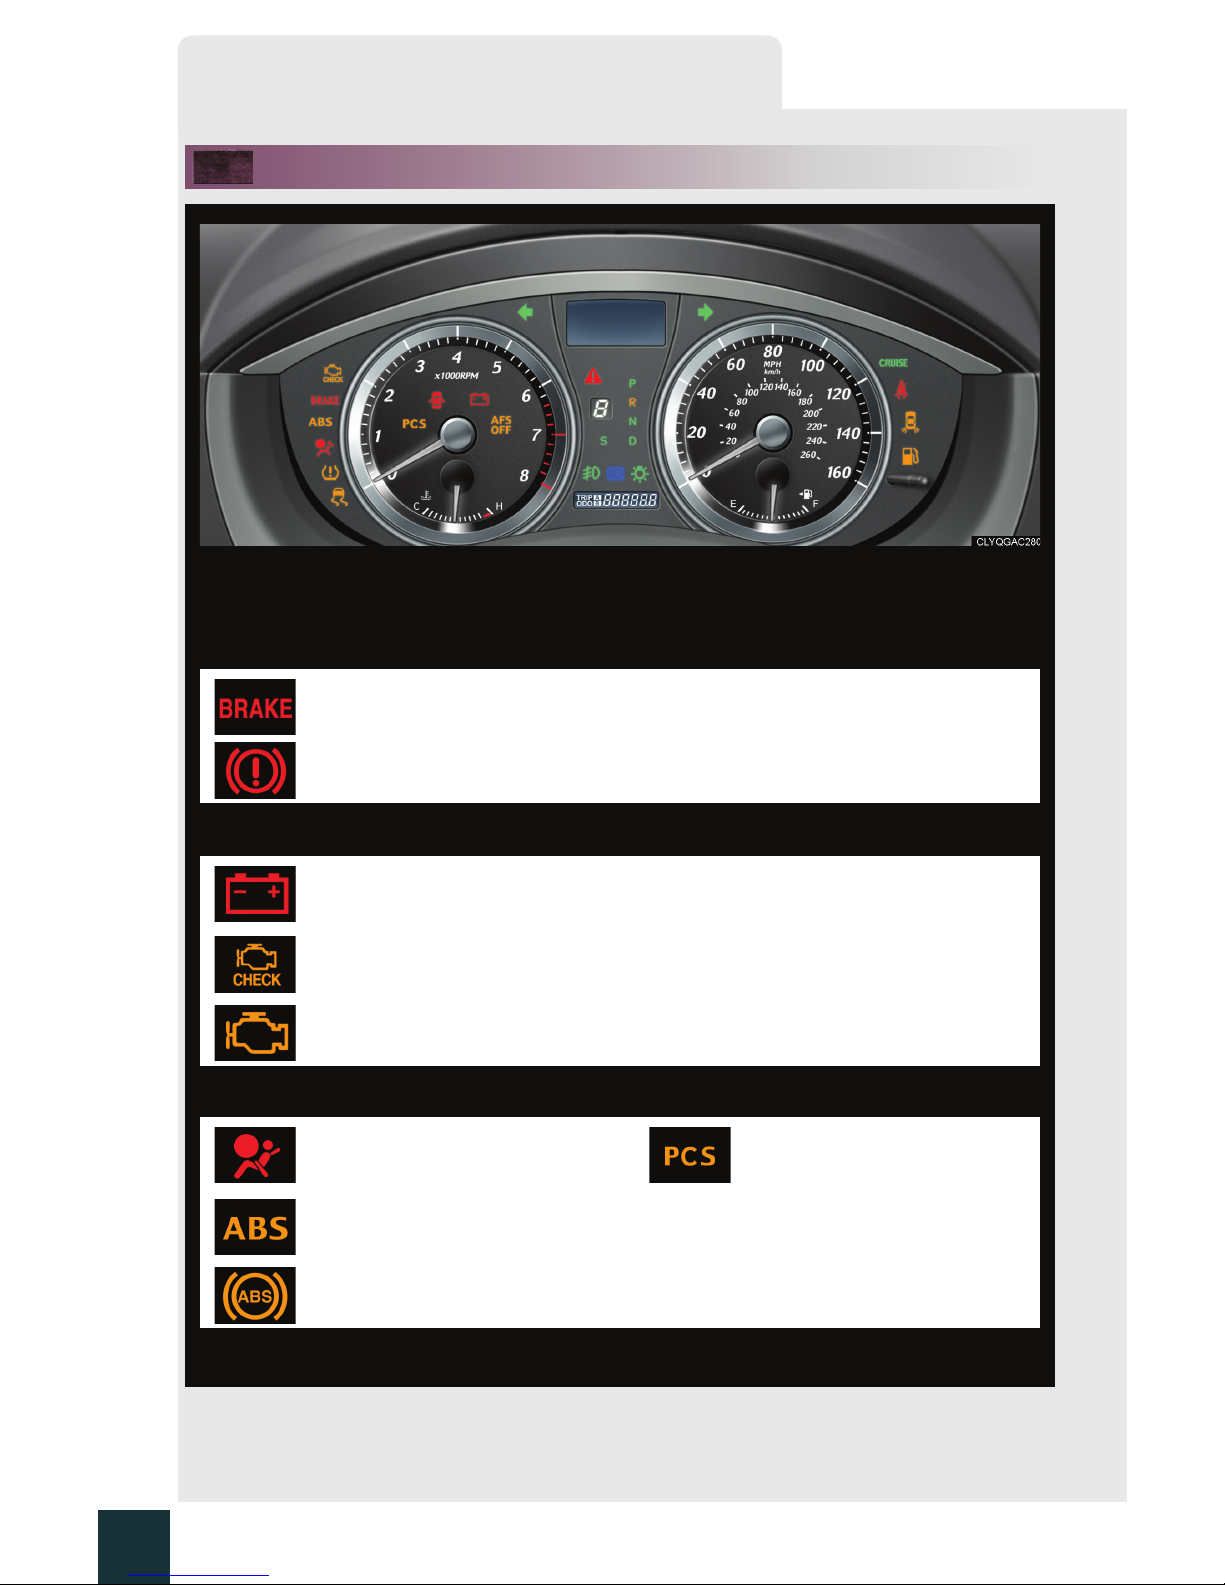
List of Warning/Indicator Lights
The units used on the speedometer, the tachometer gauge display, indicators and warning
lights may differ depending on the model / type.
Stop the vehicle immediately. Continuing to drive the vehicle may be dangerous.
(USA)
(Canada)
Brake system warning light
Stop the vehicle immediately.
Charging system warning light
(USA)
(Canada)
Malfunction
indicator lamp
Have the vehicle inspected immediately.
SRS warning light
Pre-collision system
warning light
*1
(USA)
(Canada)
ABS warning light
For further information, refer to the Owner's Manual.
Page 42
48
Entering and Exiting
Before Driving
When Driving
Rain and
Night Driving
Driving Comfort
Opening and Closing
What to do if ...
Customizing
Yo u r L e x u s
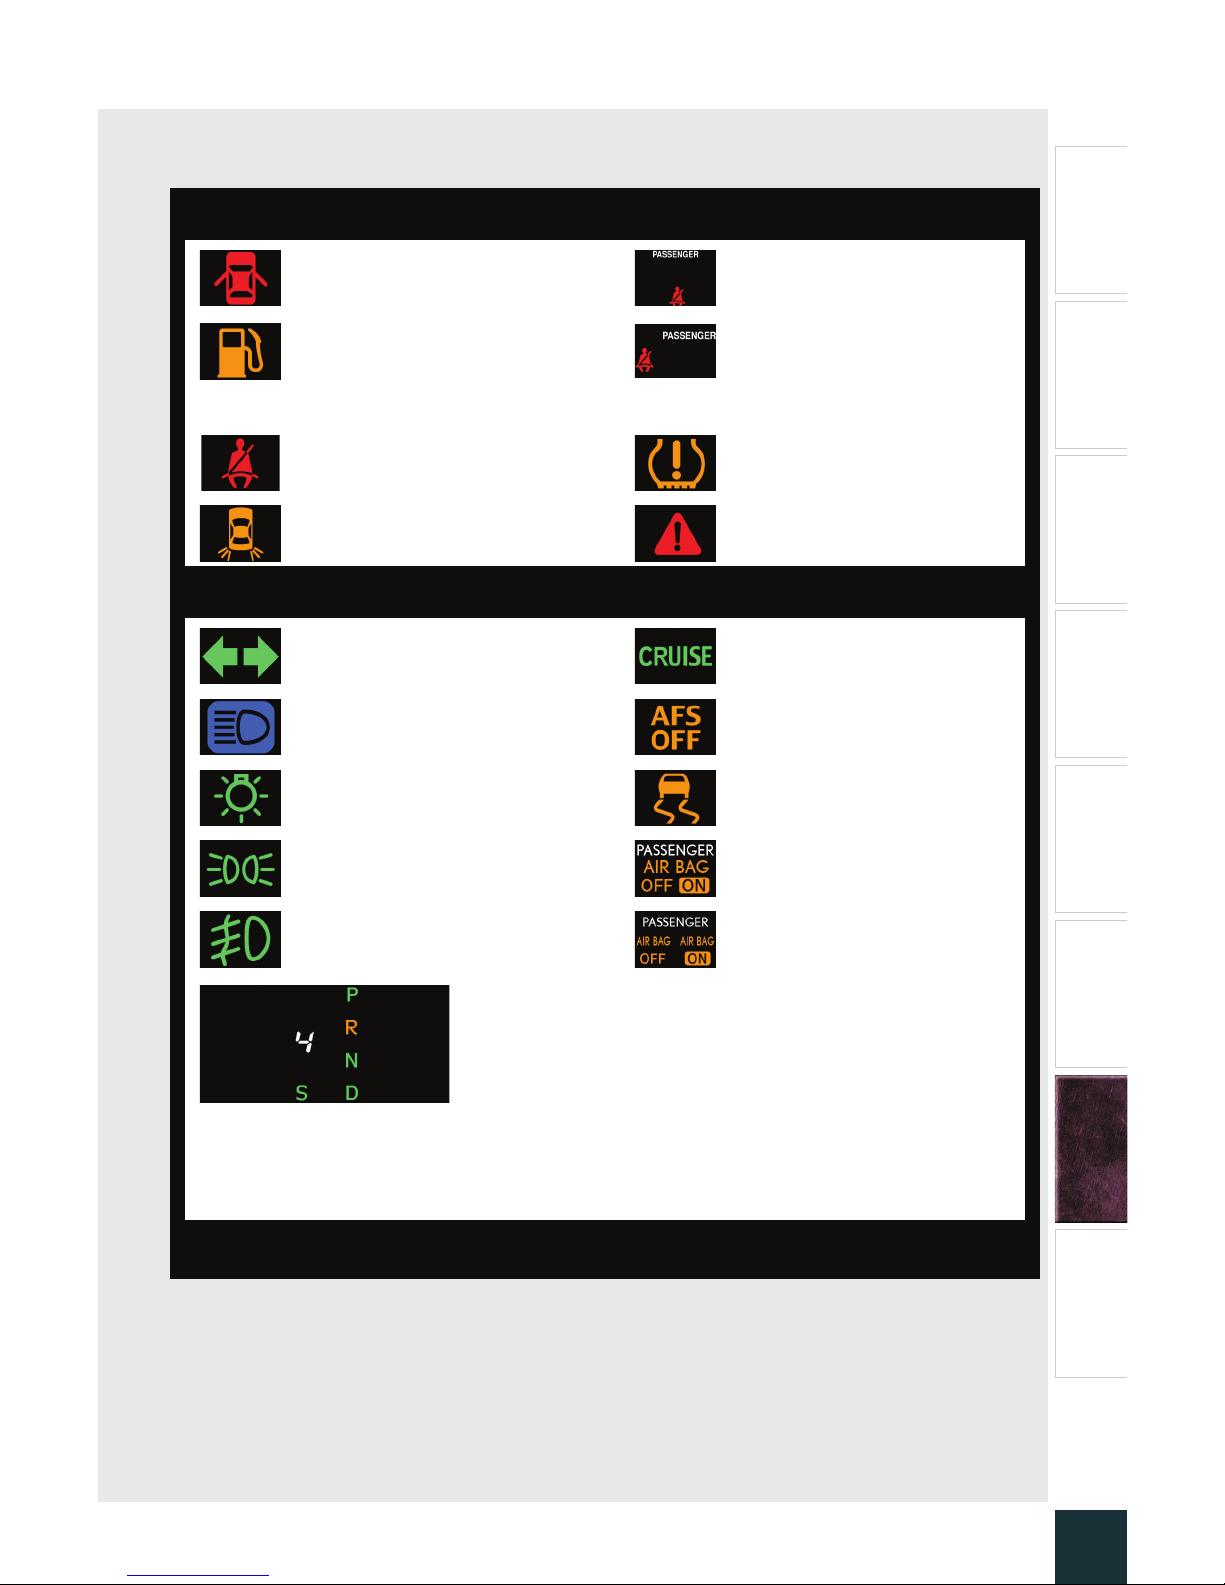
Follow the correction procedure.
Open door warning light
Front passenger’s seat belt
reminder light
*2
Low fuel level warning light
(On the cen-
ter panel)
Front passenger’s seat belt
reminder light
*3
Driver’s seat belt
reminder light
Low tire pressure warning
light
Rear light failure warning light Master warning light
See the Owner's Manual
Tu rn si gn a l i n di c at or
Cruise control indicator
Headlight high beam indicator
AFS OFF indicator
*1
Headlight indicator (USA)
Slip indicator
Tail light indicator (Canada)
SRS airbag on-off indicator
*2
Front fog light indicator
SRS airbag on-off indicator
*3
Shift position and shift range indicators
*1
: If equipped
*2
: With navigation system
*3
: Without navigation system
For further information, refer to the Owner's Manual.
Page 43
What to do if ...
49
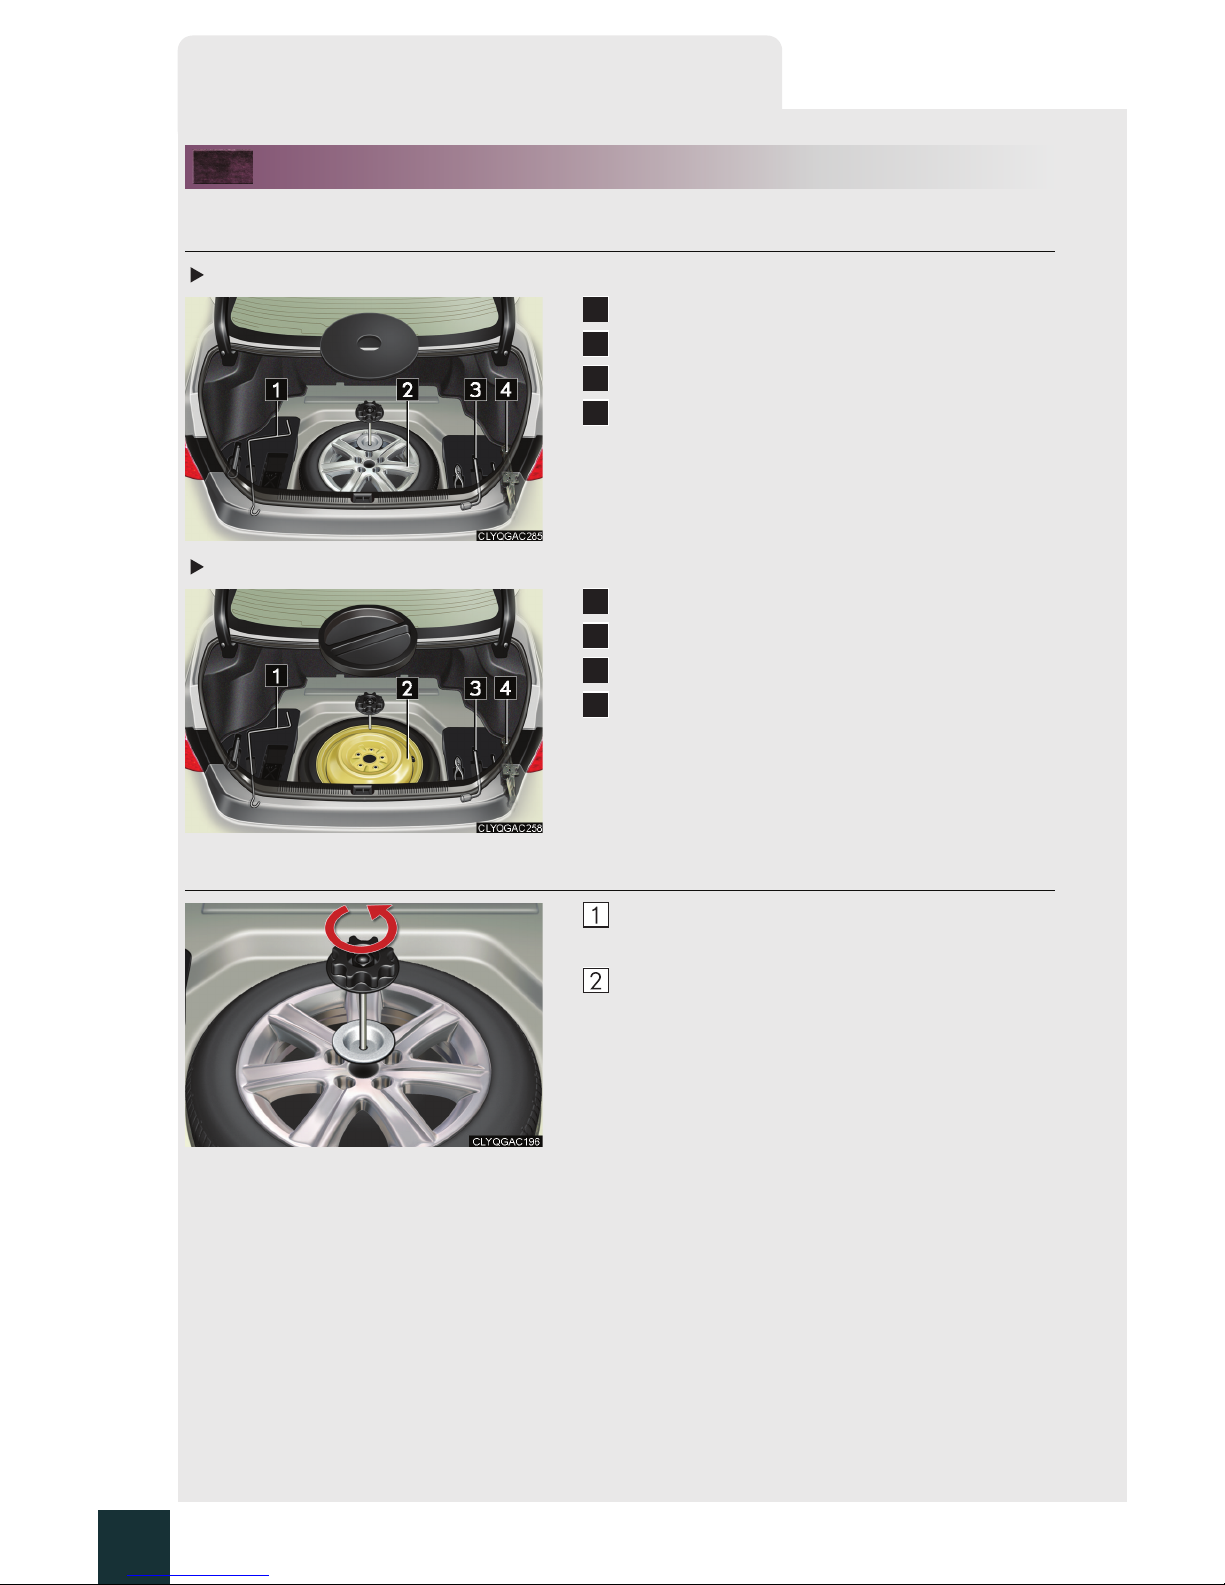
Spare Tire and Tool Compartment
■ Jack, tools, and spare tire
Ground spare tire
Jack handle
Spare tire
Wrench
Jack
Compact spare tire
Jack handle
Spare tire
Wrench
Jack
■ Taking out the spare tire
Lift up the luggage mat, and remove the spare
wheel cover.
Loosen the center fastener and remove the
spare tire.
1
2
3
4
1
2
3
4
Page 44
50
Entering and Exiting
Before Driving
When Driving
Rain and
Night Driving
Driving Comfort
Opening and Closing
What to do if ...
Customizing
Yo u r L e x u s
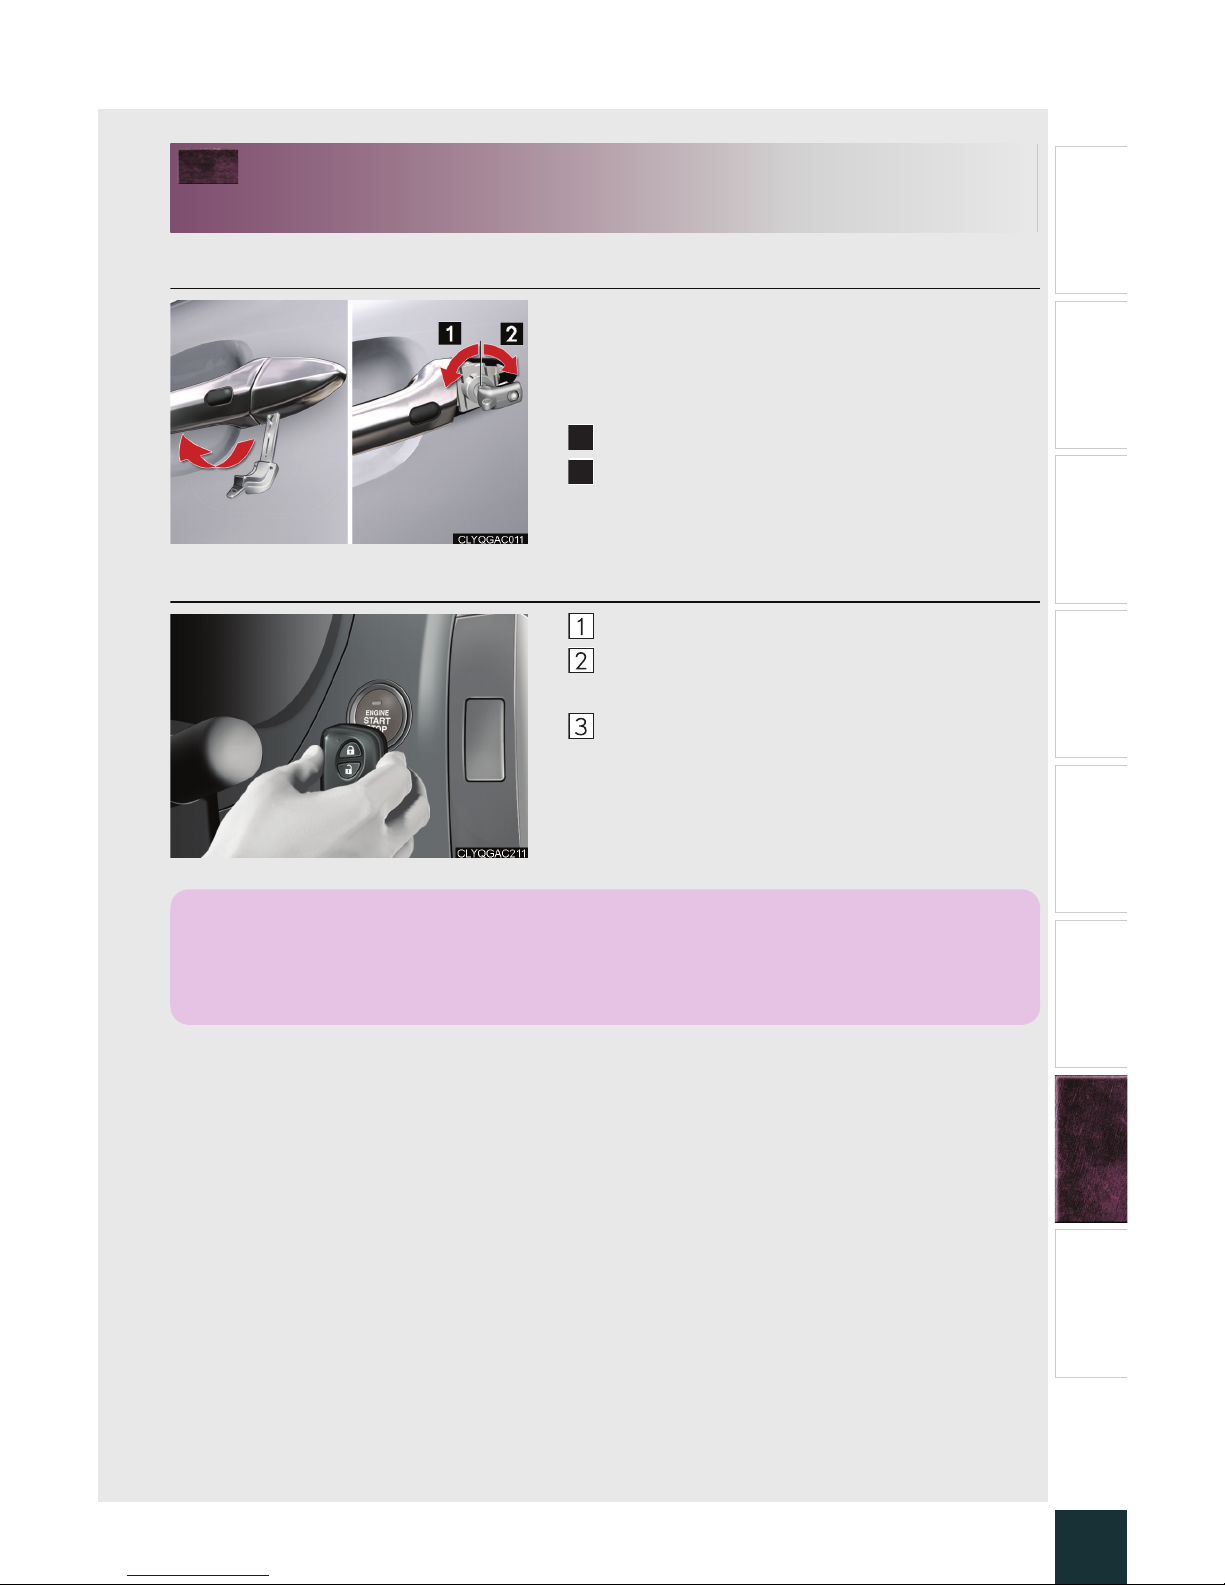
If the electronic key does not operate
properly
■ Unlocking and locking the doors
To unlock or lock the vehicle, use the mechanical
key to remove the lock cover on the driver's door
handle. The mechanical key is stored inside the
electronic key.
Locks
Unlocks
■ Starting the engine
Depress the brake pedal.
Touch the Lexus emblem side of the electronic
key to the “ENGINE START STOP” switch.
Press the “ENGINE START STOP” switch
within 10 seconds of the buzzer, keeping the
brake pedal depressed.
1
2
If the electronic key battery becomes depleted, replace it with a new battery. For instructions on replacing the battery, refer to the Owner's Manual. If you need further assistance,
contact your Lexus dealer.
Page 45
What to do if ...
51
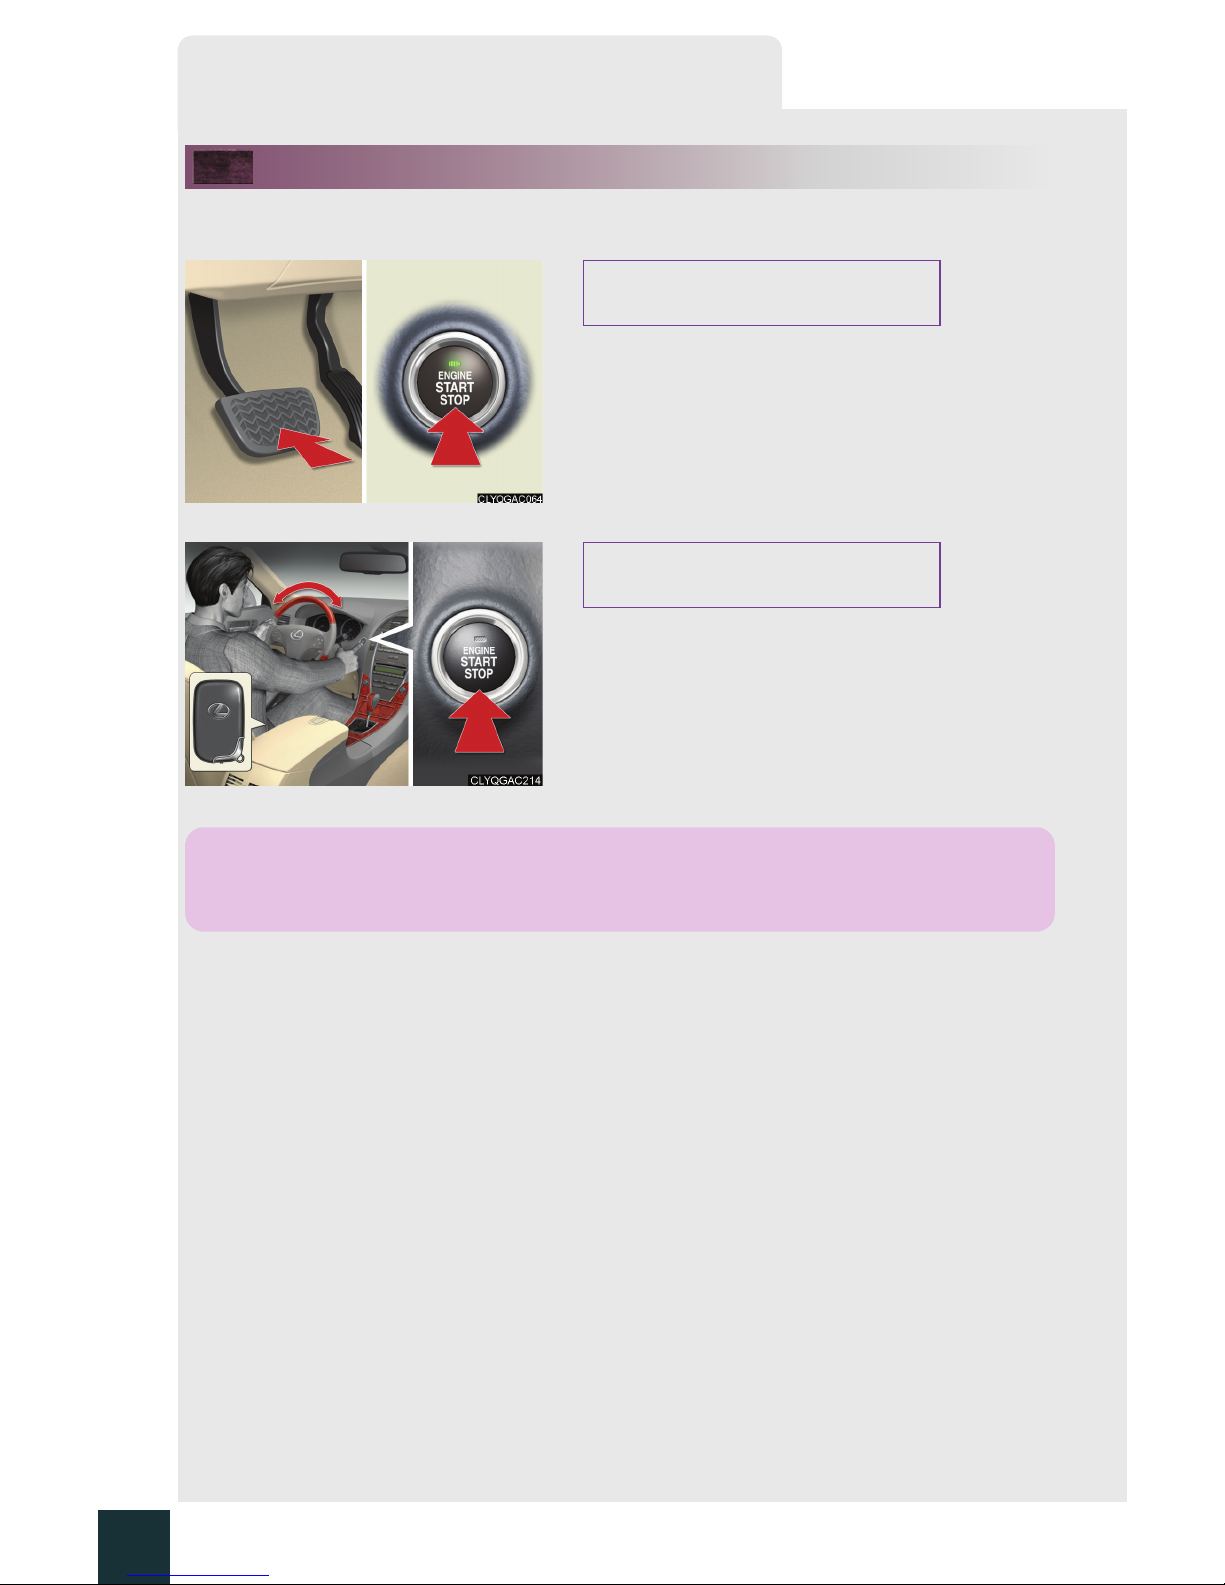
If the engine doesn't start
Make sure that the correct operating procedures have been followed.
Make sure that the brake pedal is firmly
depressed when attempting to start the engine.
(→P.1 7 )
Make sure that the steering wheel lock is released.
To release the steering wheel lock, gently turn the
wheel left or right while pressing the “ENGINE
START STOP” switch.
Brake pedal
Steering wheel lock
If the engine still does not start, see the Owner's Manual for more information or contact
your Lexus dealer.
Page 46
52
Entering and Exiting
Before Driving
When Driving
Rain and
Night Driving
Driving Comfort
Opening and Closing
What to do if ...
Customizing
Yo u r L e x u s
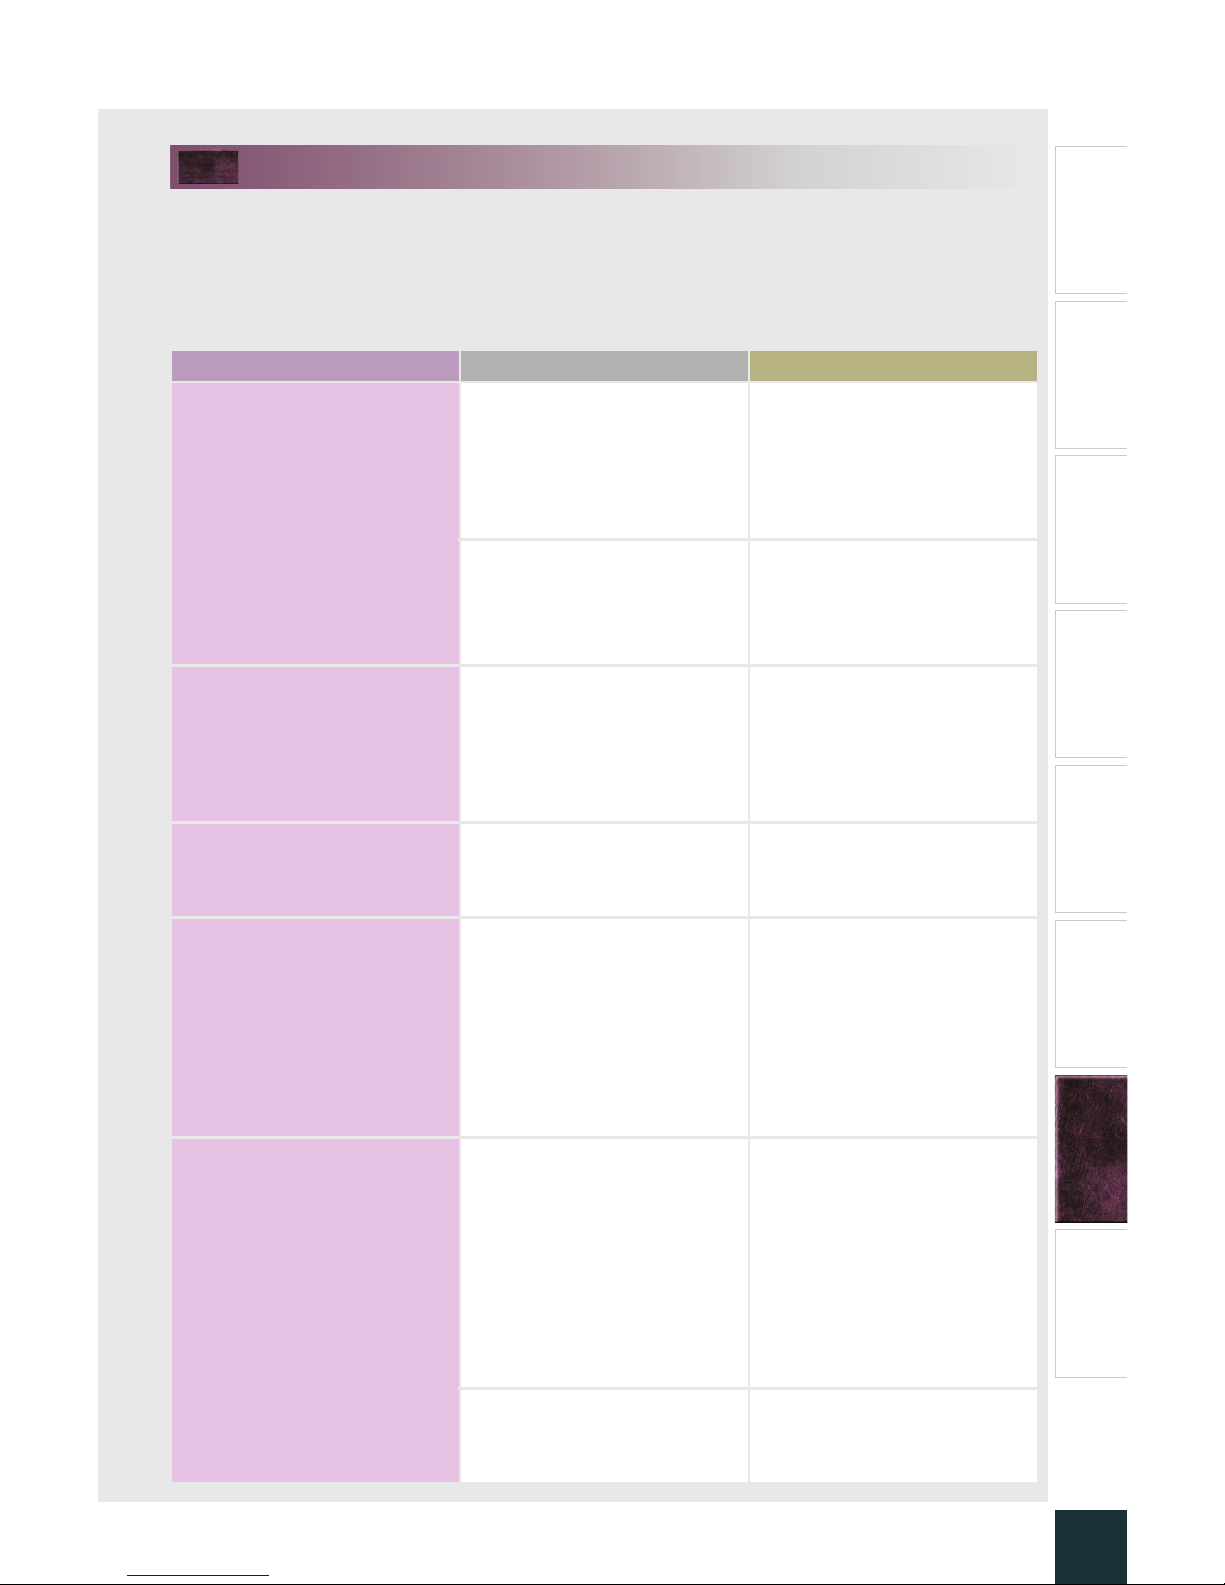
Electronic Key Alarm
The electronic key alarm uses an alarm and warning messages to indicate that the electronic
key has been used improperly. Take appropriate measure in response to any warning messages that are displayed. In some cases, an alarm may sound without an accompanying
warning message. If so, follow the correction procedure in the table below.
Alarm Situation Correction procedure
Exterior alarm sounds
once for 2 seconds
Tried to lock the doors
using the entry function
while the electronic key is
still inside the passenger
compartment
Retrieve the electronic key
from the passenger compartment and lock the
doors again.
Closed the trunk while the
electronic key is still inside
the trunk and all doors are
locked
Retrieve the electronic key
from the trunk and close
the trunk lid.
Exterior alarm sounds
once for 60 seconds
Tried to exit the vehicle
with the electronic key and
lock the doors without first
turning the “ENGINE
START STOP” switch OFF
Turn the “ENGINE START
STOP” switch OFF and
lock the doors again.
Exterior alarm sounds
once for 10 seconds
Tried to lock the vehicle
using the entry function
while a door is open
Close all of the doors and
lock the doors again.
Exterior alarm sounds
once for 3 seconds and
interior alarm sounds continuously
When the “ENGINE START
STOP” switch is in ACCESSORY or IGNITION ON
mode, an attempt was made
to open the door and exit
the vehicle, and the shift
lever was not in P
Shift the shift lever to P.
Interior alarm pings
continuously
Tu rn ed th e “E NGI NE
START STOP” switch to
ACCESSORY mode
while the driver's door is
open (Opened the driver's
door when the “ENGINE
START STOP” switch is in
ACCESSORY mode.)
Turn the “ENGINE START
STOP” switch OFF and
close the driver's door.
Turned the “ENGINE START
STOP” switch OFF while the
driver's door is open
Close the driver's door.
Page 47

Customizing Your Lexus
53
Your vehicle includes a variety of electronic features that can be personalized to your
preferences. Programming these preferences requires specialized equipment and may
be performed by an authorized Lexus dealership.
Some function settings are changed simultaneously with other functions being customized.
Contact your Lexus dealer for further details.
Item Functi on
Default
setting
Customized
setting
Smart access
system with
push-button start
Smart access system with
push-button start
ON OFF
Operation signal
(Emergency flashers)
ON OFF
Operation signal
(Buzzer)
ON OFF
Wireless remote
control
Wireless remote control ON OFF
Unlocking operation
Driver's door
unlocked in
one step,
all doors
unlocked in
two steps
All doors
unlocked in
one step
Automatic door lock function
to be activated if door is not
opened after being unlocked
ON
OFF
Time elapsed before automatic door lock function is activated if door is not opened
after being unlocked
60 seconds
30 seconds
120 seconds
Operation signal
(Emergency flashers)
ON OFF
Operation signal
(Buzzer volume)
Level 7 Level 0 to 7
Door lock buzzer ON OFF
Trunk unlocking function ON OFF
Trunk unlocking operation Push and hold
Push twice
One push
Panic function ON OFF
Page 48
54
Entering and Exiting
Before Driving
When Driving
Rain and
Night Driving
Driving Comfort
Opening and Closing
What to do if ...
Customizing
Yo u r L e x u s
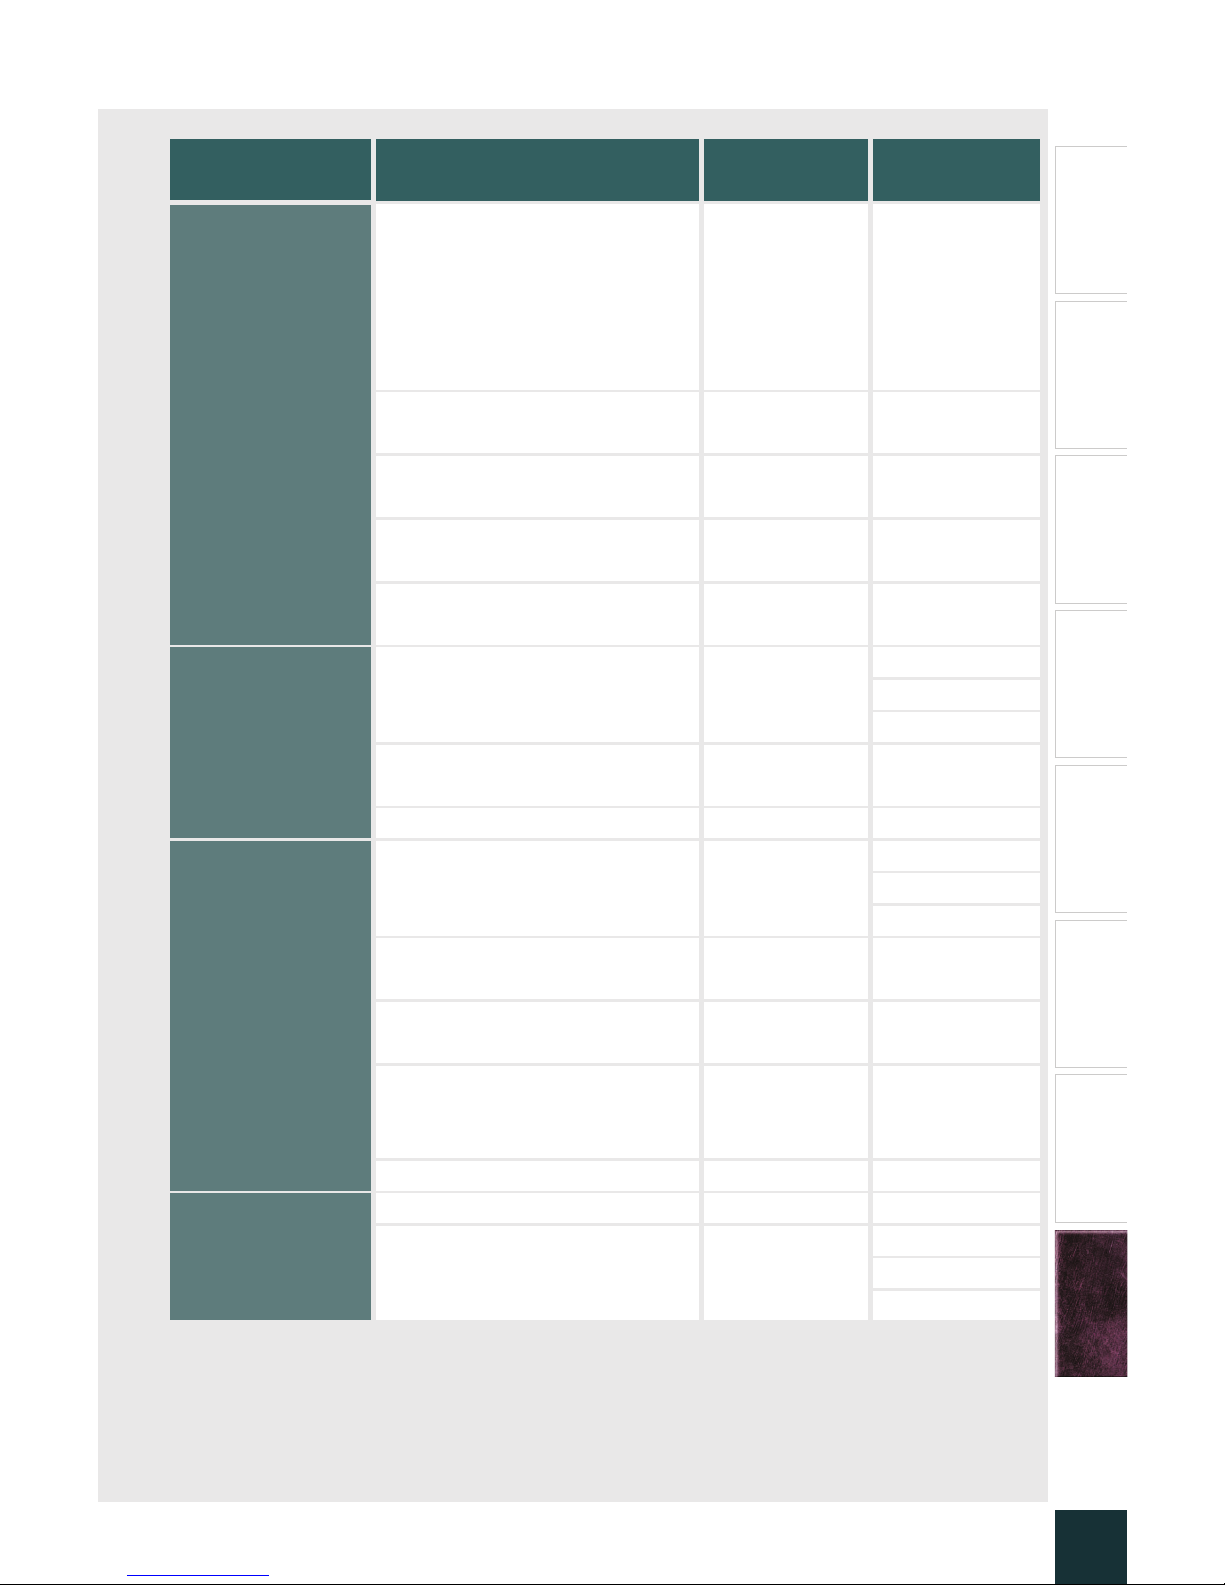
Item Function
Default
setting
Customized
setting
Door lock
Unlocking using a key
Driver's door
unlocked in
one step, all
doors
unlocked in
two steps
All doors
locked in one
step
Speed-detecting automatic
door lock function
OFF ON
Opening driver's door unlocks
all doors
OFF ON
Shifting gears to P unlocks all
doors
ON OFF
Shifting gears to position other
than P locks all doors
ON OFF
Power windows
Linked mechanical key
operation
ON
(Open and
close)
OFF
Open only
Close only
Wireless remote control linked
operation
ON
(Open only)
OFF
Linked entry function ON OFF
Moon roof
(Standard type)
Linked mechanical key
operation
ON
(Open and
close)
OFF
Open only
Close only
Linked operation of components
when mechanical key is used
Slide only Til t o nly
Wireless remote control linked
operation
ON
(Open only)
OFF
Linked operation of components
when wireless remote control
used
Slide only Til t o nly
Linked entry function ON OFF
Automatic light
control system
Light sensor sensitivity Level 3 Levels 1 to 5
Time elapsed before headlights
automatically turn off after
doors are closed
30 seconds
0 seconds
60 seconds
90 seconds
Page 49
55
Customizing Your Lexus
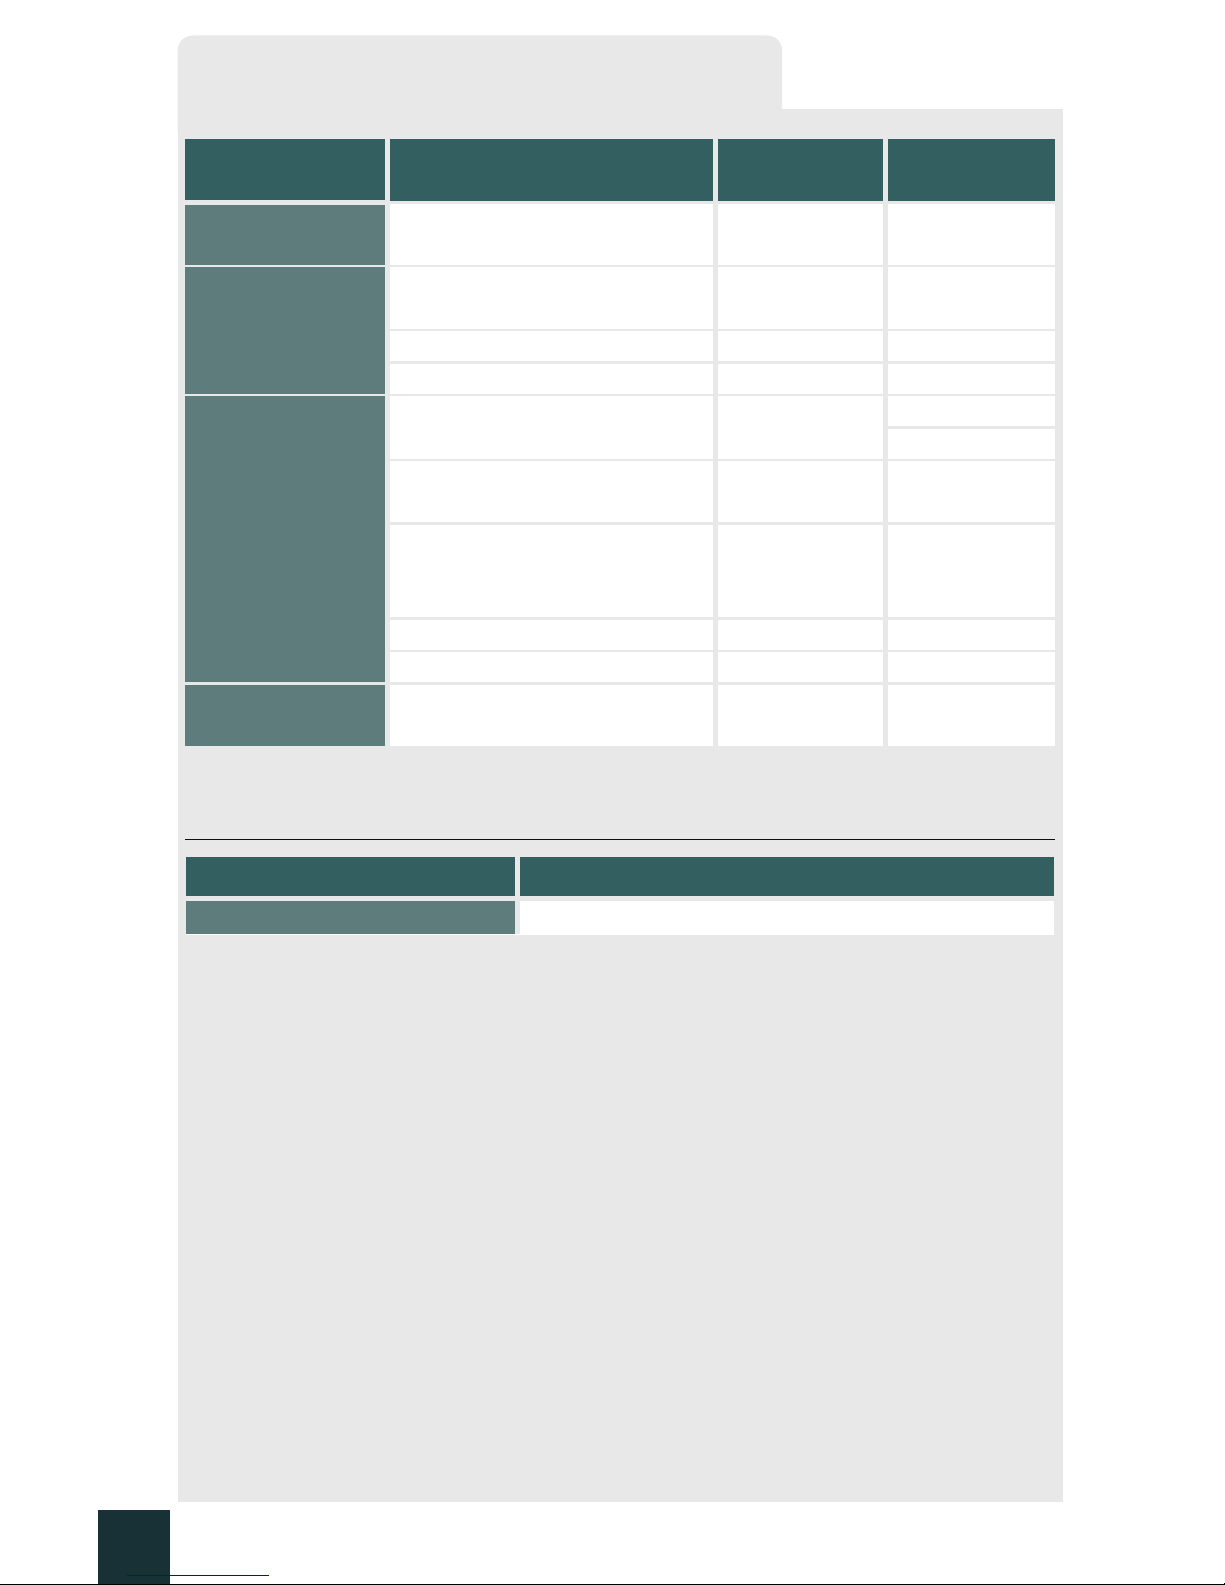
■ Multi-information display
Item Functi on
Default
setting
Customized
setting
Lights
Daytime running lights system
(USA only)
ON OFF
Intuitive parking
assist
Back sensor operation display
and buzzer
ON OFF
Buzzer volume Level 3 Level 1 to 5
Distance which a sensor detects 4.5 ft. (150 cm) 1.8 ft. (60 cm)
Illumination
Time elapsed before lights turn
off
15 seconds
7.5 sec ond s
30 seconds
Operation when the doors are
unlocked
ON OFF
Operation after the “ENGINE
START STOP” switch turned
OFF
ON OFF
Front foot well lighting ON OFF
Outer foot light ON OFF
Seat belt
reminder
Vehicle speed linked seat belt
reminder buzzer
ON OFF
Country Available languages
Canada English and French
Page 50

56
Memo
Page 51

57
Memo
Page 52

58
Your Lexus dealer
Your Lexus dealer will provide quality maintenance and any other assistance
you may require.
If there is not a Lexus dealer near you, please call the following number:
■ U.S. OWNERS
●In the U.S. mainland or Canada:
Lexus Roadside Assistance
1-800-25-LEXUS or 1-800-255-3987 (Toll-Free)
●In Hawaii:
Servco Automotive Roadside Assistance/Customer Services
1-800-25-LEXUS or 1-800-255-3987 (Toll-Free)
■ CANADIAN OWNERS
●In Canada or the U.S. mainland:
Lexus Roadside Assistance/Customer Service
1-800-26-LEXUS or 1-800-265-3987 (Toll-Free)
Please access our websites for further information.
●The U.S. mainland: www.lexus.com
●Hawaii: www.servcolexus.com
●Canada : www.lexus.ca
©2008 TOYOTA MOTOR CORPORATION
All rights reserved. This material may not be reproduced or copied, in whole or in part,
without the written permission of Toyota Motor Corporation.
 Loading...