

Page 1

Z65p Photo Jetprinter™
Photo Guide
October 2002
www.lexmark.com
Page 2

Edition: October 2002
The following paragraph does not apply to any country where such provisions are inconsistent
with local law: LEXMARK INTERNATIONAL , IN C., PROVIDES THIS PUBLICATION “AS IS” WITHOUT
WARRANTY OF ANY KIND, EITHER EXPRESS OR IMPLIED , INCLUDING, B UT NO T LIMITED T O , THE
IMPLIED WARRANTIES OF MERCHANTABILITY OR FITNESS FOR A P ARTI CULAR PURPOSE. Some
states do not allow disclaimer of express or implied warranties in certain transactions; therefore, this
statement may not apply to you.
This publication could include technical inaccuracies or typographical errors. Changes are periodically
made to the information herein; these changes will be incorporated in later editions. Improvements or
changes in the products or the programs described may be made at any time.
Comments about this publication may be addressed to Lexmark International, Inc., Department F95/032-2,
740 West New Circle Road, Lexington, Kentucky 40550, U.S.A. In the United Kingdom and Eire, send to
Lexmark International Ltd., Marketing and Services Department, Westhorpe House, Westhorpe, Marlow
Bucks SL7 3RQ. Lexmark may use or distribute any of the information you supply in any way it believes
appropriate without incurring any obligation to you. You can purchase additional copies of publications
related to this product by calling 1-800-553-9727. In the United Kingdom and Eire, call +44 (0)8704 440
044. In other countries, contact your point of purchase.
References in this publication to products, programs, or services do not imply that the manufacturer intends
to make these available in all countries in which it operates. Any ref erence to a product, program, or service
is not intended to state or imply that only that product, program, or service may be used. Any functionally
equivalent product, program, or service that does not infringe any existing intellectual property right may
be used instead. Evaluation and verification of operation in conjunction with other products, programs, or
services, except those expressly designated by the manufacturer, are the user’s responsibility.
Lexmark and Lexmark with diamond design are trademarks of Lexmark International, Inc., registered in the
United States and/or other countries.
Photo Jetprinter is a trademark of Lexmark International, Inc.
Other trademarks are the property of their respective owners.
© Copyright 2002 Lexmark International, Inc.
All rights reserved.
UNITED STATES GOV ERNMEN T RESTRICTED RIGHTS
This software and documentation are provided with RESTRICTED RIGHTS. Use, duplication or disclosure
by the Government is subject to restrictions as set forth in subparagraph (c)(1)(ii) of the Rights in Technical
Data and Computer Software clause at DFARS 252.227-7013 and in applicable FAR provisions: Lexmark
International, Inc., Lexington, KY 40550.
Safety information
• Use only the power supply provided with this product or the manufacturer’s authorized replacement
power supply.
• Connect the power cord to an electrical outlet that is near the product and easily accessible.
• Refer service or repairs, other than those described in the user documentation, to a professional
service person.
Page 3

Contents
Learning about your printer ..............................................1
Understanding the printer parts .................................................... 1
Understanding memory cards ....................................................... 3
Using the software to select your printer settings .........................6
Using the software to meet your printing needs ............................7
Printing from paper tray 1 .................................................8
Printing from paper tray 2 ...............................................11
Printing photos ................................................................14
Printing a digital photo on a photo card ...................................... 14
Designing pages for a photo album ............................................ 19
Creating a custom template ........................................................21
Printing multiple images on one sheet ........................................22
Cropping photos .......................................................................... 23
Personalizing fabric with pictures ................................................24
Troubleshooting checklist ..............................................26
iii
Page 4

Learning about your printer
Understanding the printer parts
Printing is easier than ever before. Your printer can automatically align your
cartridges and detect the type of paper you have loaded into paper tray 1.
Paper tray 1 (front)
• Load custom size paper, plain inkjet paper, or
specialty paper for special projects.
• Paper tray 1 has a paper type sensor that
automatically detects the following paper types: plain,
coated, photo/glossy, and transparencies.
Paper release lever
Press when removing paper.
Each paper tray has a paper
release lever.
Paper guide
Slide next to paper
for proper feeding.
Each paper tray
has a paper guide.
Memory card slots
Insert a memor y card
into one of these four
slots to access your
photos.
1
Page 5

Front cover
Open to install cartridges
or clear a paper jam.
Paper exit tray
Extend to hold paper as it
exits.
Paper tray 2 (rear)
Load A4 or letter size paper.
Power button
Press to tur n
the printer on
or off.
Paper tray
buttons
•Press
once to select
paper tray 1
(front) or paper
tray 2 (rear).
• If this button is
flashing, press it
once to clear a
paper jam.
USB cable
connector
Power supp ly
connector
2
Page 6

Understanding memory cards
Most digital cameras use a memory card to store photos. You can insert
the memory card into your printer and print your photos or save them on
your computer.
Inserting a m emory card
Your printer supports the following digital media:
• CompactFlash I and II
• IBM Microdrive
• Secure Digital
• MultiMedia Card
• Memory Stick
• Smartmedia
The USB Card Reader on your printer has four slots to accommodate
these media. This illustration shows you where to insert each of the
suppor ted mem ory cards.
CompactFlash I and II, IBM
Microdrive
Memory Stick
3
Secure Digital, MultiMedia
Card
Smartmedia
Page 7
Before you insert your memory card, consider the following information:
• If your memory card has a gold contact area, make sure the contact
area faces the side of your printer.
• If you are inserting a CompactFlash card, make sure the name label
faces away from your printer.
• Your printer recognizes one source for photos at a time. Insert only
one memory card at a time.
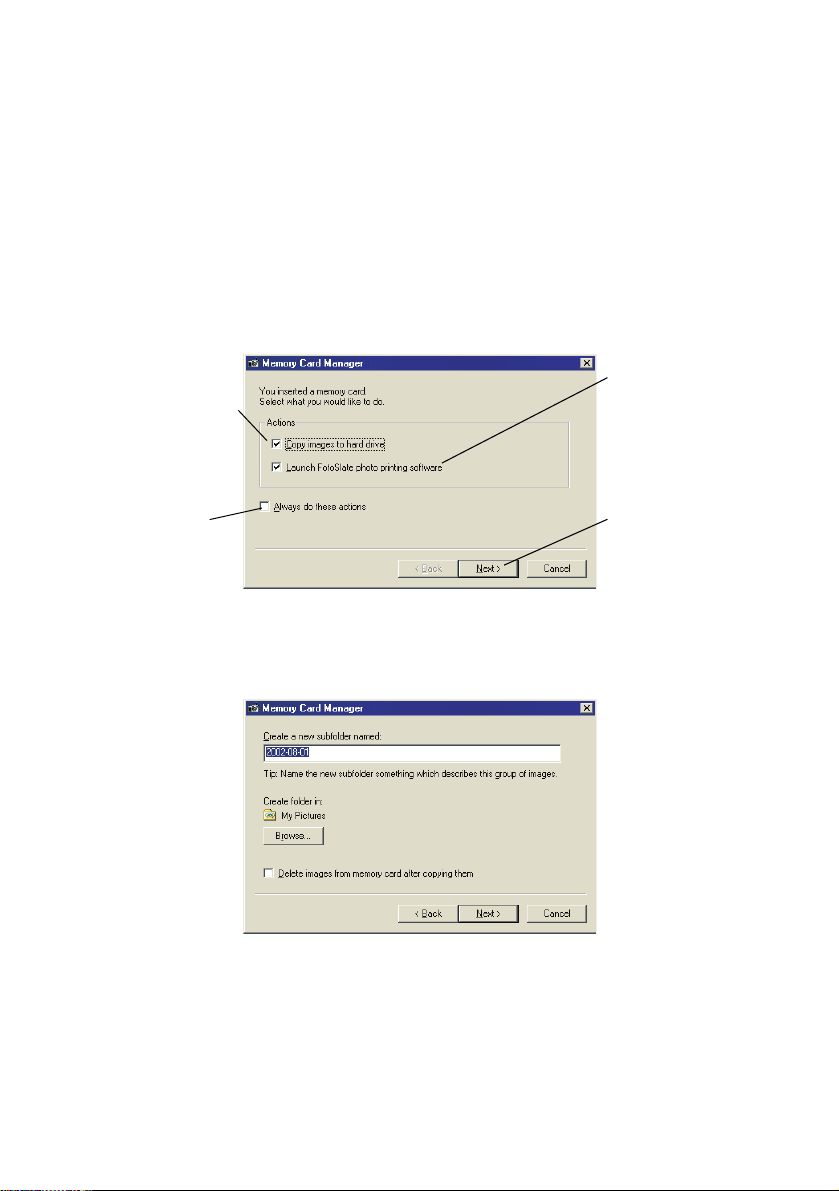
When you insert your memory card into the USB Card Reader, the
following message appears:
Select this option
to save your
photos in a folder
on your computer.
Select this option
to save your
settings.
Select this option
to launch
FotoSlate.
Click Next to
continue.
Make the selections based on your preferences. If you select Copy images
to hard drive, and then click Next, another dialog box appears.
Browse to select a folder where you want to store your photos, and then
create a new subfolder for your photos. The default folder is My Pictures,
and the default subfolder name is the current date. When you have
completed your selections, click Next.
4
Page 8
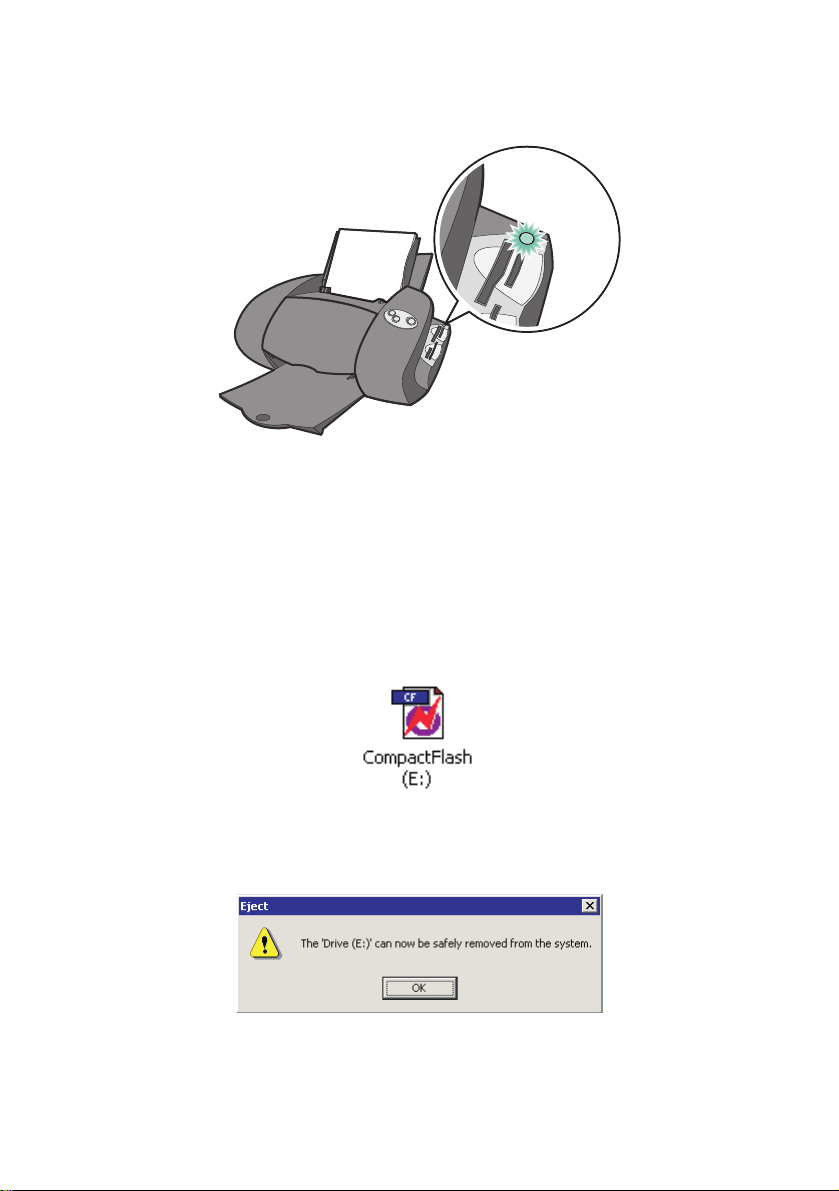
When a memory card is being written to or read from, the USB Card
Reader light comes on:
Removing your memory card
Remove your memory card in the following way to prevent data loss:
1 Double-click the My Computer icon on your desktop.
2 Right-click the icon for the removable disk drive supporting your
memory card. The icon looks similar to the one shown.
3 Select Eject from the drop-down menu.
4 Click OK on the Eject dialog box.
5 Remove your memory card from the USB Card Reader. For help,
5
Page 9
Formatting your memory cards
Formatting removes any damaged or lost data from the memory card so
that it does not take up valuable memory space on the card.
Warning: When you format a memory card, all images are deleted
from it. If you are storing photos on your memory card,
copy them to another location before you format it.
To format your memory cards:
1 Insert the memory card that you want to format into the USB Card
Reader.
2 Click Start Programs USB Card Reader Digital Media
Formatter.
3 Follow the instructions on your screen to format your memory card.
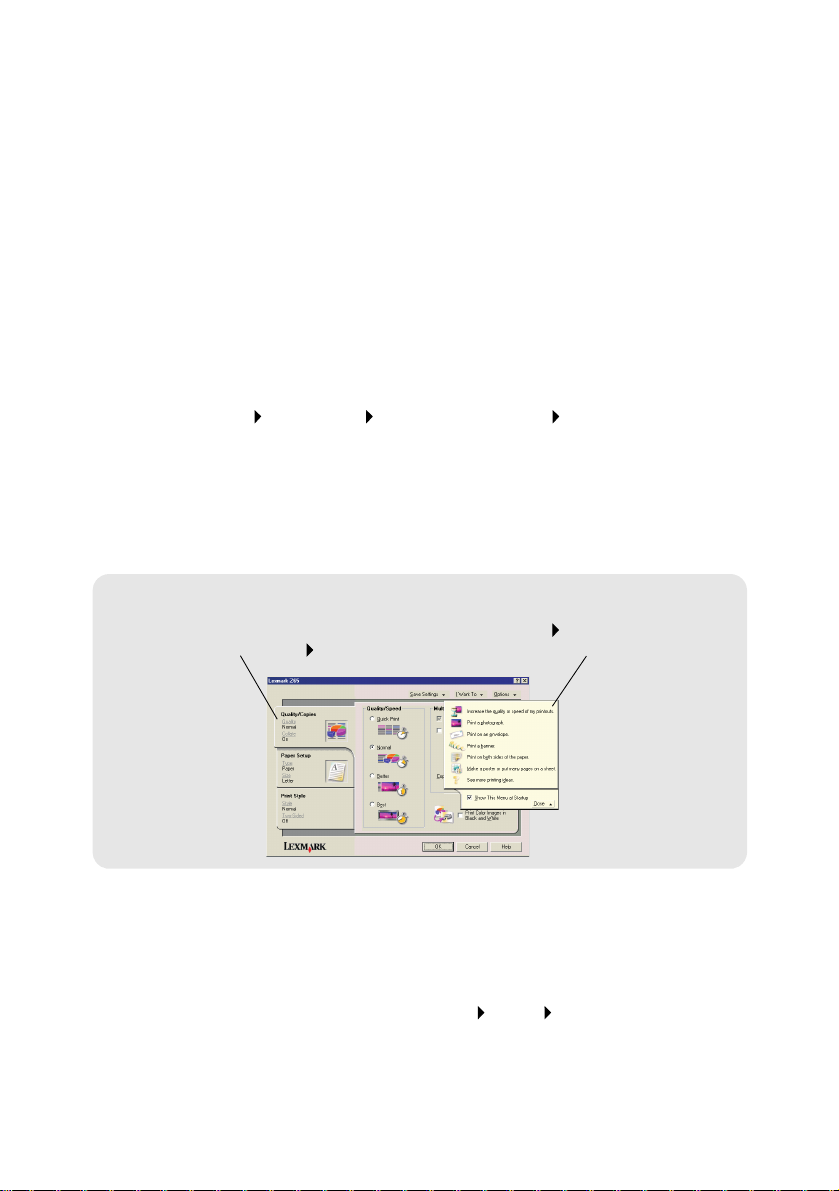
Using the software to select your printer settings
Print Properties
Use the Quality/
Copies, Paper
Setup, and Print
Style tabs to
select your printer
settings.
With your document open, click File
Print Properties or Preferences.
I Want To menu
This online,
easy-to-use
projects menu
helps you print
photos, banners,
envelopes,
posters, and m uch
more.
Print quality and paper type
To select a print quality or paper type setting:
1 With your document open, click File Print Properties or
Preferences.
6
Page 10

2
From the Quality/Copies tab, select a print quality setting.
3 From the Paper Setup tab, select a paper type setting.
The following table lists paper recommendations for each print quality:
Print quality Paper recommendation
Quick Print Plain inkjet, multipurpose, office, or xerographic
Normal Plain or premium inkjet , multipurpose, office, xerographic,
Better Premium inkjet, transparency, coated, glossy, or photo
Best Transparency, coated, glossy, or photo
iron-on transfer, or transparency
Using the software to meet your printing needs
Use the Lexmark Z65 Solution Center for:
• Aligning and maintaining cartridges
• Viewing printer status information, such as the paper type detected
in paper tray 1 and ink levels
• Troubleshooting
• Printing a test page
To open the Lexmark Solution Center:
• From your desktop, double-click the Lexmark Z65 Solution Center
icon.
or
• Click Start Programs or All Programs Lexmark Z65
Lexmark Z65 Solution Center.
Click Help on any tab to view the printer software Help.
7
Page 11
Printing from paper tray 1
From paper tray 1, you can print on any supported paper type, such as
plain, coated, photo, or glossy paper, transparencies, envelopes, labels,
iron-on transfers, or banner paper. Your paper must be within these
dimensions:
Width: 76.2 to 215.9 mm (3.0 to 8.5 in.)
Length: 127 to 432 mm (5.0 to 17.0 in.)
Note: Banner paper may be longer.
If you load transparencies or plain, coated, photo, or glossy paper into
paper tray 1, your printer detects the paper type and automatically adjusts
the Paper Type setting in the printer software for you.
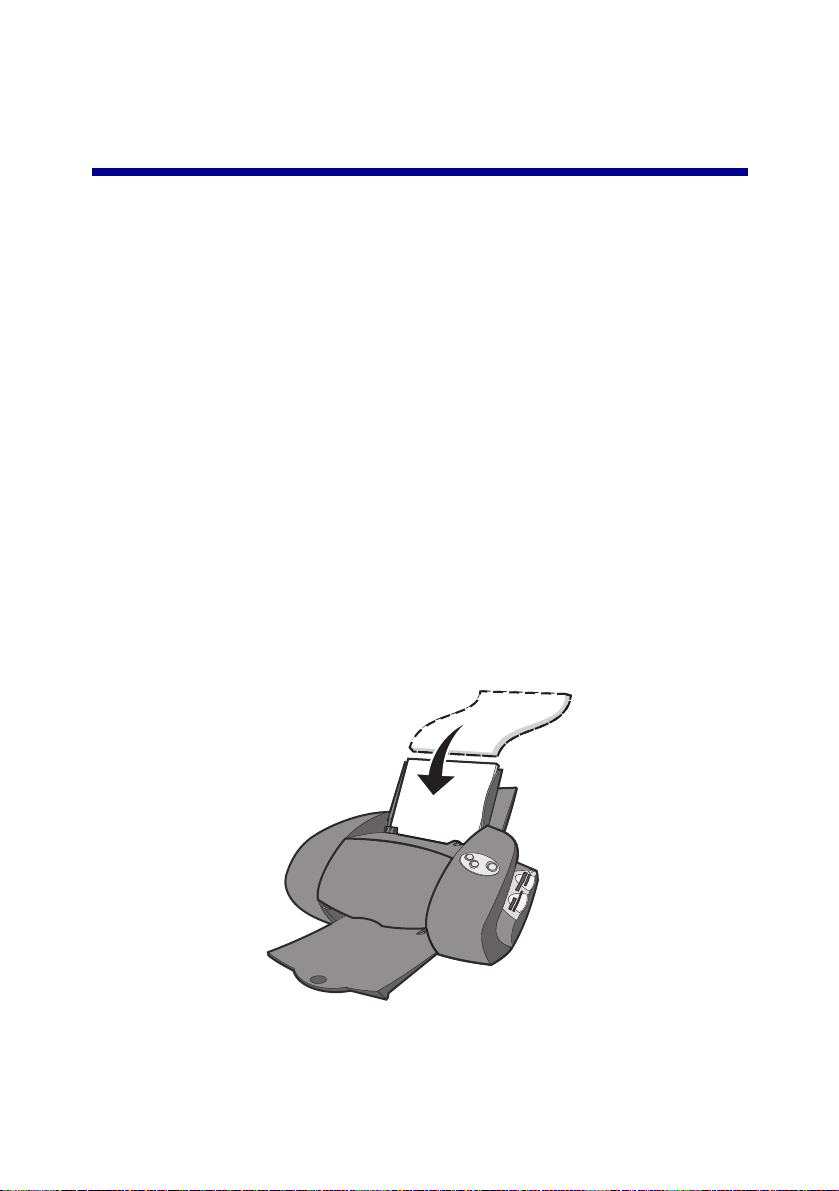
To print a document from this tray:
1 Load the paper, with the print side facing you, against the right side
of the paper tray.
8
Page 12

2
Squeeze and slide the paper guide to the left edge of the paper.
Note: To avoid a paper jam, load only one size of paper at a
time into the paper tray.
Note: Make sure you do not push the paper too far into the
printer. For example, A4 and letter size paper should
extend beyond the top of paper tray 1.
3 Make sure the paper tray 1 button is selected.
Paper tray 1
button
4 Follow these steps to open the printer software and print your
document.
a With your document open, click File Print Properties or
Preferences.
b From the Quality/Speed tab, select a print quality.
9
Page 13

c Make sure Paper Source is set to Printer Setting or Tray 1
(Front).
Note: Some software applications may override your paper
tray selection. You may need to make your paper tray
selection within the application.
d From the Paper Setup tab, make sure the Paper Type is set to
Automatic (if you want the paper type to be detected
automatically) or to the paper type for your document.
e Click OK.
f Click OK or Print.
10
Page 14

Printing from paper tray 2
From paper tray 2, you can print on A4 or letter size paper. This paper tray
does not have a paper type sensor, so you will need to select a paper type
in the printer software.
To print a document from this tray:
1 Load the paper, with the print side facing you, against the right side
of the paper tray.
11
Page 15

2
Squeeze and slide the paper guide to the left edge of the paper.
Note: To avoid a paper jam, load only one size of paper at a
time into the paper tray.
Note: Make sure you do not push the paper too far into the
printer. For example, A4 and letter size paper should
extend beyond the top of paper tray 2.
3 Make sure the paper tray 2 button is selected.
Paper tray 2
button
4 Follow these steps to open the printer software and print your
document.
a With your document open, click File Print Properties or
Preferences.
b From the Quality/Speed tab, select a print quality.
c From the Paper Setup tab, make sure Paper Source is set to
Printer Setting or Tray 2 (Rear).
12
Page 16

d Select a paper type.
Note: Some software applications may override your paper
tray selection.
e Click OK.
f Click OK or Print.
13
Page 17

Printing phot os
In this chapter, learn how to print photos and create projects using the
software that came with your printer.
Printing a digital photo on a photo card
Step 1: Load the paper
1 Load up to 10 photo cards vertically against the right side of paper
tray 1.
When you load photo cards, make sure:
• You carefully read the instructions that came with your cards.
• The print side is facing you.
• You do not push the cards too far into the printer.
• All the cards have the same dimensions.
14
Page 18

2
Squeeze and slide the paper guide to the left edge of the cards.
3 Make sure the paper tray 1 button is selected.
Paper tray 1 b utton
15
Page 19

Step 2: Access your photo
1
Insert your memory card into the corresponding memory card slot.
For help, see page 3.
Note: Insert only one memory card at a time.
The Memory Card Manager dialog box appears:
a Select Copy images to hard drive.
Note: Be sure to select this option if you want to save images
to a template when your memory card is not inserted.
b Select Launch FotoSlate.
16
Page 20

c Click Next.
Another Memory Card Manager dialog box appears.
d Enter a name for this set of images.
e Browse to select a folder on your hard drive where you want to
store your photos, and then create a new subfolder.
f Click Next.
FotoSlate launches. Your photos appear in the left pane.
2 From the toolbar, click Add Page.
3 Select a template for your photo.
If you are printing on a 4x6 photo card, select
Sheet 4x6 Portrait.
4 Click OK.
5 Left-click and drag the photo that you want to print into the template.
6 If you like, you can edit your photo in the template.
Note: Y our editing changes will be saved to the template only,
not to the original photo.
a Click Adjust on the toolbar, and then select one of these
options:
• Scroll
• Crop
• Zoom In
• Zoom Out
17
Page 21

• Rotate
• Flip
• Color
• Levels
• Auto Levels
• Blur
• Sharpen
• Despeckle
• Sepia
• Colorize
b After you edit your photo, click Accept to save the changes.
Your editing changes are saved to the template only, not to the
original photo.
Note: Y ou can find more information on editing your photos in
the FotoSlate Help or the FotoSlate User Guide.
Step 3: Print your photo
1 When you are ready to print your photo, click File Print
Properties or Preferences.
2 From the I Want To menu, click Print a photograph.
18
I Want To menu
Page 22

The Print a Photograph screen appears.
3 From Step 1 on the screen, select a print quality.
4 From Step 2 on the screen, select a paper size, and then click OK.
5 From the Paper Setup tab, make sure Paper Source is set to Printer
Setting or Tray 1 (Front).
6 From Print Properties, click OK.
7 From the Print screen, click OK or Print.
8 To prevent smudging, remove each photo as it exits the printer and
let it dry completely before stacking.
Designing pages for a photo album
Step 1: Select photos for your album
1 Access your photos.
To access photos from a memory card, see page16.
2 If you want, access more images using FotoSlate.
a From the toolbar, click Add Images.
b Select one or more images.
19
Page 23

If your image files do not appear, make sure you set Files of
Type to All Image Files or All files (*.*). For a list of supported file
types, refer to the Appendix of the FotoSlate User Guide.
c Click Open.
Your photos appear in the left pane.
3 Access photos stored on other memory cards:
a Remove the memory card you just inserted. For help, see
page 5.
b Continue with step 1 on page 19.
Step 2: Select templates to display your photos
1 Click Add Page.
2 Select a template.
a Select a page type from the Folder tree in the left pane.
• Choose an Album page to display your photos in a photo
album.
• Choose a Sheet page to maximize the printed area.
• Choose a template with a text box if you plan to add text to
your template.
b Select a template from those shown in the right pane.
c Click OK.
The template now appears in the right pane of the main window.
3 Repeat the steps above to add another template.
To remove a template:
Click the X in the upper-right corner of the template you want to remove.
Step 3: Add photos to your templates
Left-click and drag an image to one of the light gray boxes on a template
page.
To remove an image:
20
Page 24

1
Right-click an image on a page.
2 Select Remove from Page from the shortcut menu.
Step 4: Add text to your template
1 Select a template that has a text box.
2 Double-click the dark gray box.
3 In the Enter Text dialog box, type the desired text.
4 When you are finished, click OK.
Step 5: Organize photos in your layout
You can left-click an image on a page and drag it to an image box on
another page. If the new image box already contains an image, the two
images switch positions.
Step 6: Save your layout
1 Click File Save Layout As....
2 Name your layout and designate a folder for it.
3 Click Save.
Step 7: Print your layout
For help, see page 18.
Creating a custom template
1 Click Designer on the toolbar.
The FotoSlate Template Designer screen appears.
2 Browse the template library and double-click a template to select it.
3 Adjust the template to fit your needs. You can:
21
Page 25

• Click a picture area or a caption area to resize it.
• Add text to a caption area.
To add text to a caption area:
a Double-click the caption area.
b Select Use Content.
c Click De fine Content, and then type the desired text in the Enter
Text dialog box.
d Click OK.
e Click OK again.
4 Save your template.
a Click Save.
b In the Save As Template dialog box, enter a name for your
template.
c Click OK.
5 Close the Templ ate Designer dialog box.
Printing multiple images on one sheet
1 Click an image in the left pane.
22
Page 26

2
Click Add Page.
3 From the Folder tree, select a Sheet template with multiple images
on a page.
4 Click OK.
The Fill Page with Images screen appears.
5 To automatically fill your template with one image, select Create
one page per image.
To fill your template with different images, select Fill pages with
multiple images. Then add other images to your template. For help,
see “Step 3: Add photos to your templates” on page 20.
6 Click OK.
Cropping photos
1 Double-click a photo in your layout.
The photo opens in the Image Editor.
2 Click Crop from the toolbar.
An editing window appears over the photo.
23
Page 27

3
Resize the crop area.
• Move your mouse pointer to the frame of the editing window, and
then left-click your mouse button and drag the frame to resize it.
• Click Ratios on the editing window, and then select from the
available size ratios.
4 Click OK.
The editing window turns into a dashed box.
5 Click Accept from the toolbar.
Personalizing fabric with pictures
1 Open a photo in your photo application. For help, see “Step 2:
Access your photo” on page 16.
2 Load up to 25 iron-on transfers into paper tray 1 with the blank side
facing you.
24
Page 28

3
Place the iron-on transfers against the right side of the paper
support, following the loading instructions on the package.
4 Squeeze and slide the paper guide to the left edge of the iron-on
transfers.
5 Click File Print Properties.
6 From the I Want To menu, select Print a photograph.
The Print a Photograph screen appears.
7 From Step 1 on the screen, select a print quality.
8 From Step 2 on the screen, select a paper size, and then click OK.
9 From the Print Style tab, select Mirror.
10 From the Paper Setup tab, under Specialty Paper, select Iron-On
Transfer.
11 From the Paper Setup tab, make sure Paper Source is set to Printer
Setting or Tray 1 (Front).
12 From Print Properties, click OK.
13 From the Print screen, click OK or Print.
14 To prevent smudging, remove each iron-on transfer as it exits the
printer and let it dry completely before stacking.
15 Apply the iron-on transfer to a blanket, pillowcase, sheet set, T-shirt,
or another piece of fabric, following the instructions on the transfer
package.
25
Page 29

Troubleshooting chec klist
Is the power supply firmly attached to your printer and an
electrical outlet?
Are both your printer and computer on?
Is your USB cable securely attached at both ends?
Did you remove the sticker and transparent tape from the back
and bottom of both print cartridges?
Is the black cartridge (P/N 82) in the left carrier and the color
cartridge (P/N 83 or 88) in the right carrier?
Is the paper loaded correctly? Make sure you do not push the
paper too far into the printer. For help, refer to the Setup Guide.
Did you install the printer software correctly?
From your desktop, click Start Programs or All Programs.
If Lexmark Z65 does not appear in your list of programs, install the
printer software (CD–2). Refer to the Setup Guide for installation
instructions.
26
Page 30

Did you install the photo software completely?
If you did not completely install the photo software, the Memory
Card Manager dialog box does not appear when you insert your
memory card into the USB Card Reader. To check to see if the
photo software is installed:
From your desktop, click Start Programs or All Programs.
If ACD Systems does not appear in your list of programs, install the
photo software (CD–1). Refer to the Setup Guide for installation
instructions.
Is your printer connected to your computer through an external
device, such as a USB hub, switch box, scanner, or fax machine?
If not, refer to the Setup Troubleshooting section of the Setup
Guide for help. If it is, follow these steps:
1 Disconnect your printer from any external devices.
2 Connect your printer directly to your computer with a USB cable.
3 Follow these instructions to print a test page.
a Open the Lexmark Z65 Sol uti on Cente r (see page 7).
b From the Troubleshooting tab, click Print a test page.
• If the test page prints, the problem may be with your external
devices, not your printer. Check the documentation that came
with your external devices for help.
• If the test page does not print, refer to the printer software Help
(see page 7) for further troubleshooting information.
For additional help solving printing problems, refer to the Setup
Troubleshooting section of the Setup Guide.
27
Page 31

Notices
Electronic Emission
notices
Federal Communications
Commission (FCC)
compliance information
statement
The Lexmark Z65 Photo
Jetprinter has been tested
and found to comply with the
limits for a Class B digital
device, pursuant to Part 15 of
the FCC Rules. Operation is
subject to the following two
conditions: (1) this device
may not cause harmful
interference, and (2) this
device must accept any
interference received,
including interference that
may cause undesired
operation.
The FCC Class B limits are
designed to provide
reasonable protection
against harmful interference
in a residential installation.
This equipment generates,
uses and can radiate radio
frequency energy and, if not
installed and used in
accordance with the
instructions, may cause
harmful interference to radio
communications. However,
there is no guarantee that
interference will not occur in
a particular installation. If this
equipment does cause
harmful interference to radio
or television reception, which
can be determined by turning
the equipment off and on, the
user is encouraged to try to
correct the interference by
one or more of the following
measures:
• Reorient or relocate the
receiving antenna.
• Increase the separation
between the equipment
and receiver.
• Connect the equipment
into an outlet on a circuit
different from that to
which the receiver is
connected.
• Consult your point of
purchase or service
representative for
additional suggestions.
The manufacturer is not
responsible for any radio or
television interference
caused by using other than
recommended cables or by
unauthorized changes or
modifications to this
equipment. Unauthorized
changes or modifications
could void the user's
authority to operate this
equipment.
Note:To assure
compliance with FCC
regulations on
electromagnetic
interference for a Class B
computing device, use a
properly shielded and
grounded cable such as
Lexmark part number
1329605 for parallel attach
or 12A2405 for USB
attach. Use of a substitute
cable not properly shielded
and grounded may result in
a violation of FCC
regulations.
Any questions regarding this
compliance information
statement should be directed
to:
Director of Lexmark
Technology & Services
Lexmark International, Inc.
740 West New Circle Road
Lexington, KY 40550
(859) 232-3000
Industry Canada
compliance statement
This Class B digital
apparatus meets all
requirements of the
Canadian
Interference-Causing
Equipment Regulations.
Avis de conformité aux
normes d’Industrie Ca nada
Cet appareil numérique de la
classe B respecte toutes les
exigences du Règlement sur
le matériel brouilleur du
Canada.
European Community (EC)
directives conformity
This product is in conformity
with the protection
requirements of EC Council
directives 89/336/EEC and
73/23/EEC on the
approximation and
harmonization of the laws of
the Member States relating
to electromagnetic
compatibility and safety of
electrical equipment
designed for use within
certain voltage limits.A
declaration of conformity with
the requirements of the
directives has been signed
by the Director of
Manufacturing and T echnical
Support, Lexmark
International, S.A., Boigny,
France.
This product satisfies the
Class B limits of EN 55022
and safety requirements of
EN 60950.
The United Kingdom
Telecommunications Act
1984
This apparatus is approved
under the approval number
NS/G/1234/J/100003 for the
28
Page 32

indirect connections to the
public telecommunications
systems in the United
Kingdom.
ENERGY STAR
The EPA ENE R G Y STAR
Office Equipment program is
a partnership effort with
office equipment
manufacturers to promote
Japanese VCCI notice
the introduction of
energy-efficient products and
to reduce air pollution
caused by power generation.
Companies participating in
this program introduce
products that power down
when they are not being
used. This feature will cut t he
energy used by up to 50
percent. Lexmark is proud to
be a participant in this
program.
As an ENERGY STAR
Partner, Lexmark
International, Inc. has
determined that this product
meets the ENERGY STAR
guidelines for energy
efficiency.
29
Page 33

Statement of Limited Warranty
Lexmark International, Inc.
Lexington, KY
This limited warranty applies
to the United States. For
customers outside the U.S.,
refer to the country-specific
warranty information that
came with your product.
This limited warranty applies
to this product only if it was
originally purchased for your
use, and not for resale, from
Lexmark or a Lexmark
remarketer, referred to in this
statement as “Remarketer.”
Limited warranty
Lexmark warrants that this
product:
• Is manufactured from new
parts, or new and
serviceable used parts,
which perform like new
parts
• Is, during normal use, free
from defects in material
and workmanship
If this product does not
function as warranted during
the warranty period, contact
a Remarketer or Lexmark for
repair or replacement (at
Lexmark's option).
If this product is a feature or
option, this statement applies
only when that feature or
option is used with the
product for which it was
designed. T o obtain warranty
service, you may be required
to present the feature or
option with the product.
If you transfer this product to
another user, warranty
service under the terms of
this statement is available t o
that user for the remainder of
the warranty period. You
should transfer proof of
original purchase and this
statement to that user.
Limited warranty service
The warranty period starts on
the date of original purchase
as shown on the purchase
receipt. The warranty period
ends 12 months later.
To obtain warranty service
you may be required to
present proof of original
purchase. You may be
required to deliver your
product to the Remarketer or
Lexmark, or ship it prepaid
and suitably packaged to a
Lexmark designated
location. Y ou are responsible
for loss of, or damage to, a
product in transit to the
Remarketer or the
designated location.
When warranty service
involves the exchange of a
product or part, the item
replaced becomes the
property of the Remarketer
or Lexmark. The
replacement may be a new
or repaired item. The
replacement item assumes
the remaining warranty
period of the original product.
Replacement is not available
to you if the product you
present for exchange is
defaced, altered, in need of a
repair not included in
warranty service, damaged
beyond repair, or if the
product is not free of all legal
obligations, restrictions,
liens, and encumbrances.
Before you present this
product for warranty service,
remove all print cartridges,
programs, data, and
removable storage media
(unless directed otherwise by
Lexmark).
For further explanation of
your warranty alternatives
and the nearest Lexmark
authorized servicer in your
area, contact Lexmark at
(407) 563-4600, or on the
World Wide Web at http://
support.lexmark.com.
Remote technical support is
provided for this product
throughout its warranty
period. For products no
longer covered by a Lexmark
warranty, technical support
may not be available or only
be available for a fee.
Extent of limited warr a nty
We do not warrant
uninterrupted or error-free
operation of any product.
Warranty service does not
include repair of failures
caused by:
• Modification or
attachments
• Accidents or misuse
• Unsuitable physical or
operating environment
• Maintenance by anyone
other than Lexmark or a
Lexmark authorized
servicer
• Operation of a product
beyond the limit of its duty
cycle
• Use of printing media
outside of Lexmark
specifications
• Supplies (such as ink) not
furnished by Lexmark
• Products, components,
parts, materials, softw are,
or interfaces not
furnished by Lexmark
TO THE EXTENT
PERMITTED BY
APPLICABLE LAW,
NEITHER LEXMARK NOR
30
Page 34

ITS THIRD PARTY
SUPPLIERS OR
REMARKETERS MAKE
ANY OTHER WARRANTY
OR CONDITION OF ANY
KIND, WHETHER
EXPRESS OR IMPLIED,
WITH RESPECT TO THIS
PRODUCT, AND
SPECIFICALLY DISCLAIM
THE IMPLIED
WARRANTIES OR
CONDITIONS OF
MERCHANTABILITY,
FITNESS FOR A
PARTICULAR PURPOSE,
AND SATISFACTORY
QUALITY. ANY
WARRANTIES THAT MAY
NOT BE DISCLAIMED
UNDER APPLICABLE LAW
ARE LIMITED IN
DURATION TO THE
WARRANTY PERIOD. NO
WARRANTIES, EXPRESS
OR IMPLIED, WILL APPLY
AFTER THIS PERIOD. ALL
INFORMATION,
SPECIFICATIONS,
PRICES, AND SERVICES
ARE SUBJECT TO
CHANGE AT ANY TIME
WITHOUT NOTICE.
Limitation of liability
Your sole remedy under this
limited warranty is set forth in
this document. For any claim
concerning performance or
nonperformance of Lexmark
or a Remarketer for this
product under this limited
warranty, you may recover
actual damages up to the
limit set forth in the following
paragraph.
Lexmark's liability for actual
damages from any cause
whatsoever will be limited to
the amount you paid for the
product that caused the
damages. This limitation of
liability will not apply to
claims by you for bodily i njury
or damage to real property or
tangible personal property
for which Lexmark is legally
liable. IN NO EVENT WILL
LEXMARK BE LIABLE FOR
ANY LOST PROFITS, LOST
SAVINGS, INCIDENTAL
DAMAGE, OR OTHER
ECONOMIC OR
CONSEQUENTIAL
DAMAGES. This is true e ven
if you advise Lexmark or a
Remarketer of the possibility
of such damages. Lexmark is
not liable for any claim by y ou
based on a third party claim.
This limitation of remedies
also applies to claims against
any Suppliers and
Remarketers of Lexmark.
Lexmark's and its Suppliers'
and Remarketers' limitations
of remedies are not
cumulative. Such Suppliers
and Remarketers are
intended beneficiaries of this
limitation.
Additional rights
Some states do not allow
limitations on how long an
implied warranty lasts, or do
not allow the exclusion or
limitation of incidental or
consequential damages, so
the limitations or exclusions
contained above may not
apply to you.
This limited warranty gives
you specific legal rights. You
may also have other rights
that vary from state to state.
31
Page 35

Lexmark and Lexmark with diamond design are trademarks of Lexmark International, Inc.,
registered in the United States and/or other countries. Photo Jetprinter is a trademark of
Lexmark International, Inc.
© October 2002 Lexmark International, Inc.
740 West New Circle Road
Lexington, Kentucky 40550
www.lexmark.com
 Loading...