

Page 1
Printer overview
Basic printing
Printing ideas
Maintenance
Troubleshooting
Notices
Index
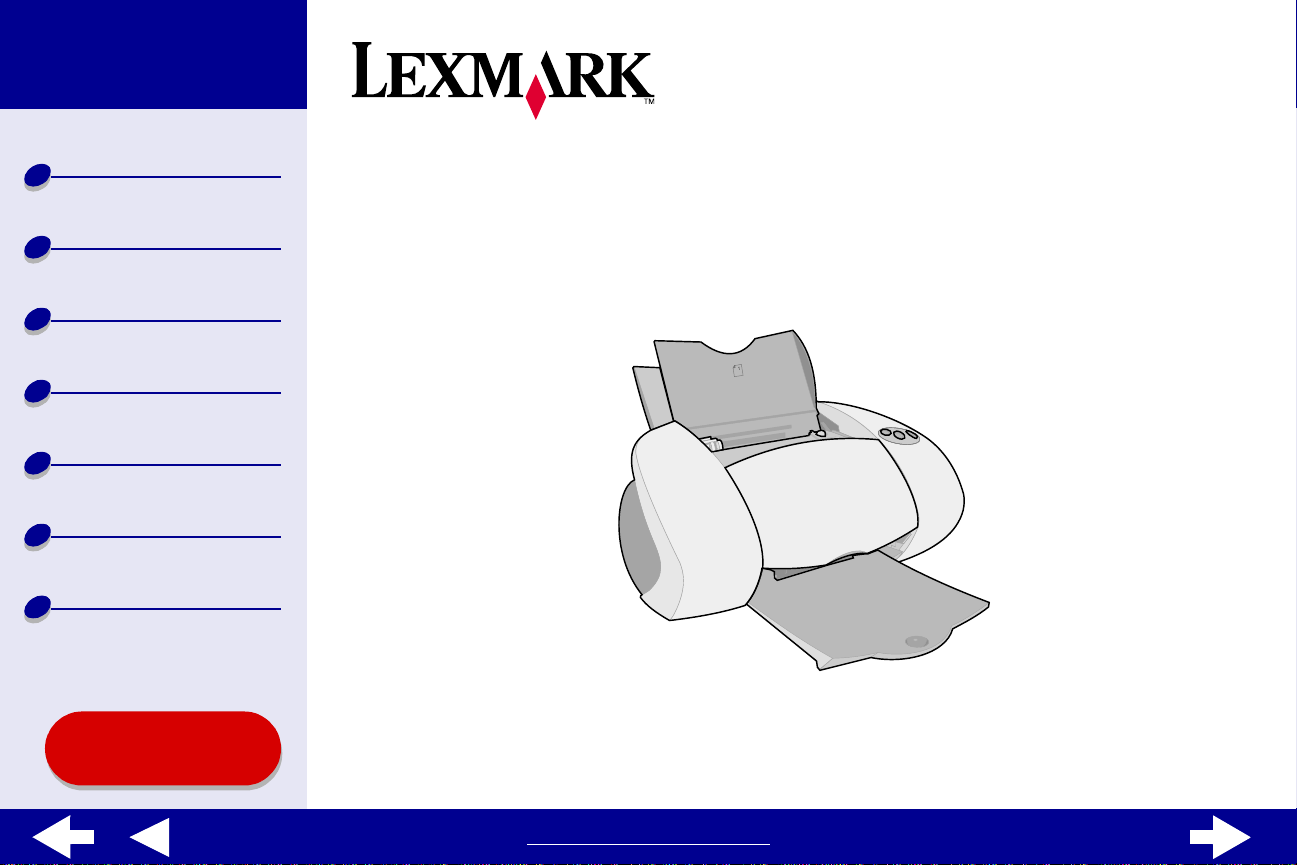
Z65, Z65n
Color Jetprinter™
Online User’s Guide for Mac OS 8.6 to 9.2
Using this
Guide...
www.lexmark.com
Page 2

Lexmark Z65
Lexmark Z65n
2Using this Guide
Printer overview
Basic printing
Printing ideas
Maintenance
Troubleshooting
Notices
Index
Navigating
• Click the categories in the left pane to navigate the pages.
• Click the blue text to link to other parts of this Online User’s Guide.
• Click the arrows at the bott om of the screen to move forward and backw ard through
the pages.
Searching
1 From the Acrobat Edit men u, choose Find.
2 In the Find What: box, type the word or phrase you want to search for.
3 Click Find.
Printing
From the Acrobat File menu:
1 Choose Page Setup, select the Landscape orientation button, and then click OK.
2 Choose Print, specify the pages you want to print, and then click Print.
www.lexmark.com
Page 3

Lexmark Z65
Lexmark Z65n
3Printer overview
Printer overview
Basic printing
Printing ideas
Maintenance
Troubleshooting
Notices
Index
• Understanding the printer software
• Understanding the printer parts
Using this
Guide...
www.lexmark.com
Page 4

Lexmark Z65
Lexmark Z65n
4Printer overview
Printer overview
Basic printing
Printing ideas
Maintenance
Troubleshooting
Notices
Index
Using this
Guide...
Understanding the printer software
Your printer software includes the:
• Page Setup dialog box
• Print dialog box
• Control Panel
To customize the settings for your document, use the Page Setup dialog and the Print
dialog. For more information on which settings to select for your document, see Printing
ideas. When you installed the printer software, the Page Setup and Print dialog boxes were
set to these default settings:
Print Quality: Normal Paper Type: Automatic
Paper Size: A4 or U.S. Letter Paper Source: Printer Setting or Paper Tray 1
(front)
Orientation: Portrait
Note: Your printer has paper type sensing capability that automatically detects
most paper types. F or more information, see Using the paper type
sensor.
www.lexmark.com
Page 5
Lexmark Z65
Lexmark Z65n
5Printer overview
Printer overview
Basic printing
Printing ideas
Maintenance
Troubleshooting
Notices
Index
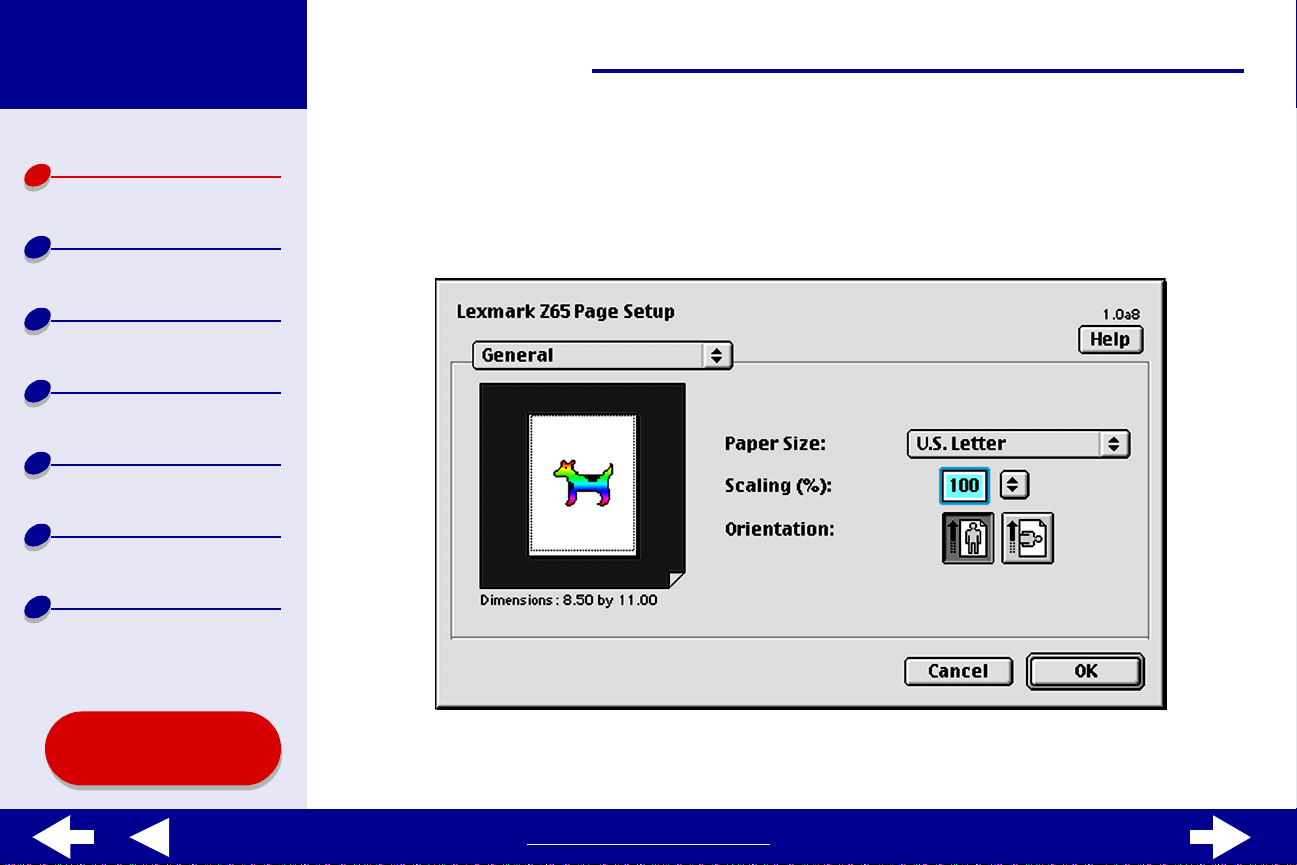
Page Setup dialog box
While the document you want to print is open, use the Page Setup dialog box to select
settings such as paper size. To customize the settings in the Page Setup dialog box:
1 From the File menu of your software application, choose Page Setup.
Using this
Guide...
www.lexmark.com
Page 6
Lexmark Z65
Lexmark Z65n
Printer overview
Basic printing
Printing ideas
Maintenance
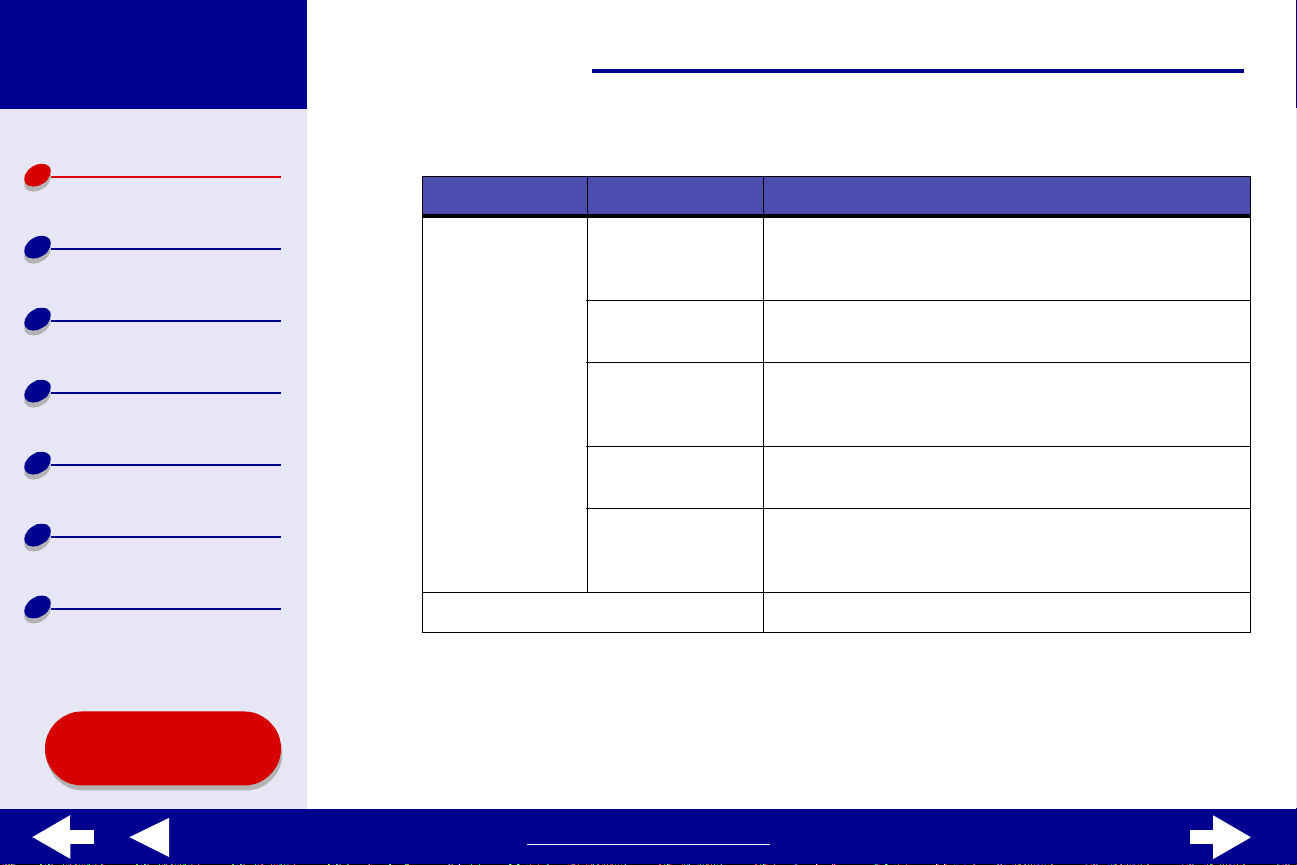
2 Change the settings as needed.
From the pop-up
menu in the upper
left, choose:
General Paper Size Choose a paper size or create a custom
Select: When you want to:
paper size.
Scaling Change the scaling value of the document.
Valid values are between 25% and 400%.
Orientation Choose between portrait and landscape.
6Printer overview
Troubleshooting
Notices
Index
Using this
Guide...
Watermark Watermarks Choose a watermark design.
For more information about these settings, click Help. When you are finished, click
Done.
3 Click OK to apply the settings and close the Page Setup dialog box.
www.lexmark.com
Page 7
Lexmark Z65
Lexmark Z65n
7Printer overview
Printer overview
Basic printing
Printing ideas
Maintenance
Troubleshooting
Notices
Index
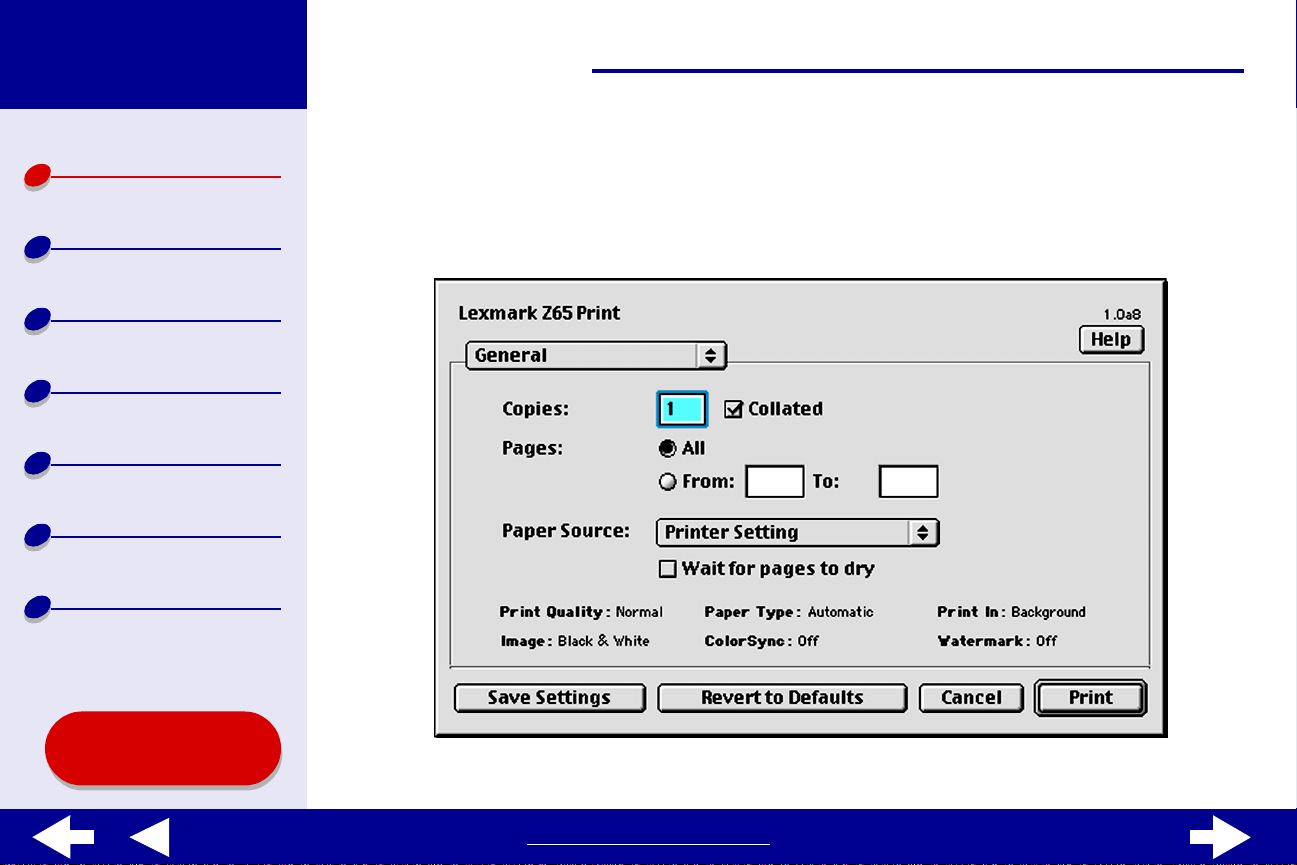
Print dialog box
While your document is open, you can use the Print dialog box to select settings that affect
the appearance of your document. To customize the settings in the Print dialog box:
1 From the software application File menu, choose Print.
Using this
Guide...
www.lexmark.com
Page 8
Lexmark Z65
Lexmark Z65n
Printer overview
8Printer overview
2 Change the settings as needed.
Basic printing
Printing ideas
Maintenance
Troubleshooting
Notices
Index
Using this
Guide...
From the
pop-up
menu in the
upper left,
choose:
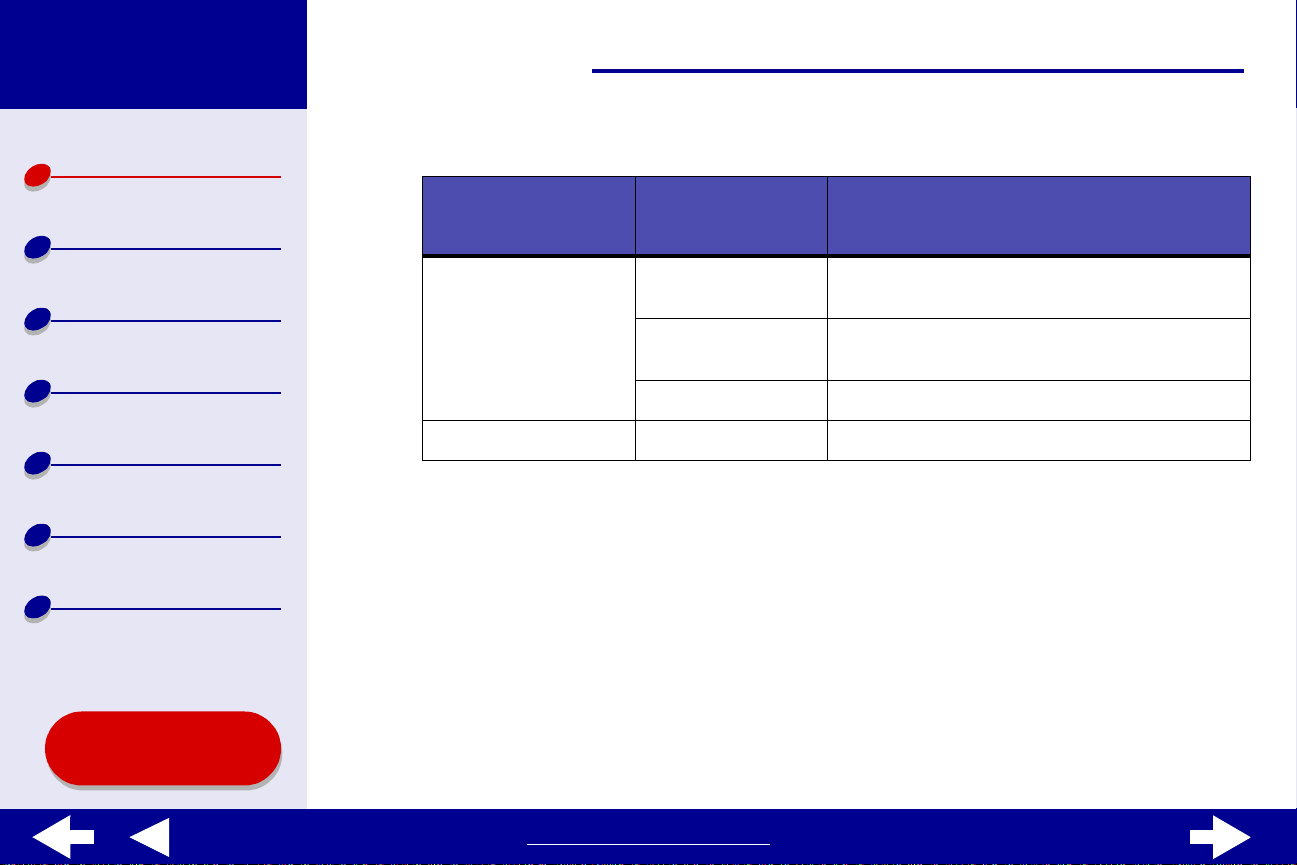
General Copies Specify the number of copies to print (from 1 to 999).
Select: When you want to:
Paper
Source
Collated Sort multiple copy jobs.
Pages Print all of the pages in a document or print a range of pages.
Wait for
pages to
dry
Revert to
Defaults
Status Area See basic status information from the Page Setup and Print dialog
Choose a paper source: Tray 1 (Front), Tray 2 (Rear), or Printer
Setting which lets you choose a tray by pressing either paper tray
button on the printer.
Add more time between pages as they exit the printer. Select this
option when you want to keep documents from smearing.
Change your settings back to the original factory settings.
boxes.
www.lexmark.com
Page 9
Lexmark Z65
Lexmark Z65n
9Printer overview
Printer overview
Basic printing
Printing ideas
Maintenance
Troubleshooting
Notices
Index
From the
pop-up
menu in the
upper left,
choose:
Paper Type/
Quality
Select: When you want to:
Print Quality Select Quick Print, Normal, Better, or Best.
Normal print quality is recommended for most documents. Higher
print quality settings result in better quality documents, but take
longer to print.
Paper Type
Tray 1
(Front)
Paper Type
Tray 2
(Rear)
Specify the type of paper loaded into paper tray 1. Automatic
Sensing is the default setting. At this setting, your printer
automatically detects some paper types. For more information,
see Using the paper type sensor.
Specify the type of paper loaded into paper tray 2. Plain is the
default setting.
Using this
Guide...
www.lexmark.com
Page 10

Lexmark Z65
Lexmark Z65n
10Printer overview
Printer overview
Basic printing
Printing ideas
Maintenance
Troubleshooting
Notices
Index
From the
pop-up
menu in the
upper left,
choose:
Layout Booklet Print a booklet.
Color ColorSync
Select: When you want to:
Poster Print a poster.
Pages/
Sheet
Print Last
Page First
Print on
Both Sides
Color
Matching
Built-In
Color
Matching
Print multiple pages on a single sheet of paper.
Print the pages in reverse order so the first page of your document
is on top of the stack in the paper exit tray.
Print your document on both sides of the paper.
Select a printer profile to match the color on the screen to the
color in the document.
Let the printer software match the color on the screen to the color
in the document.
Using this
Guide...
www.lexmark.com
Page 11
Lexmark Z65
Lexmark Z65n
11Printer overview
Printer overview
Basic printing
Printing ideas
Maintenance
Troubleshooting
Notices
Index
Using this
Guide...
From the
pop-up
menu in the
upper left,
choose:
Background
Printing
Select: When you want to:
Print in:
Foreground
Print in:
Background
Print Time • Select an exact date and time for the document to print.
Print when you have limited system resources.
Note: You cannot use the computer to perform other tasks
while printing in the foreground.
Print most documents. Background printing is recommended for
all jobs unless a problem occurs.
Note: You can use the computer to perform other tasks while
printing in the background.
• Mark a print job Urgent.
• Put a print job on hold.
3 If you want more information about the settings in the Print dialog box, click Help to
view the printer software Help. When you are fi nished, click Done.
4 To save your settings for future print jobs, click Save Settings.
5 Click Print to apply your settings and print your document.
www.lexmark.com
Page 12

Lexmark Z65
Lexmark Z65n
12Printer overview
Printer overview
Basic printing
Printing ideas
Maintenance
Troubleshooting
Notices
Index
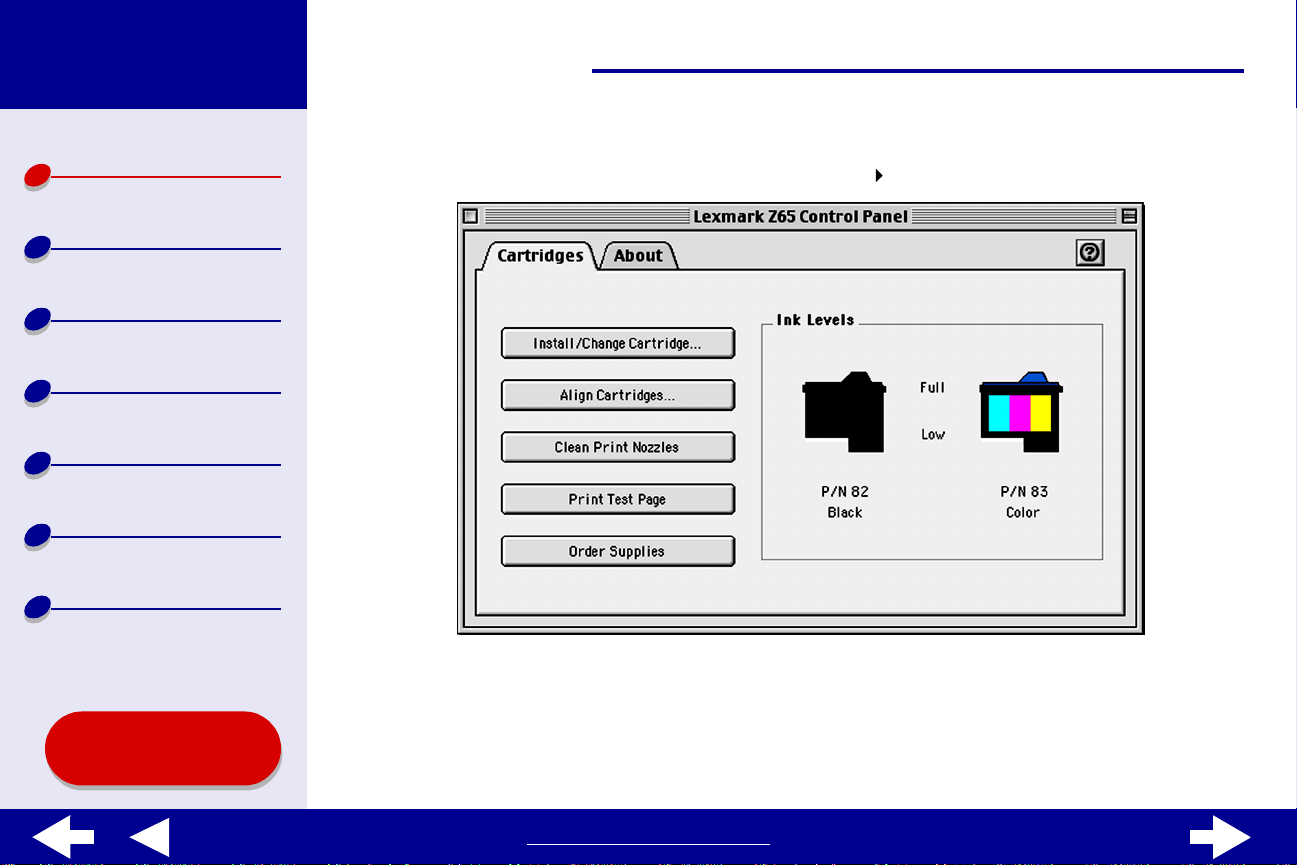
Control Panel
Use the Control Panel to monitor your printer and printer supplies. You can:
• Install cartridges • Print a test page
• Align ca rtridges • Obtain information on ordering supplies
• Clean print nozzles • Obtain software version information
• Select a printer • Configure a network printer
• Calibrate the paper type sensor
Using this
Guide...
www.lexmark.com
Page 13
Lexmark Z65
Lexmark Z65n
13Printer overview
Printer overview
Basic printing
Printing ideas
Maintenance
Troubleshooting
Notices
Index
Using the Control Panel
1 From the Apple menu, choose Control Panels Lexmark Z65 Control Panel.
Using this
Guide...
www.lexmark.com
Page 14
Lexmark Z65
Lexmark Z65n
Printer overview
Basic printing
Printing ideas
Maintenance
Troubleshooting
Notices
Index
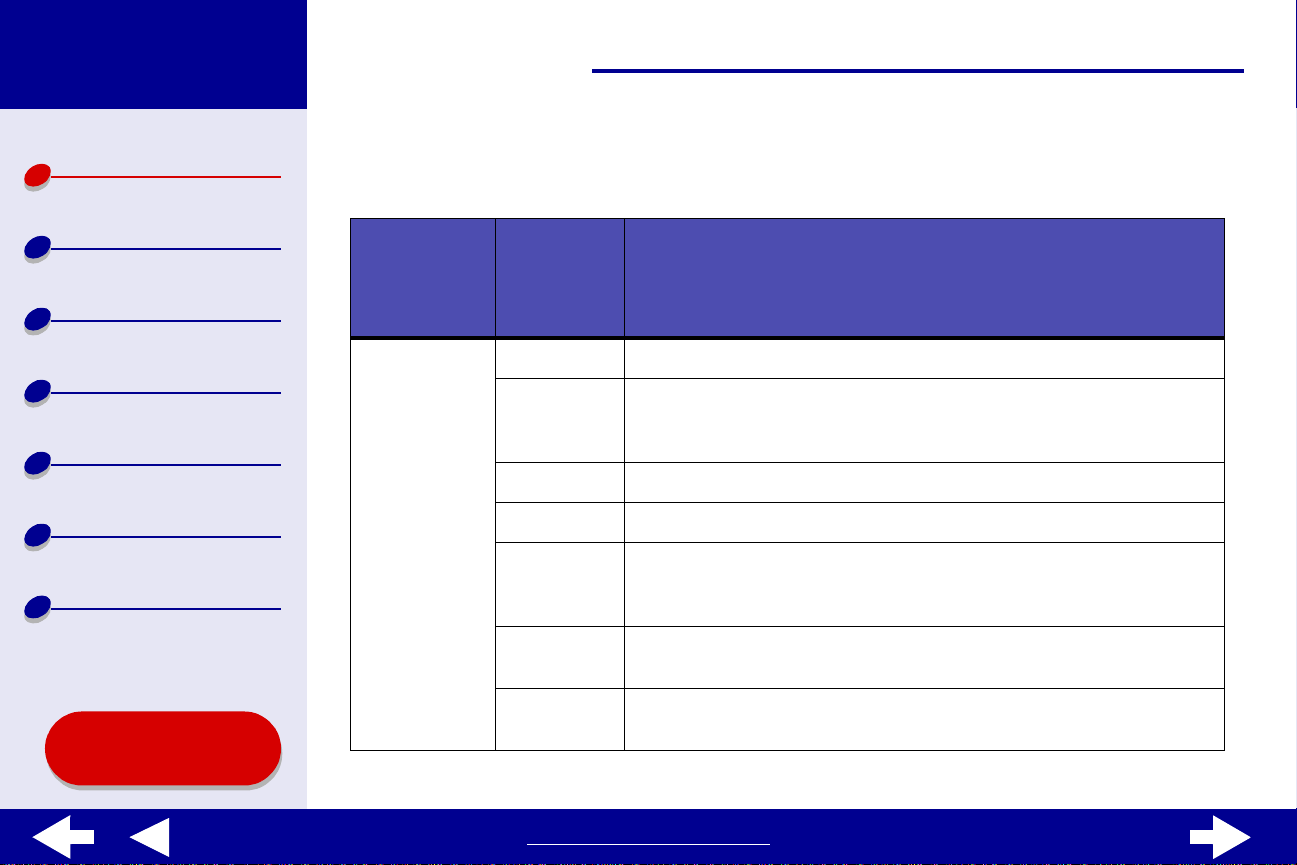
Click the: Select: When you want to:
Cartridges tab Install/Change
Cartridge
Align Cartridges Align the cartridges. For more information, see
Clean Print
Nozzles
Print Test Page Print a test page to verify your printer is functioning
Order Supplies Order supplies, such as print cartridges, from the
About tab Obtain printer software version information.
Specify cartridge settings in the printer software
when installing or changing a cartridge. For more
information, see Replacing the print cartridge.
Aligning the print cartridges.
Improve print quality by cleaning clogged print
nozzles. For more information, see Cleaning the
print cartridge nozzles.
properly.
Lexmark Web site. For more information, see
Ordering supplies.
14Printer overview
Using this
Guide...
www.lexmark.com
Page 15
Lexmark Z65
Lexmark Z65n
15Printer overview
Printer overview
Basic printing
Printing ideas
Maintenance
Troubleshooting
Notices
Index
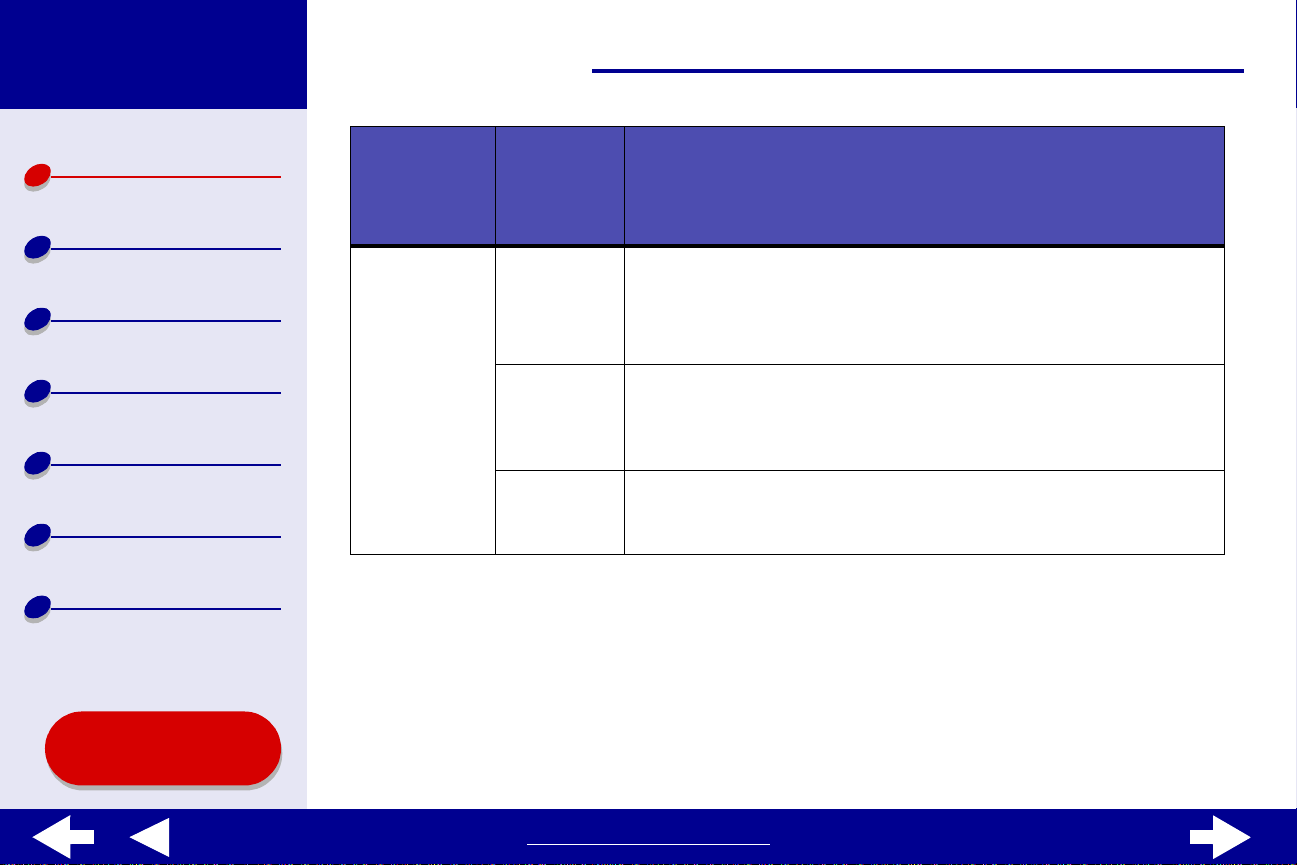
Click the: Select: When you want to:
Advanced menu Select Printer • Select a printer and make it the default printer.
• Find the IP address for the selected printer.
• Add a printer located on a remote subnet. You
can add a single printer or search the subnet for
all available printers.
• View a list of all USB, USB print sharing, and
network printers.
Network Printer
Configuration
• Configure an unconfigured network printer.
• View a list of network printers.
2 To learn more about what you can do with your printer, click the ? to view the printer
software Help. When you are finishe d, click Done.
3 Click the Close box in the upper left corner to close the Control Panel.
Using this
Guide...
www.lexmark.com
Page 16
Lexmark Z65
Lexmark Z65n
16Printer overview
Printer overview
Basic printing
Printing ideas
Maintenance
Troubleshooting
Notices
Index
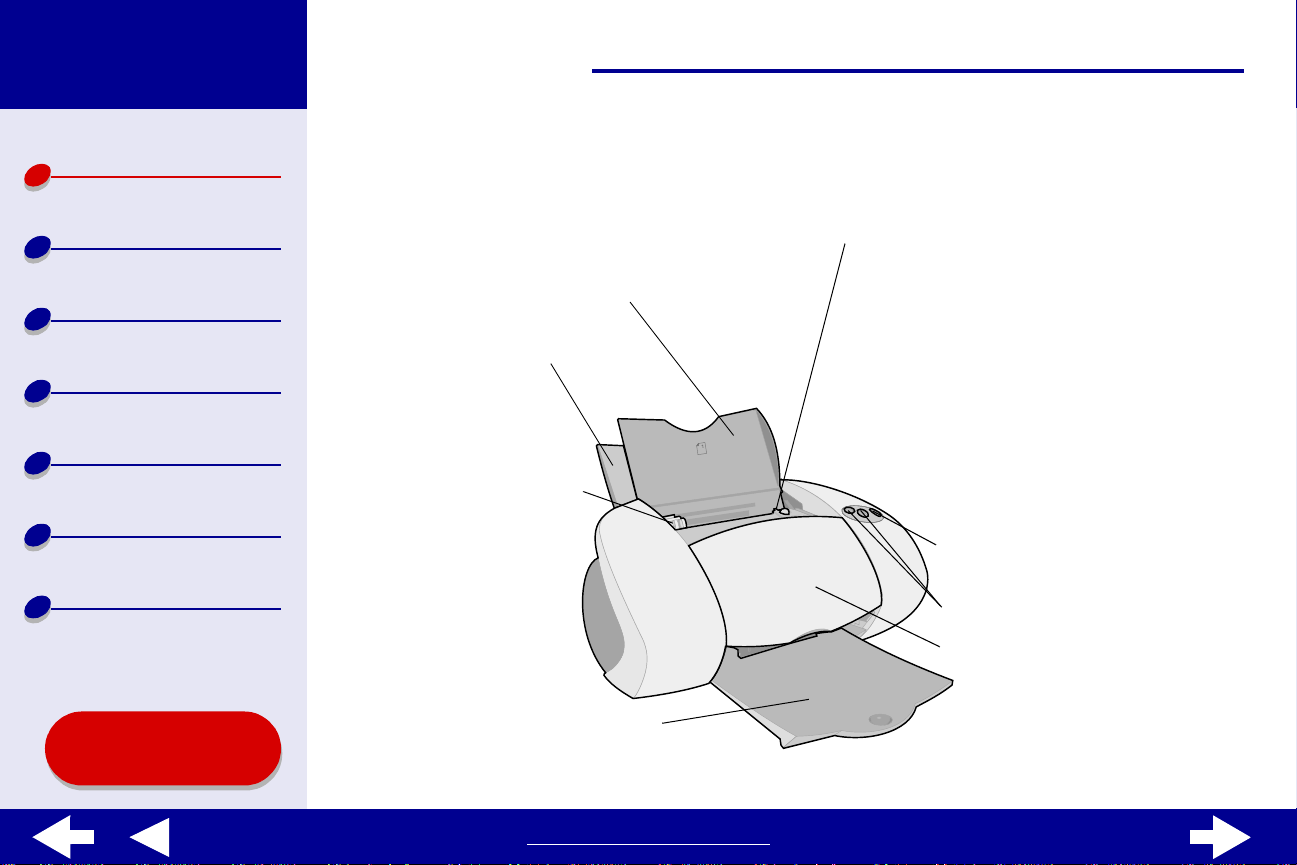
Understanding the printer parts
The table beginning on page 17 describes each part.
Paper release lever
Paper tray 1 (front)
Paper tray 2 (rear)
Paper guide
Power b utton
Paper tray bu ttons
Front cover
Using this
Guide...
Paper exit tray
www.lexmark.com
Page 17
Lexmark Z65
Lexmark Z65n
Printer overview
17Printer overview
Lexmark Z65
Basic printing
Printing ideas
Maintenance
Troubleshooting
Notices
Index
Using this
Guide...
Lexmark Z65n
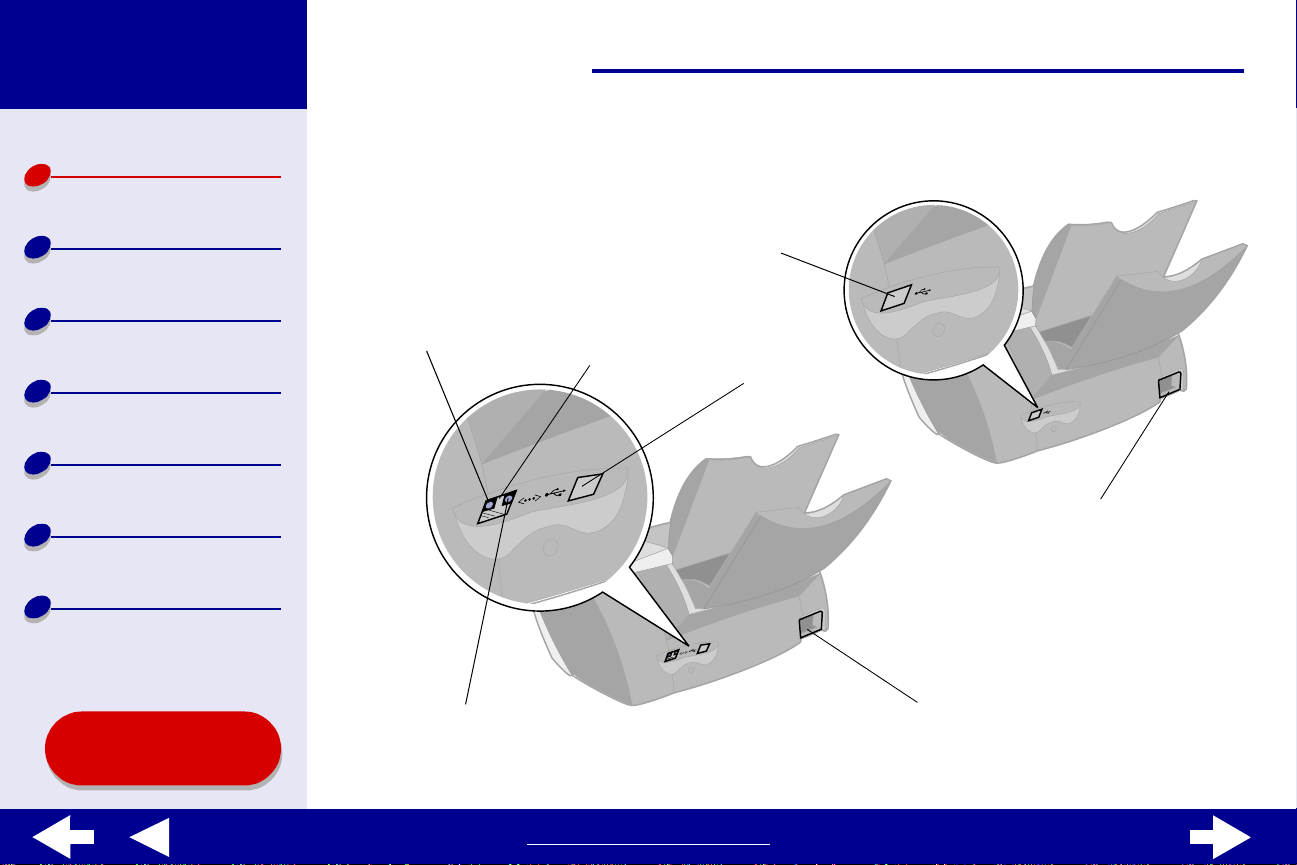
Network connection
speed light
Network link
light
Ethernet cable
connector
USB cable
connector
USB cable
connector
Powe r suppl y
connector
Power supply connector
www.lexmark.com
Page 18
Lexmark Z65
Lexmark Z65n
18Printer overview
Printer overview
Basic printing
Printing ideas
Maintenance
Troubleshooting
Notices
Index
Using this
Guide...
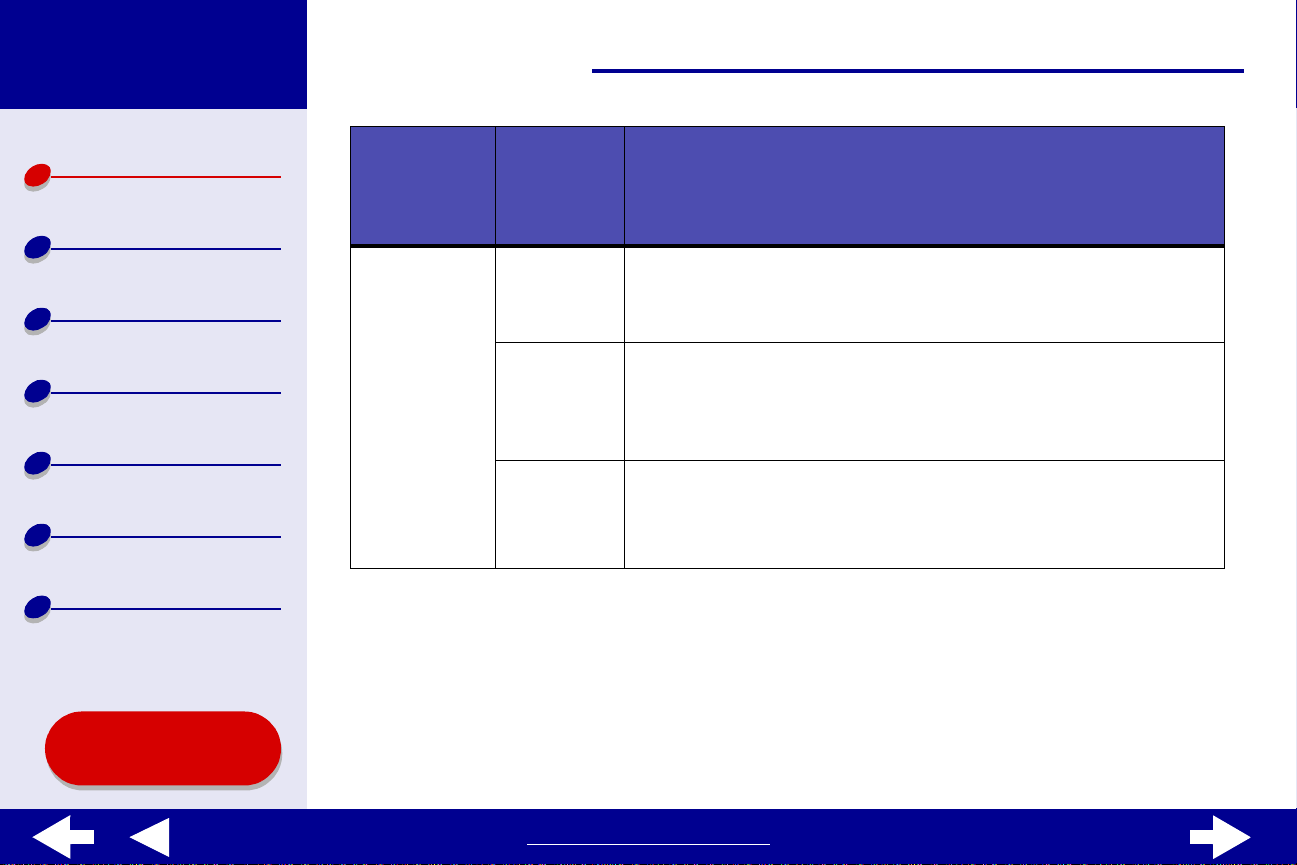
Use this: When you want to:
Ethernet cable connector Connect the printer to a network with an RJ-45 (Category 5)
Ethernet cable.
Front cover • Install or change print cartridges.
• Clear a paper jam.
Network connection speed
light
Network link light See if your network is properly connected (the light is on).
Paper exit tray Stack paper after printing.
Paper tray 1 (front) Print on most types and sizes of paper. This tray has a paper type
Paper tray 2 (rear) Print on various paper types. The default setting for this paper
See how quickly your network is transmitting data.
• When it flashes, your network is transmitting data at 100
Mbps.
• When it is on, your network is transmitting data at 10 Mbps.
sensor and should be used as the main paper tray. For more
information, see Using the paper type sensor. Check the
number icon so you can match it with the appropriate paper tray
button.
tray is for plain paper. This tray does not have a paper type
sensor. Check the number icon so you can match it with the
appropriate paper tray button.
www.lexmark.com
Page 19
Lexmark Z65
Lexmark Z65n
19Printer overview
Printer overview
Basic printing
Printing ideas
Maintenance
Troubleshooting
Notices
Index
Use this: When you want to:
Paper tray
buttons
Paper guide Make sure paper feeds correctly into the printer. Each paper tray
Paper release lever Release a sheet of paper before removing it. Each paper tray has
Power button • Turn the printer on or off.
Power supply connector Connect the power supply to the printer.
USB cable connector Connect the printer to the computer with a USB cable.
• Select a paper tray (press the button once). The light
indicates the tray that is selected.
• Eject paper from the printer.
• Check the printer status. For more information, see
Understanding error messages and flashing lights.
has a paper guide.
a paper release lever.
• Check the prin ter statu s.
For more information, see Understanding error messages and
flashing lights.
Using this
Guide...
www.lexmark.com
Page 20

Lexmark Z65
Lexmark Z65n
20Printer overview
Printer overview
Basic printing
Printing ideas
Maintenance
Troubleshooting
Notices
Index
Using the paper type sensor
Your printer has a paper type sensor in paper tray 1. If you load transparencies or plain,
coated, photo , or gl ossy paper into paper tray 1, the printer detects the paper type and
automatically adjusts the P aper Type setting i n the Print dialog box accordingly. T o enab le the
printer to automatically detect the paper type loaded in your printer:
1 From the software application File menu, choose Print.
2 From the pop-up menu i n the upper left corner, choose Paper Type/Quality.
3 From the Tray 1 (Front ) pop-up menu, choose Automatic.
4 To save the setting for future use, click Save Settings.
5 Click Print.
Note: Although the printer can detect the type of paper you are using, it cannot
detect the paper size. Make sure you select the appropriate paper size in
the Page Setup dialog.
Using this
Guide...
www.lexmark.com
Page 21

Lexmark Z65
Lexmark Z65n
16Basic printing
Printer overview
Basic printing
Printing ideas
Maintenance
Troubleshooting
Notices
Index
Basic printing is as easy as:
Step 1: Load the paper
Step 2: Customize the printer settings
Step 3: Print your document
Note: For help printing on specialty paper (such as photo paper, banner paper,
transparencies, or iron-on transfers), see Printing ide as.
Using this
Guide...
www.lexmark.com
Page 22

Lexmark Z65
Lexmark Z65n
17Basic printing
Printer overview
Basic printing
Printing ideas
Maintenance
Troubleshooting
Notices
Index
Using this
Guide...
Step 1: Load the paper
Your printer has two paper trays. The amount of paper you can load into each tray varies
depending on the thickness and weight of your paper.
1 Make sure the paper tray you want to use is open.
For this paper tray: You can load up to:
Tray 1 • 25 sheets of glossy or photo paper
• 100 sheets of premium (coated) paper
• 25 iron-on transfers
• 100 sheets of plain paper
• 10 greeting cards, index cards, photo cards, or postcards
• 10 envelopes
• 10 transparencies
• 25 sheets of labels
• 100 sheets of custom size paper
Note: This tray has a paper type sensor and should be used as the
main paper tray. For more information, see Using the paper
type sensor.
www.lexmark.com
Page 23

Lexmark Z65
Lexmark Z65n
18Basic printing
Printer overview
Basic printing
Printing ideas
Maintenance
Troubleshooting
Notices
Index
For this paper tray: You can load up to:
Tray 2 • 150 sheets of plain, A4 or letter size, paper
• 25 sheets of glossy or photo paper
• 150 sheets of premium (coated) paper
• 25 iron-on transfers
• 10 transparencies
• 25 sheets of labels
Note: Paper tray 2 does not have a paper type sensor. You may
need to select a paper type in the software. For help, see
Customize the printer settings.
2 From the software application File menu, choose Print.
3 From the pop-up menu i n the upper left corner, choose Paper Type/Quality.
4 Choose a paper source: Tray 1, Tray 2, or Printer Setting.
Note: If you choose Printer Setting, you must press the paper tray button on the
printer for the paper tray you want to print from.
Using this
Guide...
www.lexmark.com
Page 24
Lexmark Z65
Lexmark Z65n
Printer overview
19Basic printing
5 Place the paper against the right edge of the
paper tray with the print side facing you.
Basic printing
Printing ideas
Maintenance
Troubleshooting
Notices
Index
Using this
Guide...
Note: A4 size paper should extend beyond
the top of the paper tray. Letter size
paper should extend be yond t he top of
paper tray 1 and align with the top of
paper tray 2. Do not force the paper
too far into the printer.
6 Squeeze and slide the paper guide to the left edge of the paper.
For information about loading specialty paper, see Printing ideas.
www.lexmark.com
Page 25

Lexmark Z65
Lexmark Z65n
20Basic printing
Printer overview
Basic printing
Printing ideas
Maintenance
Troubleshooting
Notices
Index
Step 2: Customize the printer settings
If you are using plain A4 or letter size paper and you want normal print quality, you only need
to adjust the paper size printer setting.
If you are using specialty paper, such as photo paper, card stock, envelopes, or banner
paper, see Printing ideas to customize your printer settings.
For more information about the different printer settings, see Understanding the printer
software.
Using this
Guide...
www.lexmark.com
Page 26

Lexmark Z65
Lexmark Z65n
21Basic printing
Printer overview
Basic printing
Printing ideas
Maintenance
Troubleshooting
Notices
Index
Step 3: Print your document
After you load the paper and customize the printer settings (if necessary), you are ready to
print:
1 From the software application File menu, choose Print.
2 Click Print.
Note: The paper exit tray holds 150 sheets of paper. If you want to print more
than 150 sheets, make sure you remove the fi rst 150 sheets before you
continue printing.
Using this
Guide...
www.lexmark.com
Page 27

Lexmark Z65
Lexmark Z65n
Printer overview
20Printing ideas
Basic printing
Printing ideas
Maintenance
Troubleshooting
Notices
Index
Using this
Guide...
• Printing photos
• Printing on p re mium
(coated) paper
• Printing on both sides of a
sheet of paper
• Printing cards
• Printing envelopes
• Printing color images in
black and white
• Printing a booklet
• Printing labels
• Printing on custom size
paper
• Printing handouts
• Printing iron-on transfers
• Printing transparencies
• Printing your document in
reverse order
• Printing a banner
www.lexmark.com
Page 28
Lexmark Z65
Lexmark Z65n
21Printing ideas
Printer overview
Basic printing
Printing ideas
Maintenance
Troubleshooting
Notices
Index
Printing photos
You can load up to 25 sheets of coat ed, photo , or gl ossy paper , depending on the thic kness of
the paper. You may want to print your photos on plain paper before loading photo paper and
changing your settings . Th is e nsure s tha t y ou do not waste photo paper perfecting the image
you would lik e to print. To print on photo cards, see Printing cards.
Step 1: Load the photo paper
• If your photo paper came with instructions, read
them carefully.
• Make sure your paper is not used or damaged.
• Make sure the glossy or coated side is facing you.
• Load the photo paper against the right edge of
paper tray 1.
Note: Do not push the paper too far into the printer.
• Squeeze and slide the paper guide to the left edge of the paper.
Using this
Guide...
www.lexmark.com
Page 29

Lexmark Z65
Lexmark Z65n
22Printing ideas
Printer overview
Basic printing
Printing ideas
Maintenance
Troubleshooting
Notices
Index
Step 2: Customize the print settings
For help, see Understanding the printer software.
1 Choose a paper size and orientation:
a From the software application File menu, choose Page Setup.
b From the Paper Size pop-up menu, choose the paper size for your photo. To
choose a custom paper size, see Printing on custom size paper.
c Choose Portrait or Landscape orientation.
d Click OK.
2 Choose a paper tray, paper type, print quality, and color setting.
a From the software application File menu, choose Print.
b From the pop-up menu in the upper left, choose Paper Type/Quality.
c If Automatic is sel e cted in the Paper Type pop-up, continue with the next step to
print your photo. If Automatic is not selected, select Glossy/Photo as the paper
type.
d Choose a paper source: Tray 1 or Printer Setting.
Using this
Guide...
www.lexmark.com
Page 30

Lexmark Z65
Lexmark Z65n
Printer overview
23Printing ideas
Note: If you choose Printer Setting, you must press the paper tray button on the
printer for the paper tray you want to print from.
Basic printing
Printing ideas
Maintenance
Troubleshooting
Notices
Index
Using this
Guide...
e Select Better or Best for the print quality.
Note: Higher print quality settings result in better quality documents, but may
take longer to print.
f From the pop-up menu in the upper left corner, choose Color.
g Select Bu i lt-In Color Matching.
h From the Halftone pop-up menu, select Airbrush.
Step 3: Print your photos
Click Print.
Note: To prevent s mearing, remov e each phot o as it e xits the printer and let it dry
before stacking. You can also use the Wait for pages to dry function.
www.lexmark.com
Page 31

Lexmark Z65
Lexmark Z65n
24Printing ideas
Printer overview
Basic printing
Printing ideas
Maintenance
Troubleshooting
Notices
Index
Printing on premium (coated) paper
You can load up to 100 pages of premium (coated) paper, depending on the thickness of the
paper.
Step 1: Load the premium (coated) paper
• If your paper came with instructions, read them
carefully.
• Make sure your paper is not used or damaged.
• Make sure the print side is facing you.
• Load the paper vertically against the right side of
paper tray 1.
Note: Do not push the paper too far into the printer.
• Squeeze and slide the paper guide to the left edge of the paper.
Using this
Guide...
www.lexmark.com
Page 32

Lexmark Z65
Lexmark Z65n
25Printing ideas
Printer overview
Basic printing
Printing ideas
Maintenance
Troubleshooting
Notices
Index
Step 2: Customize the print settings
For help, see Understanding the printer software.
1 Choose a paper size and orientation:
a From the software application File menu, choose Page Setup.
b From the Paper Size pop-up menu, choose the paper size for your document. To
choose a custom paper size, see Printing on custom size paper.
c Choose Portrait or Landscape orientation.
d Click OK.
2 Choose a paper tray, paper type, and print quality:
a From the software application File menu, choose Print, and then choose a paper
source: Tray 1 or Printer Setting.
Note: If you choose Printer Setting, you must press the paper tray 1 button on
the printer .
b From the pop-up menu in the upper left corner, choose Paper Type/Quality.
Using this
Guide...
www.lexmark.com
Page 33

Lexmark Z65
Lexmark Z65n
Printer overview
26Printing ideas
c If you have chosen Automatic, continue with the next step. If it is not on, select
Plain from the Tray 1 (Front) pop-up menu.For more infor mation, see Using the
paper type sensor.
Basic printing
Printing ideas
Maintenance
Troubleshooting
Notices
Index
Using this
Guide...
d Select Better or Best for the print quality.
Note: Higher print quality settings result in better quality documents, but may
take longer to print.
Step 3: Print your document
Click Print.
Note: The paper exit tr ay h olds up to 150 shee ts of premium paper. To print more
than 150 pages, remove the first 150 sheets from the paper exit tray, and
then continue printing.
www.lexmark.com
Page 34

Lexmark Z65
Lexmark Z65n
27Printing ideas
Printer overview
Basic printing
Printing ideas
Maintenance
Troubleshooting
Notices
Index
Printing on both sides of a sheet of paper
Conserve paper by printing on both sides. You can load up to 100 sheets of paper at a time,
depending on the thickness of the paper. For the best print quality, use thick paper.
Step 1: Load the paper
• Make sure the print side is facing you.
• Load the paper v ertically against the right side of the
paper tray.
Note: Do not push the paper too far into the
printer.
• Squeeze and slide the paper guide to the left edge
of the paper.
Using this
Guide...
www.lexmark.com
Page 35

Lexmark Z65
Lexmark Z65n
28Printing ideas
Printer overview
Basic printing
Printing ideas
Maintenance
Troubleshooting
Notices
Index
Step 2: Customize the print settings
1 From the software application File menu, choose Page Setup.
2 From the Paper Size pop-up menu, choose the paper size for your document.
3 Choose Portrait or Landscape orientation.
4 Click OK.
5 From the software application File menu, choose Print.
6 Choose a paper source: Tray 1, Tray 2, or Printer Setting.
Note: If you choose Printer Setting, you must press the paper tray button on the
printer for the paper tray you want to print from.
7 From the pop-up menu i n the upper left corner, choose Layout.
8 Select Print on Both Sides.
9 Select the graphic for the binding edge (Top Flip or Side Flip) for your document.
If you selec t Top Fli p, the pages of your document tu rn lik e the pages of a l egal p ad. If
you select Side Flip, the pages of your document turn like the pages of a magazine.
Using this
Guide...
10 Continue with the next step to print your document.
www.lexmark.com
Page 36

Lexmark Z65
Lexmark Z65n
29Printing ideas
Printer overview
Basic printing
Printing ideas
Maintenance
Troubleshooting
Notices
Index
Step 3: Print your document
1 Click Print.
The odd-numbered pages print, and then your
printer software prompts you to reload the paper.
2 Remove the stack of paper from the paper exit
tray.
3 Load the stack of paper and the reloading
instruction page, with the printed side facing
away from you and the arrows pointing down,
into the paper tray you used to print the first side.
4 Click Continue.
The even- numbered pages print.
Using this
Guide...
www.lexmark.com
Page 37

Lexmark Z65
Lexmark Z65n
30Printing ideas
Printer overview
Basic printing
Printing ideas
Maintenance
Troubleshooting
Notices
Index
Printing cards
You can load up to 10 greeting c ards, inde x c ards, photo cards, or postcards int o paper tr ay 1,
depending on the thickness of the cards.
Step 1: Load the cards
• If your cards came with instructions , read them carefully.
• Make su re your cards are not used or damaged.
• Make sure the print side is facing you.
• Load the cards vertically against the right side of paper
tray 1.
Note: Do not push the cards too far into the printer.
• Squeeze and slide the paper guide to the left edge of the cards.
Using this
Guide...
www.lexmark.com
Page 38

Lexmark Z65
Lexmark Z65n
31Printing ideas
Printer overview
Basic printing
Printing ideas
Maintenance
Troubleshooting
Notices
Index
Step 2: Customize the print settings
For help, see Understanding the printer software.
1 Choose a paper size and orientation:
a From the software application File menu, choose Page Setup.
b From the Paper Size pop-up menu, choose the card size for your document. To
select a custom size paper, see Printing on custom size paper.
c Choose Portrait or Landscape orientation.
d Click OK.
2 Choose a paper tray, print quality, and paper type:
a From the software application File menu, choose Print.
b Choose a paper source: Tray 1 or Printer Setting.
Note: If you choose Printer Setting, you must press the paper tray 1 button on
the printer .
c From the pop-up menu i n the upper left, choose Paper Type/Quali ty.
Using this
Guide...
d Choose Better or Best for photo and greeting cards. Choose Normal for other
types of cards.
www.lexmark.com
Page 39

Lexmark Z65
Lexmark Z65n
Printer overview
32Printing ideas
Note: Higher print quality settings result in better quality documents, but may
take longer to print.
Basic printing
Printing ideas
Maintenance
Troubleshooting
Notices
Index
Using this
Guide...
e If you have chosen Automatic and you are printing photo cards, continue with the
next step to print your cards.For more information, see Using the paper type
sensor.
If you are printing other types of cards or have not chosen Automatic, select Plain
for the paper type.
Step 3: Print your cards
Click Print.
Note: You can use the Wait for pages to dry function or remove each card as it
exits the printer and let it dry befor e stacking.
www.lexmark.com
Page 40

Lexmark Z65
Lexmark Z65n
33Printing ideas
Printer overview
Basic printing
Printing ideas
Maintenance
Troubleshooting
Notices
Index
Printing envelopes
You can load up to 10 envelopes into paper tray 1, depending on the thickness of the
envelopes.
Step 1: Load the envelopes
Note: Do not use envelopes with holes,
windows, deep embossing, metal
clasps, string ties, or metal folding
bars.
• Make su re your envelopes are not used or
damaged.
• Make sure the print side is facing you.
• Make su re the stamp location is in the upper left corner .
• Load the envelopes vertically against the right side of paper tray 1.
Note: Do not push the envelopes too far into the printer.
Using this
Guide...
• Squeeze and slide the paper guide to the left edge of the envelopes.
www.lexmark.com
Page 41

Lexmark Z65
Lexmark Z65n
34Printing ideas
Printer overview
Basic printing
Printing ideas
Maintenance
Troubleshooting
Notices
Index
Step 2: Customize the print settings
For help, see Understanding the printer software.
1 Choose an envelope size and orientation:
a From the software application File menu, choose Page Setup.
b From the Paper Size pop-up menu, choose the appropriate en velope size.
To select a custom envelope si ze, see Printing on custom size paper.
c Choose Landscape orientation.
Note: Many software appli cations are desi gned to o ve rride the en v elope sett ings
in Page Setup. Make sure Landscape orientation is also selected in your
software application.
d Click OK.
2 Choose a paper type, print quality, and paper tray:
a From the software application File menu, choose Print.
b Choose a paper source: Tray 1 or Printer Setting.
Using this
Guide...
Note: If you choose Printer Setting, you must press the paper tray 1 button on
the printer .
www.lexmark.com
Page 42

Lexmark Z65
Lexmark Z65n
Printer overview
35Printing ideas
c From the pop-up menu i n the upper left corner, choose Paper Type/Quality.
d From the Print Quality area, choose Normal print quality.
Basic printing
Printing ideas
Maintenance
Troubleshooting
Notices
Index
Using this
Guide...
e If Tray 1 (Front) is set to Automatic, continue with the next step to print your
envelopes. For more information, see Using the paper type sensor.
If Tray 1 (Front) is not set to Automatic, select Plain for the paper type.
Step 3: Print your envelopes
Click Print.
Note: The paper exit tray holds up to 10 envelopes. To print more than 10
envelopes, remove the first 10 envelopes from the paper exit tray before
the others print.
www.lexmark.com
Page 43

Lexmark Z65
Lexmark Z65n
36Printing ideas
Printer overview
Basic printing
Printing ideas
Maintenance
Troubleshooting
Notices
Index
Printing color images in black and white
You can print color images in b lac k ink. Dep ending on the t hickness of the paper or cards, you
can load up to 10 photo cards, 25 sheets of photo paper, or 100 sheets of plain paper into
paper tray 1. You can load up to 150 sheets of plain paper at a time, depending on the
thickness, in paper tray 2.
Step 1: Load the paper
• Make sure your paper is not used or damaged.
• Make sure the print side is facing you.
• Load the paper vertically against the right side of
the paper tra y, and then press the paper tray button
once.
Note: Do not push the paper too far into the
printer.
• Squeeze and slide the paper guide to the left edge of the paper.
Using this
Guide...
www.lexmark.com
Page 44

Lexmark Z65
Lexmark Z65n
37Printing ideas
Printer overview
Basic printing
Printing ideas
Maintenance
Troubleshooting
Notices
Index
Step 2: Customize the print settings
For help, see Understanding the printer software.
1 From the software application File menu, choose Print.
2 From the pop-up menu i n the upper left, choose Color.
3 Select Bui lt- In C o lo r M a tc h ing.
4 From the Document Color pop-up men u , choose Black Only.
5 Continue customizing your document follo wing the steps in Basic printing or
Printing ide a s or continue with the next step.
Step 3: Print your document
Click Print.
Note: The paper exit tray holds up to 150 sheets of paper or 10 photo cards. To
print more than 150 sheets of paper , remove the first 150 sheets from the
paper exit tray before the others print. To print more than 10 photo cards,
remove the fir st 10 photo cards from the paper exit tr ay before the others
print.
Using this
Guide...
www.lexmark.com
Page 45

Lexmark Z65
Lexmark Z65n
38Printing ideas
Printer overview
Basic printing
Printing ideas
Maintenance
Troubleshooting
Notices
Index
Printing a booklet
You can print and bundle your document to make a booklet. You can load up to 100 she ets of
plain paper into paper tray 1 or 150 sheets of plain paper in paper tray 2, depending on the
thickness of the paper.
Step 1: Load the paper
• Make sure the print side is facing you.
• Load the paper vertically against the right side of
paper tray 1 or 2.
Note: Do not push the paper too far into the
printer.
• Squeeze and slide the paper guide to the left edge
of the paper.
Using this
Guide...
www.lexmark.com
Page 46

Lexmark Z65
Lexmark Z65n
39Printing ideas
Printer overview
Basic printing
Printing ideas
Maintenance
Troubleshooting
Notices
Index
Using this
Guide...
Step 2: Customize the print settings
For help, see Understanding the printer software.
1 Choose a paper size and orientation:
a From the software application File menu, choose Page Setup.
b From the Paper Size area, choose A4, A5, U.S. Letter, or Statement.
c Choose Portrait or Landscape orientation.
d Click OK.
2 Choose a paper tray, print quality, and paper type:
a From the software application File menu, choose Print.
b Choose a paper source: Tray 1, Tray 2, or Printer Setting.
Note: If you choose Printer Setting, you must press the paper tray button for the
paper tray you want to print from.
c From the pop-up menu i n the upper left corner, choose Paper Type/Quality.
d Select the print quality for your document following the steps in Basic printing or
Printing ide a s .
www.lexmark.com
Page 47

Lexmark Z65
Lexmark Z65n
Printer overview
40Printing ideas
e If you have chosen Automati c from Tray 1 (Front), continue with the next step .
Otherwise, select Plain from the Tray 1 (Front) or Tray 2 (Rear) pop-up menu. For
more information, see Using the paper type sensor.
Basic printing
Printing ideas
Maintenance
Troubleshooting
Notices
Index
Using this
Guide...
f From the pop-up menu in the upper left, select Layout.
g Select Booklet.
h From the Booklet pop-up menu, select the appropriate number of
sheets to bundle (2, 4, 8, 16, or 32).
Note: A bundle is the group of pages that are folded in half and
stacked before binding. When printing with thick paper,
select a smaller number of sheets to bundle for easier
binding.
www.lexmark.com
Page 48

Lexmark Z65
Lexmark Z65n
41Printing ideas
Printer overview
Basic printing
Printing ideas
Maintenance
Troubleshooting
Notices
Index
Step 3: Print your booklet
1 Click Print.
After the first half of your booklet prints, your
printer software prompts you to reload the paper.
2 Remove the stack from the paper exit tray.
3 Load the stack of paper and the reloading
instruction page, with the printed side facing
away from you and the arrows pointing down,
into the paper tray you printed the first side from.
4 Click Continue.
Using this
Guide...
www.lexmark.com
Page 49

Lexmark Z65
Lexmark Z65n
42Printing ideas
Printer overview
Basic printing
Printing ideas
Maintenance
Troubleshooting
Notices
Index
Step 4: Build your booklet
After your document prints , stack and bind your bookle t.
1 Remove the first bundle from the paper exi t tray, fold it in half, and then set it aside.
2 Remove the next bundle, fold it in half, and then stack it on top of the first bundle.
3 Continue to stack the bundles on top of each other until your bookl et is complete.
4 Bind the bundles to complete your booklet.
Five bundles
stacked to form
a booklet.
Using this
Guide...
www.lexmark.com
Page 50

Lexmark Z65
Lexmark Z65n
43Printing ideas
Printer overview
Basic printing
Printing ideas
Maintenance
Troubleshooting
Notices
Index
Printing labels
You can load up to 25 sheets of labels, depending on the thickness of the sheets.
Step 1: Load the labels
• Use only labels designed for inkjet printers.
• If your labels came with instructions, read them
carefully.
• Make sure your labels are not used or damaged.
• Do not print within 1 mm (0.04 in.) of the edge of a label.
• Make sure there are no missing or curled labels.
• Make sure the print side is facing you.
• Load the labels vertically against the right side of paper tray 1.
Note: Do not push the label sheets too far into the printer.
• Squeeze and slide the paper guide to the left edge of the sheet of labels.
Using this
Guide...
www.lexmark.com
Page 51

Lexmark Z65
Lexmark Z65n
44Printing ideas
Printer overview
Basic printing
Printing ideas
Maintenance
Troubleshooting
Notices
Index
Step 2: Customize the print settings
For help, see Understanding the printer software.
1 Choose a paper size and orientation:
a From the software application File menu, choose Page Setup.
b From the Paper Size area, choose A4 or U.S. Letter.
c Choose Portrait or Landscape orientation.
d Click OK.
2 Choose a paper tray, print quality, and paper type:
a From the software application File menu, choose Print.
b Choose a paper source: Tray 1 or Printer Setting.
Note: If you choose Printer Setting, you must press the paper tray 1 button on
the printer .
c From the pop-up menu i n the upper left, choose Paper Type/Quali ty.
d From the Print Quality area, select Normal.
Using this
Guide...
www.lexmark.com
Page 52

Lexmark Z65
Lexmark Z65n
Printer overview
45Printing ideas
Note: Higher print quality settings result in better quality documents, but may
take longer to print.
Basic printing
Printing ideas
Maintenance
Troubleshooting
Notices
Index
Using this
Guide...
e If you have chosen Automati c from Tray 1 (Front), continue with the next step to
print your labels.For more information, see Using the paper type sensor.
If you have not chosen Automatic, select Plain for the paper type.
Step 3: Print your labels
Click Print.
Note: The paper exit tray holds up to 10 sheets of labels. To print more than 10
sheets, remove the first 10 sheets from the paper exit tray before the
others print.
www.lexmark.com
Page 53

Lexmark Z65
Lexmark Z65n
46Printing ideas
Printer overview
Basic printing
Printing ideas
Maintenance
Troubleshooting
Notices
Index
Printing on custom size paper
You can load up to 100 sheets of custom size paper in tray 1 and 150 sheets in tray 2.
Step 1: Load the custom size paper
• Make sure your paper is not used or damaged.
• Mak e sure the paper size fits within these
dimensions:
– Width: 76 to 216 mm (3 to 8.5 in.)
– Height: 127 to 355.6 mm (5 to 14 in.)
• Make sure the print side is facing you.
• Load the paper vertically against the right side of paper tray 1.
Note: Do not push the paper too far into the printer.
• Squeeze and slide the paper guide to the left edge of the paper.
Using this
Guide...
www.lexmark.com
Page 54

Lexmark Z65
Lexmark Z65n
47Printing ideas
Printer overview
Basic printing
Printing ideas
Maintenance
Troubleshooting
Notices
Index
Step 2: Customize the print settings
For help, see Understanding the printer software.
1 Create a custom paper size:
a From the software application File menu, choose Page Setup.
b From the Paper Size pop-up menu, choose Edit Custom Paper Sizes, and then
click New.
c From the Units pop-up menu, choose Millimeters (mm) or Inches (in.), and then
type the dimensions for your custom paper size.
d From the Kind pop-up menu, choose U.S. Letter, En velope, or Card, and then type
a unique name for your custom paper size in the Paper Size Name box.
e Click Save, and then click Done.
f Click OK on the Page Setup dialog box.
2 To choose a print quality, paper type, or orientation other than the default settings,
follow the steps in Basic printi ng or Printing ideas.
Using this
Guide...
www.lexmark.com
Page 55

Lexmark Z65
Lexmark Z65n
48Printing ideas
Printer overview
Basic printing
Printing ideas
Maintenance
Troubleshooting
Notices
Index
Step 3: Print your document
1 From the software application File menu, choose Print.
2 Click Print.
Using this
Guide...
www.lexmark.com
Page 56

Lexmark Z65
Lexmark Z65n
49Printing ideas
Printer overview
Basic printing
Printing ideas
Maintenance
Troubleshooting
Notices
Index
Printing handouts
You can conserve paper by printing handouts. Handouts are multiple page images on a
single sheet of paper. You can load up to 100 sheets of paper in tray 1 and 150 sheets of
paper in tray 2.
Step 1: Load the paper
• If your paper came with instructions, read them
carefully.
• Make sure your paper is not used or damaged.
• Make sure the print side is facing you.
• Load the paper vertically against the right side of
the paper tray.
Note: Do not push the paper too far into the printer.
• Squeeze and slide the paper guide to the left edge of the paper.
Using this
Guide...
www.lexmark.com
Page 57

Lexmark Z65
Lexmark Z65n
50Printing ideas
Printer overview
Basic printing
Printing ideas
Maintenance
Troubleshooting
Notices
Index
Step 2: Customize the print settings
For help, see Understanding the printer software.
You can print your handouts on one side or on both sides of the paper.
1 Choose a paper size and orientation:
a From the software application File menu, choose Page Setup.
b From the Paper Size pop-up menu, choose a paper size.
c Choose Portrait or Landscape orientation, and then cli ck OK.
2 Choose a print quality and paper type:
a From the software application File menu, choose Print.
b Choose a paper source: Tray 1, Tray 2, or Printer Setting.
Note: If you choose Printer Setting, you must press the paper tray button on the
printer for the paper tray you want to print from.
c From the pop-up menu i n the upper left, choose Paper Type/Quali ty.
d Select a paper type for your document.
Using this
Guide...
e Select a print quality for your document.
www.lexmark.com
Page 58

Lexmark Z65
Lexmark Z65n
Printer overview
51Printing ideas
f From the pop-up menu in the upper left, select Layout.
g Choose Pages/Sheet.
Basic printing
Printing ideas
Maintenance
Troubleshooting
Notices
Index
Using this
Guide...
h From the Pages per Sheet pop-up menu, select the number of pages you want to
print on one sheet.
The display ed graphic shows you how the printed page will look.
i Select Print Borders to print a border around each page image.
If you are printing your handouts on one side of the paper , con ti nue wi th the next step to print
your handouts.
To print your handout on both sides of the paper:
1 Select Print on Both Sides.
2 Select a graphic for the binding edge (Top or Side Flip).
If you select Top Fli p, the pages of your handouts turn lik e the pages of a legal pad. If
you select Side Flip, the pages of your handouts turn like the pages of a magazine.
www.lexmark.com
Page 59

Lexmark Z65
Lexmark Z65n
52Printing ideas
Printer overview
Basic printing
Printing ideas
Maintenance
Troubleshooting
Notices
Index
Step 3: Print your handouts
1 Click Print.
If you formatted your handouts to print on one
side of each page, you are finished.
If you formatted your handouts to print on both
sides of each page, continue with the next step.
2 After the first half of your handouts print, your
printer software prompts you to reload the paper.
Load the paper and the reloading instruction
page, with the printed side facing away from you
and the arrows pointing do wn, into t he paper tray
you used to print the first side.
3 Click Continue.
Using this
Guide...
www.lexmark.com
Page 60

Lexmark Z65
Lexmark Z65n
53Printing ideas
Printer overview
Basic printing
Printing ideas
Maintenance
Troubleshooting
Notices
Index
Printing iron-on transfers
You can load up to 25 iron-on transfers, depending on the thickness of the iron-on transfers.
You may want t o print y our image on plai n paper before printing it on an iron-on transfer. This
ensures you do not wast e iron-on transfers perfecting the image you would lik e t o print. When
the image prints to your satisfaction, load the iron-on transfers.
Step 1: Load the iron-on transfers
• If your transfers came with instructions, read them
carefully.
• Make sure your transfers are not used or damaged.
• Make sure the print (blank) side is facing you.
• Load the iron-on transfers v ertically against t he
right side of paper tray 1.
Note: Do not push the iron-on transfers too far into the printer.
• Squeeze and slide the paper guide to the left edge of the iron-on transfers.
Using this
Guide...
www.lexmark.com
Page 61

Lexmark Z65
Lexmark Z65n
54Printing ideas
Printer overview
Basic printing
Printing ideas
Maintenance
Troubleshooting
Notices
Index
Using this
Guide...
Step 2: Customize the print settings
For help, see Understanding the printer software.
1 Choose a paper size:
a From the software application File menu, choose Page
Setup.
b From the Paper Size pop-up menu, choose A4 or U .S.
Letter.
c Click OK.
2 Choose a print quality, paper tray, and paper type:
a From the software application File menu, choose Print.
b From the pop-up menu in the upper left, choose Paper Type/Quality.
c From the Paper Type pop-up menu, choose Iron-On Transfer.
d Select Normal for the print quality.
e Choose a paper source: Tray 1 or Printer Setting .
Note: If you choose Printer Sett ing y ou m ust press t he paper t ra y 1 b utton on the
printer.
www.lexmark.com
Page 62

Lexmark Z65
Lexmark Z65n
55Printing ideas
Printer overview
Basic printing
Printing ideas
Maintenance
Troubleshooting
Notices
Index
Step 3: Print your iron-on transfers
Click Print.
Note: To prevent smu dging, remove each iron-on transfer as it exits the printer
and let it dry before stacking. You can also use the Wait for pages to d r y
function.
Using this
Guide...
www.lexmark.com
Page 63

Lexmark Z65
Lexmark Z65n
56Printing ideas
Printer overview
Basic printing
Printing ideas
Maintenance
Troubleshooting
Notices
Index
Printing transparencies
You can load up to 10 transparencies in paper tray 1,
depending on the thickness of the transparencies.
Step 1: Load the transparencies
• Use transparencies designed for inkjet printers.
• If the transparencies have paper backing sheets,
make sure you separat e the paper from the
transparencies before you load them.
• Make sure your transparencies are not used or damaged.
• If your transparencies came with instructions, read them carefully.
• Make sure the rough (print) side of the transparencies is facing you. If the
transparencies hav e a remo vab le st rip, mak e sure each strip f aces a wa y from y ou and
down.
• Load the transpar encies vertically against the right side of paper tray 1.
Note: Do not push the transparencies too far into the printer.
Using this
Guide...
• Squeeze and slide the paper guide to the left edge of the transparencies.
www.lexmark.com
Page 64

Lexmark Z65
Lexmark Z65n
57Printing ideas
Printer overview
Basic printing
Printing ideas
Maintenance
Troubleshooting
Notices
Index
Using this
Guide...
Step 2: Customize the print settings
For help, see Understanding the printer software.
1 Choose a paper size:
a From the software application File menu, choose Page Setup.
b From the Paper Size pop-up menu, choose A4 or U.S. Letter.
c Click OK.
2 Choose a paper type, print quality, and paper tray:
a From the software application File menu, choose Print.
b Choose a paper source: Tray 1 or Printer Setting.
Note: If you choose Printer Setting, you must press the paper tray 1 button on
the printer .
c From the pop-up menu i n the upper left, choose Paper Type/Quali ty.
d Click Normal or Better for the print quality.
Note: Higher print quality settings result in better quality documents, but may
take longer to print.
www.lexmark.com
Page 65

Lexmark Z65
Lexmark Z65n
Printer overview
58Printing ideas
e If you have chosen Automati c from Tray 1 (Front), continue with the next step to
print your transparencies. For more information, see Using the paper type
sensor.
Basic printing
Printing ideas
Maintenance
Troubleshooting
Notices
Index
Using this
Guide...
If Automatic is not chosen, select Transparency for the paper type.
Step 3: Print your transparencies
Click Print.
Note: To prevent sm udgi ng, remo ve each transparency as it exits the printer and
let it dry before stacking. You can also use the Wait for pages to dry
function. Transparencies may require up to 15 minutes to dry.
www.lexmark.com
Page 66

Lexmark Z65
Lexmark Z65n
59Printing ideas
Printer overview
Basic printing
Printing ideas
Maintenance
Troubleshooting
Notices
Index
Using this
Guide...
Printing your document in reverse order
Step 1: Load the paper
• Make sure the print side is facing you.
• Load the paper vertically against the right side of
the paper tra y, and then press the paper tray button
once.
Note: Do not push the paper too far into the
printer.
• Squeeze and slide the paper guide to the left edge of the paper.
Step 2: Customize the print settings
For help, see Understanding the printer software.
1 Choose a paper size and orientation:
a From the software application File menu, choose Page Setup.
b From the Paper Size pop-up menu, choose the paper size for your document.
c Choose Portrait or Landscape .
www.lexmark.com
Page 67

Lexmark Z65
Lexmark Z65n
Printer overview
60Printing ideas
d Click OK.
2 Choose a paper type and print quality:
Basic printing
Printing ideas
Maintenance
Troubleshooting
Notices
Index
Using this
Guide...
a From the software application File menu, choose Print.
b Choose a paper source: Tray 1 or Printer Setting.
Note: If you choose Printer Setting, you must press the paper tray button on the
printer for the paper tray you want to print from.
c From the pop-up menu i n the upper left, choose Paper Type/Quali ty.
d Choose a print quality.
Note: If you have chosen Automati c from Tray 1 (Front), continue with the next
step to print your document.
e For more information, see Using the paper type sensor.
If Automatic is not chosen, select the paper type for your document and then
continue with the next step.
3 From the pop-up menu i n the upper left, choose Layo ut.
4 Select Print Last Page First .
www.lexmark.com
Page 68

Lexmark Z65
Lexmark Z65n
61Printing ideas
Printer overview
Basic printing
Printing ideas
Maintenance
Troubleshooting
Notices
Index
Step 3: Print your document
Click Print.
Note: The paper exit tray holds up to 150 sheets of paper. If you want to print
more than 150 sheets, remo ve the first 150 sheets from the paper exit tray
before the others print.
Using this
Guide...
www.lexmark.com
Page 69

Lexmark Z65
Lexmark Z65n
62Printing ideas
Printer overview
Basic printing
Printing ideas
Maintenance
Troubleshooting
Notices
Index
Printing a banner
Note: Some software applications and some operating systems do not support
banner printing.
Step 1: Load the banner paper
Make sure your banner paper is not used or damaged.
1 Remove any pa per from paper tray 1.
2 Tear off enough pages for the banner including one extra sheet, and then place them
behind the printer.
3 Load the unattached, leading edge of the
first page into the printer wi th the right side
against paper tray 1.
Note: Forcing the paper too far into
the printer may cause a paper
jam. For help, see Clearing
paper misfeeds or jams.
Using this
Guide...
4 Squeeze and slide the paper guide to the
left edge of the banner paper.
www.lexmark.com
Page 70

Lexmark Z65
Lexmark Z65n
63Printing ideas
Printer overview
Basic printing
Printing ideas
Maintenance
Troubleshooting
Notices
Index
Step 2: Customize the print settings
For help, see Understanding the printer software.
1 Choose a paper size and orientation:
a From the software application File menu, choose Page Setup.
b From the Paper Size pop-up menu, choose Banner (A4) or Banner (Letter ).
Note: If you do not choose t he correct paper si ze , the banner paper may cause a
paper jam. For help, see Clearing paper misfeeds or jams.
c Choose Portrait or Landscape orientation.
d Click OK.
2 Choose a paper tray, print quality, and paper type:
a From the software application File menu, choose Print.
b Choose a paper source: Tray 1 or Printer Setting.
Note: If you choose Printer Setting, you must press the paper tray 1 button on
the printer .
Using this
Guide...
c From the pop-up menu i n the upper left corner, choose Paper Type/Quality.
www.lexmark.com
Page 71

Lexmark Z65
Lexmark Z65n
Printer overview
64Printing ideas
d If you have ch osen Automatic from Tray 1 (Front), continue with the ne xt step.If
Automatic is not chosen, select Plai n f or the paper type, and then contin ue with the
next step.
Basic printing
Printing ideas
Maintenance
Troubleshooting
Notices
Index
Using this
Guide...
e Select Normal for the print quality.
www.lexmark.com
Page 72

Lexmark Z65
Lexmark Z65n
65Printing ideas
Printer overview
Basic printing
Printing ideas
Maintenance
Troubleshooting
Notices
Index
Step 3: Print your banner
1 Click Print.
2 When the banner is finished printing:
a Press the paper tray 1 button to feed any extra paper through the printer.
b Tear the banner paper on the perforated line (if there is any extra paper).
Using this
Guide...
www.lexmark.com
Page 73

Lexmark Z65
Lexmark Z65n
50Maintenance
Printer overview
Basic printing
Printing ideas
Maintenance
Troubleshooting
Notices
Index
• Replacing the print cartridge
• Aligning the print cartridges
• Cleaning the print cartridge nozzles
• Wiping the print cartridge nozzles and contacts
• Preserving the print cartridges
• Ordering supplies
Using this
Guide...
www.lexmark.com
Page 74

Lexmark Z65
Lexmark Z65n
51Maintenance
Printer overview
Basic printing
Printing ideas
Maintenance
Troubleshooting
Notices
Index
Replacing the print cartridge
Before you install a new or replacement print cartridge, remove the used one.
Removing the used cartridge
1 Make sure the power light is on.
2 Raise the front cover.
The cartridge carrier moves to the loading position,
unless the printer is busy.
3 Remove the used cartridge. Store it in an airtight
container or dispose of it properly.
Push down on the
a
cartridge carrier tab to lift
the carrier lid.
Remove the cartridges.
b
Using this
Guide...
www.lexmark.com
Page 75

Lexmark Z65
Lexmark Z65n
52Maintenance
Printer overview
Basic printing
Printing ideas
Maintenance
Troubleshooting
Notices
Index
Installing a cartridge
For best results, use Lexmark supplies. Refilling print cartridges can affect print quality and
cause damage to the printer.
1 If you are installing a new cartridge, remove
the stick e r and transparent tape from the
back and bottom of the cartridge.
Warning: Do not touch or remov e t he gold
contact areas on the back and
bottom of the cartridge.
Using this
Guide...
www.lexmark.com
Page 76

Lexmark Z65
Lexmark Z65n
Printer overview
53Maintenance
2 Insert the color print cartridge into the right carrier. Insert the black cartridge into the
left carrie r.
Basic printing
Printing ideas
Maintenance
Troubleshooting
Notices
Index
Using this
Guide...
Insert the cartridge into the
ab
carrier.
3 Close the front cover.
Note: The front cover m ust be closed to start a new print job.
Close the carrier lid
completely.
SNAP
www.lexmark.com
Page 77

Lexmark Z65
Lexmark Z65n
54Maintenance
Printer overview
Basic printing
Printing ideas
Maintenance
Troubleshooting
Notices
Index
Using this
Guide...
Specifying cartridge settings in the printer software
Before you specify the print cartridge settings in the printer software, install the cartridges.
For help, see Installing a cartridge.
1 After you install the cartridge, from the Apple menu, choose Control Panels.
2 Choose the Lexmark Z65 Control Panel.
3 Click the Install/Cha nge Cartridge button.
4 Choose the type of cartridge you installed.
5 Important: For correct ink levels, specify whether the cartridge is a New Cartridge or
an Old Cartridge.
Note: If an old cartridge is incorrectly identified as New Cartridge in the Control
Panel, ink levels in the Control Panel may be incorrect.
6 Click OK.
7 Choose to automatically or manually align the cartridges.
8 Click Continue to print an alignment page.
9 Follow the instructions on the screen to complete cartridge alignment. For help, see
Aligning the print cartridges.
www.lexmark.com
Page 78

Lexmark Z65
Lexmark Z65n
55Maintenance
Printer overview
Basic printing
Printing ideas
Maintenance
Troubleshooting
Notices
Index
Aligning the print cartridges
Typically, you only align print cartridges after installing or replacing a cartridge. However, you
may also need to align cartridges when:
• Characters are improperly formed or are misaligned at the left margin.
• Vertical, straight lines are wavy.
To align the cartridges:
1 Load plain paper. For help, see Load the paper.
2 From the Apple menu, choose Contr ol Panels.
3 Choose the Lexmark Z65 Control Panel.
4 From the Cartridges tab , click Align Cartridges.
The Cartridge Alignment dialog box appears.
Using this
Guide...
www.lexmark.com
Page 79

Lexmark Z65
Lexmark Z65n
Printer overview
Basic printing
56Maintenance
5 Decide how you want to align the cartridges:
– If you choose Automatic Alignment (recommended), the printer determines the
best alignment and automatically aligns the cartridges.
– If you choose Manual Alignment, you must select the best alignment values from
the printed page.
Printing ideas
Maintenance
Troubleshooting
Notices
Index
Using this
Guide...
a If you chose to manually align the cartridges, find the number under the darkest
arrow for each alignment group.
b Use the arrows in the Align Cartridges dialog box to select the number that
matches the darkest arrow on the printed page f or each alig nment group, and then
click OK.
If the alignment page does not print, make sure you have completely removed the
sticker and transparent tape from both cartridges. For help, see Installing a
cartridge.
www.lexmark.com
Page 80

Lexmark Z65
Lexmark Z65n
57Maintenance
Printer overview
Basic printing
Printing ideas
Maintenance
Troubleshooting
Notices
Index
Using this
Guide...
Cleaning the print cartridge nozzles
To improve print qual ity, you may need to clean the print cartridge nozzles. Clean the nozzles
when:
• Characters are not printing completely. • Vertical, straight lines are not smooth.
• White dashes appear in graphics or printed
text.
• Print is smudged or too dark.
To clean the nozzles:
1 Load paper. For help, see Load the paper.
2 From the Apple menu, choose Control Panels Lexmark Z65 Control Panel.
3 On the Cartridges tab, click Clean Print Nozzles.
A nozzle page prints, forcing ink through the nozzles to clean any that are clogged.
4 Print your document again to verify your print quality has improved.
5 To further improve print quality, try Wiping the print cartridge nozzles and
contacts, and then print your document again. If the print quality has not improv ed,
try Cleaning the print cartridge nozzles up to two more times.
• Colors on print jobs are faded or they differ
from the colors on the screen.
www.lexmark.com
Page 81

Lexmark Z65
Lexmark Z65n
58Maintenance
Printer overview
Basic printing
Printing ideas
Maintenance
Troubleshooting
Notices
Index
Wiping the print cartridg e nozzles and contacts
If the print quality does not improve after Cleaning the print cartridge nozzles, there may
be dried ink on the nozzles or contacts.
1 Remove the print cartridge. For help, see Replacing the print cartridge.
2 Dampen a clean, lint-free cloth with water.
Hold the cloth against the nozzles for about
ab
three seconds. Gently blot and wipe in one
direction.
Nozzles Contacts
3 Allow the nozzles and contacts to dry completely.
Use another clean section of cloth. Hold the
damp cloth against the contacts for about
three seconds. Gently blot and wipe in one
direction.
Using this
Guide...
4 Reinstall the print cartridges, and then print your document again.
www.lexmark.com
Page 82

Lexmark Z65
Lexmark Z65n
Printer overview
Basic printing
Printing ideas
Maintenance
Troubleshooting
Notices
Index
59Maintenance
5 If the print quality has not improved, try Cleaning the print cartridge nozzles up to
two more times.
6 If print quality is still unsatisfactory, replace your print cartridges. For help, see
Replacing the print cartridge.
Using this
Guide...
www.lexmark.com
Page 83

Lexmark Z65
Lexmark Z65n
60Maintenance
Printer overview
Basic printing
Printing ideas
Maintenance
Troubleshooting
Notices
Index
Preserving the print car tridges
To ensure the longest life from your print cartridges and optimum performance from your
printer:
• Keep a new cartridge in its packaging until you are ready to inst all it.
• Do not remo ve a cartridge from the printer except to replace i t, clean it, or store it in an
airtight container. The cartridge will not print correctly if left exposed f or an extended
period of time.
Lexmark’s printer warranty does not cover repair of failures or damage caused by a refilled
cartridge. Lexmark does not recommend use of refilled cartridges. Refilling cartridges can
affect print quality and cause damage to the printer. For best results, use Lexmark supplies.
Using this
Guide...
www.lexmark.com
Page 84

Lexmark Z65
Lexmark Z65n
61Maintenance
Printer overview
Basic printing
Printing ideas
Maintenance
Troubleshooting
Notices
Index
Ordering supplies
To order supplies or locate a dealer near you, contact the Lexmark Web site at
www.lexmark.com.
Item: Part number:
Color cartridge 83 or 88
Black cartridge 82
USB cable 12A2405
Using this
Guide...
www.lexmark.com
Page 85

Lexmark Z65
Lexmark Z65n
62Troubleshooting
Printer overview
Basic printing
Printing ideas
Maintenance
Troubleshooting
Notices
Index
• Solving general printing problems
• Solving printer software installation problems
• Solving network printing problems
• Understanding error messages and flashing lights
• Resolving unsuccessful or slow printing
• Recovering when your computer st ops responding
• Clearing paper misfeeds or jams
• Improving print quality
• Solving specialty paper probl ems
• Alignment page does not print
Using this
Guide...
www.lexmark.com
Page 86

Lexmark Z65
Lexmark Z65n
63Troubleshooting
Printer overview
Basic printing
Printing ideas
Maintenance
Troubleshooting
Notices
Index
Solving general printing problems
When you hav e a printing problem, first mak e sure:
• The powe r supply is plugged i nto th e printer and a pro perly grounded elect rical outlet.
• Both the computer and the printer are on. If you are using your printer on a network,
make sure your computer i s connected to the network, your Lexmark adapter is on,
and all indicator lights are on. For more information, refer to the adapter
documentation. If y ou are us ing y our printer o n a n etw ork, mak e sure t he net work li nk
lights are on. For more information, see Network connection speed light.
• No printer lights are b linking. For help, see Understanding error messages and
flashing lights.
• Your printer i s connected wi th a USB cab le or an Ethernet cable, not bot h at the same
time. If you are using an Ethernet cable, make sure it is an RJ-45 (Category 5) cable.
• The printer cable is securely attached on both ends.
– If you are using a USB cable, make sure it is attached to both the printe r and to
your computer or your Lexmark adapter.
– If you are using an Ethernet cab le with a Le xmark Z65n, make sure it is at tached to
both the printer and to your network.
Using this
Guide...
• The printer software is installed correctly:
www.lexmark.com
Page 87

Lexmark Z65
Lexmark Z65n
Printer overview
64Troubleshooting
a From the Apple menu, choose Contr ol Panels.
b If there is not a Control Panel for your printe r, install the printer software.
Basic printing
Printing ideas
Maintenance
Troubleshooting
Notices
Index
Using this
Guide...
• The paper is loaded correctly. For help, see Load the paper.
• The correct paper tray is selected in your software application and on the printer. For
help, see Paper is not feeding from the correct pape r tray.
• You installed the cartridges correctly. For help, see Replacing the print cartridge.
• The printer is set as the default printer.
To set the printer to be the default printer:
a From your desktop, hig hlight the Lexmark Z65 printer icon.
b From the Printing menu, select Set Default Printer.
• The printer is c onnected directly to y our c omputer, a network connection, or through a
Lexmark adapter.
After you check al l of the previous items, try Printing a test page.
www.lexmark.com
Page 88

Lexmark Z65
Lexmark Z65n
65Troubleshooting
Printer overview
Basic printing
Printing ideas
Maintenance
Troubleshooting
Notices
Index
Printing a test page
1 From the Apple menu, choose Contr ol Panels.
2 Choose the Lexmark Z65 Control Panel.
3 From the Cartridges tab, click Print Test Page to make sure the printer is functioning
properly.
– If a test page prints, the printer is working properly. Check the documentation for
the software application you used to create your document.
– If the test page does not print, see Test page does not print.
Using this
Guide...
www.lexmark.com
Page 89

Lexmark Z65
Lexmark Z65n
66Troubleshooting
Printer overview
Basic printing
Printing ideas
Maintenance
Troubleshooting
Notices
Index
Solving printer software installation problems
If the printer software does not install properly, a communications error message appears
when you try to print. You may need to uninstall the printer software, and then reinstall it.
Uninstalling the printer software
1 Insert the printer software CD.
The Lexmark Installer screen appears.
2 Click Uninstall.
3 Follow the instructions on your screen to uninstall the printer software.
4 Restart your computer.
5 Continue with Installing the p rinter softwar e .
Note: If the installer did not automatically launch, double-click the Install icon to
launch the installer.
Using this
Guide...
www.lexmark.com
Page 90

Lexmark Z65
Lexmark Z65n
67Troubleshooting
Printer overview
Basic printing
Printing ideas
Maintenance
Troubleshooting
Notices
Index
Using this
Guide...
Installing the printer software
You can install the printer softwar e using the CD that came with your printer, or you can
download it from the Lexmark Web site at www.lexmark.com.
To connect your printer to a network with a Lexmark adapter, refer to the documentation that
came with your adapter.
Using the CD that came with your printer
1 Close all open software applications.
2 When your desktop appears, insert the printer software CD.
The Lexmark Installer screen appears.
3 Click Install and Agree.
4 Choose the country or region closest to you, and then click Continue.
Note: If the Printer Selection or the New Network Printer Found dialog box
appears, follow the instructions displayed. Click the ? on the screen or
contact your network administ rator for hel p.
5 Click Continue to print an alignment page, used to automatically align the cartridges.
www.lexmark.com
Page 91

Lexmark Z65
Lexmark Z65n
Printer overview
68Troubleshooting
6 Follow the instructions on your screen to complete printer software installation.
An alignment page prints.
Basic printing
Printing ideas
Maintenance
Troubleshooting
Notices
Index
Using this
Guide...
– If the alignment page does not print, make sure you installed the cartridges
correctly. For help, see Installing a cartridge.
– If the paper is jammed, make sure you follow the instructions on the error
message that is displa yed. For help, see Clearing paper misfeeds or jams.
Note: A printer icon is automatically created on your desktop.
Using the World Wide W e b
1 Make sure Stuffit Expander is loaded on your system.
2 From the Le xmark Web site , www.lexmark.com, select the appropriate driv er f or your
operating system.
3 Click the binhex (.hqx) file to download and install.
4 Use Stuffit Expander to expand the file on your desktop.
5 Double-click the Lexmark Z65 Installer.
6 Follow the instructions on your screen to install the printer software.
www.lexmark.com
Page 92

Lexmark Z65
Lexmark Z65n
Printer overview
Basic printing
Printing ideas
Maintenance
Troubleshooting
Notices
Index
69Troubleshooting
Note: If either the Printer Selection or the Ne w Network Printer F ound di alog bo x
appears, follow the instructions displayed. Click the ? on the screen or
contact your network administ rator for hel p.
Using this
Guide...
www.lexmark.com
Page 93

Lexmark Z65
Lexmark Z65n
70Troubleshooting
Printer overview
Basic printing
Printing ideas
Maintenance
Troubleshooting
Notices
Index
Solving network printing problems
For help, first see Solving general printing problems.
If one or more of the follo wing conditions appl ies to your network printer , y ou must enter an IP
address to set up your network printer:
• Your printer is listed as unconf igured in the Network Printer Configuration Dialog or in
the Printer Selection dialog.
• Your printer is on a remote subnet.
If one or more of the conditions abo ve applies t o your net work printer, continue with Entering
an IP address. If none of these conditi ons apply, continue with Troubleshooting your
network printer.
Entering an IP address
To enter an IP address and set up your network printer:
1 Open the Lexmark Z65 Control Panel.
2 From the Advanced menu, choose Network Printer Configuration.
Using this
Guide...
www.lexmark.com
Page 94

Lexmark Z65
Lexmark Z65n
Printer overview
Basic printing
Printing ideas
Maintenance
Troubleshooting
3 From the dialog box:
Click: To:
A printer from the list of
avai lable netw ork printers,
and then click Configure...
Add Remote... Expand the printer list to include printers on a remote subnet.
Enter an available IP address for the selected printer. For help
selecting an IP address, refer to the documentation you used to
set up your network or contact your network administrator.
• If you choose Add Single Printer, enter the IP address for
the printer you want to add.
• If you choose Search Subnet, enter the IP address of the
subnet you want to scan. Any remote printers that are
found will be added to the printer list. These printers are
saved in the list if a printer is added in the Control Panel.
71Troubleshooting
Notices
Index
Using this
The IP address of your network printer is set.
4 Click the Close box in the upper left to close the Control Panel.
Guide...
www.lexmark.com
Page 95

Lexmark Z65
Lexmark Z65n
72Troubleshooting
Printer overview
Basic printing
Printing ideas
Maintenance
Troubleshooting
Notices
Index
Troubleshooting your network printer
Try these solutions when you cannot print to your network printer:
1 Make sure your pr inter is connected to a working network connection.
2 If you own a Le xmark Z65n, make su re the netw ork link light on the printer is on. If y ou
are using a Lexmark adapter, make sure all of the indicator lights are on. For help
locating these lights, refer to the adapter documentation.
3 Make sure the printer software is installed correctly:
a From the Apple menu, choose Contr ol Panels.
b If a Control Panel for your printer does not appear, install the printer software. For
help, see Installi ng the printer software.
4 Try Printing a test page.
If the test page does not print, see Test page does not print.
Using this
Guide...
www.lexmark.com
Page 96

Lexmark Z65
Lexmark Z65n
73Troubleshooting
Printer overview
Basic printing
Printing ideas
Maintenance
Troubleshooting
Notices
Index
Understanding error messages and flashing lights
Use this section to understand printer soft ware err or messages on y our compute r screen and
blinking lights on y our printer. For information about lights on a Lexmark adapter, refer to the
adapter documentation.
Paper Jam message
When you have a paper jam, a paper tray button blinks and an error message appears on
your screen. F or help clearing a paper jam, see Clearing paper misfeeds or jams.
Ink Low message
A print cartridge is running out of ink. To order a new cartridge or locate a dealer near you,
contact the Lexmark Web site at www.lexmark.com. For help installing the cartridge, see
Replacing the print cartridge.
Using this
Guide...
www.lexmark.com
Page 97

Lexmark Z65
Lexmark Z65n
74Troubleshooting
Printer overview
Basic printing
Printing ideas
Maintenance
Troubleshooting
Notices
Index
A paper tray button is blinking
If the printer is out of paper:
1 Load paper. For help, see Load the paper.
2 Press the paper tray button.
Paper Tray 1 button Paper Tray 2 button
If the printer has a paper jam, see Clearing paper
misfeeds or jams.
Power button is blinking
The print cartridge carrier is stalled.
1 Check your computer screen for error messages.
2 Turn the printer off.
3 Wait a few seconds, and then turn the printer back
on. For more help, see Clearing paper misfeeds
or jams.
Using this
Guide...
www.lexmark.com
Page 98

Lexmark Z65
Lexmark Z65n
75Troubleshooting
Printer overview
Basic printing
Printing ideas
Maintenance
Troubleshooting
Notices
Index
Network light is not on (Lexmark Z65n only)
When your network printer is working properly, the network lights on the back of the printer
are on. For more information, see Network connection speed light. If they are not:
• Check your network cable connections.
• Make sure your network is working properly. For help, contact your network
administrator.
• If there is stil l a problem, disconnect your printer from the network and attach it
directly to your computer using a USB cable. Try Printing a test page.
Using this
Guide...
www.lexmark.com
Page 99

Lexmark Z65
Lexmark Z65n
76Troubleshooting
Printer overview
Basic printing
Printing ideas
Maintenance
Troubleshooting
Notices
Index
Resolving unsuccessful or slow printing
For help, first see Solving general printing problems.
If there is still a problem, cl ick the topic that best describes it:
• Printer is plugged in, but does not
print
• Test page does not print • Printer prints very slowly
• Printer ejects a blank page after
appearing to print
Using this
Guide...
www.lexmark.com
Page 100

Lexmark Z65
Lexmark Z65n
77Troubleshooting
Printer overview
Basic printing
Printing ideas
Maintenance
Troubleshooting
Notices
Index
Using this
Guide...
Printer is plugged in, but does not print
Make sure:
• The printer is on and the printer cable is securely attached at both ends. If your
Lexmark Z65n printer is connected to a network, make sure the network lights on the
printer are on. For help, see Network connection speed light.
• The paper is loaded correctly and not pushed too far into the printer. For help, see
Basic printing. If the paper is jammed, see Clearing paper misfeeds or jams.
• The printer is not being held or paused. To chec k the printer status:
a From y our desktop, double-click the Lexmark Z65 printer icon.
b Make sure the Hold button is not select ed.
• The printer is set as the default printer. To set the printer as the default:
a From your desktop, click the Lexmark Z65 printer icon.
b From the Printing menu, choose Select Default Printer.
After you check these items, try Printing a test page.
If the test page prints, the printer is funct ioning properly. If it does not print, see Test page
does not print.
www.lexmark.com
 Loading...