

Page 1
Printer overview
Basic printing
Printing ideas
Maintenance
Troubleshooting
Notices
Index
Z54
Color Jetprinter™
Online User’ s Guide f or Mac OS X 10.0.3 to 10.1
Using this
Guide...
www.lexmark.com
Page 2

Lexmark Z54
2Using this Guide
Printer overview
Basic printing
Printing ideas
Maintenance
Troubleshooting
Notices
Index
Navigating
• Click the categories in the left pane to navigate the pages.
• Click the blue text to link to other parts of this Online User’s Guide.
• Click the arrows at the bott om of the screen to move forward and backw ard through
the pages.
Searching
1 From the Acrobat Edit men u, choose Find.
2 In the Find What: box, type the word or phrase you want to search for.
3 Click Find.
Printing
1 From the Acrobat File menu, choose Page Setup.
2 From the Format for pop-up menu, choose Lexmark Z54, select the Landscape
orientation button, and then click OK.
3 From the Acrobat File menu, choose Print.
4 From the Printer pop-up men u, choose Lexmark Z54, specify the pages you w ant to
print, and then click Print.
www.lexmark.com
Page 3

Lexmark Z54
3Printer overview
Printer overview
Basic printing
Printing ideas
Maintenance
Troubleshooting
Notices
Index
• Understanding the printer software
• Understanding the printer parts
Using this
Guide...
www.lexmark.com
Page 4

Lexmark Z54
4Printer overview
Printer overview
Basic printing
Printing ideas
Maintenance
Troubleshooting
Notices
Index
Understanding the printer software
Your printer software includes the:
• Page Setup dialog
• Print dialog
• Lexmark Z54 Utility
To customize the settings for your document, use the Page Setup dialog and the Print
dialog. For more information on which settings to select for your document, see Printing
ideas. When you installed the printer soft ware, the Page Setup and Print dialogs were set to
these default settings:
Print Quality: Normal Paper Type: Plain
Paper Size: A4 or U.S. Letter
Orientation: Portrait
Using this
Guide...
www.lexmark.com
Page 5
Lexmark Z54
5Printer overview
Printer overview
Basic printing
Printing ideas
Maintenance
Troubleshooting
Notices
Index
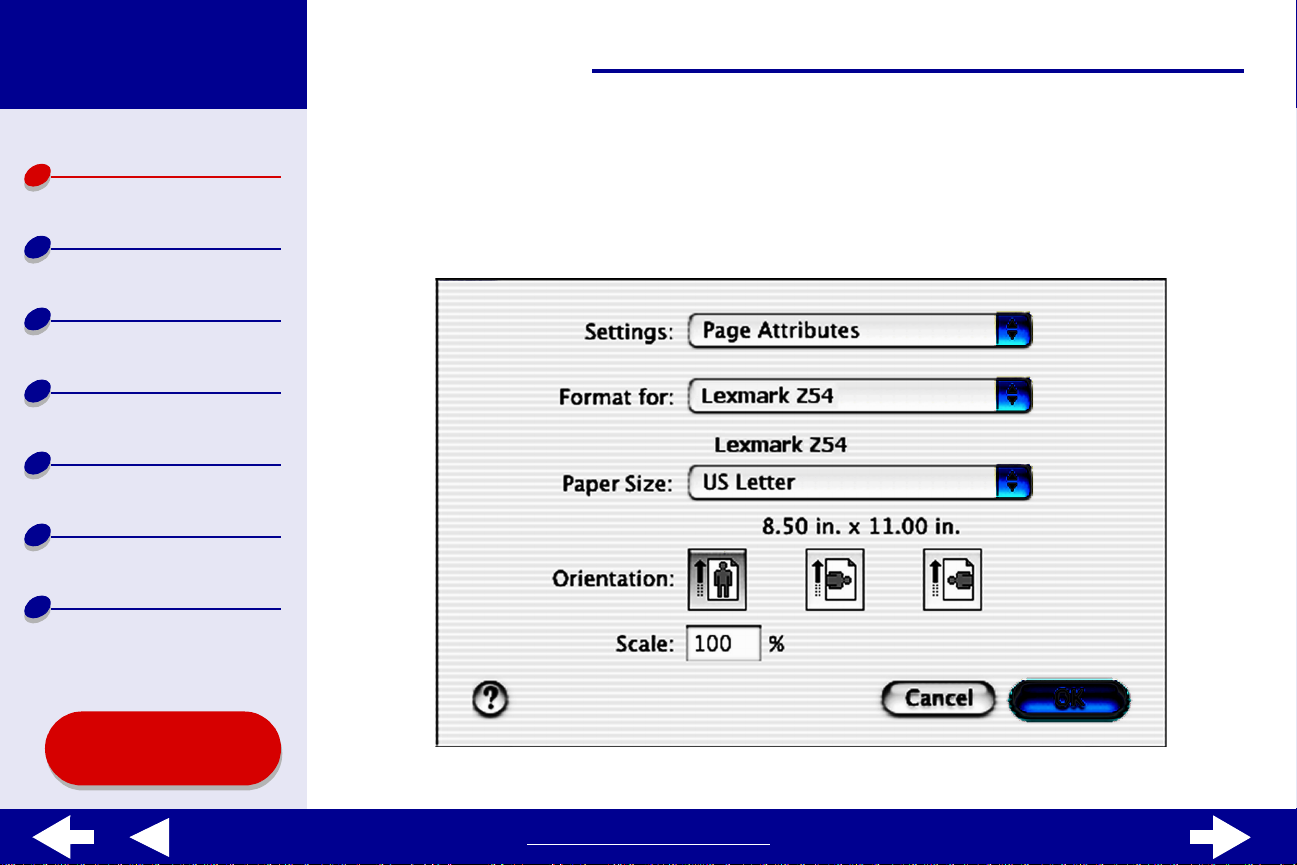
Page Setup dialog
While the document you want to print is open, use the Page Setup dialog to select settings
such as paper size. To customize the settings in the Page Setup dialog:
1 From the File menu of your software application, choose Page Setup.
Using this
Guide...
www.lexmark.com
Page 6
Lexmark Z54
Printer overview
Basic printing
Printing ideas
Maintenance
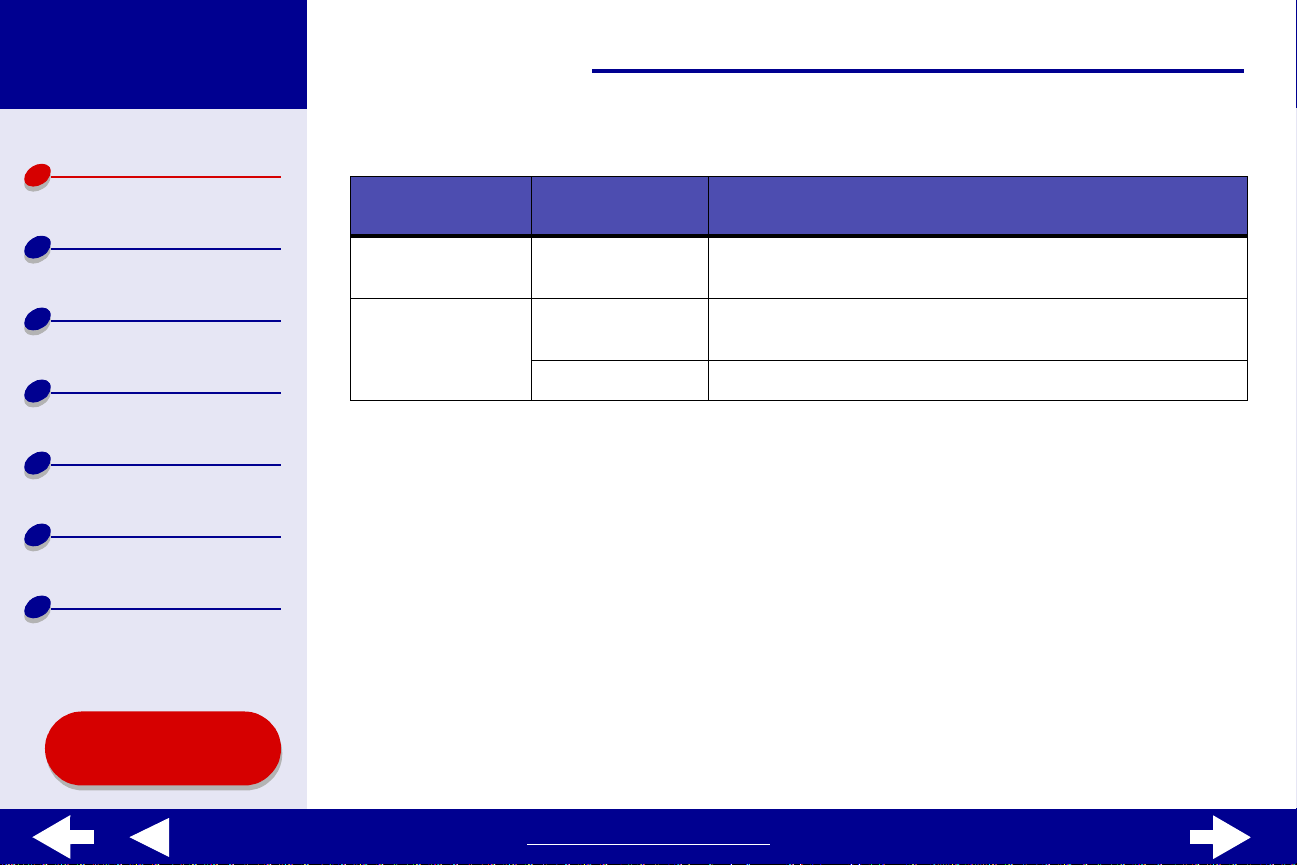
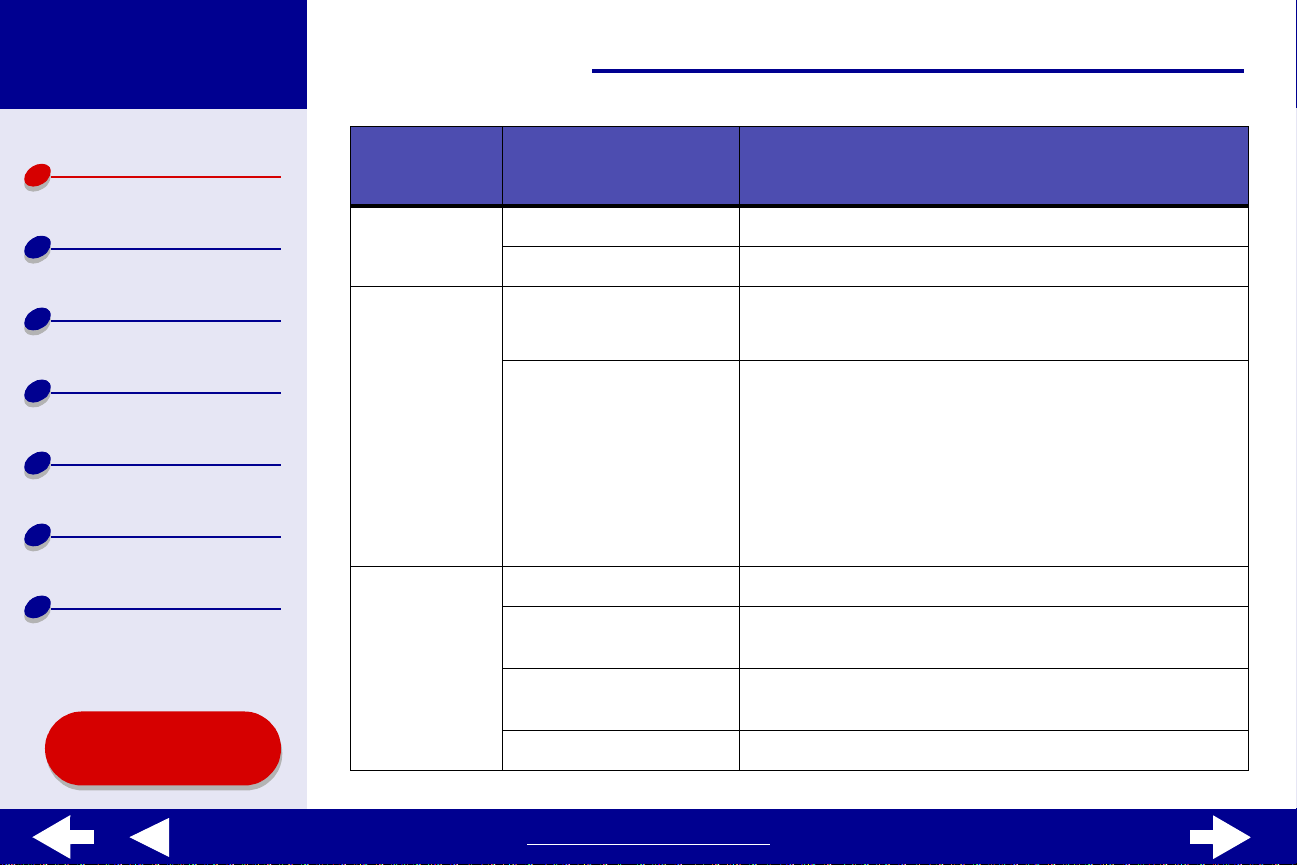
2 Change the settings as needed.
From this popup menu:
Format for Lexmark Z54 Format your page for printing with your Lexmark Z54
Settings Page Attributes Choose a paper size, orientation, or scaling value for your
Select: When you want to:
printer.
document.
Summary View a summary of the current page settings.
6Printer overview
Troubleshooting
Notices
Index
Using this
Guide...
For more information about these settings, click ? to view the OS X software Help.
3 Click OK to apply the settings and close the Page Setup dialog.
Print dialog
While your document is open, you can use the Print dialog to select settings that affect the
appearance of your document. To customize the settings in the Print dialog:
www.lexmark.com
Page 7

Lexmark Z54
Printer overview
Basic printing
Printing ideas
Maintenance
Troubleshooting
Notices
Index
7Printer overview
1 From the software application File menu, choose Print.
Using this
Guide...
www.lexmark.com
Page 8
Lexmark Z54
Printer overview
Basic printing
Printing ideas
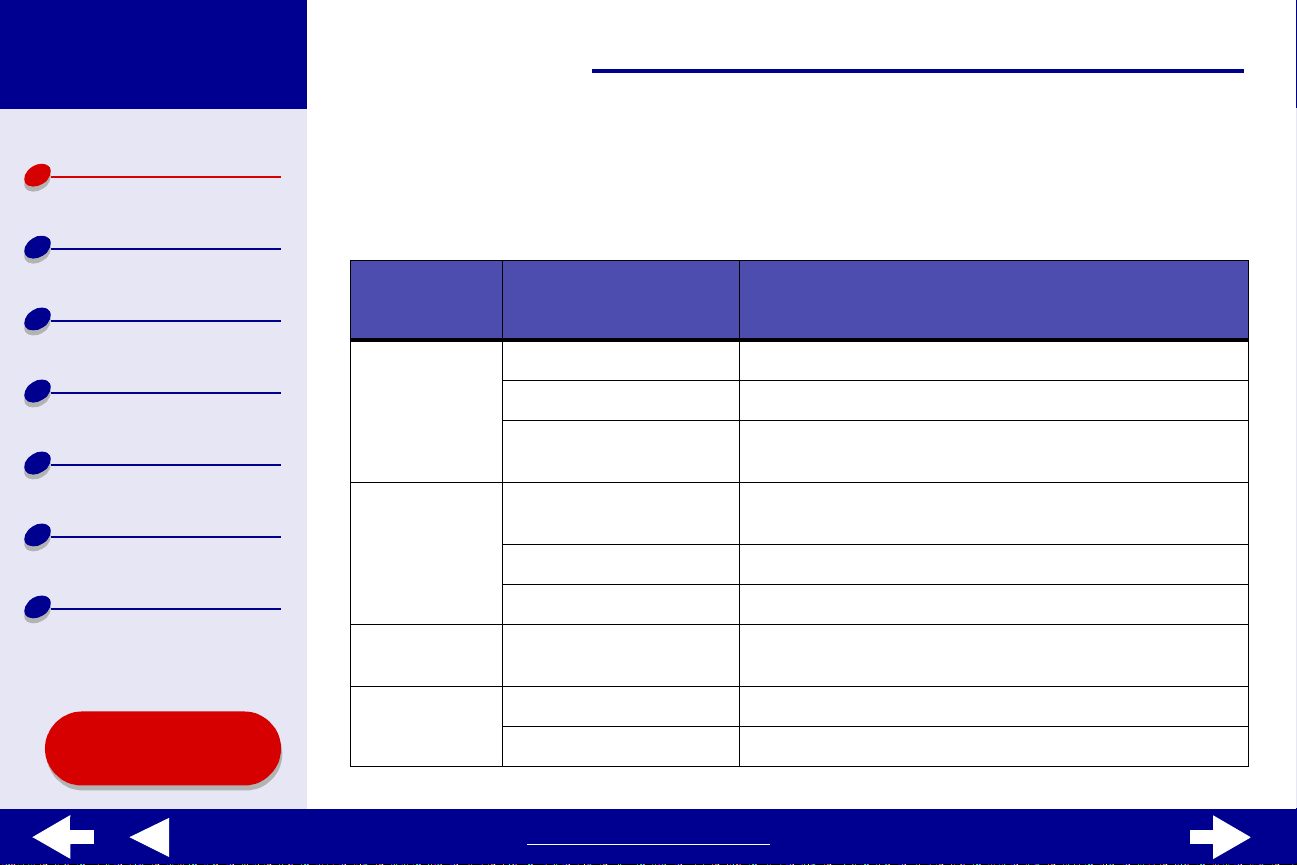
2 From the Printer pop-up menu, choose Lexmark Z54.
3 Change the settings as needed.
From the
pop-up menu,
choose:
Select: When you want to:
8Printer overview
Maintenance
Troubleshooting
Notices
Index
Using this
Guide...
Copies &
Pages
Layout Pages per Sheet Print multiple pages of your document on a single sheet
Output
Options
Color Options Document Color Choose a color setting.
Copies Specify the number of copies you want to print.
Collated Sort multiple copy jobs.
All or From Print all of the pages in a document or print a range of
pages.
of paper.
Layout Direction Print the pages of your document in a specified order.
Border Print a border around each page of your document.
Save as PDF File Print your document to a PDF.
Halftone Choose a halftone setting.
www.lexmark.com
Page 9
Lexmark Z54
9Printer overview
Printer overview
Basic printing
Printing ideas
Maintenance
Troubleshooting
Notices
Index
Using this
Guide...
From the
pop-up menu,
choose:
Advanced
Layout
Quality &
Media
Printer
Services
Select: When you want to:
Print Last Page First Print your document in reverse page order.
Mirror Print your document as a mirror image.
Paper Type Choose the paper type for your document.
Print Quality Choose a print quality. You can choose from Quick
Print, Normal, Better, or Best.
Note: Normal print quality is recommended for most
documents. Higher print quality settings result
in better quality documents for some paper
types, but take longer to print. For more
information about the appropriate print quality
for your document, see Printing ideas.
Lexmark Z54 Utility Open the Lexmark Z54 Utility.
Troubleshooting View troubleshooting information in the printer software
Help.
Order Supplies View supplies information or order supplies on the
Lexmark Web site.
Software Version View printer software version information.
www.lexmark.com
Page 10
Lexmark Z54
10Printer overview
Printer overview
Basic printing
Printing ideas
Maintenance
Troubleshooting
Notices
Index
From the
pop-up menu,
choose:
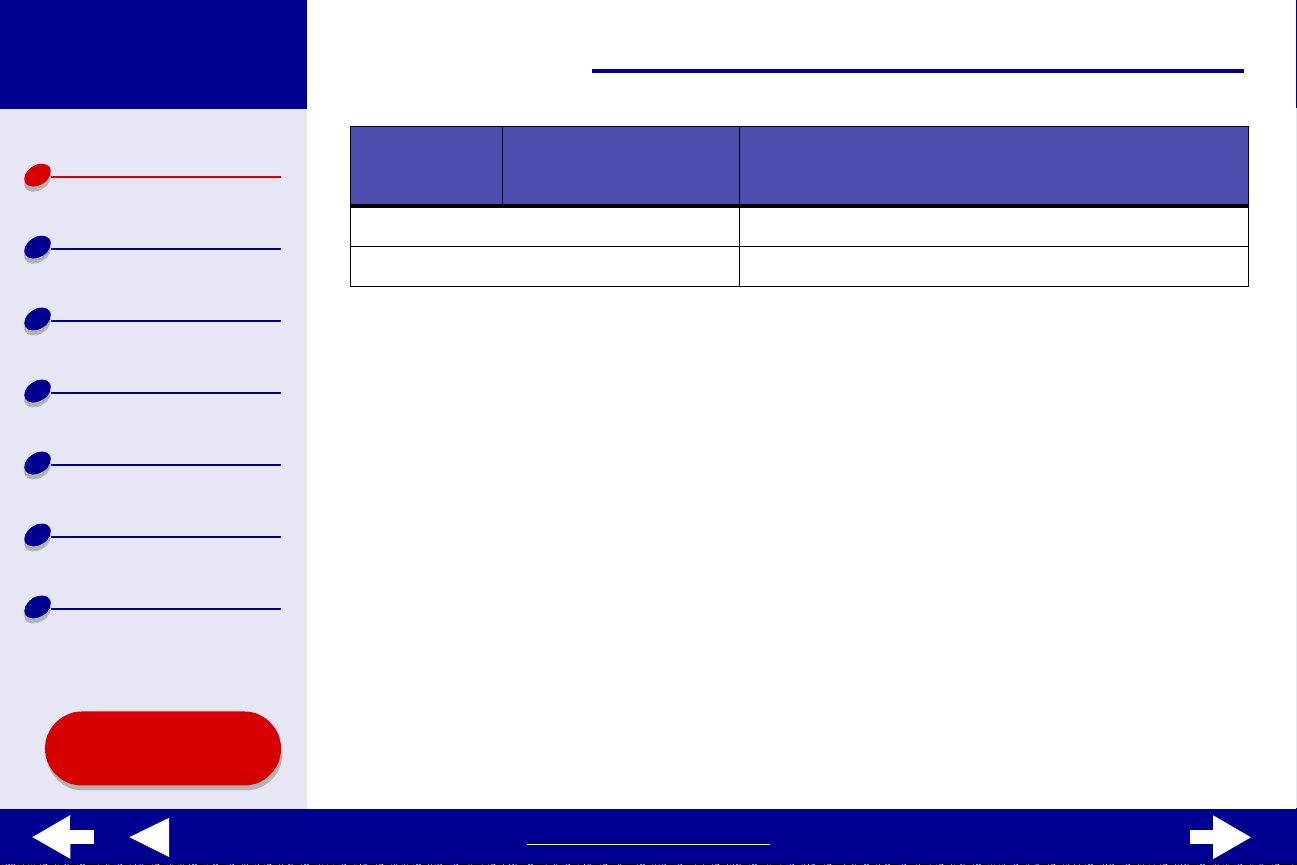
Summary View a summary of the current print settings.
Save Custom Setting Save the current print settings for future use.
Select: When you want to:
4 If you want more i nf ormation about the set tings in the Print di alog, cli c k ? to view Help
on these items. When you are finished, click the red close button.
5 Click Print to apply your settings and print your document.
Using this
Guide...
www.lexmark.com
Page 11

Lexmark Z54
11Printer overview
Printer overview
Basic printing
Printing ideas
Maintenance
Troubleshooting
Notices
Index
Lexmark Z54 Utility
Use the Lexmark Z54 Utility to monitor your printer and printer supplies. You can:
• Install cartridges • Print a test page
• Ali gn ca rtridges • Obtai n information on ordering supplies
• Clean print nozzles • Obtain softwar e version information
• Select a printer • Configure a network printer
Using the Lexmark Z54 Utility
1 From a Finder window, cli ck Computer and then, double-click the OS X disk icon
Library folder Printers folder Lexmark folder.
Using this
Guide...
www.lexmark.com
Page 12
Lexmark Z54
Printer overview
12Printer overview
2 Double-click the Lexmark Z54 Utility icon.
The Lexmark Z54 Utility appears.
Basic printing
Printing ideas
Maintenance
Troubleshooting
Notices
Index
Using this
Guide...
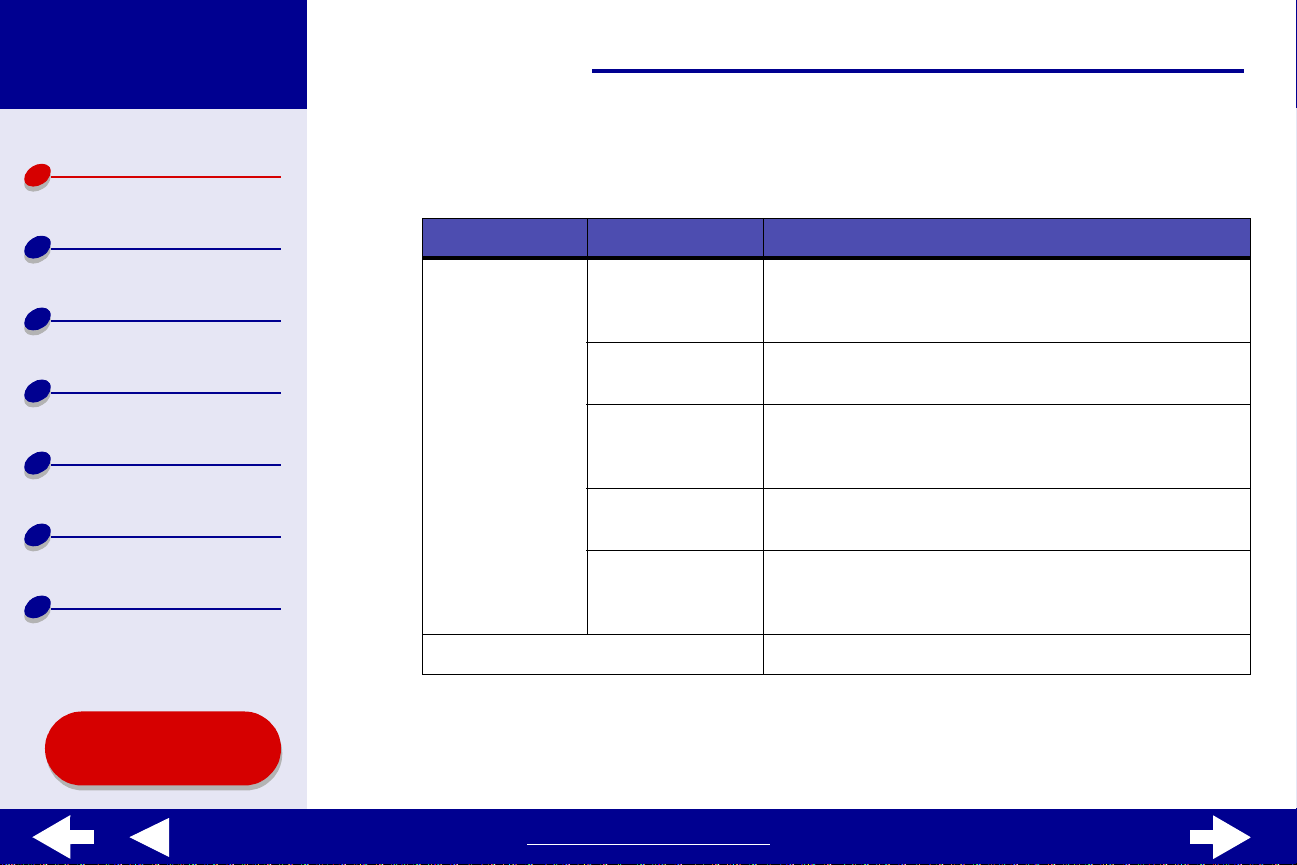
Click the: Select: When you want to:
Cartridges tab Install/Change
Cartridge
Align Cartridges Align the cartridges. For more information, see
Clean Print
Nozzles
Print Test Page Print a test page to verify your printer is functioning
Order Supplies Order supplies, such as print cartridges, from the
About tab Obtain printer software version information.
Specify cartridge settings in the printer software
when installing or changing a cartridge. For more
information, see Replacing the print cartridge.
Aligning the print cartridges.
Improve print quality by cleaning clogged print
nozzles. For more information, see Cleaning the
print cartridge nozzles.
properly.
Lexmark Web site. For more information, see
Ordering supplies.
www.lexmark.com
Page 13
Lexmark Z54
13Printer overview
Printer overview
Basic printing
Printing ideas
Maintenance
Troubleshooting
Notices
Index
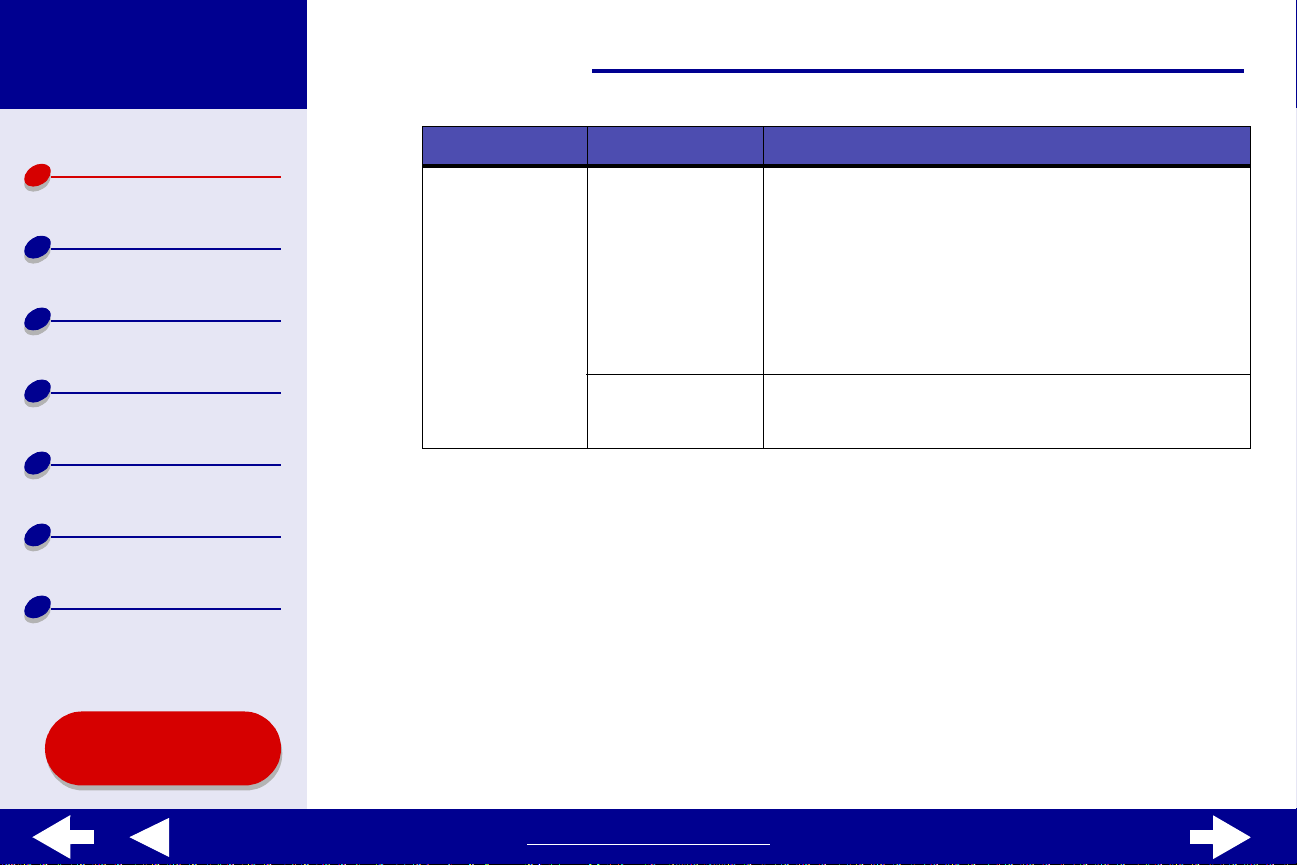
Click the: Select: When you want to:
Advanced menu Select Printer • Select a printer and make it the default printer.
• Find the IP address for the selected printer.
• Add a printer located on a remote subnet. You
can add a single printer or search the subnet for
all available printers.
• View a list of all USB, USB print sharing, and
network printers.
Network Printer
Configuration
• Configure an unconfigured network printer.
• View a list of network printers.
3 To learn more about what you can do with your printer, click the ? to view the printer
software Help. When you are finished, click the red close butt on.
4 Click the red close button to close the Lexmark Z54 Utility.
Using this
Guide...
www.lexmark.com
Page 14
Lexmark Z54
14Printer overview
Printer overview
Basic printing
Printing ideas
Maintenance
Troubleshooting
Notices
Index
Using this
Guide...
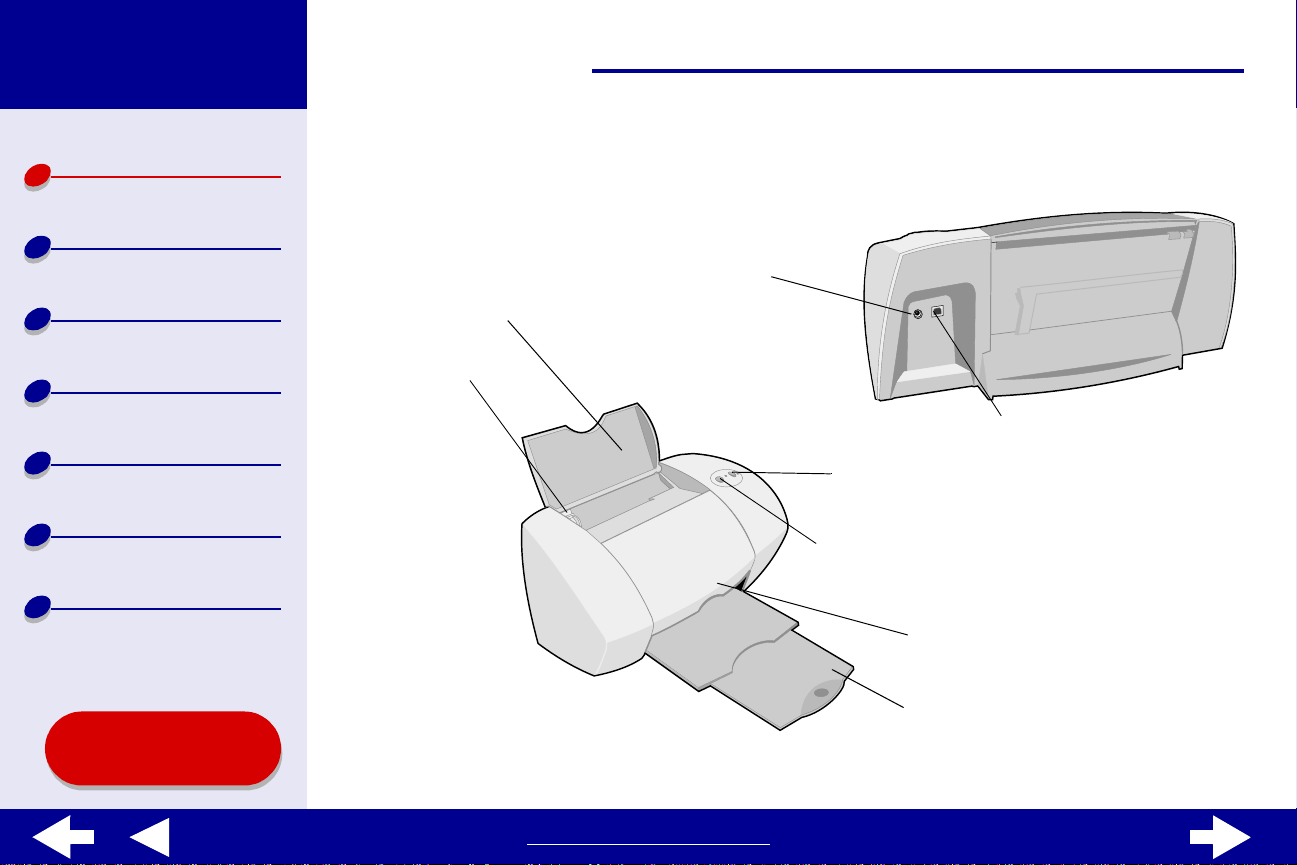
Understanding the printer parts
The table on the next page describes each part.
Power supply connector
Paper support
Paper guide
USB cable connector
Power button and Po we r light
Paper feed button and Paper feed light
Front cover
Paper exit tray
www.lexmark.com
Page 15
Lexmark Z54
Printer overview
Basic printing
15Printer overview
Use this: When you want to:
Front cover • Install or change print cartridges.
• Clear a paper jam.
Printing ideas
Maintenance
Troubleshooting
Notices
Index
Using this
Guide...
Paper exit tray Stack paper after printing.
Paper feed button Eject paper from the printer.
Paper feed light Check the printer status. For more information, see
Understanding error messages and flashing lights.
Paper guide Make sure paper feeds correctly into the printer.
Paper support Keep paper straight in the printer.
Power button Turn the printer on or off.
Power light Check the printer status. For more information, see
Understanding error messages and flashing lights.
Power supply connector Connect the power supply to the printer.
USB cable connector Connect the printer to the computer with a USB cable.
www.lexmark.com
Page 16

Lexmark Z54
16Basic printing
Printer overview
Basic printing
Printing ideas
Maintenance
Troubleshooting
Notices
Index
Basic printing is as easy as:
Step 1: Load the paper
Step 2: Customize the printer settings
Step 3: Print your document
Note: For help printing on specialty paper (such as photo paper, banner paper,
transparencies, or iron-on transfers), see Printing ide as.
Using this
Guide...
www.lexmark.com
Page 17
Lexmark Z54
17Basic printing
Printer overview
Basic printing
Printing ideas
Maintenance
Troubleshooting
Notices
Index
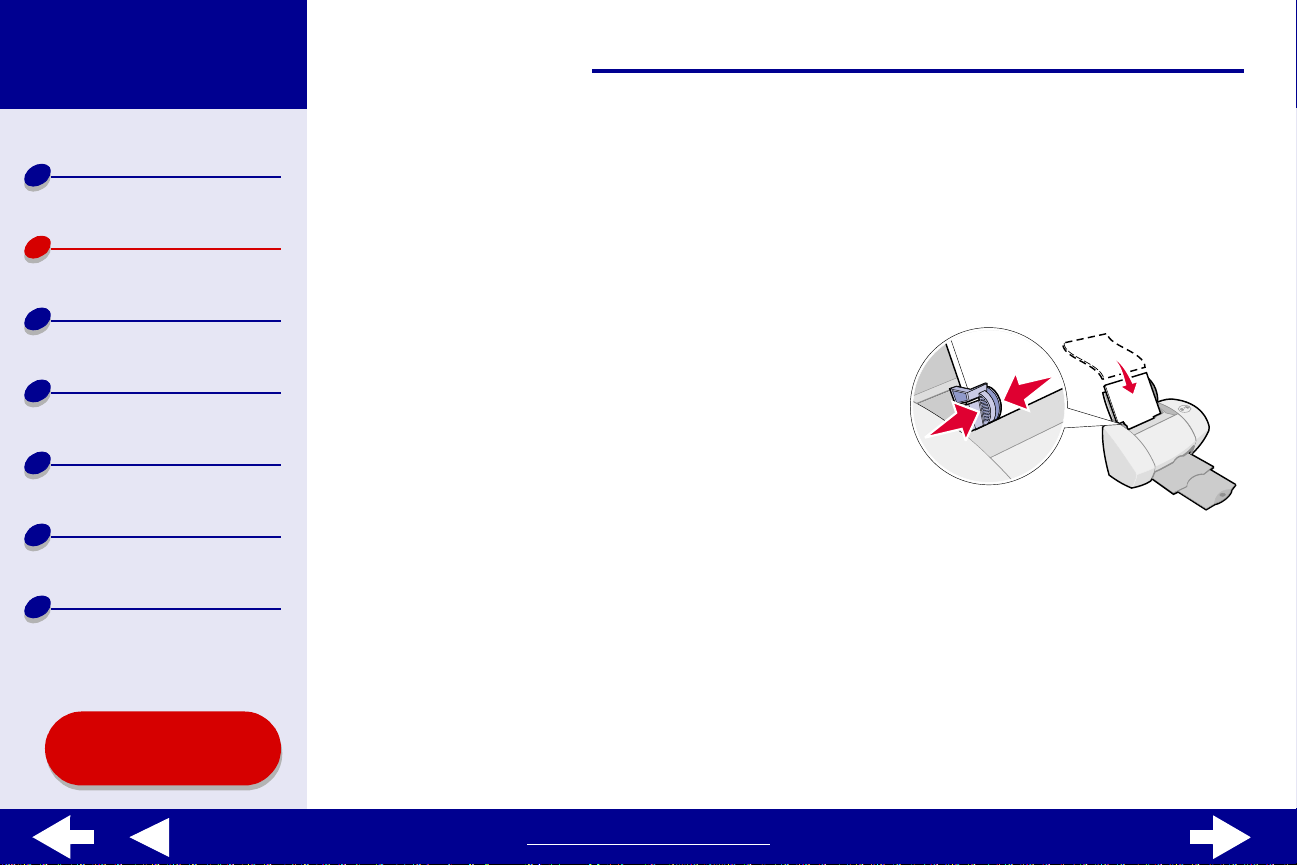
Step 1: Load the paper
You can load up to 100 sheets of paper, depending on the thickness and weight of your
paper.
1 Make sure the paper support is upright.
2 Place the paper against the right side of the
paper support with the print side facing you.
Note: A4 and letter size paper should
extend slightly beyond the top of
the paper support. Do not for ce the
paper too far into the printer.
3 Squeeze and slide the paper guide to the left
edge of the paper .
For information about loading specialty paper, see Printing ideas.
Using this
Guide...
www.lexmark.com
Page 18

Lexmark Z54
18Basic printing
Printer overview
Basic printing
Printing ideas
Maintenance
Troubleshooting
Notices
Index
Step 2: Customize the printer settings
If you are using plain A4 or letter size paper and you want normal print quality, you only need
to adjust the paper size printer setting.
If you are using specialty paper, such as photo paper, card stock, envelopes, or banner
paper, see Printing ideas to customize your printer settings.
For more information about the different printer settings, see Understanding the printer
software.
Using this
Guide...
www.lexmark.com
Page 19

Lexmark Z54
19Basic printing
Printer overview
Basic printing
Printing ideas
Maintenance
Troubleshooting
Notices
Index
Step 3: Print your document
After you load the paper and customize the printer settings (if necessary), you are ready to
print:
1 From the software application File menu, choose Print.
2 Click Print.
Note: The paper exit tray holds 50 sheets of paper. I f y ou w ant to print more than
50 sheets, make sure y ou remove the first 50 sheets before you continue
printing.
Using this
Guide...
www.lexmark.com
Page 20

Lexmark Z54
Printer overview
20Printing ideas
Basic printing
Printing ideas
Maintenance
Troubleshooting
Notices
Index
Using this
Guide...
• Printing photos
• Printing on premium
(coated) paper
• Printing cards
• Printing envelopes
• Printing color images in
black and white
• Printing labels
• Printing handouts
• Printing iron-on transfer s
• Printing transparencies
• Printing a banner
www.lexmark.com
Page 21

Lexmark Z54
21Printing ideas
Printer overview
Basic printing
Printing ideas
Maintenance
Troubleshooting
Notices
Index
Printing photos
You can load up to 25 sheets of coat ed, photo , or gl ossy paper , depending on the thic kness of
the paper. You may want to print your photos on plain paper before loading photo paper and
changing your settings . Th is e nsure s tha t y ou do not waste photo paper perfecting the image
you would lik e to print. To print on photo cards, see Printing cards.
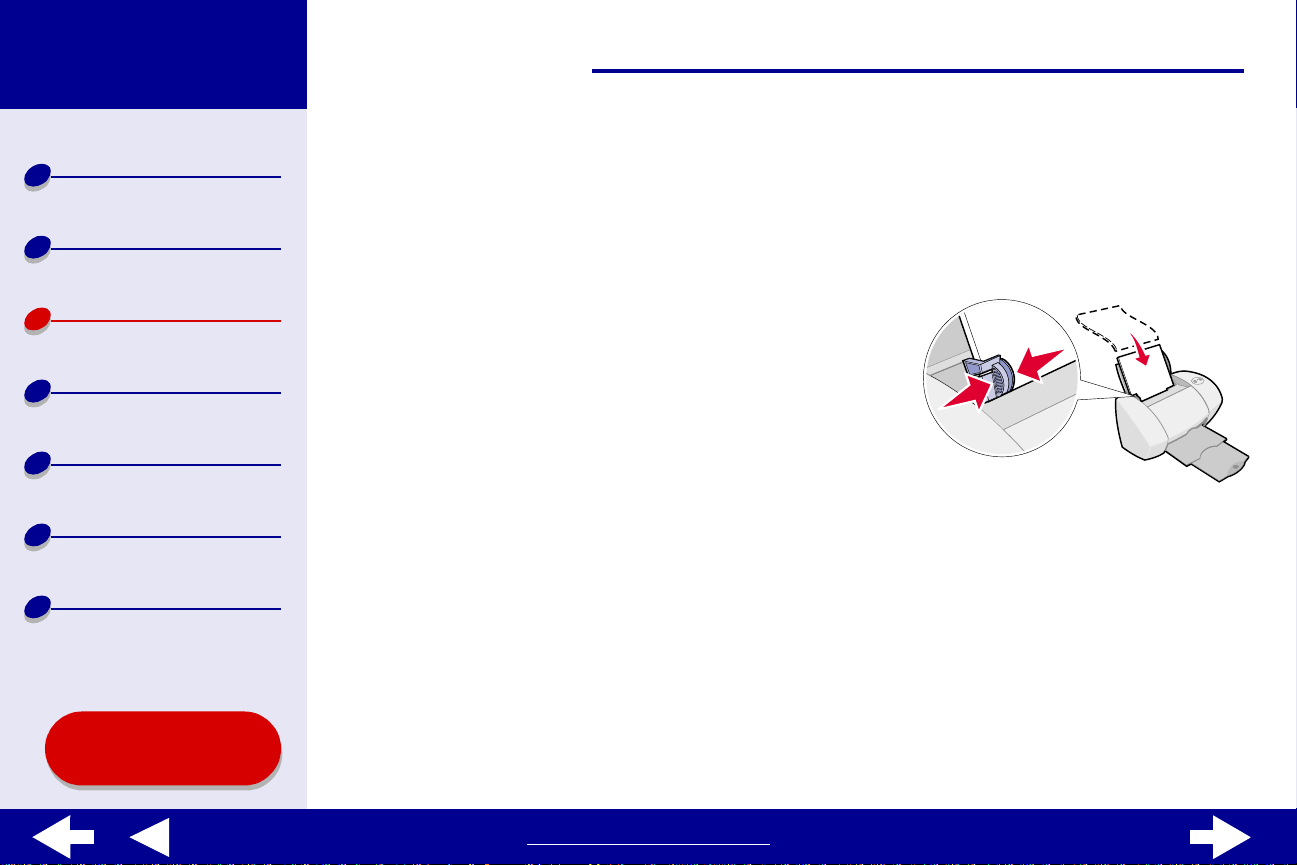
Step 1: Load the photo paper
• If your photo paper came with instructions,
read them carefully.
• Make sure your paper is not used or damaged.
• Make sure the glossy or coated side is facing
you.
• Load the paper against the right side of the
paper support.
Note: Do not push the paper too far into the printer.
• Squeeze and slide the paper guide to the left edge of the paper.
Using this
Guide...
www.lexmark.com
Page 22

Lexmark Z54
22Printing ideas
Printer overview
Basic printing
Printing ideas
Maintenance
Troubleshooting
Notices
Index
Step 2: Customize the print settings
For help, see Understanding the printer software.
1 Choose a paper size and orientation:
a From the software application File menu, choose Page Setup.
b From the Format for pop-up menu, choose Lexmark Z54.
c From the Settings pop- up menu, choose Page Attribut es.
d From the Paper Size pop-up menu, choose the paper size for your photo.
e Choose Portrait, Landscape , or Reverse Landscape orientat ion.
f Click OK.
2 Choose a paper type, print quality, and color setting:
a From the software application File menu, choose Print.
b From the Printer pop-up menu, choose Lexmark Z54.
c From the pop-up menu i n the upper left, choose Color Options.
d From the Document Color pop-up menu, choose Natur al.
Using this
Guide...
e From the Halftone pop-up menu, select Airbrush.
www.lexmark.com
Page 23

Lexmark Z54
Printer overview
23Printing ideas
f From the pop-up menu in the upper left, choose Quality & Media.
g From the Paper Type pop-up menu, choose Glossy/Photo.
Basic printing
Printing ideas
Maintenance
Troubleshooting
Notices
Index
Using this
Guide...
h From the Print Quality area, click Better or Best for the print quality.
Note: Higher print quality settings result in better quality documents, but may
take longer to print.
Step 3: Print your photos
Click Print.
Note: To prevent sme aring, remov e each photo as i t exi ts the printer and l et it dry
before stacking.
www.lexmark.com
Page 24
Lexmark Z54
24Printing ideas
Printer overview
Basic printing
Printing ideas
Maintenance
Troubleshooting
Notices
Index
Printing on premium (coated) paper
You can load up to 100 pages of premium (coated) paper, depending on the thickness of the
paper.
Step 1: Load the premium (coated)
paper
• If your paper came with instructions, read
them carefully.
• Make sure your paper is not used or damaged.
• Make sure the print side is facing you.
• Load the paper vertically against the right side of the paper support.
Note: Do not push the paper too far into the printer.
• Squeeze and slide the paper guide to the left edge of the paper.
Using this
Guide...
www.lexmark.com
Page 25

Lexmark Z54
25Printing ideas
Printer overview
Basic printing
Printing ideas
Maintenance
Troubleshooting
Notices
Index
Step 2: Customize the print settings
For help, see Understanding the printer software.
1 Choose a paper size and orientation:
a From the software application File menu, choose Page Setup.
b From the Format for pop-up menu, choose Lexmark Z54.
c From the Settings pop- up menu, choose Page Attribut es.
d From the Paper Size pop-up menu, choose the paper size for your document.
e Choose Portrait, Landscape , or Reverse Landscape orientat ion.
f Click OK.
2 Choose a paper type and print quality:
a From the software application File menu, choose Print.
b From the printer pop-up menu, choose Lexmark Z54.
c From the pop-up menu i n the upper left, choose Quality & Media.
d From the Paper Type pop-up menu, choose Plain.
Using this
Guide...
e From the Print Quality area, choose Better or Best.
www.lexmark.com
Page 26

Lexmark Z54
Printer overview
26Printing ideas
Note: Higher print quality settings result in better quality documents, but may
take longer to print.
Basic printing
Printing ideas
Maintenance
Troubleshooting
Notices
Index
Using this
Guide...
Step 3: Print your document
Click Print.
Note: The paper exit tray holds up to 50 sheets of premium paper. To print more
than 50 pages, remove the first 50 sheets from the paper exit tray, and
then continue printing.
www.lexmark.com
Page 27
Lexmark Z54
27Printing ideas
Printer overview
Basic printing
Printing ideas
Maintenance
Troubleshooting
Notices
Index
Printing cards
You can load up to 10 greeting cards, index cards, photo cards, or postcards into the paper
support, depending on the thickness of the cards.
Step 1: Load the cards
• If y our ca rds came with instructi ons , read t hem
carefully.
• Make sure your cards are not used or
damaged.
• Make sure the print side is facing you.
• Load the cards vertically against the right side
of the paper support.
Note: Do not push the cards too far into the printer.
• Squeeze and slide the paper guide to the left edge of the cards.
Using this
Guide...
www.lexmark.com
Page 28

Lexmark Z54
28Printing ideas
Printer overview
Basic printing
Printing ideas
Maintenance
Troubleshooting
Notices
Index
Step 2: Customize the print settings
For help, see Understanding the printer software.
1 Choose a paper size and orientation:
a From the software application File menu, choose Page Setup.
b From the Format for pop-up menu, choose Lexmark Z54.
c From the Settings pop- up menu, choose Page Attribut es.
d From the Paper Size pop-up menu, choose the card size for your document.
e Choose Portrait, Landscape , or Reverse Landscape orientat ion.
f Click OK.
2 Choose a print quality and paper type:
a From the software application File menu, choose Print.
b From the Printer pop-up menu, choose Lexmark Z54.
c From the pop-up menu i n the upper left, choose Quality & Media.
d Choose:
Using this
Guide...
– Glossy/Photo Paper paper type for photo cards or Plai n for other types of cards
www.lexmark.com
Page 29

Lexmark Z54
Printer overview
29Printing ideas
– Better or Best print quality for photo and greeting cards or Normal for other
types of cards
Basic printing
Printing ideas
Maintenance
Troubleshooting
Notices
Index
Using this
Guide...
Note: Higher print quality settings result in better quality documents, but may
take longer to print.
Step 3: Print your cards
Click Print.
Note: Remove each card as it exits the printer and let it dry before stacking.
www.lexmark.com
Page 30
Lexmark Z54
30Printing ideas
Printer overview
Basic printing
Printing ideas
Maintenance
Troubleshooting
Notices
Index
Using this
Guide...
Printing envelopes
You can load up to 10 envelopes , depending on the thickness of the en velopes.
Step 1: Load the envelopes
Note: Do not use envelopes with holes,
windows, deep embossing, metal
clasps, string ties, or metal folding
bars.
• Make su re your envelopes are not used or
damaged.
• Make sure the print side is facing you.
• Make su re the stamp location is in the upper left corner .
• Load the envelopes vertically against the right side of the paper support.
Note: Do not push the envelopes too far into the printer.
• Squeeze and slide the paper guide to the left edge of the envelopes.
www.lexmark.com
Page 31

Lexmark Z54
31Printing ideas
Printer overview
Basic printing
Printing ideas
Maintenance
Troubleshooting
Notices
Index
Step 2: Customize the print settings
For help, see Understanding the printer software.
1 Choose an envelope size and orientation:
a From the software application File menu, choose Page Setup.
b From the Format for pop-up menu, choose Lexmark Z54.
c From the Settings pop- up menu, choose Page Attribut es.
d Select Paper Siz e to choose the appropriate envelope size.
e Choose Landscape orientation.
Note: Many software applicat ions are designed to ov e rride the en vel ope settings
in Page Setup. Make sure Landscape orientation is also selected in your
software application.
f Click OK.
2 Choose a print quality and paper type:
a From the software application File menu, choose Print.
Using this
Guide...
b From the Printer pop-up menu, choose Lexmark Z54.
www.lexmark.com
Page 32

Lexmark Z54
Printer overview
32Printing ideas
c From the pop-up menu i n the upper left, choose Quality & Media.
d From the Print Quality area, choose Normal print quality.
Basic printing
Printing ideas
Maintenance
Troubleshooting
Notices
Index
Using this
Guide...
e Choose Plain for the paper type.
Step 3: Print your envelopes
Click Print.
Note: The paper exit tray holds up to 10 envelopes. To print more than 10
envelopes, remove the first 10 envelopes from the paper exit tray before
the others print.
www.lexmark.com
Page 33

Lexmark Z54
33Printing ideas
Printer overview
Basic printing
Printing ideas
Maintenance
Troubleshooting
Notices
Index
Printing color images in black and white
You can print color images in black ink.
Step 1: Load the paper
• Make sure your paper is not used or damaged.
• Make sure the print side is facing you.
• Load the paper vertically against the right side
of the paper support.
Note: Do not push the paper too far into
the printer .
• Squeeze and slide the paper guide to the left edge of the paper.
Using this
Guide...
www.lexmark.com
Page 34

Lexmark Z54
34Printing ideas
Printer overview
Basic printing
Printing ideas
Maintenance
Troubleshooting
Notices
Index
Step 2: Customize the print settings
For help, see Understanding the printer software.
1 From the software application File menu, choose Print.
2 From the Printer pop-up menu, choose Lexmark Z54.
3 From the pop-up menu in upper left, choose Color Options.
4 From the Document Color pop-up men u , choose Black Only.
5 Continue customizing your document follo wing the steps in Basic printing or
Printing ide a s or continue with the next step.
Step 3: Print your document
Click Print.
Note: The paper exit tray holds up to 50 sheets of paper or 10 photo cards. To
print more than 50 sheets of paper, remove the first 50 sheets from the
paper exit tray before the others print. To print more than 10 photo cards,
remove the fir st 10 cards from the paper exit tray before the others print.
Using this
Guide...
www.lexmark.com
Page 35

Lexmark Z54
35Printing ideas
Printer overview
Basic printing
Printing ideas
Maintenance
Troubleshooting
Notices
Index
Printing labels
You can load up to 25 sheets of labels, depending on the thickness of the sheets.
Step 1: Load the labels
• Use only labels designed for inkjet printers.
• If your labels came with instructions, read
them carefully.
• Make sure your labels are not used or
damaged.
• Do not print within 1 mm (0.04 in.) of the
edge of a label.
• Make sure there are no missing or curled labels.
• Make sure the print side is facing you.
• Load the labels vertically against the right side of the paper support.
Note: Do not push the label sheets too far into the printer.
Using this
Guide...
• Squeeze and slide the paper guide to the left edge of the sheet of labels.
www.lexmark.com
Page 36

Lexmark Z54
36Printing ideas
Printer overview
Basic printing
Printing ideas
Maintenance
Troubleshooting
Notices
Index
Step 2: Customize the print settings
For help, see Understanding the printer software.
1 Choose a paper size and orientation:
a From the software application File menu, choose Page Setup.
b From the Format for pop-up menu, choose Lexmark Z54.
c From the Settings pop- up menu, choose Page Attribut es.
d Select Paper Siz e to choose A4 or U.S. Letter.
e Choose Portrait or Landscape orientation.
f Click OK.
2 Choose a print quality and paper type:
a From the software application File menu, choose Print.
b From the Printer pop-up menu, choose Lexmark Z54.
c From the pop-up menu i n the upper left, choose Quality & Media.
d From the Print Quality area, select Normal.
Using this
Guide...
e From the Paper Type area, choose Plain.
www.lexmark.com
Page 37

Lexmark Z54
Printer overview
37Printing ideas
Note: Higher print quality settings result in better quality documents, but may
take longer to print.
Basic printing
Printing ideas
Maintenance
Troubleshooting
Notices
Index
Using this
Guide...
Step 3: Print your labels
Click Print.
Note: The paper exit tray holds up to 10 sheets of labels. To print more than 10
sheets, remove the first 10 sheets from the paper exit tray before the
others print.
www.lexmark.com
Page 38

Lexmark Z54
38Printing ideas
Printer overview
Basic printing
Printing ideas
Maintenance
Troubleshooting
Notices
Index
Printing handouts
You can conserve paper by printing handouts. Handouts are multiple page images on a
single sheet of paper. You can load up to 100 shee ts of paper, depending on the thickness of
the paper.
Step 1: Load the paper
• If your paper came with instructions, read
them carefully.
• Make sure your paper is not used or damaged.
• Make sure the print side is facing you.
• Load the paper vertically against the right side
of the paper support.
Note: Do not push the paper too far into the printer.
• Squeeze and slide the paper guide to the left edge of the paper.
Using this
Guide...
www.lexmark.com
Page 39

Lexmark Z54
39Printing ideas
Printer overview
Basic printing
Printing ideas
Maintenance
Troubleshooting
Notices
Index
Step 2: Customize the print settings
For help, see Understanding the printer software.
You can print your handouts on one side or on both sides of the paper.
1 Choose a paper size and orientation:
a From the software application File menu, choose Page Setup.
b From the Format for pop-up menu, choose Lexmark Z54.
c From the Settings pop- up menu, choose Page Attribut es.
d Select Paper Size to choose the paper size of your document.
e Choose Portrait, Landscape , or Reverse Landscape orientat ion.
f Click OK.
2 Choose a print quality and paper type:
a From the software application File menu, choose Print.
b From the Printer pop-up menu, choose Lexmark Z54.
c From the pop-up menu i n the upper left, choose Quality & Media.
Using this
Guide...
d Select a paper type for your document.
www.lexmark.com
Page 40

Lexmark Z54
Printer overview
40Printing ideas
e Select a print quality for your document.
f From the pop-up menu in the upper left, select Layout.
Basic printing
Printing ideas
Maintenance
Troubleshooting
Notices
Index
Using this
Guide...
g From the Pages per sheet pop-up menu, choose the number of pages you want to
print on one sheet.
h From the La y out Direct ion area, clic k the gr aphi c that s hows the o rder y ou w ant t he
pages to print on the sheet.
i If you want to print a border around each image, choose an option from the Border
pop-up menu.
Step 3: Print your handouts
Click Print.
www.lexmark.com
Page 41

Lexmark Z54
41Printing ideas
Printer overview
Basic printing
Printing ideas
Maintenance
Troubleshooting
Notices
Index
Printing iron-on transfers
You can load up to 25 iron-on transfers, depending on the thickness of the iron-on transfers.
You may want t o print y our image on plai n paper before printing it on an iron-on transfer. This
ensures you do not wast e iron-on transfers perfecting the image you would lik e t o print. When
the image prints to your satisfaction, load the iron-on transfers.
Step 1: Load the iron-on transfers
• If your transfers came with instructions, read
them carefully.
• Make sure your transfers are not used or
damaged.
• Make sure the print (blank) side is facing you.
• Load the iron-on transfers v ertically against
the right side of the paper support.
Note: Do not push the iron-on transfers too far into the printer.
• Squeeze and slide the paper guide to the left edge of the iron-on transfers.
Using this
Guide...
www.lexmark.com
Page 42

Lexmark Z54
42Printing ideas
Printer overview
Basic printing
Printing ideas
Maintenance
Troubleshooting
Notices
Index
Using this
Guide...
Step 2: Customize the print settings
For help, see Understanding the printer software.
1 Choose a paper size:
a From the software application File menu, choose Page
Setup.
b From the Format f or pop-up menu, choose
Lexmark Z54.
c From the Settings pop- up menu, choose Page Attribut es.
d Select Paper Size to choose a paper size.
e Choose Portrait, Landscape , or Reverse Landscape orientat ion.
f Click OK.
2 Choose a paper type and print quality:
a From the software application File menu, choose Print.
b From the Printer pop-up menu, choose Lexmark Z54.
c From the pop-up menu i n the upper left, choose Quality & Media.
d Click Normal for the print quality.
www.lexmark.com
Page 43

Lexmark Z54
Printer overview
Basic printing
43Printing ideas
e From the Paper Type pop-up menu, choose Iron-On Transfer.
Note: Choosing Iron-On Transfer automatically mirrors the image you want to
print. Make sure you do not select an option from your software
application that will mirror your image.
Printing ideas
Maintenance
Troubleshooting
Notices
Index
Using this
Guide...
f If your software application also mirrors the image, follow these steps:
– From the pop-up menu i n the upper left, choose Advanced Layout.
– Make sure Mirror is not chec ked.
Step 3: Print your iron-on transfers
Click Print.
Note: To prevent smudging, remove each iron-on transfer as it exits the printer
and let it dry before stacking.
www.lexmark.com
Page 44

Lexmark Z54
44Printing ideas
Printer overview
Basic printing
Printing ideas
Maintenance
Troubleshooting
Notices
Index
Printing transparencies
You can load up to 10 transparencies, depending on the thickness of the transparencies.
Step 1: Load the transparencies
• Use transparencies designed for inkjet printers.
• If the transparencies have paper backing
sheets, make sure y ou separa te the paper from
the transparencies before you load them.
• Make sure your transparenci e s are not used or
damaged.
• If your transparencies came with instructions, read them carefully.
• Make sure the rough (print) side of the transparencies is facing you. If the
transparencies hav e a remo vab le st rip, mak e sure each strip f aces a wa y from y ou and
down.
• Load the transpar encies vertically against the right side of the paper support.
Note: Do not push the transparencies too f ar into the printer.
Using this
Guide...
• Squeeze and slide the paper guide to the left edge of the transparencies.
www.lexmark.com
Page 45

Lexmark Z54
45Printing ideas
Printer overview
Basic printing
Printing ideas
Maintenance
Troubleshooting
Notices
Index
Step 2: Customize the print settings
For help, see Understanding the printer software.
1 Choose a paper size:
a From the software application File menu, choose Page Setup.
b From the Format for pop-up menu, choose Lexmark Z54.
c From the Settings pop- up menu, choose Page Attribut es.
d Choose a paper size.
e Click OK.
2 Choose a paper type and print quality:
a From the software application File menu, choose Print.
b From the Printer pop-up menu, choose Lexmark Z54.
c From the pop-up menu, choose Quality & Media.
d From the Paper Type pop-up menu, choose Transparency.
e Click Normal or Better for the print quality.
Using this
Guide...
www.lexmark.com
Page 46

Lexmark Z54
Printer overview
46Printing ideas
Note: Higher print quality settings result in better quality documents, but may
take longer to print.
Basic printing
Printing ideas
Maintenance
Troubleshooting
Notices
Index
Using this
Guide...
Step 3: Print your transparencies
Click Print.
Note: To prevent sm udgi ng, remove each transparency as it e xi ts the printer and
let it dry before stacking. Transparencies may require up to 15 minutes to
dry.
www.lexmark.com
Page 47

Lexmark Z54
47Printing ideas
Printer overview
Basic printing
Printing ideas
Maintenance
Troubleshooting
Notices
Index
Using this
Guide...
Printing a banner
Note: Some software applications and
some operating systems do not
support banner printing.
Step 1: Load the banner paper
Make sure your bann er paper i s not used or damaged.
1 Remove any paper from the paper support.
2 Tear off enough pages for the banner
including one extra sheet, and then place
them behind the printer.
3 Load the unattached leading edge of the first
page into the printer, with the right side
against the paper support.
Note: Forcing the paper too far into the
printer may cause a paper jam.
For help, see Clearing paper
misfeeds or jams.
www.lexmark.com
Page 48

Lexmark Z54
Printer overview
Basic printing
48Printing ideas
4 Squeeze and slide the paper guide to the left edge of the banner paper.
Step 2: Customize the print settings
For help, see Understanding the printer software.
Printing ideas
Maintenance
Troubleshooting
Notices
Index
Using this
Guide...
1 Choose a paper size and orientation:
a From the software application File menu, choose Page Setup.
b From the Format for pop-up menu, choose Lexmark Z54.
c From the Settings pop- up menu, choose Page Attribut es.
d Choose a paper size, either Banner A4 or Banner Letter.
Note: If you do not choose t he correct paper siz e , the banner paper ma y cau se a
paper jam. For help, see Clearing paper misfeeds or jams.
e Choose Portrait or Landscape orientation.
f Click OK.
2 Choose a paper type and print quality:
a From the software application File menu, choose Print.
b From the printer pop-up menu, choose Lexmark Z54.
www.lexmark.com
Page 49

Lexmark Z54
Printer overview
49Printing ideas
c From the pop-up menu i n the upper left, choose Quality & Media.
d Select Plain for the paper type.
Basic printing
Printing ideas
Maintenance
Troubleshooting
Notices
Index
Using this
Guide...
e Select Normal for the print quality.
Step 3: Print your banner
1 Click Print.
2 When the banner is finished printing:
a Press the paper feed button to feed any extra paper through the printer.
b Tear the banner paper on the perforated line (if there is any extra paper).
www.lexmark.com
Page 50

Lexmark Z54
50Maintenance
Printer overview
Basic printing
Printing ideas
Maintenance
Troubleshooting
Notices
Index
• Replacing the print cartridge
• Aligning the print cartridges
• Cleaning the print cartridge nozzles
• Wiping the print cartridge nozzles and contacts
• Preserving the print cartridges
• Ordering supplies
Using this
Guide...
www.lexmark.com
Page 51

Lexmark Z54
51Maintenance
Printer overview
Basic printing
Printing ideas
Maintenance
Troubleshooting
Notices
Index
Replacing the print cartridge
Before you install a new or replacement print cartridge, remove the used one.
Removing the used cartridge
1 Make sure the power light is on.
2 Raise the front cover.
The cartridge carrier moves to the loading position,
unless the printer is busy.
3 Remove the used cartridge. Store it in an airtight
container or dispose of it properly.
Using this
Guide...
www.lexmark.com
Page 52

Lexmark Z54
52Maintenance
Printer overview
Basic printing
Printing ideas
Maintenance
Troubleshooting
Notices
Index
Installing a cartridge
For best results, use Lexmark supplies. Refilling print cartridges can affect print quality and
cause damage to the printer.
Your printer came with: You can print with:
Color cartridge
(P/N 15M0120
Black cartridge
(P/N 12A1970
* You can purchase a photo cartridge (P/N 12A1990) separately.
)
)
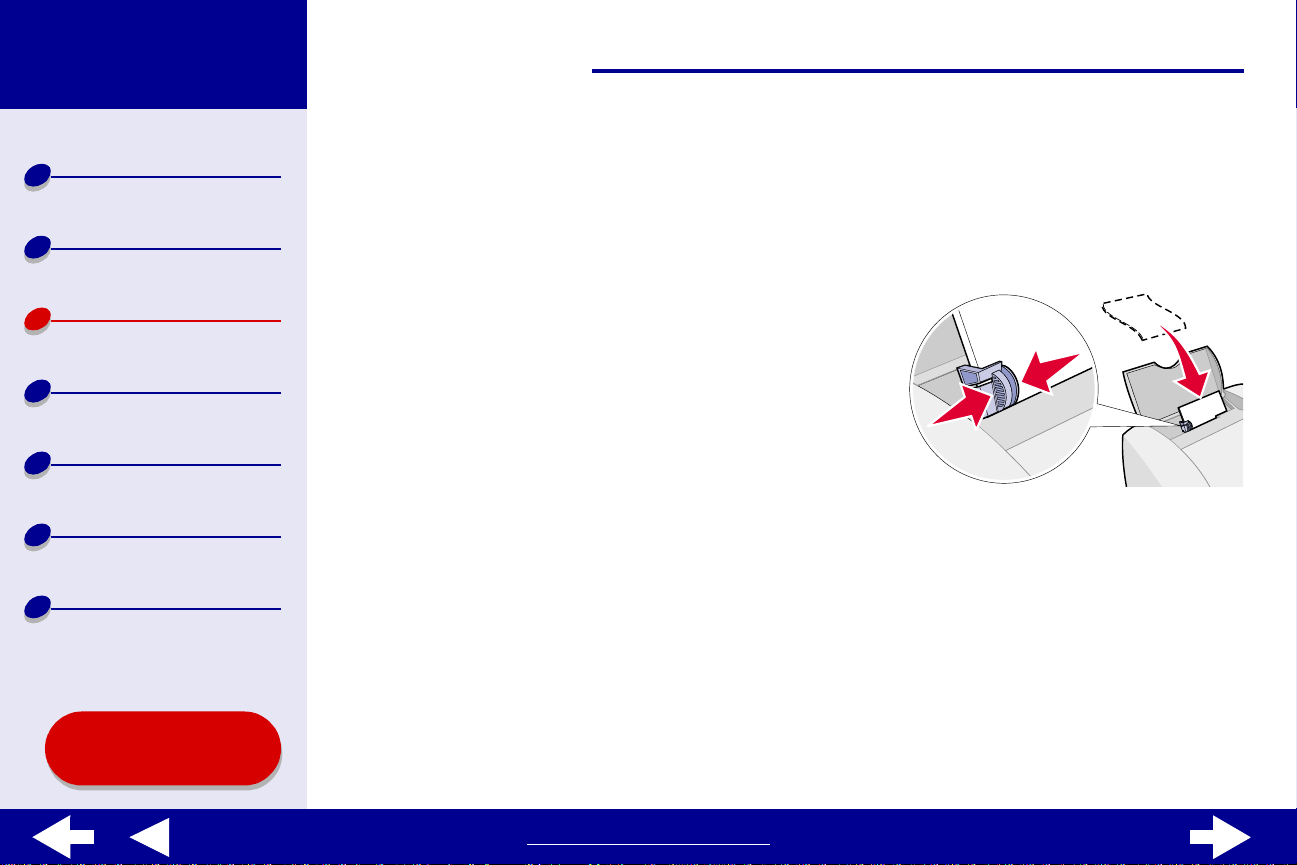
1 If you are installing a new cartridge,
remove the sticker and transparent tape
from the back and bottom of the cartridge.
Warning: Do not touch or remove the
gold contact areas on the bac k
and bottom of the cartridge.
• A black cartridge in the right carrier and a color
cartr i dge in the left carr i er.
• A photo cartridge* in the right carrier and a
color cartridge in the left carrier.
Using this
Guide...
www.lexmark.com
Page 53

Lexmark Z54
Printer overview
Basic printing
Printing ideas
53Maintenance
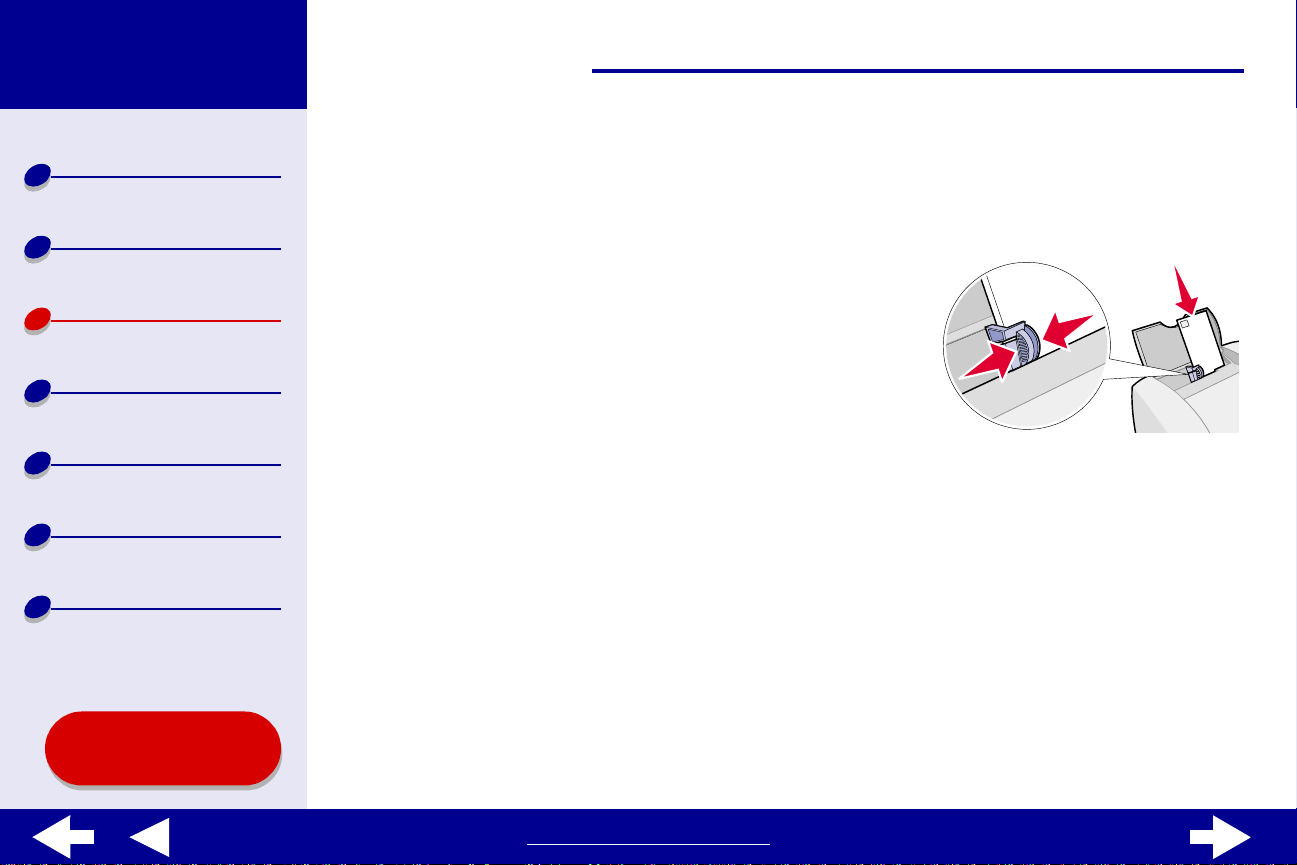
2 Open the front cover.
Note: The cartridge carrier moves to the
loading position.
3 Insert the color cartridge in the left carrier . Insert the
black cartridge in the right carrier.
Maintenance
Troubleshooting
Notices
Index
Using this
Guide...
4 Snap the cartridges into
place.
5 Close the front cover.
Note: The front cover must be closed to start a new
print job.
www.lexmark.com
SNAP
SNAP
Page 54

Lexmark Z54
54Maintenance
Printer overview
Basic printing
Printing ideas
Maintenance
Troubleshooting
Notices
Index
Specifying cartridge settings in the printer software
Before you specify the print cartridge settings in the printer software, install the cartridges.
For help, see Installing a cartridge.
1 After you install t he cartridge, from a Finder window, click Computer, and then double-
click the OS X disk icon Library folder Printers folder Lexmark folder.
2 Double-click the Lexmark Z54 Utility icon.
3 Click the Install/Cha nge Cartridge button.
4 Choose the type of cartridge you installed.
5 Important: For correct ink levels, specify whether the cartridge is a New Cartridge or
an Old Cartridge.
6 Click OK.
7 Choose to automatically or manually align the cartridges.
8 Click Continue to print an alignment page.
9 Follow the instructions on the screen to complete cartridge alignment. For help, see
Aligning the print cartridges.
Using this
Guide...
www.lexmark.com
Page 55

Lexmark Z54
55Maintenance
Printer overview
Basic printing
Printing ideas
Maintenance
Troubleshooting
Notices
Index
Using this
Guide...
Aligning the print cartridges
Typically, you only align print cartridges after installing or replacing a cartridge. However, you
may also need to align cartridges when:
• Characters are improperly formed or are misaligned at the left margin.
• Vertical, straight lines are wavy.
To align the cartridges:
1 Load plain paper. For help, see Load the paper.
2 From a Finder window, click Computer, and then double-click the OS X disk icon
Library folder Printers folder Lexmark folder.
3 Double-click the Lexmark Z54 Utility icon.
4 From the Cartridges tab , click Align Cartridges.
The Cartridge Alignment dialog appears.
5 Decide how you want to align the cartridges:
– If you choose Automatic Alignment (recommended), the printer determines the
best alignment and automatically aligns the cartridges.
– If you choose Manual Alignment, you must select the best alignment values from
the printed page.
www.lexmark.com
Page 56

Lexmark Z54
Printer overview
Basic printing
Printing ideas
Maintenance
Troubleshooting
Notices
Index
56Maintenance
a If you chose to manually align the cartridges, find the number under the darkest
arrow for each alignment group.
b Use the arrows in the Align Cartridges dialog to select the number that matches
the darkest arrow on t he printed page f or each alignment group, and then click OK.
If the alignment page does not print, make sure you have completely removed the
sticker and transparent tape from both cartridges. For help, see Installing a
cartridge.
Using this
Guide...
www.lexmark.com
Page 57

Lexmark Z54
57Maintenance
Printer overview
Basic printing
Printing ideas
Maintenance
Troubleshooting
Notices
Index
Using this
Guide...
Cleaning the print cartridge nozzles
To improve print qual ity, you may need to clean the print cartridge nozzles. Clean the nozzles
when:
• Characters are not printing completely. • Vertical, straight lines are not smooth.
• White dashes appear in graphics or printed
text.
• Print is smudged or too dark.
To clean the nozzles:
1 Load paper. For help, see Load the paper.
2 Open the Lexmark Z54 Utility.
3 On the Cartridges tab, click Clean Print Nozzles.
A nozzle page prints, forcing ink through the nozzles to clean any that are clogged.
4 Print your document again to verify your print quality has improved.
5 To further improve print quality, try Wiping the print cartridge nozzles and
contacts, and then print your document again. If the print quality has not improv ed,
try Cleaning the print cartridge nozzles up to two more times.
• Colors on print jobs are faded or they differ
from the colors on the screen.
www.lexmark.com
Page 58

Lexmark Z54
58Maintenance
Printer overview
Basic printing
Printing ideas
Maintenance
Troubleshooting
Notices
Index
Wiping the print cartridg e nozzles and contacts
If the print quality does not improve after Cleaning the print cartridge nozzles, there may
be dried ink on the nozzles or contacts.
1 Remove the print cartridge. For help, see Replacing the print cartridge.
2 Dampen a clean, lint-free cloth with water.
Hold the damp cloth against the nozzles
ab
for about three seconds. Gently blot and
wipe dry in one direction.
Nozzles
3 Allow the nozzles and contacts to dry completely.
Hold a clean section of cloth against the
contacts for about three seconds. Gently blot
and wipe dry in one direction.
Contacts
Using this
Guide...
4 Reinstall the print cartridges, and then print your document again.
www.lexmark.com
Page 59

Lexmark Z54
Printer overview
Basic printing
Printing ideas
Maintenance
Troubleshooting
Notices
Index
59Maintenance
5 If the print quality has not improved, try Cleaning the print cartridge nozzles up to
two more times.
6 If print quality is still unsatisfactory, replace your print cartridges. For help, see
Replacing the print cartridge.
Using this
Guide...
www.lexmark.com
Page 60

Lexmark Z54
60Maintenance
Printer overview
Basic printing
Printing ideas
Maintenance
Troubleshooting
Notices
Index
Preserving the print car tridges
To ensure the longest life from your print cartridges and optimum performance from your
printer:
• Keep a new cartridge in its packaging until you are ready to inst all it.
• Do not remo ve a cartridge from the printer except to replace i t, clean it, or store it in an
airtight container. The cartridge will not print correctly if left exposed f or an extended
period of time.
Lexmark’s printer warranty does not cover repair of failures or damage caused by a refilled
cartridge. Lexmark does not recommend use of refilled cartridges. Refilling cartridges can
affect print quality and cause damage to the printer. For best results, use Lexmark supplies.
Using this
Guide...
www.lexmark.com
Page 61

Lexmark Z54
61Maintenance
Printer overview
Basic printing
Printing ideas
Maintenance
Troubleshooting
Notices
Index
Ordering supplies
To order supplies or locate a dealer near you, contact the Lexmark Web site at
www.lexmark.com.
Item: Part number:
Color cartridge 15M0120 or 15M0125
Black cartridge 12A1970 or 12A1975
Photo cartridge (optional) 12A1990
USB cable 12A2405
Using this
Guide...
www.lexmark.com
Page 62

Lexmark Z54
62Troubleshooting
Printer overview
Basic printing
Printing ideas
Maintenance
Troubleshooting
Notices
Index
• Solving general printing problems
• Solving printer software installation problems
• Solving network printing problems
• Understanding error messages and flashing lights
• Resolving unsuccessful or slow printing
• Clearing paper misfeeds or j ams
• Improving print quality
• Solving specialty paper problems
• Alignment page does not print
Using this
Guide...
www.lexmark.com
Page 63

Lexmark Z54
63Troubleshooting
Printer overview
Basic printing
Printing ideas
Maintenance
Troubleshooting
Notices
Index
Using this
Guide...
Solving general printing problems
When you hav e a printing problem, first mak e sure:
• The powe r supply is plugged i nto th e printer and a pro perly grounded elect rical outlet.
• Both the computer and the printer are on. If you are using your printer on a network,
make sure your computer i s connected to the network, your Lexmark adapter is on,
and all indicator lights are on. For more information, refer to the adapter
documentation.
• No printer lights are b linking. For help, see Understanding error messages and
flashing lights.
• The printer software is installed correctly:
a From a Finder window, click Computer OS X disk Library Printers
Lexmark.
b If there is not a Lexmark Z54 Utility, install the printer softwar e.
• The paper is loaded correctly. For help, see Load the paper.
• You installed the cartridges correctly. For help, see Replacing the print cartridge.
• The printer is set as the default or current printer.
To set the printer to be the default printer:
www.lexmark.com
Page 64

Lexmark Z54
Printer overview
Basic printing
64Troubleshooting
a From the Finder, click the Applications icon.
b From the Applications folder, double-click the Utilities folder, and then double-click
Print Center.
c If necessary, from the Printer menu, click View Printer List.
Printing ideas
Maintenance
Troubleshooting
Notices
Index
Using this
Guide...
d Highlight the Lexmark Z54 in the list.
e In the Printers menu, select Make Default.
To set the printer to be the current printer:
a From the software application File menu, choose Print.
b From the Format for pop-up menu, choose Lexmark Z54.
• The printer is c onnected directly to y our c omputer, a network connection, or through a
Lexmark adapter.
After you check al l of the previous items, try Printing a test page.
www.lexmark.com
Page 65

Lexmark Z54
65Troubleshooting
Printer overview
Basic printing
Printing ideas
Maintenance
Troubleshooting
Notices
Index
Printing a test page
1 From a Finder window, click Computer, and then double-click the OS X disk icon
Library folder Printers folder Lexmark folder.
2 Double-click the Lexmark Z54 Utility icon.
3 From the Cartridges tab, click Print Test Page to make sure the printer is functioning
properly.
– If a test page prints, the printer is working properly. Check the documentation for
the software application you used to create your document.
– If the test page does not print, see Test page does not print.
Using this
Guide...
www.lexmark.com
Page 66

Lexmark Z54
66Troubleshooting
Printer overview
Basic printing
Printing ideas
Maintenance
Troubleshooting
Notices
Index
Solving printer software installation problems
If the printer software does not install properly, a communications error message appears
when you try to print. You may need to uninstall the printer software, and then reinstall it.
Uninstalling the printer software
1 Insert the printer software CD.
The Lexmark Installer screen appears.
2 Double-click the CD icon.
3 Double-click Install OS X.
4 Click Uninstall.
5 Follow the steps on your screen to uninstall the printer software.
6 Continue with Installing the p rinter softwar e .
Note: If the installer did not automatically launch, double-click the Install icon to
launch the installer.
Using this
Guide...
www.lexmark.com
Page 67

Lexmark Z54
67Troubleshooting
Printer overview
Basic printing
Printing ideas
Maintenance
Troubleshooting
Notices
Index
Using this
Guide...
Installing the printer software
You can install the printer softwar e using the CD that came with your printer, or you can
download it from the Lexmark Web site at www.lexmark.com.
To connect your printer to a network with a Lexmark adapter, refer to the documentation that
came with your adapter.
Using the CD that came with your printer
1 Close all open software applications.
2 When your desktop appears, insert the printer software CD.
3 Double-click Lexmark Z54 CD.
4 Double-click Install OS X.
5 Click Install and Agree.
Note: If the Printer Selection or the New Network Printer Found dialog box
appears, follow the instructions displayed. Click the ? on the screen or
contact your network administ rator for hel p.
6 Choose the country or region closest to you if your count ry is not listed.
7 Click Continue.
www.lexmark.com
Page 68

Lexmark Z54
Printer overview
68Troubleshooting
8 Follow the instructions on your screen to complete printer software installation.
9 On the Printer Selection screen, click Open Print Center.
Basic printing
Printing ideas
Maintenance
Troubleshooting
Notices
Index
Using this
Guide...
Note: The Lexmark Z54 should appear in the Print Center as added
automatically. If it does not, click Add Printer.
10 Click the red close button to close the Print Center.
11 On the Printer Selection screen, click Continue.
12 Click Continue to print an alignment page, used to automatically align the cartridges.
– If the alignment page does not print, make sure you installed the cartridges
correctly. For help, see Installing a cartridge.
– If the paper is jammed, make sure you follow the instructions on the error
message that is displa yed. For help, see Clearing paper misfeeds or jams.
Using the World Wide W e b
1 Make sure Stuffit Expander is loaded on your system.
2 From the Le xmark Web site , www.lexmark.com, select the appropriate driv er f or your
operating system.
3 Click the binhex (.hqx) file to download and install.
www.lexmark.com
Page 69

Lexmark Z54
Printer overview
69Troubleshooting
4 Use Stuffit Expander to expand the file on your desktop.
5 Double-click the folder to open it.
Basic printing
Printing ideas
Maintenance
Troubleshooting
Notices
Index
Using this
Guide...
6 Double-click Install.
7 Follow the instructions on your screen to install the printer software.
www.lexmark.com
Page 70

Lexmark Z54
70Troubleshooting
Printer overview
Basic printing
Printing ideas
Maintenance
Troubleshooting
Notices
Index
Solving network printing problems
For help, first see Solving general printing problems.
If one or more of the follo wing conditions appl ies to your network printer , y ou must enter an IP
address to set up your network printer:
• Your printer is listed as unconf igured in the Network Printer Configuration Dialog or in
the Printer Selection dialog.
• Your printer is on a remote subnet.
If one or more of the conditions abo ve applies t o your net work printer, continue with Entering
an IP address. If none of these conditi ons apply, continue with Troubleshooting your
network printer.
Using this
Guide...
www.lexmark.com
Page 71

Lexmark Z54
71Troubleshooting
Printer overview
Basic printing
Printing ideas
Maintenance
Troubleshooting
Notices
Index
Using this
Guide...
Entering an IP address
To enter an IP address and set up your network printer:
1 Open the Lexmark Z54 Utility.
2 From the Advanced menu, choose Network Printer Configuration.
3 From the dialog:
Click: To:
A printer from the list of
avai lable netw ork printers,
and then click Configure...
Add Remote... Expand the printer list to include printers on a remote subnet.
The IP address of your network printer is set.
4 Click Done.
Enter an available IP address for the selected printer. For help
selecting an IP address, refer to the documentation you used to
set up your network or contact your network administrator.
• If you choose Add Single Printer, enter the IP address for
the printer you want to add.
• If you choose Search Subnet, enter the IP address of the
subnet you want to scan. Any remote printers that are
found will be added to the printer list. These printers are
saved in the list if a printer is added in Print Center.
www.lexmark.com
Page 72

Lexmark Z54
Printer overview
Basic printing
72Troubleshooting
5 Click the red close button to close the Lexmark Z54 Utility.
Troubleshooting your network printer
Try these solutions when you cannot print to your network printer:
Printing ideas
Maintenance
Troubleshooting
Notices
Index
Using this
Guide...
1 Make sure your pr inter is connected to a working network connection.
2 If you are using a Le xmark adapter, make sure all of the indicator lights are on. For
help locating these lights, refer to the adapter documentation.
3 Make sure the printer software is installed correctly:
a From a Finder window, click Computer OS X icon Library Printers
Lexmark.
b If a Lexmark Z54 Utility for y our printe r does not appear, install the printer software .
For help, see Installing the printer software.
4 Try Printing a test page.
If the test page does not print, see Test page does not print.
www.lexmark.com
Page 73

Lexmark Z54
73Troubleshooting
Printer overview
Basic printing
Printing ideas
Maintenance
Troubleshooting
Notices
Index
Understanding error messages and flashing lights
Use this section to understand printer soft ware err or messages on y our compute r screen and
blinking lights on y our printer. For information about lights on a Lexmark adapter, refer to the
adapter documentation.
Paper Jam message
For help clearing a paper jam, see Clearing paper misfeeds or jams.
Ink Low message
A print cartridge is running out of ink. To order a new cartridge or locate a dealer near you,
contact the Lexmark Web site at www.lexmark.com. For help installing the cartridge, see
Replacing the print cartridge.
Using this
Guide...
www.lexmark.com
Page 74

Lexmark Z54
74Troubleshooting
Printer overview
Basic printing
Printing ideas
Maintenance
Troubleshooting
Notices
Index
Paper feed light is blinking
If the printer is out of paper:
1 Load paper. For help, see Load the paper.
2 Press the paper feed button.
If the printer has a paper jam, see Clearing paper
misfeeds or jams.
Power light is flashing
The print cartridge carrier is stalled.
1 Check your computer screen for error messages.
2 Turn the printer off.
3 Wait a few seconds, and then turn the printer back
on. For more help, see Clearing paper misfeeds or jams.
Using this
Guide...
www.lexmark.com
Page 75

Lexmark Z54
75Troubleshooting
Printer overview
Basic printing
Printing ideas
Maintenance
Troubleshooting
Notices
Index
Resolving unsuccessful or slow printing
For help, first see Solving general printing problems.
If there is still a problem, cl ick the topic that best describes it:
• Printer is plugged in, but does not
print
• Test page does not print • Printer prints very slowly
• Printer ejects a blank page after
appearing to print
Using this
Guide...
www.lexmark.com
Page 76

Lexmark Z54
76Troubleshooting
Printer overview
Basic printing
Printing ideas
Maintenance
Troubleshooting
Notices
Index
Using this
Guide...
Printer is plugged in, but does not print
Make sure:
• The printer is o n and th e printer cab l e is secur ely att ached at both ends . If y our printer
is connected to a network, make sure the Lexmark adapter is on and all indicator
lights are on. For help, refer to the adapter documentation.
• The paper is loaded correctly and not pushed too far into the printer. For help, see
Basic printing. If the paper is jammed, see Clearing paper misfeeds or jams.
• The printer is not being held or paused. To chec k the printer status:
a From the Finder, click the Applications icon.
b From the Applications folder, double-click the Utilities icon, and then double-click
the Print Center.
c If necessary, click View Printer List.
d Highlight the Lexmark Z54 in the list.
e From Queue menu, choose Start Queue, if available.
f From the Printe rs menu, choose Show Queue.
g Select your job from the list.
h Click Resume or Retry.
www.lexmark.com
Page 77

Lexmark Z54
Printer overview
77Troubleshooting
• The printer is set as the default printer. To set the printer as the default:
a From the Finder, click the Applications icon.
Basic printing
Printing ideas
Maintenance
Troubleshooting
Notices
Index
Using this
Guide...
b From the Applications folder, double-click the Utilities icon, and then double-click
the Print Center.
c If necessary, click View Printer List.
d Highlight the Lexmark Z54 in the list.
e From the Printers menu, choose Make Default.
After you check these items, try Printing a test page.
If the test page prints, the printer is funct ioning properly. If it does not print, see Test page
does not print.
www.lexmark.com
Page 78

Lexmark Z54
78Troubleshooting
Printer overview
Basic printing
Printing ideas
Maintenance
Troubleshooting
Notices
Index
Test page does not print
For help, first see Solving general printing problems, then:
• If the paper is jammed, see Clearing paper misfeeds or jams.
• Make sure the printer is not being held or paused. To check the printer status:
a From the Finder, click the Applications icon.
b From the Applications folder, double-click the Utilities icon, and then double-click
the Print Center.
c If necessary, click View Printer List.
d Highlight the Lexmark Z54 in the list.
e From the Queue menu, choose Start Queue, if availab le.
f From the Printe rs menu, choose Show Queue.
g Select your job from the list.
h Click Resume or Retry.
Using this
Guide...
www.lexmark.com
Page 79

Lexmark Z54
Printer overview
Basic printing
79Troubleshooting
i Try printing your test page again. If it still does not print, see:
– Resolving unsuccessful or slow printing
– Solving printer software installation problems
– Solving network printing problems
Printing ideas
Maintenance
Troubleshooting
Notices
Index
Using this
Guide...
Printer ejects a blank page after appearing to print
Make sure:
• You remove the sticker and transparent tape from the back and bottom of the print
cartridges. For help, see Replacing the print cartridge.
• Your cartridge does not have clogged nozzles. Try Cleaning the print cartridge
nozzles.
www.lexmark.com
Page 80

Lexmark Z54
80Troubleshooting
Printer overview
Basic printing
Printing ideas
Maintenance
Troubleshooting
Notices
Index
Printer prints very slowly
• If y ou are usin g a Mac OS X v ersion prior to 10. 1, consider upg rading to enhance print
system performance.
• Close any software applications not in use.
• Check the document you are printing. Photos and graphics may take longer to print
than regular text. Documents that are large or that contain background images may
also take longer to print.
• Check t he printer t o see if anothe r doc ument is bei ng printed. Print jobs are printe d in
the order the printer recei v es th em. I f oth er documents w ere sent t o the p rinter before
yours, y our document is delayed until the other documents print.
• Decrease the print quality set ting to Normal or Quick Print.
Note: Higher print quality settings result in better quality documents, but may
take longer to print.
Using this
Guide...
www.lexmark.com
Page 81

Lexmark Z54
81Troubleshooting
Printer overview
Basic printing
Printing ideas
Maintenance
Troubleshooting
Notices
Index
Clearing paper misfeeds or jams
Click the topic that best describes your problem:
• Paper misfeeds or multiple sheets
feed
• Printer does not feed envelopes or
specialty paper
• Printer has a paper jam
Using this
Guide...
www.lexmark.com
Page 82

Lexmark Z54
82Troubleshooting
Printer overview
Basic printing
Printing ideas
Maintenance
Troubleshooting
Notices
Index
Paper misf eeds or multiple sheets feed
Make sure:
• The edges of your paper are not curled.
• Your paper is recommended for inkjet printers.
• A piece of paper from a previous print job is not jammed in the printer.
• You do not load too much paper. Depending on the weight of the paper, you can load
up to 100 sheets of plain paper.
• You do not force the paper too far into the printer.
• The paper guide is against the lef t edge of the paper.
• The paper guide does not cause the paper to bow.
• The printer is on a flat, level surface.
• The printer settings y ou have chosen are correct for the type of document you are
printing. For help, see Basic printing or Printing id e a s.
Using this
Guide...
www.lexmark.com
Page 83

Lexmark Z54
83Troubleshooting
Printer overview
Basic printing
Printing ideas
Maintenance
Troubleshooting
Notices
Index
Using this
Guide...
Printer does not feed envelopes or specialty paper
Make sure:
• Your printer feeds paper without problems. Load the envelopes or specialty paper
vertically against the right side of the paper support. Squeeze and slide the paper
guide to the left edge of the envelopes or specialty paper. For help, see Printing
ideas.
• You select the a ppropriat e en velope or specialty paper size in the Page Setup dialog
and the appropriate paper type in the Print dialog.
• You are using a specialty paper or envelope size supported by your printer.
• Your software application is designed to print envelopes. For help, check your
software application documenta ti on.
• The envelope or specialty paper is not jammed. For help, see Printer has a paper
jam.
• Your printer is not being held or paused. To check the printer status:
a From the Finder, click the Applications icon.
b From the Applications folder, double-click the Utilities icon, and then double-click
the Print Center.
c If necessary, from the Printer menu, choose View Printer List.
www.lexmark.com
Page 84

Lexmark Z54
Printer overview
84Troubleshooting
d Highlight the Lexmark Z54 in the list.
e From the Queue , choose Start Queue, if availab le.
Basic printing
Printing ideas
Maintenance
Troubleshooting
Notices
Index
Using this
Guide...
f From the Printe rs menu, choose Show Queue.
g Select a job from the list.
h Click Resume or Retry.
Printer has a paper jam
If the paper is lodged too far into the printer and cannot be removed:
1 Turn the printer off.
2 Turn the printer back on.
3 If the printer does not automatically eject the page:
a Turn the printer off.
b Pull firmly on the paper to remove it.
If you cannot reach the paper, raise the front cover, pull the paper out, and then
close the front cover.
c Turn the printer on.
www.lexmark.com
Page 85

Lexmark Z54
85Troubleshooting
Printer overview
Basic printing
Printing ideas
Maintenance
Troubleshooting
Notices
Index
Improving print quality
If print quality is unsatisf actory, you may need t o adjust y our margi n settings , choose a higher
print quality, align the print cartridges, or clean the nozzles.
Click one of the topics below for more information on how you can improve print quality:
• Print is too dark or smudged • Printed characters are improperly
formed or misaligned
• Vertical straight lines are not smooth • Colors on the printout differ from the
colors on the screen
• Print smears on the page • Colors on the printout are faded
• Printed pages have alternating bands
of light and dark print (intermittent
printing)
• Print quality is poor at the edges • Photos do not print as expected
• Characters are missing or unexpected
Using this
Guide...
www.lexmark.com
Page 86

Lexmark Z54
86Troubleshooting
Printer overview
Basic printing
Printing ideas
Maintenance
Troubleshooting
Notices
Index
Print is too dark or smudged
• Make sure the paper is straight and not wrinkled.
• Let the ink dry completely before handling the paper.
• Mak e sure the paper type and paper size settings in the printer software match the
paper loaded in the printer. For help, see Understanding the printer software.
• Change the print quality setting to Quick Print.
• Try Cleaning the print cartridge nozzles.
Vertical straight lines are not smooth
To improve the print quality of vertical straight lines in tables, borders , and graphs:
• Select a higher print quality.
• Try Aligning the print cartridges.
• Try Cleaning the print cartridge nozzles.
Using this
Guide...
www.lexmark.com
Page 87

Lexmark Z54
87Troubleshooting
Printer overview
Basic printing
Printing ideas
Maintenance
Troubleshooting
Notices
Index
Print smears on the page
• The next page exiting the printer may be smearing the ink. Remove each page as it
exits the printer and let it dry completely before stacking.
• Try Cleaning the print cartridge nozzles.
Printed pages have alternating bands of light and dark print
(intermittent printing)
• From the Print Quality area, clic k Better or Best.
• If y our printe r is c onnected t o your computer through a hub or peripheral device , such
as a scanner or fax machin e, connect the printer direc tly to y our comput er with a USB
cable.
• If your printer is connected to your network, connect the printer directly to your
computer with a USB cable.
Using this
Guide...
www.lexmark.com
Page 88

Lexmark Z54
88Troubleshooting
Printer overview
Basic printing
Printing ideas
Maintenance
Troubleshooting
Notices
Index
Print quality is poor at the edges
Like other printers, your printer cannot print on the e xtreme edges of a page.
Margin: Minimum setting:
Left and right • 6.35 mm (0.25 in.) for U.S. Letter, U.S. Legal, Banner Letter,
and custom paper sizes
• 3.175 mm (0.125 in.) for envelopes
• 3.37 mm (0.13 in.) for most paper sizes
Top • 1.7 mm (0.067 in.)
Bottom • 12.7 mm (0.5 in.) for black print jobs
• 19 mm (0.75 in.) recommended for color print jobs
Using this
Guide...
www.lexmark.com
Page 89

Lexmark Z54
89Troubleshooting
Printer overview
Basic printing
Printing ideas
Maintenance
Troubleshooting
Notices
Index
Printed characters are im properly formed or misaligned
• Cancel all print jobs and print your job again. To cancel all print jobs:
a From the Finder, click the Applications icon.
b From the Applications folder, double-click the Utilities icon, and then double-click
the Print Center.
c If necessary, click View Printer List.
d Highlight the Lexmark Z54 in the list.
e From the Queue menu, choose Start Queue.
f From the Printe rs menu, choose Show Queue.
g Select the job you want to delete.
h Click Delete.
i Repeat step g and step h until all jobs are deleted.
• Try Aligning the print cartridges.
• Try Cleaning the print cartridge nozzles.
Using this
Guide...
www.lexmark.com
Page 90

Lexmark Z54
90Troubleshooting
Printer overview
Basic printing
Printing ideas
Maintenance
Troubleshooting
Notices
Index
Colors on the printout differ from the colors on the screen
• A cartridge may be low on ink. For help, see Replacing the print cartridge.
• Use a different paper brand. Each paper brand accepts ink differentl y and prints wit h
color variations .
Select Natural Color as the document color:
1 From the software application File menu, choose Print.
2 From the Printer pop-up menu , select Lexmark Z54.
3 From the pop-up menu i n the upper left, choose Color Options.
4 From the Document Color pop-up men u , choose Natural.
Colors on the printout are faded
Try the suggestions listed in the section Colors on the printout differ from the colors on
the screen. If the colors still seem faded, try Cleaning the print cartridge nozzles.
Characters are missing or unexpected
Try Cleaning the print cartridge nozzles.
Using this
Guide...
www.lexmark.com
Page 91

Lexmark Z54
91Troubleshooting
Printer overview
Basic printing
Printing ideas
Maintenance
Troubleshooting
Notices
Index
Photos do not print as expected
To improve the quality of printed photos:
• Select a higher print quality.
• Select photo paper as the paper type.
Using this
Guide...
www.lexmark.com
Page 92

Lexmark Z54
92Troubleshooting
Printer overview
Basic printing
Printing ideas
Maintenance
Troubleshooting
Notices
Index
Solving specialty paper problems
Use this section to help solve problems with specialty paper.
Glossy or photo papers or transparencies stick together
• Use a photo paper or transparency designed for an inkjet printer.
• Make sure y ou loaded the paper corr ectly (wi th print side f acing y ou) and selected the
appropriate settings in the printer software. For help, see Printing photos or
Printing transparencies.
• Remove each page as it exits the printer and let it dry completely before stacking.
Transparencies or photos contain white lines
• Make sure y ou loaded the paper corr ectly (wi th print side f acing y ou) and selected the
appropriate settings in the printer s oftwar e. F or help , see Printing transparenci es or
Printing photos.
• Choose a higher print quality, such as Better or Best. Fo r help, see Basic printing.
• Try Cleaning the print cartridge nozzles.
Using this
Guide...
www.lexmark.com
Page 93

Lexmark Z54
93Troubleshooting
Printer overview
Basic printing
Printing ideas
Maintenance
Troubleshooting
Notices
Index
Alignment page does not print
Make sure:
• You completely removed the transparent tape and stick er from th e back and bottom of
the print cartridges.
• You installed the cartridges correctly. For help, see Installing a cartridge.
• You loaded the paper correctly and did not push the paper too far into the printer. For
help, see Basic printing.
• If you are connected to a network with a Lexmark adapter, the indicator lights are on.
For more information, see the adapter documentation.
Using this
Guide...
www.lexmark.com
Page 94

Lexmark Z54
Printer overview
Basic printing
94Notices
This section contains inform ation regarding legal notices.
• Edition notice
• Trademarks
Printing ideas
Maintenance
Troubleshooting
Notices
Index
Using this
Guide...
• Warning
www.lexmark.com
Page 95

Lexmark Z54
95Notices
Printer overview
Basic printing
Printing ideas
Maintenance
Troubleshooting
Notices
Index
Using this
Guide...
Edition notice
Edition: January 2002
The following paragraph does not apply to any country where such provisions are
inconsistent with local law:
PUBLICATION “AS IS” WITHOUT WARRANTY OF ANY KIND, EITHER EXPRESS OR
IMPLIED, INCLUDING, BUT NOT LIMITED TO, THE IMPLIED WARRANTIES OF
MERCHANTABILITY OR FITNESS FOR A PARTICULAR PURPOSE. Some states do not
allow disclaimer of express or implied warranties in certain transactions; therefore, this
statement may not apply to you.
This publication could include technical inaccuracies or typographical errors. Changes are
periodically made to the information herein; these changes will be incorporated in later
editions. Improvements or changes in the products or the programs described may be made
at any time.
Comments about this publication may be addressed to Lexmark International, Inc.,
Department F95/032-2, 740 West New Circle Road, Lexington, Kentucky 40550, U.S.A. In
the United Kingdom and Eire, send to Lexmark International Ltd., Marketing and Services
Department, Westhorpe House, Westhorpe, Marlow, Bucks SL7 3RQ. Lexmark may use or
distribute any of the information you supply in any way it believes appropriate without
incurring any obligation to you. You can purchase additional copies of publications related to
LEXMARK INTERNATIONAL, INC., PROVIDES THIS
www.lexmark.com
Page 96

Lexmark Z54
Printer overview
Basic printing
Printing ideas
Maintenance
96Notices
this product by calling 1- 800-553-9727. I n the United Kingd om and Eire, call 0628-481500 . In
other countries, contact your point of purchase.
References in this publication to products, programs, or services do not imply that the
manufacturer intends to make these available in all countries in which it operates. Any
reference to a product, program, or service is not intended to state or imply that only that
product, program, or service may be used. Any functionally equivalent product, program, or
service that does not infringe any existing intellectual property right may be used instead.
Evaluation and ve rification of operation in conjunction with other products, programs, or
services, except those expressly designated by the manufacturer, are the user’s
responsibility.
Troubleshooting
Notices
Index
Using this
Guide...
© Copyright 2002 Lexmark International, Inc.
All rights reserved.
UNITED STATES GOVERNMENT RESTRICTED RIGHTS
This software and documentation ar e provided with RESTRICTED RIGHTS. Use , duplication,
or disclosure by the Government is subject to restrictions as set for t h in subparagraph
(c)(1)(ii) of the Rights in Technical Data and Computer Softw are clause at DFARS 252.2277013 and in applicable FAR provisions: Lexmark International, Inc., Lexington, KY 40550.
www.lexmark.com
Page 97

Lexmark Z54
97Notices
Printer overview
Basic printing
Printing ideas
Maintenance
Troubleshooting
Notices
Index
Trademarks
Lexmark and Lexmark with diamond design are trademarks of Lexmark International, Inc.,
registered in the United States and/or othe r countries. Color Jetprinter is a trademark of
Lexmark International, Inc.
Other trademarks are the property of their respective owners.
Using this
Guide...
www.lexmark.com
Page 98

Lexmark Z54
98Notices
Printer overview
Basic printing
Printing ideas
Maintenance
Troubleshooting
Notices
Index
Warning
Warning: A warning identifies something that might damage your printer hardware
or software.
Using this
Guide...
www.lexmark.com
Page 99

Lexmark Z54
99Index
Printer overview
Basic printing
Printing ideas
Maintenance
Troubleshooting
Notices
Index
Using this
Guide...
A
aligning print cartridges 55
automatic cartridge
alignment 55
B
banding 87
banner paper 47
black cartridge part number 61
blinking lights 74
buttons
paper feed 15
power 15
C
cable, part numbers
USB 61
cards 27
cartridges, print
aligning 55
cleaning 57
installing52
ordering 61
part numbers 61
preserving 60
removing 51
replacing 51
wiping 58
characters, misformed 89
cleaning, print cartridge
nozzles 57
coated paper 21
color cartridge part number 61
conserving color ink 33
contacts, wiping 58
customizing settings
banners 48
cards 28
coated paper 22
envelopes 31
foils 45
glossy paper 22
greeting cards 28
handouts 39
index cards 28
iron-on transfers 42
labels 36
n-up
See handouts
photo cards 28
photo paper 22
postcards 28
premium paper 25
printing color images in
black and white 34
transparencies 45
t-shirt transfers 42
D
dark or smudged print 86
downloaded printer driver,
installing 68
E
edition notice 95
envelopes 30
error messages
Ink Low 73
Paper Jam 73
F
flashing lights 73
foils
See transparencies
www.lexmark.com
Page 100

Lexmark Z54
100Index
Printer overview
Basic printing
Printing ideas
Maintenance
Troubleshooting
Notices
Index
Using this
Guide...
G
glossy paper 21
greeting cards 27
H
handouts 38
I
improving print quality 85
index cards 27
Ink Low message 73
installing
print cartridges 52
printer software 67
intermittent printing 87
iron-on transfers 41
L
labels 35
Lexmark Utility 11
lights
paper feed 74
power 74
loading
banner paper 47
cards 27
coated paper 21
envelopes 30
foils 44
glossy paper 21
greeting cards 27
handouts 38
index cards 27
iron-on transfers 41
labels 35
photo cards 27
photo paper 21
plain paper 17
postcards 27
premium paper 24
transparencies 44
t-shirt transfers 41
M
manual cartridge alignment 55
margins, minimum set tin gs 88
messages, error
Ink Low 73
Paper Jam 73
N
navigating User’s Guide 2
network, setting up printer 70
notices
edition notice 95
trademarks 97
warning 98
nozzles, print
wiping 58
n-up printing
See handouts
O
ordering supplies 61
P
page settings, changing 4
Page Setup dialog 5
paper exit tray 15
paper feed button 15
paper guide 15
Paper Jam message 73
paper jam, clearing 84
paper loading 17
paper misfeeds 81
www.lexmark.com
 Loading...