

Page 1

Z2400 Series User's Guide
2007 www.lexmark.com
Page 2

Page 3

Contents
Safety information.............................................................................7
Introduction........................................................................................8
Finding information about the printer...........................................................................................................................8
Understanding the printer.............................................................10
Bypassing security warnings during software installation...................................................................................10
Understanding the parts of the printer.......................................................................................................................10
Understanding the printer software.............................................................................................................................12
Installing printer software ...........................................................................................................................................................12
Installing the optional XPS driver (Windows Vista users only).......................................................................................12
Using the Windows printer software.......................................................................................................................................13
Using the Macintosh printer software.....................................................................................................................................14
Installing the printer on a wireless network..............................16
Wireless network compatibility......................................................................................................................................16
Information you will need to set up the printer on a wireless network..........................................................16
Installing the printer on a wireless network..............................................................................................................17
Interpreting the colors of the Wi-Fi indicator light.................................................................................................17
Configuring an IP address manually.............................................................................................................................18
Changing wireless settings after installation............................................................................................................18
Installing the printer on other computers..................................................................................................................19
Advanced wireless setup..................................................................................................................................................20
Creating an ad hoc wireless network...................................................................................................................................... 20
Adding a printer to an existing ad hoc wireless network ................................................................................................23
Frequently asked questions.............................................................................................................................................23
What is a network? ......................................................................................................................................................................... 23
How are home networks configured?.....................................................................................................................................24
Why do I need an installation cable?....................................................................................................................................... 26
How do I attach the installation cable?................................................................................................................................... 26
What is the difference between infrastructure and ad hoc networks?.......................................................................27
Finding the signal strength.........................................................................................................................................................28
What is an SSID? ..............................................................................................................................................................................28
How do I find out what type of security my network is using?......................................................................................28
Can I use my printer on a USB and a wireless connection at the same time?...........................................................28
What is a MAC address?................................................................................................................................................................28
How do I find the MAC address? ...............................................................................................................................................29
What is an IP address?...................................................................................................................................................................29
3
Page 4

How do I locate IP addresses?....................................................................................................................................................29
How are IP addresses assigned?................................................................................................................................................30
What is a key index?....................................................................................................................................................................... 31
Loading paper...................................................................................32
Loading paper.......................................................................................................................................................................32
Loading various paper types...........................................................................................................................................32
Printing...............................................................................................34
Printing basic documents.................................................................................................................................................34
Printing a document......................................................................................................................................................................34
Printing Web pages........................................................................................................................................................................ 34
Printing multiple copies of a document.................................................................................................................................35
Collating printed copies............................................................................................................................................................... 35
Printing the last page first (reverse page order)..................................................................................................................36
Printing multiple pages on one sheet (N-Up).......................................................................................................................36
Pausing print jobs...........................................................................................................................................................................37
Canceling print jobs.......................................................................................................................................................................38
Printing specialty documents.........................................................................................................................................38
Printing envelopes ......................................................................................................................................................................... 38
Printing labels .................................................................................................................................................................................. 39
Printing on custom-size paper...................................................................................................................................................40
Printing other specialty documents ........................................................................................................................................ 41
Saving and deleting print settings................................................................................................................................41
Working with photos.......................................................................43
Using recommended paper.............................................................................................................................................43
Printing photos.....................................................................................................................................................................43
Printing photos from a CD or removable storage device connected to the computer........................................ 43
Maintaining the printer...................................................................45
Maintaining print cartridges............................................................................................................................................45
Installing print cartridges.............................................................................................................................................................45
Removing used print cartridges................................................................................................................................................46
Refilling print cartridges............................................................................................................................................................... 46
Using genuine Lexmark print cartridges................................................................................................................................46
Aligning the print cartridges ...................................................................................................................................................... 47
Cleaning the print cartridge nozzles........................................................................................................................................47
Wiping the print cartridge nozzles and contacts................................................................................................................48
Preserving the print cartridges..................................................................................................................................................49
Cleaning the exterior of the printer..............................................................................................................................49
Ordering supplies................................................................................................................................................................50
4
Page 5

Ordering print cartridges............................................................................................................................................................. 50
Ordering paper and other supplies..........................................................................................................................................50
Troubleshooting...............................................................................52
Using the printer troubleshooting software (Windows only).............................................................................52
Setup troubleshooting......................................................................................................................................................52
Power button is not lit ..................................................................................................................................................................52
Software did not install.................................................................................................................................................................53
Page does not print........................................................................................................................................................................ 54
Solving printer power problems...............................................................................................................................................56
Removing and reinstalling the software................................................................................................................................57
Enabling the USB port in Windows.......................................................................................................................................... 58
Wireless troubleshooting.................................................................................................................................................58
Printing a network setup page .................................................................................................................................................. 58
Wireless troubleshooting checklist..........................................................................................................................................59
Wireless configuration does not continue after the USB cable is attached ..............................................................59
Cannot print over wireless network.........................................................................................................................................60
Cannot print and there is a firewall on the computer....................................................................................................... 63
Wi-Fi indicator light is not lit.......................................................................................................................................................63
Wi-Fi indicator light is green but the printer does not print (Windows only) .......................................................... 63
Wi-Fi indicator light is blinking orange during installation (Windows only).............................................................65
Wi-Fi indicator light is blinking orange during installation (Macintosh only) ..........................................................67
Wi-Fi indicator light is still orange............................................................................................................................................69
Wireless print server not installed ............................................................................................................................................70
“Communication not available” message displays when printing wirelessly ..........................................................71
Notices................................................................................................72
Product information...........................................................................................................................................................72
Edition notice........................................................................................................................................................................72
European EC directives conformity statement for radio products....................................................................75
Power consumption...........................................................................................................................................................78
Networking glossary.......................................................................83
Index...................................................................................................85
5
Page 6

6
Page 7

Safety information
Use only the power supply and power supply cord provided with this product or the manufacturer's authorized
replacement power supply and power supply cord.
Connect the power supply cord to an electrical outlet that is near the product and easily accessible.
CAUTION—POTENTIAL INJURY: Do not twist, bind, crush, or place heavy objects on the power cord. Do not
subject the power cord to abrasion or stress. Do not pinch the power cord between objects such as furniture
and walls. If the power cord is misused, a risk of fire or electrical shock results. Inspect the power cord regularly
for signs of misuse. Remove the power cord from the electrical outlet before inspecting it.
Refer service or repairs, other than those described in the user documentation, to a professional service person.
This product is designed, tested, and approved to meet strict global safety standards with the use of specific Lexmark
components. The safety features of some parts may not always be obvious. Lexmark is not responsible for the use of
other replacement parts.
CAUTION—SHOCK HAZARD: Do not set up this product or make any electrical or cabling connections, such
as the power supply cord or telephone, during a lightning storm.
SAVE THESE INSTRUCTIONS.
7
Page 8
Introduction
Finding information about the printer
Publications
See the For
Quick Setup sheet Initial setup instructions that came with the printer.
Printed Getting Started guide Additional setup instructions that came with the printer.
Note: Not all products come with printed publications.
Electronic User's Guide Complete instructions for using the printer. The electronic version installs
automatically with the printer software.
Customer support
Description Where to find (North America) Where to find (rest of world)
Telephone support
Call us at
• US: 1-800-332-4120
– Monday–Friday (8:00 AM–11:00 PM
EST), Saturday (Noon–6:00 PM EST)
• Canada: 1-800-539-6275
– Support in English: Monday–Friday
(8:00 AM–11:00 PM EST), Saturday
(Noon–6:00 PM EST)
– Support in French: Monday–Friday
(9:00 AM–7:00 PM EST)
• Mexico: 01-800-253-9627
– Monday–Friday (8:00 AM–8:00 PM EST)
Note: Support numbers and times may
change without notice. For the most recent
telephone numbers available, see the printed
warranty statement that came with your
printer.
Telephone numbers and support hours vary
by country or region.
Visit our Web site at www.lexmark.com.
Select a country or region, and then select the
Customer Support link.
Note: For additional information about
contacting Lexmark, see the printed warranty
that came with your printer.
8
Page 9

Description Where to find (North America) Where to find (rest of world)
E-mail support
For e-mail support, visit our Web site:
www.lexmark.com.
1 Click CUSTOMER SUPPORT.
2 Click Technical Support.
3 Select your printer family.
4 Select your printer model.
5 From the Support Tools section, click e-
Mail Support.
E-mail support varies by country or region,
and may not be available in some instances.
Visit our Web site at www.lexmark.com.
Select a country or region, and then select the
Customer Support link.
Note: For additional information about
contacting Lexmark, see the printed warranty
that came with your printer.
6 Complete the form, and then click
Submit Request.
Limited Warranty
Description Where to find (USA) Where to find (rest of world)
Limited Warranty Information
Lexmark International, Inc.
furnishes a limited warranty that
this printer will be free of defects in
materials and workmanship for a
period of 12 months after the
original date of purchase.
To view the limitations and conditions of
this limited warranty, see the Statement of
Limited Warranty included with this
printer, or set forth at
www.lexmark.com.
1 Click CUSTOMER SUPPORT.
2 Click Warranty Information.
Warranty information varies by
country or region. See the printed
warranty that came with your
printer.
3 From the Statement of Limited
Warranty section, click Inkjet &
All-In-One Printers.
4 Scroll through the Web page to view
the warranty.
Record the following information (located on the store receipt and the back of the printer), and have it ready when
you contact customer support so that they may serve you faster:
• Machine Type number
• Serial number
• Date purchased
• Store where purchased
9
Page 10
Understanding the printer
Bypassing security warnings during software installation
Third-party applications, including antivirus, security, and firewall programs may alert you about the printer software
being installed. For your printer to work properly, allow the printer software to be installed on your computer.
Understanding the parts of the printer
8
7
6
5
1
4
W
I
P
R
IN
F
T
I
N
I
G
2
Use the To
1
• Turn the printer on and off.
– If the printer is inactive for 30 minutes, then the printer reverts to sleep mode to
conserve energy. Press
– When the printer is in sleep mode, pressing and holding
turn off the printer.
• Cancel a print job. Press in the middle of a print job.
• Be alerted for errors.
2
• Load or eject paper.
• Cancel a print job. Press in the middle of a print job.
Wi-Fi indicator Check wireless status:
3
• Off—Indicates that no wireless option is available in the printer.
• Orange—Indicates that the printer is ready for wireless connection but it is not
connected
• Orange blinking—Indicates that the printer is configured but unable to
communicate with the wireless network
• Green—Indicates that the printer is connected to a wireless network
3
or start a print job to turn the printer back on.
for two seconds will
Paper exit tray Hold paper as it exits.
4
10
Page 11
Use the To
Access cover
5
• Install or change the print cartridges.
• Clear paper jams.
Paper feed guard Prevent items from falling into the paper slot.
6
Paper guides Keep paper straight when feeding.
7
Paper support Load paper.
8
1
2
3
Use the To
USB port Connect the printer to a computer using a USB cable.
1
Warning:Do not touch the USB port except when plugging in or removing a USB
cable or installation cable.
Power supply Connect the printer to a power source using the power cord.
2
1 Plug the power cord all the way into the power supply on the printer.
2 Plug the power cord into an electrical outlet that other electrical devices have
been using.
1
3 If the light is not on, press .
2
11
Page 12

Use the To
Internal wireless adapter Connect to a wireless network.
3
Understanding the printer software
Installing printer software
Using Windows
1 Close all open software programs.
2 Insert the printer software CD.
3 From the main installation screen, click Install.
4 Follow the instructions on the screens.
Using Macintosh
1 Close all open software applications.
2 Insert the printer software CD.
3 From the Finder desktop, double-click the printer CD icon that automatically appears.
4 Double-click the Install icon.
5 Follow the instructions on the screens.
Using the World Wide Web
1 Go to the Lexmark Web site at www.lexmark.com.
2 From the home page, navigate through the menu selection, and then click Drivers & Downloads.
3 Choose the printer and the printer driver for your operating system.
4 Follow the instructions on the screens to download the driver and install the printer software.
Installing the optional XPS driver (Windows Vista users only)
The XML Paper Specification (XPS) driver is an optional printer driver designed to make use of the advanced XPS
color and graphics features that are available only for Windows Vista users. To use XPS features, you must install the
XPS driver as an additional driver after you install the regular printer software.
Notes:
• Before installing the XPS driver, you must install the printer on your computer.
• Before installing the XPS driver, you must install the Microsoft QFE Patch and then extract the driver files from
the installation software CD. To install the patch, you must have administrator privileges on the computer.
To install the Microsoft QFE Patch and extract the driver:
1 Insert the installation software CD, and then click Cancel when the Setup Wizard appears.
2 Click Computer.
12
Page 13

3 Double-click the CD or DVD drive icon, and then double-click Drivers.
4 Double-click xps, and then double-click the setupxps file.
XPS driver files are copied to your computer, and any required Microsoft XPS files are launched. Follow the
instructions on the screen to finish installing the patch.
To install the XPS driver:
1 Click Control Panel.
2 Under Hardware and Sound, click Printer, and then click Add a Printer.
3 From the Add Printer dialog, click Add a local printer.
4 From the “Use an existing port” drop-down menu, select Virtual printer port for USB, and then click Next.
5 Click Have disk.
The Install From Disk dialog appears.
6 Click Browse, and then navigate to the XPS driver files on your computer:
a Click Computer, and then double-click (C:).
b Double-click Drivers, and then double-click Printer.
c Double-click the folder that has your printer model number, and then double-click Drivers.
d Double-click xps, and then click Open.
e From the Install From Disk dialog, click OK.
7 Click Next on the two additional dialogs that appear.
For more information on the XPS driver, see the XPS readme file on the inst allatio n softw are CD. T he file is loc ated
in the xps folder with the setupxps batch file (D:\Drivers\xps\readme).
Using the Windows printer software
When you set up the printer using the printer software CD, all the necessary software was installed. You may have
chosen to install some additional programs. The following table provides an overview of various software programs
and what they can help you do.
Note: Not all of these programs are available on all printers. For example, if you purchased a printer that does not
scan or fax items, then the printer software will not support these functions.
Use the To
LexmarkTM Productivity Studio or
Lexmark FastPics
Lexmark Fax Solutions Software
• Scan, copy, fax, e-mail, or print a photo or document.
• Transfer photos.
• Make photo greeting cards.
• Adjust settings for the printer.
• Send a fax.
• Receive a fax
• Add, edit, or delete contacts in the built-in phone book.
• Access the Lexmark Fax Setup Utility. Use the Lexmark Fax Setup Utility
to set the Speed Dial and Group Dial numbers, set Ringing and
Answering, and print fax history and status reports.
13
Page 14
Use the To
Printing Preferences
When you select File Print with a document open, a Printing Preferences
dialog appears. The dialog lets you select options for the print job such as
the following:
• Select the number of copies to be printed.
• Print two-sided copies.
• Select the paper type.
• Add a watermark.
• Enhance images.
• Save settings.
Lexmark Wireless Setup Utility
• Set up the wireless printer on a wireless network.
• Change the wireless settings of the printer.
Using the Macintosh printer software
Use the To
Print dialog Adjust the print settings and schedule print jobs.
Printer Services dialog
• Access the printer utility.
• Troubleshoot.
• Order ink or supplies.
• Contact Lexmark.
• Check the printer software version installed on the computer.
Applications are also installed with the printer software during installation. These applications are saved in the printer
folder that appears on the Finder desktop after installation.
1 From the Finder desktop, double-click the printer folder.
2 Double-click the icon of the application that you want to use.
Use the To
Lexmark All-In-One Center
• Scan photos and documents.
• Customize settings for scan jobs.
Lexmark Fax Setup Utility
• Customize settings for fax jobs.
• Create and edit the Speed Dial list.
Lexmark Network Card Reader
• View the contents of a memory device inserted into a network printer.
• Transfer photos and documents from a memory device to the computer over
a network.
14
Page 15

Use the To
Lexmark Printer Utility
• Get help with cartridge installation.
• Print a test page.
• Print an alignment page.
• Clean the print cartridge nozzles.
• Order ink or supplies.
• Register the printer.
• Contact customer support.
Lexmark Wireless Setup Assistant Set up the printer on a wireless network.
Note: Your printer may not come with these applications, depending on the features of the printer that you
purchased.
15
Page 16

Installing the printer on a wireless network
Wireless network compatibility
Your printer contains an IEEE 802.11g wireless print server. Your printer is compatible with IEEE 802.11 b/g/n routers
that are Wi-Fi certified. If you are having issues with an n router, verify with your router manufacturer that the current
mode setting is compatible with g devices, as this setting varies depending on the router brand/model.
Information you will need to set up the printer on a wireless network
To set up the printer for wireless printing, you need to know:
• The name of your wireless network. This is also known as the Service Set Identifier (SSID).
• If encryption was used to secure your network.
• The security key (either a WEP key or WPA passphrase) that allows other devices to communicate on the network
if encryption was used to secure your network.
If your wireless access point (wireless router) is using Wired Equivalent Privacy (WEP) security, the WEP key should
be:
• Exactly 10 or 26 hexadecimal characters. Hexadecimal characters are A–F, a–f, and 0–9.
or
• Exactly 5 or 13 ASCII characters. ASCII characters are letters, numbers, punctuation, and symbols found on a
keyboard.
If your wireless access point (wireless router) is using Wi-Fi Protected Access (WPA) security, the WPA passphrase
should be:
• From 8 to 63 ASCII characters. ASCII characters in a WPA passphrase are case-sensitive.
or
• Exactly 64 hexadecimal characters. Hexadecimal characters are A-F, a-f, and 0-9.
If your wireless network is not using security, then you will not have a security key. Using a wireless network with no
security is not recommended because it can allow intruders to use your network resources without your consent.
Note: Make sure you copy down the security key and SSID exactly, including any capital letters, and store it in a safe
place for future reference. Use the table provided below to write down this information.
Item Description
SSID (name of your wireless network)
Security key (WEP key or WPA passphrase)
Note: If you do not know the SSID of the network that your computer is connected to, launch the wireless utility of
the computer network adapter and look for the network name. If you cannot find the SSID or the security information
for your network, see the documentation that came with the wireless access point (wireless router), or contact the
person who set up your wireless network.
16
Page 17

Installing the printer on a wireless network
Before you install the printer on a wireless network, make sure that:
• You have completed the initial setup of the printer.
• Your wireless network is set up and working properly.
• The computer you are using is connected to the same wireless network where you want to set up the printer.
Using Windows
1 Insert the installation software CD.
2 Wait a minute for the Welcome screen to appear.
If the Welcome screen does not appear after a minute, do one of the following:
In Windows Vista:
a Click .
b Locate the Start Search box.
c Type D:\setup.exe, where D is the letter of your CD or DVD drive.
In Windows XP:
a Click Start Run.
b Type D:\setup.exe, where D is the letter of your CD or DVD drive.
3 Follow the instructions on the Welcome screen to set up the printer.
Using Macintosh
1 Insert the installation software CD.
2 Wait a minute for the Welcome screen to appear.
Note: If the Welcome screen does not appear after a minute, click the CD icon on the desktop.
3 Double-click Install.
4 Follow the instructions on the Welcome screen to set up the printer.
Interpreting the colors of the Wi-Fi indicator light
The Wi-Fi indicator light helps you determine the network status of the printer.
The following describes what the colors of the Wi-Fi indicator light mean.
• Off may indicate that the printer is off, the printer is in the initial power-up state, the internal print server is not
installed, or the internal print server is not properly connected.
The light should be in this state:
– When the printer is turned off
– When the printer is in power saver mode
– When the printer does not have an internal print server installed and you want to connect the printer to the
computer using a USB cable
• Orange may indicate that the printer is being configured for use on the wireless network, the internal print server
is not configured in infrastructure mode, or the internal print server is waiting to be configured for ad hoc mode.
17
Page 18

The light should be in this state:
– When you want to use the printer without a computer
– When you want to set up the printer on your wireless network
– When the printer is set up for an ad hoc network and is broadcasting its wireless network name (SSID)
• Blinking orange may indicate that:
– The printer is out of the range of the wireless access point (wireless router).
– The printer is trying to communicate with the wireless access point (wireless router), but the wireless access
point (wireless router) may be turned off or not working properly.
– The printer is trying to establish communication with the wireless access point (wireless router).
This is true if you have already configured the printer for use on your wireless network. When the printer has
been configured, any time you turn the printer off and then turn it back on, the internal print server in the
printer will try to connect to your wireless access point (wireless router).
– The wireless settings of the printer may no longer be valid.
• Green indicates that the printer is connected to a wireless network.
The light should be in this state when you want to start using the printer that is already set up on your wireless
network.
• Blinking green indicates that the printer internal print server is being updated.
Configuring an IP address manually
The printer will be assigned an IP address automatically through DHCP on most wireless networks.
You must select to manually assign an IP address to the printer in the following situations:
• You manually assigned IP addresses for the other network devices.
• You want to assign a specific IP address.
• You move the printer to a remote subnet.
For more information, contact the person who set up your network.
Changing wireless settings after installation
To change wireless settings on the printer, such as the configured network, the security key, or other settings:
Using Windows
1 Do one of the following:
• In Windows Vista, click .
• In Windows XP, click Start.
2 Click Programs or All Programs, and then select the printer program folder from the list.
3 Click Tools Lexmark Wireless Setup Utility.
Note: If the cable is not already connected, you may be prompted to connect the printer to the computer again
using the installation cable as part of the setup process.
4 Follow the prompts on the computer screen to reinstall the software, and then make the changes that you want.
18
Page 19

Using Macintosh
1 From the Finder desktop, double-click the printer folder.
2 Double-click Lexmark Wireless Setup Assistant.
3 Follow the instructions on the computer screen.
Installing the printer on other computers
Once the printer is configured, it can be accessed wirelessly by any other computer on the network. However, you
will need to install the printer driver on every computer that will access it. You do not need to configure the printer
again, although you will need to run the wireless setup on each computer to install the driver.
Using Windows
1 Insert the installation software CD.
2 Wait for the Welcome screen to appear.
If the Welcome screen does not appear after a minute, do one of the following:
In Windows Vista:
a Click .
b Locate the Start Search box.
c Type D:\setup.exe, where D is the letter of your CD or DVD drive.
In Windows XP:
a Click Start Run.
b Type D:\setup.exe, where D is the letter of your CD or DVD drive.
3 Follow the on screen instructions for installing a configured printer on a new computer.
Using Macintosh
1 Insert the installation software CD.
2 Wait for the Welcome screen to appear.
Note: If the Welcome screen does not appear after a minute, click the CD icon on the desktop.
3 Double-click Install.
4 Follow the on screen instructions for installing a configured printer on a new computer.
19
Page 20

Advanced wireless setup
Creating an ad hoc wireless network
The recommended way to set up your wireless network is to use a wireless access point (wireless router). A network
set up this way is called an infrastructure network. If you have an infrastructure network in your home, you should
configure your printer for use on that network.
If you do not have a wireless access point or would like to set up a standalone network between your printer and a
computer with a wireless network adapter, then you can set up an ad hoc network.
In Windows Vista
1 Click .
2 Click Control Panel.
3 Click Network and Internet.
4 Under Network and Sharing Center, click Connect to a Network.
5 In the Connect to a Network dialog, click Set up a wireless ad-hoc (computer-to-computer) network, and then
click Next.
6 Follow the instructions in the “Set up a wireless ad hoc network” wizard. As part of the setup:
a Create a network name or SSID for the network between the computer and your printer.
b Write the name of your network in the space provided so you can refer to it when running the wireless setup.
Make sure you copy the exact spelling and capitalization.
SSID (name of your wireless network)
c Go to the Security Type drop-down list, choose WEP, and then create a security key (or password).
WEP keys must be:
• Exactly 10 or 26 hexadecimal characters. Hexadecimal characters are A–F, a–f, and 0–9.
or
• Exactly 5 or 13 ASCII characters. ASCII characters are letters, numbers, punctuation, and symbols found
on a keyboard.
Note: Security is optional for ad hoc networks. The range of an ad hoc network is much less than the
range of an infrastructure network, making it less likely that intruders will connect to it without your
knowledge.
d Write the password for your network in the space provided so you can refer to it when running the wireless
setup. Make sure you copy the exact spelling and capitalization.
Security key (if network is secure)
Windows Vista will enable the ad hoc network for you. It will appear in the “Connect to a network” dialog under
“Available networks,” indicating that the computer is configured for the ad hoc network.
7 Close the Control Panel and any remaining windows.
8 If this is the first time you will be setting up the printer for use on a wireless network, insert the installation software
CD, and then follow the instructions on the Welcome screen.
20
Page 21

Otherwise:
a Click .
b Click All Programs.
c Select the printer program folder, and then click Tools Lexmark Wireless Setup Utility.
9 When the available networks are displayed, provide the network name and the security information you created.
The installer will configure the printer for use with your computer.
10 Store a copy of your network name and security information in a safe place for future reference.
In Windows XP and earlier
1 Click Start.
2 Click Control Panel.
3 Click Network and Internet Connections.
4 Click Network Connections.
5 Right-click the icon for your wireless network connection.
6 Click Enable, if it appears in the pop-up menu.
Note: If Enable does not appear, your wireless connection is already enabled.
7 Right-click the Wireless Network Connection icon.
8 Click Properties.
9 Click the Wireless Networks tab.
Note: If the Wireless Networks tab does not appear, your computer has third-party software that controls your
wireless settings. You must use that software to set up the ad hoc wireless network. For more information, see
the documentation for the third-party software to learn how to create an ad hoc network.
10 Select the Use Windows to configure my wireless network settings check box.
11 Under Preferred Networks, delete any existing networks.
a Select the network to be removed.
b Click Remove to delete the network from the list.
12 Click Add to create an ad hoc network.
13 In the Network Name (SSID) box, type the name you want to give your wireless network.
14 Write down the network name you chose so you can refer to it when running the wireless setup. Make sure you
copy the exact spelling and capitalization.
SSID (name of your wireless network)
15 If Network Authentication appears in the list, then select Open.
16 In the “Data encryption” list, select WEP.
Note: Security is optional for ad hoc networks. The range of an ad hoc network is much less than the range of
an infrastructure network, making it less likely that intruders will connect to it without your knowledge.
17 If necessary, clear the “The key is provided for me automatically” check box.
21
Page 22

18 In the Network Key box, type in a security key.
19 Write down the security key you chose so you can refer to it when running the wireless utility. Make sure you
copy the exact spelling and capitalization.
Security key (if network is secure)
Note: For more information about passwords (security keys), see “Check your security keys” in the “Wireless
troubleshooting” section of the Troubleshooting chapter.
20 In the “Confirm network key” box, type the same security key.
21 Select This is a computer-to-computer (ad hoc) network; wireless access points are not used..
22 Click OK twice to close the two open windows.
23 It may take a few minutes for your computer to recognize the new settings. To check on the status of your network:
a Right-click the Wireless Network Connections icon.
b Select View Available Wireless Networks.
• If the network is listed but the computer is not connected, select the ad hoc network and then click
Connect.
• If the network does not appear, wait a minute and then click Refresh network list.
24 If this is the first time you will be setting up the printer for use on a wireless network, insert the installation software
CD, and then follow the instructions on the Welcome screen.
Otherwise:
a Click Start.
b Click All Programs or Programs.
c Select the printer program folder from the list, and then click Tools Lexmark Wireless Setup Utility.
25 When the available networks are displayed, provide the network name and the security information you created
in steps 11-16. The utility will configure the printer for use with your computer.
26 Store a copy of your network name and security information in a safe place for future reference.
Using Macintosh
1 Make sure the computer is on.
2 Create a network name.
For Mac OS X version 10.5
a
From the Finder desktop, click System Preferences.
b Click Network.
c Click AirPort.
d From the Network Name pop-up menu, click Create Network.
e Create a name for your ad hoc network, and then click OK.
For Mac OS X version 10.4 and earlier
From the Finder desktop, click Go Applications.
a
b From the Applications folder, double-click Internet Connect.
22
Page 23

c From the toolbar, click AirPort.
d From the Network pop-up menu, click Create Network.
e Create a name for your ad hoc network, and then click OK.
3 Write down the network name you chose so you can refer to it when running the wireless utility. Make sure you
copy the exact spelling and capitalization.
SSID (name of your wireless network)
4 If this is the first time you will be setting up the printer for use on a wireless network, insert the installation software
CD, double-click the installer icon for your printer on the Finder desktop, and then follow the instructions on the
Welcome screen.
Otherwise, from the Finder desktop, double-click the printer folder, and then double-click Lexmark Wireless
Setup Assistant.
5 When prompted, provide the network name and/or the security information you created.
The utility will configure the printer for use with your computer.
6 Store a copy of your network name and security information in a safe place for future reference.
Adding a printer to an existing ad hoc wireless network
Using Windows
1 Do one of the following:
• In Windows Vista, click .
• In Windows XP, click Start.
2 Click Programs or All Programs, and then select the printer program folder from the list.
3 Click Tools Lexmark Wireless Configuration Utility.
4 Follow the instructions on the Welcome screen.
Using Macintosh
1 From the Finder desktop, double-click the printer folder.
2 Double-click Lexmark Wireless Setup Assistant.
3 Follow the instructions on the Welcome screen.
Frequently asked questions
What is a network?
A network is a collection of devices such as computers, printers, Ethernet hubs, wireless access points, and routers
connected together for communication through cables or through a wireless connection. A network can be wired,
wireless, or designed to have both wired and wireless devices.
Devices on a wired network use cables to communicate with each other.
23
Page 24
Devices on a wireless network use radio waves instead of cables to communicate with each other. For a device to be
able to communicate wirelessly, it must have a wireless print server attached or installed that lets it receive and
transmit radio waves.
How are home networks configured?
For desktop computers, laptops, and printers to communicate with each other over a network, they must be
connected by cables and/or have wireless network adapters built in or installed in them.
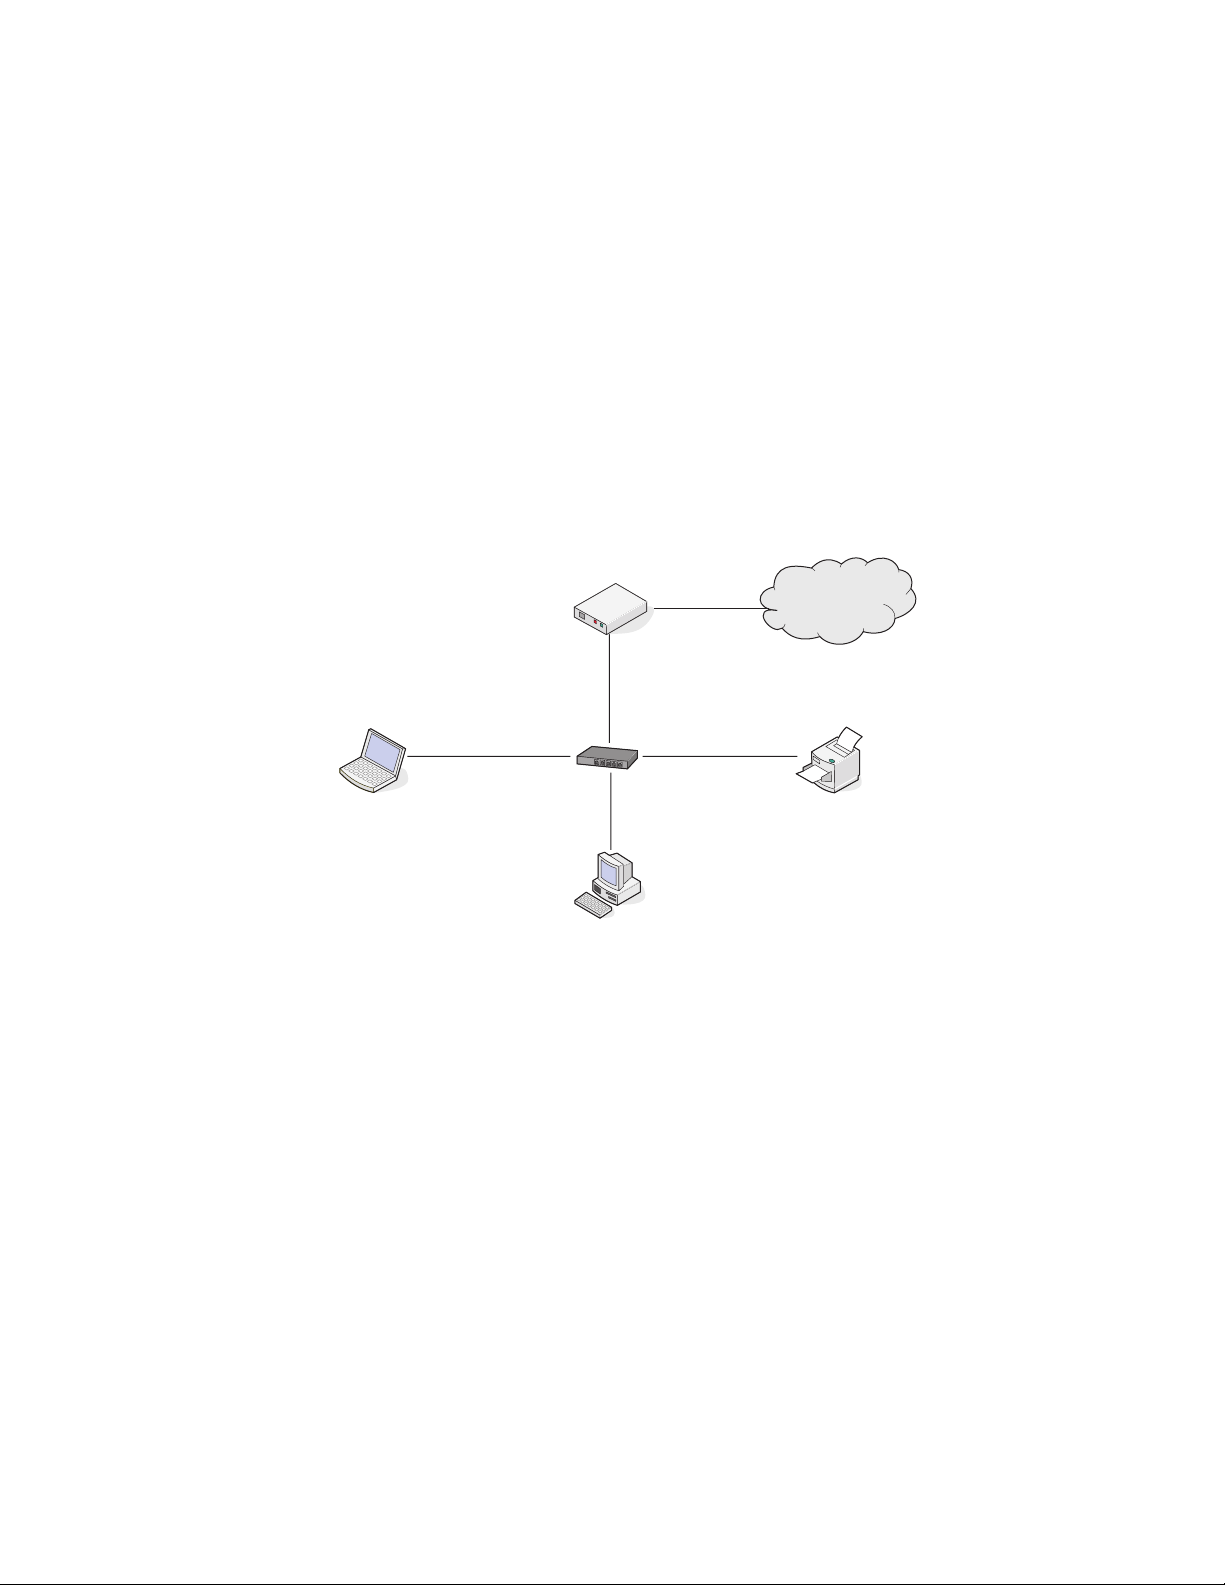
There are different ways a network can be set up. Five common examples appear below.
Note: The printers in the following diagrams represent printers with internal print servers built in to them so that
they can communicate over a network.
Wired network example
• A desktop computer, a laptop, and a printer are connected by Ethernet cables to a hub, router, or switch.
• The network is connected to the Internet through a DSL or a cable modem.
Internet
Wireless network examples
Four common wireless networks are:
• Scenario 1: Laptop and printer connected wirelessly with Internet
• Scenario 2: Desktop computer, laptop, and printer connected wirelessly with Internet
• Scenario 3: Desktop computer, laptop, and printer connected wirelessly without Internet
• Scenario 4: Laptop connected wirelessly to printer without Internet
Scenario 1: Laptop and printer connected wirelessly with Internet
A desktop computer is connected to a wireless router by an Ethernet cable.
•
• A laptop and a printer are connected wirelessly to the router.
24
Page 25
• The network is connected to the Internet through a DSL or a cable modem.
Internet
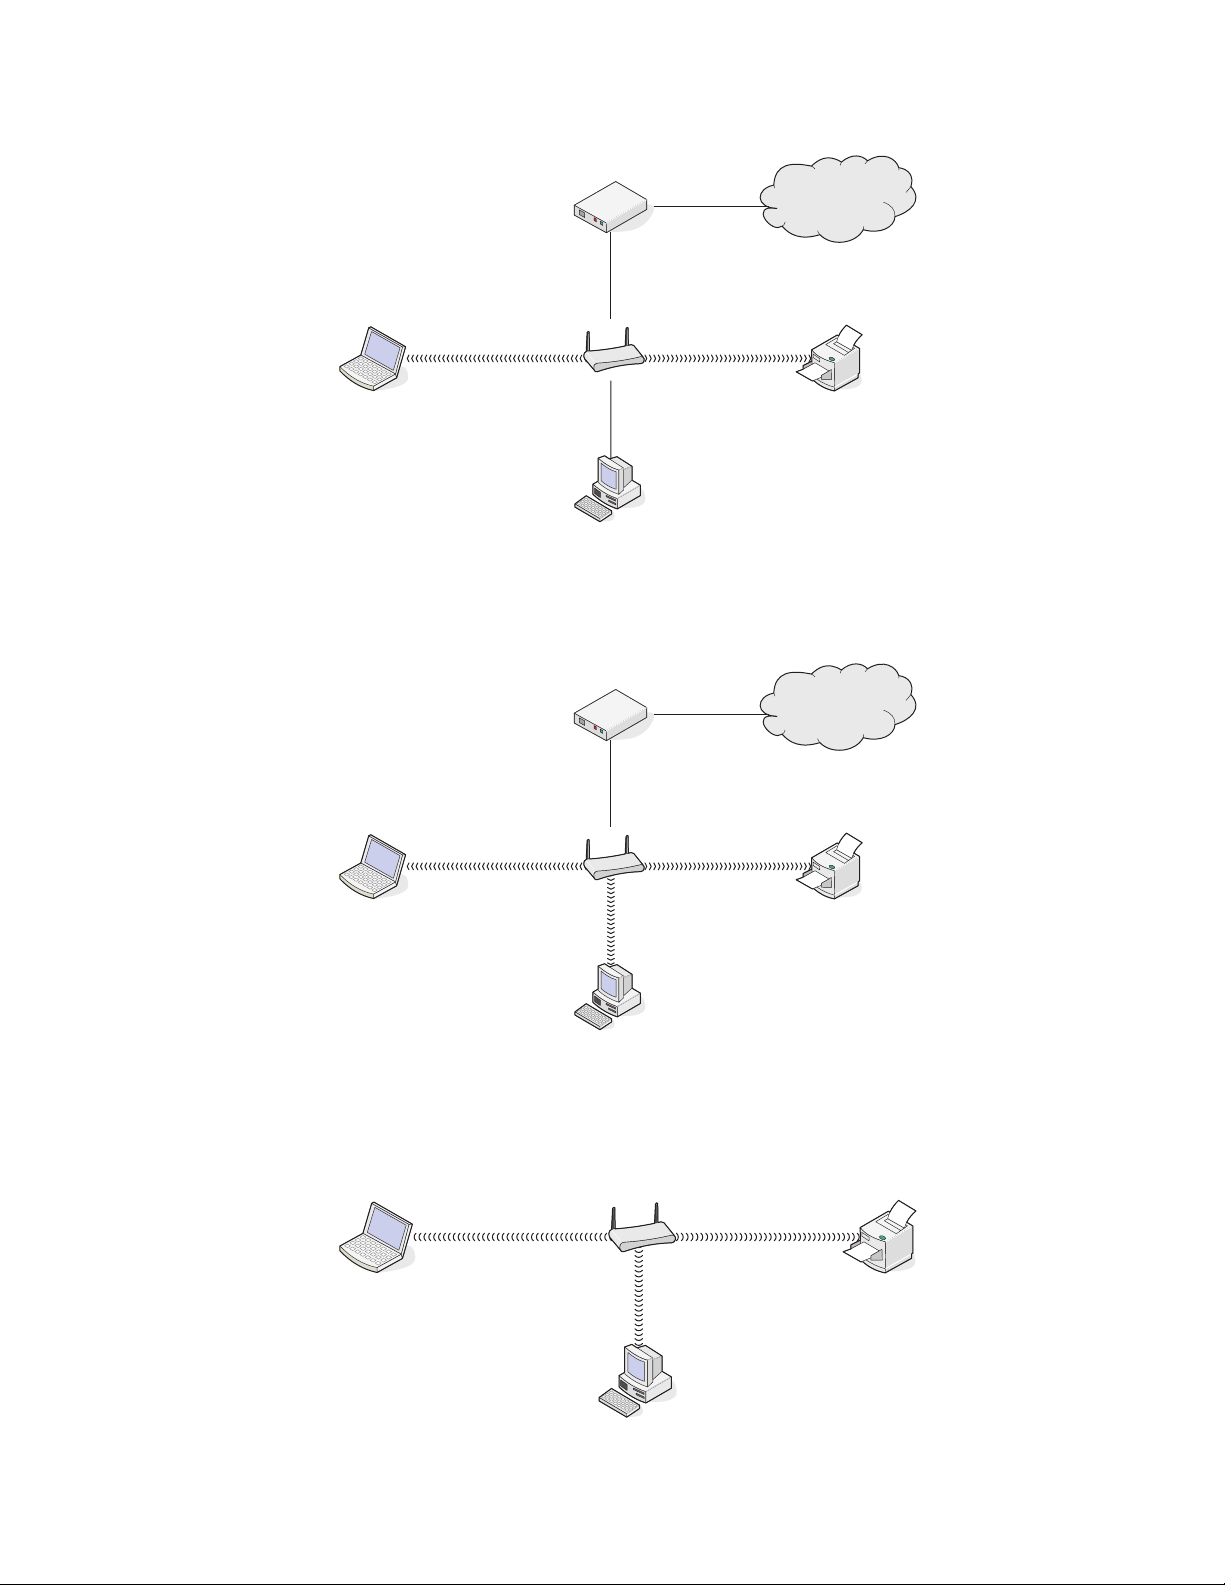
Scenario 2: Desktop computer, laptop, and printer connected wirelessly with Internet
A desktop computer, a laptop, and a printer are connected wirelessly to a wireless router.
•
• The network is connected to the Internet through a DSL or a cable modem.
Internet
Scenario 3: Desktop computer, laptop, and printer connected wirelessly without
Internet
A desktop computer, a laptop, and a printer are connected wirelessly to a wireless access point (wireless router).
•
• The network has no connection to the Internet.
25
Page 26
Scenario 4: Laptop connected wirelessly to printer without Internet
•
A laptop is directly connected wirelessly to a printer without going through a wireless router.
• The network has no connection to the Internet.
• This configuration is referred to as an ad hoc network.
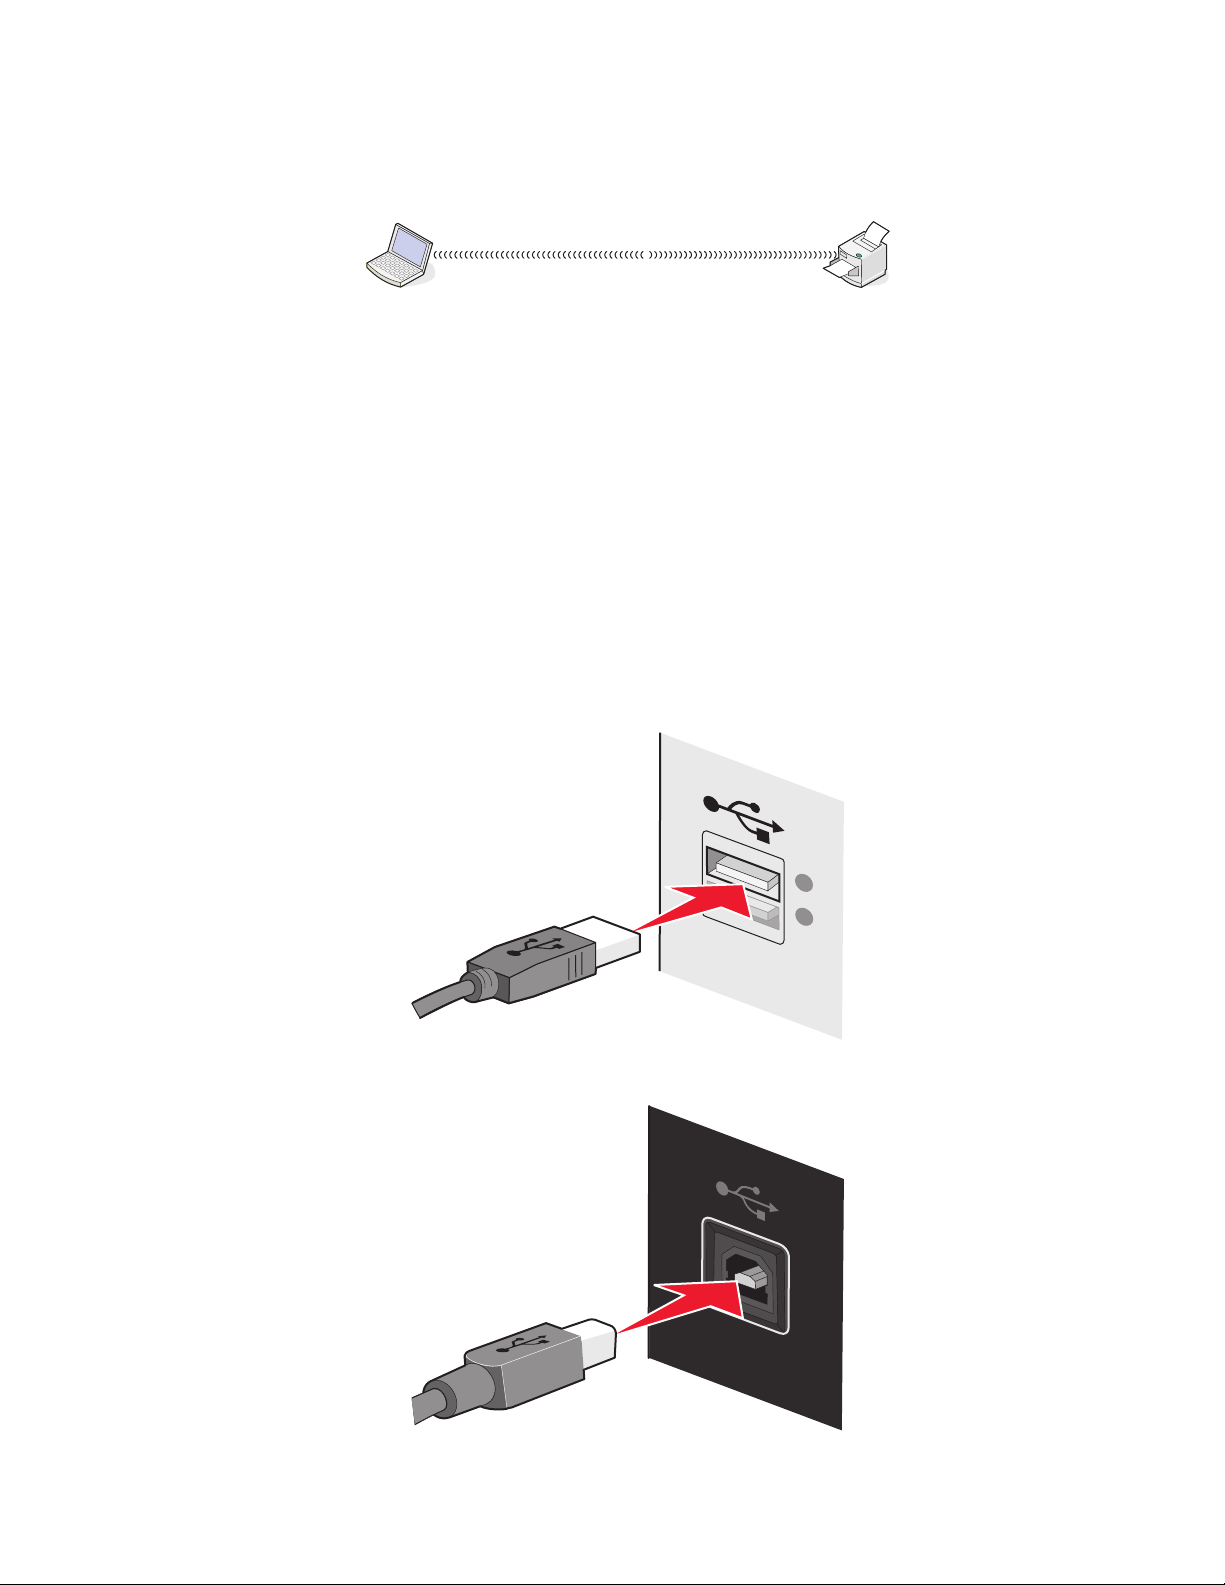
Why do I need an installation cable?
When setting up the printer on your wireless network, the printer will need to temporarily connect to a computer
using the installation cable. This temporary connection is used to set up the wireless settings of the printer.
The installation cable connects to a rectangular USB port on the installing computer and the square USB port on the
printer.
How do I attach the installation cable?
The installation cable attaches to a USB port on the computer and to the square connector on the back of the printer.
This connection allows you to configure the printer for a networked or locally-attached installation.
1 Attach the large, rectangular connector to any USB port on your computer. USB ports may be on the front or the
back of the computer, and may be horizontal or vertical.
2 Attach the small, square connector to the printer.
26
Page 27
3 Continue following the on-screen instructions.
What is the difference between infrastructure and ad hoc networks?
Wireless networks can operate in one of two modes: infrastructure or ad hoc.
In infrastructure mode, all devices on a wireless network communicate with each other through a wireless router.
Devices on the wireless network must have valid IP addresses for the current network and share the same SSID and
channel as the wireless router (wireless access point).
In ad hoc mode, a computer with a wireless network adapter communicates directly with a printer equipped with a
wireless print server. The computer must have a valid IP address for the current network and be set to ad hoc mode.
The wireless print server must be configured to use the same SSID and channel that the computer is using.
The following table compares the characteristics and requirements of the two types of wireless networks.
Infrastructure Ad hoc
Characteristics
Communication Through wireless access point
(wireless router)
Security More security options
Range Determined by range and number
of wireless access points (wireless
routers)
Speed Usually faster Usually slower
Requirements for all devices
Unique IP address for each device Yes Yes
Mode set to Infrastructure mode Ad hoc mode
Same SSID Yes, including the wireless access
point (wireless router)
Same channel Yes, including the wireless access
point (wireless router)
Lexmark recommends setting up a network in infrastructure mode using the installation CD that came with the
printer.
Infrastructure mode is the recommended setup method because it has:
Directly between devices
Restricted to range of individual
devices on network
Yes
Yes
• Increased network security
• Increased reliability
• Faster performance
• Easier setup
27
Page 28

Finding the signal strength
Wireless devices have built-in antennas that transmit and receive radio signals. The signal strength listed on the
printer network setup page indicates how strongly a transmitted signal is being received. Many factors can affect
the signal strength. One factor is interference from other wireless devices or other devices such as microwave ovens.
Another factor is distance. The farther two wireless devices are from each other, the more likely it is that the
communication signal will be weaker.
The strength of the signal received by your computer can also affect the connectivity of the printer with the network
during configuration. When you installed the wireless adapter in your computer, the adapter software probably
placed an icon in your system tray. Try double-clicking this icon, and it will tell you how strongly the computer is
receiving the wireless signal from the network.
To improve signal quality, remove sources of interference and/or move wireless devices closer to the wireless access
point (wireless router).
What is an SSID?
A Service Set Identifier (SSID) is the name that identifies a wireless network. All devices on the network must know the
SSID of the wireless network or they will not be able to communicate with each other. Usually, the wireless network
broadcasts the SSID to allow wireless devices in the area to connect to it. Sometimes, the SSID is not broadcast for
security reasons.
An SSID can contain up to 32 alphanumeric characters.
How do I find out what type of security my network is using?
You must know the security key and security mode to properly set up the printer for use on the wireless network. To
obtain this information, see the documentation that came with your wireless access point (wireless router), see the
Web page associated with the wireless access point (wireless router), or consult your system support person.
Note: The network security key is not the same as the password for the wireless access point (wireless router). The
password allows you to access the wireless access point (wireless router) settings. The security key is a WEP key or
WPA passphrase that allows printers and computers to join your wireless network.
Can I use my printer on a USB and a wireless connection at the same time?
The printer can be configured in the following ways:
• Locally-attached (connected to a computer using a USB cable)
• Wireless network
• Wireless network and locally-attached simultaneously
If you want to use the printer as both a wireless and locally-attached printer at the same time, you will need to run
the setup software again and select the additional connection type.
What is a MAC address?
A MAC address, or Media Access Control address, is a 48-bit identifier associated with the hardware of network
equipment. The MAC address may also be called the physical address because it is connected to the hardware of a
device instead of its software. The MAC address is displayed as a hexadecimal number in this format: 01-23-45-67-89AB.
28
Page 29

Every device capable of communicating on a network has a MAC address. Network printers, computers, and routers,
whether Ethernet or wireless, all have MAC addresses.
While it is possible to change the MAC address of a network device, it is not common practice to do so. For this re ason,
MAC addresses are considered permanent. IP addresses are easily changed, so MAC addresses are a more reliable
method of identifying a specific device on a network.
Routers with security capabilities may allow filtering of MAC addresses on networks. This allows a managed list of
devices to access the network, identified by their MAC addresses. MAC address filtering can help prevent access on
the network from unwanted devices, such as from intruders on a wireless network. MAC address filtering can also
prevent legitimate access if you forget to add a new device to the router's list of allowed addresses. If your network
uses MAC address filtering, be sure to add the MAC address of the printer to the list of allowed devices.
How do I find the MAC address?
Most network equipment has a unique hardware identification number to distinguish it from other devices on the
network. This is called the Media Access Control (MAC) address.
The MAC address is a series of letters and numbers located on the back of your printer.
UAA: XX XX XX XX XX XX
XX XX
X XX
XX X
UAA: XX
Note: A list of MAC addresses can be set on an access point (router) so that only devices with matching MAC addresses
are allowed to operate on the network. This is called MAC filtering. If MAC filtering is enabled in your access point
(router) and you want to add a printer to your network, the MAC address of the printer must be included in the MAC
filter list.
What is an IP address?
An IP address is a unique number used by devices (such as a wireless printer, computer, or wireless access point) on
an IP network to locate and communicate with each other. Devices on an IP network can communicate with each
other only if they have unique and valid IP addresses. A unique IP address means no two devices on the same network
have the same IP address.
An IP address is a group of four numbers separated by periods. An example of an IP address is 192.168.100.110.
How do I locate IP addresses?
How to locate a computer IP address using Windows
1 Do one of the following:
29
Page 30

In Windows Vista
a
Click .
b Click All Programs Accessories.
c Click Command Prompt.
In Windows XP and earlier
Click Start.
a
b Click All Programs or Programs Accessories Command Prompt.
2 Type ipconfig.
3 Press Enter.
The IP address appears as four sets of numbers separated by periods, such as 192.168.0.100.
How to locate a computer IP address using Macintosh
1 Click System Preferences.
2 Click Network.
For Mac OS X version 10.5
Click AirPort.
a
b Click Advanced.
c Click TCP/IP.
The IP address appears as four sets of numbers separated by periods, such as 192.168.0.100.
For Mac OS X version 10.4 and earlier
From the Show pop-up menu, select AirPort.
a
b Click TCP/IP.
The IP address appears as four sets of numbers separated by periods, such as 192.168.0.100.
How to locate a printer IP address
• You can locate the printer IP address by viewing the printer network setup page.
How are IP addresses assigned?
An IP address may be assigned by the network using DHCP. Once the printer is set up on a computer, the computer
sends all print jobs across the network to the printer using this address.
Many networks have the ability to automatically assign IP addresses. Auto-IP allows individual devices to assign
themselves a unique IP address. However, DHCP is the most commonly-used method to assign addresses.
If the IP address is not automatically assigned, you can try manually entering an address after selecting your printer
from the available list.
30
Page 31

What is a key index?
A wireless access point (wireless router) can be configured with as many as four WEP keys. Only one key is used on
the network at a time, however. The keys are numbered, and the number of a key is referred to as its key index. All
devices on the wireless network must be configured to use the same key index when multiple WEP keys are configured
on the wireless access point (wireless router).
The printer is designed to use the first key. Make sure you have configured all of the wireless devices on your network
to use the first WEP key where you have the option of selecting a key. Make sure the wireless access point (wireless
router) is also configured to use the first key. The first key will usually have an index of 0, though it may be 1 on some
devices.
31
Page 32

Loading paper
Loading paper
1 Make sure:
• You use paper designed for inkjet printers.
• The paper is not used or damaged.
• If you are using specialty paper, you follow the instructions that came with it.
• You do not force paper into the printer.
2 Load the paper vertically against the right side of the paper support.
3 Adjust the paper guide until it rests against the left edge of the paper.
Note: To avoid paper jams, make sure the paper does not buckle when you adjust the paper guide.
Loading various paper types
Load up to Make sure
100 sheets of plain paper (depending on
the thickness)
25 sheets of heavyweight matte paper
25 sheets of glossy paper
25 sheets of photo paper
10 iron-on transfers
• The paper is designed for use with inkjet printers.
• The paper is loaded against the right side of the paper support.
• The paper guide rests against the left edge of the paper.
• The stack of heavyweight matte paper does not exceed 10 mm or
1 cm in height.
• The glossy or printable side of the paper faces you. (If you are not sure
which side is the printable side, see the instructions that came with
the paper.)
• The paper is loaded against the right side of the paper support.
• The paper guide rests against the left edge of the paper.
Note: Photos require more drying time. Remove each photo as it exits,
and allow it to dry to avoid ink smudging.
• You follow the loading instructions that came with the iron-on
transfers.
• The print side of the transfers faces you.
• The transfers are loaded against the right side of the paper support.
• The paper guide rests against the left edge of the transfers.
Note: For best results, load transfers one at a time.
32
Page 33

Load up to Make sure
25 greeting cards
25 index cards
25 photo cards
25 postcards
10 envelopes
• The total thickness of the card stack does not exceed 10 mm
(0.4 inches).
• The print side of the cards faces you.
• The cards are loaded against the right side of the paper support.
• The paper guide rests against the left edge of the cards.
• The stamp location is in the upper left corner.
• The print side of the envelopes faces you.
• The envelopes are designed for use with inkjet printers.
• The envelopes are loaded against the right side of the paper support.
• The paper guide rests against the left edge of the envelopes.
Warning—Potential Damage: Do not use envelopes that have metal
clasps, string ties, or metal folding bars.
Notes:
– Do not load envelopes with holes, perforations, cutouts, or deep
embossing.
– Do not use envelopes that have exposed flap adhesive.
25 sheets of labels
25 transparencies
• You follow the loading instructions that came with the labels.
• The print side of the labels faces you.
• The adhesive on the labels does not extend to within 1 mm of the
edge of the label sheet.
• You use full label sheets. Partial sheets (with areas exposed by missing
labels) may cause labels to peel off during printing, resulting in a paper
jam.
• The label sheets are loaded against the right side of the paper support.
• The paper guide rests against the left edge of the label sheets.
• The rough side of the transparencies faces you.
• You don't use transparencies with paper backing sheets.
• The transparencies are loaded against the right side of the paper
support.
• The paper guide rests against the left edge of the transparencies.
Note: Transparencies require more drying time. Remove each
transparency as it exits, and allow it to dry to avoid ink smudging.
33
Page 34

Printing
Printing basic documents
Printing a document
1 Load the paper.
1
2
2 Do one of the following to print:
Using Windows
a With a document open in a Windows program , click File Print.
b Click Properties, Preferences, Options, or Setup.
c Select the print quality, the number of copies to print, the type of paper to be used, and how the pages should
print.
d Click OK to close any printer software dialogs.
e Click OK or Print.
Using Macintosh
a With a document open in a Macintosh application, click File Print.
b From the Printer pop-up menu, choose the printer.
c From the print options pop-up menu, choose the print quality, the number of copies to print, the type of
paper to be used, and how the pages should print.
d Click Print.
Printing Web pages
If you chose to install the Lexmark Toolbar software for your Web browser, then you can use it to create a
printer-friendly version of any Web page.
Notes:
• For Windows, the software supports Microsoft Internet Explorer 5.5 or later or a compatible version of Firefox.
• For Macintosh, the software supports a compatible version of Firefox.
34
Page 35

1 Load paper.
2 Open a Web page using a supported browser.
3 Select a print option to print the page.
You can also adjust settings or preview the page before printing.
Printing multiple copies of a document
Using Windows
1 With a document open, click File Print.
2 Click Properties, Preferences, Options, or Setup.
3 From the Copies section of the Print Setup tab, enter the number of copies that you want to print.
4 Click OK to close any printer software dialogs.
5 Click OK or Print.
Using Macintosh
1 With a document open, click File Print.
2 From the Printer pop-up menu, choose the printer.
3 In the Copies field, enter the number of copies that you want to print.
4 Click Print.
Collating printed copies
If you print multiple copies of a document, you can choose to print each copy as a set (collated) or to print the copies
as groups of pages (not collated).
Collated Not collated
Using Windows
1 With a document open, click File Print.
2 Click Properties, Preferences, Options, or Setup.
3 From the Copies section of the Print Setup tab, enter the number of copies that you want to print, and then select
Collate Copies.
4 Click OK to close any printer software dialogs.
5 Click OK or Print.
Note: The collate option is available only when you are printing multiple copies.
35
Page 36

Using Macintosh
1 With a document open, click File Print.
2 In the Copies field, enter the number of copies that you want to print, and then select Collated.
3 Click Print.
Note: To prevent smudging when printing photos, remove each photo as it exits the printer, and then let it dry before
stacking.
Printing the last page first (reverse page order)
Using Windows
1 With a document open, click File Print.
2 Click Properties, Preferences, Options, or Setup.
3 From the Copies section of the Print Setup tab, select Print Last Page First.
4 Click OK to close any printer software dialogs.
5 Click OK or Print.
Using Macintosh
1 With a document open, click File Print.
2 From the Printer pop-up menu, choose the printer.
3 Do one of the following:
For Mac OS X version 10.5
a
From the print options pop-up menu, choose Layout.
b Select Reverse Page Orientation.
For Mac OS X version 10.4
a
From the print options pop-up menu, choose Paper Handling.
b From the Page Order menu, select Reverse.
For Mac OS X version 10.3
From the print options pop-up menu, choose Paper Handling.
a
b Select Reverse page order.
4 Click Print.
Printing multiple pages on one sheet (N-Up)
Using Windows
1 With a document open, click File Print.
2 Click Properties, Preferences, Options, or Setup.
36
Page 37

3 From the Advanced tab, select N-Up under the Layout drop-down menu.
4 Select the number of page images to print on each page.
If you want each page image to be surrounded by a border, then select Print Page Borders.
5 Click OK to close any printer software dialogs.
6 Click OK or Print.
Using Macintosh
1 With a document open, click File Print.
2 From the print options pop-up menu, choose Layout.
• From the Pages per Sheet pop-up menu, choose the number of page images that you want to print on one
sheet.
• From the Layout Direction area, click the icon that shows the order that you want the page images to print
on one sheet.
• If you want to print a border around each page image, then choose an option from the Border pop-up menu.
3 Click Print.
Pausing print jobs
Using the printer folder in Windows
1 Do one of the following:
In Windows Vista
a
Click .
b Click Control Panel.
c Under Hardware and Sound, click Printer.
In Windows XP
Click Start.
a
b Click Printers and Faxes.
In Windows 2000
Click Start.
a
b Click Settings Printers.
2 Right-click the printer, and then select Pause Printing.
Using the taskbar in Windows
1 Double-click the printer icon in the taskbar.
2 Right-click the document name, and then select Pause.
37
Page 38

Using Macintosh
1 While the document is printing, click the printer icon in the Dock.
The print queue dialog appears.
2 Do one of the following:
• If you want to pause a particular print job, choose the document name, and then click Hold.
• If you want to pause all print jobs in the queue, click Pause Printer or Stop Jobs, depending on the operating
system version that you are using.
Canceling print jobs
Using Windows
1 Do one of the following to open the printer folder:
• In Windows Vista, click Control Panel Printer.
• In Windows XP, click Start Printers and Faxes.
2 Right-click the printer name, and then select Open.
3 Right-click the document name, and then select Cancel.
Using Macintosh
1 While the document is printing, click the printer icon on the dock.
2 From the queue window, select the job that you want to cancel.
3 Click the Delete icon.
Printing specialty documents
Printing envelopes
1 Load the envelopes in the printer.
2 Do one of the following:
Using Windows
a With a document open, click File Print.
b Click Properties, Preferences, Options, or Setup.
c From the Media Type list of the Print Setup tab, select Plain.
38
Page 39

d From the Paper Size list, select the envelope size.
Note: To print on a custom-size envelope, select Custom Size, and then specify the height and width of the
envelope.
e Select Portrait or Landscape orientation.
f Click OK to close any printer software dialogs.
g Click OK or Print.
Using Macintosh
a Customize the settings as needed in the Page Setup dialog.
1 With a document open, click File Page Setup.
2 From the “Format for” pop-up menu, choose the envelope size. If no size matches the size of the envelope,
then set a custom size.
3 Select an orientation.
4 Click OK.
b Customize the settings as needed in the Print dialog.
1 With a document open, click File Print.
2 From the Printer pop-up menu, choose the printer that you want to use.
3 Click Print.
Notes:
• Most envelopes use landscape orientation.
• Make sure the same orientation is also selected in the software application.
Printing labels
1 Load the label sheets in the printer.
2 Do one of the following:
Using Windows
a With a document open, click File Print.
b Click Properties, Preferences, Options, or Setup.
c From the Paper Size drop-down menu of the Print Setup tab, choose a paper size that matches the size of the
label sheet. If no paper size matches the label sheet size, then set a custom size.
If necessary, choose the appropriate type of media from the Media Type drop-down menu.
d Click OK to close any printer software dialogs.
e Click OK or Print.
Using Macintosh
a Customize the settings as needed in the Page Setup dialog.
1 With a document open, choose File Page Setup.
2 From the “Format for” pop-up menu, choose the printer that you want to use.
3 From the Paper Size pop-up menu, choose a paper size that matches the size of the label sheet. If no paper
size matches the label sheet size, then create a custom size.
39
Page 40

b Customize the settings as needed in the Print dialog.
1 With a document open, click File Print.
2 From the Printer pop-up menu, choose the printer that you want to use.
3 From the print options pop-up menu, choose Quality & Media.
4 From the Paper type pop-up menu, choose a paper type.
5 From the Print Quality menu, choose a print quality other than Quick Print.
Tips on loading label sheets
• Make sure the top of the label sheet feeds into the printer first.
• Make sure the adhesive on the labels does not extend to within 1 mm of the edge of the label sheet.
• Make sure the paper guide or paper guides rest against the edges of the label sheet.
• Use full label sheets. Partial sheets (with areas exposed by missing labels) may cause labels to peel off during
printing, resulting in a paper jam.
Note: Labels require more drying time. Remove each label sheet as it exits, and then allow it to dry to avoid ink
smudging.
Printing on custom-size paper
Before beginning these instructions, load the c ustom-size paper in the printer. For more information, see the “Loading
Paper” chapter.
Using Windows
1 With a document open, click File Print.
2 Click Properties, Preferences, Options, or Setup.
The Print Setup tab appears.
3 In the Paper Options section, from the “Paper size” list, select Custom Size.
The Define Custom Paper Size dialog appears.
4 Select the measurement units to use (inches or millimeters).
5 Click OK to close any printer software dialogs that are open.
6 Print the document.
Using Macintosh
1 With a document open, click File Page Setup.
2 From the Paper size pop-up menu, choose Manage Custom Sizes.
3 Create a custom size.
a Click +.
b In the Page Size menu, type the Width and Height of the paper.
c From the Printer Margins pop-up menu, choose the printer that you want to use. The margins are set by the
printer.
If you want to set the margins, choose User defined, and then type the margins in the Printer Margins area.
40
Page 41

d From the custom sizes list on the left of the dialog, double-click Untitled, and then type a name for the custom
paper size you set.
e Click OK.
4 Open the Paper size pop-up menu again, and then choose the name of the custom paper size you added in Step
3d.
5 Click Print.
Printing other specialty documents
When you installed the printer driver, some printer software was installed that may help you print specialty
documents such as booklets, posters, iron-on transfers, transparencies, and banners. For information about printing
these documents, see the Help installed with the programs or applications you choose to use.
Using Windows
1 Do one of the following:
• In Windows Vista, click All Programs, and then select the printer program folder from the list.
• In Windows XP, click Start Programs or All Programs, and then select the printer program folder from
the list.
2 Click the program that you want to use.
Using Macintosh
1 From the Finder desktop, double-click the printer folder.
If the printer folder is not found on the desktop:
a Go to the Mac OS X drive where the printer software was installed.
b Choose Library Printers YYYY Lexmark, and then select your printer model.
YYYY is the year that the printer was released.
2 Double-click the application that you want to use.
Saving and deleting print settings
Using Windows
1 With a document open, click File Print.
2 Click Properties, Preferences, Options, or Setup.
3 Make adjustments to the settings.
4 Click Profiles, and then click Save your current settings.
5 Select an empty location for your setting, and then assign a name.
Note: The first location contains Factory Default Settings, which cannot be changed or deleted.
6 Click Save.
7 Close all open software dialogs.
41
Page 42

Notes:
• To retrieve your print settings, click Profiles Restore a Profile, and then select the name of the profile that
you want to use.
• To delete a setting, click Profiles Delete Profiles. Select the setting that you want to delete, and then click
Delete.
Using Macintosh
The Presets pop-up menu lets you save the print settings you use often. When print settings are saved into a Preset,
there is no need to adjust the print settings for every print job.
1 With a document open, click File Print.
2 From the print options pop-up menu, choose and adjust the settings.
3 From the Presets pop-up menu, choose Save As.
The Save Preset dialog appears.
4 Type a name for the Preset.
5 Click OK.
42
Page 43

Working with photos
Using recommended paper
For best results when printing photos or other high-quality images, use Lexmark Photo Paper or Lexmark
PerfectFinish
Printing photos
Printing photos from a CD or removable storage device connected to the computer
Using Windows
1 Load photo paper with the glossy or printable side facing you. (If you are not sure which side is the printable side,
see the instructions that came with the paper.)
2 Insert a CD or any removable storage device (such as a flash drive, memory card, or digital camera) into the
computer.
If you install Lexmark FastPics or Lexmark Productivity Studio, then the software will launch when you insert the
flash drive, memory card, or digital camera.
TM
Photo Paper.
3 Follow the instructions on the computer screen to print photos.
4 Remove the CD or storage device.
Using Macintosh
1 Load photo paper with the glossy or printable side facing you. (If you are not sure which side is the printable side,
see the instructions that came with the paper.)
2 Insert a CD or any removable storage device (such as a flash drive, memory card, or digital camera) into the
computer.
3 Customize the settings as needed in the Page Setup dialog.
a With a photo open, choose File Page Setup.
b From the “Format for” pop-up menu, choose your printer series.
c From the Paper Size pop-up menu, choose the paper size loaded.
d Choose an orientation.
e Click OK.
4 Customize the settings as needed in the Print dialog.
a With a photo open, choose File Print.
b From the “Format for” pop-up menu, choose your printer series.
c For Mac OS X version 10.4 or later, click Advanced. Otherwise, proceed to the next step.
d From the Copies & Pages pop-up menu, type the number of copies to be printed.
43
Page 44

e From the same pop-up menu, choose Quality & Media.
• From the Paper Type pop-up menu, choose the type of paper you are using.
• From the Print Quality area, choose Automatic or Photo.
f Click Print.
5 Remove the CD or storage device.
44
Page 45

Maintaining the printer
Maintaining print cartridges
Installing print cartridges
1 Open the access cover, and then press down on the cartridge carrier levers.
W
P
RI
N
F
TI
N
II
W
I
P
R
I
N
F
T
I
N
I
G
2 Remove the used print cartridge or cartridges.
G
3 If you are installing new print cartridges, remove the tape from the back and bottom of the black cartridge, insert
the cartridge in the left carrier, and then close the black cartridge carrier lid.
Warning—Potential Damage: Do not touch the gold contact area on the back or the metal nozzles on the
bottom of the cartridge.
4 Remove the tape from the back and bottom of the color cartridge, insert the cartridge in the right carrier, and
then close the color cartridge carrier lid.
Warning—Potential Damage: Do not touch the gold contact area on the back or the metal nozzles on the
bottom of the cartridge.
45
Page 46

5 Close the access cover.
W
I
P
R
I
N
F
T
I
N
I
G
Note: The printer must be closed to start a new print job.
Removing used print cartridges
1 Make sure the printer is on.
2 Lift the access cover, and then press down on the cartridge carrier latch to raise the cartridge carrier lid.
The print cartridge carrier moves and stops at the loading position, unless the printer is busy.
W
P
R
IN
F
T
I
N
II
W
I
P
R
I
N
F
T
I
N
I
G
G
3 Remove the used print cartridge.
Refilling print cartridges
The warranty does not cover repair of failures or damage caused by a refilled cartridge. Lexmark does not recommend
use of a refilled cartridge. Refilling a cartridge can affect print quality and may cause damage to the printer. For best
results, use Lexmark supplies.
Using genuine Lexmark print cartridges
Lexmark printers, print cartridges, and photo paper are designed to perform together for superior print quality.
If you receive an Out of Original Lexmark Ink message, the original Lexmark ink in the indicated cartridge
(s) has been depleted.
46
Page 47

If you believe you purchased a new, genuine Lexmark print cartridge, but the Out of Original Lexmark
Ink message appears:
1 Click Learn More on the message.
2 Click Report a non-Lexmark print cartridge.
To prevent the message from appearing again for the indicated cartridge(s):
• Replace your cartridge(s) with new Lexmark print cartridge(s).
• If you are printing from a computer, click Learn more on the message, select the check box, and then click
Close.
• If you are using the printer without a computer, press Cancel.
Lexmark's warranty does not cover damage caused by non-Lexmark ink or print cartridges.
Aligning the print cartridges
Using Windows
1 Load plain paper.
2 Click Start Programs or All Programs, and then click the printer folder.
3 From the printer folder, click Maintenance Align cartridges.
4 Click Print.
5 Follow the instructions on the computer screen.
6 If you aligned the cartridges to improve print quality, print your document again. If print quality has not improved,
clean the print cartridge nozzles.
Using Macintosh
1 Load plain paper.
2 From the Finder desktop, double-click the printer folder.
3 Double-click the printer utility icon.
4 From the Maintenance tab, click Print Alignment Page.
5 Follow the instructions on the computer screen.
6 If you aligned the cartridges to improve print quality, print your document again. If print quality has not improved,
clean the print cartridge nozzles.
Cleaning the print cartridge nozzles
Using Windows
1 Load plain paper.
2 Click Start Programs or All Programs, and then click the printer folder.
3 From the printer folder, click Maintenance Clean cartridges.
4 Click Print.
47
Page 48

5 Follow the instructions on the computer screen.
6 If print quality has not improved, then wipe the print cartridge nozzles and contacts.
Using Macintosh
1 Load plain paper.
2 From the Finder desktop, double click the printer folder.
3 Double-click the printer utility icon.
4 From the Maintenance tab, click Clean Print Nozzles.
A page prints, forcing ink through the print cartridge nozzles to clean them.
5 To test if the print quality has improved, print the document again.
6 If print quality has not improved, then try cleaning the nozzles up to two more times.
Wiping the print cartridge nozzles and contacts
1 Remove the print cartridge(s).
2 Dampen a clean, lint-free cloth with water, and then place the cloth on a flat surface.
3 Gently hold the nozzles against the cloth for about three seconds, and then wipe in the direction shown.
4 Using another clean section of the cloth, gently hold the cloth against the contacts for about three seconds, and
then wipe in the direction shown.
48
Page 49

5 With another clean section of the cloth, repeat step 3 and step 4, and then let the nozzles and contacts dry
completely.
6 Reinsert the print cartridge(s), and then print the document again.
7 If the print quality does not improve, clean the print nozzles, and then try printing the document again.
8 Repeat step 7 up to two more times.
9 If print quality is still not satisfactory, replace the print cartridge(s).
Preserving the print cartridges
• Keep new cartridges in their packaging until you are ready to install them.
• Do not remove a cartridge from the printer except to replace, clean, or store it in an airtight container. The
cartridges do not print correctly if left exposed for an extended period of time.
Cleaning the exterior of the printer
1 Make sure that the printer is turned off and unplugged from the wall outlet.
CAUTION—SHOCK HAZARD: To avoid the risk of electric shock, unplug the power cord from the wall outlet
and disconnect all cables to the printer before proceeding.
2 Remove paper from the paper support and paper exit tray.
3 Dampen a clean, lint-free cloth with water.
Warning—Potential Damage: Do not use household cleaners or detergents, as they may damage the finish of
the printer.
4 Wipe only the outside of the printer, making sure to remove any ink residue that has accumulated on the paper
exit tray.
Warning—Potential Damage: Using a damp cloth to clean the interior may cause damage to your printer.
5 Make sure the paper support and paper exit tray are dry before beginning a new print job.
49
Page 50

Ordering supplies
Ordering print cartridges
Lexmark Z2400 Series (except Lexmark Z2490)
Item Part number Average cartridge standard page yield is up
1
to
Black cartridge 36A
Black cartridge
2
36
High yield black cartridge 36XLA
High yield black cartridge
2
Color cartridge 37A
Color cartridge
2
36XL
37
Page yield values available at
www.lexmark.com/pageyields.
High yield color cartridge 37XLA
High yield color cartridge
2
37XL
Photo cartridge 31 Not applicable
1
Values obtained by continuous printing. Declared yield value in accordance with ISO/IEC 24711.
2
Licensed Return Program Cartridge
Lexmark Z2490
Item Part number
Average cartridge standard page yield is up to
1
Black cartridge 4A
2
Black cartridge
4
Page yield values available at www.lexmark.com/pageyields.
Color cartridge 5A
2
Color Cartridge
5
Photo cartridge 31 Not applicable
1
Values obtained by continuous printing. Declared yield value in accordance with ISO/IEC 24711.
2
Licensed Return Program Cartridge
Ordering paper and other supplies
To purchase supplies or to locate a dealer near you, visit our Web site at www.lexmark.com.
50
Page 51

For best results when printing photos or other high-quality images, use Lexmark Photo Paper or Lexmark PerfectFinish
Photo Paper and Lexmark print cartridges.
Item Description
Lexmark Photo Paper
• Letter
• A4
• 4 x 6 in.
• 10 x 15 cm
Lexmark PerfectFinish Photo Paper
• Letter
• A4
• 4 x 6 in.
• 10 x 15 cm
• L
USB cable Part number 1021294
51
Page 52

Troubleshooting
Using the printer troubleshooting software (Windows only)
The Lexmark Service Center provides step-by-step troubleshooting help and contains links to printer maintenance
tasks and customer support.
To open the Lexmark Service Center, use one of these methods:
Method 1 Method 2
If it appears on an error message dialog, click the For
additional assistance, use the Lexmark Service
Center link.
1 Do one of the following:
• In Windows Vista, click All Programs, and then
• In Windows XP, click Start Programs or All
2 Select Lexmark Service Center.
Setup troubleshooting
Power button is not lit
These are possible solutions. Try one or more of the following:
PRESS POWER BUTTON
Make sure the printer is on by pressing .
DISCONNECT AND RECONNECT THE POWER CORD
1 Press to turn the printer off.
select the printer program folder from the list.
Programs, and then select the printer program
folder from the list.
2 Disconnect the power cord from the wall outlet.
3 Remove the power supply from the printer.
4 Plug the power cord all the way into the power supply on the printer.
2
1
5 Plug the power cord into the wall outlet.
52
Page 53

6 Plug the power cord into an electrical outlet that other electrical devices have been using.
7 Press to turn the printer on.
Software did not install
If you encountered problems while installing, or if your printer does not appear in the list in the Printers folder or as
a printer option when sending a print job, you can try uninstalling and reinstalling the software.
These are some other possible solutions. Try one or more of the following:
MAKE SURE YOUR OPERATING SYSTEM IS SUPPORTED
The following operating systems are supported: Windows Vista, Windows XP, Windows 2000 with Service Pack 3
or later, and Mac OS X versions 10.5, 10.4 and 10.3.
CHECK THAT YOUR COMPUTER MEETS THE MINIMUM SYSTEM REQUIREMENTS LISTED ON THE
PRINTER
BOX
CHECK THE USB CONNECTION
1 Check the USB cable for any obvious damage. If the cable is damaged, use a new one.
2 Firmly plug the square end of the USB cable into the back of the printer.
3 Firmly plug the rectangular end of the USB cable into the USB port of the computer.
The USB port is marked with the
USB symbol.
RECONNECT THE POWER SUPPLY
1 Press to turn the printer off.
2 Disconnect the power cord from the wall outlet.
3 Gently remove the power supply from the printer.
4 Reconnect the power supply to the printer.
5 Plug the power cord into the wall outlet.
6 Press to turn the printer on.
TEMPORARILY DISABLE SECURITY PROGRAMS IN WINDOWS
1 Close all open programs.
2 Disable any security programs.
3 Do one of the following:
• In Windows Vista, click .
• In Windows XP and earlier, click Start.
4 Click Computer or My Computer.
5 Double-click the CD or DVD drive icon.
53
Page 54

6 If necessary, double-click setup.exe.
7 Follow the instructions on the computer screen to install the software.
8 When the installation is completed, enable the security software again.
Page does not print
These are possible solutions. Try one or more of the following:
CHECK MESSAGES
If an error message appears, then resolve the error before trying to print again.
CHECK POWER
If the light is not on, then make sure that the power cord is properly connected to the printer and plugged into
a known working electrical outlet that other electrical devices have been using.
REMOVE AND THEN RELOAD PAPER
CHECK INK
Check the ink levels, and then install new print cartridges if necessary.
CHECK CARTRIDGES
1 Remove the print cartridges.
2 Make sure the sticker and tape have been removed.
1
1
3 Reinsert the cartridges.
CHECK PRINTER DEFAULT AND PAUSE SETTINGS
Using Windows
2
2
Do one of the following:
1
In Windows Vista
a Click .
b Click Control Panel.
54
Page 55

c Under Hardware and Sound, click Printer.
In Windows XP
a Click Start.
b Click Printers and Faxes.
In Windows 2000
a Click Start.
b Click Settings Printers.
2 Double-click the printer.
3 Click Printer.
• Make sure no check mark appears next to Pause Printing.
• If a check mark does not appear next to Set As Default Printer, then you must select the printer for each file
that you want to print.
Using Macintosh
For Mac OS X version 10.5
1 From the Finder desktop, click System Preferences Print & Fax.
2 From the Default Printer pop-up menu, check if the printer is the default printer.
If the printer is not the default printer, then you must select the printer for each file that you want to print.
If you want to set the printer as the default printer, then select the printer from the Default Printer pop-up
menu.
3 Click Open Print Queue.
The print queue dialog appears.
Make sure that the print job is not on hold. If the print job is on hold:
• If you want to resume a particular print job, choose the document name, and then click Resume.
• If you want to resume all print jobs in the queue, then click Resume Printer.
For Mac OS X version 10.4 and earlier
1 From the Finder desktop, click Go Utilities Print Center or Printer Setup Utility.
The Printer List dialog appears.
2 Double-click the printer.
The print queue dialog appears.
• Make sure that the print job is not on hold.
If the print job is on hold:
– If you want to resume a particular print job, choose the document name, and then click Resume.
– If you want to resume all print jobs in the queue, then click Start Jobs.
• If the printer is not in bold, then it is not the default printer. You must select the printer for each file that
you want to print.
55
Page 56

If you want to set the printer as the default printer:
a Go back to the Printer List dialog, and then select the printer.
b Click Make Default.
DISCONNECT AND RECONNECT POWER SUPPLY
1 Press to turn off the printer.
2 Disconnect the power cord from the wall outlet.
3 Remove the power supply from the printer.
4 Reconnect the power supply to the printer.
5 Plug the power cord into the wall outlet.
6 Press to turn on the printer.
REMOVE AND REINSTALL THE SOFTWARE
If you encountered problems while installing, or if your printer does not appear in the printers folder or as a printer
option when sending a print job, then try uninstalling and reinstalling the software.
Solving printer power problems
The printer and the computer cannot exchange data.
These are possible solutions. Try one or more of the following:
MAKE SURE THE PRINTER POWER SUPPLY IS ATTACHED CORRECTLY
1 Press to turn the printer off.
2 Disconnect the power cord from the wall outlet.
3 Remove the power supply from the printer.
4 Reconnect the power supply to the printer.
5 Plug the power cord into the wall outlet.
6 Press to turn the printer on.
MAKE SURE THE PRINTER IS NOT IN SLEEP MODE
If the power light is blinking on and off slowly, then the printer is in sleep mode.
1 Unplug the power cord from the wall outlet.
2 Wait ten seconds, and then insert the power cord into the wall outlet.
3 Press to turn the printer on.
56
Page 57

Removing and reinstalling the software
If the printer is not functioning properly, or if a communications error message appears when you try to use the
printer, you may need to remove and reinstall the printer software.
Using Windows
1 Do one of the following:
• In Windows Vista, click .
• In Windows XP, click Start.
2 Click Programs or All Programs, and then select the printer program folder from the list.
3 Select Uninstall.
4 Follow the instructions on the computer screen to remove the printer software.
5 Restart the computer before reinstalling the printer software.
6 Click Cancel on all New Hardware Found screens.
7 Insert the installation CD, and then follow the instructions on the computer screen to reinstall the software.
If the install screen does not appear automatically after you restart your computer, do one of the following:
In Windows Vista:
a
Click .
b Locate the Start Search box.
c Type D:\setup.exe, where D is the letter of your CD or DVD drive.
In Windows XP:
a
Click Start Run.
b Type D:\setup.exe, where D is the letter of your CD or DVD drive.
Using Macintosh
1 Close all open software applications.
2 From the Finder desktop, double-click the printer folder.
3 Double-click the Uninstaller icon.
4 Follow the instructions on the computer screen to remove the printer software.
5 Restart the computer before reinstalling the printer software.
6 Insert the installation CD, and then follow the instructions on the computer screen to reinstall the software.
If the software still does not install correctly, visit our Web site at www.lexmark.com to check for the latest software.
1 In all countries or regions except the United States, select your country or region.
2 Click the links for drivers or downloads.
3 Select your printer family.
4 Select your printer model.
57
Page 58

5 Select your operating system.
6 Select the file that you want to download, and then follow the directions on the computer screen.
Enabling the USB port in Windows
To confirm that the USB port is enabled on the computer:
1 Do one of the following:
In Windows Vista
a Click Control Panel.
b Click System and Maintenance System.
c Click Device Manager.
In Windows XP
a Click Start.
b Click Control Panel Performance and Maintenance System.
c From the Hardware tab, click Device Manager.
In Windows 2000
a Click Start.
b Click Settings Control Panel System.
c From the Hardware tab, click Device Manager.
2 Click the plus sign (+) beside Universal Serial Bus Controller.
If USB Host Controller and USB Root Hub are listed, then the USB port is enabled.
For more information, see the computer documentation.
Wireless troubleshooting
Printing a network setup page
A network setup page lists the configuration settings of your printer, including the IP address and MAC address of the
printer.
1 Make sure the printer is turned on.
2 Press .
The
light pulses.
3 Open the access cover.
4 Press and hold .
5 While holding , press .
6 When the light becomes steady, release .
The network setup page prints.
58
Page 59

Wireless troubleshooting checklist
Before beginning to troubleshoot the wireless printer, verify the following:
• The power supply is connected to the printer, and is on.
• Your SSID is correct.
Print a network setup page to verify the SSID the printer is using.
If you are not sure if your SSID is correct, run the wireless setup again.
• Your WEP key or WPA passphrase is correct (if your network is secure).
Log into the wireless access point (wireless router) and check the security settings.
A security key is like a password. All devices on the same wireless network using WEP, WPA-PSK, or WPA2-PSK
share the same security key.
If you are not sure if your security information is correct, run the wireless setup again.
• The wireless network is working properly.
Try accessing other computers on your wireless network.
If your network has Internet access, try connecting to the Internet over a wireless connection.
• The printer is within the range of the wireless network.
For most networks, the printer should be within 100 feet (30 meters) of the wireless access point (wireless router).
• The printer is located away from obstacles that could block the wireless signal.
Remove any large metal objects between the access point and the printer.
Make sure the printer and wireless access point are not separated by poles, walls, or support columns containing
metal or concrete.
• The printer is located away from other electronic devices that may interfere with the wireless signal.
Many devices can interfere with the wireless signal, including baby monitors, motors, cordless phones, security
system cameras, other wireless networks, and some Bluetooth devices.
• The Wi-Fi indicator light is lit.
• The printer driver is installed on the computer from which you are performing a task.
• The correct printer port is selected.
• The computer and printer are both connected to the same wireless network.
Wireless configuration does not continue after the USB cable is attached
Check the USB cable
If the configuration software does not allow you to continue configuring your printer wirelessly after you attach the
USB cable, there may be a problem with the cable. Try one or more of the following:
• Make sure that the USB cable is not damaged. If there is any visible damage to the USB cable, try using a new one.
• Attach the cable directly to the computer and the printer. Hubs, switch boxes, and docking stations can sometimes
interfere with the USB connection.
59
Page 60

• Make sure the USB cable is correctly attached.
1 Attach the large, rectangular connector to any USB port on your computer. USB ports may be on the front or
the back of the computer, and may be horizontal or vertical.
2 Attach the small, square connector to the printer.
Cannot print over wireless network
If you encountered problems while installing, or if your printer does not appear in the printers folder or as a printer
option when sending a print job, you can try uninstalling and reinstalling the software.
These are possible solutions. Try one or more of the following:
MAKE SURE YOUR COMPUTER IS CONNECTED TO YOUR WIRELESS ACCESS POINT (WIRELESS
ROUTER
)
• See if you have access to the Internet by opening your Web browser and accessing any site.
• If there are other computers or resources on your wireless network, check to see if you can access them from
your computer.
MOVE THE COMPUTER AND/OR PRINTER CLOSER TO THE WIRELESS ROUTER
Although the possible distance between devices in 802.11b or 802.11g networks is 300 feet, the maximum range
for optimal performance is generally 100–150 feet.
60
Page 61

CHECK WHETHER THE PRINTER IS ON THE SAME WIRELESS NETWORK AS THE COMPUTER
The SSID of the printer must match the SSID of the wireless network.
Using Windows
Type the IP address of the wireless access point (wireless router) in the Web address field of your browser.
1
If you do not know the IP address of the wireless access point:
a Do one of the following:
• In Windows Vista, click All Programs Accessories Command Prompt.
• In Windows XP and earlier, click Start Programs or All Programs Accessories Command
Prompt.
b Type ipconfig.
c Press Enter.
• The “Default Gateway” entry is typically the wireless access point.
• The IP address appears as four sets of numbers separated by periods, such as 192.168.0.100. Your IP
address might also start with the numbers 10 or 169. This is determined by your operating system or
wireless network software.
2 Type your user name and password for the wireless access point (wireless router) when prompted.
3 Click OK.
4 On the main page, click Wireless or another selection where settings are stored. The SSID appears.
5 Write down the SSID, security type, and the security keys if they are shown.
Note: Make sure you copy them down exactly, including any capital letters.
6 Store the SSID and the security keys in a safe place for future reference.
Using Macintosh with an AirPort base station
For Mac OS X version 10.5
1 From the Finder desktop, click System Preferences.
2 Click Network.
3 Click AirPort.
The SSID of the network the computer is connected to is displayed in the Network Name pop-up menu.
4 Write down the SSID.
For Mac OS X version 10.4 and earlier
1 From the menu bar, click Go Applications.
2 From the Applications folder, double-click Internet Connect.
3 From the toolbar, click AirPort.
The SSID of the network the computer is connected to is displayed in the Network pop-up menu.
4 Write down the SSID.
61
Page 62

Using Macintosh with a wireless access point (wireless router)
Type the IP address of the wireless access point (wireless router) in the Web address field of your browser and
1
continue to Step 2.
If you do not know the IP address of the wireless access point (wireless router), then do the following:
For Mac OS X version 10.5
a From the Finder desktop, click System Preferences.
b Click Network.
c Click AirPort.
d Click Advanced.
e Click TCP/IP.
The “Router” entry is typically the wireless access point (wireless router).
For Mac OS X version 10.4 and earlier
a From the Finder desktop, click System Preferences.
b Click Network.
c From the Show pop-up menu, select Airport.
d Click TCP/IP.
The “Router” entry is typically the wireless access point (wireless router).
2 Type your user name and password when prompted.
3 Click OK.
4 On the main page, click Wireless or another selection where settings are stored. The SSID will be displayed.
5 Write down the SSID, security type and the security keys if they are shown.
Notes:
• Make sure you copy them down exactly, including any capital letters.
• Store the SSID and the security keys in a safe place for future reference.
CHECK YOUR SECURITY KEYS
A security key is like a password. All devices on the same wireless network must share the same security key.
WEP key
Must meet one of the following criteria:
• Exactly 10 or 26 hexadecimal characters. Hexadecimal characters are A-F, a-f, and 0-9.
or
• Exactly 5 or 13 ASCII characters. ASCII characters are letters, numbers, and symbols found on a keyboard. ASCII
characters in a WEP key are case-sensitive.
62
Page 63

WPA-PSK or WPA2-PSK passphrase or key
Must meet one of the following criteria:
• From 8 to 63 ASCII characters. ASCII characters in a WPA passphrase are case-sensitive.
or
• Exactly 64 hexadecimal characters. Hexadecimal characters are A-F, a-f, and 0-9.
Note: If you do not know this information, see the documentation that came with the wireless network, or contact
the person who set up your wireless network.
CHECK YOUR ADVANCED SECURITY SETTINGS
• If you are using MAC address filtering to limit access to your wireless network, you must add the printer MAC
address to the list of addresses allowed to connect to the wireless access point (wireless router).
• If you set the wireless access point (wireless router) to issue a limited number of IP addresses, you must change
this so that the printer can be added.
Note: If you do not know how to make these changes, see the documentation that came with the wireless network,
or contact the person who set up your wireless network.
Cannot print and there is a firewall on the computer
Third-party (non-Microsoft) firewalls can interfere with wireless printing. If the printer and computer are configured
correctly, and the wireless network is working, but the printer will not print wirelessly, a firewall could be the problem.
If there is a firewall (other than the Windows firewall) on the computer, try one or more of the following:
• Update the firewall using the most recent update available from the manufacturer. Refer to the documentation
that came with your firewall for instructions on how to do this.
• If programs request firewall access when you install the printer or try to print, make sure you allow those programs
to run.
• Temporarily disable the firewall and install the wireless printer on the computer. Re-enable the firewall when you
have completed the wireless installation.
Wi-Fi indicator light is not lit
HECK POWER
C
Make sure the light is on.
Wi-Fi indicator light is green but the printer does not print (Windows only)
If you have completed the configuration for wireless printing and all of the settings appear to be correct, but the
printer does not print, try one or more of the following:
ALLOW THE WIRELESS INSTALLATION TO COMPLETE
Do not attempt to print, remove the installation CD, or detach the installation cable until you see the Wireless
Setup Successful screen.
63
Page 64

ENABLE THE PRINTER
Confirm that the printer is enabled.
1 Do one of the following:
In Windows Vista
a
Click Control Panel.
b Under Hardware and Sound, click Printer.
In Windows XP
Click Start Printers and Faxes.
•
2 Right-click the new printer. If you see Use Printer Online in the menu, select it.
3 Close the Printers or Printers and Faxes window and try printing again.
SELECT THE WIRELESS PRINTER
If you have previously set up your printer as a locally-attached printer, you may need to select the wireless printer
to use the printer wirelessly.
1 Do one of the following:
In Windows Vista
a
Click Control Panel.
b Under Hardware and Sound, click Printer.
In Windows XP
•
Click Start Printers and Faxes.
2 Check to see if you have a printer called Copy 1 in your folder. If you do, right-click the Copy 1 printer and click
Use Printer Online from the menu.
3 Close the Printers or Printers and Faxes window and try printing again.
SELECT THE WIRELESS PORT
If you have previously set up your printer as a locally-attached printer, you may need to select the wireless printer
to use the printer wirelessly.
1 Do one of the following:
In Windows Vista
Click Control Panel.
a
b Under Hardware and Sound, click Printer.
In Windows XP
•
Click Start Printers and Faxes.
2 Right-click the printer and select Properties from the menu.
3 Click the Ports tab.
64
Page 65

4 Locate the selected port. The selected port has a check in the Port column.
5 If the Description column of the selected port indicates that it is a USB port, scroll through the list and select
the port with Printer Port in the Description column.
6 Click OK, and then try to print again.
Wi-Fi indicator light is blinking orange during installation (Windows only)
When the Wi-Fi indicator light is blinking orange, it indicates that the printer has been set up for wireless networking
but cannot connect to the network for which it has been configured. The printer may be unable to join the network
because of interference, its distance from the wireless access point (wireless router), or until its settings are changed.
These are possible solutions. Try one or more of the following:
MAKE SURE THE WIRELESS ACCESS POINT (WIRELESS ROUTER) IS ON
Check the wireless access point (router) and, if necessary, turn it on.
MOVE YOUR WIRELESS ACCESS POINT (WIRELESS ROUTER) TO MINIMIZE INTERFERENCE
There may be temporary interference from other devices such as microwave ovens or other appliances, cordless
phones, baby monitors, and security system cameras. Make sure your wireless access point (wireless router) is not
positioned too closely to these devices.
TRY ADJUSTING EXTERNAL ANTENNAS
Antennas usually work best if they are pointing straight up. You may find that reception improves if you experiment
with different angles for the printer and/or wireless access point antennas.
MOVE YOUR PRINTER
Move the printer closer to the wireless access point (wireless router). Although the possible distance between
devices in 802.11b or 802.11g networks is 300 feet, the maximum range for optimal performance is generally 100–
150 feet.
You can find the signal strength of the network on the network setup page.
CHECK SECURITY KEYS
If your wireless access point (wireless router) is using Wired Equivalent Privacy (WEP) security, the WEP key should
be:
• Exactly 10 or 26 hexadecimal characters. Hexadecimal characters are A–F, a–f, and 0–9.
or
• Exactly 5 or 13 ASCII characters. ASCII characters are letters, numbers, and symbols found on a keyboard.
If your wireless access point (wireless router) is using Wi-Fi Protected Access (WPA) security, the WPA passphrase
should be:
• From 8 to 63 ASCII characters. ASCII characters in a WPA passphrase are case-sensitive.
or
• Exactly 64 hexadecimal characters. Hexadecimal characters are A-F, a-f, and 0-9.
65
Page 66

If your wireless network is not using security, then you will not have a security key. Using a wireless network with
no security is not recommended because it can allow intruders to use your network resources without your consent.
CHECK MAC ADDRESS
If your network uses MAC address filtering, provide the MAC address for the printer to your network.
PING THE WIRELESS ACCESS POINT (WIRELESS ROUTER) TO MAKE SURE THE NETWORK IS WORKING
1 If you do not already know it, find the IP address of the access point (router).
a Do one of the following:
• In Windows Vista, click All Programs Accessories Command Prompt.
• In Windows XP, click Start Programs or All Programs Accessories Command Prompt.
b Type ipconfig.
c Press Enter.
• The “Default Gateway” entry is typically the wireless access point (wireless router).
• The IP address appears as four sets of numbers separated by periods, such as 192.168.0.100. Your IP
address might also start with the numbers 10 or 169. This is determined by your operating system or
wireless network software.
2 Ping the wireless access point (wireless router).
a Do one of the following:
• In Windows Vista, click All Programs Accessories Command Prompt.
• In Windows XP, click Start Programs or All Programs Accessories Command Prompt.
b Type ping followed by a space and the IP address of the wireless access point. For example:
ping 192.168.0.100
c Press Enter.
3 Check to see whether the access point responds:
• If the wireless access point (wireless router) responds, you will see several lines appear that start with “Reply
from.”
It is possible that the printer did not connect to the wireless network. Turn off and then restart the printer
to try to connect again.
• If the wireless access point (wireless router) does not respond, it will take several seconds and then you will
see “Request timed out.”
Try the following:
a Do one of the following:
– In Windows Vista, click Control Panel Network and Internet Network and Sharing
Center.
– In Windows XP, click Start Control Panel Network Connection.
b Select the appropriate connection from the ones shown.
Note: If the computer is connected to the access point (router) by an Ethernet cable, the connection
may not include the word “wireless” in its name.
c Right-click the connection, and then click Repair.
66
Page 67

RUN THE WIRELESS SETUP AGAIN
If your wireless settings have changed, you must run the printer wireless setup again. Some reasons your settings
may have changed include your having manually changed your WEP or WPA keys, channel, or other network
settings; or the wireless access point (wireless router) having been reset to factory defaults.
Running the wireless setup again can also resolve issues due to misconfigurations that occured when configuring
the printer for wireless access.
Notes:
• If you change network settings, change them on all the network devices before changing them for the wireless
access point (wireless router).
• If you have already changed the wireless network settings on your wireless access point (wireless router), then
you must change the settings on all the other network devices before you can see them on the network.
1 Do one of the following:
• In Windows Vista, click .
• In Windows XP, click Start.
2 Click Programs or All Programs, and then select the printer program folder from the list.
3 Click Tools Lexmark Wireless Setup Utility.
Note: You may be prompted to connect the printer to the computer again using the installation cable as part
of the setup process.
4 Follow the instructions on the computer screen.
Wi-Fi indicator light is blinking orange during installation (Macintosh only)
When the Wi-Fi indicator light is blinking orange, it indicates that the printer has been set up for wireless networking
but cannot connect to the network for which it has been configured. The printer may be unable to join the network
because of interference, its distance from the wireless access point (wireless router), or until its settings are changed.
These are possible solutions. Try one or more of the following:
MAKE SURE THE WIRELESS ACCESS POINT IS ON
Check the wireless access point and, if necessary, turn it on.
MOVE YOUR WIRELESS ACCESS POINT TO MINIMIZE INTERFERENCE
There may be temporary interference from other devices such as microwave ovens or other appliances, cordless
phones, baby monitors, and security system cameras. Make sure the wireless access point is not positioned too
closely to these devices.
TRY ADJUSTING EXTERNAL ANTENNAS
Antennas usually work best if they are pointing straight up. You may find that reception improves if you experiment
with different angles for the printer and/or wireless access point antennas.
67
Page 68

MOVE YOUR PRINTER
Move the printer closer to the wireless access point. Although the possible distance between devices in 802.11b
or 802.11g networks is 300 feet, the effective range for optimal performance is generally 100–150 feet.
You can find the signal strength of the network on the network setup page.
CHECK SECURITY KEYS
If you are using WEP security
A valid WEP key is:
• Exactly 10 or 26 hexadecimal characters. Hexadecimal characters are A–F, a–f, and 0–9.
or
• Exactly 5 or 13 ASCII characters. ASCII characters are letters, numbers, and symbols found on a keyboard.
If you are using WPA security
A valid WPA passphrase is:
• From 8 to 63 ASCII characters. ASCII characters in a WPA passphrase are case-sensitive.
or
• Exactly 64 hexadecimal characters. Hexadecimal characters are A-F, a-f, and 0-9.
If your wireless network is not using security, then you will not have a WEP key or WPA passphrase. Using a wireless
network with no security is not recommended because it can allow intruders to use your network resources without
your consent.
CHECK THE MAC ADDRESS
If your network uses MAC address filtering, make sure that you include the MAC address of the printer in the MAC
address filter list. This will allow the printer to operate on the network.
PING THE ACCESS POINT TO MAKE SURE THE NETWORK IS WORKING
1 Check the AirPort status and, if you do not already know it, find the IP address of the wireless access point.
In Mac OS X version 10.5
From the menu bar, click System Preferences.
a
b Click Network.
c Click AirPort.
Check Status. It should be on. If it is off, click Turn AirPort On.
The AirPort status indicator should also be green. Green means the port is active (turned on) and connected.
Notes:
• Yellow means the port is active but is not connected.
• Red means the port has not been configured.
d Click Advanced.
68
Page 69

e Click TCP/IP.
• The IP address appears as four sets of numbers separated by periods, such as 192.168.0.100.
• The "Router" entry is typically the wireless access point.
In Mac OS X version 10.4 and earlier
a
Click System Preferences.
b Click Network.
c If necessary, select Network Status in the Show pop-up menu.
The AirPort status indicator should be green. Green means the port is active (turned on) and connected.
Notes:
• Yellow means the port is active but is not connected.
• Red means the port has not been configured.
d From the Show pop-up menu, select AirPort.
e Click TCP/IP.
• The IP address appears as four sets of numbers separated by periods, such as 192.168.0.100.
• The "Router" entry is typically the wireless access point.
2 Ping the wireless access point.
a From the menu bar, click Go Utilities.
b Double-click Network Utility.
c Click the Ping tab.
d Type the IP address of the wireless access point in the network address field. For example:
10.168.0.100
e Click Ping.
3 If the wireless access point responds, you will see several lines that display the number of bytes received from
the access point. This ensures that your computer is connected to the access point.
If the wireless access point does not respond, nothing is displayed. You can use Network Diagnostics to help
resolve the problem.
RUN THE WIRELESS SETUP AGAIN
1 From the Finder desktop, double-click the printer folder.
2 Double-click Lexmark Wireless Setup Assistant.
3 Follow the instructions on the computer screen.
Wi-Fi indicator light is still orange
When the Wi-Fi indicator light is orange, it may indicate that the printer is:
• Being configured for use on the wireless network
• Not configured in infrastructure mode
• Waiting to be configured for ad hoc mode
The printer may be unable to join the network because of interference, its distance from the wireless access point
(wireless router), or until its settings are changed.
69
Page 70

These are possible solutions. Try one or more of the following:
CHECK NETWORK NAME
Make sure your network does not have the same name as another network near you. For example, if you and your
neighbor both use a manufacturer's default network name, your printer could be connecting to your neighbor's
network.
If you are not using a unique network name, consult the documentation for your wireless access point (wireless
router) to learn how to set a network name.
If you set a new network name, you must reset the printer and computer SSID to the same network name.
CHECK SECURITY KEYS
If your wireless access point (wireless router) is using Wired Equivalent Privacy (WEP) security, the WEP key should
be:
• Exactly 10 or 26 hexadecimal characters. Hexadecimal characters are A–F, a–f, and 0–9.
or
• Exactly 5 or 13 ASCII characters. ASCII characters are letters, numbers, and symbols found on a keyboard.
If your wireless access point (wireless router) is using Wi-Fi Protected Access (WPA) security, the WPA passphrase
should be:
• From 8 to 63 ASCII characters. ASCII characters in a WPA passphrase are case-sensitive.
or
• Exactly 64 hexadecimal characters. Hexadecimal characters are A-F, a-f, and 0-9.
If your wireless network is not using security, then you will not have a security key. Using a wireless network with
no security is not recommended because it can allow intruders to use your network resources without your consent.
MOVE YOUR PRINTER
Move the printer closer to the wireless access point (wireless router). Although the possible distance between
devices in 802.11b or 802.11g networks is 300 feet, the maximum range for optimal performance is generally
100-150 feet.
CHECK MAC ADDRESS
If your network uses MAC address filtering, make sure that you include the MAC address of the printer in the MAC
address filter list. This will allow the printer to operate on the network. For more information, see “How do I find
the MAC address?” on page 29.
Wireless print server not installed
You may see a message during installation indicating that the printer does not have a wireless print server installed.
If you are sure the printer is capable of wireless printing, try the following:
CHECK POWER
Make sure the light is on.
70
Page 71

“Communication not available” message displays when printing wirelessly
If you are using a laptop and have power saving settings enabled, you may see the Communication not
available message on your computer screen when you attempt to print wirelessly. This can occur if the laptop
hard drive has powered down.
If you see this message, wait a few seconds and then try to print again. The laptop and printer require a few seconds
to power up again and reattach to the wireless network.
If you see this message again after you have waited long enough for the printer and the laptop to attach to the
network, there may be a problem with your wireless network. Make sure that the laptop and printer have both
received IP addresses. For more information on locating IP addresses, refer to “How do I locate IP addresses?” on
page 29.
If the printer and/or the laptop does not have an IP address, or if either has an address of 169.254.x.y (where x and y
are any two numbers between 0 and 255):
1 Shut down the device that does not have a valid IP address (the laptop, the printer, or both).
2 Turn on the device(s).
3 Check the IP addresses again.
If the laptop and/or printer still does not receive a valid IP address, there is a problem with your wireless network.
Make sure your wireless access point (wireless router) is working, and remove any obstacles that could be blocking
the wireless signal.
71
Page 72

Notices
Product information
Product name:
Lexmark Z2400 Series
Machine type:
4116
Model(s):
W01
Edition notice
January 2008
The following paragraph does not apply to any country where such provisions are inconsistent with local
law: LEXMARK INTERNATIONAL, INC., PROVIDES THIS PUBLICATION “AS IS” WITHOUT WARRANTY OF ANY KIND,
EITHER EXPRESS OR IMPLIED, INCLUDING, BUT NOT LIMITED TO, THE IMPLIED WARRANTIES OF MERCHANTABILITY
OR FITNESS FOR A PARTICULAR PURPOSE. Some states do not allow disclaimer of express or implied warranties in
certain transactions; therefore, this statement may not apply to you.
This publication could include technical inaccuracies or typographical errors. Changes are periodically made to the
information herein; these changes will be incorporated in later editions. Improvements or changes in the products
or the programs described may be made at any time.
References in this publication to products, programs, or services do not imply that the manufacturer intends to make
these available in all countries in which it operates. Any reference to a product, program, or service is not intended
to state or imply that only that product, program, or service may be used. Any functionally equivalent product,
program, or service that does not infringe any existing intellectual property right may be used instead. Evaluation
and verification of operation in conjunction with other products, programs, or services, except those expressly
designated by the manufacturer, are the user’s responsibility.
For Lexmark technical support, visit support.lexmark.com.
For information on supplies and downloads, visit www.lexmark.com.
If you don't have access to the Internet, you can contact Lexmark by mail:
Lexmark International, Inc.
Bldg 004-2/CSC
740 New Circle Road NW
Lexington, KY 40550
USA
© 2008 Lexmark International, Inc.
All rights reserved.
72
Page 73

UNITED STATES GOVERNMENT RIGHTS
This software and any accompanying documentation provided under this agreement are commercial computer
software and documentation developed exclusively at private expense.
Trademarks
Lexmark and Lexmark with diamond design are trademarks of Lexmark International, Inc., registered in the United
States and/or other countries.
PerfectFinish is a trademark of Lexmark International, Inc.
All other trademarks are the property of their respective owners.
Licensing notices
The following document can be viewed from the \Drivers\XPS directory on the installation software CD: Zopen.PDF.
Federal Communications Commission (FCC) compliance information statement
This product has been tested and found to comply with the limits for a Class B digital device, pursuant to Part 15 of
the FCC Rules. Operation is subject to the following two conditions: (1) this device may not cause harmful interference,
and (2) this device must accept any interference received, including interference that may cause undesired operation.
The FCC Class B limits are designed to provide reasonable protection against harmful interference when the
equipment is operated in a residential installation. This equipment generates, uses, and can radiate radio frequency
energy and, if not installed and used in accordance with the instructions, may cause harmful interference to radio
communications. However, there is no guarantee that interference will not occur in a particular installation. If this
equipment does cause harmful interference to radio or television reception, which can be determined by turning
the equipment off and on, the user is encouraged to try to correct the interference by one or more of the following
measures:
• Reorient or relocate the receiving antenna.
• Increase the separation between the equipment and receiver.
• Connect the equipment into an outlet on a circuit different from that to which the receiver is connected.
• Consult your point of purchase or service representative for additional suggestions.
The manufacturer is not responsible for radio or television interference caused by using other than recommended
cables or by unauthorized changes or modifications to this equipment. Unauthorized changes or modifications could
void the user's authority to operate this equipment.
Note: To assure compliance with FCC regulations on electromagnetic interference for a Class B computing device,
use a properly shielded and grounded cable such as Lexmark part number 1021294 for USB attach. Use of a substitute
cable not properly shielded and grounded may result in a violation of FCC regulations.
Any questions regarding this compliance information statement should be directed to:
Director of Lexmark Technology & Services
Lexmark International, Inc.
740 West New Circle Road
Lexington, KY 40550
(859) 232–3000
73
Page 74

Exposure to radio frequency radiation
The following notice is applicable if your printer has a wireless network card installed.
The radiated output power of this device is far below the radio frequency exposure limits of the FCC and other
regulatory agencies. A minimum separation of 20 cm (8 inches) must be maintained between the antenna and any
persons for this device to satisfy the RF exposure requirements of the FCC and other regulatory agencies.
Industry Canada compliance statement
This Class B digital apparatus meets all requirements of the Canadian Interference-Causing Equipment Standard
ICES-003.
Avis de conformité aux normes de l’industrie du Canada
Cet appareil numérique de classe B est conforme aux exigences de la norme canadienne relative aux équipements
pouvant causer des interférences NMB-003.
Industry Canada notice
The following notices are applicable if your printer has a wireless network card installed.
Industry Canada (Canada)
This device complies with Industry Canada specification RSS-210. Operation is subject to the following two condition s:
(1) this device may not cause interference, and (2) this device must accept any interference, including interference
that may cause undesired operation of the device.
This device has been designed to operate only with the antenna provided. Use of any other antenna is strictly
prohibited per regulations of Industry Canada.
To prevent radio interference to the licensed service, this device is intended to be operated indoors and away from
windows to provide maximum shielding. Equipment (or its transmit antenna) that is installed outdoors is subject to
licensing.
The installer of this radio equipment must ensure that the antenna is located or pointed such that it does not emit
RF fields in excess of Health Canada limits for the general population; consult Safety Code 6, obtainable from Health
Canada's Web site www.hc-sc.gc.ca/rpb.
The term "IC:" before the certification/registration number only signifies that the Industry Canada technical
specifications were met.
Industry Canada (Canada)
Cet appareil est conforme à la norme RSS-210 d'Industry Canada. Son fonctionnement est soumis aux deux conditions
suivantes :
(1) cet appareil ne doit pas provoquer d'interférences et (2) il doit accepter toute interférence reçue, y compris celles
risquant d'altérer son fonctionnement.
Cet appareil a été conçu pour fonctionner uniquement avec l'antenne fournie. L'utilisation de toute autre antenne
est strictement interdite par la réglementation d'Industry Canada.
74
Page 75

En application des réglementations d'Industry Canada, l'utilisation d'une antenne de gain supérieur est strictement
interdite.
Pour empêcher toute interférence radio au service faisant l'objet d'une licence, cet appareil doit être utilisé à l'intérieur
et loin des fenêtres afin de garantir une protection optimale.
Si le matériel (ou son antenne d'émission) est installé à l'extérieur, il doit faire l'objet d'une licence.
L'installateur de cet équipement radio doit veiller à ce que l'antenne soit implantée et dirigée de manière à n'émettre
aucun champ HF dépassant les limites fixées pour l'ensemble de la population par Santé Canada. Reportez-vous au
Code de sécurité 6 que vous pouvez consulter sur le site Web de Santé Canada www.hc-sc.gc.ca/rpb.
Le terme « IC » précédant le numéro de d'accréditation/inscription signifie simplement que le produit est conforme
aux spécifications techniques d'Industry Canada.
European Community (EC) directives conformity
This product is in conformity with the protection requirements of EC Council directives 2004/108/EC and 2006/95/EC
on the approximation and harmonization of the laws of the Member States relating to electromagnetic compatibility
and safety of electrical equipment designed for use within certain voltage limits.
A declaration of conformity with the requirements of the directives has been signed by the Director of Manufacturing
and Technical Support, Lexmark International, Inc., S.A., Boigny, France.
This product satisfies the Class B limits of EN 55022 and safety requirements of EN 60950.
European EC directives conformity statement for radio products
The following notices are applicable if your printer has a wireless network card installed
This product is in conformity with the protection requirements of EC Council directives 2004/108/EC, 2006/95/EC,
and 1999/5/EC on the approximation and harmonization of the laws of the Member States relating to electromagnetic
compatibility, safety of electrical equipment designed for use within certain voltage limits and on radio equipment
and telecommunications terminal equipment.
Compliance is indicated by the CE marking.
The Alert sign indicates that there are restrictions within certain member states.
A declaration of conformity with the requirements of the directives is available from the Director of Manufacturing
and Technical Support, Lexmark International, S. A., Boigny, France.
The following restrictions apply:
Country/region
All countries/regions This product is for indoor use only. This product may not be used outdoors.
L'Italia Si fa presente inoltre che l'uso degli apparati in esame è regolamentato da:
Restriction
• D.Lgs 1.8.2003, n.259, articoli 104 (attività soggette ad autorizzazione generale) e 105
(libero uso), per uso privato;
• D.M. 28.5.03, per la fornitura al pubblico dell'accesso R-LAN alle reti e ai servizi di
telecomunicazioni.
75
Page 76

This product satisfies the limits of EN 55022; safety requirements of EN 60950; radio spectrum requirements of ETSI
EN 300 328; and the EMC requirements of EN 55024, ETSI EN 301 489-1 and ETSI EN 301 489-17.
Česky
Dansk Lexmark International, Inc. erklærer herved, at dette produkt overholder de væsentlige krav og øvrige
Deutsch Hiermit erklärt Lexmark International, Inc., dass sich das Gerät dieses Gerät in Übereinstimmung mit
Ελληνική ΜΕ ΤΗΝ ΠΑΡΟΥΣΑ Η LEXMARK INTERNATIONAL, INC. ΔΗΛΩΝΕΙ ΟΤΙ ΑΥΤΟ ΤΟ ΠΡΟΪΟΝ
English Hereby, Lexmark International, Inc., declares that this type of equipment is in compliance with
Español Por medio de la presente, Lexmark International, Inc. declara que este producto cumple con los
Eesti Käesolevaga kinnitab Lexmark International, Inc., et seade see toode vastab direktiivi
Suomi Lexmark International, Inc. vakuuttaa täten, että tämä tuote on direktiivin 1999/5/EY oleellisten
Společnost Lexmark International, Inc. tímto prohlašuje, že výrobek tento výrobek je ve shodě se
základními požadavky a dalšími příslušnými ustanoveními směrnice 1999/5/ES.
relevante krav i direktiv 1999/5/EF.
den grundlegenden Anforderungen und den übrigen einschlägigen Bestimmungen der Richtlinie
1999/5/EG befindet.
ΣΥΜΜΟΡΦΩΝΕΤΑΙ ΠΡΟΣ ΤΙΣ ΟΥΣΙΩΔΕΙΣ ΑΠΑΙΤΗΣΕΙΣ ΚΑΙ ΤΙΣ ΛΟΙΠΕΣ ΣΧΕΤΙΚΕΣ
ΔΙΑΤΑΞΕΙΣ ΤΗΣ ΟΔΗΓΙΑΣ 1999/5/ΕΚ.
the essential requirements and other relevant provisions of Directive 1999/5/EC.
requisitos esenciales y cualesquiera otras disposiciones aplicables o exigibles de la Directiva
1999/5/CE.
1999/5/EÜ põhinõuetele ja nimetatud direktiivist tulenevatele muudele asjakohastele sätetele.
vaatimusten ja muiden sitä koskevien direktiivin ehtojen mukainen.
Français Par la présente, Lexmark International, Inc. déclare que l'appareil ce produit est conforme aux
exigences fondamentales et autres dispositions pertinentes de la directive 1999/5/CE.
Magyar Alulírott, Lexmark International, Inc. nyilatkozom, hogy a termék megfelel a vonatkozó alapvetõ
követelményeknek és az 1999/5/EC irányelv egyéb elõírásainak.
Íslenska Hér með lýsir Lexmark International, Inc. yfir því að þessi vara er í samræmi við grunnkröfur og
aðrar kröfur, sem gerðar eru í tilskipun 1999/5/EC.
Italiano Con la presente Lexmark International, Inc. dichiara che questo questo prodotto è conforme ai requisiti
essenziali ed alle altre disposizioni pertinenti stabilite dalla direttiva 1999/5/CE.
Latviski Ar šo Lexmark International, Inc. deklarē, ka šis izstrādājums atbilst Direktīvas 1999/5/EK
būtiskajām prasībām un citiem ar to saistītajiem noteikumiem.
Lietuvių Šiuo Lexmark International, Inc. deklaruoja, kad šis produktas atitinka esminius reikalavimus ir
kitas 1999/5/EB direktyvos nuostatas.
Malti Bil-preżenti, Lexmark International, Inc., jiddikjara li dan il-prodott huwa konformi mal-ħtiġijiet
essenzjali u ma dispożizzjonijiet oħrajn relevanti li jinsabu fid-Direttiva 1999/5/KE.
Nederlands Hierbij verklaart Lexmark International, Inc. dat het toestel dit product in overeenstemming is met de
essentiële eisen en de andere relevante bepalingen van richtlijn 1999/5/EG.
Norsk Lexmark International, Inc. erklærer herved at dette produktet er i samsvar med de grunnleggende
krav og øvrige relevante krav i direktiv 1999/5/EF.
Polski Niniejszym Lexmark International, Inc. oświadcza, że niniejszy produkt jest zgodny z
zasadniczymi wymogami oraz pozostałymi stosownymi postanowieniami Dyrektywy
1999/5/EC.
76
Page 77

Português A Lexmark International Inc. declara que este este produto está conforme com os requisitos essenciais
e outras disposições da Diretiva 1999/5/CE.
Slovensky Lexmark International, Inc. týmto vyhlasuje, že tento produkt spĺňa základné požiadavky a
všetky príslušné ustanovenia smernice 1999/5/ES.
Slovensko Lexmark International, Inc. izjavlja, da je ta izdelek v skladu z bistvenimi zahtevami in ostalimi
relevantnimi določili direktive 1999/5/ES.
Svenska Härmed intygar Lexmark International, Inc. att denna produkt står i överensstämmelse med de
väsentliga egenskapskrav och övriga relevanta bestämmelser som framgår av direktiv 1999/5/EG.
Noise emission levels
The following measurements were made in accordance with ISO 7779 and reported in conformance with ISO 9296.
Note: Some modes may not apply to your product.
1-meter average sound pressure, dBA
Printing 50
Scanning not applicable
Copying not applicable
Ready inaudible
Values are subject to change. See www.lexmark.com for current values.
Waste from Electrical and Electronic Equipment (WEEE) directive
The WEEE logo signifies specific recycling programs and procedures for electronic products in countries of the
European Union. We encourage the recycling of our products. If you have further questions about recycling options,
visit the Lexmark Web site at www.lexmark.com for your local sales office phone number.
Product disposal
Do not dispose of the printer or supplies in the same manner as normal household waste. Consult your local authorities
for disposal and recycling options.
Temperature information
Ambient temperature 15–32° C (60–90° F)
Shipping temperature -40–60° C (-40–140° F)
77
Page 78

Storage temperature 1–60° C (34–140° F)
ENERGY STAR
Power consumption
Product power consumption
The following table documents the power consumption characteristics of the product.
Note: Some modes may not apply to your product.
Mode Description Power consumption (Watts)
Printing The product is generating hard-copy output from electronic inputs. 15
Copying The product is generating hard-copy output from hard-copy original
documents.
Scanning The product is scanning hard-copy documents. not applicable
Ready The product is waiting for a print job. 6.8
Power Saver The product is in energy-saving mode. 5.6
Off The product is plugged into a wall outlet, but the power switch is
turned off.
The power consumption levels listed in the previous table represent time-averaged measurements. Instantaneous
power draws may be substantially higher than the average.
Values are subject to change. See www.lexmark.com for current values.
not applicable
0.9
Power Saver
This product is designed with an energy-saving mode called Power Saver. The Power Saver Mode is equivalent to
the EPA Sleep Mode. The Power Saver Mode saves energy by lowering power consumption during extended periods
of inactivity. The Power Saver Mode is automatically engaged after this product is not used for a specified period of
time, called the Power Saver Timeout.
Factory default Power Saver Timeout for this product (in minutes):
30 minutes
Off mode
If this product has an off mode which still consumes a small am ou nt of po we r, th en to completely stop product power
consumption, disconnect the power supply cord from the wall outlet.
78
Page 79

Total energy usage
It is sometimes helpful to calculate the total product energy usage. Since power consumption claims are provided
in power units of Watts, the power consumption should be multiplied by the time the product spends in each mode
in order to calculate energy usage. The total product energy usage is the sum of each mode's energy usage.
LEXMARK LICENSE AGREEMENTS
PLEASE READ CAREFULLY: BY USING THIS PRODUCT, YOU AGREE TO BE BOUND BY ALL THE TERMS AND CONDITIONS
OF THESE LICENSE AGREEMENTS. IF YOU DO NOT AGREE WITH THE TERMS OF THESE LICENSE AGREEMENTS,
PROMPTLY RETURN THE PRODUCT UNUSED AND REQUEST A REFUND OF THE AMOUNT YOU PAID. IF YOU ARE
INSTALLING THIS PRODUCT FOR USE BY OTHER PARTIES, YOU AGREE TO INFORM THE USERS THAT USE OF THE
PRODUCT INDICATES ACCEPTANCE OF THESE TERMS.
CARTRIDGE LICENSE AGREEMENT
I agree that the patented print cartridge(s) shipped with this printing device are sold subject to the following
license/agreement: The patented print cartridge(s) contained inside is/are licensed for a single use only and is/are
designed to stop working after delivering a fixed amount of ink. A variable amount of ink will remain in the cartridge
when replacement is required. After this single use, the license to use the print cartridge terminates, and the used
cartridge must be returned only to Lexmark for remanufacturing, refilling or recycling. If I buy another cartridge in
the future that is sold subject to the above terms, I accept such terms as to that cartridge. If you do not accept the
terms of this single use license/agreement; return this product in its original packaging to your point of purchase. A
replacement cartridge sold without these terms is available at www.lexmark.com.
LEXMARK SOFTWARE LICENSE AGREEMENT
This Software License Agreement (“License Agreement”) is a legal agreement between you (either an individual or
a single entity) and Lexmark International, Inc. (“Lexmark”) that, to the extent your Lexmark product or Software
Program is not otherwise subject to a written software license agreement between you and Lexmark or its suppliers,
governs your use of any Software Program installed on or provided by Lexmark for use in connection with your
Lexmark product. The term “Software Program” includes machine-readable instructions, audio/visual content (such
as images and recordings), and associated media, printed materials and electronic documentation, whether
incorporated into, distributed with or for use with your Lexmark product.
1 STATEMENT OF LIMITED WARRANTY. Lexmark warrants that the media (e.g., diskette or compact disk) on which
the Software Program (if any) is furnished is free from defects in materials and workmanship under normal use
during the warranty period. The warranty period is ninety (90) days and commences on the date the Software
Program is delivered to the original end-user. This limited warranty applies only to Software Program media
purchased new from Lexmark or an Authorized Lexmark Reseller or Distributor. Lexmark will replace the Software
Program should it be determined that the media does not conform to this limited warranty.
2 DISCLAIMER AND LIMITATION OF WARRANTIES. EXCEPT AS PROVIDED IN THIS LICENSE AGREEMENT AND TO
THE MAXIMUM EXTENT PERMITTED BY APPLICABLE LAW, LEXMARK AND ITS SUPPLIERS PROVIDE THE SOFTWARE
PROGRAM "AS IS" AND HEREBY DISCLAIM ALL OTHER WARRANTIES AND CONDITIONS, EITHER EXPRESS OR
IMPLIED, INCLUDING, BUT NOT LIMITED TO, TITLE, NON-INFRINGEMENT, MERCHANTABILITY AND FITNESS FOR
A PARTICULAR PURPOSE, AND ABSENCE OF VIRUSES, ALL WITH REGARD TO THE SOFTWARE PROGRAM. This
Agreement is to be read in conjunction with certain statutory provisions, as that may be in force from time to
time, that imply warranties or conditions or impose obligations on Lexmark that cannot be excluded or modified.
If any such provisions apply, then to the extent Lexmark is able, Lexmark hereby limits its liability for breach of
those provisions to one of the following: replacement of the Software Program or reimbursement of the price
paid for the Software Program.
79
Page 80

3 LICENSE GRANT. Lexmark grants you the following rights provided you comply with all terms and conditions of
this License Agreement:
a Use. You may Use one (1) copy of the Software Program. The term “Use” means storing, loading, installing,
executing, or displaying the Software Program. If Lexmark has licensed the Software Program to you for
concurrent use, you must limit the number of authorized users to the number specified in your agreement
with Lexmark. You may not separate the components of the Software Program for use on more than one
computer. You agree that you will not Use the Software Program, in whole or in part, in any manner that has
the effect of overriding, modifying, eliminating, obscuring, altering or de-emphasizing the visual appearance
of any trademark, trade name, trade dress or intellectual property notice that appears on any computer display
screens normally generated by, or as a result of, the Software Program.
b Copying. You may make one (1) copy of the Software Program solely for purposes of backup, archiving, or
installation, provided the copy contains all of the original Software Program’s proprietary notices. You may
not copy the Software Program to any public or distributed network.
c Reservation of Rights. The Software Program, including all fonts, is copyrighted and owned by Lexmark
International, Inc. and/or its suppliers. Lexmark reserves all rights not expressly granted to you in this License
Agreement.
d Freeware. Notwithstanding the terms and conditions of this License Agreement, all or any portion of the
Software Program that constitutes software provided under public license by third parties (“Freeware”) is
licensed to you subject to the terms and conditions of the software license agreement accompanying such
Freeware, whether in the form of a discrete agreement, shrink-wrap license, or electronic license terms at the
time of download. Use of the Freeware by you shall be governed entirely by the terms and conditions of such
license.
4 TRANSFER. You may transfer the Software Program to another end-user. Any transfer must include all software
components, media, printed materials, and this License Agreement and you may not retain copies of the Software
Program or components thereof. The transfer may not be an indirect transfer, such as a consignment. Prior to the
transfer, the end-user receiving the transferred Software Program must agree to all these License Agreement
terms. Upon transfer of the Software Program, your license is automatically terminated. You may not rent,
sublicense, or assign the Software Program except to the extent provided in this License Agreement, and any
attempt to do so shall be void.
5 UPGRADES. To Use a Software Program identified as an upgrade, you must first be licensed to the original
Software Program identified by Lexmark as eligible for the upgrade. After upgrading, you may no longer use the
original Software Program that formed the basis for your upgrade eligibility.
6 LIMITATION ON REVERSE ENGINEERING. You may not alter, decrypt, reverse engineer, reverse assemble,
reverse compile or otherwise translate the Software Program, except as and to the extent expressly permitted to
do so by applicable law for the purposes of inter-operability, error correction, and security testing. If you have
such statutory rights, you will notify Lexmark in writing of any intended reverse engineering, reverse assembly,
or reverse compilation. You may not decrypt the Software Program unless necessary for the legitimate Use of the
Software Program.
7 ADDITIONAL SOFTWARE. This License Agreement applies to updates or supplements to the original Software
Program provided by Lexmark unless Lexmark provides other terms along with the update or supplement.
8 LIMITATION OF REMEDIES. To the maximum extent permitted by applicable law, the entire liability of Lexmark,
its suppliers, affiliates, and resellers, and your exclusive remedy shall be as follows: Lexmark will provide the
express limited warranty described above. If Lexmark does not remedy defective media as warranted, you may
terminate your license and your money will be refunded upon the return of all of your copies of the Software
Program.
80
Page 81

9 LIMITATION OF LIABILITY. To the maximum extent permitted by applicable law, for any claim arising out of
Lexmark's limited warranty, or for any other claim whatsoever related to the subject matter of this Agreement,
Lexmark's and its suppliers’ liability for all types of damages, regardless of the form of action or basis (including
contract, breach, estoppel, negligence, misrepresentation, or tort), shall be limited to the greater of $5,000 or the
money paid to Lexmark or its Authorized remarketers for the license hereunder for the Software Program that
caused the damages or that is the subject matter of, or is directly related to, the cause of action.
IN NO EVENT WILL LEXMARK, ITS SUPPLIERS, SUBSIDIARIES, OR RESELLERS BE LIABLE FOR ANY SPECIAL,
INCIDENTAL, INDIRECT, EXEMPLARY, PUNITIVE, OR CONSEQUENTIAL DAMAGES (INCLUDING BUT NOT LIMITED
TO LOST PROFITS OR REVENUES, LOST SAVINGS, INTERRUPTION OF USE OR ANY LOSS OF, INACCURACY IN, OR
DAMAGE TO, DATA OR RECORDS, FOR CLAIMS OF THIRD PARTIES, OR DAMAGE TO REAL OR TANGIBLE PROPERTY,
FOR LOSS OF PRIVACY ARISING OUT OR IN ANY WAY RELATED TO THE USE OF OR INABILITY TO USE THE SOFTWARE
PROGRAM, OR OTHERWISE IN CONNECTION WITH ANY PROVISION OF THIS LICENSE AGREEMENT), REGARDLESS
OF THE NATURE OF THE CLAIM, INCLUDING BUT NOT LIMITED TO BREACH OF WARRANTY OR CONTRACT, TORT
(INCLUDING NEGLIGENCE OR STRICT LIABILITY), AND EVEN IF LEXMARK, OR ITS SUPPLIERS, AFFILIATES, OR
REMARKETERS HAVE BEEN ADVISED OF THE POSSIBILITY OF SUCH DAMAGES, OR FOR ANY CLAIM BY YOU BASED
ON A THIRD-PARTY CLAIM, EXCEPT TO THE EXTENT THIS EXCLUSION OF DAMAGES IS DETERMINED LEGALLY
INVALID. THE FOREGOING LIMITATIONS APPLY EVEN IF THE ABOVE-STATED REMEDIES FAIL OF THEIR ESSENTIAL
PURPOSE.
10 TERM. This License Agreement is effective unless terminated or rejected. You may reject or terminate this license
at any time by destroying all copies of the Software Program, together with all modifications, documentation,
and merged portions in any form, or as otherwise described herein. Lexmark may terminate your license upon
notice if you fail to comply with any of the terms of this License Agreement. Upon such termination, you agree
to destroy all copies of the Software Program together with all modifications, documentation, and merged
portions in any form.
11 TAXES. You agree that you are responsible for payment of any taxes including, without limitation, any goods and
services and personal property taxes, resulting from this Agreement or your Use of the Software Program.
12 LIMITATION ON ACTIONS. No action, regardless of form, arising out of this Agreement may be brought by either
party more than two years after the cause of action has arisen, except as provided under applicable law.
13 APPLICABLE LAW. This Agreement is governed by the laws of the Commonwealth of Kentucky, United States
of America. No choice of law rules in any jurisdiction shall apply. The UN Convention on Contracts for the
International Sale of Goods shall not apply.
14 UNITED STATES GOVERNMENT RESTRICTED RIGHTS. The Software Program has been developed entirely at
private expense. Rights of the United States Government to use the Software Program is as set forth in this
Agreement and as restricted in DFARS 252.227-7014 and in similar FAR provisions (or any equivalent agency
regulation or contract clause).
15 CONSENT TO USE OF DATA. You agree that Lexmark, its affiliates, and agents may collect and use information
you provide in relation to support services performed with respect to the Software Program and requested by
you. Lexmark agrees not to use this information in a form that personally identifies you except to the extent
necessary to provide such services.
16 EXPORT RESTRICTIONS. You may not (a) acquire, ship, transfer, or reexport, directly or indirectly, the Software
Program or any direct product therefrom, in violation of any applicable export laws or (b) permit the Software
Program to be used for any purpose prohibited by such export laws, including, without limitation, nuclear,
chemical, or biological weapons proliferation.
17 AGREEMENT TO CONTRACT ELECTRONICALLY. You and Lexmark agree to form this License Agreement
electronically. This means that when you click the “Agree” or “Yes” button on this page or use this product, you
acknowledge your agreement to these License Agreement terms and conditions and that you are doing so with
the intent to “sign” a contract with Lexmark.
81
Page 82

18 CAPACITY AND AUTHORITY TO CONTRACT. You represent that you are of the legal age of majority in the place
you sign this License Agreement and, if applicable, you are duly authorized by your employer or principal to enter
into this contract.
19 ENTIRE AGREEMENT. This License Agreement (including any addendum or amendment to this License
Agreement that is included with the Software Program) is the entire agreement between you and Lexmark relating
to the Software Program. Except as otherwise provided for herein, these terms and conditions supersede all prior
or contemporaneous oral or written communications, proposals, and representations with respect to the
Software Program or any other subject matter covered by this License Agreement (except to the extent such
extraneous terms do not conflict with the terms of this License Agreement, any other written agreement signed
by you and Lexmark relating to your Use of the Software Program). To the extent any Lexmark policies or programs
for support services conflict with the terms of this License Agreement, the terms of this License Agreement shall
control.
82
Page 83

Networking glossary
ad hoc mode
ad hoc network
AutoIP address
BSS (Basic Service Set)
channel
DHCP (Dynamic Host Configuration
Protocol)
DHCP IP address
DHCP server
infrastructure mode
installation cable
A setting for a wireless device that lets it communicate directly with other
wireless devices without an access point or router
A wireless network that does not use an access point
An IP address automatically assigned by a network device. If the device is set
to use DHCP, but no DHCP server is available, an AutoIP address may be assigned
by the device.
Basic Service Set describes the type of wireless network that you are using. The
BSS type can be one of the following: Infrastructure network or Ad-Hoc network.
A specific radio frequency used by two or more wireless devices to
communicate with each other. All devices on the network must use the same
channel.
A language used by DHCP servers
An IP address automatically assigned by a DHCP server
A computer or router that gives a unique IP address to each device on the
network. Unique addresses prevent conflicts.
A setting for a wireless device that lets it communicate directly with other
wireless devices using an access point or router
Connects the printer to the computer temporarily during some methods of
installation.
internal wireless print server
IP (Internet Protocol) address
ipconfig
MAC (Media Access Control) address
MAC filtering
network adapter/card
network hub
network name
ping
printer nickname
A device that lets computers and printers talk to each other over a network
without cables
The network address of a computer or printer. Each device on the network has
its own network address. The address may be assigned manually by you (Static
IP address), automatically by the DHCP server (DHCP IP address), or
automatically by the device (AutoIP address).
A command that displays the IP address and other network information of a
Windows computer
A hardware address that uniquely identifies each device on a network. You can
usually find the MAC address printed on the device.
A method of limiting access to your wireless network by specifying which MAC
addresses may communicate on the network. This setting may be specified on
wireless routers or access points.
A device that lets computers or printers talk to each other over a network
A device that connects multiple devices on a wired network
See “SSID (Service Set Identifier)” on page 84
A test to see if your computer can communicate with another device
The name you assign to your printer so that you and others can identify it on
the network
83
Page 84

router
A device that shares a single Internet connection with multiple computers or
other devices. The basic router controls network traffic.
security key
signal strength
SSID (Service Set Identifier)
Static IP address
switch
UAA (Universally Administered
Address)
USB cable
USB port
WEP (Wired Equivalent Privacy)
wireless access point
wireless router
A password, such as a WEP key or a WPA pass phrase, used to make a network
secure
Measure of how strongly a transmitted signal is being received
The name of a wireless network. When you connect a printer to a wireless
network, the printer needs to use the same SSID as the network. Also referred
to as network name or BSS (Basic Service Set).
An IP address assigned manually by you
A device similar to a network hub that can connect different networks together
An address assigned to a network printer or print server by the manufacturer.
To find the UAA, print a network setup page and look for the UAA listing.
A lightweight, flexible cable that lets the printer communicate with the
computer at much higher speeds than parallel cables
A small, rectangular port on the back of the computer that connects the
peripheral devices using a USB cable, and lets them communicate at high
speeds
A security setting that helps prevent unauthorized access to a wireless network.
Other possible security settings are WPA and WPA2.
A device that connects wireless devices together to form a wireless network
A router that also serves as a wireless access point
Wi-Fi
WPA (Wi-Fi Protected Access)
WPA2
An industry term that describes the technology used to create an interoperable
wireless local area network (WLAN).
A security setting that helps prevent unauthorized access to a wireless network.
WPA is not supported on ad hoc wireless networks. Other possible security
settings are WEP and WPA2.
A newer version of WPA. Older routers are less likely to support this. Other
possible security settings are WPA and WEP.
84
Page 85

Index
A
ad hoc wireless network
adding a printer 23
creating 20
additional computers
installing wireless printer 19
aligning print cartridges 47
assigning IP address 30
C
cable
installation 26
USB 26
canceling print jobs 38
cartridges, print
aligning 47
cleaning 47
installing 45
ordering 50
preserving 49
removing 46
using genuine Lexmark 46
wiping 48
CD
printing photos from 43
changing wireless settings after
installation (Mac) 18
changing wireless settings after
installation (Windows) 18
cleaning
exterior of the printer 49
cleaning print cartridge nozzles 47
Communication not available
message 71
configuring
IP address 18
connection
configurations 28
custom-size paper, loading 40
custom-size paper, printing 40
D
document
multiple copies, printing 35
documents
printing 34
E
emission notices 73, 74, 75, 76, 77
envelopes
loading 33, 38
printing 38
exterior of the printer
cleaning 49
F
FCC notices 73, 74
finding
information 8
MAC address 29
publications 8
Web site 8
finding IP address of computer
(Mac) 29
firewall on computer 63
G
glossy and photo paper,
loading 34
glossy paper, loading 32
greeting cards
loading 33
I
index cards
loading 33
information needed for setting up
printer on wireless network 16
information, finding 8
installation
cable 26
installing
network printer 30
print cartridges 45
printer software 12, 57
installing printer
on wireless network (Mac) 17
on wireless network
(Windows) 17
installing wireless printer
additional computers 19
IP address 29
configuring 18
IP address, assigning 30
iron-on transfers, loading 32
K
key index 31
L
labels, loading 33
labels, printing 39
last page first, printing 36
loading
custom-size paper 40
envelopes 33, 38
glossy and photo paper 34
glossy paper 32
greeting cards 33
index cards 33
iron-on transfers 32
labels 33
paper 32, 34
photo cards 33
photo paper 32
postcards 33
transparencies 33
M
MAC address 28
MAC address filtering 28
MAC address, finding 29
Mac printer software
using 14
Macintosh
installing printer on wireless
network 17
multiple copies, printing 35
multiple WEP keys 31
N
network printer
installing 30
network security 28
network setup page
printing 58
networking
finding IP address of
computer 29
finding IP address of computer
(Mac) 29
85
Page 86

finding IP address of printer 29
IP addresses 29
noise emission levels 77
notices 73, 74, 75, 76, 77, 78, 79
N-up feature 36
O
ordering paper and other
supplies 50
P
page does not print 54
paper and other supplies
ordering 50
paper exit tray 10
paper feed guard 10
paper guide 10
paper support 10
paper, loading 32, 34
parts
paper exit tray 10
paper feed guard 10
paper guide 10
paper support 10
USB port 10
Wi-Fi indicator 10
password 28
photo cards, loading 33
photo paper, loading 32
photos
printing from CD using the
computer 43
printing from digital camera
connected to computer 43
printing from removable storage
device connected to
computer 43
postcards
loading 33
power button is not lit 52
print cartridge nozzles,
cleaning 47
print cartridges
aligning 47
cleaning 47
installing 45
ordering 50
preserving 49
refilling 46
removing 46
using genuine Lexmark 46
wiping 48
print jobs
canceling 38
print settings
saving and deleting 41
printer cannot connect to wireless
network 60
printer does not print
wireless 63
printer does not print wirelessly 63
printer software
installing 12
reinstalling 57
removing 57
printing
collate 35
custom-size paper 40
documents 34
envelopes 38
labels 39
last page first 36
multiple copies 35
multiple pages on one sheet 36
network setup page 58
photos from CD using the
computer 43
photos from digital camera
connected to computer 43
photos from removable storage
device connected to
computer 43
reverse page order 36
specialty documents 41
Web page 34
printing photos
from digital camera connected to
computer 43
from flash drive connected to
computer 43
from memory card connected to
computer 43
publications, finding 8
R
recycling
WEEE statement 77
refilling print cartridges 46
removing print cartridges 46
reverse page order 36
S
safety information 7
saving and deleting print
settings 41
security information 10
wireless network 28
security key 28
Service Center 52
setting up printer
on wireless network (Mac) 17
on wireless network
(Windows) 17
setup troubleshooting
page does not print 54
power button is not lit 52
software did not install 53
software
removing and reinstalling 57
Service Center 52
XPS driver 12
software did not install 53
solving printer communication
problems 56
specialty documents, printing 41
SSID
wireless network 28
T
Toolbar
printing a Web page 34
transparencies
loading 33
troubleshooting
printer communication
problems 56
Service Center 52
wireless network 59
troubleshooting, setup
page does not print 54
power button is not lit 52
software did not install 53
troubleshooting, wireless
changing wireless settings after
installation (Mac) 18
changing wireless settings after
installation (Windows) 18
printer cannot connect to wireless
network 60
Wi-Fi indicator light is blinking
orange 65, 67
Wi-Fi indicator light is not lit 63
86
Page 87

Wi-Fi indicator light is still
orange 69
U
USB
cable 26
USB port 10
enabling 58
using
Mac printer software 14
W
Web page
printing 34
Web site
finding 8
WEP key
key index 31
Windows
installing printer on wireless
network 17
Windows software
FastPics 13
Fax Setup Utility 13
Fax Solutions Software 13
Printing Preferences 13
Productivity Studio 13
Wireless Setup Utility 13
wireless
printer does not print 63
troubleshooting 63
with USB 28
wireless installation
will not continue after attaching
USB cable 59
wireless network
adding a printer to existing ad hoc
network 23
common home configurations 24
creating an ad hoc network 20
information needed for setting up
wireless printing 16
installing printer on (Mac) 17
installing printer on
(Windows) 17
networking overview 23
security information 28
signal strength 28
SSID 28
troubleshooting 59
types of wireless networks 27
wireless network compatibility 16
wireless print server
not installed 70
wireless settings
changing after installation
(Mac) 18
wireless setup
information needed for 16
wireless signal
strength 28
wireless troubleshooting
changing wireless settings after
installation (Mac) 18
changing wireless settings after
installation (Windows) 18
printer cannot connect to wireless
network 60
Wi-Fi indicator light is blinking
orange 65, 67
Wi-Fi indicator light is not lit 63
Wi-Fi indicator light is still
orange 69
Wi-Fi indicator 10
description of colors 17
interpreting colors 17
light is not lit 63
Wi-Fi indicator light is blinking
orange 65, 67
Wi-Fi indicator light is green
printer does not print 63
Wi-Fi indicator light is still
orange 69
X
XPS driver
installing 12
87
 Loading...