

Page 1

Edition notice
E
d
i
i
t
o
n
:
A
p
r
i
l
2
0
0
0
T
h
e
f
o
o
l
l
w
n
i
g
p
a
r
a
g
r
a
p
h
d
L
E
X
M
A
R
K
N
I
T
E
R
N
A
T
O
I
N
A
E
T
I
H
E
R
E
X
P
R
E
S
S
O
R
M
I
P
M
E
R
C
H
A
N
T
A
B
I
I
L
T
Y
O
R
F
T
I
i
m
p
l
i
e
d
w
a
r
a
r
n
i
t
s
e
i
n
c
e
r
a
t
i
n
T
i
h
s
u
p
b
l
i
c
a
o
i
t
n
c
o
l
u
d
i
n
c
l
d
u
i
n
f
o
r
m
t
a
i
o
n
h
r
e
i
e
n
t
;
e
h
s
e
h
c
p
o
r
g
r
a
m
s
d
e
c
s
r
i
e
b
d
m
a
y
b
e
R
f
e
r
e
n
e
c
e
s
i
n
h
t
i
s
p
u
b
i
l
c
a
i
t
o
a
v
a
i
l
a
b
e
l
n
i
l
a
l
c
o
n
u
r
t
i
e
s
n
i
w
h
t
a
t
n
o
l
y
t
a
h
t
p
o
r
u
d
c
,
t
p
o
r
g
r
a
n
o
t
i
f
n
n
i
r
g
e
a
y
n
e
x
i
s
n
i
t
g
i
n
e
t
l
w
i
h
t
o
h
t
e
p
r
r
d
o
u
t
c
s
,
p
o
r
g
r
a
m
e
r
s
p
o
n
s
i
i
b
i
l
t
y
.
C
o
l
o
F
r
n
i
e
,
e
L
x
m
r
a
k
a
,
n
d
e
L
x
S
a
t
e
t
s
a
n
/
d
o
o
r
h
t
e
r
o
c
u
t
n
r
i
s
e
O
h
t
r
e
t
a
r
e
d
m
a
r
k
s
a
e
r
t
e
h
r
p
o
©
C
o
p
r
y
g
i
h
t
0
2
0
0
L
e
m
x
a
r
k
o
e
s
n
o
t
a
p
p
l
y
o
t
a
n
y
c
o
u
n
t
r
y
w
h
e
r
e
s
u
c
h
p
r
o
i
v
s
o
i
n
s
r
a
e
n
i
c
o
n
s
i
t
s
n
e
t
w
t
i
h
o
l
c
a
l
l
w
a
:
L
,
N
I
C
,
.
P
R
O
V
I
D
E
S
T
H
S
I
P
U
B
L
C
I
A
T
I
O
N
“
A
S
S
I
”
W
T
I
H
O
U
T
W
A
R
R
A
N
T
Y
O
F
A
N
L
I
E
D,
N
I
C
L
U
D
N
I
G
,
B
U
T
N
O
T
L
M
I
T
I
E
D
T
O
,
T
H
E
M
I
P
L
E
I
D
W
A
R
R
A
N
T
E
I
N
E
S
S
F
O
R
A
P
A
R
T
C
I
U
L
A
R
P
U
R
P
O
S
E
.
S
m
o
e
s
t
t
a
e
s
o
d
n
o
t
l
a
l
r
t
a
s
n
a
c
t
i
o
s
n
;
h
t
e
e
r
f
o
e
r
,
h
t
i
s
s
a
t
e
t
m
e
n
m
t
a
y
n
o
a
t
p
l
p
y
o
t
y
e
t
c
e
h
i
n
c
a
l
i
n
a
c
c
u
a
r
i
c
s
e
o
r
y
t
p
g
o
r
p
a
h
i
c
l
a
e
r
r
r
o
s
.
C
h
a
g
n
e
s
a
n
e
g
s
w
i
l
l
b
e
i
n
c
o
r
p
r
o
a
e
t
d
i
n
l
a
t
r
e
e
d
i
i
o
t
n
s
I
.
m
r
p
o
v
e
m
e
n
s
t
m
a
e
d
a
t
a
y
n
t
i
m
e
.
n
o
t
p
r
d
o
u
c
t
s
,
p
o
r
g
r
a
m
s
o
,
r
s
r
e
i
v
e
c
s
d
o
n
t
o
m
i
p
l
y
h
t
t
a
h
t
e
h
i
c
h
i
t
o
e
p
r
a
t
s
e
.
A
n
y
r
f
e
r
e
e
c
n
e
o
t
a
p
r
d
o
u
t
c
,
r
p
g
o
r
m
a
,
o
r
s
m
,
r
o
s
r
e
v
i
c
e
m
a
y
b
e
u
s
d
e
.
A
y
n
f
n
u
c
i
t
n
o
a
l
l
y
e
q
i
u
v
a
l
e
n
t
p
l
c
e
u
t
a
l
p
r
p
o
e
t
r
y
i
g
r
h
t
m
a
y
b
e
u
s
e
d
i
n
s
e
t
a
.
d
E
v
a
l
u
a
i
t
n
o
a
n
d
s
o
,
r
s
r
e
i
v
c
e
s
e
,
x
c
e
p
t
h
t
s
o
e
e
x
r
p
s
e
s
l
y
d
s
e
i
g
n
a
e
t
d
y
b
h
t
e
m
r
a
k
w
h
i
t
d
i
a
m
o
n
d
e
d
s
i
g
n
a
e
r
r
t
d
a
e
m
a
k
r
s
o
L
f
e
m
x
a
k
r
I
t
n
e
.
C
l
o
r
o
J
e
p
t
r
i
n
e
t
r
s
i
a
t
r
a
d
m
e
a
r
k
f
o
L
e
m
x
a
k
r
I
n
e
t
r
n
a
i
o
t
n
a
p
e
t
r
y
f
o
t
e
h
i
r
r
s
e
p
c
e
i
t
v
e
o
w
n
r
e
s
.
n
I
e
t
r
n
a
t
o
i
n
a
l
I
,
n
c
.
A
l
l
r
i
g
h
t
s
r
e
s
e
v
r
e
d
.
o
o
.
u
a
e
r
p
e
r
o
c
r
h
a
n
m
a
n
u
f
a
e
r
v
i
c
e
i
s
r
d
o
u
c
,
t
p
v
e
r
i
i
f
a
c
m
a
n
u
f
a
c
r
n
t
a
i
o
n
a
l
I
,
n
c
.
S
w
d
i
s
l
c
a
i
o
d
i
c
l
a
l
y
g
e
s
i
n
h
t
c
t
r
u
r
e
i
n
n
o
i
t
n
e
t
r
o
g
r
m
a
,
i
t
n
o
o
f
p
o
u
t
e
r
,
r
a
r
l
I
,
c
n
,
.
e
r
Y
O
F
i
m
r
e
o
f
e
m
a
d
e
o
t
e
p
o
r
d
u
c
t
n
e
d
s
o
t
d
n
e
d
o
t
s
o
r
s
e
r
i
v
c
e
r
a
i
t
n
o
i
n
e
t
e
h
u
s
e
g
i
s
e
t
e
r
d
K
N
I
D,
x
p
e
r
s
s
o
r
h
t
e
t
s
r
o
t
e
h
m
a
k
e
h
t
e
s
e
a
t
e
t
o
r
i
m
p
l
y
e
t
a
h
t
d
e
o
s
c
o
n
j
u
n
c
t
i
o
n
’
s
r
i
n
t
e
h
U
n
i
t
d
e
U
N
I
T
E
D
S
T
A
T
E
S
G
O
V
E
R
N
M
E
N
T
R
E
S
T
R
C
I
T
E
D
R
G
I
H
T
S
T
h
i
s
s
o
w
t
f
a
r
e
n
a
d
d
c
o
u
m
e
t
n
t
a
i
o
n
a
e
r
p
o
r
v
i
d
d
e
w
i
t
h
R
E
S
T
R
I
C
T
E
D
R
I
G
H
T
S
.
U
s
,
e
d
p
u
i
l
c
a
i
t
n
o
o
r
d
s
i
l
c
o
s
u
e
r
b
y
h
t
e
G
o
v
e
r
n
m
e
n
i
s
s
u
j
b
c
e
t
o
t
e
r
s
r
t
i
c
i
t
o
n
s
s
a
s
e
t
f
o
h
t
r
i
n
s
b
u
p
r
a
a
g
r
p
a
h
(
c
)
1
(
(
)
i
i
)
o
f
h
t
e
R
i
g
h
s
t
i
n
T
e
c
h
n
i
c
l
a
D
a
a
t
a
n
d
C
m
o
p
u
e
t
r
S
f
o
w
t
a
a
D
t
F
A
R
S
2
5
.
2
2
2
7
7
-
0
1
3
n
a
d
i
n
p
a
p
l
i
c
a
b
l
e
A
F
R
r
p
v
o
i
s
o
i
n
s
:
L
e
x
m
a
r
k
n
I
e
t
n
r
a
i
t
o
n
a
l
,
n
I
c
.
L
,
e
i
x
g
n
t
n
o
,
K
Y
4
5
0
5
r
.
0
t
e
c
l
a
u
e
s
Page 2

Steps to basic printing
tells you how to load paper and adjust
your printer software for printing.
Maintaining your printer
tells you how to install, replace, and align
the print cartridges.
Troubleshooting
provides information for solving printing
problems.
Appendix
provides notices and safety
information.
Index
provides quick links to the information
you need. Just click an index entry and
go to the information source.
Home page
L
e
x
m
a
rk
™
Z
2
2
/
Z
3
2
C
o
l
G
u
i
d
e
f
o
r
W
i
n
d
o
w
s
N
T
U
s
e
t
h
i
s
g
u
i
d
e
w
h
e
n
yo
u
p
r
i
n
e
t
r
o
r
w
h
e
n
yo
u
e
n
c
o
u
T
i
p
s
f
o
r
u
s
i
n
g
t
h
i
s
g
u
i
d
•
U
s
e
t
h
e
b
u
t
t
o
n
s
o
n
h
t
e
n
a
v
i
g
t
a
e
t
h
r
o
u
g
h
h
t
e
p
a
•
C
l
i
ck
t
h
e
b
l
u
e
t
e
x
t
t
o
l
i
n
•
C
l
i
ck
h
t
e
l
e
f
t
o
r
r
i
g
h
t
a
r
r
o
w
s
t
o
m
o
ve
f
o
r
w
a
r
d
o
r
b
a
ck
t
h
o
r
u
g
h
h
t
e
p
a
g
e
s.
C
l
i
ck
h
t
e
h
o
u
s
e
o
t
e
r
t
u
r
n
o
t
h
t
e
H
o
m
e
p
a
e
g
.
•
To
v
i
e
w
e
d
i
i
t
o
n
a
n
d
t
r
d
a
E
d
i
i
t
o
n
n
o
t
i
c
e
.
•
T
o
p
r
i
n
t
h
t
i
s
g
u
i
d
e
:
1
F
r
o
m
h
t
e
A
c
r
o
b
a
t
R
P
r
i
n
.
t
2
C
l
c
i
k
S
e
t
u
p
,
a
n
d
m
a
s
e
e
l
c
t
e
d
.
3
C
h
o
o
s
e
t
h
e
p
a
g
e
s
y
o
r
J
e
t
p
ri
n
t
e
r™
U
s
e
r’
s
4
.
0
a
n
d
W
i
n
d
o
w
s
2
0
0
0
h
a
ve
u
q
e
s
t
i
o
n
s
a
b
o
u
t
yo
u
r
n
t
e
r
a
p
r
o
b
l
e
m
.
e
l
e
t
f
s
i
d
e
o
f
t
h
e
s
c
r
e
e
n
o
t
g
e
s
o
f
h
t
i
s
g
u
i
d
e
.
k
t
o
a
n
o
t
h
e
r
p
a
t
r
o
f
t
h
i
s
g
i
u
d
e
.
e
m
a
r
k
i
n
f
o
r
m
a
i
t
n
o
,
c
l
i
ck
t
h
e
e
a
d
e
r
F
i
e
l
m
e
n
u
,
s
e
l
e
c
t
k
e
s
u
r
e
L
a
n
d
s
c
a
p
e
s
i
o
u
w
a
n
t
t
o
p
r
i
n
t
a
n
d
c
l
c
i
k
O
K
.
Page 3

Steps to basic printing
Steps to basic printing
This book describes how to use your printer with Windows NT 4.0
and Windows 2000. For help using your printer with Windows 95,
Windows 98, Mac OS 8.6, or Mac OS 9, refer to the hard cop y User’ s
Guide that came with your printer.
Maintaining your printer
Troubleshooting
Appendix
Index
Basic printing is as easy as:
Step 1: Load the paper
Step 2: Customize the printer software
Step 3: Print your document
3
Page 4
Steps to basic printing
Maintaining your printer
Troubleshooting
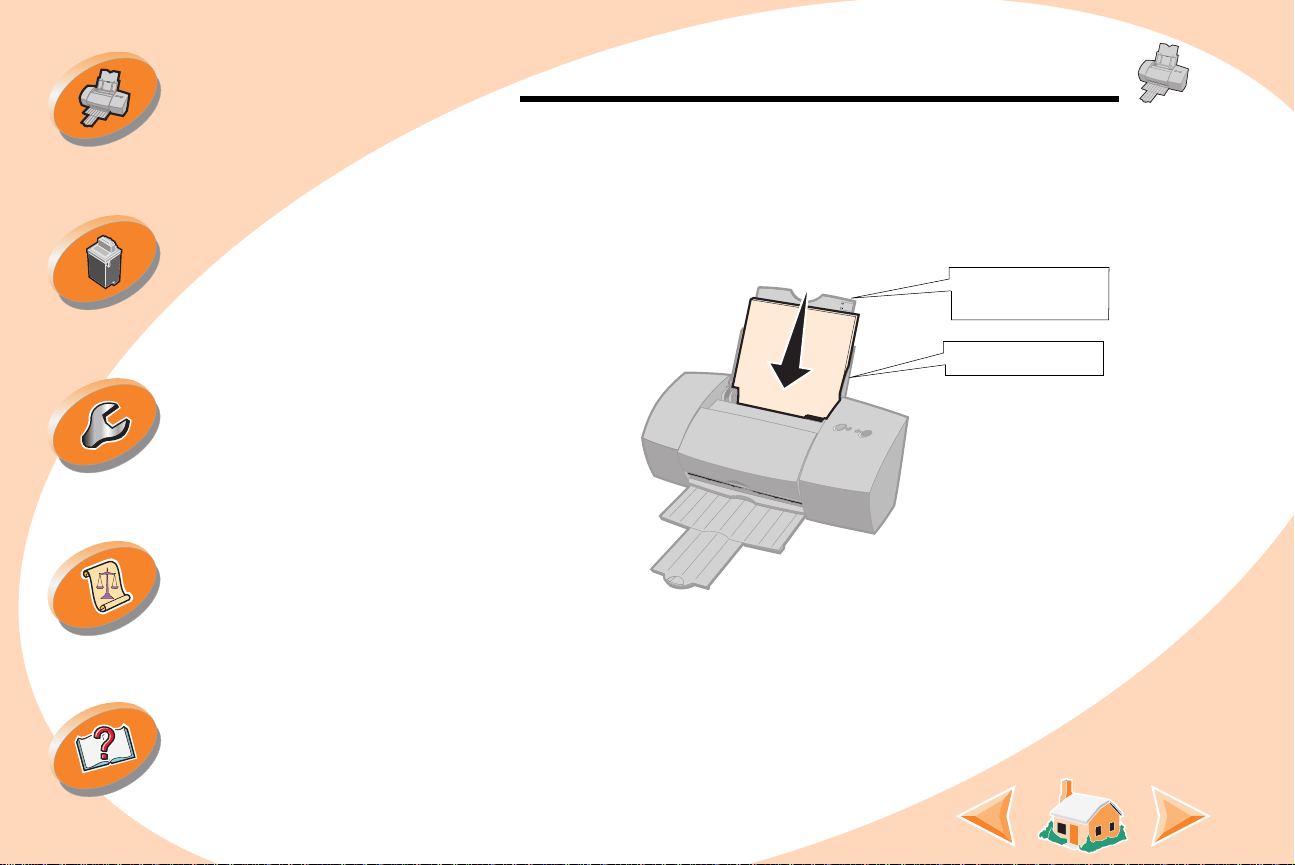
Step 1: Load the paper
You can load up to 100 sheets of paper (depending on thickness).
1
Place the paper against the right side of the sheet feeder,
with the print side facing you.
Steps to basic printing
Paper alignment
marks
Sheet feeder
Appendix
Index
4
Page 5
Steps to basic printing
Steps to basic printing
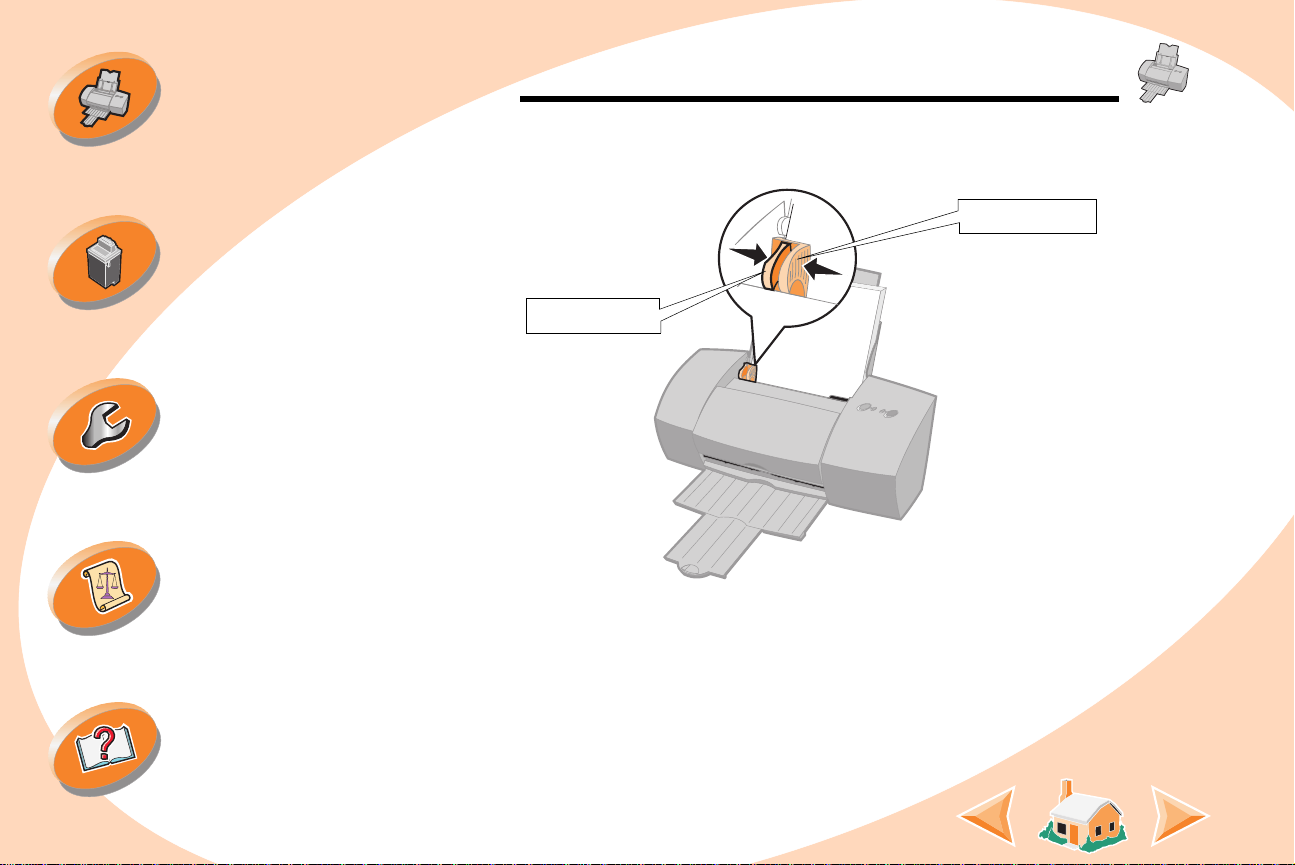
2
Squeeze the release tab and the paper guide together and
slide the paper guide to the edge of the paper.
Paper guide
Maintaining your printer
Troubleshooting
Appendix
Index
Release tab
5
Page 6
Steps to basic printing
Maintaining your printer
Troubleshooting
Steps to basic printing
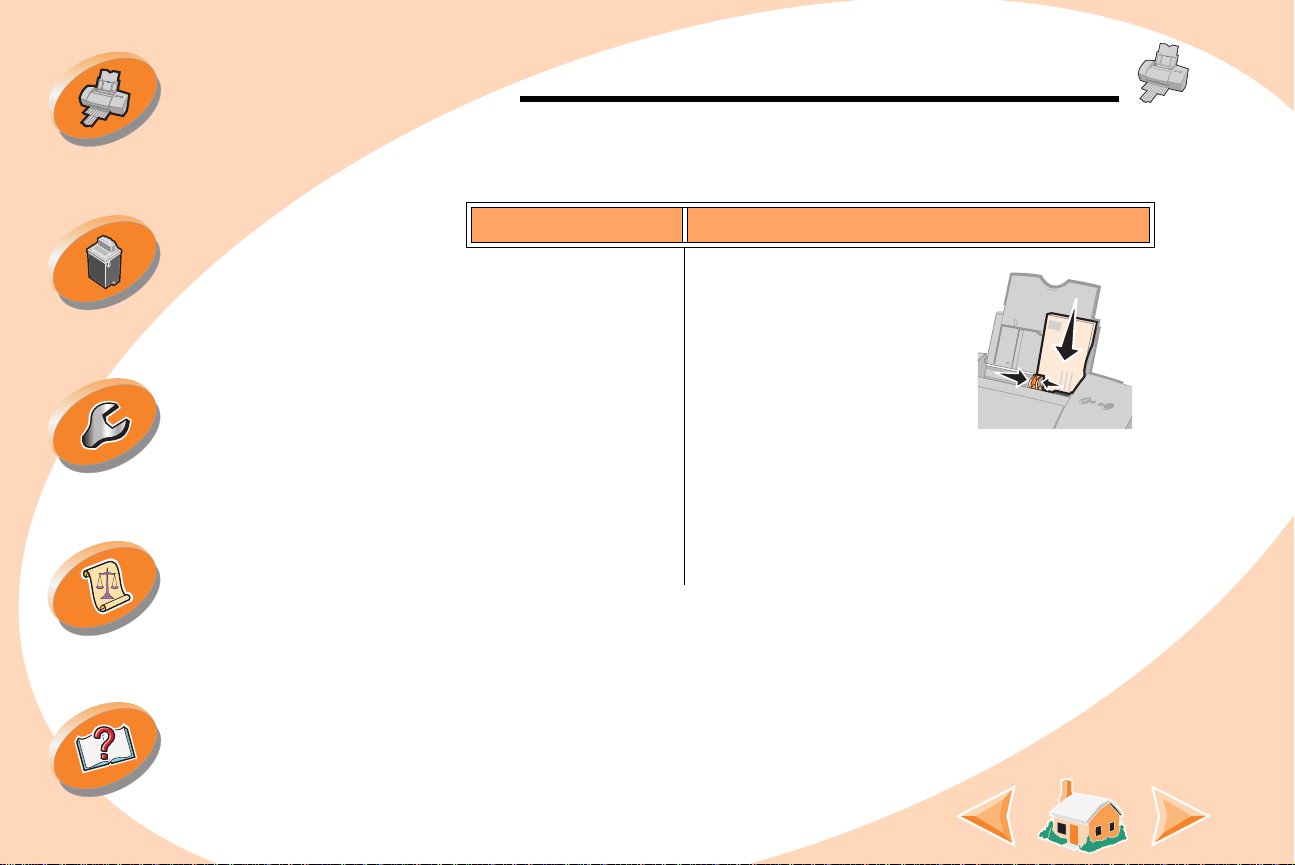
Loading specialty paper
When loading specialty paper, follow these guidelines:
Load up to: Make sure:
10 envelopes • The print side is facing
you.
• The stamp location is in
the upper left corner.
• The envelopes are loaded
vertically against the right side of the sheet
feeder.
• The paper guide is against the side of the
envelopes.
Appendix
Index
6
Page 7

Steps to basic printing
Steps to basic printing
Maintaining your printer
Troubleshooting
Appendix
Load up to: Make sure:
10 greeting cards,
• The print side is facing you.
index cards,
postcards, or photo
cards
• The cards are loaded vertically against the
right side of the sheet feeder.
• The paper guide is against the side of the
cards.
25 sheets of photo
• The glossy or coated side is facing you.
paper, glossy
paper, or coated
paper
• The paper guide is against the side of the
photo paper.
25 iron-on transfers • You follow the instructions on the packaging
to load the iron-on transfers.
• The paper guide is against the side of the
iron-on transfers.
Index
7
Page 8

Steps to basic printing
Steps to basic printing
Maintaining your printer
Troubleshooting
Appendix
Load up to: Make sure:
100 sheets of
• Your paper siz e fits within these dimensions:
custom size paper
-Width:
76 mm to 216 mm
3.0 in. to 8.5 in.
- Length:
127 mm to 432 mm
5.0 in. to 17 in.
• The paper guide is against the side of the
paper.
Index
8
Page 9
Steps to basic printing
Steps to basic printing
Maintaining your printer
Troubleshooting
Appendix
Load up to: Make sure:
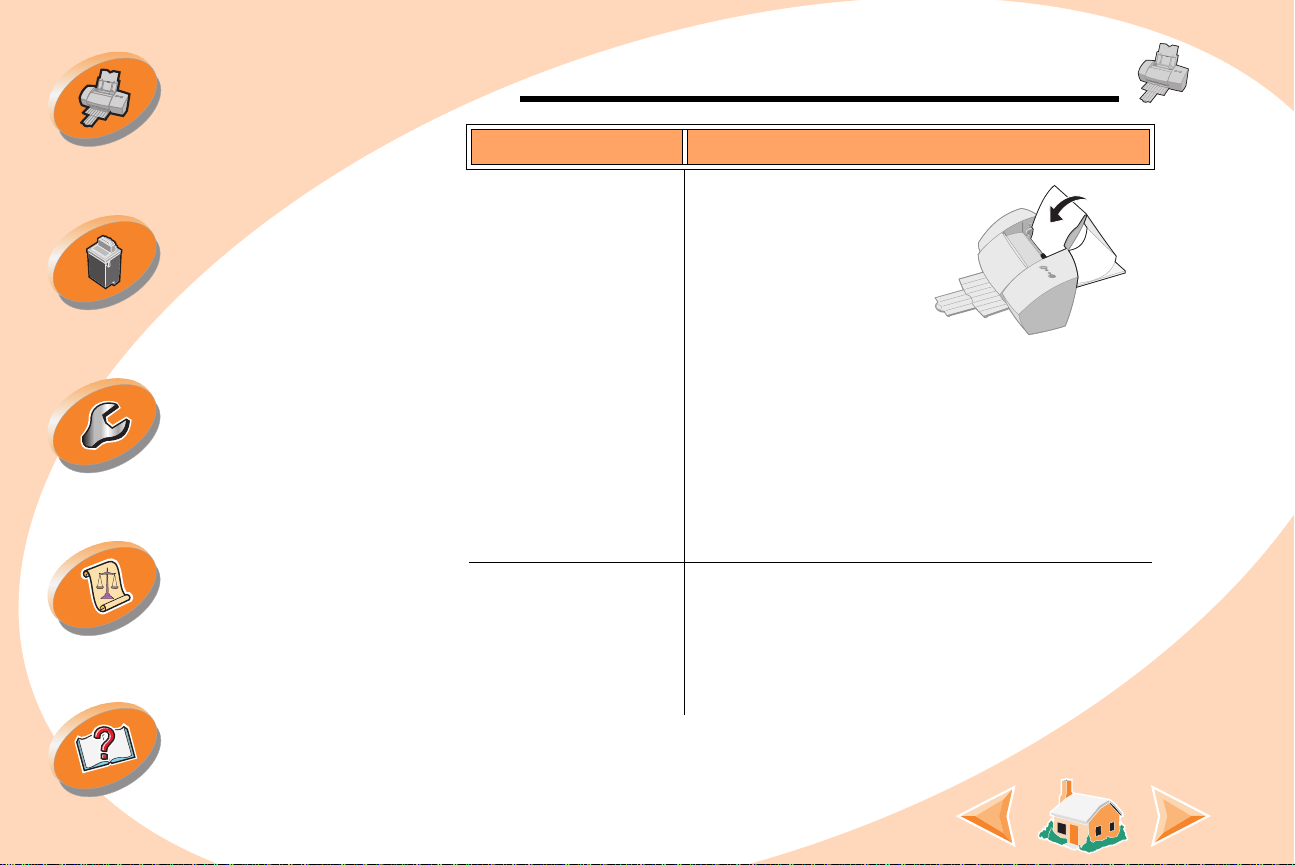
20 sheets of banner
paper
• You place the
banner paper
behind the printer.
Then bring the
unattached edge
of the first page
over the printer
and into the sheet feeder.
• The paper guide is against the side of the
paper.
Note: Make sure you select Banner or Banner A4
paper size in the printer driver.
10 transparencies • The rough side of the transparencies is
facing you (smooth side down).
• The paper guide is against the side of the
transparencies.
Index
9
Page 10

Steps to basic printing
Maintaining your printer
Steps to basic printing
Step 2: Customize the printer software
Your printer software includes several applications that let you
perform printing tasks with superior printing results. One of these
applications is the printer driver. If you are using:
•
Windows NT 4.0, your printer driver is called Document Defaults.
•
Windows 2000, your printer driver is called Printing Preferences.
The printer driver includes two tabs: P age Setup and F eatures . Both
tabs contain settings for operating your printer and its software.
Opening the printer driver from an application
Troubleshooting
Appendix
Index
When you open the printer driver from your application, you can
change printer settings ONLY for the document you are currently
creating.
1
Open the application’s File menu.
2
Choose Print (or Printer) Setup.
3
In the Printer Setup dialog box, click the Properties, Option,
or Setup button (depending on the application).
4
Change settings as needed.
10
Page 11

Steps to basic printing
Maintaining your printer
Troubleshooting
Steps to basic printing
Opening the printer driver from Windows
When you open the printer driver from Windows, the settings apply to
ALL documents, unless you change them from the application.
1
From the Start menu, select Settings, and then select
Printers.
2
From the Printers folder, right-click the printer icon for your
printer.
3
Select Document Defaults from the sidebar menu.
4
Change settings as needed.
Appendix
Index
11
Page 12
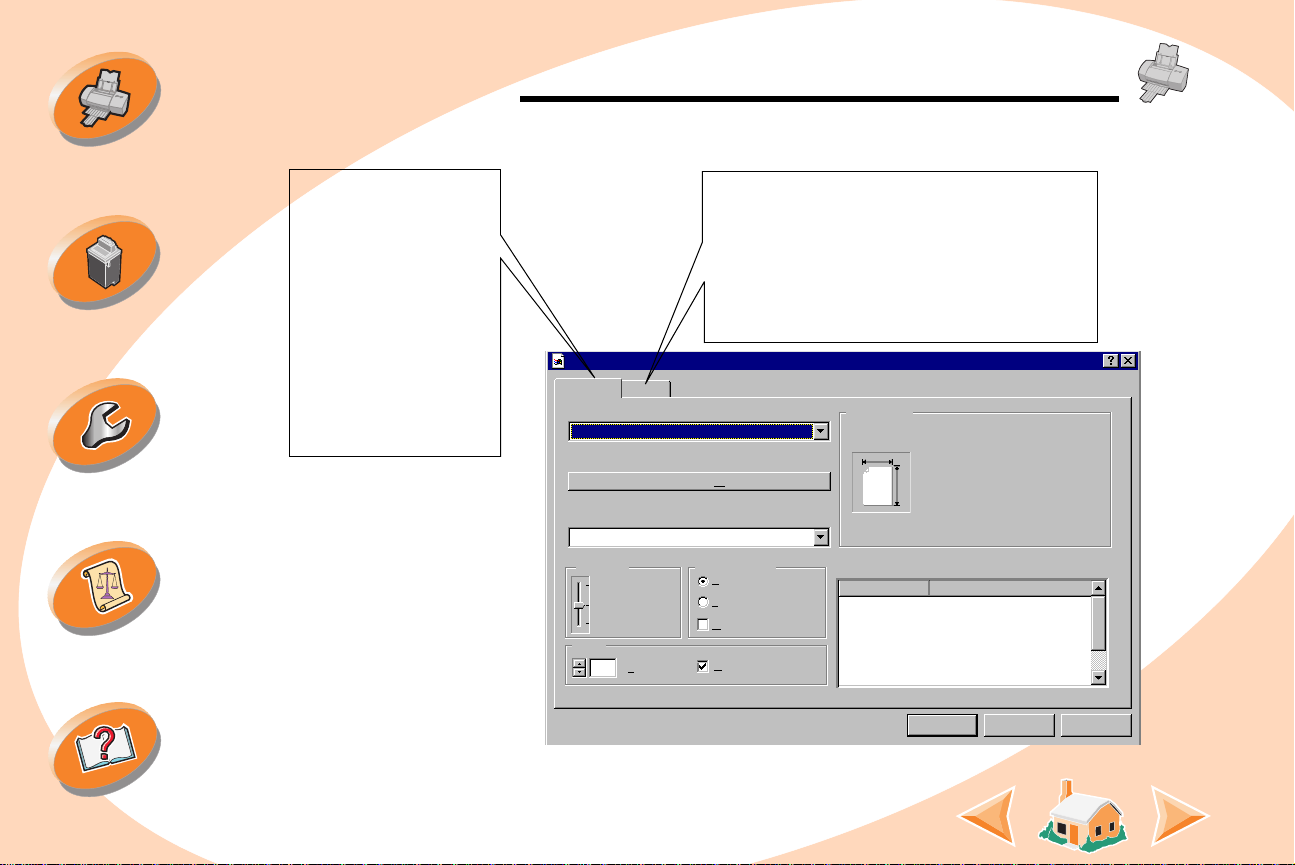
Steps to basic printing
Features
tab to:
• Choose to print in color or black and
white.
• Perform cartridge maintenance.
• Choose the default settings.
Page Setu p
tab to:
• Select a paper size,
media type, and
orientation.
• Select a print quality
setting.
• Choose the number of
copies and the order
of printing.
• View the current
printer settings.
High Speed
Page Setup
Features
Custom Paper S
ize
Hot Spot Help
Click this to create a custom paper size.
Media Type:
Plain Paper
Current Settings
Item
Setting
Print Quality
Orientation/Order
P
ortrait
L
andscape
R
everse Order Printing
1
(1
-99)
C
ollate Copies
Normal
High Quality
OK
Cancel
Help
Paper Size
Media Type
Paper Source
Print Quality
Orientation
Copies
Letter (8.5 x11 in)
Plain Paper
Automatic Paper Feed
Normal
Portrait
1
Letter (8.5 x 11in.)
Lexmark Z22/Z32 Series ColorFine Properties
Copies
Steps to basic printing
Click the...
Maintaining your printer
Troubleshooting
Appendix
Index
12
Page 13

Steps to basic printing
Steps to basic printing
Selecting settings for specialty paper
When your printer software was installed, the printer driver was set to
the default settings. Use the default settings for printing most
documents on plain paper. To change these settings for specialty
paper, use the following table:
Maintaining your printer
Troubleshooting
Appendix
Index
When you are printing on
this specialty media:
From the Page Setup tab, make these
selections:
Envelopes From the list of Paper Sizes, select the
appropriate envelope size.
Note: Many applications are designed to
override the envelope settings in the printer
software. Make sure landscape orientation is
selected in your application.
Greeting cards, index
cards, postcards, or
From the Media Type drop-down menu,
select
Greeting Card Stock
.
photo cards
Select the appropriate Paper Size setting.
13
Page 14

Steps to basic printing
Steps to basic printing
Maintaining your printer
Troubleshooting
Appendix
When you are printing on
this specialty media:
Photo paper, glossy
paper, or coated paper
Sheets of custom size
paper
From the Page Setup tab, make these
selections:
From the Media Type drop-down menu,
select
Glossy/Photo Paper
.
Select the appropriate Paper Size setting.
Notes: If you are using two cartridges, you
can print quality photos with the black and
color cartridge combination. However, for the
best possible photo quality, replace the black
cartridge, Lexmark part number 17G0050,
with a photo cartridge, Lexmark part number
12A1990. For help, see page 20.
When printing photos, remove each photo as
it exits from the printer and allow it to dry
before stacking.
Click the
Custom Paper Size
button.
Enter the dimensions for your custom
paper size. For help, see
specialty paper
.
Loading
Index
14
Page 15
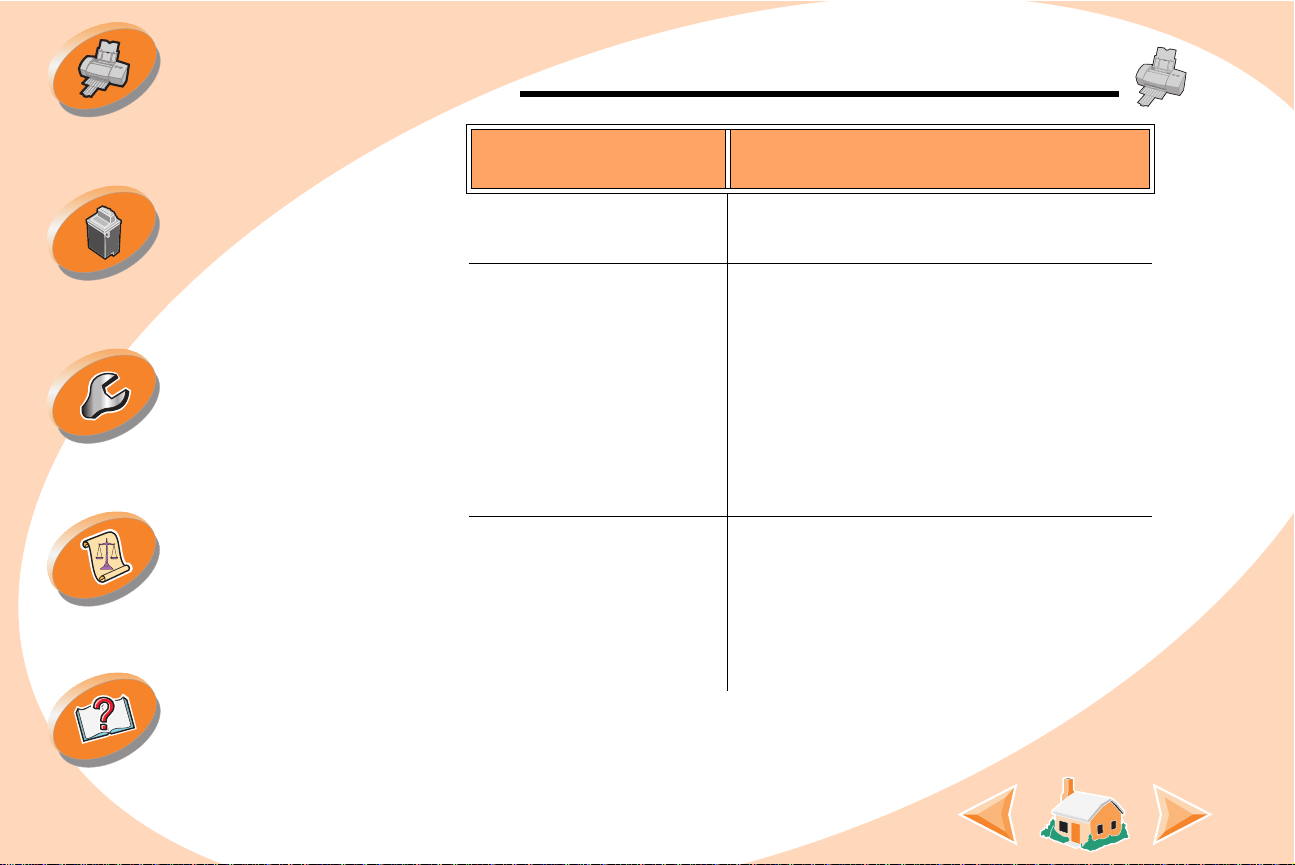
Steps to basic printing
Steps to basic printing
Maintaining your printer
Troubleshooting
Appendix
When you are printing on
this specialty media:
From the Page Setup tab, make these
selections:
Banner paper From the list of Paper Sizes, select
Banner Letter
Banner A4
or
.
Transparencies From the Media Type drop-down menu,
select
From the Print Quality area, select
or
Note: When printing transparencies, remove
each transparency as it exits from the printer
and allow it to dry before stacking.
Transparency
High Quality
.
.
Normal
Iron-on transfers From the Media Type drop-down menu,
select
Note: To ensure that the iron-on transf e r will
print correctly, you may want to print on plain
paper before printing on an iron-on transfer .
Iron-On
Transfer.
Index
15
Page 16

Steps to basic printing
Steps to basic printing
Maintaining your printer
Troubleshooting
Appendix
Step 3: Print your document
1
From your application’s File menu, click Print.
2
From the Print dialog box, click OK or Print (depending on
the application).
Note:
only . You can instantly improve print speed and print quality by simpl y
adding an optional Waterproof Black Cartridge (P/N 17G0050).
The Lexmark Z22 ships with a High Resolution Color cartridge
Index
16
Page 17

Steps to basic printing
Maintaining your printer
Troubleshooting
Appendix
Maintaining your printer
This section describes how to install, replace, and care for y our print
cartridges. You can use the Control Program, one of your printer’s
software programs, to help you with these tasks.
Using the Control Program
Installing or replacing a print cartridge
Improving print quality
Aligning the print cartridges
Cleaning the print nozzles
Wiping print nozzles and contacts
Preserving print cartridges
Index
17
Page 18

Steps to basic printing
Maintaining your printer
Troubleshooting
Maintaining your printer
Using the Control Program
The Control Program allows y ou to monitor your printer and install or
replace print cartridges. To open the Control Program from Windows:
1
From the Start menu, click Programs.
2
Click Lexmark Z22/Z32 Series ColorFine.
3
Click Lexmark Z22/Z32 Control Program.
Appendix
Index
18
Page 19
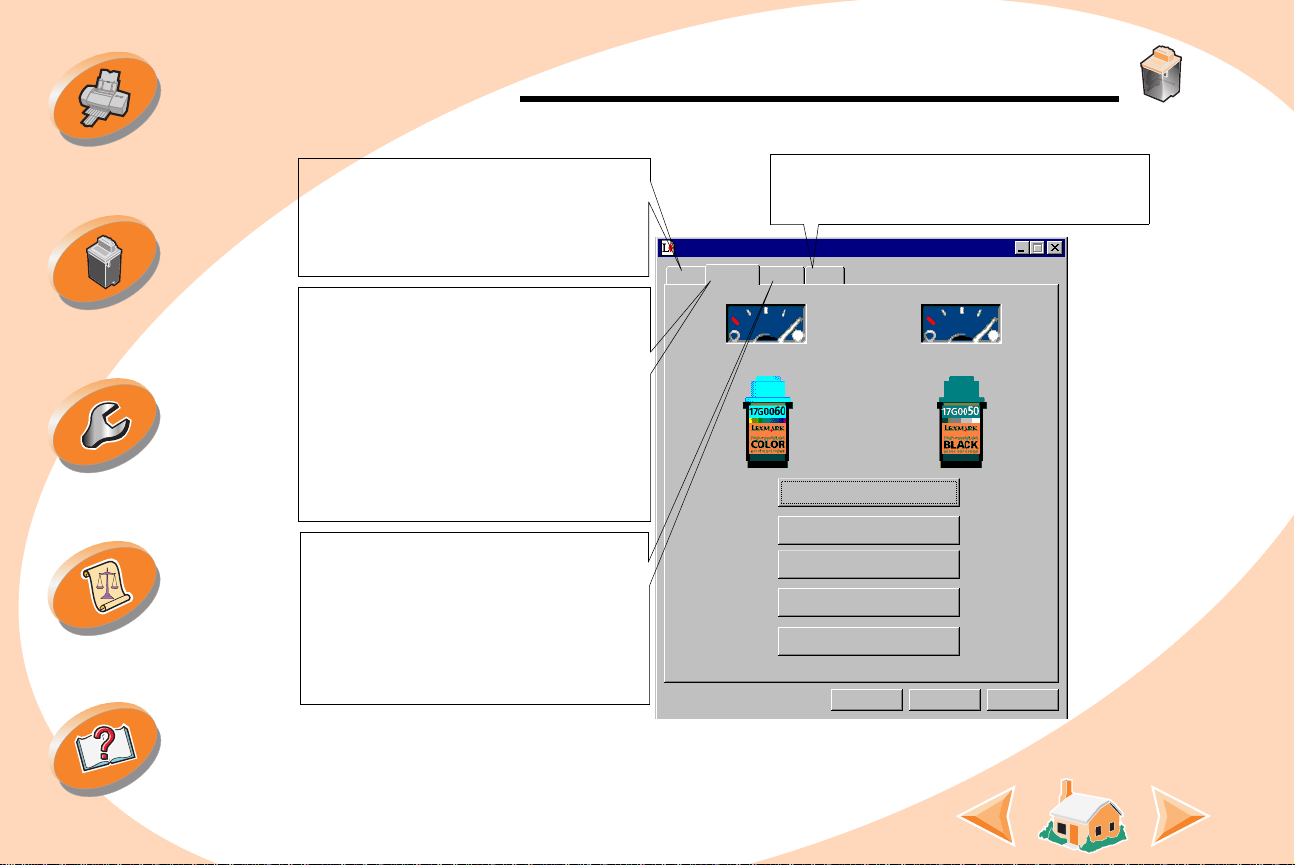
Steps to basic printing
Cartridge
tab to:
• Install or replace a print cartridge.
• Clean the print nozzles.
• Align the cartridges.
• Print a test page.
• View cartridge part numbers and
order supplies directly from Lexmark’ s
Web site.
Options
tab to:
• Control how and when the Control
Program displays.
• Enable bidirectional support.
• Disable the printer shortcut.
About
tab to find printer software version
and copyright information.
Status
tab to:
• Monitor the status of your print job.
• Cancel your print job.
Status
Cartridge
Options
About
Low
Full
Low
Full
Change Cartridges...
Align Cartridges...
Clean Print Nozzles
Order Supplies on the Web
Print Test Page
OK
Cancel
Help
Control Program Lexmark Z22/Z32 Series ColorFine 2
Maintaining your printer
Click the...
Maintaining your printer
Troubleshooting
Appendix
Index
19
Page 20
Steps to basic printing
Maintaining your printer
Maintaining your printer
Installing or replacing a print cartridge
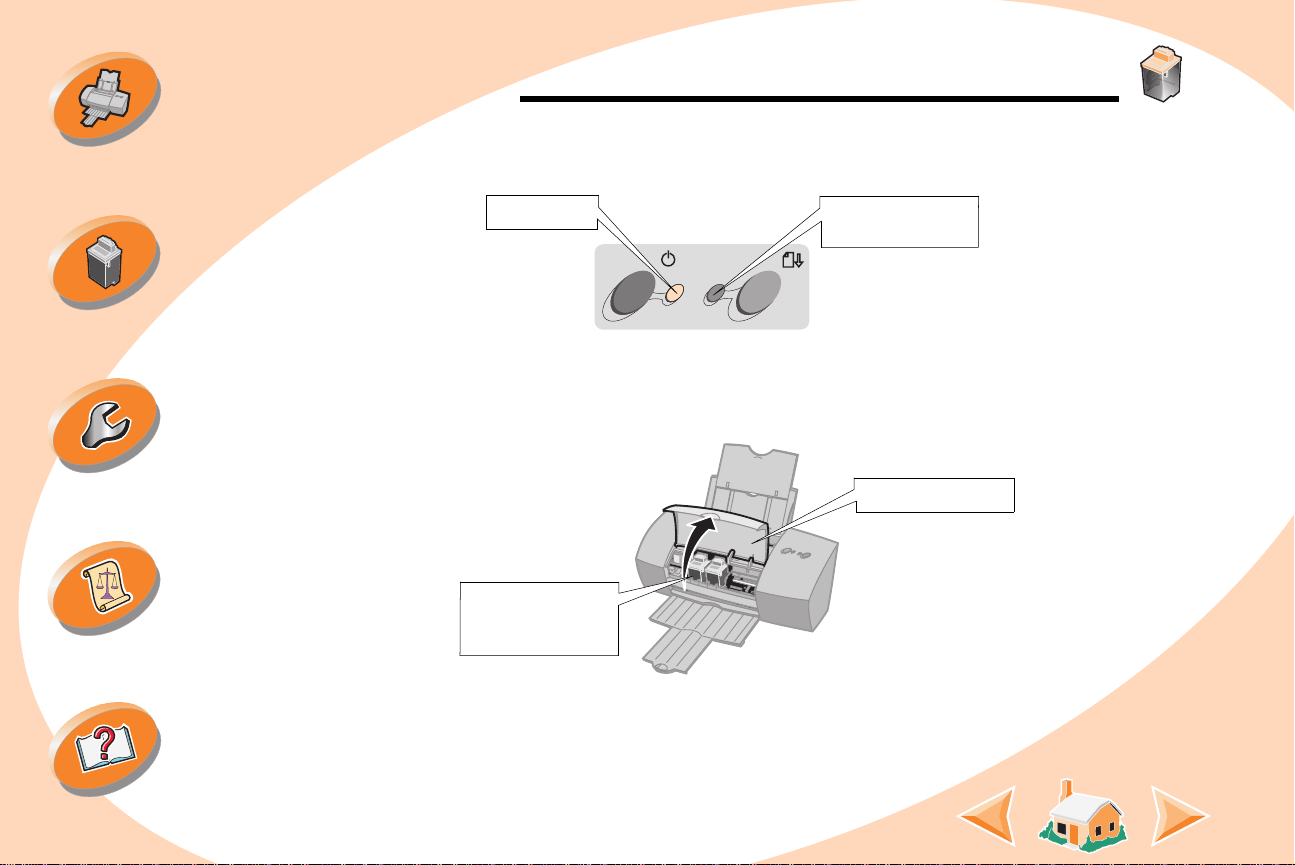
1
Make sure the Power light is On.
Power light
2
Raise the front cover . The print cartridge carrier moves to the
loading position unless the printer is busy.
Paper Feed light
Troubleshooting
Appendix
Index
Front cover
Print cartridge
carrier in the
loading position
20
Page 21
Steps to basic printing
Black Cartridge 17G0050
Color Cartridge 17G0060
Photo Cartridge 12A1990
High Yield Black Cartridge
16G0055
High Yield Color Cartridge
16G0065
Maintaining your printer
Maintaining your printer
3
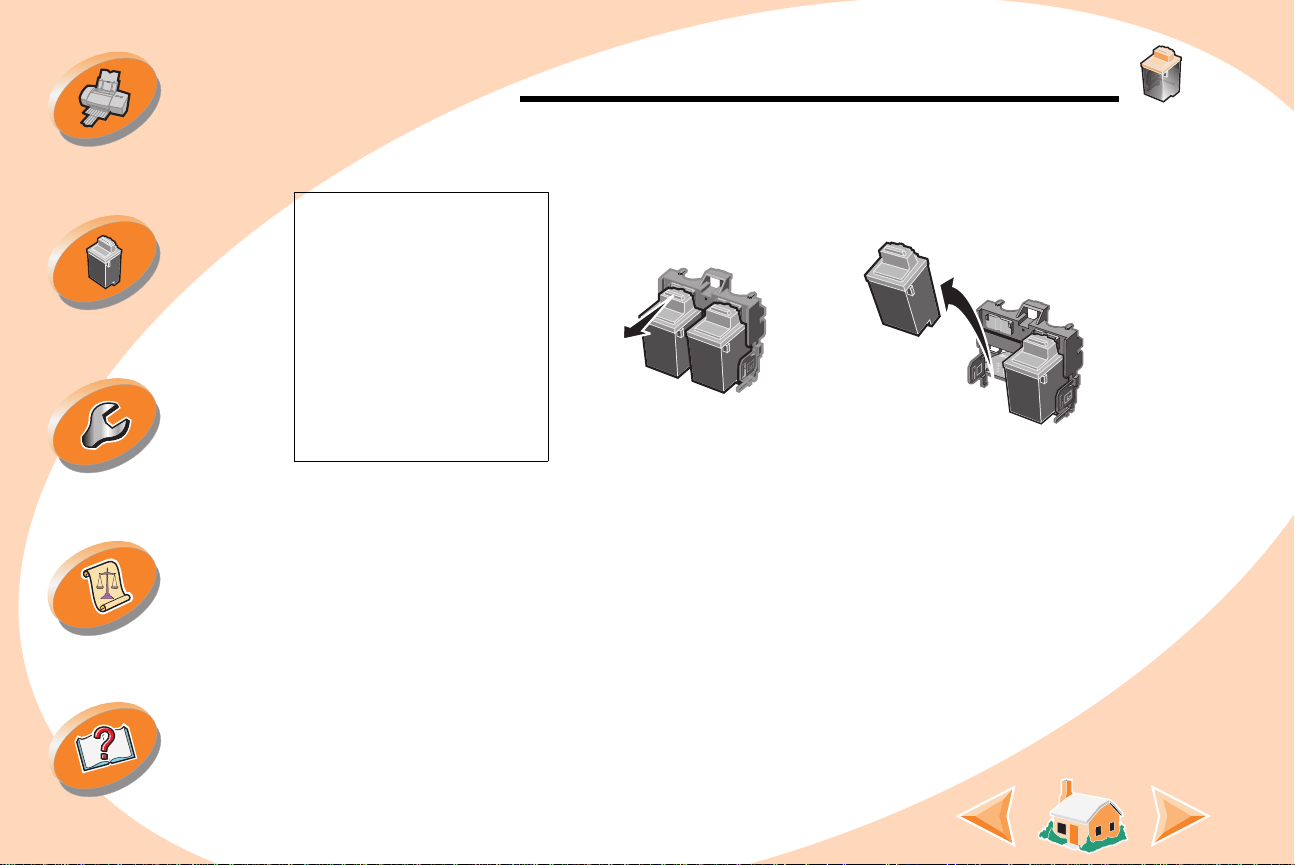
Remove the old print cartridge. Store it in an air-tight
container or dispose of it.
Troubleshooting
Appendix
Index
4
Open the Control Program. For help, see
5
Click the Cartridge tab.
6
Click Change Cartridges.
Notes:
For the best possible photo quality, print with a photo and color
page 18
.
cartridge combination in your printer. To replace the black cartridge with a
photo cartridge, see
The Lexmark Z22 ships with a High Resolution Color cartridge only. You can
instantly improve print speed and print quality by simply adding an optional
Waterproof Black Cartridge (P/N 17G0050).
page 20
.
21
Page 22
Steps to basic printing
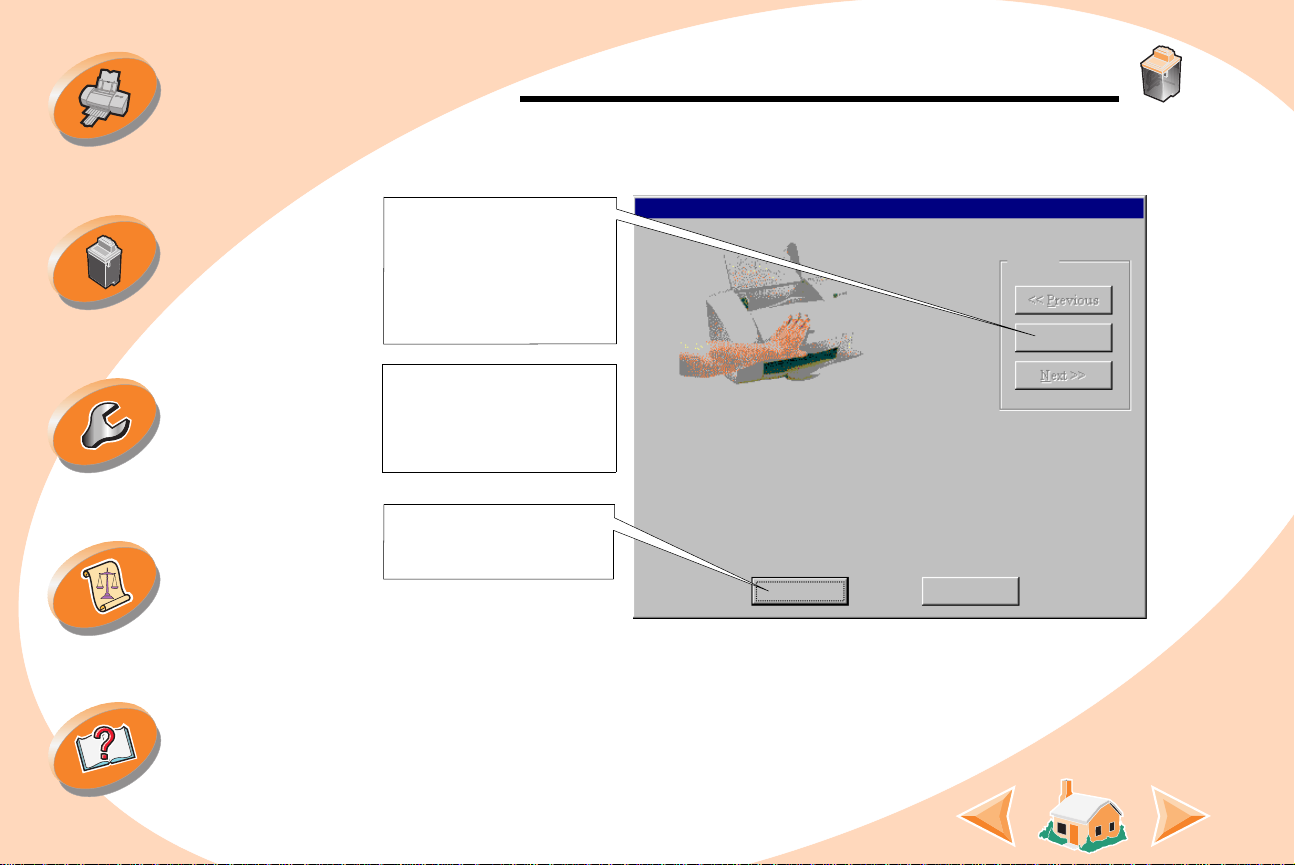
Raise the printer’s front cover.
Finished
Cancel
Stop
b
Click
Next
to advance
the instructions or
Previous
to repeat the
instructions.
Pictures
Change Cartridges
a
To control the speed
of the animation on
your screen, click
Stop
. The
Next
and
Previous
buttons
become active.
c
When installation is
complete, click
Finished
.
Maintaining your printer
Maintaining your printer
7
The Change Cartridges dialog box displays. Follow the steps
on your screen to install the cartridges.
Troubleshooting
Appendix
Index
Warning:
DO NOT
touch the gold contact area
of the print cartridge.
22
Page 23
Steps to basic printing
Maintaining your printer
Troubleshooting
Maintaining your printer
8
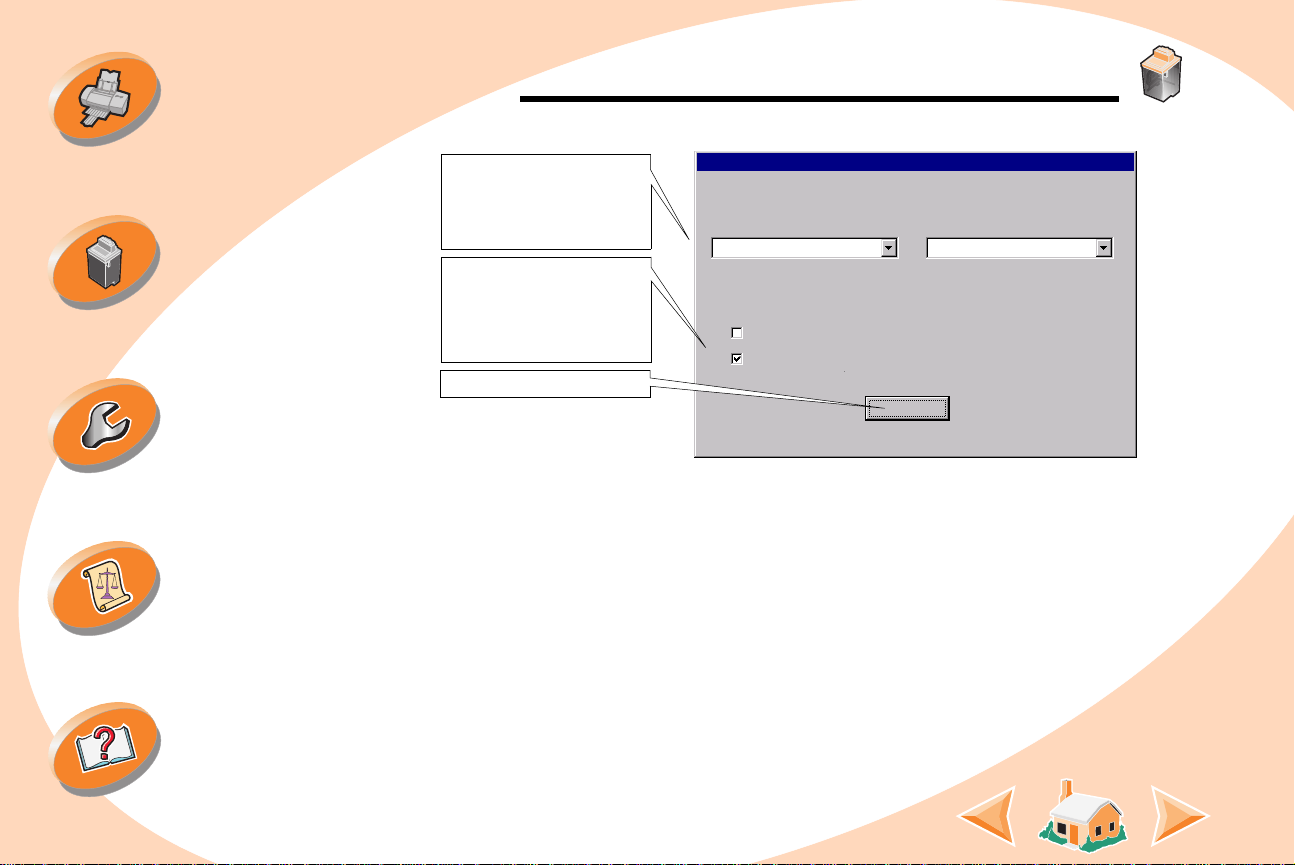
The Choose Cartridges window displays:
a
Select the
cartridge(s) you
installed in your
printer.
b
If you installed a new
cartridge(s), click the
appropriate box to
reset the ink levels to
full.
c
Click OK.
Note:
If you installed a Lexmark Z32 printer driver , both cartridges must be
installed before you can print.
Choose Cartridges
From the list boxes below, choose which cartridges you have just
installed.
LEFT Cartridge: RIGHT Cartridge:
COLOR p/n 17G0060
{
If you installed a new cartridge, reset the ink level image to
full.
Reset left cartridge’s ink level to full
{
Reset right cartridge’s ink level to full
BLACK p/n 17G0050
OK
Appendix
Index
If you installed a
combined
Lexmark Z22/Z32 printer driver, you can print
with either the black or color cartridge. It is not necessary to install two
cartridges for printing.
23
Page 24
Steps to basic printing
Maintaining your printer
9
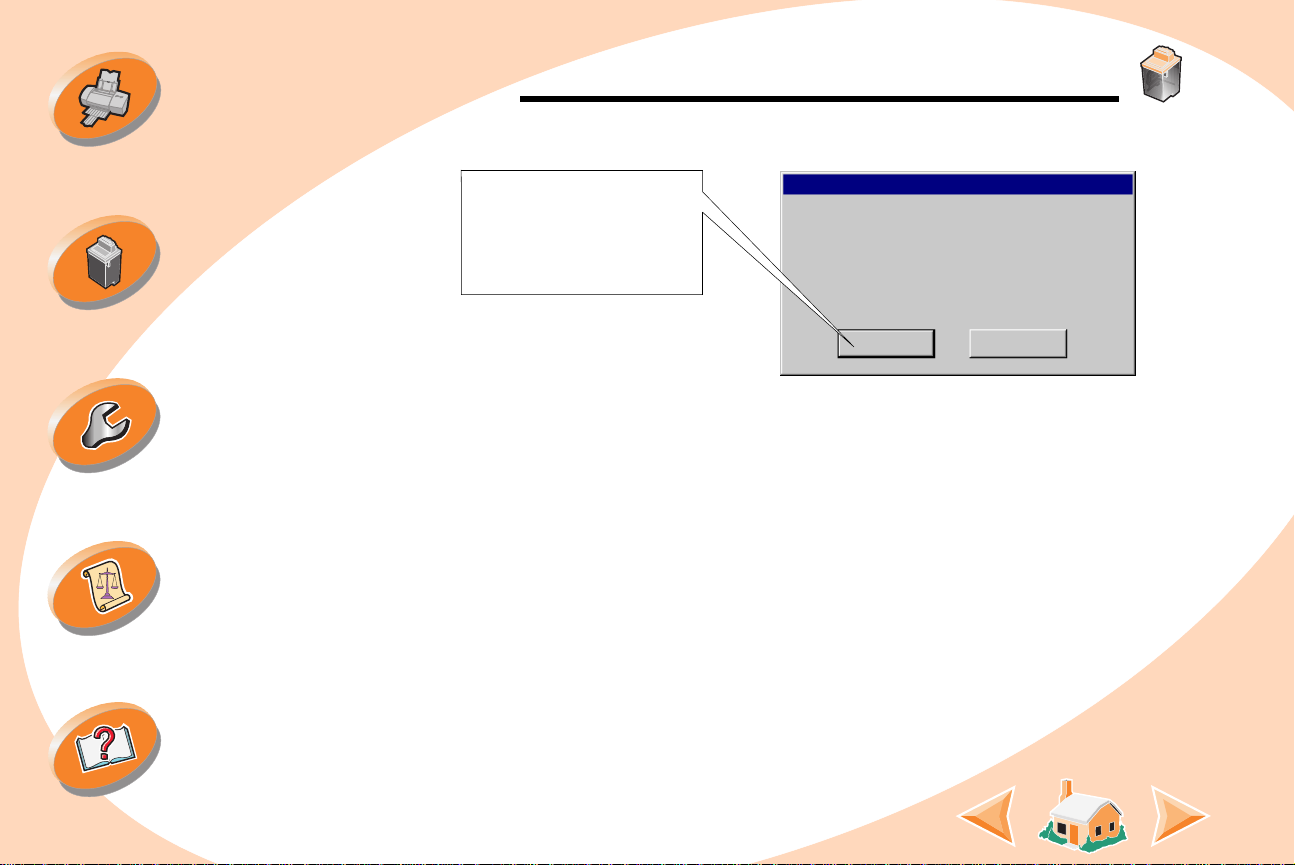
The Automatic Alignment window displays:
If you installed a new print
cartridge, click
align the print cartridges
for the best print quality.
For help, see
Align
page 25
to
.
Automatic Alignment
You changed one or more of your print cartridges.
For best print quality, you should align your
cartridges.
Do you wish to align them?
Maintaining your printer
Troubleshooting
Appendix
Index
Improving print quality
If print quality is not what you expect, y ou ma y need to align the print
cartridges or clean the print nozzles.
24
Align...
Skip
Page 25

Steps to basic printing
Maintaining your printer
Aligning the print cartridges
Normally, you only align the print
cartridges after installing a new print
cartridge. However, you may also
need to align the print cartridges
when:
Maintaining your printer
Troubleshooting
Appendix
Index
•
The black portions of a graphic or text do not align properly with
the color portions.
•
Characters are not aligned correctly at the left margin.
•
Vertical lines appear “wavy.”
To align the print cartridges:
1
Load plain paper in the printer.
2
Open the Control Program. For help, see
3
Click the Cartridges tab.
4
Click Align Cartridges. Your printer prints an alignment test
page 18
.
page and the Align Cartridge dialog box displays.
25
Page 26
Steps to basic printing
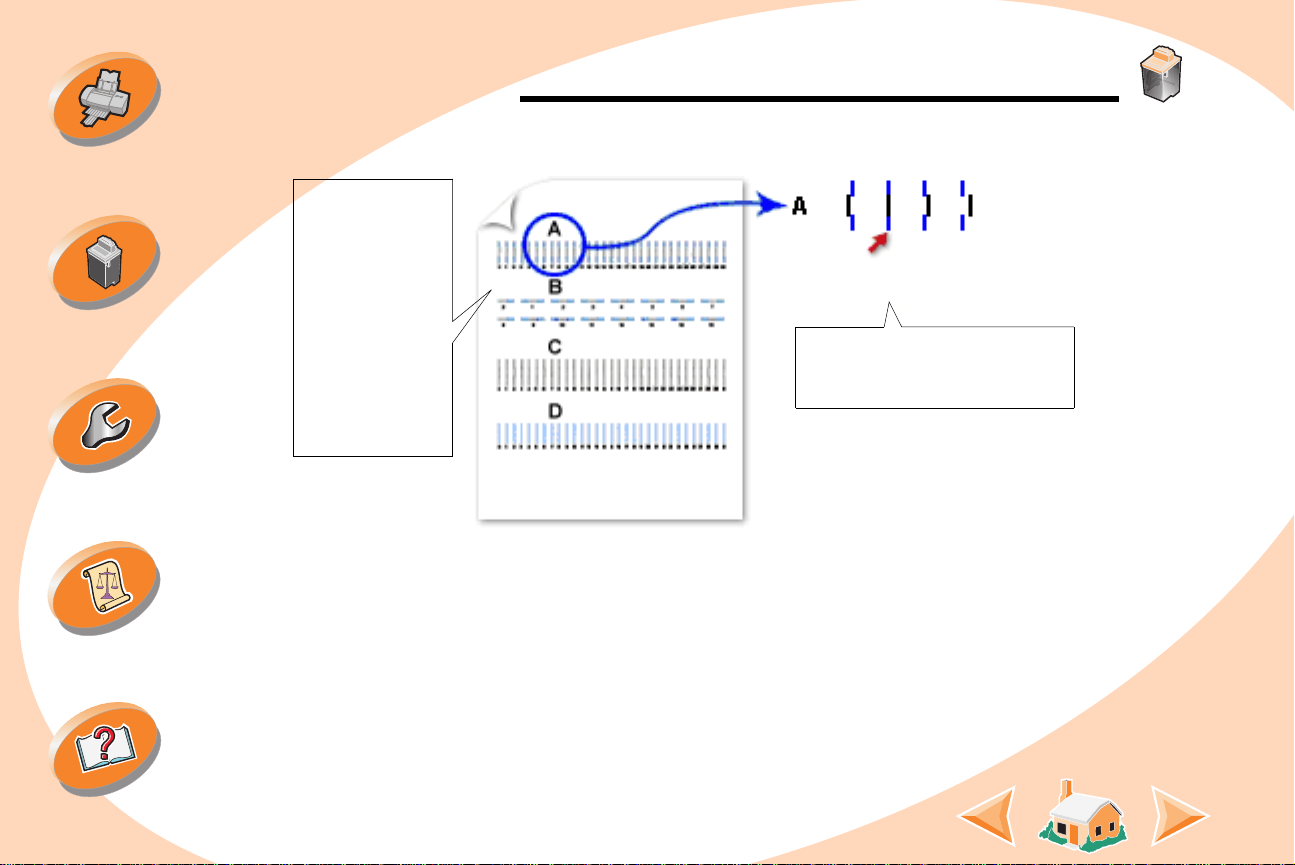
Depending on
the cartridge
combination you
installed, an
alignment test
page with
alignment
pattern(s)
prints. Each
pattern has a
number under it.
14
13
15
16
For example, in alignment
group A,
14
comes closest to
forming a straight line.
Maintaining your printer
Troubleshooting
Appendix
Maintaining your printer
The test page looks similar to the one shown:
5
From each alignment gr oup on the test page, find the number
under the alignment pattern that comes closest to forming a
straight line.
Index
26
Page 27
Steps to basic printing
Maintaining your printer
Troubleshooting
Appendix
Maintaining your printer
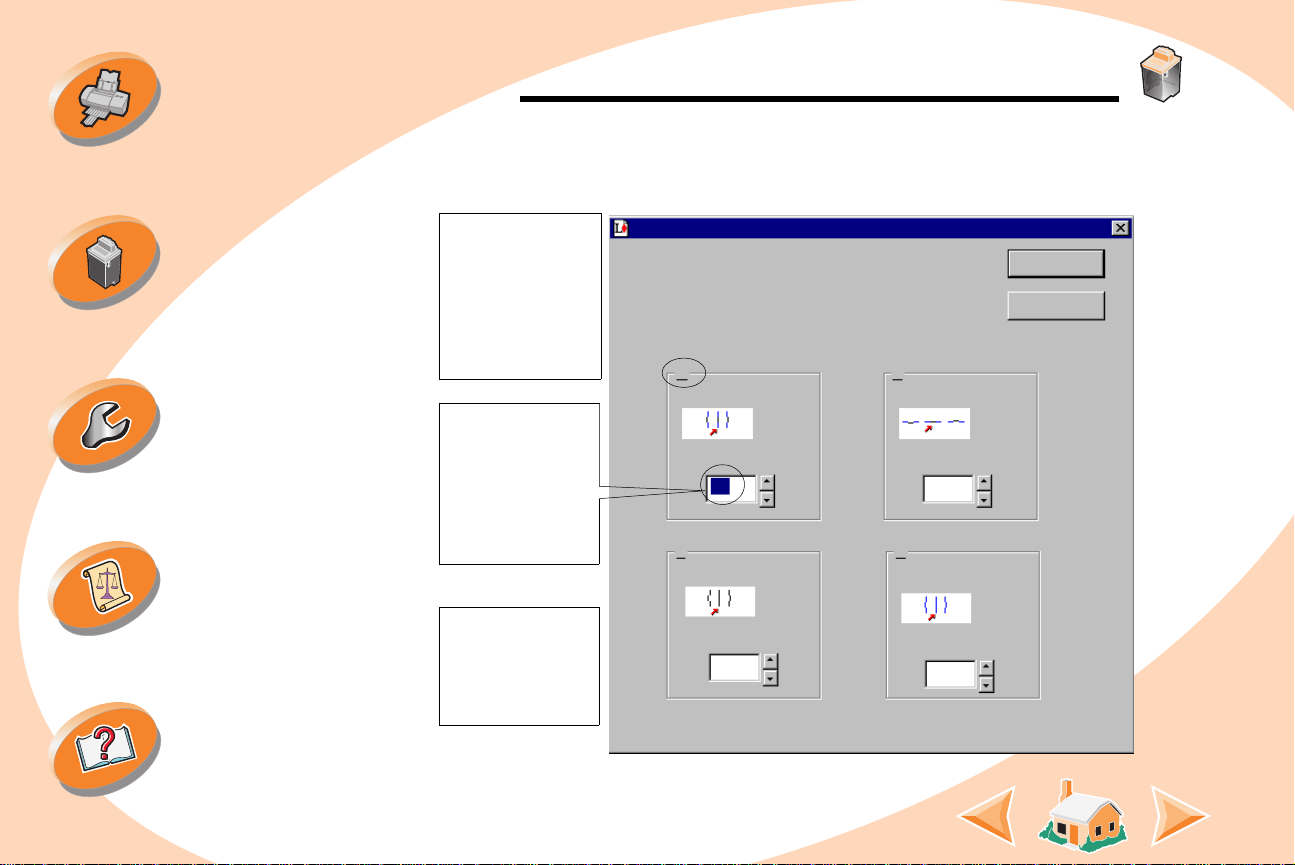
6
In the Align Cartridges dialog box, enter the pattern numbers
from the printed test page that come closest to forming a
straight line.
For example, on
the previous
14
A,
came
page in group
pattern
closest to
forming a straight
line.
a
Click these
scroll arrows
to select the
number to
enter, or type
in the
number.
b
After you have
entered a
number for all
of the patterns,
OK
click
.
Align Cartridges
1) The printer is printing an alignment page. When it is
finished, find the number in each category that comes closest
to forming a straight line.
2) Change the numbers below to the numbers you have
selected from the printed page.
3) Click OK.
A
Example
14
C
Example
15
B
Example
8
D
Example
15
OK
Cancel
Index
27
Page 28

Steps to basic printing
Maintaining your printer
Cleaning the print nozzles
The print cartridge nozzle test helps you pinpoint any clogged
nozzles. The nozzle test also cleans the print cartridge by f orcing ink
through the nozzles. A test line prints so you can see if the cleaning
process was successful. Run the nozzle test when:
Maintaining your printer
Troubleshooting
Appendix
Index
•
Characters are not printing completely.
•
White dashes appear in graphics or printed text.
•
Print is smudged or too dark.
•
Colors do not print correctly.
To run the nozzle test:
1
Load plain paper in the printer.
2
Open the Control Program. For help, see
3
Click the Cartridge tab.
28
page 18
.
Page 29
Steps to basic printing
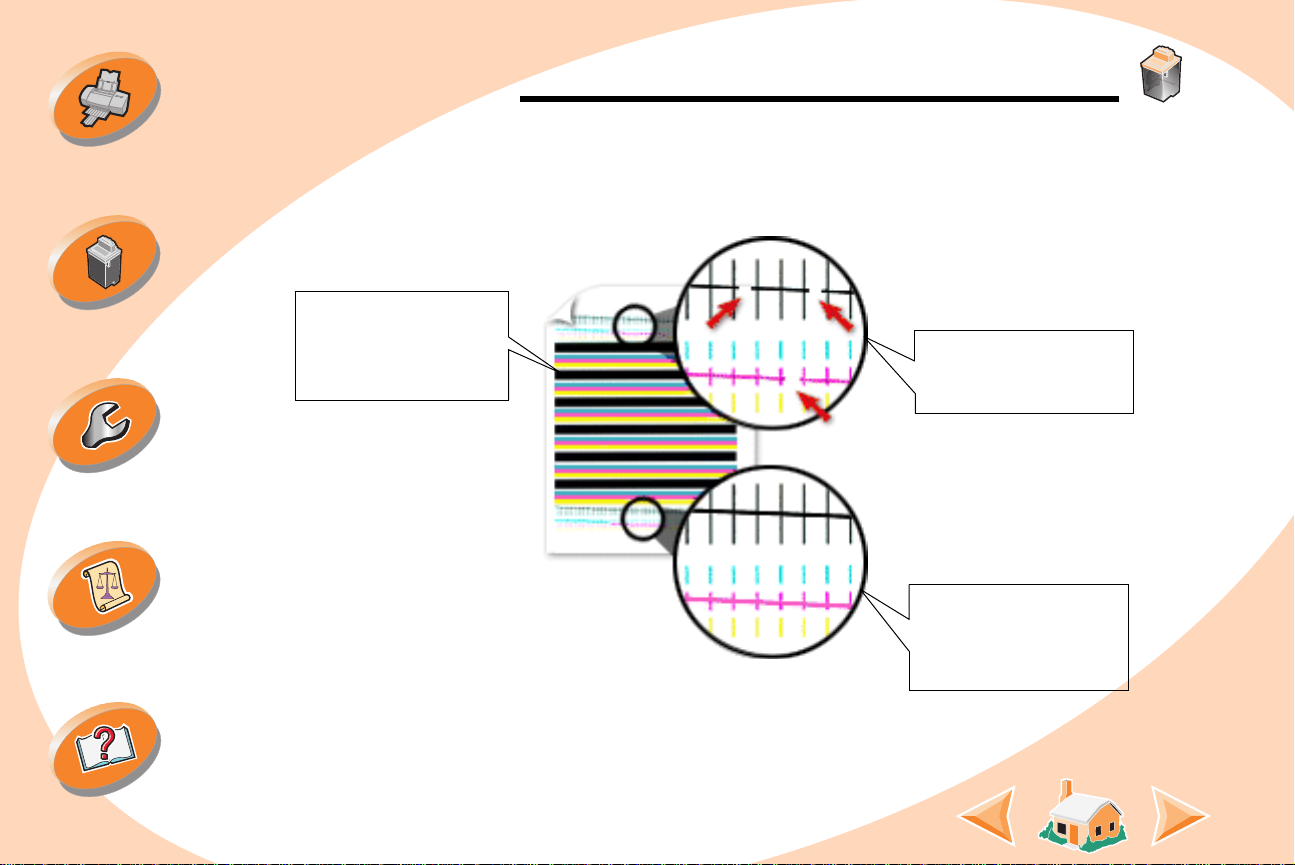
Purge lines print
when ink is forced
through the nozzles
to unclog them.
Broken lines at the top
of the page indicate
clogged nozzles.
Unbroken lines at the
bottom of the page
indicate the nozzles
were cleaned.
Maintaining your printer
Troubleshooting
Maintaining your printer
4
Click Clean Print Nozzles.
The printer feeds a sheet of paper and prints a nozzle test pattern,
similar to the one shown
:
Appendix
Index
29
Page 30
Maintaining your printer
Steps to basic printing
Maintaining your printer
Troubleshooting
Appendix
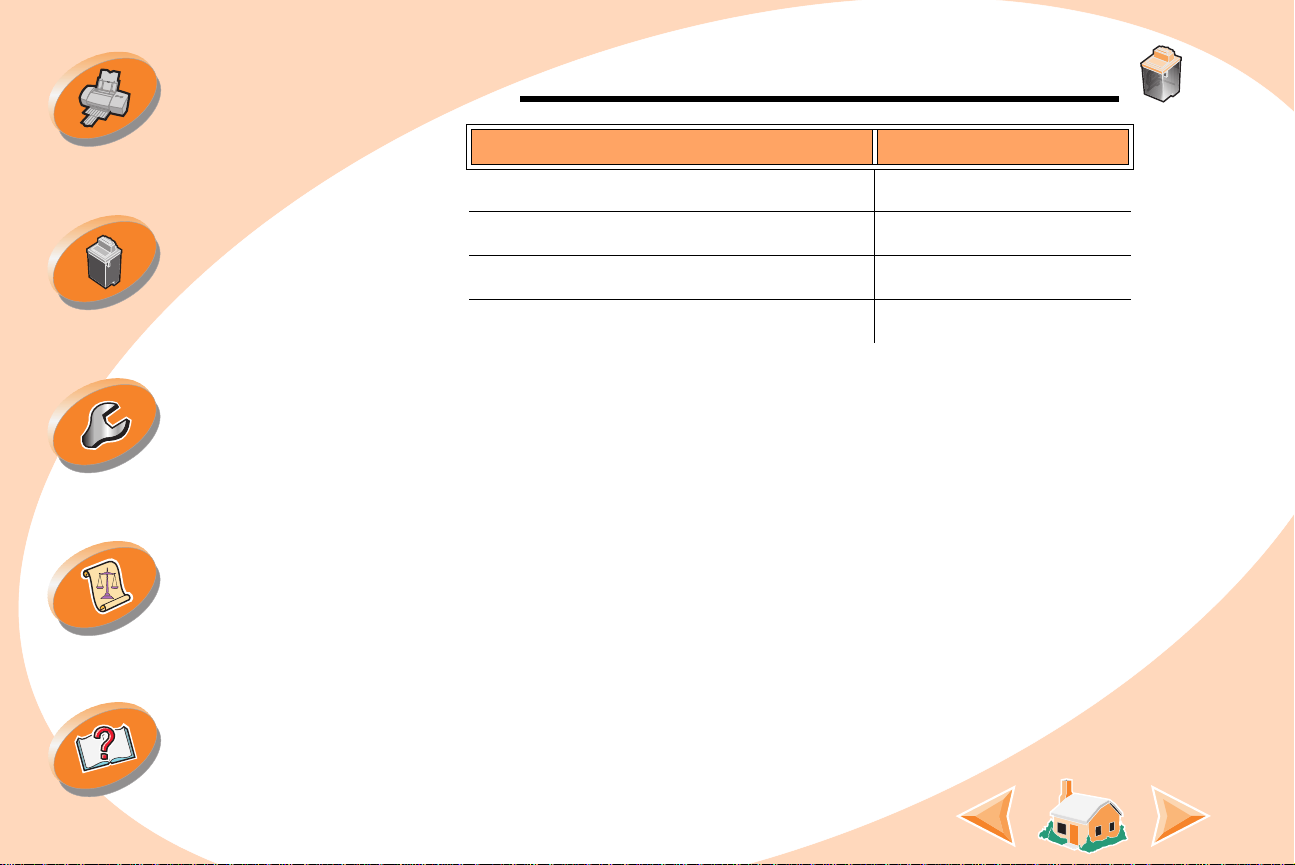
When you install these cartridges: These purge lines print:
Black cartridge only 1 purge line
Color cartridge only 3 purge lines
Black and Color cartridges 4 purge lines
Photo and Color cartridges 6 purge lines
5
Compare the diagonal lines above the printed bars to the
diagonal lines below the printed bars. Look f or a break in the
diagonal lines. A broken line indicates clogged nozzles.
If the bottom line still has breaks, run the test two more times.
•
If the print quality is satisfactory after running the test three times,
the print nozzles are clean. You do not need to complete the
remaining steps.
•
If the print quality of both sets of lines is not satisfactory after
running the test three times,
6
Remove and reinstall the print cartridge.
7
Repeat the nozzle test.
8
If the lines are still broken, continue with the next section,
Wiping print nozzles and contacts
go to step 6
.
.
Index
30
Page 31
Steps to basic printing
Maintaining your printer
Troubleshooting
Appendix
Maintaining your printer
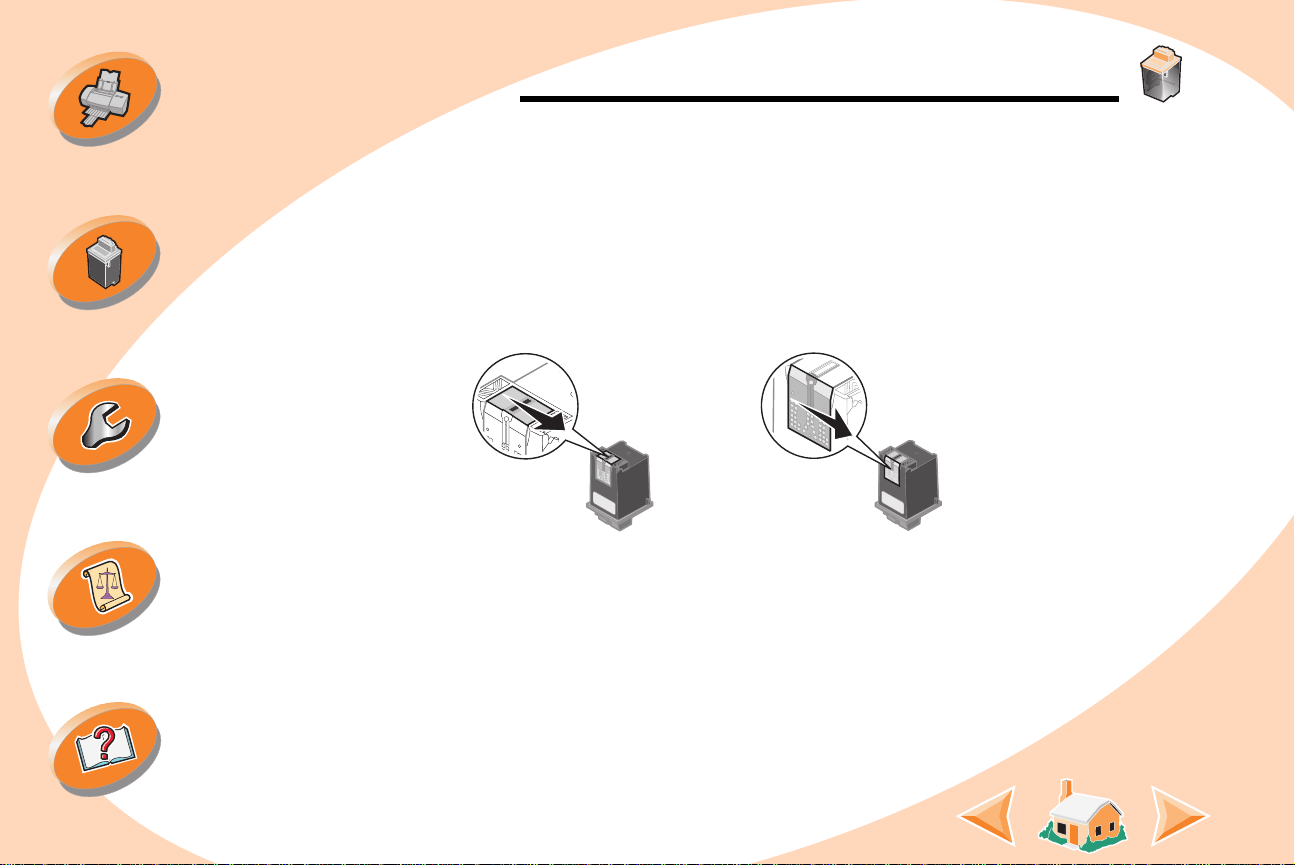
Wiping print nozzles and contacts
If print quality does not improve after cleaning the print nozzles (see
page 28
1
Remove the print cartridge(s) from the printer. For help, see
page 20
2
Dampen a clean, lint-free cloth with water. Gently wipe the
nozzles and contacts in one direction.
a
Hold the damp cloth against
the nozzles for about three
seconds. Gently blot and
wipe dry.
3
Reinstall the print cartridge(s) and repeat the nozzle test. For
help, see
), there may be dried ink on the print nozzles or contacts.
.
b
Use another clean section of cloth to gently
wipe the contacts. Hold the damp, lint-free
cloth against the contacts for about three
seconds. Gently blot and wipe dry.
page 28
.
Index
31
Page 32

Maintaining your printer
Steps to basic printing
Maintaining your printer
Troubleshooting
Appendix
Preserving print cartridges
To ensure the longest life from your print cartridge and optimum
performance from your printer:
•
Keep a new print cartridge in its packaging until you are ready to
install it.
•
Do not remove a print cartridge from the printer except to replace,
clean, or store it in an air-tight container. The print cartridge will
not print correctly if removed from the printer and left exposed for
an extended period of time.
Lexmark’s printer warranty does not cover repair of failures or
damage caused by a refilled cartridge. Lexmark does not
recommend use of refilled cartridges. Refilling cartridges can affect
print quality and cause damage to the printer. For best results, use
Lexmark supplies.
Index
32
Page 33

Steps to basic printing
Maintaining your printer
Troubleshooting
This section lists printer problems that can occur , and explains what
you can do to solve them.
From the list of printing problems below, select a category that
describes your printing problem. Then search for the solution to y our
problem.
General Printing Problems
Printer doesn’t print
Paper misfeeds or jams
Troubleshooting
Appendix
Index
Document prints with mistakes or poor quality
Problems with transparencies, photos, or envelopes
Error messages and flashing lights
33
Page 34

Steps to basic printing
Maintaining your printer
Troubleshooting
General Printing Problems
When there is a problem, first make sure that:
•
The power supply is plugged into the printer and a properly
grounded electrical outlet.
•
The printer is turned On.
•
The printer cable is securely attached to both your computer and
printer.
•
You are using a parallel cable that is an IEEE 1284-compliant cable
that supports bidirectional printing.
•
Bidirectional support is enabled in your printer software if you are
using Windows with a parallel cable:
1
From the printer’s Control Program, click the Options
tab.
2
Make sure Enable Bidirectional Support is checked.
For additional help, refer to the Troubleshooting section of your
printer software Help files.
Troubleshooting
Appendix
Index
34
Page 35

Steps to basic printing
Maintaining your printer
Troubleshooting
Printer doesn’t print
If your printer doesn’t print, your printer and your computer may not
be able to communicate properly.
The following events also indicate two-way communications
problems:
•
A message displays on yo ur computer screen indicating your
printer cannot establish bidirectional communications with your
computer.
•
Print cartridge ink lev el indicators on the Cartridges tab of the
printer’s Control Program are shaded.
•
Error messages (such as Paper Out) and job prog ress information
do not display on your computer screen.
Before proceeding, verify that:
Troubleshooting
Appendix
Index
•
The printer software has been installed correctly. See
•
The parallel or USB cable is securely attached to both the printer
and the computer.
•
The printer is plugged in and turned On.
page 47
35
.
Page 36

Steps to basic printing
Maintaining your printer
Troubleshooting
Note:
USB is
not
supported
in Windows NT
4.0. USB is
supported in
Windows 2000.
Troubleshooting
•
Your printer software is set to an LPTn port if you are using a
parallel cable or to a USB port if you are using a USB cable.
To check your port settings in Windows 2000:
1
Click Start.
2
Select Settings.
3
Click Printers.
4
Right click the Lexmark Z22/Z32 Series ColorFine icon.
5
Click Properties.
6
Click on the Ports tab.
7
Select USB or LPTn to change your port.
8
Select OK.
If you have a switch box or other device (such as a scanner or fax)
connected to the computer's parallel port, make sure it supports
bidirectional communication. You may need to disconnect your
printer from the switch box or other device and connect it directly to
your computer.
Appendix
Index
The Lexmark Z22 ships with a High Resolution Color cartridge only.
You can instantly improve print speed and print quality by simply
adding an optional Waterproof Black Cartridge (P/N 17G0050).
36
Page 37

Steps to basic printing
Maintaining your printer
Troubleshooting
If you are using a USB hub, remove the hub and connect the USB
cable directly to the computer.
Printer is plugged in but doesn’t print, or y ou get a Printer Offline
or Printer Not Ready message
Make sure:
•
The printer is turned On.
Troubleshooting
Appendix
Index
•
Paper is loaded correctly
•
The parallel or USB cable is completely plugged into the printer
•
The printer is set as the default printer.
•
The printer is not being held or paused in the print queue. T o chec k
.
the printer status:
1
From the Printers folder, double-click the Lexmark
Z22/Z32 Series ColorFine icon.
2
Click the Printer menu and make sure no check mark
appears next to the Pause Printing option.
Print a test page. If the test page prints, the printer is functioning
properly. Check your application.
37
.
Page 38

Steps to basic printing
Troubleshooting
Test page does not print
Make sure:
Maintaining your printer
Troubleshooting
Appendix
Warning: Do
not
touch the
gold contact
area of the
print cartridge.
•
The print cartridges are properly installed. For help, see
•
You are using the correct cable. If you are using a parallel cable,
page 20
make sure it is an IEEE 1284-compliant parallel cable that
supports bidirectional printing.
Printer ejects a blank page after appearing to print
Make sure:
•
Your Lexmark printer is set as the default printer.
•
You have removed the sticker and transparent tape from the
bottom of the print cartridges. For help, see
page 20
.
Printer prints very slowly
•
Close any open applications not in use.
•
Decrease your print quality setting.
•
Check the document you are printing. Photos and graphics may
take longer to print than regular text.
.
Index
38
Page 39

Steps to basic printing
Troubleshooting
•
Check your computer’s resources and consider increasing the
virtual memory for your computer
•
Consider purchasing more memory.
•
Note:
Photos and documents that contain graphics may take
longer to print than regular text.
Maintaining your printer
Troubleshooting
Appendix
Index
Paper misfeeds or jams
Paper misfeeds or multiple sheets feed through the printer
Make sure:
•
The paper is a recommended paper for inkjet printers.
•
You do not force the paper down into the printer when you load it.
Align the top edge of the paper with the paper alignment guides on
the paper support.
•
The printer is on a flat, level surface.
•
The left paper guide is against the side of the paper.
•
You do not load too much paper in the sheet feeder . Depending on
the thickness of your paper, the sheet feeder can hold up to 100
sheets of paper.
39
Page 40

Steps to basic printing
Maintaining your printer
Troubleshooting
Troubleshooting
•
The left paper guide does not cause the paper to bow in the sheet
feeder.
Printer does not feed envelopes or specialty paper
•
Make sure your printer will feed regular paper. For help loading
paper, see
•
If regular paper feeds without problems, load the envelopes
vertically against the right side of the sheet feeder . Mak e sure the
paper guide is against the side of the envelopes.
•
Make sure envelopes or the appropriate specialty paper is
selected in the printer software.
•
Make sure you are using a paper or envelope size supported by
your printer.
•
Your application may not be designed to print envelopes . For help ,
check your application’s documentation.
page 4
.
Appendix
Index
40
Page 41

Steps to basic printing
Maintaining your printer
Troubleshooting
Appendix
Troubleshooting
Printer has a paper jam
If the paper is lodged too far into the printer and can’t be removed:
1
Press the Power button to turn the printer Off.
2
Press the Power button to turn the printer back On.
3
If the printer does not eject the page, turn the printer Off.
4
Pull firmly on the paper to remove it. If y ou cannot reac h the
paper because it is too far into the printer, raise the front
cover and pull the paper out of the printer.
5
Close the front cover.
6
Press the Power button to turn the printer On.
7
Resend your document to print.
Document prints with mistakes or poor quality
Print is too dark or smudged
•
Make sure the paper is straight and unwrinkled.
•
Let the ink dry before handling the paper .
•
Make sure the Paper Type setting in the printer software matches
the type of paper loaded in the printer.
Index
41
Page 42

Troubleshooting
Steps to basic printing
Maintaining your printer
Troubleshooting
Appendix
•
Change the Print Quality setting to
page 12
•
Clean the print nozzles. For help, see
.
High Speed.
page 28
.
For help, see
Vertical straight lines are not smooth
To improve the print quality of vertical straight lines in tables,
borders, and graphs:
•
Select a higher print quality.
•
Align the print cartridges. For help, see
•
Clean the print nozzles. For help, see
page 25
page 28
.
.
Print smears on the page
•
The next page exiting the printer may be smearing the ink.
Remove the pages as they exit the printer and allow them to dry
before stacking.
•
The print nozzles may need cleaning. For help, see
page 28
.
Index
42
Page 43

Steps to basic printing
Troubleshooting
Printed pages have alternating bands of light and dark print
(intermittent printing)
Maintaining your printer
Troubleshooting
Appendix
•
Select the Print Quality setting
page 12
•
Make sure you have two-way communications between your
printer and computer. For help, see
.
High Quality
page 35
. For help, see page
.
Print quality is poor at the left, right, top, or bottom edge of page
Like other printers, your printer cannot print in the extreme left, right,
top or bottom edges of a page.
Use these minimum settings:
•
Left and right margins:
6.35 mm (0.25 in.) each for all paper sizes except A4
For A4 size paper - 3.37 mm (0.133 in.) each
•
Top and bottom margins:
Top - 1.7 mm (0.067 in.)
Bottom - 12.7 mm (0.5 in.) for most jobs
19 mm (0.75 in.) for best print quality f or color jobs.
Index
43
Page 44

Steps to basic printing
Troubleshooting
Printed characters are improperly formed or misaligned
•
Cancel any print jobs and resend your job to print.
Maintaining your printer
Troubleshooting
Appendix
•
Align the print cartridges. For help, see
•
Clean the print nozzles. For help, see
page 25
page 28
.
.
Colors on the printout differ from the colors on the screen
•
A print cartridge may be out of ink or low on ink. F or help changing
the print cartridge, see
•
Use a different brand of paper. Every paper brand accepts ink
differently and prints with slight color variations.
•
Remove any extra devices such as a scanner, and connect the
printer directly to the port.
page 20
.
Colors on the printout are faded
Try the suggestions listed in the previous section, “Colors on the
printout differ from colors on the screen.” If your colors still seem
faded, run the nozzle test. For help, see
page 28
.
Index
44
Page 45

Troubleshooting
Steps to basic printing
Maintaining your printer
Troubleshooting
Appendix
Characters are missing or unexpected
•
Make sure your Lexmark Z22/Z32 printer driver is selected as the
default printer.
•
Your printer may have two-w ay communication prob lems. Fo r help,
page 35
see
.
Problems with transparencies, photos, or envelopes
Glossy photo papers or transparencies stick together
•
Remove each page as it exits the printer and allow it to dry before
stacking.
•
Use a photo paper or transparency designed for use with an inkjet
printer.
Transparencies or photos contain white lines
•
From the Print Quality area, select High Quality. For help, see
page 12
•
Clean the print nozzles. For help, see
Printer does not feed envelopes or specialty papers
.
page 28
.
Index
For help, see
page 40
45
.
Page 46

Troubleshooting
Steps to basic printing
Maintaining your printer
Troubleshooting
Appendix
Error messages and flashing lights
Paper Jam message
page 41
.
Power
light
Paper
Feed
light
For help, see
Ink Low message
A print cartridge is running out of ink. Purchase a new print
cartridge.
The Power light is On and the Paper Feed light is blinking
•
If the printer is out of paper:
1
Load paper.
2
Press the Paper Feed button.
•
If the printer has a paper jam, see
The Power light and Paper Feed light are blinking
The print cartridge carrier has stalled. Check your screen for any
error messages.
1
Turn the printer Off.
2
Wait a few seconds and then turn the printer back On.
page 41
.
Index
46
Page 47

Appendix
Steps to basic printing
Maintaining your printer
Troubleshooting
Appendix
This section describes:
• Installing printer software
• Uninstalling printer software
• Notices
•Safety
Installing printer
software
You can obtain the printer software
using:
• the compact disc (CD-ROM)
that came with your printer
• the World Wide Web
•diskettes
If your printer software does not
install properly, a communications
error message appears when you
try to print. You may need to
uninstall, and then reinstall the
printer software. For help, see
page 48
.
Using the CD-ROM
Follow the set of instructions that
corresponds to your operating
system and printer cable (parallel
or USB):
NT 4.0 - parallel cable
1 Start Windows.
2 If any screen appears, click
Cancel
.
3 When the desktop appears,
insert the software CD.
The Lexmark Z22/Z32 front end
screen appears.
4Click
Windows 2000 - parallel or USB
cable
1 Start Windows.
2 If any screen appears, click
3 When the desktop appears,
4Click
Install Printer Software
Cancel
.
insert the software CD.
The Lexmark Z22/Z32 front end
screen appears.
Install Printer Software
Using the World Wide Web
If your computer does not have a
CD-ROM drive, you can download
the printer software from the World
Wide Web at www.lexmark.com.
1 From Le xmark’s W eb site, select
the appropriate driver for your
operating system.
2Select
3 Select a location on your hard
4 Double-click the executable
.
5 Follow the set of instructions on
.
Save to Disk
disk drive.
(.exe) file to open it.
The Win Self-Extractor window
opens.
your screen.
.
Index
47
Page 48

Appendix
Steps to basic printing
Maintaining your printer
Troubleshooting
Appendix
Using diskettes
If your computer does not have a
CD-ROM drive, you can create
driver diskettes using a friend’s
computer or a computer at your
Lexmark dealer that has a CDROM drive. You will need at least
three blank 3.5 inch diskettes.
To create diskettes of the printer
software:
1 Insert the software CD into the
CD-ROM drive.
If the CD does not run
automatically:
aFrom the
Run
b In the command-line text box,
type the letter of your CDROM drive, followed by
:\setup
d:\setup
2 When the Lexmark Z22/Z32
software installation screen
appears, select
3 Select
Start
menu, select
.
(for example,
), and then click OK.
Tools
.
Create Diskettes
.
4 Follow the instructions on the
screen.
To install the printer software from
diskettes:
1 Start Windows.
2 Insert Setup Disk 1 into your
disk drive.
.
Start
menu, select
:\setup
a:\setup
(for
), and then
3 From the
Run
4 In the command-line text box,
type the letter of your disk drive,
followed by
example,
click OK.
5 When prompted by the printer
software, insert the appropriate
disks into your disk drive and
click OK.
6 Follow the instructions on the
screen.
Uninstalling printer
software
If your printer software does not
install properly, you may need to
uninstall, and then reinstall it.
To uninstall the printer software:
1 From the
Programs
2Select
Series
3Select
Series Uninstall
4 Follow the instructions on your
screen.
To reinstall the printer software,
follow the appropriate set of
instructions from “Installing printer
software” on page 47.
Start
menu, select
.
Lexmark Z22/Z32
.
Lexmark Z22/Z32
.
Electronic emission
notices
Federal Communications
Commission (FCC)
compliance information
statement
The Lexmark Z22/Z32 Color
Jetprinter has been tested and
found to comply with the limits for a
Class B digital device, pursuant to
Part 15 of the FCC Rules.
Index
48
Page 49

Appendix
Steps to basic printing
Maintaining your printer
Troubleshooting
Appendix
Operation is subject to the
following two conditions: (1) this
device may not cause harmful
interference, and (2) this device
must accept any interference
received, including interference
that may cause undesired
operation.
The FCC Class B limits are
designed to provide reasonable
protection against harmful
interference in a residential
installation. This equipment
generates, uses and can radiate
radio frequency energy and, if not
installed and used in accordance
with the instructions, may cause
harmful interference to radio
communications. However, there is
no guarantee that interference will
not occur in a particular
installation. If this equipment does
cause harmful interference to radio
or television reception, which can
be determined by turning the
equipment off and on, the user is
encouraged to try to correct the
interference by one or more of the
following measures:
• Reorient or relocate the
receiving antenna.
• Increase the separation
between the equipment and
receiver.
• Connect the equipment into an
outlet on a circuit different from
that to which the receiver is
connected.
• Consult your point of purchase
or service representative for
additional suggestions.
The manufacturer is not
responsible for any radio or
television interference caused by
using other than recommended
cables or by unauthorized changes
or modifications to this equipment.
Unauthorized changes or
modifications could void the user's
authority to operate this
equipment.
Note:To assure compliance with
FCC regulations on
electromagnetic interference for a
Class B computing device, use a
properly shielded and grounded
cable such as Lexmark part
number 43H5856 for USB attach.
Use of a substitute cable not
properly shielded and grounded
may result in a violation of FCC
regulations.
Any questions regarding this
compliance information statement
should be directed to:
Director of Lab Operations
Lexmark International, Inc.
740 West New Circle Road
Lexington, KY 40550
(859) 232-3000
Industry Canada
Compliance Statement
This Class B digital apparatus
meets all requirements of the
Canadian Interference-Causing
Equipment Regulations.
Avis de conformité aux
normes d’Industrie Canada
Cet appareil numérique de la
classe B respecte toutes les
exigences du Règlement sur le
matériel brouilleur du Canada.
Index
49
Page 50
Appendix
Steps to basic printing
Maintaining your printer
Troubleshooting
Appendix
European Community (EC)
Directives Conformity
This product is in conformity with
the protection requirements of EC
Council directives 89/336/EEC and
73/23/EEC on the approximation
and harmonization of the laws of
the Member States relating to
electromagnetic compatibility and
safety of electrical equipment
designed for use within certain
voltage limits.
A declaration of conformity with the
requirements of the Directive has
been signed by the Director of
Manufacturing and Technical
Support, Lexmark International,
S.A., Boigny, France.
This product satisfies the Class B
limits of EN 55022 and safety
requirements of EN 60950.
Japanese VCCI Notice
The United Kingdom
Telecommunications Act
1984
This apparatus is approved under
the approval number
NS/G/1234/J/100003 for the
indirect connections to the public
telecommunications systems in the
United Kingdom.
Energy Star
The EPA ENERGY STAR
Computers program is a
partnership effort with computer
manufacturers to promote the
introduction of energy-efficient
products and to reduce air pollution
caused by power generation.
Companies participating in this
program introduce personal
computers, printers, monitors, or
fax machines that power down
when they are not being used. This
feature will cut the energy used by
up to 50 percent. Lexmark is proud
to be a participant in this program.
As an Energy Star Partner,
Lexmark International, Inc. has
determined that this product meets
the Energy Star guidelines for
energy efficiency.
Power supply
If your power supply fails, replace it
with the Lexmark replacement part
or other UL LISTED Direct Plug-In
Power Unit marked “Class 2” and
rated 30 V dc at 500mA.
Index
50
Page 51

Appendix
Steps to basic printing
Maintaining your printer
Troubleshooting
Appendix
Safety Information
• If your product is NOT marked
with this symbol , it MUST be
connected to an electrical outlet
that is properly grounded.
• The power cord must be
connected to an electrical outlet
that is near the product and
easily accessible.
• Refer service or repairs, other
than those described in the
operating instructions, to a
professional service person.
• This product is designed, tested
and approved to meet strict
global safety standards with the
use of specific Lexmark
components. The safety
features of some parts may not
always be obvious. Lexmark is
not responsible for the use of
other replacement parts.
Index
51
Page 52

A B C D E F G H I J K L M N O P Q R S T U V W X Y Z
Index
A
aligning print cartridges
25
24,
B
banding 43
banner paper
tions
9
15
46
46
loading
setting recommenda-
bidirectional communications problem indicators
blinking lights
Paper Feed
Power light
C
cards
loading
settings
cartridges, print
aligning
7
14
24, 25
35
installing
part numbers 21
preserving 32
removing
replacing 20
CD-ROM
installing software
characters, misformed 44
Choose Cartridges window
23
coated paper
loading
settings 14
contacts, print
wiping
Control Program
opening
tabs
using 18
custom size paper
loading
settings 14
20
21
48
7
31
18
19
8
D
dark or smudged print
default settings
diskettes 48
Document Defaults
customizing
tabs 10
downloaded printer driver,
installing
47
13
10
41
E
Energy Star
envelopes
loading
settings
error messages
Ink Low
Paper Jam
Printer Not Ready 37
Printer Offline
European Community Directives Conformity
50
6
13, 30
46
46
37
50
52
Page 53

A B C D E F G H I J K L M N O P Q R S T U V W X Y Z
Index
F
Federal Communications
Commission (FCC) Statement
48
flashing lights
foils
loading
settings 15
46
9
G
glossy paper
loading
settings
greeting cards
loading
settings 13
7
14
7
H
high yield black cartridge
21
high yield color cartridge
21
I
improving print quality
index cards
loading
settings
Industry Canada Compliance Statement
Ink Low message 46
installing
cartridges
printer software
intermittent printing 43
iron-on transfers
loading
settings 15
7
13
20
7
24
49
47, 48
J
Japanese VCCI Notice
50
L
lights
locating
46
Paper Feed
patterns 46
Power 46
loading
paper
specialty paper
46
4
6
M
margins, minimum settings
43
messages, error
Ink Low
Paper Jam 46
Printer Not Ready
Printer Offline 37
46
37
N
notices
electronic emission
Energy Star 50
European Community
Directives Conformity
50
50
53
Page 54

A B C D E F G H I J K L M N O P Q R S T U V W X Y Z
Index
FCC statement
Industry Canada Compli-
ance Statement
Japanese VCCI Notice
48
49
50
safety information
The United Kingdom
Telecommunications
Act 1984
nozzle test 28
nozzles, print
cleaning
wiping 31
50
28
51
O
ordering supplies
19
P
Paper Feed light 20, 46
paper guide
locating
using 5
paper loading 4
5
parallel cable, specifica-
34, 38
tions
part numbers
black cartridge
color cartridge 21
high yield black cartridge
21
high yield color cartridge
21
photo cartridge 21
photo cards
loading
settings 13
photo paper
loading
settings 14
postcards
loading
settings 13
Power light
power supply 50
print cartridge contacts,
wiping
print cartridges
7
7
7
31
20, 46
21
aligning
cleaning 28
installing 20
part numbers
preserving 32
removing
replacing 20
print nozzles
cleaning
wiping 31
print quality
improving
troubleshooting 41
printer driver
downloading
installing 47, 48
uninstalling
printer setup, troubleshooting
47
printer software
installing
uninstalling 48
printer software installation, troubleshooting
24, 25
21
21
28
24
47
48
47
47
54
Page 55

A B C D E F G H I J K L M N O P Q R S T U V W X Y Z
Index
Printing Preferences
customizing
tabs 10
printing problems
color quality
error messages
general 34
poor quality 41
specialty papers
10
44
46
45
R
release tab
locating
using
resolving problems 47
reverse page order
5
5
12
S
safety information 51
settings
banner paper
coated paper 14
custom size paper 14
15
envelopes
glossy paper 14
greeting cards 13
index cards
iron-on transfers 15
photo cards
photo paper 14
postcards 13
recommended
transparencies 15
sheet feeder
locating
using 4
software applications
Control Program
Document Defaults
(Printing Preferences)
13, 30
13
13
13
4
18
10
software, printer
installing
uninstalling 48
specialty paper
loading
specialty papers
47
6
settings
supplies, ordering 19
13
T
test page
alignment
does not print 38
transparencies
loading
settings 15
troubleshooting
error messages
flashing lights 46
poor print quality
specialty print jobs 45
two-way communications
problem indicators
25
9
U
uninstalling printer soft-
48
ware
United Kingdom Telecommunications Act 1984
46
41
35
50
55
Page 56

A B C D E F G H I J K L M N O P Q R S T U V W X Y Z
W
Windows
NT 4.0
Windows 2000 47
Windows 2000
Printing Preferences
Windows NT 4.0
Document Defaults
47
opening 11
opening
11
10
10
Index
56
 Loading...