

Page 1

Lexmark Z13
Lexmark Z23
Lexmark Z33
Printer overview
LexmarkTM Z13 Color Jetprinter
Lexmark Z23 Color Jetprinter
Lexmark Z33 Color Jetprinter
User’s Guide f or Mac OS 8.6 to 9.1
TM
Basic printing
Printing ideas
Maintenance
Troubleshooting
Notices
Index
Use this User’s Guide when you have questions about your using printer.
Navigating
• Click the categories in the left pane to navigate through the pages.
• Click the blue text to link to other parts of this User’s Guide.
• Click the arrows at the bott om of the screen to move forward and backw ard through
the pages.
Searching
1 From the Acrobat Edit men u, choose Find.
2 In the Find What: box, type the word or phrase you want to search.
3 Click Find.
Printing
From the Acrobat File menu:
1 Choose Page Setup, select the Landscape orientation button, and then click OK.
2 Choose Print, specify the pages you want to print, and then click Print.
www.lexmark.com
Page 2

Lexmark Z13
Lexmark Z23
Lexmark Z33
Printer overview
2Printer overview
This section contains i nf ormation about the printer softwa re and h ardwa re and h ow t hey work
together.
Basic printing
Printing ideas
Maintenance
Troubleshooting
Notices
Index
• Understanding the printer software
• Understanding the printer parts
www.lexmark.com
Page 3

Lexmark Z13
Lexmark Z23
Lexmark Z33
3Printer overview
Printer overview
Basic printing
Printing ideas
Maintenance
Troubleshooting
Notices
Index
Understanding the printer software
Your printer software includes the:
• Page Setup dialog box
• Print dialog box
• Control Panel
When you installed the printer software, the Page Setup and Print dialog boxes were set to
the default settings. To print a typical document on plain paper, use these default settings:
• Print Quality: Normal
• Paper Type: Plain
• Paper Size: A4 or U.S. Letter
• Orientation: Portrait
To customize the settings f o r y our document, us e the Page Setup and Print dialog boxes . For
more information on which settings to select for your document, see Printing ideas.
www.lexmark.com
Page 4
Lexmark Z13
Lexmark Z23
Lexmark Z33
4Printer overview
Printer overview
Basic printing
Printing ideas
Maintenance
Troubleshooting
Notices
Index
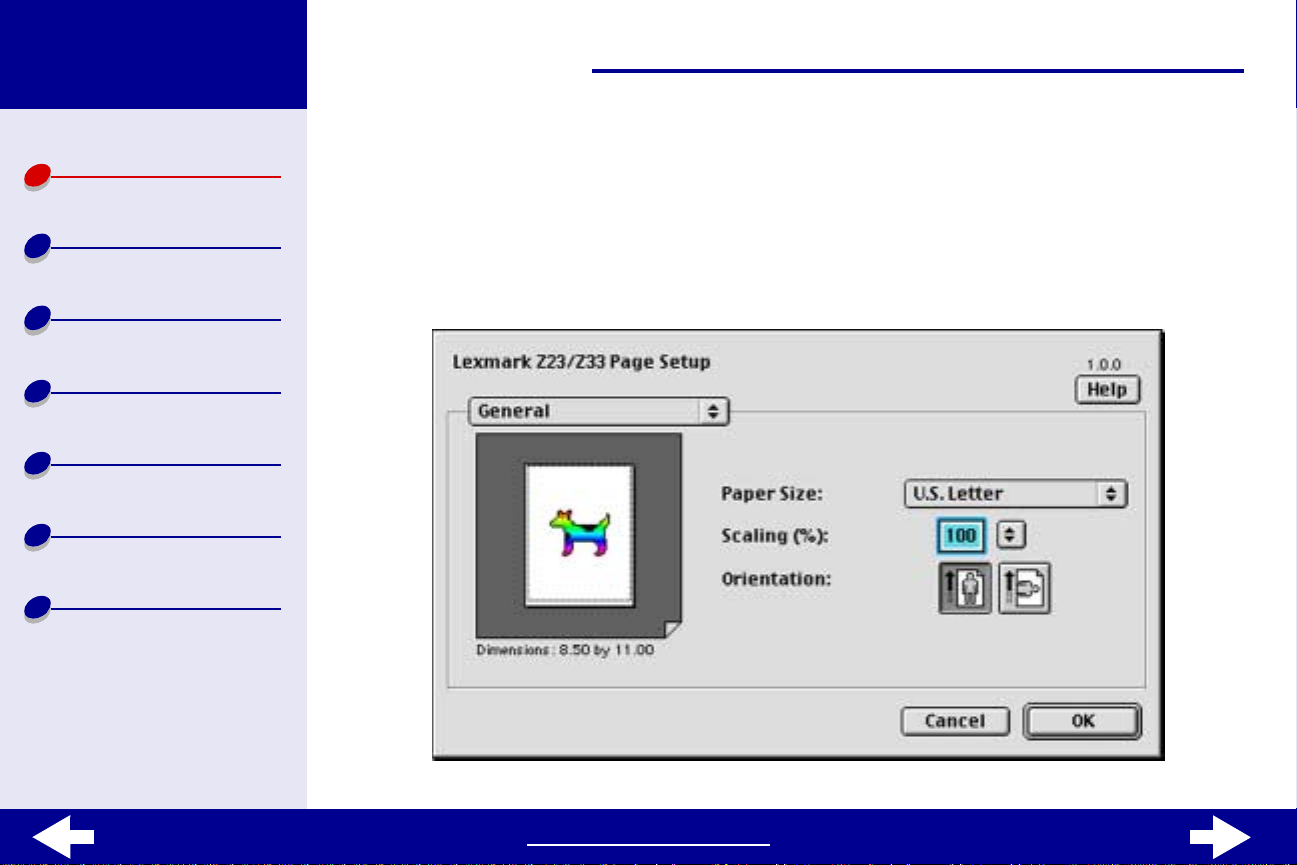
Page Setup dialog box
While your document is open, use th e Page Setu p dialog bo x to select sett ings such as paper
size and orientation.
To customize the settings in the Page Setup dialog box:
1 From the File menu of your software application, choose Page Setup.
www.lexmark.com
Page 5
Lexmark Z13
Lexmark Z23
Lexmark Z33
Printer overview
Basic printing
Printing ideas
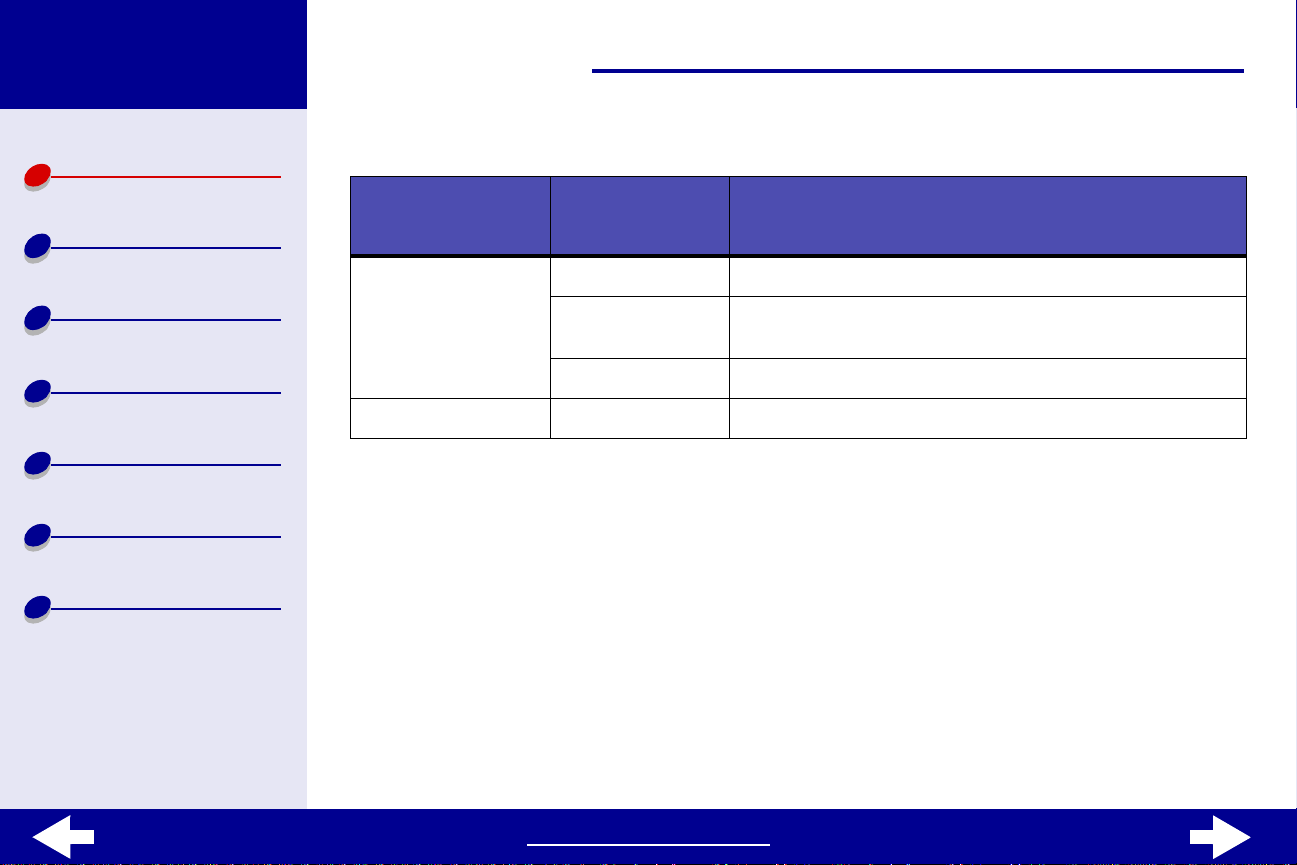
2 Change the settings as needed.
From the pop-up
menu in the upper
left, choose:
General Paper Size Choose a paper size.
Select: When you want to:
Scaling Change the scaling value of the document. Valid values
are between 25% and 400%.
5Printer overview
Maintenance
Troubleshooting
Notices
Index
Orientation Choose between portrait and landscape.
Watermark Watermarks Choose a watermark design.
• Clic k OK to apply the settings and close the P age Setup dialog box.
• If you want more information about the settings in the Page Setup dialog box, click
Help to view the printer software Help. When you are finished, click Done.
www.lexmark.com
Page 6
Lexmark Z13
Lexmark Z23
Lexmark Z33
6Printer overview
Printer overview
Basic printing
Printing ideas
Maintenance
Troubleshooting
Notices
Index
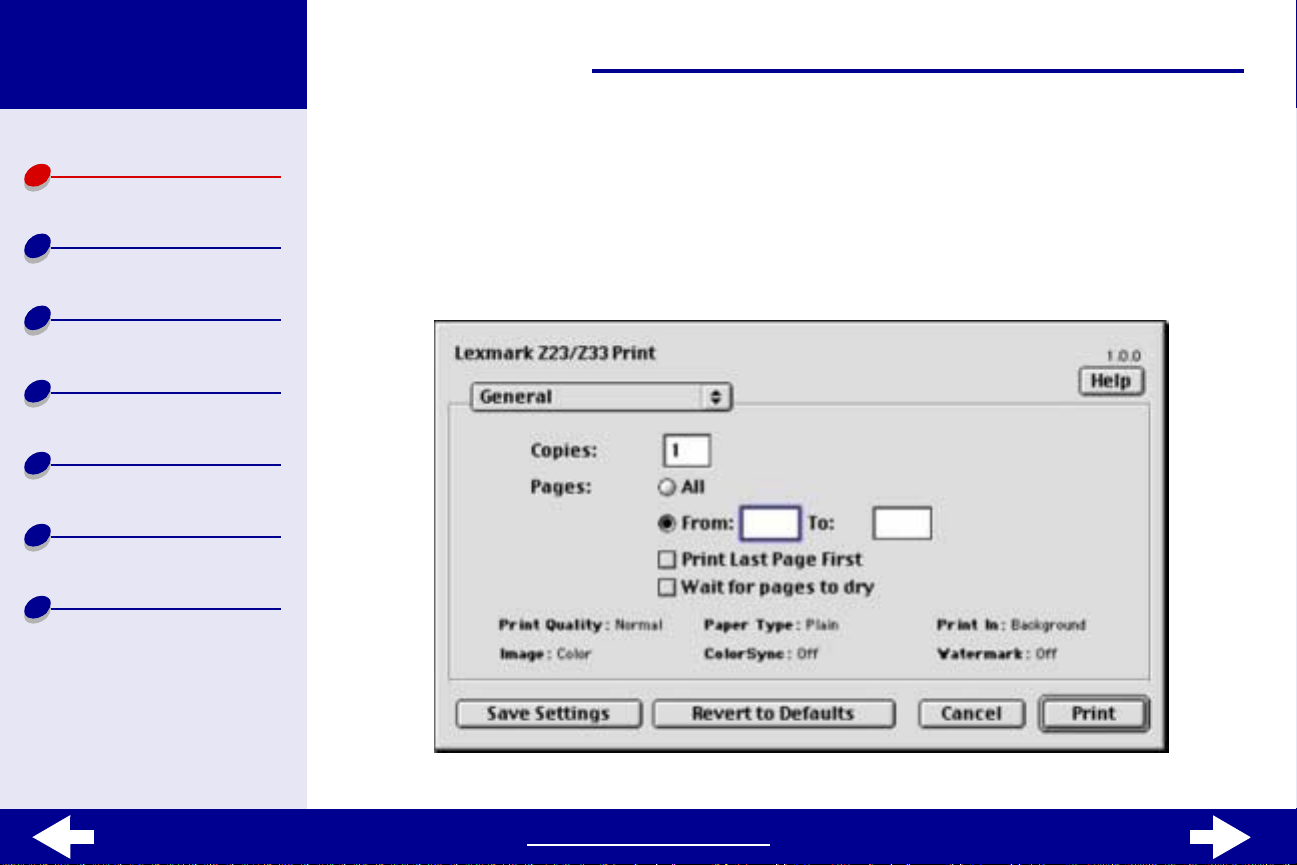
Print dialog box
While your document is open, you can use the Print dialog box to select settings that affect
the appearance of your document.
To customize the settings in the Print dialog box:
1 From the File menu of your software application, choose Print.
www.lexmark.com
Page 7

Lexmark Z13
Lexmark Z23
Lexmark Z33
Printer overview
Basic printing
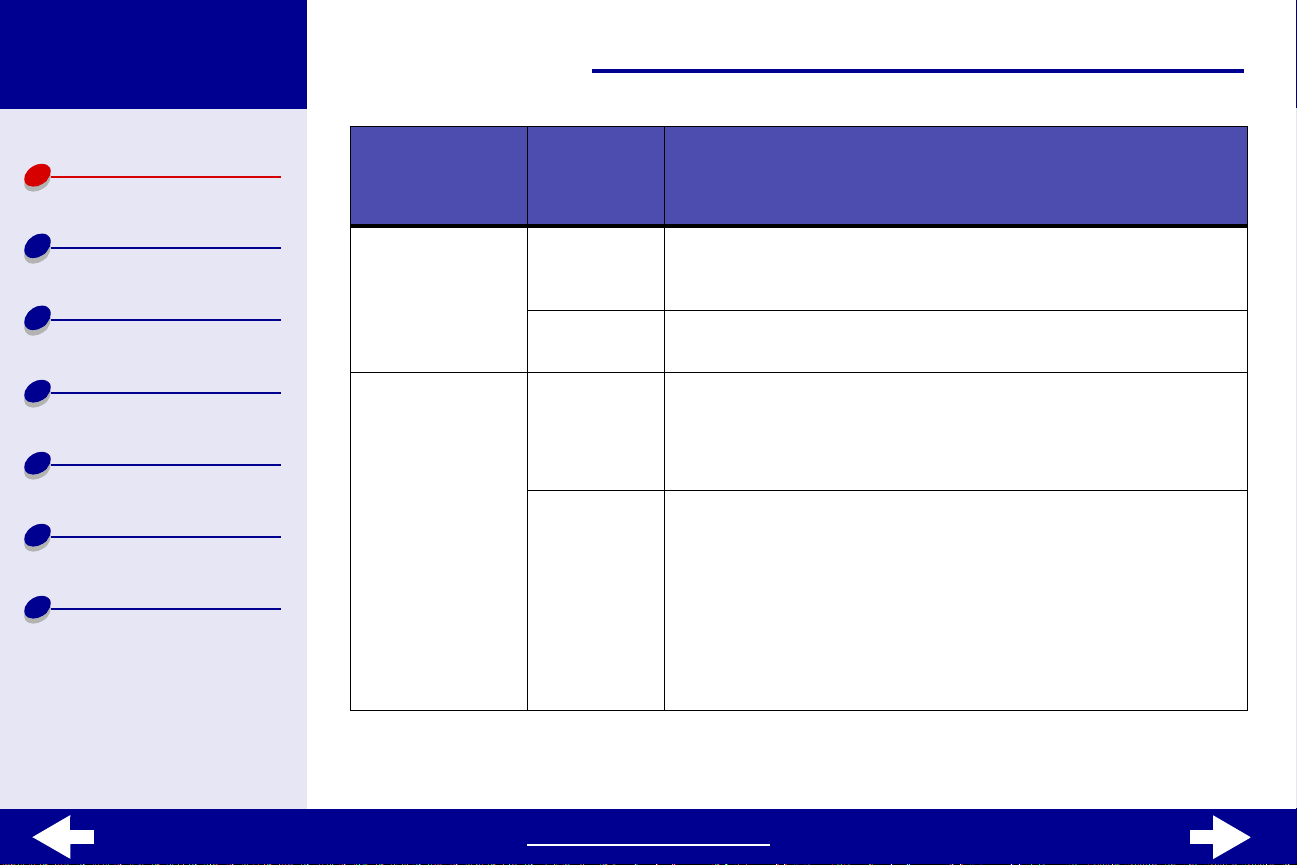
2 Change the settings as needed.
From the popup menu in the
upper left,
choose:
Select: When you want to:
7Printer overview
Printing ideas
Maintenance
Troubleshooting
Notices
Index
General Copies Specify the number of copies to print.
Pages Print all of the pages in a document or print a given range of
pages.
Paper Type/
Quality
Print Last
Page First
Wait for
pages to dry
Paper Type Specify the type of paper you’ve loaded into the printer. Select
Print Quality Select Quick Print, Normal, Better, or Best.
Print the pages in reverse order so the first page of your
document is on top of the stack in the paper exit tray.
Add more time between pages as they exit the printer. Select
this option when you want to keep documents from smearing.
Plain, Coated, Transparency, Iron-On Transfer, or Glossy/Photo
Paper.
Normal print quality is recommended for most documents.
Higher print quality settings result in better quality documents,
but take longer to print.
www.lexmark.com
Page 8
Lexmark Z13
Lexmark Z23
Lexmark Z33
8Printer overview
Printer overview
Basic printing
Printing ideas
Maintenance
Troubleshooting
Notices
Index
From the popup menu in the
upper left,
choose:
Color ColorSync
Background
Printing
Select: When you want to:
Color
Matching
Built-in Color
Matching
Print in:
Foreground
Print in:
Background
Select a printer profile to match the color on the screen to the
color in the document.
Let the printer software match the color on the screen to the
color in the document.
Print when there are not enough system resources available
otherwise.
Note: You will not be able to use your computer while
printing in foreground.
• Print most documents. Background printing is
recommended for all jobs unless a problem occurs.
• Select an exact date and time for the document to print.
• Mark a print job Urgent.
• Put a print job on hold.
Note: You can use your computer while printing in
background.
www.lexmark.com
Page 9

Lexmark Z13
Lexmark Z23
Lexmark Z33
Printer overview
Basic printing
Printing ideas
Maintenance
Troubleshooting
Notices
Index
9Printer overview
If you want more information about the settings in the Print dialog box, click Help to
view the printer software Help. When you are fi nished, click Done.
3 Click Print to apply your settings and print your document.
www.lexmark.com
Page 10

Lexmark Z13
Lexmark Z23
Lexmark Z33
10Printer overview
Printer overview
Basic printing
Printing ideas
Maintenance
Troubleshooting
Notices
Index
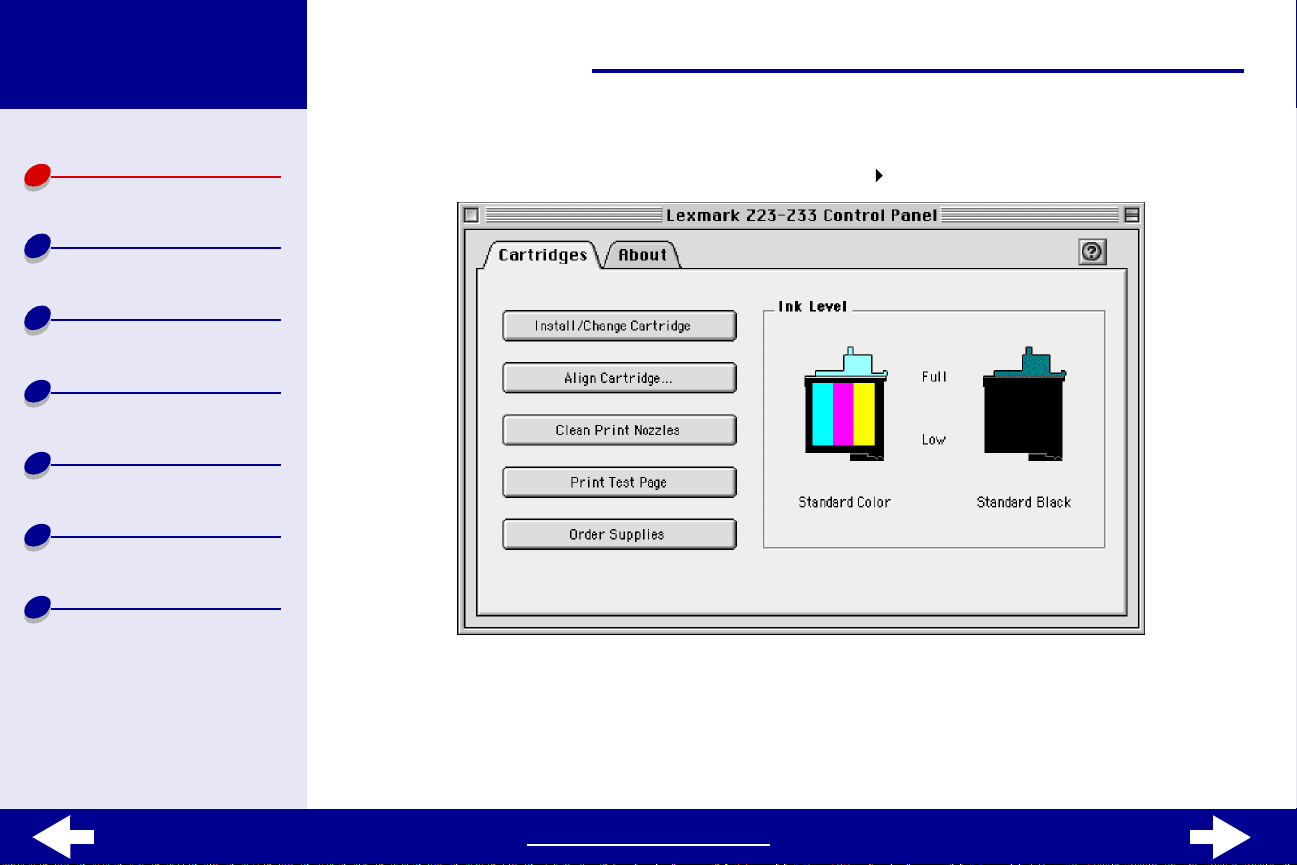
Control Panel
Use the Control Panel to:
• View ink levels.
• Install print cartridges.
• Align the print cartridges.
• Clean the print nozzles.
• Print a test page.
• Order supplies.
• View printer software version and copyright inf ormation.
www.lexmark.com
Page 11
Lexmark Z13
Lexmark Z23
Lexmark Z33
Printer overview
Basic printing
Printing ideas
Maintenance
Troubleshooting
Notices
Index
11Printer overview
To open the Control Panel:
1 From the Apple menu, choose Control Panels the Control Panel for your printer .
To learn more, click the ? to view the printer software Help. When you’re f inished, cli ck
Done.
2 Click the Close box in the upper left corner to close the Control Panel.
www.lexmark.com
Page 12
Lexmark Z13
Lexmark Z23
Lexmark Z33
12Printer overview
Printer overview
Basic printing
Printing ideas
Maintenance
Troubleshooting
Notices
Index
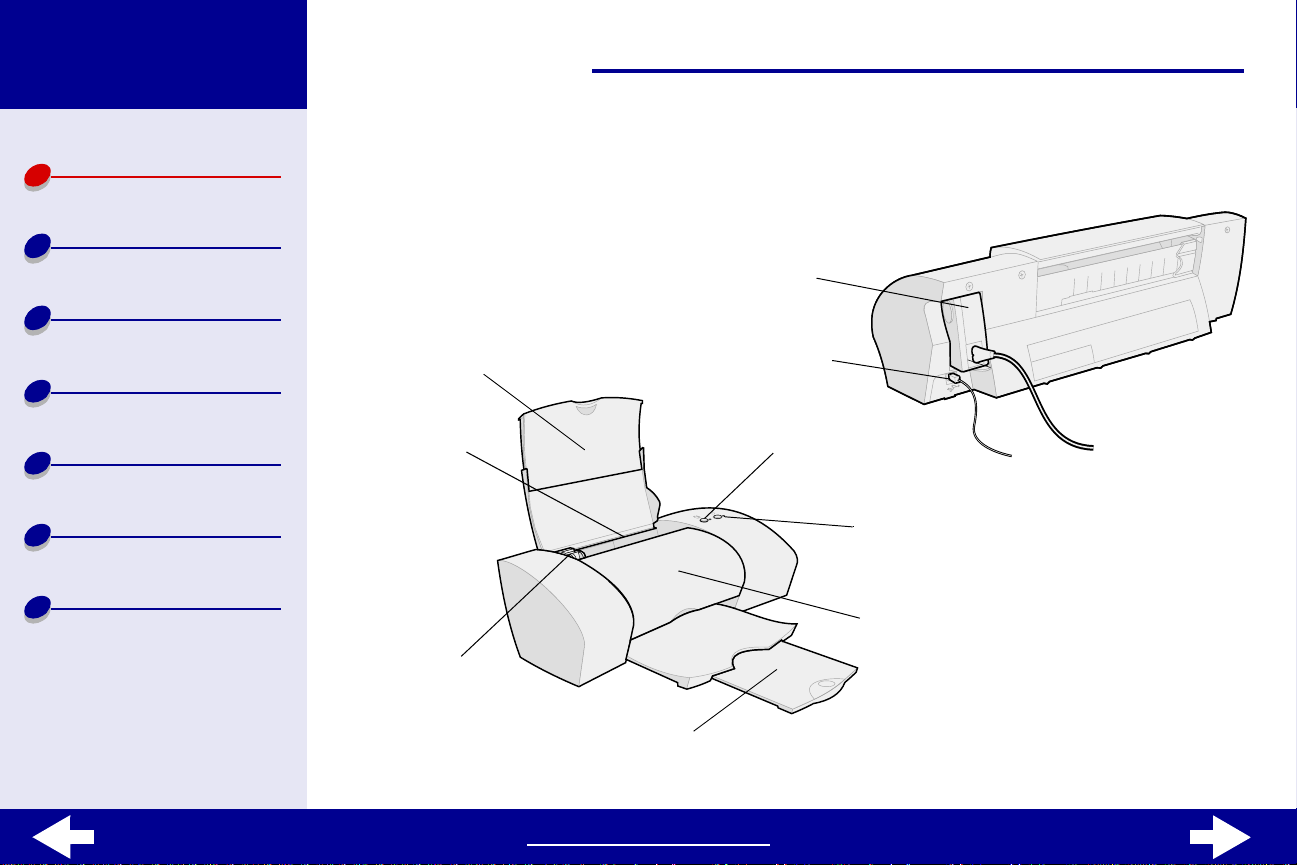
Understanding the printer parts
The table beginning on the next page describes each part.
Power sup ply
Paper support
Sheet feeder
Paper guide
USB connector
Paper Feed
button and Paper
Feed light
Power b utton
and Power
light
Front cover
Paper exit tray
www.lexmark.com
Page 13
Lexmark Z13
Lexmark Z23
Lexmark Z33
13Printer overview
Printer overview
Basic printing
Printing ideas
Maintenance
Troubleshooting
Notices
Index
Use this: When you want to:
Front cover • Install or change print cartridges.
• Clea r paper jams.
Paper exit tra y Stack paper after printing.
Paper Feed button • Eject paper from the printer.
• Advance a sheet of paper into the sheet feeder.
Paper Feed light Check the printer status. For more information, see Understanding
error messages and flashing lights.
Paper guide Make sure paper feeds correctly into the printer.
Paper support Keep paper straight in the sheet feeder. Make sure you fully extend the
paper suppor t .
Power button Turn the printer on or off.
Power light Check the printer status. For more information, see Understanding
error messages and flashing lights.
Power supply Supply power to the printer.
Sheet feeder Feed plain or specialty paper automatically. For more information, see
Printing ideas.
USB connector Connect the printer to the computer with a USB cable.
www.lexmark.com
Page 14

Lexmark Z13
Lexmark Z23
Lexmark Z33
14Basic printing
Printer overview
Basic printing
Printing ideas
Maintenance
Troubleshooting
Notices
Index
Basic printing is as easy as:
Step 1: Load the paper
Step 2: Customize the printer settings
Step 3: Print your document
Note: For help printing on specialty paper (such as photo paper, banner paper,
transparencies, or iron-on transfers), see Printing ide as.
www.lexmark.com
Page 15
Lexmark Z13
Lexmark Z23
Lexmark Z33
15Basic printing
Printer overview
Basic printing
Printing ideas
Maintenance
Troubleshooting
Notices
Index
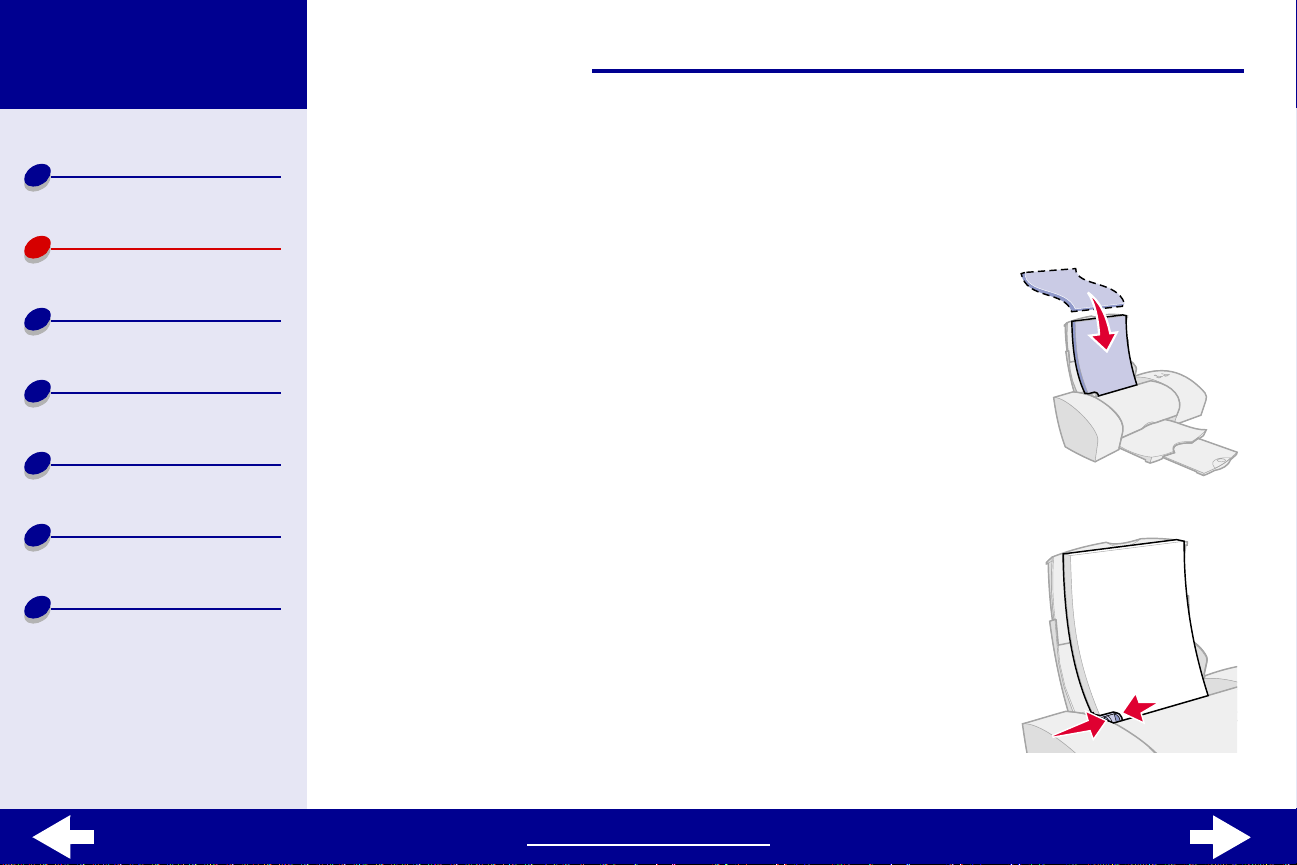
Step 1: Load the paper
You can load up to 100 sheets of plain paper at a time, depending on the thickness of the
paper.
1 Make sure the paper support is upright and fully extended.
2 Place the paper against the right side of the paper sup port
with the print side facing you.
Note: If loading letter size paper, align the top of the
paper with the top of the paper support.
3 Squeeze the release tab and the paper guide together.
Slide the paper guide to the left edge of the paper
For information about specialty paper, see Printing ideas.
www.lexmark.com
Page 16

Lexmark Z13
Lexmark Z23
Lexmark Z33
16Basic printing
Printer overview
Basic printing
Printing ideas
Maintenance
Troubleshooting
Notices
Index
Step 2: Customize the printer settings
If you are using A4 or letter si ze paper and y ou want normal print quality and speed, y ou don ’t
need to adjust the printer settings.
If you are using specialty paper, see Printing ideas to customize your printer settings.
For more information about the different printer settings, see Understanding the printer
software.
www.lexmark.com
Page 17

Lexmark Z13
Lexmark Z23
Lexmark Z33
17Basic printing
Printer overview
Basic printing
Printing ideas
Maintenance
Troubleshooting
Notices
Index
Step 3: Print your document
After you load the paper and customize the printer settings (if necessary), you are ready to
print:
1 From the software application File menu, choose Print.
2 Click Print.
www.lexmark.com
Page 18

Lexmark Z13
Lexmark Z23
Lexmark Z33
Printer overview
18Printing ideas
Your printer prints more than typical text documents. This section show s you how to get the
most from your printer, taking you step by step to print your customized documents.
Basic printing
Printing ideas
Maintenance
Troubleshooting
Notices
Index
• Printing photos
• Printing on premium paper
• Printing cards
• Printing envelopes
• Printing color images in
black and white
• Printing labels
• Printing on custom size
paper
• Printing an iron-on transfer
• Printing transparencies
• Printing your document in
reverse order
• Printing a banner
www.lexmark.com
Page 19

Lexmark Z13
Lexmark Z23
Lexmark Z33
19Printing ideas
Printer overview
Basic printing
Printing ideas
Maintenance
Troubleshooting
Notices
Index
Printing photos
You can print up to 25 sheets of coated, photo, or glossy paper at a time, depending on the
thickness of the paper . You may wan t to print your photos on plain paper bef ore loading photo
paper and changing your settings. To print on a photo card, see Printing cards.
Step 1: Load the photo paper
• If your paper came with instructions, read them care fully.
• Make sure the glossy or coated side is facing you.
• Load the photo paper against the right side of the paper
support.
Note: Make sure you do not push the photo paper too
far into the sheet feeder.
• Slide the paper guide to the lef t side of the photo paper.
www.lexmark.com
Page 20

Lexmark Z13
Lexmark Z23
Lexmark Z33
20Printing ideas
Printer overview
Basic printing
Printing ideas
Maintenance
Troubleshooting
Notices
Index
Step 2: Customize the printer settings
For help, see Understanding the printer software.
1 Choose a paper size and orientation:
a From the software application File menu, choose Page Setup.
b From the Paper Size pop-up menu, choose the paper size for your photo. To
choose a custom paper size, see Printing on custom size paper.
c Choose Portrait or Landscape orientation.
d Click OK.
2 Choose a paper type and print quality:
a From the software application File menu, choose Print.
b From the pop-up menu in the upper left of the Print dialo g box, choose Paper Type/
Quality.
www.lexmark.com
Page 21

Lexmark Z13
Lexmark Z23
Lexmark Z33
Printer overview
Basic printing
Printing ideas
Maintenance
Troubleshooting
21Printing ideas
c Choose:
– Coated or Glossy/Photo Paper for the Paper Type.
– Better or Best for the Print Quality.
Note: Higher print quality settings result in better quality documents, but may
take longer to print.
d From the pop-up menu, choose Color.
e Select Bui lt- In C o lo r M a tc h ing.
f From the Document Color pop-up menu, choose Natural Color.
g From the Halftone pop-up menu, select Airbrush (quality).
Notices
Index
Step 3: Print your photos
Click Print.
Note: To prevent smu dging, remove each photo as it exits the printer and let it
dry before stacking.
www.lexmark.com
Page 22

Lexmark Z13
Lexmark Z23
Lexmark Z33
22Printing ideas
Printer overview
Basic printing
Printing ideas
Maintenance
Troubleshooting
Notices
Index
Printing on premium paper
You can print up to 100 pages of premium paper at a time, depending on the th ic kn ess of t he
paper.
Step 1: Load the premium paper
• If your paper came with instructions, read them care fully.
• If there is a special mark on the paper, such as a
watermark, make sure the mark is facing away from you.
• Load the paper v ertically against the right side of the paper
support.
Note: Make sure you do not push the paper too far
into the sheet feeder.
• Slide the paper guide to the left side of the paper.
www.lexmark.com
Page 23

Lexmark Z13
Lexmark Z23
Lexmark Z33
23Printing ideas
Printer overview
Basic printing
Printing ideas
Maintenance
Troubleshooting
Notices
Index
Step 2: Customize the printer settings
For help, see Understanding the printer software.
1 Choose a paper size and orientation:
a From the software application File menu, choose Page Setup.
b From the Paper Size pop-up menu, choose the paper size for your document. To
choose a custom paper size, see Printing on custom size paper.
c Choose Portrait or Landscape orientation.
d Click OK.
2 Choose a paper type and print quality:
a From the software application File menu, choose Print.
b From the pop-up menu in the upper left of the Print dialo g box, choose Paper Type/
Quality.
www.lexmark.com
Page 24

Lexmark Z13
Lexmark Z23
Lexmark Z33
Printer overview
Basic printing
Printing ideas
Maintenance
Troubleshooting
Notices
Index
24Printing ideas
c Choose:
– Plain for the Paper Type.
– Better or Best for the Print Quality.
Note: Higher print quality settings result in better quality documents, but may
take longer to print.
Step 3: Print your document
Click Print.
www.lexmark.com
Page 25
Lexmark Z13
Lexmark Z23
Lexmark Z33
25Printing ideas
Printer overview
Basic printing
Printing ideas
Maintenance
Troubleshooting
Notices
Index
Printing cards
You can print up to 10 greeting cards, index cards, photo cards, or postcards at a time,
depending on the thickness of the cards.
Step 1: Load the cards
• If your cards came with instructions , read them
carefully.
• Make sure the print side is facing you.
• Load the cards vertically against the right side of the
paper support.
Note: Make sure you d o not push the cards to o f ar
into the sheet feeder.
• Slide the paper guide to the left side of the cards.
www.lexmark.com
Page 26

Lexmark Z13
Lexmark Z23
Lexmark Z33
26Printing ideas
Printer overview
Basic printing
Printing ideas
Maintenance
Troubleshooting
Notices
Index
Step 2: Customize the printer settings
For help, see Understanding the printer software.
1 Choose a paper size and orientation:
a From the software application File menu, choose Page Setup.
b From the Paper Size pop-up menu, choose the card size for your document. To
select a custom size paper, see Printing on custom size paper.
c Choose Portrait or Landscape orientation.
d Click OK.
2 Choose a paper type and print quality:
a From the software application File menu, choose Print.
b From the pop-up menu in the upper left of the Print dialo g box, choose Paper Type/
Quality.
www.lexmark.com
Page 27

Lexmark Z13
Lexmark Z23
Lexmark Z33
Printer overview
Basic printing
27Printing ideas
c Choose:
– Paper Type: Glossy/Photo Paper for photo cards or Plain for other types of
cards.
– Print Quality: Better or Best fo r photo cards or Normal for other types of cards.
Printing ideas
Maintenance
Troubleshooting
Notices
Index
Note: Higher print quality settin gs result in bet ter quality documents b ut ma y tak e
longer to print.
Step 3: Print your cards
Click Print.
Note: To prevent sm udging, remov e each ph oto card as it e xits the printer and l et
it dry before stacking.
www.lexmark.com
Page 28

Lexmark Z13
Lexmark Z23
Lexmark Z33
28Printing ideas
Printer overview
Basic printing
Printing ideas
Maintenance
Troubleshooting
Notices
Index
Printing envelopes
You can print up to 10 envelopes at a time, depending on the thickness of the envelopes.
Step 1: Load the envelopes
Note: Do not use envelopes with holes, windows,
deep embossing, metal clasps, st ring ties, or
metal folding bars. Make sure your
envelopes are unused and undamaged.
• Make sure the print side is facing you.
• Make sure the stamp locati on is in the upper lef t corner.
• Load the envelopes vertically against the right side of
the paper support.
• Make sure you do not push the envelopes too far into the sheet feeder.
• Slide the paper guide to the left side of the envelopes.
www.lexmark.com
Page 29

Lexmark Z13
Lexmark Z23
Lexmark Z33
29Printing ideas
Printer overview
Basic printing
Printing ideas
Maintenance
Troubleshooting
Notices
Index
Step 2: Customize the printer settings
For help, see Understanding the printer software.
1 Choose an envelope size and orientation:
a From the software application File menu, choose Page Setup.
b From the Paper Size pop-up menu, choose the appropriate en velope size.
To select a custom envelope si ze, see Printing on custom size paper.
c Select Landscape orientation.
Note: Many software appli cations are desi gned to o ve rride the en v elope sett ings
in Page Setup. Make sure Landscape orientation is also selected in your
software application.
d Click OK.
2 Choose a paper type:
a From the software application File menu, choose Print.
b From the pop-up menu in the upper left of the Print dialo g box, choose Paper Type/
Quality.
c Choose Plain for the Paper Type.
www.lexmark.com
Page 30

Lexmark Z13
Lexmark Z23
Lexmark Z33
30Printing ideas
Printer overview
Basic printing
Printing ideas
Maintenance
Troubleshooting
Notices
Index
Step 3: Print your envelopes
Click Print.
www.lexmark.com
Page 31

Lexmark Z13
Lexmark Z23
Lexmark Z33
31Printing ideas
Printer overview
Basic printing
Printing ideas
Maintenance
Troubleshooting
Notices
Index
Printing color images in black and white
Printing color images with black ink conserves the ink in your color cartridge.
Note: This setting is only available if there is a black print cartridge installed.
You can print up to 100 sheets of plain paper at a time, depending on the thickness of the
paper.
Step 1: Load the paper
For help, see Basic printing.
Step 2: Customize the printer settings
For help, see Understanding the printer software.
1 From the software application File menu, choose Print.
2 From the pop-up menu i n the upper left of the Print dialog
box, choose Color.
3 Select Bui lt- In C o lo r M a tc h ing.
4 From the Document Color pop-up men u , choose Black Only.
www.lexmark.com
Page 32

Lexmark Z13
Lexmark Z23
Lexmark Z33
Printer overview
Basic printing
Printing ideas
Maintenance
Troubleshooting
Notices
Index
32Printing ideas
5 Customize your document following the steps in Basic printing or Printing ideas.
Step 3: Print your document
Click Print.
www.lexmark.com
Page 33

Lexmark Z13
Lexmark Z23
Lexmark Z33
33Printing ideas
Printer overview
Basic printing
Printing ideas
Maintenance
Troubleshooting
Notices
Index
Printing labels
You can print up to 25 sheets of labels at a time, depending on the thickness of the sheets.
Step 1: Load the labels
• Use only labels designed for inkjet printers.
• If your labels came with instructions, read them
carefully.
• Make sure there are no missing or curled labels.
• Make sure the print side is facing you.
• Load the labels vertically against the right side of the
paper support.
Note: Make sure you do not push the la bel sheets too far into the sheet feeder.
• Do not print within 1 mm (0.04 in.) of the edge of a label.
• Slide the paper guide to the left side of the labels.
www.lexmark.com
Page 34

Lexmark Z13
Lexmark Z23
Lexmark Z33
34Printing ideas
Printer overview
Basic printing
Printing ideas
Maintenance
Troubleshooting
Notices
Index
Step 2: Customize the printer settings
For help, see Understanding the printer software.
1 Choose a paper size and orientation:
a From the software application File menu, choose Page Setup.
b From the Paper Size area, choose A4 or Letter.
c Choose Portrait or Landscape orientation.
d Click OK.
2 Choose a paper type and print quality:
a From the software application File menu, choose Print.
b From the pop-up menu in the upper left of the Print dialo g box, choose Paper Type/
Quality.
c Choose:
– Plain for the Paper Type.
– Better or Best for the Print Quality.
Note: Higher print quality settings result in better quality documents, but may
take longer to print.
www.lexmark.com
Page 35

Lexmark Z13
Lexmark Z23
Lexmark Z33
35Printing ideas
Printer overview
Basic printing
Printing ideas
Maintenance
Troubleshooting
Notices
Index
Step 3: Print your labels
Click Print.
www.lexmark.com
Page 36

Lexmark Z13
Lexmark Z23
Lexmark Z33
36Printing ideas
Printer overview
Basic printing
Printing ideas
Maintenance
Troubleshooting
Notices
Index
Printing on custom size paper
Follow these steps to print your document on custom size paper.
Step 1: Load the custom size paper
• Make sure the paper size fits within these dimensions:
– Width: 76 to 216 mm (3 to 8.5 in.)
– Height: 127 to 355.6 mm (5 to 14 in.)
• Make sure the print side is facing you.
• Load the paper v ertically against the right side of the paper
support.
• Do not push the paper too far into the sheet feeder.
• Slide the paper guide to the left side of the paper.
For help, see Basic printing.
www.lexmark.com
Page 37

Lexmark Z13
Lexmark Z23
Lexmark Z33
37Printing ideas
Printer overview
Basic printing
Printing ideas
Maintenance
Troubleshooting
Notices
Index
Step 2: Customize the printer settings
For help, see Understanding the printer software.
1 Create a custom paper size:
a From the software application File menu, choose Page Setup.
b From the Paper Size pop-up menu, choose Edit Custom Paper Sizes.
c Click New.
d From the Units pop-up menu, choose In ches (in.) or Millimeters (mm).
e Type the dimensions for your custom paper size.
f From the Kind pop-up menu, choose Letter, Envelope, or Card.
g Type a unique name for your custom paper size in the Paper Size Name box.
h Click Save.
i Click Done.
j Click OK on the Page Setup dialog box.
2 To choose a print quality, paper type, or orientation other than the def ault sett ings, see
Understanding the printer software.
www.lexmark.com
Page 38

Lexmark Z13
Lexmark Z23
Lexmark Z33
38Printing ideas
Printer overview
Basic printing
Printing ideas
Maintenance
Troubleshooting
Notices
Index
Step 3: Print your document
1 From the software application File menu, choose Print.
2 Click Print.
www.lexmark.com
Page 39

Lexmark Z13
Lexmark Z23
Lexmark Z33
39Printing ideas
Printer overview
Basic printing
Printing ideas
Maintenance
Troubleshooting
Notices
Index
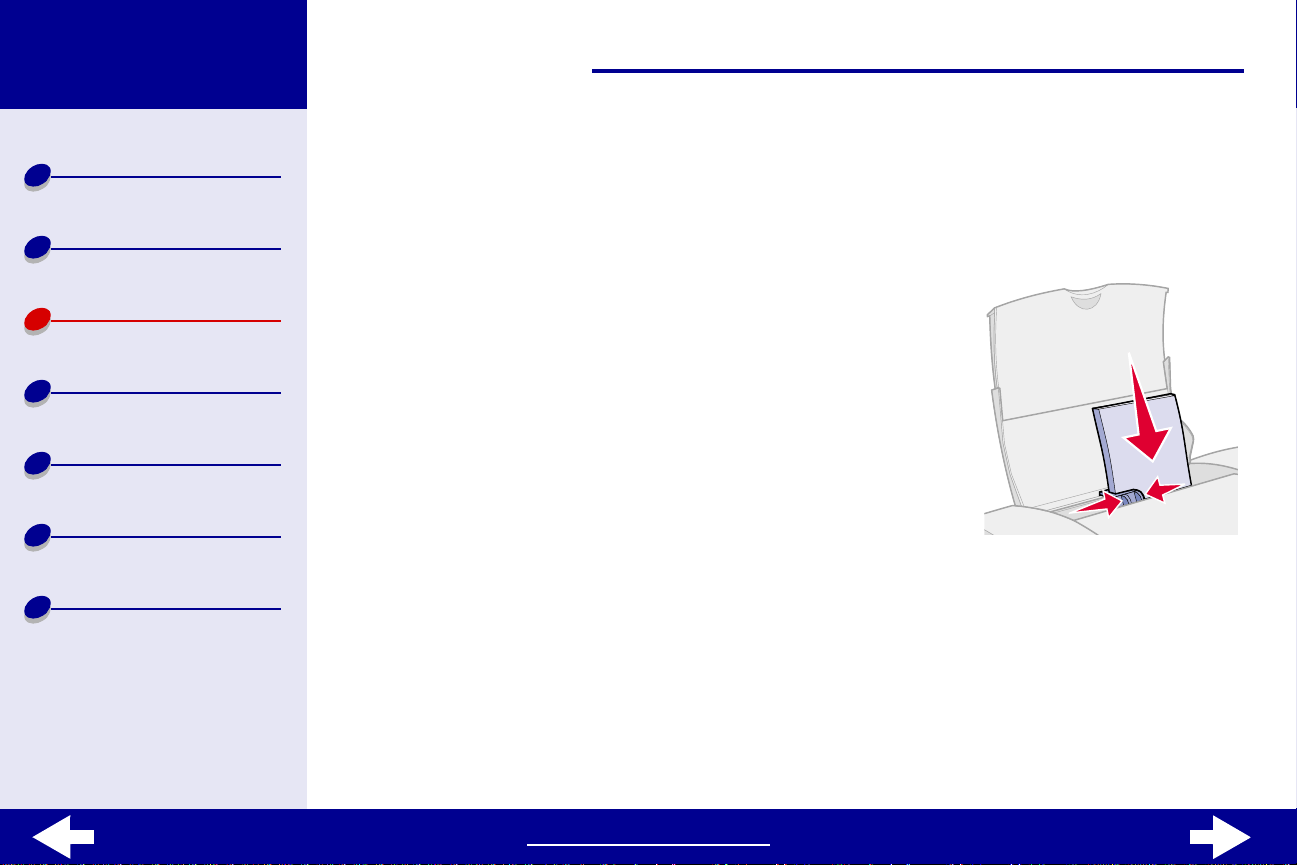
Printing an iron-on transfer
You can print up to 25 iron-on transfers at a time, depending on the thickness of the iron-on
transfers . You ma y want to print your iron-on tr ansf er on plain paper bef ore loading the iron-on
transfers and changing printer settings.
Step 1: Load the iron-on transfers
• If your paper came with instructions, read them care fully.
• Make sure the print (blank) side is facing you.
• Load the iron-on transfers vertically against the right side of
the paper support.
Note: Make sure you don’t push the iron-on transfers
too far into the sheet feeder.
• Slide the paper guide to the left side of the iron-on transfe rs.
www.lexmark.com
Page 40

Lexmark Z13
Lexmark Z23
Lexmark Z33
40Printing ideas
Printer overview
Basic printing
Printing ideas
Maintenance
Troubleshooting
Notices
Index
Step 2: Customize the printer settings
For help, see Understanding the printer software.
1 Choose a paper size:
a From the software application File menu, choose Page
Setup.
b From the Paper Size pop-up menu, choose A4 or U .S.
Letter.
2 Choose a paper type and print quality:
a From the software application File menu, choose Print.
b From the pop-up menu in the upper left of the Print dialo g box, choose Paper Type/
Quality.
c Choose:
– Iron-On Transfer for the Paper Type.
– Normal for the Print Quality.
www.lexmark.com
Page 41

Lexmark Z13
Lexmark Z23
Lexmark Z33
41Printing ideas
Printer overview
Basic printing
Printing ideas
Maintenance
Troubleshooting
Notices
Index
Step 3: Print your iron-on transfers
Click Print.
Note: To prevent smu dging, remove each iron-on transfer as it exits the printer
and let it dry before stacking.
www.lexmark.com
Page 42

Lexmark Z13
Lexmark Z23
Lexmark Z33
42Printing ideas
Printer overview
Basic printing
Printing ideas
Maintenance
Troubleshooting
Notices
Index
Printing transparencies
You can print up to 25 transparencies at a time, depending on the thickness of the
transparencies.
Step 1: Load the transparencies
• Use only transparencies designed for inkjet printers.
• If your transparencies came with instructions, read them
carefully.
• The rough (print) side of the tr ansparencies should face
you. If the transparencies have a removable strip, make
sure each strip faces away from you and down.
• Load the transpar encies vertically against the right side of
the paper support.
Note: Make sure you don’t push the transparencies too far into the sheet feeder.
• Slide the paper guide to the lef t si de of the transparencies.
www.lexmark.com
Page 43

Lexmark Z13
Lexmark Z23
Lexmark Z33
43Printing ideas
Printer overview
Basic printing
Printing ideas
Maintenance
Troubleshooting
Notices
Index
Step 2: Customize the printer settings
For help, see Understanding the printer software.
1 Choose a paper size:
a From the software application File menu, choose Page Setup.
b From the Paper Size pop-up menu, choose A4 or U.S. Letter.
c Click OK.
2 Choose a paper type and print quality:
a From the software application File menu, choose Print.
b From the pop-up menu in the upper left of the Print dialo g box, choose Paper Type/
Quality.
c Choose:
– Transparency for the Paper Type
– Normal or Better for the Print Quality
Note: Higher print quality settings result in better quality documents, but may
take longer to print.
www.lexmark.com
Page 44

Lexmark Z13
Lexmark Z23
Lexmark Z33
44Printing ideas
Printer overview
Basic printing
Printing ideas
Maintenance
Troubleshooting
Notices
Index
Step 3: Print your transparencies
Click Print.
Note: To prevent sm udgi ng, remo ve each transparency as it exits the printer and
let it dry before stacking.
www.lexmark.com
Page 45

Lexmark Z13
Lexmark Z23
Lexmark Z33
45Printing ideas
Printer overview
Basic printing
Printing ideas
Maintenance
Troubleshooting
Notices
Index
Printing your document in reverse order
Step 1: Load the paper
For help, see Basic printing.
Step 2: Customize the printer settings
For help, see Understanding the printer software.
1 Choose a paper size:
a From the software application File menu, choose Page
Setup.
b From the Paper Size pop-up menu, choose the paper size suitable for your
document.
c Click OK.
2 Choose a paper type and print quality:
a From the software application File menu, choose Print.
b From the pop-up menu in the upper left of the Print dialo g box, choose Paper Type/
Quality.
www.lexmark.com
Page 46

Lexmark Z13
Lexmark Z23
Lexmark Z33
Printer overview
Basic printing
Printing ideas
Maintenance
46Printing ideas
c Choose the paper type and print quality suitable for your document.
Note: Higher print quality settings result in better quality documents, but may
take longer to print.
3 From the pop-up menu i n the upper left corner of the Paper Type/Quality dialog box,
choose General.
4 Select Print Last Page First .
Step 3: Print your document
Troubleshooting
Notices
Index
Click Print.
www.lexmark.com
Page 47

Lexmark Z13
Lexmark Z23
Lexmark Z33
47Printing ideas
Printer overview
Basic printing
Printing ideas
Maintenance
Troubleshooting
Notices
Index
Printing a banner
You can print up to 20 sheets of banner paper at a time. The maximum paper size is 120
inches.
Load only the amount of paper your banner requires.
Step 1: Load the banner paper
1 Remove any paper from the sheet feeder.
2 Lower the top portion of the paper support.
3 Place the stack of banner paper behind the printer.
Note: Loading excess banner pape r or pushing
the paper too far into the printer may
cause a paper jam. For help, see
Clearing paper misfeeds or jams.
www.lexmark.com
Page 48

Lexmark Z13
Lexmark Z23
Lexmark Z33
Printer overview
Basic printing
Printing ideas
Maintenance
48Printing ideas
4 Load the unattached, leading edge of the first
page into the sheet feeder with the right side
against the paper support. The print side
should be facing you.
5 Slide the paper guide to the left edge of the
paper.
Step 2: Customize the printer settings
For help, see Understanding the printer software.
Troubleshooting
Notices
Index
1 Choose a paper size and orientation:
a From the software application File menu, choose Page Setup.
b From the Paper Size pop-up menu, choose Banner (A4) or Banner (Letter ).
Note: If you don’t choose Banner, the banner paper may cause a paper jam. For
help, see Clearing paper misfeeds or jams.
c Choose Portrait or Landscape orientation.
d Click OK.
www.lexmark.com
Page 49

Lexmark Z13
Lexmark Z23
Lexmark Z33
Printer overview
49Printing ideas
2 Choose a paper type and print quality:
a From the software application File menu, choose Print.
Basic printing
Printing ideas
Maintenance
Troubleshooting
Notices
Index
b From the pop-up menu in the upper left of the Print dialo g box, choose Paper Type/
Quality.
c Choose:
– Plain for the Paper Type.
– Normal for the Print Quality.
Note: Higher print quality settings result in better quality documents, but may
take longer to print.
Step 3: Print your banner
Click Print.
Note: After your banner prints, extend the paper support all the way up for your
next print job.
www.lexmark.com
Page 50

Lexmark Z13
Lexmark Z23
Lexmark Z33
Printer overview
Basic printing
50Maintenance
This section contains information to help you maintain your printer.
• Replacing the print cartridges
• Aligning the print cartridges
Printing ideas
Maintenance
Troubleshooting
Notices
Index
• Preserving the print cartridges
• Storing an extra print cartridge
• Ordering supplies
www.lexmark.com
Page 51

Lexmark Z13
Lexmark Z23
Lexmark Z33
51Maintenance
Printer overview
Basic printing
Printing ideas
Maintenance
Troubleshooting
Notices
Index
Replacing the print cartridges
Before you install a new or replacment cartridge, remove the used one.
Removing the used cartridge
1 Make sure the Power light is on.
2 Raise the front cover.
The print cartridge carrier moves to the loading
position, unless the printer is busy.
3 Remove the used print cartridge. Store it in an
airtight container or dispose of it properly. If you
own a Lexmark Z13 printer , you can store the
cartridge in the print cartridge storage unit (see
Storing an extra print cartridge).
www.lexmark.com
Page 52

Lexmark Z13
Lexmark Z23
Lexmark Z33
52Maintenance
Printer overview
Basic printing
Printing ideas
Maintenance
Troubleshooting
Notices
Index
Installing a cartridge
For best resul ts, use Lexmark supplies. Refilling cartridges can affe ct print quality and cause
damage to the printer.
1 If you’re installing a new cartridge, remove
the stick e r and transparent tape.
Warning: Do not touch the gold contact
areas on the back and bottom of
the print cartridge.
2 Click your printer name for instructions on
installing print cartridges:
Lexmark Z13 Lexmark Z23 Lexmark Z33
www.lexmark.com
Page 53

Lexmark Z13
Lexmark Z23
Lexmark Z33
53Maintenance
Printer overview
Basic printing
Printing ideas
Maintenance
Troubleshooting
Notices
Index
Lexmark Z13
Your printer shipped with a color print cartridge (P/N 10N0026). You may also purchase a
black cartridge (P/N 10N0016) separately. For more information, see Ordering supplies.
Your printer uses one print cartridge at a time: either a black or a color cartridge. To install a
print cartridge:
Open the
ab cClose the
cartridge
carrier lid.
Note: To extend the life of your color print cartr idge, print black and white
documents with a black print cartridge.
Insert the print
cartridge into
the carrier.
carrier lid
completely.
d Close the front cover.
Continue with Specifying
cartridge settings in the
printer software.
www.lexmark.com
Page 54
Lexmark Z13
Lexmark Z23
Lexmark Z33
54Maintenance
Printer overview
Basic printing
Printing ideas
Maintenance
Troubleshooting
Notices
Index
Lexmark Z23
Your printer shipped with a color print cartridge (P/N 10N0026). You may also purchase a
black cartridge (P/N 10N0016) separately. For more information, see Ordering supplies.
Your printer can print with one of the following cartridge configurations:
• A color cartridge by itself in the left carrier
• A black cartridge by itself in the right carrier
• Both a color and a bl ack cartridge
To install a print cartridge:
Open the
abc
a
cartridge
carrier lid.
Insert the print
cartridge into
the carrier.
Close the
carrier lid
completely.
Close the front cov er . Continue
d
with Specifying cartridge
settings in the printer
software.
Note: To extend the life of your color print cartridge and improve printing speed,
install a black print cartridge along with the color cartridge.
www.lexmark.com
Page 55

Lexmark Z13
Lexmark Z23
Lexmark Z33
55Maintenance
Printer overview
Basic printing
Printing ideas
Maintenance
Troubleshooting
Notices
Index
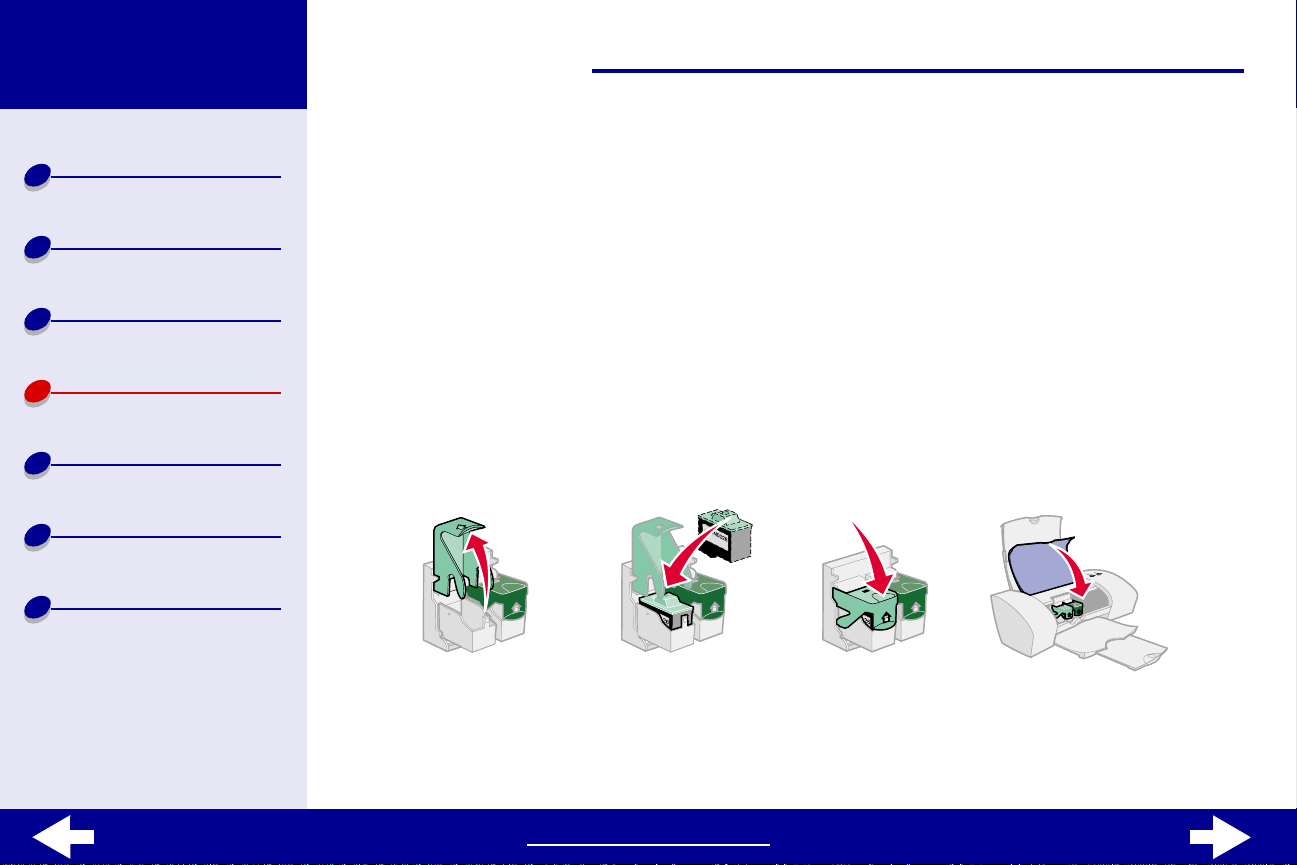
Lexmark Z33
Your printer came with two print cartridges: a color cartridge (P/N 10N0026) and a black
cartridge (P/N 10N0016).
Your printer can print with one of the following cartridge configurations:
• A color cartridge by itself in the left carrier
• A black cartridge by itself in the right carrier
• Both a color and a bl ack cartridge
To install a print cartridge:
Open the
ab cdClose the front cover.
cartridge
carrier lid.
Insert the print
cartridge into
the carrier.
Close the
carrier lid
completely.
Continue with Specifying
cartridge settings in the
printer software.
www.lexmark.com
Page 56

Lexmark Z13
Lexmark Z23
Lexmark Z33
56Maintenance
Printer overview
Basic printing
Printing ideas
Maintenance
Troubleshooting
Notices
Index
Specifying cartridge settings in the printer software
Before you specify the cartridge settings in the printer software, install the print cartridges.
For help, see Replacing the print cartridges.
After you install the cartridge, the Control Panel and Cartridge Setup dialog box open
automatically.
1 Choose the type of print cartridge you installed.
2 Specify whether the cartridge is a New Cartridge or an Old Cartridge (one that has
been used before).
Note: If an Old Cartridge (one that has been used before) is incorrectl y identif ied
as a New Cartridge your ink levels in the Control Panel may be incorrect.
3 Click OK.
4 If you installed a new cartridge, select Yes to print an alignment page.
5 Follow the instructions on the screen to complete the cartridge alignment. For help,
see Aligning the print cartridges.
www.lexmark.com
Page 57

Lexmark Z13
Lexmark Z23
Lexmark Z33
57Maintenance
Printer overview
Basic printing
Printing ideas
Maintenance
Troubleshooting
Notices
Index
Aligning the print cartridges
Normally, you only align print cartridges after installing or replacing a print cartridge.
However, you may also need to align the print cartridges when:
• Printed charact ers are improperly formed or misaligned.
• Vertical, straight lines are wavy.
To align the print cartridges:
1 Load plain paper in the printer. For help, see Load the paper.
2 From the Apple menu, choose Contr ol Panels.
3 Choose the Control Panel for your printer.
www.lexmark.com
Page 58

Lexmark Z13
Lexmark Z23
Lexmark Z33
Printer overview
Basic printing
Printing ideas
Maintenance
Troubleshooting
Notices
Index
58Maintenance
4 On the Cartridges tab, click Align Cartridges.
An alignment page with s e veral alignment patterns prints. Each pat tern has a n umber
under it. Depending on the cartridges you have installed, the number of alignment
patterns will vary.
Note: If the alignment page doesn ’t print, make su re y ou completely r emov ed the
sticker an d transparent tape from the print cartridges.
www.lexmark.com
Page 59

Lexmark Z13
Lexmark Z23
Lexmark Z33
Printer overview
Basic printing
Printing ideas
Maintenance
Troubleshooting
Notices
Index
59Maintenance
5 From the printed page, find the number under the darkest arrow. For example, in
alignment group A, number 3 is the darkest.
6 Click the arro ws in the Align Cartridges dialog bo x to display the number that matches
the darkest arrow on the printed page.
7 Click OK.
www.lexmark.com
Page 60

Lexmark Z13
Lexmark Z23
Lexmark Z33
60Maintenance
Printer overview
Basic printing
Printing ideas
Maintenance
Troubleshooting
Notices
Index
Preserving the print car tridges
To ensure the longest life from your print cartridge and optimum performance from your
printer:
• Keep a new print cartridge in its packaging until you are read y to inst all it.
• Do not remove a print cartridge from the printer except to replace, clean, or stor e it in
the cartridge storage unit (Lex mark Z13 printer only) or another airtight container. The
print cartridge will not print correctly if left exposed f or an e xt ended period of time. F or
more information, see Storing an extra print cartridge.
Lexmark’s printer warranty does not cover repair of failures or damage caused by a refilled
cartridge. Lexmark does not recommend use of refilled cartridges. Refilling cartridges can
affect print quality and cause damage to the printer. For best results, use Lexmark supplies.
www.lexmark.com
Page 61

Lexmark Z13
Lexmark Z23
Lexmark Z33
61Maintenance
Printer overview
Basic printing
Printing ideas
Maintenance
Troubleshooting
Notices
Index
Storing an extra print cartridge
Note: These instructions apply only to the Le xmark Z13 printer.
Attaching the print cartridge storage unit to the printer
1 Insert the tabs on the print cartridge
storage unit into the slots on the back of
your printer.
2 Snap the storage unit securely into place.
www.lexmark.com
Page 62

Lexmark Z13
Lexmark Z23
Lexmark Z33
62Maintenance
Printer overview
Basic printing
Printing ideas
Maintenance
Troubleshooting
Notices
Index
Inserting a print cartridge in the
storage unit
1 Insert the extra print cartridge into the
storage unit.
2 Push the cartridge down and then back to
lock it into the storage unit.
Removing a print cartridge from the
storage unit
1 Push the print cartridge down.
2 Pull the print cartridge away from your
printer and out of the storage unit.
www.lexmark.com
Page 63

Lexmark Z13
Lexmark Z23
Lexmark Z33
63Maintenance
Printer overview
Basic printing
Printing ideas
Maintenance
Troubleshooting
Notices
Index
Ordering supplies
You can order supplies from the Lexmark Web site at www.lexmark.com.
Item Part number
Color cartridge 10N0026
Black cartridge 10N0016
USB cable 12A2405
Power supply Low Volt: 14D0300
High Volt: 14D0301
www.lexmark.com
Page 64

Lexmark Z13
Lexmark Z23
Lexmark Z33
Printer overview
Basic printing
64Troubleshooting
This section contains inform ation to help you solve printing problems.
• Solving general printing problems
• Solving printer software installation problems
Printing ideas
Maintenance
Troubleshooting
Notices
Index
• Understanding error messages and flashing lights
• Resolving unsuccessful or slow printing
• Recovering when your computer st ops responding
• Clearing paper misfeeds or jams
• Improving print quality
• Improving print speed
• Solving specialty paper probl ems
• Reducing ink usage
www.lexmark.com
Page 65

Lexmark Z13
Lexmark Z23
Lexmark Z33
65Troubleshooting
Printer overview
Basic printing
Printing ideas
Maintenance
Troubleshooting
Notices
Index
Solving general printing problems
When you hav e a printing problem, first mak e sure:
• The powe r supply is plugged i nto th e printer and a pro perly grounded elect rical outlet.
• The printer is turned on, and there are no lights blinking. For help, see
Understanding error messages and flashi ng lights.
• The USB cable is securel y att ached to both the computer and the printer.
• The printer software is installed correctly. For help, see Solving printer software
installation probl ems.
• The paper is loaded correctly. For help, see Load the paper.
• The printer is set as the default printer. To set the printer to default status:
a Highlight the printer icon on your desktop.
b From the Printing menu, select Set Default Printer.
• Hubs or other d evic es, such as scanners or f ax mac hines, ar e disconnected fr om your
printer. Connect the printer directly to your computer. Print a test page from the
Control Panel. For help, see Printing a test page.
www.lexmark.com
Page 66

Lexmark Z13
Lexmark Z23
Lexmark Z33
66Troubleshooting
Printer overview
Basic printing
Printing ideas
Maintenance
Troubleshooting
Notices
Index
Printing a test page
1 From the Apple menu, choose Contr ol Panels.
2 Choose the Control Panel for your printer.
3 On the Cartridges tab, click Print a Test Page.
If the test page prints, the printer is functioning properly. If the test page does n’t print,
see Solving printer software installation problems or Resolving unsuccessful or
slow printing.
www.lexmark.com
Page 67

Lexmark Z13
Lexmark Z23
Lexmark Z33
67Troubleshooting
Printer overview
Basic printing
Printing ideas
Maintenance
Troubleshooting
Notices
Index
Solving printer software installation problems
If the printer software does not install properly, a communications error message appears
when you try to print. You may need to uninstall the printer software, and then reinstall it.
Uninstalling the printer software
1 Insert the printer software CD into your CD-RO M drive.
The Lexmark Installer screen appears.
2 Click Uninstall.
www.lexmark.com
Page 68

Lexmark Z13
Lexmark Z23
Lexmark Z33
68Troubleshooting
Printer overview
Basic printing
Printing ideas
Maintenance
Troubleshooting
Notices
Index
Installing printer software
You can install the printer softwar e using the CD that came with your printer, or you can
download it from the Lexmark Web site at www.lexmark.com.
Using the CD that came with your printer
1 Close all open software applications.
2 When your desktop appears, insert the printer software CD.
The Lexmark Installation screen appears.
3 Click Install and Agree.
4 Choose the country or region closest to you, and then click Continue.
5 Click Yes to print an alignment page.
An alignment page prints.
If the alignment page doesn’t print, make sure:
– You installed the print cartridges correctly.
– If the paper is jammed, you fo llow the instructions on the error message that
displays on your screen.
www.lexmark.com
Page 69

Lexmark Z13
Lexmark Z23
Lexmark Z33
Printer overview
Basic printing
Printing ideas
69Troubleshooting
6 Follow the instructions on the dialog box to enter alignment values using the page
printed in step 5.
7 Click Finished.
Note: A desktop printer icon is automatically created unl ess m ulti ple printers ar e
detected.
Using the World Wide W e b
Maintenance
Troubleshooting
Notices
Index
Note: Before you begin, make sure Stuffit Expander is loaded on your system.
1 From the Lexmark Web site at www.lexmark.com select the appropriate driver for
your operating system.
2 Double-click the binhex (.hqx) file to download and install.
3 Follow the instructions on your screen to install the printer software.
www.lexmark.com
Page 70

Lexmark Z13
Lexmark Z23
Lexmark Z33
70Troubleshooting
Printer overview
Basic printing
Printing ideas
Maintenance
Troubleshooting
Notices
Index
Understanding error messages and flashing lights
Click the topic that best describes your problem:
• Paper Jam message • The Paper Feed light is blinking
• Ink Low message • The Paper Feed light blinks twice and
the Power light is blinking
www.lexmark.com
Page 71

Lexmark Z13
Lexmark Z23
Lexmark Z33
71Troubleshooting
Printer overview
Basic printing
Printing ideas
Maintenance
Troubleshooting
Notices
Index
Paper Jam message
When you have a paper jam, the Paper Feed light blinks and an error message appears on
your screen. For help clearing the paper jam, see The printer has a paper jam.
Ink Low message
Note: If the ink in your cartridge is low, an error message appears on your
screen. The lights on the printer do not blink.
A print cartridge is running out of ink. Purchase a new print cartridge. For help installing it,
see Replacing the print cartridges.
The Paper Feed light is bl inking
• If the printer is out of paper:
a Load more paper . F or help, see Load the paper.
b Press the Paper Feed button.
• If the printer has a paper jam, see The pri nter has
a paper jam.
www.lexmark.com
Page 72

Lexmark Z13
Lexmark Z23
Lexmark Z33
72Troubleshooting
Printer overview
Basic printing
Printing ideas
Maintenance
Troubleshooting
Notices
Index
The Paper Feed light blinks twi ce and the
Power light is blinking
The print cartridge carrier is stalled.
1 Check your computer screen for error messages.
2 Turn the printer off.
3 Wait a few seconds, and then turn the printer back on. For more help, see Clearing
paper misfeeds or jams.
www.lexmark.com
Page 73

Lexmark Z13
Lexmark Z23
Lexmark Z33
73Troubleshooting
Printer overview
Basic printing
Printing ideas
Maintenance
Troubleshooting
Notices
Index
Resolving unsuccessful or slow printing
If your printer does not print or is printing slowly, make sure:
• The printer software is installed correctly. For help, see Solving printer software
installation probl ems.
• The USB cable is securely attached to both the printer and the computer.
• The printer is plugged into an outlet and is turned on.
• You remove any extra devices, and connect the printer directly to the USB port.
If there is still a problem, cl ick the topic that best describes it:
• Printer is plugged in, but
doesn’t print
• Test page does not print • Printer prints very slowly
• Printer ejects a blank page after appearing to
print
www.lexmark.com
Page 74

Lexmark Z13
Lexmark Z23
Lexmark Z33
74Troubleshooting
Printer overview
Basic printing
Printing ideas
Maintenance
Troubleshooting
Notices
Index
Printer is plugged in, but doesn’t print
Make sure:
• The printer is turned on.
• The paper is loaded correctly and not pushed too far into the sheet feeder. For help,
see Basic printing. If the paper is jammed, see Clearing paper misfeeds or jams.
• The printer is not being held or paused. To chec k the printer status:
a From the desktop, double-click the icon for your printer.
b Make sure the Hold button is not depressed.
Print a test page from the Control Panel . For help, see Printing a test p age
• If the test page prints, the printer is functioning properly.
• If it doesn’t print, se e Test page does not print.
www.lexmark.com
Page 75

Lexmark Z13
Lexmark Z23
Lexmark Z33
75Troubleshooting
Printer overview
Basic printing
Printing ideas
Maintenance
Troubleshooting
Notices
Index
Test page does not print
• Check the USB cable connections.
• Check the power supply connections and verify that the printer is plugged into an
electrical outlet.
• Make sure paper is correctly loaded. For help, see Basic printing.
• Make sure the print cartridge is properly installed. F or help, see Replacing the pri nt
cartridges.
• If the paper is jammed, see Clearing paper misfeeds or jams.
• Mak e sure the printer is set as the default printer. To set the printer to default status:
a Highlight the printer icon on your desktop.
b From the Printing menu, select Set Default Printer.
www.lexmark.com
Page 76

Lexmark Z13
Lexmark Z23
Lexmark Z33
76Troubleshooting
Printer overview
Basic printing
Printing ideas
Maintenance
Troubleshooting
Notices
Index
Printer ejects a blank page after appearing to print
Make sure:
• You remove the sticker and transparent tape from the print cartridge. For help, see
Replacing the print cartridges.
• The printer is set as the default printer. To set the printer to default status:
a Highlight the printer icon on your desktop.
b From the Printing menu, select Set Default Printer.
• Your print c artridge does not have clogged nozzles. Try Cleaning the print cartridge
nozzles.
www.lexmark.com
Page 77

Lexmark Z13
Lexmark Z23
Lexmark Z33
77Troubleshooting
Printer overview
Basic printing
Printing ideas
Maintenance
Troubleshooting
Notices
Index
Printer prints very slowly
• Close any software applications not in use.
• Check the document you are printing. Photos and graphics may take longer to print
than regular text. Documents that are large or that contain background images may
also take longer to print.
• Decrease the Print Quality setting to Normal or Quick Print.
Note: Higher print quality settings result in better quality documents, but may
take longer to print.
• Check your computer resources. Consider increasing the virtual memory for your
computer or increasing memory size f o r y our softw are applicati on or purchasi ng more
Random Access Memory (RAM).
If there is still a problem, restart your Macin tosh computer to maximiz e the amount of memory
available.
www.lexmark.com
Page 78

Lexmark Z13
Lexmark Z23
Lexmark Z33
78Troubleshooting
Printer overview
Basic printing
Printing ideas
Maintenance
Troubleshooting
Notices
Index
Recovering when your computer stops responding
If your Macintosh computer lo cks up whil e your document is printing, you ma y need to turn off
the printer and the computer. When you turn them back on, the printer driver spooler may
attempt to start printing the job that was in the queue bef ore the computer locked up. This
could cause your system to lock up again.
To recover from this problem:
1 Turn the printer and the computer off.
2 Hold down the Shift key and turn on the computer.
3 Continue to hold the Shift key until you see the Mac OS screen and the words
Extensions Off.
4 Release the Shift ke y.
5 Locate the printer icon on your desktop. The inactive printer spool er has an X over it.
6 Double-click the icon to open the printer dialog box.
7 Drag your print jobs to the trash can.
8 Restart the computer to enable extensions.
www.lexmark.com
Page 79

Lexmark Z13
Lexmark Z23
Lexmark Z33
79Troubleshooting
Printer overview
Basic printing
Printing ideas
Maintenance
Troubleshooting
Notices
Index
Clearing paper misfeeds or jams
Click the topic that best desribes your problem:
• Paper misfeeds or multiple sheets
feed through the printer
• The printer does not feed envelopes
or specialty paper
• The printer has a paper jam
www.lexmark.com
Page 80

Lexmark Z13
Lexmark Z23
Lexmark Z33
80Troubleshooting
Printer overview
Basic printing
Printing ideas
Maintenance
Troubleshooting
Notices
Index
Paper misfeeds or multiple sheets feed through the printer
Make sure:
• Your paper is recommended for inkjet printers.
• You don’t load too much paper into the sheet feeder. Depending on the thickness of
the paper, the sheet feeder can hold up to 100 sheets of paper. For help, see Basic
printing.
• You don’t force the paper into the printer. Align the top edge of letter size paper with
the top of paper support.
• The paper support is fully extended.
• The paper guide is against the lef t edge of the paper.
• The paper guide does not cause the paper to bow in the sheet feeder.
• The printer is on a flat, level surface.
• The printer settings y ou have chosen are correct for the type of document you are
printing. For help, see Basic printing or Printing id e a s.
www.lexmark.com
Page 81

Lexmark Z13
Lexmark Z23
Lexmark Z33
81Troubleshooting
Printer overview
Basic printing
Printing ideas
Maintenance
Troubleshooting
Notices
Index
The printer does not feed envelopes or specialty paper
Make sure:
• You select the appropriate envelope size or specialty paper in the Page Setup dialog
box and Print dialog box. For help, see Printing ideas .
• You are using a specialty paper or envelope size supported by your printer.
• Your software application is designed to print envelopes. For help, check your
software application documenta ti on.
• Your printer feeds plain paper without problems. If it does, load the envelopes or
specialty paper vertically against the right side of the sheet feeder. Slide the paper
guide to the left edge of the envelopes. For help, see Printing ideas.
www.lexmark.com
Page 82

Lexmark Z13
Lexmark Z23
Lexmark Z33
82Troubleshooting
Printer overview
Basic printing
Printing ideas
Maintenance
Troubleshooting
Notices
Index
The printer has a paper jam
When the printer has a paper jam, the Paper Feed light blinks.
1 Turn the printer off.
2 Turn the printer back on.
3 If the printer does not automatically eject the page:
a Turn the printer off.
b Pull firmly on the paper to remove it. If you cannot reach the paper, raise the front
cover, pull the paper out, and then close the front cover.
c Turn the printer on.
Note: When you load paper, make sure the paper is not pushed too far into the
sheet feeder. For example , the to p of letter siz e paper should align wi th the
top of the paper support.
www.lexmark.com
Page 83

Lexmark Z13
Lexmark Z23
Lexmark Z33
83Troubleshooting
Printer overview
Basic printing
Printing ideas
Maintenance
Troubleshooting
Notices
Index
Improving print quality
If print quality is not as high as you expected, you may need to adjust your margin settings,
choose a higher print quality, align the print cartridges, or clean the nozzles. Click one of the
topics below for more information on how you can improve your print quality.
• Adjusting the margin settings • Cleaning the print cartridge nozzles
• Choosing a higher print quality • Wiping the print cartridge nozzles and
contacts
• Aligning the print cartridges
www.lexmark.com
Page 84
Lexmark Z13
Lexmark Z23
Lexmark Z33
84Troubleshooting
Printer overview
Basic printing
Printing ideas
Maintenance
Troubleshooting
Notices
Index
Adjusting the margin settings
Like other printers , your printer cannot print on the extreme left, right, to p, or bottom edges of
a page.
Margin Minimum setting
Left and Right • 6.35 mm (0.25 in.) for most paper sizes
• 3.37 mm (0.133 in.) for A4 paper size
Top 1.7 mm (0.067 in.)
Bottom • 12.7 mm (0.5 in.) for most print jobs
• 19.0 mm (0.75 in.) for best quality
www.lexmark.com
Page 85

Lexmark Z13
Lexmark Z23
Lexmark Z33
85Troubleshooting
Printer overview
Basic printing
Printing ideas
Maintenance
Troubleshooting
Notices
Index
Choosing a higher print quality
1 From the software application File menu, choose Print.
2 From the pop-up menu i n the upper left of the Print dialog box, choose Paper Type/
Quality.
3 Choose Better or Best for the Print Quality.
Note: Higher print quality settings result in better quality, but may take longer to
print.
4 From the Paper Type pop-up menu, choose the appropriate paper type.
5 Click Print.
www.lexmark.com
Page 86

Lexmark Z13
Lexmark Z23
Lexmark Z33
86Troubleshooting
Printer overview
Basic printing
Printing ideas
Maintenance
Troubleshooting
Notices
Index
Cleaning the print cartridge nozzles
Cleaning the print cartridge nozzles forces ink through the nozzles to clear an y that are
clogged. A test page prints so you can see if the cleaning process is successful.
Clean the nozzles when:
• Printed charact ers are improperly formed or misaligned.
• White dashes appear in graphics or printed text.
• Print is smudged or too dark.
• Colors on print jobs are faded or they differ from the colors on the screen.
• Vertical, straight lines are not smooth.
To clean the print nozzles:
1 Load plain paper in the printer. For help, see Load the paper.
2 From the Apple menu, choose Contr ol Panels.
3 Choose the Control Panel for your printer.
www.lexmark.com
Page 87

Lexmark Z13
Lexmark Z23
Lexmark Z33
Printer overview
87Troubleshooting
4 On the Cartridges tab, click Clean Print Nozzles.
The printer prints a nozzle test pattern similar to the one shown
Basic printing
Printing ideas
Maintenance
Troubleshooting
Notices
Index
Broken lines at
the top of the
page indicate
clogged nozzles.
Unbroken lines
at the bottom of
the page
indicate the
nozzles were
cleaned.
www.lexmark.com
Page 88

Lexmark Z13
Lexmark Z23
Lexmark Z33
Printer overview
Basic printing
Printing ideas
88Troubleshooting
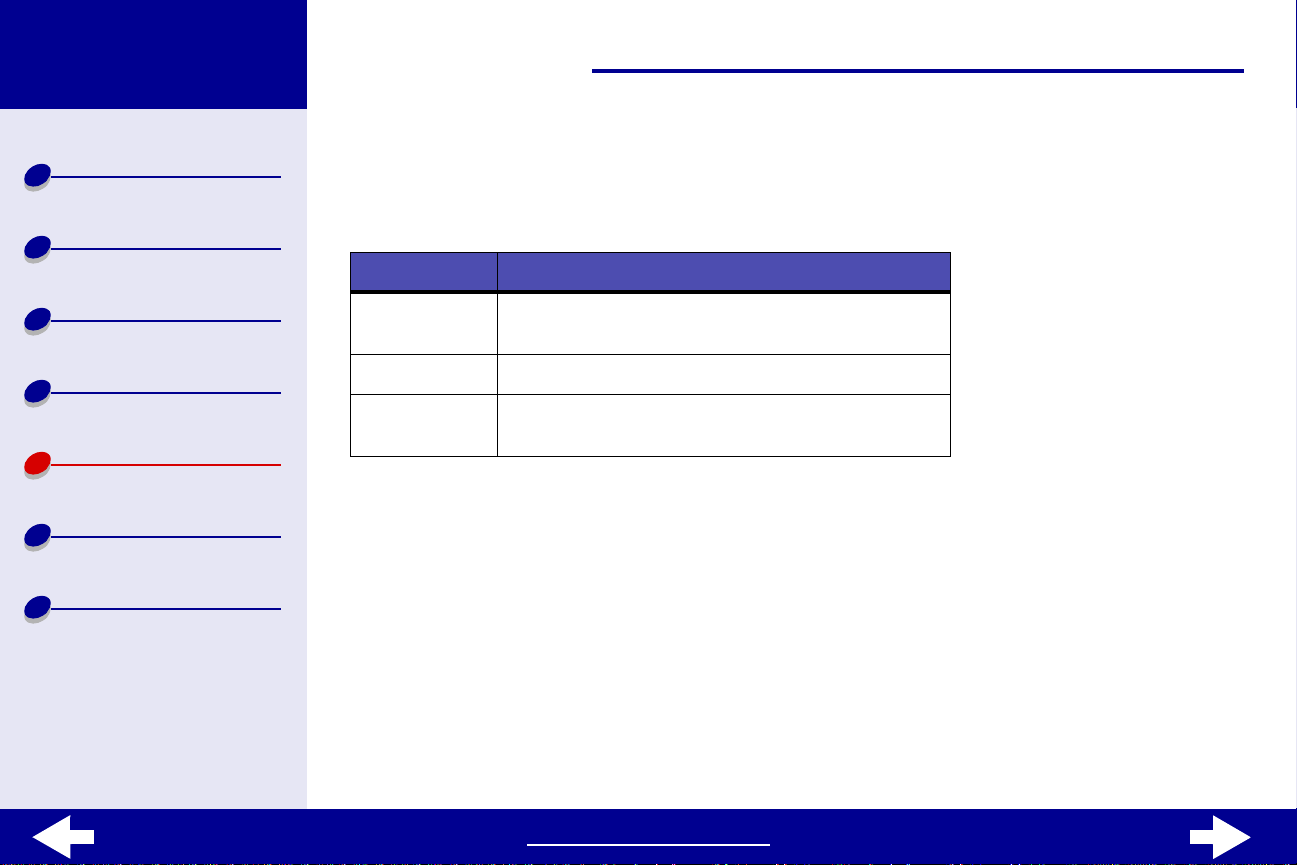
When you install a: These purge lines print:
Black cartridge 1 black purge line
Color cartridge 3 purge lines: magenta, yellow, and cyan
Black and color cartridge 4 purge lines: magenta, yellow , cyan, and black
Maintenance
Troubleshooting
Notices
Index
Note: If the correct number of purge lines did not print, replace your print
cartridge with another print cartridge. F or help, see Replacing the print
cartridges.
5 Compare the lines abov e the purge lines to the lines below. Look for a break in the
lines. A broken line indicates clogged nozzles.
If the bottom line still has breaks, clean the print nozzles up to two more times.
If the print quality is satisfactory after running the test three times, the print cartridge
nozzles are clean. You do not need to complete the remaining steps.
If the print quality of both sets of lines is not satisfactory after running the test three
times:
www.lexmark.com
Page 89

Lexmark Z13
Lexmark Z23
Lexmark Z33
Printer overview
Basic printing
89Troubleshooting
a Remove, and then reinstall the print cartridges. For help, see Replacing the print
cartridges.
b Repeat the nozzles test. If the lines are still brok en, continue wit h Wiping the pr int
cartridge nozzles and contacts.
Printing ideas
Maintenance
Troubleshooting
Notices
Index
Wiping the print cartridge nozzles and contacts
If the print quality does not i mprov e af ter cleani ng the print nozz les, there ma y be dried ink on
the nozzles or contacts.
1 Remove the print cartridge. For help, see Replacing the print cartridges.
www.lexmark.com
Page 90

Lexmark Z13
Lexmark Z23
Lexmark Z33
Printer overview
90Troubleshooting
2 Dampen a clean, lint-free cloth with water.
Basic printing
Printing ideas
Maintenance
Troubleshooting
Notices
Index
Print
nozzles
Hold the cloth against
ab
the nozzles for about
three seconds. Gently
blot and wipe in one
direction.
Use another clean
section of cloth. Hold th e
damp cloth against the
contacts for about three
seconds. Gentl y blot and
wipe in one direction.
Contacts
3 Reinstall the print cartridge, and then run the nozzle test again. For help, see
Cleaning the print cartridge nozzles.
If the print quality still does not impro ve, replace your print cartridge with a new one.
www.lexmark.com
Page 91

Lexmark Z13
Lexmark Z23
Lexmark Z33
91Troubleshooting
Printer overview
Basic printing
Printing ideas
Maintenance
Troubleshooting
Notices
Index
Improving print speed
From the software application File menu, choose Print.
1 From the pop-up menu i n the upper left corner, choose Paper Type/Quality.
2 Choose Quick Print or Normal Print Quality for faster speed.
3 Click Print.
www.lexmark.com
Page 92

Lexmark Z13
Lexmark Z23
Lexmark Z33
92Troubleshooting
Printer overview
Basic printing
Printing ideas
Maintenance
Troubleshooting
Notices
Index
Solving specialty paper problems
Click the topic that best desribes your problem:
• Glossy or photo papers or
transparencies stick together
• Transparencies or photos contain
white lines
• Printer does not feed envelopes or
specialty paper
www.lexmark.com
Page 93

Lexmark Z13
Lexmark Z23
Lexmark Z33
93Troubleshooting
Printer overview
Basic printing
Printing ideas
Maintenance
Troubleshooting
Notices
Index
Glossy or photo papers or transparencies stick together
• Remove each page as it exits the printer and let it dry before stacking.
• Use a photo paper or transparency designed for an inkjet printer.
• Make sure y ou loaded the paper corr ectly (wi th print side f acing y ou) and selected the
appropriate settings in the printer so ftwar e. F or help , see Pri nting photos or Printing
transparencies.
www.lexmark.com
Page 94

Lexmark Z13
Lexmark Z23
Lexmark Z33
94Troubleshooting
Printer overview
Basic printing
Printing ideas
Maintenance
Troubleshooting
Notices
Index
Transparencies or photos contain white lines
• Make sure y ou loaded the paper corr ectly (wi th print side f acing y ou) and selected the
appropriate settings in t he printe r soft w are. For help, see Printi ng tr ansparencie s or
Printing photos.
• Select a higher print quality such as Better or Best. For help, see Basic printing.
• Clean the print nozzles. For help, see Cleaning the print cartridge nozzles.
www.lexmark.com
Page 95

Lexmark Z13
Lexmark Z23
Lexmark Z33
95Troubleshooting
Printer overview
Basic printing
Printing ideas
Maintenance
Troubleshooting
Notices
Index
Printer does not feed envelopes or specialty paper
Make sure:
• You select the appropriate en v elope siz e or specialty p aper in the printer software . F or
help, see Printing ideas.
• You are using a specialty paper or envelope size that your printer supports.
• Your printer is not being held or paused. To check the printer status:
a From y our desktop, double-click the icon for your printer.
b From the Printing menu, make sure Stop Print Queue is not selected
• Your software application is designed to print envelopes. For help, check your
software application documenta ti on.
• Your printer feeds plain paper without problems. If it does, load envelopes vertically
against the right side of the sheet feeder. Slide the paper guide to the left side of the
envelopes. For help printing envelopes, see Printing envelopes.
www.lexmark.com
Page 96

Lexmark Z13
Lexmark Z23
Lexmark Z33
96Troubleshooting
Printer overview
Basic printing
Printing ideas
Maintenance
Troubleshooting
Notices
Index
Reducing ink usage
To save ink:
1 From the software application File menu, choose Print.
2 From the pop-up menu in the upper left corner of the Print dialog box, select Paper
Type/Quality.
3 Choose Quick Print to use the least amount of ink.
4 Click OK.
If you own a Le xmark Z23 or Le xmark Z33 printer, you can sav e color ink when you ha v e both
print cartridges loaded. To save color ink, see Printing color im ages in black and white.
www.lexmark.com
Page 97

Lexmark Z13
Lexmark Z23
Lexmark Z33
Printer overview
Basic printing
97Notices
This section contains information regarding legal notices and your printer warranty.
• Edition notice
• Trademarks
Printing ideas
Maintenance
Troubleshooting
Notices
Index
• Cautions and warnings
• Electronic emission notices
• Statement of limited warranty
www.lexmark.com
Page 98

Lexmark Z13
Lexmark Z23
Lexmark Z33
98Notices
Printer overview
Basic printing
Printing ideas
Maintenance
Troubleshooting
Notices
Index
Edition notice
January 2001
The following paragraph does not apply to any country where such provisions are
inconsistent with local law:
PUBLICATION “AS IS” WITHOUT WARRANTY OF ANY KIND, EITHER EXPRESS OR
IMPLIED, INCLUDING, BUT NOT LIMITED TO, THE IMPLIED WARRANTIES OF
MERCHANTABILITY OR FITNESS FOR A PARTICULAR PURPOSE. Some states do not
allow disclaimer of express or implied warranties in certain transactions; therefore, this
statement may not apply to you.
This publication could include technical inaccuracies or typographical errors. Changes are
periodically made to the information herein; these changes will be incorporated in later
editions. Improvements or changes in the products or the programs described may be made
at any time.
Comments about this publication may be addressed to Lexmark International, Inc.,
Department F95/032-2, 740 West New Circle Road, Lexington, Kentucky 40550, U.S.A. In
the United Kingdom and Eire, send to Lexmark International Ltd., Marketing and Services
Department, Westhorpe House, Westhorpe, Marlow, Bucks SL7 3RQ. Lexmark may use or
distribute any of the information you supply in any way it believes appropriate without
incurring any obligation to you. You can purchase additional copies of publications related to
LEXMARK INTERNATIONAL, INC., PROVIDES THIS
www.lexmark.com
Page 99

Lexmark Z13
Lexmark Z23
Lexmark Z33
Printer overview
Basic printing
Printing ideas
Maintenance
99Notices
this product by calling 1- 800-553-9727. I n the United Kingd om and Eire, call 0628-481500 . In
other countries, contact your point of purchase.
References in this publication to products, programs, or services do not imply that the
manufacturer intends to make these available in all countries in which it operates. Any
reference to a product, program, or service is not intended to state or imply that only that
product, program, or service may be used. Any functionally equivalent product, program, or
service that does not infringe any existing intellectual property right may be used instead.
Evaluation and ve rification of operation in conjunction with other products, programs, or
services, except those expressly designated by the manufacturer, are the user’s
responsibility.
Troubleshooting
Notices
Index
© Copyright 2001 Lexmark International, Inc.
All rights reserved.
UNITED STATES GOVERNMENT RESTRICTED RIGHTS
This software and documentation ar e provided with RESTRICTED RIGHTS. Use , duplication,
or disclosure by the Government is subject to restrictions as set for t h in subparagraph
(c)(1)(ii) of the Rights in Technical Data and Computer Softw are clause at DFARS 252.2277013 and in applicable FAR provisions: Lexmark International, Inc., Lexington, KY 40550.
www.lexmark.com
Page 100

Lexmark Z13
Lexmark Z23
Lexmark Z33
100Notices
Printer overview
Basic printing
Printing ideas
Maintenance
Troubleshooting
Notices
Index
Trademarks
Lexmark and Lexmark with diamond design are trademarks of Lexmark International, Inc.,
registered in the United States and/or othe r countries. Color Jetprinter is a trademark of
Lexmark International, Inc.
Apple, Mac OS, and Macintosh are trademarks of Apple Computer, Inc., registered in the
United States and other countries.
Other trademarks are the property of their respective owners.
www.lexmark.com
 Loading...